S Center User Guide (UBX 16012261)
User Manual:
Open the PDF directly: View PDF ![]() .
.
Page Count: 22


s-center - User Guide
UBX-16012261 - R02 Page 2 of 22
Document Information
Title s-center
Subtitle Evaluation Software for short range modules
Document type User Guide
Document number UBX-16012261
Revision and date R02 12-Sep-2018
Disclosure Restriction
This document applies to the following products:
Product name Type number Firmware version PCN reference Product status
s-center
u-blox or third parties may hold intellectual property rights in the products, names, logos and designs included in this
document. Copying, reproduction, modification or disclosure to third parties of this document or any part thereof is only
permitted with the
express written permission of u-blox.
The information contained herein is provided “as is” and u
-blox assumes no liability for its use. No warranty, either express or
implied, is given, including but not limited
to, with respect to the accuracy, correctness, reliability and fitness for a particular
purpose of the information. This document may be revised by u
-blox at any time without notice. For the most recent
documents, visit www.u
-blox.com.
Copyright © u
-blox AG.

s-center - User Guide
UBX-16012261 - R02 Page 3 of 22
Contents
Document Information ................................................................................................................................ 2
Contents .......................................................................................................................................................... 3
1 Overview ................................................................................................................................................... 4
1.1 Getting started ............................................................................................................................................ 4
2 Connecting to another wireless module ........................................................................................ 6
2.1 Classic Bluetooth (SPP) ............................................................................................................................. 6
2.2 Bluetooth Low Energy (SPS) ..................................................................................................................... 6
2.3 Wi-Fi (TCP) ................................................................................................................................................... 7
3 Sending and receiving data ................................................................................................................ 8
4 Settings for connecting to other modules .................................................................................. 10
4.1 Bluetooth ....................................................................................................................................................10
4.2 Wi-Fi .............................................................................................................................................................10
4.2.1 Station ................................................................................................................................................10
4.2.2 Access point ......................................................................................................................................11
4.3 Enable servers ...........................................................................................................................................11
5 Updating software ............................................................................................................................... 12
6 Configuring settings ........................................................................................................................... 13
6.1 Saving and downloading all settings ....................................................................................................13
6.2 Other settings............................................................................................................................................13
6.3 Retain or restore settings .......................................................................................................................14
7 Miscellaneous features ...................................................................................................................... 15
7.1 GATT Server ...............................................................................................................................................15
7.2 GATT Client ................................................................................................................................................15
7.3 Console Window ........................................................................................................................................16
7.4 User defines ...............................................................................................................................................16
7.5 GPIO .............................................................................................................................................................17
7.6 Wi-Fi Certificates ......................................................................................................................................17
7.7 NFC ..............................................................................................................................................................18
7.8 Bluetooth PAN ...........................................................................................................................................18
7.9 Ethernet ......................................................................................................................................................18
7.10 Bridge ...........................................................................................................................................................19
7.11 Network .......................................................................................................................................................19
7.12 Bindings ......................................................................................................................................................19
Appendix ....................................................................................................................................................... 20
A Glossary ................................................................................................................................................. 20
Related documents .................................................................................................................................... 21
Revision history ........................................................................................................................................... 21
Contact ........................................................................................................................................................... 22
s-center - User Guide
UBX-16012261 - R02 Contents Page 4 of 22
1 Overview
s-center is a powerful and easy-to-use tool for evaluating, configuring, and testing u-blox short range
modules. This user guide provides a description of the features of this software. It allows end users to
assess and configure u-blox short range modules.
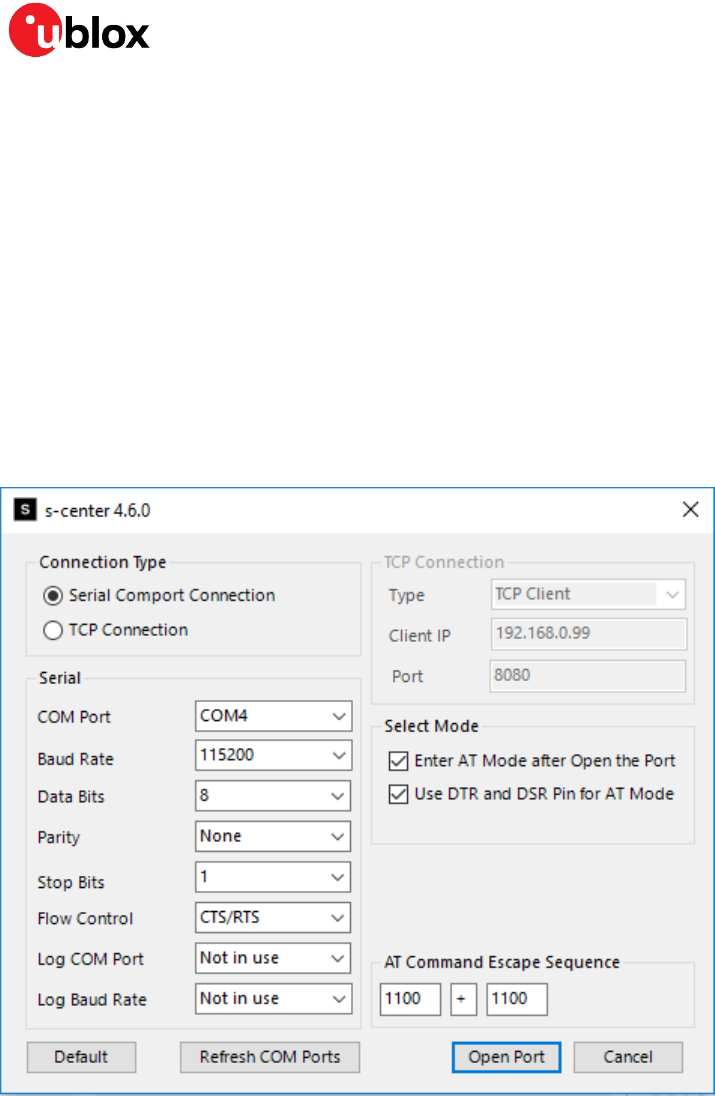
1.1 Getting started
Once you start s-center, it displays an initial window as shown in Figure 1, which prompts you to select
a COM port. For new modules, you can keep the default values. Ensure that you select the right COM
Port. Once you select the COM port and click Open Port, s-center will try to connect to the COM port.
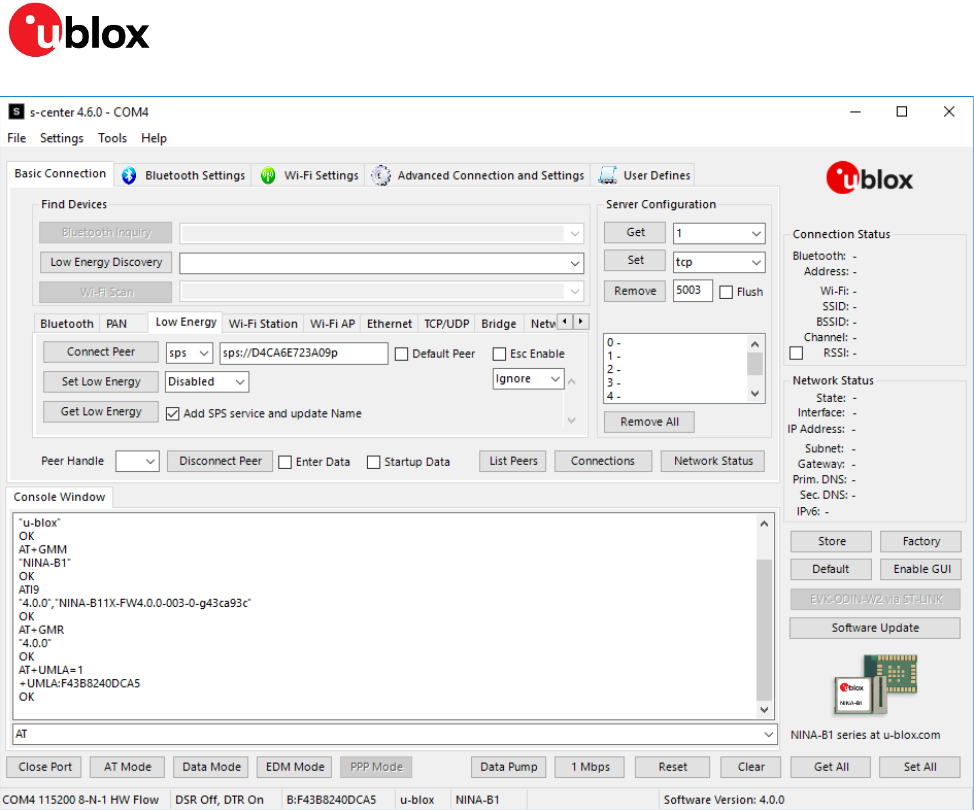
If the connection is successful, it will display the main screen, as shown in Figure 2. If the module is in
command mode, s-center will read out some information to you. s-center may additionally disable
some controls if it knows the module does not support those features.
Figure 1: Selecting COM Port
s-center - User Guide
UBX-16012261 - R02 Contents Page 5 of 22
Figure 2: Main s-center screen
s-center - User Guide
UBX-16012261 - R02 Contents Page 6 of 22
2 Connecting to another wireless module
2.1 Classic Bluetooth (SPP)
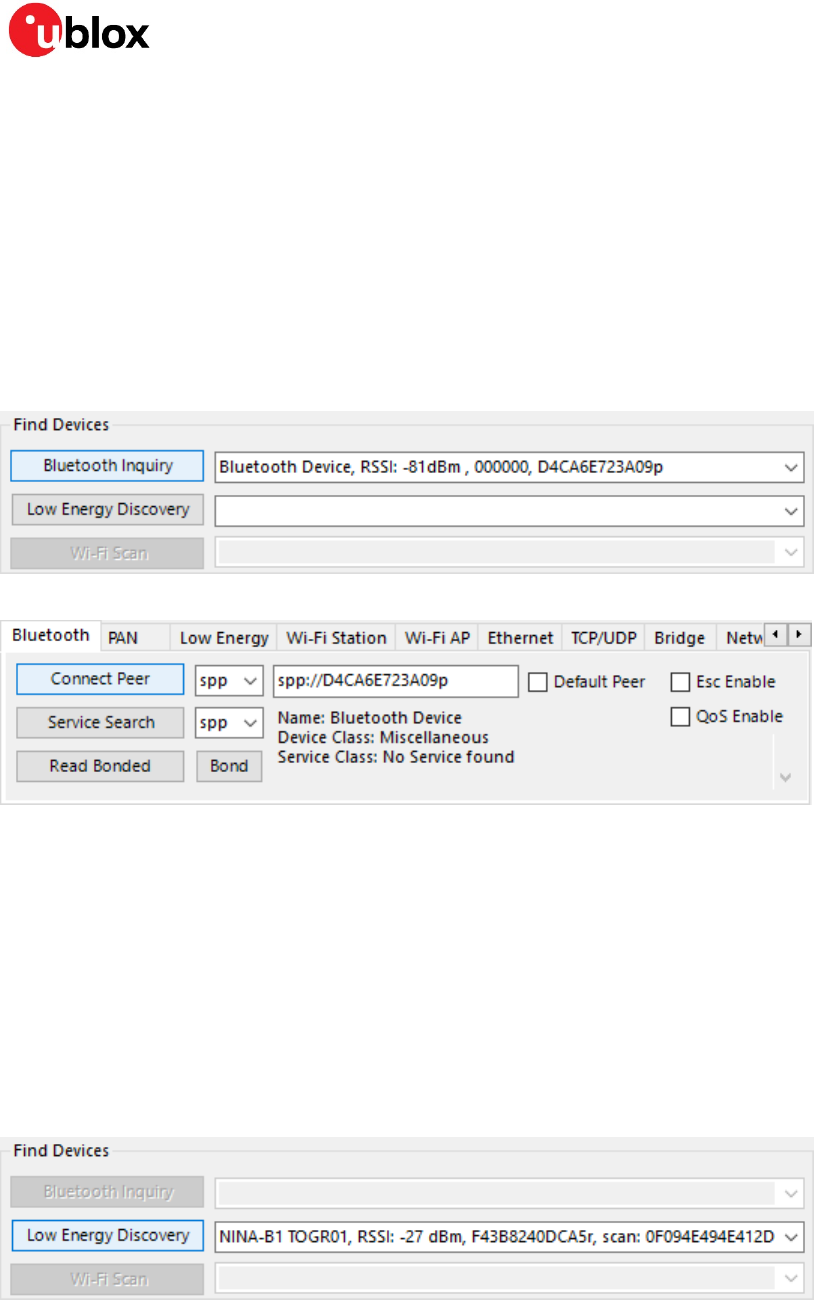
The act of searching for other Bluetooth devices is called an inquiry and is shown in Figure 3. s-center
will display a list of devices that was found in a drop down list. You can select the module you want to
connect to from the list and its Bluetooth address will automatically be entered in the form, as shown
in Figure 4. SPP is the default protocol, so you have to click Connect Peer only.
☞ The other module must have the SPP server running to connect to SPP.
☞ If the other module has any security enabled, additional steps may be necessary.
Figure 3: Bluetooth Inquiry
Figure 4: Connecting to peer with SPP
2.2 Bluetooth Low Energy (SPS)
Start searching for other Bluetooth LE devices by running a discovery, as shown in Figure 5.
s-center will collect all devices in the drop down list. Selecting an entry from this list fills in the
Bluetooth address, as shown in Figure 6. SPS is the default and only protocol available for low energy
(LE), so you only have to click Connect Peer.
☞ To establish a low energy connection, this module must be in the Central mode
☞ The other module must have the SPS server running to connect to SPS
☞ More information about SPS is provided in [1]
Figure 5: Low Energy Discovery

s-center - User Guide
UBX-16012261 - R02 Contents Page 7 of 22
Figure 6: Connecting to peer with SPS
2.3 Wi-Fi (TCP)
Connecting to another module over Wi-Fi involves more steps, as you first need to connect to an
access point and then the module. The module can of course also be an access point but it is
important to separate the roles.
Start by performing a Wi-Fi scan as shown in Figure 7. The results are displayed in the drop down list.
Selecting an access point fills in its corresponding SSID as shown in the form in Figure 8. The majority
of the values in this form can be left as default, but you may need to set the security mode and enter
a passkey or password for that security mode, and then click Activate Wi-Fi. In this example, the
security mode is WPA2 and the password is togr-wifi.
Figure 7: Scanning for Wi-Fi
Figure 8: Connecting to a Wi-Fi access point
Once the connection is established with an access point, you can attempt to connect to a peer over
TCP, as shown in Figure 9. The default protocol is TCP; enter only the IP address or host name and a
port, then click Connect Peer.
☞ The other module must have a TCP server running to connect over TCP.
Figure 9: Connecting to peer with TCP
s-center - User Guide
UBX-16012261 - R02 Contents Page 8 of 22
3 Sending and receiving data
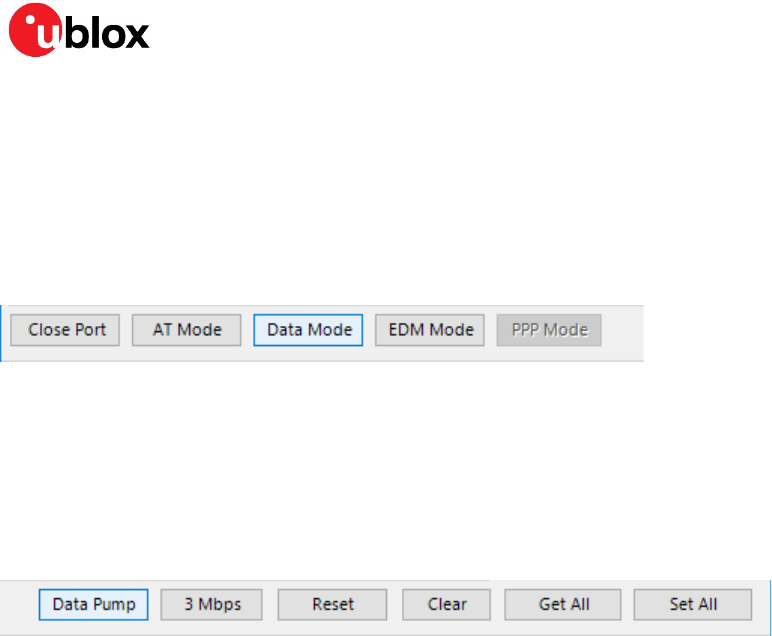
Once connected to a peer you can send data to the peer. To send data, set the module to data mode
by clicking on the Data Mode button, as shown in Figure 10. In Data mode, the module sends raw bytes
to the peer. In Data mode the module no longer accepts AT commands and any command will be
interpreted as raw bytes to send to the peer. To return the module to command mode, click the AT
Mode button (also shown in Figure 10).
Figure 10: Mode buttons, Data mode highlighted
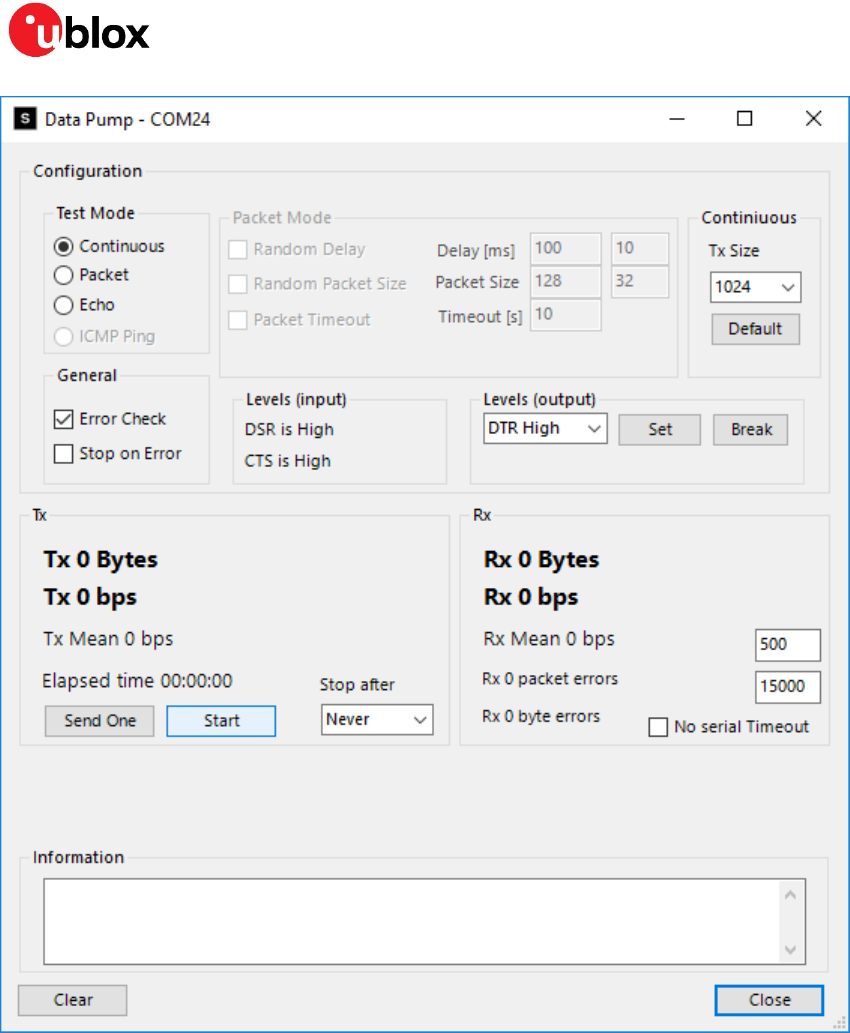
In Data mode, you can test the module’s throughput performance by clicking the Data Pump button,
as shown in Figure 11. The default values are good and you only have to click the Start button, as
shown in Figure 12. The data pump sends and expects to receive a sequence of bytes [0, 1, 2, …] (0
resets the sequence) and reports any deviations on the received data as byte errors. Only if the other
end is pumping data in this manner, can you rely on the byte errors (or lack of) to represent the link
quality.
Figure 11: Data Pump highlighted
s-center - User Guide
UBX-16012261 - R02 Contents Page 9 of 22
Figure 12: Data Pump
s-center - User Guide
UBX-16012261 - R02 Contents Page 10 of 22
4 Settings for connecting to other modules
4.1 Bluetooth
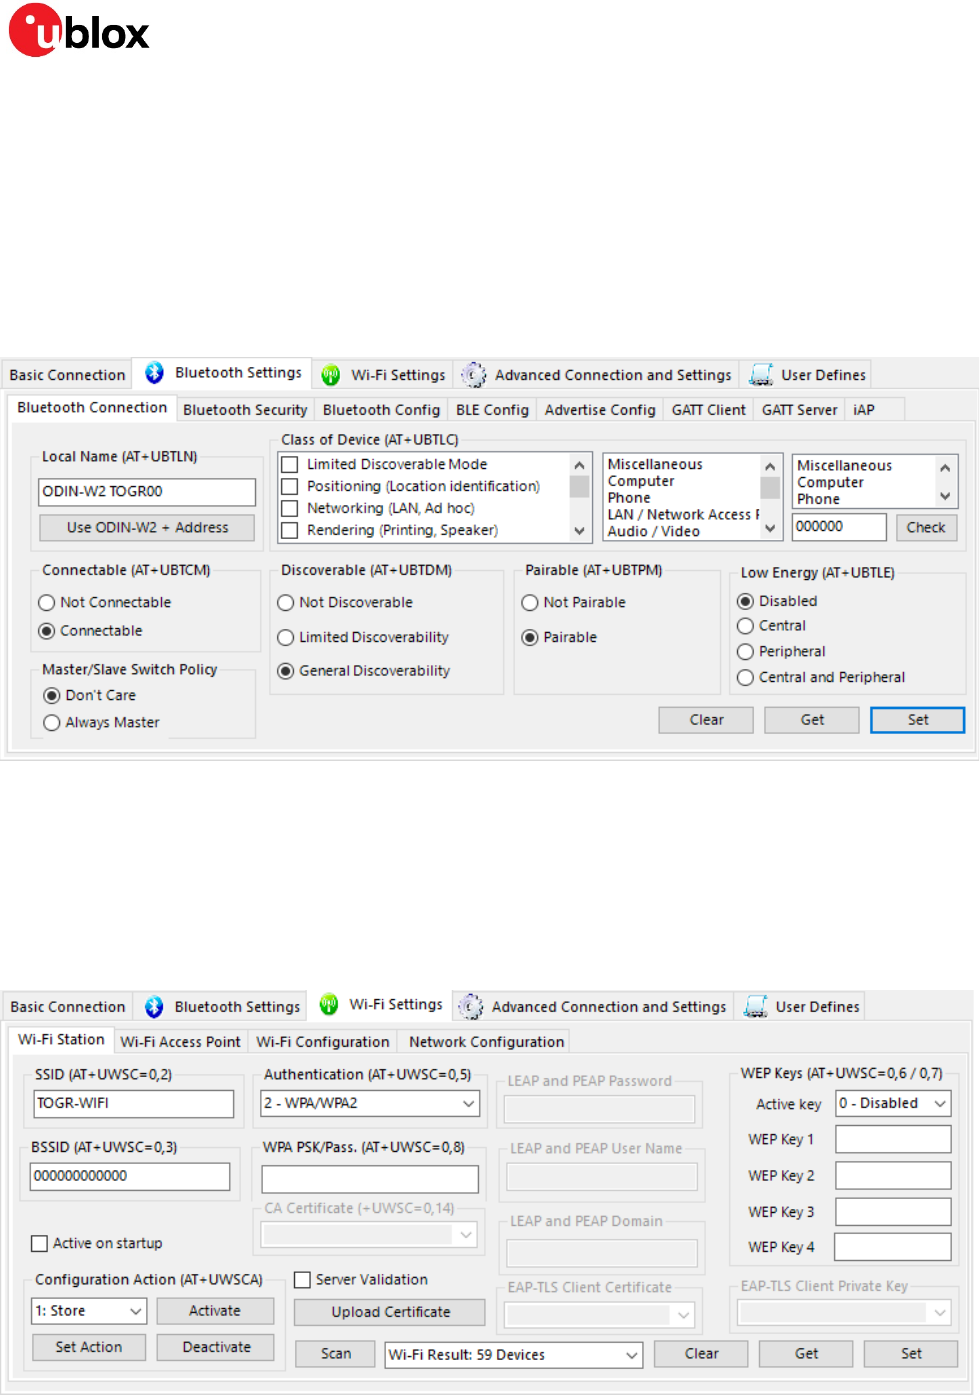
To establish Bluetooth connections, the module must be discoverable, connectable, and pairable.
Though it is not mandatory, setting a local name can help to easily find your device. To establish a low
energy connection, low energy must be active. To initiate a low energy connection, the module must
be in the Central mode while to allow incoming connections, the module must be in the Peripheral
mode.
Figure 13: Bluetooth connection settings (scaled to fit)
4.2 Wi-Fi
4.2.1 Station
Figure 14 shows the settings for Wi-Fi station. It contains a few more settings than the basic
connection tab. Most notable is the ability to store and load the settings, in case you need to reset
(restart) the module.
Figure 14: Wi-Fi station settings (scaled to fit)
s-center - User Guide
UBX-16012261 - R02 Contents Page 11 of 22
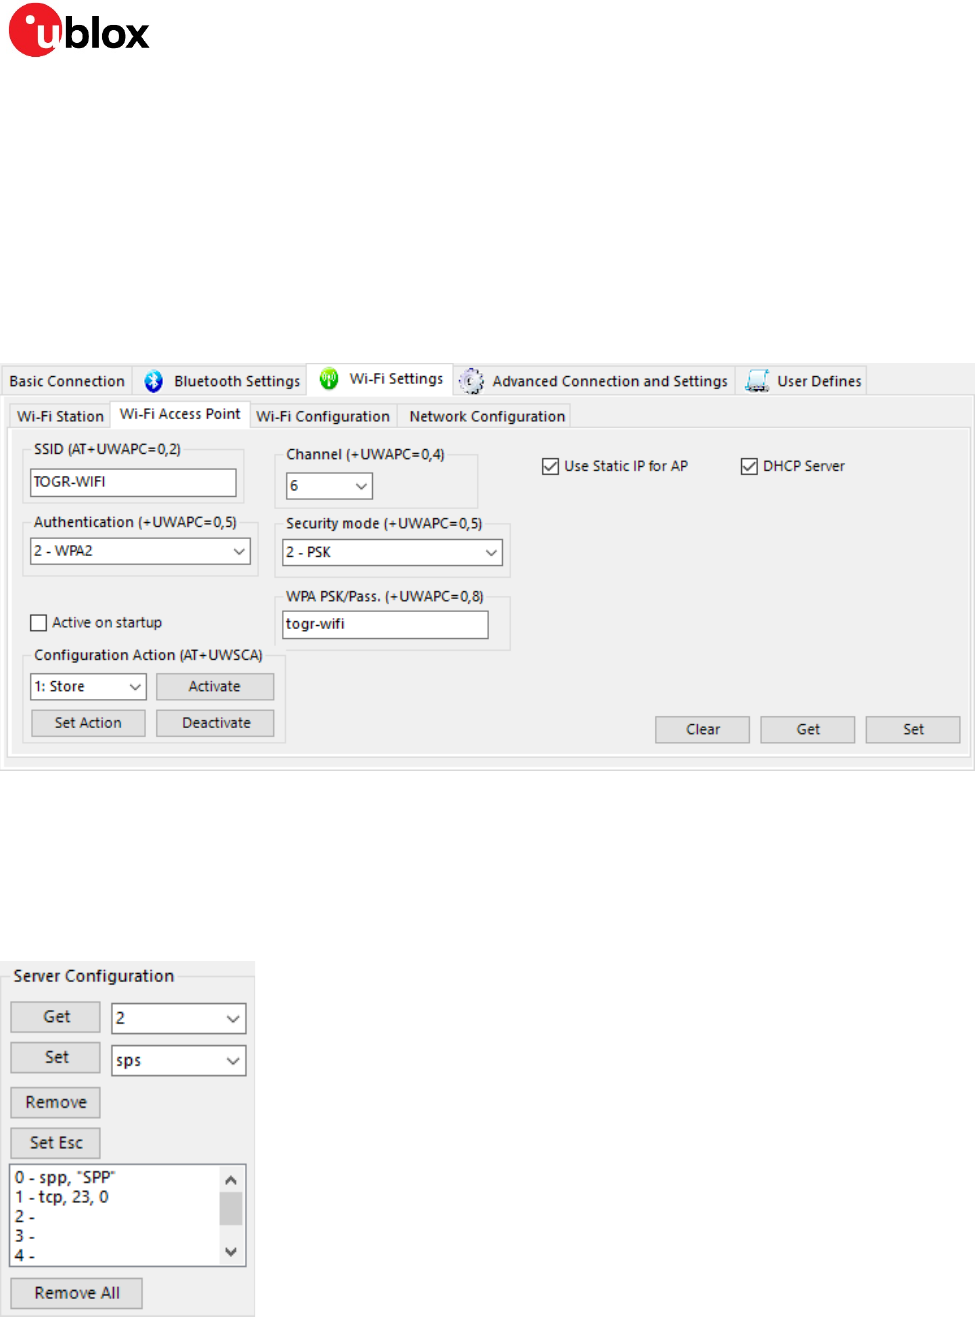
4.2.2 Access point
Figure 15 shows the Wi-Fi access point settings. Here you can set for example, the following:
• The SSID (the name other modules will see),
• Security mode and
• If this module should act as a DHCP server (allows other modules connecting to this to be
granted an IP address).
You can also store and load the settings, in case you need to reset the module.
Figure 15: Wi-Fi access point (scaled to fit)
4.3 Enable servers
Figure 16 shows the server configuration. Here you can view the currently running servers and set new
ones. You must remove a server to set a new one in its place. In the example provided below (Figure
16), the module is running an SPP server and a TCP server and is about to have an SPS server set.
Figure 16: Servers
s-center - User Guide
UBX-16012261 - R02 Contents Page 12 of 22
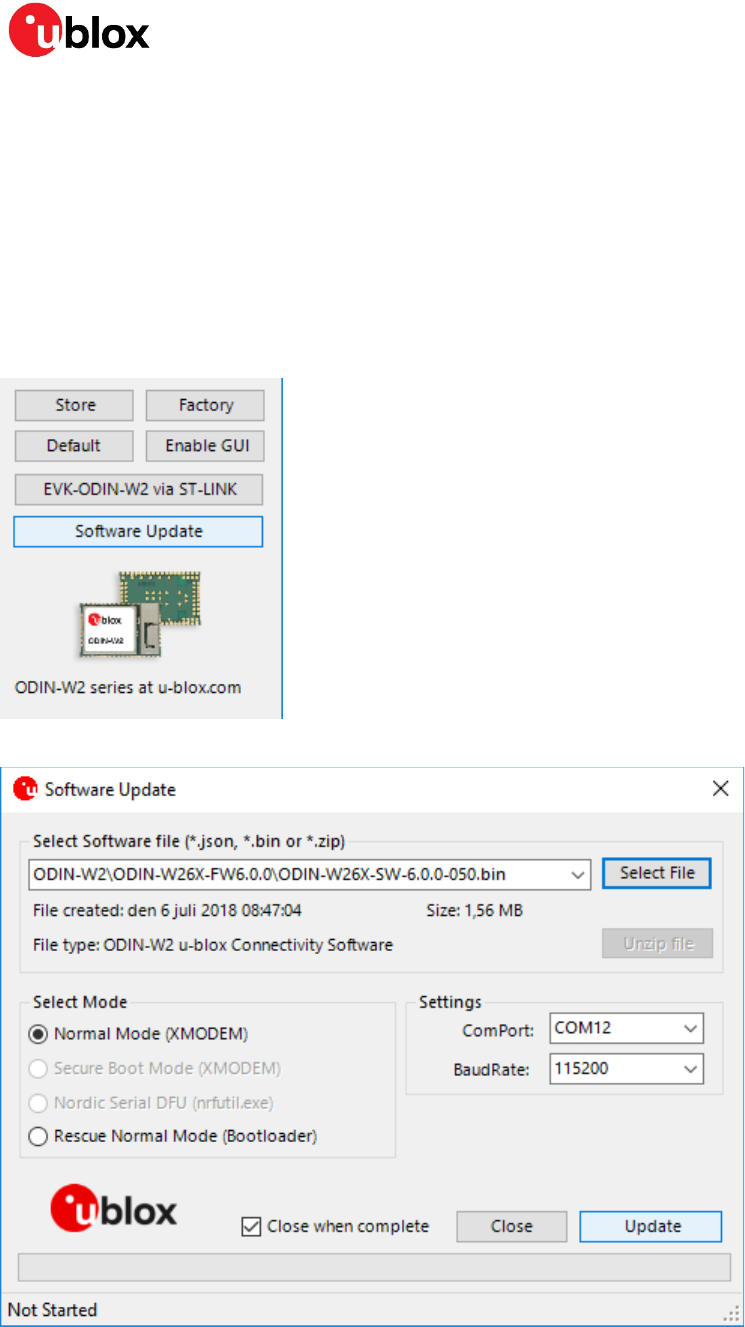
5 Updating software
Once you click the Software Update button, as shown highlighted in Figure 17, it opens the software
update dialog, as shown in Figure 18. After you click the Select File, it allows you to browse for a new
software file, and the Software Update dialog remembers the last 5 files used. The appropriate
method will be selected automatically once you select a file. In most cases, you have to click the
Software Update button only.
⚠ A software update will undo all configurations on the device; consider saving them as described in
section 6.
Figure 17: Software Update button
Figure 18: Software Update dialog
s-center - User Guide
UBX-16012261 - R02 Contents Page 13 of 22
6 Configuring settings
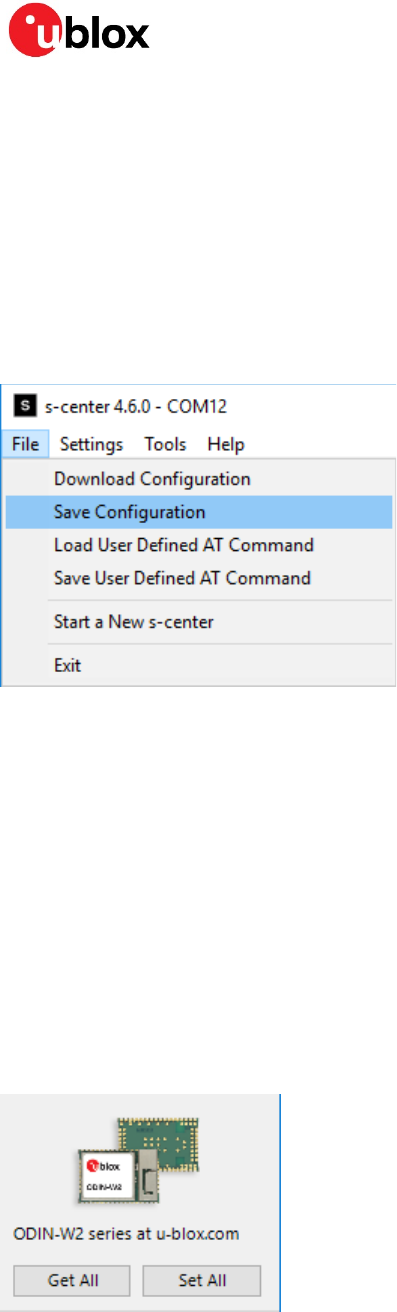
6.1 Saving and downloading all settings
To save the configuration of the device for later use, click the Save Configuration option in the File
menu, as shown in Figure 19. This will open a dialog box that prompts you to specify the location for
saving the configuration. The configuration will essentially be saved as a list of AT commands to
recreate the current configuration. If you click Download Configuration, it opens a dialog box from
where you can select the specified file. Then, s-center will run all the AT commands to recreate the
configuration.
Figure 19: File Menu
6.2 Other settings
The rest of the tabs under Bluetooth and Wi-Fi contain various settings for different functionalities.
The Advanced Connections and Settings tab contains more general purpose settings and some
specialized settings. The settings are labeled with their respective AT command and additionally, the
commands sent to the device are visible in a console window. For detailed information, see the u-blox
Short Range AT commands manual [2]. Each tab can get and set their own subset of settings; use
Get All and Set All buttons to get and set all device settings, as shown in Figure 20.
☞ s-center populates some fields with default values until read. If you immediately click Set All, it will
set these values to the module. They will not be stored however and a simple module reset will
undo the changes.
Figure 20: Get and set all settings
s-center - User Guide
UBX-16012261 - R02 Contents Page 14 of 22
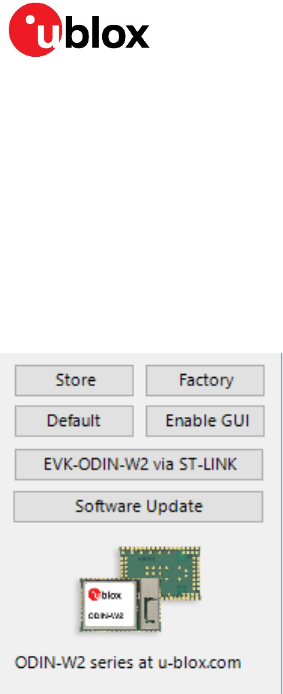
6.3 Retain or restore settings
Settings are first stored in volatile memory and will be undone during module reset (restart). To retain
the settings in the module, they need to be written to permanent memory. Use the Store button in
s-center for this, as shown in Figure 21. Additionally, for some settings to take effect, the module
must be reset. The Store button conveniently resets the module after writing. In Figure 21, you can
also see the Factory button, which allows you to undo the stored settings and restore factory defaults.
☞ Some settings are permanently stored through a separate command; these tabs will have a
separate option to store.
Figure 21: More settings buttons

s-center - User Guide
UBX-16012261 - R02 Contents Page 15 of 22
7 Miscellaneous features
7.1 GATT Server
Figure 22 shows the GATT Server. Here you can define services and characteristics that clients can
then interact with. Characteristics are added to the latest service defined. Here you can also read
values clients have written to characteristics and notify or indicate new values to the client.
Figure 22: GATT Server (scaled to fit)
7.2 GATT Client
Figure 23 shows the GATT Client. Here you can establish an ACL link to a server by entering a
Bluetooth address in the textbox to the right of the button Connect GATT, and then clicking that
button. Once connected to a server, you can Discover Services of that server and the services
associated characteristics. You can then write the characteristics to the server or register to receive
notifications.
Figure 23: GATT Client (scaled to fit)
s-center - User Guide
UBX-16012261 - R02 Contents Page 16 of 22
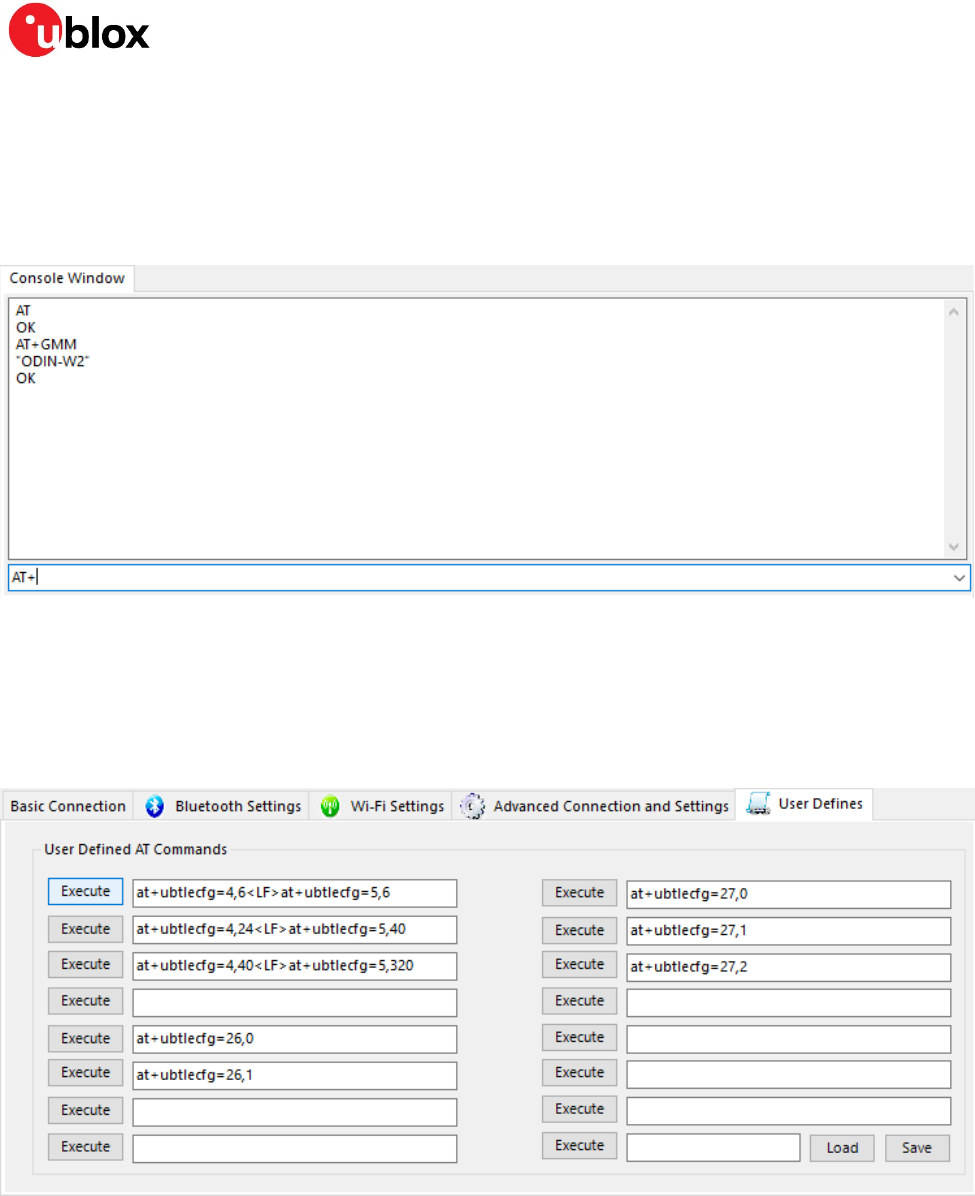
7.3 Console Window
The console window in Figure 24 allows you to enter raw AT commands to the module and view the
response. The console window also echoes the responses of AT commands sent as a result of
interacting with the features of s-center. The console does not echo the sent commands, but the
default behavior of the device is to send the command as part of the response.
Figure 24: Console Window (scaled to fit)
7.4 User defines
Figure 25 shows user defines. The User defines allow you to define and execute rudimentary macros.
These macros consist of a list of AT commands delimited by <LF> in upper case. When executing a
user define, s-center simply executes the AT commands in order with no special handling.
Figure 25: User defines (scaled to fit)

s-center - User Guide
UBX-16012261 - R02 Contents Page 17 of 22
7.5 GPIO
Allows you to configure the GPIO pins of the modules. As shown in Figure 26, select a pin first, then
specify whether it is to be configured as Output, Input or Disabled, and finally how to configure it.
Output pins can be configured with an initial value, low or high. Input pins can be configured whether
or not to use any pull resistors. Output pins can have a new value written to them and both input and
output pins can be read.
☞ Different GPIO pins are available for each modules as mentioned in the corresponding module
documentation.
Figure 26: GPIO configuration (scaled to fit)
7.6 Wi-Fi Certificates
The Wi-Fi certificate tab allows you to upload and view certificates and keys for use with Wi-Fi station
as shown in Figure 27.
☞ Only the name and MD5 of certificates and keys may be read, not the contents.
Figure 27: Wi-Fi certificate tab (scaled to fit)
s-center - User Guide
UBX-16012261 - R02 Contents Page 18 of 22
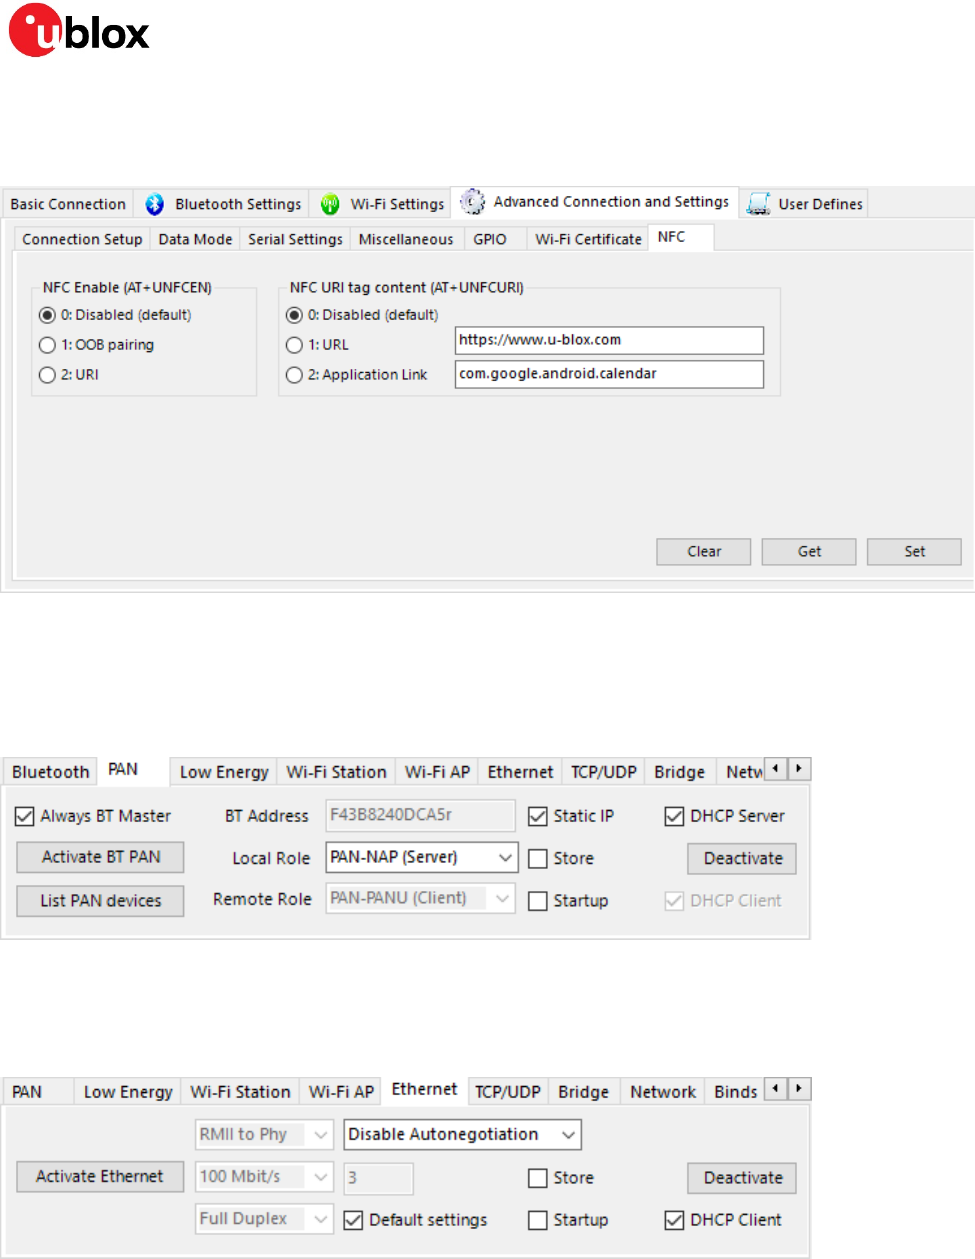
7.7 NFC
The NFC tab allows you to enable or disable NFC. When NFC is read, the module will send a response.
Figure 28: NFC (scaled to fit)
7.8 Bluetooth PAN
The Bluetooth PAN tab allows you to configure and establish or join an existing personal area network
over Bluetooth.
Figure 29: PAN settings
7.9 Ethernet
The Ethernet tab allows you to configure and establish an Ethernet connection.
Figure 30: Ethernet settings and connection
s-center - User Guide
UBX-16012261 - R02 Contents Page 19 of 22
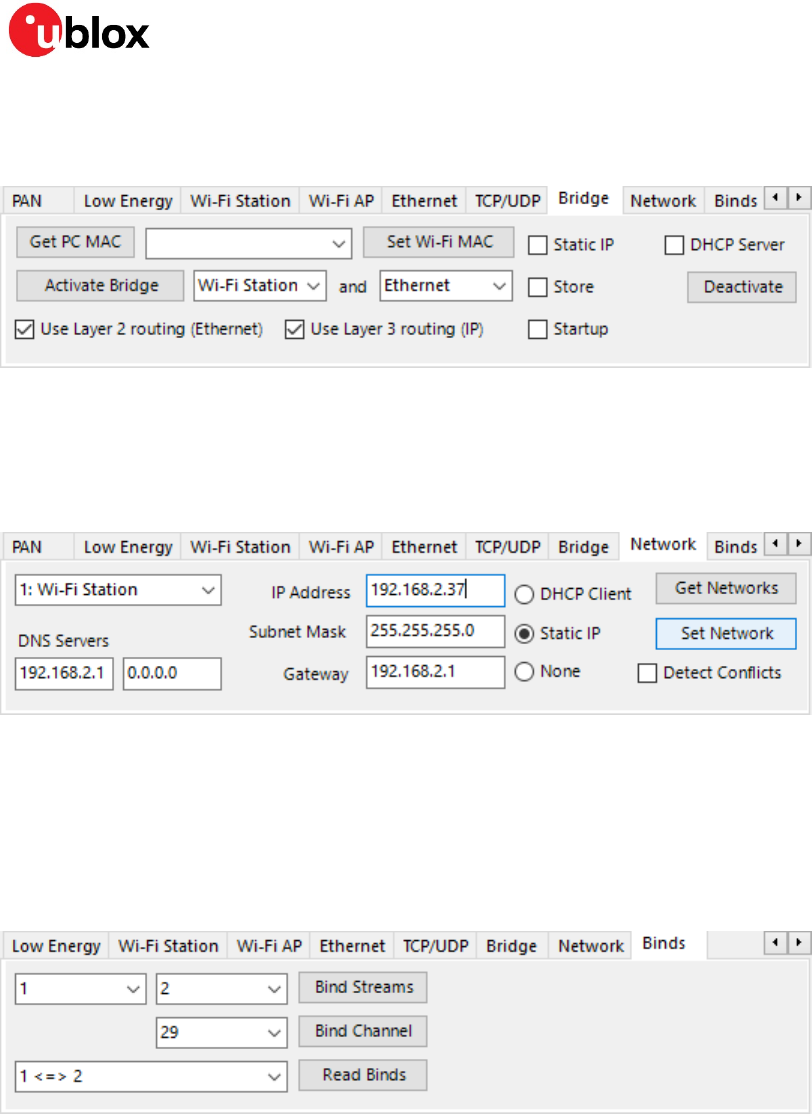
7.10 Bridge
The Bridge tab allows you to bridge two or more interfaces.
Figure 31: Bridge settings
7.11 Network
The Network tab allows you to set various network interfaces with more control. For example, setting
Wi-Fi station to use a specific IP address (static IP).
Figure 32: Network settings
7.12 Bindings
The Bind Streams option (as shown in Figure 33) allows you to bind the streams of two peers to each
other, such that the transmissions from peer 1 is received by peer 2 and vice versa. Bind Channel
allows a third peer to be hooked up to an existing bind. Bind Channel also binds the peer in the left
drop down list to the channel in the drop down list prior to the Bind Channels button.
Figure 33: Bindings
s-center - User Guide
UBX-16012261 - R02 Appendix Page 20 of 22
Appendix
A Glossary
Abbreviation Definition
ACL Asynchronous Connection-Less
DHCP Dynamic Host Configuration Protocol
GATT Generic Attribute
GPIO General Purpose Input Output
IP Internet Protocol
MD5 A hash function
NFC Near-Field Communication
PAN Personal Area Network
SSID Service Set Identifier
SPP Serial Port Profile
SPS Serial Port Service
TCP Transmission Control Protocol
WPA2 Wi-Fi Protected Access II

s-center - User Guide
UBX-16012261 - R02 Related documents Page 21 of 22
Related documents
[1] u-blox Low Energy Serial Port Service – Protocol Specification, Doc. No. UBX-16011192
[2] u-blox Short Range Modules – AT Commands Manual, Doc. No. UBX-14044127
☞ For regular updates to u-blox documentation and to receive product change notifications, register
on our homepage (www.u-blox.com).
Revision history
Revision Date Name Comments
R01 29-Feb-2018 cmag Initial release
R02 12-Dec-2018 togr, kgom Major updates in all sections.

s-center - User Guide
UBX-16012261 - R02 Contact Page 22 of 22
Contact
For complete contact information, visit us at www.u-blox.com.
u-blox Offices
North, Central and South America
u-blox America, Inc.
Phone: +1 703 483 3180
E-mail: info_us@u-blox.com
Regional Office West Coast:
Phone: +1 408 573 3640
E-mail: info_us@u-blox.com
Technical Support:
Phone: +1 703 483 3185
E-mail: support@u-blox.com
Headquarters
Europe, Middle East, Africa
u-blox AG
Phone: +41 44 722 74 44
E-mail: info@u-blox.com
Support: support@u-blox.com
Asia, Australia, Pacific
u-blox Singapore Pte. Ltd.
Phone: +65 6734 3811
E-mail: info_ap@u-blox.com
Support: support_ap@u-blox.com
Regional Office Australia:
Phone: +61 2 8448 2016
E-mail: info_anz@u-blox.com
Support: support_ap@u-blox.com
Regional Office China (Beijing):
Phone: +86 10 68 133 545
E-mail: info_cn@u-blox.com
Support: support_cn@u-blox.com
Regional Office China (Chongqing):
Phone: +86 23 6815 1588
E-mail: info_cn@u-blox.com
Support: support_cn@u-blox.com
Regional Office China (Shanghai):
Phone: +86 21 6090 4832
E-mail: info_cn@u-blox.com
Support: support_cn@u-blox.com
Regional Office China (Shenzhen):
Phone: +86 755 8627 1083
E-mail: info_cn@u-blox.com
Support: support_cn@u-blox.com
Regional Office India:
Phone: +91 80 405 092 00
E-mail: info_in@u-blox.com
Support: support_in@u-blox.com
Regional Office Japan (Osaka):
Phone: +81 6 6941 3660
E-mail: info_jp@u-blox.com
Support: support_jp@u-blox.com
Regional Office Japan (Tokyo):
Phone: +81 3 5775 3850
E-mail: info_jp@u-blox.com
Support: support_jp@u-blox.com
Regional Office Korea:
Phone: +82 2 542 0861
E-mail: info_kr@u-blox.com
Support: support_kr@u-blox.com
Regional Office Taiwan:
Phone: +886 2 2657 1090
E-mail: info_tw@u-blox.com
Support: support_tw@u-blox.com
