Selenium Webdriver Practical Guide
selenium%20webdriver%20practical%20guide
User Manual:
Open the PDF directly: View PDF ![]() .
.
Page Count: 264 [warning: Documents this large are best viewed by clicking the View PDF Link!]
#
I
\
A
M
Community
Experience
Distilled
Selenium
WebDriver
Practical
Guide
Interactively
automate
web
applications
using
Selenium
WebDriver
sourceÿ
1
open
I
community
experience
cTistHied
Satya
Avasarala
PACKT
PUBLISHING

Selenium WebDriver
Practical Guide
Interactively automate web applications using
Selenium WebDriver
Satya Avasarala
BIRMINGHAM - MUMBAI
source
f
1
open
I
I
community
experience
distilled
PUBLISHING
Selenium WebDriver Practical Guide
Copyright © 2014 Packt Publishing
All rights reserved. No part of this book may be reproduced, stored in a retrieval
system, or transmitted in any form or by any means, without the prior written
permission of the publisher, except in the case of brief quotations embedded in
critical articles or reviews.
Every effort has been made in the preparation of this book to ensure the accuracy
of the information presented. However, the information contained in this book is
sold without warranty, either express or implied. Neither the author, nor Packt
Publishing, and its dealers and distributors will be held liable for any damages
caused or alleged to be caused directly or indirectly by this book.
Packt Publishing has endeavored to provide trademark information about all of the
companies and products mentioned in this book by the appropriate use of capitals.
However, Packt Publishing cannot guarantee the accuracy of this information.
First published: January 2014
Production Reference: 1170114
Published by Packt Publishing Ltd.
Livery Place
35 Livery Street
Birmingham B3 2PB, UK.
ISBN 978-1-78216-885-0
www.packtpub.com
Cover Image by Prashant Timappa Shetty (sparkling.spectrum.123@gmail.com)

Credits
Author
Satya Avasarala
Reviewers
Anuj Chaudhary
David Askirk Fotel
Daniel Lam
Ripon Al Wasim
Acquisition Editors
Anthony Albuquerque
Richard Harvey
Lead Technical Editor
Priya Singh
Technical Editors
Dennis John
Venu Manthena
Gaurav Thingalaya
Copy Editors
Tanvi Gaitonde
Kirti Pai
Adithi Shetty
Project Coordinator
Amey Sawant
Proofreader
Clyde Jenkins
Indexers
Hemangini Bari
Monica Ajmera Mehta
Rekha Nair
Priya Subramani
Graphics
Yuvraj Mannari
Abhinash Sahu
Production Coordinator
Aparna Bhagat
Cover Work
Aparna Bhagat

About the Author
Satya Avasarala has rich experience in Java development and automation testing.
He is an engineer in computer science. He has used WebDriver for many years
now and has created several good automation frameworks. He has worked at
various large software enterprises such as Oracle Corp, Yahoo! Inc., VMware Inc.,
and the REA Group.
In addition, he is also interested in Service Oriented Architectural design and
%XVLQHVV,QWHOOLJHQFH+HLVDQ2UDFOHFHUWLÀHG6HUYLFH2ULHQWHG$UFKLWHFWXUH
Infrastructure Implementation Expert and a Business Intelligence Foundation
Suite Implementation Specialist.
I would like to thank all my acquisition editors, technical editors,
and project coordinators for constantly supporting me in completing
this book. I should also thank my colleagues, Pratik Patil and Kerri
Rusnak, for their constant encouragement and support in writing
this book. Last but not least, I would like to thank my wife, Swathi
9HQQHODJDQWLIRUVDFULÀFLQJPDQ\ZHHNHQGVZKLOH,ZDVEXV\
writing this book. Without all these people, this book wouldn't have
been a reality.

About the Reviewers
Anuj Chaudhary is a software engineer who enjoys working on software testing
and automation. He has a vast experience with various testing methodologies such
as manual testing, automated testing, performance testing, and security testing. He
has worked as an individual contributor and technical lead on various software
projects dealing with all of the stages in the application development life cycle.
He has been awarded the title of Microsoft MVP twice in a row. He writes a blog that
you can visit at www.anujchaudhary.com.
I would like to thank and congratulate the Packt Publishing team for
publishing this awesome book.
David Askirk Fotel has worked with computers since his parents brought
home an old, used IBM PS/2. He started his development career writing simple
programs in QBasic and later in Pascal. From there, he moved on to writing
programs in C. Later on, he moved on to Java and other languages. His greatest
experience so far was with Lisp, which had a great impact on his programming
style and approach to code.
David has worked on test-driven development and as a test manager, implementing
Selenium tests on an e-learning system.
7KLVERRNLVWKHÀUVWRQZKLFK'DYLGKDVZRUNHGEXWZLOOQRWEHWKHODVW

Daniel Lam is an Agile Test Developer with experience in open and closed source
test tools. He specializes in Java, Selenium WebDriver, Continuous Integration, and
BDD test frameworks.
Ripon Al Wasim is a software engineer living in Dhaka, Bangladesh. He has 12
years' experience in the software industry, three years in software development,
and nine years in software testing (both manual and automated). He has also been
involved in conducting software testing courses in various companies. He has
worked for clients in various countries such as Japan, USA, Finland, Norway, and
Bangladesh.
Ripon started participating in posting professional questions and answers on Stack
2YHUÁRZLQWKH\HDUDWhttp://stackoverflow.com/users/617450/ripon-
al-wasim.
5LSRQLVD6XQ&HUWLÀHG-DYD3URJUDPPHU6&-3+HLV-DSDQHVH/DQJXDJH
3URÀFLHQF\7HVW-/37/HYHOFHUWLÀHGDQGLVDOLWWOHIDPLOLDUZLWK-DSDQHVHFXOWXUH
DVKHVWD\HGLQ-DSDQIRURQH\HDUDVDQ,7SURIHVVLRQDO7KLVERRNLV5LSRQVÀUVW
RIÀFLDOHIIRUW
I would like to thank my mother and wife for fostering a helping
and inspiring environment at home so I could study and review.
I am also deeply thankful and grateful to Cefalo Amravi Ltd.
(http://cefalo.com/en), my current company, for providing me
a good opportunity to work with automated testing using Selenium
WebDriver. I would like to thank Yves Hwang, Product Manager
at Varnish Software (https://www.varnish-software.com/) and
Partha Guha Roy, CTO of Cefalo Amravi Ltd. for providing technical
assistance during my project work.

www.PacktPub.com
6XSSRUW¿OHVH%RRNVGLVFRXQWRIIHUVDQGPRUH
You might want to visit www.PacktPub.comIRUVXSSRUWÀOHVDQGGRZQORDGVUHODWHG
to your book.
Did you know that Packt offers eBook versions of every book published, with PDF
DQGH3XEÀOHVDYDLODEOH"<RXFDQXSJUDGHWRWKHH%RRNYHUVLRQDWwww.PacktPub.
com and as a print book customer, you are entitled to a discount on the eBook copy.
Get in touch with us at service@packtpub.com for more details.
At www.PacktPub.com, you can also read a collection of free technical articles, sign
up for a range of free newsletters and receive exclusive discounts and offers on Packt
books and eBooks.
TM
http://PacktLib.PacktPub.com
'R\RXQHHGLQVWDQWVROXWLRQVWR\RXU,7TXHVWLRQV"3DFNW/LELV3DFNWVRQOLQHGLJLWDO
book library. Here, you can access, read and search across Packt's entire library
of books.
Why Subscribe?
Fully searchable across every book published by Packt
Copy and paste, print and bookmark content
On demand and accessible via web browser
Free Access for Packt account holders
If you have an account with Packt at www.PacktPub.com, you can use this to access
PacktLib today and view nine entirely free books. Simply use your login credentials
for immediate access.
[TIPACKT
o

Table of Contents
Preface 1
Chapter 1: ,QWURGXFLQJ:HE'ULYHUDQG:HE(OHPHQWV
8QGHUVWDQGLQJWKHKLVWRU\RI6HOHQLXP
Selenium 1 or Selenium Remote Control or Selenium RC 9
Selenium 2 or Selenium WebDriver or WebDriver 12
Differences between Selenium 1 and Selenium 2 13
Handling the browser 14
Having better APIs 14
Testing mobile apps 14
Having developer support and advanced functionalities 14
Setting up a project in Eclipse 15
:HE(OHPHQWV
Locating WebElements using WebDriver 21
7KH¿QG(OHPHQWPHWKRG
7KH¿QG(OHPHQWVPHWKRG
Firebug 22
Using the By locating mechanism 23
Actions on WebElements 32
7KHJHW$WWULEXWHPHWKRG
7KHVHQG.H\VPHWKRG
7KHFOHDUPHWKRG
7KHVXEPLWPHWKRG
7KHJHW&VV9DOXHPHWKRG
7KHJHW/RFDWLRQPHWKRG
7KHJHW6L]HPHWKRG
7KHJHW7H[WPHWKRG
7KHJHW7DJ1DPHPHWKRG
7KHLV'LVSOD\HGPHWKRG
7KHLV(QDEOHGPHWKRG
7KHLV6HOHFWHGPHWKRG
6XPPDU\

Table of Contents
[ ii ]
&KDSWHU([SORULQJ$GYDQFHG,QWHUDFWLRQVRI:HE'ULYHU
8QGHUVWDQGLQJDFWLRQVEXLOGDQGSHUIRUP
/HDUQLQJPRXVHEDVHGLQWHUDFWLRQV
7KHPRYH%\2IIVHWDFWLRQ
7KHFOLFNDWFXUUHQWORFDWLRQDFWLRQ
The click on a WebElement action 49
7KHFOLFN$QG+ROGDWFXUUHQWORFDWLRQDFWLRQ
7KHFOLFN$QG+ROGD:HE(OHPHQWDFWLRQ
7KHUHOHDVHDWFXUUHQWORFDWLRQDFWLRQ
7KHUHOHDVHRQDQRWKHU:HE(OHPHQWDFWLRQ
7KHPRYH7R(OHPHQWDFWLRQ
7KHGUDJ$QG'URS%\DFWLRQ
7KHGUDJ$QG'URSDFWLRQ
7KHGRXEOH&OLFNDWFXUUHQWORFDWLRQDFWLRQ
7KHGRXEOH&OLFNRQ:HE(OHPHQWDFWLRQ
7KHFRQWH[W&OLFNRQ:HE(OHPHQWDFWLRQ
7KHFRQWH[W&OLFNDWFXUUHQWORFDWLRQDFWLRQ
/HDUQLQJNH\ERDUGEDVHGLQWHUDFWLRQV
7KHNH\'RZQDQGNH\8SDFWLRQV
7KHVHQG.H\VPHWKRG
6XPPDU\
&KDSWHU([SORULQJWKH)HDWXUHVRI:HE'ULYHU
6HWWLQJWKHGHVLUHGFDSDELOLWLHVIRUDEURZVHU
7DNLQJVFUHHQVKRWV
/RFDWLQJWDUJHWZLQGRZVDQGL)UDPHV
6ZLWFKLQJDPRQJZLQGRZV
6ZLWFKLQJDPRQJIUDPHV
+DQGOLQJDOHUWV
([SORULQJ1DYLJDWH
:DLWLQJIRU:HE(OHPHQWVWRORDG
,PSOLFLWZDLWWLPH
([SOLFLWZDLWWLPH
+DQGOLQJFRRNLHV
6XPPDU\
&KDSWHU'LIIHUHQW$YDLODEOH:HE'ULYHUV
)LUHIR['ULYHU
8QGHUVWDQGLQJWKH)LUHIR[SUR¿OH
$GGLQJWKHH[WHQVLRQWR)LUHIR[
6WRULQJDQGUHWULHYLQJDSUR¿OH
'HDOLQJZLWK)LUHIR[SUHIHUHQFHV
6HWWLQJSUHIHUHQFHV
Understanding frozen preferences 91

Table of Contents
[ iii ]
Firefox binary 93
Installing multiple versions of Firefox 93
,QWHUQHW([SORUHU'ULYHU
,QVWDOOLQJ,QWHUQHW([SORUHU'ULYHU
:ULWLQJ\RXU¿UVWWHVWVFULSWIRUWKH,(EURZVHU
%XLOGLQJWKH,QWHUQHW([SORUHUGULYHUVHUYLFH
8QGHUVWDQGLQJ,('ULYHUFDSDELOLWLHV
&KURPH'ULYHU
,QVWDOOLQJ&KURPH'ULYHU
:ULWLQJ\RXU¿UVWWHVWVFULSWIRUWKH&KURPHEURZVHU
8VLQJ&KURPH2SWLRQV
6DIDUL'ULYHU
:ULWLQJ\RXU¿UVWWHVWVFULSWIRUWKH6DIDULEURZVHU
2SHUD'ULYHU
,QVWDOOLQJ2SHUD'ULYHU
:ULWLQJ\RXU¿UVWWHVWVFULSWIRUWKH2SHUDEURZVHU
6XPPDU\
Chapter 5: 8QGHUVWDQGLQJ:HE'ULYHU(YHQWV
,QWURGXFLQJ(YHQW)LULQJ:HE'ULYHUDQG(YHQW/LVWHQHUFODVVHV
&UHDWLQJDQLQVWDQFHRI(YHQW/LVWHQHU
,PSOHPHQWLQJ:HE'ULYHU(YHQW/LVWHQHU
([WHQGLQJ$EVWUDFW:HE'ULYHU(YHQW/LVWHQHU
&UHDWLQJD:HE'ULYHULQVWDQFH
&UHDWLQJ(YHQW)LULQJ:HE'ULYHUDQG(YHQW/LVWHQHULQVWDQFHV
5HJLVWHULQJ(YHQW/LVWHQHUZLWK(YHQW)LULQJ:HE'ULYHU
Executing and verifying the events 119
5HJLVWHULQJPXOWLSOH(YHQW/LVWHQHUV
([SORULQJGLIIHUHQW:HE'ULYHUHYHQWOLVWHQHUV
Listening for WebElement value change 121
Listening for WebElement clicked 122
Listening for a WebElement search event 122
Listening for browser back navigation 122
Listening for browser forward navigation 123
Listening for browser navigateTo events 123
Listening for script execution 123
Listening for any exception 124
Unregistering EventListener with EventFiringWebDriver 124
6XPPDU\

Table of Contents
[ iv ]
&KDSWHU'HDOLQJZLWK,2
/HDUQLQJDERXWWKH)LOH+DQGOHUFODVV
&RS\LQJ¿OHVIURPWKHVRXUFHWRWKHGHVWLQDWLRQGLUHFWRU\
&RS\LQJ¿OHVIURPWKHVRXUFHWRWKHGHVWLQDWLRQGLUHFWRU\EDVHG
RQ¿OHQDPHVXI¿[
&UHDWLQJDGLUHFWRU\
'HOHWLQJD¿OHRUGLUHFWRU\
8QGHUVWDQGLQJWKH,V=LSSHGPHWKRG
8QGHUVWDQGLQJWKHPDNH([HFXWDEOHPHWKRG
8QGHUVWDQGLQJWKHPDNH:ULWDEOHPHWKRG
5HDGLQJD¿OH
8QGHUVWDQGLQJWKHFDQ([HFXWHPHWKRG
/HDUQLQJDERXWWKH7HPSRUDU\)LOHV\VWHPFODVV
8QGHUVWDQGLQJWKHGHIDXOWWHPSRUDU\¿OHV\VWHP
Creating a directory in DefaultTmpFS 133
Deleting a temporary directory 134
'HOHWLQJPXOWLSOH¿OHV
&KDQJLQJWKHWHPSRUDU\¿OHV\VWHP
/HDUQLQJDERXWWKH=LSFODVV
&RPSUHVVLQJDGLUHFWRU\
'HFRPSUHVVLQJDGLUHFWRU\
6XPPDU\
&KDSWHU([SORULQJ5HPRWH:HE'ULYHUDQG
:HE'ULYHU%DFNHG6HOHQLXP
,QWURGXFLQJ5HPRWH:HE'ULYHU
Understanding the RemoteWebDriver server 141
Downloading the server 141
Running the server 141
Understanding the RemoteWebDriver client 143
Converting an existing test script to use RemoteWebDriver server 143
8VLQJ5HPRWH:HE'ULYHUIRUWKH)LUHIR[EURZVHU
Using RemoteWebDriver and the IE browser 149
8VLQJ5HPRWH:HE'ULYHUDQGWKH&KURPHEURZVHU
([WHQGLQJWKH5HPRWH:HE'ULYHUFOLHQWWRWDNHVFUHHQVKRWV
8QGHUVWDQGLQJWKH-621ZLUHSURWRFRO
5HSODFLQJWKHFOLHQWOLEUDU\ZLWK\RXURZQFRGH
([SORULQJ:HE'ULYHU%DFNHG6HOHQLXP
6XPPDU\

Table of Contents
[ v ]
&KDSWHU8QGHUVWDQGLQJ6HOHQLXP*ULG
([SORULQJ6HOHQLXP*ULG
8QGHUVWDQGLQJWKHKXE
8QGHUVWDQGLQJWKHQRGH
0RGLI\LQJWKHH[LVWLQJWHVWVFULSWWRXVH6HOHQLXP*ULG
5HTXHVWLQJIRUQRQUHJLVWHUHGFDSDELOLWLHV
4XHXLQJXSWKHUHTXHVWLIWKHQRGHLVEXV\
'HDOLQJZLWKWZRQRGHVZLWKPDWFKLQJFDSDELOLWLHV
&RQ¿JXULQJ6HOHQLXP*ULG
6SHFLI\LQJQRGHFRQ¿JXUDWLRQSDUDPHWHUV
6HWWLQJVXSSRUWHGEURZVHUVE\DQRGH
6HWWLQJQRGHWLPHRXWV
6HWWLQJWKHOLPLWRQEURZVHULQVWDQFHV
5HUHJLVWHULQJWKHQRGHDXWRPDWLFDOO\
6HWWLQJQRGHKHDOWKFKHFNWLPH
8QUHJLVWHULQJDQXQDYDLODEOHQRGH
6HWWLQJWKHEURZVHUWLPHRXW
+XEFRQ¿JXUDWLRQSDUDPHWHUV
:DLWLQJIRUDPDWFKRIGHVLUHGFDSDELOLW\
&XVWRPL]HG&DSDELOLW\0DWFKHU
:DLW7LPHRXWIRUDQHZVHVVLRQ
'LIIHUHQWZD\VWRVSHFLI\WKHFRQ¿JXUDWLRQ
6XPPDU\
&KDSWHU8QGHUVWDQGLQJ3DJH2EMHFW3DWWHUQ
&UHDWLQJWHVWFDVHVIRURXU:RUG3UHVVEORJ
Test case 1 – Adding a new post to our WordPress blog 192
Test case 2 – Deleting a post from our WordPress blog 193
Test case 3 – Counting the number of posts on our WordPress blog 194
:KDWLVWKH3DJH2EMHFWSDWWHUQ"
8VLQJWKH#)LQG%\DQQRWDWLRQ
8QGHUVWDQGLQJ3DJH)DFWRU\
*RRGSUDFWLFHVIRUWKH3DJH2EMHFWVGHVLJQ
Consider a web page as a services provider 199
$OZD\VORRNIRULPSOLHGVHUYLFHV
8VLQJ3DJH2EMHFWVZLWKLQD3DJH2EMHFW
7KH$GG1HZ3RVW3DJH2EMHFW
7KH$OO3RVWV3DJH3DJH2EMHFW
&RQVLGHUPHWKRGVLQ3DJH2EMHFWVDVVHUYLFHVDQGQRWDV8VHU$FWLRQV
,GHQWLI\LQJVRPH:HE(OHPHQWVRQWKHÀ\
.HHSLQJWKHSDJHVSHFL¿FGHWDLOVRIIWKHWHVWVFULSW
8QGHUVWDQGLQJORDGDEOHFRPSRQHQWV

Table of Contents
[ vi ]
:RUNLQJRQDQHQGWRHQGH[DPSOHRI:RUG3UHVV
/RRNLQJDWDOOWKH3DJH2EMHFWV
7KH$GPLQ/RJLQ3DJH3DJH2EMHFW
7KH$OO3RVWV3DJH3DJH2EMHFW
The AddNewPostPage PageObject 213
The EditPostPage PageObject 213
The DeletePostPage PageObject 214
/RRNLQJDWWKHWHVWFDVHV
$GGLQJDQHZSRVW
(GLWLQJDSRVW
'HOHWLQJDSRVW
&RXQWLQJSRVWV
6XPPDU\
&KDSWHU7HVWLQJL26DQG$QGURLG$SSV
'LIIHUHQWIRUPVRIPRELOHDSSOLFDWLRQV
$YDLODEOHVRIWZDUHWRROV
$XWRPDWLQJL26DQG$QGURLGWHVWVXVLQJ$SSLXP
Automating iOS application tests 224
$XWRPDWLQJ$QGURLGDSSOLFDWLRQWHVWV
3UHUHTXLVLWHVIRU$SSLXP
6HWWLQJXS;FRGH
6HWWLQJXS$QGURLG6'.
Installing Appium 231
Automating for iOS 232
$XWRPDWLQJIRU$QGURLG
6XPPDU\
,QGH[
Preface
This book is about Selenium WebDriver, also known as Selenium 2, which is a UI
automation tool used by software developers and QA engineers to test their web
application on different web browsers. The reader is expected to have a basic idea
of programming, preferably using Java, because we take the reader through several
features of WebDriver using code examples. This book can be used as a reference for
your day-to-day usage of WebDriver.
What this book covers
Chapter 1, Introducing WebDriver and WebElementsZLOOVWDUWRIIE\EULHÁ\GLVFXVVLQJ
the history of Selenium and the differences between Selenium 1 and Selenium 2.
Then, we quickly jump into WebDriver by describing how it perceives a web page.
We will also look at what a WebDriver's WebElement is. Then, we talk about locating
WebElements on a web page and performing some basic actions on them.
Chapter 2, Exploring Advanced Interactions of WebDriver, will dive deeply into more
advanced actions that WebDriver can perform on the WebElements of a web page,
such as the dragging-and-dropping of elements from one frame of a page to another
DQGULJKWFRQWH[WFOLFNLQJRQ:HE(OHPHQWV:HUHVXUH\RXZLOOÀQGWKLVFKDSWHU
interesting to read.
Chapter 3, Exploring the Features of WebDriver, will talk about some advanced features
of WebDriver, such as taking screenshots of web pages, executing JavaScript, and
handling cookies and proxies.

Preface
[]
Chapter 4, Different Available WebDrivers, will talk about various implementations of
WebDriver, such as FirefoxDriver, IEDriver, and ChromeDriver. When we discuss
WebDriver in Chapter 1, Introducing WebDriver and WebElements, we will see that
:HE'ULYHUKDVVSHFLÀFLPSOHPHQWDWLRQVIRUPRVWRIWKHSRSXODUEURZVHUVDYDLODEOH
on the market.
Chapter 5, Understanding WebDriver Events, will deal with the event-handling aspect
of WebDriver. To state a few, events can be a value change on a WebElement,
a browser back-navigation invocation, script execution completion, and so on.
Chapter 6, Dealing with I/OZLOOLQWURGXFH\RXWRWKHÀOHKDQGOLQJIHDWXUHVRI
:HE'ULYHU&RQFHSWVVXFKDVFRS\LQJÀOHVXSORDGLQJÀOHVDQGGHOHWLQJÀOHVZLOO
be discussed in this chapter.
Chapter 7, Exploring RemoteWebDriver and WebDriverBackedSelenium, will
deal with two very important topics of WebDriver: RemoteWebDriver and
WebDriverBackedSelenium. If you want to execute a WebDriver installed on a
different machine from your machine, you can use the RemoteWebDriver class
to handle all your commands for that remote machine. One of its popular use cases
is browser compatibility testing. The other class we talk about in this chapter is
WebDriverBackedSelenium. This is useful for people who want to use WebDriver,
but still have many of their existing tests using Selenium 1. Finally, we will migrate
some code using Selenium1 APIs to use WebDriver APIs.
Chapter 8, Understanding Selenium Grid, will talk about one important and interesting
feature of Selenium named Selenium Grid. Using this, you can submit your
developed automation scenarios to a server and specify there the target platform,
that is, the OS, browser type, and version, upon which you want these scenarios
WREHH[HFXWHG,IDQRGHZLWKVXFKDFRQÀJXUDWLRQLVUHJLVWHUHGDQGDYDLODEOHWKH
server will dispatch your job to that node, and it will take care of executing your
automation scenarios in its environment and publish the results back to the server.
Chapter 9, Understanding PageObject Pattern, will talk about a well-known design
pattern named the PageObject pattern. This is a proven pattern that will give you
a better handle on your automation framework and scenarios.
Chapter 10, Testing iOS and Android Apps, we will take you through how WebDriver
can be used to automate your test scripts for iOS and Android applications. We will
also discuss a recently developed software tool called Appium.
By the end of this book, we are sure you will be one of the world's advanced
WebDriver users.

Preface
[]
What you need for this book
The following sections describe the installation of components required to work with
the code in this book.
Installing Java
In this book, all the code examples that we show covering various features of
WebDriver will be in Java. To follow these examples and write your own code, you
need Java Development Kit installed on your computer. The latest version of JDK
can be downloaded from the following link:
http://docs.oracle.com/javase/7/docs/webnotes/install/windows/jdk-
installation-windows.html
A step-by-step installation guide is available at the following link:
http://docs.oracle.com/javase/7/docs/webnotes/install/windows/jdk-
installation-windows.html
Installing Eclipse
This book is a practical guide that expects the user to write and execute WebDriver
examples. For this, it would be handy to install a Java IDE. You can install your
favorite IDE. Here, I am installing Eclipse. It can be downloaded from the
following link:
http://www.eclipse.org/downloads/packages/eclipse-ide-java-
developers/junosr2
Installing Firefox
Most of the work in this book will be done using Firefox. However, we do talk
about other browsers and their respective drivers in Chapter 4, Different Available
WebDrivers. We will work with Firefox 17.0.1, which has been tested and tried
against WebDriver 2.33.0. It can be downloaded from the following link:
https://ftp.mozilla.org/pub/mozilla.org/firefox/releases/17.0.1/
Installing Firebug
Firebug is one of the add-ons of Firefox. It is widely used to inspect HTML elements
on a web page. You can get Firebug from the following link:
https://getfirebug.com/
Preface
[]
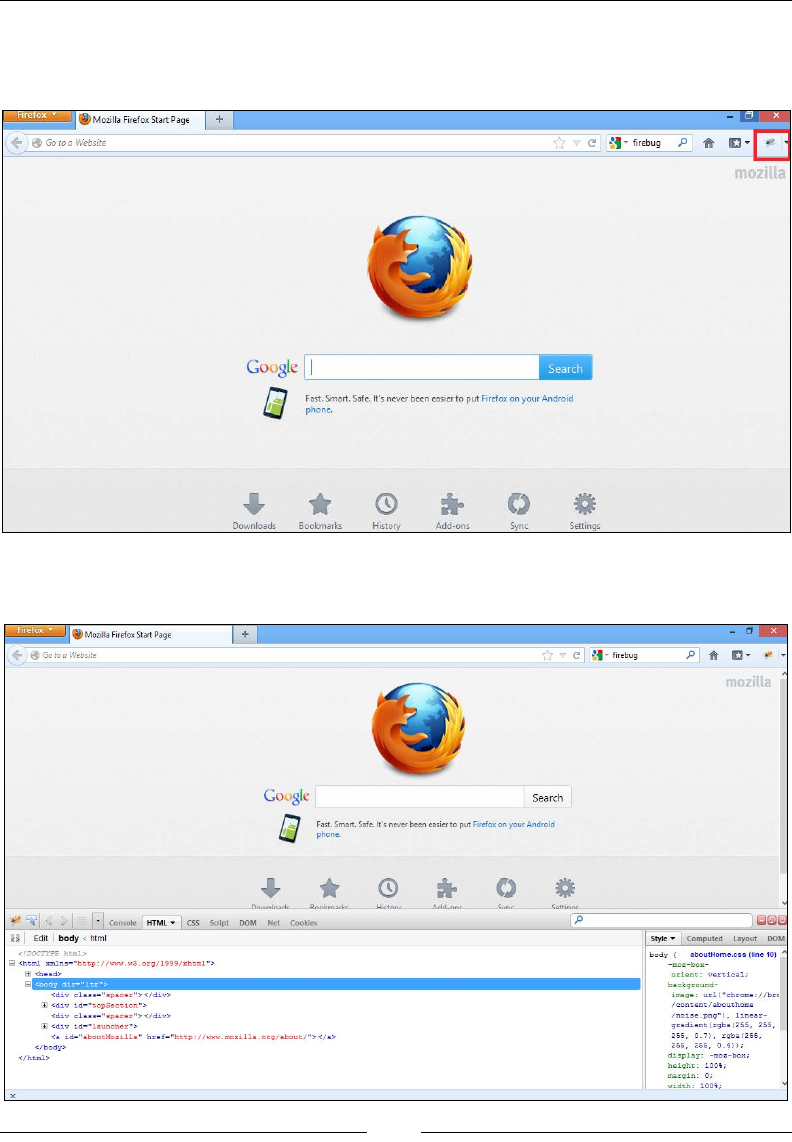
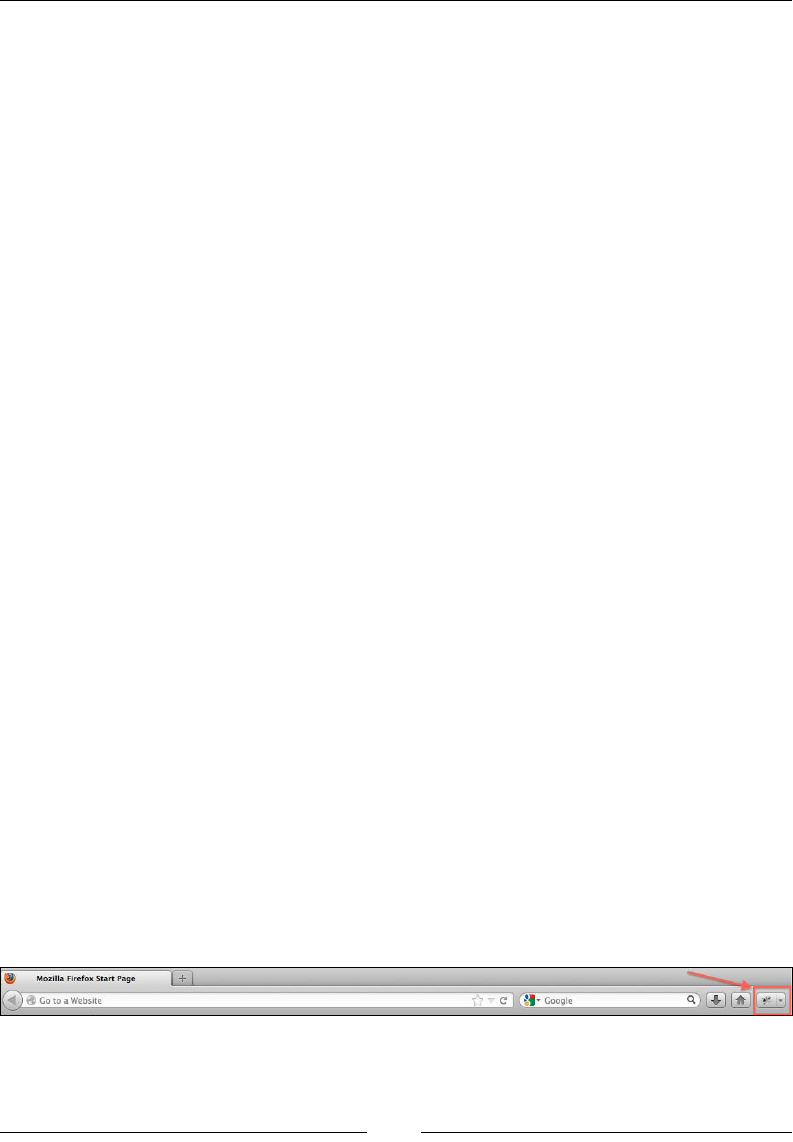
$IWHULQVWDOODWLRQZKHQ\RXRSHQWKH)LUHIR[EURZVHU\RXVKRXOGVHHWKHÀUHEXJ
icon on the top-right corner of the browser, as shown highlighted in red in the
following screenshot:
Now, click on the Firebug icon to load the Firebug UI, as shown in the following
screenshot:
Firefox
'
Mozilla
Firefox
Start
Page
+
E
41
$
Go
too
Website
C
firebug
P
#
E
mozilla
y
\
Google
1
1
Search
a
Fast.
Smart.
Safe.
It's
never
been
easier
to
put
Firefox
on
your
Android
phone.
4
©
ft-
o
Downloads
Bookmarks
History
Add-ons
Sync
Settings
Mozilla
Firefox
Start
Page
a
+
<f*
&
Go
to
a
Website
'
C
'
firebug
p
ft
c-
-
-
mozilla
>
Goggle
Search
0
Fast.
Smart.
Safe.
It's
never
been
easier
to
put
Firefox
on
your
Android
phone.
* *
©
ft
Oft
v
QnumlAailf-
fiAnkmaikt.
Cm,
Wirtnni
JWMÿnr.
•
Console
HTML
"•
CSS
Script
DOM
Net
Cookies
<>
|
Edit
body
html
Style
Computed
Layout
DOM
body
{
aboutHome.css
(line
10)
*
-muz
-box-
orient:
vertical;
background-
image:
url
(
"chrome
://brc
/content/abouthome
/noise
.png”)
,
linear-
gradient
(rgba
<255,
255,
255,
0.7),
rgba
(255,
255, 255,
0.4));
display:
-moz-box;
height:
100%;
margin:
0;
width:
100%;
<!DOCTYPS
haal>
H
<html
xmlns=”http://www-w3.org/1999/xhtml">
5
<head>
<body
dir=”ltr
">
<div
cla33=”spacer
"></div>
15
<div
id=”topSection”>
<div
class="spacer"></div>
5
<div
id=”launcher">
<a
id="aboutMozilla"
href="http
:
//www.
mozilla
.
org/about/"x/a>
</bcdy>
</html>
v
x
Preface
[ 5 ]
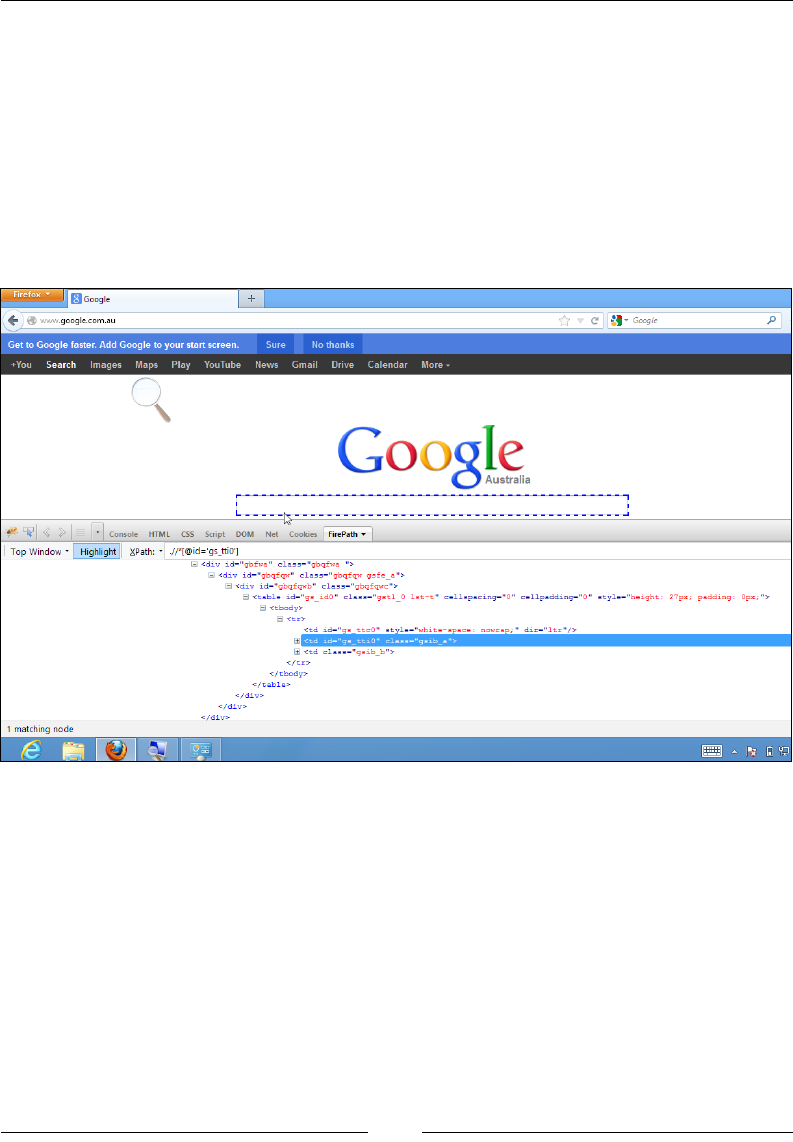
Installing FirePath
After you have installed the Firebug add-on to Firefox, it's time to extend Firebug
to have something named FirePath. FirePath is used to get XPath and CSS values
of an HTML element on a web page. You can download FirePath from the
following location:
https://addons.mozilla.org/en-US/firefox/addon/FirePath/
After installation, you should see a new tab in the Firebug UI for FirePath, as shown
in the following screenshot:
Downloading WebDriver client library
(language bindings)
As discussed earlier, test scripts need a client library with which to interact, or
FRPPDQG:HE'ULYHUWRH[HFXWHVSHFLÀFXVHUHYHQWVDJDLQVWDZHEDSSOLFDWLRQ
being tested on a browser. For this, you need to download the WebDriver client
library. In this book, we use Java language bindings to create and execute our
automation scripts.
|
google.com.au
El
Google
+
c
if*
Google
P
Get
to
Google
faster.
Add
Google
to
your
start
screen.
Search
Images
Maps
Play
YouTube
News
Gmail
Drive
Calendar
More
-
Sure
No
thanks
Q,
Goode
C
Australia
L
s>|
&
'
Console
HTML
CSS
Script
DOM
Net
Cookies
FirePath
Top
Window
•
Highlight
XPath:
•
.//*[@id='gs_ttiO']
Q
<div
id=”gbfwa"
class="gbqfwa
'*>
EJ
<div
id="gbqfqw"
class=''gbqfqw
gsfe_a">
B
<div
id="gbqfqwb"
clas3="gbqfqwc">
B
<table
id=”gs_idO''
class='’gstl_0
lst-t"
cellspacing=''0''
cellpadding="0"
style="height
:
27px;
padding:
Opx;
">
B
<tbody>
B
<tr>
<td
id="g3
ttcQ
'*
3tyle="white-3pace
:
nowrap;"
dir="lbr"/>
<td
id=''g3_ttiO"
cla33="g3ib_an>
+
II
<td
cXas3=''gsib_b">
</tr>
</cbody>
</table>
</div>
</div>
</div>
1
matching
node
[5s
I

Preface
[]
At the time of writing this book, all the code examples are written based on Selenium
Java Version 2.33.0. It is recommended that you download that version from the
following location:
https://code.google.com/p/selenium/downloads/detail?name=selenium-
java-2.33.0.zip&can=2&q=
Downloading the Firefox Driver
The good news is that you have already downloaded the Firefox Driver. Yes, the
Firefox Driver comes along with client libraries. But, for other drivers, such as the
IE Driver, Safari Driver, Chrome Driver, and so on, you have to download them
explicitly from the following link:
http://docs.seleniumhq.org/download/
We will download them when we need to in Chapter 4, Different Available WebDrivers.
Who this book is for
If you are a quality assurance/testing professional, software developer, or web
application developer looking to create automation test scripts for your web
applications, this is the perfect guide for you! As a prerequisite, this book expects
you to have a basic understanding of Java programming, although any previous
knowledge of WebDriver or Selenium 1 is not needed. By the end of this book, you
will have acquired a comprehensive knowledge of WebDriver, which will help you
in writing your automation tests.
Conventions
,QWKLVERRN\RXZLOOÀQGDQXPEHURIVW\OHVRIWH[WWKDWGLVWLQJXLVKDPRQJGLIIHUHQW
kinds of information. Here are some examples of these styles, and an explanation of
their meaning.
&RGHZRUGVLQWH[WGDWDEDVHWDEOHQDPHVIROGHUQDPHVÀOHQDPHVÀOHH[WHQVLRQV
pathnames, dummy URLs, user input, and Twitter handles are shown as follows:
"The moveByOffset() method is used to move the mouse from its current position
to another point on the web page."
A block of code is set as follows:
public class NavigateToAUrl {
public static void main(String[] args){
WebDriver driver = new FirefoxDriver();
Preface
[]
driver.get("http://www.google.com");
}
}
When we wish to draw your attention to a particular part of a code block, the
relevant lines or items are set in bold:
public class GoogleSearchButtonByName {
public static void main(String[] args){
WebDriver driver = new FirefoxDriver();
driver.get("http://www.google.com");
WebElement searchBox = driver.findElement(By.name("btnK"));
searchBox.submit();
}
}
Any command-line input or output is written as follows:
java -jar selenium-server-standalone-2.33.0.jar -role node -hub
http://172.16.87.131:1111/grid/register -registerCycle 10000
New terms and important words are shown in bold. Words that you see on the
screen, in menus or dialog boxes for example, appear in the text like this: "Open
Eclipse from the directory you have installed it in earlier. Navigate to File | New |
Java Project".
Warnings or important notes appear in a box like this.
Tips and tricks appear like this.
Reader feedback
Feedback from our readers is always welcome. Let us know what you think about
this book—what you liked or may have disliked. Reader feedback is important for us
to develop titles that you really get the most out of.
To send us general feedback, simply send an e-mail to feedback@packtpub.com,
and mention the book title via the subject of your message.
If there is a topic that you have expertise in and you are interested in either writing
or contributing to a book, see our author guide on www.packtpub.com/authors.
1
1

Preface
[]
&XVWRPHUVXSSRUW
Now that you are the proud owner of a Packt book, we have a number of things
to help you to get the most from your purchase.
'RZQORDGLQJWKHH[DPSOHFRGH
<RXFDQGRZQORDGWKHH[DPSOHFRGHÀOHVIRUDOO3DFNWERRNV\RXKDYHSXUFKDVHG
from your account at http://www.packtpub.com. If you purchased this book
elsewhere, you can visit http://www.packtpub.com/support and register to have
WKHÀOHVHPDLOHGGLUHFWO\WR\RX
Errata
Although we have taken every care to ensure the accuracy of our content, mistakes
GRKDSSHQ,I\RXÀQGDPLVWDNHLQRQHRIRXUERRNV³PD\EHDPLVWDNHLQWKHWH[WRU
the code—we would be grateful if you would report this to us. By doing so, you can
save other readers from frustration and help us improve subsequent versions of this
ERRN,I\RXÀQGDQ\HUUDWDSOHDVHUHSRUWWKHPE\YLVLWLQJhttp://www.packtpub.
com/submit-errata, selecting your book, clicking on the errata submission form link,
DQGHQWHULQJWKHGHWDLOVRI\RXUHUUDWD2QFH\RXUHUUDWDDUHYHULÀHG\RXUVXEPLVVLRQ
will be accepted and the errata will be uploaded on our website, or added to any list of
existing errata, under the Errata section of that title. Any existing errata can be viewed
by selecting your title from http://www.packtpub.com/support.
Piracy
Piracy of copyright material on the Internet is an ongoing problem across all media.
At Packt, we take the protection of our copyright and licenses very seriously. If you
come across any illegal copies of our works, in any form, on the Internet, please
provide us with the location address or website name immediately so that we can
pursue a remedy.
Please contact us at copyright@packtpub.com with a link to the suspected
pirated material.
We appreciate your help in protecting our authors, and our ability to bring you
valuable content.
Questions
You can contact us at questions@packtpub.com if you are having a problem with
any aspect of the book, and we will do our best to address it.

Introducing WebDriver and
WebElements
,QWKLVFKDSWHUZHZLOOORRNEULHÁ\LQWRWKH6HOHQLXPKLVWRU\DQGSURFHHGWRWKH
basic components of a web page, WebElements. We will learn different ways to
locate WebElements on a web page and execute various user actions on them. We
will cover the following topics in this chapter:
History of Selenium
Difference between Selenium 1 and Selenium 2
Setting up an Eclipse project to execute the example code
Locating WebElements on a web page
Actions that can be taken on the WebElements
8QGHUVWDQGLQJWKHKLVWRU\RI6HOHQLXP
Though this book is not intended to deal with Selenium 1, it is a good idea to know
EULHÁ\DERXWLWEHIRUHZHVWDUWRIIZLWK:HE'ULYHU,QWKLVZD\ZHFDQXQGHUVWDQG
how and why WebDriver has evolved.
6HOHQLXPRU6HOHQLXP5HPRWH&RQWURORU
6HOHQLXP5&
Selenium RC is a popular UI automation library, allowing developers and testers
to automate their interactions with a Web Application Under Test (WAUT) by
providing them with the necessary libraries, supported in multiple languages,
to program.
1

Introducing WebDriver and WebElements
[]
In terms of design, Selenium RC chose to use generic JavaScript named Selenium
Core to drive the WAUT on a browser. However, the decision of using generic
JavaScript that can drive the WAUT on any browser should comply with a security
policy named Same-Origin Policy. Every available browser in the market imposes
this policy on the websites that are loaded on it.
To know about this policy, we should take a closer look at how a browser executes
JavaScript loaded from a website. For every website that is loaded on it, the browser
creates a separate sandbox for the website's JavaScript, which restricts the JavaScript
to be executed only on it's respective website domain. This way, a JavaScript that
belongs to one website doesn't execute on another website that is currently loaded on
that browser. This security vulnerability, named Cross-site scripting, is the browser's
responsibility to restrict. So, coming back to Selenium RC, its generic JavaScript is
not allowed, by the browser, to execute on a website (WAUT) that is coming from
a different domain.
6RKRZGLG6HOHQLXP5&KDQGOHWKLV"7RRYHUFRPHWKLVVHFXULW\UHVWULFWLRQ
Selenium RC acts as an HTTP Proxy Server. When the test script asks to launch
a browser, Selenium RC server launches the browser and injects its JavaScript
(Selenium Core) into the browser. All the subsequent requests for the WAUT go
through Selenium RC (acting as an HTTP Proxy Server) to the actual web server
hosting WAUT. Thus making the browser think that the web application is being
served from the Selenium RC's server domain than the actual web server's domain
and allowing Selenium Core to execute and drive the web application.
Typically, it works in the following way:
1. A tester or a developer, through his/her test script, can command Selenium
RC server to perform certain actions on the WAUT on a certain browser. The
way the user can command Selenium RC to perform something is by using
the client libraries provided by Selenium RC. These libraries are provided
in different languages, such as Java, Ruby, Python, Perl, PHP, and .NET.
These commands, which are passed from the test scripts to Selenium RC,
are named Selenese commands. In a test script, you will have a set of
Selenese commands to test a scenario on the WAUT.
Chapter 1
[ 11 ]
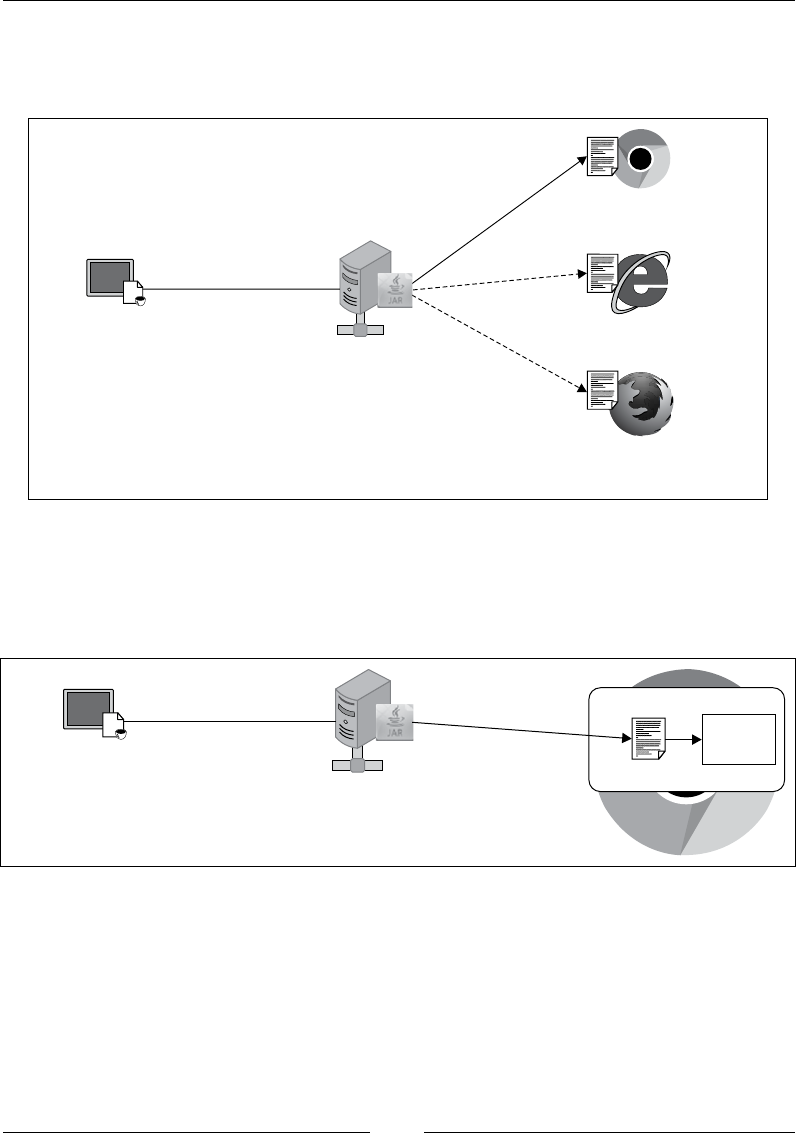
2. Once the Selenium RC server receives the command from the test script, it
will launch the test script preferred browser, and while launching, it injects
the Selenium Core into the browser.
>_
Test Script
using Client libraries
in Java, Python,
Ruby and so on., Selenium Remote Control Server
Browsers loaded with Selenium Core
JavaScript on them
Selenese Command
to launch browser
Launch
js
js
js
3. Upon loading on the browser, Selenium Core executes all the Selenese
commands from the test script, coming through Selenium RC, against the
WAUT. The browser doesn't restrict it, because it treats Selenium Core and
WAUT as a part of the same domain.
>_
Test Script
using Client libraries
in Java, Python,
Ruby and so on., Selenium Remote Control Server
Selenese Command
to be executed on WAUT
Selenese Command
to be executed on WAUT
Selenium Core
Treated as same Domain
js WAUT
4
m
4
>
_
7*

Introducing WebDriver and WebElements
[]
4. Now comes the HTTP Proxy part of the Selenium RC server. All the
requests and responses of the browser for WAUT go to the actual web
server via Selenium RC server, because the browser thinks Selenium RC
is serving WAUT.
Selenium Remote Control Server
(acting as HTTP Proxy)
Actual Web server hosting WAUT
Browser making request to Selenium RC
Request
Selenium Core
js WAUT
+
Response
Request Response
5. After execution, Selenium RC will send out the test result back to the test
script for developer's analysis.
6HOHQLXPRU6HOHQLXP:HE'ULYHURU
WebDriver
To overcome some of the limitations of Selenium 1, which we are going to discuss
shortly, WebDriver has come into existence for the following reasons:
7RJLYHDEHWWHUFRQWURORQWKHEURZVHUE\LPSOHPHQWLQJEURZVHUVSHFLÀF
implementations.
To give a better programming experience to the developer by adhering more
closely to the object-oriented programming fundamentals.
It works in the following way:
1. A tester or developer, through his/her test script, can command WebDriver to
perform certain actions on the WAUT on a certain browser. The way the user
can command WebDriver to perform something is by using the client libraries
or language bindings provided by WebDriver. These libraries are provided in
different languages, such as Java, Ruby, Python, Perl, PHP, and .NET.
J
wmm\
V
4
4
Chapter 1
[]
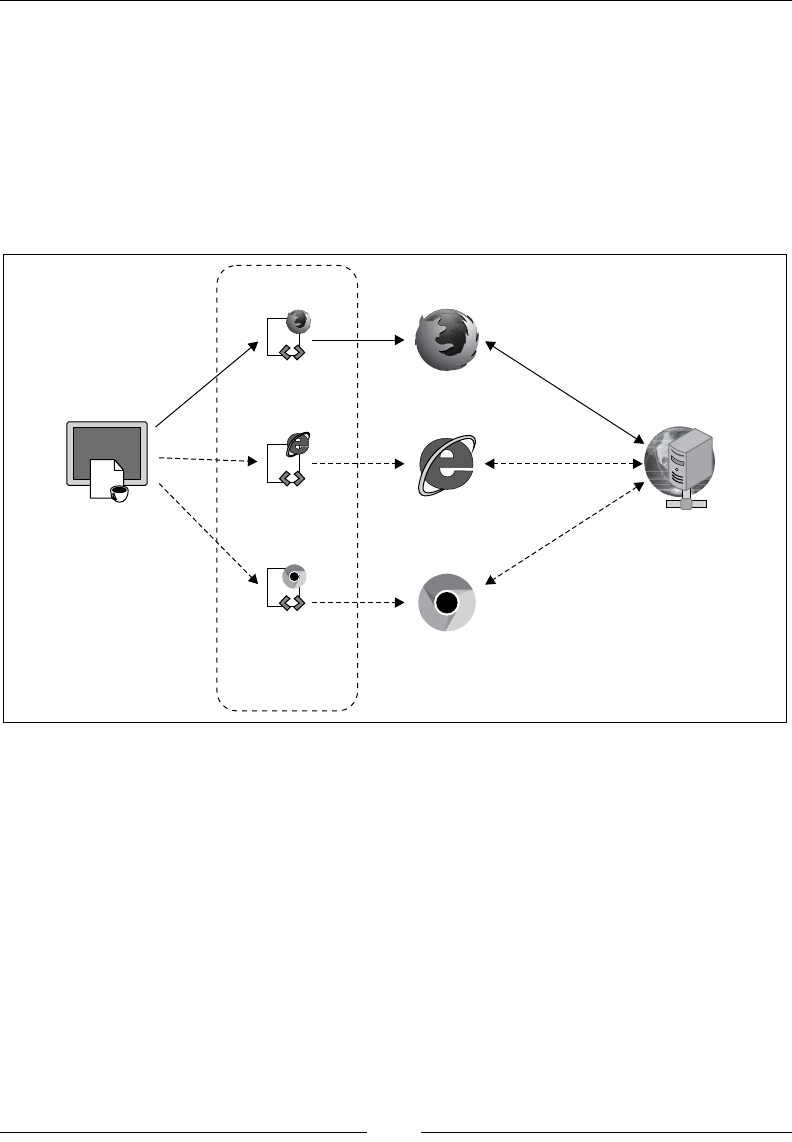
2. By using the language-binding client libraries, developers can invoke the
EURZVHUVSHFLÀFLPSOHPHQWDWLRQVRI:HE'ULYHUVXFKDV)LUHIR['ULYHU,(
Driver, Opera Driver, and so on, to interact with the WAUT on the respective
EURZVHU7KHVHEURZVHUVSHFLÀFLPSOHPHQWDWLRQVRI:HE'ULYHUZLOOZRUN
with the browser natively and execute commands from outside the browser
to simulate exactly how the application user does.
3. After execution, WebDriver will send out the test result back to the test script
for developer's analysis.
>_
Test Script using WebDriver
Client libraries supported in
Java, Ruby, Python, and so on.
Request-Response
Request-Response
Request-Response
Browsers
Web Server hosting WAUT
Web river’sD
Browser specific-
Implementations
IE Driver
Firefox Driver
Chrome Driver
+
'LIIHUHQFHVEHWZHHQ6HOHQLXPDQG
6HOHQLXP
Now that we know how Selenium 1 and Selenium 2 are designed, let's quickly see
the differences between them.
\
c?
Q
©
r
S
4

Introducing WebDriver and WebElements
[]
Handling the browser
As we saw earlier, Selenium RC drives the browser from within the browser by
sitting in it as JavaScript (Selenium Core). All the events that are to be executed on
the WAUT go through Core. This kind of approach will come with some limitations,
such as:
Core being limited within the JavaScript sandbox of the browser, as it needs
to comply with the Same-Origin policy.
%HFDXVHWKLV-DYD6FULSWOLEUDU\LVJHQHULFDQGQRWVSHFLÀFWRDQ\SDUWLFXODU
browser, the developers of test scripts sometimes end up with a situation
where their test scripts execute very well on some browsers but not on
some other.
To overcome this limitation, WebDriver, on the other hand, handles the browser
from outside the browser. It has an implementation for each browser, and the
developer who wants to execute his/her tests on a particular browser should use
that particular implementation of WebDriver. This gives the test scripts a better
handle on the browser because these WebDriver implementations speak to the
browsers natively, thus increasing the robustness of the test scripts.
Having better APIs
WebDriver comes with a better set of APIs meeting the expectations of most
developers by being closer to the object-oriented programming in terms of
its implementation.
7HVWLQJPRELOHDSSV
8VLQJ:HE'ULYHUVPRELOHVSHFLÀFLPSOHPHQWDWLRQVVXFKDV,3KRQH'ULYHUDQG
AndroidDriver, developers can actually generate test scripts that can execute their
mobile applications on simulators/emulators and actual devices. Selenium RC
doesn't support mobile application testing.
Having developer support and advanced
functionalities
WebDriver is being actively developed over a period of time, and you can see many
advanced interactions with the web as well as mobile applications, such as File
Handling, Touch APIs, and so on. The API set of it is getting bigger and bigger
ZLWKORWVRIIHDWXUHVZKLFKZHUHQHYHUWKRXJKWDERXWLQ6HOHQLXP5&'HÀQLWHO\
it is the future!
Chapter 1
[ 15 ]
Setting up a project in Eclipse
Now, let's VHWXSRXUSURMHFWLQ(FOLSVHDQGZULWHRXUÀUVW piece of code to use
WebDriver and navigate to a web page. Please follow the sequence of the
following steps to create an Eclipse WebDriver project:
1. Open Eclipse from the directory you have installed it in earlier. Navigate
to File | New | Java Project.
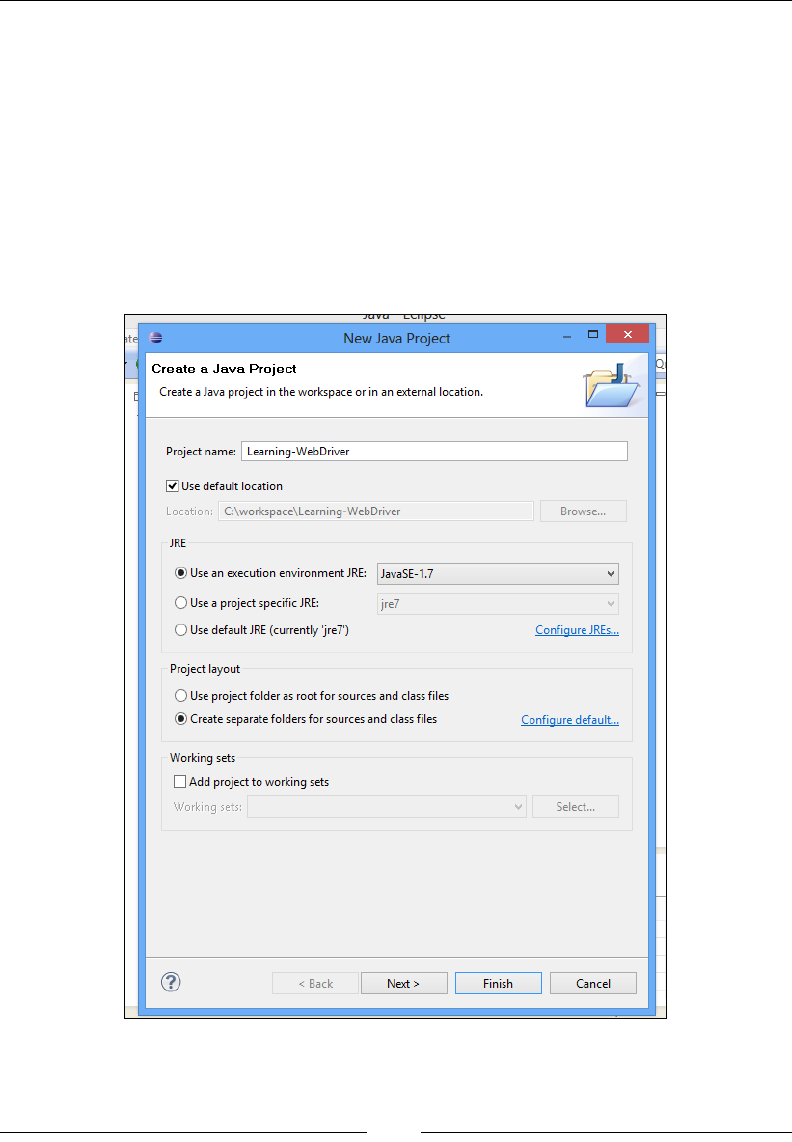
2. A New Java Project dialog appears, as shown in the following screenshot.
Enter the project name of your choice, leave the rest to default, and
click Next.
n
A
New
Java
Project
Jte
:
Create
a
Java
Project
Create
a
Java
project
in
the
workspace
or
in
an
external
location.
Project
name:
Learning-WebDriver
@
Use
default
location
Location:
C:\workspace\Learning-WebDriver
Browse...
JRE
(•)
Use
an
execution
environment
JRE:
JavaSE-1
.7
v
O
Use
a
project
specific
JRE:
O
Use
default
JRE
(currently
'jre7')
jre7
v
Configure
JREs...
Project
layout
O
Use
project
folder
as
root
for
sources
and
class
files
(•)
Create
separate
folders
for
sources
and
class
files
Configure
default...
Working
sets
l~1
Add
project
to
working
sets
Working
sets:
Select...
v
<
Back
Next
>
Finish
Cancel
Introducing WebDriver and WebElements
[]
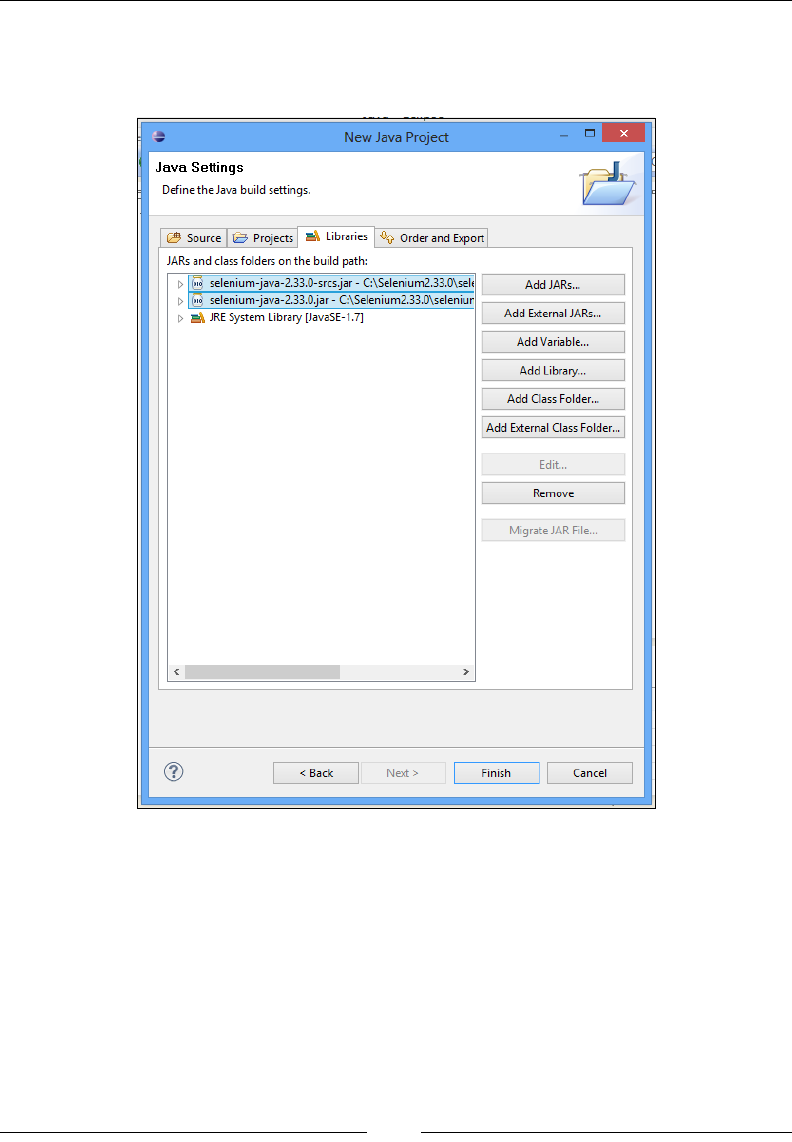
3. In the next screen, go to the Libraries tab, click on the Add External JARs…
button, and select selenium-java-2.33.0.jar and selenium-java-2.33.0-
srcs.jarÀOHVIURPWKHGRZQORDGHGORFDWLRQRI6HOHQLXP:HE'ULYHU
n
%
New
Java
Project
&
Java
Settings
Define
the
Java
build
settings.
1
3
Source
|
U3
Projects
Libraries
Order
and
Export
JARs
and
class
folders
on
the
build
path:
oio
selenium-java-2.33.0-srcs.jar
-
C:\Selenium2.33.0\seh
oio
selenium-java-2.33.0.jar
-
C:\Selenium2.33.0\seleniur
Add
JARs...
Add
External
JARs...
[>
B,
JRE
System
Library
[JavaSE-1.7]
Add
Variable...
Add
Library...
Add
Class
Folder...
Add
External
Class
Folder...
Edit...
Remove
Migrate
JAR
File...
< >
<
Back
Finish
Cancel
Next
>
Chapter 1
[]
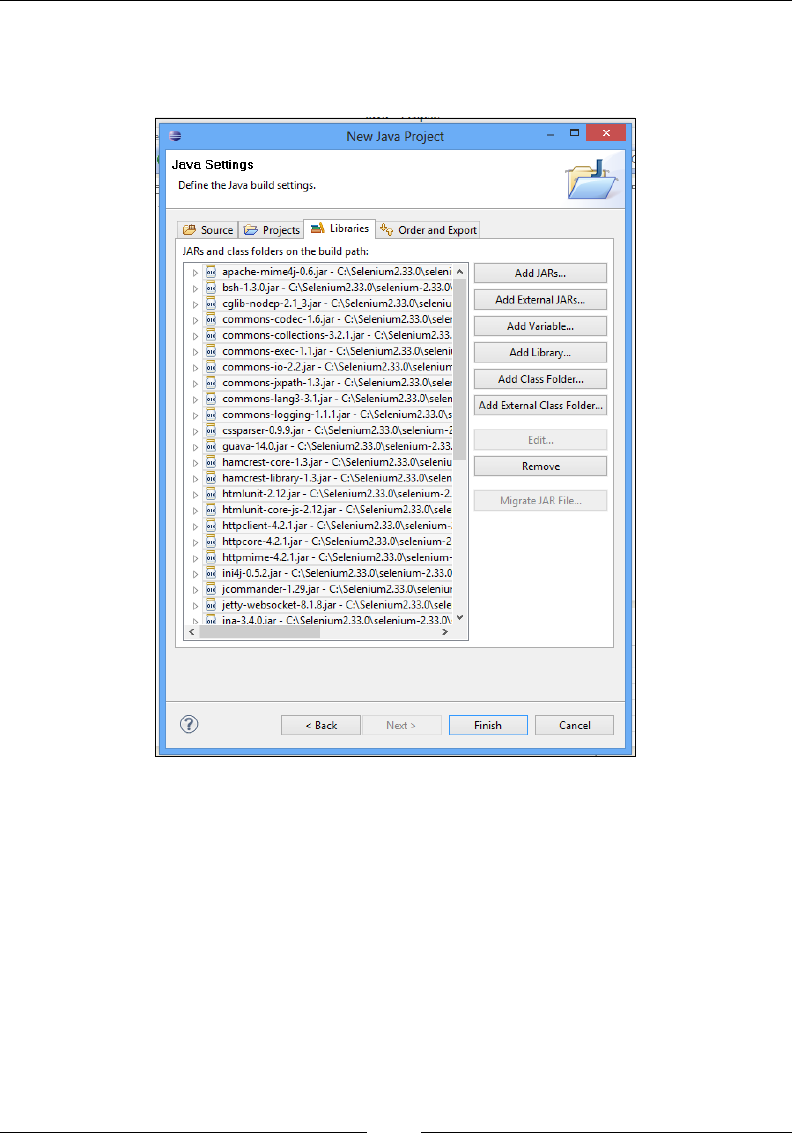
4. Click on the Add External JARs… button and add all the jars available under
the libs folder of the Selenium WebDriver directory(). Now the Libraries
section should look like this:
5. Click on Finish.
n
A
New
Java
Project
&
Java
Settings
Define
the
Java
build
settings.
Source
Projects
—
Libraries
•%.
Order
and
Export
JARs
and
class
folders
on
the
build
path:
>
IOIO
apache-mime4j-0.6.jar
-
C:\Selenium2.33.0\seleni
A
t>
ioi<j
bsh-1.3.0.jar
-
C:\Selenium2.33.0\selenium-2.33.0'
>
IOIO
cglib-nodep-2.1_3.jar
-
C:\Selenium2.33.0\seleniu
t>
oio
commons-codec-1.
6.jar
-
C:\Selenium2.33.0\seler
t>
oio
commons-collections-3.2.1.
jar
-
C:\Selenium2.33.
t>
oio
commons-exec-1.
1.
jar
-
C:\Selenium2.33.0\selenii
[>
IOIO
commons-io-2.2.jar
-
C:\Selenium2.33.0\seleniurr
t>
§
commons-jxpath-1.3.jar
-
C:\Selenium2.33.0\seler
t>
commons-lang3-3.
1.
jar
-
C:\Selenium2.33.0\selen
t>
§
commons-logging-1.1
.1
.jar
-
C:\Selenium2.33.0\s
t>
cssparser-0.9.9.jar
-
C:\Selenium2.33.0\selenium-i
t>
§
guava-14.0.jar
-
C:\Selenium2.33.0\selenium-2.33.
IOIO
hamcrest-core-1.3.jar
-
C:\Selenium2.33.0\seleniu
>
5
hamcrest-library-1.3.jar
-
C:\Selenium2.33.0\selen
>
5:
htmlunit-2.12.jar
-
C:\Selenium2.33.0\selenium-2.
t>
IOTO
htmlunit-core-js-2.12.jar
-
C:\Selenium2.33.0\sele
»
S
httpclient-4.2.1.
jar
-
C:\Selenium2.33.0\selenium-
t>
S
httpcore-4.2.1.
jar
-
C:\Selenium2.33.0\selenium-2
t>
§
httpmime-4.2.1.
jar
-
C:\Selenium2.33.0\selenium-
t>
ioTo
ini4j-0.5.2.jar
-
C:\Selenium2.33.0\selenium-2.33.0
0
ioTo
jcommander-1.29.jar
-
C:\Selenium2.33.0\seleniut
0
ioTo
jetty-websocket-8.1.8.jar
-
C:\Selenium2.33.0\sele
r>
IoTo
ina-3.4.0.iar
-
C:\Selenium2.33.0\selenium-2.33.0\
v
Add
JARs...
Add
External
JARs...
Add
Variable...
Add
Library...
Add
Class
Folder...
Add
External
Class
Folder...
Edit-
Remove
Migrate
JAR
File...
<
Back
Finish
Cancel
Next
>
Introducing WebDriver and WebElements
[]
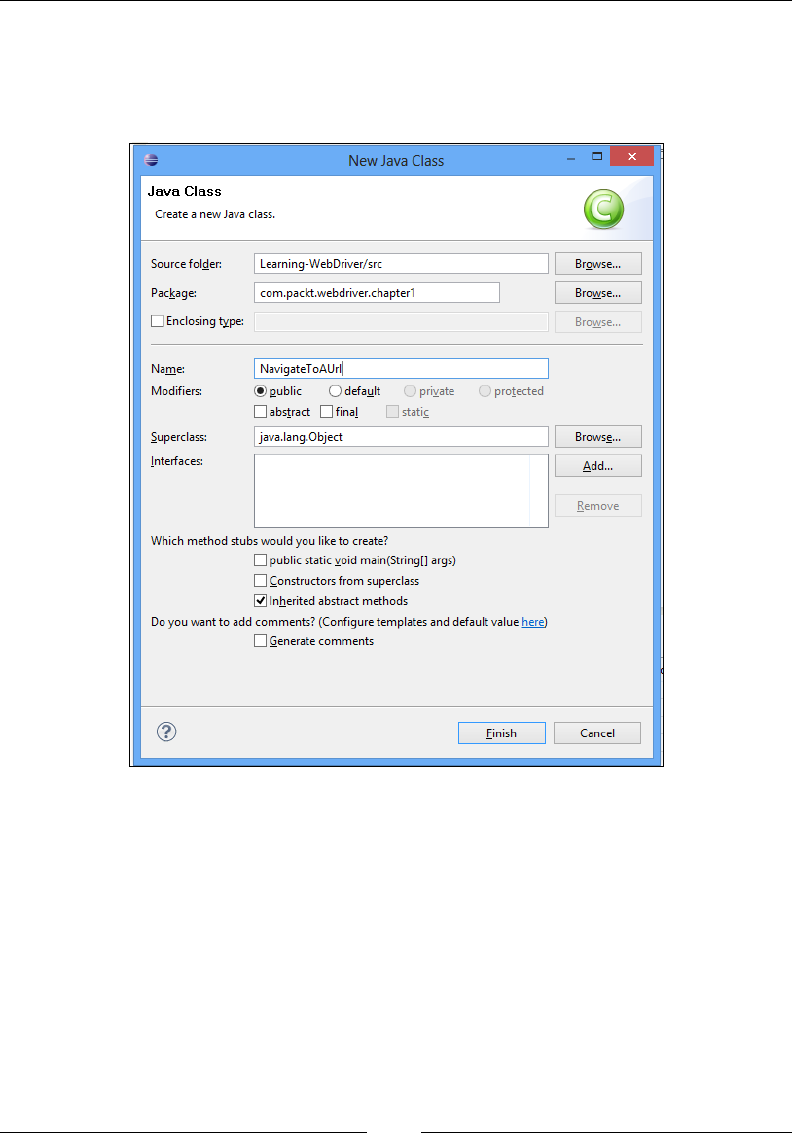
6. Now,OHWVFUHDWHRXUÀUVWFODVVWKDWXVHV:HE'ULYHUWRQDYLJDWHWRDZHE
page. In the project explorer window of Eclipse, right-click and navigate to
src | New | Class, enter the details of the class name and package name, as
shown in the following screenshot, and then click on Finish:
7. TheÀUVWSLHFHRIFRGHWRLQYRNH:HE'ULYHUand navigate to a URL is
as follows:
package com.packt.webdriver.chapter1;
import org.openqa.selenium.WebDriver;
import org.openqa.selenium.firefox.FirefoxDriver;
public class NavigateToAUrl {
public static void main(String[] args){
WebDriver driver = new FirefoxDriver();
driver.get("http://www.google.com");
}
}
New
Java
Class
Java
Class
Q
Create
a
new
Java
class.
Learning-WebDriver/src
Source
folder
Browse...
com.packt.webdriver.chapterl
Package:
I I
Enclosing
type:
Browse...
Browse...
|
NavigateToAUrl|
Name:
(•)
public
O
default
private
protected
I I
abstract
Q
final
D
static
Modifiers:
java.
lang.
Object
Browse...
Superclass:
interfaces:
Add...
Remove
Which
method
stubs
would
you
like
to
create?
I I
public
static
void
main(String[]
args)
O
Constructors
from
superclass
[ÿ1
Inherited
abstract
methods
Do
you
want
to
add
comments?
(Configure
templates
and
default
value
here)
|
I
Generate
comments
Finish
Cancel
Chapter 1
[]
Downloading the example code
You can download the example code files for all Packt books
you have purchased from your account at http://www.
packtpub.com. If you purchased this book elsewhere, you can
visit http://www.packtpub.com/support and register to
have the files e-mailed directly to you.
Lets look at each line of code. Line 1 is the name of the package in which
\RXUFODVVÀOHLVJRLQJWRUHVLGHOLQHVDQGLPSRUWQHFHVVDU\:HE'ULYHU
classes that we are going to explore, line 4 is the class declaration, and line 5
is the start of the main method.
Now, coming to the important part of the code:
WebDriver driver = new FirefoxDriver();
Line 6 is where we instantiate the Firefox implementation of the WebDriver
interface. WebDriver is an interface whose concrete implementation is done
in two classes: RemoteWebDriver and HtmlUnitDriver.
We will talk about the RemoteWebDriver and HtmlUnitDriver classes more
in depth later in this book, but right now knowing them as implementations
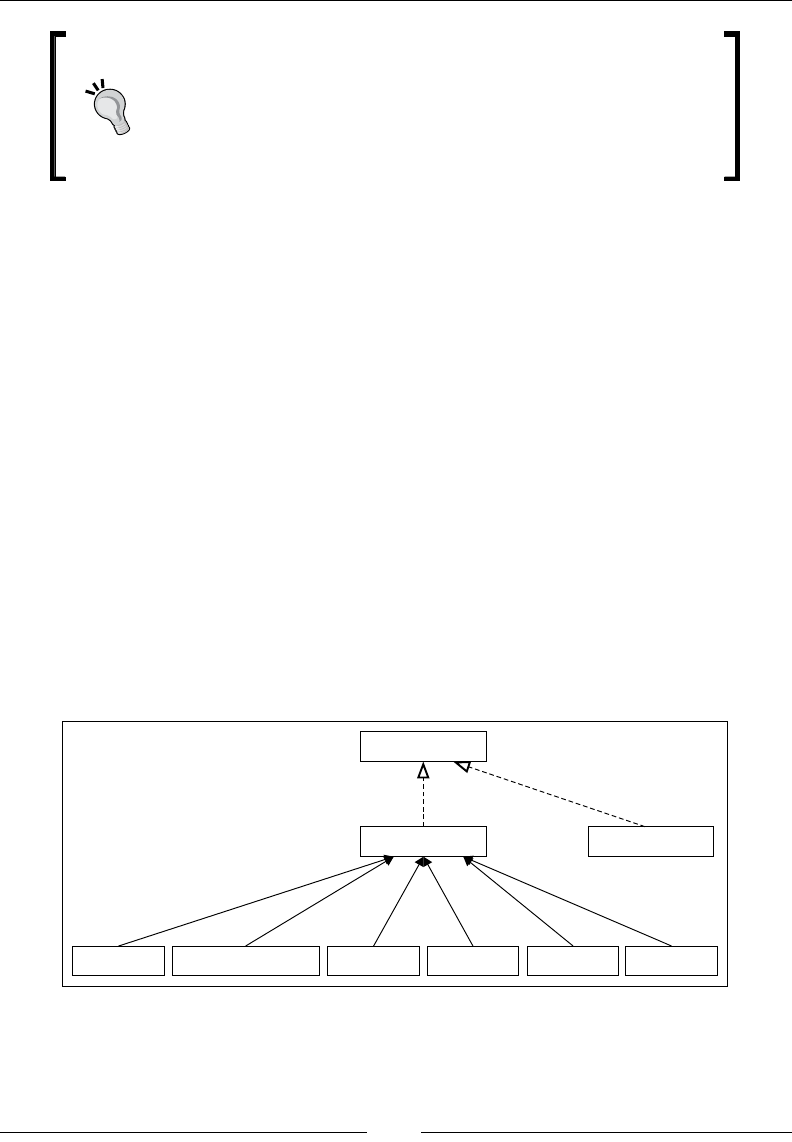
of the WebDriver LQWHUIDFHLVVXIÀFLHQWFirefoxDriver is a subclass
of the RemoteWebDriver class, which extends the RemoteWebDriver
FODVVPRUHVSHFLÀFDOO\IRUWKH)LUHIR[EURZVHU6LPLODUO\ZHKDYHWKH
InternetExplorerDriver, ChromeDriver, SafariDriver, AndroidDriver,
and IPhoneDriverFODVVHVZKLFKDUHVSHFLÀFLPSOHPHQWDWLRQVIRUWKH
UHVSHFWLYHEURZVHUVDQGGHYLFHV7KHIROORZLQJÀJXUHVKRZVWKHKLHUDUFK\
of the classes:
WebDriver
RemoteWebDriver HtmlUnitDriver
FirefoxDriver InternetExplorerDriver SafariDriver ChromeDriver AndroidDriver IPhoneDriver
Let's now look at the last line of the code:
driver.get("http://www.google.com");
A

Introducing WebDriver and WebElements
[]
In the preceding code, we use one of the methods of the WebDriver interface
called the get() method to make the browser load the requested web page
on it. If the browser, in this case Firefox, is not already opened, it will launch
a new browser window.
8. Now, execute your code by navigating to Run | Run or using the Ctrl + F11
shortcut. A Firefox browser should open and load the Google Search page in
your browser.
:HE(OHPHQWV
A web page is comprised of many different HTML elements, such as buttons,
links, a body, labels, forms, and so on, that are named WebElements in the context
of WebDriver. Together, these elements on a web page will achieve the business
functionality. For example, let's look at the HTML code of the login page of a website.
<html>
<body>
<form id="loginForm">
<label>Enter Username: </label>
<input type="text" name="Username"/>
<label>Enter Password: </label>
<input type="password" name="Password"/>
<input type="submit"/>
</form>
<a href="forgotPassword.html">Forgot Password ?</a>
</body>
</html>
In the preceding HTML code, there are different types of WebElements such as
<html>, <body>, <form>, <label>, <input>, and <a>, which together make a
web page. Let's analyze the following WebElement:
<label>Enter Username: </label>
Here, <label> is the start tag of the WebElement label. Enter Username: is the text
present on the label element. Finally, </label> is the end tag, which indicates the
end of WebElement.
Similarly, take another WebElement:
<input type="text" name="Username"/>
In the preceding code, type and name are the attributes of the WebElement input
with values text and Username, respectively.

Chapter 1
[]
UI Automation is mostly about locating these WebElements on a web page and
executing user actions on them. In the rest of the chapter, we will use various ways
to locate WebElements and execute relevant user actions on them.
/RFDWLQJ:HE(OHPHQWVXVLQJ:HE'ULYHU
Let's start this section by automating the Google Search page, which involves
opening the Google Search page, typing the search text in the textbox, and
executing the search. The code for that is as follows:
public class GoogleSearch {
public static void main(String[] args){
WebDriver driver = new FirefoxDriver();
driver.get("http://www.google.com");
WebElement searchBox = driver.findElement(By.name("q"));
searchBox.sendKeys("Packt Publishing");
searchBox.submit();
}
}
In the preceding code, lines 1 to 4 are same as the example discussed earlier. When
you look at line 5, there are three new things that are highlighted as follows:
WebElement searchBox = driver.findElement(By.name("q"));
They are the findElement() method, By.name() method, and the WebElement
interface. The findElement() and By() methods instruct WebDriver to locate a
WebElement on a web page, and once found, the findElement() method returns
the WebElement instance of that element. Actions such as click, type, and so on,
are performed on a returned WebElement using the methods declared in the
WebElement interface, which will be discussed in detail in the next section.
7KH¿QG(OHPHQWPHWKRG
In UI DXWRPDWLRQORFDWLQJDQHOHPHQWLVWKHÀUVWVWHS before executing any user
actions on it. WebDriver's findElement() method is a convenient way to locate an
element on the web page. According to WebDriver's Javadoc (http://selenium.
googlecode.com/git/docs/api/java/index.html), the method declaration is
as follows:
WebElement findElement(By by)
So, the input parameter for the findElement() method is the By instance. The By
instance is a WebElement-locating mechanism. There are eight different ways to locate
a WebElement on a web page. We will see that when we discuss By, shortly.
Introducing WebDriver and WebElements
[]
The return type of the findElement() method is the WebElement instance that
represents the actual HTML element or component of the web page. The method
UHWXUQVWKHÀUVW:HE(OHPHQWWKDWWKHGULYHUFRPHVDFURVVZKLFKVDWLVÀHVWKH
locating-mechanism condition. This WebElement instance will act as a handle to
that component from then on. Appropriate actions can be taken on that component
by the test script developer using this returned WebElement instance.
If:HE'ULYHUGRHVQWÀQGWKHHOHPHQWLWWKURZVDruntime exception named
NoSuchElementException, which the invoking class or method should handle.
The test script developer is advised to avoid using this method if he/she thinks the
WebElement will not be present on the web page. For those purposes, we can use
another method of WebDriver named findElements.
7KH¿QG(OHPHQWVPHWKRG
If developers think that they may encounter zero or more number of WebElements
for a given locating mechanism on a web page, they should rather use the
findElements() method than the findElement() method. Because the
findElement() method throws NoSuchElementException in case of zero occurrences
RI:HE(OHPHQWDQGRQWKHRWKHUKDQGRQO\WKHÀUVWRFFXUUHG:HE(OHPHQWWKDW
VDWLVÀHVWKHORFDWLQJPHFKDQLVPFRQGLWLRQWKRXJKWKHZHESDJHFRQWDLQVPXOWLSOH
WebElements. The method declaration of the findElements() method is as follows:
java.util.List<WebElement> findElements(By by)
The input parameter is same as the findElement() method, which is an instance of
the By class. The difference lies in the return type. Here, if no element is found, an
empty list is returned and if there are multiple WebElements present satisfying the
locating mechanism, all of them are returned to the caller in a list.
Firebug
Before we discuss about locating mechanism using the By class, we have to see how
Firebug works. Firebug is an add-on/plugin for Firefox, which we have installed
earlier. This is used to inspect the HTML elements on a web page loaded in Firefox.
Let's load www.google.com on Firefox. To inspect the search button element, launch
WKHÀUHEXJSOXJLQE\FOLFNLQJRQWKHÀUHEXJLFRQFORVHWRWKHWRSULJKWFRUQHUDV
shown in the following screenshot:
Mozilla
Firefox
Start
Page
(<J*
2jl±JlJi
*
i
C
1
is|'r
Coogle
Go
to
a
Website
Chapter 1
[]
Once launched, click on the Inspect Element icon, which looks like the following
screenshot:
Now move the cursor to the search button element and click on it. Firebug will
highlight the HTML code that represents the element on the web page. In this case,
it will be:
<button class="gbqfba" name="btnK" aria-label="Google Search"
id="gbqfba"><span id="gbqfsa">Google Search</span></button>
As Firebug shows the respective HTML code for the WebElement, now it's the
developer's choice to select the attribute of the element used to locate the element
and pass it to the findElement() method. For example, in this case, the element has
name, class, and id attributes declared. So it is up to the developer to choose one
attribute of the WebElement to identify the element uniquely.
WebElements on a web page may not have all the attributes
declared. It is up to the developer of the test script to select the
DWWULEXWHWKDWXQLTXHO\LGHQWLÀHVWKH:HE(OHPHQWRQWKHZHESDJH
for the automation.
8VLQJWKH%\ORFDWLQJPHFKDQLVP
By is the locating mechanism passed to the findElement() method or the
findElements() method to fetch the respective WebElement(s) on a web page.
There are eight different locating mechanisms; that is, eight different ways to identify
an HTML element on a web page. They are located by Name, ID, TagName, Class,
LinkText, PartialLinkText, XPath, and CSS.
7KH%\QDPHPHWKRG
As seen earlier, every element on a web page has many attributes. Name is one
among them. For instance, the HTML code for the Google Search button will be:
<button id="gbqfba" aria-label="Google Search" name="btnK"
class="gbqfba"><span id="gbqfsa">Google Search</span></button>
£
Convol*
HTML
-
CSS
Script
DOM
Net
Pape
Speed
FirePalh
Style
e
Layout
DOM
<r
K*pirhp
[ ]

Introducing WebDriver and WebElements
[]
Here name is one of the many attributes of the button, and its value is btnK. If we
want to identify this button and click on it in your test script, the code will look
as follows:
public class GoogleSearchButtonByName {
public static void main(String[] args){
WebDriver driver = new FirefoxDriver();
driver.get("http://www.google.com");
WebElement searchBox = driver.findElement(By.name("btnK"));
searchBox.submit();
}
}
If you observe line 5, the locating mechanism used here is By.name and the name is
btnK6RIURPZKHUHGLGZHJHWWKLVQDPH"$VGLVFXVVHGLQWKHSUHYLRXVVHFWLRQLW
LVWKHÀUHEXJWKDWKHOSHGXVJHWWKHQDPHRIWKHEXWWRQ/DXQFKWKH)LUHEXJDQGXVH
the inspect elements widget to get the attributes of an element.
7KH%\LGPHWKRG
On a web page, each element is uniquelyLGHQWLÀHGE\DQ,'LISURYLGHG$Q,'FDQ
be assigned manually by the developer of the web application or, most of the times,
left to be dynamically generated by the server where the web application is hosted,
and this ID can change over a period of time.
Now, if we consider the same HTML code of the Google Search button:
<button id="gbqfba" aria-label="Google Search" name="btnK"
class="gbqfba"><span id="gbqfsa">Google Search</span></button>
In the preceding code, the id value of this button is gbqfba. This might change by
the time you read this book, because this could be a server-generated ID.
Let us see what changes need to be made to our test script to use id instead of name:
public class GoogleSearchButtonById {
public static void main(String[] args){
WebDriver driver = new FirefoxDriver();
driver.get("http://www.google.com");
WebElement searchBox = driver.findElement(By.id("gbqfba"));
searchBox.submit();
}
}

Chapter 1
[]
We have changed the locating mechanism from the By.name() method to the
By.id() method, and used the search button's id value instead of name. Here, try to
use the By.idLGHQWLÀHUDQGXVHWKHname value (that is. btnK) instead of the id value
(that is. gbqfba). Modify line 5 as follows:
WebElement searchBox = driver.findElement(By.id("btnK"));
The test script will fail to throw an exception as follows:
Exception in thread "main" org.openqa.selenium.NoSuchElementException:
Unable to locate element: {"method":"id","selector":"btnK"}
WebDriverFRXOGQWÀQGDQHOHPHQWE\id whose value is btnK. Thus, it throws an
H[FHSWLRQVD\LQJLWFRXOGQWÀQGDQ\VXFKHOHPHQWZLWKid as btnK.
7KH%\WDJ1DPHPHWKRG
Locating an element by tag name is slightly different from name and id locating
mechanisms. The reason being it can return zero or more results. For example, on a
Google Search page, if you search for an element with the tag name button, it will
result in three WebElements because there are three buttons present on the search
page. So it is always advisable to use the findElements() method rather than the
findElement() method when trying to locate elements using tag names.
Let's see how the code looks like when a search for the number of buttons present
on a Google Search page is made.
public class GoogleSearchPageByTagName{
public static void main(String[] args){
WebDriver driver = new FirefoxDriver();
driver.get("http://www.google.com");
List<WebElement> buttons = driver.findElements(By.
tagName("button"));
System.out.println(buttons.size());
}
}
In the preceding code, we have used the By.tagName locating mechanism and
findElements() method, which returns a list of all the buttons available on the
page. On line 6, when we printed the size of the list, it returns 3.
If you are wondering how there are three buttons on the Google Search page while
only two are visible, the following are all the buttons available on the search page:
<button id=gbqfb aria-label="Google Search" class=gbqfb
name=btnG><span class=gbqfi></span></button>
<button id=gbqfba aria-label="Google Search" name=btnK
class=gbqfba><span id=gbqfsa>Google Search</span></button>
Introducing WebDriver and WebElements
[]
<button id=gbqfbb aria-label="I'm Feeling Lucky" name=btnI
class=gbqfba onclick="if(this.form.q.value)this.checked=1;else window.
top.location='/doodles/'"><span id=gbqfsb>I'm Feeling Lucky</span></
button>
7KLVLVZK\:HE'ULYHULVVRKHOSIXOWRUHYHDOWKLQJVWKDWDUHGLIÀFXOWWRÀJXUH
out manually.
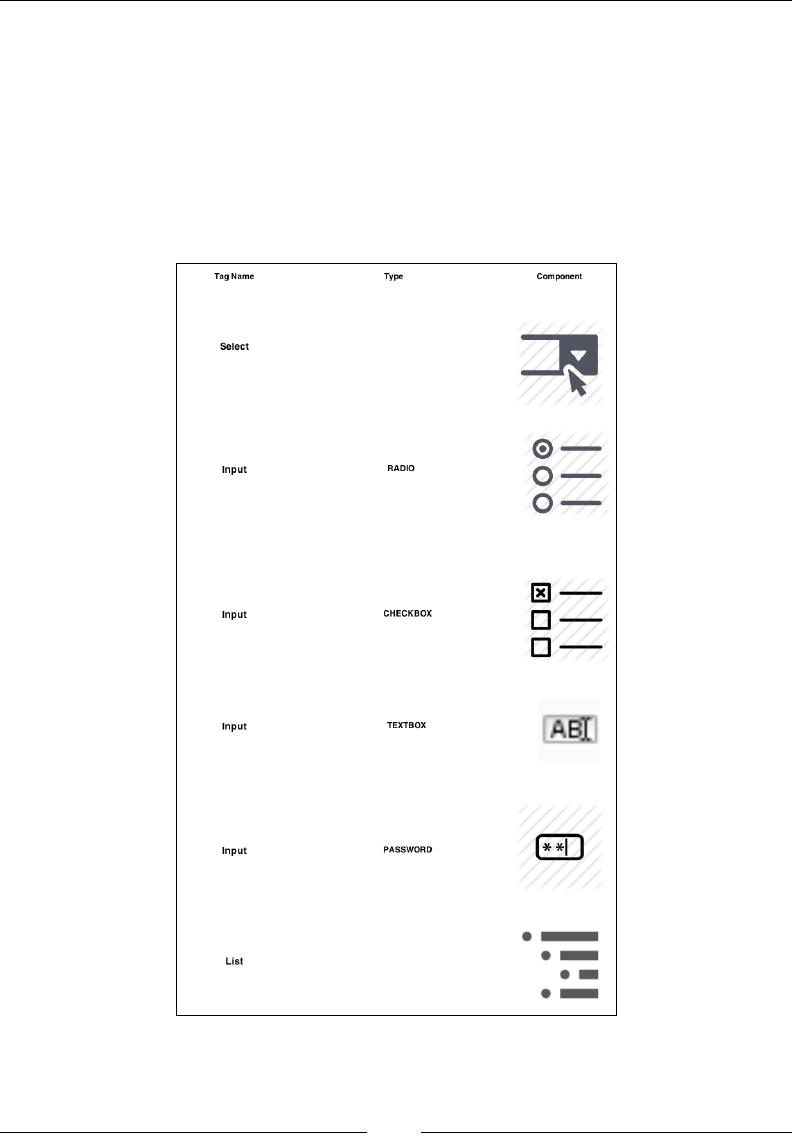
Some commonly used HTML elements are mentioned as follows, and they can be
used by tag names (also mentioned).
7KHUHDUHPDQ\WDJVZKRVHQDPHVDUHLQSXW)RUWKRVH\RXKDYHWRIXUWKHUÀOWHU
them by using the type attribute. We will learn that in the next section.
Tag
Name
Type
Component
Select
%
©
RADIO
Input
o
o
0
CHECKBOX
Input
ABI
TEXTBOX
Input
ED
PASSWORD
Input
List

Chapter 1
[]
7KH%\FODVV1DPHPHWKRG
Before we discuss about the className() method, we have to talk a little about style
and CSS. Every HTML element on a web page, generally, is styled by the web page
developer or designer. It is not mandatory that each element should be styled, but it
is generally followed to make it appealing to the end user.
So, in order to apply styles to an element, they can be declared directly in the
HOHPHQWWDJRUSODFHGLQDVHSDUDWHÀOHFDOOHGWKH&66ÀOHDQGFDQEHUHIHUHQFHG
in the element using the className() method. For instance, a style attribute for a
EXWWRQFDQEHGHFODUHGLQD&66ÀOHDVIROORZV
.buttonStyle{
width: 50px;
height: 50px;
border-radius: 50%;
margin: 0% 2%;
}
Now, this style can be applied on the button element in a web page as follows:
<button name="sampleBtnName" id="sampleBtnId" class="buttonStyle">I'm
Button</button>
So, buttonStyle is used as value for the class attribute of the button element, and it
inherits all the styles declared inWKH&66ÀOH1RZOHWVWU\WKLVRQRXU*RRJOHVHDUFK
page. We will try to make WebDriver identify the search box using its class name
and type some text into it. First, in order to get the class name of the search box,
as we know, we will use Firebug and fetch it. After getting it, change the location
mechanism to By.className and specify the class attribute value in it. The code
for that is as follows:
public class GoogleSearchByClassName{
public static void main(String[] args){
WebDriver driver = new FirefoxDriver();
driver.get("http://www.google.com");
WebElement searchBox = driver.findElement(By.className("gbqfif"));
searchBox.sendKeys("Packt Publishing");
}
}
In the preceding code, we have used the By.className locating mechanism by
passing the class attribute value to it.
Introducing WebDriver and WebElements
[]
7KH%\OLQN7H[WPHWKRG
As the name suggests, the By.linkText locating mechanism can only be used to
identify the HTML links. Before we start discussing about how WebDriver can be
commanded to identify a link element using link text, let's see what an HTML link
element looks like. The HTML link elements are represented on a web page using
the <a> tag, abbreviation for the anchor tag. A typical anchor tag looks like this:
<a href="/intl/en/about.html">About Google</a>
Here, href is the link to a different page where your web browser will take you
when clicked on the link. So, the preceding HTML code when rendered by the
browser looks like this:
This About Google is the link text. So the locating mechanism By.linkText uses
this text on an anchor tag to identify the WebElement. The code for this would look
like this:
public class GoogleSearchByLinkText{
public static void main(String[] args){
WebDriver driver = new FirefoxDriver();
driver.get("http://www.google.com");
WebElement aboutLink = driver.findElement(By.linkText("About
Google"));
aboutLink.click();
}
}
Here, the By.linkText locating mechanism is used to identify the About
Google link.
7KH%\SDUWLDO/LQN7H[WPHWKRG
The By.partialLinkText locating mechanism is an extension to the previous one.
If you are not sure of the entire link text or want to use only part of the link text,
you can use this locating mechanism to identify the link element. So let's modify
the previous example to use only partial text on the link, that is, About.
public class GoogleSearchByPartialLinkText{
public static void main(String[] args){
WebDriver driver = new FirefoxDriver();
driver.get("http://www.google.com");
About
Google
Chapter 1
[]
WebElement aboutLink = driver.findElement(By.
partialLinkText("About"));
aboutLink.click();
}
}
What happens if there are multiple links whose text has AboutLQLW"7KDWLVD
question to the findElement() method rather than to the locating mechanism.
Remember when we discussed the findElement() method earlier, it will return only
WKHÀUVW:HE(OHPHQWWKDWLWFRPHVDFURVV,Iyou want all the WebElements which
contain About in its link text, use the findElements() method, which will return a
list of all those elements.
Use WebDriver's findElements() method if you think you need
all the WebElements that satisfy a locating mechanism condition.
7KH%\[SDWKPHWKRG
WebDriver uses XPath to identify a WebElement on the web page. Before we see
how it does that, we will quickly look at the syntax for XPath. XPath is a short
name for the XML path. The HTML for our web page is also one form of the XML
document. So in order to identify an element on an HTML page, we need to use a
VSHFLÀF;3DWKV\QWD[DVIROORZV
7KHURRWHOHPHQWLVLGHQWLÀHGDV//
To identify all the div elements, the syntax will be //div
To identify the link tags that are within the div element, the syntax will be
//div/a
To identify all the elements with a tag, we use *. The syntax will be //div/*
To identify all the div elements that are at three levels down from the root,
we can use //*/*/div
7RLGHQWLI\VSHFLÀFHOHPHQWVZHXVHDWWULEXWHYDOXHVRIWKRVHHOHPHQWVVXFK
as //*/div/a[@id='attrValue'], which will return the anchor element.
This element is at third level from root within a div element, and has an id
value attrValue
Introducing WebDriver and WebElements
[]
So, we need to pass these kinds of XPath syntaxes to our WebDriver to make it
LGHQWLI\RXUWDUJHWHOHPHQW%XWJRLQJWKURXJKWKH+70/SDJHÀJXULQJRXWWKH
;3DWKIRUHDFKHOHPHQWZLOOEHH[WUHPHO\GLIÀFXOW)RUWKLVLI\RXUHPHPEHUZH
have installed a Firebug extension named FirePath. This will quickly give you the
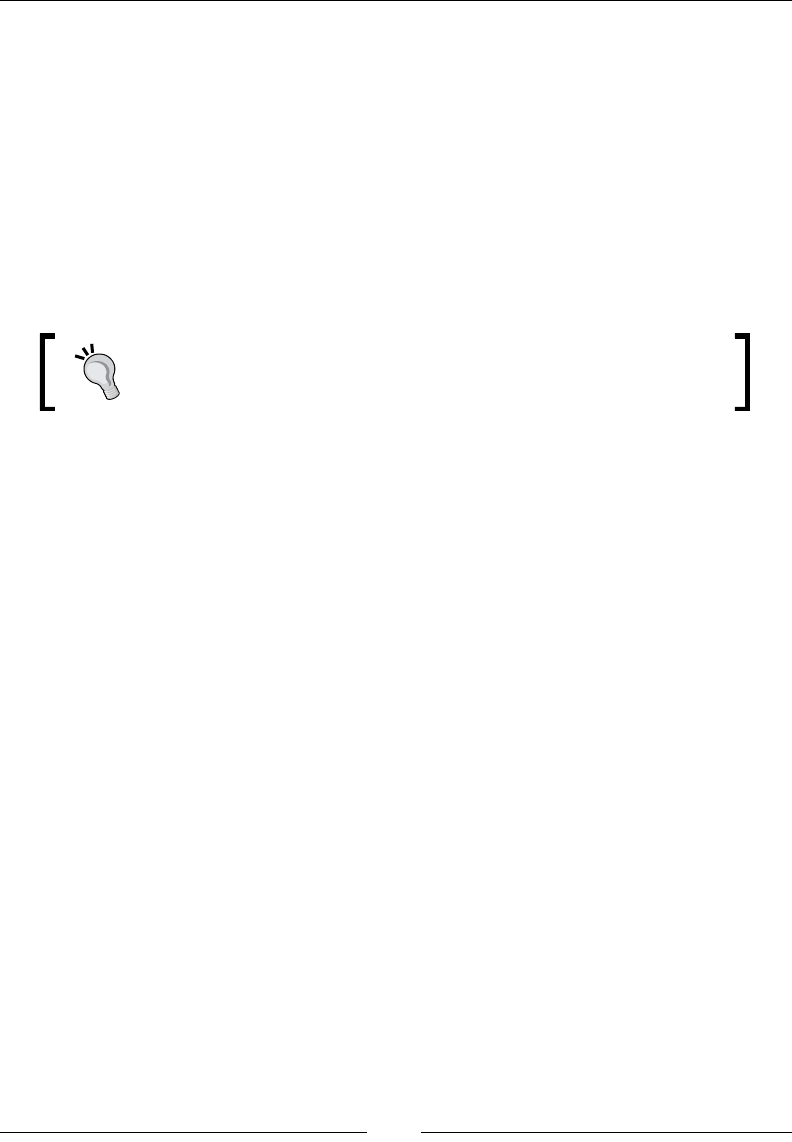
XPath of the target element that you can use in the WebDriver code. Following is
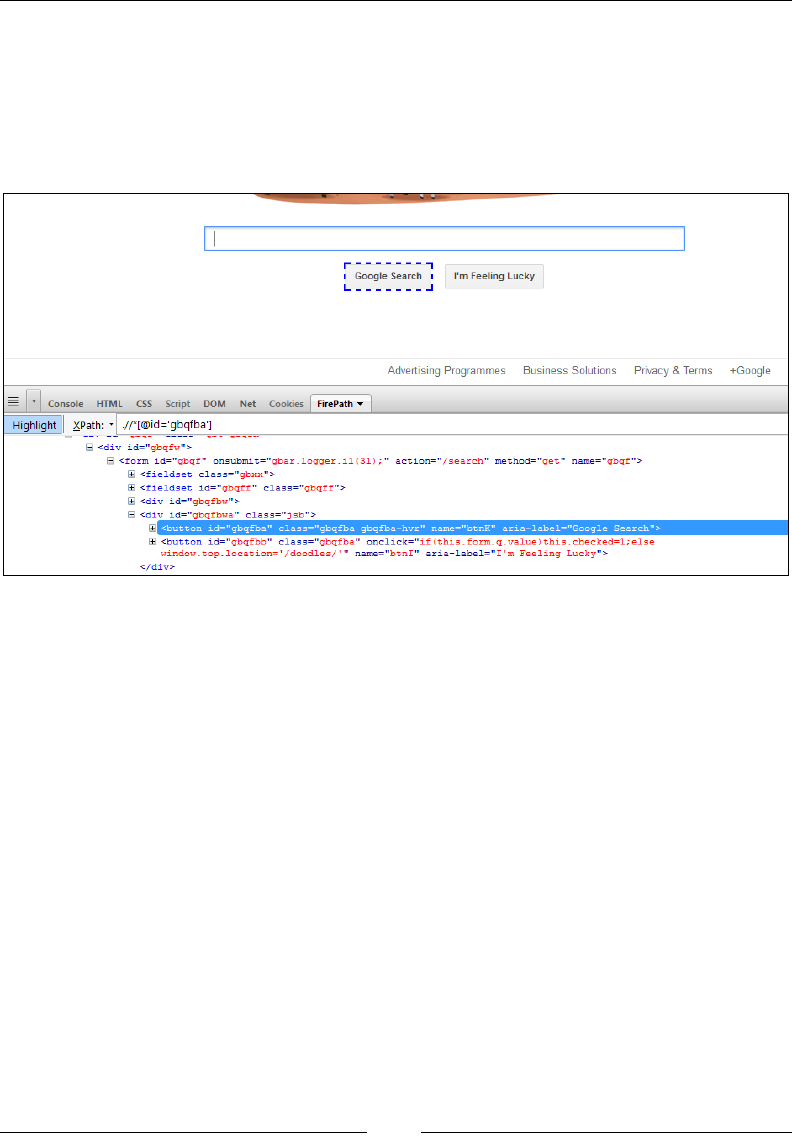
the screenshot of the XPath of the Google Search button:
If you see the preceding image, the Google Search Button is selected and in the
FirePath tab below the XPath, the value is displayed as //*[@id='gbqfba'].
Now, let us see the code example and how WebDriver uses this XPath to identify
the element.
public class GoogleSearchByXPath{
public static void main(String[] args){
WebDriver driver = new FirefoxDriver();
driver.get("http://www.google.com");
WebElement searchButton = driver.findElement(By.xpath("//*[@
id='gbqfba']"));
System.out.println(searchButton.getText());
}
}
In the preceding code, we are using the By.xpath locating mechanism and passing
the XPath of the WebElement to it.
r
Google
Search
i
I'm
Feeling
Lucky
L
J
Advertising
Programmes
Business
Solutions
Privacy
&
Terms
+Google
’
Console
HTML
CSS
Script
DOM
Net
Cookies
FirePath
Highlight
XPath:
’
.//*[@id='gbqfba']
B
<div
id=”gbqfw">
B
<form
id="gbqf”
onsubmit=”gbar
.
logger
.il
(31)
;
"
action="/search”
method=”get”
name="gbqf
”>
(±1
<f
ieldaet
cla33=”gbxx”>
(1
<f
ieldset
id=”gbqff”
cla33="gbqf
f
">
l±)
<div
id=”gbqfbw”>
B
<div
id="gbqfbwa''
cla33=''
j
sb">
_
+
<button
id=,,gbqfba”
claaa="gbqfba
gbqfba-hvr"
name="btnK”
aria-label=”Google
Searcb”>
l±)
<button
id="gbqfbb"
cla33=''gbqfba”
onclick="if
(this
.
form.
q.
value
)
this
.
checked=l;
else
window.
top
.
location='
/doodles/
'
”
najne="btnl”
aria-label="I
'm
Feeling
Lucky”>
</
div>

Chapter 1
[]
One disadvantage of using XPath is it is costly in terms of time. For every element
WREHLGHQWLÀHG:HE'ULYHUDFWXDOO\VFDQVWKURXJKWKHHQWLUHSDJHWKDWLVYHU\WLPH
consuming, and too much usage of XPath in your test script will actually make them
too slow to be executed.
7KH%\FVV6HOHFWRUPHWKRG
The By.cssSelector() method is similar to the By.xpath() method in its usage
but the difference is that it is slightly faster than the By.xpath locating mechanism.
Following are the commonly used syntaxes to identify elements:
To identify an element using the div element with id #flrs, we use the
#flrs syntax
To identify the child anchor element, we use the #flrs > a syntax, which
will return the link element
To identify the anchor element with its attribute, we use the #flrs >
a[a[href="/intl/en/about.html"]] syntax
Let's try to modify the previous code, which uses the XPath-locating mechanism
to use the cssSelector mechanism.
public class GoogleSearchByCSSSelector{
public static void main(String[] args){
WebDriver driver = new FirefoxDriver();
driver.get("http://www.google.com");
WebElement searchButton = driver.findElement(By.
cssSelector("#gbqfba"));
System.out.println(searchButton.getText());
}
}
The preceding code uses the By.cssSelector locating mechanism that uses the css
selector ID of the Google Search button.
Let's look at a slightly complex example. We will try to identify the About Google
link on the Google Search page:
public class GoogleSearchByCSSSelector{
public static void main(String[] args){
WebDriver driver = new FirefoxDriver();
driver.get("http://www.google.com");
WebElement searchButton = driver.findElement(By.
cssSelector("#flrs>a[href='/intl/en/about.html']"));
System.out.println(searchButton.getText());
}
}

Introducing WebDriver and WebElements
[]
The preceding code uses the cssSelector()PHWKRGWRÀQGWKHanchor element
LGHQWLÀHGE\LWVhref attribute[ ].
$FWLRQVRQ:HE(OHPHQWV
In the previous section, we have seen how to locate WebElements on a web page by
using different locating mechanisms. Here, we will see all the different user actions
that can be taken on a WebElement. Different WebElements will have different
actions that can be taken on them. For example, in a textbox element, we can type
in some text or clear the text that is already typed in it. Similarly for a button, we
can click on it, get the dimensions of it, and so on, but we cannot type into a button,
and for a link, we cannot type into it. So, though all the actions are listed in one
WebElement interface, it is the test script developer's responsibility to use the actions
that are supported by the target element. In case we try to execute a wrong action on
a WebElement, we don't see any exception or error thrown and also we don't see any
action that really gets executed; WebDriver ignores such actions silently.
Now, let's get into each of the actions individually by looking into their Javadocs and
a code example.
7KHJHW$WWULEXWHPHWKRG
The getAttribute action can be executed on all the WebElements. Remember
we have seen attributes of WebElement in the WebElements section. The HTML
DWWULEXWHVDUHPRGLÀHUVRI+70/HOHPHQWV7KH\DUHJHQHUDOO\NH\YDOXHSDLUV
appearing in the start tag of an element. For example, in the following WebElement:
<label name="Username" id="uname">Enter Username: </label>
In the preceding code, name and id are the attributes or attribute keys and Username
and uname are the attribute values.
The API syntax of the getAttributes() method is as follows:
java.lang.String getAttribute(java.lang.String name)
In the preceding code, the input parameter is String, which is the name of the
attribute. The return type is again String, which is the value of the attribute.
Now let's see how we can get all the attributes of a WebElement using WebDriver.
Here, we will make use of the Google Search button again. This is what the element
looks like:
<button id="gbqfba" class="gbqfba" name="btnK" aria-label="Google
Search">
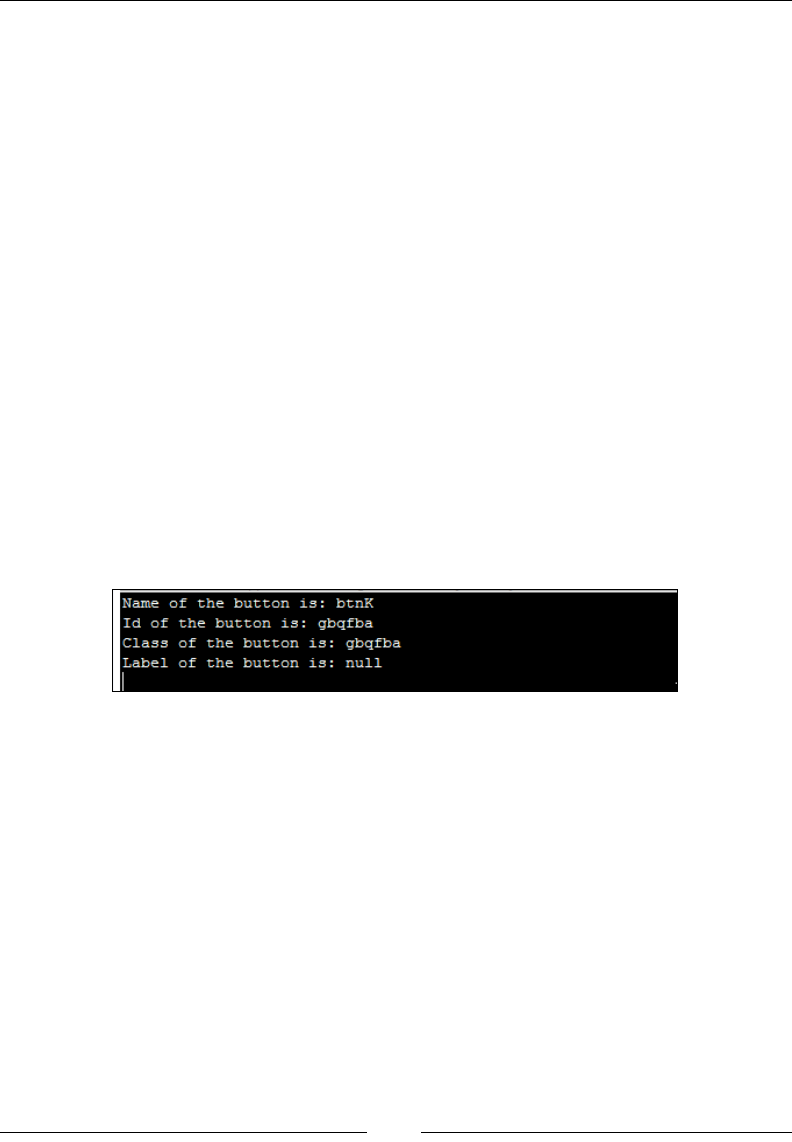
Chapter 1
[]
We will list all the attributes of this WebElement using WebDriver. The code for that
is as follows:
public class GetAttributes{
public static void main(String[] args){
WebDriver driver = new FirefoxDriver();
driver.get("http://www.google.com");
WebElement searchButton = driver.findElement(By.name("btnK"));
System.out.println("Name of the button is: "
+searchButton.getAttribute("name"));
System.out.println("Id of the button is: "
+searchButton.getAttribute("id"));
System.out.println("Class of the button is: "
+searchButton.getAttribute("class"));
System.out.println("Label of the button is: "
+searchButton.getAttribute("aria- label"));
}
}
In the preceding code, the last four lines of code use the getAttribute() method
to fetch the attribute values of the attribute name, id, class, and aria-label of the
Google Search button WebElement. The output of the preceding code is shown in
the following screenshot:
Going back to the By.tagName() method of the previous section, if the search by
locating mechanism, By.tagName, results in more than one result, you can use
the getAttribute()PHWKRGWRIXUWKHUÀOWHUWKHUHVXOWVDQGJHWWR\RXUH[DFW
intended element.
7KHVHQG.H\VPHWKRG
The sendKeys action is applicable for textbox or textarea HTML elements. This is
used to type text into the textbox. This will simulate the user keyboard and types
text into WebElements exactly as would a user.
The API syntax for the sendKeys() method is as follows:
void sendKeys(java.lang.CharSequence...keysToSend)
Name
of
the
button
is
:
btnK
Id
of
the
button
is:
gbqfba
Class
of
the
button
is:
gbqfba
Label
of
the
button
is
:
null

Introducing WebDriver and WebElements
[]
The input parameter for the preceding method is CharSequence of text that has to be
entered into the element. This method doesn't return anything.
Now, let's see a code example of how to type a search text into the Google Search
box using the sendKeys() method.
public class sendKeys{
public static void main(String[] args){
WebDriver driver = new FirefoxDriver();
driver.get("http://www.google.com");
WebElement searchBox = driver.findElement(By.name("q"));
searchButton.sendKeys("Packt Publishing");
}
}
In the preceding code, the sendKeys() method is used to type the required text in
the textbox element of the web page. This is how we deal with normal keys, but if
you want to type in some special keys, such as Backspace, Enter, Tab, Shift, and so
on, we need to use a special enum class of WebDriver named Keys. Using the Keys
enumeration, you can simulate many special keys while typing into a WebElement.
Now let's see some code example, which uses the Shift key to type the text in
uppercase in the Google Search Box:
public class SendKeys{
public static void main(String[] args){
WebDriver driver = new FirefoxDriver();
driver.get("http://www.google.com");
WebElement searchBox = driver.findElement(By.name("q"));
searchBox.sendKeys(Keys.chord(Keys.SHIFT,"packt publishing"));
}
}
In the preceding code, the chord() method from the Keys enum is used to type the
NH\ZKLOHWKHWH[WVSHFLÀHGLVEHLQJJLYHQDVDQLQSXWWREHWKHWH[WER[7U\WKLVLQ
your environment to see all the text being typed in uppercase.
7KHFOHDUPHWKRG
The clear action is similar to the sendKeys() method, which is applicable for textbox
and textarea elements. This is used to erase the text that is entered in a WebElement
using the sendKeys() method. This can be achieved using the Keys.BACK_SPACE
enum, but WebDriver has given us an explicit method to clear the text easily.

Chapter 1
[]
The API syntax for the clear() method is as follows:
void clear()
This method doesn't take any input and doesn't return any output. It is simply
executed on the target text entry element.
Now, let us see how we can clear text that is entered in the Google Search box. The
code example for it is as follows:
public class Clear{
public static void main(String[] args){
WebDriver driver = new FirefoxDriver();
driver.get("http://www.google.com");
WebElement searchBox = driver.findElement(By.name("q"));
searchBox.sendKeys(Keys.chord(Keys.SHIFT,"packt publishing"));
searchBox.clear();
}
}
We have used the WebElement's clear() method to clear the text after typing packt
publishing into the Google Search box.
7KHVXEPLWPHWKRG
The submit action can be taken on a form or on an element, which is inside a form.
This is used to submit a form of a web page to the server hosting the web application.
The API syntax for the submit() method is as follows:
void submit()
The preceding method doesn't take any input parameter and doesn't return
anything. But a NoSuchElementException is thrown when this method is
executed on a WebElement that is not present within a form.
Now, let's see a code example to submit the form on a Google Search page:
public class Submit{
public static void main(String[] args){
WebDriver driver = new FirefoxDriver();
driver.get("http://www.google.com");
WebElement searchBox = driver.findElement(By.name("q"));
searchBox.sendKeys(Keys.chord(Keys.SHIFT,"packt publishing"));
searchBox.submit();
}
}
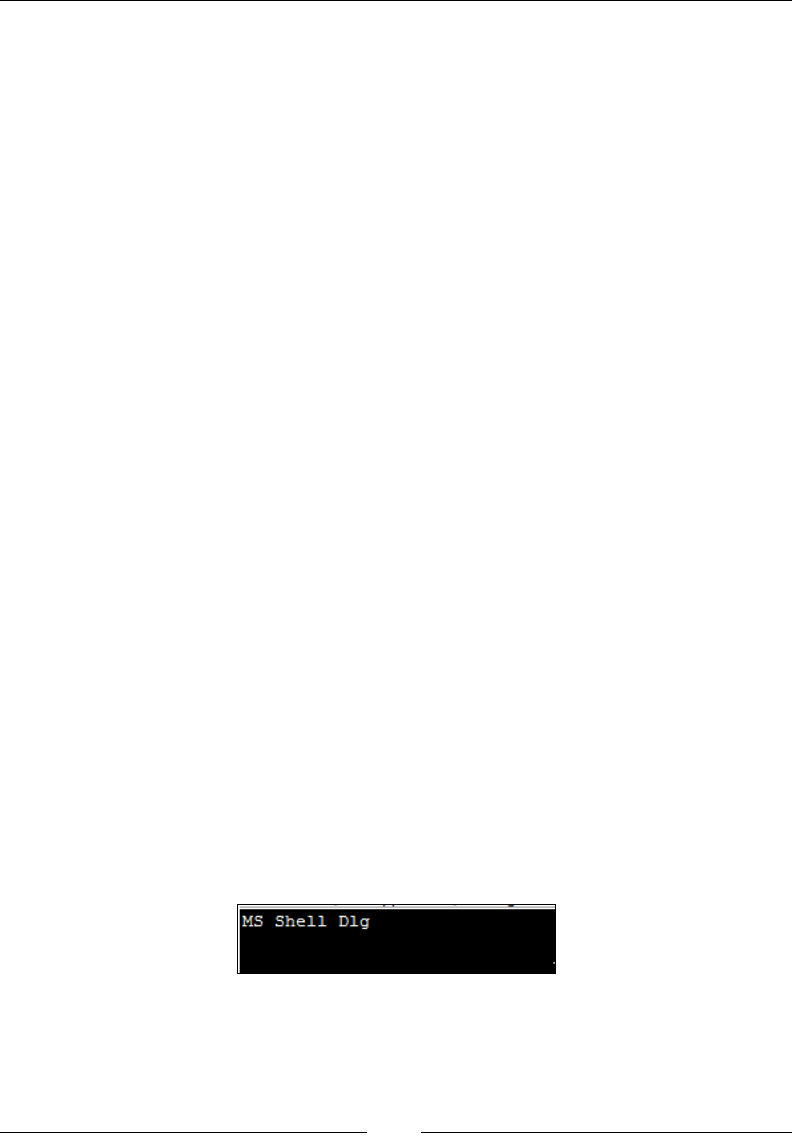
Introducing WebDriver and WebElements
[]
In the preceding code, towards the end is where the Search form is submitted to
the Google servers using the submit() method. Now, try to execute the submit()
method on an element, let's say the About Google link, which is not a part of any
form. We should see a NoSuchElementException being thrown.
So when you use the submit() method on a WebElement, make sure it is part of the
form element.
7KHJHW&VV9DOXHPHWKRG
The getCssValue action can be taken on all the WebElements. This is used to fetch
the CSS properties' values of the given element. CSS properties can be font-family,
background-color, color, and so on. This is useful when you want to validate the
CSS styles that are applied to your WebElements through your test scripts.
The API syntax for the getCssValue() method is as follows:
java.lang.String getCssValue(java.lang.String propertyName)
In the preceding code, the input parameter is the String value of the CSS property
name, and return type is the value assigned for that property name.
The following is the code example to retrieve the font-family of the text on the
Google Search button:
public class GetCSSValue{
public static void main(String[] args){
WebDriver driver = new FirefoxDriver();
driver.get("http://www.google.com");
WebElement searchButton = driver.findElement(By.name("btnK"));
System.out.println(searchButton.getCssValue("font-family"));
}
}
The preceding code uses the getCssValue()PHWKRGWRÀQGWKHIRQWIDPLO\RIWKH
text visible on the Google Search button. The output of this is shown in the
following screenshot:
MS
Shell
Dig
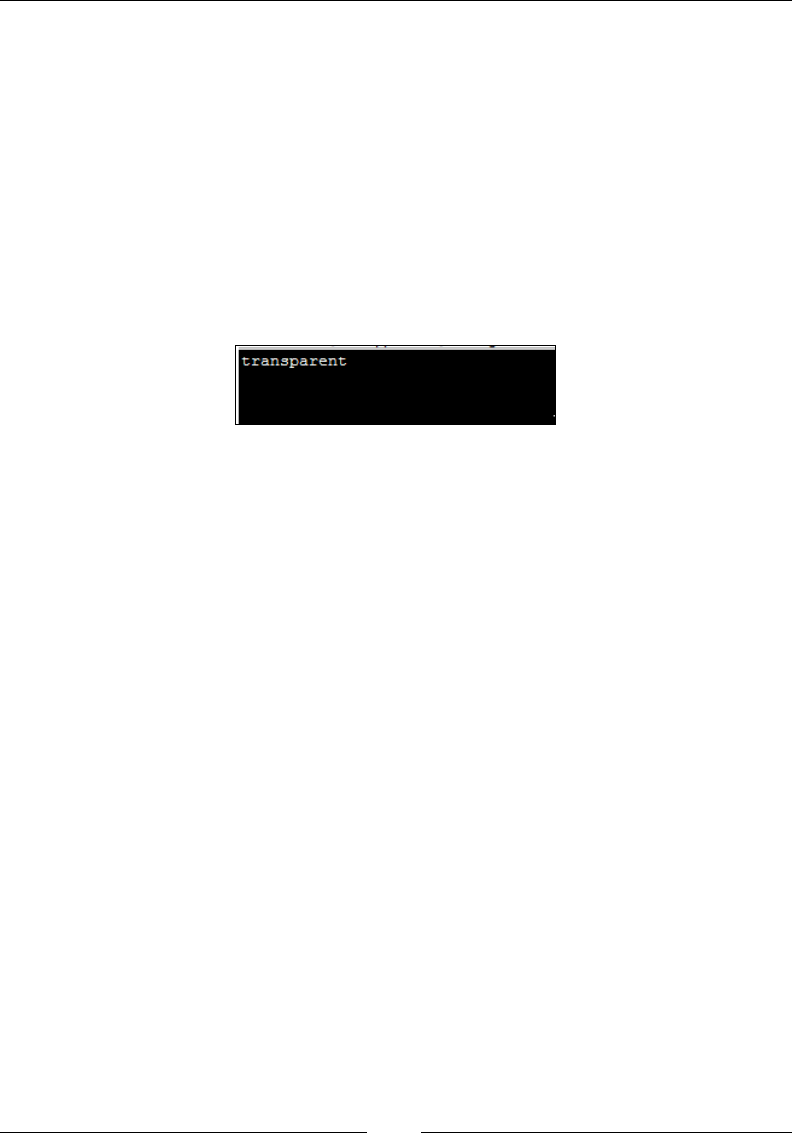
Chapter 1
[]
Similarly, we can retrieve the background color of an element using this method. Let
us see a code for this:
public class GetCSSValue2{
public static void main(String[] args){
WebDriver driver = new FirefoxDriver();
driver.get("http://www.google.com");
WebElement searchButton = driver.findElement(By.name("btnK"));
System.out.println(searchButton.getCssValue("background-color"));
}
}
The output for the preceding code is shown in the following screenshot:
7KHJHW/RFDWLRQPHWKRG
The getLocation action can be executed on all the WebElements. This is used to
get the relative position of an element where it is rendered on the web page. This
position is calculated relative to the top-left corner of the web page of which the (x, y)
coordinates are assumed as (0, 0). This method will be of use if your test script tries
to validate the layout of your web page.
The API syntax of the getLocation() method is as follows:
Point getLocation()
The preceding method obviously doesn't take any input parameter, but the return
type is a Point class, which contains the (x, y) coordinates of the element.
The following is the code to retrieve the location of the Google Search button:
public class GetLocation{
public static void main(String[] args){
WebDriver driver = new FirefoxDriver();
driver.get("http://www.google.com");
WebElement searchButton = driver.findElement(By.name("btnK"));
System.out.println(searchButton.getLocation());
}
}
transparent
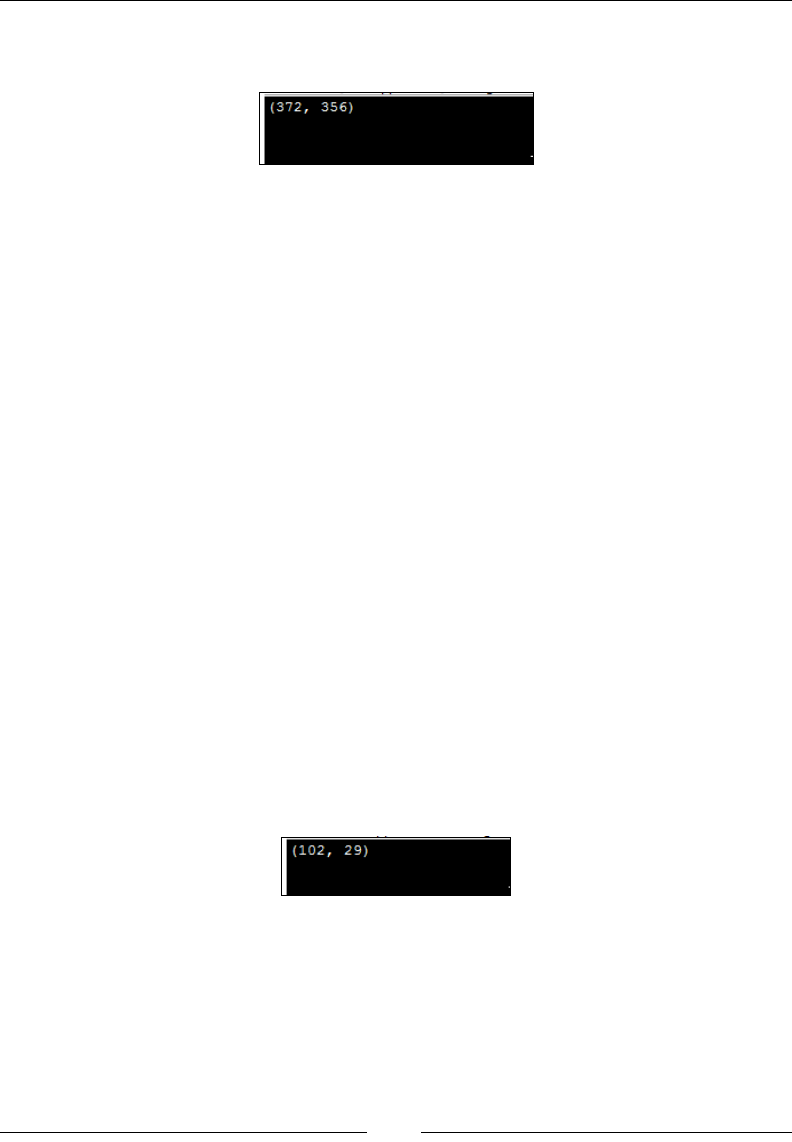
Introducing WebDriver and WebElements
[]
The output for the preceding code is the (x, y) location of the Google Search button,
as shown in the following screenshot:
7KHJHW6L]HPHWKRG
The getSize action can also be applied on all the visible components of HTML. It
will return the width and height of the rendered WebElement.
The API syntax of the getSize() method is as follows:
Dimension getSize()
The preceding method doesn't take any input parameters, and the return type is a
class instance named Dimension. This class contains the width and height of the
target WebElement.
The following is the code to get the width and height of our favorite Google
Search button:
public class GetSize{
public static void main(String[] args){
WebDriver driver = new FirefoxDriver();
driver.get("http://www.google.com");
WebElement searchButton = driver.findElement(By.name("btnK"));
System.out.println(searchButton.getSize());
}
}
The output for the preceding code is the width and height of the Google Search
button, as shown in the following screenshot:
7KHJHW7H[WPHWKRG
The getText action can be taken on all the WebElements. It will give the visible text
if the element contains any text on it or else will return nothing.
(372,
356)
(102,
29)

Chapter 1
[]
The API syntax for the getText() method is as follows:
java.lang.String getText()
There is no input parameter for the preceding method, but it returns the visible
innerText string of the WebElement if anything is available, else will return an
empty string.
The following is the code to get the text present on the Google Search button:
public class GetText{
public static void main(String[] args){
WebDriver driver = new FirefoxDriver();
driver.get("http://www.google.com");
WebElement searchButton = driver.findElement(By.name("btnK"));
System.out.println(searchButton.getText());
}
}
The preceding code uses the getText() method to fetch the text present on the
Google Search button, which returns the following:
7KHJHW7DJ1DPHPHWKRG
The getTagName action can be taken on all the WebElements. This will return the tag
name of the WebElement. For example, in the following HTML code, button is the
tag name of the HTML element:
<button id="gbqfba" class="gbqfba" name="btnK" aria-label="Google
Search">
In the preceding code, button is the tag name of the HTML element.
The API syntax for the getTagName() method is as follows:
java.lang.String getTagName()
The return type of the preceding method is String, and it returns the tag name of
the target element.
Google
Search

Introducing WebDriver and WebElements
[]
The following is the code that returns the tag name of the Google Search button:
public class GetTagName{
public static void main(String[] args){
WebDriver driver = new FirefoxDriver();
driver.get("http://www.google.com");
WebElement searchButton = driver.findElement(By.name("btnK"));
System.out.println(searchButton.getTagName());
}
}
The preceding code uses the getTagName() method to get the tag name of the
Google Search button element. The output of the code is as expected:
7KHLV'LVSOD\HGPHWKRG
The isDisplayedDFWLRQYHULÀHVLIDQHOHPHQWLVGLVSOD\HGRQWKHZHESDJHDQGFDQ
be executed on all the WebElements.
The API syntax for the isDisplayed() method is as follows:
boolean isDisplayed()
The preceding method returns a Boolean value specifying whether the target element
is displayed or not displayed on the web page.
The following is the code to verify if the Google Search button is displayed or not,
which obviously should return true in this case:
public class isDisplayed{
public static void main(String[] args){
WebDriver driver = new FirefoxDriver();
driver.get("http://www.google.com");
WebElement searchButton = driver.findElement(By.name("btnK"));
System.out.println(searchButton.isDisplayed());
}
}
The preceding code uses the isDisplayed() method to determine if the element
is displayed on a web page. The preceding code returns true for the Google
Search button.
button

Chapter 1
[]
7KHLV(QDEOHGPHWKRG
The isEnabledDFWLRQYHULÀHVLIDQHOHPHQWLV enabled on the web page and can be
executed on all the WebElements.
The API syntax for the isEnabled() method is as follows:
boolean isEnabled()
The preceding method returns a Boolean value specifying whether the target element
is enabled or not enabled on the web page.
The following is the code to verify if the Google Search button is enabled or not,
which obviously should return true in this case:
public class isEnabled{
public static void main(String[] args){
WebDriver driver = new FirefoxDriver();
driver.get("http://www.google.com");
WebElement searchButton = driver.findElement(By.name("btnK"));
System.out.println(searchButton.isEnabled());
}
}
The preceding code uses the isEnabled() method to determine if the element is
displayed on a web page. The preceding code returns true for the Google Search
button.
7KHLV6HOHFWHGPHWKRG
The isSelectedDFWLRQYHULÀHVLIDQHOHPHQW is selected right now on the web
page and can be executed only on a radio button, options in select, and checkbox
WebElements. When executed on other elements, it will return false.
The API syntax for the isSelected() method is as follows:
boolean isSelected()
The preceding method returns a Boolean value specifying whether the target element
is selected or not selected on the web page.

Introducing WebDriver and WebElements
[]
The following is the code to verify if the Google Search box is selected or not on a
search page:
public class IsSelected{
public static void main(String[] args){
WebDriver driver = new FirefoxDriver();
driver.get("http://www.google.com");
WebElement searchBox = driver.findElement(By.name("q"));
System.out.println(searchBox.isSelected());
}
}
The preceding code uses the isSelected() method. It returns false for the Google
Search box, because this is not a radio button, options in select, or a checkbox.
6XPPDU\
In this chapter, we have seen a brief history of Selenium, the architecture of
WebDriver, WebElements, how to locate them, and actions that can be taken on
them. We have also covered some of the fundamentals of WebDriver, which are
useful in your day-to-day dealing with WebDriver.
In the next chapter, we will see more advanced actions that can be performed on
WebElements.

Exploring Advanced
Interactions of WebDriver
In the previous chapter, we have discussed WebElements, how to locate them on a
web page, and some basic actions that can be performed on them. In this chapter, we
will go through some advanced ways of performing actions on WebElements.
8QGHUVWDQGLQJDFWLRQVEXLOGDQGSHUIRUP
We know how to take some basic actions, such as clicking on a button and typing
text into a textbox; however, there are many scenarios where we have to perform
multiple actions at the same time. For example, keeping the Shift button pressed and
typing text for uppercase letters, and the dragging and dropping mouse actions.
Let's see a simple scenario here. Open the selectable.htmlÀOHWKDWLVDWWDFKHGZLWK
this book. You will see tiles of numbers from 1 to 12. If you inspect the elements with
Firebug, you will see an ordered list tag (<ol>) and 12 list items (<li>) under it, as
shown in the following code:
<ol id="selectable"class="ui-selectable">
<li class="ui-state-default ui-selectee" name="one">1</li>
<li class="ui-state-default ui-selectee" name="two">2</li>
<li class="ui-state-default ui-selectee" name="three">3</li>
<li class="ui-state-default ui-selectee" name="four">4</li>
<li class="ui-state-default ui-selectee" name="five">5</li>
<li class="ui-state-default ui-selectee" name="six">6</li>
<li class="ui-state-default ui-selectee" name="seven">7</li>
<li class="ui-state-default ui-selectee" name="eight">8</li>
<li class="ui-state-default ui-selectee" name="nine">9</li>
<li class="ui-state-default ui-selectee" name="ten">10</li>
2

Exploring Advanced Interactions of WebDriver
[]
<li class="ui-state-default ui-selectee" name="eleven">11</li>
<li class="ui-state-default ui-selectee" name="twelve">12</li>
</ol>
If you click a number, it's background color changes to orange. Try selecting
the 1, 3, and 5 numbered tiles. You do that by holding the Ctrl key + 1 numbered
tile + 3 numbered tile + 5 numbered tile. So, this involves performing multiple
actions, that is, holding the Ctrl key continuously and clicking on 1, 3, and 5 tiles.
+RZGRZHSHUIRUPWKHVHPXOWLSOHDFWLRQVXVLQJ:HE'ULYHU"The following code
demonstrates that:
public class ActionBuildPerform {
public static void main(String... args) {
WebDriver driver = new FirefoxDriver();
driver.get("file://C:/selectable.html");
WebElement one = driver.findElement(By.name("one"));
WebElement three = driver.findElement(By.name("three"));
WebElement five = driver.findElement(By.name("five"));
// Add all the actions into the Actions builder.
Actions builder = new Actions(driver);
builder.keyDown(Keys.CONTROL)
.click(one)
.click(three)
.click(five)
.keyUp(Keys.CONTROL);
// Generate the composite action.
Action compositeAction = builder.build();
// Perform the composite action.
compositeAction.perform();
}
}
Now, if you see the code, line number 9 is where we are getting introduced to a new
class named Actions. This Actions class is the one that is used to emulate all the
complex user events. Using this, the developer of the test script could combine all
the necessary user gestures into one composite action. From line 9 to line 14, we have
declared all the actions that are to be executed to achieve the functionality of clicking
on the numbers 1, 3, and 5. Once all the actions are grouped together, we build that
into a composite action. This is contained on line 16. Action is an interface that has
only the perform() method, which executes the composite action. Line 18 is where
we are actually executing the action using the perform() method.

Chapter 2
[]
So, to make WebDriver perform multiple actions at the same time, you need to
follow a three-step process of using the user-facing API of the Actions class to
group all the actions, then build the composite action, and then the perform the
action. This process can be made into a two-step process as the perform() method
internally calls the build() method. So the previous code will look as follows:
public class ActionBuildPerform {
public static void main(String... args) {
WebDriver driver = new FirefoxDriver();
driver.get("file://C:/selectable.html");
WebElement one = driver.findElement(By.name("one"));
WebElement three = driver.findElement(By.name("three"));
WebElement five = driver.findElement(By.name("five"));
// Add all the actions into the Actions builder.
Actions builder = new Actions(driver);
builder.keyDown(Keys.CONTROL)
.click(one)
.click(three)
.click(five)
.keyUp(Keys.CONTROL);
// Perform the action.
builder.perform();
}
}
In the preceding code, we have directly invoked the perform() method on the
Actions instance, which internally calls the build() method to create a composite
action before executing it.
In the subsequent sections of this chapter, we will take a closer look at the Actions
class. All the actions are basically divided into two categories: mouse-based actions
and keyboard-based actions. In the following sections, we will discuss all the actions
WKDWDUHVSHFLÀFWRWKHPRXVHDQGNH\ERDUGDYDLODEOHLQWKHActions class.
/HDUQLQJPRXVHEDVHGLQWHUDFWLRQV
There are around eight different mouse actions that can be performed using the
Actions class. We will see each of their syntax and a working example.
7KHPRYH%\2IIVHWDFWLRQ
The moveByOffset() method is used to move the mouse from its current position to
another point on the web page. Developers can specify the X distance and Y distance
the mouse has to be moved. When the page is loaded, generally the initial position of
a mouse would be (0, 0), unless there is an explicit focus declared by the page.

Exploring Advanced Interactions of WebDriver
[]
The API syntax for the moveByOffset() method is as follows:
public Actions moveByOffset(int xOffSet, int yOffSet)
In the preceding code, xOffSet is the input parameter providing the WebDriver
the amount of offset to be moved along the x axis. A positive value is used to move
the cursor to the right, and a negative value is used to move the cursor to the left.
yOffSet is the input parameter providing the WebDriver the amount of offset to be
moved along the y axis. A positive value is used to move the cursor down along the
y axis and a negative value is used to move the cursor toward the top.
When the xOffSet and yOffSet values result in moving the cursor out of the
document, a MoveTargetOutOfBoundsException is raised.
Let's see a working example of it. The objective of the following code is to move
the cursor on to the number 3 tile on the web page:
public class MoveByOffSet{
public static void main(String... args) {
WebDriver driver = new FirefoxDriver();
driver.get("file://C:/Selectable.html");
WebElement three = driver.findElement(By.name("three"));
System.out.println("X coordinate: "+three.getLocation().getX()+"
Y coordinate: "+three.getLocation().getY());
Actions builder = new Actions(driver);
builder.moveByOffset(three.getLocation().getX()+1, three.
getLocation().getY()+1);
builder.perform();
}
}
We have added +1 to the coordinates, because if you observe the element in Firebug,
we have a style border of 1 px. Border is a CSS-style attribute, which when applied
WRDQHOHPHQWZLOODGGDERUGHURIWKHVSHFLÀHGFRORUDURXQGWKHHOHPHQWZLWKWKH
VSHFLÀHGDPRXQWRIWKLFNQHVV7KRXJKWKHSUHYLRXVFRGHGRHVPRYH\RXUPRXVH
over tile 3, we don't realize it because we are not doing any action there. We will
see that when we use this moveByOffset() method in combination with the click()
method shortly.
The moveByOffset() method may not work in Mac OSX and may raise
a JavaScript error when used independently like the previous code.

Chapter 2
[]
The click at current location action
The click() method is used to simulate the left-click of your mouse at its current
point of location. This method doesn't really realize where or on which element it is
clicking. It just blindly clicks wherever it is at that point of time. Hence, this method
is used in combination with some other action rather than independently, to create a
composite action.
The API syntax for the click() method is as follows:
public Actions click()
The click() method doesn't really have any context about where it is performing its
action; hence, it doesn't take any input parameter.
Let's see a code example of the click() method:
public class MoveByOffsetAndClick{
public static void main(String... args) {
WebDriver driver = new FirefoxDriver();
driver.get("file://C:/Selectable.html");
WebElement seven = driver.findElement(By.name("seven"));
System.out.println("X coordinate: "+seven.getLocation().getX()+" Y
coordinate: "+seven.getLocation().getY());
Actions builder = new Actions(driver);
builder.moveByOffset(seven.getLocation().getX()+1, seven.
getLocation().getY()+1).click();
builder.perform();
}
}
Line 8 is where we have used a combination of the moveByOffset() and click()
methods to move the cursor from point (0, 0) to the point of tile 7. Because the initial
position of the mouse is (0, 0), the X, Y offset provided for the moveByOffset()
method is nothing but the location of the tile 7 element. Now, lets try to move the
cursor from tile 1 to tile 11 and from there to tile 5 and see how the code looks. Before
we get into the code, let's inspect the selectable.html page using Firebug. The
following is the style of each tile:
#selectable li {
float: left;
font-size:4em;
height: 80px;
text-align:center;
width: 100px;
}

Exploring Advanced Interactions of WebDriver
[]
.ui-state-default, .ui-widget-content .ui-state-default, .ui-widget-
header .ui-state-default {
background:url("images/ui-bg_glass_75_e6e6e6_1x400.png") repeat-x
scroll 50% 50% #E6E6E6;
border: 1px solid #D3D3D3;
color: #555555;
font-weight: normal;
}
The three elements with which we are concerned for our offset movement in the
preceding style code are: height, width, and the border thickness. Here, the height
value is 80px, width value is 100px, and border value is 1px. Use these three factors
to calculate the offset to navigate from one tile to the other. Note that the border
thickness between any two tiles will result in 2 px; that is, 1 px from each tile. The
following is the code that uses the moveByOffset and click() methods to navigate
from tile 1 to tile 11, and from there to tile 5:
public class MoveByOffsetAndClick{
public static void main(String... args) {
WebDriver driver = new FirefoxDriver();
driver.get("file://C:/Selectable.html");
WebElement one = driver.findElement(By.name("one"));
WebElement eleven = driver.findElement(By.name("eleven"));
WebElement five = driver.findElement(By.name("five"));
int border = 1;
int tileWidth = 100;
int tileHeight = 80;
Actions builder = new Actions(driver);
//Click on One
builder.moveByOffset(one.getLocation().getX()+border, one.
getLocation().getY()+border).click();
builder.build().perform();
// Click on Eleven
builder.moveByOffset(2*tileWidth+4*border, 2*tileHeight+4*border).
click();
builder.build().perform();
//Click on Five
builder.moveByOffset(-2*tileWidth-4*border,-tileHeight-2*border).
click();
builder.build().perform();
}
}

Chapter 2
[]
7KHFOLFNRQD:HE(OHPHQWDFWLRQ
We have seen how to click a WebElement by calculating the offset to it. This process
may not be needed every time, especially when the WebElement has its own
LGHQWLÀHUVVXFKDVDQDPHRU,':HFDQXVHDQRWKHURYHUORDGHGYHUVLRQRIWKH
click() method to click directly on the WebElement.
The API syntax for clicking on a WebElement is as follows:
public Actions click(WebElement onElement)
The input parameter for this method is an instance of the WebElement on which the
click action should be performed. This method, like all the other methods in the
Actions class, will return an Actions instance.
Now, let's try to modify the previous code example to use the click(WebElement)
method instead of using the moveByOffset() method to move to the location of the
WebElement and clicking on it using the click() method:
public class ClickOnWebElement{
public static void main(String... args) {
WebDriver driver = new FirefoxDriver();
driver.get("file://C:/Selectable.html");
WebElement one = driver.findElement(By.name("one"));
WebElement eleven = driver.findElement(By.name("eleven"));
WebElement five = driver.findElement(By.name("five"));
Actions builder = new Actions(driver);
//Click on One
builder.click(one);
builder.build().perform();
// Click on Eleven
builder.click(eleven);
builder.build().perform();
//Click on Five
builder.click(five)
builder.build().perform();
}
}
Now the moveByOffset() method has been replaced by the click(WebElement)
method, and all of a sudden the complex coordinate geometry has been removed
from the code. If you're a tester, this is one more good reason to push your
GHYHORSHUVWRSURYLGHLGHQWLÀHUVIRUWKH:HE(OHPHQWV

Exploring Advanced Interactions of WebDriver
[]
If you observe the previous code or the moveByOffset and click class code, all the
operations of moving the mouse and clicking on one, eleven, and five tiles are built
separately and performed separately. This is not how we use our Actions class.
You can actually build all these actions together and then perform them. So, the
preceding code will turn out to be as follows:
public class ClickOnWebElement{
public static void main(String... args) {
WebDriver driver = new FirefoxDriver();
driver.get("file://C:/Selectable.html");
WebElement one = driver.findElement(By.name("one"));
WebElement eleven = driver.findElement(By.name("eleven"));
WebElement five = driver.findElement(By.name("five"));
Actions builder = new Actions(driver);
//Click on One, Eleven and Five
builder.click(one).click(eleven).click(five);
builder.build().perform();
}
}
The clickAndHold at current location action
The clickAndHold() method is another method of the Actions class that
left-clicks on an element and holds it without releasing the left button of the mouse.
This method will be useful when executing operations such as drag-and-drop. This
method is one of the variants of the clickAndHold() method that the Actions class
provides. We will discuss the other variant in the next section.
Now, open the Sortable.htmlÀOHWKDWcame with the book. You can see that the
tiles can be moved from one position to the other. Now let's try to move tile 3 to
the position of tile 2. The sequence of steps that are involved to do this are:
1. Move the cursor to the position of tile 3.
2. Click and hold tile 3.
3. Move the cursor in this position to the tile 2 location.
Now, let's see how this can be accomplished using the WebDriver's clickAndHold()
method:
public class ClickAndHold{
public static void main(String... args) {
WebDriver driver = new FirefoxDriver();
driver.get("file://C:/Sortable.html");
Actions builder = new Actions(driver);

Chapter 2
[ 51 ]
//Move tile3 to the position of tile2
builder.moveByOffset(200, 20)
.clickAndHold()
.moveByOffset(120, 0)
.perform();
}
}
Let's analyze the following line of code:
builder.moveByOffset(200, 20)
.clickAndHold()
.moveByOffset(120, 0)
.perform();
First we move the cursor to the location of tile 3. Then we click and hold tile 3. Then,
we move the cursor by 120px horizontally to the position of tile 2. The last line
performs all the preceding actions. Now, execute this in your eclipse and see what
happens. If you observe closely, our tile 3 doesn't properly go into the position of
tile 2. This is because we are yet to release the left button. We just commanded the
WebDriver to click and hold, but not to release. Yes, in a short while, we will discuss
the release() method of WebDriver.
7KHFOLFN$QG+ROGD:HE(OHPHQWDFWLRQ
In the previous section, we have seen the clickAndHold() method, which will click
and hold a WebElement at the current position of the cursor. It doesn't care with which
element it is dealing with. So, if we want to deal with a particular WebElement on
WKHZHESDJHZHKDYHWRÀUVWPRYHWKHFXUVRUWRWKHDSSURSULDWHSRVLWLRQDQGWKHQ
perform the clickAndHold() action. In order to avoid the hassle of moving the cursor
geometrically, WebDriver provides the developers with another variant or overloaded
method of the clickAndHold() method that takes the WebElement as input.
The API syntax is as follows:
public Actions clickAndHold(WebElement onElement)
The input parameter for this method is the WebElement that has to be clicked
and held. The return type, as in all the other methods of the Actions class, is the
Actions instance.
Now, let's refactor the example in the previous section to use this method, as follows:
public class ClickAndHold{
public static void main(String... args) {
WebDriver driver = new FirefoxDriver();

Exploring Advanced Interactions of WebDriver
[]
driver.get("file://C:/Sortable.html");
WebElement three = driver.findElement(By.name("three"));
Actions builder = new Actions(driver);
//Move tile3 to the position of tile2
builder.clickAndHold(three)
.moveByOffset(120, 0)
.perform();
}
}
The only change is that we have removed the action of moving the cursor to the
(200, 20) position and provided the WebElement to the clickAndHold() method
that will take care of identifying the WebElement.
The release at current location action
Now in the previous example, we have seen how to click and hold an element. The
ultimate action that has to be taken on a held WebElement is to release it so that the
element can be dropped or released from the mouse. The release() method is
the one that can release the left mouse button on a WebElement.
The API syntax for the release() method is as follows:
public Actions release()
The preceding method doesn't take any input parameter and returns the Actions
class instance.
Now, let's modify the previous code to include release action in it:
public class ClickAndHoldAndRelease{
public static void main(String... args) {
WebDriver driver = new FirefoxDriver();
driver.get("file://C:/Sortable.html");
WebElement three = driver.findElement(By.name("three"));
Actions builder = new Actions(driver);
//Move tile3 to the position of tile2
builder.clickAndHold(three)
.moveByOffset(120, 0)
.release()
.perform();
}
}
The preceding code will make VXUHWKDWWKHPRXVHLVUHOHDVHGDWWKHVSHFLÀHGORFDWLRQ

Chapter 2
[]
7KHUHOHDVHRQDQRWKHU:HE(OHPHQWDFWLRQ
This is an overloaded version of the release() method. Using this, you can actually
release the currently held WebElement in the middle of another WebElement. In
this way, we don't have to calculate the offset of the target WebElement from the
held WebElement.
The API syntax is as follows:
public Actions release(WebElement onElement)
The input parameter for the preceding method is obviously the target WebElement
where the held WebElement should be dropped. The return type is the instance of
the Actions class.
Let's modify the preceding code example to use this method:
public class ClickAndHoldAndReleaseOnWebElement{
public static void main(String... args) {
WebDriver driver = new FirefoxDriver();
driver.get("file://C:/Sortable.html");
WebElement three = driver.findElement(By.name("three"));
WebElement two = driver.findElement(By.name("two"));
Actions builder = new Actions(driver);
//Move tile3 to the position of tile2
builder.clickAndHold(three)
.release(two)
.perform();
}
}
Check how simple the preceding code looks. We have removed all the moveByOffset
code and added the release() method that takes the WebElement with the name
two as the input parameter.
Invoking the release() or release(WebElement) methods
without calling the clickAndHold() method will result in an
XQGHÀQHGEHKDYLRU
7KHPRYH7R(OHPHQWDFWLRQ
The moveToElement() method is another method of WebDriver that helps us to
move the mouse cursor to a WebElement on the web page.
The API syntax for the moveToElement() method is as follows:
public Actions moveToElement(WebElement toElement)

Exploring Advanced Interactions of WebDriver
[]
The input parameter for the preceding method is the target WebElement where the
mouse should be moved.
Now, go back to The clickAndHold at current location action section of this chapter and
try to modify the code to use this method. The following is the code we have written
in the The clickAndHold at current location action section:
public class ClickAndHold{
public static void main(String... args) {
WebDriver driver = new FirefoxDriver();
driver.get("file://C:/Sortable.html");
Actions builder = new Actions(driver);
//Move tile3 to the position of tile2
builder.moveByOffset(200, 20)
.clickAndHold()
.moveByOffset(120, 0)
.perform();
}
}
In the preceding code, we will replace the moveByOffset(x, y) method with the
moveToElement(WebElement) method:
public class ClickAndHold{
public static void main(String... args) {
WebDriver driver = new FirefoxDriver();
driver.get("file://C:/Sortable.html");
WebElement three = driver.findElement(By.name("three"));
Actions builder = new Actions(driver);
//Move tile3 to the position of tile2
builder.moveToElement(three)
.clickAndHold()
.moveByOffset(120, 0)
.perform();
}
}
In the preceding code, we have moved to tile 3, clicked and held it, and then
moved to the location of tile 2 by specifying its offset. If you want, you can add
the release() method before the perform() method.
There might be a number of ways to achieve the same task. It is
up to the user to choose the appropriate ones that best suit the
given circumstances.

Chapter 2
[ 55 ]
7KHGUDJ$QG'URS%\DFWLRQ
There might be many instances where we may have to drag-and-drop components
or WebElements of a web page. We can accomplish that by using many of the actions
seen until now. But WebDriver has given us a convenient out of the box method to
use. Let's see its API syntax.
The API syntax for the dragAndDropBy() method is as follows:
public Actions dragAndDropBy(WebElement source,
int xOffset,int yOffset)
The WebElement input parameter is the target WebElement to be dragged, the
xOffset parameter is the horizontal offset to be moved, and the yOffset parameter
is the vertical offset to be moved.
/HWVVHHDFRGHH[DPSOHIRULW2SHQWKH+70/ÀOHDragMe.html, provided with
this book. You can actually drag that rectangle to any location on the web page. Let's
see how we can do that using WebDriver. The following is the code example for that:
public class DragMe {
public static void main(String... args) {
WebDriver driver = new FirefoxDriver();
driver.get("file://C:/DragMe.html");
WebElement dragMe = driver.findElement(By.id("draggable"));
Actions builder = new Actions(driver);
builder.dragAndDropBy(dragMe, 300, 200).perform();
}
}
In the preceding code, dragMeLVWKH:HE(OHPHQWWKDWLVLGHQWLÀHGE\LWVId, and that
is dragged 300px horizontally and 200px vertically.
The dragAndDrop action
The dragAndDrop() method is similar to the dragAndDropBy() method. The only
difference being that instead of moving the WebElement by an offset, we move
it on to a target element.
The API syntax for the dragAndDrop() method is as follows:
public Actions dragAndDrop(WebElement source,
WebElement target)
The input parameters for the preceding method are the WebElement source and the
WebElement target, while the return type is the Actions class.

Exploring Advanced Interactions of WebDriver
[]
Let's see a working code example for it. Open the DragAndDrop.htmlÀOHWKDW
is provided with the book. Here we can actually drag the Drag me to my target
rectangle to the Drop here rectangle. Try that. Let's see how that can be achieved
using WebDriver:
public class DragAndDrop {
public static void main(String... args) {
WebDriver driver = new FirefoxDriver();
driver.get("file://C:/DragAndDrop.html");
WebElement src = driver.findElement(By.id("draggable"));
WebElement trgt = driver.findElement(By.id("droppable"));
Actions builder = new Actions(driver);
builder.dragAndDrop(src, trgt).perform();
}
}
,QWKHSUHFHGLQJFRGHWKHVRXUFHDQGWDUJHW:HE(OHPHQWVDUHLGHQWLÀHGE\WKHLU,'V
and the dragAndDrop() method is used to drag one to the other.
The doubleClick at current location action
Moving on to another action that can be performed using mouse, doubleClick()
is another out of the box method that WebDriver provides to emulate the
double-clicking of the mouse. This method, like the click() method, comes in
WZRÁDYRUV2QHLVGRXEOHFOLFNLQJD:HE(OHPHQWZKLFKZHZLOOGLVFXVVLQQH[W
section; the second is clicking at the current location of the cursor, which will be
discussed here.
The API syntax is as follows:
public Actions doubleClick()
Obviously, the preceding method doesn't take any input parameters, as it just clicks
on the current cursor location and returns an Actions class instance.
Let's see how the previous code can be converted to use this method:
public class DoubleClick {
public static void main(String... args) {
WebDriver driver = new FirefoxDriver();
driver.get("file://C:/DoubleClick.html");
WebElement dblClick= driver.findElement(By.name("dblClick"));
Actions builder = new Actions(driver);
builder.moveToElement(dblClick).doubleClick().perform();
}
}

Chapter 2
[]
In the preceding code, we have used the moveToElement(WebElement) method to
move the mouse to the location of the button element, and just double-clicked at the
current location.
7KHGRXEOH&OLFNRQ:HE(OHPHQWDFWLRQ
Now that we have seen a method that double-clicks at the current location, we will
discuss another method that WebDriver provides to emulate the double-clicking
of a WebElement.
The API syntax for the doubleClick() method is as follows:
public Actions doubleClick(WebElement onElement)
The input parameter for the preceding method is the target WebElement that has
to be double-clicked and the return type is the Actions class.
Let's see a code example for this. Now, open the DoubleClick.htmlÀOHDQGFOLFN
(single) on the Click Me button. You shouldn't see anything happening. Now
double-click on the button; you should see an alert saying Double Clicked !!. Now,
we try to do the same thing using WebDriver. The following is the code to do that:
public class DoubleClick {
public static void main(String... args) {
WebDriver driver = new FirefoxDriver();
driver.get("file://C:/DoubleClick.html");
WebElement dblClick = driver.findElement(By.name("dblClick"));
Actions builder = new Actions(driver);
builder.doubleClick(dblClick).perform();
}
}
After executing the preceding code, you should see an alert dialog saying that the
button has been double-clicked.
7KHFRQWH[W&OLFNRQ:HE(OHPHQWDFWLRQ
The contextClick() method, also known as right-click, is quite common on many
web pages these days. The context is nothing but a menu; a list of items is associated
to a WebElement based on the current state of the web page. This context menu can
be accessed by a right-click of the mouse on the WebElement. WebDriver provides
the developer with an option of emulating that action using the contextClick()
method. Like many other methods, this method has two variants as well. One is
clicking on the current location and the other overloaded method is clicking on the
WebElement. Lets discuss the context clicking on WebElement here.

Exploring Advanced Interactions of WebDriver
[]
The API syntax for the contextClick() method is as follows:
public Actions contextClick(WebElement onElement)
The input parameter is obviously the WebElement that has to be right-clicked, and
the return type is the Actions instance.
As we do normally, its time to see a code example. If you open the ContextClick.
htmlÀOH\RXFDQULJKWFOLFNRQWKHWH[WYLVLEOHRQWKHSDJHDQGLWZLOOGLVSOD\
the context menu. Now, clicking any item pops up an alert dialog stating which
item has been clicked. Now, let's see how to implement this in WebDriver in the
following code:
public class ContextClick {
public static void main(String... args) {
WebDriver driver = new FirefoxDriver();
driver.get("file://C:/ContextClick.html");
WebElement contextMenu = driver.findElement(By.id("div-context"));
Actions builder = new Actions(driver);
builder.contextClick(contextMenu)
.click(driver.findElement(By.name("Item 4")))
.perform();
}
}
,QWKHSUHFHGLQJFRGHÀUVWZHKDYHULJKWFOLFNHGXVLQJWKHcontextClick() method
on the WebElement contextMenu, and then left-clicked on Item 4 from the context
menu. This should pop up an alert dialog saying Item 4 Clicked.
The contextClick at current location action
Now that we have seen context click on a WebElement, its time to explore the
contextClick() method at the current mouse location.
The API syntax for the contextClick() method is as follows:
public Actions contextClick()
As expected, the preceding method doesn't expect any input parameter, and
returns the ActionsLQVWDQFH/HWVVHHWKHQHFHVVDU\PRGLÀFDWLRQVQHHGHGWRWKH
previous example in order to use this method. The following is the code refactored
to achieve this:
public class ContextClick {
public static void main(String... args) {
WebDriver driver = new FirefoxDriver();

Chapter 2
[]
driver.get("file://C:/ContextClick.html");
WebElement contextMenu = driver.findElement(By.id("div-context"));
Actions builder = new Actions(driver);
builder.moveToElement(contextMenu)
.contextClick()
.click(driver.findElement(By.name("Item 4")))
.perform();
}
}
7KHSUHFHGLQJFRGHÀUVWPRYHVWKHcursor to the div-context WebElement, and
then context clicks it.
Learning keyboard-based interactions
Until now, we have seen all the actions that can be taken using a mouse. It's time
WRORRNDWVRPHRIWKHDFWLRQVWKDWDUHVSHFLÀFWRWKHNH\ERDUGLQWKHActions class.
Basically, there are three different actions that are available in the Actions class that
DUHVSHFLÀFWRWKHNH\ERDUG7KH\DUHWKHkeyUp, keyDown, and sendKeys actions, each
having two overloaded methods. One method is to execute the action directly on the
WebElement, and the other is to just execute the method irrespective of its context.
The keyDown and keyUp actions
The keyDown() method is used to simulate the action of pressing and holding a
key. The keys that we are referencing here are Shift, Ctrl, and Alt keys. The keyUp()
method is used to release the key that is already pressed using the keyDown()
method. The API syntax for the keyDown() method is as follows
public Actions keyDown(Keys theKey) throws IllegalArgumentException
An IllegalArgumentException is thrown when the passed key is not one of the
Shift, Ctrl, and Alt keys.
The API syntax for the keyUp() method is as follows
public Actions keyUp(Keys theKey)
The keyUp action performed on a key, on which a keyDown action is not already
being performed, will result in some unexpected results. So, we have to make sure
we perform the keyUp action after a keyDown action is performed.

Exploring Advanced Interactions of WebDriver
[]
7KHVHQG.H\VPHWKRG
This is used to type in alphanumeric and special character keys into WebElements
such as textbox, textarea, and so on. This is different from the WebElement.
sendKeys(CharSequence keysToSend) method, as this method expects the
WebElements to have the focus before being called. The API syntax for the
sendkeys() method is as follows:
public Actions sendKeys(CharSequence keysToSend)
We expect you to implement a couple of test scripts around these keyboard events
using the keyUp, keyDown, and sendKeys() methods.
6XPPDU\
In this chapter, we have learned how to use the Actions class to create a set of
actions, and build them into a composite action to execute it in one pass using the
perform() method. In this way, we can aggregate a series of complex user actions
into a single functionality, which can be executed in one pass. In the next chapter, we
will see some of the features of WebDriver such as capabilities, taking screenshots,
and so on.

Exploring the Features
of WebDriver
Until the previous chapter, we have seen various basic and advanced interactions
that a user can perform on a webpage using WebDriver. In this chapter, we will
discuss the different capabilities and features of WebDriver that enable the test
script developer to have better control on WebDriver and consequently on the web
application that is under test. The list of features that we are going to cover in this
chapter is as follows:
Setting the desired capabilities for a browser
Taking screenshots
Locating target windows and iFrames
Exploring Navigate
Waiting for WebElements to load
Handling cookies
Let's get started without any further delay.
Setting the desired capabilities for
a browser
You, as DXVHURI:HE'ULYHUKDYHWKHÁH[LELOLW\WRFUHDWHDVHVVLRQIRUDEURZVHU
with your own set of desired capabilities that a browser should or shouldn't have.
Using the capabilities feature in WebDriver, you are given a way to specify your
choice of how your browser should behave.
3

Exploring the Features of WebDriver
[]
Some of the examples of browser capabilities include enabling a browser session
to support taking screenshots of the webpage, executing custom JavaScript on the
webpage, enabling the browser session to interact with window alerts, and so on.
7KHUHDUHPDQ\FDSDELOLWLHVWKDWDUHVSHFLÀFWRLQGLYLGXDOEURZVHUVEXWWKHUHDUH
VRPHVSHFLÀFFDSDELOLWLHVWKDWDUHJHQHULFWRDOOWKHEURZVHUV:HZLOOGLVFXVVVRPH
of them here, and the remaining, as and when we come across those features in
WKLVERRN7KHEURZVHUVSHFLÀFFDSDELOLWLHVZLOOEHGLVFXVVHGLQJUHDWHUGHWDLOLQ
the next chapter.
Capabilities is an interface in the WebDriver library whose direct implementation is
the DesiredCapabilities class. The series of steps involved in creating a browser
VHVVLRQZLWKVSHFLÀFFDSDELOLWLHVLVDVIROORZV
1. Identify all of the capabilities that you want to arm your browser with.
2. Create a DesiredCapabilities class instance and set all of the capabilities
to it.
3. Now, create an instance of WebDriver with all of the above capabilities
passed to it.
This will create an instance of Firefox/IE/Chrome or whichever browser you have
instantiated with all of your desired capabilities.
Let's create an instance of FirefoxDriver while enabling the takesScreenShot
capability:
public class BrowserCapabilities {
public static void main(String... args) {
Map capabilitiesMap = new HashMap();
capabilitiesMap.put("takesScreenShot", true);
DesiredCapabilities capabilities
= new DesiredCapabilities(capabilitiesMap);
WebDriver driver = new FirefoxDriver(capabilities);
driver.get("http://www.google.com");
}
}
In the preceding code, we set all of the capabilities that we desire in a map and
created an instance of DesiredCapabilities using that map. Now, we have created
an instance of FirefoxDriver with these capabilities. This will now launch a Firefox
browser that will have support for taking screenshots of the webpage. If you see
WKHGHÀQLWLRQRIWKHDesiredCapabilities class, the constructor of the class is
overloaded in many different ways. Passing a map is one of them. You can use the
default constructor and create an instance of the DesiredCapabilities class, and
then set the capabilities using the setCapability() method.

Chapter 3
[]
Some of the default capabilities that are common across browsers are shown in the
following table:
Capability What it is used for
takesScreenShot Tells whether the browser session can take a screenshot
of the webpage
handlesAlert Tells whether the browser session can handle modal
dialogs
cssSelectorsEnabled Tells whether the browser session can use CSS selectors
while searching for elements
javascriptEnabled Enables/disables user-supplied JavaScript execution in
the context of the webpage
acceptSSLCerts Enables/disables the browser to accept all of the SSL
certificates by default
webStorageEnabled This is an HTML5 feature, and it is possible to enable
or disable the browser session to interact with storage
objects
There are many other capabilities of WebDriver, and we will talk about them
when we cover individual features; some in this chapter, and the remaining
in the upcoming chapters.
Taking screenshots
Taking a screenshot of a webpage is a very useful capability of WebDriver. This is
very handy when your test case fails, and you want to see the state of the application
when the test case failed. The TakesScreenShot interface in the WebDriver library
is implemented by all of the different variants of WebDriver, such as Firefox Driver,
Internet Explorer Driver, Chrome Driver, and so on.
The TakesScreenShot capability is enabled in all of the browsers by default. Because
this is a read-only capability, a user doesn't have much say on toggling it. Before we
see a code example that uses this capability, we should look at an important method
of the TakesScreenShot interface—getScreenshotAs().
The API syntax for getScreenshotAs() is as follows:
public <X> X getScreenshotAs(OutputType<X> target)

Exploring the Features of WebDriver
[]
Here, OutputType is another interface of the WebDriver lib. We can ask WebDriver
to give your screenshot in three different formats; they are: BASE64, BYTES (raw
data), and FILE. If you choose the FILE format, it writes the data into a .pngÀOH
ZKLFKZLOOEHGHOHWHGRQFHWKH-90LVNLOOHG6R\RXVKRXOGDOZD\VFRS\WKDWÀOH
into a safe location so that it can be used for later reference.
7KHUHWXUQW\SHLVDVSHFLÀFRXWSXWWKDWGHSHQGVRQWKHVHOHFWHGOutputType.
For example, selecting OutputType.BYTES will return a byte array, and selecting
OutputType.FILEZLOOUHWXUQDÀOHREMHFW
Depending on the browser used, the output screenshot will be one of the following
in the order of preference:
The entire page
The current window
A visible portion of the current frame
The screenshot of the entire display containing the browser
For example, if you are using Firefox Driver, getScreenshotAs() takes the
screenshot of the entire page, but Chrome Driver returns only the visible
portion of the current frame.
It's time to take a look at the following code example:
public class TakesScreenShotExample{
public static void main(String... args) {
WebDriver driver = new FirefoxDriver();
driver.get("http://www.packtpub.com/");
File scrFile = ((TakesScreenShot)driver).
getScreenshotAs(OutputType.FILE);
System.out.println(scrFile.getAbsolutePath());
}
}
In the preceding code, we have used the getScreenshotAs() method
WRWDNHWKHVFUHHQVKRWRIWKHZHESDJHDQGVDYHLWWRDÀOHIRUPDW7KH
getAbsolutePath() method returns the path of the saved image, which
you can open and examine.
7KHÀOHWRZKLFKWKHVFUHHQVKRWGDWDLVZULWWHQLVDWHPSRUDU\ÀOH
and will be deleted as soon as the JVM exits. So it is a good idea to
FRS\WKHÀOHEHIRUHWKHWHVWFRPSOHWHV

Chapter 3
[]
/RFDWLQJWDUJHWZLQGRZVDQGL)UDPHV
WebDriver enables the developers to switch easily between the multiple windows or
frames an application loads in. For instance, when you click on the Internet banking
link on a bank web application, it will open the Internet banking application in a
separate window. At this point, you may want to switch back to the original window
to handle some events. Similarly, you may have to deal with a web application
that is divided into two frames on the web page. The frame on the left may contain
navigation items, and the frame on the right displays the appropriate web page
based on what is selected in the frame on the left. Using WebDriver, you can develop
test cases that can easily handle such complex situations.
The WebDriver.TargetLocator interface is used to locate a given frame or window.
In this section, we will see how WebDriver handles switching between browser
windows and between two frames in the same window.
6ZLWFKLQJDPRQJZLQGRZV
First, we will see a code example for handling multiple windows. For this chapter,
WKHUHLVDQ+70/ÀOHSURYLGHGZLWKWKLVERRNQDPHGWindow.html. It is a very
basic web page that links to the Google Search page. When you click on the link, the
Google Search page is opened in a different window. Every time you open a web
page using WebDriver in a browser window, WebDriver assigns a window handle
WRWKDW:HE'ULYHUXVHVWKLVLGHQWLÀHUWRLGHQWLI\WKHZLQGRZ$WWKLVSRLQWLQ\RXU
WebDriver, there are two window handles registered. Now, on the screen, you can
see that the Google Search page is in the front and has the focus. At this point, if you
ZDQWWRVZLWFKWRWKHÀUVWEURZVHUZLQGRZ\RXFDQXVH:HE'ULYHUVswitchTo()
method to do that.
The API syntax for TargetLocator is as follows:
WebDriver.TargetLocator switchTo()
This method returns the WebDriver.TargetLocator instance, where you can tell the
WebDriver whether to switch between browser windows or frames. Let's see how
WebDriver deals with this:
public class WindowHandling {
public static void main(String... args){
WebDriver driver = new FirefoxDriver();
driver.get("file://C:/Window.html");
String window1 = driver.getWindowHandle();
System.out.println("First Window Handle is: "+window1);

Exploring the Features of WebDriver
[]
WebElement link = driver.findElement(By.linkText("Google
Search"));
link.click();
String window2 = driver.getWindowHandle();
System.out.println("Second Window Handle is: "+window2);
System.out.println("Number of Window Handles so for: "
+driver.getWindowHandles().size());
driver.switchTo().window(window1);
}
}
Observe the following line in the preceding code:
String window1 = driver.getWindowHandle();
+HUHWKHGULYHUUHWXUQVWKHDVVLJQHGLGHQWLÀHUIRUWKHZLQGRZ1RZEHIRUHZH
move on to a different window, it is better to store this value so that if we want to
VZLWFKEDFNWRWKLVZLQGRZZHFDQXVHWKLVKDQGOHRULGHQWLÀHU,QRUGHUWRUHWULHYH
all of the window handles that are registered with your driver so far, you can use
the following method:
driver.getWindowHandles()
7KLVZLOOUHWXUQWKHVHWRILGHQWLÀHUVRIDOORIWKHEURZVHUZLQGRZKDQGOHVRSHQHG
in the driver session so far. Now, in our example, after we open the Google Search
page, the window corresponding to it is shown in front with the focus. If you want
WRJREDFNWRWKHÀUVWZLQGRZZHKDYHWRXVHWKHIROORZLQJFRGH
driver.switchTo().window(window1);
7KLVZLOOEULQJWKHÀUVWZLQGRZLQWRIRFXV
6ZLWFKLQJDPRQJIUDPHV
Let us now see how we can handle switching among the frames of a web page. In
WKH+70/ÀOHVVXSSOLHGZLWKWKLVERRN\RXZLOOVHHDÀOHQDPHGFrames.html. If
\RXRSHQWKDW\RXZLOOVHHWZR+70/ÀOHVORDGHGLQWZRGLIIHUHQWIUDPHV/HW
Let's see how we can switch between them and type into the text boxes available in
each frame.
public class SwitchBetweenFrames {
public static void main(String... args) {
WebDriver driver = new FirefoxDriver();
driver.get("file://C:/Frames.html");

Chapter 3
[]
Actions action = new Actions(driver);
driver.switchTo().frame(0);
WebElement txt = driver.findElement(By.name("1"));
txt.sendKeys("I'm Frame One");
driver.switchTo().defaultContent();
driver.switchTo().frame(1);
txt = driver.findElement(By.name("2"));
txt.sendKeys("I'm Frame Two");
}
}
In the preceding code, we have used switchTo().frame instead of switchTo().
window because we are moving across frames.
The API syntax for frame is as follows:
WebDriver frame(int index)
This method takes the index of the frame that you want to switch to. If your web
page has three frames, WebDriver indexes them as 0, 1, and 2 where the zero index
LVDVVLJQHGWRWKHÀUVWIUDPHHQFRXQWHUHGLQWKH'206LPLODUO\\RXFDQVZLWFK
among frames using their names by using the overloaded method of the above.
The API syntax is as follows:.
WebDriverframe(String frameNameOrframeID)
You can pass the name of the frame or its ID. Using this, you can switch to the frame
if you are not sure about the index of the target frame. The other overloaded method
is as follows:
WebDriver frame(WebElement frameElement)
The input parameter is the WebElement of the frame.
ComingEDFNWRRXUFRGHH[DPSOHÀUVWZHKDYHVZLWFKHGWRRXUÀUVWIUDPHDQG
W\SHGLQWRWKHWH[WÀHOG7KHQLQVWHDGRIGLUHFWO\VZLWFKLQJWRWKHVHFRQGIUDPHZH
have come to the main or default content, and then switched to the second frame.
The code for that is as follows:
driver.switchTo().defaultContent();

Exploring the Features of WebDriver
[]
This is very important. If you don't do this, and try to switch to the second frame
ZKLOH\RXDUHVWLOOLQWKHÀUVWIUDPH\RXU:HE'ULYHUZLOOFRPSODLQVD\LQJWKDWLW
FRXOGQWÀQGDIUDPHZLWKLQGH[1. This is because the WebDriver searches for the
VHFRQGIUDPHLQWKHFRQWH[WRIWKHÀUVWIUDPHZKLFKLVREYLRXVO\QRWDYDLODEOH6R
\RXKDYHWRÀUVWFRPHWRWKHWRSOHYHOFRQWDLQHUDQGVZLWFKWRWKHIUDPH\RXDUH
interested in.
After switching to the default content, you can now switch to the second frame using
the following code:
driver.switchTo().frame(1);
Thus, you can switch between the frames and execute the corresponding
WebDriver actions.
Handling alerts
Apart from switching between windows and frames, you may have to handle
various modal dialogs in a web application. For this, WebDriver provides an
API to handle alert dialogs. The API for that is as follows:
Alert alert()
The preceding method will switch to the currently active modal dialog on the web
page. This returns an Alert instance where appropriate actions can be taken on that
dialog. If there is no dialog currently present, and you invoke this API, it throws
back a NoAlertPresentException.
The Alert interface contains a number of APIs to execute different actions. The
following list discusses them one after the other:
void accept(): This is equivalent to the OK button action on the dialog.
The corresponding OK button actions are invoked when the accept()
action is taken on a dialog.
void dismiss():This is equivalent to clicking on the CANCEL action button.
java.lang.String getText(): This will return the text that appears on the
dialog. This can be used if you want to evaluate the text on the modal dialog.
void sendKeys(java.lang.String keysToSend): This will allow the
developer to type in some text into the alert if the alert has some provision
for it.

Chapter 3
[]
Exploring Navigate
As we know, WebDriver talks to individual browsers natively. This way it has better
control, not just on the web page, but on the browser itself. Navigate is one such
feature of WebDriver that allows the test script developer to work with the browser's
Back, Forward, and Refresh controls. As users of a web page, quite often, we use
the browser's Back and Forward controls to navigate between the pages of a single
application, or sometimes, multiple applications. As a test script developer, you may
want to develop tests that observe the behavior of the application when browser
navigation buttons are clicked, especially the Back button. For example, if you use
your navigation button in a banking application, the session should expire and the
user should be logged out. So, using the WebDriver's navigation feature, you can
emulate those actions.
The method that is used for this purpose is navigate(). The following is its
API syntax:
WebDriver.Navigation navigate()
Obviously, there is no input parameter for this method, but the return type is the
WebDriver.Navigation interface, which contains all of the browser navigation
options that help you navigate through your browser's history.
Now let's see a code example and then analyze the code:
public class WebDriverNavigate{
public static void main(String... args) {
WebDriver driver = new FirefoxDriver();
driver.navigate().to("http://www.google.com");
WebElement searchBox = driver.findElement(By.name("q"));
searchBox.sendKeys("Selenium WebDriver");
WebElement searchButton = driver.findElement(By.name("btnG"));
searchButton.click();
searchBox.clear();
searchBox.sendKeys("Packt Publishing");
searchButton.click();
driver.navigate().back();
driver.navigate().forward();
driver.navigate().refresh();
}
}

Exploring the Features of WebDriver
[]
The SUHFHGLQJFRGHRSHQVWKH*RRJOH6HDUFKSDJHDQGDWÀUVWVHDUFKHVIRUWKHWH[W
Selenium WebDriver; then, after the search results are loaded, it does a second
search for Packt Publishing and waits for the results. Now that we have a
navigation history created in the browser, it uses WebDriver navigation to go
back in the browser history, then go forward and refresh the page.
Let's analyze the navigation methods used in the preceding code. The line of code
that initially loads the Google web page uses the to() method of the Navigation
class as follows:
driver.navigate().to("http://www.google.com");
+HUHÀUVWdriver.navigate() returns the WebDriver.Navigation interface on
which the to() method is used to navigate to a web URL. The API syntax is as follows:
void to(java.lang.String url)
The input parameter for this method is the url string that has to be loaded in the
browser. This method will load the page in the browser by using the HTTP GET
operation, and it will block everything else until the page is completely loaded.
This method is the same as the driver.get(String url) method.
The WebDriver.Navigation interface also provides an overloaded method of this
to() method to make it easy to pass the URL. The API syntax for it is as follows:
void to(java.net.URL url)
Next, in the code example, we did a couple of searches for Selenium WebDriver and
Packt Publishing. Then, we tried to use Navigation's back() method to emulate
our browser's Back button using the following line of code:
driver.navigate().back();
This will take the browser to the Selenium WebDriver search results page. The API
syntax for this method is pretty straightforward, as follows:
void back()
This method doesn't take any input and doesn't return anything as well, but takes
the browser one level back in its history.
Then, the next method in the navigation is the forward() method, which is pretty
much similar to the back() method, but takes the browser one level in the opposite
direction. In the preceding code example, invoking the following should take the
browser to the Packt Publishing search results:
driver.navigate().forward();

Chapter 3
[]
The API syntax for the method is as follows:
void forward()
This method doesn't take any input and doesn't return anything as well, but takes
the browser one level forward in its history.
The last line of code in the code example uses the refresh() method of WebDriver's
navigation:
driver.navigate().refresh();
This method will reload the current URL to emulate the browser's refresh (F5 key)
action. The API syntax is as follows:
void refresh()
As you can see, the syntax is very similar to the back() and forward() methods,
and this method will reload the current URL. Hence, these are the various methods
WebDriver provides the developers to emulate some browser actions.
:DLWLQJIRU:HE(OHPHQWVWRORDG
If you have a previous WebUI automation experience, I'm sure you would have
FRPHDFURVVDVLWXDWLRQZKHUH\RXUWHVWVFULSWFRXOGQWÀQGDQHOHPHQWRQWKH
webpage as the webpage is still loading. This could happen due to various reasons.
One classic example is when the application server or webserver is serving the page
too slowly due to resource constraints; the other could be when you are accessing the
page on a very slow network. The reason could be that the element on the webpage
LVQRWORDGHGE\WKHWLPH\RXUWHVWVFULSWWULHVWRÀQGLW7KLVLVZKHUH\RXKDYH
WRFDOFXODWHDQGFRQÀJXUHWKHDYHUDJHZDLWWLPH\RXUWHVWVFULSWVVKRXOGZDLWIRU
WebElements to load on the webpage.
WebDriver provides the test script developers a very handy feature to manage wait
time. Wait time is the time your driver will wait for the WebElement to load before it
gives up and throws NoSuchElementException. Remember, in Chapter 1, Introducing
WebDriver and WebElements, we have discussed the findElement(By by) method
that throws NoSuchElementExceptionZKHQLWFDQQRWÀQGWKHWDUJHW:HE(OHPHQW
There are two ways by which you can make WebDriver wait for WebElement. They
are implicit wait time and Explicit wait time. Implicit timeouts are common to all the
WebElements and has a global timeout period associated to it, but the explicit timeouts
FDQEHFRQÀJXUHG to individual WebElements. Let's discuss each of them here.

Exploring the Features of WebDriver
[]
,PSOLFLWZDLWWLPH
Implicit wait timeLVXVHGZKHQ\RXZDQWWRFRQÀJXUH the WebDriver's wait time as
a whole for the application under test. Imagine you have hosted a web application
on a local server and on a remote server. Obviously, the time to load for a webpage
hosted on a local server would be less than the time for the same page hosted on a
remote server, due to network latency. Now, if you want to execute your test cases
DJDLQVWHDFKRIWKHP\RXPD\KDYHWRFRQÀJXUHWKHZDLWWLPHDFFRUGLQJO\VXFKWKDW
your test case doesn't end up spending more time waiting for the page or spend far
too less time and timeout. To handle these kind of wait time issues, WebDriver gives
an option to set the implicit wait time for all of the operations that the driver does
using the manage() method.
Let's see a code example of implicit wait time:
public class ImplicitWaitTime {
public static void main(String... args) {
WebDriver driver = new FirefoxDriver();
driver.manage().timeouts().implicitlyWait(10, TimeUnit.
SECONDS);
driver.get("www.google.com");
}
}
Let us analyze the following highlighted line of code:
driver.manage().timeouts().implicitlyWait(10, TimeUnit.SECONDS);
Here, driver.manage().timeouts() returns WebDriver.Timeouts interface, which
declares a method named implicitlyWait, which is where you specify the amount
of time the driver should wait when searching for a WebElement on a webpage if it is
not immediately present. Periodically, the WebDriver will poll for the WebElement on
WKHZHESDJHXQWLOWKHPD[LPXPZDLWWLPHVSHFLÀHGWRWKHSUHYLRXVPHWKRGLVRYHU,Q
the preceding code, 10 seconds is the maximum wait time your driver will wait for any
WebElement to load on your browser. If it loads within this time period, WebDriver
proceeds with the rest of the code; else, it will throw a NoSuchElementException.
Use this method when you want to specify a maximum wait time, which is
generally common for most of the WebElements on your web application. The
YDULRXVIDFWRUVWKDWLQÁXHQFHWKHSHUIRUPDQFHRI\RXUSDJHDUHQHWZRUNEDQGZLGWK
VHUYHUFRQÀJXUDWLRQDQGVRRQ%DVHGRQWKRVHFRQGLWLRQVDVDGHYHORSHURI\RXU
WebDriver test cases, you have to arrive at a value for the maximum implicit wait
time, such that your test cases don't take too long to execute and at the same time
don't timeout very frequently.

Chapter 3
[]
([SOLFLWZDLWWLPH
Implicit timeout is generic to all the WebElements of a web page. But, if you have
RQHVSHFLÀF:HE(OHPHQWLQ\RXUDSSOLFDWLRQZKHUH\RXZDQWWRZDLWIRUDYHU\ORQJ
time, this approach may not work. Setting the implicit wait time to the value of this
very long time period will delay your entire test suite execution. So you have to
make an exception for only a particular case, like this WebElement. To handle such
scenarios, WebDriver has explicit wait time for a WebElement.
So let's see how you can wait for a particular WebElement using WebDriver with the
following code:
public class ExplicitWaitTime {
public static void main(String... args) {
WebDriver driver = new FirefoxDriver();
driver.get("http://www.google.com");
WebElement element = (new WebDriverWait(driver, 20)).until(new
ExpectedCondition<WebElement>() {
@Override
public WebElement apply(WebDriver d) {
return d.findElement(By.name("q"));
}
});
}
}
The highlighted code is where we have created a conditional wait for a particular
WebElement. The ExpectedCondition interface can be used to apply the conditional
wait on a WebElement. Here, WebDriver will wait for a maximum of 20 seconds
for this particular WebElement. The implicit timeout doesn't get applied for this
WebElement. If the WebElement doesn't load within the 20 seconds maximum wait
time, as we know, the driver throws a NoSuchElementException. Thus, you can
override the implicit wait time exclusively for the WebElements you think will take
more time by using this handy explicit wait time.
Handling cookies
Let's say you are automating the Facebook webpage. There could be many scenarios
you want to automate, such as writing on your wall, writing on your friend's
wall, reading other walls, adding friends, deleting friends, and so on. For all these
actions, one common thing is to have to log in to Facebook in each of the test cases.
So, logging in to Facebook in every test case of yours will increase the overall test
H[HFXWLRQWLPHVLJQLÀFDQWO\7RUHGXFHWKHH[HFXWLRQWLPHRI\RXUWHVWFDVHV\RX
can actually skip signing in for every test case. This can be done by signing in for
RQHWLPHDQGZULWLQJDOOWKHFRRNLHVRIWKDWGRPDLQLQWRDÀOH)URPWKHQH[WORJLQ
RQZDUGV\RXFDQDFWXDOO\ORDGWKHFRRNLHVIURPWKHÀOHDQGDGGWRWKHGULYHU

Exploring the Features of WebDriver
[]
To fetch all of the cookies that are loaded for a webpage, WebDriver provides the
following method:
driver.manage().getCookies()
This will return all of the cookies that the web page stores in the current session.
Each cookie is associated with a name, value, domain, path, expiry, and the status of
whether it is secure or not. The server to validate a client cookie parses all of these
YDOXHV1RZZHZLOOVWRUHDOORIWKLVLQIRUPDWLRQIRUHDFKFRRNLHLQDÀOHVRWKDWRXU
LQGLYLGXDOWHVWFDVHVUHDGIURPWKLVÀOHDQGORDGWKDWLQIRUPDWLRQLQWRWKHGULYHU
Hence, you can skip the login, because once your driver session has this information
in it, the Facebook server treats your browser session as authenticated and directly
takes you to your requested URL.
The following is a quick code to store the cookie information:
package com.packt.webdriver.chapter3;
import java.io.BufferedWriter;
import java.io.File;
import java.io.FileWriter;
import org.openqa.selenium.By;
import org.openqa.selenium.Cookie;
import org.openqa.selenium.WebDriver;
import org.openqa.selenium.firefox.FirefoxDriver;
public class StoreCookieInfo {
public static void main(String... args) {
WebDriver driver = new FirefoxDriver();
driver.get("http://www.facebook.com");
driver.findElement(By.name("email")).sendKeys("<<ur mailID>>");
driver.findElement(By.name("pass")).sendKeys("<<ur password>>");
driver.findElement(By.name("persistent")).click();
driver.findElement(By.name("pass")).submit();
File f = new File("browser.data");
try{
f.delete();
f.createNewFile();
FileWriter fos = new FileWriter(f);
BufferedWriter bos = new BufferedWriter(fos);

Chapter 3
[]
for(Cookie ck : driver.manage().getCookies()) {
bos.write((ck.getName()+";"+ck.getValue()+";"+ck.
getDomain()
+";"+ck.getPath()+";"+ck.getExpiry()+";"+ck.
isSecure()));
bos.newLine();
}
bos.flush();
bos.close();
fos.close();
}catch(Exception ex){
ex.printStackTrace();
}
}
}
From now on, for every test case or a set of test cases, load the cookie information
from the browser.dataÀOHDQGDGGLWWRWKHGULYHUXVLQJWKHIROORZLQJPHWKRG
driver.manage().addCookie(ck);
After you add this information to your browser session and go to the Facebook page,
it will automatically redirect you to the home page without asking for a login, thus
avoiding a login every time for every test case. The code that adds all of the previous
cookies to the driver is as follows:
package com.packt.webdriver.chapter3;
import java.io.BufferedReader;
import java.io.File;
import java.io.FileReader;
import java.util.Date;
import java.util.StringTokenizer;
import org.openqa.selenium.Cookie;
import org.openqa.selenium.WebDriver;
import org.openqa.selenium.firefox.FirefoxDriver;
public class LoadCookieInfo {
public static void main(String... args){
WebDriver driver = new FirefoxDriver();
driver.get("http://www.facebook.com");
try{

Exploring the Features of WebDriver
[]
File f = new File("browser.data");
FileReader fr = new FileReader(f2);
BufferedReader br = new BufferedReader(fr);
String line;
while((line=br.readLine())!=null){
StringTokenizer str = new StringTokenizer(line,";");
while(str.hasMoreTokens()){
String name = str.nextToken();
String value = str.nextToken();
String domain = str.nextToken();
String path = str.nextToken();
Date expiry = null;
String dt;
if(!(dt=str.nextToken()).equals("null")){
expiry = new Date(dt);
}
boolean isSecure = new Boolean(str.nextToken()).
booleanValue();
Cookie ck = new Cookie(name,value,domain,path,expi
ry,isSecure);
driver.manage().addCookie(ck);
}
}
}catch(Exception ex){
ex.printStackTrace();
}
driver.get("http://www.facebook.com");
}
}
Thus, we can be directly taken to the home page without logging in again and again.
If you observe, after creating the driver instance, we have the following line:
driver.get("http://www.facebook.com");
Ideally, this line should be visible after we have set the cookies to the driver. But the
reason it is at the top is because the WebDriver doesn't allow you to set the cookies
directly into this session, because it treats those cookies as if they are from a different
domain. Try removing the previous line of code and execute it, and you will see the
error. So, initially you will try to visit the Facebook page to set the domain value
of the driver to Facebook and load all of the cookies. When you execute this code,
initially you will see the login page of Facebook, and you will be automatically taken
to the home page when the same code at the end is invoked again after the cookies
are loaded.

Chapter 3
[]
Thus, you can avoid entering the username and password on the server validating
them again and again for each test, and thereby save a lot of time by using the
WebDriver's cookies feature.
6XPPDU\
In this chapter, we have discussed the various features of WebDriver. Using these
features will help you test your target web application more effectively by designing
more innovating test frameworks and test cases.
In the next chapter, we will look at the different available WebDriver implementations.

Different Available
WebDrivers
All this while in the previous chapters, we have discussed many features
of WebDriver using FirefoxDriver. Similar to FirefoxDriver, which is an
LPSOHPHQWDWLRQRI:HE'ULYHUVSHFLÀFWRWKH)LUHIR[EURZVHUZHKDYHPDQ\
RWKHULPSOHPHQWDWLRQVRI:HE'ULYHUVSHFLÀFWRYDULRXVRWKHUEURZVHUVVXFKDV
Internet Explorer, Chrome, Safari, and Opera. In this chapter, we will go through
details of each of these implementations starting with Firefox Driver. Though all
these implementations have all the features of WebDriver that we have discussed
VRIDUWKHUHDUHDIHZWKLQJVWKDWDUHVSHFLÀFWRDSDUWLFXODUEURZVHULPSOHPHQWDWLRQ
,QWKHFKDSWHUZHZLOOFRQFHQWUDWHPRUHRQWKHVHVSHFLÀFV
FirefoxDriver
The FirefoxDriver works as an extension to the Firefox browser. It uses the
XPCOM (Cross Platform Component Object Model) framework of Mozilla
to execute the commands sent by the language bindings. Language bindings
communicate with the extension, that is, FirefoxDriver, by connecting over a socket
and sending commands. This socket is bound to a port, which is called the locking
port; typically, it would be 7055. The reason it is called the locking port is because it
is used as a mutex so that it allows only one instance of Firefox to listen to a Firefox
Driver on that port.
After this socket is established, the client language binding (in our case, the Java
binding) sends the commands to the Firefox extension in a serialized JSON format.
The JSON format contains the following components:
Context: This is the current window or frame
CommandName: For example, DragAndDrop, SendKeys
4

Different Available WebDrivers
[]
Parameters: This can be empty, or sometimes the text will need to be typed
ElementId: This is the ID of the element on which the action has to be
performed
This serialized JSON is sent over the socket or wire established earlier to the Firefox
Extension or FirefoxDriver. This is the reason Selenium-2 or WebDriver is said to be
working on JSON-Wire protocol.
Once the commands reach from the client language bindings to the FirefoxDriver,
it deserializes the JSON, and the commands are interpreted and looked up in the
Firefox Driver prototype, which are the JavaScript functions for each command.
After execution, the response is sent back via the socket to the client. This response
is again a JSON that contains methodName (this is same as the commandName in the
request), Context, isError (indicating if an error has occurred, so that the client can
thrown an exception), and ResponseText (the output of the command executed).
1RZWKDWZHKDYHVHHQWKHEDVLFÁRZRIKRZWKH)LUHIR['ULYHUZRUNVLQWKH
following section, we will learn about the Firefox browser, how it maintains user
SURÀOHVLWVSUHIHUHQFHVDQGKRZ\RXFDQGHDOZLWKWKHPXVLQJ)LUHIR[:HE'ULYHU
As you know, different browsers have different ways and mechanisms to deal with
its user's choices and preferences. Similarly, Firefox has its own way. To start with,
OHWXVWDNHDORRNDWZKDWD)LUHIR[SURÀOHLV
8QGHUVWDQGLQJWKH)LUHIR[SUR¿OH
$)LUHIR[SURÀOHLVDIROGHUWKDWWKHFirefox browser uses to store all your passwords,
bookmarks, settings, and all other user data. A Firefox user can create any number of
SURÀOHVZLWKGLIIHUHQWFXVWRPVHWWLQJVDQGXVHLWDFFRUGLQJO\$FFRUGLQJWR0R]LOOD
WKHIROORZLQJDUHWKHGLIIHUHQWDWWULEXWHVWKDWFDQEHVWRUHGLQWKHSURÀOHV
Bookmarks and browsing history
Passwords
6LWHVSHFLÀFSUHIHUHQFHV
Search engines
A personal dictionary
Autocomplete history
Download history
Cookies
DOM Storage
6HFXULW\FHUWLÀFDWHVHWWLQJV
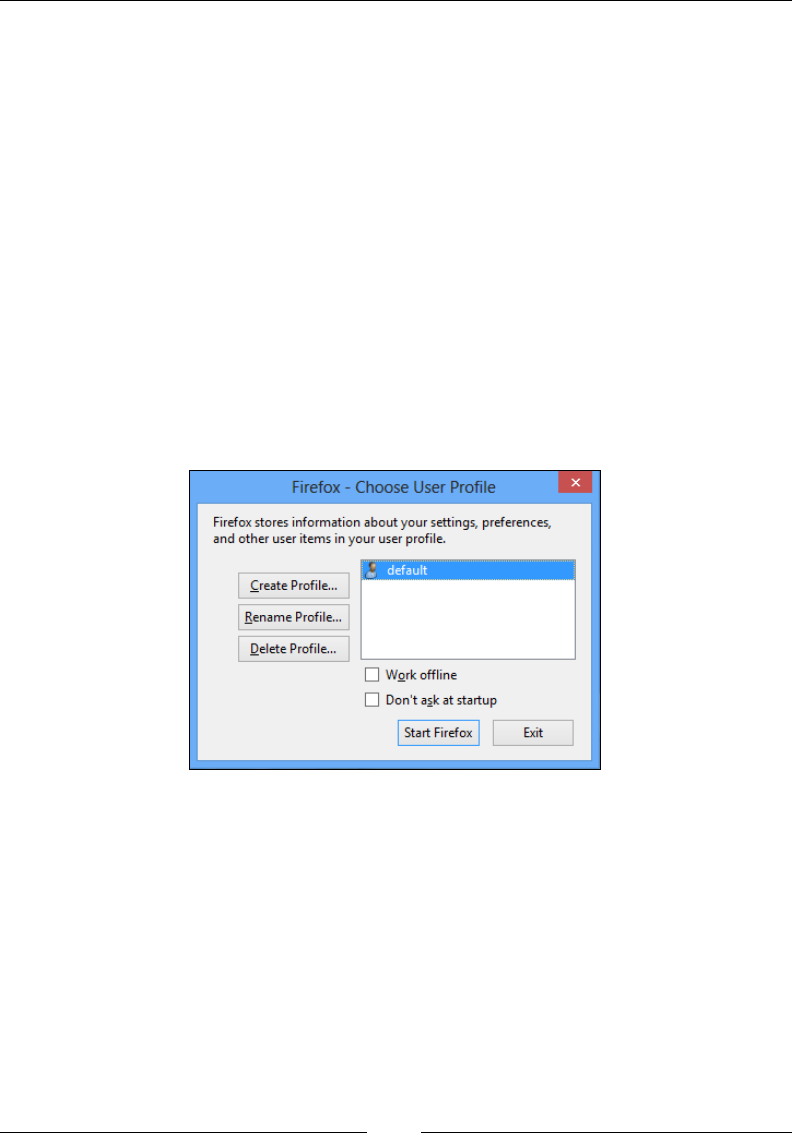
Chapter 4
[]
Security device settings
Download actions
Plugin MIME types
Stored sessions
Toolbar customizations
User styles
To create, rename, or delete a SURÀOH\RXKDYHto perform the following steps:
1. 2SHQWKH)LUHIR[SURÀOHPDQDJHU7RGRWKDWLQWKHFRPPDQGSURPSW
terminal, you have to navigate to the install directory of Firefox; typically, it
would in Program Files if you are on Windows. Navigate to the location where
\RXFDQÀQGWKHfirefox.exeÀOHDQGH[HFXWHWKHIROORZLQJFRPPDQG
firefox.exe -p
,WZLOORSHQWKHSURÀOHPDQDJHUWKDWZLOOORRNOLNHWKHIROORZLQJVFUHHQVKRW
Note that before executing the above command, you need to make sure you
close all your currently running Firefox instances.
2. Use the &UHDWH3URÀOHEXWWRQWRFUHDWHDQRWKHUSURÀOH5HQDPH3URÀOH
EXWWRQWRUHQDPHDQH[LVWLQJSURÀOHDQG'HOHWH3URÀOH button to delete one.
So, coming back to our WebDriver, whenever we create an instance of FirefoxDriver,
DWHPSRUDU\SURÀOHLVFUHDWHGDQGXVHGE\WKH:HE'ULYHU7RVHHWKHSURÀOHWKDW
is currently being used by a Firefox instance, you have to navigate to Help |
Troubleshooting Information.
Firefox
-
Choose
User
Profile
Firefox
stores
information
about
your
settings,
preferences,
and
other
user
items
in
your
user
profile.
J
default
Create
Profile...
Rename
Profile...
Delete
Profile...
dl
Work
offline
I I
Don't
ask
at
startup
Start
Firefox
Exit

Different Available WebDrivers
[]
7KLVZLOOODXQFKDOOWKHGHWDLOVRIWKDWSDUWLFXODU)LUHIR[LQVWDQFHRIZKLFKWKHSURÀOH
is a part. It will look similar to the following screenshot:
7KHKLJKOLJKWHGRYDOLQWKHSUHFHGLQJVFUHHQVKRWVKRZVWKHSURÀOHIROGHU&OLFNRQ
the Show Folder button; it should RSHQWKHORFDWLRQRIWKHSURÀOHFRUUHVSRQGLQJWR
that of your current Firefox instance. Now, let's launch a Firefox browser instance
XVLQJRXU)LUHIR['ULYHUDQGYHULI\LWVSURÀOHORFDWLRQ
Let's launch a Firefox browser using the following code:
public class FirefoxProfile {
public static void main(String... args) {
FirefoxDriver driver = new FirefoxDriver();
driver.get("http://www.google.com");
}
}
Troubleshooting
Information
This
page
contains
technical
information
that
might
be
useful
when
you're
trying
to
solve
a
problem.
If
you
are
looking
for
answers
to
common
questions
about
Firefox,
check
out
our
support
website.
Copy
raw
data
to
clipboard
Copy
text
to
clipboard
Application
Basics
Name
Firefox
23.0
Version
User
Agent
Mozilla/5.0
(Windows
NT
6.2;
rv:23.0)
Gecko/20100101
Firefox/23.0
Show
Folder
[4
Profile
Folder
about:pluains
Enabled
Plugins
Build
Configuration
Crash
Reports
Memory
Use
about:buildconfia
aboutcrashes
about:memorv
Name
Enablei
I
2
S
Firefox
WebDrivei
:driver©googlecode.coi
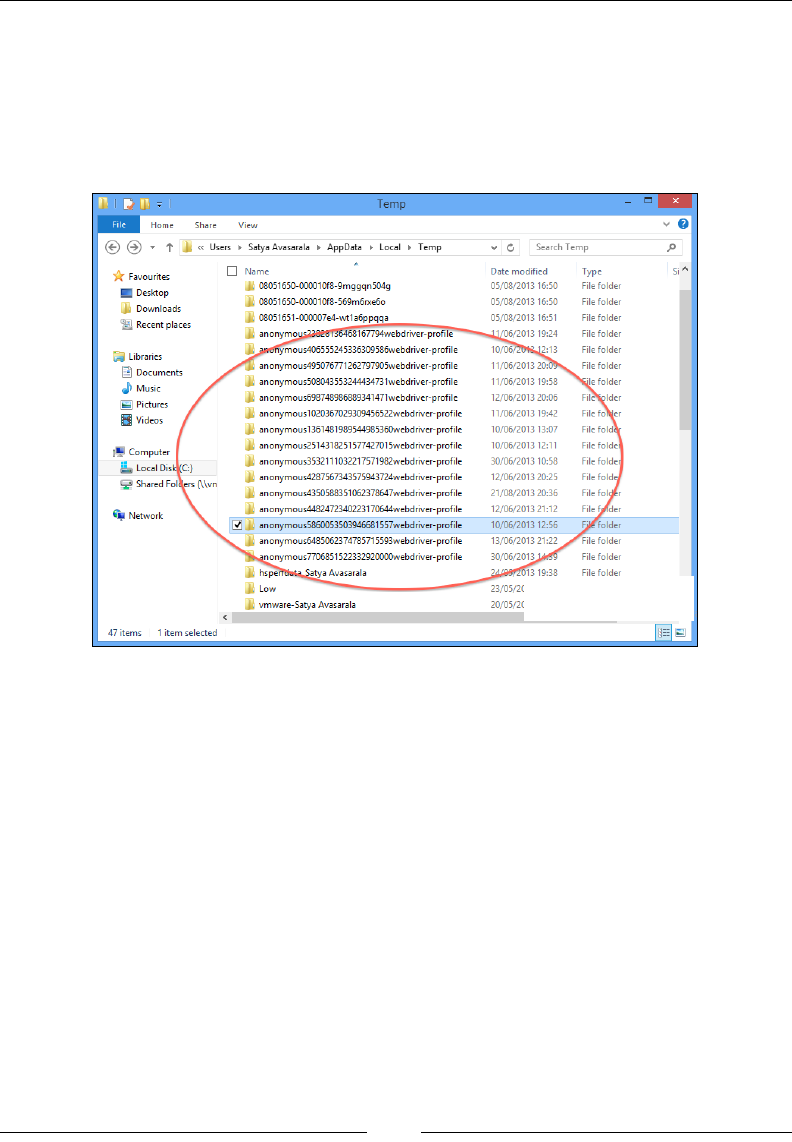
Chapter 4
[]
This will launch a browser instance. Now navigate to Help | Troubleshooting
Information, and once the info is launched, click the Show Folder button. This will
RSHQWKHFXUUHQW:HE'ULYHUVSURÀOHGLUHFWRU\(YHU\WLPH\RXODXQFKD)LUHIR[
LQVWDQFHXVLQJ)LUHIR['ULYHULWZLOOFUHDWHDQHZSURÀOHIRU\RX,I\RXJRRQHOHYHO
DERYHWKLVGLUHFWRU\\RXZLOOVHHWKHSURÀOHVFUHDWHGE\\RXU)LUHIR['ULYHUDV
shown in the following screenshot:
All the above folders correspond to each of the Firefox instances launched by the
FirefoxDriver.
8QWLOQRZZHKDYHVHHQZKDW)LUHIR[SURÀOHVDUHDQGKRZ:HE'ULYHUFUHDWHVRQH
every time it launches the browser. Now, let's see how we can create our own custom
SURÀOHVXVLQJ:HE'ULYHU$3,V7KHIROORZLQJLVWKHFRGHH[DPSOHWRFUHDWH\RXU
RZQ)LUHIR[SURÀOHXVLQJWKH:HE'ULYHUOLEUDU\DQGset in it the options you want
your browser to have, overriding what FirefoxDriver gives you:
public class FirefoxCustomProfile {
public static void main(String... args){
FirefoxProfile profile = new FirefoxProfile();
FirefoxDriver driver = new FirefoxDriver(profile);
driver.get("http://www.google.com");
}
}
grr
P
P-
Temp
v
6
File
Home
Share
View
(?)
(?)
T
«
Users
Satya
Avasarala
AppData
Local
Temp
v
C
Search
Temp
P
I~1
Name
10
08051
650-00001
0f8-9mggqn504g
0
08051
650-00001
0f8-569m6rxe6o
0
08051
651
-000007e4-wt1
a6ppqqa
).
anonymoi
Si
A
Date
modified
Type
"if
Favourites
Desktop
0
Downloads
Recent
places
05/08/2013
16:50
05/08/2013
16:50
05/08/2013
16:51
44ÿ06/2013
19:24
10/06??&K42:13
11/06/2013
2ftfe
11/06/2013
19:58
12/06/2013
20:06
11/06/2013
19:42
10/06/2013
13:07
10/06/2013
12:11
30/06/2013
10:58
12/06/2013
20:25
21/08/2013
20:36
12/06/2013
21:12
File
folder
File
folder
File
folder
File
folder
File
folder
File
folder
'file
folder
11
67794webdriver-profile
)
.ji»*«ff!ymous406555245336309586webdriver-profile
anonymous495076771262797905webdriver-profile
j
.
anonymous508043553244434731webdriver-profile
i
.
anonymous698748986889341471webdriver-profile
i
.
anonymous1020367029309456522webdriver-profile
Libraries
IH|
Documents
J)
Music
IB
Pictures
3
Videos
i
Filefclder
File
fo\er
I
.
anonymous1361481989544985360webdriver-profile
.
anonymous2514318251
57742701
5webdriver-profile
J.
anonymous3532111032217571982webdriver-profile
I
.
anonymous4287567343575943724webdriver-profile
I
.
anonymous4350588351062378647webdriver-profile
i
.
anonymous4482472340223170644webdriver-profile
File
fold
V-
File
foldeX
File
folde
J
File
fold
J
File
folder
Filefÿer
iff
Computer
[
Local
DiskuC:)
5?
Shared
Folfcrs
(\\vn
Network
[H
anonymous5860053503946681
557webdriver-profile
10/06/2013
12:56
FJf
folder
.
anonymous6485062374785715593webdriver-profile
Vsÿnonymous7706851522332920000webdriver-
profile
'a
Avasarala
13/06/2013
21:22
30/06/20131*ÿ
File
folder
File
folder
lfSTl319:38
File
folder
j.
hspe
j.
Low
.
vmware-
Satya
Avasarala
23/05/2(
20/05/2C
<
ii|ÿj
|
47
items
1
item
selected
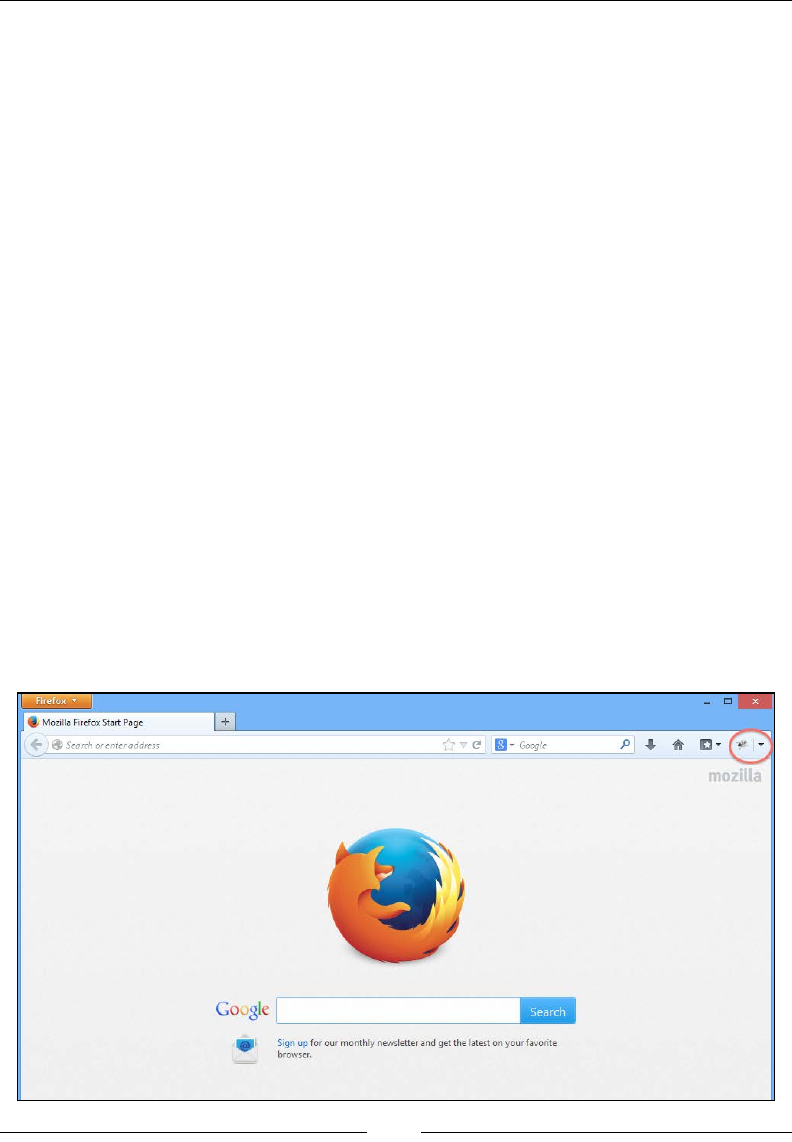
Different Available WebDrivers
[]
In the preceding code, FirefoxCustomProfile is the class that has been instantiated
WRFUHDWHRXUFXVWRPSURÀOHIRURXU)LUHIR[EURZVHU1RZKDYLQJDQLQVWDQFHRI
that class, we can set various options and preferences in it, which we will discuss
shortly. Before we go to that, there are two overloaded versions of constructors for
)LUHIR[3URÀOH2QHFUHDWHVDQHPSW\SURÀOHDQGPROGVLWDFFRUGLQJWRUHTXLUHPHQWV
7KLVLVVHHQLQWKHSUHFHGLQJFRGH7KHVHFRQGYHUVLRQFUHDWHVDSURÀOHLQVWDQFHIURP
DQH[LVWLQJSURÀOHGLUHFWRU\DVIROORZV
public FirefoxProfile(java.io.File profileDir)
Here, the input parameter profileDir is the directory location of any existing
SURÀOH7KHSURÀOHGLUHFWRU\LVWKHRQHWKDWZHVDZLQWKHSUHFHGLQJVFUHHQVKRW
Let us discuss some interesting customizations or tailoring that we can do to our
)LUHIR[EURZVHUXVLQJ)LUHIR[SURÀOHV
Adding the extension to Firefox
In this section, we will see how we can extend our Firefox test browser with some
additional capabilities. As we are familiar with our Firebug extension, we will try
to extend our test Firefox browser to have this extension. If you observe, though we
have installed the Firebug extension to our Firefox, when the tests execute using our
FirefoxDriver, we don't see the Firebug extension to the test browser. This is because
WKHSURÀOHVWKDWDUHEHLQJXVHGDUHGLIIHUHQW:KHQHYHU:HE'ULYHUODXQFKHVDQHZ
)LUHIR[EURZVHULWFUHDWHVDQHZSURÀOHRQWKHGLVNDQGWKLVSURÀOHGRHVQWFRQWDLQ
the Firebug extension in it. The following is the screenshot of the Firefox browser
that you launch as a user:
(L3
J
£
Mozilla
Firefox
Start
Page
+
C
|
0
'
Google
p
*
#
c-
&
Search
or
enter
address
<*ÿ
\
Goggle
Sign
up
for
our
monthly
newsletter
and
get
the
latest
on
your
favorite
browser.

Chapter 4
[]
The Firebug plugin is visible on the top-right part of the browser. Now, if you
launch the browser using WebDriver, you will not see the plugin attached to it. The
following is the screenshot showing that:
As you can see, the browser where you have installed Firebug as an extension shows
it, but the Firefox launched by WebDriver doesn't have that extension. After all, that's
:HE'ULYHUVGHIDXOWSURÀOH1RZOHWVFKDQJHLWVSURÀOHXVLQJWKHaddExtension()
PHWKRGSURYLGHGE\)LUHIR[3URÀOHThis method is used to add extensions to the
Firefox browser. The following is the API syntax for the method:
public void addExtension(java.io.File extensionToInstall)
throws java.io.IOException
7KHLQSXWSDUDPHWHULVWKH;3,ÀOHWKDWKDVWREHLQVWDOOHGRQWKH)LUHIR[EURZVHU,I
:HE'ULYHUGRHVQWÀQGWKHÀOHLQWKHVSHFLÀHGORFDWLRQLWZLOOUDLVHDQIOException.
7KHIROORZLQJLVWKHFRGHWRRYHUULGHWKHGHIDXOWSURÀOHDQGH[WHQGWKH)LUHIR[
browser to have the Firebug extension. Along with the book is the Firebug extension
provided. Point to that in your code when you execute it as follows:
public class AddExtensionToProfile {
public static void main(String... args){
FirefoxProfile profile = new FirefoxProfile();
try {
profile.addExtension(new File("C:\\firebug-1.12.0-fx.xpi"));
} catch (IOException e) {
e.printStackTrace();
n
I
New
Tab
+
->
0
"
Google
P
C-
*
Hi
Search
or
enter
address
WebDriver
x
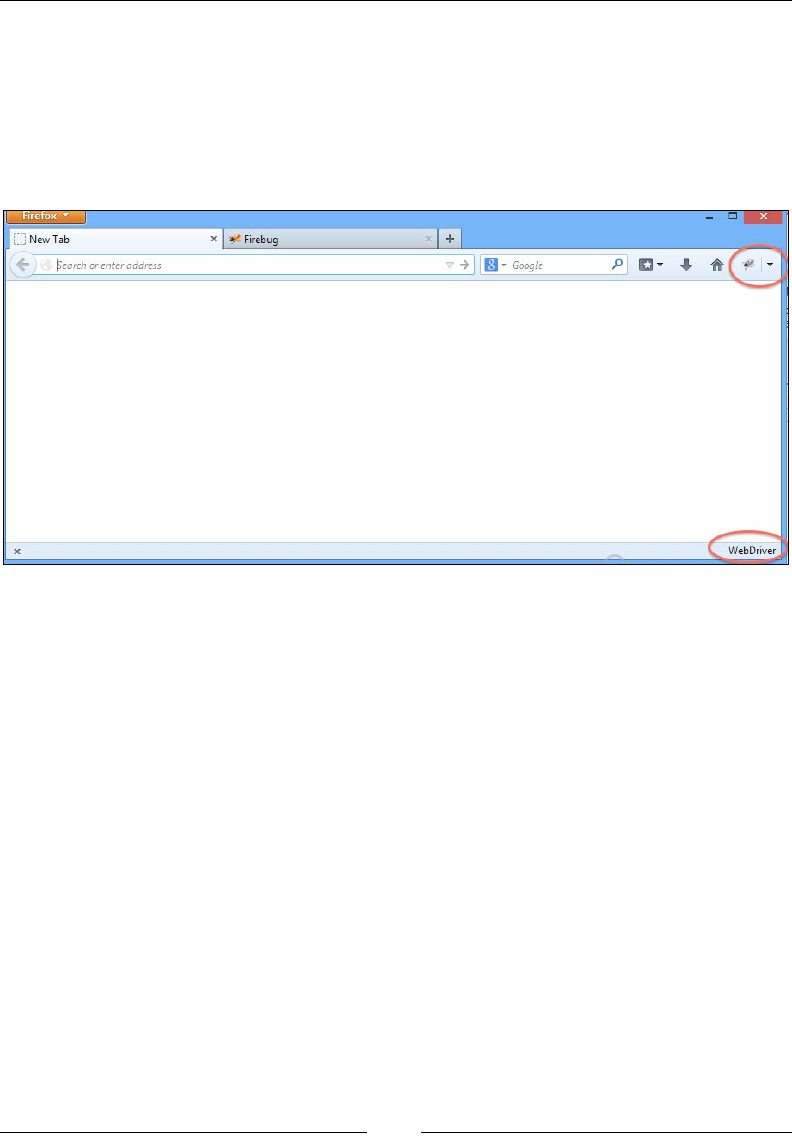
Different Available WebDrivers
[]
}
FirefoxDriver driver = new FirefoxDriver(profile);
}
}
Now, if you see the Firefox browser that is launched by the FirefoxDriver, you will
ÀQGWKH)LUHEXJH[WHQVLRQLQVWDOOHGRQLWDVshown in the following screenshot:
6WRULQJDQGUHWULHYLQJDSUR¿OH
:HFDQDOVRZULWHWKHSURÀOHLQIRUPDWLRQRIWKHEURZVHUWRWKH-621ÀOHDQGFDQ
ODWHULQVWDQWLDWHQHZEURZVHUVZLWKWKHVDPHSURÀOH7KHFirefoxProfile class
does SURYLGHDPHWKRGWRH[SRUWWKHSURÀOHLQIRUPDWLRQDV-6217KHIROORZLQJ
is its API syntax:
public String toJson()
The output or return type is a String, which contains the JSON information in it.
1RZWRFUHDWHDEURZVHUZLWKWKHVDPHSURÀOHWKHFirefoxProfile class provides a
static method that takes the JSON string as the input. The following is the API syntax:
public static FirefoxProfile fromJson(java.lang.String json)throws
java.io.IOException
This is a static method in the FirefoxProfile class that takes the JSON string to
FUHDWHDSURÀOHIURP7KHIROORZLQJLVWKHFRGHH[DPSOHIRUWKDW
public class StoringAndCreatingTheProfile {
public static void main(String... args){
Hrefox
[_J
New
Tab
x
Firebug
+
P
C
-
*
ft
C
*
+
0
~
Google
Search
or
enter
address
WebDriver
x

Chapter 4
[]
FirefoxProfile profile = new FirefoxProfile();
String json="";
try {
profile.addExtension(new File("C:\\firebug-1.12.0-fx.xpi"));
json = profile.toJson();
System.out.println(json);
} catch (IOException e) {
e.printStackTrace();
}
try {
FirefoxDriver driver = new
FirefoxDriver(FirefoxProfile.fromJson(json));
} catch (IOException e) {
e.printStackTrace();
}
}
}
,QWKHSUHFHGLQJFRGHLQWKHÀUVWtry-catchEORFNZHKDYHH[SRUWHGWKHSURÀOHDVD
-621VWULQJ,Q\RXUWHVWFDVH\RXFDQZULWHWKDW-621LQIRUPDWLRQWRDÀOHDQGVWRUH
LW/DWHU\RXFDQUHDGWKH-621ÀOHDQGcreate a FirefoxDriver from that, as we did
in the second try-catch block.
Dealing with Firefox preferences
Until now, we have seen how Firefox SURÀOHVDUHDQGKRZZHFDQFUHDWHRXU
RZQFXVWRPL]HGSURÀOHVIRU)LUHIR['ULYHU1RZOHWXVVHHKRZZHFDQVHWRXU
preferences in the SURÀOHVZHFUHDWHDQGZKHUH)LUHIR['ULYHUVWRUHVWKHP
$FFRUGLQJWR0R]LOODD)LUHIR[3UHIHUHQFHLVDQ\YDOXHRUGHÀQHGEHKDYLRUWKDWFDQ
EHVHWE\DXVHU7KHVHYDOXHVDUHVDYHGWRWKHSUHIHUHQFHÀOHV,I\RXRSHQWKHSURÀOH
directory by navigating to Help | Troubleshooting Information and clicking on
the Show FolderEXWWRQ\RXZLOOVHHWZRSUHIHUHQFHÀOHVWKH\DUHprefs.js and
user.js. All the user preferences are written to the prefs.jsÀOHE\WKH)LUHIR[
application during the launch. A user can override those values to those of his/her
choice, and they are stored in the user.jsÀOH7KHYDOXHLQuser.js for a preference
takes precedence over all the other values set for that particular preference. So, your
FirefoxDriver overwrites all the default preferences of Firefox in the user.jsÀOH
for you. When you add a new preference, FirefoxDriver writes that to the user.js
SUHIHUHQFHÀOHDQGWKH)LUHIR[EURZVHUEHKDYHVDFFRUGLQJO\

Different Available WebDrivers
[]
Now, let us see the default preferences that FirefoxDriver writes to the user.jsÀOH
public class SettingPreferences {
public static void main(String... args){
FirefoxProfile profile = new FirefoxProfile();
FirefoxDriver driver = new FirefoxDriver(profile);
driver.get("http://www.google.com");
}
}
In the preceding code, we are not setting any preferences, but it will still launch the
Firefox browser. Now, open the user.js ÀOHLQWKHSURÀOHGLUHFWRU\7KHIROORZLQJ
are the list of all the preferences that FirefoxDriver sets for you by default:
user_pref("extensions.update.notifyUser", false);
user_pref("security.warn_entering_secure.show_once", false);
user_pref("devtools.errorconsole.enabled", true);
user_pref("extensions.update.enabled", false);
user_pref("browser.dom.window.dump.enabled", true);
user_pref("offline-apps.allow_by_default", true);
user_pref("dom.disable_open_during_load", false);
user_pref("extensions.blocklist.enabled", false);
user_pref("browser.startup.page", 0);
user_pref("toolkit.telemetry.rejected", true);
user_pref("prompts.tab_modal.enabled", false);
user_pref("app.update.enabled", false);
user_pref("app.update.auto", false);
user_pref("toolkit.networkmanager.disable", true);
user_pref("browser.startup.homepage", "about:blank");
user_pref("network.manage-offline-status", false);
user_pref("browser.search.update", false);
user_pref("toolkit.telemetry.enabled", false);
user_pref("browser.link.open_newwindow", 2);
user_pref("browser.EULA.override", true);
user_pref("extensions.autoDisableScopes", 10);
user_pref("browser.EULA.3.accepted", true);
user_pref("security.warn_entering_weak", false);
user_pref("toolkit.telemetry.prompted", 2);
user_pref("browser.safebrowsing.enabled", false);
user_pref("security.warn_entering_secure", false);
user_pref("security.warn_leaving_secure.show_once", false);
user_pref("webdriver_accept_untrusted_certs", true);
user_pref("browser.download.manager.showWhenStarting", false);
user_pref("dom.max_script_run_time", 30);

Chapter 4
[]
user_pref("javascript.options.showInConsole", true);
user_pref("network.http.max-connections-per-server", 10);
user_pref("network.http.phishy-userpass-length", 255);
user_pref("extensions.logging.enabled", true);
user_pref("security.warn_leaving_secure", false);
user_pref("browser.offline", false);
user_pref("browser.link.open_external", 2);
user_pref("signon.rememberSignons", false);
user_pref("webdriver_enable_native_events", true);
user_pref("browser.tabs.warnOnClose", false);
user_pref("security.fileuri.origin_policy", 3);
user_pref("security.fileuri.strict_origin_policy", false);
user_pref("webdriver_assume_untrusted_issuer", true);
user_pref("startup.homepage_welcome_url", "");
user_pref("browser.shell.checkDefaultBrowser", false);
user_pref("browser.safebrowsing.malware.enabled", false);
user_pref("security.warn_submit_insecure", false);
user_pref("webdriver_firefox_port", 7055);
user_pref("dom.report_all_js_exceptions", true);
user_pref("security.warn_viewing_mixed", false);
user_pref("browser.sessionstore.resume_from_crash", false);
user_pref("browser.tabs.warnOnOpen", false);
user_pref("security.warn_viewing_mixed.show_once", false);
user_pref("security.warn_entering_weak.show_once", false);
This Firefox Driver treats them as Frozen Preferences and doesn't allow the
test script developer to change them. However, there are a few preferences in the
preceding list that FirefoxDriver allows you to change, which we will see shortly.
Setting preferences
Now we will learn how to set our own preferences. As an example, we will see how
to change the user agent of your browser. Many web applications these days are
have the main/normal site as well as the mobile site / m. site. The application will
validate the user agent of the incoming request and accordingly decide whether to
act as a server for a normal site or mobile site. So, in order to test your mobile site
from your laptop or desktop browser, you just have to change your user agent.
Let us see a code example where we can change the user agent preference of our
Firefox browser using FirefoxDriver, and send a request to the Google Search page.
But before going to that, let's see the setPreference() method provided by the
FirefoxProfile class:
public void setPreference(java.lang.String key,
String value)

Different Available WebDrivers
[]
The input parameters are: key, which is a string and represents your preference; and
value, which has to be set to the preference.
There are two other overloaded versions of the preceding method shown; one of
which is as follows:
public void setPreference(java.lang.String key,
int value)
The other overloaded version is as follows:
public void setPreference(java.lang.String key,boolean value)
Now, using the preceding setPreference() method, we will try to change the user
agent of our browser using the following code:
public class SettingPreferences {
public static void main(String... args){
FirefoxProfile profile = new FirefoxProfile();
profile.setPreference("general.useragent.override", "Mozilla/5.0
(iPhone; U; CPU iPhone OS 4_0 like Mac OS X; en-us)
AppleWebKit/532.9 (KHTML, like Gecko) Version/4.0.5
Mobile/8A293 Safari/6531.22.7");
FirefoxDriver driver = new FirefoxDriver(profile);
driver.get("http://www.google.com");
}
}
In the preceding code for the setPreference() method, general.useragent.
override is sent as the name of the preference, and the second parameter is the
value for that preference, which represents the iPhone user agent. Now open the
user.jsÀOHIRUWKLVSDUWLFXODU)LUHIR[LQVWDQFHDQG\RXZLOOVHHWKHHQWU\IRUWKLV
preference. You should use the following preference in your user.jsÀOH
user_pref("general.useragent.override", "Mozilla/5.0 (iPhone; U;
CPU iPhone OS 4_0 like Mac OS X; en-us) AppleWebKit/532.9
(KHTML, like Gecko) Version/4.0.5 Mobile/8A293
Safari/6531.22.7");
Apart from this, you will observe that the mobile version of the Google Search page
has been served to you.
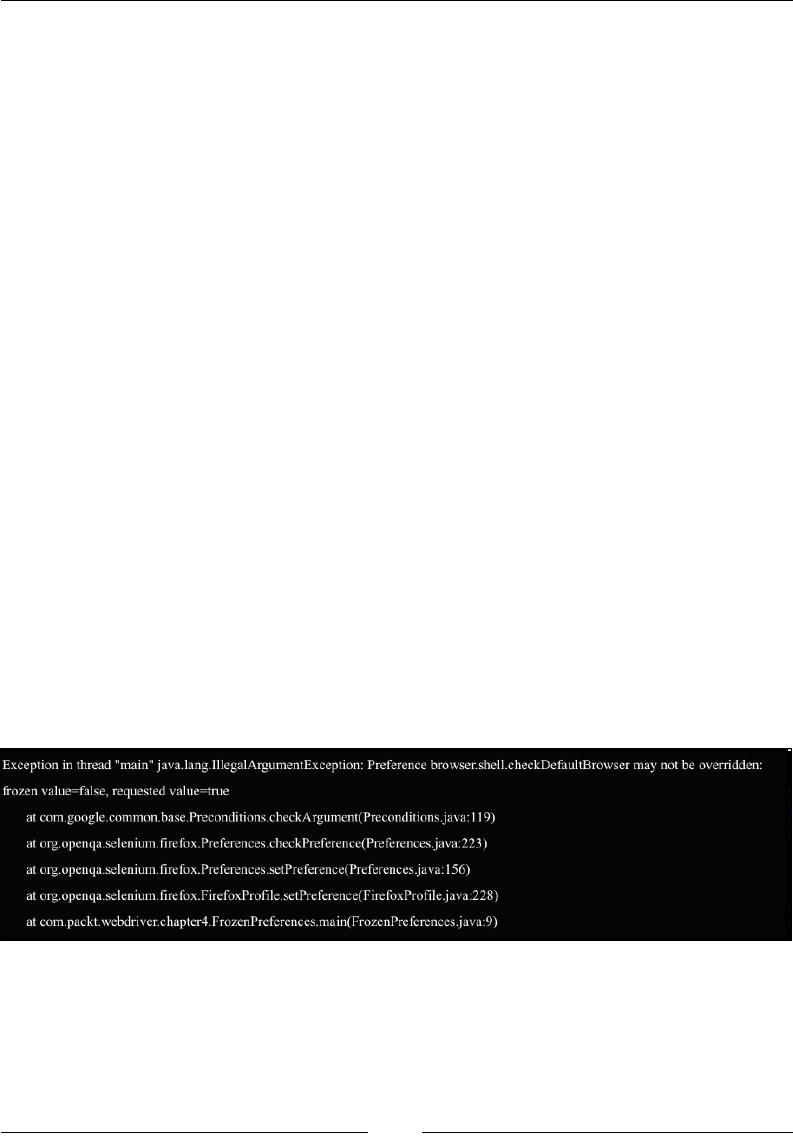
Chapter 4
[]
Understanding frozen preferences
Now, let's go back to the big list of frozen preferences that user.js contains,
which we have seen earlier. The Firefox Driver thinks that a test script developer
doesn't have to deal with them and doesn't allow those values to be changed. Let us
pick one frozen preference and try to change its values in our code. Let's consider
the preference browser.shell.checkDefaultBrowser, whose value FirefoxDriver
implementers thought should be set to false so that the Firefox browser does not
ask you whether to make Firefox your default browser, if it is not already, while you
are busy executing your test cases. Ultimately, you don't have to deal with the pop
up itself in your test scripts. Apart from setting the preference value to false, the
implementers of FirefoxDriver also thought of freezing this value so that users don't
alter these values. That is the reason these preferences are called frozen preferences.
1RZZKDWKDSSHQVLI\RXWU\WRPRGLI\WKHVHYDOXHVLQ\RXUWHVWVFULSWV"/HWVVHH
a code example:
public class FrozenPreferences {
public static void main(String... args){
FirefoxProfile profile = new FirefoxProfile();
profile.setPreference("browser.shell.checkDefaultBrowser", true);
FirefoxDriver driver = new FirefoxDriver(profile);
driver.get("http://www.google.com");
}
}
Now when you execute your code, you will immediately see an exception saying
you're not allowed to override these values. The following is the exception stack
trace you will see:
This is how FirefoxDriver mandates a few preferences that are not to be touched.
However, there are a few preferences of our frozen list, which FirefoxDriver allows
to alter through code. For that, it explicitly exposes methods in the FirefoxProfile
FODVV7KRVHH[HPSWHGSUHIHUHQFHVDUHIRUGHDOLQJZLWK66/FHUWLÀFDWHVDQGQDWLYH
HYHQWV+HUHZHZLOOVHHKRZZHFDQRYHUULGHWKH66/FHUWLÀFDWHVSUHIHUHQFHV
Exception
in
thread
"main"
java.lang.IUegalArgumentException:
Preference
browser.shell.checkDefaultBrowser
may
not
be
overridden:
frozen
value=false,
requested
value=true
at
com.google.common.base.Preconditions.checkArgument(Preconditions.java:
119)
at
org.openqa.selenium.firefox.Preferences.checkPreference(Preferences.java:223)
at
org.openqa.selenium.firefox.Preferences.setPreference(Preferences.java:
1
56)
at
org.openqa.selenium.firefox.FirefoxProfile.setPreference(FirefoxProfile.java:228)
at
com.packt.webdriver.chapter4.FrozenPreferences.main(FrozenPreferences.java:9)

Different Available WebDrivers
[]
Let's use a code example that tries to override the default Firefox behavior to handle
66/FHUWLÀFDWHVThe FirefoxProfile class has two methods to handle the SSL
FHUWLÀFDWHVWKHÀUVWRQHLVDVIROORZV
public void setAcceptUntrustedCertificates(boolean
acceptUntrustedSsl)
7KLVOHWV)LUHIR[NQRZZKHWKHUWRDFFHSW66/FHUWLÀFDWHVWKDWDUHXQWUXVWHG%\
default, it is set to trueWKDWLV)LUHIR[DFFHSWV66/FHUWLÀFDWHVWKDWDUHXQWUXVWHG
The second method is as follows:
public void setAssumeUntrustedCertificateIssuer(boolean
untrustedIssuer)
7KLVOHWV)LUHIR[DVVXPHWKDWWKHXQWUXVWHGFHUWLÀFDWHVDUHLVVXHGE\XQWUXVWHG
RUVHOIVLJQHGFHUWLÀFDWLRQDJHQWV)LUHIR[E\GHIDXOWDVVXPHVWKHLVVXHUWREH
untrusted. That assumption is particularly useful when you test an application in
WKHWHVWHQYLURQPHQWZKLOHXVLQJWKHFHUWLÀFDWHIURPWKHSURGXFWLRQHQYLURQPHQW
The preferences, webdriver_accept_untrusted_certs and webdriver_assume_
untrusted_issuerDUHWKHRQHVUHODWHGWRWKH66/FHUWLÀFDWHV1RZOHWXVFUHDWHD
Java code to modify the values for these two values. By default, the values are set to
true, as seen in the user.jsÀOH/HWVPDUNWKHPDVfalse with the following code:
public class SSLCertificatesPreferences {
public static void main(String... args){
FirefoxProfile profile = new FirefoxProfile();
profile.setAssumeUntrustedCertificateIssuer(false);
profile.setAcceptUntrustedCertificates(false);
FirefoxDriver driver = new FirefoxDriver(profile);
driver.get("http://www.google.com");
}
}
Here, we have set the values to false, and now if we open the user.jsÀOHLQWKH
SURÀOHGLUHFWRU\RIWKLVLQVWDQFHRI)LUHIR[\RXZLOOVHHWKHYDOXHVVHWWRfalse,
as follows:
user_pref("webdriver_accept_untrusted_certs", false);
user_pref("webdriver_assume_untrusted_issuer", false);

Chapter 4
[]
Similarly, FirefoxDriver enables native events to be invoked in the Firefox browser
by exposing a method named setEnableNativeEvents(). Using this method, you
can override the preference webdriver_enable_native_events in the user.jsÀOH
Firefox binary
Imagine a situation where you have to test your web application against two different
versions of the Firefox browser. By default, when you instantiate FirefoxDriver, the
Firefox version that is available on the PATH variable is launched. But if you want to
launch a different version of Firefox, we need to use Firefox Binary.
,QVWDOOLQJPXOWLSOHYHUVLRQVRI)LUHIR[
Now that you have Firefox 17.0.1 version on your machine, let's install Firefox 23.0
version on your system by performing the following steps:
1. Download this version from Mozilla and start installing it.
2. When you reach the following screen in your installation, select Custom.
n
Mozilla
Firefox
Setup
#
Setup
Type
Choose
setup
options
Choose
the
type
of
setup
you
prefer,
then
dick
Next.
O
Standard
Firefox
will
be
installed
with
the
most
common
options.
(ft)
Custom
You
may
choose
individual
options
to
be
installed.
Recommended
for
experienced
users.
<
Back
Cancel
Next
>

Different Available WebDrivers
[]
3. Enter the path as C:\Mozilla Firefox\LQWKHSDWKÀHOGDVVKRZQDV
follows, and proceed with the installation:
4. Now try to launch Firefox from your code; it will launch Firefox 17.0.1 as it is
available in the PATH variable.
5. So, in order to use Firefox 23.0, try to use Firefox Binary. The following is the
code example for it:
public class MultipleFirefoxBinaries {
public static void main(String... args){
FirefoxBinary binary = new FirefoxBinary(new
File("C:\\Mozilla Firefox\\firefox.exe"));
FirefoxProfile profile = new FirefoxProfile();
FirefoxDriver driver = new FirefoxDriver(binary, profile);
driver.get("http://www.google.com");
}
}
n
Mozilla
Firefox
Setup
Choose
Install
Location
Choose
the
folder
in
which
to
install
Mozilla
Firefox.
Setup
will
install
Mozilla
Firefox
in
the
following
folder.
To
install
in
a
different
folder,
dick
Browse
and
select
another
folder.
Click
Next
to
continue.
Destination
Folder
C:V4ozilla
Firefbx\
Browse...
Space
required:
41.7MB
Space
available:
50.9GB
<
Back
Cancel
Next
>
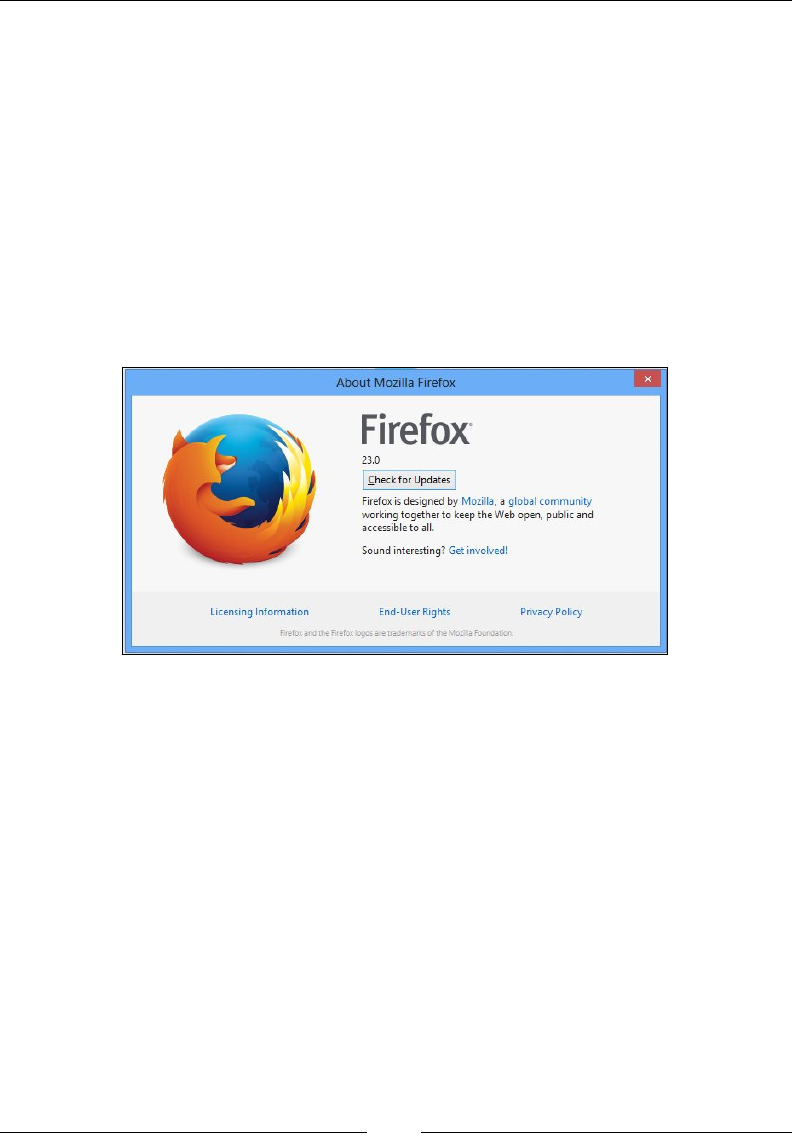
Chapter 4
[]
,QWKHSUHFHGLQJFRGHWKHÀUVWOLQHRIWKHPDLQIXQFWLRQLQVWDQWLDWHVWKH
FirefoxBinary class by providing the path to the firefox.exeÀOHWKDWODXQFKHV
Firefox 23.0. The API syntax for the constructor is as follows:
publicFirefoxBinary(java.io.File pathToFirefoxBinary)
+HUHWKHLQSXWSDUDPHWHULVDÀOHZKRVHSDWKLVVHWWRWKHfirefox.exeÀOHRIWKH
targeted version.
Now, we have to use one of the overloaded versions of the FirefoxDriver constructor,
which takes FirefoxBinary and FirefoxProfile as the input parameters to
instantiate as shown in preceding code. When executed, the preceding code
should launch Firefox 23.0. Navigate to Help | About Firefox to arrive at the
following screenshot:
InternetExplorerDriver
In order to execute your test scripts on the Internet Explorer browser, you need
WebDriver's InternetExplorerDriver.
Installing InternetExplorerDriver
IEDriver server can be downloaded from https://code.google.com/p/selenium/
downloads/list.
The following are the sequence of steps you need to perform to install the driver:
1. Download the 32-bit or 64-bit version based on the Internet Explorer that is
installed on your computer.
2. 8Q]LSWKHÀOHDQG\RXZLOOVHHWKHIEDriverServer.exeÀOH
About
Mozilla
Firefox
Firefox
4
V
23.0
I
Check
for
Updates
Firefox
is
designed
by
Mozilla,
a
global
community
working
together
to
keep
the
Web
open,
public
and
accessible
to
all.
/
Sound
interesting?
Get
involved!
Licensing
Information
End-User
Rights
Privacy
Policy
rs
are
trademarks
of
the
Mozilla
Foundatioi
Firefox
and
the
Firefox
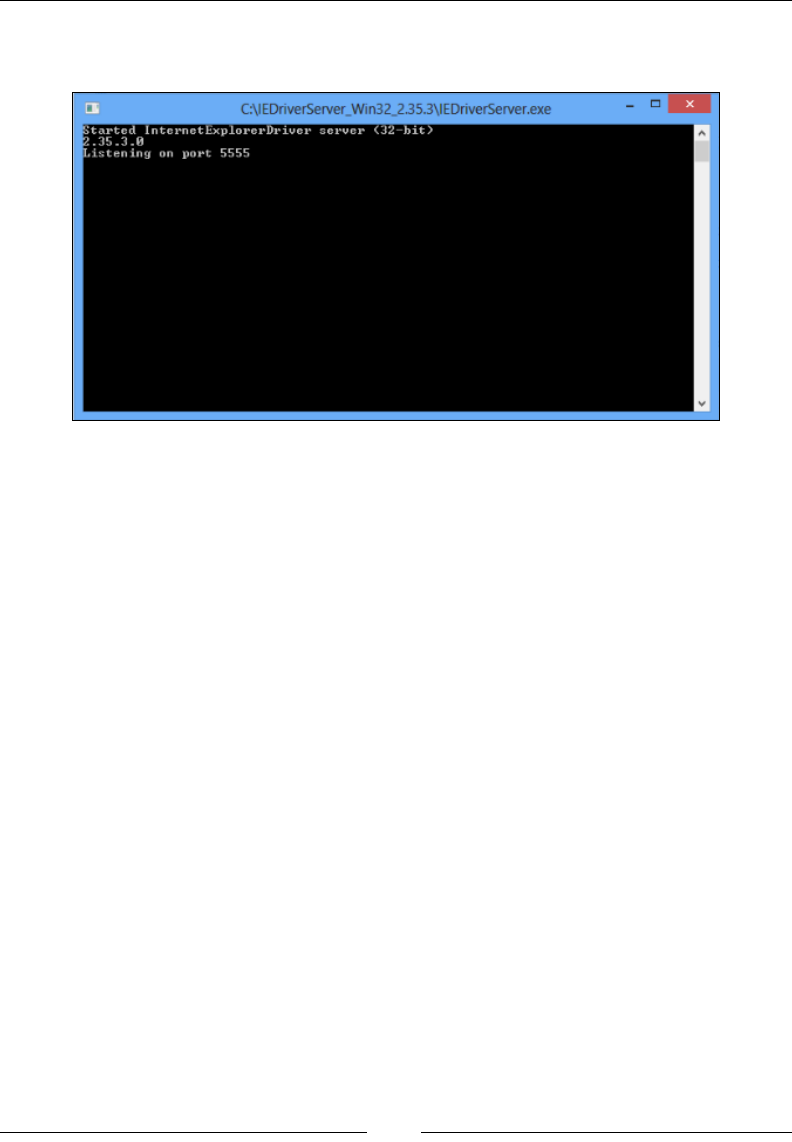
Different Available WebDrivers
[]
3. 'RXEOHFOLFNRQWKHÀOHWRODXQFK:HE'ULYHUV,QWHUQHW([SORUHU'ULYHUDVD
service that listens on a port shown as follows:
Here, the InternetExplorerDriver is running as the service on port 5555.
4. Start your server, and it might start on a different random port. Now point
your browser to http://localhost:5555/status and it will return the
details of the IE Server as JSON in the following manner:
{
"sessionId": "",
"status": 0,
"value": {
"build": {
"version": "2.35.3.0"
},
"os": {
"arch": "x86",
"name": "windows",
"version": "6.2.9200"
}
}
}
Until now, you have started IEDriver as a service that listens on a port and can
be communicated over HTTP. Your client library constructs all your test script
commands as JSON and hands it over to the IEDriver server. This again confers
to JSONWireProtocol. The IEDriver server then uses its IEThreadExplorer class,
which is written in C++, to drive the IE browser using the Component Object Model
framework.
C:\IEDriverServer.Wi
n32_235.3\IEDrlverServer.exe
fctartcd
IntcroctLxplorcrDriucr
server
<32-hit>
E.
35.
3.0
Listening
on
port
5555
A
v
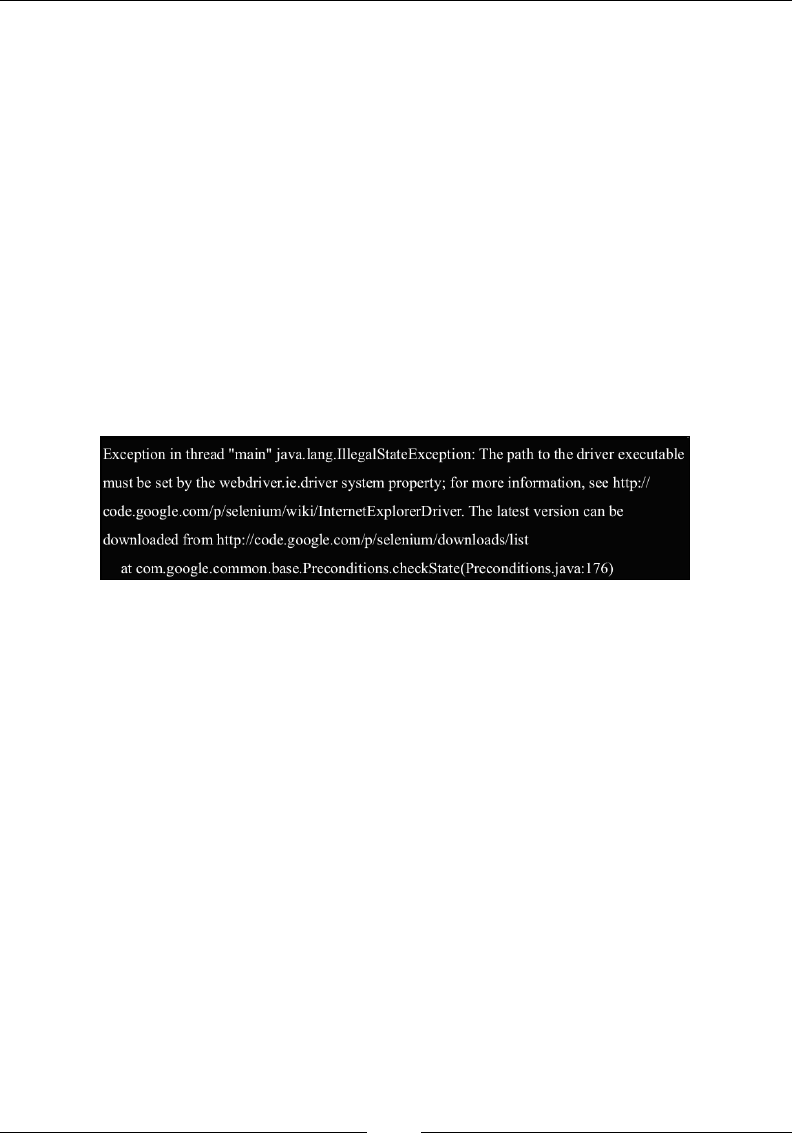
Chapter 4
[]
:ULWLQJ\RXU¿UVWWHVWVFULSWIRUWKH,(EURZVHU
Now you are all set to write test scripts that run on the Internet Explorer browser.
The following is the code that instantiates InternetExplorerDriver:
import org.openqa.selenium.WebDriver;
import org.openqa.selenium.ie.InternetExplorerDriver;
public class UsingIEDriver {
public static void main(String... args) {
WebDriver driver = new InternetExplorerDriver();
driver.get("http://www.google.com");
}
}
2QWKHÀUVWOLQHLQWKHPDLQPHWKRGZHKDYHFUHDWHGDQLQVWDQFHRI
InternetExplorerDriver. But when you try to execute the code, you will see an
exception thrown from the driver code as follows:
This is because your InternetExplorerDriver expects your code to specify the location
of the IEDriverServer.exeÀOH%HIRUHWKHWHVWFDVHH[HFXWLRQVWDUWV,('ULYHUQHHGV
to know the location of IEDriverServer.exe to start it as a server on a port.
1RZPRGLI\WKHSUHFHGLQJFRGHWRKDYHWKHORFDWLRQRIWKHVHUYHUÀOHE\VHWWLQJD
system property. It looks as follows:
public class UsingIEDriver {
public static void main(String... args) {
System.setProperty("webdriver.ie.driver",
"C:\\IEDriverServer_Win32_2.35.3\\IEDriverServer.exe");
WebDriver driver = new InternetExplorerDriver();
driver.get("http://www.google.com");
}
}
,I\RXDUHZRQGHULQJZKHUH\RXFDQÀQGWKHOLVWRIDOOWKHSURSHUWLHVKHUHLVWKH
location: http://selenium.googlecode.com/git/docs/api/java/constant-
values.html#org.openqa.selenium.ie.InternetExplorerDriver.NATIVE_
EVENTS.
Exception
in
thread
"main"
java.lang.IllegalStateException:
The
path
to
the
driver
executable
must
be
set
by
the
webdriver.ie.driver
system
property;
for
more
information,
see
http://
code.
google.
com/p/selenium/wiki/IntemetExplorerDriver.
The
latest
version
can
be
downloaded
from
http://code.google.eom/p/selenium/downloads/list
at
com.google.common.base.Preconditions.checkState(Preconditions.java:176)
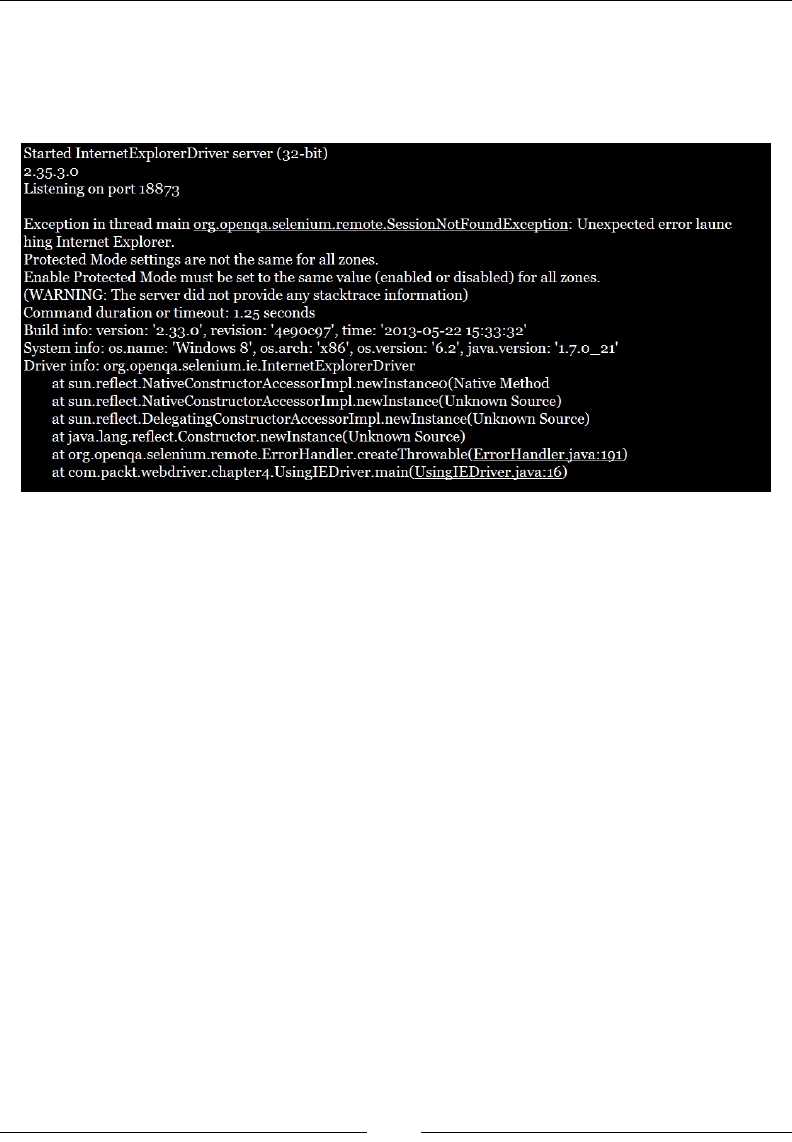
Different Available WebDrivers
[]
6RE\VHWWLQJWKDW,QWHUQHW([SORUHU'ULYHUNQRZVWKHORFDWLRQRIWKHVHUYHUÀOHDQG
starts the server. The following is the output message of the server that has started
on port 18873. But you will still see another exception being thrown by IEDriver, as
shown in the following screenshot:
Here, the driver talks about the Protected Mode settings of the IE browser for different
zones. The reason behind it, in the very own words of developers of IEDriver, is
stated at http://code.google.com/r/bookie988-wiki-modifications/source/
browse/InternetExplorerDriverInternals.wiki.
IE7 on Windows Vista introduced the concept of Protected Mode, which allows for
some measure of protection to the underlying Windows OS when browsing. The
problem is that when you manipulate an instance of IE via COM, and navigate to
a page that would cause a transition into or out of Protected Mode, IE requires that
another browser session be created. This will orphan the COM object of the previous
session, not allowing you to control it any longer.
In IE7, this will usually manifest itself as a new top-level browser window; in
IE8, a new IExplore.exe process will be created, but it will usually (not always!)
seamlessly attach it to the existing IE top-level frame window. Any browser
automation framework that drives IE externally (as opposed to using a WebBrowser
control) will run into these problems.
In order to work around that problem, IEDriver dictates that to work with IE, all
zones must have the same Protected Mode setting. As long as it's on for all zones or
off for all zones, IEDriver can prevent the transitions to different Protected Mode
zones that would invalidate the IEDriver's browser object. It also allows users to
continue to run with the user account controls turned on and to run securely in the
browser if they set Protected Mode on for all zones.
Started
InternetExplorerDriver
server
(32-bit)
2.3530
Listening
on
port
18873
Exception
in
thread
main
org.openqa.selenium.remote.SessionNotFoundException:
Unexpected
error
launc
hing
Internet
Explorer.
Protected
Mode
settings
are
not
the
same
for
all
zones.
Enable
Protected
Mode
must
be
set
to
the
same
value
(enabled
or
disabled)
for
all
zones.
(WARNING:
The
server
did
not
provide
any
stacktrace
information)
Command
duration
or
timeout:
1.25
seconds
Build
info:
version:
'2.33.0',
revision:
'4090097',
time:
'2013-05-22
15:33:32'
System
info:
os.name:
'Windows
8',
os.
arch:
'x86',
os.version:
'6.2',
java.version:
'i.7.o_2i'
Driver
info:
org.openqa.selenium.ie.InternetExplorerDriver
at
sun.reflect.NativeConstructorAccessorImpl.newInstanceo(Native
Method
at
sun.reflect.NativeConstructorAccessorImpl.newInstance(Unknown
Source)
at
sun.reflect.DelegatingConstructorAccessorImpl.newInstance(Unknown
Source)
at
java.lang.reflect.Constructor.newInstance(Unknown
Source)
at
org.openqa.selenium.remote.ErrorHandler.createThrowable(ErrorHandler.iava:ioi)
at
com.packt.webdriver.chapter4.UsingIEDriver.main(UsingIEDriver.iava:i6)
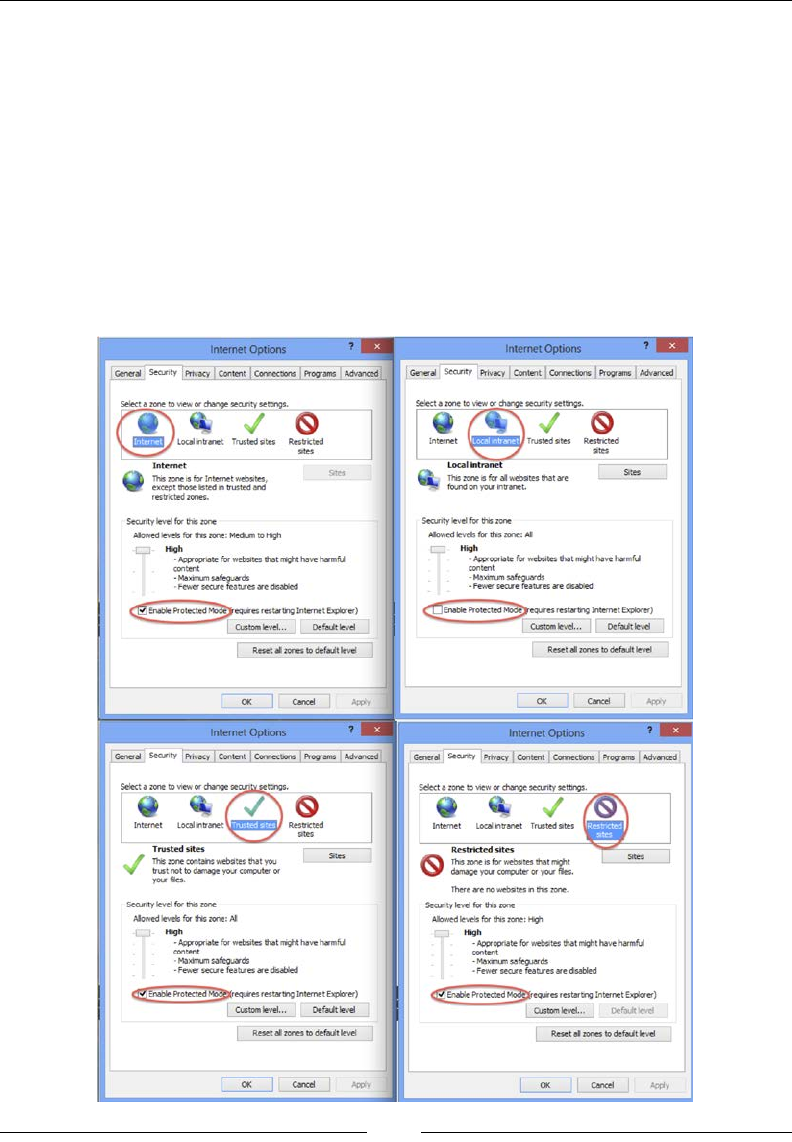
Chapter 4
[]
In earlier releases of the IE Driver, if the user's Protected Mode settings were not
correctly set, it would launch IE, and the process would simply hang until the HTTP
request timed out. This was suboptimal, as it gave no indication about what needed
to be set. Erring on the side of caution, IE Driver does not modify the user's Protected
Mode settings. Current versions, however, check that the Protected Mode settings
are properly set, and return an error response if they are not.
Now, open your IE browser and go to Tools | Internet Options | Security. The
following are the screenshots of settings for the four different security zones. If you
observe, the Enable Protected Mode is unchecked for the Local Intranet zone in
my settings, although it is checked for the rest of the three zones. You might have
different settings.
General
Security
prrvacy
Cor
tent
Connections
Proyams
Advanced
7
7
Internet
Options
internet
Options
Privacy
Content
Connections
Program
Advanced
Ger««l
Seed
a
«ne
to
>tw»
ihange
security
settngs.
Seteet
a
rone
ta
w>
or
dary
scanty
sewngs.
(D
G
*
y
G
y
'rusted
»ees
Resorted
Local
r
tranct
'meted
stes
Resected
Internet
ates
9tes
local
intranet
Thu
rone
a
for
al
webates
Prot
are
fojnd
on
you
intranet.
Internet
fha
rone
«
Internet
webstes.
except
Prose
ksted
n
trusted
and
restricted
rones.
Sites
*
y
Scanty
level
for
pro
rone
Alowed
levels
lor
Pro
rone:
Al
Seojnty
level
for
Pro
rone
Mowed
<ev«fe
for
Pro
rone
Meduw
rough
Hroh
High
-
Apu
donate
Aar
websites
tfrot
mÿit
have
l-arfj
content
Haxmm
safeguards
-
Fewer
seore
featues
are
cfeabed
Arproorate
for
websnes
trot
syght
have
harariU
content
-
Maoin
safeguards
Fewer
score
featues
are
doable
d
Enable
Protected
MÿJrwo
restarting
Internet
Explorer)
level...
De**itlevd
rcqurcs
restar
tng
Internet
Explorer)
Custom
level..
Defoÿt
level
*
Enable
Protected
Reset
al
rones
to
defroit
level
Reset
al
rones
to
defadt
level
OK
Cancel
Cancel
A«*V
OK
*wr
7
?
Infer
net
Options
Internet
Options
General
Scanty
Srrvacy
Content
Connections
Programs
Advanced
General
Scanty
Privacy
Content
Connections
Prog-ams
Advanced
Select
a
rone
to
view
or
change
Sdect
none
to
View
or
Change
security
settings
y
*
G
l'Restncted|i
y
*
y
Internet
local
ntraner
ftestreted
Internet
Local
rtranet
Treated
»tes
sites
,A
Trusted
sites
The
rone
ccntoK
webates
that
you
Peat
not
to
carnage
you
computer
or
you
lies
Restricted
sites
Tha
rone
a
for
wetrotes
Prot
mdM
damage
you
computer
or
rou
Wes.
Sites
Sites
V
G
There
are
no
rebates
n
Pro
rone.
Secunty
level
for
Pro
rone
Mowed
«v*fc
for
Pro
rone:
Al
Scanty
level
for
Pro
rone
Ate
wed
levels
for
pro
rone:
royi
High
tftgh
-
Acpooratr
for
websites
that
Tight
have
hanwfj
content
Haxrun
safeguards
-
Fewer
setue
featues
ae
daabied
Acer
cerate
for
webates
Prot
might
have
hanaftj
content
-
Maxrru-
safeguards
•
Fewer
score
feat
res
are
dsabled
(|7
Enable
Protected
Moÿfrcqurcs
restarsng
Internet
Explorer)
HoefaJnevd
fnaole
Protected
restarting
Internet
Explorer)
Gatam
level.
..
DetaJtbvd
Custom
level...
Reset
al
rones
to
aefaut
level
Reset
al
rones
to
defaiit
te.d
OK
|
Caned
Cancel
OK
Acdv
CO

Different Available WebDrivers
[]
Now, check the Local Intranet option as well and rerun the preceding Java test
script. Your IEDriver should launch the IE browser successfully and bring in the
*RRJOH6HDUFKSDJH&RQJUDWXODWLRQV<RXKDYHH[HFXWHG\RXUÀUVWFRGHWRODXQFK
the IE browser.
Having done that, you may not be able to check and modify your browser security
settings every time you execute your test scripts. To deal with this, IEDriver gives
you an option to ignore these security domains. Setting this option as a desired
capability will solve the problem. The following is the code to do that:
public class UsingIEDriver {
public static void main(String... args) {
System.setProperty("webdriver.ie.driver",
"C:\\IEDriverServer_Win32_2.35.3\\IEDriverServer.exe");
DesiredCapabilities ieCapabilities =
DesiredCapabilities.internetExplorer();
ieCapabilities.setCapability(InternetExplorerDriver.INTRODUCE_
FLAKINE
SS_BY_IGNORING_SECURITY_DOMAINS,
true);
WebDriver driver = new InternetExplorerDriver(ieCapabilities);
driver.get("http://www.google.com");
}
}
%XLOGLQJWKH,QWHUQHW([SORUHUGULYHUVHUYLFH
The IEDriver server SURYLGHVDZD\IRUWKHWHVWVFULSWGHYHORSHUWRFRQÀJXUHLW
that is, the port it should run on, the location where the WHPSRUDU\ÀOHVVKRXOGEH
extracted, and so on via the client library. The InternetExplorerDriverService.
Builder class can be used to achieve this. Let us see how we can do that. Currently,
every time you execute your UsingIEDriver.java class, the IEDriverServer is
started on a different random port. Suppose you want to make sure your server
always started on the same port, you can do that using this builder class. Similarly, if
you want to execute your tests pointing to an IEDriver server running on a different
machine, you can do that as well by pointing to the machine's IP address. Let's see
how to achieve that in the following code:
public class BuildingIEDriverService {
public static void main(String... args){
System.setProperty("webdriver.ie.driver",
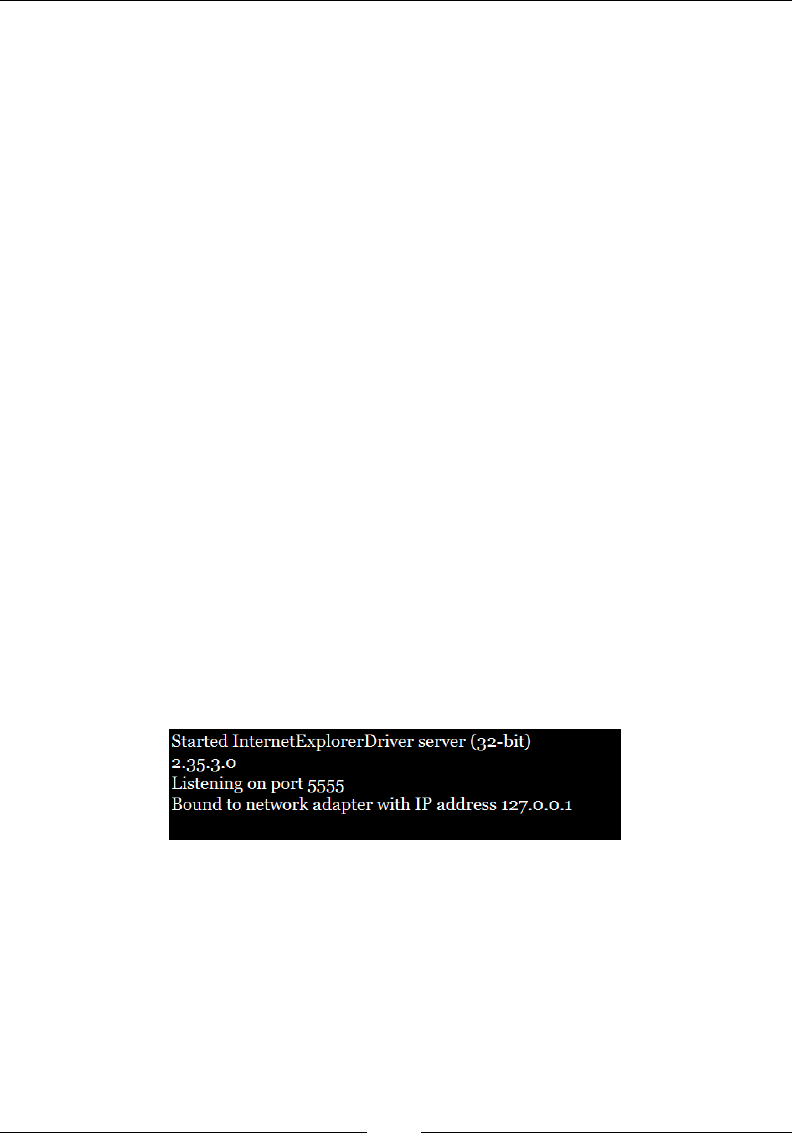
Chapter 4
[]
"C:\\IEDriverServer_Win32_2.35.3\\IEDriverServer.exe");
InternetExplorerDriverService.Builder builder
= new InternetExplorerDriverService.Builder();
InternetExplorerDriverService srvc =
builder.usingPort(5555).withHost("127.0.0.1").build();
DesiredCapabilities ieCapabilities = DesiredCapabilities
.internetExplorer();
ieCapabilities.setCapability(
InternetExplorerDriver.INTRODUCE_FLAKINESS_BY_IGNORING_SECURITY_DO
MAINS,true);
WebDriver driver = new InternetExplorerDriver(srvc,
ieCapabilities);
driver.get("http://www.google.com");
}
}
The highlighted lines of the preceding code is where we have created an instance of
the InternetExplorerDriverService builder class and used the builder design
pattern to assign a port 5555 and a host IP 127.0.0.1, which is the localhost here,
as we run the driver on the same machine as the service. Now, when you start
executing this code, the code initially starts the IEDriver service on the port and
starts executing your test commands onto that server. The output of the preceding
code execution will be as follows:
Started
InternetExplorerDriver
server
(32-bit)
2-35-3-0
listening
on
port
5555
Bound
to
network
adapter
with
IP
address
127.0.0.1
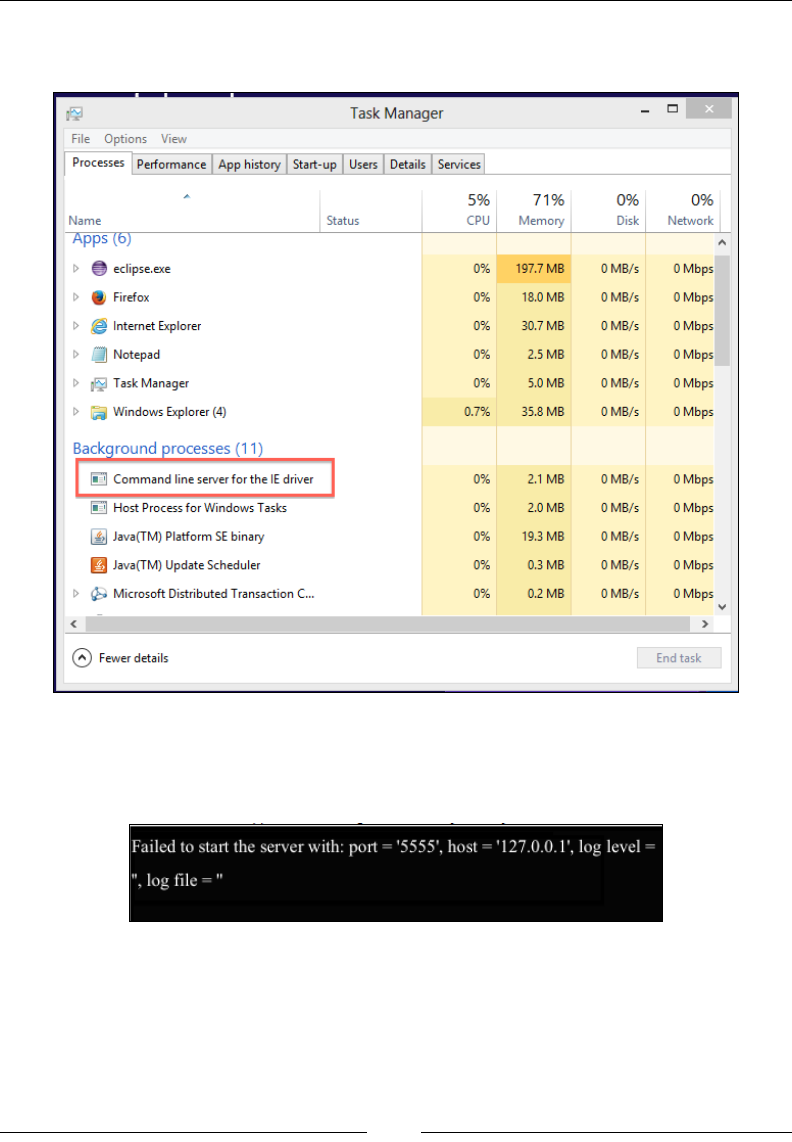
Different Available WebDrivers
[]
Open your task manager of Windows OS, and you will see the IEDriver Server
process running, as shown in the following screenshot:
Now if you reexecute your code, you will not be able to start your IEDriver server,
because it's already started and is running on that port. So, your test case will result
in the following error:
So, before reexecuting your test case, end the IEDriver server process in the
WDVNPDQDJHUDQGUHUXQ\RXUWHVWFDVH,WVKRXOGZRUNÀQH%XWLWZLOOEHKLJKO\
inconvenient to do this process manually every time before you execute your test
case. This is the reason your WebDriver client library has an inbuilt method called
quit() to do it for you.
©
Task
Manager
File
Options
View
Processes
Performance
App
history
Start-up
Users
Details
Services
5%
71%
CPU
|
Memory
j
0% 0%
Disk
|
Network
,
Status
Name
Apps
(5J
>
eclipse.exe
>
%
Firefox
>
Internet
Explorer
_|
Notepad
>
|ÿl
Task
Manager
>
Windows
Explorer
(4)
A
0%
197.7
MB
OMB/s
0
Mbps
0%
18.0
MB
OMB/s
0
Mbps
0%
30.7
MB
OMB/s
0
Mbps
0%
2.5
MB
OMB/s
0
Mbps
0%
5.0
MB
OMB/s
0
Mbps
0.7%
35.8
MB
OMB/s
0
Mbps
Background
processes
(1
1)
[ÿ1
Command
line
server
for
the
IE
driver
0%
2.1
MB
OMB/s
0
Mbps
fi~l
Host
Process
for
Windows
Tasks
|
j>l
JavafTM)
Platform
SE
binary
JavafTM)
Update
Scheduler
>
Microsoft
Distributed
Transaction
C...
0%
2.0
MB
OMB/s
0
Mbps
0%
19.3
MB
OMB/s
0
Mbps
0%
0.3
MB
OMB/s
0
Mbps
0%
0.2
MB
OMB/s
0
Mbps
v
<
>
(*)
Fewer
details
End
task
Failed
to
start
the
server
with:
port
=
'5555',
host
=
'127.0.0.
1*,
log
level
=
",
log
file
=
”

Chapter 4
[]
The API syntax is as follows:
void quit()
This will kill the driver, driver's server, and all associated browser windows for you.
Modify your BuildingIEDriverService class to have this method at the end shown
as follows, and try executing it several times. Your test script should be executed
without any failures irrespective of the number of times you execute it.
public class BuildingIEDriverService {
public static void main(String... args){
System.setProperty("webdriver.ie.driver",
"C:\\IEDriverServer_Win32_2.35.3\\IEDriverServer.exe");
InternetExplorerDriverService.Builder builder
= new InternetExplorerDriverService.Builder();
InternetExplorerDriverService srvc =
builder.usingPort(5555).withHost("127.0.0.1").build();
DesiredCapabilities ieCapabilities = DesiredCapabilities
.internetExplorer();
ieCapabilities.setCapability(
InternetExplorerDriver.INTRODUCE_FLAKINESS_BY_IGNORING_SECURITY_
DO
MAINS, true);
WebDriver driver = new InternetExplorerDriver(srvc,
ieCapabilities);
driver.get("http://www.google.com");
driver.quit();
}
}
But if you want to just stop the IEDriver server and not close the associated browser
windows, you can invoke stop() on the InternetExplorerDriverService. Add the
following code instead of driver.quit() to the preceding code and reexecute it:
srvc.stop();

Different Available WebDrivers
[]
Understanding IEDriver capabilities
In this section, we will discuss some of the important capabilities of
InternetExplorerDriver. In the two preceding test scripts, we have seen how to use
DesiredCapabilities. That is where we have set the IEDriver capability to ignore the
security domains. The code is as follows:
DesiredCapabilities ieCapabilities = DesiredCapabilities
.internetExplorer();
ieCapabilities.setCapability(InternetExplorerDriver.INTRODUCE_FLAK
INESS_BY_IGNORING_SECURITY_DOMAINS,true);
Similar to INTRODUCE_FLAKINESS_BY_IGNORING_SECURITY_DOMAINS, IEDriver has
many other capabilities. The following is a list of those with an explanation on why
it is used:
Capability Value to be Set Purpose
INITIAL_BROWSER_URL URL, for example,
http://www.
google.com
This capability is set with the URL
value that the driver should navigate
the browser to as soon as it opens up.
INTRODUCE_
FLAKINESS_BY_
IGNORING_SECURITY_
DOMAINS
True or False This defines if the IEDriverServer
should ignore the browser security
domain settings.
NATIVE_EVENTS True or False This tells the IEDriver server
whether to use native events or
JavaScript events for executing
mouse or keyboard actions.
REQUIRE_WINDOW_
FOCUS
True or False If the value is set to True, the IE
browser window will get the focus.
This is especially useful when
executing native events.
ENABLE_PERSISTENT_
HOVERING
True or False If set to True, IEDriver will
persistently fire a mouse-hovering
event. This is especially important
to overcome issues with how IE
handles mouse-over events.
IE_ENSURE_CLEAN_
SESSION
True or False If True, it clears all the cookies,
cache, history, and saved form data
of all the instances of IE.
IE_SET_PROXY_BY_
SERVER
True or False If True, the proxy server set for the
IEDriver server is used. If False,
WindowsProxyManager is used to
determine the proxy server.
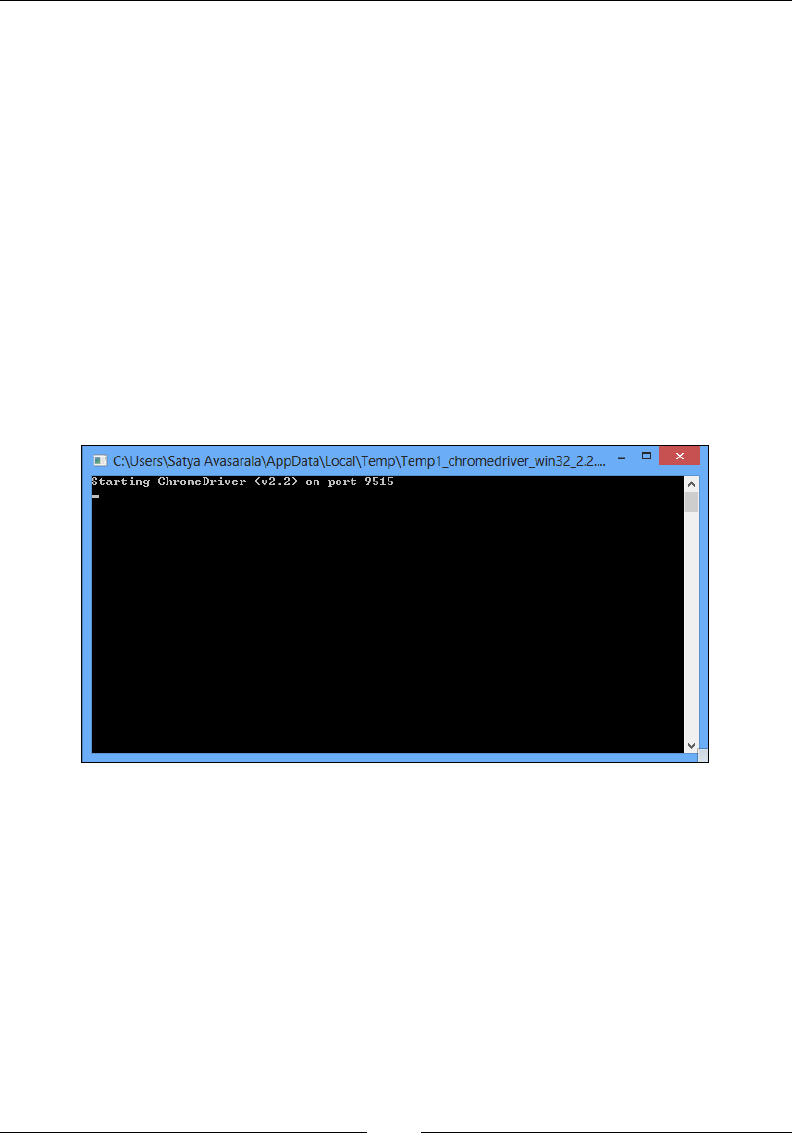
Chapter 4
[]
&KURPH'ULYHU
ChromeDriver, to some extent, is similar to IEDriver in the way it works. It has three
FRPSRQHQWVWRLWWKHÀUVWLVWKHFOLHQWODQJXDJHELQGLQJVWKHVHFRQGLVWKH&KURPH
browser itself, and the third is the Chrome Driver Server that sits in between the
language bindings and the Chrome browser.
,QVWDOOLQJ&KURPH'ULYHU
The following are the sequence of steps to install ChromeDriver:
1. Download the ChromeDriver Server installable from http://
chromedriver.storage.googleapis.com/index.html, and download the
server that is appropriate for your OS platform.
2. 8Q]LSWKHÀOHDQGUXQWKHchromedriver.exeÀOHLI\RXDUHRQ:LQGRZV
This should start your ChromeDriver Server on port 9515, as follows:
3. Now, if you haven't installed the Chrome browser, it's time to do so. You can
install the Chrome browser from https://www.google.com/intl/en_uk/
chrome/browser/.
ChromeDriver, similar to IEDriver, uses JSONWireProtocol to communicate with
the Chrome Driver server. It serializes all your test script commands into JSON and
sends them over the wire to the Chrome Driver server. The server uses the Chrome's
automation proxy framework to control the Chrome browser.
C:\Users\Satya
Avasarala\AppData\Local\Temp\Temp1_chromedriver_win32_2.2....
”
n
starting
Chrome
Driver
<v2.2>
on
port
9515
v
LJ

Different Available WebDrivers
[]
:ULWLQJ\RXU¿UVWWHVWVFULSWIRUWKH&KURPH
browser
Let us bring on our standard Google Search page using ChromeDriver, as shown in
the following code:
public class UsingChromeDriver {
public static void main(String... args){
System.setProperty("webdriver.chrome.driver",
"C:\\chromedriver_win32_2.2\\chromedriver.exe");
WebDriver driver = new ChromeDriver();
driver.get("http://www.google.com");
WebElement searchBox = driver.findElement(By.name("q"));
searchBox.sendKeys("Chrome Driver");
}
}
Here also, you will specify the ChromeDriver server location as a system property.
ChromeDriver will launch the server before executing its test commands. In the
second line of the main method, an instance of ChromeDriver has been created. The
rest is the same as with FirefoxDriver or IEDriver.
If you execute the above code several times, you will see that the port being assigned
to the server changes randomly. Similar to the IEDriver server, if you want your
ChromeDriver server to use the same port, you can use the ChromeDriverService
class as follows:
public class BuildingChromeDriverService {
public static void main(String... args){
//Start the ChromeDriver Server
System.setProperty("webdriver.chrome.driver",
"C:\\chromedriver_win32_2.2\\chromedriver.exe");
ChromeDriverService.Builder builder = new
ChromeDriverService.Builder();
ChromeDriverService srvc = builder.usingDriverExecutable(new
File("C:\\chromedriver_win32_2.2\\chromedriver.exe"))
.usingPort(65423).build();
try {
srvc.start();
} catch (IOException e) {
e.printStackTrace();
}

Chapter 4
[]
//Execute your test-script commands
WebDriver driver = new ChromeDriver(srvc);
driver.get("http://www.google.com");
WebElement searchBox = driver.findElement(By.name("q"));
searchBox.sendKeys("Chrome Driver");
//Stop the Server
driver.quit();
srvc.stop();
}
}
The whole implementation is exactly like what we have done for the
InternetExplorerDriver server.
8VLQJ&KURPH2SWLRQV
ChromeOptions are similar to )LUHIR[SURÀOHV<RXFDQDGGH[WHQVLRQVWR\RXU
Chrome browser, specify the binary location of the Chrome browser if you have
multiple versions of Chrome browsers installed on your machine, and so on. In this
section, we will see how we can use ChromeOptions to add an extension.
The UsingChromeOptions class is as follows:
public class UsingChromeOptions {
public static void main(String... args){
//Start the ChromeDriver Server
System.setProperty("webdriver.chrome.driver",
"C:\\chromedriver_win32_2.2\\chromedriver.exe");
ChromeDriverService.Builder builder = new
ChromeDriverService.Builder();
ChromeDriverService srvc = builder.usingDriverExecutable(new
File("C:\\chromedriver_win32_2.2\\chromedriver.exe"))
.usingPort(65423).build();
try {
srvc.start();
} catch (IOException e) {
e.printStackTrace();
}
// Chrome Options
ChromeOptions opts = new ChromeOptions();
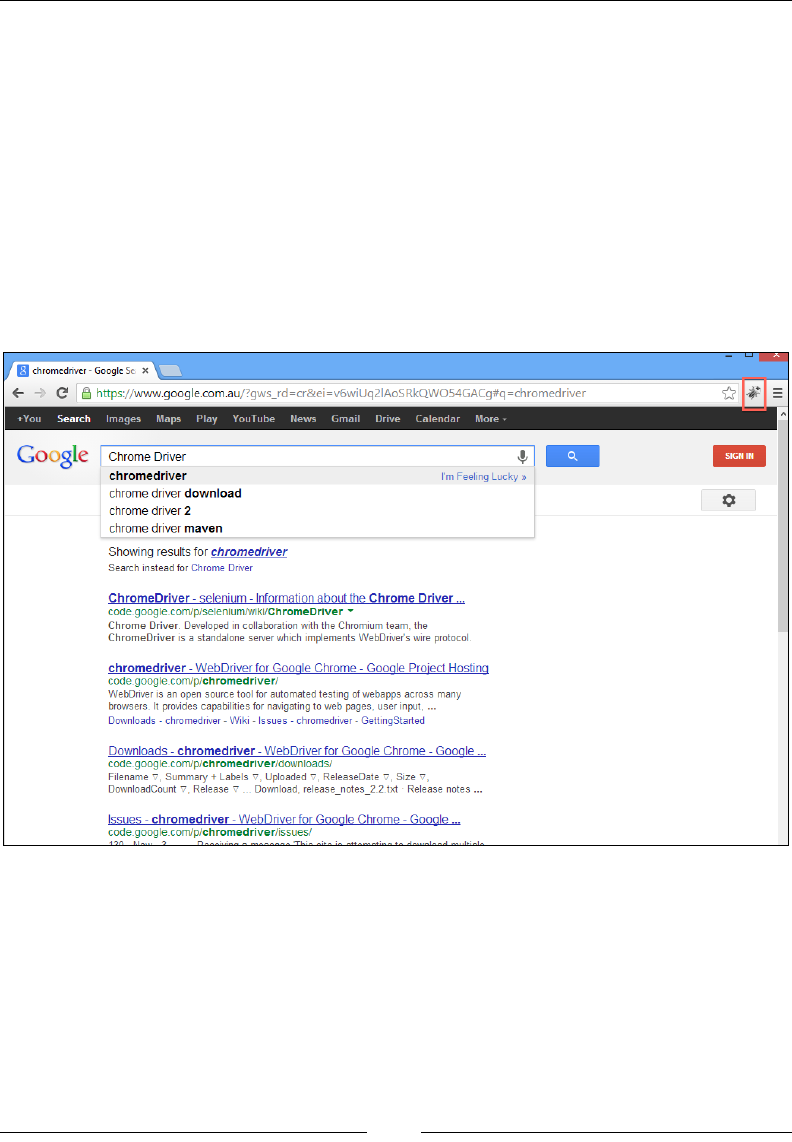
Different Available WebDrivers
[]
opts.addExtensions(new File("C:\\firebug.crx"));
//Execute your test-script commands
WebDriver driver = new ChromeDriver(srvc, opts);
driver.get("http://www.google.com");
WebElement searchBox = driver.findElement(By.name("q"));
searchBox.sendKeys("Chrome Driver");
}
}
The highlighted code is where we have added the Firebug.crxÀOHZKLFKLVD
&KURPHH[WHQVLRQÀOH1RZ\RXZLOOVHHWKHÀUHEXJH[WHQVLRQDGGHGWR\RXU
browser as follows:
Similarly, you can use Chrome options to add more extensions, arguments, and
Binaries to your Chrome browser.
H
chromedriver
-
Google
Se
x
*
4-
C
3
https://www.google.com.au/?gws_rd=cr&ei=v6wiUq2lAoSRkQW054GACg#q=chromedriver
A
+You
Search
Images
Maps
Play
YouTube
News
Gmail
Drive
Calendar
More-
Google
i
Chrome
Driver
chromedriver
chrome
driver
download
chrome
driver
2
chrome
driver
maven
SIGN
IN
I'm
Feeling
Lucky
»
o
Showing
results
for
chromedriver
Search
instead
for
Chrome
Driver
ChromeDriver
-
selenium
-
Information
about
the
Chrome
Driver
...
code.google.com/p/selenium/wiki/ChromeDriver
”
Chrome
Driver
Developed
in
collaboration
with
the
Chromium
team,
the
ChromeDriver
is
a
standalone
server
which
implements
WebDriver's
wire
protocol.
chromedriver
-
WebDriver
for
Gooole
Chrome
-
Gooale
Project
Hosting
code
google
com/p/chromedriver/
WebDriver
is
an
open
source
tool
for
automated
testing
of
webapps
across
many
browsers.
It
provides
capabilities
for
navigating
to
web
pages,
user
input,
...
Downloads
-
chromedriver
-
Wiki
-
Issues
-
chromedriver
-
GettingStarted
Downloads
-
chromedriver
-
WebDriver
for
Gooale
Chrome
-
Gooale
..
code.google.com/p/chromedriver/downloads/
Filename
v.
Summary
+
Labels
v.
Uploaded
V,
ReleaseDate
v.
Size
v,
DownloadCount
v.
Release
v
...
Download,
release_notes_2-2.txt
Release
notes
...
Issues
-
chromedriver
-
WebDriver
for
Gooale
Chrome
-
Gooale
code
google
com/p/chromedriver/issues/
1
~!
|~|
1
1
»
i
—|

Chapter 4
[]
SafariDriver
SafariDriver is implemented as an extension to the Safari browser. SafariDriver
communicates with this extension using web sockets, which is slightly different in
implementation from the rest of the WebDrivers. SafariDriver comes bundled default
with the Selenium.jarÀOHMXVWDVZLWK)LUHIR['ULYHU<RXGRQRWKDYHWRGRZQORDG
it separately.
As I've mentioned earlier, the Safari Driver is implemented as an extension to the
Safari browser. This extension comprises of the following three different components:
Global Extension: This is the component of the extension that talks to the
external world; that is, to the WebDriver client bindings. This is loaded when
WKH6DIDULEURZVHULVÀUVWODXQFKHGDQGLQMHFWVDVFULSWLQWRHYHU\ZHESDJH
that is loaded onto the Safari browser. This also maintains a record of all
the Safari browser windows opened. Global extensions talks to the client
bindings using web sockets.
Injected Script: This script is injected into the web page loaded on the
browser, and it is primarily responsible for executing all your test script
commands. The injected scripts talks to the global extension using
SafariContentBrowsertabProxy, while Global Extension talks to the
injected script using SafariWebPageProxy.
Page Script: This is an extra script injected as a tag by the above injected
script, each time it is loaded. While the injected script handles most of the
client commands, this script takes care of some of the commands that are
executed in the page's context. The page script communicates with the
injected script using window.postMessage.
:ULWLQJ\RXU¿UVWWHVWVFULSWIRUWKH6DIDUL
browser
This is as straightforward as FirefoxDriver. Download and install the Safari browser,
if you haven't done already. The following is the test script using the Safari Driver:
public class UsingSafariDriver {
public static void main(String... args){
System.setProperty("SafariDefaultPath",
"C:\\Safari\\Safari.exe");
WebDriver driver = new SafariDriver();
driver.get("http://www.google.com");
driver.findElement(By.name("q")).sendKeys("Packt Publishing");

Different Available WebDrivers
[]
driver.findElement(By.name("btnG")).click();
driver.quit();
}
}
In your test script, you have to mention the path to the Safari browser executable to
be launched. Otherwise, you can set it in the system's PATH variable. From there on,
your test script should look the same as the FirefoxDriver test script.
OperaDriver
OperaDriver is, obviously, used to test your application on the Opera browser
using WebDriver. OperaDriver is being developed by the Opera software itself.
It uses the scope transport protocol to communicate between OperaDriver and
the Opera browser.
Installing OperaDriver
The following are the sequence of steps to be performed to install OperaDriver:
1. You need to download the OperaDriver software. It is available at
https://github.com/operasoftware/operadriver/downloads. I have
downloaded version 1.1.
2. Apart from that, you need to install the Opera browser. Right now,
OperaDriver has support only up to the Opera browser 12.x or older. So, try
to install the 12 or older version of the Opera browser. You can install older
versions at http://arc.opera.com/pub/opera/. We've installed the 12.11
version of the browser.
:ULWLQJ\RXU¿UVWWHVWVFULSWIRUWKH2SHUD
browser
7KHIROORZLQJLVWKHÀUVWWHVWscript that can be used to launch the Google Search
page on the Opera browser:
public class UsingOperaDriver {
public static void main(String... args){
System.setProperty("os.name","windows");
System.setProperty("opera.binary", "C:\\Program
Files\\Opera\\opera.exe");
WebDriver driver = new OperaDriver();

Chapter 4
[ 111 ]
driver.get("http://www.google.com");
driver.findElement(By.name("q")).sendKeys("Packt Publishing");
driver.findElement(By.name("btnG")).click();
driver.quit();
}
}
You will specify the Binary location and platform name, and the rest should be
similar to other drivers.
6XPPDU\
In this chapter, you have seen some of the major implementations of WebDriver
that are widely used in the industry. The other similar drivers are the Safari Driver
and the Opera Driver that work in similar lines. The underlying technology for every
driver is JSONWireProtocol, which is fundamental for all the implementations.
In the next chapter, we will learn about the framework that WebDriver provides
to deal with keyboard and mouse events.

Understanding WebDriver
Events
Selenium WebDriver provides a very good framework for tracking the various
events that happen while you're executing your test scripts using WebDriver. Many
QDYLJDWLRQHYHQWVWKDWJHWÀUHGEHIRUHDQGDIWHUDQHYHQWRFFXUVVXFKDVEHIRUHDQG
after navigating to a URL, before and after browser back-navigation, and so on) can
be tracked and captured. To throw an event, WebDriver gives you a class named
EventFiringWebDriver, and to catch that event, it provides the test script developer
an interface named WebDriverEventListener. The test script developer should
provide their own implementations for the overridden methods from the interface.
In this chapter, we will see how we can track various browser navigation events and
web element action events that get triggered during the execution of your test cases.
Introducing EventFiringWebDriver and
EventListener classes
The EventFiringWebDriver class is a wrapper around your normal WebDriver that
gives WKHGULYHUWKHFDSDELOLW\WRÀUHHYHQWV7KHEventListener class, on the other
hand, waits to listen from EventFiringWebDriver and handles all of the events
that are dispatched. There can be more than one listener waiting to hear from the
EventFiringWebDriverFODVVIRUDQHYHQWWRÀUH$OORIWKHHYHQWOLVWHQHUVVKRXOGEH
registered with the EventFiringWebDriverFODVVWRJHWQRWLÀHG
5

Understanding WebDriver Events
[]
7KHIROORZLQJÁRZGLDJUDPH[SODLQVZKDWKDVWREHGRQHWRFDSWXUHDOORIWKHHYHQWV
raised by EventFiringWebDriver during the execution of test cases:
Create a Event istenernL
Class
Create a WebDriver
nstancei
Create an nstance ofi
EventFiringWebDriver for the
driver created above
Create an nstance ofi
EventListener lassc
created above
Register the Event
Listener lass with thec
EventFiringWebDriver.
Execute the vents withe
the
EventFiringWebDriver
Verify if you Listenerr
class got informed about
the vents occurencee
Creating an instance of EventListener
The EventListener class handles all of the events that are dispatched by the
EventFiringWebDriver class. There are the following two ways to create an
EventListener class:
By implementing the WebDriverEventListener interface.
By extending the AbstractWebDriverEventListener class provided in the
WebDriver library.
It is up to you, as a test script developer, to choose which way to go by.
yr
I
V
I
V

Chapter 5
[ 115 ]
,PSOHPHQWLQJ:HE'ULYHU(YHQW/LVWHQHU
The WebDriverEventListener interface has all of the event methods declared.
The EventFiringWebDriver class, as soon as it realizes an event has occurred,
will invoke the registered method of WebDriverEventListener. Here, we
have created an IAmTheEventListener named class and have implemented
WebDriverEventListener. As a result, you have to provide implementations for all
of the methods declared in it. Right now, in WebDriverEventListener, there are 15
methods. We will discuss each one of them shortly. For now, make sure you allow
your Eclipse IDE to provide you dummy implementations for all of these methods.
The class that we have created with all 15 overridden methods is as follows (we have
provided implementations for couple of methods):
public class IAmTheEventListener implements WebDriverEventListener{
////////// NAVIGATION RELATED METHODS ////////////////
@Override
public void beforeNavigateTo(String url, WebDriver driver) {
System.out.println("Before Navigate To "+url);
}
@Override
public void afterNavigateTo(String url, WebDriver driver) {
// TODO Auto-generated method stub
}
@Override
public void beforeNavigateBack(WebDriver driver) {
System.out.println("Before Navigate Back. Right now I'm at
"+driver.getCurrentUrl());
}
@Override
public void afterNavigateBack(WebDriver driver) {
// TODO Auto-generated method stub
}
@Override
public void beforeNavigateForward(WebDriver driver) {
// TODO Auto-generated method stub
}
@Override

Understanding WebDriver Events
[]
public void afterNavigateForward(WebDriver driver) {
// TODO Auto-generated method stub
}
/////////////////// FINDBY RELATED METHODS ///////////////
@Override
public void beforeFindBy(By by, WebElement element, WebDriver
driver) {
// TODO Auto-generated method stub
}
@Override
public void afterFindBy(By by, WebElement element, WebDriver
driver) {
// TODO Auto-generated method stub
}
//////////////////// CLICKON RELATED METHODS ///////////////
@Override
public void beforeClickOn(WebElement element, WebDriver driver) {
// TODO Auto-generated method stub
}
@Override
public void afterClickOn(WebElement element, WebDriver driver) {
// TODO Auto-generated method stub
}
///////////////// CHANGE OF VALUE RELATED METHODS //////////////
@Override
public void beforeChangeValueOf(WebElement element, WebDriver
driver) {
// TODO Auto-generated method stub
}
@Override
public void afterChangeValueOf(WebElement element, WebDriver
driver) {
// TODO Auto-generated method stub
}
/////////////// SCRIPT EXECUTION RELATED METHODS ///////////////
@Override

Chapter 5
[]
public void beforeScript(String script, WebDriver driver) {
// TODO Auto-generated method stub
}
@Override
public void afterScript(String script, WebDriver driver) {
// TODO Auto-generated method stub
}
/////////////// EXCEPTION RELATED METHODS ///////////////////////
@Override
public void onException(Throwable throwable, WebDriver driver) {
// TODO Auto-generated method stub
}
}
Extending AbstractWebDriverEventListener
The second way to create a listener class is by extending the
AbstractWebDriverEventListener class. AbstractWebDriverEventListener
is an abstract class that implements WebDriverEventListener. Though it doesn't
really provide any implementation for the methods in the WebDriverEventListener
interface, it creates a dummy implementation such that the listener class that you are
creating doesn't have to contain all of the methods; only the ones that you, as a test
script developer, are interested. The following is a class we have created that extends
AbstractWebDriverEventListener and provides implementations for a couple
of methods in it. This way we can override only the methods that we are interested
rather than all of the methods in our class:
public class IAmTheEventListener2 extends
AbstractWebDriverEventListener{
@Override
public void beforeNavigateTo(String url, WebDriver driver) {
System.out.println("Before Navigate To "+url);
}
@Override
public void beforeNavigateBack(WebDriver driver) {
System.out.println("Before Navigate Back. Right now I'm at
"+driver.getCurrentUrl());
}
}

Understanding WebDriver Events
[]
Creating a WebDriver instance
Now that we have created our listener class that listens for all of the events
generated, it's time to create our test script class and let it call IAmTheDriver.java.
After you create the class, create a FirefoxDriver instance in it:
WebDriver driver = new FirefoxDriver();
The FirefoxDriver instance will be the underlying driver instance that drives all of
your driver events. This is nothing new compared to what we have done until now
in all of the chapters in this book. The step explained in the next section is where we
make this driver an instance of EventFiringWebDriver.
Creating EventFiringWebDriver and
EventListener instances
Now that we have the basic driver instance, pass it as an argument while
constructing the EventFiringWebDriver instance. We will be using this instance
of the driver to execute all of the further user actions.
Now, using the following code, instantiate the EventListener,
IAmTheEventListener.java, or IAmTheEventListener2.java classes that we
created previously. This will be the class to which all of the events are dispatched:
EventFiringWebDriver eventFiringDriver
= new EventFiringWebDriver(driver);
IAmTheEventListener eventListener = new IAmTheEventListener();
Registering EventListener with
EventFiringWebDriver
In order for the HYHQWH[HFXWLRQVWREHQRWLÀHGWREventListener, we have
registered EventListener to the EventFiringWebDriver class. Now the
EventFiringWebDriverFODVVZLOONQRZZKHUHWRVHQGWKHQRWLÀFDWLRQV7KLV
is done as shown in the following line of code:
eventFiringDriver.register(eventListener);

Chapter 5
[]
Executing and verifying the events
Now it's time for our test script to execute events such as navigation events.
/HWVÀUVWQDYLJDWHWR*RRJOHDQGWKHQ)DFHERRN1RZZHZLOOXVHWKHEURZVHU
back-navigation to go back to Google. The full code of the test script is as follows:
public class IAmTheDriver {
public static void main(String... args){
WebDriver driver = new FirefoxDriver();
EventFiringWebDriver eventFiringDriver = new
EventFiringWebDriver(driver);
IAmTheEventListener eventListener = new IAmTheEventListener();
eventFiringDriver.register(eventListener);
eventFiringDriver.get("http://www.google.com");
eventFiringDriver.get("http://www.facebook.com");
eventFiringDriver.navigate().back();
}
}
In the preceding code, we modify our listener class to record navigateTo
and navigateBack before and after events inherited from the
AbstractWebDriverEventListenerFODVV7KHPRGLÀHGPHWKRGVDUHDVIROORZV
@Override
public void beforeNavigateTo(String url, WebDriver driver) {
System.out.println("Before Navigate To: "+url
+" and Current url is: "+driver.getCurrentUrl());
}
@Override
public void afterNavigateTo(String url, WebDriver driver) {
System.out.println("After Navigate To: "+url
+" and Current url is: "+driver.getCurrentUrl());
}
@Override
public void beforeNavigateBack(WebDriver driver) {
System.out.println("Before Navigate Back. Right now I'm at "
+driver.getCurrentUrl());
}

Understanding WebDriver Events
[]
@Override
public void afterNavigateBack(WebDriver driver) {
System.out.println("After Navigate Back. Right now I'm at "
+driver.getCurrentUrl());
}
Now, if you execute your test script, the output will be as follows:
If you observe the second line in the previously shown output, the expected
after-navigation URL is http://www.google.com, but the current URL is
http://www.google.com.au. This is due to Google redirection to your local server.
5HJLVWHULQJPXOWLSOH(YHQW/LVWHQHUV
We can register more than one listener with EventFiringWebDriver. Once the
HYHQWRFFXUVDOORIWKHUHJLVWHUHGOLVWHQHUVDUHQRWLÀHGDERXWLW/HWVPRGLI\
our test script as follows to register both our IAmTheListener.java and
IAmTheListener2.javaÀOHV
public class RegisteringMultipleListeners {
public static void main(String... args){
WebDriver driver = new FirefoxDriver();
EventFiringWebDriver eventFiringDriver = new
EventFiringWebDriver(driver);
IAmTheEventListener eventListener = new IAmTheEventListener();
IAmTheEventListener2 eventListener2 = new
IAmTheEventListener2();
eventFiringDriver.register(eventListener);
eventFiringDriver.register(eventListener2);
eventFiringDriver.get("http://www.google.com");
eventFiringDriver.get("http://www.facebook.com");
eventFiringDriver.navigate().back();
}
}
Before
Navigate
To:
http://www.google.com
and
Current
url
is:
about:
blank
After
Navigate
To:
http://www.google.com
and
Current
url
is:
https://www.google.com.au/
Before
Navigate
To:
http://www.facebook.com
and
Current
url
is:
https://www.google.com.au/
After
Navigate
To:
http://www.facebook.com
and
Current
url
is:
https://www.facebook.com/
Before
Navigate
Back.
Right
now
I'm
at
https://www.facebook.com/
After
Navigate
Back.
Right
now
I'm
at
https://www.google.com.au/
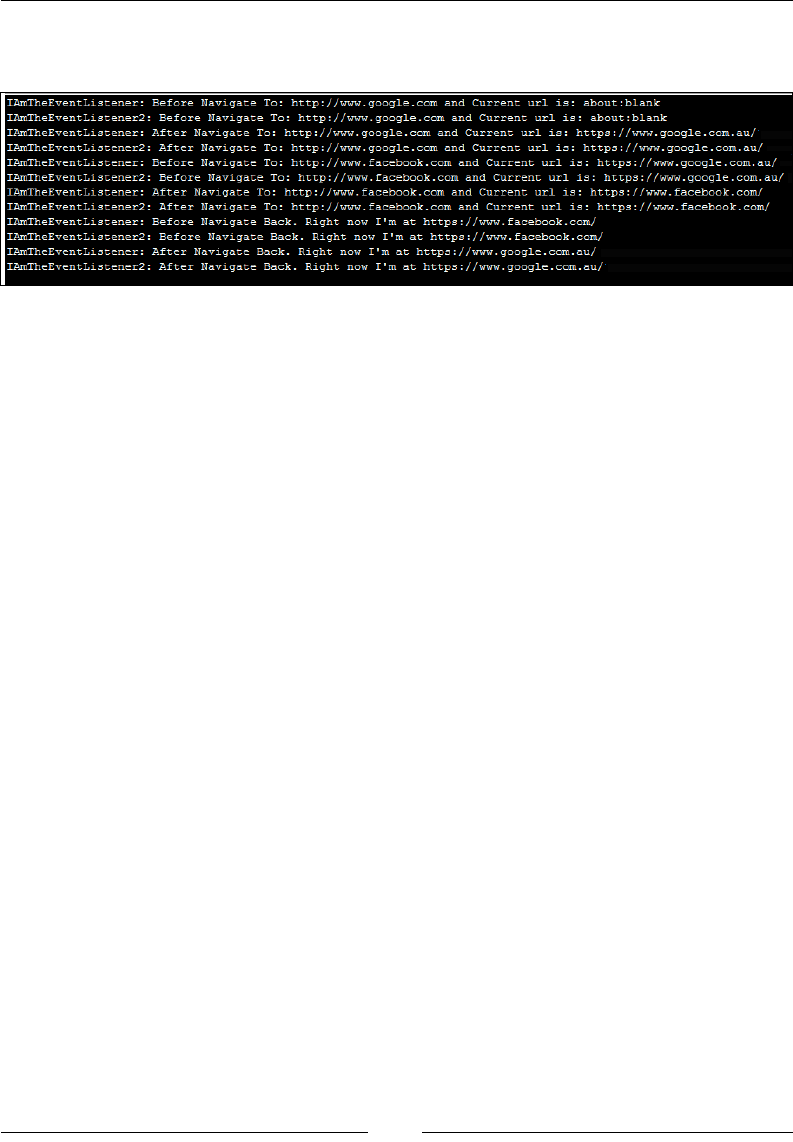
Chapter 5
[]
Now, modify the listeners slightly to differentiate the log statements. Now, if you
execute the preceding code, you will see the output as follows:
Exploring different WebDriver event
listeners
We have seen some of the methods in our EventListeners that get invoked when
their corresponding events are executed, for example, before and after navigation
methods are invoked when the navigateTo event is triggered. Here we'll see all of
the methods that WebDriverEventListener provides us.
/LVWHQLQJIRU:HE(OHPHQWYDOXHFKDQJH
This event occurs when the value of a WebElement changes when the sendKeys()
or clear() methods are executed on them. There are two methods associated with
this event.
public void beforeChangeValueOf(WebElement element, WebDriver driver)
The preceding method is invoked before the WebDriver attempts to change the value
of the WebElement. As a parameter, the WebElement itself is passed to the method
so that you can log the value of the element before the change.
public void afterChangeValueOf(WebElement element,
WebDriver driver)
The preceding method is the second method associated with the value-change
event that is invoked after the driver changes the value of the WebElement. Again,
the WebElement and the WebDriver are sent as parameters to the method. If an
exception occurs while changing the value, this method is not invoked.
IAmTheEventListener
:
Before
Navigate
To:
http://www.google.com
and
Current
url
is:
about
:
blank
IAmTheEventListener2
:
Before
Navigate
To:
http://www.google.com
and
Current
url
is:
about:
blank
IAmTheEventListener:
After
Navigate
To:
http://www.google.com
and
Current
url
is:
https://www.google.com.au/
IAmTheEventListener2
:
After
Navigate
To:
http://www.google.com
and
Current
url
is:
https://www.google.com.au/
IAmTheEventListener:
Before
Navigate
To:
http://www.faceboolc.com
and
Current
url
is:
https://www.google.com.au/
IAmTheEventListener2
:
Before
Navigate
To:
http://www.faceboolc.com
and
Current
url
is:
https://www.google.com.au/
IAmTheEventListener:
After
Navigate
To:
http://www.faceboolc.com
and
Current
url
is:
https://www.faceboolc.com/
IAmTheEventListener2
:
After
Navigate
To:
http://www.faceboolc.com
and
Current
url
is:
https://www.faceboolc.com/
IAmTheEventListener:
Before
Navigate
Back.
Right
now
I'm
at
https://www.facebook.com/
IAmTheEventListener2
:
Before
Navigate
Back.
Right
now
I'm
at
https://www.facebook.com/
IAmTheEventListener:
After
Navigate
Back.
Right
now
I'm
at
https://www.google.com.au/
IAmTheEventListener2
:
After
Navigate
Back.
Right
now
I'm
at
https://www.google.com.au/

Understanding WebDriver Events
[]
/LVWHQLQJIRU:HE(OHPHQWFOLFNHG
This event occurs when a WebElement is clicked, that is by executing
webElement.click(). There are two methods to listen for this event in the
WebDriverEventListener implementation.
public void beforeClickOn(WebElement element, WebDriver driver)
The preceding method is invoked when the WebDriver is about to click on a
particular WebElement. The WebElement that is going to be clicked on and the
WebDriver that is clicking on it are sent as parameters to this method so that the test
script developer can interpret which driver performed the click action, and on which
element the action was performed.
public void afterClickOn(WebElement element, WebDriver driver)
The EventFiringWebDriverFODVVQRWLÀHVWKHSUHFHGLQJPHWKRGDIWHUWKHFOLFN
action is taken on a WebElement. Similar to the beforeClickOn() method, this
method is also sent the WebElement and WebDriver instances. If an exception
occurs during a click event, this method is not called.
/LVWHQLQJIRUD:HE(OHPHQWVHDUFKHYHQW
This event is triggered when the WebDriver searches for a WebElement on
the webpage using findElement() or findElements(). There are, again, two
methods associated for this event.
public void beforeFindBy(By by, WebElement element, WebDriver driver)
The preceding method is invoked just before WebDriver begins searching for
a particular WebElement on the page. For parameters, it sends the locating
mechanism, that is, the WebElement that is searched for and the WebDriver
instance that is performing the search, by instance.
public void afterFindBy(By by, WebElement element, WebDriver driver)
Similarly, the EventFiringWebDriver class calls the preceding method after the
search for an element is over and the element is found. If there are any exceptions
during the search, this method is not called, and an exception is raised.
Listening for browser back navigation
The browser back navigation event, as we have already seen, gets invoked when we
use the driver.navigation().back() method. The browser goes back one level in
its history. Just as all other events, this event is associated with two methods.
public void beforeNavigateBack(WebDriver driver)

Chapter 5
[]
The preceding method is invoked before the browser takes you back in its history.
The WebDriver that invoked this event is passed as a parameter to this method.
public void afterNavigateBack(WebDriver driver)
Just as in all after <<event>> methods, the preceding method is invoked when
the navigate-back action is triggered. The preceding two methods will be invoked
irrespective of the navigation of the browser; that is, if the browser doesn't have any
history and you invoke this method, the browser doesn't take you to any of its history.
But even in that case, as the event is triggered, those two methods are invoked.
Listening for browser forward navigation
This event is very similar to the browser back navigation, except that this is browser
forward navigation, that is using, driver.navigate().forward(). The two
methods associated with this event are as follows:
public void afterNavigateForward(WebDriver driver)
public void beforeNavigateForward(WebDriver driver)
Just as in browser back navigation, these methods are invoked irrespective of
whether or not the browser takes you one level forward.
Listening for browser navigateTo events
As we've seen earlier, this event occurs whenever the driver executes driver.
get(url). The related methods for this event are as follows:
public void beforeNavigateTo(java.lang.String url, WebDriver
driver)
public void afterNavigateTo(java.lang.String url, WebDriver
driver)
The URL that is used for the driver navigation is passed as a parameter to the
preceding methods along with the driver that triggered the event.
Listening for script execution
This event is triggered whenever the driver executes a JavaScript. The associated
methods for this event are as follows:
public void beforeScript(java.lang.String script, WebDriver
driver)
public void afterScript(java.lang.String script, WebDriver
driver)

Understanding WebDriver Events
[]
The preceding methods get the JavaScript that was executed as a string, and the
WebDriver that executed it as a parameter. If there an exception occurs during
script execution, the afterScript() method will not be invoked.
Listening for any exception
This event occurs when the WebDriver comes across some exceptions. For instance, if
you try to search for a WebElement using findElement(), and that element doesn't
exist on the page, the driver throws an exception (NoSuchElementException). At
WKLVSRLQWWKLVHYHQWLVWULJJHUHGDQGWKHIROORZLQJPHWKRGJHWVQRWLÀHG
public void onException(java.lang.Throwable throwable, WebDriver
driver)
In all the after<<event>> methods, we have seen that they will not be invoked if the
driver comes across any exception. In that case, instead of those after<<events>>
methods, the onException() method is invoked and the throwable object and the
WebDriver object are sent to it as parameters.
Unregistering EventListener with
EventFiringWebDriver
Now, we have seen the different kinds of events that get triggered, and the
EventFiringWebDriver class notifying all of the listeners registered to it.
If, at any point, you want one of your event listeners to stop hearing from
EventFiringWebDriver, you can do that by unregistering from that driver.
The following API unregisters an event listener from a driver:
public EventFiringWebDriver unregister(WebDriverEventListener
eventListener)
The parameter of the method should be the event listener that wants to opt out of
JHWWLQJHYHQWVQRWLÀFDWLRQV
6XPPDU\
In this chapter, you have learned about EventFiringWebDriver and EventListeners,
and how they work together to make the developer's life easy in order to debug what
is going on at each step while the test cases get executed.
In the next chapter, we will learn how WebDriver handles I/O operations on
DÀOHV\VWHP

Dealing with I/O
,QWKLVFKDSWHUZHZLOOVHHKRZWRKDQGOHDÀOHV\VWHPXVLQJ:HE'ULYHULQRXUWHVW
scripts. In our web application, there may be scenarios where we have to download
ÀOHVWKLVLVVRPHWKLQJDWHVWVFULSWGHYHORSHUKDVWRGHDOZLWKZKLOHZULWLQJWHVW
VFULSWV)RUWKLV\RXPD\KDYHWRZRUNZLWKWKHÀOHV\VWHPWRFRS\ÀOHVIURPRQH
ORFDWLRQWRDQRWKHU]LSRUXQ]LSÀOHVGHOHWHGLUHFWRULHVRUÀOHVDQGVRRQ6HOHQLXP
:HE'ULYHUSURYLGHV\RXDJRRGVHWRIFODVVHVWRKDQGOHWKHÀOHV\VWHP,QWKLV
chapter, we will learn about the following three important classes of WebDriver:
FileHandler
TemporaryFileSystem
Zip
Learning about the FileHandler class
In this section, we will look at different I/O actions that we can perform using
WebDriver. We will basically go through all the methods that our FileHandler
class offers us. To start with, let's look at the copy() methods. It has two overloaded
methods.
&RS\LQJ¿OHVIURPWKHVRXUFHWRWKH
destination directory
WebDriver provides a method in the FileHandler class to copy the contents of the
source directory to the destination directory. The API syntax for the method is
as follows:
public static void copy(java.io.File from,
java.io.File to) throws java.io.IOException
6

Dealing with I/O
[]
8VLQJWKHSUHFHGLQJPHWKRG\RXFDQFRS\DOOWKHÀOHVRIRQHGLUHFWRU\WRDQRWKHU
The example of the code for doing this is as follows; but, for it to work, you need to
create two directories, Src and DestZLWKWZRÀOHVfile1.rtf and file2.txt in the
SrcGLUHFWRU\DQGVRPHUDQGRPWH[WLQWKRVHÀOHV
public class CopyFromSrcToDestDir {
public static void main(String... args){
try {
FileHandler.copy(new File("C:\\Src\\"), new File("C:\\
Dest\\"));
} catch (IOException e) {
e.printStackTrace();
}
}
}
The copy()PHWKRGZLOOFRS\DOOWKHÀOHVRISrc directory to the Dest directory. You
can also FRS\DVSHFLÀFÀOHVD\file1.rtf, by specifying its source and destination
paths. So, the copy() method will look as follows:
FileHandler.copy(new File("C:\\Src\\file1.rtf"), new File("C:\\Dest\\
file1.rtf"));
,IWKHHQWLUHSDWKLVQRWVSHFLÀHGRQWKHGHVWLQDWLRQVLGHWKHUHZLOOEHDQ
IOException thrown. The exception will look as follows:
&RS\LQJ¿OHVIURPWKHVRXUFHWRWKH
GHVWLQDWLRQGLUHFWRU\EDVHGRQ¿OHQDPHVXI¿[
There is a overloaded method of the preceding copy() method that will copy all the
ÀOHVIURPWKHVRXUFHGLUHFWRU\WRWKHGHVWLQDWLRQGLUHFWRU\ZLWKWKHVDPHVXIÀ[7KH
API syntax for it is as follows:
public static void copy(java.io.File source,
java.io.File dest,java.lang.String suffix)
throws java.io.IOException
java.io.FileNotFoundException:
C:\Dest
(Socket
operation
on
non-socket)
at
java.io.FileOutputStream.open(Native
Method)
at
java.io.FileOutputStream
<init>(Unknown
Source)
at
java.io.FileOutputStream.<init>(Unknown
Source)
at
org.openqa.selenium.io.FileHandler.copyFile(FileHandler.java:
1
89)
at
org.openqa.selenium.io.FileHandler.copy(FileHandler.java:
1
56)
at
org.openqa.selenium.io.FileHandler.copy(FileHandler.java:141)
at
com.packt.webdriver.chapter6.CopyFromSrcToDestDir.main(CopyFromSrcToDestDir.java:12)

Chapter 6
[]
The third parameter shownLQWKHIROORZLQJFRGHLVWKHVXIÀ[.txt, which is to be
copied from the source directory to the destination directory. Before we see the
code example, in the source directory, create file1.txt, file2.txt, file1.rtf
and file2.rtf. Now, try to execute the following code, and see what happens:
public class CopySimilarFilesFromSrcToDestDir {
public static void main(String... args){
try {
FileHandler.copy(new File("C:\\Src\\"), new
File("C:\\Dest\\"), ".txt");
} catch (IOException e) {
e.printStackTrace();
}
}
}
The preceding method will copy all the .txtÀOHVIURPWKHsource directory to
the destination directory. All the .rtfÀOHVZLOOEHOHIWEHKLQG1RZFUHDWHD
file11.txtÀOHLQWKHsource directory. Then modify the preceding code as
shown in the following line:
FileHandler.copy(new File("C:\\Src\\"), new File("C:\\Dest\\"),
"1.txt");
&KDQJHWKHVXIÀ[WR1.txt instead of .txt'HOHWHDOOWKHÀOHVIURPWKHdestination
directory and execute the code. This should copy the file1.txt and file11.txt
ÀOHVWRWKHdestination directory.
Creating a directory
You FDQFUHDWHDGLUHFWRU\DWDQ\VSHFLÀHGORFDWLRQZLWKWKHVSHFLÀHGQDPHXVLQJWKH
following method. The API syntax for this is as follows:
public static boolean createDir(java.io.File dir)
throws java.io.IOException
As the input parameter, you need to pass the full path of the directory that you want
to create. The code example for using this method is as follows:
public class CreateDirectory {
public static void main(String... args){
try {
FileHandler.createDir(new File("C:\\SelDir"));
} catch (IOException e) {
e.printStackTrace();

Dealing with I/O
[]
}
}
}
The preceding code will create a directory named SelDir under the C:\\ directory.
'HOHWLQJD¿OHRUGLUHFWRU\
TheIROORZLQJPHWKRGLVXVHGWRGHOHWHDÀOHRUGLUHFWRU\IURPWKHÀOHV\VWHP7KH
API syntax for the method is as follows:
public static boolean delete(java.io.File toDelete)
The inputSDUDPHWHUFDQEHDSDWKWRDÀOHRUGLUHFWRU\7KHFileHandler class will
delete whatever is passed to it. The code example to delete the SelDir directory that
was created in the previous section is as follows:
public class DeleteFileOrDirectory {
public static void main(String... args){
FileHandler.delete(new File("C:\\SelDir\\"));
}
}
8QGHUVWDQGLQJWKH,V=LSSHGPHWKRG
The following method is used to verify whether or QRWDÀOHLVD=,3ÀOHRUQRW7KLV
method of the FileHandler class will return a boolean value that is trueLIWKHÀOHLV
D=,3ÀOHRWKHUZLVHLWLVfalse. The API syntax for it is as follows:
public static boolean isZipped(java.lang.String fileName)
7KHLQSXWSDUDPHWHUIRUWKHPHWKRGLVWKHQDPHRIWKHÀOHWKDWKDVWREHYHULÀHG
Now lets zip the Dest folder and verify it with the isZipped() method. The code
is as follows:
public class IsZipped {
public static void main(String... args){
System.out.println(FileHandler.isZipped("C:\\Dest.zip"));
}
}
The preceding code will print trueEHFDXVHLWLVD=,3ÀOH1RZLI\RXPRGLI\WKH
parameter filename as follows, the method will return false, because this is a
IROGHUDQGQRWD=,3ÀOH
FileHandler.isZipped("C:\\Dest")

Chapter 6
[]
8QGHUVWDQGLQJWKHPDNH([HFXWDEOHPHWKRG
Using the following method in the FileHandler class, you can set the permissions
RQDÀOHWRH[HFXWDEOH,I\RXDUHXVLQJ/LQX[LWVOLNHVHWWLQJFKPRGRQ\RXUÀOH
The API syntax for the method is as follows:
public static boolean makeExecutable(java.io.File file)
throws java.io.IOException
7KHLQSXWSDUDPHWHULVWKHÀOHWKDWKDVWREHPDGHH[HFXWDEOH7KHFRGHIRULWLV
as follows:
public class MakeExecutable {
public static void main(String... args){
try {
FileHandler.makeExecutable(new File("C:\\Src\\file1.
txt"));
} catch (IOException e) {
e.printStackTrace();
}
}
}
,Q/LQX[DQGRWKHUQL[V\VWHPVWKHSHUPLVVLRQVRQWKHÀOHEHIRUHDQGDIWHU
executing the preceding code are shown in the following screenshot:
,Q:LQGRZV\RXFDQULJKWFOLFNRQWKHÀOHWRVHHWKHSHUPLVVLRQVLQLWVProperties |
Security window.
8QGHUVWDQGLQJWKHPDNH:ULWDEOHPHWKRG
Similar to the makeExecutable() method, we have a method in the FileHandler
class that can alter the SHUPLVVLRQVIRUDÀOHWRPDNHLWZULWDEOH7KH$3,V\QWD[IRU
the method is as follows:
public static boolean makeWritable(java.io.File file)
throws java.io.IOException
n
research
—
bash
—
bash
—
84x34
0
O O
Before
code
execution
r
satya
.
avasaralaifrmachi
ne
:~/
research!
Is
-altr
filel.txt
-
1
satya
.
avasarala
833630939
5
Sep
17
22:25
filel.txt
sa
tya
.
avasarala@machi
ne
:~/
research!
satya
.
avasarala@machi
ne
research!
satya
.
avasaralaifmachi
ne
:~/
research!
Is
-altr
filel.txt
1
satya.
avasarala
833630939
5
Sep
17
22:
-
r
- -
r
- -
r
filel.
txt
-
r
-
x
r
- -
r
-
-
satya
.
avasarala@machi
ne
research!
After
code
execution
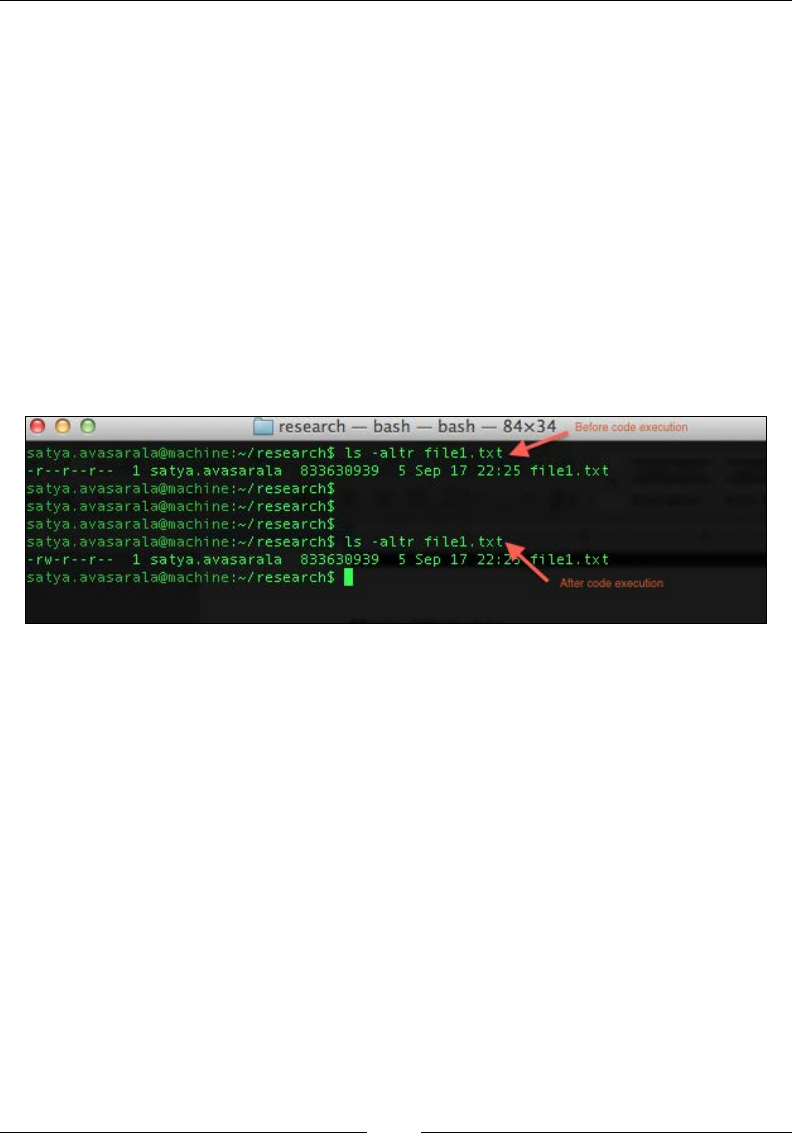
Dealing with I/O
[]
7KLVPHWKRGDOVRWDNHVWKHÀOHDVDQLQSXWSDUDPHWHU7KHFRGHH[DPSOHIRULWLV
as follows:
public class MakeWritable {
public static void main(String... args){
try {
FileHandler.makeWritable(new
File("C:\\Src\\file1.txt"));
} catch (IOException e) {
e.printStackTrace();
}
}
}
7KHIROORZLQJVFUHHQVKRWVKRZVWKHSHUPLVVLRQVRQWKHÀOHEHIRUHDQGDIWHU
executing the preceding code:
,Q:LQGRZV\RXFDQULJKWFOLFNRQWKHÀOHWRVHHWKHSHUPLVVLRQVLQLWVProperties |
Security window.
5HDGLQJD¿OH
The FileHandler classDOVRSURYLGHVDPHWKRGWKDWFDQUHDGWKHFRQWHQWRIDÀOH
as a String variable. AllWKHFRQWHQWRIWKHWDUJHWÀOHLVQRZDYDLODEOHDVDString
variable in your test script. The API syntax for the method is as follows:
public static java.lang.String readAsString(java.io.File toRead)
throws java.io.IOException
7KHLQSXWSDUDPHWHULVWKHÀOHSDWKWKHFRQWHQWRIZKLFKKDVWREHUHDG7KHFRGH
example for it is as follows:
public class ReadFileAsString {
public static void main(String... args){
try {
n
research
—
bash
—
bash
—
84x34
O
rs
le
execi
letore
satya
.
avasarala@machi
ne
research!
Is
-altr
filel.txt'
1
satya.
avasarala
833630939
5
Sep
17
22:25
filel.txt
satya
.
avasarala@machi
ne
resea
rch$
satya
.
avasarala@machi
ne
resea
rch$
satya
.
avasarala@machi
ne
:~/
resea
rch$
satya
.
avasarala@machi
ne
researchS
Is
-altr
filel.txt
1
satya.
avasarala
833630939
5
Sep
17
22:
-
r
-
-
r
- -
r
txt
-
rw-
r-
-
r-
-
satya
.
avasarala@machi
ne
:~/
researchS
|
Alter
code
execution

Chapter 6
[]
String fileContent = FileHandler.readAsString(new
File("C:\\Src\\file1.txt"));
System.out.println(fileContent);
} catch (IOException e) {
e.printStackTrace();
}
}
}
TheSUHFHGLQJFRGHVKRXOGSULQWDOOWKHFRQWHQWVRIWKHÀOH to the console. Make sure
WKDWWKHUHLVVRPHFRQWHQWLQWKHÀOHEHIRUH\RXH[HFXWHWKLVFRGHMXVWWRPDNHVXUH
you see some content in the console.
8QGHUVWDQGLQJWKHFDQ([HFXWHPHWKRG
The FileHandler class provides us another method that can verify whether or not
DÀOHLV executable. This will validate the permissionsRQWKHÀOHEHIRUHJLYLQJXVWKH
result. If executableSHUPLVVLRQVZHUHVHWRQWKHÀOHWKLVPHWKRGZLOOUHWXUQtrue;
otherwise, it returns false. The API syntax is as follows:
public static java.lang.Boolean canExecute(java.io.File file)
7KHLQSXWSDUDPHWHULVWKHÀOHSDWKWKDWZHDUHLQWHUHVWHGLQGHWHUPLQLQJZKHWKHURU
not it is executable. The return type is a Boolean value letting us know whether or
QRWZHFDQH[HFXWHWKDWÀOH7KHFRGHH[DPSOHLVDVIROORZV
public class CanExecute {
public static void main(String... args){
try {
System.out.println(FileHandler.canExecute(new File("C:\\
Src\\file1.txt")));
FileHandler.makeExecutable(new File("C:\\Src\\file1.
txt"));
System.out.println(FileHandler.canExecute(new File("C:\\
Src\\file1.txt")));
} catch (IOException e) {
e.printStackTrace();
}
}
}

Dealing with I/O
[]
Assuming, initially, that the permission for the file1.txtÀOHLVZKLFKLV
ready-only, after executing the preceding code, you will see the output shown
in the following screenshot:
The output states that initially you cannot executeWKHÀOHDQGDIWHUH[HFXWLQJWKH
makeExecutable() methodRQWKHÀOHWKHcanExecute() method returns true.
/HDUQLQJDERXWWKH7HPSRUDU\)LOHV\VWHP
class
,QWKLVVHFWLRQZHZLOOVHHWKHWHPSRUDU\ÀOHV\VWHPWKDW:HE'ULYHUXVHV$VWKH
QDPHVXJJHVWVWKHÀOHVWKDWDUHFUHDWHGXQGHUWHPSRUDU\ÀOHV\VWHPDUHWHPSRUDU\
WKDWLVWKHÀOHVDUHGHOHWHGDVVRRQDV\RXUWHVWVFULSWLVH[HFXWHG
8QGHUVWDQGLQJWKHGHIDXOWWHPSRUDU\
¿OHV\VWHP
WebDriver generally uses your AppData\Local\Temp folder as your temporary
ÀOHV\VWHPRQ:LQGRZV%XWZHFDQÀJXUHWKDWRXW7KHUHLVDPHWKRGLQWKH
TemporaryFilesystemFODVVWKDWZLOOVKRZWKHGHIDXOWWHPSRUDU\ÀOHV\VWHP
that is being used by WebDriver. The API syntax for that method is as follows:
public static TemporaryFilesystem getDefaultTmpFS()
The preceding method will return the TemporaryFilesystem class based on the
default temporary directory. The TemporaryFilesystem class doesn't have a direct
method to print the absolute path of the temporary directory. To get that, lets create
a directoryLQWKHWHPSRUDU\ÀOHV\VWHP
false
true

Chapter 6
[]
&UHDWLQJDGLUHFWRU\LQ'HIDXOW7PS)6
To create a directory, the TemporaryFilesystem class has an built-in method. The
API syntax for that is as follows:
public java.io.File createTempDir(java.lang.String prefix,
java.lang.String suffix)
The input parameters for the preceding method are the prefix and suffix strings
for the directory you want to create. WebDriver will add the prefix and suffix
strings to either ends of the random and unique name it generates for your directory
LQWKHWHPSRUDU\ÀOHV\VWHP0DNHVXUH\RXSDVVVXFKprefix and suffix strings
WKDWZLOOHQDEOH\RXWRLGHQWLI\\RXUGLUHFWRU\7KHUHWXUQW\SHLVWKHÀOHREMHFW
representing your newly created directory.
7KHFRGHWKDWZLOOFUHDWHDGLUHFWRU\LQWKHGHIDXOWWHPSRUDU\ÀOHV\VWHPLVDVIROORZV
public class DefaultTemporaryFileSystem {
public static void main(String... args) {
File f = TemporaryFilesystem.getDefaultTmpFS()
.createTempDir("prefix", "suffix");
System.out.println(f.getAbsolutePath());
try {
Thread.sleep(30000);
} catch (InterruptedException e) {
e.printStackTrace();
}
}
}
,QWKHKLJKOLJKWHGFRGHZHJRWWKHGHIDXOWÀOHV\VWHPDQGFUHDWHGDGLUHFWRU\WKHUH
The output of the execution is shown as follows:
In the output, C:\Users\SATYAA~1\AppData\Local\Temp represents the default
ÀOHV\VWHPORFDWLRQDQGprefix3951927706786433878suffix is the directory that we
have just created. As discussed earlier, this directory gets deleted once the test script
execution is over. In the preceding code, I have added a 30-second delay using the
Thread.sleep()PHWKRGVRWKDWZHFDQRSHQWKHWHPSRUDU\ÀOHV\VWHPand see the
newly created directory. Observe that the directory gets deleted once the test script
execution is over.
C:\Users\SATYAA~lAppDala\LocaOTemp\prenx3951927706786433878suffix

Dealing with I/O
[]
'HOHWLQJDWHPSRUDU\GLUHFWRU\
Although the createTempDir() method creates a temporary directory, the
deleteTempDir() method deletes that temporary directory. The API syntax
for the method is as follows:
public void deleteTempDir(java.io.File file)
7KHLQSXWSDUDPHWHUIRUWKLVPHWKRGLVWKHGLUHFWRU\ÀOHREMHFWWKDWZHKDYHFUHDWHG
The code that uses this method is as follows:
public class DeleteTempDir {
public static void main(String... args) {
File f = TemporaryFilesystem.getDefaultTmpFS()
.createTempDir("prefix", "suffix");
System.out.println(f.getAbsolutePath());
try {
Thread.sleep(30000);
} catch (InterruptedException e) {
e.printStackTrace();
}
TemporaryFilesystem.getDefaultTmpFS().deleteTempDir(f);
try {
Thread.sleep(30000);
} catch (InterruptedException e) {
e.printStackTrace();
}
}
}
The highlighted code uses the deleteTempDir() method to delete the directory that
we have created. The Thread.sleep() method is used to make sure you get time
to see the directory while the execution is taking place.
'HOHWLQJPXOWLSOH¿OHV
In the previous section, we have seen how to delete one temporary directory. But if
we want to delete all the temporary directories we have created, there is a method
to do that. The API syntax for that is as follows:
public void deleteTemporaryFiles()

Chapter 6
[]
7KHSUHFHGLQJPHWKRGZLOOGHOHWHDOOWKHWHPSRUDU\GLUHFWRULHVDQGÀOHVWKDWZHKDYH
FUHDWHGLQWKHWHPSRUDU\ÀOHV\VWHP7KHFRGHH[DPSOHWRGRWKDWLVDVIROORZV
public class DeleteTemporaryFiles {
public static void main(String... args) {
File f1 = TemporaryFilesystem.getDefaultTmpFS()
.createTempDir("prefix1", "suffix1");
System.out.println("File1: "+f1.getAbsolutePath());
File f2 = TemporaryFilesystem.getDefaultTmpFS()
.createTempDir("prefix2", "suffix2");
System.out.println("File1: "+f2.getAbsolutePath());
try {
Thread.sleep(30000);
} catch (InterruptedException e) {
e.printStackTrace();
}
TemporaryFilesystem.getDefaultTmpFS().deleteTemporaryFiles();
try {
Thread.sleep(30000);
} catch (InterruptedException e) {
e.printStackTrace();
}
}
}
In the previous code, we have created two directories, the names of which start
with prefix1 and prefix2 and end with suffix1 and suffix2. Now, using
the deleteTemporaryFiles() method, we have removed those two directories
simultaneously.
&KDQJLQJWKHWHPSRUDU\¿OHV\VWHP
Until now, we have created our temporary directories in the default temporary
ÀOHV\VWHPC:\Users\SATYAA~1\AppData\Local\Temp\. But, if we want to set
DQRWKHUORFDWLRQDVWKHWHPSRUDU\ÀOHV\VWHPORFDWLRQIRURXUWHVWVFULSWVZHFDQ
The TemporaryFilesystem class provides a method for that. The API syntax for
the method is as follows:
public static TemporaryFilesystem getTmpFsBasedOn(java.io.File
directory)
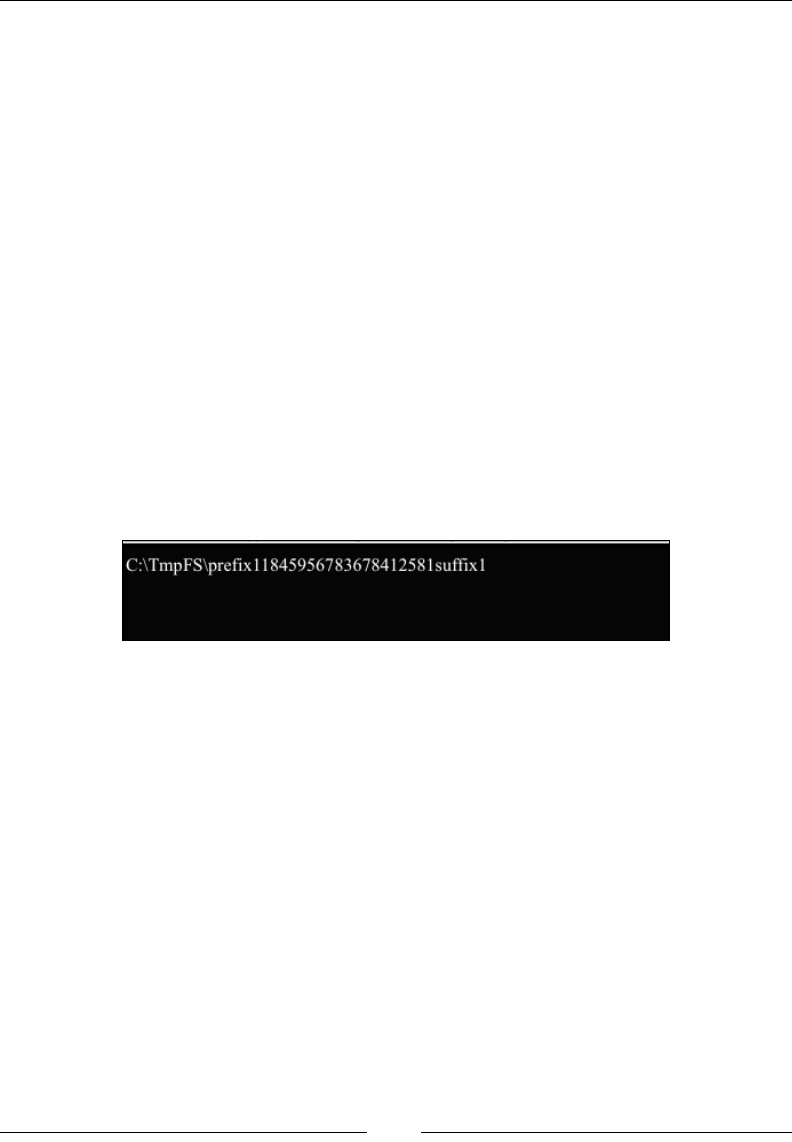
Dealing with I/O
[]
The input parameter for this method is the directory that we wish to make our
WHPSRUDU\ÀOHV\VWHP/HWVVHHWKHIROORZLQJFRGHH[DPSOHVKRZLQJKRZZHFDQ
FKDQJHRXUWHPSRUDU\ÀOHV\VWHP
public class ChangeTmpFS {
public static void main(String... args) {
TemporaryFilesystem tmpFS = TemporaryFilesystem.
getTmpFsBasedOn(new File("C:\\TmpFS"));
File f = tmpFS.createTempDir("prefix1", "suffix1");
System.out.println(f.getAbsolutePath());
try {
Thread.sleep(30000);
} catch (InterruptedException e) {
e.printStackTrace();
}
}
}
In the preceding code, we have chosen C:\\TmpFSDVRXUWHPSRUDU\ÀOHV\VWHPDQG
having done that, created a directory within it. The output of the preceding code will
be the following:
Learning about the Zip class
WebDriver libraries also give test script developers the option of dealing with
WKH=,3ÀOHV7KH\ZLOOOHW\RX]LSDGLUHFWRU\DQGDOVRXQ]LSD]LSSHGÀOHLQWR
a directory.
&RPSUHVVLQJDGLUHFWRU\
You can compress aGLUHFWRU\LQWRD=,3ÀOHXVLQJWKHPHWKRGSURYLGHGE\
WebDriver. The API syntax for it is as follows:
public void zip(java.io.File inputDir,
java.io.File output)
throws java.io.IOException
C:\TmpFS\prefix
11
8459567836784
1
258
1
suffix
1

Chapter 6
[]
7KHLQSXWSDUDPHWHUVDUHWKHGLUHFWRU\WKDWKDVWREHFRPSUHVVHGDQGWKHRXWSXWÀOH
WRZKLFKWKH=,3ÀOHVKRXOGEHZULWWHQ7KHFRGHWRGRWKDWLVDVIROORZV
public class ZipDir {
public static void main(String... args){
Zip zip = new Zip();
try {
zip.zip(new File("C:\\TmpFS"), new File("C:\\TmpFS.zip"));
} catch (IOException e) {
e.printStackTrace();
}
}
}
Executing the preceding code will create a TmpFS.zipÀOHZLWKall the zipped
contents of the TmpFS directory.
'HFRPSUHVVLQJDGLUHFWRU\
Now, let's have a look at the reverse process. You canGHFRPSUHVVRUXQ]LSWKHÀOH
created in the previous section. For this, the Zip class provides a method named
unzip. The API syntax for that method is as follows:
public void unzip(java.io.File source,
java.io.File outputDir)
throws java.io.IOException
7KHLQSXWSDUDPHWHUVDUHWKH=,3ÀOHDQGWKHoutput directory. The code for it is
demonstrated as follows:
public class UnzipToDir {
public static void main(String... args){
Zip zip = new Zip();
try {
zip.unzip(new File("C:\\TmpFS.zip"), new
File("C:\\"));
} catch (IOException e) {
e.printStackTrace();
}
}
}
([HFXWLQJWKHSUHFHGLQJFRGHZLOOGHFRPSUHVVWKH=,3ÀOHWRDIROGHUXVLQJWKH
same name.

Dealing with I/O
[]
6XPPDU\
:HKDYHVHHQYDULRXVÀOHKDQGOLQJFODVVHVDQGPHWKRGVRI:HE'ULYHUWKDWZLOOKHOS
\RXDVDWHVWVFULSWGHYHORSHUKDYHEHWWHUFRQWURORYHUWKHÀOHV\VWHPDQGZULWH
better test cases in your automation.
In the next chapter, we will learn about executing test scripts on remote machines
using RemoteWebDriver and supporting test scripts, which are coded for Selenium 1,
with WebDriver.

Exploring RemoteWebDriver
and WebDriverBackedSelenium
So far, we have created our test cases and tried to execute them on various browsers.
All of these tests were executed against the browsers that were installed on a local
machine where test cases reside. This may not be possible at all times. There is a
high possibility that you may be working on Mac or Linux, but want to execute
your tests on IE on a Windows machine. In this chapter, we will learn about the
following topics:
Executing test cases on a remote machine using RemoteWebDriver
A detailed explanation of the JSON wire protocol
A brief history about how Selenium 1 test cases were written,
and how we can migrate them to use WebDriver APIs using the
WebDriverBackedSelenium class
,QWURGXFLQJ5HPRWH:HE'ULYHU
RemoteWebDriver is an implementation class of the WebDriver interface that a test
script developer can use to execute their test scripts via the RemoteWebDriver server
on a remote machine. There are two parts to RemoteWebDriver: a server and a client.
Before we start working with them, let us rewind and see what we have been doing.
7
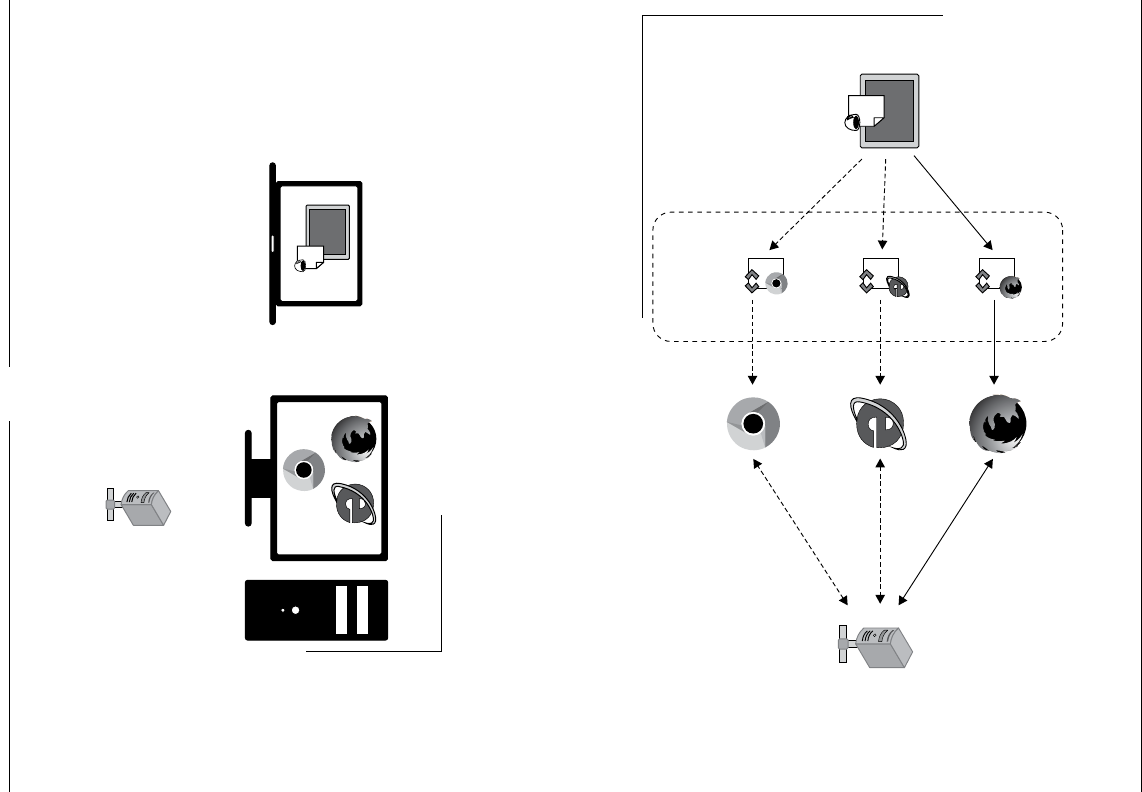
Exploring RemoteWebDriver and WebDriverBackedSelenium
[]
The following diagram explains what we have been doing so far.
>_
Test script using WebDriver
Client libraries supported in
Java, Ruby, Python, and so on
Request-Response
Request-Response
Request-Response
Browsers
Web Server hosting WAUT
WebDriver’s
Browser-specific
Implementations
IE Driver
Firefox Driver
Chrome Driver
+
The test script using WebDriver client libraries, Firefox Driver (or IE Driver or
Chrome Driver), and Firefox browser (or IE browser or Chrome browser) are sitting
on the same machine. The browser is loading the web application, which may or may
not be hosted remotely; anyway, this is not within the scope of our discussion.
We will discuss different scenarios of test script execution as follows:
Test cript using Web riversD
Client libraries support in
Java, Ruby, Python, and so on
Web Server hosting WAUT
>_
Different browsers located
on a different machine.
1!
_
I
@
*
o
V
v
fa
®
*
4
'ttt-m
\
*

Chapter 7
[]
The test script is located on a local machine, while the browsers are installed on
a remote machine. In this scenario, RemoteWebDriver comes into the picture. As
mentioned earlier, there are two components associated with RemoteWebDriver:
the server and the client. Let us start with the RemoteWebDriver server.
8QGHUVWDQGLQJWKH5HPRWH:HE'ULYHUVHUYHU
The RemoteWebDriver server is a component that listens on a port for various
requests from a RemoteWebDriver client. Once it receives the requests, it forwards
them to any of the following: Firefox Driver, IE Driver, or Chrome Driver, whichever
is asked.
Downloading the server
Let us download the RemoteWebDriver server and start running it. You can
download it from https://code.google.com/p/selenium/downloads/, but for our
SXUSRVHVOHWXVGRZQORDGDVSHFLÀFYHUVLRQof it as we are using WebDriver Version
7KHVSHFLÀFYHUVLRQFDQEHGRZQORDGHGIURPhttps://code.google.com/p/
selenium/downloads/detail?name=selenium-server-standalone-2.33.0.jar.
This server JAR should be downloaded to the remote machine on which the browsers
are located. Also, make sure the remote machine has Java runtime installed on it.
Running the server
Open your command-line tool on the remote machine and navigate to the location to
which you have downloaded the JARÀOH1RZWRVWDUWWKHRemoteWebDriver server,
execute the following command:
java –jar selenium-server-standalone-2.33.0.jar
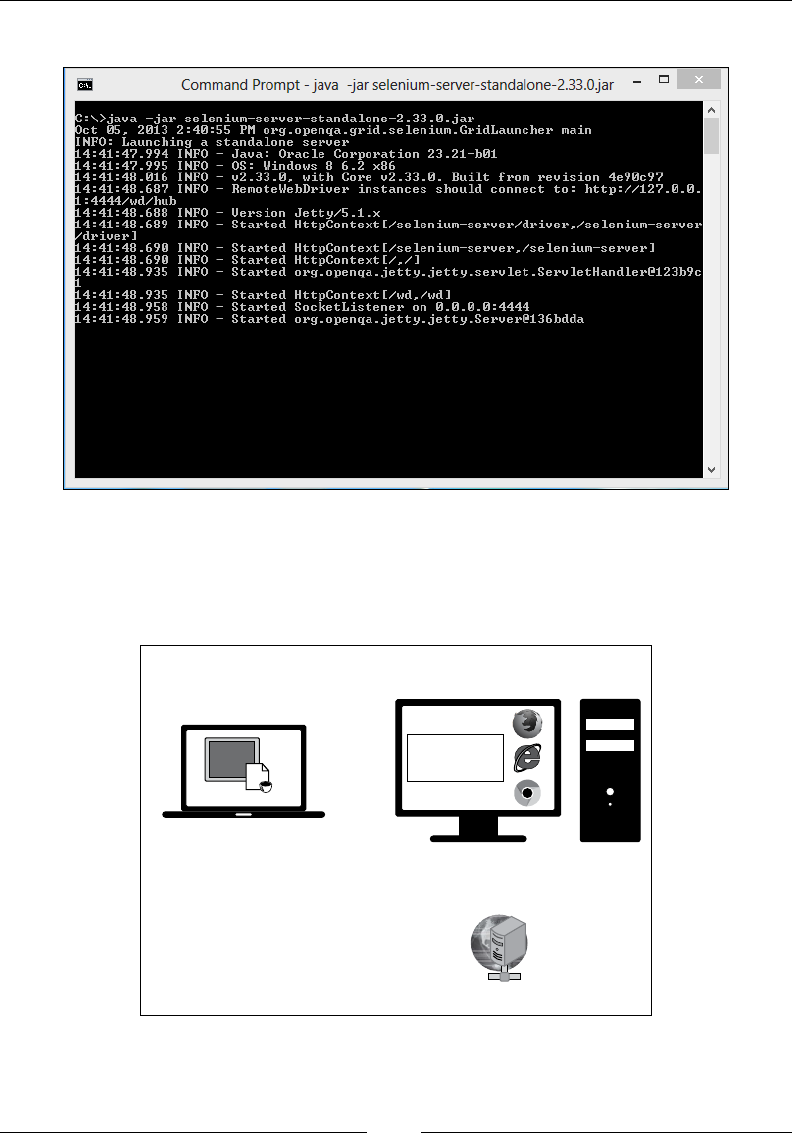
Exploring RemoteWebDriver and WebDriverBackedSelenium
[]
The following screenshot shows what you should see in your console:
Now, the server has started and is listening on the <remote-machine-ip>:4444
address for remote connections from the RemoteWebDriver client. Now the
previously seen image (the second image in the Introducing RemoteWebDriver section)
will appear as follows:
Test cript using Web riversD
Client libraries support in
Java, Ruby, Python, and so on
Web Server hosting WAUT
>_
Different browsers located
on a different machine.
RemoteWebDriver
Server
n
Command
Prompt
-
java
-jar
selenium-server-standalone-2.33.0jar
A
C:\>java
-jar
selenium-server-standalone-2
.33
.0.
jar
Oct
05,
2013
2:40:55
PM
org.openqa.gr
id.
selenium.GridLauncher
main
INFO:
Launching
a
standalone
server
14:41:47.994
INFO
-
Java:
Oracle
Corporation
23.21-b01
14:41:47.995
INFO
-
OS:
Windows
8
6.2
x86
14:41:48.016
INFO
-
v2.33.0,
with
Core
v2.33.0.
Built
from
revision
4e90c97
14:41:48.687
INFO
-
RemoteUebDriver
instances
should
connect
to:
http://127.0-0.
1
:
4444/wd/hub
14:41:48.688
INFO
-
Uersion
Jetty/5.
1.x
14:41:48.689
INFO
—
Started
HttpContext
[/selenium—
server/driver,
/selenium—
server
/driver!
14:41:48.690
INFO
—
Started
HttpContext
[/selenium—
server,
/selenium—
server
]
14:41:48.690
INFO
-
Started
HttpContext
[/,
/I
14:41:48.935
INFO
-
Started
org.openqa.
jetty.
jetty
.servlet
.ServletHandler0123b9c
1
14:41:48.935
INFO
-
Started
HttpContext
[/wd,/wd]
14:41:48.958
INFO
-
Started
SocketListener
on
0.0.0.0:4444
14:41:48.959
INFO
-
Started
org.openqa.
jetty.
jetty
.Server0136bdda
v
m
4

Chapter 7
[]
8QGHUVWDQGLQJWKH5HPRWH:HE'ULYHUFOLHQW
Now that we have our RemoteWebDriver server up and running, it is time for us
to create the RemoteWebDriver client. Fortunately, we don't have to do anything
much to create a RemoteWebDriver client. It's nothing but the language-binding
client libraries that serve as a RemoteWebDriver client. The client, as it used to when
executing tests locally, translates your test script requests to JSON payload and sends
them across to the RemoteWebDriver server using the JSON wire protocol.
When you execute your tests locally, the WebDriver client libraries talk to your
Firefox Driver, IE Driver, or Chrome Driver directly. Now, when you try to execute
your tests remotely, the WebDriver client libraries talk to the RemoteWebDriver
server and the server talks to either the Firefox Driver, IE Driver, or Chrome Driver,
whichever the WebDriver client asks for.
Converting an existing test script to use
5HPRWH:HE'ULYHUVHUYHU
Let us take a test script that we have executed locally; that is, where the test scripts
and the browser were on the same machine:
public class ExistingTest {
public static void main(String... args){
WebDriver driver = new FirefoxDriver();
}
}
The preceding test script creates an instance of Firefox Driver and launches the
Firefox browser. Now let us try to convert this test script to use the RemoteWebDriver
server that we have started earlier. Before we do that, let us see the constructor of
RemoteWebDriver, which is as follows:
RemoteWebDriver(java.net.URL remoteAddress,
Capabilities desiredCapabilities)
The input parameters for the constructor are one of the addresses of the
RemoteWebDriver server running on the remote machine and the desired
capabilities your test script needs. We will see those desired capabilities shortly.
Now, let's modify the test script to use RemoteWebDriver. Replace WebDriver
driver = new FirefoxDriver(); with the following code:
DesiredCapabilities capabilities = new DesiredCapabilities();
RemoteWebDriver remoteWD = null;
try {

Exploring RemoteWebDriver and WebDriverBackedSelenium
[]
remoteWD = new RemoteWebDriver(new
URL("http://10.172.10.1:4444/wd/hub"),capabilities);
} catch (MalformedURLException e) {
e.printStackTrace();
}
We have created a RemoteWebDriver instance that tries to connect to
http://10.172.10.1:4444/wd/hub, where the RemoteWebDriver server is
running and listening for requests. Having done that, we also need to specify
which browser your test case should get executed on. This can be done using the
DesiredCapabilities instance. So let's ask RemoteWebDriver to run our test scripts
on the Firefox browser. The preceding code will be changed to the following code:
DesiredCapabilities capabilities = new DesiredCapabilities();
capabilities.setBrowserName("firefox");
RemoteWebDriver remoteWD = null;
try {
remoteWD = new RemoteWebDriver(new URL("http:// 10.172.10.1:4444/
wd/hub"),capabilities);
} catch (MalformedURLException e) {
e.printStackTrace();
}
Now RemoteWebDriver will launch the Firefox browser and execute your test case
RQLW6RWKHPRGLÀHGWHVWFDVHZLOOORRNDVIROORZV
package com.packt.webdriver.chapter7;
import java.net.MalformedURLException;
import java.net.URL;
import org.openqa.selenium.remote.DesiredCapabilities;
import org.openqa.selenium.remote.RemoteWebDriver;
public class UsingRemoteWebDriver {
public static void main(String... args){
DesiredCapabilities capabilities = new DesiredCapabilities();
capabilities.setBrowserName("firefox");
RemoteWebDriver remoteWD = null;
try {
remoteWD = new RemoteWebDriver(new URL("http://
10.172.10.1:4444/wd/hub"),capabilities);
} catch (MalformedURLException e) {
e.printStackTrace();
}
}
}
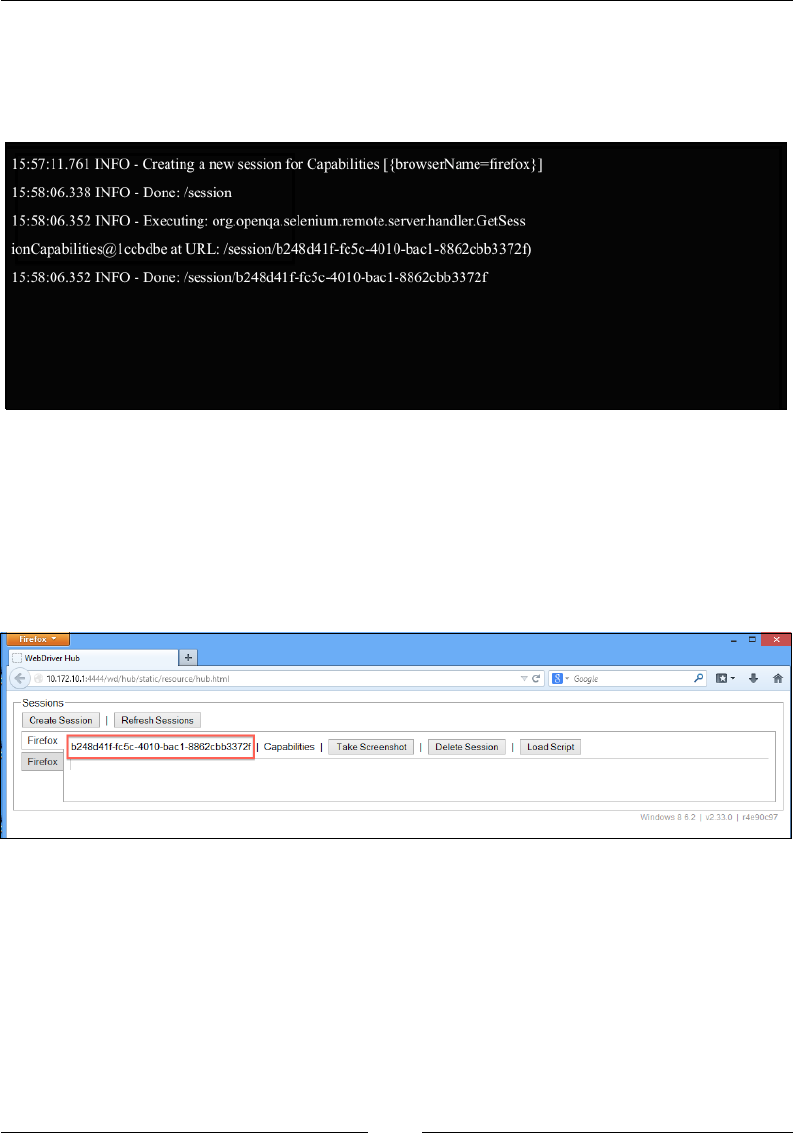
Chapter 7
[]
Now execute this test script from your local machine to establish a connection between
the RemoteWebDriver client and the RemoteWebDriver server. The RemoteWebDriver
server will launch the Firefox browser. The following is the output you will see in the
console where the RemoteWebDriver server is running:
It says that a new session with the desired capabilities is being created, which, after
being created, prints the session ID on to the console. At any point in time, you can
view all of the sessions that are established with the RemoteWebDriver server by
navigating to http://10.172.10.1:4444/wd/hub.
It will give the entire list of sessions that the RemoteWebDriver server is currently
handling. The screenshot of this is as follows:
This is a very basic portal that lets the test script developer see all of the sessions
created with the RemoteWebDriver server and perform some basic operations on
it, such as terminating a session, taking a screenshot of a session, loading a script
to a session, and seeing all of the desired capabilities of a session. The following
screenshot shows all of the default desired capabilities of our current session.
15:57:1
1.761
INFO
-
Creating
a
new
session
for
Capabilities
[{browserName=firefox}]
15:58:06.338
INFO
-
Done:
/session
15:58:06.352
INFO
-
Executing:
org.openqa.selenium.remote.server.handler.GetSess
ionCapabilities@lccbdbe
at
URL:
/session/b248d41f-fc5c-4010-bacl-8862cbb3372f)
15:58:06.352
INFO
-
Done:
/session/b248d41f-fc5c-4010-bacl-8862cbb3372f
hretox
I
[j
WebDriver
Hub
+
p
n-
*
ft
v
C
|
[
0
*
Google
(*
10.172.10.1:4444/wd/hub/static/resource/hub.html
r-
Sessions
Create
Session
|
Refresh
Sessions
Firefox
b248d41f-fc5c-4010-bac1-8862cbb3372f
|
Capabilities
|
Take
Screenshot
|
Delete
Session
|
Load
Script
Firefox
Windows
8
6.2
|
V2.33.0
|
r4e90c97
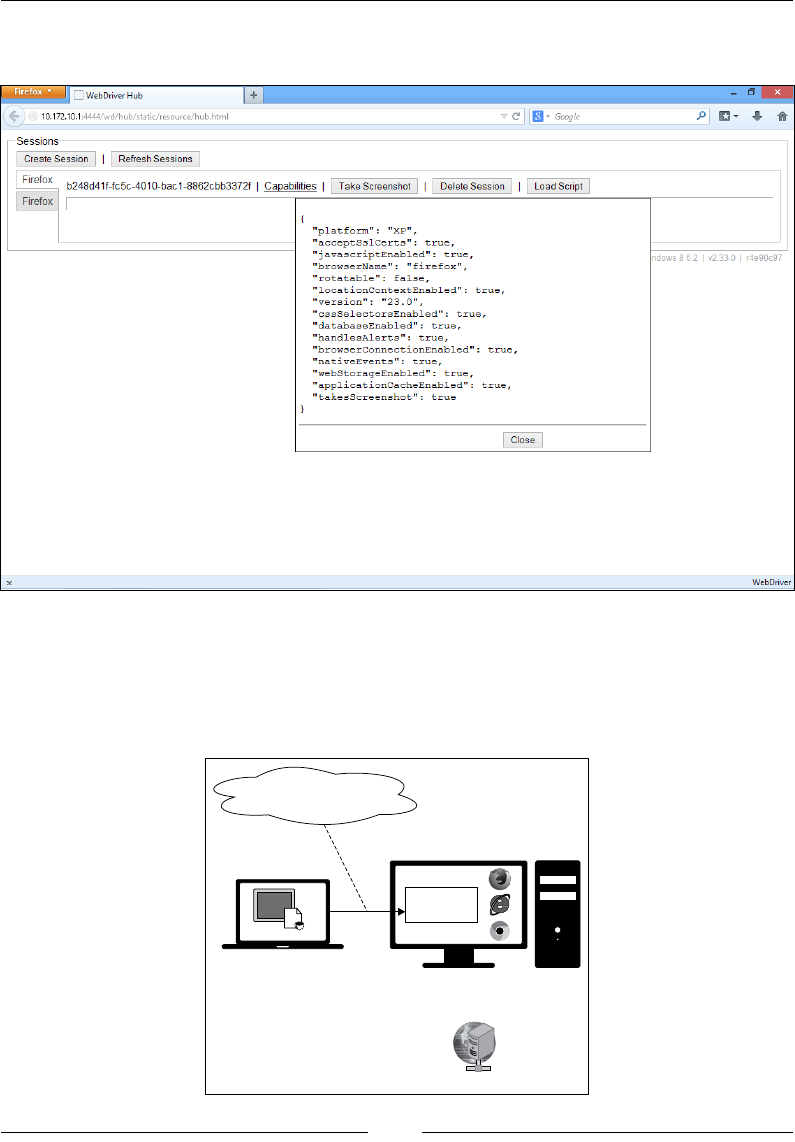
Exploring RemoteWebDriver and WebDriverBackedSelenium
[]
You can see the popup by hovering over the Capabilities link, as shown in the
following screenshot:
Those are the default desired capabilities that are set implicitly by the server for
this session. Now, we have successfully established a connection between our
test script, which is using a RemoteWebDriver client on one machine, and the
RemoteWebDriver server on another machine. The original diagram of running
the test scripts remotely is as follows:
Test cript using Web riversD
Client libraries support in
Java, Ruby, Python, and so on
Web Server hosting WAUT
>_
Different browsers located
on a different machine.
RemoteWebDriver
Server
Connection made on
http://10.172.10.1:4444/wd/hub
10.172.10.1
44-ÿ
,.d
hub
itatic
i
eccurce
hub.html
+
(3
(ÿ
v
C
j
0
’
Google
p
c-
*
a
Sessions
Create
Session
|
Refresh
Sessions
Firefox
b248d41
f-fc5c-401
0-bac
1
-8862cbb3372f
|
Capabilities
|
Delete
Session
|
Load
Script
Take
Screenshot
Firefox
{
"platform":
"XP",
"acceptSslCerts"
:
true,
"
j
avascriptEnabled"
:
"browserName"
:
true,
"firefox",
ndows
8
6.2
|
V2.33.0
|
r4e90c97
"rotatable":
false,
"locationContextEnabled"
:
true,
"version":
"23.0",
"cssSelectorsEnabled"
:
true,
"databaseEnabled"
:
true,
"handlesAlerts"
:
true,
"browserConnectionEnabled"
:
true,
"nativeEvents"
:
true,
"webStorageEnabled"
:
true,
"applicationCacheEnabled"
:
true,
"takesScreenshot":
true
}
Close
WebDriver
x
\
\
\
\
\
\
1
\\
#
\
\
\
m
\
\
\
>s5

Chapter 7
[]
8VLQJ5HPRWH:HE'ULYHUIRUWKH)LUHIR[
browser
We have seen how the RemoteWebDriver client is connected to the RemoteWebDriver
server. Now we will see what actions the RemoteWebDriver server performs to load
your application, which is being tested on the Firefox browser.
As soon as the server receives a request on port 4444LWYHULÀHVZKLFKEURZVHUKDV
DVNHGIRUWKHGHVLUHGFDSDELOLWLHV:KHQWKHVHUYHUÀJXUHVRXWWKDWWKHUHTXHVWLV
for the Firefox browser, it launches the Firefox Driver as an extension to the Firefox
browser, as discussed in Chapter 4, Different Available WebDrivers.
The RemoteWebDriver server opens a socket connection, usually to the Firefox
Driver, on port 7055. From then on, all of your test script commands are handed
over by the RemoteWebDriver server to Firefox Driver through this socket. So, from
where did the RemoteWebDriverVHUYHUÀQGWKH)LUHIR['ULYHU")LUHIR['ULYHUFRPHV
along with the RemoteWebDriverVHUYHU-$5ÀOH<RXGRQWKDYHWRGRZQORDGRU
start it explicitly, unlike with IE Driver or Chrome Driver.
Using DesiredCapabilities, you can specify the RemoteWebDriver server on
which you want your test script commands to be executed on Firefox browser, as
shown in the following code:
DesiredCapabilities capabilities = new DesiredCapabilities();
capabilities.setBrowserName("firefox");
The parameter passed to the setBrowserName() method will indicate which browser
to launch. In this case, it is "firefox". The parameters that can be passed to this
method are chrome, htmlunit, internet explorer, and so on; they are case-sensitive.
Now, let us modify our test case to pass some commands to the browser, as shown in
the following code:
public class UsingRemoteWebDriver {
public static void main(String... args){
DesiredCapabilities capabilities = new DesiredCapabilities();
capabilities.setBrowserName("firefox");
RemoteWebDriver remoteWD = null;
try {
remoteWD = new RemoteWebDriver(new
URL("http://10.172.10.1:4444/wd/hub"),capabilities);
} catch (MalformedURLException e) {
e.printStackTrace();
}
remoteWD.get("http://www.google.com");
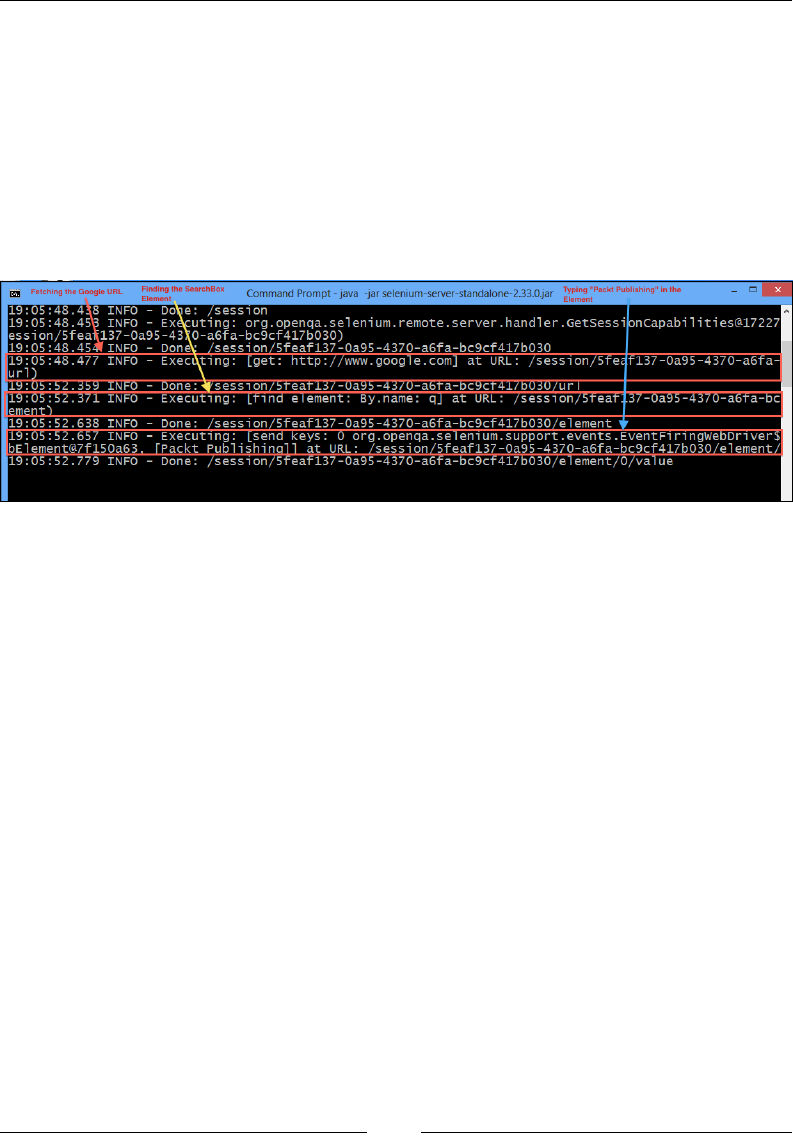
Exploring RemoteWebDriver and WebDriverBackedSelenium
[]
remoteWD.findElement(By.name("q")).sendKeys("Packt Publishing");
}
}
As seen in a previous section, a session is established between the RemoteWebDriver
client and the server. After that, the commands are interpreted by the
RemoteWebDriver server and passed on to the Firefox Driver that is running
on http://localhost:7055. The following screenshot shows the commands
interpreted by the server and the output seen in the console on which the
RemoteWebDriver server is running:
On the console, we see three different commands being interpreted, which were sent
from the test script or the RemoteWebDriver client to the server.
7KHÀUVWFRPPDQGIURPWKHWHVWVFULSWLVDVIROORZV
remoteWD.get("http://www.google.com");
Its corresponding execution on the server side is as follows:
19:05:48.477 INFO - Executing: [get: http://www.google.com] at URL: /
session/5feaf137-0a95-4370-a6fa-bc9cf417b030/url)
The second command from the test script is as follows:
WebElement element = remoteWD.findElement(By.name("q"));
Its corresponding execution on the server side is as follows:
19:05:52.371 INFO - Executing: [find element: By.name: q] at URL: /
session/5feaf137-0a95-4370-a6fa-bc9cf417b030/element)
The third command from the test script is as follows:
element.sendKeys("Packt Publishing");
Finding
the
SearchBox
Element
Typing
"Paekt
Publishing"
in
the
Element
n
Fetching
the
Google
URL
Command
Prompt
-
java
-jar
selenium-server-standalone-2.33.0jar
3S
19:05:48.438
INFO
-
Do\ie:
/session
19:05
:
48.
4
5)3
ession/5feafl37-0a95-43\0-a6fa-bc9cf417b030)
m
INFO
19:05:48.477
INFO
-
Executing:
A
INFO
-
Executing:
org.openqa.
selenium.
remote.
server.
handler.
GetSessibnCapabi
lities@17227
session/5f
eaf
137-0a95-4370-a6f
a-bc9cf417b030
Don
IMHIK
•TTy
g.
’•
reTeTe
V;
url
w
»E
2,
L
INFO
-
Executing:
element:
By.
name:
qj
at
URL:
/session
2
session/5feafl37-0a95-4370-a6fa-bc9cf417b030/element
_
_
org.openqa.se
I
em
urn.
support
.events
.Event
Fi
nngwebDriver
_
session/5f
eaf
137-0a95-4370-a6f
a-bc9cf417b030/el
ement
sessi
on/5f
eaf
137-0a95-4370-a6f
a-bc9cf
417b030/el
ement/O/val
ue
19:05:52.638
INFO
Done:
v
:eys
:
I
at
URL:
T
2
2
iiMl]
2
119:05:52.779
INFO
Done
:

Chapter 7
[]
Its corresponding execution on the server side is as follows:
19:05:52.657 INFO - Executing: [send keys: 0 org.openqa.selenium.support.
events.EventFiringWebDriver$EventFiringWebElement@7f150a63, [Packt
Publishing]] at URL: /session/5feaf137-0a95-4370-a6fa-bc9cf417b030/
element/0/value)
Now, our initial diagram of the process of running test scripts looks as follows:
Test cript using Web riversD
Client libraries support in
Java, Ruby, Python, and so on
Web Server hosting WAUT
>_
RemoteWebDriver
Server
Firefox
Driver
Connection made on
http://10.172.10.1:4444/wd/hub
Connection made to
http://www.google.com from
browser
Connection made to
http://localhost:7055/
Different browsers located
on a different machine.
8VLQJ5HPRWH:HE'ULYHUDQGWKH,(EURZVHU
Using IE browser to execute our test scripts is similar to using the Firefox browser,
except for a couple of variations in how IE Driver is launched. Let's see this by
changing the test script that we used for the Firefox browser to the following script,
using "internet explorer":
public class UsingRemoteWebDriverAndIEBrowser {
public static void main(String... args){
DesiredCapabilities capabilities
= new DesiredCapabilities();
capabilities.setBrowserName("internet explorer");
RemoteWebDriver remoteWD = null;
try {
remoteWD = new RemoteWebDriver(new
URL("http://10.172.10.1:4444/wd/hub"),capabilities);
V
\
\
\
\
\
Qi
\
'k
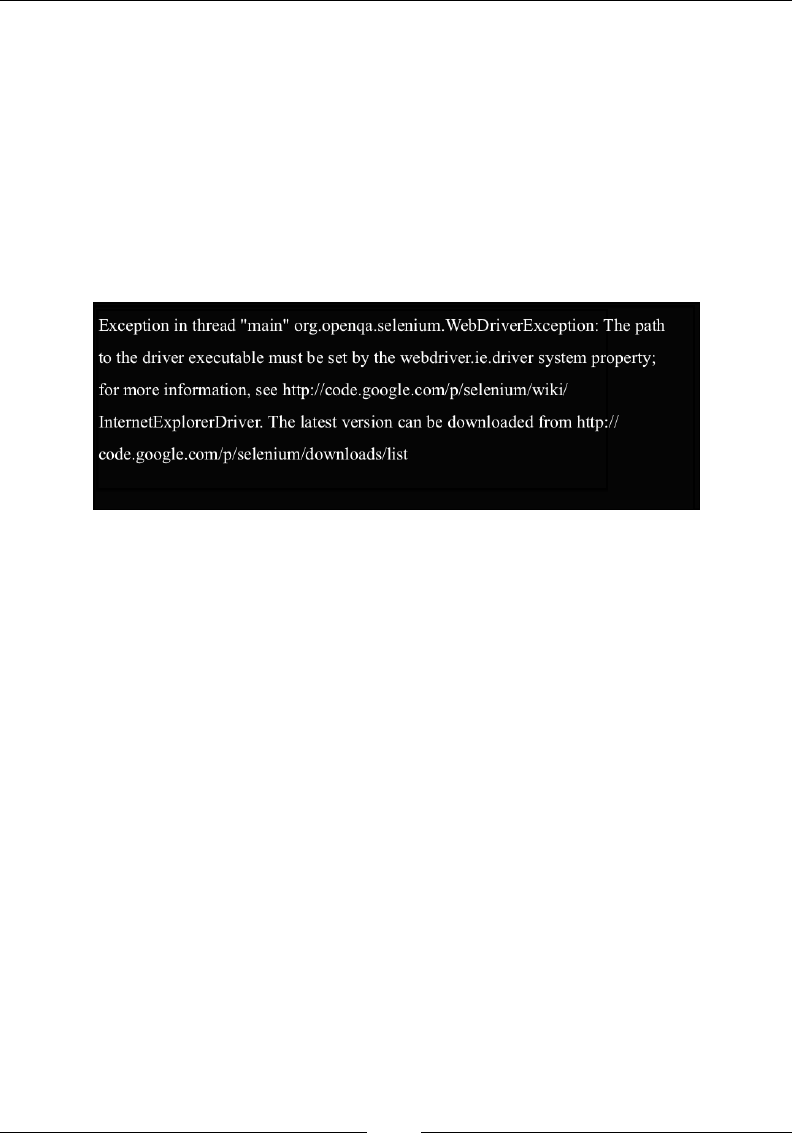
Exploring RemoteWebDriver and WebDriverBackedSelenium
[]
} catch (MalformedURLException e) {
e.printStackTrace();
}
remoteWD.get("http://www.google.com");
WebElement element = remoteWD.findElement(By.name("q"));
element.sendKeys("Packt Publishing");
}
}
We are passing "internet explorer" to the setBrowserName() method. Now, if
you try to execute this code, you will see the following exception:
The exception says that we have set the path for the IE Driver executable. This is
a little different from Firefox Driver, because the RemoteWebDriver server has the
Firefox Driver bundle within it's JAR and can thus launch it whenever required. But,
for IE Driver, you need to specify the path for the executable explicitly. Stopping the
RemoteWebDriver server and restarting it using the following command will do this:
C:\>java -Dwebdriver.ie.driver="C:\IEDriverServer.exe" -jar selenium-
server-standalone-2.33.0.jar
Now the RemoteWebDriver server knows the location of your IE Driver and will
launch it whenever there is a request for the IE browser from the RemoteWebDriver
client. Try executing the preceding test script now, and you should see the IE
browser getting launched and executing your test commands. The output on the
console of the RemoteWebDriver server will appear as follows:
10:32:20.808 INFO - Executing: [new session: {browserName=internet
explorer}] at URL: /session)
10:32:20.811 INFO - Creating a new session for Capabilities
[{browserName=internet explorer}]
Started InternetExplorerDriver server (32-bit)
2.35.3.0
Listening on port 3382
Exception
in
thread
"main"
org.openqa.selenium.WebDriverException:
The
path
to
the
driver
executable
must
be
set
by
the
webdriver.ie.
driver
system
property;
for
more
information,
see
http://eode.google.eom/p/selenium/wiki/
IntemetExplorerDriver.
The
latest
version
can
be
downloaded
from
http://
code.google.com/p/selenium/downloads/list
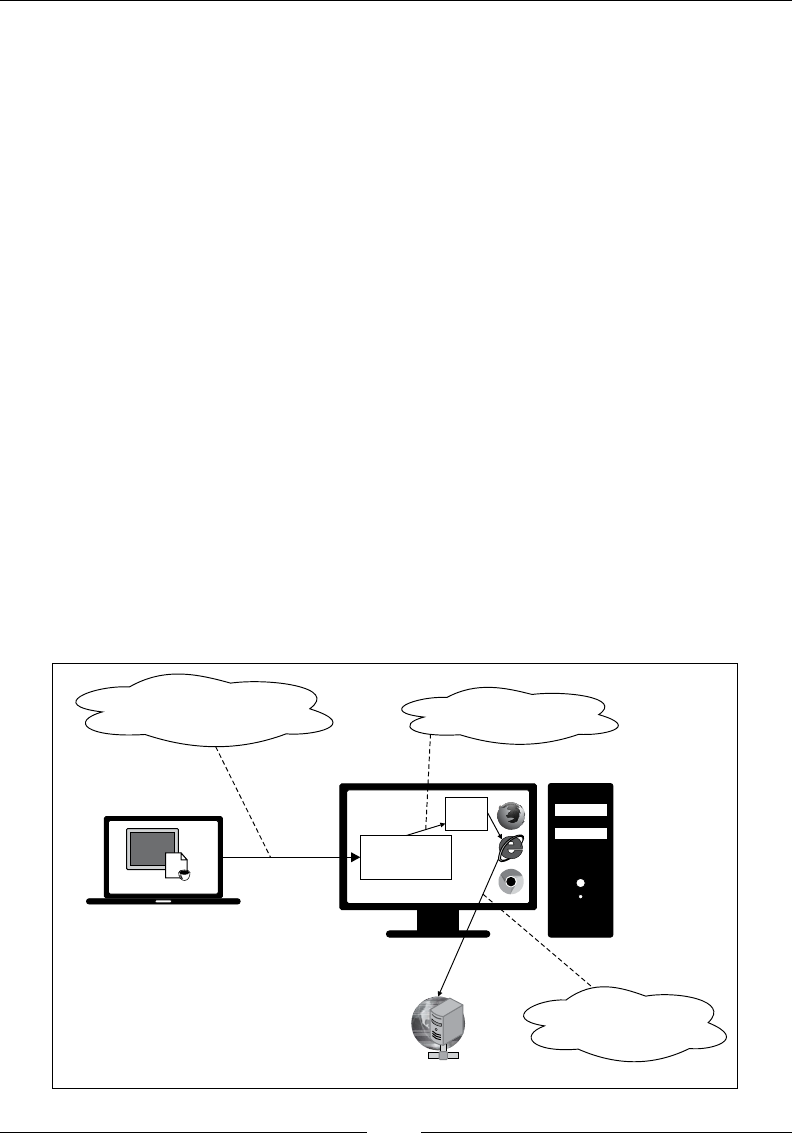
Chapter 7
[ 151 ]
10:32:23.377 INFO - Done: /session
10:32:23.392 INFO - Executing: org.openqa.selenium.remote.server.handler.
GetSessionCapabilities@37783b at URL: /se
ssion/357fd3ed-3165-4284-a165-7af59f8034b6)
10:32:23.395 INFO - Done: /session/357fd3ed-3165-4284-a165-7af59f8034b6
10:32:23.419 INFO - Executing: [get: http://www.google.com] at URL: /
session/357fd3ed-3165-4284-a165-7af59f8034b6/
url)
10:32:25.071 INFO - Done: /session/357fd3ed-3165-4284-a165-7af59f8034b6/
url
10:32:25.083 INFO - Executing: [find element: By.name: q] at URL: /
session/357fd3ed-3165-4284-a165-7af59f8034b6/element)
10:32:25.122 INFO - Done: /session/357fd3ed-3165-4284-a165-7af59f8034b6/
element
10:32:25.136 INFO - Executing: [send keys: 0 org.openqa.selenium.support.
events.EventFiringWebDriver$EventFiringWe
bElement@57f37f37, [Packt Publishing]] at URL: /session/357fd3ed-3165-
4284-a165-7af59f8034b6/element/0/value)
10:32:25.625 INFO - Done: /session/357fd3ed-3165-4284-a165-7af59f8034b6/
element/0/value
So, the RemoteWebDriver server has started the IE Driver, created a connection
with it, and started executing the three test script commands. The remote test script
execution scenario looks as follows:
Test cript using Web riversD
Client libraries support in
Java, Ruby, Python, and so on
Web Server hosting WAUT
>_
RemoteWebDriver
Server
IE
Driver
Connection made on
http://10.172.10.1:4444/wd/hub
Connection made to
http://www.google.com from
browser
Connection made to
http://localhost:<random-port>/
Different browsers located
on a different machine.
\
\
a
\
'k

Exploring RemoteWebDriver and WebDriverBackedSelenium
[]
8VLQJ5HPRWH:HE'ULYHUDQGWKH&KURPH
browser
Using RemoteWebDriver with the Chrome browser is exactly the same as the IE
browser. The browser name should be set to "chrome" for the setBrowserName()
method and the RemoteWebDriver server should be started with the following
command:
C:\>java -Dwebdriver.ie.driver="C:\IEDriverServer.exe"
-Dwebdriver.chrome.driver="C:\chromedriver.exe"
-jar selenium-server-standalone-2.33.0.jar
Now, this RemoteWebDriver server is ready to accept requests from
RemoteWebDriver clients for both IE and Chrome browsers.
The test script for the Chrome browser will appear as follows:
public class UsingRemoteWebDriverAndChromeBrowser {
public static void main(String... args){
DesiredCapabilities capabilities
= new DesiredCapabilities();
capabilities.setBrowserName("chrome");
RemoteWebDriver remoteWD = null;
try {
remoteWD = new RemoteWebDriver(new
URL("http://10.172.10.1:4444/wd/hub"),capabilities);
} catch (MalformedURLException e) {
e.printStackTrace();
}
remoteWD.get("http://www.google.com");
WebElement element = remoteWD.findElement(By.name("q"));
element.sendKeys("Packt Publishing");
}
}
The console output for the RemoteWebDriver server, after executing the preceding
test script, is as follows:
12:54:59.407 INFO - Executing: [new session: {browserName=chrome}] at
URL: /session)
12:54:59.517 INFO - Creating a new session for Capabilities
[{browserName=chrome}]
Starting ChromeDriver (v2.2) on port 24483
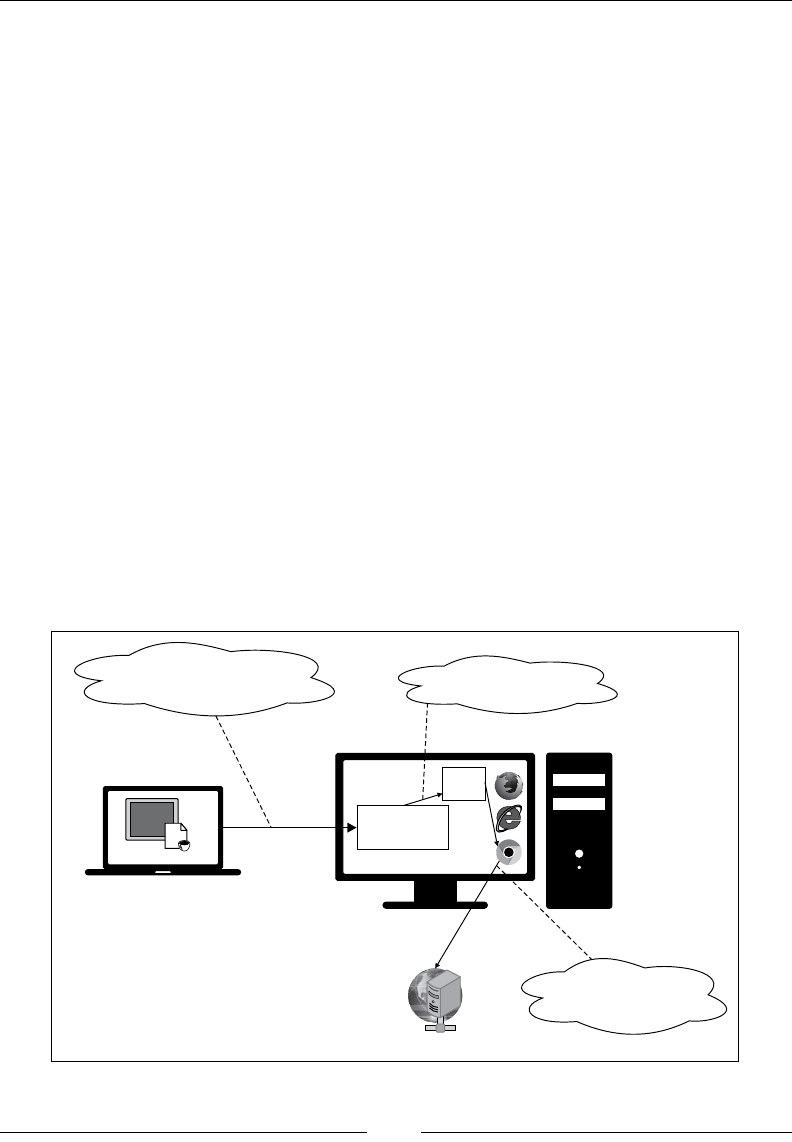
Chapter 7
[]
12:55:01.544 INFO - Done: /session
12:55:01.558 INFO - Executing: org.openqa.selenium.remote.server.handler.
GetSessionCapabilities@683e68 at URL: /se
ssion/bfd0c71d-e326-4286-9f92-fa3046a1ccb7)
12:55:01.562 INFO - Done: /session/bfd0c71d-e326-4286-9f92-fa3046a1ccb7
12:55:01.586 INFO - Executing: [get: http://www.google.com] at URL: /
session/bfd0c71d-e326-4286-9f92-fa3046a1ccb7/
url)
12:55:04.655 INFO - Done: /session/bfd0c71d-e326-4286-9f92-fa3046a1ccb7/
url
12:55:04.669 INFO - Executing: [find element: By.name: q] at URL: /
session/bfd0c71d-e326-4286-9f92-fa3046a1ccb7/element)
12:55:04.799 INFO - Done: /session/bfd0c71d-e326-4286-9f92-fa3046a1ccb7/
element
12:55:04.816 INFO - Executing: [send keys: 0 org.openqa.selenium.support.
events.EventFiringWebDriver$EventFiringWe
bElement@4f4b7de3, [Packt Publishing]] at URL: /session/bfd0c71d-e326-
4286-9f92-fa3046a1ccb7/element/0/value)
12:55:05.361 INFO - Done: /session/bfd0c71d-e326-4286-9f92-fa3046a1ccb7/
element/0/value
The RemoteWebDriver server has started the Chrome Driver on port 24483 and
executed the test script commands on the Chrome browser. The remote test script
execution scenario in this case looks as shown in the following diagram:
Test cript using Web riversD
Client libraries support in
Java, Ruby, Python, and so on
Web Server hosting WAUT
>_
RemoteWebDriver
Server
Chrome
Driver
Connection made on
http://10.172.10.1:4444/wd/hub
Connection made to
http://www.google.com from
browser
Connection made to
http://localhost:<random-port>/
Different browsers located
on a different machine.
\
V
m
\
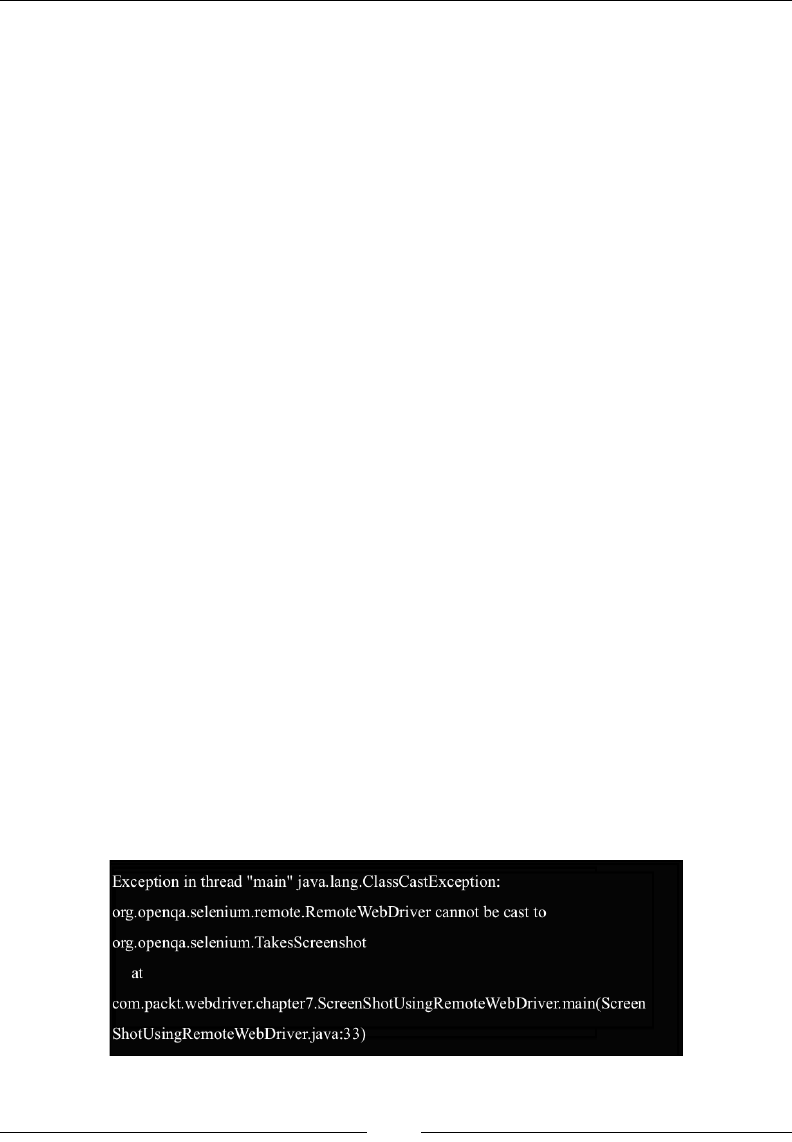
Exploring RemoteWebDriver and WebDriverBackedSelenium
[]
([WHQGLQJWKH5HPRWH:HE'ULYHUFOLHQWWRWDNH
screenshots
If you compare the signatures of RemoteWebDriver to those of Firefox Driver, IE
Driver, or Chrome Driver, you will observe that all of the other drivers implement
the TakesScreenshot interface. This will allow the instances of those drivers to take
a screenshot of your page, which is loaded on the browsers. But, if you try to do
the same thing using the instance of a RemoteWebDriver, your test script will fail,
throwing a ClassCastException.
The following is the code you can try:
public class ScreenShotUsingRemoteWebDriver {
public static void main(String... args){
DesiredCapabilities capabilities
= new DesiredCapabilities();
capabilities.setBrowserName("firefox");
WebDriver remoteWD = null;
try {
remoteWD = new RemoteWebDriver(new
URL("http://10.172.10.1:4444/wd/hub"),capabilities);
} catch (MalformedURLException e) {
e.printStackTrace();
}
remoteWD.get("http://www.google.com");
WebElement element = remoteWD.findElement(By.name("q"));
element.sendKeys("Packt Publishing");
File scrFile = ((TakesScreenshot)remoteWD).
getScreenshotAs(OutputType.FILE);
System.out.println(scrFile.getAbsolutePath());
}
}
The test script will fail with the following exception:
Exception
in
thread
"main"
java.lang.ClassCastException:
org.openqa.selenium.remote.RemoteWebDriver
cannot
be
cast
to
org.openqa.selenium.TakesScreenshot
at
com.packt.webdriver.chapter7.ScreenShotUsingRemoteWebDriver.main(Screen
ShotUsingRemoteWebDriver.java:33)

Chapter 7
[ 155 ]
This is because RemoteWebDriver doesn't implement the TakesScreenshot
interface. There are the following two ways to deal with this:
7KHÀUVWDSSURDFKLVWRFUHDWH\RXURZQWebDriver class that extends the
RemoteWebDriver class and implements the TakesScreenshot interface
by providing the implementation for the getScreenshotAs() method, as
shown in the following code:
public class CustomRemoteWebDriver extends RemoteWebDriver
implements TakesScreeshot {
public <X> X getScreenshotAs(OutputType<X> target) {
// Get the screenshot as base64.
String base64 = execute(DriverCommand.SCREENSHOT).
getValue().toString();
// ... and convert it.
return target.convertFromBase64Png(base64);
}
}
Instantiate the CustomRemoteWebDriver class instead of directly instantiating
RemoteWebDriver in your class, which will allow you to take the screenshot.
The second approach is to use the Augmenter class. This will enhance
the RemoteWebDriver instance based on the set DesiredCapabilities.
This is still in its early stages of implementation, so using it may result in
unexpected results sometimes. Using this, you can take the screenshots.
Our test script, after using the Augmenter class, will look as follows:
public class ScreenShotUsingRemoteWebDriver {
public static void main(String... args){
DesiredCapabilities capabilities = new
DesiredCapabilities();
capabilities.setBrowserName("firefox");
WebDriver remoteWD = null;
try {
remoteWD = new RemoteWebDriver(new
URL("http://10.172.10.1:4444/wd/hub"),capabilities);
} catch (MalformedURLException e) {
e.printStackTrace();
}
remoteWD.get("http://www.google.com");
WebElement element = remoteWD.findElement(By.name("q"));
element.sendKeys("Packt Publishing");

Exploring RemoteWebDriver and WebDriverBackedSelenium
[]
remoteWD = new Augmenter().augment(remoteWD);
File scrFile = ((TakesScreenshot)remoteWD).
getScreenshotAs(OutputType.FILE);
System.out.println(scrFile.getAbsolutePath());
}
}
Thus, using the RemoteWebDriver class, you will still be able to take
screenshots of the web pages loaded on your browsers.
Understanding the JSON wire protocol
All this while, in many places, we have mentioned that WebDriver uses the JSON
wire protocol to communicate between client libraries and different drivers (that
is, Firefox Driver, IE Driver, Chrome Driver, and so on) implementations. In this
section, we will see exactly what it is and which different JSON APIs a client library
should implement to talk to the drivers.
JavaScript Object Notation (JSON) is used to represent objects with complex data
structures. It is used primarily to transfer data between a server and a client on the
web. It has very much become an industry standard for various REST web services,
playing a strong alternative to XML.
$VDPSOH-621ÀOHVDYHGDVD.jsonÀOHZLOOORRNDVIROORZV
{
"firstname": "John",
"lastname": "Doe",
"address": {
"streetnumber":"678",
"street":"Victoria Street",
"city":"Richmond",
"state":"Victoria",
"country":"Australia"
}
"phone":"+61470315430"
}
A client can send a person's details to a server in the preceding JSON format,
which the server can parse and create an instance of the Person object for use in
its execution. Later, the response can be sent back by the server to the client in the
JSON format, the data of which the client can use to create an object of a class. This
process of converting an object's data to the JSON format and JSON-formatted data
to an object is named serialization and de-serialization, respectively, which is quite
common in REST web services these days.

Chapter 7
[]
Our WebDriver uses the same approach to communicate between client libraries
(language bindings) and drivers, such as Firefox Driver, IE Driver, Chrome Driver,
and so on. Similarly, the RemoteWebDriver client and the RemoteWebDriver server
use the JSON wire protocol to communicate among themselves. But, all of these
drivers use it under the hood, hiding all of the implementation details from us and
making our lives simpler. For any existing or new client library, they should provide
implementations for building all of the WebDriver JSON APIs, and any existing
or new WebDriver should handle these requests and provide implementations for
them. The list of APIs for various actions that we can take on a webpage is as follows:
/status
/session
/sessions
/session/:sessionId
/session/:sessionId/timeouts
/session/:sessionId/timeouts/async_script
/session/:sessionId/timeouts/implicit_wait
/session/:sessionId/window_handle
/session/:sessionId/window_handles
/session/:sessionId/url
/session/:sessionId/forward
/session/:sessionId/back
/session/:sessionId/refresh
/session/:sessionId/execute
/session/:sessionId/execute_async
/session/:sessionId/screenshot
/session/:sessionId/ime/available_engines
/session/:sessionId/ime/active_engine
. . .
. . .
/session/:sessionId/touch/flick
/session/:sessionId/touch/flick
/session/:sessionId/location
/session/:sessionId/local_storage
/session/:sessionId/local_storage/key/:key
/session/:sessionId/local_storage/size
/session/:sessionId/session_storage
/session/:sessionId/session_storage/key/:key
/session/:sessionId/session_storage/size
/session/:sessionId/log
/session/:sessionId/log/types
/session/:sessionId/application_cache/status

Exploring RemoteWebDriver and WebDriverBackedSelenium
[]
The complete documentation is available at https://code.google.com/p/
selenium/wiki/JsonWireProtocol.
The client libraries will translate your test script commands to the JSON format and
send the requests to the appropriate WebDriver API. The WebDriver will parse these
requests and take necessary actions on the web page.
Let us see that with an example. Suppose your test script has a the following code:
driver.get("http://www.google.com");
The client library will translate that to JSON by building a JSON payload and post
the request to the appropriate API. In this case, the API that handles the driver.
get(URL) method is as follows:
/session/:sessionId/url
The following code shows what happens in the client library layer before the request
is sent to the driver; the request is sent to the RemoteWebDriver server running on
10.172.10.1:4444:
HttpClient httpClient = new DefaultHttpClient();
HttpPost postMethod = new HttpPost("http://10.172.10.1:4444/wd/hub/
session/"+sessionId+"/url");
JSONObject jo=new JSONObject();
jo.put("url","http://www.google.com");
StringEntity input = new StringEntity(jo.toString());
input.setContentEncoding("UTF-8");
input.setContentEncoding(new BasicHeader(HTTP.CONTENT_TYPE,
"application/json"));
postMethod.setEntity(input);
HttpResponse response = httpClient.execute(postMethod);
The RemoteWebDriver server will forward that request to the driver; the driver will
execute the test script commands that arrive in the preceding format on the web
application under the test that is loaded in the browser.
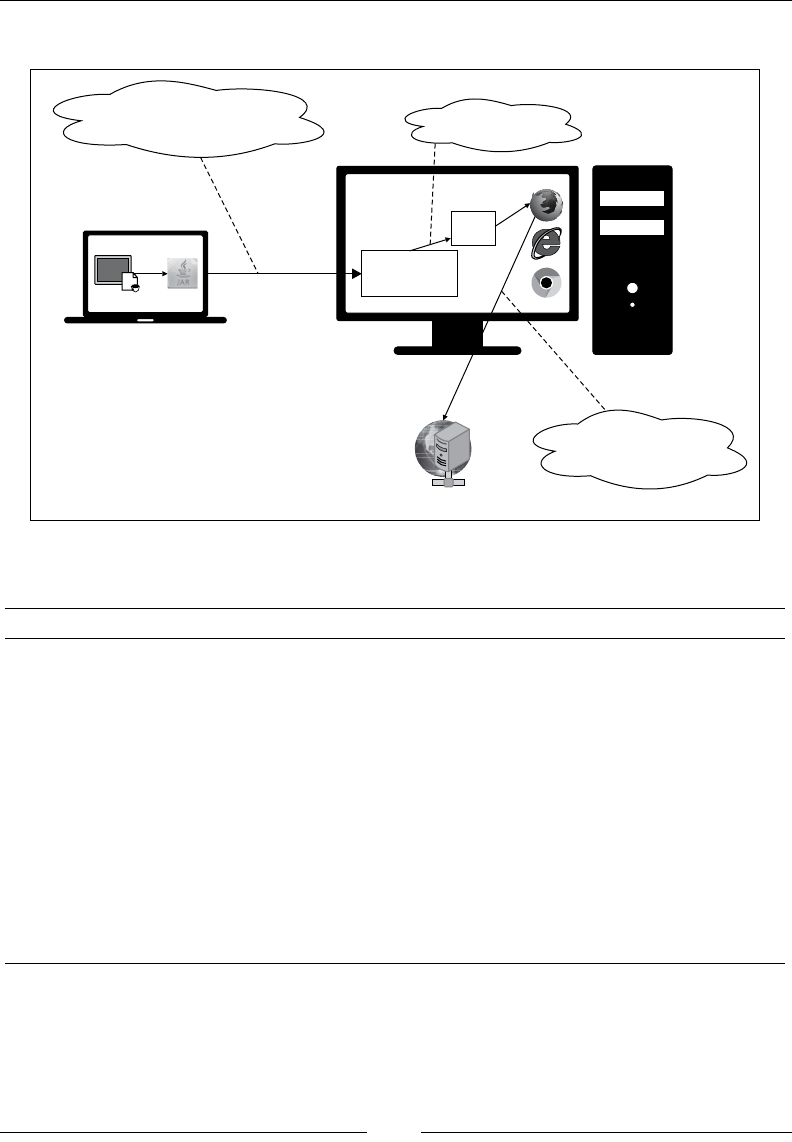
Chapter 7
[]
7KHIROORZLQJGLDJUDPVKRZVZKDWGDWDÁRZVDWHDFKVWDJH
Test cript using Web riversD
Client libraries support in
Java, Ruby, Python, and so on
Web Server hosting WAUT
>_
RemoteWebDriver
Server
Firefox
Driver
Native
Code
Connection made on
http://10.172.10.1:4444/wd/hub
Connection made to
http://www.google.com from
browser
Connection made to
http://localhost:7055/
Different browsers located
on a different machine.
bd
c
a
The following table shows which command is executed at each stage:
Stage in the preceding diagram Command executed at that stage
adriver.get("http://www.google.com");
b"http://10.172.10.1:4444/wd/hub/
session/"+sessionId+"/url"
{
"url": "http://www.google.com"
}
c"http://localhost:7705/
{
"url": "http://www.google.com"
}
Native Code Talks natively to the browser
d"http://www.google.com"
\
\
\
\
V
\

Exploring RemoteWebDriver and WebDriverBackedSelenium
[]
,QWKHSUHYLRXVGLDJUDPWKHÀUVWVWDJHLVFRPPXQLFDWLRQEHWZHHQ\RXUWHVWVFULSW
DQGFOLHQWOLEUDU\7KHGDWDRUFRPPDQGWKDWÁRZVEHWZHHQWKHPLVUHSUHVHQWHG
as a in the image; a is nothing but the following code:
driver.get("http://www.google.com");
The client library, as soon as it receives the preceding command, will convert it to
the JSON format and communicate with the RemoteWebDriver server, which is
represented as b.
Next, the RemoteWebDriver server forwards the JSON payload request to the Firefox
'ULYHULQWKLVFDVHDQGWKHGDWDWKDWÁRZVWKURXJKLVUHSUHVHQWHGDVc.
Firefox Driver will speak to the Firefox browser natively, and then the browser will
send a request for the asked URL to load, which is represented as d.
Replacing the client library with your
own code
Replacing the client library with your own code is probably is not the best idea to
replace the client libraries with your code in real-time testing, because they handle all
of the serialization and de-serialization while letting you concentrate on writing the
test scripts for your application. But, let's do that to get a more clear understanding
of what exactly our client libraries do and how they communicate with the drivers
on the JSON wire protocol.
7RGRWKLV\RXQHHGWRGRZQORDGVRPH-$5ÀOHVDVVKRZQLQWKHIROORZLQJVWHSV
1. 7KHÀUVWRQHLVWKHApache HttpClient and the Apache Wink. The Apache
HttpClient is used to send requests from a client to the server over HTTP.
Apache Wink is used to create JSON-formatted objects. You can download
Apache HttpClient 4.3 from http://hc.apache.org/downloads.cgi.
'RZQORDGWKH=,3ÀOHDQGDGGWKH-$5ÀOHVXQGHUWKHlib folder to your
project in Eclipse. You can download Apache Wink 1.4 from http://wink.
apache.org/downloads.html'RZQORDGWKH=,3ÀOHDQGDGGWKH-$5ÀOHV
from the lib and dist folders.
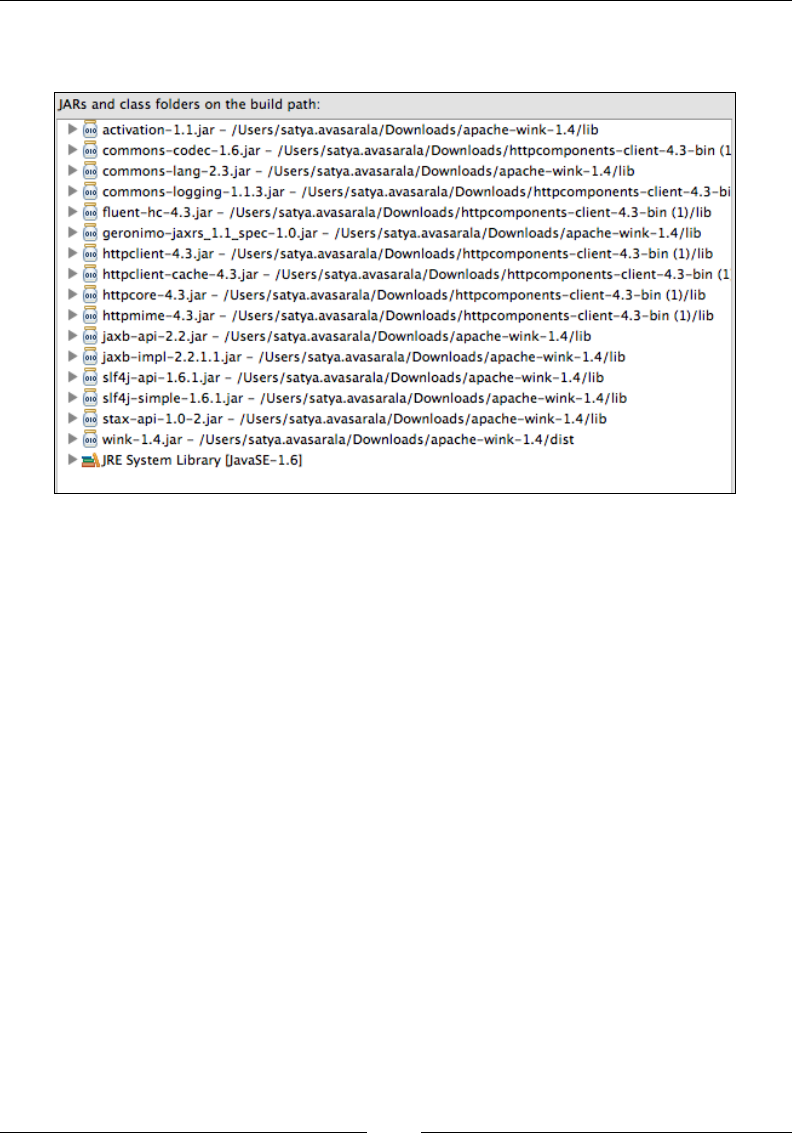
Chapter 7
[]
2. $IWHUDGGLQJWKH-$5ÀOHV\RXU-DYDEXLOGSDWKLQ(FOLSVHVKRXOGORRN
as follows:
3. Now that our project is set up, let's see the following test script before
we start:
public class TestScriptUsingClientLibrary {
public static void main(String... args){
// Create a session with RemoteWebDriver
// to open Firefox
DesiredCapabilities capabilities = new
DesiredCapabilities();
capabilities.setBrowserName("firefox");
RemoteWebDriver remoteWD = null;
try {
remoteWD = new RemoteWebDriver(new
URL("http://10.172.10.1:4444/wd/hub"),capabilities);
} catch (MalformedURLException e) {
e.printStackTrace();
}
// Navigate to google Search Page
remoteWD.get("http://www.google.com");
// Find SearchBox Element
WebElement element = remoteWD.findElement(By.name("q"));
JARs
and
class
folders
on
the
build
path:
§
activation-
1.1.
jar
-
/Users/satya.avasarala/Downloads/apache-wink-
1.4/lib
@
commons-codec-1.6.jar
-
/Users/satya.avasarala/Downloads/httpcomponents-dient-4.3-bin
(1
@
commons-lang-2.3.jar
-
/Users/satya.avasarala/Downloads/apache-wink-1.4/lib
@
commons-logging-1.
1.3.jar
-
/Users/satya.avasarala/Downloads/httpcomponents-client-4.3-bi
§
fluent-hc-4.3.jar
-
/Users/satya.avasarala/Downloads/httpcomponents-client-4.3-bin
(l)/lib
§
geronimo-jaxrs_l.l_spec-1.0.jar
-
/Users/satya.avasarala/Downloads/apache-wink-1.4/lib
§
httpclient-4.3.jar
-
/Users/satya.avasarala/Downloads/httpcomponents-dient-4.
3-bin
(l)/lib
§
httpclient-cache-4.3.jar
-
/Users/satya.avasarala/Downloads/httpcomponents-client-4.
3-bin
(1
§;
httpcore-4.3.jar
-
/Users/satya.avasarala/Downloads/httpcomponents-client-4.3-bin
(l)/lib
§
httpmime-4.3.jar
-
/Users/satya.avasarala/Downloads/httpcomponents-client-4.3-bin
(l)/lib
§
jaxb-api-2.2.jar
-
/Users/satya.avasarala/Downloads/apache-wink-
1.4/lib
§
jaxb-impl-2.2.1.1.jar
-
/Users/satya.avasarala/Downloads/apache-wink-
1.4/lib
§
slf4j-api-1.6.1.jar
-
/Users/satya.avasarala/Downloads/apache-wink-1.4/lib
§
slf4j-simple-1.6.1.jar
-
/Users/satya.avasarala/Downloads/apache-wink-1.
4/lib
§
stax-api-l.0-2.jar
-
/Users/satya.avasarala/Downloads/apache-wink-1.
4/lib
§
wink-1.4.jar
-
/Users/satya.avasarala/Downloads/apache-wink-1.4/dist
S4JRE
System
Library
[java5E-1.6|

Exploring RemoteWebDriver and WebDriverBackedSelenium
[]
// Type Packt Publishing in SearchBox
element.sendKeys("Packt Publishing");
// End the Session
remoteWD.quit();
}
}
4. The preceding code shows how we normally add client libraries (selenium-
2.33.0.jar) to our project. Now we will try to replace this and do what a
client library does to communicate with the remote driver. The code for that
is as follows:
public class TestScriptUsingJSONWireProtocol {
public static void main(String... args){
HttpClient httpClient = new DefaultHttpClient();
HttpResponse response=null;
String searchBox = null;
String searchButton = null;
HttpPost postMethod = null;
HttpGet getMethod = null;
HttpDelete deleteMethod = null;
try {
// Create a session with RemoteWebDriver
// to open Firefox
postMethod = new HttpPost("http://10.172.10.1:4444/wd/
hub/session");
StringEntity input=null;
JSONObject jo=new JSONObject();
jo.put("browserName","firefox");
JSONObject caps = new JSONObject();
caps.put("desiredCapabilities", jo);
System.out.println(caps.toString());
input = new StringEntity(caps.toString());
input.setContentEncoding("UTF-8");
input.setContentEncoding(new BasicHeader(HTTP.CONTENT_
TYPE, "application/json"));
postMethod.setEntity(input);
//postMethod.set
response = httpClient.execute(postMethod);

Chapter 7
[]
//Get Sessions
httpClient = new DefaultHttpClient();
getMethod = new HttpGet("http://10.172.10.1:4444/wd/hub/
sessions");
response = httpClient.execute(getMethod);
JSONObject json = new JSONObject(response.getEntity().
getContent());
System.out.println(json.toString());
String sessionId = new JSONObject(json.
getString("value").substring(1, json.getString("value").
length()-1)).getString("id");
System.out.println("Current SessionId is: "+sessionId);
// Navigate to Google Search Page
httpClient = new DefaultHttpClient();
postMethod = new HttpPost("http:// 10.172.10.1:4444/wd/
hub/session/"+sessionId+"/url");
jo=new JSONObject();
jo.put("url","http://www.google.com");
input = new StringEntity(jo.toString());
input.setContentEncoding("UTF-8");
input.setContentEncoding(new BasicHeader(HTTP.CONTENT_
TYPE, "application/json"));
postMethod.setEntity(input);
response = httpClient.execute(postMethod);
// Find SearchBox Element
httpClient = new DefaultHttpClient();
postMethod = new HttpPost("http:// 10.172.10.1:4444/wd/
hub/session/"+sessionId+"/element");
jo=new JSONObject();
jo.put("using","name");
jo.put("value","q");
input = new StringEntity(jo.toString());
input.setContentEncoding("UTF-8");
input.setContentEncoding(new BasicHeader(HTTP.CONTENT_
TYPE, "application/json"));
postMethod.setEntity(input);
response = httpClient.execute(postMethod);
json = new JSONObject(response.getEntity().getContent());
System.out.println(json.toString());
String searchBoxId = json.getJSONObject("value").
getString("ELEMENT");

Exploring RemoteWebDriver and WebDriverBackedSelenium
[]
System.out.println("SearchBox Id is : "+ searchBoxId);
//Click on SearchBox
httpClient = new DefaultHttpClient();
postMethod = new HttpPost("http:// 10.172.10.1:4444/wd/
hub/session/"+sessionId+"/element/"+searchBoxId+"/click");
response = httpClient.execute(postMethod);
// Type Packt Publishing in SearchBox
httpClient = new DefaultHttpClient();
postMethod = new HttpPost("http:// 10.172.10.1:4444/wd/
hub/session/"+sessionId+"/element/"+searchBoxId+"/value");
jo=new JSONObject();
jo.put("value",Arrays.asList(new String[]{"packt
publishing"}));
input = new StringEntity(jo.toString());
input.setContentEncoding("UTF-8");
input.setContentEncoding(new BasicHeader(HTTP.CONTENT_
TYPE, "application/json"));
postMethod.setEntity(input);
response = httpClient.execute(postMethod);
// End the Session
httpClient = new DefaultHttpClient();
deleteMethod = new HttpDelete("http:// 10.172.10.1:4444/
wd/hub/session/"+sessionId);
//response = httpClient.execute(deleteMethod);
} catch (Exception e) {
e.printStackTrace();
}
}
}
Each section in the original test script that uses a client library has an corresponding
section in the other test script that doesn't use the client library. Each command is
mapped to an API, and the necessary JSON payload is built and sent across the wire
to the server or driver. That is what your client library does.
In the previous example, we have used RemoteWebDriver; but, you can instead
talk directly to the drivers such as, Firefox Driver, IE Driver, and Chrome Driver by
replacing the RemoteWebDriver server URL with the corresponding driver URL, that
is, http://localhost:<<port_the_driver_is_running>>. You just have to make
sure the driver is up and running.

Chapter 7
[]
([SORULQJ:HE'ULYHU%DFNHG6HOHQLXP
This section is for those test script developers who have quite a few test scripts
already written in Selenium 1, also known as Selenium RC, and are planning to
move to WebDriver. Moving entirely to WebDriver is a good idea theoretically, but
when it comes to migrating the test scripts, it is a task that is going to keep you busy
for a while, depending on how abstract your current test scripts are. The WebDriver
library has provided us a class named WebDriverBackedSelenium, using which you
can start leveraging WebDriver APIs while making sure your old Selenium 1 test
VFULSWVZRUNÀQH%HIRUHZHORRNDWWebDriverBackedSelenium, let us see how the
good old Selenium 1 test scripts look.
If you remember, in Chapter 1, Introducing WebDriver and WebElements, we have
discussed the history of Selenium and seen how Selenium 1 used to work by
injecting the Selenium-core JavaScript into the browser and driving it, as shown
in the following diagram:
>_
Test-Script
using Client libraries
in Java, Python, Ruby and so on, Selenium Remote Control Server
Browsers loaded with Selenium Core
JavaScript on them
Selenese Command
to launch browser
Launch
js
js
js
Just as with RemoteWebDriver test scripts, Selenium 1 tests require a Selenium
server running to execute the test scripts against the target browser. It is the same
selenium-standalone-server.jarÀOHWKDWZHYHXVHGXQWLOQRZWRVHUYHDVD
Selenium server. A typical Selenium 1 test script will look like the following:
public class UsingSeleniumOne {
public static void main(String... args){
Selenium sel = new DefaultSelenium("localhost",4444,"*firefox",
"http://www.google.com");
sel.start();
(((*_£([
;\
!
!
I
I
1

Exploring RemoteWebDriver and WebDriverBackedSelenium
[]
sel.open("http://www.google.com.au/");
try {
Thread.sleep(20000);
} catch (InterruptedException e) {
e.printStackTrace();
}
sel.type("name=q", "Packt Publishing");
sel.click("name=btnG");;
}
}
The DefaultSelenium class is the implementation of the Selenium interface. The
parameters passed to it are as follows:
The host
The port on which the Selenium server is running
The target browser on which the test script should be getting executed
The base URL or the initial URL of the web application under test
Then, we start the Selenium test script execution and proceed with using
Selenese commands.
Having similar test scripts in your test base, if you decide to go with Selenium 2, that
is, WebDriver, and at the same time, \RXDUHVXUHWKHH[LVWLQJWHVWVZRUNÀQH\RXKDYH
to resort to the WebDriverBackedSelenium class. The WebDriverBackedSelenium
class is an extension of DefaultSelenium. While using WebDriverBackedSelenium,
you should know one thing: using this class, your test scripts will still go through
DefaultSelenium, that is, the Selenium 1 way of invoking browser and executing your
tests. The main reason you modify your test scripts to use WebDriverBackedSelenium
is because if you want to extend or implement new test scripts, from now on, you can
use WebDriver APIs while not breaking the existing stuff. Let us see this with the help
of an example. Let us try to convert the previous test script using DefaultSelenium to
using WebDriverBackedSelenium.
7KHPRGLÀHGFRGHZLOOORRNDVIROORZV
public class UsingWebDriverBackedSelenium {
public static void main(String... args){
WebDriver driver = new FirefoxDriver();
String baseUrl = "http://www.google.com.au/";
Selenium sel = new WebDriverBackedSelenium(driver, baseUrl);
sel.open("http://www.google.com.au/");
try {

Chapter 7
[]
Thread.sleep(20000);
} catch (InterruptedException e) {
e.printStackTrace();
}
sel.type("name=q", "Packt Publishing");
sel.click("name=btnG");
}
}
In the Selenium 1 code, consider the following lines of code:
Selenium sel = new DefaultSelenium("localhost",4444,"*firefox",
"http://www.google.com");
sel.start();
They will be replaced with:
WebDriver driver = new FirefoxDriver();
String baseUrl = "http://www.google.com.au/";
Selenium sel = new WebDriverBackedSelenium(driver, baseUrl);
From that point forward, the rest of the test script commands will go to the
DefaultSelenium instance via the WebDriverBackedSelenium class as it extends
the DefaultSelenium class. At this point, if you want to extend your test scripts
to use some of the WebDriver APIs, you can use the following method to get the
underlying WebDriver:
public WebDriver getWrappedDriver()
Using this method, you can handle the WebDriver instance, which is the same
instance of Selenium that our test script has used so far to execute its commands.
Once you get a handle on the WebDriver instance, you can invoke various
WebDriver APIs. So, to reiterate, replacing the DefaultSelenium code with the
WebDriverBackedSelenium code will not make your existing test script commands
use WebDriver APIs; they still go through the Selenium 1 libraries, and you need
to replace those methods with the WebDriver API methods. However, using the
getWrappedDriver() method of WebDriverBackedSelenium, you can extend your
test script to use the WebDriver APIs.
You should look forward to migrating your test scripts from using Selenium 1
methods to WebDriver APIs. Some of the advantages of migrating test scripts from
using Selenium 1 to Selenium 2 are as follows:
Better object-oriented APIs in WebDriver compared with Selenium 1 APIs
Better emulation of user actions of WebDriver than that of Selenium 1
Most browsers support WebDriver over Selenium 1

Exploring RemoteWebDriver and WebDriverBackedSelenium
[]
6XPPDU\
Thus, we have seen what RemoteWebDriver is and how to execute test scripts
remotely on a different machine using the RemoteWebDriver server and the
RemoteWebDriver client. This type of execution of test scripts is something you, as a
WHVWVFULSWGHYHORSHUZLOOFRPHDFURVVRIWHQ6RPDVWHULQJLWZLOOGHÀQLWHO\EHXVHIXO
You have also seen what the JSON wire protocol is and the work our client libraries
do behind the scenes to send and receive our requests and responses to and from the
GULYHUV5HSODFLQJWKHPZLWK\RXUFRGHLVGHÀQLWHO\QRWDQRSWLRQEXWNQRZLQJKRZ
WKH\ZRUNDQGWKH$3,UHIHUHQFHWKH\XVHLVGHÀQLWHO\XVHIXO
Finally, you now know how to enhance your existing test scripts and
test frameworks using Selenium 1 to work with WebDriver APIs using
WebDriverBackedSelenium.
In the next chapter, we will see what a Selenium Grid is and how it works.

Understanding Selenium Grid
Now that we know what Remote WebDriver is and how it works, we are ready
to learn about Selenium Grid. In this chapter, we will cover the following topics:
Why we need Selenium Grid
What Selenium Grid is
How we can use Selenium Grid
Test cases using Selenium Grid
&RQÀJXULQJ6HOHQLXP*ULG
([SORULQJ6HOHQLXP*ULG
Let us try to understand why we need Selenium Grid by analyzing a scenario. You
have a web application that you have to test on the IE 8 browser on Windows XP
platform, IE 10 browser on Windows 8, Chrome on Mac OS X, and Firefox on Red
Hat Linux machines. This can be achieved by altering your test case to point to the
Remote WebDriver running on the target platform (that is, Windows XP, Windows
8, Mac, or Linux), as shown in the following code:
WebDriver driver = new RemoteWebDriver(new URL("http://<WindowsXP-
ip>:4444/wd/hub"), capabilities);
WebDriver driver = new RemoteWebDriver(new URL("http://<Windows8-
ip>:4444/wd/hub"), capabilities);
WebDriver driver = new RemoteWebDriver(new URL("http://<MacOS-
ip>:4444/wd/hub"), capabilities);
WebDriver driver = new RemoteWebDriver(new URL("http://<Linux-
ip>:4444/wd/hub"), capabilities);
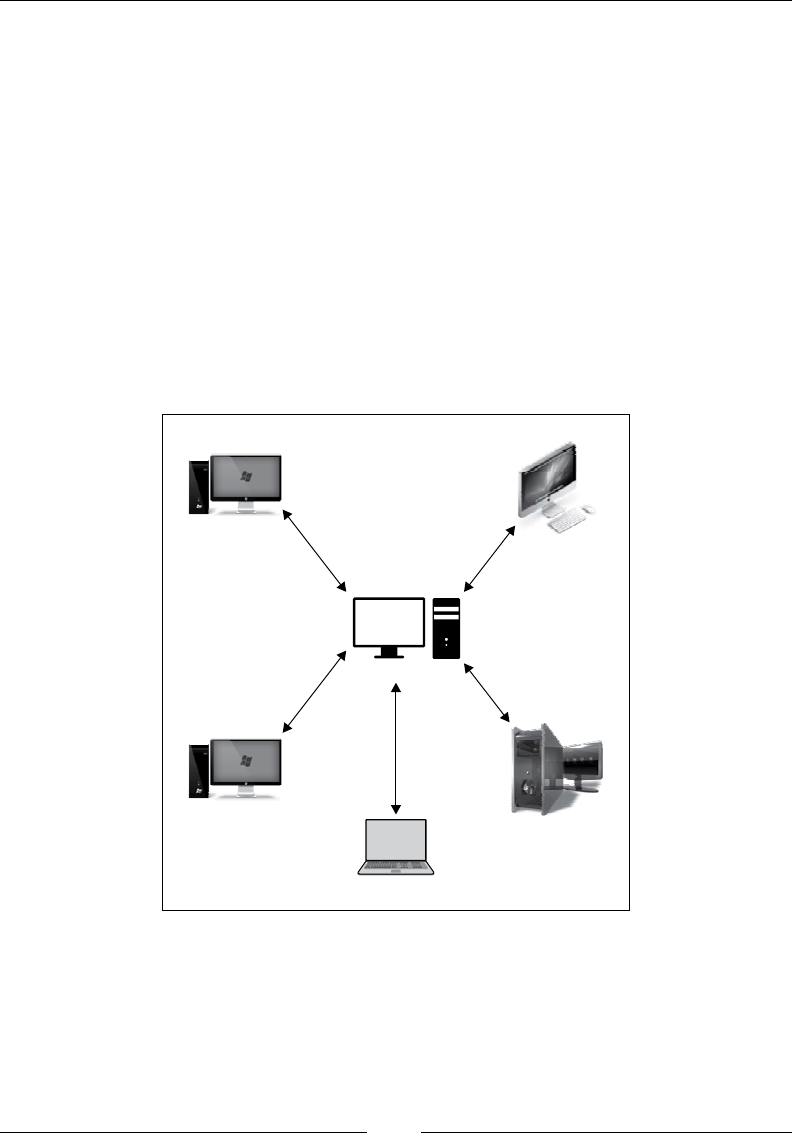
Understanding Selenium Grid
[]
This is something we have learned in the previous chapter. If you observe, in the
preceding code, your test scripts are tightly coupled to the machines that host the
target platform and the target browsers. If the Windows 8 host changes, you should
refactor your test script to handle that. This is not an ideal way of designing your
tests. The focus of your test scripts should be on the functionality of your web
application and not on the infrastructure that is used to execute these test scripts.
There should be a central point to manage all the different environments. To solve
this, we make use of Selenium Grid.
Selenium Grid is a testing infrastructure with several different platforms (such as
Windows, Mac, Linux, and so on) for your tests to execute, and these platforms are
managed from a central point. The central point known as hub, has the information
of all the different testing platforms known as nodes, and assigns these nodes to
execute tests whenever the test scripts request them. The following diagram shows
what a Selenium Grid looks like:
Hub
Safari on Mac OSX
Node
Node
IE on Windows8XP
Machine hosting test script
Firefox on Linux
Node
Node
IE10 on Windows 8
In the preceding diagram, there is one hub, four nodes of different platforms, and the
machine where your test scripts are located. The test script will communicate with
the hub and request for a target platform to be executed. The hub assigns a node
with the target platform to the test script. The node executes the test script and sends
the result back to the hub, which in turn forwards the results to the test script. This is
what Selenium Grid looks like and how works at a high level.
R.
&
R

Chapter 8
[]
Now that we have seen how Selenium Grid works theorectically, let us see what
works as hubs and nodes in it. Fortunately, as we are dealing with Selenium Grid 2,
we can use the same Remote WebDriver server that we used in the previous chapter
to work as Selenium Grid as well. If you remember, we have used selenium-
server-standalone-2.33.0.jar to start as a Remote WebDriver. We can use the
VDPH-$5ÀOHWREHVWDUWHGLQWKHKXEPRGHRQWKHKXEPDFKLQHDQGDFRS\RIWKH
-$5ÀOHFDQEHVWDUWHGLQWKHQRGHPRGHRQWKHQRGHPDFKLQH,Q6HOHQLXP*ULG
Remote WebDriver and Selenium Grid jars used to be different. Now, both those
functionalities are combined into one JAR. Try executing the following command
RQ\RXU-$5ÀOH
java –jar selenium-server-standalone-2.33.0.jar –help
The following output shows how to use the server in a grid environment:
----------------------------------
To use in a grid environment :
----------------------------------
Usage :
-hubConfig:
(hub) a JSON file following grid2 format that defines the hub
properties.
-nodeTimeout:
(node) <XXXX> the timeout in seconds before the hub
automatically ends a test that hasn't had any activity in the
last X seconds. The browser will be released for another test to
use. This typically takes care of the client crashes.
-throwOnCapabilityNotPresent:
(hub) <true | false> default to true. If true, the hub will
reject test requests right away if no proxy is currently
registered that can host that capability. Set it to false to have
the request queued until a node supporting the capability is
added to the grid.
-maxSession:
(node) max number of tests that can run at the same time on the
node, independently of the browser used.

Understanding Selenium Grid
[]
-hub:
(node) <http://localhost:4444/grid/register> : the url that will
be used to post the registration request. This option takes
precedence over -hubHost and -hubPort options.
-hubPort:
(node) <xxxx> : the port listened by a hub the registration
request should be sent to. Default to 4444. Option -hub takes
precedence over this option.
-registerCycle:
(node) how often in ms the node will try to register itself
again. Allow to restart the hub without having to restart the
nodes.
-capabilityMatcher:
(hub) a class implementing the CapabilityMatcher interface.
Defaults to
org.openqa.grid.internal.utils.DefaultCapabilityMatcher. Specify
the logic the hub will follow to define if a request can be
assigned to a node. Change this class if you want to have the
matching process use regular expression instead of exact match
for the version of the browser for instance. All the nodes of a
grid instance will use the same matcher, defined by the registry.
-port:
(hub & node) <xxxx> : the port the remote/hub will listen on.
Default to 4444.
-hubHost:
(node) <IP | hostname> : the host address of a hub the
registration request should be sent to. Default to localhost.
Option -hub takes precedence over this option.
-newSessionWaitTimeout:
(hub) <XXXX>. Default to no timeout ( -1 ) the time in ms after

Chapter 8
[]
which a new test waiting for a node to become available will time
out.When that happens, the test will throw an exception before
starting a browser.
-nodePolling:
(node) how often the hub checks if the node is still alive.
-host:
(hub & node) <IP | hostname> : usually not needed and determined
automatically. For exotic network configuration, network with
VPN, specifying the host might be necessary.
-unregisterIfStillDownAfter:
(node) in ms. If the node remains down for more than
unregisterIfStillDownAfter millisec, it will disappear from the
hub.Default is 1min.
-cleanupCycle:
(node) <XXXX> in ms. How often a proxy will check for timed out
thread.
-nodeConfig:
(node) a JSON file following grid2 format that defines the node
properties.
-prioritizer:
(hub) a class implementing the Prioritizer interface. Default to
null ( no priority = FIFO ).Specify a custom prioritizer if you
need the grid to process the tests from the CI, or the IE tests
first for instance.
-servlets:
(hub & node) <com.mycompany.MyServlet,com.mycompany.MyServlet2>
to register a new servlet on the hub/node. The servlet will
accessible under the path /grid/admin/MyServlet
/grid/admin/MyServlet2

Understanding Selenium Grid
[]
-proxy:
(node) the class that will be used to represent the node. By
default org.openqa.grid.selenium.proxy.DefaultRemoteProxy.
-browserTimeout:
(hub/node) The timeout in seconds a browser can hang
-grid1Yml:
(hub) a YML file following grid1 format.
-role:
<hub|node> (default is no grid, just run an RC/webdriver server).
When launching a node, the parameters will be forwarded to the
server on the node, so you can use something like -role node
-trustAllSSLCertificates. In that case, the SeleniumServer will
be launch with the trustallSSLCertificates option.
You will see two options: To use as a standalone server, which acts as a Remote
WebDriver, and To use in a grid environment, which describes Selenium Grid. In
WKLVFKDSWHUZHZLOOXVHWKLV-$5ÀOHDVD6HOHQLXP*ULG
Understanding the hub
The hub is the central point of a Selenium Grid. It has a registry of all the available
nodes that are part of a particular grid. The hub is again a Selenium server running
in the hub mode listening on port 4444 of a machine by default. The test scripts will
try to connect to the hub on this port, just as any Remote WebDriver. The hub will
WDNHFDUHRIUHURXWLQJWKHWHVWVFULSWWUDIÀFWRWKHDSSURSULDWHWHVWSODWIRUPQRGH/HW
us see how we can start a hub node. Navigate to the location where you have your
6HOHQLXPVHUYHUMDUÀOHDQGH[HFXWHWKHIROORZLQJFRPPDQG
java -jar selenium-server-standalone-2.33.0.jar -role hub

Chapter 8
[]
Doing this will start your server in the hub mode. By default, the server starts
listening on port 4444; however, you can start your server on the port of your choice.
Suppose you want to start the server on port 1111; it can be done as follows:
java -jar selenium-server-standalone-2.33.0.jar
-role hub –port 1111
The following screenshot shows the console output of the Grid Hub being started on
port 1111:
All the test scripts should connect to the hub on this port. Now, launch your browser
and connect to the machine that is hosting your hub on port 1111. Here, the machine
that is hosting my hub has the IP address 172.16.87.131.
What you should see on your browser is shown in the following screenshot:
C:\>java
-jar
selenium-server-standalone-2.
33.0.
jar
-role
hub
-port
1111
Dct
19,
2013
6:11:14
PM
org.openqa.
grid.
selenium.
GridLauncher
main
INFO:
Launching
a
selenium
grid
server
2013-10-19
18:12:05.
629
:
INFO
:
os
js
.
Server
:
jetty-7
.
x
.
y-SNAPSHOT
2013-10-19
18:
12
:
05
.663:
INFO:
os
jsh
.ContextHandler
:
started
o.s
.
j
.s
.ServletContextHandler{/,nul
1
}
2013-10-19
18
:
12
:
05
.
672
:
INFO
:
os
js
.
AbstractConnector
:
Started
SocketConnector@0
.0.0.0:
1111
e
oo
D
Selenium
Grid2.0
help
x
CD
172.16.87.131:1111
You
arc
using
grid
2.33.0
Find
help
on
the
official
selenium
wiki
:
more
help
here
default
monitoring
page
:
console

Understanding Selenium Grid
[]
It shows the version of the server that is being used as the Grid Hub. Now, click the
Console link to navigate to the Grid Console:
$V\RXFDQVHHWKHSDJHWDONVDERXWPDQ\FRQÀJXUDWLRQSDUDPHWHUV:HZLOOGLVFXVV
WKHVHFRQÀJXUDWLRQSDUDPHWHUVLQWKH&RQÀJXULQJ6HOHQLXP*ULG section. So, until
now, you have learned how to start a grid on a port and listen for connections.
Understanding the node
As our hub is up and running, it's now time to start the node. Here, my node is a
Mac OS X platform with Chrome, Firefox, and Safari installed on it. So, if any test
script requests the hub for a Mac OS X platform, the hub will choose this node. Let us
see how we can start the node. The command to start the node and register with the
hub is as follows.
java –jar selenium-server-standalone-2.33.0.jar –role node –hub
http://172.16.87.131:1111/grid/register
e
o o
Console
*
s=i
w
a
4
®
#
=
Q
D
172.16.87.131:llll/grid/console?config=true&configDebug=true
r'
Se
Grid
Console
v.2.33.0
Config
for
the
hub
:
host
:
null
port
:
1111
cleanUpCycle
:
5000
timeout
:
300000
browserTimeout
:
0
newSessionWaitTimeout
:
-1
gridlMapping
:
{}
throwOnCapabilityNotPresent
:
true
capabilityMatcher
:
org.openqa.
grid.
internal.
utils.
DefaultCapability
Matcher
prioritizer
:
null
servlets
:
all
oarams
:
browserTimeout
:
0
capabilityMatcher
:
org.openqa.
grid,
internal,
utils.
DefaultCapability
Matcher
cleanUpCycle
:
5000
host
:
null
maxSession
:
5
newSessionWaitTimeout
:
-1
nodePolling
:
5000
port
:
1111
prioritizer
:
null
role
:
hub
servlets
:
[]
throwOnCapabilityNotPresent
:
true
timeout
:
300000
Config
details
:
hub
launched
with
:-role
hub
-port
1111
the
final
configuration
comes
from
:
the
default
:
host
:
null
port
:
4444
cleanUpCycle
:
5000
Mmpnur
_
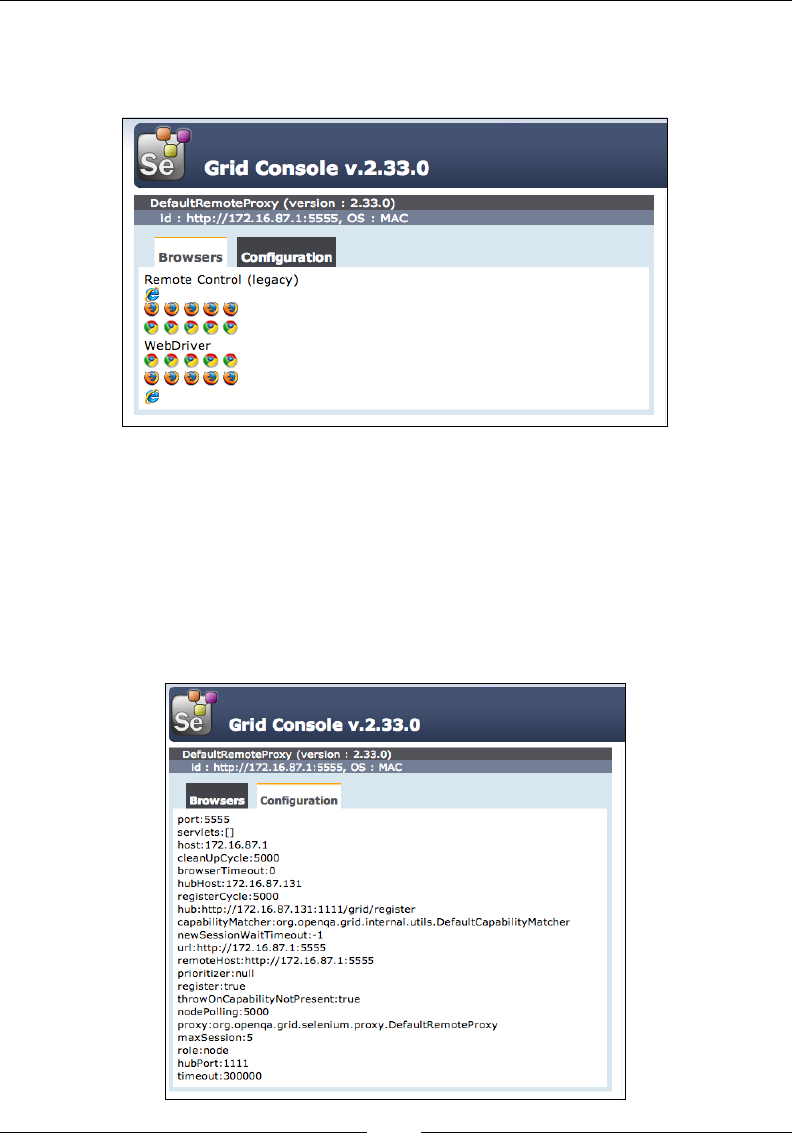
Chapter 8
[]
This will start the Selenium server in the node mode and register this node with the
already started hub. If you go back to the Grid Console on the browser, you will see
the following screenshot:
The preceding screenshot shows the node URL KWWS, which in this
case is running on the MAC platform. By default, the number of browsers listed for
HYHU\QRGHLVÀYHIRU)LUHIR[IRU&KURPHDQGIRU,(7KLVFDQEHRYHUULGGHQ
by specifying the -browser option, which we will see in the &RQÀJXULQJ6HOHQLXP
Grid section shortly. Also, this grid can work with both Selenium RC and Selenium
WebDriver test scripts. Now, click the &RQÀJXUDWLRQ tab of the node in the console
8,7KHGHIDXOWFRQÀJXUDWLRQZLWKZKLFKWKHQRGHLVUHJLVWHUHGZLWKWKHKXEFDQEH
seen in the following screenshot:
tft
be
Grid
Console
v.2.33.0
DefaultRemoteProxy
(version
:
2.33.0)
://172.
16.87.
1
:
5555,
OS
:
MAC
Id
:
in::
Configuration
Browsers
Remote
Control
(legacy)
WebDriver
mmm
»
m
m
Grid
Console
v.2.33.0
DefaultRemoteProxy
(version
:
2.33.0)
://172.
16.87.
1:5555,
OS
:
MAC
Id
:
ms;
Browsers
Configuration
port:
5555
servlets:
[]
host:
172.
16.87.1
cleanUpCycle:5000
browserTimeout:0
hubHost:
172.
16.87.
131
registerCycle:5000
hub:http://172.
16.87.
131:
1111/grid/register
capabi
lity
Matcher
:org.openqa.
grid,
internal,
utils.
DefaultCapability
Matcher
newSessionWaitTimeout:-l
url:http://172.
16.87.
1:5555
remoteHost:
http://172.16.87.
1:5555
prioritizer:null
register:true
throwOnCapabilityNotPresent:true
nodePolling:5000
proxy
:org.openqa.
grid.
selenium,
proxy.
DefaultRemoteProxy
maxSession:5
role:node
hubPort:
1111
timeout:
300000
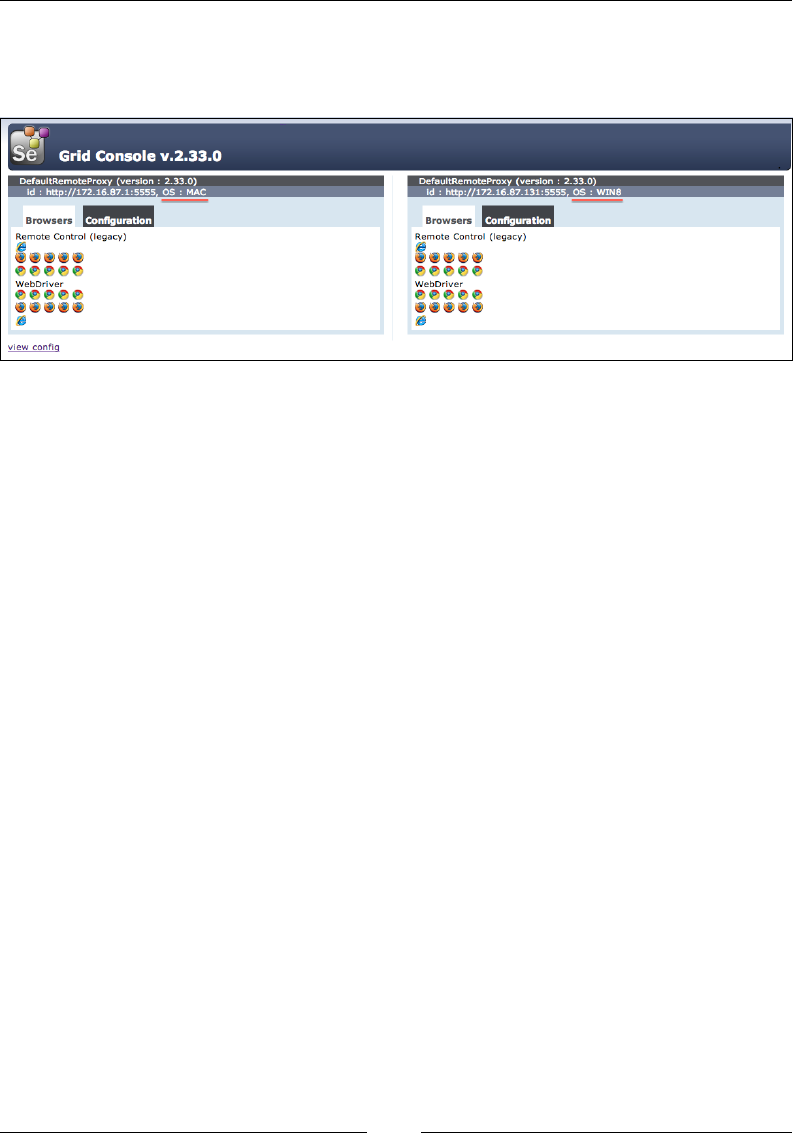
Understanding Selenium Grid
[]
Similarly, start another node that is Windows-based and register with the same
hub using the same command used to start the node on Mac. Now, go back to the
Console UI to see the two registered nodes, as shown in the following screenshot:
Modifying the existing test script to use
6HOHQLXP*ULG
Until now, we have seen test scripts that run on our local machines or on Remote
WebDriver servers. Executing test scripts on Selenium Grid is very similar to
executing tests on Remote WebDriver, except that you will mention the platform
details as well for Grid.
Let us look at a test script that uses the Remote WebDriver server:
public class UsingRemoteWebDriver {
public static void main(String... args){
DesiredCapabilities capabilities = new DesiredCapabilities();
capabilities.setBrowserName("firefox");
RemoteWebDriver remoteWD = null;
try {
remoteWD = new RemoteWebDriver(new URL("http://<remote-
webdriver-ip>:4444/wd/hub"),capabilities);
} catch (MalformedURLException e) {
e.printStackTrace();
}
remoteWD.get("http://www.google.com");
WebElement element = remoteWD.findElement(By.name("q"));
element.sendKeys("Packt Publishing");
remoteWD.quit();
}
}
ft
Grid
Console
v.2.33.0
DefaultRemoteProxy
(version
:
2.33.0)
://172.
16.87.
1:5555,
OS
:
MAC
DefaultRemoteProxy
(version
:
2.33.0)
://172-
16.87.
131:
5555,
OS
:
WIN8
L
in::
n
in::
Configuration
Configuration
Browsers Browsers
Remote
Control
(legacy)
Remote
Control
(legacy)
mmmm
&
mmmmm
WebDriver WebDriver
mmmmm
mmmmm
0
0
view
confia

Chapter 8
[]
Let us modify the test script to use the Selenium Grid Hub that we started earlier:
public class UsingSeleniumGrid {
public static void main(String... args){
DesiredCapabilities capabilities = new DesiredCapabilities();
capabilities.setBrowserName("firefox");
RemoteWebDriver remoteWD = null;
try {
remoteWD = new RemoteWebDriver(
new URL("http://172.16.87.131:1111/wd/hub"),
capabilities);
} catch (MalformedURLException e) {
e.printStackTrace();
}
remoteWD.get("http://www.google.com");
WebElement element = remoteWD.findElement(By.name("q"));
element.sendKeys("Packt Publishing");
remoteWD.quit();
}
}
There is absolutely no difference in the code as long as you only care for the
browser (Firefox, in this case), and the platform the test script is going to execute
is not important for you. But if you want your test script to be executed on a Mac
OS platform and on the Firefox browser, you have to add that capability in the test
VFULSW7KHPRGLÀHGYHUVLRQRIWKHDERYHWHVWVFULSWZRXOGORRNDVIROORZV
public class UsingSeleniumGrid {
public static void main(String... args){
DesiredCapabilities capabilities
= new DesiredCapabilities();
capabilities.setPlatform(Platform.MAC);
capabilities.setBrowserName("firefox");
RemoteWebDriver remoteWD = null;
try {
remoteWD = new RemoteWebDriver(
new URL("http://172.16.87.131:1111/wd/hub"),
capabilities);
} catch (MalformedURLException e) {
e.printStackTrace();
}
remoteWD.get("http://www.google.com");
WebElement element = remoteWD.findElement(By.name("q"));
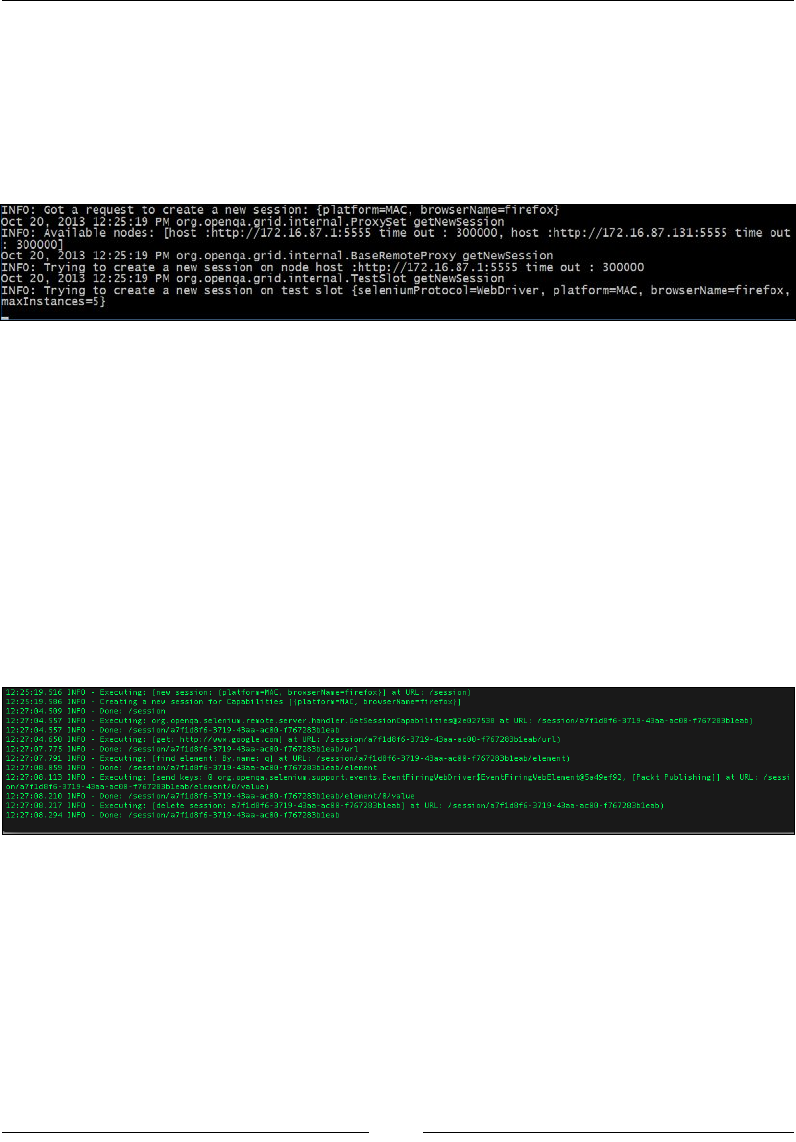
Understanding Selenium Grid
[]
element.sendKeys("Packt Publishing");
remoteWD.quit();
}
}
Now, try executing the above test script and observe the log output of the hub and
the node. The output log of the hub is as follows:
The sequence of steps that happens at the hub end is as follows:
1. The hub gets a request to create a new session for platform=MAC,
browserName=firefox.
2. ,WYHULÀHVWKHDYDLODEOHQRGHVWKDWPDWFKWKHcapabilities request.
3. If available, it creates a new session with the node host; if not, it rejects the
request from the test script saying that the desired capabilities don't match
with any of the registered nodes.
4. If a session is created with the node host in the preceding step, create a new
test slot session and hand over the test script to the node.
Similarly, the output you should see on the Console log of the node is as follows:
The sequence of steps is performed on the node host is as follows:
1. The node host creates a new session with the requested desired capabilities.
This will launch the browser.
2. It executes the test script's steps on the launched browser.
3. It ends the session and forwards the result to the hub, which in turn sends it
to the test script.
INFO:
Got
a
request
to
create
a
new
session:
{platform=MAC,
browserName=fi
refox}
Oct
20,
2013
12:25:19
PM
org.
openqa.
grid.
internal
.Proxyset
getNewSession
INFO:
Available
nodes:
[host
:http://172.
16.
87.
1:5555
time
out
:
300000,
k
300000]
Oct
20,
2013
12:25:19
PM
org.
openqa.
gri
d.
i
nternal
.BaseRemoteProxy
getNewSession
INFO:
Trying
to
create
a
new
session
on
node
host
:http://172.
16.
87.
1:5555
time
out
:
300000
Oct
20,
2013
12:25:19
PM
org.
openqa.
grid.
internal
.TestSlot
getNewSession
INFO:
Trying
to
create
a
new
session
on
test
slot
{seleniumProtocol=WebDriver,
platform=MAC,
browserName=f
i
ref
ox
,
|maxlnstances=5}
,
host
:http://172.
16.
87.
131:5555
time
out
12:25:19.516
INFO
-
Executing:
[new
session:
{platform=MAC,
browserName=fi
refox}
]
at
URL:
/session)
12:25:19.586
INFO
-
Creating
a
new
session
for
Capabilities
[
{platform=MAC,
browserName=fi
refox}
]
12:27:04.509
INFO
12:27:04.557
INFO
-
Executing:
org
.
openqa
,
seleni
urn
,
remote
.
server
.
handler
.
GetSessi
onCapabi
li
ti
es@2e027538
at
URL:
/sessi
on/a7f
Id8f6-3719-43aa-ac00-f
767283bleab)
12:27:04.557
INFO
12:27:04.650
INFO
-
Executing:
[get:
http://www.google.com]
at
URL:
/sessi
On/a7fld8f6-3719-43aa-ac00-f767283bleab/url)
12:27:07.775
INFO
12:27:07.791
INFO
-
Executing:
[find
element:
By,
name:
q]
at
URL:
/sessi
on/a7fld8f6-3719-43aa-acO0-f767283bleab/element)
12:27:08.059
INFO
12:27:08,113
INFO
-
Executing:
[send
keys:
O
org
.
openqa
,
seleni
urn
,
support
.
events
.
EventFi
ri
ngWebDri
ver$EventFi
ri
ngWebElement@5a49ef92,
[Packt
Publishing]]
at
URL:
/sessi
on/
a7fld8f6-
3719
-43aa-ac00-f767283bleab/element/O/
value)
12:27:08.210
INFO
12:27:08.217
INFO
-
Executing:
[delete
session:
a7fld8f6-3719-43aa-ac00-f767283bleab]
at
URL:
/sessi
On/a7fld8f6-3719-43aa-ac00-f767283bleab)
12:27:08.294
INFO
Done:
/session
Done
:
/sessi
on/a7f
Id8f6-3719-43aa-ac00-f767283bleab
Done:
/sessi
on/a7fld8f6-3719-43aa-acO0-f767283bleab/url
Done
:
/sessi
on/a7fld8f6-3719-43aa-ac0O-f767283bleab/
element
Done
:
/sessi
On/a7fld8f6-3719-43aa-ac00-f767283bleab/
element/
0/
value
Done
:
/sessi
on/a7fld8f6-3719-43aa-acO0-f767283bleab
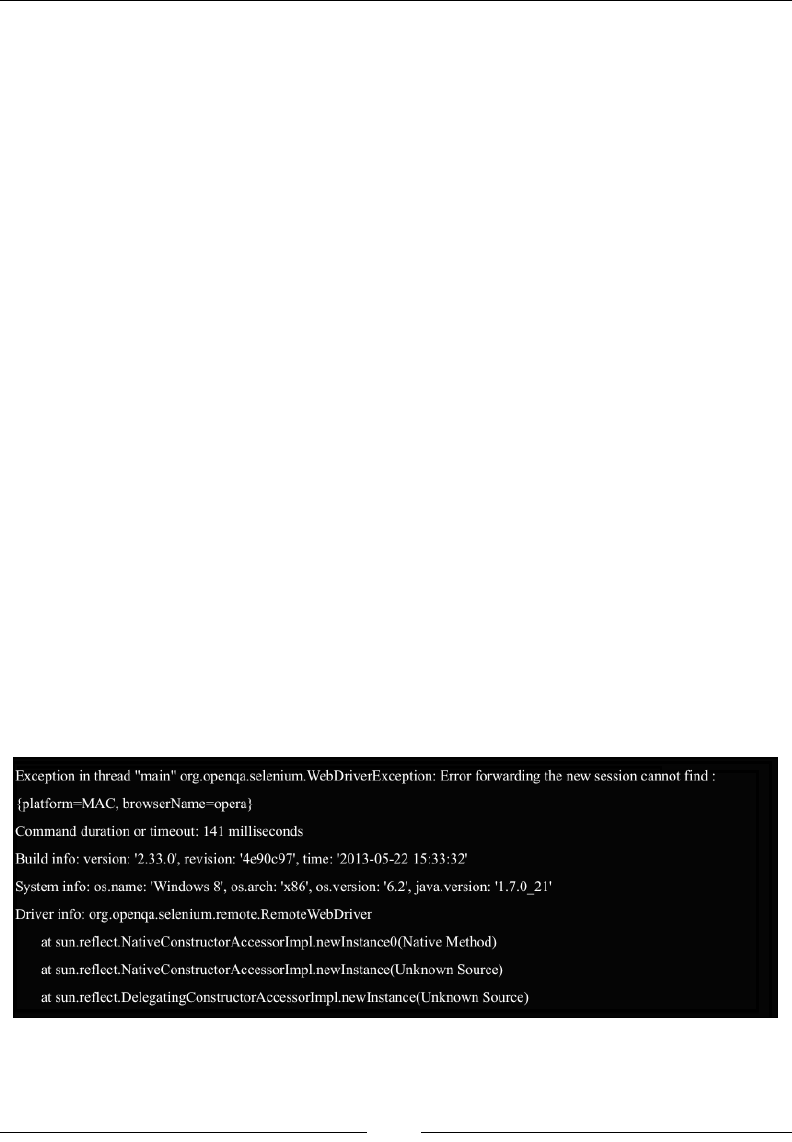
Chapter 8
[]
Requesting for nonregistered capabilities
The hub will reject the request from the test script when the test script asks for a
capability that is not registered with the hub. Let's modify the preceding test script
to request for the Opera browser instead of Firefox. The test script should look
as follows:
ublic class UsingSeleniumGrid {
public static void main(String... args){
DesiredCapabilities capabilities = new DesiredCapabilities();
capabilities.setPlatform(Platform.MAC);
capabilities.setBrowserName("opera");
RemoteWebDriver remoteWD = null;
try {
remoteWD = new RemoteWebDriver(
new URL("http://172.16.87.131:1111/wd/hub"),
capabilities);
} catch (MalformedURLException e) {
e.printStackTrace();
}
remoteWD.get("http://www.google.com");
WebElement element = remoteWD.findElement(By.name("q"));
element.sendKeys("Packt Publishing");
remoteWD.quit();
}
}
The hub checks if there is any node matching the desired capabilities. If it doesn't
ÀQGDQ\DVLQWKLVFDVHLWwill reject the request from the test script by throwing
an exception, as shown in the following screenshot:
Exception
in
thread
"main"
org.openqa.
selenium.
WebDriverException:
Error
forwarding
the
new
session
cannot
find
:
{platform=MAC,
browserName=opera}
Command
duration
or
timeout:
141
milliseconds
Build
info:
version:
’2.33.0’,
revision:
'4e90c97\
time:
’2013-05-22
15:33:32’
System
info:
os.
name:
'Windows
8',
os.arch:
'x86',
os.
version:
'6.2',
java.
version:
'1.7.0
21'
Driver
info:
org.openqa.
selenium.remote.RemoteWebDriver
at
sun.reflect.NativeConstructorAccessorImpl.newInstanceO(Native
Method)
at
sun.reflect.NativeConstructorAccessorImpl.newInstance(Unknown
Source)
at
sun.reflect.DelegatingConstructorAccessorImpl.newInstance(Unknown
Source)
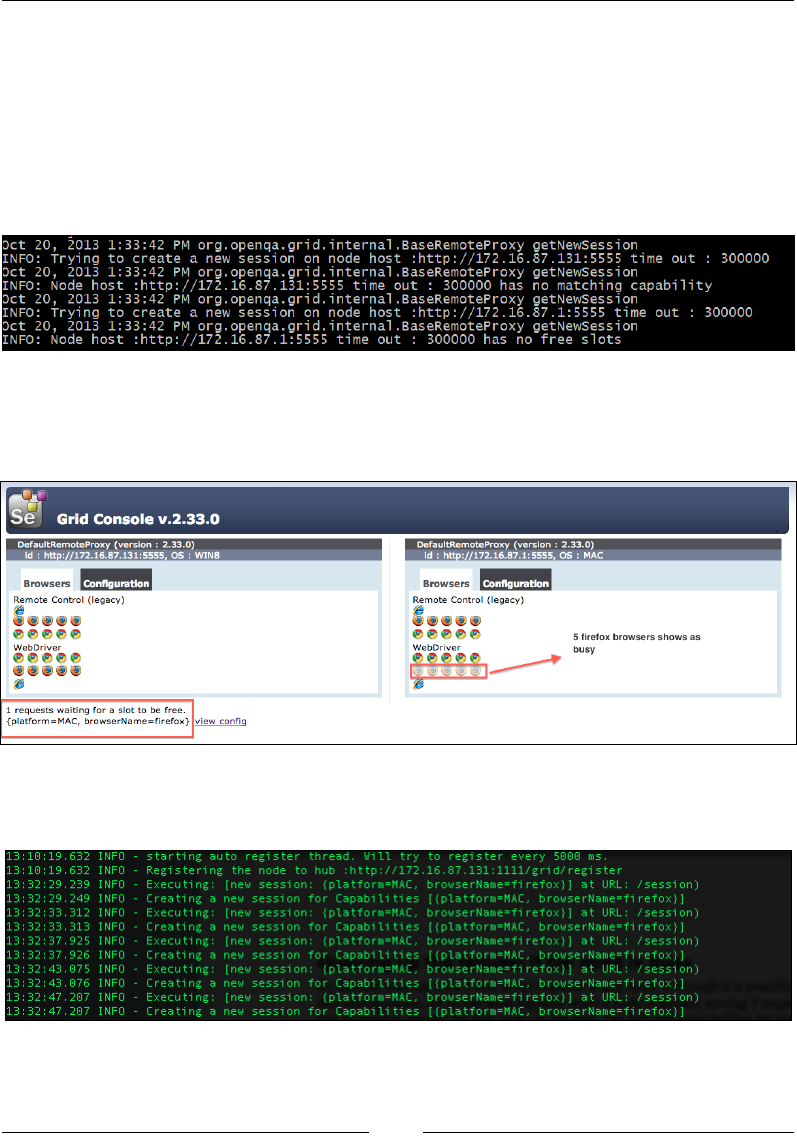
Understanding Selenium Grid
[]
Queuing up the request if the node is busy
By default, you can VHQGÀYHWHVWVFULSWUHTXHVWVWRDQ\QRGH$OWKRXJKLWLVSRVVLEOH
WRFKDQJHWKDWFRQÀJXUDWLRQOHWXVVHHZKDWKDSSHQVZKHQDQRGHLVDOUHDG\VHUYLQJ
ÀYHUHTXHVWVDQG\RXÀUHXSDQRWKHUUHTXHVWIRUWKDWQRGHYLDWKHKXE7KHKXEZLOO
keep polling the node until it gets a free test slot from the node. The test scripts are
made to wait all this while. The log output you will see on the console for the sixth
request would be as follows:
The hub says there no free slots for the sixth session to be established with the
same node, and the Grid Console UI on the browser says that too, as shown in the
following screenshot:
0HDQZKLOHRQWKHQRGHKRVWWKHQRGHWULHVWRFUHDWHVHVVLRQVIRUWKHÀYHUHTXHVWV
and starts executing the test scripts as shown in the following screenshot:
Dct
20,
2013
1:33:42
PM
org.
openqa.
grid.
internal
.
BaseRemoteProxy
getNewSession
INFO:
Trying
to
create
a
new
session
on
node
host
:http://172.
16.
87.
131:5555
time
out
:
300000
Oct
20,
2013
1:33:42
PM
org.
openqa.
grid.
internal
.BaseRemoteProxy
getNewSession
INFO:
Node
host
:http://172
.16.87
.131:
5555
time
out
:
300000
has
no
matching
capability
Oct
20,
2013
1:33:42
PM
org.
openqa.
grid.
internal
.BaseRemoteProxy
getNewSession
INFO:
Trying
to
create
a
new
session
on
node
host
:http://172.
16.
87.
1:5555
time
out
:
300000
Oct
20,
2013
1:33:42
PM
org.
openqa.
grid.
internal
.BaseRemoteProxy
getNewSession
INFO:
Node
host
:http://172.
16.
87.
1:5555
time
out
:
300000
has
no
free
slots
Grid
Console
v.2.33.0
Def
a
u
I
tRe
m
ote
Proxy
(version
:
2.33.0)
16.87.
131:
5555,
OS
:
WIN8
DefaultRemoteProxy
(version
:
2.33.0)
://172.
16.87.
1:5555,
OS
:
MAC
id
:
Id
:
UU
UK
Configuration Configuration
Browsers
Remote
Control
(legacy)
Browsers
Remote
Control
(legacy)
£
*
&&&
£
**
5
firefox
browsers
shows
as
busy
WebDriver WebDriver
0
6
1
requests
waiting
for
a
slot
to
be
free.
{platform
=
MAC,
browserName=
firefox}
view
confi
starting
auto
register
thread.
Will
try
to
register
every
5000
ms.
Registering
the
node
to
hub
:
http
:
//172
.
16
.
87
.
131
:
1111/gri
d/
regi
ster
13:32:29.239
INFO
-
Executing:
[new
session:
{platform=MAC,
browserName=fi
refox}
]
at
URL:
/session)
13:32:29.249
INFO
13:32:33.312
INFO
13:32:33.313
INFO
13:10:19.632
INFO
13:10:19.632
INFO
Creating
a
new
session
for
Capabilities
[
{platform=MAC,
browserName=fi
refox}
]
Executing:
[new
session:
{platform=MAC,
browserName=fi
refox}
]
at
URL:
/session)
Creating
a
new
session
for
Capabilities
[
{platform=MAC,
browserName=fi
refox}
]
13:32:37.925
INFO
-
Executing:
[new
session:
{platform=MAC,
browserName=fi
refox}
]
at
URL:
/session)
13:32:37.926
INFO
Creating
a
new
session
for
Capabilities
[
{platform=MAC,
browserName=fi
refox}
]
Executing:
[new
session:
{platform=MAC,
browserName=fi
refox}
]
at
URL:
/session)
Creating
a
new
session
for
Capabilities
[
{platform=MAC,
browserName=fi
refox}
]
13:32:43.075
INFO
13:32:43.076
INFO
13:32:47.207
INFO
-
Executing:
[new
session:
{platform=MAC,
browserName=fi
refox}
]
at
URL:
/session)
13:32:47.207
INFO
Creating
a
new
session
for
Capabilities
[
{platform=MAC,
browserName=fi
refox}
]
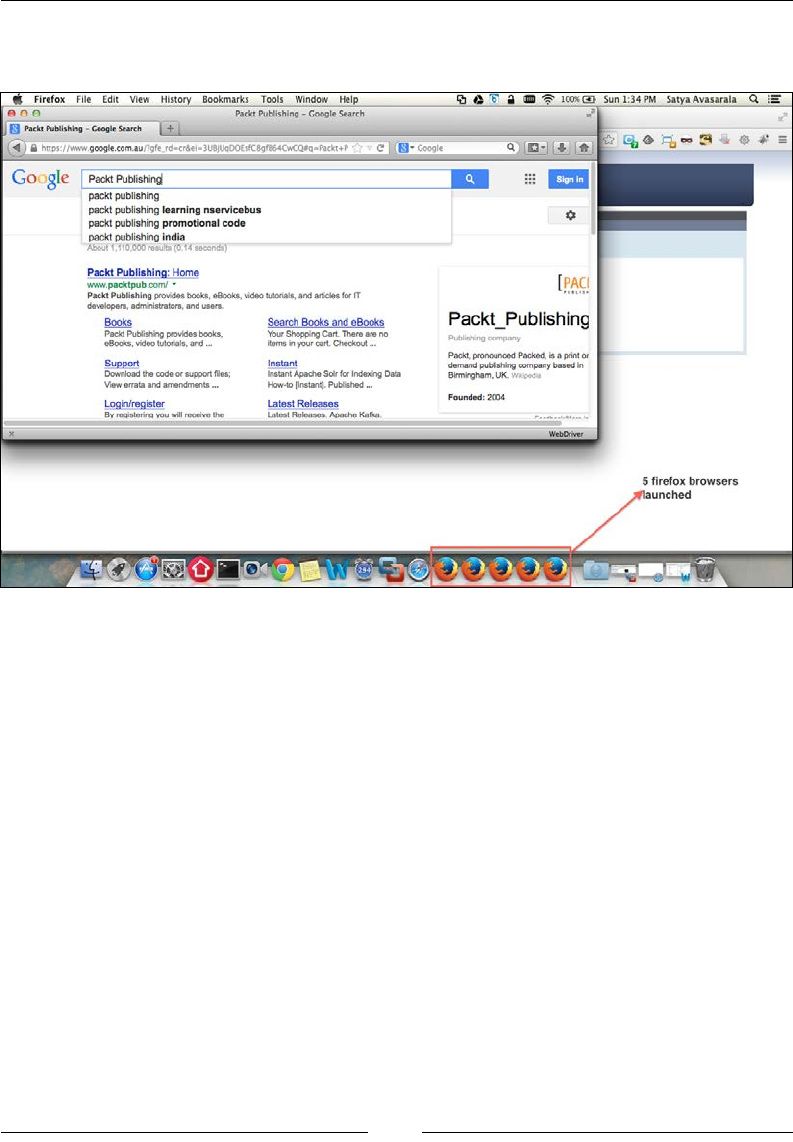
Chapter 8
[]
8SRQFUHDWLQJWKHVHVVLRQVÀYH)LUHIR[ZLQGRZVDUHODXQFKHGDQGWKHWHVWVFULSWV
are executed on them as shown in the following screenshot:
8SRQVHUYLQJWKHÀYHWHVWVFULSWUHTXHVWVWKHKXEZLOOHVWDEOLVKWKHZDLWLQJVL[WK
session with the node, and the sixth request will be served.
'HDOLQJZLWKWZRQRGHVZLWKPDWFKLQJ
capabilities
When two nodes of the same capabilities are registered with a hub, a test script
UHTXHVWUHFHLYHVWKHQRGHWKDWLVUHJLVWHUHGÀUVWZLWKWKHKXE,IWKHÀUVWUHJLVWHUHG
node is busy handling other test script requests, only then the hub directs the request
to the second node with matching requested capabilities.
&RQ¿JXULQJ6HOHQLXP*ULG
7KHUHDUHPDQ\FRQÀJXUDWLRQRSWLRQVWKDW6HOHQLXP*ULGSURYLGHVWRFRQWUROWKH
behavior of a node and a hub while you execute your test scripts. We will discuss
them here in this section.
A
Firtfox
Flit
Ldit
View
History
Bookmarks
Tools
Window
Help
WOO
j
f
l
P«Wi
Publishing
Gaegir
Srarrh
https
V/wwwgooglt.toma>»/7gf«
rd«tr&ei»3U6juoOOtifC>gf»640»<Qdq-P»tfn*P
*£j
O
b
S
100s
CD
bun
1
i
4
PM
Satya
Avasarala
Q
i=,
Packt
Publishing
-
Coogle
Search
tj
—
?
<*
»
5
«
[Dll
c
IlH-
OC-OO
*
*
Go
glc
Packt
Publishing
packt
publishing
packt
publishing
teaming
nservicebus
packt
publishing
promotional
code
packt
publishing
India
About
1.110
000
result*
(0
14
*econ&)
o
Packt
Publishing:
Home
www
pecktpub
com/
*
Peeks
Publishing
provide*
book*
e&oofc*.
video
Monel*,
end
artefe*
for
IT
developer*,
adm-mstrator*.
and
user*
Books
Pedrt
FNiblUNng
provides
books.
oOooks,
video
tutorial*,
and
—
[PACI
Packt_Publishing
Search
Books
and
o
Books
Yow
Shooing
Cert
There
ere
no
items
ri
your
cerl
ChecfwM
...
company
Packt.
pronounced
Pecked,
a
e
pom
or
demand
publishing
company
based
*i
Birmingham.
Utt
c->:
--
Support
Download
the
code
or
support
Ittea.
View
errata
and
amendment*
—
Instant
instant
Apache
So
k
for
Indexing
Data
How-fo
[instant]
Putftahed
..
Founded:
?0O4
Latest
Releases
Login/
register
By
rwjislnroxj
you
will
roanva
the
Latest
Retaases
Apeche
Kaflui
WcbOrrvar
X
5
firefox
browsers
launched
KSWP'®
v
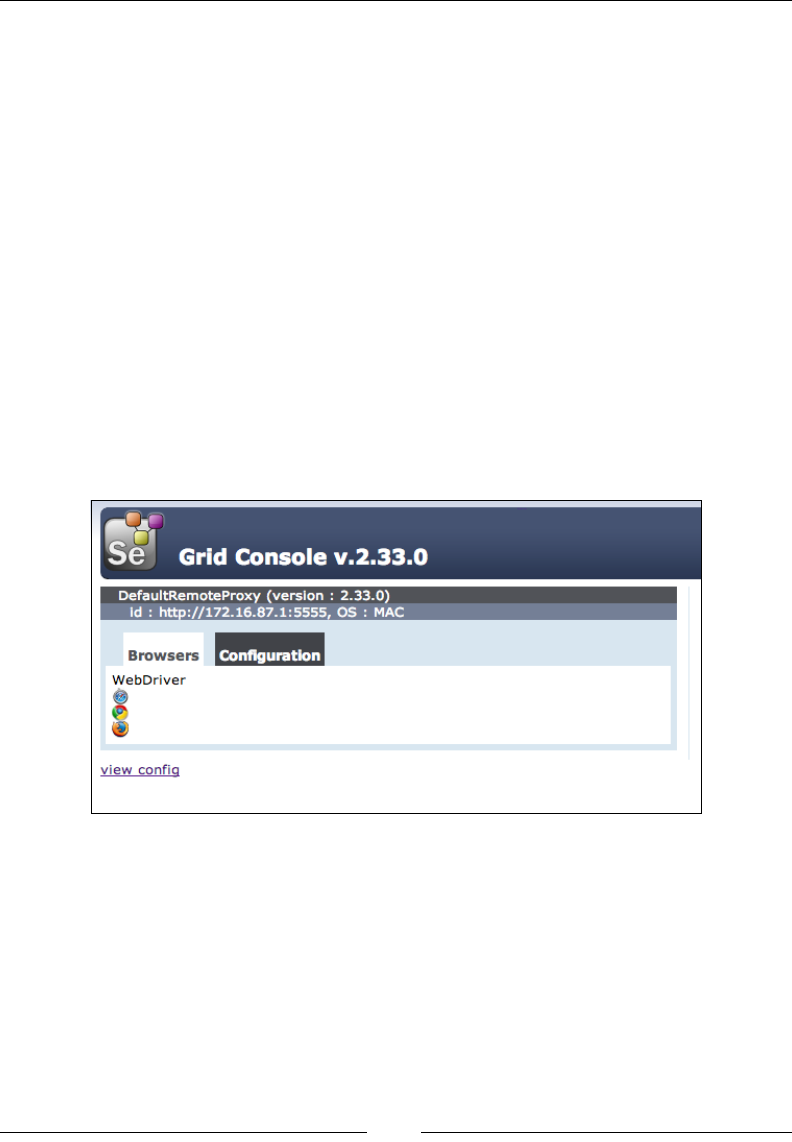
Understanding Selenium Grid
[]
6SHFLI\LQJQRGHFRQ¿JXUDWLRQSDUDPHWHUV
In this section, we will go throughWKHFRQÀJXUDWLRQSDUDPHWHUVIRUDQRGH
Setting supported browsers by a node
As we saw earlier, when we register a node with a hub, by default the node is shown
DVVXSSRUWLQJÀYHLQVWDQFHVRIWKH)LUHIR[EURZVHUÀYHLQVWDQFHVRIWKH&KURPH
browser, and one instance of Internet Explorer, irrespective of whether or not the
node actually supports them. But to register your node with the browsers of your
choice, Selenium Grid provides a -browser option, using which we can achieve this.
Let us say we want our node to be registered as supporting Firefox, Chrome, and
Safari browsers; we can do that using the following command:
java -jar selenium-server-standalone-2.33.0.jar -role node -hub
http://172.16.87.131:1111/grid/register -browser browserName=firefox
-browser browserName=chrome -browser browserName=safari
The Grid Console looks as shown in the following screenshot:
6HWWLQJQRGHWLPHRXWV
This parameter is set when registering a node with a hub. The value provided to these
parameters is the time in seconds that a hub can actually wait before it terminates a test
script execution on a node if the test script doesn't perform any kind of activity on
the node.
m
Grid
Console
v.2.33.0
DefaultRemoteProxy
(version
:
2.33.0)
://172.
16.87.
1:5555,
OS
:
MAC
Id
:
Hu:
Configuration
Browsers
WebDriver
*
view
confio

Chapter 8
[]
7KHFRPPDQGWRFRQÀJXUH\RXUQRGHZLWKDQRGHWLPHRXWLVDVIROORZV
java -jar selenium-server-standalone-2.33.0.jar -role node -hub
http://172.16.87.131:1111/grid/register -nodeTimeout 300
Here, we have registered a node with a node timeout value of 300 seconds. So, the
hub will terminate the test script if it doesn't perform any activity on the node for
more than 300 seconds.
6HWWLQJWKHOLPLWRQEURZVHULQVWDQFHV
We have seen that by default, there are 11 instances of browsers getting registered
for a node. We have seen how to register our own browser. In this section, we
will see how many instances of those browsers we can allow in our node. For this
WREHFRQWUROOHG6HOHQLXP*ULGFRPHVRXWZLWKDFRQÀJXUDWLRQSDUDPHWHUFDOOHG
maxInstances, using which we can specify how many instances of a particular
browser we want our node to provide. The command to do that is as follows:
java -jar selenium-server-standalone-2.33.0.jar -role node -hub
http://172.16.87.131:1111/grid/register -browser "browserName=firefox,max
Instances=3" -browser "browserName=chrome,maxInstances=3" -browser "brows
erName=safari,maxInstances=1"
Here, we are registering a node that provides three instances of Firefox, three instances
of Chrome, and one instance of Safari. The Grid Console will look as follows:
ft
Grid
Console
v.2.33.0
DefaultRemoteProxy
(version
:
2.33.0)
://172.
16.87.
1:5555,
OS
:
MAC
Id
:
m2:
Configuration
Browsers
WebDriver
view
confia

Understanding Selenium Grid
[]
5HUHJLVWHULQJWKHQRGHDXWRPDWLFDOO\
If the hub crashes or restarts after a node registers to it, all the information of the nodes
that are already registered is lost. Going back to each of the nodes and reregistering
them manually would prove to be tedious. The impact will be even more if we haven't
realized that the hub has restarted because all the test scripts would fail as a result. So,
to handle this kind of situation, Selenium*ULGSURYLGHVDFRQÀJXUDWLRQSDUDPHWHUWR
a node through which we can specify the node to reregister itself automatically to the
KXEDIWHUDVSHFLÀHGDPRXQWRIWLPH,IQRWVSHFLÀHGWKHGHIDXOWWLPHRIUHUHJLVWUDWLRQ
LVÀYHVHFRQGV7KLVZD\ZHUHDOO\GRQWKDYHWRZRUU\HYHQLIWKHKXEFUDVKHVRU
UHVWDUWVRXUQRGHZLOOWU\WRUHUHJLVWHUHYHU\ÀYHVHFRQGV
,I\RXZDQWWRPRGLI\WKLVWLPHWKHFRQÀJXUDWLRQSDUDPHWHUWRGHDOZLWKLV
registerCycle. The command to specify is as follows:
java -jar selenium-server-standalone-2.33.0.jar -role node -hub
http://172.16.87.131:1111/grid/register -registerCycle 10000
The output you will see on the node log console during startup is as follows:
17:47:01.231 INFO - starting auto register thread. Will try to
register every 10000 ms.
17:47:01.232 INFO - Registering the node to hub
:http://172.16.87.131:1111/grid/register
6HWWLQJQRGHKHDOWKFKHFNWLPH
8VLQJWKLVFRQÀJXUDWLRQSDUDPHWHUZHFDQVSHFLI\KRZIUHTXHQWO\WKHKXEFDQSROOD
node for its availability. The parameter that is used to achieve this is nodePolling. By
specifying this to the hub at the node level, each node can specify its own frequency at
ZKLFKLWFDQEHKHDOWKFKHFNHG7KHFRPPDQGWRFRQÀJXUH\RXUQRGHLVDVIROORZV
java -jar selenium-server-standalone-2.33.0.jar -role node -hub
http://172.16.87.131:1111/grid/register -nodePolling 10
Now, the hub will poll this node every 10 seconds to check its availability.
Unregistering an unavailable node
Although the nodePollingFRQÀJXUDWLRQZLOOPDNHWKHKXESROOWKHQRGHRIWHQ
the unregisterIfStillDownAfterFRQÀJXUDWLRQZLOOOHWWKHKXEXQUHJLVWHUWKH
node if the poll doesn't produce an expected result. Let's say a node is down, and
the hub tries to poll the node and is unable to connect to it. At this point, how
long the hub is going to poll for the availability of the node is determined by the
unregisterIfStillDownAfter parameter. Beyond this time, the hub will and
unregister the node.

Chapter 8
[]
The command to do that is as follows:
.java -jar selenium-server-standalone-2.33.0.jar -role node -hub
http://172.16.87.131:1111/grid/register -nodePolling 5 -
unregistIfStillDownAfter 20000
+HUHWKHKXEZLOOSROOWKHQRGHHYHU\ÀYHVHFRQGVLIWKHQRGHLVGRZQWKHSROOLQJ
will continue for 20 seconds, that is, the hub will poll four times and then unregister
the node from the grid.
6HWWLQJWKHEURZVHUWLPHRXW
7KLVFRQÀJXUDWLRQLVWROHWWKHQRGHNQRZKRZORQJLWVKRXOGZDLWEHIRUHLWHQGV
a test script session when the browser seems to hang. Beyond this time, the node
will abort the browser session and start with the next waiting test script. The
FRQÀJXUDWLRQSDUDPHWHUIRUWKLVLVbrowserTimeout. The command to specify
that is as follows:
java -jar selenium-server-standalone-2.33.0.jar -role node -hub
http://172.16.87.131:1111/grid/register –browserTimeout 60
6RWKHVHDUHWKHVRPHRIWKHFRQÀJXUDWLRQSDUDPHWHUVWKDW\RXFDQVSHFLI\DWWKH
node end and have a better control over the Selenium Grid environment.
+XEFRQ¿JXUDWLRQSDUDPHWHUV
This section talks about some of theFRQÀJXUDWLRQSDUDPHWHUVRQWKHKXEVLGH
:DLWLQJIRUDPDWFKRIGHVLUHGFDSDELOLW\
As we saw earlier, when the test script asks for a test platform with some desired
FDSDELOLW\WKHKXEZLOOUHMHFWWKHUHTXHVWLILWGRHVQWÀQGDsuitable node with the
desired capability.
Altering the value for the throwOnCapabilityNotPresent parameter can alter this
behavior. By default, it is set to true, which means the hub will reject the request if it
GRHVQWÀQGDVXLWDEOHQRGHZLWKWKDWFDSDELOLW\%XWVHWWLQJWKLVSDUDPHWHUWRfalse
will queue the request, and the hub will wait until a node with that capability is
added to the grid. The command that has to be invoked is as follows:
java -jar selenium-server-standalone-2.33.0.jar -role hub -port 1111
-throwOnCapabilityNotPresent false
Now, the hub will not reject the request but will place the request in a queue and
wait until the requested platform is available.

Understanding Selenium Grid
[]
&XVWRPL]HG&DSDELOLW\0DWFKHU
By default, the hub will use the org.openqa.grid.internal.utils.
DefaultCapabilityMatcher class to match the node that is requested. If you do
not like the implementation logic of the DefaultCapabilityMatcher class, you can
extend the class, implement your own CapabilityMatcher class, and provide your
own logic in it.
Once developed, you can ask the hub to use that class to match the capabilities
ZLWKWKHQRGHVXVLQJDFRQÀJXUDWLRQparameter named capabilityMatcher. The
command to achieve this is as follows:
java -jar selenium-server-standalone-2.33.0.jar -role hub
-port 1111
-capabilityMatcher com.yourcomp.CustomCapabilityMatcher
7KHKXEZLOOXVHWKHORJLFGHÀQHGLQ\RXUCustomCapabilityMatcher class to
identify the nodes to be assigned to the test script requests.
:DLW7LPHRXWIRUDQHZVHVVLRQ
When a capability-matched node is busy executing other test scripts, the latest test
script will wait for the node to be available. By default, there is no wait timeout; that is,
WKHWHVWVFULSWZLOOZDLWIRUWKHQRGHWREHDYDLODEOHLQGHÀQLWHO\7RDOWHUWKDWEHKDYLRU
and to let the test script throw an exception if it doesn't get the node within a limited
WLPH6HOHQLXP*ULGRSHQVDFRQÀJXUDWLRQWKDWHQDEOHVWKHWHVWVFULSWWRGRVR7KH
FRQÀJXUDWLRQSDUDPHWHUFRQWUROOLQJWKDWbehavior is newSessionWaitTimeout. The
command for that is as follows:
java -jar selenium-server-standalone-2.33.0.jar -role hub
-port 1111 -newSessionWaitTimeout 120000
Here, the test script will wait for two minutes before it throws an exception saying it
couldn't obtain a node to execute itself.
'LIIHUHQWZD\VWRVSHFLI\WKHFRQ¿JXUDWLRQ
There are two ways to VSHFLI\WKHFRQÀJXUDWLRQSDUDPHWHUWRWKH6HOHQLXP*ULGV
KXEDQGQRGH7KHÀUVWRQHLVZKDWZHKDYHEHHQVHHLQJDOOWKLVWLPHWKDWLV
VSHFLI\LQJWKHFRQÀJXUDWLRQSDUDPHWHUVRYHUWKHFRPPDQGOLQH7KHVHFRQGZD\RI
GRLQJLWLVSURYLGLQJD-621ÀOHWKDWFRQWDLQVDOOWKHVHFRQÀJXUDWLRQSDUDPHWHUV

Chapter 8
[]
$QRGHFRQÀJXUDWLRQÀOHVD\nodeConfig.json³DW\SLFDO-621ÀOHKDYLQJDOOWKH
FRQÀJXUDWLRQSDUDPHWHUV³ORRNVVRPHWKLQJVLPLODUWRWKHIROORZLQJ
{
"capabilities":
[
{
"browserName": "*firefox",
"maxInstances": 5,
"seleniumProtocol": "Selenium"
},
{
"browserName": "*googlechrome",
"maxInstances": 5,
"seleniumProtocol": "Selenium"
},
{
"browserName": "*iexplore",
"maxInstances": 1,
"seleniumProtocol": "Selenium"
},
{
"browserName": "firefox",
"maxInstances": 5,
"seleniumProtocol": "WebDriver"
},
{
"browserName": "chrome",
"maxInstances": 5,
"seleniumProtocol": "WebDriver"
},
{
"browserName": "internet explorer",
"maxInstances": 1,
"seleniumProtocol": "WebDriver"
}
],
"configuration":
{
"proxy": "org.openqa.grid.selenium.proxy.DefaultRemoteProxy",
"maxSession": 5,
"port": 5555,
"host": ip,
"register": true,
"registerCycle": 5000,
"hubPort": 4444,

Understanding Selenium Grid
[]
"hubHost": ip
}
}
Similarly, a hubFRQÀJXUDWLRQÀOHhubConfig.json) looks as follows:
{
"host": null,
"port": 4444,
"newSessionWaitTimeout": -1,
"servlets" : [],
"prioritizer": null,
"capabilityMatcher":
"org.openqa.grid.internal.utils.DefaultCapabilityMatcher",
"throwOnCapabilityNotPresent": true,
"nodePolling": 5000,
"cleanUpCycle": 5000,
"timeout": 300000,
"browserTimeout": 0,
"maxSession": 5
}
2QFHWKHVHÀOHVDUHFRQÀJXUHGWKH\FDQEHSURYLGHGWRWKHQRGHDQGKXEXVLQJWKH
following command:
java -jar selenium-server-standalone.jar -role node -nodeConfig
nodeconfig.json
java -jar selenium-server-standalone.jar -role hub -hubConfig
hubconfig.json
This way, you can VSHFLI\WKHFRQÀJXUDWLRQRI\RXUKXEDQGQRGHXVLQJ-621ÀOHV
6XPPDU\
In this chapter, you have seen what a Selenium Grid is, how a hub and node will
ZRUNDQGPRUHLPSRUWDQWO\XQGHUVWRRGKRZWRFRQÀJXUH\RXU6HOHQLXP*ULGWR
have a better control over the environment and infrastructure. Having a good setup
of Selenium Grid will help you validate your test scripts on various and multiple
environments very easily, and so you can execute your test scripts in parallel.
In the next chapter, we will discuss effective ways of designing your test automation
framework using a design pattern called PageObject pattern, which is supported
by WebDriver.

Understanding PageObject
Pattern
Until now, we have seen various APIs of WebDriver and learned how to use them to
accomplish various actions on the web application we're testing. We created many
test scripts that use these APIs and are executed on a daily or weekly basis. One big
challenge that you have to deal with, regarding these test scripts, is maintainability.
In this chapter, we will cover the following topics:
:KDWLVWKH3DJH2EMHFWSDWWHUQGHVLJQ"
Good practices for designing PageObjects
Extensions to the PageObject pattern
An end-to-end example
$GHFHQWO\ZULWWHQWHVWVFULSWZRXOGZRUNMXVWÀQHDVORQJDVWKHWDUJHWZHE
application doesn't change. But once one or more pages in your web application
change, you as a test script writer shouldn't be in a position where you have to
refactor your test scripts at a hundred different places. Let us see that with an
example. We will try to go through this chapter by working on a WordPress blog.
Before we start, I would like you to create a WordPress blog (http://wordpress.
com/about) or use one of your existing ones.
Creating test cases for our WordPress
blog
Here, we are using a WordPress blog with the following URL http://
pageobjectpattern.wordpress.com/. Let us create three test cases for
it before we start talking about the PageObject pattern.
9

Understanding PageObject Pattern
[]
Test case 1 – Adding a new post to our
WordPress blog
The following test script will log in to the Admin portal of our WordPress blog and
add a new blog post:
public class TestAddNewPost {
public static void main(String... args) {
WebDriver driver = new FirefoxDriver();
// Login to Admin portal
driver.get("http://pageobjectpattern.wordpress.com/wp-admin");
WebElement email = driver.findElement(By.id("user_login"));
WebElement pwd = driver.findElement(By.id("user_pass"));
WebElement submit = driver.findElement(By.id("wp-submit"));
email.sendKeys("pageobjectpattern@gmail.com");
pwd.sendKeys("webdriver123");
submit.click();
// Go to AllPosts page
driver.get("http://pageobjectpattern.wordpress.com/wp-
admin/edit.php");
// Add New Post
WebElement addNewPost = driver.findElement(By.linkText("Add
New"));
addNewPost.click();
// Add New Post's Content
driver.switchTo().frame("content_ifr");
WebElement postBody = driver.findElement(By.id("tinymce"));
postBody.sendKeys("This is description");
driver.switchTo().defaultContent();
WebElement title = driver.findElement(By.id("title"));
title.click();
title.sendKeys("My First Post");
// Publish the Post
WebElement publish = driver.findElement(By.id("publish"));
publish.click();
}
}
The following is the sequence of steps that the preceding code performs:
1. Log in to the WordPress Admin portal.
2. Go to the All Posts page.
3. Click on the Add New post button.

Chapter 9
[]
4. Add a new post by providing the title and description.
5. Publish the post.
7HVWFDVH±'HOHWLQJDSRVWIURPRXU
WordPress blog
The following test script will log in to our WordPress blog and delete an existing post:
public class TestDeletePost {
public static void main(String... args) {
WebDriver driver = new FirefoxDriver();
// Login to Admin portal
driver.get("http://pageobjectpattern.wordpress.com/wp-admin");
WebElement email =
driver.findElement(By.id("user_login"));
WebElement pwd =
driver.findElement(By.id("user_pass"));
WebElement submit = driver.findElement(By.id("wp-
submit"));
email.sendKeys("pageobjectpattern@gmail.com");
pwd.sendKeys("webdriver123");
submit.click();
// Go to a All Posts page
driver.get("http://pageobjectpattern.wordpress.com/wp-
admin/edit.php");
// Click on the post to be deleted
WebElement post = driver.findElement(By.linkText("My
First Post"));
post.click();
// Delete Post
WebElement publish = driver.findElement(By.linkText("Move
to Trash"));
publish.click();
}
}
The following is the sequence of steps that the preceding test script follows to delete
a post:
1. Log in to the WordPress Admin portal.
2. Go to the All Posts page.
3. Click on the post to be deleted.
4. Delete the post.

Understanding PageObject Pattern
[]
7HVWFDVH±&RXQWLQJWKHQXPEHURISRVWV
on our WordPress blog
The following test script will count all the posts currently available on our
WordPress blog:
public class TestPostsCount {
public static void main(String... args){
WebDriver driver = new FirefoxDriver();
// Login to Admin portal
driver.get("http://pageobjectpattern.wordpress.com/wp-admin");
WebElement email =
driver.findElement(By.id("user_login"));
WebElement pwd =
driver.findElement(By.id("user_pass"));
WebElement submit = driver.findElement(By.id("wp-
submit"));
email.sendKeys("pageobjectpattern@gmail.com");
pwd.sendKeys("webdriver123");
submit.click();
// Count the number of posts.
driver.get("http://pageobjectpattern.wordpress.com/wp-
admin/edit.php");
WebElement postsContainer = driver.findElement(By.id("the-
list"));
List postsList = postsContainer.findElements(By.
tagName("tr"));
System.out.println(postsList.size());
}
}
The following is the sequence of steps that the preceding test script follows to count
the number of posts currently available on our blog:
1. Log in to the Admin portal.
2. Go to the All Posts page.
3. Count the number of posts available.

Chapter 9
[]
In the previous three test scripts, we log in to WordPress and perform some actions,
such as creating a post, deleting a post, and counting the number of existing posts.
Imagine that the ID of an element on the login page has changed, and we have to
modify that in all the three, different test cases; or, if the All Posts page has changed,
WKDWZHKDYHWRHGLWDOOWKHWKUHHWHVWFDVHVWRUHÁHFWWKHQHZFKDQJHV,QVWHDGRI
three cases, if you have 50 test cases, changing each of them every time there is a
FKDQJHLQWKHWDUJHWDSSOLFDWLRQLVYHU\GLIÀFXOW)RUWKLVSXUSRVH\RXQHHGWRGHVLJQ
a test framework that keeps the changes that you need to make the test cases to a
minimum. The PageObject pattern is one such design pattern that can be used to
design your test framework.
What is the PageObject pattern?
Whenever we are designing an automation framework for testing web applications,
we have to accept the fact that the target application and its elements are bound to
FKDQJH$QHIÀFLHQWIUDPHZRUNLVRQHWKDWQHHGVPLQLPDOUHIDFWRULQJWRDGDSWWR
new changes in the target application. Let us try to build the preceding test scenarios
LQWRWKH3DJH2EMHFWGHVLJQSDWWHUQPRGHO/HWXVÀUVWVWDUWEXLOGLQJD3DJH2EMHFWIRU
the login page. This should look as shown in the following code:
public class AdminLoginPage {
WebDriver driver;
WebElement email;
WebElement password;
WebElement submit;
public AdminLoginPage(WebDriver driver){
this.driver = driver;
driver.get("http://pageobjectpattern.wordpress.com/wp-
admin");
email = driver.findElement(By.id("user_login"));
password = driver.findElement(By.id("user_pass"));
submit = driver.findElement(By.id("wp-submit"));
}
public void login(){
email.sendKeys("pageobjectpattern@gmail.com");
password.sendKeys("webdriver123");
submit.click();
}
}

Understanding PageObject Pattern
[]
So, all the elements that are part of the process of signing in are listed in the
AdminLoginPage class and there is a method named login() which manages
the populating of these elements and submitting the login form. Thus, this
AdminLoginPageobject class will represent WordPress's administration login
page, constituting all the elements that are listed on the page as member variables
and all the actions that can be taken on the page as methods. Now, let us see how
we need to refactor the test case so far to use our newly created PageObject. Let us
consider the following TestAddNewPost test case:
public class TestAddNewPostUsingPageObject {
public static void main(String... args) {
WebDriver driver = new FirefoxDriver();
// Login to Admin portal
AdminLoginPage admLoginPage = new AdminLoginPage(driver);
admLoginPage.login();
// Go to New Posts page
driver.get("http://pageobjectpattern.wordpress.com/wp-
admin/edit.php");
WebElement addNewPost = driver.findElement(By.linkText("Add
New"));
addNewPost.click();
// Add New Post
driver.switchTo().frame("content_ifr");
WebElement postBody = driver.findElement(By.id("tinymce"));
postBody.sendKeys("This is description");
driver.switchTo().defaultContent();
WebElement title = driver.findElement(By.id("title"));
title.click();
title.sendKeys("My First Post");
WebElement publish = driver.findElement(By.id("publish"));
publish.click();
}
}
In the preceding test case, the entire code for logging in to the admin page is
contained in just two lines:
AdminLoginPage admLoginPage = new AdminLoginPage(driver);
admLoginPage.login();
Navigating to the admin login page, identifying the elements, providing values
for the elements, and submitting the form—everything is taken care of by the
PageObject. Thus, from now on, the test case need not be refactored for any changes
to the admin page in the future. You just have to change the PageObject and all
the test cases using this PageObject will start using the new changes without even
knowing they occured.

Chapter 9
[]
Now that you have seen what a PageObject looks like, the Selenium library provides
even more convenient ways to implement your PageObjects. Let us see them here.
8VLQJWKH#)LQG%\DQQRWDWLRQ
An element in the PageObject is marked with the @FindBy annotation. It is used
to direct the WebDriver to locate that element on a page. It takes the locating
mechanism (that is, By Id or Name or Class Name) and the value of the element
for that locating mechanism as input.
There are two ways of using the @FindBy annotation:
Usage 1 is shown as follows:
@FindBy(id="user_login")
WebElement userId;
Usage 2 is shown as follows:
@FindBy(how=How.ID, using="user_login")
WebElement userId;
The preceding two usages direct the WebDriver to locate the element using the
locating mechanism ID with the value user_login and assigns that element to the
WebElement userId. In usage 2, we have used the enumeration How. This enumeration
supports all the different locating mechanisms that our By class supports. The
enumeration constants supported in the How enumeration are as follows:
CLASS_NAME
CSS
ID
ID_OR_NAME
LINK_TEXT
NAME
PARTIAL_LINK_TEXT
TAG_NAME
XPATH

Understanding PageObject Pattern
[]
Using the How enumeration, we will see how our AdminLoginPage class changes:
public class AdminLoginPage {
WebDriver driver;
@FindBy(how=How.ID, id="user_login")
WebElement email;
@FindBy(how=How.ID, id="user_pass")
WebElement password;
@FindBy(how=How.ID, id="wp-submit")
WebElement submit;
public AdminLoginPage(WebDriver driver){
this.driver = driver;
driver.get("http://pageobjectpattern.wordpress.com/wp-
admin");
}
public void login(){
email.sendKeys("pageobjectpattern@gmail.com");
password.sendKeys("webdriver123");
submit.click();
}
}
When the test case instantiates the preceding class in the constructor, we navigate to
the WordPress login page using the following code specifed in the constructor:
driver.get("http://pageobjectpattern.wordpress.com/wp-admin");
Once the driver state is set to this page, all the FindBy declared elements, that is,
email, password, and submit, are initialized by the WebDriver using the locating
PHFKDQLVPVVSHFLÀHGLQWKHFindBy annotation.
Understanding PageFactory
Another important class that the WebDriver library provides to support the
PageObject pattern is the PageFactory class. Once the PageObject class declares
elements using the FindBy annotation, you can instantiate that PageObject class and
its elements using the PageFactory class. This class supports a static method named
initElements. The API syntax for this method is as follows:
initElements(WebDriver driver, java.lang.Class PageObjectClass)
Now, let us see how this can be used in our test case to create AdminLoginPage:
public class TestAddNewPostUsingPageObjects {
public static void main(String... args){
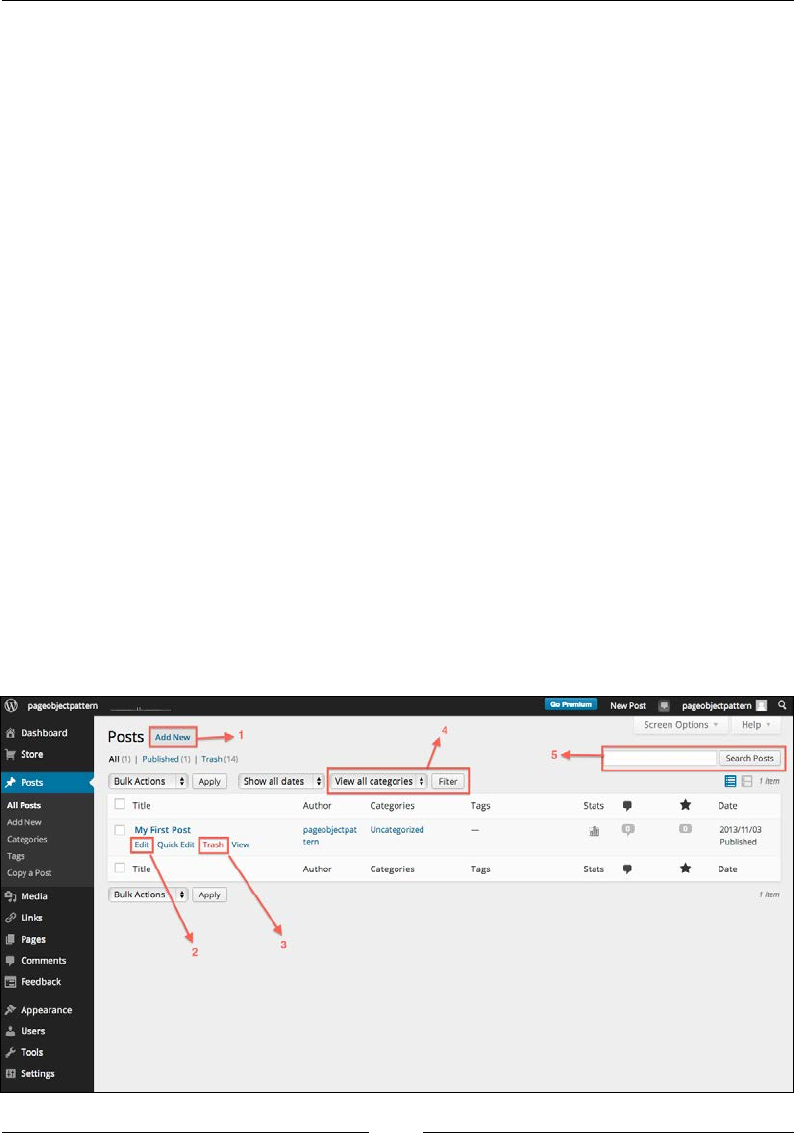
Chapter 9
[]
WebDriver driver = new FirefoxDriver();
AdminLoginPage loginPage
= PageFactory.initElements(driver, AdminLoginPage.class);
loginPage.login();
}
}
The PageFactory class instantiates the AdminLoginPage class and gives it the
driver instance. The AdminLoginPage PageObject navigates the driver instance to
a URL (http://pageobjectpattern.wordpress.com/wp-admin, in this case) and
then populates all its elements annotated with the FindBy annotation.
Good practices for the PageObjects
design
So, now that you have seen what a simple implementation of PageObject looks
like, it's time to consider some good practices in designing PageObjects for your
test framework.
Consider a web page as a services provider
At a high level, when you look at a page in a web application, it is nothing but an
aggregation of various User Services in one place. For example, if you take a look at
the All Posts page in our WordPress Admin console, there are many sections in it, as
shown in the following screenshot:
»
\\‘
pageotojectpattem
New
Pott
*
pageobjectpattem
Q
Screen
Options
•
Help
»
4
ft
Dashboard
W
Store
POStS
|
Add
New
|
»
All
1|
|
Pubfcs»M!d
|
Trash
('4)
1
/
5
1M
rch
Posts
Posts
Show
all
dates
t
View
all
categories
t
Filter
Bulk
Actions
$
Aopty
i
/rent
Stats
9
All
Posts
Title
Author
Categories
Tags
Date
Add
New
A
P
O
aM
am/03
Published
My
First
Post
Fdil
I
Quick
(to
pageotyectpat
Uncategcrued
Categories
|TMJIJ
tern
View
it
Stats
9
Title
Author
Categories
Tags
Date
Copy
a
Post
*3
Media
tP
Links
i
Page*
9
Comments
H
feedback
Bulk
Actions
t
Apply
l
ntm
3
2
p
Appearance
M
Users
y
Tools
Q]
Settings

Understanding PageObject Pattern
[]
In the preceding All PostsSDJHDXVHUFDQSHUIRUPWKHIROORZLQJÀYHGLIIHUHQW
activities:
Add a New post.
Edit a selected post.
Delete a selected post.
Filter the posts seen by category.
Search for some desired text in all the posts.
The preceding activities are nothing but the services that the All Posts page provides
to its users. So, your PageObject should also provide these services to the test case,
which is the user of this PageObject. The code for the All Posts PageObject should
look as follows:
public class AllPostsPage {
WebDriver driver;
@FindBy(how=How.ID, using="the-list")
WebElement postsContainer;
@FindBy(how=How.ID, using="post-search-input")
WebElement searchPosts;
@FindBy(how=How.ID, using="cat")
WebElement viewByCategories;
public AllPostsPage(WebDriver driver){
this.driver = driver;
driver.get("http://pageobjectpattern.wordpress.com/wp-
admin/edit.php");
}
public void createANewPost(String title, String description) {
}
public void editAPost(String title){
}
public void deleteAPost(String postTitle) {
}
public void filterPostsByCategory(String category){
}
public void searchInPosts(String searchText){
}
}
Now, we have mapped WKHLGHQWLÀHGVHUYLFHVRQWKHSDJHWRWKHmethods in our
PageObject. When a test case wants to execute a service, it will take assistance from
the PageObject to accomplish that.

Chapter 9
[]
$OZD\VORRNIRULPSOLHGVHUYLFHV
There are services that a page provides ZKLFKFDQEHLGHQWLÀHGYHU\FOHDUO\RQLW
But, there are some such services that are not visible on the page, but are implied.
For example, in the All PostsSDJHZHKDYHLGHQWLÀHGÀYHVHUYLFHVMXVWE\ORRNLQJ
at the page. But let us say your test case wants to know the count of existing posts;
this information is available on the All Posts page, and we have to make sure
that your PageObject provides that as an implied service. Now, you extend your
PageObject for the All Posts page with this implied service, which looks as follows:
public class AllPostsPage {
WebDriver driver;
@FindBy(how=How.ID, using="the-list")
WebElement postsContainer;
@FindBy(how=How.ID, using="post-search-input")
WebElement searchPosts;
@FindBy(how=How.ID, using="cat")
WebElement viewByCategories;
public AllPostsPage(WebDriver driver){
this.driver = driver;
driver.get("http://pageobjectpattern.wordpress.com/wp-
admin/edit.php");
}
public void createANewPost(String title, String description) {
}
public void editAPost(String title){
}
public void deleteAPost(String postTitle) {
}
public void filterPostsByCategory(String category){
}
public void searchInPosts(String searchText){
}
public int getAllPostsCount(){
}
}
Now your test cases can use the same PageObject to avail the implied services
relevant to the All Posts page.

Understanding PageObject Pattern
[]
Using PageObjects within a PageObject
There will be many situations where you need to use PageObjects within a
PageObject. Let us analyze that using a scenario on the All Posts page. When you
click on Add New to add a new post, the browser actually navigates to a different
page. So, you have to create two PageObjects, one for the All Posts page and another
for the Add New page. Designing your PageObjects to simulate the exact behavior of
our target application will keep things very clear and independent of each other. You
may be able to navigate to the Add New page in several different ways. Creating
a PageObject of its own for the Add New page and using it wherever needed will
make your test framework adhere to good object-oriented fundamentals, and make
the maintenance of your test framework easy. Let us see what using PageObjects
within a PageObject will look like.
The AddNewPost PageObject
The AddNewPost PageObject adds new posts as shown in the following code:
public class AddNewPost {
WebDriver driver;
@FindBy(how=How.ID, using="content_ifr")
WebElement newPostContentFrame;
@FindBy(how=How.ID, using="tinymce")
WebElement newPostContentBody;
@FindBy(how=How.ID, using="title")
WebElement newPostTitle;
@FindBy(how=How.ID, using="publish")
WebElement newPostPublish;
public AddNewPost(WebDriver driver){
this.driver = driver;
System.out.println(driver.getCurrentUrl());
}
public void addNewPost(String title, String descContent){
driver.switchTo().frame(newPostContentFrame);
newPostContentBody.sendKeys(descContent);
driver.switchTo().defaultContent();
newPostTitle.click();
newPostTitle.sendKeys(title);
newPostPublish.click();
}
}

Chapter 9
[]
The AllPostsPage PageObject
The AllPostsPage PageObject deals with the All posts page, as shown in the
following code:
public class AllPostsPage {
WebDriver driver;
@FindBy(how=How.ID, using="the-list")
WebElement postsContainer;
@FindBy(how=How.ID, using="post-search-input")
WebElement searchPosts;
@FindBy(how=How.ID, using="cat")
WebElement viewByCategories;
@FindBy(how=How.LINK_TEXT, using="Add New")
WebElement addNewPost;
public AllPostsPage(WebDriver driver){
this.driver = driver;
driver.get("http://pageobjectpattern.wordpress.com/wp-
admin/edit.php");
}
public void createANewPost(String title, String description) {
addNewPost.click();
AddNewPost newPost = PageFactory.initElements(driver,
AddNewPost.class);
newPost.addNewPost(title, description);
}
public void editAPost(String title){
}
public void deleteAPost(String postTitle) {
}
public void filterPostsByCategory(String category){
}
public void searchInPosts(String searchText){
}
public int getAllPostsCount(){
}
}
Now, if you observe in the AllPostsPage PageObject, we have instantiated the
AddNewPage PageObject in the createNewPost() method. Thus, we are using one
PageObject with another and keeping the behavior as close as possible to the target
application.

Understanding PageObject Pattern
[]
&RQVLGHUPHWKRGVLQ3DJH2EMHFWVDVVHUYLFHV
and not as User Actions
There might sometimes be confusion surrounding what methods make a PageObject.
We have seen earlier that each PageObject should contain User Services as their
methods. But quite often, we see some implementations of PageObjects in several
test frameworks that constitute User Actions as their methods. So what is the
GLIIHUHQFHEHWZHHQD8VHU6HUYLFHDQG8VHU$FWLRQ"$VZHKDYHDOUHDG\VHHQVRPH
of the examples of User Services on the WordPress Admin console are as follows:
Create a new post
Delete a post
Edit a post
Search in posts
Filter posts
Count all existing posts
All the preceding services talk about the various functionalities of the target
application. Now, let us see some of examples of User Actions.
The following are some examples of User Actions:
Mouse click
Typing text in a textbox
Navigating to a page
Clicking on a checkbox
Select an option from a dropdown
The previous list showed some examples of User Actions on a page. They are
common across many applications. Your PageObject is not meant to provide your
test case with User Actions, but with User Services instead. So each method in your
PageObject should map to a service that the target page provides to the user. In order
to accomplish a User Service, PageObject methods should contain many User Actions.
Several User Actions come together to accomplish a User Service.
1

Chapter 9
[]
An example of what your PageObject will look like if it provisions its methods with
User Actions instead of User Services is as follows; let us see what the AddNewPage
PageObject will look like:
public class AddNewPost {
WebDriver driver;
@FindBy(how=How.ID, using="content_ifr")
WebElement newPostContentFrame;
@FindBy(how=How.ID, using="tinymce")
WebElement newPostContentBody;
@FindBy(how=How.ID, using="title")
WebElement newPostTitle;
@FindBy(how=How.ID, using="publish")
WebElement newPostPublish;
public AddNewPost(WebDriver driver){
this.driver = driver;
System.out.println(driver.getCurrentUrl());
}
public void typeTextinTitle(String title){
newPostTitle.sendKeys(title);
}
public void clickPublishButton(){
newPostPublish.click();
}
public void typeTextinContent(String descContent){
driver.switchTo().frame(newPostContentFrame);
newPostContentBody.sendKeys(descContent);
}
}
So, in the code of the AddNewPage PageObject, we have three different methods to
accomplish three different User Actions. So the caller object, instead of just invoking
the addNewPage(String title, String description) method, should now
invoke the following:
typeTextinTitle(String title)
typeTextinContent(String description)
clickPublishButton()
The preceding User Actions are three different User Actions to accomplish adding a
new post User Service. The caller of these methods should also keep in mind the order
in which these User Actions need to be called; that is, the clickPublishButton()
method should always come last. This introduces unnecessary complexity to your
test cases and other PageObjects that try to add new posts in the system. Thus, User
Services will hide most of the implementation details from the users of the PageObjects
and reduce the cost of maintenance of your test cases.
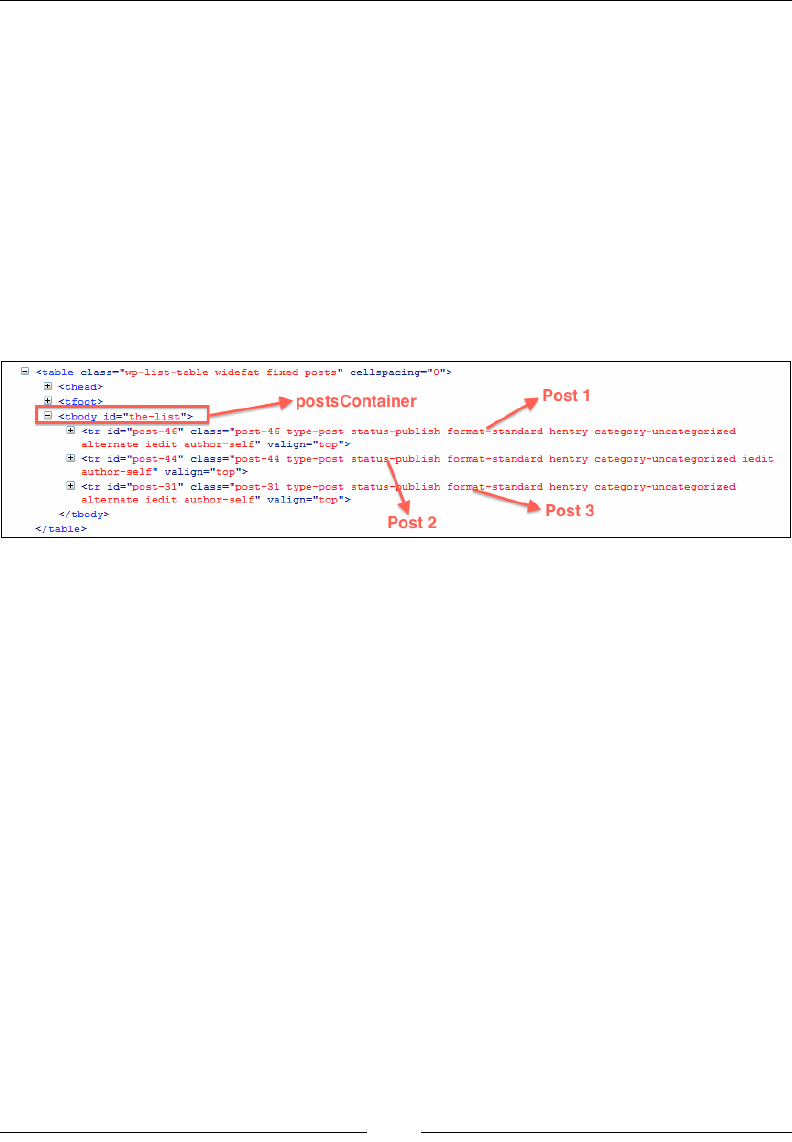
Understanding PageObject Pattern
[]
,GHQWLI\LQJVRPH:HE(OHPHQWVRQWKHÀ\
In all the PageObjects, we have initialized the elements that we are going to use
during object instantiation, using the @FindBy annotation. It is always good to
identify all the elements of a page that are required to accomplish a User Service and
assign them to the member variables in your PageObject. However, it is not always
possible to do that. For example, if you want to edit a particular post in the All Posts
page, it is not mandatory, during PageObject initialization, to map each post on the
page to a member variable in your PageObject. When you have large number of
posts, your PageObject initialization will be unnecessarily spending time mapping
the posts to your member variables, even though we don't use them. Besides, we
don't even know how many member variables we need to map all the posts in the
All Posts page. The HTML for the All Posts page looks as follows:
There is a root HOHPHQWLGHQWLÀHGby the-list, which contains all the posts in
the WordPress blog. Within this element, we can see that there's Post1, Post2, and
Post3. So having your PageObject initialized for all the three posts is not an optimal
solution. You can initialize your PageObject with a member variable mapped to the
root element and the target post will be retrieved from it whenever required.
Let us take a look at the the AllPostsPage PageObject that implements its
EditPost() method in the following way:
public class AllPostsPage {
WebDriver driver;
@FindBy(how=How.ID, using="the-list")
WebElement postsContainer;
public void editAPost(String presentTitle,
String newTitle, String description){
List<WebElement> allPosts
= postsContainer.findElements(By.className("row-
title"));
for(WebElement ele : allPosts){
if(ele.getText().equals(presentTitle)){
-I
<table
cla3S="wp-list-table
widefat
fixed
posts"
cellspacing=”0">
S)
<thead>
QÿÿtbodÿjUi=ÿthe-ÿÿtÿ>
6
<tr
id="post-46"
class="post-46
type-post
status-publish
f
ormatÿstandard
hentry
category-uncategorized
alternate
iedit
author-self"
valign="top">
l+l
<tr
id="post-44"
class="post-44
type-post
status-publish
format-standard
hentry
category-uncategorized
iedit
author-self"
valign="top">
\
l+l
<tr
id="post-31"
class="post-31
type-post
status-Yublish
fo
alternate
iedit
author-self"
valign="top">
</
tbody>
</table>
Post
1
postsContainer
b-standard
hentry
category-uncategorized
Post
3
Post
2

Chapter 9
[]
Actions builder = new Actions(driver);
builder.moveToElement(ele);
builder.click(driver.findElement(
By.cssSelector(".edit>a")));
// Generate the composite action.
Action compositeAction = builder.build();
// Perform the composite action.
compositeAction.perform();
break;
}
}
EditPost editPost
= PageFactory.initElements(driver, EditPost.class);
editPost.editPost(newTitle, description);
}
}
2EVHUYHLQWKHSUHYLRXVFRGHWKDWRQO\WKHURRWHOHPHQWLGHQWLÀHGE\the-list;
the element that contains all the posts in the All Posts page is mapped to a member
variable, named pageContainer in the AllPostsPage PageObject. The target post
is extracted only when it is needed in the editAPost() method. This way, your
PageObject initialization doesn't take much time and has all the necessary
elements mapped.
.HHSLQJWKHSDJHVSHFL¿FGHWDLOVRIIWKHWHVW
script
The ultimate aim of the3DJH2EMHFWSDWWHUQGHVLJQLVWRPDLQWDLQWKHSDJHVSHFLÀF
details, such as the IDs of the elements on the page, the way we reach a particular
page in the application, and so on, away from the test script. Building your test
framework using the PageObject pattern should allow you to keep your test scripts
YHU\JHQHULFDQGQHHGLQJQRPRGLÀFDWLRQHDFKWLPHWKHSDJHLPSOHPHQWDWLRQGHWDLOV
change. Finally whenever there is a change done to a web page, say a login page, the
number of changes that need to be done for 50 test scripts that use this page should
be ideally zero. Just changing the PageObject should handle adapting all the tests to
the new changes.

Understanding PageObject Pattern
[]
8QGHUVWDQGLQJORDGDEOHFRPSRQHQWV
The loadable component is an extension to the PageObject pattern. The
LoadableComponent class in the WebDriver library will help test case developers
make sure that the page or a component of the page is loaded successfully. It
tremendously reduces the efforts to debug your test cases. The PageObject should
extend this LoadableComponent abstract class and, as a result, it is bound to provide
implementation for the following two methods:
protected abstract void load()
protected abstract void isLoaded() throws java.lang.Error
The page or component that has to be loaded in the load()and isLoaded() methods
determines whether or not the page or component is fully loaded. If it is not fully
loaded, it throws an error.
Let us now modify the AdminLoginPage PageObject to extend the
LoadableComponent class and see how it looks, using the following code:
package com.packt.webdriver.chapter9.pageObjects;
import org.junit.Assert;
import org.openqa.selenium.WebDriver;
import org.openqa.selenium.WebElement;
import org.openqa.selenium.support.CacheLookup;
import org.openqa.selenium.support.FindBy;
import org.openqa.selenium.support.How;
import org.openqa.selenium.support.PageFactory;
import org.openqa.selenium.support.ui.LoadableComponent;
public class AdminLoginPageUsingLoadableComponent extends LoadableComp
onent<AdminLoginPageUsingLoadableComponent>{
WebDriver driver;
@FindBy(how=How.ID, using="user_login")
WebElement email;
@FindBy(how=How.ID, using="user_pass")
WebElement password;
@FindBy(how=How.ID, using="wp-submit")
WebElement submit;
public AdminLoginPageUsingLoadableComponent(WebDriver driver){
this.driver = driver;
PageFactory.initElements(driver, this);
}
public AllPostsPage login(){
email.sendKeys("pageobjectpattern@gmail.com");
password.sendKeys("webdriver123");
submit.click();
return PageFactory.initElements(driver,

Chapter 9
[]
AllPostsPage.class);
}
@Override
protected void load() {
driver.get("http://pageobjectpattern.wordpress.com/wp-
admin");
}
@Override
protected void isLoaded() throws Error {
Assert.assertTrue(driver.getCurrentUrl().contains("wp-
admin"));
}
}
The URL thatKDVWREHORDGHGLVVSHFLÀHGLQWKHload() method and the isLoaded()
method validates whether or not the correct page is loaded. Now, the changes that
are to be done in your test case are as follows:
AdminLoginPageUsingLoadableComponent loginPage
= new AdminLoginPageUsingLoadableComponent(driver).get();
The get() method, again, from the LoadableComponent class will make sure the
component is loaded by invoking the isLoaded() method.
:RUNLQJRQDQHQGWRHQGH[DPSOHRI
WordPress
Now that we have understood what PageObjects are, it is time to take a look at an
end-to-end example that interacts and tests the WordPress Admin console. First, we
will see all the PageObjects and then the test cases that use them.
Looking at all the PageObjects
/HWXVÀUVWVHHDOOWKHPageObjects that are involved in testing the WordPress
Admin console.
7KH$GPLQ/RJLQ3DJH3DJH2EMHFW
The AdminLoginPage PageObject deals with the login page. This object has to be
refactored if any changes have been made to the page in the target application,
using the following code:
package com.packt.webdriver.chapter9.pageObjects;
import org.openqa.selenium.WebDriver;

Understanding PageObject Pattern
[]
import org.openqa.selenium.WebElement;
import org.openqa.selenium.support.CacheLookup;
import org.openqa.selenium.support.FindBy;
import org.openqa.selenium.support.How;
import org.openqa.selenium.support.PageFactory;
public class AdminLoginPage {
WebDriver driver;
@FindBy(how=How.ID, using="user_login")
WebElement email;
@FindBy(how=How.ID, using="user_pass")
WebElement password;
@FindBy(how=How.ID, using="wp-submit")
WebElement submit;
public AdminLoginPage(WebDriver driver){
this.driver = driver;
driver.get("http://pageobjectpattern.wordpress.com/wp-
admin");
}
public AllPostsPage login(){
email.sendKeys("pageobjectpattern@gmail.com");
password.sendKeys("webdriver123");
submit.click();
return PageFactory.initElements(driver,
AllPostsPage.class);
}
}
The constructor of the AdminLoginPage PageObject accepts the WebDriver instance.
This will let the test framework use the same driver instance throughout the execution
across test scripts as well as PageObjects; thus, the state of the browser and web
application is preserved. You will see similar constructors for all the PageObjects.
Apart from the constructor, the AdminLoginPage PageObject provides the login()
service. This service lets the test scripts log in to the WordPress blog and, in return,
gets the AllPostsPage PageObject. Before returning the instance of the AllPostsPage
PageObject, the PageFactory PageObject will initialize all the WebElements of the
AllPostsPage PageObject. Thus, all of the implementation details of the login service
are hidden from the test script, and it can work with the AllPostsPage PageObject.
The AllPostsPage PageObject
The AllPostsPage PageObject deals with the All Posts page, using the following
code:
package com.packt.webdriver.chapter9.pageObjects;
import java.util.List;

Chapter 9
[]
import org.openqa.selenium.By;
import org.openqa.selenium.WebDriver;
import org.openqa.selenium.WebElement;
import org.openqa.selenium.interactions.Action;
import org.openqa.selenium.interactions.Actions;
import org.openqa.selenium.support.FindBy;
import org.openqa.selenium.support.How;
import org.openqa.selenium.support.PageFactory;
public class AllPostsPage {
WebDriver driver;
@FindBy(how=How.ID, using="the-list")
WebElement postsContainer;
@FindBy(how=How.ID, using="post-search-input")
WebElement searchPosts;
@FindBy(how=How.ID, using="cat")
WebElement viewByCategories;
@FindBy(how=How.LINK_TEXT, using="Add New")
WebElement addNewPost;
public AllPostsPage(WebDriver driver){
this.driver = driver;
driver.get("http://pageobjectpattern.wordpress.com/wp-
admin/edit.php");
}
public void createANewPost(String title, String description){
addNewPost.click();
AddNewPostPage newPost = PageFactory.initElements(driver,
AddNewPostPage.class);
newPost.addNewPost(title, description);
}
public void editAPost(String presentTitle, String newTitle,
String description){
goToParticularPostPage(presentTitle);
EditPostPage editPost = PageFactory.initElements(driver,
EditPostPage.class);
editPost.editPost(newTitle, description);
}
public void deleteAPost(String title) {
goToParticularPostPage(title);
DeletePostPage deletePost =
PageFactory.initElements(driver, DeletePostPage.class);
deletePost.delete();
}
public void filterPostsByCategory(String category){
}
public void searchInPosts(String searchText){

Understanding PageObject Pattern
[]
}
public int getAllPostsCount(){
List<WebElement> postsList = postsContainer.findElements(By.
tagName("tr"));
return postsList.size();
}
private void goToParticularPostPage(String title){
List<WebElement> allPosts
= postsContainer.findElements(By.className("row-
title"));
for(WebElement ele : allPosts){
if(ele.getText().equals(title)){
Actions builder = new Actions(driver);
builder.moveToElement(ele);
builder.click(driver.findElement(
By.cssSelector(".edit>a")));
// Generate the composite action.
Action compositeAction = builder.build();
// Perform the composite action.
compositeAction.perform();
break;
}
}
}
}
The AllPostsPage PageObject provides six services. They are as follows:
Create a Post
Edit a Post
Delete a Post
Filter posts by Category
Search for text in posts
Count the number of posts available.
Once the test scripts obtains an instance of this PageObject via the login service of
the AdminLoginPage PageObject, it can use any of the six services of this PageObject
and test it. If any of the implementation details change, such as the navigation to a
particular post or the ID of a WebElement on this page, the test script doesn't really
have to worry about it. Modifying this PageObject will apply the changes to the
WordPress blog.

Chapter 9
[]
The AddNewPostPage PageObject
The AddNewPostPage PageObject deals with adding a new post to the blog, using the
following code:
package com.packt.webdriver.chapter9.pageObjects;
import org.openqa.selenium.WebDriver;
import org.openqa.selenium.WebElement;
import org.openqa.selenium.support.FindBy;
import org.openqa.selenium.support.How;
public class AddNewPostPage {
WebDriver driver;
@FindBy(how=How.ID, using="content_ifr")
WebElement newPostContentFrame;
@FindBy(how=How.ID, using="tinymce")
WebElement newPostContentBody;
@FindBy(how=How.ID, using="title")
WebElement newPostTitle;
@FindBy(how=How.ID, using="publish")
WebElement newPostPublish;
public AddNewPostPage(WebDriver driver){
this.driver = driver;
System.out.println(driver.getCurrentUrl());
}
public void addNewPost(String title, String descContent){
driver.switchTo().frame(newPostContentFrame);
newPostContentBody.sendKeys(descContent);
driver.switchTo().defaultContent();
newPostTitle.click();
newPostTitle.sendKeys(title);
newPostPublish.click();
}
}
The AddNewPostPage PageObject is instantiated in the createANewPost service
of the AllPostsPage PageObject. This PageObject provides a service named
addNewPost that takes inputs for title and description for the post and publishes
a new post in the blog with them.
The EditPostPage PageObject
The EditPostPage PageObject deals with editing an existing post, using the
following code:
package com.packt.webdriver.chapter9.pageObjects;
import org.openqa.selenium.WebDriver;
import org.openqa.selenium.WebElement;

Understanding PageObject Pattern
[]
import org.openqa.selenium.support.FindBy;
import org.openqa.selenium.support.How;
public class EditPostPage {
WebDriver driver;
@FindBy(how=How.ID, using="content_ifr")
WebElement newPostContentFrame;
@FindBy(how=How.ID, using="tinymce")
WebElement newPostContentBody;
@FindBy(how=How.ID, using="title")
WebElement newPostTitle;
@FindBy(how=How.ID, using="publish")
WebElement newPostPublish;
public EditPostPage(WebDriver driver){
this.driver = driver;
System.out.println(driver.getCurrentUrl());
}
public void editPost(String title, String descContent){
driver.switchTo().frame(newPostContentFrame);
newPostContentBody.clear();
newPostContentBody.sendKeys(descContent);
driver.switchTo().defaultContent();
newPostTitle.click();
newPostTitle.clear();
newPostTitle.sendKeys(title);
newPostPublish.click();
}
}
The EditPostPage PageObject is similar to the AddNewPostPage PageObject and is
instantiated at the editAPost service of the AllPostsPage PageObject. This provides
a service named editPost to edit an existing post. The new title and description
are passed as input parameters to this service.
The DeletePostPage PageObject
The DeletePostPage PageObject deals with deleting an existing post, using the
following code:
package com.packt.webdriver.chapter9.pageObjects;
import org.openqa.selenium.WebDriver;
import org.openqa.selenium.WebElement;
import org.openqa.selenium.support.FindBy;
import org.openqa.selenium.support.How;
public class DeletePostPage {
WebDriver driver;

Chapter 9
[]
@FindBy(how=How.LINK_TEXT, using="Move to Trash")
WebElement moveToTrash;
public DeletePostPage(WebDriver driver){
this.driver = driver;
System.out.println(driver.getCurrentUrl());
}
public void delete(){
moveToTrash.click();
}
}
The DeletePostPage PageObject is similar to AddNewPostPage and EditPostPage
PageObjects and is instantiated at the deleteAPost service of the AllPostsPage
PageObject. This provides a service named delete to delete an existing post.
As you can see, the AddNewPostPage, EditPostPage, and DeletePostPage
PageObjects take you to the same page. So, it makes sense to merge all these three
PageObjects into one that provides services for adding, editing, and deleting posts.
Looking at the test cases
Now it is time to see the test cases that use the PageObjects discussed earlier to
interact with the WordPress Admin console.
Adding a new post
This test case deals with adding a new post to the blog, using the following code:
package com.packt.webdriver.chapter9;
import org.openqa.selenium.WebDriver;
import org.openqa.selenium.chrome.ChromeDriver;
import org.openqa.selenium.support.PageFactory;
import com.packt.webdriver.chapter9.pageObjects.AdminLoginPage;
import com.packt.webdriver.chapter9.pageObjects.AllPostsPage;
public class TestAddNewPostUsingPageObjects {
public static void main(String... args){
WebDriver driver = new FirefoxDriver();
AdminLoginPage loginPage =
PageFactory.initElements(driver, AdminLoginPage.class);
AllPostsPage allPostsPage = loginPage.login();
allPostsPage.createANewPost("Creating New Post using
PageObjects",
"Its good to use PageObjects");
}
}

Understanding PageObject Pattern
[]
The following is the sequence of steps executed in the preceding test script to test
how to add a new post to the WordPress blog:
1. First, the test script creates a FirefoxDriver instance, because it intends to
test the scenario of adding a new post to the blog on the Firefox browser.
2. Then, it creates an instance of the AdminLoginPage PageObject that uses the
same driver instance created in the previous step.
3. Once it gets the instance of the AdminLoginPage PageObject, it uses the
login service to log in to the WordPress admin console. The login service,
in return, gives out an instance of the AllPostsPage PageObject instance to
the test script.
4. The test script uses the instance of the AllPostsPage PageObject obtained in
the previous step to use one of the many services provided by the All Posts
page. In this case, it uses the createANewPost service.
Editing a post
This test case deals with the testing and editing of a post in the blog using the
following code:
package com.packt.webdriver.chapter9;
import org.openqa.selenium.WebDriver;
import org.openqa.selenium.chrome.ChromeDriver;
import org.openqa.selenium.support.PageFactory;
import com.packt.webdriver.chapter9.pageObjects.AdminLoginPage;
import com.packt.webdriver.chapter9.pageObjects.AllPostsPage;
public class TestEditPostUsingPageObjects {
public static void main(String... args){
System.setProperty("webdriver.chrome.driver",
"C:\\chromedriver_win32_2.2\\chromedriver.exe");
WebDriver driver = new ChromeDriver();
AdminLoginPage loginPage =
PageFactory.initElements(driver,
AdminLoginPage.class);
AllPostsPage allPostsPage = loginPage.login();
allPostsPage.editAPost("Creating New Post using
PageObjects",
"Editing Post using PageObjects","Test framework
low maintenance");
}
}

Chapter 9
[]
The following is the sequence of steps executed in this test script to test the editing of
a post in the WordPress blog:
1. First, the test script creates a ChromeDriver instance, because it intends to
test this scenario of editing a post in the blog on the Chrome browser.
2. Then, it creates an instance of the AdminLoginPage PageObject that uses the
driver instance created in the previous step.
3. Once it gets the instance of the AdminLoginPage PageObject, it uses the
login service to log in to the WordPress Admin console. The login service, in
return, gives out an instance of the AllPostsPage PageObject instance to the
test script.
4. The test script uses the instance of the AllPostsPage PageObject obtained in
the previous step to use one of the many services provided by the All Posts
page. In this case, it uses the editAPost service.
Deleting a post
This test case deals with deleting a post, using the following code:
package com.packt.webdriver.chapter9;
import org.openqa.selenium.WebDriver;
import org.openqa.selenium.chrome.ChromeDriver;
import org.openqa.selenium.support.PageFactory;
import com.packt.webdriver.chapter9.pageObjects.AdminLoginPage;
import com.packt.webdriver.chapter9.pageObjects.AllPostsPage;
public class TestDeleteAPostUsingPageObjects {
public static void main(String... args){
System.setProperty("webdriver.chrome.driver",
"C:\\chromedriver_win32_2.2\\chromedriver.exe");
WebDriver driver = new ChromeDriver();
AdminLoginPage loginPage =
PageFactory.initElements(driver,
AdminLoginPage.class);
AllPostsPage allPostsPage = loginPage.login();
allPostsPage.deleteAPost("Creating New Post using
PageObjects");
}
}

Understanding PageObject Pattern
[]
The following is the sequence of steps executed in the preceding test script to test the
deleting of a post in the WordPress blog:
1. First, the test script creates a ChromeDriver instance, because it intends to
test this scenario of editing a post in the blog on the Chrome browser.
2. Then, it creates an instance of the AdminLoginPage PageObject that uses the
same driver instance created in the previous step.
3. Once it gets the instance of the AdminLoginPage PageObject, it uses the
login service to log in to the WordPress Admin console. The login service,
in return, gives out an instance of the AllPostsPage PageObject instance to
the test script.
4. The test script uses the instance of the AllPostsPage PageObject obtained in
the previous step to use one of the many services provided by the All Posts
page. In this case, it uses the deleteAPost service.
Counting posts
This test case deals with the counting of posts currently available in the blog, using
the following code:
package com.packt.webdriver.chapter9;
import org.openqa.selenium.WebDriver;
import org.openqa.selenium.chrome.ChromeDriver;
import org.openqa.selenium.support.PageFactory;
import com.packt.webdriver.chapter9.pageObjects.AdminLoginPage;
import com.packt.webdriver.chapter9.pageObjects.AllPostsPage;
public class TestPostsCountUsingPageObjects {
public static void main(String... args){
System.setProperty("webdriver.chrome.driver",
"C:\\chromedriver_win32_2.2\\chromedriver.exe");
WebDriver driver = new ChromeDriver();
AdminLoginPage loginPage =
PageFactory.initElements(driver,
AdminLoginPage.class);
AllPostsPage allPostsPage = loginPage.login();
System.out.println(allPostsPage.getAllPostsCount());
}
}

Chapter 9
[]
The following is the sequence of steps executed in the preceding test script to test the
counting of the number of posts in the WordPress blog:
1. First, the test script creates a ChromeDriver instance, because it intends to
test this scenario of editing a post in the blog on Chrome browser.
2. Then, it creates an instance of the AdminLoginPage PageObject that uses the
driver instance created in the previous step.
3. Once it gets the instance of the AdminLoginPage PageObject, it uses the
login service to log in to the WordPress Admin console. The login service,
in return, gives out an instance of the AllPostsPage PageObject instance to
the test script.
4. The test script uses the instance of the AllPostsPage PageObject obtained in
the previous step to use one of the many services provided by the All Posts
page. In this case, it uses the getAllPostsCount service.
6XPPDU\
In this chapter, we have seen what a PageObject pattern is and how we can implement
a test framework using PageObjects. We have seen numerous advantages of this. The
PageObject pattern and the LoadableComponents class provides the test framework
to adapt easily to changes made to the target application, without changing any test
cases. We should always remember that a better-designed test framework is always
ÁH[LEOHWRFKDQJHVPDGHWRWKHWDUJHWDSSOLFDWLRQ
In the next chapter, we will look at testing iOS and Android mobile applications.

Testing iOS and Android Apps
In all our previous chapters, we have worked on web applications that are loaded
in desktop browsers. But with the increasing number of mobile users, businesses
today have to serve their users on mobile devices as well. In this chapter, we will
take a look at the available software tools in the market that make use of Selenium
WebDriver, which help us test our applications on iOS and Android platforms.
'LIIHUHQWIRUPVRIPRELOHDSSOLFDWLRQV
There are three different forms in which an application can reach a user on the
mobile platform. They are as follows:
Native apps: Native appsDUHSXUHO\VSHFLÀFWR the target mobile platform.
They are developed in the platform-supported languages and are very much
tied to underlying SDKs. For iOS, applications are developed in Objective-C
and are dependent on iOS SDK; similarly, for the Android platform, they are
developed in Java and are dependent on Android SDK.
PVLWH: m.site, also known as mobile website, on the other hand, is a mini
version of your web application that loads on the browsers of your mobile
devices. On iOS devices, it can be Safari or Chrome, and on Android devices,
it can be the Android default browser or Chrome.
10
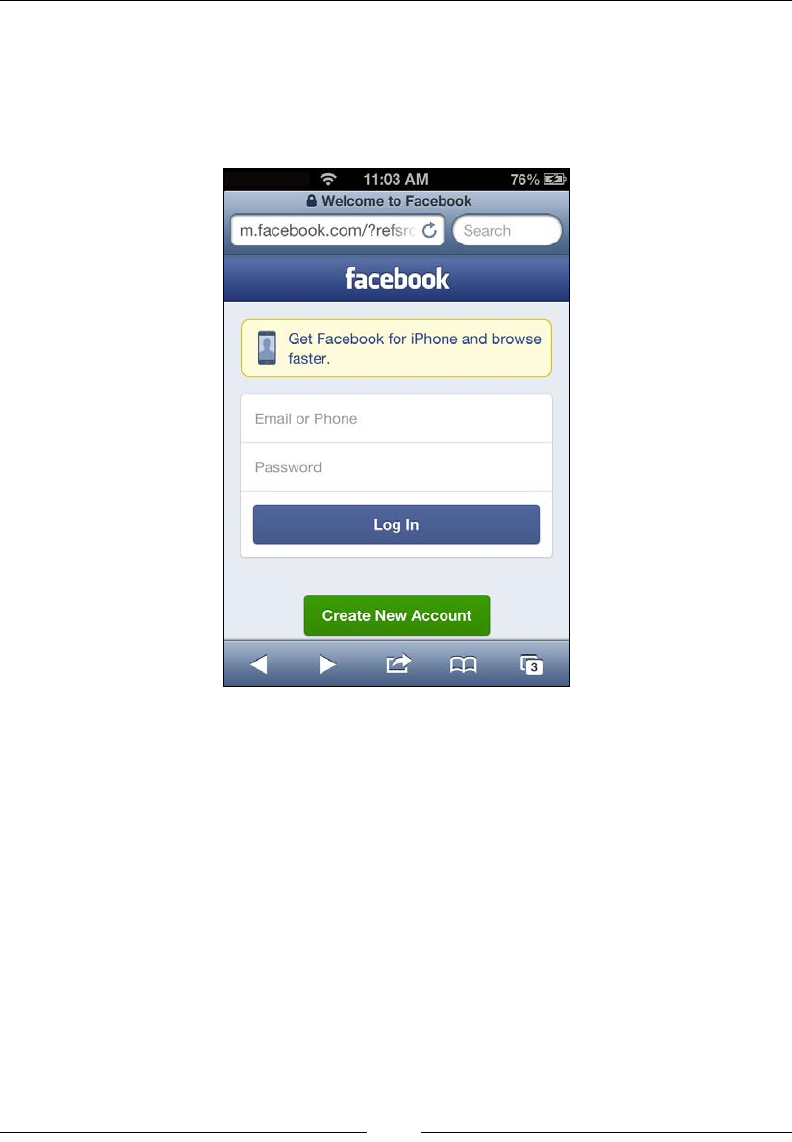
Testing iOS and Android Apps
[]
For example, on your iOS or Android device, open your browser and type
in www.facebook.com. Before the page loads, you will observe that a URL
redirection happens from www.facebook.com to m.facebook.com. Facebook
application servers realize that the request has originated from a mobile
device and start servicing its mobile site rather than the regular desktop site.
These m.sites use JavaScript and HTML5 to be developed just as your normal
web applications.
Hybrid apps: The Hybrid app is a combination of the native app and web
app. When you develop a native app, some parts of it load HTML web pages
into the app trying to make the user feel he/she is using a native application.
They generally use WebViews in native apps to load the web pages.
Now, you as a test scripts developer, have to test all these different applications on
various mobile devices.
11:03
AM
76%
S3
i
A
Welcome
to
Facebook
m.facebook.com/?refs
Search
facebook
Get
Facebook
for
iPhone
and
browse
faster.
Email
or
Phone
Password
Log
In
Create
New
Account
3

Chapter 10
[]
Available software tools
In order to automate the testing of your applications on mobile devices, there are
many software tools available. The following are some of the tools that are built
based on Selenium WebDriver:
AndroidDriver: This driver is a direct implementation of WebDriver, which
is similar to FirefoxDriver, IEDriver, and so on. It acts as the client library
with which your test script interacts. Its server side is the AndroidWebDriver
that is installed on the device, or the emulator and executes all the test script
commands that gets forwarded from AndroidDriver.
iPhoneDriver: This driver works very similar to AndroidDriver, but only
on iOS platforms. In order to use it, you need to set up a server on the
simulator or on the device. iPhoneDriver, however, is no longer supported
and is deprecated.
iOSDriver: As the name says, this driver is used for automating native,
hybrid, and m.site applications on iOS platforms. It uses native UI
Automation libraries to automate on the iOS platform. For the test scripts, all
this is transparent because it can still continue to use the WebDriver API in
its favorite client language bindings. The test script communicates with the
iOS Driver using the JSON wire protocol. However, if you want to execute
your test scripts against the Android platform, you cannot use this driver.
Selendroid: This driver is similar to iOSDriver and can execute your native,
hybrid, and m.site application test scripts on the Android platform. It
uses the native UI Automator library provided by Google. The test scripts
communicate with the Selendroid driver over the JSON wire protocol while
using its favorite client language bindings.
Appium: This is another tool that can let you execute your test scripts against
Android and iOS platforms without your having to change the underlying
driver. Appium can also work with Firefox OS platforms. In the rest of the
chapter, we will see how we can work with Appium.
$XWRPDWLQJL26DQG$QGURLGWHVWV
XVLQJ$SSLXP
Appium is an upcoming tool that can be used to automate your test scripts for both
Android and iOS platforms. It can be used to automate native, m.sites, and hybrid
applications. It internally uses WebDriver's JSON wire protocol.
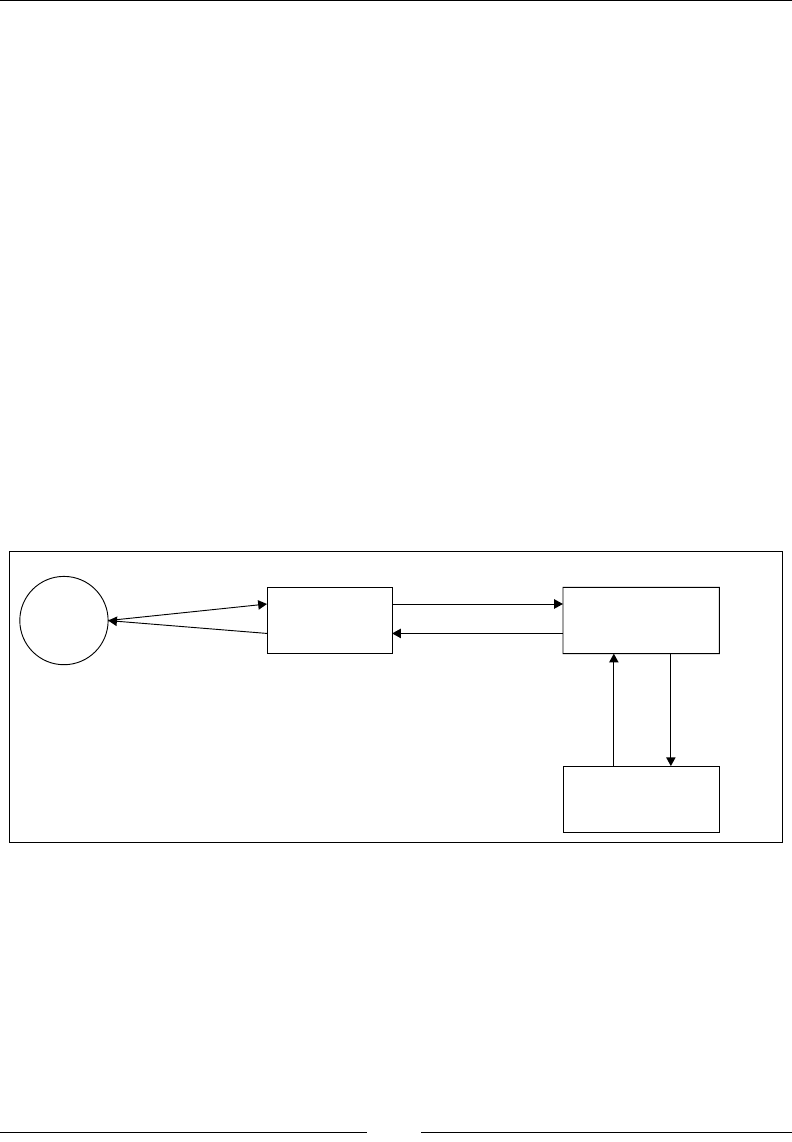
Testing iOS and Android Apps
[]
$XWRPDWLQJL26DSSOLFDWLRQWHVWV
For automating iOS app tests, Appium uses Apple Instruments. According to
Apple, Instruments is a performance, analysis, and testing tool for dynamically
WUDFLQJDQGSURÀOLQJ26;DQGL26FRGH,WLVDÁH[LEOHDQGSRZHUIXOWRROWKDW
lets you track one or more processes and examine the collected data. In this way,
Instruments helps you understand the behavior of both user apps and the operating
system. In particular, Appium uses UI Automation Instrument. UI Automation
Instrument is used to automate user interface tests of iOS apps. More information
about this instrument can be found at https://developer.apple.com/library/
mac/documentation/DeveloperTools/Conceptual/InstrumentsUserGuide/
UsingtheAutomationInstrument/UsingtheAutomationInstrument.html.
Appium works as a Remote WebDriver and receives the commands from your test
scripts over JSON wire protocol. These commands are passed to Apple Instruments
to be executed on the native app launched on a simulator or a real device. Before
the commands are passed on to the Apple Instruments, Appium translates the
JSON commands into UI Automation JavaScript commands that are understood by
Instruments. Apple Instruments will launch your app on the simulator or real device
and start executing your test script commands on it. This process is shown in the
following diagram:
UI Automation Library
JS Commands
Safari on Simulator or
real device
Test Script Apple InstrumentsAppium
WebDriver Commands
JSON Response JS Response
Response Executes JS
Commands
After the command is executed against your app on the simulator or device, the
target app sends the response to the Instruments, which are transferred to Appium
in the JavaScript response format. Appium translates the UI Automation JavaScript
responses into Selenium WebDriver JSON wire protocol responses and sends them
back to your test script.
>
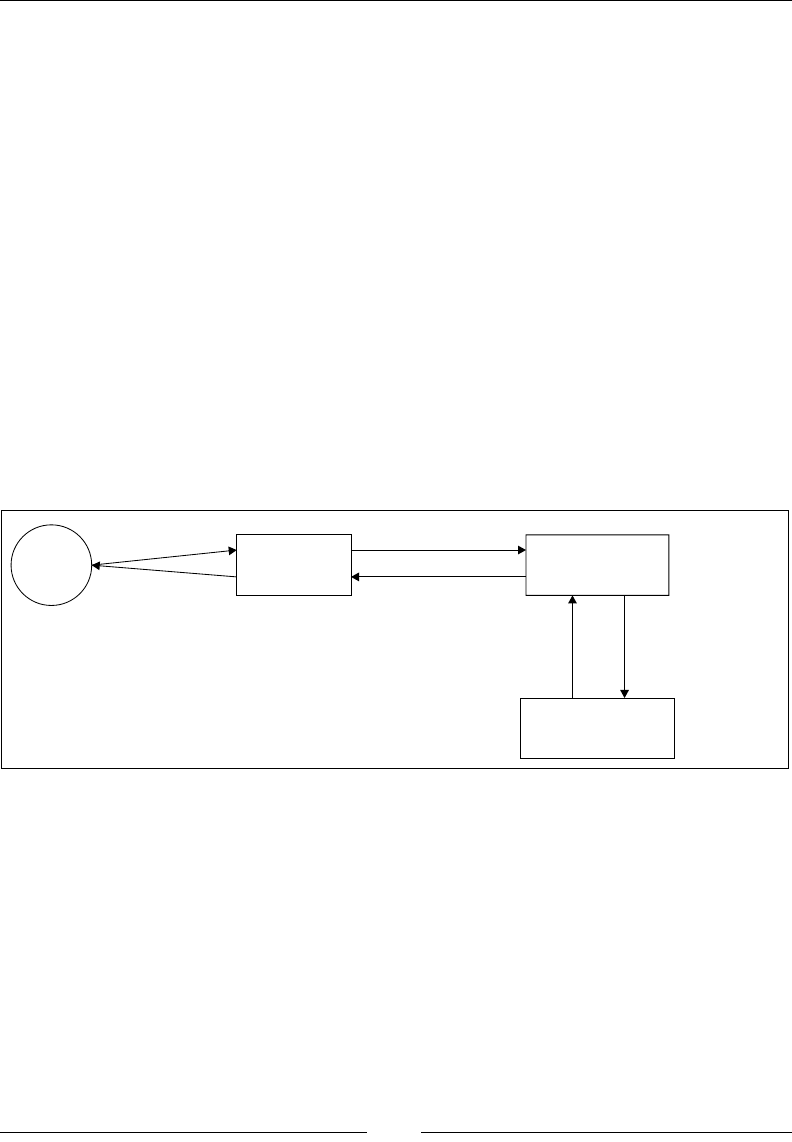
Chapter 10
[]
The main advantages of using Appium for your iOS automation testing are
as follows:
It uses the iOS platform-supported UI Automation library and Instruments
provided by Apple itself.
Even though you are using the JavaScript library, your tests and you as a
test script developer are not really tied to it. You can use your own Selenium
WebDriver client-language bindings, such as Java, Ruby, Python, and so on,
to develop your test scripts. Appium will take care of translating them into
JavaScript for you.
You don't have to modify your native or hybrid apps for the purpose
of testing.
$XWRPDWLQJ$QGURLGDSSOLFDWLRQWHVWV
Automating Android tests for your Android apps is similar to automating iOS apps
tests. Except for the fact that your target platform is changing, your test scripts would
QRWXQGHUJRDQ\FKDQJH7KHIROORZLQJLVWKHGLDJUDPWKDWVKRZVWKHZRUNÁRZ
UI Automator API Requests
Chrome or Chromium on
Simulator or
real device
Test Script UI Automator
Appium
WebDriver Commands
JSON Response Response
Response Executes UI Automator
Java Commands
Again, Appium works as a Remote WebDriver and receives the commands from
your test scripts over the JSON wire protocol. These commands are passed to Google
UI Automator, which comes with Android SDK, to be executed on the native app
launched on a simulator or a real device. Before the commands are passed on the UI
Automator, Appium translates the JSON commands into UI Automator commands
that are understood by UI Automator. This UI Automator will launch your app
on the simulator or real device and start executing your test script commands on
it. After the command is executed against your app on the simulator or device,
the target app sends the response to the UI Automator, which is transferred to
Appium in the UI Automator response format. Appium translates the UI Automator
responses into Selenium WebDriver JSON wire protocol responses and sends them
back to your test script.
>
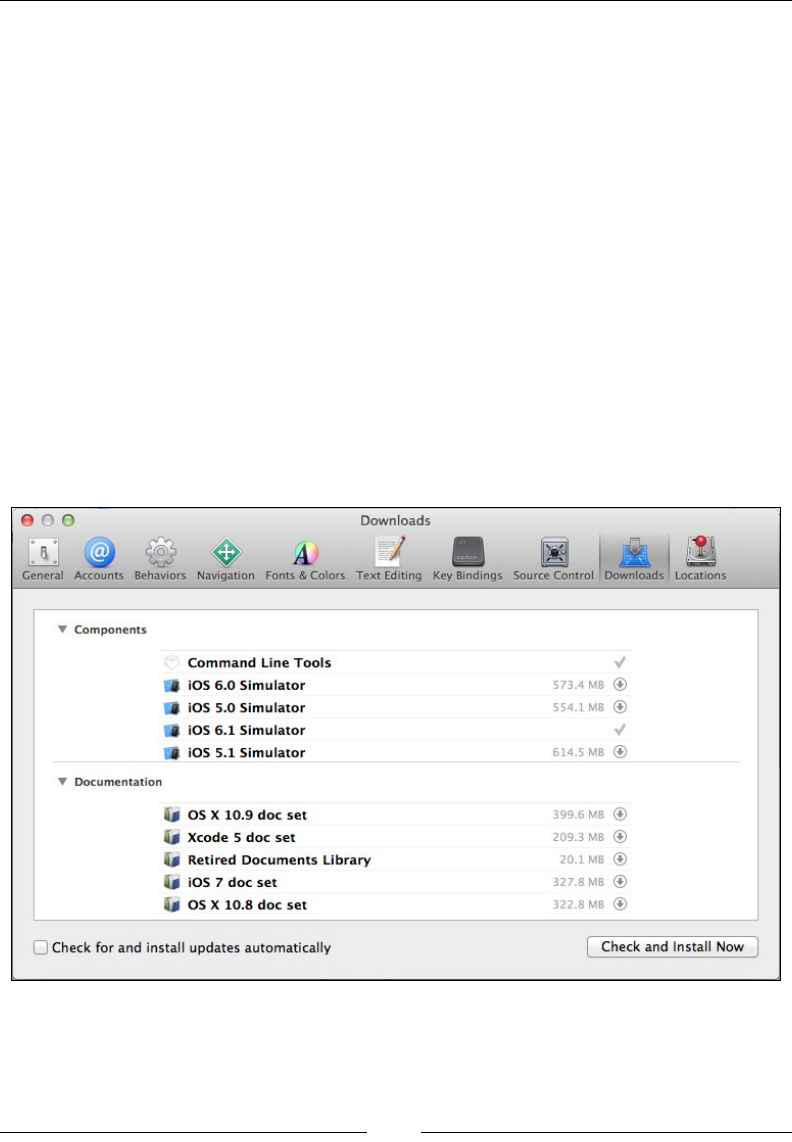
Testing iOS and Android Apps
[]
This is the high-level architecture that helps you understand how Appium works
with Android and iOS devices to execute your test commands.
3UHUHTXLVLWHVIRU$SSLXP
Before we start discussing some working examples with Appium, we need to install
some prerequisite tools for iOS and Android platforms. We need to setup Xcode and
Android SDK for this purpose, for which I'll be showing the examples on Mac OS.
Setting up Xcode
To set up the Xcode, we will perform the following steps:
1. You can download the latest Xcode from https://developer.apple.com/
xcode/.
2. After downloading it, install and open it.
3. Now navigate to Preferences | Downloads and install Command Line
Tools and iOS Simulators, as shown in the following screenshot:
e
o
o
Downloads
V
o
A
M
General
Accounts
Behaviors
Navigation
Fonts
&
Colors
Text
Editing
Key
Bindings
Source
Control
Downloads
Locations
Components
Command
Line
Tools
it
iOS
6.0
Simulator
it
iOS
5.0
Simulator
tit
iOS
6.1
Simulator
'it
iOS
5.1
Simulator
573.4
MB
®
554.1
MB
®
V
614.5
MB
®
Documentation
399.6
MB
®
209.3
MB
®
20.1
MB
®
327.8
MB
®
322.8
MB
®
4|
OS
X
10.9
doc
set
kg
Xcode
5
doc
set
kg
Retired
Documents
Library
kg
iOS
7
doc
set
kg
os
X
10.8
doc
set
O
Check
for
and
install
updates
automatically
Check
and
Install
Now
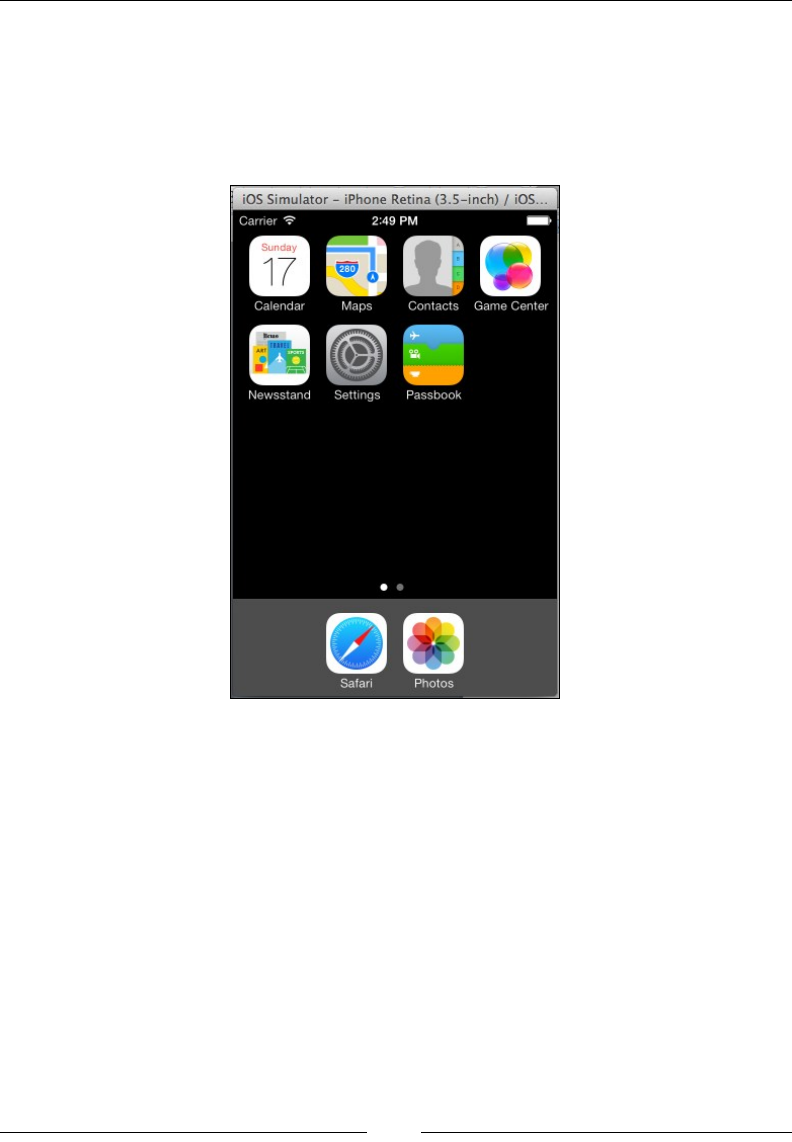
Chapter 10
[]
If you are using DUHDOGHYLFH\RXQHHGDSURYLVLRQSURÀOHLQVWDOOHGRQWKHGHYLFH
and USB debugging enabled on it.
Try to launch the iPhone simulator and verify that it works. You can launch the
simulator by navigating to Xcode | Open Developer Tool | iOS Simulator. The
simulator should look similar to what is shown in the following screenshot:
Setting up Android SDK
You need to install Android SDK from http://developer.android.com/sdk/
index.html. Download the Android Developer Tools (ADT) and install.
iPhone
Retina
(3.5-inch)
/
iOS...
||
iOS
Simulator
-
Carrier
?
2:49
PM
mmna
Calendar
Maps
siiii
Contacts
Game
Center
*>-
Newsstand
Settings
Passbook
•
•
Safari
Photos
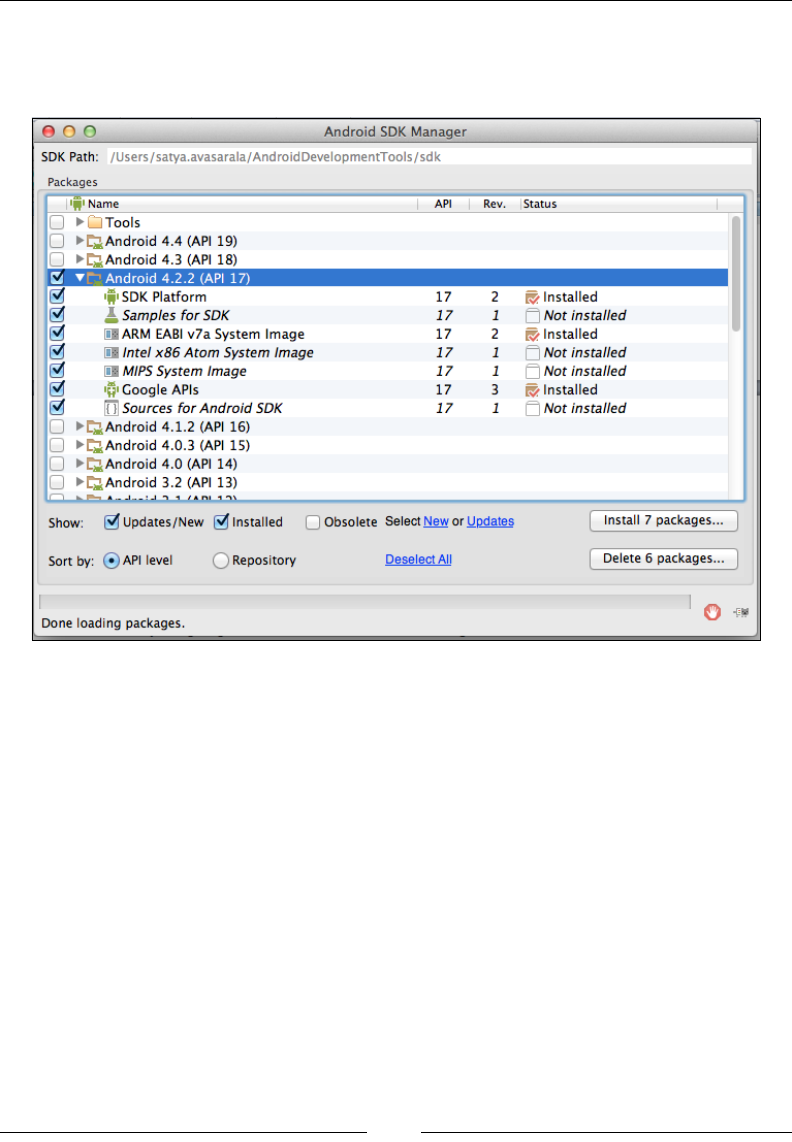
Testing iOS and Android Apps
[]
Launch the installed ADT. Now, download any Android whose API level is 17, and
install it. You can do that by navigating to Window | Android SDK Manager. You
should see something similar to what is shown in the following screenshot:
Here, we are installing Android 4.2.2, which is API level 17.
&UHDWLQJ$QGURLG(PXODWRU
If you want to execute your test scripts on an Android Emulator, you have to create
one. To create one, we will perform the following steps:
1. In ADT, open the Android device manager by navigating to Windows |
Android Virtual Device Manager. It launches the AVD Manager, as shown
in the following screenshot:
0
O O
Android
SDK
Manager
SDK
Path:
/Users/satya.avasarala/AndroidDevelopmentTools/sdk
Packages
1
Name
API
Rev.
Status
Android
4.4
(API
19)
4.3
(API
18)
Cl
Android
4.2.2
(API
17)
0
'S'
SDK
Platform
(Vf
1
Samples
for
SDK
(Vf
HARM
EABI
v7a
System
Image
0
H
Intel
x86
Atom
System
Image
0
H
MIPS
System
Image
(Vf
'S'
Coogle
APIs
0
ft
Sources
for
Android
SDK
Android
4.1.2
(API
16)
Android
4.0.3
(API
15)
Android
4.0
(API
14)
Android
3.2
(API
13)
Installed
P
Not
installed
Installed
p
Not
installed
p
Not
installed
Installed
P
Not
installed
2
17
17
1
17
2
17
1
17
1
3
17
17
1
i~l
Install
7
packages...
0
Updates/New
(ÿInstalled
QlObsolete
Select
New
or
Updates
Show:
Delete
6
packages...
Sort
by:
(V)
API
level
0
Repository
Deselect
All
1
o
Done
loading
packages.
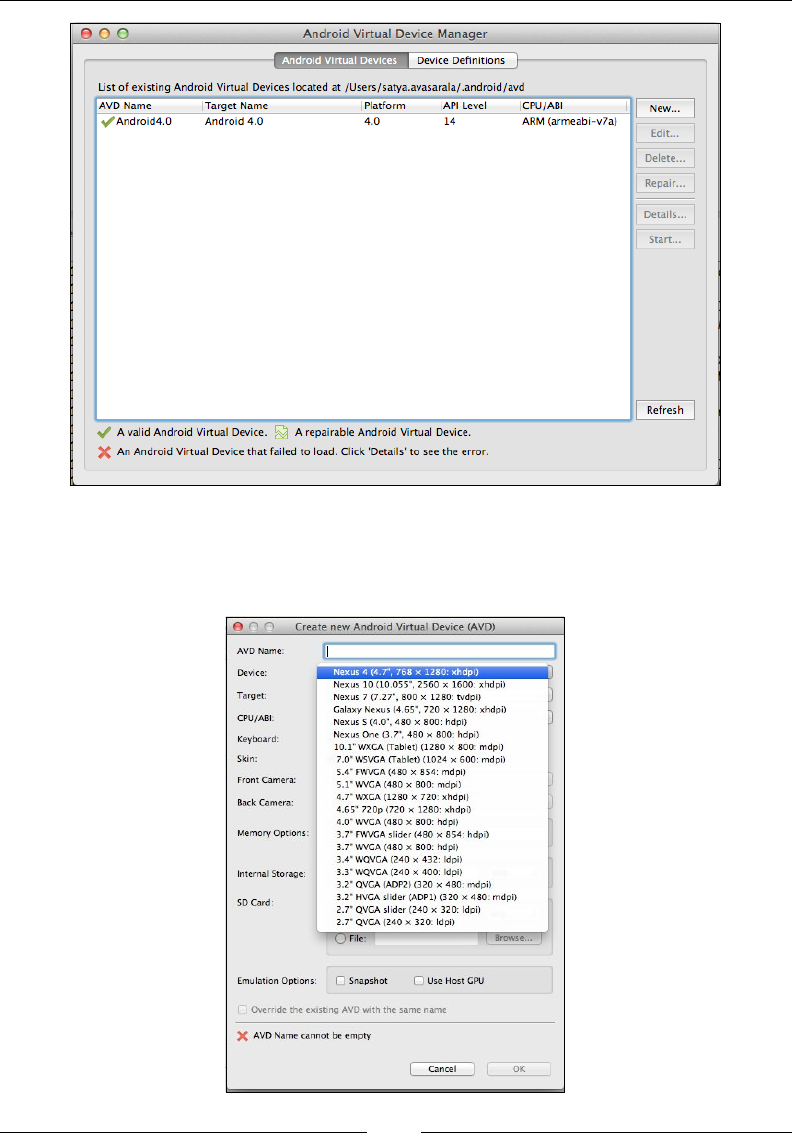
Chapter 10
[]
2. Now create a new virtual device or emulator by clicking on the New button.
You should see a window that will take all the necessary information from
you, as shown in the following screenshot:
e
o o
Android
Virtual
Device
Manager
Device
Definitions
1
Android
Virtual
Devices
List
of
existing
Android
Virtual
Devices
located
at
/Users/satya.avasarala/.
android
/avd
Platform
API
Level
AVD
Name
Target
Name
CPU/ABI
New...
Android
4.0
4.0
14
ARM
(armeabi-v7a)
Edit...
Delete...
Repair...
Details...
Start...
Refresh
A
valid
Android
Virtual
Device.
A
repairable
Android
Virtual
Device.
X
An
Android
Virtual
Device
that
failed
to
load.
Click
'Details'
to
see
the
error.
e
o o
Create
new
Android
Virtual
Device
(AVD)
AVD
Name:
Nexus
4
(4.7",
768
x
1280:
xhdpi)
Device:
Nexus
10
(10.055",
2560
x
1600:
xhdpi)
Nexus
7
(7.27".
800
x
1280:
tvdpi)
Galaxy
Nexus
(4.65",
720
x
1280:
xhdpi)
Nexus
S
(4.0",
480
x
800:
hdpi)
Nexus
One
(3.7",
480
x
800.
hdpi)
10.1"
WXGA
(Tablet)
(1280
x
800:
mdpi)
7.0"
WSVGA
(Tablet)
(1024
x
600:
mdpi)
5.4"
FWVGA
(480
x
854:
mdpi)
5.1"
WVGA
(480
x
800:
mdpi)
4.7"
WXGA
(1280
x
720:
xhdpi)
4.65"
720p
(720
x
1280:
xhdpi)
4.0"
WVGA
(480
x
800:
hdpi)
3.7"
FWVGA
slider
(480
x
854:
hdpi)
3.7"
WVGA
(480
x
800:
hdpi)
3.4"
WQVGA
(240
x
432:
Idpi)
3.3"
WQVGA
(240
x
400:
Idpi)
3.2"
QVGA
(ADP2)
(320
x
480:
mdpi)
3.2"
HVGA
slider
(ADP1)
(320
x
480
mdpi)
2.7"
QVGA
slider
(240
x
320:
Idpi)
2.7"
QVGA
(240
x
320:
Idpi)
Target:
CPU/ABI:
Keyboard:
Skin:
Front
Camera:
Back
Camera:
Memory
Options
Internal
Storage:
SD
Card:
1
Browse...
File:
Emulation
Options:
Q
Snapshot
Use
Host
GPU
Override
the
existing
AVD
with
the
same
name
X
AVD
Name
cannot
be
empty
Cancel
OK

Testing iOS and Android Apps
[]
3. Launch the Emulator to see if it was created successfully. It might take
several minutes for the Android Virtual Device to start. The following
is the screenshot that shows a started Android Emulator:
Using real device for executing your tests
To use real devices for testing your application using Appium, you need to root the
device. There are many online guides that can help you root your Android device.
Rooting your Android device might devoid your warranty
from your phone manufacturer. So make sure you root the
GHYLFHVWKDWDUHPHDQWVSHFLÀFDOO\IRUWHVWLQJDQGQRW\RXU
personal devices.
eon
5554:Android4.0
2
*
10:40
o“©
®
O
APPS
WIDGETS
L/
~
\
A
*
~
+
Calculator
Calendar
API
Demos
Browser
©
£
#
Clock
Dev
Tools
Camera
Custom
Locale
d>
ft
B
B
Downloads
Email
Gallery
Gestures
Builder
si
**
LM
"
Messaging
Music
People
Phone
|Z1
#
p
Search
Settings
Speech
Recorder
Widget
Preview
*=>
1=1
Si
a
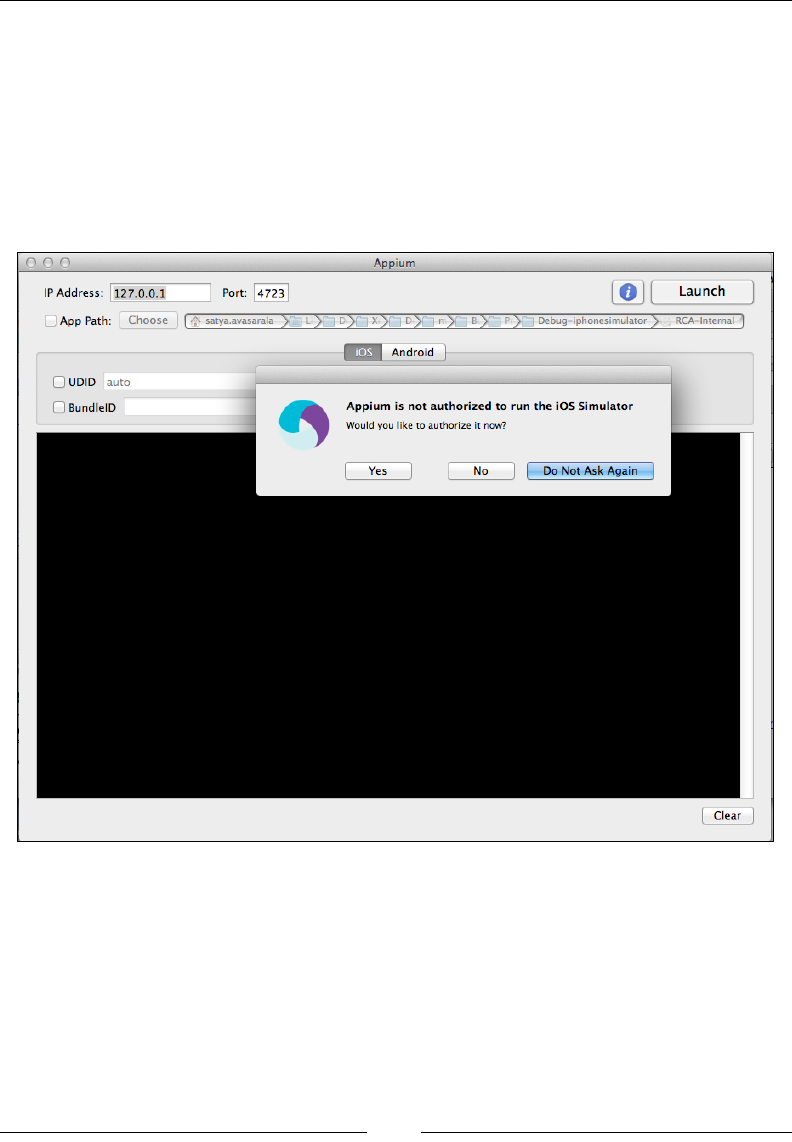
Chapter 10
[]
,QVWDOOLQJ$SSLXP
You can download Appium from http://appium.io/. Click on the Download
AppiumEXWWRQWRGRZQORDG$SSLXPVSHFLÀFWR\RXUZRUNVWDWLRQSODWIRUP+HUH,
DPXVLQJ0DFVRLWZLOOGRZQORDGWKH$SSLXP'0*ÀOHRI9HUVLRQ
Copy Appium to the ApplicationsIROGHUDQGWU\WRODXQFKLW7KHÀUVWWLPHLWLV
launched, it asks for your authorization to run the iOS simulators, as shown in the
following screenshot:
After you grant the authorization, click on Launch to start the Appium server. By
default, it starts at http://localhost:4723. This is the remote URL to which your
test scripts should be using to direct the test commands.
poo
Appium
®[
Port:
4722
Launch
IP
Address:
127.0.0.1
App
Path:
Choose
[
satya.avasarala
y
1ÿ>
>ÿ>
rÿ>
[ÿ>
Fÿ>
Debug-iphonesimulator~y
RCA-Intemal
]
Android
iOS
UDID
auto
BundlelD
«>
Appium
is
not
authorized
to
run
the
iOS
Simulator
Would
you
like
to
authorize
it
now?
|
Do
Not
Ask
Again
|
|_Yes_|
No
Clear

Testing iOS and Android Apps
[]
$XWRPDWLQJIRUL26
Let's see what happens internally when we try to execute our RemoteWebDriver test
script for automating the Google Search page:
import java.net.MalformedURLException;
import java.net.URL;
import org.openqa.selenium.By;
import org.openqa.selenium.WebDriver;
import org.openqa.selenium.WebElement;
import org.openqa.selenium.remote.DesiredCapabilities;
import org.openqa.selenium.remote.RemoteWebDriver;
public class AppiumiOS {
public static void main(String... args){
DesiredCapabilities desiredCapabilities = new
DesiredCapabilities();
desiredCapabilities.setCapability("device", "iPhone
Simulator");
desiredCapabilities.setCapability("version", "7.0");
desiredCapabilities.setCapability("app", "safari");
URL url = null;
try {
url = new URL("http://127.0.0.1:4723/wd/hub");
} catch (MalformedURLException e) {
// TODO Auto-generated catch block
e.printStackTrace();
}
WebDriver remoteWebDriver = new RemoteWebDriver(url,
desiredCapabilities);
remoteWebDriver.get("http://www.google.com");
WebElement ele =
remoteWebDriver.findElement(By.name("q"));
ele.click();
ele.sendKeys("Packt Publishing");
WebElement searchButton =
remoteWebDriver.findElement(By.name("btnG"));
System.out.println(searchButton.getSize());
searchButton.click();
remoteWebDriver.quit();
}
}

Chapter 10
[]
If you observe, the preceding code is very much similar to the test script for
RemoteWebDriver. However, there are a few differences though. The following
code depicts that:
desiredCapabilities.setCapability("device", "iPhone Simulator");
desiredCapabilities.setCapability("version", "7.0");
desiredCapabilities.setCapability("app", "safari");
The preceding code is the set of desired capabilites that we specify to help Appium
decide on which the platform our test script should get executed.
desiredCapabilities.setCapability("device", "iPhone Simulator");
The preceding code informs Appium that we need to use the iPhone simulator. If we
want to use the iPad simulator, the capability will look like the following:
desiredCapabilities.setCapability("device", "iPad Simulator");
If we want to use a real device, we just have to specify iPhone or iPad. Appium will
pick the device that is connected to the Mac via USB.
The second desired capability that we have mentioned is the version of the iPhone
simulator to use:
desiredCapabilities.setCapability("version", "7.0");
Here we are using the iOS 7.0 simulator. At the time of writing this book, Appium
works with iOS7 simulators with Xcode 5, and iOS6.1 simulators with Xcode 4.6.
The third desired capability is shown in the following code:
desiredCapabilities.setCapability("app", "safari");
In the preceding code, we point Appium to the target application. Here, we
mention the path to our native or hybrid app. In our test script, while we are loading
http://www.google.com in a Safari browser, we are asking Appium to launch the
Safari app already existing on the simulator.
$QGÀQDOO\RXUWHVWVFULSWLVWU\LQJWRFRQQHFWWRWKH$SSLXP6HUYHURQSRUW4723,
as shown in the following code:
url = new URL("http://127.0.0.1:4723/wd/hub");
We start creating a RemoteWebDriver instance with the Appium server in our test
script using the following code:
WebDriver remoteWebDriver = new RemoteWebDriver(url,
desiredCapabilities);
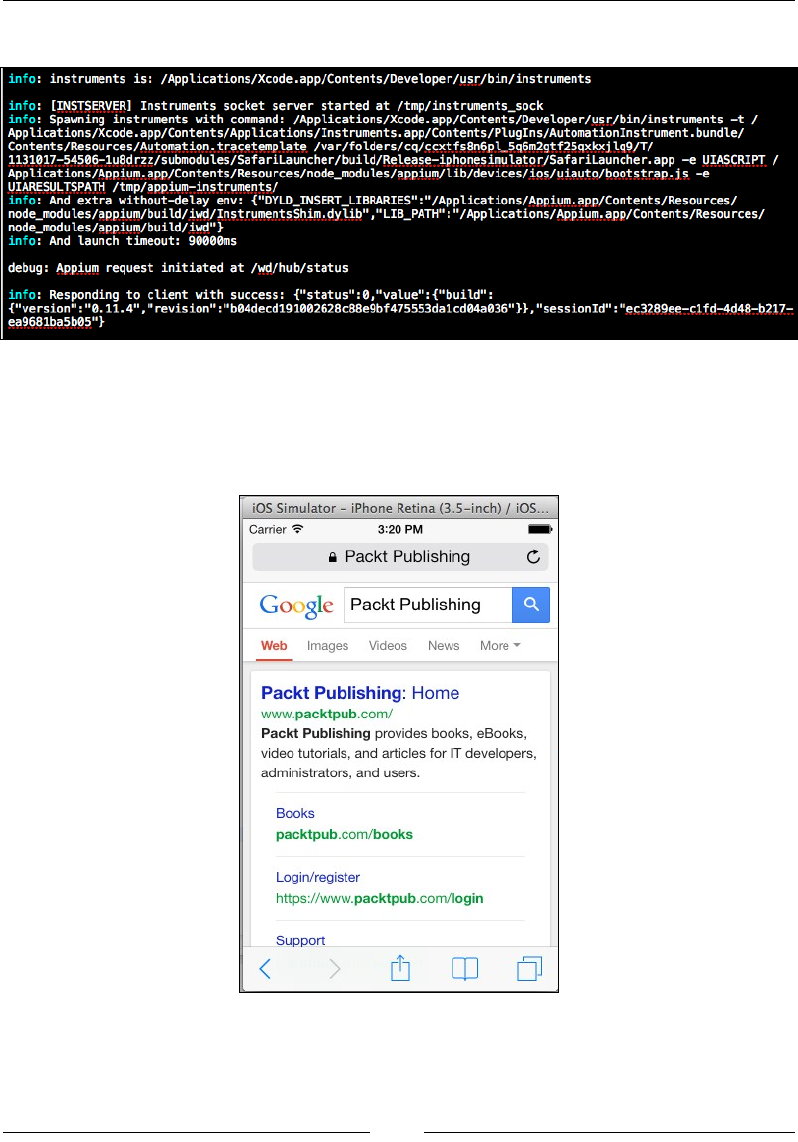
Testing iOS and Android Apps
[]
The following log output is what the Appium tries to do:
In the preceding screenshot, it tries to launch the iOS simulator, and meanwhile
establishes a session with your test script. After that, the Safari app is launched on
the simulator, and all our test script commands are executed on the simulator. The
following is the screenshot of the simulator while it executes our test script:
info:
instruments
is:
/Applications/Xcode.app/Contents/Developer/usr/bin/instruments
info:
[INSTSERVER]
Instruments
socket
server
started
at
/tmp/instruments_sock
info:
Spawning
instruments
with
command:
/Applications/Xcode.app/Contents/Developer/usr/bin/instruments
-t
/
Applications/Xcode.app/Contents/Applications/Inst
ruments.app/Contents/Pluglns/Automationlnstrument
.bundle/
Contents/Resources/Autonation.
tracetenplate
/var/folders/cq/ccxtfs8n6pl_5q6m2gtf25qxkxjlq9/T/
1131017-54506-lu8drzz/submodules/SafariLauncher/build/Release-iphonesimulator/SafariLauncher.app
-e
UIASCRIPT
/
Applications/Appium.
app/Contents/Resources/node_modules/appium/lib/devices/ios/uiauto/bootstrap.
j
s
-e
UIARESULTSPATH
/tmp/appium-instruments/
info:
And
extra
without-delay
env:
{"DYLD_INSERT_LIBRARIES":
"/Applications/Appium.
app/Content
s/Resources/
node_modules/appium/build/iwd/InstrumentsShim.dylib","LIB_PATH":"
'/Applications/Appium.
app/Contents/Resources/
node_modules/appiun/build/iwd"}
info:
And
launch
timeout:
90000ms
debug:
Appium
request
initiated
at
/wd/hub/status
info:
Responding
to
client
with
success:
{"status"
:0#
"value":
{"build":
{"version"
:
"0.
11.4"
,
"
revision"
:
"b04decdl91002628c88e9bf
475553dalcd04a036"}},
"sessionld"
:
"ec3289ee-clf
d-4d48-b217-
ea9681ba5b05">
iOS
Simulator
-
iPhone
Retina
(3.5-inch)
/
iOS...
Carrier
9
3:20
PM
C
A
Packt
Publishing
Got
)gle
Packt
Publishing
m
Web
Images
Videos
News
More
~
Packt
Publishing:
Home
www.packtpub.com/
Packt
Publishing
provides
books,
eBooks,
video
tutorials,
and
articles
for
IT
developers,
administrators,
and
users.
Books
packtpub.com/books
Login/register
https://www.packtpub.com/login
Support
CD
0
<

Chapter 10
[]
Similarly, we can work on another example of m.site for Facebook. The following is
the code that opens http://www.facebook.com on the Safari browser of the iPhone
simulator where the URL is redirected to Facebook's m.site, and then the test script
tries to log in:
public class AppiumiOSFacebook {
public static void main(String... args){
DesiredCapabilities desiredCapabilities = new
DesiredCapabilities();
desiredCapabilities.setCapability("device", "iPhone
Simulator");
desiredCapabilities.setCapability("version", "7.0");
desiredCapabilities.setCapability("app", "safari");
URL url = null;
try {
url = new URL("http://127.0.0.1:4723/wd/hub");
} catch (MalformedURLException e) {
// TODO Auto-generated catch block
e.printStackTrace();
}
WebDriver remoteWebDriver = new RemoteWebDriver(url,
desiredCapabilities);
remoteWebDriver.get("http://www.facebook.com");
System.out.println("The current url is:
"+remoteWebDriver.getCurrentUrl());
WebElement email =
remoteWebDriver.findElement(By.name("email"));
WebElement password =
remoteWebDriver.findElement(By.name("pass"));
WebElement login =
remoteWebDriver.findElement(By.name("login"));
email.sendKeys("test.appium@gmail.com");
password.sendKeys("123456");
login.click();
remoteWebDriver.quit();
}
}
The output for the next line of code is shown in the following screenshot.
System.out.println("The current url is:
"+remoteWebDriver.getCurrentUrl());
The
current
url
is:
https://m.facebook.com/?refsrc=http%3A%2F
%2Fwww.apple.com%2F&_rdr

Testing iOS and Android Apps
[]
The following is the screenshot of the Facebook login page being loaded on Safari in
the iPhone simulator:
$XWRPDWLQJIRU$QGURLG
Until now, we have seen how to automate our test scripts that use the Appium
server and iOS simulators. Now, we shall work on Android. Here, we will try to
execute our test scripts on the Android real device. We need to make sure we have
installed Chrome on our Android device and connect our device to our machine.
Now, we navigate to our ANDROID_HOME/sdk/platform-tools and execute the
following code:
./adb devices
Android Debug Bridge (adb), is a command-line tool that lets you communicate
with the Android emulator or real device. All the Android devices that are connected
to the host will be listed. Here, we've attached one device to our machine, and the
output is as follows:
List of devices attached
GIHIHIGHYLFH
iOS
Simulator
-
iPhone
Retina
(3.5-inch)
/
iOS...
Carrier
5:49
PM
C
A
facebook.com
B
Get
Facebook
for
iPhone
and
browse
faster.
test.appium@gmail.com
Log
In
Create
New
Account
Forgot
password?
•
Help
Center
<
>
CD
0

Chapter 10
[]
The hex code is the connected device's ID, and device in the listing says the listed is a
real device and not an emulator.
The following is the test script for automating the Google Search page on the
Android device:
public class AppiumAndroid {
public static void main(String... args){
DesiredCapabilities desiredCapabilities
= new DesiredCapabilities();
desiredCapabilities.setCapability("device", "Android");
desiredCapabilities.setCapability("app", "chrome");
URL url = null;
try {
url = new URL("http://127.0.0.1:4723/wd/hub");
} catch (MalformedURLException e) {
// TODO Auto-generated catch block
e.printStackTrace();
}
WebDriver remoteWebDriver = new RemoteWebDriver(url,
desiredCapabilities);
//WebDriver remoteWebDriver = new FirefoxDriver();
remoteWebDriver.get("http://www.google.com");
WebElement ele =
remoteWebDriver.findElement(By.name("q"));
ele.click();
ele.sendKeys("Packt Publishing");
WebElement searchButton =
remoteWebDriver.findElement(By.name("btnG"));
System.out.println(searchButton.getSize());
searchButton.click();
remoteWebDriver.quit();
}
}
The following is the desired capability that will allow Appium to understand that the
preceding test script needs to be executed on the Android device:
desiredCapabilities.setCapability("device", "Android");
$SSLXPZLOOXVHWKHÀUVWGHYLFHIURPWKHOLVWRIGHYLFHVWKDWDGEUHWXUQV2QFH
the device is chosen, the following desired capability will launch Chrome browser
on the device and start executing the test script commands on it:
desiredCapabilities.setCapability("app", "chrome");

Testing iOS and Android Apps
[]
6XPPDU\
In this chapter, we have discussed the different ways a business can reach out to
its users on mobile platforms. We also discussed the various software tools that
DUHFUHDWHGEDVHGRQ6HOHQLXP:HE'ULYHU$QGÀQDOO\ZHZHQWWKURXJKRQHRI
WKHXSFRPLQJVRIWZDUHWRROVDQGPRGLÀHGRXUWHVWVFULSWWRZRUNZLWKL26DQG
Android platforms.
For more examples on using Appium, please visit the website and github forums at
http://appium.io/ and https://github.com/appium/appium/tree/master/
sample-code/examples.
Index
6\PEROV
-browser option
@FindBy annotation
using 197, 198
A
AbstractWebDriverEventListener
extending 117
acceptSSLCerts capability
a command
actions 43, 44
Actions class 44
actions, on WebElements
clear() method 34, 35
getAttribute() method 32, 33
getCssValue() method 36, 37
getLocation() method 37
getSize() method 38
getTagName() method 39, 40
getText() method 38
isDisplayed() method 40
isEnabled() method 41
isSelected() method 41, 42
sendKeys() method 33, 34
submit() method 35
AddNewPost PageObject 202
AddNewPostPage PageObject 213
AdminLoginPage PageObject , 210
afterScript() method 124
alerts
handling 68
AllPostsPage PageObject 203, 210, 212
Android
automating for 236, 237
Android application tests
automating, Appium used 225
Android Debug Bridge (adb)
Android Developer Tools (ADT) 227
AndroidDriver 223
Android SDK
Android Emulator, creating 228-230
setting up 227
Apache HttpClient
Apache Wink
Appium
about 223
advantages 225
Android, automating for 236, 237
installing 231
iOS, automating for 232-235
pre-requisites 226
URL 231
used, for automating Android app tests
225, 226
used, for automating iOS app tests 224
working 224
Augmenter class 155
%
back() method 70
b command
beforeClickOn() method 122
best practices, PageObjects design
about 199
loadable components 208, 209
looking, for implied services 201
methods, considering in PageObjects as
services 204, 205

[]
PageObjects, using within PageObject 202
SDJHVSHFLÀFGHWDLOVNHHSLQJRIIWHVWVFULSW
207
WebElements, identifying 206
web page, considering as service provider
199, 200
Border
browser
capabilities, setting 61-63
browser back navigation
listening for 122
browser forward navigation
listening for 123
browser navigateTo events
listening for 123
BuildingIEDriverService class 103
build() method 45
%\FODVV1DPHPHWKRG27
%\FVV6HOHFWRUPHWKRG31
%\LGPHWKRG24, 25
%\OLQN7H[WPHWKRG
By locating mechanism, using
By.className() method 27
By.cssSelector() method 31
By.id() method 24, 25
By.linkText() method 28
By.name() method 23, 24
By.partialLinkText() method 28, 29
By.tagName() method 25, 26
By.xpath() method 29, 30
%\QDPHPHWKRG21-25
%\SDUWLDO/LQN7H[WPHWKRG,
%\WDJ1DPHPHWKRG25,
%\[SDWKPHWKRG, 30
C
CANCEL action button
canExecute() method 131, 132
capabilities
CapabilityMatcher class
c command
Chrome browser
and RemoteWebDriver, using 152, 153
ChromeDriver
about 105
ChromeOptions, using 107, 108
ÀUVWWHVWVFULSWZULWLQJ106
installing 105
ChromeDriverService class
ChromeOptions
using 107
class attribute 27
className() method 27
clear() method 34, 35, 121
click
at current location action 47
on WebElement action 49
on WebElement action, API syntax 49
clickAndHold
about 50-53
at current location action 50, 51
WebElement action 51
click() method
about 47, 48
API syntax 47
click(WebElement) method
client library
replacing, with code 160-164
CommandName
Context
contextClick() method
API syntax 58
at current location action 58, 59
on WebElement action 57
cookies
handling 74-77
createTempDir() method 134
Cross-site scripting 10
cssSelector() method 32
cssSelectorsEnabled capability
Current Location action
clickAndHold at 50, 51
contextClick at 58
doubleClick at 56
D
d command
DefaultSelenium class
GHIDXOWWHPSRUDU\ÀOHV\VWHP132
DeletePostPage PageObject 214
deleteTempDir() method 134
deleteTemporaryFiles() method 135

[]
de-serialization
DesiredCapabilities class
directory
compressing 136, 137
creating 127, 128
creating, in DefaultTmpFS 133
decompressing 137
deleting 128
doubleClick
at Current Location action 56, 57
on WebElement action 57
doubleClick() method
about 56
API syntax 56
dragAndDrop action 55
dragAndDropBy action 55
dragAndDropBy() method
API syntax 55
dragAndDrop() method
about 56
API syntax 55
GULYHUQDYLJDWLRQEDFNPHWKRG122
E
Eclipse
project, setting up 15-20
EditPostPage PageObject 213
ENABLE_PERSISTENT_HOVERING 104
EventFiringWebDriver class
about 113
EventListener class, registering with 118
EventListener class, unregistering with 124
EventFiringWebDriver instance
creating 118
EventListener class
about 113
registering, with EventFiringWebDriver
class 118
unregistering, with EventFiringWebDriver
class 124
EventListener instance
AbstractWebDriverEventListener, extend-
ing 117
creating 114, 118
EventFiringWebDriver instance, creating
118
WebDriverEventListener, implementing
115
WebDriver instance, creating 118
events
executing 119, 120
verifying 119, 120
exception
listening for 124
existing test script
modifying, for Selenium Grid use 178
H[LVWLQJWHVWVFULSWPRGLÀFDWLRQIRU
Selenium Grid use
hub end, steps 180
multiple nodes, dealing with 183
node, steps 180
nonregistered capabilities, requesting 181
request, queuing up 182, 183
test script 178, 179
Explicit wait time 73
extension
adding, to Firefox 84-86
F
FileHandler class
about 128, 129
canExecute() method 131, 132
directory, creating 127, 128
directory, deleting 128
ÀOHGHOHWLQJ128
ÀOHUHDGLQJ130, 131
ÀOHVFRS\LQJIURPVRXUFHWRGHVWLQDWLRQ
directory 125-127
IsZipped() method 128
makeExecutable() method 129
makeWritable() method 129
ÀOHV
copying, from source to destination direc-
tory 125, 126
copying, from source to destination direc-
WRU\RQVXIÀ[126, 127
deleting 128
reading 130, 131
ÀQG(OHPHQWPHWKRG21, 22
ÀQG(OHPHQWVPHWKRG22
FireBug 22, 23

[]
Firebug plugin
Firefox Binary
about 93
multiple versions, installing 93-95
Firefox browser
RemoteWebDriver used 147, 148
)LUHIR[&XVWRP3URÀOHFODVV
Firefox Driver
FirefoxDriver instance
Firefox preferences
)LUHIR[SURÀOH
about 80-84
creating 81
deleting 81
extensions, adding 84-86
frozen preferences 91, 92
preferences 87-89
preferences, setting 89, 90
renaming 81
retrieving 86, 87
storing 86
)LUHIR[3URÀOHFODVV, ,
forward() method 70
frames
switching among 66, 67
frozen preferences ,
G
getAbsolutePath() method
getAttribute() method 32, 33
getCssValue() method , 37
getLocation() method 37
get() method 20
getScreenshotAs() method , 155
getSize() method
getTagName() method , 40
getText() method
global extension
Google Search Button 30, 32
H
handlesAlert capability
hub 170 174,
KXEFRQÀJXUDWLRQSDUDPHWHUV
CapabilityMatcher 188
VXLWDEOHQRGHÀQGLQJ187
WaitTimeout 188
Hybrid app 222
I
IE browser
and RemoteWebDriver, using 149-151
IE_ENSURE_CLEAN_SESSION 104
IE_SET_PROXY_BY_SERVER 104
iFrames
locating 65
IllegalArgumentException
Implicit wait time 72
implied services 201
INITIAL_BROWSER_URL 104
injected script
InternetExplorerDriver
about 95
capabilities 104
installing 95, 96
service, building 100-103
writing 97-100
,QWHUQHW([SORUHU'ULYHU6HUYLFH%XLOGHUFODVV
100, 101
INTRODUCE_FLAKINESS_BY_IGNOR-
ING_SECURITY_DOMAINS 104
iOS
automating for 232-235
iOS Application tests
automating, Appium used 224
iOSDriver 223
iPhoneDriver 223
isDisplayed() method 40
isEnabled() method 41
isError
isSelected() method 41, 42
IsZipped() method
J
MDYDODQJ6WULQJJHW7H[W
javascriptEnabled capability
JavaScript Object Notation (JSON)
JSON format
components 79
JSON format, components
CommandName 79

[]
context 79
ElementId 80
parameters 80
JSON wire protocol , 157,
K
keyDown() method
keyUp action
keyUp() method
about 59
API syntax 59
L
loadable components ,
Local Intranet option 100
locking port
M
PDNH([HFXWDEOHPHWKRG132
makeWritable() method
maxInstances
methodName
mobile applications
Hybrid app 222
m.site 221
native apps 221
moveByOffset action 45
moveByOffset() method 45-
moveByOffset(x, y) method 54
moveToElement action 53, 54
moveToElement() method
about 53
API syntax 53
moveToElement(WebElement) method 54
PVLWH221
multiple EventListeners
registering 120
PXOWLSOHÀOHV
deleting 134
N
native apps 221
Native Code command
NATIVE_EVENTS 104
Navigate
about 69
exploring 69-71
node ,
QRGHFRQÀJXUDWLRQSDUDPHWHUV
browser instances limits, setting 185
browser timeout, setting 187
node health-check time, setting 186
node, reregistering automatically 186
node timeouts, setting 184
supported browsers, setting by node 184
unavailable node, unregistering 186
nodes 170
O
OK button
Opera Driver
about 110
ÀUVWWHVWVFULSWZULWLQJ110
installing 110
P
PageFactory class
PageObject
@FindBy annotation, using 197, 198
about 195, 196, 209
AddNewPost PageObject 202
AllPostsPage PageObject 203
AddNewPostPage PageObject 213
AdminLoginPage PageObject 209, 210
AllPostsPage PageObject 203, 210, 212
DeletePostPage PageObject 214
EditPostPage PageObject 213
PageFactory class 198
using, within PageObject 202
PageObjects design
best practices 199
page script
perform() method 44, 45
post
adding, to WordPress blog 192, 215, 216
counting, on WordPress blog 194
counting 218, 219
deleting 217, 218
deleting, from WordPress blog 193
editing 216, 217

[]
pre-requisites, Appium
Android SDK, setting up 227, 228
Xcode, setting up 226, 227
project
setting up, in Eclipse 15-20
Q
quit() method 102
R
refresh() method 71
release
at current location action 52
on WebElement action 53
release() method 51, 52
release(WebElement) method 53
RemoteWebDriver
about 139-141
and Chrome browser, using 152, 153
and IE browser, using 149-151
client 139
server 139
using, for Firefox browser 147, 148
RemoteWebDriver class 155
RemoteWebDriver client
about 143, 148
existing test script, converting 143-146
extending, to take screenshots 154-156
RemoteWebDriver server
about 141
downloading 141
running 141, 142
REQUIRE_WINDOW_FOCUS 104
ResponseText
S
SafariDriver
about 109
ÀUVWWHVWVFULSWZULWLQJ109
global extension 109
injected script 109
page script 109
screenshots
taking 63, 64
script execution
listening for 123
Selendroid 223
Selenium
history 9
Selenium 1 9-12
Selenium 2 12, 13
Selenium 1
about 9-12
and Selenium 2, difference between 13, 14
Selenium 2
about 12, 13
and Selenium 1, difference between 13, 14
Selenium Grid
about 169, 170
FRQÀJXULQJ183
diagram 170
hub 170
nodes 170
working 171, 174
6HOHQLXP*ULGFRQÀJXUDWLRQ
KXEFRQÀJXUDWLRQSDUDPHWHUV187
QRGHFRQÀJXUDWLRQSDUDPHWHUVVSHFLI\LQJ
184
specifying, ways 188, 190
6HOHQLXP5&See Selenium 1
6HOHQLXP:HE'ULYHUSee Selenium 2
sendKeys() method 33, 34
serialization
service provider
web page, considering as 199, 200
setBrowserName() method 147, 152
setCapability() method
setEnableNativeEvents() method
setPreference() method ,
Show Folder button ,
software tools
AndroidDriver 223
Appium 223
iOSDriver 223
iPhoneDriver 223
Selendroid 223
submit() method 35
switchTo() method

[]
T
takesScreenShot capability
TakesScreenshot interface 155
target windows
locating 65
temporary directory
deleting 134
WHPSRUDU\ÀOHV\VWHP
changing 135, 136
TemporaryFilesystem class
GHIDXOWWHPSRUDU\ÀOHV\VWHP132
directory, creating in DefaultTmpFS 133
PXOWLSOHÀOHVGHOHWLQJ134
temporary directory, deleting 134
WHPSRUDU\ÀOHV\VWHPFKDQJLQJ135, 136
test cases
creating, for WordPress blog 191
7KUHDGVOHHSPHWKRG133
throwOnCapabilityNotPresent parameter
to() method 70
try-catch block
type attribute
U
unregisterIfStillDownAfter parameter
UsingChromeOptions class 107
V
void accept()
void dismiss()
YRLGVHQG.H\VMDYDODQJ6WULQJNH\V-
ToSend)
W
Web Application Under Test (WAUT)
WebDriverBackedSelenium
exploring 165- 167
WebDriverBackedSelenium class ,
WebDriverEventListener
implementing 115
WebDriver event listeners
browser back navigation, listening for 122
browser forward navigation, listening for
123
browser navigateTo events, listening for
123
exception, listening for 124
script execution, listening for 123
WebElement clicked, listening for 122
WebElement search event, listening for 122
WebElement value change, listening for
121
WebDriver instance
creating 118
WebDriver javadoc
URL 21
WebElement action
clickAndHold 51
click on 49
contextClick 57, 58
doubleClick 57
release on 53
WebElement, clicking
listening for 122
WebElements
about 20, 21
actions 32
By locating mechanism, using 23
Explicit wait time 73
ÀQG(OHPHQWPHWKRG21, 22
ÀQG(OHPHQWVPHWKRG22
FireBug 22, 23
identifying 206
Implicit wait time 72
loading 71
locating, WebDriver used 21
WebElement search event
listening for 122
WebElement value change
listening for 121
web page
considering, as service provider 199, 200
webStorageEnabled capability
WebViews 222
windows
switching among 65, 66
WordPress blog
post, adding to 192, 215

[]
post, deleting from 193
posts, counting 194
test cases, creating for 191
URL 191
X
Xcode
setting up 226, 227
xOffSet
XPath
disadvantage 31
XPCOM (Cross Platform Component Object
Model) framework
Y
yOffSet
Z
Zip class
directory, compressing 136, 137
directory, decompressing 137

Thank you for buying
6HOHQLXP:HE'ULYHU3UDFWLFDO*XLGH
About Packt Publishing
3DFNWSURQRXQFHGSDFNHGSXEOLVKHGLWVÀUVWERRNMastering phpMyAdmin for Effective
MySQL Management" in April 2004 and subsequently continued to specialize in publishing
KLJKO\IRFXVHGERRNVRQVSHFLÀFWHFKQRORJLHVDQGVROXWLRQV
Our books and publications share the experiences of your fellow IT professionals in adapting
and customizing today's systems, applications, and frameworks. Our solution based books
give you the knowledge and power to customize the software and technologies you're using
WRJHWWKHMREGRQH3DFNWERRNVDUHPRUHVSHFLÀFDQGOHVVJHQHUDOWKDQWKH,7ERRNV\RXKDYH
seen in the past. Our unique business model allows us to bring you more focused information,
giving you more of what you need to know, and less of what you don't.
Packt is a modern, yet unique publishing company, which focuses on producing quality,
cutting-edge books for communities of developers, administrators, and newbies alike. For
more information, please visit our website: www.packtpub.com.
About Packt Open Source
In 2010, Packt launched two new brands, Packt Open Source and Packt Enterprise, in order to
continue its focus on specialization. This book is part of the Packt Open Source brand, home
to books published on software built around Open Source licences, and offering information
to anybody from advanced developers to budding web designers. The Open Source brand
also runs Packt's Open Source Royalty Scheme, by which Packt gives a royalty to each Open
Source project about whose software a book is sold.
Writing for Packt
We welcome all inquiries from people who are interested in authoring. Book proposals
should be sent to author@packtpub.com. If your book idea is still at an early stage and you
ZRXOGOLNHWRGLVFXVVLWÀUVWEHIRUHZULWLQJDIRUPDOERRNSURSRVDOFRQWDFWXVRQHRIRXU
commissioning editors will get in touch with you.
We're not just looking for published authors; if you have strong technical skills but no writing
experience, our experienced editors can help you develop a writing career, or simply get some
additional reward for your expertise.
source
[
1
open
I I
community
experience
distilled
PUBLISHING
6HOHQLXP7HVWLQJ7RROV
%HJLQQHUV*XLGH
ISBN: 978-1-84951-830-7 Paperback: 232 pages
Learn to use Selenium testing tools from scratch
1. Automate web browsers with Selenium
WebDriver to test web applications.
2. Set up Java environment for using Selenium
WebDriver.
3. Learn good design patterns for testing web
applications.
6HOHQLXP7HVWLQJ7RROV&RRNERRN
ISBN: 978-1-84951-574-0 Paperback: 326 pages
Over 90 recipes to build, maintain, and improve test
automation with Selenium WebDriver
1. Learn to leverage the power of Selenium
WebDriver with simple examples that illustrate
real-world problems and their workarounds.
2. Each sample demonstrates key concepts
allowing you to advance your knowledge
of Selenium WebDriver in a practical and
incremental way.
3. Explains testing of mobile web applications
with Selenium Drivers for platforms such as
iOS and Android.
Please check ZZZ3DFNW3XEFRP for information on our titles
source
[
1
open
I
I
community
experience
distilled
PUBLISHING
Selenium
2
Testing
Tools
LMm
to
UM
Sotonlufn
tooting
toot*
front
scratch
Beginner’s
Guide
David
Bums
Selenium
Testing
Tools
Cookbook
.
and
improve
ten
automaBon
I
.........
ISESlSSf
Unmesh
Gundecha
,QVWDQW6HOHQLXP7HVWLQJ7RROV
Starter
ISBN: 978-1-78216-514-9 Paperback: 52 pages
A short, fast, and focused guide to Selenium Testing
tools that delivers immediate results
1. Learn something new in an Instant! A short,
fast, focused guide delivering immediate
results.
2. Learn to create web tests using Selenium Tools.
3. Learn to use PageObject pattern.
4. Run and analyze test results on an easy-to-use
platform.
6HOHQLXP7HVWLQJ7RROV
%HJLQQHUV*XLGH
ISBN: 978-1-84951-026-4 Paperback: 232 pages
Test your web applications with multiple browsers
using the Selenium Framework to ensure the quality
of web applications
1. Save your valuable time by using Selenium to
record, tweak, and replay your test scripts.
2. Get rid of any bugs deteriorating the quality of
your web applications.
3. Take your web applications one step closer
to perfection using Selenium tests.
4. Packed with detailed working examples
that illustrate the techniques and tools for
debugging.
Please check ZZZ3DFNW3XEFRP for information on our titles
source
[
1
open
I
I
community
experience
distilled
PUBLISHING
Short
|
Fast
Focused
Selenium
Testing
Tools
Starter
A
short,
f«i,
and
loniud
gusdc
to
SiMum
Testing
tools
that
(Wwn
inwne*ate
results
[PACKT]
Unmesh
Gundecha
y
K
Selenium
1.0
Testing
Tools
Test
your
web
applications
with
multiple
browsers
using
the
Selenium
Framework
to
ensure
the
quality
or
web
applications
Beginner’s
Guide
l
David
Burns
