X2O Instructions Rev115 Smb97310
smb97510 smb97510
smb97312 smb97312
smb97380 smb97380
smb97512 smb97512
smb97515 smb97515
User Manual: smb97310
Open the PDF directly: View PDF ![]() .
.
Page Count: 24

WWW.SMITTYBILT.COM
For Technical Support/Warranty Information please call 310-762-9944
Smittybilt, 400 West Artesia Blvd, Compton, CA 90220
Installation Instructions
X2O Winches
SAFETY PRECAUTIONS
SAFETY PRECAUTIONSSAFETY PRECAUTIONS
SAFETY PRECAUTIONS
Warning! Observe safety precautions for personal safety and the safety of others. Improper
equipment operation may cause personal injury and equipment damage.
Read the following carefully before attempting to operate your winch and keep the instructions
for future reference.
1. Dress properly:
-Don’t wear loose clothing or jewelry. They can be caught in moving parts.
-Wear leather gloves when handling winch cable. Do not handle cable with bare hands as
broken wires can cause injuries.
-Non-skid footwear is recommended
2. Keep a safe distance:
-Ensure that all persons stand well clear of winch cable and load during winch operation, 1.5
times the cable length recommended. If a cable pulls loose or breaks under load, it can lash
back and cause serious personal injury or death.
-Don’t step over the cable.
-All visitors and onlookers should be kept away from the work area.
-Keep proper footing and balance at all times.
3. Don’t’ abuse the cord:
-Never carry your winch by the cord or yank it to disconnect it from the receptacle.
-Keep cord from heat, oil and sharp edges.
4. Don’t overwork the winch:
-If the motor becomes uncomfortably hot to touch, stop and let it cool for a few minutes.
-Don’t maintain power to the winch if the motor stalls.
-Don’t exceed maximum line pull ratings shown in tables. Shock loads must not exceed these
ratings.
5. Avoid unintentional starting:
-Winch clutch should be disengaged when not in use and fully engaged when in use.
6. Check damaged parts:
-Before using, you should check your winch carefully. Any part that is damaged should be
properly repaired or replaced by an authorized service centre.
7. Repair your winch:
-When repairing, use only identical replacement parts or it may cause considerable danger for
the user.
8. Re-spool the cable:
-Leather gloves must be worn while re-spooling. To re-spool correctly, it is necessary t keep a
slight load on the cable. Hold the cable with one hand and the remote control switch with the
NOTE: Read entire manual thoroughly before installing and using this
product.
Keep manual with winch for
reference, warranty and
future use.

WWW.SMITTYBILT.COM
For Technical Support/Warranty Information please call 310-762-9944
Smittybilt, 400 West Artesia Blvd, Compton, CA 90220
Installation Instructions
X2O Winches
other. Start as far back and in the centre as you can. Walk up keeping load on the cable as the
winch is powered in.
-Do not allow the cable to slop through your hand and do not approach the winch too closely.
-Turn off the winch and repeat the procedure until all the cable except 1m is in.
-Disconnect the remote control switch and finish spooling in cable by rotating the drum by hand
with clutch disengaged.
-On hidden winches, spool in cable under power but keep hands clear.
WINCH OPERATION WARNINGS
Read the following carefully before attempting to operate your winch and keep the instructions
for future reference. Smittybilt electric winches are intended for recreational self-recovery usage
only.
1. The uneven spooling of cable, while pulling a load, is not a problem, unless there is a
cable pile up on one end of the drum. If this happens reverse the winch to relieve the load
and move your anchor point further to the centre of the vehicle. After the job is done, you
can unspool and rewind for a neat lay of the cable.
2. Store the remote control switch inside your vehicle where it will not become damaged,
inspect it before you plug it in.
3. When ready to begin spooling in, plug in remote control switch with clutch disengaged, do
not engage clutch with motor running.
4. Never connect the hook back to the cable, this causes cable damage. Always use a sling
or chain of suitable strength.
5. Observe your winch while winching, if possible while standing at a safe distance. Stop the
winching process every meter or so to assure the cable is not pulling up in one corner.
Jamming the cable can break your winch.
6. Do not attach tow hook to winch mounting plate, they must be attached to vehicle frame.
7. The use of a snatch block will aid recovery operations by providing a doubling of the winch
capacity and a halving of the winching speed, and the means to maintain a direct line pull
to the centre of the rollers. When double loading during stationary winching, the winch
hook should be attached to the chassis of the vehicle.
8. Ensure rated “D” or bow shackles are used in conjunction with an approved tree trunk
protector to provide a safe anchor point.
9. When extending winch cable, ensure that at least five wraps of cable remain on drum at all
times. Failure to do this could result in the cable parting from the drum under load. Serious
personal injury or property damage may result.
10. All winches are provided with a red cable marking to identify that 5 cable wraps remain on
the winch drum when this mark appears at the rollers. No recovery should be attempted
beyond this marking.

WWW.SMITTYBILT.COM
For Technical Support/Warranty Information please call 310-762-9944
Smittybilt, 400 West Artesia Blvd, Compton, CA 90220
Installation Instructions
X2O Winches
11. Since the greatest pulling power is achieved on the innermost layer of your winch, it is
desirable to pull off as much line as you can for heavy pulls(you must leave at least 5
wraps minimum on the drum----red cable). If this is not practical use a snatch block and
double line arrangement.
12. Draping a heavy blanket or similar object over the extended winch cable is recommended
as it will dampen any back lash should a failure occur.
13. Neat, tight spooling avoids cable binding, which is caused when a load is applied and the
cable is pinched between the others. If this happens, alternatively power the winch in and
out. Do not attempt to work a bound cable under a load, free by hand.
14. Apply blocks to wheels when vehicles are on an incline.
15. Battery:
-Be sure that the battery is in good condition. Avoid contact with battery acid or other
contaminants.
-Always wear eye protection when working around a battery.
-Have the engine running when using the winch, to avoid flattening the battery.
16. Winch cable:
-Be sure that the cable is in good condition and is attached properly.
-Do not use the winch if cable is frayed.
-Do not move the vehicle to pull a load.
-Do not replace the cable with a cable of lesser strength.
-The life of the cable is directly related to the use and care it receives. Following its first and
subsequent uses, a cable must be wound on to the drum under a load of at least 500lbs (230kgs) or
the outer wraps will draw into the inner wraps and severely damage the cable during winching. The
first winch use should be a familiarization run while in a relaxed, non-recovery situation. Spool out
the cable until the red cable mark appears(about 5 wraps on the drum),then rewind the cable on the
drum under a load of 500lbs(230kgs) or more. This will slightly tension and stretch the new cable
and create a tight cable wrap around the drum. Failure to do so may result in cable damage and
reduced cable life.
-When the cable is replaced, be sure to apply loctite, or an equal compound, to the cable clamp
thread. Tighten the clamp screw properly but do not over tighten. The loctite will prevent loosening
of the screw in arduous conditions. Loctite 7471 primer and 222 threadlocker are recommended.
17. Do not attempt to exceed the pulling limits of this winch.
18. Do not drive your vehicle to assist the winch in any way. Vehicle movement in
combination with winch operation may overload the cable, the winch itself or cause damaging shock
loads. 19. Shock loads when winching are dangerous! A shock load occurs when an increase force
is suddenly applied to the cable. A vehicle rolling back on a slack cable may induce a damaging
shock load.

WWW.SMITTYBILT.COM
For Technical Support/Warranty Information please call 310-762-9944
Smittybilt, 400 West Artesia Blvd, Compton, CA 90220
Installation Instructions
X2O Winches
20. The winches shown in this manual are solely for vehicle and boat mounted, non-
industrial applications.
21. Do not use winch in hoisting applications due to required hoist safety factors and
features.
22. Do not use the winch to lift, support or otherwise transport personnel.
INSTALLATION
INSTALLATIONINSTALLATION
INSTALLATION
Mounting your winch
1. The winch is to be mounted into a suitable steel mounting frame using the 4 point
foot mounting system in either a horizontal or vertical plane.
It’s very important that the winch be mounted on a flat surface so that the three
sections (motor, cable drum and gear housing) are properly aligned.
--The fitment of winches and / or a frontal protection system may affect the triggering of
SRS air bags. Check that the mounting system has been tested and approved for
winch fitment in the airbag equipped vehicle.
2. Winch mounting frames and / or frontal protection systems are suggested to suit
most popular vehicles. Winch frames are packaged with detailed fitting instructions.
3. Should you wish to manufacture your own mounting plate the dimensions below will
assist. A steel mount plate 6mm thick is recommended. Fasteners should be steel high
tensile grade 5 or better. A poorly designed mount may void warranty.
4. The winch should be secured to the mounting with 3/8” UNC x 1-1/4” stainless steel
bolts and spring washers provided.
5. The roller fairlead is to be mounted so as to guide the rope onto the drum evenly.
WWW.SMITTYBILT.COM
For Technical Support/Warranty Information please call 310-762-9944
Smittybilt, 400 West Artesia Blvd, Compton, CA 90220
Installation Instructions
X2O Winches
X20- 8,000 X20-10,000, 12,000
X20- 15,000
WWW.SMITTYBILT.COM
For Technical Support/Warranty Information please call 310-762-9944
Smittybilt, 400 West Artesia Blvd, Compton, CA 90220
Installation Instructions
X2O Winches
Lubrication installation
All moving parts in the winch are permanently lubricated with high temperature lithium grease
at the time of assembly. Lubricate cable periodically using light penetrating oil. Inspect for broken
strands and replace if necessary. If the cable becomes worn or damaged it must be replaced.
Cable installation
Unwind the new cable by rolling it along the ground, to prevent kinking. Remove old cable and
observe the manner in which it is attached to the cable drum flange.
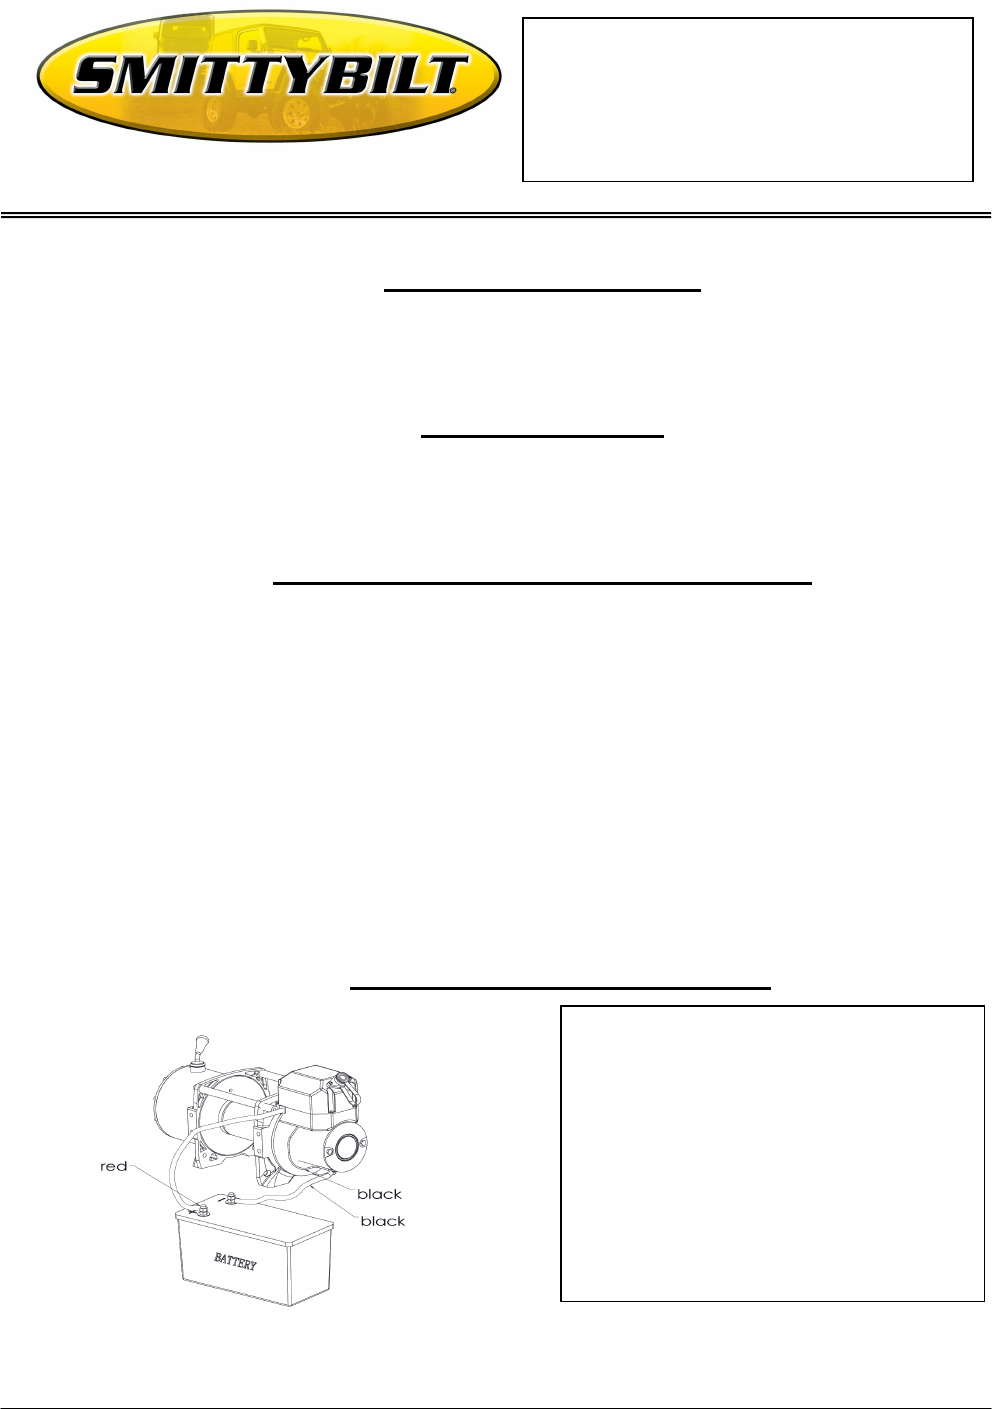
Electrical Connection (8000 ,10000,12000,)
For normal self-recovery work, your existing electrical system is adequate. A fully charged
battery and proper connections are essential. Run the vehicle engine during winching operations to
keep battery charged.
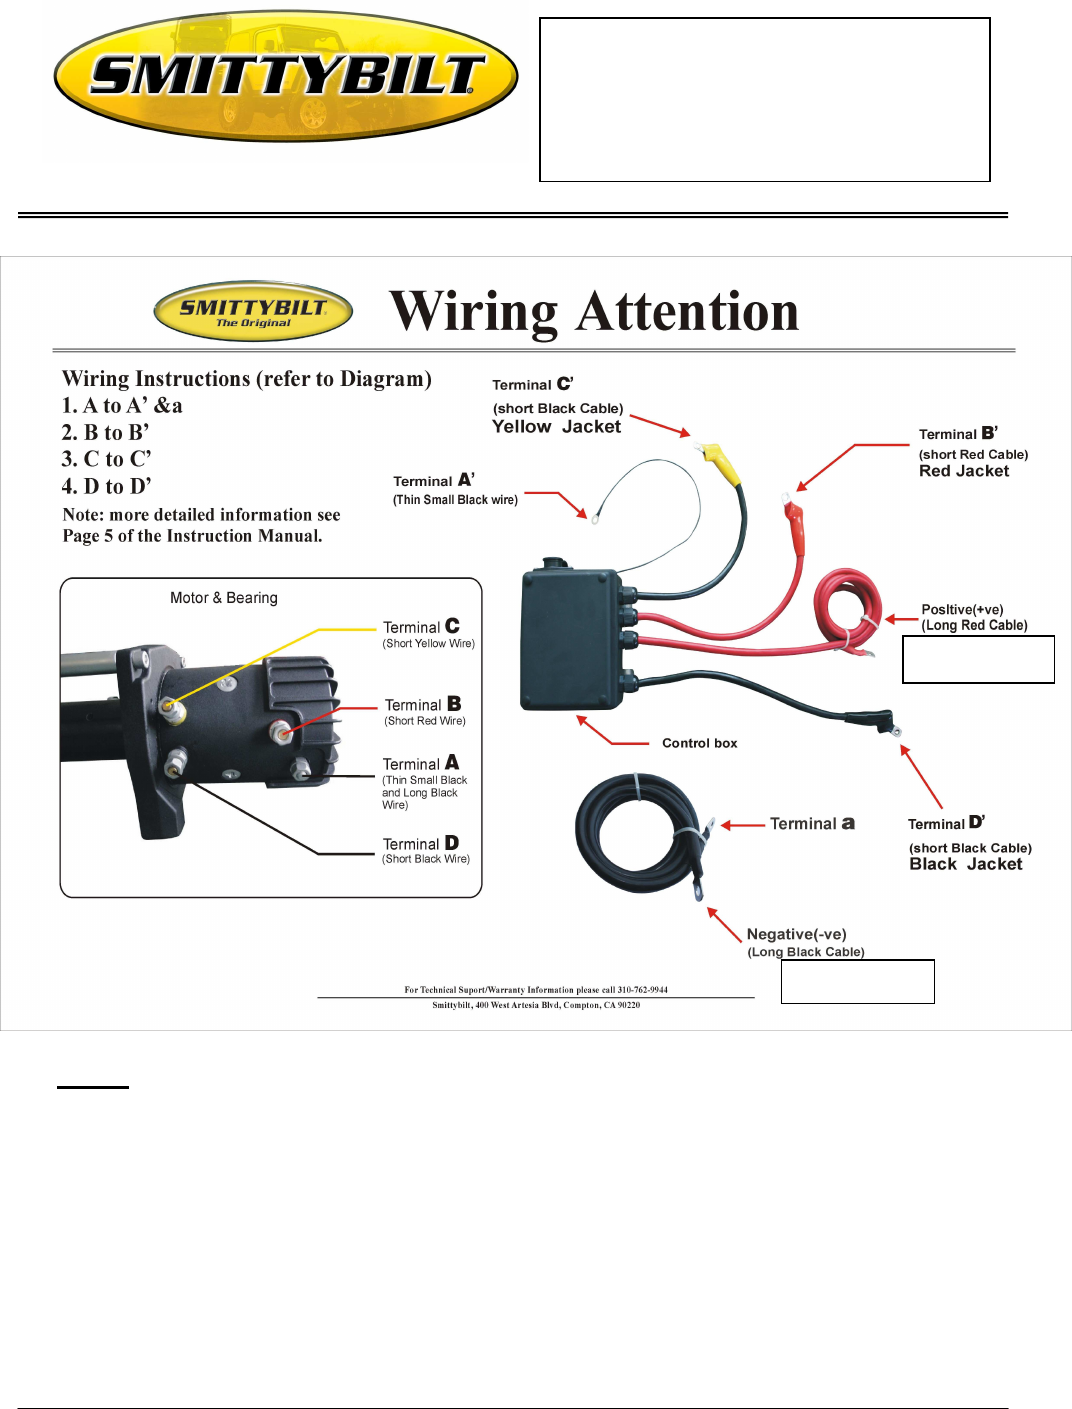
Pay close attention to proper electrical cable connection as follows (Refer to diagram 1)
1. Short red cable (B’) connecting to the red terminal (B) of the motor.
2. Short black cable with yellow jacket (C’) connecting to the yellow terminal(C) of the motor.
3. Short black cable with black jacket (D’) connecting to the black terminal (D) of the motor.
The thin black cable (a’) connecting to bottom terminal (A) of the motor
4. Long black cable (1.8m), one terminal (A’) connecting to the bottom terminal (A) of the
motor, and the other terminal negative (-) connecting to negative (-) terminal of battery.
5. Long red cable positive (+) connecting to positive (+) terminal of battery.
Electrical connection (15,000)
1. Long black cable (1.8m), one
terminal (A’) connecting to the
bottom terminal (A) of the motor, and
the other terminal negative (-)
connecting to negative (-) terminal of
battery.
2. Long red cable positive (+)
connecting to positive (+) terminal of
battery.
WWW.SMITTYBILT.COM
For Technical Support/Warranty Information please call 310-762-9944
Smittybilt, 400 West Artesia Blvd, Compton, CA 90220
Installation Instructions
X2O Winches
(Diagram 1)
Note:
1. Your battery must be kept in good condition.
2. Be sure battery cables are not drawn taught across any surfaces, which could possibly
damage them.
3. Corrosion on electrical connections will reduce performance or may cause a short.
4. Clean all connections especially in remote control switch and receptacle.
5. In salty environments use a silicone sealer to protect from corrosion.
6. Index the heads of the plate studs into the keyhole slots on the back of the winch.
7. Attach the winch/Adaptor plate assembly to your trailer hitch, by inserting the trailer hitch
ball through the shaped hole in the adaptor plate.
To Battery +
To Battery -
WWW.SMITTYBILT.COM
For Technical Support/Warranty Information please call 310-762-9944
Smittybilt, 400 West Artesia Blvd, Compton, CA 90220
Installation Instructions
X2O Winches
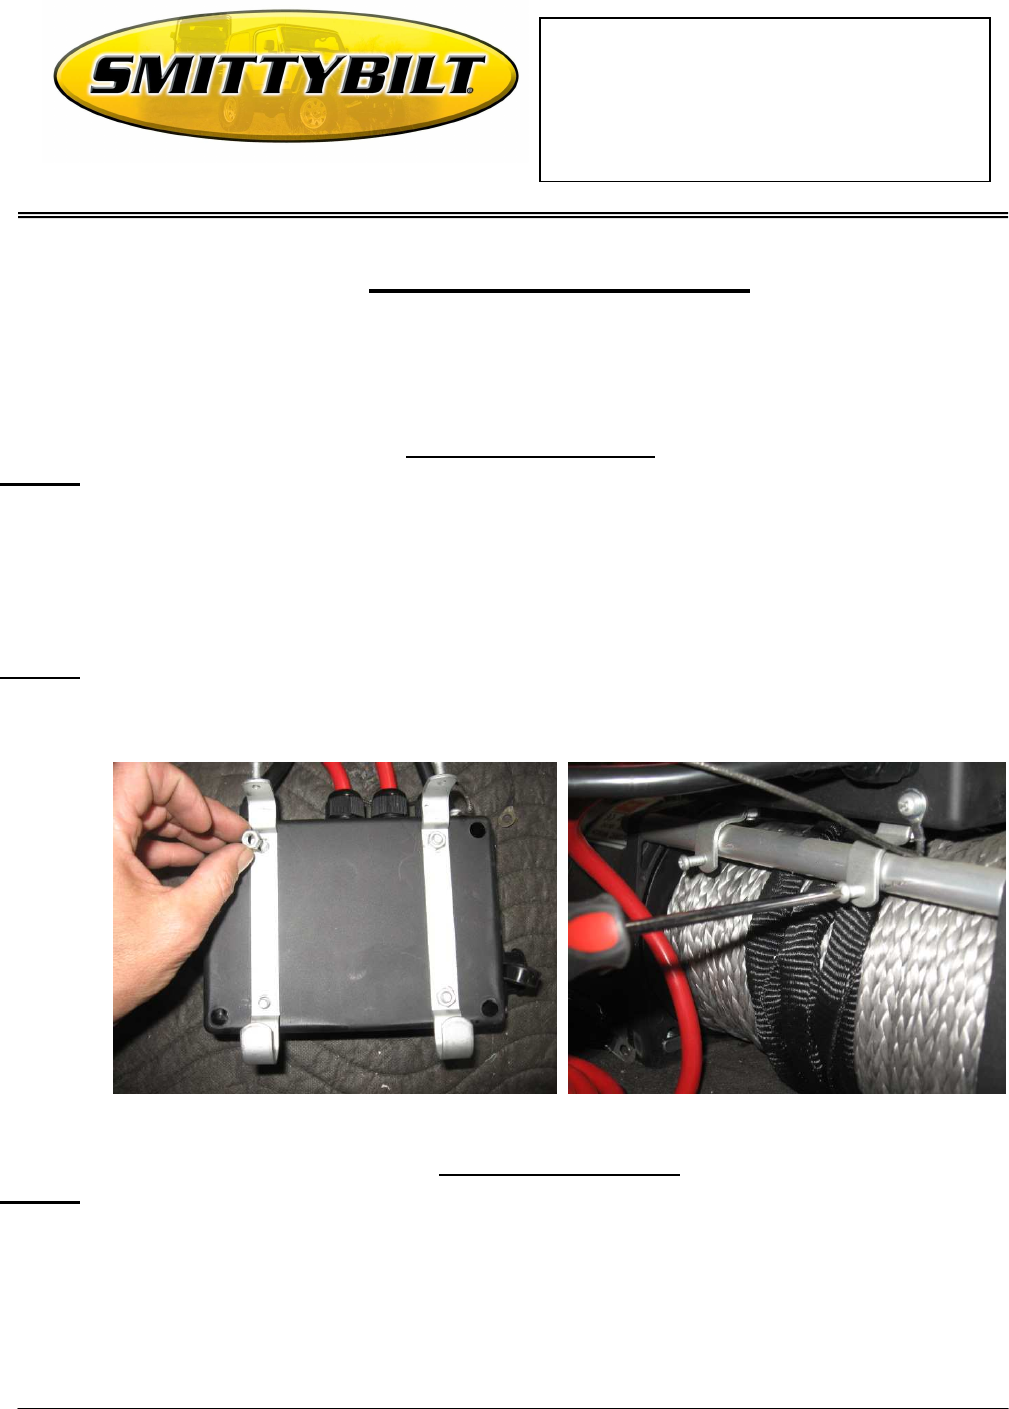
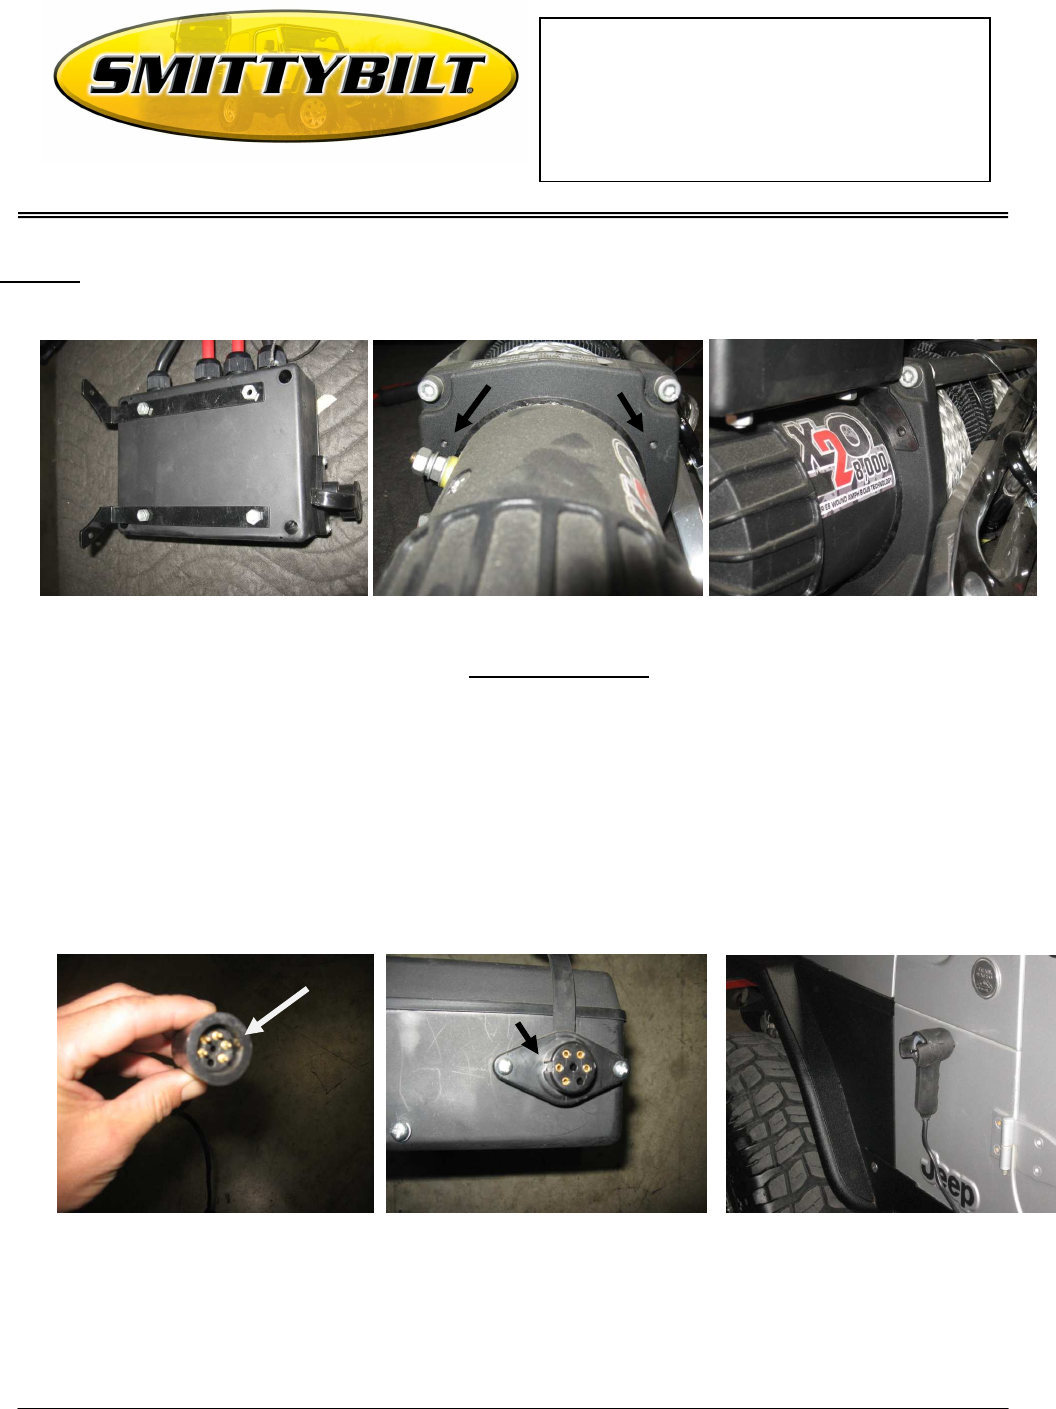
Installing the control box
It is recommended to install you winch control box prior to installing your winch.
You may install the control box in a separate location using 3-4 AWG marine cable (not
included)
Determine if you want your control box located over the motor (side) or the drum (Center)
DRUM (Center Mount)
Step 1: Install the two included zinc brackets on the bottom of the control box by removing the
four nuts on the bottom of the box, then placing the brackets over the bolts and then
secure brackets by re-installing the nut. (Fig A) (Note: The hooks on the brackets go
towards the front of the winch.) Use caution when installing brackets in order not to push
the bolts up into the control box. To help prevent this, install brackets with the control box
on its side instead of laying it flat on a table.
Step 2: Secure the brackets to the winch by placing the front hooks on the brackets around the
front tie-rod then push the rear down over the rear tie-rods. Secure by tightening the
the screw on the rear of each bracket (Fig B)
(Fig A) (Fig B)
MOTOR (Side Mount)
Step 1: Install the two black motor mount brackets on the bottom of the control box by removing
the four nuts on the bottom of the box, then placing the brackets over the bolts and then
secure brackets by re-installing the nut. Note: The end of the brackets point outward.
(Fig D) Use caution when installing brackets in order not to push
the bolts up into the control box. To help prevent this, install brackets with the control box
on its side instead of laying it flat on a table.
WWW.SMITTYBILT.COM
For Technical Support/Warranty Information please call 310-762-9944
Smittybilt, 400 West Artesia Blvd, Compton, CA 90220
Installation Instructions
X2O Winches
Step 2: Install the control box by lining it up with the two holes on the motor side upright, then
Secure with the included hardware. (Fig E, F)
(Fig D) (Fig E) (Fig F)
Remote Control
Do not force end of remote plug into the plug on the control box.
Line the tab on the inside of the remote socket end with the groove on the remote plug on
the control box. (Fig G,H)
Push the toggle switch upward to operate the winch “Outward” .Note: You should always
“Free Spool” the winch outward.
Push the toggle switch downward to operate the winch “Inward”
The remote features a magnet on the front which enables you to keep the remote off of the
ground by having it placed on your vehicle, bumper, ect. (Fig I)
(Fig G) (Fig H) (Fig I)

WWW.SMITTYBILT.COM
For Technical Support/Warranty Information please call 310-762-9944
Smittybilt, 400 West Artesia Blvd, Compton, CA 90220
Installation Instructions
X2O Winches
Winch Operation
The best way to get acquainted with how your winch operates is to make a few test runs
before you actually need to use it. Plan your test in advance. Remember you can hear your
winch as well as you can see it operate. Get to recognize the sound of a light steady pull, a
heavy pull, and sounds caused by load jerking or shifting. Soon you will gain confidence in
operating your winch and its use will become second nature to you.
Operating
1. Ensure the vehicle is secure by applying the parking brake or chocking the wheels.
2. Pull out the winch cable the desired length and connect to an anchor point.
The winch clutch allows rapid uncoiling of the cable for hooking onto the load or anchor
point. The shifter tab located on the gear housing of the winch operates the clutch as
follows:
a) To disengage the clutch, move the clutch shifter tab into the “OUT” position. Cable may
not be free spooled off the drum.
b) To engage the clutch, move the clutch shifter tab into the “IN” position. The winch is
now ready for pulling.
3. Recheck all cable rigging before proceeding.
4. Plug in the winch hand control. It is recommended that the winching operation takes place
from the driver’s position to ensure safe operation.
5. To commence winching operation, start vehicle engine, select neutral in transmission,
maintain engine speed at idle.
6. Operated the remote control switch to IN or OUT until the vehicle has been retrieved.
Regularly check the winch to ensure cable is winding onto the drum evenly.
MAINTENANCE
MAINTENANCEMAINTENANCE
MAINTENANCE
It is highly recommended that the winch be used regularly (once a month). Simply power
the cable out 15m, free spool 5m and then power back in. this will keep all components in
good working condition so that the winch can be relied on when needed. Contact your
authorized outlet for technical assistance and repairs.

WWW.SMITTYBILT.COM
For Technical Support/Warranty Information please call 310-762-9944
Smittybilt, 400 West Artesia Blvd, Compton, CA 90220
Installation Instructions
X2O Winches
1. Never winch with your vehicle in gear or in part, which would damage your vehicle’s
transmission.
2. Never wrap the cable around the object and hook onto the cable itself. This can cause
damage to the object being pulled, and kink or fray the cable
3. Keep hands, clothing, hair and jewellery clear of the drum area and cable when winching.
4. Never use the winch if the cable is frayed, kinked or damaged.
5. Never allow anyone to stand near the cable or in line with the cable behind the winch while
it is under power. If the cable should slip or brake, it can suddenly whip back towards the
winch, causing a hazard for anyone in the area. Always stand well to the side while winding
6. Don’t leave the switch plugged in when is not in use.
TROUBLE SHOOTING
S
ymptom
Possible cause
Suggested remedy
Motor does not
turn on Safety switch is off Turn safety switch to ON position
Switch Assy not
connected properly Insert switch Assy firmly to the connector
Loose battery cable Tighten nuts on cable connectors
Solenoid malfunctioning Tap solenoid to free contact, applying 12 volts to
coil terminal directly. The solenoid will make an
audible clicking sound when activating.
Defective switch Assy Replace switch Assy
Defective motor Check for voltage at armature port with switch
pressed. If voltage is present, replace motor.
Water has entered
motor Drain and dry. Run in short bursts without load
until completely dry.
Motor runs too hot Long period of operation
Let winch cool down periodically.
Motor runs slowly or
without normal power Battery runs down Recharge battery by running vehicle
Insufficient current or
voltage Clean, tighten or replace the connector.
Motor runs but cable
drum does not turn Clutch not engaged Turn clutch into IN position, if that does not work,
ask a qualified technician to check and repair.
Motor runs in one
direction only Defective or stuck
solenoid Tap solenoid to free contacts. Repair or replace
solenoid.
WWW.SMITTYBILT.COM
For Technical Support/Warranty Information please call 310-762-9944
Smittybilt, 400 West Artesia Blvd, Compton, CA 90220
Installation Instructions
X2O Winches
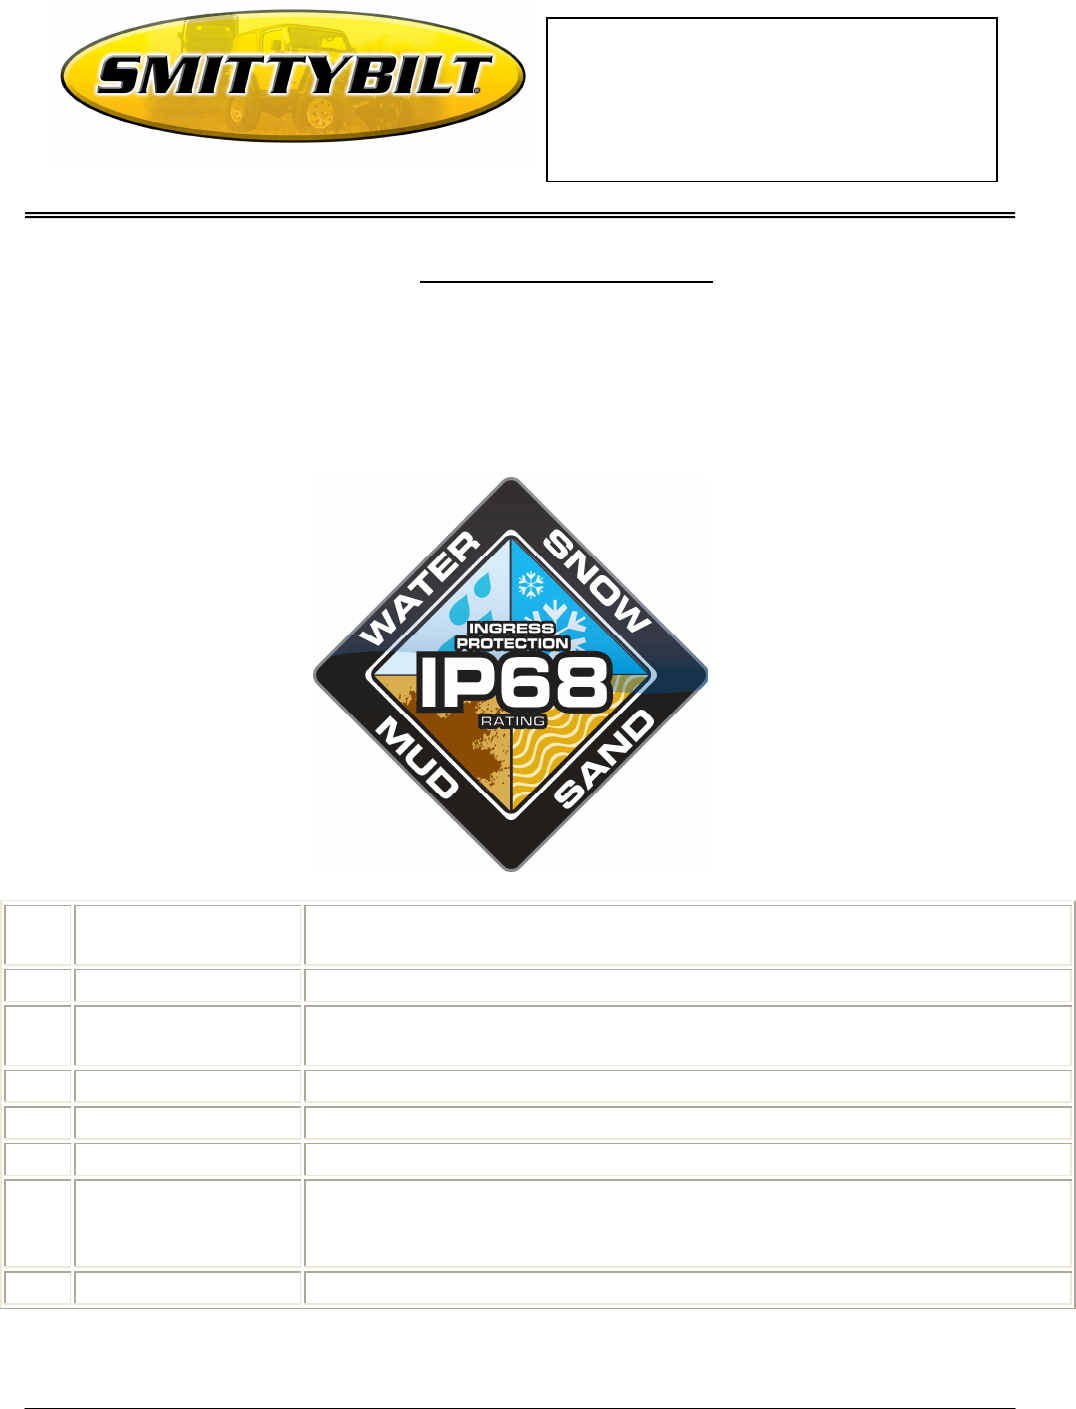
Understanding IP Ratings
The first digit indicates the level of protection that the enclosure provides against access to
hazardous parts (e.g., electrical conductors, moving parts) and the ingress of solid foreign
objects.
The second digit indicates protection of the equipment inside the enclosure against harmful
ingress of water.
Level
Object size
protected against
Effective against
0
—
No protection against contact and ingress of objects
1 >50 mm Any large surface of the body, such as the back of a hand, but no
protection against deliberate contact with a body part
2
>12.5 mm
Fingers or similar objects
3
>2.5 mm
Tools, thick wires, etc.
4
>1 mm
Most wires, screws, etc.
5 Dust protected
Ingress of dust is not entirely prevented, but it must not enter in
sufficient quantity to interfere with the satisfactory operation of the
equipment; complete protection against contact
6
Dust tight
No ingress of dust; complete protection against contact

WWW.SMITTYBILT.COM
For Technical Support/Warranty Information please call 310-762-9944
Smittybilt, 400 West Artesia Blvd, Compton, CA 90220
Installation Instructions
X2O Winches
Level
Protected
against
Testing for Details
0
Not protected
—
—
1 Dripping water Dripping water (vertically falling drops) shall have no harmful effect.
Test duration: 10 minutes
Water equivalent to 1mm
rainfall per minute
2
Dripping water
when tilted up to
15°
Vertically dripping water shall have no harmful effect when the enclosure is tilted at an angle up to 15° from its
normal position.
Test duration: 10 minutes
Water equivalent to 3mm
rainfall per minute
3 Spraying water Water falling as a spray at any angle up to 60° fro m the vertical shall have no harmful effect.
Test duration: 5 minutes
Water volume: 0.7 litres per
minute
Pressure: 80–100 kN/m²
4 Splashing water Water splashing against the enclosure from any direction shall have no harmful effect.
Test duration: 5 minutes
Water volume: 10 litres per
minute
Pressure: 80–100 kN/m²
5 Water jets Water projected by a nozzle (6.3mm) against enclosure from any direction shall have no harmful effects.
Test duration: at least 3
minutes
Water volume: 12.5 litres
per minute
Pressure: 30 kN/m² at
distance of 3m
6 Powerful water jets
Water projected in powerful jets (12.5mm nozzle) against the enclosure from any direction shall have no harmful
effects.
Test duration: at least 3
minutes
Water volume: 100 litres
per minute
Pressure: 100 kN/m² at
distance of 3m
7 Immersion up to
1 m
Ingress of water in harmful quantity shall not be possible when the enclosure is immersed in water under defined
conditions of pressure and time (up to 1 m of submersion).
Test duration: 30 minutes
Immersion at depth of 1m
8 Immersion
beyond 1 m
The equipment is suitable for continuous immersion in water under conditions
which shall be specified by the manufacturer. Normally, this will mean that the
equipment is hermetically sealed. However, with certain types of equipment, it can
mean that water can enter but only in such a manner that it produces no harmful
effects.
Test
duration:
continuous
immersion in
water
WWW.SMITTYBILT.COM
For Technical Support/Warranty Information please call 310-762-9944
Smittybilt, 400 West Artesia Blvd, Compton, CA 90220
Installation Instructions
X2O Winches
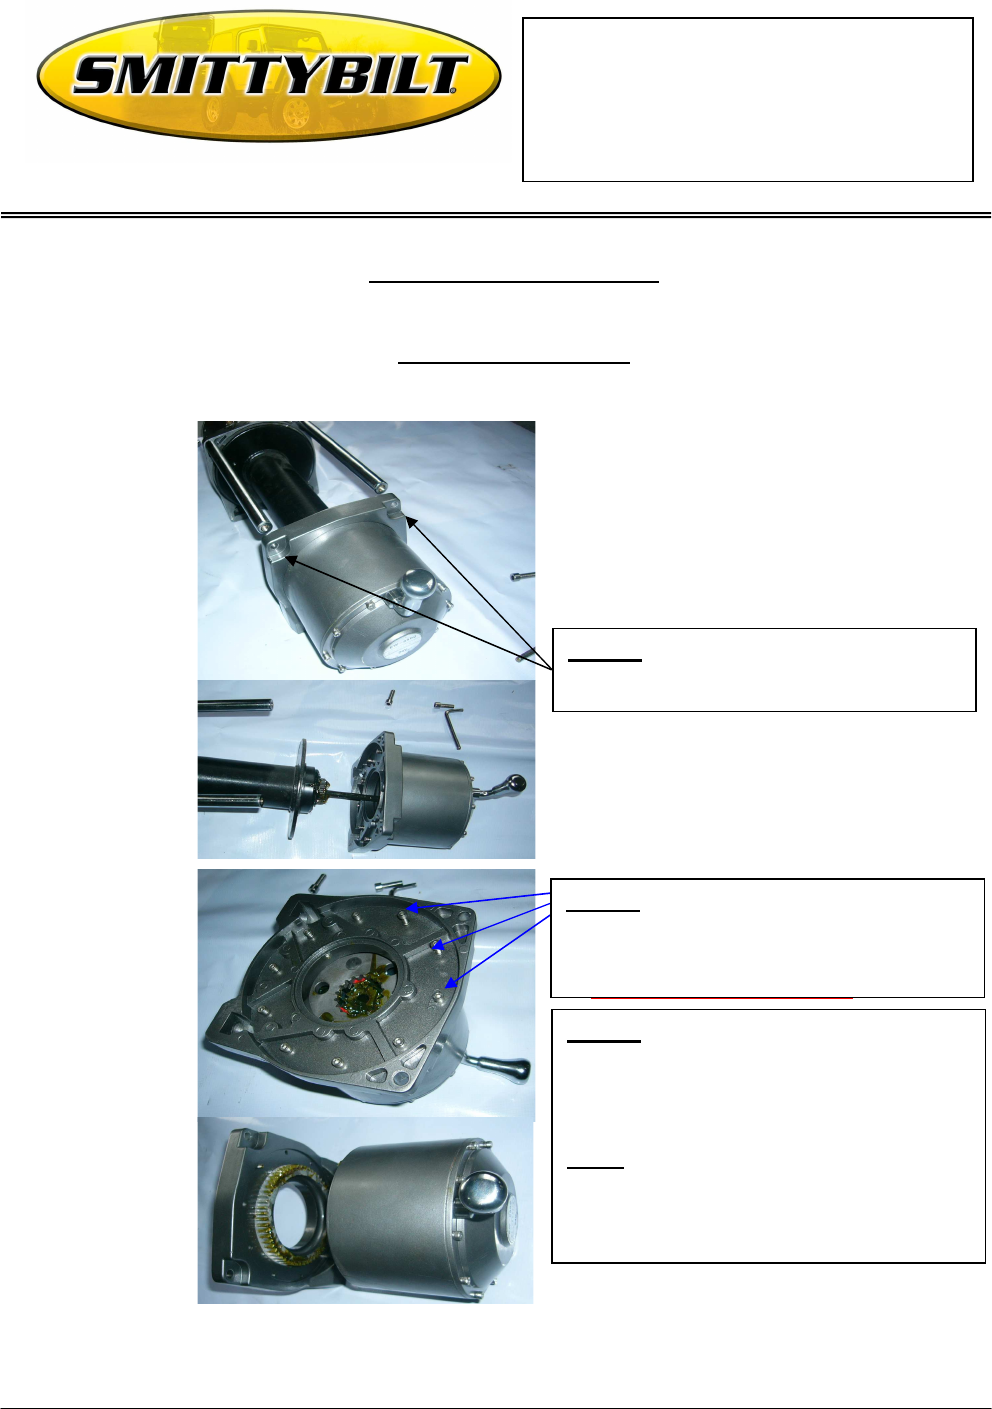
Gear Housing “Clocking”
In some situations you may need to “Clock” (turn) your Gear Housing in order to gain access
to them. To clock the Gear Box
Step 1
: Loose the tie
rods to take the gear
box
Step 2
: take off the retaining
bolts (totally
10pcs)
Retaining
Step
3
: get the gear
box rotated; then
connect the gear box
Note pls: the rotation of
gear box must be 36
degrees, or a degree
which is the multiple of
Step 1:
Loosen and remove the two tie
rod bolts on the gear box side.
Step 2:
Remove the small retaining bolts on the
inside of the gear box
Step 3:
Rotate the gear box to the
optimal position needed. Then re-install
the retaining bolts and re connect gear
box to the tie-rod bars.
Note: “Clocking” must be done in 36
degree intervals due to the position of
the retaining bolt holes.

WWW.SMITTYBILT.COM
For Technical Support/Warranty Information please call 310-762-9944
Smittybilt, 400 West Artesia Blvd, Compton, CA 90220
Installation Instructions
X2O Winches
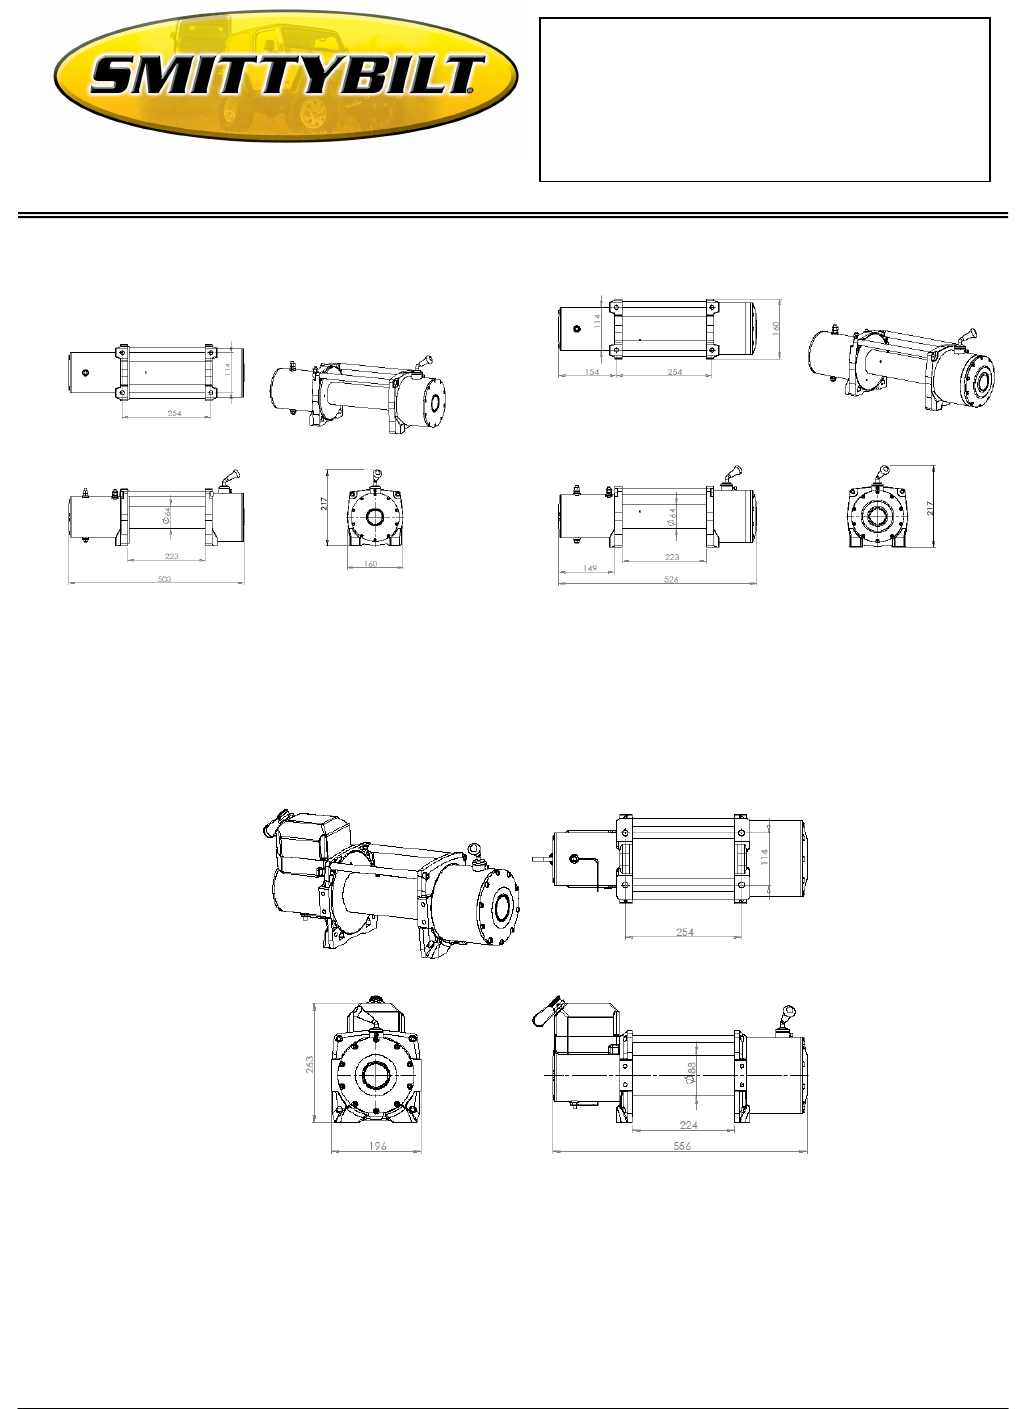
8000lbs Features and Specifications
Single line rated pull 8000lbs (3600kgs)
Motor 5.5 hp series wound
Control 12’ Remote Switch
Gear train 3 stage planetary
Gear reduction ratio 150:1
Clutch Sliding Ring Gear
Braking Automatic In-The-Drum
Drum size Diameter 2.5”(63.5mm) x
length 8.8”(224mm)
Cable 5/16”(8.1mm) x 98.5’
Fairlead 4 Way Roller Fairlead
Remote Control Included
Battery Recommended: 650 CCA
Battery Leads 25mm, 72” L (1.83m)
Net weight 88 lbs ( 39.9 kgs)
Overall dimension
(length x width x
height)
21” x 6.3” x 8.6” (532
x 160 x 218mm)
Mounting bolt pattern 10” x 4.5” (254 x 114.3mm)
Pull, Speed, Amps
Line pull lbs(kgs) Line speed ft./min (m/min)
Current (Amps)
0 39.4 (12) 96
4000 (1818) 15.7 (4.8) 279
6000 (2727) 11.0 (3.3) 385
8000 (3636) 10.2 (3.1) 440
Line pull and rope capacity in layer
Layer Rated line pull lbs(kgs) Total rope on drum ft (Meters)
1 8000 (3630) 18.3 (5.6)
2 6493 (2945) 40.75 (12.4)
3 5464 (2478) 58.5 (17.8)
4 4717 (2140) 85.3 (26)

WWW.SMITTYBILT.COM
For Technical Support/Warranty Information please call 310-762-9944
Smittybilt, 400 West Artesia Blvd, Compton, CA 90220
Installation Instructions
X2O Winches
10,000lbs Features and Specifications
Single line rated pull 10000lbs (4318kgs)
Motor 5.5hp Series Wound
Control 12’ Remote switch
Gear train 3 stage planetary
Gear reduction ratio 218:1
Clutch Sliding Ring Gear
Braking Automatic In-The-Drum
Drum size Diameter 2.5”(63.5mm) x
length 9.6”(224mm)
Cable 3/8”” x 98.5’
Fairlead 4 Way Roller Fairlead
Remote Control Included
Battery Recommended: 650 CCA
Battery Leads 25mm, 72” L (1.83m)
Net weight 94lbs (42.6kgs)
Overall dimension
(length x width x
height)
21.1” x 6.3” x 8.6”
(530 x 160 x 218mm)
Mounting bolt pattern 10” x 4.5” (254 x 114.3mm)
Pull, Speed, Amps
Line pull lbs(kgs) Line speed ft./min (m/min)
Current (Amps)
0 31.16 (9.5) 76
2000 (907) 18.4 (5.6) 157
4000 (1814) 13.8 (4.2) 223
8000 (3628) 8.5 (2.6) 343
10000 (4536) 6.1 (1.8) 415
Line pull and rope capacity in layer
Layer Rated line pull lbs(kgs) Total rope on drum ft (Meters)
1 10000 (4545) 18.3 (5.6)
2 8849 (4014) 40.7 (12.4)
3 7194 (3263) 58.6 (17.9)
4 6310 (2862) 85.3 (26.0)

WWW.SMITTYBILT.COM
For Technical Support/Warranty Information please call 310-762-9944
Smittybilt, 400 West Artesia Blvd, Compton, CA 90220
Installation Instructions
X2O Winches
12000lbs Features and Specifications
Single line rated pull 12000lbs (5454kgs)
Motor 6.6hp Series Wound
Control 12’ Remote switch
Gear train 3 stage planetary
Gear reduction ratio 265:1
Clutch Sliding Ring Gear
Braking Automatic In-The-Drum
Drum size Diameter 2.5”(63.5mm) x
length 9.6”(224mm)
Cable 3/8”(9.5mm) x 98.5’’(26m)
Remote control switch Included
Battery Recommended: 650 CCA
Battery Leads 25mm, 72” L (1.83m)
Net weight 94lbs, 40kgs
Overall dimension
(length x width x
height)
21.1” x 6.3” x 8.6”
(530 x 160 x 218mm)
Mounting bolt pattern 10” x 4.5” (254 x 114.3mm)
Pull, Speed, Amps
Line pull lbs(kgs) Line speed ft./min (m/min)
Current (Amps)
0 24.6 (7.5) 70.3
3000 (1361) 11.5 (3.5) 138
6000 (2727) 9.1 (2.7) 217
9000 (4082) 7.3 (2.2) 260
12000 (5454) 5.6 (1.7) 330
Line pull and rope capacity in layer
Layer Rated line pull lbs(kgs) Total rope on drum ft (Meters)
1 12000 (5454) 15.5 (4.7)
2 10619 (4817) 36.2 (11.0)
3 8633 (3916) 56.5 (17.2)
4 7573 (3435) 85.5 (26.6)

WWW.SMITTYBILT.COM
For Technical Support/Warranty Information please call 310-762-9944
Smittybilt, 400 West Artesia Blvd, Compton, CA 90220
Installation Instructions
X2O Winches
15000lbs Features and Specifications
Single line rated pull 15000lbs (6818kgs)
Motor 6.6hp Series Wound
Control 12’ Remote switch
Gear train 3 stage planetary
Gear reduction ratio 420:1
Clutch Sliding Ring Gear
Braking Automatic In-The-Drum
Drum size 3.6”(88mm)diameterX8.7”(
221.6 mm )length
Cable ½” x98.4’ (96mmx 30m)
Remote control switch Included
Battery Recommended: 650 CCA
Battery Leads 25mm, 72” L (1.83m)
Net weight 52kgs
Overall dimension
(length x width x
height)
555×196×249mm
Mounting bolt pattern 10” x 4.5” (254 x 114.3mm)
Pull, Speed, Amps
Line pull lbs(kgs) Line speed ft./min (m/min)
Current (Amps)
0 23.9/7.28 70.3
4000 (1701) 10.5 (3.2) 152
75000 (3402) 8.2 (2.5) 239
11250 (5103) 5.2 (1.6) 332
15000(6818) 3.9 (1.2 422
Line pull and rope capacity in layer
Layer Rated line pull lbs(kgs) Total rope on drum ft (Meters)
1 15000 (6818) 15.5 (4.7)
2 12059 (5470) 36.2 (11.0)
3 10082 (4573) 56.5 (17.2)
4 8662 (3929) 85.5 (26)
WWW.SMITTYBILT.COM
For Technical Support/Warranty Information please call 310-762-9944
Smittybilt, 400 West Artesia Blvd, Compton, CA 90220
Installation Instructions
X2O Winches
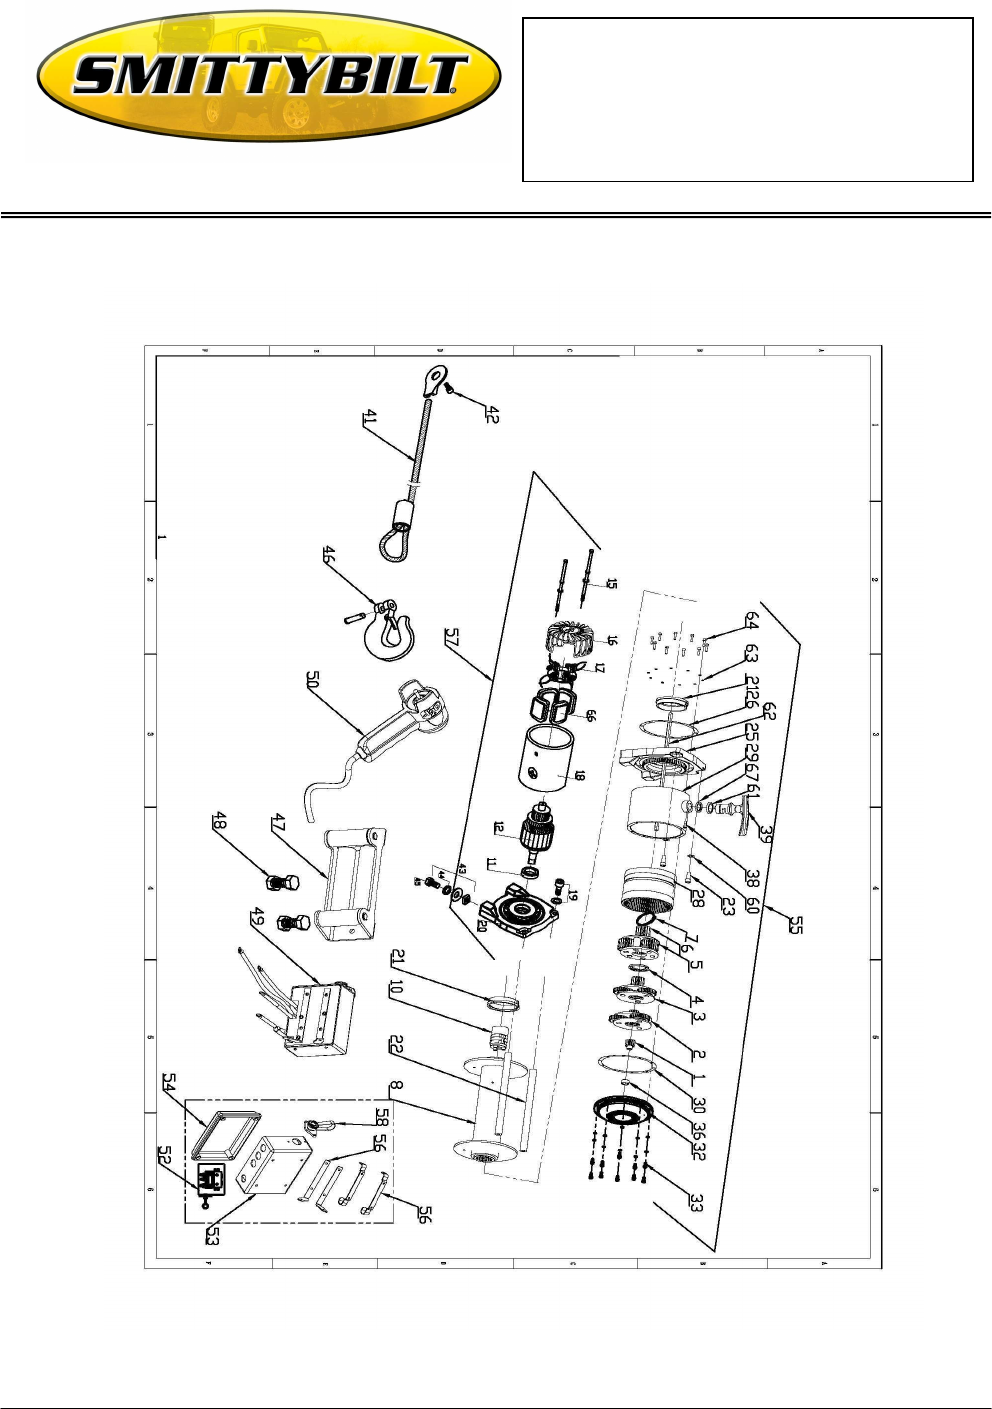
X20 Winch Components Diagram

WWW.SMITTYBILT.COM
For Technical Support/Warranty Information please call 310-762-9944
Smittybilt, 400 West Artesia Blvd, Compton, CA 90220
Installation Instructions
X2O Winches
X20 Winch Components List
8000 lbs 10000lbs 12000lbs Description Part No on drawing
97380-01 97310-01 97312-01 Sun Gear-Input 1
97380-02 97310-02 97312-02 Gear Carrier-Input 2
97380-03 97380-03 97380-03 Gear Carrier-Intermediate 3
97380-04 97380-04 97380-04 Washer-1.2mm thickness 4
97380-05 97380-05 97380-05 Gear Carrier-Output 5
97380-06 97380-06 97380-06 Outer Spline 6
97380-07 97380-07 97380-07 Spline Positioning Ring 7
97380-08 97380-08 97380-08 Drum 8
97380-10 97380-10 97380-10 Brake System 10
97380-11 97380-11 97380-11 Coupling Joint 11
97380-12 97310-12 97312-12 Rotor 12
97380-23 97380-23 97380-23 clutch bolt 23
97380-15 97380-15 97380-15 Motor Long Bolts 15
97380-16 97380-16 97380-16 Motor End Cover 16
97380-17 97380-17 97380-17 Carbon Frame &Brush Ass’y 17
97380-18 97380-18 97380-18 Stator 18
97380-19 97380-19 97380-19 Tie Rod Bolt 19
97380-20 97380-20 97380-20 Motor Base 20
97380-21 97380-21 97380-21 Nylon Bearing 21
97380-22 97380-22 97380-22 Tie Rod 22
97380-25 97380-25 97380-25 Gear Box Base 25
97380-26 97380-26 97380-26 Gasket 26
97380-28 97380-28 97380-28 Clutch Gear 28
97380-29 97380-29 97380-29 Gear Box Tube 29
97380-30 97380-30 97380-30 Gasket 30

WWW.SMITTYBILT.COM
For Technical Support/Warranty Information please call 310-762-9944
Smittybilt, 400 West Artesia Blvd, Compton, CA 90220
Installation Instructions
X2O Winches
8000 lbs 10000lbs 12000lbs Description Part No on drawing
97380-32 97380-32 97312-32 Gear Box End Cover 32
97380-33 97380-33 97380-33 Bolt + Spring Washer 33
97380-36 97380-36 97380-36 Bearing 36
97380-38 97380-38 97380-38 Locking Pin 38
97380-39 97380-39 97380-39 Clutch Lever 39
97380-41 97310-41 97312-41 Wire Rope 41
97380-42 97380-42 97380-42 Wire Rope Fix Bolt 42
97380-43 97380-43 97380-43 Screw 43
97380-44 97380-44 97380-44 Spring Washer 44
97380-45 97380-45 97380-45 Winch Mount Bolt 45
97380-46 97380-46 97380-46 Clevis Hook 46
97380-47 97380-47 97380-47 Roller Fairlead 47
97380-48 97380-48 97380-48 Fairlead Mount Bolt 48
97380-53 97380-53 97380-53 Control Box Cover 53
97380-49 97380-49 97380-49 Control Box 49
97380-50 97380-50 97380-50 Remote Control 50
97380-52 97380-52 97380-52 Integrated Solenoid Module 52
97380-54 97380-54 97380-54 control box bottom 54
97380-55 97310-55 97312-55 Complete Gear Assembly 55
97380-56 97380-56 97380-56 control box mounting bracket 56
97380-57 97310-57 97312-57 Complete Motor Assembly 57
97380-58 97380-58 97380-58 Rubber Plug 58
97380-67 97380-67 97380-67 rubber seal 67
97380-60 97380-60 97380-60 washer 60
97380-61 97380-61 97380-61 clutch base cover 61
97380-62 97380-62 97380-62 drive shaft 62
97380-63 97380-63 97380-63 washer 63
97380-64 97380-64 97380-64 bolt 64
97380-66 97380-66 97380-66 winding 66

WWW.SMITTYBILT.COM
For Technical Support/Warranty Information please call 310-762-9944
Smittybilt, 400 West Artesia Blvd, Compton, CA 90220
Installation Instructions
X2O Winches
Compliment your new Winch with a Smittybilt Winch Cover or other Smittybilt products
Winch Access. Bag (#2726) Black Box (#2805) Winch Cradle (#2811)
Winch Pull Strap (#769402) Winch Quick Connect Cables Winch Plates
Warning
Rollover and other types of vehicle accidents may result in serious injury or death to you, your
passengers and others sharing the road. Smittybilt accessories are decorative and are not intended
to reduce or avoid injury or damage in the event of an accident. The weight and location of
Smittybilt accessories may affect your vehicles’ handling, stability and performance, creating an
increased risk of accident or rollover. Before installing any accessory, check state laws and assure
that the accessory will not obscure any lights or interfere with proper operation on your vehicle’s
safety equipment. Consult your owner’s manual and the Smittybilt instructions, or additional safety
information. Smittybilt products, nor the warnings contained herein, are not a substitute for your
safe driving. Don’t drink and drive, always use seat belts and don’t drive faster than conditions
permit.

WWW.SMITTYBILT.COM
For Technical Support/Warranty Information please call 310-762-9944
Smittybilt, 400 West Artesia Blvd, Compton, CA 90220
Installation Instructions
X2O Winches
SMITTYBILT ADVANTAGE WARRANTY
LIMITED LIFETIME WARRANTY FOR MECHANICAL COMPONENTS
LIMITED ONE (1) YEAR WARRANTY FOR ELECTRICAL COMPONENTS
Smittybilt Automotive Products, LLC (SAP) warrants to the original purchaser that (a) the mechanical components (e.g., gears,
clutch, spools, etc.) of any SAP winch will be free of defects in material and workmanship for the lifetime of the winch, and (b) the
electrical components (e.g., electric motor, wires, solenoid, etc.) will be free of defects in material and workmanship for a period of
one (1) year from the original date of purchase. This Warranty applies only to the original purchaser of the winch. To obtain any
warranty service, you must provide SAP with proof of purchase and date of purchase acceptable to SAP, such as a copy of your
purchase receipt.
This warranty does not cover the removal or reinstallation of the winch. SAP will, at its sole option, repair, replace or refund the
purchase price of a defective winch or component, provided you return the defective winch or component during the warranty
period, transportation charges prepaid, to SAP. Attach your name, address, telephone number, a brief description of the problem,
and a copy of your receipt and original bill of sale bearing the SAP serial number of the defective winch and date of purchase.
This warranty does not apply (i) to finish, paint or the wire rope; (ii) if the winch has been damaged by accident, abuse,
misuse, collision, overloading, modification, misapplication, improper installation, or improper service; or (iii) any normally
wearable part such as the break mechanism. This Warranty is void if any SAP serial number has been removed or defaced.
Commercial or industrial use or application, or any hoisting application
of the winch voids the Warranty. This Warranty is good only for winches bought, sold and used in the United States unless
otherwise specifically agreed in writing by SAP.
THE WARRANTY SET FORTH ABOVE IS THE ONLY WARRANTY. THERE ARE NO OTHER WARRANTIES,
EXPRESS OR IMPLIED, INCLUDING BUT NOT LIMITED TO IMPLIED WARRANTIES OF MERCHANTABILITY OR
FITNESS FOR A PARTICULAR PURPOSE. ANY IMPLIED WARRANTY WHICH BY LAW MAY NOT BE EXCLUDED IS
LIMITED IN DURATION TO ONE (1) YEAR FROM THE DATE OF ORIGINAL RETAIL PURCHASE OF THE PRODUCT.
No
SAP
dealer, agent or employee is authorized to make any modification, extension or addition to this warranty. SAP SHALL
NOT BE LIABLE FOR SPECIAL, INDIRECT, INCIDENTAL OR CONSEQUENTIAL DAMAGES (INCLUDING, BUT NOT
LIMITED TO, LOST PROFITS, DOWN TIME OR LOSS OF USE) UNDER ANY LEGAL THEORY, EVEN IF SAP WAS
ADVISED OF THE POSSIBILITY OF SUCH DAMAGES. Some states do not allow the exclusion of implied warranties or the
exclusion or limitation of liability for incidental or consequential damages, or limitations on how long an implied warranty lasts, so
the above limitation or exclusion may not apply to you. This Warranty gives you specific legal rights. You may also have other
rights that vary from state to state. SAP reserves the right to change product design without notice. In situations in which SAP has
changed a product design, SAP shall have no obligation to upgrade or otherwise modify previously manufactured products.
To assure product quality, Smittybilt reserves the right to change product design, material, specification and finishes
without prior notice to customers. This limited warranty gives you specific legal rights and you may also have other
rights, which may vary from state to state. Some states do not allow limitations on how long an implied warranty lasts,
so the above limitations may not apply as to you. Also, some states do not allow the exclusion or limitation of incidental
or consequential damages, so the above limitations or exclusions may not apply to you. Smittybilt reserves the right to
discontinue product lines and substitute products, or provide other remedies than those listed in this limited warranty for
those discontinued products.
instructions, or additional safety information. Smittybilt products, nor the warnings contained herein, are not a substitute
for your safe driving.

WWW.SMITTYBILT.COM
For Technical Support/Warranty Information please call 310-762-9944
Smittybilt, 400 West Artesia Blvd, Compton, CA 90220
Installation Instructions
X2O Winches
Warranty Information Card
First name:
Last name:
Age: Sex:
Marital Status:
Level of Education:
City/Province:
Zip/Postal Code:
Country:
Telephone Number:
Email Address:
Which Smittybilt winch did you purchase?
Model Number:
Date of Purchase:
Where did you purchase this product?
Store or catalog name:
Store Location:
How satisfied were you with the dealer and/or sales staff?
Who installed or will install your Smittybilt product?
Is this the first time you have purchase a winch?
If no, what brand have you brought before?
What type of vehicle will this Smittybilt winch be installed on?
Year: Make: Model:
2WD: 4WD:
What is the vehicles main use?
What other accessories have you purchased for your vehicle?
Please fill out this warranty form and return to Smittybilt at the address below. Note: Keep a copy
of this for yourself.
