SQream Statement Editor Version 2.1.1 Ui Guide
User Manual:
Open the PDF directly: View PDF ![]() .
.
Page Count: 13
SQream Statement Editor Version 2.1.1
SQream Technologies
2019-01-22 | Version 2.1.1
Table of Contents
Overview. . . . . . . . . . . . . . . . . . . . . . . . . . . . . . . . . . . . . . . . . . . . . . . . . . . . . . . . . . . . . . . . . . . . . . . . . . . . . . . . . . . Ê1
1. The SQream Statement Editor. . . . . . . . . . . . . . . . . . . . . . . . . . . . . . . . . . . . . . . . . . . . . . . . . . . . . . . . . . . . . . Ê1
2. Login . . . . . . . . . . . . . . . . . . . . . . . . . . . . . . . . . . . . . . . . . . . . . . . . . . . . . . . . . . . . . . . . . . . . . . . . . . . . . . . . . . . . Ê1
3. The Statement Editor. . . . . . . . . . . . . . . . . . . . . . . . . . . . . . . . . . . . . . . . . . . . . . . . . . . . . . . . . . . . . . . . . . . . . . Ê2
3.1. Toolbar . . . . . . . . . . . . . . . . . . . . . . . . . . . . . . . . . . . . . . . . . . . . . . . . . . . . . . . . . . . . . . . . . . . . . . . . . . . . . . Ê3
3.2. Editor . . . . . . . . . . . . . . . . . . . . . . . . . . . . . . . . . . . . . . . . . . . . . . . . . . . . . . . . . . . . . . . . . . . . . . . . . . . . . . . . Ê4
3.3. Results . . . . . . . . . . . . . . . . . . . . . . . . . . . . . . . . . . . . . . . . . . . . . . . . . . . . . . . . . . . . . . . . . . . . . . . . . . . . . . . Ê4
3.3.1. Sort Results . . . . . . . . . . . . . . . . . . . . . . . . . . . . . . . . . . . . . . . . . . . . . . . . . . . . . . . . . . . . . . . . . . . . . . . Ê4
3.3.2. Show Statistics . . . . . . . . . . . . . . . . . . . . . . . . . . . . . . . . . . . . . . . . . . . . . . . . . . . . . . . . . . . . . . . . . . . . Ê4
3.3.3. Copy Query Results to Clipboard or to a File . . . . . . . . . . . . . . . . . . . . . . . . . . . . . . . . . . . . . . . . . Ê5
3.4. Database Tree . . . . . . . . . . . . . . . . . . . . . . . . . . . . . . . . . . . . . . . . . . . . . . . . . . . . . . . . . . . . . . . . . . . . . . . . Ê5
3.4.1. Database Level. . . . . . . . . . . . . . . . . . . . . . . . . . . . . . . . . . . . . . . . . . . . . . . . . . . . . . . . . . . . . . . . . . . . Ê6
3.4.2. Schema Level . . . . . . . . . . . . . . . . . . . . . . . . . . . . . . . . . . . . . . . . . . . . . . . . . . . . . . . . . . . . . . . . . . . . . Ê6
3.4.3. Table Level . . . . . . . . . . . . . . . . . . . . . . . . . . . . . . . . . . . . . . . . . . . . . . . . . . . . . . . . . . . . . . . . . . . . . . . Ê7
3.4.4. System Views - Catalog. . . . . . . . . . . . . . . . . . . . . . . . . . . . . . . . . . . . . . . . . . . . . . . . . . . . . . . . . . . . . Ê8
3.4.5. System Views - Predefined Queries . . . . . . . . . . . . . . . . . . . . . . . . . . . . . . . . . . . . . . . . . . . . . . . . . Ê8
4. Documentation . . . . . . . . . . . . . . . . . . . . . . . . . . . . . . . . . . . . . . . . . . . . . . . . . . . . . . . . . . . . . . . . . . . . . . . . . . . Ê8
5. Show Locks. . . . . . . . . . . . . . . . . . . . . . . . . . . . . . . . . . . . . . . . . . . . . . . . . . . . . . . . . . . . . . . . . . . . . . . . . . . . . . . Ê9
5.1. Show Locks and Filter . . . . . . . . . . . . . . . . . . . . . . . . . . . . . . . . . . . . . . . . . . . . . . . . . . . . . . . . . . . . . . . . . Ê9
5.2. Release a Lock . . . . . . . . . . . . . . . . . . . . . . . . . . . . . . . . . . . . . . . . . . . . . . . . . . . . . . . . . . . . . . . . . . . . . . . . Ê9
6. DDL Optimizer . . . . . . . . . . . . . . . . . . . . . . . . . . . . . . . . . . . . . . . . . . . . . . . . . . . . . . . . . . . . . . . . . . . . . . . . . . . Ê9
6.1. Select Table and Settings. . . . . . . . . . . . . . . . . . . . . . . . . . . . . . . . . . . . . . . . . . . . . . . . . . . . . . . . . . . . . . Ê10
6.2. Optimizer Results . . . . . . . . . . . . . . . . . . . . . . . . . . . . . . . . . . . . . . . . . . . . . . . . . . . . . . . . . . . . . . . . . . . . Ê10
7. Allow Desktop Notification . . . . . . . . . . . . . . . . . . . . . . . . . . . . . . . . . . . . . . . . . . . . . . . . . . . . . . . . . . . . . . . Ê11
Copyright . . . . . . . . . . . . . . . . . . . . . . . . . . . . . . . . . . . . . . . . . . . . . . . . . . . . . . . . . . . . . . . . . . . . . . . . . . . . . . . Ê11

Overview
This guide describes the functionality and benefits of the SQream Statement Editor, and is designed
for data analysts working with the SQream database.
1. The SQream Statement Editor
The SQream Statement Editor is a database administration tool and easy-to-use client application
for the SQream database. It allows data analysts to create and update database objects, such as
databases, schemas, tables and views. In addition they can ingest data into the tables and then
retrieve data by standard SQL queries.
Please note that all database related actions are permission-driven and users must have the
appropriate roles to perform their activities in the SQream Statement Editor.
SQream Statement Editor is a web-application and currently supports the Chrome browser only.
2. Login
Open your browser and navigate to the URL of your SQream Statement Editor.
This is your login screen:
1
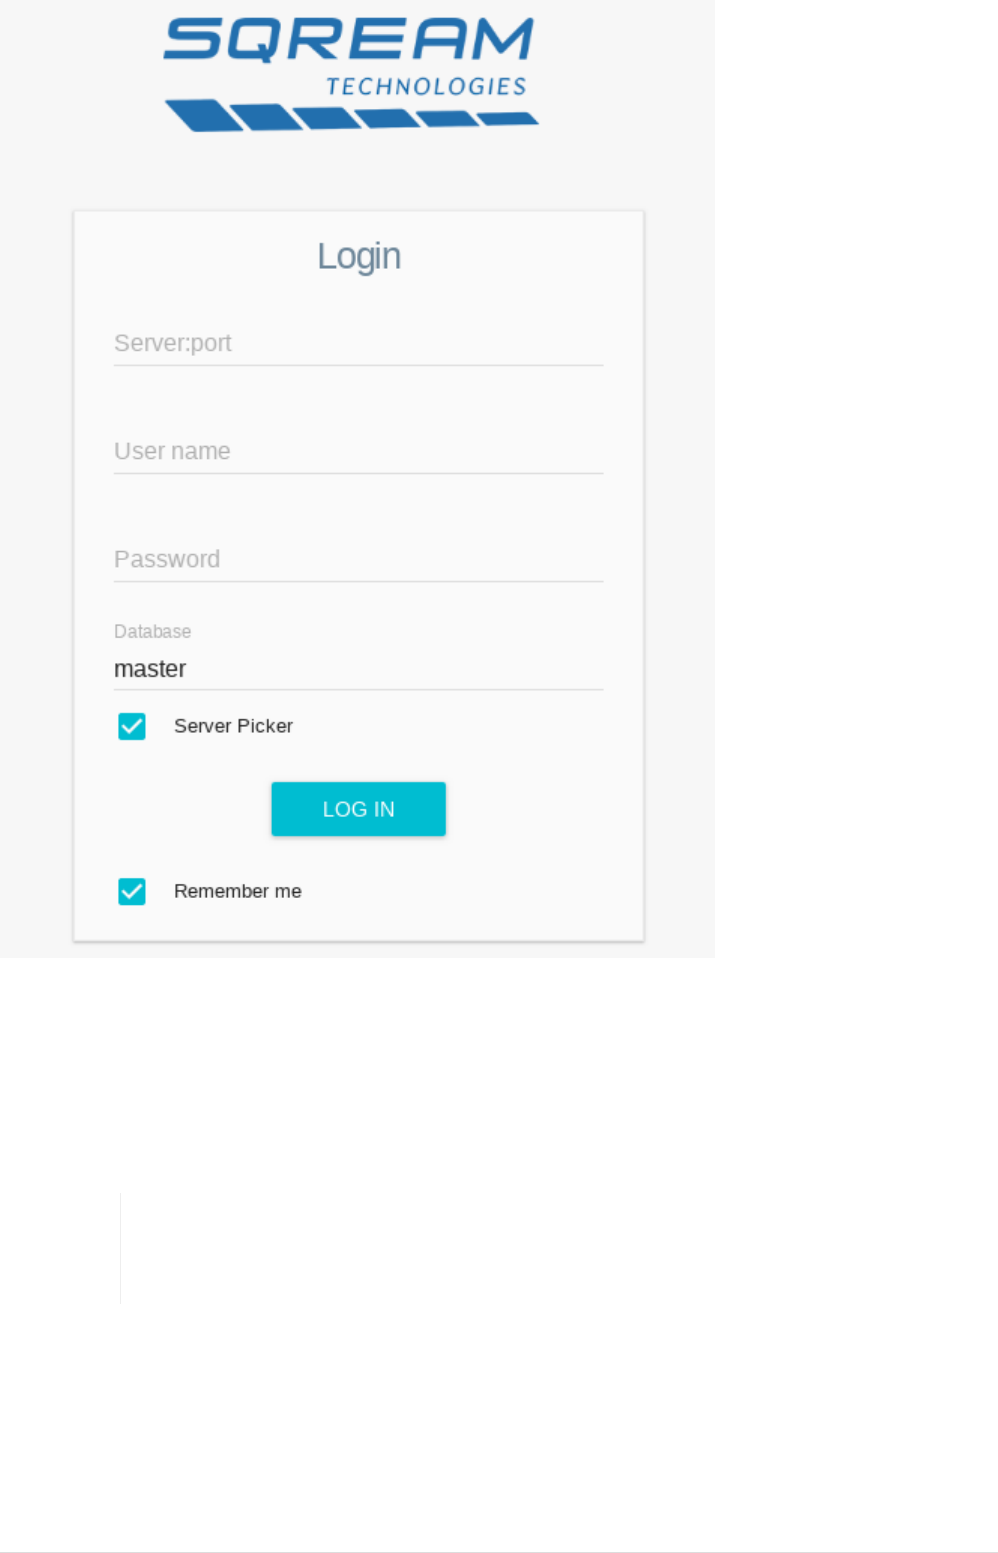
Figure 1. Login Screen
Log in with your SQream DB credentials, including server IP and port, username and respective
password, and database name. It is recommended to connect to the Load Balancer (Server Picker)
of the SQream database. Check the respective check box. Then click LOG IN.
If this is your first connection, the master database is your default database.
For AWS cloud users, the default credentials are:
Username: sqream
Password: <Your EC2 Instance ID>.
3. The Statement Editor
The Statement Editor contains the following panes:
•Toolbar - Use the Toolbar at the top to select the database you want to work on, use RUN to
2
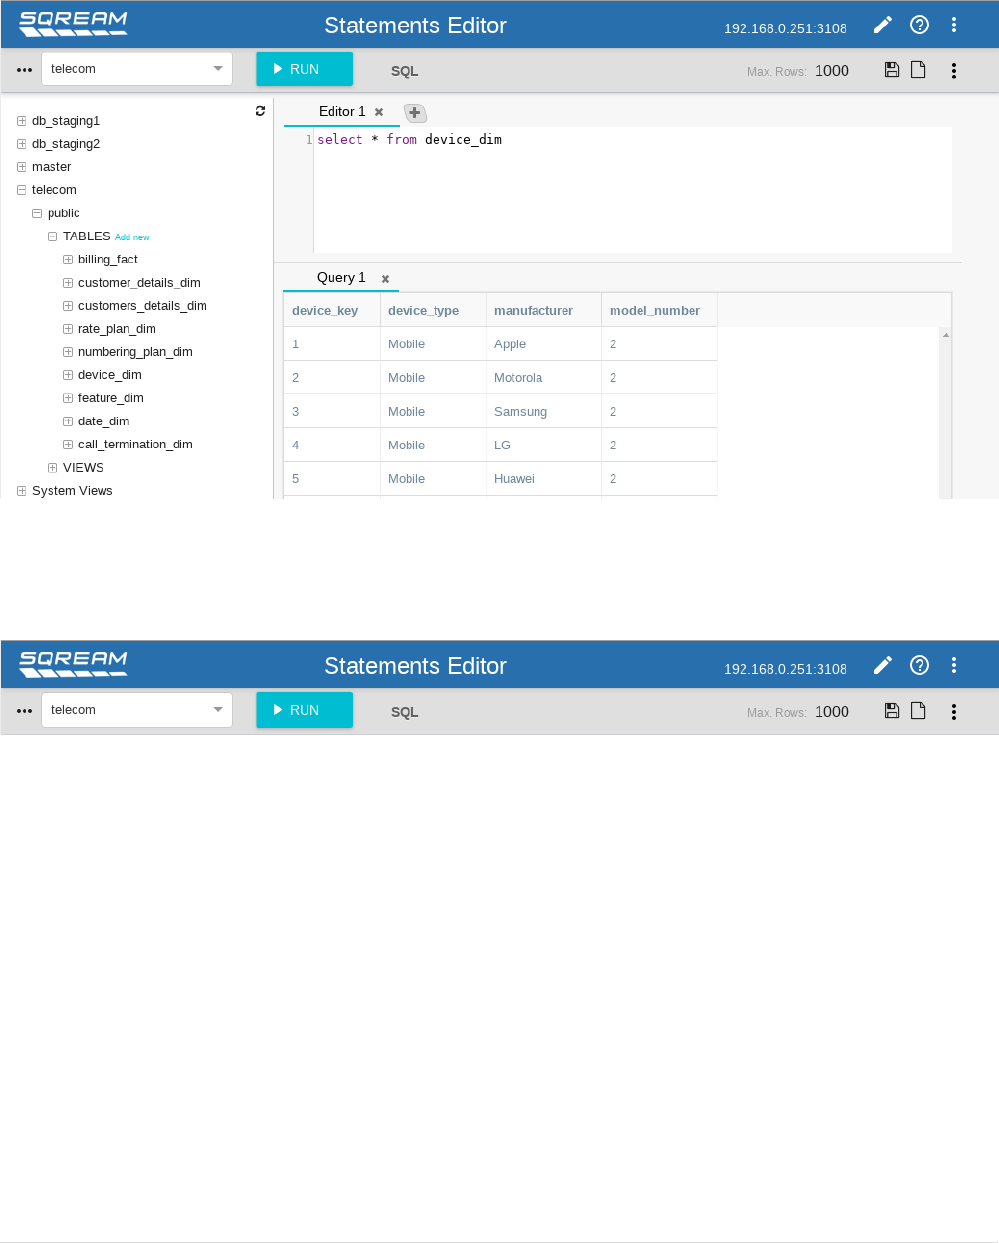
execute a statement.
•Database Tree - Use the left Database Tree pane to view and manage all of the objects in one or
more databases. For example, add or drop a table.
•Editor - In the Editor pane you write your statements. The Editor supports multiple tabs,
whereas each tab can point to a different database.
•Results - Shows the results of the queries. Any time you run a query, the Results pane opens a
new tab with updated query results. This allows you to view ad-hoc results in addition to
queries you ran previously in the system.
Figure 2. Statements Editor
3.1. Toolbar
Features of the toolbar:
•Toggle Database Tree - Click … to show or hide the Database Tree pane.
•Database - Select the database you want to work on from the dropdown list.
•Run/Stop - Use the RUN button to execute the query in the Editor pane. Use same button to stop
the query.
•SQL - Use the SQL link to format your database query into a well-formatted script.
•Max. Rows - By default the system limits the result set to 1000 rows. You can change this if
required.
•Save - Save the query in the editor as a text file to your local computer.
•Load - Load a query from a text file on your local computer.
3

•Append new results - When checked, every query execution will open a new Results tab. If not
checked the Results tab is replaced and overwritten.
3.2. Editor
After you selected the database in the toolbar, you can start writing your query in the Editor pane.
To execute the query click RUN in the toolbar.
Typically you open multiple Editor tabs to seperate your queries. Each Editor tab can run a query
on a different database.
You can have multiple queries in one Editor pane, then highlight one query only and execute it.
The Editor supports several keyboard shortcuts:
•Ctrl+Enter - Execute the query in your Editor pane, or exeucte the highlighted part of your
query in your Editor pane.
•Ctrl+Space - Auto-complete feature.
•Ctrl+Up - Switch to next Editor tab.
•Ctrl+Down - Switch to previous Editor tab.
For the complete list of supported SQL statements and respective commands
please refer to the SQream SQL Reference Guide under the "Data Definition
Language".
3.3. Results
The Results pane shows the query results and the execution time for the query. If an error occured,
a red error message appears.
Additional functionality: Right mouse click the query results tab, allows you to rename the results
query tab name, show the SQL query, reload the results, close the current results tab or all result
tabs.
Remember, the number of returned rows is limited by default to 1000 rows.
Change it if necessary.
3.3.1. Sort Results
Once the query results appear in the Results pane, you can sort them ascending or descending by
single click on the column name.
3.3.2. Show Statistics
4
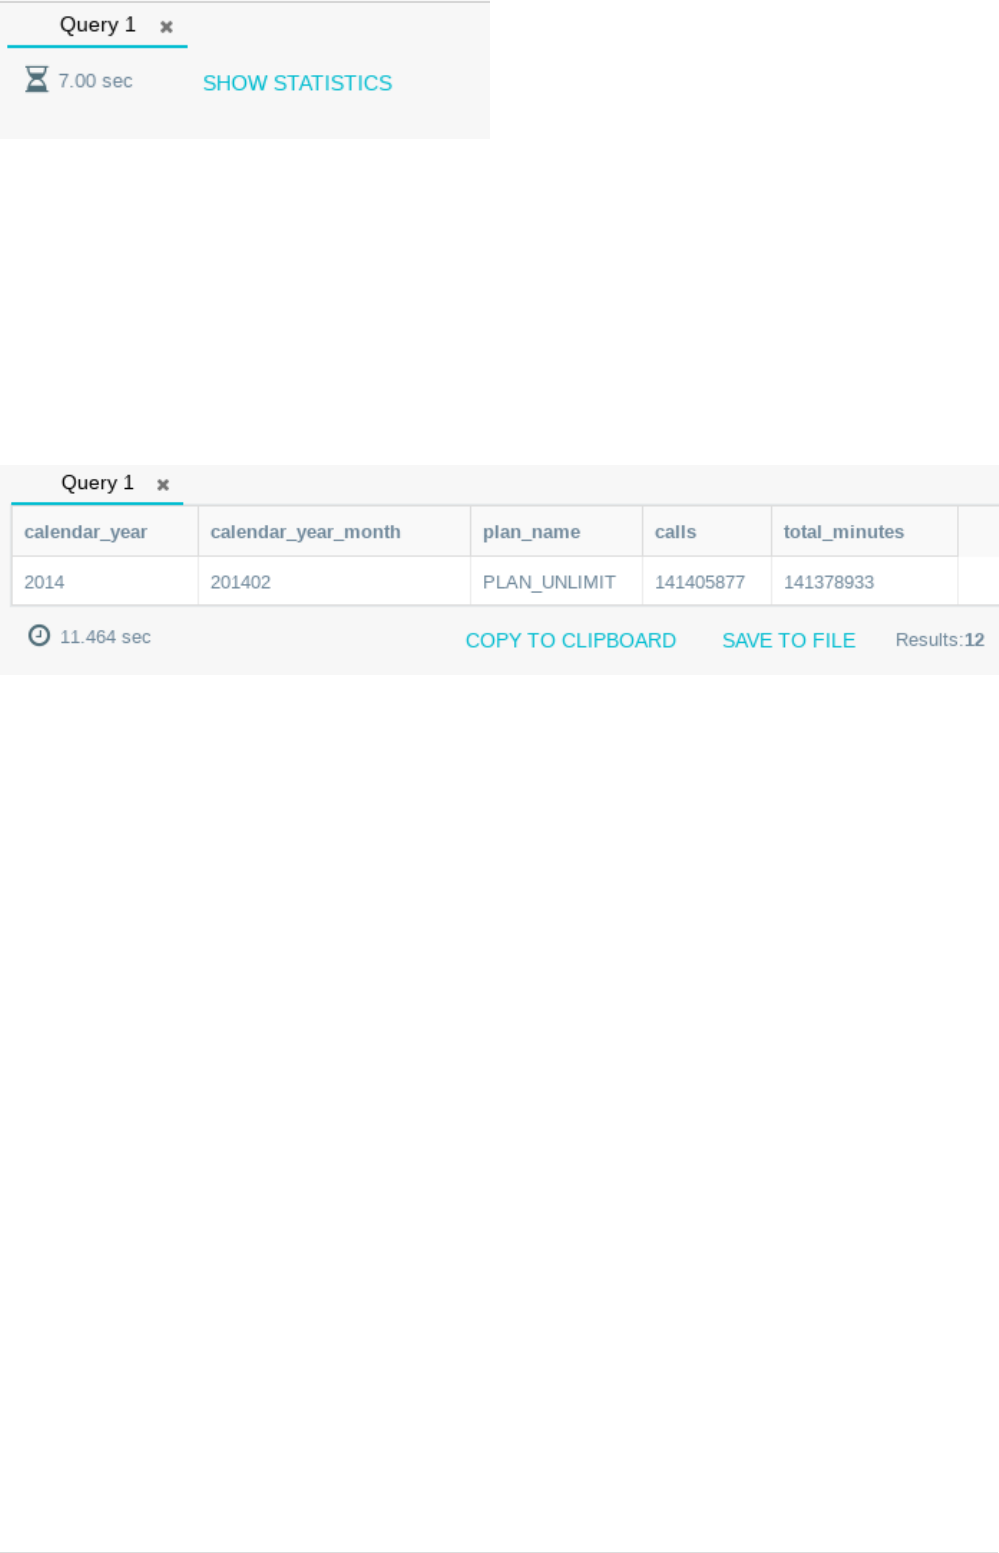
While the query executes, you can see the progress in the Results pane: Hour glass and number of
seconds.
Click the SHOW STATISTICS link to review the query statistics, such as the query’s execution plan
and performance metrics during execution. This feature is an advanced monitoring tool. It is
typically used when you encounter performance issues and you want to send more information to
the SQream support team.
3.3.3. Copy Query Results to Clipboard or to a File
Query results can be saved to the clipboard or a local file. Use the COPY TO CLIPBOARD link or
SAVE TO FILE link to save the results in CSV format to either clipboard or local file.
3.4. Database Tree
5
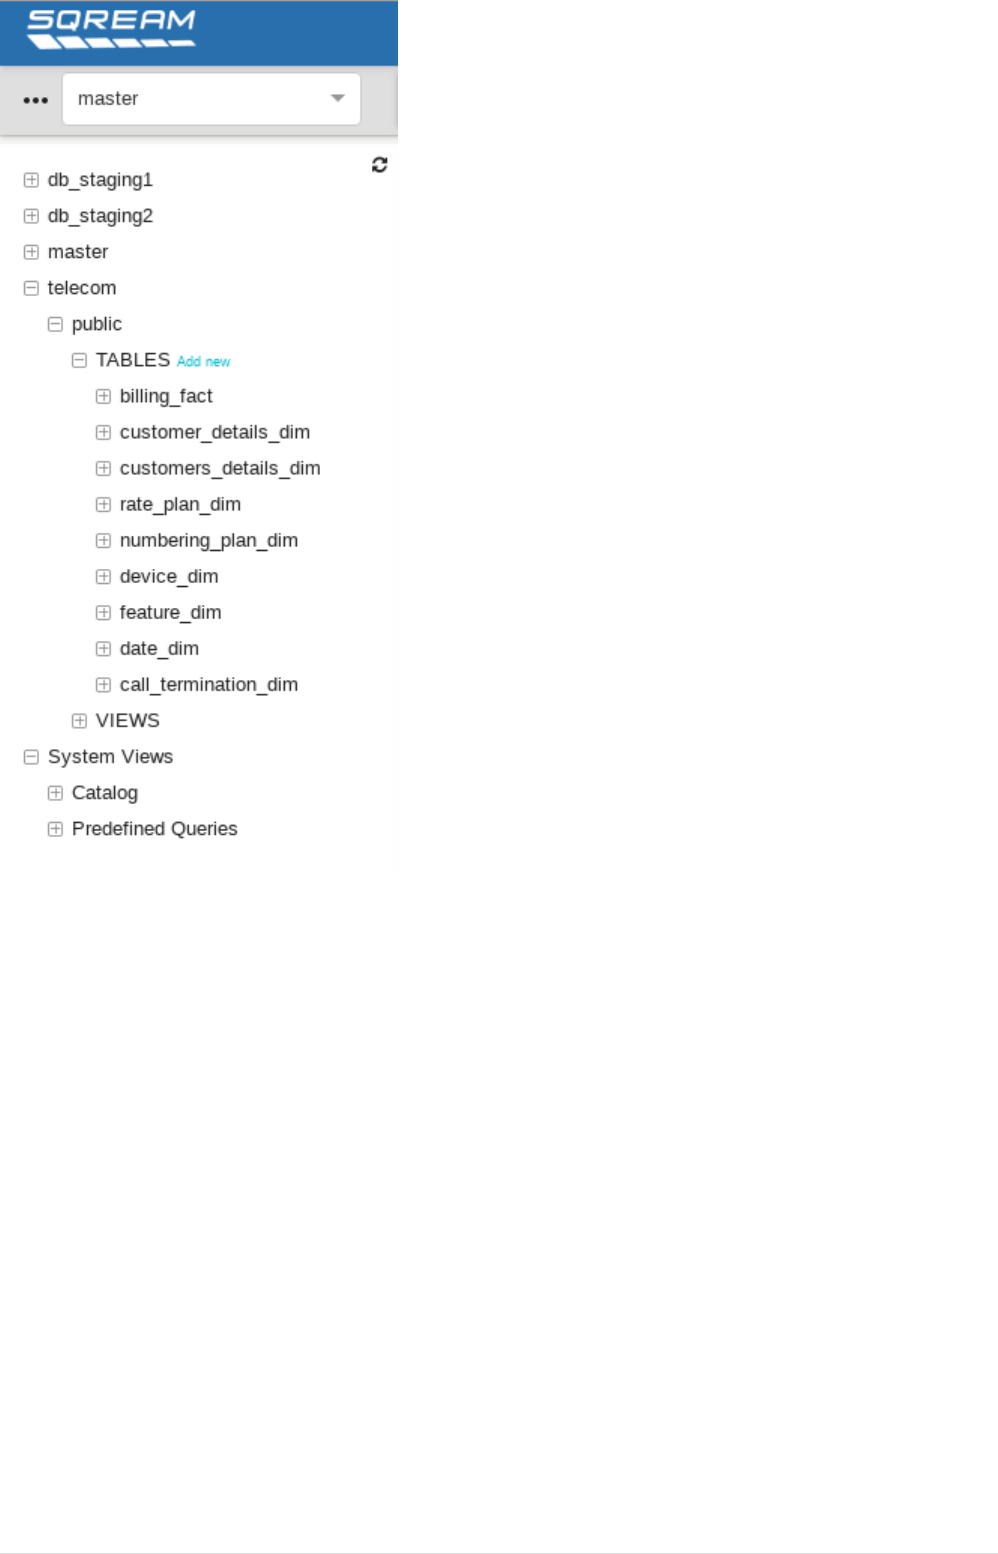
Figure 3. Database Tree
The Database Tree pane shows the various databases and database objects, such as tables and
views. In addition it allows you to view metadata information and run pre-defined queries for
statistics.
Using the Database Tree pane you can create new tables, rename the table, truncate or drop a table.
You can create DDL scripts for a single table or all tables of a database.
3.4.1. Database Level
Right mouse click on the database name, allows you to copy the DDL script to create all tables of
this database to the clipboard.
3.4.2. Schema Level
Right mouse click on the schema name, allows you to copy the script to drop this schema to the
clipboard.
6

3.4.3. Table Level
Right mouse click on the table name offers the following actions. All of them (except Show row
count) create a database script to be copied to the clipboard. You can use these scripts in the editor
or save them to a file.
•Get DDL: Creates a database script to create this table
•Show row count, equivalent to "select count (*) from table"
•SELECT to clipboard
•INSERT to clipboard
•DELETE to clipboard
•Rename table
•Create table LIKE
•Add column
•Truncate table
•Drop table
Create a new table
Add a new table by running a statement, or alternatively use the Add new link. The Create a new
table diaglog opens. Fill out the required information and click EXEC.
Figure 4. Create a new Table
7
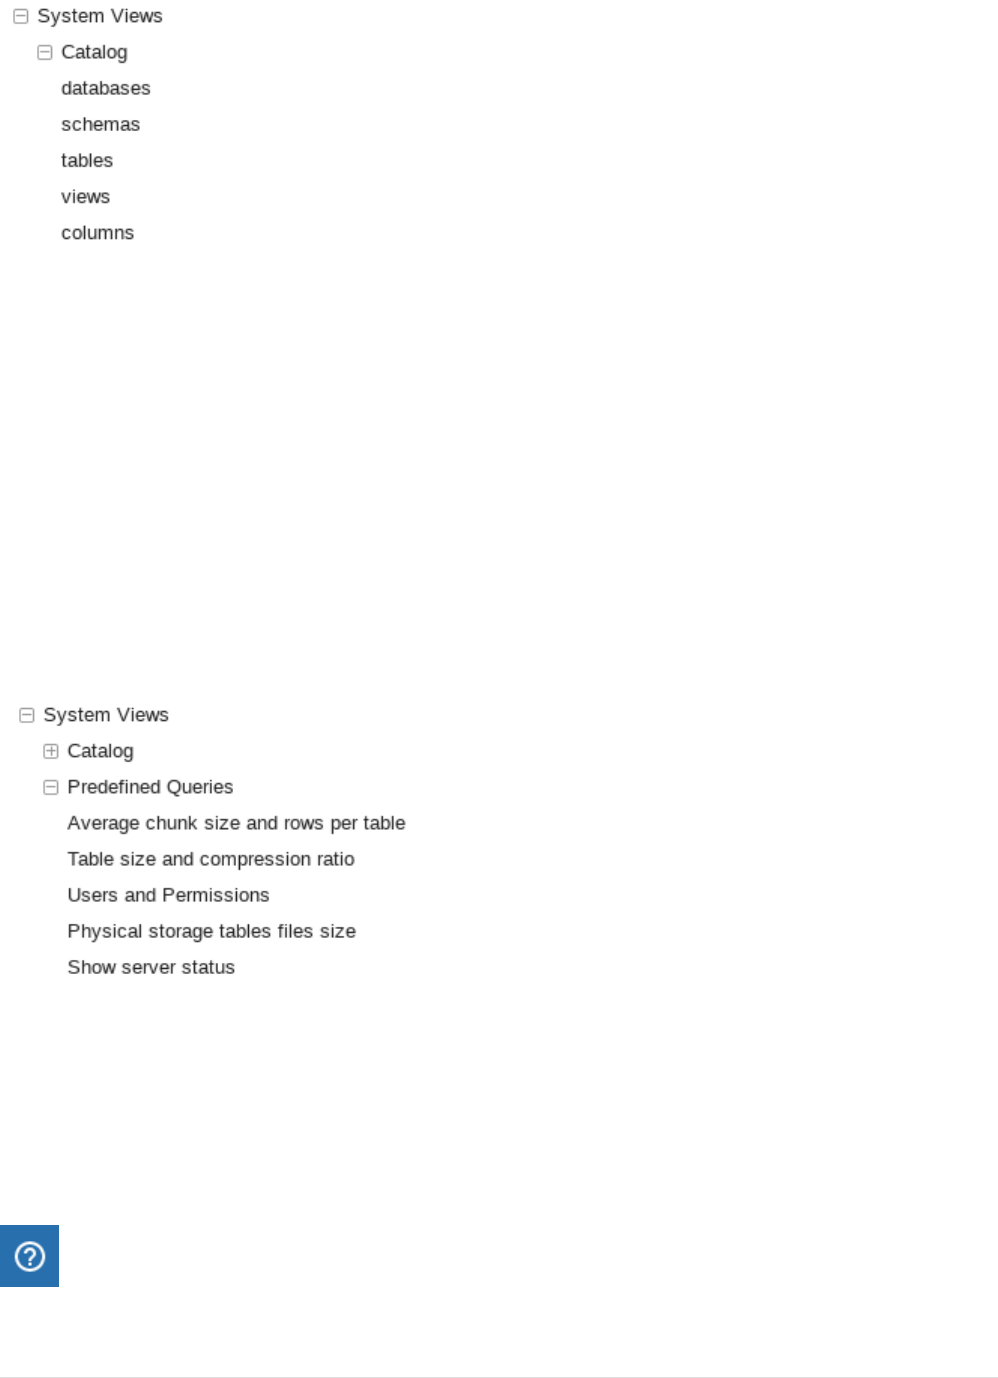
3.4.4. System Views - Catalog
The SQream Database catalog or information schema consists of views that contain information
about all database objects. This provides access to database metadata, column types, tables and
their row-counts, etc.
To retrieve information from the catalog views click the catalog view name in the left pane, for
example databases. The Editor then populates the relevant database query and runs it. Review the
results in the results pane.
For the full list of available catalog views, their description and usage please refer to the SQream
SQL Reference Guide under the "Catalog (information schema)".
3.4.5. System Views - Predefined Queries
The predefined queries allow you to retrieve performance related information using predefined
queries on the catalog views. This information is typically used by support team members or
advanced DBAs to analyze database internal data, such as chunk size, compression rate or physical
size of a specific table.
To run a predefined query click the query name in the left pane, for example Average chunk size
and rows per table. The Editor then populates the relevant database query and runs it. Review the
results in the results pane.
4. Documentation
8
Use the documentation icon at your top right corner to open the list of available SQream support
documentation.
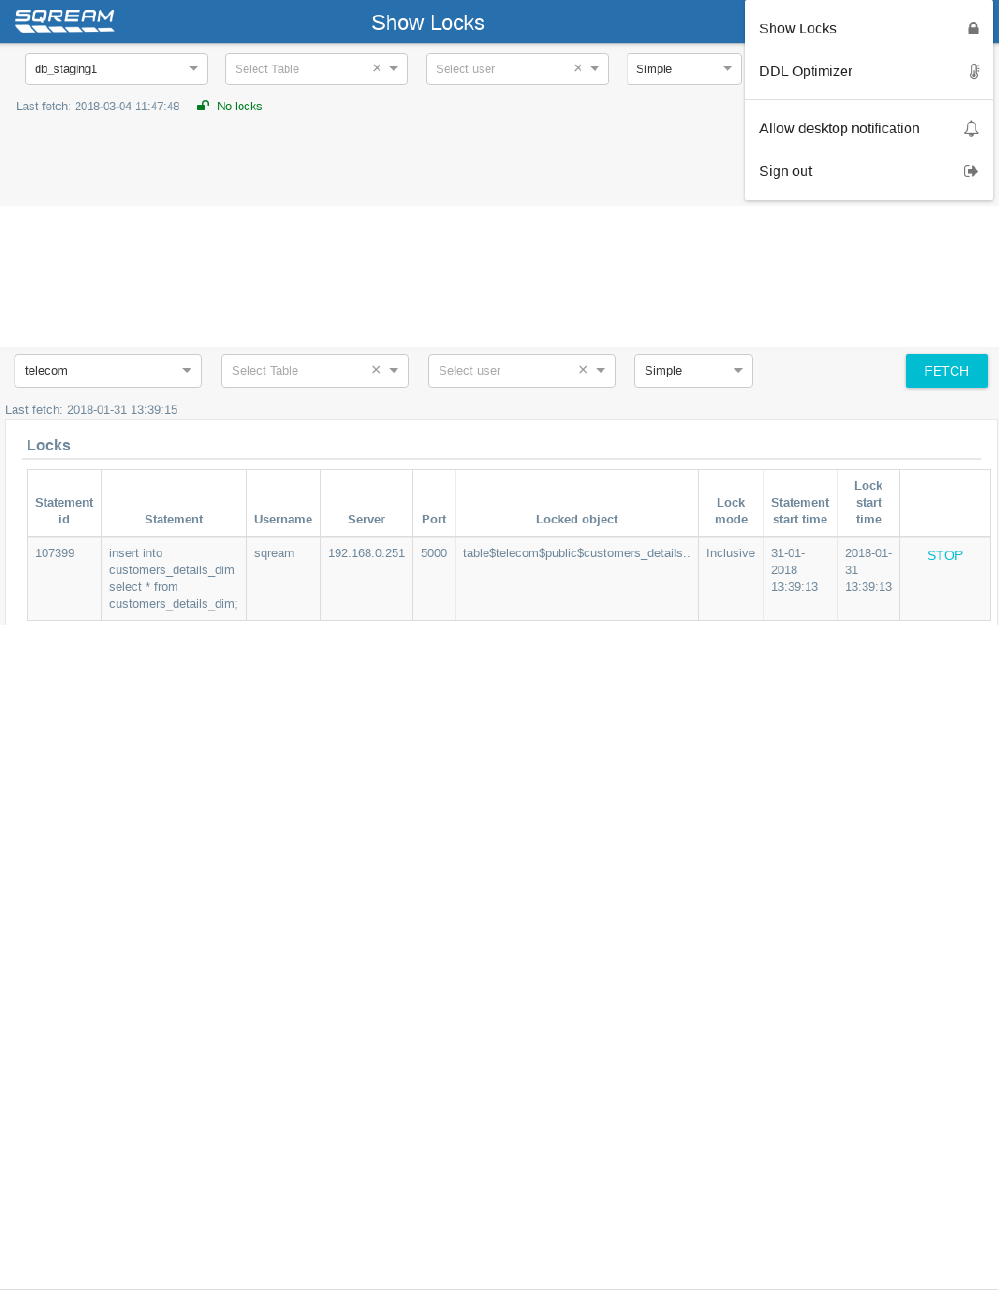
5. Show Locks
The Show Locks module allows you to review database locks that currently occur in your system,
also referred to as active locks. If required you can release a lock by stopping the statement.
Figure 5. Show Locks
5.1. Show Locks and Filter
•Show Locks - Select a specific database from the dropdown list and click FETCH.
•Filter - Use additional filter conditions per table and/or user to filter for specific locks.
5.2. Release a Lock
To release a lock you can stop a query statement by using the STOP link at the statement line.
6. DDL Optimizer
The DDL Optimizer module allows you to analyze your database tables and recommend possible
optimization:
•For varchar fields, it checks the actual data and may recommend a smaller size. For example,
VARCHAR(25) instead of VARCHAR(100).
•For all fields that allow NULL, it checks whether the column actually contains NULL values. If
not, it recommends to change the field to NOT allow NULL. .
9
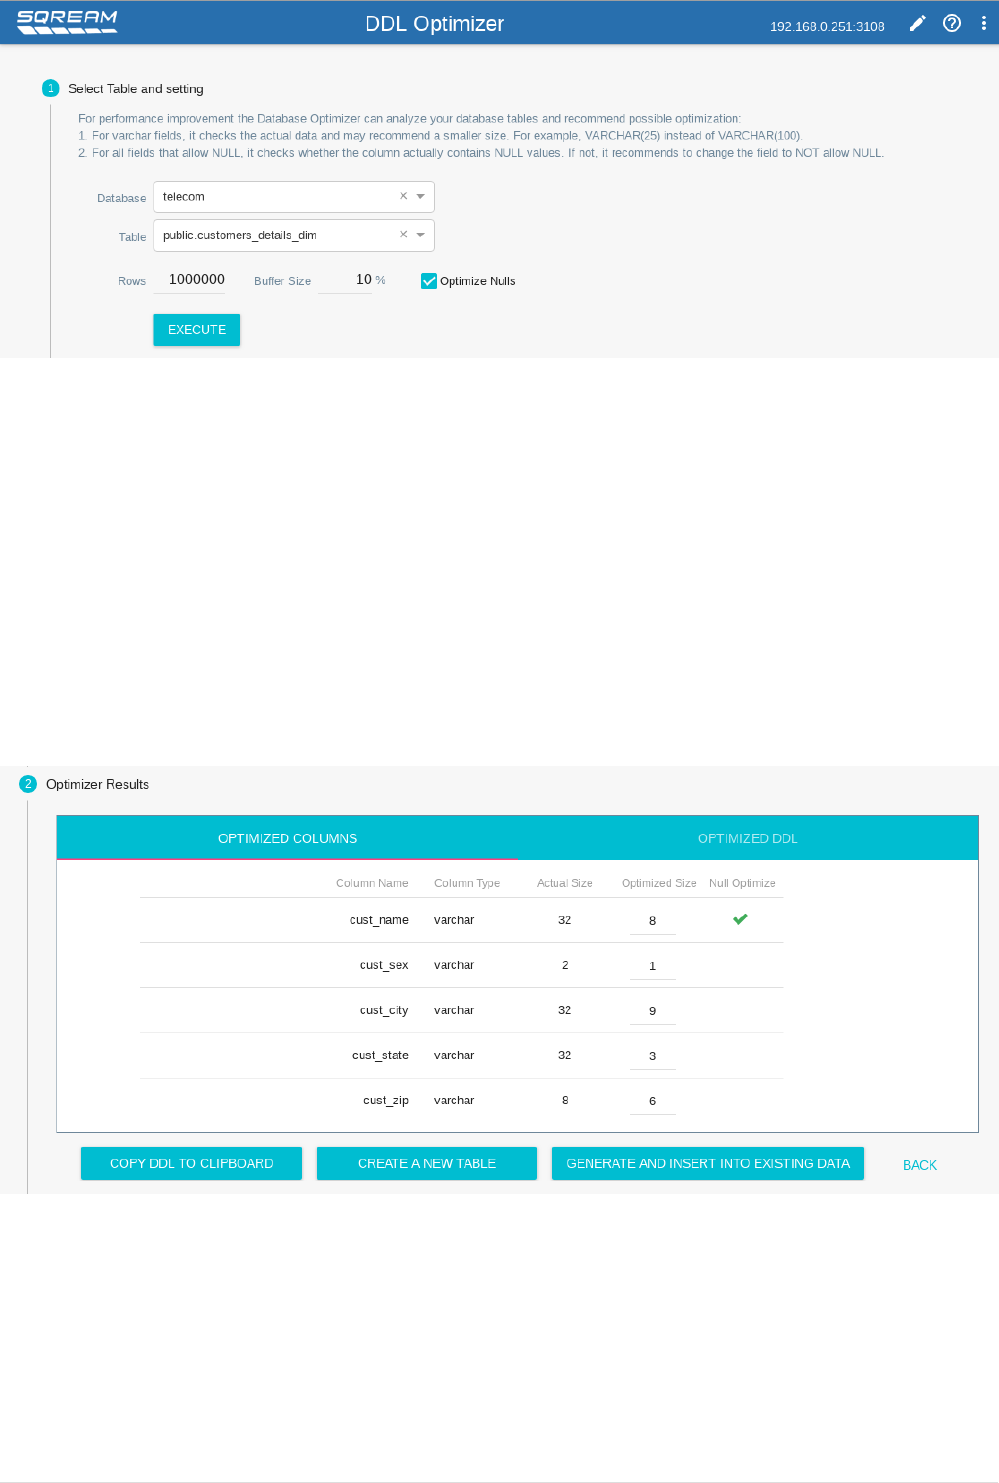
6.1. Select Table and Settings
•From the dropdown box select the database and respective table.
•Rows: The number of rows in the table to run the optimization process on. 1,000,000 is the
default.
•Buffer Size: For VARCHAR optimization the system checks the actual data length of the field and
adds a buffer to the recommendation. 10% is the default.
•Optimize NULLs: Select this checkbox to activate the optimization for fields that allow NULL.
Click EXECUTE to start the optimization process.
6.2. Optimizer Results
In the OPTIMIZED COLUMNS tab you can review the system recommendation to (1) decrease the
length of VARCHAR fields or (2) remove the allow NULL option. In the OPTIMIZED DDL tab you can
review the DDL statement to create the recommended table.
•COPY DDL TO CLIPBOARD - Copies the DDL statement to create the recommended table to the
clipboard
•CREATE A NEW TABLE - Creates a new table in same database and schema as the original
10
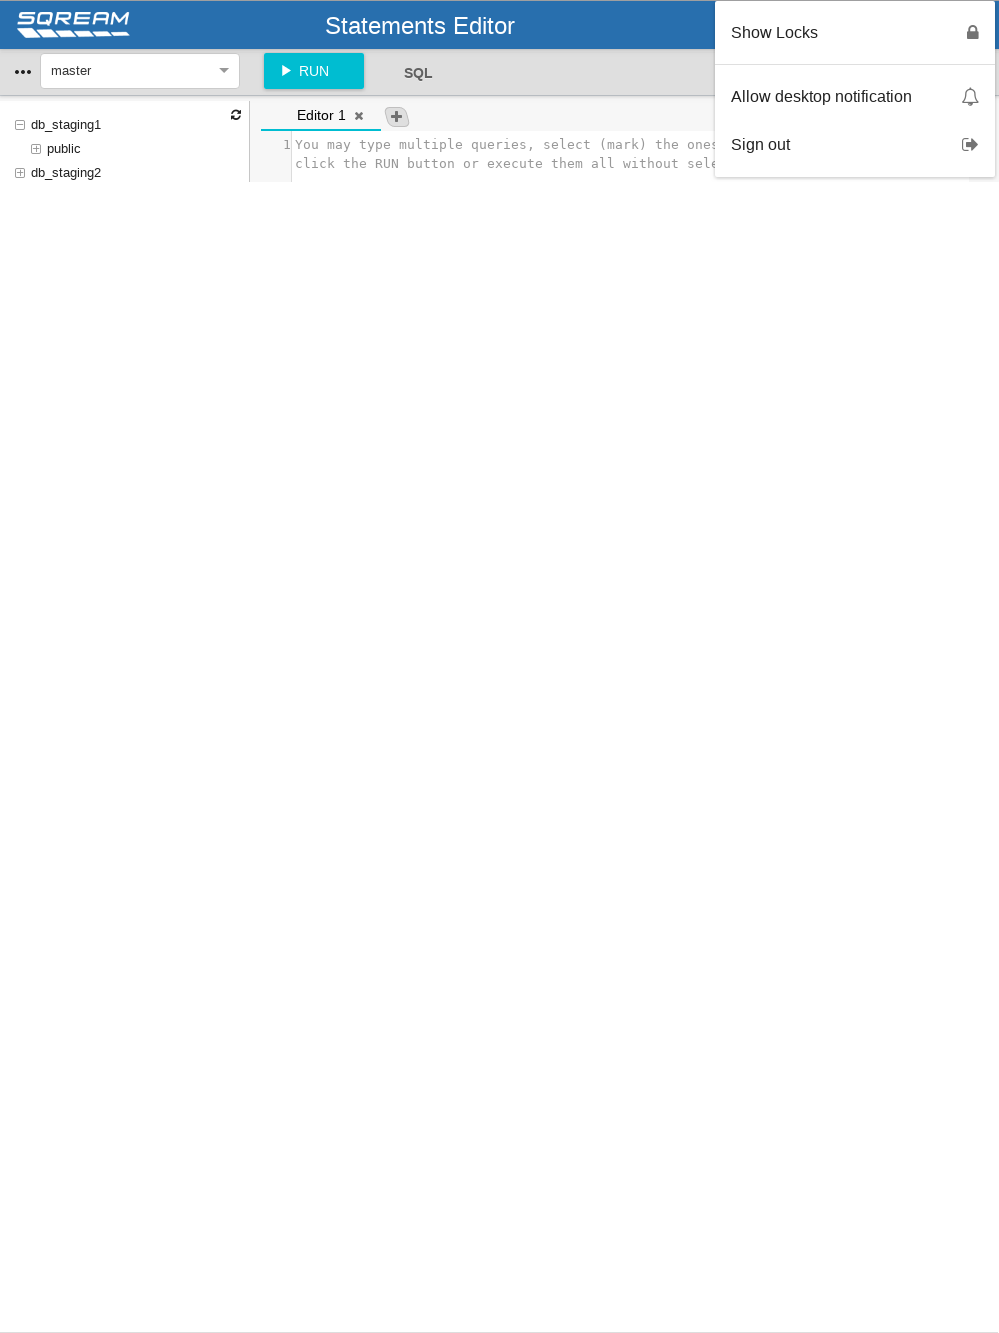
table. New table name = [table_name]_new. No data is populated to the new table.
•CREATE AND INSERT INTO EXISTING DATA - Create a new table in same database and
schema as the original table and populates the data.
7. Allow Desktop Notification
Figure 6. Allow Desktop Notification
While a long query is executing you might want to get notified once the query has finished. This
allows you to switch to another browser tab or another application, and get a notification to your
desktop when the query is over.
Enable the desktop notification through the Allow Desktop Notification from your top right menu
options.
Copyright
Copyright © 2010-2019. All rights reserved.
This document is provided for information purposes only and the contents hereof are subject to
change without notice. This document is not warranted to be error-free, nor subject to any other
warranties or conditions, whether expressed orally or implied in law, including implied warranties
and conditions of merchant- ability or fitness for a particular purpose.
We specifically disclaim any liability with respect to this document and no contractual obligations
are formed either directly or indirectly by this document.
This document may not be reproduced in any form, for any purpose, without our prior written
permission.
11
