Temoa Install Instructions
User Manual:
Open the PDF directly: View PDF ![]() .
.
Page Count: 7

Getting TEMOA running with CPLEX and SQLite
By Jeff Bennett, jab6ft@virginia.edu, 9/8/2017
The purpose of this document is to formally record how to get TEMOA running with CPLEX and SQLite so
that it can be quickly transferred to another machine. The steps are based on
http://www.temoaproject.org/download/ and Joseph Saylor’s readMe file with elaborated steps to
make it more straightforward for a user with little or no python experience. These steps were developed
for a Windows machine.
Notes: anything in italics are code segments; skip installation of any software already present on the
machine
1. Install Git
a. Purpose: Version control software
i. https://www.slideshare.net/HubSpot/git-101-git-and-github-for-beginners
ii. http://product.hubspot.com/blog/git-and-github-tutorial-for-beginners
b. Download latest version from https://git-scm.com/
c. Installation instructions
i. Select the second option "Use Git from the Windows Comand Prompt" to
ensure git is added to your computer's path
ii. Select "Use the OpenSSL library"
iii. Select “Checkout Windows-style, commit Unix-style line endings”
iv. Select “Use Windows’ default console window”
v. Leave configuration options as-is
vi. Finish installing.
2. Install Anaconda2 for Python 2.7
a. Purpose: Distribution of the Python language and common libraries
b. Download the latest version of Anaconda2 for Python version 2.7
https://www.anaconda.com/download/
c. Install using default settings
3. Install Pyomo
a. Purpose: Library from Sandia National Labs for optimization modeling
b. Installation steps:
i. Start Anaconda2 terminal (Programs>Anaconda2>Anaconda Prompt)
ii. Verify version of Python
python --version
1. If Python 2.7.X does not appear, then troubleshooting is necessary
iii. Install Pyomo
pip install pyomo
pip install pyomo.extras
Note: If errors – may need to first install MS Visual C++ Compiler for
Python https://www.microsoft.com/en-
us/download/details.aspx?id=44266
iv. Exit Anaconda
exit

4. Install CPLEX
a. Purpose: Powerful linear optimization solver
b. Navigate to CPLEX website
https://www.ibm.com/developerworks/community/blogs/jfp/entry/CPLEX_Is_Free_For
_Students?lang=en
c. Select the appropriate link either a) Students or b)Teachers, researchers and university
staff
d. Follow the steps to create an account using your institutional email address (i.e.
abc123@virgina.edu) and download CPLEX
e. Install using default settings
5. Install DB Browser for SQLite
a. Purpose: Viewer for SQLite files
b. Download the latest version http://sqlitebrowser.org/
c. Install with default settings
6. Install TEMOA
a. Select the directory where TEMOA will be installed and record the pathname, i.e. “C:\”
b. Decide what name to give the folder with temoa files, “temoa” is recommended and is
used below
c. Start Windows command prompt terminal (Start, type cmd, hit enter)
d. Navigate to the path
cd pathname
e. Clone git (copies all of TEMOA’s files from the repository)
git clone https://github.com/TemoaProject/temoa/
7. Install GLPK
a. Purpose: Required to prepare input files for CPLEX
b. Download the latest version: https://www.gnu.org/software/glpk/ or for Windows:
https://sourceforge.net/projects/winglpk/
c. Unzip and copy files to location of your choice
d. Record directory to w32 folder (for 32 bit OS) or w64 folder (for 64 bit OS)
e. Add directory to path
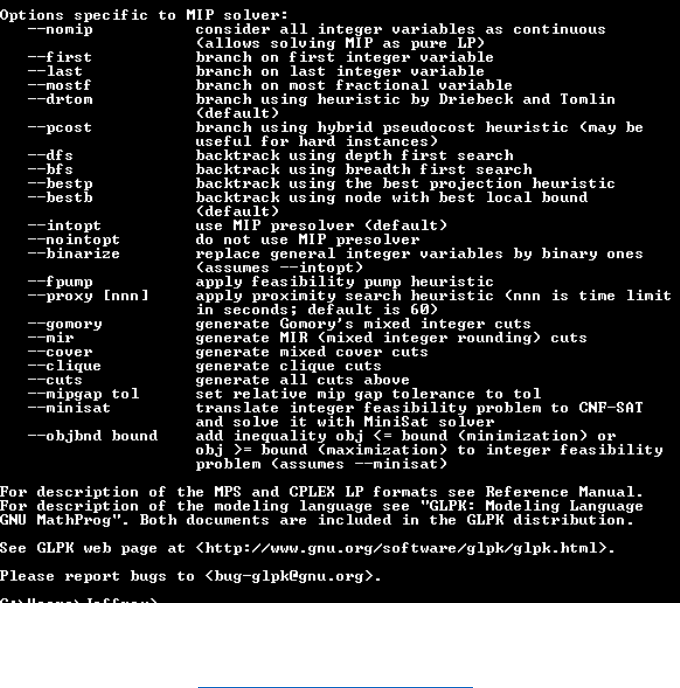
f. Test glpsol works
i. Start windows command prompt (Start, type “cmd”, enter)
glpsol --help
ii. Output should resemble this:
8. Optional: Install Notepad++
a. Purpose: Text editor with increased abilities for searching and highlighting code syntax
b. Download latest version from https://notepad-plus-plus.org/
c. Install using default settings
d. It is recommended to make this the default program for opening *.txt files
9. Create test cases
a. Navigate to the directory “temoa_model” in the directory where TEMOA is installed
b. Open config_sample
c. Save As a new file (if using Notepad++)
i. File name: “config_sample_cplex”
ii. Save as type: “All Types(*.*)”
d. Confirm the below lines are set as follows
i. Line 11: --input=db_io/temoa_utopia.sqlite
ii. Line 15: --output=db_io/temoa_utopia.sqlite
e. Update the code as follows
i. Line 19: --scenario=test_run_cplex
ii. Line 35: --solver=CPLEX # Optional, indicate the solver
f. Save
g. Save As a new file (if using Notepad++)
i. File name: “config_sample_glpk”
h. Update the code as follows
i. Line 19: --scenario=test_run_glpk
ii. Line 35: --solver=GLPK # Optional, indicate the solver
10. Run test case
a. Start Anaconda2 terminal (Programs>Anaconda2>Anaconda Prompt)
b. Verify version of Python
python --version
i. If Python 2.7.X does not appear, then troubleshooting is necessary
c. Change directory to the location of temoa (shown as “C:\temoa”)
cd C:\temoa
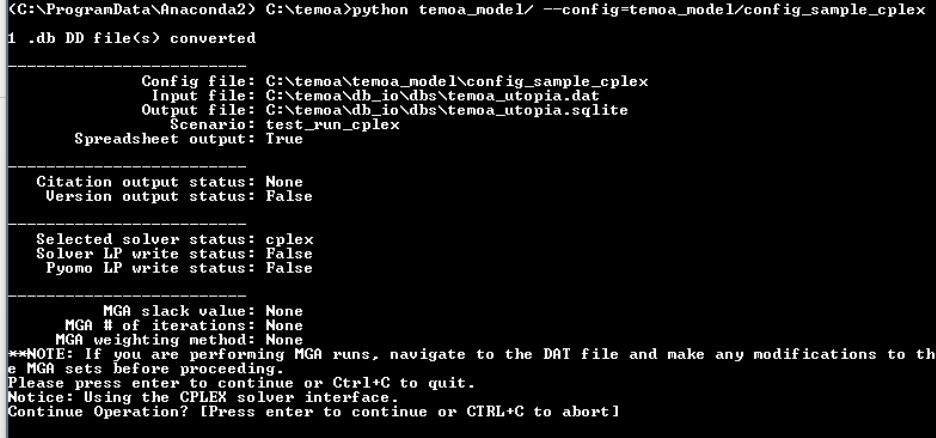
d. Run test case 1
python temoa_model/ --config=temoa_model/config_sample_cplex
e. Expected Results
After submitting command:
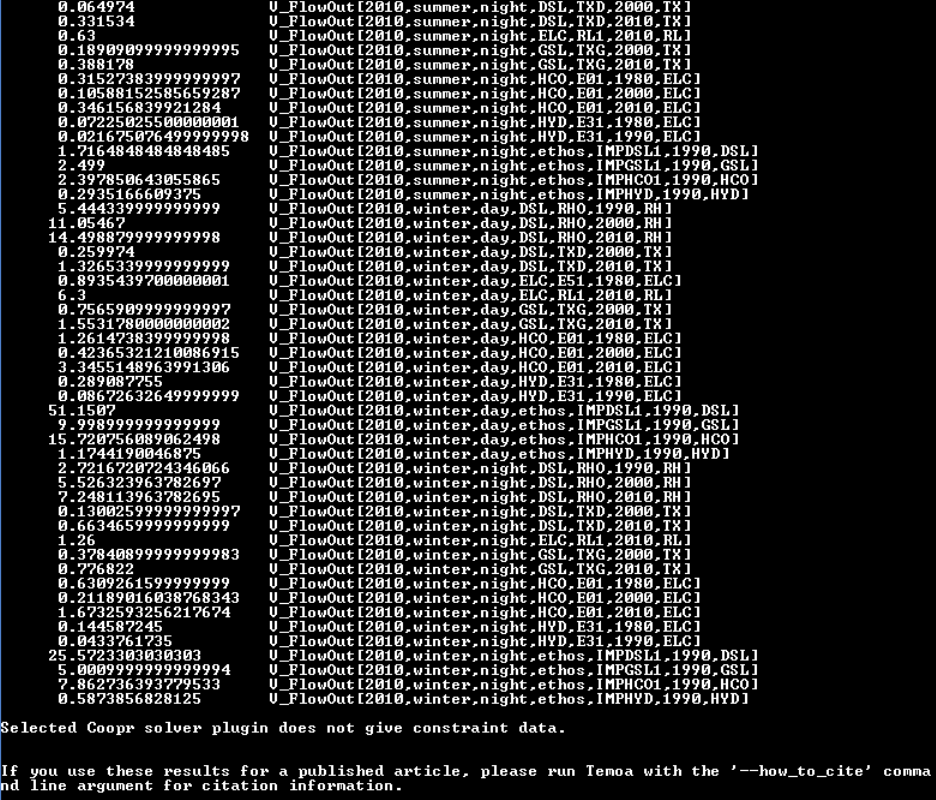
After hitting enter to continue:
f. Run test case 2
python temoa_model/ --config=temoa_model/config_sample_glpk
g. Expected Results
After submitting command:
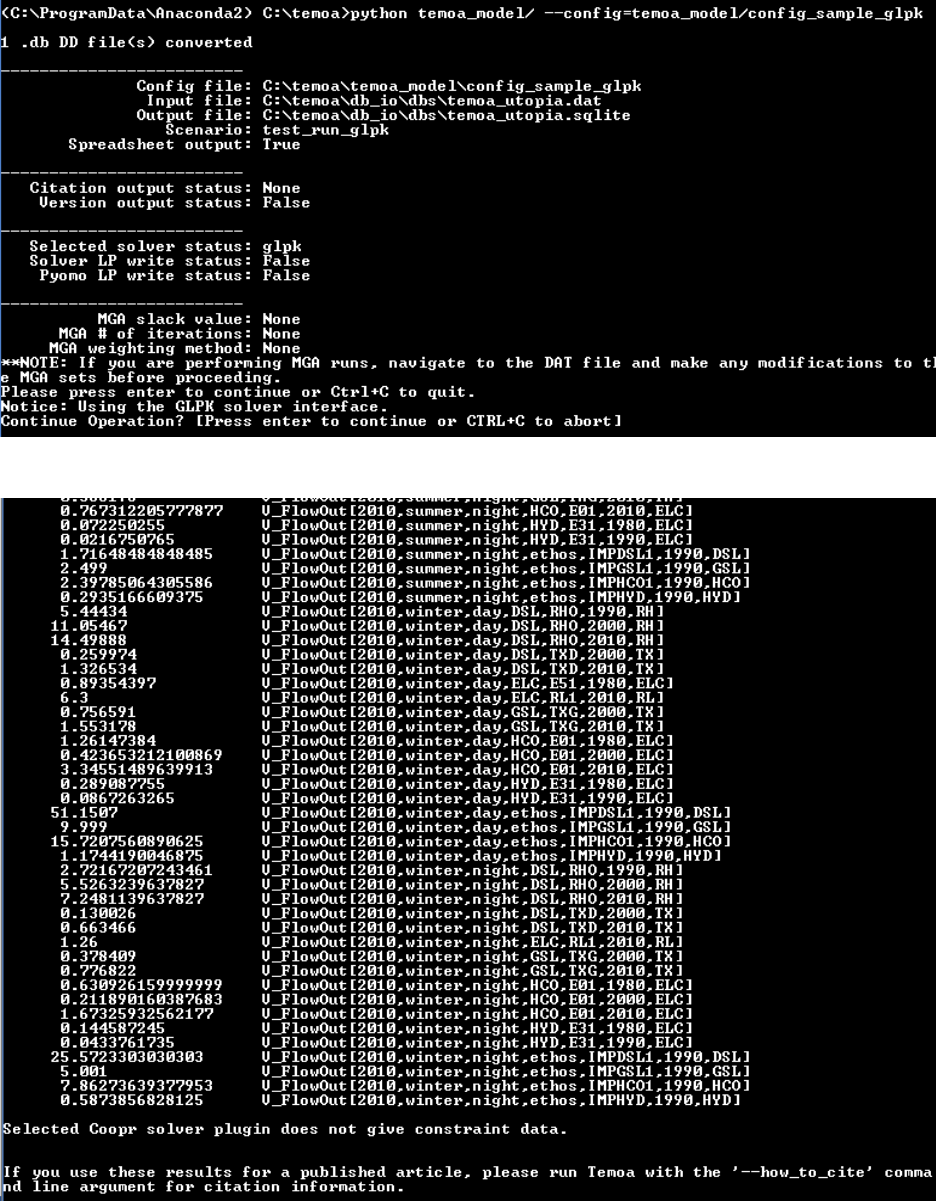
After hitting enter to continue:
h. Exit Anaconda
Exit

Addendum – Background on TEMOA
DeCarolis, J., Hunter, K., Sreepathi, S., “The TEMOA Project: Tools for Energy Model
Optimization and Analysis,” International Energy Workshop 2010, 21-23 June 2010, Stockholm,
Sweden.
Hunter, K., Sreepathi, S., DeCarolis, J., “Modeling for insight using Tools for Energy Model
Optimization Analysis (Temoa)”, Journal of Energy Economics, 40 (2013), 339-349.
Addendum – Background on creating TEMOA configuration files
• Example located in temoa_model\config_sample
• Config files can have any file extension, .txt makes it easy to read in
• There are a number of flags that you need to specify (mandatory and optional)
• first two are source of input and source of output: where to direct
• if running from database, input and output will be there same
• there will be a set of database tables that contain input data that you specify for your energy system
• blank tables will contain output data
a. two different flags to specify text file as input and database as output if wanted
• name the scenario: model stores results in output tables and indexes by scenario name so results
get aggregated an you can query by name of scenario (mandatory)
• need to specify path to db_io folder (database input/output) for necessary files and scripts
• optional files:
a. save excel: saves output to excel workbook where each sheet contains different sets of data,
dividing by sectors with each sector having a different sheet for activity and capacity
b. save text file: saves log of information from shell
c. solver: specify solver if needed
d. keep pyomo lp file: lp file gets generated by pyomo and set to solver to solve – helps with
debugging
e. modeling to generate alternatives: for uncertainty analysis
i. if choosing to run modeling to generate alternatives (mga): need to specify slack file,
iteration number, how many mga iterations you want to
generate, and the method by which you want to update the objective function:
either integer or normalized weighting
