The Definitive Guide To HTML5 WebSocket
User Manual:
Open the PDF directly: View PDF ![]() .
.
Page Count: 200 [warning: Documents this large are best viewed by clicking the View PDF Link!]
- The Definitive Guide to HTML5 WebSocket
- Contents at a Glance
- Contents
- Foreword
- About the Authors
- About the Technical Reviewer
- Acknowledgments
- Chapter 1: Introduction to HTML5 WebSocket
- Chapter 2: The WebSocket API
- Chapter 3: The WebSocket Protocol
- Chapter 4: Building Instant Messaging and Chat over WebSocket with XMPP
- Chapter 5: Using Messaging over WebSocket with STOMP
- Chapter 6: VNC with the Remote Framebuffer Protocol
- Chapter 7: WebSocket Security
- Chapter 8: Deployment Considerations
- Appendix A: Inspecting WebSocket Traffic
- Appendix B: WebSocket Resources
- Index


v
Contents at a Glance
Foreword ���������������������������������������������������������������������������������������� xiii
About the Authors ���������������������������������������������������������������������������� xv
About the Technical Reviewer ������������������������������������������������������� xvii
Acknowledgments �������������������������������������������������������������������������� xix
Chapter 1: Introduction to HTML5 WebSocket ■ �������������������������������� 1
Chapter 2: The WebSocket API ■ ����������������������������������������������������� 13
Chapter 3: The WebSocket Protocol ■ ��������������������������������������������� 33
Chapter 4: Building Instant Messaging and Chat ■
over WebSocket with XMPP ��������������������������������������������������������� 61
Chapter 5: Using Messaging over WebSocket with STOMP ■ ���������� 85
Chapter 6: VNC with the Remote Framebuffer Protocol ■ ������������� 109
Chapter 7: WebSocket Security ■ �������������������������������������������������� 129
Chapter 8: Deployment Considerations ■ �������������������������������������� 149
Appendix A: Inspecting WebSocket Traffic ■ ��������������������������������� 163
Appendix B: WebSocket Resources ■ �������������������������������������������� 177
Index ���������������������������������������������������������������������������������������������� 183
www.it-ebooks.info

1
Chapter 1
Introduction to HTML5
WebSocket
This book is for anyone who wants to learn how to build real-time web applications.
You might say to yourself, “I already do that!” or ask “What does that really mean?” Let’s
clarify: this book will show you how to build truly real-time web applications using a
revolutionary new and widely supported open industry standard technology called
WebSocket, which enables full-duplex, bidirectional communication between your client
application and remote servers over the Web—without plugins!
Still confused? So were we a few years ago, before we started working with HTML5
WebSocket. In this guide, we’ll explain what you need to know about WebSocket, and
why you should be thinking about using WebSocket today. We will show you how to
implement a WebSocket client in your web application, create your own WebSocket
server, use WebSocket with higher-level protocols like XMPP and STOMP, secure traffic
between your client and server, and deploy your WebSocket-based applications. Finally,
we will explain why you should be thinking about using WebSocket right now.
What is HTML5?
First, let’s examine the “HTML5” part of “HTML5 WebSocket.” If you’re already an expert
with HTML5, having read, say, Pro HTML5 Programming, and are already developing
wonderfully modern and responsive web applications, then feel free to skip this section
and read on. But, if you’re new to HTML5, here’s a quick introduction.
HTML was originally designed for static, text-based document sharing on the
Internet. Over time, as web users and designers wanted more interactivity in their HTML
documents, they began enhancing these documents, by adding form functionality and
early “portal” type capabilities. Now, these static document collections, or web sites,
are more like web applications, based on the principles of rich client/server desktop
applications. These web applications are being used on almost any device: laptops, smart
phones, tablets—the gamut.
HTML5 is designed to make the development of these rich web applications easier,
more natural, and more logical, where developers can design and build once, and deploy
anywhere. HTML5 makes web applications more usable, as well, as it removes the need
for plugins. With HTML5, you now use semantic markup language like <header> instead
of <div class="header">. Multimedia is also much easier to code, by using tags like
www.it-ebooks.info
CHAPTER 1 ■ INTRODUCTION TO HTML5 WEBSOCKET
2
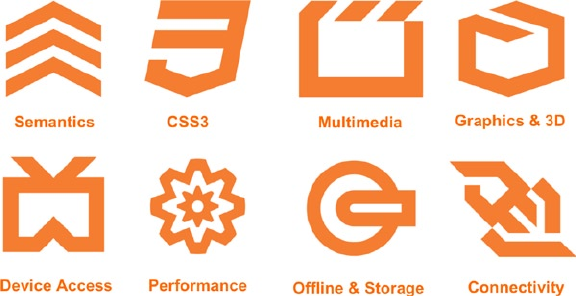
Figure 1-1. HTML5 feature areas (W3C, 2011)
<audio> and <video> to pull in and assign the appropriate media type. Additionally, by
being semantic, HTML5 is more accessible, since screen readers can more easily read
its tags.
HTML5 is an umbrella term that covers the large number of improvements and
changes happening in web technologies, and includes everything from the markup you
use on your web pages to the CSS3 styling, offline and storage, multimedia, connectivity,
and so on. Figure 1-1 shows the different HTML5 feature areas.
There are lots of resources that delve into these areas of HTML5. In this book, we
focus on the Connectivity area, namely the WebSocket API and protocol. Let’s take a look
at the history of HTML5 connectivity.
HTML5 Connectivity
The Connectivity area of HTML5 includes technologies like WebSocket, Server-Sent
Events, and Cross-Document Messaging. These APIs were included in the HTML5
specification to help simplify some of the areas where browser limitations prevented
web application developers from creating the rich behavior they desired or where web
application development was becoming overly complex. One example of simplification in
HTML5 is Cross-Document Messaging.
Before HTML5, communication between browser windows and frames was
restricted for security reasons. However, as web applications started to bring together
content and applications from different web sites, it became necessary for those
applications to communicate with each other. To address this, standards bodies and
major browser vendors agreed to support Cross-Document Messaging, which enables
secure cross-origin communication across browser windows, tabs, and iFrames. Cross-
Document Messaging defines the postMessage API as a standard way to send and receive
messages. There are many use cases for consuming content from different hosts and
domains—such as mapping, chat, and social networks—to communicate inside the web
www.it-ebooks.info
CHAPTER 1 ■ INTRODUCTION TO HTML5 WEBSOCKET
3
browser. Cross-Document Messaging provides asynchronous messages passing between
JavaScript contexts.
The HTML5 specification for Cross-Document Messaging also clarifies and refines
domain security by introducing the concept of origin, which is defined by a scheme, host,
and port. Basically, two URIs are considered from the same origin if and only if they have
the same scheme, host and port. The path is not considered in the origin value.
The following examples show mismatched schemes, hosts, and ports (and therefore
different origins):
• https://www.example.com and http://www.example.com
• http://www.example.com and http://example.com
• http://example.com:8080 and http://example.com:8081
The following examples are URLs of the same origin:
http://www.example.com/page1.html and http://www.example.com/page2.html.
Cross-Document Messaging overcomes the same-origin limitation by allowing
messages to be exchanged between different origins. When you send a message, the
sender specifies the receiver’s origin and when you receive a message the sender’s origin
is included as part of the message. The origin of the message is provided by the browser
and cannot be spoofed. On the receiver’s side, you can decide which messages to process
and which to ignore. You can also keep a “white list” and process only messages from
documents with trusted origins.
Cross-Document Messaging is a great example of where the HTML5 specification
simplifies communication between web applications with a very powerful API. However,
its focus is limited to communicating across windows, tabs, and iFrames. It does not
address the complexities that have become overwhelming in protocol communication,
which brings us to WebSocket.
Ian Hickson, the lead writer of the HTML5 specification, added what we now call
WebSocket to the Communication section of the HTML5 specification. Originally called
TCPConnection, WebSocket has evolved into its own independent specification. While
WebSocket now lives outside the realm of HTML5, it’s important for achieving real-
time connectivity in modern (HTML5-based) web applications. WebSocket is also often
discussed as part of the Connectivity area of HTML5. So, why is WebSocket meaningful
in today’s Web? Let’s first take a look at older HTTP architectures where protocol
communication is significant.
Overview of Older HTTP Architectures
To understand the significance of WebSocket, let’s first take a look at older architectures,
specifically those that use HTTP.
HTTP 101 (or rather, HTTP/1.0 and HTTP/1.1)
In older architectures, connectivity was handled by HTTP/1.0 and HTTP/1.1. HTTP is
a protocol for request-response in a client/server model, where the client (typically a
web browser) submits an HTTP request to the server, and the server responds with the
www.it-ebooks.info
CHAPTER 1 ■ INTRODUCTION TO HTML5 WEBSOCKET
4
requested resources, such as an HTML page, as well as additional information about the
page. HTTP was also designed for fetching documents; HTTP/1.0 sufficed for a single
document request from a server. However, as the Web grew beyond simple document
sharing and began to include more interactivity, connectivity needed to be refined to
enable quicker response time between the browser request and the server response.
In HTTP/1.0, a separate connection was made for every request to the server, which,
to say the least, did not scale well. The next revision of HTTP, HTTP/1.1, added reusable
connections. With the introduction of reusable connections, browsers could initialize a
connection to a web server to retrieve the HTML page, then reuse the same connection
to retrieve resources like images, scripts, and so on. HTTP/1.1 reduced latency between
requests by reducing the number of connections that had to be made from clients to servers.
HTTP is stateless, which means it treats each request as unique and independent.
There are advantages to a stateless protocol: for example, the server doesn’t need to keep
information about the session and thus doesn’t require storage of that data. However, this
also means that redundant information about the request is sent for every HTTP request
and response.
Let’s take a look at an example HTTP/1.1 request from a client to a server. Listing 1-1
shows a complete HTTP request containing several HTTP headers.
Listing 1-1. HTTP/1.1 Request Headers from the Client to the Server
GET /PollingStock/PollingStock HTTP/1.1
Host: localhost:8080
User-Agent: Mozilla/5.0 (Windows; U; Windows NT 5.1; en-US; rv:1.9.1.5)
Gecko/20091102 Firefox/3.5.5
Accept: text/html,application/xhtml+xml,application/xml;q=0.9,*/*;q=0.8
Accept-Language: en-us
Accept-Encoding: gzip,deflate
Accept-Charset: ISO-8859-1,utf-8;q=0.7,*;q=0.7
Keep-Alive: 300
Connection: keep-alive
Referer: http://localhost:8080/PollingStock/
Cookie: showInheritedConstant=false; showInheritedProtectedConst
ant=false; showInheritedProperty=false; showInheritedProtectedPr
operty=false; showInheritedMethod=false; showInheritedProtectedM
ethod=false; showInheritedEvent=false; showInheritedStyle=false;
showInheritedEffect=false;
Listing 1-2 shows an example HTTP/1.1 response from a server to a client.
Listing 1-2. HTTP/1.1 Response Headers from the Server to the Client
HTTP/1.x 200 OK
X-Powered-By: Servlet/2.5
Server: Sun Java System Application Server 9.1_02
Content-Type: text/html;charset=UTF-8
Content-Length: 321
Date: Wed, 06 Dec 2012 00:32:46 GMT
www.it-ebooks.info
CHAPTER 1 ■ INTRODUCTION TO HTML5 WEBSOCKET
5
In Listings 1-1 and 1-2, the total overhead is 871 bytes of solely header information
(that is, no actual data). These two examples show just the request’s header information
that goes over the wire in each direction: from the client to the server, and the server to
client, regardless of whether the server has actual data or information to deliver to the
client.
With HTTP/1.0 and HTTP/1.1, the main inefficiencies stem from the following:
HTTP was designed for document sharing, not the rich, •
interactive applications we’ve become accustomed to on our
desktops and now the Web
The amount of information that the HTTP protocol requires to •
communicate between the client and server adds up quickly the
more interaction you have between the client and server
By nature, HTTP is also half duplex, meaning that traffic flows in a single direction at
a time: the client sends a request to the server (one direction); the server then responds
to the request (one direction). Being half duplex is simply inefficient. Imagine a phone
conversation where every time you want to communicate, you must press a button, state
your message, and press another button to complete it. Meanwhile, your conversation
partner must patiently wait for you to finish, press the button, and then finally respond
in kind. Sound familiar? We used this form of communication as kids on a small scale,
and our military uses this all the time: it’s a walkie-talkie. While there are definitely
benefits and great uses for walkie-talkies, they are not always the most efficient form of
communication.
Engineers have been working around this issue for years with a variety of well-known
methods: polling, long polling, and HTTP streaming.
The Long Way Around: HTTP Polling, Long Polling,
and Streaming
Normally when a browser visits a web page, an HTTP request is sent to the server that
hosts that page. The web server acknowledges the request and sends the response back
to the web browser. In many cases, the information being returned, such as stock prices,
news, traffic patterns, medical device readings, and weather information, can be stale by
the time the browser renders the page. If your users need to get the most up-to-date real-
time information, they can constantly manually refresh the page, but that’s obviously an
impractical and not a particularly elegant solution.
Current attempts to provide real-time web applications largely revolve around
a technique called polling to simulate other server-side push technologies, the most
popular of which is Comet, which basically delays the completion of an HTTP response to
deliver messages to the client.
Polling is a regularly timed synchronous call where the client makes a request to the
server to see if there’s any information available for it. The requests are made at regular
intervals; the client receives a response, regardless of whether there’s information.
Specifically, if there’s information available, the server sends it. If no information is
available, the server returns a negative response and the client closes the connection.
www.it-ebooks.info
CHAPTER 1 ■ INTRODUCTION TO HTML5 WEBSOCKET
6
Polling is a good solution if you know the exact interval of message delivery, because
you can synchronize the client to send a request only when you know information will be
available on the server. However, real-time data is often not that predictable, and making
unnecessary requests and therefore superfluous connections is inevitable. Consequently,
you may open and close many connections needlessly in a low-message rate situation.
Long polling is another popular communication method, where the client requests
information from the server and opens a connection during a set time period. If the
server does not have any information, it holds the request open until it has information
for the client, or until it reaches the end of a designated timeout. At that point, the client
re-requests the information from the server. Long polling is also known as Comet, which
we mentioned earlier, or Reverse AJAX. Comet delays the completion of the HTTP
response until the server has something to send to the client, a technique often called a
hanging-GET or pending-POST. It’s important to understand that when you have a high
message volume, long polling does not provide significant performance improvements
over traditional polling, because the client must constantly reconnect to the sever to fetch
new information, resulting in the network behavior equivalent to rapid polling. Another
issue with long polling is the lack of standard implementations.
With streaming, the client sends a request, and the server sends and maintains an
open response that is continually updated and kept open (either indefinitely or for a
set period of time). The server updates the response whenever a message is ready to be
delivered. While streaming sounds like a great solution to accommodate unpredictable
message delivery, the server never signals to complete the HTTP response, and thus the
connection remains open continuously. In such situations, proxies and firewalls may
buffer the response, resulting in increased latency of the message delivery. Therefore,
many streaming attempts are brittle on networks where firewalls or proxies are present.
These methods provide almost-real-time communication, but they also involve
HTTP request and response headers, which contain lots of additional and unnecessary
header data and latency. Additionally, in each case, the client must wait for requests
to return before it can initiate subsequent requests, therefore significantly increasing
latency.
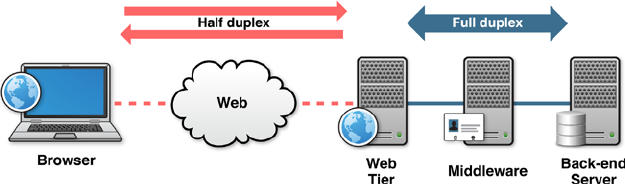
Figure 1-2 shows the half duplex nature of these connections over the Web,
integrating into an architecture where you have full duplex connections over TCP in your
intranet.
Figure 1-2. Half duplex over the Web; Full duplex over TCP on the back-end
www.it-ebooks.info
CHAPTER 1 ■ INTRODUCTION TO HTML5 WEBSOCKET
7
Introducing WebSocket
So, where does this bring us? To eliminate many of these issues, the Connectivity section
of the HTML5 specification includes WebSocket. WebSocket is a naturally full-duplex,
bidirectional, single-socket connection. With WebSocket, your HTTP request becomes a
single request to open a WebSocket connection (either WebSocket or WebSocket over TLS
(Transport Layer Security, formerly known as SSL)), and reuses the same connection
from the client to the server, and the server to the client.
WebSocket reduces latency because once the WebSocket connection is established,
the server can send messages as they become available. For example, unlike polling,
WebSocket makes a single request. The server does not need to wait for a request from
the client. Similarly, the client can send messages to the server at any time. This single
request greatly reduces latency over polling, which sends a request at intervals, regardless
of whether messages are available.
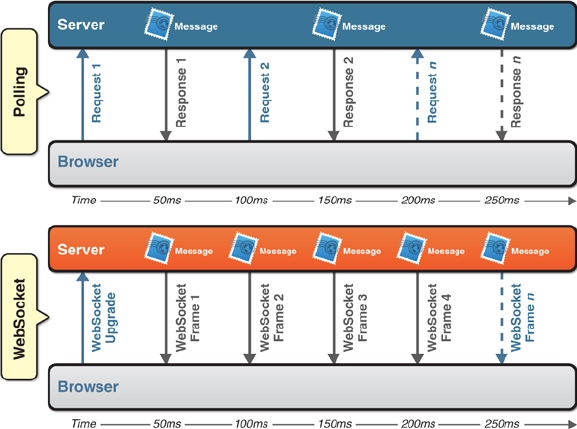
Figure 1-3 compares a sample polling scenario with a WebSocket scenario.
Figure 1-3. Polling vs WebSocket
In essence, WebSocket fits into the HTML5 paradigm of semantics and
simplification. It not only eliminates the need for complicated workarounds and latency
but also simplifies the architecture. Let’s delve into the reasons a bit further.
Why Do You Need WebSocket?
Now that we’ve explored the history that brought us to WebSocket, let’s look at some of
the reasons why you should use WebSocket.
www.it-ebooks.info
CHAPTER 1 ■ INTRODUCTION TO HTML5 WEBSOCKET
8
WebSocket is about Performance
WebSocket makes real-time communication much more efficient.
You can always use polling (and sometimes even streaming) over HTTP to receive
notifications over HTTP. However, WebSocket saves bandwidth, CPU power, and latency.
WebSocket is an innovation in performance.
WebSocket is about Simplicity
WebSocket makes communication between a client and server over the Web much
simpler.
Those who have already gone through the headache of establishing real-time
communication in pre-WebSocket architectures know that techniques for real-time
notification over HTTP are overly complicated. Maintaining session state across stateless
requests adds complexity. Cross-origin AJAX is convoluted, processing ordered requests
with AJAX requires special consideration, and communicating with AJAX is complicated.
Every attempt to stretch HTTP into use cases for which it was not designed increases
software complexity.
WebSocket enables you to dramatically simplify connection-oriented
communication in real-time applications.
WebSocket is about Standards
WebSocket is an underlying network protocol that enables you to build other standard
protocols on top of it.
Many web applications are essentially monolithic. Most AJAX applications typically
consist of tightly coupled client and server components. Because WebSocket naturally
supports the concept of higher-level application protocols, you can more flexibly evolve
clients and servers independently of one another. Supporting these higher-level protocols
enables modularity and encourages the development of reusable components. For
example, you can use the same XMPP over WebSocket client to sign in to different chat
servers because all XMPP servers understand the same standard protocol.
WebSocket is an innovation in interoperable web applications.
WebSocket is about HTML5
WebSocket is part of an effort to provide advanced capabilities to HTML5 applications in
order to compete with other platforms.
Every operating system needs networking capabilities. The ability for applications to
open sockets and communicate with other hosts is a core feature provided by every major
platform. HTML5 is, in many ways, a trend toward making web browsers fully capable
application platforms that are analogous to operating systems. Low-level networking APIs
like sockets would not mesh with the origin security model or API design style of the Web.
WebSocket provides TCP-style networking for HTML5 applications without wrecking
browser security and it has a modern API.
WebSocket is a key component of the HTML5 platform and an incredibly powerful
tool for developers.
www.it-ebooks.info
CHAPTER 1 ■ INTRODUCTION TO HTML5 WEBSOCKET
9
You Need WebSocket!
Simply put, you need WebSocket to build world-class web applications. WebSocket
addresses the major deficiencies that make HTTP unsuitable for real-time
communication. The asynchronous, bidirectional communication patterns enabled by
WebSocket are a return to the general flexibility afforded by transport layer protocols on
the Internet.
Think about all the great ways you can use WebSocket and build true real-time
functionality into your applications, like chat, collaborative document editing, massively
multiplayer online (MMO) games, stock trading applications, and the list goes on. We’ll
take a look at specific applications later in this book.
WebSocket and RFC 6455
WebSocket is a protocol, but there is also a WebSocket API, which enables your
applications to control the WebSocket protocol and respond to events triggered by the
server. The API is developed by the W3C (World Wide Web Consortium) and the protocol
by the IETF (Internet Engineering Task Force). The WebSocket API is now supported
by modern browsers and includes methods and attributes needed to use a full duplex,
bidirectional WebSocket connection. The API enables you to perform necessary actions
like opening and closing the connection, sending and receiving messages, and listening
for events triggered by the server. Chapter 2 describes the API in more detail and gives
examples of how to use the API.
The WebSocket Protocol enables full duplex communication between a client and
a remote server over the Web, and supports transmission of binary data and text strings.
The protocol consists of an opening handshake followed by basic message framing, and is
layered over TCP. Chapter 3 describes the protocol in more detail and shows you how to
create your own WebSocket server.
The World of WebSocket
The WebSocket API and protocol have a thriving community, which is reflected by
a variety of WebSocket server options, developer communities, and myriad real-life
WebSocket applications that are being used today.
WebSocket Options
There are a variety of WebSocket server implementations available out there, such as
Apache mod_pywebsocket, Jetty, Socket.IO, and Kaazing’s WebSocket Gateway.
The idea for The Definitive Guide for HTML5 WebSocket was born from the desire to
share our knowledge, experiences, and opinions from years of working with WebSocket
and related technologies at Kaazing. Kaazing has been building an enterprise WebSocket
gateway server and its client libraries for over five years.
www.it-ebooks.info

CHAPTER 1 ■ INTRODUCTION TO HTML5 WEBSOCKET
10
The WebSocket Community: It Lives!
We’ve listed a few reasons to use WebSocket and will explore real, applicable examples of
how you can implement WebSocket yourself. In addition to the wide variety of WebSocket
servers available, the WebSocket community is thriving, especially regarding HTML5
gaming, enterprise messaging, and online chat. Every day, there are more conferences
and coding sessions devoted not only to specific areas of HTML5 but also to real-time
communication methods, especially WebSocket. Even companies that build widely
used enterprise messaging services are integrating WebSocket into their systems.
Because WebSocket is standards-based, it’s easy to enhance your existing architecture,
standardize and extend your implementations, as well as build new services that were
previously impossible or difficult to build.
The excitement around WebSocket is also reflected in online communities like
GitHub, where more WebSocket-related servers, applications, and projects are created
daily. Other online communities that are thriving are http://www.websocket.org, which
hosts a WebSocket server we will use as an example in the subsequent chapters and
http://webplatform.org and http://html5rocks.com, which are open communities
that encourage the sharing of all information related to HTML5, including WebSocket.
Note ■ More WebSocket servers are listed in Appendix B.
Applications of WebSocket
At the time of writing this book, WebSocket is being used for a wide variety of
applications. Some applications were possible with previous “real-time” communication
technologies like AJAX, but they have dramatically increased performance. Foreign
exchange and stock quote applications have also benefited from the reduced bandwidth
and full-duplex connection that WebSocket provides. We’ll take a look at how you can
examine WebSocket traffic in Chapter 3.
With the increase in application deployment to the browser, there has also been
a boom to HTML5 games development. WebSocket is a natural fit for gaming over the
Web, as gameplay and game interaction are incredibly reliant on responsiveness. Some
examples of HTML5 games that use WebSocket are popular online betting applications,
game controller applications that integrate with WebGL over WebSocket, and in-game
online chat. There are also some very exciting massively multiplayer online (MMO)
games that are widely used in browsers from all types of mobile and desktop devices.
Related Technologies
You may be surprised to learn that there are other technologies that you can use in
conjunction with or as an alternative to WebSocket. The following are a few other
emerging web communication technologies.
Server-Sent Events
WebSocket is a good choice for when your architecture requires bidirectional, full duplex
communication. However, if your service primarily broadcasts or pushes information to
www.it-ebooks.info

CHAPTER 1 ■ INTRODUCTION TO HTML5 WEBSOCKET
11
its clients and does not require any interactivity (such as newsfeeds, weather forecasts,
and so on), then using the EventSource API provided by Server-Sent Events (SSE) is
a good option. SSE, which is part of the HTML5 specification, consolidates some Comet
techniques. It is possible to use SSE as a common, interoperable syntax for HTTP polling,
long polling, and streaming. With SSE, you get auto-reconnect, event IDs, and so on.
Note ■ Although WebSocket and SSE connections both begin with HTTP requests, the
performance benefits you see and their abilities might be quite different. For example,
SSE cannot send streaming data upstream from the client to the server and supports only
text data.
SPDY
SPDY (pronounced “speedy”) is a networking protocol being developed by Google,
and is supported by a growing number of browsers, including Google Chrome, Opera,
and Mozilla Firefox. In essence, SPDY augments HTTP to improve the performance of
HTTP requests by doing things like compressing HTTP headers and multiplexing. Its
main purpose is to improve the performance of web pages. While WebSocket is focused
on optimizing communication between web application front-ends and servers, SPDY
optimizes delivery application content and static pages, as well. The differences between
HTTP and WebSocket are architectural, not incremental. SPDY is a revised form of HTTP,
so it shares the same architectural style and semantics. It fixes many of the non-intrinsic
problems with HTTP, adding multiplexing, working pipelining, and other useful
enhancements. WebSocket removes request-response style communication and enables
real-time interaction and alternative architectural patterns.
WebSocket and SPDY are complementary; you will be able to upgrade your
SPDY-augmented HTTP connection to WebSocket, thus using WebSocket over SPDY
and benefitting from the best of both worlds.
Web Real-Time Communication
Web Real-Time Communication (WebRTC) is another effort to enhance the
communication capabilities of modern web browsers. WebRTC is peer-to-peer technology
for the Web. Browsers can communicate directly without funneling all of the data through
a server. WebRTC includes APIs that let browsers communicate with each other in real
time. At the time of writing this book, the WebRTC is still in draft format by the World Wide
Web Consortium (W3C) and can be found at http://www.w3.org/TR/webrtc/.
The first applications for WebRTC are real-time voice and video chat. WebRTC
is already a compelling new technology for media applications, and there are many
available sample applications online that enable you to test this out with video and audio
over the Web.
WebRTC will later add data channels. These data channels are planned to use similar
API as WebSocket for consistency. Additionally, if your application makes use of
streaming media and other data, you can use both WebSocket and WebRTC together.
www.it-ebooks.info
CHAPTER 1 ■ INTRODUCTION TO HTML5 WEBSOCKET
12
Summary
In this chapter, you were introduced to HTML5 and WebSocket and learned a little bit
about the history of HTTP that brought us to WebSocket. We hope that by now you’re as
excited as we are to learn more about WebSocket, get into the code, and dream about all
the wonderful things you’ll be able to do with it.
In the subsequent chapters, we’ll delve more into the WebSocket API and protocol
and explain how to use WebSocket with standard, higher-level application protocols,
talk about security aspects of WebSocket, and describe enterprise-level features and
deployment.
www.it-ebooks.info

13
Chapter 2
The WebSocket API
This chapter introduces you to the WebSocket Application Programming Interface (API),
which you can use to control the WebSocket Protocol and create WebSocket applications.
In this chapter, we examine the building blocks of the WebSocket API, including its events,
methods, and attributes. To learn how to use the API, we write a simple client application,
connect to an existing, publicly available server (http://websocket.org), which allows us
to send and receive messages over WebSocket. By using an existing server, we can focus
on learning about the easy-to-use API that enables you to create WebSocket applications.
We also explain step-by-step how to use the WebSocket API to power HTML5 media using
binary data. Finally, we discuss browser support and connectivity.
This chapter focuses on the client application side of WebSocket, which enables you
to extend the WebSocket Protocol to your web applications. The subsequent chapters
will describe the WebSocket Protocol itself, as well as using WebSocket within your
environment.
Overview of the WebSocket API
As we mentioned in Chapter 1, WebSocket consists of the network protocol and an API
that enable you to establish a WebSocket connection between a client application and the
server. We will discuss the protocol in greater detail in Chapter 3, but let’s first take a look
at the API.
The WebSocket API is an interface that enables applications to use the WebSocket
Protocol. By using the API with your applications, you can control a full-duplex
communication channel through which your application can send and receive messages.
The WebSocket interface is very straightforward and easy to use. To connect to a remote
host, you simply create a new WebSocket object instance and provide the new object with
a URL that represents the endpoint to which you wish to connect.
A WebSocket connection is established by upgrading from the HTTP protocol to
the WebSocket Protocol during the initial handshake between the client and the server,
over the same underlying TCP connection. Once established, WebSocket messages can
be sent back and forth between the methods defined by the WebSocket interface. In your
application code, you then use asynchronous event listeners to handle each phase of the
connection life cycle.
The WebSocket API is purely (and truly) event driven. Once the full-duplex
connection is established, when the server has data to send to the client, or if resources
that you care about change their state, it automatically sends the data or notifications.
www.it-ebooks.info

CHAPTER 2 ■ THE WEBSOCKET API
14
With an event-driven API, you do not need to poll the server for the most updated
status of the targeted resource; rather, the client simply listens for desired notifications
and changes.
We will see different examples of using the WebSocket API in the subsequent
chapters when we talk about higher-level protocols, such as STOMP and XMPP. For
now, though, let’s take a closer look at the API.
Getting Started with the WebSocket API
The WebSocket API enables you to establish full-duplex, bidirectional communication
over the Web between your client application and server-side processes. The WebSocket
interface specifies the methods that are available for the client and how the client
interacts with the network.
To get started, you first create a WebSocket connection by calling the WebSocket
constructor. The constructor returns a WebSocket object instance. You can listen for
events on that object. These events tell you when the connection opens, when messages
arrive, when the connection closes, and when errors occur. You can interact with the
WebSocket instance to send messages or close the connection. The subsequent sections
explore each of these aspects of the WebSocket API.
The WebSocket Constructor
To establish a WebSocket connection to a server, you use the WebSocket interface to
instantiate a WebSocket object by pointing to a URL that represents the endpoint to which
you want to connect. The WebSocket Protocol defines two URI schemes, ws and wss for
unencrypted and encrypted traffic between the client and the server, respectively. The
ws (WebSocket) scheme is analogous to an HTTP URI scheme. The wss (WebSocket
Secure) URI scheme represents a WebSocket connection over Transport Layer Security
(TLS, also known as SSL), and uses the same security mechanism that HTTPS uses to
secure HTTP connections.
Note ■ We’ll discuss WebSocket security in depth in Chapter 7.
The WebSocket constructor takes one required argument, URL (the URL to which you
want to connect) and one optional argument, protocols (either a single protocol name
or an array of protocol names that the server must include in its response to establish the
connection). Examples of protocols you can use in the protocols argument are XMPP
(Extensible Messaging and Presence Protocol), SOAP (Simple Object Access Protocol), or
a custom protocol.
Listing 2-1 illustrates the one required argument in the WebSocket constructor,
which must be a fully qualified URL starting with the ws:// or wss:// scheme. In this
example, the fully qualified URL is ws://www.websocket.org. If there is a syntax error in
the URL, the constructor will throw an exception.
www.it-ebooks.info

CHAPTER 2 ■ THE WEBSOCKET API
15
Listing 2-1. Sample WebSocket Constructor
// Create new WebSocket connection
var ws = new WebSocket("ws://www.websocket.org");
When connecting to a WebSocket server, you can optionally use the second
argument to list the protocols your application supports, namely for protocol negotiation.
To ensure that the client and the server are sending and receiving messages they
both understand, they must use the same protocol. The WebSocket constructor enables
you to define the protocol or protocols that your client can use to communicate with
a server. The server in turn selects the protocol to use; only one protocol can be used
between a client and a server. These protocols are used over the WebSocket Protocol. One
of the great benefits of WebSocket, as you’ll learn in Chapters 3 through 6, is the ability
to layer widely used protocols over WebSocket, which lets you do great things like take
traditional desktop applications to the Web.
Note ■ The WebSocket Protocol (RFC 6455) refers to protocols you can use with
WebSocket as “subprotocols,” even though they are higher-level, fully formed protocols.
Throughout this book, we’ll generally refer to protocols that you can use with WebSocket
simply as “protocols” to avoid confusion.
Before we get too far ahead of ourselves, let’s return to the WebSocket constructor in
the API. During the initial WebSocket connection handshake, which you’ll learn more
about in Chapter 3, the client sends a Sec-WebSocket-Protocol header with the protocol
name. The server chooses zero or one protocol and responds with a Sec-WebSocket-Protocol
header with the same name the client requested; otherwise, it closes the connection.
Protocol negotiation is useful for determining which protocol or version of a protocol
a given WebSocket server supports. An application might support multiple protocols and
use protocol negotiation to select which protocol to use with a particular server. Listing 2-2
shows the WebSocket constructor with support for a hypothetical protocol, “myProtocol”:
Listing 2-2. Sample WebSocket Constructor with Protocol Support
// Connecting to the server with one protocol called myProtocol
var ws = new WebSocket("ws://echo.websocket.org", "myProtocol");
Note ■ In Listing 2-2, the hypothetical protocol “myProtocol” is a well-defined, perhaps
even registered and standardized, protocol name that both the client application and the
server can understand.
www.it-ebooks.info
CHAPTER 2 ■ THE WEBSOCKET API
16
The WebSocket constructor can also include an array of protocol names that the
client supports, which lets the server decide which one to use. Listing 2-3 shows a sample
WebSocket constructor with a list of protocols it supports, represented as an array:
Listing 2-3. Sample WebSocket Constructor with Protocol Support
// Connecting to the server with multiple protocol choices
var echoSocket = new
WebSocket("ws://echo.websocket.org", ["com.kaazing.echo",
"example.imaginary.protocol"])
echoSocket.onopen = function(e) {
// Check the protocol chosen by the server
console.log(echoSocket.protocol);
}
In Listing 2-3, because the WebSocket server at ws://echo.websocket.org only
understands the com.kaazing.echo protocol and not example.imaginary.protocol, the
server chooses the com.kaazing.echo protocol when the WebSocket open event fires.
Using an array gives you flexibility in enabling your application to use different protocols
with different servers.
We’ll discuss the WebSocket Protocol in depth in the next chapter, but in essence,
there are three types of protocols you can indicate with the protocols argument:
Registered protocols: Standard protocols that have been ·
officially registered according to RFC 6455
(The WebSocket Protocol) and with the IANA (Internet
Assigned Numbers Authority), the official governing body for
registered protocols. An example of a registered protocol is
Microsoft’s SOAP over WebSocket protocol. See
http://www.iana.org/assignments/websocket/websocket.xml
for more information.
Open protocols: Widely used and standardized protocols like ·
XMPP and STOMP, which have not been registered as official
standard protocols. We will examine how to use these types of
protocols with WebSocket in the subsequent chapters.
Custom protocols: Protocols that you’ve written and want to use ·
with WebSocket.
In this chapter, we focus on using the WebSocket API as you would for your own
custom protocol and examine using open protocols in the later chapters. Let’s take a look
at the events, objects, and methods individually and put them together into a working
example.
www.it-ebooks.info
CHAPTER 2 ■ THE WEBSOCKET API
17
WebSocket Events
The WebSocket API is purely event driven. Your application code listens for events on
WebSocket objects in order to handle incoming data and changes in connection status.
The WebSocket Protocol is also event driven. Your client application does not need to poll
the server for updated data. Messages and events will arrive asynchronously as the server
sends them.
WebSocket programming follows an asynchronous programming model, which
means that as long as a WebSocket connection is open, your application simply listens
for events. Your client does not need to actively poll the server for more information. To
start listening for the events, you simply add callback functions to the WebSocket object.
Alternatively, you can use the addEventListener() DOM method to add event listeners
to your WebSocket objects.
A WebSocket object dispatches four different events:
Open ·
Message ·
Error ·
Close ·
As with all web APIs, you can listen for these events using on<eventname> handler
properties, as well as using the addEventListener(); method.
WebSocket Event: Open
Once the server responds to the WebSocket connection request, the open event fires and a
connection is established. The corresponding callback to the open event is called onopen.
Listing 2-4 illustrates how to handle the event when the WebSocket connection is
established.
Listing 2-4. Sample Open Event Handler
// Event handler for the WebSocket connection opening
ws.onopen = function(e) {
console.log("Connection open...");
};
By the time the open event fires, the protocol handshake has completed and the
WebSocket is ready to send and receive data. If your application receives an open event,
you can be sure that a WebSocket server successfully handled the connection request and
has agreed to communicate with your application.
WebSocket Event: Message
WebSocket messages contain the data from the server. You may also have heard of
WebSocket frames, which comprise WebSocket messages. We’ll discuss the concept of
messages and frames in more depth in Chapter 3. For the purposes of understanding
www.it-ebooks.info
CHAPTER 2 ■ THE WEBSOCKET API
18
how messages work with the API, the WebSocket API only exposes complete messages,
not WebSocket frames. The message event fires when messages are received. The
corresponding callback to the message event is called onmessage.
Listing 2-5 shows a message handler receiving a text message and displaying the
content of the message.
Listing 2-5. Sample Message Event Handler for Text Messages
// Event handler for receiving text messages
ws.onmessage = function(e) {
if(typeof e.data === "string"){
console.log("String message received", e, e.data);
} else {
console.log("Other message received", e, e.data);
}
};
In addition to text, WebSocket messages can handle binary data, which are handled
as Blob messages, as shown in Listing 2-6 or as ArrayBuffer messages, as shown in
Listing 2-7. Because the application setting for the WebSocket message binary data type
affects incoming binary messages, you must decide the type you want to use for incoming
binary data on the client before reading the data.
Listing 2-6. Sample Message Event Handler for Blob Messages
// Set binaryType to blob (Blob is the default.)
ws.binaryType = "blob";
// Event handler for receiving Blob messages
ws.onmessage = function(e) {
if(e.data instanceof Blob){
console.log("Blob message received", e.data);
var blob = new Blob(e.data);
}
};
Listing 2-7 shows a message handler checking and handling for ArrayBuffer messages.
Listing 2-7. Sample Message Event Handler for ArrayBuffer Messages
// Set binaryType to ArrayBuffer messages
ws.binaryType = "arraybuffer";
// Event handler for receiving ArrayBuffer messages
ws.onmessage = function(e) {
if(e.data instanceof ArrayBuffer){
console.log("ArrayBuffer Message Received", + e.data);
// e.data is an ArrayBuffer. Create a byte view of that object.
var a = new Uint8Array(e.data);
}
};
www.it-ebooks.info

CHAPTER 2 ■ THE WEBSOCKET API
19
WebSocket Event: Error
The error event fires in response to unexpected failures. The corresponding callback to
the error event is called onerror. Errors also cause WebSocket connections to close. If you
receive an error event, you can expect a close event to follow shortly. The code and reason in
the close event can sometimes tell you what caused the error. The error event handler is
a good place to call your reconnection logic to the server and handle the exceptions coming
from the WebSocket object. Listing 2-8 shows an example of how to listen for error events.
Listing 2-8. Sample Error Event Handler
// Event handler for errors in the WebSocket object
ws.onerror = function(e) {
console.log("WebSocket Error: " , e);
//Custom function for handling errors
handleErrors(e);
};
WebSocket Event: Close
The close event fires when the WebSocket connection is closed. The corresponding
callback to the close event is called onclose. Once the connection is closed, the client
and server can no longer receive or send messages.
Note■ The WebSocket specification also defines ping and pong frames that can be used
for keep-alive, heartbeats, network status probing, latency instrumentation, and so forth, but
the WebSocket API does not currently expose these features. Although the browser receives
a ping frame, it will not fire a visible ping event on the corresponding WebSocket. Instead,
the browser will respond automatically with a pong frame. However, a browser-initiated ping
that is unanswered by a pong after some period of time may also trigger the connection
close event. Chapter 8 covers WebSocket pings and pongs in more detail.
You also trigger the onclose event handler when you call the close() method and
terminate the connection with the server, as shown in Listing 2-9.
Listing 2-9. Sample Close Event Handler
// Event handler for closed connections
ws.onclose = function(e) {
console.log("Connection closed", e);
};
The WebSocket close event is triggered when the connection is closed, which can
be due to a number of reasons such as a connection failure or a successful WebSocket
closing handshake. The WebSocket object attribute readyState reflects the status of the
connection (2 for closing or 3 for closed).
www.it-ebooks.info

CHAPTER 2 ■ THE WEBSOCKET API
20
The close event has three useful properties you can use for error handling and
recovery: wasClean, code, and error. The wasClean property is a boolean indicating
whether the connection was closed cleanly. The property is true if the WebSocket closed
in response to a close frame from the server. If the connection closes due to some other
reason (for example, because underlying TCP connection closed), the wasClean property
is false. The code and reason properties indicate the status of the closing handshake
conveyed from the server. These properties are symmetrical with the code and reason
arguments given in the WebSocket.close() method, which we’ll describe in detail later
in this chapter. In Chapter 3, we will cover the closing codes and their meanings as we
discuss the WebSocket Protocol.
Note ■ For more details about WebSocket events, see the WebSocket API specification at
http://www.w3.org/TR/websockets/.
WebSocket Methods
WebSocket objects have two methods: send() and close().
WebSocket Method: send()
Once you establish a full-duplex, bidirectional connection between your client and server
using WebSocket, you can invoke the send() method while the connection is open (that
is, after the onopen listener is called and before the onclose listener is called). You use
the send() method to send messages from your client to the server. After sending one
or more messages, you can leave the connection open or call the close() method to
terminate the connection.
Listing 2-10 is an example of how you can send a text message to the server.
Listing 2-10. Sending a Text Message Over WebSocket
// Send a text message
ws.send("Hello WebSocket!");
The send() method transmits data when the connection is open. If the connection
is not available or closed, it throws an exception about the invalid connection state.
A common mistake people make when starting out with the WebSocket API is attempting
to send messages before the connection is open, as shown in Listing 2-11.
Listing 2-11. Attempting to Send Messages Before Opening a Connection
// Open a connection and try to send a message. (This will not work!)
var ws = new WebSocket("ws://echo.websocket.org")
ws.send("Initial data");
www.it-ebooks.info

CHAPTER 2 ■ THE WEBSOCKET API
21
Listing 2-11 will not work because the connection is not yet open. Instead, you
should wait for the open event before sending your first message on a newly constructed
WebSocket, as shown in Listing 2-12.
Listing 2-12. Waiting for the Open Event Before Sending a Message
// Wait until the open event before calling send().
var ws = new WebSocket("ws://echo.websocket.org")
ws.onopen = function(e) {
ws.send("Initial data");
}
If you want to send messages in response another event, you can check the
WebSocket readyState property and choose to send the data only while the socket is
open, as shown in Listing 2-13.
Listing 2-13. Checking the readyState Property for an Open WebSocket
// Handle outgoing data. Send on a WebSocket if that socket is open.
function myEventHandler(data) {
if (ws.readyState === WebSocket.OPEN) {
// The socket is open, so it is ok to send the data.
ws.send(data);
} else {
// Do something else in this case.
//Possibly ignore the data or enqueue it.
}
}
In addition to the text (string) messages, the WebSocket API allows you to send
binary data, which is especially useful to implement binary protocols. Such binary
protocols can be standard Internet protocols typically layered on top of TCP, where the
payload can be either a Blob or an ArrayBuffer. Listing 2-14 is an example of how you can
send a binary message over WebSocket.
Note ■ Chapter 6 shows an example of how you can send binary data over WebSocket.
Listing 2-14. Sending a Binary Message Over WebSocket
// Send a Blob
var blob = new Blob("blob contents");
ws.send(blob);
// Send an ArrayBuffer
var a = new Uint8Array([8,6,7,5,3,0,9]);
ws.send(a.buffer);
www.it-ebooks.info
CHAPTER 2 ■ THE WEBSOCKET API
22
Blob objects are particularly useful when combined with the JavaScript File API
for sending and receiving files, mostly multimedia files, images, video, and audio. The
sample code at the end of this chapter uses the WebSocket API in conjunction with the
File API, reads the content of a file, and sends it as a WebSocket message.
WebSocket Method: close()
To close the WebSocket connection or to terminate an attempt to connect, use the
close() method. If the connection is already closed, then the method does nothing. After
calling close(), you cannot send any more data on the closed WebSocket. Listing 2-15
shows an example of the close() method:
Listing 2-15. Calling the close() Method
// Close the WebSocket connection
ws.close();
You can optionally pass two arguments to the close() method: code (a numerical
status code) and reason (a text string). Passing these arguments transmits information
to the server about why the client closed the connection. We will discuss the status
codes and reasons in greater detail in Chapter 3, when we cover the WebSocket closing
handshake. Listing 2-16 shows an example of calling the close() method with an
argument.
Listing 2-16. Calling the close() Method with a Reason
// Close the WebSocket connection because the session has ended successfully
ws.close(1000, "Closing normally");
Listing 2-16 uses code 1000, which means, as it states in the code, that the
connection is closing normally.
WebSocket Object Attributes
There are several WebSocket Object attributes you can use to provide more information
about the WebSocket object: readyState, bufferedAmount, and protocol.
WebSocket Object Attribute: readyState
The WebSocket object reports the state of the connection through the read-only attribute
readyState, which you’ve already learned a bit about in the previous sections. This
attribute automatically changes according to the connection state, and provides useful
information about the WebSocket connection.
Table 2-1 describes the four different values to which the readyState attribute can
be set to describe connection state.
www.it-ebooks.info

CHAPTER 2 ■ THE WEBSOCKET API
23
Table 2-1. readyState Attributes, Values, and Status Descriptions
Attribute Constant Value Status
WebSocket.CONNECTING 0 The connection is in progress but has not been
established.
WebSocket.OPEN 1 The connection has been established. Messages
can flow between the client and server.
WebSocket.CLOSING 2 The connection is going through the closing
handshake.
WebSocket.CLOSED 3 The connection has been closed or could not be
opened.
(World Wide Web Consortium, 2012)
As the WebSocket API describes, when the WebSocket object is first created, its
readyState is 0, indicating that the socket is connecting. Understanding the current state
of the WebSocket connection can help you debug your application, such as to ensure
you’ve opened the WebSocket connection before you’ve attempted to start sending
requests to the server. This information can also be useful in understanding the lifespan
of your connection.
WebSocket Object Attribute: bufferedAmount
When designing your application, you may want to check for the amount of data buffered
for transmission to the server, particularly if the client application transports large
amounts of data to the server. Even though calling send() is instant, actually transmitting
that data over the Internet is not. Browsers will buffer outgoing data on behalf of your
client application, so you can call send() as often as you like with as much data as you
like. If you want to know how quickly that data is draining out to the network, however,
the WebSocket object can tell you the size of the buffer. You can use the bufferedAmount
attribute to check the number of bytes that have been queued but not yet transmitted to
the server. The values reported in this attribute do not include framing overhead incurred
by the protocol or buffering done by the operating system or network hardware.
Listing 2-17 shows an example of how to use the bufferedAmount attribute to send
updates every second; if the network cannot handle that rate, it adjusts accordingly.
Listing 2-17. bufferedAmount Example
// 10k max buffer size.
var THRESHOLD = 10240;
// Create a New WebSocket connection
var ws = new WebSocket("ws://echo.websocket.org/updates");
// Listen for the opening event
ws.onopen = function () {
www.it-ebooks.info

CHAPTER 2 ■ THE WEBSOCKET API
24
// Attempt to send update every second.
setInterval( function() {
// Send only if the buffer is not full
if (ws.bufferedAmount < THRESHOLD) {
ws.send(getApplicationState());
}
}, 1000);
};
Using the bufferedAmount attribute can be useful for throttling the rate at which
applications send data to the server avoiding network saturation.
Pro Tip ■ You may want to examine the WebSocket object’s bufferedAmount attribute
before attempting to close the connection to determine if any data has yet to be transmitted
from the application.
WebSocket Object Attribute: protocol
In our previous discussion about the WebSocket constructor, we mentioned the protocol
argument that lets the server know which protocol the client understands and can use
over WebSocket. The WebSocket object protocol attribute provides another piece of
useful information about the WebSocket instance. The result of protocol negotiation
between the client and the server is visible on the WebSocket object. The protocol
attribute contains the name of the protocol chosen by the WebSocket server during the
opening handshake. In other words, the protocol attribute tells you which protocol to
use with a particular WebSocket. The protocol attribute is the empty string before the
opening handshake completes and remains an empty string if the server does not choose
one of the protocols offered by the client.
Putting It All Together
Now that we’ve walked through the WebSocket constructor, events, attributes, and
methods, let’s put together what we have learned about the WebSocket API. Here, we
create a client application to communicate with a remote server over the Web and
exchange data using WebSocket. Our sample JavaScript client uses the “Echo” server
hosted at ws://echo.websocket.org, which receives and returns any message you send
to the server. Using an Echo server can be useful for pure client-side testing, particularly
for understanding how the WebSocket API interacts with the server.
First, we create the connection, then display on a web page the events triggered by
our code, which come from the server. The page will display information about the client
connecting to the server, sending and receiving messages to and from the server, then
disconnecting from the server.
Listing 2-18 shows a complete example of communication and messaging with
the server.
www.it-ebooks.info
CHAPTER 2 ■ THE WEBSOCKET API
25
Listing 2-18. Complete Client Application Using the WebSocket API
<!DOCTYPE html>
<title>WebSocket Echo Client</title>
<h2>Websocket Echo Client</h2>
<div id="output"></div>
<script>
// Initialize WebSocket connection and event handlers
function setup() {
output = document.getElementById("output");
ws = new WebSocket("ws://echo.websocket.org/echo");
// Listen for the connection open event then call the sendMessage function
ws.onopen = function(e) {
log("Connected");
sendMessage("Hello WebSocket!")
}
// Listen for the close connection event
ws.onclose = function(e) {
log("Disconnected: " + e.reason);
}
// Listen for connection errors
ws.onerror = function(e) {
log("Error ");
}
// Listen for new messages arriving at the client
ws.onmessage = function(e) {
log("Message received: " + e.data);
// Close the socket once one message has arrived.
ws.close();
}
}
// Send a message on the WebSocket.
function sendMessage(msg){
ws.send(msg);
log("Message sent");
}
// Display logging information in the document.
function log(s) {
var p = document.createElement("p");
p.style.wordWrap = "break-word";
www.it-ebooks.info

CHAPTER 2 ■ THE WEBSOCKET API
26
p.textContent = s;
output.appendChild(p);
// Also log information on the javascript console
console.log(s);
}
// Start running the example.
setup();
</script>
After running the web page, the output should look similar to the following:
WebSocket Sample Client
Connected
Message sent
Message received: Hello WebSocket!
Disconnected
If you see this output, congratulations! You’ve successfully created and executed
your first sample WebSocket client application. If the example does not work, you’ll need
to investigate why it has failed. You may find useful information in the JavaScript console
of your browser. It is possible, though increasingly unlikely, that your browser does not
support WebSocket. While the latest versions of every major browser contain support for
the WebSocket API and protocol, there are still some older browsers in use that do not have
this support. The next section shows you how to ensure your browser supports WebSocket.
Checking for WebSocket Support
Since (surprisingly) not all web browsers support WebSocket natively yet, it’s good
practice to include in your code a way to determine the browser support and, if possible,
provide a fallback. Most modern browsers support WebSocket, but depending on your
users, you’ll likely want to use one of these techniques to cover your bases.
Note ■ Chapter 8 discusses various WebSocket fallback and emulation options.
www.it-ebooks.info

CHAPTER 2 ■ THE WEBSOCKET API
27
There are several ways to determine whether your own browser supports WebSocket.
One handy tool to use to investigate your code is the web browser’s JavaScript console.
Each browser has a different way to initiate the JavaScript console. In Google Chrome, for
example, you can open the console by choosing View ➤ Developer ➤ Developer Tools,
then clicking Console. For more information about Chrome Developer Tools,
see https://developers.google.com/chrome-developer-tools/docs/overview.
Pro Tip ■ Google’s Chrome Developer Tools also enables you to inspect WebSocket
traffic. To do so, in the Developer Tools panel, click Network, then at the bottom of the panel,
click WebSockets. Appendix A covers useful WebSocket debugging tools in detail.
Open your browser’s interactive JavaScript console and evaluate the expression
window.WebSocket. If you see the WebSocket constructor object, this means your web
browser supports WebSocket natively. If your browser supports WebSocket but your
sample code does not work, you’ll need to further debug your code. If you evaluate the
same expression and it comes back blank or undefined, your browser does not support
WebSocket natively.
To ensure your WebSocket application works in browsers that do not support
WebSocket, you’ll need to look at fallback or emulation strategies. You can write this
yourself (which is very complex), use a polyfill (a JavaScript library that replicates
the standard API for older browsers), or use a WebSocket vendor like Kaazing, which
supports WebSocket emulation that enables any browser (back to Microsoft Internet
Explorer 6) to support the HTML5 WebSocket standard APIs. We’ll discuss these options
further in Chapter 8 as part of deploying your WebSocket application to the enterprise.
As part of your application, you can add a conditional check for WebSocket support,
as shown in Listing 2-19.
Listing 2-19. Client Code to Determine WebSocket Support in a Browser
if (window.WebSocket){
console.log("This browser supports WebSocket!");
} else {
console.log("This browser does not support WebSocket.");
}
Note ■ There are many online resources that describe HTML5 and WebSocket compatibility
with browsers, including mobile browsers. Two such resources are http://caniuse.com/
and http://html5please.com/.
www.it-ebooks.info

CHAPTER 2 ■ THE WEBSOCKET API
28
Using HTML5 Media with WebSocket
As part of HTML5 and the Web platform, the WebSocket API was designed to work well
with all HTML5 features. The data types that you can send and receive with the API are
broadly useful for transferring application data and media. Strings, of course, allow you to
represent web data formats like XML and JSON. The binary types integrate with APIs like
drag-and-drop, FileReader, WebGL, and the Web Audio API.
Let’s take a look at using HTML5 media with WebSocket. Listing 2-20 shows a
complete client application using HTML5 Media with WebSocket. You can create your
own HTML file based on this code.
Note ■ To build (or simply follow) the examples in this book, you can choose to use the
virtual machine (VM) we’ve created that contains all the code, libraries, and servers we use
in our examples. Refer to Appendix B for instructions on how to download, install, and start
the VM.
Listing 2-20. Complete Client Application Using HTML5 Media with WebSocket
<!DOCTYPE html>
<title>WebSocket Image Drop</title>
<h1>Drop Image Here</h1>
<script>
// Initialize WebSocket connection
var wsUrl = "ws://echo.websocket.org/echo";
var ws = new WebSocket(wsUrl);
ws.onopen = function() {
console.log("open");
}
// Handle binary image data received on the WebSocket
ws.onmessage = function(e) {
var blob = e.data;
console.log("message: " + blob.size + " bytes");
// Work with prefixed URL API
if (window.webkitURL) {
URL = webkitURL;
}
var uri = URL.createObjectURL(blob);
var img = document.createElement("img");
img.src = uri;
document.body.appendChild(img);
}
www.it-ebooks.info
CHAPTER 2 ■ THE WEBSOCKET API
29
// Handle drop event
document.ondrop = function(e) {
document.body.style.backgroundColor = "#fff";
try {
e.preventDefault();
handleFileDrop(e.dataTransfer.files[0]);
return false;
} catch(err) {
console.log(err);
}
}
// Provide visual feedback for the drop area
document.ondragover = function(e) {
e.preventDefault();
document.body.style.backgroundColor = "#6fff41";
}
document.ondragleave = function() {
document.body.style.backgroundColor = "#fff";
}
// Read binary file contents and send them over WebSocket
function handleFileDrop(file) {
var reader = new FileReader();
reader.readAsArrayBuffer(file);
reader.onload = function() {
console.log("sending: " + file.name);
ws.send(reader.result);
}
}
</script>
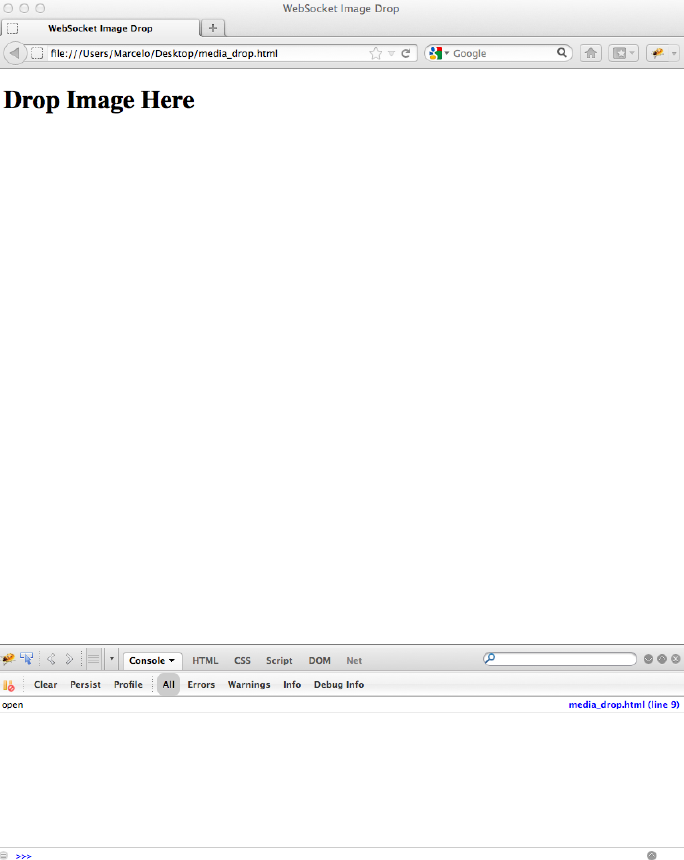
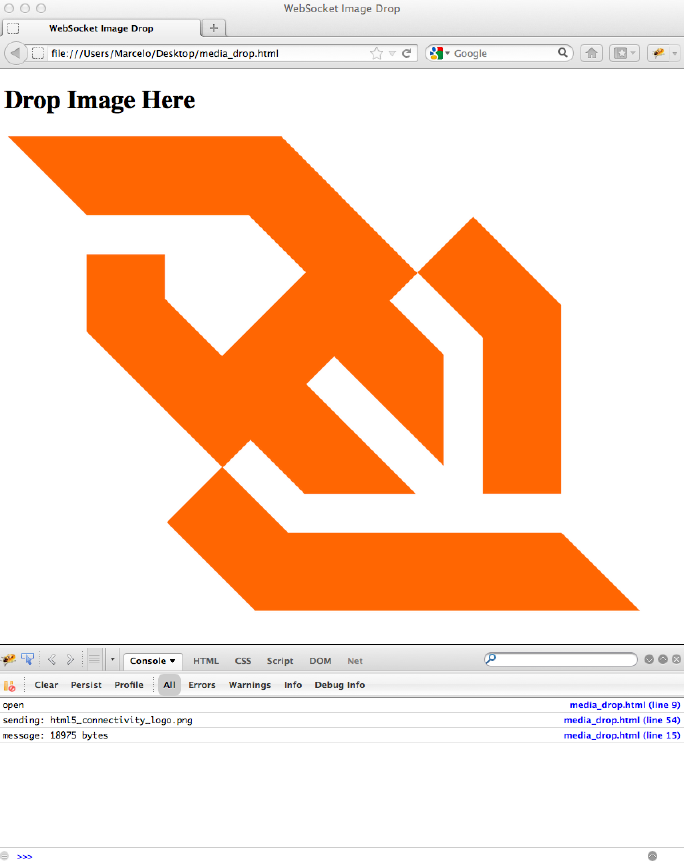
Open this file in your favorite modern browser. Take a look at your browser’s
JavaScript console while the WebSocket connection opens. Figure 2-1 shows the client
application running in Mozilla Firefox. Notice that, at the bottom of this figure, we’ve
displayed the JavaScript console, available in Firebug (a powerful web development and
debugging tool available at http://getfirebug.com).
www.it-ebooks.info
CHAPTER 2 ■ THE WEBSOCKET API
30
Figure 2-1. Client application using HTML5 Media with WebSocket displaying in
Mozilla Firefox
Now, try dragging and dropping an image file onto this page. After you finish
dropping the image file onto the page, you should see the image rendered on the web
page, as shown in Figure 2-2. Notice how Firebug displays information about the image
file being added to your page.
www.it-ebooks.info

CHAPTER 2 ■ THE WEBSOCKET API
32
Note ■ The server websocket.org currently only accepts small messages, so this
example will only work with image files less than 65kb in size, though this limit may change.
You can experiment with larger media on your own servers.
The “wow” factor of this demo may be diminished by the fact that the media is
originating from the same browser where it is ultimately displayed. You could accomplish
the same visual result with AJAX or even without the network at all. Things get really
interesting when a client or server sends some media data out that is displayed by a
different browser—even thousands of other browsers! The same mechanics of reading
and displaying binary image data work in a broadcast scenario just the same as in this
simplified echo demo.
Summary
In this chapter, you learned about the various aspects of the WebSocket API, which
enables you to initiate a WebSocket connection from a client application running in a
browser and send messages from a server over a WebSocket connection to your client.
You learned the basic concepts behind the WebSocket API, including events, messages,
and attributes, as well as saw a few examples of the API in action. You also learned
how to create your own WebSocket application with a publicly available WebSocket
Echo server, which you can use for further testing of your own applications. For an
authoritative definition of the interface, see the full WebSocket API specification at
http://www.w3.org/TR/websockets/.
In Chapter 3, you will learn about the WebSocket Protocol and step through
constructing your own basic WebSocket server.
www.it-ebooks.info
33
Chapter 3
The WebSocket Protocol
WebSocket is a network protocol that defines how servers and clients communicate over
the Web. Protocols are agreed-upon rules for communication. The suite of protocols that
comprise the Internet is published by the IETF, the Internet Engineering Task Force. The
IETF publishes Requests for Comments, called RFCs, which precisely specify protocols,
including RFC 6455: The WebSocket Protocol. RFC 6455 was published in December 2011
and contains the exact rules that must be followed when implementing a WebSocket
client or server.
In the previous chapter, we explored the WebSocket API, which allows applications
to interact with the WebSocket Protocol. In this chapter, we take you through a brief
history of the Internet and protocols, why the WebSocket Protocol was created, and how
it works. We use network tools to observe and learn about WebSocket network traffic.
Using an example WebSocket server written in JavaScript with Node.js, we examine how
WebSocket handshakes establish WebSocket connections, how messages are encoded
and decoded, and how connections are kept alive and closed. Finally, we use this
example WebSocket server to remote control several browsers at the same time.
Before the WebSocket Protocol
To better understand the WebSocket Protocol, let’s look at some of the historical context
by taking a quick tour to see how WebSocket fits into an important family of protocols.
prOtOCOLS!
Protocols are one of the greatest parts of computing. They span programming
languages, operating systems, and hardware architectures. They allow components
written by different people and operated by different agents to communicate
amongst themselves from across the room or across the world. So many of the
success stories in open, interoperable systems are due to well-designed protocols.
Before the introduction of the World Wide Web and its constituent technologies like
HTML and HTTP, the Internet was a very different network. For one, it was much smaller
and, for another, it was essentially a network of peers. Two protocols were and still are
prevalent when communicating between Internet hosts: the Internet Protocol (IP, which
www.it-ebooks.info

CHAPTER 3 ■ THE WEBSOCKET PROTOCOL
34
is responsible for simply transmitting packets between two hosts on the Internet) and the
Transmission Control Protocol (TCP, which can be viewed as a pipe stretched across the
Internet and carries a reliable stream of bytes in each direction between two endpoints).
Together, TCP over IP (TCP/IP) has historically been and continues to be the core
transport layer protocol used by innumerable network applications.
A Brief History of the Internet
In the beginning, there was TCP/IP communication between Internet hosts. In
this scenario, either host can establish new connections. Once a TCP connection is
established, either host can send data at any time, as shown in Figure 3-1.
Figure 3-1. TCP/IP communication between Internet hosts
Any other feature you might want in a network protocol must be built on top of the
transport protocol. These higher layers are called application protocols. For example, two
important application layer protocols that predate the Web are IRC for chat and Telnet
for remote terminal access. IRC and Telnet clearly require asynchronous bidirectional
communication. Clients must receive prompt notification when another user sends a
chat message or when a remote application prints a line of output. Since these protocols
typically run over TCP, asynchronous bidirectional communication is always available.
IRC and Telnet sessions maintain persistent connections on which the client and server
can send freely to each other at any time. TCP/IP also serves as the foundation for two
other important protocols: HTTP and WebSocket. Before we get ahead of ourselves,
though, let’s take brief look at HTTP.
The Web and HTTP
In 1991, the World Wide Web project was announced in its earliest public form. The Web
is a system of linked hypertext documents using Universal Resource Locators (URLs). At
the time, URLs were a major innovation. The U in URL, standing for universal, points to
the then-revolutionary idea that all hypertext documents could be interconnected. HTML
documents on the Web link to other documents by URLs. It makes sense, then, that the
protocol of the Web is tailored to fetching resources. HTTP is a simple synchronous
request-response style protocol for document transfer.
The earliest web applications used forms and full page reloads. Every time a user
submitted information, the browser would submit a form and fetch a new page. Every
www.it-ebooks.info
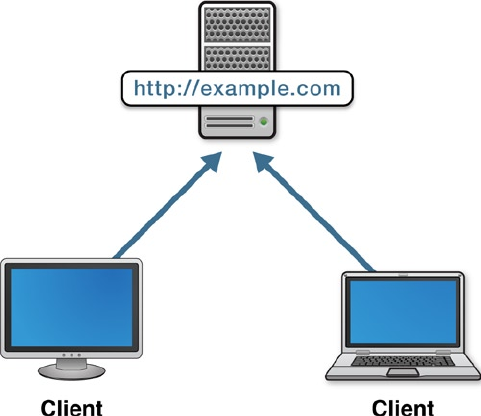
CHAPTER 3 ■ THE WEBSOCKET PROTOCOL
35
time there was updated information to display, the user or browser had to refresh an
entire page to fetch a complete resource by using HTTP.
With JavaScript and the XMLHttpRequest API, a set of techniques called AJAX were
developed to allow more seamless applications that did not have abrupt transitions
during every interaction. AJAX let applications fetch just the resource data of interest and
update a page in place without navigation. With AJAX, the network protocol is still HTTP;
the data is only sometimes, but not always, XML despite the XMLHttpRequest name.
The Web has become pretty popular. So popular, in fact, that many confuse the
Web with the Internet since the Web is often the only significant Internet application
they use. NAT (Network Address Translation), HTTP proxies, and firewalls have also
become increasingly common. Today, many Internet users do not have publicly visible
IP addresses. There are many reasons why users do not each have unique IP addresses,
including security measures, overcrowding, and simple lack of necessity. The lack of
addresses prevents addressability; for example, worms that require public addresses
cannot access unaddressed users. Additionally, there are not enough IPv4 addresses for
all Web users. NAT allows users to share public IP addresses and still surf the Web. Finally,
the dominant protocol, HTTP, does not require addressable clients. HTTP works fairly
well for interactions driven by client applications, since the client initiates every HTTP
request, as shown in Figure 3-2:
Figure 3-2. HTTP clients connected to a Web server
Essentially, HTTP made the Web possible with its built-in support for text (thus
supporting our interconnected HTML pages), URLs, and HTTPS (secure HTTP over
Transport Layer Security (TLS)). However, in some ways, HTTP also caused the Internet
to regress due to its popularity. Because HTTP does not require addressable clients,
www.it-ebooks.info

CHAPTER 3 ■ THE WEBSOCKET PROTOCOL
36
addressing in the Web world is asymmetrical. Browsers can address resources on servers
via URLs, but there is no way for a server-side application to proactively send a resource to
a client. Clients can only make requests, and the server can only respond to outstanding
requests. In this asymmetrical world, protocols that require full-duplex communication
just don’t work as well.
One way to work around that limitation is to have the client open HTTP requests just
in case the server has an update to share. The umbrella term for using HTTP requests to
reverse the flow of notifications is called “Comet.” As we discussed in the earlier chapters,
Comet is basically a set of techniques that stretch HTTP to the limit with polling, long
polling, and streaming. These techniques essentially simulate some of TCP’s capabilities
in order to address the same server-to-client use cases. Because of the mismatch
between synchronous HTTP and these asynchronous applications, Comet tends to be
complicated, non-standard, and inefficient.
Note ■ In server-to-server communication, each host can address the other. It is
possible for one server to simply make an HTTP request to the other when there is new
data available, which is the case with the PubSubHubbub protocol for server-to-server
feed update notification. PubSubHubbub is an open protocol that extends RSS and Atom,
and enables publish/subscribe communication between HTTP servers. While server-to-server
communication is possible with WebSocket, this book focuses on client–server
communication in real-time web applications.
Introducing the WebSocket Protocol
This short history of the Internet lesson brings us to today. Now, web applications
are quite powerful with significant client-side state and logic. Often, modern web
applications require bidirectional communication. Immediate notification of updates
is more the rule than the exception, and users increasingly expect responsive real-time
interactivity. Let’s take a look at what WebSocket gives us.
WebSocket: Internet Capabilities for Web Applications
WebSocket preserves many of the things we like about HTTP for web applications (URLs,
HTTP security, easier message based data model, and built-in support for text) while
enabling other network architectures and communication patterns. Like TCP, WebSocket
is asynchronous and can be used as a transport layer for higher-level protocols.
WebSocket is a good base for messaging protocols, chat, server notifications, pipelined
and multiplexed protocols, custom protocols, compact binary protocols, and other
standard protocols for interoperating with Internet servers.
WebSocket provides TCP-style network capabilities to web applications. Addressing
is still unidirectional. Servers can send clients data asynchronously, but only when there
is an open WebSocket connection. WebSocket connections are always established from
www.it-ebooks.info
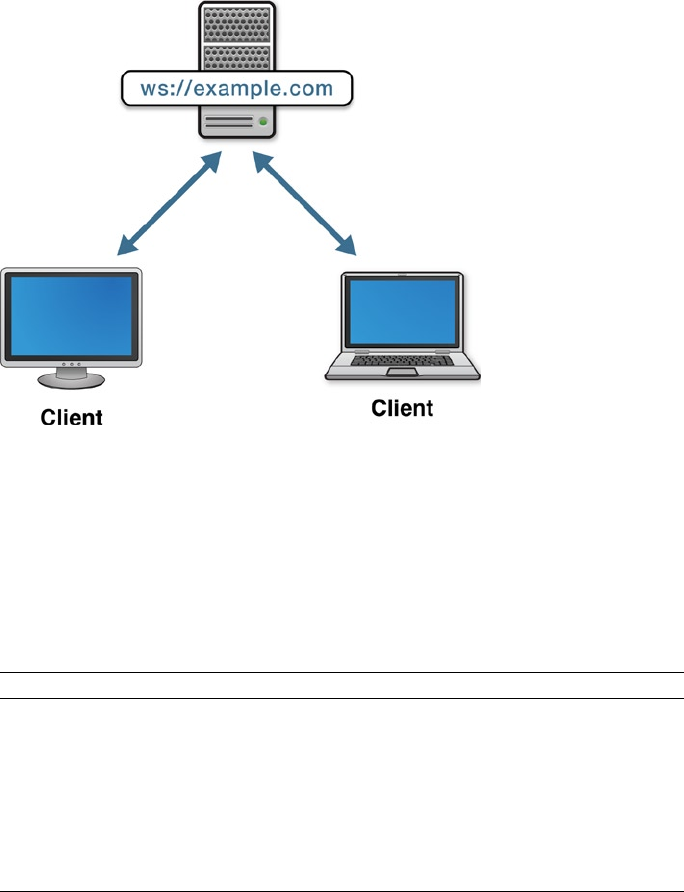
CHAPTER 3 ■ THE WEBSOCKET PROTOCOL
37
the client to the server. A WebSocket server can also act as a WebSocket client. However,
with WebSocket, web clients like browsers cannot accept connections that they did not
initiate. Figure 3-3 shows WebSocket clients connected to a server, where either the client
or the server can send data at any time.
Figure 3-3. WebSocket clients connected to a server
WebSocket bridges the world of the Web and the world of the Internet (or more
specifically, TCP/IP). Asynchronous protocols that were not previously easy to use with
web applications can now easily communicate using WebSocket. Table 3-1 compares the
main areas of TCP, HTTP, and WebSocket.
Table 3-1. Comparison of TCP, HTTP, and WebSocket
Feature TCP HTTP WebSocket
Addressing IP address and port URL URL
Simultaneous transmission Full duplex Half duplex Full duplex
Content Byte streams MIME messages Text and binary
messages
Message boundaries No Yes Yes
Connection oriented Yes No Yes
www.it-ebooks.info

CHAPTER 3 ■ THE WEBSOCKET PROTOCOL
38
TCP only communicates byte streams, so message boundaries must be represented
in a higher-level protocol. One very common mistake made by beginning socket
programmers using TCP is assuming that every call to send() will result in one
successful receive. While this may happen to be true for simple tests, when load and
latency vary, the bytes sent on a TCP socket will be unpredictably fragmented. TCP
data can be spread over multiple IP packets or combined into fewer packets at the
discretion of the operating system. The only guarantee in TCP is that the individual
bytes that arrive on the receiving side will arrive in order. Unlike TCP, WebSocket
transmits a sequence of discrete messages. With WebSocket, multi-byte messages will
arrive in whole and in order, just like HTTP. Because message boundaries are built into
the WebSocket Protocol, it is possible to send and receive separate messages and avoid
common fragmentation mistakes.
It bears mentioning that before the Internet, another networking model was being
followed: Open Systems Interconnection (OSI), which includes seven layers: physical,
data link, network, transport, session, presentation, and application. However, while the
terminology may be similar, OSI was not designed with the Internet in mind. The TCP/IP
model, which was designed for the Internet, comprises just four layers: link, Internet,
transport, and application, and is the model that drives the Internet today.
IP is at the Internet layer and TCP layers on top of IP at the transport layer.
WebSocket layers on top of TCP (and therefore IP), and is also considered a transport
layer because you can layer application-level protocols on top of WebSocket.
Inspecting WebSocket Traffic
In Chapter 2, we used the WebSocket API without really seeing what was happening at
the network level. If you want to see WebSocket traffic flowing over a network,
you can use tools like Wireshark (http://www.wireshark.org/) or tcpdump
(http://www.tcpdump.org/) and inspect what’s inside the communication stack.
Wireshark enables you to “dissect” the WebSocket protocol, which lets you view the parts of
the WebSocket Protocol we’ll discuss later in this chapter (for example, opcodes, flags, and
payloads) in a convenient UI, as shown in Figure 3-4. It will even display unmasked versions
of messages sent from WebSocket clients. We’ll discuss masking later in this chapter.
Note ■ Appendix A covers WebSocket traffic debugging tools in detail.
www.it-ebooks.info
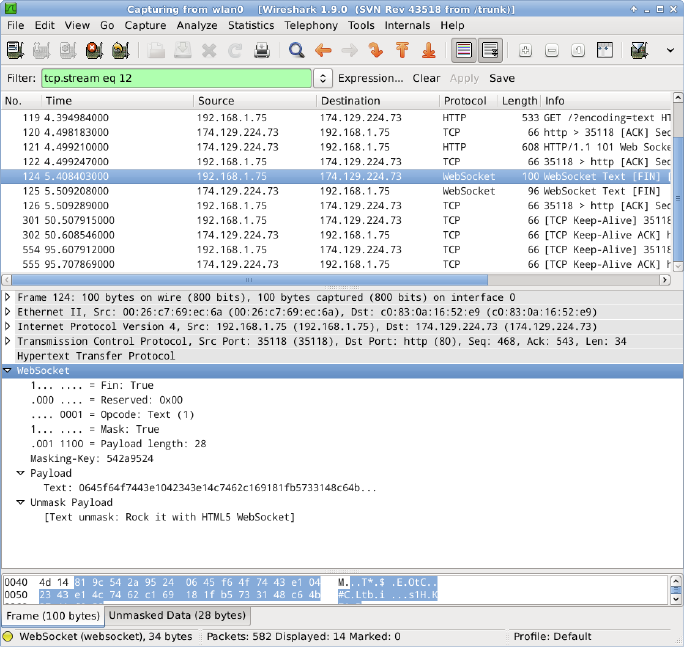
CHAPTER 3 ■ THE WEBSOCKET PROTOCOL
39
Figure 3-4. Viewing a WebSocket session in Wireshark
WebKit (the browser engine that powers Google Chrome and Apple Safari) also
recently added support for inspecting WebSocket traffic. In the latest versions of the
Chrome browser, you can see WebSocket messages in the Network tab of the Developer
Tools. Figure 3-5 shows this must-have tool for developing with WebSocket.
www.it-ebooks.info
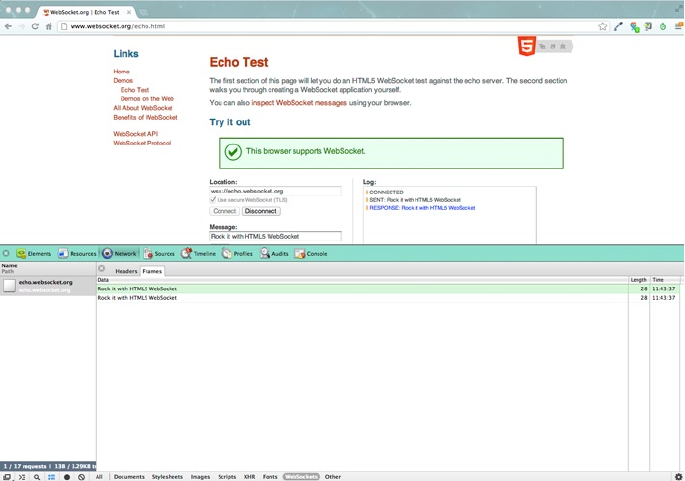
CHAPTER 3 ■ THE WEBSOCKET PROTOCOL
40
We highly recommend using these tools to watch WebSockets in action, not only
to learn about protocols, but also to better understand what is happening during the
WebSocket session.
The WebSocket Protocol
Let’s take a closer look at the WebSocket Protocol. For each part of the protocol, we will
look at JavaScript code to handle that particular syntax. Afterward, we will combine these
snippets into an example server library and two simple applications.
The WebSocket Opening Handshake
Every WebSocket connection begins with an HTTP request. This request is much like any
other, except that it includes a special header: Upgrade. The Upgrade header indicates that
the client would like to upgrade the connection to a different protocol. In this case, the
different protocol is WebSocket.
Figure 3-5. Using Google Chrome Developer Tools to view a WebSocket session
www.it-ebooks.info
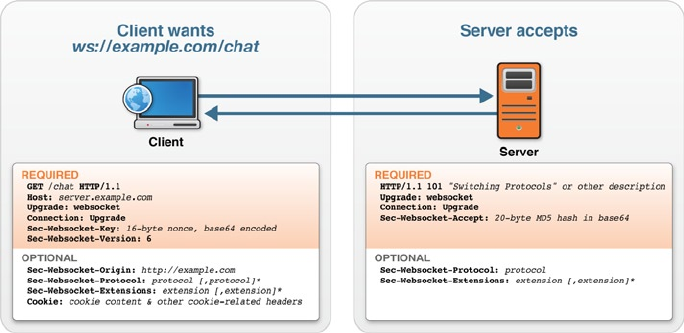
CHAPTER 3 ■ THE WEBSOCKET PROTOCOL
41
Figure 3-6. Example of a WebSocket opening handshake
Let’s look at an example handshake recorded during a connection to
ws://echo.websocket.org/echo. Until the handshake completes, a WebSocket session
conforms to the HTTP/1.1 protocol. The client sends the HTTP request shown in Listing 3-1.
Listing 3-1. HTTP Request from the Client
GET /echo HTTP/1.1
Host: echo.websocket.org
Origin: http://www.websocket.org
Sec-WebSocket-Key: 7+C600xYybOv2zmJ69RQsw==
Sec-WebSocket-Version: 13
Upgrade: websocket
Listing 3-2 shows the server sending back the response.
Listing 3-2. HTTP Response from the Server
101 Switching Protocols
Connection: Upgrade
Date: Wed, 20 Jun 2012 03:39:49 GMT
Sec-WebSocket-Accept: fYoqiH14DgI+5ylEMwM2sOLzOi0=
Server: Kaazing Gateway
Upgrade: WebSocket
Figure 3-6 illustrates the HTTP request upgrade to WebSocket from the client to the
server, also known as the WebSocket opening handshake.
www.it-ebooks.info

CHAPTER 3 ■ THE WEBSOCKET PROTOCOL
42
Figure 3-6 shows the required and optional headers. Some headers are strictly
required and must be present and precise for a WebSocket connection to succeed. Other
headers in this handshake are optional but allowed because the handshake is an HTTP
request and response. After a successful upgrade, the syntax of the connection switches
over to the data-framing format used to represent WebSocket messages. Connections
will not succeed unless the server responds with the 101 response code, Upgrade header,
and Sec-WebSocket-Accept header. The value of the Sec-WebSocket-Accept response
header is derived from the Sec-WebSocket-Key request header and contains a special key
response that must match exactly what the client expects.
Computing the Key Response
To successfully complete the handshake, the WebSocket server must respond with a
computed key. This response shows that the server understands the WebSocket Protocol
specifically. Without the exact response, it might be possible to dupe some unsuspecting
HTTP server into upgrading a connection accidentally!
This response function takes the key value from the Sec-WebSocket-Key header sent
by the client and returns the computed value that the client expects in the returning
Sec-WebSocket-Accept header. Listing 3-3 uses the Node.js crypto API to compute the
SHA1 hash of the combined key and suffix:
Listing 3-3. Computing the Key Response Using the Node.jspto API Crypto API
var KEY_SUFFIX = "258EAFA5-E914-47DA-95CA-C5AB0DC85B11";
var hashWebSocketKey = function(key) {
var sha1 = crypto.createHash("sha1");
sha1.update(key + KEY_SUFFIX, "ascii");
return sha1.digest("base64");
}
Note ■ The KEY_SUFFIX in Listing 3-3 is a constant key suffix included in the protocol
specification that every WebSocket server must know.
In the WebSocket opening handshake and computing the key response, the
WebSocket protocol relies on Sec- headers that are defined in RFC 6455. Table 3-2
describes these WebSocket Sec- Headers.
www.it-ebooks.info

CHAPTER 3 ■ THE WEBSOCKET PROTOCOL
43
Message Format
While a WebSocket connection is open, the client and server can send messages to each
other at any time. These messages are represented on the network with a binary syntax
that marks the boundaries between messages and includes concise type information.
More precisely, these binary headers mark the boundaries between something else,
called frames. Frames are partial data that can be combined to form messages. You may
see “frame” and “message” used interchangeably in discussions about WebSocket. These
terms are both used because it is (at least currently) rare to use more than one frame per
Table 3-2. WebSocket Sec- Headers and Their Descriptions (RFC 6455)
Header Description
Sec-WebSocket-Key Can only appear once in an HTTP request.
Used in the opening WebSocket handshake from the
client to the server to prevent cross-protocol attacks.
See Sec-WebSocket-Accept.
Sec-WebSocket-Accept Can only appear once in an HTTP response.
Used in the opening WebSocket handshake from
the server to the client, to confirm that the server
understands the WebSocket protocol.
Sec-WebSocket-Extensions May appear multiple times in an HTTP request (which is
logically the same as a single Sec-WebSocket-Extensions
header field that contains all values), but can only
appear once in an HTTP response.
Used in the WebSocket opening handshake from the
client to the server, and then from the server to the
client. This header helps the client and server agree on
a set of protocol-level extensions to use for the duration
of the connection.
Sec-WebSocket-Protocol Used in the opening WebSocket handshake from the
client to the server, then from the server to negotiate a
subprotocol. This header advertises the protocols that
a client-side application can use. The server uses the
same header to select at most one of those protocols.
Sec-Websocket-Version Used in the opening WebSocket handshake from the
client to the server to indicate version compatibility.
The version for RFC 6455 is always 13. The server
responds with this header if it does not support the
version of the protocol requested by the client. In that
case, the header sent by the server lists
the versions it does support. This only happens if the
client predates RFC 6455.
www.it-ebooks.info

CHAPTER 3 ■ THE WEBSOCKET PROTOCOL
44
message. Also, in early drafts of the protocol frames were messages, and the message
representation on the wire was called framing.
You’ll recall from Chapter 2, that the WebSocket API does not expose frame-level
information to applications. It is possible to deal with sub-message data units at the
protocol level, even though the API works in terms of messages. There is typically only
one frame in a message, but a message can be composed of any number of frames.
Servers could use different numbers of frames to begin delivering data before the entirety
of the data is available.
Let’s take a closer look at the aspects of the WebSocket frame. Figure 3-7 illustrates
the WebSocket frame header.
Figure 3-7. WebSocket frame header
WebSocket framing code is responsible for:
Opcodes ·
Length ·
Decoding Text ·
Masking ·
Multi-frame messages ·
Opcodes
Every WebSocket message has an opcode specifying the type of the message payload. The
opcode consists of the last four bits in the first byte of the frame header. Opcodes have a
numerical value, as described in Table 3-3.
www.it-ebooks.info

CHAPTER 3 ■ THE WEBSOCKET PROTOCOL
45
With four bits used for opcodes, there can be up to 16 different values. The
WebSocket Protocol defines only five opcodes, and the remaining opcodes are reserved
for future use in extensions.
Length
The WebSocket Protocol encodes frame lengths using a variable number of bits, which
allows small messages to use a compact encoding while still allowing the protocol to carry
medium-sized and even very large messages. For messages under 126 bytes, the length is
packed into one of the first two header bytes. For lengths between 126 and 216, two extra
bytes are used. For messages larger than 126 bytes, eight bytes of length are included. The
length is encoded in the last seven bits of the second byte of the frame header. The values
126 and 127 in that field are treated as special signals that additional bytes will follow to
complete the encoded length.
Decoding Text
Text WebSocket messages are encoded with UCS Transformation Format—8 bit, or
UTF-8. UTF-8 is a variable-length encoding for Unicode that is also backward compatible
with seven-bit ASCII. UTF-8 is also the only encoding allowed in WebSocket text
messages. Keeping the encoding to UTF-8 prevents the babel of different encodings
found in the myriad “plain text” formats and protocols from hindering interoperability.
In Listing 3-4, the deliverText function uses the buffer.toString() API from
Node.js to convert the payload of an incoming message to a JavaScript string. UTF-8 is the
default encoding for buffer.toString(), but is specified here for clarity.
Table 3-3. Defined Opcodes
Opcode Type of Message Payload Description
1 Text The data type of the message is text.
2 Binary The data type of the message is binary.
8 Close The client or server is sending a closing
handshake to the server or client.
9 Ping The client or server sends a ping to
the server or client (see Chapter 8 for
more details on using pings and pongs).
10 (hex 0xA) Pong The client or server sends a pong to the
server or client (see Chapter 8 for more
details on using pings and pongs).
www.it-ebooks.info
CHAPTER 3 ■ THE WEBSOCKET PROTOCOL
46
Listing 3-4. UTF-8 Text Encoding
case opcodes.TEXT:
payload = buffer.toString("utf8");
Masking
WebSocket frames sent upstream from browsers to servers are “masked” to obfuscate
their contents. The purpose of masking is not to prevent eavesdropping, but is intended
for an unusual security reason and to improve compatibility with existing HTTP proxies.
See Chapter 7 for further explanation of the sort of cross-protocol attacks that masking is
intended to prevent.
The first bit of the second byte of the frame header indicates whether the frame is
masked; the WebSocket Protocol requires that clients mask every frame they send. If there
is a mask, it will be four bytes following the extended length portion of the frame header.
Every payload received by a WebSocket server is first unmasked before processing.
Listing 3-5 shows a simple function that unmasks the payload portion of a WebSocket
frame given four mask bytes.
Listing 3-5. Unmasking the Payload
var unmask = function(mask_bytes, buffer) {
var payload = new Buffer(buffer.length);
for (var i=0; i<buffer.length; i++) {
payload[i] = mask_bytes[i%4] ^ buffer[i];
}
return payload;
}
After unmasking, the server has the original message contents: binary messages can
be delivered directly, and text messages will be UTF-8 decoded and exposed through the
server API as strings.
Multi-Frame Messages
The fin bit in the frame format allows for multi-frame messages or streaming of partially
available messages, which may be fragmented or incomplete. To transmit an incomplete
message, you can send a frame that has the fin bit set to zero. The last frame has the fin bit
set to 1, indicating that the message ends with that frame’s payload.
The WebSocket Closing Handshake
We looked at the WebSocket opening handshake earlier in this chapter. In human
interactions, we often shake hands when first meeting. Sometimes we shake hands when
parting, as well. The same is the case in this protocol. WebSocket connections always
begin with the opening handshake, as that is the only way to initialize the conversation.
On the Internet and other unreliable networks, connections can close at any time, so it
is not possible to say that connections always end with a closing handshake. Sometimes
the underlying TCP socket just closes abruptly. The closing handshake gracefully closes
connections, allowing applications to tell the difference between intentionally and
accidentally terminated connections.
www.it-ebooks.info

CHAPTER 3 ■ THE WEBSOCKET PROTOCOL
47
When a WebSocket closes, the endpoint that is terminating the connection can send
a numerical code and a reason string to indicate why it is choosing to close the socket.
The code and reason are encoded in the payload of a frame with the close opcode (8). The
code is represented as an unsigned 16-bit integer. The reason is a short UTF-8 encoded
string. RFC 6455 defines several specific closing codes. Codes 1000–1015 are specified for
use in the WebSocket connection layer. These codes indicate that something has failed in
the network or in the protocol. Table 3-4 lists the codes in this range, their descriptions,
and scenarios in which each code might be applicable.
Table 3-4. Defined WebSocket Closed Codes
Code Description When to Use this Code
1000 Normal Close Send this code when your session has
successfully completed.
1001 Going Away Send this code when closing the connection
because the application is going away and there
is no expectation that a follow-up connection
will be attempted. The server may be shutting
down or the client application may be closing.
1002 Protocol Error Send this code when closing the connection due
to a protocol error.
1003 Unacceptable Data Type Send this code when your application receives a
message of an unexpected type that it
cannot handle.
1004 Reserved Do not send this code. According to RFC 6455,
this status code is reserved and may be defined
in the future.
1005 Reserved Do not send this code. The WebSocket API uses
this code to indicate that no code was received.
1006 Reserved Do not send this code. The Websocket API uses
this code to indicate that the connection has
closed abnormally.
1007 Invalid Data Send this code after receiving a message for which
the formatting does not match the message type.
If a text message ever contains malformed UTF-8
data, the connection should close with this code.
1008 Message Violates Policy Send this code when your application terminates
the connection for a reason not covered by another
code or when you do not wish to disclose the
reason a message cannot be handled.
(continued)
www.it-ebooks.info

CHAPTER 3 ■ THE WEBSOCKET PROTOCOL
48
Note ■ Chapter 2 describes how the WebSocket API uses the close codes. For additional
information about the WebSocket API, see http://www.w3.org/TR/websockets/.
Other code ranges are reserved for specific purposes. Table 3-5 lists the four
categories of close codes defined in RFC 6455.
Code Description When to Use this Code
1009 Message Too Large Send this code when receiving a message that
is too large for your application to handle.
(Remember, frames can have payload lengths
up to 64 bits long. Even if you have a big server,
some messages are still too large.)
1010 Extension Required Send this code from the client (browser) when
your application requires one or more specific
extensions that the server did not negotiate.
1011 Unexpected Condition Send this code when your application cannot
continue handling the connection for an
unforeseen reason.
1015 TLS Failure (reserved) Do not send this code. The WebSocket API uses
this code to indicate when TLS has failed before
the WebSocket handshake.
Table 3-4. (continued)
www.it-ebooks.info

CHAPTER 3 ■ THE WEBSOCKET PROTOCOL
49
Support for Other Protocols
The WebSocket Protocol supports higher-level protocols and protocol negotiation.
Paradoxically, RFC 6455 refers to protocols you can use with WebSocket as “subprotocols,”
even though they are higher-level, fully formed protocols. As we mentioned in Chapter 2,
throughout this book, we’ll generally refer to protocols that you can use with WebSocket
simply as “protocols” to avoid confusion.
In Chapter 2, we explained how to negotiate higher-layer protocols with the
WebSocket API. At the network level, these protocols are negotiated using the
Sec-WebSocket-Protocol header. Protocol names are header values sent from the client
in the initial upgrade request:
Sec-WebSocket-Protocol: com.kaazing.echo, example.protocol.name
This header indicates that the client can use either protocol (com.kaazing.echo or
example.protocol.name) and the server can choose which protocol to use. If you send
this header in an upgrade request to ws://echo.websocket.org, the server response will
include the following header:
Sec-WebSocket-Protocol: com.kaazing.echo
This response indicates that the server has elected to speak the com.kaazing.echo
protocol. Selecting a protocol does not change the syntax of the WebSocket Protocol
itself. Instead, these protocols are layered on top of the WebSocket Protocol to provide
higher-level semantics for frameworks and applications. We will examine three different
use cases of layering widely used, standards-based protocols on top of WebSocket in the
subsequent chapters.
Table 3-5. WebSocket Close Code Ranges
Code Description When to Use this Code
0-999 Prohibited Codes below 1000 are invalid and can
never be used for any purpose.
1000-2999 Reserved These codes are reserved for use in
extensions and revised versions of the
WebSocket protocol itself. Use these codes
as the standard prescribes. See Table 3-4.
3000-3999 Registration Required These codes are intended for use
by “libraries, frameworks, and
applications.” These codes should be
publicly registered with IANA (Internet
Assigned Numbers Authority).
4000-4999 Private Use these codes for custom purposes
in your applications. Because they are
not registered, do not expect them to be
widely understood by other WebSocket
software.
www.it-ebooks.info

CHAPTER 3 ■ THE WEBSOCKET PROTOCOL
50
To simply extend the WebSocket Protocol, there is another mechanism, called
extensions.
Extensions
Like protocols, extensions are negotiated with a Sec- header. The connecting client
sends a Sec-WebSocket-Extensions header containing the names of the extension
(or extensions) it supports.
Note ■ While you cannot negotiate more than one protocol at a time, you can negotiate
more than one extension at a time.
For example, Chrome might send the following header to indicate that it will accept
an experimental compression extension:
Sec-WebSocket-Extensions: x-webkit-deflate-frame
Extensions are so named because they extend the WebSocket Protocol. Extensions
can add new opcodes and data fields to the framing format. You may find it more difficult
to deploy a new extension than a new protocol (or “subprotocol”) because browser
vendors must explicitly build in support for these extensions. You’ll probably find it much
easier to write a JavaScript library that implements a protocol than to wait for all browser
vendors to standardize an extension and all users to update their browsers to the version
supporting that extension.
Writing a WebSocket Server in JavaScript
with Node.js
Now that we’ve examined the essentials of the WebSocket Protocol, let’s step through
writing our own WebSocket server. There are many existing implementations of the
WebSocket Protocol; you may choose to use an existing implementation in your
applications. However, you may need to write a new server or modify an existing server
out of necessity or just because you can. Writing your own implementation of the
WebSocket Protocol can be fun and illuminating, and can help you understand and
evaluate other servers, clients, and libraries. Best of all, it can give you new insights on
networking, communication, and the Web.
The example server in this chapter is written in JavaScript using the IO APIs provided
by Node.js. We chose these technologies simply to limit the code samples in this book to
a single language. Since you are likely using JavaScript with HTML5 for your front-end
development, there is a good chance you will be able to read this code fluently, as well.
Of course, it isn’t necessary that you write your server in JavaScript, and there are strong
reasons why you might choose another language. The fact that WebSocket is a language-
agnostic protocol means you can select any programming language capable of listening
on a socket and create a server.
www.it-ebooks.info

CHAPTER 3 ■ THE WEBSOCKET PROTOCOL
51
We wrote this example to work with Node.js 0.8. It will not run with earlier versions
of Node.js and may require some modification in the future if the Node APIs change. The
websocket-example module combines the preceding code snippets and some additional
code to form a WebSocket server. This example is not fully robust and production-ready,
but it does serve as a simple, self-contained example of the protocol.
Note ■ To build (or simply follow) the examples in this book, you can choose to use the
virtual machine (VM) we’ve created that contains all the code, libraries, and servers we use in our
examples. Refer to Appendix B for instructions on how to download, install, and start the VM.
Building a Simple WebSocket Server
Listing 3-6 starts us off by building a simple WebSocket server. You can also open the file
websocket-example.js to view the sample code.
Listing 3-6. WebSocket Server API Written in JavaScript with Node.js
// The Definitive Guide to HTML5 WebSocket
// Example WebSocket server
// See The WebSocket Protocol for the official specification
// http://tools.ietf.org/html/rfc6455
var events = require("events");
var http = require("http");
var crypto = require("crypto");
var util = require("util");
// opcodes for WebSocket frames
// http://tools.ietf.org/html/rfc6455#section-5.2
var opcodes = { TEXT : 1
, BINARY: 2
, CLOSE : 8
, PING : 9
, PONG : 10
};
var WebSocketConnection = function(req, socket, upgradeHead) {
var self = this;
var key = hashWebSocketKey(req.headers["sec-websocket-key"]);
www.it-ebooks.info
CHAPTER 3 ■ THE WEBSOCKET PROTOCOL
52
// handshake response
// http://tools.ietf.org/html/rfc6455#section-4.2.2
socket.write('HTTP/1.1 101 Web Socket Protocol Handshake\r\n' +
'Upgrade: WebSocket\r\n' +
'Connection: Upgrade\r\n' +
'sec-websocket-accept: ' + key +
'\r\n\r\n');
socket.on("data", function(buf) {
self.buffer = Buffer.concat([self.buffer, buf]);
while(self._processBuffer()) {
// process buffer while it contains complete frames
}
});
socket.on("close", function(had_error) {
if (!self.closed) {
self.emit("close", 1006);
self.closed = true;
}
});
// initialize connection state
this.socket = socket;
this.buffer = new Buffer(0);
this.closed = false;
}
util.inherits(WebSocketConnection, events.EventEmitter);
// Send a text or binary message on the WebSocket connection
WebSocketConnection.prototype.send = function(obj) {
var opcode;
var payload;
if (Buffer.isBuffer(obj)) {
opcode = opcodes.BINARY;
payload = obj;
} else if (typeof obj == "string") {
opcode = opcodes.TEXT;
// create a new buffer containing the UTF-8 encoded string
payload = new Buffer(obj, "utf8");
} else {
throw new Error("Cannot send object. Must be string or Buffer");
}
this._doSend(opcode, payload);
}
www.it-ebooks.info
CHAPTER 3 ■ THE WEBSOCKET PROTOCOL
53
// Close the WebSocket connection
WebSocketConnection.prototype.close = function(code, reason) {
var opcode = opcodes.CLOSE;
var buffer;
// Encode close and reason
if (code) {
buffer = new Buffer(Buffer.byteLength(reason) + 2);
buffer.writeUInt16BE(code, 0);
buffer.write(reason, 2);
} else {
buffer = new Buffer(0);
}
this._doSend(opcode, buffer);
this.closed = true;
}
// Process incoming bytes
WebSocketConnection.prototype._processBuffer = function() {
var buf = this.buffer;
if (buf.length < 2) {
// insufficient data read
return;
}
var idx = 2;
var b1 = buf.readUInt8(0);
var fin = b1 & 0x80;
var opcode = b1 & 0x0f; // low four bits
var b2 = buf.readUInt8(1);
var mask = b2 & 0x80;
var length = b2 & 0x7f; // low 7 bits
if (length > 125) {
if (buf.length < 8) {
// insufficient data read
return;
}
if (length == 126) {
length = buf.readUInt16BE(2);
idx += 2;
} else if (length == 127) {
www.it-ebooks.info
CHAPTER 3 ■ THE WEBSOCKET PROTOCOL
54
// discard high 4 bits because this server cannot handle huge lengths
var highBits = buf.readUInt32BE(2);
if (highBits != 0) {
this.close(1009, "");
}
length = buf.readUInt32BE(6);
idx += 8;
}
}
if (buf.length < idx + 4 + length) {
// insufficient data read
return;
}
maskBytes = buf.slice(idx, idx+4);
idx += 4;
var payload = buf.slice(idx, idx+length);
payload = unmask(maskBytes, payload);
this._handleFrame(opcode, payload);
this.buffer = buf.slice(idx+length);
return true;
}
WebSocketConnection.prototype._handleFrame = function(opcode, buffer) {
var payload;
switch (opcode) {
case opcodes.TEXT:
payload = buffer.toString("utf8");
this.emit("data", opcode, payload);
break;
case opcodes.BINARY:
payload = buffer;
this.emit("data", opcode, payload);
break;
case opcodes.PING:
// Respond to pings with pongs
this._doSend(opcodes.PONG, buffer);
break;
case opcodes.PONG:
// Ignore pongs
break;
case opcodes.CLOSE:
// Parse close and reason
var code, reason;
if (buffer.length >= 2) {
code = buffer.readUInt16BE(0);
reason = buffer.toString("utf8",2);
www.it-ebooks.info
CHAPTER 3 ■ THE WEBSOCKET PROTOCOL
55
}
this.close(code, reason);
this.emit("close", code, reason);
break;
default:
this.close(1002, "unknown opcode");
}
}
// Format and send a WebSocket message
WebSocketConnection.prototype._doSend = function(opcode, payload) {
this.socket.write(encodeMessage(opcode, payload));
}
var KEY_SUFFIX = "258EAFA5-E914-47DA-95CA-C5AB0DC85B11";
var hashWebSocketKey = function(key) {
var sha1 = crypto.createHash("sha1");
sha1.update(key+KEY_SUFFIX, "ascii");
return sha1.digest("base64");
}
var unmask = function(maskBytes, data) {
var payload = new Buffer(data.length);
for (var i=0; i<data.length; i++) {
payload[i] = maskBytes[i%4] ^ data[i];
}
return payload;
}
var encodeMessage = function(opcode, payload) {
var buf;
// first byte: fin and opcode
var b1 = 0x80 | opcode;
// always send message as one frame (fin)
// Second byte: mask and length part 1
// Followed by 0, 2, or 8 additional bytes of continued length
var b2 = 0; // server does not mask frames
var length = payload.length;
if (length<126) {
buf = new Buffer(payload.length + 2 + 0);
// zero extra bytes
b2 |= length;
buf.writeUInt8(b1, 0);
buf.writeUInt8(b2, 1);
payload.copy(buf, 2);
} else if (length<(1<<16)) {
buf = new Buffer(payload.length + 2 + 2);
www.it-ebooks.info
CHAPTER 3 ■ THE WEBSOCKET PROTOCOL
56
// two bytes extra
b2 |= 126;
buf.writeUInt8(b1, 0);
buf.writeUInt8(b2, 1);
// add two byte length
buf.writeUInt16BE(length, 2);
payload.copy(buf, 4);
} else {
buf = new Buffer(payload.length + 2 + 8);
// eight bytes extra
b2 |= 127;
buf.writeUInt8(b1, 0);
buf.writeUInt8(b2, 1);
// add eight byte length
// note: this implementation cannot handle lengths greater than 2^32
// the 32 bit length is prefixed with 0x0000
buf.writeUInt32BE(0, 2);
buf.writeUInt32BE(length, 6);
payload.copy(buf, 10);
}
return buf;
}
exports.listen = function(port, host, connectionHandler) {
var srv = http.createServer(function(req, res) {
});
srv.on('upgrade', function(req, socket, upgradeHead) {
var ws = new WebSocketConnection(req, socket, upgradeHead);
connectionHandler(ws);
});
srv.listen(port, host);
};
Testing Our Simple WebSocket Server
Now, let’s test our server. Echo is the “Hello, World” of networking, so the first thing we
will do with our new server API is create an server, as shown in Listing 3-7. Echo servers
simply respond with whatever the connected client sends. In this case, our WebSocket
echo server will respond with whatever WebSocket messages it receives.
Listing 3-7. Building an Echo Server Using Your New Server API
var websocket = require("./websocket-example");
websocket.listen(9999, "localhost", function(conn) {
console.log("connection opened");
www.it-ebooks.info

CHAPTER 3 ■ THE WEBSOCKET PROTOCOL
57
conn.on("data", function(opcode, data) {
console.log("message: ", data);
conn.send(data);
});
conn.on("close", function(code, reason) {
console.log("connection closed: ", code, reason);
});
});
You can start this server on the command line with node. Make sure websocket-
example.js is in the same directory (or installed as a module).
> node echo.js
If you then connect a WebSocket to this echo server from your browser, you will see
that every message you send from your client is echoed back by the server.
■Note When your server listens on localhost, the browser must be on the same machine.
You can also try this out with the Echo client example from Chapter 2.
Building a Remote JavaScript Console
One of the best aspects of JavaScript is how amenable it is to interactive development.
Consoles like those built into the Chrome Developer Tools and Firebug are one of the
reasons JavaScript development can be so productive. A console, also called a REPL
for “Real Eval Print Loop,” lets you enter an expression and see the result. We’ll take
advantage of the Node.js repl module and add a custom eval() function. By adding
WebSocket, we can remotely control a web application over the Internet! With this
WebSocket-powered console, we will be able to remotely evaluate expressions from a
command-line interface. Even better, we can enter one expression and see the results of
evaluating that expression for every client concurrently connected.
In this example, you’ll use the same server shown in Listing 3-6, then build two small
snippets: one that acts as a remote control and one that acts as the object you control.
Figure 3-8 shows what you’ll build in the next example.
www.it-ebooks.info
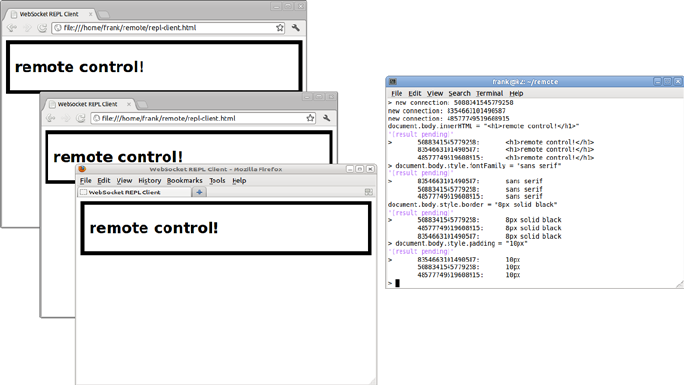
CHAPTER 3 ■ THE WEBSOCKET PROTOCOL
58
Before you build this example, ensure you’ve built the example in Listing 3-6. If
you’ve also built the Echo Server piece (Listing 3-7), you’ll need to shut down the Echo
Server before testing the ensuing code snippets. Listing 3-8 contains the JavaScript code
for the remote control.
Listing 3-8. websocket-repl.js
var websocket = require("./websocket-example");
var repl = require("repl");
var connections = Object.create(null);
var remoteMultiEval = function(cmd, context, filename, callback) {
for (var c in connections) {
connections[c].send(cmd);
}
callback(null, "(result pending)");
}
websocket.listen(9999, "localhost", function(conn) {
conn.id = Math.random().toString().substr(2);
connections[conn.id] = conn;
console.log("new connection: " + conn.id);
conn.on("data", function(opcode, data) {
console.log("\t" + conn.id + ":\t" + data);
});
conn.on("close", function() {
Figure 3-8. Remote JavaScript console
www.it-ebooks.info
CHAPTER 3 ■ THE WEBSOCKET PROTOCOL
59
// remove connection
delete connections[conn.id];
});
});
repl.start({"eval": remoteMultiEval});
We will also need a simple web page to control. The script on this page simply opens
a WebSocket to our control server, evaluates any message it receives, and responds with
the result. The client also logs incoming expressions to the JavaScript console. You will
see these expressions if you open your browser’s developer tools. Listing 3-9 shows the
web page containing the script.
Listing 3-9. repl-client.html
<!doctype html>
<title>WebSocket REPL Client</title>
<meta charset="utf-8">
<script>
var url = "ws://localhost:9999/repl";
var ws = new WebSocket(url);
ws.onmessage = function(e) {
console.log("command: ", e.data);
try {
var result = eval(e.data);
ws.send(result.toString());
} catch (err) {
ws.send(err.toString());
}
}
</script>
Now if you run node websocket-repl.js, you will see an interactive interpreter.
If you load repl-client.html in a couple of browsers, you will see that each browser
evaluates your commands. Listing 3-10 shows the output for two expressions,
navigator.userAgent and 5+5.
Listing 3-10. Expression Output from the Console
> new connection: 5206121257506311
new connection: 6689629901666194
navigator.userAgent
'(result pending)'
> 5206121257506311: Mozilla/5.0 (X11; Ubuntu; Linux x86_64; rv:13.0)
Gecko/20100101 Firefox/13.0.1
6689629901666194: Mozilla/5.0 (X11; Linux x86_64) AppleWebKit/537.1
(KHTML, like Gecko) Chrome/21.0.1180.15 Safari/537.1
5+5
www.it-ebooks.info
CHAPTER 3 ■ THE WEBSOCKET PROTOCOL
60
'(result pending)'
> 6689629901666194: 10
5206121257506311: 10
Suggested Extensions
The remote JavaScript console is a good starting point for some interesting projects. Here
are a couple ways to extend this example:
Create an HTML5 user interface for the remote control console. ·
Use a WebSocket to communicate between the user interface
and the controlling server. Consider how using a socket simplifies
sending pipelined commands and receiving delayed responses
compared to a communication strategy like HTTP with AJAX.
Once you’ve read Chapter 5, modify the remote control server to ·
use STOMP. You could broadcast commands to every connected
browser session using a topic and receive replies on a queue.
Consider how to mix in new functionality such as a remote
control service to a message driven application.
Summary
In this chapter, we explored a brief history of the Internet and protocols and why the
WebSocket Protocol was created. We examined the WebSocket Protocol in detail,
including the wire traffic, the opening and closing handshakes, and the framing
format. We used Node.js to build an example WebSocket server powering a simple
echo demo and a remote control console. While this chapter provides a good
overview of the WebSocket Protocol, you can read the full protocol specification here:
http://tools.ietf.org/html/rfc6455.
In the next chapters, we will use higher-level protocols on top of WebSocket to build
feature-rich, real-time applications.
4
www.it-ebooks.info

61
Chapter 4
Building Instant Messaging
and Chat over WebSocket
with XMPP
Chat is a great example of an Internet application that has become more difficult to
build in an HTTP-only world. Chat and instant messaging applications are inherently
asynchronous: either party can send a message at will without requiring a specific request
or response. These applications are excellent use cases for WebSocket as they benefit
hugely from reduced latency. When chatting with your friends and colleagues, you want
as little delay as possible in order to have natural conversations. After all, if there were lots
of lag, it would hardly be instant messaging.
Instant messaging is a perfect fit for WebSocket; chat applications are common
demos and examples of this technology. Most common examples use simplistic custom
messages instead of a standard protocol. In this chapter, we delve much deeper than
these basic demos, using a mature protocol to tap into a wealth of different server
implementations, powerful features, and proven scalability and extensibility.
First, we explore layering protocols with WebSocket and some of the key choices
you need to make before building an application that uses a higher-level protocol over
WebSocket. In this example, we use XMPP, which stands for eXtensible Messaging and
Presence Protocol, and is a standard that is widely used in instant messaging applications.
We take advantage of this protocol for communication by using it on top of a WebSocket
transport layer. In our example, we step through connecting a web application to the
Jabber Instant Messaging (IM) network using XMPP over WebSocket, including adding
the ability to indicate user’s status and online presence.
Layered Protocols
In Chapter 3, we discussed simple demonstrations of the WebSocket Protocol that involve
sending and receiving messages directly on the WebSocket layer. Our remote control
console example demonstrated that it is possible to use WebSocket to build simple
applications involving bidirectional communication. Imagine extending simple demos
www.it-ebooks.info
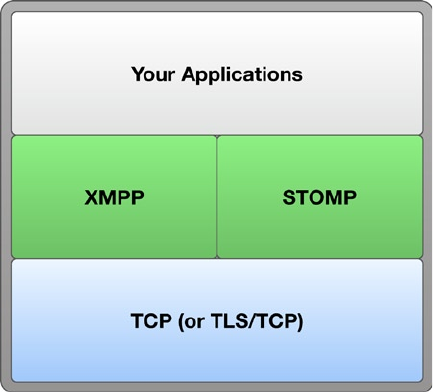
CHAPTER 4 ■ BUILDING INSTANT MESSAGING AND CHAT OVER WEBSOCKET WITH XMPP
62
Figure 4-1. Internet application layer diagram
like the remote control to build more full-featured applications like chat clients and
servers. One of the great things about WebSocket is that you can layer other protocols on
top of WebSocket to extend your applications over the Web. Let’s take a look at layering a
protocol over WebSocket.
Figure 4-1 shows a typical layering of Internet application layer protocols over TCP.
An application uses a protocol like XMPP or STOMP (Simple Text Oriented Messaging
Protocol, which we discuss in Chapter 5) to communicate between clients and servers.
XMPP and STOMP, in turn, are communicated over TCP. When using encrypted
communication, the application layer protocols are on top of TLS (or SSL), which in turn
is layered above TCP.
The WebSocket view of the world is much the same. Figure 4-2 shows a similar
diagram with WebSocket inserted as an additional layer between the application layer
protocols and TCP. XMPP and STOMP are layered on top of WebSocket, which is layered
on top of TCP. In the encrypted case, secure WebSocket communication using the
wss:// scheme is performed over a TLS connection. The WebSocket transport layer
is a relatively thin layer that enables web applications to establish full duplex network
connections. The WebSocket layer can be treated much the same as the TCP layer in
Figure 4-1 and used for all of the same protocols.
www.it-ebooks.info
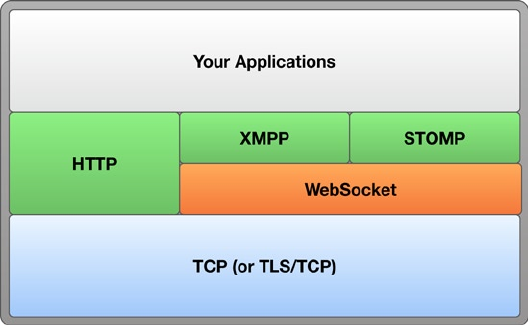
CHAPTER 4 ■ BUILDING INSTANT MESSAGING AND CHAT OVER WEBSOCKET WITH XMPP
63
Figure 4-2 includes HTTP for two reasons. One, it illustrates that HTTP exists as an
application layer protocol on top of TCP that can be used directly in web applications.
AJAX applications use HTTP as their primary or only protocol for all network interaction.
Second, Figure 4-2 shows that applications using WebSocket do not need to completely
ignore HTTP. Static resources are almost always loaded over HTTP. For instance, the
HTML, JavaScript, and CSS making up your user interfaces can still be served over HTTP
even when you choose to use WebSocket for communication. As such, in your application
protocols stack, you might use both HTTP and WebSocket over TLS and TCP.
WebSocket really shines when used as a transport layer for standard application-level
protocols. In doing so, you can reap the amazing benefits of a standard protocol along
with the power of WebSocket. Let’s take a look at some of these benefits by examining the
widely used standard chat protocol, XMPP.
XMPP: A Streaming Mile of XML
Chances are high that you have read and written your fair share of XML (eXtensible
Markup Language). XML is part of a long heritage of markup languages based on angle
brackets stretching back several decades through SGML, HTML, and their ancestors. The
World Wide Web Consortium (W3C) publishes its syntax and many web technologies
use it. In fact, prior to HTML5, XHTML was the ordained successor to HTML4. The X in XML
stands for eXtensible, and XMPP makes use of the extensibility it affords. Extending XMPP
means using XML’s extension mechanism to create namespaces, which are called XEPs
(XMPP Extension Protocols). There is a large repository of XEPs at http://xmpp.org.
XML is a format for documents; XMPP is a protocol. So, how does XMPP use
document syntax for real-time communication? One way to accomplish this is to send
each message in a discrete document. However, this method would be unnecessarily
verbose and wasteful. Another way is to treat the conversation as one long document that
grows as time passes and messages are transmitted, which is how XMPP approaches the
Figure 4-2. Web application layer diagram
www.it-ebooks.info
CHAPTER 4 ■ BUILDING INSTANT MESSAGING AND CHAT OVER WEBSOCKET WITH XMPP
64
document syntax. Each direction of the bidirectional conversation that takes place during
an XMPP connection is represented by a streaming XML document that ends when
the connection terminates. The root node of that streaming document is a <stream/>
element. The top-level children of the stream are the individual data units of the protocol,
called stanzas. A typical stanza might look something like Listing 4-1, with whitespace
removed to save bandwidth.
Listing 4-1. XMPP Stanza
<message type="chat" to="desktopuser@localhost">
<body>
I like chatting. I also like angle brackets.
</body>
</message>
Standardization
You can use XMPP over WebSocket (XMPP/WS) today, although there is no standard for
doing so. There is a draft specification at the IETF that may, after work and time, someday
inspire a standard. There are also several implementations of XMPP/WS, some of them
more experimental than others.
A standard for XMPP over WebSocket will let independent server and client
implementations interoperate with a higher probability of success and will nail down all
of the choices for binding XMPP communication to the WebSocket transport layer. These
choices include options for each semantic difference between WebSocket and TCP and how
to make use of message boundaries and opcodes, as discussed in Chapter 3. A standard will
also define a stable subprotocol name for the protocol header in the WebSocket handshake
that XMPP over WebSocket clients and servers will recognize. In the experimental stage,
software you find or create to use XMPP over WebSocket may vary on some of these choices.
Each variation is an opportunity for incompatibility between clients and servers that expect
specific behavior.
While the benefits of standardization are numerous, we don’t need to wait for a fully
baked standard to build a cool application. We can select one client and one server that
we know work well together. For example, the ejabberd-websockets module bundles a
JavaScript client library that implements the draft proposal for XMPP over WebSocket.
Alternatively, Kaazing WebSocket Gateway is a gateway (server) and incorporates a suite
of compatible clients.
Choosing a Connectivity Strategy
There are two ways to connect to an XMPP server with WebSocket: modify the XMPP
server to accept WebSocket connections or use a proxy server. While you can enable
your XMPP server to accept XMPP over WebSocket, doing so requires an update to the
server, which may not be possible if you do not control the server operations. Such is
the case with public XMPP endpoints like talk.google.com and chat.facebook.com.
In these cases, you need to create your own module according to the specification at
www.it-ebooks.info

CHAPTER 4 ■ BUILDING INSTANT MESSAGING AND CHAT OVER WEBSOCKET WITH XMPP
65
http://tools.ietf.org/html/draft-moffitt-xmpp-over-websocket-01. Alternatively,
at the time of the writing of this book, there are a few experimental modules:
ejabberd-websockets and Openfire’s module with WebSocket support. Figure 4-3
illustrates a client connecting to a WebSocket-enabled XMPP server.
Figure 4-3. Connecting to a WebSocket-aware XMPP server
The second approach is to use a proxy server that accepts WebSocket connections
from clients and makes corresponding TCP connections to back-end servers. In this case,
the back-end servers are standard XMPP servers that accept XMPP over TCP connections.
XmppClient in the Kaazing WebSocket Gateway takes this gateway approach. Here,
applications can connect through Kaazing’s gateway to any XMPP server, even servers
that have no explicit support for WebSocket. Figure 4-4 shows an example of a WebSocket
gateway server accepting WebSocket connections and making corresponding TCP
connections to a back-end XMPP server.
Figure 4-4. Connecting to an XMPP server through a WebSocket proxy
Stanza-to-Message Alignment
When choosing your connectivity strategy, it is important to understand how WebSocket
messages (which typically comprise a single WebSocket frame) are aligned to XMPP
stanzas, as the two approaches differ. In the case of WebSocket-aware XMPP servers,
stanzas are mapped one-to-one onto WebSocket messages. Each WebSocket message
contains exactly one stanza, and there can be no overlap or fragmentation. The draft
XMPP for WebSocket subprotocol specifies this alignment. Stanza-to-message alignment
is not necessary in the gateway scenario, because it is relaying WebSocket to TCP and
vice versa. TCP does not have message boundaries, so the TCP stream might be split
arbitrarily into WebSocket messages. In the gateway case, however, the client must be
www.it-ebooks.info
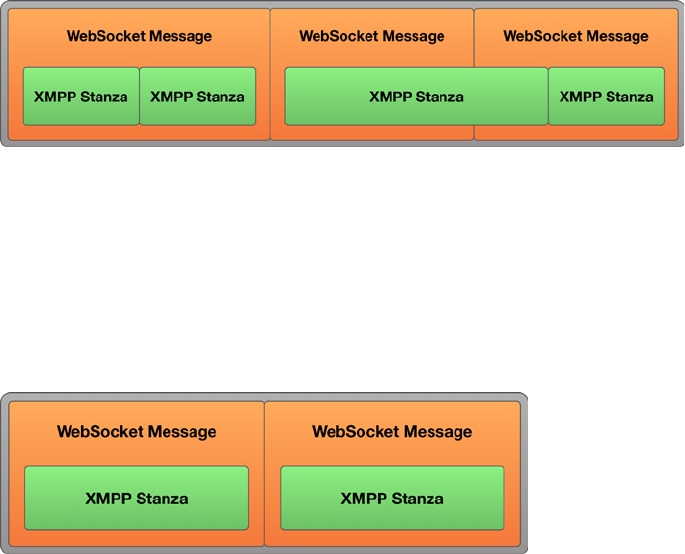
CHAPTER 4 ■ BUILDING INSTANT MESSAGING AND CHAT OVER WEBSOCKET WITH XMPP
66
capable of defragmenting characters into stanzas by understanding streaming XML.
Figure 4-5 shows the stanza-to-message alignment as described in the XMPP over
WebSocket subprotocol draft proposal. See Chapter 2 and Chapter 3 for discussions about
registering WebSocket subprotocol drafts.
Figure 4-5. Stanza-to-message alignment (XMPP over WebSocket subprotocol draft proposal)
This figure shows how WebSocket messages are aligned to XMPP stanzas in the case
where an XMPP server can directly communicate over WebSocket to a client.
Figure 4-6 shows an example where the stanza is not aligned to the message. This
figure shows how WebSocket messages do not need to be aligned to stanzas where a
proxy server accepts WebSocket connections and connects to the back-end XMPP server
over TCP.
Figure 4-6. No stanza-to-message alignment (WebSocket to TCP proxy)
Federation
Many IM networks are walled gardens. Users with accounts on a particular network can
only chat among themselves. Conversely, Jabber (http://www.jabber.org) is federated,
which means users on independently operated servers can communicate if the servers
cooperate. The Jabber network comprises thousands of servers on different domains and
millions of users. Configuring a server for federation is beyond the scope of this book.
Here, we focus on connecting clients to a single server. You can later connect your server
to the larger federated world.
www.it-ebooks.info

CHAPTER 4 ■ BUILDING INSTANT MESSAGING AND CHAT OVER WEBSOCKET WITH XMPP
67
Building a Chat and Instant Messaging
Application over WebSocket
Now that we’ve walked through some of the important concepts behind using XMPP
over WebSocket, let’s take a look at a working example and delve into the more practical
details. Here, we’ll use a WebSocket-enabled XMPP server and build a typical chat
application that communicates with the server using XMPP over WebSocket.
Using a WebSocket-Enabled XMPP Server
To build and run the example chat application for this chapter, you will need a
WebSocket-enabled XMPP chat server that is compatible with a client library. As we
mentioned, as of the writing of this book, there are a few options, including ejabberd-
websockets, an Openfire module, and a proxy called node-xmpp-bosh that understands
the WebSocket Protocol, an open source project built by Dhruv Matan. Because of the
experimental nature of these modules, your mileage may vary. However, these modules
are being rapidly developed, and you’ll likely have numerous solid options by the
publication (or your reading) of this book.
Note ■ For the purposes of this bleeding-edge example, we’ve chosen Strophe.js for the
client library. To build this example yourself, choose a WebSocket-enabled XMPP server
(or update your own XMPP server) and ensure that it is compatible with Strophe.js. Alterna-
tively, as previously mentioned, to build (or even follow) the examples in this book, you can
use the virtual machine (VM) we’ve created that contains all the code, libraries, and servers
we use in our examples. Refer to Appendix B for instructions on how to download, install,
and start the VM. Due to the experimental nature of the technologies used in this chapter
and for learning purposes, we strongly recommend you use the VM we’ve provided.
Setting Up Test Users
To test your chat application, you need a messaging network with at least two users to
demonstrate interaction. To that end, create a pair of users on the WebSocket-enabled chat
server. Then, you can use these test users to chat back and forth using the application
you’ll build in this chapter.
To ensure your server is correctly configured, try connecting two desktop XMPP
clients. For example, you can install any two of the following clients: Pidgin, Psi, Spark,
Adium, or iChat. You can find lots more at http://xmpp.org. Chances are, you already
have one or two of them installed. In the first chat client, you should see the online status
of the second user. Likewise, you should see the status of the first user in the second
client. Leave one of these users logged in so that you can test your WebSocket chat
application as you develop it.
www.it-ebooks.info
CHAPTER 4 ■ BUILDING INSTANT MESSAGING AND CHAT OVER WEBSOCKET WITH XMPP
68
The Client Library: Strophe.js
To enable your chat application to communicate with your chat server using XMPP over
WebSocket, you need a client library that enables the client to interact with XMPP. In this
example, we use Strophe.js, which is an open-source XMPP client library for JavaScript
that can run in web browsers. Strophe.js provides a low-level API for interacting with
XMPP, and includes functions for constructing, sending, and receiving stanzas. To
build higher-level abstractions like chat clients, you’ll need some knowledge of XMPP.
However, Strophe.js is naturally extensible and gives precise control to developers using
the library.
At the time of writing this book, the stable branch of Strophe.js uses a
communication layer called BOSH. BOSH, specified in the XEP-0124 extension, stands
for Bidirectional-streams over Synchronous HTTP. It is an XMPP-specific way of achieving
bidirectional communication over half-duplex HTTP similar to the Comet techniques
mentioned in Chapter 1. BOSH is older than WebSocket, and was developed out of
similar needs to address the limitations of HTTP.
WeBSOCKet, NOt BOSh
The ejabberd-websocket README calls XMPP over WebSocket “a more elegant,
modern and faster replacement to Bosh.” Certainly, now that WebSocket has been
standardized and is nearing ubiquitous deployment, Comet-like communication
techniques are quickly becoming obsolete.
See Chapter 8 for a discussion of WebSocket emulation, which talks about how to
use WebSocket with technologies that do not have native support.
Connecting and Getting Started
Before you start chatting, you need to connect your client to your XMPP/WS server. In this
step, we will establish a connection from an HTML5 client application running in a web
browser to a WebSocket-enabled XMPP server. The socket, once connected, will send XMPP
stanzas back and forth between the client and the server for the duration of the session.
To get started, create a new file called chat.html, shown in Listing 4-2. The HTML
portion of the application is just a bare-bones page including the Strophe.js library and
the JavaScript comprising the chat application.
Listing 4-2. chat.html
<!DOCTYPE html>
<title>WebSocket Chat with XMPP</title>
<meta charset="UTF-8">
<link rel="stylesheet" href="chat.css">
<h1>WebSocket Chat with XMPP</h1>
www.it-ebooks.info
CHAPTER 4 ■ BUILDING INSTANT MESSAGING AND CHAT OVER WEBSOCKET WITH XMPP
69
<!-- connect -->
<div class="panel">
<input type="text" id="username" placeholder="username">
<input type="password" id="password" placeholder="password">
<button id="connectButton">Connect</button>
</div>
<div id="presenceArea" class="panel"></div>
<div id="chatArea" class="panel"></div>
<div id="output"></div>
<!-- scripts -->
<script src="strophe.js"></script>
<script src="chat_app.js"></script>
We will link this HTML document with a tiny CSS file that adds a little bit of style to
the user interface, shown in Listing 4-3.
Listing 4-3. chat.css
body {
font-family: sans-serif;
}
#output {
border: 2px solid black;
border-radius: 8px;
width: 500px;
}
#output div {
padding: 10px;
}
#output div:nth-child(even) {
background-color: #ccc;
}
panel {
display: block;
padding: 20px;
border: 1px solid #ccc;
}
We will start with a minimal version of chat_app.js and add to it as we expand the
functionality of this example. To begin, the script will simply connect to the XMPP server
with Strophe.js and log its connection status. It also uses two input values: a username
and a password. These values are used to authenticate the user when establishing the
connection.
www.it-ebooks.info
CHAPTER 4 ■ BUILDING INSTANT MESSAGING AND CHAT OVER WEBSOCKET WITH XMPP
70
Listing 4-4. Initial Version of chat_app.js
// Log messages to the output area
var output = document.getElementById("output");
function log(message) {
var line = document.createElement("div");
line.textContent = message;
output.appendChild(line);
}
function connectHandler(cond) {
if (cond == Strophe.Status.CONNECTED) {
log("connected");
connection.send($pres());
}
}
var url = "ws://localhost:5280/";
var connection = null;
var connectButton = document.getElementById("connectButton");
connectButton.onclick = function() {
var username = document.getElementById("username").value;
var password = document.getElementById("password").value;
connection = new Strophe.Connection(
{proto: new Strophe.Websocket(url)});
connection.connect(username, password, connectHandler);
}
Be aware that this example requires the user to enter his or her credentials. In
production, it is very important to make sure that credentials are not sent across the
network unencrypted. Actually, it is far better to not send credentials across the network
at all. See Chapter 7 for information about using encryption and authentication for
WebSocket. If your chat application is part of a larger suite of web applications, you’ll
likely want to use a single sign-on mechanism, especially if you are building a chat widget
for a larger site or if your users authenticate with external credentials.
If everything goes according to plan, you should see “connected” logged onto
the page. If so, you have successfully logged a user into a chat server using XMPP over
WebSocket. You should see the connected user has come online in the roster UI of the
other XMPP client that you left connected earlier (see Figure 4-7).
www.it-ebooks.info
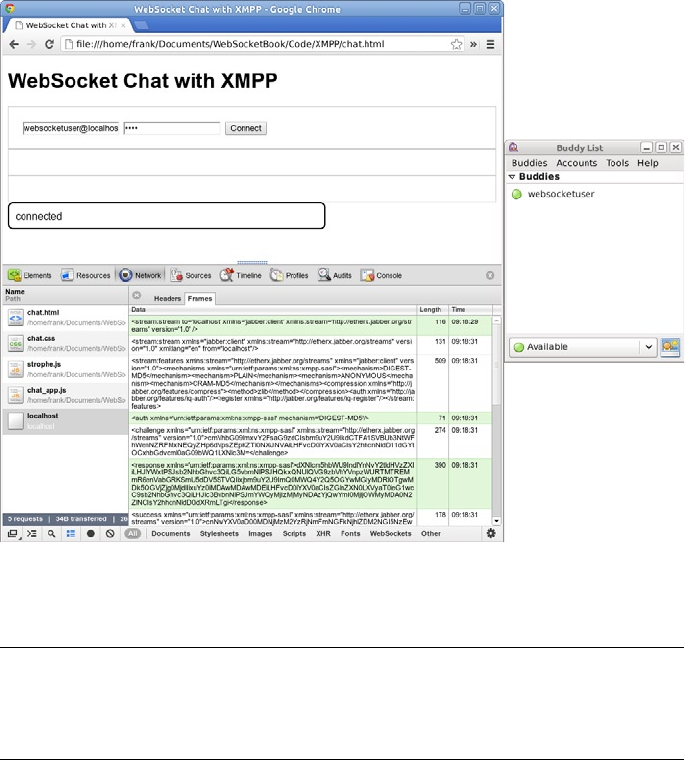
CHAPTER 4 ■ BUILDING INSTANT MESSAGING AND CHAT OVER WEBSOCKET WITH XMPP
71
Note ■ The $pres() function call in the connect handler is necessary to indicate that the
user has logged online. These presence updates can convey more details, as we will see in
the next section.
Presence and Status
Now that we know we can connect a user, let’s take a look at tracking user presence and
status. The way the web user appeared to be online in the contact list of the desktop
user is due to the presence features of XMPP. Even when you are not chatting, presence
information is constantly pushed out from the server. You may receive presence updates
when your contacts sign online, become idle, or change their status text.
Figure 4-7. Logging in from chat.html and appearing online in Pidgin. Each WebSocket
message displayed in the developer tools contains an XMPP stanza
www.it-ebooks.info
CHAPTER 4 ■ BUILDING INSTANT MESSAGING AND CHAT OVER WEBSOCKET WITH XMPP
72
In XMPP, each user has a presence. The presence has an availability value,
represented by a show tag, and a status message. To change this presence information,
send a presence stanza, as shown in Listing 4-5:
Listing 4-5. Presence Stanza Example
<presence>
<show>chat</show>
<status>Having a lot of fun with WebSocket</status>
</presence>
Let’s add a way for the user to change their status to chat_app.js (see Listing 4-6).
First, we can append some basic form controls to set the online/offline portion of the
status, called “show” in XMPP parlance. These controls will display as a dropdown menu
with the four choices for availability. The values in the dropdown menu have short
specified names like “dnd” for “do not disturb.” We will also give these human readable
labels like “Away” and “Busy.”
Listing 4-6. Presence Update UI
// Create presence update UI
var presenceArea = document.getElementById("presenceArea");
var sel = document.createElement("select");
var availabilities = ["away", "chat", "dnd", "xa"];
var labels = ["Away", "Available", "Busy", "Gone"];
for (var i=0; i<availabilities.length; i++) {
var option = document.createElement("option");
option.value = availabilities[i];
option.text = labels[i];
sel.add(option);
}
presenceArea.appendChild(sel);
The status text is free form, so we will use an input element, as shown in Listing 4-7.
Listing 4-7. Input Element for Status Text
var statusInput = document.createElement("input");
statusInput.setAttribute("placeholder", "status");
presenceArea.appendChild(statusInput);
Finally, we’ll add a button that causes the update to be sent out to the server (see
Listing 4-8). The $pres function builds a presence stanza. To update the status of the
connected user, the presence stanza contains two child nodes: show and status. Try
this out, and notice that the desktop client reflects the web user’s status practically
instantaneously. Figure 4-8 illustrates the example so far.
www.it-ebooks.info
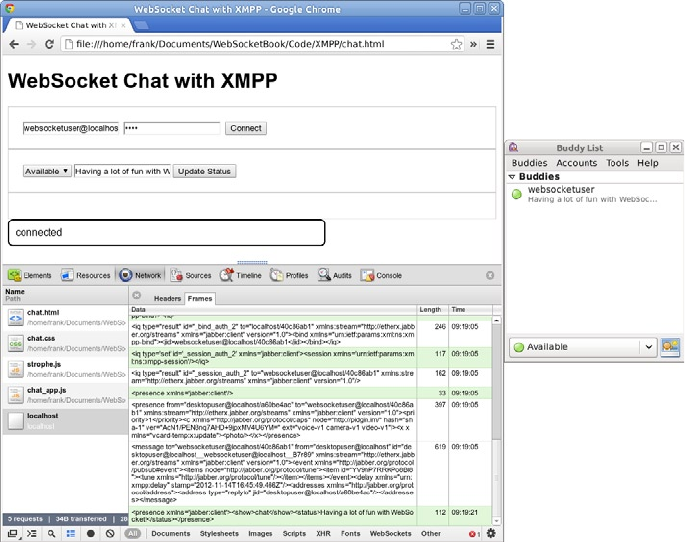
CHAPTER 4 ■ BUILDING INSTANT MESSAGING AND CHAT OVER WEBSOCKET WITH XMPP
73
To see other users’ presence updates in our web application, we need to understand
incoming presence stanzas. In this simplified example, these presence updates will just
be logged as text. Listing 4-9 shows how to do this in chat_app.js. In a full-fledged chat
application, the presence updates are usually updated next to the chat conversation.
Listing 4-8. Button Event to Send the Update
var statusButton = document.createElement("button");
statusButton.onclick = function() {
var pres = $pres()
.c("show").t("away").up()
.c("status").t(statusInput.value);
connection.send(pres)
}
presenceArea.appendChild(statusButton);
Figure 4-8. Updating presence status from the browser. The most recent WebSocket message
sent by the client contains a presence stanza.message by client
www.it-ebooks.info
CHAPTER 4 ■ BUILDING INSTANT MESSAGING AND CHAT OVER WEBSOCKET WITH XMPP
74
Listing 4-9. Handling Presence Updates
function presenceHandler(presence) {
var from = presence.getAttribute("from");
var show = "";
var status = "";
Strophe.forEachChild(presence, "show", function(elem) {
show = elem.textContent;
});
Strophe.forEachChild(presence, "status", function(elem) {
status = elem.textContent;
});
//
if (show || status){
log("[presence] " + from + ":" + status + " " + show);
}
// indicate that this handler should be called repeatedly
return true;
}
To handle presence updates with this function, we register the handler with
the connection object (see Listing 4-10). This call to addHandler() will associate the
presenceHandler() function with every presence stanza.
Listing 4-10. Registering the Presence Handler
connection.addHandler(presenceHandler, null, "presence", null);
Figure 4-9 shows that as websocketuser updates his presence status using the desktop
client to “Gone fishing – Do Not Disturb,” the browser client displays it right away.
www.it-ebooks.info

CHAPTER 4 ■ BUILDING INSTANT MESSAGING AND CHAT OVER WEBSOCKET WITH XMPP
75
Exchanging Chat Messages
Here, we get to the core of any IM application: chat messages. Chat messages are
represented as message stanzas with the type attribute set to chat. The Strophe.js
connection API has an addHandler() function that lets us listen for incoming message
stanzas matching that type, as shown in Listing 4-11.
Listing 4-11. Listening for Incoming “Chat” Message Stanzas
function messageHandler(message) {
var from = message.getAttribute("from");
var body = "";
Strophe.forEachChild(message, "body", function(elem) {
body = elem.textContent;
});
// Log message if body was present
if (body) {
log(from + ": " + body);
}
Figure 4-9. Observing presence changes in the browser
www.it-ebooks.info
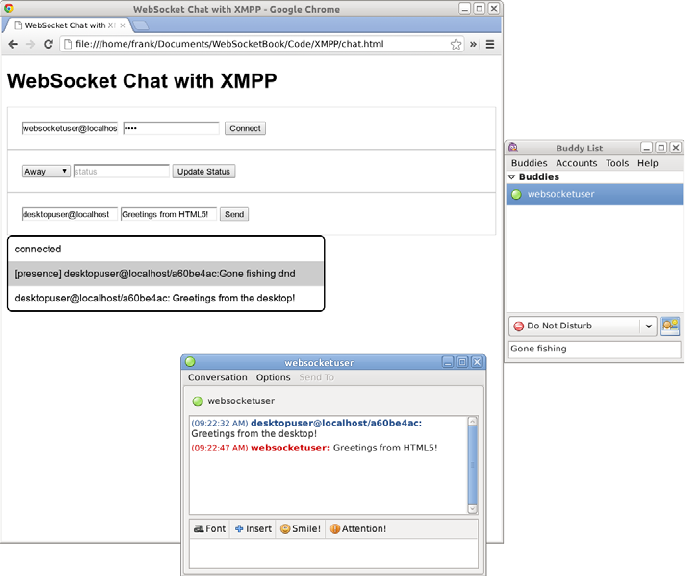
CHAPTER 4 ■ BUILDING INSTANT MESSAGING AND CHAT OVER WEBSOCKET WITH XMPP
76
// Indicate that this handler should be called repeatedly
return true;
}
We also need to associate this handler with the connection after connecting, as
shown in Listing 4-12.
Listing 4-12. Associating the addHandler with the Connection
connection.addHandler(messageHandler, null, "message", "chat");
Now, try sending a message from one of your chat clients, like Pidgin, to the web
user. The message handler function should be called with a message stanza. Figure 4-10
illustrates a chat message exchange.
Figure 4-10. Chatting between Pidgin and chat.html
To send a message back to the web user, you need to send a message stanza to the
server. This message stanza must have a type attribute of "chat" and a body element
containing the actual chat text, as shown in Listing 4-13.
www.it-ebooks.info
CHAPTER 4 ■ BUILDING INSTANT MESSAGING AND CHAT OVER WEBSOCKET WITH XMPP
77
Listing 4-13. Sending a Message Stanza to the Server
<message type="chat" to="desktopuser@localhost">
<body>
I like chatting. I also like angle brackets.
</body>
</message>
To build this message with Strophe.js, use the $msg builder function. Create a
message stanza with the type attribute set to chat and the to attribute set to the user with
whom you want to chat. The other user should receive the message shortly after you send
the message on the connection. Listing 4-14 shows an example of this message stanza.
Listing 4-14. Building a Message with Strophe.js
// Create chat UI
var chatArea = document.getElementById("chatArea");
var toJid = document.createElement("input");
toJid.setAttribute("placeholder", "user@server");
chatArea.appendChild(toJid);
var chatBody = document.createElement("input");
chatBody.setAttribute("placeholder", "chat body");
chatArea.appendChild(chatBody);
var sendButton = document.createElement("button");
sendButton.textContent = "Send";
sendButton.onclick = function() {
var message = $msg({to: toJid.value, type:"chat"})
.c("body").t(chatBody.value);
connection.send(message);
}
chatArea.appendChild(sendButton);
And now, you’re chatting. Of course, you can chat between web clients, desktop
clients, or a combination of the two. This chat application is a great example of HTML5
and WebSocket enabling desktop-class experiences in the web browser through
integration with standard network protocols. This web application is a true peer of the
desktop client. They are both first-class participants in the same network, because they
understand the same application level protocol. And yes, XMPP is a standard protocol,
even if this particular layering onto WebSocket is not yet standardized. It retains nearly all
of the benefits of XMPP over TCP, even as a draft.
Conversations between any number of web and desktop clients are possible.
The same users can connect from either client. In Figure 4-11, both users are using the
web client.
www.it-ebooks.info
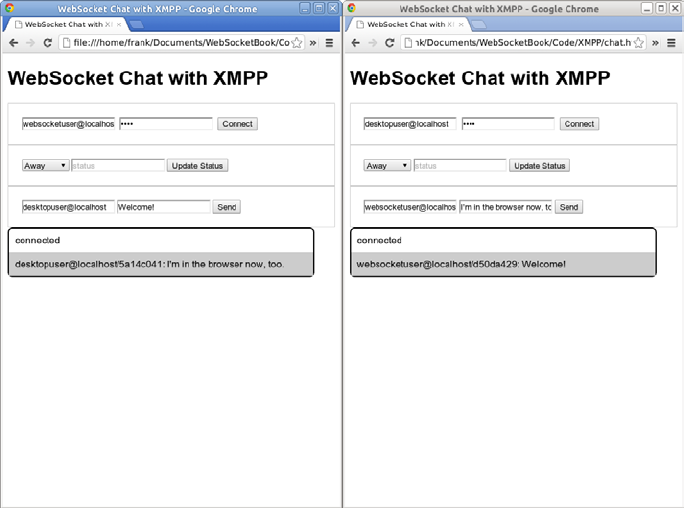
CHAPTER 4 ■ BUILDING INSTANT MESSAGING AND CHAT OVER WEBSOCKET WITH XMPP
78
Pings and Pongs
Depending on your server configuration, this application might automatically disconnect
after a period of time. The disconnection is probably because the server sent a ping and
the client didn’t promptly respond with a pong. Pings and pongs are used in XMPP for the
same purpose they are used in WebSocket: to keep connections alive and to check the
health of a connection. Pings and pongs use iq stanzas. In XMPP, “iq” stands for info/
query and is a way of performing request/response queries on top of the asynchronous
connection. A ping looks like Listing 4-15.
Listing 4-15. XMPP Server ping
<iq type="get" id="86-14" from="localhost"
to="websocketuser@localhost/cc9fd219" >
<ping xmlns="urn:xmpp:ping"/>
</iq>
The server will expect a response in the form of an iq result with the matching ID
(see Listing 4-16).
Figure 4-11. Conversation between web clients
www.it-ebooks.info
CHAPTER 4 ■ BUILDING INSTANT MESSAGING AND CHAT OVER WEBSOCKET WITH XMPP
79
Listing 4-16. Setting the Client Response
<iq type="result" id="86-14" to="localhost"
from "websocketuser@localhost/cc9fd219" />
To handle pings in Strophe.js, we need to register a function to handle all iq stanzas
with the urn:xmpp:ping namespace and type="get" (see Listing 4-17). As in the previous
steps, we do this by registering a handler on the connection object. The handler code
builds the appropriate response and sends it back to the server.
Listing 4-17. Registering a Handler for iq Stanzas
function pingHandler(ping) {
var pingId = ping.getAttribute("id");
var from = ping.getAttribute("from");
var to = ping.getAttribute("to");
var pong = $iq({type: "result", "to": from, id: pingId, "from": to});
connection.send(pong);
// Indicate that this handler should be called repeatedly
return true;
}
Listing 4-18 shows how the handler is registered.
Listing 4-18. Registered addHandler
connection.addHandler(pingHandler, "urn:xmpp:ping", "iq", "get");
Completed Chat Application
Listing 4-19 shows the finished, end-to-end chat application, complete with pings and pongs.
Listing 4-19. Final Version of chat_app.js
// Log messages to the output area
var output = document.getElementById("output");
function log(message) {
var line = document.createElement("div");
line.textContent = message;
output.appendChild(line);
}
function connectHandler(cond) {
if (cond == Strophe.Status.CONNECTED) {
log("connected");
connection.send($pres());
}
}
www.it-ebooks.info
CHAPTER 4 ■ BUILDING INSTANT MESSAGING AND CHAT OVER WEBSOCKET WITH XMPP
80
var url = "ws://localhost:5280/";
var connection = null;
var connectButton = document.getElementById("connectButton");
connectButton.onclick = function() {
var username = document.getElementById("username").value;
var password = document.getElementById("password").value;
connection = new Strophe.Connection({proto: new Strophe.Websocket(url)});
connection.connect(username, password, connectHandler);
// Set up handlers
connection.addHandler(messageHandler, null, "message", "chat");
connection.addHandler(presenceHandler, null, "presence", null);
connection.addHandler(pingHandler, "urn:xmpp:ping", "iq", "get");
}
// Create presence update UI
var presenceArea = document.getElementById("presenceArea");
var sel = document.createElement("select");
var availabilities = ["away", "chat", "dnd", "xa"];
var labels = ["Away", "Available", "Busy", "Gone"];
for (var i=0; i<availabilities.length; i++) {
var option = document.createElement("option");
option.value = availabilities[i];
option.text = labels[i];
sel.add(option);
}
presenceArea.appendChild(sel);
var statusInput = document.createElement("input");
statusInput.setAttribute("placeholder", "status");
presenceArea.appendChild(statusInput);
var statusButton = document.createElement("button");
statusButton.textContent = "Update Status";
statusButton.onclick = function() {
var pres = $pres();
c("show").t(sel.value).up();
c("status").t(statusInput.value);
connection.send(pres);
}
presenceArea.appendChild(statusButton);
function presenceHandler(presence) {
var from = presence.getAttribute("from");
var show = "";
var status = "";
www.it-ebooks.info
CHAPTER 4 ■ BUILDING INSTANT MESSAGING AND CHAT OVER WEBSOCKET WITH XMPP
81
Strophe.forEachChild(presence, "show", function(elem) {
show = elem.textContent;
});
Strophe.forEachChild(presence, "status", function(elem) {
status = elem.textContent;
});
if (show || status){
log("[presence] " + from + ":" + status + " " + show);
}
// Indicate that this handler should be called repeatedly
return true;
}
// Create chat UI
var chatArea = document.getElementById("chatArea");
var toJid = document.createElement("input");
toJid.setAttribute("placeholder", "user@server");
chatArea.appendChild(toJid);
var chatBody = document.createElement("input");
chatBody.setAttribute("placeholder", "chat body");
chatArea.appendChild(chatBody);
var sendButton = document.createElement("button");
sendButton.textContent = "Send";
sendButton.onclick = function() {
var message = $msg({to: toJid.value, type:"chat"})
.c("body").t(chatBody.value);
connection.send(message);
}
chatArea.appendChild(sendButton);
function messageHandler(message) {
var from = message.getAttribute("from");
var body = "";
Strophe.forEachChild(message, "body", function(elem) {
body = elem.textContent;
});
// Log message if body was present
if (body) {
log(from + ": " + body);
}
www.it-ebooks.info
CHAPTER 4 ■ BUILDING INSTANT MESSAGING AND CHAT OVER WEBSOCKET WITH XMPP
82
// Indicate that this handler should be called repeatedly
return true;
}
function pingHandler(ping) {
var pingId = ping.getAttribute("id");
var from = ping.getAttribute("from");
var to = ping.getAttribute("to");
var pong = $iq({type: "result", "to": from, id: pingId, "from": to});
connection.send(pong);
// Indicate that this handler should be called repeatedly
return true;
}
Suggested Extensions
Now that we’ve built a basic browser-based chat application, you can take this example
and do lots of other cool things to turn it into a full-fledged application.
Build a User Interface
Our example web page, chat.html, obviously does not have the most beautiful or usable
user interface. Consider enhancing the UI of your chat client to incorporate more user-
friendly features like tabbed conversations, automatic scrolling, and a visible contact list.
Another benefit of building this as a web application is that you have many powerful tools
for making a gorgeous and flexible design come to life with HTML, CSS, and JavaScript.
Use XMPP Extensions
XMPP has a rich extension ecosystem. There are hundreds of extension proposals or
“XEPs” on http://xmpp.org. These range from functionality like avatars and group chat
to VOIP session initialization.
XMPP can be a great way to add social features to web applications. The built-in
support for contacts, presence, and chat provides a social core on top of which you can
add collaboration, social notifications, and so on. Many extensions have this goal. These
include XEPS for microblogging, commenting, avatars, and publishing personal event
streams.
Connect to Google Talk
Google Talk, the chat service you may be familiar with from Gmail and Google+, is
actually part of the Jabber IM network. There is a publicly accessible XMPP server
listening on talk.google.com on port 5222. If you have a Google account, you can point
www.it-ebooks.info
CHAPTER 4 ■ BUILDING INSTANT MESSAGING AND CHAT OVER WEBSOCKET WITH XMPP
83
any compatible XMPP client at that address and log in. To connect to Google Talk with
your own web client, point a WebSocket proxy server at that address. That server requires
encryption, so make sure the server is configured to make connections over TLS.
Summary
In this chapter, we explored how to layer protocols, specifically standard protocols,
over WebSocket and how standard application layer protocols like XMPP may fit into a
standard web architecture. We built a simple chat client that uses the widely used chat
protocol, XMPP, over WebSocket. In doing so, we saw the power of using WebSocket as
a transport layer along with this standard application layer protocol to connect a web
application to an interactive network.
In the next chapter, we will use STOMP on top of WebSocket to build a feature-rich,
real-time messaging application.
o
www.it-ebooks.info

85
Chapter 5
Using Messaging over
WebSocket with STOMP
In the previous chapter, we explored the concept of layering protocols over WebSocket
and some of the key benefits of layering a standards-based protocol over WebSocket.
Specifically, we looked at building a standard instant messaging and presence protocol,
XMPP, over WebSocket. In this chapter, we examine how to use a messaging protocol
with WebSocket.
Messaging is an architectural style characterized by sending asynchronous messages
between independent components, allowing you to build loosely coupled systems.
Messaging provides an abstraction layer for communication patterns, and thus is a very
flexible and powerful way to write networked applications.
Key players in messaging are the message broker and the clients. The message
broker accepts connections from the clients, handles messages coming from the clients,
and sends messages to them. The broker can also handle responsibilities such as
authentication, authorization, message encryption, reliable message delivery, message
throttling, and fanout. When clients connect to the message broker, they can send
messages to the broker, as well as receive messages sent by the broker to them. This
model is called publish/subscribe, where the message broker publishes a number of
messages and the client subscribes to all or, more commonly, a subset of the messages.
Messaging is widely used in enterprises as well to integrate disparate enterprise
applications. Besides loosely coupling enterprise systems, enterprise messaging focuses
on key enterprise requirements, including encryption, single sign-on, authorization, high
availability, and scalability.
Similar to how we layered XMPP over WebSocket, you can also layer a
publish/subscribe protocol over WebSocket. One example of a publish/subscribe
(or, colloquially, pub/sub) protocol is STOMP (Simple or Streaming Text Oriented
Messaging Protocol). Figure 5-1 shows a diagram of how STOMP over WebSocket relates
to the layering of other protocols.
www.it-ebooks.info
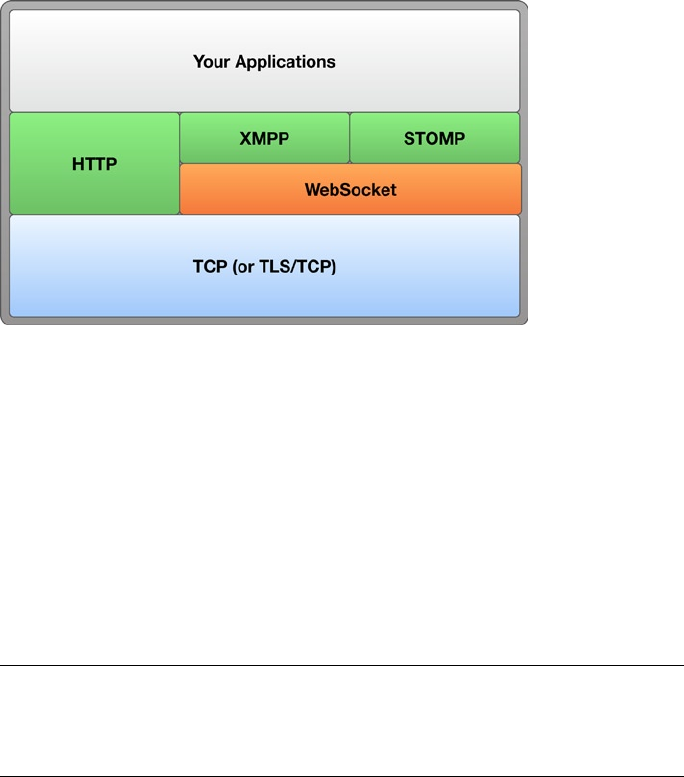
CHAPTER 5 ■ USING MESSAGING OVER WEBSOCKET WITH STOMP
86
WebSocket is very well suited to a typical messaging architecture, where there may
be a high volume of messages flowing from the message broker to the client at fast rates.
For example, one typical use case for messaging is a client subscribing to foreign exchange
or stock information; in this case, the messages (the exchange rate, the stock value, and
so on) are very small but the client’s receiving of the messages in real time and with low
latency is crucial to the success of the application. Based on what you’ve hopefully learned
in this book so far, you can see how WebSocket is a great fit for such applications.
In this chapter, we’ll examine pub/sub models, a widely used protocol (STOMP),
then walk through building your own pub/sub application—a game!—using STOMP over
WebSocket. We’ll use the popular open source message broker Apache ActiveMQ and
explore some of the ways you can use STOMP with WebSocket in your own architecture.
Note ■ The Text portion of the STOMP definition signifies that the protocol is text oriented.
Chapter 6, which focuses on the RFB protocol, describes how to use a binary-oriented
protocol over WebSocket.
Overview of Publish and Subscribe Models
A common messaging pattern is the publish/subscribe pattern (pub/sub). In the
pub/sub pattern, clients connect to a broker that dispatches messages. A client can
publish messages to the broker and/or subscribe to one or more message feeds.
In the messaging world there are two frequently used message distribution
techniques, as shown in Figure 5-2:
Figure 5-1. Layering STOMP over WebSocket
www.it-ebooks.info
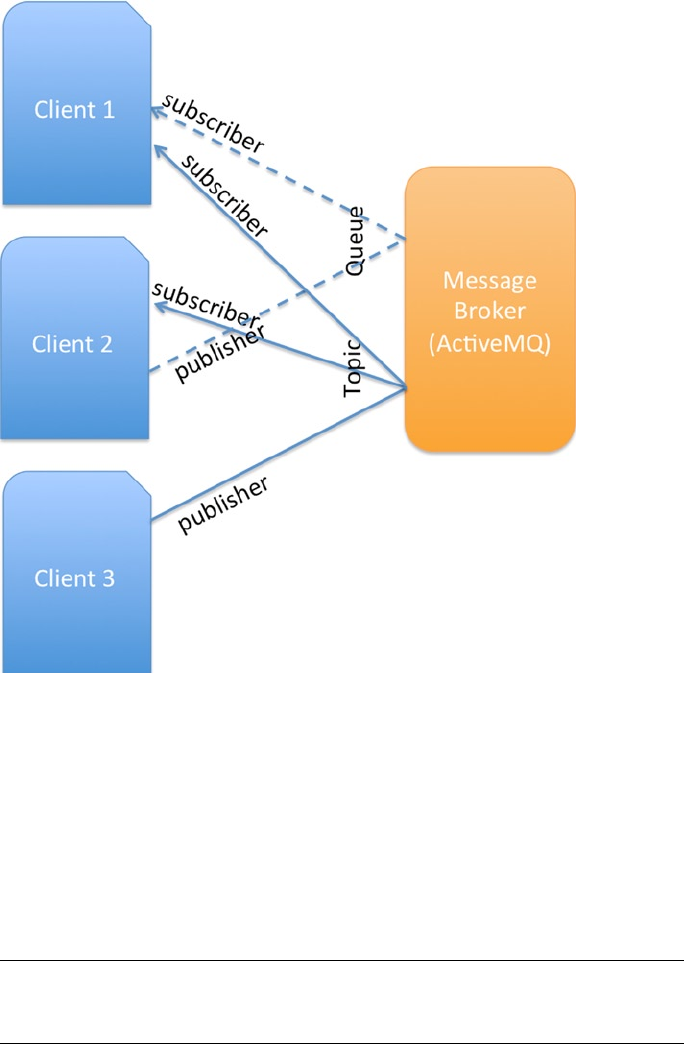
CHAPTER 5 ■ USING MESSAGING OVER WEBSOCKET WITH STOMP
87
Queue: A distribution mechanism for delivering messages to a •
single consumer. Any number of clients (publishers) can publish
messages to a queue, but every message is consumed by one and
only one client (consumer).
Topic: A distribution mechanism for delivering messages •
to multiple consumers. Any number of clients (publishers)
can publish messages to a topic, and any number of clients
(consumers) can consume them.
Note ■ Not every message broker uses topics and queues. In this chapter, though, we use
Apache ActiveMQ, which does support topics and queues.
Figure 5-2. Messaging with topics and queues
www.it-ebooks.info
CHAPTER 5 ■ USING MESSAGING OVER WEBSOCKET WITH STOMP
88
The more you use WebSocket, the more you may realize that the requirements for
building WebSocket-powered applications resemble classic messaging concepts. For
example, perhaps you want to extend the reach of your enterprise messaging protocols
to the Web by distributing large quantities of messages to a large number of clients. Or,
suppose you’re building a collaborative application that requires your WebSocket clients
to send and receive data to and from other WebSocket clients. These two examples
illustrate messaging applications and WebSocket applications alike. As you will see in this
chapter, the two technologies work well together and layering messaging over WebSocket
enables you to build powerful messaging applications.
Messaging systems differ in how they integrate with clients. Some, like brokers that
support STOMP, offer protocol-level interoperability. Anyone implementing a compatible
protocol client can connect to those systems from any platform and language. Others
offer APIs that are provided for some select platforms chosen by the system vendor.
The simplest open, widely used protocol for messaging is STOMP: Simple
(or Streaming) Text Oriented Messaging Protocol. The most widely used messaging
API in the enterprise is JMS: Java Message Service. Unlike STOMP, which promotes
interoperability by defining a wire protocol, JMS is just an API. STOMP has been
implemented for many different languages; because of its nature as an API, JMS is almost
exclusively reigning in the Java world.
A newly standardized open messaging protocol is AMQP: Advanced Message
Queuing Protocol. AMQP 1.0 became an OASIS standard in October 2012. Although
AMQP was created with wide industry support, whether it can live up to the popularity
and success of STOMP and JMS remains to be seen. To learn more about AMQP,
see http://amqp.org.
In this chapter we walk through using STOMP over WebSocket (STOMP/WS). But if
your interest is JMS or AMQP over WebSocket, there are vendors and projects that can offer
you these capabilities. In addition, there are several proprietary pub/sub implementations
over WebSocket: some are simple, some more sophisticated. See Appendix B for a list of
current WebSocket servers that may have the support you need. The steps in this chapter
will hopefully also help give you a general understanding of how pub/sub over WebSocket
implementations work.
Introduction to STOMP
STOMP is an open protocol for messaging that was originally developed for use with
Apache ActiveMQ and has spread widely to other systems. STOMP does not have topics
or queues. STOMP messages are sent and received from destinations; the STOMP
server decides how these destinations behave. This behavior is similar to HTTP, in that
servers just have URLs, and it is up to the server to decide how to serve those URLs.
In the example we build in this chapter, we use STOMP with ActiveMQ. ActiveMQ uses
destination names to expose messaging features including topics and queues, temporary
destinations, and hierarchical subscriptions.
There is a running joke about standards whose names include the word “simple”:
they are almost universally overcomplicated. Examples include SNMP (Simple Network
Management Protocol), SOAP (Simple Object Access Protocol), and SMTP (Simple
Mail Transfer Protocol). STOMP is a genuinely simple protocol: it is text oriented and
resembles HTTP in its appearance. Each frame consists of a command, headers,
www.it-ebooks.info

CHAPTER 5 ■ USING MESSAGING OVER WEBSOCKET WITH STOMP
89
and a body. STOMP message bodies can contain any text or binary data. Listing 5-1 shows
an example SEND frame containing a text body. This example depicts a NULL terminated
SEND frame, which sends a message to a destination named /topic/hello/world.
The black square at the end of the message represents NULL, an unprintable character.
Listing 5-1. A NULL Terminated SEND Frame
SEND
destination: /topic/hello/world
content-type: text/plain
hello, world!
The content-length header communicates the size of the frame body. This header
is optional. Messages without content-length headers end with NULL (0x00) bytes to
mark the end of their body content. Messages terminated in that way cannot contain
NULL bytes in the middle of their payload.
Note ■ The syntax of STOMP frames is handled by client and server software you can use
in your applications, but if you would like to develop your own implementation, you can refer
to the specification at http://stomp.github.com.
You can layer STOMP over WebSocket in the same manner as any TCP-level
protocol, or align it such that each STOMP frame occupies exactly one WebSocket frame.
Getting Started with Web Messaging
Now that we’ve examined messaging concepts, as well as some of the great benefits
WebSocket can bring to a messaging protocol like STOMP, let’s build a working example
of a messaging application that communicates messages via a message broker to a client,
using STOMP over WebSocket.
In this example, we’ll use a widely available open source message broker, Apache
ActiveMQ, which supports WebSocket. We’ll step through configuring ActiveMQ to accept
WebSocket connections, allowing us to communicate using STOMP over WebSocket.
ActiveMQ also conveniently includes out-of-the-box demos, which we’ll use to walk
through some of the concepts we’ve discussed. Then, we’ll build our own STOMP/WS
application. You can learn more about ActiveMQ at http://activemq.apache.org.
www.it-ebooks.info
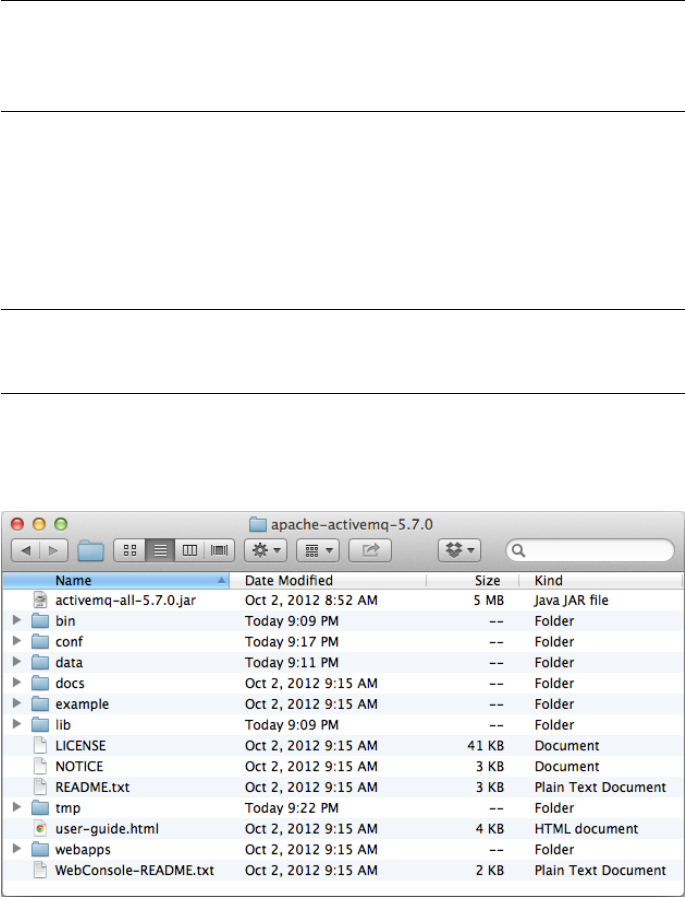
CHAPTER 5 ■ USING MESSAGING OVER WEBSOCKET WITH STOMP
90
Note■ To build (or even follow) the examples in this book, you can choose to use the virtual
machine (VM) we’ve created that contains all the code, libraries, and servers we use in our
examples. Refer to Appendix B for instructions on how to download, install, and start the VM.
Setting Up a Message Broker
To get started, download the message broker from
http://activemq.apache.org/download.html. At the time of writing this book, the most
recent ActiveMQ version available is 5.7, supporting STOMP 1.1, but more recent versions
should work just as well.
Note■ The ActiveMQ download is available in two flavors: one for Windows (*.zip), and
one for the various Unix flavors: Linux, Unix, and Mac (*.tar.gz).
After downloading and extracting ActiveMQ, your directory structure should look
similar to what’s shown in Figure 5-3.
Figure 5-3. The ActiveMQ home directory after installation
www.it-ebooks.info
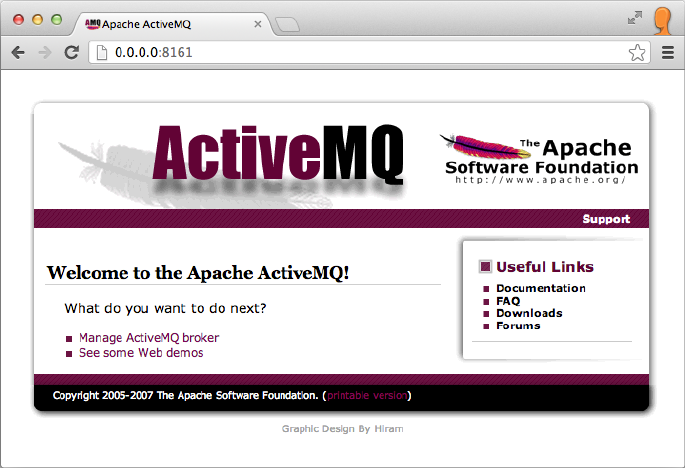
CHAPTER 5 ■ USING MESSAGING OVER WEBSOCKET WITH STOMP
91
The Welcome page lists useful links. The first link, Manage ActiveMQ broker, takes
you to the ActiveMQ management console, which we’ll describe in more depth later. The
second link, “See some Web demos” takes you to the launch page for the demos that ship
with the product. Click the See some Web demos link, or simply append /demo to the
URL: http://0.0.0.0:8161/demo.
The first demo in the list is the WebSocket example. In order for this demo to work,
we need to configure the WebSocket transport that implements STOMP over it. In your
terminal, stop ActiveMQ; for example, if you started it with the command in Listing 5-1,
simply press Ctrl+C. Once you’ve stopped ActiveMQ, you can now configure the message
broker to use WebSocket.
To start ActiveMQ, open a terminal and navigate to the bin directory in your
ActiveMQ home, which is the directory where you extracted ActiveMQ. Run the
command shown in Listing 5-2.
Listing 5-2. Starting Apache ActiveMQ
$> ./activemq console
After successfully starting up ActiveMQ, you can open a browser and navigate to the
Welcome page at http://0.0.0.0:8161, as shown in Figure 5-4.
Figure 5-4. The Apache ActiveMQ Welcome Page
www.it-ebooks.info
CHAPTER 5 ■ USING MESSAGING OVER WEBSOCKET WITH STOMP
92
First, open the file ActiveMQ_HOME/conf/activemq.xml and search for the string
transportConnectors. Below the openwire transport connector, add the snippet shown
in Listing 5-3.
Listing 5-3. Declaring the WebSocket Connector
<transportConnectors>
<transportConnector name="websocket" uri="ws://0.0.0.0:61614"/>
</transportConnectors>
Now, the transport connector section of your activemq.xml file should look similar
to Listing 5-4 (newly added section highlighted).
Listing 5-4. activemq.xml Snippet with the WebSocket Connector
<!-- The transport connectors expose ActiveMQ over a given
protocol to clients and other brokers. For more
information, see:
http://activemq.apache.org/configuring-transports.html -->
<transportConnectors>
<transportConnector name="openwire" uri="tcp://0.0.0.0:61616"/>
</transportConnectors>
<transportConnectors>
<transportConnector name="websocket" uri="ws://0.0.0.0:61614"/>
</transportConnectors>
Save the activemq.xml file and start ActiveMQ again, as shown in Listing 5-2.
Confirm that the WebSocket connector has been started, by looking for the line shown in
Listing 5-5 in the console.
Listing 5-5. Log Message Indicating that the WebSocket Connector has been Started
INFO | Connector websocket Started
Now, you’re ready to start the WebSocket example that ships as part of ActiveMQ. Navigate
to http://0.0.0.0:8161/demo, and click the WebSocket example link, or simply enter the
direct URL in your browser’s address bar: http://0.0.0.0:8161/demo/websockets.html.
Figure 5-5 shows the page that displays at this URL.
www.it-ebooks.info

CHAPTER 5 ■ USING MESSAGING OVER WEBSOCKET WITH STOMP
93
Note ■ To troubleshoot the demo or learn more about configuring WebSocket with
ActiveMQ, see the product’s instructions at http://activemq.apache.org/websockets.html.
Seeing STOMP Concepts in Action
ActiveMQ’s WebSocket demo illustrates some of the basic STOMP concepts we discussed
earlier in this chapter and provides an easy way to see them in action before building the
application ourselves. Let’s take a look at how these concepts surface in this demo.
To get started, you must first connect to the server. When we updated the activemq.xml
file, we set up the server URL at ws://0.0.0.0:61614/stomp. You can use this URL now.
Then, you need to provide user credentials: a user name and a password. We will use
guest both as the user name (labeled as Login in the sample), and as the password.
Finally, you must provide a queue as a destination. By default it’s called test. The /queue
prefix indicates that this is a queue, and /test is the name of the queue. Feel free to
change the latter part of the string, for example: /queue/stompDemo.
Note ■ For the demo to work, you just need to change the server URL. Be sure to use
0.0.0.0 instead of localhost. All the other fields are pre-populated for you, and you don’t
need to change them.
After you click Connect, your application displays, as shown in Figure 5-6.
Figure 5-5. The WebSocket Demo, which ships with Apache ActiveMQ
www.it-ebooks.info

CHAPTER 5 ■ USING MESSAGING OVER WEBSOCKET WITH STOMP
94
In Figure 5-6, notice that the STOMP messages are logged. Let’s take a closer look at
these messages. First, the WebSocket connection is established, and a STOMP connection
is opened with the credentials provided: guest/guest. A heartbeat message is then sent.
After successfully creating the STOMP connection, the demo application subscribes to
the stompDemo queue.
Now, open a second browser window (you can open a new window of the same
browser or start a different browser) and provide the exact same connection data you
used above. At this point, you can start sending messages back and forth between the
browser windows.
Building a STOMP over WebSocket Application
Now that we’ve looked at a simple demo of a STOMP/WS application, let’s try building
one. Here, we step through building an application that allows users to play the popular
Figure 5-6. Running the Apache ActiveMQ WebSocket Demo
www.it-ebooks.info
CHAPTER 5 ■ USING MESSAGING OVER WEBSOCKET WITH STOMP
95
hand game rock-paper-scissors, also known as “roshambo.” If you’re not familiar
with the game, Wikipedia provides plenty of information about it:
http://en.wikipedia.org/wiki/Rock-paper-scissors.
The Flow of the Game
Let’s review the requirements and the flow of the game. The traditional way of playing the
game requires participants to call their object (rock, paper, or scissors) at exactly the same
time. To achieve this, the game is preceded by a “sync-up phase,” after which the players
shout their choice.
The beauty of playing the game in a browser is that users can be remote, which also
means that this “sync-up phase” will work slightly differently. To imitate the “sync-up
phase” in an online setting, we’ll instead hide the players’ selections from each other until
both players have picked their object.
Here is an overview of how the browser-based game works between two players:
1. Player 1 (the player that moves first) selects an option (rock,
paper, or scissors). Player 1’s app displays this selection.
2. Player 2’s (the slower player’s) app receives Player 1’s move
(but does not display the selection) and indicates that Player 1
has made a selection.
3. Player 2 selects a move (rock, paper, or scissors).
4. Player 1’s app receives and displays Player 2’s selection.
5. Player 2’s app displays the selections of both Player 1 and
Player 2.
The challenge with building this application is whether we can make it run
exclusively in the browser, without any back-end code or logic. How do we do this? With
messaging and WebSocket, of course.
First, we must consider how the apps will communicate. For the purposes of this
demonstration, we’ll walk through building this game with two players, where the two
applications communicate directly with each other. You’ll recall from Figure 5-2 that we
can use queues (which deliver messages to a single consumer), rather than topics (which
distribute messages to multiple consumers).
To achieve our goals, and keep our application reasonably straightforward, we build
the app with two queues, where Player 1’s app publishes to one queue and Player 2’s app
consumes from the same queue. Player 2’s app then publishes to a second queue and
Player 1’s app consumes messages from the second queue.
The queues will be identified by the players’ names that we ask them to enter before
starting the game.
www.it-ebooks.info
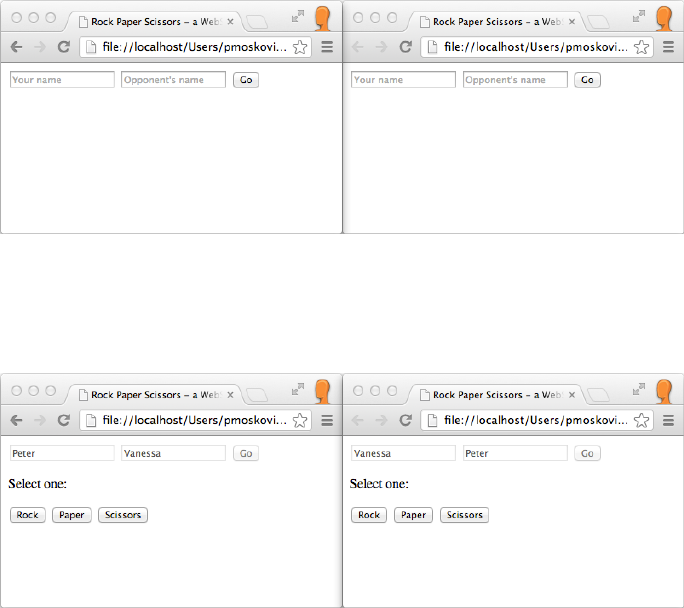
CHAPTER 5 ■ USING MESSAGING OVER WEBSOCKET WITH STOMP
96
Based on these requirements, let’s walk through the players’ interactions with
the app. When the app starts, it waits for the players to enter their names, as shown in
Figure 5-7.
Figure 5-8. Users entering their names in the rock-paper-scissors application
Figure 5-7. Running the rock-paper-scissors application in two browser windows side-by-side
The players enter their names and click the Go button, as shown in Figure 5-8.
Player 1 (Peter) makes a selection. This selection is reflected in the interface, as
shown in Figure 5-9. On Player 2’s (Vanessa’s) screen, a message displays that indicates
to the player that the opponent has made a selection: Your opponent is waiting for you.
Make your move!
www.it-ebooks.info
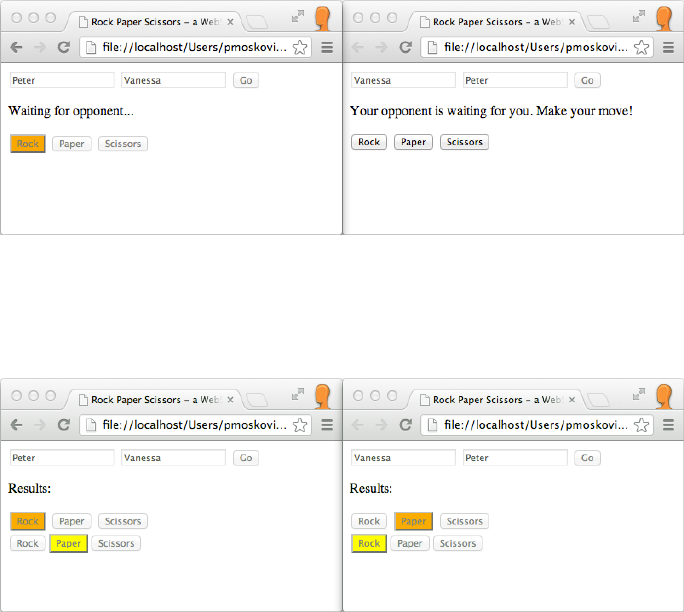
CHAPTER 5 ■ USING MESSAGING OVER WEBSOCKET WITH STOMP
97
After the second player makes a selection, the results are displayed immediately to
both players, as shown in Figure 5-10.
In a “real” rock-paper-scissors game, after each round you want to declare a winner.
For the sake of keeping this demo simple and the source code focused, we do not include
this feature.
Creating the Game
Our simple application consists of our own HTML and a JavaScript file, and leverages two
external open source JavaScript resources. The first JavaScript library is called stomp.js,
and was written by Jeff Mesnil. This library is included in the distribution for this book,
but can also be found on GitHub: https://github.com/jmesnil/stomp-websocket. This
library enables a JavaScript application to speak STOMP/WS with our WebSocket-enabled
ActiveMQ message broker.
The second JavaScript library is jQuery, which we use for simplicity and helps
us write our code in a more concise manner. We call our HTML and JavaScript files
containing our application logic index.html and rps.js, respectively.
Figure 5-9. Player 1 moves
Figure 5-10. Player 2 moves
www.it-ebooks.info
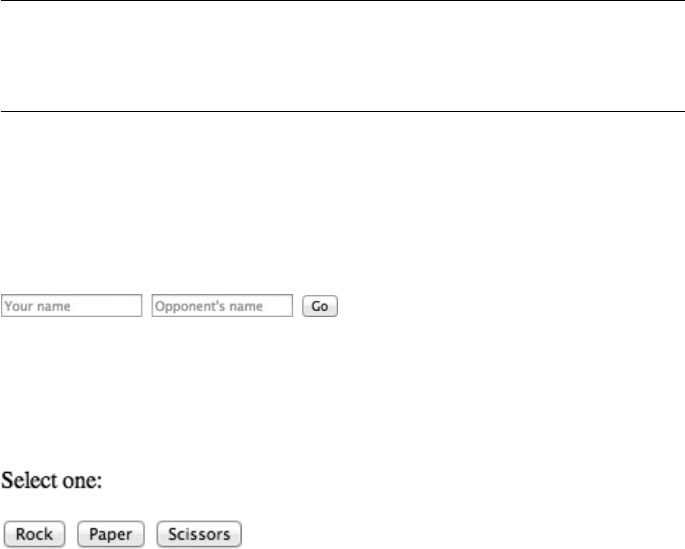
CHAPTER 5 ■ USING MESSAGING OVER WEBSOCKET WITH STOMP
98
Note ■ We built our app jQuery version 1.8.2. The minified jQuery library,
jquery-1.8.2.min, is included in the distribution of this book, but you can also
download it from the official jQuery download site: http://jquery.com/download.
Building the HTML File
In this example, we keep our HTML code simple so that we can focus on the messaging
logic of the application. After including the JavaScript libraries, we need to create the
form fields and button for the players’ names, as shown in Figure 5-11.
Figure 5-11. Creating the form fields for the players’ names
Then, we create a div for the instructions and another one for the buttons, shown in
Figure 5-12, which allows players to make their choice.
Figure 5-12. Buttons representing the user’s selection
Finally, we have an empty div that will display the opponent’s choice. Listing 5-6
shows the source code of our HTML file.
Listing 5-6. Source Code of the index.html File
<!DOCTYPE html>
<html>
<head>
<title>Rock Paper Scissors - a WebSocket Demo</title>
<!-- JavaScript libraries used: jQuery and the
open source STOMP library -->
<script src="js/jquery-1.8.2.min.js"></script>
<script src='js/stomp.js'></script>
<script src='js/rps.js'></script>
</head>
<body>
<!-- Form fields and button for the players' names.
The queues are named after the users -->
<div id="nameFields">
<input id="myName" type="text" placeholder="Your name"/>
www.it-ebooks.info
CHAPTER 5 ■ USING MESSAGING OVER WEBSOCKET WITH STOMP
99
<input id="opponentName" type="text" placeholder="Opponent's name"/>
<button id="goBtn" onclick="startGame();">
Go
</button>
</div>
<!-- Instructions and buttons for the users to make their selections,
hidden initially -->
<div id="instructions" style="visibility:hidden;">
<p>Select one:</p>
</div>
<div id="buttons" style="visibility:hidden;">
<button id="rockBtn" name="rock" onclick="buttonClicked(this);">
Rock
</button>
<button id="paperBtn" name="paper" onclick="buttonClicked(this);">
Paper
</button>
<button id="scissorsBtn" name="scissors" onclick="buttonClicked(this);">
Scissors
</button>
</div>
<!-- div to display opponent's choice, initially empty; populated by
JavaScript code in rps.js -->
<div id="opponentsButtons"></div>
</body>
</html>
Writing the Game Code
Now, that we’ve built a simple user interface for our app, let’s take a closer look at the
JavaScript code. First, we declare the variables, as shown in Listing 5-7. Notice that we
include our connection URL to our WebSocket-enabled STOMP-based message broker,
ActiveMQ.
Listing 5-7. Declaring the Variables Used in the JavaScript Code
// ActiveMQ STOMP connection URL
var url = "ws://0.0.0.0:61614/stomp";
// ActiveMQ username and password. Default value is "guest" for both.
var un, pw = "guest";
var client, src, dest;
// Variables holding the state whether the local and
// remote user had his/her turn yet
var hasUserPicked, hasOpponentPicked = false;
www.it-ebooks.info
CHAPTER 5 ■ USING MESSAGING OVER WEBSOCKET WITH STOMP
100
// HTML code for the opponent's three buttons and variable
// for opponent's pick
var opponentsBtns = '<button id="opponentRockBtn" name="opponentRock"
disabled="disabled">Rock</button>' + '<button id="opponentPaperBtn"
name="opponentPaper" disabled="disabled">Paper</button>' +
'<button id="opponentScissorsBtn" name="opponentScissors"
disabled="disabled">Scissors</button>';
var opponentsPick;
// Variables for this user's three buttons
var rockBtn, paperBtn, scissorsBtn;
After the DOM hierarchy has been fully constructed, we check whether the browser
supports WebSocket. If it doesn’t, we hide the divs that were rendered by the HTML page,
and display a warning (Listing 5-8).
Listing 5-8. Checking Whether the Browser Supports WebSocket
// Testing whether the browser supports WebSocket.
// If it does, fields are rendered for users' names
$(document).ready(function() {
if (!window.WebSocket) {
var msg = "Your browser does not have WebSocket support. This
example will not work properly.";
$("#nameFields").css("visibility", "hidden");
$("#instructions").css("visibility", "visible");
$("#instructions").html(msg);
}
});
The startGame() function is invoked by the onclick event of the goBtn. This
function, shown in Listing 5-9, disables all the elements of the previously filled out form,
makes the instructions and button divs visible, and constructs the names for the source
(src) and destination (dest) queues.
Listing 5-9. The startGame() Function
var startGame = function() {
// Disabling the name input fields
$("#myName").attr("disabled", "disabled");
$("#opponentName").attr("disabled", "disabled");
$("#goBtn").attr("disabled", "disabled");
// Making the instructions and buttons visible
$("#instructions").css("visibility", "visible");
$("#buttons").css("visibility", "visible");
// Queues are named after the players
www.it-ebooks.info
CHAPTER 5 ■ USING MESSAGING OVER WEBSOCKET WITH STOMP
101
dest = "/queue/" + $("#opponentName").val();
src = "/queue/" + $("#myName").val();
connect();
};
The last function call of Listing 5-9 invokes the connect() function, which
establishes the STOMP connection, displayed in Listing 5-10. The calls inside the
connect() function are provided by the open source STOMP JavaScript library that we
use: stomp.js.
Listing 5-10. The connect() Function, Establishing the STOMP Connection
// Establishing the connection
var connect = function() {
client = Stomp.client(url);
client.connect(un, pw, onconnect, onerror);
};
The client.connect API has two callback functions. The first, onconnect(), is
invoked upon successful connection; the second, onerror(), is invoked when an error
occurs.
Let’s take a closer look at the onconnect() callback function. After a log to the
console that we have successfully connected, we subscribe to the queue, defined by the
src variable. This queue is named after this player. Whenever there’s a message arriving
in on this queue, the callback defined as the second parameter of client.subscribe
will be executed. When the incoming message indicates that the opponent has already
picked, we set the hasOpponentPicked to true. Then, we draw the buttons representing
the opponent player’s pick, but hide them if this player hasn’t moved yet, shown in
Listing 5-11.
Listing 5-11. Code Rendering the Game Buttons
// Function invoked when connection is established
var onconnect = function() {
console.log("connected to " + url);
client.subscribe(src, function(message) {
console.log("message received: " + message.body);
// The incoming message indicates that the
// opponent had his/her turn (picked).
// Therefore, we draw the buttons for the opponent.
// If this user hasn't had his/her move yet,
// we hide the div containing the buttons,
// and only display them
// when this user has had his/her move too.
hasOpponentPicked = true;
if (!hasUserPicked) {
$("#opponentsButtons").css("visibility", "hidden");
www.it-ebooks.info
CHAPTER 5 ■ USING MESSAGING OVER WEBSOCKET WITH STOMP
102
$("#instructions").html("<p>Your opponent is waiting for you.
Make your move!</p>");
} else {
$("#instructions").html("<p>Results:</p>");
client.disconnect( function() {
console.log("Disconnected...");
});
}
$("#opponentsButtons").html(opponentsBtns);
switch (message.body) {
case "rock" :
opponentsPick = "#opponentRockBtn";
break;
case "paper" :
opponentsPick = "#opponentPaperBtn";
break;
case "scissors" :
opponentsPick = "#opponentScissorsBtn";
break;
}
$(opponentsPick).css("background-color", "yellow");
});
console.log("subscribed to " + src);
};
In case of an error, we can easily handle it using the onerror() callback function,
shown in Listing 5-12. An easy way to test the execution of this function is by creating a
connection first, and then stopping ActiveMQ. By doing so, you’ll see an error message on
the console indicating that the connection has been lost.
Listing 5-12. Capturing Errors with the onerror Callback Function
var onerror = function(error) {
console.log(error);
};
The last function of our code is invoked when the user selects one of the three
options: rock, paper, or scissors. The send() function of the client object takes three
parameters: the destination, the headers (which is null in our case), and the message
(the name of our button DOM object). We switch the hasUserPicked flag to true, indicating
that the user has already picked. Then, we disable the form fields. Depending whether the
opponent has moved, we either display the opponent’s move, or change the instruction
message, letting this player know that we’re waiting for the opponent (Listing 5-13).
www.it-ebooks.info
CHAPTER 5 ■ USING MESSAGING OVER WEBSOCKET WITH STOMP
103
Listing 5-13. Adding Interaction to the User Selections (Rock, Paper, or Scissors)
// ActiveMQ STOMP connection URL
var url = "ws://0.0.0.0:61614/stomp";
// ActiveMQ username and password. Default value is "guest" for both.
var un, pw = "guest";
var client, src, dest;
// Variables holding the state whether the local and remote user had his/her
turn yet
var hasUserPicked, hasOpponentPicked = false;
// HTML code for the opponent's three buttons and
// variable for opponent's pick
var opponentsBtns = '<button id="opponentRockBtn" name="opponentRock"
disabled="disabled">Rock</button>' + '<button id="opponentPaperBtn"
name="opponentPaper" disabled="disabled">Paper</button>' +
'<button id="opponentScissorsBtn" name="opponentScissors"
disabled="disabled">Scissors</button>';
var opponentsPick;
// Variables for this user's three buttons
var rockBtn, paperBtn, scissorsBtn;
// Testing whether the browser supports WebSocket.
// If it does, fields are rendered for users' names
$(document).ready(function() {
if (!window.WebSocket) {
var msg = "Your browser does not have WebSocket support. This example
will not work properly.";
$("#nameFields").css("visibility", "hidden");
$("#instructions").css("visibility", "visible");
$("#instructions").html(msg);
}
});
// Getting started with the game. Invoked after
// this user's and opponent's name are submitted
var startGame = function() {
// Disabling the name input fields
$("#myName").attr("disabled", "disabled");
$("#opponentName").attr("disabled", "disabled");
$("#goBtn").attr("disabled", "disabled");
// Making the instructions and buttons visible
$("#instructions").css("visibility", "visible");
$("#buttons").css("visibility", "visible");
// Queues are named after the players
www.it-ebooks.info
CHAPTER 5 ■ USING MESSAGING OVER WEBSOCKET WITH STOMP
104
dest = "/queue/" + $("#opponentName").val();
src = "/queue/" + $("#myName").val();
connect();
};
// Establishing the connection
var connect = function() {
client = Stomp.client(url);
client.connect(un, pw, onconnect, onerror);
};
// Function invoked when connection is established
var onconnect = function() {
console.log("connected to " + url);
client.subscribe(src, function(message) {
console.log("message received: " + message.body);
// The incoming message indicates that the
// opponent had his/her turn (picked).
// Therefore, we draw the buttons for the opponent.
// If this user hasn't had his/her move yet,
// we hide the div containing the buttons, and only display
// them when this user has had his/her move too.
hasOpponentPicked = true;
if (!hasUserPicked) {
$("#opponentsButtons").css("visibility", "hidden");
$("#instructions").html("<p>Your opponent is waiting for you. Make
your move!</p>");
} else {
$("#instructions").html("<p>Results:</p>");
client.disconnect( function() {
console.log("Disconnected...");
});
}
$("#opponentsButtons").html(opponentsBtns);
switch (message.body) {
case "rock" :
opponentsPick = "#opponentRockBtn";
break;
case "paper" :
opponentsPick = "#opponentPaperBtn";
break;
case "scissors" :
opponentsPick = "#opponentScissorsBtn";
break;
}
$(opponentsPick).css("background-color", "yellow");
});
www.it-ebooks.info
CHAPTER 5 ■ USING MESSAGING OVER WEBSOCKET WITH STOMP
105
console.log("subscribed to " + src);
};
var onerror = function(error) {
console.log(error);
};
var buttonClicked = function(btn) {
client.send(dest, null, btn.name);
hasUserPicked = true;
console.log("message sent: " + btn.name);
// Setting the background color of the button
// representing the user's choice to orange.
// Disabling all the buttons (to prevent changing the vote).
$("#" + btn.id).css("background-color", "orange");
$("#rockBtn").attr("disabled", "disabled");
$("#paperBtn").attr("disabled", "disabled");
$("#scissorsBtn").attr("disabled", "disabled");
// Checking if the other user has moved yet. If so,
// we display the buttons that were drawn beforehand
// (see onconnect)
if (hasOpponentPicked) {
$("#opponentsButtons").css("visibility", "visible");
$("#instructions").html("<p>Results:</p>");
client.disconnect(function() {
onerror = function() {};
console.log("Disconnected...");
});
} else {
$("#instructions").html("<p>Waiting for opponent...</p>");
}
};
To run the app, ensure ActiveMQ is WebSocket-enabled (as shown in Listing 5-4),
run ActiveMQ, and then open index.html in your WebSocket-enabled browser.
Monitoring Apache ActiveMQ
ActiveMQ provides a simple monitoring interface that gives you insight into what’s happening
under the covers. To access the management interface, click the Manage ActiveMQ broker
link on the ActiveMQ Welcome page, or navigate to http://0.0.0.0:8161/admin/. After
running the Rock Paper Scissors demo once, you will have two queues, one for each player.
In our example, the opponents are Peter and Vanessa, and the queues are named after them.
As Figure 5-13 shows, each queue has one consumer (the opponent player), and we sent one
message to each queue (message enqueued). Both of these messages were dequeued soon
thereafter (message dequeued).
www.it-ebooks.info
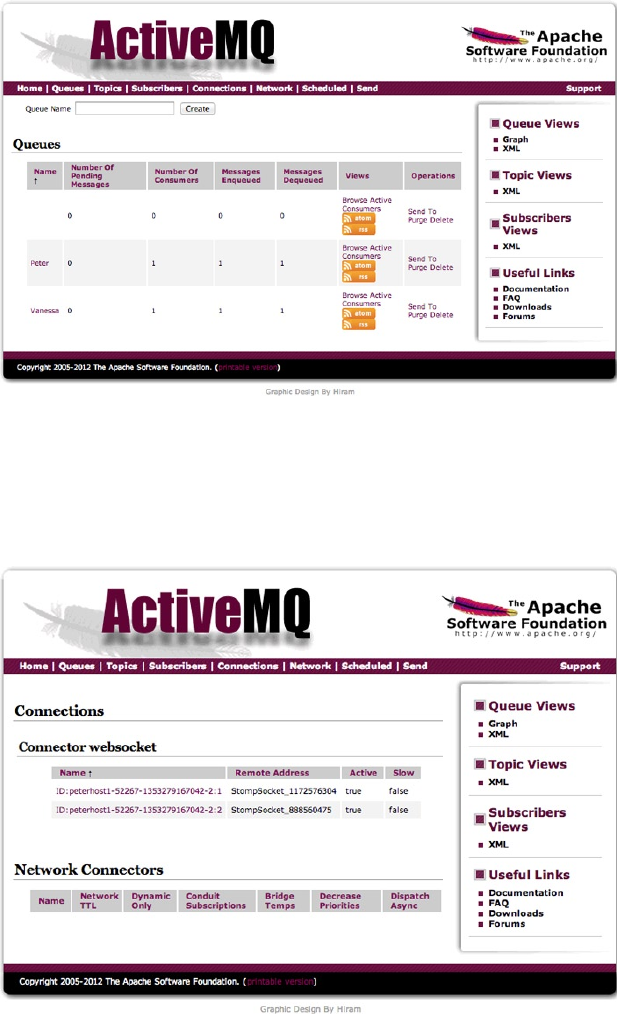
CHAPTER 5 ■ USING MESSAGING OVER WEBSOCKET WITH STOMP
106
The management console also lists the currently active connections. In our demo,
we have two active WebSocket connections, created through the ActiveMQ WebSocket
Connector, shown in Figure 5-14.
Figure 5-13. The ActiveMQ management interface: monitoring message queues
Figure 5-14. Active ActiveMQ connections created through the WebSocket Connector
www.it-ebooks.info
CHAPTER 5 ■ USING MESSAGING OVER WEBSOCKET WITH STOMP
107
Suggested Extensions
While we’ve walked through building a very simple game to show messaging over
WebSocket, there are many ways you can extend this game to make it more fully featured
and even exciting. When playing rock-paper-scissors in person, finding out the winner is
part of the excitement of the game. In an online environment, that’s not quite the case.
Declaring the winner would be a simple but significant enhancement to the app.
Another extension is to make the game more secure. Rather than relying on
application logic to hide the opponent’s move, you could centralize the game logic by
creating a dedicated queue that accepts the moves, and another one that distributes the
results. This logic would prevent players (or their browsers) from discovering the moves
in advance. Additionally, you can use topics to inform all players about the game results,
giving winning players publicity.
To improve player interaction, you could:
Automatically match up lonely players who don’t have •
opponents. A queue would be ideal for round-robin match
making.
Build a bot that uses artificial intelligence that players can choose •
as an opponent.
The Future of Web Messaging
Combining messaging concepts with low latency WebSocket communication opens
the door to myriad incredible applications. As we have seen in this chapter, real-time
collaborative “peer-to-peer” web and mobile applications can be built very easily. These
applications can include shared document editing, interactive social presentation and
learning tools, as well as social software with real time activity streams. Almost any type of
audience can leverage such apps, including the consumer marketplace, education, health
care, and transportation.
Another key application of web messaging is in the realm of machine-to-machine
(M2M) communication. M2M, sometimes referred to as the “Internet of Things” (IoT),
focuses on connecting everyday objects to the Internet. Implementing smart meters to
track and automatically report utility usage, interacting with home appliances (such as
checking if the door is locked or if the oven is turned off), installing credit-card-sized
capable computers (such as the Raspberry Pi), monitoring devices and moving vehicles,
telemetry, and augmented reality are just a few of the use cases that M2M addresses.
Most modern real-time enterprises employ a corporate services architecture as
part of an efficient IT infrastructure. Diverse client facing or internal applications make
requests to common services to efficiently deliver revenue and productivity. The notion
of an Enterprise Service Bus (ESB) has been an accepted model for global corporations
for more than ten years. WebSocket now allows these enterprise services to be extended
securely to any web device allowing a more collaborative relationship with customers,
partners, and mobile employees.
www.it-ebooks.info
CHAPTER 5 ■ USING MESSAGING OVER WEBSOCKET WITH STOMP
108
Complex Event Process engines can also benefit from WebSocket architectures
by consuming, analyzing, and actively responding to events during the user’s browser
session, a mobile device, or a thick desktop client application.
In a similar fashion, BPMS (Business Process Management Systems) would be able
to update the status of tasks that are part of large business processes executed throughout
the enterprise and show to the user in real-time what’s happening with relevant parts of
the business.
The Web is clearly changing from a world of documents to a universe of activities
where live applications, not documents, flourish. WebSocket is a key component of this
new Web and will significantly transform how we use the Web in the enterprise and even
in our daily lives. The nature of the WebSocket provides the same kind of connectivity
that internal corporate clients already use to connect to the Enterprise Service Bus but
extending them to the Web.
A new and evolving set of capabilities, grouped together under the Web RTC
(Real Time Collaboration) umbrella with browser-based video and audio feeds are taking
us beyond real-time data on an even more exhilarating journey.
Summary
In this chapter we reviewed the concepts of messaging, an architectural style
characterized by sending asynchronous messages to build loosely coupled systems.
You learned about the pub/sub pattern, as well as STOMP, an open messaging protocol.
We explored an open-source STOMP and WebSocket-enabled message broker, Apache
ActiveMQ. After learning about simple configuration changes, we ran the ActiveMQ
STOMP-WebSocket demo, and then we built one on our own: rock-paper-scissors. Finally,
we reviewed the monitoring and management capabilities of Apache ActiveMQ.
In the next chapter, we will use RFB, the protocol used by VNC, on top of WebSocket
to build a real-time desktop sharing experience purely using HTML5.
www.it-ebooks.info

109
Chapter 6
VNC with the Remote
Framebuffer Protocol
In the previous chapters, you learned how to layer two powerful protocols, XMPP and
STOMP, over WebSocket. With these protocols, we were able to examine chat, presence,
and messaging, all of which can be used to create rich applications and implement systems
to power our browser-based world. In Chapter 4, we saw how we could use a widely
used standard chat protocol with WebSocket and enabled a traditional desktop-based
chat application to be used over the Web, as well as witnessed the benefits of layering
WebSocket with a standard chat protocol. Similarly, in Chapter 5, we looked at how
to interact with TCP-based message brokers from web applications. In both cases, we
explored the transition between a traditional, desktop application-based world to a
web-enabled world, and looked at how the full-duplex, low-latency connection over
the Web provided by WebSocket can be beneficial to such applications. In this chapter,
we look at an even more complex (yet standard) protocol and how to transform it using
WebSocket as the communication platform.
With applications distributed among desktops using myriad operating systems,
programs, and browser versions, it has become increasingly important for users to be
system-agnostic, for Information Technology groups to be able to support any system
from anywhere, and for application developers to be able to operate on any system.
There are also times when users need to access a specific operating system. One popular
way to access a specific system is using VNC (Virtual Network Computing).
VNC lets you share desktops over any network. It essentially allows you to view and
control the interface of another computer remotely and can be thought of as the GUI
(graphical user interface) equivalent to Telnet. You can also think of VNC as a long, virtual
cable that enables you to view and control another desktop with its mouse, keyboard, and
video signals.
As its name implies, VNC is used over networks. Due to challenges that we’ll
investigate in this chapter, VNC has not been easily used over the Web. With HTML5 and
WebSocket, we can overcome some of these challenges and examine how highly portable
rich Internet applications can leverage HTML5 and WebSocket to use VNC.
In this chapter, we’ll explore how you can use WebSocket with the Remote
Framebuffer (RFB) Protocol to expand virtual network computing to the Web. We’ll also
look at how, as a binary protocol, RFB uses the WebSocket API in a different way than the
text-oriented protocols we discussed in the previous two chapters. After taking a look
at RFB and VNC, we’ll step through how to build a VNC client that connects to an open
r
www.it-ebooks.info
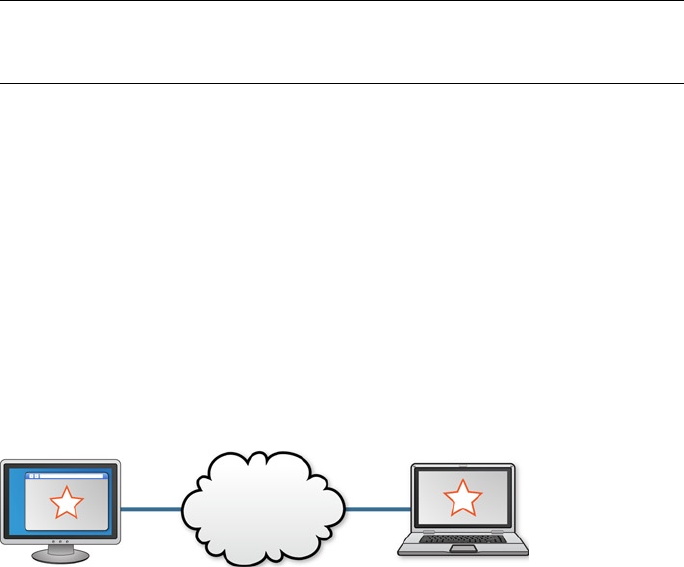
CHAPTER 6 ■ VNC WITH THE REMOTE FRAMEBUFFER PROTOCOL
110
source VNC server using RFB over WebSocket. We’ll walk through techniques used to
enable screen sharing (a typical use case for VNC) over WebSocket and examine how to
enable remote device input from a keyboard and mouse. Sound complex? RFB is indeed a
more complex protocol than XMPP and STOMP.
The code examples that accompany this book contain the full, end-to-end RFB
over WebSocket application that you can run against a VNC server. But, if you do not
wish to work through the complexities of RFB, you can follow the steps in this chapter by
referring to the Virtual Machine (VM) we provided (see Appendix B for instructions). The
VM contains working code that you can run, examine, and digest at will. In the hands-on
portion of this chapter, we’ll highlight the code snippets in our application that are
specifically pertinent to WebSocket and techniques for building an RFB over WebSocket
client. After you explore the ideas in this chapter at a high level, you can run the code
yourself and see how it all works together. Then, to analyze the code more closely, you
can open the code examples in the VM.
The layering of RFB over WebSocket may not be for the fainthearted, but this
compelling example contrasts to some of the more common WebSocket use cases like
chat, as it illustrates the more interactive and graphical capabilities you can implement
using HTML5 and WebSocket. Additionally, it shows how WebSocket can help bridge
HTML5 and legacy systems.
Note■ The VNC over WebSocket demo we use in this chapter was originally developed by
Kaazing in 2010 to showcase WebSocket technology.
An Overview of Virtual Network Computing
The desktop metaphor for computing has been extremely popular for several decades.
Historically, popular desktop operating systems have had networked windowing systems
and remote access protocols that enabled the use of their systems from terminals
and other PCs. Over the past few decades, the rise of the personal computer has also
stimulated an explosion of desktop applications. Most of these desktop applications
are now legacy applications, and not all of these legacy applications have comparable
alternatives. VNC is a standard way to give users and systems the ability to continue
to access legacy applications and systems, without concern for operating system
compatibility. VNC also enables you to remotely interact with systems and applications
on another computer as though you are actually using that computer.
Figure 6-1 shows a desktop controlling another computer’s mouse and keyboard
over the Web. The pixels of the remote display are duplicated on the controlling machine.
Figure 6-1. Accessing the desktop of another PC over the Internet
www.it-ebooks.info
CHAPTER 6 ■ VNC WITH THE REMOTE FRAMEBUFFER PROTOCOL
111
VNC is extremely useful for a multitude of purposes, from software testing and
deployment to education. In a software development environment, you can test
your application in a variety of combinations of operating systems, applications and
application versions—all without leaving your own desktop. For example, you can test
your new STOMP or XMPP over WebSocket application in any browser (legacy or not)
on any type of system, such as Google Chrome on Mac OS. This ability can be extremely
useful when you need to access legacy applications that are not available or that you
cannot personally install.
VNC is also very useful for collaboration or education, where not only screen sharing
is needed but also the ability to access another’s desktop to assist with using a particular
application. Imagine, for instance, an architecture student using a CAD (computer-aided
design) application to design a room. A teaching assistant might be able to better explain
to the student where to adjust dimensions without needing to have the CAD application
installed on his or her own computer, and without needing to meet the student in
person. Similarly, a technician can diagnose and fix a user’s computer without needing
to be on site.
There are several protocols for remotely accessing desktops. Some of these are
platform specific, like Microsoft’s Remote Desktop Protocol (RDP), X Window System or
X11 (for UNIX, Linux, and Mac OS X), Chromoting (for the Google Chromebook), Apple
Remote Desktop (ARD), and NX (for Linux and Solaris). Others, like Remote Framebuffer
(RFB), are cross-platform.
VNC is an open source technology that is based on the RFB protocol and, as such,
is platform independent. RFB is an IETF specification and is the basis for many VNC
servers, as well as a thriving community that can help provide optimizations when you
need them. Because it is so widely used, there are many resources available to help you
get started and to help you get VNC working in your network.
While VNC is fairly ubiquitous and easy to implement in your network, VNC protocols
have not typically worked well in web applications. There have been AJAX applications
for remote desktop access, but they haven’t been particularly optimal because HTTP’s
request-response communication is less than ideal for transmitting these protocols.
Remote desktop applications are very bidirectional in nature. Users can perform input
actions at any time. Likewise, the display can update at any time. A bidirectional transport
layer protocol is critically important for making an efficient remote desktop application.
There are plugin-based remote desktop applications that run in browsers, but with
WebSocket we can bring these applications to pure HTML5 environments.
To better understand how the underlying technology for VNC works with WebSocket,
let’s take a closer look at RFB, as well as the difference between binary- and text-oriented
protocols.
An Overview of the Remote Framebuffer Protocol
The Remote Framebuffer (RFB) protocol is an informational specification from the IETF
(RFC 6143). While it is not an official standard, it is widely used and there are many
interoperable implementations. RFC 6143 itself is over a decade old and has been revised
several times.
Let’s break down the protocol definition. A framebuffer is an array containing all of
the pixel values displayed by a graphical computer system, and is the lowest common
www.it-ebooks.info

CHAPTER 6 ■ VNC WITH THE REMOTE FRAMEBUFFER PROTOCOL
112
denominator model of a desktop computer. RFB is therefore a way to remotely access a
framebuffer. For any system with a keyboard, mouse, and screen, there is probably a way
to access it with RFB.
The RFB protocol was designed to have the server to do the “heavy lifting,” enabling
the client to be simple and thin. Clients built against the RFB protocol are also stateless,
meaning that if the client disconnects and reconnects, the new session does not lose the
state of the framebuffer.
Binary- and Text-Oriented Protocols
Protocols are generally oriented towards binary data or text strings. Binary protocols can be
more compact than text-oriented protocols, and can neatly and naturally embed arbitrary
binary data structures like images, audio and video. Binary protocols are intended to be read
by machines rather than humans, and can optimize the data structure to be sent in any form
to preserve efficiency.
Text-oriented protocols like STOMP and XMPP tend to transmit relatively larger
messages on the wire and, as such, are more expensive to parse when compared with
binary protocols. However, text-oriented protocols can be implemented by virtually any
language, are readable by humans, and have flexible variable length fields. While binary
protocols can be a more efficient way to transport data, text-oriented protocols may give
you more flexibility, and can be easier to implement and deploy.
RFB is a binary protocol that transmits binary image data. The data can be
compressed and can be streamed to and from servers with very high frequency updates.
Image data can be streamed at high frequency from the server; similarly, clients can
generate streams of input events caused by users moving their mice and pressing keys.
These input events are compactly encoded in a binary format that takes very few bytes to
transmit. The WebSocket Protocol can handle binary data or text strings. As such, binary
WebSocket messages are a natural fit for the RFB protocol.
Note ■ Wireshark supports analyzing RFB protocol sessions, which can be useful when
debugging a new implementation. For more information, see Chapter 3, where we discussed
examining the WebSocket Protocol, and Appendix A, where we discuss dissecting and
debugging WebSocket traffic using Wireshark.
Choosing to Use RFB over WebSocket
As we discussed in Chapter 4, you can build your own chat protocol; similarly, you could
build your own remote access protocol that only works with your application. But, as we
also mentioned, you would be missing out on the immense benefits of using a widely
used, open, interoperable protocol. For example, there are numerous cross-platform
servers designed for VNC available that are based on RFB, many of which are continually
optimized and enhanced by a growing community of developers. As new operating
systems are developed and versioned, you can work with the community to leverage the
benefits, and focus on what you want your application to do.
www.it-ebooks.info
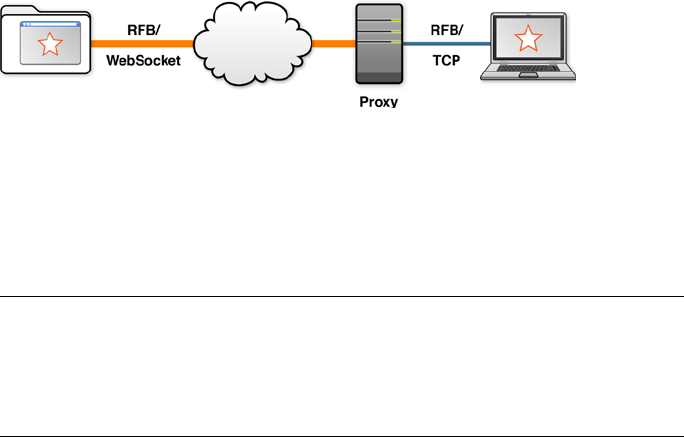
CHAPTER 6 ■ VNC WITH THE REMOTE FRAMEBUFFER PROTOCOL
113
In the next section, we walk through a basic example of using VNC, which illustrates
how to use RFB over WebSocket: viewing another computer’s screen using a web client and
controlling it (with a keyboard and mouse). Figure 6-2 illustrates the flow of information
in our example. Here, an RFB client runs in a browser tab and communicates with an RFB
(VNC) server using a WebSocket to TCP proxy between the web client and RFB server.
Using this client, a user can view and control a remote desktop entirely within a web
application over WebSocket and RFB.
Figure 6-2. Connecting with RFB over WebSocket
Building a VNC (RFB) Client over WebSocket
Now that we’ve examined some of the concepts behind VNC over WebSocket, let’s take a
look at a working example.
Note ■ For the purposes of this section, while “VNC” refers to remote desktop
connections that use RFB as the underlying protocol, we will refer to the components that
use RFB for VNC as “RFB components” (specifically, the “RFB client” and “RFB server”).
By using RFB, you effectively build a VNC application.
In this example, we look at how we can combine this popular and widely used
technology with WebSocket. We examine the key components of an RFB client we built
using HTML5 and WebSocket, which can view and control the graphical user interface of
another computer.
We’ve seen how WebSocket can elevate HTML5 applications to first class network
participants. The client application in this section is much like a desktop RFB client
in every way, except it is implemented using web technology and runs in the browser.
We also add remote device input, which allows you to control the other GUI with your
keyboard and mouse. The steps in this section not only show you how to control the GUI
of a remote computer over RFB and WebSocket, you might find this example inspirational
when building your own graphical applications that use WebSocket. Finally, we examine
some of the exciting applications that you can build that will let your users remotely
control another computer—all from within a browser tab.
The client side of this application is split into two layers. The protocol library,
RfbClient.js, comprises an implementation of the RFB protocol in JavaScript. This
library handles the RFB syntax defined by the specification that is understood by all
compatible servers.
www.it-ebooks.info
CHAPTER 6 ■ VNC WITH THE REMOTE FRAMEBUFFER PROTOCOL
114
The user interface of the client is composed of vnc.html, ui.js, and vnc.css.
These files define the page structure, application behavior, and appearance of the VNC
application, respectively. On the server side, we use a Node.js script to proxy WebSocket
connections to TCP connections. This proxy connects to a backend RFB server running
on a remote desktop.
Setting Up a Proxy Server
RFB is an application layer protocol that uses TCP for its transport layer. This layering
should be fairly familiar by now, as it is a common theme shared by the protocols in the
previous two chapters. As discussed in Chapter 4, when using a standard TCP protocol
over WebSocket, you have a choice between upgrading the server to accept WebSocket
connections and using a proxy to relay between WebSocket and TCP.
In the example shown in Listing 6-1, we use a simple proxy adapted from the Node.js
server we wrote in Chapter 3. This proxy is unaware of RFB and is completely application
agnostic. It simply handles incoming WebSocket connections and makes outgoing TCP
connections. Data streams in as WebSocket messages on one side of the proxy and out as
TCP on the other. In our completed application, the proxy will handle connections from
our RFB client and proxy the WebSocket connection over TCP to the back-end RFB server.
Refer to Figure 6-2 in the previous section, which shows where the proxy server lies in our
architecture.
Listing 6-1. Proxy Server Code
var websocket = require("./websocket-example");
var net = require("net");
var remotePort = 5900;
var remoteHost = "192.168.56.101";
websocket.listen(8080, "localhost", function(websocket) {
// set up backend TCP connection
var tcpsocket = new net.Socket({type:"tcp4"});
tcpsocket.connect(remotePort, remoteHost);
// TCP handler functions
tcpsocket.on("connect", function() {
console.log("TCP connection open");
});
tcpsocket.on("data", function(data) {
websocket.send(data);
});
tcpsocket.on("error", function() {
console.log("TCP connection error", arguments);
});
www.it-ebooks.info
CHAPTER 6 ■ VNC WITH THE REMOTE FRAMEBUFFER PROTOCOL
115
// WebSocket handler functions
websocket.on("data", function(opcode, data) {
tcpsocket.write(data);
});
websocket.on("close", function(code, reason) {
console.log("WebSocket closed")
// close backend connection
tcpsocket.end();
});
console.log("WebSocket connection open");
});
While there are many RFB servers that accept WebSocket connections directly, you
have the flexibility to use any compatible RFB server with this example. Note, though, that
because the binding of RFB onto WebSocket has not been specified, there may be some
potential complications and incompatibility. In our example, we use the popular and
widely used open source TightVNC server (which is based on RFB) on a virtual machine.
TightVNC does not currently support WebSocket natively, but works with our proxy server.
The address of the virtual machine is hard coded into the proxy script. Hardcoding
the address is convenient for development but is not suitable for production. To use this
in your environment, you may need to change the hostname and port variables. Also, we
should emphasize that neither the WebSocket server nor the VNC server in this example
authenticates incoming connections, which is extremely unwise for any purpose other
than a simple demonstration. See Chapter 7 for better security practices.
The RFB Client
Now that we have set up a proxy server that can accept RFB over WebSocket connections,
we can build the front-end portion, or the client. While the RFB client is thin in nature, we
want it to be able to view the screen of the RFB server, which involves receiving graphical
information about what is happening on that screen. We also want to be able to control
the remote computer (also known as the RFB server).
In this section, we explore:
Building a simple client in JavaScript ·
Techniques for working with the binary data from the RFB ·
protocol and the WebSocket Protocol
Connecting to the server ·
Enabling the client to accept framebuffer updates ·
Using HTML5 <canvas> to render a framebuffer ·
Handling device input ·
www.it-ebooks.info

CHAPTER 6 ■ VNC WITH THE REMOTE FRAMEBUFFER PROTOCOL
116
Implementing RFB in JavaScript
The client side of this RFB application is an HTML5 application that runs in the browser.
It makes use of HTML, CSS, and JavaScript. The basic user interface is defined by some
HTML markup. The logic of the application, including a library to communicate using the
RFB protocol, is written in JavaScript.
Listing 6-2 shows the starting HTML that includes the protocol library and
application scripts:
Listing 6-2. Starting HTML with Protocol Library and Application Scripts
<!DOCTYPE html>
<title>RFB over WebSocket</title>
<script src="bytes.js"></script>
<script src="RfbClient.js"></script>
<script src="ui.js"></script>
Pro Tip ■ Because JavaScript is purely event-driven, there is no way to wait inside of a
running function for more bytes to become available. Every function must run to completion
and return quickly. To enable a JavaScript application to receive RFB protocol messages,
we map the protocol to event handlers that can run in the browser. This design technique is
useful for implementing many different types of protocols.
Working with Byte Streams
In Chapter 2, we demonstrated how to send and receive binary data with the WebSocket
API. Writing binary messages is as simple as calling WebSocket.send() with Blob and
ArrayBuffer arguments. Reading binary messages is automatic, as the type of incoming
message events matches WebSocket.binaryType. It is straightforward to communicate
using WebSocket messages using the WebSocket API, and to implement protocols with a
message-aligned binding to the WebSocket Protocol. In contrast, arbitrary application-level
protocols like RFB are not aligned to WebSocket frames. The syntax of such a protocol is
defined in terms of streams of bytes. Each call to WebSocket.onmessage is not guaranteed
to contain one and only one complete RFB message. RFB messages can be fragmented or
conflated into more or fewer than the expected number of WebSocket messages. A stream
abstraction can be useful to bridge the gap between the two modes of communication.
In Listing 6-3, the file bytes.js contains utilities used by RfbClient.js to simplify
reading and writing byte streams. In particular, it contains a CompositeStream API that
joins sequences of discrete ArrayBuffers into logical streams of bytes. When binary
WebSocket messages arrive, RfbClient.js calls CompositeStream.append() to add
the new bytes to the inbound stream. To read and parse messages at the RFB protocol
level, RFB handler code calls CompositeStream.consume() to pull bytes out of the
stream. Similarly, RfbClient.js uses functions in bytes.js to write numbers as bytes in
messages to the server. These functions make use of the standard DataView type, calling
www.it-ebooks.info
CHAPTER 6 ■ VNC WITH THE REMOTE FRAMEBUFFER PROTOCOL
117
setter methods on the ArrayBuffers with bytes representing 8, 16, and 32 bit integers.
Listing 6-3 shows the numerical functions in bytes.js.
Listing 6-3. Numerical functions in bytes.js
$prototype.appendBytes = function appendBytes() {
ba = new Uint8Array(arguments);
this.append(ba.buffer);
}
$prototype.appendUint16 = function appendUint16(n) {
var b = new ArrayBuffer(2);
var dv = new DataView(b);
dv.setUint16(0, n);
this.append(b);
}
$prototype.appendUint32 = function appendUint32(n) {
var b = new ArrayBuffer(4);
var dv = new DataView(b);
dv.setUint32(0, n);
this.append(b);
}
These functions make it easier to write arrays of bytes containing messages in the
syntax of the RFB protocol.
Setting Up the Connection
The RfbProtocolClient connect function sets the initial client state and creates an
empty stream, a WebSocket, and event handlers for that socket. This function also
sets the first readHandler to versionHandler, since the RFB protocol starts with an
exchange of version information between the server and client. Listing 6-4 shows the
RfbProtocolClient connect function we must set up to connect to our server. The
connect function also constructs an empty CompositeStream. That stream will contain
bytes representing partial RFB messages from the server.
Listing 6-4. RfbProtocolClient Connect Function
RfbProtocolClient = function() {};
$prototype = RfbProtocolClient.prototype;
$prototype.connect = function(url) {
this.socket = new WebSocket(url);
this.socket.binaryType = "arraybuffer";
this.stream = new CompositeStream();
bindSocketHandlers(this, this.socket);
www.it-ebooks.info
CHAPTER 6 ■ VNC WITH THE REMOTE FRAMEBUFFER PROTOCOL
118
this.buttonMask = 0;
// set first handler
this.readHandler = versionHandler;
}
The bindSocketHandlers() function sets up the WebSocket event handlers used
by this protocol client. The message handler does something interesting: it adds any
incoming data to the byte stream and calls the current read handler, then continues
calling the current read handler until that handler returns false. This function allows the
message handler to effectively loop over the incoming data and process any number of
messages. If there is a partial message left in the stream, it remains there until the socket
produces another message event. At that time, the read handler that last returned false
is called again. The presence of additional bytes might cause that handler to then return
true. Listing 6-5 shows the bindSocketHandlers() function.
Listing 6-5. The bindSocketHandlers() Function
var bindSocketHandlers = function($this, socket) {
socket.onopen = function(e) {
// Ignore WebSocket open event.
// The server will send the first message.
}
var stream = $this.stream;
socket.onmessage = function messageHandler(e) {
// Append bytes to stream.
stream.append(e.data);
// Read handler loop.
while($this.readHandler($this, stream)) {
// Do nothing.
}
}
socket.onclose = socket.onerror = function() {
console.log("Connection closed", arguments);
}
}
Each event handler expects a certain number of bytes to be able to read a complete
message. If there are fewer bytes in the incoming stream, the handler returns false,
which puts the WebSocket message event handler back into a waiting state. If there are
enough bytes to read a complete protocol data message, the handler reads that many
bytes out of the stream, processes them, and returns true. Each handler can also set the
next handler variable before returning true.
In Listing 6-6, the versionHandler() function sets the readHandler variable to
numSecurityTypesHandler, because the next state the client enters reads a message
containing the number of security types supported by the server.
www.it-ebooks.info
CHAPTER 6 ■ VNC WITH THE REMOTE FRAMEBUFFER PROTOCOL
119
Listing 6-6. The versionHandler() Function
var versionHandler = function($this, stream) {
if (stream.length < 12) {
return false;
}
var version = new Uint8Array(stream.consume(12));
// Echo back version.
sendBytes($this, version.buffer)
// Set next handler.
$this.readHandler = numSecurityTypesHandler;
return true;
}
Enabling the Client to Accept Framebuffer Updates
Once you’ve connected the client to the server, the client must send a message requesting
framebuffer updates. Doing so will enable the client to receive the data from the
RFB server.
The RFB protocol defines different types of framebuffer updates. Each type is
indicated with a numerical code in the protocol message. In this example, we will only
use two basic encoding types: Raw and CopyRect. Raw, as you might guess, represents
pixel data as a raw, uncompressed bitmap. CopyRect is an instruction from the server to
copy a portion of the current bitmap elsewhere on the screen. Since many user interfaces
contain large solid color regions, this can be a very efficient way to update a client screen.
When no more rectangles remain in the stream, the client can request another
update. This implementation, as shown in Listing 6-7, is a compromise between polling for
and streaming the data in order to throttle server-sent updates without being too chatty.
Listing 6-7. Framebuffer Requests
var doUpdateRequest = function doUpdateRequest($this, incremental) {
var request = new CompositeStream();
request.appendBytes(3); // type (u8 3)
request.appendBytes(1); // incremental
request.appendBytes(0,0,0,0); // top left corner: x (u16 0) y (u16 0)
request.appendUint16($this.width); // width (u16 800)
request.appendUint16($this.height); // height (u16 600)
sendBytes($this, request.consume(request.length));
}
www.it-ebooks.info
CHAPTER 6 ■ VNC WITH THE REMOTE FRAMEBUFFER PROTOCOL
120
Listing 6-7 shows the framebuffer requests, which specify the position of the top left
corner of the area to update. They also contain the height and width of the region, which
allows clients to elect to update only a portion of the framebuffer. For this example, we
will always request updates across the entire canvas. The incremental byte indicates to
the server that the client has a copy of the current framebuffer and can apply updates.
That is more efficient than sending the entire contents of the screen over and over again.
Using HTML5 <canvas> to Draw a Framebuffer
Now that the client can accept framebuffer updates, let’s render this information on the
client, which enables the client to view the GUI information coming from the RFB server
(or TightVNC in our case).
One of the most important new elements in HTML5 is <canvas>. The <canvas>
element supports a 2d drawing API that gives HTML5 applications the ability to
manipulate pixel graphics. Low-level drawing is required to efficiently display a
framebuffer in an application, because application code must be able to set each pixel
color individually.
Listing 6-8 creates a canvas element, sets its initial width and height, and gets a
drawing context.
Listing 6-8. Creating a Canvas Element
Screen = function(width, height) {
this.canvas = document.createElement("canvas");
this.canvas.setAttribute("height", height);
this.canvas.setAttribute("width", width);
this.context = this.canvas.getContext("2d");
}
The 2d drawing context provides the drawing API for interacting with the canvas
element. Many of the 2d context functions deal with drawing primitive shapes. Functions
such as fillRect are ideal for displaying most programmatically generated graphics. To
display a framebuffer, we need to use the lower level functions exposed by the canvas 2d
context. The putImageData() function is an ideal low-level pixel function, directly setting
the pixel values of a canvas from an array of color data. Listing 6-9 shows an example of
this function.
Listing 6-9. The putImageData() Function
context.putImageData(imageData, xPos, yPos);
Similarly, there is a getImageData() function that can retrieve pixel values from a
canvas context, as shown in Listing 6-10.
Listing 6-10. The a getImageData() Function
context.getImageData(xSrc, ySrc, width, height);
www.it-ebooks.info

CHAPTER 6 ■ VNC WITH THE REMOTE FRAMEBUFFER PROTOCOL
121
We will use these canvas functions to update the canvas with framebuffer updates
from the RFB protocol. Conveniently, ImageData is a type that is compatible with
the binary messages sent and received by WebSocket. In fact, in modern browsers,
getImageData() returns a Uint8ClampedArray, one of the TypedArray views that can
wrap array buffers.
Note ■ Older browsers with canvas support use an obsolete ImageData type, which is
not a typed array; it must be converted into one.
To render the client framebuffer, RfbClient.js handles two kinds of updates: Raw
and CopyRect. More advanced clients can also handle other pixel encodings.
Raw Pixel Data
The simplest framebuffer update consists of raw pixel data. Raw pixels are indicated with
encoding type zero (0x0) in the RFB protocol. Listing 6-11 shows the pixel data, which
consists simply of red, green, and blue values for every pixel in the updated portion of the
framebuffer.
Listing 6-11. Raw Pixel Data
$prototype.putPixels = function putPixels(array, width, height, xPos, yPos) {
var imageData = this.context.createImageData(width, height);
copyAndTransformImageData(array, imageData);
this.context.putImageData(imageData, xPos, yPos);
}
CopyRect
The second encoding type used in this example is copyRect, which is encoding type
one (0x01) in the RFB protocol. This function is a clever operation that is well suited to
conveying framebuffer updates that mostly consist of the same repeated pixel values.
Just like the raw encoding, copyRect rectangle messages specify position, width,
and height. This information represents the target rectangle in the framebuffer that will
be filled by the update. Instead of also sending the current pixel data for that rectangle,
however, copyRect messages have just two more payload values: the X and Y position of a
source rectangle. The source rectangle has the same width and height as the destination
or target rectangle. Every pixel from the source is copied verbatim into the corresponding
pixel in the destination area.
To implement copyRect, we need both getImageData and putImageData. The
copyRect() function contains the location, width, and height of the source pixels along with
the location of the destination pixels. It operates on the framebuffer canvas in much the same
was as the raw putPixels function does, except it takes its pixel data from the current canvas.
Listing 6-12 shows the copyRect() function with getImageData and putImageData.
www.it-ebooks.info

CHAPTER 6 ■ VNC WITH THE REMOTE FRAMEBUFFER PROTOCOL
122
Listing 6-12. The copyRect() Function
$prototype.copyRect = function copyRect(width, height, xPos, yPos, xSrc, ySrc){
// get pixel data from the current framebuffer
var imageData = this.context.getImageData(xSrc, ySrc, width, height);
// put pixel data in target region
this.context.putImageData(imageData, xPos, yPos);
Other Encodings and Efficiency
While sending raw pixels over the Internet is very inefficient, copyRect is extremely
efficient when you are lucky enough to have repeated pixel values in your framebuffer. Real
desktops are more complex than this, so there are more advanced encodings that can be
used to reduce bandwidth usage of RFB. These encodings use compression algorithms to
reduce the bandwidth required to send pixel data. For example, encoding 16 (0x10) uses
ZLIB for compression. This is the style of encoding you would ideally like to use in a real
RFB-based application. Most RFB clients and servers support compressed updates.
Handling Input in the Client
So far we’ve built enough of an RFB client to be able to observe a desktop updating in real
time (in effect, screen sharing). In order to interact with that desktop, we need to handle
user input, which will allow the RFB client to control the mouse and keyboard of the RFB
server. In this section, we examine how to accept the mouse and keyboard input on the
client and communicate that input information to the RFB server.
Client to Server Messages
The RFB protocol defines types of messages that the client sends to the server. These
message types indicate what kind of message the client sends to the server. As previously
described, the message type is the first byte of the client to server message and is
represented by an integer. Table 6-1 describes what kinds of message types exist in the
RFB specification.
Table 6-1. Message Types in the RFB Specification
Message Type Number Message Type
0SetPixelFormat
2SetEncodings
3FramebufferUpdateRequest
4KeyEvent
5PointerEvent
6ClientCutText
www.it-ebooks.info

CHAPTER 6 ■ VNC WITH THE REMOTE FRAMEBUFFER PROTOCOL
123
Listing 6-13 shows the mouse event.
Listing 6-13. Mouse Event
var doMouseEvent = function ($this, e) {
var event = new CompositeStream();
event.appendBytes(5); // type (u8 5)
event.appendBytes($this.buttonMask);
In this section, we will focus on RFB client to server message types 4 and 5, keyboard
and mouse events respectively.
Mouse Input
Handling mouse and keyboard input is an important part of our sample implementation
and represents the capturing actions from the keyboard and mouse clicks. These actions
trigger JavaScript events that are sent from the client to the server. This lets VNC users
control applications running on remote systems. In our application, we will detect input
events in JavaScript and send the corresponding RFB protocol messages over our open
WebSocket.
In the RFB protocol, a PointerEvent represents either movement or a pointing
device button press or release. The PointerEvent message is a binary event message
consisting of a message-type byte that specifies what kind of message is being sent to the
server (for example, a pointing device click, a pointing device movement, and so on), a
button-mask byte which carries the current state of the pointing device buttons from 1 to 8
that are represented by the bits 0 to 7 where 0 means the button is up and 1 means the
button is down or pressed, and two position values each consisting of an unsigned short
integer that represents the X and Y coordinates in relation to the screen (see Figure 6-3).
Figure 6-3. Pressing the left mouse button generates a binary PointerEvent message of 6 bytes
www.it-ebooks.info

CHAPTER 6 ■ VNC WITH THE REMOTE FRAMEBUFFER PROTOCOL
124
// position
event.appendUint16(e.offsetX);
event.appendUint16(e.offsetY);
sendBytes($this, event.consume(event.length));
}
Listing 6-14 indicates that when mouse motion is detected, a mouse event is sent to
the VNC server.
Listing 6-14. Mouse Event to the VNC Server
$prototype.mouseMoveHandler = function($this, e) {
doMouseEvent($this, e);
}
Similarly, when a mouse click is detected, the button that was clicked is transmitted
as a mouse event, as shown in Listing 6-15.
Listing 6-15. Transmitting a Mouse Click as a Mouse Event
$prototype.mouseDownHandler = function($this, e) {
if (e.which == 1) {
// left click
$this.buttonMask ^= 1;
} else if (e.which == 3) {
// right click
$this.buttonMask ^= (1<<2);
}
doMouseEvent($this, e);
}
Table 6-2 describes the mouse event types that are relevant to the RFB event
listeners.
Table 6-2. Mouse Event Types
Event Type Description
mousedown Indicates that the pointing device was pressed down over
an element
mouseup Indicates that the pointing device was released over an element
mouseover Indicates that the pointing device is over an element
mousemove Indicates that the pointing device is moved while it is over
an element
www.it-ebooks.info

CHAPTER 6 ■ VNC WITH THE REMOTE FRAMEBUFFER PROTOCOL
125
Keyboard Input
In addition to the PointerEvent messages, the RFB protocol specifies that KeyEvent
messages indicate a key was pressed or released. The KeyEvent message is a binary event
message consisting of a message-type byte which specifies what kind of message is being
sent to the server (a keyboard event in this case), a down-flag byte that indicates if the key
is pressed when the value is 1 or if the key is now released if the value is 0, two bytes of
padding and the key itself specified in the four bytes of the key field. Figure 6-4 shows the
relationship between the keyboard input and the KeyEvent.
Figure 6-4. Pressing the ‘T’ key generates a binary KeyEvent message of 8 bytes
The RFB protocol uses the same key codes as the X Window System even if the client
(or server) is not running the X Window System. These codes are not the same as the key
codes on DOM KeyboardEvents, so a mapping function is necessary. Listing 6-16 shows
the KeyEvent function for our example.
Listing 6-16. The KeyEvent() Function
var doKeyEvent = function doKeyEvent($this, key, downFlag) {
var event = new CompositeStream();
event.appendBytes(4); // type (u8 4)
event.appendBytes(downFlag);
event.appendBytes(0,0); // padding
event.appendUint32(key);
sendBytes($this, event.consume(event.length));
}
www.it-ebooks.info
CHAPTER 6 ■ VNC WITH THE REMOTE FRAMEBUFFER PROTOCOL
126
In Listing 6-16, the doKeyEvent() function takes a key value and a downFlag and
constructs the corresponding RFB client message. The padding bytes seem wasteful.
They clearly are today, since network bandwidth and latency are more precious than
CPU cycles. Aligning integer values to 32-bit boundaries is a vestigial optimization in the
protocol design that trades bytes of network bandwidth for processing speed on some
computing platforms. Since we are generating these values in JavaScript, which doesn’t
even have a 32-bit integer type, it looks pretty funny!
Note ■ Keyboard events are device-dependent, which means a mapping with the
operating system must occur for the keyboard events to be generated.
Table 6-3 describes the DOM Keyboard Event Types.
Table 6-3. DOM Keyboard Event Types
Event Type Description
keydown Indicates that a specific key was pressed on the keyboard and
triggers before the keypress event
keyup Indicates that a specific key was released
This example uses the event.which property to detect keyboard keys. The property
is a legacy DOM API, but is suitable for the purposes of this example. The event.which
property returns the value of the character represented by the key that was pressed or
released. We can map that value to the key value used by RFB in KeyEvent messages.
Putting It All Together
At this point, we are ready to connect to a RFB server and start using a remote desktop.
Open vnc.html in a modern browser that supports the required JavaScript APIs. This will
probably work from your local file system. Otherwise, serve all of the static files for this
example from a location where you can reach them with your browser.
Start the WebSocket-to-TCP proxy and the back-end RFB server. When you press
the Connect button in your application, you should see a remote desktop appear in your
browser tab. Try using the UI of the remote system. It’s magical.
Note ■ Keep in mind that you can simply install and launch the server and client from the
VM. See Appendix B for more information.
www.it-ebooks.info
CHAPTER 6 ■ VNC WITH THE REMOTE FRAMEBUFFER PROTOCOL
127
Enhancing the Application
To enhance this application, you have a few obvious options. For one, you can try
removing the WebSocket to TCP proxy and connect directly to an RFB server that
contains integrated WebSocket support. You can also implement other RFB features;
RFB supports many other pixel encoding mechanisms not included in this example.
There are negotiable authentication mechanisms, as well, that you can add support for.
Furthermore, RFB servers can be configured to support different color depths. You could
add these modes to the RFB client protocol library.
With the power of VNC/RFB over WebSocket technology you should be able to
design a web application that connects to multiple desktops on the same web page as a
way to work with them. Imagine that you have three panels on a web page and each one
of them is connected to a remote system through VNC over WebSocket where you can
perform an action on one that is controlling a Windows system, switch to another panel
that controls a Linux system, then finally focus on the third panel that controls a Mac
OS. While these three remote systems are running for you in parallel, you can perform
additional tasks in your browser or on your desktop.
The mechanism you learned in this chapter is only the beginning of what you could
develop with WebSocket in terms of simultaneously connecting remotely to several
different machines from a single web page without installing anything on your system.
Summary
In this chapter, we discussed some key points from the history of network computing,
specifically virtual network computing. We examined the widely implemented Remote
Framebuffer (RFB) protocol, stepped through how to layer RFB and WebSocket to enable
you to control the GUI of another computer remotely, and highlighted key techniques
for using RFB with WebSocket. We also looked at some of the educational and technical
benefits of VNC over WebSocket, as well as a comparison of binary-oriented and
text-oriented protocols. We also explored potentially exciting uses and applications you can
build to enable users to perform tasks they couldn’t before, like viewing and controlling
multiple desktops from the same web page.
Now that we’ve stepped through a few real-life demos and use cases of WebSocket,
we’ll discuss WebSocket security and how to secure WebSocket applications in the
next chapter.
www.it-ebooks.info

129
Chapter 7
WebSocket Security
The chapters in this book so far have shown you how WebSocket enables full-duplex,
bidirectional communication over the Web. We’ve looked at how layering WebSocket
with commonly used standard protocols like XMPP and STOMP enables you to take your
TCP-based architectures to the Web and allow your applications to be accessed from
almost anywhere. You also learned how you can enable remote control of systems over
the Internet using VNC.
With these abilities comes the challenge and complexity of security. Web security is
a topic that is as important as it is misunderstood. Although aspects of a software system
can be designed with security in mind, the properties of a system that are relevant to
security can be very complex due to the interactions of many different components.
Enhancing security on the system means applying techniques to the software system to
protect against threats.
The topic of Web security spans network and browser security, including
application-level security and even the security of operating systems. When you enable
your users to access systems over the Internet, you expose your assets (your database,
server, application, and so on) to all types of intended and unintended risks. Web security
techniques mitigate and address threats over the Internet.
The WebSocket standard handles core security by providing for unencrypted and
encrypted transport, and by defining WebSocket as a frame within which all existing
security protocols can operate. We cannot prove that WebSocket itself possesses
something called “security” or offer any final, bulletproof recipes. We can, however,
examine specific types of threats related to WebSocket and recommend best practices to
help write and deploy more secure applications.
This chapter describes WebSocket security in detail, explains security decisions
made in the protocol and API designs, and recommends practices for deploying
WebSocket services and applications. There are numerous Web security resources
available that you should read, particularly those relating to any protocols you want to
layer with WebSocket. In this chapter, we focus on aspects of security that pertain directly
to WebSocket.
WebSocket Security Overview
Deploying applications over the Web presents security challenges you must consider
when deciding to use WebSocket. Such challenges include attacks on servers that may
exploit flaws in WebSocket servers in order to gain control over them. There are also
www.it-ebooks.info

CHAPTER 7 ■ WEBSOCKET SECURITY
130
denial of service attacks, which are attempts to make resources unavailable for the
system’s users. The goal of such attacks is to prevent a web site, service, or server from
working efficiently—temporarily or even indefinitely.
Allowing users to access your web applications can also expose your users to attacks.
Malicious persons and evil robots are constantly attempting to copy, delete, and modify
precious user data. Some of these attacks may rely on impersonation, while others may
be more passive eavesdropping and interception. These common threats are typically
mitigated using authentication and encrypted communication.
In addition to these well-known types of attacks, there are unintended and
ambiguous attacks against those who are neither using nor deploying WebSocket.
Examples of these include legacy proxy and monitoring systems that confuse WebSocket
traffic and HTTP traffic.
Many of the WebSocket Protocol design choices that we examined in Chapter 3
make sense in light of security and were added to mitigate specific attacks. After all, if
the purpose of WebSocket is to open a free-flowing pipe of bytes between two endpoints,
then everything else is decorative. As it happens, some of these trappings are necessary
to thwart very specific types of attacks. These threats may affect users of the protocol, or
more curiously, innocent bystanders who happen to be on the same network.
Table 7-1 describes some of these security issues and a brief description of how some
features of the WebSocket Protocol were specifically designed to mitigate these attacks.
We’ll delve more into each of these areas in the subsequent sections, and explore higher-
level WebSocket security areas like authentication and application-level security.
Table 7-1. Types of Attacks Addressed by the WebSocket API and Protocol
This Type of Attack . . . is Addressed by this WebSocket API or Protocol Feature
Denial of service Origin header
Denial of service by
connection flooding
Throttling new connections using the Origin header
Proxy server attacks Masking
Man-in-the middle,
eavesdropping
WebSocket Secure (wss://)
WebSocket Security Features
Before we examine the aspects of the WebSocket API and Protocol that address specific
areas of security, let’s review the WebSocket handshake. The WebSocket handshake
contains several of the components that help establish security on the WebSocket
connection.
As we described in Chapter 3, WebSocket connections begin with an HTTP request
containing special headers. The contents of that request were very carefully designed
for security and compatibility with HTTP. To review, Listing 7-1 is an example of a client
sending WebSocket handshake:
www.it-ebooks.info

CHAPTER 7 ■ WEBSOCKET SECURITY
131
Listing 7-1. Client Initiating a WebSocket Handshake
Request
GET /echo HTTP/1.1
Host: echo.websocket.org
Origin: http://www.websocket.org
Sec-WebSocket-Key: 7+C600xYybOv2zmJ69RQsw==
Sec-WebSocket-Version: 13
Upgrade: websocket
The server sends back a response, as shown in Listing 7-2.
Listing 7-2. Server Responding to and Completing a WebSocket Handshake
Response
101 Switching Protocols
Connection: Upgrade
Date: Wed, 20 Jun 2012 03:39:49 GMT
Sec-WebSocket-Accept: fYoqiH14DgI+5ylEMwM2sOLzOi0=
Server: Kaazing Gateway
Upgrade: WebSocket
Two significant areas in the handshake to note are the Origin header and the
Sec- headers, which we’ll examine in the next sections.
Origin Header
The WebSocket Protocol (RFC 6455) was published at the same time as another
document that defines a key idea necessary for WebSockets to be safely deployed across
the Web: origin. The origin concept appears in earlier specifications such as Cross-
Document Messaging and Cross-Domain Resource Sharing, and is widely used today.
However, in order for the WebSocket standard to be usefully and safely rolled out to
the Web, the origin concept needed to be more precisely defined. RFC 6454 achieves
this by defining and describing the principles behind the same origin policy and, more
importantly, the origin header.
Note■ For the complete RFC 6454 specification, see
http://www.ietf.org/rfc/rfc6454.txt.
Origins consist of a scheme, host, and port. In serialized form, an origin looks like a
URL: the scheme and host are separated by :// and a colon precedes the port. For origins
where the port matches the default port for the scheme, the port is omitted.
www.it-ebooks.info
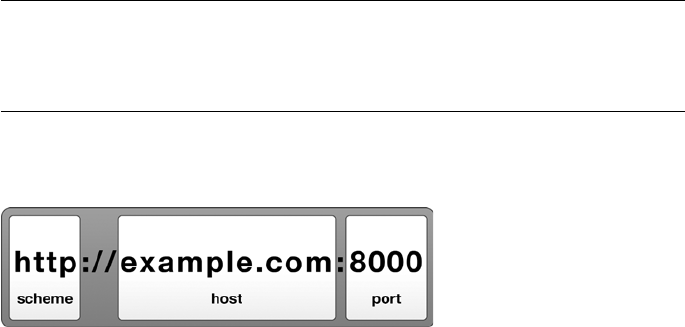
CHAPTER 7 ■ WEBSOCKET SECURITY
132
Note ■ Since most serialized origins use port 80, which matches the default HTTP port,
the port is commonly omitted from the origin. A typical serialized origin looks like this:
http://example.com
Figure 7-1 shows an example origin, containing a scheme, host, and port.
Figure 7-1. Diagram of an origin
If any component of two origins differs, browsers treat those origins as completely
separate origins. Browsers can enforce consistent rules for communicating and sharing
data between origins. For instance, applications with different origins can communicate
using the postMessage() API, but they are able to scope their messages based on the
origins of the sender and receiver.
Origin replaces older, less standardized, and more complex rules, sometimes referred
to as the “same-domain policy.” The same-domain policy was not comprehensive: pages
could still hotlink images and embed iframes from any origin. This policy included rules
for the referer header, which in addition to being spelled incorrectly by the specification,
included URL paths and thereby leaked too much information. As a result, referers
were frequently hidden and could not be relied on for access control. For cross-domain
scripting, non-standard rules were enforced for pages with partially matching origins that
differed only by port or scheme. In short, the same-domain policy was a mess.
The origin model cleans up all the cross-domain rules for web applications. It
defines an origin as the trio (scheme, host, and port). If two URLs differ at all in one of
those three ways, they have different origins.
The origin model also makes it possible to host public and semi-public services.
For example, a server could allow several origins, allowing connections to exchange
data with applications all over the Web. A public service could even try allowing every
origin by default, blocking only those origins known to be problematic. As such, origin is
more flexible than older same-domain policies under which all non-similar origins were
assumed to be malicious and were blocked by default.
Mitigating Denial of Service
Origin allows the receiving party to reject connections that it does not want to handle.
Web servers can inspect the origin header of incoming requests and choose not to handle
connections from unknown or possibly malicious origins. This ability can be extremely
helpful in mitigating denial of service (DoS) attacks.
www.it-ebooks.info
CHAPTER 7 ■ WEBSOCKET SECURITY
133
Denial of service attacks against web servers come in many flavors. Some DoS
attacks begin from botnets consisting of thousands of compromised PCs; such attacks
are completely under the control of the attacker. Some may consider that botnets are just
a part of modern life on the Internet. There are other attacks, however, that web origin
security can address directly. The web platform can make it more challenging to abuse
features of the Web to launch DoS attacks. In the case of WebSocket, because receiving
servers can use the origin header to verify the origin of incoming requests, DoS attacks
are much more difficult to accomplish. Servers can ban connections from unknown or
attacking origins, saving server resources by rejecting connections.
The proper origin header is included in all WebSocket requests made by browsers.
What about applications that don’t run in browsers at all? You may notice that there is
nothing stopping you from opening a socket in a console application and writing any
origin you like. Servers don’t really know that a request with a particular origin header
came from a web application; all they know is that a request did not come from a web
application from a different origin. One question people ask over and over again is, if
origin is so easily spoofed, what security does it provide? Understanding the answer
requires understanding the true nature of WebSockets, as described in the next section.
What is a WebSocket (from a Security Perspective)?
If you’ve made it this far in this book, you know the many benefits afforded by using
WebSocket in your applications. As described in Chapter 1, WebSocket has many
desirable features. WebSocket is a simple, standard, full-duplex protocol with low
overhead that can be used to build scalable, near real-time network servers. If you’re
an astute student of computing or recall slightly earlier days, you know that most of
these traits apply equally well to plain, unadulterated TCP/IP. That is, they are traits of
sockets (in particular SOCK_STREAM) and not of WebSockets. So why add the “Web” to
“Sockets”? Why not simply build traditional Internet applications on top of TCP?
To answer this question, we need to distinguish between “unprivileged” and
“privileged” application code. Unprivileged code is code running within a known origin,
and is typically JavaScript running inside of a web page. In the Web security model, TCP
connections cannot be safely opened by “unprivileged code.” If unprivileged application
code were allowed to open TCP connections, it would be possible for a script to originate
HTTP requests with spoofed headers that falsely appear to come from a different origin.
The ability to spoof headers in this way would make it pointless to have rules governing
how scripts can make HTTP connections if the same scripts could sidestep those rules
by re-implementing HTTP over TCP. Allowing TCP connections from web applications
would break the origin model.
WebSocket connections formed from unprivileged code must therefore follow the same
model as AJAX and other network capabilities allowed to unprivileged code. The HTTP
handshake puts connection initialization under browser control and allows the browser
to set the origin header and other headers that are necessary for preserving the origin
model. This way, WebSocket allows applications to perform Internet-style networking with
lightweight bidirectional connections while coexisting with HTTP applications, servers, and
sandboxing rules.
WebSocket connections formed from privileged code can typically open any network
connections; this ability isn’t a problem (or at least, isn’t a problem for the Web), because
www.it-ebooks.info
CHAPTER 7 ■ WEBSOCKET SECURITY
134
privileged apps have always been open to use any network connections and must be
installed and executed by users. Native applications do not run in a web origin, so origin
rules need not apply for WebSockets formed from privileged code.
Don’t Confuse the User
In the past, one way to grant network access to unprivileged code was to prompt the user to
grant selective permission to use the network when an application requested it. In theory, this
method offers a solution to the same problems. When the user grants selective permission,
the code could be allowed to make network connections when the user explicitly allowed it,
though the application would put the responsibility of knowing how the application should
behave on the user. In reality, users do not know the impact of granting permissions to code,
and most users will blithely click OK. Users just want applications to work.
Security-related prompts are typically annoying, confusing, and often ignored,
resulting in drastic consequences. The WebSocket approach denies applications from
ever opening an unmediated TCP connection; however, it offers the same capabilities as
typical networks, its security is better, and there is no user interface impact on the user
because of origin. Origin lets the receiving server deny connections instead of asking the
user to allow a connection.
Throttling New Connections
Although the origin header prevents floods of connections from being established at the
HTTP layer, there is still a potential DoS threat from floods of connections opening at
the TCP layer. Even open TCP connections carrying no data cost resources, and there is
the potential for vast numbers of clients to overwhelm a server even with connections
that the server would ultimately reject. To prevent connection overload, the WebSocket
API requires browsers to throttle opening new connections. As you saw in Chapter 2,
every call to the WebSocket constructor results in a new, open network socket. Browsers
limit the rate at which underlying TCP sockets open, which in turn prevents floods of TCP
connections from opening to hosts that will not accept them as WebSocket upgrades, and
does not unduly slow down applications that legitimately want to open one or a small
number of connections to the same host.
Headers with the “Sec-” Prefix
In the WebSocket opening handshake, there are several required HTTP headers, as
you can see in Listings 7-1 and 7-2. Some of these headers are pervasive across the web
platform, like origin, while other new headers were introduced to support WebSocket.
The new headers were carefully chosen and named to prevent abuse of AJAX APIs to
spoof WebSocket requests.
The client sends an HTTP request to the server asking to upgrade the protocol to
WebSocket. If the server supports this upgrade, it responds with the corresponding
headers. As explained in Chapter 3, some of these headers are required in order for the
upgrade to complete successfully. Servers and browsers both enforce this exchange and
www.it-ebooks.info
CHAPTER 7 ■ WEBSOCKET SECURITY
135
acknowledgement of headers. Of these headers, some begin with the prefix “Sec-”, and
are described in RFC 6455. These headers are used in the opening WebSocket handshake
(see Table 3-2 for a full description of these Sec- headers):
• Sec-WebSocket-Key
• Sec-WebSocket-Accept
• Sec-WebSocket-Extensions
• Sec-WebSocket-Protocol
• Sec-WebSocket-Version
Several header names are reserved by browsers for platform-level usage in the
XMLHttpRequest specification and thus are off-limits for use in applications. These
header names include those starting with Sec-, as well as common security-critical
headers like referer, host, and cookie.
The new headers defined in RFC 6455 are all prefixed with Sec-. These prefixes
are so named because the browser is opening WebSocket connections on behalf of
applications, but the low-level, security sensitive parameters in the handshake are off-
limits to application code. This effectively locks down upgrade requests so that they can
only be made through APIs like the WebSocket constructor and not through general
HTTP APIs like XMLHttpRequest.
WebSocket Secure Handshake: Accept Keys
You may recall from our discussion of the WebSocket Protocol that WebSocket
connections succeed based on the server’s response. The server must respond to the
initial WebSocket handshake with the 101 response code, WebSocket upgrade header,
and Sec-WebSocket-Accept header. The value of the Sec-WebSocket-Accept response
header is derived from the Sec-WebSocket-Key request header and contains a special key
response that must match exactly what the client expects.
The reason for the required exchange of the Sec-WebSocket-Key and Sec-WebSocket
headers between the client and server is not obvious. The keys are only used during
connection initialization, are easily intercepted, and clearly offer no protection to
WebSocket clients or servers. What could these keys be protecting? These keys actually
protect non-WebSocket servers and eliminate the possibility of cross-protocol attacks.
Examples of cross-protocol attacks are those that make specially crafted WebSocket
requests to non-WebSocket servers in order to establish connections or otherwise exploit
them, and confuse servers expecting one protocol by making cleverly crafted connections
with another protocol. To prevent cross protocol attacks using WebSocket, the handshake
requires that the server transform a client-supplied key. If the server does not reply as
expected, the client closes the connection. The WebSocket RFC contains a Globally
Unique Identifier (GUID), which is a magic key used to identify the protocol rather than
the connection or the user or any other participant in the system. The GUID is
258EAFA5-E914-47DA-95CA-C5AB0DC85B11.
www.it-ebooks.info
CHAPTER 7 ■ WEBSOCKET SECURITY
136
The server reads the value of the Sec-WebSocket-Key header and performs the
following steps:
Server adds GUID: 1. 258EAFA5-E914-47DA-95CA-C5AB0DC85B11
Server transforms result with SHA1 hash2.
Server transforms result with Base64 encoding3.
Server sends result back as the value of the 4. Sec-WebSocket-Accept
header
By performing a specific transformation of the provided key, the server proves that it
specifically understands the WebSocket Protocol, as a server that doesn’t know the hash
isn’t really a WebSocket server. This transformation heads off direct cross-protocol attacks,
because real WebSocket clients and servers will insist on only talking among themselves.
HTTP Proxies and Masking
In Chapters 2 and 3, we discussed WebSocket frames, which comprise WebSocket
messages. WebSocket frames sent from browsers to servers are masked to obfuscate the
frames’ contents, because intercepting proxy servers can be confused by WebSocket
traffic. In Chapter 3, we discussed how masking WebSocket frames improves
compatibility with existing HTTP proxies. There is, however, another, rather unusual and
subtle reason for masking that has to do with security.
Unlike regular HTTP request-response traffic, WebSocket connections can remain
open for a long time. In older architectures, proxy servers are configured to allow such
connections and can handle the traffic gracefully, but they can also interfere with
WebSocket traffic and cause headaches.
A proxy server acts as an intermediary between a client and another server, is often
used to monitor traffic, and can sometimes close a connection if it has been open too
long. Proxy servers may choose to close long-lived WebSocket connections because the
proxy server sees the connections as trying to connect with an unresponsive HTTP server.
Figure 7-2 shows a simple example of a network topology with WebSocket, proxy
servers, and web applications. Here, client applications in a browser access back-end
TCP-based services using a WebSocket connection. Some of these clients are located
inside a corporate intranet, protected by a corporate firewall and configured to access
the Web through explicit proxy servers (see Figure 7-2); these proxy servers may cache
content and provide some level of security. Other client applications access a WebSocket
server directly. In both cases, the client requests may be routed through transparent
proxy servers.
f
www.it-ebooks.info

CHAPTER 7 ■ WEBSOCKET SECURITY
137
Figure 7-2. Network topology with proxy servers
Figure 7-2 shows three types of proxy servers:
Forward proxy server: Typically installed, configured, and •
controlled by the server administrator. A forward proxy server
directs outgoing requests from an intranet to the Internet.
Reverse proxy server: Typically installed, configured, and •
controlled by the server administrator. A reverse proxy server (or
firewall) is typically deployed in a network DMZ in front of the
server and performs security functions to protect internal servers
from incoming attacks from the Internet.
Transparent proxy server: Typically controlled by a network •
operator. A transparent proxy server typically intercepts network
communication for caching or preventing company intranet users
from accessing the Web for specific purpose. Network operators
may use a transparent proxy server to cache commonly accessed
websites to reduce network load.
All these intercepting proxy servers can be confused by WebSocket traffic, which
can be especially true with transparent proxy servers. For example, attackers may poison
an HTTP cache on a transparent proxy server. HTTP cache poisoning is a type of attack
in which an attacker exercises control over an HTTP cache to serve dangerous content
in place of the requested resources. Cache poisoning became a major issue during the
standardization of WebSocket after a group of researchers wrote a paper outlining a
theoretical attack on transparent intercepting proxies using HTTP upgrade requests. This
paper, Talking to Yourself for Fun and Profit (Huang, Chen, Barth, Rescorla, & Jackson, 2011)
www.it-ebooks.info

CHAPTER 7 ■ WEBSOCKET SECURITY
138
convinced the working group that WebSocket was dangerous to standardize without
some protection against these possible attacks. How could poisoning be prevented? After
much contentious debate by the working group, masking was added to the WebSocket
Protocol. Masking is a technique for obscuring (but not encrypting) the protocol contents
to prevent confusion in transparent intercepting proxies. As discussed in Chapter 3,
masking transforms the payload of each message sent from browsers to WebSocket
servers by XORing the contents with a few random bytes.
Previously, we mentioned that plugins and extensions can open sockets if they
request permission, and that installed applications use network connections with
arbitrary traffic all the time. What’s stopping someone behind such a proxy from opening
a terminal and crafting that kind of network traffic manually? The answer is: nothing
at all. Masking does not fix the problems in the proxies, though it does not exacerbate
an existing problem. On the Web, where applications are not installed and you run
thousands of scripts from different sources simply by browsing around, everything is
magnified. Web APIs have to be more paranoid.
Like origin, masking is a security feature that does not need to be cryptographically
secure against eavesdropping. Both ends and any middlemen can understand the
masked payload if they desire. However, for middlemen who do not understand the
masked payload, they are critically protected from misinterpreting the content of
WebSocket messages as HTTP requests and responses.
Secure WebSocket Uses TLS (You Should, Too!)
As we discussed in Chapter 3, the WebSocket Protocol defines WebSocket (ws://)
and WebSocket Secure (wss://) prefixes; both connections use the HTTP upgrade
mechanism to upgrade to the WebSocket Protocol. Transport Layer Security (TLS) is the
protocol used when accessing secure websites with a URL that begins with https://. TLS
protects data during transit and verifies its authenticity. WebSocket Secure connections
are secured by tunneling through TLS using the WebSocket Secure (WSS) URL scheme
wss://. By securing WebSocket communication with TLS, you protect the confidentiality,
integrity, and availability of your network communications. In this chapter, we focus
on confidentiality and integrity as they pertain to WebSocket security, and explore the
benefits of TLS from a deployment standpoint in Chapter 8.
Note ■ TLS has its own RFC defined by the IETF: http://tools.ietf.org/html/rfc5246.
You can use a plain, unencrypted WebSocket connection (prefixed by ws://) for
testing or even simple topologies. If you are deploying a service on a network, the benefits
of wire-level encryption are enormous and the drawbacks are relatively small.
The major historical drawbacks of using encryption on the Web have all been greatly
reduced with enhancements to the TLS protocol and modern machines. In the past, you
might have chosen not to use HTTPS due to high CPU cost, lack of virtual hosting, and
slow startup times for new connections. These concerns are now allayed with modern
improvements.
www.it-ebooks.info
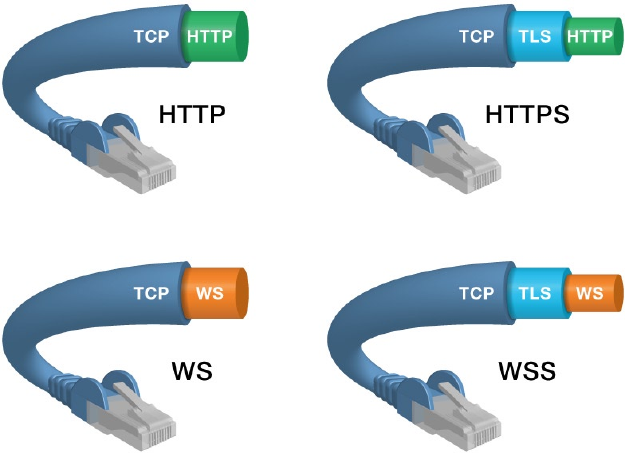
CHAPTER 7 ■ WEBSOCKET SECURITY
139
There are some pleasant side effects of deploying TLS, as well. Encrypted WebSocket
traffic generally works more smoothly through proxies. Encryption prevents proxies from
inspecting traffic, so they generally just let the bytes through without attempting to buffer
or change the traffic flow. See Chapter 8 for more information about deploying encrypted
WebSocket services.
Just like WebSocket begins with an HTTP handshake before upgrading to WebSocket,
the WebSocket Secure (WSS) handshake begins with an HTTPS handshake. The HTTPS
and WSS protocols are very similar, with both running on top of TLS over TCP connections.
You configure TLS encryption for WebSocket wire traffic the same way you do for HTTP:
using certificates. With HTTPS, the client and server first establish a secure connection and
only then begins the HTTP protocol. Similarly, WSS establishes a secure connection, begins
the HTTP handshake, and then upgrades to the WebSocket wire protocol. The benefit of
this is that if you know how to configure HTTPS for encrypted communication, then you
also know how to configure WSS for encrypted WebSocket communication.
The cables at the top of the Figure 7-3 show how HTTPS is not a separate protocol,
rather the combination of HTTP running on a TLS connection. Commonly, HTTPS uses
a different port than HTTP (HTTPS’s default port is 443 and HTTP’s default port is 80).
HTTP runs directly on TCP and HTTPS runs on TLS, which, in turn, runs on TCP.
Figure 7-3. HTTP, HTTPS, WS, and WSS
www.it-ebooks.info
CHAPTER 7 ■ WEBSOCKET SECURITY
140
The cables at the bottom of the figure show that the same is true for WebSocket
Secure (WSS) connectivity. The WebSocket (WS) protocol runs on TCP (like HTTP), and
the WSS connection runs on TLS, which, in turn, runs on TCP. The WebSocket Protocol
is compatible with HTTP such that the WebSocket connection uses the same ports: the
WebSocket default port is 80 and WebSocket Secure (WSS) uses port 443 by default.
Authentication
To confirm the identity of users connecting to our servers via WebSocket, WebSocket
handshakes can include cookie headers. Using cookie headers allows servers to use the
same cookies for WebSocket authentication that are used to authenticate HTTP requests.
At the time of writing this book, browsers do not allow other forms of HTTP
authentication from the WebSocket API. Interestingly, the API does not disallow these
mechanisms; they just won’t work with browsers. If a server responds to a WebSocket
upgrade request with status 401 Authentication Required, for instance, the browser will
simply close the WebSocket connection. The assumption in this model is that users will
have already logged into an application via HTTP before that application attempts to
open a WebSocket connection.
Alternatively, authentication could take place over the application layer protocol
after the WebSocket upgrade has completed. Protocols such as XMPP and STOMP have
semantics for identifying users and exchanging credentials built into those layers. One
could deploy unauthenticated WebSockets but require authentication at the next protocol
layer. In the following section, Application Level Security, we discuss how authorization
can be enforced at the application protocol level, as well.
Application Level Security
Application Level Security dictates how applications can protect themselves from
attacks that may expose private information. This level of security protects the resources
exposed by the application. You can take advantage of application level security on your
WebSocket-based system if you are using a standard protocol such as XMPP, STOMP, or
Advanced Message Queueing Protocol (AMQP). Configuring permissions is specific to
the server.
In Chapter 5, we used the Apache ActiveMQ message broker to illustrate how to build
applications using STOMP over WebSocket. Here, we’ll continue to build upon the ActiveMQ
configuration and restrict access to its resources, and we’ll do so by implementing security to
the sample WebSocket application that ships with Apache ActiveMQ.
In this section, we review two application security measures. First, we take a look
at a simple authentication plugin that requires users to authenticate themselves before
accessing ActiveMQ. Then, we take a look at how to configure authorization to protect
specific queues and topics.
Before we get started, let’s make sure that you can access the demo without
providing credentials to ensure you don’t already have application authentication and
authorization configured. Using the following command, start ActiveMQ:
$> bin/activemq console
www.it-ebooks.info
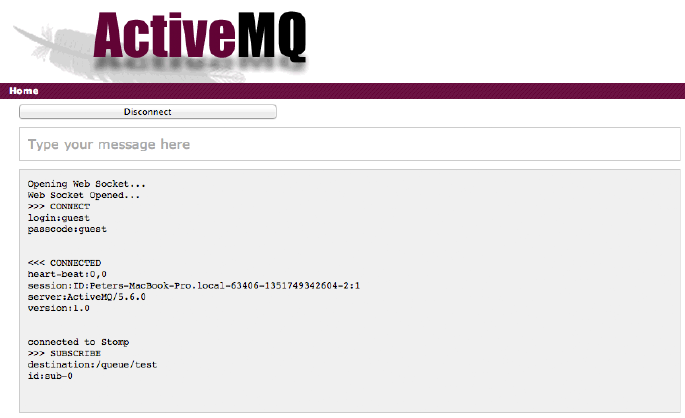
CHAPTER 7 ■ WEBSOCKET SECURITY
141
Navigate to the ActiveMQ welcome page, by default located at http://0.0.0.0:8161/.
Click the See some web demos link, and open the WebSocket example. The default URL for
this demo is: http://0.0.0.0:8161/demo/websocket/index.html.
Modify the host name in the Server URL field from localhost to 0.0.0.0, and click
Connect. As Figure 7-4 indicates, you should now be connected.
Figure 7-4. Apache ActiveMQ configured with no authentication
Since ActiveMQ isn’t configured to perform authentication, any credentials you
enter are simply ignored. You can confirm this behavior by changing the Login and
Password fields to arbitrary values, then clicking Connect again. You should still be able
to connect. Now, let’s add authentication to our application.
Application Authentication
When configured, authentication blocks users from accessing ActiveMQ, unless they
provide the right credentials. Let’s review how to configure authentication and how you
can define the credentials for your users.
Listing 7-3 shows a sample configuration snippet that you can add to the
configuration we used in Chapter 5. When you add this to the conf/activemq.xml file in
the Apache ActiveMQ installation directory, you restrict user access to the system and
ActiveMQ challenges the user with a username and a password.
www.it-ebooks.info

CHAPTER 7 ■ WEBSOCKET SECURITY
142
Note ■ You can define various configuration files for Apache ActiveMQ. To keep our example
simple, here we modify the default one. For additional Apache ActiveMQ configurations, see
the ACTIVEMQ_HOME/conf directory.
Listing 7-3. Sample Apache ActiveMQ Configuration
<plugins>
<simpleAuthenticationPlugin>
<users>
<authenticationUser username="system"
password="${activemq.password}"
groups="users,admins"/>
<authenticationUser username="user"
password="${guest.password}"
groups="users"/>
<authenticationUser username="guest"
password="${guest.password}" groups="guests"/>
</users>
</simpleAuthenticationPlugin>
</plugins>
Listing 7-3 is available as a sample in the conf/activemq-security.xml file, as well.
Let’s start the Apache ActiveMQ message broker with the new configuration. In the
ACTIVEMQ_HOME directory enter the following:
$> bin/activemq console
Now, when you try to access the sample application with the same username and
password provided by the demo causes the system to reject the user’s login as shown in
Figure 7-5. The reason for this is that the value of the pre-populated value of the Login
and Password fields is guest, by default, while the configuration you just added refers to
the ${guest.password} property, as specified in the ACTIVEMQ_HOME/conf/credentials.
properties file.
www.it-ebooks.info
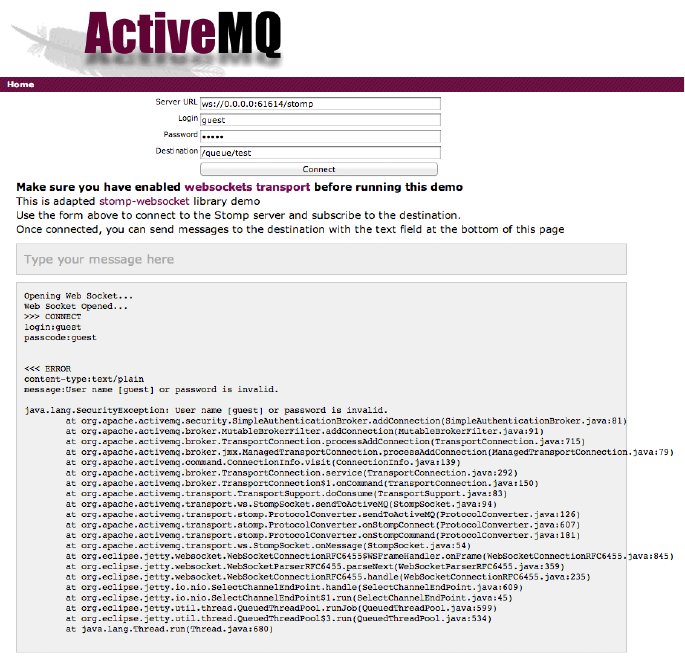
CHAPTER 7 ■ WEBSOCKET SECURITY
143
Providing the right username and password combination will let the user access
the system. The default password for the guest user is password (as defined in
ACTIVEMQ_HOME/conf/credentials.properties).
Listing 7-4 shows a line in the authentication plugin configuration that tells the
Apache ActiveMQ message broker that the user guest has his or her own password and
that the user is part of the guests group.
Listing 7-4. Setting a Password and Group for User Guest
<authenticationUser username="guest" password="${guest.password}"
groups="guests"/>
Figure 7-5. Apache ActiveMQ rejects user login with new configuration
www.it-ebooks.info
CHAPTER 7 ■ WEBSOCKET SECURITY
144
Application Authorization
After successful authentication, you want to grant access to certain application resources,
while denying access to some others. In this section, we review what you need to do to
grant users and groups access to specific queues and topics.
Listing 7-5 shows a configuration that, when added to the ACTIVEMQ_HOME/conf/
activemq.xml file, restricts deliberate access to the message broker destinations.
The configuration shows how to enable or disable access to the users depending
on the application requirements. Similar to the authentication snippet, the
authorizationPlugin must be surrounded by the <plugins> tag. The order of
authorization and authentication within the plugins tag is not relevant.
Listing 7-5. Restricting Deliberate Access to the Message Broker Destinations
<authorizationPlugin>
<map>
<authorizationMap>
<authorizationEntries>
<authorizationEntry queue=">" read="admins"write="admins"
admin="admins" />
<authorizationEntry queue="USERS.>" read="users" write="users"
admin="users" />
<authorizationEntry queue="GUEST.>" read="guests"
write="guests,users" admin="guests,users" />
<authorizationEntry queue="TEST.Q" read="guests" write="guests" />
<authorizationEntry topic=">" read="admins" write="admins"
admin="admins" />
<authorizationEntry topic="USERS.>" read="users" write="users"
admin="users" />
<authorizationEntry topic="GUEST.>" read="guests"
write="guests,users" admin="guests,users" />
<authorizationEntry topic="ActiveMQ.Advisory.>" read="guests,
users" write="guests,users" admin="guests,users"/>
</authorizationEntries>
</authorizationMap>
</map>
</authorizationPlugin>
The sample configuration in Listing 7-5 specifies that admins have full access to all
the queues and topics, while guests have access only to queues and topics that have a
GUEST. prefix in their name.
Restart ActiveMQ to pick up the configuration changes. When you reload the sample
demo application in the web browser, be sure to change the default password to the value
of password, then click Connect. The user will be authenticated but will not be able to
send or receive messages, as the topic name doesn’t have the right prefix.
Figure 7-6 shows that the user can connect to the system but cannot send to the test
queue.
y
www.it-ebooks.info
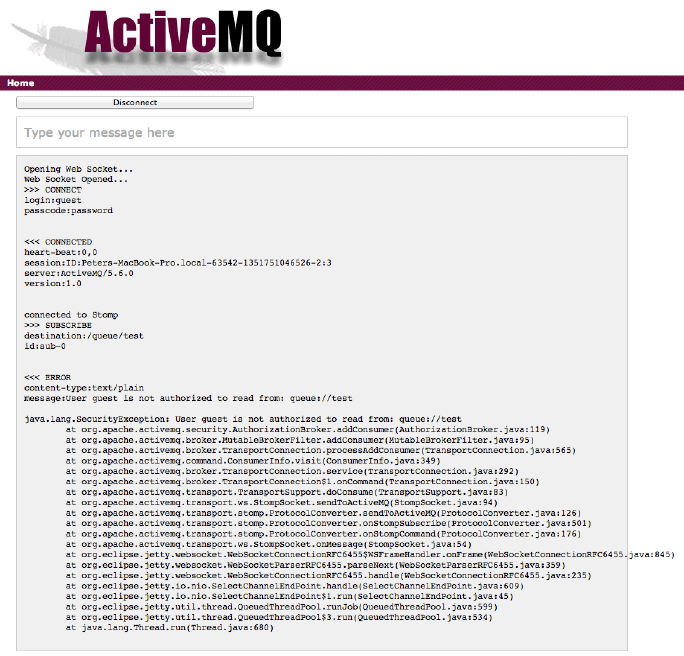
CHAPTER 7 ■ WEBSOCKET SECURITY
145
Now, set the Destination field to /queue/GUEST.test, then click Connect. Figure 7-7
shows the result of the successful login and that the user is now authorized to send and
receive messages on this queue.
Figure 7-6. User successfully connects but cannot send messages
www.it-ebooks.info
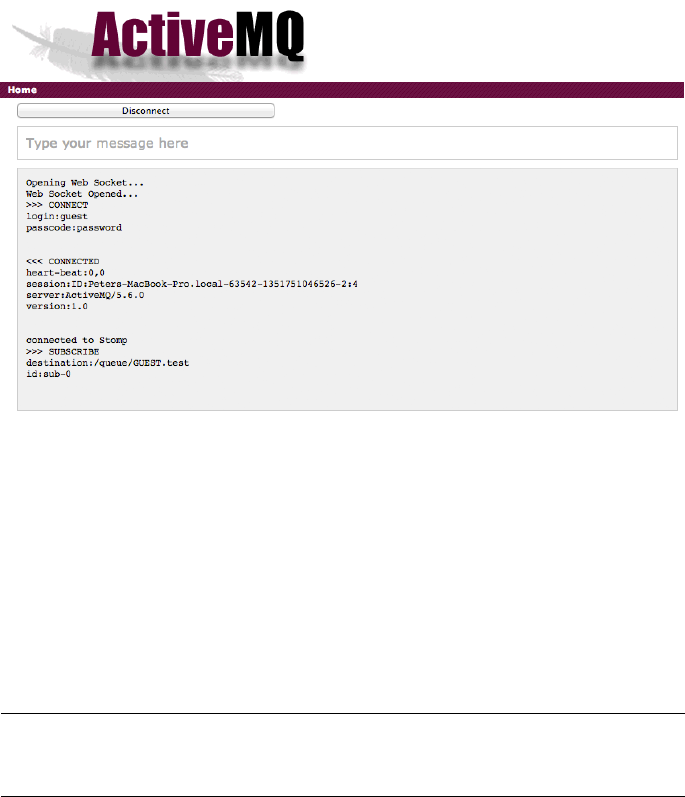
CHAPTER 7 ■ WEBSOCKET SECURITY
146
The user is now able to send and receive messages because you set an authorization
policy in the ActiveMQ configuration to let users, part of the guests group to read, write,
and manage any queues and topics that are prefixed with GUEST. Listing 7-6 shows the
authorization policy.
Listing 7-6. Authorization Policy in ActiveMQ
<authorizationEntry queue="GUEST.>" read="guests" write="guests,users"
admin="guests,users" />
Note ■ Apache ActiveMQ makes use of destination wildcards providing support for
federated name hierarchies.
As you can see, you can control security for your application simply by configuring
your back-end message broker. Enhancing security on your application resources further
tightens the security model over WebSocket, from your back-end server over WebSocket,
all the way to the application in the browser.
Figure 7-7. User successfully connects and is authorized to receive messages
www.it-ebooks.info
CHAPTER 7 ■ WEBSOCKET SECURITY
147
Summary
Security is an extremely important aspect of Web application deployment, and is no
less important with WebSocket applications. In this chapter, we examined areas of Web
security that pertain to WebSocket, and how to address them with commonly used
security protocols like TLS, features built into WebSocket like masking, and the origin
header, whose definition was refined specifically for the WebSocket specification. Finally,
we stepped through an example of how you can implement application-level security
through application authentication and authorization to protect resources at the source.
In the next chapter, we’ll further explore security as it relates to deployment, as well
as discuss considerations you need to make when you decide to deploy your WebSocket
application to the Web.
www.it-ebooks.info

149
Chapter 8
Deployment Considerations
After you’ve built, secured, and tested any web application, the next logical step is to
deploy it. Many considerations you must make when deploying WebSocket applications
are similar to those of any web application. In this chapter, we focus on the areas of
web application deployment that you should think about when deploying WebSocket
applications in particular.
When deploying an application, there are myriad factors you must consider,
especially for enterprises, such as business requirements, how clients will interact with
the application, the information the application uses, the number of clients that will
use the application at any given time, and so on. Some applications may require high
availability and must support many concurrent connections, while others may have a
stronger emphasis on performance and low latency. With WebSocket applications, you’ll
need to provide for the same requirements, keeping in mind the nature of the WebSocket
Protocol and the type of application you’re building. In this chapter, we’ll look at some of
the major aspects of deployment as they specifically relate to WebSocket, like WebSocket
emulation, proxies and firewalls, load balancing, and capacity planning.
Overview of WebSocket Application Deployment
When deploying any web application, there are some general requirements you need to
take into account, such as the variety of browsers that will be using your application, the
type of application, the nature of the traffic your servers must handle, and whether the
application is driven by the server or by user interaction. Now that your mind is exploding
with all sorts of new applications you can build with WebSocket, you’ll need to take these
application requirements into consideration when deploying them.
For example, you can imagine a WebSocket-based messaging application (using
STOMP over WebSocket, as we described in Chapter 5) where your application must
support thousands—nay, tens of thousands—concurrent connections. Your application
may be a stock portfolio application, where your users can track the millions of stock
transactions that happen daily. This data must refresh instantly and in real time in
order for the application to be useful; as such, you may be looking at a system where the
full-duplex connection is used by the server to stream continuous stock information
to the user’s browser or mobile device, with little user interaction. In another case, you
may want to use WebSocket to create a customizable video streaming application, where
large amounts of data (several minute-long video files) may stream over the connection,
but to just a few thousand clients at time; this traffic may be sporadic throughout the
www.it-ebooks.info
CHAPTER 8 ■ DEPLOYMENT CONSIDERATIONS
150
day, with peaks during certain times of the day, and with heavy interaction by users
requesting, sharing, and posting videos. Each scenario is ideal for WebSocket, and each
has different deployment requirements.
In the earlier chapters of this book, you also learned about different ways you can use
standard protocols over WebSocket. One of the choices you can make, which you learned
in Chapter 4, is that you can choose to enable WebSocket in your server (for example, you
could enable your XMPP chat server to speak WebSocket) or choose to use a gateway that
sits between your TCP-based server and your clients, but enables you to layer standard
protocols over WebSocket to take advantage of the full-duplex connection. In each of
these cases, you may need to think about how your WebSocket-enabled back-end server
or your WebSocket gateway will handle a variety of client connections.
The difference between application deployment and WebSocket application
deployment is not vast, but there are some areas to think about when deploying your
WebSocket application.
WebSocket Emulation and Fallback
While modern browsers natively support WebSocket, there are still many older versions
of browsers without native WebSocket support that are widely used, many of which are
in corporate environments or under business requirements that strictly control browsers
and versions. As a developer, you often do not have control over the type of browser used
to access your application, but you still want to accommodate as wide an audience as
possible. There are ways to achieve “emulation” of WebSocket’s capabilities by using
other communication strategies between cooperating client libraries and servers. There is
also the option to fall back to another communication technique as a last resort.
Plugins
One way you can establish full-duplex communication is with plugins. A common plugin
is Adobe Flash, which lets you open a TCP socket. While Flash tends to be installed in
most desktop browsers, if it is not present, users must explicitly download it, which can
be intrusive to the user experience. Using a plugin for communication also impacts the
performance of your application due to the expensive communication between Flash
and your application code. Even worse, using Flash sockets can cause your application to
hang for up to three seconds while connecting. Also, keep in mind that Adobe Flash is not
fully supported in the popular iOS, Android, and Windows RT environments. This lack
of support means plugin-based fallback strategies are becoming less and less viable as
browsers continue to move away from plugin-based extensibility.
Polyfills
A viable alternative to plugins is a polyfill, which is a library that implements a standard
API using legacy browser features. Polyfills allow developers to target new web standards
while creating applications and still reach users with older browsers. A number of polyfills
exist for a variety of HTML5 features, including graphics, forms, and databases. Polyfills
www.it-ebooks.info
CHAPTER 8 ■ DEPLOYMENT CONSIDERATIONS
151
can use multiple strategies to implement a standard API. For example, Kaazing has a
polyfill for the WebSocket API that uses secret sauce streaming techniques and provides
a fallback solution for WebSocket applications running on browsers that do not support
WebSocket.
Modernizr, an open source project for HTML5 best practices, maintains a wiki
with an up-to-date list of polyfills and their descriptions for a wide array of HTML5
technologies, including WebSocket at https://github.com/Modernizr/Modernizr/
wiki/HTML5-Cross-Browser-Polyfills.
Different Abstraction Layers
There are other libraries like Socket.io that use WebSocket and Comet techniques to
expose a single API. Some of these libraries have APIs that are the same as the standard
WebSocket API, and therefore are polyfills. Other libraries include APIs that differ from
the WebSocket API, but use WebSocket as a transport strategy to provide a different
communication abstraction. This technique does not necessarily make them less optimal
than polyfills, but code written against standard interfaces is more portable and future
proof in anticipation of the day when fallback libraries are no longer necessary.
Even the best fallback implementations that employ Comet techniques have
their downsides. These are, essentially, the flipside of the benefits of using WebSocket
as a transport layer protocol in your applications. Emulation is essential for ensuring
connectivity with legacy browsers and over adverse networks, but it is important to know
what you are losing when you resort to a fallback strategy. Many of the reasons are what
compelled WebSocket to be developed in the first place. When choosing and designing
your fallback strategy, you may want to keep in mind that these emulation techniques:
• Are Non-Standard: As we described in Chapter 1, these fallback
options are non-standard, which was one of the reasons
WebSocket was created. With these non-standard techniques,
different WebSocket emulation clients and servers cannot
communicate among themselves.
• Provide Decreased Performance: High performance Comet
implementations can stream data in only one direction: from the
server to the browser. Even optimal WebSocket emulation over AJAX
implementations cannot stream data from browsers to servers.
• Have Browser Connection Limits: Browsers restrict the number
of HTTP connections per host. Comet connections count against
this limit.
• Have Complicated (or Non-Functional) Cross-Origin
Deployment: WebSocket has had origin security built in from day
one. Cross-origin AJAX requires additional configuration to work
with legacy browsers, when it works at all.
www.it-ebooks.info
CHAPTER 8 ■ DEPLOYMENT CONSIDERATIONS
152
Proxies and Other Network Intermediaries
In Chapter 7, we discussed proxy servers and how they relate to WebSocket security.
Proxies fall into the category of “middleboxes,” which are network intermediaries that sit
between your web applications and servers.
There are two distinct classes of middleboxes that can impact deployment:
intermediaries that sit between your servers and the Internet, and intermediaries that
sit between your users and the Internet. On the server side, you or your organization
typically controls firewalls and reverse proxies that are part of your server infrastructure.
These server-side intermediaries are added in order to support your infrastructure or
enforce security policies.
On the client side, users are frequently behind firewalls and forward proxies. Their
connections pass through these intermediaries on the way out to the network. With the
exception of some closed environments, you cannot control the networks used to connect
to your servers. You can, however, make decisions when deploying your WebSocket
servers that can make connections through those networks smoother and more
frequently successful.
When considering deploying your WebSocket application, you’ll want to take into
account the various possible intermediaries that can handle traffic between your clients
and servers.
Reverse Proxies and Load Balancing
Reverse proxies are specific types of servers that accept web client connections on behalf
of one or more servers. There are several uses for reverse proxies including hiding the
existence and characteristics of the origin servers, application firewall, TLS (or SSL)
termination and offloading, load balancing, caching static content, and enabling dynamic
content through WebSocket. Reverse proxies can also be used whenever multiple web
servers must be accessible from a single public IP address and port.
Figure 8-1 shows a simple topology with reverse proxy server in front of an HTTP
server and a WebSocket server.
www.it-ebooks.info
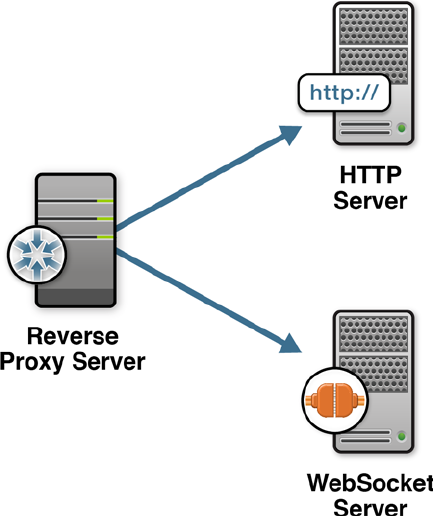
CHAPTER 8 ■ DEPLOYMENT CONSIDERATIONS
153
Using a reverse proxy server provides several benefits, including enabling you to
deploy, administer, and update your WebSocket server separately from other servers in
your network. While reverse proxy servers can enable your application to use a single
port to access the servers in your topology, as the number of users increase, you’ll need
to consider load-balancing options. For example, you may have an HTTP server serving
static content and multiple WebSocket servers serving dynamic content for your web
application.
You can use a reverse proxy as a load balancer in front of your servers by configuring
the proxy server to balance the load among a number of WebSocket servers. For
example, you can create a network of HTTP and WebSocket servers by using the
reverse proxy server to point to ws1.example.com, ws2.example.com, and so on, as
shown in Figure 8-2.
Figure 8-1. Reverse Proxy Server in Front of HTTP and WebSocket Servers
www.it-ebooks.info
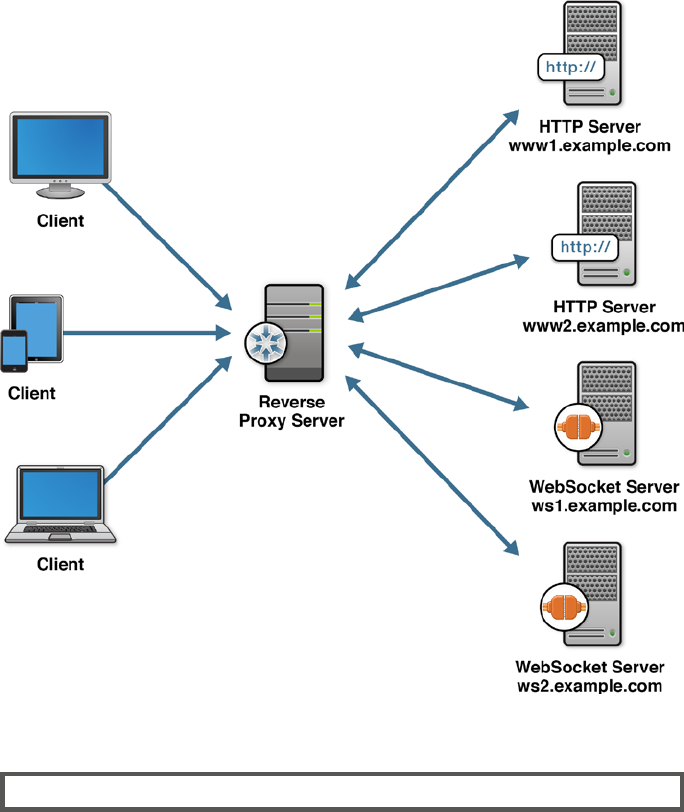
CHAPTER 8 ■ DEPLOYMENT CONSIDERATIONS
154
reVerSe CONNeCtIVItY
Figure 8-2. Reverse proxy server as a load balancer
Reverse proxy servers connect to servers inside your secure network in order to
establish end-to-end communication. Sometimes, the back-end server you would
like to use cannot receive connections, which commonly occurs in two situations:
during early development when you want to allow connections to a WebSocket server
running on localhost or on a local network, and in some enterprise deployments,
where application servers are behind a firewall that prevents all incoming connections
(usually for security reasons and/or the policy of your organization).
www.it-ebooks.info

CHAPTER 8 ■ DEPLOYMENT CONSIDERATIONS
155
You may recall our discussion about addressability in Chapter 3, where we
identified a fundamental problem: some machines on the Internet can only
make outgoing connections and cannot be directly addressed. WebSocket
essentially solves this problem for web clients, which cannot be directly
accessed by servers. Servers can only send newly available data to a client on a
connection that was initiated by that client. By keeping a persistent connection
open from web clients, WebSocket removes this limitation. Similarly, reverse
connectivity or tunneling keeps a persistent connection open from WebSocket
servers. Reverse connectivity for servers uses persistent connections from
non-addressable hosts to publicly available endpoints. The publicly available
endpoint forwards connections over this persistent tunnel to servers that would
otherwise be unable to accept connections. If your WebSocket server does not
have a public address, you may want to use reverse connectivity to make
it available.
Traverse Proxies and Firewalls with Transport
Layer Security (TLS or SSL)
Throughout this book, we’ve mentioned Transport Layer Security (TLS, formerly known
as SSL) frequently for an important reason. TLS hides network traffic from inspection
and interference by man-in-the-middle attackers. TLS helps connections flow smoothly
through some kinds of common web proxies, as well. In this section, we look at the
effects of different types of proxy on WebSocket connections. Hopefully, by the end of this
section, you’ll see why we recommend deploying WebSocket over TLS, even when it is
not a security requirement.
Because forward proxies manage traffic between private networks and the Internet,
they can also close a connection if it has been open for too long. This expected action by
a proxy server represents a risk to technologies, like WebSocket, that require persistent
connections. We discuss how to offset this with pings and pongs later in this chapter.
Proxies are also more likely to buffer unencrypted HTTP responses, thereby introducing
unpredictable latency during HTTP response streaming.
Without any intermediary servers, a WebSocket connection can be established
smoothly, as long as both understand the WebSocket Protocol. However, with the
proliferation of network intermediaries between you and the Internet, there are cases that
you need to understand when deploying your WebSocket-based application, as described in
Table 8-1.
www.it-ebooks.info

CHAPTER 8 ■ DEPLOYMENT CONSIDERATIONS
156
Proxies are often grouped into two categories: explicit and transparent proxies.
The proxy server is explicit when the browser is explicitly configured to use it. For explicit
proxies you have to provide your browser with the proxy’s host name, port number, and
optionally user name and password. The proxy server is transparent when the browser is
not aware that the traffic is intercepted by a proxy.
Table 8-1. Using Encrypted/Unencrypted WebSocket with Explicit and Transparent
Proxy Servers
Proxy
Server Type
WebSocket
Connection
Connection Result Considerations
No proxy Unencrypted and
Encrypted
Connection succeeds WebSocket connections
succeed if there are no
network intermediaries
between the client and the
server.
Explicit Unencrypted Connection
succeeds*
*Only if the proxy
server correctly
ignores traffic after
the CONNECT
method
An explicit proxy server
allows the CONNECT
method. The resulting
connection is non-secure.
Explicit Encrypted Connection succeeds An explicit proxy server
allows the CONNECT
method. The client sends the
TLS handshake, followed by
the WebSocket connection
upgrade handshake. After
this series of handshakes
succeeds, WebSocket traffic
can start flowing unimpeded
through the proxy server.
Transparent Unencrypted Connection fails A well-behaved transparent
proxy server does not
understand the 101 response
code, and thus should cause
the WebSocket handshake to
fail almost immediately.
Transparent Encrypted Connection succeeds Because the traffic is
encrypted, a transparent
proxy allows the connection
to succeed and the
WebSocket traffic to flow.
www.it-ebooks.info
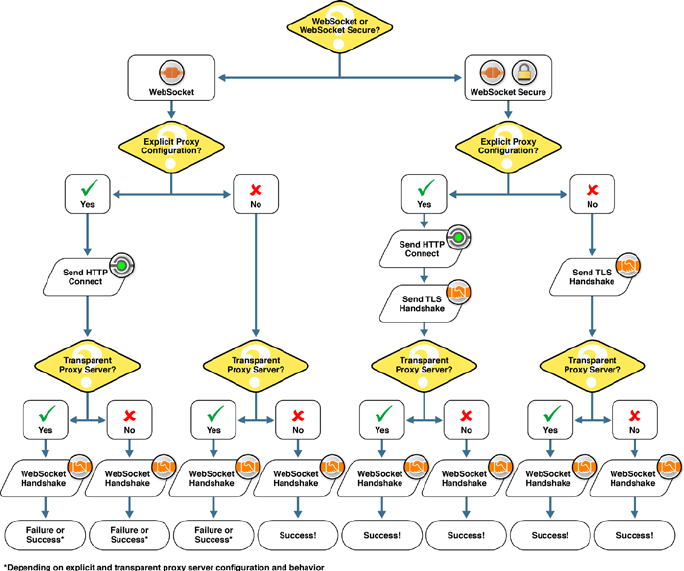
CHAPTER 8 ■ DEPLOYMENT CONSIDERATIONS
157
Figure 8-3. How WebSocket interacts with proxy servers
Using WebSocket Secure (WSS) increases the odds that connections will succeed
even when there are middleboxes on the network performing transparent inspection and
modification of outgoing connections.
Figure 8-3 further illustrates the cases where the WebSocket connection may or
may not succeed depending on a combination of variables such as plain WebSocket
Protocol vs. WebSocket Secure and explicit proxy configuration as well as transparent
proxy servers.
As you can see in Figure 8-3, using WSS can dramatically increase the chances that
your WebSocket connection will succeed, even when the traffic has to traverse explicit
and transparent proxies.
www.it-ebooks.info

CHAPTER 8 ■ DEPLOYMENT CONSIDERATIONS
158
Deploying TLS
Deploying TLS requires cryptographic digital certificates that are used to identify
WebSocket servers. In production environments, these certificates must be signed by
a certificate authority (CA) that is known and trusted by web browsers. If you use an
untrusted certificate, users will see security errors when accessing your server, which is
how TLS prevents man-in-the-middle attacks from hijacking connections as they open.
During development, you can sign your own certificates and configure your browser to
trust those certificates and ignore the security warnings.
WebSocket Pings and Pongs
Connections can unexpectedly close for many reasons beyond your control. Any web
application should be coded to gracefully deal with intermittent connectivity and recover
appropriately. There are, however, reasons connections close that can and should be
avoided. One common cause of connectivity loss that is avoidable is inactivity at the TCP
level, which in turn affects WebSocket connections.
Note ■ Because WebSocket connections are layered on top of TCP connections,
connection issues that occur at the TCP level affect WebSocket connections.
With a full-duplex connection between your client and WebSocket server, there
may be times when there is no data flowing over the connection. At that point, a network
intermediary may terminate the connection. Specifically, network components that are
not aware of “always on” connections sometimes close down inactive TCP, and therefore
WebSocket, connections. For example, proxy servers and home routers sometimes
terminate what they perceive as idle connections. The WebSocket Protocol supports
pings and pongs both to perform health checks on the connection and to keep the
connection open.
Using WebSocket pings and pongs keeps the connection open and ready for data
flow. Pings and pongs can originate from either side of an open WebSocket connection.
The WebSocket Protocol supports client-initiated and server-initiated pings and pongs.
The browser or server can send pings, pongs, or both at appropriate intervals to keep
connections active. Note that we’ve said browser, and not WebSocket client: as we
mentioned in Chapter 2, the WebSocket API does not currently support client-initiated
pings and pongs. While the browser may send pings and pongs according to its own keep-
alive and health-check policies, most pings and pongs are going to be server-initiated;
the WebSocket client can then respond to pings with a pong. Alternatively, the browser
or server can send pongs without receiving a ping, which gives you flexibility in keeping
your connections alive. The exact intervals you use depend on the audience for your
application and the normal rate of data flowing over your application’s WebSocket
connections. Conservatively, sending a pong every thirty seconds ought to keep most
connections alive, but sending pongs less frequently saves bandwidth and server
resources.
www.it-ebooks.info
CHAPTER 8 ■ DEPLOYMENT CONSIDERATIONS
159
WebSocket Buffering and Throttling
With WebSocket applications using full-duplex connections, you can control the rate
at which applications send data to the server, also known as “throttling.” Throttling the
traffic can help avoid saturation or bottlenecks in the network that may be influenced by
other limitations, such as Internet bandwidth and server CPU limits, which we’ll discuss
in the subsequent sections. The WebSocket API enables you to control the rate that the
applications send data to the server, with the WebSocket bufferedAmount attribute, which
we discussed in Chapter 2. The bufferedAmount attribute represents the number of bytes
that have been queued but not transmitted to the server yet.
You can also throttle client connections to the server and allow the server to
determine whether to accept or reject the client connection depending on pre-defined
settings in the server.
Monitoring
To assess your system’s performance, you can also configure a monitoring tool to track
user activity, server performance, and terminate client sessions, if necessary. Monitoring
is extremely useful not only in analyzing the health of your network and system, but also
in diagnosing the root cause of performance bottlenecks or failures and identifying areas
where you can tune aspects of the system for better performance.
Ideally, you should be able to provide visibility and control needed to assure that
business transactions are flowing through the system without any issues and meeting the
service-level agreements (SLAs).
Capacity Planning
Implementing WebSocket in your architecture enables you to build flexible and scalable
frameworks. Even with this flexibility, you must still plan for the needs of the deployment,
including sizing considerations, specifically in relation to hardware capacity. Among
these areas are the memory and CPU of the server (whether it’s your back-end server that
has been WebSocket-enabled or a gateway that enables WebSocket traffic to flow between
clients and back-end servers), and network optimization. In general, sizing means
estimating the hardware requirements for your application.
Table 8-2 describes areas you may want to take into account when thinking about
the hardware requirements for your WebSocket application. The items in this checklist
contain factors to consider when deploying any application and may certainly change
over time as your user base, data, and system grow.
www.it-ebooks.info

CHAPTER 8 ■ DEPLOYMENT CONSIDERATIONS
160
Alternatively, there are a number of cloud-based WebSocket service offerings
available that essentially eliminate the need for a WebSocket developer to consider
capacity planning. The service providers take responsibility for ensuring sufficient
capacity is available to their customers, allowing the elastic scaling of the deployed
applications.
Socket Limits
As you know, WebSocket servers hold many connections open at the same time. You
should be aware that if you run a server without changing any operating system settings,
you probably would not be able to maintain more than a few thousand open sockets.
You’ll see errors reporting that you cannot open any more files, even if there are plenty
of CPU and memory resources available. (Remember, in UNIX, just about everything is a
Table 8-2. Capacity Planning Checklist
Planning Item Notes
Message Size Identify the typical size of data your WebSocket server
will send to your clients.
Frequency Identify the rate of message delivery. For example,
whether your application requires slow delivery (such
as human-generated chat messages) or rapid delivery
(such as machine-generated messages like up-to-date
positioning of multiple airplanes).
Concurrency Identify the number of clients that will connect to your
server at the same time.
Data Duplication Determine whether all (or most) clients receive the
same data or if each client receives unique data.
Software Configuration Identify limitations or possible performance
enhancements from the server software (for example,
the Java Virtual Machine).
Memory Determine memory requirements based on message
size and delivery rate.
Network Identify the network requirements for the network •
interface card (NIC), as well as the requirements if
you’re using virtual server with software NICs.
Identify the bandwidth and latency requirements •
for your servers’ connections to the Internet.
User Expectations Determine how the user will use the application,
such as whether information transmitted to one
device must be continually updated on all the user’s
devices.
www.it-ebooks.info

CHAPTER 8 ■ DEPLOYMENT CONSIDERATIONS
161
file, including sockets! You could see an error message about files, even if you aren’t using
the disk.) Operating systems limit the number of open files per user; by default, this limit
is fairly low. These limits are in place to prevent abuse on shared systems where many
users have to contend for the same resources. On a server, however, you likely want to
allow one process to run full-throttle and use as many open files as it can.
For example, on Linux, the command ulimit -a displays the current user limits,
including the maximum allowable number of open files. You can fortunately raise this
limit on Linux (for example, you can run ulimit -n 10000 to set the user limit to ten
thousand open files). There is also a system-wide maximum, fs.file-max, that you
can raise using the sysctl command. These commands might not be the same for your
operating system, as file limits are dependent on the operating system. For example, on
Microsoft Windows, the commands vary by version; in some cases, you cannot modify
the limit. Consult the references for your system in order to set the maximum number of
open sockets for your WebSocket server.
WebSocket Application Deployment Checklist
Table 8-3 is a checklist that summarizes considerations for deploying WebSocket
applications.
Table 8-3. WebSocket Application Deployment Checklist
Planning Item Notes
WebSocket Emulation and
Fallback
Identify your users’ browsers and versions.•
Determine if a fallback strategy is necessary. If so, •
employ polyfill, plugin, or Comet fallbacks.
Reverse Proxy and Load
Balancing
Identify the port(s) you want to open to the public.•
Identify the servers with which the reverse proxy •
must operate.
Determine whether you can open a port in your •
firewall, and therefore whether you should use
reverse connectivity.
Identify the load requirements of your network •
resources, including servers and client connections.
Traversing Proxies and
Firewalls with TLS
Identify proxies and firewalls that may disrupt your •
WebSocket traffic.
Decide to use TLS for security and/or connectivity •
reasons.
Keep Alive Identify the connections you want to monitor.•
Set ping intervals to prevent connection timeout.•
(continued)
www.it-ebooks.info

CHAPTER 8 ■ DEPLOYMENT CONSIDERATIONS
162
Planning Item Notes
Buffering and Throttling Identify where throttling may improve performance.
Monitoring Identify areas for monitoring.
Hardware Capacity Planning Identify the memory and CPU requirements for •
your WebSocket server.
Identify bandwidth requirements.•
Identify the disk requirements of your servers.•
Decide if a cloud-based offering would better suit •
your application deployment.
Socket Limits Identify the number of concurrent socket •
connections your system requirements.
Identify the socket limits for your server.•
Table 8-3. (continued)
Summary
In this chapter, we examined the steps you can take after you’ve built your WebSocket
server and application and added the necessary security enhancements to prepare
your application for public consumption. We looked at some of the tasks an application
developer can perform to allow all types of users to access their WebSocket application,
even if the user does not have a WebSocket-enabled browser. We explored ways you can
work with reverse proxy servers and TCP keepalive to maintain WebSocket connections,
use TLS to protect your data (not only from intruders but also from proxies and firewalls),
as well as plan for enterprise-wide deployment.
You’ve now walked with us through the history of the WebSocket API and Protocol
and examined the benefits of using WebSocket over older HTTP architectures. We’ve
looked at sample WebSocket traffic and through this examination witnessed the
possibilities of improved performance. We’ve stepped through using the WebSocket
API and seen how much simpler it is to create full-duplex, bidirectional communication
between a client and server than with older (and more convoluted) AJAX-based
architectures. We explored some of the powerful ways you can use WebSocket to extend
TCP layer application protocols over the Web with widely used standards, like XMPP
and STOMP. With these use cases, we’ve seen how you can empower standard chat and
messaging protocols with full-duplex, real-time capabilities. We’ve seen how you can
easily implement desktop sharing using VNC over WebSocket to a plugin-free HTML5
browser client. We’ve also looked at security and deployment for WebSocket applications,
and considerations you should make before making your applications publicly available.
After reading The Definitive Guide to HTML5 WebSocket, we hope you are not only
armed with a good understanding of WebSocket but are also inspired to take advantage
of this technology to ramp up your existing applications and architectures and develop
new applications that were previously challenging or impossible. It’s still in its early days,
and we believe that WebSocket will transform not only web development but also the way
users can interact with information and devices over the Web.
www.it-ebooks.info

163
APPENDIX A
Inspecting WebSocket Traffic
When experimenting and building applications with WebSockets, occasionally you may
need to take a closer look at what exactly is happening under the covers. Throughout this
book, we’ve used some of these tools to examine WebSocket traffic. In this appendix, we
review three handy tools:
Google Chrome Developer Tools: a set of HTML5 applications •
that ships with Chrome and allows you to inspect, debug, and
optimize Web applications
Google Chrome Network Internals (or “net-internals”): a set of •
tools that allows you to inspect network behavior including DNS
lookups, SPDY, HTTP caching, as well as WebSocket
Wireshark: a tool that enables you to analyze network protocol •
traffic
WebSocket Frame Inspection with Google
Chrome Developer Tools
Google Chrome Developer Tools offer a wide range of features to help web developers.
Here we focus on how it helps you learn about and debug WebSockets. If you’re
interested in learning more about Google Chrome Developer Tools in general, there’s
plenty of information available online.
To access the Developer Tools, open Google Chrome, then click the Customize
and Control Google Chrome icon, located to the right of the address bar. Select
Tools ➤ Developer Tools, as shown in Figure A-1. Most developers who use this tool
frequently prefer the keyboard shortcut to the menu selection.
www.it-ebooks.info
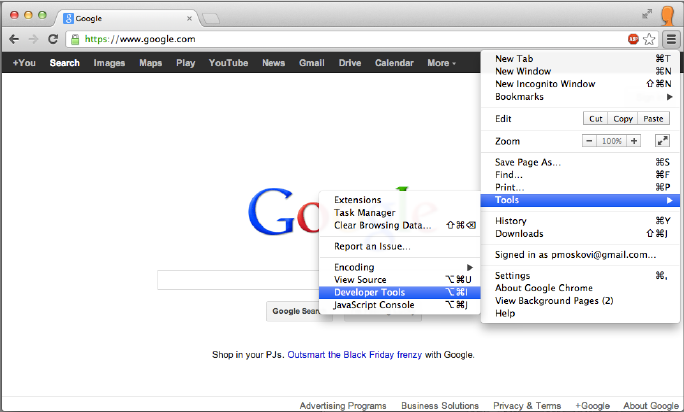
APPENDIX A ■ INSPECTING WEBSOCKET TRAFFIC
164
Google Chrome Developer Tools provide you with detailed information about your
page or application through eight panels, allowing you to perform the following tasks:
Elements panel: inspect and modify the DOM tree•
Resources panel: inspect resources loaded•
Network panel: inspect network communication; this is the •
panel you’ll use the most while building WebSocket-enabled
applications.
Sources panel: inspect source files and debug JavaScript•
Timeline panel: analyze where time is spent when loading or •
interacting with your page
Profiles panel: profile the time and memory usage•
Audits panel: analyze the page as it loads and makes suggestions •
to improve it.
Console: display error messages and execute commands. The •
console can be used along with any of the above panels. Press the
Esc key on your keyboard to open and close the console. Along
with the Network panel, the Console is the Web and WebSocket
developer’s best friend.
First, let’s take a closer look at the Network panel. Open Chrome and navigate to
http://www.websocket.org. We will use the Echo Test on websocket.org to learn about
Figure A-1. Opening Google Chrome Developer Tools
www.it-ebooks.info
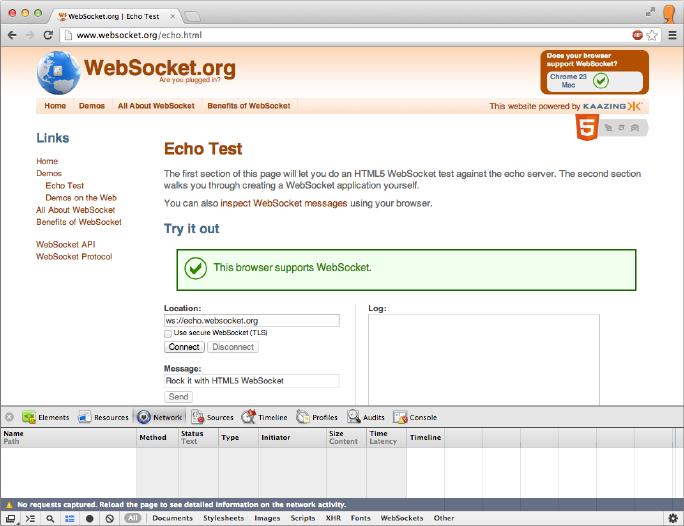
APPENDIX A ■ INSPECTING WEBSOCKET TRAFFIC
165
the WebSocket Frame inspection that Google Chrome Developer Tools provide.
To access the Echo demo, click the Echo Test link on the page, which will take you to
http://www.websocket.org/echo.html. Open Google Chrome Developer Tools if you
haven’t opened it yet, and click the Network panel. Make sure your Network panel is
empty. If it is not empty, click the Clean icon at the bottom of the Chrome Window, the
sixth icon from the left in Figure A-2.
Figure A-2. Examining the creation of a WebSocket connection with Google Chrome
Developer Tools
Notice that the location field contains a WebSocket URL that we’ll connect to:
ws://echo.websocket.org. Click the Connect button to create the connection.
Notice that the WebSocket connection displays in your Network panel. Click the name,
echo.websocket.org, which is under the Headers tab; doing so allows you to look at the
WebSocket handshake (Figure A-3). Listing A-1 shows the entire WebSocket handshake.
www.it-ebooks.info
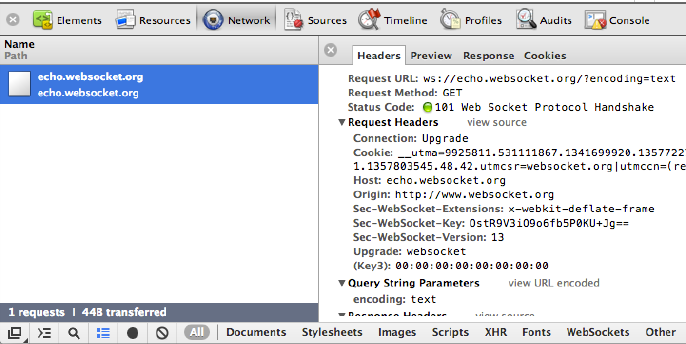
APPENDIX A ■ INSPECTING WEBSOCKET TRAFFIC
166
Listing A-1. The WebSocket Handshake
Request URL:ws://echo.websocket.org/?encoding=text
Request Method:GET
Status Code:101 Web Socket Protocol Handshake
Request Headers
Connection:Upgrade
Cookie:__utma=9925811.531111867.1341699920.1353720500.135372
5565.33; __utmb=9925811.4.10.1353725565; __utmc=9925811; __
utmz=9925811.1353725565.33.30.utmcsr=websocket.org|utmccn=(referral)|
utmcmd=referral|utmcct=/
Host:echo.websocket.org
Origin:http://www.websocket.org
Sec-WebSocket-Extensions:x-webkit-deflate-frame
Sec-WebSocket-Key:JfyxfhR8QIm3BSb0q/Tw5w==
Sec-WebSocket-Version:13
Upgrade:websocket
(Key3):00:00:00:00:00:00:00:00
Query String Parameters
encoding:text
Response Headers
Access-Control-Allow-Credentials:true
Access-Control-Allow-Headers:content-type
Access-Control-Allow-Origin:http://www.websocket.org
Connection:Upgrade
Date:Sat, 24 Nov 2012 03:08:27 GMT
Sec-WebSocket-Accept:Yr3WGnQMtPOktDVP1aBU3l5DfFI=
Server:Kaazing Gateway
Upgrade:WebSocket
(Challenge Response):00:00:00:00:00:00:00:00:00:00:00:00:00:00:00:00
Figure A-3. Inspecting the WebSocket handshake
www.it-ebooks.info
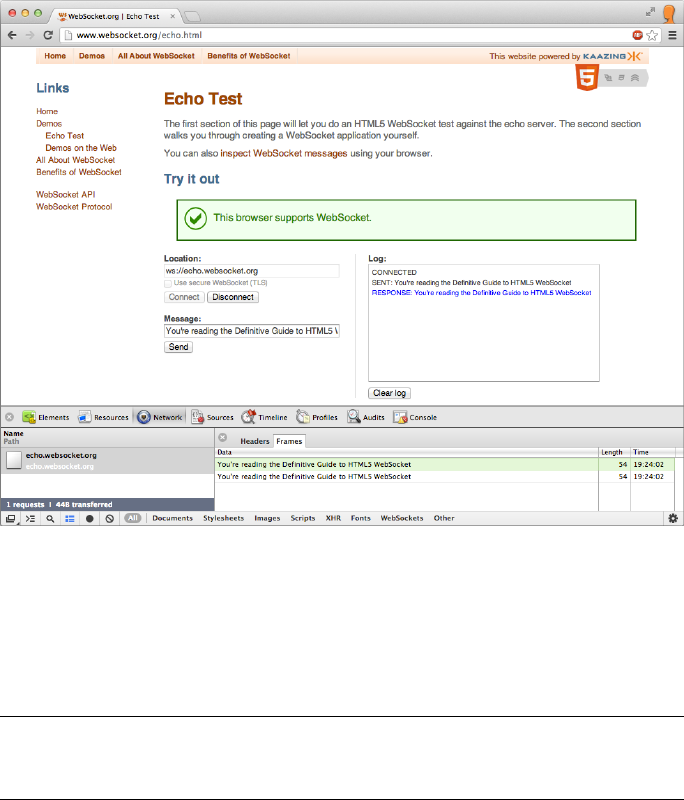
APPENDIX A ■ INSPECTING WEBSOCKET TRAFFIC
167
Now, feel free to change the contents of the Message field and click the Send button.
To inspect the WebSocket frames, you’ll need to click on the Name on the far left again,
which will refresh the panel on the right, adding the Frames tab, as shown in Figure A-4.
Figure A-4. Inspecting WebSocket frames
The WebSocket Frame inspector shows the data (which is text in this example), the
length of the data, the time it was sent, as well as the direction of the data: a light green
background indicates traffic from the browser to the WebSocket server (upload), and
white indicates traffic from the server to the browser (download).
Note ■ As you’re sending WebSocket messages, be sure to always click the Name
column to trigger the refresh of the Frames tab.
As you navigate to the Sources tab, and locate the echo.js file, you see a variable
called "websocket" that represents our WebSocket connection. By displaying the
Console, you can simply send a message to the WebSocket server, using the send()
function, as shown in Listing A-2.
www.it-ebooks.info
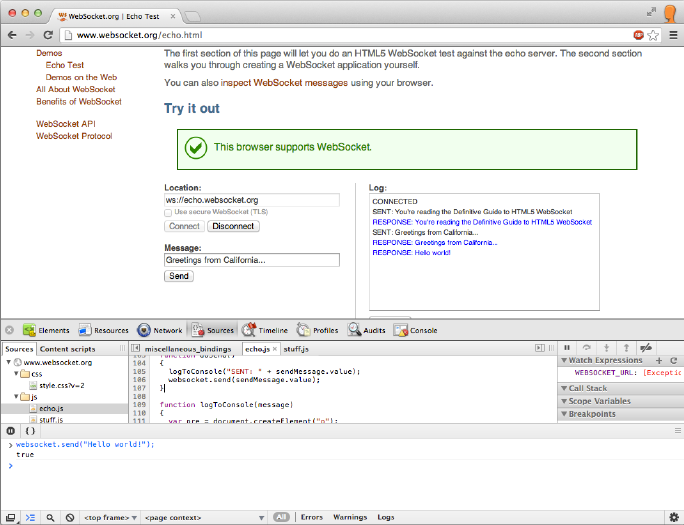
APPENDIX A ■ INSPECTING WEBSOCKET TRAFFIC
168
Listing A-2. Sending a WebSocket Message Using the Chrome Console
websocket.send("Hello World!");
In Figure A-5 we sent a Hello World! message from the console, and you can see
that in the Log window, the Echo service sent us a response. If you display your Network
tab, you can also see the corresponding WebSocket frames.
Figure A-5. Sending WebSocket messages from the Chrome Console
As demonstrated, the Chrome Developer Tools offer web developers a simple
and effective way to “look under the hood” of their applications. Chrome’s Network tab
provides unique insight not only into the WebSocket handshake but also allows you to
easily inspect the WebSocket frames.
Google Chrome Network Internals
Most of the time, Chrome Developer Tools display more than enough information to
productively develop and debug web applications. Sometimes, however, lower-level
details can help diagnose unusual connection failures or provide otherwise inaccessible
information when investigating the behavior of the browser itself. Chrome has internal
diagnostic pages that are extremely valuable in those rare situations in which you would
www.it-ebooks.info

APPENDIX A ■ INSPECTING WEBSOCKET TRAFFIC
169
like to observe the internal state of the browser. Chrome’s internal tools expose events
related to DNS requests, SPDY sessions, TCP timeouts, proxies, and other internal
workings of the browser.
Google Chrome includes several additional utilities. For a list of them, type
chrome://about in the browser’s address bar.
Note ■ In Google Chrome, the URL about:about redirects to chrome://about. Other
browsers, such as Mozilla Firefox, have useful URLs listed on their about:about pages.
The page displays the following list of useful internal Chrome utilities:
• chrome://appcache-internals
• chrome://blob-internals
• chrome://bookmarks
• chrome://cache
• chrome://chrome-urls
• chrome://crashes
• chrome://credits
• chrome://dns
• chrome://downloads
• chrome://extensions
• chrome://flags
• chrome://flash
• chrome://gpu-internals
• chrome://history
• chrome://ipc
• chrome://inspect
• chrome://media-internals
• chrome://memory
• chrome://nacl
• chrome://net-internals
• chrome://view-http-cache
• chrome://newtab
www.it-ebooks.info
APPENDIX A ■ INSPECTING WEBSOCKET TRAFFIC
170
• chrome://omnibox
• chrome://plugins
• chrome://policy
• chrome://predictors
• chrome://profiler
• chrome://quota-internals
• chrome://settings
• chrome://stats
• chrome://sync-internals
• chrome://terms
• chrome://tracing
• chrome://version
• chrome://print
In the address bar, type chrome://net-internals. One use of net-internals is to
inspect TCP socket events. These TCP sockets are used to transport WebSocket and
other protocols used by the browser for communication. When you click Sockets on the
left, Chrome displays the socket pools. What we’re interested in is the currently active,
live sockets, so click the View live sockets link. In a separate window or tab, open the
WebSocket Echo test at http://www.websocket.org/echo.html, and click Connect.
A new entry shows up right away, along with the following URL: ws://echo.websocket.
org/?encoding=text. Click the entry, and on the right, you’ll see the network internals,
as shown in Listing A-4.
Listing A-4. Network Internals of a WebSocket Handshake
830: SOCKET
ws://echo.websocket.org/?encoding=text
Start Time: 2012-11-23 20:08:27.489
t=1353730107489 [st= 0] +SOCKET_ALIVE [dt=?]
--> source_dependency = 828 (SOCKET_STREAM)
t=1353730107489 [st= 0] +TCP_CONNECT [dt=91]
--> address_list = ["174.129.224.73:80"]
t=1353730107489 [st= 0] TCP_CONNECT_ATTEMPT [dt=91]
--> address = "174.129.224.73:80"
t=1353730107580 [st= 91] -TCP_CONNECT
--> source_address = "10.0.1.5:57878"
t=1353730107582 [st= 93] SOCKET_BYTES_SENT
--> byte_count = 470
t=1353730107677 [st=188] SOCKET_BYTES_RECEIVED
--> byte_count = 542
www.it-ebooks.info
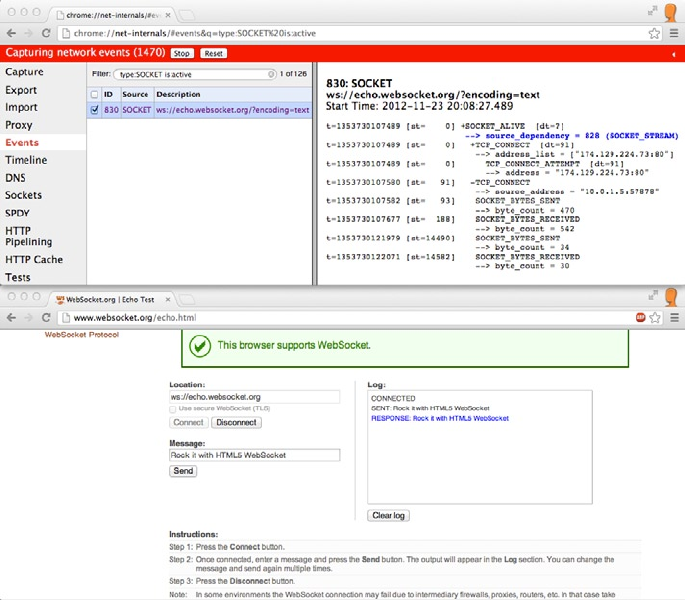
APPENDIX A ■ INSPECTING WEBSOCKET TRAFFIC
171
Now, from the window that displays websocket.org, let’s send a message. The
net-internals panel refreshes, and shows the number of bytes sent (see Figure A-6).
Figure A-6. Google Chrome net-internals utility
Much like the Google Developer Tools, net-internals is packaged and shipped
with Google Chrome. Net-internals is a very handy tool if deeper, lower-level network
diagnostics are required.
Analyzing Network Packets with Wireshark
Wireshark is a very powerful, free, and open source tool (available for download at
http://www.wireshark.org) that provides detailed insight into network interfaces,
allowing you to see and analyze what’s traveling on the wire. Wireshark is a useful tool
in WebSocket developers’ hands but is widely used by network administrators, as well.
Wireshark can capture live network data through the network interface that you can then
export/import, filter, color code, and search.
Figure A-7 shows the Wireshark UI as it captures network packets. Under the menu
bar and the main toolbar you see the Filter tool bar, which is used to filter the collected
www.it-ebooks.info
APPENDIX A ■ INSPECTING WEBSOCKET TRAFFIC
172
data. This data displays in a tabular format in the packet list pane. The packet details pane
shows information about the packet selected in the packet list pane. The packet bytes
pane, just above the status bar, displays the packet data, selected in the packet list pane.
Figure A-7. Wireshark capturing network packets
Start Wireshark and select the network adapter you’re using: if you’re hard-wired
to the network, your adapter will be different than when you use WiFi. In our experiment
with Wireshark, we’ll inspect the WebSocket traffic between a browser and a WebSocket
server, running on websocket.org. To get started, navigate with your browser to
http://www.websocket.org. Then, click the Echo Test link. You can alternatively point
your browser directly at http://www.websocket.org/echo. Now, you’re ready to establish
a WebSocket connection. Click the Connect button.
Since there tends to be quite a bit of traffic on the network, the traffic between your
browser and websocket.org quickly scrolls out of view. To ensure we see some useful data,
we’ll filter for traffic going to www.websocket.org.
Figure A-8 shows how you can filter out packets with a specific IP address:
ip.dst_host==174.129.224.73. Wireshark supports the double-equal sign in the condition,
as well as the eq operator. In this figure, also notice the WebSocket handshake in the
packet details page.
www.it-ebooks.info
APPENDIX A ■ INSPECTING WEBSOCKET TRAFFIC
173
Another great feature of Wireshark is that it can follow various protocol streams. In
Figure A-9 you can see how it follows a TCP stream. It displays the TCP segments that are
on the same TCP connection as the selected packet. You can follow a protocol stream by
right-mouse clicking on a packet in the packet list pane and choosing Follow from the
context menu.
Figure A-8. Filtering network packetsnetwork packets
www.it-ebooks.info
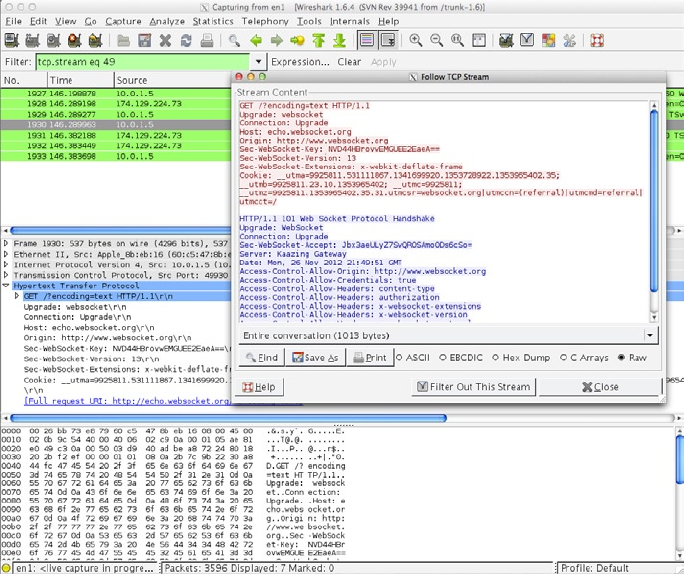

APPENDIX A ■ INSPECTING WEBSOCKET TRAFFIC
175
Figure A-10. Wireshark updates live
Summary
In this appendix, we explained some useful tools for inspecting, dissecting, and debugging
WebSocket traffic. These tools will help you when building your WebSocket-enabled
applications. The next appendix discusses the Virtual Machine (VM) we provide,
which includes the open source code (libraries, tools, and servers) we used to build the
examples in this book.
www.it-ebooks.info

177
Appendix B
WebSocket Resources
Throughout this book, we’ve used a number of resources that help us build WebSocket
applications every day. In this appendix, we walk through how to use the VM (virtual
machine) that contains all the code and software pre-installed that you need to build or
follow the examples in this book. We also summarize where to get all the libraries, servers,
and other technologies we used in this book. Finally, we include a list of WebSocket
servers and clients that are available at the time of writing this book.
Using the Virtual Machine
The VM accompanied by this book can be downloaded from the publisher’s web site.
Simply navigate to http://apress.com and search for this book’s title (or go directly
to www.apress.com/9781430247401). Click the Source Code/Downloads tab and click
Download Now. After downloading it, you can start the VM using VirtualBox. VirtualBox
is available as a free download from http://virtualbox.org for Windows, Mac, Linux,
and Solaris host operating systems.
To open the VM, extract it, and double-click the WebSocketBook.ova file, or choose
File ➤ Import Appliance from the menu of VirtualBox, and select the WebSocketBook.vbox
file. The operating system of the VM is Ubuntu.
Once you’ve downloaded and installed the VM, you’ll notice a few items on the
desktop:
Icons for Chapters 2–6•
A • README.txt file
First, open and read the README.txt, which explains the servers and services that are
automatically started for you when you install the VM. To build the examples described in
Chapters 2–6, you can simply start building against the servers and libraries provided in
the VM, which are described in the relevant chapter.
Tables B-1 and B-2 describe the servers and libraries that we use throughout the
book and whether they are included in the VM.
www.it-ebooks.info

APPENDIX B ■ WEBSockEt RESouRcES
178
Table B-1. Servers Used in this Guide
Server Description Where you can get it Used in
Chapters
Apache
ActiveMQ
A popular open source message
broker with support for
messaging APIs and protocols,
like JMS (Java Message Service)
and STOMP (Simple or Streaming
Text Oriented Messaging
Protocol).
http://activemq.
apache.org
5 and 7
node-xmpp-
bosh
An open source server written by
Dhruv Matani that enables XMPP
connections over BOSH and
WebSocket to any XMPP server.
The server is implemented in
JavaScript using Node.js.
http://github.com/
dhruvbird/node-
xmpp-bosh
4
Openfire An open source RTC (real-time
collaboration) server with support
for XMPP (Extensible Messaging
and Presence Protocol).
http://www.
igniterealtime.org/
projects/openfire
4
TightVNC TightVNC is a cross-platform,
open source VNC server.
http://tightvnc.com 6
Websocket.orgA publicly hosted WebSocket
server with a simple Echo Service
for testing and learning about
WebSocket.
http://www.
websocket.org
1, 3, and 7
Table B-2. Libraries and Other Tools Used in this Guide
Library/Tool Description Where you can get it Used in Chapters
jQuery 1.8.2 A widely popular and
commonly used open
source JavaScript library
simplifying cross-browser
web development.
http://jquery.com 5
Node.js A popular open source server
for writing applications in
JavaScript. Node.js is based on
Google Chrome’s performant
open source V8 JavaScript
with support for event-driven
asynchronous I/O operations.
http://nodejs.org 3 and 6
(continued)
www.it-ebooks.info

APPENDIX B ■ WEBSockEt RESouRcES
179
WebSocket Servers
While you can enable a server to accept WebSocket connections or indeed write your
own WebSocket server, there are a few existing implementations that might make your
life easier when developing your own WebSocket applications. At the time this book was
written, the following are some of the WebSocket servers that are available (list provided
by http://refcardz.dzone.com/refcardz/html5-websocket):
Alchemy-Websockets (.NET): • http://alchemywebsockets.net/
Apache ActiveMQ: • http://activemq.apache.org/
apache-websocket (Apache module): • http://github.com/
disconnect/apache-websocket#readme
APE Project (C): • http://www.ape-project.org/
Autobahn (virtual appliance): • http://autobahn.ws/
Caucho Resin (Java): • http://www.caucho.com/
Cowboy: • http://github.com/extend/cowboy
Cramp (Ruby): • http://cramp.in/
Diffusion (Commercial product): • http://www.pushtechnology.
com/home
EM-WebSocket (Ruby): • http://github.com/igrigorik/
em-websocket
Extendible WebSocket Server (PHP): • http://github.com/
wkjagt/Extendible-Web-Socket-Server
Library/Tool Description Where you can get it Used in Chapters
Node Package
Manager (npm)
A Node.js package manager,
allowing easy installation of
Node.js packages.
http://npmjs.org None (included
in the VM)
Strophe.js An open source XMPP library
for JavaScript, originally
created by Jeff Moffitt.
http://strophe.im/
strophejs
4
VirtualBox An open source virtualization
product supporting
Windows, Mac, Linux, and
Solaris as the host operating
system, and a significantly
larger number of guest
operating systems.
http://virtualbox.
org
None (used to
start the VM)
Table B-2. (continued)
www.it-ebooks.info
APPENDIX B ■ WEBSockEt RESouRcES
180
gevent-websocket (Python): • http://www.gelens.org/code/
gevent-websocket/
GlassFish (Java): • http://glassfish.java.net/
Goliath (Ruby): • http://github.com/postrank-labs/goliath
Jetty (Java): • http://jetty.codehaus.org/jetty/
jWebsocket (Java): • http://jwebsocket.org/
Kaazing WebSocket Gateway (Commercial product): •
http://kaazing.com/
libwebsockets (C): • http://git.warmcat.com/cgi-bin/cgit/
libwebsockets/
Misultin (Erlang): • http://github.com/ostinelli/misultin
net.websocket (Go): • http://code.google.com/p/go.net/
websocket
Netty (Java): • http://netty.io/
Nugget (.NET): • http://nugget.codeplex.com/
phpdaemon (PHP): • http://phpdaemon.net/
Pusher (cloud service): • http://pusher.com/
pywebsockets (Python): • http://code.google.com/p/
pywebsocket/
RabbitMQ (Erlang): • http://github.com/videlalvaro/
rabbitmq-websockets
Socket.io (Node.js): • http://socket.io/
SockJS-node (Node): • http://github.com/sockjs/sockjs-node
SuperWebSocket (.NET): • http://superwebsocket.codeplex.com/
Tomcat (Java): • http://tomcat.apache.org/
Tornado (python): • http://www.tornadoweb.org/
txWebSocket (Python/Twisted): • http://github.com/rlotun/
txWebSocket
vert.x (Java): • http://vertx.io/
Watersprout (PHP): • http://github.com/chrisnetonline/
WaterSpout-Server/blob/master/server.php
web-socket-ruby (Ruby): • http://github.com/gimite/
web-socket-ruby
www.it-ebooks.info
APPENDIX B ■ WEBSockEt RESouRcES
181
Webbit (Java): • http://github.com/webbit/webbit
WebSocket-Node (Node.js): • http://github.com/Worlize/
WebSocket-Node
websockify (Python): • http://github.com/kanaka/websockify
XSockets (.NET): • http://xsockets.net/
Yaws (Erlang): • http://yaws.hyber.org/websockets.yaws
www.it-ebooks.info

183
Index
n A
Application deployment
abstraction layers
connection limits, 151
cross origin deployment, 151
decreased performance, 151
emulation and fallback, 150
full-duplex communication, 150
messaging, 149
Modernizr, 151
non-standard layer, 151
plugins, 150
buering and throttling
capacity planning
monitoring, 159
planning checklist, 160
distinct classes
encrypted/unencrypted
WebSocket, 156
explicit proxy, 156
rewalls with TLS, 155
in HTTP and WebSocket, 153
interaction proxy server, 157
reverse and load
balancing, 152–153
server as a load balancer, 154
servers, 155
server-side intermediary, 152
SSL termination, 152
TLS, 158
transparent proxy, 156
transport layer security (TLS), 155
transverse proxy, 155
web clients, 155
WebSocket secure (WSS), 157
pings and pongs, full duplex
communication, 158
proxies and network
intermediaries, 152–158
reverse connectivity, 154
socket limits, 160
WebSocket application, 149–151
WebSocket checklist, 161
n B, C, D
Business Process Management Systems
(BPMS), 108
n E, F, G
Enterprise Service Bus (ESB), 107
n H, I
HTML5 WebSocket, 1
applications
community, 10
options, 9
connectivity, 2–3
communication
cross document messaging, 2
mismatches, 3
TCPConnection, 3
data trac
full duplex communication, 6
half duplex communication, 6
HTTP, 3, 101
HTTP pooling and streaming, 5
long polling, 6
polling, 5
request headers, 4
response headers, 4
streaming, 6
versions, 3
www.it-ebooks.info
■ Index
184
dene, 1–2
designed to, 1
feature areas, 2
umbrella term, 2
high level protocols, 1
HTTP architecture, 3–6
initiating
connections, 7
latency, 7
Polling vs. WebSocket, 7
is about HTML5
performance, 8
simplicity, 8
standards, 8
web applications, 9
needs of, 7–9
real time communication
server-sent events, 10
SPDY, 11
WebRTC, 11
and RFC 6455, 9
technologies, 10–11
world of, 9–10
n J, K, L
Jabber Instant Messaging (IM), 61
n M, N
Machine-to-machine (M2M)
communication, 107
n O, P, Q
Onconnect() callback function, 101
n R
Remote Framebuer Protocol, 109
accessing another PC, 110
AJAX applications, 111
Apple Remote Desktop (ARD), 111
computer aided design (CAD), 111
Microsoft’s RDP, 111
protocols for access, 111
X11, 111
application enhancement, 127
ArrayBuers
bindSocketHandlers(), 118
byte streams, 116
canvas element, 120
CompositeStream.append(), 116
CompositeStream.
consume(), 116
connection setting, 117
copyRect() function, 121
doKeyEvent(), 126
DOM keyboard events, 126
eciency, 122
enable, accept updates, 119
encoding, 122
event, mouse, 123
FrameBuer requests, 119
hardcoding, 115
HTML, 116
HTML5 application, 113
HTML5 <canvas>, 120
input handling, 122
JavaScript, implement RFB, 116
keyboard input, 125
keydown, 126
KeyEvent(), 125
KeyEvent message, 125
keyup, 126
layers, 113
message types, 122
mousedown, 124
mouse event to VNC server, 124
mouse input, 123
mousemove, 124
mouseover, 124
mouseup, 124
numerical functions, 117
PointerEvent message, 123
protocol library, 113
proxy server, 114
putImageData() function, 120
raw pixel data, 121
RFB client, 115
RfbProtocolClient connect
function, 117
RFB servers, 115
to server messages, 122
transmit a mouse click, 124
versionHandler(), 119
WebSocket.send(), 116
binary and text-oriented
connection over WebSocket, 113
transmit binary image, 112
use over WebSocket, 112
HTML5 WebSocket (cont.)
www.it-ebooks.info
■ Index
185
denition, 111
description, 111–113
graphical user interface (GUI), 109
over WebSocket application, 110
virtual machine (VM), 110
virtual network computing
(VNC), 110–111
client over WebSocket, 113–126
code setting, proxy server, 114
n S, T, U
Simple Text Oriented Messaging
Protocol (STOMP)
ActiveMQ, 88
Apache ActiveMQ, 91
directory structure, 90
STOMP over WebSocket, 89
URL, 92–93
WebSocket Connector, 92
Adding interaction, 104–105
activemq.xml le, 92
game buttons, 102
HTML le, 98–99
JavaScript code, 100
JavaScript library, 97
rock-paper-scissors, 97
startGame() function, 100–101
Web Messaging, 89
Apache ActiveMQ, 105–106
game buttons, 101
JavaScript code, 99
onerror callback function, 101–102
rock-paper-scissors, 96
roshambo, 95
sync-up phase, 95
BPMS, 108
concepts, 107
ESB, 107
M2M addresses, 107
concepts, 93–94
extension, 107
key players, 85
NULL terminated SEND frame, 89
publish/subscribe models, 87
STOMP/WS application, 96,
99–102, 104–106
Web Messaging, 90–93
activemq.xml le, 92
publish/subscribe models
AMQP, 88
message distribution techniques, 86
messaging systems, 88
topics and queues, 87
publish/subscribe protocol, 85
STOMP/WS application, 95, 101,
105–106
Web Messaging, 89–90, 92, 107–108
WebSocket, 86
SSL, 155
n V
VNC with RFB protocol, 109
n W, X, Y, Z
WebSocket API
argument, constructor, 15
array as protocol, 16
ArrayBuer message, 18
binary message, 21
blob messages, 18
bueredAmount attributes, 23
call close() method, 22
client server connection, 15
close-event, 19
close() method, 22
connection, 14
constructor, 14
custom protocols, 16
error-event, 19
events, 17
handling and recovery, error, 20
message-event, 17
message to the server, 20
messaging before connection, 20
methods, 20
object attributes, 22
objects, events, 17
onclose, 19
onerror, 19
onmessage event, 18
onopen event, 17
open-event, 17
open event, message, 21
open protocols, 16
protocol attributes, 24
protocol support, constructor, 15
readyState attributes, 22–23
readyState property, 21
registered protocols, 16
www.it-ebooks.info
■ Index
186
send() method, 20, 23
send updates, 23
subprotocols, 15
transport layer security, 14
wasClean property, 20
WebSocket secure scheme, 14
client application, 28
image in client applications, 31
Mozilla FireFox, WebSocket
display, 30
client code, JavaScript console, 27
communicate and message, 25
connection establish
full duplex communication, 13
interface, 13
messages, 13
STOMP, 14
XMPP, 14
fundamentals, 13–14
gathering, 24–25
HTML5 media, 28, 30–31
initialization, 14–24
support checking, 26–27
WebSocket protocol
AJAX
application protocols, 34
client connection, 35
close code ranges, 49
closed codes, 47
closing handshake, 46
code, frames, 44
comet, 36
compression extension, 50
connection with request, 40
decoding text, 45
extensions, 50
frames, message, 43
full duplex communication, 36
header, frames, 44
HTTP request, 41
internet history, 34
IRC, 34
key response, 42
length, 45
masking, 46
message format, 43
multi-frame messages, 46
network address translation
(NAT), 35
Opcodes, 44
opening handshake, 40–41
PubSubHubbub protocol, 36
requests, 49
response from server, 41
RFC 6455, 43
RSS and Atom, 36
Sec-Headers, 43
server response, 49
subprotocols, 49
support for others, 49
TCP/IP communication, 34
TCP socket, 46
Telnet, 34
text support, 35
transport layer security (TLS), 35
uniform resource locators
(URLs), 34
unmasking, payload, 46
UTF-8 text encoding, 46
web and HTTP, 34
XMLHttpRequest, 35
initialization, 36–40
byte streams
client connection, 37
discrete message, 38
Google Chrome developer
tools, 40
internet capabilities, 36
open systems interconnection
(OSI), 38
TCP style network, 36
TCP vs. HTTP vs. WebSocket, 37
trac inspection, 38
WebKit, 39
WebSocket in Wireshark, 39
JavaScript with Node.js, 50–51, 56–60
chat messages
code snippets, 51
Echo server, 56
expression output, 59
extensions, 60
IO APIs, 50
remote JavaScript
console, 57–58
repl-client.html, 59
testing server, 56
websocket-repl.js, 58
WebSocket server, 51
protocols, 33–36, 40–50
closed codes, 48
dene, 33
WebSocket API (cont.)
www.it-ebooks.info
■ Index
187
WebSocket resources
Apache ActiveMQ
jQuery1.8.2, 178
libraries, 178
node.js, 178
node package manager (NPM), 179
node-xmpp-bosh, 178
Openre, 178
servers, 178
Strophe.js, 179
TightVNC, 178
tools, 178
VirtualBox, 179
Websocket.org, 178
servers, 179
virtual machine, 177–179
WebSocket security
ActiveMQ
advanced message queueing
protocol (AMQP), 140
Apache ActiveMQ message, 140
authentication, 141
authorization, 144
congure, ActiveMQ, 141
login with new conguration, 143
message broker, 144
policy, authorization, 146
receive messages, 146
sample Apache ActiveMQ, 142
send messages, 145
setting password, 143
STOMP, 140
XMPP, 140
AJAX
cross domain rules, 132
Denial of Service, 132
DoS, 133
handshake, accept keys, 135
headers with Sec-prex, 134
HTTP proxies and masking, 136
network topology, 137
origin header, 131
postMessage() API, 132
privileged code, 133
proxy servers, 136–137
RFC 6455, 131
scheme, host and port, 132
Sec-headers, 135
security perspective, 133
Sec-WebSocket-Key header, 136
server response, 131
throttling new connections, 134
transparent proxy server, 136
unmediated TCP, 134
unprivileged code, 133
WebSocket Handshake, 131
WebSocket trac, 137
XORing, 138
application level security, 140–146
attacks by API and protocol, 130
authentication, 140
communication, 129
dene, 129
features, 130–138
HTTP
unencrypted connection, 138
WebSocket secure (WSS), 139
WS and WSS, 139
STOMP, 129
threats, 130
TLS, 138–139
XMPP, 129
WebSocket Trac inspection
audits panel
creation examining, 165
Chrome console,
send messages, 168
console, 164
element panel, 164
message using console, 168
network panel, 164
opening Chrome, 164
panel list, 164
prole panel, 164
resource panel, 164
source panel, 164
timeline panel, 164
WebSocket frames, 167
WebSocket handshake, 166
capturing packets
Echo test link, 172
ltering packets, 173
follow, TCP stream, 174
TCP segments, 173
updates, 175
with Google Chrome developer
tools, 163–168
with Google Chrome network
internals, 168–171
net internals, 171
of a WebSocket handshake, 170
utilities, 169
network packets,
Wireshark, 171–175
www.it-ebooks.info
■ Index
188
WebSocket with XMPP
addHandler, 79
BOSH, 68
changes in browser, 75
chat_app.js, 70, 79
chat.css, 69
chat.html, 68
client library, 68
client response, 79
completed application, 79
connect and start, 68
connection, 76
exchange of messages, 75
handling updates, 74
iq stanzas, 79
listen, incoming message, 75
logging, Pidgin, 71
message to server, 77
Pidgin and chat.html, 76
pings and pongs, 78
presence and status, 71
registering handler, 74
server ping, 78
stanza, presence, 72
status message, 72
status text, 72
Strophe.js, message with, 77
test users, 67
update UI, presence, 72
web client conversation, 78
WebSocket enabled server, 67
XMPP parlance, 72
chat and instant messaging
application, 67–72, 74–79
button event, 73
not bosh, 68
connection to XMPP server
connectivity strategy, 64
federation, 66
gateway, 64
no stanza to message
alignment, 66
standardization, 64
stanza, 64
stanza-to-message
alignment, 65
subprotocol
draft proposal, 66
to XMPP server, connection, 65
WebSocket handshake, 64
world wide web consortium
(W3C), 63
XmppClient, 65
extensions
Google Talk connection, 82
user interface, 82
use XMPP, 82
instant messaging, 61
layered protocols, 61–63
internet application layer
simple text oriented messaging
protocol (STOMP), 62
web application layer, 63
streaming mile of XML, 63–66
www.it-ebooks.info

e Denitive Guide to HTML5 WebSocket
Copyright © 2013 by Vanessa Wang, Frank Salim, Peter Moskovits
is work is subject to copyright. All rights are reserved by the Publisher, whether the whole or part
of the material is concerned, specically the rights of translation, reprinting, reuse of illustrations,
recitation, broadcasting, reproduction on microlms or in any other physical way, and transmission
or information storage and retrieval, electronic adaptation, computer software, or by similar or
dissimilar methodology now known or hereafter developed. Exempted from this legal reservation are
brief excerpts in connection with reviews or scholarly analysis or material supplied specically for
the purpose of being entered and executed on a computer system, for exclusive use by the purchaser
of the work. Duplication of this publication or parts thereof is permitted only under the provisions
of the Copyright Law of the Publisher’s location, in its current version, and permission for use must
always be obtained from Springer. Permissions for use may be obtained through RightsLink at the
Copyright Clearance Center. Violations are liable to prosecution under the respective Copyright Law.
e W3C logo on the front cover is licensed under Creative Commons Attribution 3.0. e Creative
Commons license applies to the use of the logo provided on the front cover and no other content from
this book.
ISBN-13 (pbk): 978-1-4302-4740-1
ISBN-13 (electronic): 978-1-4302-4741-8
Trademarked names, logos, and images may appear in this book. Rather than use a trademark
symbol with every occurrence of a trademarked name, logo, or image we use the names, logos, and
images only in an editorial fashion and to the benet of the trademark owner, with no intention of
infringement of the trademark.
e use in this publication of trade names, trademarks, service marks, and similar terms, even if they
are not identied as such, is not to be taken as an expression of opinion as to whether or not they are
subject to proprietary rights.
While the advice and information in this book are believed to be true and accurate at the date of
publication, neither the authors nor the editors nor the publisher can accept any legal responsibility
for any errors or omissions that may be made. e publisher makes no warranty, express or implied,
with respect to the material contained herein.
President and Publisher: Paul Manning
Lead Editor: Ben Renow-Clarke; Chris Nelson
Technical Reviewer: Tony Pye
Editorial Board: Steve Anglin, Mark Beckner, Ewan Buckingham, Gary Cornell, Louise Corrigan,
Morgan Ertel, Jonathan Gennick, Jonathan Hassell, Robert Hutchinson, Michelle Lowman,
James Markham, Matthew Moodie, Je Olson, Jerey Pepper, Douglas Pundick,
Ben Renow-Clarke, Dominic Shakeshaft, Gwenan Spearing, Matt Wade, Tom Welsh
Coordinating Editor: Katie Sullivan
Copy Editor: Michael Sandlin
Compositor: SPi Global
Indexer: SPi Global
Artist: SPi Global
Cover Designer: Anna Ishchenko
Distributed to the book trade worldwide by Springer Science+Business Media New York, 233
Spring Street, 6th Floor, New York, NY 10013. Phone 1-800-SPRINGER, fax (201) 348-4505, e-mail
orders-ny@springer-sbm.com, or visit www.springeronline.com. Apress Media, LLC is a California
LLC and the sole member (owner) is Springer Science + Business Media Finance Inc (SSBM Finance
Inc). SSBM Finance Inc is a Delaware corporation.
For information on translations, please e-mail rights@apress.com, or visit www.apress.com.
Apress and friends of ED books may be purchased in bulk for academic, corporate, or promotional
use. eBook versions and licenses are also available for most titles. For more information, reference
our Special Bulk Sales–eBook Licensing web page at www.apress.com/bulk-sales.
Any source code or other supplementary materials referenced by the author in this text is available
to readers at www.apress.com. For detailed information about how to locate your book’s source code,
go to www.apress.com/source-code/.
www.it-ebooks.info

vii
Contents
Foreword ���������������������������������������������������������������������������������������� xiii
About the Authors ���������������������������������������������������������������������������� xv
About the Technical Reviewer ������������������������������������������������������� xvii
Acknowledgments �������������������������������������������������������������������������� xix
Chapter 1: Introduction to HTML5 WebSocket ■ �������������������������������� 1
What is HTML5? �������������������������������������������������������������������������������������� 1
HTML5 Connectivity ��������������������������������������������������������������������������������� 2
Overview of Older HTTP Architectures ���������������������������������������������������� 3
HTTP 101 (or rather, HTTP/1�0 and HTTP/1�1) �����������������������������������������������������������3
The Long Way Around: HTTP Polling, Long Polling, and Streaming ��������������������������� 5
Introducing WebSocket ��������������������������������������������������������������������������� 7
Why Do You Need WebSocket? ���������������������������������������������������������������� 7
WebSocket is about Performance ����������������������������������������������������������������������������8
WebSocket is about Simplicity ��������������������������������������������������������������������������������� 8
WebSocket is about Standards ��������������������������������������������������������������������������������� 8
WebSocket is about HTML5 �������������������������������������������������������������������������������������� 8
You Need WebSocket! ����������������������������������������������������������������������������������������������� 9
WebSocket and RFC 6455 ����������������������������������������������������������������������� 9
The World of WebSocket �������������������������������������������������������������������������� 9
WebSocket Options ��������������������������������������������������������������������������������� 9
The WebSocket Community: It Lives!���������������������������������������������������������������������� 10
Applications of WebSocket �������������������������������������������������������������������������������������10
www.it-ebooks.info
■ Contents
viii
Related Technologies ���������������������������������������������������������������������������� 10
Server-Sent Events ������������������������������������������������������������������������������������������������� 10
SPDY ����������������������������������������������������������������������������������������������������������������������� 11
Web Real-Time Communication ����������������������������������������������������������������������������� 11
Summary ����������������������������������������������������������������������������������������������� 12
Chapter 2: The WebSocket API ■ ����������������������������������������������������� 13
Overview of the WebSocket API ������������������������������������������������������������ 13
Getting Started with the WebSocket API ���������������������������������������������� 14
The WebSocket Constructor ����������������������������������������������������������������������������������� 14
WebSocket Events �������������������������������������������������������������������������������������������������� 17
WebSocket Methods ����������������������������������������������������������������������������������������������� 20
WebSocket Object Attributes ���������������������������������������������������������������������������������� 22
WebSocket Object Attribute: bufferedAmount �������������������������������������������������������� 23
Putting It All Together ���������������������������������������������������������������������������� 24
Checking for WebSocket Support ���������������������������������������������������������� 26
Using HTML5 Media with WebSocket ���������������������������������������������������� 28
Summary ����������������������������������������������������������������������������������������������� 32
Chapter 3: The WebSocket Protocol ■ ��������������������������������������������� 33
Before the WebSocket Protocol ������������������������������������������������������������� 33
A Brief History of the Internet ��������������������������������������������������������������������������������� 34
The Web and HTTP �������������������������������������������������������������������������������������������������� 34
Introducing the WebSocket Protocol ����������������������������������������������������� 36
WebSocket: Internet Capabilities for Web Applications ������������������������������������������ 36
Inspecting WebSocket Traffic ���������������������������������������������������������������������������������38
The WebSocket Protocol ������������������������������������������������������������������������ 40
The WebSocket Opening Handshake ����������������������������������������������������������������������40
Computing the Key Response ��������������������������������������������������������������������������������� 42
Message Format ����������������������������������������������������������������������������������������������������� 43
www.it-ebooks.info
■ Contents
ix
The WebSocket Closing Handshake ����������������������������������������������������������������������� 46
Support for Other Protocols ������������������������������������������������������������������������������������49
Extensions �������������������������������������������������������������������������������������������������������������� 50
Writing a WebSocket Server in JavaScript with Node�js ����������������������� 50
Building a Simple WebSocket Server ��������������������������������������������������������������������� 51
Testing Our Simple WebSocket Server ������������������������������������������������������������������� 56
Building a Remote JavaScript Console �������������������������������������������������������������������57
Summary ����������������������������������������������������������������������������������������������� 60
Chapter 4: Building Instant Messaging and Chat ■
over WebSocket with XMPP ��������������������������������������������������������� 61
Layered Protocols ���������������������������������������������������������������������������������� 61
XMPP: A Streaming Mile of XML ������������������������������������������������������������ 63
Standardization ������������������������������������������������������������������������������������������������������64
Choosing a Connectivity Strategy ��������������������������������������������������������������������������� 64
Federation��������������������������������������������������������������������������������������������������������������� 66
Building a Chat and Instant Messaging Application over WebSocket �������67
Using a WebSocket-Enabled XMPP Server ������������������������������������������������������������� 67
Setting Up Test Users ���������������������������������������������������������������������������������������������� 67
The Client Library: Strophe�js���������������������������������������������������������������������������������� 68
Connecting and Getting Started ������������������������������������������������������������������������������ 68
Presence and Status ����������������������������������������������������������������������������������������������� 71
Exchanging Chat Messages ������������������������������������������������������������������������������������ 75
Pings and Pongs ����������������������������������������������������������������������������������������������������� 78
Completed Chat Application ����������������������������������������������������������������������������������� 79
Suggested Extensions ��������������������������������������������������������������������������� 82
Build a User Interface �������������������������������������������������������������������������������������������� 82
Use XMPP Extensions ��������������������������������������������������������������������������������������������� 82
Connect to Google Talk ������������������������������������������������������������������������������������������� 82
Summary ����������������������������������������������������������������������������������������������� 83
www.it-ebooks.info
■ Contents
x
Chapter 5: Using Messaging over WebSocket with STOMP ■ ���������� 85
Overview of Publish and Subscribe Models ������������������������������������������ 86
Introduction to STOMP ��������������������������������������������������������������������������� 88
Getting Started with Web Messaging ���������������������������������������������������� 89
Setting Up a Message Broker ��������������������������������������������������������������������������������� 90
Seeing STOMP Concepts in Action �������������������������������������������������������������������������� 93
Building a STOMP over WebSocket Application ������������������������������������� 94
The Flow of the Game ��������������������������������������������������������������������������������������������� 95
Creating the Game �������������������������������������������������������������������������������������������������� 97
Monitoring Apache ActiveMQ �������������������������������������������������������������������������������� 105
Suggested Extensions ������������������������������������������������������������������������� 107
The Future of Web Messaging ������������������������������������������������������������� 107
Summary ��������������������������������������������������������������������������������������������� 108
Chapter 6: VNC with the Remote Framebuffer Protocol ■ ������������� 109
An Overview of Virtual Network Computing ���������������������������������������� 110
An Overview of the Remote Framebuffer Protocol ����������������������������������������������� 111
Binary- and Text-Oriented Protocols ��������������������������������������������������������������������� 112
Choosing to Use RFB over WebSocket ������������������������������������������������������������������ 112
Building a VNC (RFB) Client over WebSocket ��������������������������������������� 113
Setting Up a Proxy Server ������������������������������������������������������������������������������������ 114
The RFB Client ������������������������������������������������������������������������������������������������������ 115
Using HTML5 <canvas> to Draw a Framebuffer �������������������������������������������������� 120
Handling Input in the Client ���������������������������������������������������������������������������������� 122
Putting It All Together�������������������������������������������������������������������������������������������� 126
Enhancing the Application ������������������������������������������������������������������� 127
Summary ��������������������������������������������������������������������������������������������� 127
www.it-ebooks.info
■ Contents
xi
Chapter 7: WebSocket Security ■ �������������������������������������������������� 129
WebSocket Security Overview ������������������������������������������������������������ 129
WebSocket Security Features ������������������������������������������������������������� 130
Origin Header �������������������������������������������������������������������������������������������������������� 131
Headers with the “Sec-” Prefix����������������������������������������������������������������������������� 134
WebSocket Secure Handshake: Accept Keys ������������������������������������������������������� 135
HTTP Proxies and Masking ����������������������������������������������������������������������������������� 136
Secure WebSocket Uses TLS (You Should, Too!) ���������������������������������� 138
Authentication ������������������������������������������������������������������������������������� 140
Application Level Security ������������������������������������������������������������������� 140
Application Authentication ������������������������������������������������������������������������������������ 141
Application Authorization �������������������������������������������������������������������������������������� 144
Summary ��������������������������������������������������������������������������������������������� 147
Chapter 8: Deployment Considerations ■ �������������������������������������� 149
Overview of WebSocket Application Deployment �������������������������������� 149
WebSocket Emulation and Fallback ���������������������������������������������������� 150
Plugins ������������������������������������������������������������������������������������������������������������������ 150
Polyfills �����������������������������������������������������������������������������������������������������������������150
Different Abstraction Layers ���������������������������������������������������������������������������������151
Proxies and Other Network Intermediaries ����������������������������������������� 152
Reverse Proxies and Load Balancing �������������������������������������������������������������������152
Traverse Proxies and Firewalls with Transport Layer Security (TLS or SSL) ��������� 155
Deploying TLS ������������������������������������������������������������������������������������������������������� 158
WebSocket Pings and Pongs ��������������������������������������������������������������� 158
WebSocket Buffering and Throttling���������������������������������������������������� 159
Monitoring ������������������������������������������������������������������������������������������� 159
www.it-ebooks.info
■ Contents
xii
Capacity Planning �������������������������������������������������������������������������������� 159
Socket Limits ��������������������������������������������������������������������������������������� 160
WebSocket Application Deployment Checklist ������������������������������������ 161
Summary ��������������������������������������������������������������������������������������������� 162
Appendix A: Inspecting WebSocket Traffic ■ ��������������������������������� 163
WebSocket Frame Inspection with Google
Chrome Developer Tools ���������������������������������������������������������������������� 163
Google Chrome Network Internals ������������������������������������������������������ 168
Analyzing Network Packets with Wireshark ���������������������������������������� 171
Summary ��������������������������������������������������������������������������������������������� 175
Appendix B: WebSocket Resources ■ �������������������������������������������� 177
Using the Virtual Machine ������������������������������������������������������������������� 177
WebSocket Servers ����������������������������������������������������������������������������� 179
Index ���������������������������������������������������������������������������������������������� 183
www.it-ebooks.info

xiii
Foreword
e browser is, hands down, the most popular and ubiquitous deployment platform
available to us today: virtually every computer, smartphone, tablet, and just about every
other form factor imaginable can now execute JavaScript, render a web page, and of
course, talk HTTP. is, on its own, is a remarkable achievement, especially when you
realize that it only took us a little over a decade to get to this stage. However, this is also
just the beginning. e browser of yesterday looks nothing like what we now have access
to thanks to all of the innovations of HTML5.
It is hard to overstate the importance of what HTML5 WebSocket enables: up until
now, the browser could only speak one language (HTTP), and that language was not
designed for the requirements of the modern, real-time Web. Yes, we’ve made progress
with interim solutions such as long-polling and Flash sockets, but the complexity and cost
of these solutions has always limited the capabilities of what we could do. WebSockets
changes all of that: it is designed from the ground up to be data agnostic (binary and text),
full-duplex, and optimized for minimum overhead, both in bytes and in latency.
WebSockets is TCP for the web-browser, except with a more robust and much easier
to use API. Suddenly, our client is able to implement any network protocol directly in
the browser, which opens up an entire new world of possibilities. An XMPP chat client?
Easy. Need to connect your client to a custom binary protocol deployed on your existing
network? No problem! Even better, you can script, style, and deploy these clients directly
in the browser with all the web authoring tools you already know, love, and use.
e browser of yesterday talked to an HTTP server. With WebSockets, the browser
can talk to anyone and implement any protocol: complete the HTTP handshake,
upgrade the connection, and you are o to the races. We are no longer talking about
building slightly better or more interactive pages. With WebSockets we can build entirely
new types of apps and experiences that can be delivered to your users today, directly in
their browser.
is book provides a great from-the-ground-up discussion of what WebSockets are,
what problems they are helping us to solve, as well as a number of practical examples
that will get you up and running in no time. You will be pleasantly surprised how easy
it is to work with WebSocket and how much you can accomplish with very little code.
Working with WebSockets is a blast, and this book by Vanessa, Frank, and Peter is a
tting guide. Enjoy!
Ilya Grigorik
Developer Advocate - Make the Web Fast, Google
www.it-ebooks.info
xv
About the Authors
Vanessa Wang is an HTML5 and WebSocket enthusiast
who has spent more than fteen years writing about
technology. Vanessa has an MA in Education and
is currently Manager of Technical Publications at
Kaazing and co-organizer of the San Francisco HTML5
User Group. When she’s not writing, she enjoys
organizing community events for HTML5 and related
technologies, kickboxing, riding her motorcycle, and
playing her cello. Follow her on Twitter (@vjwang).
Frank Salim is a software engineer at Google.
Previously, he was one of the original engineers at
Kaazing who helped craft the WebSocket gateway and
client strategy. Frank is a San Diego native currently
residing in San Francisco, California. He holds a degree
in computer science from Pomona College. When he is
not programming, Frank enjoys reading, painting, and
inline skating. In 2010, Frank co-authored Pro HTML5
Programming (Apress).
www.it-ebooks.info

■ About the Authors
xvi
Peter Moskovits is the head of real-time solutions
development at Kaazing, a software company
enhancing the way businesses and customers
communicate across the Web using the new HTML5
WebSocket standard. Peter works closely with
architects and the developer community to build
and deploy the best possible web communication
solutions. Before joining Kaazing, Peter held various
product management leadership roles and was
responsible for Oracle’s portal product strategy. Peter is
a frequent speaker at conferences and industry events,
such as GoTo, YOW!, JavaOne, Oracle OpenWorld,
HTML5DeConf, DevCon5, and various user group
meetings. He is also the co-author of the Oracle
WebCenter 11g Handbook.
www.it-ebooks.info
xvii
About the Technical
Reviewer
Tony Pye has a background in software consultancy,
web development, and engineering. However, instead
of taking his technical expertise into manufacturing,
he took the path to geekdom and in 2003 became a
partner and head of digital production at INK Digital
Agency, one of the UK’s national Top 10 digital
agencies.*
In addition to having an extensive knowledge of
current software and coding standards, Tony keeps
a sharp eye on the future, watching for emerging
technologies, thus ensuring his team remains at
the forefront of an ever-changing digital landscape. Although businesses face many
challenges, Tony has the underlying knowledge and experience to dene their
technical problems and produce innovative digital solutions for a range of commercial
environments.
In his spare time, Tony particularly enjoys traveling to sunnier climes where
he can pursue his passion for scuba diving. You can contact Tony via email at
tony@inkdigitalagency.com.
*Nominated in the Recommended Agency Register (RAR) awards 2012.
www.it-ebooks.info

xix
Acknowledgments
Many thanks to Peter Lubbers (Pro HTML5 Programming, 2nd ed.), whose guidance and
enthusiasm for HTML5 made this book possible, and to Ilya Grigorik whose passion for
web performance and real-time technologies is truly inspiring. anks to Steve Atkinson
and Frank Greco, who tirelessly provided insightful feedback at odd hours of the day
and night. Much gratitude to Je Mesnil and Dhurv Matani for their awesome code
(check them out on GitHub!) that enabled some of the cutting-edge examples we used
in this book. Special thanks to Kaazing and Apress for their support and giving us the
opportunity to share our passion for WebSocket.
Vanessa Wang
Frank Salim
Peter Moskovits
My deepest appreciation to Julian for his encouragement, support, and never-ending
patience. anks to Camper and Tilson for simply being awesome, and to the Pins for
not-so-silently keeping me company during the late nights and early mornings. Special
thanks to my family for all the sacrices they made to put me here.
And, nally, much gratitude and respect to my incredible co-authors and friends,
Frank and Peter, for their brilliance, creativity, and enthusiasm.
Vanessa Wang
I’d like to sincerely thank my family for their support, having thanked them more
facetiously in the past. I would like to thank April for her excellent advice and patience.
Of course, I would also like to thank my co-authors, Vanessa and Peter.
Frank Salim
ank you, Anna, for your incredible support and understanding while working on the
book . . . and beyond. I’m thankful to Danka and Lea, the sweetest kids ever, who were so
easy on me and didn’t (always) get upset when I had to sit down and work. Special thanks
to Aniko for her tireless help.
And last, but not least, I’m grateful that I could work with my two co-authors,
Vanessa and Frank, two exceptional colleagues and friends. ank you guys for the
opportunity - I enjoyed every moment of it.
Peter Moskovits
www.it-ebooks.info
