The Definitive Guide To Mysql 5 3rd Edition
User Manual:
Open the PDF directly: View PDF ![]() .
.
Page Count: 785 [warning: Documents this large are best viewed by clicking the View PDF Link!]

The Definitive Guide to MySQL 5
Copyright © 2005 by Michael Kofler
All rights reserved. No part of this work may be reproduced or transmitted in any form or by any means,
electronic or mechanical, including photocopying, recording, or by any information storage or retrieval
system, without the prior written permission of the copyright owner and the publisher.
ISBN (pbk): 1-59059-535-1
Printed and bound in the United States of America 987654321
Trademarked names may appear in this book. Rather than use a trademark symbol with every occurrence
of a trademarked name, we use the names only in an editorial fashion and to the benefit of the trademark
owner, with no intention of infringement of the trademark.
Lead Editor: Jason Gilmore
Translator and Editor: David Kramer
Editorial Board: Steve Anglin, Dan Appleman, Ewan Buckingham, Gary Cornell, Tony Davis,
Jason Gilmore, Jonathan Hassell, Chris Mills, Dominic Shakeshaft, Jim Sumser
Associate Publisher: Grace Wong
Project Manager: Beth Christmas
Copy Edit Manager: Nicole LeClerc
Assistant Production Director: Kari Brooks-Copony
Production Editor: Laura Cheu
Compositor: Linda Weidemann, Wolf Creek Press
Proofreader: April Eddy
Artist: Kinetic Publishing Services, LLC
Interior Designer: Van Winkle Design Group
Cover Designer: Kurt Krames
Manufacturing Manager: Tom Debolski
Distributed to the book trade worldwide by Springer-Verlag New York, Inc., 233 Spring Street, 6th Floor,
New York, NY 10013. Phone 1-800-SPRINGER, fax 201-348-4505, e-mail orders-ny@springer-sbm.com, or
visit http://www.springeronline.com.
For information on translations, please contact Apress directly at 2560 Ninth Street, Suite 219, Berkeley,
CA 94710. Phone 510-549-5930, fax 510-549-5939, e-mail info@apress.com, or visit http://www.apress.com.
The information in this book is distributed on an “as is” basis, without warranty. Although every precaution
has been taken in the preparation of this work, neither the author(s) nor Apress shall have any liability to
any person or entity with respect to any loss or damage caused or alleged to be caused directly or indirectly
by the information contained in this work.
The source code for this book is available to readers at http://www.apress.com in the Source Code section.
5351fm_final.qxd 8/26/05 6:12 PM Page ii
www.it-ebooks.info

Contents at a Glance
About the Author . . . . . . . . . . . . . . . . . . . . . . . . . . . . . . . . . . . . . . . . . . . . . . . . . . . . . . . . . . . . . . . . . . . . . xxiii
About the Translator . . . . . . . . . . . . . . . . . . . . . . . . . . . . . . . . . . . . . . . . . . . . . . . . . . . . . . . . . . . . . . . . . . . xxv
Preface . . . . . . . . . . . . . . . . . . . . . . . . . . . . . . . . . . . . . . . . . . . . . . . . . . . . . . . . . . . . . . . . . . . . . . . . . . . . . xxvii
PART 1 ■ ■ ■ Introduction
■CHAPTER 1 What Is MySQL? . . . . . . . . . . . . . . . . . . . . . . . . . . . . . . . . . . . . . . . . . . . . . . . . . . . . 3
■CHAPTER 2 The Test Environment . . . . . . . . . . . . . . . . . . . . . . . . . . . . . . . . . . . . . . . . . . . . . . 17
■CHAPTER 3 Introductory Example (An Opinion Poll with PHP) . . . . . . . . . . . . . . . . . . . . 47
PART 2 ■ ■ ■ Administrative Tools and
User Interfaces
■CHAPTER 4 mysql, mysqladmin, and mysqldump . . . . . . . . . . . . . . . . . . . . . . . . . . . . . . . . 61
■CHAPTER 5 MySQL Administrator and MySQL Query Browser. . . . . . . . . . . . . . . . . . . . . 71
■CHAPTER 6 phpMyAdmin . . . . . . . . . . . . . . . . . . . . . . . . . . . . . . . . . . . . . . . . . . . . . . . . . . . . . . 87
■CHAPTER 7 Microsoft Office, OpenOffice/StarOffice. . . . . . . . . . . . . . . . . . . . . . . . . . . . . 117
PART 3 ■ ■ ■ Fundamentals
■CHAPTER 8 Database Design. . . . . . . . . . . . . . . . . . . . . . . . . . . . . . . . . . . . . . . . . . . . . . . . . . 137
■CHAPTER 9 An Introduction to SQL . . . . . . . . . . . . . . . . . . . . . . . . . . . . . . . . . . . . . . . . . . . . 189
■CHAPTER 10 SQL Recipes. . . . . . . . . . . . . . . . . . . . . . . . . . . . . . . . . . . . . . . . . . . . . . . . . . . . . . 217
■CHAPTER 11 Access Administration and Security . . . . . . . . . . . . . . . . . . . . . . . . . . . . . . . . 263
■CHAPTER 12 GIS Functions. . . . . . . . . . . . . . . . . . . . . . . . . . . . . . . . . . . . . . . . . . . . . . . . . . . . . 299
■CHAPTER 13 Stored Procedures and Triggers. . . . . . . . . . . . . . . . . . . . . . . . . . . . . . . . . . . . 317
■CHAPTER 14 Administration and Server Configuration . . . . . . . . . . . . . . . . . . . . . . . . . . . 345
iii
5351fm_final.qxd 8/26/05 6:12 PM Page iii
www.it-ebooks.info
PART 4 ■ ■ ■ Programming
■CHAPTER 15 PHP . . . . . . . . . . . . . . . . . . . . . . . . . . . . . . . . . . . . . . . . . . . . . . . . . . . . . . . . . . . . . . 403
■CHAPTER 16 Perl . . . . . . . . . . . . . . . . . . . . . . . . . . . . . . . . . . . . . . . . . . . . . . . . . . . . . . . . . . . . . . 481
■CHAPTER 17 Java (JDBC and Connector/J) . . . . . . . . . . . . . . . . . . . . . . . . . . . . . . . . . . . . . . 507
■CHAPTER 18 C. . . . . . . . . . . . . . . . . . . . . . . . . . . . . . . . . . . . . . . . . . . . . . . . . . . . . . . . . . . . . . . . 527
■CHAPTER 19 Visual Basic 6/VBA. . . . . . . . . . . . . . . . . . . . . . . . . . . . . . . . . . . . . . . . . . . . . . . . 545
■CHAPTER 20 Visual Basic .NET and C# . . . . . . . . . . . . . . . . . . . . . . . . . . . . . . . . . . . . . . . . . . 573
PART 5 ■ ■ ■ Reference
■CHAPTER 21 SQL Reference. . . . . . . . . . . . . . . . . . . . . . . . . . . . . . . . . . . . . . . . . . . . . . . . . . . . 599
■CHAPTER 22 MySQL Tools and Options. . . . . . . . . . . . . . . . . . . . . . . . . . . . . . . . . . . . . . . . . . 667
■CHAPTER 23 API Reference . . . . . . . . . . . . . . . . . . . . . . . . . . . . . . . . . . . . . . . . . . . . . . . . . . . . 693
PART 6 ■ ■ ■ Appendixes
■APPENDIX A Glossary. . . . . . . . . . . . . . . . . . . . . . . . . . . . . . . . . . . . . . . . . . . . . . . . . . . . . . . . . . 723
■APPENDIX B The Files for this Book . . . . . . . . . . . . . . . . . . . . . . . . . . . . . . . . . . . . . . . . . . . . 729
■APPENDIX C Bibliography. . . . . . . . . . . . . . . . . . . . . . . . . . . . . . . . . . . . . . . . . . . . . . . . . . . . . . 731
■INDEX . . . . . . . . . . . . . . . . . . . . . . . . . . . . . . . . . . . . . . . . . . . . . . . . . . . . . . . . . . . . . . . . . . . . . . . . . . . 733
■CONTENTS AT A GLANCEiv
5351fm_final.qxd 8/26/05 6:12 PM Page iv
www.it-ebooks.info

Contents
About the Author . . . . . . . . . . . . . . . . . . . . . . . . . . . . . . . . . . . . . . . . . . . . . . . . . . . . . . . . . . . . . . . . . . . . . xxiii
About the Translator . . . . . . . . . . . . . . . . . . . . . . . . . . . . . . . . . . . . . . . . . . . . . . . . . . . . . . . . . . . . . . . . . . . xxv
Preface . . . . . . . . . . . . . . . . . . . . . . . . . . . . . . . . . . . . . . . . . . . . . . . . . . . . . . . . . . . . . . . . . . . . . . . . . . . . . xxvii
PART 1 ■ ■ ■ Introduction
■CHAPTER 1 What Is MySQL? . . . . . . . . . . . . . . . . . . . . . . . . . . . . . . . . . . . . . . . . . . . . . . . . . 3
What Is a Database? . . . . . . . . . . . . . . . . . . . . . . . . . . . . . . . . . . . . . . . . . . . . . . . . . . 3
Relations, Database Systems, Servers, and Clients . . . . . . . . . . . . . . . . . . . 3
Relational Versus Object-Oriented Database Systems . . . . . . . . . . . . . . . . . 4
Tables, Records, Fields, Queries, SQL, Index, Keys . . . . . . . . . . . . . . . . . . . . 4
MySQL . . . . . . . . . . . . . . . . . . . . . . . . . . . . . . . . . . . . . . . . . . . . . . . . . . . . . . . . . . . . . 5
Features of MySQL . . . . . . . . . . . . . . . . . . . . . . . . . . . . . . . . . . . . . . . . . . . . . . 5
Limitations of MySQL . . . . . . . . . . . . . . . . . . . . . . . . . . . . . . . . . . . . . . . . . . . . . . . . . 7
MySQL Version Numbers . . . . . . . . . . . . . . . . . . . . . . . . . . . . . . . . . . . . . . . . . . . . . . 8
Alpha, Beta, Gamma, Production (Generally Available) . . . . . . . . . . . . . . . . . 9
MySQL Functions Ordered by Version Number . . . . . . . . . . . . . . . . . . . . . . . 9
MySQL Licensing . . . . . . . . . . . . . . . . . . . . . . . . . . . . . . . . . . . . . . . . . . . . . . . . . . . 11
Rights and Duties with Respect to the GPL . . . . . . . . . . . . . . . . . . . . . . . . . 11
Use of MySQL with an Open Source License . . . . . . . . . . . . . . . . . . . . . . . . 12
Use of MySQL with a Commercial License . . . . . . . . . . . . . . . . . . . . . . . . . 12
Commercial Licenses for Client Libraries
(Connector/ODBC, Connector/J, etc.) . . . . . . . . . . . . . . . . . . . . . . . . . . . 13
Client Licenses for the PHP Project, F(L)OSS Exception . . . . . . . . . . . . . . . 14
MySQL Version Names . . . . . . . . . . . . . . . . . . . . . . . . . . . . . . . . . . . . . . . . . . 14
Support Contracts . . . . . . . . . . . . . . . . . . . . . . . . . . . . . . . . . . . . . . . . . . . . . . 15
Alternatives to MySQL . . . . . . . . . . . . . . . . . . . . . . . . . . . . . . . . . . . . . . . . . . . . . . . 16
Summary . . . . . . . . . . . . . . . . . . . . . . . . . . . . . . . . . . . . . . . . . . . . . . . . . . . . . . . . . . 16
■CHAPTER 2 The Test Environment . . . . . . . . . . . . . . . . . . . . . . . . . . . . . . . . . . . . . . . . . 17
Windows or Unix/Linux? . . . . . . . . . . . . . . . . . . . . . . . . . . . . . . . . . . . . . . . . . . . . . . 17
MySQL in Practice (Public Internet Server) . . . . . . . . . . . . . . . . . . . . . . . . . . 17
Development Environment . . . . . . . . . . . . . . . . . . . . . . . . . . . . . . . . . . . . . . . 18
Installation Under Windows. . . . . . . . . . . . . . . . . . . . . . . . . . . . . . . . . . . . . . . . . . . . 18
v
5351fm_final.qxd 8/26/05 6:12 PM Page v
www.it-ebooks.info
Installing Apache 2.0. . . . . . . . . . . . . . . . . . . . . . . . . . . . . . . . . . . . . . . . . . . . 18
Installing MySQL 5.0 . . . . . . . . . . . . . . . . . . . . . . . . . . . . . . . . . . . . . . . . . . . . 20
Installing PHP 5.0. . . . . . . . . . . . . . . . . . . . . . . . . . . . . . . . . . . . . . . . . . . . . . . 23
Installing Perl . . . . . . . . . . . . . . . . . . . . . . . . . . . . . . . . . . . . . . . . . . . . . . . . . . 25
Installation Under SUSE Linux 9.3 . . . . . . . . . . . . . . . . . . . . . . . . . . . . . . . . . . . . . . 27
Installing Apache 2, PHP 5, and Perl . . . . . . . . . . . . . . . . . . . . . . . . . . . . . . . 27
Installing MySQL 5.0 . . . . . . . . . . . . . . . . . . . . . . . . . . . . . . . . . . . . . . . . . . . . 30
Installation Under Red Hat Enterprise Linux 4 . . . . . . . . . . . . . . . . . . . . . . . . . . . . 31
Installing Apache 2 . . . . . . . . . . . . . . . . . . . . . . . . . . . . . . . . . . . . . . . . . . . . . 31
Installing MySQL 5 . . . . . . . . . . . . . . . . . . . . . . . . . . . . . . . . . . . . . . . . . . . . . 32
Compiling PHP 5 . . . . . . . . . . . . . . . . . . . . . . . . . . . . . . . . . . . . . . . . . . . . . . . 33
Installing Perl 5.8. . . . . . . . . . . . . . . . . . . . . . . . . . . . . . . . . . . . . . . . . . . . . . . 36
Compiling the MySQL Developer Version (Linux) . . . . . . . . . . . . . . . . . . . . . . . . . . 36
Installing Bitkeeper . . . . . . . . . . . . . . . . . . . . . . . . . . . . . . . . . . . . . . . . . . . . . 37
Downloading the MySQL Developer Version. . . . . . . . . . . . . . . . . . . . . . . . . 37
Compiling MySQL . . . . . . . . . . . . . . . . . . . . . . . . . . . . . . . . . . . . . . . . . . . . . . 37
Setting Up the mysql Database for Managing Access Privileges . . . . . . . . 37
Configuration Files and Init-V Scripts . . . . . . . . . . . . . . . . . . . . . . . . . . . . . . 37
Starting the MySQL Server . . . . . . . . . . . . . . . . . . . . . . . . . . . . . . . . . . . . . . . 38
Configuring Apache . . . . . . . . . . . . . . . . . . . . . . . . . . . . . . . . . . . . . . . . . . . . . . . . . . 38
Configuration Files. . . . . . . . . . . . . . . . . . . . . . . . . . . . . . . . . . . . . . . . . . . . . . 38
Elementary Settings . . . . . . . . . . . . . . . . . . . . . . . . . . . . . . . . . . . . . . . . . . . . 39
Access Privileges for Individual Directories (.htaccess) . . . . . . . . . . . . . . . 40
Configuring PHP . . . . . . . . . . . . . . . . . . . . . . . . . . . . . . . . . . . . . . . . . . . . . . . . . . . . . 43
Configuring MySQL . . . . . . . . . . . . . . . . . . . . . . . . . . . . . . . . . . . . . . . . . . . . . . . . . . 45
Launching the MySQL Server . . . . . . . . . . . . . . . . . . . . . . . . . . . . . . . . . . . . 45
■CHAPTER 3 Introductory Example (An Opinion Poll with PHP) . . . . . . . . . . . 47
Overview . . . . . . . . . . . . . . . . . . . . . . . . . . . . . . . . . . . . . . . . . . . . . . . . . . . . . . . . . . . 47
Assumptions . . . . . . . . . . . . . . . . . . . . . . . . . . . . . . . . . . . . . . . . . . . . . . . . . . 47
Database Development . . . . . . . . . . . . . . . . . . . . . . . . . . . . . . . . . . . . . . . . . . . . . . . 48
Executing the mysql Command-Line Interpreter . . . . . . . . . . . . . . . . . . . . . 49
Setting Up the Database . . . . . . . . . . . . . . . . . . . . . . . . . . . . . . . . . . . . . . . . . 50
Creating Tables. . . . . . . . . . . . . . . . . . . . . . . . . . . . . . . . . . . . . . . . . . . . . . . . . 50
Why Make It Complicated, When It Could Be So Much Easier? . . . . . . . . . 52
The Questionnaire . . . . . . . . . . . . . . . . . . . . . . . . . . . . . . . . . . . . . . . . . . . . . . . . . . . 53
Questionnaire Evaluation and Displaying Results . . . . . . . . . . . . . . . . . . . . . . . . . 53
The mysql Interface Versus the mysqli Interface . . . . . . . . . . . . . . . . . . . . . 54
Establishing a Connection to the Database . . . . . . . . . . . . . . . . . . . . . . . . . 54
Evaluating the Data and Storing It in the Database . . . . . . . . . . . . . . . . . . . 54
Displaying the Survey Results . . . . . . . . . . . . . . . . . . . . . . . . . . . . . . . . . . . . 55
Program Code (results.php) . . . . . . . . . . . . . . . . . . . . . . . . . . . . . . . . . . . . . . 55
The Resulting HTML Code . . . . . . . . . . . . . . . . . . . . . . . . . . . . . . . . . . . . . . . 57
Ideas for Improvements . . . . . . . . . . . . . . . . . . . . . . . . . . . . . . . . . . . . . . . . . . . . . . 57
■CONTENTSvi
5351fm_final.qxd 8/26/05 6:12 PM Page vi
www.it-ebooks.info
PART 2 ■ ■ ■ Administrative Tools and
User Interfaces
■CHAPTER 4 mysql, mysqladmin, and mysqldump. . . . . . . . . . . . . . . . . . . . . . . . . 61
mysql . . . . . . . . . . . . . . . . . . . . . . . . . . . . . . . . . . . . . . . . . . . . . . . . . . . . . . . . . . . . . 61
Launching mysql . . . . . . . . . . . . . . . . . . . . . . . . . . . . . . . . . . . . . . . . . . . . . . . 62
mysql Options . . . . . . . . . . . . . . . . . . . . . . . . . . . . . . . . . . . . . . . . . . . . . . . . . 63
Using mysql Interactively . . . . . . . . . . . . . . . . . . . . . . . . . . . . . . . . . . . . . . . . 64
Tips for Using mysql Under Unix/Linux . . . . . . . . . . . . . . . . . . . . . . . . . . . . . 66
Tips for Using mysql Under Windows . . . . . . . . . . . . . . . . . . . . . . . . . . . . . . 67
Processing SQL Files with mysql . . . . . . . . . . . . . . . . . . . . . . . . . . . . . . . . . . 69
mysqladmin . . . . . . . . . . . . . . . . . . . . . . . . . . . . . . . . . . . . . . . . . . . . . . . . . . . . . . . . 70
mysqldump. . . . . . . . . . . . . . . . . . . . . . . . . . . . . . . . . . . . . . . . . . . . . . . . . . . . . . . . . 70
■CHAPTER 5 MySQL Administrator and MySQL Query Browser . . . . . . . . . . . 71
Installation . . . . . . . . . . . . . . . . . . . . . . . . . . . . . . . . . . . . . . . . . . . . . . . . . . . . . . . . . 71
Establishing a Connection . . . . . . . . . . . . . . . . . . . . . . . . . . . . . . . . . . . . . . . . . . . . 72
MySQL Administrator . . . . . . . . . . . . . . . . . . . . . . . . . . . . . . . . . . . . . . . . . . . . . . . . 73
Server Information . . . . . . . . . . . . . . . . . . . . . . . . . . . . . . . . . . . . . . . . . . . . . 74
Service Control . . . . . . . . . . . . . . . . . . . . . . . . . . . . . . . . . . . . . . . . . . . . . . . . 74
Startup Variables . . . . . . . . . . . . . . . . . . . . . . . . . . . . . . . . . . . . . . . . . . . . . . . 75
User Administration . . . . . . . . . . . . . . . . . . . . . . . . . . . . . . . . . . . . . . . . . . . . . 75
Server Connections . . . . . . . . . . . . . . . . . . . . . . . . . . . . . . . . . . . . . . . . . . . . . 78
Health . . . . . . . . . . . . . . . . . . . . . . . . . . . . . . . . . . . . . . . . . . . . . . . . . . . . . . . . 78
Server Logs . . . . . . . . . . . . . . . . . . . . . . . . . . . . . . . . . . . . . . . . . . . . . . . . . . . 78
Backup . . . . . . . . . . . . . . . . . . . . . . . . . . . . . . . . . . . . . . . . . . . . . . . . . . . . . . . 78
Restore . . . . . . . . . . . . . . . . . . . . . . . . . . . . . . . . . . . . . . . . . . . . . . . . . . . . . . . 80
Replication Status . . . . . . . . . . . . . . . . . . . . . . . . . . . . . . . . . . . . . . . . . . . . . . 81
Catalogs . . . . . . . . . . . . . . . . . . . . . . . . . . . . . . . . . . . . . . . . . . . . . . . . . . . . . . 81
MySQL Query Browser . . . . . . . . . . . . . . . . . . . . . . . . . . . . . . . . . . . . . . . . . . . . . . . 82
Input and Execution of SQL Commands . . . . . . . . . . . . . . . . . . . . . . . . . . . . 82
Changing Data in SELECT Results . . . . . . . . . . . . . . . . . . . . . . . . . . . . . . . . . 84
History and Bookmarks for SQL Commands. . . . . . . . . . . . . . . . . . . . . . . . . 84
Executing Several Commands at Once (Scripts) . . . . . . . . . . . . . . . . . . . . . 84
Stored Procedures . . . . . . . . . . . . . . . . . . . . . . . . . . . . . . . . . . . . . . . . . . . . . . 85
MySQL Help . . . . . . . . . . . . . . . . . . . . . . . . . . . . . . . . . . . . . . . . . . . . . . . . . . . 85
■CONTENTS vii
5351fm_final.qxd 8/26/05 6:12 PM Page vii
www.it-ebooks.info
■CHAPTER 6 phpMyAdmin . . . . . . . . . . . . . . . . . . . . . . . . . . . . . . . . . . . . . . . . . . . . . . . . . . . 87
Installation and Configuration. . . . . . . . . . . . . . . . . . . . . . . . . . . . . . . . . . . . . . . . . . 87
Installing phpMyAdmin Files. . . . . . . . . . . . . . . . . . . . . . . . . . . . . . . . . . . . . . 88
Configuring phpMyAdmin . . . . . . . . . . . . . . . . . . . . . . . . . . . . . . . . . . . . . . . . 88
config Authentication. . . . . . . . . . . . . . . . . . . . . . . . . . . . . . . . . . . . . . . . . . . . 89
http and Cookie Authentication . . . . . . . . . . . . . . . . . . . . . . . . . . . . . . . . . . . 91
User Management, Securing MySQL . . . . . . . . . . . . . . . . . . . . . . . . . . . . . . . . . . . . 94
Securing MySQL . . . . . . . . . . . . . . . . . . . . . . . . . . . . . . . . . . . . . . . . . . . . . . . 94
Creating New Users. . . . . . . . . . . . . . . . . . . . . . . . . . . . . . . . . . . . . . . . . . . . . 95
Creating and Editing Databases . . . . . . . . . . . . . . . . . . . . . . . . . . . . . . . . . . . . . . . . 98
Creating a Database . . . . . . . . . . . . . . . . . . . . . . . . . . . . . . . . . . . . . . . . . . . . 98
Editing Existing Tables. . . . . . . . . . . . . . . . . . . . . . . . . . . . . . . . . . . . . . . . . . 100
Setting Foreign Key Rules. . . . . . . . . . . . . . . . . . . . . . . . . . . . . . . . . . . . . . . 100
Documenting the Database Structure . . . . . . . . . . . . . . . . . . . . . . . . . . . . . 101
Viewing, Inserting, and Editing Data . . . . . . . . . . . . . . . . . . . . . . . . . . . . . . . . . . . 102
Executing SQL Commands . . . . . . . . . . . . . . . . . . . . . . . . . . . . . . . . . . . . . . . . . . . 104
Import and Export . . . . . . . . . . . . . . . . . . . . . . . . . . . . . . . . . . . . . . . . . . . . . . . . . . 105
Database Backup (SQL File) . . . . . . . . . . . . . . . . . . . . . . . . . . . . . . . . . . . . . 106
Exporting Tables (CSV Text File) . . . . . . . . . . . . . . . . . . . . . . . . . . . . . . . . . . 107
Importing a Database or Tables (SQL File) . . . . . . . . . . . . . . . . . . . . . . . . . 107
Inserting Table Data (Text File) . . . . . . . . . . . . . . . . . . . . . . . . . . . . . . . . . . . 108
Server Administration . . . . . . . . . . . . . . . . . . . . . . . . . . . . . . . . . . . . . . . . . . . . . . . 109
Auxiliary Functions . . . . . . . . . . . . . . . . . . . . . . . . . . . . . . . . . . . . . . . . . . . . . . . . . 110
Creating a Database for phpMyAdmin. . . . . . . . . . . . . . . . . . . . . . . . . . . . . 110
SQL Bookmarks and History. . . . . . . . . . . . . . . . . . . . . . . . . . . . . . . . . . . . . 111
Saving Information on Relations . . . . . . . . . . . . . . . . . . . . . . . . . . . . . . . . . 111
Creating a PDF Relational Diagram . . . . . . . . . . . . . . . . . . . . . . . . . . . . . . . 113
Transformations (Alternative Representation of Column Contents) . . . . . 115
■CHAPTER 7 Microsoft Office, OpenOffice/StarOffice . . . . . . . . . . . . . . . . . . . . . 117
Installing Connector/ODBC . . . . . . . . . . . . . . . . . . . . . . . . . . . . . . . . . . . . . . . . . . . 117
Setting Up ODBC Data Sources . . . . . . . . . . . . . . . . . . . . . . . . . . . . . . . . . . 118
Microsoft Access . . . . . . . . . . . . . . . . . . . . . . . . . . . . . . . . . . . . . . . . . . . . . . . . . . . 120
Importing and Exporting Tables . . . . . . . . . . . . . . . . . . . . . . . . . . . . . . . . . . 122
Converter: Access ➤MySQL (exportsql.txt) . . . . . . . . . . . . . . . . . . . . . . . . 123
Microsoft Excel. . . . . . . . . . . . . . . . . . . . . . . . . . . . . . . . . . . . . . . . . . . . . . . . . . . . . 125
Importing Data with MS Query. . . . . . . . . . . . . . . . . . . . . . . . . . . . . . . . . . . 125
Connector/J Installation. . . . . . . . . . . . . . . . . . . . . . . . . . . . . . . . . . . . . . . . . . . . . . 127
Connector/J . . . . . . . . . . . . . . . . . . . . . . . . . . . . . . . . . . . . . . . . . . . . . . . . . . 127
Installation . . . . . . . . . . . . . . . . . . . . . . . . . . . . . . . . . . . . . . . . . . . . . . . . . . . 127
■CONTENTSviii
5351fm_final.qxd 8/26/05 6:12 PM Page viii
www.it-ebooks.info
OpenOffice/StarOffice Base . . . . . . . . . . . . . . . . . . . . . . . . . . . . . . . . . . . . . . . . . . 128
Creating a Connection to a MySQL Database . . . . . . . . . . . . . . . . . . . . . . . 128
Tables . . . . . . . . . . . . . . . . . . . . . . . . . . . . . . . . . . . . . . . . . . . . . . . . . . . . . . . 130
Queries . . . . . . . . . . . . . . . . . . . . . . . . . . . . . . . . . . . . . . . . . . . . . . . . . . . . . . 131
Forms, Reports, and Additional Functions . . . . . . . . . . . . . . . . . . . . . . . . . . 132
OpenOffice/StarOffice Data Source View. . . . . . . . . . . . . . . . . . . . . . . . . . . . . . . . 133
Establishing a Data Source. . . . . . . . . . . . . . . . . . . . . . . . . . . . . . . . . . . . . . 134
Importing Data . . . . . . . . . . . . . . . . . . . . . . . . . . . . . . . . . . . . . . . . . . . . . . . . 134
PART 3 ■ ■ ■ Fundamentals
■CHAPTER 8 Database Design . . . . . . . . . . . . . . . . . . . . . . . . . . . . . . . . . . . . . . . . . . . . . . 137
Further Reading . . . . . . . . . . . . . . . . . . . . . . . . . . . . . . . . . . . . . . . . . . . . . . . . . . . . 137
Table Types . . . . . . . . . . . . . . . . . . . . . . . . . . . . . . . . . . . . . . . . . . . . . . . . . . . . . . . . 138
MyISAM Tables. . . . . . . . . . . . . . . . . . . . . . . . . . . . . . . . . . . . . . . . . . . . . . . . 138
InnoDB Tables. . . . . . . . . . . . . . . . . . . . . . . . . . . . . . . . . . . . . . . . . . . . . . . . . 139
HEAP Tables . . . . . . . . . . . . . . . . . . . . . . . . . . . . . . . . . . . . . . . . . . . . . . . . . . 140
Temporary Tables. . . . . . . . . . . . . . . . . . . . . . . . . . . . . . . . . . . . . . . . . . . . . . 141
Other Table Types. . . . . . . . . . . . . . . . . . . . . . . . . . . . . . . . . . . . . . . . . . . . . . 141
Table Files. . . . . . . . . . . . . . . . . . . . . . . . . . . . . . . . . . . . . . . . . . . . . . . . . . . . 142
MySQL Data Types. . . . . . . . . . . . . . . . . . . . . . . . . . . . . . . . . . . . . . . . . . . . . . . . . . 142
Integers (xxxINT) . . . . . . . . . . . . . . . . . . . . . . . . . . . . . . . . . . . . . . . . . . . . . . 142
Fixed-Point Numbers (DECIMAL) . . . . . . . . . . . . . . . . . . . . . . . . . . . . . . . . . 144
Date and Time (DATE, TIME, DATETIME, TIMESTAMP) . . . . . . . . . . . . . . . . 145
Character Strings (CHAR, VARCHAR, xxxTEXT) . . . . . . . . . . . . . . . . . . . . . . 147
Binary Data (xxxBLOB and BIT) . . . . . . . . . . . . . . . . . . . . . . . . . . . . . . . . . . 151
Options and Attributes. . . . . . . . . . . . . . . . . . . . . . . . . . . . . . . . . . . . . . . . . . 152
Tips and Tricks on Database Design . . . . . . . . . . . . . . . . . . . . . . . . . . . . . . . . . . . 153
Rules for Good Database Design . . . . . . . . . . . . . . . . . . . . . . . . . . . . . . . . . 153
Tips for Naming . . . . . . . . . . . . . . . . . . . . . . . . . . . . . . . . . . . . . . . . . . . . . . . 153
Tips on the Design Process . . . . . . . . . . . . . . . . . . . . . . . . . . . . . . . . . . . . . 153
Normalization Rules. . . . . . . . . . . . . . . . . . . . . . . . . . . . . . . . . . . . . . . . . . . . . . . . . 154
A First Attempt . . . . . . . . . . . . . . . . . . . . . . . . . . . . . . . . . . . . . . . . . . . . . . . . 155
The First Normal Form. . . . . . . . . . . . . . . . . . . . . . . . . . . . . . . . . . . . . . . . . . 155
Second Normal Form. . . . . . . . . . . . . . . . . . . . . . . . . . . . . . . . . . . . . . . . . . . 156
Third Normal Form. . . . . . . . . . . . . . . . . . . . . . . . . . . . . . . . . . . . . . . . . . . . . 158
Normalization Theory. . . . . . . . . . . . . . . . . . . . . . . . . . . . . . . . . . . . . . . . . . . 159
Managing Hierarchies . . . . . . . . . . . . . . . . . . . . . . . . . . . . . . . . . . . . . . . . . . . . . . . 160
Hierarchy Problems . . . . . . . . . . . . . . . . . . . . . . . . . . . . . . . . . . . . . . . . . . . . 161
Building the Hierarchy Tree. . . . . . . . . . . . . . . . . . . . . . . . . . . . . . . . . . . . . . 162
Searching for Lower-Ranked Categories in the categories Table. . . . . . . 164
Searching for Higher-Ranked Categories in the categories Table . . . . . . 165
■CONTENTS ix
5351fm_final.qxd 8/26/05 6:12 PM Page ix
www.it-ebooks.info
Relations . . . . . . . . . . . . . . . . . . . . . . . . . . . . . . . . . . . . . . . . . . . . . . . . . . . . . . . . . . 166
1:1 Relations . . . . . . . . . . . . . . . . . . . . . . . . . . . . . . . . . . . . . . . . . . . . . . . . . 166
1:n Relations . . . . . . . . . . . . . . . . . . . . . . . . . . . . . . . . . . . . . . . . . . . . . . . . . 167
n:m Relations . . . . . . . . . . . . . . . . . . . . . . . . . . . . . . . . . . . . . . . . . . . . . . . . . 168
Primary and Foreign Keys . . . . . . . . . . . . . . . . . . . . . . . . . . . . . . . . . . . . . . . . . . . . 168
Primary Key . . . . . . . . . . . . . . . . . . . . . . . . . . . . . . . . . . . . . . . . . . . . . . . . . . 168
Foreign Keys. . . . . . . . . . . . . . . . . . . . . . . . . . . . . . . . . . . . . . . . . . . . . . . . . . 169
Referential Integrity (Foreign Key Constraints) . . . . . . . . . . . . . . . . . . . . . . 170
Indexes . . . . . . . . . . . . . . . . . . . . . . . . . . . . . . . . . . . . . . . . . . . . . . . . . . . . . . . . . . . 173
Ordinary Indexes, Unique Indexes, Primary Indexes . . . . . . . . . . . . . . . . . 174
Full-Text Index . . . . . . . . . . . . . . . . . . . . . . . . . . . . . . . . . . . . . . . . . . . . . . . . 175
Query and Index Optimization . . . . . . . . . . . . . . . . . . . . . . . . . . . . . . . . . . . 176
Views. . . . . . . . . . . . . . . . . . . . . . . . . . . . . . . . . . . . . . . . . . . . . . . . . . . . . . . . . . . . . 178
The Definition of a View . . . . . . . . . . . . . . . . . . . . . . . . . . . . . . . . . . . . . . . . 178
Example Database mylibrary (Library Management) . . . . . . . . . . . . . . . . . . . . . . 180
Properties of the Database . . . . . . . . . . . . . . . . . . . . . . . . . . . . . . . . . . . . . . 181
Properties of the Tables. . . . . . . . . . . . . . . . . . . . . . . . . . . . . . . . . . . . . . . . . 181
Example Database myforum (Discussion Group) . . . . . . . . . . . . . . . . . . . . . . . . . 183
The Discussion Group Database myforum . . . . . . . . . . . . . . . . . . . . . . . . . 183
Hierarchies Among Messages . . . . . . . . . . . . . . . . . . . . . . . . . . . . . . . . . . . 184
Example Database Exceptions (Special Cases). . . . . . . . . . . . . . . . . . . . . . . . . . . 185
The Table testall. . . . . . . . . . . . . . . . . . . . . . . . . . . . . . . . . . . . . . . . . . . . . . . 186
The Table text_text . . . . . . . . . . . . . . . . . . . . . . . . . . . . . . . . . . . . . . . . . . . . 186
The Table test_blob . . . . . . . . . . . . . . . . . . . . . . . . . . . . . . . . . . . . . . . . . . . . 186
The Table test_date . . . . . . . . . . . . . . . . . . . . . . . . . . . . . . . . . . . . . . . . . . . . 186
The Table test_enum. . . . . . . . . . . . . . . . . . . . . . . . . . . . . . . . . . . . . . . . . . . 186
The Table test_null. . . . . . . . . . . . . . . . . . . . . . . . . . . . . . . . . . . . . . . . . . . . . 186
The Table test_sort1 . . . . . . . . . . . . . . . . . . . . . . . . . . . . . . . . . . . . . . . . . . . 186
The Table test_sort2 . . . . . . . . . . . . . . . . . . . . . . . . . . . . . . . . . . . . . . . . . . . 187
The Tables importtable1, importtable2, exporttable. . . . . . . . . . . . . . . . . . 187
■CHAPTER 9 An Introduction to SQL. . . . . . . . . . . . . . . . . . . . . . . . . . . . . . . . . . . . . . . . 189
Introduction. . . . . . . . . . . . . . . . . . . . . . . . . . . . . . . . . . . . . . . . . . . . . . . . . . . . . . . . 189
DML, DDL, and DCL. . . . . . . . . . . . . . . . . . . . . . . . . . . . . . . . . . . . . . . . . . . . 190
Simple Queries (SELECT) . . . . . . . . . . . . . . . . . . . . . . . . . . . . . . . . . . . . . . . . . . . . 190
Determining the Number of Data Records (Lines) . . . . . . . . . . . . . . . . . . . 191
Determining the Number of Distinct Data Records (DISTINCT). . . . . . . . . 191
Column Restriction . . . . . . . . . . . . . . . . . . . . . . . . . . . . . . . . . . . . . . . . . . . . 191
Limiting the Number of Resulting Records (LIMIT). . . . . . . . . . . . . . . . . . . 192
Determining the Number of Records Suppressed by LIMIT
(SQL_CALC_FOUND_ROWS, FOUND_ROWS) . . . . . . . . . . . . . . . . . . . . 192
■CONTENTSx
5351fm_final.qxd 8/26/05 6:12 PM Page x
www.it-ebooks.info
Sorting Records (ORDER BY) . . . . . . . . . . . . . . . . . . . . . . . . . . . . . . . . . . . . . . . . . 193
Choosing the Sort Order . . . . . . . . . . . . . . . . . . . . . . . . . . . . . . . . . . . . . . . . 194
Trying Out Different Sort Orders. . . . . . . . . . . . . . . . . . . . . . . . . . . . . . . . . . 194
Selecting Data Records (WHERE, HAVING) . . . . . . . . . . . . . . . . . . . . . . . . . . . . . . 195
Linking Data from Several Tables . . . . . . . . . . . . . . . . . . . . . . . . . . . . . . . . . . . . . 197
JOINs Across Two Tables . . . . . . . . . . . . . . . . . . . . . . . . . . . . . . . . . . . . . . . 197
JOINs Across Three or More Tables . . . . . . . . . . . . . . . . . . . . . . . . . . . . . . 198
Uniting Query Results . . . . . . . . . . . . . . . . . . . . . . . . . . . . . . . . . . . . . . . . . . . . . . . 200
Grouped Queries, Aggregate Functions . . . . . . . . . . . . . . . . . . . . . . . . . . . . . . . . 201
Aggregate Functions . . . . . . . . . . . . . . . . . . . . . . . . . . . . . . . . . . . . . . . . . . . 201
GROUP_CONCAT: Aggregate Functions . . . . . . . . . . . . . . . . . . . . . . . . . . . . 202
GROUP BY for Several Columns . . . . . . . . . . . . . . . . . . . . . . . . . . . . . . . . . . 203
GROUP BY WITH ROLLUP . . . . . . . . . . . . . . . . . . . . . . . . . . . . . . . . . . . . . . . 204
Altering Data (INSERT, UPDATE, and DELETE) . . . . . . . . . . . . . . . . . . . . . . . . . . . 205
Executing a Backup . . . . . . . . . . . . . . . . . . . . . . . . . . . . . . . . . . . . . . . . . . . 205
Inserting Data Records (INSERT) . . . . . . . . . . . . . . . . . . . . . . . . . . . . . . . . . 206
Altering Data Records (UPDATE) . . . . . . . . . . . . . . . . . . . . . . . . . . . . . . . . . 207
Deleting Data Records (DELETE) . . . . . . . . . . . . . . . . . . . . . . . . . . . . . . . . . 208
Creating New Tables, Databases, and Indexes . . . . . . . . . . . . . . . . . . . . . . . . . . 209
Creating a Database (CREATE DATABASE) . . . . . . . . . . . . . . . . . . . . . . . . . 210
Creating Tables (CREATE TABLE) . . . . . . . . . . . . . . . . . . . . . . . . . . . . . . . . . 210
Creating Indexes (CREATE INDEX) . . . . . . . . . . . . . . . . . . . . . . . . . . . . . . . . 211
Changing the Table Design (ALTER TABLE) . . . . . . . . . . . . . . . . . . . . . . . . . 212
Deleting Databases and Tables (DROP) . . . . . . . . . . . . . . . . . . . . . . . . . . . 213
Automatic Table Design Changes (Silent Column Changes) . . . . . . . . . . . 213
The SHOW Command . . . . . . . . . . . . . . . . . . . . . . . . . . . . . . . . . . . . . . . . . . 214
INFORMATION_SCHEMA Tables . . . . . . . . . . . . . . . . . . . . . . . . . . . . . . . . . . 215
■CHAPTER 10 SQL Recipes. . . . . . . . . . . . . . . . . . . . . . . . . . . . . . . . . . . . . . . . . . . . . . . . . . . . 217
Character Strings . . . . . . . . . . . . . . . . . . . . . . . . . . . . . . . . . . . . . . . . . . . . . . . . . . . 217
Basic Functions . . . . . . . . . . . . . . . . . . . . . . . . . . . . . . . . . . . . . . . . . . . . . . . 217
Changing the Character Set . . . . . . . . . . . . . . . . . . . . . . . . . . . . . . . . . . . . . 218
Setting the Client Character Set . . . . . . . . . . . . . . . . . . . . . . . . . . . . . . . . . 219
Pattern Matching . . . . . . . . . . . . . . . . . . . . . . . . . . . . . . . . . . . . . . . . . . . . . 220
Date and Time . . . . . . . . . . . . . . . . . . . . . . . . . . . . . . . . . . . . . . . . . . . . . . . . . . . . . 221
Syntax for Date and Time . . . . . . . . . . . . . . . . . . . . . . . . . . . . . . . . . . . . . . . 222
Calculating with Date and Time . . . . . . . . . . . . . . . . . . . . . . . . . . . . . . . . . 223
Unix Timestamps . . . . . . . . . . . . . . . . . . . . . . . . . . . . . . . . . . . . . . . . . . . . . . 225
Time Zones . . . . . . . . . . . . . . . . . . . . . . . . . . . . . . . . . . . . . . . . . . . . . . . . . . 227
ENUMs and SETs . . . . . . . . . . . . . . . . . . . . . . . . . . . . . . . . . . . . . . . . . . . . . . . . . . . 229
ENUM . . . . . . . . . . . . . . . . . . . . . . . . . . . . . . . . . . . . . . . . . . . . . . . . . . . . . . . 229
SET . . . . . . . . . . . . . . . . . . . . . . . . . . . . . . . . . . . . . . . . . . . . . . . . . . . . . . . . . 229
■CONTENTS xi
5351fm_final.qxd 8/26/05 6:12 PM Page xi
www.it-ebooks.info
Variables and Conditionals (IF, CASE). . . . . . . . . . . . . . . . . . . . . . . . . . . . . . . . . . . 230
Variables . . . . . . . . . . . . . . . . . . . . . . . . . . . . . . . . . . . . . . . . . . . . . . . . . . . . . 230
IF Queries . . . . . . . . . . . . . . . . . . . . . . . . . . . . . . . . . . . . . . . . . . . . . . . . . . . . 232
CASE Branching. . . . . . . . . . . . . . . . . . . . . . . . . . . . . . . . . . . . . . . . . . . . . . . 232
Copying Data from One Table to Another. . . . . . . . . . . . . . . . . . . . . . . . . . . . . . . . 233
Creating a New Table by Copying. . . . . . . . . . . . . . . . . . . . . . . . . . . . . . . . . 233
Copying into Existing Tables . . . . . . . . . . . . . . . . . . . . . . . . . . . . . . . . . . . . . 234
Pivot Tables. . . . . . . . . . . . . . . . . . . . . . . . . . . . . . . . . . . . . . . . . . . . . . . . . . . . . . . . 234
Pivot Tables for Book Titles, Languages, and Categories. . . . . . . . . . . . . . 235
Pivot Table Query Results by Month. . . . . . . . . . . . . . . . . . . . . . . . . . . . . . . 236
SubSELECTs . . . . . . . . . . . . . . . . . . . . . . . . . . . . . . . . . . . . . . . . . . . . . . . . . . . . . . . 237
Syntax Variants. . . . . . . . . . . . . . . . . . . . . . . . . . . . . . . . . . . . . . . . . . . . . . . . 237
Examples . . . . . . . . . . . . . . . . . . . . . . . . . . . . . . . . . . . . . . . . . . . . . . . . . . . . 239
Ensuring the Integrity of Data . . . . . . . . . . . . . . . . . . . . . . . . . . . . . . . . . . . . . . . . . 240
Searching for Titles Without Authors . . . . . . . . . . . . . . . . . . . . . . . . . . . . . . 240
Searching for Invalid Publisher Links:
Invalid Records in 1 : n Relations . . . . . . . . . . . . . . . . . . . . . . . . . . . . . . 241
Searching for Invalid Links Between Authors and Titles
(n : m Relation) . . . . . . . . . . . . . . . . . . . . . . . . . . . . . . . . . . . . . . . . . . . . . 241
Tracking Down Duplicates . . . . . . . . . . . . . . . . . . . . . . . . . . . . . . . . . . . . . . . . . . . 242
Bringing a Table into Normal Form. . . . . . . . . . . . . . . . . . . . . . . . . . . . . . . . . . . . . 243
Processing the First or Last n Records . . . . . . . . . . . . . . . . . . . . . . . . . . . . . . . . . 244
Searching Data (SELECT) . . . . . . . . . . . . . . . . . . . . . . . . . . . . . . . . . . . . . . . 244
Changing Records (UPDATE and DELETE). . . . . . . . . . . . . . . . . . . . . . . . . . 245
Delete All Threads Except the Last 500. . . . . . . . . . . . . . . . . . . . . . . . . . . . 246
Selecting Random Records. . . . . . . . . . . . . . . . . . . . . . . . . . . . . . . . . . . . . . . . . . . 246
Selection Without a random Column . . . . . . . . . . . . . . . . . . . . . . . . . . . . . . 246
Selection with a random Column. . . . . . . . . . . . . . . . . . . . . . . . . . . . . . . . . 247
Selection on the Basis of an id Column. . . . . . . . . . . . . . . . . . . . . . . . . . . . 247
Full-Text Search . . . . . . . . . . . . . . . . . . . . . . . . . . . . . . . . . . . . . . . . . . . . . . . . . . . . 248
Fundamentals. . . . . . . . . . . . . . . . . . . . . . . . . . . . . . . . . . . . . . . . . . . . . . . . . 248
Book Search. . . . . . . . . . . . . . . . . . . . . . . . . . . . . . . . . . . . . . . . . . . . . . . . . . 251
Forum Search. . . . . . . . . . . . . . . . . . . . . . . . . . . . . . . . . . . . . . . . . . . . . . . . . 252
Locking . . . . . . . . . . . . . . . . . . . . . . . . . . . . . . . . . . . . . . . . . . . . . . . . . . . . . . . . . . . 253
Syntax . . . . . . . . . . . . . . . . . . . . . . . . . . . . . . . . . . . . . . . . . . . . . . . . . . . . . . . 254
GET_LOCK and RELEASE_LOCK. . . . . . . . . . . . . . . . . . . . . . . . . . . . . . . . . . 254
Transactions . . . . . . . . . . . . . . . . . . . . . . . . . . . . . . . . . . . . . . . . . . . . . . . . . . . . . . . 255
Why Transactions. . . . . . . . . . . . . . . . . . . . . . . . . . . . . . . . . . . . . . . . . . . . . . 255
Controlling Transactions . . . . . . . . . . . . . . . . . . . . . . . . . . . . . . . . . . . . . . . . 256
Trying Out Transactions. . . . . . . . . . . . . . . . . . . . . . . . . . . . . . . . . . . . . . . . . 257
Transactions and Locking . . . . . . . . . . . . . . . . . . . . . . . . . . . . . . . . . . . . . . . 258
Isolation Degree for Transactions. . . . . . . . . . . . . . . . . . . . . . . . . . . . . . . . . 260
Error Protection . . . . . . . . . . . . . . . . . . . . . . . . . . . . . . . . . . . . . . . . . . . . . . . 261
■CONTENTSxii
5351fm_final.qxd 8/26/05 6:12 PM Page xii
www.it-ebooks.info
■CHAPTER 11 Access Administration and Security. . . . . . . . . . . . . . . . . . . . . . . . . 263
Introduction. . . . . . . . . . . . . . . . . . . . . . . . . . . . . . . . . . . . . . . . . . . . . . . . . . . . . . . . 263
Communication Between the Client and the MySQL Server . . . . . . . . . . . 263
Access Administration. . . . . . . . . . . . . . . . . . . . . . . . . . . . . . . . . . . . . . . . . . 265
First Aid. . . . . . . . . . . . . . . . . . . . . . . . . . . . . . . . . . . . . . . . . . . . . . . . . . . . . . . . . . . 268
Protecting the MySQL Installation . . . . . . . . . . . . . . . . . . . . . . . . . . . . . . . . 269
Creating a New Database and User. . . . . . . . . . . . . . . . . . . . . . . . . . . . . . . 270
Granting the Right to Create One’s Own Database. . . . . . . . . . . . . . . . . . . 271
Oops! I Forgot the root Password! . . . . . . . . . . . . . . . . . . . . . . . . . . . . . . . . 272
The Internal Workings of the Access System . . . . . . . . . . . . . . . . . . . . . . . . . . . . 273
Two-Tiered Access Control . . . . . . . . . . . . . . . . . . . . . . . . . . . . . . . . . . . . . . 273
Privileges . . . . . . . . . . . . . . . . . . . . . . . . . . . . . . . . . . . . . . . . . . . . . . . . . . . . 273
The mysql Database . . . . . . . . . . . . . . . . . . . . . . . . . . . . . . . . . . . . . . . . . . . 276
The user Table . . . . . . . . . . . . . . . . . . . . . . . . . . . . . . . . . . . . . . . . . . . . . . . . 277
The user.Host Column . . . . . . . . . . . . . . . . . . . . . . . . . . . . . . . . . . . . . . . . . . 281
The db and host Tables . . . . . . . . . . . . . . . . . . . . . . . . . . . . . . . . . . . . . . . . . 284
The tables_priv and columns_priv Tables. . . . . . . . . . . . . . . . . . . . . . . . . . 286
The procs_priv Table . . . . . . . . . . . . . . . . . . . . . . . . . . . . . . . . . . . . . . . . . . . 287
Tools for Setting Access Privileges. . . . . . . . . . . . . . . . . . . . . . . . . . . . . . . . . . . . . 287
Changing Access Privileges with GRANT and REVOKE . . . . . . . . . . . . . . . 288
Viewing Access Privileges with SHOW GRANT . . . . . . . . . . . . . . . . . . . . . . 289
Changing a Password with mysqladmin . . . . . . . . . . . . . . . . . . . . . . . . . . . 290
Secure Password Authentication Since MySQL 4.1 . . . . . . . . . . . . . . . . . . . . . . . 290
Updating the Client Libraries . . . . . . . . . . . . . . . . . . . . . . . . . . . . . . . . . . . . 290
old-passwords Mode. . . . . . . . . . . . . . . . . . . . . . . . . . . . . . . . . . . . . . . . . . . 291
Parallel Operation with Old and New Passwords . . . . . . . . . . . . . . . . . . . . 291
Problems with Establishing a Connection . . . . . . . . . . . . . . . . . . . . . . . . . . . . . . . 292
Possible Causes of the Connection Difficulty . . . . . . . . . . . . . . . . . . . . . . . 292
Further Tips for Error-Checking . . . . . . . . . . . . . . . . . . . . . . . . . . . . . . . . . . 295
System Security . . . . . . . . . . . . . . . . . . . . . . . . . . . . . . . . . . . . . . . . . . . . . . . . . . . . 295
Security at the System Level . . . . . . . . . . . . . . . . . . . . . . . . . . . . . . . . . . . . 295
Security Measures in the Storage of Critical Data . . . . . . . . . . . . . . . . . . . 296
The MySQL Server as Security Risk. . . . . . . . . . . . . . . . . . . . . . . . . . . . . . . 296
Running the MySQL Server Without root or Administrator Privileges. . . . 296
Network Security, Firewall . . . . . . . . . . . . . . . . . . . . . . . . . . . . . . . . . . . . . . 297
■CHAPTER 12 GIS Functions. . . . . . . . . . . . . . . . . . . . . . . . . . . . . . . . . . . . . . . . . . . . . . . . . . 299
GIS Data Formats. . . . . . . . . . . . . . . . . . . . . . . . . . . . . . . . . . . . . . . . . . . . . . . . . . . 299
Specifying Coordinates . . . . . . . . . . . . . . . . . . . . . . . . . . . . . . . . . . . . . . . . . 299
Well-Known Text, Well-Known Binary (OpenGIS) . . . . . . . . . . . . . . . . . . . . 300
■CONTENTS xiii
5351fm_final.qxd 8/26/05 6:12 PM Page xiii
www.it-ebooks.info
MySQL’s GIS Implementation . . . . . . . . . . . . . . . . . . . . . . . . . . . . . . . . . . . . . . . . . 301
Data Types . . . . . . . . . . . . . . . . . . . . . . . . . . . . . . . . . . . . . . . . . . . . . . . . . . . 302
Simple Geometric Functions. . . . . . . . . . . . . . . . . . . . . . . . . . . . . . . . . . . . . 303
Function for Spatial Analysis. . . . . . . . . . . . . . . . . . . . . . . . . . . . . . . . . . . . . 306
Indexing Geometric Data. . . . . . . . . . . . . . . . . . . . . . . . . . . . . . . . . . . . . . . . 308
SQL Examples (the Database glacier) . . . . . . . . . . . . . . . . . . . . . . . . . . . . . . . . . . 309
Creating the Table . . . . . . . . . . . . . . . . . . . . . . . . . . . . . . . . . . . . . . . . . . . . . 309
Inserting the Data . . . . . . . . . . . . . . . . . . . . . . . . . . . . . . . . . . . . . . . . . . . . . 310
Querying the Data . . . . . . . . . . . . . . . . . . . . . . . . . . . . . . . . . . . . . . . . . . . . . 310
SQL Examples (the Database opengeodb) . . . . . . . . . . . . . . . . . . . . . . . . . . . . . . 312
Data Source and Import . . . . . . . . . . . . . . . . . . . . . . . . . . . . . . . . . . . . . . . . 313
Import . . . . . . . . . . . . . . . . . . . . . . . . . . . . . . . . . . . . . . . . . . . . . . . . . . . . . . . 313
Radial Search . . . . . . . . . . . . . . . . . . . . . . . . . . . . . . . . . . . . . . . . . . . . . . . . . 313
■CHAPTER 13 Stored Procedures and Triggers . . . . . . . . . . . . . . . . . . . . . . . . . . . . . 317
Why Stored Procedures? Why Triggers? . . . . . . . . . . . . . . . . . . . . . . . . . . . . . . . . 317
Triggers. . . . . . . . . . . . . . . . . . . . . . . . . . . . . . . . . . . . . . . . . . . . . . . . . . . . . . 318
Hello, SP World! . . . . . . . . . . . . . . . . . . . . . . . . . . . . . . . . . . . . . . . . . . . . . . . . . . . . 318
The Command Interpreter mysql . . . . . . . . . . . . . . . . . . . . . . . . . . . . . . . . . 319
The MySQL Query Browser. . . . . . . . . . . . . . . . . . . . . . . . . . . . . . . . . . . . . . 320
SP Implementation. . . . . . . . . . . . . . . . . . . . . . . . . . . . . . . . . . . . . . . . . . . . . . . . . . 322
SP Administration. . . . . . . . . . . . . . . . . . . . . . . . . . . . . . . . . . . . . . . . . . . . . . . . . . . 322
Creating, Editing, and Deleting SPs . . . . . . . . . . . . . . . . . . . . . . . . . . . . . . . 323
Security. . . . . . . . . . . . . . . . . . . . . . . . . . . . . . . . . . . . . . . . . . . . . . . . . . . . . . 325
Backup and Restoration of SPs . . . . . . . . . . . . . . . . . . . . . . . . . . . . . . . . . . 325
SP Syntax and Language Elements . . . . . . . . . . . . . . . . . . . . . . . . . . . . . . . . . . . . 325
General Syntax Rules. . . . . . . . . . . . . . . . . . . . . . . . . . . . . . . . . . . . . . . . . . . 326
Calling SPs (CALL) . . . . . . . . . . . . . . . . . . . . . . . . . . . . . . . . . . . . . . . . . . . . . 327
Parameters and Return Values . . . . . . . . . . . . . . . . . . . . . . . . . . . . . . . . . . . 328
Encapsulation of Commands (BEGIN-END) . . . . . . . . . . . . . . . . . . . . . . . . . 329
Branching . . . . . . . . . . . . . . . . . . . . . . . . . . . . . . . . . . . . . . . . . . . . . . . . . . . . 331
Loops. . . . . . . . . . . . . . . . . . . . . . . . . . . . . . . . . . . . . . . . . . . . . . . . . . . . . . . . 331
Error Handling (Handlers) . . . . . . . . . . . . . . . . . . . . . . . . . . . . . . . . . . . . . . . 333
Cursors . . . . . . . . . . . . . . . . . . . . . . . . . . . . . . . . . . . . . . . . . . . . . . . . . . . . . . 334
SP Examples. . . . . . . . . . . . . . . . . . . . . . . . . . . . . . . . . . . . . . . . . . . . . . . . . . . . . . . 336
Adding a Category . . . . . . . . . . . . . . . . . . . . . . . . . . . . . . . . . . . . . . . . . . . . . 336
Adding a Title . . . . . . . . . . . . . . . . . . . . . . . . . . . . . . . . . . . . . . . . . . . . . . . . . 337
Determining Parent Categories . . . . . . . . . . . . . . . . . . . . . . . . . . . . . . . . . . 338
Producing a List of Hierarchically Ordered Categories. . . . . . . . . . . . . . . . 339
Triggers . . . . . . . . . . . . . . . . . . . . . . . . . . . . . . . . . . . . . . . . . . . . . . . . . . . . . . . . . . . 341
Creating a Trigger . . . . . . . . . . . . . . . . . . . . . . . . . . . . . . . . . . . . . . . . . . . . . 342
Deleting a Trigger. . . . . . . . . . . . . . . . . . . . . . . . . . . . . . . . . . . . . . . . . . . . . . 342
Implementation Details and Administrative Assistance . . . . . . . . . . . . . . . 342
Functional Limitations . . . . . . . . . . . . . . . . . . . . . . . . . . . . . . . . . . . . . . . . . . 343
An Example. . . . . . . . . . . . . . . . . . . . . . . . . . . . . . . . . . . . . . . . . . . . . . . . . . . 343
■CONTENTSxiv
5351fm_final.qxd 8/26/05 6:12 PM Page xiv
www.it-ebooks.info
■CHAPTER 14 Administration and Server Configuration . . . . . . . . . . . . . . . . . . . 345
First Steps. . . . . . . . . . . . . . . . . . . . . . . . . . . . . . . . . . . . . . . . . . . . . . . . . . . . . . . . . 345
Using Administrative Tools . . . . . . . . . . . . . . . . . . . . . . . . . . . . . . . . . . . . . . 345
Setting the root Password. . . . . . . . . . . . . . . . . . . . . . . . . . . . . . . . . . . . . . . 346
MySQL Server Configuration File . . . . . . . . . . . . . . . . . . . . . . . . . . . . . . . . . 347
Restarting the MySQL Server . . . . . . . . . . . . . . . . . . . . . . . . . . . . . . . . . . . . 347
Basic Configuration of the MySQL Server. . . . . . . . . . . . . . . . . . . . . . . . . . 348
Directories . . . . . . . . . . . . . . . . . . . . . . . . . . . . . . . . . . . . . . . . . . . . . . . . . . . 348
Communication Settings. . . . . . . . . . . . . . . . . . . . . . . . . . . . . . . . . . . . . . . . 348
Default Table Format . . . . . . . . . . . . . . . . . . . . . . . . . . . . . . . . . . . . . . . . . . . 349
Default Character Set and Sort Order for New Tables . . . . . . . . . . . . . . . . 349
Time Zones. . . . . . . . . . . . . . . . . . . . . . . . . . . . . . . . . . . . . . . . . . . . . . . . . . . 349
The Language for Error Messages. . . . . . . . . . . . . . . . . . . . . . . . . . . . . . . . 350
SQL Mode . . . . . . . . . . . . . . . . . . . . . . . . . . . . . . . . . . . . . . . . . . . . . . . . . . . . 350
Backups . . . . . . . . . . . . . . . . . . . . . . . . . . . . . . . . . . . . . . . . . . . . . . . . . . . . . . . . . . 352
Backing Up Databases (mysqldump). . . . . . . . . . . . . . . . . . . . . . . . . . . . . . 352
Restoring a Database (mysql). . . . . . . . . . . . . . . . . . . . . . . . . . . . . . . . . . . . 355
Fast Backups (mysqlhotcopy). . . . . . . . . . . . . . . . . . . . . . . . . . . . . . . . . . . . 356
Database Migration . . . . . . . . . . . . . . . . . . . . . . . . . . . . . . . . . . . . . . . . . . . . . . . . . 358
Importing and Exporting Text Files . . . . . . . . . . . . . . . . . . . . . . . . . . . . . . . . . . . . . 360
Special Characters in the Imported or Exported File . . . . . . . . . . . . . . . . . 360
Working with Character Strings, Numbers, Dates, and BLOBs . . . . . . . . . 360
Importing with LOAD DATA INFILE . . . . . . . . . . . . . . . . . . . . . . . . . . . . . . . . 361
Importing with mysqlimport . . . . . . . . . . . . . . . . . . . . . . . . . . . . . . . . . . . . . 364
Exporting with SELECT … INTO OUTFILE . . . . . . . . . . . . . . . . . . . . . . . . . . 364
Exporting with mysqldump . . . . . . . . . . . . . . . . . . . . . . . . . . . . . . . . . . . . . . 366
Exporting with mysql in Batch Mode . . . . . . . . . . . . . . . . . . . . . . . . . . . . . . 366
Logging . . . . . . . . . . . . . . . . . . . . . . . . . . . . . . . . . . . . . . . . . . . . . . . . . . . . . . . . . . . 368
Why Logging?. . . . . . . . . . . . . . . . . . . . . . . . . . . . . . . . . . . . . . . . . . . . . . . . . 369
Drawbacks . . . . . . . . . . . . . . . . . . . . . . . . . . . . . . . . . . . . . . . . . . . . . . . . . . . 369
Logging Changes (update log) . . . . . . . . . . . . . . . . . . . . . . . . . . . . . . . . . . . 369
Errors, Logins, and Slow Queries . . . . . . . . . . . . . . . . . . . . . . . . . . . . . . . . . 372
Administration of Logging Files . . . . . . . . . . . . . . . . . . . . . . . . . . . . . . . . . . 373
Replication . . . . . . . . . . . . . . . . . . . . . . . . . . . . . . . . . . . . . . . . . . . . . . . . . . . . . . . . 374
Introduction . . . . . . . . . . . . . . . . . . . . . . . . . . . . . . . . . . . . . . . . . . . . . . . . . . 374
Setting Up the Replication Master System . . . . . . . . . . . . . . . . . . . . . . . . . 376
Setting Up the Replication Slave System . . . . . . . . . . . . . . . . . . . . . . . . . . 378
Setting Up a Replication System with LOAD DATA . . . . . . . . . . . . . . . . . . . 379
Inside Replication. . . . . . . . . . . . . . . . . . . . . . . . . . . . . . . . . . . . . . . . . . . . . . 380
Client Programming. . . . . . . . . . . . . . . . . . . . . . . . . . . . . . . . . . . . . . . . . . . . 382
■CONTENTS xv
5351fm_final.qxd 8/26/05 6:12 PM Page xv
www.it-ebooks.info
Administration of MyISAM Tables. . . . . . . . . . . . . . . . . . . . . . . . . . . . . . . . . . . . . . 383
myisamchk. . . . . . . . . . . . . . . . . . . . . . . . . . . . . . . . . . . . . . . . . . . . . . . . . . . 383
Using myisamchk. . . . . . . . . . . . . . . . . . . . . . . . . . . . . . . . . . . . . . . . . . . . . . 384
Speed Optimization, Memory Usage . . . . . . . . . . . . . . . . . . . . . . . . . . . . . . 384
Shrinking and Optimizing MyISAM Tables. . . . . . . . . . . . . . . . . . . . . . . . . . 385
Repairing MyISAM Tables . . . . . . . . . . . . . . . . . . . . . . . . . . . . . . . . . . . . . . . 385
Compressing MyISAM Tables (myisampack) . . . . . . . . . . . . . . . . . . . . . . . 385
Administration of InnoDB Tables. . . . . . . . . . . . . . . . . . . . . . . . . . . . . . . . . . . . . . . 386
Tablespace Administration . . . . . . . . . . . . . . . . . . . . . . . . . . . . . . . . . . . . . . 386
Logging Files . . . . . . . . . . . . . . . . . . . . . . . . . . . . . . . . . . . . . . . . . . . . . . . . . 390
Server Tuning . . . . . . . . . . . . . . . . . . . . . . . . . . . . . . . . . . . . . . . . . . . . . . . . . . . . . . 393
Optimal Memory Management. . . . . . . . . . . . . . . . . . . . . . . . . . . . . . . . . . . 394
Query Cache. . . . . . . . . . . . . . . . . . . . . . . . . . . . . . . . . . . . . . . . . . . . . . . . . . 396
ISP Database Administration. . . . . . . . . . . . . . . . . . . . . . . . . . . . . . . . . . . . . . . . . . 397
Working with ssh . . . . . . . . . . . . . . . . . . . . . . . . . . . . . . . . . . . . . . . . . . . . . . 398
Working via phpMyAdmin. . . . . . . . . . . . . . . . . . . . . . . . . . . . . . . . . . . . . . . 398
Implementing Custom PHP Scripts for Administration. . . . . . . . . . . . . . . . 398
Custom Perl Scripts for Administration . . . . . . . . . . . . . . . . . . . . . . . . . . . . 399
PART 4 ■ ■ ■ Programming
■CHAPTER 15 PHP . . . . . . . . . . . . . . . . . . . . . . . . . . . . . . . . . . . . . . . . . . . . . . . . . . . . . . . . . . . . . 403
mysql Functions. . . . . . . . . . . . . . . . . . . . . . . . . . . . . . . . . . . . . . . . . . . . . . . . . . . . 403
Establishing a Connection. . . . . . . . . . . . . . . . . . . . . . . . . . . . . . . . . . . . . . . 404
Executing SQL Commands . . . . . . . . . . . . . . . . . . . . . . . . . . . . . . . . . . . . . . 405
Evaluating SELECT Results . . . . . . . . . . . . . . . . . . . . . . . . . . . . . . . . . . . . . . 406
Transactions . . . . . . . . . . . . . . . . . . . . . . . . . . . . . . . . . . . . . . . . . . . . . . . . . . 409
Error Handling and Search . . . . . . . . . . . . . . . . . . . . . . . . . . . . . . . . . . . . . . 409
mysqli Classes, Methods, and Properties . . . . . . . . . . . . . . . . . . . . . . . . . . . . . . . 410
Which Will It Be: mysql or mysqli? . . . . . . . . . . . . . . . . . . . . . . . . . . . . . . . . 410
Availability Tests. . . . . . . . . . . . . . . . . . . . . . . . . . . . . . . . . . . . . . . . . . . . . . . 411
Overview of Classes . . . . . . . . . . . . . . . . . . . . . . . . . . . . . . . . . . . . . . . . . . . 411
Making the Connection . . . . . . . . . . . . . . . . . . . . . . . . . . . . . . . . . . . . . . . . . 411
Executing SQL Commands . . . . . . . . . . . . . . . . . . . . . . . . . . . . . . . . . . . . . . 413
Evaluating SELECT Results (mysqli_result). . . . . . . . . . . . . . . . . . . . . . . . . 413
Executing Several SQL Commands at Once . . . . . . . . . . . . . . . . . . . . . . . . 415
SQL Commands with Parameters (Prepared Statements). . . . . . . . . . . . . 415
Transactions . . . . . . . . . . . . . . . . . . . . . . . . . . . . . . . . . . . . . . . . . . . . . . . . . . 418
Outsourcing Database Functions into a Class. . . . . . . . . . . . . . . . . . . . . . . . . . . . 418
More Security with a Separate Password File . . . . . . . . . . . . . . . . . . . . . . 418
Security and Convenience with the MyDb Class . . . . . . . . . . . . . . . . . . . . 419
■CONTENTSxvi
5351fm_final.qxd 8/26/05 6:12 PM Page xvi
www.it-ebooks.info
Displaying a SELECT Result As a Table . . . . . . . . . . . . . . . . . . . . . . . . . . . . . . . . . 422
Character Strings, Dates, Times, BLOBs, and NULL . . . . . . . . . . . . . . . . . . . . . . . 424
Character Strings and BLOBs. . . . . . . . . . . . . . . . . . . . . . . . . . . . . . . . . . . . 424
Dates and Times . . . . . . . . . . . . . . . . . . . . . . . . . . . . . . . . . . . . . . . . . . . . . . 425
NULL . . . . . . . . . . . . . . . . . . . . . . . . . . . . . . . . . . . . . . . . . . . . . . . . . . . . . . . . 426
Inserting Linked Data Records . . . . . . . . . . . . . . . . . . . . . . . . . . . . . . . . . . . . . . . . 427
Processing Input from Forms . . . . . . . . . . . . . . . . . . . . . . . . . . . . . . . . . . . . . . . . . 427
Code Structure . . . . . . . . . . . . . . . . . . . . . . . . . . . . . . . . . . . . . . . . . . . . . . . . 428
Creating the Form . . . . . . . . . . . . . . . . . . . . . . . . . . . . . . . . . . . . . . . . . . . . . 431
Validation of Form Data. . . . . . . . . . . . . . . . . . . . . . . . . . . . . . . . . . . . . . . . . 435
Storing the Form Data. . . . . . . . . . . . . . . . . . . . . . . . . . . . . . . . . . . . . . . . . . 435
Deleting a Title . . . . . . . . . . . . . . . . . . . . . . . . . . . . . . . . . . . . . . . . . . . . . . . . 438
Room for Improvement . . . . . . . . . . . . . . . . . . . . . . . . . . . . . . . . . . . . . . . . . 439
Pagewise Representation of Search Results. . . . . . . . . . . . . . . . . . . . . . . . . . . . . 439
Code Structure . . . . . . . . . . . . . . . . . . . . . . . . . . . . . . . . . . . . . . . . . . . . . . . . 441
Author Search. . . . . . . . . . . . . . . . . . . . . . . . . . . . . . . . . . . . . . . . . . . . . . . . . 442
Title Search. . . . . . . . . . . . . . . . . . . . . . . . . . . . . . . . . . . . . . . . . . . . . . . . . . . 443
Displaying Search Results . . . . . . . . . . . . . . . . . . . . . . . . . . . . . . . . . . . . . . 443
Links to Additional Pages . . . . . . . . . . . . . . . . . . . . . . . . . . . . . . . . . . . . . . . 445
Managing Hierarchical Data . . . . . . . . . . . . . . . . . . . . . . . . . . . . . . . . . . . . . . . . . . 446
Code Structure . . . . . . . . . . . . . . . . . . . . . . . . . . . . . . . . . . . . . . . . . . . . . . . . 447
Displaying the Category Tree . . . . . . . . . . . . . . . . . . . . . . . . . . . . . . . . . . . . 448
Inserting Subcategories . . . . . . . . . . . . . . . . . . . . . . . . . . . . . . . . . . . . . . . . 450
Deleting Categories and Subcategories . . . . . . . . . . . . . . . . . . . . . . . . . . . 452
Searching for Parent Categories . . . . . . . . . . . . . . . . . . . . . . . . . . . . . . . . . 453
Searching for Subcategories . . . . . . . . . . . . . . . . . . . . . . . . . . . . . . . . . . . . 454
Speed Optimization . . . . . . . . . . . . . . . . . . . . . . . . . . . . . . . . . . . . . . . . . . . . . . . . . 455
Ground Rules for Efficient Code Execution . . . . . . . . . . . . . . . . . . . . . . . . . 455
Statistical and Benchmarking Help . . . . . . . . . . . . . . . . . . . . . . . . . . . . . . . 456
Example: Generating the Category List Efficiently . . . . . . . . . . . . . . . . . . . 457
Unicode . . . . . . . . . . . . . . . . . . . . . . . . . . . . . . . . . . . . . . . . . . . . . . . . . . . . . . . . . . . 461
Setting the HTML and HTTP Coding. . . . . . . . . . . . . . . . . . . . . . . . . . . . . . . 461
Binary Data (BLOBs) and Images . . . . . . . . . . . . . . . . . . . . . . . . . . . . . . . . . . . . . . 464
Fundamentals and Programming Techniques. . . . . . . . . . . . . . . . . . . . . . . 465
Program Code . . . . . . . . . . . . . . . . . . . . . . . . . . . . . . . . . . . . . . . . . . . . . . . . 468
Stored Procedures . . . . . . . . . . . . . . . . . . . . . . . . . . . . . . . . . . . . . . . . . . . . . . . . . . 471
SP Administrator . . . . . . . . . . . . . . . . . . . . . . . . . . . . . . . . . . . . . . . . . . . . . . . . . . . 472
Installation . . . . . . . . . . . . . . . . . . . . . . . . . . . . . . . . . . . . . . . . . . . . . . . . . . . 472
Using the Program. . . . . . . . . . . . . . . . . . . . . . . . . . . . . . . . . . . . . . . . . . . . . 472
Code . . . . . . . . . . . . . . . . . . . . . . . . . . . . . . . . . . . . . . . . . . . . . . . . . . . . . . . . 475
■CONTENTS xvii
5351fm_final.qxd 8/26/05 6:12 PM Page xvii
www.it-ebooks.info
■CHAPTER 16 Perl . . . . . . . . . . . . . . . . . . . . . . . . . . . . . . . . . . . . . . . . . . . . . . . . . . . . . . . . . . . . . 481
Programming Techniques . . . . . . . . . . . . . . . . . . . . . . . . . . . . . . . . . . . . . . . . . . . . 481
The Modules DBI and DBD::mysql . . . . . . . . . . . . . . . . . . . . . . . . . . . . . . . . 481
Establishing a Connection to the Database. . . . . . . . . . . . . . . . . . . . . . . . . 482
Executing SQL Commands . . . . . . . . . . . . . . . . . . . . . . . . . . . . . . . . . . . . . . 483
Evaluating SELECT Queries. . . . . . . . . . . . . . . . . . . . . . . . . . . . . . . . . . . . . . 485
Character Strings, BLOBs, DATEs, SETs, ENUMs, and NULL . . . . . . . . . . . 489
DBD::mysql-specific Methods and Attributes . . . . . . . . . . . . . . . . . . . . . . . 492
Unicode. . . . . . . . . . . . . . . . . . . . . . . . . . . . . . . . . . . . . . . . . . . . . . . . . . . . . . 493
Transactions . . . . . . . . . . . . . . . . . . . . . . . . . . . . . . . . . . . . . . . . . . . . . . . . . . 494
Error-Handling . . . . . . . . . . . . . . . . . . . . . . . . . . . . . . . . . . . . . . . . . . . . . . . . 494
Example: Deleting Invalid Data Records (mylibrary). . . . . . . . . . . . . . . . . . . . . . . 496
CGI Example: Library Management (mylibrary). . . . . . . . . . . . . . . . . . . . . . . . . . . 497
Book Search (mylibrary-find.pl) . . . . . . . . . . . . . . . . . . . . . . . . . . . . . . . . . . 497
Simple Input of New Books (mylibrary-simpleinput.pl) . . . . . . . . . . . . . . . 500
CGI Unicode Example. . . . . . . . . . . . . . . . . . . . . . . . . . . . . . . . . . . . . . . . . . . . . . . . 503
Book Search (mylibrary-find-utf8.pl) . . . . . . . . . . . . . . . . . . . . . . . . . . . . . . 504
Input of New Books (mylibrary-simpleinput-utf8.pl) . . . . . . . . . . . . . . . . . 505
■CHAPTER 17 Java (JDBC and Connector/J) . . . . . . . . . . . . . . . . . . . . . . . . . . . . . . . . 507
Introduction. . . . . . . . . . . . . . . . . . . . . . . . . . . . . . . . . . . . . . . . . . . . . . . . . . . . . . . . 507
The Java Installation . . . . . . . . . . . . . . . . . . . . . . . . . . . . . . . . . . . . . . . . . . . 507
Connector/J Installation . . . . . . . . . . . . . . . . . . . . . . . . . . . . . . . . . . . . . . . . 509
Programming Techniques . . . . . . . . . . . . . . . . . . . . . . . . . . . . . . . . . . . . . . . . . . . . 511
A First Example . . . . . . . . . . . . . . . . . . . . . . . . . . . . . . . . . . . . . . . . . . . . . . . 512
Establishing the Connection . . . . . . . . . . . . . . . . . . . . . . . . . . . . . . . . . . . . . 513
Problems in Establishing a Connection . . . . . . . . . . . . . . . . . . . . . . . . . . . . 515
Executing SQL Commands . . . . . . . . . . . . . . . . . . . . . . . . . . . . . . . . . . . . . . 516
Evaluating SELECT Queries. . . . . . . . . . . . . . . . . . . . . . . . . . . . . . . . . . . . . . 518
Prepared Statements. . . . . . . . . . . . . . . . . . . . . . . . . . . . . . . . . . . . . . . . . . . 522
Transactions . . . . . . . . . . . . . . . . . . . . . . . . . . . . . . . . . . . . . . . . . . . . . . . . . . 522
Batch Commands . . . . . . . . . . . . . . . . . . . . . . . . . . . . . . . . . . . . . . . . . . . . . 523
Working with Binary Data (BLOBs). . . . . . . . . . . . . . . . . . . . . . . . . . . . . . . . 523
■CHAPTER 18 C. . . . . . . . . . . . . . . . . . . . . . . . . . . . . . . . . . . . . . . . . . . . . . . . . . . . . . . . . . . . . . . . 527
The C API (libmysqlclient) . . . . . . . . . . . . . . . . . . . . . . . . . . . . . . . . . . . . . . . . . . . . 527
Hello, World! . . . . . . . . . . . . . . . . . . . . . . . . . . . . . . . . . . . . . . . . . . . . . . . . . . . . . . . 527
Assumptions. . . . . . . . . . . . . . . . . . . . . . . . . . . . . . . . . . . . . . . . . . . . . . . . . . 527
Introductory Example. . . . . . . . . . . . . . . . . . . . . . . . . . . . . . . . . . . . . . . . . . . 528
Compiling and Linking. . . . . . . . . . . . . . . . . . . . . . . . . . . . . . . . . . . . . . . . . . 529
Makefile . . . . . . . . . . . . . . . . . . . . . . . . . . . . . . . . . . . . . . . . . . . . . . . . . . . . . 530
. . . . . . . . . . . . . . . . . . . . . . . . . . . . . . . 530
■CONTENTSxviii
5351fm_final.qxd 8/26/05 6:12 PM Page xviii
www.it-ebooks.info
Establishing the Connection . . . . . . . . . . . . . . . . . . . . . . . . . . . . . . . . . . . . . . . . . . 532
Evaluation of the Configuration File my.cnf. . . . . . . . . . . . . . . . . . . . . . . . . 532
Evaluation of Options in the Command Line. . . . . . . . . . . . . . . . . . . . . . . . 532
Executing SQL Commands . . . . . . . . . . . . . . . . . . . . . . . . . . . . . . . . . . . . . . . . . . . 533
Simple Commands. . . . . . . . . . . . . . . . . . . . . . . . . . . . . . . . . . . . . . . . . . . . . 533
Executing Several Commands at a Time. . . . . . . . . . . . . . . . . . . . . . . . . . . 535
Prepared Statements. . . . . . . . . . . . . . . . . . . . . . . . . . . . . . . . . . . . . . . . . . . 538
Character Set Settings (Unicode) . . . . . . . . . . . . . . . . . . . . . . . . . . . . . . . . . 542
Working with Binary Data and Special Characters. . . . . . . . . . . . . . . . . . . . . . . . 542
Storing Binary Data in a Database and Reading It . . . . . . . . . . . . . . . . . . . 543
Error Handling. . . . . . . . . . . . . . . . . . . . . . . . . . . . . . . . . . . . . . . . . . . . . . . . . . . . . . 544
■CHAPTER 19 Visual Basic 6/VBA . . . . . . . . . . . . . . . . . . . . . . . . . . . . . . . . . . . . . . . . . . . . 545
Fundamentals and Terminology . . . . . . . . . . . . . . . . . . . . . . . . . . . . . . . . . . . . . . . 545
Connector/ODBC Options . . . . . . . . . . . . . . . . . . . . . . . . . . . . . . . . . . . . . . . . . . . . 546
ADO Programming and Visual Basic/VBA . . . . . . . . . . . . . . . . . . . . . . . . . . . . . . . 548
Introduction . . . . . . . . . . . . . . . . . . . . . . . . . . . . . . . . . . . . . . . . . . . . . . . . . . 548
Establishing the Connection . . . . . . . . . . . . . . . . . . . . . . . . . . . . . . . . . . . . . . . . . . 550
Establishing the Connection with a DSN . . . . . . . . . . . . . . . . . . . . . . . . . . . 550
Establishing a Connection Without a DSN. . . . . . . . . . . . . . . . . . . . . . . . . . 550
ADO Programming Techniques. . . . . . . . . . . . . . . . . . . . . . . . . . . . . . . . . . . 553
Example: authors Column for the titles Table . . . . . . . . . . . . . . . . . . . . . . . 559
Example: Adding a New Book Title. . . . . . . . . . . . . . . . . . . . . . . . . . . . . . . . 562
Example: Storing an Image File in BLOB Format and
Then Reading It . . . . . . . . . . . . . . . . . . . . . . . . . . . . . . . . . . . . . . . . . . . . 565
Converter: Microsoft SQL Server to MySQL. . . . . . . . . . . . . . . . . . . . . . . . . . . . . . 567
Properties of mssql2mysql . . . . . . . . . . . . . . . . . . . . . . . . . . . . . . . . . . . . . . 567
Assumptions. . . . . . . . . . . . . . . . . . . . . . . . . . . . . . . . . . . . . . . . . . . . . . . . . . 567
Restrictions. . . . . . . . . . . . . . . . . . . . . . . . . . . . . . . . . . . . . . . . . . . . . . . . . . . 568
How to Use It . . . . . . . . . . . . . . . . . . . . . . . . . . . . . . . . . . . . . . . . . . . . . . . . . 568
Setting Parameters . . . . . . . . . . . . . . . . . . . . . . . . . . . . . . . . . . . . . . . . . . . . 568
VBMySQLDirect . . . . . . . . . . . . . . . . . . . . . . . . . . . . . . . . . . . . . . . . . . . . . . . . . . . . 570
Installation . . . . . . . . . . . . . . . . . . . . . . . . . . . . . . . . . . . . . . . . . . . . . . . . . . . 570
Application . . . . . . . . . . . . . . . . . . . . . . . . . . . . . . . . . . . . . . . . . . . . . . . . . . . 571
Example . . . . . . . . . . . . . . . . . . . . . . . . . . . . . . . . . . . . . . . . . . . . . . . . . . . . . 571
■CHAPTER 20 Visual Basic .NET and C# . . . . . . . . . . . . . . . . . . . . . . . . . . . . . . . . . . . . . 573
Communication Between ADO.NET and MySQL . . . . . . . . . . . . . . . . . . . . . . . . . . 573
Establishing a Connection with Connector/Net. . . . . . . . . . . . . . . . . . . . . . 574
Establishing the Connection with the ODBC Data Provider . . . . . . . . . . . . 578
■CONTENTS xix
5351fm_final.qxd 8/26/05 6:12 PM Page xix
www.it-ebooks.info
Programming Techniques . . . . . . . . . . . . . . . . . . . . . . . . . . . . . . . . . . . . . . . . . . . . 580
Executing SQL Commands (MySqlCommand) . . . . . . . . . . . . . . . . . . . . . . 580
Commands with Parameters (MySql Parameters) . . . . . . . . . . . . . . . . . . . 581
Evaluating Individual SELECT Results (ExecuteScalar) . . . . . . . . . . . . . . . 582
Reading SELECT Results (MySqlDataReader). . . . . . . . . . . . . . . . . . . . . . . 583
DataSet, DataTable, MySqlDataAdapter . . . . . . . . . . . . . . . . . . . . . . . . . . . 585
Auxiliary Methods . . . . . . . . . . . . . . . . . . . . . . . . . . . . . . . . . . . . . . . . . . . . . 587
Error-Handling . . . . . . . . . . . . . . . . . . . . . . . . . . . . . . . . . . . . . . . . . . . . . . . . 587
Windows.Forms and ASP.NET Controls . . . . . . . . . . . . . . . . . . . . . . . . . . . . 588
Transactions . . . . . . . . . . . . . . . . . . . . . . . . . . . . . . . . . . . . . . . . . . . . . . . . . . 589
Example: Storing New Titles in mylibrary . . . . . . . . . . . . . . . . . . . . . . . . . . . . . . . 589
Example: Storing an Image File in a BLOB and Then Reading It. . . . . . . . . . . . . 592
PART 5 ■ ■ ■ Reference
■CHAPTER 21 SQL Reference . . . . . . . . . . . . . . . . . . . . . . . . . . . . . . . . . . . . . . . . . . . . . . . . . 599
Syntax . . . . . . . . . . . . . . . . . . . . . . . . . . . . . . . . . . . . . . . . . . . . . . . . . . . . . . . . . . . . 599
Object Names. . . . . . . . . . . . . . . . . . . . . . . . . . . . . . . . . . . . . . . . . . . . . . . . . 599
Case Sensitivity . . . . . . . . . . . . . . . . . . . . . . . . . . . . . . . . . . . . . . . . . . . . . . . 600
Character Strings. . . . . . . . . . . . . . . . . . . . . . . . . . . . . . . . . . . . . . . . . . . . . . 600
Character Set and Sort Order . . . . . . . . . . . . . . . . . . . . . . . . . . . . . . . . . . . . 601
Numbers . . . . . . . . . . . . . . . . . . . . . . . . . . . . . . . . . . . . . . . . . . . . . . . . . . . . . 602
Automatic Transformation of Numbers and Character Strings . . . . . . . . . 602
Date and Time . . . . . . . . . . . . . . . . . . . . . . . . . . . . . . . . . . . . . . . . . . . . . . . . 602
Binary Data. . . . . . . . . . . . . . . . . . . . . . . . . . . . . . . . . . . . . . . . . . . . . . . . . . . 603
Binary Numbers . . . . . . . . . . . . . . . . . . . . . . . . . . . . . . . . . . . . . . . . . . . . . . . 603
Comments . . . . . . . . . . . . . . . . . . . . . . . . . . . . . . . . . . . . . . . . . . . . . . . . . . . 603
Semicolons at the End of SQL Commands . . . . . . . . . . . . . . . . . . . . . . . . . 603
Operators . . . . . . . . . . . . . . . . . . . . . . . . . . . . . . . . . . . . . . . . . . . . . . . . . . . . . . . . . 604
Arithmetic Operators, Bit Operators. . . . . . . . . . . . . . . . . . . . . . . . . . . . . . . 605
Comparison Operators . . . . . . . . . . . . . . . . . . . . . . . . . . . . . . . . . . . . . . . . . 605
Pattern Matching with LIKE. . . . . . . . . . . . . . . . . . . . . . . . . . . . . . . . . . . . . . 605
Pattern Matching with REGEXP . . . . . . . . . . . . . . . . . . . . . . . . . . . . . . . . . . 605
Binary Character String Comparison . . . . . . . . . . . . . . . . . . . . . . . . . . . . . . 606
Logical Operators. . . . . . . . . . . . . . . . . . . . . . . . . . . . . . . . . . . . . . . . . . . . . . 606
Variables and Constants . . . . . . . . . . . . . . . . . . . . . . . . . . . . . . . . . . . . . . . . . . . . . 607
Variable Assignment . . . . . . . . . . . . . . . . . . . . . . . . . . . . . . . . . . . . . . . . . . . 607
Evaluating and Displaying Variables . . . . . . . . . . . . . . . . . . . . . . . . . . . . . . 607
Global System Variables versus System Variables at the
Connection Level . . . . . . . . . . . . . . . . . . . . . . . . . . . . . . . . . . . . . . . . . . . 608
SET PASSWORD . . . . . . . . . . . . . . . . . . . . . . . . . . . . . . . . . . . . . . . . . . . . . . . 608
Structured Variables . . . . . . . . . . . . . . . . . . . . . . . . . . . . . . . . . . . . . . . . . . . 608
■CONTENTSxx
5351fm_final.qxd 8/26/05 6:12 PM Page xx
www.it-ebooks.info
MySQL Data Types. . . . . . . . . . . . . . . . . . . . . . . . . . . . . . . . . . . . . . . . . . . . . . . . . . 609
Command Overview (Thematic) . . . . . . . . . . . . . . . . . . . . . . . . . . . . . . . . . . . . . . . 611
Command Reference (Alphabetical). . . . . . . . . . . . . . . . . . . . . . . . . . . . . . . . . . . . 614
Function Reference . . . . . . . . . . . . . . . . . . . . . . . . . . . . . . . . . . . . . . . . . . . . . . . . . 652
Arithmetic Functions . . . . . . . . . . . . . . . . . . . . . . . . . . . . . . . . . . . . . . . . . . . 652
Comparison Functions, Tests, Branching. . . . . . . . . . . . . . . . . . . . . . . . . . . 653
Type Conversion (Cast) . . . . . . . . . . . . . . . . . . . . . . . . . . . . . . . . . . . . . . . . . 653
String Processing. . . . . . . . . . . . . . . . . . . . . . . . . . . . . . . . . . . . . . . . . . . . . . 654
Date and Time . . . . . . . . . . . . . . . . . . . . . . . . . . . . . . . . . . . . . . . . . . . . . . . . 656
GROUP BY Functions . . . . . . . . . . . . . . . . . . . . . . . . . . . . . . . . . . . . . . . . . . . 661
Additional Functions . . . . . . . . . . . . . . . . . . . . . . . . . . . . . . . . . . . . . . . . . . . 662
GIS Data Types and Functions . . . . . . . . . . . . . . . . . . . . . . . . . . . . . . . . . . . . . . . . 663
Language Elements for Stored Procedures and Triggers. . . . . . . . . . . . . . . . . . . 665
■CHAPTER 22 MySQL Tools and Options. . . . . . . . . . . . . . . . . . . . . . . . . . . . . . . . . . . . . 667
Overview . . . . . . . . . . . . . . . . . . . . . . . . . . . . . . . . . . . . . . . . . . . . . . . . . . . . . . . . . . 667
Common Options and Configuration Files . . . . . . . . . . . . . . . . . . . . . . . . . . . . . . . 667
Common Options . . . . . . . . . . . . . . . . . . . . . . . . . . . . . . . . . . . . . . . . . . . . . . 668
Setting Options in Configuration Files . . . . . . . . . . . . . . . . . . . . . . . . . . . . . 669
Memory Specifications . . . . . . . . . . . . . . . . . . . . . . . . . . . . . . . . . . . . . . . . . 671
Options in Environment Variables (aka System Variables). . . . . . . . . . . . . 671
Rules for Specifying Options. . . . . . . . . . . . . . . . . . . . . . . . . . . . . . . . . . . . . 671
mysqld (Server) . . . . . . . . . . . . . . . . . . . . . . . . . . . . . . . . . . . . . . . . . . . . . . . . . . . . 672
Basic Settings . . . . . . . . . . . . . . . . . . . . . . . . . . . . . . . . . . . . . . . . . . . . . . . . 672
Logging, Replication . . . . . . . . . . . . . . . . . . . . . . . . . . . . . . . . . . . . . . . . . . . 674
InnoDB Configuration. . . . . . . . . . . . . . . . . . . . . . . . . . . . . . . . . . . . . . . . . . . 677
Miscellaneous . . . . . . . . . . . . . . . . . . . . . . . . . . . . . . . . . . . . . . . . . . . . . . . . 679
mysqld_safe (Server Start) . . . . . . . . . . . . . . . . . . . . . . . . . . . . . . . . . . . . . . . . . . . 679
mysql_install_db (New Installation of the mysql Database) . . . . . . . . . . . . . . . . 680
mysql_fix_privileges (Updating the mysql Database) . . . . . . . . . . . . . . . . . . . . . 680
mysql_fix_extensions (Renaming MyISAM Files) . . . . . . . . . . . . . . . . . . . . . . . . . 681
mysql (SQL Command Interpreter). . . . . . . . . . . . . . . . . . . . . . . . . . . . . . . . . . . . . 681
mysqladmin (Administration) . . . . . . . . . . . . . . . . . . . . . . . . . . . . . . . . . . . . . . . . . 683
mysqldump (Backup/Export). . . . . . . . . . . . . . . . . . . . . . . . . . . . . . . . . . . . . . . . . . 684
mysqlimport (Text Import, Bulk Import) . . . . . . . . . . . . . . . . . . . . . . . . . . . . . . . . . 687
mysqlshow (Displaying Information) . . . . . . . . . . . . . . . . . . . . . . . . . . . . . . . . . . . 688
Example . . . . . . . . . . . . . . . . . . . . . . . . . . . . . . . . . . . . . . . . . . . . . . . . . . . . . 688
myisamchk (Repairing MyISAM Files) . . . . . . . . . . . . . . . . . . . . . . . . . . . . . . . . . . 689
myisampack (Compressing MyISAM Files) . . . . . . . . . . . . . . . . . . . . . . . . . . . . . . 690
■CONTENTS xxi
5351fm_final.qxd 8/26/05 6:12 PM Page xxi
www.it-ebooks.info
■CHAPTER 23 API Reference. . . . . . . . . . . . . . . . . . . . . . . . . . . . . . . . . . . . . . . . . . . . . . . . . . 693
PHP API (mysql Interface) . . . . . . . . . . . . . . . . . . . . . . . . . . . . . . . . . . . . . . . . . . . . 693
PHP-API (mysqli Interface) . . . . . . . . . . . . . . . . . . . . . . . . . . . . . . . . . . . . . . . . . . . 697
The mysqli Class . . . . . . . . . . . . . . . . . . . . . . . . . . . . . . . . . . . . . . . . . . . . . . 697
mysqli_result Classes . . . . . . . . . . . . . . . . . . . . . . . . . . . . . . . . . . . . . . . . . . 698
mysqli_stmt Class . . . . . . . . . . . . . . . . . . . . . . . . . . . . . . . . . . . . . . . . . . . . . 699
Perl DBI . . . . . . . . . . . . . . . . . . . . . . . . . . . . . . . . . . . . . . . . . . . . . . . . . . . . . . . . . . . 699
Common Variable Names . . . . . . . . . . . . . . . . . . . . . . . . . . . . . . . . . . . . . . . 700
Establishing the Connection . . . . . . . . . . . . . . . . . . . . . . . . . . . . . . . . . . . . . 700
Executing SQL Commands, Evaluating SELECT Queries . . . . . . . . . . . . . . 701
Error Handling . . . . . . . . . . . . . . . . . . . . . . . . . . . . . . . . . . . . . . . . . . . . . . . . 703
Auxiliary Functions. . . . . . . . . . . . . . . . . . . . . . . . . . . . . . . . . . . . . . . . . . . . . 704
MySQL-Specific Extension of the DBD::mysql Driver. . . . . . . . . . . . . . . . . 704
JDBC (Connector/J) . . . . . . . . . . . . . . . . . . . . . . . . . . . . . . . . . . . . . . . . . . . . . . . . . 706
Establishing a Connection. . . . . . . . . . . . . . . . . . . . . . . . . . . . . . . . . . . . . . . 706
Executing SQL Commands . . . . . . . . . . . . . . . . . . . . . . . . . . . . . . . . . . . . . . 707
Processing SELECT Results (ResultSet Class) . . . . . . . . . . . . . . . . . . . . . . 708
Transactions . . . . . . . . . . . . . . . . . . . . . . . . . . . . . . . . . . . . . . . . . . . . . . . . . . 709
ADO.NET (Connector/Net) . . . . . . . . . . . . . . . . . . . . . . . . . . . . . . . . . . . . . . . . . . . . 710
Establishing a Connection, Connection Properties . . . . . . . . . . . . . . . . . . . 710
Executing and Evaluating SQL Commands . . . . . . . . . . . . . . . . . . . . . . . . . 710
Altering Data in DataSet/DataTable . . . . . . . . . . . . . . . . . . . . . . . . . . . . . . . 712
Transactions . . . . . . . . . . . . . . . . . . . . . . . . . . . . . . . . . . . . . . . . . . . . . . . . . . 712
C API . . . . . . . . . . . . . . . . . . . . . . . . . . . . . . . . . . . . . . . . . . . . . . . . . . . . . . . . . . . . . 713
Data Structures . . . . . . . . . . . . . . . . . . . . . . . . . . . . . . . . . . . . . . . . . . . . . . . 713
Connection and Administration. . . . . . . . . . . . . . . . . . . . . . . . . . . . . . . . . . . 715
Executing and Evaluating SQL Commands . . . . . . . . . . . . . . . . . . . . . . . . . 717
Prepared Statements. . . . . . . . . . . . . . . . . . . . . . . . . . . . . . . . . . . . . . . . . . . 719
PART 6 ■ ■ ■ Appendixes
■APPENDIX A Glossary. . . . . . . . . . . . . . . . . . . . . . . . . . . . . . . . . . . . . . . . . . . . . . . . . . . . . . . . 723
■APPENDIX B The Files for this Book . . . . . . . . . . . . . . . . . . . . . . . . . . . . . . . . . . . . . . . . 729
Trying Out the Example Programs . . . . . . . . . . . . . . . . . . . . . . . . . . . . . . . . . . . . . 729
Updates, Errata, Links, Discussion Forum. . . . . . . . . . . . . . . . . . . . . . . . . . . . . . . 729
■APPENDIX C Bibliography . . . . . . . . . . . . . . . . . . . . . . . . . . . . . . . . . . . . . . . . . . . . . . . . . . . 731
■INDEX . . . . . . . . . . . . . . . . . . . . . . . . . . . . . . . . . . . . . . . . . . . . . . . . . . . . . . . . . . . . . . . . . . . . . . . . . . . 733
■CONTENTSxxii
5351fm_final.qxd 8/26/05 6:12 PM Page xxii
www.it-ebooks.info

About the Author
■MICHAEL KOFLER earned his Ph.D. in computer science at Graz Technical University. He has written
a number of successful computer books on topics such as Visual Basic, Linux, Mathematica, and
Maple. Kofler is also the author of Definitive Guide to Excel VBA, Second Edition, published by Apress.
xxiii
5351fm_final.qxd 8/26/05 6:12 PM Page xxiii
www.it-ebooks.info

About the Translator
■DAVID KRAMER earned his Ph.D. in mathematics at the University of Maryland, and his M.A. in
music at Smith College. For many years he worked in higher education, first as a professor of math-
ematics and computer science, and later as a director of academic computing. Since 1995 he has
worked as an independent editor and translator. He has edited hundreds of books in mathematics
and the sciences and has translated a number of books in a variety of fields, including The Defini-
tive Guide to Excel VBA, by Michael Kofler; Cryptography in C and C++, by Michael Welschenbach;
and Enterprise JavaBeans 2.1, by Stefan Denninger and Ingo Peters, all published by Apress; Luck,
Logic, and White Lies, by Jörg Bewersdorff; The Game’s Afoot! Game Theory in Myth and Paradox,
by Alexander Mehlmann; and the novel To Err Is Divine, by Ágota Bozai.
xxv
5351fm_final.qxd 8/26/05 6:12 PM Page xxv
www.it-ebooks.info

Preface
MySQL is the most widely used database system in the Open Source sector. There are many reasons
why this is so:
• MySQL is fast.
• MySQL is stable.
• MySQL is easy to learn.
• MySQL runs on popular operating systems (Windows, Linux, Mac OS X, various flavors of Unix).
• MySQL applications can be created in a great variety of programming languages (such as C,
C++, C#, Java, Perl, PHP, Python, VB, and VB.NET).
• MySQL is extensively documented on the Internet, and there are many books on the subject
available.
• MySQL is available for many applications free of charge (GPL license).
• Since the licensing restrictions of GPL are unacceptable for many commercial applications,
there are reasonably priced commercial licenses and optional support contracts.
MySQL is on the verge of repeating in the database market the success achieved by Linux in the
operating system sector. In combination with PHP or Perl, MySQL is increasingly used as the database
system for web sites. (A favorite combination is Linux + Apache + MySQL + Perl or PHP. Such systems
are called “LAMP systems” for short.) MySQL is not just for small web sites; it is used by large firms
with huge amounts of data, such as Yahoo!, Slashdot, and NASA.
What Does This Book Offer?
This book provides a complete application- and example-oriented introduction to the database
system MySQL. No previous knowledge of SQL or database design is assumed.
The introductory part of the book begins with an extensive introduction on installing MySQL,
Apache, PHP, and Perl under Windows and Linux. We also consider the installation of components
that are used in combination with MySQL. Building on this, our first example will show the basic use
of MySQL and PHP.
The second part of the book introduces the most important administrative tools and user
interfaces: mysql, mysqladmin, mysqldump; the programs MySQL Administrator, MySQL Query
Browser; and finally phpMyAdmin. The latter program is particularly well suited for off-site admin-
istration using a web browser. A separate chapter shows how Microsoft Office, Sun StarOffice, and
OpenOffice can be used to access MySQL databases.
Part 3 provides a large amount of background material on the database language SQL, the
proper design of databases, stored procedures, MySQL’s access system, and on many other topics
on administration (such as backups, logging, and replication).
In Part 4, “Programming,” we emphasize the language PHP: In a long chapter you will learn
about techniques of programming. A number of example programs show how to use the interfaces
mysql and mysqli (new in PHP 5). We deal with other programming languages, too, with chapters
devoted to Perl, Java, C, Visual Basic 6, as well as VB.NET and C#. xxvii
5351fm_final.qxd 8/26/05 6:12 PM Page xxvii
www.it-ebooks.info
We end the main text with a reference section (Part 5) that provides an overview of the SQL
commands of MySQL, the commands and options of the administrative tools, and the functions
of important programming interfaces (PHP, Perl, C, Java, ADO.NET).
Finally, there are several appendices, comprising (A) a glossary of terms, (B) information on
the example files for this book (available at www.apress.com), and a bibliography with suggestions
for further reading.
In combination with the example databases and programs, this book should provide a good
foundation for the development of your own database applications. In this I wish you much fun
and success.
What Is New in This Third Edition?
This edition is an extensive revision of the second edition. Most of the changes relate to changes in the
MySQL server from version 4.1 to version 5.0. But there is also much that is new in areas surrounding
MySQL, including new programming interfaces (e.g., mysqli in PHP 5) and new administrative tools.
The most important new developments are collected in the following list.
Changes from MySQL 4.1 to 5.0
• Support for Unicode and other new character sets (additions and changes throughout the
book).
• Views (a new section in Chapter 8).
•INFORMATION_SCHEMA tables (a new section in Chapter 9).
•SubSELECTs (a new section in Chapter 10).
• Improved password authentication and additional privileges for access administration
(Chapter 11).
• GIS functions (new Chapter 12).
• Stored procedures and triggers (new Chapter 13).
• New ways of administering InnoDB tables (a new section in Chapter 14).
• Various new SQL commands, functions, and data types (changes and additions in the entire
book, with a reference in Chapter 21).
• Various new options for the MySQL server and its administrative tools (additions and
changes in the entire book, with a reference in Chapter 22).
Changes in Surrounding Areas
• MySQL Administrator and MySQL Query Browser (new Chapter 5).
• Many new functions in phpMyAdmin (new Chapter 6).
• Database interface in OpenOffice/StarOffice (three new sections in Chapter 7).
• The object-oriented interface mysqli in PHP 5 (new Chapter 15, reference in Chapter 23).
• New functions in the C-API (Chapter 18, reference in Chapter 23).
• New ADO.NET driver Connector/Net (Chapter 20, reference in Chapter 23).
■PREFACExxviii
5351fm_final.qxd 8/26/05 6:12 PM Page xxviii
www.it-ebooks.info
What Does This Book Not Offer?
Several chapters in this book deal with the programming of MySQL applications in a variety of
programming languages, such as PHP, Perl, C, Java, and Visual Basic. These chapters assume that
the reader is familiar with the specific programming language. (There is simply no room in this
book to offer an introduction to a number of programming languages.) In other words, you will
profit from, say, the PHP chapter in this book only if you are already familiar with the program-
ming language PHP.
Example Programs, Source Code
The source code for all of the examples is available at www.apress.com in the downloads section.
In the longer program listings in this book you will find at the beginning of the example a com-
ment line that specifies the file name appearing in the example files on the web site, for example,
<!— php/titleform.php —>
To save space, sometimes only the most interesting passages in the program code are printed.
Versions
The functionality of MySQL and of the programs, programming languages, and libraries placed in its
environment changes with every new version—which sometimes appear weekly. The following sum-
mary indicates which versions I have worked with (explanations of the various names will appear at
appropriate places in the book):
Apache: Version 2.n.
Connector/J: Versions 3.1.7 and 3.2.0.
Connector/ODBC (formerly MyODBC): Version 3.51.11.
gcc: Version 3.3.
Java: Versions 1.4.2 and 1.5.0.
Linux: MySQL and other programs were tested for this book under Linux and Windows. Under
Linux, the distributions Red Hat Enterprise 4 and SUSE Professional 9.2 and 9.3 beta were used.
Microsoft Office: Office 2000.
Microsoft Visual Basic,VBA, ADO: Visual Basic programs were developed and tested with VB6,
VBA6, and ADO version 2.8.
Microsoft Visual Basic .NET, C#, ADO.NET: Information presented is based on Visual Studio
2005 beta (.NET Framework 2.0).
Microsoft Windows: All tests under Windows were carried out with Windows XP SP2. The infor-
mation given should also, in principle, be valid for Windows 2000 and for future versions of
Windows.
MySQL: Version 5.0.3.
OpenOffice: Version 2.0 beta.
Perl: Version 5.8.
PHP: Versions 5.0 and 5.3.
phpMyAdmin: Version 2.6.1.
■PREFACE xxix
5351fm_final.qxd 8/26/05 6:12 PM Page xxix
www.it-ebooks.info
Notation
• SQL commands and functions, as well as methods, classes, and key words in SQL, C, Java,
PHP, Perl, VB, etc., generally appear in italic (e.g., SELECT, mysql_query).
• Unix/Linux user names also appear in italic (e.g., root, mysql).
•M
ENU COMMANDS USE CAPS AND SMALL CAPS (e.g., FILE | OPEN).
• File and directory names use a monospace font (e.g., /usr/local or C:\Windows).
• Programs and programming commands are in the monospace font as well (e.g., mysql or
cmd.exe).
• Program listings and command line input also appear in the monospace font.
SQL commands are generally written in UPPERCASE letters. This is not a syntactic necessity,
but merely a typographical convention. MySQL does not distinguish between uppercase and lower-
case in interpreting SQL commands.
In specifying Windows directories, we will often not write out the absolute path, since it
depends in any case on the particular installation. We observe the following conventions:
Windows\ means the Windows directory (e.g., C:\Windows or D:\WinNT4).
Programs\ means the directory under Windows for program installation (e.g., C:\Programs or
D:\Program Files).
Mysql\ means the MySQL installation directory (e.g., C:\Program Files\Mysql).
Commands
Many commands will be presented in this book. We will be moving back and forth between the Unix/
Linux and Windows conventions. The following two commands are equivalent:
root# mysqladmin -u root -h localhost password xxx
> mysqladmin -u root -h localhost password xxx
In each case we have given the system prompt (root# for Unix/Linux and >for Windows). You type
in only what follows the prompt (here in boldface type). Under Unix/Linux it is possible to divide
long inputs over several lines. The lines are separated by means of the backslash symbol \. We shall
often use this convention in this book. The following command thus corresponds to the command
above:
root# mysqladmin -u root -h localhost \
password xxx
In each case, xxx is to be replaced by the relevant text (in this example by your password). I have
indicated that xxx is dummy text by the use of a slant font.
■PREFACExxx
5351fm_final.qxd 8/26/05 6:12 PM Page xxx
www.it-ebooks.info

Abbreviations
I have attempted in this book to make as little use of abbreviations as possible. However, there are
several abbreviations that will be used repeatedly without being introduced anew in each chapter:
ADO Active Data Objects (Microsoft database library).
ADO.NET ADO for .NET (incompatible with ADO!).
BLOB Binary Large Object (binary data block).
GIS Geographical information system.
GPL GNU Public License (important license for Open Source software).
HTML HyperText Markup Language (format for describing web documents).
InnoDB Not an abbreviation, but the name of a company that has developed a special table
format for MySQL (InnoDB tables).
ISP Internet Service Provider.
MySQL The name of the company that developed the database system MySQL.
ODBC Open Database Connectivity (interface for database access, particularly popular
under Windows).
PHP PHP Hypertext Preprocessor (a scripting programming language for HTML pages).
RPM Red Hat Packet Manager (a format for Linux software packages).
SQL Structured Query Language (database programming language).
URL Uniform Resource Locator (Internet address of the form http://www.company.com/
page.html).
VB Visual Basic (programming language).
VBA Visual Basic for Applications (programming language within the Microsoft Office
package).
VBA.NET Visual Basic for Applications (programming language within the Microsoft Office
package).
■PREFACE xxxi
5351fm_final.qxd 8/26/05 6:12 PM Page xxxi
www.it-ebooks.info


What Is MySQL?
This chapter begins with an overview of the most important concepts from the world of databases
and then delves into the possibilities and limitations of MySQL. What is MySQL? What can it do, and
what is it unable to do?
In addition to describing the central functions of MySQL, we shall also discuss fully the issue
of licensing MySQL. When is one permitted to use MySQL without payment, and when is a license
required?
What Is a Database?
Before we can answer the central question of this chapter, namely, What is MySQL? you and I must
find a common language. Therefore, this section presents a rudimentary database glossary, without
going into great detail. (If you have already had significant dealings with relational databases, you
can skip the next couple of pages in good conscience.)
There is scarcely to be found a term that is less precise than database. A database can be a list
of addresses residing in a spreadsheet program (such as Excel), or it can be the administration files
of a telecommunications firm in which several million calls are registered daily, their charges accu-
rately calculated, monthly bills computed, and warning letters sent to those who are in arrears.
A simple database can be a stand-alone operation (residing locally on a computer for a single user),
while others may be used simultaneously by thousands of users, with the data parceled out among
several computers and dozens of hard drives. The size of a database can range from a few kilobytes
into the terabytes.1
In ordinary usage, the word “database” is used to refer to the actual data, the resulting database
files, the database system (such as MySQL or Oracle), or a database client (such as a PHP script or a
program written in C++). Thus there arises a great potential for confusion as soon as two people
begin to converse on the subject of databases.
Relations, Database Systems, Servers, and Clients
A database is an ordered collection of data, which is normally stored in one or more associated files.
The data are structured as tables, where cross references among tables are possible. The existence
of such relations among the tables leads to the database being called a relational database.
Let us clarify matters with an example. A database might consist of a table with data on a firm’s
customers (name, address, etc.), a table with data on the products the firm offers, and finally, a table
3
CHAPTER 1
■ ■ ■
1It all started with the megabyte, which is about one million bytes. A terabyte is 1024 gigabytes, which in
turn is approximately one thousand megabytes. The prefix “mega-” comes from the Greek for “great,” or
“large,” while “giga-” is derived from the Greek word for “giant.” In turn, “tera-” is from the Greek word for
“monster.” It would appear that numbers once regarded as large, gigantic, or even monstrously huge have
5351c01_final.qxd 8/26/05 4:47 PM Page 3
www.it-ebooks.info
containing the firm’s orders. Through the table of orders it is possible to access the data in the other
two tables (for example, via customer and product numbers).
MySQL, Oracle, the Microsoft SQL server, and IBM DB2 are examples of relational database sys-
tems. Such a system includes the programs for managing relational databases. Among the tasks of a
relational database system are not only the secure storage of data, but also such jobs as the
processing of commands for querying, analyzing, and sorting existing data and for storing new
data. All of this should be able to take place not only on a single computer, but over a network as
well. Instead of a database system we shall often speak of a database server.
Where there are servers, there are clients. Every program that is connected to the database sys-
tem is called a database client. Database clients have the job of simplifying the use of the database
for the end user. No user of a database system in his or her right mind would wish to communicate
directly with the database server. That is much too abstract and inconvenient. (Let programmers
worry about such direct communication!) Instead, the user has a right to expect convenient tables,
listboxes, and so on to enable the location of data or to input new data.
Database clients can assume a variety of forms, and indeed, they are often not recognized by
the user as database programs at all. Some examples of this type of client are HTML pages for the
display and input of messages in an on-line discussion group, a traditional program with several
windows for managing addresses and appointments, and a Perl script for executing administrative
tasks. There is thus wide scope for database programming.
Relational Versus Object-Oriented Database Systems
Relational databases have dominated the database world for decades, and they are particularly well
suited for business data, which usually lend themselves to structuring in the form of tables. Except
for the following two paragraphs, this entire book discusses only relational databases (though we shall
not always stress this point).
Another kind of database is the object-oriented database. Such databases can store free-standing
objects (without having to arrange them in tables). Although in recent years there has been a trend in
the direction of object-oriented programming languages (such as Object-Store, O2, Caché), object-
oriented databases have found only a small market niche.
Note that relational databases can be accessed by means of object-oriented programming
languages. However, that does not turn a relational database into an object-oriented one. Object-
oriented database systems enable direct access to objects defined in the programming language
in question and the storage of such objects in the database without conversion (persistency). It is
precisely this that is not possible with relational database systems, in which everything must be
structured in tables.
Tables, Records, Fields, Queries, SQL, Index, Keys
We have already mentioned tables, which are the structures in which the actual data are located.
Every line in such a table is called a data record, or simply record, where the structure of each record
is determined by the definition of the table. For example, in a table of addresses every record might
contain fields for family name, given name, street, and so on. For every field there are precise condi-
tions on the type of information that can be stored (such as a number in a particular format, or a
character string with a predetermined maximum number of characters).
The description of a database consisting of several tables with all of its fields, relations, and
indexes (see below) is called a database model. This model defines the construction of the data
structures and at the same time provides the format in which the actual data are to be stored.
Tables usually contain their data in no particular order (more precisely, the order is usually that
in which the data have been entered or modified). However, for efficient use of the data it is neces-
sary that from these unordered data a list can be created that is ordered according to one or more
. For
CHAPTER 1 ■WHAT IS MYSQL?4
5351c01_final.qxd 8/26/05 4:47 PM Page 4
www.it-ebooks.info
example, one could obtain a list of all of one’s customers, ordered by ZIP code, who have ordered
a rubber ducky within the past twelve months.
To create such a list, one formulates queries. The result of the query is again a table; however,
it is one that exists in active memory (RAM) and not on the hard drive.
To formulate a query one uses SQL instructions, which are commands for selecting and extracting
data. The abbreviation SQL stands for Structured Query Language, which has become a standard in the
formulation of database queries. Needless to say, every producer of a database system offers certain
extensions to this standard, which dilutes the goal of compatibility among various database systems.
When tables get large, the speed at which a query can be answered depends significantly on
whether there is a suitable index giving the order of the data fields. An index is an auxiliary table
that contains only information about the order of the records. An index is also called a key.
An index speeds up access to data, but it has disadvantages as well. First, every index increases
the amount of storage on the hard drive necessary for the database file, and second, the index must
be updated each time the data are altered, and this costs time. (Thus an index saves time in the read-
ing of data, but it costs time in entering and altering data. It thus depends on the use to which the
data are to be put whether an index is on the whole a net plus or minus in the quest for efficiency.)
A special case of an index is a primary index, or primary key, which is distinguished in that the
primary index must ensure a unique reference to a record. Often, for this purpose one simply uses a
running index number (ID number). Primary indexes play a significant role in relational databases,
and they can speed up access to data considerably.
MySQL
MySQL is a relational database system. If you can believe many diehard MySQL fans, MySQL is
faster, more reliable, and cheaper—or, simply put, better—than any other database system (includ-
ing commercial systems such as Oracle and DB2). Many MySQL opponents continue to challenge
this viewpoint, going even so far as to assert that MySQL is not even a relational database system.
We can safely say that there is a large bandwidth of opinion.
• The fact is that there is an ever increasing number of MySQL users, and the overwhelming
majority of them are quite satisfied with MySQL. Thus for these users we may say that
MySQL is good enough.
• It is also the fact, however, that MySQL still lacks a number of features that are taken for
granted with other database systems. If you require such features, then MySQL is (at least
for the present) not the database system for you. MySQL is not a panacea.
Next we shall examine some of the possibilities and limitations of MySQL.
Features of MySQL
The following list shows the most important properties of MySQL. This section is directed to the
reader who already has some knowledge of relational databases. We will use some terminology
from the relational database world without defining our terms exactly. On the other hand, the
explanations should make it possible for database novices to understand to some extent what
we are talking about.
Relational Database System: Like almost all other database systems on the market, MySQL
is a relational database system.
Client/Server Architecture: MySQL is a client/server system. There is a database server
(MySQL) and arbitrarily many clients (application programs), which communicate with the
server; that is, they query data, save changes, etc. The clients can run on the same computer
k or the Internet).
CHAPTER 1 ■WHAT IS MYSQL? 5
5351c01_final.qxd 8/26/05 4:47 PM Page 5
www.it-ebooks.info
Almost all of the familiar large database systems (Oracle, Microsoft SQL Server, etc.) are client/
server systems. These are in contrast to the file-server systems, which include Microsoft Access,
dBase, and FoxPro. The decisive drawback to file-server systems is that when run over a net-
work, they become extremely inefficient as the number of users grows.
SQL compatibility: MySQL supports as its database language—as its name suggests—SQL
(Structured Query Language). SQL is a standardized language for querying and updating data
and for the administration of a database.
There are several SQL dialects (about as many as there are database systems). MySQL adheres
to the current SQL standard (at the moment SQL:2003), although with significant restrictions
and a large number of extensions.
Through the configuration setting sql-mode you can make the MySQL server behave for the most
part compatibly with various database systems. Among these are IBM DB/2 and Oracle. (The set-
ting sql-mode changes some of the syntax conventions, and performs no miracles. More details
are to be had in Chapter 14.)
A readable and entertaining article on the topic of how MySQL differs from other current data-
base systems can be found at http://sql-info.de/mysql/gotchas.html.
SubSELECTs: Since version 4.1, MySQL is capable of processing a query in the form
SELECT * FROM table1 WHERE x IN (SELECT y FROM table2)
(There are also numerous syntax variants for subSELECTs.)
Views: Put simply, views relate to an SQL query that is viewed as a distinct database object and
makes possible a particular view of the database. MySQL has supported views since version 5.0.
Stored procedures: Here we are dealing with SQL code that is stored in the database sys-
tem. Stored procedures (SPs for short) are generally used to simplify certain steps, such as
inserting or deleting a data record. For client programmers this has the advantage that they do
not have to process the tables directly, but can rely on SPs. Like views, SPs help in the adminis-
tration of large database projects. SPs can also increase efficiency. MySQL has supported SPs
since version 5.0.
Triggers: Triggers are SQL commands that are automatically executed by the server in certain
database operations (INSERT, UPDATE, and DELETE). MySQL has supported triggers in a lim-
ited form from version 5.0, and additional functionality is promised for version 5.1.
Unicode: MySQL has supported all conceivable character sets since version 4.1, including
Latin-1, Latin-2, and Unicode (either in the variant UTF8 or UCS2).
User interface: There are a number of convenient user interfaces for administering a MySQL server.
Full-text search: Full-text search simplifies and accelerates the search for words that are
located within a text field. If you employ MySQL for storing text (such as in an Internet discus-
sion group), you can use full-text search to implement simply an efficient search function.
Replication: Replication allows the contents of a database to be copied (replicated) onto a
number of computers. In practice, this is done for two reasons: to increase protection against
system failure (so that if one computer goes down, another can be put into service) and to
improve the speed of database queries.
Transactions: In the context of a database system, a transaction means the execution of several
database operations as a block. The database system ensures that either all of the operations
are correctly executed or none of them. This holds even if in the middle of a transaction there
is a power failure, the computer crashes, or some other disaster occurs. Thus, for example, it
cannot occur that a sum of money is withdrawn from account A but fails to be deposited in
account B due to some type of system error.
CHAPTER 1 ■WHAT IS MYSQL?6
5351c01_final.qxd 8/26/05 4:47 PM Page 6
www.it-ebooks.info

Transactions also give programmers the possibility of interrupting a series of already executed
commands (a sort of revocation). In many situations this leads to a considerable simplification
of the programming process.
In spite of popular opinion, MySQL has supported transactions for a long time. One should
note here that MySQL can store tables in a variety of formats. The default table format is called
MyISAM, and this format does not support transactions. But there are a number of additional
formats that do support transactions. The most popular of these is InnoDB, which will be
described extensively in this book.
Foreign key constraints: These are rules that ensure that there are no cross references in linked
tables that lead to nowhere. MySQL supports foreign key constraints for InnoDB tables.
GIS functions: Since version 4.1, MySQL has supported the storing and processing of two-
dimensional geographical data. Thus MySQL is well suited for GIS (geographic information
systems) applications.
Programming languages: There are quite a number of APIs (application programming inter-
faces) and libraries for the development of MySQL applications. For client programming you
can use, among others, the languages C, C++, Java, Perl, PHP, Python, and Tcl.
ODBC: MySQL supports the ODBC interface Connector/ODBC. This allows MySQL to be
addressed by all the usual programming languages that run under Microsoft Windows (Delphi,
Visual Basic, etc.). The ODBC interface can also be implemented under Unix, though that is
seldom necessary.
Windows programmers who have migrated to Microsoft’s new .NET platform can, if they wish,
use the ODBC provider or the .NET interface Connector/NET.
Platform independence: It is not only client applications that run under a variety of operating
systems; MySQL itself (that is, the server) can be executed under a number of operating systems.
The most important are Apple Macintosh OS X, Linux, Microsoft Windows, and the countless
Unix variants, such as AIX, BSDI, FreeBSD, HP-UX, OpenBSD, Net BSD, SGI Iris, and Sun Solaris.
Speed: MySQL is considered a very fast database program. This speed has been backed up by a
large number of benchmark tests (though such tests—regardless of the source—should be con-
sidered with a good dose of skepticism).
Limitations of MySQL
Many of the shortcomings listed in this section can be found on the to-do list of the team of MySQL
developers, or have already been implemented.
■Tip The documentation for MySQL is not at all silent on the subject of shortcomings or missing features. There
is a quite readable section in the MySQL documentation on the topic “How standards-compatible is MySQL?”
There you will find extensive information on the points at which MySQL fails to comply with current standards.
Often, a reason for the shortcoming is provided, and sometimes as well some pointers on how to get around the
difficulty: http://www.mysql.com/doc/en/Compatibility.html.
• When MySQL is used with standard tables (table type MyISAM), then locking, that is, the
temporary blocking of access to or alteration of database information, is in operation only
for entire tables (table locking). You can circumvent the table-locking problem by imple-
menting transaction-capable table formats, such as InnoDB, that support row locking.
CHAPTER 1 ■WHAT IS MYSQL? 7
5351c01_final.qxd 8/26/05 4:47 PM Page 7
www.it-ebooks.info
• In using MyISAM tables, MySQL is not able to execute hot backups, which are backups during
operation without blocking the tables with locks. Here again, the solution is InnoDB, though
here the hot backup function is available only in the form of a commercial supplement.
• Many database systems offer the possibility of defining custom data types. MySQL does not
support such functionality, nor is any currently planned.
• MySQL has up to now ignored the general XML trend. It is not clear when MySQL will support
direct processing of XML data. Numerous commercial database systems offer considerably
more functionality in this area, and even the SQL:2003 standard provides for a host of XML
functions.
• MySQL is in fact a very fast database system, but it is very limited in its usability for real-time
applications, and it offers no OLAP functions. OLAP stands for online analytical processing,
and refers to special methods for the management and analysis of multidimensional data.
OLAP-capable database systems are often called data warehouses.
• MySQL supports, since version 5.0, stored procedures and triggers, but these functions have
not yet fully matured (this applies especially to triggers) and do not yet have the same stabil-
ity and plenitude of functions offered by commercial database systems.
• Similar restrictions hold as well for the GIS functions introduced in version 4.1. Commercial
database systems offer in some cases considerably greater functionality.
MySQL Version Numbers
Even for connoisseurs of MySQL it is a bit of a challenge to keep track of which version of MySQL is
current and which functions are contained in which versions. This section provides some informa-
tion on MySQL numbering.
As of January 2005 there are four main versions being worked on by the MySQL development
team:
•MySQL 3.23.n:The first version of this series, 3.23.0, was published in August 1999. Since
3.23.32 (January 2001) MySQL 3.23.nhas been considered stable. The current version is
3.23.58. Although MySQL 3.23 does not contain many of the innovations of recent years,
it is the version most in use among Internet providers. There will be no further extensions
to MySQL 3.23.n. New versions will only fix discovered errors or security holes.
•MySQL 4.0.n:The first version of this series, 4.0.0, was published in October 2001. Since
March 2003 (4.0.12) MySQL 4.0.nhas been considered stable and is now recommended for
production use. The current version is 4.0.23. As with MySQL 3.23, new versions appear only
to correct bugs.
•MySQL 4.1.n:The first version in this series (4.1.0) has been available for download since
April 2003. Since October 2004 (version 4.1.7), MySQL 4.1.nhas been considered stable and
is recommended for production use.
•MySQL 5.0.n:The first version in this series (5.0.0) has been available since December 2003
for download. The current version is 5.0.2, which, however, has alpha status and is therefore
not recommended for production use. It is expected that MySQL 5.0.nwill be stable by the
time this book is published.
CHAPTER 1 ■WHAT IS MYSQL?8
5351c01_final.qxd 8/26/05 4:47 PM Page 8
www.it-ebooks.info

Alpha, Beta, Gamma, Production (Generally Available)
MySQL versions are identified by the attributes alpha, beta, gamma, and production:
•Alpha means that the version is in the throes of the development process and that new func-
tions and even incompatible changes are to be expected. Although an alpha version is not
published until it contains no known errors, it is highly probable that many undiscovered
errors still lurk within. Loss of data during testing of an alpha version is quite possible! Alpha
versions are of interest only to developers who wish to try out the latest features of MySQL.
•Beta means that this version is largely complete, but it has not been thoroughly tested. Major
changes are not expected.
•Gamma means that the beta versions have become more or less stable. The goal now is to
discover errors and resolve them.
•Production or Generally Available (GA) means that MySQL developers have the impression
that the version is mature and stable enough that it can be used for mission-critical purposes.
According to the MySQL documentation, in production versions, only corrections, and no
new functionality, are to be expected. However, this has not always held true in the past, and
even with stable versions substantial changes have been made. Of particular note is the case
of MySQL 3.23.n. After the version had been declared stable (3.23.32), there came general
support for InnoDB and BDB tables (3.23.34), and later, integrity rules for InnoDB tables
(3.23.44). Furthermore, many minor extensions were introduced. As a rule, MySQL develop-
ers are pleased with such extensions, but at the same time, compatibility problems among
different production versions can arise.
In practice, this means that a new MySQL version (that is, n.n.0) always has the status alpha.
With higher version numbers, the status rises to beta, gamma, and finally, production.
Normal MySQL users should use exclusively MySQL versions that have the status production.
If you are developing web applications, you should find out which version your Internet service
provider is using. (Since Internet service providers are concernced with maintenance and stability,
they are not generally keen on using the latest version, preferring earlier versions, which may not
contain many of the functions of the newer versions.)
■Tip If you want to experiment with a development version that is not yet available in compiled format (and thus
has not even reached alpha status), instructions on downloading and compiling the source code can be obtained at
http://dev.mysql.com/doc/mysql/en/installing-source.html.
MySQL Functions Ordered by Version Number
It is not always the easiest thing in the world to determine which particular database version can
be used with which version of MySQL. Of course, the version number often reveals when a function
first became officially available, but it often happens that thereafter, significant changes to the func-
tion are made or bugs fixed, so that a stable implementation occurs only several versions later. Note
as well that certain functions are available only for particular table formats.
Table 1-1 ventures a glance into the future. The entries are based on information contained in
the MySQL documentation as of spring 2005.
The projections into the future come, naturally, without warranty of any kind. In the past, it fre-
quently occurred that particular functions became available earlier or later than originally projected.
CHAPTER 1 ■WHAT IS MYSQL? 9
5351c01_final.qxd 8/26/05 4:47 PM Page 9
www.it-ebooks.info

Table 1-1. MySQL Functions Past and Future
Function Version
Replication 3.23
Full-text search in MyISAM tables 3.23
Transactions with BDB tables 3.23.34
Transactions with InnoDB tables 3.23.34
Referential integrity for InnoDB tables 3.23.34
DELETE and DELETE across several tables 4.0
UPDATE across several tables 4.0
UNION (unite several SELECT results) 4.0
Query cache (speeds up repeated SQL commands) 4.0
Embedded MySQL library 4.0
Encrypted connections (Secure Socket Layer, SSL) 4.0
Hot backup for InnoDB (commercial add-on product) 4.0
GPL for client libraries (previously LGPL) 4.0
SubSELECT s4.1
Unicode support (UTF8 and UCS2 = UTF16) 4.1
GIS support (GEOMETRY data type, R-tree index) 4.1
Prepared Statements (SQL commands with parameters) 4.1
ROLLUP extension for GROUP BY 4.1
Better password encryption in the mysql.user table 4.1
Individual InnoDB tablespace files for each table 4.1
VARCHAR columns with more than 255 characters 5.0
Genuine BIT data type 5.0
Stored procedures (SPs) probably 5.0
Triggers (automatic execution of SQL code) 5.0/5.1
Views 5.0
Space-saving InnoDB tablespace format 5.0/5.1
New schema management (data dictionary, INFORMATION_SCHEMA database) 5.0
FULL OUTER JOIN probably 5.1
Referential integrity for MyISAM tables probably 5.1
Fail-safe replication probably 5.1
Hot backup for MyISAM tables probably 5.1
Column-level constraints probably 5.1
Views probably 5.1
XML support planned, but
no date given
User-defined data type not currently
planned
CHAPTER 1 ■WHAT IS MYSQL?10
5351c01_final.qxd 8/26/05 4:47 PM Page 10
www.it-ebooks.info

The information for the table was drawn from the following pages of the MySQL documentation:
http://dev.mysql.com/doc/mysql/en/roadmap.html
http://dev.mysql.com/doc/mysql/en/todo.html
http://dev.mysql.com/doc/mysql/en/news.html
MySQL Licensing
One of the most interesting features of MySQL is the license. MySQL is an open source project. That is,
the complete source code of MySQL is freely available. Since June 2000 (that is, since version 3.23.19)
the GNU Public License (GPL) has been valid for MySQL. It is thus ensured that MySQL will continue
to be freely available in the sense of the open source idea. (For commercial applications of MySQL
there is a second, commercial license available in addition to GPL. More on this later.)
Rights and Duties with Respect to the GPL
Open source is often incorrectly interpreted to mean “without cost.” It is indeed true that GPL soft-
ware can be used without payment of fees, provided that one adheres to certain conditions. However,
the open source idea goes much further:
• Since the source code is freely available, when there are problems, you are not at the mercy
of a software vendor.
• When problems arise, you can perhaps attempt to repair the problem yourself or to imple-
ment features that are lacking. Furthermore, you can appeal to the developers’ group for help.
• You can be certain that the program code has been read by many developers and does not
contain any unsavory surprises (such as so-called back doors such as the database system
Interbase had for many years, whereby access to every Interbase database was possible via
a hard-coded password).
• You are permitted to alter GPL products, and indeed sell the resulting new programs.
At the end of this list of GPL merits there are a few demerits (for commercial applications). If
you wish to use a GPL program as the basis for a commercial product, you must again make your
own source code freely available, in the sense of GPL, with the changes made. This is seldom some-
thing that developers of commercial products wish to do.
In general, then, every program that is derived from GPL software exists under the terms of GPL.
(GPL is, so to speak, transmitted.)
■Tip Further information on the open source idea, the full text of GPL, and explanations can be found at the
following addresses:
http://www.gnu.org/copyleft/gpl.html
http://www.opensource.org/osd.html
CHAPTER 1 ■WHAT IS MYSQL? 11
5351c01_final.qxd 8/26/05 4:47 PM Page 11
www.it-ebooks.info
Use of MySQL with an Open Source License
The following list collects the different situations in which one may freely use MySQL in the sense
of GPL:
• MySQL can be used without cost if an application is locally developed and not used com-
mercially. It is only when the resulting solution is to be sold to customers that the question
of licensing comes into play. This rule is expressed on the MySQL home page as follows:
Free use for those who never copy, modify, or distribute.
• MySQL can be used freely within a web site. If you also develop a PHP application and install
it with your Internet service provider, you do not have to make your PHP code freely available
in the sense of GPL.
• Likewise, an Internet service provider may make MySQL available to its customers without
having to pay MySQL license fees. (Since MySQL is running exclusively on the ISP computer,
this application is considered internal.)
• Finally, MySQL can be used free of charge for all projects that themselves run under the GPL
or comparable free license. (If you have developed a new free e-mail client for Linux, say, and
wish to store e-mails in a MySQL database, you may do so without further ado.)
Use of MySQL with a Commercial License
In the sense of GPL the following uses are prohibited:
• You may not change or extend MySQL (that is, the database server) or sell the new version or
product thus created without simultaneously making the source code of your changes freely
available. You are thus prohibited from developing a new database system based on MySQL
if you are not prepared to make your extensions freely available to the MySQL community
in the sense of GPL.
• It is forbidden to develop a commercial product, such as a bookkeeping program, that is geared
toward MySQL as the database without making the code available in the open source sense.
If the limitations of the GPL are not acceptable to you as a commercial developer, then you
may sell your product (program) together with a commercial MySQL license. This can prove worth-
while because MySQL remains available to you even if you are unable or unwilling to make your
code available in the sense of GPL.
The firm MySQL offers commercial licenses for consumers (that is, purchasers of their database
applications) in two formats:
MySQL Network: Here the buyer obtains the right to run one MySQL Pro Certified Server with Inn-
oDB support for one year. (A server is considered to be one computer, regardless of the number of
CPUs.) There is no limitation on the number of clients that can access the server. The program
MySQL Network also contains access to special compiled server versions that are said to be partic-
ularly stable, e-mail and telephone support, as well as various other services. Updates to the
MySQL server (even for versions 4.0 and 5.0, etc.) are free during the period of the program.
Classic Commercial License: Since the introduction of the program MySQL Network the once
common normal licenses have become hard to find. (Use the last link of the following list.)
Classic MySQL licenses have no time limit, but are restricted to a particular principal server
version. (If you have a license for version 4.0, you must apply for a new license for version 5.0.)
The cost is quite reasonable in comparison to commercial database systems (currently $295
for a license without InnoDB support and $595 for a license with InnoDB support, with a sig-
nificant reduction starting at ten licenses).
CHAPTER 1 ■WHAT IS MYSQL?12
5351c01_final.qxd 8/26/05 4:47 PM Page 12
www.it-ebooks.info

The advantage of the program MySQL Network is in the additional services and the free update
option. Classic licenses are cheaper, on the other hand, once the MySQL server has been installed
and should just run.
■Tip Further information on licensing MySQL can be found at the following web sites:
http://www.mysql.com/company/legal/licensing/
http://www.mysql.com/network/
https://order.mysql.com/
https://shop.mysql.com/?sub=vt&id=software
Commercial Licenses for Client Libraries
(Connector/ODBC, Connector/J, etc.)
In addition to the actual MySQL server, the MySQL company offers client libraries that are necessary
for the development of application programs (there are additional drivers that have been developed
outside of the firm MySQL, such as the PHP driver):
C-API: Application interface for C programming
Connector/C++: Library for C++ programming
Connector/J: JDBC driver for Java programming
Connector/MXJ: J2EE MBean driver for Java programming
Connector/NET: .NET driver primarily for programming under Windows
Connector/ODB: ODBC driver for all programming under Windows
Like MySQL, these drivers are available under GPL. Many MySQL client libraries, such as the
JDBC driver Connector/J, used to be available in earlier versions under LGPL (lesser Gnu public
license), which implies fewer restrictions for commercial applications. The situation changed,
however, with version 4.0.
If you wish to use these drivers in commercial applications, the following rule is in force: If MySQL
client programs access a MySQL-licensed server, then this server license is valid for the client libraries.
It is thus usually unnecessary to obtain licenses for the use of client libraries, because the client libraries
are automatically included with the server license.
However, if you develop and sell a commercial program but do not deliver it together with
MySQL and leave the installation of the MySQL server and its licensing to the customer, then you
must obtain licenses for the client libraries used in your program.
Explicit licensing of the client library is seen by the MySQL company as an exception, since as
a rule, the server is licensed. Commercial licensing of the client library actually represents nothing
other than a protection of the MySQL company’s commercial interests. They want to avoid the situ-
ation in which commercial developers get around having to obtain a commercial license simply by
not providing the MySQL server. The customer then loads the GPL version of the MySQL server from
the Internet and believes that all is right with the world. In such a case the MySQL company would
receive nothing for the development of a commercial MySQL product.
CHAPTER 1 ■WHAT IS MYSQL? 13
5351c01_final.qxd 8/26/05 4:47 PM Page 13
www.it-ebooks.info

Client Licenses for the PHP Project, F(L)OSS Exception
Since MySQL 4.0, the GPL license for client libraries has led to problems with some other open
source projects. For example, the PHP project is not subordinate to GPL, but to another open source
license that is considerably more liberal and contains fewer restrictions for commercial applica-
tions. If PHP were to provide the MySQL client library under GPL, the GPL would have to hold for
the entire PHP project. PHP developers were not agreeable to this. MySQL therefore defined an
exception that permitted the PHP project to make the MySQL client library part of PHP.
For other open source projects that do not use the GPL license, MySQL has defined the FLOSS
or FOSS license exception. FLOSS stands for Free/Libre and Open Source Software. (On the MySQL
website the exception is often abbreviated FOSS.) Open source projects that exist under a license
that is part of the FOSS exception are permitted to integrate the MySQL client library into their code
without the GPL restrictions coming into play. Further details on these license exceptions can be
found here:
http://www.mysql.com/company/legal/licensing/faq.html
http://www.mysql.com/company/legal/licensing/foss-exception.html
Red Hat has long considered these license exceptions as not extensive enough. Therefore, the
Linux distribution Red Hat Enterprise (RHEL) and Fedora Core for years contained the obsolete
MySQL 3.23.npackage. That has changed with Red Hat Enterprise 4 (February 2005) and Fedora
Core 4 (April 2005). Both distributions contain MySQL 4.1, which at this time is the most stable
version of MySQL.
MySQL Version Names
Since MySQL 4.0, the free (in the sense of GPL) and commercial versions have different names. Here
they are:
Name License Functionality
MySQL Standard GPL All default functions that can be considered stable
Community Edition (including InnoDB)
MySQL Max GPL Same as MySQL Standard, but with additional functions
Community Edition and table drivers that have not reached full maturity
MySQL Classic commercial Like MySQL Standard, but without InnoDB
MySQL Pro commercial Like MySQL Standard, but with InnoDB (thus with
transactions)
MySQL Pro commercial Like MySQL Pro, but usable only in the context of the
Certified Server program MySQL Network and optimized for maximum
stability and security
For ordinary GPL applications, the use of the Standard version is recommended. The additional
functions in the Max version are for use only in special applications. Currently (version 5.0), the Stan-
dard and Max versions differ in the support of BDB tables and the SSL encryption of client/server
connections. These functions will be incorporated into the Standard and commercial versions only
when they are considered sufficiently stable. You can determine which functions the running version
of MySQL supports with the SQL command SHOW VARIABLES. In the following code you can see the
results of MySQL Standard 5.0.2.
CHAPTER 1 ■WHAT IS MYSQL?14
5351c01_final.qxd 8/26/05 4:47 PM Page 14
www.it-ebooks.info

mysql> SHOW VARIABLES LIKE 'have%';
Variable_name Value
have_archive NO
have_bdb NO
have_compress YES
have_crypt YES
have_csv NO
have_example_engine NO
have_geometry YES
have_innodb YES
have_isam NO
have_ndbcluster NO
have_openssl NO
have_query_cache YES
have_raid NO
have_rtree_keys YES
have_symlink YES
In the case of commercial applications, the decision between Classic and Pro depends simply
on whether InnoDB is needed. (The license for the Pro version is more expensive.) The Classic and
Pro versions cannot be simply downloaded at www.mysql.com, but are provided only after a license
has been issued.
MySQL Pro Certified Server has been available only since the beginning of 2005, as part of the pro-
gram MySQL Network. MySQL promises users of this program particularly stable and secure versions.
If you wish to know which server version is being run, then execute the following SQL command:
mysql> SHOW VARIABLES LIKE 'version';
Variable_name Value__________ .
version 5.0.2-alpha-standard
This output shows that the Standard version 5.0.2 is running. There is no additional Max func-
tionality and no license for commercial use.
■Note Do not confuse MySQL Max with MaxDB. The latter is the former SAP-DB database system that since
2004 has been maintained and sold by the MySQL firm. There are indeed similarities between the database sys-
tems MySQL and MaxDB, but there are considerable differences. This book is strictly about MySQL, not MaxDB.
Support Contracts
Regardless of whether you are using a commercial or GPL version of MySQL, you may take out
a support contract with MySQL. You thereby simultaneously support the further development
of MySQL.
■Tip Details on commercial MySQL licenses and paid support can be found at http://www.mysql.com/support/.
Links to various companies that offer commercial MySQL support can be found at http://solutions.mysql.com.
CHAPTER 1 ■WHAT IS MYSQL? 15
5351c01_final.qxd 8/26/05 4:47 PM Page 15
www.it-ebooks.info
Alternatives to MySQL
Of course, there are many alternatives to MySQL, particularly if you are prepared to pay (lots of)
money for licenses and perhaps also for the requisite hardware. Among these are IBM DB2,
Informix, Microsoft SQL Server, and Oracle.
If you are looking for a database in the open source realm, then PostgreSQL is currently perhaps
the most interesting alternative. However, be warned: The discussion between advocates of MySQL and
those of PostgreSQL usually resembles more a war of religions than what might be termed measured
intellectual discourse. In any case, PostgreSQL (http://www.postgresql.org/) offers more functions
than MySQL (even if MySQL is slowly catching up). At the same time, PostgreSQL is considered slower
and less stable (even if in this regard the reputation of PostgreSQL has greatly improved).
For small database solutions (also in the sense of saving memory) you might consider SQLite
(http://www.sqlite.org/). This is a tiny library (about 250 KB binary code) that is available for ele-
mentary database functions. SQLite is available free of charge even for commercial applications
and is especially suited for stand-alone solutions (less for network applications). SQLite is moreover
integrated into the current versions of PHP.
There are also several formerly commercial database systems that have been converted to open
source. The best known of these is Firebird, formerly Interbase from Inprise/Borland (http://
firebird.sourceforge.net/).
Finally, I refer you to the already mentioned database MaxDB, formerly SAP-DB (http://
www.mysql.com/products/maxdb/). It is maintained and marketed by the firm MySQL but otherwise
has little to do with the MySQL database system. MaxDB is a professional and comprehensive
–database system that shares the drawbacks of large (commercial) database systems: complex
installation, administration, and maintenance, and comparatively small user base and corres-
pondingly small amount of documentation and help in the Internet.
Summary
MySQL is a very capable relational client/server database system. It is sufficiently secure and stable
for many applications, and it offers an excellent cost/benefit ratio (not only because MySQL is free
itself, but also because it makes comparatively modest demands on hardware). MySQL has thus
developed into a quasi standard in the realm of Internet databases.
Above all, in the Linux world, MySQL is used increasingly by applications as the background
database engine, whether it be managing logging data more efficiently than previously or managing
e-mail, MP3 files, addresses, or comparable data. MySQL is poised to play a similar role to that of the
Jet Engine in the Microsoft operating system (where in many respects, MySQL offers a meaningfully
better technical basis). Thanks to the ODBC interface, MySQL is now being used in the Windows
world for such tasks.
Apart from technical data, MySQL has the advantage over other open source database systems
in that it is by far the most widely used such system. It follows that MySQL has been more thoroughly
tested and documented than other database systems and that it is relatively easy to find developers
with MySQL experience.
However, MySQL cannot (yet) compete in every respect with the big boys of the commercial
database system world. You are not likely to choose MySQL if you require functions that MySQL
does not yet support.
The decisive question is, then, Is MySQL good enough for my application? Not only millions of
website developers, but also firms and organizations such as Associated Press, Citysearch, Cox Com-
munications, Los Alamos National Labs (7 terabytes of data), Lycos, NASA, Sony, Suzuki, Wikipedia,
and Yahoo! have answered this question in the affirmative. If you choose MySQL, you will be in good
company.
CHAPTER 1 ■WHAT IS MYSQL?16
5351c01_final.qxd 8/26/05 4:47 PM Page 16
www.it-ebooks.info

The Test Environment
In this chapter we discuss how to set up the test environment for MySQL on a local computer.
Since MySQL usually doesn’t run all by itself, but in combination with other programs, this chapter
also discusses Apache, PHP, and Perl, as well as the configuration of these programs.
We consider installation under Windows and under Linux. The chapter includes some advanced
topics, such as administration of the MySQL service under Windows and the compilation of a MySQL
developer version under Linux.
Windows or Unix/Linux?
The question of under which operating system to run MySQL can easily lead to fisticuffs, so strongly
are opinions held. But we shall remain civil in this section, and perhaps for the entire book. The fact is
that MySQL, as well as Apache, PHP, Perl, and most of the other programs that are usually run in con-
junction with MySQL, were developed originally under Unix/Linux and only later ported to Windows.
MySQL in Practice (Public Internet Server)
In practice, that is, on a publicly available server on the Internet, the above-mentioned programs
are run predominately under Unix/Linux. For this reason alone—the greater deployment in the
world at large—the programs running under Unix/Linux have been better and more extensively
tested. Possible errors or security holes in the Unix/Linux version of MySQL are thus more likely
to be discovered and repaired quickly.
A further argument for deployment under Unix/Linux is that the programs function more effi-
ciently as a rule. This has less to do with the view that Windows is generally slower than Unix/Linux
(I have no desire to discuss that issue here), but with the fact that the process and thread models of
these operating systems are quite different from each other. Programs such as Apache and MySQL
are first and foremost optimized for the programming model of Unix/Linux, not for that of Windows,
and this by itself often gives a significant speed advantage to Unix/Linux.
Therefore, the development communities of the programs mentioned above are unanimously
in favor of having their programs run under Unix/Linux, and not under Windows. You would do well
to take this opinion to heart.
■Note When speaking of Windows, we generally mean Windows 2000/XP/2003. In principle, MySQL runs under
Windows 9x/ME, but there it is impossible to provide reasonable security of the system against unauthorized access.
In general, the tests in this book were carried out under Windows XP.
17
CHAPTER 2
■ ■ ■
5351c02_final.qxd 8/26/05 4:53 PM Page 17
www.it-ebooks.info

Development Environment
Things look somewhat different if you are currently only developing a database application. During
the development you will use a test environment that is usually accessible only to you or your team.
Thus you have no reason to expect problems in security or in efficiency due to large numbers of
accesses to the system. Since there is good compatibility between the Windows and Unix/Linux
versions, there is little to be said against, for example, developing a discussion group first under
Windows and then porting the completed solution to the Linux server of your ISP.
If you have at least two computers in your test environment, you can, of course, install MySQL,
Apache, etc., on one computer under Linux, and carry out the actual development work (database
design, creation of script files, etc., on the second computer under Windows (say, because your
favorite editor runs under Windows).
To this extent, the entire discussion of Windows versus Unix/Linux doesn’t amount to much,
and for development you should use the operating system that you find more to your liking.
Nevertheless, there are also arguments against Windows for the development phase. One is
that by developing the entire project under Unix/Linux you gain considerable experience that will
be valuable later during the process of bringing the project on line on a Unix/Linux server (specifi-
cally in reference to issues of access rights and security).
Another argument deals with the deployment of system functions that under Unix/Linux usually
are available in a form different from that offered under Windows. For example, under Unix/Linux one
can simply send an e-mail by program code (such as in a PHP or Perl script). Under Windows there are
no standard interfaces for such tasks.
Installation Under Windows
The following sections describe the separate installation of Apache 2, PHP 5, Perl 5.8, and MySQL
5.0. Separate installation has the advantage that you can choose the version for each component
and have a better understanding of which programs are installed on your computer and how they
are configured. This also simplifies management later and updating specific components.
■Note The installation is easier if you use a complete package that contains all the components. The best-
known such packages are
The Saint WAMP
(TSW) and
XAMPP for Windows
:
http://sourceforge.net/projects/yawamp/
http://www.apachefriends.org/de/xampp-windows.html
The packages have two disadvantages: First, in addition to Apache, PHP, Perl, and MySQL, they contain countless
additional components that you probably don’t need. Second, as this book went to press there was no complete
package with MySQL 5.0. Instead, you get the older, but more stable, versions MySQL 4.1 or 4.0.
Installing Apache 2.0
Deactivate IIS
If you are working on a Windows server version, you should first ensure that the Microsoft Internet
Information Server (IIS for short) is not running. Installation of Apache in the standard setting (port
80) fails if IIS is running in parallel (for which there is seldom any reason).
To check on or deinstall IIS, execute SETTINGS | CONTROL PANEL | ADD OR REMOVE PROGRAMS | ADD/
REMOVE WINDOWS COMPONENTS. If necessary, deactivate the option IIS in WINDOWS COMPONENTS WIZARD,
which will stop and deinstall the program.
CHAPTER 2 ■THE TEST ENVIRONMENT18
5351c02_final.qxd 8/26/05 4:53 PM Page 18
www.it-ebooks.info
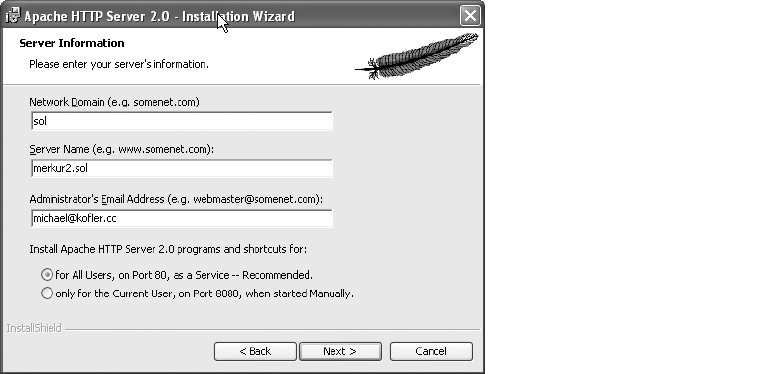
Install Apache
Apache is available for Windows at www.apache.org (and various mirror sites). Download the
apache_2.n_xxx.msi file onto your computer and launch the installation program in Windows
Explorer with a double click. A dialog box appears for the basic configuration (see Figure 2-1). There
you must enter the domain name (e.g., sol) and the server name (e.g., uranus.sol). This information
will be needed if your computer runs as a single test computer. As a rule, the proper values are auto-
matically entered in the dialog fields. If you are unsure what these names are on your computer, you
can look at the dialog SETTINGS | CONTROL PANEL | SYSTEM | COMPUTER NAME. You must also specify the
e-mail address of the web server administrator (you, that is) and whether the web server should use
port 80.
After installation, Apache will be automatically configured as a service under Windows
NT/2000/XP and immediately launched. On the right side of the task bar there appears a small
icon that shows the state of Apache (a green arrow when the program is running). You can use
this icon to start and stop Apache.
Starting and Stopping Apache
You can start and stop Apache with the menu commands PROGRAMS | APACHE HTTP SERVER | CONTROL
APACHE SERVER | START and | STOP. The command PROGRAMS | APACHE HTTP SERVER | CONFIGURE APACHE
SERVER | EDIT HTTPD.CONF starts the editor notepad and shows there the Apache configuration.
As a first test to determine whether Apache is actually running, open in your web browser the
page http://localhost. You should be able to see the default start page of the web browser. Then
there should be two directory entries that are valid for a default installation: for the configuration file,
C:\Programs\Apache Group\Apache2\conf\httpd.conf; for the web files, C:\Programs\Apache Group\
Apache2\htdocs.
CHAPTER 2 ■THE TEST ENVIRONMENT 19
Figure 2-1. Apache installation
5351c02_final.qxd 8/26/05 4:53 PM Page 19
www.it-ebooks.info
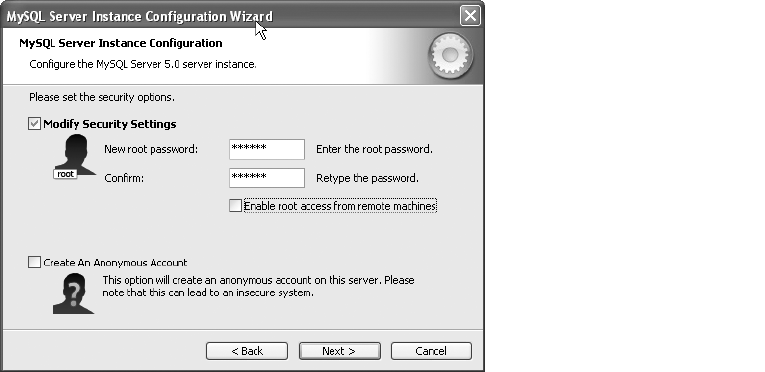
Installing MySQL 5.0
The MySQL installation file for MySQL 5.0 can be found as a ZIP archive at http://dev.mysql.com/
downloads/mysql/5.0.html. The archive contains setup.exe as a single file. After it is launched, an
installation assistant appears in which generally you can set only the installation type (SETUP TYPE)
to TYPICAL.
After installation of the server in the directory C:\Programs\MySQL\MySQL Server 5.0, the instal-
lation program asks whether you wish to set up an account at mysql.com. You will generally skip this
optional step with SKIP SIGN-UP.
The MySQL Configuration Assistant
Much more useful is the configuration assistant, which is automatically executed after installation
(see Figure 2-2). If needed, you can later start this assistant anew with PROGRAMS | MYSQL | MYSQL
SERVER 5.0 | MYSQL SERVER INSTANCE CONFIG WIZARD. The assistant fulfills two functions: it sets up the
MySQL configuration file and secures the MySQL server with a password.
The following list describes the most important steps the assistant takes when you choose
DETAILED CONFIGURATION. (You will never go wrong by selecting, in case of doubt, the default sugges-
tions of the assistant.)
Server Type: Here you can choose among DEVELOPER, SERVER, and DEDICATED SERVER. The options
influence how much of main memory the MySQL server attempts to reserve. The greater the
portion, the faster the server will run, but the more strongly other programs will be affected.
For web developers, DEVELOPER is the optimal setting. (If you carry out benchmark tests, you
will get better results with large databases using SERVER or DEDICATED SERVER.)
CHAPTER 2 ■THE TEST ENVIRONMENT20
Figure 2-2. The MySQL configuration assistant
5351c02_final.qxd 8/26/05 4:53 PM Page 20
www.it-ebooks.info
Database Usage: The options MULTIFUNCTIONAL, TRANSACTIONAL, ONLY, and NON-TRANSACTIONAL
ONLY determine for which table types the MySQL server will be configured (for experts: MyISAM,
InnoDB, or both). The default setting is MULTIFUNCTIONAL, and you should choose that.
InnoDB Tablespace Setting: At this point you should specify where InnoDB database files
should be stored (by default in the installation directory).
Concurrent Connections: This determines the number of database connections that generally
can be open simultaneously. As long as MySQL is running on a development computer, the num-
ber will be somewhat small. Therefore, choose the option DECISION SUPPORT (20 connections). On
the other hand, if the MySQL server is in full operation with a well-frequented website, the num-
ber of connections will be significantly higher (option ONLINE TRANSACTION PROCESSING).
Enable TCP/IP Networking: There are two possibilities under Windows for how the MySQL
server communicates with applications: via named pipes or via the network protocol TCP/IP.
The assistant recommends activating TCP/IP and to using port 3306. Here, too, you should
follow the assistant’s suggestion if there is no compelling reason to do otherwise.
Default Character Set: MySQL supports all possible character sets for storing text in a data-
base. Here you set the default character set. It holds whenever you do not explicitly choose
a different set for the database design (that is, this setting in no way restricts what you can do
in the future). Since all examples in this book use the latin1 character set, it is a good idea to
choose this as the default.
Install as Windows Service: The MySQL server can be launched as a *.exe file or a Windows
service. The second variant is more convenient and secure. Accept the default setting.
Security Options: At this, perhaps most important, point in the setup assistant you determine
who will be allowed to make a connection to the MySQL server and whether a password will be
required. The most secure setting, and the one that I recommend, is shown in Figure 2-2: the
only user is root, which is protected by a password. The user root will be the database adminis-
trator and will be allowed to register only from the local computer (not from another computer
in the network). Moreover, there are no anonymous accounts (connection allowed without a
password).
Of course, you can set up other users later who can access MySQL or particular MySQL data-
bases (more on this in Chapter 11).
To test whether your MySQL installation was successful, launch the MySQL command line
interpreter mysql.exe using PROGRAMS | MYSQL | MYSQL SERVER 5.0 | MYSQL COMMAND LINE CLIENT.
Then give the password that you used for the MySQL configuration. If all goes as it should, the
MySQL input request appears in the input window. There you execute the command status. The
result should look like that in Figure 2-3.
CHAPTER 2 ■THE TEST ENVIRONMENT 21
5351c02_final.qxd 8/26/05 4:53 PM Page 21
www.it-ebooks.info
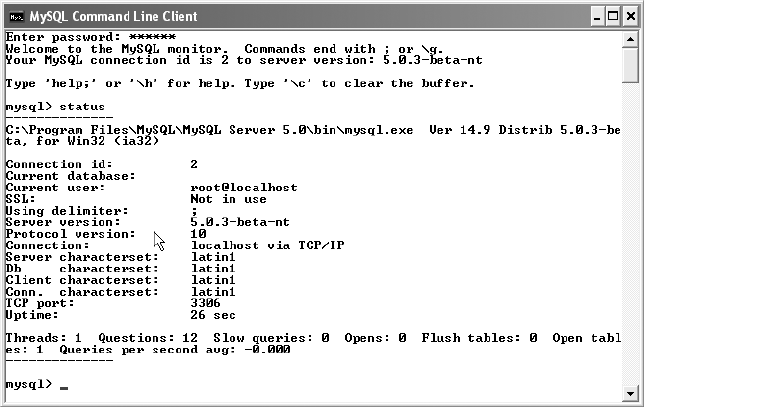
MySQL Service: Manual Setup, Removal, Starting, and Stopping
During installation, MySQL is set up as a Windows service, which is launched automatically when
the computer is started. Normally, there is no reason to change this configuration. Should it be nec-
essary, however, to do so, the following suggestions should be of help:
MySQL System Tray Monitor: Using START | PROGRAMS | MYSQL SYSTEM TRAY MONITOR, you launch
a small program that appears as an icon in the right side of the Windows task bar (where the
time is displayed). With the right mouse button you can start and stop the MySQL service.
MySQL Administrator: In the module Service Control of the MySQL administrator described in
Chapter 5 you can set up, delete, start, and stop a service.
Windows System Control: With SETTINGS | CONTROL PANEL ADMINISTRATIVE TOOLS | SERVICES you
find yourself in a dialog for managing all services running under Windows. There you can also
start and stop services and perform numerous other functions (see Figure 2-4).
Commands: Finally, you can carry out these administrative tasks in an input request window.
For installation, execute the following two commands. The mysqld command installs the serv-
ice under the name MySQL and must be written all on one line:
> cd C:\Programs\MySQL\MySQL Server 5.0\bin
> mysqld —install MySQL
—defaults-file="C:\Programs\MySQL\MySQL Server 5.0\my.ini"
The program is thereby installed as a Windows service, but not launched. In the future, the service
will be automatically started when the computer is started and terminated when the computer is
shut down. To start or stop the service manually, execute the following two commands:
> net start MySQL
> net stop MySQL
To deinstall the service, use the option —remove:
> mysqld —remove MySQL
CHAPTER 2 ■THE TEST ENVIRONMENT22
Figure 2-3. Testing MySQL
5351c02_final.qxd 8/26/05 4:53 PM Page 22
www.it-ebooks.info
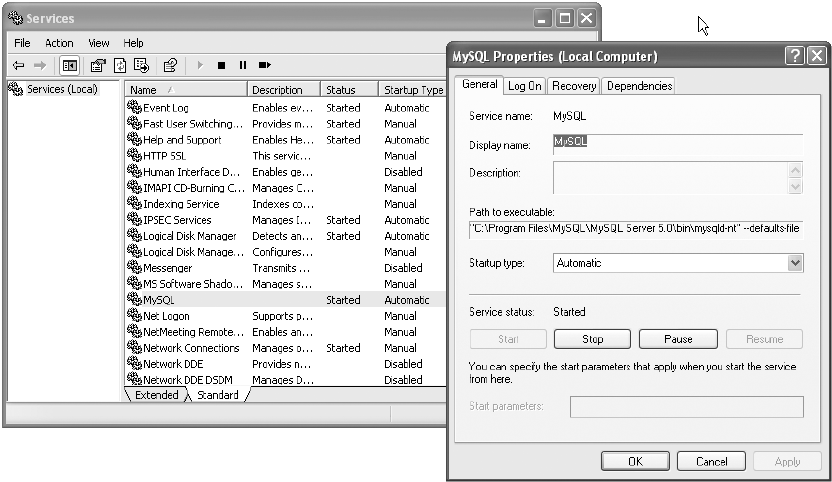
Installing PHP 5.0
On the website http://www.php.net/downloads.php you can find the latest version of PHP in two
variants: as a ZIP archive and as an installation program. Since the installation program is geared
toward the Internet Information Server, but in this book Apache is used as a web server, you should
opt for the ZIP variant.
Installation comprises the following steps:
• Extract the contents of the archive into the directory of your choice. (For the following exam-
ples we assume that the installation directory is C:\php5).
• Insert the lines below given in boldface into the Apache configuration file httpd.conf. The
best location within that file is in the other LoadModule instructions, of which there are gen-
erally quite a few:
# Changes in C:\Programs\Apache Group\Apache2\conf\httpd.conf
...
LoadModule php5_module "c:/php5/php5apache2.dll"
AddType application/x-httpd-php .php
PHPIniDir "C:/php5"
...
• Create a copy of C:\php5\php.ini-recommended with the new name C:\php5\php.ini.
• Restart Apache (command PROGRAMS | APACHE HTTP SERVER | CONTROL APACHE SERVER | RESTART).
Restarting Apache is required whenever there is a change in php.ini or httpd.conf.
CHAPTER 2 ■THE TEST ENVIRONMENT 23
Figure 2-4. Managing Windows services
5351c02_final.qxd 8/26/05 4:53 PM Page 23
www.it-ebooks.info
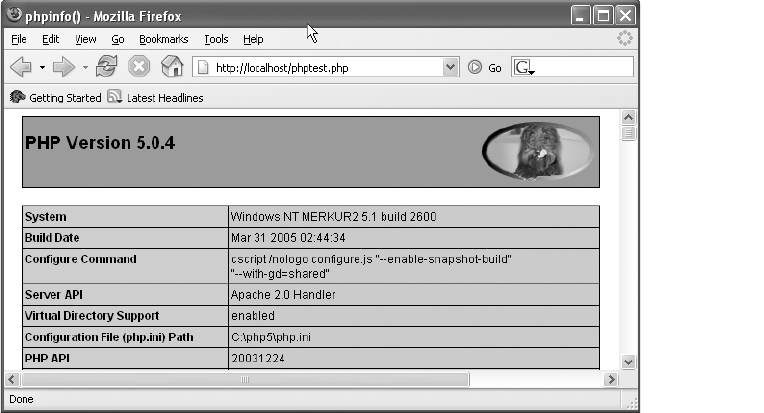
PHP is now installed as an extension of Apache and will be launched along with Apache. To test
whether the installation was successful, use a text editor to place the file phptest.php in the direc-
tory C:\Programs\Apache Group\Apache2\htdocs with the following content:
<?php phpinfo(); ?>
Then open http://localhost/phptest.php with a web browser. You should see the status of PHP, as
shown in Figure 2-5.
MySQL Extensions for Configuring PHP
As a final step, PHP must be so configured that it can access the MySQL server. It is necessary that
PHP be able to find two DLL files that are included with PHP. You must carry out the following steps:
• Copy the file C:\php5\libmysql.dll into the Windows directory, generally C:\Windows or
C:\Winnt.
• Open the file with a text editor (e.g., Notepad) and change the following lines shown in bold-
face or insert them:
; changes in c:\php5\php.ini
...
extension_dir = "c:/php5/ext"
extension = php_mysql.dll
extension = php_mysqli.dll
To find the right lines, your best bet is to use EDIT|FIND. Note that the forward slash, not
the usual backslash, is used as a separator. Before the lines extension=... there should be
no semicolon; otherwise, the line will be considered a comment and ignored.
• For the changes to take effect, Apache must be restarted (command PROGRAMS | APACHE HTTP
SERVER | CONTROL APACHE SERVER | RESTART).
CHAPTER 2 ■THE TEST ENVIRONMENT24
Figure 2-5. The PHP test page
5351c02_final.qxd 8/26/05 4:53 PM Page 24
www.it-ebooks.info
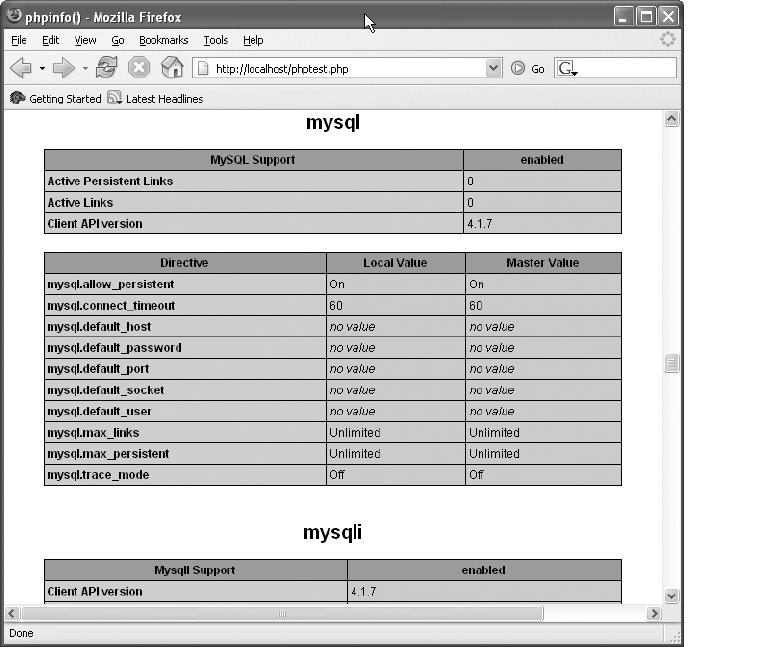
Should problems arise, load the PHP test page (see Figure 2-5) once more. Check whether the
file name in the line Configuration Path (php.ini) File (fifth line) is indeed C:\php5\php.ini. If that
is not the case, copy your php.ini file to the location that specifies the test page. (The likely configu-
ration error, from experience, is that PHP expects the configuration file to be in a different place.
That is why your changes in php.ini were ignored.)
You can again check whether all is ok in the PHP test page. It now contains a description of the
parameters of the interfaces mysql and mysqli (see Figure 2-6).
Installing Perl
The firm ActiveState offers the current version of Perl for Windows with the package ActivePerl.
ActivePerl can be downloaded without cost as an MSI file from www.activestate.com. (You will also
find on this website a host of commercial products related to Perl.) In Windows ME and Windows
2000 you begin the installation with a double click on the MSI file. In older versions of Windows you
must first install the Windows installer. (A download link can be found at www.activestate.com, key-
word System Requirements.)
CHAPTER 2 ■THE TEST ENVIRONMENT 25
Figure 2-6. Information on the mysql and mysqli interfaces on the PHP test page
5351c02_final.qxd 8/26/05 4:53 PM Page 25
www.it-ebooks.info
Testing the Perl Installation
To test the Perl installation, create a test file with the name test.pl and the following content:
#!/usr/bin/perl -w
print "Hello world!\n";
print
Please hit Return to end the program!";
$wait_for_return = <STDIN>;
It should now be possible to start with a double click on the file. The program shows the text “Hello
world!” in a command window, waits for a Return, and then ends. If a double click fails, open the
input request window and try the following command:
C:\> perl C:\directory_with_my_perl_files\test.pl
MySQL Support for Perl Installation
Having installed Perl does not mean that you are done. Perl is not yet capable of communicating
with MySQL. Perl must be extended through two supplementary modules:
DBI: DBI stands for database interface. The DBI module is a general interface for database
programming.
DBD-MySQL: DBD stands for database driver. This module contains the MySQL-specific
extensions of DBI.
The installation of both packages is done with the program ppm (Perl package manager), which
is included with ActivePerl. The program can be launched in an input request window. It assumes
a running Internet connection. The use of ppm is via the following lines (for ActivePerl 5.8.6):
C:> ppm
PPM - Programmer’s Package Manager version 3.1.
Type ‘help’ to get started.
PPM> install dbi
Install ‘dbi’ version 1.46 in ActivePerl 5.8.6.811.
Downloaded 540637 bytes.
Extracting 73/73: blib/arch/auto/DBI/Driver_xst.h
Installing C:\Programs\Perl\site\lib\auto\DBI\dbd_xsh.h
Installing C:\Programs\Perl\site\lib\auto\DBI\DBI.bs
...
Successfully installed dbi version 1.46 in ActivePerl 5.8.6.811.
PPM> install DBD-Mysql
Install ‘DBD-Mysql’ version 2.9003 in ActivePerl 5.8.6.811.
Downloaded 178968 bytes.
Extracting 17/17: blib/arch/auto/DBD/mysql/mysql.lib
Installing C:\Programs\Perl\site\lib\auto\DBD\mysql\mysql.bs
Installing C:\Programs\Perl\site\lib\auto\DBD\mysql\mysql.dll
...
Unfortunately, DBD MySQL version 2.9003 is incompatible with the current version of MySQL.
The version is based on an old version of the MySQL client library and can create a connection with
MySQL version 4.1 or 5.0 only if the MySQL server is so configured that it uses the old and insecure
authentication procedure (MySQL option old-passwords; see Chapter 11).
Fortunately, there is already a new version of the DBD MySQL module on the Internet. The fol-
lowing commands show how to install it:
CHAPTER 2 ■THE TEST ENVIRONMENT26
5351c02_final.qxd 8/26/05 4:53 PM Page 26
www.it-ebooks.info

ppm> remove DBD-Mysql
Remove ‘DBD-Mysql’ version 2.9003 from ActivePerl 5.8.6.811.
...
ppm> install http://theoryx5.uwinnipeg.ca/ppms/DBD-mysql.ppd
Install ‘DBD-mysql’ version 2.9005_3 in ActivePerl 5.8.6.811.
====================
Downloaded 625824 bytes.
Extracting 37/37: blib
Installing C:\Programs\Perl\site\lib\auto\DBD\mysql\mysql.bs
Installing C:\Programs\Perl\site\lib\auto\DBD\mysql\mysql.dll
...
Successfully installed DBD-mysql version 2.9005_3 in ActivePerl 5.8.6.811.
■Tips If your Internet connection runs over an HTTP proxy, you must execute the following command
before the install command. Of course,
myproxy.com:8080
must be replaced by the actual proxy address:
set http_proxy=http://myproxy.com:8080/. If a firewall is installed on your computer, the program
perl.exe must have the right to access the Internet. Make a corresponding rule as necessary.
You can determine the available packages with search pattern. Furthermore, search mysql finds, for
example, all additional Perl packages whose names contain
mysql
(regardless of whether in the middle,
beginning, or end).
DBD-MySQL assumes that the MySQL client library is installed on the computer. This library
is located in the file C:\Programs\MySQL\MySQL Server 5.0\bin\libmysql.dll and is part of the
MySQL installation. For Perl to be able to find the file, it must be copied into the Windows direc-
tory, or else the PATH environment variable must be extended to include the directory C:\Programs\
MySQL\MySQL Server 5.0\bin\ (see Chapter 4).
Precise instructions for testing the Perl environment and programming MySQL applications
with Perl are given in Chapter 16.
Installation Under SUSE Linux 9.3
SUSE Linux 9.3 contains Apache 2, PHP 4.3 and PHP 5, Perl 5.8, and MySQL 4.1. In order to follow
the examples of this book, you need PHP 5 and MySQL 5. The following two sections show how to
install the packages Apache 2, PHP 5, and Perl 5.8, and then the current MySQL package, available
from dev.mysql.com.
Installing Apache 2, PHP 5, and Perl
During installation, you must pay attention a bit, because SUSE installs PHP 4.3 and MySQL 4.1 by
default. If you wish to follow the instructions given here, install, instead of the PHP 4.3 package, the
PHP 5 variant. Ignore the MySQL package shipped with SUSE entirely. This will spare you having to
deinstall packages later.
Selecting Apache Modules: To install, execute SYSTEM | YAST, start the module SOFTWARE |
INSTALL SOFTWARE, set the filter to SELECTIONS, and choose the item SIMPLE WEBSERVER WITH
APACHE2.
Deactivating PHP 4 Packages: Now change the filter to SEARCH and specify php4 as the search
pattern. Deactivate all packages shown.
Activate PHP 5 Packages: Give php5 as the search pattern and activate all packages shown
CHAPTER 2 ■THE TEST ENVIRONMENT 27
5351c02_final.qxd 8/26/05 4:53 PM Page 27
www.it-ebooks.info
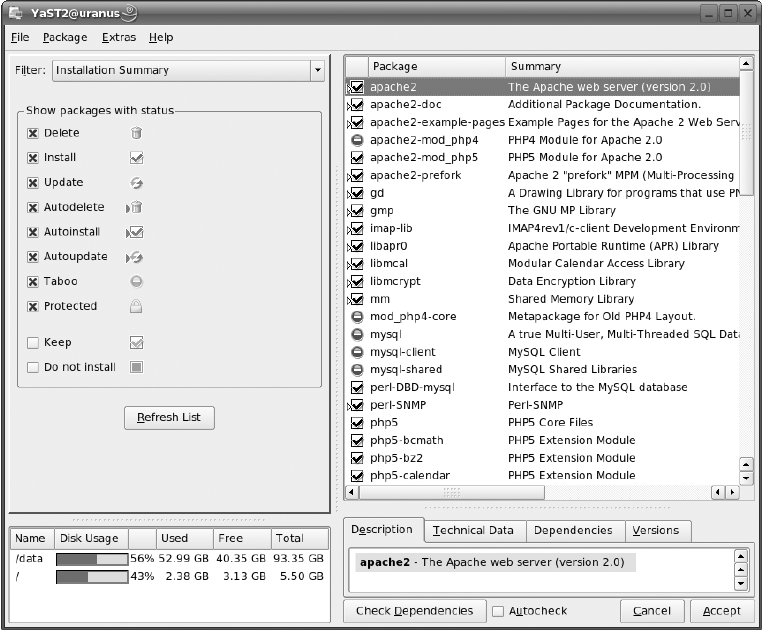
Deactivate MySQL Packages: Give mysql as the search pattern and deactivate the packages
mysql, mysql-client, and mysql-shared. (These are 4.1 packages. In the next section you will
find instructions on installing MySQL 5.0.)
Activate the MySQL Driver for Perl: In the mysql search results you will find the package
perl-DBD-mysql. You will need this package to access MySQL from Perl. (Perl itself is already
installed.)
Resolve Package Dependencies: Click on CHECK DEPENDENCIES. YaST now shows a warning
that the packages php5-mysql, php5-mysqli, and perl-DBD require the package mysql-shared.
Select IGNORE THIS CONFLICT. (The conflict will be resolved later in the manual installation of
MySQL 5.0.)
Display Summary: To check things, change the filter to SUMMARY. YaST shows which packages
it will install (the boxes are checked) and whichit will not (symbol for “do not enter”). The
result should look like Figure 2-7.
Package Installation: With ACCEPT, all selected packages are installed. YaST may first show
a dialog in which it indicates additional packages that must be installed (e.g., Perl-DBI).
CHAPTER 2 ■THE TEST ENVIRONMENT28
Figure 2-7. Package installation in SUSE Linux with YaST
5351c02_final.qxd 8/26/05 4:53 PM Page 28
www.it-ebooks.info
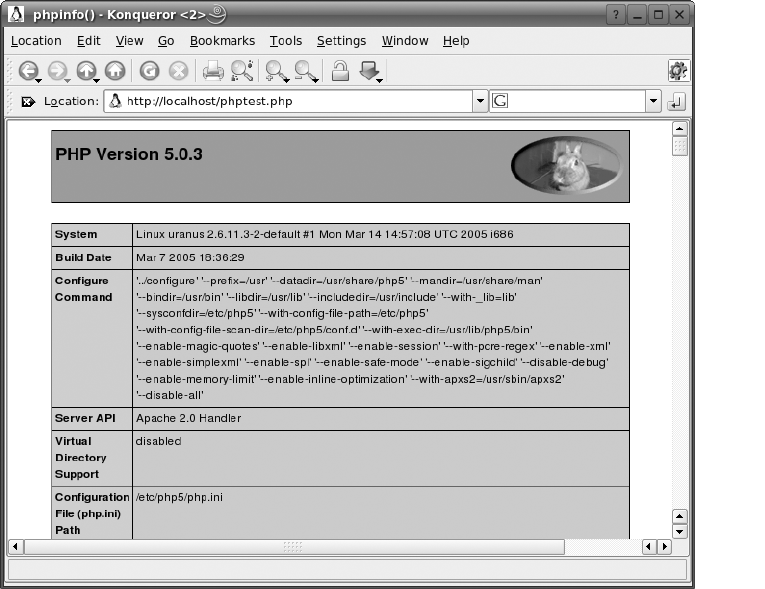
The web server Apache is not launched by default. For that, you must execute the following
command as root:
root# /etc/init.d/apache2 start
If you wish Apache to be started automatically in the future, execute in addition the command
root# insserv apache2
and then two directory specifications: configuration files, /etc/apache2/*; web files, /srv/www/htdocs.
Testing Apache and PHP
To test whether the server is actually running, open with your web browser the page http://localhost.
You should see an Apache test page.
To check that PHP also is functioning, place, using a text editor, the file phptest.php in the
directory /srv/www/htdocs with the following content:
<?php phpinfo(); ?>
Then open http://localhost/phptest.php with a web browser. You should see the PHP status page
(see Figure 2-8).
CHAPTER 2 ■THE TEST ENVIRONMENT 29
Figure 2-8. The PHP test page
5351c02_final.qxd 8/26/05 4:53 PM Page 29
www.it-ebooks.info

Testing Perl
Hints for testing the Perl environment and programming MySQL applications in Perl are given in
Chapter 16.
Installing MySQL 5.0
To install the MySQL server, download the current version from the following site in the form of RPM
files: http://dev.mysql.com/downloads/mysql/5.0.html. (RPM is the usual format for packages under
Linux.)
The packages listed in Table 2-1 are generally needed only by the MySQL server, MySQL client,
and MySQL shared. To install, execute the following command, which here for reasons of space is
broken by a backslash into three lines. After successful installation, you will be directed to set a root
password for the MySQL server:
root# rpm -i MySQL-server-5.0.n-0.i386.rpm \
MySQL-client-5.0.n-0.i386.rpm \
MySQL-shared-5.0.n-0.i386.rpm
PLEASE REMEMBER TO SET A PASSWORD FOR THE MySQL root USER !
To do so, start the server, then issue the following commands:
/usr/bin/mysqladmin -u root password 'new-password'
/usr/bin/mysqladmin -u root -h uranus password 'new-password'
See the manual for more instructions.
Table 2-1. RPM MySQL Package
Package Name Contents
MySQL-server-n.rpm Contains the MySQL server.
MySQL-client-n.rpm Contains client programs (mysql, mysqladmin, etc.).
MySQL-shared-n.rpm Contains the shared libraries used by many programs to access MySQL.
MySQL-devel-n.rpm Contains libraries and include files for program development in C.
MySQL-embedded-n.rpm Contains a special version of the MySQL server that can be integrated
into other programs (for C developers only).
MySQL-bench-n.rpm Contains scripts with benchmark tests.
MySQL-Max-n.rpm Contains the Max version of the MySQL server, which contains some
supplementary table formats and experimental functions.
The MySQL server is launched at once after installation. If you wish the database server to be
launched automatically in the future, execute this command:
root# insserv mysql
Securing the MySQL Server
After a new installation, anyone can log in as root without a password to MySQL and have unre-
stricted privileges to read, change, and delete all databases. For reasons of security it is absolutely
necessary that you give a password for root. To do this, execute the following commands, where
instead of hostname give the name of your computer:
root# mysqladmin -u root password 'secret'
root# mysqladmin -u root -h hostname password 'secret'
CHAPTER 2 ■THE TEST ENVIRONMENT30
5351c02_final.qxd 8/26/05 4:53 PM Page 30
www.it-ebooks.info
It can happen that you will obtain the error Host ‘hostname’ is not allowed to connect to this
MySQL server’. If that happens, the host name was entered into the access database during installa-
tion without the domain name. To solve this problem, you must restart the program mysql and
update the table mysql.user with an UPDATE command. Then you can change the second root pass-
word with mysqladmin. The following lines summarize the commands that must be executed. Of
course, you must replace uranus.sol and uranus with the real name of your computer, once with
and once without the domain name:
root# mysql -u root -p
Enter password: *******
mysql> USE mysql;
mysql> UPDATE user SET host="uranus.sol" WHERE host="uranus";
mysql> FLUSH PRIVILEGES;
mysql> exit
root# mysqladmin -u root -h uranus password ‘secret’
Extensive background information on MySQL access management can be found in Chapter 11.
The problem with incorrect host names in the MySQL access database has to do with the Linux net-
work configuration and is described in Chapter 11.
Installation Under Red Hat Enterprise Linux 4
Red Hat Enterprise Linux 4 contains Apache 2, PHP 4.3, Perl 5.8, and MySQL 4.1. However, to follow
the examples of this book, you need PHP 5 and MySQL 5. The following sections carry out a custom
installation step by step.
• Install Apache 2 (included package)
• Install MySQL 5 (package from dev.mysql.com)
• Compile PHP 5
• Install Perl 5.8 (included package)
The installation instructions assume that none of the above programs, nor PHP 4.3 or MySQL 4.1,
was installed. If any of them have been, then they should be deinstalled with system-config-packages
or with rpm -e.
My installation was tested under Red Hat Enterprise Linux 4 ES. The information given should
hold as well for other RHEL versions and, with some restrictions, for Fedora. (Fedora Core 4 contains
PHP 5 packages, so you can save the trouble of compilation.)
Installing Apache 2
To install Apache 2, launch, using APPLICATIONS | SYSTEM SETTINGS | ADD/REMOVE APPLICATIONS, the pro-
gram system-config-packages. There activate the option WEB-SERVER and then click on the link
Details. In the detail dialog, deactivate the packages php-ldap and php (see Figure 2-9). Then start
the installation with the button UPDATE.
CHAPTER 2 ■THE TEST ENVIRONMENT 31
5351c02_final.qxd 8/26/05 4:53 PM Page 31
www.it-ebooks.info
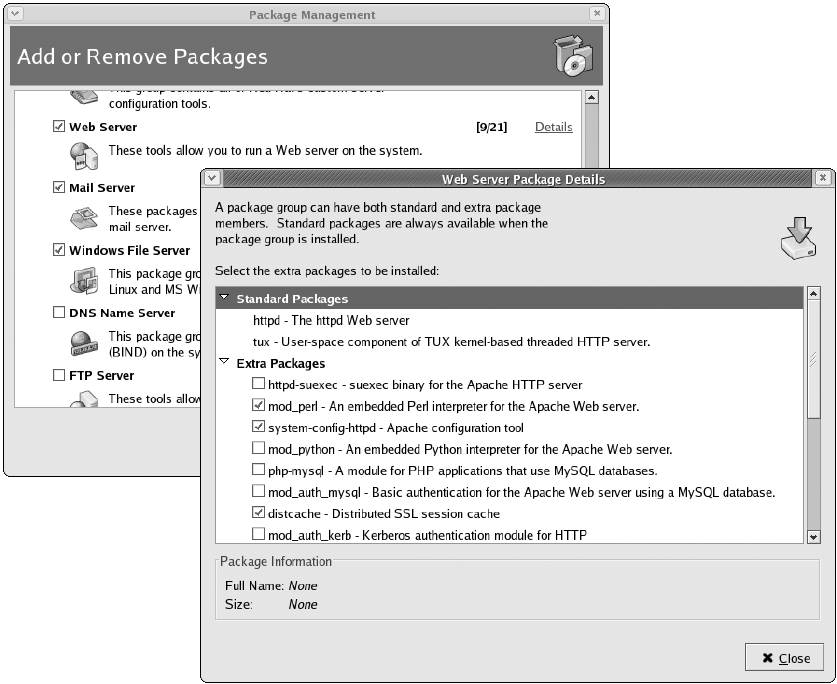
To start Apache, execute the following command:
root# /etc/init.d/httpd start
If you want Apache to be started each time the computer is turned on, then execute as well the
following two commands:
root# chkconfig —add httpd
root# chkconfig —level 35 httpd on
To test whether the web server is actually running, open the page http://localhost with a web
browser. You should see an Apache test page. Then there are two directory specifications: configura-
tion files, /etc/httpd/*; web files /var/www/html.
Installing MySQL 5
The installation of the MySQL packages is done as under SUSE Linux. In brief, download the packages
MySQL server, MySQL client, and MySQL shared from dev.mysql.com and install them with rpm -i:
CHAPTER 2 ■THE TEST ENVIRONMENT32
Figure 2-9. Installation of Apache under Red Hat Enterprise Linux 4
5351c02_final.qxd 8/26/05 4:53 PM Page 32
www.it-ebooks.info
root# rpm -i MySQL-server-5.0.n-0.i386.rpm \
MySQL-client-5.0.n-0.i386.rpm \
MySQL-shared-5.0.n-0.i386.rpm
Under Red Hat the MySQL server is installed in such a way that it is started automatically each time
the computer is turned on. The insserv command given in the previous section is therefore unnec-
essary (and if it were, under Red Hat, it would be —addmysql).
Then execute the following commands to secure the MySQL user root with a password. Of
course, give your computer name instead of hostname:
root# mysqladmin -u root password 'secret'
root# mysqladmin -u root -h hostname password 'secret'
MySQL 5.0.3 is incompatible with the SELinux default installations from RHEL 4. This has the
consequence that many commands (e.g., SHOW DATABASES) do not work. It is unclear whether new
versions of the MySQL server or new versions of the SELinux policy will solve this problem. Should
that not be the case, you must deactivate SELinux for the MySQL server. To do this, execute as root the
command system-config-securitylevel, switch into the dialog SELINUX, search in SELINUX POLICY for
the option SELINUX SERVICE PROTECTION | DISABLE SELINUX PROTECTION FOR MYSQLD DAEMON, and activate
this option. The MySQL server then must be restarted.
Compiling PHP 5
Installing the Development Tools
Before you begin compilation, you need various development tools (compiler, make, etc.). To install
these programs, launch system-config-packages, activate the group, and install the programs con-
tained therein.
In my test system, this seemingly trivial problem caused mammoth headaches: an update pre-
viously carried out with up2date was apparently in conflict with the development packages, and
system-config-packages was incapable of resolving the package dependencies.
I eventually installed the necessary programs with an up2date command. The most current
versions of the desired packages and all dependent packages were installed from the Internet. The
command assumes that you have set up up2date and have access to a fast Internet connection.
Depending on what packages are already installed in your system, it could happen that the follow-
ing command should be extended to include other packages:
root# up2date gcc gcc.c++ make autoconf gettext binutils bison flex \
libxml2 libxml2-devel libjpeg libjpeg-devel \
libpng libpng-devel libpng10 libpng10-devel \
gd gd-devel httpd-devel
In addition, for your MySQL installation you will need a suitable MySQL-devel package with the
developer files. You can find the package at dev.mysql.com for download. Installation is carried out
with rpm:
root# rpm -i MySQL-devel-5.0.n.i386.rpm
Downloading and Installing PHP 5 Source Code
The source code for PHP 5 can be found at the following site as a *.tar.bz2 archive:
http://www.php.net/downloads.php
The directory /usr/local/src will be used for all further work. To be able to work there as a regular
user, as root, change the owner of this directory:
CHAPTER 2 ■THE TEST ENVIRONMENT 33
5351c02_final.qxd 8/26/05 4:53 PM Page 33
www.it-ebooks.info
root# chown username.username/usr/local/src
Now unpack the PHP 5 source code in this directory:
user$ cd /usr/src/linux
user$ tar xjvf php-5.0.n.tar.bz2
user$ cd php-5.0.n
Compiling PHP 5
With ./configure you specify the options with which PHP is to be compiled. If you wish to use par-
ticular PHP extensions, you must specify additional options. The configure command given here
suffices for the examples in this book. When you input the commands on a single line, the backslash
should be omitted.
A couple of words on the option configure are in order: —prefix specifies where PHP 5 is to
be installed; —with-apxs2 means that PHP 5 is to be compiled as an extension module for Apache
2. The directory that follows specifies the location for the Apache module. —with-libxml-dir spec-
ifies where the XML libraries are located. Analogously, —with-zlib-dir gives the path to the zlib
library.
—with-mysql specifies that PHP is to be compiled with the traditional mysql interface (see
Chapter 15). The path that follows points to the MySQL installation directory, which in the pre-
compiled MySQL packages from dev.mysql.com is simply /usr.
—with-mysqli specifies that the new mysqli interface is to be integrated into PHP (see Chap-
ter 15). The file that follows is part of the MySQL-devel package. This involves a script that gives
information about the installed MySQL version and its installation locations.
The additional —with-xxx and —enable-xxx options activate various supplementary functions
of PHP. An endless list with further options is given by the command ./configure —help. An exam-
ple configure command follows:
user$ ./configure —prefix=/usr/local/php5 \
—with-apxs2=/usr/local/apache2/bin/apxs \
—with-libxml-dir=/usr/lib \
—with-zlib —with-zlib-dir=/usr/lib \
—with-mysql=/usr —with-mysqli=/usr/bin/mysql_config \
—with-jpeg-dir=/usr —enable-exif \
—with-gd —enable-soap —enable-sockets \
—enable-force-cgi-redirect —enable-mbstring
If configure complains that certain programs or libraries are missing, you must install these
with up2date and then execute configure again.
To compile, execute the command make. The process takes several minutes. (If you later exe-
cute ./configure again with different options, you must execute make clean before make. This
deletes the results of previous compilations.)
user$ make
CHAPTER 2 ■THE TEST ENVIRONMENT34
5351c02_final.qxd 8/26/05 4:53 PM Page 34
www.it-ebooks.info

■Tip If a large number of
multiple-defined
errors for the library libmysql occur during compilation, then
./configure has introduced an error in the Makefile. (This has happened frequently in my tests; it remains
unclear why.)
The solution consists in opening the file Makefile in an editor before executing make. There, search for the
line
EXTRA_LIBS = …
. In this line, you will find
-lmysqlclient
contained twice. Delete one occurrence, save the
file, and execute make again.
Finally, the freshly compiled PHP module must be installed in such a way that Apache can find
it. So make install must be executed by root:
root# make install
PHP 5 is thereby installed in the directory /usr/local/php5. The place for the configuration file
php.ini is /usr/local/php5/lib/. By default, this file does not yet exist. That is, PHP 5 runs with the
default settings (which will suffice for the time being). The pattern for *.ini files can be found in
/usr/local/src/php-5.n.
Changing the Apache Configuration; Restarting Apache
The next step consists of altering the Apache configuration file /etc/httpd /conf/httpd.conf so
that Apache uses the PHP 5 module. To do this, open the file in a text editor and add the line given
below in boldface:
# changes in /usr/local/apache2/conf/httpd.conf
...
LoadModule php5_module modules/libphp5.so
AddType application/x-httpd-php .php
...
### Section 2: ...
The web server must be restarted before Apache can use the module:
root# /etc/init.d/httpd restart
To test whether PHP 5 is working, create the test file /var/www/html/phptest.php. This file must be
readable from the Apache account nobody and have the following content:
<? phpinfo(); ?>
Now look at the page http://localhost/testphp.php with your web browser. The result should look
like Figure 2-10.
CHAPTER 2 ■THE TEST ENVIRONMENT 35
5351c02_final.qxd 8/26/05 4:53 PM Page 35
www.it-ebooks.info

Installing Perl 5.8
Perl 5.8 is installed under Red Hat Linux by default. What is missing are the modules perl-DBI and
perl-DBD-MySQL, which allow Perl to communicate with MySQL. These packages are included, but they
cannot be installed with the program system-config-packages, because MySQL 4.1 would also be
installed. Therefore, manual installation with the command rpm -i is required. With Red Hat Enter-
prise ES 4 these two packages are on CD 2. Insert the disk and execute the following commands:
root# cd /mnt/cdrom/RedHat/RPMS
root# rpm -i perl-DBI-*.rpm
root# rpm -i perl-DBD-MySQL-*.rpm
Hints for testing the Perl environment and programming MySQL applications appear in Chapter 16.
Compiling the MySQL Developer Version (Linux)
This section is directed at MySQL pros who wish to compile the current MySQL developer version
themselves. This not particularly difficult under Linux, but it is advisable to do this only under cer-
tain circumstances, and then only if you are unwilling to wait several months for the next version of
MySQL. (The first test versions of MySQL 5.0 appeared every half year. So it is wearying to be work-
ing continually with the latest official version, while in the current developer version, countless
errors have been corrected and new functions implemented.)
If you already have MySQL installed on your computer, you should make a backup of all your
databases with phpMyAdmin or mysqldump. Then stop MySQL (/etc/init.d/mysql stop) and delete
the existing MySQL installation.
CHAPTER 2 ■THE TEST ENVIRONMENT36
Figure 2-10. PHP 5 under Red Hat Enterprise Linux 4
5351c02_final.qxd 8/26/05 4:53 PM Page 36
www.it-ebooks.info
Installing Bitkeeper
The source code of the MySQL developer version is not available on the Internet as a tar package.
Instead, MySQL enables access to the source code through the version control system Bitkeeper.
The first step is to download Bitkeeper from http://www.bitmover.com/cgi-bin/download.cgi and
install it. A no-charge registration is required. To install Bitkeeper in the directory /usr/local/bk,
execute the following commands:
root# chmod u+rx bk-<version>-x86-glibc23-linux.bin
root# ./bk-<version>-x86-glibc23-linux.bin /usr/local/bk
Downloading the MySQL Developer Version
The following commands show how to install the MySQL 5.0 developer version. The commands
assume that the user user has write permission in /usr /src. The export command is necessary only
if your web access is via a proxy server. In this case, you must specify the address and port number:
user$ cd /usr/src/
user$ export http_proxy="http://proxy.firma.de:8080/"
user$ bk clone bk://mysql.bkbits.net/mysql-5.0 mysql-5.0
The following two commands release the source code files for local use:
user$ cd /usr/src/mysql-5
user$ bk -r edit
At the first startup of bk, its license must be verified (press Qto terminate the display of the
license text and then confirm the license with Y). Then bk will give extensive information about
which files it has just copied, deleted, or synchronized.
Compiling MySQL
To compile MySQL with InnoDB, execute the following commands:
user$ aclocal; autoheader; autoconf; automake
user$ (cd innobase; aclocal; autoheader; autoconf; automake)
user$ ./configure
user$ make
root# make install
Setting Up the mysql Database for Managing Access Privileges
Before the MySQL server can be started for the first time, the database mysql must be set up for man-
aging MySQL access privileges. The following lines assume that the database files are to be stored in
/usr/local/mysql and that the MySQL server uses the account mysql. (If MySQL has already been
run on your computer, you can continue to use its databases. In this case, skip the following two
commands.)
root# ./scripts/mysql_install_db —ldata=/usr/local/mysql
root# chown -R mysql /usr/local/mysql
Configuration Files and Init-V Scripts
To start the MySQL server you need an Init-V script. In the MySQL source files you will find a suitable
model in support-files/mysql.server. The file /etc /my.cnf is used to configure various MySQL
parameters. Here, too, the support-files directory contains a model:
CHAPTER 2 ■THE TEST ENVIRONMENT 37
5351c02_final.qxd 8/26/05 4:53 PM Page 37
www.it-ebooks.info
root# cp support-files/mysql.server /etc/init.d/mysql
root# cp support-files/my-medium.cnf /etc/my.cnf
Now you must make some small changes in the two files, which are shown in boldface in the
following lines of code. /etc/my.cnf governs which socket file client and server should be used for
local communication. By default, the MySQL server uses /tmp/mysql.sock, while PHP is generally
set to /var /lib/mysql/mysql.sock:
# Changes in /etc/my.cnf
...
[client]
socket = /var/lib/mysql/mysql.sock
...
[mysqld]
socket = /var/lib/mysql/mysql.sock
...
/etc/init.d/mysql is responsible for starting the MySQL server. There you specify where the
MySQL binary files and where the MySQL database files are to be found. (If MySQL has already been
run on your computer, you can continue to use its databases. In this case, set datadir so that it
points to the previous database directory. As a rule, this is /var/lib/mys.)
# Changes in /etc/init.d/mysql
...
basedir=/usr/local
datadir=/usr/local/mysql
...
Starting the MySQL Server
To start the MySQL server, finally, execute the following command:
root# /etc/init.d/mysql start
If you wish the server to start automatically when the computer is booted up, execute the following
two commands:
root# insserv mysql (for SUSE)
root# chkconfig —add mysql (for Red Hat, Fedora, Mandrakelinux, etc.)
Configuring Apache
Configuration Files
Almost all Apache settings are governed by the configuration file httpd.conf. This file’s location
depends on the operating system:
Windows: Programs\Apache Group\Apache2\conf\httpd.conf
Red Hat Enterprise Linux:/etc/httpd/conf/httpd.conf, /etc/httpd/conf.d/*.conf
SUSE Linux: /etc/apache2/httpd.conf, /etc/apache2/*.conf, /etc/apache2/conf.d/*.conf, /etc/
sysconfig/apache2
With Red Hat and SUSE, the configuration is not to be found in a single file. It is scattered
among countless files in the directories given above. You should use grep as needed to search for
a file in which you wish to make changes.
CHAPTER 2 ■THE TEST ENVIRONMENT38
5351c02_final.qxd 8/26/05 4:53 PM Page 38
www.it-ebooks.info

You need to take particular care with SUSE. There, some *.conf files are generated afresh at
each start. For this reason, you should make configuration changes under SUSE either directly in
/etc/sysconfig/apache2 or in a separate file, such as /etc/apache2/httpd.conf.local. To ensure
that this file is looked at, you must add the file name to the variable APACHE_CONF_INCLUDE_FILES
in the file /etc/sysconfig/apache2.
■Caution Configuration changes do not become effective until Apache has been restarted. Under Windows, you
must use the forward slash as the separator in Apache configuration files, not the usual backslash.
Elementary Settings
There is insufficient space here to give too many details on the Apache configuration. In the follow-
ing, then, only the most elementary settings from httpd.conf will be described.
ServerName: This setting gives the network name of the computer on which Apache is run-
ning. It is under this name that the web server is reachable by other computers on the network.
(If this setting is absent, Apache attempts to discover the network name on its own.)
DocumentRoot: This setting gives the directory in which the web files (*.html, *.php, etc.) are
located. Table 2-2 summarizes the default settings for various installations.
LoadModule: When Apache is compiled so that it can load modules at run time (which is gen-
erally the case), LoadModule instructions are necessary, which look something like this:
LoadModule php5_module modules/libphp5.so # for Linux
LoadModule php5_module "c:/php5/php5apache2.dll" # for Windows
AddType: AddType instructions create the association between file identifiers and application
type. Thanks to the following setting, Apache knows that *.php should be executed by the PHP
interpreter:
AddType application/x-httpd-php .php
PHPIniDir: This setting is passed to the PHP interpreter and tells it from what location it
should read the file php.ini. This option should make the configuration of PHP easier; it often
fails for some quite trivial reason: PHP could not find the php.ini file or it evaluated obsolete
versions of the file. PHPIniDir has been available only since Apache 2 and is evaluated only by
the Windows version of Apache:
PHPIniDir "C:/php5"
AddDefaultCharset: This setting tells which character set the web files have.
<Directory “xxx”>: This block, consisting of many lines, describes all the properties of a
web directory. <Directory /> contains the default settings that hold for, among others,
DocumentRoot. The <Directory> block ends with </Directory>. The following lines give an
example:
<Directory /> or <Directory "directory ...">
...
AllowOverride AuthConfig FileInfo
Option Indexes
</Directory>
CHAPTER 2 ■THE TEST ENVIRONMENT 39
5351c02_final.qxd 8/26/05 4:53 PM Page 39
www.it-ebooks.info

Within the <Directory> block, various options control what is allowed or forbidden in this
directory and who has access to it. Here only two options will be presented:
AllowOverride: It is often desirable that Apache not evaluate the file .htaccess in web
directories and apply the supplementary settings contained therein to the directory (see
the next section). For this to work, you must specify with AllowOverride which changes are
permissible. Possible settings are None (forbids all changes, often is the default), All (per-
mits all changes), and a combination of AuthConfig (authentication), FileInfo (language
and character set settings, error file), Indexes,Limit (access privileges), and Options.
Options Indexes: If the address http://computername/directory/ is given in the browser,
Apache returns automatically, depending on the configuration of DirectoryIndex, the
page index.html, index.php, etc. (more on this later). If no DirectoryIndex files exist, then
Options Indexes has the effect that Apache displays a table of contents. This is often useful
during program development, but thereafter can represent a security risk. (In addition to
Indexes there are many other keywords that can be set with Options.)
DirectoryIndex: With this option you can specify one or more files that Apache looks for when
only a directory is given in the web browser. A usual setting is index.html index.php main.php
default.php. Now if only the address http://computername/directory/ is given in the browser,
Apache searches this directory for the given files and returns the first valid file.
Default Directory for Web Files
Table 2-2 summarizes the directories in which web files (*.html, *.php, etc.) are stored by default.
In this directory, or in subdirectories that you create, you can store your own PHP examples.
Note that Apache runs under a separate account under Linux (under Red Hat it is apache,
under SUSE it is wwwrun). With all web files, access privileges should be set such that the user and
also Apache can read them. To change access privileges use the Unix commands chown and chmod.
For example, chmod a+x * has the effect that everyone can read all files.
Table 2-2. Directory with Web Files
Installation DocumentRoot Location
Windows C:\Programs\Apache Group\Apache2\htdocs
Red Hat / Fedora by default /var/www/html
SUSE Linux by default /srv/www/htdocs
Access Privileges for Individual Directories (.htaccess)
Once Apache is running, everyone on the network or with the Internet has access to all web pages
that Apache can process. This is not always desirable, particularly on development computers. There
are three options for restricting access to web pages:
Protection in httpd.conf: In httpd.conf you can set precisely from what addresses the web pages
of a particular directory can be read. Space limitation forbids a description of these mechanisms.
Protection via a Firewall: If a firewall is running on the development computer, it can be so
configured that Apache cannot be contacted from outside (that is, over the network). The web
pages can then be viewed only from the local computer.
Password Protection of an Individual Directory: For such protection, place in the web direc-
tory to be protected a file with the name .htaccess and specify that this directory can be read
only after authentication witha user name and password. Apache evaluates .htaccess and dis-
om this directory with their browsers.
CHAPTER 2 ■THE TEST ENVIRONMENT40
5351c02_final.qxd 8/26/05 4:53 PM Page 40
www.it-ebooks.info

In what follows, we will deal with the last of these variants. It is also useful for securing a directory
that is publicly accessible over the Internet from unknown users. A typical example is the PHP program
phpMyAdmin, which is used on countless web sites for administration of MySQL (see Chapter 6).
Password File
The first step in password protection is to create a password file. For security reasons, the password
data are not stored in .htaccess, but in a separate file. This file can be located outside the publicly
accessible web directories. In the following example the password file is named site.pwd.
The password file is generated with the Apache auxiliary program htpasswd. (If you are working
under SUSE with Apache 2, the command is htpasswd2.) Choose the option -c (create), and specify
the name of the password file and a user name. The program will ask you for the desired password,
and then it generates the password file, in which the user name appears in plain text, the password
in encrypted form.
> htpasswd -c site.pwd myname
New password: **********
Re-type new password: **********
Adding password for user myname
To add an additional combination of user name and password to a preexisting password file, exe-
cute htpasswd again, this time without the option -c:
> htpasswd site.pwd name2
New password: **********
Re-type new password: **********
Adding password for user name2
The resulting password file will look something like this:
myname:$apr1$gp1.....$qljDszVJOSCS.oBoPJItS/
name2:$apr1$A22.....$OV01Nc1FcXgNsruT9c6Iq1
■Tip If you wish to execute htpasswd.exe under Windows, you have to open a command window (command
prompt) and specify the complete path name inside quotation marks (usually "Programs\Apache Group\Apache\
bin\htpasswd.exe").
If you want to create or enlarge the password file in a directory of an Internet service provider, then use ssh or
ssh to access the computer of the ISP (in order to execute htpasswd there). Many ISPs make available other con-
figuration aids.
The .htaccess File
When a file with the name .htaccess is located in a web directory, Apache evaluates all configuration
settings in this file. The same syntax holds as in httpd.conf. However, only certain directory-specific
settings can be made.
With the following .htaccess file, the content of a directory (including all subdirectories!) is
protected:
AuthType Basic
AuthUserFile "c:/Programs/Apache Group/Apache2/htdocs/test/site.pwd"
AuthName "myrealm"
Require valid-user
AuthUserFile specifies the complete file name of the password file. AuthName denotes the extent
(realm) for which access is valid. The idea is that you shouldn’t have to log in every time you wish
CHAPTER 2 ■THE TEST ENVIRONMENT 41
5351c02_final.qxd 8/26/05 4:53 PM Page 41
www.it-ebooks.info
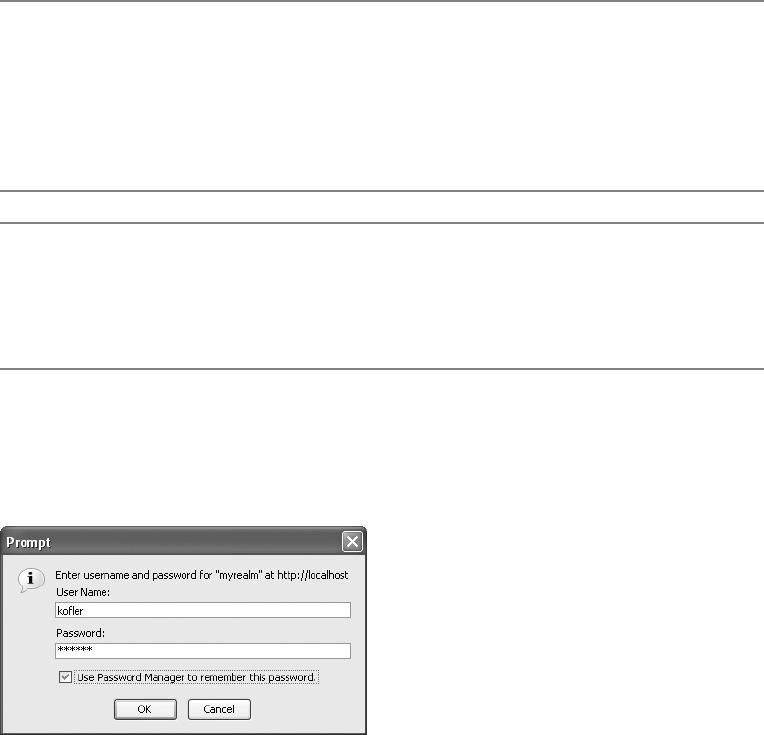
to access directories protected by .htaccess. Once you have logged in with a particular AuthName
designation, this login is valid for all directories with this AuthName designation.
For .htaccess this means that you give the same AuthName character string for directories with
a common login. Conversely, you can give differing domain names for different directories; then a
new login is required for each directory.
Require valid-user means that every valid combination of user name and password is valid
for login. Alternatively, you could specify here that a login is permitted only for specified users:
Require user myname name2 name3
Further details on user authentication and .htaccess configuration can be found, for example,
on these web pages:
http://apache-server.com/tutorials/ATusing-htaccess.html
http://www.apacheweek.com/features/userauth
■Caution .htaccess files are effective only if httpd.conf is permitted in the Apache configuration file.
If the Apache default configuration contains the entry AllowOverride None for the affected directory or for
the default directory /, then all .htaccess files are without any effect. If only individual options are specified in
AllowOverride, but in .htaccess additional settings are changed, an error can even be triggered that makes
it impossible to view certain files in the directory.
For .htaccess files to be considered, httpd.conf must contain the setting AllowOverride All or
AllowOverride AuthConfig for the affected directory (that is, in the relevant <Directory> group).
■Tip Under Windows it is impossible using Windows Explorer to create a file with the name .htaccess. Explorer
believes that this name is invalid. Name the file htaccess.txt, and then use an input request window to rename
the file with the command RENAME htaccess.txt .htaccess.
Windows users will perhaps wonder why the file name must begin with a period. This is the usual method under
Unix/Linux to identify hidden files. Such files are not displayed by file managers by default.
Access to a Protected Directory
As soon as you attempt to read a file from a protected directory with a browser, the web browser
presents a login dialog (see Figure 2-11).
CHAPTER 2 ■THE TEST ENVIRONMENT42
Figure 2-11. Access to a web directory protected by .htaccess
5351c02_final.qxd 8/26/05 4:53 PM Page 42
www.it-ebooks.info

Configuring PHP
The settings and options of the PHP interpreter are governed by the file php.ini. Table 2-3 summa-
rizes where this file is usually found.
Table 2-3. Location of the PHP Configuration File
Installation Location of php.ini
Windows C:\php5\php.ini
Linux self-compiled /usr/local/php5/lib/php.ini
Red Hat / Fedora by default /etc/php.ini
SUSE by default /etc/php5/php.ini
Under Windows, the location of php.ini is usually set by PHPIniDir in the Apache configuration
file httpd.conf (since Apache 2). If this setting is lacking, the PHP interpreter php.ini searches in
the Windows directory.
■Note When the PHP interpreter php.ini cannot find this file or if it doesn’t exist, it uses the default setting.
If you are uncertain whether or from where the PHP interpreter php.ini is reading, have a look at the PHP test
page, which is created by the PHP function phpinfo() (see Figure 2-5).
The pattern for php.ini can be found under Windows in the PHP installation directory (e.g., C:\php5\) and
under Linux after a self-installation in /usr/local/src/php-5.n/. As a starting point for your own settings, you
are best off using the provided file php.ini-recommended.
Changes in php.ini become effective only after Apache is restarted.
Elementary Settings
There is insufficient space here to go into the countless options in php.ini. In what follows we shall
therefore describe only the most important options, always giving you the settings used in this book.
display_errors = On:This setting has the effect that error alerts are displayed when there is an
error in a PHP script. This is very useful during program development. It should be turned off
for servers on the Internet, since error messages often give information about the code, which
could lead to a breach in security. (If during the development of a PHP page you see a blank
page in your web browser instead of a result, then the display_errors setting is almost always
to blame.)
error_reporting = E_All:This setting results in all PHP errors and warnings being displayed.
magic_quotes_gpc = On:This setting has the effect that when data is transferred between web
pages (Get/Post/Cookie), special characters such as ‘, “, \, and the zero byte are replaced by \’,
\”, \\, and \0. Details on Magic Quotes can be found in Chapter 15. This setting was turned to
On because currently (alas), the default setting is used by almost all Internet service providers,
and in developing code it is useful to have the same settings as those of the ISP.
default_charset:This option should either not be set at all (which is the case in the default
configuration) or for the examples of this chapter be set to “iso-8859-1”. default_charset gov-
erns whether the PHP interpreter should report in the transfer of HTML documents that the
pages are coded according to a particular character set.
CHAPTER 2 ■THE TEST ENVIRONMENT 43
5351c02_final.qxd 8/26/05 4:53 PM Page 43
www.it-ebooks.info

max_execution_time = 30:This option tells after how much time (in seconds) the execution of
the PHP script should be aborted.
max_imput_time = 60:This option specifies how long PHP should wait for data (e.g., during
file upload by a client to the PHP program).
file_uploads = On:This setting has the result that PHP can process file uploads.
upload_max_filesize = 2M:This option specifies how large a file can be in a file upload.
post_max_size = 8M:This option specifies the maximum size of a data set that can be sent to
the PHP program via a (POST) form.
memory_limit = 8M:This options specifies how much memory a PHP script is allowed to take up.
PHP Extensions
PHP extensions enable the use of additional functions that are not integrated directly into PHP.
Which functions are directly integrated into PHP and which are realized as extensions depends on
how PHP is compiled.
• If you compile PHP yourself under Unix/Linux, you generally integrate desired extensions
directly into the PHP interpreter (through suitable ./configure options) and therefore do not
need to bother with extensions in php.ini.
• In some Linux distributions (e.g., SUSE), PHP is delivered strongly modularized; that is, each
extension can be installed individually as a package. Thus in this case as well you need not
be concerned with php.ini; the package management system manages the work for you.
• Most likely, you will be dealing with the PHP extension mechanism for Windows. The PHP ver-
sion for Windows contains hardly any supplementary functions. Instead, all possible extensions
are provided in the form of extension libraries (*.dll files in the subdirectory ext).
If you wish to use extensions, the variable extension_dir must be set in php.ini in such a way
that it specifies the directory in the PHP installation:
extension_dir = "c:\php5\ext\"
Furthermore, you must specify in php.ini the desired extensions via extension settings. The line for
the OpenSSL module would look like this:
extension=php_openssl.dll
php.ini normally already contains a host of such extension instructions, to which a semicolon is
prefixed. In php.ini, the semicolon indicates a comment. To use the extension, you must remove
the semicolon. Under Unix/Linux, the file identifier for libraries is .so instead of .dll.
■Note Many PHP extensions access additional libraries. These must be installed in such a way that the PHP
interpreter can find them. Under Windows, this means that such libraries must be copied into the Windows direc-
tory or the Windows system directory.
For example, the PHP extension DLL php_mysql.dll uses functions from libmysql.dll. This file is included
with the current versions of PHP, but by default it is located in the PHP directory, where it will not be found by the
PHP interpreter. Therefore, you must copy the file libmysql.dll into the Windows directory before you restart
Apache. If you neglect this copying, the Apache restart will fail with an error message that a DLL cannot be loaded.
CHAPTER 2 ■THE TEST ENVIRONMENT44
5351c02_final.qxd 8/26/05 4:53 PM Page 44
www.it-ebooks.info

Configuring MySQL
There are many settings that can be made and changed via a configuration file. Table 2-4 summa-
rizes the usual location of this configuration file.
Table 2-4. Location of the MySQL Configuration File
Installation Name of the MySQL Configuration File
Recent Windows installations C:\Programs\MySQL\MySQL Server n.n\my.ini
Old Windows installations C:\my.cnf or Windows\my.ini
Linux /etc/my.cnf
Basically, there are default setting for all MySQL options, so that it is possible to run MySQL
without a configuration file or without changes to an existing file. Details on the syntax and count-
less available options in the configuration file can be found in Chapters 14 and 22.
Launching the MySQL Server
Changes in configuration files become effective only after a restart of the MySQL server:
Windows: Under Windows, the simplest way to restart the server is to execute MYSQL SYSTEM
TRAY MONITOR. This is a small icon on the task bar (near the clock), in which you can execute the
commands SHUTDOWN INSTANCE (end the server) and START INSTANCE.
If SYSTEM TRAY MONITOR does not run, launch the program in the menu START | PROGRAMS |
MYSQL. If the program does run but is not shown in the task bar, the problem is usually the
task bar setting. Click the task bar with the right mouse button, execute the command TASKBAR,
and deactivate the option HIDE INACTIVE ICONS.
Linux: Under Unix/Linux everything is much easier. A brief command suffices. To restart, you
use the relevant Init-V script, which you execute first with the parameter stop and then with the
parameter start. Depending on the distribution, this script has the name mysql or mysqld.
root# /etc/init.d/mysql[d] restart
CHAPTER 2 ■THE TEST ENVIRONMENT 45
5351c02_final.qxd 8/26/05 4:53 PM Page 45
www.it-ebooks.info

Introductory Example
(An Opinion Poll with PHP)
The best way of becoming familiar with a new database or development system is to work through
a full-fledged example. Thus in this chapter our goal is to create a web site for the purpose of con-
ducting an opinion poll.
To a certain extent this is a trivial example, and its results certainly could be accomplished
without the use of MySQL. However, it brings into focus the interplay between MySQL and a script
programming language (for this example we have used PHP). Moreover, our example casts light on
the entire process of database design from first beginnings right up to the completed application.
Overview
Our opinion poll consists of two pages. The file vote.html contains a simple questionnaire with a
single question: What is your favorite programming language for developing MySQL applications?
The question is followed by a selection of choices for a response (see Figure 3-1). After one of the
options is selected and OK is clicked, the result page results.php is displayed (see Figure 3-2).
Assumptions
You can try out this example on my web site (www.kofler.cc). However, from a pedagogical point
of view it would be better for you to attempt to re-create this example for yourself. For this you will
need a test environment consisting of Apache/MySQL/PHP that permits you the following:
• creation of a new MySQL database (that is, you need sufficient privileges to be able to exe-
cute CREATE DATABASE)
• moving files into a directory on the web server
• executing PHP script files
Information on setting up such a test environment on a local computer can be found in the previ-
ous chapter.
A complete understanding of our example requires some basic knowledge of databases. If you
have never had much, if anything, to do with databases and as a consequence run into difficulties
in understanding what is going on, please do not despair. Chapter 8 provides an introduction to
relational database systems, while Chapter 9 explains how to use the database query language SQL.
In this example, the programming language PHP will be used. The code is rather straightfor-
ward; that is, you should have no difficulty in understanding it even you don’t know a word of PHP.
However, you should know in general how embedded script languages function in HTML. (The
Active Server pages developed by Microsoft are based on the same idea.) 47
CHAPTER 3
■ ■ ■
5351c03_final.qxd 8/26/05 4:56 PM Page 47
www.it-ebooks.info
Database Development
To save the results of our questionnaire with MySQL, you must first set up a database and then place
a table in that database. (Every MySQL database consists of tables. A particular feature of this exam-
ple is that only a single table is required. As a rule, when the requirements of the project are more
complex, several linked tables will be used.)
CHAPTER 3 ■INTRODUCTORY EXAMPLE (AN OPINION POLL WITH PHP) 48
Figure 3-1. The questionnaire
Figure 3-2. Results of the survey
5351c03_final.qxd 8/26/05 4:56 PM Page 48
www.it-ebooks.info

Executing the mysql Command-Line Interpreter
Both operations—generating a database and creating a new table—require that you communicate
with MySQL. Under Unix/Linux you execute the command mysql. Under Windows, execute the
menu command PROGRAMS | MYSQL | MYSQL SERVER N.N| MYSQL COMMAND LINE CLIENT.
■Note If mysql immediately terminates, possibly with an error message such as
Access denied for user xy
, then
either access to MySQL is completely denied to user xy, or it is protected by a password. In either case you must
invoke mysql with the options -u name and -p:
> mysql -u username -p
Enter password: xxx
Furthermore, mysql has dozens of other options. The most important of these are described in Chapter 4, while all
of them are collected in Chapter 22. Background information on the MySQL security system (access protection,
passwords, privileges) can be found in Chapter 11.
The distinction between MySQL and mysql is somewhat confusing: MySQL denotes the database server, which
normally is launched automatically at system startup. The server runs continuously in the background. (This chapter
assumes that the server is up and running.) The program name of the server is, depending on the operating system,
mysqld (Unix/Linux) or mysqld.exe,mysqld-nt.exe, etc. (Windows).
In contrast to these, we have the command-line interpreters mysql and mysql.exe. These programs come
into play when administration or maintenance are to be carried out interactively. The program mysql has the task
of transmitting interactive commands to the server and displaying the results of these commands on the monitor.
Alternatives to mysql, such as the MySQL Administrator and the convenient HTML interface phpMyAdmin, will
be introduced in Chapters 5 and 6.
In mysql you can now input commands that will be transmitted to the database server (see
Figure 3-3). To test whether a connection can even be made, execute the command STATUS. The
result should be the display of various pieces of status information about the database (such as
the version number):
mysql> STATUS;
mysql Ver 14.7 Distrib 5.0.2, for Win95/Win98 (i32)
Connection id: 2
Current database:
Current user: ODBC@localhost
SSL: Not in use
Using delimiter: ;
Server version: 5.0.2-alpha
Protocol version: 10
Connection: localhost via TCP/IP
Server characterset: latin1
Db characterset: latin1
Client characterset: latin1
Conn. characterset: latin1
TCP port: 3306
Uptime: 12 days 1 hour 26 min 20 sec1
Threads: 2 Questions: 3099 Slow queries: 0 Opens: 6
Flush tables: 1 Open tables: 0 Queries per second avg: 0.003
CHAPTER 3 ■INTRODUCTORY EXAMPLE (AN OPINION POLL WITH PHP) 49
5351c03_final.qxd 8/26/05 4:56 PM Page 49
www.it-ebooks.info
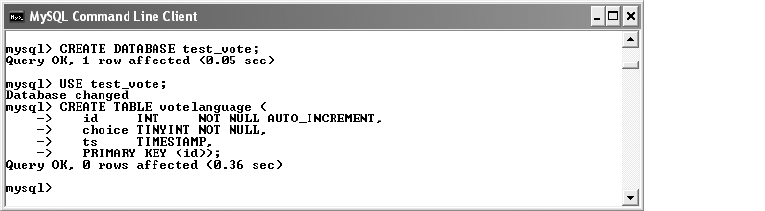
If problems arise in starting up mysql or in executing status, the most probable cause is that
the database server hasn’t even been started or that access has been denied to you. More informa-
tion on installation can be found in Chapter 2, while information on access and security can be
found in Chapter 11.
Setting Up the Database
To set up the new database test_vote, in mysql execute the command CREATE DATABASE. Note that you
must end the command with a semicolon. In the following two lines your input appears in boldface:
mysql> CREATE DATABASE test_vote;
Query OK, 1 row affected (0.09 sec)
The reply delivered by mysql may look a bit weird. The output 1 row affected indicates that in the
list of all databases, which internally, of course, is in the form of a MySQL table, one row was changed.
What is important here is only that the CREATE DATABASE command was executed correctly.
The database name test_vote was not chosen quite arbitrarily. In the default setting of MySQL
access privileges, every user is permitted to create databases on a local computer that begin with
the word “test.” In particular, when you are not the MySQL administrator (but rely on the help of a
system administrator), a name of the form test_xy can save any number of emails or telephone calls.
The drawback of the name test_xy is that every user of the local computer can edit, or even delete,
the database. This is no problem for this introductory example, but in the case of a real-life applica-
tion you probably will want to give your database a bit more security. Necessary information on this
can be found in Chapter 11.
Creating Tables
The database test_vote has been created, but it is not yet possible to store any information. For this you
need tables. To create a new table within the database test_vote, use the command CREATE TABLE.
Before you execute this command, however, you must specify the database into which the table
is to be placed. The requisite command for this is USE. It determines the default database to which
further commands are to be applied. (MySQL is managing other databases besides the newly created
database test_vote.)
CHAPTER 3 ■INTRODUCTORY EXAMPLE (AN OPINION POLL WITH PHP) 50
Figure 3-3. The MySQL monitor
5351c03_final.qxd 8/26/05 4:56 PM Page 50
www.it-ebooks.info

mysql> USE test_vote;
Database changed
mysql> CREATE TABLE votelanguage (
-> id INT NOT NULL AUTO_INCREMENT,
-> choice TINYINT NOT NULL,
-> ts TIMESTAMP,
-> PRIMARY KEY (id));
Query OK, 0 rows affected (0.75 sec)
The CREATE TABLE command may seem a bit strange at first. But just go ahead and input the
boldface commands listed above line for line. (You can terminate each command with Return.
The semicolon indicates to mysql that the end of a command has been reached.)
If you should make a typing error during the input of a command, MySQL will usually inform
you of this fact with an error message. You must now repeat the entire command. Using the cursor
keys ↑and ↓you can recall and correct previously input lines.
If MySQL has accepted CREATE TABLE in spite of a typographical error (because the command,
though semantically not what you had in mind, is nonetheless syntactically correct), you can delete
the incorrectly defined table with DROP TABLE votelanguage;. That accomplished, you can repeat
the command CREATE TABLE.
Instead of creating the table votelanguage via a CREATE TABLE command, you could, of
course, use an administration tool such as MySQL Administrator or phpMyAdmin. This assumes,
of course, that such a program is installed and that you have learned how to use it. The program
mysql is not known for its ease of use, but it has the advantage of offering the best way of docu-
menting the steps to be executed.
Now let us explain what is actually going on. With CREATE TABLE you have brought into being
a table with three columns, id, choice, and ts. Once the table is filled with data (namely, the results
of the survey), the content of the table can be displayed something like this:
id choice ts
1 4 20050114154618
2 5 20050114154944
3 4 20050114154953
4 3 20050114154954
5 3 20050114154957
6 6 20050114155012
7 3 20050114155021
8 1 20050114155027
...
The interpretation of these data is that the first person to respond to the survey chose the pro-
gramming language PHP, while the second chose VB, and the third selected PHP. The next respondents
chose, in order, Perl, Other, Perl, and C. The column id thus contains a running identification number
that identifies the lines (the data set). The column choice contains, in coded form, the selection made
by the survey participant, where the numbers 1 through 6 correspond to the programming languages
C, Java, Perl, PHP, VB, and Other. The column ts contains the time at which the query was executed.
(For example, the first participant filled out vote.html on January 14, 2005, at 15:46:18.)
■Note Like any other specialized subject, the database world has its own argot. Database vocabulary includes
the term
data record
for each line of the table above. Instead of
columns
(here id and choice) one often speaks
of
fields
.
CHAPTER 3 ■INTRODUCTORY EXAMPLE (AN OPINION POLL WITH PHP) 51
5351c03_final.qxd 8/26/05 4:56 PM Page 51
www.it-ebooks.info
In order to generate a table with the two columns id and choice, the following command would
suffice:
CREATE TABLE votelanguage (id INT, choice TINYINT, ts TIMESTAMP);
The result is that the column id is declared with the data type INT, and choice is declared to be
of data type TINYINT. This means that in theory, 231 individuals (2,147,483,648, that is) could partic-
ipate in our survey before the range for id was exhausted. (If id were declared as type UNSIGNED
INT, then the number of potential participants would be doubled.) In choice, on the other hand,
there are 216 different values available. (The data types INT and TINYINT are discussed in Chapter 8
together with the other MySQL data types.)
By this point, you may be wondering why I have plagued you with such a complicated com-
mand as CREATE TABLE when there is a much easier way to achieve the same result. The difference
between the complicated and simple variants is the difference between good and bad database cre-
ation. (And you wouldn’t want me to be leading you astray on our very first example, would you?)
The attribute AUTO_INCREMENT for the column id has the effect that with each new record the
appropriate value for id is automatically inserted. Thus when the results of the survey are saved, only
choice has to be specified, since the database takes care of id on its own. This attribute ensures a con-
sistent numbering of the data records, which is important for efficient management of the table.
The attribute NOT NULL ensures that actual values must be placed in both columns. It is not
permitted to store the data record NULL or (in the case of choice) not to insert any value at all. Thus
this attribute prevents invalid data records from being stored. (Go ahead and try to force MySQL to
accept such a data record. It will refuse and present you with an error message.)
PRIMARY KEY (id) has the effect that the column id is used to identify the data records. That
is the reason that the column was provided for in the first place, but MySQL is not so clever as to be
able to read your mind, and it requires that it be informed precisely as to what your wishes are. (In
this case, id will from now on be called a primary key.) The definition of a primary key has a decisive
influence on the speed with which data records can be accessed. That holds especially for linked
tables—but let us not get ahead of ourselves. We shall stick for the moment with simple tables, always
define a single primary key (and do so, if possible, for an INT field with the attributes NOT NULL
and AUTO_INCREMENT).
Why Make It Complicated,When It Could Be So Much Easier?
Perhaps it has occurred to you that we have presented a rather convoluted solution to an easy prob-
lem. It could done in a much simpler fashion. All we need to do is to control six counters, such as in
a table of the following form:
id counter
1 2
2 0
3 7
4 9
5 2
6 1
Such a display would mean that two participants expressed a preference for the C language, none
for Java, seven for Perl, nine for PHP, and so on. Each time a preference is registered, the corresponding
counter is incremented by 1. The database would consist altogether of six lines; one wouldn’t have to
worry about performance; memory requirements would be essentially zero—nothing but advantages!
And all of this is aside from the fact that the six counters could be effortlessly stored in a small text file.
In short, MySQL is totally unnecessary for this survey.
All right, then, you are correct! However, such an attitude is helpful only as long as we are deal-
ing with a simple application. What happens when you would like to offer each participant the
CHAPTER 3 ■INTRODUCTORY EXAMPLE (AN OPINION POLL WITH PHP) 52
5351c03_final.qxd 8/26/05 4:56 PM Page 52
www.it-ebooks.info
opportunity to make a comment? What if you allow the participants to fill out the questionnaire
only after a login (to rule out the possibility of multiple voting)? What if you wish to record the time
and IP address for each participant (again to secure against attempts at manipulating the survey)?
In all these cases, you would have to store the responses in a table like the one that we have
presented. (The table would have merely to be enlarged by a column or two. The structure of the
program can remain essentially the same.) So, if the conception of this example seems a bit overly
complicated at first glance, the reason is that we are keeping open the possibility, even in this first
example, of a later extension.
The Questionnaire
As we have mentioned already in the introduction, our entire project consists of two web pages. The
first page (vote.html) contains the questionnaire. This is pure HTML code (without PHP). The sec-
ond page (results.php) carries out two tasks: evaluating the questionnaire and displaying the results.
The HTML code of the questionnaire is given here, so that the code for evaluation in the next
section will be understandable. Most important are the attributes name and value of the elements
of the questionnaire. All of the radio buttons have the name vote, while value contains values between
1 and 6. The OK button has the name submitbutton, and as value the character string “OK” is used.
<!DOCTYPE HTML PUBLIC "-//W3C//DTD HTML 4.0//EN">
<!— php/vote/vote.html —>
<html><head>
<meta http-equiv="Content-Type"
content="text/html; charset=iso-8859-1" />
<title>MySQL-poll</title>
</head>
<body>
<h2>MySQL-poll</h2>
<p><b>What is your favorite
programming language for developing MySQL applications?</b></p>
<form method="POST" action="results.php">
<p> <input type="radio" name="vote" value="1" />C/C++
<br /><input type="radio" name="vote" value="2" />Java
<br /><input type="radio" name="vote" value="3" />Perl
<br /><input type="radio" name="vote" value="4" />PHP
<br /><input type="radio" name="vote" value="5" />
ASP[.NET] / C# / VB[.NET] / VBA
<br /><input type="radio" name="vote" value="6" />
another language
</p>
<p><input type="submit" name="submitbutton" value="OK" /></p>
</form>
<p>Go directly to the <a href="results.php">result</a>.</p>
</body>
</html>
Questionnaire Evaluation and Displaying Results
One can call results.php either directly (for example, via a link) or using the data in the question-
naire. In one case, what is shown is only the current state of the questionnaire. In the other case, the
data are also evaluated and stored in the database.
CHAPTER 3 ■INTRODUCTORY EXAMPLE (AN OPINION POLL WITH PHP) 53
5351c03_final.qxd 8/26/05 4:56 PM Page 53
www.it-ebooks.info
The mysql Interface Versus the mysqli Interface
The programming language PHP offers, starting with version 5, the interfaces mysql and mysqli as
two alternatives for communication with MySQL.
• The mysql functions are already familiar from previous versions of PHP, and they work with
almost all versions of MySQL. This example is based on the old mysql interface and therefore
works as well with older versions of PHP and MySQL.
• The new mysqli interface, on the other hand, is object oriented and assumes at least PHP 5
and MySQL 4.1 (or newer versions). You will learn about the mysqli interface in Chapter 15.
Establishing a Connection to the Database
The opening lines of results.php consist of HTML code. Then comes the first task within the PHP
code, which is to create a link to MySQL. For this purpose, the PHP function mysql_connect is used,
to which three pieces of information are passed:
• user name
• password
• computer name (host name)
If you have installed MySQL on the local computer and have not yet secured it with a password,
then you may simply pass empty character strings as parameters. The specification of the computer
name is necessary only if the web server (that is, Apache) is running on a different computer from
the one that is running MySQL.
The function mysql_connect returns an identification number that is stored in the variable
link. In the present example, link is used only to identify possible problems in creating the link.
In this case, an error message is displayed, and the PHP code is ended abruptly with exit. Otherwise,
the active database is selected with mysql_select_db. (MySQL usually manages several databases,
and the effect of mysql_select_db is that the following commands automatically refer to test_vote.)
Evaluating the Data and Storing It in the Database
The next task in results.php consists in evaluating the data in the questionnaire and storing them in
the database. The data are passed to the elements submitbutton and vote of the global field $_POST.
(Compare the name and value attributes in vote.html.) The auxiliary function array_item is used to
read out this field.
If results.php was called via the questionnaire of vote.html, then the variable submitbutton
contains the character string “OK”. For the sake of security, a validation test is also carried out for
the variable vote. (For example, a participant may have forgotten to select one of the choices.) If vote
contains a valid value, then this value is stored in the database. The SQL command to accomplish
this will look something like the following:
INSERT INTO votelanguage (choice) VALUES (3)
What INSERT INTO accomplishes is to insert a new data record (a new row) into the table vote-
language. The expression (choice) specifies all of the fields of the data record for which values should
be passed by means of the command VALUES (…). Since MySQL takes responsibility for the field id
(attribute AUTO_INCREMENT; see above), in this example choice is the only field affected. Of course,
instead of “3” the value of the variable vote will be placed, depending on which of the programming
languages was selected in the questionnaire. The SQL command thus constructed is then passed
along to MySQL with the PHP function mysql_query.
CHAPTER 3 ■INTRODUCTORY EXAMPLE (AN OPINION POLL WITH PHP) 54
5351c03_final.qxd 8/26/05 4:56 PM Page 54
www.it-ebooks.info

■Tip If you have never had dealings with SQL and thus are unfamiliar with the syntax of SQL commands, fear
not. In Chapter 9 you will find an extensive introduction to SQL. The two commands used in this chapter, namely,
INSERT
and
SELECT
, are presumably more or less self-explanatory.
The columns
id
and
ts
of the
votelanguage
table are automatically filled in by MySQL:
id
with the unique run-
ning number, and
ts
with the current time.
Displaying the Survey Results
Regardless of whether the questionnaire has just been evaluated, the previous results of the survey
must be able to be displayed. (If a new vote has been cast, it will be taken into account.)
First a check must be made as to whether the votelanguage table contains any data at all. (When
the questionnaire is first placed on the Internet, no votes have yet been cast.) The required SQL query
looks like this:
SELECT COUNT(choice) FROM votelanguage
The SQL command is again executed with mysql_query. What is new this time is that a link
to the result of the query is stored in the variable result. The result of a SELECT command is, in gen-
eral, a table. However, in the above example this table consists of merely a single row and a single
column. (Furthermore, result contains only an ID number, which is used as a parameter in various
other mysql_xxx functions. It is the task of PHP to take care of the actual management of the result.)
To evaluate the result, the function mysql_result($result, 0, 0) is used, by which the element in
the table from the first row and first column is read. (With MySQL functions, counting begins with 0.)
Provided that the votelanguage table is not empty, a loop is executed to report the percentage
of votes cast for each programming language. The requisite SQL queries look similar to the one
above, only now the number of data records that contain a particular value of choice (for example,
3) is counted:
SELECT COUNT(choice) FROM votelanguage WHERE choice = 3
For evaluation, mysql_result is used. Then a bit of calculation is necessary to round the per-
centages to two decimal places.
Program Code (results.php)
<!DOCTYPE HTML PUBLIC "-//W3C//DTD HTML 4.0//EN">
<!— php/vote/results.php —>
<html><head>
<meta http-equiv="Content-Type"
content="text/html; charset=iso-8859-1" />
<title>Survey Result</title>
</head><body>
<h2>Survey Result</h2>
<?php
$mysqlhost="localhost";
$mysqluser="root";
$mysqlpasswd="";
$mysqldbname="test_vote";
CHAPTER 3 ■INTRODUCTORY EXAMPLE (AN OPINION POLL WITH PHP) 55
5351c03_final.qxd 8/26/05 4:56 PM Page 55
www.it-ebooks.info
// Create connection to the database
$link =
@mysql_connect($mysqlhost, $mysqluser, $mysqlpasswd);
if ($link == FALSE) {
echo "<p><b>Unfortunately, a connection to the
database cannot be made. Therefore, the results cannot be
displayed at this time. Please try again later.</b></p>
</body></html>\n";
exit();
}
mysql_select_db($mysqldbname);
// if questionnaire data are available:
// evaluate + store
function array_item($ar, $key) {
if(array_key_exists($key, $ar)) return($ar[$key]);
return(''); }
$submitbutton = array_item($_POST, 'submitbutton');
$vote = array_item($_POST, 'vote');
if($submitbutton=="OK") {
if($vote>=1 && $vote<=6) {
mysql_query(
"INSERT INTO votelanguage (choice) VALUES ($vote)");
}
else {
echo "<p> Not a valid selection. Please vote
again. Back to
<a href=\"vote.html\">questionnaire</a>.</p>
</body></html>\n";
exit();
}
}
// display results
echo "<p><b> What is your favorite programming language
for developing MySQL applications?</b></p>\n";
// Number of votes cast
$result =
mysql_query("SELECT COUNT(choice) FROM votelanguage");
$choice_count = mysql_result($result, 0, 0);
// Percentages for the individual voting categories
if($choice_count == 0) {
echo "<p>No one has voted yet.</p>\n";
}
else {
echo "<p>$choice_count individuals have thus far taken part
in this survey:</p>\n";
$choicetext = array("", "C/C++", "Java", "Perl", "PHP",
"VB/VBA/VBScript", "Andere");
CHAPTER 3 ■INTRODUCTORY EXAMPLE (AN OPINION POLL WITH PHP) 56
5351c03_final.qxd 8/26/05 4:56 PM Page 56
www.it-ebooks.info
print("<p><table>\n");
for($i=1; $i<=6; $i++) {
$result = mysql_query(
"SELECT COUNT(choice) FROM votelanguage " .
"WHERE choice = $i");
$choice[$i] = mysql_result($result, 0, 0);
$percent = round($choice[$i]/$choice_count*10000)/100;
print("<tr><td>$choicetext[$i]:</td>");
print("<td>$percent %</td></tr>\n");
}
print("</table></p>\n");
}
?>
</body>
</html>
The Resulting HTML Code
If you are relatively inexperienced with PHP, you might find it helpful to have a look at the resulting
HTML code (that is, what the user finally sees in the browser, as depicted in Figure 3-2) as an aid to
understanding the program presented above.
<!DOCTYPE HTML PUBLIC "-//W3C//DTD HTML 4.0//EN">
<!— results.php —>
<html><head>
<meta http-equiv="Content-Type"
content="text/html; charset=iso-8859-1" />
<title>Survey Results</title>
</head><body>
<h2>Survey Results</h2>
<p><b>What is your favorite programming language
for the development of MySQL applications?</b></p>
<p>17 people have thus far taken part
in this survey:</p>
<p><table>
<tr><td>C/C++:</td><td>17.65 %</td></tr>
<tr><td>Java:</td><td>11.76 %</td></tr>
<tr><td>Perl:</td><td>17.65 %</td></tr>
<tr><td>PHP:</td><td>41.18 %</td></tr>
<tr><td>ASP[.NET] / C# / VB[.NET] / VBA:</td><td>11.76 %</td></tr>
<tr><td>Other:</td><td>0 %</td></tr>
</table></p>
</body></html>
Ideas for Improvements
Layout: It may have occurred to you that I have not paid much attention to the appearance of
things in this example. Naturally, the results of the survey could be presented in a colorful bar
graph. However, that has nothing to do with the subject of this book, namely, MySQL. Introduc-
tions to the attractive presentation of HTML documents, to the PHP programming of graphics
libraries, and the like can be found in quantity in a number of books on HTML and PHP (and,
of course, on the Internet).
CHAPTER 3 ■INTRODUCTORY EXAMPLE (AN OPINION POLL WITH PHP) 57
5351c03_final.qxd 8/26/05 4:56 PM Page 57
www.it-ebooks.info

Questionnaire and Results on a Single Page: It is certainly possible to execute all the elements
of our survey—questionnaire, evaluation, and presentation of results—-with a single PHP script.
However, as a rule, it is a good idea for the participants not to see the previous results before
casting a vote.
Options: You could make the survey more interesting or more informative by offering addi-
tional opportunities for input. In our example, there could be a text field for the input of other
programming languages or perhaps a text field for comments or for information about the pro-
fessional background of the participants. However, you must consider that the more you ask,
the more superfluous data you will collect. (If someone does not want to answer a required
question, you may get a deliberately false response.)
Multiple Selection: In principle, you could construct the questionnaire in such a way that a
participant could select more than one programming language. In the HTML form you would
use check boxes instead of radio buttons. However, the necessary changes in the design of the
database are somewhat more complicated. The table votes must now be able to store in each
data record an arbitrary collection of programming languages. It would be easy, though ineffi-
cient, to reserve a separate column in the table for each programming language and then store
the value 1 or 0 depending on whether or not the language was voted for. If you do not want the
votes table to take up any more space in memory than necessary, then you could store a multi-
ple selection as a combination of bits. For this purpose, MySQL offers the data type (SET). But
this option would make the program code for the storage and evaluation of the survey results
considerably more complicated.
Protection Against Manipulation: In most Internet surveys, the goal is not to obtain informa-
tion but to promote interest, and thereby obtain a large number of accesses to one’s web page.
In such cases, there is not much point in protecting the survey against misuse. However, if you
wish to provide such protection, you have a number of possibilities:
• You could place a “cookie” containing a random number on the participant’s computer and
store this same value in the database. In this way, an attempt to cast additional votes could
be easily caught. (The disadvantage is that many Internet users are opposed to cookies and
delete all cookies at startup or else prohibit their placement altogether.)
• You could require a login with e-mail address and password. Only those who have registered
may vote. You store information in the database on who has already voted. (The disadvan-
tage is that Internet users tend to have little patience for logins. Not many Internet users
would give their e-mail address simply for the privilege of filling out your questionnaire.)
It is true, in general, that you cannot completely prevent such manipulation of a survey. That is,
every system of security can be gotten around by someone who puts enough effort into the attempt.
■Tip You will find an extensive example that implements the ideas mentioned in this section in the book
PHP 5 & MySQL
, which I coauthored with Hernd Öggl (Addison-Wesley, 2005). Moreover, there are many com-
plete PHP solutions for questionnaires available, both with and without MySQL support. Before you set about
reinventing the wheel, you might want to take a look at some of the PHP sites on the Internet, for example the
following: http://phpsurveyor.sourceforge.net/.
CHAPTER 3 ■INTRODUCTORY EXAMPLE (AN OPINION POLL WITH PHP) 58
5351c03_final.qxd 8/26/05 4:56 PM Page 58
www.it-ebooks.info


mysql, mysqladmin, and
mysqldump
The end user should never see MySQL as a program. Instead, a convenient program or several web
sites should be used to provide access to the database, assist in the input of new data, and execute
backups.
For such tasks, you can use the commands mysql, mysqladmin, and mysqldump presented in this
chapter or the user interfaces presented in the following chapters: MySQL Administrator, MySQL
Query Browser, and phpMyAdmin. (On the Internet you will find countless additional administra-
tion programs, some of which are free, others commercial. In this book there is unfortunately
insufficient space to describe these tools.)
The commands mysql, mysqladmin, and mysqldump are for use in text mode. They must be exe-
cuted in an input or console window for Unix/Linux. There are neither menus nor other forms of
assistance. What at first glance seems a drawback is in many circumstances an advantage: The com-
mands can be employed over a network (e.g., in an ssh console). Furthermore, they are suitable for
automating administrative tasks (script programming). Finally, the programs are so small that you
can launch them in several windows to try out something quickly. To experienced MySQL users
these programs are as necessary as a Swiss army knife is to a mountain climber.
■Tip In this chapter you will learn about the commands mysql,mysqladmin, and mysqldump only superficially.
However, these commands offer many additional possibilities, as will be described elsewhere in the book. For
example, you can import and export text files and make backups with all sorts of options. These application
possibilities are demonstrated in Chapter 14. A reference to all options and functions follows in Chapter 22.
mysql
In the previous chapter you became acquainted with mysql as a simple command interpreter, with
which you can execute SQL commands and view the resulting tables in text mode. This section gives
some further tips for using mysql with MySQL.
Once again, just to be clear, mysql is a relatively small program that serves only to send com-
mands to the MySQL server and display the results. mysql is therefore not the MySQL server, but
a client program that communicates with the server.
61
CHAPTER 4
■ ■ ■
5351c04_final.qxd 8/26/05 5:00 PM Page 61
www.it-ebooks.info
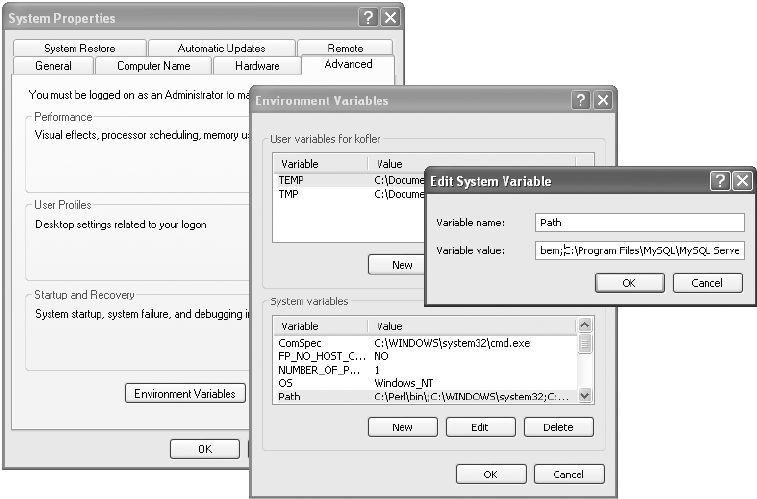
Launching mysql
Unix/Linux: On Unix/Linux systems you simply specify mysql in a console window and press
Return. Other command tools are also launched in this way (mysqladmin, mysqldump). The pro-
grams are normally installed in the directory /usr/bin, so that it is unnecessary to provide the
name of the directory. See Figure 4-1.
Windows: mysql and some other command tools are stored in the directory C:\Programs\
MySQL\MySQL Server n.n\bin. This directory is normally not a part of the PATH system variable,
which contains all directories with executable programs. There are the following possibilities
for launching the programs:
• The easiest and most convenient method is to execute the command in PROGRAMS |
MYSQL | MYSQL SERVER N.N. | MYSQL COMMAND LINE CLIENT. This starts mysql with the
options -u root -p. After the launch, you must specify the root password. The menu
command unfortunately does not allow you to start mysql with other options or to
execute a command other than mysql.
• You can open an input request window (PROGRAMS | ACCESSORIES | COMMAND PROMPT)
and there give the name of the program and the complete path:
> C:\Programs\MySQL\MySQL Server n.n\bin\mysql.exe
• You can save some typing and use Explorer with Drag&Drop to copy the name into the
window. Alternatively, you can first use CD to move into the directory C:\Programs\
MySQL\MySQL Server n.n\bin.
CHAPTER 4 ■MYSQL, MYSQLADMIN, AND MYSQLDUMP62
Figure 4-1. Setting the Windows system variables
5351c04_final.qxd 8/26/05 5:00 PM Page 62
www.it-ebooks.info
• In the long run, it will prove most convenient to extend the system variable PATH to
the MySQL tools. To do this execute START | SETTINGS | CONTROL PANEL | SYSTEM, click in the
dialog sheet ADVANCED, select the system variable PATH with a double click, and add
the MySQL bin directory (see Figure 4-1). All directories in PATH must be separated
by semicolons.
From now on, in every command window (regardless of the current directory or drive), input
of the MySQL command name is sufficient to execute it.
mysql Options
When you start mysql you can use various options. To get a connection to the server you generally
need two options, namely, -u name -p. The following list describes these and a few additional options
and also gives some background information. These options are not only for mysql, but also for
mysqladmin, mysqldump, and most other command tools.
-u name or —user=name: This option specifies which MySQL user name you wish to use. Depend-
ing on how MySQL is configured, there can be many MySQL users (see also Chapter 11). If no
users have yet been set up or if you have administrative tasks to perform, use the user name root.
This user exists in every MySQL installation and is considered the system administrator.
If you omit the option -u, then under Unix/Linux the current login name will be used, while
under Windows, it will be ODBC. A login is possible only if users with these names have been
set up on the MySQL server.
-p:This option has the effect that when mysql is started, a password can be given. This option
is absolutely required if MySQL users have passwords.
Alternatively, you can give the password when the command is given with password="xxx". This
is insecure, however, since the password appears in plain text in the process or task bar.
-h computername or —host=computername:mysql can also communicate with the MySQL server
when it is running on another computer. For this you must specify the name or IP address of
this computer with the option -h.
For this to function, some conditions must be satisfied: First, computername must be reachable
over the network. You can check that independently with the command ping computername.
Second, the TCP/IP port 3306 must be usable. If there is a firewall between your computer and
the computer on which the MySQL server is running, it can happen that the firewall blocks
communication over this port.
Third, the external MySQL server must be configured so that it permits connections from your
local computer. This is not the default case! Extensive information on the correct configuration
of access rights is given in Chapter 11.
—protocol=name:This option specifies which communication protocol you wish to use. It is sel-
dom necessary to give this option, since mysql usually chooses the correct protocol by default.
If the program mysql and the MySQL server are running on different computers, then the only
relevant protocol is tcp (that is, communication takes place over TCP/IP). mysql uses this pro-
tocol by default when the option -h is given.
On the other hand, if mysql is running on the same computer as the server, then, depending
on the MySQL server configuration, there exist the alternatives socket (Unix/Linux) and pipe
or memory (both Windows). Without the option -h, mysql uses by default under Windows the
protocol tcp, while under Unix/Linux it uses socket.
CHAPTER 4 ■MYSQL, MYSQLADMIN, AND MYSQLDUMP 63
5351c04_final.qxd 8/26/05 5:00 PM Page 63
www.it-ebooks.info
-P n or —port=n:This option specifies which TCP/IP port number is to be used. This option is
necessary only in exceptional cases, when the MySQL server does not use the default port 3306.
This option has an effect only if communication is over TCP/IP.
—default-character-set=name:This option tells which character set will be used for communi-
cation between mysql and the MySQL server. This should be the same character set that is used
by default in the input window (Windows) or the console window (Linux). Among the charac-
ter sets supported by MySQL are latin1 (ISO-8559-1), latin2 (ISO-8559-2), utf8 (Unicode), and
cp850 (the DOS character set for Western Europe).
databasename:As a final parameter, you can pass the name of a database to mysql (without
options). This database then will be the default database for all future commands. You can
change the default database at any time thereafter with the command USE databasename.
Example: With the following command you can create a connection to the MySQL server on
the computer uranus. As default database, mylibrary is used, and as character set, Unicode (utf8):
> mysql -u root -p -h uranus —default-character-set=utf8 mylibrary
Password: ********
Using mysql Interactively
The program mysql is launched as usual with the options -u and -p. Now SQL commands can
be input. The commands can extend over several lines and must be terminated with a semicolon.
If you have not specified the desired default database at the start of mysql, then execute
USE databasename as your first command:
> mysql -u root -p
Enter password: xxx
Welcome to the MySQL monitor. Commands end with ; or \g.
Your MySQL connection id is 248 to server version: 5.0.2-alpha-standard
Type 'help;' or '\h' for help. Type '\c' to clear the buffer
mysql> USE mylibrary;
Database changed
mysql> SELECT titelID, title FROM titles LIMIT 10;
+---------+----------------------------------------+
| titleID | title |
+---------+----------------------------------------+
| 11 | A Guide to the SQL Standard |
| 52 | A Programmer's Introduction to PHP 4.0 |
| 19 | Alltid den där Annette |
| 51 | Anklage Vatermord |
| 78 | Apache Webserver 2.0 |
| 3 | Client/Server Survival Guide |
| 63 | Comédia Infantil |
| 77 | CSS-Praxis |
| 86 | Dansläraren Återkomst |
| 80 | Darwin's Radio |
+---------+----------------------------------------+
10 rows in set (0.01 sec)
CHAPTER 4 ■MYSQL, MYSQLADMIN, AND MYSQLDUMP64
5351c04_final.qxd 8/26/05 5:00 PM Page 64
www.it-ebooks.info

■Caution You can do a great deal of damage with mysql. For example, DELETE FROM tablename deletes
all data records from the table
tablename
without so much as a “by your leave.” And what is more, there is no
way of undoing the damage. If you would like to avoid such fatal errors, you should use mysql with the option
--i-am-a-dummy. Then mysql permits the commands
UPDATE
and
DELETE
only if they are protected with the
keyword
WHERE
or
LIMIT
. There are some additional security limitations.
In addition to the SQL commands, you can use some commands offered by mysql (for example,
source filename). These commands do not need to be terminated with a semicolon. As with SQL
commands, these are case-insensitive. Each of the commands exists in a two-character short form,
such as \h for help. In the short form the commands can also be given at the end of a line; the only
place they must be written out in full is at the beginning of a new line. Table 4-1 gives only the most
important commands. A list of all the commands can be found in Chapter 22.
Table 4-1. The Most Important mysql Commands
Abbreviation Command Interpretation
\c clear terminates input of command.
\h help displays a list of commands.
\q exit or quit ends mysql. Under Unix/Linux this also works with Ctrl+D.
\s status shows status information on the MySQL server.
\T [f] tee [filename] logs all input and output into the specified file.
\t notee ends tee. The logging can be resumed at any time with tee
or \T. The file name does not have to be given again.
\u db use database makes the specified database the default.
\. fn source filename executes the SQL commands contained in the given file. The
commands must be separated by semicolons.
Simplifying Input
Terminating Input: It often occurs, particularly with multiline commands, that you note an
error in a line above the one that you are typing and as a result wish to terminate the entire in-
put (so that you can start all over again). To accomplish this, regardless of the cursor position,
simply input \c and press Return. Note, however, that \c does not have this effect within a
character string enclosed in single or double quotation marks.
History Function: mysql remembers the last commands that were input (even after program
termination!). These commands can be recalled with the cursor keys ↑and ↓.
Terminating mysql
With exit or quit or \q or Ctrl+D (the last of these only under Unix/Linux) you can terminate mysql.
Under Windows you can also simply close the command window.
CHAPTER 4 ■MYSQL, MYSQLADMIN, AND MYSQLDUMP 65
5351c04_final.qxd 8/26/05 5:00 PM Page 65
www.it-ebooks.info
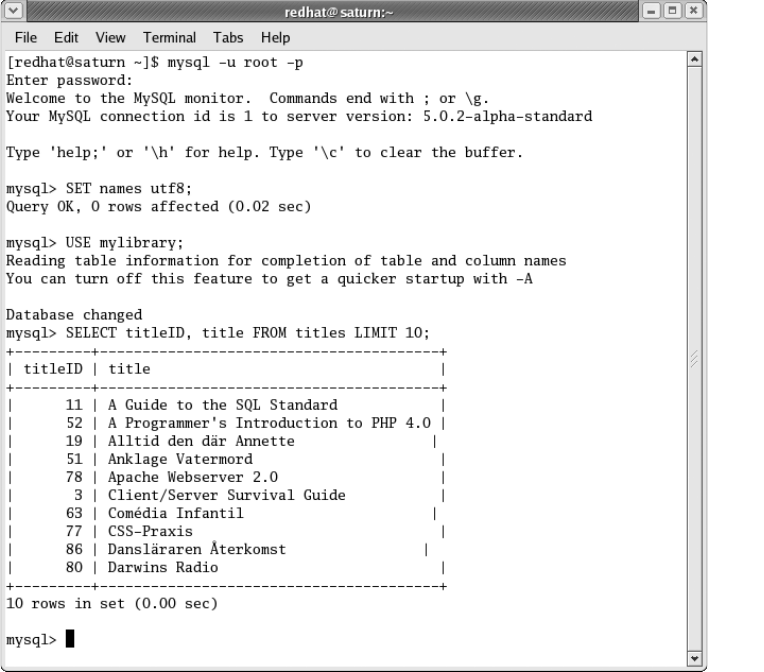
Tips for Using mysql Under Unix/Linux
Scroll Region: Under Unix/Linux, mysql is usually executed in a shell window (see Figure 4-2).
Every such program (xterm, console, gnome-terminal, etc.) offers the possibility of setting the
number of lines that are kept in temporary storage. If you provide a large enough value, then
you can use a scroll bar to examine previously input commands and copy them with the mouse
to the clipboard.
Keyboard Shortcuts: Under most operating systems, mysql relies on the readline library. There-
fore, the usual suspects in the lineup of Unix/Linux keyboard shortcuts are available for editing
input (for example, Ctrl+K for deleting a line from the cursor location to the end, Ctrl+Y for
restoring the most recently deleted text). Most of the keyboard shortcuts correspond to those
under the editor Emacs.
Furthermore, names of tables and columns can be automatically completed with Tab, after the
initial letters have been input.
CHAPTER 4 ■MYSQL, MYSQLADMIN, AND MYSQLDUMP66
Figure 4-2. Use of the MySQL command interpreter under Linux in a console window
5351c04_final.qxd 8/26/05 5:00 PM Page 66
www.it-ebooks.info
Private Configuration File: Frequently used settings or options (such as user name and pass-
word) can be stored under Unix/Linux in a user-specific configuration file with the name
~/.my.cnf. Options related to all client tools are placed in the group [client], while those relat-
ing specifically to mysql go into the group [mysql]. The following lines provide an example.
(Further details on creating configuration files can be found in Chapter 22.)
# Options for all MySQL tools
[client]
user=username
password=xxx
# Options for mysql
[mysql]
database=mydatabase
Since the file contains a password in plain text, it should be protected from prying eyes:
user$ chmod 600 ~/.my.cnf
Problems with Character Sets
With many current Linux distributions, the character set utf8 is the default; otherwise, it is generally
latin1 (ISO-8559-1) or latin9 (ISO-8559-15). If communication between mysql and the MySQL server
does not take place in a single character set, then international special characters will get screwed
up. The problem can be simply solved in one of two ways:
• The simplest approach is to start mysql as usual and then execute the SQL command
SET NAMES ‘name’, where name is the character set valid in the console. MySQL supports
considerably fewer character sets than Unix/Linux, but in most cases, latin1 or utf8 will
work. (MySQL does not know about the character set latin9. Use instead latin1. The only
difference between the two character sets is the euro symbol.)
• The other variant consists in starting mysql with the option —default-character-set=name,
where instead of name, again the desired character set is given.
Which character set is being used for communication between mysql and the MySQL server
can be determined in mysql quite easily with the command status. The relevant lines are Server and
Conn. character set.
Tips for Using mysql Under Windows
mysql is executed in an input window. (The window is sometimes called a command window or
DOS window.) Many of the particulars of this program are configurable. You can access the config-
uration dialog by clicking on the title bar with the right mouse button (see Figure 4-3).
Color: In the command window are usually displayed white characters on a black background.
That is not particularly easy on the eyes. If your eyes would prefer a white background and black
characters, then consult the COLORS dialog sheet to change the setting.
Window Size: There is not much room in an 80 ✕25 character display for representing the
results of SELECT. The dialog sheet LAYOUT comes to your aid here, allowing you to change
the window size.
Scroll Region: A larger window does nothing to increase the number of lines displayed. This
setting can be changed by enlarging the SCREEN BUFFER SIZE in the dialog sheet LAYOUT. This sets
the virtual window size. In the window, a segment of the virtual window is visible, and you can
use the scroll bar to see previous commands and results.
CHAPTER 4 ■MYSQL, MYSQLADMIN, AND MYSQLDUMP 67
5351c04_final.qxd 8/26/05 5:00 PM Page 67
www.it-ebooks.info
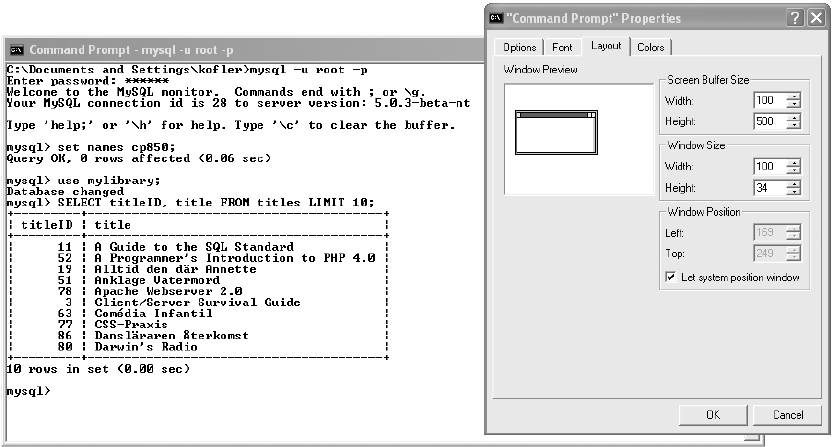
Clipboard: The command window offers the possibility of copying and pasting text to and
from the clipboard. To copy, select a rectangular region with the mouse and simply press
Return. To paste, click anywhere in the window with the right mouse button. For these short-
cuts to function you must have activated the option QUICKEDIT MODE in the OPTIONS dialog
sheet.
When you close the configuration dialog, you are asked whether the settings should hold only
for the current window or whether they should be saved, with the result that the shortcut (link)
to the input window will be changed. Choosing the second variant will ensure that in the
future, the command window will have the properties described here.
Problems with Character Sets
The MySQL server generally uses the character set latin1 or utf8 by default. In the command window,
however, what is used is the DOS-compatible character set cp850. For this reason, various special
characters (such as äåèéöüß) are incorrectly displayed in the command window. What is worse, the
DOS character set is also used in data records that are stored using an INSERT or UPDATE command
in the command window. If you then look at those data records with another program (for example,
with phpMyAdmin), the special characters are seen to be incorrect.
As usual, there is a variety of ways of solving the problem:
• The simplest solution is to start mysql as usual and then execute the SQL command
SET NAMES cp850. This informs the MySQL server that the cp850 character set is to be
used for communication with mysql. The MySQL server will adapt all character strings
as needed.
CHAPTER 4 ■MYSQL, MYSQLADMIN, AND MYSQLDUMP68
Figure 4-3. Configuration of the MySQL command interpreter under Windows
5351c04_final.qxd 8/26/05 5:00 PM Page 68
www.it-ebooks.info
• You get the same result by starting mysql with the option default-character-set=cp850. You
might, however, get the error message Character set ‘cp850’ is not a compiled character set and
is not specified in the … file. That is, mysql has not found the file that describes the character
set cp850. You can get around this by using the additional option --character-sets-dir="C:/
Programs/MySQL/MySQL Server 5.0/share/charsets", with the appropriate directory specifica-
tion for your MySQL installation. This variant has the drawback of lots of typing.
• The third variant involves the typeface and character set of the input window.
You have to change the typeface, because RASTER FONTS (the default) is incompatible with
most character sets. Click on the window bar with the right mouse button, choose
PROPERTIES, and set the typeface LUCIDA CONSOLE.
Now you just have to set the proper character set before starting mysql. If the MySQL server
uses latin1 by default, then give the command CHCP 65001 in the window to activate
Codepage 1252. (A Codepage is the Windows expression for a character set. Codepage 1252
corresponds primarily to the Latin1 character set.) After these preparations, start mysql.
If the MySQL server is so configured that the character set utf8 is used, then execute
CHCP 65001. (The Windows Codepage 65001 corresponds to the Unicode character set utf8.)
Which character set is actually used for communication between mysql and the MySQL server
can be determined with the command status. The relevant lines are Server and Conn. characterset.
Processing SQL Files with mysql
Up to now you have learned how to use mysql for interactive execution of SQL commands. How-
ever, you can also use mysql to process SQL commands that are located in a file. For this, start
mysql as follows:
> mysql [options] databasename < file.sql
This will execute all SQL commands for the database databasename contained in file.sql. The
file does not, of course, have to end in .sql. It is only the content that matters. In particular, all
the commands must be separated by semicolons. (You can set a different delimiter in the file
using the command DELIMITER symbol. This is necessary when the SQL file contains the com-
mand CREATE FUNCTION, PROCEDURE, or TRIGGER, since semicolons occur inside these
commands.)
Reading In Database Backups
In practice, you will relatively often come across *.sql files containing a database backup done with
mysqldump. To read in such files, you generally first create the new database with mysqladmin. The fol-
lowing two commands show how to proceed. (mysqladmin and mysqldump are introduced in the next
section.)
> mysqladmin -u root -p create dbname
Password: *******
> mysql -u root -p dbname < backupfile.sql
Password: *******
CHAPTER 4 ■MYSQL, MYSQLADMIN, AND MYSQLDUMP 69
5351c04_final.qxd 8/26/05 5:00 PM Page 69
www.it-ebooks.info

■Tip Database backups made with a current version of mysqldump contain SQL commands for activation
of the character set of the backup file. So you do not have to worry about the character set.
As for backups made with earlier versions of mysqldump or with another program (e.g., phpMyAdmin),
this information can be absent. For a backup to be read in correctly, you must therefore use the option
default-character-set=... when you start with the command mysql. If you don’t know the character
set that was used, try
latin1
. This character set was the default with MySQL 4.0 and was changed in rela-
tively few installations:
> mysql -u root -p —default-character-set=latin1 name < backup.sql
Backups made with current versions of phpMyAdmin use the character set
utf8
by default.
mysqladmin
The program mysqladmin assists in various administrative tasks, for example, in creating and delet-
ing databases and in changing passwords. The syntax is simple:
> mysqladmin [options] admincommand
The same options as for mysql are passed to mysqladmin for creating a connection to the server
(-u,-p, -h, etc.). The admincommand that follows determines which task mysqladmin carries out.
Here we will look at only three of the most important commands: create creates a new database;
drop deletes a database; and password changes a password of the MySQL user designated via -u.
> mysqladmin -u root -p create newdatabase
Password: *******
> mysqladmin -u root -p drop testdatabase
Password: *******
Dropping the database is potentially a very bad thing to do.
Any data stored in the database will be destroyed.
Do you really want to drop the 'testdatabase' database [y/N] y
Database "'testdatabase'" dropped
> mysqladmin -u root -p password "new password"
Password: old password
mysqldump
The program mysqldump creates a backup of a database. The resulting backup file contains SQL
commands for creating its tables and inserting the data. The syntax of mysqldump looks like this:
> mysqldump [options] dbname > backupfile.sql
The same options are passed to mysqldump as to mysql for creating a connection to the MySQL
server (-u, -p, -h, etc.). In addition, you can control various details of the backup with addi-
tional options. For ordinary backups, however, that is usually unnecessary.
The resulting backup file is a text file. In current versions of mysqldump, the character set
utf8 is used by default. If you wish to use a different character set, you must specify this with
default-character-set=....
CHAPTER 4 ■MYSQL, MYSQLADMIN, AND MYSQLDUMP70
5351c04_final.qxd 8/26/05 5:00 PM Page 70
www.it-ebooks.info

MySQL Administrator and
MySQL Query Browser
The programs MySQL Administrator and MySQL Query Browser are two relatively new MySQL
user interfaces. As the name suggests, MySQL Administrator helps with administrative tasks. The
MySQL Query Browser helps in assembling and trying out SQL commands.
Unlike other programs (like the program phpMyAdmin introduced in the next chapter),
MySQL Administrator and MySQL Query Browser were developed directly by the firm MySQL AB.
Thus these two programs have somewhat of an official character. They replace the old standbys
WinMySQLadmin and MySQL ControlCenter from earlier versions of MySQL, neither of which will
be developed further.
This chapter is based on version 1.0.19 of MySQL Administrator and version 1.1.5 of MySQL
Query Browser, which became the current version in February 2005. Both versions were then con-
sidered stable (attribute Generally Available), though they continue to exhibit obvious problems
and instabilities. In other words, the functionalities of the programs are promising, but crashes are
a daily occurrence. Before you install the programs, you should certainly download the latest ver-
sion of dev.mysql.com.
■Tip The programs MySQL Administrator and MySQL Query Browser simplify many administrative tasks and
tests of SQL commands. Nevertheless, the use of these programs assumes that you are familiar with MySQL
administration, database design, the security system, and the syntax of SQL. Relevant chapters for such funda-
mentals are Chapters 8 through 14. This chapter gives only a first taste of these topics without much on details
or background.
Installation
Windows: The programs are available as a *.msi file (Microsoft Installer) under dev.mysql.com
as a free download (GPL license). To install, open the file with a double click. Installation pro-
ceeds without difficulty and files are placed by default in the directory C:\Programs\MySQL.
Then you can launch the program with START | PROGRAMS | MYSQL | NAME.
Linux (i386-Compatible RPM System): These programs are included with some current distri-
butions of Linux and can be installed with the package management system of the distribution
(e.g., YaST under SUSE).
If that is not the case, then precompiled RPM packages for i386-compatible processors are
available at dev.mysql.com for download. To install them, download the *.rpm files and execute
the command rpm -i packagename.rpm. Then you can execute the programs with the commands
71
CHAPTER 5
■ ■ ■
5351c05_final.qxd 8/26/05 5:51 PM Page 71
www.it-ebooks.info

Linux (i386-Compatible Other Package System): For distributions with another package sys-
tem (e.g., Debian), you will find precompiled tar.gz packages. Their installation is a bit more
complicated. After download, unpack the archive into the directory /usr/local:
root# cd /usr/local
root# tar xzf mysql-query-browser-<version>-linux.tar.gz
root# tar xzf mysql-administrator-<version>-linux.tar.gz
Then change the variable MYPATH in the script files for launching the two programs:
...
# change in /usr/local/mysql-query-browser/bin/mysql-query-browser
...
MYPATH=/usr/local/mysql-query-browser/bin
# change in /usr/local/mysql-administrator/bin/mysql-administrator
...
MYPATH=/usr/local/mysql-administrator/bin
Finally, create two links so that every user of the system can easily launch the programs:
root# cd /usr/bin/X11
root# ln -s /usr/local/mysql-administrator/bin/mysql-administrator .
root# ln -s /usr/local/mysql-query-browser/bin/mysql-query-browser .
Unix/Linux/Mac OS X: If you are using a non-i386 system (e.g., PowerPC) or if you are using
another Unix derivative, you must compile the program yourself. The source code together
with installation instructions can be found at dev.mysql.com.
Stable versions for Mac OS X were not available as of February 2005, but they are being pre-
pared. Friends of Apple will have to use other administrative tools for the time being.
Establishing a Connection
After launching the MySQL Administrator or the MySQL Query Browser, you must establish a con-
nection to the MySQL server before you can use the programs (see Figure 5-1). This section treats
both programs equally, since the mechanisms for making a connection are the same.
CHAPTER 5 ■MYSQL ADMINISTRATOR AND MYSQL QUERY BROWSER72
Figure 5-1. Connection dialog for the MySQL Query Browser
5351c05_final.qxd 8/26/05 5:51 PM Page 72
www.it-ebooks.info

You need to provide the following information:
STORED CONNECTION: With the Windows version of MySQL Administrator you give the following
connection parameters a name. Under this name you can call up the connection data at a later
launch of the program and save having to input all the parameters anew. This field is then of
particular practicality when you use the programs in combination with several MySQL servers.
With the Linux version it is somewhat more complicated to save the connection data. After you
have given all additional parameters, you choose from a list box the entry SAVE THIS CONNECTION.
Then a dialog appears in which you can give the connection a name.
SERVER HOST: Here you give the network name of the computer on which the MySQL server is
executed. If it is a local computer, then specify localhost.
PORT: By default, the connection takes place via the TCP/IP protocol, where the MySQL default
port 3306 is used. Another port number should be given only if your MySQL server is specially
configured.
USERNAME AND PASSWORD: Here you give the MySQL user name (e.g., root) and the associated
password. The password is not stored together with other connection data for reasons of
security, and so it must be given each time.
There is an easier way. After the first connection is established, execute TOOLS | OPTIONS |
GENERAL OPTIONS and activate the option STORE PASSWORDS. (This is, of course, a security risk,
since someone could find the file in which the password is stored.)
DEFAULT SCHEMA (only with Query Browser): This input field specifies the name of the database
for which you must execute SQL commands. The input is optional. If you leave the field empty,
you can choose a database later with FILE | CHANGE DEFAULT SCHEMA.
DETAILS: Only in rare cases is it necessary to input optional connection parameters in this field.
If the MySQL server is configured without TCP/IP for security reasons, give here, under Windows,
the name of the Named Pipe, under Linux, the file name of the Socket File. (These terms will be
explained in Chapter 11.)
■Tip MySQL Administrator offers the possibility of launching the MySQL server from the local computer. To do
so, press Ctrl in the connection dialog (see Figure 5-1). This will turn the OK button into a SKIP button, so that you
can skip the connection dialog. (The connection dialog is useful only when the MySQL server is already running.)
MySQL Administrator offers only a small fraction of the usual functionality.
MySQL Administrator
MySQL Administrator helps with management of a MySQL server (loading, determining the number
of open connections, determining the status, etc.) as well as carrying out a number of management
tasks. The program can be used for administration both on a local server and over a network.
Many functions of the program are available
• only for administration of local servers
• only for those with sufficient access privileges (root)
• only for those with sufficient operating system access privileges
For example, you can launch or halt a local MySQL server only if you are logged in as root
(Unix/Linux) or system administrator (Windows).
CHAPTER 5 ■MYSQL ADMINISTRATOR AND MYSQL QUERY BROWSER 73
5351c05_final.qxd 8/26/05 5:51 PM Page 73
www.it-ebooks.info
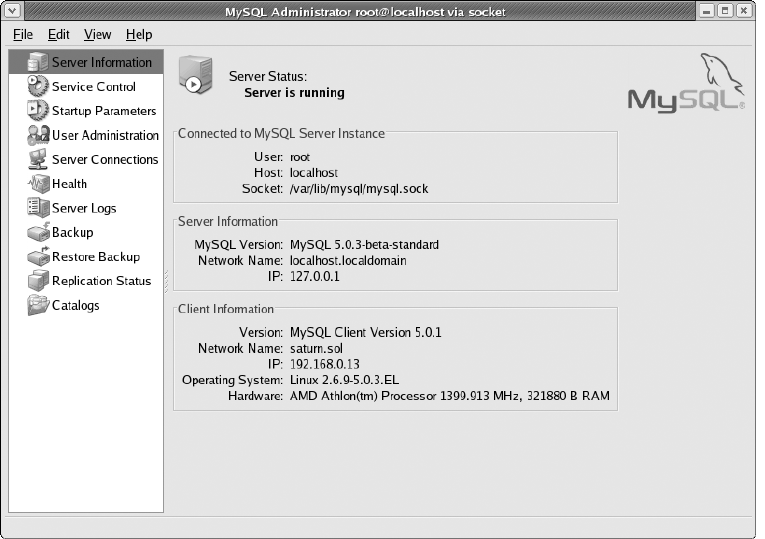
The large number of functions of MySQL Administrator are dispersed among several modules.
These modules are selected via a sidebar, and then make their functions available in one or more
dialog sheets. These modules will be briefly introduced in the following sections.
Server Information
This module collects status information on connections to the MySQL server, its version, and the
client library of MySQL Administrator (see Figure 5-2).
Service Control
With this module you can start and stop the MySQL server. This works only for local MySQL servers
(not for those running on another computer over a network) and only if MySQL Administrator was
launched by someone with system administrator privileges. The Linux version of MySQL Adminis-
trator that I tested crashes during startup and shutdown of the MySQL server. The Windows version,
on the other hand, works just fine.
In the Windows version of MySQL Administrator you can set a number of options in the dialog
sheet CONFIGURE SERVICE. In the Linux version of MySQL Administrator this possibility is lacking.
There you have to set the options in the dialog sheet STARTUP VARIABLES (see the next section).
CHAPTER 5 ■MYSQL ADMINISTRATOR AND MYSQL QUERY BROWSER74
Figure 5-2. Server information in MySQL Administrator
5351c05_final.qxd 8/26/05 5:51 PM Page 74
www.it-ebooks.info
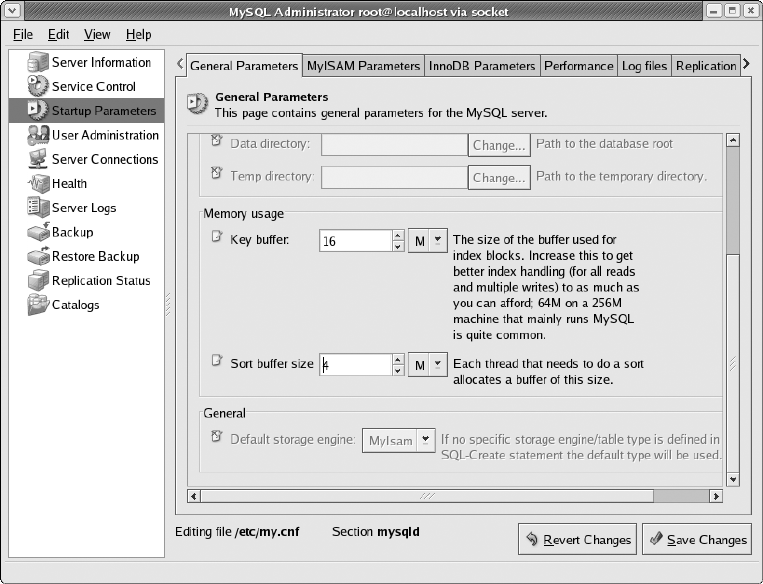
Startup Variables
This module enables, in a number of dialog sheets (see Figure 5-3), a convenient changing of the
MySQL configuration file, which usually is located at /etc/my.cnf (Unix/Linux) or C:\Programs\MySQL\
MySQL Server n.n\my.ini (Windows). The text file can contain countless options, of which the most
important are described in Chapters 14 and 22. The options are evaluated by the MySQL server at
startup. Changes to the file take effect only after a restart of the MySQL server.
If the file does not yet exist, it will be automatically created after a query. Each change to the file
assumes that MySQL Administrator has write privileges to the file. If MySQL Administrator does not
find the file, you will have to search for it yourself.
MySQL Administrator displays a small button before each option that tells whether the option
is active (red X symbol). Inactive options are not stored in the configuration file. The MySQL server
then uses internal default values for such options.
User Administration
This module helps in setting up new MySQL users and in changing the access privileges of existing users.
This part of MySQL Administrator assumes that you understand the MySQL security system (see Chap-
ter 11). The User Administration module differs in certain respects from comparable administration
tools (e.g., phpMyAdmin), for which reason it is worthwhile going into some details of how it is used.
CHAPTER 5 ■MYSQL ADMINISTRATOR AND MYSQL QUERY BROWSER 75
Figure 5-3. Changing startup options of MySQL
5351c05_final.qxd 8/26/05 5:51 PM Page 75
www.it-ebooks.info

Changing a Password for Several User/Host Combinations
The MySQL access system makes it possible to grant a user different access rights depending on
the location from which the user establishes a connection to the MySQL server. Therefore, MySQL
Administrator shows a list of permitted host names for each user. In Figure 5-4 you see, for example,
that the user root can establish a connection to the MySQL server from the computers localhost,
merkur1.sol, and 192.168.80.1.
Basically, every combination of user name and host name can have its own password. In prac-
tice, however, it is usual to have a single password for each user, independent of the host names.
MySQL Administrator makes it quite easy in such cases to change a user’s password for all host
names. You simply choose the user name, without host name, in the list USER ACCOUNTS (that is,
without @name) and then change the password. This change is then valid for all host names.
Setting Up New Users
To set up a new user, click on the button NEW USER, specify a user name and password, and confirm
the input with APPLY CHANGES. MySQL Administrator then creates a new user, where % is used as the
host name. This allows the user to access MySQL from every location in the network. (The symbol %
CHAPTER 5 ■MYSQL ADMINISTRATOR AND MYSQL QUERY BROWSER76
Figure 5-4. User management in MySQL Administrator
5351c05_final.qxd 8/26/05 5:51 PM Page 76
www.it-ebooks.info
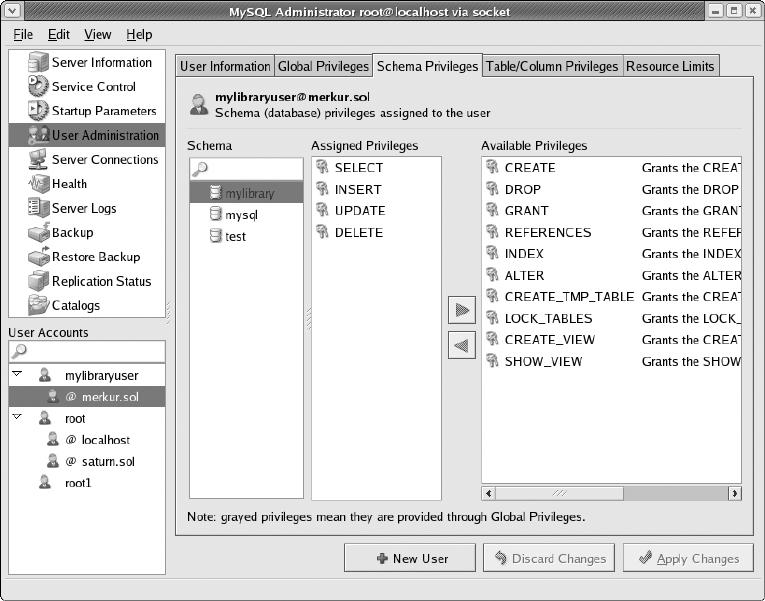
is a wildcard for any host name. It is not directly visible in MySQL Administrator. Only a look at the
table mysql.user shows what MySQL Administrator has done.)
Often, such free access is undesirable for security reasons. To limit access to certain computers,
click with the right mouse button on the user name, execute ADD HOST, and provide the desired host
name (e.g., localhost). The table mysql.user now contains two entries for the user name with the
host names % and localhost. Then click on the user name again with the right mouse button and
execute REMOVE HOST. This will delete the host name %.
Setting Privileges
MySQL distinguishes between global privileges (access rights), which hold for all databases, and
object privileges, which hold for particular databases, tables, and columns. By default, MySQL
Administrator shows object privileges only at the database level (dialog sheet SCHEMA PRIVILEGES).
If you also wish to see global privileges as well as object privileges at the table and column level,
you must set the corresponding options in the configuration dialog (TOOLS | OPTIONS | ADMINISTRATOR
under Windows or FILE | PREFERENCES | ADMINISTRATOR under Linux).
To assign privileges to a user or take them away, first select the desired object in the relevant
dialog sheet (e.g., a database). Then mark the desired privilege in the column AVAILABLE PRIVILEGES
and push the arrow button in the column ASSIGNED PRIVILEGES (see Figure 5-5).
CHAPTER 5 ■MYSQL ADMINISTRATOR AND MYSQL QUERY BROWSER 77
Figure 5-5. Management of access privileges in MySQL Administrator
5351c05_final.qxd 8/26/05 5:51 PM Page 77
www.it-ebooks.info
Server Connections
This module consists of two dialog sheets:
•T
HREADS shows a list of all active MySQL threads (corresponds to the SQL command
SHOW PROCESSLIST).
•U
SER CONNECTION contains a list of all currently active MySQL users together with their
threads. These data as well come from SHOW PRIVILEGES, with the only difference being
that the list is grouped by user name. One look will tell you which users have a large
number of open connections.
Health
This module gives an overview in four dialog sheets of the use and load of the MySQL server.
•C
ONNECTION HEALTH shows in three charts the rate of the number of active connections, the
amount of network traffic, and the number of SQL queries per second. The charts are of
interest only when the MySQL server is heavily burdened. This is frequently the case in a
production setting, but not on a development computer.
•M
EMORY HEALTH shows the use of two important memory locations (Query Cache and
Key Buffer).
•S
TATUS VARIABLES and SERVER VARIABLES use tables to manage countless additional status values.
Noteworthy in this module is that you can customize the graphical display with minimal
effort. With the right mouse button you can add new graphs and even new dialog sheets. (The
Windows version of MySQL Administrator offers considerably more convenience than the Linux
version and also allows the customization of existing graphs.)
In the forms for custom graphs you can use all the variables from the dialog sheets STATUS
VARIABLES and SERVER VARIABLES. The variable names must be placed in brackets. If you prefix the
optional caret character (^), then instead of the absolute value of the variables, you get relative
values since the previous refreshing of the graphs. For example, the formula for the Query Cache
Hitrate looks like this:
(^[Qcache_hits] /
(^[Qcache_hits] + ^[QCache_inserts] + ^[QCache_not_cached])) * 100
In this way, the relation between the number of cache hits and that of all cache inserts is calculated
as a percentage (value between 0 and 100).
Server Logs
With this module you can conveniently read the logging data of the MySQL server. However, this
functions only when the various logging functions have been activated. The relevant logging options
can be changed in the dialog sheet LOG FILES of the module STARTUP PARAMETERS.
Backup
With the backup module you can, not surprisingly, make backups of your databases. The method of
making a single backup is somewhat involved, so it is best suited for carrying out regular backups:
First you have to create, using NEW PROJECT, a backup project. This project, which you give a name
in the field PROJECT NAME, contains all the settings for the backup: which databases are to be backed
up, which options hold for the backup, and when the backup should be regularly executed. (The
CHAPTER 5 ■MYSQL ADMINISTRATOR AND MYSQL QUERY BROWSER78
5351c05_final.qxd 8/26/05 5:51 PM Page 78
www.it-ebooks.info
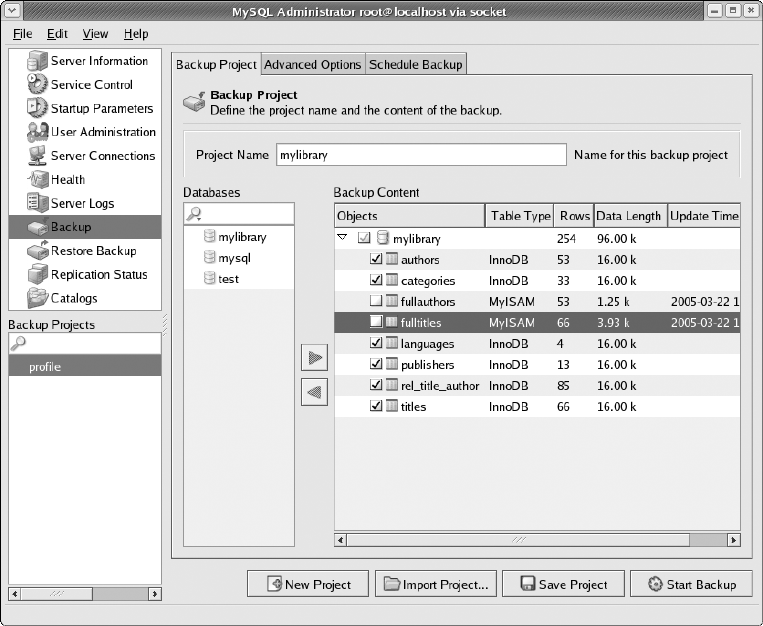
Setting the Scope of the Backup
The backup project can encompass one or more databases. By default, all tables from the selected
database are backed up. In the list box BACKUP CONTENT select individual tables (see Figure 5-6).
Backup Options
In the dialog tab ADVANCED OPTIONS you can set the details of the backup. Here are some of the
details:
LOCK ALL TABLES has the effect that at the beginning of a backup all tables are blocked with
the command LOCK. This makes possible a consistent backup of MyISAM tables. However, the
entire database is locked during the backup. In addition, the start time of the backup depends
on when the program receives a LOCK for all tables. (If the database is in use, first all LOCK
operations must terminate.)
SINGLE TRANSACTION has the effect that the entire backup is accomplished as a single large trans-
action. This ensures a consistent backup of InnoDB tables. However, such extensive transactions
can have negative effects on the speed of database usage at the time of backup.
CHAPTER 5 ■MYSQL ADMINISTRATOR AND MYSQL QUERY BROWSER 79
Figure 5-6. Definition of a backup project
5351c05_final.qxd 8/26/05 5:51 PM Page 79
www.it-ebooks.info

With a NORMAL BACKUP, each table is backed up individually. This is the most efficient method,
but it has the disadvantage that changes in the database can be made during the backup. This
can lead to inconsistencies among tables.
COMPLETE BACKUP has the effect that all tables of the selected databases are always backed up.
The selection of individual tables in the dialog sheet BACKUP PROJECT is ignored in this case.
NOCREATESresults in the backup containing no CREATE TABLES commands.
NOEXTENDED INSERTShas the effect that for each record in a table, an individual INSERT
command is used. (By default, several records are collected into a single INSERT command.
This makes the backup smaller and more efficient.)
ADD DROP TABLE has the effect that before each CREATE TABLE command, a DROP TABLE
command is executed. This deletes existing tables before the backup table is read in.
COMPLETE INSERTSresults in the INSERT commands containing the column names (that is,
INSERT INTO tablename (colname1, colname2) VALUES …).
ANSI QUOTES has the result that table and column names are set between ANSI-compatible
quotation marks (“name”) instead of the MySQL-typical single quotes (‘name’).
DISABLE KEYS results in table indices being temporarily deactivated when the data are read in.
This saves some time with large tables.
Executing a Backup
To execute a backup, first save the project settings with SAVE PROJECT and then click on EXECUTE
BACKUP NOW. You will then be requested to select a name for the file into which the backup is to be
written. This is a text file with UTF8 encoding containing SQL commands. The backup file looks
similar to the result of mysqldump. (MySQL Administrator does not use this command, however.
It uses its own backup code.)
Automating a Backup
MySQL Administrator offers in the dialog sheet SCHEDULE the possibility of executing backups on
a regular basis. The resulting backup files are written into a chosen directory. To this end, MySQL
Administrator is automatically started up by the operating system with a special option.
For regular backups it is thus not necessary that MySQL Administrator be running constantly.
Under Windows, it is the TASKPLANNER that deals with this (PROGRAMS | ACCESSORIES | SYSTEM TOOLS |
SCHEDULED TASKS), while under Unix/Linux it is the cron system. However, in my tests, setting up
regular backups has worked only with the Windows version of MySQL Administrator.
Restore
With this module you can read in previously backed up databases. In the dialog sheet RESTORE
CONTENT you can specify after the selection of a backup file which table should be restored (by
default all of them).
Normally, the tables will be read into the database that was used in the backup. However,
sometimes it is desirable to read the tables into another database. If you wish to do this, in the
Linux version of MySQL Administrator you give the name of the desired database in the field
RESTORE SELECTED TABLES IN, while in the Windows version it is the field TARGET SCHEMA.
■Caution You should use this module only for backup files that you created with MySQL Administrator, not for
backup files from other tools (phpMyAdmin, mysqldump, etc.). The RESTORE BACKUP module relies on the backup file
following the conventions of MySQL Administrator. That is not always the case with other types of backups.
CHAPTER 5 ■MYSQL ADMINISTRATOR AND MYSQL QUERY BROWSER80
5351c05_final.qxd 8/26/05 5:51 PM Page 80
www.it-ebooks.info

Replication Status
When the MySQL server is part of a replication system, this module shows the replication status.
Background information on the topic of replication can be found in Chapter 14. In MySQL Admin-
istrator you can configure replication in the module STARTUP VARIABLES.
Catalogs
Behind the name Catalogs hides a module for managing databases and tables (Figure 5-7). With it
you can get a quick look at existing databases, tables, indices, etc.
This module was actually designed for creating new tables and modifying existing ones. In the
version tested, however, these functionalities were difficult to use and also unstable. Until the situa-
tion changes, it is more efficient to type in the requisite CREATE TABLE and ALTER TABLE commands
by hand or to use phpMyAdmin for database design.
CHAPTER 5 ■MYSQL ADMINISTRATOR AND MYSQL QUERY BROWSER 81
Figure 5-7. Table properties of the mylibrary database
5351c05_final.qxd 8/26/05 5:51 PM Page 81
www.it-ebooks.info
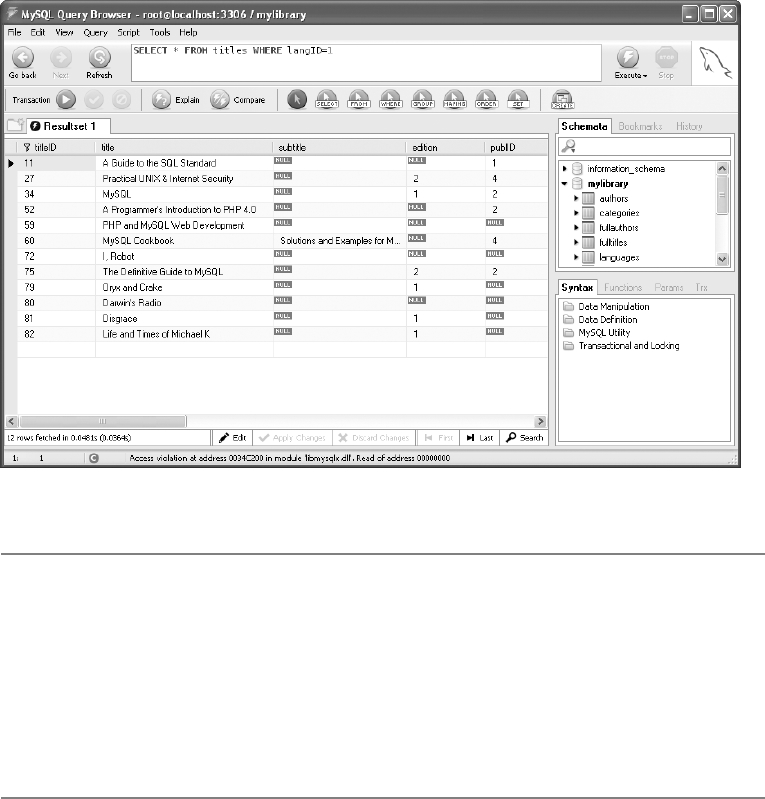
MySQL Query Browser
The main task of the MySQL Query Browser is to help you in composing and testing SQL commands.
Additionally, the program offers some auxiliary functions: you can insert data into tables, alter data
in tables, test regular expressions (for the SQL operator REGEX), read MySQL help texts, etc.
Input and Execution of SQL Commands
To become familiar with the MySQL Query Browser, input a simple SQL command. SQL keywords
are shown automatically in color. Execute the command with the EXECUTE button. The results are
then displayed as a table (see Figure 5-8).
■Tip A few keyboard shortcuts make using the MySQL Query Browser more efficient and convenient:
Ctrl+Return executes the current SQL command (like EXECUTE).
Ctrl+Shift+Return executes the command, but shows the result in a new dialog sheet. This has the advantage
that the results of previous commands remain available.
F11 changes the arrangement of the individual windows and enlarges the input region for SQL commands. This
makes it easier to enter long SQL commands. If you press F11 again, the standard layout is restored.
F12 closes the individual windows except for the current result region. This makes it easier to read extensive
results. Pressing F12 again restores the original window layout.
CHAPTER 5 ■MYSQL ADMINISTRATOR AND MYSQL QUERY BROWSER82
Figure 5-8. First experiments with the MySQL Query Browser
5351c05_final.qxd 8/26/05 5:51 PM Page 82
www.it-ebooks.info
SQL commands with a mouse click: Using various arrow buttons you can assemble SQL com-
mands with minimal typing effort. The following click sequences provide an example:
• Click on the button SELECT.
• Click on the columns title, subtitle, and edition of the titles table.
• Click on the button WHERE.
• Click on the column langID of the titles table.
• Input the WHERE condition =2 from the keyboard.
• Click on the button ORDER.
• Click on the column title of the titles table.
From these mouse clicks the MySQL Query Browser forms the following command, which
you can now execute with EXECUTE:
SELECT t.title, t.subtitle, t.edition, t.catID FROM mylibrary.titles t
WHERE t.langID=2 ORDER BY t.title
Here tis an alias (abbreviation) for the table mylibrary.titles. This alias could also have been de-
fined via …FROM mylibrary.titles AS t …. The MySQL Query Browser does not use the optional
AS, which leaves some SQL pros perplexed. MySQL users familiar with SQL will prefer to type
in SQL commands from the keyboard.
Exporting SELECT results: With FILE | EXPORT RESULTSET you can export the most recent result
of SELECT commands in the formats CSV, HTML, XML, and Excel.
Comparing SELECT results: A special function of the MySQL Query Browser is that it can com-
pare the results of two SELECT commands. To do this, first you must divide the result table with
the context menu command SPLIT TAB VERTICALLY. Then execute an SQL command for each of
the two domains. Both SQL commands must refer to the same column. Finally, execute QUERY |
COMPARE RESULTSETS. The program marks records in white, green, and red depending on whether
they are present in the second result, lacking in the second result, or additional records exist
(see Figure 5-9).
BLOBs: The content of BLOB columns is not directly displayed. However, you can look at the
data in a separate editor window or store them in a file.
Analyzing internal SQL execution: The button EXPLAIN gives internal information about the
execution of the most recent SQL command. MySQL pros can thus find out which indices were
used. The interpretation of the result is relatively difficult (see also Chapter 8).
Transactions: In addition to SELECT commands, you can also, of course, execute UPDATE,
INSERT, DELETE, and other commands. In this case, the result table simply remains empty.
If you are working with InnoDB tables, you can also execute such commands as transactions
with the buttons START/COMMIT/ROLLBACK TRANSACTION.
Using several result regions: With FILE | NEW QUERY TAB you open an additional SQL input field
and result region. In this way you can test several SQL commands in parallel.
CHAPTER 5 ■MYSQL ADMINISTRATOR AND MYSQL QUERY BROWSER 83
5351c05_final.qxd 8/26/05 5:51 PM Page 83
www.it-ebooks.info
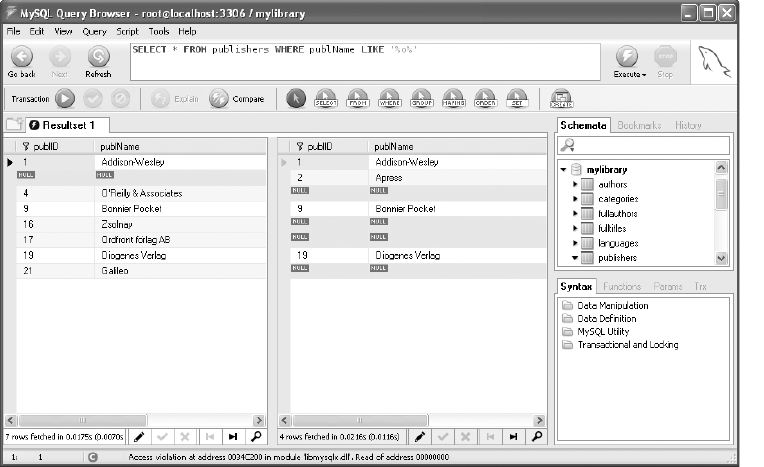
Changing Data in SELECT Results
With simple SELECT queries containing data from only one table (no JOINs) and without GROUP BY
or aggregation functions, the results can be changed. To do so, click on the EDIT button at the bot-
tom of the table. This button is available only for results that can be changed.
To change a table field, you must activate it with a double click. You simply add new records
to the end of the table. To delete a record (a row), execute DELETE ROWS with the right mouse button.
Changes take effect only after you click the button APPLY CHANGES.
History and Bookmarks for SQL Commands
The MySQL Query Browser stores all executed SQL commands automatically in a so-called history
list, which can be accessed via the sidebar at the right edge of the window (if the sidebar is wide
enough). With Drag&Drop you can move the command into the input region and execute it with
a double click.
You can give frequently used commands a name with Ctrl+B and store them in the bookmark
list. This list is also found in the sidebar.
Executing Several Commands at Once (Scripts)
Open an SQL script input area with FILE | NEW SCRIPT TAB. There you can specify several SQL com-
mands separated by semicolons. You can then execute these commands all at once (EXECUTE button)
or step by step (SCRIPT menu).
These scripts represent several ordinary SQL commands, and not stored procedures (see the
next section). The commands can be stored as a *.sql file using the FILE menu. The history and
CHAPTER 5 ■MYSQL ADMINISTRATOR AND MYSQL QUERY BROWSER84
Figure 5-9. Comparing SELECT results
5351c05_final.qxd 8/26/05 5:51 PM Page 84
www.it-ebooks.info
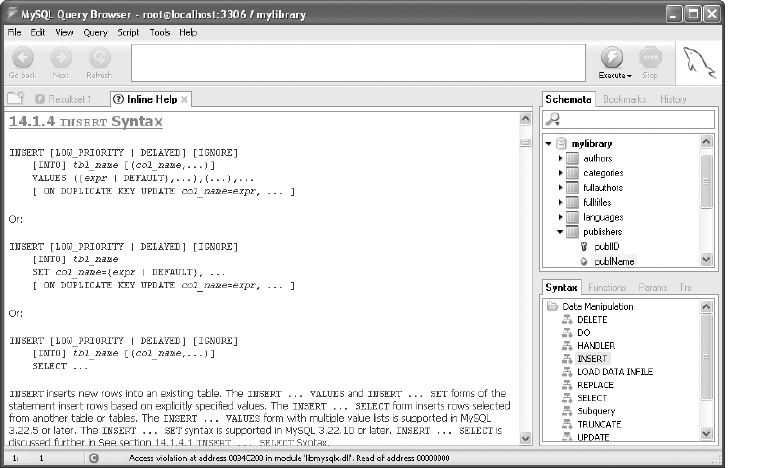
Stored Procedures
The MySQL Query Browser makes available a number of elementary functions for input of stored
procedures. These functions will be considered in greater detail in Chapter 13. (Stored procedures
are functions composed of several SQL commands that are controlled directly by the MySQL server.
Stored procedures are thus a characteristic of the MySQL server, while scripts belong to the MySQL
Query Browser.)
MySQL Help
The MySQL Query Browser can also be used for reading MySQL help (see Figure 5-10). The help
texts are accessible via the lists SYNTAX and FUNCTIONS in the sidebar. These are extracts from the
online documentation available at http://dev.mysql.com/doc/.
CHAPTER 5 ■MYSQL ADMINISTRATOR AND MYSQL QUERY BROWSER 85
Figure 5-10. Reading a help text
5351c05_final.qxd 8/26/05 5:51 PM Page 85
www.it-ebooks.info

phpMyAdmin
The program phpMyAdmin is perhaps the best-beloved administrative tool for MySQL. You can
create, modify, and delete databases and tables; insert, change, and delete data records; and import
and export entire databases, among many other administrative tasks.
Which administrative functions are available in phpMyAdmin depends on the access privileges
that phpMyAdmin has on the MySQL server. On your local test system, you will set up phpMyAdmin
with root privileges; then you will be able to access all databases and carry out all administrative
functions. On the other hand, with your Internet service provider (ISP) you will have phpMyAdmin
access privileges only to your own databases.
phpMyAdmin comprises a number of PHP script files. The use of phpMyAdmin assumes that a
web server (generally Apache) and PHP are installed. As with any PHP program, the following holds
true for phpMyAdmin: Scripts are executed on the web server, but the resulting HTML pages can be
accessed from any location. This shows the great advantage of phpMyAdmin: You can use the pro-
gram for the administration of a MySQL server that is not running on the local computer but, for
example, on that of your ISP. From the point of view of the ISP, phpMyAdmin is a local program and
therefore has full access to the MySQL server.
The programs MySQL Administrator and MySQL Query Browser introduced in the previous
chapter, in contrast, are suitable only for administration of an external MySQL server when data-
base access is possible over a network. It is thus that your application generally fails: Most MySQL
installations are so configured by the ISP for security reasons that only local database access is per-
mitted (and not over the Internet).
This chapter describes the installation and configuration of phpMyAdmin 2.6.1 and the use of
its most important functions. Please note that this version is still incompatible with MySQL 5.0. For
this reason you cannot use or administer some new functions of MySQL 5, including views, stored
procedures, and triggers. Another innovation of MySQL 4.1, namely, the management of geometric
data (GIS functions) is not supported by phpMyAdmin. However, one can expect that there will be
a new version of phpMyAdmin once MySQL 5.0.nbecomes sufficiently widespread.
■Tip While phpMyAdmin simplifies interaction with the MySQL server, the assumption is that you understand the
concepts of MySQL administration, database design, the security system, and the syntax of SQL. Fundamentals on
these topics can be found in Chapters 8 through 14.
Installation and Configuration
This section assumes that Apache and PHP are already available on the computer on which php-
MyAdmin is to be installed, and that PHP is able to communicate with MySQL (see Chapter 2).
87
CHAPTER 6
■ ■ ■
5351c06_final.qxd 8/26/05 5:54 PM Page 87
www.it-ebooks.info
Installing phpMyAdmin Files
You will find phpMyAdmin on the website http://www.phpmyadmin.net/ as a *.zip or *.tar.bz2
archive. All files in this archive must be copied into a subdirectory of the DocumentRoot directory of
Apache. Depending on the operating system, this directory might be called Programs\Apache Group\
Apache2\htdocs, /var/www/html, or /srv/www/htdocs. The amount of space needed for phpMyAdmin
after unpacking is about 8 MB.
Local Windows Computer: Under Windows, use a ZIP file utility such as WinZip for unpacking
the files, or with Windows XP use Windows Explorer (file manager). Then rename the new
directory phpMyAdmin-version to a simpler name (in the following examples, simply
phpmyadmin).
Local Linux Computer: Under Linux, switch into the DocumentRoot directory and unpack the
archive with tar:
root# cd <documentroot directory >
root# tar xjf phpMyAdmin-version.tar.bz2
root# mv phpMyAdmin-version phpmyadmin
phpMyAdmin is included with some Linux distributions. In such a case, you need only to
install the relevant packages. Note, however, that the version provided may not be the most
recent one.
Web Server with ISP: Somewhat more complicated is installing phpMyAdmin on an external
web server (assuming that phpMyAdmin is not already available there by default).
ISP with Shell Login: First load phpMyAdmin-version.tar.bz2 from phpmyadmin.net onto
your local computer. Then transfer this file with an FTP client to the ISP. There, log in with
ssh and execute the above three Linux-specific commands.
ISP without Shell Login: If you have ssh access to your account at the ISP, you must
unpack phpMyAdmin on the local computer into an arbitrary directory. Then transfer the
entire directory tree with an FTP client to the ISP. Since there are over five hundred files
totaling about 8 MB, it will take awhile. Note that your FTP client should use binary (not
text) mode.
Configuring phpMyAdmin
Before you can use phpMyAdmin, you must change some of the settings in the file config.inc.php in
the phpMyAdmin installation directory. There are different variants that depend on how the password
for MySQL access is specified. These variants are described in detail in the following two sections:
Password as plain text in config.inc.php (config authentication): In the simplest case, you
enter the MySQL user name and password directly into config.inc.php. This variant is recom-
mended for a local test system or an individual ISP account.
http and cookie authentication: With these two variants, the user must register in a login win-
dow before using phpMyAdmin. This has two immediate advantages: First, authentication is
more secure, since the MySQL password does not have to be present in config.inc.php. Second,
in this way, various users can register to administer their own databases. Thus these two meth-
ods are particularly recommended for ISPs that manage a number of accounts.
CHAPTER 6 ■PHPMYADMIN88
5351c06_final.qxd 8/26/05 5:54 PM Page 88
www.it-ebooks.info

config Authentication
The lines of config.inc.php shown below show what is relevant for a minimal configuration.
Normally, only the character strings shown in boldface have to be changed.
Address of phpMyAdmin: $cfg[‘PmaAbsoluteUri’] must contain the address under which php-
MyAdmin is to be reached over the network. For the computer name, the actual computer in
the network must be used (in my local test network it is uranus.sol). localhost is permissible
only for a local installation that is not accessible over a network. Instead of phpmyadmin, the
directory under which phpMyAdmin is reachable in your installation must be given (with case
distinction and a slash at the end).
# changes in config.inc.php
...
# must contain the computer name and the phpMyAdmin installation directory:
$cfg['PmaAbsoluteUri'] = 'http://uranus.sol/phpmyadmin/';
...
You can also attempt to leave $cfg[‘PmaAbsoluteUri’] empty; in many cases, phpMyAdmin is
able to determine the correct setting. However, phpMyAdmin will constantly give a warning.
You can avoid this by setting the variable config.inc.php to TRUE in
$cfg[‘PmaAbsoluteUri_DisableWarning’].
MySQL user name and password: The following parameters specify how phpMyAdmin makes
the connection to the MySQL server. Normally, you must give the password and can leave the
other values as they are. If MySQL is not yet secured with a password, the password string must
be left empty.
If you are setting up config.inc.php for the phpMyAdmin installation at an ISP, then instead of
root, you must give the MySQL user name that was given you by the ISP. You may have to give a
computer name from the local network of your ISP instead of localhost (only if at your ISP the
web server and the MySQL server are running on different computers).
$cfg['Servers'][$i]['host'] = 'localhost'; // MySQL computer name
...
$cfg['Servers'][$i]['auth_type'] = 'config'; // must be 'config'
$cfg['Servers'][$i]['user'] = 'root'; // MySQL user
$cfg['Servers'][$i]['password'] = 'xxx'; // MySQL password
...
Optional communication parameters: If the MySQL server running under Unix or Linux is so
configured that only local access over a socket file is possible (and not over TCP/IP), you must
use the setting socket as connect_type. If phpMyAdmin does not find the socket file, then give
its file name:
$cfg['Servers'][$i]['connect_type'] = 'socket'; // access over socket file
$cfg['Servers'][$i]['socket'] = ''; // socket file name
If localhost is not given as the host name, the access takes place automatically over TCP/IP. You
can now optionally specify the TCP/IP port over which the connection should be established.
■Note With RHEL 4, TCP/IP must be used, since Apache cannot access the MySQL socket file by default because
of the SELinux configuration.
$cfg['Servers'][$i]['port'] = '3306'; // port number
$cfg['Servers'][$i]['connect_type'] = 'tcp'; // access over TCP/IP
CHAPTER 6 ■PHPMYADMIN 89
5351c06_final.qxd 8/26/05 5:54 PM Page 89
www.it-ebooks.info
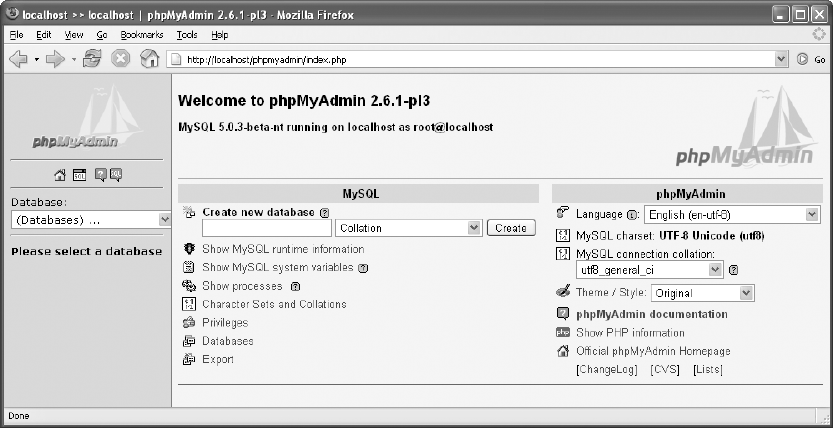
mysql or mysqli interface: Since version 5, PHP supports two interfaces (modules) for com-
municating with MySQL: mysql and mysqli. Both variants will be presented in detail in Chapter
15. Keep in mind you should use the mysqli extension for MySQL 4.1 and newer. It is faster and
more secure:
$cfg['Servers'][$i]['extension'] = 'mysqli'; // mysqli interface
Trying Out phpMyAdmin
Now you can test phpMyAdmin by typing the address http://localhost/phpmyadmin/index.php or
http://computername/phpmyadmin/index.php in your web browser. On the start page of phpMyAdmin
you can set the language and the layout of phpMyAdmin.
The start page should look something like Figure 6-1 (depending on the version of phpMyAd-
min that you have installed and what access privileges phpMyAdmin has on the MySQL server). If
all goes well, create a bookmark to this page to save having to type in the address in the future.
If a warning is displayed on the phpMyAdmin start page that you are using a multibyte character
set but the PHP extension mbstring is unavailable, you must activate this extension. In most Linux dis-
tributions it suffices to install the relevant package. Under Windows, the extension is already installed,
but it must be explicitly activated. To do so, search in php.ini for the line extension=php_mbstring.dll
and remove the prefixed semicolon. Then restart Apache, both under Unix/Linux and under Windows
for the change to take effect.
Protecting the phpMyAdmin Directory
There is a security problem with the phpMyAdmin installation at your ISP: Not only you, but every
web surfer who can guess the name of your phpMyAdmin directory can alter or delete your data-
bases using phpMyAdmin.
CHAPTER 6 ■PHPMYADMIN90
Figure 6-1. phpMyAdmin start page
5351c06_final.qxd 8/26/05 5:54 PM Page 90
www.it-ebooks.info
You can prevent this by securing access to the phpMyAdmin directory with a password using
an .htaccess file. Then everyone who wishes to use a browser to view a PHP file from the phpMyAdmin
directory will have to log in and provide a password. (The login name and password are completely
independent of the account login and from MySQL’s internal access system. Details on the use of an
.htaccess file can be found in Chapter 2.)
An additional security problem can result from the fact that the file config.inc.php contains
your MySQL password in plain text. Sometimes, the computer of an ISP is configured in such a way
that the web files can be accessed via FTP. In that case, the protection offered by .htaccess is insuf-
ficient. You must ensure that it is impossible to read config.inc.php with anonymous FTP.
Servicing Several MySQL Servers with phpMyAdmin
Host, user, and password entries for multiple MySQL servers are possible in config.inc.php. If you
make such entries, then on the start page of MySQL there appears a listbox with the names of the
computers whose MySQL servers can be managed. Selecting one of these names establishes a link
to that server.
The variable $cfg[‘ServerDefault’] determines the server that phpMyAdmin uses to establish a
link at startup. If the variable is set to 0, then at startup phpMyAdmin initially sets no link, but merely
presents a listbox with the selection of servers.
If you do not wish to have simply the computer name (array variable host) displayed in the list-
box, then you can use $cfg[‘Servers’][$i][‘verbose’] to display a different character string.
Additional Configuration Options
In addition to the MySQL access data in config.inc.php, you can also set various options. The fol-
lowing list describes only the most important of these, together with their associated variables:
$cfg[‘Confirm’] = true/false: This variable specifies whether a confirmation query should be
displayed before data are deleted (default: true).
$cfg[‘MaxRows’] = n: Specifies how many data records should be displayed per page as the
result of a query (default is 30).
$cfg[‘ExecTimeLimit’] = n: Specifies how long the execution of the PHP code will be allowed to
run (default is 300 seconds). The time is relevant primarily for time-intensive import/export
commands.
$cfg[‘ShowBlob’]=true/false: Specifies whether the contents of fields of type xxxBLOB are to be
displayed (default: false).
$cfg[‘ProtectBinary’] = false/’blob’/’all’: Specifies whether the contents of BLOB fields are to be
write protected. By default (‘blob’), BLOBs cannot be changed. The prohibition against change
to any table content (regardless of data type) is effected by ‘all’, while ‘false’ permits everything
to be changed.
If you wish to change the width of the left column of the main window (by default, 200 pixels),
open the file themes/themename/layout.inc.php and there change $cfg[‘LeftWidth’]. In this column
are displayed the listbox for database selection and the list of tables in the current database. Here
themename gives the name of the layout (e.g., original or darkblue_orange).
http and Cookie Authentication
The configuration described in the previous section with $cfg[‘Servers’][$i][‘auth_type’] = ‘config’
is simple, but it is inflexible if various users wish to manage their own databases, and insecure
CHAPTER 6 ■PHPMYADMIN 91
5351c06_final.qxd 8/26/05 5:54 PM Page 91
www.it-ebooks.info

because user names and passwords appear in plain text in config.inc.php. If you wish to allow
many users uniform access to phpMyAdmin, you should consider the two configuration variants
described here.
Assumptions
• This section assumes that you are using at least phpMyAdmin 2.6.1 and MySQL 4.1.2. With
older versions of the two programs, http and cookie authentication function only if you
first set up an additional MySQL user that is able to read the tables mysql.user,mysql.db,
and mysql.tables_priv. This user must be registered in config.inc.php together with a
password (parameters controluser and controlpasswd). The precise process is described
in the phpMyAdmin help file Documentation.html under Using authentication modes).
•http authentication assumes that the PHP interpreter is executed as an Apache module (and
not as a CGI program). That is the case in current versions of PHP.
• For http authentication to function, the phpMyAdmin directory may not be protected via
.htaccess. (If that is the case, then http authentication and that for .htaccess come into
conflict.)
•cookie authentication is designed for the case in which http authentication is not possible
(for example, when the Microsoft Internet Information Server (IIS) is used as the web server).
This form of authentication assumes that the user permits cookies from phpMyAdmin.
http Authentication
To get phpMyAdmin to use http authentication, execute the boldface changes below in
config.inc.php:
# in config.inc.php
$cfg['Servers'][$i]['controluser'] = ''; // empty since phpMyAdmin
$cfg['Servers'][$i]['controlpass'] = ''; // version 2.6.1
$cfg['Servers'][$i]['auth_type'] = 'http'; // http authentication
$cfg['Servers'][$i]['user'] = ''; // empty!
$cfg['Servers'][$i]['password'] = ''; // empty!
All other settings in config.inc.php are as described in the previous section (thus the parame-
ters host, connect_type, port, extension, etc.). Whenever you now wish to use phpMyAdmin, a web
browser dialog appears (see Figure 6-2) in which you must input a MySQL user name and associ-
ated password. For further work in phpMyAdmin you then have the privileges of a MySQL user.
CHAPTER 6 ■PHPMYADMIN92
Figure 6-2. Login dialog for http authentication
5351c06_final.qxd 8/26/05 5:54 PM Page 92
www.it-ebooks.info
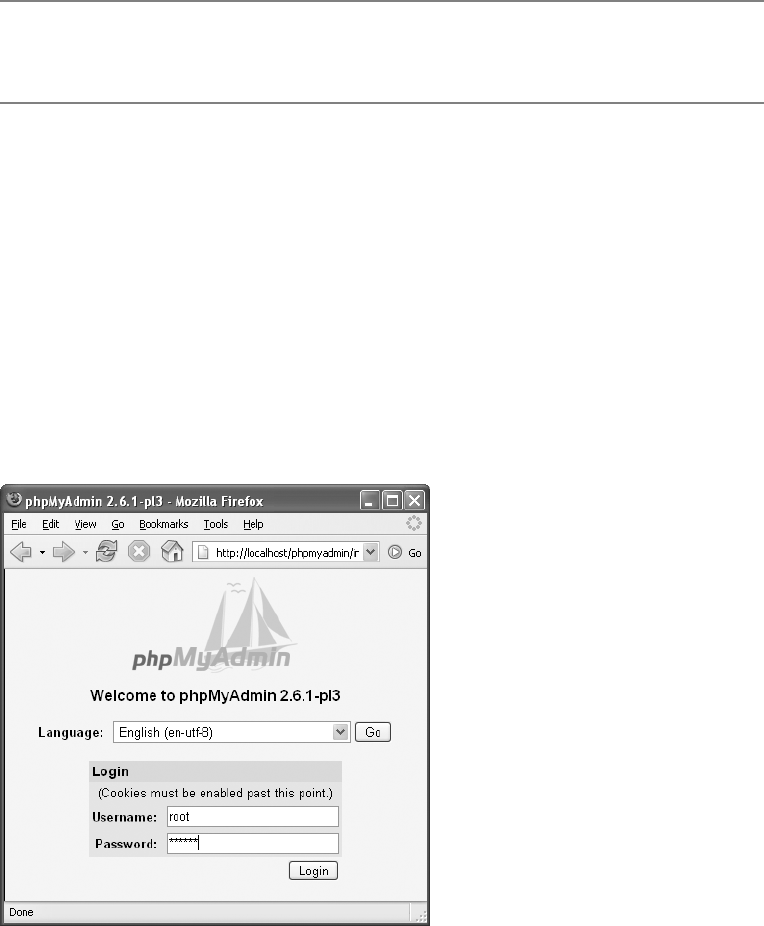
The http authentication is more secure than the direct entry of a user name and password in
config.inc.php. Note, however, that the login data in the http protocol are transmitted from the
browser to the web server in plain text. You can attain greater security if your web server also sup-
ports the https protocol. In this case, the login data are encrypted before being transmitted.
■Note If an error occurs with phpMyAdmin 2.6.1 at login, an empty page will appear in the web browser. There
is no way to repeat the login. You will have to close the web browser and restart it. It is also impossible to log out
and then log in again. In this case as well you must restart the web browser.
cookie Authentication
For cookie authentication you must change the auth_type line in config.inc.php. Moreover, you
must provide a character string for the parameter blowfish_secret. This string is used to encrypt the
login data (user name and password) before they are stored as cookies on the local computer.
# in config.inc.php
$cfg['blowfish_secret'] = 'xxxxxx';
...
$cfg['Servers'][$i]['controluser'] = ''; // empty since pma
$cfg['Servers'][$i]['controlpass'] = 'xxx'; // version 2.6.1
$cfg['Servers'][$i]['auth_type'] = 'cookie'; // cookie authentication
$cfg['Servers'][$i]['user'] = ''; // empty!
$cfg['Servers'][$i]['password'] = ''; // empty!
The login input fields are displayed only within the phpMyAdmin start page (see Figure 6-3).
CHAPTER 6 ■PHPMYADMIN 93
Figure 6-3. Login dialog for cookie authentication
5351c06_final.qxd 8/26/05 5:54 PM Page 93
www.it-ebooks.info

User Management, Securing MySQL
MySQL employs a rather complex system for managing access privileges. The basic idea is that
every user and every program that wishes to use MySQL must have an account. The account data
consist of three pieces of information: a user name, a password, and the name of the client com-
puter. (Here the client is the program that wishes to communicate with the MySQL server.) This
section shows how you can register new phpMyAdmin users, change access privileges, and protect
MySQL. Further details and basic information on user management can be found in Chapter 11.
■Note Changes in the MySQL user management can be carried out only from a MySQL local installation if php-
MyAdmin is running with
root
privileges. The MySQL installation of your ISP prevents other users from using this
account. (If that is not the case, you should immediately seek another ISP.) Your MySQL account at your ISP does
not allow you to change MySQL access privileges.
Securing MySQL
For a MySQL installation to be considered secure, it must satisfy the following conditions:
• There is no user without a password.
• There is no user without a user name. (If the User column has empty entries, then anyone
can log in!)
• There is no user whose Host column contains %(which here indicates that the user can log
in from anywhere in the network or the Internet).
• There are as few users as possible (in the ideal case only root) who have unrestricted access
(all privilege columns contain Y). In managing access privileges in phpMyAdmin you can
recognize unrestricted access privileges in that the column GLOBAL PRIVILEGES contains the
value ALL PRIVILEGES.
After installation under Linux, MySQL recognizes four combinations of user and host names
(see Table 6-1). None of these combinations is secured by a password. That is, all four violate the
above-mentioned security rules.
Table 6-1. Data Types for bind_param
User Name (User) Host Name (Host) Access Privileges
root localhost unrestricted
root computer name unrestricted
empty (arbitrary name) localhost greatly restricted
empty (arbitrary name) computer name greatly restricted
For the sake of security, the two entries without user names should be deleted, and both root
entries should be password protected. Of help here is phpMyAdmin’s privilege management (see
Figure 6-4). To navigate to this page, click in the phpMyAdmin start page on the link PRIVILEGES.
CHAPTER 6 ■PHPMYADMIN94
5351c06_final.qxd 8/26/05 5:54 PM Page 94
www.it-ebooks.info

Deleting insecure entries: To do this, check the affected users in the user overview (in Figure 6-4,
this includes the two users “Any”) and then click OK to delete these users.
Securing entries with a password: With a click on the EDIT symbol in the last column of a given
user you reach a new page that summarizes all the access privileges of the selected user. This page
offers, among other things, the possibility of giving a new password. To reduce the chance of a typo,
you have to enter it twice.
■Note After the password for
root
for
localhost
has been changed, phpMyAdmin will display the error message
access denied
the next time a page is changed. To get phpMyAdmin to work again you have either to enter the
new password in config.inc.php (
config
authentication) or log in again (
http
and
cookie
authentication).
Creating New Users
For the sake of security, the user root should be used only for administrative purposes. If you wish
to develop a new MySQL application, you should create a new MySQL user that has exactly the priv-
ileges that are required for the application. As a rule, it suffices for this user to be able to read and
alter a particular database.
CHAPTER 6 ■PHPMYADMIN 95
Figure 6-4. Managing users and access privileges in phpMyAdmin
5351c06_final.qxd 8/26/05 5:54 PM Page 95
www.it-ebooks.info
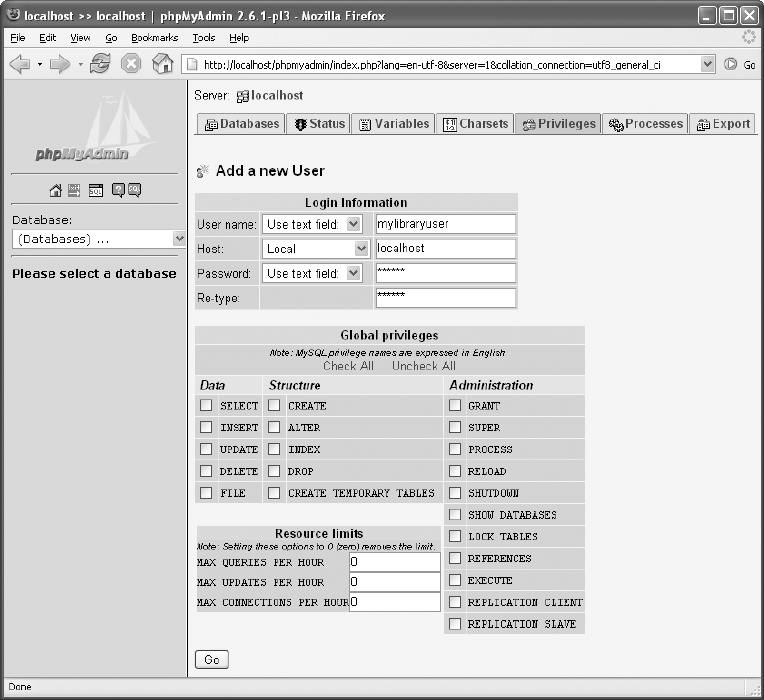
Adding a user: To add a new user, click on the phpMyAdmin start page on PRIVILEGES, and on
the PRIVILEGES page click on the link ADD A NEW USER. On the following page (see Figure 6-5), type in
the new name in the field USER NAME. In the field HOST, you normally choose the entry LOCAL. Then
phpMyAdmin adds the text LOCALHOST automatically to the next column. This means that the new
user can contact MySQL only from the local computer, which for PHP applications is generally suf-
ficient. Finally, you must give the password twice (which should differ as much as possible from the
root password!).
Leave all the global privileges empty! (Only in the next step will the user obtain privileges for
access to a particular database. Global privileges are unnecessary.)
Adding database-specific privileges: The OK button in the previous dialog leads to a new page,
in which you can set the access details. At DATABASE-SPECIFIC PRIVILEGES you select, in the listbox, the
database to which the user should have access (see Figure 6-6). This database must already exist for
it to appear. If it does not yet exist, you can type the name in the text field.
CHAPTER 6 ■PHPMYADMIN96
Figure 6-5. Adding a new user
5351c06_final.qxd 8/26/05 5:54 PM Page 96
www.it-ebooks.info
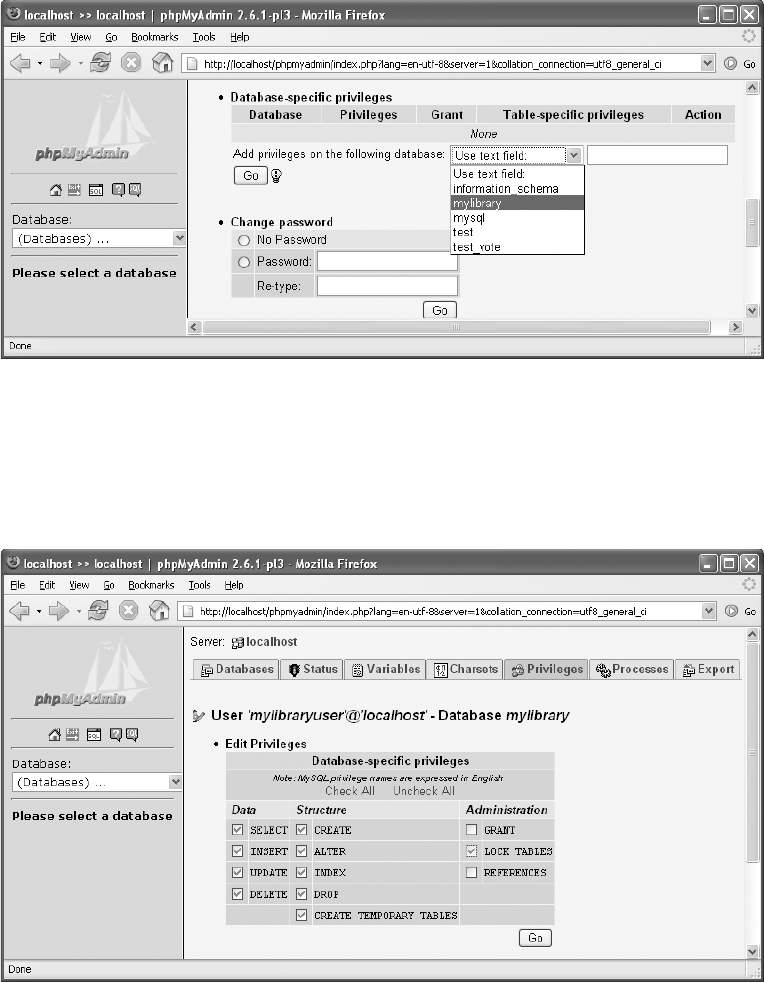
The selection of a database in the list box leads at once to another page, on which you specify
the privileges that the user is to have for the given database (see Figure 6-7). Here are a few words
about the meaning of these privileges:
CHAPTER 6 ■PHPMYADMIN 97
Figure 6-6. Selecting a database for the new user
Figure 6-7. Setting database-specific privileges
5351c06_final.qxd 8/26/05 5:54 PM Page 97
www.it-ebooks.info
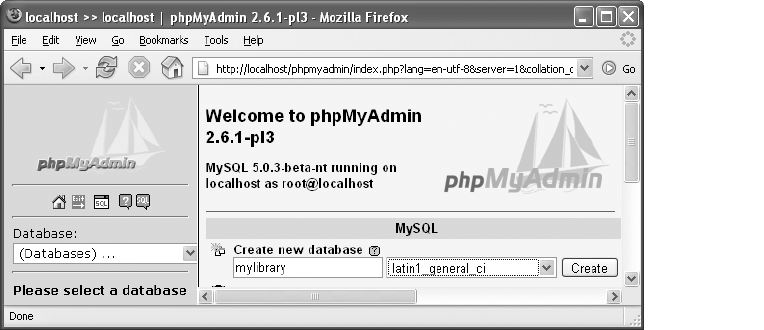
•SELECT, INSERT, UPDATE, and DELETE are always necessary so that the user (and the asso-
ciated PHP pages) can read and edit tables.
• CREATE, ALTER, INDEX, DROP, and CREATE TEMPORARY TABLES permit the user to change
the structure of the database (the schema). It depends on the type of application whether
this is necessary.
•GRANT allows the user to pass his or her privileges along to other users. For security’s sake,
this privilege should not be granted.
• LOCK TABLES allows the user to lock tables using the command LOCK. This is necessary in
rare cases so that several linked SQL commands can be executed as a unit without other
users being able to alter the underlying data. A better alternative to LOCK TABLES is the use
of InnoDB tables and transactions.
•REFERENCES is currently neither documented nor implemented.
Table-specific rights make it possible to allow the user to perform operations on individual
tables that are not allowed for the entire database. A change in table-specific privileges is necessary
only in rare special cases and will not be described here.
Creating and Editing Databases
This section assumes that you understand the fundamentals of database design and in particular,
MySQL tables and data types. This information can be obtained in Chapter 8. There the mylibrary
database, which is used as an example in this section, is described in detail.
Creating a Database
Nothing is simpler than creating a new database. In the start page of phpMyAdmin, simply type in
the name of the database and the sort order and click on the button CREATE. See Figure 6-8. The sort
order determines the character set.
CHAPTER 6 ■PHPMYADMIN98
Figure 6-8. Creating a new database
5351c06_final.qxd 8/26/05 5:54 PM Page 98
www.it-ebooks.info

The most important character sets for the United States and Western Europe are latin1 (with
the sort orders general, german1, german2, danish, spanish, and swedish) and utf8 (Unicode, with
a variety of sort orders).
The new database is empty; that is, it does not yet contain any tables. The next step is to create
one or more tables (see Figure 6-9). To do this, first select the desired database in the database list-
box to arrive at the STRUCTURE page of the database. (After creating a new database you are sent to
this page automatically.)
In the first step, you give the name of a table as well as the desired number of columns (fields).
When in doubt, it is better to specify too many than too few. Simply leave the excess columns empty.
Now phpMyAdmin displays an enormous input form. Here you provide the following data for
each column (field) of the table:
FIELD:Name of the column.
TYPE:Data type, e.g., INT or VARCHAR.
LENGTH:This field is optional for most data types. Only with VARCHAR columns must you
specify the maximum number of characters (up to 255).
COLLATION:This field determines the desired character set and the sort order (only when these
settings differ from the default settings).
ATTRIBUTES:This field is normally left empty. With integer numeric types you can set UNSIGNED
if you wish to limit to nonnegative values.
NULL:This field specifies whether the column is allowed to contain NULL values.
DEFAULT:Here you can specify the default values for the column that will be stored if another
value is not specifically input when a data record is added (optional).
EXTRA:The only option that you can select here is AUTO_INCREMENT. This normally makes sense
only for the primary key field.
INDEX OPTIONS: The five options that follow determine whether a primary index, a regular index,
eated.
CHAPTER 6 ■PHPMYADMIN 99
Figure 6-9. Creating new tables
5351c06_final.qxd 8/26/05 5:54 PM Page 99
www.it-ebooks.info
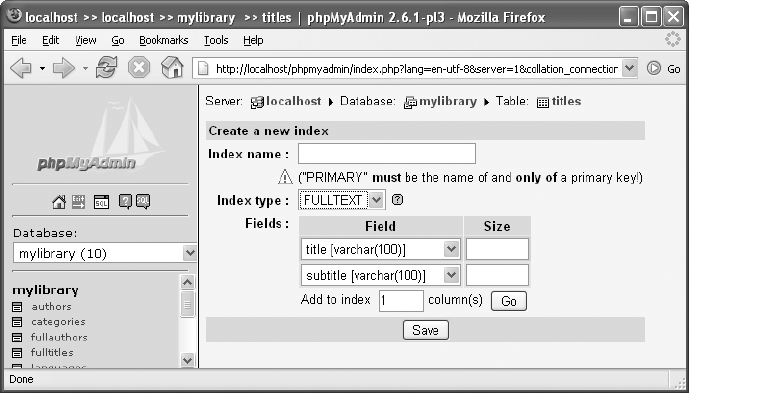
Below the column definition block you can place a comment, which usually contains information
about the table’s content. Furthermore, you should select here the table type (MyISAM or InnoDB). The
field for sorting is relevant only if the default sort order of the table is to vary from that of the database.
You terminate the design process with SAVE.
Editing Existing Tables
To make changes to a table, first select the desired database in phpMyAdmin and then the table.
The options for processing the table are given in a number of views:
STRUCTURE: Here you can delete or add columns and indexes.
OPERATIONS: Here, among other things, you can rename a table, change the table type, or move
or copy the table into another database.
EMPTY: Here you can delete all the records from the table. The table itself is not thereby deleted.
Creating an Index Across Several Columns
To create a new index for a column, simply click the mouse on the relevant index symbol in the
STRUCTURE view for the table. However, if you wish to insert an index across more than one column,
you must specify the number of columns in the STRUCTURE view, in the Indexes area, and then click
OK. On the next page you can select the desired columns and the index type (see Figure 6-10). Spec-
ifying the index name is optional. If you leave the name blank, generally the name of an indexed
column will be used.
Setting Foreign Key Rules
If you are using InnoDB tables, you can maintain the relationships between the tables using
integrity rules (foreign key rules; see Chapter 8). To do so, first select a table that contains one or
more foreign keys (that is, fields that refer to other tables) and then click on the link RELATION VIEW.
CHAPTER 6 ■PHPMYADMIN100
Figure 6-10. Creating a full-text index across two columns
5351c06_final.qxd 8/26/05 5:54 PM Page 100
www.it-ebooks.info
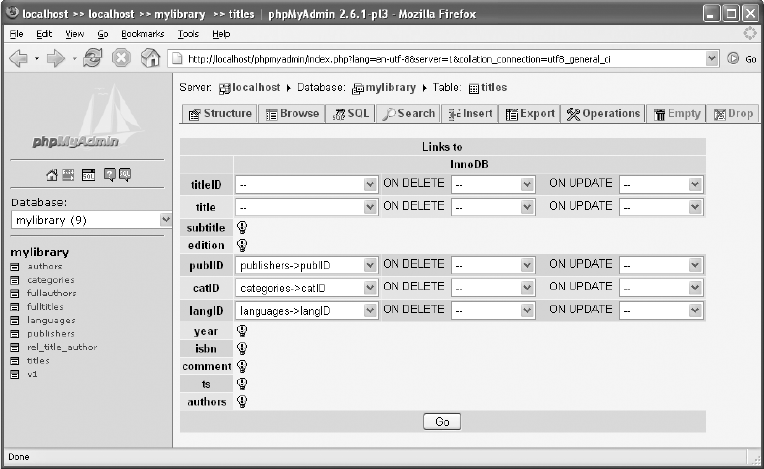
On the following page you can now specify, for each foreign key, to which primary key of another
table it refers (see Figure 6-11). For example, the field titles.catID refers to the field categories.catID. If
you define a foreign key rule for this, then it will be impossible for titles to refer to a nonexistent entry
in categories.
With the fields ON DELETE and ON UPDATE you can define how MySQL should behave with
DELETE and UPDATE commands that would violate the integrity rules. The default behavior is sim-
ply to trigger an error and not execute the command. In many cases, however, it can be a good idea
to delete all affected records (CASCADE) or to set the affected foreign fields to NULL (SET NULL).
If you wish to do one of these things, you must select the corresponding option.
Documenting the Database Structure
If you have completed the definition of a new database, you may wish to document your results,
and phpMyAdmin can assist you: Click in the left column on the database name and then on the
link DATA DICTIONARY. This takes you to a page in which phpMyAdmin shows the most important
properties of all the tables (see Figure 6-12).
CHAPTER 6 ■PHPMYADMIN 101
Figure 6-11. Setting foreign key rules
5351c06_final.qxd 8/26/05 5:54 PM Page 101
www.it-ebooks.info
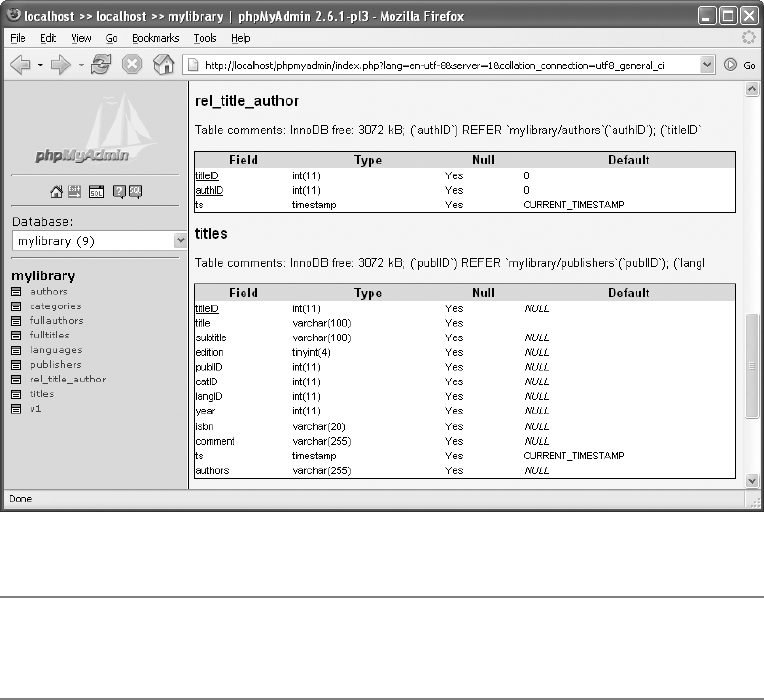
■Tip phpMyAdmin is able to draw a graphical relational diagram and export it as a PDF file. However, to have
this functionality available, you must first generate some auxiliary tables and configure phpMyAdmin in such a
way that it can access these tables. This will be discussed in detail later in the chapter.
Viewing, Inserting, and Editing Data
Once a database contains some date, you can effortlessly browse through tables with the help of
phpMyAdmin. To do so, select the desired table and choose the view BROWSE. phpMyAdmin now
displays the first 30 records. If you click on the column titles, phpMyAdmin sorts the list accordingly
(see Figure 6-13). With the buttons <<, <, >, and >> you can move to the first, previous, next, and last
pages. Fields with extensive text are automatically shortened if you click on the T symbol (in the
upper left corner of the table).
CHAPTER 6 ■PHPMYADMIN102
Figure 6-12. Overview of the mylibrary database structure
5351c06_final.qxd 8/26/05 5:54 PM Page 102
www.it-ebooks.info
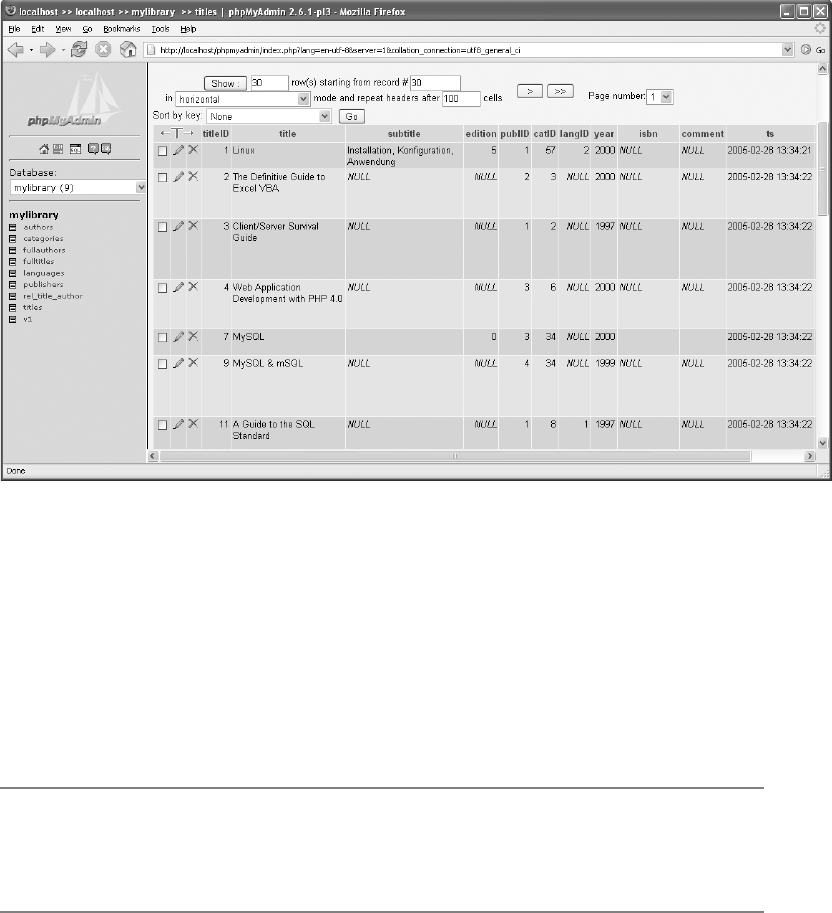
Starting with this view, you can now delete individual data records (x button) or edit them
(EDIT button). You can also first check several records and then edit or delete them as a group.
The view INSERT allows for the input of exactly two new records (see Figure 6-14). Note that for
columns with the AUTO_INCREMENT attribute (typically ID columns or primary keys) and with
TIMESTAMP columns you normally should not provide a value. MySQL supplies a suitable value
automatically.
The selection list FUNCTION in the input form makes it possible to apply an SQL function to the
following input character string. For example, you can store PASSWORD(‘abc’) instead of simply
‘abc’ in a column that contains encrypted passwords.
■Tip The input of large numbers of records using phpMyAdmin is rather cumbersome. In practice, however,
it is seldom necessary. Normally, it is the task of your PHP program to store data in the database. Nevertheless,
if you wish to enter some test data records quickly, it is best to compose them in a text editor or table calculation
program, store them as a text file, and then import the file, as discussed later in this chapter.
CHAPTER 6 ■PHPMYADMIN 103
Figure 6-13. Examining the content of a table
5351c06_final.qxd 8/26/05 5:54 PM Page 103
www.it-ebooks.info
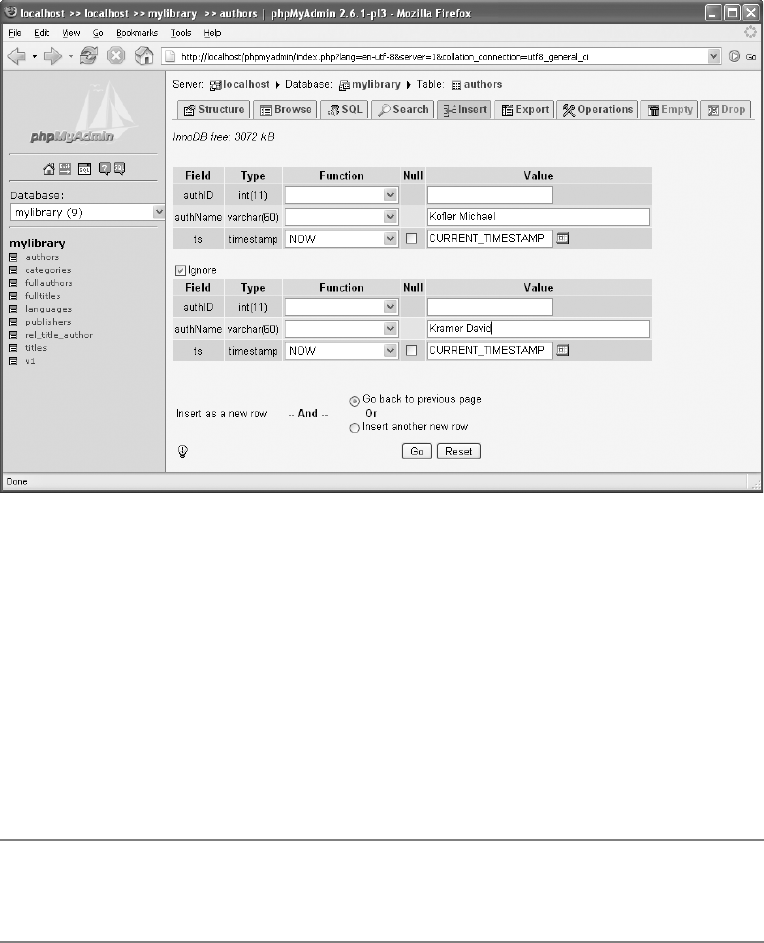
Executing SQL Commands
After selecting a database or table, you can input an SQL command in the SQL view and then exe-
cute it. If this is a SELECT command, the results are displayed as in Figure 6-13.
Of particular practicality is the possibility of inputting SQL commands in a separate window
(see Figure 6-15). To open this window, click in phpMyAdmin in the left column on the SQL button
(above the list of databases). This window offers the most convenient way of inserting columns into
the current table in the edit region.
You can also input and execute several SQL commands at once. In this case, the commands
must be separated by semicolons.
■Note If you have set up a database for phpMyAdmin to support various auxiliary functions, as discussed later
in the chapter, phpMyAdmin keeps track of the executed SQL commands. In the view SQL-HISTORY you can conve-
niently access the most recently executed commands.
CHAPTER 6 ■PHPMYADMIN104
Figure 6-14. Inputting a new record
5351c06_final.qxd 8/26/05 5:54 PM Page 104
www.it-ebooks.info
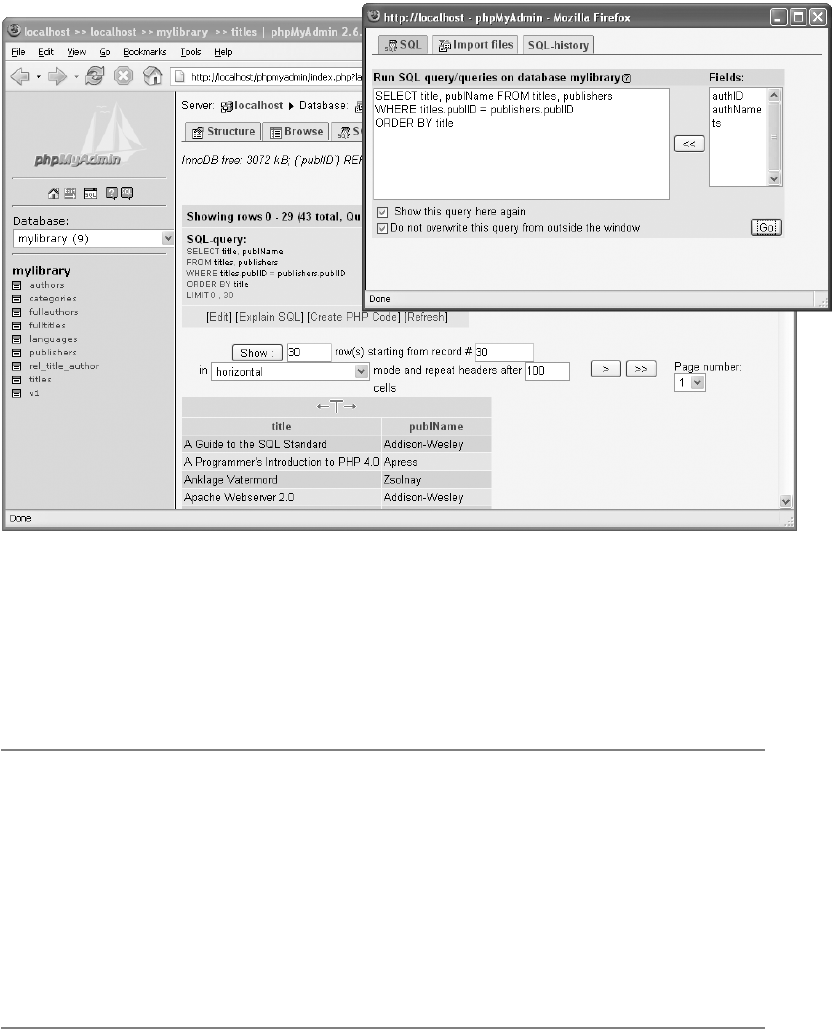
Import and Export
There are several options offered by phpMyAdmin for importing and exporting tables or entire
databases. This section summarizes these possibilities.
■Note The import and export of large databases and tables is problematic, since the maximum run time of
a PHP script is limited. You can attempt to increase this time in config.inc.php (
$cfg[‘ExecTimeLimit’] = n
).
However, if PHP is securely configured, this setting is ignored. The only thing to do is to make a change to
max_execution_time
in the PHP configuration file php.ini. Another consideration is that PHP is limited in the
size of upload files (setting
upload_max_filesize = 2M
in php.ini).
If PHP is executed on your ISP’s computer, you have no control over the file php.ini. (You could, of course,
ask your ISP to change some variables, but you are not likely to receive a positive response.) So you should try to
break up your imports and exports into small portions (e.g., store each table individually instead of the entire data-
base all at once).
Another alternative is to execute the database exportation with the command mysqldump and importation
with mysql.
CHAPTER 6 ■PHPMYADMIN 105
Figure 6-15. Executing SQL commands
5351c06_final.qxd 8/26/05 5:54 PM Page 105
www.it-ebooks.info
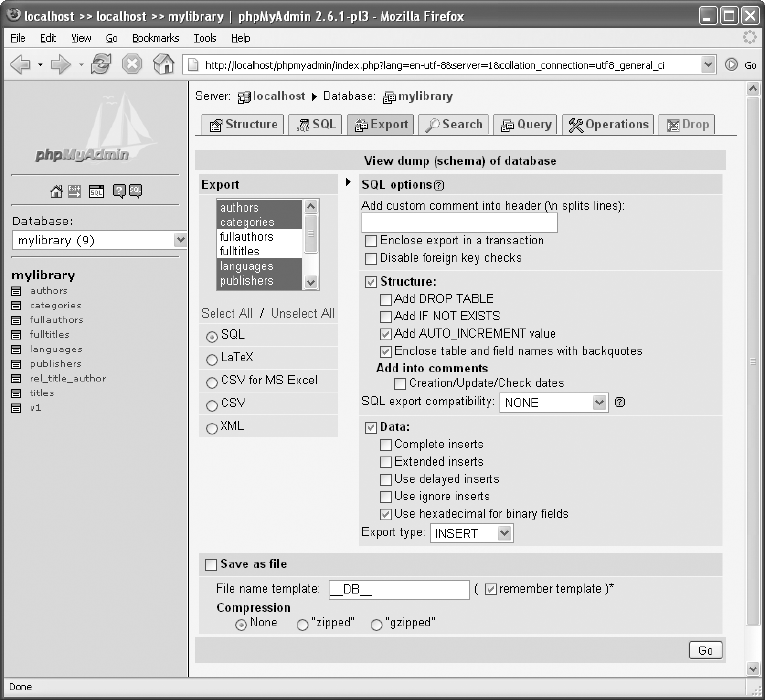
Database Backup (SQL File)
To save an entire database that can later be completely restored (even on another computer), select
the desired database, switch into the view EXPORT, and select there the option SQL (see Figure 6-16).
Then select all the tables and change options as required. As a rule, you will not go wrong by stick-
ing with the default settings.
When you click OK, phpMyAdmin creates a new page with countless CREATE TABLE and
INSERT commands. You can now select these commands, copy them into a text editor, and save
them. Even simpler is to click on the option SAVE as file. Then phpMyAdmin transfers the data to
your web browser, which displays a SAVE dialog that allows you to save the transferred data to a local
*.sql file. (Optionally, you can execute the upload in compressed form. Then the SQL commands
are stored in a *.gz or *.zip file.)
CHAPTER 6 ■PHPMYADMIN106
Figure 6-16. Database backup
5351c06_final.qxd 8/26/05 5:54 PM Page 106
www.it-ebooks.info
Here is a brief explanation of the most important export options:
Disable foreign key checks: If you are exporting InnoDB tables with foreign key rules, you should
activate this option. Then phpMyAdmin adds SET FOREIGN_KEY_CHECKS=0 to the beginning of
the SQL file and SET FOREIGN_KEY_CHECKS=1 at the end. This deactivates checking the integra-
tion rules during a later importation. This not only speeds up the importation; it also prevents
errors if the tables are not created in the correct order.
Structure options: These options control the construction of the CREATE TABLE commands.
For example, you can insert the command DROP TABLE before CREATE TABLE to delete a like-
named preexisting table.
Data options: These options control the formation of INSERT commands. COMPLETE INSERTS means
that at each INSERT command, all column names are given, which as a rule is superfluous.
EXTENDED INSERTS means that several records can be inserted with a single INSERT command. That
is more efficient, but it can result in commands that are so long that they cannot be processed at
a later importation (error message got a packet bigger than ‘max_allowed_packet’ bytes).
In the listbox EXPORT TYPE you can select the commands UPDATE or REPLACE instead of INSERT.
(This makes sense if you merely wish to update existing data.)
Please note that the resulting SQL file is a UTF8 (Unicode) file.
Exporting Tables (CSV Text File)
CSV stands for comma-separated value. CSV files are simply text files whose entries are separated by
commas or optionally another symbol. Most spreadsheet programs are capable of importing such
files without problems. As a rule, it is a good idea to export only one table per CSV file, and not all
tables of a database at once.
There is a problem with character sets. In the default setting, phpMyAdmin 2.6 offers no possi-
bility of setting the character set of a CSV file. Instead, phpMyAdmin creates Unicode files (UTF8),
which causes importation problems under Excel. Fortunately, the solution is easy. Simply change a
variable in config.inc.php:
# in config.inc.php
$cfg['AllowAnywhereRecoding'] = TRUE;
From now on, a listbox appears at the end of the export dialog in which you can select the desired
text code.
Importing a Database or Tables (SQL File)
When a database or table is exported in the form of SQL commands (either with the export function
just described or with the command mysqldump), you use the SQL view for importing. The following
points summarize how to import a database from a *.sql file:
Create a database: On the phpMyAdmin start page, create a new, initially empty, database.
Select an SQL file: The new database is automatically active. Change into the SQL view (see
Figure 6-17) and select with Browse the local *.sql file with the CREATE TABLE and INSERT
commands. (The commands must be separated with semicolons.)
CHAPTER 6 ■PHPMYADMIN 107
5351c06_final.qxd 8/26/05 5:54 PM Page 107
www.it-ebooks.info
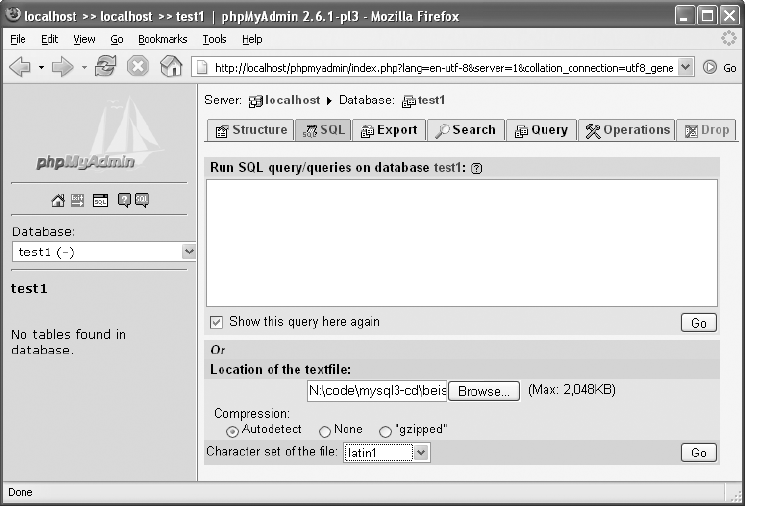
Select the character set: By default, phpMyAdmin assumes that it is dealing with a *.sql file
with the utf8 character set. If that is not the case, set the desired character set. (The *.sql files
containing the example databases for this book use the latin1 character set.)
Begin the importation: With OK, the file is read from the local file system, transferred via the
Internet to phpMyAdmin, and there evaluated.
Inserting Table Data (Text File)
The content of individual tables can be imported from a text file by phpMyAdmin. The table must
already exist with the proper number of columns and the correct data types. To import the data,
first activate the STRUCTURE view of the table and click on INSERT DATA FROM A TEXTFILE INTO TABLE. The
link, which is easy to overlook, is located at the end of the page.
On the following page, select the file to be imported and specify how the files are to be sepa-
rated, how the individual fields are labeled, etc. With the settings in Figure 6-18, the importation
of a typical CSV file succeeds, whose lines look like this:
"1";"Linux";"Installation, Konfiguration, Anwendung";"5";"1";"57";
"2";"2000";NULL;NULL
"2";"The Definitive Guide to Excel VBA";NULL;NULL;"2";"3";
NULL;"2000";NULL;NULL
CHAPTER 6 ■PHPMYADMIN108
Figure 6-17. Database importation from an SQL file
5351c06_final.qxd 8/26/05 5:54 PM Page 108
www.it-ebooks.info

Character set problems: phpMyAdmin 2.6 does not allow you to set the character set for
importation. For it to succeed, the text file must have the same character set as holds for the MySQL
server and the connection to the server. You can determine this character set by looking at the con-
tents of the MySQL variables character_set_server and character_set_connection. To do so, click in
the phpMyAdmin start page on the link SHOW MYSQL SYSTEM VARIABLES.
Server Administration
The dialog sheet OPERATIONS in the DATABASE and TABLE views contains commands for renaming and
copying databases and tables and transferring tables to another database.
If you click on the HOME symbol at the top of the phpMyAdmin window, you find yourself at the
phpMyAdmin start page. If you have sufficient phpMyAdmin login privileges, this page contains
links for carrying out various administrative tasks:
SHOW MYSQL RUNTIME INFORMATION displays the status of the MySQL server (corresponds to
SHOW STATUS).
SHOW MYSQL SYSTEM VARIABLES displays the content of the MySQL variables (corresponds to
SHOW VARIABLES).
SHOW PROCESSES displays the current process list (corresponds to SHOW PROCESSLIST). If you
have sufficient privileges, you can also terminate a process.
CHAPTER 6 ■PHPMYADMIN 109
Figure 6-18. Importing a text file with table data
5351c06_final.qxd 8/26/05 5:54 PM Page 109
www.it-ebooks.info
CHARACTER SETS AND COLLATIONS leads to a page with a summary of all character sets and sort
orders supported by the MySQL server (corresponds to SHOW COLLATION).
PRIVILEGES leads to a page that lists all MySQL users. From this page you can add new users,
change the privileges of existing users, and delete users.
DATABASES leads to a list of all databases. With ACTIVATE DATABASE STATISTICS you can determine
the sizes of all databases. Also practical is the link CHECK PRIVILEGES, indicated by a padlock,
which leads to a page that tells which MySQL users have access to a database.
EXPORT leads to the export dialog that was considered in the previous section (see Figure 6-16).
The only difference is that now you can select and back up several databases at the same time.
Auxiliary Functions
The common feature of all the functions considered in this chapter is that first, several tables must
be created in which phpMyAdmin can store information. Therefore, this section begins with the
steps required to create these tables. In what follows, you will learn about other ways that this can
happen. (The auxiliary functions and the following configuration instructions are geared to the
advanced phpMyAdmin user.)
Creating a Database for phpMyAdmin
In what follows, I am assuming that you are using the phpMyAdmin config authentication
($cfg[‘Servers’][$i][‘auth_type’] = ‘config’), that is, that in config.inc.php the user name and pass-
word are contained in plain text. On the other hand, if you are using cookie or http authentication,
the optimal way of proceeding is a bit different. (Tips in that direction can be found in the unfortu-
nately difficult to read phpMyAdmin documentation.)
Creating the database phpmyadmin:Ideally, you will place all auxiliary tables for phpMyAdmin
in a single database, which you will name phpmyadmin. So create a new, empty database with
this name. (If you do not have the privileges to create new databases, you can place the
phpMyAdmin auxiliary tables in the next step in any existing database.)
Creating auxiliary tables: Open the file scripts/create_tables_mysql_4_1_2+.sql from the
phpMyAdmin installation directory into a text editor. If you are using a version of MySQL older
than 4.1.2, you must use create_tables.sql.
In the editor, copy all the CREATE TABLE commands and execute them in SQL view in the new
SQL database. You thereby create the phpMyAdmin tables pma_bookmark, pma_column_info,
pma_history, pma_pdf_pages, pma_relation, pma_table_coords, and pma_table_info. (But do
not execute the commands DROP DATABASE, CREATE DATABASE, USE, and GRANT also con-
tained in the *.sql file.)
Adapting config.inc.php:Now you must adapt config.inc.php. At issue are the following two
lines, which set the user name and password for access to the database with the phpMyAdmin
auxiliary table. Here you enter the same user and the same password as in the phpMyAdmin
basic configuration:
// in config.inc.php
$cfg['Servers'][$i]['controluser'] = 'root'; // MySQL user name
$cfg['Servers'][$i]['controlpass'] = 'xxx';
If you have created the phpMyAdmin auxiliary tables not in their own database phpmyadmin
but in some other database, you must replace phpmyadmin in the following line with the data-
base name:
; // DB name
CHAPTER 6 ■PHPMYADMIN110
5351c06_final.qxd 8/26/05 5:54 PM Page 110
www.it-ebooks.info
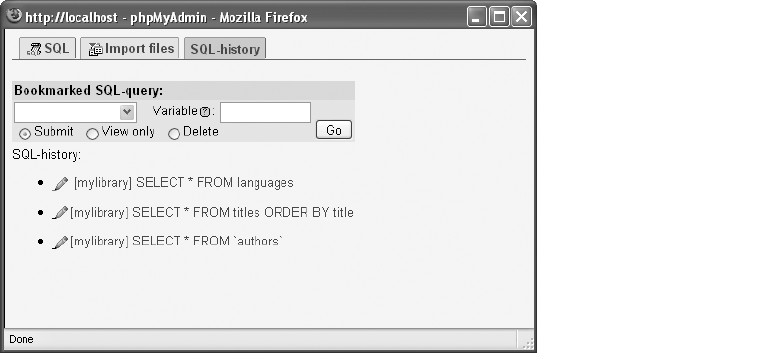
SQL Bookmarks and History
If you frequently execute SQL commands in phpMyAdmin, it is burdensome to have to repeatedly
input them. But phpMyAdmin can store these commands in a separate table. You simply need to
make a small change in the file config.inc.php, in which you indicate in what table phpMyAdmin
should store the SQL commands or the sequence of most recently executed commands:
# in config.inc.php
$cfg['Servers'][$i]['bookmarktable'] = 'pma_bookmark';
$cfg['Servers'][$i]['history'] = 'pma_history';
From now on, you can store all SQL commands that you process in the SQL window provided
by phpMyAdmin under an arbitrary name (bookmark). In the dialog sheet SQL-HISTORY you can exe-
cute or edit again all sorts of stored entries (see Figure 6-19). The history shows only stored SQL
commands that were used with SUBMIT or VIEW ONLY.
Saving Information on Relations
By itself, phpMyAdmin is incapable of determining through which fields tables are linked (not even
if integrity rules were defined for InnoDB tables). However, you can specify this information yourself,
which simplifies editing tables in the future. You need to make a small change in config.inc.php:
# in config.inc.php
$cfg['Servers'][$i]['relation'] = 'pma_relation';
$cfg['Servers'][$i]['table_info'] = 'pma_table_info';
Now from the STRUCTURE sheet of each table, via the link RELATION VIEW, you enter a dialog in which
you can specify, for each foreign key field, which field of another table it refers to. (With InnoDB tables
with foreign key rules you can skip this step.) Moreover, you can specify which columns of the current
table should be shown with references.
This is most easily understood with the help of an example: The fields publID, catID, and
langID of the table titles from the sample database mylibrary refer to the tables publishers, cate-
gories, and languages. This information was given in Figure 6-20 in the section LINKS TO. If another
CHAPTER 6 ■PHPMYADMIN 111
Figure 6-19. SQL bookmarks and history
5351c06_final.qxd 8/26/05 5:54 PM Page 111
www.it-ebooks.info
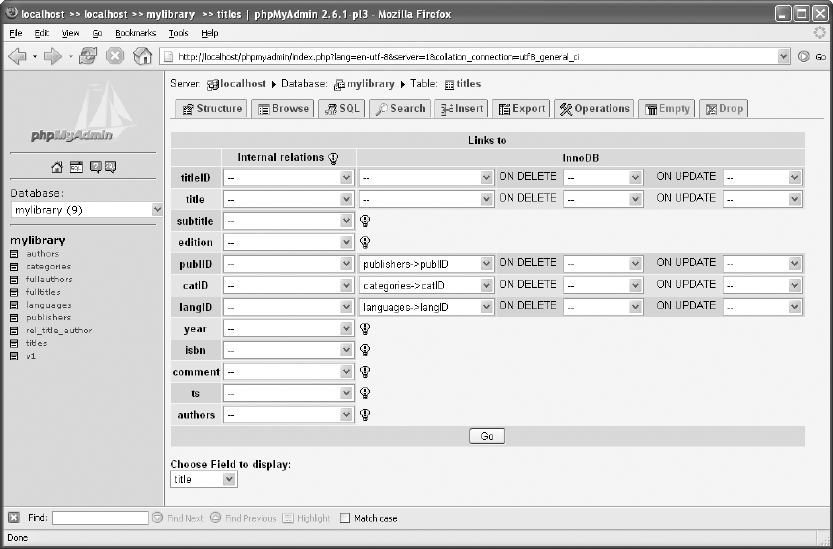
table refers to the titles table, then instead of the titleID number, the book title (CHOOSE FIELD TO
DISPLAY) should be displayed.
The input of such additional information for all tables is, to be sure, a bit tedious. In the follow-
ing, the processing of this database with phpMyAdmin will be much simpler.
• When you look at the contents of a table, foreign key fields are executed as links. When you
click on a link, the corresponding record of the linked table will be displayed.
• When you change a record in a table or insert a new one, you do not have to give an ID num-
ber in the foreign key field. Instead, listboxes are displayed that offer a convenient selection
of linked fields (see Figure 6-21). The listbox contains each entry twice: once ordered by the
ID field and a second time ordered by the field to be displayed.
• The link DATA DICTIONARY in the STRUCTURE sheet of the TABLE view provides detailed informa-
tion about the structure of a database and is well designed for printing (as documentation
on the database).
• Finally, you can create a PDF file for documenting the table structure that contains all the
relevant information.
CHAPTER 6 ■PHPMYADMIN112
Figure 6-20. References from the table titles to other tables in the database mylibrary
5351c06_final.qxd 8/26/05 5:54 PM Page 112
www.it-ebooks.info
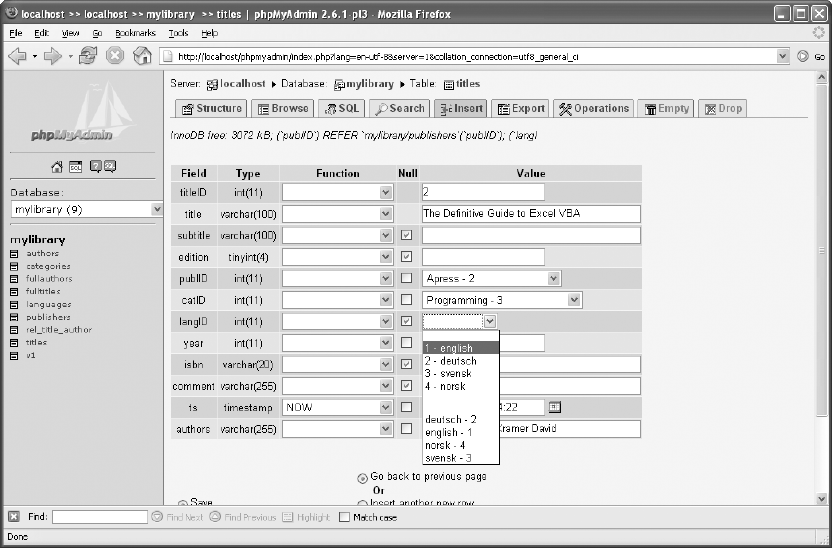
Creating a PDF Relational Diagram
You can also use phpMyAdmin to draw a diagram that shows the relationships among the tables of
a database. The procedure is a bit cumbersome, however, and the result hardly justifies the effort.
You first need to make a small change in config.inc.php:
# in config.inc.php
$cfg['Servers'][$i]['table_coords'] = 'pma_table_coords';
$cfg['Servers'][$i]['pdf_pages'] = 'pma_pdf_pages';
The creation of a PDF document now proceeds in several steps:
• The process begins in the STRUCTURE sheet of the DATABASE view with the link EDIT PDF PAGES.
• Now you must give the PDF to be created a name and select the document for editing.
• You must select all the tables to be documented. (For some reason, each table must be
selected separately.)
• For the STRUCTURE view in which the links among the tables are to be displayed, you must
specify for each table the start coordinates within the page. The coordinate range for an
A4 page is from 0 (left) to 750 (right) for the X coordinate, and from 0 (above) to 600 (below)
for the Y coordinate.
With a modern web browser you can move the tables directly to the screen with drag&drop
(button TOGGLE SCRATCHBOARD).
CHAPTER 6 ■PHPMYADMIN 113
Figure 6-21. Listboxes simplify input and editing of foreign key fields.
5351c06_final.qxd 8/26/05 5:54 PM Page 113
www.it-ebooks.info
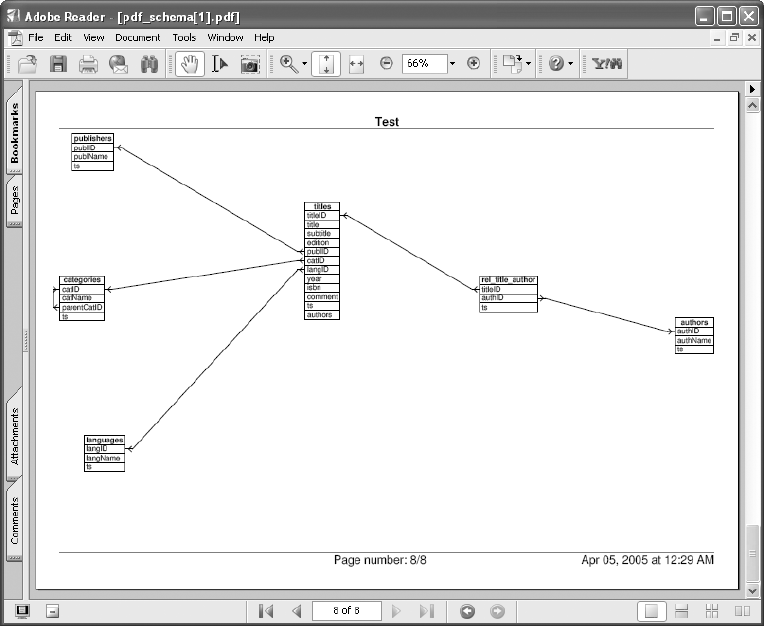
• The remaining options specify how the PDF document should be formatted:
SHOW GRID produces a background of lattice lines and coordinate axes. This is helpful in
the layout phase.
SHOW COLOR relates to the color of the connecting lines between the tables. (The output of
colored lines on a black-and-white printer generally doesn’t look very good.)
SHOW DIMENSION OF TABLES shows the size of each table in the coordinate system of the PDF
document. This option is useful only during layout.
DISPLAY ALL TABLES WITH SAME WIDTH relates to the width of the tables in the PDF document.
A uniform width can be easier to read in some circumstances.
DATA DICTIONARY specifies whether a detailed description of the properties of all the tables
should be integrated into the PDF document (one page per table).
With OK the PDF document is created and sent to the web browser. Depending on the browser
settings, you can display the document at once with Adobe Acrobat or you may have to store it in
a local file first. Such a diagram is shown in Figure 6-22.
CHAPTER 6 ■PHPMYADMIN114
Figure 6-22. Relational diagram of the mylibrary database
5351c06_final.qxd 8/26/05 5:54 PM Page 114
www.it-ebooks.info
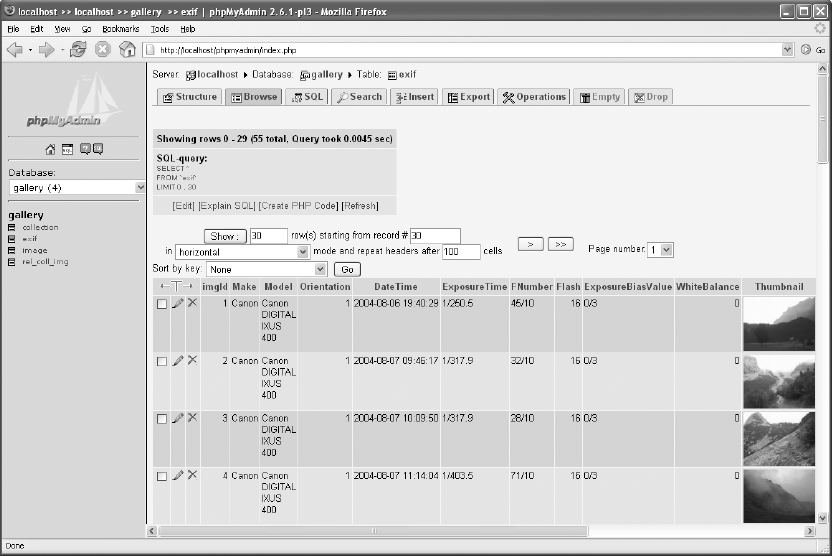
Transformations (Alternative Representation of
Column Contents)
phpMyAdmin can transform the contents of individual columns based on specified rules. This leads
to some new possibilities for displaying tables:
Inline images: With BLOB columns with images (JPEG/PNG), the images can be displayed
directly in the TABLE view. Figure 6-23 shows a table whose thumbnail column contains JPEG
images. For this column the MIME type image/jpeg and the transformation rule image/jpeg
inline were set.
Links: With text columns containing web links or file names, links to the web site or file can be
built into the TABLE view.
A small change needs to be made in config.inc.php so that phpMyAdmin knows in which
table to store the transformation rules:
# in config.inc.php
$cfg['Servers'][$i]['column_info'] = 'pma_column_info';
CHAPTER 6 ■PHPMYADMIN 115
Figure 6-23. Table view with inline images
5351c06_final.qxd 8/26/05 5:54 PM Page 115
www.it-ebooks.info
If you now wish to change the properties of a column, phpMyAdmin offers three new input fields:
MIME/TYPE: In this listbox you can select the data type of the column (e.g., image/jpeg or
text/plain). The list entry auto-detect does not work, unfortunately.
TRANSFORMATION OPTIONS: Here you can specify additional transformation options. For example,
you can give a prefix to the address with text/plain link as the first option.
ISBN: In the titles table of mylibrary there is an ISBN field. If you specify for this field the MIME
type text/plain, the transformation text/plain link, and the option ‘http://www.amazon.com/
exec/obidos/ASIN/’, then phpMyAdmin creates suitable links to amazon.com from the ISBN.
CHAPTER 6 ■PHPMYADMIN116
5351c06_final.qxd 8/26/05 5:54 PM Page 116
www.it-ebooks.info

Microsoft Office,
OpenOffice/StarOffice
In practice, it often happens that a Microsoft Office program will wish to access a database, for
example, to evaluate data with pivot tables, represent data in charts, or insert data in a mail-merge
document. This chapter describes how to create a connection between any of Microsoft Office,
Sun StarOffice, and OpenOffice and the MySQL server. There are two possibilities:
• ODBC (Open Database Connectivity) is a popular mechanism, above all under Windows, for
integrated access to a variety of database systems. The only assumption is a so-called ODBC
driver for the database system, which creates an interface between the ODBC system and the
database. The freely available Connector/ODBC at http://dev.mysql.com performs this task.
• JDBC (Java Database Connectivity) is the Java counterpart to ODBC. Under Unix/Linux JDBC
in combination with the MySQL driver Connector/J represents the simplest way of accessing
the MySQL server from StarOffice and OpenOffice. (There is also an ODBC implementation
for Unix/Linux, but it is not available by default in many systems.)
Installing Connector/ODBC
Connector/ODBC 3.51 (formerly MyODBC) is the ODBC driver for MySQL. The driver supports the
functions defined in ODBC version 3.5.1 (according to the on-line handbook, Complete Core API and
Level 2 Features). For installation you should obtain Connector/ODBC from the MySQL web server.
Most recently, Connector/ODBC was to be found at the following address: http://dev.mysql.com/
downloads/connector/odbc/3.51.html.
Installation is quite easy. The two DLL files myodbc3.dll and myodbc3S.sll are copied into the
Windows\System32 directory and registered. The library libmysql.dll, which is used by other MySQL
applications, is not required for Connector/ODBC and is therefore not installed.
You can convince yourself that installation was successful by looking at the ODBC driver win-
dow (see Figure 7-1). You reach this dialog with SETTINGS | CONTROL PANEL | ADMINISTRATIVE TOOLS |
DATA SOURCES.
117
CHAPTER 7
■ ■ ■
5351c07_final.qxd 8/26/05 5:57 PM Page 117
www.it-ebooks.info
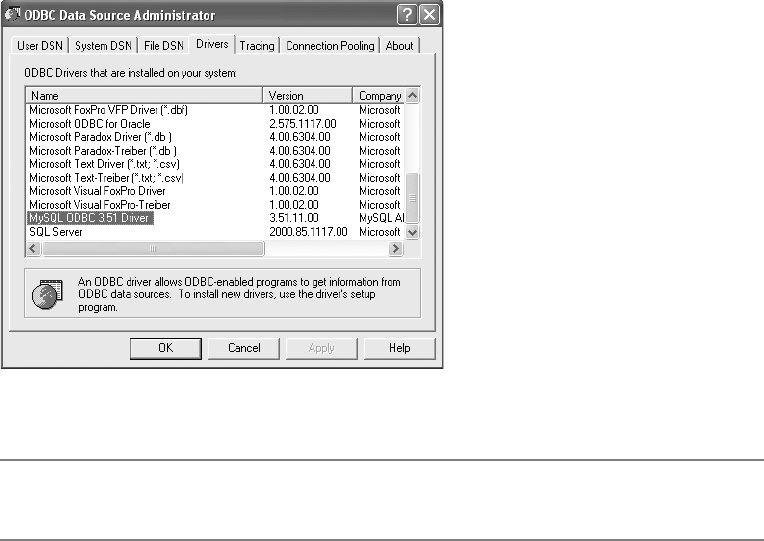
■Note ODBC is also used under Unix. Thus there exists Connector/ODBC for Unix as well. However, in this book
we will consider only the Windows application of Connector/ODBC.
Setting Up ODBC Data Sources
Since the repeated setting of database connection parameters (user name, password, etc.) becomes
tedious after a while, ODBC provides for the definition of so-called data sources. Once such a data
source has been set up, for establishing a connection one needs only the selection of the data source
name (DSN).
Many programs with an ODBC interface consider DSNs merely a convenient option for creat-
ing a connection. With other programs, such as Access and Excel, however, DSNs are the only way
to an ODBC connection. That is, you must set up such a data source before you can create an ODBC
connection to a MySQL server.
DSNs are usually set up in the ODBC administrator dialog. (Many Windows programs them-
selves provide dialogs for this purpose, but they are no improvement.) You launch the ODBC
administrator dialog in the system control, under Windows, for example, with START | SETTINGS |
CONTROL PANEL | ADMINISTRATIVE TOOLS | DATA SOURCES (ODBC). There you have the choice among
three DSN types: user, system, and file DSNs.
User DSNs: These are available only to the user who has defined the DSN.
System DSNs: These DSNs are available to all users of the computer. With both user and
system DSNs the settings are managed internally by ODBC.
File DSNs: Here we are dealing with individual files with the identifier *.dsn, in which
all setting data are stored in text format. These files are usually stored in the directory
Program Files\Common Files\ODBC\Data Sources. File DSNs are more transparent to
some extent, because it is clear what information is stored where.
If you wish to access more than one MySQL database, you must make use of the corresponding
CHAPTER 7 ■MICROSOFT OFFICE, OPENOFFICE/STAROFFICE118
Figure 7-1. List of ODBC drivers
5351c07_final.qxd 8/26/05 5:57 PM Page 118
www.it-ebooks.info
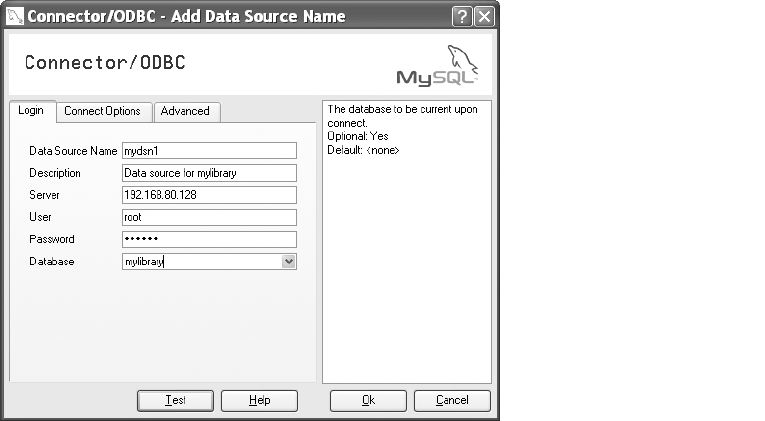
The definition of a new DSN begins with clicking on the ADD button in the User DSN or System
DSN dialog sheet. There appears a dialog in which you can choose from among various ODBC driv-
ers. The correct choice in our case is, of course, MySQL. A double click now leads into a further
dialog (see Figure 7-2) in which you must make the following settings:
Data Source Name: Here is where you specify the name of the DSN (that is, under what name
the data source can be addressed by ODBC programs). Select a name that is connected to the
database name and the use to which the DSN is to be put.
Server: Here you give the name or IP address of the computer on which MySQL (i.e., the server)
is running. If it is the local computer, then give localhost.
User and Password: The access system described in Chapter 11 holds for Connector/ODBC, as
it does for all other MySQL programs. (If you are unable to achieve a Connector/ODBC connec-
tion, then inadequate access privileges is the most likely cause of the difficulty.)
In the fields User and Password you can input the user name and password for access to the
database. However, whether you should actually do this is another question entirely. First, you
provide access to the database to anyone who can use the DSN. Second, the password is not
encrypted and can therefore easily be discovered.
To circumvent this security risk, you can leave both fields empty. Then every time you or someone
else wishes to use this DSN to obtain a connection to MySQL, the dialog pictured in Figure 7-2
appears. While this is very practical, in that the name and password can be input, it is very con-
fusing for the average user. It is not clear that a user name and password are indeed to be entered,
and it is possible that some poor user will stumble around in the other input fields of this dialog,
which can lead to errors that will be difficult to unravel.
Database: Here you specify the name of the MySQL database (e.g., mylibrary, if you wish to
access the most frequently mentioned database in this book).
CHAPTER 7 ■MICROSOFT OFFICE, OPENOFFICE/STAROFFICE 119
Figure 7-2. Connector/ODBC basic setting
5351c07_final.qxd 8/26/05 5:57 PM Page 119
www.it-ebooks.info

Connect Options: In the PORT input field of this tab the IP port can be specified if the default
port 3306 is not to be used. In most cases, this field remains empty. Also, additional input fields
in the dialog sheet CONNECT OPTIONS are normally left empty.
If MySQL is running on a computer other than the one on which Connector/ODBC is running
and there is a firewall between the two computers, then port 3306 must be opened. Otherwise,
no communication between MySQL and Connector/ODBC will be possible.
Advanced: In this tab you can set a large number of additional options. These options will be
described in detail in Chapter 19 in connection with ADO programming.
For now, what is important is that you activate the two options DON’TOPTIMIZE COLUMN WIDTH
and RETURN MATCHING ROWS. These options are necessary so that Microsoft Access and Excel
communicate correctly with MySQL.
With the button TEST you can quickly check whether a connection to the MySQL server succeeds
with the current settings.
If you later change the settings of a DSN, simply open the ODBC administration dialog. A double
click on the DSN (or the button CONFIGURE) leads again to the dialog shown in Figure 7-2.
Microsoft Access
Access and MySQL are two programs that are fundamentally different from each other. Access has
a very well developed user interface, which simplifies the design of databases as well as the devel-
opment of database programs. Unfortunately, Access can be quite slow if more than three or four
users wish to access the database simultaneously. Furthermore, Access is quite unsuitable for Inter-
net applications.
In comparison, MySQL is incomparably more efficient and secure in multiuser operation.
However, while there exists a variety of user interfaces to MySQL, at present, none of these offers
the convenience of Access.
Taking all of this into consideration, it seems a good idea to try to combine the best of both
worlds. Even though there are many limitations, the potential applications of Access in combina-
tion with MySQL are quite numerous:
• Access tables can be exported to MySQL and there edited further.
• MySQL tables can be imported to Access or a link to the tables can be created and the data
further edited.
• Data from Access and MySQL databases can be combined.
• You can develop the design of a new database in Access and then export the entire database
to MySQL.
• You can use Access as an interface for changing the contents of MySQL tables.
• You can develop complex queries in Access and then place the SQL code in your scripts.
• You can create and print database reports.
• You can develop VBA code in Access for automatically processing data from MySQL data-
bases in Access.
• You can create diagrams of database structures.
■Note This section assumes that you are familiar with Access.An introduction to Access would be beyond the
scope of this book. All procedures described in this section were tested with Access 2000.
CHAPTER 7 ■MICROSOFT OFFICE, OPENOFFICE/STAROFFICE120
5351c07_final.qxd 8/26/05 5:57 PM Page 120
www.it-ebooks.info

Problems
Don’t let your hopes soar too high. Access was never conceived as an interface to MySQL and will never
become one. Thus it is not surprising that a number of difficulties exist when integrating the two:
• There are several data types that are available either only in Access or only in MySQL. In
import/export such data types can create trouble. For example, MySQL ENUMs and SETs
are turned into simple text fields upon importation. There are also problems to be had with
single-precision FLOATs. In general, you should use DOUBLE floating-point numbers if you
plan on working with Access.
You should generally count on having to change various attributes of a MySQL table as a
result of importing it into Access and later exporting it back to MySQL.
• MySQL presently offers a way of creating links between tables only for the InnoDB format.
Relations (including rules for ensuring referential integrity) that are easily constructed in
Access are lost upon exportation to MySQL.
• The SQL dialect of MySQL and that of Access are not quite identical. Thus it can happen that
SQL queries developed in Access will function in MySQL only after some minor adjustments.
Assumptions
• If you wish to change data from linked MySQL tables in Access, the option Return Matching
Rows must be set in the definition of the ODBC data source (DSN). If you are working with
Access 2.0, you will also need the option Simulate ODBC 1.0.
• All linked MySQL tables must be equipped with a TIMESTAMP field so that data can be altered.
(You don’t need to concern yourself with the care and feeding of this field, since both MySQL
and Access automatically store the time of the last change. Access requires this information
to distinguish altered data from unaltered data.)
• All MySQL tables must be equipped with a primary index (usually an INT field with the prop-
erty AUTO_INCREMENT).
• A significant source of problems is the existence of incompatible data types:
• MySQL tables use DOUBLE instead of FLOAT and DATETIME instead of DATE.
• Avoid BIGINT, SET, and ENUM.
• Access has occasional problems with BLOBs and believes that it is dealing with OLE
objects.
■Tip If you are working in Access with linked tables and if after an alteration in a data record you see
#deleted
displayed, then one of the above conditions has not been satisfied.
If you develop queries in Access and then wish to use the SQL code in MySQL, you will frequently find yourself
in a compatibility quagmire. (The SQL dialect of Access is different from that in MySQL.) Here is how you can solve
this problem: Work with linked tables, and in Access execute the following command (while the window for query
formulation is open): QUERY | SQL SPECIFIC | PASS-THROUGH. You thereby let Access know in no uncertain terms that
the program should hold more rigorously to SQL standards.
CHAPTER 7 ■MICROSOFT OFFICE, OPENOFFICE/STAROFFICE 121
5351c07_final.qxd 8/26/05 5:57 PM Page 121
www.it-ebooks.info

Importing and Exporting Tables
Imported Tables Versus Linked Tables
If you wish to process MySQL data in Access, then you have two possibilities: You can first import
the table(s) into Access and then do the processing, or else you can merely create a link between
Access and the MySQL tables.
• With linked tables you can insert or alter data, although the table will then be managed by
MySQL. Here Access serves simply as the interface. A change in the table’s properties (inser-
tion or deletion of a column, for example) is not possible with linked tables. The principal
advantages are that the creation of links proceeds very quickly (independent of the size of
the tables) and the data remain with MySQL.
• There are no restrictions on imported tables as they pertain to changes in the table design.
Since the tables are now stored in an Access database file, you can carry out all the opera-
tions provided by Access. However, there can be problems if you later attempt to return the
table(s) to MySQL, since not all of the Access data types can be transformed to MySQL data
types without further ado.
Importing MySQL Tables into Access
The first step is either to open an existing Access database or to create a new (empty) database. Then
you execute FILE | GET EXTERNAL DATA | IMPORT and in the file selection dialog you choose ODBC as
the file type. As if by magic, the dialog SELECT DATASOURCE appears. In the dialog sheet MACHINE DATA
SOURCES, all the user and system DSNs are enumerated. Select the DSN of your choice. As a rule,
there will now appear the dialog shown in Figure 7-2, in which you have merely to provide the user
name and password.
If the connection to MySQL can be established, then the next dialog (see Figure 7-3) shows
a list of all tables in the database specified by the DSN. There you can mark several tables at once
(mouse button+Ctrl). The importation is initiated by clicking OK, which can take a bit of time if the
tables are large. (Access creates a local copy of the tables and stores them in an Access database file.)
Note that on being imported, many column attributes (e.g., AUTO_INCREMENT) are lost, and
that the forms of indexes are frequently changed (so that a MySQL UNIQUE index in Access becomes
an index that allows duplicates).
CHAPTER 7 ■MICROSOFT OFFICE, OPENOFFICE/STAROFFICE122
Figure 7-3. Selection of tables to be imported into Access
5351c07_final.qxd 8/26/05 5:57 PM Page 122
www.it-ebooks.info

Creating Links to MySQL Tables
The way to create a database link is the same as with the importation of a MySQL table. The only
difference is that this time, you begin with the Access menu command FILE | GET EXTERNAL DATA |
IMPORT | LINK TABLES.
■Caution If you change the properties of a table in MySQL (for example, if you add a new column), then you
must update the connection to this table in Access.To do this, execute TOOLS | DATABASE UTILITIES | LINKED TABLE
MANAGER and select the table to be updated.
Exporting Access Tables to MySQL
If you have imported a table from MySQL to Access and then changed it, or if you have developed
an entire database in Access and then wish to transport it to MySQL, then you have to go in the
opposite direction.
To do this, you mark the table in the Access database window, execute the command FILE |
EXPORT, and choose the file type ODBC. In the EXPORT dialog you can specify the name of the table
under MySQL. (As a rule, you can use the name being used under Access by clicking OK.)
In principle, exportation functions acceptably well, but usually there is some additional man-
ual work required. The following list gives some of the basic problems with exportation:
• All indexes defined in Access are lost (including the primary index).
• The Access column property Required is not translated into the MySQL attribute NOT NULL.
• The Access column property Autonumber is not translated into the MySQL attribute
AUTO_INCREMENT.
• The translation of data types is not always optimal. For example, Currency is translated to
DOUBLE (MySQL). Here DECIMAL would be preferable. In general, you should check your
MySQL tables carefully for such losses in translation.
Unfortunately, there is no possibility in Access to export several tables simultaneously. Thus if you
wish to export an entire database, you must repeat the steps outlined above for each table.
Converter: Access ➤MySQL (exportsql.txt)
Due to the problems enumerated in the previous section that arise in the export of individual tables
from Access to MySQL, Pedro Freire has programmed a converter that writes an entire Access data-
base to a file *.sql, which then can be input with mysql. The quality of this converter is considerably
better than ODBC Export, which is integrated into Access. This free program, exportSQL.txt, can be
obtained at the following address: http://www.cynergi.net/exportsql.
The method for exporting is documented in the program code. Here is a summary:
• Load the database to be exported into Access.
• With Alt+F11 switch into the VBA editor, there insert a new module (INSERT | MODULE), and
copy the entire file exportsql.txt into the module (see the link above). You can work in the
VBA editor only if you are working with an Access 2000 database. If the database was created
with an earlier version of Access, then you must open a new module in the database window
and insert the code into this module.
CHAPTER 7 ■MICROSOFT OFFICE, OPENOFFICE/STAROFFICE 123
5351c07_final.qxd 8/26/05 5:57 PM Page 123
www.it-ebooks.info
• Change the export options in the program code. This involves a block of constants (Private
Const name =…) that control certain parameters of the exportation process. As a rule, you
will have to change only the two constants ADD_SQL_FILE and DEL_SQL_FILE, which spec-
ify the names of the file into which the export files are to be written.
• Begin exporting with F5. (In the macro dialog you must select the procedure exportSQL.)
• During the exportation process you may see displayed some warning messages relating to
incompatibilities between Access and MySQL data types, which you must approve by click-
ing OK. The warnings will appear as well in the resulting files. (The affected lines begin with
#Warning.)
• In MySQL generate an empty new database (with CREATE DATABASE).
• Execute the SQL command specified in esql_add.txt. You can best accomplish this with
mysql:
> mysql -u root -p databasename < C:\tmp\esql_add.txt
Enter password: xxxxx
If errors occur, you may have to alter esql_add.txt in a text editor. In some situations
some small changes in the program code of the converter may be necessary. Before mak-
ing a new attempt, you must delete any existing data. For this, the second file esql_del.txt
will be of help:
> mysql -u root -p databasename < C:\tmp\esql_del.txt
Enter password: xxxxx
Problems
• Access permits a number of special characters in table and column names that MySQL does
not allow. The following changes in the program code (indicated in boldface) will permit
exportSQL.txt to replace these characters automatically with an underscore ( _ ):
Private Function conv_name(strname As String) As String
...
Select Case Mid$(str, I, 1)
Case " ", Chr$(9), Chr$(10), Chr$(13), "-", ")", "("
...
• In those countries where floating-point numbers are formatted with a comma for the deci-
mal point (MySQL doesn’t support this format), the following remedy is available:
Sub exportSQL()
...
Select Case crs.Fields(cfieldix).Type
...
Case Else
sqlcode = sqlcode & conv_str(str(crs.Fields(cfieldix).Value))
•PRIMARY KEY columns must have the attribute NOT NULL in MySQL. However, exportsql.txt
does not guarantee this condition, and that can lead to problems. The solution is to edit the
column definitions of the export file esql_add.txt in a text editor.
Other Converters Between MySQL and Access
In addition to exportsql.txt, there are many other converters between MySQL and Access (in both
directions) that I have not tested in detail, such as importsql and MyAccess. Many of these tools are
CHAPTER 7 ■MICROSOFT OFFICE, OPENOFFICE/STAROFFICE124
5351c07_final.qxd 8/26/05 5:57 PM Page 124
www.it-ebooks.info
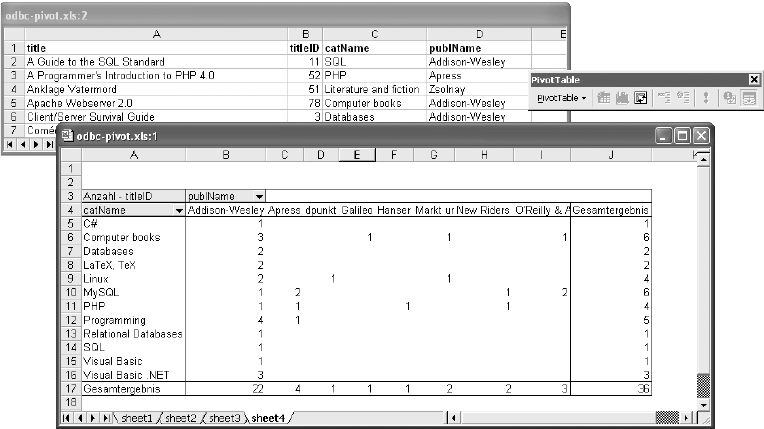
freely available, while others are commercial programs. An overview of such programs is available at
http://solutions.mysql.com/.
Microsoft Excel
Excel is of interest to users of MySQL primarily as a data analysis tool. Thanks to Connector/ODBC,
you can import MySQL data into an Excel worksheet and there perform analyses, create graphics,
and so on. In Figure 7-4 you can see, as an example, a pivot table that for the mylibrary database tells
which publisher has published how many books in a given category. (Because of the relatively small
number of data records the result is, of course, not very informative. But if mylibrary contained a
large number of books, then this table would allow you to determine easily which publishers spe-
cialize in which subjects.)
Importing Data with MS Query
Whether you wish to insert MySQL data directly into an Excel worksheet (command DATA |
GET EXTERNAL DATA | NEW DATABASE QUERY) or to create a pivot table or chart based on external data,
Excel will launch the auxiliary program MS Query. This program functions as the interface between
Excel and an external database, and it assists in the setting of import and query parameters.
In this program you select the DSN in the dialog CHOOSE DATA SOURCE. At that point, the
QUERY WIZARD appears, which assists in the creation of a database query. In the first step you select
the required tables or table fields (see Figure 7-5). In the next two steps you can specify the filter
criteria (corresponding to WHERE conditions) and the sort order.
CHAPTER 7 ■MICROSOFT OFFICE, OPENOFFICE/STAROFFICE 125
Figure 7-4. An Excel pivot table
5351c07_final.qxd 8/26/05 5:57 PM Page 125
www.it-ebooks.info
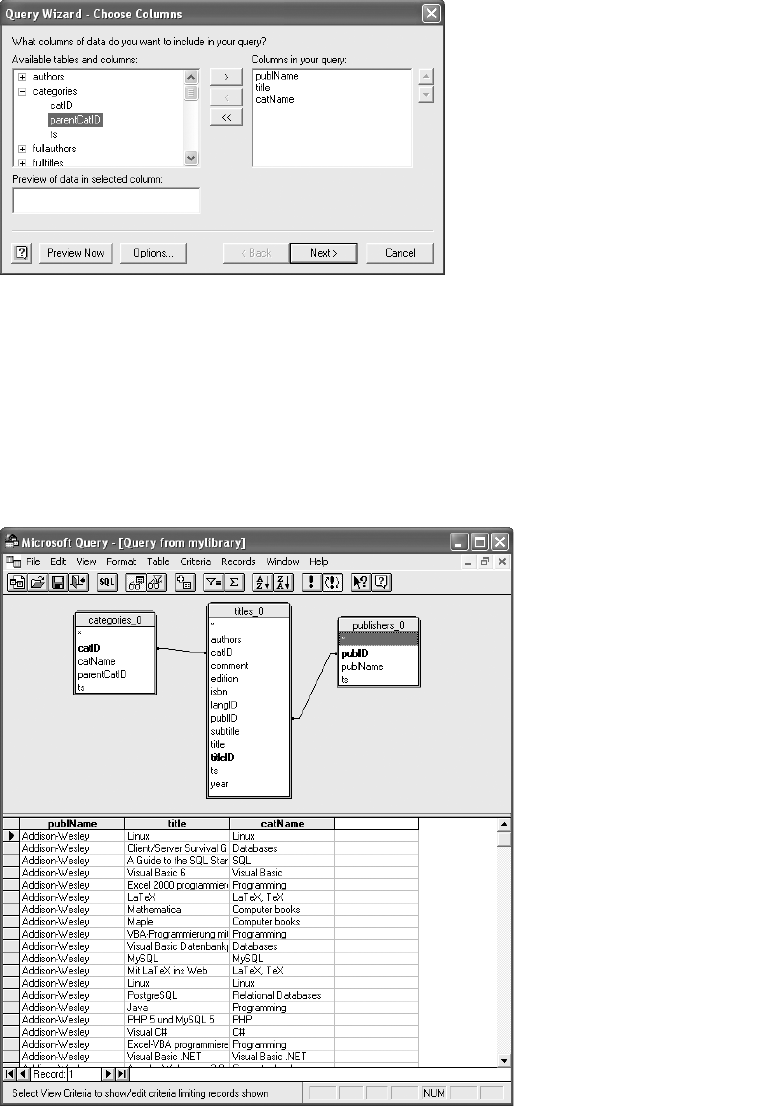
If these specifications suffice for executing the query, you can terminate MS Query with FINISH.
However, it is usually preferable first to click on the option VIEW DATA OR EDIT QUERY. In this case, the
query is displayed by MS Query in development mode, where it can be optimized (see Figure 7-6).
In particular, any relations between the tables that MS Query has not recognized on its own can be
established. To accomplish this you simply Drag&Drop the ID fields from one table to the other.
A dialog appears in which you can set the relational properties.
CHAPTER 7 ■MICROSOFT OFFICE, OPENOFFICE/STAROFFICE126
Figure 7-5. Selection of a column in MS Query
5351c07_final.qxd 8/26/05 5:57 PM Page 126
www.it-ebooks.info

■Tip Excel frequently has difficulties with the importation of information about data. You can solve some of these
problems with the help of the SQL function CONCAT. To format a column with this function, open the dialog EDIT
COLUMN in MS Query with a double click on the column in question. In the input field FIELD you set the expression
present there in
CONCAT(…)
. For example, from
table.birthdate
you would produce
CONCAT(table.birthdate)
.
Connector/J Installation
OpenOffice and StarOffice can access MySQL databases either via ODBC or JDBC. If you wish to
work under Windows with ODBC, then you must, as described at the beginning of this chapter,
install Connector/ODBC and set up a data source. Under Unix/Linux, however, JDBC is generally
the better option, since JDBC is much easier to set up under these operating systems.
JDBC (Java database connectivity) is part of the Java system. This section assumes that a Java run-
time environment is installed on your computer, e.g., the J2SE Runtime Environment 5.0 from Sun.
This runtime environment is necessary for executing Java programs. (OpenOffice and StarOffice are
not pure Java programs, but they use certain Java functions.) If you need to obtain a runtime environ-
ment for your operating system, you can download one from (search for JRE) http://java.sun.com/
j2se/1.5.0/download.jsp.
Connector/J
JDBC does not contain a driver for MySQL. This task is handled by Connector/J, available (free of
charge, GPL license) from http://dev.mysql.com. For this book the stable version 3.1.7 was tested.
(The new version 3.2.nwas still in alpha phase as of March 2005.)
At http://dev.mysql.com/ you can find Connector/J in various versions as a tar.gz archive for
Unix/Linux or as a ZIP file for Windows. Both archives contain exactly the same files: Java is platform-
independent.
■Note Connector/J is included as a package with many Linux distributions and is easily installed with the
appropriate package management program.
Installation
Installation is quite easy: Unpack the archive into the directory of your choice and copy the file
mysql-connector-java-n.n.n-bin.jar into the directory lib/ext of your Java installation. This *.jar
file contains the entire driver. All the other files of the Connector/J package contain the source code,
documentation, etc., many things that you don’t need for running the driver. (Under Unix/Linux
you need root privileges to copy the *.jar file.)
There now remains the question of where Java is installed on your computer. Here are two typi-
cal paths: under Windows, C:\Programs\Java\jre1.5.0_01\lib\ext; under Linux, /usr/lib/jvm/
jre-1.4.2-sun/lib/ext. If you are using OpenOffice 2.0, you can determine the location of the Java
installation with OPTIONS | OPENOFFICE.ORG | JAVA (see Figure 7-7).
CHAPTER 7 ■MICROSOFT OFFICE, OPENOFFICE/STAROFFICE 127
5351c07_final.qxd 8/26/05 5:57 PM Page 127
www.it-ebooks.info
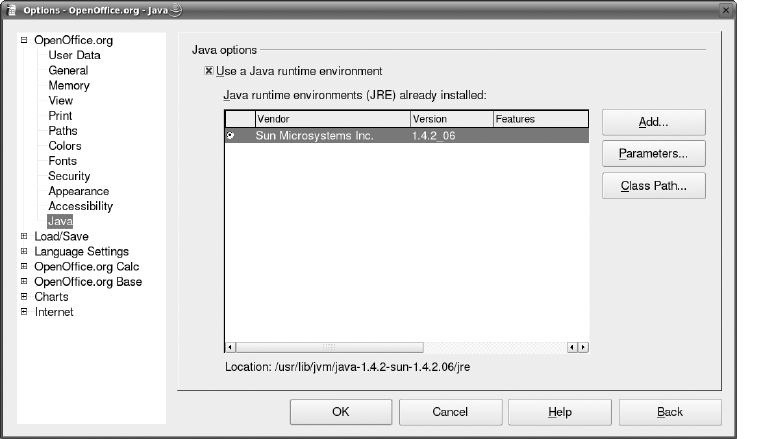
Note that OpenOffice must be restarted before it will recognize the newly installed Connector/J.
This includes the Quickstart program in the task bar.
OpenOffice/StarOffice Base
A significant innovation in OpenOffice 2.0 and StarOffice 8.0 is the database component Base. It
makes possible the generation of custom databases and simplifies management and use of external
databases. This section describes the basic functions of Base for accessing MySQL databases. (The
previous versions OpenOffice 1.1 and StarOffice 7.0 also had database functions, but they were less
conveniently hidden in the data view. The next section, on OpenOffice/StarOffice Calc, goes into
this data view.)
Creating a Connection to a MySQL Database
To open a new database project, execute FILE | NEW | DATABASE and select the option CONNECT TO AN
EXISTING DATABASE and the database type MYSQL. In the next step you have the choice between ODBC
and JDBC. If you wish to use Connector/J, as described in the previous section, choose JDBC.
In the third step you can check with the button TEST CLASS (see Figure 7-8) whether the instal-
lation of Connector/J was successful. If that is the case, provide the name of the database and the
computer name of the MySQL server (usually localhost).
CHAPTER 7 ■MICROSOFT OFFICE, OPENOFFICE/STAROFFICE128
Figure 7-7. Determining the Java installation path with OpenOffice
5351c07_final.qxd 8/26/05 5:57 PM Page 128
www.it-ebooks.info
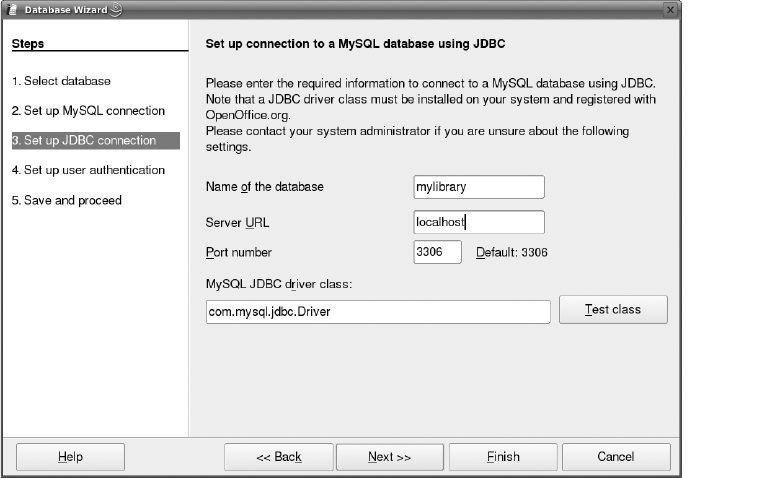
In step four you need to give the MySQL user name. If this user is secured with a password
(which is generally the case), then activate the option PASSWORD REQUIRED. Now you can check with
the button TEST CONNECTION whether all went well. You will be asked for the password.
Before ending the DATABASE WIZARD you need to give a file name. In the Base file, first only the
connection parameters are stored, then later queries, forms, and reports. The actual data remain
on the MySQL server. The Base file thus contains not the content of the database, but simply objects
that enable access to and management of the database. For this reason, the Base file is generally
quite small.
Now the database component Base appears. This gives, in basic view, an overview of four modules:
TABLES, QUERIES, FORMS, and REPORTS (see Figure 7-9). At first, the existing tables in the MySQL database
are available. Queries and other database objects have to be created. A preview of the currently selected
table can be obtained by setting the listbox at the lower right in the window to DOCUMENT.
CHAPTER 7 ■MICROSOFT OFFICE, OPENOFFICE/STAROFFICE 129
Figure 7-8. Creating a connection to a MySQL database
5351c07_final.qxd 8/26/05 5:57 PM Page 129
www.it-ebooks.info
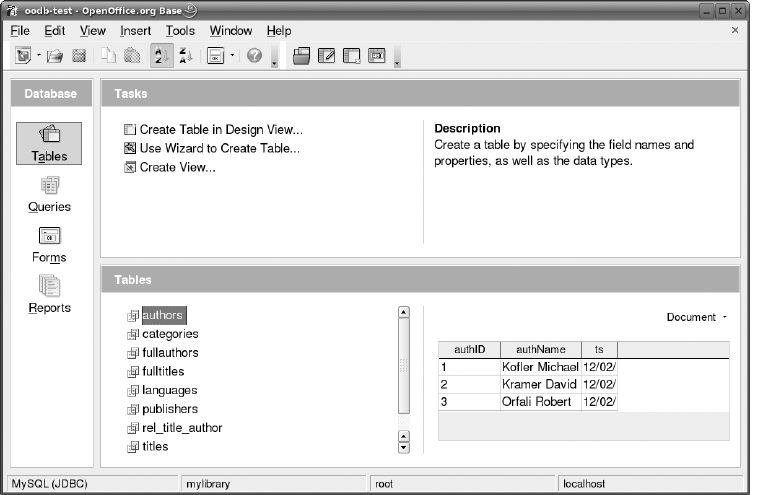
Tables
The module TABLES displays a list of all existing tables and views. You now have various options,
which are briefly described here:
Open a table: A double click on the table name opens the table view. You can browse through
the table, and add, change, and delete records (see Figure 7-10). You can also copy or move
via drag&drop rows that you have selected with Ctrl or Shift into other OpenOffice/StarOffice
components.
Create a new table:You can create new tables either with a simple table editor (OpenOffice
calls this the DESIGN VIEW) or with a wizard. The wizard offers a number of predefined table
layouts and can save you time if one of the model tables suits your requirements.
Change the table layout: The context menu EDIT leads into the DESIGN VIEW of an existing table.
There you can add, edit, or delete columns; define or delete indexes; etc. Note, however, that
not all functions offered by MySQL are available. Since Base is also compatible with other data-
base systems, the editing possibilities are reduced to the lowest common denominator.
Copy data to the clipboard: The context menu command COPY copies all records of the current
table to the clipboard. You can then insert the data into other OpenOffice/StarOffice compo-
nents or into other text editors (format RTF or HTML).
Create a new view: This point leads to the query editor described later, in which you can create
an SQL query. On the basis of this query a new view is created and stored in the database (see
also Chapter 8).
Delete tables or views: You can also delete database objects via the context menu.
CHAPTER 7 ■MICROSOFT OFFICE, OPENOFFICE/STAROFFICE130
Figure 7-9. The OpenOffice/StarOffice database component Base
5351c07_final.qxd 8/26/05 5:57 PM Page 130
www.it-ebooks.info

■Caution All operations change the MySQL database directly, not just some local copy of the data. If you delete
a table in Base, it is irretrievably lost.
Queries
The module QUERIES is the most interesting part of Base. Here you can formulate queries simply and
conveniently. This is particularly helpful to SQL beginners. You can create queries either in DESIGN
view, with a wizard, or in SQL view. The wizard, however, is useful only for queries that process data
in only one table. In SQL view you must input the SQL code directly, which you can do just as well
without Base. Therefore, we will concentrate on the query editor in DESIGN view, which looks much
like the program MS Query introduced earlier in this chapter.
In the query design window you add with a double click all the tables whose data you wish to
edit. The next step is to link fields between the tables using drag&drop. For example, in Figure 7-11,
the publishers and titles tables are linked by the publID field. For Base to execute this link, move the
publID field from the publishers table to the publID field of the titles table. (You can also use the
reverse order, from titles to publishers.)
By default, Base creates so-called INNER JOINS. This means that in linking, only those fields
that appear in both tables are considered. If NULL fields are to be allowed in one table, then you
need a LEFT or RIGHT JOIN. The relational properties can be set by double clicking on the linking
line. (More on the JOIN variants appears in Chapter 9.)
■Tip For Base to be able to generate the correct SQL code for MySQL for links among several tables, you must
deactivate the option Use the SYNTAX {OJ} FOR OUTER JOINS IN EDIT | DATABASE | ADVANCED SETTINGS.
CHAPTER 7 ■MICROSOFT OFFICE, OPENOFFICE/STAROFFICE 131
Figure 7-10. Viewing and editing a table with Base
5351c07_final.qxd 8/26/05 5:57 PM Page 131
www.it-ebooks.info
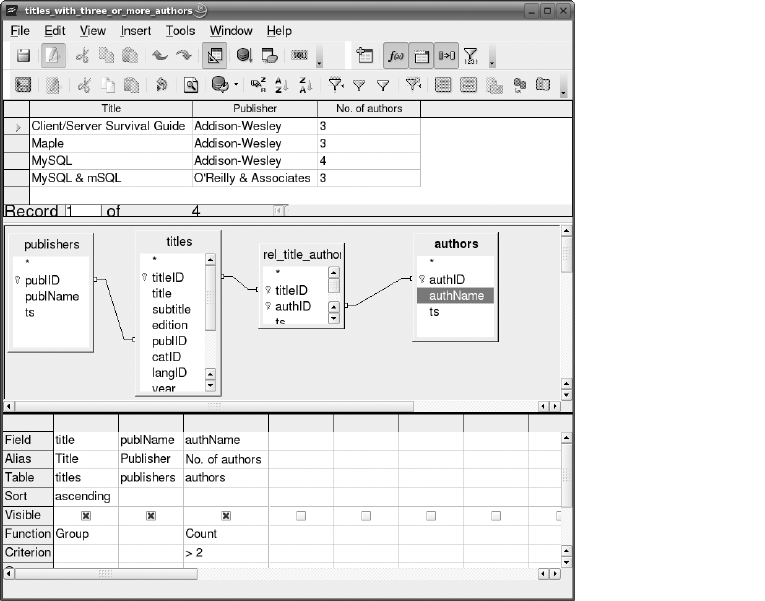
After these preparations, you simply need to select the desired result columns with a double
click, provide a label (row ALIAS), and if necessary set the sort order and grouping and aggregate
functions. In the query shown in Figure 7-11, the result is grouped by title. For every such group,
the number of authors is calculated. In the result, only titles with more than two authors will be
displayed.
A click on the button EXECUTE QUERY returns the result of the query. If you wish to know what
the SQL code of your query looks like, you can toggle between design and SQL modes with the
DESIGN VIEW button.
Forms, Reports, and Additional Functions
The modules FORMS and REPORTS and the TOOLS menu lead to additional Base functions, which will
be described here only briefly. The problem is that these functions are not fully developed and are
useful at best only in very simple situations.
In the FORMS module, you can create input and editing forms (see Figure 7-12). Such forms
make input and searching for data easier than via direct processing of tables. Base offers two ways
of creating forms: via DESIGN view or a wizard. As a Base novice you will be better off with the wiz-
ard; using design view requires extensive experience in trying things out, and even then, it remains
complex to work with. (Tip: Via VIEW | TOOLBARS you can activate the DATABASE toolbars. They contain
the elements you need for creating forms.)
CHAPTER 7 ■MICROSOFT OFFICE, OPENOFFICE/STAROFFICE132
Figure 7-11. Creating and testing a query
5351c07_final.qxd 8/26/05 5:57 PM Page 132
www.it-ebooks.info
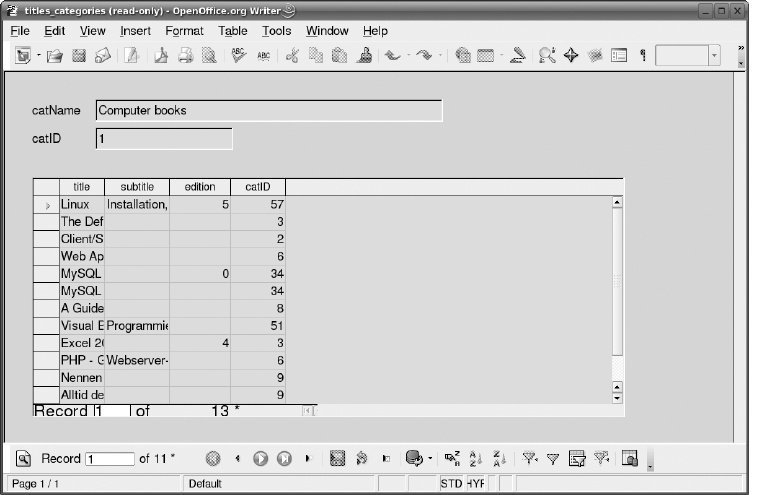
The module REPORTS makes it possible to define a database report with the help of a wizard.
Reports allow for pretty-printing of a table, view, or query. Unfortunately, the REPORTS module does
not come close to offering the functionality of Microsoft Access, neither in creating the report nor
in its structure. Reports can process data in only a single database object. If you wish to print linked
data from several tables, you must first create a suitable query. Changing a report after it has been
created is well-nigh impossible. The context menu EDIT opens the report as a Writer document, but
there you can carry out only very elementary changes in the layout (e.g., text size). A more extensive
editing fails because the internal structure of the report is inaccessible via menu commands or tool-
bars.
TOOLS | RELATIONSHIPS should lead to an editor in which you can set links between tables of a
database that Base doesn’t recognize. With MySQL databases, however, this command leads to an
error, The database does not support relations! which of course is completely false: MySQL is a rela-
tional database.
TOOLS | USER ADMINISTRATION displays a dialog for MySQL user administration. The information
contained in this dialog is mostly incorrect. In my experience, this dialog causes more problems
than it solves. Avoid it! (You are better off using phpMyAdmin for user administration.)
OpenOffice/StarOffice Data Source View
Independently of the Base components described in the previous sections, all other OpenOffice/
StarOffice components offer a so-called DATA SOURCE view. This view can be toggled on and off with
F4 or VIEW | DATA SOURCES, and it helps in entering data from external databases into Calc, Writer, etc.
CHAPTER 7 ■MICROSOFT OFFICE, OPENOFFICE/STAROFFICE 133
Figure 7-12. A simple form that shows all titles of a selected category
5351c07_final.qxd 8/26/05 5:57 PM Page 133
www.it-ebooks.info

■Tip DATA SOURCE view is also available in OpenOffice 1.1 and StarOffice 7. It offers functions for administering
tables and queries similar to those of the new Base components. However, these functions are hidden behind an
unintuitive interface and some of them are not well developed.
Establishing a Data Source
If you are working with OpenOffice 2/StarOffice 8, all known Base data sources are displayed in DATA
SOURCE view. To define a new data source, execute FILE | NEW | DATABASE. You can change the assign-
ment between the data source name and the Base files as needed in the dialog TOOLS | OPTIONS | BASE |
DATABASES.
In OpenOffice 1.1/StarOffice 7, you can launch an analogous wizard with the context menu
command ADMINISTRATE DATA SOURCES. There you click on the button NEW DATA SOURCE, choose the
database type MySQL in the first dialog sheet, and in the second sheet, the option CONNECTOR/J.
The rest of the configuration is more complex than in Base: you have to specify so-called data
source URLs with localhost:3306/dbname. If the MySQL server is not running on the local com-
puter, then instead of localhost, give the name of the computer. Instead of dbname, give the name
of the desired database (e.g., mylibrary).
Importing Data
In DATABASE view you can select a table or a query and execute it with a double click. Now you can
insert an entire table or a set of lines selected with Ctrl or Shift into a table calculation sheet or text
document. See Figure 7-13.
CHAPTER 7 ■MICROSOFT OFFICE, OPENOFFICE/STAROFFICE134
5351c07_final.qxd 8/26/05 5:57 PM Page 134
www.it-ebooks.info


Database Design
The first stage in any database application is the design of the database. The design will have a
great influence on the efficiency of the application, the degree of simplicity or difficulty in program-
ming and maintenance, and the flexibility in making changes in the design. Errors that occur in the
design phase will come home to roost in the heartache of future efforts at correction. But don’t expect
any easy recipe! Database design has a great deal to do with experience, and in a single chapter one
can do no more than present some pointers to get you started.
This chapter discusses the fundamentals of relational databases, summarizes the different data
and table types available under MySQL, and demonstrates, using the mylibrary database, the appli-
cation of normalization rules. (The mylibrary database is used to manage a collection of books, and
authors and publishers will be used in many of the examples in the book.) Additional topics are the
correct use of indexes and integrity rules (foreign key constraints).
■Tip This chapter serves as the basis for database design, but it does not explain how to create a new database
and its associated tables. There are two ways of doing this:
The easiest is to use an interface such as MySQL Administrator or phpMyAdmin (see Chapters 5 and 6). This
allows you to define the properties of new tables with a few clicks of the mouse.
The other possibility is to create databases and tables with SQL commands (e.g.,
CREATE TABLE name…
;
see Chapter 9). To be sure, the formulation of such commands is relatively tedious, but the advantage is that such
commands can also be executed in a PHP script, which can be useful if you want to create temporary tables.
Further Reading
There are countless books that deal exclusively, independently of any specific database system, with
database design and SQL. Needless to say, there is a variety of opinion as to which of these books
are the good ones. Therefore, consider the following recommendations as my personal hit list:
Joe Celko: SQL for Smarties, Morgan Kaufmann Publishers, 1999. (This is not a book for SQL
beginners. Many examples are currently not realizable in MySQL, because MySQL is not suf-
ficiently compatible with ANSI-SQL/92. Nonetheless, it is a terrific example-oriented book
on SQL.)
Judith S. Bowman et al.: The Practical SQL Handbook, Addison-Wesley, 2001.
Michael J. Hernandez: Database Design for Mere Mortals, Addison-Wesley, 2003. (The first half
is somewhat long-winded, but the second half is excellent and very clearly written.)
Another book that is frequently recommended, but with which I am not familiar, is Peter Gulutzan
and Trudy Pelzer’s SQL-99 Complete, Really, R&D Books, 1999.
137
CHAPTER 8
■ ■ ■
5351c08_final.qxd 8/26/05 10:03 PM Page 137
www.it-ebooks.info
If you are not quite ready to shell out your hard-earned cash for yet another book and you are
interested for now in database design only, you may find the compact introduction on the design
of relational databases by Fernando Lozano adequate to your needs. See http://www.edm2.com/
0612/msql7.html.
Table Types
A peculiarity of MySQL is that when you create a new table, you can specify its type. MySQL sup-
ports a number of table types, distinguished by a variety of properties. The three most important
types are MyISAM, InnoDB, and HEAP.
If you do not specify the type when you create a table, then the MySQL server decides for you,
based on its configuration, either for MyISAM or InnoDB. The default type is set with the option
default-table-type in the MySQL configuration file.
This section provides a brief look at the different table types recognized by MySQL as well as
some of their properties and when the use of one type or another is appropriate.
MyISAM Tables
The MyISAM table type is mature, stable, and simple to manage. If you have no particular reason to
choose another type, then you should use this type. Internally, there are two variants of this table type,
and the MySQL server chooses the appropriate type on its own:
MyISAM Static: These tables are used when all columns of the table have fixed, predetermined
size. Access in such tables is particularly efficient. This is true even if the table is frequently
changed (that is, when there are many INSERT, UPDATE, and DELETE commands). Moreover,
data security is quite high, since in the case of corrupted files or other problems, it is relatively
easy to extract records.
MyISAM Dynamic: If in the declaration of a table there is also only a single VARCHAR, xxxTEXT,
or xxxBLOB field, then MySQL automatically selects this table type. The significant advantage
over the static MyISAM variant is that the space requirement is usually significantly less: Char-
acter strings and binary objects require space commensurate with their actual size (plus a few
bytes overhead).
However, it is a fact that data records are not all the same size. If records are later altered, then
their location within the database file may have to change. In the old place there appears a hole
in the database file. Moreover, it is possible that the fields of a record are not all stored within a
contiguous block within the database file, but in various locations. All of this results in increas-
ingly longer access times as the edited table becomes more and more fragmented, unless an
OPTIMIZE TABLE or an optimization program is executed every now and then (myisamchk; see
Chapter 14).
MyISAM Compressed: Both dynamic and static MyISAM tables can be compressed with the
auxiliary program myisamchk. This usually results in a shrinkage of the storage requirement for
the table to less than one-half the original amount (depending on the contents of the table). To
be sure, thereafter, every data record must be decompressed when it is read, but it is still possi-
ble under some conditions that access to the table is nevertheless faster, particularly with a
combination of a slow hard drive and fast processor.
The decisive drawback of compressed MyISAM tables is that they cannot be changed (that is,
they are read-only tables).
CHAPTER 8 ■DATABASE DESIGN138
5351c08_final.qxd 8/26/05 10:03 PM Page 138
www.it-ebooks.info
InnoDB Tables
In addition to the MyISAM format, MySQL supports a second table format, namely InnoDB. This is
a modern alternative to MyISAM, which above all offers the following additional functions:
Transactions: Database operations in InnoDB tables can be executed as transactions. This
allows you to execute several logically connected SQL commands as a single entity. If an error
occurs during execution, then all of the commands (not only the one during which the error
occurred) are nullified. In addition, transactions offer other advantages that improve the secu-
rity of database applications.
Transactions can be executed in all four isolation levels of the ANSI-SQL/92 standard (READ
UNCOMMITTED, READ COMMITTED, REPEATABLE READ, SERIALIZABLE; see also Chapter 10).
Row Level Locking: In implementing transactions, the InnoDB table driver uses internal row
level locking. This means that during a transaction, the entire table does not have to be
blocked for access by other users (which is the case for a MyISAM table during a LOCK TABLE
command), but only the data records are actually affected. If many users are simultaneously
making changes on a large table, row level locking can bring about an enormous advantage in
efficiency.
The InnoDB table driver automatically recognizes deadlocks (that is, the condition in which two
processes mutually block each other) and in such a case, terminates one of the two processes
automatically.
Foreign Key Constraints: When you define relations between your tables, the InnoDB table
driver automatically ensures that the referential integrity of the table is preserved after DELETE
commands. Thus it is impossible, for example, for a record in table A to refer to a no longer
existing table B. (In database lingo this function is called a foreign key constraint.)
Crash Recovery: After a crash, InnoDB tables are automatically and very quickly returned to
a consistent state (provided that the file system of the computer was not damaged). I have not
tested this functionality.
The InnoDB table driver has been an integral component of MySQL since version 3.23.34. The
development of the table driver and its commercial support come from the independent company
Innobase (see http://www.innodb.com).
Limitations and Drawbacks
If InnoDB tables had only advantages and no drawbacks, one could dump MyISAM tables in the
garbage and be done with it. But that is not the case, as the following list reveals:
Tablespace Administration: While with the MyISAM table driver, each table is stored in its
own file, which grows or shrinks as required, the InnoDB table driver stores all data and indexes
in a tablespace, comprising one or more files, that forms a sort of virtual file system. These
files cannot later be made smaller. Nor is it possible to stop the MySQL server and then copy
a table by simply copying its file. Therefore, in the administration of InnoDB tables, the com-
mand mysqldump must be employed more frequently than with MyISAM tables.
Record Size: A data record can occupy at most 8000 bytes. This limit does not hold for TEXT
and BLOB columns, of which only the first 512 bytes are stored in the database proper. Data
in such columns beyond this size are stored in separate pages of the master space.
Storage Requirement: The storage requirements for InnoDB tables are much greater than those
for equivalent MyISAM tables (up to twice as big).
Full-Text Index: For InnoDB tables one cannot use a full-text index.
CHAPTER 8 ■DATABASE DESIGN 139
5351c08_final.qxd 8/26/05 10:03 PM Page 139
www.it-ebooks.info

GIS Data: Geometric data cannot be stored in InnoDB tables.
COUNT Problem: On account of open transactions, it is relatively difficult for the InnoDB table
driver to determine the number of records in a table. Therefore, executing a SELECT COUNT(*)
FROM TABLE is much slower than with MyISAM tables. This limitation should be eliminated
soon.
Table Locking: InnoDB uses its own locking algorithms in executing transactions. Therefore,
you should avoid LOCK TABLE … READ/WRITE. Instead, you should use SELECT … IN SHARE
MODE or SELECT … FOR UPDATE. These commands have the additional advantage that they
block only individual records and not the entire table. For future versions of MySQL, the
InnoDB-specific commands LOCK TABLE … IN SHARE MODE and LOCK TABLE … IN
EXCLUSIVE MODE are planned.
mysql Tables: The mysql tables for managing MySQL access privileges cannot be transformed
into InnoDB tables. They must remain in MyISAM format.
License Costs: Adding InnoDB support to a commercial MySQL license doubles the cost. (This
is relevant only if you are developing a commercial product. With open source programs,
Indoor projects, and normal websites, the free MySQL version suffices. See also Chapter 1.)
■Tip Further details on the limitations of InnoDB tables in relation to MyISAM tables can be found at the follow-
ing address: http://dev.mysql.com/doc/mysql/en/innodb-restrictions.html.
MyISAM or InnoDB?
You can specify individually for each table in your database which table driver is to be used. That is,
it is permitted within a single database to use both MyISAM and InnoDB tables. This allows you to
choose the optimal table driver for each table, depending on its content and the application that will
be accessing it.
MyISAM tables are to be recommended whenever you want to manage tables in the most
space- and time-efficient way possible. InnoDB tables, on the other hand, take precedence when
your application makes use of transactions, requires greater security, or is to be accessed by many
users simultaneously for making changes.
There is no generally valid answer to the question of which table type offers faster response.
In principle, since transactions take time and InnoDB tables take up more space on the hard drive,
MyISAM should have the advantage. But with InnoDB tables you can avoid the use of LOCK TABLE
commands, which offers an advantage to InnoDB, which is better optimized for certain applications.
Furthermore, the speed of an application depends heavily on hardware (particularly the
amount of RAM), the settings in the MySQL configuration file, and other factors. Therefore, I can
provide here only the following advice: In speed-critical applications, perform your own tests on
both types of tables.
HEAP Tables
HEAP tables exist only in RAM (not on the hard drive). They use a hash index, which results in par-
ticularly fast access to individual data records. HEAP tables are often used as temporary tables. See
the next section for more about this topic.
In comparison to normal tables, HEAP tables present a large number of functional restrictions,
of which we mention here only the most important: No xxxTEXT or xxxBLOB data types can be used.
Records can be searched only with = or <=> (and not with <, >, <=, or >=). AUTO_INCREMENT is not
supported. Indexes can be set up only for NOT NULL columns.
CHAPTER 8 ■DATABASE DESIGN140
5351c08_final.qxd 8/26/05 10:03 PM Page 140
www.it-ebooks.info
HEAP tables should be used whenever relatively small data sets are to be managed with maxi-
mal speed. Since HEAP tables are stored exclusively in RAM, they disappear as soon as MySQL is
terminated. The maximum size of a HEAP table is determined in the MySQL configuration file by
the parameter max_heap_table_size.
Temporary Tables
With all of the table types listed above there exists the possibility of creating a table on a temporary
basis. Such tables are automatically deleted as soon as the link with MySQL is terminated. Further-
more, temporary tables are invisible to other MySQL links (so that it is possible for two users to
employ temporary tables with the same name without running into trouble).
Temporary tables are not a separate table type unto themselves, but rather a variant of the
types that we have been describing. Temporary tables are often created automatically by MySQL
in order to assist in the execution of SELECT queries.
Temporary tables are not stored in the same directory as the other MySQL tables, but in a spe-
cial temporary directory (under Windows it is usually called C:\Windows\Temp, while under Unix it
is generally /tmp or /var/tmp or /usr/tmp). The directory can be set at MySQL startup.
Other Table Types
MySQL recognizes a variety of other table types, of which those listed here are the most important
variants. Note that these table types are available only in the Max version or self-compiled version
of MySQL. You can determine which table types your MySQL version supports with the command
SHOW ENGINES.
BDB Tables: BDB tables were historically the first transactions-capable MySQL table type.
Now that the InnoDB table driver has matured, there is not much reason to use BDB tables.
Compressed Tables (type ARCHIVE, since MySQL 4.1): This table type is designed for the
archiving and logging of large data sets. The advantage of this table type is that the records
are immediately compressed when they are stored.
However, ARCHIVE tables make sense only if the records are not to be altered. (INSERT is
permitted, but UPDATE and DELETE are not allowed.)
ARCHIVE tables cannot be indexed. For each SELECT command, therefore, all records must
be read! So use this table type only if you expect to access the data relatively rarely.
Tables in Text Format (type CSV, since MySQL 4.1): Records from CSV tables are saved as text
files with comma-separated values. For example, “123”,”I am a character string”. CSV tables
cannot be indexed.
NDB Tables (MySQL Cluster, since MySQL 4.1): The NDB table type belongs with the MySQL
cluster functions, which are integrated into the MySQL Max version. (NDB stands for network
database.) This table type is transactions-capable and is most suitable for databases that are
distributed among a large number of computers. However, the use of this table type requires
that first a number of MySQL Max installations be specially configured for cluster operation.
Detailed information can be found at http://dev.mysql.com/doc/mysql/en/ndbcluster.html.
External Tables (type FEDERATED, since MySQL 5.0): This table type enables access to tables
in an external database. The database system can be located, for example, on another com-
puter in the local network. At present, the external database must be a MySQL database,
though perhaps in the future, MySQL will allow connection with other database systems.
CHAPTER 8 ■DATABASE DESIGN 141
5351c08_final.qxd 8/26/05 10:03 PM Page 141
www.it-ebooks.info
There are some restrictions in accessing FEDERATED tables: Neither transactions nor query
optimization with Query Cache are possible. The structure of external tables cannot be changed
(though the records can be). In other words, ALTER TABLE is not permitted, while INSERT,
UPDATE, and DELETE are.
Further information on all the MySQL table types can be found as a separate chapter in the
MySQL documentation at http://dev.mysql.com/doc/mysql/en/storage-engines.html.
Table Files
You can specify the location for database files at MySQL startup. (Under Unix/Linux /var/lib/mysql
is frequently used, while under Windows it is usually C:\Programs\MySQL\MySQL Server n.n\data.)
All further specifications are relative to this directory.
A description of each table is saved in a *.frm file. The *.frm files are located in directories whose
names correspond to the name of the database: data/dbname/tablename.frm. This file contains the
table schema (data types of the columns, etc.).
Beginning with MySQL 4.1, an additional file, db.opt, is stored in the database directory, which
relates to the entire database: data/dbname/db.opt. This file contains the database settings.
For each MyISAM table, two additional files are created: data/dbname/tablename.MYD, with
MyISAM table data, and data/dbname/tablename.MYI, with MyISAM indexes (all indexes of the table).
InnoDB tables are stored in individual files for each table or else collectively, in the so-called
tablespace (depending on whether innodb_file_per_table is specified in the MySQL configuration
file). The location and name of the tablespace are also governed by configuration settings. In current
MySQL installations, the default is data/dbname/tablename.ibd for InnoDB table data (data and
indexes), and data/ibdata1, -2, -3 for the tablespace and undo logs, and data/ib_logfile0, -1, -2
for InnoDB logging data.
If triggers are defined for the tables (see Chapter 13), then their code is currently stored in a file
data/dbname/tablename.TRG, though it is possible that this will change in future versions of MySQL.
MySQL Data Types
Every table is composed of a number of columns. For each column, the desired data type may be
specified. This section provides an overview of the data types available in MySQL.
Integers (xxxINT)
With the INT data type, both positive and negative numbers are generally allowed. With the attrib-
ute UNSIGNED, the range can be restricted to the positive integers. But note that then subtraction
returns UNSIGNED integers, which can lead to deceptive and confusing results.
With TINYINT, numbers between -128 and +127 are allowed. With the attribute UNSIGNED,
the range is 0 to 255. If one attempts to store a value above or below the given range, MySQL simply
replaces the input with the largest or, respectively, smallest permissible value. See Table 8-1.
CHAPTER 8 ■DATABASE DESIGN142
5351c08_final.qxd 8/26/05 10:03 PM Page 142
www.it-ebooks.info

Table 8-1. Data Types for Integers
MySQL Data Type Meaning
TINYINT(m) 8-bit integer (1 byte, -128 to +127); the optional value mgives the desired
column width in SELECT results (Maximum Display Width), but has no
influence on the permitted range of numbers.
SMALLINT(m) 16-bit integer (2 bytes, -32,768 to + 32,767)
MEDIUMINT(m) 24-bit integer (3 bytes, -8,388,608 to +8,388,607)
INT(m), INTEGER(m) 32-bit integer (4 bytes, -2.147,483,648 to +2,147,483,647)
BIGINT(m) 64-bit integer (8 bytes, ±9.22*1018)
SERIAL Synonym for BIGINT AUTO_INCREMENT NOT NULL PRIMARY KEY
Optionally, in the definition of an integer field, the desired column width (number of digits)
can be specified, such as, for example, INT(4). This parameter is called M(for Maximum Display
Size) in the literature. It assists MySQL as well as various user interfaces in presenting query results
in a readable format.
■Note Note that with the
INT
data types, the
M
restricts neither the allowable range of numbers nor the possible
number of digits. In spite of setting
INT(4)
, for example, you can still store numbers greater than 9999. However, in
certain rare cases (such as in complex queries for the evaluation of which MySQL constructs a temporary table), the
numerical values in the temporary tables can be truncated, with incorrect results as a consequence.
AUTO_INCREMENT Integers
With the optional attribute AUTO_INCREMENT you can achieve for integers that MySQL automati-
cally inserts a number that is 1 larger than the currently largest value in the column when a new
record is created for the field in question. AUTO_INCREMENT is generally used in the definition
of fields that are to serve as the primary key for a table.
The following rules hold for AUTO_INCREMENT:
• This attribute is permitted only when one of the attributes NOT NULL, PRIMARY KEY, or
UNIQUE is used as well.
• It is not permitted for a table to possess more than one AUTO_INCREMENT column.
• The automatic generation of an ID value functions only when in inserting a new data
record with INSERT, a specific value or NULL is not specified. However, it is possible to
generate a new data record with a specific ID value, provided that the value in question
is not already in use.
• If you want to find out the AUTO_INCREMENT value that a newly inserted data record has
received, after executing the INSERT command (but within the same connection or trans-
action), execute the command SELECT LAST_INSERT_ID().
• If the AUTO_INCREMENT counter reaches its maximal value, based on the selected integer
format, it will not be increased further. No more insert operations are possible. With tables
that experience many INSERT and DELETE commands, it can happen that the 32-bit INT
range will become used up, even though there are many fewer than two billion records in
the table. In such a case, use a BIGINT column.
CHAPTER 8 ■DATABASE DESIGN 143
5351c08_final.qxd 8/26/05 10:03 PM Page 143
www.it-ebooks.info

Binary Data (BIT and BOOL)
The keyword BOOL in MySQL is a synonym for TINYINT. This was also true prior to version 5.0.2 for
BIT. Beginning with version 5.0.3, BIT is an independent data type for storing binary values with up
to 64 bits.
Floating-Point Numbers (FLOAT and DOUBLE)
Since version 3.23 of MySQL, the types FLOAT and DOUBLE correspond to the IEEE numerical types
for single and double precision that are available in many programming languages.
Optionally, the number of digits in FLOAT and DOUBLE values can be set with the two parame-
ters mand d. In that case, mspecifies the number of digits before the decimal point, while dgives the
number of places after the decimal point. The floating-point data types are summarized in Table 8-2.
Table 8-2. Data Types for Floating-Point Numbers
Data Type Meaning
FLOAT(m, d) Floating-point number, 8-place accuracy (4 byte); the optional values mand d
give the desired number of places before and after the decimal point in SELECT
results; these values have no influence on the actual way the numbers are stored.
DOUBLE(m, d) Floating-point number, 16-place accuracy (8 byte).
REAL(m, d) Synonym for DOUBLE.
The parameter mdoes no more than assist in the formatting of numbers; it does not limit the
permissible range of numbers. On the other hand, dhas the effect of rounding numbers when they
are stored. For example, if you attempt to save the number 123456.789877 in a field with the attrib-
ute DOUBLE(6,3), the number stored will, in fact, be 123456.790.
■Note MySQL expects floating-point numbers in international notation, that is, with a decimal point, and not a
comma (which is used in a number of European countries). Results of queries are always returned in this notation,
and very large or very small values are expressed in scientific notation (e.g., 1.2345678901279e+017).
If you have your heart set on formatting floating-point numbers differently, you will have either to employ the
function
FORMAT
in your SQL queries (though this function is of use only in the thousands groupings) or to carry
out your formatting in the client programming language (that is, in PHP, Perl, etc.).
Fixed-Point Numbers (DECIMAL)
The integer type DECIMAL is recommended when rounding errors caused by the internal represen-
tation of numbers as FLOAT or DOUBLE are unacceptable, perhaps with currency values. Since the
numbers are stored as character strings, the storage requirement is much greater. At the same time,
the possible range of values is smaller, since exponential notation is ruled out. The fixed-point data
types are summarized in Table 8-3.
Table 8-3. Data Types for Fixed-Point Numbers
Data Type Meaning
DECIMAL(p, s) Fixed-point number, saved as a character string; arbitrary number of digits
(1 byte per digit + 2 bytes overhead)
NUMERIC, DEC Synonym for DECIMAL
CHAPTER 8 ■DATABASE DESIGN144
5351c08_final.qxd 8/26/05 10:03 PM Page 144
www.it-ebooks.info

The two parameters pand sspecify the total number of digits (precision) and, respectively,
the number of digits after the decimal point (scale). The range in the case of DECIMAL(6,3) is from
9999.999 to -999.999. This bizarre range results from the apparent fact that six places are reserved
for the number plus an additional place for the minus sign. When the number is positive, the place
for the minus sign can be commandeered to store another digit. If pand sare not specified, then
MySQL automatically uses (10, 0), with the result that positive integers with eleven digits and nega-
tive integers with ten digits can be stored.
Date and Time (DATE,TIME, DATETIME,TIMESTAMP)
Table 8-4 summarizes the data types for storing time values.
Table 8-4. Data Types for Date and Time
MySQL Keyword Meaning
DATE Date in the form ‘2003-12-31’, range 1000-01-01 to 9999-12-31 (3 bytes)
TIME Time in the form ‘23:59:59’, range ±838:59:59 (3 bytes)
DATETIME Combination of DATE and TIME in the form ‘2003-12-31 23:59:59’ (8 bytes)
YEAR Year 1900–2155 (1 byte)
Data Validation
In older versions of MySQL, the DATE and DATETIME data types did only a limited amount of
type checking. Values between 0 and 12 for months, and between 0 and 31 for days, were gener-
ally allowed. However, it is the responsibility of the client program to provide correct data. (For
example, 0 is a permissible value for a month or day, in order to provide the possibility of storing
incomplete or unknown data.)
Beginning with MySQL 5.0.2 there is a more thorough validation, so that only valid data can
be stored. Still allowed are the month and day values 0, as well as the date 0000-00-00.
Validation can be controlled through the MySQL system variable sql_mode (see also Chapter 14).
Table 8-5 summarizes the sql_mode values that are relevant for time validation.
Table 8-5. sql_mode Settings
Setting Meaning
ALLOW_INVALID_DATES Obviously incorrect dates (e.g., 2005-02-31) are accepted.
NO_ZERO_DATE 0000-00-00 will no longer be accepted as a valid date.
NO_ZERO_IN_DATE 0 will not be accepted as a valid month or day.
Peculiarities of TIMESTAMP
Among the data types for date and time, TIMESTAMP plays a particular role. Fields of this type are
automatically updated whenever the record is altered, thereby reflecting the time of the last change.
Fields of type TIMESTAMP are therefore usually employed only for internal management, not for
the storage of “real” data, though such is possible.
Many database operations with particular client libraries (such as with Connector/ODBC) work
correctly only if every table in the database has a TIMESTAMP column. The time of the last change is
often needed for internal administration of the data.
CHAPTER 8 ■DATABASE DESIGN 145
5351c08_final.qxd 8/26/05 10:03 PM Page 145
www.it-ebooks.info

For the automatic TIMESTAMP updating to function properly, the column involved must have
either no explicit value assigned or else NULL. In either case, MySQL itself inserts the current time.
If there is more than one TIMESTAMP column in a table, then the first column is updated for
which a constant time value is not explicitly defined (DEFAULT 0).
Since MySQL 4.1.3 it has been possible to control the behavior of TIMESTAMP columns more
precisely through two attributes. Possible combinations of attributes are shown in Table 8-6.
Table 8-6. TIMESTAMP Variants
Setting Meaning
TIMESTAMP DEFAULT CURRENT_TIMESTAMP The column is automatically updated both
ON UPDATE CURRENT_TIMESTAMP when a new record is created and for each
change in a record.
TIMESTAMP As above, but with less typing.
TIMESTAMP DEFAULT CURRENT_TIMESTAMP The column is initialized when a new record
is created, but is left unchanged thereafter.
TIMESTAMP ON UPDATE The column is initialized to zero when it is
CURRENT_TIMESTAMP created. The current time is stored only on
subsequent changes.
TIMESTAMP DEFAULT ‘yyyy-mm-dd hh:mm:ss’ The column is initialized on creation to the
ON UPDATE CURRENT_TIMESTAMP given time; the current time is stored only
when changes are subsequently made.
■Caution Do not use a
TIMESTAMP
column if you wish to store the date and time yourself. For that, one has
the data type
DATETIME
.
If you wish to deviate from the default behavior and not have the
TIMESTAMP
column change when a record
is changed, then you must specify the date and time explicitly:
UPDATE tablename SET col='new value, ts=ts;
MySQL versions through 4.0 formatted
TIMESTAMP
values in the form
YYYYMMDDHHMMSS
(instead of
YYYY-MM-DD HH:MM:SS
). This can lead to eventual incompatibilities when data are later processed. Add a zero
if you prefer the old format (that is,
SELECT ts+0 FROM table
).
Microseconds: In future versions of MySQL it is possible that TIMESTAMP columns will also
store microseconds. The syntax for such times has already been set (2005-31-12 23:59:59.nnnnnn),
and there exist various MICROSECOND functions for processing such data. However, actually stor-
ing the data is not yet possible (this includes MySQL 5.0.2).
Functions for Processing and Formatting Dates and Times
MySQL returns dates in the form 2005-12-31. However, with INSERT and UPDATE it manages to
deal with other formats, provided that the order year/month/day is adhered to and the values are
numeric. If the year is given as a two-digit number, then the following interpretation is made:
70–99 becomes 1970–1999, while 00–69 becomes 2000–2069.
If query results are to be specially formatted, there are several MySQL functions available for
processing date and time values. The most flexible of these is DATE_FORMAT, whose application
is demonstrated in the following example:
CHAPTER 8 ■DATABASE DESIGN146
5351c08_final.qxd 8/26/05 10:03 PM Page 146
www.it-ebooks.info

SELECT DATE_FORMAT(birthdate, '%Y %M %e') FROM students
1977 September 3
1981 October 25
...
■Tip
DATE_FORMAT
, as well as many other MySQL functions for processing dates and times, are introduced
in Chapter 10. There you will also learn how to convert times among different time zones. A reference for all time
and date functions is in Chapter 21.
Character Strings (CHAR,VARCHAR, xxxTEXT)
Table 8-7 summarizes the data types for storing character strings.
Table 8-7. Data Types for Character Strings
MySQL Keyword Meaning
CHAR(n) character string with specified length, maximum 255 characters
VARCHAR(n) character string with variable length, maximum 255 characters (MySQL
through 4.1: n<256; MySQL from 5.0.3: n<65,535)
TINYTEXT character string with variable length, maximum 255 bytes TEXT
character string with variable length, maximum 216-1 characters
MEDIUMTEXT character string with variable length, maximum 224-1 characters
LONGTEXT character string with variable length, maximum 232-1 characters
With CHAR, the length of a character string is strictly specified. For example, CHAR(20) demands
20 bytes in each record, regardless of the length of the character string actually stored. (Blank char-
acters at the beginning of a character string are eliminated before storage. Short character strings
are extended with blanks. These blank characters are automatically deleted when the data are read
out, with the result that it is impossible to store a character string that actually has blank characters
at the end.)
In contrast, the length of a character string of type VARCHAR or one of the four TEXT types is
variable. The storage requirement depends on the actual length of the character string.
Although VARCHAR and TINYTEXT, both of which can accept a character string up to a length of
65,535 characters, at first glance seem equivalent, there are, in fact, several features that distinguish
one from the other: The maximum number of characters in VARCHAR columns must be specified (in
the range 0 to 65,535) when the table is declared. Character strings that are too long will be unceremo-
niously, without warning, truncated when they are stored. In contrast, with xxxTEXT columns one
cannot specify a maximal length. (The only limit is the maximal length of the particular text type.)
■Caution When it creates a new table, MySQL frequently changes the column definition into a form that is
more efficient for MySQL (see also Chapter 9). These automatic changes are described in the MySQL documen-
tation as
silent column changes
. They affect both
CHAR
and
VARCHAR
columns:
VARCHAR(n)
with
n
<4 is always changed into
CHAR(n)
.
CHAR(n)
with
n
>3 is changed into
VARCHAR(n)
if there are additional
VARCHAR
,
TEXT
, or
BLOB
columns in the
table. If the table contains only columns with constant length, then
CHAR(n)
remains unchanged.
CHAPTER 8 ■DATABASE DESIGN 147
5351c08_final.qxd 8/26/05 10:03 PM Page 147
www.it-ebooks.info
New Aspects of VARCHAR: In MySQL 5.0 there are two significant innovations for the data type
VARCHAR. (In the tested version 5.0.3, the new VARCHAR implementation was available only
for MyISAM tables, and not for InnoDB tables.)
• The maximal column size for MyISAM tables is now 65,535 bytes (it was previously
255 bytes). The maximum number of characters depends on the character set, since
many character sets require more than 1 byte per character.
• Spaces at the beginning and end of VARCHAR values are now stored in the table. Thus
INSERT INTO table (varcharcolumn) VALUES (‘ abc ’) actually stores ‘ abc ’ in the col-
umn, that is, a space, the characters a, b, and c, and finally another space character.
(Previously, MySQL deleted spaces at the end of VARCHAR values, which was in viola-
tion of the ANSI standard.)
Binary Attribute: Columns of type CHAR and VARCHAR can optionally be given the attribute
BINARY. They then behave essentially like BLOB columns (see below). The attribute BINARY
can also be useful when you store text: What you achieve is that in sorting, it is exclusively the
binary code of the characters that is considered (and not a particular sorting table). Thus case
distinction is made, which otherwise would not be the case. This makes the internal manage-
ment of binary character strings simpler and therefore faster than is the case with garden-variety
character strings.
Character Set Fundamentals
With all text columns you can use the additional attributes CHARACTER SET charactersetname
COLLATE sortorder to specify the desired character set and sort order. Character sets determine
what code is used to represent the various characters. Most character sets agree on the 128 English
ASCII characters (e.g., code 65 for the letter A). More problematic is the representation of interna-
tional characters.
Latin Character Sets: In the past, each linguistic region developed various one-byte character sets,
of which the Latin character sets have achieved the most widespread use: Latin1, alias ISO-8859-1,
contains all characters usual in Western Europe (äöüßáàå etc.). Latin2, alias ISO-8859-2, contains
characters from Central and East European languages. Latin0, alias Latin9, alias ISO-8859-15, is
the same as Latin 1, but with the euro symbol included.
The problem with these character sets is obvious: None of these character sets contains all the
characters of all the European languages, so there is no Latin character set for all of Europe.
Unicode Variants: To solve this problem, the 2-byte Unicode character set was developed.
With 65,535 possible characters, it covers not only all of Europe, but most of the Asian languages
as well.
However, Unicode determines only which code is associated with which character, not how the
codes are internally stored. For this there are several variants, of which UCS-2 (universal char-
acter set) and UTF-8 (Unicode transfer format) are the most important.
• UCS-2, alias UTF-16, represents what is apparently the simplest solution, to represent
each character by 2 bytes (thus 16 bits). This format is called UTF-16 or UCS-2. Almost
all operating system functions of Microsoft Windows use this representation.
However, this representation has two drawbacks: First, the storage requirement for char-
acters is automatically doubled, even in those cases in which only European or even only
the English ASCII characters are to be stored. Second, the byte code 0 appears in many
places in Unicode character strings. Thus in texts with English ASCII characters, every
second byte is zero. Many C programs, email servers, and the like assume that a zero byte
signals the end of a character string.
CHAPTER 8 ■DATABASE DESIGN148
5351c08_final.qxd 8/26/05 10:03 PM Page 148
www.it-ebooks.info

• UFT-8 is the most popular alternative to UTF-16. In this case, all the ASCII characters
(7 bit) are represented as before by a single byte whose first bit is 0. All other Unicode
characters are represented by strings of 2 to 4 bytes.
The clear disadvantage of this format is that there is no obvious relationship between the
number of bytes and the number of characters in a document. Because of its greater
compatibility to existing programs and a number of other advantages, UTF-8 has estab-
lished itself as the standard under Unix/Linux and most other components important
for Web development. When Unicode is mentioned in this book, it will always mean
the UTF-8 format.
Despite the clear advantages of Unicode, in any of its formats, there are two reasons not to
jump on the bandwagon immediately: First, the Unicode character set is incompatible with
the well-known 1-byte character sets. Second, Unicode support for components used in Web
development are anything but perfect. (The weakest link in the chain is PHP, and the situation
will likely not improve before version 5.2.)
MySQL Character Set Support
Through version 4.0 of MySQL, the character set and sort order for all text fields were specified by
the MySQL server. The Latin1 character set was the default, together with the Swedish sort order.
Another character set and sort order could be specified in the MySQL configuration file, but this
setting then held for all databases. Furthermore, any change required restarting the database server
and re-creation of all indexes. Unicode was not supported at all.
Beginning with MySQL 4.1, the situation has greatly improved: Now the character set and sort
order can be specified individually for every column. At the same time, the selection of character
sets and sort orders is larger than ever, including Unicode UTF-8 and UCS-2.
A long list of all the character sets as well as the associated possible sort orders can be displayed
with the SQL command SHOW COLLATION, and the result is displayed here in abbreviated form.
(Note that character sets and sort orders cannot be randomly mixed. Each character set offers a par-
ticular selection of sort orders. The default sort order for each character set is indicated by Yes in the
column Default.)
SHOW COLLATION
Collation Charset Id Default Compiled Sortlen
ascii_bin ascii 65 0
ascii_general_ci ascii 11 Yes 0
binary binary 63 Yes Yes 1
latin1_bin latin1 47 Yes 1
latin1_danish_ci latin1 15 0
latin1_general_ci latin1 48 0
latin1_general_cs latin1 49 0
latin1_german1_ci latin1 5 0
latin1_german2_ci latin1 31 Yes 2
latin1_spanish_ci latin1 94 0
latin1_swedish_ci latin1 8 Yes Yes 1
latin2_bin latin2 77 0
latin2_croatian_ci latin2 27 0
latin2_general_ci latin2 9 Yes 0
latin2_hungarian_ci latin2 21 0
latin5_bin latin5 78 0
latin5_turkish_ci latin5 30 Yes 0
latin7_bin latin7 79 0
latin7_estonian_cs latin7 20 0
latin7_general_ci latin7 41 Yes 0
CHAPTER 8 ■DATABASE DESIGN 149
5351c08_final.qxd 8/26/05 10:03 PM Page 149
www.it-ebooks.info

latin7_general_cs latin7 42 0
utf8_bin utf8 83 Yes 1
utf8_czech_ci utf8 202 Yes 8
utf8_danish_ci utf8 203 Yes 8
utf8_estonian_ci utf8 198 Yes 8
utf8_general_ci utf8 33 Yes Yes 1
utf8_icelandic_ci utf8 193 Yes 8
utf8_latvian_ci utf8 194 Yes 8
utf8_lithuanian_ci utf8 204 Yes 8
utf8_persian_ci utf8 208 Yes 8
utf8_polish_ci utf8 197 Yes 8
utf8_roman_ci utf8 207 Yes 8
utf8_romanian_ci utf8 195 Yes 8
utf8_slovak_ci utf8 205 Yes 8
utf8_slovenian_ci utf8 196 Yes 8
utf8_spanish2_ci utf8 206 Yes 8
utf8_spanish_ci utf8 199 Yes 8
utf8_swedish_ci utf8 200 Yes 8
utf8_turkish_ci utf8 201 Yes 8
utf8_unicode_ci utf8 192 Yes 8
...
Table 8-8 gives additional information about the most important combinations of character set
and sort order.
Table 8-8. The Most Important Character Sets and Sort Orders
Character Set Sort Order Meaning
latin1 latin1_swedish_ci Swedish sort order, valid in MySQL by default for
latin1 columns; ci stands for case-insensitive.
latin1 latin1_general_ci General sort order, suitable for many Western
European languages without taking country-specific
issues into account.
latin1 latin1_general_cs As above, but case-sensitive: uppercase letters are
sorted before lowercase letters.
latin1 latin1_german1_ci German sort order according to the DIN-1 standard
(ä=a, ö=o, ü=u, ß=s).
latin1 latin1_german2_ci German sort order according to the DIN-2 standard
(telephone directory rules, thus ä = ae, ö = oe, ü = ue,
ß = ss).
utf8 utf8_general_ci General sort order, suitable for many Western Euro-
pean languages without taking country-specific issues
into account; is the default in MySQL for utf8 columns.
If you do not specify a character set and sort order for a column, then the default character set
for the table, the database, or the MySQL server is used, depending on the level at which the default
settings are defined.
Which character set is optimal for your database depends, of course, on the application. If there
will be no need to use characters outside of the Western European languages, then you can stick with
latin1. This character set generally poses no problems for further data processing.
CHAPTER 8 ■DATABASE DESIGN150
5351c08_final.qxd 8/26/05 10:03 PM Page 150
www.it-ebooks.info

■Tip There is much more in this book on the subject of character sets and sort orders. See the topics SQL syntax,
SQL commands, MySQL variables, and MySQL configuration. Furthermore, all the chapters on programming discuss
issues surrounding the processing of Unicode character strings. Look in the index under
Unicode
.
Binary Data (xxxBLOB and BIT)
For the storage of binary data there are four BLOB data types at your service, all of which display
almost the same properties as the TEXT data types. (Recall that “BLOB” is an acronym for “binary
large object.”) The only difference is that text data are usually compared and sorted in text mode
(case-insensitive), while binary data are sorted and compared according to their binary codes.
There is considerable disagreement as to whether large binary objects should even be stored
in a database. The alternative would be to store the data (images, for example) in external files and
provide links to these files in the database.
The advantage to using BLOBs is the resulting integration into the database (more security,
simpler backups, unified access to all data). The drawback is the usually significant slowdown. It is
particularly disadvantageous that large and small data elements—strings, integers, etc.—on the one
hand and BLOBs and long texts on the other must be stored all mixed together in a table file. The
result is a slowdown in access to all of the data records.
Note as well that BLOBs in general can be read only as a whole. That is, it is impossible to read,
say, the last 100 kilobytes of an 800-kilobyte BLOB. The entire BLOB must be transmitted.
Table 8-9 summarizes the data types for binary data.
Table 8-9. Data Types for Binary Data
MySQL Keyword Meaning
BIT(n) Bit data, where nis the number of bits (up to 64)
TINYBLOB Binary data with variable length, maximum 255 bytes
BLOB Binary data with variable length, maximum 216-1 bytes
MEDIUMBLOB Binary data with variable length, maximum 224-1 bytes
LONGBLOB Binary data with variable length, maximum 232-1 bytes
BIT Data
New since MySQL 5.0.3 is the possibility of defining columns of width up to 64 bits. To be sure, the
data type BIT existed previously, but in earlier versions of MySQL, BIT was a synonym for TINYINT(1).
There is a new syntax b’0101’ for writing bit values. SELECT queries return binary values for
BIT columns. However, the tested client programs were incapable of displaying these values cor-
rectly. If necessary, use SELECT bitcolumn+0 to convert binary values to integers, and use SELECT
BIN(bitcolumn+0) to display these integers in binary notation.
If you insert numbers into BIT columns causing underflow or overflow, all the bits will be set
to 1. If, for example, you were to insert the numbers -1, 0, 1, 7, 8 into a BIT(3) column, the following
binary values will be stored: b’111’, b’000’, b’001’, b’111’, b’111’.
Other Data Types
The two data types ENUM and SET are a peculiarity of MySQL. They enable a particularly efficient
management of character set enumerations and combinations for the MySQL server.
CHAPTER 8 ■DATABASE DESIGN 151
5351c08_final.qxd 8/26/05 10:03 PM Page 151
www.it-ebooks.info

With ENUM you can manage a list of up to 65,535 character strings assigned consecutive num-
bers. Then one of these strings can be selected in a field.
SET follows a similar idea, but here arbitrary combinations are possible. Internally, the strings
are associated with powers of 2 (1, 2, 4, 8, etc.), so that a bitwise combination is possible. Accord-
ingly, the memory requirement is greater than with ENUMs (1 bit per string). At most 64 strings
can be thus combined. (The memory requirement is then 8 bytes.)
These data types have some drawbacks, however. First, managing them with PHP is relatively
complex (for example, if you wish to determine the strings available in an ENUM field). Second,
most other database systems know nothing about ENUM and SET, which could complicate a future
transition to another database system. Therefore, it is often better to use additional linked tables in
place of ENUMs and SETs.
Table 8-10 summarizes the additional data types.
Table 8-10. Additional Data Types
MySQL Keyword Meaning
ENUM Enumeration of up to 65,535 strings (1 or 2 bytes; see Chapter 10)
SET Combination of up to 255 strings (1 to 8 bytes; see Chapter 10)
GEOMETRY, POINT, etc. Geometric object (since MySQL 4.1; see Chapter 12)
Options and Attributes
A variety of options and additional attributes can be specified when a column is created. Table 8-11
lists the most important options. Note that many attributes are suitable only for particular data types.
Table 8-11. Important Column Attributes and Options
MySQL Keyword Meaning
NULL The column may contain NULL values. (This setting holds by default.)
NOT NULL The value NULL is not permitted.
DEFAULT xxx The default value xxx will be used if no other value is specified on input.
DEFAULT For TIMESTAMP columns, the current time is stored when new records
CURRENT_TIMESTAMP are input.
ON UPDATE For TIMESTAMP columns, the current time is stored when changes are
CURRENT_TIMESTAMP made (UPDATE).
PRIMARY KEY Defines the column as a primary key.
AUTO_INCREMENT A sequential number is automatically input. AUTO_INCREMENT can
be used only for a column with integer values. Moreover, the options
NOT NULL and PRIMARY KEY must be given. (Instead of PRIMARY KEY,
the column can be given a UNIQUE index.)
UNSIGNED Integers are stored without a sign. Warning: calculations are then also
made without a sign.
CHARACTER SET name For strings, specifies the character set and optionally the desired sort
[COLLATE sort] order.
Unfortunately, MySQL does not allow a function to be given as default value. It is also impossi-
ble, for example, to specify DEFAULT RAND() if you wish to have a random number automatically
stored in a column. It is also impossible to define validation rules for columns (so that, for example,
CHAPTER 8 ■DATABASE DESIGN152
5351c08_final.qxd 8/26/05 10:03 PM Page 152
www.it-ebooks.info
Tips and Tricks on Database Design
Rules for Good Database Design
• Tables should not contain redundant (repetitive) data. (If you are repeatedly entering the
same numbers or strings in a table, something is wrong.)
• Tables should not have columns like order1, order2, order3. Even if you allow for 10 such
columns, the day will come when a customer orders 11 articles.
• The storage requirements for all your tables should be as small as possible.
• Frequently required database queries should be able to be executed simply and efficiently.
(One usually notices a violation of this rule only when the database contains not a couple
of test records, but thousands or even millions. At that point, a change in the design may
no longer be possible.)
These rules have the same import as the normalization rules presented in the next section, but
these here are often easier to follow.
Tips for Naming
• MySQL is case-sensitive in regard to database and table names, but not so with column
names. It is thus important, at least with your databases and tables, to arrive at a uniform
system for using upper- and lowercase letters. (In the example databases in this book, only
lowercase letters are generally used for naming databases and tables.)
• Names of databases, tables, and columns can be at most 64 characters long.
• Avoid special characters (e.g., üàû) in names. MySQL allows all alphanumeric characters, but
different operating systems and Linux distributions use different default character sets, and
changing a system could lead to problems.
• Choose clear field and table names. Take care in naming fields that they describe the content
accurately. Thus authName is better than name.
• A uniform naming system for fields can save many careless errors. Whether you prefer
author_name or authName is irrelevant, as long as you are consistent.
• Similarly, you should consider how you want to deal with singular and plural. In my tables,
I have tried to use plural exclusively. There is no rule as to what is correct, but it is confusing
if half your tables use singular, the other half plural.
Tips on the Design Process
It is no easy matter to distribute a collection of data efficiently and intelligently among several tables.
Novices in the area of database design should take the following suggestions to heart:
• Begin with a relatively small number of test data, and attempt to enter them in one or more
tables. (The scope of the test data should not, however, be so small that obvious design prob-
lems go undetected. But it should not be so large that the time taken up in design is too great.)
• Perform your first experiments not with real MySQL tables, but instead, with some work-
sheets in a table calculation program such as Excel or OpenOffice Calc. (Figure 8-1 gives
a preview of the next section.) This allows you to work in a far less complex environment.
At this point, you should be focusing on the distribution of data among the tables and their
columns, not on database-specific details such as column format and indexes.
CHAPTER 8 ■DATABASE DESIGN 153
5351c08_final.qxd 8/26/05 10:03 PM Page 153
www.it-ebooks.info
Normalization Rules
Why is it that authors of books think about nothing (well, almost nothing) but books? The author
begs the indulgence of his readers in that the example in this section deals with books. The goal of
the section is to create a small database in which data about books can be stored: book title, pub-
lisher, author(s), publication date, and so on. These data can of course, be stored without a database,
in a simple list in text format, for example, as appears in the Bibliography at the end of this book:
Michael Kofler: Linux, 7th edition. Addison-Wesley 2004.
Michael Kofler, David Kramer: Definitive Guide to Excel VBA, Second Edition. Apress 2003.
Robert Orfali, Dan Harkey, Jeri Edwards: Client/Server Survival Guide. Addison-Wesley 1997.
Tobias Ratschiller, Till Gerken: Web Application Development with PHP 4.0. New Riders 2000.
This is a nice and convenient list, containing all necessary information. Why bother with all
the effort to transform this text (which perhaps exists as a document composed with some word-
processing program) into a database?
Needless to say, the reasons are legion. Our list can be easily searched, but it is impossible to
organize it in a different way, for example, to create a list of all books by author xor to create a new
list ordered not by author, but by title.
The resulting database mylibrary will be improved step by step in the course of this chapter.
The finished database is available for download at the Apress website. In addition, the mylibrary
database is the basis for countless examples in this book.
CHAPTER 8 ■DATABASE DESIGN154
Figure 8-1. Database design with a table calculation program
5351c08_final.qxd 8/26/05 10:03 PM Page 154
www.it-ebooks.info

A First Attempt
Just think: Nothing is easier than to turn our list into a database table. (To save space we are going
to abbreviate the book titles and names of authors.)
Table 8-12 immediately shows itself to be riddled with problems. A first glance reveals that lim-
iting the number of authors to three was an arbitrary decision. What do you do with a book that has
four or five authors? Do we just keep adding columns, up to authorN, painfully aware that those
columns will be empty for most entries?
CHAPTER 8 ■DATABASE DESIGN 155
Table 8-12. Library Database: First Attempt
title publName year authName1 authName2 authName3
Linux Addison-Wesley 2004 Kofler M
Definitive Guide … Apress 2003 Kofler M Kramer D
Client/Server … Addison-Wesley 1997 Orfali R Harkey D Edwards E.
Web Application … New Riders 2000 Ratschiller T Gerken T
The First Normal Form
Database theorists have found, I am happy to report, a solution to such problems. Simply apply to
your database, one after the other, the rules for the three normal forms. The rules for the first normal
form are as follows (though for the benefit of the reader, they have been translated from the language
of database theorists into what we might frivolously call “linguistic normal form,” or, more simply,
plain English):
• Columns with similar content must be eliminated.
• A table must be created for each group of associated data.
• Each data record must be identifiable by means of a primary key.
In our example, the first rule is clearly applicable to the authorN columns.
The second rule seems not to be applicable here, since in our example we are dealing exclusively
with data that pertain specifically to the books in the database. Thus a single table would seem to suf-
fice. (We will see, however, that this is not, in fact, the case.)
The third rule signifies in practice that a running index must be used that uniquely identifies
each row of the table. (It is not strictly necessary that an integer be used as primary key. Formally,
only the uniqueness is required. For reasons of efficiency the primary key should be as small as
possible, and thus an integer is generally more suitable than a character string of variable length.)
A reconfiguration of our table after application of the first and third rules might look like that
depicted in Table 8-13.
Table 8-13. Library Database: First Normal Form
titleID title publName year authName
1 Linux Addison-Wesley 2004 Kofler M.
2 Definitive Guide … Apress 2003 Kofler M.
3 Definitive Guide … Apress 2003 Kramer D.
4 Client/Server … Addison-Wesley 1997 Orfali R.
5 Client/Server … Addison-Wesley 1997 Harkey D.
6 Client/Server … Addison-Wesley 1997 Edwards E.
7 Web Application … New Riders 2000 Ratschiller T.
2000 Gerken T.
5351c08_final.qxd 8/26/05 10:03 PM Page 155
www.it-ebooks.info

Clearly, the problem of multiple columns for multiple authors has been eliminated. Regardless
of the number of authors, they can all be stored in our table. Of course, there is no free luncheon, and
the price of a meal here is rather high: The contents of the columns title, publName, and year are
repeated for each author. There must be a better way!
Second Normal Form
Here are the rules for the second normal form:
• Whenever the contents of columns repeat themselves, this means that the table must be
divided into several subtables.
• These tables must be linked by foreign keys.
If you are new to the lingo of the database world, then the term foreign key probably seems a bit,
well, foreign. A better word in everyday English would probably be cross reference, since a foreign key
refers to a line in a different (hence foreign) table. For programmers, the word pointer would perhaps
be more to the point, while in Internet jargon the term link would be appropriate.
In Table 8-13, we see that data are repeated in practically every column. The culprit of this
redundancy is clearly the author column. Our first attempt to give the authors their very own table
can be seen in Tables 8-14 and 8-15.
Table 8-14. titles Table: Second Normal Form
titleID title publName year
1 Linux Addison-Wesley 2004
2 Definitive Guide Apress 2003
3 Client/Server Addison-Wesley 1997
4 Web Application New Riders 2000
Table 8-15. authors Table: Second Normal Form
authID titleID authName
1 1 Kofler M.
2 2 Kofler M.
3 2 Kramer D.
4 3 Orfali R.
5 3 Harkey D.
6 3 Edwards E.
7 4 Ratschiller T.
8 4 Gerken T.
In the authors table, the first column, with its running authID values, provides the primary key.
The second column takes over the task of the foreign key. It points, or refers, to rows of the titles table.
For example, row 7 of the authors table indicates that Ratschiller, T. is an author of the book with ID
titleID=4, that is, the book Web Application ….
CHAPTER 8 ■DATABASE DESIGN156
5351c08_final.qxd 8/26/05 10:03 PM Page 156
www.it-ebooks.info

Second Normal Form, Second Attempt
Our result could hardly be called optimal. In the authors table, the name Kofler, M. appears twice.
As the number of books in this database increases, the amount of such redundancy will increase as
well, whenever an author has worked on more than one book.
The only solution is to split the authors table again and live without the titleID column. The
information as to which book belongs to which author must be specified in yet a third table. These
three tables are shown in Tables 8-16 through 8-18.
Table 8-16. titles Table: Second Normal Form
titleID title publName year
1 Linux Addison-Wesley 2004
2 Definitive Guide Apress 2003
3 Client/Server Addison-Wesley 1997
4 Web Application New Riders 2000
Table 8-17. authors Table: Second Normal Form
authID authName
1 Kofler M.
2 Kramer D.
3 Orfali R.
4 Harkey D.
5 Edwards E.
6 Ratschiller T.
7 Gerken T.
Table 8-18. rel_title_author Table: Second Normal Form
titleID authID
11
21
22
33
34
35
46
47
This is certainly the most difficult and abstract step, probably because a table of the form
rel_title_author has no real-world content. Such a table would be completely unsuited for unauto-
mated management. But once a computer has been provided with a suitable program, such as
MySQL, it has no trouble at all processing such data. Suppose you would like to obtain a list of all
authors of the book Client/Server …. MySQL would first look in the titles table to find out what titleID
number is associated with this book. Then it would search in the rel_title_author table for data records
.
CHAPTER 8 ■DATABASE DESIGN 157
5351c08_final.qxd 8/26/05 10:03 PM Page 157
www.it-ebooks.info

■Note It may have occurred to you to ask why in the
rel_title_author
table there is no
ID
column, say,
rel_title_author_ID
. Usually, such a column is omitted, since the combination of
titleID
and
authID
is already an
optimal primary key. (Relational database systems permit such primary keys, those made up of several columns.)
Third Normal Form
The third normal form has a single rule, and here it is:
• Columns that are not directly related to the primary key must be eliminated (that is, trans-
planted into a table of their own).
In the example under consideration, the column publisher appears in the titles table. The set
of publishers and the set of book titles are independent of one another and therefore should be
separated. Of course, it should be noted that each title must be related to the information as to the
publisher of that title, but it is not necessary that the entire name of the publisher be given. A for-
eign key (that is, a reference, a pointer, a link) suffices. See Tables 8-19 and 8-20.
Table 8-19. titles Table: Third Normal Form
titleID title publID year
1 Linux 1 2001
2 Definitive Guide 2 2003
3 Client/Server 1 1997
4 Web Application 3 2000
Table 8-20. publishers Table: Third Normal Form
publID publName
1 Addison-Wesley
2 Apress
3 New Riders
The authors and rel_title_author tables remain the same in the third normal form. The com-
pleted book database now consists of four tables.
If we had paid closer attention to the rules for the first normal form (associated data belong
together in a table), we could, of course, have saved some of our intermediate attempts. But that
would have diminished the pedagogical value of our example. In fact, in practice, it often occurs
that only when test data are inserted and redundancies are noticed does it become clear how the
tables need to be subdivided.
■Tip The
mylibrary
database is somewhat more complex than the previous sections would indicate.The
titles
table
contains some additional fields, for example, for storing a subtitle or a comment. An additional
languages
table con-
tains a list of all languages in which the books are written. The
langID
field of the
titles
table contains the language for
each title. Finally, the
categories
table contains a hierarchical list of all book categories (e.g.,
Computer books
). The
catID
field of the
titles
table supplies the category for each title.
The structure of the
categories
table is handled in the next section. A summary of all the database properties
can be found at the end of the chapter.
CHAPTER 8 ■DATABASE DESIGN158
5351c08_final.qxd 8/26/05 10:03 PM Page 158
www.it-ebooks.info

Normalization Theory
More Theory …
The three normal forms for relational databases were first formulated by the researcher E. F. Codd.
They continue to form the basis for a branch of research that is concerned with the formal descrip-
tion of mathematical sets in general and of relational databases in particular.
Depending on what you read, you may come across three additional normal forms, which,
however, are of much less significance in practice. The normal forms and their rules are described
much more precisely than we have done. However, such descriptions are so teeming with such
exotica as entities, attributes, and their ilk that the connection with relational databases can easily
be lost.
If you are interested in further details on this topic, then you are encouraged to look into a good
book on the subject of database design (see also the suggestions at the beginning of this chapter).
Less Theory …
I have attempted to present the first three normal forms in as simple and example-oriented a way as
possible, but perhaps even that was too theoretical. Actually, the normal forms are not necessarily
helpful to database beginners, since the correct interpretation of the rules is often difficult. Here are
some rules that will perhaps make those first steps less shaky:
• Give yourself sufficient time to develop the database. (If at a later date you have to alter the
database design, when the database is already stuffed with real data and there is already client
code in existence, changes will take a great deal of time and effort.)
• Avoid giving columns names with numbers, such as name1, name2, or object1, object2. There
is almost certainly a better solution involving an additional table.
• Immediately supply your database with some test data. Attempt to include as many special
cases as possible. If you encounter redundancies, that is, columns in which the same content
appears several times, this is usually a hint that you should break your table into two (or more)
new tables.
• Try to understand the ideas of relations (more on this later in the chapter).
• A good database design cannot be obtained unless you have had some experience with SQL
(see also the following two chapters). Only when you know and understand the range of
SQL queries can you judge the consequences of the various ways of organizing your data.
• Orient yourself using an example database (from this book or from another book on databases).
■Tip A good example of normalizing a database can be found at http://www.phpbuilder.com/columns/
barry20000731.php3.
Normal Forms: Pro and Con
Normal forms are a means to an end, nothing more and nothing less. Normal forms should be a
help in the design of databases, but they cannot replace human reasoning. Furthermore, it is not
always a good idea to follow the normal form thoughtlessly, that is, to eliminate every redundancy.
Con: The input of new data, say, in a form on a web page, becomes more and more complex as
the number of tables among which the data are distributed increases. This is true as much for the
end user (who is led from one page to another) as for the programmer.
CHAPTER 8 ■DATABASE DESIGN 159
5351c08_final.qxd 8/26/05 10:03 PM Page 159
www.it-ebooks.info

Furthermore, for efficiency in queries, it is sometimes advantageous to allow for a bit of redun-
dancy. Bringing together data from several tables is usually slower than reading data from a single
table. This is true especially for databases that do not change much but that are frequently given com-
plex queries to respond to. (In a special area of databases, the data warehouses, redundancy is often
deliberately planned for in order to obtain better response times. The purpose of data warehouses is
the analysis of complex data according to various criteria. However, MySQL is not a reasonable choice
of database system for such tasks anyhow, and therefore, we shall not go more deeply into the particu-
lar features of this special application area.)
Pro: Redundancy is generally a waste of storage space. You may hold the opinion that in the era
of 400-gigabyte hard drives this is not an issue, but a large database will inevitably become a slow
database (at the latest, when the database size exceeds the amount of RAM).
As a rule, databases in normal form offer more flexible query options. (Unfortunately, one usually
notices this only when a new form of data query or grouping is required, which often occurs months
after the database has become operational.)
Managing Hierarchies
In the mylibrary database, the table categories helps to order the books into various categories (text-
books, children’s books, etc.). What is important here is that the categories can be ordered hierarchically.
From the point of view of database design, this is simple: The field parentID simply refers, for each
category, to the parent category. (For the root category All books, parentID contains the value NULL.
This special case must always be taken into account in management and evaluation of the categories
table.) Table 8-21 shows the hierarchy, and Table 8-22 shows how this hierarchy can be represented in
a database table.
Table 8-21. Example Data for the categories Table
All books
—Children’s books
—Computer books
—Databases
—Object-oriented databases
—Relational databases
—SQL
—Programming
—Perl
—PHP
—Literature and fiction
Table 8-22. Database Representation of the Hierarchy of Table 8-20
catID CatName parentCatID
1 Computer books 11
2 Databases 1
3 Programming 1
4 Relational databases 2
5 Object-oriented databases 2
CHAPTER 8 ■DATABASE DESIGN160
5351c08_final.qxd 8/26/05 10:03 PM Page 160
www.it-ebooks.info

catID CatName parentCatID
6PHP 3
7 Perl 3
8 SQL 2
9 Children’s books 11
10 Literature and fiction 11
11 All books NULL
Hierarchy Problems
Although the representation of such hierarchies looks simple and elegant at first glance, they cause
many problems as well. For example, it is impossible with simple SELECT queries to determine all
subcategories or supercategories. Therefore, generally a number of queries have to be executed in
the client program to construct the hierarchy. The necessary programming techniques are described
in Chapter 15 for the programming language PHP. You can also use stored procedures for evaluating
hierarchies (see Chapter 13).
■Tip In point of fact, this chapter is supposed to be dealing with database design and not with SQL, but these
two topics cannot be cleanly separated. There is no point in creating a super database design if the capabilities
of SQL do not suffice to extract the desired data from the database’s tables.
If you have no experience with SQL, you should dip into the following chapter a bit. Consider the following
instructions as a sort of “advanced database design.”
Almost all problems with hierarchies have to do with the fact that SQL does not permit recur-
sive queries:
• With individual queries it is impossible to find all categories lying above a given category in
the hierarchy.
Example: The root category is called Relational databases (parentCatID=2). You would like to
create a list that contains Computer books ➤Databases ➤Relational databases.
With SELECT * FROM categories WHERE catID=2, you indeed find Databases, but not Com-
puter books, which lies two places up the hierarchy. For that, you must execute an additional
query SELECT * FROM categories WHERE catID=1. Of course, this can be accomplished in a
loop in the programming language of your choice (Perl, PHP, etc.), but not with a single SQL
instruction.
• It is just as difficult to represent the entire table in hierarchical form (as a tree). Again, you
must execute a number of queries.
• It is not possible without extra effort to search for all books in a higher category.
Example: You would like to find all books in the category Computer books.
With SELECT * FROM titles WHERE catID=1 you find only those titles directly linked to the
category Computer books, but not the titles in the categories Databases, Relational databases,
Object-oriented databases, etc. The query must be the following: SELECT * FROM titles
WHERE catID IN (1, 2 …), where 1, 2 … are the ID numbers of the subordinate categories.
The actual problem is to determine these numbers.
CHAPTER 8 ■DATABASE DESIGN 161
5351c08_final.qxd 8/26/05 10:03 PM Page 161
www.it-ebooks.info

• In the relatively simple representation that we have chosen, it is not possible to associate
the same subcategory with two or more higher-ranking categories.
Example: The programming language SQL is linked in the above hierarchy to the higher-
ranking category Databases. It would be just as logical to have a link to Programming.
Therefore, it would be optimal to have SQL appear as a subcategory of both Databases
and Programming.
• There is the danger of circular references. Such references can, of course, appear only as
a result of input error, but where there are human beings who input data (or who write
programs), there are certain to be errors. If a circular reference is created, most database
programs will find themselves in an infinite loop. The resolution of such problems can be
difficult.
None of these problems is insuperable. However, hierarchies often lead to situations in which
answering a relatively simple question involves executing a whole series of SQL queries, and that is
a slow process. Many problems can be avoided by doing without genuine hierarchies (for example,
by allowing at most a two-stage hierarchy) or if supplementary information for a simpler resolution
of hierarchies is provided in additional columns or tables (see the following section).
Building the Hierarchy Tree
If you have taken to heart the section on normalization of databases, then you know that redun-
dancy is bad. It leads to unnecessary usage of storage space, management issues when changes
are made, etc.
Yet there are cases in which redundancy is quite consciously sought in order to increase the
efficiency of an application.
The following lines should make clear that database design is a multifaceted subject. There are
usually several ways that lead to the same goal, and each of these paths is, in fact, a compromise of
one sort or another. Which compromise is best depends largely on the uses to which the database
will be put: What types of queries will occur most frequently? Will data be frequently changed?
The necessity will continually arise to display the categories table in hierarchical representation
similar to that of Table 8-21. As we have already mentioned, such processing of the data is con-
nected either with countless SQL queries or complex client-side code.
A possible solution is provided by the two additional columns hierNr and hierIndent. The first
of these gives the row number in which the record would be located in a hierarchical representa-
tion. (The assumption is that data records are sorted alphabetically by catName within a level of the
hierarchy.) The second of these two columns determines the level of indentation. In Table 8-23 are
displayed for both of these columns the values corresponding to the representation in Table 8-21.
Table 8-23. categories Table with the hierNr Column
catID CatName parentCatID HierNr hierIndent
1 Computer books 11 2 1
2 Databases 1 3 2
3 Programming 1 7 2
4 Relational databases 2 5 3
5 Object-oriented databases 2 4 3
6 PHP 3 9 3
7 Perl 3 8 3
8 SQL 2 6 3
CHAPTER 8 ■DATABASE DESIGN162
5351c08_final.qxd 8/26/05 10:03 PM Page 162
www.it-ebooks.info

catID CatName parentCatID HierNr hierIndent
9 Children’s books 11 1 1
10 Literature and fiction 11 10 1
11 All books NULL 0 0
A simple query in mysql proves that this arrangement makes sense. Here are a few remarks on
the SQL functions used: CONCAT joins two character strings. SPACE generates the specified number
of blank characters. AS gives the entire expression the new Alias name category:
SELECT CONCAT(SPACE(hierIndent*2), catName) AS category,
hierNr, hierIndent
FROM categories ORDER BY hierNr
category hierNr hierIndent
All books 0 0
Children's books 1 1
Computer books 2 1
Databases 3 2
Object-oriented databases 4 3
Relational databases 5 3
SQL 6 3
Programming 7 2
Perl 8 3
PHP 9 3
Literature and fiction 10 1
You may now ask how the numerical values hierIndent and hierNr actually come into exis-
tence. The following example-oriented instructions show how a new data record (the computer
book category Operating systems) is inserted into the table:
1. The data of the higher-ranking initial record (that is, Computer books) are known: catID=1,
parentCatID=11, hierNr=1, hierIndent=1.
2a. Now we search within the Computer books group for the first record that lies in the hierar-
chy immediately after the record to be newly inserted (here, this is Programming). All that
is of interest in this record is hierNr.
Here is a brief explanation of the SQL command:
WHERE parentCat_ID=1 finds all records that are immediately below Computer books in the
hierarchy (that is, Databases and Programming).
catName>‘Operating Systems’ restricts the list to those records that occur after the new
record Operating Systems.
ORDER BY catname sorts the records that are found.
LIMIT 1 reduces the result to the first record.
SELECT hierNr FROM categories
WHERE parentCatID=1 AND catName>'Operating Systems'
ORDER BY catName
LIMIT 1
The query just given returns the result hierNr=7. It is thereby clear that the new data record
should receive this hierarchy number. First, however, all existing records with hierNr>=7
should have their values of hierNr increased by 1.
CHAPTER 8 ■DATABASE DESIGN 163
5351c08_final.qxd 8/26/05 10:03 PM Page 163
www.it-ebooks.info
2b. It can also happen that the query returns no result, namely, when there are no entries in the
higher-ranking category or when all entries come before the new one in alphabetic order.
(This would be the case if you wished to insert the new computer book category Software
engineering.)
In that case, you must search for the next record whose hierNr is larger than hierNr for the
initial record and whose hierIndent is less than or equal to hierIndent of the initial record.
(In this way, the beginning of the next equal- or higher-ranking group in the hierarchy is
sought.)
SELECT hierNr FROM categories
WHERE hierNr>1 AND hierIndent<=1
ORDER BY hierNr LIMIT 1
This query returns the result 10 (that is, hierNr for the record Literature and fiction). The
new record will get this hierarchy number. All existing records with hierNr>=10 must have
their hierNr increased by 1.
2c. If this query also returns no result, then the new record must be inserted at the end of the
hierarchy list. The current largest hierNr value can easily be determined:
SELECT MAX(hiernr) FROM categories
3. To increase the hierNr of the existing records, the following command is executed (for case 2a):
UPDATE categories SET hierNr=hierNr+1 WHERE hiernr>=7
4. Now the new record can be inserted. For parentCatID, the initial record catID will be used.
Above, hierNr=7 was determined. Here hierIndent must be larger by 1 than was the case
with the initial record:
INSERT INTO categories (catName, parentCatID, hierNr, hierIndent)
VALUES ('Operating systems', 1, 7, 2)
The new columns in categories simplify many read operations. But the insert operations are
still complex. It is more complicated to alter the hierarchy after the fact. Imagine that you wish to
change the name of one of the categories in such a way as to change its place in the alphabetical
order. This would affect not only the record itself, but many other records as well. For large sections
of the table it will be necessary to determine hierNr. You see, therefore, that redundancy is bad.
In summary, you will have to decide whether it is more important to optimize read operations
or write operations. For this book I have left categories without the two additional columns hierNr
and hierIndent. First of all, this has pedagogical justification: In Chapters 13 (on stored procedures)
and 15 (PHP) I can demonstrate various programming techniques for processing hierarchical data
with maximum efficiency. Furthermore, I have the impression that the advantages of the simpler
database design would win out in the case of a real application. Even managing the huge book data-
base at amazon.com, a few thousand categories would suffice. One can expect serious problems of
efficiency as a rule only with much larger tables.
Searching for Lower-Ranked Categories in the categories Table
Suppose you want to search for all Databases titles in the titles table. Then it would not suffice to
search for all titles with catId=2, since you also want to see all the titles relating to Relational data-
bases, Object-oriented databases, and SQL (that is, the titles with catID equal to 4, 5, and 8). The
totality of all these categories will be described in the following search category group.
There are two problems to be solved: First, you must determine the list of the catID values for
the search category group. For this a series of SELECT queries is needed, and we shall not go into
CHAPTER 8 ■DATABASE DESIGN164
5351c08_final.qxd 8/26/05 10:03 PM Page 164
www.it-ebooks.info

that further here. Then you must determine from the titles table those records whose catID numbers
agree with the values just found.
Thus in principle, the title search can be carried out, but the path is thorny, with the necessity
of several SQL queries and client-side code.
The other solution consists in introducing a new (redundant) table, in which are stored all
records lying above each of the categories records. This table could be called rel_cat_parent, and it
would consist of two columns: catID and parentID (see Table 8-24). We see, then, for example, that
the category Relational databases (catID=4) lies under the categories All books, Computer books,
and Databases (parentID=11, 1, 2).
Table 8-24. Some Entries in the Table rel_cat_parent
catID parentID
111
21
211
31
311
41
42
411
..
The significant drawback of the rel_cat_parent table is that it must be synchronized with every
change in the categories table. But that is relatively easy to take care of.
In exchange for that effort, now the question of all categories ranked below Databases is easily
answered:
SELECT catID FROM rel_cat_parent
WHERE parentID=2
If you would like to determine all book titles that belong to the category Databases or its sub-
categories, the requisite query looks like the following. The key word DISTINCT is necessary here,
since otherwise, the query would return many titles with multiplicity:
SELECT DISTINCT titles.title FROM titles, rel_cat_parent
WHERE (rel_cat_parent.parentID = 2 OR titles.catID = 2)
AND titles.catID = rel_cat_parent.catID
We are once more caught on the horns of the efficiency versus normalization dilemma: The
entire table rel_cat_parent contains nothing but data that can be determined directly from cate-
gories. In the concrete realization of the mylibrary database, I decided to do without rel_cat_parent.
Searching for Higher-Ranked Categories in the categories Table
Here we confront the converse question to that posed in the last section: What are the higher-rank-
ing categories above an initial, given category? If the initial category is Perl (catID=7), then the
higher-ranking categories are first Programming, then Computer books, and finally, All books.
When there is a table rel_cat_parent like that described above, then our question can be answered
by a simple query:
CHAPTER 8 ■DATABASE DESIGN 165
5351c08_final.qxd 8/26/05 10:03 PM Page 165
www.it-ebooks.info

SELECT CONCAT(SPACE(hierIndent*2), catName) AS category
FROM categories, rel_cat_parent
WHERE rel_cat_parent.catID = 7
AND categories.catID = rel_cat_parent.parentID
ORDER BY hierNr
category
All books
Computer books
Programming
On the other hand, if rel_cat_parent is not available, then a series of SELECT instructions must
be executed in a loop categories.parentCatID until this contains the value NULL.
Relations
If you want to transform a database into normal form, you have to link a number of tables. These
links are called relations in database-speak. At bottom, there are three possible relations between
two tables:
1:1. In a one-to-one relation between two tables, each data record of the first table corresponds
to precisely one data record of the second table and vice versa. Such relations are rare, since in
such a case the information in both tables could as easily be stored in a single table.
1:n.In a one-to-many relation, a single record in the first table can correspond to several records
in the second table (for example, a vendor can be associated with many orders). The converse
may be impossible: A single order cannot, say, be filled by many vendors. Occasionally, one
hears of an n-to-1 relation, but this is merely a 1-to-nrelation from the opposite point of view.
n:m.Here a data record in the first table can be linked to several records in the second table,
and vice versa. (For example, several articles can be included in a single order, while the same
article may be included in several different orders. Another example is books and their authors.
Several authors may have written a single book, while one author may have written several
books.)
1:1 Relations
A one-to-one relation typically comes into being when a table is divided into two tables that use the
same primary key. This situation is most easily grasped with the aid of an example. A table contain-
ing a corporation’s personnel records contains a great deal of information: name, department, date
of birth, date of employment, and so on. This table could be split into two tables, called, say, person-
nel and personnel_extra, where personnel contains the frequently queried and generally accessible
data, while personnel_extra contains additional, less used, and more private data.
There are two possible reasons for such a division. One is the security aspect: It is simple to pro-
tect the table personnel_extra from general access. (For MySQL, this argument is less important, since
access privileges can in any case be set separately for each column of a table. Since MySQL 5.0, the
security problem can also be solved with Views.)
The other reason is that of speed. If a table contains many columns, of which only a few are
required by most queries, it is more efficient to keep the frequently used columns in a single table.
(In the ideal situation, the first table would contain exclusively columns of a given size. Such tables
are more efficient to manage than tables whose columns are of variable size. An overview of the
types of tables supported by MySQL can be found in the first section of this chapter.)
The significant disadvantage of such a separation of tables is the added overhead of ensuring
that the tables remain synchronized.
CHAPTER 8 ■DATABASE DESIGN166
5351c08_final.qxd 8/26/05 10:03 PM Page 166
www.it-ebooks.info

1:nRelations
One-to-many relations come into play whenever a particular field of a data record in a detail table
can refer to various columns of another table (the master table).
The linkage takes place via key fields. The columns of the master table are identified by a pri-
mary key. The detail table contains a foreign key field, whose contents refer to the master table.
Here are a few examples:
The mylibrary database: Here there is a one-to-many relation between the titles and publishers
tables. The table publishers is the master table with the primary key publishers.publID.
Each publisher (1) can publish several books (n).
The mylibrary database contains two additional 1-to-nrelations: between titles and languages
(field langID) and between titles and categories (field catID).
A business application containing tables with orders: A detail table contains data on all
processed orders. In this table, a foreign key field refers to the master table, with its list of all cus-
tomers.
Each customer (1) can execute many orders (n).
Discussion groups containing tables with messages: A detail table contains data on every con-
tribution to a discussion group in place on the website (title, text, date, author, group, etc.). Two
possible master tables are a group table with a list of all discussion groups, and an author table
with a list of all members of the website who are allowed to make contributions to a discussion.
Each author (1) can contribute to arbitrarily many discussions (n). Each discussion group (1)
can contain arbitrarily many contributions (n).
A database containing tables of music CDs: A detail table contains data on every CD in the col-
lection (title, performer, number of disks, etc.). Two possible master tables are a table containing
a list of performers occurring in the database, and a recording label table with a list of recording
companies.
Each performer (1) can appear on arbitrarily many CDs (n). Each label (1) can market arbitrar-
ily many CDs (n).
■Note Often during the creation of a database, one attempts to give the same name to fields of two tables that
will later be linked by a relation. This contributes to clarity, but is not required.
It is also possible for the primary and foreign keys to be located in the same table. Then a data
record in such a table can refer to another record in the same table. This is useful if a hierarchy is to
be represented. Here are a few examples:
The mylibrary database: Each category in the categories table refers via the field parentID to
a subcategory (or to NULL).
A table of personnel: In this table, each employee record (except for that of the top banana)
refers to a field containing that individual’s immediate supervisor.
Discussion groups, a table with messages: In these tables, each message refers to a field con-
taining the next-higher message in the hierarchy (that is, the one to which the current message
is responding).
A music database, containing tables with different types of music: Each style field refers to a
field with the name of the genre of which the current style is a subset (for example, bebop within
the category jazz, or string quartet within the category of chamber music).
CHAPTER 8 ■DATABASE DESIGN 167
5351c08_final.qxd 8/26/05 10:03 PM Page 167
www.it-ebooks.info
n:mRelations
For n:mrelations, it is necessary to add an auxiliary table to the two original tables so that the n:m
relation can be reduced to two 1:nrelations. Here are some examples:
The mylibrary database: Here we have an n:m relation between book titles and authors. The
relation is established by means of the rel_title_author table.
A possible extension of this table could be an additional field that determines the order of
authors (if it is not to be simply in alphabetical order).
Business application, a table with orders: To establish a relation between an order and the
articles included in the order, the auxiliary table specifies how many of article xare included
in order y.
This table could then consist of the columns articleID, orderID, quantity, and perhaps also
price. To be sure, the price is contained in the articles table, but it could change over time, with
the price at the time of purchase different from the current price. In this case, the orders table
would contain the price that was valid at the time of the order.
College administration, list of exams: To keep track of which student has passed which exam
and when and with what grade, it is necessary to have a table that stands between the table of
students and the table of exams.
Primary and Foreign Keys
Relations depend intimately on primary and foreign keys. This section provides a comprehensive
explanation of these two topics and their application. Alas, we cannot entirely avoid a bit of a
detour into referring to various SQL commands which are not formally introduced until the end
of this chapter and the chapter following.
Primary Key
The job of the primary key is to locate, as fast as possible, a particular data record in a table (for
example, to locate the record with id=314159 from a table of a million records). This operation must
be carried out whenever data from several tables are assembled—in short, very often indeed.
With most database systems, including MySQL, it is also permitted to have primary keys that
are formed from several fields of a table. Whether it is a single field or several that serve as primary
key, the following properties should be satisfied:
• The primary key must be unique. It is not permitted that two records have the same content
in their primary key field.
• The primary key should be compact, and there are two reasons for this:
First, for the primary key it is necessary to maintain an index (the primary index) to maxi-
mize the speed of search (e.g., for id=314159). The more compact the primary field key, the
more efficient the management of this index. Therefore, an integer is more suitable than a
character string of variable length for use as a primary key field.
Second, the content of the primary key field is used as a foreign key in other tables, and there,
as well, it is efficient to have the foreign key as compact as possible. (Relations between tables
are established not least to avoid wasted space on account of redundancies. This makes sense
only if the use of key fields doesn’t take up even more space.)
CHAPTER 8 ■DATABASE DESIGN168
5351c08_final.qxd 8/26/05 10:03 PM Page 168
www.it-ebooks.info

With most database systems it has become standard practice to use a 32- or 64-bit integer as
primary key field, generated automatically in sequence (1, 2, 3, …) by the database system. Thus
neither the programmer nor the user need be concerned how a new and unique primary key value
is to be found for each new record.
In MySQL such fields are declared as follows:
CREATE TABLE publishers
(publID INT NOT NULL AUTO_INCREMENT,
othercolumns ...,
PRIMARY KEY (publID))
If we translate from SQL into English, what we have is this: The field publID is not permitted to
contain NULL. Its contents are generated by the database (unless another value is explicitly inserted
there). The field functions as a primary key; that is, MySQL creates an index to enable rapid search.
It is thereby ensured that the publID value is unique when new records are input.
For tables in which one expects to make many new entries or changes, one should usually use
BIGINT (64-bit integer) instead of INT (32 bits).
■Note The name of the primary key field plays no role. In this book we usually use
id
or
tablenameID
. Often, you
will see combinations with
no
or
nr
(for “number”) as, for example, in
customerNr
.
Foreign Keys
The task of the foreign key field is to refer to a record in the detail table. However, this reference
comes into being only when a database query is formulated, for example, in the following form:
SELECT titles.title, publishers.publName FROM titles, publishers
WHERE titles.publID = publishers.publID
ORDER BY title
With this, an alphabetical list of all book titles is generated, in which the second column gives
the publisher of the book. The result would look something like this:
title publName
Client/Server ... Addison-Wesley
Definitive Guide ... Apress
Linux Addison-Wesley
Web Application ... New Riders
Decisive here is the clause WHERE titles.publID = publishers.publID. It is here that the link
between the tables is created. Chapter 9 discusses some other ways of linking two tables with
queries.
In the declaration of a table the foreign key plays no particular role. For MySQL, a foreign key
field is just another ordinary table field. There are no particular key words that must be employed.
In particular, no index is necessary (there is practically never a search to find the contents of the for-
eign key). Of course, you would not be permitted to supply the attribute AUTO_INCREMENT. After
all, you want to specify yourself the record to which the field refers. You need to take care, though,
that the foreign key field is of the same data type as the type of the primary key field. Otherwise, the
evaluation of the WHERE condition can be very slow.
CREATE TABLE titles
(othercolumns ...,
publisherID INT NOT NULL)
CHAPTER 8 ■DATABASE DESIGN 169
5351c08_final.qxd 8/26/05 10:03 PM Page 169
www.it-ebooks.info
Whether you specify the attribute NOT NULL depends on the context. In most cases, NOT NULL
is to be recommended in order to avoid at the outset the occurrence of incomplete data. However, if
you wish to allow, for example, that in the book database a book could be entered that had no pub-
lisher, then you should do without NOT NULL.
Referential Integrity (Foreign Key Constraints)
If you delete the author Kofler from the authors table in the mylibrary database, you will encounter
problems in many SQL queries that access the books Linux and Definitive Guide. The authID number
1 specified in the rel_title_author table no longer exists in the authors table. In database language, one
would put it like this: The referential integrity of the database has been damaged.
As a database developer, it is your responsibility to see that such events cannot happen. There-
fore, before deleting a data record you must always check whether there exists a reference to the
record in question in another table.
Since one cannot always rely on programmers, many databases have rules for maintaining refer-
ential integrity. So-called foreign key constraints (integrity rules) test at every change in the database
whether any cross references between tables are affected. Depending on the declaration of the foreign
key, there are then two possible consequences: Either the operation will simply not be executed (error
message), or all affected records in dependent tables are deleted as well. Which modus operandi is to
be preferred depends on the data themselves.
MySQL also offers such a control mechanism, though at the present only for InnoDB tables. The
following lines show a fragment of SQL code for declaring a foreign key with integrity rules. (SQL com-
mands for creating and editing tables are discussed in Chapter 9.)
CREATE TABLE titles
(column1, column2, ...,
publID INT,
FOREIGN KEY (publID) REFERENCES publishers (publisherID)
This means that titles.publID is a foreign key that refers to the primary key publishers.publID.
With options such as ON DELETE, RESTRICT, and ON DELETE CASCADE, one may further specify
how the database system is to respond to potential damage to its referential integrity.
CREATE TABLE titles
(column1, column2, ...,
publID INT,
FOREIGN KEY (publisherID) REFERENCES publishers (publID)
)
This means that titles.publID is a foreign key that refers to the primary key publishers.publID.
The integrity rule has the following effects on the two tables:
•In titles, you cannot insert a title with a publID number that does not exist in the publishers
table. (Nor can you change the value of publID in titles for an existing title if there is no cor-
responding publishers data record.)
• You cannot delete a publisher from publishers that is referred to by the titles table. (Here as
well the restriction on UPDATE commands is in effect.)
This has consequences for the order of operations: If you wish to store a new title for a new
publisher, you must first enter the publisher and then the title. If you wish to delete a publisher and
a title, you must first delete the title and then the publisher. (The latter operation is possible only if
there are no additional titles from the publisher in question in the titles table.)
CHAPTER 8 ■DATABASE DESIGN170
5351c08_final.qxd 8/26/05 10:03 PM Page 170
www.it-ebooks.info

Syntax
The general syntax for defining a foreign key constraint for a foreign key field table1.column1 looks
as follows:
FOREIGN KEY [name] (column1) REFERENCES table2 (column2)
[ON DELETE {CASCADE | SET NULL | NO ACTION | RESTRICT}]
[ON UPDATE {CASCADE | SET NULL | NO ACTION | RESTRICT}]
The foreign key constraint can be named with name. The foreign key is table1.column1 for
which the constraint is defined. The field of the second table to which the constraint refers is
table2.column2. (In many cases, column2 is the primary key of table2. This is not requisite, but
column2 must be equipped with an index.)
One may also have foreign key constraints in which table1 and table2 are the same table. This
makes sense when a table possesses references to itself. This is the case, for example, with the cate-
gories table in mylibrary, where parentCatID refers to CatID, thus creating a hierarchical
relationship among the categories.
Actions When Integrity Is Damaged
The optional clause ON DELETE determines how the table driver should behave if a record that is
referred to by table1 is deleted from table2. There are four possibilities:
RESTRICT is the default behavior. The DELETE command causes an error, and the record is not
deleted. (An error does not necessarily mean the termination of a running transaction. The com-
mand is simply not executed. The transaction must, as usual, be terminated with a COMMIT or
ROLLBACK.)
SET NULL has the effect that the record from table2 is allowed to be deleted. In table1, all records
that refer to the deleted record will have column1 set to NULL. This rule assumes that NULL is a
permitted value for table1.column1.
For the titles/publisher example, this means that if you remove publisher xfrom publishers, then
all records in titles that were published by this publisher will have their publID set to NULL.
CASCADE has the effect that the record from table2 is allowed to be deleted. At the same time,
however, all records from table1 that refer to that record will be deleted.
For the titles/publishers example, this means that if you delete publisher xfrom the publishers
table, then all records in titles that were published by publisher xwill be deleted from titles.
NO ACTION has the effect that the loss of referential integrity is tolerated. This action seldom
makes sense, since it is easier simply not to use a foreign key constraint.
These four actions can also be specified analogously for ON UPDATE (where by default,
RESTRICT again holds). The UPDATE rules come into effect if in table2, the key field of an existing
record is altered. In such a case, the effect of RESTRICT, SET NULL, and NO ACTION is the same as
with ON DELETE.
On the other hand, the effect of CASCADE is a bit different: A change in the key field in table2
is now also carried out in the foreign key field in table1. For the titles/publishers example, this
means that if you change the publID field for publisher xin publishers, then the publID field will
be updated for all affected records in titles.
■Note Integrity rules do not prevent you from deleting an entire table. For example, you can execute
DROP
TABLE publishers
, even if this means damaging the referential integrity.
CHAPTER 8 ■DATABASE DESIGN 171
5351c08_final.qxd 8/26/05 10:03 PM Page 171
www.it-ebooks.info

Conditions for Setting Up Integrity Rules
Foreign key constraints can be used only if a set of preconditions is satisfied. If such conditions
have not been satisfied, then the result is an error message, generally Error 1005: Can’t create table
xxx (errno: 150), and the constraint is not stored. (The cause of the error can be quite trivial, such
as a typo in the name of a column.)
• Each of table1.column1 and table2.column2 must be equipped with at least an ordinary
index. This index is not created by FOREIGN KEY, and must therefore be explicitly provided
for in CREATE TABLE or after the fact with ALTER TABLE.
table2.column2 is often the primary key field of table2, but that is not necessary.
If you use keys across several fields (INDEX(columnA, columnB)), then the key field from the
foreign key constraint must appear first. Otherwise, an additional separate index for the field
must be created.
• The data types of table1.column1 and table2.column2 must agree to the extent that a direct
comparison is possible without transformation of data types. Most efficient is if both fields
are declared with INT or BIGINT. Both columns must be of the same sign type (SIGNED or
UNSIGNED).
• If the optional rule ON DELETE/UPDATE SET NULL is defined, then the value NULL must
be permitted in table1.column1.
• The foreign key constraint must be satisfied from the start: If the tables are already filled with
data, it can happen that individual records do not conform to the integrity rules. In this case,
an ALTER TABLE command results in error 1216 (A foreign key constraint fails). The records
must be corrected before the constraint can be set up.
■Tip If an error occurs in setting up a foreign key constraint, you can obtain more precise information about the
cause of the error with
SHOW INNODB STATUS
.
Finding Unsatisfied Integrity Rules
The obvious question upon receipt of error 1216 is, “How can the error-ridden records be found?’’
A simple subSELECT command returns all records in the titles table for which titles.publID contains
a value for which there is no corresponding value in publishers.publID:
SELECT titleID, publID FROM titles
WHERE publID NOT IN (SELECT publID FROM publishers)
titleID publID publishers.publID
66 99 NULL
The title with titleID=66 thus refers to a publisher with publID=99 in the publishers table, but
there is no such ID number in that table. Now you must either insert the missing publisher or delete
the title with ID equal to 66. (In the titles table you could also change erroneous publIDs to NULL,
though in practice, that is often not allowed in linked tables.)
CHAPTER 8 ■DATABASE DESIGN172
5351c08_final.qxd 8/26/05 10:03 PM Page 172
www.it-ebooks.info

Deleting Foreign Key Constraints
To delete a foreign key constraint, execute ALTER TABLE:
ALTER TABLE tablename DROP FOREIGN KEY foreign_key_id
You can determine the foreign_key_id of the index to be deleted with SHOW CREATE TABLE. Note
that deleting foreign key constraints can cause problems if you are using replication at the same
time. The reason is that the foreign key index can have a different name in the duplicated database
from that in the original database.
Temporarily Deactivating Integrity Checks
With SET foreign_key_checks=0 you can turn off the automatic checking of integrity rules. This can
make sense, for example, to speed up the reading in of large backup tables. SET foreign_key_checks=1
reactivates the rules. While the rules are deactivated, changes in the database will not be checked. If
integrity rules have been violated, the errors incurred will not be automatically recognized.
Foreign Key Constraints for the mylibrary Database
The mylibrary database consists exclusively of InnoDB tables. All the relations among the tables are
secured with integrity rules, as shown in Table 8-25.
Table 8-25. Foreign Keys and Referenced Keys in the mylibrary Database
Foreign Key Referenced Key
titles.publID publishers.publID
titles.langID languages.langID
titles.catID categories.catID
categories.parentCatID categories.catID
rel_title_author.titleID titles.titleID
rel_title_author.authID authors.authID
Indexes
If you are searching for a particular record in a table or would like to create a series of data records
for an ordered table, MySQL must load all the records of the table. The following lines show some
of the relevant SELECT commands (details to follow in the next chapter):
SELECT column1, column2 ... FROM table WHERE column3=12345
SELECT column1, column2 ... FROM table ORDER BY column3
SELECT column1, column2 ... FROM table WHERE column3 LIKE 'Smith%'
SELECT column1, column2 ... FROM table WHERE column3 > 2000
With large tables, performance will suffer under such everyday queries. Fortunately, there is
a simple solution to cure our table’s performance anxiety: Simply use an index for the affected col-
umn (in the example above, for column3).
An index is a special file or, in the case of InnoDB, a part of the tablespace, containing refer-
ences to all the records of a table. (Thus a database index functions like the index in this book. The
index saves you the trouble of reading the entire book from one end to the other if you simply want
to find out where a particular topic is covered.)
CHAPTER 8 ■DATABASE DESIGN 173
5351c08_final.qxd 8/26/05 10:03 PM Page 173
www.it-ebooks.info

■Caution Indexes are not a panacea! They speed up access to data, but they slow down each alteration in the
database. Every time a data record in changed, the index must be updated. This drawback can be ameliorated to
some extent with various SQL commands by means of the option
DELAY_KEY_WRITE
. The effect of this option is
that the index is not updated with each new or changed record, but only now and then.
DELAY_KEY_WRITE
is use-
ful, for example, when many new records are to be inserted in a table as quickly as possible.
A further apparent disadvantage of indexes is that they take up additional space on the hard drive. Therefore,
use indexes only for those columns that will often be searched and sorted. Indexes remain largely useless when
the column contains many identical entries. (In such cases, you might ask yourself whether the normalization of
the database has been optimally carried out.)
In principle, an index can be created for each field of a table, up to a maximum of sixteen
indexes per table. (MySQL also permits indexes for several fields simultaneously. That makes sense if
sorting is frequently carried out according to a combination of fields, as in WHERE country=‘Austria’
AND city=‘Graz’).
Indexes for InnoDB Tables
Indexes are more important for InnoDB tables than for MyISAM tables. In the former, indexes are
used not only for searching for records, but also for row level locking. This means that during a trans-
action, individual records are barred from access by other users. This affects, among others, the
commands SELECT … LOCK IN SHARE MODE, SELECT … FOR UPDATE, and INSERT, UPDATE,
and DELETE. (There is more on transactions in Chapter 10.)
The internal labeling of locked records takes place, for the sake of efficiency, not in the actual
tables, but in the index. This works, of course, only if a suitable index is available.
Limitations
• MySQL cannot use indexes where inequality operators are used (WHERE column != …).
• Likewise, indexes cannot be used for comparisons where the contents of the column are
processed by a function (WHERE DAY(column)= …).
• With JOIN operations (that is, in uniting data from various tables), indexes are of use only
when primary and foreign keys refer to the same data type.
• If the comparison operators LIKE and REGEXP are used, an index is of use only when there is
no wild card at the beginning of the search pattern. With LIKE ‘abc%’ an index is of use, but
with LIKE ‘%abc’, it is not.
• Indexes are used with ORDER BY operations only if the records do not have to be previously
selected by other criteria. (Unfortunately, an index rarely helps to speed up ORDER BY with
queries in which the records are taken from several tables.)
• Indexes are ineffectual if a column contains the same value over and over. It is therefore not
advisable to index a column with 0/1 or Y/N values.
Ordinary Indexes, Unique Indexes, Primary Indexes
Ordinary Index
The only task of an ordinary index (definition via the keyword KEY or INDEX) is to speed up access to
data. You should therefore index columns that you frequently use in conditions (WHERE column=…)
or for sorting (ORDER BY column). If possible, index columns with compact data (e.g., integers).
CHAPTER 8 ■DATABASE DESIGN174
5351c08_final.qxd 8/26/05 10:03 PM Page 174
www.it-ebooks.info
Unique Index
With an ordinary index it is allowed for several data records in the indexed field to refer to the same
value. (In a table of personnel, for example, the same name can appear twice, even though it refers
to two distinct individuals.)
When it is clear from context that a column contains unique values, you should then define an
index with the key word UNIQUE. This has two consequences. One is that MySQL has an easier time
managing the index; that is, the index is more efficient. The other is that MySQL ensures that no
new record is added if there is already another record that refers to the same value in the indexed
field. (Often, a UNIQUE index is defined for this reason alone, that is, not for access optimization,
but to avoid duplication.)
Primary Index
For primary key fields, mentioned repeatedly in the previous section, a primary index must be
defined. This involves a UNIQUE index that is distinguished only in that it has the name PRIMARY.
Foreign Key Index
Even if you define an integrity rule for a foreign key field (see the previous section), MySQL defines
an internal index. This index serves to maintain the foreign key constraint as efficiently as possible.
Combined Indexes
An index can cover several columns, as in INDEX(columnA, columnB). A peculiarity of such indexes
is that MySQL can selectively use such an index. Thus when a query requires an index for columnA
only, the combined index for INDEX(columnA, columnB) can be used. This holds, however, only for
partial indexes at the beginning of the series. For instance, INDEX(A, B, C) can be used as index for
Aor (A, B), but not as index for Bor Cor (B, C).
Limits on the Index Length
In the definition of an index for CHAR and VARCHAR columns you can limit an index to a particular
number of characters (which must be smaller than the maximum number of characters allowed in
this field). The consequence is that the resulting index file is smaller and its evaluation quicker than
otherwise. In most applications, that is, with character strings representing names, perhaps ten to
fifteen characters altogether suffice to reduce the search set to a few data records.
With BLOB and TEXT columns you must institute this restriction, where MySQL permits a max-
imal index length of 255 characters.
Full-Text Index
An ordinary index for text fields helps only in the search for character strings that stand at the begin-
ning of the field (that is, whose initial letters are known). On the other hand, if you store texts in fields
that consist of several, or possibly very many, words, an ordinary index is useless. The search must be
formulated in the form LIKE ‘%word%’, which for MySQL is rather complex and with large data sets
leads to long response times.
In such cases it helps to use a full-text index. With this type of index, MySQL creates a list of
all words that appear in the text. A full-text index can be created during the database design or
afterwards:
ALTER TABLE tablename ADD FULLTEXT(column1, column2)
CHAPTER 8 ■DATABASE DESIGN 175
5351c08_final.qxd 8/26/05 10:03 PM Page 175
www.it-ebooks.info

In SELECT queries, one can now search for records that contain one or more words. This is the
query syntax:
SELECT * FROM tablename
WHERE MATCH(column1, column2) AGAINST('word1', 'word2', 'word3')
Then all records will be found for which the words word1, word2, and word3 appear in the columns
column1 and column2.
■Note The InnoDB table driver does not support full-text indexes.
An extensive description of the SQL syntax for full-text search, together with a host of application examples,
can be found in Chapter 10.
Query and Index Optimization
Realistic performance estimates can be made only when the database has been filled with a suffi-
cient quantity of test data. A test database with several hundred data records will usually be located
entirely in RAM after the first query, and all queries will be answered quickly with or without an
index. Things become interesting when tables contain well over 1000 records and when the entire
size of the database is larger than the total RAM of the MySQL server.
In making the decision as to which columns should be provided with indexes, one may some-
times obtain some assistance from the command EXPLAIN SELECT. This is simply an ordinary
SELECT command prefixed with the key word EXPLAIN. Instead of SELECT being simply executed,
MySQL places information in a table as to how the query was executed and which indexes (to the
extent that they exist) came into play.
Here are some pointers for interpreting the table created by EXPLAIN. In the first column
appear the names of the tables in the order in which they were read from the database. The column
type specifies how the table is linked to the other tables (JOIN). This functions most efficiently (i.e.,
quickly) with the type system, while more costly are the types const, eq_ref, ref, range, index, and
ALL. (ALL means that for each record in the next-higher table in the hierarchy, all records of this
table must be read. That can usually be prevented with an index.
The column possible_keys specifies which indexes MySQL can access in the search for data
records. The column key specifies which index MySQL has actually chosen. The length of the index
in bytes is given by key_len. For example, with an index for an INTEGER column, the number of
bytes is 4. Information on how many parts of a multipart index are used is also given by key_len.
As a rule, the smaller key_len is the better (that is, the faster).
The column ref specifies the column of a second table with which the linkage was made, while
rows contains an estimate of how many records MySQL expects to read in order to execute the
entire query. The product of all the numbers in the rows column allows one to draw a conclusion
as to how many combinations arise from the query.
Finally, the column extra provides additional information on the JOIN operation, for example,
using temporary when MySQL must create a temporary table in executing a query.
■Tip Though the information proffered by
EXPLAIN
is often useful, the interpretation requires a certain amount
of MySQL and database experience. You will find further information in the MySQL documentation: http://
dev.mysql.com/doc/mysql/en/query-speed.html and http://dev.mysql.com/doc/mysql/en/
explain.html.
A quite readable presentation on MySQL speed optimization can be found in the OpenOffice format:
http://dev.mysql.com/tech-resources/presentations/ and http://dev.mysql.com/Downloads/
CHAPTER 8 ■DATABASE DESIGN176
5351c08_final.qxd 8/26/05 10:03 PM Page 176
www.it-ebooks.info

Example 1
This query produces an unordered list of all books with all their authors. All ID columns are equipped
with primary indexes.
USE mylibrary
EXPLAIN SELECT * FROM titles, rel_title_author, authors
WHERE rel_title_author.authID = authors.authID
AND rel_title_author.titleID = titles.titleID
CHAPTER 8 ■DATABASE DESIGN 177
table type key key_len ref rows Extra
titles ALL authName 60 NULL 53 Using index
rel_title_author ref authID 4 authors.authID 1 Using index
authors eq_ref PRIMARY 4 rel_title_author.titleID 1
This EXPLAIN result means that first all records from the titles table are read, with the index auth-
Name being used. (This was not actually necessary, since the SELECT command does not require the
sorting of results.) Then with the help of the authID index of rel_title_author and the primary index of
authors, the links to the two other tables are made. The tables are thus optimally indexed, and for each
part of the query there are indexes available.
To save space, some of the columns of the EXPLAIN result were removed, including possible_keys.
This column contains a list of all indexes that were used for the corresponding part of the query. The
column key tells which of these indexes MySQL chose.
Example 2
Here the query produces a list of all books (together with their authors) that have been published by a
particular publisher. The list is ordered by book title. Again, all ID columns are equipped with indexes.
Furthermore, in the titles table, title and publID are indexed:
EXPLAIN SELECT title, authName
FROM titles, rel_title_author, authors
WHERE titles.publID=2
AND titles.titleID = rel_title_author.titleID
AND authors.authID = rel_title_author.authID
ORDER BY title
table type key key_len ref rows Extra
titles ref publIDIndex 5 const 4 Using where;
Using
filesort
rel_title_author ref PRIMARY 4 titles.titleID 2 Using index
authors eq_ref PRIMARY 4 rel_title_author.authID 1
The interpretation is this: The tables are optimally indexed; that is, for each part of the query
there are indexes available. It is interesting that the title list (ORDER BY title) is apparently sorted
externally, although there is an index for the title column as well. The reason for this is perhaps that
the title records are first selected in accordance with the condition publID=2, and the title index can
then no longer be applied.
5351c08_final.qxd 8/26/05 10:03 PM Page 177
www.it-ebooks.info

Example 3
This example uses the same SELECT query as does Example 2, but it assumes that titles.publID does
not have an index. The result is that now all 53 records of the titles table must be read. The index
authName is indeed used, but it is of no help in speeding up the query. Using temporary means that
a temporary table holding intermediate results was created.
CHAPTER 8 ■DATABASE DESIGN178
Views
Views make it possible to define a special representation of one or more tables. A view behaves much
like a table. That is, you can query data with SELECT queries and (depending on the definition of the
view) alter data with INSERT, UPDATE, and DELETE.
Views have been available since MySQL 5.0. This section assumes that you are familiar with
SELECT commands (see the following chapter) and that you understand MySQL access privileges
(see Chapter 11). Note that phpMyAdmin 2.6, the version current at the time of writing, still cannot
deal with views.
There are two basic reasons for using views:
Security: It can happen that you wish to prevent certain users of a database from having full
access to a table. A typical example is a personnel table in a business setting, in which data on
all employees are stored. You would like all users to have access to certain data (names and
telephone numbers) but not to others (birth date and salary).
The solution is a view that contains the columns accessible by everyone. You have to set the
MySQL access privileges in such a way that the user is allowed to access the view, but not the
underlying table.
Convenience: In many applications, the same queries must be executed repeatedly to collect
data from one or more tables according to certain requirements. Instead of forcing every user
or programmer to formulate repeatedly the same complex SELECT commands, you, as the data-
base administrator, can define a view.
The Definition of a View
Views act like virtual tables containing the result of a SELECT query. So it is no surprise that the defi-
nition is based on a SELECT command. The following two examples define two views for the
mylibrary database and show five records for each of these views.
CREATE VIEW v1 AS
SELECT titleID, title, subtitle FROM titles
ORDER BY title, subtitle
SELECT * FROM v1 LIMIT 5
table type key key_len ref rows Extra
titles index authName 60 NULL 53 Using index;
Using
temporary;
Using
filesort
rel_title_author ref PRIMARY 4 titles.titleID 4 Using index
authors eq_ref PRIMARY 4 rel_title_author.authID 4 Using where
5351c08_final.qxd 8/26/05 10:03 PM Page 178
www.it-ebooks.info

titleID title subtitle
11 A Guide to the SQL Standard NULL
52 A Programmer's Introduction ... NULL
19 Alltid den där Annette NULL
51 Anklage Vatermord Der Fall Philipp Halsmann
78 Apache Webserver 2.0 Installation, ...
CREATE VIEW v2 AS
SELECT title, publname, catname FROM titles, publishers, categories
WHERE titles.publid=publishers.publid
AND titles.catID = categories.catID
AND langID=2
SELECT * FROM v2 ORDER BY title LIMIT 5
title publname catname
Anklage Vatermord Zsolnay Literature and fiction
Apache Webserver 2.0 Addison-Wesley Computer books
CSS-Praxis Galileo Computer books
Ein perfekter Freund Diogenes Verlag Literature and fiction
Excel 2000 programmieren Addison-Wesley Programming
To execute CREATE VIEW you must have the Create View privilege. What privileges are and how
they are managed will be discussed in Chapter 11.
Changing View Records
Whether the commands INSERT, UPDATE, and DELETE can be used with a view (that is, whether
the view is updatable) depends on the underlying SELECT command. For changeable views, the fol-
lowing rules hold:
• The SELECT command may not contain GROUP BY, DISTINCT, LIMIT, UNION, or HAVING.
• Views that process data from more than one table are almost always unchangeable.
• The view should contain all columns for which primary or unique indexes or foreign key
constraints have been defined. If such columns are missing from the view, the MySQL option
updatable_views_with_limit decides whether changes should be made with a warning (cur-
rent default setting 1) or should trigger an error (setting 0).
View Options
The complete syntax of the CREATE VIEW command looks like this:
CREATE [OR REPLACE] [ALGORITHM = UNDEFINED | MERGE | TEMPTABLE]
VIEW name [(columnlist)] AS select command
[WITH [CASCADED | LOCAL] CHECK OPTION]
The following points provide a brief explanation of the various options:
•OR REPLACE means that an existing view should be replaced by the new view without an
error message.
•ALGORITHM tells how the view is represented internally. This option was, alas, undocu-
mented as this section was written. By default, MySQL always uses UNDEFINED (can be
determined via SHOW CREATE TABLE viewname).
•WITH CHECK OPTION means that changes to view records are allowed only if the WHERE
conditions of the SELECT command are satisfied. WITH CHECK OPTION is relevant, of
course, only if the view is changeable.
CHAPTER 8 ■DATABASE DESIGN 179
5351c08_final.qxd 8/26/05 10:03 PM Page 179
www.it-ebooks.info

The variant WITH LOCAL CHECK OPTION affects views that themselves are derived from
other views (which is allowed!). LOCAL means that only the WHERE conditions of the CREATE
VIEW command are considered, and not the WHERE conditions of the subordinate views.
The exact opposite effect is achieved by CASCADED CHECK OPTION: The WHERE condi-
tions of all subordinate views are considered. If you specify neither CASCADED nor LOCAL,
then the default CASCADED holds.
Viewing View Definitions
Just as you can determine with SHOW CREATE TABLE name the SQL code of the command for creat-
ing a table, SHOW CREATE VIEW name is possible for views. You must have the Create View privilege
in order to be able to execute CREATE VIEW.
SHOW CREATE VIEW v1
CREATE ALGORITHM=UNDEFINED VIEW `mylibrary`.`v1` AS
SELECT `mylibrary`.`titles`.`titleID`,
`mylibrary`.`titles`.`title`,
`mylibrary`.`titles`.`subtitle`
FROM `mylibrary`.`titles`
ORDER BY `mylibrary`.`titles`.`title`,
`mylibrary`.`titles`.`subtitle`
Deleting Views
SHOW TABLES returns a list of all tables and views. To delete views, though, you cannot use DROP
TABLE. Instead, you must use the command DROP VIEW viewname.
Example Database mylibrary
(Library Management)
In the course of this chapter I have presented several aspects of database design in reference to
the mylibrary database. This has caused the description of the mylibrary database to have been so
extended that you may have lost an overview of the tables, fields, and indexes that this database
comprises, the data types used, and so on. Therefore, this section offers a summary of all the prop-
erties of the mylibrary database. The totality of these properties is usually called a database schema.
Figure 8-2 presents a graphical summary of the schema. The figure shows neither the data
types of the columns nor all the indexes, but nevertheless, one sees clearly which columns are used
as primary indexes and how the tables are related one to the other. (Like all the schema figures in
this book, this one was created with the query designer in OpenOffice.)
■Note A *.sql file with the complete definition of the
mylibary
database containing test data records can be
found in the companion files to this book. To read in this file, use phpMyAdmin to create an empty database with
Latin1
as the default character set, then change to the page
SQL
, and load the *.sql file. Alternatively, you can
create the database with the following two commands:
> mysqladmin -u root -p create mylibrary
> mysql -u root -p mylibrary < mylibrary.sql
CHAPTER 8 ■DATABASE DESIGN180
5351c08_final.qxd 8/26/05 10:03 PM Page 180
www.it-ebooks.info
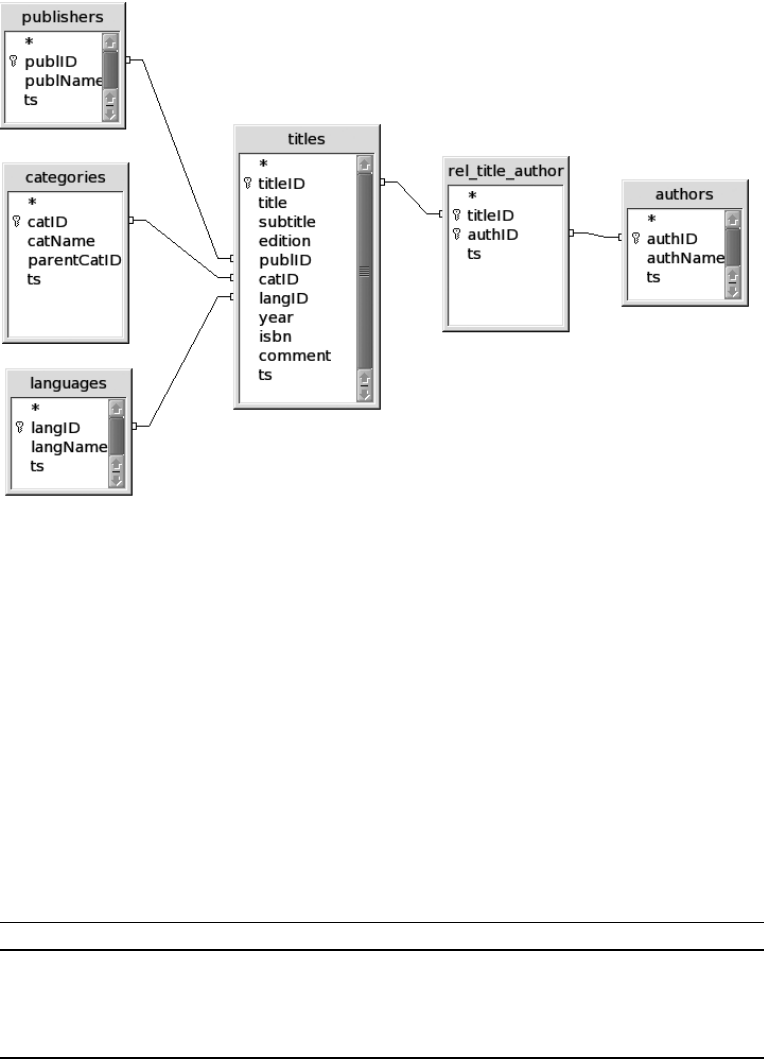
Properties of the Database
For the database mylibrary and all the text fields contained therein, the default character set is latin1
and the sort order is latin1_german1_ci.
Properties of the Tables
All the tables are InnoDB tables. Tables 8-26 through 8-31 specify for each mylibrary table all fields,
data types, attributes, and indexes. The meaning of most of the columns does not require additional
explication. Worthy of note and as yet unexplained is the ts column that appears in each table. In
this column the time of the last change is automatically logged. This column is necessary so that the
database can be used by ODBC/ADO programs.
Table 8-26. Properties of the authors Table
Field Data Type Attribute Index, Foreign Key Constraints
authID INT NOT NULL PRIMARY KEY
AUTO_INCREMENT
authName VARCHAR(60) KEY
ts TIMESTAMP
CHAPTER 8 ■DATABASE DESIGN 181
Figure 8-2. The schema of the mylibrary database
5351c08_final.qxd 8/26/05 10:03 PM Page 181
www.it-ebooks.info

Table 8-27. Properties of the categories Table
Field Data Type Attribute Index, Foreign Key Constraints
catID INT NOT NULL PRIMARY KEY
AUTO_INCREMENT
catName VARCHAR(60) NOT NULL KEY
parentCatID INT KEY,
FOREIGN KEY categories.catID
ts TIMESTAMP
Table 8-28. Properties of the languages Table
Field Data Type Attribute Index, Foreign Key Constraints
langID INT NOT NULL PRIMARY KEY
AUTO_INCREMENT
langName VARCHAR(60) NOT NULL KEY
ts TIMESTAMP
Table 8-29. Properties of the publishers Table
Field Data Type Attribute Index, Foreign Key Constraints
publID INT NOT NULL PRIMARY KEY
AUTO_INCREMENT
publName VARCHAR(60) NOT NULL KEY
ts TIMESTAMP
Table 8-30. Properties of the rel_title_author Table
Field Data Type Attribute Index, Foreign Key Constraints
authID INT NOT NULL PRIMARY KEY,
FOREIGN KEY authors.authID
titleID INT NOT NULL PRIMARY KEY,
KEY,
FOREIGN KEY titles.titleID
ts TIMESTAMP
Table 8-31. Properties of the titles Table
Field Data Type Attribute Index, Foreign Key Constraints
titleID INT NOT NULL PRIMARY KEY
AUTO_INCREMENT
title VARCHAR(100) NOT NULL KEY
subtitle VARCHAR(100)
edition TINYINT
publID INT KEY,
FOREIGN KEY publishers.publID
CHAPTER 8 ■DATABASE DESIGN182
5351c08_final.qxd 8/26/05 10:03 PM Page 182
www.it-ebooks.info

Field Data Type Attribute Index, Foreign Key Constraints
catID INT KEY,
FOREIGN KEY categories.catID
langID INT KEY,
FOREIGN KEY languages.langID
year INT
isbn VARCHAR(20)
comment VARCHAR(255)
ts TIMESTAMP
Example Database myforum (Discussion Group)
Most of the examples in this book use the mylibrary database, which we have been talking about
throughout this chapter. Since all SQL concepts cannot be revealed by a single database, and partic-
ularly such a small one as mylibrary, two additional databases will be presented in this and the next
sections: myforum and exceptions.
The first of these is a database for a real PHP application, whose code is not discussed in the book
due to lack of space. What is at issue here is rather the design (schema) of the database. The database
contains more than one thousand records and thus forms a good basis for trying out full-text search
with MySQL (see Chapter 10).
There is no application behind the database exceptions. This database serves exclusively for
experimenting with unusual MySQL data types and testing various sort orders.
The Discussion Group Database myforum
Among the best-loved MySQL applications are guest books, discussion groups, and other websites
that offer users the possibility of creating a text and thereby adding their own voices to the website.
The database myforum shows how a database can serve as the basis for a discussion group. The
database consists of three tables:
•forums contains a list of the names of all discussion groups. Furthermore, each group can be
assigned a particular language (English or German).
•users contains a list of all users registered in the database who are permitted to contribute to
discussions. For each registered user, a login name, password, and email address are stored.
The column authent contains a random character string that is sent to a new user by email
at the time of registration. The account is activated only after the user clicks on the link con-
tained in the email (column active) and supplies the random number.
•messages contains all the stored contributions. These consist of a Subject row, the actual text,
forumID, userID, and additional management information. This table is the most interesting
of the three from the standpoint of database design, and it will be considered further in this
section.
MyISAM tables are used for this database, since at present only this format supports full-text
search. All columns with strings use the Latin1 character set and the sort order latin1_german1_ci.
The schema for the database is summarized in Figure 8-3.
CHAPTER 8 ■DATABASE DESIGN 183
5351c08_final.qxd 8/26/05 10:03 PM Page 183
www.it-ebooks.info
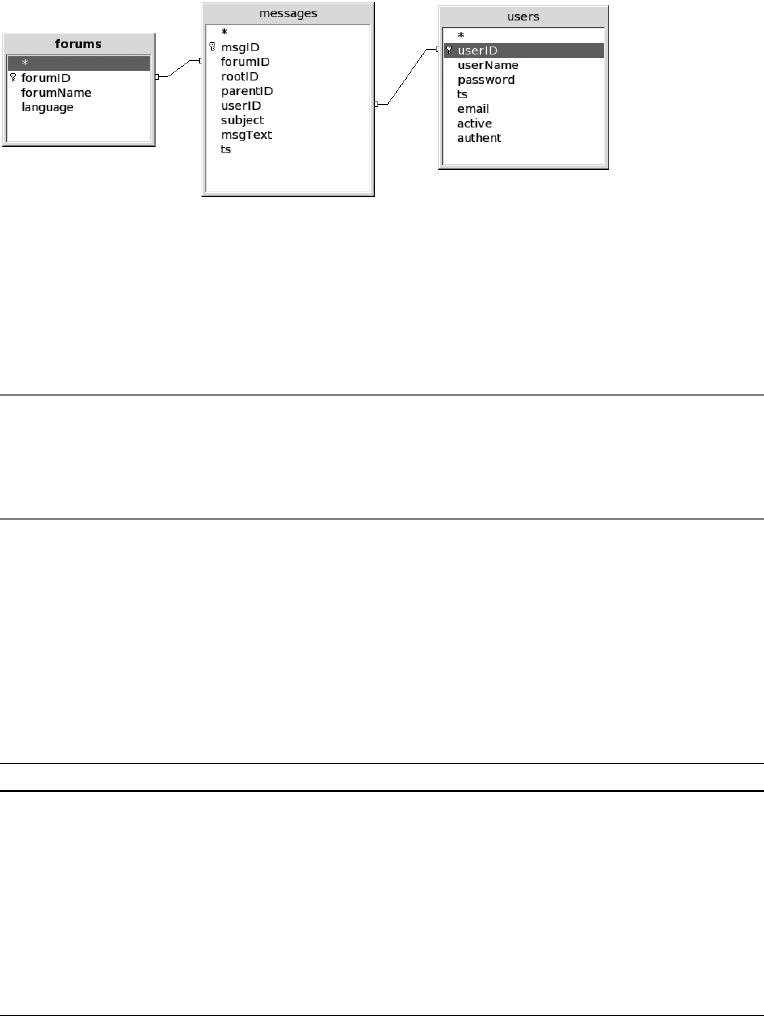
The myforum database, which is included in the files accompanying this book, contains more
than 3,000 forum contributions from the website www.kofler.cc. (For this book, the authors’ names
have been concealed.) This database is well suited for trying out various aspects of full-text search
(see also Chapter 10).
■Note The
messages
table is a good demonstration that a full-text index can occupy a considerable amount of
space. In the test database,
messages
contains about 3000 messages with about 1.5 million characters altogether.
For storing the
messages
data about 1.7 megabytes are required. The storage requirement for the full-text index is
another 1.4 megabytes, which practically doubles the requirement for the entire table!
Hierarchies Among Messages
As we have already seen in the case of the mylibrary database, there is a battle in myforum in dealing
with hierarchies. A significant feature of discussion groups is that the discussion thread is represented
in a hierarchical list. The hierarchy is the result of the fact that each contribution can elicit a response.
A discussion among the five participants Antony, Banquo, Coriolanus, Duncan, and Edmund (A, B, C,
D, and Efor short) might look like that depicted in Table 8-32.
Table 8-32. Discussion Threads
Sample Messages
A: How do I sort with MySQL Tables? (17.1.2005 12:00)
B: first answer (17.1.2005 18:30)
A: thanks! (17.1.2005 19:45)
C: better suggestion (19.1.2005 10:30)
D: second answer (18.1.2005 3:45)
A: I don’t understand that (18.1.2005 9:45)
D: the same explanation, but with more detail (18.1.2005 22:05)
E: third answer (18.1.2005 19:00)
Here as illustration a description of the content is added to the title line (subject) of each con-
tribution. In reality, the title line usually contains just the thread title.
A representation in database format might look like that shown in Table 8-33. It is assumed
here that the five participants Athrough Ehave userID numbers 201 through 205. The messages
CHAPTER 8 ■DATABASE DESIGN184
Figure 8-3. The myforum database schema
5351c08_final.qxd 8/26/05 10:03 PM Page 184
www.it-ebooks.info

of the thread have msgID numbers that begin with 301. (In practice, it is natural to expect that
a thread will not exhibit sequential msgID numbers. More likely, other threads will break into the
sequence.) The table is sorted chronologically (that is, in the order in which the messages were
posted).
Table 8-33. The messages Table with the Data Records of a Discussion Thread
msgID forumID rootID parentID userID subject ts
301 3 301 NULL 201 How do I… 2005-01-17 12:00
302 3 301 301 202 first answer 2005-01-17 18:30
303 3 301 302 201 thanks! 2005-01-17 19:45
304 3 301 301 204 second answer 2005-01-18 3:45
305 3 301 304 201 I don’t understand… 2005-01-18 9:45
306 3 301 301 205 third answer 2005-01-18 19:00
307 3 301 304 204 the same… 2005-01-18 22:05
308 3 301 302 203 better suggestion 2005-01-19 10:30
The hierarchy is expressed via the column parentID, which refers to the message up one level in
the hierarchy. If parentID has the value NULL, then the contribution is one that began a new thread.
The column rootID refers to the first message of a thread. This column may not contain NULL.
For the first message of a thread, one has msgID=rootID. The latter column actually contains redun-
dant information, since one can determine via parentID the start message for any message. However,
rootID simplifies this task and greatly increases the efficiency of the entire forum (for example, in
determining the number of messages in a thread or assembling all the messages of a thread with a
simple SELECT query).
Example Database Exceptions (Special Cases)
When you begin to develop an application with a new database, programming language, or API that
is unfamiliar to you it is often practical to implement a simple test database for quickly testing vari-
ous special cases. For the work on this book, as well as for testing various APIs and various import and
export tests, the database exceptions was used. Among the tables of this database are the following:
• Columns with most data types supported by MySQL, including xxxTEXT, xxxBLOB, SET,
and ENUM
•NULL values
• Texts and BLOBs with all possible special characters
• All 255 text characters (code 1 to 255)
The following paragraphs provide an overview of the tables and their contents. The column
names indicate the data type (thus the column a_blob has data type BLOB). The id column is an
AUTO_INCREMENT column (type INT). In all the columns except the id column the value NULL
is allowed.
CHAPTER 8 ■DATABASE DESIGN 185
5351c08_final.qxd 8/26/05 10:03 PM Page 185
www.it-ebooks.info
The Table testall
This table contains columns with the most important MySQL data types (though not all types).
Columns: id, a_char, a_text, a_blob, a_date, a_time, a_timestamp, a_float, a_decimal, a_enum,
a_set
The Table text_text
With this table you can test the use of text.
Columns: id, a_varchar (maximum 100 characters), a_text, a_tinytext, a_longtext
The Table test_blob
With the test_blob table you can test the use of binary data (import, export, reading and storing
a client program, etc.).
Columns: id, a_blob
Content: A record (id=1) with a 512-byte binary block. The binary data represent byte for byte
the codes 0, 1, 2, …, 255, 0, 1, …, 255
The Table test_date
With this table you can test the use of dates and times.
Columns: id, a_date, a_time, a_datetime, a_timestamp
Content: A data record (id=1) with the values 2005-12-31, 23:59:59 and again 2005-12-31,
23:59:59
The Table test_enum
With this table you can test the use of SET and ENUM.
Columns: id, a_enum, and a_set (with the character strings ‘a’, ‘b’, ‘c’, ‘d’, ‘e’)
Content:
id a_enum a_set
1 a a
2 e b,c,d
3
4 NULL NULL
The Table test_null
With this table you can test whether NULL (first record) can be distinguished from an empty char-
acter string (second record).
Columns: id, a_text
Content:
id a_text
1 NULL
2
3 'a text'
The Table test_sort1
With this table you can test various sort orders (ORDER BY) for the Latin1 and UTF-8 (Unicode)
contains sequential numbers from 33 to 126
CHAPTER 8 ■DATABASE DESIGN186
5351c08_final.qxd 8/26/05 10:03 PM Page 186
www.it-ebooks.info
and from 161 to 255; latin1char contains the Latin1 characters for the code in id; utf8char contains
the associated Unicode characters. The two CHAR columns were deliberately not given an index.
Content:
id latin1char ut8char
...
65 'A' 'A'
66 'B' 'B'
...
The Table test_sort2
This table also serves for testing sort orders. It contains again three columns, id, latin1text, and utf8text
(data type VARCHAR(100) for both character sets Latin1 and UTF8). This time, the text columns contain
entire words, namely abc, Abc, ABC, Bar, Bär, Bären, Barenboim, bärtig, and Ärger. In the next chapter
you will find examples using the tables test_sort1 and test_sort2.
The Tables importtable1, importtable2, exporttable
These three tables contain test data for importation and exportation of text files. A description of the
tables as well as numerous possibilities for import and export by MySQL can be found in Chapter 14.
CHAPTER 8 ■DATABASE DESIGN 187
5351c08_final.qxd 8/26/05 10:03 PM Page 187
www.it-ebooks.info

An Introduction to SQL
This chapter provides an introduction to the database language Structured Query Language,
or SQL for short. This language is used primarily to formulate instructions to a database system,
including queries and commands to change or delete database objects. The most important of
these commands are SELECT, INSERT, UPDATE, and DELETE, and these are the main attractions
in this chapter, which aims to instruct in large part by presenting many examples.
The following chapter, as a sort of continuation of the present one, provides a selection of
recipes for solving everyday SQL problems, such as dealing with character strings and with dates
and times, and formulating subSELECT instructions (that is, SELECT commands whose results
depend on another SELECT command), using transactions, and full-text search.
Introduction
All of the examples presented in this chapter are based on the example databases presented in
the previous chapter. If you wish to try out these databases for yourself, then you must download
them to your own test environment. (All the source code is available at www.apress.com, in the
Downloads section.) Which database is involved in a particular example will be clear from the line
USE databasename that appears at the beginning of the example or the beginning of the section in
question.
The best way of testing simple SQL commands is to use the MySQL command interpreter mysql.
This program can be launched under Unix/Linux with the command mysql, while under Windows,
you use PROGRAMS | MYSQL | MYSQL SERVER N.N| MYSQL COMMAND CLIENT. (Please note that you must
terminate mysql commands with a semicolon. We shall not indicate the semicolon in this chapter,
because it is not required by other client programs. That is, it is not part of the MySQL syntax. Addi-
tional information on mysql can be found in Chapter 4.)
When you get to the point of editing multiline SQL commands, you will find that the level of
comfort and convenience afforded by mysql goes into a steep decline. A better alternative is to use
one of the numerous MySQL interfaces (such as the MySQL Query Browser or phpMyAdmin). Such
programs have the advantage that the results of a query are displayed in a reader-friendly tabular
format.
■Note In this book we generally write SQL commands and key words in uppercase letters, reserving lowercase
for the names of databases, tables, and columns. Sometimes, we use a mixed format (e.g.,
columnName
). MySQL
is largely case-insensitive. The exception is in the names of databases and tables, where case distinction is made.
With names for such objects you must hew to the straight and narrow path of exactitude with regard to case.
Details on MySQL naming rules can be found in Chapter 21.
189
CHAPTER 9
■ ■ ■
5351c09_final.qxd 8/26/05 6:17 PM Page 189
www.it-ebooks.info
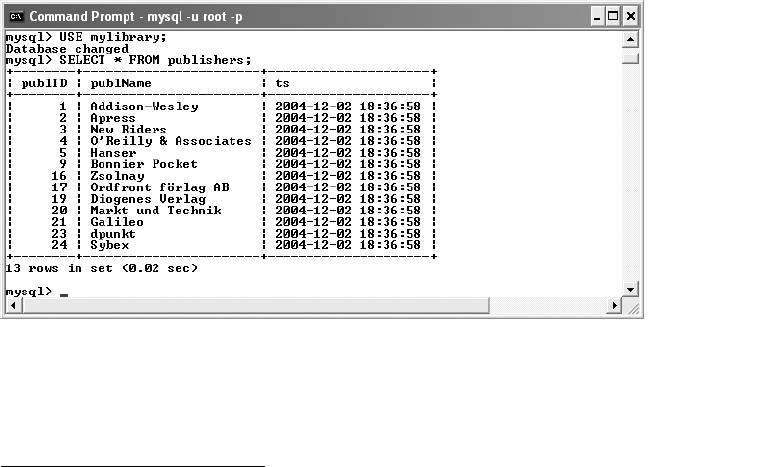
DML, DDL, and DCL
SQL commands can be divided into three groups:
•Data Manipulation Language (DML): SELECT, INSERT, UPDATE, and DELETE, and several
additional commands serve to read from the tables of a database and to store and update
them. These commands form the centerpiece of this and the next chapter.
•Data Definition Language (DDL): With CREATE TABLE, ALTER TABLE, and their ilk the design
(schema) of a database can be changed. Some such commands are presented at the end of
this chapter.
• Data Control Language (DCL): GRANT, REVOKE, and several additional SQL commands
help in setting the security mechanisms of MySQL. They will be presented in Chapter 11.
In Chapter 21 you will find an alphabetical reference to all SQL commands.
Simple Queries (SELECT)
Here is a simple database query: SELECT * FROM tablename. This query returns all data records of
the table specified. The asterisk indicates that the query is to encompass all the columns of the table.
(See Figure 9-1.)
Use mylibrary
SELECT * FROM publishers
publID publName_______________
1 Addison-Wesley
2 Apress
3 New Riders
4 O'Reilly & Associates
5 Hanser
CHAPTER 9 ■AN INTRODUCTION TO SQL190
Figure 9-1. First SQL experiments in the MySQL monitor mysql
5351c09_final.qxd 8/26/05 6:17 PM Page 190
www.it-ebooks.info

■Note
SELECT
can be used without reference to a database or to tables, for example, in the form
SELECT 2*3
,
in which case
SELECT
returns its result in the form of a small table (one column, one row). This is used relatively
often to determine the content of MySQL variables or functions (as in, say,
SELECT NOW(),
to determine the cur-
rent time).
Determining the Number of Data Records (Lines)
Perhaps you do not have a craving to view your data records in gruesome detail, but would like
merely to determine how many records there are in one of your tables. For that, you can use the
following query:
SELECT COUNT(publID) FROM publishers
COUNT(publID)____
5
In this query you could specify, instead of publID, any column of the table (or *for all columns).
In any case, MySQL optimizes the query and returns only the number of records, without actually
reading them.
Determining the Number of Distinct Data Records (DISTINCT)
If the same values can appear multiple times in a column of a table and you wish to determine the
number of distinct values, you must use the key word DISTINCT. For example, if you wish to know
the number of publishers represented in the titles table, the query should look like this:
SELECT COUNT(DISTINCT publID) FROM titles
COUNT(DISTINCT publID)____
11
It is not necessary that the result be identical to that of the previous query. It could happen that
the publishers table contains names of publishers that have not published any titles.
The next example using DISTINCT shows that it is possible to carry out simple calculations in
SQL commands. This command computes the average number of authors per book. To this end,
COUNT(*) returns the number of entries in the table rel_title_author. (This table creates the relation
between books and authors.) COUNT(DISTINCT titleID) returns the number of different titles in
this table:
SELECT COUNT (*) / COUNT(DISTINCT titleID) FROM rel_title_author
COUNT(*) / COUNT(DISTINCT titleID)____
1.27
Column Restriction
Often, you are not interested in all the columns of a table. In such a case you must specify the
columns explicitly (instead of using the asterisk).
CHAPTER 9 ■AN INTRODUCTION TO SQL 191
5351c09_final.qxd 8/26/05 6:17 PM Page 191
www.it-ebooks.info

SELECT publName FROM publishers
publName____________
Addison-Wesley
Apress
New Riders
O'Reilly & Associates
Hanser
■Tip If a query is going to return a large number of data records, you should get accustomed to the idea of
specifying explicitly only those columns of interest (instead of taking the lazy person’s route of simply typing an
asterisk). The reason is that MySQL (unnecessary data extraction), the client program (memory usage), and the
network (unnecessary data transfer) work significantly more efficiently if the data set to be processed is limited
to the absolute minimum.
Limiting the Number of Resulting Records (LIMIT)
You can limit not only the number of columns in a query result, but also the number of data records.
Imagine that your titles table contains the names of 100,000 books, but you would like to access only
the first ten of these (for example, to display in an HTML document). To query the remaining 99,990
records would be a gross squandering of CPU time, memory, and network capacity. To avoid such a
scenario, you can limit the number of records returned with LIMIT n. The following command
returns two records from the titles table:
USE mylibrary
SELECT title FROM titles LIMIT 2
title__________________________
Client/Server Survival Guide
Definitive Guide to Excel VBA
To return the next two records, execute a new query, but this time with LIMIT offset, n. Here
offset specifies the number of the record at which access to the table is to begin. (Warning: The enu-
meration of data records begins with 0. An offset of nskips the first nrecords and, since counting
begins with 0, starts processing at record number n.)
SELECT title FROM titles LIMIT 2, 2
title___________________________________
Linux
Web Application Development with PHP 4.0
Determining the Number of Records Suppressed by
LIMIT (SQL_CALC_FOUND_ROWS, FOUND_ROWS)
When you execute a SELECT query with LIMIT, you obtain only a partial result. Particularly in
the page-by-page display of data, it would often be helpful to know exactly how many records
are available altogether.
Beginning with MySQL 4.0, you can use in a SELECT query the additional option
SQL_CALC_FOUND_ROWS. Then, in a second query you can evaluate the SQL function
FOUND_ROWS(), which tells how many records the query would have returned without LIMIT.
CHAPTER 9 ■AN INTRODUCTION TO SQL192
5351c09_final.qxd 8/26/05 6:17 PM Page 192
www.it-ebooks.info

The following query returns the three alphabetically first titles from the titles table. Then, with
FOUND_ROWS it is determined how many records are available altogether:
SELECT SQL_CALC_FOUND_ROWS title FROM titles ORDER BY title LIMIT 3
title_________________________
A Guide to the SQL Standard
Alltid den där Annette
Client/Server Survival Guide
SELECT FOUND_ROWS()
FOUND_ROWS()___________
26
The use of CALC_FOUND_ROWS and FOUND_ROWS is especially useful in complex queries
in which a separate SELECT query for determining the number of records would be time intensive.
Note, however, that the option CALC_FOUND_ROWS prevents certain kinds of optimization that
MySQL carries out in LIMIT queries. Therefore, use CALC_FOUND_ROWS only when you then really
wish to evaluate FOUND_ROWS.
Sorting Records (ORDER BY)
SELECT returns its results in no particular order. If you would like your list of results ordered, then
you must request this explicitly via ORDER BY column. The following command returns an alpha-
betically ordered list of the authors in the mylibrary database.
SELECT authName FROM authors ORDER BY authName
authName________
Bitsch Gerhard
Darween Hugh
Date Chris
DuBois Paul
Edwards E.
Garfinkel Simon
Gerken Till
Harkey D.
Holz Helmut
...
If you would like the reverse order, then you must add the key word DESC (for descending) to
ORDER BY, as in, for example, ORDER BY authName DESC. The order of the results depends on the
sort order that was specified for the relevant column when the table was defined.
■Note In point of fact, the sequence of
SELECT
results, even without
ORDER BY
, is not random, but it depends
rather on the order in which the records are stored in the table. However, you probably have no influence on this
order. Therefore, do not expect that
SELECT
results will have a particular order. In the case of new tables, query
results usually are returned ordered by increasing
id
number (if
id
is an
AUTO_INCREMENT
field). But as soon as
records are altered or deleted, the ordering is ruined. Do not rely on it!
You will learn in Chapter 10 how to select records in a truly random fashion.
CHAPTER 9 ■AN INTRODUCTION TO SQL 193
5351c09_final.qxd 8/26/05 6:17 PM Page 193
www.it-ebooks.info
Choosing the Sort Order
In sorting character strings, the sort order that was set for the relevant column is used. If no sort
order has been defined for the column, then the sort order of the table is used. If there is no default
setting here as well, then the sort order for the database is used. If no sort order has been defined for
the database, then MySQL uses the default sort order that is valid for the character set for the col-
umn. (The default sort order for a given character string can be determined with the SQL command
SHOW CHARACTER SET.)
If you wish to use a different sort order, you can specify it with COLLATE. However, the only
sort orders that are allowed are those that are provided for the column’s character set (see SHOW
COLLATION). Note that then any index that is present cannot be used. In other words, using a dif-
ferent sort order with a large table is slow and inefficient!
SELECT authName FROM authors
ORDER BY authName COLLATE latin1_german2_ci
You can also change the sort order of a column after the fact. The index is then automatically
updated:
ALTER TABLE authors MODIFY authName VARCHAR(60)
CHARACTER SET latin1 COLLATE latin1_german2_ci
If the desired sort order for the column’s character set does not exist, you can use CONVERT
to change the data to be sorted into another character set. It should be clear to you, however, that
with large tables this is a very time-intensive process. In the following example, the author names
are converted from latin1 to utf8 and then sorted in Polish order:
SELECT authName FROM authors
ORDER BY CONVERT(authName USING utf8) COLLATE utf8_polish_ci
Trying Out Different Sort Orders
You can use the tables test_sort1 and test_sort2 from the example database exceptions to try out at your
leisure the sort orders supported by MySQL. The following commands provide some examples. You can
determine the list of available sort orders with SHOW COLLATION. To save space, the SELECT results
are not given in tabular format. Unrepresentable characters have been deleted.
The results of the first four commands differ in the order of international symbols and some
special characters:
USE exceptions
SELECT latin1char FROM test_sort1
ORDER BY latin1char COLLATE latin1_general_ci
! " # $ % & ' ( ) * + , - . / 0 1 2 3 4 5 6 7 8 9 : ; < = > ? @ A a
À à á Á Â â Ã ã Ä ä Å å Æ æ b B c C ç Ç d D ? ∂ E e È è É é ê Ë ë F
f g G h H I i ì Ì Í í î Î ï Ï j J K k L l m M n N ñ Ñ O o ò Ò ó Ó Ô ô
Õ õ Ö ö ø Ø P p Q q r R S s ß T t u U Ù ù ú Ú û Û Ü ü V v W w x X y Y
? ? ÿ Z z ? ? [ \ ] ...
SELECT latin1char FROM test_sort1
ORDER BY latin1char COLLATE latin1_german1_ci
! " # $ % & ' ( ) * + , - . / 0 1 2 3 4 5 6 7 8 9 : ; < = > ? @ Æ a
à á â ä å Å Ä Ã A ã À Á Â æ b B c Ç C ç d D é É Ë e E È ê è ë f F G
g h H Í ï Ì I i ì í î Î Ï J j K k L l m M ñ Ñ n N ó Õ Ö Ø Ó Ò O Ô ò o
ø ö õ ô P p Q q r R S ß s t T ù ú u û ü U Ù Ú Ü Û V v w W x X y Y ? ?
CHAPTER 9 ■AN INTRODUCTION TO SQL194
5351c09_final.qxd 8/26/05 6:17 PM Page 194
www.it-ebooks.info
SELECT latin1char FROM test_sort1
ORDER BY latin1char COLLATE latin1_swedish_ci
! " # $ % & ' ( ) * + , - . / 0 1 2 3 4 5 6 7 8 9 : ; < = > ? @ â á
à a à  Á À ã A b B ç c Ç C D d ∂ ? e è Ë É È é ê ë E f F G g h H Ï
i Ì í Í ï î ì Î I J j K k L l m M ñ Ñ n N ó Ô Ó Õ O ò o Ò õ ô P p Q q
r R S s T t u Ù û Ú Û U ù ú V v W w x X Y Ü ? y ü ? z Z å Å [ Æ æ Ä \
ä ö ] Ö ^ _ ` { | } ...
SELECT utf8char FROM test_sort1
ORDER BY utf8char COLLATE utf8_general_ci
! " # $ % & '‘ ( ) * + , - . / 0 1 2 3 4 5 6 7 8 9 : ; < = > ? @ a à
á â ä å Å Ä Ã A ã À Á Â b B c Ç ç C d D ë e Ë É è é È E ê F f G g H
h Ï Í Ì I Î î i í ì ï j J K k l L m M ñ Ñ n N Ó o Ò O ò ô Ô Õ Ö ö õ ó
P p Q q R r S s T t u ü Ù û ú ù Ú U Ü Û v V W w x X y ? ÿ Y ? z Z [ \
] ^ _ ` { | } ...
In the following examples as well you will have to look closely to detect the differences. For exam-
ple, in the second example (German sort order according to the DIN-1 standard), Bar comes before
Bär, while in the third example, (German DIN-2 standard), Bär = Baer comes before Bar. In the
Swedish sort order the characters Ä, Å, and Ö come after all the other letters of the alphabet, and so
Ärger appears at the end of the list. The last example shows that the Unicode sort order utf8_general_ci
corresponds exactly to German DIN-1, at least for the words given here:
SELECT latin1text FROM test_sort2
ORDER BY latin1text COLLATE latin1_general_ci
abc Abc ABC Ärger Bar Barenboim Bär Bären bärtig
SELECT latin1text FROM test_sort2
ORDER BY latin1text COLLATE latin1_german1_ci
abc Abc ABC Ärger Bar Bär Bären Barenboim bärtig
SELECT latin1text FROM test_sort2
ORDER BY latin1text COLLATE latin1_german2_ci
abc Abc ABC Ärger Bär Bären bärtig Bar Barenboim
SELECT latin1text FROM test_sort2
ORDER BY latin1text COLLATE latin1_swedish_ci
abc Abc ABC Bar Barenboim Bär Bären bärtig Ärger
SELECT utf8text FROM test_sort2
ORDER BY utf8text COLLATE utf8_general_ci
abc Abc ABC Ärger Bar Bär Bären Barenboim bärtig
Selecting Data Records (WHERE, HAVING)
Often, it is not all of the records in a table that are of interest, but only those that satisfy one or more
conditions. Such conditionals are introduced with WHERE. In our first example, we wish to display
the names of only those authors whose surname starts with one of the letters L through Z:
CHAPTER 9 ■AN INTRODUCTION TO SQL 195
5351c09_final.qxd 8/26/05 6:17 PM Page 195
www.it-ebooks.info

SELECT authName FROM authors WHERE authName>='M'
authName__________
Orfali R.
Pohl Peter
Ratschiller Tobias
Reese G.
...
In our second example, we employ the operator LIKE to compare character strings. The query
determines all authors whose names contain the sequence of letters er. With the operator LIKE, the
character % serves as a placeholder for an arbitrary character string.
SELECT authName FROM authors WHERE authName LIKE '%er%'
authName______________
Bitsch Gerhard
Gerken Till
Kofler Michael
Kramer David
Pohl Peter
Ratschiller Tobias
Schmitt Bernd
Yarger R.J.
■Caution Comparisons with
LIKE
can be very slow when they are applied to large tables. All the data records
must be read and analyzed. It is impossible to use indexes to optimize such queries. A frequently used alternative
to
LIKE
is the employment of a full-text index; see Chapter 10.
Comparisons with a large number of values can be carried out easily with IN:
SELECT authID, authName FROM authors
WHERE authID IN (2, 7, 12)
authID authName____________
2 Kramer David
7 Gerken Till
12 Yarger R.J.
Instead of formulating conditionals with WHERE, you could instead use HAVING. The WHERE
conditionals are executed first, while HAVING conditionals are used only on intermediate results
(returned by WHERE). The advantage of HAVING is that the conditions can also be applied to cal-
culated fields (for example, to SUM(columnXy) in a GROUP BY query). An example appears in the
section after next.
HAVING conditionals are less easily optimized for MySQL than WHERE conditionals, and they
should be avoided if an equivalent WHERE is possible.
■Note Please note that the conditional
colname = NULL
is not permitted. If you are searching for records that
contain
NULL
, you must work with
ISNULL(colname)
.
CHAPTER 9 ■AN INTRODUCTION TO SQL196
5351c09_final.qxd 8/26/05 6:17 PM Page 196
www.it-ebooks.info

Linking Data from Several Tables
Up to now, all of our examples with SELECT have been applied to the search for records from a sin-
gle table. However, with relational databases we are usually dealing with a number of related tables.
Therefore, we are usually interested in applying a SELECT command to combine data from several
tables. For this we will use the JOIN syntax.
JOINs Across Two Tables
A first attempt to create a list of all book titles (column title) together with their publishers (column
publName) from the tables titles and publishers is a colossal failure:
USE mylibrary
SELECT title, publName FROM titles, publishers
title publName___________
Client/Server Survival Guide Addison-Wesley
Definitive Guide to Excel VBA Addison-Wesley
Linux Addison-Wesley
Web Application Development with PHP 4.0 Addison-Wesley
Client/Server Survival Guide Apress
Definitive Guide to Excel VBA Apress
Linux Apress
Web Application Development with PHP 4.0 Apress
Client/Server Survival Guide New Riders
Definitive Guide to Excel VBA New Riders
Linux New Riders
Web Application Development with PHP 4.0 New Riders
...
MySQL returns a list of all possible combinations of titles and publishers. In our relatively small
database we can pick ourselves up from this minicatastrophe without too much damage. But imag-
ine a database with 10,000 titles and 500 publishers, resulting in 5,000,000 combinations.
If queries spanning several tables are to return sensible results, precise information must be
given as to how the data from the different tables are to be joined together. One possibility for for-
mulating this connection is offered by WHERE. Since the linking field publID occurs in both tables,
we must use the form table.column to indicate precisely which field is meant.
SELECT title, publName FROM titles, publishers
WHERE titles.publID = publishers.publID
title publName______________
Linux, 5th ed. Addison-Wesley
Definitive Guide to Excel VBA Apress
Client/Server Survival Guide Addison-Wesley
Web Application Development with PHP 4.0 New Riders
MySQL New Riders
MySQL & mSQL O'Reilly \& Associates
...
There are quite a few additional ways of arriving at the same result. One variant consists in
creating the table list with LEFT JOIN and then forming the linking connection with ON:
SELECT title, publName
FROM titles LEFT JOIN publishers
ON titles.publID = publishers.publID
CHAPTER 9 ■AN INTRODUCTION TO SQL 197
5351c09_final.qxd 8/26/05 6:17 PM Page 197
www.it-ebooks.info

Another variant makes use of the key word USING, in which the common linking field is speci-
fied. However, this variant assumes that the linking field (in this case publID) has the same name in
both tables. That is, of course, not always the case:
SELECT title, publName
FROM titles LEFT JOIN publishers
USING (publID)
JOINs Across Three or More Tables
Things become a bit more confusing when the query must examine data from more than two tables.
The following query returns a list of all book titles with all their authors. (Books with several authors
occur in this list with multiplicity.) The relation between the tables titles and authors is created in the
third table rel_title_author. The condition for the resulting data records is that titleID agree in the tables
titles and rel_title_author and simultaneously authID in the tables authors and rel_title_author.
SELECT title, authName
FROM titles, rel_title_author, authors
WHERE titles.titleID = rel_title_author.titleID
AND authors.authID = rel_title_author.authID
ORDER BY title
title authName____________
A Guide to the SQL Standard Date Chris
A Guide to the SQL Standard Darween Hugh
Alltid den där Annette Pohl Peter
Client/Server Survival Guide Orfali R.
Client/Server Survival Guide Harkey D.
Client/Server Survival Guide Edwards E.
Definitive Guide to Excel VBA Kofler Michael
Definitive Guide to Excel VBA Kramer David
Excel 2000 programmieren Kofler Michael
Jag saknar dig, jag saknar dig Pohl Peter
LaTeX Kopka Helmut
Linux für Internet und Intranet Holz Helmut
Linux für Internet und Intranet Schmitt Bernd
Linux für Internet und Intranet Tikart Andreas
Linux, 5th ed. Kofler Michael
Maple Kofler Michael
Maple Komma Michael
Maple Bitsch Gerhard
...
Our next example is somewhat more complex: Here we generate a list of publishers and their
authors. (Thus the query determines which authors write for which publishers.) The connection
between publishers and authors is made via the tables titles and rel_title_author, so that altogether,
four tables are brought into play.
The SQL key word DISTINCT has the effect that equivalent data records are output only once.
Since there are authors in the mylibrary database who have written several books (for the same
publisher), the simple joining of these tables would result in many combinations in which an
author and publisher combination occurred with multiplicity.
CHAPTER 9 ■AN INTRODUCTION TO SQL198
5351c09_final.qxd 8/26/05 6:17 PM Page 198
www.it-ebooks.info

SELECT DISTINCT publName, authName
FROM publishers, titles, rel_title_author, authors
WHERE titles.titleID = rel_title_author.titleID
AND authors.authID = rel_title_author.authID
AND publishers.publID = titles.publID
ORDER BY publName, authName
publName authName_________
Addison-Wesley Bitsch Gerhard
Addison-Wesley Darween Hugh
Addison-Wesley Date Chris
Addison-Wesley Edwards E.
Addison-Wesley Harkey D.
...
Apress Kofler Michael
Apress Kramer David
New Riders DuBois Paul
New Riders Gerken Till
New Riders Ratschiller Tobias
...
Syntax Variants
If you read about the details of FROM under the description of the SELECT syntax in the MySQL
documentation, you may find your head spinning from the large number of (almost) identical vari-
ants. Tables 9-1 and 9-2 provide a brief overview.
Table 9-1. Unconditional JOIN (Combination of
All Possibilities; Seldom Useful)
Syntax Variant
(1) FROM table1, table2
(2) FROM table1 JOIN table2
(3) FROM table1 CROSS JOIN table2
(4) FROM table1 INNER JOIN table2
(5) FROM table1 STRAIGHT_JOIN table2
Table 9-2. Conditional JOIN
Syntax Variant
(6) FROM table1, table2 WHERE table1.xyID = table2.xyID
(7) FROM table1 LEFT [OUTER] JOIN table2 ON table1.xyID = table2.xyID
(8) FROM table1 LEFT [OUTER] JOIN table2 USING (xyID)
(9) FROM table1 NATURAL [LEFT [OUTER]] JOIN table2
(10) FROM table2 RIGHT [OUTER] JOIN table1 ON table1.xyID = table2.xyID
(11) FROM table2 RIGHT [OUTER] JOIN table1 USING (xyID)
In (1) through (4) in Table 9-1, MySQL tries on its own to find an optimal sequence for access
to the data. Variant (5) is distinguished from the other four in that there, the order of data extraction
CHAPTER 9 ■AN INTRODUCTION TO SQL 199
5351c09_final.qxd 8/26/05 6:17 PM Page 199
www.it-ebooks.info

from the tables is not optimized by MySQL. With (6), in joining the two tables, only those fields are
considered that are identical.
With (7) and (9), for every record of the first (left) table a result record is generated, even when
the linked field contains NULL. For example, if the titles table is used for table1, and the publishers
table for table2, then LEFT JOIN will return even those titles for which no publisher name has been
stored. (The key word OUTER is optional and has no effect on the function.)
Variants (10) and (11) correspond to (7) and (8). Note, however, that table1 and table2 have
been interchanged. The MySQL documentation recommends not using RIGHT JOIN for improved
compatibility with other databases, but instead using LEFT JOIN (with exchanged order of tables).
The USING variants assume that the ID fields in both tables have the same name. In the case
of NATURAL, like-named fields in both tables are automatically used for joining. Therefore, except
for the ID field, there can be no other like-named fields.
■Caution Please note that with
LEFT JOIN
the order of the tables is significant.
•
titles LEFT JOIN publishers
returns titles that have no publisher, but no publishers that have not published
a single title.
•
publishers LEFT JOIN titles
returns, contrariwise, publishers that have yet to publish a title, but no titles that
do not have an associated publisher.
In contrast to many other SQL dialects, MySQL recognizes no
FULL JOIN
, which would return all such combina-
tions. Such a function will likely exist beginning with MySQL 5.1.
Uniting Query Results
Starting with MySQL 4.0, with UNION you can unite two or more SELECT queries. You thereby obtain
a table of results in which the results of the individual queries are arranged one after another:
SELECT command UNION [ALL] SELECT command ...
The following example shows how the results of two SELECT commands on the same table are
united. (Of course, the queries could also be with regard to separate tables, but then you would have
to be sure that the tables had the same number of columns. Furthermore, the columns should exhibit
the same data type. If that is not the case, then MySQL attempts to fit the data to the data type of the
first SELECT command.)
USE mylibrary
SELECT *FROM authors WHERE authName LIKE 'b%'
UNION
SELECT * FROM authors WHERE authName LIKE 'g%'
authID authName__________________________
22 Bitsch Gerhard
26 Garfinkel Simon
7 Gerken Till
Normally, duplicate records are automatically eliminated from the result. Only when you use
UNION ALL does the result contain the duplicates.
You can also place the individual SELECT terms in parentheses. Then, for each part of the query,
as well as for the complete result, you can use LIMIT and ORDER as you wish. The following query
first selects at most ten records from the tables tbl1 and tbl2 and unites them. From these (at most
twenty) records, only the five most recent are displayed:
CHAPTER 9 ■AN INTRODUCTION TO SQL200
5351c09_final.qxd 8/26/05 6:17 PM Page 200
www.it-ebooks.info

(SELECT * FROM tbl1 ORDER BY colA LIMIT 10)
UNION
(SELECT * FROM tbl2 ORDER BY colA LIMIT 10)
ORDER BY colTimestamp LIMIT 5
■Note At present,
UNION
is the only set operator in MySQL. The key words
MINUS
and
INTERSECT
, available in
many other database systems, are not available in MySQL.
Grouped Queries, Aggregate Functions
The data records for our books, stored in the mylibrary database, are assigned to various categories.
If you require information as to which categories contain which books, then you will find the follow-
ing query helpful. (Warning: Books that have not been assigned to a category will not appear at all.
If you wish to see all books, then you must execute FROM titles LEFT JOIN categories ON titles.catID =
categories.catID.)
USE mylibrary
SELECT catName, title FROM titles, categories
WHERE titles.catID = categories.catID
ORDER BY catName, title
catName title__________________________________
Children's books Alltid den där Annette
Children's books Jag saknar dig, jag saknar dig
Computer books LaTeX
Computer books Linux, 5th ed.
Computer books Maple
Databases Client/Server Survival Guide
Databases Visual Basic Datenbankprogrammierung
Programming Definitive Guide to Excel VBA
Programming Visual Basic
SQL A Guide to the SQL Standard
Aggregate Functions
If you wish to determine only how many books there are in each category, you can put the fingers
of both hands to work and begin counting in the list just produced: two children’s books, three
computer books not more precisely categorized, two books on databases, and so on.
It has probably crossed your mind that there may be a more automated way of doing this:
GROUP BY name creates in the resulting list a group for each member of the specified column.
With GROUP BY catName in the above query a single row is made out of the two entries with
catName=‘Children’s books’. Which title is shown depends on the sort order, if any.
We see that with GROUP BY alone we do not accomplish much (unless we merely wanted to
generate a list of all the categories, but there are easier ways of accomplishing that). However, in
connection with GROUP BY, SQL supports aggregate functions. This means that in the column list
at the beginning of a SELECT you can use functions like COUNT, SUM, MIN, and MAX. It is when
these functions are brought into play that GROUP BY finally becomes a useful tool, as is demon-
strated by the following example: We shall count (COUNT) how many entries are associated with
each category.
New here is also the use of the key word AS, whereby the second column in the query is given
the name nrOfItems. Without AS, the column would have the name ‘COUNT(itemID)’, which not
CHAPTER 9 ■AN INTRODUCTION TO SQL 201
5351c09_final.qxd 8/26/05 6:17 PM Page 201
www.it-ebooks.info

only would be a bit confusing, but would increase the amount of typing each time the column was
referenced (e.g., in ORDER BY).
SELECT catName, COUNT(title) AS nrOfItems
FROM titles, categories
WHERE titles.catID = categories.catID
GROUP BY catname
ORDER BY catname
catName nrOfItems________
Children's books 2
Computer books 3
Databases 2
Programming 2
SQL 1
If you would like a list of all categories, even those for which at present there are no books, then
you must make the connection between the two tables with LEFT JOIN (as described in the previ-
ous section). This time, the resulting list will be sorted so that the categories with the most books
are displayed first.
SELECT catName, COUNT(title) AS nrOfItems
FROM categories LEFT JOIN titles ON titles.catid = categories.catid
GROUP BY catname
ORDER BY nrOfItems DESC
catName nrOfItems
Computer books 5
MySQL 4
Programming 3
Children's books 3
PHP 2
Databases 2
Literature and fiction 2
LaTeX, TeX 1
SQL 1
Object-oriented databases 0
All books 0
Relational Databases 0
Perl 0
■Tip The SQL function
IF
can be placed within an aggregate function, for example, to enable the consideration of
only those values that satisfy a certain condition when you are using
COUNT
or
SUM
. Application examples can be
found in the next chapter.
GROUP_CONCAT: Aggregate Functions
The aggregate function GROUP_CONCAT has been available since MySQL 4.1. It makes it possible
to group together character strings. This function offers many fascinating application possibilities,
as shown by the following example, which returns a table of all book titles that have more than one
author, together with a character string with the authors arrayed in alphabetical order.
The simplest way to proceed is to pass only the column name to the function GROUP_CONCAT.
MySQL then arranges the strings into a group in some arbitrary order, separated by commas. With
ATOR provides the desired separator character:
CHAPTER 9 ■AN INTRODUCTION TO SQL202
5351c09_final.qxd 8/26/05 6:17 PM Page 202
www.it-ebooks.info

SELECT title,
GROUP_CONCAT(authname ORDER BY authname SEPARATOR ', ')
AS authors,
COUNT(authors.authID) AS cnt
FROM authors, titles, rel_title_author
WHERE authors.authID = rel_title_author.authID
AND titles.titleID = rel_title_author.titleID
GROUP BY titles.titleID
HAVING cnt>1
ORDER BY title
title authors cnt
A Guide to the SQL Standard Darween Hugh, Date Chris 2
Client/Server Survival Guide Edwards Jeri, Harkey Dan, ... 3
Linux für Internet und Intranet Holz Helmut, Schmitt Bernd, ... 3
Maple Bitsch Gerhard, Kofler Michael, ... 3
Mit LaTeX ins Web Goosens Michael, Rahtz Sebastian 2
MySQL Kofler Michael, Kramer David 2
MySQL & mSQL King Tim, Reese Georg, Yarger ... 3
PHP 5 und MySQL 5 Kofler Michael, Öggl Bernd 2
PHP and MySQL Web Development Thomson Laura, Wellington Luke 2
The Definitive Guide to ... Kofler Michael, Kramer David 2
The Definitive Guide to ... Kofler Michael, Kramer David 2
Visual C# Frank Eller, Kofler Michael 2
Web Application Development ... Gerken Till, Ratschiller Tobias 2
GROUP BY for Several Columns
GROUP BY can also be used for several columns. The following query provides information about
the numbers of book titles in various languages and the categories in which they appear. Note that
with this query, all titles are lost that are not assigned a language or category:
SELECT, langName, catName, COUNT(*)
FROM titles, languages, categories
WHERE titles.catID = categories.catID
AND titles.langID = languages.langID
GROUP BY langName, catName
langName catName COUNT(*)__
deutsch C# 1
deutsch Children's books 1
deutsch Computer books 5
deutsch Databases 1
deutsch LaTeX, TeX 2
deutsch Linux 4
deutsch Literature and fiction 7
deutsch MySQL 1
deutsch PHP 3
deutsch Programming 4
deutsch Relational Databases 1
deutsch Visual Basic 1
deutsch Visual Basic .NET 3
english Computer books 1
english Literature and fiction 2
english MySQL 3
english PHP 2
CHAPTER 9 ■AN INTRODUCTION TO SQL 203
5351c09_final.qxd 8/26/05 6:17 PM Page 203
www.it-ebooks.info

english Science Fiction 3
english SQL 1
norsk Literature and fiction 1
svensk Children's books 2
svensk Literature and fiction 9
GROUP BY WITH ROLLUP
Since MySQL 4.1, the key words WITH ROLLUP can be appended to GROUP BY column. If GROUP
BY groups only a single column, then WITH ROLLUP simply has the effect that an additional sum
row is added, with the group name NULL being used:
SELECT langName, COUNT(*)
FROM titles, languages
WHERE titles.langID = languages.langID
GROUP BY langName WITH ROLLUP
langName COUNT(*)
deutsch 34
english 12
norsk 1
svensk 11
NULL 58
Of greater interest is the effect of ROLLUP on several columns. In this case, GROUP BY returns
a final sum for the first column and supplementary partial sums for the second column. (The sum
rows in the following are shown in boldface.)
SELECT langName, catName, COUNT(*)
FROM titles, languages, categories
WHERE titles.catID = categories.catID
AND titles.langID = languages.langID
GROUP BY langName, catName WITH ROLLUP
langName catName COUNT(*)
deutsch C# 1
deutsch Children's books 1
deutsch Computer books 5
deutsch Databases 1
deutsch LaTeX, TeX 2
deutsch Linux 4
deutsch Literature and fiction 7
deutsch MySQL 1
deutsch PHP 3
deutsch Programming 4
deutsch Relational Databases 1
deutsch Visual Basic 1
deutsch Visual Basic .NET 3
deutsch NULL 34
english Computer books 1
english Literature and fiction 2
english MySQL 3
english PHP 2
english Sience Fiction 3
english SQL 1
english NULL 12
norsk Literature and fiction 1
norsk NULL 1
svensk Children's books 2
CHAPTER 9 ■AN INTRODUCTION TO SQL204
5351c09_final.qxd 8/26/05 6:17 PM Page 204
www.it-ebooks.info

svensk Literature and fiction 9
svensk NULL 11
NULL NULL 58
Altering Data (INSERT, UPDATE, and DELETE)
Executing a Backup
Before you start playing around with your database, you should consider backing up individual tables
or perhaps the whole database, so that after you make a mess of things, you can restore the database
to its original pristine condition. You have the choice of executing a backup with mysqldump (see
Chapter 4) or directly with SQL commands. This section discusses one way of proceeding.
■Tip MySQL novices frequently change or delete more records than intended in applying
UPDATE
and
DELETE
commands, by applying them to the entire table. If you launch mysql with the option --i-am-a-dummy, then the
risk of accidental damage is reduced considerably: mysql refuses to execute
UPDATE
and
DELETE
commands
without a
WHERE
.
Creating Copies of a Table
The following instruction creates a new table with the name newtable and copies all the data records
of table into the new table. The column definitions of the new table are identical to those of the old
one, but there are some occasional differences. For example, the attribute AUTO_INCREMENT is lost.
Moreover, in the new table, no indexes are created:
CREATE TABLE newtable SELECT * FROM table
Restoring Tables
With the given commands, first all data records of the original table table are deleted. Then the
records that were saved into newtable are copied back into table. (The original AUTO_INCREMENT
values remain untouched during the copying back and forth.)
DELETE FROM table
INSERT INTO table SELECT * FROM newtable
If you no longer require the backup data, you can simply delete newtable:
DROP TABLE newtable
Making a Backup of an Entire Database
With the program mysqldump (under Windows it is mysqldump.exe) you can create a backup file (in
text format) of a complete database. Note, please, that you cannot execute mysqldump from within
mysql, but rather, you must launch it as a freestanding program in a shell or command window.
user$ mysqldump -u loginame -p dbname > backupfile
Enter password: xxxx
CHAPTER 9 ■AN INTRODUCTION TO SQL 205
5351c09_final.qxd 8/26/05 6:17 PM Page 205
www.it-ebooks.info
Restoring a Database
There is no counterpart to mysqldump for reading in a saved database. Instead, you will have to rely
on the command mysql, where you give the backup file as input source. The database dbname must
already exist.
user$ mysql -u loginname -p dbname < backupfile
Enter password: xxxx
Of course, you can also recreate the database in interactive mode:
user$ mysql -u root -p
Enter password: xxxx
mysql> CREATE DATABASE dbname; -- if dbname does not yet exist
mysql> USE dbname;
mysql> SOURCE backupfile;
Inserting Data Records (INSERT)
With INSERT you can add a new record to a table. After the name of the table there must appear first
a list of the column names and then a list with the values to be inserted. (Columns with a default
value, columns that can be NULL, and AUTO_INCREMENT columns do not have to be specified.)
In the following example, a new data record is saved in the table titles in the mylibrary database.
Only two columns (title and year) will be specified. All remaining columns are taken care of by MySQL:
A new AUTO_INCREMENT value is placed in titleID, and in the other columns, the requisite default
value or NULL. (This process is allowed only because when the titles table was created, a default value
was specifically provided for, and NULL was specified as a permissible value.)
USE mylibrary
INSERT INTO titles (title, year)
VALUES ('MySQL', 2005)
One may do without naming the columns if values for all columns (including default and
AUTO_INCREMENT columns) are given and the order of the columns is followed exactly. In the
case of titles, there are quite a few columns: titleID, title, subtitle, edition, publID, catID, langID,
year, isbn, comment, and ts.
In the following command, for some columns the value NULL is given. In most cases MySQL then
actually stores the value NULL. However, in the titles table there are two exceptions: MySQL automati-
cally generates for the titleID column a new ID number (on account of the AUTO_INCREMENT
attribute) and stores in ts the current date and time (since we are dealing with a TIMESTAMP column).
INSERT INTO titles
VALUES (NULL, 'deleteme', '', 1, NULL, NULL, NULL, 2005, NULL, NULL, NULL)
Another syntax variant enables several new records to be inserted with a single command:
INSERT INTO table (columnA, columnB, columnC)
VALUES ('a', 1, 2), ('b', 12, 13), ('c', 22, 33), ...
INSERT with Related Tables
If you are dealing with related tables, then normally, insertion of records is not accomplished with
a single INSERT command. For example, to store a book record in the mylibrary database, new
records must be stored in at least the tables titles and rel_title_author. If the new book was written
by an author or authors whose names have not yet been stored in the database, or if it was pub-
lished by a publisher that is currently unknown to the database, then new data records will also
have to be added to the tables publishers and authors.
CHAPTER 9 ■AN INTRODUCTION TO SQL206
5351c09_final.qxd 8/26/05 6:17 PM Page 206
www.it-ebooks.info
However, now we have the problem that not all the data for the INSERT command are known at
the outset. To store a book published by a new publisher, the publID of the publisher must be given
in the titles table. This is an AUTO_INCREMENT value, which is generated by MySQL only when the
new publisher is stored in the database.
There must, then, be a way to access the last-generated AUTO_INCREMENT value. And indeed
there is. The function for this is LAST_INSERT_ID(), which returns the AUTO_INCREMENT value of
the last INSERT command. This function has effect only within the current connection. That is,
AUTO_INCREMENT values that may have arisen through the INSERT commands of other database
users are ignored.
The following lines show how a book with a good deal of new information (three new authors,
a new publisher) is stored. The book in question is the following: Randy Yarger, George Reese, Tim
King, MySQL & mSQL, O’Reilly 1999.
INSERT INTO publishers (publName) VALUES ('O\'Reilly & Associates')
SELECT LAST_INSERT_ID()
4 <--- publID for the publishes
INSERT INTO authors (authName) VALUES ('Yarger R.')
SELECT LAST_INSERT_ID()
12 <--- authID for the first author
INSERT INTO authors (author) VALUES ('Reese G.')
SELECT LAST_INSERT_ID()
13 <--- authID for the second author
INSERT INTO authors (author) VALUES ('King T.')
SELECT LAST_INSERT_ID()
14 <--- authID for the third author
INSERT INTO titles (title, publID, year)
VALUES ('MySQL & mSQL', 4, 1999)
SELECT LAST_INSERT_ID()
9 <--- titleID for the book
INSERT INTO rel_title_author
VALUES (9, 12), (9, 13), (9,14)
Of course, you will put in these values manually only for trying things out. In practice, you will
not, of course, input these commands manually. In practice, the user interface of a PHP or Perl or
Java program will take care of evaluation and reevaluation of the ID values. The program will also
ensure that authors and publishers who already appear in the database are not stored again by mis-
take. (For the programming language PHP, such a program is introduced in Chapter 15.)
Altering Data Records (UPDATE)
With UPDATE you can change individual fields of an existing database. The usual syntax of this
command is the following:
UPDATE tablename
SET column1=value1, column2=value2, ...
WHERE columnID=n
Thus individual fields of a record specified by its ID value are changed. In the following exam-
ple we change the title of the Linux book (titleID=1):
USE mylibrary
UPDATE titles SET title='Linux, 6th ed.' WHERE titleID=1
If UPDATE is used without WHERE, then the change is instituted for all data records (beware!). The
following command, for example, would change the publication date of all books to the year 2005:
UPDATE titles SET year=2005
CHAPTER 9 ■AN INTRODUCTION TO SQL 207
5351c09_final.qxd 8/26/05 6:17 PM Page 207
www.it-ebooks.info

With certain restrictions, calculations are permissible in UPDATE commands. Let us suppose
that the price of the book was stored in the titles table. Then it would be easy to increase all prices
by five percent:
UPDATE title SET price=price*1.05
Editing Data Records in Sorted Lists (UPDATE with ORDER BY and LIMIT)
If you want to change the first or last ndata records, with the UPDATE command you can also spec-
ify ORDER BY and LIMIT (since MySQL 4.0). The following command sets the field mydata to zero
for the first ten data records (in alphabetical order) of the table tablename:
UPDATE tablename SET mydata=0 ORDER BY name LIMIT 10
Updating with Linked Tables
You can process the data from several tables using UPDATE commands (since MySQL 4.0). The follow-
ing example changes the column columnA of table1, where the new data come from table2.columnB.
The link between the two fields is established via the common ID field table1ID (a genuine example of
a multitable UPDATE command is given in Chapter 10):
UPDATE table1, table1
SET table1.columnA = table.columnB
WHERE table1.table1ID = table2.table1ID
Deleting Data Records (DELETE)
There can be little doubt that the syntactically simplest command of this section is DELETE. All
records selected with WHERE are simply deleted. Here it is not required to specify the columns
(indeed, it is not possible), since in any case, the entire data record is made to disappear without
a trace. The following instruction deletes a single record from the titles table:
USE mylibrary
DELETE FROM titles WHERE titleID=8
■Caution If
DELETE
is executed without a
WHERE
condition, then all the records of the table will be deleted.
There is no “undo” possibility. The table itself with its definition of columns, indexes, etc. remains intact. If you
wish to delete the table itself, then you must execute the command
DROP TABLE
.
Deleting Records from Linked Tables
In MySQL 3.23, the DELETE command can be used with reference to only a single table. Since
MySQL 4.0, the following syntax is allowed:
DELETE t1, t2 FROM t1, t2, t3 WHERE condition1 AND condition2 ...
With this, all data records from tables t1 and t2 that satisfy the specified conditions are deleted.
The conditions may contain arbitrary connections among the tables t1, t2, and t3. (To formulate it
more generally, DELETE deletes records from only those tables that are given before FROM. In the
conditions, records can be used from all tables that appear after FROM.)
The following example deletes from the titles table all book titles of the author Kofler Michael.
To find the titles to be deleted, a link is created among the three tables titles, rel_title_author, and
authors:
CHAPTER 9 ■AN INTRODUCTION TO SQL208
5351c09_final.qxd 8/26/05 6:17 PM Page 208
www.it-ebooks.info

USE mylibrary
DELETE titles FROM titles, rel_title_author, authors
WHERE titles.titleID=rel_title_author.titleID
AND authors.authID=rel_title_author.authID
AND authors.authName='Kofler Michael'
The following variant of the command given above deletes not only the titles, but Kofler Michael
from the authors table, as well as all records from rel_title_author that create the link between the
author Kofler Michael and his books (the difference here is that now all three tables are listed before
FROM):
DELETE titles, rel_title_author, authors
FROM titles, rel_title_author, authors
WHERE titles.titleID=rel_title_author.titleID
AND authors.authID=rel_title_author.authID
AND authors.authName='Kofler Michael'
The linkage between the tables can also be made via JOIN operators.
■Caution The two commands just presented are syntactically correct, to be sure, but they lead to the following
error:
a foreign key constraint fails
. The reason is that there are two
Foreign Key
rules for the table
rel_title_author
.
One of them says that a title still in use in
rel_title_author
cannot be deleted from
titles
. The second rule says that
no author can be deleted from
authors
if it is being pointed to by
rel_title_author
. Therefore, you must first delete
the relevant entry from
rel_title_author
, which alas requires the use of several separate
DELETE
commands.
There are several ways of getting around this difficulty: You can temporarily turn off the checking of
Foreign Key
rules via
SET foreign_key_checks=0
, and after the
DELETE
command reactivate it by
SET foreign_key_checks=1
.
(
SET
is an independent SQL command.)
You can formulate the
Foreign Key
rules with
ON DELETE CASCADE
. Then even dependent data records from
other tables are automatically deleted.
The third alternative consists in completely eschewing
Foreign Key
rules or else using MyISAM tables (which
do not support data integrity rules).
Deleting Data Records from Sorted Lists (DELETE with ORDER BY and LIMIT)
ORDER BY can also be used in DELETE commands (since MySQL 4.0). This makes it possible, in
combination with LIMIT, to delete the first or last nelements of a table. In doing so, one may use
an arbitrary sort criterion. The following command deletes the most recently entered or changed
author from the authors table (the column ts contains the time of the last change):
DELETE FROM authors ORDER BY ts DESC LIMIT 1
Creating New Tables, Databases, and Indexes
Normally, you will use the MySQL Administrator, phpMyAdmin, or another administration tool to
create or alter databases or tables. This spares you from the error-prone formulation of CREATE and
ALTER commands.
Sometimes, it can be useful to execute a change directly in the mysql command interpreter. Fur-
thermore, it occasionally happens that you have to alter databases or tables in a client program (for
instance, in a PHP script). For such cases you need to know the syntax of the CREATE and ALTER
commands. In what follows, only the most important syntax variants will be described. A reference
to the most important options for ALTER and CREATE is contained in Chapter 21.
CHAPTER 9 ■AN INTRODUCTION TO SQL 209
5351c09_final.qxd 8/26/05 6:17 PM Page 209
www.it-ebooks.info

■Note Regardless of the tool that you choose to work with, before you begin, the question of access rights must
be clarified. If MySQL is securely configured and you do not happen to be the MySQL administrator, then you are not
permitted to create a new database at all.The topics of access rights and security are discussed in Chapter 11.
With existing databases or tables, you can use
SHOW CREATE DATABASE name
or
SHOW CREATE TABLE name
in SQL code to create the database or table anew.
Creating a Database (CREATE DATABASE)
Before you can set up any tables, you must first create a database. This creates an empty directory
on the hard drive. To create a database named mylibrary, use the command
CREATE DATABASE mylibrary
Optionally, you can specify a default character set and sort order:
CREATE DATABASE mylibrary
DEFAULT CHARACTER SET latin1 COLLATE latin1_general_ci
The following USE command makes the new database the default database for all future SQL
commands:
USE mylibrary
Creating Tables (CREATE TABLE)
New tables are created with the command CREATE TABLE. The syntax for this command, somewhat
simplified, looks like this:
CREATE [TEMPORARY] TABLE [IF NOT EXISTS] tblname (
colname1 coltype coloptions reference,
colname2 coltype coloptions reference...
[ , index1, index2 ...] )
[ ENGINE = MyISAM|InnoDB|HEAP ]
[ DEFAULT CHARSET = csname [ COLLATE = colname ]]
The main part of the command describes the columns of the table (name, data type, attributes)
as well as the indexes (index name, indexed columns in parentheses, e.g., publIDIndex (publID)).
The syntax will become clearer when we look at an example. The following command generates the
titles table:
CREATE TABLE titles (
titleID INT NOT NULL AUTO_INCREMENT,
title VARCHAR(100) NOT NULL,
subtitle VARCHAR(100),
edition TINYINT,
publID INT,
catID INT,
langID INT,
year INT,
isbn VARCHAR(20),
comment VARCHAR(255),
ts b,
PRIMARY KEY (titleID),
KEY publIdIndex (publID),
KEY langID (langID),
CHAPTER 9 ■AN INTRODUCTION TO SQL210
5351c09_final.qxd 8/26/05 6:17 PM Page 210
www.it-ebooks.info

KEY catID (catID),
KEY title (title),
CONSTRAINT titles_ibfk_1 FOREIGN KEY (publID)
REFERENCES publishers (publID),
CONSTRAINT titles_ibfk_2 FOREIGN KEY (langID)
REFERENCES languages (langID),
CONSTRAINT titles_ibfk_3 FOREIGN KEY (catID)
REFERENCES categories (catID) )
ENGINE = InnoDB
DEFAULT CHARSET = latin1 COLLATE = latin1_german1_ci
The formulation of the Foreign Key rules (CONSTRAINT …) assumes that the tables categories,
languages, and publishers already exist. If that is not the case, you can add the integrity rules later
using ALTER TABLE.
Creating New Tables with SELECT Results
You can store the result of a query directly in a new table. (In practice, this path is sometimes fol-
lowed in order to store the results of a complex query temporarily.) To do this, you simply specify
the name of a new table with CREATE TABLE and insert an ordinary SELECT command at the end
of the instruction. The following instruction copies all titles with catID=1 (category Computer books)
into the new table computerbooks:
USE mylibrary
CREATE TABLE computerbooks
SELECT * FROM titles WHERE catID=1
From then on, the new table is available. With SELECT you can convince yourself that indeed the
desired data are in the table:
SELECT title FROM computerbooks
title____________________________
Linux, 5th ed.
LaTeX
Mathematica
Maple
Practical UNIX & Internet security
When the time comes that you no longer have any need of the table computerbooks, you can
easily delete it:
DROP TABLE computerbooks
MySQL determines the column properties of the new table corresponding to the results of the
SELECT command. It can transpire that the old and new tables will differ in some details.
Creating Indexes (CREATE INDEX)
Indexes can be created either in the CREATE TABLE command, or later using CREATE INDEX or
ALTER TABLE . The syntax for describing the index is the same in all three cases. The following three
commands show three variants for providing the title column of the title table with an index. The
index received the name idxtitle. (Of course, only one of the three commands can be executed. If
you try a second command, MySQL will inform you that an index already exists.)
CHAPTER 9 ■AN INTRODUCTION TO SQL 211
5351c09_final.qxd 8/26/05 6:17 PM Page 211
www.it-ebooks.info
CREATE TABLE titles (
titleID ..., title ..., publID ..., year ...,
PRIMARY KEY \dots,
INDEX idxtitle (title))
CREATE INDEX idxtitle ON title (title)
ALTER TABLE titles ADD INDEX idxtitle (title)
SHOW INDEX FROM tablename produces a list of all defined indexes. Existing indexes can be
eliminated with DROP INDEX indexname ON tablename.
If you wish to reduce the number of significant characters per index in the index to the first
16 characters, the syntax looks like this:
ALTER TABLE titles ADD INDEX idxtitle (title(16))
Changing the Table Design (ALTER TABLE)
With ALTER TABLE you can change various details of a table such as adding or deleting columns,
changing properties of columns (such as data type), and defining or deleting indexes. The following
example shows how you can increase the maximum number of characters in the title column of the
titles table to 150:
ALTER TABLE titles CHANGE title title VARCHAR(150) NOT NULL
Perhaps somewhat confusing in the ALTER TABLE command is the twofold naming of title.
The first occurrence refers to the current name of the column, while the second is the new (but here
unchanged) name of the column.
Here are the most important syntax variants of ALTER TABLE:
Add a Column
ALTER TABLE tblname ADD newcolname coltype coloptions
[FIRST | AFTER existingcolumn]
Alter a Column
ALTER TABLE tblname CHANGE oldcolname newcolname coltype coloptions
Delete a Column
ALTER TABLE tblname DROP colname
Add an Index
ALTER TABLE tblname ADD PRIMARY KEY (indexcols ...)
ALTER TABLE tblname ADD INDEX [indexname] (indexcols ...)
ALTER TABLE tblname ADD UNIQUE [indexname] (indexcols ...)
ALTER TABLE tblname ADD FULLTEXT [indexname] (indexcols ...)
Add Foreign Key Rules
ALTER TABLE tblname ADD FOREIGN KEY [idxname]
(column1) REFERENCES table2 (column2)
CHAPTER 9 ■AN INTRODUCTION TO SQL212
5351c09_final.qxd 8/26/05 6:17 PM Page 212
www.it-ebooks.info

Delete an Index
ALTER TABLE tblname DROP PRIMARY KEY
ALTER TABLE tblname DROP INDEX indexname
ALTER TABLE tblname DROP FOREIGN KEY indexname
Change the Character Set of All Text Columns
ALTER TABLE tblname CONVERT TO CHARACTER SET charsetname
Change the Type of the Table (MyISAM, InnoDB)
ALTER TABLE tblname ENGINE typename
The attempt to change from MyISAM to InnoDB fails if the MyISAM table contains a full-text
index or geometric data. (These functions are not supported by InnoDB.)
If you wish to change the type of large number of tables, then under Unix/Linux, the use of the
script mysql_convert_table_format is to be recommended. If you do not specify any table names, all
tables of the database will be converted:
root# mysql_convert_table_format [opt] --type=InnoDB dbname [tblname]
■Caution Do not change the table type of the tables of the
mysql
database! These tables, which contain
management information internal to MySQL (user and access privileges), should as a matter of principle be left
in MyISAM format.
Deleting Databases and Tables (DROP)
The following two commands delete a table or an entire database. It cannot be undone:
DROP TABLE tblname
DROP DATABASE dbname
Automatic Table Design Changes (Silent Column Changes)
When you create (CREATE TABLE) or change (ALTER TABLE) a table, MySQL will under certain condi-
tions automatically make changes to the table design. The reason is either that the table will thereby
become more efficient or that your design wishes cannot be carried out by MySQL.
For those migrating from other database systems, such highhandedness can be an annoyance.
You should therefore always convince yourself, using SHOW CREATE TABLE that the table design is
what you think it is. The following example shows that MySQL makes a VARCHAR(20) column out of
a CHAR(20) column and gives the two columns the attribute DEFAULT NULL.
CREATE TABLE test1 (col1 VARCHAR(20), col2 CHAR(20))
SHOW CREATE TABLE test1
CREATE TABLE `test1` (
`col1` varchar(20) default NULL,
`col2` varchar(20) default NULL
) ENGINE=MyISAM DEFAULT CHARSET=latin1
CHAPTER 9 ■AN INTRODUCTION TO SQL 213
5351c09_final.qxd 8/26/05 6:17 PM Page 213
www.it-ebooks.info

The following list shows the most important design changes that MySQL carries out:
•VARCHAR(n) columns with n< 4 are transformed into CHAR(n) columns.
•CHAR(n) columns with n > 3 are transformed into VARCHAR(n) columns if there exist in the
table additional VARCHAR, TEXT, or BLOB columns. However, if the table consists exclusively
of columns of constant length, then CHAR(n) remains unchanged.
• In the case of TIMESTAMP columns, the attributes NULL and NOT NULL are not eliminated.
The reason is that MySQL is incapable of storing the value NULL in TIMESTAMP. The assign-
ment NULL has the effect that the current time or the value 0000-00-00 00:00:00 is stored.
• With PRIMARY KEY columns, the attribute NOT NULL is added if you do not do so yourself.
• If you do not specify a default value for a column, then MySQL defines a suitable value
(NULL, 0, or an empty character string).
Further information on such peculiarities, which the MySQL documentation calls silent col-
umn changes, can be found at http://dev.mysql.com/doc/mysql/en/silent-column-changes.html.
Retrieving Metadata About Databases and Tables Administration tools must be able to determine
the databases that MySQL is managing, the tables contained within these databases, the properties
of the columns of these tables, and so on. Even in everyday dealings with MySQL, it is often useful
to retrieve a quick overview of the indexes in a table. Such information, not about the content of
your tables but about the tables’ properties, is called metadata.
The SHOW Command
The traditional way of retrieving metadata is to execute SHOW commands. For example, SHOW
DATABASES returns a list of all databases to which the current user has access. SHOW TABLES
returns a list of the tables in the current database, SHOW COLUMNS information about the
columns of a table, and so on.
Table 9-3 collects these commands that return metadata about databases and tables. Most of
them allow you to limit the results with the option LIKE pattern. For example, SHOW DATABASES
LIKE ‘test%’ returns all databases whose name begins with test. Here is an example of a SHOW
command:
SHOW COLUMNS FROM mylibrary.titles
Field Type Null Key Default Extra
titleID int(11) PRI NULL auto_increment
title varchar(100) MUL
subtitle varchar(100) YES NULL
edition tinyint(4) YES NULL
publID int(11) YES MUL NULL
catID int(11) YES MUL NULL
langID int(11) YES MUL NULL
year int(11) YES NULL
isbn varchar(20) YES NULL
comment varchar(255) YES NULL
ts timestamp YES CURRENT_TIMESTAMP
The precise syntax of these commands can be found in Chapter 21. Some additional SHOW
commands for retrieving additional data are also described there. For example, SHOW COLLATIONS
returns all sort orders supported by MySQL, while SHOW WARNINGS returns all warnings returned
by the most recently executed command.
CHAPTER 9 ■AN INTRODUCTION TO SQL214
5351c09_final.qxd 8/26/05 6:17 PM Page 214
www.it-ebooks.info

Table 9-3. SHOW Commands
Command Function
SHOW DATABASES Returns a list of all databases
SHOW TABLES FROM dbname Returns a list of all tables in dbname
SHOW [FULL] COLUMNS FROM tablename Returns detailed information about all columns of
the table tablename
SHOW INDEX FROM tablename Returns information about all indexes of the table
INFORMATION_SCHEMA Tables
The SHOW commands work properly. However, they do not conform to the SQL:2003 standard and
are furthermore inconsistent: For each type of query, the powerful SELECT command can be used,
only not for determining data that underlie the database system itself.
MySQL 5.0 comes to the rescue with INFORMATION_SCHEMA tables. Using SELECT commands,
you can retrieve specific metadata from these tables about databases, tables, columns, and so on. The
great advantage vis-à-vis SHOW commands is that the whole panoply of syntax variants of SELECT is
available. Furthermore, INFORMATION_SCHEMA tables return considerably more information than
do SHOW commands. The following command offers an example:
SELECT column_name, ordinal_position, column_default,
data_type, collation_name
FROM information_schema.columns
WHERE table_schema="mylibrary" AND table_name="titles"
column_name ordinal_position is_nullable data_type collation_name
titleID 1 int NULL
title 2 varchar latin1_german1_ci
subtitle 3 YES varchar latin1_german1_ci
edition 4 YES tinyint NULL
publID 5 YES int NULL
catID 6 YES int NULL
langID 7 YES int NULL
year 8 YES int NULL
isbn 9 YES varchar latin1_german1_ci
comment 10 YES varchar latin1_german1_ci
ts 11 YES timestamp NULL
Table 9-4 collects the content of these tables. Here information_schema is a virtual database, one
that does not actually exist as a file. Therefore, neither SHOW DATABASES nor SELECT * FROM
information_schema.schemata works with this database, nor does USE information_schema work
either.
The information_schema tables cannot be changed (INSERT, UPDATE, etc. are not allowed). In
accessing these tables and columns, there is no case distinction. A list of all available tables can be
determined with SHOW TABLES FROM information_schema, and the available columns with SHOW
COLUMNS FROM information_schema.tablename. So you can see that SHOW still has its uses.
The names of the tables and columns are in conformity with the SQL:2003 standard. However,
there are some tables and columns provided for in the standard that MySQL does not yet imple-
ment. In return, however, there are some additional columns with MySQL-specific information,
for example, for the table type (Engine = MyISAM, InnoDB, etc.).
CHAPTER 9 ■AN INTRODUCTION TO SQL 215
5351c09_final.qxd 8/26/05 6:17 PM Page 215
www.it-ebooks.info

Table 9-4. information_schema Tables
Table Content
information_schema.schemata Contains data on all available databases.
.tables Describes the properties of all tables.
.columns Describes the properties of all table columns.
.statistics Contains statistical information on the table indexes.
.views Describes the properties of all views.
.table_constraints Lists the PRIMARY, UNIQUE, and FOREIGN KEY
indexes of all tables.
.key_column_usage Also lists all indexes, but contains even more detail than
table_constraints.
.referential_constraints Describes all FOREIGN KEY rules (not yet
implemented).
User Management and Privileges
.user_privileges Contains a list of every MySQL user. The data come
from the table mysql.user.
.schema_privileges Describes database-specific privileges (table mysql.db).
.table_privileges Describes table-specific privileges (table
mysql.tables_priv).
.column_privileges Describes access privileges to individual columns (table
mysql.columns_priv).
Character Sets and Sort Orders
.character_sets Contains all available character sets.
.collations Contains all available sort orders.
.collation_character_set_applicability Specifies which sort orders are stuitable for which
character sets.
Stored Procedures and Trigger
.routines Contains information about all stored procedures
(corresponds to the content of the table mysql.proc).
.parameters Describes the parameters of stored procedures (not yet
implemented).
.triggers Contains data on all triggers (not yet implemented).
For the information_schema tables, the usual MySQL access privileges do not apply. Every user
who wishes to register with the MySQL server can execute SELECT commands for all
information_schema tables.
CHAPTER 9 ■AN INTRODUCTION TO SQL216
5351c09_final.qxd 8/26/05 6:17 PM Page 216
www.it-ebooks.info

SQL Recipes
This chapter contains a collection of small SQL examples that go somewhat beyond the elementary
level of the other examples in this chapter. The goal is to give you an idea of some of the possibilities
that the world of SQL opens to you and to provide recipes for solving frequently occurring problems.
Most of these examples are based on the example databases introduced in Chapter 8, and so
you can easily try these commands out yourself. However, we will also introduce some techniques
based on imaginary databases and tables.
Character Strings
MySQL recognizes a large number of functions that allow for the processing of character strings in
queries. The following examples introduce several of these functions. A reference for MySQL func-
tions for processing character strings can be found in Chapter 21.
Basic Functions
Concatenating Character Strings
CONCAT(s1, s2, …) concatenates the given character strings into a single string. This function is use-
ful for joining together several columns (for example, when you have stored first and last names in
different columns and now wish to put them together):
SELECT CONCAT(firstname, ' ', lastname) FROM addresses
Extracting Parts of Character Strings
SUBSTRING(s, pos, n) returns ncharacters of the character string sstarting at position pos. (The first
character is addressed at position pos=1, not at pos=0.) The following command returns the first ten
characters of all book titles from the mylibrary database:
USE mylibrary
SELECT SUBSTR(title, 1, 10) FROM titles
Those familiar with the syntax of the Basic programming language can use LEFT, RIGHT, and
MID instead of SUBSTR to read strings conveniently from the beginning or from the end. We will
offer an example of this later.
Determining the Length of a Character String
CHAR_LENGTH(s) returns the number of characters in a character string, and LENGTH the number
of bytes required to store the string. In the case of latin1 strings, both values are always the same. 217
CHAPTER 10
■ ■ ■
5351c10_final.qxd 8/26/05 6:24 PM Page 217
www.it-ebooks.info

But if you use Unicode or another multibyte character set, then more than one byte per character is
frequently necessary.
Shortening Strings to a Particular Length
The function IF(a, b, c) evaluates expression a. If the result is (TRUE), the function returns b; other-
wise, c. The goal of the following example is to shorten book titles to the form “beginning of title, …
end of title,” so that the entire length of the resulting character string is at most thirty characters.
Titles with thirty characters or fewer are unchanged:
SELECT IF(CHAR_LENGTH(title)>30,
CONCAT(LEFT(title, 20), ' ... ', RIGHT(title, 5)),
title)
FROM titles AS shorttitle
shorttitle___________________
Linux für Internet u ... ranet
Mathematica
Practical UNIX & Int ... urity
Visual Basic Datenba ... erung
...
Storing Altered Character Strings
Of course, you can also use character string functions to alter MySQL tables. The following com-
mand replaces the character “with the character ‘in the column mycolumn of the table mytable.
The function REPLACE is used for this purpose:
UPDATE mytable SET mycolumn = REPLACE(mycolumn, '"', '\'')
The next command searches for the blank character. If this character is found, then presum-
ably the string is composed of several parts (words). The UPDATE command shortens this string to
the first word. New here is the function LOCATE, which returns the position of the search pattern
within a character string:
UPDATE mytable
SET mycolumn = LEFT(mycolumn, LOCATE(" ", mycolumn )-1)
WHERE LOCATE(" ", mycolumn) > 1
Changing the Character Set
With the function CONVERT(x USING charset) you can change the character set of a string. The
following command returns its results in Unicode (the example databases for this book use latin1
character strings). Note that in general, changing the character set has no effect, since the change
occurs only in the MySQL server. The server passes its results to the client, and in this passage, all
character strings are adapted to the client’s character set:
SELECT CONVERT(title USING utf8) FROM titles
That CONVERT actually works can be seen by transforming the character string into hexadeci-
mal representation:
SELECT HEX(CONVERT('äöü' USING latin1))
E4F6FC
SELECT HEX(CONVERT('äöü' USING utf8))
C3A4C3B6C3BC
CHAPTER 10 ■SQL RECIPES218
5351c10_final.qxd 8/26/05 6:24 PM Page 218
www.it-ebooks.info

You can also use the CONVERT function to copy data from one column of a table into another
and thereby change the character set. The following commands add a new column, title_utf8, to the
titles table and copy into it the book titles in Unicode format:
ALTER TABLE titles ADD title_utf8 VARCHAR(100) CHARSET utf8
UPDATE titles SET title_utf8 = CONVERT(title USING utf8)
As a check, you can determine how many bytes are necessary for storing the title. Titles with
special characters require more bytes in utf8 format than in the original latin1 column:
SELECT title,
LENGTH(title) AS latin1length,
LENGTH(titles_utf8) AS utf8length FROM titlescopy
HAVING latin1length!=utf8length ORDER BY title
title latin1length utf8length
Alltid den där Annette 22 23
Comédia Infantil 16 17
Dansläraren Återkomst 21 23
Das Haus meiner Väter 21 22
Gengångare 10 11
Kärleken 8 9
Linux für Internet und Intranet 31 32
Linux im Büro 13 14
Nicht alle Eisbären halten Winterschlaf 39 40
PHP - Grundlagen und Lösungen 29 30
Specifying the Character Set of a Character String (Cast Operator)
When character strings in an SQL command appear in an encoding that differs from the default
character set of the client (see the following section), then such strings must be prefixed with a cast
operator that specifies the character string. Such operators consist of the name of the character set
preceded by the underscore character, for example, _utf8 or _latin1:
INSERT INTO titles (title) VALUES( _utf8 'title in UTF-8 encoding)
Setting the Client Character Set
What good is it if the MySQL server can operate with all sorts of character sets, but the client (that is,
for example, your PHP program or the command line interpreter) assumes a single particular char-
acter set? The MySQL client libraries thus automatically translate all character strings from the client’s
character set into the character set of the server (and vice versa). In the given character set, charac-
ters that cannot be represented are replaced with a question mark.
Which aspects of the relation between client and server are used with which character sets is
governed by several MySQL system variables, which are listed in Table 10-1.
Table 10-1. MySQL Character Set Variables
Variable Interpretation
@@character_set_client Client’s character set
@@character_set_server Server’s default character set
@@character_set_connection Character set for the connection between client and server
@@character_set_results Character set for SELECT results
@@character_set_database Default character set for the database
CHAPTER 10 ■SQL RECIPES 219
5351c10_final.qxd 8/26/05 6:24 PM Page 219
www.it-ebooks.info

The client does not always guess correctly the character set in which you wish to process your
data. The simplest thing to do is to check the state of the variables with the following command:
SHOW VARIABLES LIKE 'character_set\_%'
Variable_name Value_____
character_set_client latin1
character_set_connection latin1
character_set_database latin1
character_set_results latin1
character_set_server latin1
character_set_system utf8
With some client programs you can specify the desired character set right at the start or when
the connection is established, for example, in the program mysql or mysqldump using the option
--default-character-set=utf8. Otherwise, you must set the variables shown above in your client
program yourself. For example, if you wish to process UTF-8 data, the command looks like this:
SET @@session.character_set_client = 'utf8'
SET @@session.character_set_results = 'utf8'
SET @@character_set_connection = 'utf8'
Instead of the three SET commands, you can simply execute the command SET NAMES ‘utf8’; it
resets all three variables. As an alternative, the command SET CHARACTER SET ‘utf8’ is available. It
assigns utf8 to character_set_client and character_set_results and provides character_set_connection
the value of character_set_database, which is sufficient in most cases.
After these preparations you should be able to execute SQL commands with UTF-8 character
strings and retrieve SELECT results in UTF-8 format.
Pattern Matching
Pattern Matching with LIKE
The operator LIKE is suited for simple pattern matching. It supports two wild cards: _ for a single
arbitrary character, and % for an arbitrary number (including 0) of characters. As with ordinary string
comparison, LIKE does not distinguish between uppercase and lowercase. Here is an example:
SELECT 'MySQL' LIKE '%sql'
1
The following SELECT command returns all book titles that contain the character string “SQL”:
USE mylibrary
SELECT title FROM titles WHERE title LIKE '%SQL%'
If the character _ or % is itself to be used in the pattern to be matched, then it must be
preceded by a backslash, as in ‘50%’ LIKE ‘%\%’, which returns 1. If you wish to use a character
other than the backslash as the escape character, then you may specify such a character with
ESCAPE: ‘50%’ LIKE ‘%&%’ ESCAPE ‘&’, which also returns 1.
■Note Please note that doing pattern matching in large tables is very slow.This holds for
LIKE
, and even more
so for
REGEXP
. In many cases it makes more sense to do a full-text search instead of pattern matching.
CHAPTER 10 ■SQL RECIPES220
5351c10_final.qxd 8/26/05 6:24 PM Page 220
www.it-ebooks.info

Pattern Matching with REGEXP
The command REGEXP offers many more possibilities for formulating a pattern, as does the
equivalent command RLIKE. As with LIKE, case distinction is not made. Here we give a few syn-
tactic examples. A table with the most important elements of REGEXP pattern matching appears
in Chapter 21.
In the simplest case, expr REGEXP pattern tests whether the character string pattern is con-
tained in expr:
SELECT 'abcabc' REGEXP 'abc', 'abcabc' REGEXP 'cb'
1, 0
The search pattern does not have to describe the entire character string, but only a part. If you
wish to encompass the entire character string, you must use ^ and $ in the search:
SELECT 'abc' REGEXP '^abc$', 'abcabc' REGEXP '^abc$'
1, 0
Square brackets indicate a selection from among several characters, where a hyphen is used to
indicate a range of characters; for example, a-c indicates the inclusive range from ato c. The opera-
tor + indicates that at least one of the characters must appear at least once in the search expression:
SELECT 'cde' REGEXP '[a-c]+', 'efg' REGEXP '[a-c]+'
1, 0
Parentheses indicate an entire character string, and curly braces indicate how many times the
character string must appear in succession:
SELECT 'xabcabcz' REGEXP '(abc){2}', 'xabcyabcz' REGEXP '(abc){2}'
1, 0
Note that REGEXP is successful when the search pattern is found at any location within the
character string.
■Tip A large number of additional examples can be found in the appendix to the MySQL documentation:
http://dev.mysql.com/doc/mysql/en/regexp.html.
Binary Character String Comparison
Character strings are generally compared without regard to case sensitivity. That is, 'a'='A' returns
1 as a result. If you wish to execute a binary search, you must write BINARY in front of one of the
operands. BINARY is a “cast” operator. That is, it changes the data type of an operand (thus changes
a number or character string into a binary object). BINARY can be used for ordinary string compari-
son and also for pattern matching with LIKE and REGEXP:
SELECT 'a'='A', BINARY 'a' = 'A', 'a' = BINARY 'A'
1, 0, 0
SELECT 'abcabc' REGEXP 'ABC', 'abcabc' REGEXP BINARY 'ABC'
1, 0
Date and Time
Most of the examples of this section assume that mytable has a column ts with time values (data
type DATETIME or TIMESTAMP).
CHAPTER 10 ■SQL RECIPES 221
5351c10_final.qxd 8/26/05 6:24 PM Page 221
www.it-ebooks.info

Syntax for Date and Time
Basically, dates and times in SQL commands must be given as character strings, using a syntax
that the MySQL server understands. The following three queries are equivalent, and work for both
DATETIME and TIMESTAMP columns:
SELECT COUNT(*) FROM mytable
WHERE ts BETWEEN '2004-05-16 08:34:07' AND '2005-02-11 00:15:44'
SELECT COUNT(*) FROM mytable
WHERE ts BETWEEN '2004/05/16 08:34:07' AND '2005/02/11 00:15:44'
SELECT COUNT(*) FROM mytable
WHERE ts BETWEEN '20040516083407' AND '20050211001544'
Note that BETWEEN a AND b means that the start and end times are included (that is, d>=a AND
d<=b).
Determining the Number of Records by Day, Month, and Year
It happens quite often that you want to know how many records there are for a particular day or
month. Of course, you can execute a number of queries with BETWEEN start AND end. But it is
much simpler to format the data field with various functions and determine the number using
GROUP BY and COUNT.
Our first example returns the number of votes by month for the year 2005 for the database
bigvote. Month and year are determined by the MySQL functions MONTH and YEAR (the database
bigvote has the same structure as test_vote from Chapter 3, but it contains about 5,000 entries):
USE bigvote
SELECT COUNT(*), MONTH(ts) AS m
FROM votelanguage
WHERE YEAR(ts)=2002
GROUP BY m
COUNT(*) m___
152 1
227 2
... ...
58 12
If you want all results (not just for one year), then the expression for the grouping must contain
both the year and the month. For this, you should use the DATE_FORMAT function (whose syntax is
described in Chapter 21):
SELECT COUNT(*), DATE_FORMAT(ts, '%Y-%m') AS m_y
FROM votelanguage
GROUP by m_y
count(*) m_y___
214 2002-05
111 2002-06
226 2002-07
... .......
73 2006-01
Formatting Dates and Times
DATE_FORMAT(date, format) and TIME_FORMAT assist in the representation of dates and times
in formats other than the MySQL default format. Three examples illustrate the syntax:
CHAPTER 10 ■SQL RECIPES222
5351c10_final.qxd 8/26/05 6:24 PM Page 222
www.it-ebooks.info

SELECT DATE_FORMAT('2005-12-31', '%M %d %Y')
December 31 2005
SELECT DATE_FORMAT('2005-12-31', '%D of %M')
31st of December
SELECT TIME_FORMAT('02:17', '%H')
02
Names of weekdays, months, and so on are always given in English, regardless of the language
in which MySQL is executed (language option). A list of all formatting codes of both functions is
provided in Chapter 21.
Calculating with Date and Time
For calculations with date and time, you can generally not use the operators +, -, etc., but rather must
use special SQL functions. The following list names the most important such functions. A complete
reference is given in Chapter 21:
•ADDDATE, DATE_ADD:These two equivalent functions add a time interval to a date
(DATETIME or TIMESTAMP) (e.g., 3 days or 7 minutes).
•ADDDATE(‘2005-12-31 6:00’, INTERVAL 3 MINUTE) returns 2005-31-12 6:03.
• If you wish to add an arbitrary TIME interval, then specify the interval as HOUR_SECOND
or use the function ADDTIME.
•ADDDATE(‘2005-12-31 6:00’, INTERVAL ‘3:15:22’ HOUR_SECOND) returns 2005-31-12
9:15:22.
•SUBDATE, DATE_SUB:As above, but now the time interval is subtracted.
•ADDTIME (since MySQL 4.1): Adds a date to a date or a time to a time. In contrast to
ADDDATE, the first parameter may now be of data type TIME. In the second parameter, the
involved interval specification is absent.
•ADDTIME(‘2005-12-31 6:00’, ‘3:15:22’) returns 2005-31-12 9:15:22.
•SUBTIME (since MySQL 4.1): As above, but now a time is subtracted.
•DATEDIFF (since MySQL 4.1): Returns the number of days between two dates. The time por-
tions of the dates are ignored in the calculation.
•DATEDIFF(‘2005-12-31’, ‘2005-12-28’) returns 3.
•DATEDIFF(‘2005-12-31 00:00:00’, ‘2005-12-28 23:59:59’) also returns 3.
•TIMEDIFF (since MySQL 4.1): Returns the time difference between two times (TIME) or
between two dates (DATETIME or TIMESTAMP). However, the function cannot be used to sub-
tract a time from a date.
•TIMEDIFF(‘2005-12-31 12:30’, ‘2005-12-30 19:45’) returns 16:45:00.
•Conversion functions: MySQL offers countless functions for extracting parts of time data or
for calculating the time between various intervals: HOUR,MINUTE, SECOND,
TIME_TO_SEC, SEC_TO_TIME,DAYOFYEAR,LAST_DAY,MONTH,WEEK,STR_TO_DATE,
UNIX_TIMESTAMP, FROM_UNIXNAME, UTC_DATE, UTC_TIME, etc.
■Tip Since MySQL 4.1, many MySQL time functions are able to work with microseconds. However, since there is
no MySQL data type that can store microseconds, these functions are at present rather worthless. Further informa-
tion on this topic can be found at http://dev.mysql.com/tech-resources/articles/4.1/time.html.
CHAPTER 10 ■SQL RECIPES 223
5351c10_final.qxd 8/26/05 6:24 PM Page 223
www.it-ebooks.info

Some Examples
The table workingtimes will serve as the basis for the following examples, in which you can store, for
example, your hours spent at work:
USE test
CREATE TABLE workingtimes (
id INT AUTO_INCREMENT,
begintime DATETIME,
endtime DATETIME,
PRIMARY KEY (id))
INSERT INTO workingtimes (begintime, endtime) VALUES
('2005-03-27 7:15', '2005-03-27 18:00'),
('2005-03-28 8:00', '2005-03-28 18:00'),
('2005-03-29 7:30', '2005-03-29 16:50'),
('2005-03-30 7:00', '2005-03-30 17:15')
The first attempt to calculate the working time for each workday fails miserably. The reason is
that MySQL interprets the character strings for the subtraction endtime - begintime with time values
simply as integers, for example, ‘2005-03-27 7:15:00’ as 20050327071500. MySQL can subtract these
numbers, of course, but the result is pure nonsense, since time is not recorded in the decimal sys-
tem, but rather with seconds and minutes in the range 0 to 59 instead of 0 to 99:
SELECT DATE_FORMAT(begintime, '%Y-%m-%d') AS dt,
endtime - begintime AS s
FROM workingtimes
dt s_____
2005-03-27 108500
2005-03-28 100000
2005-03-29 92000
2005-03-30 101500
The simplest path to the desired result is to use the function TIMEDIFF:
SELECT DATE_FORMAT(begintime, '%Y-%m-%d') AS dt,
TIMEDIFF(endtime, begintime) AS s
FROM workingtimes
dt t______
2005-03-27 10:45:00
2005-03-28 10:00:00
2005-03-29 09:20:00
2005-03-30 10:15:00
An attempt to simply add these times with SUM again fails. MySQL attempts to interpret
results like 10:45:00 as ordinary numbers:
SELECT SUM(TIMEDIFF(endtime, begintime)) AS sumtime
FROM workingtimes
sumtimes
39
To obtain the correct result, you must transform the time differences into seconds using
TIME_TO_SEC, add them, and then convert them back into usual time representations with
SEC_TO_TIME, which returns even time intervals of more than 24 hours in the format
CHAPTER 10 ■SQL RECIPES224
5351c10_final.qxd 8/26/05 6:24 PM Page 224
www.it-ebooks.info

SELECT SEC_TO_TIME(SUM(TIME_TO_SEC(TIMEDIFF(endtime, begintime))))
AS sumtime
FROM workingtimes
sumtime__
40:20:00
The following query returns the number of workdays with ten or more hours:
SELECT COUNT(*) FROM workingtimes
WHERE endtime >= ADDTIME(begintime, '10:00')
COUNT(*)
3
Unix Timestamps
In Unix, time is reckoned from January 1, 1970. Since then, every second has been counted. The
resulting integer is called a Unix timestamp. Timestamps are of interest to MySQL users for two rea-
sons: First, they are useful in carrying out calculations (since simple addition and subtraction yield
correct results); second, programming languages like PHP and Perl offer many functions that take
timestamps as parameters or return them as results.
■Caution Unix timestamps should not be confused with the MySQL
TIMESTAMP
. MySQL uses a format similar
to that of Unix for internal storage. However, in the execution of SQL commands, MySQL
TIMESTAMP
s are trans-
formed into character strings of the form ‘2005-12-31 23:59:59’.
Unix timestamps are stored, for historical reasons, as signed 32-bit integers. Therefore, an overflow will occur in
the year 2038. Thus for the time period between 1970 and 2038, timestamps are very practical objects: compact and
simple to work with. But what then? First of all, there is a bit in reserve if the timestamp is viewed as an unsigned
integer. Under this assumption, the overflow will not occur until the beginning of the twenty-second century. More-
over, it is anticipated that Unix/Linux will move to a 64-bit timestamp in the coming years. It is thus highly unlikely
that the “year-2000” problem will recur in the year 2038.
Transformation Functions
With the MySQL functions FROM_UNIXTIME and UNIX_TIMESTAMP you can carry out transfor-
mations between MySQL dates (DATE, DATETIME, and TIMESTAMP) and Unix timestamps:
SELECT NOW(), UNIX_TIMESTAMP(NOW())
2004-12-20 11:19:53 1103537993
SELECT FROM_UNIXTIME(1103600000)
2004-12-21 04:33:20
Application Example
The following command uses the table workingtimes from the previous section. To calculate the
working time, the time values will be transformed in Unix timestamps using UNIX_TIMESTAMP :
CHAPTER 10 ■SQL RECIPES 225
5351c10_final.qxd 8/26/05 6:24 PM Page 225
www.it-ebooks.info

SELECT DATE_FORMAT(begintime, '%Y-%m-%d') AS dt,
UNIX_TIMESTAMP(endtime) - UNIX_TIMESTAMP(begintime) AS s
FROM workingtimes
dt s_____
2005-03-27 38700
2005-03-28 36000
2005-03-29 33600
2005-03-30 36900
To make these values, which are in seconds, more understandable, you can use the function
SEC_TO_TIME:
SELECT DATE_FORMAT(begintime, '%Y-%m-%d') AS dt,
SEC_TO_TIME(UNIX_TIMESTAMP(endtime) - UNIX_TIMESTAMP(begintime)) AS t
FROM workingtimes
dt t_____
2005-03-27 10:45:00
2005-03-28 10:00:00
2005-03-29 09:20:00
2005-03-30 10:15:00
You can even return the total working time, using SUM. For example, here is the result for all
the days in March 2005:
SELECT SEC_TO_TIME(SUM(UNIX_TIMESTAMP(endtime) -
UNIX_TIMESTAMP(begintime))) AS sumtime
FROM workingtimes
WHERE begintime>='2005-03-01 00:00:00' AND
begintime<='2005-03-31 23:59:59'
sumtime__
40:20:00
Avoiding Changes to TIMESTAMP
If you have a table with a TIMESTAMP column and execute an UPDATE on that table, then the con-
tent of the TIMESTAMP columns changes as well. (After all, the purpose of a TIMESTAMP column
is to log the time of creation and the most recent change.)
It can happen, however, that in correcting a record you wish to avoid changing the TIMESTAMP
value. For this, you can deal with the TIMESTAMP column explicitly with SET, returning the column
to its previous value. The following example assumes that the TIMESTAMP column has the name ts:
UPDATE table SET data='new text', ts=ts WHERE id=123
When a large number of changes are in play, it is safer first to create a new column oldts of the
previous TIMESTAMP values and copy all the TIMESTAMP values into it:
ALTER TABLE table ADD oldts DATETIME
UPDATE table SET ts=ts, oldts=ts
Now you can carry out all the changes you want without worrying about the ts column. When
you are done, you simply restore the ts column to its original condition and delete the oldts column:
UPDATE table SET ts=oldts
ALTER TABLE table DROP oldts
CHAPTER 10 ■SQL RECIPES226
5351c10_final.qxd 8/26/05 6:24 PM Page 226
www.it-ebooks.info
Time Zones
As a rule, MySQL users do not need to be concerned about time zones, since the interchange of
dates and times functions automatically within the local time zone with most SQL functions. Inter-
nally, MySQL stores TIMESTAMPs in Coordinated Universal Time (UTC) format. In SQL commands,
however, TIMESTAMPs are automatically translated into local time.
This section goes in some detail into the subject of time-zone management by MySQL. Here
you will find extensive information, such as how you can set the time zone yourself and which func-
tions are thereby affected.
Server and Client Time Zones
Through MySQL 4.0, only the time zone of the server was configurable. Since version 4.1, MySQL
distinguishes two time zones.
Server Time Zone (System Variable
global.time_zone
)
To the extent that the MySQL server is not otherwise explicitly configured, it acquires at startup the
time zone of the computer on which it is running. You can determine the currently valid time zone
with SELECT @@global.time_zone. The result is usually SYSTEM, which in and of itself is not partic-
ularly informative:
SELECT @@global.time_zone
SYSTEM
Fortunately, you can determine the computer’s time zone with SHOW_VARIABLES (system
variable system_time_zone; this variable cannot be read with SELECT). In the following example,
the MySQL server is running in the Central European (CET) time zone, which encompasses many
of the capitals of “Old Europe,” such as Paris, Vienna, and Berlin:
SHOW VARIABLES LIKE 'system_time_zone'
CET
It is easier to calculate the difference in time between NOW and UTC_TIMESTAMP:
SELECT TIMEDIFF(NOW(), UTC_TIMESTAMP)
01:00:00
MySQL users who have SUPER privileges can change the time zone of the MySQL server on
the fly with SET GLOBAL time_zone = …. However, this works only if no binary logging and no
replication are engaged. If that is the case, you must change default-time-zone in my.cnf/my.ini
(see Chapter 22) and then restart the MySQL server.
Client Time Zone (System Variable
session.time_zone
)
By default, the client takes its time zone from that of the server. This makes sense, in general, because
server and client usually are running in the same time zone.
However, it is possible to set the client time zone with SET time_zone = … (now without the key-
word GLOBAL!). You can determine the current state with SELECT @@session.time_zone.
Setting the Client Time Zone
MySQL is often used as a web database. In this case, the MySQL server and the web server run either
on the same computer or on two different computers in the same network, in any case, in the same
time zone. Even if the users are distributed throughout the world, the connection to the MySQL server
launches a PHP or Java program that runs on the web server and thereby in the same time zone as the
MySQL server. Time-zone management has no effect.
CHAPTER 10 ■SQL RECIPES 227
5351c10_final.qxd 8/26/05 6:24 PM Page 227
www.it-ebooks.info

However, if you are programming a web application, you could certainly make use of MySQL’s
ability to manage time zones: You can give your web users the option of setting their own time zone.
With this information it is a simple matter to set time_zone accordingly after the connection is made
to the MySQL server. A single SQL command suffices for the web user to see date and time values in
the local time zone.
The following example assumes that the server is running in the CET time zone (Central
Europe). The SQL function NOW() returns the CET time. After adjusting time_zone to GMT-8,
NOW() returns the local time of Los Angeles, Seattle, Vancouver, and their longitudinal brethren:
SELECT NOW()
2005-12-07 16:29:54
SET time_zone='-8:00'
SELECT NOW()
2005-12-07 07:29:57
With SET only session.time_zone is changed, not global.time_zone. The setting is valid only
until the connection to the MySQL server is ended.
Specifying the Time Zone
Windows: If the MySQL server is running under Windows, time zones must be given with respect
to Coordinated Universal Time (UTC), for example, ‘+1:00’ for Berlin, ‘0:00’ for London, ‘-5:00’ for
New York.
Linux: If the MySQL server is running under Unix/Linux and has been properly configured (see
Chapter 14), then one may use the operating system’s time-zone names, such as Europe/Berlin
or CET for Berlin, Europe/London or Greenwich or GMT for London, and America/New_York for
New York.
Automatic Calculation of the Time Zone
Table 10-2 shows which data and functions are affected by time-zone settings.
CHAPTER 10 ■SQL RECIPES228
Table 10-2. Adjusting the Time Zone
Function Automatic Time-Zone Adjustment No Time-Zone Adjustment
Storing dates/times TIMESTAMP columns DATE, TIME, and DATETIME
columns
Determine current time NOW(),CURDATE(),CURTIME(),UNIX_TIMESTAMP(),UTC_DATE(),
CURRENT_xxx(), LOCALTIMExxx(), UTC_TIME(),UTC_TIMESTAMP()
SYSDATE()
Conversion between Unix UNIX_TIMESTAMP(datetime),
timestamps and DATETIME FROM_UNIXTIME(timestamp)
Calculation and formatting All other date and time functions,
of dates and times such as ADDDATE,SUBDATE,HOUR,
MINUTE, DATE_FORMAT,
TIME_FORMAT,CONVERT_TZ
Manual Time-Zone Conversion
Independently of which time zones are valid for client and server, you can convert between time
zones using CONVERT_TZ. This function expects in its first parameter a time value (date plus time;
a time alone will not suffice), in the second parameter the time zone of the first parameter, and in
the third parameter the time zone into which the time is to be converted.
5351c10_final.qxd 8/26/05 6:24 PM Page 228
www.it-ebooks.info
In the following example, a time in Berlin is converted to the time in New York. When it is 12
noon in Berlin, it is 6 a.m. in New York:
SELECT CONVERT_TZ('2005-12-31 12:00', 'Europe/Berlin', 'America/New_York')
2005-12-31 06:00:00
ENUMs and SETs
The data types ENUM and SET introduced in Chapter 8 offer a particularly efficient way of storing
a single character string from among ngiven character strings (1 out of n, with n< 65,536) or any
combination of ngiven strings (mout of n, with n < 256). This section offers some tips for operating
with ENUM and SET columns.
ENUM
With ENUM you can manage a list of up to 65,535 character strings. Each string is given a number
in sequence, and these are stored by MySQL in the ENUM column instead of the string itself. This
saves on space and speeds up processing. Note that in each field of an ENUM column you can save
only a single string, that is, a single number associated with that string. Saving multiple strings in
such a field is impossible. (If you want to store a combination of several predefined strings, you can
use a SET column.)
In queries involving comparison of character strings there is no case distinction. In addition
to the predefined character strings, an empty character string can also be stored in a field (as well
as NULL, unless this has been excluded via NOT NULL).
Such a field is then handled like any other character string field. The following commands
show how a table with an ENUM enumeration is generated and used. In the field color of the table
testenum, one of five predefined colors can be stored:
CREATE TABLE testenum
(color ENUM ('red', 'green', 'blue', 'black', 'white'))
INSERT testenum VALUES ('red')
SELECT * FROM testenum WHERE color='red'
SET
SET uses a similar idea, though here arbitrary combinations are possible. Internally, the character
strings are ordered by powers of 2 (1, 2, 4, 8, etc.), so that a bitwise combination is possible. The
storage requirement is correspondingly larger (one bit per character string). At most 64 character
strings can be combined (in which case the storage requirement is 8 bytes).
For a combination of several character strings to be stored in one field, these must be given
separated by commas (and with no blank characters between strings). The order of the strings is
irrelevant and is not considered. In query results, combinations are always specified in the order
in which the set was defined:
CREATE TABLE testset
(fontattr SET ('bold', 'italic', 'underlined'))
INSERT testset VALUES ('bold,italic')
In queries using the operator “=” an exact comparison is made of the entire combination. The
result is that only those records are returned for which the combination corresponds exactly. Thus
if in testset only the above-inserted record is stored with ‘bold,italic’, then the following query
returns no result:
SELECT * FROM testset WHERE fontattr='italic'
CHAPTER 10 ■SQL RECIPES 229
5351c10_final.qxd 8/26/05 6:24 PM Page 229
www.it-ebooks.info

In order to locate records in which an attribute has been set (regardless of its combination with
other attributes), the MySQL function FIND_IN_SET can be used. This function returns the position
of the sought character string within the set (in our example, 1 if ‘bold’ is found, 2 for ‘italic’, etc.):
SELECT * FROM testset WHERE FIND_IN_SET('italic', fontattr)>0
ENUM and SET values are represented internally as integers, not as character strings. If you wish
to determine the internally stored value via a query, simply use SELECT x+0 FROM table, where xis the
column name of the ENUM or SET column. It is also permitted to store numeric values with INSERT
and UPDATE commands.
If you would like to determine the list of all admissible character strings for an ENUM or SET
field (in a client program, for example), you must summon DESCRIBE tablename columnname to
your aid. This SQL command returns a table in which the field columnname is described. The col-
umn Type of this table contains the ENUM or SET definition.
■Note The contents of
ENUM
and
SET
fields are not alphabetically sorted, but are maintained in the order in
which the character strings for selection were defined. The reason for this is that MySQL works internally with
numeric values associated with the character strings. If you would like an alphabetic sorting, you must transform
the string explicitly into a character string, for example, via
SELECT CONCAT(x) AS xstr …ORDER BY xstr
.
Variables and Conditionals (IF, CASE)
This section shows how you can read and edit variables with SQL commands and how you can con-
struct simple IF and CASE distinctions in queries.
■Tip A new feature of MySQL 5.0 is that now one can create functioning SQL programs in so-called stored proce-
dures (SPs). The SQL dialect of MySQL has been extended to allow for programming of the kind done in ordinary
programming languages. However, these language constructs can be used only in SPs, not in usual SQL commands.
They will be explored in detail in Chapter 13.
Variables
MySQL offers the possibility of storing simple values (scalars, but not lists, as, for example, the results
of a SELECT command) in variables. In normal applications, variables generally play a small role, yet
they are an important element of SQL when used to call stored procedures (see Chapter 13).
There are three types of variables in MySQL:
Ordinary variables: Such variables are indicated by a prefixed @ sign. They lose their content
at the close of the SQL connection.
System and server variables: Such variables contain states or attributes of the MySQL server.
They are indicated by two prefixed @ signs (e.g., @@binlog_cache_size).
Many system variables exist in two forms, one specifically for the current connection (e.g.,
@@session.wait_timeout) and one globally for the MySQL server (e.g., @@global.wait_timeout
containing the default value for this variable).
Local variables and parameters within stored procedures: These variables are declared locally
within an SP and are valid only within the stored procedure. They are not indicated by a special
sign, but they must have names that are distinguishable from names of tables and columns.
CHAPTER 10 ■SQL RECIPES230
5351c10_final.qxd 8/26/05 6:24 PM Page 230
www.it-ebooks.info

In this section we will be dealing primarily with ordinary variables. Variables in stored proce-
dures will be considered in detail in Chapter 13, while system variables and server variables will be
treated in Chapters 14 and 21. The syntax for assignment and use of variables is always the same.
Variable Assignment
As the following examples show, there are several ways of assigning values to variables. Note that
SET uses the assignment operator =, while SELECT users :=. The last variant, the assignment of sev-
eral columns to several variables, has been permissible only since MySQL 5.0, and then only if the
SELECT command returns precisely one data record. You must therefore use a suitable WHERE
conditional or LIMIT 1.
SET @varname = 3
SELECT @varname := 3
SELECT @varname := COUNT(*) FROM table
SELECT COUNT(*) FROM table INTO @varname
SELECT title, subtitle FROM titles WHERE titleID=... INTO @t, @st
Use of Variables
Once a variable has been defined, it can be used in any SQL command. Through MySQL 4.1 you
have to pay attention to uppercase and lowercase distinction, but since MySQL 5.0, case distinction
in variables no longer applies.
SELECT @varname
@varname_____
123
SELECT * FROM titles WHERE titleID=@varname
With variables, you can also perform simple calculations. The following example shows how
you can determine, for the bigvote database, the percentage of participants who gave a particular
answer in the survey (this database has the same structure as test_vote from Chapter 3, but it con-
tains more entries):
USE bigvote
SELECT @total := COUNT(*) FROM votelanguage
@total := COUNT(*)
4807
SELECT choice, COUNT(*) / @total * 100 AS percentage
FROM votelanguage GROUP BY choice ORDER BY percentage DESC
choice percentage
4 49.19908466819
3 12.87705429581
1 11.75369253172
2 11.37923861036
5 7.53068441855
6 7.26024547534
In practice, however, such calculations are seldom used. Instead, for programming of complex
query or insertion operations you should use a programming language such as PHP or Perl that
makes variables available and therefore makes the use of MySQL variables unnecessary (see also
the introductory example in Chapter 3).
CHAPTER 10 ■SQL RECIPES 231
5351c10_final.qxd 8/26/05 6:24 PM Page 231
www.it-ebooks.info
IF Queries
With the function IF introduced earlier in this chapter, you can return one of two different results,
depending on the evaluation of a condition:
IF(condition, result1, result2)
Of course, you can also nest IF queries:
IF(condition1, result1, IF(condition2, result2a, result2b)
If you wish to test whether a column contains NULL, you may use the function ISNULL (expr).
In many cases, you can use IFNULL instead of a nesting of IF and ISNULL. The following expression
returns expr2 if expr1 is NULL, and expr1 otherwise:
IFNULL(expr1, expr2) corresponds to IF(ISNULL(expr1), expr2, expr1)
CASE Branching
The CASE construct has two syntactic variants. The first of these returns result1 if expr=val1, result2
if expr=val2, and so on:
CASE expr
WHEN val1 THEN result1
WHEN val2 THEN result2
...
ELSE resultn
END
With the second variant, it is not a condition that is evaluated, but an arbitrary number of con-
ditions. The result is result1 if condition cond1 holds, result2 if condition cond2 holds, and so on:
CASE
WHEN cond1 THEN result1
WHEN cond2 THEN result2
...
ELSE resultn
END
The following example returns an alphabetical list of all English book titles (langID=1) from the
mylibrary database. What is of interest here is that the articles a, an, and the are ignored in sorting.
Thus A Programmer’s Introduction will be found under the letter P, not A. To achieve this, sorting is
not done directly by title, but using the CASE construct, which returns a truncated character string,
with any article removed:
SELECT title FROM titles
WHERE langID=1
ORDER BY
CASE
WHEN LEFT(title,2)="A " THEN MID(title,3)
WHEN LEFT(title,3)="An " THEN MID(title,4)
WHEN LEFT(title,4)="The " THEN MID(title,5)
ELSE title
END
CHAPTER 10 ■SQL RECIPES232
5351c10_final.qxd 8/26/05 6:24 PM Page 232
www.it-ebooks.info

title____________________
Darwin's Radio
The Definitive Guide to MySQL
Disgrace
A Guide to the SQL Standard
...
Practical UNIX & Internet Security
A Programmer's Introduction to PHP 4.0
In analogy to this example, you could do the same with articles in German (der, die, das),
French (le, la, les), or Russian (just kidding, Russian has no articles). You could also filter out the www
in web addresses or any other part of a character string.
■Note Please observe that such search criteria significantly slow the execution of SQL queries. MySQL must
first create a list of all titles and then sort them. It is not possible to use the existing index of the
title
column.
Copying Data from One Table to Another
Creating a New Table by Copying
With the command CREATE TABLE newtable SELECT … FROM oldtable you can create a new table
and insert into it all the records selected with a SELECT command. MySQL automatically generates
all the necessary columns in newtable corresponding to the data selected by SELECT:
CREATE DATABASE newlibrary
USE newlibrary
CREATE TABLE publishers SELECT * FROM mylibrary.publishers
If you now look at the table definition with SHOW CREATE TABLE oldtable or newtable, you will
discover that in the process of copying, the indexes and AUTO_INCREMENT attribute for the col-
umn publID, as well as some TIMESTAMP attributes, have gone missing. Furthermore, the table
type has changed from InnoDB to MyISAM.
SHOW CREATE TABLE mylibrary.publishers -- (original)
CREATE TABLE publishers(
publID INT(11) NOT NULL AUTO_INCREMENT,
publName VARCHAR(60) COLLATE latin1_german1_ci NOT NULL default '',
ts TIMESTAMP NOT NULL DEFAULT CURRENT_TIMESTAMP
ON UPDATE CURRENT_TIMESTAMP,
PRIMARY KEY (publID),
KEY publName (publName)
) ENGINE=InnoDB DEFAULT CHARSET=latin1 COLLATE=latin1_german1_ci
SHOW CREATE TABLE newlibrary.publishers -- (new)
CREATE TABLE publishers (
publID INT(11) NOT NULL default '0',
publName VARCHAR(60) CHARACTER SET latin1
COLLATE latin1_german1_ci NOT NULL default '',
ts TIMESTAMP NOT NULL DEFAULT '0000-00-00 00:00:00'
) ENGINE=MyISAM DEFAULT CHARSET=latin1
To avoid such unwanted changes in the table structure, it is preferable first to create the new table
just like the old one with a separate CREATE TABLE command and then use INSERT INTO …SELECT …
ySQL 4.1.)
CHAPTER 10 ■SQL RECIPES 233
5351c10_final.qxd 8/26/05 6:24 PM Page 233
www.it-ebooks.info

USE newlibrary
CREATE TABLE publishers LIKE mylibrary.publishers
INSERT INTO publishers SELECT * FROM mylibrary.publishers
■Tip Tables can also be copied and moved with the MySQL import and export commands. These commands are
described in Chapter 14 in the discussion of backups.
Copying into Existing Tables
To copy data into an existing table, use the command INSERT INTO … SELECT. You must make sure
that the number of columns and their types match and that they are given in the correct order. If the
source table has fewer columns than the target table, you can simply specify NULL or a fixed value
for a column in the SELECT part, for example, SELECT NULL, publID, publName, ts, 0,“abc”:
INSERT INTO newlibrary.publishers
SELECT publID, publName, ts FROM mylibrary.publishers
The greatest source of problems with such commands is, yet again, AUTO_INCREMENT
fields. If the source and target tables contain records with the same ID number, then an INSERT
command results in an error (Duplicate entry xy for key …). There are several ways of getting
around this problem:
• You can use INSERT IGNORE INTO …, which avoids the error message and leads to the
affected records being simply not copied.
• You can use REPLACE … instead of INSERT INTO …, which results in the affected records
being overwritten on copying.
• You can change the publID column in copying so that no conflicts arise. (This variant is
possible only if no other records are referred to or if the foreign key field is also changed
accordingly.)
SELECT @maxid := MAX(publID) FROM newlibrary.publishers;
INSERT INTO newlibrary.publishers
SELECT publID + @maxid, publName, ts FROM mylibrary.publishers
Pivot Tables
Pivot tables collect information from a data source and arrange it in groups. The simplest way to
understand these tables is by way of an example: In the mylibrary database, for each book title there
can be stored a publisher, a category, and a language. Suppose we wish to know how many titles
there are for every combination of category and language. Pivot tables provide a simple statistical
evaluation of table data.
Many database systems offer special OLAP commands for creating pivot tables. OLAP stands
for online analytical processing and includes special methods for the management and evaluation
of multidimensional data, where here “multidimensional” refers to the several characteristics by
which the data can be grouped. OLAP-capable database systems are often called data warehouses.
Unfortunately, MySQL does not support OLAP functions, except for GROUP BY (see Chapter 9).
Therefore, you generally have to use external programs to create pivot tables. Especially well suited
for this task is Microsoft Excel (see Chapter 7.)
In simple cases, you can make use of SQL functions in MySQL. Of particular practical use is the
function SUM in combination with IF. SUM allows for the return of the sum of a grouped column.
CHAPTER 10 ■SQL RECIPES234
5351c10_final.qxd 8/26/05 6:24 PM Page 234
www.it-ebooks.info

With IF, the formation of the sum can be made dependent on a number of criteria. The following
two examples show how to proceed.
Pivot Tables for Book Titles, Languages, and Categories
For our first example we use the mylibrary database. The goal is to return a table that tells how many
titles there are in each combination of category and language (of course, only for those titles that
have such information associated with them). The starting data looks like this:
USE mylibrary
SELECT title, langName, catName
FROM titles, categories, languages
WHERE titles.catID = categories.catID
AND titles.langID = languages.langID
title langName catName_______________
A Guide to the SQL Standard english SQL
Practical UNIX & Internet Security english Computer books
MySQL english MySQL
MySQL Cookbook english MySQL
PHP and MySQL Web Development english PHP
Visual Basic deutsch Programming
Excel 2000 programmieren deutsch Programming
LaTeX deutsch Computer books
Nennen wir ihn Anna deutsch Children's books
Mathematica deutsch Computer books
Jag saknar dig, jag saknar dig svensk Children's books
Hunderna i Riga svensk Literature and fiction
Ute av verden norsk Literature and fiction
...
We will now group this list by category (GROUP BY). For each category we will use
SUM(IF(titles.langID=n, 1, 0)) to count the titles that appear in a particular language. COUNT(*)
counts the titles in the category (independent of the category). WITH ROLLUP has the effect that
GROUP BY also computes the sum of each column (the last row of the result):
SELECT catName,
SUM(IF(titles.langID=1, 1, 0)) AS english,
SUM(IF(titles.langID=2, 1, 0)) AS deutsch,
SUM(IF(titles.langID=3, 1, 0)) AS svensk,
SUM(IF(titles.langID=4, 1, 0)) AS norsk,
COUNT(*)
FROM titles, categories, languages
WHERE titles.catID = categories.catID
AND titles.langID = languages.langID
GROUP BY catName WITH ROLLUP
catName english deutsch svensk norsk COUNT(*)___
C# 0 1 0 0 1
Children's books 0 1 2 0 3
Computer books 1 5 0 0 6
Databases 0 1 0 0 1
LaTeX, TeX 0 2 0 0 2
Linux 0 3 0 0 3
Literature and fiction 2 7 9 1 19
MySQL 3 1 0 0 4
CHAPTER 10 ■SQL RECIPES 235
5351c10_final.qxd 8/26/05 6:24 PM Page 235
www.it-ebooks.info

PHP 2 3 0 0 5
Programming 0 4 0 0 4
Relational Databases 0 1 0 0 1
Science Fiction 3 0 0 0 3
SQL 1 0 0 0 1
Visual Basic 0 1 0 0 1
Visual Basic .NET 0 2 0 0 2
NULL 12 34 11 1 58
There is an obvious problem with this query in the SUM(…) terms. What would happen if the
languages column contained not four, but twenty or thirty languages? In such cases you would have
to write the SQL code for the query in a client program (e.g., in a PHP script): First you would obtain
a list of all languages, then for each language, add a SUM(…) term to the SQL query.
You can determine the number of titles in each language like this:
SELECT langName, COUNT(*)
FROM titles, categories, languages
WHERE titles.catID = categories.catID
AND titles.langID = languages.langID
GROUP BY langName
langName COUNT(*)___
deutsch 15
english 5
norsk 1
svensk 5
Pivot Table Query Results by Month
Our second example evaluates the table votelanguage, with query results of a simple poll (see the
example in Chapter 3). The goal is to display for each month the percentages of votes, in order to
determine a change in opinion or to detect an attempt at manipulating the results. The starting
data, about 3,300 records, look like this:
USE bigvote
SELECT * FROM votelanguage LIMIT 5
id choice ts_____________
1 4 20010516083407
2 3 20010516083407
3 5 20010516083407
4 4 20010516083407
5 2 20010516083407
It is easy to determine the number of participants in the poll by month:
SELECT DATE_FORMAT(ts, '%Y-%m') AS mnth, COUNT(*)
FROM votelanguage
GROUP BY mnth
mnth COUNT(*)_____
2001-05 214
2001-06 111
... ...
CHAPTER 10 ■SQL RECIPES236
5351c10_final.qxd 8/26/05 6:24 PM Page 236
www.it-ebooks.info

The number of votes for each programming language is again determined with SUM(IF(…)):
SELECT DATE_FORMAT(ts, '%Y-%m') AS mnth,
SUM(IF(choice=1, 1, 0)) AS c,
SUM(IF(choice=2, 1, 0)) AS java,
SUM(IF(choice=3, 1, 0)) AS perl,
SUM(IF(choice=4, 1, 0)) AS php,
SUM(IF(choice=5, 1, 0)) AS vb,
SUM(IF(choice=6, 1, 0)) AS other,
COUNT(*)
FROM votelanguage
GROUP BY mnth
mnth c java perl php vb other COUNT(*)
2001-05 20 24 30 110 16 14 214
2001-06 6 13 15 64 7 6 111
...
If you now want to know the percentage distribution, you have to divide the SUM expressions by
COUNT(*). The results are then made readable by multiplying by 100 and using the ROUND function:
SELECT DATE_FORMAT(ts, '%Y-%m') AS mnth,
ROUND(SUM(IF(choice=1, 1, 0)) * 100 / COUNT(*), 1) AS c,
ROUND(SUM(IF(choice=2, 1, 0)) * 100 / COUNT(*), 1) AS java,
ROUND(SUM(IF(choice=3, 1, 0)) * 100 / COUNT(*), 1) AS perl,
ROUND(SUM(IF(choice=4, 1, 0)) * 100 / COUNT(*), 1) AS php,
ROUND(SUM(IF(choice=5, 1, 0)) * 100 / COUNT(*), 1) AS vb,
ROUND(SUM(IF(choice=6, 1, 0)) * 100 / COUNT(*), 1) AS other
FROM votelanguage
GROUP BY mnth
mnth c java perl php vb other
2001-05 9.3 11.2 14.0 51.4 7.5 6.5
2001-06 5.4 11.7 13.5 57.7 6.3 5.4
...
SubSELECTs
MySQL has offered since version 4.1 the possibility of executing so-called subSELECTs, a sort of col-
lection of nested SELECT queries. (In most other database systems, subSELECTs have always been
taken for granted.
■Tip If you are working with an older version of MySQL, you can recast sub
SELECT
commands as a
JOIN
query.
To do so, however, is not particularly intuitive. In the more complex cases it is also necessary first to create a tem-
porary table for intermediate results.
Syntax Variants
There are many ways of formulating subSELECTs. The following list gives the most important vari-
ants. Examples will follow in the next section.
SELECT … WHERE col = [ANY/ALL] (SELECT …):With this variant, the second SELECT query
must return a single value (one row and one column). This value is used for the comparison
ailable, such as col>…, col<=…, col<>….)
CHAPTER 10 ■SQL RECIPES 237
5351c10_final.qxd 8/26/05 6:24 PM Page 237
www.it-ebooks.info

A comparison can be modified using the keyword ANY, its synonym SOME, or ALL. In this case,
the second SELECT query can return more than one value. ANY/SOME means that all suitable
values should be considered. The total query might then return several results. The formulation
col = ANY… means the same as col IN … (see the next variant).
The effect of ALL is not so obvious: The expression comparison operator ALL has the value TRUE
if the comparison is true for all the results of the second SELECT query or if the second SELECT
query returns no result.
SELECT … WHERE col [NOT] IN (SELECT …):In this variant the second SELECT query may
return an entire list of individual values. This list is then processed in the form SELECT … WHERE
col IN (n1, n2, n3). In place of IN, one may use NOT IN.
SELECT ROW(value1, value2, …) = [ANY] (SELECT col1, col2,…):This query tests whether
a record exists satisfying certain specified criteria. The possible results are 1(true) and NULL
(false). The main difference between this variant and the two previous ones is that the com-
parison criterion is not a single value, but a group of values.
MySQL compares the record ROW(value1, value2, …) with the result of the second SELECT
command, which must return precisely one data record. If the result record is the same as
the ROW record, then the entire query returns 1. Otherwise, it returns NULL.
If the optional keyword ANY or its synonym SOME is used, the second SELECT query may
return more than one result. If at least one of them is identical to the ROW record, then the
entire query returns the result 1.
SELECT … WHERE col = [NOT] EXISTS (SELECT …):In this variant, the second SELECT query
is executed for every record found in the first SELECT query. Only if this second query yields
a result (that is, at least one record) does the record from the first SELECT query remain in the
result list. In this variant, the negation operation NOT may be prefixed.
EXISTS constructions are generally useful only if the records of the two SELECT commands are
joined with a WHERE condition (as with a JOIN operation).
SELECT … FROM (SELECT …) AS name WHERE …:In this variant, which is seldom used in prac-
tice, first the SELECT command in parentheses is executed. It returns a table, which serves as the
basis of the outer SELECT command. In other words, the outer SELECT command does not
access a preexisting table, as is usually the case, but a table that is itself the result of a SELECT
command. Such tables are called derived tables. The SQL syntax prescribes that such a table
must be named using AS name.
SELECT commands may be nested within one another. However, such commands can be diffi-
cult to read and understand. SELECT commands can also be used within WHERE conditions of
UPDATE and DELETE commands for determining which records have been changed or deleted.
■Tip You will find an interesting article on sub
SELECT
syntax at http://dev.mysql.com/tech-resources/
articles/4.1/subqueries.html. Sub
SELECT
s are also extensively discussed in the MySQL documentation:
http://dev.mysql.com/doc/mysql/en/subqueries.html
Limitations
MySQL is not yet capable of evaluating LIMIT in subSELECT commands; for example, SELECT …
WHERE … IN (SELECT … LIMIT 10). If you try to do this, you will receive the following error mes-
sage: ERROR 1235 (42000): This version of MySQL doesn’t yet support ‘LIMIT & IN/ALL ANY/SOME
subquery’.
CHAPTER 10 ■SQL RECIPES238
5351c10_final.qxd 8/26/05 6:24 PM Page 238
www.it-ebooks.info

If you use subSELECTs to alter records (DELETE,UPDATE), the table to be updated and the
subSELECT table must be different.
It has been my experience that in many cases, subSELECTs are executed extremely inefficiently.
The reason is that subSELECTs for MySQL seem to be much more difficult to optimize than ordinary
SELECT command with JOINs. In speed-critical applications it would be a good idea to use equiva-
lent SQL commands without subSELECTs.
SubSelects with Older Versions of MySQL
If you are working with an earlier version of MySQL (4.0 and earlier), it is often possible to reformu-
late a subSELECT command as a JOIN query. However, to do so is not particularly intuitive.
The following two equivalent SELECT commands provide an example. Both commands return
book titles whose publID is invalid (that is, not contained in the publishers table). Since in the mylibrary
database there is an integrity rule between titles and publishers, such a case should never occur. There-
fore, both commands return no resulting records. First as a subSELECT:
SELECT * FROM titles
WHERE publID NOT IN
(SELECT publID FROM publishers)
and then using JOIN:
SELECT titles.*
FROM titles LEFT JOIN publishers
ON titles.publID=publishers.publID
WHERE ISNULL(publishers.publID) AND NOT(ISNULL(titles.publID))
In more complex cases involving equivalents of subSELECTs, it may be necessary to use a tem-
porary table with intermediate results.
Examples
The following query returns all book titles whose publisher’s name begins with “O.” Then, a list of
publID values for the key word IN is returned with a separate SELECT query.
USE mylibrary
SELECT title FROM titles WHERE publID IN
(SELECT publID FROM publishers WHERE publName LIKE 'O%')
title______________________________
MySQL & mSQL
Practical UNIX & Internet security
MySQL Cookbook
Comédia Infantil
Hunderna i Riga
You would also obtain this result if you were to execute the publID comparison with = ANY:
SELECT title FROM titles WHERE publID = ANY
(SELECT publID FROM publishers WHERE publName LIKE 'O%')
Finally, you obtain the same result with the following command, which demonstrates the not
particularly intuitive EXISTS syntax variant. Here the second SELECT command, the one in parenthe-
ses, is executed for every book title. A book title returned by the first SELECT command is considered
only if this second command has a nonempty result. The condition titles.publID = publishers.publID
creates the relation between the two SELECT queries:
CHAPTER 10 ■SQL RECIPES 239
5351c10_final.qxd 8/26/05 6:24 PM Page 239
www.it-ebooks.info

SELECT title FROM titles WHERE EXISTS
(SELECT * FROM publishers WHERE
titles.publID = publishers.publID AND
publName LIKE 'O%')
The following command tests whether the title table contains one or more books for which
title=’Linux’ and subtitle=’Installation, Konfiguration, Anwendung’ are valid. The result is 1. That is,
there are such titles. Caution: Without ANY, the query would return 1only if there existed precisely
one such title.
SELECT ROW('Linux', 'Installation, Konfiguration, Anwendung') = ANY
(SELECT title, subtitle FROM titles)
1
The next command uses a derived table. The inner SELECT command returns a table with titles
of books with more than one author. The outer SELECT command processes this result and sorts it
in order of increasing number of authors:
SELECT * FROM
(SELECT titles.titleID, title, COUNT(authID) AS authCount
FROM titles, rel_title_author
WHERE titles.titleID = rel_title_author.titleID
GROUP BY rel_title_author.titleID
HAVING authCount>1) AS titleAuthCount
ORDER BY authCount DESC
titleID title authCount
23 Maple 3
9 MySQL & mSQL 3
3 Client/Server Survival Guide 3
25 Linux für Internet und Intranet 3
69 Visual C# 2
2 The Definitive Guide to Excel VBA 2
59 PHP and MySQL Web Development 2
34 MySQL 2
... ...
Ensuring the Integrity of Data
During the creation of a database project (database design, development of program code, and so
on), it often happens that test data sets are incompletely deleted and some references to tables lead
nowhere. Of course, programming errors can also lead to such problems in the actual operation of a
database system, which is always an indication that somewhere or other there is an error in the code.
Whatever the cause, one of the burdensome tasks of database administration is to manage the
integrity of the data and correct errors as they are discovered. In the following, you will find some
tips for such error management. All the examples refer to the database mylibrary.
This section is also a good example of the application possibilities of subSELECTs.
Searching for Titles Without Authors
Every title in the mylibrary database is required to have at least one author. The relationship between
the tables titles and authors is via the table rel_title_author.
The following query tests each title in titles to see whether there is an entry in rel_title_author
with a corresponding titleID number. Only the titles that do not have such an entry are displayed
(due to NOT EXISTS):
CHAPTER 10 ■SQL RECIPES240
5351c10_final.qxd 8/26/05 6:24 PM Page 240
www.it-ebooks.info

SELECT title FROM titles WHERE NOT EXISTS
(SELECT * FROM rel_title_author
WHERE titles.titleID = rel_title_author.titleID)
Searching for Invalid Publisher Links:
Invalid Records in 1 : nRelations
In an ideal world, all the records in the titles table should refer with publID to a publisher, or else the
relevant field should contain NULL. But what happens if a publisher is inadvertently deleted? Then
there are titles records with publIDs that refer to a no longer existing publisher. (Similar problems can
arise with other relations between other tables, with the titles table and the catID and langID fields.
The following query thus does not find all titles records with incorrect cross references, but only those
whose publID is invalid. Thus we are merely giving an example of how to find such records.)
■Note The
mylibrary
database certainly contains no invalid records, because all relations between tables have
been ensured with foreign key rules.
Nonetheless, to simulate invalid records, an invalid record will be inserted in the
titles
table. (The command
assumes that there is no publisher with
publID=9999
.) In order to make it possible for the
INSERT
command to
be executed, the integrity rules must first be switched off (
SET …
):
SET foreign_key_checks=0
INSERT INTO titles (title, publID) VALUES ('deleteme', 9999)
SET foreign_key_checks=1
The following query searches for titles whose publID value does not appear in the publishers table:
SELECT title, titles.publID FROM titles
WHERE publID NOT IN (SELECT publID FROM publishers)
There are two ways to correct such errors: You can simply delete any invalid titles (which in this
case is the called-for solution), or you can associate the title with a publisher (which you will have to
create if the publisher does not already appear in the list of publishers):
DELETE FROM titles WHERE publID NOT IN
(SELECT publID FROM publishers)
Searching for Invalid Links Between Authors and Titles
(n:mRelation)
Somewhat more complicated is the search for n: mrelations (such as in the title/author relation-
ship). Now there are three sources of errors:
• Titles that refer via rel_title_author to nonexistent authors.
• Authors that refer via rel_title_author to nonexistent titles.
• Entries in rel_title_author for which both titleID and authID refer to invalid records. (If the
search for illegal records is based on existing authors or titles, then this third source of errors
remains unexposed.)
To simulate the error situation, three invalid records will be inserted into rel_title_author,
covering all three error sources. The following instruction assumes that there exists an author
with authID=1 and a title with titleID=1, but no author or title with ID number 9999:
CHAPTER 10 ■SQL RECIPES 241
5351c10_final.qxd 8/26/05 6:24 PM Page 241
www.it-ebooks.info

SET foreign_key_checks=0
INSERT INTO rel_title_author (titleID, authID)
VALUES (1,9999), (9999,1), (9999, 9999)
SET foreign_key_checks=1
A simple subSELECT command finds the relevant records:
SELECT titleID, authID FROM rel_title_author
WHERE authID NOT IN (SELECT authID FROM authors) OR
titleID NOT IN (SELECT titleID FROM titles)
authID titleID_______
9999 1
1 9999
9999 9999
One can just as easily delete the invalid data:
DELETE FROM rel_title_author
WHERE authID NOT IN (SELECT authID FROM authors) OR
titleID NOT IN (SELECT titleID FROM titles)
Tracking Down Duplicates
In database management, the problem repeatedly arises that data records are stored inadvertently
in duplicate. As the following example involving the table authors and the database mylibrary
shows, such records are easy to find. To this end, we form groups of identical author names and
then display those groups with more than one member:
USE mylibrary
SELECT authName, COUNT(*) AS cnt
FROM authors
GROUP BY authName
HAVING cnt>1
In a second step, one could obtain all the authID numbers for these records. Then duplicate
entries can be removed, and you should replace in the table rel_title_author the second authID
number by the first, and then delete the second entry from the table authors.
For example, suppose that due to an input error the author Gary Cornell appears twice:
authID authName________
123 Cornell Gary
758 Cornell Gary
In the titles table there are two different books by Gary. The first of these, The Sex Life of Unix,
is associated with authID=123, while the second book, More Sex Life of Unix, has authID=758. Gary
has two authIDs!
To alleviate this problem, we decide to use only authID=123, and so we change all rel_title_author
entries with 758 to 123:
UPDATE rel_title_authors SET authID=123 WHERE authID=758
Now all of Gary’s books have authID=123. Finally, we delete the obsolete entry in the authors
table:
DELETE FROM authors WHERE authID=758
In the titles table it is permitted for several books to have the same title. Therefore, several
CHAPTER 10 ■SQL RECIPES242
5351c10_final.qxd 8/26/05 6:24 PM Page 242
www.it-ebooks.info
SELECT title, subtitle, edition, COUNT(*) AS cnt
FROM titles
GROUP BY title, subtitle, edition
HAVING cnt>1
It is more difficult to track down duplicates that involve typographical errors. With English
words one can use SOUNDEX. This function returns a character string that corresponds to the pro-
nunciation of the text. However, the result must be manually examined. SOUNDEX does not find all
similar records, and it considers as duplicates names that are really different. The following query
uses MIN(authName) to return the alphabetically first of the similar-sounding names:
SELECT SOUNDEX(authName) AS snd,
COUNT(*) AS cnt,
MIN(authName) AS firstname
FROM authors
GROUP BY snd
HAVING cnt>1
Bringing a Table into Normal Form
In Chapter 8 we described in detail the first three normal forms, which are considered the starting
point for solid database design. In the best of all possible worlds, all design issues are dealt with at
the outset, but in the world as we know it, it frequently happens that one comes to grips with these
rules after it is too late.
But what does that mean, “too late”? The example of this section shows how you can move
redundant information into a new table, thereby creating the third normal form after the fact.
The starting point for our example is the table messages, which contains a field author with the
names of the contributors to an on-line discussion forum. Since many authors contribute multiple
messages, their names appear repeatedly. This shortcoming will be corrected with the new table
users, which is to contain a list of all the authors’ names. In messages, the author column will be
replaced by a userID column.
The first step is to create the new table users:
CREATE TABLE users (userID INT NOT NULL AUTO_INCREMENT,
username VARCHAR(60) NOT NULL,
PRIMARY KEY (userID))
With the command INSERT INTO … SELECT introduced earlier in this chapter, all names can
be inserted into the new users table. SELECT must be executed with the option DISTINCT, so that
each name is inserted only once. For the userID column, the value NULL is passed. This leads to
MySQL placing AUTO_INCREMENT numbers in the column automatically:
INSERT INTO users SELECT DISTINCT NULL, author FROM messages
Now the original table messages must be expanded to contain the new userID column:
ALTER TABLE messages ADD userID INT
Next, the userID column should be filled with data in such a way that the numbers refer to the
corresponding entries in the user column. Note, please, that the UPDATE command in this form is
valid only starting with version 4.0. Although UPDATE refers to both messages and users, it is only
the former that is changed. (Only messages.userID is newly set by SET.)
UPDATE messages, users
SET messages.userID = users.userID
WHERE messages.author = users.username
CHAPTER 10 ■SQL RECIPES 243
5351c10_final.qxd 8/26/05 6:24 PM Page 243
www.it-ebooks.info

Starting with MySQL 4.1, you can use the following subSELECT command as an alternative to
the above command. It has exactly the same effect, but it is easier to understand. Note that the
inner SELECT command refers to the outer SELECT command through messages.author:
UPDATE messages SET userID=
(SELECT userID FROM users WHERE users.username = messages.author)
A brief check shows that everything worked as planned:
SELECT messages.author, users.userName, users.userID
FROM messages, users
WHERE messages.userID = users.userID LIMIT 5
author userName userID____
boehnke boehnke 9
Michael Michael 10
cjander cjander 11
Frauke Frauke 12
Bernd Bernd 13
Now the column messages.author can be deleted; the information contained therein is recover-
able via messages.userID and the new users table:
ALTER TABLE messages DROP author
Processing the First or Last
n
Records
All the examples of this section use the test database myforum.
Searching Data (SELECT)
The question repeatedly arises how to construct a list of the “top ten,” or, better, the top n, which
means the nfirst, the best, the worst, the oldest, or the most pleasing records in a data set. This
question is easily answered: Use a SELECT command in combination with ORDER BY and LIMIT.
With ORDER BY you have to give a sort criterion, for example, a date. If you want not the first,
but the last results, then reverse the sort order with DESC. (For example, ORDER BY date DESC, and
LIMIT restricts the number of results to a particular value.)
The following query returns the last five entries in the myforum discussion groups. With LEFT,
the subject text is reduced to twenty characters, to make the result easier to read:
USE myforum
SELECT LEFT(subject, 20) AS subj, forumID, ts
FROM messages ORDER BY ts DESC LIMIT 5
subj forumID timest_________
Re: Run-time error ' 1001 20050124154825
Re: Re: Suche Erfahr 1 20050124132214
Re: Full text search 1006 20050124092312
Re: MySQL on ASP wit 1006 20050124052830
Full text searches 1006 20050123211616
Our second example searches not for arbitrary messages, but for those that start a new thread
(rootID=msgID), and only for the forum 1006 (MySQL, English):
CHAPTER 10 ■SQL RECIPES244
5351c10_final.qxd 8/26/05 6:24 PM Page 244
www.it-ebooks.info

SELECT LEFT(subject, 20) AS subj, forumID, ts FROM messages
WHERE rootID=msgID AND forumID=1006
ORDER BY ts DESC LIMIT 5
subj forumID timest_________
Full text searches 1006 20050123211616
MySQL and ASP 1006 20051021223216
where do I save this 1006 20051016013629
samples do not work 1006 20051014151020
ASP and MySQL 1006 20050730224220
In our next example, the five longest threads are found (that is, the threads that have the largest
number of contributions). For this, COUNT and GROUP BY are used to return to number of messages
that have the same rootID number.
SELECT COUNT(*) AS answerCount, rootID FROM messages
GROUP BY rootID ORDER BY answerCount DESC LIMIT 5
answerCount rootID
11 767
9 1392
8 1134
7 495
7 748
Unfortunately, with this query it was impossible to display the subject. The reason is that
GROUP BY groups all the messages of a thread, and with COUNT the number of messages can be
determined. But there is no string function that distinguishes the first of several subject texts. (With
numerical values, one could use MIN or MAX.) A subSELECT command is of no use here, since no
LIMIT expressions are allowed within it. You must therefore work either with temporary tables or
manually execute an additional query:
SELECT subject FROM messages WHERE msgID IN (767, 1392 ...)
Changing Records (UPDATE and DELETE)
Just as with SELECT you can select the first or last nrecords using ORDER BY and LIMIT n, you can
as well change these records with UPDATE and DELETE.
The first of our two examples is rather trivial: To save space, UPDATE replaces the text of the old-
est 100 messages with the bilingual notification message no longer available/Nachricht steht nicht
mehr zur Verfügung. Important here is the instruction ts=ts, which ensures that ts is left unchanged.
(Otherwise, the oldest 100 messages would suddenly seemingly become the newest.)
UPDATE messages
SET msgText="message no ... / Nachricht ...", ts=ts
ORDER BY ts LIMIT 100
It is even easier to delete the last 100 messages:
DELETE messages ORDER BY ts LIMIT 100
Both commands are easily understood, but they have the disadvantage that they destroy the
threads. It can also happen that the start message of a thread is overwritten or deleted, while (newer)
replies remain. That is not, of course, what we had in mind.
CHAPTER 10 ■SQL RECIPES 245
5351c10_final.qxd 8/26/05 6:24 PM Page 245
www.it-ebooks.info

Delete All Threads Except the Last 500
The following commands delete complete threads except for the most recent 500. Unfortunately,
the process is somewhat complex. The first command returns the time at which the oldest of the
500 most recent threads was begun. This time is stored in the variable @oldtime:
SELECT @oldtime := ts FROM messages
WHERE rootID=msgID ORDER BY ts DESC LIMIT 499,1
@oldtime := ts
20050911093909
The next command tests how many threads exist that are even older. This information is not
necessary for further processing, but it constitutes a sort of plausibility check:
SELECT COUNT(*) FROM messages WHERE ts<@oldtime AND rootID=msgID
COUNT(*)___
117
Now we need to return a list of msgID numbers of the start messages of the threads that are to
be deleted. This is written to a temporary table rootIDs using CREATE … SELECT. This table will be
stored in RAM for reasons of efficiency (ENGINE = HEAP):
CREATE TEMPORARY TABLE rootIDs ENGINE=HEAP
SELECT rootID FROM messages WHERE ts<@oldtime AND rootID=msgID
The table rootIDs is now used to delete the old messages:
DELETE messages FROM messages, rootIDs
WHERE messages.rootID=rootIDs. rootID
Now the temporary table rootIDs can be deleted:
DROP TABLE rootIDs
Selecting Random Records
It is sometimes desirable to select data records at random, for example, to display images or
advertisements on a website.
Selection Without a random Column
The easiest procedure is to obtain a random selection by selecting all records with SELECT, but
executing ORDER BY with the addition of RAND(). This will yield a list sorted by random numbers.
Then LIMIT can be used to select the first record.
The following example is based on a copy of the titles table from the mylibrary database. With
two identical queries, two (possibly) different (randomly selected) titles are selected from the copy
titlescopy:
USE mylibrary
CREATE TABLE titlescopy SELECT * FROM titles
SELECT titleID, title FROM titlescopy
ORDER BY RAND() LIMIT 1
titleID title
59 PHP and MySQL Web Development
CHAPTER 10 ■SQL RECIPES246
5351c10_final.qxd 8/26/05 6:24 PM Page 246
www.it-ebooks.info
SELECT titleID, title FROM titlescopy
ORDER BY RAND() random LIMIT 1
titleID title
2 Definitive Guide to Excel VBA
If you wish to select two or more records randomly with only one SELECT query, then specify
LIMIT n instead of LIMIT 1.
Selection with a random Column
The process just described has an obvious drawback: With large tables, it is extremely inefficient.
All the records must be read into active memory, and there sorted by random numbers, all in order
to select a single record.
For large tables it is therefore a good idea to provide the table with a column of random num-
bers at the time that the table is declared. Of course, the random column can also be created after
the fact, as the following lines prove: The first ALTER TABLE command adds the column, while the
second equips the column with an index. UPDATE then stores a random value in the new column
for each existing record. (When a new record is added, you must then supply a new random num-
ber for the random column. Unfortunately, at present, MySQL does not allow a function such as
RAND to be specified as a default value.)
ALTER TABLE titlescopy ADD random DOUBLE
ALTER TABLE titlescopy ADD INDEX (random)
UPDATE titlescopy SET random = RAND()
Now, to select a random record, use the following command:
SELECT titleID, title FROM titlescopy
WHERE random > RAND() ORDER BY random LIMIT 1
At first glance, this does not seem any more efficient than the previous example. In fact,
however, MySQL now has selected only a single record from the table that satisfies the condition
random > RAND(). Since an index was constructed for the random column, access is very efficient.
Do not forget ORDER BY! Otherwise, MySQL chooses any old record that satisfies
random > RAND(), and not necessarily the one whose value is closest to the random number.
The selection of a record would then no longer be purely random, but would depend on how
the records are stored in the table.
Of course, the variant with the random column is not without its own drawbacks:
• More space on the hard drive is required to store the table (additional column plus index).
• Every change in the table is slower than previously (index for the random column).
• It is possible to select only a single random record. (If you use LIMIT 5, then you obtain five
records to be sure, but it is always the same package of five records.)
• On inserting new records, you must always assign a random number to the random column.
Selection on the Basis of an id Column
Perhaps both of the solutions that we have offered seem unnecessarily complicated. We have only
to read the nth of nmax records, where nmax can be easily obtained with SELECT COUNT(*) FROM
table. Unfortunately, there is no SQL command to read the nth data record. MySQL decides the order
in which the records are stored (for example, the table driver), and this cannot be controlled from
outside.
CHAPTER 10 ■SQL RECIPES 247
5351c10_final.qxd 8/26/05 6:24 PM Page 247
www.it-ebooks.info

One solution would be to use an AUTO_INCREMENT column. If the table contains 1,000
records, then the id column would have to contain the values from 1 to 1,000, and the selection
would be possible with WHERE id = CEILING(RAND()*1000). The problem, however, is that you
cannot rely on the id column being filled without gaps. As soon as you delete records from the
table, gaps arise that are never filled upon the addition of new records to the table.
Full-Text Search
If you are using SQL to search for a word in a character string, the query is often posed in the follow-
ing form:
SELECT * FROM tablename WHERE column LIKE '%word%'
This query indeed achieves its goal. The only question is, when? There are few queries that are
more time-consuming for MySQL to answer than this. (What is worse is searching for several words,
perhaps in several columns.) It is not only that all the records of the table must be read. Addition-
ally, many character string comparisons must be made. A traditional index cannot help you here.
Unfortunately, what is most difficult for the computer is simple for the user, who has become
accustomed to using an Internet search engine to input a number of search terms without having
to deal with complex search criteria.
If you wish to be able to process such queries efficiently in MySQL, you need a full-text index.
This is a particular type of index, one that creates a list of all words that appear in a column of a table.
MySQL has supported this type of index for MyISAM tables since version 3.23.23.
Fundamentals
Creating a Full-Text Index
To provide an existing table with a full-text index, you should execute the following command. You
may specify arbitrarily many xxxTEXT and (VAR)CHAR columns.
ALTER TABLE tablename ADD FULLTEXT(column1, column2)
Of course, new tables can also be generated at once with a full-text index:
CREATE TABLE tablename (id INT NOT NULL AUTO_INCREMENT,
column1 VARCHAR(50), column2 VARCHAR(100),
PRIMARY KEY (id), FULLTEXT (column1, column2))
■Note A full-text index can currently be created only for MyISAM tables (not for InnoDB tables).
Words of three letters or fewer are not included in the full-text index and can therefore not be searched for.
(You can change this default value by entering the setting
ft_min_word_len = 3
in the configuration file my.cnf
or my.ni, restarting the server, and regenerating the index for the relevant tables with
REPAIR TABLE tablename
QUICK
.)
Full-Text Search
For a full-text search, the SQL expression MATCH AGAINST is used:
SELECT * FROM tablename
WHERE MATCH(column1, column2) AGAINST('word1 word2 word3') > 0.001
CHAPTER 10 ■SQL RECIPES248
5351c10_final.qxd 8/26/05 6:24 PM Page 248
www.it-ebooks.info

The result is that all data records are found in which at least one of the three words word1,
word2, word3 is contained. The list of columns in MATCH must correspond exactly to the one with
which the index was generated. There is no case distinction in the search criteria in AGAINST. The
order of search criteria is also irrelevant. Words with three or fewer letters are generally ignored.
MATCH returns as result a floating-point number whose magnitude reflects the relevance of
the result. If no words are found or if the search criteria appear in very many records and are there-
fore ignored, then MATCH returns 0.
The expression MATCH … > 0.001 excludes results for which MATCH returns very small values.
(This gets rid of statistical outliers and inaccuracies due to floating-point representation.)
■Note For the above command
MATCH(title, subtitle)
to be able to be executed, a full-text index over exactly
these two columns must exist. An index over more columns, or two full-text indexes each over one column (that
is, one for
title
and one for
subtitle
) will not do.
Ordering Results
A MATCH expression can be used to order results. The following query returns the five best results.
The condition must be formulated with HAVING, since WHERE does not accept the alias mtch:
SELECT *,
MATCH(column1, column2) AGAINST('word1 word2 word3') AS mtch
FROM tablename
HAVING mtch > 0.001
ORDER BY mtch DESC
LIMIT 5
Boolean Search Expressions
By default, all search criteria specified in AGAINST are joined by a logical OR. Since MySQL 4.0, you
can connect search criteria using a Boolean expression. For this, you must follow the search expres-
sion with IN BOOLEAN MODE. Furthermore, the special symbols shown in Table 10-3 can be used
in the formulation of the expression.
Table 10-3. Boolean Search Expressions (IN BOOLEAN MODE)
Symbol Meaning
+word The word must be contained in the data record. Thus AGAINST(‘+word1 +word2’
IN BOOLEAN MODE) corresponds to a Boolean AND in both search criteria.
-word The word may not appear in the data record.
~word The word should not appear in the record. In contrast to -word, such records are
not completely excluded, but are given a lesser value. Thus ~word is suited to
eliminate “noise words,” that is, expressions that are more hindrance than help
in a search.
<word Gives the word a lesser standing.
>word Gives the word a greater standing.
word* Searches for words that begin with word (e.g., word, words, wordless).
“word1 word2” This exact word order should be searched. Case-insensitive.
() Parentheses can be used to group expressions. AGAINST(‘+mysql +(buch book)’
IN BOOLEAN MODE) searches for data records that contain mysql and either
buch or book.
CHAPTER 10 ■SQL RECIPES 249
5351c10_final.qxd 8/26/05 6:24 PM Page 249
www.it-ebooks.info

A Boolean full-text search might look like this:
SELECT * FROM tablename
WHERE MATCH(column1, column2)
AGAINST('+word1 +word2 -word3' IN BOOLEAN MODE)
A significant drawback to Boolean search is that MATCH returns only 1 or 0, according to
whether the search criteria were fulfilled or not. There is no longer an evaluation of relevance.
■Note Observe that in a full-text search, search patterns like
LIKE
are not allowed. The only exception is the
variant
word*
, where the wild card
*
must be placed at the end of the word.
Full-Text Search over Several Tables
A full-text search can be defined only for a single table. To search for data in linked tables, you will
have to equip both tables with a full index. The resulting SQL search queries are, however, compli-
cated to formulate and difficult to optimize for the server. (There is an example in the following
subsection on book search.)
Limitations
In order for full-text search to function, there must be at least three records in the table. Experi-
ments with tables that contain only one or two records have ended in failure. In general, MATCH
functions better with larger tables than with smaller, for which it occasionally returns results that
are difficult to understand.
Full-text search is based on entire words. The slightest alteration (plurals, endings, etc.) is con-
sidered a different word. This makes searching at times more difficult.
To find all relevant records, variants have to be given in AGAINST (for example, AGAINST(‘book
books’) or AGAINST(‘book books bookcase bookend’) to obtain all records having to do with books.
One way out is offered by the wild card *, which, however, can be used only in Boolean mode
(AGAINST(‘book*’ IN BOOLEAN MODE).
A word in the sense of full-text search is considered to be a character string composed of
letters, numbers, and the characters ‘ and _. Fortunately, letters with diacritical marks like üàé are
considered letters. Note, however, that expressions like C++ are not considered words and therefore
cannot be searched for.
Words must be at least four characters in length if they are to be considered. This makes the
search for abbreviations like SQL impossible. (This limitation can be removed by a reconfiguration
of the server; see below.)
Full-text search is case-insensitive (which usually makes sense, but sometimes is a bother).
Full-text search is currently available only for MyISAM tables (and not for InnoDB tables).
The creation of a full-text index is relatively slow. This affects not only the initial creation of
an index, but all further changes in the table as well.
Full-Text Search for Words of Three Letters
As we have already mentioned, full-text search operates by default only for words of four or more
letters. The reason for this is to avoid inflating the index with words like a, and, the, and the like.
However, that makes the search for terms like ADO and PHP impossible.
With the configuration parameter ft_min_word_len (mysqld), you can set the minimum length
of words for the full-text index. To do this, enter the parameter into the MySQL configuration file
(/etc/my.cnf or Windows \my.ini) in the section [mysqld]. For the setting to take effect, you will
CHAPTER 10 ■SQL RECIPES250
5351c10_final.qxd 8/26/05 6:24 PM Page 250
www.it-ebooks.info

have to restart the MySQL server and regenerate the full-text index (the easiest way to do this is with
REPAIR TABLE tablename QUICK).
Book Search
For the following examples, a new MyISAM table, fulltitles, was created in the mylibrary database,
which otherwise consists exclusively of InnoDB tables. In doing so, a particular syntax variant of the
CREATE TABLE command was used. MySQL first executes the SELECT command. Its results are
then added to the new table. At the same time, the results determine the column names and col-
umn properties of the new table:
CREATE TABLE fulltitles ENGINE = MyISAM
SELECT titleID, title, subtitle FROM titles
Then the new table is supplied with a full-text index for the columns title and subtitle:
ALTER TABLE fulltitles ADD FULLTEXT(title, subtitle)
SELECT title,
MATCH(title, subtitle) AGAINST('excel basic') AS fulltextmatch
FROM fulltitles
HAVING fulltextmatch > 0.001
ORDER BY fulltextmatch DESC
title fulltextmatch_____
Visual Basic 2.7978503848587
Visual Basic Datenbankprogrammierung 2.7667480431589
VBA-Programmierung mit Excel 7 2.3731654830885
Definitive Guide to Excel VBA 2.3467841568515
Excel 2000 programmieren 2.3467841568515
In the above query, the condition fulltextmatch > 0.001 was formulated with HAVING, since
WHERE does not know the alias column name (that is, AS fulltextname). The following variant is
a bit more efficient, but requires more typing:
SELECT title, MATCH(title, subtitle) AGAINST('excel basic') AS fulltextmatch
FROM fulltitles
WHERE MATCH(title, subtitle) AGAINST('excel basic') > 0.001
ORDER BY fulltextmatch DESC
Search by Title and Author
A full-text index can be defined only for a single table. If you wish to search for author and title
simultaneously (such as excel and kofler), then you must equip all the tables with a full-text index
and then in the query specify MATCH expressions for each index. However, the resulting queries
are relatively inefficient (especially with large data sets).
CREATE TABLE fullauthors ENGINE = MyISAM
SELECT authName, authID FROM authors
ALTER TABLE fullauthors ADD FULLTEXT(authName)
SELECT title, authname FROM fulltitles, fullauthors, rel_title_author
WHERE fulltitles.titleID = rel_title_author.titleID
AND fullauthors.authID = rel_title_author.authID
AND MATCH(title, subtitle) AGAINST('excel kofler')
AND MATCH(authName) AGAINST ('excel kofler')
CHAPTER 10 ■SQL RECIPES 251
5351c10_final.qxd 8/26/05 6:24 PM Page 251
www.it-ebooks.info

title authname_____
VBA-Programmierung mit Excel 7 Kofler Michael
Excel 2000 programmieren Kofler Michael
Definitive Guide to Excel VBA Kofler Michael
If fulltitles contained, say, 100,000 titles, and fullauthors as many author names, then the above
query would be somewhat slow despite the full-text index. It would be more efficient to store the
relevant data in a single table. In the following example fulltitles must be expanded to include an
authors column with author names. (The author column must now be updated after each change,
which is a significant disadvantage.) Subsequently, a new full-text index can be set up to encompass
the columns title, subtitle, and authors:
ALTER TABLE fulltitles ADD COLUMN authors VARCHAR(255)
UPDATE fulltitles SET authors =
(SELECT GROUP_CONCAT(authname SEPARATOR ', ')
FROM authors, rel_title_author
WHERE authors.authID = rel_title_author.authID
AND fulltitles.titleID = rel_title_author.titleID
GROUP BY fulltitles.titleID)
ALTER TABLE fulltitles DROP INDEX title
ALTER TABLE fulltitles ADD FULLTEXT(title, subtitle, authors)
The search command can now be formulated thus:
SELECT title, authors FROM fulltitles
WHERE MATCH(title, subtitle, authors)
AGAINST('+excel +kofler' IN BOOLEAN MODE)
Forum Search
The following examples relate to the table messages in the database myforum. The full-text index
was created with the following command:
USE myforum
ALTER TABLE messages ADD FULLTEXT(msgText, subject)
There are almost 500 entries that deal with MySQL:
SELECT COUNT(*) FROM messages
WHERE MATCH(msgText, subject) AGAINST('mysql') > 0.001
COUNT(*)_
464
MySQL believes that the following entries have the greatest relevance. This result should be
taken with a grain of salt: The mechanism of full-text search is not blessed with clairvoyant insight,
and the selection from among the many contributions is more or less random, reflecting generally
the frequency with which the expression “MySQL” appears:
SELECT subject, msgID,
MATCH(msgText, subject) AGAINST('mysql') AS mtch
FROM messages
ORDER BY mtch DESC
LIMIT 5
CHAPTER 10 ■SQL RECIPES252
5351c10_final.qxd 8/26/05 6:24 PM Page 252
www.it-ebooks.info

subject msgID mtch____________
help needed with figuring out error message 332 3.368218421936
where is MySQL database? 359 3.329582452774
MYSQL access ... 357 3.159619092941
An update to the first edition of MySQL? 775 3.151849031448
MySql ASP.NET & VB.NET sample code? 2585 3.133650779724
The search for the strings mysql and odbc gives 67 hits:
SELECT COUNT(*) FROM messages
WHERE MATCH(msgText, subject)
AGAINST('+mysql +odbc' IN BOOLEAN MODE)
COUNT(*)___
67
To obtain the five best hits, the query has to be changed a bit. As WHERE criterion we have
the Boolean search expression ‘+mysql +odbc’, which, however, returns only the values 0 and 1.
For sorting, we use instead the expression ‘mysql odbc’. The query is here additionally restricted
by forumID = 1006 to entries in the English-language MySQL forum:
SELECT LEFT(subject, 40) AS subj,
msgID,
MATCH(msgText, subject) AGAINST('mysql odbc') AS mtch
FROM messages
WHERE MATCH(msgText, subject) AGAINST('+mysql +odbc' IN BOOLEAN MODE)
AND forumID=1006
ORDER BY mtch DESC
LIMIT 5
subj msgID mtch____________
Connecting ASP with MySQL 1975 5.6947469711304
MySQL on Visual Basic with ADO 1655 5.2777800559998
Access & MySQL 238 4.8645100593567
RecordCount with MySQL 2948 3.7673554420471
MySQL on ASP with ADO 1464 3.3525133132935
Locking
MySQL is a client/server database system. This means that several programs can simultaneously
access the database, read data, and make changes. This can lead to problems when two programs
(clients) change the same data at the same time.
Consider, for example, an airline flight reservation system: Two travel agencies check at the same
time whether a particular flight has any available seats (e.g., SELECT … WHERE flightnumber =…).
Both agents obtain the result OK, even though only a single seat is available. Based on these results,
the agents each book the flight. If the airline’s code for its booking system isn’t a total basket case, only
one agency will receive confirmation, and the other traveler will be out of luck. It would be a much
worse situation if the reservation program relied on the validity of a SELECT result obtained millisec-
onds earlier; then both customers would receive confirmation and would have to fight over the seat
at boarding time.
There are many solution procedures for such problems. The most elegant, and generally the
most efficient, are transactions, which are dealt with in the following section. Transactions are avail-
able, however, only if you are using InnoDB tables. If you are using MyISAM tables, then you must
rely on what is called locking. Locking means that one or more tables are reserved for a period of
CHAPTER 10 ■SQL RECIPES 253
5351c10_final.qxd 8/26/05 6:24 PM Page 253
www.it-ebooks.info

time for the exclusive use of a single program (client). Until the locking has been removed, other
clients will be unable to make changes to the tables or even, depending on the type of locking,
read them.
Syntax
To reserve tables for exclusive use, execute the command LOCK TABLE[S]:
LOCK TABLE table1 locktype, table2 locktype ...
The following lock variants (locktypes) are available:
READ:All MySQL users are allowed to read the table, but no one may make any changes
(including the user who executed the LOCK command). A READ LOCK is granted only when
the table is not blocked by any WRITE LOCKs.
READ LOCAL:Like READ, but INSERT commands are allowed if they don’t alter any existing
data records.
WRITE:The current user is permitted to read and change the table. All other users are completely
blocked: They may neither read data in the table nor make changes to the data. A WRITE LOCK is
permitted when the table is not blocked by any other LOCKs (READ or WRITE).
LOW PRIORITY WRITE:Like WRITE, but during the waiting time (that is, until all other READ
and WRITE LOCKs are ended), other users receive as the need arises a new READ LOCK. How-
ever, this can increase the waiting time until the granting of a WRITE LOCK.
To end the locking, execute UNLOCK TABLE[S] without additional parameters. This will end all
of the client’s LOCKs. To block other clients as little as possible, LOCKs should be ended as soon as
possible.
■Tips MySQL always executes individual commands in such a way that they cannot be influenced by other
commands. Therefore, no locking is necessary for a single command
UPDATE … WHERE id=1234
or
DELETE …
WHERE id=5678
.
You need to execute locking only if you are executing several interdependent commands during which another
client should not alter the underlying data. Usually, that is the case when you first execute a
SELECT
command
and then process the resulting data with an
UPDATE
or
DELETE
command.
LOCK
and
UNLOCK
should not be used for InnoDB tables. With older versions of MySQL (< 4.0.22), the locking
mechanisms of MySQL and InnoDB can get in each other’s way.
LOCK
also ends the current transaction, which is
often an undesired outcome. Instead, use transactions that block only individual records (instead of entire tables).
If you really wish to block an entire InnoDB table, there is available a new command, since MySQL 5.0.3, namely,
LOCK TABLE[S] TRANSACTIONAL
.
GET_LOCK and RELEASE_LOCK
If you require locks only to secure communication between two processes, then instead of LOCK/
UNLOCK you can use the functions GET_LOCK and RELEASE_LOCK. GET_LOCK(name, time)
defines a lock with the name name for the time time (in seconds). The function is usually executed
with DO, for example, DO GET_LOCK(‘abc’, 10). RELEASE_LOCK(name) released the lock on name.
CHAPTER 10 ■SQL RECIPES254
5351c10_final.qxd 8/26/05 6:24 PM Page 254
www.it-ebooks.info
Neither function actually executes a lock on the table; that is, neither MySQL nor a database
nor a table is blocked. As long as a process has defined a lock with a certain name, no other process
can obtain a lock with the same name. The second process is blocked by the call GET_LOCK until
the first process has released the lock.
Transactions
Probably the most interesting feature of InnoDB tables is that in contrast to MyISAM tables, they
support transactions. This means that several SQL commands can be encapsulated as a single oper-
ation. This section describes in detail why it is useful to use transactions, how to implement them,
and what you have to watch out for when using them. This section also goes into how transactions
are implemented in MySQL.
Why Transactions
Transactions can help in making the operation of a database system more efficient and secure:
First of all, transactions ensure that a group of SQL commands that begin with BEGIN and end with
COMMIT are executed either as a unit or not at all. Even if the connection with the server is dropped
during the transaction, power goes out, or the computer crashes, it cannot happen that only some
of the commands are executed.
Let’s look at an example: You wish to transfer 100 dollars from account 123 to account 456.
Therefore, you first execute
UPDATE tablename SET value=value-100 WHERE accountno=123
and then
UPDATE tablename SET value=value+100 WHERE accountno=456
If you are working without transactions and some misfortune occurs between the two commands,
it can happen that 100 dollars was withdrawn from the first account but not deposited to the sec-
ond. With transactions, that cannot occur: Either both commands are correctly executed, or neither
of them.
Transactions also ensure that data cannot be simultaneously changed by two users. With
MyISAM tables, you can achieve this result with LOCK TABLE. But that has the effect of blocking
access to the entire table for all clients. With InnoDB tables, in contrast, only the affected records
are blocked.
Finally, transactions make for easier programming. A transaction can be aborted at any time,
which makes protecting against errors much simpler.
Acid Rules
The database-theoretic answer as to why one should use transactions can be summed up in one
word: ACID. We are not talking about controlled substances here, but an acronym: Atomicity, Consis-
tency, Isolation, Durability. Thus ACID encompasses four concepts that are considered in database
theory to be the basis of secure simultaneous use of a database by multiple users. MySQL in combi-
nation with the InnoDB table driver passes the ACID test, adhering to its rules and regulations, which
can be described in somewhat greater detail as follows:
Atomicity means that a transaction is indivisible. The database system must ensure that either
all the commands of a transaction are correctly executed, or none of them. This holds even for
such extreme cases as a crash during execution of the transaction.
CHAPTER 10 ■SQL RECIPES 255
5351c10_final.qxd 8/26/05 6:24 PM Page 255
www.it-ebooks.info
Consistency requires that at the end of the transaction the database be in a consistent state.
If a transaction were to lead to a violation of validity rules, then it must be broken off and
undone (ROLLBACK). Validity rules include foreign key constraints, which are discussed in
greater detail in Chapter 8.
Isolation means that several transactions can run independently and simultaneously without
interfering with each other. Each transaction sees the entire database in the condition that it
found it right up to the end of the transaction (other than those changes made by the trans-
action). If a transaction inserts, changes, or deletes records, a transaction running in parallel
does not see this.
Complete fulfillment of the isolation requirement can be achieved only at great cost, and in
practice, this means cost in speed. For this reason, the ANSI-92/SQL standard provides for four
degrees of isolation, so that database programmers can decide on the appropriate level of secu-
rity and the tradeoff against speed. The default isolation level depends on the database system,
and for the InnoDB table driver it is REPEATABLE READ. We will have more to say later on isola-
tion degree.
Durability requires that a transaction itself be preserved even if right after the end of the trans-
action there is a crash or other comparable problem. (The InnoDB table driver therefore writes
changes first in a logging file. If a crash occurs, that is, before the changes can actually be made
to the database, the changes can be reconstructed after restart of the MySQL server and trans-
ferred to the database.
Many database systems make compromises in their durability requirements to achieve improve-
ments in speed. In the case of the InnoDB table driver, most significant in this regard is the
option innodb_flush_log_at_trx_commit, which controls when transactions can be stored in the
logging file.
Controlling Transactions
By default, MySQL is in auto commit mode. This means that every SQL command is executed in
a single, small transaction. This has no effect on the use of transaction-capable tables.
There are two ways of executing several SQL commands together as a transaction:
• You can start an ad hoc transaction with START TRANSACTION or BEGIN and terminate it
with COMMIT or ROLLBACK. START TRANSACTION or BEGIN deactivate the auto commit
mode for this one transaction. If you subsequently wish to begin a transaction, then you
must begin with another BEGIN.
• You can turn off auto commit mode. Then all the commands are considered together as
a transaction until confirmed by COMMIT or aborted by ROLLBACK.
Again note that transactions are supported only for InnoDB tables, not for MyISAM tables.
BEGIN, COMMIT, and ROLLBACK
BEGIN or START TRANSACTION introduces a transaction, COMMIT ends it and stores all changes,
and ROLLBACK aborts the transaction and stores no changes.
In InnoDB tables one may not have nested transactions. If you begin a new transaction with
BEGIN while a previous transaction is still open, the open transaction is closed with COMMIT.
Transactions are managed by the client. If the connection is lost during a transaction, then all
uncommitted changes are aborted (as with ROLLBACK).
CHAPTER 10 ■SQL RECIPES256
5351c10_final.qxd 8/26/05 6:24 PM Page 256
www.it-ebooks.info

Savepoints
Since MySQL 4.0.14, InnoDB has supported savepoints. This allows one to mark points within a trans-
action using SAVEPOINT name. ROLLBACK TO SAVEPOINT name ends the transaction, accepting all
changes up to the SAVEPOINT and aborting all those that follow.
SAVEPOINTs can be used only within a transaction, and at the end of the transaction, all
SAVEPOINTs are deleted.
Automatic Transaction Termination
Transactions are also concluded automatically by the following commands (as with COMMIT):
ALTER TABLE,CREATE INDEX, CREATE TABLE,DROP DATABASE,DROP TABLE,LOCK TABLES,
RENAME TABLE,SET AUTOCOMMIT = 1, TRUNCATE,UNLOCK TABLES. On the other hand, trans-
actions are not ended when an ordinary error occurs in the execution of an SQL command.
Setting Auto Commit Mode
The auto commit mode is deactivated with the SQL command SET AUTOCOMMIT = 0. Commands
that relate to transaction-capable tables will now automatically be considered a transaction until
they are ended with COMMIT or ROLLBACK. Then a new transaction begins automatically. (That is,
you no longer need to execute START TRANSACTION. Just this convenience is often reason enough
to work with SET AUTOCOMMIT = 0.)
An important consequence of AUTOCOMMIT = 0 is that if the connection is lost, whether or
not intentionally, all SQL commands that have not been confirmed with a COMMIT are aborted.
Note also that AUTOCOMMIT = 0 can lead to very long transactions if you do not regularly
execute COMMIT or ROLLBACK. The current state of auto commit can be determined with
SELECT @@autocommit.
Controlling Transactions in Client Programming
Most libraries and APIs for MySQL programming (such as JDBC, ODBC, ADO, ADO.NET) provide spe-
cial functions or methods for beginning and ending transactions. If these don’t work, you can instead
explicitly execute the commands SET AUTOCOMMIT and START TRANSACTION/COMMIT/ROLLBACK.
Trying Out Transactions
To try out transactions, you must establish two connections to the database. The simplest way to do
this is to execute the monitor mysql in two windows. Then execute commands first in one window
and then in the other. The following examples assume that there is a (still empty) table table1 in the
database innotest. (In practice, of course, you will have several records, but for the purposes of this
first demonstration, even a single record suffices.)
CREATE DATABASE innotest
USE innotest
CREATE TABLE table1(colA INTEGER, colB INTEGER)
■Note This example shows the effect that transactions can have when data in a table are changed nearly simul-
taneously by two users. The example is very simple, and the simultaneity takes place in slow motion. Nonetheless,
it should make you aware that in real applications it can certainly happen that database commands from two
users or programs can be woven together as in the following example. If such an effect on the end result is pos-
sible, then you must exclude the possibility by the use of transactions or (if you wish to stick with MyISAM tables)
by executing
LOCK TABLE
.
CHAPTER 10 ■SQL RECIPES 257
5351c10_final.qxd 8/26/05 6:24 PM Page 257
www.it-ebooks.info

At time point 0, connection A begins a transaction (BEGIN) and changes, in the confines of this
transaction, a record of the table table1.
At time point 1 (as indicated in the righthand column of Table 10-4) the contents of table1 look
different to the two different connections. For connection A, the record with colA=1 already has
colB=11. Since this transaction has not actually been executed, connection B sees the original value
colB=10 for the same record.
Table 10-4. Two Parallel Transactions
Connection A Connection B Time
USE innotest USE innotest
INSERT INTO table1
VALUES (1, 10)
SELECT * FROM table1
colA colB
1 10
START TRANSACTION 0
UPDATE table1
SET colB=11 WHERE colA=1
SELECT * FROM table1 SELECT * FROM table1 1
colA colB colA colB
1 11 1 10
BEGIN 2
UPDATE table1
SET colB=colB+3 WHERE
colA=1
COMMIT 3
SELECT * FROM table1 SELECT * FROM table1 4
colA colB colA colB
1 11 1 14
ROLLBACK
SELECT * FROM table1 SELECT * FROM table1 5
colA colB colA colB
1 11 1 11
At time point 2, B begins a transaction, in which colB of the data record with colA=1 is to be
increased by 3. The InnoDB table driver recognizes that it cannot execute this command at this
time, and it blocks B, which then waits until A completes its transaction.
At time point 3, A completes its transaction with COMMIT, whereby colB attains the definitive
value 11. And now B’s UPDATE command can be completed.
At time point 4, A sees colB=11. For B things look as though colB already had the value 14.
Now B cancels its transaction. Then at time point 5 both A and B see the value actually stored,
namely colB=11.
Transactions and Locking
The InnoDB table driver generally takes care of all necessary locking operations on its own, as soon
as you execute your transactions. However, there are cases where the default behavior of InnoDB is
not optimal. In such cases, InnoDB offers several possibilities of having its locking behavior altered.
CHAPTER 10 ■SQL RECIPES258
5351c10_final.qxd 8/26/05 6:24 PM Page 258
www.it-ebooks.info
SELECT … LOCK IN SHARE MODE
A peculiarity of the InnoDB table driver is that SELECT commands are immediately executed even
on blocked records. The results returned do not consider the possibility of open transactions of
other clients (see connection B at time point 1 in the example above), and thus return potentially
outmoded data.
If you execute the SELECT with the key word LOCK IN SHARE MODE appended, then when the
command is executed, it is held pending until all transactions already begun have been terminated
(of course, only to the extent that these transactions affect result records of the SELECT command).
Thus if in the above example B were to issue the command
SELECT * FROM table1 LOCK IN SHARE MODE
at time 1, then a result would be displayed only when the transaction begun by A had been com-
pleted (time point 3).
If SELECT … LOCK IN SHARE MODE is executed within a transaction, then additionally, all
result records for all other clients will be locked until the end of the transaction. Such a lock is called
a shared lock, whence the key word SHARE. With a shared lock you are assured that the records read
during your transactions are not being changed or deleted by other clients.
With a shared lock, locked records can continue to be read by all clients, even if other clients
are also using SELECT LOCK IN SHARE MODE. Any attempt by a client to change such records leads
to the client being blocked until your transaction is completed.
SELECT … FOR UPDATE
The key words FOR UPDATE also represent an extension of the normal SELECT. With this, all result
records are provided an exclusive lock.
With a shared lock, locked records cannot be changed by other clients. They can continue to be
read by all clients with a normal SELECT command, but not with SELECT … LOCK IN SHARE MODE.
The difference between a shared lock and an exclusive lock therefore relates only to whether other
clients can execute SELECT … LOCK IN SHARE MODE.
INSERT, UPDATE, DELETE
All three of these commands have the effect that changed records are locked by an exclusive lock
until the end of the transaction. If links between tables must be checked (foreign key constraints)
during the execution of an INSERT, UPDATE, or DELETE command, then the affected records of
the linked tables will be locked by an exclusive lock.
Gap and Next Key Locks
InnoDB uses by default gap and next key locks when open conditions are used with SELECT …
LOCK IN SHARE MODE, SELECT … FOR UPDATE, UPDATE, or DELETE (e.g., WHERE id>100 or
WHERE id BETWEEN 100 AND 200). The result is that not only the records currently affected by the
condition are blocked, but also records that do not yet even exist that might be inserted by another
transaction. (For which commands next key locks are used depends on the currently valid isolation
degree; see the next section.)
Thus if you execute SELECT … WHERE id>100 FOR UPDATE in a transaction, then no other
user can input new records with id>100 for the duration of the transaction.
CHAPTER 10 ■SQL RECIPES 259
5351c10_final.qxd 8/26/05 6:24 PM Page 259
www.it-ebooks.info
Deadlocks
The InnoDB table driver automatically recognizes deadlock situations (that is, situations in which
two or more processes block one another, each waiting for the other to finish, ad infinitum). In such
situations an error occurs in the process that triggered the deadlock; SQL commands that are still
open are aborted with a ROLLBACK.
Deadlocks that InnoDB doesn’t know about can also arise when SQL commands affect both
InnoDB tables and other tables as well. In order for the clients not to have to wait forever in such
cases, the configuration setting innodb\_lock\_wait\_timeout=n determines the maximum wait
time (by default, 50 seconds).
Isolation Degree for Transactions
Before the start of a transaction, its isolation level can be defined:
SET [SESSION|GLOBAL] TRANSACTION ISOLATION LEVEL
READ UNCOMMITTED | READ COMMITTED |
REPEATABLE READ | SERIALIZABLE
SET can be executed in three different ways:
SET without SESSION or GLOBAL:In this case, the selected setting holds only for the next
transaction. Note, please, that this behavior is different from that of the usual SET syntax,
where SET works without the specification of what is to be set, as in SET SESSION.
SET SESSION:Here, the setting holds for the current connection until its termination or until
another isolation degree is specified.
SET GLOBAL:Here, the setting holds for all new connections to MySQL (but not for the current
connection).
The isolation degree influences the manner in which commands are executed within a transac-
tion. In the following list, the isolation degrees are ordered according to increasing exclusivity. This
means that you achieve the greatest access speed with READ UNCOMMITTED (no mutual blocking),
while with SERIALIZABLE, you obtain the greatest security against simultaneous changes of data by
clients. We now describe the four isolation degrees:
READ UNCOMMITTED:SELECT reads the current data and considers all changes arising from
other running transactions. SELECT is therefore not isolated from other transactions. (The
expression read uncommitted means that data of other transactions that are not yet completed
with COMMIT can flow into the SELECT result.) If you execute the example from Table 10-4 in
READ UNCOMMITTED mode, then at time point 1, transaction B sees colA=1 and colB=11.
Please note that while READ UNCOMMITTED does not ensure isolation for SELECT, it does so
for UPDATE. Even in READ UNCOMMITTED mode, the UPDATE command of transaction B is
blocked at time point 2 until transaction A is finished. UPDATE is therefore correctly executed
in READ UNCOMMITTED mode.
READ COMMITTED:SELECT takes into account changes by other transactions that have been
confirmed with COMMIT. This means that one and the same SELECT command within a trans-
action can have different results if another transaction is closed in the intervening time. In
comparison with READ UNCOMMITTED, the isolation for SELECT is somewhat better, but not
perfect.
CHAPTER 10 ■SQL RECIPES260
5351c10_final.qxd 8/26/05 6:24 PM Page 260
www.it-ebooks.info

REPEATABLE READ:SELECT takes into account no changes by other transactions, regardless
of whether these transactions have been confirmed with COMMIT. Thus the ACID isolation
requirement for SELECT is satisfied for this isolation degree. One and the same SELECT com-
mand always returns one and the same result (as long, of course, as the transaction does not
itself change data).
SERIALIZABLE:This mode functions much like REPEATABLE READ. The only difference is that
ordinary SELECT commands are automatically executed as SELECT … LOCK IN SHARE MODE,
and therefore supply all records with a shared lock.
By default, InnoDB uses the isolation level REPEATABLE READ. In most cases, this mode offers
sufficient isolation for a variety of transactions without influencing transaction speed unduly. Inn-
oDB is optimized for REPEATABLE READ mode and executes the required locks especially efficiently.
One can change the default setting in the MySQL configuration file with the option
transaction-isolation. In setting the option, the names of the isolation levels consisting of more
than one word must be separated by hyphens (thus, for example, transaction-level =
read-committed).
You can determine the isolation level of a connection or of the server with the following command:
SELECT @@tx_isolation, @@global.tx_isolation
@@tx_isolation @@global.tx_isolation
READ-UNCOMMITTED REPEATABLE-READ
Isolation Level and Next Key Locks
As we have already mentioned, InnoDB supports gap and next key locks. This means that in open
conditions (e.g., WHERE id>100), not only currently existing records are blocked, but also data that
do not yet exist that would satisfy the condition.
InnoDB uses gap and next key locks only when open conditions appear in commands. Moreover,
the locking is also dependent on the command being executed and on the isolation level. For the isola-
tion degrees REPEATABLE READ and SERIALIZABLE, gap and next key locks are used for the following
commands: SELECT … LOCK IN SHARE MODE, SELECT … FOR UPDATE, UPDATE, DELETE.
Error Protection
When you use transactions, you increase the odds of receiving certain error messages from the server.
You should therefore always check in your code, even with apparently noncritical commands (such as
SELECT), whether errors have occurred during execution.
While a transaction is open, another client cannot execute any operation that affects the
records of the open transaction.
For example, Client A executes BEGIN and then INSERT INTO table VALUES (1, 2). Client B
attempts to execute SELECT * FROM table. This command is blocked until client A terminates its
transaction with COMMIT or ROLLBACK.
Many clients, such as mysql, will wait forever for an open transaction to be completed (there is no
timeout). But other clients can experience a timeout or other error. In sum, close your transactions as
soon as possible.
Every transaction can be broken off due to a deadlock situation. (The InnoDB table driver
automatically recognizes deadlock situations, that is, the situation in which two transactions
mutually block each other. To avoid a permanent blocking of the server, one client’s transaction
will be terminated.)
CHAPTER 10 ■SQL RECIPES 261
5351c10_final.qxd 8/26/05 6:24 PM Page 261
www.it-ebooks.info

Access Administration and Security
It is a fact of life, or at least of human social organization, that not all information is intended to be
made available to all individuals. Thus with MySQL, a database is generally set up in such a way that
not everyone can see all of the data (let alone change or delete it). In order to protect data from prying
eyes (or unauthorized tampering), MySQL provides a dual access system. The first level determines
whether the user has the right to communicate with MySQL at all. The second level determines what
actions (such as SELECT, INSERT, DROP) are permitted for which databases, tables, or columns.
This chapter describes rather extensively the access system of MySQL, both its internal man-
agement and the tools that can assist you in changing access privileges.
Introduction
Communication Between the Client and the MySQL Server
Before any mechanisms for MySQL access administration can become effective, the client (for
example, a Perl script, the command interpreter mysql, or the MySQL Query Browser) must be
able to communicate with the MySQL server. This section summarizes the possible forms of
communication.
If you wish to try out the various communication protocols, your best bet is to use the program
mysql, introduced in Chapter 4, with the option --protocol. Allowable settings are tcp, socket, pipe,
and memory. With the command STATUS you can determine the currently set communication protocol:
> mysql -u root -p --protocol=tcp
Enter password: xxx
mysql> status
...
Connection: localhost via TCP/IP
Communication over a Network
When the client and server are executed on different computers, the situation is simple: Communi-
cation between the two programs must take place over the network protocol TCP/IP. For this to
happen, two conditions must be satisfied:
• The computers must be linked by TCP/IP. This can be easily checked with the command
ping computername.
• Port 3306, used by default by MySQL, must not be blocked by a firewall.
263
CHAPTER 11
■ ■ ■
5351c11_final.qxd 8/26/05 6:30 PM Page 263
www.it-ebooks.info
Communication on a Local Computer (localhost)
When the client and server are running on the same computer, there are several possible variants:
TCP/IP: The network protocol can also be used for communication between programs running
on a single computer. Under Windows, this is the usual case.
Socket file (Unix/Linux only): A socket file enables efficient communication under Unix/Linux
between two programs. This is not a normal file (it contains no data and has length 0 bytes).
Under Unix/Linux, local communication takes place over a socket file by default, since it is
more efficient than TCP/IP.
Named pipes (only Windows 2000/XP): Named pipes are more or less the Windows answer to
socket files under Unix/Linux. However, on the MySQL server, named pipes are deactivated by
default and must be activated with the option enable-named-pipes. Moreover, the MySQL client
program must support this communication variant. Since these conditions are seldom fulfilled,
named pipes are hardly ever used in practice.
Shared memory (only Windows 2000/XP): Shared memory is another Windows alternative to
the Unix socket file. Here client and server use the same region of memory for communication.
In practice, however, shared memory is used as seldom as named pipes. This is because on the
one hand, this form of communication can be used only when the configuration file of the
MySQL server contains the option shared_memory (which is not the case by default). If this con-
dition is satisfied, the client program must also support this communication variant, which is
generally not the case. The command interpreter mysql is theoretically capable of this (option
protocol=memory), but in practical tests it simply returns an error message: Can’t open shared
memory; client could not create request event.
In the further course of this book, only the two most common communication forms will be
discussed, namely, TCP/IP and socket files.
Determining the Communication Forms Supported by the MySQL Server
Which communication variants your MySQL server offers depends on how the program was com-
piled and how it has been configured (see also Chapter 14). The current status of a running MySQL
server can be determined with certain SHOW VARIABLES commands:
SHOW VARIABLES LIKE 'skip_net%'
skip_networking OFF
SHOW VARIABLES LIKE 'port'
port 3306
SHOW VARIABLES LIKE 'socket'
socket /var/lib/mysql/mysql.sock
SHOW VARIABLES LIKE 'named%'
named_pipe OFF
SHOW VARIABLES LIKE 'shared%'
shared_memory OFF
shared_memory_base_name MYSQL
These commands take care of the following: The MySQL server supports TCP/IP; that is, the
network functions are not deactivated for security reasons via the option skip-networking. The
TCP/IP communication uses port 3306.
The MySQL server supports communication over the socket file /var/lib/ mysql/mysql.sock.
(The variable socket is available only with Unix/Linux versions of the MySQL server.)
The MySQL server supports neither named pipes nor shared memory. (The three variables
named_pipe, shared_memory, and shared_memory_base_name) are available only under the
Windows version of the MySQL server.)
CHAPTER 11 ■ACCESS ADMINISTRATION AND SECURITY264
5351c11_final.qxd 8/26/05 6:30 PM Page 264
www.it-ebooks.info
Access Administration
Normally, it is undesirable to allow everyone to execute all database operations. To be sure, there
must be one, or perhaps even several, administrators who have wide-ranging powers. However, it
would be a great security risk to allow all users to act as they please in altering records or even
deleting entire databases.
There can be many different degrees of access rights. In a company with an employee database,
for example, it may make sense to allow all employees to read part of the database (for example, to
find someone’s telephone number), while other parts remain invisible (such as personnel records).
MySQL offers a finely meshed system for setting such access privileges. In the MySQL docu-
mentation this system is called the access privilege system, while the individual lists of the system
are called access control lists (ACLs). The management of these lists is carried out internally in the
tables of the mysql database, which will be described in detail.
This section assumes that communication between the client and the MySQL server is possible
in principle.
Setting the Access Privileges
There are several ways to set access privileges:
• The simplest and most convenient way is to use an administration program with a graphical
user interface. Two of these programs—MySQL Administrator and phpMyAdmin—were
described in Chapters 5 and 6. Note, however, that even the most convenient user interface
is of little help if you do not understand the concepts of MySQL access.
• You can change mysql directly with INSERT and UPDATE commands.
• You can use the SQL commands GRANT and REVOKE, which offer greater convenience.
• You can use the Perl script mysql_setpermission.pl. This script is even easier to use than
GRANT and REVOKE, though it assumes, of course, that you have a Perl installation up and
running.
User Name, Password, and Host Name
MySQL’s access process has two phases. In the first phase, the question is whether the user is permitted
to make a connection to MySQL at all. (Such does not imply the right to read or alter any databases, but
nevertheless, such access provides the capability to pass SQL commands to MySQL. Then MySQL
decides, based on its security settings, whether this command should actually be executed.)
While you are probably accustomed to providing a user name and password to enter the operat-
ing system of a multiuser computing system, MySQL evaluates a third piece of information: the name
of the computer (host name) from which you are accessing MySQL. Since MySQL’s entire security sys-
tem is based on this informational triple, it seems not inappropriate to take a few moments now to
explain what is going on.
User Name: The user name is the name under which you announce your presence to MySQL.
The management of MySQL user names has nothing to do with login names managed by the oper-
ating system. It is, of course, possible, and indeed, it is often advisable, to use the same name for
both purposes, but management of each of these names is independent of the other. There is no
mechanism to synchronize these operations (such that, for example, a new MySQL user name is
generated when the operating system generates a new user name).
The user name can be up to sixteen characters in length, and it is case-sensitive. In principle,
such names do not have to be composed exclusively of ASCII characters. But since different operating
systems handle special characters differently, such characters often lead to problems and therefore
should be avoided.
CHAPTER 11 ■ACCESS ADMINISTRATION AND SECURITY 265
5351c11_final.qxd 8/26/05 6:30 PM Page 265
www.it-ebooks.info

Password: What holds for user names holds for passwords as well. There is no relation between
the MySQL password and that used for the operating system, even if they are identical. Within MySQL,
passwords are stored in 45-bit encrypted form, which allows passwords to be checked, but does not
allow reconstruction of a password. Even if an attacker should gain access to the user table of MySQL,
there is no way for the villain to determine the passwords.
■Caution
For security reasons do not use the same password for MySQL as for the operating system!
MySQL passwords must often be supplied in plain text in script files, configuration files, and programs. Thus
they are in danger of being intercepted. If an attacker who acquires such a password were to gain access not only
to your database, but also discovers that the same password allows entry into the operating system, the villain will
be very happy indeed.
This warning is directed particularly at Internet service providers that allow their clients direct access to the
computer (FTP, Telnet, SSH) in addition to access to a MySQL database. Be sure to give different passwords for
these two different forms of access!
Since version 4.1, MySQL has used a new authentication system and better-encrypted passwords. Older
MySQL client programs are therefore no longer capable of establishing a connection to the MySQL server. Back-
ground information on suggested solutions to this authentication problem follow later in this chapter.
Passwords, like user names, are case-sensitive, and they can be of arbitrary length. Special
characters outside of the ASCII character set are possible, but are not recommended.
Host Name: In establishing a connection, you must normally specify the computer on which
the MySQL server is running. This computer name is generally referred to as hostname. The host
name can be given as an IP number (e.g., 192.168.23.45). You can omit specification of the host
name only if the MySQL server is running on the same computer as your client program.
When determining access rights, MySQL evaluates the information as to where the access
request is coming from, that is, from what host name. When client and server are running on differ-
ent computers, the evaluation of the host name can cause problems for two reasons:
• The MySQL server must be capable of resolving the computer name. In establishing a con-
nection, the server first receives from the client its IP number. Then the server attempts to
find the associated computer name (by contacting a name server). If that is unsuccessful,
then the computer uses the IP number instead of the name for determining whether access
should be allowed.
• Even if the name resolution succeeds, the name server can return the host name either with
or without the domain name, depending on the configuration (e.g., mars or mars.sol). Only
when the host name agrees exactly with the entry in the mysql.host table will access to
MySQL be granted.
■Note When the client and server are running under Unix/Linux on the same computer and are using a socket
file for communication, the MySQL server uses for authentication not the local computer name, but the name
localhost
as host name. This means that the MySQL server distinguishes two different entries in the access
system, according to whether communication takes place over TCP/IP or a socket file:
username1 / password1 / computername
under TCP/IP
username2 / password2 / localhost
under socket file
Extensive background information on these special cases and various other problems with host names and in
establishing connections in general can be found later in this chapter.
CHAPTER 11 ■ACCESS ADMINISTRATION AND SECURITY266
5351c11_final.qxd 8/26/05 6:30 PM Page 266
www.it-ebooks.info
Default Values: If no other parameters are given in establishing a MySQL connection, then
under Unix/Linux the current login name is given as user name, while under Windows it is the char-
acter string ODBC. As password an empty character string is passed. The host name is localhost.
You can easily test this. Launch the program mysql and execute the command status. The cur-
rent user name is displayed in the line current user. The following commands were executed under
Linux:
kofler:~ > mysql -p
Enter password: xxx
Welcome to the MySQL monitor.
mysql> status
...
Current user: kofler@localhost
Connection: localhost via UNIX socket
If in establishing a connection you must provide a user name other than the login name, a host
name, and a password, then the start of mysql looks something like this:
kofler:~ > mysql -u surveyadmin -h uranus.sol -p
Enter password: xxx
mysql> status
...
Current user: surveyadmin@saturn.sol
Connection: uranus.sol via TCP/IP
Here we have a TCP/IP connection between the client (computer saturn.sol) and the server
(computer name uranus.sol).
MySQL recognizes the term anonymous user. This expression comes into play when any user
name is permitted in establishing a connection to MySQL. In this case, status shows as ithe user
name used when the connection was established, but internally, an empty character string is used
as user name. This is important primarily for the evaluation of additional access privileges. Further
background information is contained later in this chapter, where the inner workings of the access
system are discussed.
When a PHP script establishes the connection to the database and no other user name is sup-
plied, then what is used as user name is the name of the account under which the PHP interpreter
is executed. (As a rule, this is the same account under which Apache is also executed. Thus for
security reasons, most Unix/Linux systems use an account that has few privileges, such as apache
or wwwrun.)
Default Security Settings
Depending on how old your MySQL installation is and whether you installed MySQL under Win-
dows or Linux, there are more or less (un)safe default settings for MySQL access administration.
Current Windows versions: Since versions 4.1.5 and 5.0.2, the MySQL server has been distrib-
uted together with a new installation program, which was described in Chapter 2. If you
followed the instructions in that chapter, your MySQL installation is already relatively secure.
The only user with unrestricted privileges is the system manager root, who, however, can gain
access only from the local computer and must sign in with a password.
Older Windows versions: The default installation under older versions of Windows is much
more insecure than the newer versions. Here root can log on both from the local computer and
over the network, and can do so without a password. Moreover, all users of the local system
can gain access without a password and have extensive privileges. For example, they can read
all databases, alter them, and even completely delete them. Finally, anyone (arbitrary user
name, arbitrary computer in the network) can gain access, even though such users have no
CHAPTER 11 ■ACCESS ADMINISTRATION AND SECURITY 267
5351c11_final.qxd 8/26/05 6:30 PM Page 267
www.it-ebooks.info

Unix/Linux: The default settings under Unix/Linux are not as insecure as those under the old
Windows installations, but they are by no means secure: root can gain access on the local com-
puter without a password. Furthermore, all users on the local system (also with any user name)
are permitted to access MySQL without a password; in contrast to root, these users have no
rights whatsoever (they can’t even execute a SELECT command). Access from an external com-
puter is by default not allowed.
■Caution To make things perfectly clear: As long as
root
is not protected by a password, anyone can gain
access to the MySQL server under this name and do whatever he wants with your databases. With old Windows
installations it is not even necessary to use the local computer: A connection as
root
is possible over a network.
In the next section, on first aid, you will learn how with a little effort you can replace this default setting with some-
thing more restrictive.
For those with little experience with Unix/Linux,
root
under Unix/Linux plays somewhat the same role as
Admin-
istrator
under Windows, that is, a superuser with almost unrestricted privileges. However, be advised that user
names under MySQL have no connection with the login names for the operating system. Thus
root
has so many
privileges under MySQL because the MySQL default setting was chosen, not because under Unix/Linux
root
has
such privileges. It would have been possible to choose a name other than
root
for the MySQL user with adminis-
trative access privileges. In fact, in the interests of security it would be a good idea to replace
root
by a different
user name.
You may perhaps be asking yourself where the default security settings come from. These settings
are stored in the mysql database, which under Windows is created by the MySQL setup program. Under
Unix/Linux, the script mysql_install_db is executed during RPM installation, which creates and sets
up the mysql database.
Under Unix/Linux one can execute mysql_install_db manually, for example, to re-create the
mysql database. To do this, the MySQL server must first be stopped. The script must be executed
under the same account that is used for executing the MySQL server (usually mysql). You can exe-
cute mysql_install_db also as root, in which case you must be the owner of the mysql database
directory and change the following files contained therein:
root# mysql_install_db
root# chown mysql -R /var/lib/mysql/mysql
Test Databases: Regardless of the operating system under which MySQL is installed, any user
who connects to MySQL can create test databases. The only condition is that the name of the data-
base must begin with test. Please note that not only can every MySQL user create such a database,
in addition, every user can read, alter, and delete all data in such a database. In fact, anyone can
delete the entire database. In short, the data in test databases are completely unprotected.
Tables 11-2, 11-3, and 11-5, which appear later in the chapter, depict this default setting. To
understand these figures it is necessary that you understand the mysql table functions user and db,
which are described in this chapter.
First Aid
Perhaps you are not quite ready to immerse yourself in the depths of SQL access management. In
that case, this section provides a bit of first aid advice.
The instructions assume that you communicate with the MySQL server with the commands
mysql and mysqladmin (see Chapter 4). You can, of course, execute equivalent commands with a
graphical user interface.
CHAPTER 11 ■ACCESS ADMINISTRATION AND SECURITY268
5351c11_final.qxd 8/26/05 6:30 PM Page 268
www.it-ebooks.info

Protecting the MySQL Installation
The following commands assume that you can sign into the MySQL server as root:
> mysql -u root
Welcome to the MySQL monitor. ...
If root has been secured with a password, then the above command fails. You must provide the
option -p and then you will be asked for the root password:
> mysql -u root -p
Enter password: xxx
Welcome to the MySQL monitor. ...
All further commands relate to the database mysql, in which the user settings are stored. (If you
execute the commands in mysql, don’t forget to provide a semicolon at the end of each command.)
USE mysql
A SELECT command will give you a quick overview of all users. The results will of course proba-
bly look different on your computer. When a MySQL server has been in operation a long time and a
variety of MySQL users have been defined, this list can be rather long.
SELECT user, host, password FROM user
user host password
root localhost
root uranus.sol
uranus.sol
localhost
This means that there are currently four users, none of whom is secured with a password.
Here uranus.sol is the name of the local system. The following list presents possible steps to take
for achieving security:
Set the root password: A simple UPDATE command defines a single password for all root users,
regardless of from where they log on:
UPDATE user SET password = PASSWORD('secret') WHERE user = 'root'
Replace root with another name: By default, the MySQL user responsible for administration
has the name root. If someone tries to attack your system, the first thing that will be attempted
is to see whether a root login without a password is possible or whether the root password can
be guessed. Therefore, you increase the security of your system considerably if you choose
another name besides root:
UPDATE user SET user = 'myroot' WHERE user = 'root'
This has of course the consequence that you must always use this new name when you log
in for system administrative tasks. Instead of mysql -u root -p, you must now call yourself
mysql -u myroot -p.
Delete anonymous users: For the sake of security, you should delete all anonymous users, that
is, those for whom the user column is empty. Only those explicitly registered in the MySQL user
table should be able to log in:
DELETE FROM user WHERE user = ''
CHAPTER 11 ■ACCESS ADMINISTRATION AND SECURITY 269
5351c11_final.qxd 8/26/05 6:30 PM Page 269
www.it-ebooks.info
Set a password for every user: In general, the user table should contain no user without a pass-
word. As database administrator you can give every such user a password known to you with a
single UPDATE command. This has the effect that the affected users can no longer log into the
MySQL server. These users will contact you, and you can set a password for each such user:
UPDATE user SET password = PASSWORD(secret) WHERE password = ''
Deal with users who can log in from anywhere: A last source of insecurity is the existence of
MySQL users who can log in from anywhere. You can recognize such users by the fact that the
column host contains only a percent sign (%):
SELECT user, host, password FROM user WHERE host = '%'
There is no general rule for dealing with such users. In individual cases such a user could be
allowed this privilege. However, often it would suffice to restrict the permissible network
addresses to the local network or a range of IP numbers. (Note, however, that MySQL evaluates
IP numbers only when it cannot determine the host names.) The following command allows
logins only from the local network (which in this example has the name sol):
UPDATE user SET host = '%.sol' WHERE host = '%'
For all these commands to become effective, you must now execute the command FLUSH
PRIVILEGES. MySQL keeps a copy of the mysql database in RAM, for speed optimization, which
is updated via FLUSH PRIVILEGES:
FLUSH PRIVILEGES
Creating a New Database and User
Among the bread-and-butter tasks of a database administrator is setting up a new database and
making it available to a user (who then can insert tables and fill them with data).
This task is easily accomplished. You have merely to execute the following two commands
with mysql. The result is the creation of the database forum, to which the user forumadmin has
been granted unrestricted access.
CREATE DATABASE forum
GRANT All ON forum.* TO forumadmin@localhost IDENTIFIED BY 'xxx'
It is often useful to create a second access to the database, one with fewer privileges (and there-
fore with fewer security risks):
GRANT Select, Insert, Update, Delete ON forum.*
TO forumuser@localhost IDENTIFIED BY 'xxx'
Depending on the application, it can be a good idea to give ordinary users the ability to lock
(LOCK) tables, create temporary tables, and execute stored procedures (since MySQL 5.0). The
IDENTIFIED part was omitted. That is, the password of forumuser remains unchanged:
GRANT Lock Tables, Create Temporary Tables, Execute ON forum.*
TO forumuser@localhost
When the MySQL server is running under Unix/Linux, @localhost allows only one local login
over a socket file. If you also wish to allow a local login over TCP/IP (as is required for Java programs),
you must also grant privileges (ALL, SELECT, INSERT, etc.) for username@localcomputername:
GRANT ALL ON forum.* TO forumadmin@rechnername IDENTIFIED BY 'xxx'
GRANT privileges ... ON forum.* TO forumuser@rechnername IDENTIFIED BY 'xxx'
CHAPTER 11 ■ACCESS ADMINISTRATION AND SECURITY270
5351c11_final.qxd 8/26/05 6:30 PM Page 270
www.it-ebooks.info
Creating New Users
After the database that we have just created, forum, has been in operation for a while, it turns out
that another individual, operating from another computer, requires unrestricted access to this data-
base. The following command gives user forumadmin2 on computer uranus.sol full privileges:
GRANT ALL ON forum.* TO forumadmin2@uranus.sol IDENTIFIED BY 'xxx'
If you wish to allow forumadmin2 to sign in from any computer, then the command looks like this:
GRANT ALL ON forum.* TO forumadmin2@'%' IDENTIFIED BY 'xxx'
If you wish to go so far as to allow forumadmin2 access to all databases (and not just forum), the
command is as follows:
GRANT ALL ON *.* TO forumadmin2@uranus.sol IDENTIFIED BY 'xxx'
In comparison to root, the only privilege that forumadmin2 does not possess is the right to
change access privileges. But a small change remedies the situation:
GRANT ALL ON *.* TO forumadmin2@uranus.sol
IDENTIFIED BY 'xxx' WITH GRANT OPTION
Now forumadmin2 has the same privileges as root.
Granting the Right to Create One’s Own Database
When there are many users each with his or her own databases (for example, on the system of an
Internet service provider), it becomes increasingly burdensome for the administrator to create yet
another database for a particular user. In such cases it would be a good idea to give this user the
right to create databases. In order to prevent a jungle of databases from appearing with no clue as
to which belongs to whom, it is usual practice to allow a user to create only databases that begin
with that user’s user name. That is, a user named, say, kofler, is allowed to create databases named,
say, kofler_test, kofler_forum, kofler1, koflerXy, etc., but no databases whose names do not begin
with kofler.
In the following, the way to proceed will be demonstrated for a user with the remarkable user
name username. If this user is not yet known to MySQL, then first it must be created:
GRANT USAGE ON *.* TO username@localhost IDENTIFIED BY 'xxx'
Then, sad to tell, you must wrestle with an INSERT command, since the more convenient GRANT
command does not, alas, permit wild cards in the specification of database names. Therefore, the nec-
essary changes in the database db must be made directly. The allowable database names consist of
username and arbitrary additional characters usually expressed with %. The relevant columns of the
following command are shown in boldface:
INSERT INTO mysql.db (Host, Db, User, Select_priv, Insert_priv,
Update_priv, Delete_priv, Create_priv, Drop_priv, Grant_priv,
References_priv, Index_priv, Alter_priv, Create_tmp_table_priv,
Lock_tables_priv, Create_view_priv, Show_view_priv)
VALUES ('localhost', 'username%', 'username', 'Y', 'Y', 'Y', 'Y',
'Y', 'Y', 'N', 'Y', 'Y', 'Y', 'Y', 'Y', 'Y', 'Y')
For these changes to become effective, FLUSH PRIVILEGES must finally be executed:
FLUSH PRIVILEGES
CHAPTER 11 ■ACCESS ADMINISTRATION AND SECURITY 271
5351c11_final.qxd 8/26/05 6:30 PM Page 271
www.it-ebooks.info

Oops! I Forgot the root Password!
What do you do if you have forgotten the root password for MySQL (and there is no other MySQL user
with sufficient administrative privileges and a known password to restore the forgotten password)?
Fear not, as the MySQL developers have thought about this possibility. The way to proceed
is this: Terminate MySQL (that is, the MySQL server mysqld) and then restart it with the option
skip_grant_tables. The result is that the table with access privileges is not loaded. You can now
delete the encrypted password for root, terminate MySQL, and then restart without the given
option. Now you can give the root user a new password.
In each case, we assume that you have system administrator privileges on the operating system
under which MySQL is running.
The first step is to terminate MySQL. Under Windows, you end MySQL in the Service Manager
(SETTINGS | CONTROL PANEL | ADMINISTRATIVE TOOLS | SERVICES). Under Unix/Linux, execute the following
command:
root# /etc/rc.d/mysql stop
Now enter the option skip_grant_tables in the MySQL configuration file in the section
[mysqld]. The configuration file is located here: under Unix/Linux, /etc/my.cnf; under Windows,
C:\Programs\MySQL\MySQL Server n.n/my.ini:
# changes in my.cnf and my.ini
...
[mysqld]
skip_grant_tables
...
Then restart the MySQL server, under Windows in the Service Manager dialog mentioned pre-
viously, under Unix/Linux with the following command:
root# /etc/rc.d/mysql start
Now you can use mysql to reset the root password both for the host name localhost and the
actual computer name (only Unix/Linux):
root# mysql -u root
Welcome to MySQL monitor.
mysql> USE mysql;
Database changed.
mysql> UPDATE user SET password=PASSWORD('new password')
> WHERE user='root' AND host='localhost';
Query OK, 1 row affected (0.00 sec)
mysql> UPDATE user SET password=PASSWORD('new password'wort')
> WHERE user='root' AND host='computername';
Query OK, 1 row affected (0.00 sec)
After these changes in the mysql.user table, stop the MySQL server again as previously
described or else with the command mysqladmin shutdown. Delete again skip_grant_tables from
the MySQL configuration database and restart the MySQL server.
■Caution The procedures described here can, of course, be used by an attacker who wishes to spy on your
data or manipulate it somehow. The only (fortunately, not easily achieved) condition is to acquire Unix/Linux
root
access (or
administrator
rights under Windows). This shows how important it is not only to secure MySQL, but also
the computer on which MySQL is running. (The topic of security under Unix/Linux and Windows is, like any number
of other topics, beyond the scope of this book.)
CHAPTER 11 ■ACCESS ADMINISTRATION AND SECURITY272
5351c11_final.qxd 8/26/05 6:30 PM Page 272
www.it-ebooks.info

The Internal Workings of the Access System
You may be sorely tempted to skip over this foundational section, especially since the management
of access privileges is rather complicated. However, I strongly suggest that you gird up your loins
and make the effort to read through the description of the mysql tables. Regardless of the means
that you use for setting up security on your system, it is helpful first to understand the inner work-
ings of the system itself. This holds even for the case that you yourself are not the manager of access
privileges, but that they are managed by a system administrator. It is only when you understand
how it all works that you will be able to tell your system administrator just what your needs are.
Two-Tiered Access Control
Access control for MySQL databases is managed in two tiers: First, it is merely checked whether
the user has the right to establish a connection to MySQL. This is accomplished by the evaluation
of three pieces of information: user name, host name, and password.
Only if a connection can be established does the second level of access control come into play,
which involves every single database command. For example, if a SELECT is executed, MySQL
checks whether the user has access rights to the database, the table, and the column. If an INSERT
is executed, then MySQL tests whether the user is permitted to alter the database, the table, and
finally the column.
Privileges
How, then, does MySQL manage the information as to which commands can be executed? MySQL
uses tables in which are stored privileges. If a user, let us call her athena, has a Select privilege for the
database owls, then she is permitted to read all the data in owls (but not to change it). If athena has
a global Select privilege, then it holds for all databases saved under MySQL.
The privileges recognized by MySQL are displayed in Table 11-1. Note that the names in the
corresponding columns of mysql tables always end in _priv. The Select privilege is thus stored in the
column Select_priv. In part, the column names are abbreviated (e.g., Create_tmp_table for the Cre-
ate Temporary Table privilege).
■Caution In the past, new privileges were introduced with almost every version of MySQL. In comparison to
version 3.23, MySQL 5.0 offers the following new privileges:
Alter Routine
,
Create Routine
,
Create Temporary Table
,
Execute
,
Lock Tables
,
Show Databases
,
Replication Client
,
Replication Slave
,
Super
. (A list of all available privileges
together with a brief description can be obtained with the command
SHOW PRIVILEGES
.)
If you are updating an older MySQL installation, you must update the
mysql
tables as well so that you can use
the new privileges. Under Unix/Linux, the script mysql_fix_privilege_tables will be of help, while under Win-
dows, you can use the like-named SQL file (see also Chapter 14).
CHAPTER 11 ■ACCESS ADMINISTRATION AND SECURITY 273
5351c11_final.qxd 8/26/05 6:30 PM Page 273
www.it-ebooks.info

Table 11-1. MySQL Privileges
MySQL Privilege Meaning
For Access to Tables
Select May read data (SELECT command).
Insert May insert new records (INSERT).
Update May change existing data records (UPDATE).
Delete May delete existing records (DELETE).
Lock Tables May lock tables (LOCK).
For Changing Databases,Tables, and Views
Create May create new databases and tables.
Create Temporary Table May create temporary tables.
Alter May rename tables and alter their structure.
Index May add and delete table indexes.
References Undocumented; perhaps will allow in the future to set up links between
tables.
Drop May delete existing databases and tables.
Create View May define views (since MySQL 5.0).
Show View May inspect view definitions with SHOW CREATE VIEW
(since MySQL 5.0).
For Stored Procedures (since MySQL 5.0, see Chapter 13)
Alter Routine May change existing stored procedures.
Create Routine May define new stored procedures.
Execute May execute stored procedures.
For Data Access
File May read and alter files of the local file system.
Create User May create new MySQL users (since MySQL 5.0.3).
For MySQL Administration
Grant Option May give other users one’s privileges.
Show Databases May see a list of all databases (SHOW DATABASES).
Process May see the MySQL processes of other users (SHOW PROCESSLIST).
Super May end the MySQL processes of other users (KILL), create SPs und
triggers, and change and execute some administrative commands
(CHANGE/PURGE MASTER, SET GLOBAL).
Reload May execute various commands (reload, refresh, flush-xxx).
Replication Client May determine information about the participants in a replication
system.
Replication Slave May read data of the MySQL server via replication.
Shutdown May shut down MySQL.
In the MySQL documentation, you will encounter (for example, in the description of the GRANT
command) the privileges All and Usage. All means that all privileges should be granted with the excep-
tion of Grant. Usage means that all privileges should be denied.
CHAPTER 11 ■ACCESS ADMINISTRATION AND SECURITY274
5351c11_final.qxd 8/26/05 6:30 PM Page 274
www.it-ebooks.info

All and Usage are thus themselves not independent privileges, but an aid in avoiding a listing
of privileges in executing the GRANT command.
The meaning of most of the privileges should be clear without further explanation. For the not-
so-clear privileges there will be some explanation in the coming paragraphs. Replication Client and
Replication Slave are described in Chapter 14 in the discussion of replication.
Privileges are given in this book with an initial capital letter followed by lowercase letters in
order to distinguish them from their like-named SQL commands (Select privilege and SELECT
command). MySQL couldn’t care less how you distribute uppercase and lowercase letters.
The Grant Option Privilege
The Grant Option privilege indicates that a MySQL user can dispense access privileges. (This is most
easily accomplished with the SQL command GRANT, whence the name of the privilege.) However,
the ability to dispense privileges is limited to the privileges possessed by the grantor. That is, no user
can give privileges to another that he or she does not already possess.
■Caution The
Grant Option
privilege is an often overlooked security risk. For example, a test database is cre-
ated to which all members of a team have unrestricted access. To this end, all the privileges in the relevant entry
in the
db
table are set to
Y
(the
db
table will be described a bit later).
A perhaps unforeseen consequence is that everyone who has unrestricted access to this test table can give
unrestricted access privileges (either to himself or to other MySQL users) for other databases as well!
The File Privilege
MySQL users with the File privilege may use SQL commands for direct access to the file system of
the computer on which the MySQL server is running, for example, with the command SELECT …
INTO OUTFILE name or the command LOAD DATA or with the function LOAD_FILE.
In the case of file access, it is necessary, of course, to pay heed to the access privileges of the file
system. (Under Unix/Linux the MySQL server normally runs under the mysql account. Therefore,
only those files that are readable by the Unix/Linux user mysql can be read.) Nevertheless, the File
privilege is often a considerable security risk.
The Privileges Process and Super
The Process privilege gives the user the right to determine, using the command SHOW PROCESSLIST,
a list of all processes (connections), including those of other users. (One may obtain a list of one’s
own processes without this privilege.)
The privilege Super permits the user to end both his own and others’ processes with KILL. (If the
Super privilege has not been granted, then only the current process can be ended.)
The Super privilege also permits the execution of some administrative commands: CHANGE
MASTER for executing the client configuration of a replication system, PURGE MASTER to delete
binary logging files, and SET GLOBAL for changing global MySQL variables.
Global Privileges Versus Object Privileges
In MySQL privileges can be chosen to be either global or related to a particular object. Global indi-
cates that the privilege is valid for all MySQL objects (that is, for all databases, tables, and columns
of a table).
The management of object-related privileges is somewhat more difficult, but it is also more
secure. Only thus can you achieve, for example, that a particular MySQL user can alter a particular
CHAPTER 11 ■ACCESS ADMINISTRATION AND SECURITY 275
5351c11_final.qxd 8/26/05 6:30 PM Page 275
www.it-ebooks.info

table, and not all tables managed under MySQL. An assumption in the use of object-related privi-
leges is that the corresponding global privileges are not set. (What is globally allowed cannot be
withheld at the object level.)
This hierarchical idea is maintained within the object privileges as well. First it is checked
whether access to an entire database is allowed. Only if that is not allowed is it then checked whether
access to the entire table named in the SQL command is allowed. Only if that is forbidden is it then
checked whether perhaps access to individual columns of the table is allowed.
information_schema Tables
The virtual information_schema tables introduced in Chapter 9 are a special case of privilege
administration. Everyone who is permitted to log into the MySQL server is permitted to execute
SELECT queries for such tables. No Select privilege is required for this.
The mysql Database
It is not surprising that the management by MySQL of access privileges is carried out by means of a
database. This database has the name mysql, and it consists of several tables, responsible for vari-
ous aspects of access privileges.
■Note It is sometimes not entirely a simple matter to distinguish among the various uses to which the word
“MySQL” is put. In this book we attempt to use different type styles to obtain some degree of clarity:
MySQL: the database system as a whole.
mysqld: the MySQL server (MySQL daemon).
mysql: the MySQL monitor (a type of command interpreter).
mysql
: the database for managing MySQL access privileges.
The Tables of the Database mysql
The database mysql contains a large number of tables for various administrative tasks. Six tables are
for managing access privileges. These tables are often referred to as grant tables. Table 11-2 provides
an overview of the tasks of these grant tables.
Table 11-2. mysql Tables for Administration of Access Privileges
Name Meaning
user Controls who (user name) can access MySQL from which computer (host
name). This table also contains global privileges.
db Specifies which user can access which databases.
host Extends the db table with information on the permissible host names (those that
are not present in db).
tables_priv Specifies who can access which tables of a database.
columns_priv Specifies who can access which columns of a table.
func Enables the management of UDFs (user-defined functions); this is still
undocumented.
procs_priv Specifies who is permitted to execute individual stored procedures.
CHAPTER 11 ■ACCESS ADMINISTRATION AND SECURITY276
5351c11_final.qxd 8/26/05 6:30 PM Page 276
www.it-ebooks.info

When you newly install MySQL, the default values of user and db depend on the operating sys-
tem. The contents of these two tables are displayed in Tables 11-4, 11-5, and 11-7, which appear later.
The effect of these settings was discussed earlier. (The tables host, tables_priv, and columns_priv
start off life empty.)
In MySQL’s two-tiered access system, the table user is solely responsible for the first level (that
is, for the connection to MySQL). The user table contains all global privileges.
For the second tier (that is, access to specific objects: databases, tables, and columns) it is the
tables db, host, tables_priv, and columns_priv that are responsible, in addition to user.
The tables db, host, tables_priv, and columns_priv come into play in this order when the privi-
leges for their respective tiers are set to N(which stands for “No”). In other words, if the Select
privilege is granted to a user in user, then the other four tables will not be consulted in checking
the permissibility of a SELECT command executed by that user.
The result is that if fine distinctions in access privileges are to be made, the global privileges
in the user table must be set to N.
An Example
Before we attempt to describe the individual tables in detail, we present an example: Let us suppose
that a particular MySQL user, let us call him zeus, is to be allowed to read a particular column of a
particular table, and nothing else. Then zeus (with user name, host name, password) must be entered
in the user table. There all of zeus’s global privileges will be set to N.
Furthermore, zeus (with user name, host name) must be registered in the columns_priv table as
well. There it must also be specified which column zeus is permitted to access (database name, table
name, column name). Finally, there the Select privilege (and only this privilege) must be activated. In
the tables db, host, and tables_priv no entries for zeus are necessary.
The user Table
The user table (see Table 11-3) fulfills three tasks:
• This table alone regulates who has any access at all to MySQL.
• Global privileges can be granted through this table. Note that the column names of the table
differ somewhat from those of the privileges (e.g., the Create_tmp_table column for the
Create Temporary Table privilege).
• Since MySQL 4.0 the table contains several new columns for encrypted access via SSL (secure
socket layer), for identity control in accordance with the X509 standard and for managing
such control, and for the number of database connections, that is, the maximal number of
updates and queries permitted to be executed per hour.
Table 11-3. Schema of the user Table
Field Type Null Default
Host char(60) No
User char(16) No
Password char(45) No
Select_priv enum(‘N’, ‘Y’) No N
Insert_priv enum(‘N’, ‘Y’) No N
Update_priv enum(‘N’, ‘Y’) No N
Continued
CHAPTER 11 ■ACCESS ADMINISTRATION AND SECURITY 277
5351c11_final.qxd 8/26/05 6:30 PM Page 277
www.it-ebooks.info

Table 11-3. (Continued)
Field Type Null Default
Delete_priv enum(‘N’, ‘Y’) No N
Create_priv enum(‘N’, ‘Y’) No N
Drop_priv enum(‘N’, ‘Y’) No N
Reload_priv enum(‘N’, ‘Y’) No N
Shutdown_priv enum(‘N’, ‘Y’) No N
Process_priv enum(‘N’, ‘Y’) No N
File_priv enum(‘N’, ‘Y’) No N
Grant_priv enum(‘N’, ‘Y’) No N
Create_view_priv enum(‘N’, ‘Y’) No N
Show_view_priv enum(‘N’, ‘Y’) No N
References_priv enum(‘N’, ‘Y’) No N
Index_priv enum(‘N’, ‘Y’) No N
Alter_priv enum(‘N’, ‘Y’) No N
Show_db_priv enum(‘N’, ‘Y’) No N
Super_priv enum(‘N’, ‘Y’) No N
Create_tmp_table_priv enum(‘N’, ‘Y’) No N
Lock_tables_priv enum(‘N’, ‘Y’) No N
Execute_priv enum(‘N’, ‘Y’) No N
Alter_routine_priv enum(‘N’, ‘Y’) No N
Create_routine_priv enum(‘N’, ‘Y’) No N
Create_user_priv enum(‘N’, ‘Y’) No N
Repl_slave_priv enum(‘N’, ‘Y’) No N
Repl_client_priv enum(‘N’, ‘Y’) No N
ssl_type enum(‘’, ‘ANY’, ‘X509’, ‘SPECIFIED’) No 0
ssl_cipher blob No 0
x509_issuer blob No 0
x509_subject blob No 0
max_questions int No 0
max_updates int No 0
max_connections int No 0
max_user_connections int No 0
Access Control (User, Host, and Password Columns)
For control over who can connect to MySQL there are three necessary identifiers—as we have men-
tioned already several times—that must be evaluated: user name, host name, and password. Here
we shall say a few words about how this information is stored in the fields User, Host, and Password.
User Name: Access control is case-sensitive. In the User field no wild cards are allowed. If the
User field is empty, then any user name is permitted for accessing MySQL. Then the user is
considered to be an anonymous user. This means that in the second tier of access control the
acter string.
CHAPTER 11 ■ACCESS ADMINISTRATION AND SECURITY278
5351c11_final.qxd 8/26/05 6:30 PM Page 278
www.it-ebooks.info

Password: The password must be stored in the column Password and there be encrypted with
the SQL function PASSWORD. It is not possible to store a password in plain text. Furthermore,
wild cards are not allowed. If the password field remains empty, then a connection can be made
with no password whatsoever. (An empty password field thus does not mean that an arbitrary
password can be given.)
With MySQL 4.1 the encryption of the Password column has changed. The encrypted code of
the password contains 45 characters (in earlier versions of MySQL it was only 16 characters).
Be thou once more warned: For reasons of security you should never use as your MySQL pass-
word a password that you use to gain admittance to the operating system.
Host Name: The host name can be given either as a name or as an IP number. Here the wild
cards _(an arbitrary character) or %(zero or more characters) are permitted, for example,
192.168.37.% or %.myfavoriteenterprise.com. In the case of IP numbers, the forms (which are
equivalent to those of the first example) 192.168.37.0/255.255.255.0 and 192.168.37.0/24 are
permitted. If the host name is given simply as the character %, a connection can be made
from any computer. As with the user name, the host name is case-sensitive.
To enable access on the local computer, give localhost as the host name. When Unix/Linux users
wish to obtain local access via TCP/IP (important for Java applications), then the actual com-
puter name must be used as the host name. If both forms of access are to be enabled, then the
user must be defined twice, once with the host name localhost, and once with computername.
■Tip Normally, the host name must be given together with the domain name. Thus if the computer
saturn.sol
wants to gain access from the network
*.sol
, the column
Host
in the
user
table must contain the character string
saturn.sol
and not just
saturn
. Depending on your network configuration (file /etc/hosts or the configuration of
an existing domain name server), it could be that one has to specify the host name without the domain name.
Further details on this and other picky details will be discussed further along in this chapter.
The Order of Evaluation in the user Table
It often happens that in making a connection to MySQL several records match the given login data.
If, for example, you log in as root from the local computer under the default settings of the user table
for Windows (Table 11-5), then all four entries would match. MySQL then decides in favor of the
most nearly exact description (thus in this case for root/localhost and not for ‘’%). The reason for this
is that with an exact match in the login one can expect more in the way of access privileges.
In order to speed up the selection of the correct record, the user table is sorted internally by
MySQL. Here the field Host serves as the first sort criterion, and User as the second. In sorting,
those character strings without the wild cards _and %are given priority. Empty character strings
and the character string %come in last in the sort order. Tables 11-4 and 11-5 show the default
settings for the user table in their respective internal sort orders.
■Caution The order in which the entries in the
user
table are evaluated often leads to unexpected problems.
Suppose that the MySQL default settings hold for user privileges and that you add a new user with
Host = ‘%’
and
User = ‘peter’
in the
user
table. If
peter
now attempts to register from the local computer (that is, from
localhost
),
it is not the entry
%/
‘
peter’
that comes into play, but the entry from the default setting
Host = ‘localhost’
and
User = ‘’
. The reason is that MySQL gives precedence to entries with a unique hostname (
Host = ‘localhost’
) over
those with a wild card (
Host=
‘
%’
).
The easiest and surest way out of this difficulty is to delete the entry
Host = ‘localhost’
and
User = ‘’
from the
user
table. In general, for security, you should avoid entries whose
User
column is empty.
CHAPTER 11 ■ACCESS ADMINISTRATION AND SECURITY 279
5351c11_final.qxd 8/26/05 6:30 PM Page 279
www.it-ebooks.info

Privileges
The user table is responsible not only for access control for MySQL, but also for global privileges. To
this end there are currently countless xxx_priv fields that take part, which can be set to Yor N. Since
Ystands for “yes,” this setting means that the associated privilege is set globally for the MySQL user
(for all databases, tables, and columns). Contrariwise, Nmeans “no” (or non in French, nein in Ger-
man, nyet in Russian; you get the idea), and so such a setting means that the operation in question
is not allowed globally, and therefore the tables db, host, tables_priv, and columns_priv will be con-
sulted for object-specific privileges.
SSL Encryption and X509 Identification
To make communication between client and server particularly secure, the X509 standard can be
used for user identification, and data transfer can be effected with SSL (secure socket layer) encryp-
tion. This requires a special compiled version of the MySQL server such as MySQL Max. (The SSL
functions are not currently integrated into MySQL Standard.) Whether your version of MySQL sup-
ports SSL can be determined with the SQL command SHOW VARIABLES LIKE ‘have_openssl’.
Note that the encryption of data affects the speed of the MySQL server and makes sense only if
data transfer is taking place over the Internet, that is, if the MySQL server and the client are running
on different computers.
The encryption of a local connection (if, for example, PHP/Apache accesses a MySQL server
that is running on the same computer) does not increase the security of the application. In this case,
the security is much more greatly determined by how communication between Apache and the web
user takes place (e.g., encryption via HTTPS).
■Tip This book does not go into details of the configuration and application of SSL and X509. More extensive
information can be found at http://dev.mysql.com/doc/mysql/en/secure-connections.html.
Restriction of MySQL Use
With the columns max_questions and max_updates you can specify how many queries (SELECT
commands) and data changes (INSERT and UPDATE) are permitted to be executed per hour;
max_connections specifies how many connections can be established per hour; max_user_
connections, new in MySQL 5.0, limits the number of simultaneous connections that an individual
user can have. The default setting 0 means that there are no restrictions.
Default Setting
As was described in the introduction to this chapter, after installation of MySQL there are various
default settings of the user table that depend on the particular operating system. Tables 11-4 and
11-5 give these settings (for MySQL version 5.0.n).
CHAPTER 11 ■ACCESS ADMINISTRATION AND SECURITY280
5351c11_final.qxd 8/26/05 6:30 PM Page 280
www.it-ebooks.info

Table 11-4. Default Setting for the user Table under Unix/Linux
Select_priv to Super_priv to ssl_xxx,
Host User Password Alter_priv Repl_client_priv x509_xxx max_xxx
localhost root Y Y NULL 0
computername root Y Y NULL 0
localhost N N NULL 0
computername N N NULL 0
Table 11-5. Default Setting for the user Table under Windows
Select_priv Super_priv bis ssl_xxx,
Host User Password bis Alter_priv Repl_client_priv x509_xxx max_xxx
localhost root xxxxxx Y Y NULL 0
CHAPTER 11 ■ACCESS ADMINISTRATION AND SECURITY 281
Note that Table 11-5 holds only for current MySQL installations, and then only if the installation
was carried out as described in Chapter 2. For older MySQL installations under Windows, a default
setting was used that was even more insecure than that under Unix/Linux.
The user.Host Column
As briefly mentioned in the previous section, the Host column of the user table specifies from which
computer a particular user is to obtain access to the MySQL server. The computer name can be given
with the wild card %or by an IP number.
What looks simple at first glance is, alas, in practice a source of numerous problems. Therefore,
this section contains various pieces of background information and some tips for solving connec-
tion problems.
Note that the problems mentioned here do not always occur. It depends primarily on the net-
work configuration, that is, on a factor outside of the MySQL server.
Host Name with or without Domain Name?
When you insert a new entry in the user table, the question arises whether the host name
should appear with or without the domain name, that is, for example, uranus or uranus.sol.
Which variant is correct depends on how the MySQL server resolves the network name. I have
made the discovery that the probability of success is higher if you include the domain name.
(The resolution of network names depends on the file /etc/hosts and, to the extent available,
the configuration of a domain name server running in the local network, thus on factors that
lie outside of MySQL.)
Depending on the network settings, it can happen that during installation of the MySQL
server, the column user.Host is entered without domain name. This is due to the script
mysql_install_db. If MySQL evaluates the complete network name in establishing a connec-
tion, then a local connection under TCP/IP is impossible. The problem is that mysql -u root
is functioning, but mysql -u root -h computername is not.
In this case, you have to change the domain name explicitly. The necessary commands look
like those below (of course, you will have to change uranus.sol and uranus to the names that apply
in your situation):
5351c11_final.qxd 8/26/05 6:30 PM Page 281
www.it-ebooks.info
root# mysql -u root
mysql> USE mysql;
mysql> UPDATE user SET host="uranus.sol"
WHERE host="uranus";
mysql> FLUSH PRIVILEGES;
computername Versus localhost Under Unix/Linux
When the MySQL server is executed under Unix/Linux, the default security settings provide two
entries for local access to the server: localhost and computername (see Table 11-4). The reason for
this dualism is that connections between the client program and the MySQL server running on the
same computer can take place in two ways: over a socket file or via the network protocol TCP/IP.
If you launch the program mysql on the same computer as the MySQL server, you can test both
connection options: If you do not specify a host name or if you give localhost as host name, the con-
nection succeeds over the socket file (first and second commands below). The same holds as well if
you use the option --protocol=socket (variant three).
If, on the other hand, you specify the actual computer name or the IP address, the connection
proceeds over TCP/IP (fourth through eighth commands). You can use the command status to
determine how the connection actually is made:
linux:~ $ mysql -u root -p via socket file (1)
linux:~ $ mysql -h localhost -u root -p (2)
linux:~ $ mysql -h localhost -u root -p --protocol=socket (3)
linux:~ $ mysql -h uranus -u root -p via TCP/IP (4)
linux:~ $ mysql -h uranus.sol -u root -p (5)
linux:~ $ mysql -h 127.0.0.1 -u root -p (6)
linux:~ $ mysql -h 192.168.0.2 -u root -p (7)
linux:~ $ mysql -h uranus -u root -p --protocol=tcp (8)
Welcome to the MySQL monitor. ...
mysql> status
...
Connection: uranus via TCP/IP
TCP port: 3306
localhost Problems with Red Hat Linux and Fedora Core
With Red Hat Linux and Fedora Core it can be necessary, in rare cases, to enter localhost.localdomain
in the Host column of the user table for local TCP/IP connections (instead of the otherwise usual
computer name). The reason is that with Red Hat, the IP address 127.0.0.1 is linked to the name
localhost.localdomain (file /etc/hosts).
localhost Problems with SUSE
With SUSE as well there can be problems, in rare cases, with localhost. The reason is that after the
execution of a network configuration, the line 127.0.0.2 computername is entered in /etc/hosts.
This line can cause confusion if computername is associated with a different IP address. Such prob-
lems generally occur in this case as well only when a local TCP/IP connection is sought. There are
several options for alleviating this problem:
• As a first attempt, you should try to specify the complete computer name (including domain
name) in the Host table. At least in my configuration, this was sufficient for establishing a
local TCP/IP connection in spite of the 127.0.0.2 line in /etc/hosts.
CHAPTER 11 ■ACCESS ADMINISTRATION AND SECURITY282
5351c11_final.qxd 8/26/05 6:30 PM Page 282
www.it-ebooks.info

• If that doesn’t work, you can enter the IP number 127.0.0.2 in the Host column instead of the
computer name. This should usually work, but it actually only alleviates the symptom, and
does not get at the cause.
• A third variant is to specify the complete computer name in the Host column and to com-
ment out the 127.0.0.2 line in /etc/hosts (by prefixing a # sign). Then you must restart the
network and the MySQL server, so that the changes can take effect and so that the MySQL
server will no longer use temporary storage for name resolution:
root# /etc/init.d/network restart
root# /etc/init.d/mysql stop
The main disadvantage of this variant is that there can now be compatibility problems with
other SUSE packages that may depend on the SUSE standard configuration.
Establishing the Host Name and IP Address Under Unix/Linux
You can determine the current computer name with the command hostname. With hostname -f you
get the entire computer name, including the domain name. If you pass this computer name to the
command host, the complete computer name (including domain name) and associated IP address
will be returned. Conversely, host can return a computer name given an IP address:
linux:~ $ hostname
uranus
linux:~ $ hostname -f
uranus.sol
linux:~ $ host uranus.sol
uranus.sol. has address 192.168.0.2
linux:~ $ host 192.168.0.2
2.0.168.192.in-addr.arpa. domain name pointer uranus.sol.
In addition to host, you can also use the command resolveip, which is installed with MySQL.
The MySQL server uses the same algorithm as resolveip in resolving network names and IP
addresses. If resolveip and host give different results, there is a problem in the configuration. The
most likely source of error is the file /etc/hosts or an incorrect configuration of the domain name
server (DNS) if one is used in the local network:
linux:~ $ resolveip uranus
IP address of uranus is 192.168.0.2
linux:~ $ resolveip uranus.sol
IP address of uranus is 192.168.0.2
linux:~ $ resolveip 192.168.0.2
Host name of 192.168.0.2 is uranus.sol
■Tip The MySQL server takes care by default of the ordering of IP numbers and host names (so that repeated
accesses can take place as rapidly as possible). If you change the network configuration, you must delete this
temporary storage: root# mysqladmin flush-hosts.
Host Name or IP Address?
In principle, in the Host column you can specify the computer’s IP address instead of the computer
name. The advantage of IP numbers is that the numerous sources of error in name resolution no
CHAPTER 11 ■ACCESS ADMINISTRATION AND SECURITY 283
5351c11_final.qxd 8/26/05 6:30 PM Page 283
www.it-ebooks.info

longer exist. However, this advantage is paid for in the drawback that in many networks, IP numbers
frequently change (in some circumstances at each restart if the IP number is assigned dynamically
by a DHCP server). Therefore, controlling access on the basis of IP addresses can succeed only if the
management of IP addresses in your network is organized relatively strictly.
If there exist equivalent entries in the user table that differ only in that one has an IP number and
the other an associated computer name, then the entry with the computer name takes precedence.
The db and host Tables
The db Table
The db table (see Table 11-6) contains information on which databases a particular user is permit-
ted to read, edit, and delete. The function of this table is easy to understand: If user ulocated at
computer hwishes to access database dby executing a SELECT command and does not possess a
global Select privilege, then MySQL pores over the db table and looks for the first User/Host/Db entry
for the triple u/h/d. (As we saw in the case of the user table, uniquely identifying entries take prece-
dence over those with wild cards. The entries are case-sensitive.) If a matching entry is found, then
all that must be checked is whether the column Select_priv contains the value Y.
Table 11-6. The Schema for the db Table
Field Type Null Default
Host char(60) No —
Db char(64) No —
User char(16) No —
Select_priv enum(‘N’, ‘Y’) No N
Insert_priv enum(‘N’, ‘Y’) No N
Update_priv enum(‘N’, ‘Y’) No N
Delete_priv enum(‘N’, ‘Y’) No N
Create_priv enum(‘N’, ‘Y’) No N
Drop_priv enum(‘N’, ‘Y’) No N
Grant_priv enum(‘N’, ‘Y’) No N
References_priv enum(‘N’, ‘Y’) No N
Index_priv enum(‘N’, ‘Y’) No N
Alter_priv enum(‘N’, ‘Y’) No N
Create_tmp_table_priv enum(‘N’, ‘Y’) No N
Lock_tables_priv enum(‘N’, ‘Y’) No N
Create_view_priv enum(‘N’, ‘Y’) No N
Show_create_priv enum(‘N’, ‘Y’) No N
Create_routine_priv enum(‘N’, ‘Y’) No N
Alter_routine_priv enum(‘N’, ‘Y’) No N
Execute_priv enum(‘N’, ‘Y’) No N
In order for security control to be executed quickly, MySQL maintains various mysql tables pre-
sorted in RAM. However, this has the consequence that direct changes in these tables become active
only when MySQL is ordered to reread these tables with FLUSH PRIVILEGES or mysqladmin reload.
CHAPTER 11 ■ACCESS ADMINISTRATION AND SECURITY284
5351c11_final.qxd 8/26/05 6:30 PM Page 284
www.it-ebooks.info

Practically the same rules as in the user table hold for the settings of User and Host in the db
table. The only exception relates to the Host column: If this remains empty, then MySQL evaluates
the host table as well (see the heading “The host Table”).
Default Setting
After installation of MySQL, all users (those who are able to access MySQL) are permitted to set up,
edit, and delete the database test as well as databases whose names begin with test_. (Under Windows,
the underscore in the database name is not required.) This default setting is supposed to allow a non-
bureaucratic testing of MySQL without the beleaguered system administrator having to set up such
databases.
An obvious problem with this arrangement is that anyone with access to MySQL has the right
to create a database and stuff it with data and then stuff it some more until the computer’s hard
drive is full.
Table 11-7 shows the default setting for the db table. Please note in particular that for test data-
bases all privileges except for Grant, Alter_routine, and Execute_priv are set. Grant=‘n’ is important,
so that privileges from the test databases cannot be transferred to other databases.
Table 11-7. Default Setting of the db Table
Select_priv, Grant_priv, Alter_routine,
Host Db User Insert_priv, etc. Execute_priv
% test Y N
% test_% Y N
■Note Have you understood the privileges system of MySQL? Then see whether you can answer the following
question:
Can a MySQL user create and edit a
test
database even if all global privileges are set to
N
?
The answer is yes, of course. If all the global privileges are set to
N
, then the object-specific privileges are con-
sulted (where every database that begins with
test
is considered an object). This is precisely the concept of the
privilege system of MySQL.
The host Table
The host table (see Table 11-8) is an extension of the db table if the latter’s Host field is empty. In this
case, entries for the database in question are sought in the host table. If an entry that matches the
computer name is found there, the privilege settings in db and host are joined with a logical AND
(that is, privileges must be granted in both tables).
The host table is brought into play relatively rarely. (As a rule, the settings of the db table meet
all requirements.) This is also expressed in the fact that the commands GRANT and REVOKE, intro-
duced below, do not affect the host table. Thus the host table is empty in the default setting.
CHAPTER 11 ■ACCESS ADMINISTRATION AND SECURITY 285
5351c11_final.qxd 8/26/05 6:30 PM Page 285
www.it-ebooks.info

Table 11-8. Schema of the host Table
Field Type Null Default
Host char(60) No
Db char(64) No
Select_priv enum(‘N’, ‘Y’) No N
Insert_priv enum(‘N’, ‘Y’) No N
...
Show_create_priv enum(‘N’, ‘Y’) No N
The tables_priv and columns_priv Tables
With the tables tables_priv (see Table 11-9) and columns_priv (see Table 11-10) privileges can be set
for individual tables and columns. For Host and User the same rules hold as for the user table. In the
fields Db, Table_name, and Column_name, on the other hand, no wild cards are permitted. All the
fields except Column_name are case-sensitive.
Table 11-9. Schema of the tables_priv Table
Field Type Null Default
Host char(60) No
Db char(64) No
User char(16) No
Table_name char(64) No
Table_priv set1 No
Column_priv set2 No
Timestamp timestamp Yes
Grantor char(77)
Table 11-10. Schema of the columns_priv Table
Field Type Null Default
Host char(60) No
Db char(64) No
User char(16) No
Table_name char(64) No
Column_name char(64) No
Column_priv set2 No
Timestamp timestamp Yes
Grantor char(77)
In the undocumented column Grantor is stored information as to who has granted the access
rights (for example, root@localhost).
CHAPTER 11 ■ACCESS ADMINISTRATION AND SECURITY286
5351c11_final.qxd 8/26/05 6:30 PM Page 286
www.it-ebooks.info

Unlike the tables described above, these tables have their privileges managed by two sets. (Sets
are a peculiarity of MySQL; see also Chapter 8. With sets an arbitrary combination of all character
strings specified by set definitions can be stored.) The two sets for tables_priv and columns_priv
look like this:
set1: SET('Select', 'Insert', 'Update', 'Delete', 'Create', 'Drop',
'Grant', 'References', 'Index', 'Alter')
set2: SET('Select', 'Insert', 'Update', 'References')
Here set2 contains only those privileges that hold for individual columns. (The Delete privilege
is missing, because only an entire data record can be deleted, not an individual field of a record. This
field can, of course, be set to NULL, 0, or ‘’, but for that the Update privilege suffices.)
It is my sad duty to report that it is not documented as to when in the table tables_priv the field
Table_priv is to be used and when the field Column_priv. If one considers how the fields are changed
by the SQL command GRANT, one may venture the following hypotheses:
• Privileges that relate to the entire table are stored in the field Table_priv.
• Privileges that relate to individual columns are stored in the field Column_priv, as well as
in the tables_priv and columns_priv tables. The tables_priv table is to a certain extent a con-
glomeration of all privileges for which there are additional details in the columns_priv table
(perhaps divided over several data records). The reason for this is probably the idea that
evaluating both tables leads to simplification or increased speed for MySQL.
If possible, use the commands GRANT and REVOKE for setting column privileges.
The procs_priv Table
The procs_priv table (Table 11-11) has been available since MySQL 5.0.3. It governs who can execute
which stored procedures. The table is relevant only for users who have no privileges for executing
and altering stored procedures on the global level (user table) or the table level (db table). In such
cases the procs_priv table offers the possibility to allow a user to execute or change particular stored
procedures.
Table 11-11. The Schema of the procs_priv Table
Field Type Null Default
Host char(60) No
Db char(64) No
User char(16) No
Routine_name char(64) No
Proc_priv set(‘Execute’, ‘Alter Routine’, ‘Grant’) No
Timestamp timestamp(14) Yes
Grantor char(77)
Tools for Setting Access Privileges
One can edit the tables of a database (assuming, of course, that you have the appropriate access
privileges) with the usual SQL commands INSERT, UPDATE, and DELETE. However, that is a tiring
and error-prone occupation. It is much more convenient to use the commands GRANT and
CHAPTER 11 ■ACCESS ADMINISTRATION AND SECURITY 287
5351c11_final.qxd 8/26/05 6:30 PM Page 287
www.it-ebooks.info

REVOKE, which are the centerpiece of this section. More convenient are graphical user interfaces
such as MySQL Administrator and phpMyAdmin, described in Chapters 5 and 6.
■Caution MySQL maintains, for reasons of speed optimization, copies of the
mysql
tables in RAM. Direct changes
to the tables are effective only if they are explicitly reread by MySQL via the SQL command
FLUSH PRIVILEGES
or the
external program mysqladmin reload. (With
GRANT
and
REVOKE
this rereading takes place automatically.)
Changing Access Privileges with GRANT and REVOKE
The syntax of the GRANT and REVOKE commands, in simplified form, is as follows:
GRANT privileges
ON [database.]table or database.spname
TO user@host [IDENTIFIED BY 'password']
[WITH GRANT OPTION]
REVOKE privileges
ON [database.]table or database.spname
FROM user@host
If you wish to change the access privileges for all the tables of a database, the correct form to
use is ON database.*. If you wish to alter global privileges, then specify ON *.*. It is not allowed to use
wild cards in database names.
For user you can specify ‘’ to indicate all users on a particular computer (for example,
‘’@computername). On the other hand, for host you must use ‘%’ (for example, username@‘%’).
Depending on their function, these commands change the mysql tables user, db, tables_priv,
columns_priv, and procs_priv. (The host table remains untouched.)
■Tip The complete syntax of
GRANT
and
REVOKE
is given in Chapter 21. However, you can get a fairly good feel
for these commands from the following examples.
Registering New Users
All users with the computer name *.myorganization.com are permitted to link to MySQL if they know
the password xxx. The privilege Usage means that all global privileges have been set to N. The users
thereby at first have no privileges whatsoever (to the extent that so far no individual databases, tables,
or columns have been made accessible to all users who can log into MySQL):
GRANT Usage ON *.* TO ''@'%.mycompany.com' IDENTIFIED BY 'xxx'
The following command gives the user admin on the local computer unrestricted privileges. All
privileges (including Grant) are set:
GRANT All ON *.* TO admin@localhost IDENTIFIED BY 'xxx'
WITH GRANT OPTION
Enabling Access to a Database
The following command gives the user peter on the local computer the right to read and alter data
in all tables of the database mylibrary. If peter@localhost is unknown to the user table of the mysql
CHAPTER 11 ■ACCESS ADMINISTRATION AND SECURITY288
5351c11_final.qxd 8/26/05 6:30 PM Page 288
www.it-ebooks.info
database, then this name is added without a password. (If there is already a peter@localhost, then
the password is not changed.)
GRANT Select, Insert, Update, Delete
ON mylibrary.* TO peter@localhost
If you wish to add to peter’s privileges the right to lock tables, create temporary tables, and exe-
cute stored procedures (which is useful in many applications), the command looks like this:
GRANT Select, Insert, Update, Delete, Create Temporary Tables,
Lock Tables, Execute
ON mylibrary.* TO peter@localhost
Prohibiting Changes in a Database
The next command takes away from peter the right to make changes to mylibrary, but peter retains
the right to read the database using SELECT (assuming that the command of the previous example
was just executed).
REVOKE Insert, Update, Delete
ON mylibrary.* FROM peter@localhost
Enabling Access to a Table
With the following command the user kahlila on the local computer is given the right to read data
from the table authors in the database mylibrary (but not to alter it):
GRANT Select ON mylibrary.authors TO kahlila@localhost
Enabling Access to Individual Columns
The access privileges for katherine are more restrictive than those for kahlila: She is permitted only
to read the columns title and subtitle of the table books in the database mylibrary.
GRANT Select(title, subtitle) ON mylibrary.books TO kathrine@localhost
Granting Database Access to All Local Users
All users on the local computer can read and edit data in the mp3 database:
GRANT Select, Insert, Delete, Update ON mp3.* TO ''@localhost
Viewing Access Privileges with SHOW GRANT
If you have lost track of which privileges a particular user has, the command SHOW GRANTS is just
what you need:
SHOW GRANTS FOR peter@localhost
Grants for peter@localhost:
GRANT SELECT ON mylibrary.* TO 'peter'@'localhost'
SHOW GRANTS FOR testuser@localhost
GRANT USAGE ON *.* TO 'testuser'@'localhost'
IDENTIFIED BY PASSWORD 'xxxxxxxxxxxxxxxxxxx'
GRANT SELECT, INSERT, UPDATE, DELETE,
CREATE TEMPORARY TABLES, LOCK TABLES
ON 'myforum'.* TO 'ptestuser'@'localhost'
CHAPTER 11 ■ACCESS ADMINISTRATION AND SECURITY 289
5351c11_final.qxd 8/26/05 6:30 PM Page 289
www.it-ebooks.info
Changing a Password with mysqladmin
The program mysqladmin carries out various administrative tasks (see also Chapters 4 and 14). Although
this program does not offer any immediate assistance in managing access privileges, it enables chang-
ing a password. This gives ordinary MySQL users without root privileges a simple way to change their
passwords. (Of course, the current password must be known.)
> mysqladmin -u peter -p password newPW
Enter password: oldPW
The above command changes the password for the user peter on the computer localhost. Please
note that the new password is passed as a parameter, while the old password is entered on request.
(This order, first the new and then the old, is rather unusual.)
If the MySQL server is running under Unix/Linux and the test user peter has local access via
TCP/IP, then you must also change the password for the computer name. (As already mentioned,
mysql.user contains, under Unix/Linux, two entries from local users, one as hostname=‘localhostl’
for the socket file, and one as hostname=’computername’ for TCP/IP.)
> mysqladmin -u peter -p -h uranus.sol password newPW
Enter password: oldPW
Since MySQL 4.1, the MySQL server has used a new procedure for password encryption, which
will be described in the following section. If for reasons of compatibility you wish to use the old
encryption method, then use mysqladmin old-password:
> mysqladmin -u peter -p old-password newPW
Enter password: oldPW
Secure Password Authentication Since MySQL 4.1
Since MySQL 4.1, the MySQL server uses by default an improved method for password encryption.
The text length of the password column in the table mysql.user has been enlarged to 45 characters
(previously 16). The number of characters refers to the encrypted code, and not the password itself.
In the password column the password is not stored in plain text, but in an encrypted form.
At the same time, the authentication protocol has changed by which the client program transmits
the password to the MySQL server. This transmission of the password now takes place in encrypted
form, while previously, it was in plain text.
Both of these measures improve the security of the MySQL authentication. However, they are
also the reason that countless MySQL applications suddenly fail to function properly after a MySQL
server update. The error message is the typical: Client does not support authentication protocol
requested by server.
In this section I will describe various possibilities for getting around this difficulty. Further
information can be found at http://dev.mysql.com/doc/mysql/en/old-client.html.
Updating the Client Libraries
The best solution to the problem consists in installing a new version of the client libraries. However,
this recommendation is easier to state than to carry out: With Linux installations, manual interven-
tion into the PHP or Perl installation is very difficult when the distributor does not offer a suitable
update, and that is seldom the case. If you don’t want to migrate to a newer distribution, you can
attempt to install a package from another distribution. But this can result in unavoidable depend-
ency conflicts in the Linux package management, whose solution requires a great deal of Linux
know-how. The other alternative consists in compiling the program in question. Only Linux pros
will be able to do so.
CHAPTER 11 ■ACCESS ADMINISTRATION AND SECURITY290
5351c11_final.qxd 8/26/05 6:30 PM Page 290
www.it-ebooks.info
The following list tells from which version on, the various programming languages are compat-
ible with the new MySQL authentication:
C: You need libmysqlclient
libmysqlclient from version 14.
Perl: You need the module perl-DBD-MySQL
perl-DBD-MySQL in version 2.9004 or higher.
PHP with mysql interface: PHP 5.0.3.
PHP with mysqli interface: PHP 5.0.0.
Java: You must use Connector/J at least version 3.1.
ODBC: You must use Connector/ODBC at least version 3.51.10.
Furthermore, the client libraries are capable of communicating with newer MySQL servers
(that is, they manage both the old and the new authentication). Therefore, an update is backward
compatible.
old-passwords Mode
If an update of the client libraries is impossible, you can run the MySQL server in old-passwords
mode. To do so, enter in the MySQL configuration file my.cnf or my.ini the option old-passwords
in the section [mysqld]. After a restart, the MySQL server behaves as though it were version 4.0:
• The function PASSWORD encrypts passwords according to the old algorithm.
• The SQL command GRANT uses the old algorithm for encryption.
• The MySQL server accepts the old authentication protocol for logins.
Note that this option holds only for the definition of new passwords. Existing passwords
remain unchanged and must be re-created. (If that is not done, the MySQL server demands,
despite the old-passwords mode, an authentication based on the new protocol.)
Parallel Operation with Old and New Passwords
The old-passwords mode has the obvious drawback that the security improvements of MySQL 4.1
go unused. If on your system only a few users rely on the old authentication protocol, while the rest
of the users are able to use other programming languages and the new authentication method, then
a parallel operation with both the old and new passwords recommends itself. In that case, no change
in my.cnf or my.ini is required, and thus the option old-passwords must not be used.
The MySQL server decides, based on the length of the password, whether the old or new authen-
tication protocol is to be used. For passwords whose encrypted code is only sixteen characters long,
the old method is used, while for longer passwords, it is the new one.
The only problem with parallel operation is that you, as database administrator, must take care
how you define passwords. For users who rely on the old method, you must define passwords with
the function OLD_PASSWORD(‘secret’) or mysqladmin old-password. If you use the SQL command
GRANT, then leave out the part IDENTIFIED BY and insert the password manually. The following
lines demonstrate how this is done:
GRANT ALL ON databasename.* TO newuser@localhost
UPDATE mysql.user SET password = OLD_PASSWORD('secret')
WHERE user='newuser' AND host='localhost'
FLUSH PRIVILEGES
CHAPTER 11 ■ACCESS ADMINISTRATION AND SECURITY 291
5351c11_final.qxd 8/26/05 6:30 PM Page 291
www.it-ebooks.info
Problems with Establishing a Connection
If you experience connection problems, regardless of what programming language you are using,
you should first perform a test interactively with the program mysql to determine whether you can
establish a connection. Only when that succeeds is it worthwhile pursuing a search for the cause
of the error in the program that you are using or developing.
Changes to access privileges or to the mysql database become effective only after FLUSH
PRIVILEGES is executed (or after a restart of the MySQL server). Many administration programs
with dialogs for user management do not automatically execute FLUSH PRIVILEGES.
Therefore, if you have changed access privileges but see no result, execute in mysql as root the
command FLUSH PRIVILEGES (or the equivalent mysqladmin flush-privileges).
In the case of an existing connection, changes made may take effect in part only after a new
login, despite the execution of FLUSH PRIVILEGES. The following rules are in effect:
• Changed global privileges will go into effect only after a new connection is made.
• Changed database privileges go into effect only after the command USE table is executed.
• Changed table and column privileges go into effect at the next SQL command.
Possible Causes of the Connection Difficulty
The following list gives the typical causes of problems in establishing connections. Note that a par-
ticular error message can arise from one of several different causes.
The MySQL server does not run: If you attempt a connection with mysql, you obtain error 2002
(Can’t connect to MySQL server on ‘hostname’) or error 2003 (Can’t connect to local MySQL server
through socket /var/lib/mysql/mysql.sock).
Under Windows, you can tell whether the server is running by looking in the task manager,
while under Unix you use the command ps | grep -i mysql. As result, a list of processes
should appear (since the server divides itself into a number of processes for reasons of effi-
ciency). If that does not occur, then the server must be started (under Linux with the
command /etc/init.d/mysql[d] start).
The client program does not find the socket file: Under Unix/Linux, communication takes
place mostly over a socket file if server and client are running on the same computer. For this
to function, both programs must agree on the location of this file. When problems arise, you
should ensure that there is an entry socket=filename in the configuration file /etc/my.cnf in
the section [client], where filename specifies the actual location of the socket file. Normally,
this file has the name /var/lib/mysql/mysql.sock.
The client program cannot access the socket file (SELinux): Many Linux distributions (e.g.,
RHEL 4) are configured in such a way that Apache cannot access files outside the htdocs
directory. Therefore, PHP or a Perl CGI script cannot use the MySQL socket file. The previ-
ously mentioned error 2002 is triggered. The remedy: Communicate via TCP/IP or deactivate
SELinux for Apache (under RHEL with system-config-security).
The network connection between client and server is broken: If your program is running on
a different computer from that of the MySQL server, execute on the client computer the com-
mand ping serverhostname to test whether a connection to the server computer exists. If that
is not the case, you must first repair the network configuration.
CHAPTER 11 ■ACCESS ADMINISTRATION AND SECURITY292
5351c11_final.qxd 8/26/05 6:30 PM Page 292
www.it-ebooks.info
MySQL accepts no connections over the network (over TCP/IP): This can be achieved with the
option –skip-networking or a corresponding setting in my.cnf. This setting is often chosen to
give MySQL maximum security. A database connection is then available only from the local
computer and only via a socket file.
The problem is generally recognizable from error 2003 (Can’t connect to MySQL server). A solu-
tion is to remove the option my.cnf from the start script.
MySQL accepts no connections from your computer: This problem generally arises when the
MySQL server is running on the computer of an Internet service provider. There the server is gen-
erally so configured that only connections from local computers (or a local network) are allowed.
For administration you must therefore either create a telnet/ssh connection or use a program
that is executed locally on the server and is served via the internet (e.g., phpMyAdmin).
Name resolution of host names does not work correctly: In establishing a connection over a net-
work, error 1130 arises (Host n.n.n.n’ is not allowed to connect to this MySQL server). The most
likely cause of this error is either the incorrect specification of the host name in the mysql.user
table or an incorrect name-server configuration. Depending on the network configuration, the
host names must be given in the column user.Host with or (more seldom) without domain name.
A solution is to add domain names to the host names in the mysql.user table (uranus ➤uranus.sol)
or to remove this (uranus.sol ➤uranus) and try again. (Do not forget FLUSH PRIVILEGES.)
If that does not work, you can test with the commands hostname, host, and resolveip whether
there are problems with name resolution. An emergency solution that almost always works (but
is inflexible) is to give the IP number instead of the host name in the user.Host column. There are
many other suggestions about dealing with host-name problems earlier in this chapter.
User name or password is incorrect: Watch out for typos! Note as well that not only user name
and password must correspond, but the host name as well. (Thus a connection is usually possi-
ble only from certain specific computers.) Also, read the previous point relating to resolution of
the host name; perhaps that is where the problem resides.
Note that the user.Password column does not contain passwords in plain text, but in encrypted
form. If you wish to change a password with SQL commands, you must use the function
PASSWORD(“xxx”).
The client program uses an old MySQL library for password authentication: The error mes-
sage Client does not support authentication protocol requested by server results from an attempt
to create a connection to a MySQL server 4.1 or higher while your client program is geared to a
MySQL server 4.0 or below. With MySQL 4.1 an improved password encryption algorithm and
new authentication protocol were introduced, which unfortunately are incompatible with the
old protocol. The solution is to update the client program and its MySQL library or to use the
MySQL server option old-passwords. Details on this appear in the previous section.
An incorrect entry was used in the mysql.user table: When user xattempts to register with
computer y, the MySQL server compares the entries in the user table in a particular order: First,
entries are considered whose Host character string is unique, and only then Host entries with
wild cards (% and _). Within these two groups, again unique User strings are preferred to those
with wild cards.
The result of this order of precedence is that user abc on the local computer (localhost) will
be unable under certain circumstances to register, although in the user table there is an entry
Host=’%’ / User=’abc’. The reason is that in the default setting of access privileges there is also an
entry Host=’localhost’ / User=’’. This entry is given precedence to the first one because there the
host name is given explicitly.
CHAPTER 11 ■ACCESS ADMINISTRATION AND SECURITY 293
5351c11_final.qxd 8/26/05 6:30 PM Page 293
www.it-ebooks.info
To solve the problem, either add a second entry Host=’localhost’ / User=’abc’ to the user table or
delete the entry Host=’localhost’ / User=’’. I recommend the second variant, since an entry with
user=’’ always represents a security risk.
No user name was specified: If you do not specify a user name in your program for making
a connection, then the login name of the account under which the program was launched is
given automatically. In programs that are launched interactively, this is your login name.
With programs that run over a web server (PHP or JSP scripts, Perl CGI files, etc.), the account
name of the web server is used. For security reasons the web server usually runs not as root
(Linux) or with administrator privileges (Windows), but in a separate account, such as wwwrun
or apache. The problem is now that in the mysql access tables, the user wwwrun or apache is
unknown. Therefore, access to the database is denied. Therefore, do not forget in script files
to specify the user name for the connection to MySQL explicitly.
The connection succeeds, but access to the database is impossible: This error occurs immedi-
ately if you specify the desired database during the establishment of the connection. However,
the error cannot occur until you select the desired database (USE dbname). Error message 1045
is, for example, Access denied for user … to database ….
The most likely cause of the error is that the user in fact does not have access rights to the
database. Perhaps in GRANT you have specified only the Usage privilege (which allows a login,
but not the actual use of a database). Execute the command GRANT SELECT, INSERT … ON
dbname.* TO name@hostname to allow database access to dbname.
If the MySQL server is running on the computer of an Internet service provider (ISP),then the
server is generally so configured that only local access is possible. In other words, your PHP or
Perl scripts run without problems (because they are executed on the same computer), but you
cannot access your databases from home, say, with MySQL Administrator.
Here the issue is the correct (because secure) setting of the access privileges. You will find
scarcely an ISP that allows MySQL connections from an arbitrary computer on the Internet.
You must therefore use programs for administration that run locally on the computer of the
ISP (e.g., phpMyAdmin).
It is impossible to create a local TCP/IP connection: This problem usually occurs under Unix/
Linux. A local connection succeeds only if with option -h no computer name or IP number is
specified. The most likely cause is a problem with the resolution of the host name. As a rule, you
must add the domain name in the column user.Host, and then it works. Another cause can be
the local network configuration (file /etc/hosts). We have already given some tips in this chap-
ter especially for Red Hat Fedora and SUSE Linux.
The local connection fails for Java programs: This problem is usually connected with the pre-
vious point, since Java programs, in contrast to most other MySQL clients, generally use TCP/IP
(and not a socket file). Have a look in Chapter 17, where there are some troubleshooting tips.
Another cause of error can be the incorrect installation of Connector/J (see Chapter 17),
but then an error occurs in the attempt to use JDBC (java.lang.ClassNotFoundException:
com.mysql.jdbc.Driver).
Port 3306 is blocked: Between the MySQL server and your program there is a firewall that is
blocking port 3306. This problem can occur only when your program and the MySQL server are
running on different computers. If you manage the firewall yourself, you must clear port 3306;
otherwise, you must ask the administrator to do so.
CHAPTER 11 ■ACCESS ADMINISTRATION AND SECURITY294
5351c11_final.qxd 8/26/05 6:30 PM Page 294
www.it-ebooks.info

An update of the MySQL server causes problems: In all previous updates of MySQL (from 3.23
to 4.0 to 4.1 to 5.0) the mysql tables of the security system were greatly expanded. If you carry
out an update of the MySQL server, you must be sure to bring the mysql tables into conformity
with the new security system. For this, the script mysql_fix_privilege_tables is provided (see
also Chapter 14). This script creates all new columns in the mysql tables, but retains the default
setting Nfor these columns. You may need to take a close look at the new access privileges and
explicitly grant certain individual new privileges. I have already mentioned the authentication
problems caused by changing from version 4.0 to version 4.1 or newer.
■Tip An additional list of possible causes of errors and some tips for alleviating them can be found in the MySQL
documentation: http://dev.mysql.com/doc/mysql/en/access-denied.html.
Further Tips for Error-Checking
If you believe that your mysql database is properly configured, yet database access fails nonetheless,
stop the MySQL server, add temporarily skip-grant-tables to the [mysql] section in my.cnf or my.ini
and restart the server. Now everyone has access to all data. If access now succeeds, you at least know
with certainty that the problem resides in the mysql tables. Do not forget to remove skip-grant-tables
from the configuration file.
MySQL manages temporary storage (cache) with a list of most recently used IP addresses and
associated host names. This cache has the effect that the usually time-consuming process of name
resolution is necessary only on first access. However, if you change your network configuration
without restarting the MySQL server, it can happen that this cache contains incorrect, that is, no
longer valid, entries. To run the MySQL server without this cache, add skip-host-cache in the
[mysql] section of my.cnf or my.ini and restart the server.
Unfortunately, there is no way to make the MySQL server save precise information as to why
a login attempt failed. In the error log (file hostname.err; see Chapter 14) is mentioned only the IP
address of the login attempt, but not the course of name resolution, which entries in the mysql
tables were looked at, etc.
System Security
Up to this point we have dealt in this chapter with issues of security from the point of view of the
MySQL user and access administration. In reality, of course, your data within a MySQL database
are only as secure as the database server and the underlying operating system.
Security at the System Level
To secure your MySQL database system you should begin by asking the following questions:
• Are there security loopholes that would place an attacker in a position to log in as root
(Unix/Linux) or with administrator privileges (Windows 2000/XP)?
To minimize such risks, you should employ as secure an operating system as possible, carry
out routine security updates, institute a firewall, and so on. (However, system security is not
the subject of this book.)
CHAPTER 11 ■ACCESS ADMINISTRATION AND SECURITY 295
5351c11_final.qxd 8/26/05 6:30 PM Page 295
www.it-ebooks.info
• Are the logging files secured? There, for example, the passwords can be found in plain text.
• Are script files containing passwords in plain text adequately secured? (And if full-fledged
security is impossible, is it ensured that the user name/password combination in these files
is provided with minimal access privileges? Is it ensured that the given password can really
be used only for this MySQL login, that for convenience the same password as for root was
not used?)
Security Measures in the Storage of Critical Data
An additional issue concerns the data within a database. You should prepare yourself for the worst-
case scenario—the possibility that an attacker gains access to your data—by encrypting key
information within the database:
• If you store login information in the database (for example, the login information for users
of your web site), then do not store the passwords in plain text, but only as MD5 check sums.
These check sums are sufficient to verify a password. (The drawback is that a forgotten pass-
word cannot be restored from the check sum.)
• If you store even more sensitive data (credit card information, say, to take a particularly rele-
vant example), such data should be encrypted. You should ask whether MySQL is a suitable
database system for managing such data. If you store such critical data, you should engage
security experts to make your system as secure as possible. Anything less should be consid-
ered gross negligence.
The MySQL Server as Security Risk
The MySQL server itself can present a security risk. Since errors in the code of the MySQL server are
continually being discovered and corrected, it is absolutely necessary to carry out regular updates
to the most recent version of MySQL. (With many Linux distributions this happens automatically
via the update system.)
For example, at the beginning of 2005, security holes were found in the area of user-defined
functions (UDFs). These holes were able to be exploited by a worm (a type of virus), because count-
less MySQL Windows installations were running without a password or with one that was easy to
guess. Since then, the UDF implementation has been changed to prevent such misuse. More details
are available at http://dev.mysql.com/tech-resources/articles/security_alert.html and http://
dev.mysql.com/doc/mysql/en/udf-security.html.
Note as well that a MySQL user with File privileges can read and alter files in the local file sys-
tem. The extent of this ability depends on how the file system itself is secured (access privileges for
directories and files) and under what account the MySQL server (and thus mysqld) is running.
Running the MySQL Server Without root or
Administrator Privileges
In no case should the MySQL server be run as root under Unix/Linux or with administrator privi-
leges under Windows, since then, every MySQL user with File privileges would have the run of the
entire file system.
CHAPTER 11 ■ACCESS ADMINISTRATION AND SECURITY296
5351c11_final.qxd 8/26/05 6:30 PM Page 296
www.it-ebooks.info
Linux: With all current Linux distributions MySQL is already correctly configured. You can
check this with the following command:
root# ps au | grep mysqld
root ... /bin/sh /usr/bin/mysqld_safe ...
mysql ... /usr/sbin/mysqld ...
mysql ... /usr/sbin/mysqld ...
...
This means that the script mysqld_safe is executed by root, but the various threads of the MySQL
server mysqld are executed by the user mysql. (The script mysqld_safe must be executed by root.
It serves only to start mysqld. It runs until the MySQL server is explicitly shut down. The script
restarts mysqld automatically if the server crashes.)
If mysqld is executed as root, the following entry in /etc/my.cnf can help:
# file /etc/my.cnf
[mysqld]
user = mysql
Windows: Under Windows, the MySQL server unfortunately runs by default in the account
System and thereby has unrestricted privileges. Moreover, it is difficult to achieve a secure con-
figuration, which requires the creation of a new user, changing all the access privileges to all
the MySQL directories, etc. How to proceed is detailed in the article at http://dev.mysql.com/
tech-resources/articles/security_alert.html previously mentioned (see step 9 in the
article).
Network Security, Firewall
Under Unix/Linux, the MySQL server is frequently used exclusively by local programs over a socket
file. That is the case, for example, when only PHP scripts on the local web server or local administra-
tion programs access the database server. In this case, it is most secure to deactivate completely the
network functions of the MySQL server with the option skip-networking in /etc/my.cnf (section
[mysqld]).
If you set up MySQL as a database server only within a local network, the use of skip-networking
is not possible. However, you should at least close the IP port 3306 with an IP packet filter (firewall).
The MySQL server uses this port by default for TCP/IP communication. By closing this port you
make the MySQL server inaccessible from outside the network.
Internet access over dynamic web sites is still possible in spite of all security measures, since
dynamic web sites are generated from the locally running web server (which in turn calls a script inter-
preter). The MySQL server is thus addressed locally, and external communication is accomplished not
via port 3306, but via the HTTP protocol (normally port 80). If there is a security loophole there, then
closing port 3306 will not be of any help.
CHAPTER 11 ■ACCESS ADMINISTRATION AND SECURITY 297
5351c11_final.qxd 8/26/05 6:30 PM Page 297
www.it-ebooks.info

GIS Functions
Geographic information systems (GIS for short) are software packages that allow for the process-
ing of spatial data. Such programs are as a rule included in database systems that can directly manage
and process geographic data. MySQL has offered such functions since version 4.1.
These functions are of interest not only for those seeking to realize a complete GIS, but also for
those wishing to manage geographic data. Even if you don’t have much to do with geography, you
would be surprised to learn what sorts of data involve spatial considerations. Just think, for exam-
ple, about the images inside your digital camera. Each photo was taken at a particular location. Why
not consider sorting the pictures by geographic coordinates? You could then later execute queries
along the lines of, “show all pictures taken within ten kilometers of my house.”
The current implementation of geometric functions in MySQL is not as well developed as in
many commercial products (for example, Oracle Spatial and DB2 Spatial). Moreover, the GIS imple-
mentation of MySQL is limited to two-dimensional vectorial data. However, the GIS functions of
MySQL are sufficient for many tasks, and they open a whole new world of possibilities.
■Note Parts of this chapter were written by Bernd Öggl for our jointly written book
PHP 5 and MySQL 5
. Thanks
to his educational studies in geography and his professional qualifications as an instructor in GIS systems and
databases, he has considerably more experience in the realm of GIS than I do. I am very grateful to him for allow-
ing me to use his work for this book.
If you are looking for more information on MySQL GIS functions, then you should take a look at the relevant chap-
ter of the MySQL documentation: http://dev.mysql.com/doc/mysql/en/spatial-extensions-in-mysql.
html. The article http://dev.mysql.com/tech-resources/articles/4.1/gis-with-mysql.html provides
some ideas for using geometric data in nongeographic applications.
GIS Data Formats
Before we go into a description of the GIS functions of MySQL, it would be well to consider the cur-
rent standards for geographic data. This section summarizes some of the important concepts and
data formats. This information is particularly indispensable if you are going to be importing or
exporting geographic data.
Specifying Coordinates
You have likely encountered coordinate specifications of the form N47 16 06.6 E11 23 35.9. A geo-
graphic position is specified in degrees, minutes, and seconds. In this case, the location in question
is to be found at 47 degrees, 16 minutes, 6.6 seconds north latitude and 11 degrees, 23 minutes,
299
CHAPTER 12
■ ■ ■
5351c12_final.qxd 8/26/05 6:33 PM Page 299
www.it-ebooks.info

35.9 seconds east longitude. Such data are called geographic coordinates. A drawback to such nota-
tion is the difficulty in calculation by human beings, who have become accustomed to the decimal
system. Since the coordinates describe a position on the ellipsoid of revolution Earth, in calculating
distances, one must also take into account the curvature of the planetary surface.
To simplify matters, projective coordinates are generally used in practice, whereby the ellipsoid
is cut into strips on which distance between points is measured linearly. Until recently, there was a
large number of projective coordinate systems competing with one another. Many countries had
their own system, optimized for local considerations.
UTM format: A unified format, called UTM, should simplify matters when it becomes the stan-
dard for geographic coordinates. It divides the planet into 60 strips of 6 degrees of longitude each. It
is valid from 84 degrees north latitude to 80 degrees south latitude. In each of these zones, positions
are described with a value to the right and a value upward, in meters.
All UTM coordinates relate to a specific datum. A datum tells which model of ellipsoid should
be used and where the source should be set relative to the center of the earth.
For converting from traditional coordinates into UTM coordinates there are freely available
programs and libraries on the Internet. A good starting point is the site
http://www.remotesensing.org/.
An example: The following lines contain the UTM coordinates of some locations in the Aus-
trian Tirol:
681547.32, 5237595.88, Innsbruck
680397.55, 5233845.59, Mutters
685271.40, 5239558.18, Rum
685387.69, 5235857.76, Aldrans
679141.11, 5233807.33, Natters
Of course, one must know the coordinate system that is being used. The UTM system used here
describes data with rightward and upward values in meters. One can read off that Innsbruck is 3,750
meters higher (that is, more northerly) and about 1,150 meters to the right (eastward) of Mutters.
Tirol is in UTM zone 32, and therefore the specified data are to be found in UTM 32, datum WGS84.
Well-Known Text,Well-Known Binary (OpenGIS)
For depicting lines and polygons one requires rules of syntax. In the past, countless formats were
developed. The formats Well-Known Text (WKT) and Well-Known Binary (WKB) are an attempt to
replace these formats with an open standard. Both formats are directly supported by MySQL.
Open GIS Consortium (OGC)
Behind these formats stands the Open Geospatial Consortium, or Open GIS Consortium (OGC). This
is a consortium of businesses, research institutes, universities, and public authorities. Among the
266 members are to be found major corporations, universities, and NGOs.
In 1997, the OGC published the document OpenGIS Simple Features Specifications for SQL.
It describes how geographic data can be stored and managed in relational database systems. The
specification comprises data types, text format, and binary format for representing geometric data
as well as a large number of functions for processing geometric data and for performing calcula-
tions and geometric analysis. Additional details can be found at http://www.opengis.org/docs/
99-049.pdf.
CHAPTER 12 ■GIS FUNCTIONS300
5351c12_final.qxd 8/26/05 6:33 PM Page 300
www.it-ebooks.info

WKT and WKB Formats
Well-Known Text is a format for the textual representation of geometric objects. The UTM coordi-
nates of Innsbruck in WKT format look like this:
POINT(681547.32 5237595.88)
Note that the pair of coordinates are separated by a space. Lines consist of two or more points sepa-
rated by commas:
LINESTRING(681547.32 5237595.88, 685387.69 5235857.76)
Table 12-1 provides a brief summary of WKT elements.
Table 12-1. Well-Known Text Representation of Various Geometric Objects
WKT Example Description
POINT(1 1) Point with coordinates x= 1 and y= 1.
LINESTRING(0 0, 1 1, 3 3) Line with two segments.
POLYGON((0 0, 5 0, 5 5, 0 5, 0 0)) Rectangular drawing.
MULTIPOINT(1 1, 5 5) Multipoint with two points.
MULTILINESTRING((0 0, 5 5), Three lines in a multilinestring element.
(10 10, 20 20, 40 20), (10 10, 2 0))
MULTIPOLYGON(((0 0, 5 0, 5 5, 0 5, 0 0)), Two polygonal drawings.
((10, 10, 30 30, 30 10, 10 10)))
GEOMETRYCOLLECTION(POINT(100 100),
POINT(10 10), LINESTRING(1 1, 100 1, 100 100)) Two points and a line in a geometry collection
field.
You may perhaps have noticed that two sets of parentheses are used in defining a polygon for
bounding the coordinates. This is not a typographical error. As you will see in the following section,
a polygon can contain holes in its interior. To define such forms, additional closed LINESTRING
objects can be specified inside the outer parentheses. For example, the following polygon has a hole
in the middle:
POLYGON((1 1, 9 1, 9 9, 1 9, 1 1),(3 3, 3 6, 6 6, 6 3, 3 3))
The WKT format is the primary means of importing spatial data into a MySQL database.
The WKB format is the binary translation of Well-Known Text. All coordinates are given as
double-precision values (64-bit floating-point numbers). The MySQL server uses WKB internally
for storing geometric data.
MySQL’s GIS Implementation
The GIS functions in MySQL have been available since version 4.1. Geometric data can at present
be stored only in MyISAM tables, and not in InnoDB or other types of tables. The MySQL GIS imple-
mentation is oriented toward the OpenGIS standard previously mentioned. MySQL does not
currently implement all the functions envisioned in this standard.
CHAPTER 12 ■GIS FUNCTIONS 301
5351c12_final.qxd 8/26/05 6:33 PM Page 301
www.it-ebooks.info
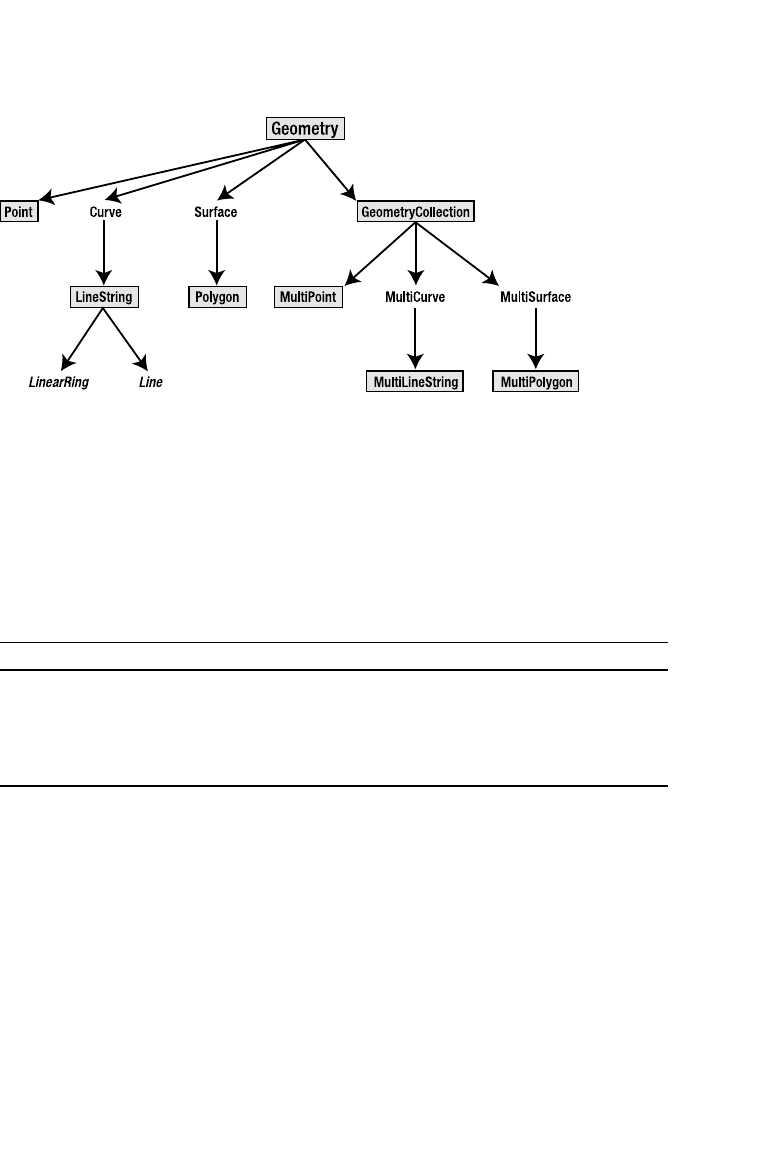
Data Types
The geometric data types in MySQL are based on the OGC specifications and ordered in the hierar-
chy shown in Figure 12-1.
The objects shown in the figure with a gray background are the data types that you can use in
MySQL. LinearRing and Line are described in the OGC specification, but they do not function in the
current implementation of MySQL. In practice, this causes no limitation, since you can always use
the LineString type. Curve,MultiCurve,Surface, and MultiSurface are abstract classes that currently
have only a single derived class. Table 12-2 shows the types that take one object per cell.
Table 12-2. Geometric Types in MySQL That Store Exactly One Object
Geometric Type Description
GEOMETRY Geometric type, not further specified.
POINT A point in the coordinate system; zero-dimensional.
LINESTRING One or more linear segments joining two points; one-dimensional.
POLYGON A closed LINESTRING; two-dimensional.
Points, lines, and polygons can be stored in a Geometry table column. The OGC specification
does not provide for these classes being used in this way, but nevertheless, they function in MySQL.
As a rule, however, one should try to limit columns to a single geometric type. In application devel-
opment this also results in a clearer picture of what is going on.
The POLYGON object requires further explanation. According to the definition, a MySQL polygon
consists of an outer closed ring, within which additional rings may appear that represent holes. These
holes may touch at a point, but not otherwise overlap. What is important here is that holes inside a
polygon are not part of the surface of the object. An example of this appears in the next section.
The following example shows several geometric types in a table:
CREATE TABLE glacier (
id INT NOT NULL PRIMARY KEY,
border POLYGON NOT NULL,
ela LINESTRING,
ref POINT)
CHAPTER 12 ■GIS FUNCTIONS302
Figure 12-1. Hierarchy of geometric objects in MySQL
5351c12_final.qxd 8/26/05 6:33 PM Page 302
www.it-ebooks.info

The geometric types can be used in the MySQL CREATE instruction just like standard SQL types
(INTEGER,VARCHAR, …).
■Note There is currently no GIS support for a number of MySQL user interfaces. Therefore, for example, with
phpMyAdmin 2.6 you cannot create tables of geometric data types. The only current exception is MySQL Admin-
istrator. You can use the mysql command interpreter, which accepts every SQL command that adheres to MySQL
syntax.
MySQL also offers types that can store a collection of like objects in a cell. These are shown in
Table 12-3.
Table 12-3. Geometric Types in MySQL That Store Several Objects in a Single Cell
Geometric Type Description
GEOMETRYCOLLECTION A variety of geometric objects.
MULTIPOINT One or more POINT types.
MULTILINESTRING One or more LINESTRING types.
MULTIPOLYGON One or more POLYGON types.
These types are oriented to the specifications of OGC as set out in the OpenGIS Simple features
for SQL. There is also a hierarchical structure in which geometric data can be depicted. Somewhat
simplified, this means that there is a base class (Geometry) and the derived classes of points, lines,
and polygons. Each type offers certain functions for querying information about an object of that
type. They will be described in the following section.
Simple Geometric Functions
Functions for Converting the Geometric Format
There are several functions available in MySQL for conversion between the internal geometric for-
mat and WKT and WKB. These are shown in Table 12-4.
Table 12-4. Functions for Converting MySQL Geometric Data
Function Description
ASTEXT Returns a geometry type as Well-Known Text.
ASBINARY Returns a geometry type as Well-Known Binary.
GEOMFROMTEXT Creates the internal MySQL GEOMETRY format from a WKT string.
GEOMFROMWKB Creates the internal MySQL GEOMETRY format from a WKB string.
For example, to store a point from the table mountain, you might use
INSERT INTO mountain(pt) VALUES(GEOMFROMTEXT('POINT(681547 5237595)'))
Moreover, for each data type there is an available conversion function from the WKT or
WKB format. Thus, for example, there exist POINTFROMTEXT, LINESTRINGFROMTEXT, and
POLYGONFROMTEXT. However, you achieve the same result with the GEOMFROMTEXT function.
CHAPTER 12 ■GIS FUNCTIONS 303
5351c12_final.qxd 8/26/05 6:33 PM Page 303
www.it-ebooks.info

SRID: With each of the functions xxxFROMTEXT and xxxFROMWKB you can use an optional
SRID (spatial reference system identifier) value. This value denotes a coordinate system for the geo-
metric object. This makes it theoretically possible to store within a table geometric objects whose
points are specified in different coordinate systems.
In the current version, however, MySQL ignores SRID information; all geometric calculations
are carried out as though a planar Cartesian coordinate system were being used.
Functions in the Geometry Class
All geometric objects in MySQL support these functions. As parameter, a suitable geometric object
is passed to the SQL functions, as displayed in Table 12-5.
Table 12-5. Functions for All Geometric Objects in MySQL
Function Description
DIMENSION Returns the dimension of the object. Possible results:
-1 for an empty object
0 for a point (length = 0, width = 0)
1 for a line (length > 0, width = 0)
2 for a polygon, etc. (length > 0, width > 0)
ENVELOPE Returns the bounding box of the geometric object. The result has the data
type POLYGON.
GEOMETRYTYPE Returns the type of the geometric object as a character string (POINT,
LINESTRING, POLYGON, …).
SRID Returns the identifier of the coordinate system. (MySQL stores a coordinate
system identifier for every geometric object; however, it does not evaluate this
information.)
The bounding box is called a minimal bounding rectangle (MBR) and is defined as the smallest
rectangle that encloses the geometric form. With compound geometric types this rectangle contains
all the constituent objects. In the following example, the variable @mp is assigned a Multipoint
object with three points:
SET @mp = GEOMFROMTEXT('MULTIPOINT(1 1, 10 99, 0 5)')
SELECT ASTEXT(ENVELOPE(@mp))
ASTEXT(ENVELOPE(@mp))
POLYGON((0 1,10 1,10 99,0 99,0 1))
The ASTEXT function specifies the bounding box in WKT format:
SELECT GEOMETRYTYPE(@mp)
GEOMETRYTYPE(@mp)
MULTIPOINT
Functions for Point Objects
In addition to the functions of the geometry class, two additional methods can be applied to points:
X(pt) and Y(pt). They return the coordinates of the point as a floating-point number:
SET @pt = GEOMFROMTEXT('POINT(33.2 99.9)')
SELECT X(@pt), Y(@pt)
X(@pt) Y(@pt)
33.2 99.9
CHAPTER 12 ■GIS FUNCTIONS304
5351c12_final.qxd 8/26/05 6:33 PM Page 304
www.it-ebooks.info

Functions for Line Objects
LINESTRING objects offer somewhat more functionality than points. Table 12-6 provides an overview
of these geometric functions.
Table 12-6. Geometric Functions for Line Objects
Function Description
GLENGTH The length of the line (as a floating-point number).
ISCLOSED 1 if the starting point is the same as the ending point; otherwise 0.
NUMPOINTS The number of points that the line comprises.
STARTPOINT The first point.
ENDPOINT The last point.
POINTN(g, N) The point at location N.
A common application is the calculation of the length of a route.
SET @ls = GEOMFROMTEXT('LINESTRING(2 2, 9 0, 9 9)')
SELECT GLENGTH(@ls)
GLENGTH(@ls)
16.280109889281
To specify the start and terminal points in Well-Known Text format, a simple SELECT query will
suffice:
SELECT ASTEXT(STARTPOINT(@ls)), ASTEXT(ENDPOINT(@ls))
ASTEXT(STARTPOINT(@ls)) ASTEXT(ENDPOINT(@ls))
POINT(2 2) POINT(9 9)
In contrast, only two functions can be used with MULTILINESTRING objects: GLENGTH and
ISCLOSED. The result of GLENGTH is the sum of the lengths of all the components, and ISCLOSED
returns TRUE (1) if all segments are closed. Note that a closed line of type LINESTRING is not a poly-
gon. If you use a polygon function such as AREA, you will always obtain NULL as result.
■Note The OpenGIS standard provides the names
LENGTH
and not
GLENGTH
for the length function. But in
MySQL, the function
LENGTH
returns the number of bytes of a character string.
Functions for Polygon Objects
Table 12-7 shows the functions that can be used with polygon objects.
Table 12-7. Geometric Functions for Polygon Objects
Function Description
AREA Area of the polygon.
EXTERIORRING Outer ring of the polygon as LINESTRING.
INTERIORRINGN(g, N) Inner ring of the polygon as LINESTRING.
NUMINTERIORRINGS Number of inner rings (holes).
CHAPTER 12 ■GIS FUNCTIONS 305
5351c12_final.qxd 8/26/05 6:33 PM Page 305
www.it-ebooks.info

In calculating areas (AREA), all holes in a polygon are subtracted out. In the following example,
the quadrilateral @po has a hole of size 3✕3:
SET @po = POLYFROMTEXT('POLYGON((1 1, 9 1, 9 9, 1 9, 1 1),
(3 3, 3 6, 6 6, 6 3, 3 3))')
SELECT AREA(@po), NUMINTERIORRINGS(@po)
AREA(@po) NUMINTERIORRINGS(@po)
55 1
SELECT ASTEXT(INTERIORRINGN(@po, 1))
ASTEXT(INTERIORRINGN(@po, 1))
LINESTRING(3 3,3 6,6 6,6 3,3 3)
If the AREA function is applied to a MULTIPOLYGON object, the individual areas are added.
Functions for GeometryCollection Objects
Table 12-8 shows the functions for GeometryCollection objects.
Table 12-8. Geometric Functions for GeometryCollection Objects
Function Description
GEOMETRYN(g, N) Returns the geometric object at position N.
NUMGEOMETRIES(g) Number of objects in a collection.
A GeometryCollection can hold any number of objects in a cell. After you have fetched the
desired object with GEOMETRYN from a collection, you can process it further with various func-
tions. In the following example, the length of a LineString is sought:
SET @gc = GEOMFROMTEXT('GEOMETRYCOLLECTION(
POINT(10 10), POINT(0 100), POINT(40 40),
LINESTRING(10 0, 10 10, 20 10))')
SELECT GLENGTH(GEOMETRYN(@gc, 4))
GLENGTH(GEOMETRYN(@gc, 4))
20
Function for Spatial Analysis
In addition to the geometric functions described in the previous section, the OpenGIS Simple Fea-
tures for SQL provides for a series of functions for spatial analysis. The current GIS implementation
of MySQL supports only calculations based on the bounding box of a geometric object. Thus well-
known functions from GIS systems such as Buffer, Distance, Intersection, Union, ConvexHull, and
SymDifference cannot be used.
The active analysis functions are collected in Table 12-9. Each function receives two geometric
objects as parameters. The result is either 1for TRUE or 0for FALSE.
CHAPTER 12 ■GIS FUNCTIONS306
5351c12_final.qxd 8/26/05 6:33 PM Page 306
www.it-ebooks.info
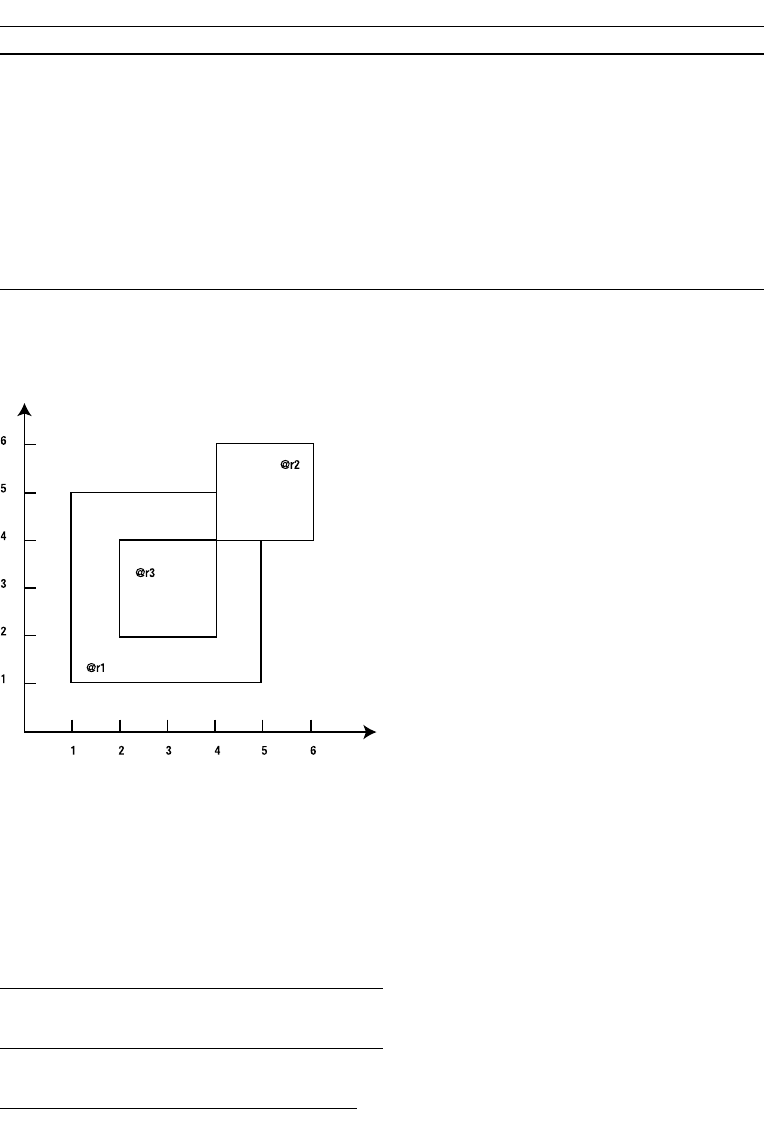
Table 12-9. Bounding Box Functions
Function Description
MBRCONTAINS(G1,G2) TRUE if the bounding box of G2 is completely within the bounding
box of G1.
MBRWITHIN(G1,G2) TRUE if the bounding box of G1 is completely within the bounding
box of G2.
MBREQUAL(G1,G2) TRUE if the bounding boxes are identical.
MBRINTERSECTS(G1,G2) TRUE if the bounding boxes of G1 and G2 touch or overlap.
MBROVERLAPS(G1,G2) TRUE if the bounding boxes of G1 and G2 overlap.
MBRTOUCHES(G1,G2) TRUE if the bounding boxes of G1 and G2 touch.
MBRDISJOINT(G1,G2) TRUE if the bounding boxes of G1 and G2 neither touch nor overlap.
In the following, some examples involving three rectangles @r1, @r2, and @r3 will be pre-
sented. A schematic representation of these three objects appears as Figure 12-2.
The following SQL commands can be input directly into an SQL text field in phpMyAdmin.
You can use any database. Of course, you could also use the command interpreter mysql:
SET @r1 = GEOMFROMTEXT('POLYGON((1 1, 5 1, 5 5, 1 5, 1 1))')
SET @r2 = GEOMFROMTEXT('POLYGON((4 4, 6 4, 6 6, 4 6, 4 4))')
SET @r3 = GEOMFROMTEXT('POLYGON((2 2, 4 2, 4 4, 2 4, 2 2))')
SELECT MBROVERLAPS(@r1,@r2), MBRINTERSECTS(@r1,@r2)
MBROVERLAPS(@r1,@r2) MBRINTERSECTS(@r1,@r2)
1 1
SELECT MBRINTERSECTS(@r1,@r3), MBRCONTAINS(@r1,@r3)
MBRINTERSECTS(@r1,@r3) MBRCONTAINS(@r1,@r3)
1 1
MBRTOUCHES(@r2,@r3), MBROVERLAPS(@r2,@r3)
MBRTOUCHES(@r2,@r3) MBROVERLAPS(@r2,@r3)
1 0
CHAPTER 12 ■GIS FUNCTIONS 307
Figure 12-2. Schematic representation of the bounding boxes of three rectangles
5351c12_final.qxd 8/26/05 6:33 PM Page 307
www.it-ebooks.info

Functions for querying the relations among precise geometric boundaries of objects are not yet
implemented in MySQL. The OGC specification prescribes a number of functions that exist in MySQL
(see Table 12-10) but are applied only to the bounding box. In the current version of MySQL it doesn’t
matter whether you use CONTAINS or MBCONTAINS.
Table 12-10. Geometric Functions (Return Only Bounding Box Results in MySQL)
Function Description
CONTAINS(G1,G2) TRUE if G2 is completely within the bounding box of G1.
WITHIN(G1,G2) TRUE, if G1 is completely within the bounding box of G2.
CROSSES(G1,G2) G1 and G2 do not cross (see the online documentation).
EQUALS(G1,G2) TRUE if the objects are identical.
INTERSECTS(G1,G2) TRUE if G1 and G2 touch or overlap.
OVERLAPS(G1,G2) TRUE if G1 and G2 overlap.
TOUCHES(G1,G2) TRUE if G1 and G2 touch.
DISJOINT(G1,G2) TRUE if G1 and G2 neither touch nor overlap.
The functions DISTANCE and RELATED provided in the OpenGIS standard are entirely absent
in the current version of MySQL. Later in the chapter I will present an example that shows how you
can get around this issue.
Indexing Geometric Data
With any database query, the speed of execution depends to a great extent on whether an index is
present, and spatial data are no exception. The good news for MySQL databases is that spatial indexes
are supported, and they are also very easy to set up:
CREATE TABLE mountain (
id INT NOT NULL AUTO_INCREMENT PRIMARY KEY,
pt POINT NOT NULL,
SPATIAL INDEX(pt) )
The geometric column pt is thereby provided with a spatial index. However, you could also add
the index to an existing table after the fact. To do so, use ALTER TABLE with ADD SPATIAL INDEX or
the CREATE command:
ALTER TABLE mountain ADD SPATIAL INDEX(pt)
CREATE SPATIAL INDEX pt ON mountain(pt)
MySQL uses an R-tree index for indexing spatial data, where “R” stands for “region.” The regions
that are pictured in the tree structure contain either the bounding box of the geometric objects to be
indexed or a reference to R-tree rectangles in the next-lower level. In MySQL these R-trees are man-
aged using quadratic splitting.
Accelerated access in queries comes at the cost of speed in insertions and storage requirements.
For example, the cities table introduced in this chapter requires for the spatial index half again as much
space as the data set itself.
If you wish to check the magnitude of the difference in speed with and without an index, you
can explicitly suppress the index in a query: IGNORE INDEX(pt) shuts off the geometric index for
the column pt.
CHAPTER 12 ■GIS FUNCTIONS308
5351c12_final.qxd 8/26/05 6:33 PM Page 308
www.it-ebooks.info

To check whether MySQL actually has built the index in the query, you can follow the execution
of the query with EXPLAIN SELECT:
EXPLAIN SELECT city FROM cities WHERE MBRCONTAINS ...
In the output of this SQL query you will see which indexes MySQL has available, which it uses, and
how many rows can be excluded by use of the index. In the following example you will have the pos-
sibility of using EXPLAIN SELECT on a complex query.
SQL Examples (the Database glacier)
This section presents an example of the use of a GIS database. Here you will find mainly SQL code,
which you can try out for yourself. The data are represented in Figure 12-3, displayed as two highly
stylized glaciers, showing the border, the line between the accumulation and ablation regions (ela,
shown as a dashed line), and a reference point (ref). One of the glaciers contains a rock island that is
not covered by ice and therefore does not belong to the glacier’s polygonal surface (shown in gray in
the figure).
Creating the Table
The following commands show how you can generate the table glacier and fill it with data. If you
wish to save yourself the trouble typing in commands, create a new database with mysqladmin and
then using mysql import the file glacier.sql, which you will find in the directory databases of the
example files for this book.
CREATE TABLE glacier (
id INT NOT NULL PRIMARY KEY,
border POLYGON NOT NULL,
ela LINESTRING NOT NULL,
ref POINT NOT NULL,
name VARCHAR(20),
SPATIAL KEY(border),
SPATIAL KEY(ela),
SPATIAL KEY(ref) )
CHAPTER 12 ■GIS FUNCTIONS 309
Figure 12-3. The graphical representation of the data for an SQL example
5351c12_final.qxd 8/26/05 6:33 PM Page 309
www.it-ebooks.info

Inserting the Data
INSERT INTO glacier VALUES ( 1,
GEOMFROMTEXT('POLYGON(
(2500 1500,1000 2500,2500 3500,3000 5000,3000 6000,
3500 6500,4000 5500,4500 3000,5500 2000,2500 1500),
(3395 2827,3861 2840,4094 2374,3395 2594,3395 2827)
)'),
GEOMFROMTEXT('LINESTRING(2500 3500, 4500 3000)'),
GEOMFROMTEXT('POINT(2850 2350)'), 'gl_1')
INSERT INTO glacier VALUES ( 2,
GEOMFROMTEXT('POLYGON((7000 2000,5500 2000,6500 3000,
6500 5000,7000 5500,8000 5000,8500 4000,8000 3000,
8500 2500,7000 2000))'),
GEOMFROMTEXT('LINESTRING(6500 3500, 8000 3000)'),
GEOMFROMTEXT('POINT(7250 2750)'), 'gl_2')
When you store this table with mysqldump, the geometric data will be output in WKB format,
not WKT.
Querying the Data
After the data have been input, you should check whether they were imported correctly. The sim-
plest way of checking the geometric data is with the asText function:
SELECT name, ASTEXT(ref), ASTEXT(ela) FROM glacier
name ASTEXT(ref) ASTEXT(ela)
gl_1 POINT(2850 2350) LINESTRING(2500 3500,4500 3000)
gl_2 POINT(7250 2750) LINESTRING(6500 3500,8000 3000)
You can also query the length of the lines:
SELECT name, GLENGTH(ela),GLENGTH(border) FROM glacier
name GLENGTH(ela) GLENGTH(border)
gl_1 2061.5528128088 NULL
gl_2 1581.1388300842 NULL
The result is somewhat surprising, since the length of the bounding polygon is NULL. In fact,
polygons have no length, only an area. If you wish to determine the length of the outer polygon, you
need to use the EXTERIORRING function:
SELECT name,AREA(border), GLENGTH(EXTERIORRING(border)) FROM glacier
name AREA(border) GLENGTH(EXTERIORRING(border))
gl_1 8933474 15016.935459803
gl_2 5875000 11263.66792108
Note that the area of the first glacier is automatically diminished by the area of the rock island.
The area of the island can also be determined with the following trick: The following command
transforms the geometric object into a textual representation, replaces LINESTRING with
POLYGON, transforms the result back into a geometric object, and then returns its area:
SELECT AREA(GEOMFROMTEXT(
CONCAT(REPLACE(
ASTEXT(INTERIORRINGN(border, 1)),
'LINESTRING(', 'POLYGON(('),
')') )) AS innerArea
FROM glacier WHERE id = 1
innerArea
191526
CHAPTER 12 ■GIS FUNCTIONS310
5351c12_final.qxd 8/26/05 6:33 PM Page 310
www.it-ebooks.info

Here the function INTERIORRINGN returns a type LINESTRING. To calculate the area, how-
ever, a POLYGON is needed. Unfortunately, there is no way to convert between these two types, and
therefore a textual replacement must be carried out using the REPLACE function. Additionally, the
CONCAT function is used to insert the closing parentheses.
That the two geometric objects (or their bounding boxes) touch is shown by the TOUCHES
function:
SELECT TOUCHES(g1.border,g2.border)
FROM glacier AS g1 , glacier AS g2
WHERE g1.id=1 AND g2.id=2
TOUCHES(g1.border,g2.border)
1
For the two objects to be compared, the table must be referenced twice in FROM. In the WHERE
condition, for g1 the first record is selected, and for g2 the second. A further value of interest is the
total area of the glacier. Nothing could be simpler:
SELECT SUM(AREA(border)) FROM glacier
SUM(AREA(border))
14808474
Or perhaps you would like to know the total length of the glacier’s border:
SELECT SUM(GLENGTH(EXTERIORRING(border))) FROM glacier
SUM(GLENGTH(EXTERIORRING(border)))
26280.603380883
Glaciologists would certainly like to know how much area is in the accumulation region (that
is, above the dashed line) and how much lies below. Here, alas, MySQL must take a pass, since spa-
tial operators such as intersection, union, and difference are not yet implemented in MySQL.
One could formulate additional queries, for example, regarding the position of the reference
points. The smaller the xvalues, the farther to the west the glacier lies. To find the most westerly
and easterly points on the glacier, use the following command:
SELECT MIN(X(ref)), MAX(X(ref)) FROM glacier
MIN(X(ref)) MAX(X(ref))
2850 7250
You can also collect several geometric columns of a table into a GEOMETRYCOLLECTION:
SELECT ASTEXT(GEOMFROMTEXT(
CONCAT('GEOMETRYCOLLECTION(',
ASTEXT(border),',', ASTEXT(ref), ')')))
AS collection FROM glacier
collection
GEOMETRYCOLLECTION(POLYGON((2500 1500,1000 2500,2500 3500,
3000 5000,3000 6000,3500 6500,4000 5500,4500 3000,
5500 2000,2500 1500),
(3395 2827,3861 2840,4094 2374,3395 2594,3395 2827)),
POINT(2850 2350))
GEOMETRYCOLLECTION(POLYGON((7000 2000,5500 2000,6500 3000,
6500 5000,7000 5500,8000 5000,8500 4000,8000 3000,
8500 2500,7000 2000)),
POINT(7250 2750))
In this example, renewed use is made of CONCAT. In order that GEOMFROMTEXT function cor-
rectly and create a GEOMETRYCOLLECTION, the corresponding character string must stand at the
beginning of the parenthesized expression. Furthermore, the individual objects within the parenthe-
ses must be separated by commas. These are supplied by the CONCAT function.
CHAPTER 12 ■GIS FUNCTIONS 311
5351c12_final.qxd 8/26/05 6:33 PM Page 311
www.it-ebooks.info

The bounding box of each geometric object is always a rectangle, which in MySQL is repre-
sented as a POLYGON. In the special case of a POINT object, the polygon is reduced to a single
point:
SELECT ASTEXT(ENVELOPE(ela)) FROM glacier
ASTEXT(ENVELOPE(ela))
POLYGON((6500 3000,8000 3000,8000 3500,6500 3500,6500 3000))
POLYGON((2500 3000,4500 3000,4500 3500,2500 3500,2500 3000))
SELECT ASTEXT(ENVELOPE(ref)) FROM glacier
ASTEXT(ENVELOPE(ref))
POLYGON((7250 2750,7250 2750,7250 2750,7250 2750,7250 2750))
POLYGON((2850 2350,2850 2350,2850 2350,2850 2350,2850 2350))
SELECT ASTEXT(ENVELOPE(border)) FROM glacier
ASTEXT(ENVELOPE(border))
POLYGON((1000 1500,5500 1500,5500 6500,1000 6500,1000 1500))
POLYGON((5500 2000,8500 2000,8500 5500,5500 5500,5500 2000))
SQL Examples (the Database opengeodb)
The opengeodb example database consists of a single table, cities. This table contains locations in
Austria, Germany, and Switzerland, together with their coordinates (in the UTM system, zone 32U),
postal code (zip), and other data. The following command displays ten randomly selected records:
SELECT id, ASTEXT(pt), zip, country AS cnt, state AS st, city, district
FROM cities ORDER BY RAND() LIMIT 10
id ASTEXT(pt) zip cnt st city district
3357 POINT(863667 5784840) 15848 DE BB Friedland
7249 POINT(320685 5500822) 54441 DE RP Mannebach
14857 POINT(605034 5213504) 6555 AT 7 Kappl
16458 POINT(588645 5122467) 7747 CH GR Viano
9104 POINT(702844 5728043) 6388 DE ST Piethen
2231 POINT(501094 5976100) 25709 DE SH Diekhusen-...
13113 POINT(726772 5656658) 6712 DE ST Würchwitz
10491 POINT(474289 5403425) 75328 DE BW Schömberg
13518 POINT(421059 5942907) 26409 DE NI Wittmund Berdum
12622 POINT(396497 5621193) 57635 DE RP Werkhausen
Table 12-11 summarizes the column properties of the table. Note that a spatial index has been
defined for the pt column.
Table 12-11. Properties of the cities Table
Field Data Type Attribute Index
id INT NOT NULL AUTO_INCREMENT PRIMARY KEY
pt POINT NOT NULL SPATIAL KEY
zip INT NULL KEY
country VARCHAR(10) NULL KEY
state CHAR(2) NULL
city VARCHAR(100) NULL KEY
district VARCHAR(100) NULL
CHAPTER 12 ■GIS FUNCTIONS312
5351c12_final.qxd 8/26/05 6:33 PM Page 312
www.it-ebooks.info

In comparison with the tiny glacier table, cities comprises almost 18,000 records. The volume of
data is about 1MB, and the indexes require an additional 1.2 megabytes. Thus this table is useful not
only for trying out various SQL commands, but also for efficiency tests (such as searching for coor-
dinates with and without an index).
Data Source and Import
The example database opengeodb.sql is based on the like-named OpenGeoDB project. This is an ini-
tiative in German-speaking countries to create a freely available database with the names of locations
with their geographic positions. The database is available at the following location for download (LGPL
license; that is, even commercial use of the data is permitted): http://opengeodb.de/download/.
The quality of the data is good, but not perfect. OpenGeoDB notes that the data have been only
moderately checked, and errors may well be present. In the following examples we will be concerned
not with a concrete application, but with testing the GIS functions of MySQL with real data.
Import
The initial data are in the form of a CSV (comma-separated values) file, not in the form of an SQL
file that can be directly read in by MySQL. The following lines show some entries from this text file:
30443; AT; 3; -; -; -; Zwingendorf; -; -; 48.7; 16.2333; -; 2063
30444; CH; AG; -; -; -; Aarau; -; -; 47.3833; 8.05; -; 5000,5004,5001
30445; CH; AG; -; -; -; Aarburg; -; -; 47.3167; 7.9; -; 4663
30446; CH; AG; -; -; -; Aettenschwil; -; -; 47.1833; 8.36667; -; 5645
The coordinates of the locations appear in columns 10 and 11 and are given in degrees latitude
and longitude. This coordinate system is, however, unsuitable for MySQL. Fortunately, there is
an open source library, Proj.4, available on the Internet for conversion from decimal degrees
into the projective UTM system. Binary packages for Windows and for Linux can be found at
http://www.remotesensing.org/proj/.
From this package, the executable cs2cs is used to transform from one coordinate system
into the other. The following example shows the transformation of a coordinate pair from the
latlong system into the UTM system in Zone 32U:
user@host > echo "11.4 47.2667" | cs2cs +proj=latlong +to +proj=utm +zone=32U
681547.32 5237595.88 0.00
■Note Parts of this chapter were written by Bernd Öggl (Innsbruck, Austria). Thanks to his educational studies in
geography and his professional qualifications as an instructor in GIS systems and databases, he has considerably
more experience in the realm of GIS than I do. I am very grateful to him for allowing me to use his work for this book.
Radial Search
Imagine the following scenario: You wish to develop a trading community in which you can specify
a maximal spatial separation of product groups. A typical search might be to locate all used washing
machines within a radius of 30 kilometers of your location. The cities table offers the necessary basis
for such searches.
To start with, we need the coordinates of the base point (which is Innsbruck in the following
example). These coordinates are stored with a simple SELECT command in the variables @x0 and
@y0 (in the case of large cities, it is better to work with the comparison zip=… rather than city=…):
CHAPTER 12 ■GIS FUNCTIONS 313
5351c12_final.qxd 8/26/05 6:33 PM Page 313
www.it-ebooks.info

SELECT X(pt), Y(pt) FROM cities
WHERE city='Innsbruck' LIMIT 1 INTO @x0, @y0
SELECT @x0, @y0
@x0 @y0
681547.32 5237595.88
Now we have to search for locales in the cities table whose location falls within a certain dis-
tance from @x0 and @y0. Since the MySQL GIS implementation does not yet support a DISTANCE
function, the distance must be calculated using the Pythagorean theorem (the square root of the
sum of the squares of the distances between the respective xand ycoordinates). The result is then
divided by 1,000 and rounded, yielding the distance in kilometers:
SELECT ROUND(SQRT(POW(@x0 - X(pt), 2) + POW(@y0 - Y(pt), 2)) / 1000) AS distance,
city FROM cities
HAVING distance<=30 ORDER BY distance
distance city
0 Innsbruck
4 Rum
4 Natters
4 Mutters
4 Aldrans
5 Sistrans
5 Völs
... ...
29 Wallgau
29 Pertisau
30 Tux
49 rows in set (0.15 sec)
Speed Optimization
The result is correct, but it is bothersome that the query took relatively long to execute. The reason
is that MySQL must compute the distance for all 17,000 records without being able to use the spatial
index for the column pt. The query can be executed considerably faster if first, a subSELECT com-
mand is used to determine all records that lie within 30 kilometers of the start point. The condition
of this subSELECT command uses the function MBRCONTAINS, which MySQL can execute much
more efficiently thanks to the pt index.
However, to do this, some preparations are necessary. First, a geometric object (variable @bbox)
must be created that describes the square 30 kilometers around the starting point. This is difficult to
do in pure SQL code. (The two SELECT commands show the intermediate results and serve to clarify
the code, but they are not necessary. If you develop your application with PHP or another program-
ming language, the assembling of the MULTIPOINT string is much simpler.)
SET @d0 = 30000
SET @str = CONCAT('MULTIPOINT(', @x0-@d0, ' ', @y0-@d0, ', ',
@x0+@d0, ' ', @y0+@d0, ')')
SET @bbox = ENVELOPE(GEOMFROMTEXT(@str))
SELECT @str
@str
MULTIPOINT(651547.32 5207595.88, 711547.32 5267595.88)
SELECT ASTEXT(@bbox)
ASTEXT(@bbox)
POLYGON((651547.32 5207595.88, 711547.32 5207595.88,
711547.32 5267595.88, 651547.32 5267595.88,
651547.32 5207595.88))
CHAPTER 12 ■GIS FUNCTIONS314
5351c12_final.qxd 8/26/05 6:33 PM Page 314
www.it-ebooks.info

Using the POLYGON object in the variable @bbox, all points that reside within can easily be
determined. (Note that processing time is 0.00 seconds, that is, too short to measure with mysql.)
SELECT city, X(pt), Y(pt) FROM cities
WHERE MBRCONTAINS(@bbox, pt)
city X(pt) Y(pt)
Farchant 659311.95 5266601.84
Krün 671959.24 5263256.57
...
Mittenwald 669666.07 5255771.14
Scharnitz 672340.12 5250287.98
54 rows in set (0.00 sec)
Now from these results we can remove all cities whose distance is greater than 30 kilometers.
(The rectangular POLYGON object with length 60 kilometers is larger than a circle with a radius of
30 kilometers.) In the following subSELECT command, the inner command returns all such cities.
The outer command calculates the actual distances and excludes the cities that are too far away.
Note that the entire time for execution of this command is only 0.01 seconds, thus much less than
in the first version of our radial search.
SELECT ROUND(SQRT(POW(@x0 - sub.x, 2) + POW(@y0 - sub.y, 2)) / 1000) AS distance,
sub.city
FROM (SELECT city, X(pt) AS x, Y(pt) AS y FROM cities
WHERE MBRCONTAINS(@bbox, pt)) AS sub
HAVING distance<=30 ORDER BY distance
distance sub.city
0 Innsbruck
4 Rum
... ...
30 Tux
49 rows in set (0.01 sec)
CHAPTER 12 ■GIS FUNCTIONS 315
5351c12_final.qxd 8/26/05 6:33 PM Page 315
www.it-ebooks.info

Stored Procedures and Triggers
Stored procedures (SPs) are the most significant innovation in MySQL 5.0. These are custom SQL
procedures or functions that are stored and executed directly by the MySQL server. With SPs you
have an SQL-based programming language at your service. SPs make it possible to store part of the
logic of a client-server database application.
In this chapter you will learn why SPs are a good idea (greater speed, greater data security, less
code redundancy, etc.). The following sections describe details about the SP implementation in
MySQL and provide several application examples.
A trigger is the automatic calling of SQL commands or SPs before or after INSERT, UPDATE,
or DELETE commands. For example, you can test for every UPDATE operation whether the altered
data obey certain conditions. The trigger implementation in MySQL 5.0 is unfortunately not very
complete. Triggers will probably not be of practical use until version 5.1. Nevertheless, this chapter
provides an introduction to the use of triggers.
■Tip Further information on SPs and triggers can be found, as usual, at the MySQL website: http://
dev.mysql.com/doc/mysql/en/stored-procedures.html,http://dev.mysql.com/doc/mysql/en/
triggers.html,http://dev.mysql.com/tech-resources/articles/,mysql-storedprocedures.pdf.
Why Stored Procedures? Why Triggers?
Stored procedures are a collection of SQL commands that are stored and executed in the MySQL
server. Depending on the application, the following advantages can accrue:
Greater speed: It often happens that in carrying out a database operation, a large amount of
data must be transported back and forth between the PHP program and the database server:
The PHP program executes a SELECT command, processes the result, executes an UPDATE
command based on the results, and returns LAST_INSERT_ID, etc. If all of these steps can be
executed on the server in an SP, a great deal of overhead in data transmission can be saved.
SPs have the additional advantage that the database server can preprocess the code (this is
similar to a compiler, which creates a binary file from source text). However, the extent to
which such optimizing functions are available under MySQL and whether they provide a
measurable increase in speed is not documented.
Note that the use of SPs is no guarantee of improved speed. You will achieve a speed advan-
tage only if the SP’s code is efficient. Since SQL is a much more primitive program than PHP,
it is not always possible to achieve optimal code in an SP.
317
CHAPTER 13
■ ■ ■
5351c13_final.qxd 8/26/05 6:47 PM Page 317
www.it-ebooks.info

The use of SPs has the result that the MySQL server is more greatly burdened, while the opposite
is the case for the web server with PHP. Whether the net result is positive or negative depends on
the entire configuration. If the MySQL server and the web server are running on different com-
puters and the MySQL server is the bottleneck, then the intensive use of SPs can worsen the
situation, even if the web server carries less of a load.
Avoidance of code redundancy, better maintenance: It is frequently the case that several
applications access the same database. Then generally there are identical or similar code seg-
ments in each application for checking the input values, inserting new data records, updating
tables, etc. If such code can be offloaded to an SP, then not only is code redundancy avoided,
but all the affected applications are easier to maintain. When the database schema is changed,
often only a single SP needs to be changed, and not the code in every conceivable application.
Increase in database security: In many security-critical industries, such as banking, it is unde-
sirable for user programs to be able to access tables directly. Instead, the client programs must
use SPs for all database operations. There are thus SPs for obtaining data (SELECT), inserting
new data, changing existing data, etc. At first glance, this seems rather complicated, and indeed,
the creation and maintenance of a large number of SPs is a considerable task. The advantage for
the database administrator, however, is that every data access can be monitored, and logged if
necessary. Therefore, one can institute security rules of arbitrary stringency.
Of course, stored procedures do not offer only advantages. Among the greatest drawbacks is
that SPs normally cannot be easily ported from one database system to another. The reason for this
is that (almost) every database system uses a different syntax or syntax extensions for SPs. There-
fore, it is an enormous task to port SPs for the Microsoft SQL server or for Oracle to MySQL. (The
same holds of course in the other direction.)
Triggers
Triggers make it possible to execute a set of SQL commands or a stored procedure automatically
after or before INSERT, UPDATE, or DELETE commands. For example, you can test every UPDATE
operation to see whether the altered data conform to a particular set of rules. Other possible appli-
cations include changes to logging and updating variables or columns in other tables.
Since trigger code is automatically executed at each change in the table, complex triggers can
result in sharply diminished data throughput. This is particularly true when a command changes a
large number of records (UPDATE table SET columnA = columnA + 1); the trigger code must be exe-
cuted for each data record.
Hello, SP World!
The best way to begin to understand the world of stored procedures is by means of a small example.
The function shorten reduces character strings to a prescribed maximum length. For example,
shorten(“abcdefghijklmnopqrstuvwxyz”, 15) returns the string “abcde ... vwxyz”.
■Note There are two types of stored procedures: procedures and functions. The two types differ in a number of
details that will be discussed in the following sections. For now, suffice it to say that functions can return values,
while procedures support reference parameters and a greater variety of SQL commands (e.g.,
SELECT
and
INSERT
).
Procedures must be called with
CALL
, while functions can be embedded in ordinary SQL commands. The example
in this section shows the definition of a function.
CHAPTER 13 ■STORED PROCEDURES AND TRIGGERS318
5351c13_final.qxd 8/26/05 6:47 PM Page 318
www.it-ebooks.info
In early 2005, there were only two programs that could be used for inputting and testing func-
tions: the command interpreter mysql and MySQL Query Browser. Other administrative tools such
as phpMyAdmin 2.6 were offering no support for SPs, a situation that will change soon, and may well
have done so by the time you are reading this book. If that is not yet the case, you might consider
making use of SP Administrator, a small tool that will be introduced in Chapter 15 as an example of
PHP programming. With SP Administrator you can conveniently create, edit, test, and archive SPs
(backup and restore).
The Command Interpreter mysql
To launch the command interpreter, execute under Linux the command mysql -u root -p in a
console window and provide the required password. Under Windows, execute PROGRAMS | MYSQL |
MYSQL SERVER | MYSQL COMMAND LINE CLIENT.
Defining an SP: In mysql, make mylibrary the active database and change the delimiter charac-
ter from ;to $$. These two characters indicate the end of input. Since the code of an SP might use
the semicolon, it is an unsuitable character for termination. Keep in mind that all input must now
be terminated by $$:
mysql> use mylibrary
mysql> delimiter $$
The next step is to define the new function shorten. Try to avoid typos! When mysql encounters
an error, you can, of course, correct it, but the process is highly counterintuitive.
The code of shorten should be easy to understand. Two parameters are passed to the function:
a string sand an integer nrepresenting the maximum length of the result. The function returns a
string (data type VARCHAR(255)). If nis less than 15, then oversized strings are converted to the
desired length using the SQL string function LEFT. If nis greater than or equal to 15, then oversized
strings are shortened so that the resultant string contains the first n – 10 and the last 5 characters,
with the string " ... " in between.
mysql> CREATE FUNCTION shorten(s VARCHAR(255), n INT)
-> RETURNS VARCHAR(255)
-> BEGIN
-> IF ISNULL(s) THEN
-> RETURN '';
-> ELSEIF n<15 THEN
-> RETURN LEFT(s, n);
-> ELSE
-> IF CHAR_LENGTH(s) <= n THEN
-> RETURN s;
-> ELSE
-> RETURN CONCAT(LEFT(s, n-10), ' ... ', RIGHT(s, 5));
-> END IF;
-> END IF;
-> END$$
Query OK, 0 rows affected (0.00 sec)
CHAPTER 13 ■STORED PROCEDURES AND TRIGGERS 319
5351c13_final.qxd 8/26/05 6:47 PM Page 319
www.it-ebooks.info

■Tip Instead of typing the code directly into mysql, you could as well use a text editor. The text file should com-
prise the following commands:
— file sp.sql
DROP FUNCTION IF EXISTS shorten;
DELIMITER $$
CREATE FUNCTION shorten ... $$
Now you can read in the text file with the command mysql and thereby define the function:
> mysql -u root -p mylibrary < sp.sql
If an error occurs, simply edit the file in the editor and try again. Note that it is impossible to read in the text file
in interactive mysql mode using the command
source filename
, since
source
requires the commands to be sepa-
rated by semicolons, and it does not accept the command
delimiter
.
Trying out the SP: After having successfully defined the function, you can now try it out.
Observe that your custom functions can be implemented with ordinary SQL commands:
mysql> SELECT shorten("abcdefghijklmnopqrstuvwxyz", 15)$$
abcde ... vwxyz
mysql> SELECT title, shorten(title, 20) FROM titles LIMIT 10$$
A Guide to the SQL Standard A Guide to ... ndard
A Programmer's Introduction to PHP 4.0 A Programm ... P 4.0
Alltid den där Annette Alltid den ... nette
Anklage Vatermord Anklage Vatermord
Apache Webserver 2.0 Apache Webserver 2.0
Client/Server Survival Guide Client/Ser ... Guide
Comédia Infantil Comédia Infantil
CSS-Praxis CSS-Praxis
Dansläraren Återkomst Danslärare ... komst
Darwins Radio Darwins Radio
If the command termination string $$ bothers you, then put mysql back into default mode:
mysql> delimiter ;
The MySQL Query Browser
Instead of the command interpreter mysql, you can use the MySQL Query Browser. As of March
2005 its functions were not yet fully mature, but in any case, it offers more convenience than the
command interpreter mysql.
Defining an SP: First select the database mylibrary via FILE | SELECT SCHEMA and then execute
the command SCRIPT | CREATE STORED PROCEDURE. After you have specified the desired name and type
(procedure or function), the Query Browser presents a template for you to complete with code (see
Figure 13-1). When you are finished, store the new SP with EXECUTE. If you have committed a syntax
error, you must halt execution with STOP. Correct the error and try again.
Testing the SP: To try out your new function, execute FILE | NEW QUERY TAB, give the command
SELECT shorten(title, 20), title FROM titles, execute it with EXECUTE (see Figure 13-2).
Editing an SP: While you have the dialog for defining the function shorten open, you can easily
edit it. (Don’t forget to execute EXECUTE.)
CHAPTER 13 ■STORED PROCEDURES AND TRIGGERS320
5351c13_final.qxd 8/26/05 6:47 PM Page 320
www.it-ebooks.info
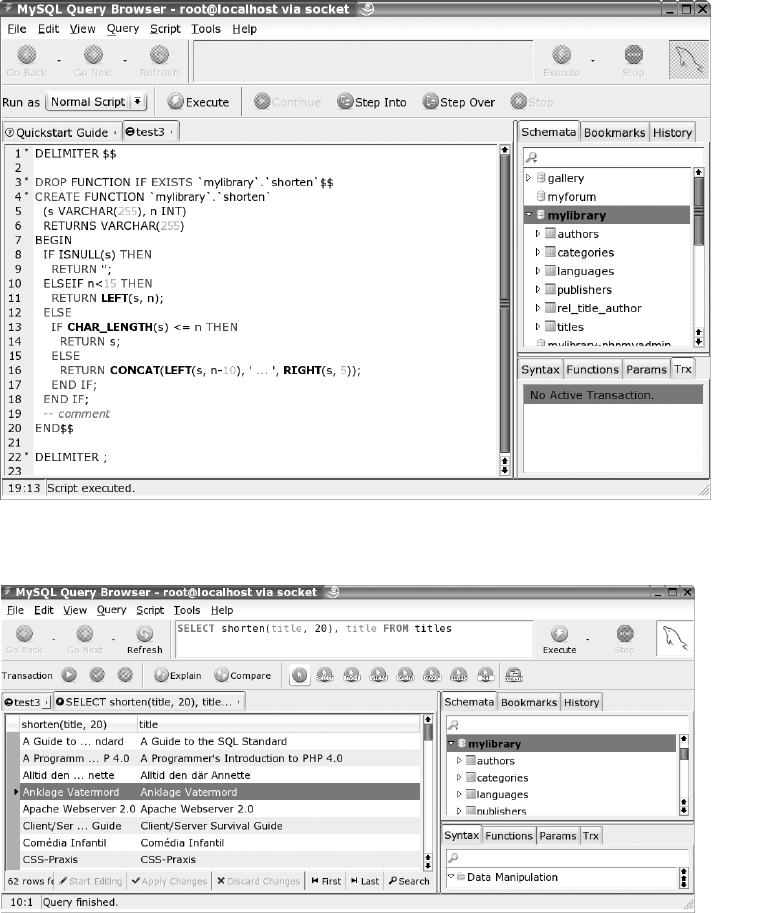
If you have already closed the dialog, editing after the fact is difficult. The Query Browser
provides only the command SCRIPT | EDIT ALL STORED PROCEDURES. That should open a new dialog
containing the code of all SPs in the current database. (In the tested version 1.1.5 of the Query
Browser this did not function, though it did with older versions.) Now you can copy the DELIMITER
instructions at the beginning and end as well as the DROP and CREATE commands of your SP into a
new script dialog (FILE | NEW SCRIPT TAB). There you can edit your code and then execute EXECUTE.
CHAPTER 13 ■STORED PROCEDURES AND TRIGGERS 321
Figure 13-1. Definition of a custom function in the MySQL Query Browser
Figure 13-2. Testing a function in the MySQL Query Browser
5351c13_final.qxd 8/26/05 6:47 PM Page 321
www.it-ebooks.info
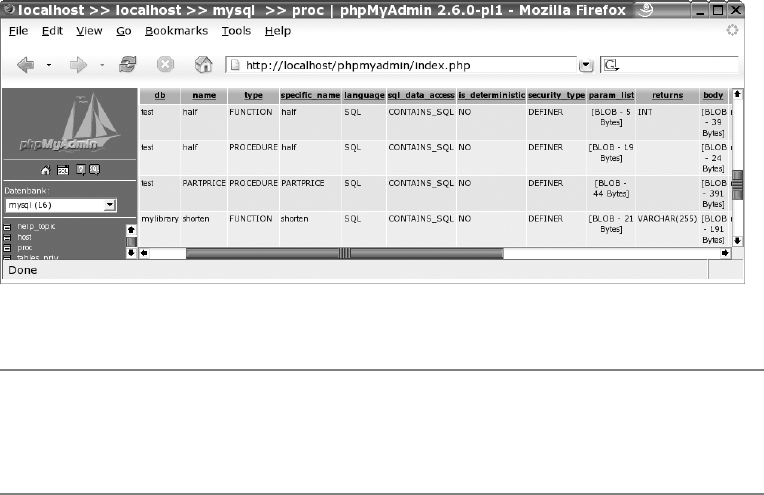
SP Implementation
The SQL 2003 standard: I have already mentioned that there are almost as many SP syntaxes as
there are database systems. The syntax of SPs in MySQL 5.0 is fortunately based on a standard,
namely SQL:2003. SPs in MySQL are thus largely compatible with SPs in the database system IBM
DB/2. However, they are incompatible with SPs from Oracle and Microsoft SQL Server.
In the future, MySQL will likely offer an interface that permits the formulation of SPs using
external programming languages (e.g., PHP and Perl). That would open up attractive programming
opportunities for PHP programmers in particular, since SPs can use all of the features of PHP. How
all this would affect the speed of SPs remains to be seen.
Internal storage of SPs: MySQL stores SPs in the table mysql.proc. In the columns of this table
are stored the name of the underlying database, the name and type (PROCEDURE or FUNCTION)
of the SP, the parameters, the actual code, and various other attributes (see Figure 13-3). Note that
every SP is associated with a particular database.
■Caution SPs can be stored only if the table
mysql.proc
actually exists. If you did not do a clean install of
MySQL 5.0 but used an earlier version of MySQL and upgraded to version 5.0, the database
mysql
may have
been left unchanged and thus be without the
proc
table. Instructions for creating this table after the fact can be
found at http://dev.mysql.com/doc/mysql/en/upgrading-grant-tables.html.
SP Administration
This section describes the SQL commands for administration of SPs. These allow you to create, edit,
and delete SPs. The direct application of these commands is relatively tedious. Unfortunately, in
March 2005 there were still no usable administrative tools to simplify working with SPs. Such tools
are to be expected in the near future. As a transitional aid, you can use the SP Administrator, intro-
duced in Chapter 15.
CHAPTER 13 ■STORED PROCEDURES AND TRIGGERS322
Figure 13-3. MySQL internal storage of stored procedures
5351c13_final.qxd 8/26/05 6:47 PM Page 322
www.it-ebooks.info
Creating, Editing, and Deleting SPs
Creating SPs
As the Hello SP World example demonstrated, new SPs are created using CREATE FUNCTION or
CREATE PROCEDURE. You need the privilege Create Routine in order to be able to execute these
commands. The following lines summarize the syntax for these commands:
CREATE FUNCTION name ([parameterlist]) RETURNS datatype
[options] sqlcode
CREATE PROCEDURE name ([parameterlist])
[options] sqlcode
Both commands associate the SP with the current database. It is allowable for a function and a
procedure to have the same name. In the definition, the following options can be specified:
LANGUAGE SQL: The only permissible setting for the option LANGUAGE is currently SQL. This
setting holds by default. Future versions of MySQL will likely offer the option of defining SPs in
other programming languages.
[NOT] DETERMINISTIC: An SP is considered to be deterministic when it always returns the
same result with the same parameters. (SPs whose result depends on a database table are thus
not deterministic.)
By default, SPs are nondeterministic. However, deterministic SPs can be executed with greater
efficiency. (For example, it is possible to store the result of an SP for particular parameters in a
cache.) At the moment, however, the MySQL DETERMINISTIC option is ignored.
SQL SECURITY DEFINER or INVOKER: The SQL SECURITY mode specifies the access privileges
with which an SP is to be executed. Details will be given later in the chapter.
COMMENT ‘text’: The comment text is stored together with the SP.
Semicolons separate individual commands within an SP. These semicolons can cause problems
with the execution of CREATE commands. If you use the command interpreter mysql, you must set a
different separator using DELIMITER, as described earlier in this chapter. Additional details on the
definition of a parameter list and on SP syntax rules for the actual code follow in the next section.
Deleting SPs
The following two commands delete an existing procedure or function. The optional key words
IF EXISTS have the effect that the command is executed without triggering an error even if the SP to
be deleted does not exist. You need the privilege Alter Routine to execute the command. The creator
of the function or procedure (that is, the user who executed CREATE FUNCTION/PROCEDURE) has
this privilege automatically.
DROP FUNCTION [IF EXISTS] name
DROP PROCEDURE [IF EXISTS] name
Changing SPs
With ALTER you can change the name of an SP and some of its options. You need again the Alter
Routine privilege to execute this command:
ALTER FUNCTION/PROCEDURE name
[NAME newname]
[SQL SECURITY DEFINER/INVOKER]
[COMMENT ‘newcomment’]
CHAPTER 13 ■STORED PROCEDURES AND TRIGGERS 323
5351c13_final.qxd 8/26/05 6:47 PM Page 323
www.it-ebooks.info

■Note MySQL currently (version 5.0.3) offers no way of changing the code of an existing SP. If that is what you
would like to do, then you must first delete the SP with
DROP
, and then create it anew with
CREATE
.
Determining Existing SPs
The two commands SHOW PROCEDURE STATUS and SHOW FUNCTION STATUS return a list of
all defined procedures and functions. Using LIKE pattern you can limit the output to those proce-
dures/functions whose names correspond to a given search pattern. In any case, you will obtain the
SPs of all databases (not only the current database). In the following example, the return columns
Modified and Created have been left out:
SHOW FUNCTION STATUS
Db Name Type Definer Security_type Comment
mylibrary faculty FUNCTION root@192.168.80.1 DEFINER
mylibrary shorten FUNCTION root@192.168.80.1 DEFINER
mylibrary shortentest FUNCTION root@localhost DEFINER
mylibrary swap_name FUNCTION root@192.168.80.1 DEFINER
test test FUNCTION root@localhost DEFINER
More complete information is provided by the table information_schema.routines. It contains
all data of the table mysql.proc, though in part it employs different column names:
SELECT routine_name, routine_type, created
FROM information_schema.routines
WHERE routine_schema='mylibrary'
routine_name routine_type created
categories_insert PROCEDURE 2005-01-31 11:29:16
...
test FUNCTION 2005-02-06 10:43:11
titles_insert_all PROCEDURE 2005-01-31 11:29:17
Determining the Code of an SP
If you know the name of an SP, you can access its code. Execute the command SHOW CREATE
FUNCTION/PROCEDURE name:
SHOW CREATE FUNCTION shorten
Function sql_mode Create Function
shorten CREATE FUNCTION mylibrary.shorten(s VARCHAR(255),
n INT) RETURNS VARCHAR(255)
BEGIN
IF ISNULL(s) THEN
RETURN '';
ELSEIF n<15 THEN
RETURN LEFT(s, n);
ELSE
IF CHAR_LENGTH(s) <= n THEN
RETURN s;
ELSE
RETURN CONCAT(LEFT(s, n-10), ' ... ',
RIGHT(s, 5));
END IF;
END IF;
END
CHAPTER 13 ■STORED PROCEDURES AND TRIGGERS324
5351c13_final.qxd 8/26/05 6:47 PM Page 324
www.it-ebooks.info
Security
Only users possessing the above-mentioned privileges Create Routine and Alter Routine may create,
change, or delete SPs. The privilege Execute determines which MySQL users are allowed to execute
SPs. All three privileges can be set via user administration (see Chapter 11).
Even if the current user has the right to execute SPs, the question remains open which database
operations for the SP are allowed. (For example, can a record be deleted from a table via a particular
SP?) MySQL distinguishes two variants:
SQL SECURITY INVOKER: SPs that are defined with this option have the same access privileges
as the MySQL user who executes the SP. (The SP is allowed to delete records if the user who
launched the SP is allowed to.)
SQL SECURITY DEFINER: In this case, the SP has the same privileges as the MySQL user who
defined the SP. This security mode holds by default; that is, if the option SQL SECURITY
INVOKER is not taken, then DEFINER holds. (Caution: SPs defined by root have unrestricted
privileges in all databases.)
Backup and Restoration of SPs
The usual mechanisms for creating database backups unfortunately continue to ignore SPs. This
holds, for example, for the version of MySQL Administrator that was available in March 2005, for the
command mysqldump, and the export tool of phpMyAdmin 2.6.
To carry out a backup of all SPs for all databases, your best bet is to back up the table
mysql.proc, for example:
> mysqldump -u root -p mysql proc > backup.sql
However, this method has two significant drawbacks:
• You must have access privileges to mysql.proc. Normally, this is possessed only by root, not
an ordinary user.
• It is impossible to back up SPs only from a particular database. This makes it impossible as
well to read in the SPs of a particular database without simultaneously overwriting the SPs
of all other databases.
You can also execute a backup manually by executing SHOW CREATE FUNCTION/PROCEDURE
for all the SPs in a database and saving the result to a file. A particularly convenient approach is to
perform an SP backup using SP Administrator, introduced in Chapter 15.
SP Syntax and Language Elements
SPs consist primarily of a collection of ordinary SQL commands, such as those that you have come to
know from Chapters 9 and 10. In addition, however, there are some additional commands available
to SPs, such as those that allow you to create loops and conditional branches, and to run through all
the records in a table (cursor functions). These SP-specific commands are the focus of this section.
As has been mentioned repeatedly, there are two types of SPs: procedures and functions.
Table 13-1 summarizes the most important differences between the two.
CHAPTER 13 ■STORED PROCEDURES AND TRIGGERS 325
5351c13_final.qxd 8/26/05 6:47 PM Page 325
www.it-ebooks.info

Table 13-1. Differences Between Procedures and Functions
Procedures Functions
Calling Only with CALL Possible in all SQL commands,
e.g., in SELECT and UPDATE
commands.
Return Can return one or more SELECT Returns a single value
results (command RETURN); the data
type of the return value must be
specified in the declaration with
RETURNS.
Parameters Value and reference parameters Only value parameters allowed,
possible (IN, OUT, INOUT) thus no identification with IN,
etc.
Commands allowed All SQL commands, including No commands that access tables.
in the code SELECT, INSERT, UPDATE, DELETE,
CREATE TABLE
Calling other functions May call other procedures and May call only functions, not
and procedures functions procedures.
General Syntax Rules
These are the most important syntax rules for SPs:
Semicolon: SPs can consist of arbitrarily many SQL commands. The commands must be sepa-
rated by semicolons. Even control structures for branches and loops must be terminated with
a semicolon.
BEGIN–END: Several commands that do not fall between key words (for example, between
THEN and END IF) must be placed between BEGIN and END. For this reason, the code of
every SP that consists of more than one instruction must be introduced by BEGIN and termi-
nated by END.
New lines: A new line in the code has the same syntactic effect as a space character. It thus
doesn’t matter whether an IF–THEN–ELSE–END-IF construction is divided over several lines
or placed all on one line.
Variables: Local variables (SP-internal variables) and parameters are used without a prefixed
@ character. Within an SP you can access ordinary SQL variables, which as usual must be iden-
tified with the @ character.
Case distinction: There is no case distinction in the definition or invocation of SPs. It is all the
same whether you write shorten, SHORTEN, or Shorten.
For this reason, it is impossible to define a number of functions or procedures whose names
are the same except for case.
It is, however, permitted to have a function and a procedure with the same name, since when
it is called, MySQL can tell whether a function or a procedure is being invoked.
Special characters: Avoid the use of international characters such as ä, à, ñ in SP names.
MySQL accepts such characters in the CREATE command, but you may experience problems
in administering and using functions and procedures with such characters in their names.
Comments: Comments are introduced with a double hyphen (—) and extend to the end of
the line.
CHAPTER 13 ■STORED PROCEDURES AND TRIGGERS326
5351c13_final.qxd 8/26/05 6:47 PM Page 326
www.it-ebooks.info

Calling SPs (CALL)
Functions and procedures have different ways of being invoked. SPs are associated with a database.
If you wish to execute an SP belonging to another database, you must prefix the name of the data-
base, e.g., CALL dbname.spname().
Functions
Functions, like the predefined SQL functions, are integrated into ordinary SQL commands. For
example, the shorten function from the “Hello World” section can be called thus:
SELECT shorten("a very long character string", 15)
SELECT shorten(title, 30), shorten(subtitle, 20) FROM titles
UPDATE titles SET title = shorten(title, 70)
WHERE CHAR_LENGTH(title)>70
With SET or SELECT INTO you can store the result of a function in an SQL variable, which you
can then place in other SQL commands:
SET @s = " a very long character string "
SET @a = shorten(@s, 15)
SELECT shorten(@s, 10) INTO @b
SELECT @s, @a, @b
@s @a @b
a very long character string a ver ... tring a very lon
Procedures
Procedures must be called with CALL. You can return as result a table (as with a SELECT command).
It is impossible to link procedures to SQL commands in any other way.
The following examples use the procedures get_title and half:
PROCEDURE mylibrary.get_title(IN id INT)
BEGIN
SELECT title, subtitle, publName
FROM titles, publishers
WHERE titleID=id
AND titles.publID = publishers.publID;
END
PROCEDURE mylibrary.half(IN a INT, OUT b INT)
BEGIN
SET b = a/2;
END
Here get_title behaves like a SELECT command, which is not surprising, since that is what the
procedure contains.
CALL get_title(1)
title subtitle publName
Linux Installation, Konfiguration, Anwendung Addison-Wesley
In the case of procedures with reference parameters (OUT or INOUT), the result can be evalu-
ated only if an SQL variable is passed as parameter.
CALL half(10, @result)
SELECT @result
result
5
CHAPTER 13 ■STORED PROCEDURES AND TRIGGERS 327
5351c13_final.qxd 8/26/05 6:47 PM Page 327
www.it-ebooks.info

Recursion
In the code of a procedure, other functions and procedures can be called, while in the code of a
function, only other functions (and not procedures) can be called. Functions and procedures can
even call themselves. This makes possible the realization of recursive algorithms. The following
lines show the standard example of recursion: evaluation of the factorial function (1*2*3*4, etc.):
CREATE FUNCTION factorial(n BIGINT) RETURNS BIGINT
BEGIN
IF n>=2 THEN
RETURN n * factorial(n-1);
ELSE
RETURN n;
END IF;
END
SELECT factorial(6)
factorial(6)
720
Parameters and Return Values
For functions and procedures there is a slightly unusual rule for the declaration of parameters and
for the ways of returning results. This section discusses the relevant syntax variants.
Parameters of Procedures
Procedures are created by the command CREATE PROCEDURE. A parameter list is optional. Note,
however, that you must provide a pair of parentheses even if there are no parameters.
CREATE PROCEDURE name ([parameterlist])
[options] sqlcode
If there is more than one parameter, they must be separated by commas. Each parameter is
specified as follows:
[IN or OUT or INOUT] parametername datatype
The keywords IN, OUT, and INOUT determine whether the parameter is to be used only for
input, only for output, or for data transport in both directions. (The default is IN.)
All data types from MySQL are allowed, such as INT and VARCHAR(n) and DOUBLE. However,
in contrast to the definition of table columns, it is impossible to provide additional attributes to the
data type such as NULL and NOT NULL. MySQL currently does not attempt to do type checking
when it passes parameters, but that may change in future versions.
■Caution Be careful to give your parameters names that differ from those of your columns and tables.
Otherwise, ambiguity can enter into the formulation of SQL commands in procedure code.
Results of Procedures (SELECT)
Unlike functions, procedures cannot return a single value. In procedures, however, one may use ordi-
nary SELECT commands. It is even allowed for a procedure to execute several SELECT commands in
sequence. The procedure then returns several result tables. However, only those programming lan-
guages that support the MULTI_RESULT mode are capable of evaluating several results. If you are
working with PHP, you must use the method multi_query of the mysqli interface.
CHAPTER 13 ■STORED PROCEDURES AND TRIGGERS328
5351c13_final.qxd 8/26/05 6:47 PM Page 328
www.it-ebooks.info
Function Parameters
The CREATE command for creating new functions looks very much like that for procedures:
CREATE FUNCTION name ([parameterlist]) RETURNS datatype
[options] sqlcode
A significant difference, however, is that functions do not support reference parameters. For
this reason, the keywords IN, OUT, and INOUT are not permitted in the parameter list.
Function Results
Functions can return a value with the command RETURN, which also terminates the function exe-
cution. RETURN can be used only in functions, not in procedures. The data type of the return value
must be specified in the parameter list with RETURNS.
Encapsulation of Commands (BEGIN-END)
Every procedure or function that consists of more than one SQL command must be introduced with
BEGIN and terminated with END. BEGIN–END constructs are also possible within the code, for exam-
ple in an IF conditional or in a loop if local variables, conditions, handlers, or cursors are to be declared.
(The following sections will reveal the meaning of the terms handler and cursor.)
Within the BEGIN–END block a particular order must be adhered to:
BEGIN
DECLARE variables;
DECLARE cursors;
DECLARE conditions;
DECLARE handler;
other SQL commands;
END;
Before the BEGIN, an optional label can be given. The same name must then appear after the
END. Naming a block makes sense if the block may be exited early with LEAVE. The following lines
show the syntax of such a construction:
blockname: BEGIN
commands;
IF condition THEN LEAVE blockname; END IF;
further commands;
END blockname;
Variables
There are two types of variables to consider:
Ordinary SQL variables: Such variables are prefixed with the @ character. These variables can
be used in SPs just as they are in ordinary SQL commands (see Chapter 10). They maintain
their contents until the termination of the connection to the MySQL server.
Local variables and parameters: These variables are used without the @ character. They must
be declared with DECLARE before they are used. The content of a local variable is lost as soon
as the procedure or function terminates.
Variables are local within the BEGIN–END group in which they are defined. This means that
within a procedure several like-named variables can coexist within different levels of definition
(see the following example). In the case of a recursive SP call, each instance of the SP has its
own variables that are independent of those of the other instances (as in PHP).
CHAPTER 13 ■STORED PROCEDURES AND TRIGGERS 329
5351c13_final.qxd 8/26/05 6:47 PM Page 329
www.it-ebooks.info

Which type of variables you use in an SP is up to you. To avoid side effects, local variables are
generally preferable. On the other hand, ordinary variables can be advantageous with recursive
functions, since they maintain their value through all function and procedure calls.
Declaration (DECLARE)
The declaration of local variables must take place within a BEGIN–END group and before other
commands in the group. The syntax of variable declaration looks like this:
DECLARE varname1, varname2, ... datatype [DEFAULT value];
As you can see, you must provide the data type for all local variables. Local variables contain
NULL by default, unless you initialize them with another value.
■Caution Be very careful not to give your variables names that coincide with those of columns or tables that
you use in your SP. It is allowed syntactically, but it frequently leads to hard-to-detect errors (which can be
revealed, for example, in that a variable, despite an assignment otherwise, always contains
NULL
).
The following example demonstrates the levels of definition of local variables. There are three
variables, all called x, but declared in different levels of the code and therefore independent of one
another. When you call the procedure, three results are returned, 2, 1, and then 0.
CREATE PROCEDURE test()
BEGIN
DECLARE x INT DEFAULT 0;
BEGIN
DECLARE x INT DEFAULT 1;
IF TRUE THEN
BEGIN
DECLARE x INT DEFAULT 2;
SELECT x;
END;
END IF;
SELECT x;
END;
SELECT x;
END
Variable Assignment
Variable assignments of the form x = x + 1 are not permitted in SQL. Instead, you must use either SET
or SELECT INTO. The latter is a variant of SELECT, in which the command ends with INTO varname.
This variant is permitted only for SELECTs that return a single data record (not several records). In
functions, only SET can be used, since there the use of SELECT and various other SQL commands is
not allowed.
SET var1=value1, var2=value2, var3=value3 ...
SELECT var:=value
SELECT 2*7 INTO var
SELECT COUNT(*) FROM table WHERE condition INTO var
SELECT title, subtitle FROM titles WHERE titleID=...
INTO mytitle, mysubtitle
CHAPTER 13 ■STORED PROCEDURES AND TRIGGERS330
5351c13_final.qxd 8/26/05 6:47 PM Page 330
www.it-ebooks.info
Branching
IF–THEN–ELSE Branching
The SQL syntax for IF branching looks like this:
IF condition THEN
commands;
[ELSE IF condition THEN
commands;]
[ELSE
commands;]
END IF;
As already mentioned, the use of BEGIN and END within a control structure is not necessary.
The condition can be formulated as with WHERE or HAVING in SELECT queries.
Instead of the IF structure presented here, in simple cases you may use the IF function that
was introduced in Chapter 10.
CASE Branching
CASE is a syntactic variant of IF that is particularly useful when all the branch decisions depend on
the value of a single expression.
CASE expression
WHEN value1 THEN
commands;
[WHEN value2 THEN
commands;]
[ELSE
commands;]
END CASE;
Loops
MySQL offers a host of variants for constructing loops. The future holds out the offer of a FOR loop,
which in MySQL 5.0.3 has not yet been implemented and whose syntax is not yet documented.
REPEAT–UNTIL
The instructions between REPEAT and UNTIL are executed until the condition is first satisfied.
Since the condition is not evaluated until the end of the loop body, there is always at least one
pass through the loop.
The loop can be given an optional label. The same loop name must then appear at the end of
the loop. Naming a loop can be useful if you exit the loop prematurely with LEAVE or wish to repeat
a loop iteration with ITERATE (more on this soon).
[loopname:] REPEAT
commands;
UNTIL condition
END REPEAT [loopname];
The following lines show an example of a REPEAT–UNTIL loop. Here test(n) returns a string
that contains the * character ntimes. (This could, of course, have been accomplished much more
simply. The purpose here is to demonstrate the syntax.)
CHAPTER 13 ■STORED PROCEDURES AND TRIGGERS 331
5351c13_final.qxd 8/26/05 6:47 PM Page 331
www.it-ebooks.info

CREATE FUNCTION test(n INT) RETURNS TEXT
BEGIN
DECLARE i INT DEFAULT 0;
DECLARE s TEXT DEFAULT '';
myloop: REPEAT
SET i = i+1;
SET s = CONCAT(s, "*");
UNTIL i>=n END REPEAT;
RETURN s;
END
SELECT test(5)
test(5)
*****
WHILE
The instructions between DO and END WHILE are executed as long as the condition is satisfied.
Since the condition is evaluated at the beginning of the loop, it can happen that the loop is not
executed even once (namely, when the condition is not satisfied on its initial evaluation). If you
wish to use LEAVE or ITERATE, you must provide the loop with a label.
[loopname:] WHILE condition DO
commands;
END WHILE [loopname];
LOOP
The instructions LOOP and END LOOP are executed until the loop is exited with LEAVE loopname.
It is not syntactically required that the loop be given a name, but in practice, it is usually done
(unless you wish to create an infinite loop).
loopname: LOOP
commands;
END LOOP loopname;
The following lines give an example of a LOOP. Here test(n) returns once again a string with n
asterisks.
CREATE FUNCTION test (n INT) RETURNS TEXT
BEGIN
DECLARE i INT DEFAULT 0;
DECLARE s TEXT DEFAULT '';
myloop: LOOP
SET i = i+1;
SET s = CONCAT(s, "*");
IF i>=n THEN LEAVE myloop; END IF;
END LOOP myloop;
RETURN s;
END
LEAVE and ITERATE
LEAVE loopname aborts execution of a loop. LEAVE can also be used to break off a BEGIN–END
block prematurely.
ITERATE loopname has the effect that the commands of the loop body are executed once
again. In contrast to LEAVE, ITERATE cannot be used with a BEGIN–END block.
CHAPTER 13 ■STORED PROCEDURES AND TRIGGERS332
5351c13_final.qxd 8/26/05 6:47 PM Page 332
www.it-ebooks.info

Error Handling (Handlers)
Errors may occur during the execution of SQL commands within an SP. SQL therefore provides a
mechanism using handlers to react to such errors.
A handler must be defined after the declaration of variables, cursors, and conditions but before
the SQL commands of a BEGIN–END block. Here is the syntax:
DECLARE type HANDLER FOR condition1, condition2, condition3, ... command;
type: Allowable types are currently CONTINUE and EXIT. The former means that program exe-
cution simply continues with the next command after the occurrence of an error. EXIT means
that the BEGIN–END block is exited and the program continued after that point. (Future ver-
sions of MySQL will support a third variant: UNDO.)
condition: The condition or conditions enumerate under what conditions the handler should
be activated. There are several ways of formulating the conditions:
SQLSTATE ‘errorcode’: Specifies a particular error code.
SQLWARNING: Encompasses all 01nnn SQLSTATEs.
NOT FOUND: Encompasses all other errors (hence SQLSTATEs that do not begin with
01 or 02).
mysqlerrornumber: Specifies the MySQL error number instead of the SQLSTATE code.
conditionname: Refers to a condition that was formulated with DECLARE CONDITION
(more below).
command: This command is executed when an error occurs. Usually, a variable is used that is
evaluated in the following code. The command must be present (in the case of DECLARE EXIT
HANDLER as well).
■Tip An example of error handling can be found in the next section. The difference between MySQL error numbers
and
SQLSTATE
values is that the former are MySQL-specific, while the latter are standardized. For example, MySQL
error 1329 (
No data to fetch
) corresponds to
SQLSTATE
error code
‘02000’
. A list of all MySQL error codes and the
associated
SQLSTATE
values can be found in the online MySQL documentation at http://dev.mysql.com/
doc/mysql/en/error-handling.html.
Conditions
Conditions make it possible to give certain error codes a clear name. A condition must be defined
before a handler. The name of the condition can then be used in the handler. The syntax of a condi-
tion looks like this:
DECLARE name CONDITION FOR condition;
The condition can be formulated with SQLSTATE ‘errorcode’ or mysqlerrornumber (see above).
The following example shows the declaration of a variable, a condition, and a handler for the error
duplicate key.
DECLARE dupkey VARCHAR(100);
DECLARE duplicate_key CONDITION FOR SQLSTATE '23000';
DECLARE CONTINUE HANDLER FOR duplicate_key SET myerror='dupkey';
CHAPTER 13 ■STORED PROCEDURES AND TRIGGERS 333
5351c13_final.qxd 8/26/05 6:47 PM Page 333
www.it-ebooks.info
Triggering Errors
Sometimes it would be helpful if you could trigger an error in an SP when a certain situation occurs
(such as passing an invalid parameter). IBM DB/2 provides the SQL command SIGNAL SQLSTATE
xxx for this purpose. Unfortunately, there is no such command (yet) in MySQL.
The only current option is to deliberately execute an invalid command. In a procedure, you
could execute, for example, SELECT `errorreport` or SET `errorreport`=0. The backward apostro-
phes normally indicate the name of a database, table, or column. This command will trigger the
error Unknown column ‘errorreport’ in ‘field list’. This is a bit confusing, but it has the advantage
that your error report is part of the MySQL error announcement.
In functions the execution of SELECT is not allowed. Here you can use RETURN `errorreport`.
This leads to the error Unknown column ‘errorreport’ in ‘order clause’.
Searching for Errors
Handlers and conditions help in protecting SPs in the case of errors. It is often much more difficult to
localize errors made during the development of an SP. MySQL has no debugger for SPs, and the error
reports are often of little assistance. To get at least an idea during the execution of an SP of the value
of a variable or which code segment is being executed, in a procedure you can misuse a SELECT
command to output variables or text. (Simply place a SELECT varname; in a loop.)
Cursors
From your everyday life you know the concept of a cursor, mouse, and places within a text docu-
ment that allow for textual input. In database jargon, a cursor is something else: a pointer to a
particular record in a table. Cursors offer the possibility of looping through all the records of a
table. Typical applications are the selective copying of modified data from a table into a second
table, and changes to the content of an extensive table that could be formulated with difficulty if
at all using an UPDATE command.
The efficacy of the use of cursors is disputed: Cursor advocates maintain that they are a practical
tool for executing particular operations with extreme ease. Opponents claim that the use of cursors is
a sign of bad programming practice and maintain that almost every problem has a cursorless solution
whose code is not only more elegant, but also more efficient. But in the end, no one can take from you
the choice whether to use cursors. Yet if you are processing large amounts of data, you should not
blindly assume that an algorithm with cursors will operate more efficiently than one without. Try both
and see for yourself.
Syntax
The use of cursors involves several steps: First, you declare the cursor with DECLARE cursorname
CURSOR FOR SELECT …;. You may use any SELECT command. Then you must activate the cursor
with OPEN cursorname.
Now you have available the command FETCH cursorname INTO var1, var2, …, where the first
column of the record is stored in var1, the second in var2, and so on. (The variables must have been
previously declared and of the correct type. Note that the variables must not have the same names
as the columns, since that can lead to problems.)
The question now arises, what happens after FETCH has read all the SELECT results? The
answer is simple: MySQL error 1329 is triggered (No data to fetch), which corresponds to SQLSTATE
02000. This error is unavoidable, but it can be caught with a handler (see the previous section). For
this reason, error-handling is a necessary part of every SP that uses cursors. Usually NOT FOUND
is used as the error condition, where all SQLSTATE values 02nnn are encompassed.
The cursor can be ended with CLOSE cursorname. But this is usually not done, since the cursor
BEGIN–END block.
CHAPTER 13 ■STORED PROCEDURES AND TRIGGERS334
5351c13_final.qxd 8/26/05 6:47 PM Page 334
www.it-ebooks.info

Limitations
The following limitations exist for cursors in MySQL 5.0:
• Cursors are read-only. That is, you can only read data, not alter it.
• Cursors are forward-only. That is, data must be processed in the order in which it is delivered
by the MySQL server.
• Cursors are asensitive. It is therefore not permitted to change a cursor’s underlying tables
while you are reading the cursor’s records. If you do so anyway, the MySQL server guarantees
no consistent behavior.
An Example
The following lines show a simple application of a cursor. A procedure runs through all records of
the titles table and sums the number of characters for title and subtitle. This sum is divided by the
number of records, which yields the average length of title plus subtitle. The cursor commands and
error-handling are highlighted in boldface:
CREATE PROCEDURE mylibrary.cursortest(OUT avg_len DOUBLE)
BEGIN
DECLARE t, subt VARCHAR(100);
DECLARE done INT DEFAULT 0;
DECLARE n BIGINT DEFAULT 0;
DECLARE cnt INT;
DECLARE mycursor CURSOR FOR
SELECT title, subtitle FROM titles;
DECLARE CONTINUE HANDLER FOR NOT FOUND SET done=1;
SELECT COUNT(*) FROM titles INTO cnt;
OPEN mycursor;
myloop: LOOP
FETCH mycursor INTO t, subt;
IF done=1 THEN LEAVE myloop; END IF;
SET n = n + CHAR_LENGTH(t);
IF NOT ISNULL(subt) THEN
SET n = n + CHAR_LENGTH(subt);
END IF;
END LOOP myloop;
SET avg_len = n/cnt;
END
The following lines show the procedure call and evaluation of the result, which is written using
a reference parameter in the variable @result.
CALL cursortest(@result)
SELECT @result
@result
29.47
Of course, this result could have been obtained much more efficiently without an SP using a
simple SQL command:
SELECT (SUM(CHAR_LENGTH(title)) + SUM(CHAR_LENGTH(subtitle))) COUNT(*) AS avg_len
FROM titles
avg_len
29.47
CHAPTER 13 ■STORED PROCEDURES AND TRIGGERS 335
5351c13_final.qxd 8/26/05 6:47 PM Page 335
www.it-ebooks.info
SP Examples
This section illustrates the application possibilities of SPs using a number of examples. All the
examples are based on the database mylibrary, introduced in Chapter 8.
Adding a Category
The following procedure adds a new category to the categories table. The new category name and
the parentCatID number must be passed to the procedure, which returns the new catID number,
making it possible to avoid the otherwise usual determination of last_insert_id. If invalid data are
sent to the procedure (empty string, NULL, incorrect parentCatID number), the return value is –1.
If there is already a like-named category within the group specified by parentCatID, the procedure
does not add a new category and returns the catID number of the existing category.
This example also shows that a well-programmed insert SP can do much more than a simple
INSERT command. Depending on the application, of course, all conceivable tests are possible, such
as whether a value is contained within a permissible range. If you as database administrator do not
give your users the Insert privilege but instead force them to insert all data via INSERT SPs, you can
avoid many erroneous entries in your tables. (Of course, you should make available a correspon-
ding UPDATE SP so that invalid entries don’t creep into the database in this way.)
The code consists of ordinary SQL commands in combination with some IF queries, and it
should be easy to understand. The BEGIN–END block has the name proc. This makes it possible to
abort code execution with LEAVE proc. Note that in the tested version of MySQL the system variable
@@last_insert_id contains obsolete values, while the function LAST_INSERT_ID() does not.
CREATE PROCEDURE categories_insert
(IN newcatname VARCHAR(60), IN parent INT, OUT newid INT)
proc: BEGIN
DECLARE cnt INT;
SET newid=-1;
— validation
SELECT COUNT(*) FROM categories
WHERE parentCatID=parent INTO cnt;
IF ISNULL(newcatname) OR TRIM(newcatname)="" OR cnt=0 THEN
LEAVE proc;
END IF;
— Test whether the category already exists
SELECT COUNT(*) FROM categories
WHERE parentCatID=parent AND catName=newcatname
INTO cnt;
IF cnt=1 THEN
— determine the existing catID number
SELECT catID FROM categories
WHERE parentCatID=parent AND catName=newcatname
INTO newid;
LEAVE proc;
END IF;
— insert new category
INSERT INTO categories (catName, parentCatID)
VALUES (newcatname, parent);
SET newid = LAST_INSERT_ID();
END proc
CHAPTER 13 ■STORED PROCEDURES AND TRIGGERS336
5351c13_final.qxd 8/26/05 6:47 PM Page 336
www.it-ebooks.info

The procedure is used thus:
CALL categories_insert('Microsoft Access', 2, @catid)
SELECT @catid
@catid
90
Adding a Title
With the following procedure you can insert a book title together with the author and publisher into
the mylibrary database. If a book has more than one author, they must be separated by semicolons.
The call to titles_insert_all might look like this:
CALL titles_insert_all(
'Programmieren mit der .NET-Klassenbibliothek',
'Addison-Wesley', 'Eller Frank;Schwichtenberg Holger', @newID)
Noteworthy in the procedure is that it involves four tables: The title is stored in the titles table,
while the author goes into the authors table and the publisher into publishers if said publisher is
not there already. Furthermore, the cross-reference between the new title and the author goes into
rel_title_authors.
The procedure titles_insert_all recognizes existing authors even if the first and last name are
reversed, say if you specified Stephen King instead of King Stephen. This is accomplished by com-
paring existing authors with both author and swap_name(author). (The code for swap_name
appears a bit later.)
This precaution ensures that obvious duplicates do not end up in the authors table (one
Stephen King and one King Stephen). The correct author format, family name first, cannot thereby
be ensured, but at least a later correction is easy. (If some titles are associated with the correctly
spelled author, and others with the incorrect one, then correction becomes more complex.)
Of course, one could think of various improvements, such as additional parameters for the
remaining columns of the titles table, better parameter validation, and so on. But the idea of
the procedure should be clear.
This example also makes clear that SP code can often be complicated and difficult to read.
The same algorithm in PHP would not occupy fewer lines, but it would be more understandable
and therefore easier to maintain over the long term. (This also suggests a reason why many data-
base administrators warn against the overuse of SPs. The maintenance of a large number of SPs
can become a nightmare.)
CREATE PROCEDURE titles_insert_all
(IN newtitle VARCHAR(100), IN publ VARCHAR(60),
IN authList VARCHAR(255), OUT newID INT)
proc: BEGIN
DECLARE cnt, pos INT;
DECLARE aID, pblID, ttlID INT;
DECLARE author VARCHAR(60);
SET newID=-1;
— Search for/store publisher
SELECT COUNT(*) FROM publishers WHERE publname=publ INTO cnt;
IF cnt=1 THEN
SELECT publID FROM publishers WHERE publname=publ INTO pblID;
ELSE
INSERT INTO publishers (publName) VALUES (publ);
SET pblID = LAST_INSERT_ID();
END IF;
CHAPTER 13 ■STORED PROCEDURES AND TRIGGERS 337
5351c13_final.qxd 8/26/05 6:47 PM Page 337
www.it-ebooks.info

— store the title
INSERT INTO titles (title, publID) VALUES (newtitle, pblID);
SET ttlID = LAST_INSERT_ID();
— loop over all authors in authList
authloop: WHILE NOT (authList="") DO
SET pos = LOCATE(";", authList);
IF pos=0 THEN
SET author = TRIM(authList);
SET authList ="";
ELSE
SET author = TRIM(LEFT(authList, pos-1));
SET authList = SUBSTR(authList, pos+1);
END IF;
IF author = "" THEN ITERATE authloop; END IF;
— search for/store author
SELECT COUNT(*) FROM authors
WHERE authName=author OR authName=swap_name(author)
INTO cnt;
IF cnt>=1 THEN
SELECT authID FROM authors
WHERE authName=author OR authName=swap_name(author)
LIMIT 1 INTO aID;
ELSE
INSERT INTO authors (authName) VALUES (author);
SET aID = LAST_INSERT_ID();
END IF;
— update rel_title_authors
INSERT INTO rel_title_author (titleID, authID)
VALUES (ttlID, aID);
END WHILE authloop;
— return value
SET newID=ttlID;
END proc
CREATE FUNCTION swap_name(s VARCHAR(100)) RETURNS VARCHAR(100)
BEGIN
DECLARE pos, clen INT;
SET s = TRIM(s);
SET clen = CHAR_LENGTH(s);
SET pos = LOCATE(" ", REVERSE(s));
IF pos = 0 THEN RETURN s; END IF;
SET pos = clen-pos;
RETURN CONCAT(SUBSTR(s, pos+2), " ", LEFT(s, pos));
END
Determining Parent Categories
The procedure get_parent_categories takes a catID number and returns a table with all the parent
categories. Let us consider an example:
CALL get_parent_categories(57)
catID catName
11 All books
1 Computer books
56 Operating Systems
57 Linux
CHAPTER 13 ■STORED PROCEDURES AND TRIGGERS338
5351c13_final.qxd 8/26/05 6:47 PM Page 338
www.it-ebooks.info
The procedure creates a temporary HEAP table (which is located in RAM, not on the hard
drive) and stores all the categories there. The column level serves only to store the order in which
the categories are entered. The result table is sorted in the reverse order.
If the startid number is valid, the corresponding category data are read into the variables id,
pid, and cname. The counter ias well as id and cname are inserted into the new table __parent_cats.
In the following loop, the parent category is searched for until parentCatID has the value NULL.
Here as well the data found are inserted into __parent_cats.
After the end of the loop, the contents of the temporary table are output via SELECT. This out-
put is the result of the procedure. The temporary table, no longer needed, is deleted.
CREATE PROCEDURE get_parent_categories(startid INT)
BEGIN
DECLARE i, id, pid, cnt INT DEFAULT 0;
DECLARE cname VARCHAR(60);
DROP TABLE IF EXISTS __parent_cats;
CREATE TEMPORARY TABLE __parent_cats
(level INT, catID INT, catname VARCHAR(60)) ENGINE = HEAP;
main: BEGIN
— check startid
SELECT COUNT(*) FROM categories WHERE catID=startID INTO cnt;
IF cnt=0 THEN LEAVE main; END IF;
— insert the startid category into __parent_cats
SELECT catID, parentCatID, catName
FROM categories WHERE catID=startID
INTO id, pid, cname;
INSERT INTO __parent_cats VALUES(i, id, cname);
— loop for searching for parent categories
parentloop: WHILE NOT ISNULL(pid) DO
SET i=i+1;
SELECT catID, parentCatID, catName
FROM categories WHERE catID=pid
INTO id, pid, cname;
INSERT INTO __parent_cats VALUES(i, id, cname);
END WHILE parentloop;
END main;
SELECT catID, catname FROM __parent_cats ORDER BY level DESC;
DROP TABLE __parent_cats;
END
During execution of the procedure a warning will normally be triggered. This comes from
DROP TABLE, which notes that the table to be deleted does not exist.
Producing a List of Hierarchically Ordered Categories
In the previous example, all parent categories were sought. In this example, get_subcategories lives
up to its name by delivering all subcategories. This is a more complex task, since subcategories can
be branched. Therefore, get_categories calls the recursive procedure find_subcategories, which finds
all subcategories of a given category.
Like get_parent_categories, the procedure get_subcategories uses a temporary table for storing
its results. A significant difference, though, is that this time, the table is not deleted. It remains as
the result of the procedure call. As the following examples show, it can be used in a variety of useful
ways by the client program.
The start category is passed to get_subcategories. The procedure then writes in the second
parameter how many subcategories it found (including the start category).
CHAPTER 13 ■STORED PROCEDURES AND TRIGGERS 339
5351c13_final.qxd 8/26/05 6:47 PM Page 339
www.it-ebooks.info

CALL get_subcategories(1, @result)
SELECT @result
@result
26
In addition to this result, the table subcats is available with the results of the search. In addition
to the columns catID and catName, the table contains two more columns: rank gives the row num-
ber and is used for sorting the data; level gives the hierarchical level of the category (where for the
start category, we have level=0). The following command indents the categories according to their
hierarchical placements.
SELECT rank, level, catID,
CONCAT(SPACE(level*2), catname)
FROM __subcats ORDER BY rank
rank level catID CONCAT(SPACE(level*2), catname)
0 0 1 Computer books
1 1 2 Databases
2 2 69 IBM DB/2
3 2 86 Microsoft Access
4 2 67 Microsoft SQL Server
5 2 34 MySQL
6 2 5 Object-oriented databases
7 2 68 Oracle
8 2 77 PostgreSQL
9 2 4 Relational Databases
10 2 8 SQL
11 1 36 LaTeX, TeX
12 1 56 Operating Systems
13 2 57 Linux
14 2 58 Mac OS
15 2 59 Windows
16 1 3 Programming
17 2 54 C
18 2 53 C#
19 2 55 C++
20 2 50 Java
21 2 7 Perl
22 2 6 PHP
23 2 52 VBA
24 2 51 Visual Basic
25 2 60 Visual Basic .NET
The __subcats table can also be used to search for book titles within these categories:
SELECT title FROM titles, __subcats
WHERE titles.catID = __subcats.catID
ORDER BY title;
title
A Guide to the SQL Standard
A Programmer's Introduction to PHP 4.0
Apache Webserver 2.0
Client/Server Survival Guide
...
When the result table is no longer needed, it is simply deleted. (If the user of the procedure
neglects to do so, the table will be deleted at termination of the MySQL connection. There is thus
no danger that memory will be clogged up with temporary tables.)
DROP TABLE __subcats
CHAPTER 13 ■STORED PROCEDURES AND TRIGGERS340
5351c13_final.qxd 8/26/05 6:47 PM Page 340
www.it-ebooks.info
Program Code
The procedure get_categories creates a temporary table, tests whether startid is valid, and if so, enters
the first record into __subcats. Then the procedure find_subcategories is called. After that call termi-
nates, the number of records in __subcats is determined and returned in the parameter n.
CREATE PROCEDURE get_subcategories(IN startid INT, OUT n INT)
BEGIN
DECLARE cnt INT;
DECLARE cname VARCHAR(60);
DROP TABLE IF EXISTS __subcats;
CREATE TEMPORARY TABLE __subcats
(rank INT, level INT, catID INT, catname VARCHAR(60))
ENGINE = HEAP;
SELECT COUNT(*) FROM categories WHERE catID=startID INTO cnt;
IF cnt=1 THEN
SELECT catname FROM categories WHERE catID=startID INTO cname;
INSERT INTO __subcats VALUES(0, 0, startid, cname);
CALL find_subcategories(startid, cname, 1, 0);
END IF;
SELECT COUNT(*) FROM __subcats INTO n;
END
The procedure find_subcategories uses a cursor to run through all subcategories. All cate-
gories found are entered into subcats, and the INOUT parameter catrank is increased by 1. Then
find_subcategories is called recursively, and catlevel is also increased by 1.
CREATE PROCEDURE find_subcategories
(IN id INT, IN cname VARCHAR(60), IN catlevel INT,
INOUT catrank INT)
BEGIN
DECLARE done INT DEFAULT 0;
DECLARE subcats CURSOR FOR
SELECT catID, catName FROM categories WHERE parentCatID=id
ORDER BY catname;
DECLARE CONTINUE HANDLER FOR NOT FOUND SET done=1;
OPEN subcats;
subcatloop: LOOP
FETCH subcats INTO id, cname;
IF done=1 THEN LEAVE subcatloop; END IF;
SET catrank = catrank+1;
INSERT INTO __subcats VALUES (catrank, catlevel, id, cname);
CALL find_subcategories(id, cname, catlevel+1, catrank);
END LOOP subcatloop;
CLOSE subcats;
END
Triggers
Triggers are used for the automatic calling of SQL commands or SPs before or after INSERT, UPDATE,
and DELETE commands. For example, you could test for each UPDATE operation whether the altered
data conform to certain conditions.
This section provides a first introduction to the trigger implementation of MySQL 5.0. Note,
however, that triggers are currently (MySQL 5.0.3) implemented only half-heartedly. In contrast to
SPs, they are not really ready for practical application. The MySQL online documentation promises
CHAPTER 13 ■STORED PROCEDURES AND TRIGGERS 341
5351c13_final.qxd 8/26/05 6:47 PM Page 341
www.it-ebooks.info
more trigger functionality for version 5.1. Until this version appears, you can execute only rather
trivial tasks with triggers, as demonstrated by the example at the end of this section.
Creating a Trigger
You create a new trigger with the command CREATE TRIGGER. Only MySQL users with the Super
privilege can execute this command.
CREATE TRIGGER name BEFORE|AFTER INSERT|UPDATE|DELETE
ON tablename FOR EACH ROW code
You can define up to six triggers for each table, whose code is to be executed before or after
each INSERT, UPDATE, or DELETE command. If the command encompasses more than one record,
the trigger will be executed for each record.
Currently (MySQL 5.0.3), each trigger must have a unique name within a table. In the future,
trigger names will be valid for the entire database.
There are similar syntax rules for trigger code as for SPs. In particular, the code must be intro-
duced with BEGIN and terminated with END if it contains more than one command. All SP language
elements are available for triggers. However, there are many restrictions as to which SQL commands
may be used in trigger code (more on this below).
Within the trigger code you can access the columns of the current record:
OLD.columnname returns the content of an existing record before it is changed or deleted
(UPDATE, DELETE).
NEW.columnname returns the content of a new or altered record (INSERT, UPDATE).
You may change NEW.columnname in BEFORE INSERT triggers and BEFORE UPDATE triggers.
Deleting a Trigger
To delete a trigger, execute DROP TRIGGER. You need to specify the table and trigger names. The
option IF EXISTS is not yet supported.
DROP TRIGGER tablename.triggername
In contrast to SPs, there are not yet any administrative commands like ALTER TRIGGER, SHOW
CREATE TRIGGER, or SHOW TRIGGER STATUS. It is not currently clear whether, when, and with
what syntax such commands will be implemented.
Implementation Details and Administrative Assistance
Currently (MySQL 5.0.3), MySQL trigger code is stored in the text file tablenname.TRG in the directory
of the database. One can guess that this location will change in future versions of MySQL. Probably,
triggers, like SPs, will be managed in a table of the mysql database.
Furthermore, there is currently nothing in the way of administrative help: MySQL Query
Browser, MySQL Administrator, phpMyAdmin, etc., know nothing about triggers. To execute the
CREATE TRIGGER command you must use the command interpreter mysql, where, as in the case
of SPs, you must change the delimiter character.
Even mysqldump has not yet heard about triggers. If you wish to execute a backup of defined
triggers, you should back up the *.TRG files in the database directory.
CHAPTER 13 ■STORED PROCEDURES AND TRIGGERS342
5351c13_final.qxd 8/26/05 6:47 PM Page 342
www.it-ebooks.info

Functional Limitations
Alas, there are at present many restrictions on triggers that make practical application of them well
nigh impossible:
• One cannot access tables in trigger code, not even the table for which the trigger was defined.
As with SP functions, the commands SELECT, UPDATE, INSERT, etc., are unavailable.
• There are no commands or language elements to cancel the DELETE, UPDATE, or INSERT
command from within a trigger or to raise an error.
• Trigger code cannot call an SP with CALL.
• No transaction commands can be called in trigger code.
An Example
The two triggers presented here ensure that you can place only floating-point numbers between 0
and 1 in the column percent of the table test. (Numbers that are too large or too small are replaced
with the value NULL.)
USE test
CREATE TABLE test (id SERIAL, percent DOUBLE)
DELIMITER $$
CREATE TRIGGER test_before_insert
BEFORE INSERT ON test FOR EACH ROW
BEGIN
IF NEW.percent < 0.0 OR NEW.percent > 1.0 THEN
SET NEW.percent = NULL;
END IF;
END$$
CREATE TRIGGER test_before_update
BEFORE UPDATE ON test FOR EACH ROW
BEGIN
IF NEW.percent < 0.0 OR NEW.percent > 1.0 THEN
SET NEW.percent = NULL;
END IF;
END$$
DELIMITER ;
The following commands prove that the triggers work as advertised with INSERT and UPDATE
commands.
INSERT INTO test (percent) VALUES (-1), (0.3), (1.5)
SELECT * FROM test
id percent
1 NULL
2 0.3
3 NULL
UPDATE test SET percent = 1.7 WHERE id =2
SELECT * FROM test
id percent
1 NULL
2 NULL
3 NULL
CHAPTER 13 ■STORED PROCEDURES AND TRIGGERS 343
5351c13_final.qxd 8/26/05 6:47 PM Page 343
www.it-ebooks.info

Administration and
Server Configuration
This chapter describes the administration and configuration of the MySQL server. Among the most
important themes that we treat are backups, logging files, migration of databases from one computer
to another (or from one version of MySQL to a newer one), and import/export of text files. This chap-
ter also goes specifically into the maintenance of MyISAM and InnoDB tables.
Some advanced topics are treated in this chapter: Whether you set up a replication system or
wish to achieve greater processing speed, this chapter gives the relevant introductions and tips.
Finally, this chapter goes into the painful question of the various options for administration of
databases that are present at an Internet service provider. (The problem is that in such a case you
are not the database administrator and thus have very limited access rights.)
■Tip Additional topics on administration of MySQL appear in the following chapters: Chapters 4 through 6
discuss the use of user interfaces for administration (mysql, MySQL Administrator, etc.). Chapter 11 goes into
security and user administration as well as the
mysql
database. Chapter 22 contains a reference on mysqld,
mysql,mysqladmin, etc.
First Steps
This section summarizes information on the elementary steps for administration and points to
other places in the book where you can find further details.
Using Administrative Tools
With MySQL you get a number of administrative tools (such as mysqladmin and myisamchk), some
of which are described in some detail in this chapter. A common feature of all these tools is that
they are command-oriented programs. That is, there is no graphical user interface, and the tool
is used with options and commands.
Under Unix/Linux the tools are executed in a shell window, while under Windows they are
executed in a command window. Chapter 4 contains tips on the optimal configuration of the com-
mand window as well as the proper setup of the Windows system variable PATH.
Most of the administrative tools can be used with their full functionality only if you sign in as
root and provide your password. To do this you specify the options -u and -p at launch of mysqld.
With command help (mysql --help for example) you can obtain a brief overview of the available
options and commands. Some of the commands described in this chapter, generally those involv-
ing shell or Perl scripts, are available only under Unix and Linux, and not under Windows. 345
CHAPTER 14
■ ■ ■
5351c14_final.qxd 8/26/05 6:50 PM Page 345
www.it-ebooks.info
mysqladmin
As the name of the program implies, mysqladmin assists in the execution of a variety of administra-
tive tasks:
• Create and delete databases
• Change a user’s password
• Input again the privileges database mysql
• Update database and logging files (clear buffer or intermediate storage)
• Determine status information and variables of the MySQL server
• List and store MySQL processes
• Test connection to MySQL server (ping)
• Shut down the MySQL server (shutdown)
The following examples demonstrate a few possible applications:
> mysqladmin -u root -p create newDatabaseName
Enter password: xxx
> mysqladmin -i 5 ping
mysqld is alive
mysqld is alive
...
> mysqladmin status
Uptime: 435152 Threads: 2 Questions: 26464 Slow queries: 3
Opens: 140 Flush tables: 1 Open tables: 0
Queries per second avg: 0.061
> mysqladmin -u root -p processlist
Enter password: xxx
Id User Host db Command Time State Info
1 ODBC localhost books3 Sleep 7
196 root localhost Query 0 show processlist
...
Each time mysqladmin is called, only one operation can be executed. Most mysqladmin operations
can be carried out as well with SQL commands (for example, with mysql or with a client program).
The advantage of mysqladmin is that the program is easily adapted to the automation of administra-
tive tasks.
A reference to all mysqladmin options and commands can be found in Chapter 22.
Setting the root Password
The first and most important administrative task after a new installation of MySQL is to secure the
MySQL user root with a password. If you did not do so during installation, as described in Chapter 2,
you will find in Chapter 11 a detailed description of the MySQL access system and a general intro-
duction to securing the MySQL server (not only for root). Here we offer a brief summary:
Unix/Linux: Execute the following two commands. You must give the complete network name
of the computer, e.g., uranus.sol.
root# mysqladmin -u root -h localhost password xxx
root# mysqladmin -u root -h computername password xxx
CHAPTER 14 ■ADMINISTRATION AND SERVER CONFIGURATION346
5351c14_final.qxd 8/26/05 6:50 PM Page 346
www.it-ebooks.info

Windows: Execute START | PROGRAMS | MYSQL | MYSQL SERVER N.N| MYSQL SERVER INSTANCE CONFIG
WIZARD. This program takes you step by step through the basic configuration. Simply leave the
default settings unchanged. Of particular interest here is the step PLEASE SET THE SECURITY OPTIONS.
Here you should give root a password, activate the option ROOT MAY ONLY CONNECT FROM LOCALHOST,
and deactivate the option CREATE AN ANONYMOUS ACCOUNT.
MySQL Server Configuration File
If you followed the installation instructions in Chapter 2, the MySQL server mysqld should be run-
ning and should perform without problems for most application situations. If you have particular
wishes, such as changing the logging or optimizing performance, you can specify a number of
options in the MySQL configuration file. Table 14-1 shows where that file is to be found.
Table 14-1. Files for Setting Global and Local Options
Type of Options Windows Unix/Linux
Global options (both for Current MySQL versions: C:\Programs\MySQL\ /etc/my.cnf
mysqld and for some MySQL Server n.n\my.ini
client programs) Older MySQL versions: C:\my.cnf or Windows\
my.ini
User-specific options /.my.cnf
(only for client programs)
The server-specific options in the configuration file begin with the line [mysqld]. The following
option has the effect that new tables are created by default as InnoDB tables (not as MyISAM tables).
# Example of the server-specific part of
# /etc/my.conf (Linux) or my.ini (Windows)
[mysqld]
default-storage-engine=INNODB
Some important options will be introduced in this chapter. A reference on options appears in
Chapter 22.
Restarting the MySQL Server
Changes in the configuration files take effect only after a restart of the affected files. This holds as
well for the MySQL server. If you change any server-specific options, you must then restart the server.
Under Windows, the easiest way to do so is with MYSQL SYSTEM TRAY MONITOR. This is a small
icon at the right or lower border of the toolbar, in which you can execute the commands SHUTDOWN
INSTANCE (shut down the server) or START INSTANCE with the right mouse button. If the SYSTEM TRAY
MONITOR is not running, launch the program in the menu START | PROGRAMS | MYSQL. If the program
is running but is not displayed in the toolbar, the problem is usually the toolbar settings. Click on
the toolbar with the right mouse button, execute the command PROPERTIES, and deactivate the
option HIDE INACTIVE ICONS.
Under Unix/Linux things are much simpler. A brief command accomplishes what in Windows
necessitated a complex search in the user interface. To restart, use the appropriate Init V script,
which you execute first with the parameter stop and then with start.
Red Hat:
root# /etc/init.d/mysqld stop
root# /etc/init.d/mysqld start
CHAPTER 14 ■ADMINISTRATION AND SERVER CONFIGURATION 347
5351c14_final.qxd 8/26/05 6:50 PM Page 347
www.it-ebooks.info
SUSE:
root# /etc/init.d/mysql stop
root# /etc/init.d/mysql start
Basic Configuration of the MySQL Server
This section introduces some elementary options for the MySQL configuration file my.cnf/my.ini.
The settings become effective after the MySQL server is restarted. With these options, the hyphen (-)
and underscore (_) have the same effect. Thus, for example, skip_networking and skip-networking
are equivalent.
Directories
After being started, the MySQL server has to locate the directories in which the MySQL programs
and databases are located. Under Linux it is usual to specify these directories using options in the
Init V file (e.g., /etc/init.d/mysql). Under Windows, the relevant options are set in my.ini; basedir
gives the installation path, while datadir provides the path to the database files.
# in /etc/my.conf (Linux) or my.ini (Windows)
[mysqld]
basedir=C:/Programs/MySQL/MySQL Server 5.0/
datadir=C:/Programs/MySQL/MySQL Server 5.0/Data/
In the course of this chapter you will become acquainted with additional options for setting the
location of logging files, InnoDB masterspace files, etc. If these options are not set explicitly, then
basedir and datadir hold as default settings.
Communication Settings
The MySQL server can communicate in up to four different ways with client programs, depending
on the operating system. Which variants are actually active and which parameters are valid are set
with options.
TCP/IP: Communication over TCP/IP is active by default and uses port 3306. You can set a
different port with the option port.
skip-networking stops all communication over TCP/IP. This option is often used for reasons
of security. Clients can then communicate with the server only from the local computer over
a socket file (Unix/Linux) or named pipes or shared memory (both Windows).
Socket file (Unix/Linux only): The option socket specifies the location of the socket file. The
option should be given in both the section [mysqld] and the section [client], since commu-
nication succeeds only if both client and server are in agreement as to this location.
Named pipes (Windows only): The option enable-named-pipes activates named pipes. With
socket you can specify the name of the named pipe (by default it is MySQL).
Shared memory (Windows only): The option shared-memory activates communication over
a common memory block. The option shared-memory-base-name gives the memory block a
name (by default it is MYSQL).
# in /etc/my.conf (Linux) or my.ini (Windows)
[mysqld]
# TCP/IP
port = 3306
# skip-networking
CHAPTER 14 ■ADMINISTRATION AND SERVER CONFIGURATION348
5351c14_final.qxd 8/26/05 6:50 PM Page 348
www.it-ebooks.info
# Socket File (Unix/Linux)
socket = /var/lib/mysql/mysql.sock
# Named Pipe (Windows)
enable-named-pipes
socket = MySQL
# Shared memory (Windows)
shared_memory
shared_memory_base_name = MYSQL
[client]
socket = /var/lib/mysql/mysql.sock
Default Table Format
As described in Chapter 8, MySQL supports a variety of table types. If you create a new table with
CREATE TABLE, the option ENGINE name determines the table type. If this option is lacking, then
the MySQL server uses the default table type that was set with default-storage-engine.
# in /etc/my.conf (Linux) or my.ini (Windows)
[mysqld]
default-storage-engine=INNODB
Default Character Set and Sort Order for New Tables
As described in Chapter 8, starting with MySQL 4.1, you can specify for each database, each table,
and indeed for each column of a table an arbitrary character set and a corresponding sort order.
The following settings in the MySQL configuration file hold only for the case that no character set
was specified in the CREATE command.
Note that character-set-server replaces the option default-character-set known from ear-
lier versions of MySQL. Although default-character-set is still supported for reasons of
compatibility, it is considered deprecated.
# in /etc/my.cnf (Linux) or my.ini (Windows)
[mysqld]
character-set-server = latin1
collation-server = latin1_german1_ci
Note that the character set for communication between client and server is independent of
character-set-server. In some programming languages and client programs you must set the
desired character set with the option default-character-set=xxx or via SET NAMES ‘xxx’. This
holds, for example, for C, PHP, Perl, and command tools such as mysql and mysqldump.
Time Zones
At launch, the MySQL server takes on the time zone of the computer on which it is running. A dif-
ferent time zone can be set in the configuration file with the option default-time-zone. Under
Windows, the time zone must be specified in terms of the offset from Coordinated Universal Time
(UTC), for example, +1:00 for Berlin and -5:00 for New York. Under Linux you can also use the usual
international denotations for time zones or their abbreviations, provided that the MySQL table
mysql.time_zone has been previously initialized (more on this in the next subsection).
# in /etc/my.cnf (Linux)
[mysqld]
default-time-zone = Europe/London
CHAPTER 14 ■ADMINISTRATION AND SERVER CONFIGURATION 349
5351c14_final.qxd 8/26/05 6:50 PM Page 349
www.it-ebooks.info

Initializing Time Zone Tables
Since MySQL 4.1.3 several time_zone tables are located in the mysql database, which contains
among other things all information on access privileges. By default, these tables are empty. To fill
the tables with data, execute under Unix/Linux the following command, where instead of /usr/
share/zoneinfo, you may have to specify a different directory in which time zone files are located
on your computer. The MySQL server must be running when the command is executed:
root# mysql_tzinfo_to_sql /usr/share/zoneinfo | mysql -u root -p mysql
Password: xxxxxxxx
The table mysql.time_zone_name now contains a long list with all the time zone names. (In my
Linux installation the table has 1600 entries.)
SELECT name FROM mysql.time_zone_name LIMIT 5
name
Africa/Abidjan
Africa/Accra
Africa/Addis_Ababa
Africa/Algiers
Africa/Asmera
Under Windows there is no such possibility to initialize the time zone table. For this reason,
with MySQL servers that are running under Windows, time zones must be specified as offsets from
the UTC, that is, in the form ‘+1:00’.
Background information on time zone management in MySQL, on the possibility of setting the
time zone for a MySQL connection locally, and on SQL functions for calculating with dates and times
is to be found in Chapter 10.
The Language for Error Messages
If you would like MySQL to report errors to you in German, French, or some other language, you
have merely to set the option language in one of the configuration files. The language chosen will
also be used for entries in the error logging file hostname.err.
MySQL currently supports 20 languages. A look at the directory mysql\share\ (Windows) or
/usr/share/mysql (Linux) will let you know which they are. If, for example, you prefer German error
messages, then execute the following change in the MySQL configuration file:
# in /etc/my.cnf or my.ini (Windows)
[mysqld]
language = german
If MySQL cannot find the language file, then provide the complete path, for example language = /usr/
share/mysql/danish.
SQL Mode
Since version 4.1, the MySQL server can be run in several different modes. The desired mode is set
with the option sql-mode, where several modes can be named simultaneously if they are compatible.
The modes must be separated by commas. The mode can be changed while the server is running
with SET [GLOBAL] sql_mode=‘mode1,mode2’.
The following list briefly describes the most important modes. Note that ansi, db2, maxdb,
mssql, mysql323, mysql40, oracle, and postgresql are simply abbreviations for various other options.
For example, ansi corresponds to the modes real_as_float, pipes_as_concat, ansi_quotes,
ignore_space, and only_full_group_by.
CHAPTER 14 ■ADMINISTRATION AND SERVER CONFIGURATION350
5351c14_final.qxd 8/26/05 6:50 PM Page 350
www.it-ebooks.info

ansi:The MySQL server conforms as closely as possible to the ANSI SQL standard.
db2,maxdb,mssql,mysql323,mysql40,oracle,postgresql:The MySQL server conforms as closely
as possible to the given database system.
allow_invalid_dates:The MySQL server accepts obviously incorrect dates, such as 30.2.2005.
This had been the default behavior since MySQL 4.1 and was replaced in MySQL 5.0 with a check
on the validity of dates.
ansi_quotes:Character strings must be enclosed within simple apostrophes (e.g., ‘I am a string’),
object names in double quotes (e.g., “tablename”).
error_for_division_by_zero:This setting triggers an error on division by zero. (The default
behavior of the MySQL server is to return the value NULL and post a warning.)
ignore_space:In a function call, the MySQL server accepts spaces between the function name
and the parentheses (e.g., SQRT (3)). By default, that is an error, since it could lead to ambiguity.
no_zero_date:The MySQL server considers 0000-00-00 an invalid date and triggers an error.
(The default behavior is to store such a date as is, which is often useful as a way of storing the
information date unknown.)
no_zero_in_date:The MySQL server considers 00 for the month or day as an error. (The default
behavior is to accept dates such as 2005-12-00. This allows the recording of a partial date, here
without the day of the month.)
only_full_group_by:The MySQL server considers GROUP BY expressions as invalid if the group-
ing column was not named with a SELECT command.
pipes_as_concat:The MySQL server considers | | as an operator for concatenating character
strings (like the function CONCAT). By default, | | is equivalent to the OR operator.
real_as_float:The MySQL server considers REAL a synonym for FLOAT (8 digits). By default,
REAL is a synonym for DOUBLE (16 digits).
strict_all_tables:The MySQL server triggers an error if you insert data with an INSERT com-
mand and don’t specify the value for a column without a default value. (By default, the MySQL
server provides a possibly suitable value, for example 0 for numeric columns.)
strict_trans_tables:This setting is similar to strict_all_tables. In this setting, however, the
MySQL server distinguishes different table types. With transaction-capable tables (e.g., InnoDB),
an invalid INSERT command is always aborted, while with other tables (MyISAM), the command
is aborted only if the error affects the first record inserted with INSERT. If, on the other hand,
more than one record is entered simultaneously and the error occurs only at the nth record, the
entire command is executed, and suitable default values are inserted.
A detailed description of all these modes can be found at http://dev.mysql.com/doc/mysql/
en/server-sql-mode.html. This book describes the MySQL server in default SQL mode (that is,
without the option sql-mode being set).
■Note In connection with the SQL mode, the MySQL server notes the valid SQL mode at the time of the definition
of a stored procedure. When the stored procedure is later executed, the SQL mode valid at the time of definition is
used. An informative and readable article on the topic of when MySQL behaves other than as a normal database
system can be found at http://sql-info.de/mysql/gotchas.html.
CHAPTER 14 ■ADMINISTRATION AND SERVER CONFIGURATION 351
5351c14_final.qxd 8/26/05 6:50 PM Page 351
www.it-ebooks.info
Backups
Backups are undoubtedly one of the most important tasks of a database administrator. MySQL
offers a variety of methods for executing a backup.
• The classical way, so to speak, uses the command mysqldump. This command returns a file
with SQL commands for generating the tables of the database and filling them anew with
data. Backups using mysqldump are comparatively slow, but they offer maximal portability.
Therefore, mysqldump is used for database migration (for example, to copy a database from
one MySQL installation to another).
The command mysql is used to re-create the database.
• Significantly faster is simply to copy the database directories at the system level. This is effi-
cient and secure if the MySQL server is stopped for this purpose. However, if the server is to
continue running, then it must be ensured that during the copying process no changes are
allowed to be made in the database. This task is taken care of under Unix/Linux by the script
mysqlhotcopy.
To re-create the database it is necessary merely to copy the backed-up directory into the
MySQL database directory. Note that this form of backup is possible only for MyISAM tables,
and not for InnoDB tables.
• One can use logging files in combination with regular backup files for incremental backups.
However, that is practicable only as long as the number of changes in the database is not too
large. Backup strategies based on logging files are not handled in this section, but in the sec-
tion on logging.
• Another variant of securing data is replication. This mechanism allows a database to be
synchronized on two different computers. For databases that are changed frequently this
can result in a high demand on communication between the computers. If you really want
nothing more than to keep two copies of your database on two different hard drives, then
it is more efficient to mirror a hard drive using RAID. Replication is not dealt with in this
section, but in the section of this chapter on replication.
Hot Backups: Both the execution of mysqldump and the copying of database directories can take
place while the database is in operation. However, the integrity of the backup is ensured only if read
lock is executed during the backup for the affected tables.
The result is, on the one hand, that the backup can be executed only when the table is not
blocked by a write lock. On the other hand, no client can access the tables during the execution of
the backup. Since the backup of large databases can take a relatively long time (especially if you use
mysqldump), blocking is quite burdensome.
To circumvent this problem, commercial database systems offer hot backup mechanisms that
permit a backup while the system is running without the complete blocking of entire tables. For
MyISAM tables, MySQL is unfortunately incapable of this (despite the promises of mysqlhotcopy).
If you use InnoDB tables, however, you can execute hot backups with the supplementary program
InnoDB Hot Backup (see http://www.innodb.com/order.php).
Backing Up Databases (mysqldump)
The command mysqldump returns a long list of SQL commands required for the exact recreation of
a database. Normally, the program returns a CREATE TABLE command for each table in order to
generate the table together with indexes, as well as numerous INSERT commands (one for each
record). The following example shows the result of mysqldump for the authors table of the mylibrary
database presented in Chapter 8.
CHAPTER 14 ■ADMINISTRATION AND SERVER CONFIGURATION352
5351c14_final.qxd 8/26/05 6:50 PM Page 352
www.it-ebooks.info
A couple of brief comments are called for: Lines that begin with -- are considered comments
in SQL. In addition, as in C, /* introduces a comment. A MySQL-specific form of comment is intro-
duced by /*!n, where nis the MySQL version number. If the MySQL server version is less than n, then
everything up to the closing */ is considered a comment. However, if the server version number is
greater than or equal to n, then the instructions contained in the comment are in fact executed. This
prevents syntax errors from being triggered in older MySQL versions.
The various SET commands store the current character set settings and reset the character set
to Unicode. (The following commands thus use the UTF8 character set.) Moreover, unique and for-
eign key tests are deactivated so that the commands can be more efficiently executed.
The actual backup begins with the command DROP TABLE, which deletes the table authors if it
exists. Then the table is created anew with CREATE TABLE and filled with data using INSERT. At the
end of the output are some instructions that restore the most recently valid settings (character set,
foreign key tests, etc.).
> mysqldump -u root -p mylibrary authors
Enter password: xxx
-- MySQL dump 10.9
-- Host: localhost Database: mylibrary
-- Server version 5.0.2-alpha-standard-log
/*!40101 SET @OLD_CHARACTER_SET_CLIENT =@@CHARACTER_SET_CLIENT */;
/*!40101 SET @OLD_CHARACTER_SET_RESULTS=@@CHARACTER_SET_RESULTS */;
/*!40101 SET @OLD_COLLATION_CONNECTION =@@COLLATION_CONNECTION */;
/*!40101 SET NAMES utf8 */;
/*!40014 SET @OLD_UNIQUE_CHECKS=@@UNIQUE_CHECKS,
UNIQUE_CHECKS=0 */;
/*!40014 SET @OLD_FOREIGN_KEY_CHECKS=@@FOREIGN_KEY_CHECKS,
FOREIGN_KEY_CHECKS=0 */;
/*!40101 SET @OLD_SQL_MODE=@@SQL_MODE,
SQL_MODE="NO_AUTO_VALUE_ON_ZERO" */;
--
-- Table structure for table `authors`
--
DROP TABLE IF EXISTS `authors`;
CREATE TABLE `authors` (
`authID` int(11) NOT NULL auto_increment,
`authName` varchar(60) collate latin1_german1_ci NOT NULL default '',
`ts` timestamp NOT NULL default CURRENT_TIMESTAMP
on update CURRENT_TIMESTAMP,
PRIMARY KEY (`authID`),
KEY `authName` (`authName`)
) ENGINE=InnoDB DEFAULT CHARSET=latin1 COLLATE=latin1_german1_ci;
--
-- Dumping data for table `authors`
--
/*!40000 ALTER TABLE `authors` DISABLE KEYS */;
LOCK TABLES `authors` WRITE;
INSERT INTO `authors` VALUES
(1,'Kofler Michael','2004-12-02 18:36:51'),
(2,'Kramer David','2004-12-02 18:36:51'),
(3,'Orfali Robert','2004-12-02 18:36:51'),
...
Usually, it makes sense to direct the output of mysqldump not to the screen, but to a backup file
using > filename.
> mysqldump -u root -p mylibrary authors > backup.sql
CHAPTER 14 ■ADMINISTRATION AND SERVER CONFIGURATION 353
5351c14_final.qxd 8/26/05 6:50 PM Page 353
www.it-ebooks.info
Backup of All Databases
The following command creates a backup of all databases managed by MySQL and stores these in a
single file. During the backup, the database is blocked for all write operations:
> mysqldump -u root --all-databases > backup.sql
Syntax of mysqldump
The general syntax of mysqldump is the following:
mysqldump [options] dbname [tables] > backup.sql
If no tables are specified, then mysqldump writes all the tables of the database dbname into the file
backup.sql. Optionally, the backup can be limited to specific tables. If you wish to back up more
than one database or even all of them, then the following syntax variants are what you use:
mysqldump [options] --databases dbname1 dbname2 ...
mysqldump [options] --all-databases
The details of the backup can be controlled by a large number of options. An extensive descrip-
tion and reference to all the options appears in Chapter 22. To execute a simple backup, the default
settings generally suffice. They have the following effect:
• During the backup read lock is executed for each table.
• The resulting backup file is as small as possible (one INSERT command for multiple records
of the table).
• The resulting file contains DROP TABLE commands to delete existing tables when the data-
base is restored.
• All features of the database are retained (including MySQL-specific features that could inter-
fere with migration to a different database system).
• The backup is created in UTF8 format and contains necessary SQL commands for resetting
the character set when the data are read back into the database.
The default settings are not recommended for backing up InnoDB tables if individual tables
could be changed during the backup, thus jeopardizing the integrity of the backup, or when the
resulting files should be backward compatible or as compatible as possible to other database
servers. In such cases, you must set additional options. In many cases it is even necessary to deacti-
vate all settings with skip-opt and then set each option individually. In the following you will find
two suggestions for options in the case of unusual requirements.
Secure backup of a MyISAM database: In the default setting, individual tables are protected
against changes during backup, but it can happen that table B is changed during the backup of
table A. This could have the consequence that backed-up table A refers to a record of table B that
was deleted just before it was backed up. The solution is the option --lock-all-tables:
> mysqldump -u root -p --lock-all-tables databasename > backup.sql
Backup of InnoDB databases: With InnoDB tables, LOCK commands solve nothing. The
option --single-transaction, however, executes the backup within a transaction. Since --single-
transaction is incompatible with the default settings, you must use --skip-opt and set a large
number of other options. The resulting command is divided over three lines here in order to fit it on
the page:
> mysqldump -u root -p --skip-opt --single-transaction --add-drop-table \
--create-options --quick --extended-insert \
—set-charset —disable-keys databasename > backup.sql
CHAPTER 14 ■ADMINISTRATION AND SERVER CONFIGURATION354
5351c14_final.qxd 8/26/05 6:50 PM Page 354
www.it-ebooks.info
Views and Stored Procedures
You can back up the definitions of views with mysqldump, but backing up stored procedures is not
supported. If you wish to execute an ordinary backup with mysqldump, the stored procedures belong-
ing to the database will not be backed up. There is currently no backup tool that can simply back up
the stored procedures of a particular database. You can execute
> mysqldump -u root -p mysql proc > backup.sql
to back up the table mysql.proc, but the backup will contain the SPs of all databases. That makes
reading in the backup at a later time problematic.
You can achieve a usable result if you restrict the backup of the proc table to the records belong-
ing to the database you wish to back up. To do so, supply a condition with the option --where: here
db is the column within the proc table that contains the database names, and --no-create-info
keeps the proc table from being re-created and thereby destroying the existing stored procedures
of other databases.
> mysqldump -u root -p "--where=db='dbname'" --no-create-info \
mysql proc > backup.sql
Before using backup.sql, you must delete any existing SPs of the table dbname. If you forget
to do so, when you attempt to overwrite existing SPs with the backup you will trigger an error.
DELETE FROM mysql.proc WHERE db='dbname'
Until there is an official backup tool for stored procedures, you can execute your backups with the
example program SP Administrator; see Chapter 15.
mybackup
The Perl script mybackup is currently not included with MySQL. However, you can find it on the
Internet: http://www.mswanson.com/mybackup/.
The script mybackup uses mysqldump. The advantage over mysqldump is that the backup files (one
per database) are written into a specified directory and there immediately compressed with gzip
and if required, broken up into pieces of size 2GB.
Restoring a Database (mysql)
There is no direct inverse operator for mysqldump, simply because the old workhorse mysql is com-
pletely satisfactory for this purpose.
The re-creation of a database works even if you use a different (newer) version of MySQL or if
MySQL is running on a different computer (under a different operating system). On the other hand,
the attempt to read in a backup onto an older version of MySQL can be problematic. If the backup
database uses functions or data types that the old MySQL version is unaware of, difficulties are
unavoidable.
Restoring a Single Database
If backup.sql contains only a single database, then the restore command looks like this:
> mysql -u root -p databasename < backup.sql
Enter password: xxx
The database databasename must already exist. If that is not the case, then you can easily
create it with mysqladmin create databasename.
CHAPTER 14 ■ADMINISTRATION AND SERVER CONFIGURATION 355
5351c14_final.qxd 8/26/05 6:50 PM Page 355
www.it-ebooks.info

Restoring Several Databases
If several databases were backed up with mysqldump, then backup.sql contains the requisite CREATE
DATABASE commands for creating the databases anew if they do not yet exist. There is no necessity
to create the databases first. You also do not need to specify a database when mysql is called.
> mysql -u root -p < backup.sql
Enter password: xxx
Reading In Databases and Tables Interactively
You can read in *.sql files interactively in the program mysql, that is, without restarting this pro-
gram each time. For this, you use the command SOURCE or its abbreviated form /. and specify the
file name of the *.sql file. (Under Windows, directories can be separated with either /or \. The file
name does not need to be placed in quotation marks.)
Now mysql executes every SQL command in the file. However, the many outputs to the monitor
(Query OK, 1 row affected) that are normally displayed are burdensome. They can be prevented by
launching mysql with the option --silent:
> mysql -u root -p --silent
Enter password: xxx
mysql> USE dbname
mysql> \. /tmp/backup.sql
Problems with Character Sets
Backups made with a current version of mysqldump use by default the UTF8 character set. However,
since the backup file also contains all necessary commands for using this character set, there is no
problem in restoring a backup.
But when a backup is made with an older version of mysqldump or with some other backup pro-
gram entirely, the situation is different. In restoring the backup with mysql, you absolutely must
specify the required character set with --default-character-set:
> mysql -u root -p --default-character-set=latin1 mylibrary < mylibrary.sql
Fast Backups (mysqlhotcopy)
For a considerable time, the Perl script mysqlhotcopy has been provided with the Unix/Linux version
of MySQL. This script is supposed to help in improving the speed of backups executed with mysqldump.
The basic idea of the program is first to execute a read lock for the specified databases and then with
FLUSH TABLES to ensure that the database files are actually in their current versions. Then the data-
base files are directly copied.
■Caution mysqlhotcopy creates a direct copy of table files. Therefore, the command can be used only with
MyISAM tables, not InnoDB tables. Beware: With InnoDB tables you will receive no error message, but the backup
will be unusable.
The documentation to mysqlhotcopy is obtained with the following command. Instead of /usr/local/bin
you may have to give another path: user$ perldoc /usr/local/bin/mysqlhotcopy.
CHAPTER 14 ■ADMINISTRATION AND SERVER CONFIGURATION356
5351c14_final.qxd 8/26/05 6:50 PM Page 356
www.it-ebooks.info

Making a Backup
In the simplest case, the use of mysqlhotcopy is as follows:
root# mysqlhotcopy dbname1 dbname2 dbname3 backup/
With this the databases dbname1, dbname2, and dbname3 are copied into the specified backup
directory. (This backup directory must already exist.) Each database is copied into a subdirectory
named for the database; mysqlhotcopy must be capable of reading the MySQL database files that
usually are located in /var/lib/mysql/dbname/.
Options
Table 14-2 gives merely the most important options. A full description of all the options can be
found in the documentation.
Table 14-2. mysqlhotcopy Options
Option Meaning
--allowold overwrites existing backup files.
--keepold archives existing backup files into the directory dbname_old. If this directory
already exists, then its contents are overwritten.
--flushlog has the effect that MySQL changes made in the databases after the backup are
written to a new logging file. This option makes sense only if the logging files are
to be used for an incremental backup.
--noindices copies for (My)ISAM tables only the actual data, not the index files. (More
precisely, the first 2KB of the index files are copied. This makes possible an
uncomplicated, though slow, restoration of the index files with myisamchk -r. But
the backup can be executed more quickly, because fewer data must be copied.)
The options -u, -p, -P, and -S, as well as --user=, --password=, --port=, and --socket=, function
as they do with all MySQL tools, but with one exception. In the case of -p, the password must be
given here (while all other tools provide interactive password input, which is more secure).
Restoring a Database
To restore a database you simply copy the relevant database directory into MySQL’s data directory. If
you execute this operation as root, you must then specify the owner of the database files with chown.
(The owner must have the same account under which mysqld is running, usually mysql.)
root# chown -R mysql.mysql /var/lib/mysql/dbname
■Caution If the database to be restored already exists, the files involved in an operational MySQL cannot simply
be overwritten. First execute
DROP DATABASE
.
It is possible to re-create data only if the version of MySQL that is running is compatible with the version under
which the backup was executed. (With each change in the main version number the format of database files can
conceivably change.)
CHAPTER 14 ■ADMINISTRATION AND SERVER CONFIGURATION 357
5351c14_final.qxd 8/26/05 6:50 PM Page 357
www.it-ebooks.info

Database Migration
The term “migration” applied to databases denotes the transport of a database from one system to
another. There are many reasons that can account for the migratory instinct appearing in a database:
• installation of a new database server
• transfer of a development system (for example, on a local computer) to a production system
(on the ISP’s computer)
• a MySQL update (for example, from version 4.1 to 5.0)
• a change in database system (for example, from Microsoft SQL Server to MySQL)
Transfer of Databases Between MySQL Systems
Migration between MySQL systems is generally carried out with the backup tools mysqldump and
mysql, which we have previously described. In other words, with the old MySQL server you make
a complete backup using mysqldump, install the new MySQL server, and read in the saved databases
with mysql.
If the tables are in MyISAM format and compatible versions of MySQL are running on both
computers (say, 5.0.n), then the migration can be effected by simply copying the database files.
This holds even if MySQL is running under different operating systems.
The main advantage of direct copying of MyISAM tables as opposed to the use of mysqldump/
mysql is, of course, the much greater speed.
MySQL guarantees compatibility of database files only within main versions (such as from
5.0.17 to 5.0.18), and not between major updates (such as from 3.23 to 4.0 or 4.0 to 4.1). In such
cases it is safer to use mysqldump and mysql. With InnoDB tables, there is no provision for direct
copying of the so-called masterspace files, and so there is no avoiding mysqldump.
In migrating with mysqldump/mysql, you do not necessarily have to create (possibly enormous)
files. You can pass the output of mysqldump directly to mysql.
The following command demonstrates the usual way of proceeding. It assumes that the com-
mand is executed on the computer with the source database and that the data are transported to
a second computer (host name destinationhost). There the database in question must already exist,
and the access privileges must allow access to the source computer. For space considerations the
command is broken over two lines:
root# mysqldump -u root --password=xxx dbname | \
mysql -u root --password=yyy -h destinationhost dbname
If you wish to change only the format of database files, say from MyISAM to InnoDB, then
you do not need to go through any migration process at all. The command ALTER TABLE
tablename TYPE=newtype will be adequate to meet your needs. If you wish to convert a large
number of tables, then under Unix/Linux the Perl script mysql_convert_table_format will save
you a great deal of effort. (The script assumes that a connection to the MySQL server can be
established.)
■Tip A special case of migration, namely, setting up a database on an ISP, is described toward the end of this
chapter. The usual problem in doing this is the possession of inadequate access privileges to the ISP computer.
If you copy databases from Windows to Unix/Linux, there can arise problems with the case-sensitivity of file
extensions. The Perl script mysql_fix_extensions solves this problem (see Chapter 22).
CHAPTER 14 ■ADMINISTRATION AND SERVER CONFIGURATION358
5351c14_final.qxd 8/26/05 6:50 PM Page 358
www.it-ebooks.info
MySQL Server Update
Usually, an update to the MySQL server (such as from 5.0.7 to 5.0.8) is done in such a way that
the server is stopped, the old version deinstalled, and the new version installed. (Although an
update usually causes no problems, it is recommended before any server update to create a
complete backup with mysqldump of all databases. Better safe than sorry!)
This simple process is possible in updating from 4.nto 5.n. However, there are also some
details to keep track of:
Installation directory: Under Windows, the default location of the MySQL installation has
changed. While the server previously was usually installed in the directory c:\mysql, now by
default the directory C:\Programs\MySQL\MySQL Server n.n is used. All database files must
be copied before server startup into the new directory.
Also, the location of the configuration file has changed. While previously under Windows
the MySQL server evaluated the file Windows\my.ini, now it reads C:\Programs\MySQL\
MySQL Server n.n\my.ini.
mysql database: If you wish to continue to use the mysql database with its information on
access administration, you must back up this database before installation and then read it in
after installation. This can be problematic in that the mysql database was expanded to include
additional tables and columns.
Under Unix/Linux you can simply update the database mysql restored from an earlier version
using the script mysql_fix_privilege_tables. To execute the script, you must give the root
password.
Under Windows, this script is unavailable. Instead, you must execute the file scripts/
mysql fix_privilege_tables.sql with the mysql command interpreter. (The following
command must be given on a single line.)
> mysql -u root -p mysql <
"c:\programs\MySQL\MySQL Server 5.0\scripts\mysql_fix_privilege_tables.sql"
In my experience, many problems and errors have arisen in attempting to adapt old mysql tables
to the new MySQL conventions. Furthermore, all passwords remain in the old format, so that the
security advantage of the new authentication system goes unused (see Chapter 11).
If you must migrate very large MySQL user tables, it is often simpler to migrate the access data
manually from the old mysql tables into the new ones. Here it can be helpful to install, parallel
to the new mysql database, the old version under another name (e.g., oldmysql).
Further information on executing MySQL server updates can be found at http://dev.mysql.com/
doc/mysql/en/upgrade.html.
Changing the Database System
For migrating to MySQL from another database system or vice versa there is no universal solution.
Almost every database system offers a tool, comparable to mysqldump, that represents the contents of
the database as an SQL file. The problem is that the resulting files are seldom precisely compatible (for
example, due to different column types or lack of ANSI SQL/92 conformity). With Find and Replace you
can solve some of these problems. Under Unix/Linux the tools awk and sed can be helpful.
I have developed a small script especially for migration from the Microsoft SQL server to
MySQL that in many cases is helpful (see Chapter 19). For other database systems you will find suit-
able converters at http://solutions.mysql.com/ and http://solutions.mysql.com/software/.
If you are working under Windows, then ODBC is often helpful. For example, you can use Access
to import a database of an ODBC-compatible system and then export it to MySQL. Do not expect,
emain intact.
CHAPTER 14 ■ADMINISTRATION AND SERVER CONFIGURATION 359
5351c14_final.qxd 8/26/05 6:50 PM Page 359
www.it-ebooks.info
Importing and Exporting Text Files
Sometimes, the contents of a table should be written as efficiently as possible into a text file or read
from such a file. MySQL offers several ways of doing this:
• The SQL command LOAD DATA reads in a text file and transfers the contents into a table.
• With mysqlimport there is a command available that is equivalent to LOAD DATA. It is espe-
cially well suited for automating the importation of a script file.
• The SQL command SELECT … INTO OUTFILE writes the result of a query into a text file.
• If you wish to automate exportation with a script, then the command mysqldump is to be rec-
ommended. Its functionality is similar to that of SELECT … INTO OUTFILE.
• In many cases you can use the universal tool mysql for implementing text, HTML, or XML
exportation.
If none of the above commands suits your needs, then you will have to write your own script to
assist you in importing or exporting. The programming language Perl was made for such tasks.
Special Characters in the Imported or Exported File
A common feature of LOAD DATA, SELECT … INTO OUTFILE, mysqlimport, and mysqldump is the set
of options for handling special characters in a text file. There are four options for this purpose, which
as SQL commands look like this:
FIELDS TERMINATED BY 'fieldtermstring'
ENCLOSED BY 'enclosechar'
ESCAPED BY 'escchar'
LINES TERMINATED BY 'linetermstring'
fieldtermstring specifies the character string that separates the columns within the row (for
example, a tab character).
enclosechar specifies a character that is permitted to appear in the text file before and after
individual entries (usually a single or double quote character for character strings). If an entry
begins with this character, then that character is deleted at the beginning and end. (The end
of a column is recognized by fieldtermstring.)
escchar specifies the escape character that is to be used to indicate special characters (the
default is the backslash). This is necessary if special characters appear in character strings of
the text file that are also used for separating rows or columns. Moreover, MySQL expects code
0 in the form \0 (where the backslash is to be replaced by escchar).
linetermstring specifies the character string with which a row is terminated. With DOS/
Windows text files the character string ‘\r\n’ must be used.
Working with Character Strings, Numbers, Dates, and BLOBs
For all the commands introduced in this section there is a data format that must be followed exactly.
In particular, for importation you must hold to the format expected by MySQL. For exportation you
have somewhat more leeway, in that you can use SQL functions for formatting data in the SELECT
command (such as DATE_FORMAT for formatting dates and times).
Moreover, there are four options that you can use to determine how rows and columns should
be separated and how character strings and special characters should be indicated. (Details can be
found in Chapter 21 under LOAD DATA and SELECT … INTO OUTFILE.)
CHAPTER 14 ■ADMINISTRATION AND SERVER CONFIGURATION360
5351c14_final.qxd 8/26/05 6:50 PM Page 360
www.it-ebooks.info

Numbers: For very large and very small numbers in the FLOAT and SINGLE formats one has
the use of scientific notation in the form -2.3e-037.
Character Strings: Strings are not changed in importation and exportation. Special characters
contained in the character string are marked by default with the backslash in order to distin-
guish these from the characters used for separation (e.g., tab, carriage return, linefeed).
BLOBs: Binary objects are treated byte for byte like character strings. Neither in importing nor
exporting is there the possibility of using hexadecimal character strings (0x123412341234 …).
Date and Time: Dates are treated as character strings of the form 2005-12-31, and times as
character strings of the form 23:59:59. Timestamp values are considered integers of the form
20051231235959.
NULL: The treatment of NULL is problematic. The following text assumes that the backslash is
used as the escape character for special characters and the double quote character for indicat-
ing a character string. If you use other characters (options FIELDS ESCAPED BY ‘?’ ENCLOSED
BY ‘?’), then you will have to reconfigure the following paragraphs.
In exporting with escape characters, NULL is represented by \N. In exporting without escape
characters NULL is simply represented by the four characters NULL. However, NULL or \N is
placed between double quote characters (though not if they are in a text or BLOB field) and
can therefore be distinguished from character strings.
In importing with escape characters, MySQL accepts NULL, \N, and “\N” as NULL. However,
“NULL” is interpreted as a character string (consisting of the four characters NULL).
■Caution If you use neither escape characters for special characters nor “enclose” characters for character
strings in importing and exporting, then the condition
NULL
cannot be distinguished from the character string
NULL
.
In the character string \N the
N
must be uppercase. Note that \n is the newline character.
Importing with LOAD DATA INFILE
The syntax of LOAD DATA is as follows:
LOAD DATA [loadoptions] INFILE 'filename.txt' [duplicateoptions]
INTO TABLE tablename [importoptions] [IGNORE ignorenr LINES]
[(columnlist)]
The result is that the file filename.txt is imported into the table tablename. There are various
options (see the SQL reference in Chapter 21) that can be given, as well as the column names for
the table. To execute the command you need the File privilege (so that files can be read).
If the MySQL server and the LOAD DATA command are executed on different computers, LOAD
DATA reads the file from the file system of the MySQL server. This is generally not correct. To read the
file from the local file system, the variant LOCAL INFILE … must be used.
If the text file to be imported contains characters outside the ASCII character set, you must set
the character set of the text with SET NAMES before the command LOAD DATA.
Example 1
The following example assumes that the table importtable1 in the database exceptions already
exists. The table consists of five columns: one AUTO_INCREMENT column (id) and the columns
a_double, a_datetime, a_time, and a_text. The column name refers to its data type.
CHAPTER 14 ■ADMINISTRATION AND SERVER CONFIGURATION 361
5351c14_final.qxd 8/26/05 6:50 PM Page 361
www.it-ebooks.info

The text file import1-latin1.txt is to be imported into this table. In the following expression,
➤represents the tab character. The file uses the character set Latin1, separates the lines in the
Windows-typical way with carriage return and line feed, and furthermore contains some stumbling
blocks, such as decimal numbers and dates in various notations.
12.3 ➤12/31/1999 ➤17:30 ➤text
-0.33e-2 ➤2000/12/31 ➤11:20 ➤"text in quotes"
1,23 ➤31.12.2001 ➤0:13 ➤"german text with äöüß"
Before the importation, any existing records from importtable1 are deleted, and the character
set is set to Latin1.
USE exceptions
DELETE FROM importtable1
SET NAMES 'latin1'
The import command looks like this:
LOAD DATA INFILE 'c:/import1-latin1.txt'
INTO TABLE importtable1
FIELDS TERMINATED BY '\t'
ENCLOSED BY '\"'
LINES TERMINATED BY '\r\n'
(a_number, a_date, a_time, a_string)
Query OK, 3 rows affected (0.00 sec)
Records: 3 Deleted: 0 Skipped: 0 Warnings: 3
SHOW WARNINGS returns a list of warnings that report on various importation problems:
SHOW WARNINGS
Level Code Message
Warning 1264 Out of range value adjusted for column 'a_date' at row 1
Warning 1265 Data truncated for column 'a_number' at row 3
Warning 1264 Out of range value adjusted for column 'a_date' at row 3
The following SELECT command shows that the importation was only partially successful. In
both the first and third lines, the date has been incorrectly interpreted. Moreover, in the third line
the decimal number with the German comma for a decimal point has caused problems; namely,
the part to the right of the decimal point has gone missing. In sum, take care to obey the MySQL
formatting rules to the letter when preparing a file for importation.
If you execute the SELECT command with mysql in an input or console window, you must,
before execution of the SELECT command, set the character set valid in the window (e.g., cp850
under Windows, utf8 in most current Linux distributions).
SET NAMES utf8
SELECT * FROM importtable1
id a_number a_datetime a_time a_string
1 12.3 0000-00-00 00:00:00 17:30:00 text
2 -0.0033 2000-12-31 00:00:00 11:20:00 text in quotes
3 1 0000-0000 00:00:00 00:13:00 german text with äöüß
Example 2 (BLOB, NULL)
The starting point for our second example is the table importtable2 with columns id and a_blob.
The second column is allowed to contain NULL.
The following Unix text file is to be imported into this table (again, ➤represents a tab character):
CHAPTER 14 ■ADMINISTRATION AND SERVER CONFIGURATION362
5351c14_final.qxd 8/26/05 6:50 PM Page 362
www.it-ebooks.info

1 ➤NULL
2 ➤"NULL"
3 ➤\N
4 ➤"\N"
5 ➤\n
6 ➤"\n"
7 ➤0x414243
8 ➤"0x414243"
9 ➤blob blob
10 ➤"blob blob"
The text file is imported with the following command. (By default, the backslash serves as
escape character, and the tab sign as column separator.) REPLACE means that existing data records
are to be replaced.
USE exceptions
LOAD DATA INFILE '/tmp/import2.txt' REPLACE
INTO TABLE importtable2
FIELDS ENCLOSED BY '\"'
Query OK, 20 rows affected (0.01 sec)
Records: 10 Deleted: 10 Skipped: 0 Warnings: 0
In order to analyze the result of the importation in more detail, we shall use SELECT * and add the
additional columns LENGTH(a_blob) and ISNULL. This enables us to distinguish the state NULL
(length NULL) from the character string NULL (length 4):
SELECT *, LENGTH(a_blob), ISNULL(a_blob) FROM importtable2
id a_blob LENGTH(a_blob) ISNULL(a_blob)
1 NULL NULL 1
2 NULL 4 0
3 NULL NULL 1
4 NULL NULL 1
5 1 0
6 1 0
7 0x414243 8 0
8 0x414243 8 0
9 blob blob 9 0
10 blob blob 9 0
We see that in the first six records, NULL was treated correctly in only the first, third, and fourth
records. In the second record, the character string “NULL” was stored, while in the fifth and sixth
records a newline character was stored.
The attempt to read in a hexadecimal number as a binary object fails. Both times, 0x414243 is
interpreted as the character string "0x414243" (and not, as intended in record 7, as hex code for the
character string "ABC").
CSV Import
Sometimes, one wishes to import data into MySQL from a spreadsheet program like Excel. Such
programs generally offer the possibility to store tables in CSV (comma-separated values) format. In
principle, the importation of such files proceeds effortlessly. For files that were created with Excel
under Windows, suitable import options look like this:
FIELDS TERMINATED BY ',' ENCLOSED BY '\"'
LINES TERMINATED BY '\r\n'
CHAPTER 14 ■ADMINISTRATION AND SERVER CONFIGURATION 363
5351c14_final.qxd 8/26/05 6:50 PM Page 363
www.it-ebooks.info
In practice, importation usually runs into trouble with the formatting of dates (usually in the
form 12/31/2003, about which MySQL is clueless). In particular, with Microsoft software, the auto-
matic country-specific formatting of numbers can cause problems when, for example, Excel suddenly
represents a decimal number with a comma instead of a period for the decimal point. In such cases
one can get help from a special import script for MySQL (or else you can program your own export fil-
ters for Excel).
Importing with mysqlimport
If you wish to execute LOAD DATA not as an SQL command but through an external program, then
MySQL offers the tool mysqlimport. (It relies on LOAD DATA.)
mysqlimport databasename tablename.txt
The command reads the specified file into a like-named table of the database databasename.
(The table name is thus taken from the file name, with the file identifier being eliminated. Thus
mysqlimport db1 authors.txt imports the data into the table authors of the database db1.)
Please note that the file normally is read from the file system of the MySQL server. If you are
working at another computer and wish to read a file that is located there, you must use the option
--local. The character set of the text file is set as usual with --default-character-set=.
The options --fields-terminated-by, --fields-enclosed-by, --fields-escaped-by, and
--lines-terminated-by correspond to the SQL options described at the beginning of this section.
These options should be placed in quotation marks, for example, "--fields-enclosed-by=+".
To carry out the importation demonstrated in the previous section (example 2) with
mysqlimport, the file to be imported must first be renamed to correspond with the table name in
importtable2.txt. Then the following command is necessary, here separated onto two lines with
\ for space reasons:
root# mysqlimport --local "--fields-enclosed-by=\"" \
exceptions /tmp/importtable2.txt
Under Windows (that is, for importing a Windows text file), the command would look like this
(broken into two lines here for reasons of space):
> mysqlimport --local "--fields-enclosed-by=\"" \
"—lines-terminated-by=\r\n" exceptions C:\importtable2.txt
Exporting with SELECT … INTO OUTFILE
With the command SELECT … INTO OUTFILE we are dealing with a garden-variety SELECT, where
before the FROM part, INTO OUTFILE is used to specify a file name and several possible options:
SELECT [selectoptions] columnlist
INTO OUTFILE 'filename.txt' exportoptions
FROM ... WHERE ... GROUP BY ... HAVING ... ORDER BY ... LIMIT ...
The result of the query is thus stored in the file filename.txt. With exportoptions various options
can be specified for dealing with special characters (see the SQL reference in Chapter 21).
Example
The following example assumes that there exists a table exporttable in the current database that has
the following contents (note in particular the field a_char in the second data record):
CHAPTER 14 ■ADMINISTRATION AND SERVER CONFIGURATION364
5351c14_final.qxd 8/26/05 6:50 PM Page 364
www.it-ebooks.info

SELECT * FROM exporttable
id a_char a_text a_blob a_date a_time ...
1 char char text text blob blob 2001-12-31 12:30:00
2 ' " \ ; + adsf NULL 2000-11-17 16:54:54
... a_timestamp a_float a_decimal a_enum a_set
20001117164643 3.14159 0.012 b e,g
20001117165454 -2.3e-037 12.345 b f,g
The data types of the columns are taken from the column names. The following lines show the
result of an OUTFILE exportation without special options. The tab character is again indicated by
a hooked arrow. The resulting file has two lines, which for reasons of space are here distributed over
five lines:
SELECT * INTO OUTFILE '/tmp/testfile.txt'
FROM exporttable
1 ➤char char ➤text text ➤blob blob ➤2001-12-31 ➤12:30:00 ➤20001117164643 ➤➥
3.14159 ➤0.012 ➤b ➤e,g
2 ➤' " \\ ; + ➤adsf ➤\N ➤2000-11-17 ➤16:54:54 ➤
20001117165454 ➤-2.3e-037 ➤12.345 ➤b ➤f,g
In the second attempt a semicolon is used as column separator. All fields are enclosed at begin-
ning and end with a double quote character. As escape character, the backslash, is used (the default
setting). Of particular interest is the behavior in the field a_char:
' " \ ; + becomes "' \" \\ ; +"
The semicolon within the character string remains untouched, since it is clear on account of
the double quote character where a_char ends. However, the double quote becomes a backslash
to ensure that the character is not misinterpreted at the end of the character string.
Please note also that NULL is represented as \N, and in fact, without being enclosed in double
quotes.
SELECT * INTO OUTFILE '/tmp/testfile.txt'
FIELDS TERMINATED BY ';' ENCLOSED BY '\"'
FROM exporttable
1;"char char";"text text";"blob blob";"2001-12-31";"12:30:00";
20001117164643;3.14159;0.012;"b";"e,g"
2;"' \" \\ ; +";"adsf";\N;"2000-11-17";"16:54:54";
20001117165454;-2.3e-037;12.345;"b";"f,g"
In our third attempt, a semicolon is again used as a column separator. The plus sign (+) is used
as optional field identifier (that is, only with character strings, dates, times, and BLOBs, and not
with numbers). Finally, the exclamation mark (!) is used as escape character. Again the most inter-
esting feature is the transformation of a_char:
' " \ ; + becomes +' " \ ; !++
SELECT * INTO OUTFILE '/tmp/testfile.txt'
FIELDS TERMINATED BY ':' OPTIONALLY ENCLOSED BY '+' ESCAPED BY '!'
FROM exporttable
Now NULL becomes !N (that is, for NULL, too, the changed escape character is used).
1;+char char+;+text text+;+blob blob+;+2001-12-31+;+12:30:00+;
20001117164643;3.14159;0.012;+b+;+e,g+
2;+' " \ ; !++;+adsf+;!N;+2000-11-17+;+16:54:54+;
20001117165454;-2.3e-037;12.345;+b+;+f,g+
CHAPTER 14 ■ADMINISTRATION AND SERVER CONFIGURATION 365
5351c14_final.qxd 8/26/05 6:50 PM Page 365
www.it-ebooks.info
Basically, the data stored in a text file with LOAD DATA can be read again into a table
unchanged if the same options are used as with SELECT … INTO OUTFILE.
Exporting with mysqldump
As an alternative to SELECT … INTO OUTFILE there is the auxiliary program mysqldump. This pro-
gram is actually primarily a backup program (see also earlier in this chapter and Chapter 22).
The program mysqldump always stores entire tables (and not the result of a particular SELECT
query). A further difference is that mysqldump normally does not return a text file with the raw data, but
entire INSERT commands. The resulting file can then later be read in with mysql. To use mysqldump for
text exportation you must specify the option --tab:
mysqldump --tab=verz [options] databasename tablename
With --tab a directory is specified. In this directory mysqldump stores two files for each table:
tablename.txt and tablename.sql. The *.txt file contains the same data as after SELECT … INTO
OUTFILE. The *.sql file contains a CREATE TABLE command, which allows the table to be re-created.
As with mysqlimport, the representation of special characters can be controlled with four options:
--fields-terminated-by, --fields-enclosed-by, --fields-escaped-by, and --lines-terminated-by.
These options are analogous to the SQL options described at the beginning of this section. They
should be set in quotation marks (for example, "--fields-enclosed-by=+"). In the following exam-
ple, the command is divided over two lines:
C:\> mysqldump -u root -p --tab=C:\tmp "--fields-enclosed-by=\""
exceptions exporttable
Enter password: ******
XML Exporting with mysqldump
If you execute mysqldump with the option --xml, you obtain as result an XML file. By default, the
Unicode character set (UTF8) is used. With --default-character-set you can switch to another
character set.
root# mysqldump -u root -p --xml mylibrary > /tmp/mylibrary.xml
Enter password: ******
Exporting with mysql in Batch Mode
The universal tool mysql can be used to execute SQL commands in batch mode and store the results
in a text file. In contrast to mysqldump, mysql is distinguished in that the resulting file is actually more
or less readable—for human beings, that is. (However, there is no attempt to make the file suitable
for a later reexportation.)
In the simplest case, execute mysql in the following form (here once again divided over two
lines with \):
> mysql -u root --password=xxx --batch --default-character-set=latin1 \
"--execute=SELECT * FROM authors;" mylibrary > output.txt
The SQL command is passed with the option --execute, where the entire option must be
placed in quotation marks. In the resulting text file output.txt the columns are separated by tab
characters. The first line contains the column headings.
CHAPTER 14 ■ADMINISTRATION AND SERVER CONFIGURATION366
5351c14_final.qxd 8/26/05 6:50 PM Page 366
www.it-ebooks.info
Exchanging Rows and Columns
If a table has many columns, then mysql returns very long rows, which can be difficult to interpret. In
this case, instead of --batch you can use the option --vertical. Then each record is divided over sev-
eral lines, where in each row only one data item is given (this command must be typed on one line).
> mysql -u root -p =xxx --vertical
"--execute=SELECT * FROM titles;" \
mylibrary > test.txt
The resulting file looks like this:
*************************** 1. row ***************************
titleID: 1
title: Linux, 5th ed.
subtitle: NULL
edition: NULL
publID: 1
catID: 1
langID: NULL
year: 2000
isbn: NULL
comment: NULL
*************************** 2. row ***************************
titleID: 2
title: Definitive Guide to Excel VBA
...
Generating HTML Tables
If instead of --batch the option --html is used, then mysql generates an HTML table with column
headers (see Figure 14-1). However, the resulting file does not contain any HTML headers. The text
uses the character set specified by --default-character-set. The following command must be
given on a single line.
> mysql -u root -p=xxx --html
"--execute=SELECT * FROM titles;" \
--default-character-set=latin1 mylibrary > test.html
CHAPTER 14 ■ADMINISTRATION AND SERVER CONFIGURATION 367
5351c14_final.qxd 8/26/05 6:50 PM Page 367
www.it-ebooks.info
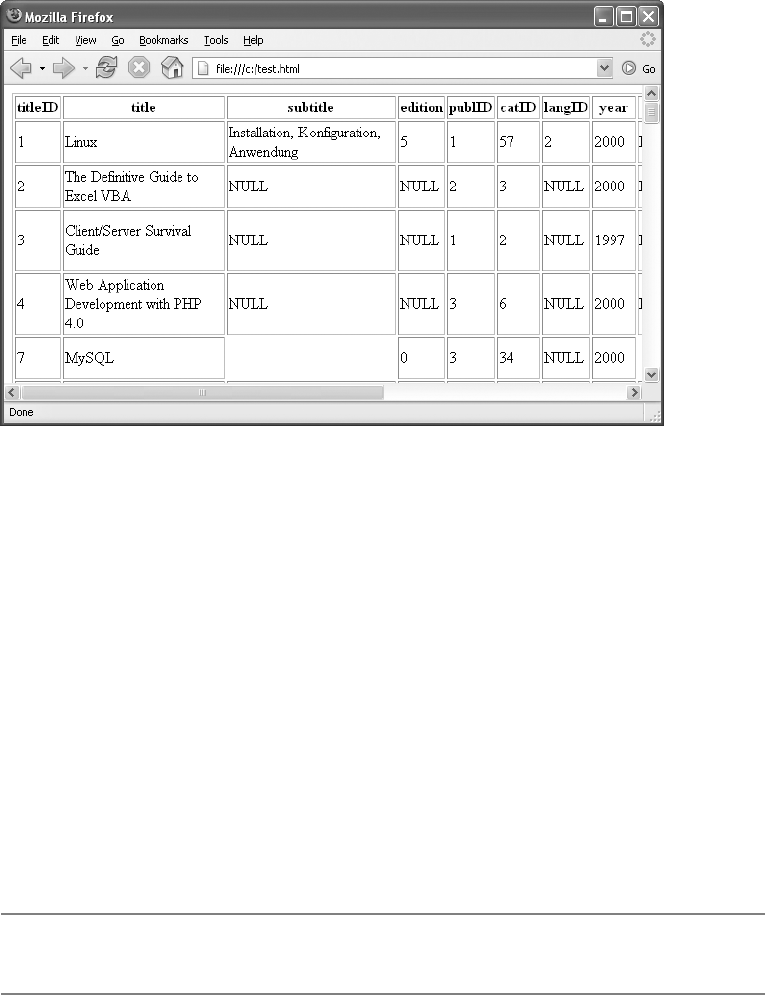
XML Exporting with mysql
Like mysqldump, mysql is also capable of creating XML files. The following command must be input
in a single line:
> mysql -u root -p --xml --default-character-set=utf8
"--execute=SELECT * FROM titles;" mylibrary > C:\test.xml
Logging
The term logging generally denotes the recording of each change in a database. (As you will see in
the course of this section, there are other items that can be recorded as well.) Thus, if a MySQL
client program executes the command
INSERT INTO mydatabase.mytable (col1, col2) VALUES (1, 'xy')
then MySQL changes the table mydatabase.mytable accordingly. If logging is activated, then the
command itself is also saved in the logging file.
■Tip In the MySQL documentation you will find a great deal of information on the subject of logging:
http://dev.mysql.com/doc/mysql/en/log-files.html.
CHAPTER 14 ■ADMINISTRATION AND SERVER CONFIGURATION368
Figure 14-1. A table created with mysql
5351c14_final.qxd 8/26/05 6:50 PM Page 368
www.it-ebooks.info
Why Logging?
There are various goals that can be achieved through logging:
Security: It is not possible to execute backups uninterruptedly. Thus, for example, if you make a
backup every night, and then the next day your hard drive crashes, all that day’s changes would
be lost. If you have a logging file (naturally, on a different hard drive), then you can re-create the
lost data.
Logging files also help in determining who has used the database when, at what times an
unusually large number of failed attempts to access MySQL were made, etc.
Monitoring: Normally, you know only the current state of the data. If your tables contain
TIMESTAMP columns, then the time of the last change can easily be determined. But it is impos-
sible to determine who made this change. If such information is important for your system, if it
should be possible to find out who changed what data when, then you can activate an expanded
logging protocol that will capture this additional information.
Optimization: Often, it is difficult to determine which queries are most burdensome to a data-
base system. Therefore, MySQL offers the possibility to log all queries whose execution takes
a particularly long time.
Replication: Replication denotes the process of synchronizing databases on several comput-
ers. For replication it is required that logging be carried out on the master computer. (Details
on replication follow in the next section of this chapter.)
Transactions: Logging is also carried out with transaction-capable tables (such as InnoDB). In
this case, logging files ensure that completed transactions can be executed even after a crash of
the database. (Details on transaction logging for InnoDB tables appear later in this chapter.)
Based on the various purposes that it fulfills, MySQL supports various types of logging, which
are presented in this section. As long as logging is activated, the logging files are stored in the same
directory in which the directories of the various MySQL databases are located. There is, however,
the possibility of using various options to change the location. If you value maximum speed and
security, the logging files should reside on a different hard drive from that on which the database
files are located.
Drawbacks
In the default setting almost all logging variants are deactivated. (The only exception is the logging of
errors.) The main reason for this deactivation is speed: Logging slows down the operation of MySQL
considerably. How great the losses in speed are depends on which logging variants are activated and
which SQL commands are typically executed. For example, in update log, only those commands that
change a database are logged (but no SELECT commands).
The second drawback is the tendency of logging files rapidly to consume more and more space
on your hard drive. In particular, with database systems in which data are frequently altered, logging
files often require significantly more space than the actual database.
Logging Changes (update log)
The update log is responsible for the logging of changes to a database. In the past, MySQL could
carry out this logging in two ways: in text form (log-update) and in binary format (log-bin). Since
version 5.0, this form of logging can be done only in binary form; that is, the option log-update is
no longer available. The reason for this change is the numerous advantages of the binary format:
CHAPTER 14 ■ADMINISTRATION AND SERVER CONFIGURATION 369
5351c14_final.qxd 8/26/05 6:50 PM Page 369
www.it-ebooks.info
• The logging file contains more information, such as the time of each change and the client
thread ID number. (If you wish to know the users behind the ID numbers, you must activate
an additional logging file with the option log, in which each login to the MySQL server is
recorded.)
• Transactions are handled correctly. (The commands of a transaction are recorded only after
a COMMIT.)
• The logging files are significantly smaller.
• Writing the logging files is more efficient.
• The logging files can be used as the basis for replication.
• According to the MySQL documentation, binary logging slows operation of the MySQL server
by only one percent. (To be sure, it is not indicated under what circumstances this value holds.
If the database operation consists overwhelmingly of changes, the speed advantage could
diminish sharply.)
The only drawback to binary logging is that the logging files cannot be viewed with an ordinary
text editor; however, they can be viewed with the auxiliary program mysqlbinlog.
The internal format of the binary logging files has changed with every principal version num-
ber of MySQL (3.n, 4.n, 5.n). New MySQL server versions and new versions of mysqlbinlog cannot
cope with the old formats, but that is not true in the opposite direction.
Activating Binary Update Logging
Binary logging is activated by the line log-bin in the configuration file. MySQL must then be
restarted so that the change can become effective.
# in /etc/my.cnf (Unix/Linux) or \my.ini (Windows)
[mysqld]
log-bin [=name]
MySQL now creates two new files, name-bin.001 and name-bin.index, in the directory in which
the database directories are located. If no name is given in the log-bin option, MySQL uses the com-
puter name. The file name-bin.index contains a directory of all logging files. (At each server start a
new logging file is begun.)
If you are using replication (see the next section), you should by all means specify a name with
log-bin. If you do not do so and the network name of the computer on which the MySQL server is
running changes at a later date, the names of the logging files will change, which could cause prob-
lems with replication.
MySQL also logs in name-bin.n all changes to the contents and structure of all databases (thus,
for example, the generation of a new table, adding a new column). MySQL logs only actual changes.
SELECT and UPDATE commands that leave the data unchanged will not be logged.
The logging files can be viewed with mysqlbinlog; they look somewhat like the following exam-
ple (where we have broken long lines and provided some comments):
> mysqlbinlog saturn-bin.002 | less
#050222 16:52:19 server id 1 end_log_pos 53492
# Query thread_id=20 exec_time=0 error_code=0
SET TIMESTAMP=1109087539;
SET ONE_SHOT CHARACTER_SET_CLIENT=33,COLLATION_CONNECTION=33,
COLLATION_DATABASE=8,COLLATION_SERVER=8;
# at 53492
#050222 16:52:19 server id 1 end_log_pos 53601
# Query thread_id=20 exec_time=0 error_code=0
CHAPTER 14 ■ADMINISTRATION AND SERVER CONFIGURATION370
5351c14_final.qxd 8/26/05 6:50 PM Page 370
www.it-ebooks.info
SET TIMESTAMP=1109087539;
/*!40000 ALTER TABLE "languages" ENABLE KEYS */;
# at 53601
#050222 16:52:19 server id 1 end_log_pos 53763
# Query thread_id=20 exec_time=0 error_code=0
SET TIMESTAMP=1109087539;
SET ONE_SHOT CHARACTER_SET_CLIENT=33,COLLATION_CONNECTION=33,
COLLATION_DATABASE=8,COLLATION_SERVER=8;
# at 53763
#050222 16:52:19 server id 1 end_log_pos 54171
# Query thread_id=20 exec_time=0 error_code=0
SET TIMESTAMP=1109087539;
CREATE TABLE "publishers" (
"publID" int(11) NOT NULL auto_increment,
"publName" varchar(60) collate latin1_german1_ci NOT NULL default '',
"ts" timestamp NOT NULL default CURRENT_TIMESTAMP
on update CURRENT_TIMESTAMP,
PRIMARY KEY ("publID"),
KEY "publName" ("publName")
) ENGINE=InnoDB DEFAULT CHARSET=latin1 COLLATE=latin1_german1_ci;
Starting New Logging Files
When you stop and restart the MySQL server, the server automatically begins to fill the next logging file
with data (name-bin.000002, .000003, etc.). A change in the logging file can, of course, be effected with-
out a server restart, and in fact, with the SQL command FLUSH LOGS or with mysqladmin flush-logs.
Furthermore, MySQL automatically begins a new logging file when the current file exceeds size
max_binlog_size (1GB by default).
A suitable time to begin filling new logging files is after the execution of a complete backup.
(The new logging file can help later to reconstruct all changes that occurred after the backup.)
Deleting Logging Files
Logging files that are no longer needed should be deleted with PURGE MASTER LOGS TO. This
command is described later in this chapter when we discuss replication. If you would like to delete
all update logging files, execute RESET MASTER.
Restoring a Database on the Basis of a Logging File
If, perish the thought, misfortune should visit you, then the reconstruction of your database begins
with the last full backup to restore the database. Then you employ all your logging files made since
the last backup. The SQL commands contained therein are simply executed with mysql. (Be careful
to follow the correct order. The oldest logging file must be executed first.)
root# mysqlbinlog name-bin.000031 | mysql -u root -p
root# mysqlbinlog name-bin.000032 | mysql -u root -p
root# mysqlbinlog name-bin.000033 | mysql -u root -p
Determining the Location of the Logging File
You can determine the location of the logging file yourself. (For reasons of security and speed the
logging files should be located on a different hard drive from that on which the database resides.)
For this you specify the file name with the option log-bin. MySQL extends the file name with .nnn
(that is, with a three-digit running integer).
CHAPTER 14 ■ADMINISTRATION AND SERVER CONFIGURATION 371
5351c14_final.qxd 8/26/05 6:50 PM Page 371
www.it-ebooks.info
Please make sure that the MySQL server, which under Unix/Linux is usually executed as
user mysql, has writing privileges in the specified directory (here /var/log/mysql):
# in /etc/my.cnf or \my.ini (Windows)
[mysqld]
log-bin = /var/log/mysql/myupdatelog-bin
Logging Files for Various Table Types
The logging procedure described in this section works for all table types (it is independent of type).
However, some table types require their own logging files. Information on logging files for InnoDB
appears later in this chapter.
Halting Logging Temporarily
If you wish to execute SQL commands that are not to be logged, execute SET SQL_LOG_BIN=0.
(To do so, you need to have the Super privilege.) Logging is reactivated with SQL_LOG_BIN=1.
Further Logging Options
There are numerous additional logging options for restricting logging to individual databases,
excepting certain databases from logging, limiting the maximal size of files, and improving the syn-
chronization of files (less speed, greater security). A reference to these options appears in Chapter 22,
and there is much more information at http://dev.mysql.com/doc/mysql/en/binary-log.html.
Errors, Logins, and Slow Queries
Logging Errors (error log)
MySQL automatically logs each launch and shutdown of the MySQL server as well as all server error
messages in the file hostname.err in the database directory. (Instead of hostname, the actual computer
name is used.) FLUSH LOGS renames the file name.old and begins a new error logging file.
There is no option whereby this error logging can be prevented. With the option log-error,
however, you can set the name and location of the file:
# in /etc/my.cnf or my.ini (Windows)
[mysqld]
log-error=/var/log/mysql/mysqlerrorlog
Logging Logins and Operations (general query log)
With the option log you can enable the logging of each connection to MySQL as well as every com-
mand. If you do not specify a file name, then MySQL creates the file hostname.log in the database
directory, where instead of hostname, the actual computer name is used. The resulting file is not for
the purpose of restoring data but for keeping track of which users are looking at and changing what
data, etc.
# in /etc/my.cnf or my.ini (Windows)
[mysqld]
log
CHAPTER 14 ■ADMINISTRATION AND SERVER CONFIGURATION372
5351c14_final.qxd 8/26/05 6:50 PM Page 372
www.it-ebooks.info
The following lines show a small section of such a log:
/usr/sbin/mysqld, Version: 5.0.2-alpha-standard-log. started with:
Tcp port: 3306 Unix socket: /var/lib/mysql/mysql.sock
Time Id Command Argument
050222 11:18:58 1 Connect root@localhost on
1 Query SET SESSION interactive_timeout=1000000
1 Query SET SESSION sql_mode=''
1 Query SET NAMES utf8
1 Query SHOW VARIABLES LIKE 'datadir'
1 Query SHOW VARIABLES LIKE 'log_error'
050222 11:19:09 1 Query show databases
050222 11:22:45 1 Query /*!40101 SET @OLD_SQL_MODE=@@SQL_MODE,
sql_mode='' */
1 Query SELECT count(*) FROM `mylibrary`.`authors`
1 Query SHOW CREATE DATABASE
WITH IF NOT EXISTS `mylibrary`
1 Query SET SQL_QUOTE_SHOW_CREATE=1
1 Query SHOW CREATE TABLE `mylibrary`.`authors`
1 Query SELECT /*!40001 SQL_NO_CACHE */ *
FROM `mylibrary`.`authors`
1 Query SELECT count(*)
FROM `mylibrary`.`categories`
In comparison to update logging, here all commands are logged immediately, as soon as they
are passed to the server. This holds as well for transactions, independent of whether they are later
completed with a COMMIT. In contrast to update logging, all commands are actually logged, even
those that do not alter any data.
Logging Slow Queries
If MySQL is becoming painfully slow due to the burden of complex queries, it is often useful to
undertake an analysis to find out which SELECT queries are actually causing the greatest delays.
To do this, use the option log-slow-queries. Then MySQL will create a logging file with the name
hostname-slow.log.
All queries whose execution takes longer than ten seconds will be logged. You can change this
default time limit by setting the variable long_query_time. By setting the option log-long-format
you can have all queries logged, even those that must be carried out without the use of an index
(e.g., SELECT * … WHERE txtcolumn LIKE ‘%abc%’):
# in /etc/my.cnf or my.ini (Windows)
[mysqld]
log-slow-queries
long_query_time=5
log-queries-not-using-indexes
Administration of Logging Files
Logging files are like children: It is easier to create them than to take care of them, and furthermore,
they grow on you. And just as children will take over your life if you aren’t careful, your logging files
will very quickly fill even the largest hard drive if you don’t take prophylactic measures. Therefore,
do not log more than is absolutely necessary.
CHAPTER 14 ■ADMINISTRATION AND SERVER CONFIGURATION 373
5351c14_final.qxd 8/26/05 6:50 PM Page 373
www.it-ebooks.info
Update Logs and Error Logging
With mysqladmin flush-logs or the SQL command FLUSH LOGS, MySQL closes the currently active
logging file and begins a new update logging file (with a new running number). At the same time,
the error logging file name.err will be renamed name.old and a new error logging file will be started.
You have unrestricted access to all update logging files with the exception of the currently
active file. You can thus move these files to another directory, compress them, and even delete them
(for example, if they exceed a certain age or if they are older than the last complete backup). Under
Unix/Linux you can develop a cron job to automate this task.
Logins and Slow Queries
With logging files for logins and operations (option log) and for slow queries (option log-slow-queries)
there is a problem in that there is only one file, which gradually grows larger and larger. The MySQL
documentation recommends that you simply rename these files while MySQL is running and then
execute mysqladmin flush-logs or FLUSH LOGS:
root# cd logpath
root# mv hostname.log hostname.log.old
root# mv hostname-slow.log hostname-slow.old
root# mysqladmin flush-logs
The *.old files can now be compressed and eventually deleted.
Error Logging
Alas, neither mysqladmin flush-logs nor FLUSH LOGS has any effect on the logging file for error
messages (hostname.err). Therefore, it is impossible to manipulate this file while MySQL is running.
If this file becomes too large (which is seldom the case), you must stop MySQL, rename the file, and
then restart MySQL.
Replication
Introduction
Replication makes it possible to synchronize two or more MySQL servers running on different
computers.
Different database systems employ differing methods of establishing replication. If you are
familiar with replication from another database system, you should not expect MySQL to exhibit
the exact same properties.
MySQL currently supports master/slave replication exclusively. There is one master system
(read/write). This system is responsible for all changes to data. Additionally, there are one or more
slave systems (read-only) on which, perhaps after a brief delay, exactly the same data are available
as on the master system.
The exchange of data between the master and slaves is accomplished via binary logging files
belonging to the master. The slaves remain in contact with the master and synchronize their data-
bases by taking the requisite SQL commands from the logging files.
Replication functions even when the computers are running under different operating sys-
tems. (For example, the master can be running under Linux and a slave under Windows.)
CHAPTER 14 ■ADMINISTRATION AND SERVER CONFIGURATION374
5351c14_final.qxd 8/26/05 6:50 PM Page 374
www.it-ebooks.info

■Tip In addition to the information of this section, in Chapter 21 you will find a reference to all SQL commands
for running replication, and in Chapter 22 there is a reference to all mysqld options related to replication.
Further information can be found in the MySQL documentation, the section “Replication in MySQL”: http://
dev.mysql.com/doc/mysql/en/replication.html.
Why Replication?
There are two reasons that argue in favor of setting up a replication system: security and speed.
Security: Thanks to replication, your database is available on several computers. If a slave
computer goes off-line, the entire system can continue to run without interruption. (A new slave
system can later synchronize itself.)
If the master computer goes off-line, then the preservation of the data can be taken over by a
slave computer. Alternatively, the entire system can be reconfigured so that a slave computer takes
over the role of the master. In either case, though, the entire system is available as read-only.
If you are considering replication for reasons of security only, you should also consider a RAID
system, whereby the contents of two (or more) hard drives are synchronized. A RAID system, how-
ever, protects only against a hard-drive crash, and not against an operating system crash, power
outage, or the like.
Note that replication can also be used as a substitute for conventional backups. (Thanks to
replication, the backup is always current. If you also require a conventional backup, you can exe-
cute it on the slave computer without involving the master computer.)
Speed: If the speed of a database system is limited primarily by many read-only queries (and not
by a large number of alterations to the data), then a replication system can gain you great savings in
time: The expensive queries are divided among several slave systems, while the master system is used
exclusively or primarily for updates. (Of course, part of the theoretical increase in speed is lost due to
the increased communication overhead.)
Please note that you can gain speed only if the programming of the client is compatible with
your system. The client programs must divide your queries according to a load-balancing procedure
(or simply at random) among all available slave systems. MySQL itself provides no mechanism for
this purpose.
If your interest in replication is motivated by performance problems, you should consider alter-
native performance-enhancing measures, in particular, better hardware (in the following order: more
RAM, a faster hard drive, a RAID system, a multiprocessor system).
Limitations
• MySQL currently supports replication only in the form of a master/slave system (one-way
replication). All changes in data must be carried out on a single master system. The slave
systems can be used only for database queries (read-only).
It is not currently possible for a slave system to take over the role of the master automatically
if it should go out of service (fail-safe replication). Thus replication can produce a system that
is secure against breakdowns for database queries, but not for alterations to the data. Fail-safe
replication is planned for MySQL 5.1.
It is also impossible to synchronize changes to several systems (multiple-master replication).
That would lead to problems, for example, with AUTO_INCREMENT values. It is therefore
impossible, for example, to execute changes in a MySQL database on a notebook computer
and later bring these into balance with the master system on another computer.
CHAPTER 14 ■ADMINISTRATION AND SERVER CONFIGURATION 375
5351c14_final.qxd 8/26/05 6:50 PM Page 375
www.it-ebooks.info
• If possible, the same MySQL version should run on the master and slave computers. Replica-
tion usually works if the version number on the slave is higher than that on the client.
• In older versions of MySQL there were many commands that caused problems with replica-
tion. Most of these problems have been solved in MySQL 5.0. Therefore, use the most current
MySQL version that you can.
Setting Up the Replication Master System
This section describes the preparatory work for setting up a replication system on the master com-
puter. Note, please, that this introduction does not show the only way to proceed. There are even
several ways for transferring the start data to the slave. (One variant will be shown a bit later in this
chapter.)
This section and the next assume that the database mysql, too, is to be replicated with its access
privileges. This is usually a good idea, so that all users who are permitted to read data from the mas-
ter system will be able to read data from the slaves with the same access information.
This method of proceeding is, however, burdened with some drawbacks. Everyone who is per-
mitted to change the master is now permitted to do the same to the slaves. However, changes to data
should fundamentally be made to the master, for otherwise, replication falls apart. If you thus wish to
exclude data alteration on the slaves, you (as database administrator) must exclude the mysql data-
base from replication (binlog-ignore-db=mysql), and instead, manage the mysql databases separately
for the master and all of the slaves. However, that causes synchronization problems. For example, if a
user obtains a new password on the master, the changed password must be entered on all the slaves.
Setting Up the Replication User
The first step consists in setting up a new user on the master system that is responsible for commu-
nication between master and client. The user name is irrelevant, and in this section we will use the
name replicuser.
This user requires the Replication Slave privilege for access to the binary logging files. Instead
of slavehostname, specify the complete computer name or IP number of the slave computer. For
security reasons you should use as password a combination of characters that is in use neither in
the operating system nor in the database:
GRANT REPLICATION SLAVE ON *.*
TO replicuser@slavehostname IDENTIFIED BY 'xxx'
If you have in mind to use the commands LOAD TABLE FROM MASTER and LOAD DATA FROM
MASTER, then you must also grant replicuser the privileges Select, Reload, and Super. These com-
mands are conceived primarily as aids for the MySQL developer and experts; they can help in setting
up and managing a replication system.
If the replication system is to have several slaves, then you must execute GRANT for all the
slave computers. Alternatively, you can permit access for all computers in the local system (e.g.,
replicuser@‘%.netname’). This can simplify administration, though at the cost of introducing an
unnecessary security risk.
On the slave system, use mysql -u replicuser -p -h masterhostname to test whether it is
possible to establish a connection. This has only the effect of ruling out possible errors that have
nothing to do with replication.
Shutdown
In setting up the slave (see the next section) you must specify the position in the logging files at
which the slave is to begin reading. You can determine this position with the following command:
CHAPTER 14 ■ADMINISTRATION AND SERVER CONFIGURATION376
5351c14_final.qxd 8/26/05 6:50 PM Page 376
www.it-ebooks.info

FLUSH TABLES WITH READ LOCK
SHOW MASTER STATUS
File Position Binlog_do_db Binlog_ignore_db
saturn-bin.000005 375344
You must note the information from the first two columns (file and position). If SHOW MASTER
STATUS returns no result (empty set), then binary logging is not yet activated. Next, shut down the
MySQL server, for example, with mysqladmin shutdown or with an Init V script such as /etc/init.d/
mysql stop.
Creating a Snapshot
Now you create a copy (called a snapshot) of all the databases. You will need this snapshot for the
installation of the initial state of all the databases on the slave computers.
Under Windows use WinZip or another compression program; under Unix/Linux your best bet
is to use tar. The archive should contain only the database directories, not the various logging files
that are also usually found at this location.
root# cd mysql-data-dir
root# tar vczf snapshot.tgz
If you are using InnoDB tables on the master, the snapshot must also contain the InnoDB
tablespace files (ibdata):
root# tar vczf snapshot.tgz ibdata* */*
You can also create the snapshot with mysqldump --all-databases --master-data (with InnoDB
tables with the additional option --single-transaction). However, the resulting snapshot file is then
considerably larger, and moreover, the creation of the snapshot and the later reading on the slave
computer by mysql take longer.
Server Configuration
In order for the MySQL server to be able to function as a replication master, you must associate a
unique ID number with the server, using the option server-id. (Every computer in the replication
system must be so designated.) Moreover, you must activate binary logging with the option log-bin.
Here you should provide a name for the logging files (here mysqlmaster). If you do not do so, the
MySQL server automatically chooses the name of the computer plus bin. If the computer name
should change due to a change in the network configuration, replication could fall apart.
# master configuration
# in /etc/my.cnf or my.ini (Windows)
[mysqld]
log-bin=mysqlmaster
server-id=1
Then restart the server. You can again use the server in normal fashion. All changes to the data-
base will now be recorded in the binary logging file. As soon as a slave system goes online, it will
automatically synchronize its database based on the logging files.
■Tip A brief description of additional master options can be found in the mysqld reference in Chapter 22. For
example, you can restrict the replication to individual databases (option binlog-do-db) or exclude several data-
bases from the replication (binlog-ignore-db).
CHAPTER 14 ■ADMINISTRATION AND SERVER CONFIGURATION 377
5351c14_final.qxd 8/26/05 6:50 PM Page 377
www.it-ebooks.info

Setting Up the Replication Slave System
Setting Up the Databases (Snapshot)
If the MySQL server is already using replication that is no longer to be used but is to be replaced by
a new configuration, then execute RESET SLAVE. With this, the server forgets the old replication
configuration.
Now stop the slave server. If there were already databases there, move their files into a backup
directory (better safe than sorry).
Then copy the database files of the snapshot into the database directory with WinZip or tar xzf.
Make sure that the files can be read and written by the MySQL server. Under Unix/Linux you do this
by executing chown -R mysql.mysql (Red Hat) or chown -R mysql.daemon (SUSE).
The following commands summarize the process under Linux. It is assumed here that the MySQL
data directory is /var/lib/mysql:
root# cd /var/lib/
root# mv mysql/ mysql-bak/ creates a backup of /var/lib/mysql
root# mkdir mysql creates an empty mysql directory
root# cd mysql
root# tar xzfv snapshot.tgz opens the snapshot there
root# cd ..
root# chown mysql.daemon -R mysql/ change owner of mysql/
Configuration File
With the slave system as well, the configuration file must be changed a bit. With server-id each
slave system also obtains a unique identification number. With master-host, master-user, and
master-password you specify how the slave system is related to the master.
■Note If InnoDB files were in the snapshot, then the configuration file of the slave must have exactly the same
InnoDB options as that of the master so that the InnoDB
tablespace
files can be correctly recognized when the
server is started. The logging of all changes (i.e., update logging) is not necessary for the slaves and should be
deactivated for speed optimization. A short description of additional slave options can be found in the mysqld
option reference in Chapter 22.
# slave configuration
# in /etc/my.cnf or my.ini (Windows)
[mysqld]
server-id=2
innodb_xxx = <as with the master>
Now the slave system can be brought on-line. Start the server. If problems arise, look at the
error log (file hostname.err).
A useful additional option in the configuration file might be read-only. This option has the
effect that the slave system is unable to execute SQL commands on its own. This ensures that no
changes can be made on the slave that are unknown to the master.
Starting Replication
To start replication between slave and master, execute the following command. The slanted text
should be replaced by the configuration data of the master:
CHAPTER 14 ■ADMINISTRATION AND SERVER CONFIGURATION378
5351c14_final.qxd 8/26/05 6:50 PM Page 378
www.it-ebooks.info
CHANGE MASTER TO
MASTER_HOST = 'master_hostname',
MASTER_USER = 'replication user name',
MASTER_PASSWORD = 'replication password',
MASTER_LOG_FILE = 'log file name',
MASTER_LOG_POS = log_offset
If the master is running on the computer saturn.sol and all other specifications are the same as
those of the previous section, then the command would look like this:
CHANGE MASTER TO
MASTER_HOST = 'saturn.sol',
MASTER_USER = 'replicuser',
MASTER_PASSWORD = 'xxx',
MASTER_LOG_FILE = 'saturn-bin.000005,
MASTER_LOG_POS = 375344
If binary logging was not instituted before replication was set up or the name of the logging
files was changed during the setup of the master, then specify MASTER_LOG_FILE = ‘’ and
MASTER_LOG_POS = 0.
Now to start the replication slave system, you need only the command
START SLAVE
First Test
With mysql create a connection to the master system and add a new data record to the table of your
choice. Then use mysql to establish a connection to a slave system and test whether the new record
appears there. If that is the case, then rejoice, for your replication system is working. (Of course, you
could also generate and then delete new tables and even entire databases on the master. The slave
system understands and carries out these commands as well.)
Take a look, too, into the logging file hostname.err on the slave system. There you should see
entries on the status of the replication, for example in the following form:
050317 18:49:24 [Note] Slave SQL thread initialized, starting replication
in log 'FIRST' at position 0,
relay log './uranus-relay-bin.000001' position: 4
050317 18:49:24 [Note] Slave I/O thread: connected to master
'replicuser@merkur1.sol:3306',
replication started in log 'FIRST' at position 4
As a further test you can shut down the slave system, make changes in the master system, and
then start up the slave system again. The databases on the slave system should be automatically
synchronized within a couple of seconds.
Setting Up a Replication System with LOAD DATA
A replication system can be set up much more easily if one makes use of the command LOAD DATA
FROM MASTER. A couple of conditions must be satisfied first:
• On the master, MyISAM tables must be used exclusively.
• The mysql database should not be replicated. (LOAD DATA ignores the mysql database.
Therefore, this database must already exist on the slave system.)
CHAPTER 14 ■ADMINISTRATION AND SERVER CONFIGURATION 379
5351c14_final.qxd 8/26/05 6:50 PM Page 379
www.it-ebooks.info
• The MySQL configuration file of the master should contain log-bin and a unique server-id
setting.
• The MySQL configuration file of the slave should also contain log-bin and a unique
server-id setting.
Master: If these conditions are satisfied, then setting up the replication system is child’s play.
You set up the replication user on the master, to which you grant the privileges Select, Reload, and
Super:
GRANT SELECT, RELOAD, SUPER, REPLICATION SLAVE ON *.*
TO replicuser@slavehostname IDENTIFIED BY 'xxx'
If the databases on the master are already filled in, then the variables net_read_timeout and
net_write_timeout should have their values increased. (The default value is 30. The variables should
be reset to the default after the replication system has been set up.)
SET GLOBAL net_read_timeout=600
SET GLOBAL net_write_timeout=600
Slave: On the slave, set the host name and user name and password for the replication process:
CHANGE MASTER TO
MASTER_HOST = 'saturn.sol',
MASTER_USER = 'replicuser',
MASTER_PASSWORD = 'xxx'
On the slave as well, net_read_timeout and net_write_timeout should be increased:
SET net_read_timeout=600
SET net_write_timeout=600
The following command transfers all the databases and tables from master to slave and starts
the replication system:
LOAD DATA FROM MASTER
If an error occurs in executing this command, then life becomes complicated: You must stop
the slave server, delete all (partially) transferred database directories, and then begin again. Possible
sources of the problem are too-small values of net_read_timeout and net_write_timeout (from mas-
ter and/or slave) as well as the presence of InnoDB tables. LOAD DATA FROM MASTER looks at the
configuration settings replicate_ignore_xxx, with which individual tables or entire databases can
be excluded from replication (see Chapter 22).
Inside Replication
The master.info file (Slave)
At the initial startup of replication, the slave system will have the file master.info added to its data-
base directory. In this file MySQL keeps track of which binary logging file is currently being used, to
what point this file has been evaluated, how the master can be contacted (host name, user name,
password), etc. This file is absolutely necessary for the operation of replication. The MySQL docu-
mentation naturally emphatically recommends that you not mess around with this file:
CHAPTER 14 ■ADMINISTRATION AND SERVER CONFIGURATION380
5351c14_final.qxd 8/26/05 6:50 PM Page 380
www.it-ebooks.info

14
masterbinlogname.000007
265
saturn.sol
replicuser
saturn
3306
60
0
■Note The content of master.info can also be determined with the SQL command
SHOW SLAVE STATUS
.
Changes can be carried out with
CHANGE MASTER TO
. Both of these commands will be described in the SQL
reference in Chapter 21.
Relay Files (Slave)
Once replication is running on the slave computer, the files relay-log.info, hostname-relay-bin.index,
and hostname-relay-bin.nnn appear in the data directory. These files are created by a separate IO
thread (subprocess) on the slave server, using a copy of the binary logging files on the master. The
sole task of the IO thread is to copy these data from master to slave. A second SQL thread then exe-
cutes the SQL commands contained in the logging files.
By default, commands that have already been processed are automatically deleted from the
relay files. If that is not your wish, use the option relay-log-purge=0.
Excluding Databases and Tables from Replication
If you do not want all of the databases or tables of the master replicated, there are two ways of
excluding some of them: You can exclude databases from logging in the master configuration file
(binlog-ignore-db), or you can exclude databases and tables from replication in the slave configu-
ration file (replicate-ignore-table, replicate-wild-ignore-table, replication-ignore-db).
Turning Off Replication Temporarily (Master)
If you wish to execute an SQL command on the master that is not to be replicated on the slave, then
first execute the command SQL_LOG_BIN=0 and then the command SET SQL_LOG_BIN=1. (For
this, the Super privilege is necessary.)
Ending the Master and Slave Servers
Master and slave servers run independently of each other, and they can be stopped and restarted
independently and in either order without loss of data. If the slave is unable to make a connection
to the master, or to reconnect, then it attempts a connection every 60 seconds. As soon as the con-
nection is reestablished, all outstanding changes are read from the binary logging files and executed
on the slave. This works even if the slave was down for a long time and has a great deal of catching
up to do.
Several Slaves, Replication Chains
One may have an arbitrary number of slaves, all accessing the same master. From the master’s point
of view, nothing is different (except for the additional burden of accesses).
CHAPTER 14 ■ADMINISTRATION AND SERVER CONFIGURATION 381
5351c14_final.qxd 8/26/05 6:50 PM Page 381
www.it-ebooks.info
In addition, MySQL offers the possibility of creating replication chains of the form A ➤B➤C.
Here Bwould be a slave with respect to A, but a master with respect to C. This generally increases
the overhead and is therefore not worthwhile. However, a possible scenario is a slow network connec-
tion between Aand B(say, one server is in Europe and the other in the USA) and a fast connection
between Band C. On computer B, the configuration log-slave-updates must be used.
Replication and Transactions
Transactions are not executed on the slave systems until they have been terminated on the master
by COMMIT. On the other hand, if a transaction on the master is terminated by ROLLBACK, then
the affected SQL commands are neither logged in the logging files nor executed on the slave system.
It is even possible to use a transaction-capable table format (InnoDB) on the master system,
while using an ordinary MyISAM table on the slave. Since transaction management takes place entirely
on the master, it is unnecessary to have slave support on the slave. However, it is necessary to have
the slave properly set up before replication begins. (If the tables in the start state come from a file
snapshot, then they are in the same format as those of the master and must be explicitly transformed
on the slave to MyISAM tables. Note that changes in the format of a table are replicated from master
to slaves.)
Client Programming
If the goal of a replication system is to ensure against system failure or to increase speed by dividing
up the queries among several systems, then changes are necessary to the client as well.
In establishing the connection, a distinction must be made as to whether data are going to be
queried only or whether changes are required as well. If INSERT, UPDATE, or DELETE commands
are to be executed, then a connection to the master system must be made.
On the other hand, if data are to be queried only, then the connection should be made to the
server that is currently the least burdened. Since the client program as a rule has no way of deter-
mining this, the Connect function should randomly select a computer from a predetermined list
of computer names or IP numbers and attempt to make a connection. If this does not succeed
(because this server is currently unreachable), then Connect should make an attempt to connect
to another server.
Random Server Selection
The following example in the programming language PHP assumes that you wish to read (and not
alter) data and to select the server randomly to improve efficiency. To do this you define in mysqlhosts[]
an array of all the server names (or IP addresses) and use rand(min, max) to select an element of the
array.
After the connection has been established, the single query mysql_list_dbs is executed (corre-
sponding to the SQL command SHOW DATABASES):
<html><head><title>test</title></head><body>
<?php
$mysqlhosts[0]="venus.sol"; // list of all servers
$mysqlhosts[1]="mars.sol"; // of the replication system
$mysqlhost=$mysqlhosts[rand(0,1)]; // select the server randomly
$mysqluser="user"; // user name
$mysqlpasswd="xxx"; // password
$connID=mysql_connect($mysqlhost, $mysqluser, $mysqlpasswd);
...
?>
</body></html>
CHAPTER 14 ■ADMINISTRATION AND SERVER CONFIGURATION382
5351c14_final.qxd 8/26/05 6:50 PM Page 382
www.it-ebooks.info
Crashproof Server Selection
The starting point for our second example is similar. However, now our goal is to make the connec-
tion process immune to a connection failure. The following lines demonstrate a possible procedure
whereby at most ten connection attempts are made.
$tries=0;
while($tries<10 && !$connID) {
$mysqlhost=$mysqlhosts[rand(0,1)];
$connID = @mysql_connect($mysqlhost, $mysqluser, $mysqlpasswd);
$tries++;
}
if(!$connID) {
echo "<p>Sorry, no database server found.\n";
echo "</body></html>";
exit();
}
Administration of MyISAM Tables
As we have already mentioned in Chapter 8, MyISAM tables are stored in the files dbname/tablename.MYD
(data) and dbname/tablename.MYI (indexes). This allows the simple copying and moving of tables and
databases. However, such operations are allowed only if the server is not using the databases (the best
procedure is to stop the server for this purpose).
In rare cases, it may be necessary to work with the MyISAM table files directly, such as to restore
indexes or repair damaged files. This section offers the tools that you will need.
myisamchk
The command myisamchk is, in a sense, a universal tool for the maintenance of MyISAM tables. With
this command you can accomplish the following:
• Check the integrity of MyISAM tables.
• Repair damaged MyISAM table files (e.g., after a power outage).
• Release unused storage space in MyISAM files.
• Re-create the index to MyISAM tables.
Instead of myisamchk, you can also use the following SQL commands:
ANALYZE TABLE provides information about internal index management.
CHECK TABLE tests the table file for errors in consistency.
OPTIMIZE TABLE optimizes the use of storage space in tables.
REPAIR TABLE attempts to repair defective tables.
OPTIMIZE and REPAIR TABLE work only for MyISAM tables. The advantage of the SQL com-
mands over myisamchk is that you do not need to worry about the MySQL server and myisamchk
interfering with each other. The disadvantage is that the MySQL server must be running (which
may be problematic after a crash), that under some circumstances not all errors can be corrected,
that there are fewer options for control of the process, and that the SQL commands are somewhat
slower in their execution.
CHAPTER 14 ■ADMINISTRATION AND SERVER CONFIGURATION 383
5351c14_final.qxd 8/26/05 6:50 PM Page 383
www.it-ebooks.info

An extension to myisamchk is the command myisampack, with which MyISAM tables can be
compressed. In this way, a great deal of space can be saved. However, only read access to such
tables is then possible. At the end of this section we shall have more to say about myisampack.
■Tip A reference to all options of myisamchk and myisampack can be found in Chapter 22. Further information
on the use of myisamchk, particularly for the repair of defective table files, can be found in the MySQL documenta-
tion: http://dev.mysql.com/doc/mysql/en/table-maintenance.html.
Using myisamchk
The syntax of the myisamchk command is as follows:
myisamchk [options] tablename1 tablename2 ...
The table names are given as complete file names, either with or without the ending *.MYI (but,
surprisingly, not with *.MYD). Depending on the options specified, however, both MyISAM files, that
is, name.MYD (data) and name.MYI (indexes), are analyzed or changed.
To check on the integrity of all tables in the database mydatabase you should execute the fol-
lowing command. (You must, of course, replace /var/lib/mysql with your actual database
directory.)
root# myisamchk /var/lib/mysql/mydatabase/*.MYI
You can use myisamchk independently of the MySQL server (the server may be running, but it
does not have to be). If the server is running, then mysqladmin flush-tables or the SQL command
FLUSH TABLES must be executed first.
■Caution If myisamchk actually changes MyISAM files and not just checks them, it must be ensured that the
MySQL server does not change any data during this time.
Therefore, you must execute if necessary the SQL command
LOCK TABLE name
with mysql, followed by
myisamchk, and then, finally,
UNLOCK TABLES
. You must not leave mysql during this time, since otherwise, the
LOCK
s would end.
Speed Optimization, Memory Usage
In the case of large tables, the analysis, and even more the repair, of tables is a very costly operation.
The speed of myisamchk depends greatly on the amount of available RAM.
The memory usage of myisamchk is set by four variables. In the default setting, myisamchk
requires about 3MB of RAM. If you have more memory to squander, then you should raise the
values of the appropriate variables, since then myisamchk will execute much more quickly for large
tables. The MySQL documentation recommends the following values:
root# myisamchk -sort_buffer=64M -key_buffer=64M \
-read_buffer=1M -write_buffer=1M ...
Furthermore, for repairing database files myisamchk requires a huge amount of space on the
hard drive (among other reasons, because a copy of the database file is first made). A copy of
the file is placed in the directory specified by the environment variable TMPDIR. You can also spe-
cify this directory via --tmpdir.
CHAPTER 14 ■ADMINISTRATION AND SERVER CONFIGURATION384
5351c14_final.qxd 8/26/05 6:50 PM Page 384
www.it-ebooks.info

Shrinking and Optimizing MyISAM Tables
The MyISAM table driver attempts, normally, to keep table files as small as possible. However, if you
delete a large number of records from your tables or if you often carry out changes to records with
columns of variable size (VARCHAR, xxxTEXT, xxxBLOB), then the optimization algorithm runs up
against its limit. In the worst case, the database files are significantly larger than necessary. More-
over, the data are scattered throughout the file, which slows down access to the database.
The following command provides some assistance. It regenerates the database file and
optimizes the index file in view of providing the speediest access to the database. With the
option --set-character-set the character set is specified for the sort order. The effect of
--check-only-changed is that only those tables are processed that were changed since the last
processing by myisamchk. (For space reasons, the command has been split using a backslash
over two lines.)
root# myisamchk --recover --check-only-changed --sort-index \
--analyze databasepath/*.MYI
■Tip If you would like to check the performance of myisamchk, create a test database and then delete at
random about half of the data records: DELETE FROM testtable WHERE RAND()>0.5.
Repairing MyISAM Tables
For me, this section is largely of a theoretical nature, because fortunately, I have thus far had no
problems with corrupt MyISAM tables. Corrupted files can arise when the database is stopped by
a power failure, when MySQL or the operating system crashes, or if the MyISAM table driver con-
tains errors.
Damaged MyISAM files make themselves known in MySQL service by error messages like
Index-file/Record-file/Table is crashed or No more room in index/record file. In such a case, myisamchk
will not, of course, be able to work a miracle. Data that for some reason are no longer available or
have been overwritten cannot be restored. However, myisamchk can repair the database to the extent
that at least all other records can again be read:
root# myisamchk --recover databasepath/*.MYI
If you suspect that only the index file has been affected, then execute myisamchk with the addi-
tional option --quick (which is considerably faster). In this case myisamchk regenerates the index file.
In particularly difficult cases, that is, when myisamchk --recover fails, you can attempt recovery
with --safe-recover. However, that will take much longer than --recover.
Compressing MyISAM Tables (myisampack)
If you exclusively read (but do not change) large tables, then it is a good idea to compress your files.
Not only does this save space, but in general, it speeds up access (since larger portions of the table
can reside in the file buffer of the operating system):
root# myisampack databaspath/*.MYI
Although with myisampack the identifier *.MYI is specified for the index file, the command
changes only the data file *.MYD. To uncompress compressed table files, you should execute
myisamchk with the option --unpack.
CHAPTER 14 ■ADMINISTRATION AND SERVER CONFIGURATION 385
5351c14_final.qxd 8/26/05 6:50 PM Page 385
www.it-ebooks.info

Administration of InnoDB Tables
While InnoDB tables offer, in comparison to MyISAM tables, a number of additional functions
(transactions and integrity rules), they make administration a bit more complex. This section pro-
vides some tips for managing tablespace and logging files, copying and moving InnoDB tables, and
the optimal configuration of the MySQL server.
■Tip A quick overview of the most important InnoDB parameters can be obtained with the command
SHOW
VARIABLES LIKE ‘innodb%’
. A summary of the InnoDB configuration parameters for the MySQL server can be
found in Chapter 22.
Tablespace Administration
While MyISAM files and indexes are stored in their own files within a directory with the name of the
database (e.g., data/dbname/tablename.myd), all InnoDB tables and indexes are stored in a virtual file
system, which in the InnoDB documentation is called the tablespace. The tablespace itself can be
composed of a number of files.
You can use InnoDB tables without any particular configuration settings, in which case at the
first start of the MySQL server the file ibdata1, of size 10MB, is created for the tablespace and can be
enlarged repeatedly by 8MB as required.
A peculiarity of tablespace files is that they cannot be made smaller. Thus when you delete tables
or records, the space in the tablespace is released and can be used for new tables, but the size of the
tablespace file is unchanged.
A significant innovation since MySQL 4.1 is that with a suitable configuration, a separate
tablespace file is created for each table (instead of storing all tables in a single giant tablespace file).
Details on this will be discussed shortly.
Determining the Space Requirements of InnoDB Tables
The tablespace is more or less a black box that you cannot see into. For example, there is no com-
mand to return any sort of directory of the tablespace. The command SHOW TABLE STATUS does
give information about how much space the individual InnoDB tables and their indexes require
within the tablespace and how much space is available before the tablespace will have to be enlarged.
In what follows, only the relevant columns of the SHOW command are displayed. The storage of
tables and indexes is managed in 16KB blocks, which is why SHOW always returns integer multi-
ples of 16,384:
SHOW TABLE STATUS FROM mylibrary
Name Engine Data_Length Index_Length Comment
authors InnoDB 16384 16384 InnoDB free: 3072 kB ...
categories InnoDB 16384 49152 InnoDB free: 3072 kB ...
In general, the space requirement for the tablespace file is significantly greater in MySQL 4.n
than for an equivalent MyISAM table file. The situation has improved since version 5.0.3 through
a more compact table format, which is used automatically within the tablespace files. The storage
requirement is reduced by about 20 percent, but remains greater than for MyISAM tables. However,
the new format brings with it no speed disadvantage.
Apparently, beginning with MySQL 5.1 the InnoDB table driver will offer the possibility of
transparently compressing individual pages within the tablespace. This will cause the memory
requirement to go down significantly, though at the cost of greater demand on CPU.
CHAPTER 14 ■ADMINISTRATION AND SERVER CONFIGURATION386
5351c14_final.qxd 8/26/05 6:50 PM Page 386
www.it-ebooks.info
Individual tablespace Files for Each Table
Since MySQL 4.1 there has been the option of creating an individual tablespace file for each table.
This has a host of advantages over the exclusive use of a central tablespace file, and so we shall
describe this variant first.
Individual tablespace files are currently not the default, but are activated via the option
innodb_file_per_table. Even after a server restart, this setting holds only for newly created tables.
Existing tables remain in the central masterspace.
Note that despite individual tablespace files, there must always be a central masterspace file
(which the MySQL server automatically creates at initial startup without any particular configuration).
# in /etc/my.cnf or my.ini (Windows)
[myslqd]
innodb_file_per_table
The MySQL server now creates, for every new InnoDB table, a file with the name databasename/
tablename.ibd. This file begins life at size 64KB and grows as necessary. It contains table data and all
indexes.
To migrate existing tables from the central tablespace to individual tablespace files, you must
make a backup of these tables (mysqldump), delete the tables, and then re-create the backup by read-
ing the tables back in.
If you should later remove the option innodb_file_per_table from the configuration file, the
individual tablespace files remain active. New tables, however, will be stored in the central tablespace.
The migration of individual tables into the central tablespace is precisely as in the opposite direction:
backup, delete tables, restore backup.
To determine which tables are stored in individual files and which in the central tablespace,
you must look in the MySQL data directory to see what dbname/tablename.ibd files exist. SHOW
TABLE STATUS gives no information, and moreover, the MySQL server currently offers no way of
determining this information.
Pluses and minuses: According to an email from the InnoDB developer Heikki Tuuri in the
mysql mailing list, individual tablespace files are only marginally slower than the exclusive use of
a central tablespace. The significant disadvantage is that when a table is deleted, the corresponding
tablespace file is also deleted. In contrast to the use of a central tablespace file, DROP TABLE imme-
diately creates space on the hard drive.
Note that (in contrast to MyISAM tables) it is not permitted to move or copy individual table-
space files from one directory to another or from one MySQL server installation to another. You
must adhere to the rules outlined later in this chapter (see the section “Copying, Deleting, and
Moving InnoDB Tables”).
Configuration of the Central Tablespace
By default (that is, without any particular configuration settings), the MySQL server creates at initial
startup a 10MB file ibdata1 that is increased as needed in 8MB increments. The following remarks
are of interest only if you wish to manage the location and size of the files of the central tablespace
yourself. For this there exist the parameters innodb_data_home and innodb_data_file_path. The for-
mer specifies the directory in which all InnoDB files are stored (by default the MySQL data directory),
and the latter contains the names and sizes of the tablespace files. A possible setting in the configura-
tion file before the first startup of the MySQL server is the following:
# in /etc/my.cnf or my.ini (Windows)
[mysqld]
innodb_data_home = D:/data
innodb_data_file_path = ibdata1:1G;ibdata2:1G:autoextend:max:2G
CHAPTER 14 ■ADMINISTRATION AND SERVER CONFIGURATION 387
5351c14_final.qxd 8/26/05 6:50 PM Page 387
www.it-ebooks.info
This means that the tablespace consists of the files D:\data\ibdata1 and D:\data\ibdata2. If
these files do not exist, they will be created, of size 1GB each. If the InnoDB tables require more
space while the server is running, then ibdata2 will be enlarged automatically in 8MB increments
(to a maximum of 2GB).
In the management of the tablespace files you should observe the following:
• The MySQL server requires write privileges for the innodb_data_home directory so that it can
create and alter the tablespace files.
• If you do not use the autoextend attribute, as administrator you must enlarge the tablespace
in good time (that is, before reaching the limits of a tablespace file). If the InnoDB driver
determines in a transaction that the tablespace is full and cannot be enlarged any further,
the transaction will be aborted with ROLLBACK.
Using Hard Drive Partitions Directly
InnoDB also offers the option of using an entire hard drive partition directly (that is, without a file
system managed by the operating system). For this, instead of specifying the file name, you give the
device name of the partition and append the exact size specification (newraw). The partition size
must be an integer multiple of 1MB. (The following example uses the Linux device notation.)
innodb_data_home_dir=
innodb_data_file_path=/dev/hdb1:61440Mnewraw
After the partition has been initialized by MySQL, you must stop the MySQL server and replace
newraw by raw. (The former is necessary only if you are adding a new partition.)
innodb_data_home_dir=
innodb_data_file_path=/dev/hdb1:61440Mraw
The InnoDB documentation unfortunately contains no information about whether better per-
formance can be obtained by the direct use of hard drive partitions (one suspects that it can) and if
so, how much. I have been able to obtain little concrete information from the MySQL mailing list.
Enlarging the Central Tablespace
In principle, the files of the central tablespace cannot be enlarged. The one exception is the
autoextend attribute, which, however, can be specified only for the last tablespace file in innodb_
data_file_path. To enlarge the amount of space available in the central tablespace, you must
therefore add an additional file to innodb_data_file_path. The process looks in detail like this:
• Stop the MySQL server.
• If the size of the last tablespace file was variable due to autoextend, you must determine its
actual size in megabytes (the number of bytes according to DIR or ls divided by 1,048,576).
The resulting size must be specified in the innodb_data_file_path setting.
If innodb_data_file_path does not yet exist in the configuration file, then previously, ibdata
was used as the default file, and you must determine and specify its size.
• Add one or more new files to innodb_data_file_path.
By default, all files must be located in the one directory (or in directories relative to it). If you
wish to divide the tablespace files among several partitions, hard drives, etc., then you must
specify an empty character string for innodb_data_home, and in innodb_data_file_path you
must use absolute file names.
Note that the order of the files specified up to now in innodb_data_file_path cannot be
CHAPTER 14 ■ADMINISTRATION AND SERVER CONFIGURATION388
5351c14_final.qxd 8/26/05 6:50 PM Page 388
www.it-ebooks.info
• Restart the MySQL server. If the server does not detect an erroneous configuration, it will
generate the new tablespace files. This process will also log any errors in the file
hostname.err.
Let us suppose that the previous setting looks like the following and that ibdata2 has current
size of 1904MB:
innodb_data_file_path = ibdata1:1G;ibdata2:1G:autoextend
You now want to increase the size of the tablespace to 4GB. The new setting must look like the
following:
innodb_data_file_path = ibdata1:1G;ibdata2:1904M;ibdata3:1100MB:autoextend
If you use individual tablespace files, you save all this trouble. In the central tablespace are
stored only relatively few (temporary) data, for which reason its size can remain relatively small.
And the individual tablespace files grow automatically.
Shrinking the Tablespace
It is, unfortunately, impossible to make the files of the central tablespace smaller. If you delete large
InnoDB tables or change them into another table format, the space within the tablespace is freed
up, but the tablespace files cannot be made smaller. The only way to shrink them is by the following
process:
• Make a backup of all InnoDB tables with mysqldump.
• Delete all InnoDB tables (DROP TABLE …).
• Stop the MySQL server (mysqladmin shutdown).
• Delete the current tablespace files (ibdata…). If you have enough space, it is, of course, more
secure first to move the files into another directory.
• Change innodb_data_file_path in the MySQL configuration file.
• Restart the MySQL server. New tablespace files corresponding to the innodb_data_file_path
setting will be created.
• Re-create all your InnoDB tables from your backup files.
Copying, Deleting, and Moving InnoDB Tables
From your experience with MyISAM tables you are accustomed to the fact that (after a server shut-
down) you can simply copy or move all files dbname.tablename. The MySQL server recognizes at
restart which tables are to be found where. This is very practical for backups or making a copy of
a table or database.
If you use InnoDB tables, none of this is possible, not even if you use an individual tablespace
file for each table.
Moving tables: To move a table from one database into another, execute RENAME
dbname.tablename TO dbnamenew.tablenamenew.
Copying tables: To copy a table, you must either create a new table and copy the data with
INSERT … SELECT, or you must make a backup of the table (mysqldump) and then create the table
under another name.
Deleting tables: DROPTABLE tablename deletes the given table. If the table was located in an
individual tablespace file, this file is deleted as well. If the table was, on the other hand, in the cen-
tral tablespace, then the space it occupied is given up. However, the tablespace files are not made
smaller.
CHAPTER 14 ■ADMINISTRATION AND SERVER CONFIGURATION 389
5351c14_final.qxd 8/26/05 6:50 PM Page 389
www.it-ebooks.info
*.frm files: Caution is necessary with the *.frm files. These files give the structure of a table and
are located in the relevant database directory (even with InnoDB tables!). The *.frm files and associ-
ated tables stored in tablespace must always be synchronized. You must not simply delete *.frm
files. If you wish to delete a table, execute DROP TABLE; then the *.frm file will be deleted.
Making a Backup
There are several ways of making a backup of InnoDB tables:
• The most elegant way is to use InnoDB Hot Backup. This auxiliary program makes the
backup while the server is running, without blocking tables. However, InnoDB Hot Backup
is a commercial program and is not freely available; see http://www.innodb.com/order.php.
• Of course, you can always use mysqldump. The command must be used with
single-transaction.
• If you are prepared to stop the MySQL server, you can simply copy the tablespace files. Note,
though, that you must use the exact same innodb_data_file_path setting as well as all *.frm
files. On the other hand, you do not require the transaction logging files. If the server was
properly shut down, these files no longer contain any relevant data.
Migrating the tablespace
According to the MySQL documentation, the tablespace files are independent of the operating sys-
tem. Only the CPU’s floating-point representation must be correct. If those conditions are satisfied,
then the tablespace files can be moved without problem between, say, Windows and Linux. Of
course, you must take care here, too, that the innodb_data_file_path setting is correct and that all
*.frm files are moved as well. (In practice, it will usually be the case that both MyISAM and InnoDB
tables are to be copied. For this, all database directories and all tablespace files are simply copied.
The InnoDB documentation contains no information as to whether the tablespace file format is
dependent in any way on the version. Heikki Tuuri, the developer of the InnoDB table driver, has
promised forward compatibility for all present and future versions. (It has always been a tradition
with MySQL that database files be able to be moved without difficulty to a new version.)
In general, an occasional backup with mysqldump is a good idea. The backup file then exists in
text format, which is immune against possible compatibility problems.
Logging Files
Transaction Logging
InnoDB logs all changes in logging files with the names ib_logfile0, ib_logfile1, etc. The purpose
of these logging files is to make large transactions possible as well as to restore InnoDB data after a
crash.
If MySQL is properly configured and there is sufficient memory, then most of the currently
needed data should reside in RAM. To improve speed, changes to data are first made only in RAM,
and not in the actual data files (that is, in the case of InnoDB, in the tablespace).
Only when a transaction is completed with COMMIT are the changes in data actually stored on
the hard drive, and then first in the InnoDB logging files ib_logfile0, ib_logfile1, etc. The changed
parts of the tablespace are only gradually transferred to the hard drive, all this for reasons of effi-
ciency. If a crash occurs during these proceedings, then the tablespace can be restored with the help
of the logging files.
The logging files ib_logfile0, etc., have two purposes. On the one hand, they satisfy the ACID
condition of durability, so that transactions that have been carried out are not endangered even if
CHAPTER 14 ■ADMINISTRATION AND SERVER CONFIGURATION390
5351c14_final.qxd 8/26/05 6:50 PM Page 390
www.it-ebooks.info

there is a crash immediately after the transaction has been completed. On the other hand, the log-
ging files enable transactions of almost unlimited size, even those for which it is not possible to hold
all pending (but not yet confirmed) changes in RAM.
The InnoDB logging files are filled in order. When the last file is full, the InnoDB table driver
begins writing data to the first logging file. Therefore, the entire size of all logging files limits the
quantity of tablespace changes that can be temporarily stored before a COMMIT. The maximum
size of all logging files is currently limited to 4GB.
The transaction logging files are necessary only while the MySQL server is running. As soon as
the MySQL server has been properly shut down, these files are no longer needed. For example, if
you make a backup with ibdata files, you do not need to copy the logging files.
Size and Location of the Logging Files
The proper dimensioning of the logging files has a great influence on the speed of MySQL/InnoDB.
The location, size, and number of logging files are determined by the configuration parameters
innodb_log_group_home, innodb_log_files_in_group, and innodb_log_file_size. By default, two
logging files of size 5MB each are created in MySQL’s data directory.
The InnoDB documentation recommends that the total size of the logging files be about the
size of the buffer (parameter innodb_buffer_pool_size, which is 8MB by default). If the buffer is
larger than the logging files, then it can happen that the InnoDB table driver will have to make a so-
called checkpoint, involving temporary storage of uncommitted changes.
If you wish to change the location, size, or number of logging files, you must stop the MySQL
server. Now delete the existing logging files ib_logfilen (only when you are sure that shutdown
took place without error) and change /etc/my.cnf or my.ini. New logging files will be created at
the subsequent restart of the MySQL server.
■Note If you value maximal speed, then you should have the logging files stored on a different hard drive from
that on which the
tablespace
files reside. If the MySQL server finds logging files when it is started up that do not
correspond to the innodb_log_ parameters, then the startup process is broken off. You will find error messages
in the error logging file hostname.err. The creation of new logging files (even if there is no error) is also logged in
hostname.err.
Logging Synchronization
The configuration parameters innodb_flush_log_at_trx_commit and innodb_flush_method tell when
(how often) and how logging files are synchronized. For innodb_log_at_trx_commit there are three
settings, which allow one to make tradeoffs between speed and security:
• The setting 0 means that the data are written about once per second into the current logging
file, and then the file is synchronized. (Writing means here that the data are passed to an I/O
function of the operating system. Synchronization means that changes are actually physi-
cally written to the hard drive.)
If there is a crash during the time between the COMMIT and the synchronization of the
logging file, the transaction is lost and cannot be reconstructed at a later restart. Therefore,
innodb_flush_log_at_trx_commit=0 is a strike against the ACID durability condition.
CHAPTER 14 ■ADMINISTRATION AND SERVER CONFIGURATION 391
5351c14_final.qxd 8/26/05 6:50 PM Page 391
www.it-ebooks.info

• More secure is the default setting 1. Now writing and synchronization take place with each
COMMIT. The drawback is that if you make mostly small transactions, then the hard drive
limits the number of possible transactions per second. (For a hard drive with 7200 revolutions
per minute, that is, 120 per second, at most 120 transactions can be executed per second, a
theoretical limit that is never reached in practice.)
• The setting 2 is a good compromise. Here the writing takes place at each COMMIT, but the
synchronization only about once per second. If the MySQL server crashes, then immediately
terminated transactions are not lost (since the synchronization can take place after a crash).
However, if the operating system crashes (power outage, for example), then transactions are
lost as with setting 0.
The parameter innodb_flush_method determines whether the operating system function fsync
(the default) or O_SYNC (setting O_DSYNC) is used for synchronizing the logging files. With many
Unix versions, O_SYNC is faster.
■Caution Even in the most secure setting, the security of data is dependent on how the operating system actually
carries out the synchronization of the logging files. If after a power failure the logging file is defective or synchroniza-
tion is only partially successful, there can be problems with the reconstruction of data at the next startup. Precisely
this happened to wikimedia.org in February 2005. Read the following article.You will learn a great deal about how
(in)secure database files are despite all security measures, logging, etc.: http://meta.wikimedia.org/wiki/
February_2005_server_crash and http://lists.mysql.com/mysql/180326.
Archive Logging
The transaction logging files are conceived only for internal data management, not for backups. If
you require a record of all changes to data since a particular time (since the last complete backup),
then you must use MySQL binary logging, which functions entirely independently of the InnoDB
table driver. (See the discussion earlier in this chapter.)
InnoDB can, in principle, also carry out such logging. This type of logging is called archive log-
ging in the InnoDB documentation. However, archive logging makes sense only if InnoDB is used
independently of MySQL.
Should you wish for some reason to use archive logging, it can be activated with innodb_log_
archive.
Tips for Speed Optimization
This section offers some tips for speed optimization. The information here is relevant only if you are
using primarily InnoDB tables and are working with large data sets.
■Tip Look at the section “Performance Tuning Tips” in the InnoDB documentation: http://dev.mysql.com/
doc/mysql/en/innodb-tuning.html. In optimizing for speed there is also useful information in the InnoDB
status information, which can be retrieved with
SHOW INNODB STATUS
.
Buffer Settings
Perhaps the most important parameter for influencing the speed of the InnoDB table driver is
innodb_buffer_pool_size. This parameter specifies how much RAM should be used for temporary
CHAPTER 14 ■ADMINISTRATION AND SERVER CONFIGURATION392
5351c14_final.qxd 8/26/05 6:50 PM Page 392
www.it-ebooks.info
storage of InnoDB tables and indexes. The more such data is available in RAM, the less often access
must be made to the hard drive in SELECT commands. By default, the InnoDB table driver reserves
only 8MB as a buffer. Larger values (the InnoDB documentation recommends up to 80 percent of
main memory for a dedicated database server) can dramatically increase the speed of SELECT
queries. (The total size of the transaction logging files should be as large as the buffer storage.)
Depending on the application, two additional parameters influence what data are stored tem-
porarily in RAM: innodb_log_buffer_size sets the size of the buffer for transaction logging, while
innodb_additonal_mem_pool_size determines how much space in RAM is reserved for various other
information such as metadata on open tables. This buffer (by default 1MB) should be enlarged if you
are dealing with a large number of InnoDB tables.
Block Operations
If you are carrying out extensive block operations (such as importing a table with a million data
records or changing from MyISAM to InnoDB format), you can speed up the process with a few
tricks:
• Use the setting SET unique_checks=0. Then no check is made whether the data of a UNIQUE
column or the primary index column are actually unique. Of course, you should use this set-
ting only if you are absolutely sure that there are, in fact, no duplicates!
• Use the setting SET foreign_key_checks=0. With this setting you achieve that the integrity
conditions are not checked. Of course, here, too, this setting should be used only if you are
convinced of the integrity of your data (e.g., in restoring backup data).
• Execute all the INSERT commands for a table as a single transaction. Usually, importation
consists of countless INSERT commands, which by default (auto commit) are all carried out in
separate transactions. With SET AUTOCOMMIT=0, all INSERT commands are collected into a
single transaction. Keep in mind that this transaction must be confirmed with a COMMIT.
This technique works only if the transaction logging files are large enough. Note that with
large transactions, a ROLLBACK can be unusually long, even taking hours. Note as well that
CREATE TABLE has the effect of COMMIT. Therefore, it is impossible to read in several tables
in a single transaction.
Logging Settings
In the previous section we made reference to the possible settings of the logging parameters. Here is
a brief summary:
•innodb_flush_log_at_trx_commit=2 is useful is you wish to execute as many (small) transac-
tions per second as possible and are prepared to lose the last few seconds of data in case of
a crash.
• Ideally, the logging files should be located on a different hard disk from those of the
tablespace files.
• Depending on the operating system, innodb_flush_method=O_DSYNC may speed up logging.
Server Tuning
Server tuning refers to the optimal configuration of the MySQL server so that it uses hardware as
efficiently as possible and executes SQL commands with maximum efficiency.
CHAPTER 14 ■ADMINISTRATION AND SERVER CONFIGURATION 393
5351c14_final.qxd 8/26/05 6:50 PM Page 393
www.it-ebooks.info

Server tuning is worthwhile, as a rule, only if very large databases are involved (in the gigabyte
range), many queries per second are to be processed, and the computer is serving primarily as a
database server.
This section provides merely a first introduction to this topic and is restricted primarily to
the correct configuration of the buffer storage and the use of the query cache. Note, however, that
server tuning is only a component of the larger topic that perhaps might be called optimization of
database applications. On this theme one could easily write an entire book, which would, among
other things, answer the following questions:
• What possibilities are there to optimize the database design in such a way that the most fre-
quently used commands are executed with maximum efficiency? Were the optimal indexes
set up? The correct database design is assuredly the most important and undervalued com-
ponent of speed optimization. Fine tuning the server for a poorly designed database is like
hitching a racehorse to a carriage with square wheels. (See also Chapter 8.)
• What is the best hardware for the task (within a given price range)?
• What is the best operating system (if there is a choice)?
• What is the optimal table format?
• Can the burden of many SELECT queries be divided among a number of computers?
■Tip Many questions will go here unanswered, not least because I myself have too little experience with very
large database applications. Further information can be found in the MySQL documentation: http://dev.mysql.
com/doc/mysql/en/mysql-optimization.html.
A wealth of tuning information is contained in the book, the website, and the news and mailing list contribu-
tions of the MySQL guru Jeremy Zawodny. Do a Google search or have a look at the following site: http://
jeremy.zawodny.com/mysql/.
Finally, of particular worth is the following presentation in OpenOffice/Star Office format. It is a lecture on per-
formance tuning for MySQL/InnoDB by Peter Zaitsev: http://dev.mysql.com/tech-resources/
presentations/ and http://dev.mysql.com/Downloads/Presentations/OSCON-2004.sxi.
Optimal Memory Management
MySQL reserves at startup a portion of main memory for certain tasks, such as a cache for data
records and a location for sorting data. The size of this buffer is controlled by options in the con-
figuration file and generally cannot be altered while the server is in operation. It can happen that
MySQL leaves a great deal of RAM unused, even though there was sufficient memory available
and MySQL could make use of it.
The setting of the parameters takes place in the mysqld section of the MySQL configuration file.
Memory sizes can be abbreviated by K (kilobytes), M (megabytes), and G (gigabytes). The following
lines clarify the syntax.
# in /etc/my.cnf or my.ini (Windows)
[mysqld]
key_buffer_size = 32M
In the following, various important configuration parameters will be introduced (though not
all of them by a long shot). Unfortunately, one cannot say which parameter settings should be
changed and to what, it all depends heavily on the specific application. However, first attempts
should include key_buffer_size and table_cache:
CHAPTER 14 ■ADMINISTRATION AND SERVER CONFIGURATION394
5351c14_final.qxd 8/26/05 6:50 PM Page 394
www.it-ebooks.info
• The parameter key_buffer_size (default 8M) tells how much storage is to be reserved for
index blocks. The higher the value, the more rapid is table access to columns for which there
is an index. On dedicated database servers it can make sense to increase key_buffer_size up
to one-fourth of the available RAM.
• The parameter table_cache (default 64) specifies how many tables can be open at one time.
The opening and closing of table files costs time, and so a larger value of the parameter can
increase parallel access to many tables. On the other hand, open tables cost RAM, and the
number is also limited by the operating system. The number of tables open in MySQL can
be determined with SHOW STATUS (variable open_tables).
• The parameter sort_buffer (default 2M) specifies the size of the sorting buffer. This buffer is
used in SELECT commands with ORDER BY or GROUP BY if there is no index available. If the
buffer is too small, then a temporary file must be used, which is, of course, slow. The default
value of 2MB should suffice for many purposes.
• The parameter read_buffer_size (formerly record_buffer, default 128K) specifies how much
memory each thread reserves for reading sequential data from tables. The parameter should
not be unnecessarily large, since this memory is required for each new MySQL connection
(thus for each MySQL thread, not only once for the entire server). It is best to increase the
parameter only when it is needed for a particular session with SET SESSION
read_buffer_size=n.
• The parameter read_rnd_buffer_size (default 256K) has an effect similar to that of read_
buffer_size, except that it is valid for the case in which the records are to be read out in a
particular order (as with ORDER BY). A larger value can avoid search operations on the hard
disk, which can slow things down considerably with large tables. As with read_buffer_size,
read_rnd_buffer_size should be increased only as needed with SET SESSION.
• The parameter bulk_insert_buffer_size (default 8M) specifies how much memory is reserved
for the execution of INSERT commands in which many records are to be inserted simultane-
ously (such as INSERT … SELECT …). This parameter can also be changed for individual
connections with SET SESSION.
• The parameter join_buffer_size (default 128K) specifies how much memory is to be used
for JOIN operations when there is no index for the JOIN columns. (For tables that are fre-
quently linked there should definitely be an index for the linking field. This will contribute
more to speed efficiency than increasing this parameter.)
• The parameter tmp_table_size (default 32M) specifies how large temporary HEAP tables can
get. If this size is exceeded, then the tables are transformed into MyISAM tables and stored
in a temporary file.
• The parameter max_connections (default 100) gives the maximum number of database con-
nections that can be open at one time. The value should not be unnecessarily high, since
each connection requires memory and a file descriptor. On the other hand, persistent con-
nections profit from a larger number of allowed connections, since then it is less frequent
that a connection is closed and a new one has to be opened. (With SHOW STATUS you can
determine max_used_connections. This is the maximum number of connections that were
open simultaneously up to a particular time.)
CHAPTER 14 ■ADMINISTRATION AND SERVER CONFIGURATION 395
5351c14_final.qxd 8/26/05 6:50 PM Page 395
www.it-ebooks.info

■Tip You can get a look at the most important current settings with the command
SHOW VARIABLES LIKE
‘%size%
.
If you use InnoDB tables, you should definitely look also at the InnoDB options; see the previous section of this
chapter.
A brief description of all available parameters of the MySQL server can be obtained by launching mysqld with
the option --help. A more complete description is given in the MySQL documentation: http://dev.mysql.com/
doc/mysql/en/show-variables.html.
Query Cache
The query cache is a new function in MySQL 4.0. The basic idea of the query cache is to store the
results of SQL queries. If later this exact same query is to be executed, then the stored result can
be used instead of having to search through all the affected tables.
The query cache is no panacea, though, for speed optimization. In particular, queries must be
deleted from the query cache as soon as the underlying tables are altered:
• The query cache is therefore useful only if the data change relatively seldom (thus many
SELECT commands in relation to the number of UPDATE, INSERT, and DELETE com-
mands), and it is expected that particular queries will be frequently repeated (which is
frequently the case with web applications).
• The SELECT commands must be exactly the same (including spaces and case), so that the
query cache knows that they are, in fact, the same.
• The SELECT commands cannot contain user-defined variables and cannot use certain
functions, the most significant of which are RAND, NOW, CURTIME, CURDATE,
LAST_INSERT_ID, and HOST.
If these conditions are not satisfied, then the query cache SELECT queries will, in the worst
case, slow the system down somewhat (due to the management overhead).
Activating the Query Cache
By default, the query cache is deactivated (due to the default setting query_cache_size=0). To acti-
vate the query cache, execute the following changes to the MySQL configuration file:
# in /etc/my.cnf or my.ini (Windows)
[mysqld]
query_cache_size = 32M
query_cache_type = 1 # 0=Off, 1=On, 2=Demand
query_cache_limit = 50K
Now 32MB of RAM is reserved for the query cache. In the cache are stored only SELECT results
that require less than 50KB. (This avoids the situation in which a few large query results force all
other results out of the cache.)
After a server restart, the cache is automatically active. For MySQL applications nothing changes
(except that the reaction time to repeated queries is less).
Demand Mode
The query cache can also be run in demand mode. In this case, only those SELECT queries are con-
sidered that are executed with the option SQL_CACHE, as in SELECT SQL_CACHE * FROM authors.
This mode is useful if you wish to control which commands use the cache.
CHAPTER 14 ■ADMINISTRATION AND SERVER CONFIGURATION396
5351c14_final.qxd 8/26/05 6:50 PM Page 396
www.it-ebooks.info

No Temporary Storage of SQL Query Results
If you wish to prevent a SELECT command from using the active query cache (query_cache_type=1),
then simply add the option SQL_NO_CACHE. This makes sense with commands about which one is
certain that they will not soon be repeated and would therefore take up space unnecessarily in the
query cache.
Turning the Query Cache On and Off for a Connection
You can change the mode of the query cache for a particular connection. Just execute SET query_
cache_type = 0/1/2/OFF/ON/DEMAND.
Determining the Status of the Query Cache
If you wish to know how well the query cache is functioning, whether its size is well chosen, etc.,
then execute the command SHOW STATUS LIKE ‘qcache%’. As result you receive a list of status
variables, whose meaning is briefly described in Table 14-3.
Table 14-3. Query Cache Status Variables
Status Variable Meaning
Qcache_queries_in_cache Tells how many queries have results in the cache.
Qcache_inserts Tells how many queries have been cached up to now. This value is
generally greater than Qcache_queries_in_cache, since results are
removed from the cache due to lack of space or changes to tables.
Qcache_hits Tells how often a query was able to be answered directly from the
cache.
Qcache_lowmem_prunes Tells how many results were deleted from the cache because it was
full. (If this value is high, that is an indication that the cache size is
too small.)
Qcache_not_cached Tells how many queries were not accepted into the cache (e.g.,
because a function like RAND or NOW or the option SQL_NO_
CACHE was used).
Qcache_free_memory Tells how much memory is currently free in the cache.
With FLUSH QUERY CACHE you can defragment the cache (which, the MySQL documentation
states, makes possible improved memory usage, but it does not empty the cache). RESET QUERY
CACHE deletes all entries from the cache.
ISP Database Administration
Up to now we have assumed that you have installed MySQL on your own computer and have
unrestricted access to the server. And indeed, this is the usual starting point for every database
administrator.
However, with MySQL the situation can be a bit different. Often, your database is located on
the computer of an Internet service provider. There you have almost no administrative privileges.
That is, the ISP administers MySQL on its own. (If you have a responsible ISP, it will automatically
carry out backups of your databases, but don’t count on it.) Nonetheless, you will have to carry out
certain administrative tasks:
CHAPTER 14 ■ADMINISTRATION AND SERVER CONFIGURATION 397
5351c14_final.qxd 8/26/05 6:50 PM Page 397
www.it-ebooks.info

• Create new databases (provided that the ISP permits this).
• Execute backups. (Even if your ISP does this regularly, it is good to be able to be responsible
for your own data.)
• Execute a database upload. (For example, you have developed a database application on
your own computer and now wish to transfer the completed database to the ISP computer.)
Working with ssh
Administration is at its simplest when your ISP provides you with ssh access. Then you can log into
the ISP’s computer and use all of the commands introduced in this chapter. Needless to say, with
commands such as mysqldump you can access only your own databases. But that should suffice. For
moving files between your local computer and that of the ISP, you can use ftp.
Unfortunately, not all ISPs offer their clients access via ssh, since this means extra work for the
ISP and greater security risks.
Working via phpMyAdmin
Probably the most popular solution to this administrative problem is offered by phpMyAdmin, a col-
lection of PHP scripts installed in a www directory on the ISP’s computer (see Chapter 6). In principle,
phpMyAdmin is suited for all the administrative tasks mentioned above. In practice, however, there is
usually a problem.
For the execution of PHP scripts—and thus for phpMyAdmin as well—there is a time limit. If
the execution of a script exceeds the allotted time, the script is automatically terminated. In most
cases this limit represents a sensible protective measure against programmer error (such as infinite
loops), but unfortunately, it makes the backup of a large database impossible.
Implementing Custom PHP Scripts for Administration
Instead of working with phpMyAdmin, you can, of course, program your own PHP scripts for
administration and store them in a directory on your web site. For example, you can execute a
backup of a database with a PHP file of the following design:
<?php system("/usr/bin/mysqldump --host=hostname --user=username " .
"--password=xxx dbname > backup.sql"); ?>
Instead of /usr/bin you may have to specify a different path (for example, /usr/local/bin). In
some circumstances things will work without a path name being specified. As hostname you can use
localhost if the web server and MySQL are running on the same computer.
After you have loaded the page via your web browser (and thereby executed the script), you can
transfer the file backup.sql, which is located in the same directory as the script, to your computer,
again via the web browser or FTP.
■Note With an ISP the web server (and thus the PHP script as well) is usually executed under the account
nobody
or
apache
. This user usually has writing privileges in your directories.
mysqldump works only if you have granted extensive
write
privileges for the directory in which the PHP script
is located. For this the command chmod a+w directory would be necessary, but you might not be able to exe-
cute it without ssh. Instead, use your FTP client to set the directory’s access privileges.
CHAPTER 14 ■ADMINISTRATION AND SERVER CONFIGURATION398
5351c14_final.qxd 8/26/05 6:50 PM Page 398
www.it-ebooks.info
Conversely, for an upload you first transfer via FTP the file upload.sql generated on your com-
puter into the directory in which your PHP administration scripts are located. Then you execute a
script via your web browser according to the following pattern:
<?php system("/usr/bin/mysql --host=hostname --user=username " .
"--password=xxx dbname < upload.sql"); ?>
For the upload to succeed, the specified database must already exist. If that is not the case, you
can first create the database with mysqladmin (which you also execute in the PHP script via system).
If you have previously created upload.sql with mysqldump, then the database at the ISP may not
contain the tables defined in upload.sql. If necessary, you must insert some DROP TABLE IF EXISTS
commands in upload.sql.
In comparison to phpMyAdmin, the advantage of this way of proceeding is that no time is lost
in the transfer of the database files over the Internet. Instead, the upload file is read from the local
computer, or the download file is written there. However, this does not change anything in regard
to the time limit for PHP scripts. Of course, you can transport somewhat larger databases with the
method presented here than with phpMyAdmin, but sooner or later you will find yourself nose to
nose with the PHP time limit.
Do not forget to secure access to the directory with your administrative scripts with .htaccess.
The use of .htaccess is described in Chapter 2.
Custom Perl Scripts for Administration
What works with PHP works also, of course, with Perl, and often better. The advantage of Perl is that
in the execution of CGI scripts there is often no time limit. (But this depends on the provider.)
In Perl, too, there is a system function for calling external commands. In the lines below there is
also code added that evaluates and displays the return value of this function. The mysqldump and mysql
commands look exactly the same in the PHP scripts presented above. Even the preparatory work is
identical:
#!/usr/bin/perl -w
use CGI qw(:standard);
use CGI::Carp qw(fatalsToBrowser);
print header(), start_html("Backup");
if(system("/usr/bin/mysqldump --host=hostname --user=username " .
"--password=xxx dbname > backup.sql")) {
print p(), "failed", end_html(); }
else {
print p(), "done", end_html(); }
CHAPTER 14 ■ADMINISTRATION AND SERVER CONFIGURATION 399
5351c14_final.qxd 8/26/05 6:50 PM Page 399
www.it-ebooks.info


PHP
PHP stands for PHP: Hypertext Preprocessor (a typical recursive abbreviation in the world of Unix).
PHP is a script programming language for HTML pages. The code embedded in an HTML file is
executed by the server. (The Active Server Pages of Microsoft also follow this plan.)
When a programming language is brought into play with MySQL, that language is almost
always PHP. The reason for this is that PHP and MySQL offer almost ideal conditions for building
dynamic websites: simple deployment, high speed, and unbeatable price (free). This is the reason
that this PHP chapter is much more extensive than the following chapters, which deal with other
programming languages.
Since PHP 5 there are two interfaces available for MySQL programming: The mysql functions
are known to many PHP programmers from earlier versions of PHP. New since PHP 5 is the object-
oriented interface mysqli, which enables more elegant programming features and access to new
MySQL functions (e.g., the particularly efficient execution of SQL commands with parameters using
prepared statements). However, mysqli assumes that you have available versions PHP 5 and MySQL 4.1
or newer.
After an introduction to the most important mysqli functions, classes, methods, and proper-
ties, I will introduce several examples of elementary programming techniques, for example the
paged representation of search results, the processing of hierarchical data, and working with Uni-
code character strings.
Assumptions: This chapter assumes that PHP and MySQL have been correctly installed and con-
figured (see Chapter 2). Most of the examples are based on the newer mysqli interface and use the
database mylibrary, which was presented in Chapter 8. Note that you must synchronize the login and
password strings in the files mysql-intro.php, mysqli-intro.php, and password.php for the examples to
work properly. Read as well the readme file in the directory containing the example files for this chapter.
mysql Functions
The mysql functions are not an integral part of PHP, but an extension. In order for this extension
to be used, PHP under Linux must have been compiled with the option —with-mysql. With the
Windows version of PHP, the corresponding extension is provided as a DLL. However, the extension
must be activated in php.ini, and PHP must find all the requisite DLLs (see also Chapter 2).
You can find out whether the PHP version you are using recognizes the mysql functions with
a minimal PHP script, which contains the line <?php phpinfo() ?>. The result of this script is a long
table containing available PHP functions. The mysql part of the output should look something like
Figure 15-1.
403
CHAPTER 15
■ ■ ■
5351c15_final.qxd 8/26/05 7:10 PM Page 403
www.it-ebooks.info

Establishing a Connection
To establish a connection, execute mysql_connect, where you need to pass three pieces of information:
the computer name (hostname) of the MySQL server, the MySQL user name, and the password. If
MySQL is running on the same computer as the PHP script, the computer name should be localhost.
$conn = mysql_connect("localhost", "username", "xxx");
With RHEL and Fedora, SELinux is configured in such a way that Apache and PHP are not
permitted to access the MySQL socket file. Therefore, instead of localhost, the actual name of the
computer must be given. Communcation with the MySQL server now takes place via TCP/IP
instead of the socket file.
The function returns an identification number. You will need this number in the future only if
you open more than one connection to MySQL. (As long as there is only one connection to MySQL,
this connection is the default connection. The ID number therefore does not need to be given in
calling various mysql_xxx functions.)
With an optional fourth parameter you can specify whether, in the case of multiple executions of
mysql_connect with the same connection data, only a link to the existing connection should be returned
(the default is false) or a new connection should be established (true). The format mysql_connect($host,
$name, $pw, true) is thus absolutely necessary if you need several distinct connections.
In the optional fifth parameter you can pass client flags. A possible constant is
MYSQL_CLIENT_COMPRESS (if the data exchange should be compressed).
If problems occur, the variable conn contains the value FALSE. Moreover, mysql_connect sends
an error message to the web server, so that in the resulting HTML document an unattractive error
message appears. To avoid this message, the character @must be placed before mysql_connect. (This
character generally inhibits the display of error messages in PHP function calls.)
If you wish to provide the PHP code for establishing the connection itself with a readable error
message, the necessary code looks something like this:
CHAPTER 15 ■PHP404
Figure 15-1. PHP recognizes the mysql functions.
5351c15_final.qxd 8/26/05 7:10 PM Page 404
www.it-ebooks.info

$conn = @mysql_connect("localhost", "username", "xxx");
if($conn == FALSE) {
echo "<p>error message ...</p>\n";
exit();
}
As soon as a connection has been made, you can execute SQL commands with various mysql_xxx
functions and much else besides. In order to avoid having to specify the desired database every time,
you can select a default database with mysql_select_db. (This corresponds to the SQL command USE
databasename.)
mysql_select_db("mylibrary");
The functions mysql_get_client_info, mysql_get_host_info, mysql_get_proto_info, and
mysql_get_server_info, as well as mysql_client_encoding, mysql_stat, and mysql_thread_id provide
precise information about the current connection: the version of the client library, the type of con-
nection to the server, the version number of the protocol, the server version, the valid character set,
the current status of the server, and the thread number of the MySQL server process.
You close the connection to MySQL with mysql_close.
Executing SQL Commands
To execute SQL commands, you pass them as a character string to the function mysql_query. If the
command is not intended for the current database, you can add the name of the desired database
using mysql_db_query. With both of these functions an optional final parameter can be given: the
ID number of the connection (that is, the return value of mysql_connect) if there is more than one
connection to MySQL.
$result = mysql_query("SELECT COUNT(*) FROM titles");
$result = mysql_db_query("mylibrary", "SELECT COUNT(*) FROM titles");
Every type of SQL command can be executed with mysql_query: queries with SELECT; changes to
data with INSERT, UPDATE, and DELETE; changes to the database structure with CREATE TABLE; etc.
■Caution The SQL command must not be terminated with a semicolon. (That would be an SQL syntax error.)
It is impossible to pass several commands simultaneously. If you wish to execute more than one command, you
must execute
mysql_query
once for each command.
After INSERT, UPDATE, and DELETE commands (and all other commands that change data
records) you can determine with mysql_affected_rows how many records were changed. This func-
tion is also useful after CREATE TABLE … SELECT … for determining how many records were
inserted into the newly created table.
Moreover, after an INSERT command you can determine with mysql_insert_id the
AUTO_INCREMENT value that was used for the last new record to be inserted.
$n = mysql_affected_rows(); // number of changed records
$new_id = mysql_insert_id(); // ID number of the last AUTO_INCREMENT record
Since PHP 4.3, the function mysql_info has offered additional information about the last ALTER
TABLE, CREATE TABLE, INSERT INTO, LOAD DATA, and UPDATE command. The returned string con-
tains, for example, information on duplicates and warnings. For example, if you execute the command
CREATE TABLE backup SELECT * FROM table, then mysql_info returns a string of the form “Records:
nnn Duplicates: nnn Warnings: nnn”.
CHAPTER 15 ■PHP 405
5351c15_final.qxd 8/26/05 7:10 PM Page 405
www.it-ebooks.info

If an SQL command can be correctly executed, mysql_query returns a nonzero value. If the
command involved a query, the return value of mysql_query is a reference to a PHP resource (e.g.,
a character string of the form “Resource id #2”). The return value can be used in various other
functions (e.g., mysql_fetch_row) to evaluate individual fields of the table. In the examples of this
chapter, the return value will generally be stored in a variable called result. (The use of SELECT
results will be described in detail in the following section.)
On the other hand, if an SQL command cannot be executed, mysql_query returns the result
FALSE (i.e., 0). Moreover, an error message is displayed, which you can suppress by executing
mysql_query with a prefixed @character. (The cause of the error can be determined by evaluating
mysql_errno and mysql_error. More information on error evaluation will be given shortly.)
Evaluating SELECT Results
When you execute a SELECT query with mysql_query, you obtain as result a reference to a table
with rows rows and cols columns:
$result = mysql_query("SELECT * FROM titles");
$rows = mysql_num_rows($result);
$cols = mysql_num_fields($result);
This is also the case in two special situations:
• If the query returns only a single value (e.g., SELECT COUNT(*) FROM table), the table has
only one row and one column.
• If the query returns no result at all (e.g., when there is no record that satisfies a WHERE condi-
tion), the table has 0 rows. This case can be recognized only by evaluating mysql_num_rows.
Only when an SQL query is syntactically incorrect or there is a problem communicating with
MySQL will you get no result whatsoever (that is, the return value of mysql_query is FALSE).
The simplest, but slowest, access to the individual fields of a table is offered by mysql_result.
In two parameters you give the desired row and column numbers. (The count begins at 0, as with
all PHP/MySQL functions.) Instead of the column number, you can also give the column name (or
an alias, if you processed the SQL query with AS alias).
$item = mysql_result($result, $row, $col);
It is much more efficient to evaluate the result row by row. For this there are three functions:
$row = mysql_fetch_row($result);
$row = mysql_fetch_array($result);
$row = mysql_fetch_assoc($result);
$row = mysql_fetch_object($result);
•mysql_fetch_row returns a record in the form of a simple array. Access to the columns is via
$row[$n].
•mysql_fetch_array returns a record in the form of an associative array. Access to the columns
is via $row[$n] or $row[$colname] (so, for example, $row[3] or $row[“publName”]). The col-
umn name is case-sensitive.
•mysql_fetch_assoc (available since PHP 4.0.3) also returns an associative field, which can be
read in the form $row[$colname]. In contrast to mysql_fetch_array, one is not allowed to give
the column number as parameter.
•mysql_fetch_object returns a data record as object. Access to the column is via $row->colname.
CHAPTER 15 ■PHP406
5351c15_final.qxd 8/26/05 7:10 PM Page 406
www.it-ebooks.info
A common feature of all four functions is that with each call, the next record is automatically
returned (or FALSE if the end of the list of data has been reached). If this specified order should be
changed, the currently active record can be changed with mysql_data_seek:
mysql_data_seek($result, $rownr);
PHP stores query results until the end of the script. If a query result must be released earlier
(for example, if you have executed a large number of queries in a script and don’t want to waste
memory), you can release the result early with mysql_free_result. This is particularly useful if the
script contains a loop that executes SQL queries.
mysql_free_result($result);
An Example with SELECT
The following lines should clarify the interplay among the various functions. After the connection,
protected with an if, the program executes the query SELECT * FROM titles for the database mylibrary
and displays the titles (and subtitles, when present) found in rows. htmlspecialchars ensures that any
special characters in a book title (e.g., <, >, “) are coded in conformity to HTML. After the output, the
result object is deleted and the connection ended.
// example mysql-intro.php
if($conn = @mysql_connect("localhost", "root", "xxx")) {
mysql_select_db("mylibrary");
if($result=mysql_query("SELECT * FROM titles ORDER BY title")) {
printf("<p>Number of records: %d</p>\n", mysql_num_rows($result));
printf("<p>Number of columns: %d</p>\n",
mysql_num_fields($result));
while($row = mysql_fetch_object($result)) {
if($row->subtitle)
printf("<br />%s -- %s\n",
htmlspecialchars($row->title), htmlspecialchars ($row->subtitle));
else
printf("<br />%s\n", htmlspecialchars($row->title));
}
mysql_free_result($result);
}
} else {
printf("<p>Sorry, could not connect to MySQL server! %s</p>\n",
mysql_error());
}
The output is shown in Figure 15-2.
CHAPTER 15 ■PHP 407
5351c15_final.qxd 8/26/05 7:10 PM Page 407
www.it-ebooks.info

Column Names and Metainformation
If you are processing generally valid queries and wish to display the results, you need not only the
data themselves, but also metainformation about the nature of the data, such as the names of the
columns and their data types.
mysql_field_name returns the name of the specified column. mysql_field_table gives in addi-
tion which table the data come from (important in queries that collect data from several tables).
mysql_field_type gives the data type of the column as a string (e.g., “BLOB”). mysql_field_len gives
the maximum length of the column (of particular interest with the data types CHAR and VARCHAR).
$colname = mysql_field_name($result, $n);
$tblname = mysql_field_table($result, $n);
$typename = mysql_field_type($result, $n);
$collength = mysql_field_len($result, $n);
Even more detailed information on a column is given by mysql_field_flags and mysql_fetch_field:
The function mysql_field_flags returns a string in which the most important attributes of the column
are given (e.g., “not_null primary_key”). The properties are separated by spaces; the evaluation pro-
ceeds most simply with explode.
mysql_fetch_field, on the other hand, returns an object that provides some of the same infor-
mation as that in the string of mysql_field_flags. Evaluation takes place in the form colinfo->name,
colinfo->blob, etc.
$colflags = mysql_field_flags($result, $n);
$colinfo = mysql_fetch_field($result, $n);
Queries with mysql_unbuffered_query
You can also execute SELECT queries with mysql_unbuffered_query (instead of with mysql_query).
This has the effect that the query results are not transferred at once into the memory of the PHP
interpreter, but only as needed (that is, when individual result records are read). That yields the
following consequences:
CHAPTER 15 ■PHP408
Figure 15-2. The mylibrary title list as result of the example program
5351c15_final.qxd 8/26/05 7:10 PM Page 408
www.it-ebooks.info
• The data remain on the server until they are fetched by the PHP script. This means that dur-
ing this time, resources are blocked on the MySQL server. (The PHP interpreter must reserve
only a very small amount of memory for this intermediate storage.)
• You must read in the found records, one after the other, with mysql_fetch_row,
mysql_object, mysql_assoc, or mysql_array (forward only). On the other hand, the func-
tions mysql_fetch_result and mysql_data_seek are unavailable. Already read records
cannot be read a second time, because only one record at a time is present in the mem-
ory of the PHP interpreter.
• You may not execute a new SQL command for the given MySQL connection before you have
read all the records of the SELECT result. If you nevertheless wish to do so, either you need
an additional connection to the MySQL server or you must explicitly release the SELECT
command with mysql_free_result($result).
• You can determine the number of found records only by running through all the result
records. You cannot use mysql_num_rows.
•mysql_buffered_query is designed only for SELECT queries (and not for commands that
return no result, such as INSERT or DELETE).
The function mysql_unbuffered_query is especially suitable when very large SELECT results are
to be processed record by record without much client memory being reserved for the purpose. Since
it is in the nature of PHP pages to process mostly very small amounts of data, and since the execution
time of PHP code is limited (via the setting max_execution_time in php.ini), there are few situations
in which this function has real advantages over mysql_query.
Transactions
There are no functions for managing transactions. If you wish to execute several SQL commands as
a transaction, then first execute mysql_query(“BEGIN”). With mysql_query(“COMMIT”) you confirm
the transaction, and with mysql_query(“ROLLBACK”) you can undo all the commands of the trans-
action. Note that at present, MySQL supports transactions only for InnoDB tables.
Error Handling and Search
All mysql_xxx functions return FALSE if an error occurs during execution. Information on the nature
of the error is obtained by evaluating the functions mysql_errno (returns an error number) and
mysql_error (error message).
Many mysql functions themselves write error messages to the HTML output. If you wish to sup-
press that, you must call the function with a prefixed @character or use the setting display_errors = Off
in php.ini.
$result = @mysql_query($sql);
if(!$result) {
printf("<p>error: %d -- %s</p>\n", mysql_errno(),
htmlspecialchars(mysql_error()));
}
In general, you must always count on there being errors, especially in the execution of SQL com-
mands that alter data. A possible cause of error can be connection problems with the MySQL server.
In searching for errors, the function mysql_query_test can be useful. It is seen as a replacement
for mysql_query, and it displays every executed SQL command in blue. If an error occurs, the error
message is displayed at once.
CHAPTER 15 ■PHP 409
5351c15_final.qxd 8/26/05 7:10 PM Page 409
www.it-ebooks.info

function mysql_query_test($sql) {
echo '<p><font color="#0000ff"> SQL:', htmlspecialchars($sql),
"</font></p>\n";
$result = mysql_query($sql);
if($result) return $result;
echo '<p><font color="#ff0000">Error: ',
htmlspecialchars(mysql_error()), "</font></p>\n";
die();
}
■Tip What should you do if an example from this book fails to function properly? The error message, if one is
displayed, often does not indicate a clear cause of the problem.
The cause of problems is almost always database access: The PHP script cannot, for example, read the data
in the database and therefore returns incorrect data or no data at all. There are many possible reasons for this, but
they almost always have to do with access privileges: incorrect password, no password when one was required.
Only when MySQL is not secured at all will access from the local computer be possible with the combination
name = “root” and password = “”
.
mysqli Classes, Methods, and Properties
The mysqli interface is considered, at least by developers of MySQL applications, to be among the
most important innovations in PHP 5. This interface makes possible object-oriented programming
of database access with MySQL and is thus a great help in the creation of readable code.
A second advantage of mysqli in comparison to the older mysql interface is that with it, SQL com-
mands with parameters can be executed very efficiently (prepared statements). Such commands have
been possible only since MySQL 4.1. They offer somewhat greater efficiency when several equivalent
SQL commands are to be executed that differ only in their parameters.
If you are using stored procedures, there is a second argument in favor of mysqli: With multi_query
you can execute stored procedures that return not one, but several records (thus the results of several
SELECT commands). To do so is much more complicated with the mysql interface.
The mysqli interface can be used in both an object-oriented and procedural manner. However,
this book describes only the object-oriented approach. If you prefer to work procedurally, then use
the interface mysql introduced in the previous section.
Which Will It Be: mysql or mysqli?
With two interfaces available, the following question naturally arises: Which interface is better, and
which one should I use?
In favor of mysqli one can say that it is the more modern interface. It offers more functions,
leads usually to simpler code, and in many instances promises greater speed. For this reason, all the
remaining sections of the chapter are based on mysqli.
Against mysqli one may say that this interface assumes PHP 5 and MySQL 4.1 (or newer ver-
sions). If you are writing code that must be compatible with PHP 4.nor MySQL 4.0, you should stick
with mysql.
Although you may freely install the newest program versions on your development computer,
many Internet service providers are very conservative as regards migrating to new versions of soft-
ware. Stability and maturity generally count for more than new functionality. Thus the mysql
interface will surely justify its existence for a few more years.
CHAPTER 15 ■PHP410
5351c15_final.qxd 8/26/05 7:10 PM Page 410
www.it-ebooks.info
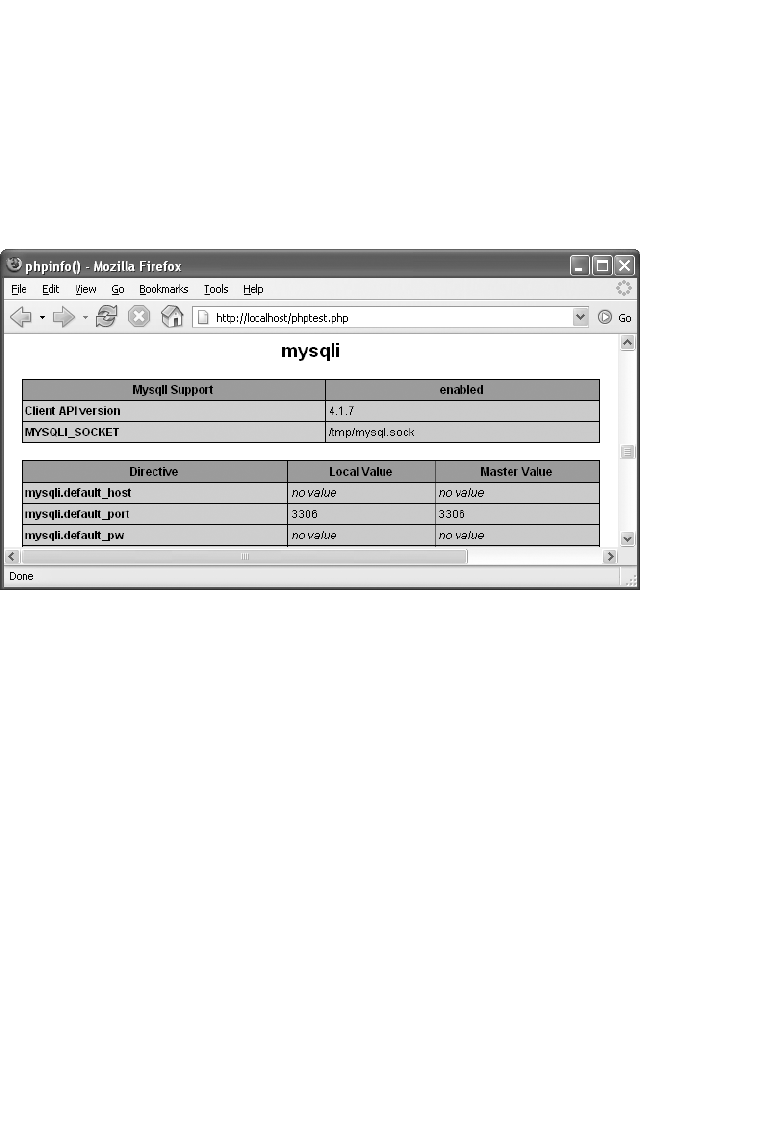
Availability Tests
The mysqli interface is, like the mysql interface, not an integral component of PHP, but an extension.
For this extension to be usable, PHP must be compiled under Linux with the option —with-mysqli.
With the Windows version of PHP the corresponding extension is provided as a DLL, and the extension
must be activated in php.ini, and PHP must be able to find all requisite DLLs (see also Chapter 2).
You can most easily determine whether the version of PHP that you are using recognizes the
mysqli interface with a minimal PHP script, containing simply the line <?php phpinfo(); ?>. The result
of this script is a long table of the available PHP functions. The mysqli part of the output should look
something like that in Figure 15-3.
Overview of Classes
mysqli makes three classes available:
mysqli:Objects of this class control the connection to the MySQL server. To establish a connec-
tion, you use a constructor. The most important method is called query, and its purpose is to
execute SQL queries. With SELECT queries you obtain as result a mysql_result object.
mysqli_result:Objects of this class contain the result of SELECT queries.
mysqli_stmt:With objects of this class you can define and execute parameterized SQL commands.
You create mysqli_stmt objects with $mysqli ->prepare.
Making the Connection
To create a new connection to the MySQL server, pass to the mysqli constructor the name of the
server (or localhost if the MySQL server is running on the local computer), the user name, and the
password. Three additional parameters are optional: the name of the database that you wish to use,
the port number of the MySQL server (by default 3306), and the name of the socket file or named
pipe. You can later change the default database for the active connection with the method select_db.
With RHEL and Fedora, SELinux is configured in such a way that Apache and PHP are not per-
mitted to access the MySQL socket file. Therefore, instead of localhost, the actual name of the
CHAPTER 15 ■PHP 411
Figure 15-3. PHP recognizes the mysqli interface.
5351c15_final.qxd 8/26/05 7:10 PM Page 411
www.it-ebooks.info

computer must be given. Communcation with the MySQL server now takes place via TCP/IP
instead of the socket file.
As a rule, the constructor returns a mysqli object. However, you must test with the function
mysqli_connect_errno whether an error occurred in building the connection. The associated error
message is returned by mysqli_connect_error.
With various methods and properties such as client_info, character_set_name, get_client_info,
get_host_info, get_server_info, and stat you can determine characteristics of the database connection.
When you no longer need the connection to the database, you should explicitly close the
mysqli object with close.
// create connection to the database
$mysqli = new mysqli("localhost", "user", "password", "mylibrary");
// test whether connection OK
if(mysqli_connect_errno()) {
echo "<p>Sorry, no connection! ", mysqli_connect_error(), "</p>\n";
exit();
}
// use connection
...
// close connection
$mysqli->close();
All further examples in this section assume that $mysqli is an object with an active MySQL
connection.
Establishing the Connection with real_connect
The establishment of a connection with the mysqli constructor as described above has the drawback
that you cannot set any MySQL-specific connection options. If that is necessary (even if seldom), this
is how you can make the connection:
$mysqli = mysqli_init(); // create mysqli object
$mysqli->options(...); // set additonal options (optional)
$mysqli->ssl_set(...); // set SSL options (optional)
// create connection to MySQL server
$mysqli->real_connect("localhost", "user", "password", "mylibrary");
// test whether OK
if(mysqli_connect_errno()) {
echo "<p>Sorry, no connection! ", mysqli_connect_error(), "</p>\n";
exit(); }
Additional Connection Options
The methods options and ssl_set are optional. With options you can set various MySQL options, for
example to set the timeout period for a connection or to execute an SQL command directly after the
connection is made:
$mysqli->options(MYSQLI_OPT_CONNECT_TIMEOUT, 10);
$mysqli->options(MYSQLI_INIT_COMMAND, "SQL command ...");
With ssl_set you can set the keys and other parameters for SSL encryption:
$mysqli->ssl_set("key", "cert", "ca", "capath", "cipher");
In the optional fifth through seventh parameters you can pass to the method real_connect
the IP port number of the MySQL (generally 3306), the server’s socket file for internal Unix/Linux
communication, as well as some flags with specific connection attributes. Some allowable flags
CHAPTER 15 ■PHP412
5351c15_final.qxd 8/26/05 7:10 PM Page 412
www.it-ebooks.info

are MYSQLI_CLIENT_COMPRESS and MYSQL_CLIENT_SSL, if all transmitted data is to be respec-
tively compressed or encrypted via SSL.
$mysqli->real_connect("localhost", "user", "password", "mylibrary",
3306, "/var/lib/mysql/mysql.sock", MYSQLI_CLIENT_COMPRESS);
Executing SQL Commands
The mysqli interface offers a number of ways to execute SQL commands, but the most frequently used
is the method query. With SQL commands that don’t return data (e.g., INSERT, UPDATE, DELETE),
query normally returns TRUE. In addition, $mysqli->affected_rows returns the number of changed
records. $mysqli->insert_id returns the AUTO_INCREMENT value generated from the last INSERT
command.
if($mysqli->query("INSERT ...")) {
echo "<p>changed records: ", $mysqli->affected_rows, "</p>\n";
echo "<p>new ID value: ", $mysqli->insert_id, "</p>\n";
}
With SELECT commands, query returns a mysqli_result object. $result->num_rows gives the
number of found records, and $result->field_count the number of result columns.
if($result = $mysqli->query("SELECT ...")) {
echo "<p>found records: ", $result->num_rows, "</p>\n";
echo "<p>number of columns: ", $result->field_count, "</p>\n";
...
$result->close();
}
If an error occurs in the execution of a command, the query return value is FALSE. More precise
information about the error can be obtained with $mysqli->errno and $mysqli->error.
■Tip Note that you can pass only a single command to
query
. If you wish to execute several commands simul-
taneously, you must use the method
multi_query
, which will be described shortly.
If you wish to execute the same SQL command several times with different parameters, then your most effi-
cient option is first to prepare the command and then execute it. The use of such
prepared statements
is the
subject of the next major section of this chapter.
A third alternative to
query
is the method
real_query
, which executes an SQL command without transmitting
the result. The method returns
TRUE
or
FALSE
, depending on whether the SQL command was executed without
error. If the command returns records, they must be processed with the methods
store_result
and
use_result
.
(Caution: If you do not read the resulting records with
store_result
or
use_result
, then all following SQL commands
will result in an
out-of-sync
error.)
Evaluating SELECT Results (mysqli_result)
By default, query transfers all result data from the server to the client and makes them available as
amysqli_result object. If you want the results to remain on the server, to be read as needed record by
record, than pass to query the additional parameter MYSQLI_USE_RESULT. This is useful when you
are processing large data sets that should not be brought over to the client all at once. (In other words,
the client would be burdened, and so the server must keep SELECT results longer in memory.) A dis-
advantage of MYSQLI_USE_RESULT is that you can determine the number of records only by reading
all the records.
CHAPTER 15 ■PHP 413
5351c15_final.qxd 8/26/05 7:10 PM Page 413
www.it-ebooks.info

As in the mysql interface, mysqli also offers four methods similar to one another for reading the
result row by row:
$row = $result->fetch_row();
$row = $result->fetch_array();
$row = $result->fetch_assoc();
$row = $result->fetch_object();
•fetch_row returns a record in the form of a simple array. Access to the columns is via $row[$n].
•fetch_array returns a record in the form of an associative array. Access to the columns is via
$row[$n] or $row[$colname] (e.g., $row[3] oder $row[“publName”]). The column name
is case-sensitive.
•fetch_assoc also returns an associative field, which can be read in the form $row[$colname]. In
contrast to fetch_array, here it is not permitted to pass the column number as a parameter.
•fetch_object returns a record as an object. Access to the columns is via $row->colname, where
the column names are case-sensitive.
A common feature of all four methods is that with each call, the next record is automatically
retrieved (or FALSE if the end of the data list is reached). If the specified order is to be changed, the
currently active record can be changed with $result->data_seek.
$result->data_seek($rownr);
The fetch methods automatically change SQL NULL values into the PHP constant NULL. The
following lines show the application of fetch_assoc in outputting the content of a simple SELECT
query. The function htmlspecialchars ensures that any special characters stored in the database
(e.g., <, >, “, &) are transformed to the correct HTML code.
// example mysqli-intro.php
if($result = $mysqli->query("SELECT title, subtitle FROM titles")) {
while($row = $result->fetch_assoc()){
if($row["subtitle"]==NULL)
printf("<br />%s\n", htmlspecialchars($row["title"]));
else
printf("<br />%s -- %s\n", htmlspecialchars($row["title"]),
htmlspecialchars($row["subtitle"]));
}
// release content of result
$result->close();
}
Metadata on the SELECT Result
The already mentioned properties $result->num_rows and $result->field_count give the number of
found records as well as the number of columns. $result->lengths returns an array whose elements
contain the number of characters in each column for the last record read with fetch_xxx.
If you require more precise data about the nature of the query results, you should evaluate
$meta=$result->fetch_fields(). This method returns an object array. Each object contains, among
other things, the following data:
$meta[$n]->name name of the column
$meta[$n]->table name of the underlying table
$meta[$n]->max_length longest string in the SELECT result
$meta[$n]->type data type ID (Integer)
CHAPTER 15 ■PHP414
5351c15_final.qxd 8/26/05 7:10 PM Page 414
www.it-ebooks.info

The following lines show how to evaluate the object array in a loop:
foreach($result->fetch_fields() as $meta)
printf("<br />Name=%s Table=%s Len=%d Type=%s\n",
$meta->name, $meta->table, $meta->max_length, $meta->type);
Executing Several SQL Commands at Once
With query you can execute only a single SQL command. Sometimes, however, it is useful to execute
several commands simultaneously. To do so, pass a character string to the method multi_query con-
taining the commands, separated by semicolons. The method returns TRUE if the first command was
executed without error. Otherwise, it returns FALSE. (The return value TRUE gives no information as
to whether the remaining commands were executed without error; see the remark below.)
Since each command can return results, the use of multi_query also changes how you evaluate
results: The result of the first command can be read with the method use_result or store_result. The
difference between the two methods is that in using use_result, the result remains on the server and
is transferred to the client record by record. With store_result, all results are immediately transferred
to the client, which in general is more efficient.
You can test whether there are additional results with more_results. This method returns TRUE or
FALSE as result. If you want to process the next result, execute next_result. This method also returns
TRUE or FALSE, depending on whether there are further results. If there are, they must be read with
use_result or store_result.
The following lines show a typical application of these methods: With the first SQL command
the variable @a is initialized. This variable is passed to a stored procedure (that is, a user-defined SQL
function). Then the values of @a and @b are output with SELECT. Each result object is displayed with
the function show_result, which formats the result as a table. The code of show_result appears later in
the chapter. (In this example the third SQL command simply returns a result.)
$sql = "SET @a=12; CALL mysp(@a, @b); SELECT @a, @b";
$ok = $mysqli->multi_query($sql);
if($ok)
do {
$result = $mysqli->store_result();
if($result) {
show_table($result);
$result->close();
}
} while($mysqli->next_result());
■Caution The methods
multi_query
and
next_result
are problematic if errors occur during the processing
of commands. The return value of the method
multi_query
and the
mysqli
properties
errno
,
error
,
info
, and
warning_count
relate to only the first SQL command. There is no way of determining errors from the second
command on.
The source of this problem is the implementation of the method
next_result
, which in PHP 5.0.3 returns only
TRUE
or
FALSE
. However, the underlying C-API function
mysql_next_result
distinguishes three variants (further
results, no further results, and error).
SQL Commands with Parameters (Prepared Statements)
With many PHP pages, similar queries must be executed that differ only in the values of individual
parameters. In such cases, MySQL, from version 4.1, provides prepared statements: The complete
CHAPTER 15 ■PHP 415
5351c15_final.qxd 8/26/05 7:10 PM Page 415
www.it-ebooks.info

command is sent to the MySQL server only once; thereafter, only the parameters vary. This reduces
considerably the amount of data to be transmitted and also makes the processing of the commands
more efficient, since the MySQL server must analyze the structure of the command only once.
From the point of view of PHP programming, the greatest advantage of prepared statements is
that the code is much more elegant and understandable. It is no longer necessary to compose a valid
command out of the individual parameters (including the quoting of character strings and BLOBs).
Instead, it suffices to store the parameters in simple PHP variables and then execute execute.
Before you do so, some preparations are required. First you must specify the SQL command
with $mysqli->prepare. In the command you place question marks in place of the parameters. As
result, you obtain a mysqli_stmt object, which becomes the basis for all further operations. The fol-
lowing text assumes that this object has been stored in the variable $stmt.
Then, with $stmt->bind_param you bind the parameters to the PHP variables. (Take care to
place things in the correct order.) Each parameter’s data type must be specified by the appropriate
character, as shown in Table 15-1.
Table 15-1. Data Types for bind_param
Character Meaning
iwhole number (integer)
dfloating-point (double)
scharacter string (string)
bbinary data (BLOBs, binary)
In order actually to execute the SQL command, store the desired values in the PHP variables and
then execute $stmt->execute. You can repeat the process as often as you like. When you no longer
need the mysqli_stmt object, you should release it explicitly at once. You thereby not only free the
object from local memory, you also signal the MySQL server that no further commands are to follow
and it can therefore delete the prepared statement.
The following example clarifies the process:
// example mysqli-prepared.php
// prepare SQL command with parameters
$stmt = $mysqli->prepare(
"INSERT INTO titles (title, subtitle, langID) VALUES (?, ?, ?)");
$stmt->bind_param('ssi', $title, $subtitle, $langID);
// execute command multiple times
$title = "new Linux title 1";
$subtitle = "new subtitle 1";
$langID = 1;
$stmt->execute();
$title = "new MySQL title 2";
$subtitle = "new subtitle 2";
$langID = 2;
$stmt->execute();
// release command
$stmt->close();
After INSERT, UPDATE, and DELETE commands, $stmt->affected_rows returns the number
of changed records. $mysqli->insert_id (not $stmt->insert_id!) returns the last-generated
AUTO_INCREMENT value.
CHAPTER 15 ■PHP416
5351c15_final.qxd 8/26/05 7:10 PM Page 416
www.it-ebooks.info

Evaluating SELECT Results (Prepared Statements)
Unlike $mysqli->query,$stmt->execute does not return a mysqli_result object. Instead, the
mysqli_stmt object offers a significantly more elegant way of evaluating SELECT results: After carry-
ing out the query, use $stmt->bind_result to bind the columns of the result to PHP variables. Then
$stmt->fetch moves the next data record into these variables. fetch returns the value TRUE or FALSE,
depending on whether a record was found or all records have been processed.
By default, the SELECT results remain on the MySQL server and are transmitted to the client by
fetch record by record. If you wish to have all the results transferred to the client at once, then execute
$stmt->store_result. This is more efficient and relieves the server if you need to read all the records. In
the additional code for reading the data, store_result changes nothing. That is, the method is optional.
// example mysqli-prepared.php
// execute query
$stmt = $mysqli->prepare("SELECT titleID, title FROM titles");
$stmt->execute();
// transfer all results to the client (optional!)
$stmt->store_result();
// bind SELECT result to variables
$stmt->bind_result($titleID, $title);
// loop through all results
while($stmt->fetch())
printf("<br />%d %s\n",
htmlspecialchars($titleID), htmlspecialchars($title));
$stmt->close();
If you wish to know how many records the SELECT command has returned, you can retrieve
that number with $stmt->num_rows. However, this property functions only if you first execute
$stmt->store_result.
Of course, you can combine the method bind_result presented here with the method
bind_param presented in the previous section, for example if you wish to execute a command
of the form SELECT … FROM … WHERE column = ? several times. The following lines provide
an example.
// example mysqli-prepared.php
// preparation
$stmt = $mysqli->prepare(
"SELECT titleID, title FROM titles WHERE title LIKE ?");
$stmt->bind_param('s', $pattern);
// first SELECT command
$pattern="%Linux%";
$stmt->execute();
$stmt->store_result();
$stmt->bind_result($titleID, $title);
echo "<p></p>\n";
while($stmt->fetch())
printf("<br />%d %s\n", $titleID, htmlspecialchars($title));
// second SELECT command
$pattern="%MySQL%";
$stmt->execute();
$stmt->store_result();
$stmt->bind_result($titleID, $title); // possibly unnecessary
echo "<p></p>\n";
while($stmt->fetch())
printf("<br />%d %s\n", $titleID, htmlspecialchars($title));
// clean up
$stmt->close();
CHAPTER 15 ■PHP 417
5351c15_final.qxd 8/26/05 7:10 PM Page 417
www.it-ebooks.info

Unfortunately, it cannot be determined from the PHP documentation whether it is sufficient
to execute bind_result after the first call of the execute method, or whether bind_result must be exe-
cuted after every query. The above example worked in my tests even without the second bind_result
call. It is unclear whether one can rely on such behavior. You will be safer (and not lose too much
time) if you use execute and bind_result in pairs.
Transactions
The mysqli interface currently has no method corresponding to the SQL commands BEGIN
TRANSACTION and START TRANSACTION. If you have to use transactions, then you must first
deactivate auto commit mode with $mysqli->autocommit(0). (There is also no method or prop-
erty that gives information on the current commit mode. You must execute a query with SELECT
@@autocommit. Note that at present, MySQL supports transactions only for InnoDB tables.)
Once autocommit has been deactivated, all the SQL commands form a transaction, which you
can close with the mysqli method commit or abort with rollback. The next transaction begins along
with commit or rollback. Caution: If you forget commit or if an error occurs or a break in the connec-
tion interrupts before commit, then all SQL commands in the current transaction are rolled back.
Instead of the methods autocommit, commit, and rollback, you could simply execute the corre-
sponding SQL commands with real_query, for example $mysqli ->real_query(“START TRANSACTION”).
Outsourcing Database Functions into a Class
Most PHP projects consist of a large number of PHP files, and in most of the files the same code
fragments appear again and again: building a connection to the MySQL database, executing simple
queries, etc. Such a way of doing things is impractical for a variety of reasons:
Redundancy: Redundant code is generally to be avoided. If you discover an error, you may
have to correct it dozens of times. The same is true when access data change due to a change
in provider, and you have to change user name and password in dozens of files.
Security: For reasons of security, the MySQL user name and password should never appear
in plain text in a PHP file that is directly accessible over the web.
Error-handling: For convenience, and to achieve the most compact and readable code possi-
ble, one is tempted to minimize error handling routines or to avoid them altogether.
The solution to all three problems is to store all the MySQL access data as well as all functions
that are used repeatedly in a separate PHP file. This file can then be included in every project file.
More Security with a Separate Password File
Theoretically, visitors to your website should never see any of your PHP source code. (The code is
evaluated by the web server, but the user normally sees only the resulting HTML document.) But
there are some possible errors that can allow visitors to read a PHP file in plain text:
• The web server (for example, during an update) is unconfigured or incorrectly configured,
and it displays the PHP file without evaluating it.
• The PHP page is accessible via anonymous FTP. (That is a serious configuration error! If
there is a directory for anonymous FTP, it must be kept separate from the directory with
HTML and PHP files!)
CHAPTER 15 ■PHP418
5351c15_final.qxd 8/26/05 7:10 PM Page 418
www.it-ebooks.info

• When a PHP page is changed, a backup copy is stored (for example, under the name
name.php~ or name.php.bak). This file is not processed by the PHP interpreter due to its file
identifier being different from *.php. An attacker can easily determine by poking around
whether any such files exist.
To make it unlikely that strangers will obtain your MySQL password, you should store the
MySQL login information in a separate file. This information might look like this:
<?php
// file password.php
$mysqluser="user"; // user name for MySQL access
$mysqlpasswd="xxx"; // password
$mysqlhost="localhost"; // name of the computer on which MySQL is running
$mysqldb="mylibrary"; // name of the database
?>
Where you should store this file to keep it secure depends on the configuration of the web server.
On my website I have created a directory htdocs/_private/ and secured access to that directory with
a.htaccess file. Therefore, you can access the address http://www.kofler.cc/_private/password.php
only if you specify the HTTP user name given in .htaccess and the password stored in encrypted form
in the associated authentication file. And even then, you will see in the web browser only an empty file.
■Tip Use the file identifier *.php (and not *.inc) for your password and other include files. This will ensure that
the file is executed by the PHP interpreter in case of direct HTTP access.
Loading a Password File
The password file must be loaded into the PHP file in which the connection to MySQL is to be made
using the require_once function. This function has the effect that the file is loaded only once, even if
the require_once command appears in several PHP files that mutually call each other. If the password
file is not found, then require_once leads to an error and the abortion of the script.
If you suppose, for example, that the files intro.php and password.php are located in the direc-
tories /www/user1234/htdocs/php-example/general/intro.php and /www/user1234/htdocs/_private/
password.php, then the require_once instruction in intro.php must look like the following. In the path
specification the two periods .. mean that a subdirectory should be used. Depending on how the
directories with the PHP scripts and the include file are placed relative to one another, you will of
course have to change the path specification with require_once. (The example in the files for this
book always read the password file from the local directory. This simplifies the installation of the
example files, but is of course less secure.)
// file intro.php
require_once("../../_private/password.php");
$mysqli = new mysqli($mysqlhost, $mysqluser, $mysqlpasswd, $mysqldb);
...
Security and Convenience with the MyDb Class
After the storage of the MySQL access data, one can certainly go a step further and store all the code
necessary for database access in a separate PHP file. This file thus encapsulates all MySQL functions
that you frequently need in your project. In the process, you can use the new possibilities for object-
oriented programming offered by PHP 5 and formulate the code in its own class.
CHAPTER 15 ■PHP 419
5351c15_final.qxd 8/26/05 7:10 PM Page 419
www.it-ebooks.info

The following lines give an example of how such a class might look. The example uses the
mysqli interface; the code can also be realized analogously with the mysql interface.
// example file mydb.php
class MyDb {
protected $mysqli;
// constructor (create an object of this class)
function __construct() {
require_once('password.php');
$this->mysqli = @new mysqli($mysqlhost, $mysqluser,
$mysqlpasswd, $mysqldb);
// test whether connection OK
if(mysqli_connect_errno()) {
printf("<p>Sorry, no connection! %s\n</p>",
mysqli_connect_error());
// add any needed HTML code to conclude the code
// (</body></html> etc.)
$this->mysqli = FALSE;
exit();
}
}
// destructor (delete object)
function __destruct() {
$this->close();
}
// explicitly terminate object/connection
function close() {
if($this->mysqli)
$this->mysqli->close();
$this->mysqli = FALSE;
}
// execute SELECT return object field
function queryObjectArray($sql) {
if($result = $this->mysqli->query($sql)) {
if($result->num_rows) {
while($row = $result->fetch_object())
$result_array[] = $row;
return $result_array; }
else
return FALSE;
} else {
printf("<p>Error: %s</p>\n", $this->mysqli->error);
return FALSE;
}
}
// execute SELECT return individual value
// Note: return value for error is -1 (not 0)!
function querySingleItem($sql) {
if ($result = $this->mysqli->query($sql)) {
if ($row=$result->fetch_array()) {
$result->close();
return $row[0];
} else {
return -1;
}
CHAPTER 15 ■PHP420
5351c15_final.qxd 8/26/05 7:10 PM Page 420
www.it-ebooks.info
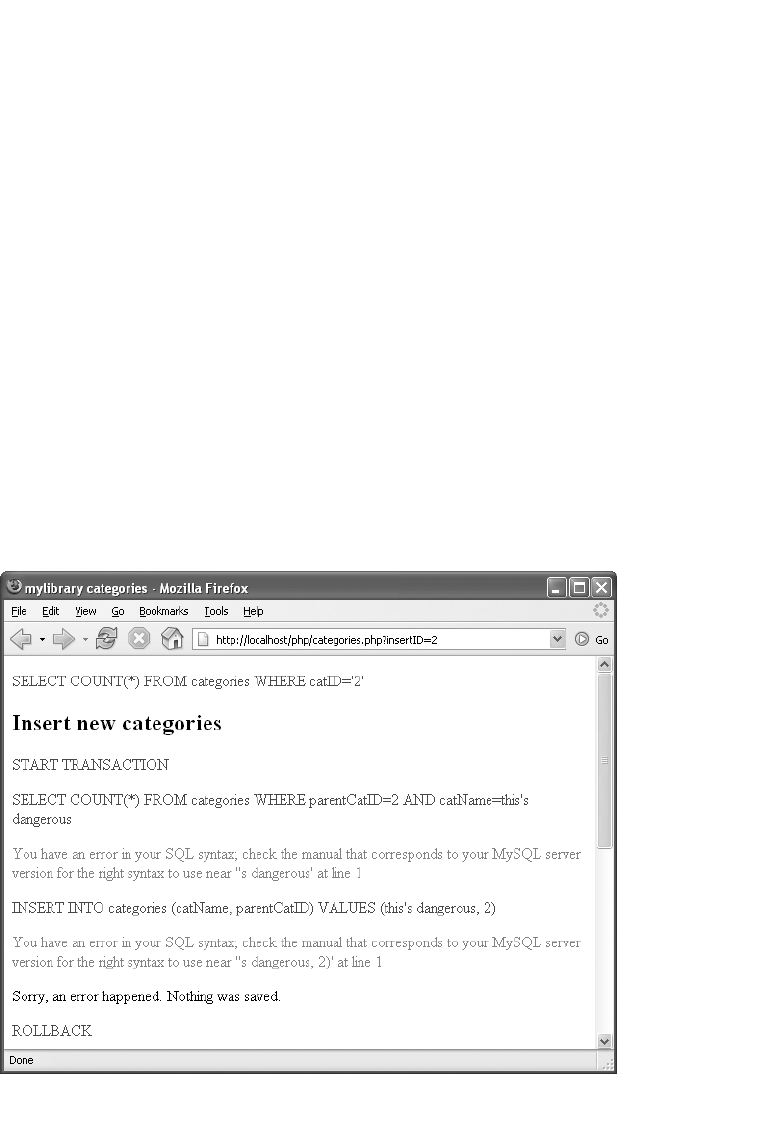
} else {
printf("<p>Error: %s</p>\n", $this->mysqli->error);
return -1;
}
}
// execute SQL command without result (INSERT, DELETE, etc.)
function execute($sql) {
if ($this->mysqli->real_query($sql)) {
return TRUE;
} else {
print $this->mysqli->error;
return FALSE;
}
}
// return insert_id
function insertId() {
return $this->mysqli->insert_id;
}
}
Debugging and Error Search with MyDb
Variables are a very practical extension to this class. They govern whether all executed SQL com-
mands and all error messages are to be output to the HTML document. To do so is practical during
code development and simplifies the identification of errors (see Figure 15-4). The following code
segment shows the required changed to the function execute.
CHAPTER 15 ■PHP 421
Figure 15-4. Error search made easy!
5351c15_final.qxd 8/26/05 7:10 PM Page 421
www.it-ebooks.info

class MyDb {
protected $mysqli;
protected $showerror = TRUE; // display error message
protected $showsql = FALSE; // display SQL code
function execute($sql) {
$this->printsql($sql);
if($this->mysqli->real_query($sql))
return TRUE;
else {
$this->printerror($this->mysqli->error);
return FALSE;
}
}
...
private function printsql($sql) {
if($this->showsql)
printf("<p><font color=\"#0000ff\">%s</font></p>\n",
htmlspecialchars($sql)); }
private function printerror($txt) {
if($this->showerror)
printf("<p><font color=\"#ff0000\">%s</font></p>\n",
htmlspecialchars($txt)); }
}
■Tip Later in this chapter I will describe some extensions to the MyDb class that help in optimizing PHP pages
for efficiency. The method
showStatistics
displays how many SQL commands have been executed thus far, how
many records have been returned, how much time has elapsed, etc.
Application of the MyDb Class
PHP code based on a MyDb object is normally very compact, as the following lines show:
// example file test-mydb.php
require_once("mydb.php");
$db = new MyDb();
// query for single value
if(($n = $db->querySingleItem("SELECT COUNT(*) FROM titles"))!=-1)
printf("<p>number per title: %d</p>\n", $n);
// SELECT
if($result = $db->queryObjectArray("SELECT * FROM titles")) {
foreach($result as $row)
printf("<br />TitleID=%d Title=%s Subtitle=%s\n",
$row->titleID, $row->title, $row->subtitle);
}
Numerous examples in the following sections of this chapter use the MyDb class.
Displaying a SELECT Result As a Table
The following example shows how the result of a simple query (SELECT * FROM titles) can be dis-
played in an HTML table (see Figure 15-5). The code for table output is contained in the function
show_table. All character strings are translated correctly into HTML code with the PHP function
htmlspecialchars. This function ensures that even strings with HTML special characters, such as
CHAPTER 15 ■PHP422
5351c15_final.qxd 8/26/05 7:10 PM Page 422
www.it-ebooks.info
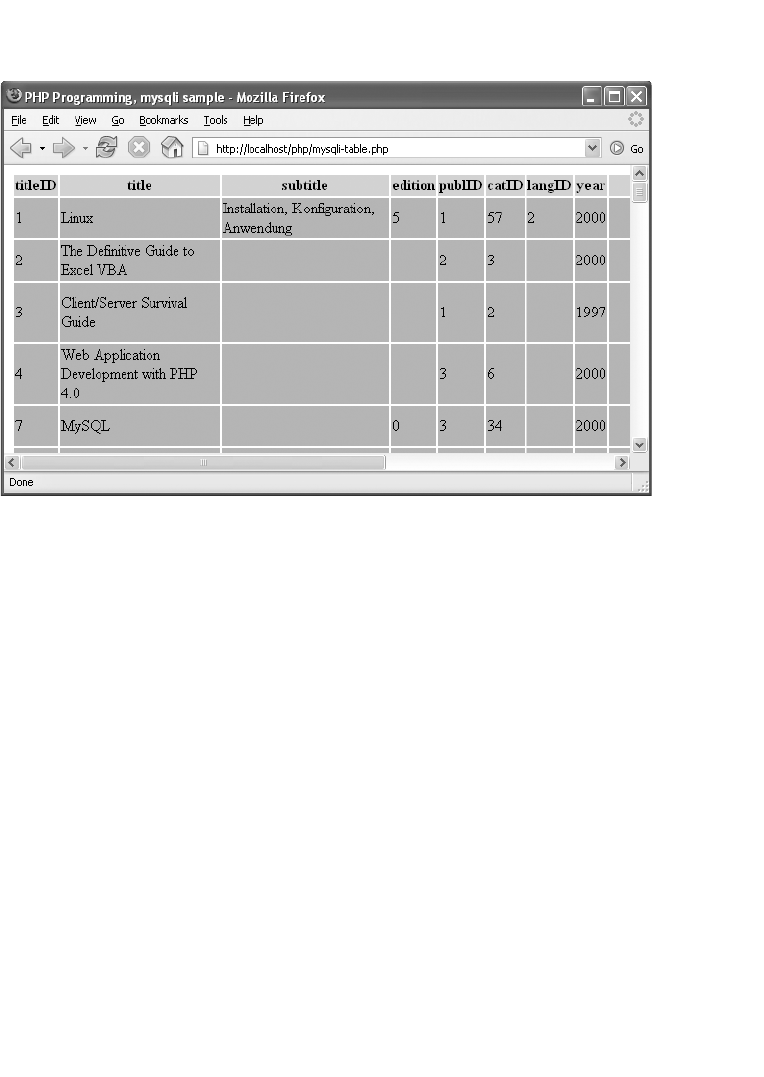
<and >, are correctly represented. The structure of the table is limited to a minimum. With little effort,
you can customize the layout of the table with the CSS file table.css to your own specifications.
// example file mysqli-table.php
// displays the result of a query as an HTML table
function show_table($result) {
if(!$result) {
echo "<p>No valid query result.</p>\n";
return;
}
if($result->num_rows>0 && $result->field_count>0) {
echo "<table>";
// column labels
echo "<tr>";
foreach($result->fetch_fields() as $meta)
printf("<th>%s</th>", htmlspecialchars($meta->name));
echo "</tr>\n";
// table content
while($row = $result->fetch_row()) {
echo "<tr>";
foreach($row as $col)
printf("<td>%s</td>", htmlspecialchars($col));
echo "</tr>\n";
}
echo "</table>\n";
}
}
CHAPTER 15 ■PHP 423
Figure 15-5. Displaying a simple query as a table
5351c15_final.qxd 8/26/05 7:10 PM Page 423
www.it-ebooks.info

The application of this function looks like this:
if($result = $mysqli->query("SELECT * FROM titles")) {
show_table($result);
$result->close();
}
Character Strings, Dates, Times, BLOBs, and NULL
When you are reading and outputting data from a MySQL table, you must adhere to the HTML syntax
rules. Likewise, you must adhere to the MySQL syntax when you are assembling INSERT and UPDATE
commands. This section offers some tips on handling such situations.
■Tip If you are using the
mysqli
interface, you can use prepared statements with bound parameters and bound
result variables (see the discussion earlier in the chapter). This has the advantage that PHP then takes care that
character strings, BLOBs, and dates are correctly formatted.
Storing Data
To change records in the database, you must pass the necessary SQL commands as a character
string to mysql_query or $mysqli->query. The following lines show how an INSERT command can
be formulated:
$sql = "INSERT INTO tablename (column, column2, ...) "
. "VALUES($data1, $data2, ...);
Reading Data
To read data, execute a query with mysql_query or $mysqli->query and then evaluate the result
$result with mysql_fetch_xxx or $resul ->fetch_xxx.
$result = mysql_query("SELECT ...");
$row = mysql_fetch_row($result);
$data = $row[0];
Character Strings and BLOBs
Storing Character Strings in MySQL
In SQL commands, a character string must be placed within quotation marks, where there is a choice
between double “and single ‘quotes. Problems arise when the string itself contains quotation marks
or other characters (\) impermissible in SQL. This can easily lead to syntax errors:
$data = "O'Reilly";
$sql = "INSERT INTO publishers (publName) VALUES('$data')";
The resulting (invalid) SQL command looks like this:
INSERT INTO publishers (publName) VALUES('O'Reilly')
Help is provided by the function mysql_real_escape_string and the method $mysqli ->escape_string.
This replaces ‘, “, \, and 0 bytes with \’, \”, \\, and \0. (This process is often called quoting.)
CHAPTER 15 ■PHP424
5351c15_final.qxd 8/26/05 7:10 PM Page 424
www.it-ebooks.info

$sql = "INSERT INTO publishers (publName) VALUES('"
. $mysqli->escape_string($data) . "')";
Now the SQL command is correct:
INSERT INTO publishers (publName) VALUES('O\'Reilly')
■Note If the data to be stored come from an HTML form and the PHP configuration variable
magic_quotes_gpc
is set to
On
, then the data are already quoted. In this case of course, no additional quoting should be done. Further
information on
Magic Quotes
appears in Chapter 5.
Outputting Character Strings
In outputting character strings to an HTML document you should generally use the function
htmlspecialchars or htmlentities. htmlspecialchars replaces the characters <, >, “, and &with
<, />, /", and /&. Additionally, htmlentities replaces a large number of special
characters with HTML code, for example, äwith ä. This is necessary in particular when
the character set of the HTML document does not provide for the direct representation of the
special characters.
Two optional parameters can be passed to htmlspecialchars and htmlentities. The first
parameter determines whether the characters ‘and “should be replaced. Possible settings are
ENT_QUOTES (‘and “are replaced), ENT_NOQUOTES (‘ and “remain unchanged), and
ENT_COMPAT (“is replaced, ‘is unchanged). By default, ENT_COMPAT holds.
The second parameter determines the character set of the output string. By default, both
functions assume that the output string is in the Latin1 character set (ISO-8859-1). Alternative
settings include iso-8859-15, utf-8, and cp1252.
For example, if Unicode strings are stored in your database, the correct call to htmlentitites
looks like this:
printf("<p>%s</p>\n",
htmlentities($data, ENT_COMPAT, "UTF-8"));
Further tips on dealing with Unicode character strings appear later in this chapter.
BLOBs
Binary data (BLOBs) are treated exactly like character strings. PHP, in contrast to C, has no problem
with zero bytes/0 codes.
Dates and Times
Storing Dates and Times in MySQL
To format a date or time according to MySQL rules, you can use PHP functions such as date and
strftime. If the data come from user input, you must, of course, carry out the usual validation tests.
(MySQL does only a cursory validation check and stores many dates that could not possibly exist.)
On the other hand, if you wish to store a PHP timestamp in a MySQL TIMESTAMP column, you
should use the MySQL function FROM_UNIXTIME in an INSERT or UPDATE command.
$data = time(); // data contains the current time as a Unix timestamp
$sql = "INSERT INTO table (column) VALUES (FROM_UNIXTIME($data))";
CHAPTER 15 ■PHP 425
5351c15_final.qxd 8/26/05 7:10 PM Page 425
www.it-ebooks.info

Reading Dates and Times from MySQL
When you read dates and times from a DATETIME column, you receive a character string of the form
2005-12-31 23:59:59. With DATE columns, the time is of course not included. In many cases it is most
practical for the further processing of dates in PHP to use the MySQL function UNIX_TIMESTAMP.
You thereby obtain a 32-bit integer that gives the number of seconds elapsed since 1.1.1970.
$sql = "SELECT UNIX_TIMESTAMP(column) FROM table WHERE ...";
$result = $mysqli->query($sql);
$row = $result->fetch_row();
$ts = $row[0];
You can obtain a desired format using the MySQL function DATE_FORMAT. The following SQL
command returns a string of the form December 31 2005.
SELECT DATE_FORMAT(column, '%M %d %Y') FROM table
With a TIME column you obtain a string of the form 23:59:59. If you do not wish to extract hours,
minutes, and seconds from this string, the MySQL function TIME_TO_SEC provides the number of
seconds since 00:00:00. In addition, there are many MySQL functions for processing times. Warning:
UNIX_TIMESTAMP does not work with TIME columns!
With TIMESTAMP columns, MySQL returns a string of the form yyyy-dd-mm hh:mm:ss. If instead
you desire a PHP-compatible timestamp value, then use the MySQL function UNIX_TIMESTAMP in
your SQL query.
SELECT UNIX_TIMESTAMP(column) FROM table
NULL
Storing NULL
To store NULL in a column, simply pass the string NULL to the SQL command without quotation
marks:
INSERT INTO table (column) VALUES (NULL)
If you wish to store NULL in place of empty character strings, the following is recommended:
$sql = "INSERT INTO table (column) VALUES (";
if(isset($data)
$sql .= "'" . $mysqli->escape_string($data) . "')";
else
$sql .= "NULL)"
NULL-Test
When you are reading data from a MySQL column that allows the value NULL, you must query
this value before further processing of the data. If you are using the mysql interface, execute isset($data)
for this purpose. The function returns FALSE if the underlying data had the value NULL. Similar
tests for data type can be made with is_numeric, is_string, etc. Note, however, that tests with the
function empty lead to incorrect results when applied to character strings: empty returns the result
TRUE for NULL and the empty string “”.
The mysqli interface offers much greater convenience for the programmer: the fetch_xxx methods
automatically convert MySQL NULL values to the PHP value NULL. You can also simply execute a
query of the form if($data == NULL).
CHAPTER 15 ■PHP426
5351c15_final.qxd 8/26/05 7:10 PM Page 426
www.it-ebooks.info

Inserting Linked Data Records
To insert a record into a table, simply execute an INSERT command. Things become more difficult
when several tables are linked. Then you must worry about the correct key when executing the INSERT
command.
As a rule, an AUTO_INCREMENT column is responsible for the link between two tables. With
$mysqli->insert_id (mysqli) or mysql_insert_id (mysql) you can determine the ID value of the most
recently stored record.
The following lines show how a new book title, including two authors, is stored in the mylibrary
database. Note that three ID values must be stored during the process in order to insert the record
in the rel_title_author table. It is assumed that the publisher (here Addison-Wesley) has already been
stored as publID=1 in the database.
$mysqli->query("INSERT INTO titles (title, publID, year)
VALUES ('A Guide to the SQL Standard', 1, 1997)");
$titleID = $mysqli->insert_id;
$mysqli->query("INSERT INTO authors (authName)
VALUES ('Date Chris')");
$author1ID = $mysqli->insert_id;
$mysqli->query("INSERT INTO authors (authName)
VALUES ('Darween Hugh')");
$author2ID = $mysqli->insert_id;
$mysqli->query("INSERT INTO rel_title_author (titleID, authID)
VALUES ($titleID, $author1ID),
($titleID, $author2ID)");
In practice, that is, when data are given interactively, the storage of new entries becomes more
complicated. For example, you have to check whether an author already exists in the database. If so,
its ID must be stored in rel_title_author, and otherwise, a new author must be registered. (Or was
there a typo? To minimize such an eventuality, some similar-sounding or -looking names could be
displayed and offered as alternatives.)
Processing Input from Forms
The following example describes the code for managing a form for input or for changing data in
the mylibrary database (see Figure 15-6). The resulting code is relatively extensive. Some intensive
involvement with this example is worth the effort due to its general nature: In almost every data-
base application you have to evaluate, validate, and store form input or transfer existing data into
a form in order to alter or delete it. This example has the added feature that the form data are not
associated with a single table but are distributed over several linked tables.
Not much need be said about using the form. Most of the input fields are optional, with only
title and author being mandatory. If there are several authors of a book, their names can be sepa-
rated with semicolons. With the input fields publisher and language you can either select an existing
entry or input a new publisher or language. The button DELETE TITLE is visible only if the form is used
to change an existing title.
CHAPTER 15 ■PHP 427
5351c15_final.qxd 8/26/05 7:10 PM Page 427
www.it-ebooks.info
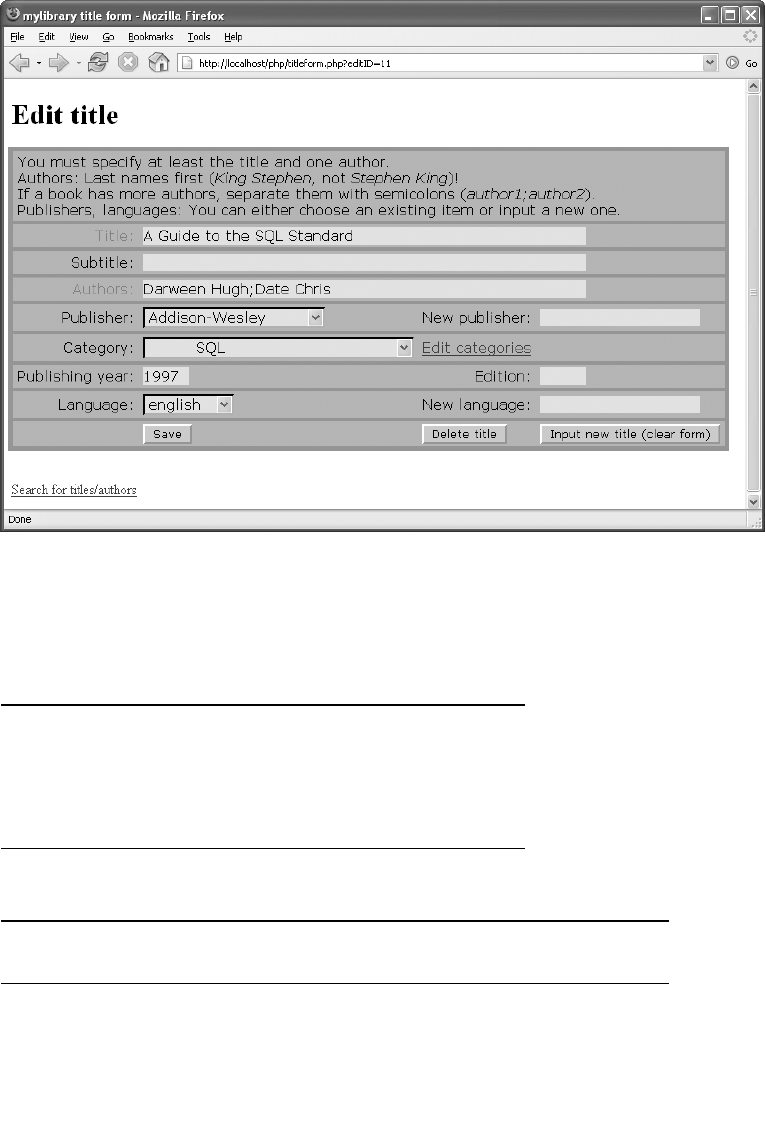
Code Structure
The code is divided among the following files:
formtitle.php Main code
mydb.php Class MyDb with database methods
mylibraryfunctions.php Auxiliary functions
formfunctions.php Functions for output of a form
form.css CSS file for formatting the form
Two mechanisms are used for data transfer when a page is changed:
POST Form data in the form of a field (form[“title”),form[“authors”], etc.)
REQUEST URL parameter (editID gives the ID number of the title to be changed)
CHAPTER 15 ■PHP428
Figure 15-6. Title input form for mylibrary
5351c15_final.qxd 8/26/05 7:10 PM Page 428
www.it-ebooks.info

■Note formtitle.php is related to the two pages find.php and categories.php, which are described in
the following sections. These three pages, together with formtitle.php, form a complete example: title input,
title search, and category management. All three pages access the classes and functions of mydb.php,
mylibraryfunctions.php, and formfunctions.php.
The additional file deletegarbage.php is contained in the source code for ths book. It deletes authors with-
out titles, titles without authors, publishers without books, etc., from
mylibrary
. This page is also useful for deleting
incomplete or invalid data, perhaps resulting from testing, from
mylibrary
.
Of central importance in the evaluation of these data is the tiny yet indispensable function
array_item, which is defined in the file mylibraryfunctions.php. array_item($x, “abc”) returns
$x[“abc”] if such an element exists, and otherwise FALSE. Since it is not always clear in advance
what elements a field contains, array_item spares you burdensome warnings such as that an ele-
ment doesn’t exist or error messages that such a field doesn’t exist.
function array_item($ar, $key) {
if(is_array($ar) && array_key_exists($key, $ar))
return $ar[$key];
else
return FALSE; }
Code Management
The central management of titleform.php is effected with relatively few lines of code, which are
reproduced in the following. All the remaining code is to be found in functions and in the MyDb
class. Depending on what data are passed to the page, there are two basic cases:
An existing title is to be processed (editID=…): In this case, the titleID number is to be passed
to the function read_title_data. This retrieves all the data (title, subtitle, authors, publisher, etc.)
and returns them as a field. This field has the same structure as that of the form data.
Form data are to be processed: Depending on the button with which the form was terminated,
a title is to be stored or deleted, or else the form is simply to be emptied (in order to input a new
title). The form data are located in the field formdata, from whose elements any existing Magic
Quotes are removed.
The title is stored only if validation with validate_data is successful. Then formdata is deleted
and an empty form for the input of the next title is displayed. If validate_data discovers an error,
then first error messages are displayed and then the form with the old data is displayed again.
The title is deleted after a query. The query form is output with the function build_delete_form.
Its DELETE button has the name btnReallyDelete.
The storage and deletion functions are executed in memory within a transaction. Only if the
function is executed without error is the transaction confirmed with COMMIT.
Finally, the form is refreshed and displayed, either with existing data for correction or else
empty for input of a new title. The form is not displayed if $showform==FALSE is in effect.
(That is the case only if the delete query is displayed.)
CHAPTER 15 ■PHP 429
5351c15_final.qxd 8/26/05 7:10 PM Page 429
www.it-ebooks.info

■Note This is not a book on PHP, but it won’t hurt to include here a bit of background information on
Magic Quotes
:
With
Magic Quotes
the developers of PHP hoped to make the programmer’s job easier. Special characters in strings
coming from external sources (a form sent with
GET
or
POST
or from a cookie) are automatically provided with back-
slashes. This avoids problems with such characters, such as in compound SQL commands. In principle, then,
Magic
Quotes
should be of great use. Unfortunately, that is not always the case.
The problem is that
Magic Quotes
are turned on and off in the PHP configuration file php.ini (variable
magic_quotes_gpc
). If your PHP scripts are running on an ISP, you generally have no control over the PHP con-
figuration. This means that every time form data are processed, you must first test whether
Magic Quotes
are
active. In the examples of this chapter, any existing quoting will be deleted (see the following code listing).
$db = new MyDb(); // establish connection to MySQL
$showform=TRUE; // should the form be displayed at the end?
if(($editID = array_item($_REQUEST, 'editID'))
&& is_numeric($editID))
// case 1: process existing title
$formdata = read_title_data($editID);
else {
// case 2: process form data
$formdata = array_item($_POST, "form");
if(is_array($formdata)) {
if(get_magic_quotes_gpc()) // eliminate Magic Quotes
while($i = each($formdata))
$formdata[$i[0]] = stripslashes($i[1]);
// respond depending on button
if(array_item($formdata, "btnClear"))
// clear form
$formdata = FALSE;
elseif(array_item($formdata, "btnDelete")) {
// query whether title really should be deleted
if(build_delete_form($formdata))
$showform = FALSE; }
elseif(array_item($formdata, "btnReallyDelete")) {
// delete title
$db->execute("START TRANSACTION");
if(delete_title($formdata))
$db->execute("COMMIT");
else
$db->execute("ROLLBACK");
$formdata = FALSE; }
elseif(validate_data($formdata)) {
// check data and store if ok
$db->execute("START TRANSACTION");
if(save_data($formdata))
$db->execute("COMMIT");
else
$db->execute("ROLLBACK");
$formdata = FALSE; }
}
CHAPTER 15 ■PHP430
5351c15_final.qxd 8/26/05 7:10 PM Page 430
www.it-ebooks.info

if($showform) {
// alter data or input new?
if(array_item($formdata, "titleID"))
echo "<h1>Edit title</h1>";
else
echo "<h1>Input new title</h1>";
// display form
build_form($formdata);
}
Creating the Form
You will have a better grasp of the processing of the form if you understand its internal structure.
Therefore, the following lines show some of the HTML code of the form. Important for the evalua-
tion are the element names form[title], form[publisher], etc. (in boldface). A table with four columns
is used to format the form.
<table class="myformtable">
<form method="post" action="titleform.php">
<tr><td class="myformtd" colspan="4" >explanation ...</td></tr>
<tr><td align="right" class="myformtd">
<span class="red">Title:</span></td>
<td class="myformtd" colspan="3" >
<input class="mycontrol" name="form[title]" size="60"
maxlength="100" value="Client/Server Survival Guide"/></td>
</tr>
...
<tr><td align="right" class="myformtd">Publisher:</td>
<td class="myformtd">
<select class="mycontrol" name="form[publisher]" >
<option value="none">(choose)</option>
<option value="1" selected="selected" >Addison-Wesley</option>
...
</select></td>
<td align="right" class="myformtd">New publisher:</td>
<td class="myformtd">
<input class="mycontrol" name="form[newpubl]"
size="20" maxlength="40" /></td>
</tr>
...
<tr><td align="right" class="myformtd"></td>
<td class="myformtd">
<input class="mybutton" type="submit" value="Save"
name="form[btnSave]" /></td>
<td class="myformtd">
<input class="mybutton" type="submit" value="Delete title"
name="form[btnDelete]" /></td>
<input type="hidden" name="form[titleID]" value="3" />
<td class="myformtd">
<input class="mybutton" type="submit"
value="Input new title (clear form)"
name="form[btnClear]" /></td>
</tr>
</form></table>
CHAPTER 15 ■PHP 431
5351c15_final.qxd 8/26/05 7:10 PM Page 431
www.it-ebooks.info

The layout of the table, its cells and controls, is determined by several CSS definitions in
form.css:
/* example file form.css */
.myformtable {
font-family: Verdana, Arial, Helvetica, sans-serif;
border: 5px solid #9090e0;
border-spacing: 0px;
border-collapse: collapse; }
.myformtd {
background-color: #b0b0ff;
border-width: 4px 0px;
border-style: solid;
border-color: #9090e0;
padding: 3px 5px; }
.mycontrol {... }
.mybutton { ... }
.red { color: red; }
Display the Input Form
A field with any existing form data is passed to the function build_form (if data are to be corrected
or changed). These data are inserted into the corresponding form elements (value=”...”).
The creation of HTML forms with PHP code is a task that comes up often and is liable to error.
In this and some additional examples in this book this task is therefore relegated to auxiliary func-
tions, which appear in formfunctions.php (see the following topic).
// example file titleform.php
function build_form($formdata) {
global $db; // database access
form_start("titleform.php");
// input field for book title
form_new_line();
form_label("Title:", TRUE);
form_text("title", array_item($formdata, "title"), 60, 100, 3);
form_end_line();
// input field for subtitle and author names
... and so on
From the database point of view, things become interesting when a selection list for the publishers
is to be displayed. The list is created with an SQL query and passed in the form of a two-dimensional
field to form_list. The third parameter of this function specifies the list element that is selected.
// selection list for publisher
form_new_line();
form_label("Publisher:");
$sql = "SELECT publName, publID FROM publishers ORDER BY publName";
form_list("publisher", $db->queryArray($sql),
array_item($formdata, "publisher"));
form_label("New publisher:");
form_text("newpubl", array_item($formdata, "newpubl"), 20, 40);
form_end_line();
Things get more complicated with the list for categories. Here we are dealing with a hierarchical
structure whose list elements must be appropriately indented. Such a field is created in the function
build_category_array (file mylibraryfunctions.php). Details on this recursive function appear later in
this chapter, whose general theme is dealing with hierarchical data.
CHAPTER 15 ■PHP432
5351c15_final.qxd 8/26/05 7:10 PM Page 432
www.it-ebooks.info

// selection list for category
form_new_line();
form_label("Category:");
// determine all categories
$sql = "SELECT catName, catID, parentCatID FROM categories " .
"ORDER BY catName";
$rows = $db->queryObjectArray($sql);
// form two associative fields
// subcats[catID] contains a field with sub-catIDs
// catNames[catID] contains the name
foreach($rows as $row) {
$subcats[$row->parentCatID][] = $row->catID;
$catNames[$row->catID] = $row->catName; }
// form hierarchical category list
$rows = build_category_array($subcats[NULL], $subcats, $catNames);
form_list("category", $rows , array_item($formdata, "category"));
form_url("categories.php", "Edit categories", 2);
form_end_line();
After some further text input and labeling fields we finally come to the buttons. The Delete button
is displayed only if an existing title is displayed in the form. In this case the titleID number is passed in
an invisible element, so that this number is in any case contained in the form data.
// buttons
form_new_line();
form_label("");
form_button("btnSave", "Save");
// delete button for existing title
if(array_item($formdata, "titleID")) {
form_button("btnDelete", "Delete title");
form_hidden("titleID", $formdata["titleID"]); }
else
form_empty_cell(1);
form_button("btnClear", "Input new title (clear form)");
form_end_line();
// end of the form
form_end();
}
Auxiliary Functions for Form Creation
The auxiliary functions used in build_form are located in formfunctions.php. In the following, some func-
tions are presented as examples. These functions are used as well in numerous examples in this book.
// example file formfunctions.php
// start and end form
function form_start($action) {
echo '<table class="myformtable">', "\n";
echo '<form method="post" ',
html_attribute("action", $action), ">\n"; }
function form_end() {
echo "</form></table>\n\n"; }
// start and end one line of the form
function form_new_line() { echo "<tr>"; }
function form_end_line() { echo "</tr>\n\n"; }
// auxiliary function, returns $name="value"
function html_attribute($name, $value) {
CHAPTER 15 ■PHP 433
5351c15_final.qxd 8/26/05 7:10 PM Page 433
www.it-ebooks.info

A table is used for formatting the form. The number of columns in this table is not specified.
You must simply take care to use the same number of columns in each line. Most of the functions
use a cell (thus <td> through </td>) for their output. With some of the functions, the output can
extend over several columns using an optional parameter (attribute colspan).
The function form_label writes text right justified in a cell. Thus the function is well suited for
labeling the subsequent input and control elements. The optional parameter emphasize tells whether
the label should be colored.
// label cell
function form_label($caption, $emphasize =FALSE) {
echo '<td align="right" class="myformtd">';
if($emphasize )
echo '<span class="red">', htmlspecialchars($caption), '</span>';
else
echo htmlspecialchars($caption);
echo '</td>', "\n"; }
The function form_text creates a text input field, while name determines the name of the ele-
ment (the result is then form[“name”]), value the default value, size and maxlength the desired size.
// create a one-cell text input field
function form_text($name, $value,
$size=40, $maxlength=40, $colspan=1) {
if($colspan>1)
echo '<td class="myformtd" ',
html_attribute("colspan", $colspan), '>';
else
echo '<td class="myformtd"> ';
echo '<input class="mycontrol" ',
html_attribute("name", "form[$name]"),
html_attribute("size", $size),
html_attribute("maxlength", $maxlength);
if($value)
echo html_attribute("value", $value);
echo ' /></td>', "\n";
}
The function form_list creates a selection list, and name determines the name of the control ele-
ment; rows contains a two-dimensional list, where row[n][0] must contain the list entry and row[n][1]
the associated value. The function selected can contain the value of the selected list element.
// create selection list (<option>-Tag)
function form_list($name, $rows, $selected=-1) {
echo '<td class="myformtd">';
echo '<select class="mycontrol" ',
html_attribute("name", "form[$name]"), '>', "\n";
echo '<option value="none">(choose)</option>';
foreach($rows as $row) {
echo '<option ', html_attribute("value", $row[1]);
if($selected==$row[1])
echo 'selected="selected" ';
$listentry = str_replace(" ", " ", htmlspecialchars($row[0]));
echo ">$listentry</option>\n";
}
echo '</select></td>', "\n";
}
CHAPTER 15 ■PHP434
5351c15_final.qxd 8/26/05 7:10 PM Page 434
www.it-ebooks.info

Validation of Form Data
When the form data are passed to titleform.php, validate_data checks whether the data contained
in the field (array) are correct. Depending on the result, the function returns TRUE or FALSE. Then
depending on this result, the data are either stored or displayed again in the form to be corrected.
Error messages are passed to show_error_msg. This function is located in formfunctions.php
and returns the text as a paragraph colored red.
// example file titleform.php
function validate_data($formdata) {
$result = TRUE;
if(trim($formdata["title"])=="") {
show_error_msg("You must specify a title!");
$result = FALSE; }
if(trim($formdata["authors"])=="") {
show_error_msg("You must specify at least one title!");
$result = FALSE; }
$year = $formdata["publyear"];
if(!empty($year) && ((!is_numeric($year)) || $year<1000
|| $year>2100)) {
show_error_msg("Publishing year must be a four-digit number " .
"(or empty).");
$result = FALSE; }
if(!empty($edition) && ((!is_numeric($edition)) || $edition<1
|| $edition>100)) {
show_error_msg("Edition must be a number <= 100 (or empty).");
$result = FALSE; }
return $result;
}
Storing the Form Data
The most interesting function in this example from the database point of view is save_data. It stores the
data passed to the field formdata in various tables of the mylibrary database. Depending on whether
new data were entered or existing data altered, the title must be stored with INSERT or UPDATE.
(Which in this case is recognized by save_data based on the existence of $formdata[titleID].)
In addition, various special cases must be taken into consideration, such as the search for exist-
ing authors and storing new authors, publishers, and languages. Furthermore, the link between title
and author must be created or corrected in the table rel_title_author.
If no error occurs during storage, the function returns the result TRUE. The return value is used
to confirm or abort the transaction started before the function call.
// example file titleform.php
function save_data($formdata) {
global $db;
// search for and store authors
$authors = explode(";", $formdata["authors"]);
foreach($authors as $author) {
$author = trim($author);
$sql = "SELECT authID FROM authors WHERE authName = " .
$db->sql_string($author);
$rows = $db->queryObjectArray($sql);
if($rows)
CHAPTER 15 ■PHP 435
5351c15_final.qxd 8/26/05 7:10 PM Page 435
www.it-ebooks.info

// note IDs of existing authors
$authIDs[] = $rows[0]->authID;
else {
// also note new author and ID
$sql = "INSERT INTO authors (authName) " .
"VALUES (" . $db->sql_string($author) . ")";
if(!$db->execute($sql))
return FALSE;
$authIDs[] = $db->insertId();
}
}
// store new publisher or note ID of selected publisher
if($formdata["newpubl"]) {
$sql = "SELECT publID FROM publishers WHERE publName = " .
$db->sql_string($formdata["newpubl"]);
$rows = $db->queryObjectArray($sql);
if($rows)
// publisher already exists
$publID = $rows[0]->publID;
else {
// store new publisher
$sql = "INSERT INTO publishers (publName) " .
"VALUES (" . $db->sql_string($formdata["newpubl"]) . ")";
if(!$db->execute($sql))
return FALSE;
$publID = $db->insertId();
}
}
else
// read publID from selection list
$publID = $formdata["publisher"];
// analogous procedure for languages (language) --> $langID
...
// update existing title (UPDATE)
if(array_item($formdata, "titleID")) {
$titleID = array_item($formdata, "titleID");
$sql = "UPDATE titles SET " .
"title=" . $db->sql_string($formdata["title"]) . ", " .
"subtitle=" . $db->sql_string($formdata["subtitle"]) . ", " .
"langID=" . ID_or_NULL($langID) . "," .
"publID=" . ID_or_NULL($publID) . "," .
"catID=" . ID_or_NULL($formdata["category"]) . "," .
"year=" . num_or_NULL($formdata["publyear"]) . ", " .
"edition=" . num_or_NULL($formdata["edition"]) . " " .
"WHERE titleID=$titleID";
if(!$db->execute($sql))
return FALSE;
// delete exising rel_title_author entry
$sql = "DELETE FROM rel_title_author WHERE titleID=$titleID";
if(!$db->execute($sql))
return FALSE;
}
CHAPTER 15 ■PHP436
5351c15_final.qxd 8/26/05 7:10 PM Page 436
www.it-ebooks.info

else {
// store new title (INSERT)
$sql = "INSERT INTO titles (title, subtitle, " .
"langID, publID, catID, year, edition) VALUES (" .
$db->sql_string($formdata["title"]) . ", " .
$db->sql_string($formdata["subtitle"]) . ", " .
ID_or_NULL($langID) . "," .
ID_or_NULL($publID) . "," .
ID_or_NULL($formdata["category"]) . "," .
num_or_NULL($formdata["publyear"]). "," .
num_or_NULL($formdata["edition"]) . ") ";
if(!$db->execute($sql))
return FALSE;
$titleID = $db->insertId();
}
// create link between title and authors
foreach($authIDs as $authID) {
$sql = "INSERT INTO rel_title_author (titleID, authID) " .
"VALUES ($titleID, $authID)";
if(!$db->execute($sql))
return FALSE;
}
// output confirmation of success as link
echo "<p>Title ",
build_href("titleform.php", "editID=$titleID",
$formdata['title']),
" has been saved.</p>\n";
return TRUE;
}
The confirmation of success for the storage process is output as a link (titleform.php?editID=nnn).
With a simple click, the user can see the title again and make corrections as necessary.
Auxiliary Functions
In creating the SQL commands, the auxiliary functions ID_or_NULL and num_or_NULL as well as
the method sql_string are used:
// example file titleform.php
function num_or_NULL($n) {
if(is_numeric($n)) return $n;
else return 'NULL'; }
function ID_or_NULL($id) {
if($id=="none")
return 'NULL';
else
return $id; }
// example file mydb.php
function escape($txt) {
return trim($this->mysqli->escape_string($txt)); }
function sql_string($txt) {
if(!$txt || trim($txt)=="")
return 'NULL';
else
return "'" . $this->escape(trim($txt)) . "'";
CHAPTER 15 ■PHP 437
5351c15_final.qxd 8/26/05 7:10 PM Page 437
www.it-ebooks.info
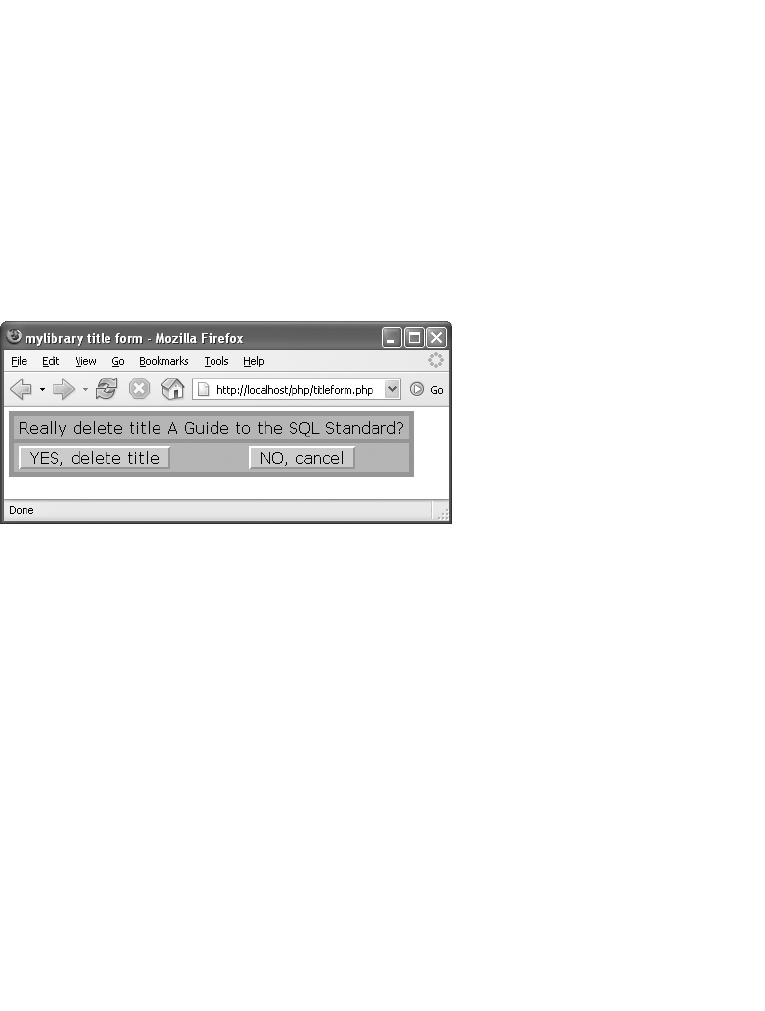
In creating the link, we use the function build_href.
// example file mylibraryfunctions.php
function s($url, $query, $txt) {
if($query)
return "<a href=\"$url?" . $query . "\">" .
htmlspecialchars($txt) . "</a>";
else
return "<a href=\"$url\">" . htmlspecialchars($txt) . "</a>"; }
Deleting a Title
Before an existing title can be deleted, a query must be answered (see Figure 15-7). This form is
output with the function build_delete_form.
The function delete_title is responsible for the file deletion. It deletes not only the title, but also
the entries that are no longer needed in the table rel_title_author.
// example file titleform.php
function delete_title($formdata) {
global $db;
if((!$titleID = array_item($formdata, "titleID"))
|| !is_numeric($titleID))
return FALSE;
$sql = "DELETE FROM rel_title_author WHERE titleID=$titleID";
if(!$db->execute($sql))
return FALSE;
$sql = "DELETE FROM titles WHERE titleID=$titleID LIMIT 1";
if(!$db->execute($sql))
return FALSE;
echo "<p>One title has been deleted.</p>\n";
return TRUE;
}
CHAPTER 15 ■PHP438
Figure 15-7. Query before a title is deleted
5351c15_final.qxd 8/26/05 7:10 PM Page 438
www.it-ebooks.info

Room for Improvement
If you are motivated to work on this example, here are some suggestions for improving it:
Titles: In storing new titles, there is no check as to whether the title already exists. To institute
such a control is complicated by the fact that a simple comparison of titles does not suffice,
since there can easily be two books with the same title, such as Linux. The ISBN could be used
as a unique identifier, but its presence in the form is not required. However, a simple query
whether a book with the same title and author already exists should catch most errors.
Authors: Author names in the authors table always begin with the family name, since that is
the only sorting criterion that makes sense. In addition, titleform.php expects input in this
form (thus Kofler Michael and not Michael Kofler). Problems occur when the user does not
adhere to this rule.
One possible improvement would be to provide separate fields for given name and family
name. That would make the input of multiple authors more complicated.
One could also consider a test in storing new names whether the name in the reverse order
already appears in the authors table. That would help prevent duplicates.
Categories: There is no way in the form to define a new category. Rather, the category must
be summoned from the page categories.php. Then the title input must be redone, since the
category list cannot be updated.
It would be more convenient if as with publishers and languages, a new category could be
placed directly in the form. In that case, the relevant parent category should be selected in
a category selection field. The danger of erroneous input would be rather great.
Delete titles: The function delete_title deletes only the title (entries in the tables titles and
rel_title_author). One could also delete authors and publishers if they were no longer associ-
ated with any titles.
Pagewise Representation of Search Results
There is a search option on almost every dynamic website. If there are more than nsearch results,
only the first nare displayed. Buttons or links make it possible to go to the next page. Relevant pro-
gramming techniques are demonstrated in the file find.php.
The program find.php makes it possible to search the mylibrary database for titles and authors.
Using the program is easy: For a title search, specify the first letters of the title and/or select a cate-
gory (Figure 15-8). The program searches for titles that fulfill both criteria. For an author search you
specify the first letters of the author name (family name).
■Tip This example does not provide for full-text search. Nevertheless, you can search in this example for books
in which the search string appears somewhere in the title (that is, not necessarily at the beginning). To do so, sim-
ply preface the search string with the percent sign
%
. Thus
%mysql
finds not only
MySQL Cookbook
, but also
PHP 5 and MySQL 5
.
The search results (Figure 15-9) are ordered alphabetically and contain links to find.php, for
finding all titles by a given author, all titles of a category, and detailed information about a partic-
ular title. If there are more search results than $pagesize (this variable is declared at the beginning
of find.php), there appear after the search results links to the following and previous pages.
CHAPTER 15 ■PHP 439
5351c15_final.qxd 8/26/05 7:10 PM Page 439
www.it-ebooks.info
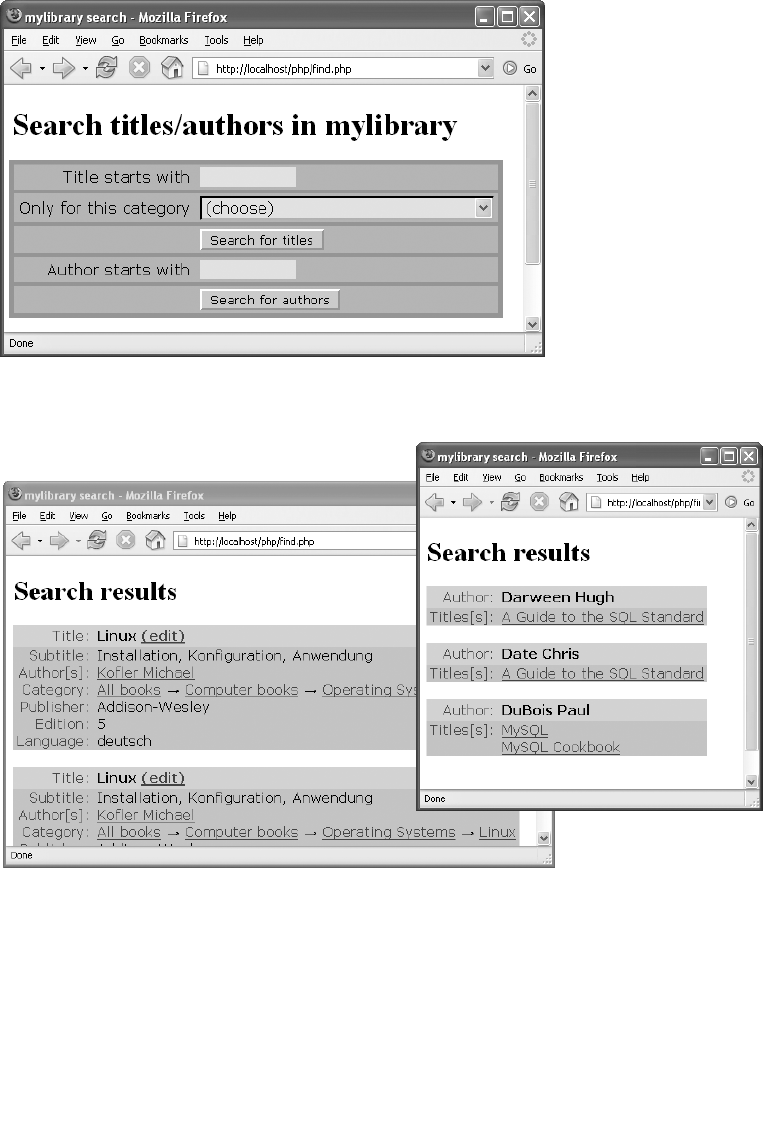

Code Structure
The code is divided among the following five files:
find.php Main code
mydb.php Class MyDb with database methods
mylibraryfunctions.php Auxiliary functions
formfunctions.php Functions for output of a form
form.css CSS file for formatting the form
resulttable.css CSS file for formatting the search result
Two mechanisms are used for providing the data when a page is changed:
POST Contains the input from the search form in the form of a field:
form[“title”),form[“authors”],form[“btnAuthor”], etc.
REQUEST Contains URL parameters:
titleID: Display this title
titlePattern: Display titles corresponding to the search pattern
authID: Display this author
authPattern: Display authors matching the search pattern
catID: Display all titles of this category
page: Display this page
Code Flow
The greater portion of the code is in functions, some of which will be presented in the following
sections. The control of the code takes place in the following lines.
First, the parameters passed to the page are evaluated. Here the function array_item from the
file mylibraryfunctions.php introduced in the previous section comes into play. The parameters
titlePattern and authPattern must be coded within the URL so that any special characters that might
be present will not cause any problems. This encoding is decoded with urldecode.
// example file find.php
$db = new MyDb(); // connection to MySQL
$pagesize = 5; // search results per page
// evaluate URL parameters
$titleID = array_item($_REQUEST, 'titleID');
$authID = array_item($_REQUEST, 'authID');
$catID = array_item($_REQUEST, 'catID');
$authPattern = urldecode(array_item($_REQUEST, 'authPattern'));
$titlePattern = urldecode(array_item($_REQUEST, 'titlePattern'));
$page = array_item($_REQUEST, 'page');
// validation control
if(!$page || $page<1 || !is_numeric($page)) $page=1;
elseif($page>100) $page=100;
if(!is_numeric($catID)) $catID = FALSE;
if(!is_numeric($authID)) $authID = FALSE;
if(!is_numeric($titleID)) $titleID = FALSE;
Any Magic Quotes are removed from the form data. A percent character is appended to the
search pattern for titles and authors. This character is necessary for the later formation of a SELECT
command. (WHERE title LIKE ‘abc%’ searches for titles beginning with abc.)
CHAPTER 15 ■PHP 441
5351c15_final.qxd 8/26/05 7:10 PM Page 441
www.it-ebooks.info

// form data
$formdata = array_item($_POST, "form");
if(is_array($formdata)) {
// remove Magic Quotes
if(get_magic_quotes_gpc())
while($i = each($formdata))
$formdata[$i[0]] = stripslashes($i[1]);
$authPattern = array_item($formdata, "author") . "%";
if(!array_item($formdata, "btnAuthor")) {
$catID = array_item($formdata, "category");
$titlePattern = array_item($formdata, "title") . "%"; }
}
After these preparations, we come to the nitty gritty. If titlePattern, titleID, or catID contains
values, then three functions are called one after the other: build_title_query, to formulate the SQL
command; show_titles, to represent the search result; and finally show_page_links, to display links
to the previous and following pages as necessary. The code for author search is completely analo-
gous. If there are no data to be searched for, an empty form is displayed with build_form.
if($titlePattern || $titleID || $catID) {
// title search
$sql = build_title_query($titlePattern, $titleID, $catID,
$page, $pagesize);
$rows = $db->queryObjectArray($sql);
show_titles($rows, $pagesize);
$query = "catID=$catID&titleID=$titleID&titlePattern=" .
urlencode($titlePattern);
show_page_links($page, $pagesize, sizeof($rows), $query);
echo '<p><a href="find.php">Back to search form</a></p>', "\n";
}
elseif($authPattern || $authID) {
// author search, analogous code
...
}
else {
// display search form
echo "<h1>Search titles/authors in mylibrary</h1>\n";
build_form(); }
Author Search
The SQL command for author search is formulated in the function build_author_query. If authID
contains an author ID number, the command is simply the following:
SELECT authID, authName FROM authors WHERE authID=...
On the other hand, if the search is for authors whose name corresponds to a pattern, then the
SQL code is somewhat more complicated:
SELECT authID, authName FROM authors
WHERE authName LIKE 'abc%'
ORDER BY authName
LIMIT 20, 11
Of greatest interest here is the LIMIT part, which restricts the result to a given size. LIMIT 20, 11
means that the SELECT command should return the twentieth through thirtieth results (thus the third
page if size=10).
CHAPTER 15 ■PHP442
5351c15_final.qxd 8/26/05 7:10 PM Page 442
www.it-ebooks.info

You may be wondering why 11 authors are being sought when the size is 10. The reason is that in
this way it can be determined whether there are any additional search results. (In any case, only ten
results are displayed. If the query returns 11 authors, then the function show_page_links, described
below, will create a link to the next page.)
// example file find.php
function build_author_query($pattern, $authID, $page, $size) {
global $db;
$sql = "SELECT authID, authName FROM authors ";
if($authID)
return $sql . "WHERE authID = $authID";
else
return $sql ."WHERE authName LIKE " . $db->sql_string($pattern) .
" ORDER BY authNAME " .
"LIMIT " . (($page-1) * $size) . "," . ($size + 1);
}
Title Search
The function build_title_query is analogous to build_author_query. The only difference is that in some
situations, two search criteria must be considered, that is, the category and the search pattern for a title.
Therefore, two conditions are set, which are then combined in the form WHERE cond1 AND cond2. If
no category or search pattern is specified, that criterion is simply set to TRUE.
In the category search the condition catID=n is insufficient: Indeed, with subcategory_list a list
is created that contains all subcategories of the given category. (If you are searching for Computer
books, you also want to see results in the categories Databases, Programming, etc.) The function
subcategory_list is located in mylibraryfunctions.php and will be described in the next section of
this chapter.
// example file find.php
function build_title_query($pattern, $titleID, $catID,
$page, $size) {
... analogous to build_author_query
if($catID && $catID!="none") {
$catsql = "SELECT catID, parentCatID FROM categories";
$rows = $db->queryObjectArray($catsql);
foreach($rows as $row)
$subcats[$row->parentCatID][] = $row->catID;
$cond1 = "catID IN (" .
subcategory_list($subcats, $catID) . ") "; }
else
$cond1 = "TRUE";
if($pattern)
$cond2 = "title LIKE " . $db->sql_string($pattern) . " ";
else
$cond2 = "TRUE";
$sql .= "WHERE " . $cond1 . " AND " . $cond2 .
" ORDER BY title ";
... and so on, as in build_author_query
}
Displaying Search Results
The functions show_authors and show_titles are passed fields whose elements contain authID and
authName for any authors found, and titleID and titleName for found titles. All further author and
CHAPTER 15 ■PHP 443
5351c15_final.qxd 8/26/05 7:10 PM Page 443
www.it-ebooks.info

title data are returned within the show_ functions in one or two additional SQL queries. In
show_authors the query for titles that the authors have written looks like this:
SELECT title, rel_title_author.titleID, authID
FROM titles, rel_title_author
WHERE titles.titleID = rel_title_author.titleID
AND rel_title_author.authID IN (1, 2, 3, ...)
ORDER BY title
Then it is a matter of presenting this information in a visually appealing manner. This example
uses a table, whose cells are structured by the CSS file resulttable.css.
// example file find.php
function show_authors($authors, $pagesize) {
global $db;
echo "<h1>Search results</h1>\n";
if(!$authors) {
echo "<p>Sorry, no authors found.</p>\n";
return; }
// create string with authIDs
$items = min($pagesize, sizeof($authors));
for($i=0; $items; $i++)
if($i==0)
$authIDs = $authors[$i]-authID;
else
$authIDs .= "," . $authors[$i]->authID;
// return titles that these authors have written ermitteln
$sql = "SELECT title, rel_title_author.titleID, authID " .
"FROM titles, rel_title_author ".
"WHERE titles.titleID = rel_title_author.titleID " .
"AND rel_title_author.authID IN ($authIDs) " .
"ORDER BY title";
$rows = $db->queryObjectArray($sql);
// display all authors
echo '<table class="resulttable">', "\n";
for($i=0; $items; $i++) {
echo td1("Author:", "td1head"),
td2($authors[$i]-authName, "td2head");
// show all titles for each author
$titles=0;
foreach($rows as $row)
if($authors[$i]->authID == $row->authID) {
if($titles==0)
echo td1("Titles[s]:");
else
echo td1("");
echo td2url($row->title, "find.php?titleID=$row->titleID");
$titles++;
}
// blank line before next title
echo td1("", "tdinvisible"), td2asis(" ", "tdinvisible");
}
echo "</table>\n";
}
CHAPTER 15 ■PHP444
5351c15_final.qxd 8/26/05 7:10 PM Page 444
www.it-ebooks.info

The auxiliary functions td1 and td2xxx are used for output of the table cells:
function td1($txt, $class="td1") {
echo "<tr><td class=\"$class\">",
htmlspecialchars($txt), "</td>\n"; }
function td2($txt, $class="td2") {
echo "<td class=\"$class\">",
htmlspecialchars($txt), "</td></tr>\n"; }
function td2asis($txt, $class="td2") {
echo "<td class=\"$class\">$txt</td></tr>\n"; }
...
The code for show_titles is much more extensive, since for each title much more information
must be displayed. However, the principle is the same as in show_authors, and so I will not discuss
its code further.
Links to Additional Pages
There are two ways that you might display links to additional pages:
• You could begin by determining the total number of search results using a command of
the form SELECT COUNT(*) ...WHERE. Then you could easily compute how many pages
are necessary for displaying the results and create links to all these pages.
• The other variant is simply to test when a page is created whether there are any additional
search results (by passing as second parameter to LIMIT not pagesize, but pagesize+1). This
information is sufficient for setting a link to the next page if there is one.
The function show_page_links is based on the second alternative. Four parameters are passed
to the function: the current page number, the number of results per page, the number of most
recently found search results, and in query the list of parameters that should be passed in the link
to the next or previous page (e.g., authPattern=abc).
The function show_page_links first creates the links to previous pages (if page>1), and then
links to the following page (if results>pagesize). For creating the links, the auxiliary function
build_href from mylibraryfunctions.php is used.
// example file find.php
function show_page_links($page, $pagesize, $results, $query) {
if(($page==1 && $results<=$pagesize) || $results==0)
return;
echo "<p>Goto page: ";
if($page>1) {
for($i=1; $i<$page; $i++)
echo build_href("find.php", $query . "&page=$i", $i), " ";
echo "$page "; }
if($results>$pagesize) {
$nextpage = $page + 1;
echo build_href("find.php", $query . "&page=$nextpage",
$nextpage); }
echo "</p>\n";
}
CHAPTER 15 ■PHP 445
5351c15_final.qxd 8/26/05 7:10 PM Page 445
www.it-ebooks.info
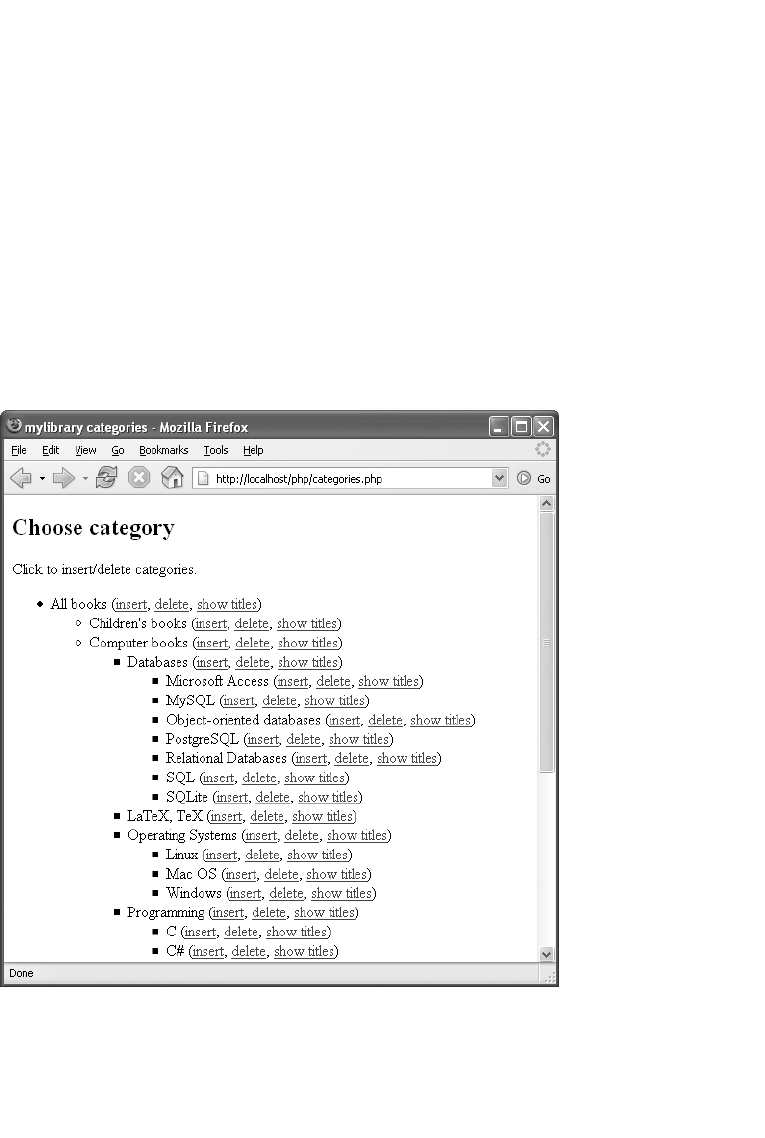
Managing Hierarchical Data
It is quite easy to express hierarchies in a table: an additional column with a reference to the par-
ent element suffices. It is thus, for example, that the book categories in the mylibrary database
(see Chapter 8) are managed. Additional application domains include managing the personnel
hierarchy in a corporation (at the top is the chief executive, then the division heads, followed by
the group leaders, etc.) and genealogical trees (first Adam and Eve, and so on).
As easy as the construction of such hierarchies is, the evaluation of hierarchical tables is corre-
spondingly difficult. One generally requires recursive functions (that is, functions that call themselves)
to determine all elements ordered above or below a particular point in the hierarchy.
This section takes as an example the categories table of the mylibrary database to demonstrate
some programming techniques that you can use, with the necessary modifications, in managing
your own hierarchical data.
The greatest portion of the functions discussed here are to be found in categories.php. This
page assists in the management of book categories (see Figure 15-10). It is easy to use: a click of the
mouse deletes existing categories or creates new subcategories (see as well Figure 15-12 further
along in this section).
When a category is deleted, all of its subcategories are deleted as well (but only if these cate-
gories are not in use). The link SHOW TITLES leads to find.php?catID=… (see the previous section)
and displays all titles associated with a particular category, including all of its subcategories.
CHAPTER 15 ■PHP446
Figure 15-10. Managing the book categories
5351c15_final.qxd 8/26/05 7:10 PM Page 446
www.it-ebooks.info

With MySQL 5.0, you can also use stored procedures for processing tables with hierarchical
data. Examples of such a nature can be found in Chapter 13.
Code Structure
The code is divided among the following files:
categories.php Main code
mydb.php Class MyDb with database methods
mylibraryfunctions.php Auxiliary functions
Two mechanisms are used for data transfer when a page is changed:
POST Contains the new categories from the input form (submitbutton, subcategories)
REQUEST Contains URL parameters:
insertID: Insert subcategories to this category
deleteID: Delete this category
Code Flow
The majority of the code is contained in functions, some of which will be described in the following
sections. The control of the code is managed in the following lines:
// example file categories.php
$db = new MyDb(); // connection to MySQL
$insertID = array_item($_REQUEST, 'insertID');
$deleteID = array_item($_REQUEST, 'deleteID');
$submitbutton = array_item($_POST, 'submitbutton');
$subcategories = array_item($_POST, 'subcategories');
if(get_magic_quotes_gpc()) // no magic quotes
$subcategories = stripslashes($subcategories);
The functions delete_ new_categories and insert_new_categories are executed in transactions.
Depending on the function’s return value, the transaction is confirmed or aborted. This ensures that
either the complete deletion or insertion operation was executed without error or the category list
was left unchanged.
// delete category
if($deleteID) {
$sql = "SELECT COUNT(*) FROM categories WHERE catID='$deleteID'";
if($db->querySingleItem($sql)==1) {
$db->execute("START TRANSACTION");
if(delete_category($deleteID)==-1)
$db->execute("ROLLBACK");
else
$db->execute("COMMIT"); }}
// store or insert new categories
if($insertID) {
$sql = "SELECT COUNT(*) FROM categories WHERE catID='$insertID'";
$n = $db->querySingleItem($sql); }
if($insertID && $n==1) {
echo "<h2>Insert new categories</h2>\n";
CHAPTER 15 ■PHP 447
5351c15_final.qxd 8/26/05 7:10 PM Page 447
www.it-ebooks.info

// store new categories
if($subcategories) {
$db->execute("START TRANSACTION");
if(insert_new_categories($insertID, $subcategories))
$db->execute("COMMIT");
else
$db->execute("ROLLBACK"); }
// input form
print_category_entry_form($insertID); }
// display complete list of all categories
else {
echo "<h2>Choose category</h2>\n";
echo "<p>Click to insert/delete categories.</p>\n";
... details in the next section
print_categories($rows, NULL); }
Displaying the Category Tree
To represent the category tree (see Figure 15-10), first all the categories are determined with a single
SQL query. Then in the next step, these data are used to create two additional fields. The purpose of
these fields is to avoid searching for field elements in the function print_categories. Instead of running
through all categories in a loop to find those for which parentCatID==n holds, the desired categories
are immediately available as subcats[catID]. (More precisely, the search is delegated to PHP’s internal
operations: when you access array[key], PHP must look for the element with the key key. PHP carries
out this search very efficiently.)
The significance of the field catNames should be clear at first glance. catName[catID] simply
contains the category names for the category selected with catID.
On the other hand, subcats is somewhat more difficult to understand: every element
subcats[catID] again contains a field whose elements contain the catID numbers of all subcate-
gories. However, the elements are inserted with a somewhat inverted logic: in the foreach loop,
parentCatID serves as key, while catID is the value that is added to the field. Fortunately, the spe-
cial case parentCatID==NULL does not require special handling. PHP also accepts NULL as the
key in a field. Note that subcats[n] contains the subcategories in alphabetical order, since the ini-
tial data were sorted in rows with ORDER BY catName.
The PHP syntax array[] = abc means that abc is inserted as a new element in the field array.
If array does not yet exist, a new field is created in which abc is the first element.
// preparations for calling print_categories
// determine all categories
$sql = "SELECT catName, catID, parentCatID " .
"FROM categories ORDER BY catName";
$rows = $db->queryObjectArray($sql);
// create fields subcats and catNames
foreach($rows as $row) {
$subcats[$row->parentCatID][] = $row->catID;
$catNames[$row->catID] = $row->catName; }
// display categories beginning with the root element
print_categories($subcats[NULL], $subcats, $catNames);
In the first paramenter, a field with the root element(s) is passed to the function print_categories
(subcats[NULL]). Then these elements are looped through and output. The field catNames is used
for determining the category names. If there are subcategories (test with array_key_exists($catID,
$subcats)), these are simply passed with $subcats[$catID] in a recursive call to print_categories.
CHAPTER 15 ■PHP448
5351c15_final.qxd 8/26/05 7:10 PM Page 448
www.it-ebooks.info
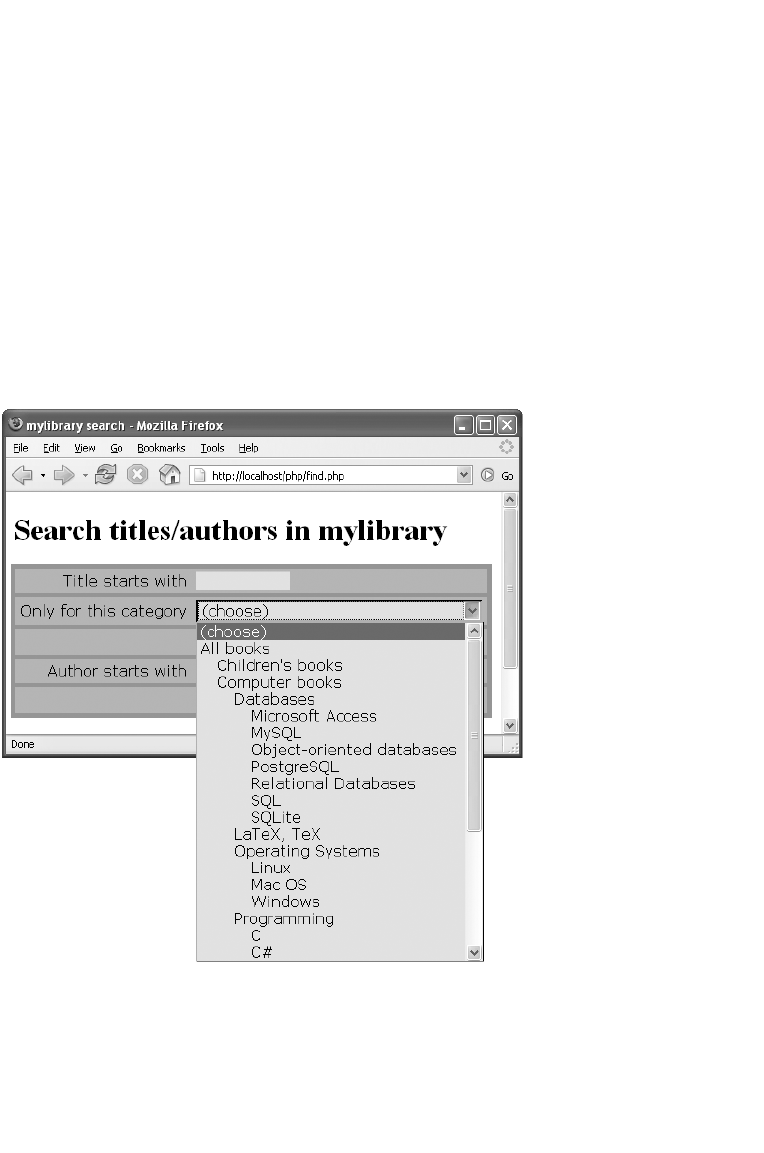
function print_categories($catIDs, $subcats, $catNames) {
echo "<ul>";
foreach($catIDs as $catID) {
printf("<li>%s (%s, %s, %s)</li>\n",
htmlspecialchars($catNames[$catID]),
build_href("categories.php", "insertID=$catID", "insert"),
build_href("categories.php", "deleteID=$catID", "delete"),
build_href("find.php", "catID=$catID", "show titles"));
if(array_key_exists($catID, $subcats))
print_categories($subcats[$catID], $subcats, $catNames);
}
echo "</ul>\n";
}
Selection List for Catagories (for titleform.php, find.php)
The two pages titleform.php and find.php contain a listbox for selecting a category. In this field
the list entries are indented to indicate the hierarchical structure (see Figure 15-11).
To create such list fields, the pages titleform.php and find.php use the functions
build_category_array (file mylibraryfunctions.php) and form_list (file formfunctions.php).
build_category_array returns a two-dimensional field. Each entry contains two elements:
the category text and the catID number. form_list then uses these data to create the listbox.
CHAPTER 15 ■PHP 449
Figure 15-11. Selection list for catagories
5351c15_final.qxd 8/26/05 7:10 PM Page 449
www.it-ebooks.info

In principle, build_category_array is structured like the function print_categories shown above,
and it expects the same parameters (in particular the fields catNames and subcats). What is new is
the fourth, optional, parameter indent, which contains the current indentation level.
The function inserts the categories passed in the first parameter into the field tmp. If this cate-
gory possesses subcategories, then these are also inserted via a recursive call to the function (shown
in boldface).
The field tmp is declared to be static, so that its value is not lost in the call to build_category_array.
(Normally, functions are declared to be local within a function; that is, each function call contains its
own independent variables.) At the first call to build_category_array with indent==0, the content of tmp
is cleared. Note that the usual function unset cannot be used here, since it does not work as desired
with static variables (a PHP-specific problem).
To indent the list entries correctly, build_category_array governs the current indentation level
in the parameter indent. The list entries are prefixed with indent*3 spaces. In form_list these entries
are replaced by the HTML special character (that is, by fixed spaces that are not treated as
whitespace and can therefore be properly represented by the browser).
// example file mylibraryfunctions.php
function build_category_array($catIDs, $subcats, $catNames, $indent=0) {
static $tmp;
if($indent==0)
$tmp = FALSE; // clear tmp
foreach($catIDs as $catID) {
$pair[0] = str_repeat(" ", $indent*3) . $catNames[$catID];
$pair[1] = $catID;
$tmp[] = $pair;
if(array_key_exists($catID, $subcats))
build_category_array($subcats[$catID], $subcats, $catNames, $indent+1); }
if($indent==0)
return $tmp; }
The function build_category_array will appear again in the next section, where the topic is
speed optimization.
Inserting Subcategories
When you click on an INSERT link, first the function build_category_entry_form is called. It returns
a reduced representation of the hierarchy tree containing only the categories directly above and
below the selected category. A small form consisting of a text field and a button allows for the input
of new categories (see Figure 15-12). We will not go more deeply into this function for reasons of
space. Furthermore, the function offers nothing new in the way of programming techniques.
The insertion of new categories is managed by the function insert_new_categories. Two param-
eters are passed to the function: the catID number of the category of which the new category is to
define as a subcategory, and a character string with one or more new category names (separated by
semicolons).
CHAPTER 15 ■PHP450
5351c15_final.qxd 8/26/05 7:10 PM Page 450
www.it-ebooks.info
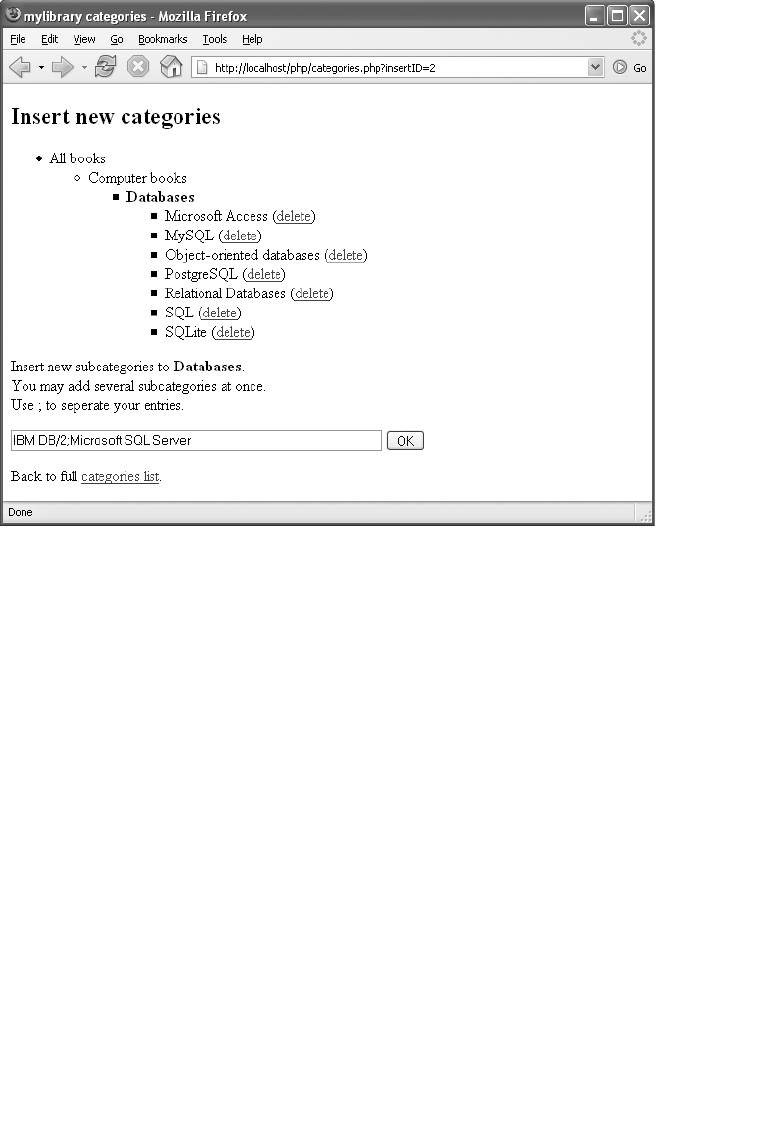
The function insert_new_categories uses explode to split the string into several field elements
and then for each field element calls insert_new_category. If an error occurs in storing a category
(return value -1), the function call is aborted.
// example file categories.php
function insert_new_categories($insertID, $subcategories) {
global $db;
$subcatarray = explode(";", $subcategories);
$count = 0;
foreach($subcatarray as $newcatname) {
$result = insert_new_category($insertID, trim($newcatname));
if($result == -1) {
echo "<p>Sorry, an error happened. Nothing was saved.</p>\n";
return FALSE; }
elseif($result)
$count++; }
if($count)
if($count==1)
echo "<p>One new category has been inserted.</p>\n";
else
echo "<p>$count new categories have been inserted.</p>\n";
return TRUE;
}
The function insert_new_category stores a new category. First a test is made whether this cate-
gory already exists. The function returns one of three values: 1(the category was deleted), 0(the
category was not deleted), -1 (an SQL or database error occurred).
CHAPTER 15 ■PHP 451
Figure 15-12. Input of new categories
5351c15_final.qxd 8/26/05 7:10 PM Page 451
www.it-ebooks.info

function insert_new_category($insertID, $newcatName) {
global $db;
// newcatName is empty
if(!$newcatName) return 0;
$newcatName = $db->sql_string($newcatName);
// newcatName already exists
$sql = "SELECT COUNT(*) FROM categories " .
"WHERE parentCatID=$insertID " .
" AND catName=$newcatName";
if($db->querySingleItem($sql)>0) {
return 0; }
$sql = "INSERT INTO categories (catName, parentCatID) " .
"VALUES ($newcatName, $insertID)";
if($db->execute($sql))
return 1;
else
return -1;
}
Deleting Categories and Subcategories
A category can be deleted only after all of its subcategories have been deleted. Therefore,
delete_category calls itself recursively (shown in boldface in the listing). There is an additional
condition that must be fulfilled before deletion can take place: There can be no titles that belong
to such a category.
// example file categories.php
function delete_category($catID) {
global $db;
// search out and delete subcategories
$sql = "SELECT catID FROM categories " .
"WHERE parentCatID='$catID'";
if($rows = $db->queryObjectArray($sql)) {
$deletedRows = 0;
foreach($rows as $row) {
$result = delete_category($row->catID);
if($result==-1)
return -1;
else
$deletedRows ++;
}
// if not all subcategories can be deleted,
// then do not delete this category
if($deletedRows != count($rows))
return 0;
}
// if category is being used, do not delete
$sql = "SELECT COUNT(*) FROM titles WHERE catID='$catID'";
if($n = $db->querySingleItem($sql)>0) {
$sql = "SELECT catName FROM categories WHERE catID='$catID'";
$catname = $db->querySingleItem($sql);
printf("<br />Category %s is used in %d titles. " .
"You cannot delete it.\n", $catname, $n);
return 0;
}
CHAPTER 15 ■PHP452
5351c15_final.qxd 8/26/05 7:10 PM Page 452
www.it-ebooks.info
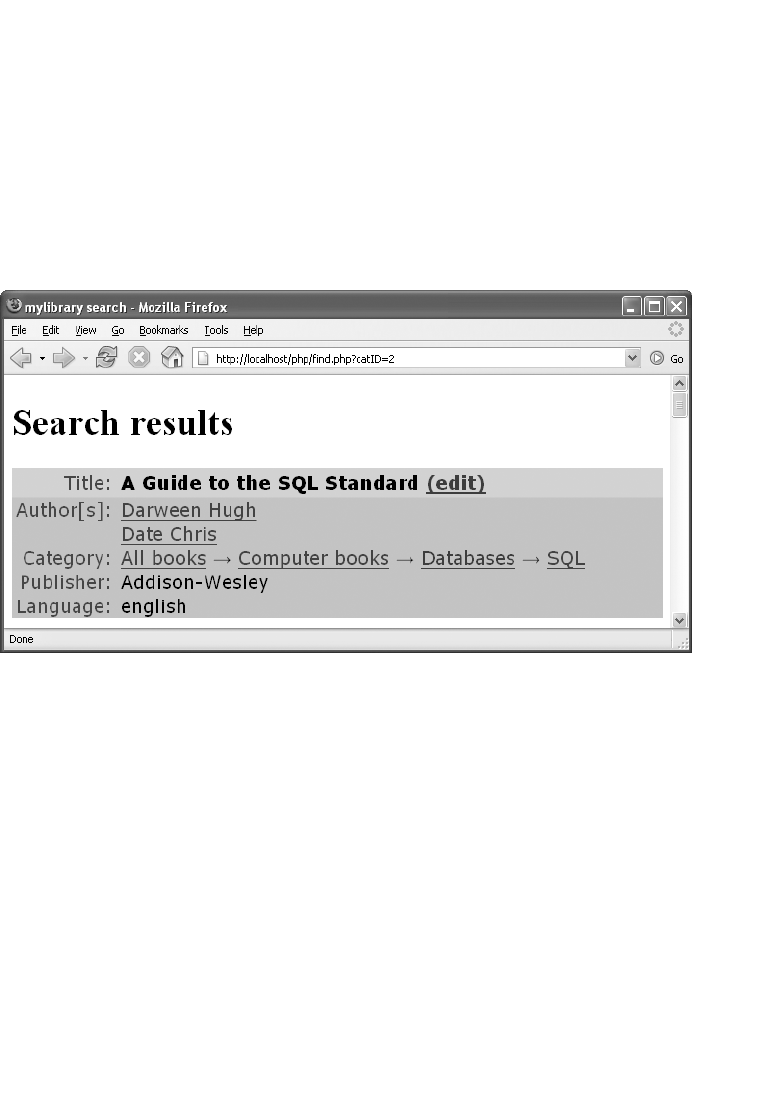
// delete category
$sql = "DELETE FROM categories WHERE catID='$catID' LIMIT 1";
if($db->execute($sql))
return 1;
else
return -1;
}
Searching for Parent Categories
In the search results of find.php, not only a link to the category is displayed, but also links to all
the subcategories (see Figure 15-13). That makes the search for related titles particularly easy.
Of interest here is of course the search for the parent categories. To this end, show_titles uses
the function build_cat_string, which returns a string with all the requisite links. Three parameters
are passed to build_cat_string: the fields catNames and catParents and the catID number of the
current category.
First the two fields are initialized. catNames contains the category name for each catID index.
The field catParents contains the catID number of the parent category.
// example file find.php
function show_titles($titles, $pagesize) {
...
// determine all categories
$sql = "SELECT catName, catID, parentCatID FROM categories";
$rows = $db->queryObjectArray($sql);
// form associative fields for category names and parentCatID
foreach($rows as $cat) {
$catNames[$cat->catID] = $cat->catName;
$catParents[$cat->catID] = $cat->parentCatID; }
...
CHAPTER 15 ■PHP 453
Figure 15-13. Links to the book’s category as well as all its subcategories
5351c15_final.qxd 8/26/05 7:10 PM Page 453
www.it-ebooks.info

// loop over all titles
foreach($titlerows as $title) {
... display various title information
// display category and subcategories
if($title->catID)
echo td1("Category:"), td2asis(
build_cat_string($catNames, $catParents, $title->catID));
The function build_cat_string first creates a link to the category specified by catID. Then it runs
through a loop to search for all categories lying above it in the hierarchy. Links are created to these
categories as well. Rightward-pointing arrows between the links are provided by →. The func-
tion build_href from mylibraryfunctions.php is used, as in many other examples in this book, for
forming the link (hence <a href=”link?query”> txt</a>).
function build_cat_string($catNames, $catParents, $catID) {
$tmp = build_href("find.php", "catID=$catID", $catNames[$catID]);
while($catParents[$catID] != NULL) {
$catID = $catParents[$catID];
$tmp = build_href("find.php", "catID=$catID", $catNames[$catID]) .
" → " . $tmp; }
return $tmp;
}
Searching for Subcategories
You can specify a category as search criterion in the search form find.php. If you now select the
criterion Databases, you expect, of course, that the result will also contain the titles of the sub-
categories MySQL, SQL, etc. Therefore, it is insufficient to use catID=nnn as search criterion in
the SELECT query. First you must compile a list of ID numbers of all the subcategories and then
use that list as SELECT criterion, that is, catID IN (n1, n2, n3 …).
Such a list is returned by the function subcategory_list. It expects as parameters the initial
category as well as the associative field subcats, where subcats[catID] contains a field with the
catID numbers of all subcategories. The following lines show the formation of subcats and then
the call to subcategory_list within build_title_query:
// example file find.php
function build_title_query(...) {
...
$catsql = "SELECT catID, parentCatID FROM categories";
$rows = $db->queryObjectArray($catsql);
foreach($rows as $row)
$subcats[$row->parentCatID][] = $row->catID;
$cond1 = "catID IN (" .
subcategory_list($subcats, $catID) . ") ";
The function subcategory_list stores catID in the temporary variable lst. If there are subcate-
gories (that is, if the field subcats contains an element with the key catID), then subcategory_list is
called recursively for all subcategories. The result is added to lst.
function subcategory_list($subcats, $catID) {
$lst = $catID;
if(array_key_exists($catID, $subcats))
foreach($subcats[$catID] as $subCatID)
$lst .= ", " . s($subcats, $subCatID);
return $lst;
}
CHAPTER 15 ■PHP454
5351c15_final.qxd 8/26/05 7:10 PM Page 454
www.it-ebooks.info

Speed Optimization
When you test your PHP pages on your local system, you are likely to be satisfied with the speed at
which things take place. However, when later the project can be reached over the Internet, things
can suddenly slow considerably: Most Internet service providers run several websites on a single
server. The greater the number of simultaneous hits to these sites, the slower each site becomes.
Furthermore, many database applications become slower as the database grows in size. That
is true particularly if your program code has not been optimized so that it is miserly with respect
to resources in working with large data sets (memory, CPU cycles, database accesses, data transfer
over the network).
For these reasons it is desirable, even for simple projects, to pay attention to writing well thought
out and efficient code. This section provides some tips and examples. Also take a look at Chapter 14,
where the issue was discussed of configuring the MySQL server as efficiently as possible (query cache,
etc.), independently of PHP.
Ground Rules for Efficient Code Execution
Database design: The most important principle for the efficient construction of a dynamic
website is a good database design. If the structure of the data does not correspond to your
requirements, then all attempts at optimization are doomed.
From the point of view of efficiency, the design is good if the following rules for efficiency are
easy to fulfill. (Note that such optimized databases do not generally meet all the criteria of nor-
mal forms, since, for example, they contain redundant data. Database theoreticians may not
be happy with such databases, but you can often gain speed with redundancy.)
One aspect of database design is the correct use of indexes. All columns that are frequently
searched by content (WHERE column = …) should be equipped with an index. Note, however,
that too many indexes is not a good thing: they increase the memory requirement for each
table and slow down changes to the data.
As few SQL queries as possible per page: Every SQL command that is sent from the PHP
interpreter to the MySQL server results in a considerable expense of resources: transferring
a command, executing a command on the server, transferring the result. Therefore, the
fewer SQL commands needed for constructing a page or in general performing an action,
the better.
This old piece of database wisdom holds also for the combination PHP/MySQL, even if with
certain restrictions: If the MySQL server is properly configured, then frequently used tables
should be contained completely in RAM. And if Apache and MySQL are running on the same
computer (which is often the case), then the network ceases to be a brake on speed. The over-
head due to an SQL command is then rather small. For example, if you can avoid a costly PHP
loop by using an additional SQL command, the overall performance can increase. In sum,
avoid unnecessary SQL commands, but don’t avoid them at any price.
Keep SELECT results as small as possible: One should almost always avoid a query that
returns 1,000 records. The great cost of such queries often is caused not by the actual execution
of the query, but by its transmission to the PHP interpreter and the subsequent evaluation with
PHP code. Filter the data on the MySQL server by providing your SELECT queries with suitable
conditions.
The most efficient possible PHP code (few loop passes, etc.): Many problems can be solved in
ways that are more or less efficient. Attempt in particular to avoid search and sort procedures
in PHP by building the necessary criteria and sorting rules into your SELECT command. (MySQL
is optimized for such tasks, in contrast to your code.)
CHAPTER 15 ■PHP 455
5351c15_final.qxd 8/26/05 7:10 PM Page 455
www.it-ebooks.info

You will note that these rules partially contradict one another. Often it can be determined with
concrete tests whether it is more efficient to execute a single SELECT query that returns 1,000 records
(greater cost from transferring larger data sets) or 20 SELECTs that each return 100 records (greater
cost because the PHP interpreter must contact the MySQL server 20 times and wait for its answer).
■Tip Before you begin with your optimization, consider which pages will be called frequently. Often, pages with
read and search access are called more frequently than those that alter data. Optimize the pages that are needed
most frequently. Optimize the database design so that frequently occurring tasks are executed efficiently.
Let us suppose that search queries and data changes occur in the frequency 100 to 1. If you are able to execute
search queries twice as fast as previously, but with the result that data changes, due to the changed design, now take
three times as long, you will have reaped an enormous increase in efficiency.
If you are working on a website like Yahoo! or GMX, where millions of accesses per day are to be expected,
efficiency of the code occupies a place of supreme importance. However, optimally efficient code is often com-
plex, difficult to maintain, and error-prone. For websites that experience many fewer hits, the priorities should be
directed toward making the code clear, simple, and easy to maintain.
Statistical and Benchmarking Help
If you have encapsulated database access (for example, with the previously introduced MyDb
class), it is easy to determine the number of SQL commands, the number of returned records, the
time for the execution of the SQL commands, and the total time for creating the class as well as
the time since the last reset. At the end of the page, output this basic information with a call to
$db->showStatistics().
This information will at least give you a first impression of the cost of creating the page from
the database point of view (see also Figure 10-14). Note, however, that the times given are strongly
dependent on what else the computer was doing when you were testing your page, whether the
data sought were already in the cache of the MySQL server, etc. Therefore, apply a certain amount
of skepticism to the results.
To determine the exact time, the PHP function microtime is used. The function microtime_float
changes its result into a floating-point number. The extensions to the class file mydb.php look in part
like this:
// example file mydb.php
class MyDb {
...
protected $sqlcounter = 0; // counter for SQL commands
protected $rowcounter = 0; // counter for SELECT records
protected $dbtime = 0; // time elapsed for SQL commands
protected $starttime; // total time
// constructor
function __construct() {
...
$this->starttime = $this->microtime_float();
}
function queryObjectArray($sql) {
$this->sqlcounter++;
$this->printsql($sql);
$time1 = $this->microtime_float();
$result = $this->mysqli->query($sql);
$this->dbtime += ($time2 - $this->microtime_float());
CHAPTER 15 ■PHP456
5351c15_final.qxd 8/26/05 7:10 PM Page 456
www.it-ebooks.info

if($result) {
if($result->num_rows) {
while($row = $result->fetch_object())
$result_array[] = $row;
$this->rowcounter += sizeof($result_array);
return $result_array; }
else
return FALSE;
} else {
$this->printerror($this->mysqli->error);
return FALSE;
}
}
...
function showStatistics() {
$totalTime = $this->microtime_float() - $this->starttime;
printf("<p><font color=\"#0000ff\">SQL commands: %d\n",
$this->sqlcounter);
printf("<br />Sum of returned rows: %d\n", $this->rowcounter);
printf("<br />Sum of query time (MySQL): %f\n", $this->dbtime);
printf("<br />Processing time (PHP): %f\n",
$totalTime - $this->dbtime);
printf("<br />Total time since MyDb creation / " .
"last reset: %f</font></p>\n", $totalTime); }
function resetStatistics() {
$this->sqlcounter = 0;
$this->rowcounter = 0;
$this->dbtime = 0;
$this->starttime = $this->microtime_float(); }
private function microtime_float() {
list($usec, $sec) = explode(" ", microtime());
return ((float)$usec + (float)$sec); }
}
Example: Generating the Category List Efficiently
In the previous section the function build_category_array from mylibraryfunctions.php was
introduced. This function returns a field from which the category selection list is created.
This section compares three variants of this function and shows how a function can be opti-
mized step by step. The complete code can be found in optimize/show_categories_list.php. The
speed difference between the slowest and fastest variants is hardly noticeable with a small number
of categories. But it grows dramatically as the number of categories grows (by a factor of 50 with
more than 1,000 elements).
Creating the Test Data
The starting point for the following tests if a category list built from random data with about
1,000 entries. To create a corresponding categories table, call once the page optimize/
create_categories_test.php. The code contained there resolves the integrity rules for titles.catID,
renames the categories table oldcategories, and then creates a new categories table with random
data. To restore the status quo, call optimize/remove_categories_test.php.
CHAPTER 15 ■PHP 457
5351c15_final.qxd 8/26/05 7:10 PM Page 457
www.it-ebooks.info

Variant 1: One SQL Query, Worse PHP Code
The function build_category_array1 expects as parameter a sorted field with all categories as well
as the parentCatID number of the initial element (parentCatID=NULL means that the entire tree,
beginning with the root element, is to be displayed). The category list is determined before the call
to build_category_array1 through a single SELECT command.
Now the function searches through the entire rows field for entries with the matching parentCatID
and adds these to the static field tmp. For each found category, print_categories is called recursively to
take care of the category’s subcategories.
// example file optimize/show_categories_list.php
$sql = "SELECT catName, catID, parentCatID FROM categories ORDER BY catName";
$categories = $db->queryObjectArray($sql);
$rows = build_category_array1($categories);
...
function build_category_array1($rows, $parentCatID=NULL, $indent=0) {
static $tmp;
if($indent==0)
$tmp=FALSE; // unset does not work with static variables
foreach($rows as $row)
if($row->parentCatID==$parentCatID) {
$pair[0] = str_repeat(" ", $indent*3) . $row->catName;
$pair[1] = $row->catID;
$tmp[] = $pair;
build_category_array1($rows, $row->catID, $indent+1);
}
if($indent==0)
return $tmp;
}
Result: There turn out to be exactly n2passes through build_category_array1. That explains
why the first variant becomes unbearably slow as the number of categories grows. On the other
hand, the code is easy to understand.
Variant 2: Many Small SQL Queries
The function build_category_array1 is so slow because it searches for each category by a simple
pass through the entire list of categories. To avoid that, build_category_array2 determines only the
subcategories of the given category.
In other words, instead of one query with many results, now many queries must be executed,
each of which, however, returns only a few results. (For 1,000 categories, 1,000 queries are required,
which return all the categories. Thus the same amount of data is transferred from the MySQL server
in both cases, but the overhead is greater in this variant.)
In constructing the recursive function, not much is changed in comparison to
build_category_array1. Only in creating the SQL query, now only one case distinction is necessary:
whether the parameter parentCatID contains NULL. In this case, the condition must be formulated
with ISNULL(catID), since catID=NULL is not permitted in SQL.
function b($parentCatID=NULL, $indent=0) {
global $db;
static $tmp;
if($parentCatID==NULL) {
$tmp = FALSE; // delete tmp
$sql = "SELECT catName, catID FROM categories " .
"WHERE ISNULL(parentCatID) ORDER BY catName"; }
CHAPTER 15 ■PHP458
5351c15_final.qxd 8/26/05 7:10 PM Page 458
www.it-ebooks.info
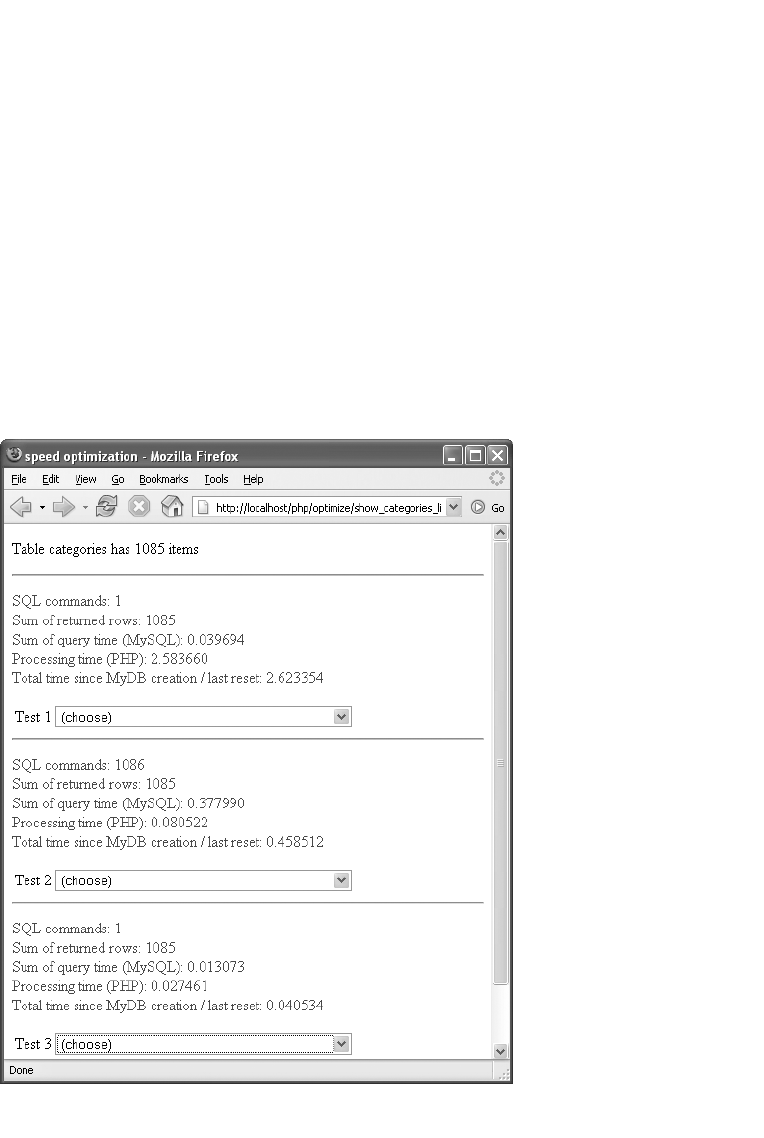
else
$sql = "SELECT catName, catID FROM categories " .
"WHERE parentCatID=$parentCatID ORDER BY catName";
if($rows = $db->queryObjectArray($sql))
foreach($rows as $row) {
$pair[0] = str_repeat(" ", $indent*3) . $row->catName;
$pair[1] = $row->catID;
$tmp[] = $pair;
build_category_array2($row->catID, $indent+1);
}
if($parentCatID==NULL)
return $tmp;
}
Result: The more categories there are, the faster variant 2 is in comparison to variant 1. This result
proves that in many instances, it is better to pay the price of more SQL queries than to process enor-
mous lists of SELECT results with inefficient PHP code. (With small category lists, variant 2 is somewhat
slower than variant 1.)
Figure 15-14 shows, however, that while the total time for creating the selection list has gone down,
the burden on the MySQL server is much higher than it was in the first variant (2.26 vs. 0.04 seconds).
CHAPTER 15 ■PHP 459
Figure 15-14. Speed comparison in constructing the category selection list
5351c15_final.qxd 8/26/05 7:10 PM Page 459
www.it-ebooks.info

■Note You may be wondering why no prepared statements were used here. The answer is simple: Because of
the recursive nature of
build_category_array2
, the use of prepared statements is relatively difficult here and would
not lead to a significant increase in speed. Prepared statements are more suitable when one and the same query
is executed repeatedly in a loop.
Variant 3: One SQL Query, Optimized PHP Code
Variant 3 returns to the initial situation of variant 1: first all categories are determined with a single
SQL query. But now, instead of blindly beginning to search through the category field for individual
elements, two additional fields, catNames and subcats, are created, for which catID and parentCatID
are used as index (key). This then enables direct access to the needed data, that is, without lengthy
search loops. Details on the code appeared earlier in the chapter, under the heading “Displaying the
Category Tree.”
Result: Variant 3 is faster than the previous two variants with large category lists. Even with small
category lists the additional time for creating the fields catNames and subcats is made up for. The only
drawback of this variant is that it requires some mental effort to understand the code. This makes it
difficult to make changes later (in particular if they are to be carried out by another programmer).
Other Possibilities for Improvement
The results achieved by the third variant are already so good that further optimization hardly seems
necessary. Nevertheless, if we assume that the category list will be changed relatively seldom but read
very often, then two further improvements come to mind:
Use of an auxiliary table: Every time a category selection field is displayed, the category list
must be sorted and ordered by hierarchy with indentation. The results of this task could well
be stored in a table.
Before this table is output, it would have to be tested whether any categories had changed in
the meantime. Criteria could be the number of elements and the time of the last change. This
point in time can be determined relatively easily if the categories table has been equipped with
a supplementary TIMESTAMP column (SELECT MAX(ts) FROM categories). If categories has
changed, the auxiliary table would have to be re-created.
A different table design: More elegant than a supplementary table that has to be updated con-
tinually is to enlarge the categories table by two columns: indent gives the indent level of the
associated entry, and position the position of the element in the hierarchically ordered list.
SELECT catName, catID, indent FROM categories ORDER BY position then returns the cate-
gories in the order needed for creating the listbox.
Of course, there are disadvantages with this variant as well: The additional columns run con-
trary to the normalization rules, since they contain redundant data. Moreover, the storage space
for the table increases (though only minimally). And finally, the insertion of new categories is
considerably more complex, since the correct positional value must be determined for the new
element; furthermore, position must be increased for all categories beneath the new one in the
hierarchy.
From the point of view of efficiency, these drawbacks may be overlooked, since they take effect
only rarely (when changes are made). However, the PHP code for inserting new records would
become more extensive and thereby more error-prone.
CHAPTER 15 ■PHP460
5351c15_final.qxd 8/26/05 7:10 PM Page 460
www.it-ebooks.info

Unicode
By default, PHP serves up HTML documents in the Latin1 character set (ISO-8559-1). Setting a different
character set directly in PHP code is currently not provided for. (Such functions may well be offered in a
forthcoming version) Nevertheless, PHP is in principle already capable of creating HTML documents in
almost any other character set. Functions such as echo and print output strings without change, and
thus do not concern themselves with the character set.
The actual problem is that all PHP string functions assume that the character strings employ
the Latin1 character set (1 byte per character). If the strings are encoded in UTF-8, then each char-
acter has a code consisting of up to 3 bytes. The consequences are these:
•strlen returns the number of bytes instead of the number of characters.
• You can no longer rely on the results of case operators.
• You can no longer reliably sort arrays of strings.
• Important functions such as stripslashes, substr, and split can cause problems.
The situation is not entirely hopeless: PHP offers the functions utf8_encode and utf8_decode
for converting strings between UTF-8 and ISO-8859-1. If PHP is compiled with the iconv extension
or if the extension module is activated (under Windows extension= php_iconv.dll in php.ini), then
in addition to the standard string functions, there are some iconv variants available. For example,
iconv_strlen($s, “UTF-8”) determines the actual number of characters in a UTF-8 character string.
Even more supplementary functions are offered by the mbstring extension. With these you can use
regular expressions with multibyte strings, send email, etc.
In sum, if Latin1 suffices for your purposes, then use that character set. That will keep your
problems to a minimum. On the other hand, if the requirements of your program demand that you
use the Unicode character set, look in the remainder of this section for some tips as to what you
need to watch out for in your programming.
Setting the HTML and HTTP Coding
Meta-Tag: According to the HTML standard, all documents without a specified character set use
Latin1 (that is, ISO-8859-1). You can specify the character set to be used at the beginning of an
HTML document in a <meta> tag. In HTML code it looks like this:
<!DOCTYPE HTML PUBLIC "-//W3C//DTD HTML 4.01 Transitional//EN"
"http://www.w3.org/TR/html4/loose.dtd">
<html><head>
<meta http-equiv="Content-Type"
content="text/html; charset=utf-8" />
...
Allowable charset settings are utf-8, iso-8859-1, iso-8859-15, etc. However, there is a problem
in that many web browsers simply ignore this information and instead rely on the HTTP header.
Header information: The HTTP protocol defines how a web browser and web server commu-
nicate with each other. In addition to the HTML <meta> tag, this protocol offers a second way of
setting the character set. Most web browsers rely on the information in the HTTP protocol and ignore
the character set specification in the <meta> tag.
What determines the character set is the header information about the document type. The
HTTP header is sent before the actual HTML document and is therefore not part of the HTML code.
Some web browsers, however, offer a command for displaying page information or properties from
which the header information follows (with Firefox it is TOOLS | PAGE INFO; see Figure 15-15).
CHAPTER 15 ■PHP 461
5351c15_final.qxd 8/26/05 7:10 PM Page 461
www.it-ebooks.info
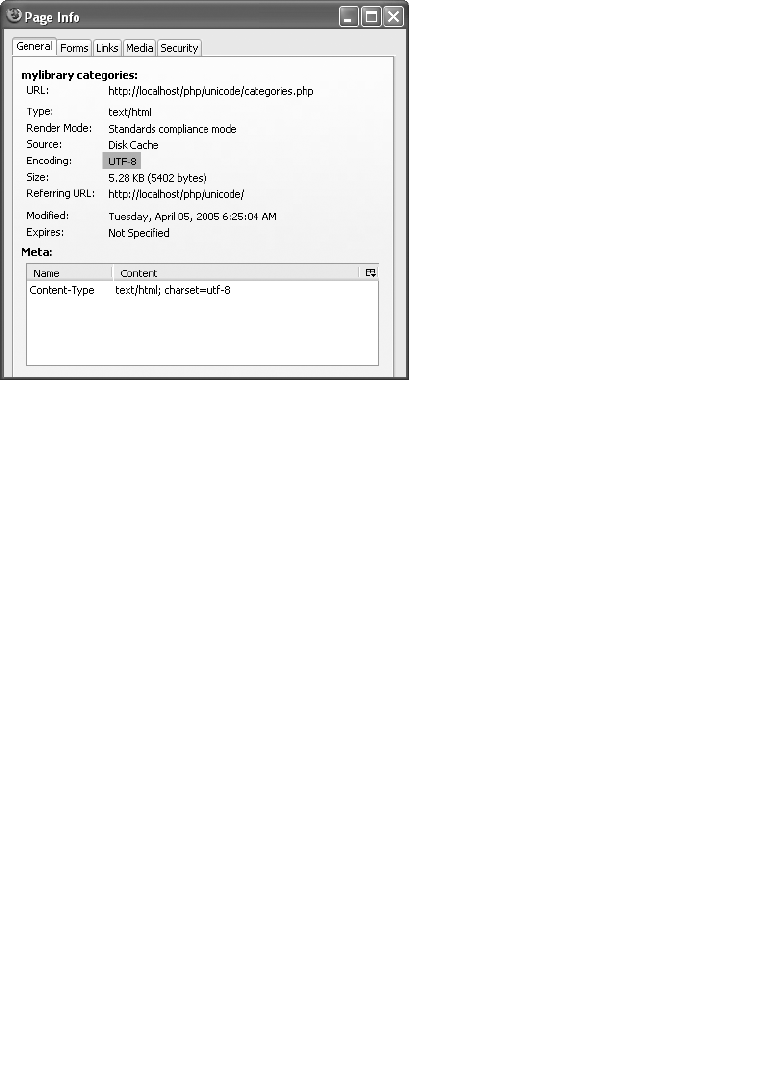
So where does the Header information about the document type and character set come from?
There are several possibilities. (When there are several mutually contradictory settings, the first-
named points in the following list have precedence.)
• The PHP code of the page in question
<?php header("Content-Type: text/html; charset=utf-8"); ?>
• The PHP default setting (default_charset=“utf-8” in php.ini)
• The Apache directory configuration (AddDefaultCharset in .htaccess)
• The Apache default setting (AddDefaultCharset utf-8 in httpd.conf)
If your entire website consists of Unicode documents, it is most convenient to change the Apache
configuration file. If you have no influence over the Apache and PHP configuration (such as when your
website is located at an ISP), it is most secure to insert the header function with all of your PHP scripts.
Note that the header function must be called before each HTML output.
MySQL
Neither the mysql nor mysqli interface offers functions or methods for setting the character set.
However, a simple SQL command suffices to inform the MySQL server that the SQL commands
to come are encoded in UTF-8 and that you want SELECT results in this encoding as well.
SET NAMES 'utf8'
Execute this command with mysql_query or $mysqli->query.
Note that SET NAMES governs only the character set for communication between MySQL and
your PHP script. SET NAMES has no influence over the character set in which data are actually
stored in MySQL tables. (That character set is determined when the table is created with CREATE
CHAPTER 15 ■PHP462
Figure 15-15. Determining the character set of an HTML document
5351c15_final.qxd 8/26/05 7:10 PM Page 462
www.it-ebooks.info

TABLE.) MySQL automatically converts all character strings from the table character set to the pro-
cessing character set. But watch out! If in the process characters appear that are not representable
in the second character set, such characters are replaced with a question mark. (Such characters
also lead to loss of information.)
PHP Character Set Functions
Almost every PHP script employs string functions. By default, these functions assume that each charac-
ter is represented by a single byte. However, that is not the case with UTF-8 strings, in which a character
has length from 1 to 3 bytes. The following recommendations should help in porting code:
• Output functions such as printf and echo are usually unproblematic.
• The concatenation of strings with .causes no trouble.
• Sorting strings should generally be left to MySQL.
• The functions htmlentities and htmlspecialchars can be called in a form that is compatible
with UTF-8:
echo htmlspecialchars($txt, ENT_COMPAT, "UTF-8");
echo htmlentities($txt, ENT_COMPAT, "UTF-8");
• Some elementary string functions can be replaced with equivalent functions from the
already mentioned PHP extensions iconv and mbstring. (Unfortunately, these extensions do
not provide a UTF-8–compatible replacement for all string functions, not by a long shot.)
Example
In the directory unicode in the PHP example files you will find a UTF-8–compatible variant of the
mylibrary example scripts that were described in the previous three sections of this chapter. The
Unicode transformation of this example was by and large without problems. The following points
summarize the changes that were made:
•A header function was inserted at the beginning of the files find.php, titleform.php, and
categories.php to change the HTTP coding to Unicode:
<?php header("Content-Type: text/html; charset=utf-8"); ?>
•A <meta> tag was inserted in the header of these files to set the HTML coding to Unicode. (As
we have said, this information is ignored by many browsers. Nonetheless, they should be
given so that the HTML syntax rules are adhered to.)
<meta http-equiv="Content-Type" content="text/html; charset=utf-8" />
• After the connection to the MySQL server was made, communication was changed over to
Unicode with SET NAMES ‘utf8’:
$db = new MyDb();
$db->execute("SET NAMES 'utf8'");
CHAPTER 15 ■PHP 463
5351c15_final.qxd 8/26/05 7:10 PM Page 463
www.it-ebooks.info

• All calls to htmlspecialchars($txt) were replaced by htmlspecialchars($txt, ENT_COMPAT,
“UTF-8”). To minimize typing, the new function htmlspecial_utf8 was defined in
mylibraryfunctions.php.
function htmlspecial_utf8($txt) {
return htmlspecialchars($txt, ENT_COMPAT, "UTF-8"); }
Open problems: In the example code, there are some string functions that are incompatible
with UTF-8. Particularly problematic is the function explode in titleform.php, which decomposes
a string of several authors (e.g., “name1;name2”) into individual names. When the user inputs an
author name whose UTF-8 encoding contains a byte with the code 59 (the ASCII code for the semi-
colon character), the name will be broken into two pieces at that point. Unfortunately, such invalid
UTF-8 strings may well exist. (Not every random sequence of byte codes yields a valid UTF-8 string.)
In my tests such an error did not occur. However, if you fancy using titleform.php for the input
of Japanese or Chinese book titles with several authors, sooner or later such an error will occur. Here
the function mb_split from the mbstring extension would come to your aid.
Another problematic function is stripslashes, though in our example it should not lead to any
errors. It is used in the example a number of times to remove the backslash escape character from
form data. (Depending on the configuration, PHP inserts backslashes automatically. Further infor-
mation can be found in any good PHP book under the heading Magic Quotes.)
The function stripslashes is not UTF-8 compatible, but that is true also of the automatic quot-
ing by Magic Quotes, so any errors should cancel themselves out. However, most secure would be
to deactivate Magic Quotes by setting magic_quotes_gpc = Off in php.ini.
The character set in the mylibrary database: All tables of the mylibrary database use the Latin1
character set (see also Chapter 8, where the design of the database is described in detail). At first sight
it might seem surprising that converting the tables to UTF-8 is not absolutely necessary. Yet the exam-
ple works at the first try, since the MySQL server automatically converts all strings between UTF-8
(PHP code) and Latin1 (database). However, a loss of information can occur if a user inputs Unicode
characters that cannot be represented in the Latin1 character set.
Thus it makes sense to convert a PHP project to UTF-8 only if the underlying database is con-
verted to UTF-8. To convert existing table data, use the following SQL command:
ALTER TABLE tblname CONVERT TO CHARACTER SET 'utf8' [COLLATE 'utf8-...']
Binary Data (BLOBs) and Images
One of the most frequently raised questions in PHP and MySQL newsgroups and discussion forums
is this: How can I give visitors to my website the ability to upload images that later can be displayed?
In this section I will answer the question using an example project (see Figure 15-16) that demon-
strates the required programming techniques.
CHAPTER 15 ■PHP464
5351c15_final.qxd 8/26/05 7:10 PM Page 464
www.it-ebooks.info
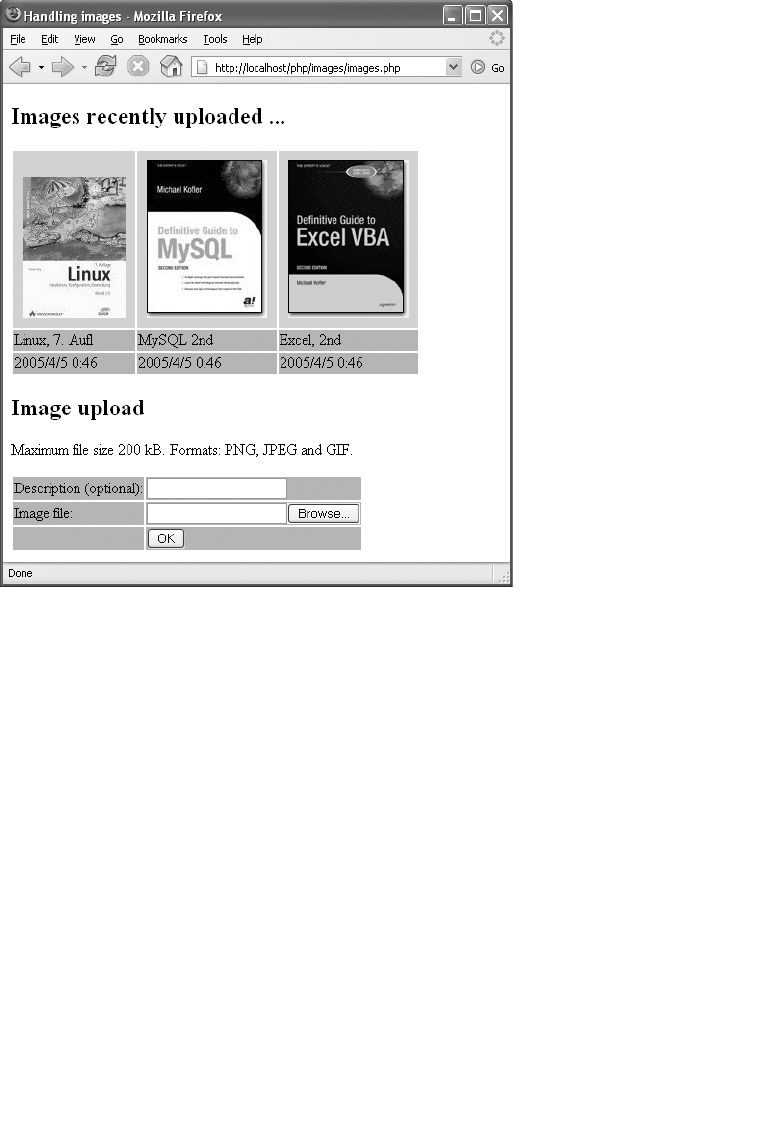
Fundamentals and Programming Techniques
Database Design
The starting point for our example is the database testimages with the table images. The CREATE
TABLE command shows the structure of the table:
CREATE TABLE images (
id BIGINT NOT NULL AUTO_INCREMENT,
name VARCHAR(100) NOT NULL,
type VARCHAR(100) NOT NULL,
image LONGBLOB NOT NULL,
ts TIMESTAMP NOT NULL,
PRIMARY KEY (id))
The images table contains in addition to the usual primary index id the column name for
describing the image, type for storing the image format (e.g., “JPEG IMAGE”), image for storing
the image data, as well as ts for logging the time of insertion.
CHAPTER 15 ■PHP 465
Figure 15-16. Storing and displaying images
5351c15_final.qxd 8/26/05 7:10 PM Page 465
www.it-ebooks.info

■Caution From the point of view of efficiency, it is not a good idea to store images or other large binary data
sets in a database. For such purposes, a traditional file system is much more suitable. Databases with many
BLOBs suffer a loss of speed, above all because it is difficult for the database system to store needed data and
indexes temporarily in RAM. It is therefore more efficient to store images as normal files and store only the file
names in the database.
In practice, however, the storage of binary in BLOBs is relatively common, for two reasons: First, managing
data (e.g., backups, migrating the server) is easier when all the data are stored in a central location; and second,
many ISPs do not allow local files to be created and read with PHP scripts or other programming code.
The HTML Form for File Transfer
To offer an HTML page the possibility of transferring a file to a web server, you need a specially
constructed form. Most important is that the attributes method and enctype be correctly set. The
input field for the file name (which the browser automatically equips with the Browse button) is
formed of an <input> field with the attribute type = “file”.
If you wish to limit the file size, you can do so with a hidden field with the attribute
name=”MAX_FILE_SIZE”. The following lines show the code for the upload form, where the file
size is restricted to 200KB. The form is formatted as a table for easier viewing. The layout of the
table elements is accomplished by the file table.css.
<form method="post" action="filename.php"
enctype="multipart/form-data" >
<input type="hidden" value="204800" name="MAX_FILE_SIZE" />
filename: <input name="imgfile" type="file" />
<input type="submit" value="OK" name="submitbtn" />
</form>
PHP Evaluation of the $_FILES Field
The PHP script that is called with the form data contains the usual form fields as usual in the
$_POST field (i.e., $_POST[‘descr’] with the description of the image as well as $_POST[‘submitbtn’]
with the string ‘OK’). The information on the file to be transferred is to be found in the $_FILES field.
Access is in accord with the example form shown above via the key ‘imgfile’ (see the name attribute
with <input type=”file”>), and it returns again a field. Its elements give information on the trans-
ferred file:
$imgfile = $_FILES['imgfile'];
$name = $imgfile['name']; // file name (without volume/path)
$type = $imgfile['type']; // file type, e.g., "image/gif"
$size = $imgfile['size']; // file size in Bytes
$uperr = $imgfile['error']; // error number (0 = no error)
$tmpfile = $imgfile['tmp_name']; // name of the local temporary file
The transferred file is stored by the web server in a temporary file (file name $tmpfile). This file
can be read by the PHP script, for example with the functions fopen and fread. Note that this file is
automatically deleted after the execution of the PHP script.
The file transfer is a relatively dangerous operation from a security point of view. Therefore, it
is recommended to validate the code for further processing of the file. The following query tests
whether $tmpfile is empty, whether a transmission error has occurred, or whether the specified file
is not a file that has been transferred (is_uploaded_file) but is a local file. This validation is necessary
so that an attacker cannot attempt to evaluate a local system file (e.g., the Unix/Linux password file
/etc/passwd). Such cases have occurred in the past.
CHAPTER 15 ■PHP466
5351c15_final.qxd 8/26/05 7:10 PM Page 466
www.it-ebooks.info

if(!$tmpfile or $uperr or !is_uploaded_file($tmpfile))
echo "<p>error ...</p>\n";
else {
... // read and process the temporary file
}
Optionally, you could also evaluate the file type and size in the validation query.
Storing the Transferred File in the MySQL Database
To store the transferred file in the MySQL database, read the entire file into a variable and execute
an INSERT command. In the simplest case, the code looks like this:
$file = fopen($tmpfile, "rb"); // open file (read-only, binary)
$imgdata = fread($file, $size); // read file
fclose($file);
$mysqli->query(
"INSERT INTO images (image) " .
"VALUES ('" . $mysqli->escape_string($imgdata) . "')");
In the code of the example program presented further below, the INSERT command is some-
what more complicated, since in addition to the MIME type of the image (e.g., “GIF image”) the file
name or an image description is to be stored.
Displaying Images from a MySQL Database
It is somewhat more complicated to read an image out of a MySQL database and display it within
an HTML document. Basically, it is impossible to create an HTML document in a PHP script (which
is the usual task of such a script) and at the same time generate the data for representing an image.
The two tasks must be separated into two PHP scripts.
The first (usual) script creates the HTML page including the <img> tag for the image. However,
the name of the local image file is not specified in this tag, as is otherwise usual, but instead, the
name of the second PHP script together with the ID number of the image.
// PHP-Script pictures.php
echo "<img src=\"showpic.php?id=$id"\" />";
The browser gets to see, for example, the tag <img src=”showpic.php?id=3” /> and it now calls
the second script showpic.php?id=3. Its code looks like this (somewhat simplified):
// PHP-Script showpic.php
$result = $mysqli->query("SELECT image FROM images WHERE id = $id");
$row = $result->fetch_object();
header("GIF image"); // file type
echo $row->image;
Actually, a bit more code is required to create the database connection, determine $id, and
protect the script against possible errors. If the image database contains not only GIF images but
also bitmaps in other forms, the file type, set by header, must also be determined from the database.
What is crucial at this point is that the second PHP script not create a second HTML file and not
create any output with echo before the header function is called. This function advises the PHP
interpreter to create not the usual HTML text file, but an image file.
CHAPTER 15 ■PHP 467
5351c15_final.qxd 8/26/05 7:10 PM Page 467
www.it-ebooks.info

Processing Large Files
If you wish to allow for the transfer of very large files, you should pay attention to several factors:
• The limit for the maximal size of a transferred file must be set sufficiently high. The limit is
set in the PHP configuration file php.ini with the variable upload_max_filesize (default value
2MB).
• The limit for POST transfers must also be sufficiently great (php.ini, variable post_max_size,
default value 8MB).
• The PHP interpreter must be capable of reserving enough memory to process files of the
maximal size envisioned (php.ini, variable memory_limit, default value 8 MByte).
• The PHP interpreter must give the script sufficient time for processing the data (php.ini,
variable max_execution_time). The default value of 30 seconds is generally too small for
large files.
• The variable max_input_time may have to be increased (default value 60 seconds). This vari-
able specifies how much time is to be taken for the the transfer of data over the Internet.
• For the transfer of an image between the PHP script and MySQL server to succeed, the maxi-
mal packet size (which limits the INSERT command, for example) must be sufficiently large.
The MySQL variable max_allowed_packet can be changed either in the MySQL configuration
file (/etc/my.cnf or my.ini) or with the SQL command SET max_allowed_packet=n. The default
value is a measly 1MB!
Program Code
The entire code of the example project consists of the following files, which are to be found in the
directory images:
connect.php Offers the functions connect_to_picdb and array_item.
images.php Displays a table with the last ten images and a form for transferring additional
images. The script contains as well the code for evaluation of the form.
showpic.php Displays a single image.
table.css CSS file for formatting tables.
connect.php
This file contains two functions: connect_to_picdb creates a connection to the MySQL database
testimages, while array_item reads an element from a PHP field (if it exists).
// example file images/connect.php
function connect_to_picdb() {
$mysqluser = "root"; // user name
$mysqlpw = "xxxx"; // password
$mysqlhost = "localhost"; // name of the computer on which MySQL is running
$mysqldb = "testimages"; // name of the database
$mysqli = new mysqli($mysqlhost, $mysqluser, $mysqlpw, $mysqldb);
if(mysqli_connect_errno()) {
echo "<p>Sorry, no connection to database ...",
"</p></body></html>\n";
exit(); }
return $mysqli;
CHAPTER 15 ■PHP468
5351c15_final.qxd 8/26/05 7:10 PM Page 468
www.it-ebooks.info

images.php
The code in images.php is divided into three parts. The first part is responsible for processing the form
data. When a file has been transferred without error, the contents of the table images are stored.
The switch construction evaluates the type of the transferred file and then returns a new MIME
string. (MIME stands for multipurpose internet mail extensions. Originally, MIME was used only for
email attachments, but now MIME also controls how a web browser with a variety of data types should
behave.) The MIME type must be specified when an image is displayed and is therefore stored together
with every image in the images table. Unfortunately, the type information after a file transfer does not
correspond to MIME, but instead uses other strings (which in addition depend on the web browser).
<!DOCTYPE HTML PUBLIC "-//W3C//DTD HTML 4.01 Transitional//EN"
"http://www.w3.org/TR/html4/loose.dtd">
<html><head> ... </head><body>
<?php // images/images.php
include("connect.php");
$mysqli = connect_to_picdb();
// Part I: store the image
$submitbtn = array_item($_POST, 'submitbtn');
$descr = array_item($_POST, 'descr');
$imgfile = array_item($_FILES, 'imgfile');
// are there form data to be processed?
if($submitbtn == 'OK' and is_array($imgfile)) {
$name = $imgfile['name'];
$type = $imgfile['type'];
$size = $imgfile['size'];
$uperr = array_item($imgfile, 'error');
$tmpfile = $imgfile['tmp_name'];
if(!$descr) $descr = $name;
switch ($type) {
case "image/gif":
$mime = "GIF Image"; break;
case "image/jpeg":
case "image/pjpeg":
$mime = "JPEG Image"; break;
case "image/png":
case "image/x-png":
$mime = "PNG Image"; break;
default:
$mime = "unknown"; }
if(!$tmpfile or $uperr or $mime == "unknown" or
!is_uploaded_file($tmpfile))
echo "<p>error message ...</p>\n";
else {
// read file and store it in the database
$file = fopen($tmpfile, "rb");
$imgdata = fread($file, $size);
fclose($file);
if(!$mysqli->query(
"INSERT INTO images (name, type, image) " .
"VALUES ('" . $mysqli->escape_string($descr) . "', " .
" '$mime', " .
" '" . $mysqli->escape_string($imgdata) . "')"))
printf("<p>error message ...: %s</p>\n", $mysqli->error);
}
}
CHAPTER 15 ■PHP 469
5351c15_final.qxd 8/26/05 7:10 PM Page 469
www.it-ebooks.info

The second code segment serves to read the last ten images from the database and display
them in a table. As described earlier, the actual display of the images is delegated to the script
showpic.php.
// Part II: Display the most recently inserted images
echo "<h2>last inserted images ...</h2>\n";
$sql =
"SELECT id, name, " .
"DATE_FORMAT(ts, '%Y/%c/%e %k:%i') AS dt " .
"FROM images ORDER BY ts DESC LIMIT 10";
$result = $mysqli->query($sql);
if($result->num_rows==0)
echo "<p>There are no more images ...</p>\n";
else {
// display the images in a table
while($row = $result->fetch_object())
$rows[] = $row;
echo "<table>\n<tr>";
for($i=0; $i<sizeof($rows); $i++) // first line: images
echo "<th>",
"<img src=\"showpic.php?id=" .
$rows[$i]->id . "\" /></th>";
echo "</tr>\n<tr>";
for($i=0; $i<sizeof($rows); $i++) // second line: text
echo "<td>", htmlspecialchars($rows[$i]->name), "</td>";
echo "</tr>\n<tr>";
for($i=0; $i<sizeof($rows); $i++) // third line: date
echo "<td>", $rows[$i]->dt, "</td>";
echo "</tr>\n</table>\n";
}
The third part of images.php contains the HTML code for the form for transferring additional
images. The form is contained within a table that helps with the formatting.
// Part III: represent the form
?>
<h2>image upload</h2>
<p>maximal file size: 200 kByte.
allowed formats: PNG, JPEG, and GIF.</p>
<table>
<form method="post" action="images.php"
enctype="multipart/form-data">
<input type="hidden" value="204800" name="MAX_FILE_SIZE" />
<tr><td>description (optional):</td>
<td><input name="descr" type="text" /></td></tr>
<tr><td>file name:</td>
<td><input name="imgfile" type="file" /></td></tr>
<tr><td></td>
<td><input type="submit" value="OK"
name="submitbtn" /></td></tr>
</form>
</table>
</body></html>
CHAPTER 15 ■PHP470
5351c15_final.qxd 8/26/05 7:10 PM Page 470
www.it-ebooks.info

Stored Procedures
Fortunately, there is little to write on the subject of stored procedures: calling SQL commands that
call or changes stored procedures (CREATE FUNCTION, etc.) is done via the usual mysqli methods.
The following points show the possible cases.
Calling a stored procedure that returns no records: For this you can use either
$mysqli->real_query or $mysqli->query.
$sql = "CALL categories_insert('abc', 123, @newcatID)";
$ok = $mysqli->real_query($sql);
Calling a stored procedure that returns records (one SELECT command): For such com-
mands you would generally use $mysql->query, since this method immediately returns the
result.
$sql = "CALL categories_select(123)";
$result = $mysqli->query($sql);
Calling a stored procedure that returns several records (several SELECTs) or calling several
SQL commands: If several SELECT commands are executed in a stored procedure, the proce-
dure returns several lists of records. For these to be processed, the command must be executed
with $mysqli->multi_query. To read the list of records, use use_result or store_result, and for
navigation to the next record list, use next_result.
$sql = "CALL many_selects(123)";
$ok = $mysqli->multi_query($sql);
You can also use multi_query when you wish to execute several SQL commands simultane-
ously (regardless of how many lists of records you expect as result). The SQL commands must
be separated by semicolons.
$sql = "SET @myvar=1;
CALL complicated_calculation(123, @myvar);
SELECT * FROM table WHERE id=@myvar";
$ok = $mysqli->multi_query($sql);
Definition of a new stored procedure (CREATE command): In most PHP applications it is
seldom necessary to define new stored procedures. If that is the case, however, you must
use real_query or query to execute CREATE FUNCTION or CREATE PROCEDURE, and never
multi_query. The reason is that multi_query interprets the semicolon as a separator between
commands. But semicolons also appear in the code of stored procedures. If you wish to exe-
cute a DROP command before a CREATE command, the two commands must be executed
separately.
$sql = "DROP PROCEDURE IF EXISTS mysp";
$ok = $mysqli->real_query($sql);
$sql = "CREATE PROCEDURE mysp (OUT abc DOUBLE)
BEGIN
DECLARE t, subt VARCHAR(100);
...
END";
$ok = $mysqli->real_query($sql);
■Note You can also use stored procedures if you use the older
mysql
interface for PHP programming. The only
restriction involves the
mysqli
method
multi_query
, for which there is no equivalent
mysql
function. Strings con-
taining several commands must therefore be split up and the commands executed separately.
CHAPTER 15 ■PHP 471
5351c15_final.qxd 8/26/05 7:10 PM Page 471
www.it-ebooks.info

SP Administrator
As of March 2005, the available MySQL user interfaces were unsuitable for convenient processing,
administration, and testing of stored procedures (SPs). Until professional tools for this purpose
appear, the program SP Administrator introduced here is a good stopgap. At the same time, it can
serve as a PHP example program of independent interest.
Though SP Administrator does not distinguish itself through an elegant interface, such as
phpMyAdmin will probably offer in the near future, the program does take care of the following
everyday SP tasks efficiently and effortlessly:
• Create new SPs (with code template)
• Edit SPs
• Execute and test SPs, clear display of arbitrarily many SELECT results
• Delete SPs
• Back up and restore all SPs in a database
The program demonstrates some interesting programming techniques and various aspects of
how to use SPs with PHP.
Installation
The code of SP Administrator is located in the directory spadmin with the example files. The file
password.php needs to be modified. If the user specified there is not root, that user needs privileges
to define and execute SPs (Execute privilege).
Using the Program
The program’s entire user interface is on the page spadmin.php. There you must first select a data-
base. Then in a second form you can choose the action that you wish to take (see above). With some
operations (ALTER, CALL, DROP) you must also select the desired SP. (Caution: Deletion of SPs is
carried out without preliminary warning.) Figure 15-17 shows the program processing an SP.
CHAPTER 15 ■PHP472
5351c15_final.qxd 8/26/05 7:10 PM Page 472
www.it-ebooks.info
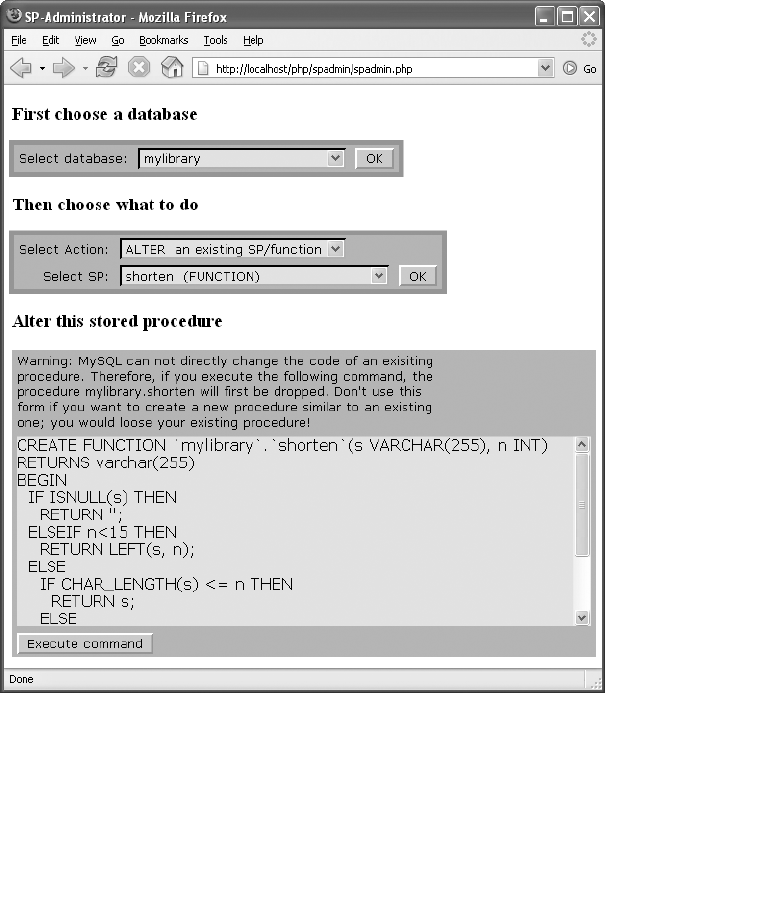
Trying Out SPs
If you select the action CALL A PROCEDURE, you can specify several commands in the input region,
which then will all be executed. All SELECT results that arise will be output one after the other (see
Figure 15-18).
CHAPTER 15 ■PHP 473
Figure 15-17. Changing an SP
5351c15_final.qxd 8/26/05 7:10 PM Page 473
www.it-ebooks.info
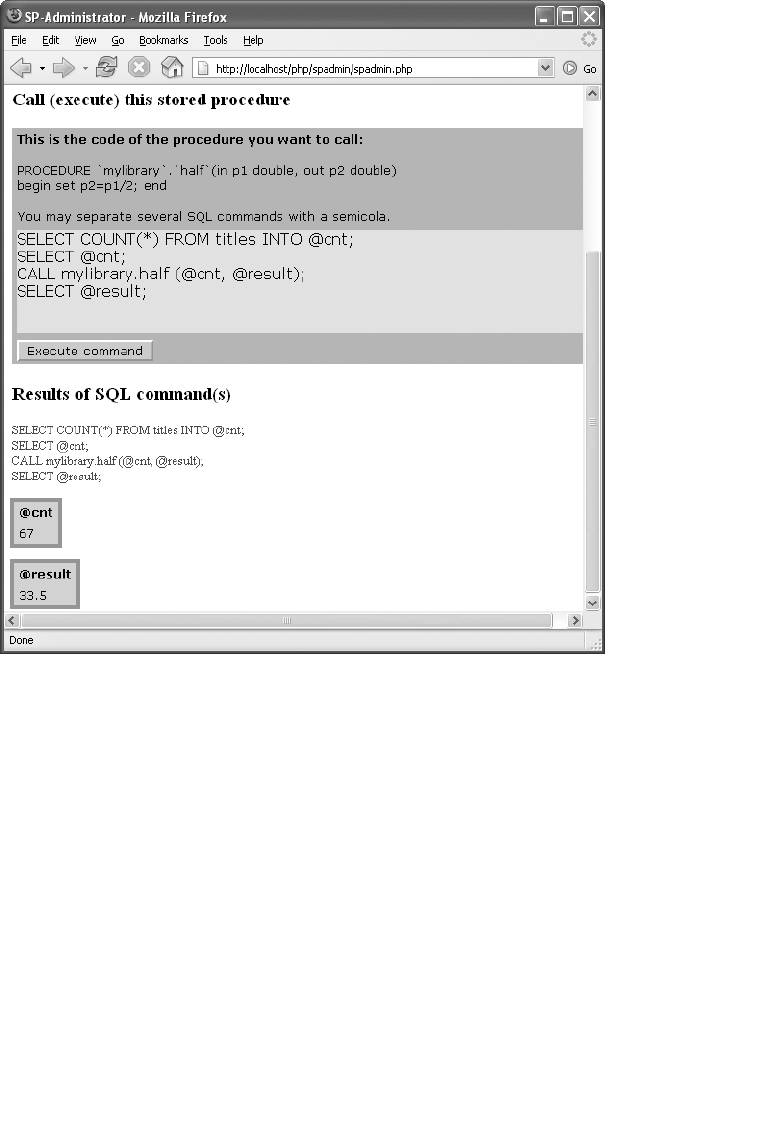
Backing Up and Restoring SPs
When you execute the action BACKUP ALL SPS, most browsers should display a dialog for storing the
resulting file sp.sql. This file contains SQL instructions to re-create all the SPs in the current data-
base. The following lines show in part what such a file looks like:
DELIMITER $$
DROP PROCEDURE IF EXISTS mylibrary.cursortest$$
CREATE PROCEDURE `mylibrary`.`cursortest`(OUT avg_len DOUBLE)
BEGIN
DECLARE t, subt VARCHAR(100);
...
SET avg_len = n/cnt;
END$$
DROP FUNCTION IF EXISTS mylibrary.faculty$$
CREATE FUNCTION `mylibrary`.`faculty`(n BIGINT) RETURNS BIGINT
BEGIN
...
END$$
DELIMITER ;
CHAPTER 15 ■PHP474
Figure 15-18. Trying out an SP
5351c15_final.qxd 8/26/05 7:10 PM Page 474
www.it-ebooks.info

RESTORE SPSleads to a form in which you can read in the backup file. The file must be in the
form given above.
■Caution The
restore
function ignores the
DELIMITER
instructions in the backup file and always uses $$ as the
separator between SQL commands.
SP Administrator is unable to set the character set for backup and restore. It always uses
Latin1
.
The backup format is chosen in such a way that the backup file can be restored with the com-
mand mysql:
user$ mysql -u root -p --default-characterset=latin1 databasename < sp.sql
Password: *******
Code
The code is divided among the following files:
spadmin.php Start page
spfunctions.php Auxiliary functions
backup.php Transfers the text file sp.php with the backup of all SPs to the browser (file
download)
password.php MySQL login data
formfunctions.php Functions for output of a form
sp.css CSS file for formatting forms and tables
The program uses a host of session variables, within which the inputs of all three forms are
stored, so that they are available again after a page change. The evaluation of the form data and
management of the session variables is accomplished with the code in spadmin.php. The actual
work is done by functions in spfunctions.php, and in what follows we shall present the most inter-
esting of them.
Form for SP Selection
The function show_sp_form displays the form for selecting an SP and an action (e.g., ALTER). The
function show_sp_form accesses various form_xxx functions from formfunctions.php. The list of
available SPs is determined by a SELECT query for the table information_schema.routines, where
the procedure or function name and the type are concatenated into a character string of the form
name_type with CONCAT. This string is entered as a value attribute in the elements of the listbox
and decomposed into its components when an SP is selected (variables spname and type).
// example file spfunctions.php
function show_sp_form($mysqli, $formdata, $dbname) {
form_start("spadmin.php");
form_new_line();
form_label("Select Action:");
$rows = array(array('ALTER an existing SP/function', 'alter'),
array('CALL a procedure/function', 'call'),
...
array('Restore SPs', 'restore'));
CHAPTER 15 ■PHP 475
5351c15_final.qxd 8/26/05 7:10 PM Page 475
www.it-ebooks.info

form_list("action", $rows, $formdata["action"],
"[choose an action]");
form_empty_cell();
form_end_line();
form_new_line();
form_label("Select SP:");
$sql = "SELECT CONCAT(routine_name, ' (', routine_type, ')')
AS displayname,
CONCAT(routine_type, '_', routine_name) AS internalname
FROM information_schema.routines
WHERE routine_schema = '$dbname'
ORDER BY displayname";
$rows = queryArray($mysqli, $sql);
form_list("spname", $rows, array_item($formdata, "spname"),
"[choose a SP]");
form_button("btnAction", "OK");
form_end_line();
form_end();
}
Executing and Testing SPs
To test an SP, the user can specify arbitrary SQL commands in the form provided for this purpose (see
Figure 15-18). These are passed in the variable cmd to the function test_sp. This function displays the
SQL code (auxiliary function printsql in spfunctions.php) and then executes $mysqli->multi_query.
If PHP detects an error during command execution (which at present is the case only if the error
occurs in the first SQL command), printerror steps in to display various error messages. Then all
available results are read with store_result and next_result and then output with show_table in attrac-
tive tables. (printerror and show_table are auxiliary functions that are defined in spfunctions.php.)
// example file spfunctions.php
function test_sp($mysqli, $dbname, $cmd) {
echo "<h3>Results of SQL command(s)</h3>\n";
$mysqli->select_db($dbname);
printsql($cmd);
$ok = $mysqli->multi_query($cmd);
if($mysqli->info)
printerror("Info: " . $mysqli->info);
if($mysqli->warning_count)
printerror("Warnings: " . $mysqli->warning_count);
if($mysqli->errno)
printerror("Error: " . $mysqli->error);
if($ok) {
do {
$result = $mysqli->store_result();
if($result) {
show_table($result);
$result->close();
}
} while($mysqli->next_result());
}
}
CHAPTER 15 ■PHP476
5351c15_final.qxd 8/26/05 7:10 PM Page 476
www.it-ebooks.info

Backing Up SPs (File Download)
The function backup_sps returns a string with the SQL commands for an SP backup. The function
first returns a list of all SPs (functions and procedures) and then executes SHOW CREATE for each
function. The results of these commands are then collected in the variable result. In the process,
each CREATE command is prefixed by a DROP IF EXISTS, so that any existing SPs are first deleted
without an error message and then redefined.
// example file spfunctions.sp
$separator = "$$";
function backup_sps($mysqli, $dbname) {
global $separator;
$sep = $separator . "\n";
$result = "DELIMITER $sep";
$sql = "SELECT routine_name, routine_type
FROM information_schema.routines
WHERE routine_schema = '$dbname'";
$rows = queryArray($mysqli, $sql);
foreach($rows as $row) {
$spname = $row[0];
$type = $row[1];
if($type=="FUNCTION") {
$sql = "SHOW CREATE FUNCTION $dbname.$spname";
$create = queryArray($mysqli, $sql);
$result .= "DROP FUNCTION IF EXISTS $dbname.$spname" . $sep .
$create[0]["Create Function"] . $sep;
}
else {
$sql = "SHOW CREATE PROCEDURE $dbname.$spname";
$create = queryArray($mysqli, $sql);
$result .= "DROP PROCEDURE IF EXISTS $dbname.$spname" . $sep .
$create[0]["Create Procedure"] . $sep;
}
}
$result .= "DELIMITER ;\n";
return $result; }
The function backup_sps is called by the page backup.php?dbname=name. How a file download is
realized is demonstrated by backup.php. Instead of creating an HTML page, as is usual, three header
calls have the effect that the browser recognizes the data as a text file (type text/plain) and treats it
as an attachment. The data are therefore not displayed in the browser, but instead, a SAVE dialog
appears. The Expires instruction makes it clear to the browser and any intermediate web proxy that
this file is not suitable for temporary cache storage. After these preparations, the actual backup data
are simply output with echo.
// example file backup.php
require_once 'spfunctions.php';
require_once 'password.php';
$dbname = array_item($_REQUEST, 'dbname');
if(!$dbname)
exit;
else
$dbname = urldecode($dbname);
$mysqli = @new mysqli($mysqlhost, $mysqluser, $mysqlpasswd);
CHAPTER 15 ■PHP 477
5351c15_final.qxd 8/26/05 7:10 PM Page 477
www.it-ebooks.info

if(mysqli_connect_errno()) {
html_start('MySQL connection error');
printerror("Sorry, no connection!");
html_end();
exit(); }
header('Content-Type: text/plain');
header('Content-Disposition: attachment; filename="sp.sql"');
header('Expires: ' . gmdate('D, d M Y H:i:s') . ' GMT');
echo backup_sps($mysqli, $dbname);
It remains to discuss how the page backup.php is called. This step takes place in spadmin.php
during the evaluation of the form data. The name of the database that is to be stored is coded by
urlencode, so that any special characters that might be present will not cause any problems.
// example file spadmin.php
if($action=='backup') {
header("Location: " . baseurl() . "/backup.php?dbname=" .
urlencode($dbname));
exit; }
Restoring an SP (File Upload)
While a backup is involved in transferring data from the server to the client, now the data transport
goes in the opposite direction. A form with an <input> of type file is used for selecting the file in
the client file system. In addition to such fields, the browser displays a SEARCH button. If this button
is clicked, a file-selection dialog appears. The form is created with show_restore_form, which we do
not show here. The following lines show instead the form code (without layout elements for the
sake of clarity).
<form method="post" action="spadmin.php"
enctype="multipart/form-data" >
<input type="hidden" name="MAX_FILE_SIZE" value="100000" />
<input type="file" size="40" name="spfile" />
<input type="submit" value="Restore" name="form[btnRestore]" />
</form>
The evaluation of the form data takes place in spadmin.php. If the data seem to be error-free,
the contents of the file are read into the variable sql and passed to the function restore_sps.
// example file spadmin.php
$formdata = array_item($_POST, "form");
if(array_item($formdata, 'btnRestore')) {
$spfile = array_item($_FILES, 'spfile');
if($spfile && is_array($spfile)){
$uperr = $spfile['error']; // error number (0 = no error)
$tmpfile = $spfile['tmp_name']; // local, temporary file
$size = $spfile['size'];
if(!$uperr && $size>0 && $tmpfile && is_uploaded_file($tmpfile)) {
$file = fopen($tmpfile, "rb"); // open file
$sql = fread($file, $size); // read file
fclose($file);
restore_sps($mysqli, $sql);
}}}
The function restore_sps decomposes the string with explode into separate SQL commands,
where separator is used as a separator. Then each command that is not empty or contains
DELIMITER is executed.
CHAPTER 15 ■PHP478
5351c15_final.qxd 8/26/05 7:10 PM Page 478
www.it-ebooks.info

The function restore_sps uses two auxiliary functions whose code is also located in
sp-functions.php: printsql outputs the code of the command to the website (as feedback),
and execute executes $mysqli->real_query and displays if necessary an error message.
// example file spfunctions.php
function restore_sps($mysqli, $sql) {
global $separator;
echo "<h3>Restore SPs</h3>\n";
$cmds = explode($separator, $sql);
foreach($cmds as $cmd)
if(trim($cmd)!="" && strpos($cmd, "DELIMITER")===FALSE) {
printsql($cmd);
$ok = execute($mysqli, $cmd);
if($ok) echo "<font color=\"#00cc00\">OK</font>\n";}
}
CHAPTER 15 ■PHP 479
5351c15_final.qxd 8/26/05 7:10 PM Page 479
www.it-ebooks.info

Perl
For many years, Perl has been the best-beloved scripting language in the Unix/Linux universe.
Moreover, Perl continues to play an important role as a programming language for CGI scripts, by
which dynamic websites can be realized. This chapter gives a brief introduction to MySQL database
access with Perl and shows, by means of a few examples, the considerable bandwidth of possible
applications.
Programming Techniques
This chapter assumes that Perl and the modules DBI and DBD::mysql are installed on your com-
puter and that they are functioning properly. An introduction to the installation procedure can be
found in Chapter 1.
Further information on both Perl modules can be found in the official MySQL documentation
(the chapter “MySQL APIs”). Furthermore, the command perldoc nets you extensive on-line help:
perldoc DBI
perldoc DBI::FAQ
perldoc DBD::mysql
HTML versions of these three help pages can be found at, for example, http://search.cpan.org/.
Finally, a compact reference to DBI functions and methods can be found in Chapter 23.
The Modules DBI and DBD::mysql
Access to MySQL is carried out in Perl via the modules DBI and DBD::mysql. (The abbreviation “DBI”
stands for database interface, while “DBD” stands for database driver.) DBI is a general interface for
database programming, independent of particular database systems. Thus DBI can be used for data-
base programming with Oracle, DB2, etc. Ideally, the code is the same in every case; that is, you can
switch database systems without changing the Perl code (with the exception of datasource character
strings for establishing the connection).
DBD::mysql is used by DBI to communicate with MySQL. (There exist comparable driver mod-
ules for a host of other database systems.) Which driver module DBI must use is determined by the
character string specified when the connection is established (method connect). Therefore, the
instruction use DBI at the beginning of the Perl script suffices for incorporating the DBI module.
Although DBI actually follows a process that is independent of the database, DBD:: mysql
makes available a number of MySQL-specific functions. The reason for this is that DBI constitutes
the greatest common denominator of all database systems, and thus is relatively small. The use of
MySQL-specific functions simplifies MySQL programming with Perl considerably, but leads, of
course, to the result that the code can be ported to another database system only with difficulty.
DBI and DBD are object-oriented modules. For this reason, most of their functions are available
in the form of methods, which are applied to objects (which in Perl are represented by handles). For 481
CHAPTER 16
■ ■ ■
5351c16_final.qxd 8/26/05 7:28 PM Page 481
www.it-ebooks.info

example, DBI->connect returns a handle to a database object (which is usually stored in the variable
$dbh). Various functions that affect the database can now be executed as methods of this object, for
example, $dbh->do(“INSERT …”), for executing an SQL command.
Establishing a Connection to the Database
The database connection is established with the DBI method connect. The first parameter to this
method is a character string specifying the type of the database and the name of the computer (or
localhost). The syntax of the character string can be deduced from the following example. The next
two parameters must contain the user name and password.
A fourth, optional, parameter can be used to specify numerous attributes. For example,
‘RaiseError’=>1 has the effect that the Perl script is ended with an error message if the connection
to the database cannot be established. A reference to additional connection attributes for the
fourth parameter can be found in Chapter 23.
use DBI;
$datasource = "DBI:mysql:database=mylibrary;host=localhost";
$user = "root";
$passw = "xxx";
$dbh = DBI->connect($datasource, $user, $passw,
{'RaiseError' => 1});
With RHEL and Fedora, SELinux is configured in such a way that Apache and PHP are not
permitted to access the MySQL socket file. Therefore, instead of localhost, the actual name of the
computer must be given. Communication with the MySQL server now takes place via TCP/IP
instead of the socket file.
■Tip Note that older versions of DBD::mysql do not support the new password system since MySQL 4.1 (error
message
Client does not support authentication protocol requested by server
). If the installation of a newer version
of DBD::mysql is impossible, you must launch the MySQL server with the option --old-passwords or insert
entries with the SQL function
OLD_PASSWORD
. More detail on this can be found in Chapter 11.
Specifying the Configuration File (Unix/Linux Only)
If you are working under Unix/Linux, you can you may specify the name of a configuration file in
which the user name, password, and possible additional connection options are specified in the
datasource character string. This is practical if such configuration files are stored in the home direc-
tories of the users. (Information on creating configuration files can be found in Chapter 22.)
In the following example, the option mysql_read_default_file specifies the location of the con-
figuration file (relative to the home directory from the environment variable HOME). The option
mysql_read_default_group specifies the group [mygroup] within the configuration file. If this option
is not used, then connect automatically evaluates the group [client]. The second and third parame-
ters to the method connect are both specified as undef, to make it clear that the user name and
password are specified in another location:
$datasource = "DBI:mysql:database=mylibrary;" .
"mysql_read_default_file=$ENV{HOME}/.my.cnf;" .
"mysql_read_default_group=mygroup";
$dbh = DBI->connect($datasource, undef, undef, {'RaiseError' => 1});
CHAPTER 16 ■PERL482
5351c16_final.qxd 8/26/05 7:28 PM Page 482
www.it-ebooks.info

The associated configuration file ~/.my.cnf might look like the following:
[mygroup]
user=root
password=xxx
host=uranus.sol
Please note that access rights to this file are set in such a way that only the user is allowed to read it.
Under Windows, I was unable to evaluate a configuration file with DBI->connect(). This func-
tion appears to be available only under Unix/Linux (though such a restriction is not explicitly
documented).
Terminating the Connection
All accesses to the database are attained via the variable $dbh (or from variables derived from it).
When the connection to the database is no longer needed, it should be closed with disconnect:
$dbh->disconnect();
Persistent Connections
The Perl DBI module itself offers no possibility of making use of persistent connections in order to
minimize the time for repeated establishment of a connection to the database. You can, however,
achieve persistent connections by a slight detour.
If you execute CGI Perl scripts via the Apache module mod_perl (which is recommended for rea-
sons of efficiency), you achieve by use of the Perl module Apache::DBI that MySQL connections remain
after the script has ended and are reused when another script requires the same type of MySQL con-
nection. To use the module you have merely to insert use Apache::DBI before all use DBI commands in
your script. No other changes are necessary. (Apache::DBI replaces the connect method of DBI with its
own version.) Additional information on Apache::DBI can be found at the following location: http://
search.cpan.org/~abh/Apache-DBI/DBI.pm.
Note, however, that persistent connections have some drawbacks: They take over the connec-
tion in an unknown state; it could happen that the most recently executed script has changed some
(system) variables, that the autocommit mode has been set in some undesired way, and so on.
Executing SQL Commands
SQL Commands Without Record List As Result
SQL commands that do not return a list of records are generally executed by means of do:
$n = $dbh->do("INSERT INTO authors (authName) " .
"VALUES ('New author')");
Normally, do returns the number of altered data records. Other possible return values are as
follows:
“0E0” means that no record has been changed. This character string can be changed into a
number by means of an arithmetic operation (i.e., $n+=0).
-1 means that the number of changed records is unknown.
undef means that an error has occurred.
CHAPTER 16 ■PERL 483
5351c16_final.qxd 8/26/05 7:28 PM Page 483
www.it-ebooks.info

Determining AUTO_INCREMENT Values
After INSERT commands it is frequently necessary to determine the AUTO_INCREMENT value of
the newly inserted data record. For this task, the attribute mysql_insertid of DBD::mysql is helpful:
$id = $dbh->{'mysql_insertid'};
■Note The attribute
mysql_insertid
is not portable; that is, it is available only for MySQL databases. In porting
the code to another database system you will have to find another way of proceeding.
SELECT Queries
SQL commands that return a list of records (typically SELECT commands) cannot be executed with
do. Instead, the query must first be prepared with prepare.
Since version 4.1, MySQL has been capable of executing prepared statements quite efficiently.
However, only the current versions of DBD::mysql use the new MySQL functions. While prepare is
available in older versions of DBD::mysql, it is somewhat slower.
The return value of prepare is a statement handle, which must be used for all further operations
with the query, even for the method execute, in order actually to execute the query. (If an error occurs
in the execution of the query, the return value is undef.)
$sth = $dbh->prepare("SELECT * FROM titles LIMIT 5");
$sth->execute();
Then the resulting records can be output with $sth, about which we shall have more to say in
the next section. When the evaluation is complete, the resources bound to $sth should be released
with finish:
$sth->finish(); # delete query object
SQL Queries with Wild Cards for Parameters
It often happens that the same type of query needs to be executed over and over with varying
parameters (WHERE id=1, WHERE id=3, etc.). In such cases, DBI offers the possibility of replacing
the parameters in prepare by a question mark, which serves as a wild card. Each question mark cor-
responds to a parameter, whose value must subsequently be specified with execute. Note that in
execute, the correct order of the parameters must be adhered to. The following lines demonstrate
how to proceed:
$sth = $dbh->prepare("SELECT * FROM titles " .
"WHERE catID=? AND publID=?");
$sth->execute(1, 1); # titles with catID=1 und publID=2
... # evaluate results
$sth->execute(1, 2); # tites with catID=1 und publID=2
... # evaluate results
$sth->finish(); # delete query object
In working with wild cards a few points should be noted: First of all, wild cards must be given in
SQL commands unquoted (even if it is a character string). Secondly, the value passed to execute by the
DBI module is dealt with automatically with quote, which places character strings in single quotation
marks and prefixes a backslash to the apostrophe and backslash characters. If you wish to pass NULL
to an SQL command, you must specify the value undef, which quote turns into NULL.
CHAPTER 16 ■PERL484
5351c16_final.qxd 8/26/05 7:28 PM Page 484
www.it-ebooks.info

If you execute the commands
$sth = $dbh->prepare("INSERT INTO publishers (publName)" .
"VALUES (?)");
$sth->execute("O'Reilly");
with Perl, then it is the following SQL command that is actually executed in MySQL:
INSERT INTO publishers (publName) VALUES ('O\'Reilly')
This example shows that prepare and execute are suitable not only for SELECT queries, but also
for all SQL queries that need to be executed a number of times.
■Tip Wild cards can also be used when SQL commands are executed with
do
. This does not contribute to
increased speed, but it does generally improve readability, since
DBI
takes care of both single quotation marks
and
quote
:
$dbh->do("INSERT INTO table (cola, colb)
VALUES (?, ?), undef, ($data1, $data2)");
Evaluating SELECT Queries
Provided that no error occurs in a query (test by if(defined($sth))), the resulting records can be read
via the statement handle (i.e., $sth). There are several different methods for accomplishing this.
Reading Data Records with fetch Alias fetchrow_array
The two equivalent methods fetch and fetchrow_array return an array with the values of the next
record. Within the array, the value NULL is expressed by undef. When the end of the record list is
reached or if an error occurs, the array is empty. (To distinguish between these two cases, $sth->err()
must be evaluated.) The following lines execute a query and display the results line by line. Here
NULL is represented as a character string <NULL>:
$sth = $dbh->prepare("SELECT * FROM titles LIMIT 5");
$sth->execute();
while(@row = $sth->fetchrow_array()) { # process all records
foreach $field (@row) { # each field
if(defined($field)) { # test whether NULL
print "$field\t";
} else {
print "<NULL>\t";
}
}
print "\n";
}
$sth->finish();
The evaluation of the columns in a foreach loop is rather the exception. To be sure, the individ-
ual columns could also be selected in the form $row[n], where n=0 must be specified for the first
column. A further variant consists in assigning all the columns at once to the variables in question.
Then, of course, the correct order of the variables must be heeded:
($titleID, $title, ...) = @row;
CHAPTER 16 ■PERL 485
5351c16_final.qxd 8/26/05 7:28 PM Page 485
www.it-ebooks.info

Selecting Individual Values
It is often clear from the outset that a query will return only a single value (e.g., SELECT COUNT(*)
FROM …). In this case, neither a loop over all records nor an evaluation of all elements of an array is
necessary. Instead, simply assign fetchrow_array to a scalar variable:
$sth = $dbh->prepare("SELECT COUNT(*) FROM titles");
$sth->execute();
$result = $sth->fetchrow_array();
print "$result\n";
$sth->finish();
■Caution You can use
fetchrow_array
in the scalar context (
$field = $sth->fetchrow_array()
) only if the
SELECT
result contains only one column. If the result has more than one column, the scalar result of
fetchrow_array
is
undefined. It could be the first or equally the last column.
But in addition, the scalar evaluation of
fetchrow_array
is not without its problems. There are now three rea-
sons for which
$field
can contain the value
undef
: The column contains
NULL
in the record in question, the last
record was reached, or an error has occurred.
Instead of the code given above, you could use the following shorthand version:
$result = $dbh->selectrow_array("SELECT COUNT(*) ... ");
Binding Columns to Variables
In processing a SELECT command, instead of transmitting every data record manually in variables,
you can automate this step and at the same time increase the efficiency and readability of your pro-
gram a bit. To do this you bind the column of the query with bind_col to individual variables. Each
time that fetchrow_array is executed, the associated variables contain the value of the new record.
It is necessary that bind_col be executed after execute. The return value of bind_col is false if an error
occurs. Please note that column numbering begins with 1 (not, as is usual in Perl, with 0):
$sth = $dbh->prepare("SELECT titleID, title FROM titles");
$sth->execute();
$sth->bind_col(1, \$titleID);
$sth->bind_col(2, \$title);
while($sth->fetchrow_array()) {
print "$title $titleID\n";
}
$sth->finish();
$dbh->disconnect();
Instead of binding the variables individually, you can do this for all columns at once with
bind_columns. Please observe the correct sequence and number of variables:
$sth->bind_columns(\$titleID, \$title);
Determining the Number of Data Records
The DBI module provides no possibility of determining the number of records returned by a SELECT
command. (This has to do with the fact that with many database servers the records are transmitted
to the module only when they are needed.) If you wish to know how many resulting records there are,
you have the following options:
CHAPTER 16 ■PERL486
5351c16_final.qxd 8/26/05 7:28 PM Page 486
www.it-ebooks.info

• You can count during the evaluation. (This variant is ruled out if you wish to know the num-
ber of records in advance.)
• You can execute the second query with SELECT COUNT(*) . . . . Depending on the applica-
tion, this can be relatively costly.
• You may use the DBI method fetchall_arrayref (see below). Thereby all resulting records are
transmitted together into a local array, so that the number can easily be determined.
• You may use the method $sth->rows(). This method can be evaluated after execute(). At first
glance, this seems the obvious solution, but it has, in fact, a number of drawbacks:
First, the method is not portable. (According to the DBI documentation, rows may be used
to determine the altered records, say after UPDATE or DELETE, but not for investigating
records read with SELECT.)
Second, the method is itself available in conjunction with the DBD::mysql driver only when
queries are evaluated without the attribute mysql_use_result. That is indeed the default set-
ting, but it is not always particularly efficient.
Determining Column Names and Other Metainformation
If you wish to program a generally valid function for representing tables, you need not only the data
themselves, but also metainformation about the data (column names, data types, etc.). This infor-
mation is made available by DBI via various attributes of $sth:
$sth->{‘NUM_OF_FIELDS’} returns the number of columns.
$sth->{‘NAME’} returns a pointer to an array with the names of all columns. The same holds for
$sth->{‘NAME_lc’} and $sth->{‘NAME_uc’}, but with the names all in lowercase or uppercase,
respectively.
$sth->{‘NULLABLE’} returns a pointer to an array whose values tell whether a column can
contain NULL.
$sth->{‘PRECISION’} and $sth->{‘SCALE’} return pointers to arrays with the maximum number
of characters and the number of decimal places, respectively.
$sth->{‘TYPE’} returns a pointer to an array with numerical values that permit one to determine
the data types of the columns.
The following loop demonstrates the evaluation of this information:
$sth = $dbh->prepare("SELECT * FROM testall");
$sth->execute();
for($i=0; $i < $sth->{'NUM_OF_FIELDS'}; $i++) {
print @{$sth->{'NAME'}}[$i] . " " .
@{$sth->{'TYPE'}}[$i] . "\n";
}
■Tip
DBD::mysql
makes available some additional attributes with MySQL-specific information. These attributes
are presented in their own subsection of this chapter, together with other MySQL-specific (and therefore non-
portable) extensions of the
DBI
module.
CHAPTER 16 ■PERL 487
5351c16_final.qxd 8/26/05 7:28 PM Page 487
www.it-ebooks.info

Reading Data Records with fetchrow_arrayref
The functioning of fetchrow_arrayref is similar to that of fetchrow_array. The sole difference is that
now pointers (references) to arrays instead of the arrays themselves are returned. This method
returns undef if the end of the data list is reached or an error has occurred.
while(my $arrayref = $sth->fetchrow_arrayref()) {
foreach $field (@{$arrayref}) {
... as before
}
Reading Data Records with fetchrow_hashref
The method fetchrow_hashref returns an associative array (hash) with the values of the next data
record. It returns undef if the end of the record list has been reached or an error has occurred.
Access to the individual columns is effected with $row->{‘columnname’}. In providing the
columnname, attention must be paid to case-sensitivity. The following lines demonstrate its
application:
$sth = $dbh->prepare("SELECT title, titleID FROM titles LIMIT 5");
$sth->execute();
while($row = $sth->fetchrow_hashref()) {
print "$row->{'title'}, $row->{'titleID'}\n";
}
$sth->finish();
$dbh->disconnect();
If fetchrow_hashref is called with the optional parameter “NAME_lc” or “NAME_uc”, then all
the hash keys are transformed into lowercase or uppercase, respectively.
Reading All Data Records with fetchall_arrayref
A drawback to all the access methods described above is that the data records must be read
sequentially, and thereafter, they are no longer available. It is thus impossible to move about to
your heart’s content in the list of data records. (Depending on the database system, this has at
least the advantage that it is miserly with resources. Under MySQL, fetchall_arrayref does not
exhibit this advantage because by default, all records that are found are immediately transmitted
to the client. This can be avoided only by using the attribute mysql_use_result. More about
mysql_use_result can be found further along in this section.)
If you wish to access all records in an arbitrary order and to do so multiple times, you could
output the entire result of the query fetchall_arrayref. As result you obtain an array with pointers to
the individual records, which themselves are arrays. Access to an individual element is then accom-
plished via $result->[$row][$col], where the indices begin with 0:
$sth = $dbh->prepare("SELECT titleID, title FROM titles");
$sth->execute();
$result = $sth->fetchall_arrayref();
print "$result->[2][5]\n"; # third record, sixth column
$sth->finish();
$dbh->disconnect();
The number of records and columns can be determined as follows:
$rows = @{$result};
$cols = @{$result->[0]};
CHAPTER 16 ■PERL488
5351c16_final.qxd 8/26/05 7:28 PM Page 488
www.it-ebooks.info

An optional parameter can be passed to fetchall_arrayref, which influences both the columns
to be read and the organization of the data. The following command reads only the first, fourth, and
last columns:
$result = $sth->fetchall_arrayref([0,3,-1]);
The following command reads all columns, but returns a pointer to an array that contains
pointers to hashes. Access to individual elements is via $result->[$row]->{‘columnname’}, as in,
for example, $result->[3]->{‘titleID’}:
$result = $sth->fetchall_arrayref({});
Our last example again returns hashes, but this time only for columns with the names titleID
and title:
$result = $sth->fetchall_arrayref({titleID=>1, title=>1});
In general, it makes better sense to limit the number of columns in the SELECT command,
instead of waiting for fetchall_arrayref to do so, after all the data have been extracted from the data-
base. The method fetchall_arrayref can be executed only once per query. If you would like to
execute the method more than once, you must execute execute before each call.
If the query has returned no result, then fetchall_arrayref returns a pointer to an empty array.
If an error occurs during data selection, then $result contains all data read to that point. If in any
event you are working without ‘RaiseError’ => 1, then after fetchall_arrayref, you should see to it that
$sth->err() is evaluated.
Instead of the three methods prepare, execute, and fetchall_arrayref, you can also use the short-
hand form $dbh->selectall_arrayref($sql).
Character Strings, BLOBs, DATEs, SETs, ENUMs, and NULL
Altering Data
To alter data records in your database you must transmit the relevant SQL commands as character
strings to do. The structure of this character string must conform to the syntax of MySQL (see
Chapter 21).
The starting point for the following description of the various data types is the variable data,
which contains the data to be stored. The contents of this variable should be placed in an INSERT
command, which is stored temporarily in the variable sql. In the simplest case, it goes like this:
$sql = "INSERT INTO tablename VALUES('$data1', '$data2', ...);
Dates and times: To format a date or time according to the MySQL official regulations, you
must use the corresponding Perl function or module (for example, gmtime() or TIME::Local).
Timestamps: Perl and MySQL timestamps have the same meaning, but different formats.
A Perl timestamp (function time()) is simply a 32-bit integer that gives the number of seconds since
1/1/1970. MySQL, on the other hand, expects a timestamp in the form yyyy-dd-mm hh:mm:ss.
As a rule, timestamps are used to mark the time of the most recent change. In such a case, you
simply pass NULL, and MySQL automatically takes care of proper storage:
$sql .= "NULL";
On the other hand, if you would like to store a Perl timestamp as a MySQL timestamp, then you
should use the MySQL function FROM_UNIXTIME in your INSERT or UPDATE command:
$data = time(); // data contains the current time as a Unix timestamp
$sql .= "FROM_UNIXTIME(" . $data . ")";
CHAPTER 16 ■PERL 489
5351c16_final.qxd 8/26/05 7:28 PM Page 489
www.it-ebooks.info

Character strings and BLOBs: If special characters occur in a character string or BLOB, then
there are frequently problems with quotation. SQL requires that the single-quote, double-quote,
0-byte, and backslash characters be prefixed by a backslash.
If you place value on the portability of your Perl code, then you should use the method
$dbh->quote() for quoting character strings. This method not only adds \or \0 to the character
string, but also encloses the character string in single quotation marks. Thus $dbh->quote(“ab’c’’)
returns ‘ab\’c’. (If you execute an SQL command with wild cards, quote() will be used automatically.)
$sql .= $dbh->quote($data);
In putting together SQL commands, the Perl construct qq{}, which returns the specified char-
acter string, is often useful. Within qq{}, variables are replaced by their contents (but not quoted).
The advantage of qq{} over a direct concatenation of character strings with $sql=“INSERT …” is that
within qq{} the single- and double-quote characters may be used:
$data = $dbh->quote($data);
$sql = qq{INSERT INTO table (col1, col2, col3)
VALUES ($data, 'abc', PASSWORD("abc"))};
NULL: I am pleased to be able to inform you, dear reader, that $dbh->quote() also treats the
value undef correctly, and in this case returns NULL (without a single quote):
$sql .= $dbh->quote($data);
If you do not wish to use quote(), then you might try the following:
$sql .= defined($data) ? "'$data'" : "NULL";
Please note that within an SQL character command you do not place NULL in quotation marks
as if it were a character string.
Reading Data
The starting point for the following considerations is the variable $data, which contains a data field.
For example, $data can be initialized as follows:
$sth = $dbh->prepare("SELECT * FROM titles");
$sth->execute();
@row = $sth->fetchrow_array();
$data = $row(0);
Timestamps: Timestamps in the form of a character string of the form 2005-12-31 23:59:59 are
contained in data. This won’t get you very far in Perl. If you want to work with the timestamp value
in Perl, then use the MySQL function UNIX_TIMESTAMP and formulate the corresponding SELECT
query. Then for the above date data contains the value 20051231235959:
SELECT ..., UNIX_TIMESTAMP(a_timestamp) FROM ...
Date: For a DATETIME column, data contains a character string of the form 2005-12-31 23:59:59.
For DATE columns, the time information is lacking. For the further processing of dates in Perl, it is
practical in many cases here, too, to use the function UNIX_TIMESTAMP. You can obtain any format
you like with the MySQL format DATE_FORMAT. The following instruction results in data containing
a character string of the form ‘December 31 2005’.
SELECT ..., DATE_FORMAT(a_date, '%M %d %Y')
Time: For a TIME column, data contains a character string of the form 23:59:59. If you do not
wish to extract hours, minutes, and seconds from this character string, then the MySQL function
CHAPTER 16 ■PERL490
5351c16_final.qxd 8/26/05 7:28 PM Page 490
www.it-ebooks.info

TIME_TO_SEC can be used to return the number of seconds since 00:00:00. Additionally, you can, of
course, use any of the numerous MySQL functions for processing times. Warning: UNIX_TIMESTAMP
does not work for TIME columns.
■Tip In Chapter 21 you will find an overview of the MySQL functions for processing and converting dates
and times.
NULL: Since $data is as yet undefined, it contains undef. Whether $data contains NULL can
be determined with the Perl function defined($data). (Do not compare $data with “ ” or 0to detect
NULL. Both comparisons return True, though preceded by a Perl warning.)
Character strings and BLOBs: Perl, in contrast to C, has no difficulties with binary data; that is,
even 0-bytes within a character string are correctly handled. Thus data truly contains the exact data
from the database.
If you wish to output character strings read from tables into HTML documents, as a rule you
must use the function escapeHTML.
If problems arise in reading large BLOBs because the maximum amount of data per field is lim-
ited, then this limit can be set (before execute) with $dbh->{‘LongReadLen’}=n. The value nspecifies
the maximum number of bytes.
Take note that 0 means that long fields will not be read at all. In this case, $data contains the
value undef, which cannot be distinguished from NULL.
Determining Elements of an ENUM or SET
The use of ENUMs and SETs presents no problems in and of itself: The values are passed in both direc-
tions as simple character strings. Note that with ENUMs no empty spaces are permitted between the
comma-separated items.
When in a Perl program you wish to display the character strings of an ENUM or SET for selec-
tion (in an HTML listbox, for example), you must determine the definition of this field with the SQL
command DESCRIBE tablename columnname:
USE exceptions
DESCRIBE test_enum a_enum
Field Type Null Key ...
a_enum enum('a','b','c','d','e') YES ...
The column Type of the result table contains the required information. In the following lines of
code, the character string enum(‘a’, ‘b’, ‘c’) will first be decomposed step by step and then displayed
line by line. (The algorithm assumes that the SET or ENUM character string contains no commas.)
$sth = $dbh->prepare("DESCRIBE test_enum a_set");
$sth->execute();
$row = $sth->fetchrow_hashref();
$tmp = $row->{'Type'}; # enum(...) or set(...)
($tmp) = $tmp =~ m/\((.*)\)/; # xyz('a','b','c') --> 'a','b','c'
$tmp =~ tr/'//d; # 'a','b','c' --> a,b,c
@enums = split(/,/, $tmp); # @enums[0]=a, @enums[1]=b ...
foreach $enum (@enums) { # output all values
print "$enum\n";
}
CHAPTER 16 ■PERL 491
5351c16_final.qxd 8/26/05 7:28 PM Page 491
www.it-ebooks.info

DBD::mysql-specific Methods and Attributes
Whereas the DBI module represents the greatest common denominator of all database APIs,
DBD::mysql contains as well various MySQL-specific functions. Their application leads to Perl code
that can be transferred to other database systems only with difficulty. However, such code is often
more efficient.
This section introduces only the most important MySQL-specific methods and attributes.
Chapter 23 contains a complete reference of DBD::mysql extensions.
Using rows to Determine the Number of Records Found with SELECT
The method $sth->rows(), which was mentioned previously, is, in fact, not MySQL-specific. But only
with the DBD::mysql driver does this method return, after execute, the number of records found.
This holds only if queries are executed without the attribute mysql_use_result.
Determining the AUTO_INCREMENT Value
The $dbh attribute mysql_insertid has also been mentioned. It enables you to determine the
AUTO_INCREMENT value of the most recently inserted data record after an INSERT command:
$id = $dbh->{'mysql_insertid'};
Determining Additional Column Information
DBI makes a number of $sth attributes available that make it possible to determine information
about the columns of a SELECT result (for example, $sth-> {‘NAME’}). DBD::mysql adds some addi-
tional attributes, such as ‘MYSQL_IS_BLOB’, to establish whether a column contains BLOBs; or
‘MYSQL_TYPE_NAME’, to determine the name of the data type of the column.
mysql_store_result Versus mysql_use_result
If a SELECT command is executed with prepare and execute, then usually, DBD::mysql calls the C
function mysql_store_result. This means that all the data records found have been transmitted at
once to the client and retained there in memory until $sth->finish() is executed.
If between prepare and execute you set the attribute mysql_use_result to 1, then DBD::mysql
uses the C function mysql_use_result for transmitting the records. This means that records are
brought from the server to the client only when they are needed. In particular, in processing large
amounts of data the memory requirement can be greatly lowered on the client side. (This advan-
tage is lost if you use fetchall_arrayref.)
$sth = $dbh->prepare("SELECT * FROM table");
$sth->{'mysql_use_result'}=1;
$sth->execute();
A summary of the difference between mysql_store_result and mysql_use_result is shown in
Table 16-1.
CHAPTER 16 ■PERL492
5351c16_final.qxd 8/26/05 7:28 PM Page 492
www.it-ebooks.info

Table 16-1. mysql_store_result Versus mysql_use_result
mysql_store_result (default) mysql_use_result
$sth->rows(); This function returns the number This function returns 0 or the number of
of records found. records transmitted thus far.
Locking The READ-LOCK time is minimal. If locking is used, the table is blocked until
the last record is read.
Client Memory All found records are stored at the Only one record is stored at the client at
Requirement client. one time.
Speed Access to the first record is com- Access to the first record is very rapid;
paratively slow (since all records further access is slower than with
are transmitted to the client); it is mysql_store_result.
very fast thereafter.
Unicode
There are several things you need to consider when you are processing Unicode with a Perl script:
• You must inform the MySQL server that communication is to take place in UTF-8.
$dbh->do("SET NAMES 'utf8'");
Instead of ‘utf8’, other character set names supported in MySQL are allowed, such as ‘latin1’.
The default character set that MySQL uses depends on the configuration. Therefore, do not
rely on a particular character set being active in every MySQL installation, not even ‘latin1’.
Note that SET NAMES governs only the character set for communication between MySQL and
your Perl program. SET NAMES has no influence over the character set in which data are stored
in MySQL tables. (That character set is determined when the tables are defined with CREATE
TABLE.) MySQL automatically converts all character strings from the table character set to the
processing character set. But be careful. If characters are present that are not representable in
the second character set, then these characters are replaced by the ?character. (This also results
in a loss of information.)
• Strings that you obtain from MySQL are now UTF-8 encoded. For Perl to interpret such strings
correctly, you must inform Perl of the situation. To do so, use the function decode(“utf8”, …)
from the module Encode.
use Encode; # makes Encode and Decode functions available
...
$utf8data = decode("utf8", $data_from_mysql);
• If your Perl script produces output, you must inform Perl that the results are to be in UTF-8
encoding.
binmode(STDOUT, ":utf8"); # set output to be in UTF8
• If your Perl script itself contains strings in UTF-8, then you must set use utf8.
use utf8;
$utf8data = "äöüß";
• With CGI scripts you must specify in the HTTP header that the output is to be in UTF-8:
print header(-type => "text/html", -charset => "utf-8");
CHAPTER 16 ■PERL 493
5351c16_final.qxd 8/26/05 7:28 PM Page 493
www.it-ebooks.info

Depending on the particular applications that you foresee for your script, some of the above
points may not be applicable. Under Unix/Linux the Perl interpreter often recognizes from the envi-
ronment variable $LANG that it is being executed in a UTF-8 system and then processes Unicode
correctly by default. But my experience indicates that one cannot rely on this always to be the case.
■Tip Later in this chapter you will find two CGI Perl scripts that process Unicode. In these a number of Unicode
programming techniques are demonstrated. There is no space here for going into the fine points of Perl and Uni-
code, for which you should obtain a current book on Perl or look at the following web pages, which offer a good
introduction to Perl and Unicode (and MySQL):
http://www.perldoc.com/perl5.8.0/pod/perluniintro.html
http://perlwelt.horus.at/Beispiele/Magic/PerlUnicodeMysql/
http://lists.mysql.com/perl/3312
Transactions
Even in transaction-capable tables (e.g., InnoDB), database commands are executed by default
individually. To form a transaction out of several commands, you must first turn off autocommit
mode with the instruction $dbh->{‘AutoCommit’}=0. If you are not working with {‘RaiseError’=>1}
(see below), you should check whether the change in autocommit mode was accepted.
From now on, all SQL commands will form a transaction, which is eventually confirmed with
$dbh->commit() or aborted with $dbh->rollback(). At the same time, the next transaction begins.
The Perl code for this looks as follows:
$dbh->{'AutoCommit'} = 0; # turn of autocommit mode
if($dbh->{'AutoCommit'}) { # test whether it worked
print "transaction error\n";
exit(); }
$dbh->do("SQL-Kommando"); # all SQL commands form a transaction
$dbh->do("SQL-Kommando");
...
$dbh->commit(); # confirm transaction
$dbh->rollback(); # or abort transaction
Error-Handling
There are several possibilities for Perl script error-handling. The most convenient way (especially
during program development) is to specify the option {‘RaiseError’=>1} in establishing the connec-
tion. The result is that an error message is automatically displayed at each error. Additionally, the
Perl program is terminated immediately. (This holds not only for errors during the connection, but
also for all additional errors that occur in the execution of DBI methods.)
For many administrative tasks this sort of error-handling is sufficient. However, once you employ
Perl for programming dynamic web pages, the termination of a script (and perhaps the display of a
cryptic error message) is quite the opposite of what one might call user-friendly.
You can achieve more refined error-handling by turning off DBI’s automatic response to errors
and executing connect() with {‘PrintError’=>0}. Now you must consistently evaluate the two DBI
methods err() and errstr(). The first of these contains the error number, or 0 if no error has occurred,
while errstr() contains the error text corresponding to the last error to have occurred.
CHAPTER 16 ■PERL494
5351c16_final.qxd 8/26/05 7:28 PM Page 494
www.it-ebooks.info

■Note DBI methods return
undef
if an error has occurred. However, individual DBI methods sometimes also
return
undef
in the course of their normal operation (such as when a data field contains
NULL
). For this reason,
a simple evaluation of the return value is usually insufficient.
The methods err() and errstr() can also be applied to the DBI handles $dbh and $sth (depend-
ing on the context in which the method that caused the error was executed). Immediately after the
connection has been established, err() or errstr() must be applied to DBI (since $dbh cannot be used
after an unsuccessful connection attempt).
Example
The following lines show error-handling for Perl DBI code. In this example, the reaction to an error
is always that the script is terminated, but of course, you can execute other instructions. Note par-
ticularly how err() and errstr() are applied to the objects DBI, $dbh, and $sth.
The code contains something particular to MySQL: With the SELECT command, error-handling
occurs only after execute. With many other database systems an error can be recognized after prepare.
$datasource = "DBI:mysql:database=exceptions;host=localhost;";
$user = "root";
$passw = "xxx";
$dbh = DBI->connect($datasource, $user, $passw,
{'PrintError' => 0});
if(DBI->err()) {
print "connection error: " . DBI->errstr() . "\n";
exit(); }
$dbh->do("INSERT INTO testall (a_float) VALUES (10.0)");
if($dbh->err()) {
print "error wth INSERT command: " . $dbh->errstr() . "\n";
exit(); }
$sth = $dbh->prepare("SELECT * FROM test_blob");
$sth->execute();
if($sth->err()) {
print "error in SELECT execute: " . $sth->errstr() . "\n";
exit(); }
while(my $hashref = $sth->fetchrow_hashref()) {
if($sth->err()) {
print "error in SELECT fetch: " . $sth->errstr() . "\n";
exit(); }
print length($hashref->{'a_blob'}) . "\n";
}
$sth->finish();
$dbh->disconnect();
Logging (trace)
If you suspect that the cause of an error is not in your code, but in MySQL, DBI, DBD::mysql, or some
other origin, it can help to display internal DBI logging information or to write it to a file. This is enabled
by trace(), which, like err() and errstr(), can be applied to all DBI objects (including DBI itself).
Expected as parameters are the desired logging level (0 = none, 9 = maximal logging) and an
optional file name. Without a file name, the logging data are sent to STDERR (under Windows, to
the standard output STDOUT):
DBI->trace(2); # activate logging globally for the DBI module
CHAPTER 16 ■PERL 495
5351c16_final.qxd 8/26/05 7:28 PM Page 495
www.it-ebooks.info

Example: Deleting Invalid Data Records
(mylibrary)
After months-long experiments with the database mylibrary, a variety of invalid records have accu-
mulated. This is a scenario well known to many database developers, and one often forgets to clean
house after the testing is complete.
In the case of the mylibrary database, the script delete-invalid-entries.pl offers help in most
cases. It takes care of the following cases:
• Book titles, authors, and publishers whose names begin with test are deleted. (To avoid viola-
tion of the foreign key rules, for titles and authors, first the corresponding entries are deleted
from rel_title_author, and only then are the entries deleted from titles and authors.
• In the same way, orphaned book titles, authors, and publishers are deleted. “Orphaned” refers
to entries that are not part of complete book information, such as authors without any books,
publishers without any books, or books without any authors.
Of course, the script could be enlarged, for example to delete orphaned categories and lan-
guages. On the other hand, there is no point in searching for invalid relations between tables, since
foreign key rules see to it that such a situation does not arise. Thus it cannot happen that the titles
table refers to a publisher that does not exist.
Program Code
The script begins as usual with establishing a connection to the database. If an error occurs (then or
later), the script, on account of {‘RaiseError’ => 1}, is simply terminated with an error message:
#!/usr/bin/perl -w
# delete-invalid-entries.pl
use strict;
use DBI;
# declare variables
my($datasource, $user, $passw, $dbh, $sth, $n, $row);
# create connection to database
$datasource = "DBI:mysql:database=mylibrary;host=localhost;";
$user = "root";
$passw = "xxx";
$dbh = DBI->connect($datasource, $user, $passw,
{'RaiseError' => 1);
The following SELECT command searches for books whose title or subtitle begins with test. In
the loop that follows, the found titles are deleted first from rel_title_author and then from titles.
# delete test titles
$sth = $dbh->prepare(
"SELECT DISTINCT title, titles.titleID " .
"FROM titles, rel_title_author " .
"WHERE titles.titleID = rel_title_author.titleID " .
" AND (title LIKE 'test%' OR subtitle LIKE 'test%')");
$sth->execute();
while($row = $sth->fetchrow_hashref()) {
print "Delete title: $row->{'title'}\n";
$dbh->do("DELETE FROM rel_title_author " .
"WHERE titleID=$row->{'titleID'}");
CHAPTER 16 ■PERL496
5351c16_final.qxd 8/26/05 7:28 PM Page 496
www.it-ebooks.info

$dbh->do("DELETE FROM titles " .
"WHERE titleID=$row->{'titleID'}"); }
$sth->finish();
# delete test authors
# code similar to the above ...
# delete test publishers
# code similar to the above...
The following DELETE command uses the subSELECTs available since MySQL 4.1. It deletes all
titles that have a titleID number that does not appear in rel_title_author. Orphaned authors are
handled similarly.
# delete orphaned titles
$n = $dbh->do(
"DELETE FROM titles WHERE titleID NOT IN " .
" (SELECT titleID FROM rel_title_author)");
if($n>0) {
print "Deleted $n orphaned titles\n"; }
# delete orphaned authors
# code similar to the above ...
For orphaned publishers, in the subSELECT command the case that publID has the value
NULL must be excluded, since that value is allowed for the publID column. However, NULL is
not a suitable value in the comparison NOT IN ….
# delete orphaned publishers
$n = $dbh->do(
"DELETE FROM publishers " .
"WHERE publID NOT IN " .
" (SELECT DISTINCT publID FROM titles " .
" WHERE NOT publID IS NULL)");
if($n>0) {
print "Deleted $n orphaned publishers\n"; }
# end of program
$dbh->disconnect();
CGI Example: Library Management (mylibrary)
Access to the database looks the same in CGI scripts as it does in Perl programs, which for adminis-
trative purposes are usually executed as stand alone. One must, however, note in the output of data
from the database that special characters in character strings are coded with escapeHTML accord-
ing to the HTML syntax.
This section introduces two small Perl programs that access the mylibrary database:
•mylibrary-simpleinput.pl enables the input of new book titles.
• mylibrary-find.pl enables the search for book titles.
Book Search (mylibrary-find.pl)
The script mylibrary-find.pl assists in locating books in the mylibrary database. The initial letters
of the title are given in the search form. Clicking the OK button leads to an alphabetical list of all
titles found, together with their authors, publisher, and year of publication (see Figure 16-1).
CHAPTER 16 ■PERL 497
5351c16_final.qxd 8/26/05 7:28 PM Page 497
www.it-ebooks.info

Program Structure
The script mylibrary-find.pl looks after the display of a simple form as well as the evaluation of
that form (including the display of search results). The method param() of CGI is used to evaluate
the form variable formSearch.
Program Code
The code begins with the declaration of modules and variables. The combination of strict and my
helps in discovering typographical errors in variable names; DBI enables access to the database;
CGI assists in the output of HTML structures; CGI::Carp displays error messages in the resulting
HTML document, which is especially practical in searching for errors.
#!/usr/bin/perl -w
# mylibrary-find.pl
use strict;
use DBI;
use CGI qw(:standard);
use CGI::Carp qw(fatalsToBrowser);
# declaration of variables
my($datasource, $user, $passw, $dbh, $search, $sql, $sth, $result,
$rows, $i, $row);
Establishing the connection to the database offers nothing new over our previous examples in
this chapter. If an error occurs, an error message (in the form of an HTML document) is displayed,
and the script is terminated. If the connection succeeds, then the HTML document is opened with
several methods from the CGI module:
# create connection to database
$datasource = "DBI:mysql:database=mylibrary;host=localhost;";
$user = "root";
$passw = "xxx";
$dbh = DBI->connect($datasource, $user, $passw,
{'PrintError' => 0});
# display error message and end script if necessary
if(DBI->err()) {
print header(),
start_html("Sorry, no database connection"),
p("Sorry, no database connection"), end_html();
exit();
}
CHAPTER 16 ■PERL498
Figure 16-1. Searching for book titles
5351c16_final.qxd 8/26/05 7:28 PM Page 498
www.it-ebooks.info

# inform MySQL that communication will be in the Latin-1
# character set
$dbh->do("SET NAMES 'latin1'");
# introduce HTML document
print header(-type => "text/html", -charset => "latin-1"),
start_html("Perl programming, search form for the ",
"mylibrary database"), "\n",
h2("Search for titles in the mylibrary database"), "\n";
Evaluate Form, Display Search Results
If the script is called with form data, then the form variable formSearch is evaluated with param.
The special characters _and %are removed from the character string. If the variable search is not
empty, then in sql an extensive SELECT command is assembled and executed. The results are trans-
mitted with fetchall_arrayref into a two-dimensional array.
Some notes on the SELECT query: GROUP_CONCAT in combination with GROUP BY titleID
creates a sorted string with all the authors of the given title. LEFT JOIN makes a connection between
the tables titles and publishers, which is valid even if no publisher is specified for the title.
# process form data
$search = param('formSearch');
# delete characters _ and %
$search =~ tr/%_//d;
if($search) {
print p(), b("Titles beginning with ", encode_entitiesescapeHTML($search));
# Titelsuche
$sql = "SELECT titles.titleID, title, year, publName, " .
" GROUP_CONCAT(authname ORDER BY authname SEPARATOR ', ') " .
" AS authors " .
"FROM titles, authors, rel_title_author " .
" LEFT JOIN publishers ON titles.publID = publishers.publID " .
"WHERE titles.titleID = rel_title_author.titleID " .
" AND authors.authID = rel_title_author.authID " .
" AND title LIKE '$search%' " .
"GROUP BY titles.titleID " .
"ORDER BY title " .
"LIMIT 100";
$sth = $dbh->prepare($sql);
$sth->execute();
$result = $sth->fetchall_arrayref({});
$sth->finish();
The evaluation of the array begins with a test as to whether any book titles were found at all.
In the following loop the title information is output, with any HTML special characters being trans-
formed with escapeHTML into the correct HTML code.
# were titles found?
$rows = @{$result};
if($rows==0) {
print p(), "Sorry, no titles found."; }
# display titles
else {
# loop over all records
for($i=0; $i<$rows; $i++) {
$row = $result->[$i];
CHAPTER 16 ■PERL 499
5351c16_final.qxd 8/26/05 7:28 PM Page 499
www.it-ebooks.info

print p(),
b(escapeHTML($row->{'title'})), ": ",
i(escapeHTML($row->{'authors'})), ". ",
escapeHTML($row->{'publName'}), " ",
$row->{'year'}, ".";
}
print p(), hr(), p(), "New search:", p();
}
}
Display the Form
# display the form
print start_form(),
p(), "Search for title beginning with ... ",
textfield({-name => 'formSearch', -size => 20,
-maxlength => 20}), " ",
submit({-name => 'formSubmit', -value => 'OK'}),
end_form();
print end_html();
# program ends
$dbh->disconnect();
Ideas for Improvements
The code as it stands permits only a search based on the initial letters of a title. It would be desir-
able, of course, to allow a search by author(s), categories, and so on, ideally in the form of a full-text
search. (A somewhat more refined example of book search in mylibrary was presented in Chapter 15,
where PHP was used as the programming language. That program offers pagewise representation of
the search results as well as cross references between results, for example to display all titles written
by a particular author.)
Simple Input of New Books (mylibrary-simpleinput.pl)
This section presents a minimalist input form for new books (see Figure 16-2). In two input fields
are placed the new book title and a list of authors. The script then tests which if any of the authors
are already stored in the database. All as yet unknown authors are added with INSERT. Then the
new title is stored as well as the requisite entries in rel_title_author for relating title and authors.
CHAPTER 16 ■PERL500
5351c16_final.qxd 8/26/05 7:28 PM Page 500
www.it-ebooks.info
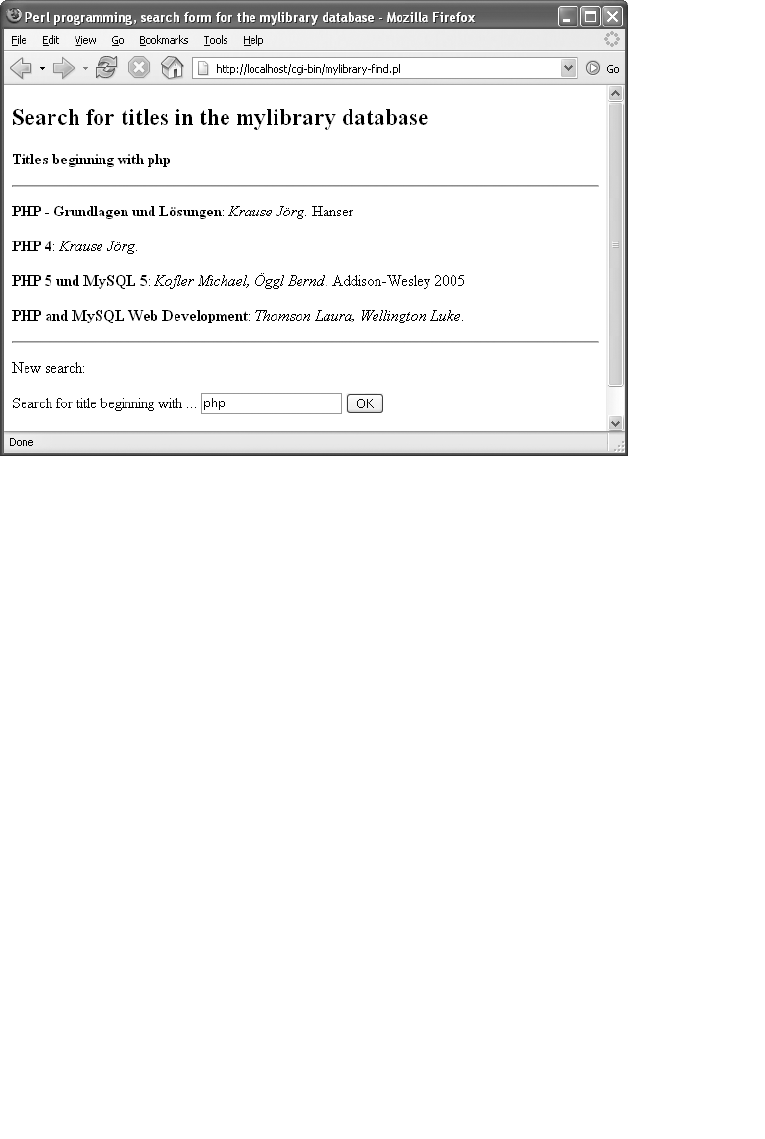
Program Structure
The script mylibrary-simpleinput.pl displays a simple form and then evaluates it when OK is clicked.
The method param() of the CGI module is used to transmit the two form variables: formTitle with the
title, and formAuthors with the list of authors.
Program Code
As with mylibrary-find.pl, the code begins with the declaration of modules and variables:
#!/usr/bin/perl -w
# mylibrary-simpleinput.pl
use strict;
use DBI;
use CGI qw(:standard);
use CGI::Carp qw(fatalsToBrowser);
# declaration of variables
my($datasource, $user, $passw, $dbh, @row,
$formTitle, $formAuthors, $titleID, $authID, $author);
The next lines of code are similar to those of the script mylibrary-find.pl, which we have just
seen, and so we do not reproduce the code:
# create connection to database
... as with mylibrary-find.pl
# if an error occurs, display error message, end script
... as with mylibrary-find.pl
# introduce HTML document
... as with mylibrary-find.pl
CHAPTER 16 ■PERL 501
Figure 16-2. Simple book title input
5351c16_final.qxd 8/26/05 7:28 PM Page 501
www.it-ebooks.info

Storing a Book Title and Its Authors
If the script is called with form data (these are located in param()), there follows a quick test as to
whether a title and author list have been specified. If that is not the case, then an error message is
displayed. The program is continued below with the redisplay of the form:
# evaluate form data
if(param()) {
$formTitle = param('formTitle');
$formAuthors = param('formAuthors');
# were both title and authors given?
if($formTitle eq "" || $formAuthors eq "") {
print p(), b("Please specify title and at least one author!"); }
For storing the book title in the titles table, the INSERT command with one parameter is passed
to do. As parameter, $formTitle is passed. The effect of this way of proceeding is that $formTitle (with
a minimal amount of typing) is placed in single quotation marks, and all special characters are han-
dled correctly:
# form data are correct; store
else {
# store title
$dbh->do("INSERT INTO titles (title) VALUES (?)",
undef, ($formTitle));
$titleID = $dbh->{'mysql_insertid'};
The list of authors is processed in a foreach loop. For each author, a test is made as to whether
the author already resides in the authors table. If that is indeed the case, then authID is read from
the authors table. Otherwise, the new author is stored, and the new authID value is determined
with mysql_insertid. Finally, the combination of titleID and authID must be stored in the table
rel_title_author:
# store authors
foreach $author (split(/;/, $formAuthors)) {
# does the author already exist?
@row = $dbh->selectrow_array("SELECT authID FROM authors " .
"WHERE authName = " .
$dbh->quote($author));
# yes: determine existing authID
if(@row) {
$authID = $row[0]; }
# no: store new author, determine new authID
else {
$dbh->do("INSERT INTO authors (authName) VALUES (?)",
undef, ($author));
$authID = $dbh->{'mysql_insertid'};
}
# store entry in in rel_title_author table
$dbh->do("INSERT INTO rel_title_author (titleID, authID) " .
"VALUES ($titleID, $authID)");
}
In the HTML document a brief announcement is made that the new title was successfully
stored. Then the form variables are deleted so that the next title can be input in the form:
CHAPTER 16 ■PERL502
5351c16_final.qxd 8/26/05 7:28 PM Page 502
www.it-ebooks.info

# feedback
print p(), "Your last input has been saved.";
print br(), "You may now continue with the next title.";
# delete form variables (for the next input)
param(-name=>'formTitle', -value=>'');
param(-name=>'formAuthors', -value=>'');
}
}
Displaying the Form
The remaining lines of code serve to display the form and close the HTML document:
print start_form(),
p(), "Title:",
br(), textfield({-name => 'formTitle', -size => 60,
-maxlength => 80}),
p(), "Authors:",
br(), textfield({-name => 'formAuthors', -size => 60,
-maxlength => 100}),
br(), "(Last name first! If you want to specify more ",
"than one author, use ; to separate them!)",
p(), submit({-name => 'formSubmit', -value => 'OK'}),
end_form();
print end_html();
# program end
$dbh->disconnect();
Ideas for Improvements
The script mylibrary-simpleinput.pl does not permit one to specify subtitle, publisher, category,
etc. Furthermore, it is as good as completely unprotected against input errors. It is impossible to
make changes to titles already stored. Thus there is enormous potential to improve this script!
(A much more satisfactory input form was presented in Chapter 15. There, to be sure, the program-
ming language PHP was used. Nonetheless, many of the techniques employed there could easily be
ported to Perl.)
CGI Unicode Example
This section uses the two scripts from the previous section and presents the two Unicode variants
mylibrary-find-utf8.pl and mylibrary-simpleinput-utf8.pl. The code of the two scripts is similar
to the previous code, as was to be expected, and for that reason, this section will be limited to point-
ing out the differences. These code fragments will be emphasized in boldface type.
■Note Please note that older browsers have difficulties on occasion with Unicode HTML documents. This is par-
ticularly true, as in the following examples, when form data are processed. The examples were successfully tested
with two modern browsers (Internet Explorer 6.0 under Windows XP SP2 and Firefox 1.0 under Windows and Linux);
Unicode incompatibilities with older browsers are nonetheless a real possibility.
CHAPTER 16 ■PERL 503
5351c16_final.qxd 8/26/05 7:28 PM Page 503
www.it-ebooks.info

Book Search (mylibrary-find-utf8.pl)
In the first part of the script there are two new instructions: use Encode qw (decode) enables the
function Encode::decode, while binmode informs Perl that output is to be produced in the Unicode
character set (UTF-8).
SET NAMES ‘utf8’ has the effect that communication with the MySQL server takes place in
the Unicode character set. The options -charset=>”utf-8” and -encoding=>’utf-8’ are passed to the
functions header and start_html. This is necessary so that the browser recognizes that the HTML
document is UTF-8 encoded. One does not need to use use utf8, because the script contains no
Unicode characters.
#!/usr/bin/perl -w
# mylibrary-find-utf8.pl
...
use Encode qw(decode);
binmode(STDOUT, ":utf8");
# definition of variables as in mylibrary-find.pl ...
# connection to the database as in mylibrary-find.pl ...
# inform MySQL that communication
# is in the Latin-1 character set
$dbh->do("SET NAMES 'utf8'");
# introduce HTML document
print header(-type => "text/html", -charset => "utf-8"),
start_html(-encoding => 'utf-8',
"Perl programming, search form for the mylibrary database"), "\n",
h2("Search for titles in the mylibrary database"), "\n";
If a search string from the form is passed to the script, it must be transformed from the UTF-8
format into the internal Perl character set format. (If you neglect this step, Perl considers the form
input to be a Latin-1 string.)
The code for searching for suitable titles is no different from the example of the previous sec-
tion. However, in outputting the results you must again think about applying the decode function
to inform Perl that it is dealing with UTF-8 strings.
$search = decode('utf8', param('formSearch'));
# title search as in mylibrary-find.pl ...
# output results
...
print p(),
b(escapeHTML( decode("utf8", $row->{'title'}) )), ": ",
i(escapeHTML( decode("utf8", $authors) )), ". ",
escapeHTML( decode("utf8", $row->{'publName'}) ), " ",
$row->{'year'}, "\n";
In connection with the search results, the search form is displayed with the previous input,
which happens automatically. However, Perl does not recognize the UTF-8 character set for input
and messes up all non-ASCII characters. To prevent this, the form parameter formsearch must be
assigned the previously UTF-8 decoded variable search.
The HTML form option accept-charset =”utf-8” should make it clear to the browser that UTF-8
input is expected. (However, the browsers that I tested worked fine without this option.)
# display search form
param('formSearch', $search);
print start_form('-accept-charset' => 'utf-8'),
... and so on as in mylibrary-find.pl
CHAPTER 16 ■PERL504
5351c16_final.qxd 8/26/05 7:28 PM Page 504
www.it-ebooks.info

Input of New Books (mylibrary-simpleinput-utf8.pl)
The changes in mylibrary-simpleinput-utf8.pl with respect to the Latin-1 variant in the previous
section look similar to those in mylibrary-find-utf8.pl. The function binmode(STDOUT, “:utf8”) is
not required, since the script processes only input and produces no (Unicode) output.
#!/usr/bin/perl -w
# mylibrary-simpleinput-utf8.pl
...
use Encode qw(decode);
# definition of variables as in mylibrary-simpleinput.pl ...
# connection to database as in mylibrary- simpleinput.pl ...
# inform MySQL that communication is
# to be in the Latin-1 character set
$dbh->do("SET NAMES 'utf8'");
# HTML/HTTP header as in mylibrary-find.pl ...
# form data are in the UTF-8 character set
if(param()) {
$formTitle = decode('utf8', param('formTitle'));
$formAuthors = decode('utf8', param('formAuthors'));
...
# and so on, as in mylibrary-find.pl ...
CHAPTER 16 ■PERL 505
5351c16_final.qxd 8/26/05 7:28 PM Page 505
www.it-ebooks.info

Java (JDBC and Connector/J)
This chapter describes the development of MySQL applications with the programming language
Java. As an interface to MySQL we will use JDBC in combination with the driver Connector/J.
All the tests for this chapter were carried out under Windows XP (with Sun JDK 1.5.0) and under
SUSE Linux 9.2 (with Sun JDK 1.4.2, package java-1_4_2-sun-devel). The connection to MySQL was
made in each case with Connector/J 3.1.7 and 3.2.0 alpha.
Introduction
The Java Installation
To develop your own Java programs you need the Java Software Development Kit (Java SDK, or sim-
ply JDK). The most widely distributed JDK is from Sun (the creator of Java); however, there are Java
implementations available from other developers, such as IBM. This chapter focuses primarily on
the Sun implementation.
JDK is bundled with many Linux implementations and can be simply installed with the package
manager. For Linux distributions without Java, or for working under Windows, you can download the
JDK without charge from java.sun.com/downloads (about 40 megabytes). The official name is Java 2
Platform Standard Edition n SDK (or J2SE nSDK) for short), where nis the current version number.
After installation you have to complete the environment variable PATH to the bin directory of
the Java installation. To do this, modify the file autoexec.bat under Windows 9x/ME. Under Win-
dows NT/2000/XP, open the dialog CONTROL PANEL | SYSTEM | ADVANCED | ENVIRONMENT VARIABLES (see
Figure 17-1). The components of PATH are separated by semicolons.
C:\> PATH
PATH=C:\Programs\Perl\bin\;C:\WINDOWS\system32;C:\WINDOWS;
C:\WINDOWS\System32\Wbem;C:\programs\mysql\mysql server 5.0\bin;
C:\Programs\Java\jdk1.5.0_01\bin
With SUSE 9.2, Java is located in the directory /usr/lib/jvm/java-1.4.2-sun, where additionally,
there are two links from /usr/lib/jvm/jre to /etc/alternatives/jre and from /etc/alternatives/
jre to /usr/lib/jvm/java-1.4.2-sun. (These links make it possible to install different Java implemen-
tations in parallel and to switch between them.) The content of the PATH variables looks like this:
linux:~ $ echo $PATH
/home/suse/bin:/usr/local/bin:/usr/bin:/usr/X11R6/bin:/bin:
/usr/games:/opt/gnome/bin:/opt/kde3/bin:/usr/lib/jvm/jre/bin/
507
CHAPTER 17
■ ■ ■
5351c17_final.qxd 8/26/05 7:36 PM Page 507
www.it-ebooks.info
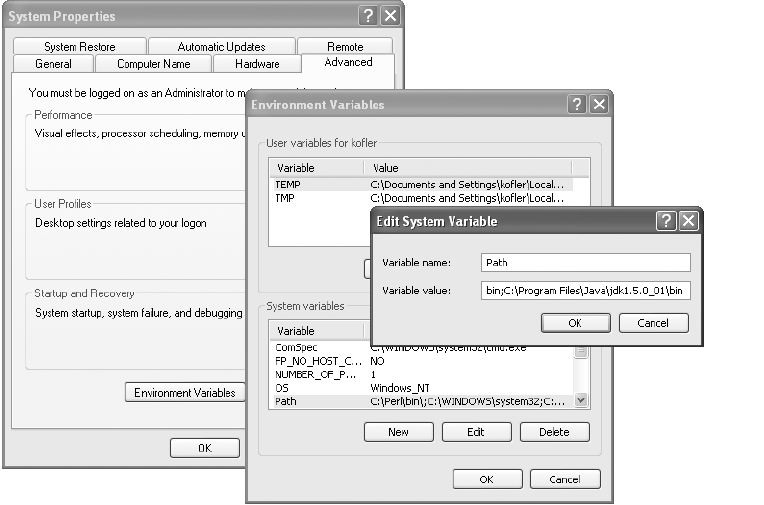
After installation, under Windows you can test in the command window, or under Linux in a
console window, whether everything proceeded properly:
C:\> java -version
java version "1.5.0_01"
Java(TM) 2 Runtime Environment, Standard Edition (build 1.5.0_01-b08)
Java HotSpot(TM) Client VM (build 1.5.0_01-b08, mixed mode, sharing)
linux:~ # java -version
java version "1.4.2_06"
Java(TM) 2 Runtime Environment, Standard Edition (build 1.4.2_06-b03)
Java HotSpot(TM) Client VM (build 1.4.2_06-b03, mixed mode)
Hello, World!
To try out the Java compiler, create the following file Hellow.java. Note that the file name must
match that of the class Hellow defined in the code exactly, including case distinction:
/* example file Hellow.java */
public class Hellow
{
public static void main(String[] args)
{
System.out.println("Hello, world!");
}
}
CHAPTER 17 ■JAVA (JDBC AND CONNECTOR/J)508
Figure 17-1. Setting the PATH variables under Windows XP
5351c17_final.qxd 8/26/05 7:36 PM Page 508
www.it-ebooks.info

To compile, change to the directory of the file Hellow.java and execute the following command:
> javac Hellow.java
As result, you obtain the file Hellow.class. This program is executed as follows:
> java Hellow
Hello World!
Note that you must not specify the .class. If you do, java Hellow.class doesn’t work.
Connector/J Installation
Connector/J is a JDBC driver for MySQL. JDBC is a collection of classes that help in the program-
ming of database applications with Java. JDBC is independent of specific database systems.
Therefore, to create a connection to a database system via JDBC, a driver specific to the database
must be used. For MySQL database systems this driver is Connector/J.
Versions
Connector/J is a so-called type-4 driver, which means that it is implemented completely in Java.
Connector/J assumes JDBC 2.0 (that is, at least Java 2, version 1.2). There are currently three ver-
sions of Connector/J in circulation.
• Connector/J 3.0 is especially for MySQL 3.23 and 4.0.
• Connector/J 3.1 can be used in combination with all currently available versions of MySQL.
This version supports in particular the new features of MySQL 4.1: new password authenti-
cation, Unicode character sets, and prepared statements.
• Connector/J 3.2 was available in alpha version in March 2005. Among the new features is
the support of new MySQL 5.0 cursor functions. Until Connector/J 3.2 reaches maturity,
you should use version 3.1 (even in combination with MySQL 5.0).
■Note Earlier versions of Connector/J had the name MM.MySQL. After the programmer Mark Matthews moved
over to the MySQL team, the driver was called Connector/J and is now officially supported by MySQL.
Connector/J is available under the GPL. If you wish to use Connector/J in commercial applications, the MySQL
server used must be properly licensed.
Installation
The installation of Connector/J was briefly described in Chapter 7. This section returns to the topic,
but with more technical detail and with reference to a variety of installation possibilities.
Connector/J is available for download at www.mysql.com as a *.zip (Windows) or *.tar.gz file.
Both archives contain exactly the same files. (Java is platform-independent.) To install, unpack the
contents of the archive into the directory of your choice. Under Windows, use Windows Explorer or
the program WinZip, and under Linux the following command:
linux:~ # tar -xzf mysql-connector-java-n.tar.gz
CHAPTER 17 ■JAVA (JDBC AND CONNECTOR/J) 509
5351c17_final.qxd 8/26/05 7:36 PM Page 509
www.it-ebooks.info

Table 17-1 summarizes the most important files and directories of the archive:
Table 17-1. Directories and files of the Connector/J archive
Directory/File Content
mysql-connector-java-n.n.n/ Directory of the actual library files; all further entries of this
table are in relation to this directory.
/mysql-connector-java-n.jar All Java classes of the driver as a Java archive file; this file is the
actual driver.
/com/* All Java classes of the driver as individual files.
/docs/* Extensive documentation in PDF and HTML format.
/org/* The Java start class of the driver under the old driver name
(org.gjt.mm.mysql.Driver).
The crucial point here is that the Java runtime environment should be able to find the new
library when executing programs. To ensure this state of affairs, there are several possibilities:
• The simplest solution is generally to copy the file mysql-connector-java-n.jar into the Java
installation directory jre\lib\ext, which is automatically checked during the execution of
Java programs. Now there remains the question of where Java is installed on your computer.
Typical paths are C:\Programs\Java\jre1.5.0_01\lib\ext under Windows and /usr/lib/
jvm/jre-1.4.2-sun/lib/ext under SUSE.
• Alternatively, you can set the environment variable CLASSPATH. This variable specifies all
directories in which there are classes that should be taken into account when Java programs
are executed. So that Connector/J will be considered, you must add the directory in which
mysql-connector-java-n.jar is located to CLASSPATH. Note that for the execution of Java
programs from the current directory, CLASSPATH must also contain the path “.” (that is, a
period, which denotes the current directory).
Under Windows, you can set CLASSPATH temporarily with the DOS command SET var=xxx.
To set it permanently, use the dialog CONTROL PANEL | SYSTEM | ADVANCED | ENVIRONMENT VARIABLES
under Windows 2000/XP, or under Windows 9x/ME, the file autoexec.bat. Components of
CLASSPATH are separated by semicolons.
Under Linux, you can set CLASSPATH with the command export var=xxx or permanently in
/etc/profile. The specified directories in CLASSPATH are separated with colons.
• For initial testing there is also the option of copying the com and org directories from Connector/J
into the local directory (that is, into the directory in which the program that you have devel-
oped resides).
You can test whether the installation of Connector/J was successful with the following
miniprogram. It should run without reporting any errors:
/* example file HelloMySQL.java */
import java.sql.*;
public class HelloMySQL {
public static void main(String[] args) {
try {
Driver d = (Driver)
Class.forName("com.mysql.jdbc.Driver").newInstance();
System.out.println("OK"); }
catch(Exception e) {
System.out.println("Error: " + e.toString()); }
}
CHAPTER 17 ■JAVA (JDBC AND CONNECTOR/J)510
5351c17_final.qxd 8/26/05 7:36 PM Page 510
www.it-ebooks.info

And If It Doesn’t Work?
If something goes wrong, then the usual suspect is that the Connector/J classes have not been
found. The error message usually looks something like this: java.lang.ClassNotFoundException:
com.mysql.jdbc.Driver. Here are some of the possible sources of error:
• If you have copied mysql-connector-java-n.n.n.jar into the directory jre\lib\ext, then it
is possible that more than one Java interpreter resides on the computer. (It is also possible
that a run-time version and a development version have been installed in parallel.) You have
apparently copied mysql-connector-java-3.0.n.jar into the directory of an interpreter that
is not the active one. Try again with a different directory.
Under Linux you can determine the correct directory easily with which java. With some dis-
tributions what is returned in only a link pointing to the actual file. Under SUSE Linux you
must actually follow two links before you get to the location of the interpreter.
linux$ which java
/usr/bin/java
linux$ ls -l /usr/bin/java
... /usr/bin/java -> /etc/alternatives/java
linux$ ls -l /etc/alternatives/java
... /etc/alternatives/java -> /usr/lib/jvm/jre-1.4.2-sun/bin/java
Unfortunately, there is not a comparable option under Windows, since the relevant settings
are located in the somewhat opaque registration database. However, you can determine
with START | SETTINGS | CONTROL PANEL | ADD/REMOVE HARDWARE which Java versions are already
installed and when installation took place.
• If you have edited CLASSPATH, then perhaps Java is having no trouble locating Connector/J’s
classes, but is unable to locate the classes of your own program (error message java.lang.
NoClassDefFoundError). If CLASSPATH is defined, then it must also point to the current
directory.
Under Windows, you can determine the contents of CLASSPATH in a command window with
echo %CLASSPATH%, and under Linux in a console window with echo $CLASSPATH. Under Win-
dows, the components of CLASSPATH are separated with semicolons, while under Linux it
is colons that do the separation. The following commands show possible settings (where, of
course, you must adapt the configuration to your own installation):
> ECHO %CLASSPATH%
.;C:\Programs\mysql-connector-java-3.0.3-beta
linux: $ echo $CLASSPATH
.:/usr/local/mysql-connector-java-3.0.3-beta/
Programming Techniques
The following examples assume that Java SDK and Connector/J have been correctly installed. All
example programs run only in text mode. Of course, Java programs with an AWT or Swing interface
will look more attractive, but for demonstrating programming techniques, text mode is completely
satisfactory and offers the advantage that the code remains compact and easy to read.
CHAPTER 17 ■JAVA (JDBC AND CONNECTOR/J) 511
5351c17_final.qxd 8/26/05 7:36 PM Page 511
www.it-ebooks.info

■Tip Additional information on Connector/J can be found in the associated online documentation, which is avail-
able in HTML and PDF format as well as being readable over the Internet: http://dev.mysql.com/doc/
connector/j/en/index.html.
Every Java program that uses Connector/J is actually a JDBC program. (JDBC is the database interface of
Java. Only relatively few details of a MySQL JDBC program are actually MySQL-specific.)
This section provides only a first introduction to JDBC programming. More advanced information is to be found
in books on Java that discuss JDBC.
A First Example
The following example offers a first impression of the construction of a JDBC program. The use of
import java.sql facilitates access to the JDBC interfaces and classes. The Connector/J driver is loaded
with Class.forName(“…\nolinebreak”).newInstance(). (This must take place before a connection is
established.)
The connection is established with the method DriverManager.getConnection, where the most
important parameters (driver name, host name, and database name) are passed in the form of a
URL; details to follow.
Before you can execute an SQL command, a Statement object must be created, whose method
executeQuery returns a ResultSet object, which contains the result of the query. In the following
example, all data records are read through (method next), selectively chosen (getInt, getString, etc.),
and output to the console window:
/* example file SampleIntro.java */
import java.sql.*;
public class SampleIntro
{
public static void main(String[] args)
{
try {
Connection conn;
Statement stmt;
ResultSet res;
// load the Connector/J driver
Class.forName("com.mysql.jdbc.Driver").newInstance();
// establish connection to MySQL
conn = DriverManager.getConnection(
"jdbc:mysql://uranus/mylibrary", "username", "xxx");
// execute SELECT query
stmt = conn.createStatement();
res = stmt.executeQuery(
"SELECT publID, publName FROM publishers " +
"ORDER BY publName");
// process results
while (res.next()) {
int id = res.getInt("publID");
String name = res.getString("publName");
System.out.println("ID: " + id + " Name: " + name);
}
res.close();
}
CHAPTER 17 ■JAVA (JDBC AND CONNECTOR/J)512
5351c17_final.qxd 8/26/05 7:36 PM Page 512
www.it-ebooks.info

catch(Exception e) {
System.out.println("Error: " + e.toString() );
}
}
}
Upon execution, the program returns the following result:
ID: 1 Name: Addison-Wesley
ID: 2 Name: Apress
ID: 9 Name: Bonnier Pocket
ID: 5 Name: Hanser
Establishing the Connection
Establishing the Connection with DriverManager.getConnection
As already mentioned in our introductory example, the Connector/J driver must be loaded before
the connection is established. For this, execute the method Class.forName and pass the name of the
driver. The method returns a Driver object, which you generally will not need. More to the point is
that Connector/J is registered as a result of this call as a JDBC driver, which now can be used:
// SampleConnection1.java
// load Connector/J driver
Class.forName("com.mysql.jdbc.Driver").newInstance();
For further programming, what is much more important is the Connection object that you cre-
ate with the method DriverManager.getConnection. To this method you usually pass three character
strings, containing the basic information about the database, as a URL (uniform resource locator),
the user name, and the password:
// connection to MySQL
Connection conn = DriverManager.getConnection(
"jdbc:mysql://uranus/mylibrary", "username", "password");
The construction of the URL looks like this (here split into two lines):
jdbc:mysql://[host1][,host2...][:port]/
[dbname][?para1=val1][¶2=val2][¶3=val3]...
Tables 17-2 and 17-3 describe the components of the connection URL and the most important
optional connection parameters. A complete list of parameters can be found in the Connector/J
Readme file.
Table 17-2. Components of the Connection URL
Component Function
jdbc:mysql:// Selects the driver.
host1 Specifies the host name (localhost if a server on the local computer is to be
accessed).
host2, host3 Specifies additional (optional) host names, to be used only if the connection
the previously named host is unsuccessful.
:port Specifies the port number (by default, 3306).
/dbname Specifies the default database.
?para1=value1 Specifies the first optional parameter (see Table 17-3).
¶2=value2 Specifies all additional optional parameters.
CHAPTER 17 ■JAVA (JDBC AND CONNECTOR/J) 513
5351c17_final.qxd 8/26/05 7:36 PM Page 513
www.it-ebooks.info

Table 17-3. Optional Parameters in the Connection URL (with Default Settings)
Parameter Function
allowMultiQueries=false Specifies whether several SQL commands can be executed at once. If
this option is used, the SQL commands must be separated by
semicolons. This option has been available since Connector/J 3.1.1.
autoreconnect=false Specifies whether the driver should attempt on its own to reconnect
if the connection is broken.
connectTimeout=0 Specifies in milliseconds the wait time for a connection to be estab-
lished. A setting of 0 means that no timeout is used. This setting
functions only since Java 2, version 1.4.
initialTimeout=2 Specifies in seconds the time between attempts at reestablishing a
broken connection. This time does not hold for the first connection.
maxReconnects=3 Specifies the maximum number of reconnects.
useCompression=false Compresses communication between the Java program and the
MySQL server.
relaxAutoCommit=false Specifies whether the driver is to accept COMMIT and ROLLBACK
commands without reporting an error even if MySQL supports no
transactions for the affected tables (for example, because the tables
are in MyISAM format).
useTimezone=false Specifies whether times should be converted between the client and
server time zones.
All further database operations proceed from the Connection object. If you wish to close the
connection at the end of the program, simply use the method close on the Connection object.
Establishing the Connection with DataSource.getConnection
Since Java 2, version 1.4, in addition to the method DriverManager.getConnection, which we have
already described, there is an alternative way to establish a database connection: the DataSource
class (package javax.sql). The JDBC documentation recommends this way, because it allows for the
use of advanced functions, such as connection pooling and the execution of distributed transactions
(that is, database operations that process data from several databases).
The following lines do not go into these additional possibilities, but simply show the principles
of establishing the connection. To do this, you generate an object of the class com.mysql.jdbc.jdbc2.
optional.MysqlDataSource and with the methods setServerName and setDatabaseName, set the host
and database names. The actual connection is then established with getConnection, where you have
to pass only the user name and password. This method returns a Connection object, which in the
DriverManager variant is the starting point for all further database operations.
If you wish to set additional connection parameters, you can use the method setURL (the for-
mat of the URL, as described previously) or pass a Properties field to getConnection:
// SampleConnection2.java
import java.sql.*;
import javax.sql.*; // for DataSource
public class SampleConnection2
{
public static void main(String[] args)
{
try {
com.mysql.jdbc.jdbc2.optional.MysqlDataSource ds;
Connection conn2;
CHAPTER 17 ■JAVA (JDBC AND CONNECTOR/J)514
5351c17_final.qxd 8/26/05 7:36 PM Page 514
www.it-ebooks.info

// create connection with a DataSource object
ds = new com.mysql.jdbc.jdbc2.optional.MysqlDataSource();
ds.setServerName("uranus");
ds.setDatabaseName("mylibrary");
conn2 = ds.getConnection("root", "xxxx");
// and so on, as before ...
}
catch(Exception e) {
System.out.println("Error: " + e.toString() );
}
}
}
■Tip If you wish to use more advanced JDBC functions, you should look at the Connector/J driver directory
com\mysql\jdbc\jdbc2\optional. There you will find, for example, the Java source texts for the Connector/J
classes
MysqlPooledConnection
and
MySQLConnectionPoolDataSource
.
Problems in Establishing a Connection
Normally, the connection between a client program and the MySQL server is established via TCP/IP
when the programs are running on different computers. On the other hand, if both programs are run-
ning on the same computer and a Linux/Unix system is being used, then the connection is established
over a socket file, which is more efficient than TCP/IP.
However, Java does not support sockets, and so the connection is always over TCP/IP. The impor-
tance here is that in MySQL access control, the name localhost is not used as host name, but instead,
the actual name of the computer. This state of affairs frequently leads to difficulties, with an error
message that usually looks something like this:
linux:~/ java SampleConnection1
Error: java.sql.SQLException: Server configuration denies access
to data source
What is particularly irritating is that a local connection using the same access information (e.g.,
with mysql -h localhost -u name -p) works just fine. The reason is that mysql deals with local access
by default over socket files, but Java does not.
The following points should help you in solving such problems. (Additional tips for solving access
problems—independent of Java—can be found in Chapter 11.) The starting point for our example is a
MySQL server that is running on the computer uranus.sol with IP number 192.168.0.2. The Java pro-
gram is to run on the same computer.
• It can be that for security reasons, every network connection to the MySQL server is forbid-
den. (For this, at server start the option --skip-networking must be passed, or else this option
must be entered in my.cnf.) Whether such is the case can be determined with the following
command:
linux~/$ mysql -h uranus.sol -u name -p databasename
Enter password: xxxxx
ERROR 2003: Can't connect to MySQL server
The only solution is to remove this option.
• It can also be the case that network access is indeed allowed, but the table mysql.user, which
is responsible for access control, contains an invalid entry in the column hostname. This
case can also be recognized with mysql. (Note that this time, the error message is different.)
CHAPTER 17 ■JAVA (JDBC AND CONNECTOR/J) 515
5351c17_final.qxd 8/26/05 7:36 PM Page 515
www.it-ebooks.info

linux~/$ mysql -h uranus.sol -u name -p databasename
Enter password: xxxxx
ERROR 1130: Host '192.168.0.2' is not allowed to connect
to this MySQL server
With the command resolveip 192.168.0.2 you can determine which host name is expected
by MySQL for this address. (On my computer, the command returns the result uranus.sol.)
Then you can check whether the table mysql.user contains a corresponding entry (and not,
say, simply uranus).
• Another possible cause is that there is a correct entry in mysql.user, but the specified user
name and password do not match. Note that this time, the error message looks different:
linux~/$ mysql -h uranus.sol -u name -p databasename
Enter password: xxxxx
ERROR 1045: Access denied for user: 'root@192.168.0.2'
(Using password: YES)
Once you have succeeded in gaining access to the MySQL server with the program mysql by
giving the computer name, the Java program should generally run if the same user name and pass-
word are used.
Executing SQL Commands
Before you can execute SQL commands, you need a Statement object. You obtain it with
conn.createStatement:
Statement stmt = conn.createStatement();
If you have in mind executing SELECT queries, then you can use two optional parameters to
select the cursor type and specify whether the data resulting from SELECT are able to be changed:
stmt = conn.createStatement(resultcursortype, resultconcurrency);
By default, the cursor type is forward only, and the data are read only. Additional details to follow.
The Statement class now offers a selection of various execute methods:
executeUpdate: for INSERT, UPDATE, and DELETE commands;
executeQuery: for SELECT queries;
executeBatch: for executing several commands that have been previously specified with
addBatch as a block (which can increase efficiency);
execute: to execute an arbitrary SQL command (where it is not known in advance what sort of
command it will be).
In the following pages we shall look more closely at the variants executeUpdate, executeQuery,
and executeBatch.
Executing INSERT, UPDATE, and DELETE Commands
The execution of an INSERT, UPDATE, or DELETE command is quite simple: You simply pass the
SQL command as a character string to the method executeUpdate:
stmt.executeUpdate(
"INSERT INTO publishers (publName) VALUES ('new publisher')");
The method executeUpdate returns an int value that specifies how many records were changed by
the command.
CHAPTER 17 ■JAVA (JDBC AND CONNECTOR/J)516
5351c17_final.qxd 8/26/05 7:36 PM Page 516
www.it-ebooks.info

If you wish to pass strings to the SQL command that contain special characters like ‘, “, \, and
so on, you should use prepared statements, which will be discussed shortly.
With the method getWarnings you can determine the warnings that occurred during the execu-
tion of the SQL command (corresponds to SHOW WARNINGS). The method returns an SQLWarning
object until all warnings have been processed.
Determining ID Numbers from a New Data Record (AUTO_INCREMENT)
There are several ways of determining the AUTO_INCREMENT number of newly created records.
Which variant is to be preferred depends on the version of Java that you are using.
Variant 1: Starting with Java 1.4, the method getGeneratedKeys has been available. If you are
working with a current version of Java, then getGeneratedKeys represents the best, most efficient,
and most portable option. The method returns a ResultSet object (which will be described later
when we discuss the evaluation of SELECT queries).
If there is precisely one new record, then the ResultSet object contains only one record with the
sought ID number. To evaluate, execute first the method next (to address the first record of the Result-
Set object) and then read the ID number with the method getInt(1) (the index 1 denotes the column of
the record):
// SampleGetID1
stmt.executeUpdate("INSERT ...");
ResultSet newid = stmt.getGeneratedKeys();
newid.next();
int id = newid.getInt(1);
Furthermore, getGeneratedKeys should return a complete list of new ID numbers when INSERT
commands were executed that generate several new data records. In order for JDBC to take note of
new ID numbers, the optional parameter Statement.RETURN_GENERATED_KEYS must be passed
to executeUpdate.
stmt.executeUpdate(
"INSERT INTO publishers (publName) VALUES ('publisher1'), ('publisher2')",
Statement.RETURN_GENERATED_KEYS);
ResultSet newids = stmt.getGeneratedKeys();
while(newids.next()) { // returns the IDs of publisher1 and publisher2
System.out.println("ID: " + newids.getInt(1));
}
Variant 2: If you are working with an older version of Java, you can use the method
getLastInsertID of the Statement object to obtain the last AUTO_INCREMENT value. However, this
method is defined specifically only for the Statement class of Connector/J, not for the Statement
interface from java.sql. Therefore, you must transform the Statement object, via a cast operation,
into an object of the class com.mysql.jdbc.Statement before you can use the method. (This works
for PreparedStatement objects as well, which will be described further on.)
The principal disadvantage of getLastInsertID is that the resulting code is not portable, func-
tioning only for MySQL in combination with the Connector/J driver:
// SampleGetID2.java
Statement stmt = conn.createStatement();
stmt.executeUpdate(
"INSERT INTO publishers (publName) VALUES ('new publisher')");
long id = ((com.mysql.jdbc.Statement)stmt).getLastInsertID();
Variant 3: A third possibility (the slowest!) is to execute the additional SQL command SELECT
LAST_INSERT_ID() after the INSERT command. However, you must see to it that this command is
executed in the same MySQL connection and within a transaction. If you are working with InnoDB
ansaction with conn.commit():
CHAPTER 17 ■JAVA (JDBC AND CONNECTOR/J) 517
5351c17_final.qxd 8/26/05 7:36 PM Page 517
www.it-ebooks.info

// SampleGetID3.java
conn.setAutoCommit(false);
stmt.executeUpdate(
"INSERT INTO publishers (publName) VALUES ('new publisher')");
ResultSet newid = stmt.executeQuery("SELECT LAST_INSERT_ID()");
if(newid.next()) {
id = newid.getInt(1);
System.out.println("new ID = " + id); }
conn.commit();
Evaluating SELECT Queries
In order to be able to evaluate the results of a SELECT query, you must execute the SQL command
with executeQuery. This method returns a ResultSet object:
Statement stmt = conn.createStatement();
ResultSet res = stmt.executeQuery(
"SELECT publID, publName FROM publishers " +
"WHERE publID < 10 ORDER BY publName");
■Caution If you have already developed JDBC programs with database drivers other than Connector/J, you
should take note of the default properties of
ResultSet
objects:
By default, the
ResultSet
object cannot be edited (read only).
By default, the
ResultSet
object supports free navigation. This has the consequence that all data are immediately
transferred from MySQL server to client, even with large query results. This behavior differs from that of many
other JDBC drivers, for which the
ResultSet
is
forward only
by default and is transferred only as required.
If you wish to have
ResultSet
properties that differ from the default behavior, then you must specify this in the cre-
ation of
Statement
objects for the query. More details to follow (see the headings
Forward-Only ResultSet
s and
Variable ResultSet
s).
Immediately after the execution of executeQuery, no record is active. To address the first record,
the method res.next() must be executed. All further records will be run through with next() until this
method returns the result false.
For the currently active record, the individual columns can be selected with the methods getInt,
getString, etc. Optionally, this method can be passed the column number (e.g., res.getInt(1) for the
first column) or the column name (e.g., res.getInt(“publID”). The latter variant leads to more readable
code, but is slower.
The following loop selects all found records from the previously given SELECT query and dis-
plays them in the console window:
while (res.next()) {
int id = res.getInt("publID");
String name = res.getString("publName");
System.out.println("ID: " + id + " Name: " + name);
}
Invalid and Empty Queries
If the syntax of an SQL command is invalid, then the execution of executeQuery throws an
SQLException exception.
CHAPTER 17 ■JAVA (JDBC AND CONNECTOR/J)518
5351c17_final.qxd 8/26/05 7:36 PM Page 518
www.it-ebooks.info

If the query returns no result (zero records), then executeQuery returns simply an empty
ResultSet object (not NULL). The only way to determine whether a SELECT query has returned
results is by executing res.next(). Once this method has returned the value false, the ResultSet
object is empty.
Checking for NULL
Methods such as getInt and getFloat that return elementary Java data types are incapable of differ-
entiating 0 and NULL. To determine whether the last selected data field contained NULL, one has
the method wasNull:
int n = res.getInt(1);
if(res.wasNull)
System.out.println("n = [NULL]");
else
System.out.println("n = " + n);
With character strings, the use of wasNull is unnecessary, since in String variables, the state
null can be stored. You can therefore execute String s = res.getString(…) and then test whether
s == null.
Character Strings/Unicode
Internally, all character strings in Java are stored in the Unicode format. Connector/J and the MySQL
server automatically take care of conversion of strings into the character set of the table. However, this
has worked only since MySQL 4.1 and Connector/J 3.1. If you are working with older versions, you can
select the desired character set with parameters of the JDBC connection URL.
Navigating in the ResultSet
In addition to the method next, there are several additional methods for selecting the currently
active data record: previous activates the previous record, while first and last activate the records
that their names imply. With these methods, the data record pointer is directed to the place before
the first or after the last record. You can test with isFirst and isLast whether the beginning or end of
the record list has been reached. The method getRow returns the number of the current record (1 for
the first); absolute activates a record that is specified by its number.
Determining the Number of Found Records
Since Connector/J returns by default navigable ResultSets, it is rather simple to determine the num-
ber of records: With last, the last record is activated, and then with getRow its number is
determined:
res.last();
int n = res.getRow();
If you then wish to run a loop over all records, you must set the record pointer to the beginning:
res.beforeFirst();
while(res.next()) ...
If you also want to determine the number of columns, you need a ResultSetMetaData object,
which we discuss in the next section.
CHAPTER 17 ■JAVA (JDBC AND CONNECTOR/J) 519
5351c17_final.qxd 8/26/05 7:36 PM Page 519
www.it-ebooks.info

Determining Metadata About the ResultSet
If you do not know in advance which data your SELECT query returns (for example, if you wish to
write a program that can work with arbitrary tables), you can employ the class ResultSetMetaData to
return all relevant information about the SELECT result: the number of columns (getColumnCount),
their names (getColumnName), their data types (getColumnType and getColumnTypeName), and the
number of decimal places (getPrecision, getScale). With methods such as isNullable, isAutoIncrement,
and isSigned, you can find out additional properties of each column. All of these methods require as
parameter the column number about which you want information.
You obtain a ResultSetMetaData object with the method getMetaData, which is applied to a
ResultSet object. The following lines show a simple application of ResultSetMetaData:
int i, n;
ResultSetMetaData meta = res.getMetaData();
n = meta.getColumnCount();
System.out.println("number of columns: " + meta.getColumnCount());
for(i=1; i<=n; i++) {
System.out.println("column " + i + ": " +
" Name: " + meta.getColumnName(i) +
" datatype: " + meta.getColumnTypeName(i));
}
Forward-Only ResultSets
By default, ResultSets are freely navigable; that is, you can change the currently active record at
will using previous, next, etc. This is convenient, but it has the drawback that when you execute
executeQuery, all data records that are found must be transferred from the MySQL server to the
Java program. This can involve not only large data sets, but also the need for the Java program to
reserve a large amount of memory. When you are processing numerous data sequentially, this is
not the optimal way to proceed.
If you wish to transfer the records individually, you must define the Statement object for your
SELECT query as follows. (Integer.MIN_VALUE is the smallest representable integer. Connector/J
requires that exactly this value be passed.)
Statement stmt = conn.createStatement(
java.sql.ResultSet.TYPE_FORWARD_ONLY,
java.sql.ResultSet.CONCUR_READ_ONLY);
stmt.setFetchSize(Integer.MIN_VALUE);
ResultSet res = stmt.executeQuery("SELECT ...");
■Caution Note that you can use only
next()
for navigation in the
ResultSet
(that is, navigation is
forward-only
).
Note as well that you can execute a further SQL command for the existing connection (
Connection
object) only when
you have completely run through the
ResultSet
or have closed the connection with
close
. (You may, of course, have
a second connection open.)
Variable ResultSets
If you want to edit the data in a table, you generally execute INSERT, UPDATE, and DELETE com-
mands. However, JDBC offers another possibility: You can insert, edit, and delete data records
directly in a ResultSet object; these changes are then executed in the underlying table. However,
for this to function, certain conditions must be satisfied:
CHAPTER 17 ■JAVA (JDBC AND CONNECTOR/J)520
5351c17_final.qxd 8/26/05 7:36 PM Page 520
www.it-ebooks.info

• The Statement object must be opened with the additional parameter
ResultSet.CONCUR_UPDATABLE.
• The SELECT query can encompass only one table (no JOINs), may not use any GROUP
functions, and must include the primary index.
If these conditions are satisfied, you can delete the current record from the ResultSet and the
database with deleteRow.
To edit the current record, execute the methods updateInt(n, 123), updateString(n, “new text”),
etc. You must then confirm these changes with updateRow.
To insert a new record, first execute moveToInsertRow. Now specify the value to be stored with
updateXxx methods and confirm the insertion operation with insertRow.
If you wish to know the ID number of the new record (AUTO_INCREMENT), execute last. This
ensures that the new record is also the active record. You can then select the ID column with getInt(n).
The following program first selects all records from the publisher table of the mylibrary data-
base. Then a new record is inserted, after which it is edited and then deleted. Records inserted into
a ResultSet can no longer be edited. Therefore, in our example program, the ResultSet is first input
anew.
// SampleChangeResultSet.java
stmt = conn.createStatement(ResultSet.TYPE_SCROLL_SENSITIVE,
ResultSet.CONCUR_UPDATABLE);
// insert new publisher; then display all publishers
res = stmt.executeQuery(
"SELECT publID, publName FROM publishers ORDER BY publID");
res.moveToInsertRow();
res.updateString(2, "New publisher");
res.insertRow();
res.last();
int newid = res.getInt(1);
res.beforeFirst();
while (res.next())
System.out.println(res.getString(1) + " " + res.getString(2));
res.close();
// change previously inserted new publisher
res = stmt.executeQuery(
"SELECT publID, publName FROM publishers WHERE publID = " + newid);
res.next();
res.updateString(2, "new with another name");
res.updateRow();
// ... and delete
res.last();
res.deleteRow();
res.close();
Closing a ResultSet Object
If you no longer need a ResultSet object, you should close it explicitly with close. This allows
reserved memory to be returned earlier than otherwise. In the case of incompletely run-through
forward-only ResultSets, the result is the release of resources blocked by the MySQL server.
CHAPTER 17 ■JAVA (JDBC AND CONNECTOR/J) 521
5351c17_final.qxd 8/26/05 7:36 PM Page 521
www.it-ebooks.info

Prepared Statements
Prepared statements make it possible to formulate an SQL command with placeholders. Before the exe-
cution of the command, the placeholders must be passed. The advantage of this way of proceeding is
that JDBC looks after the transformation of character strings and binary data into a MySQL-compatible
syntax. This includes both the addition of quotation marks at the beginning and end of strings and the
transformation of special characters such as ‘into \’ and \into \\.
Prepared statements can also offer an advantage in speed, since the SQL code must be trans-
ferred only once to the database server.
The starting point for prepared statements is a PreparedStatement object, which is generated
with the method prepareStatement. Note that character-string parameters may not be enclosed in
quotation marks, which is usually the case with strings (that is, VALUES (?) and not VALUES(‘?’)).
To pass parameters, use methods such as setString, setInt, setNull, setDate, and
setBinaryStream. (A complete reference is given in the class description of PreparedStatement.)
To execute the SQL command, use, depending on the type of command, the familiar methods of
the Statement class, for example, executeUpdate, executeQuery, addBatch, and executeBatch. What is
new is that you can no longer pass parameters to these methods: The SQL command was already
defined in prepareStatement, and the parameters are set with setXxx methods.
In the following example, two new publishers are inserted into the publisher table of the
mylibrary database:
// SamplePreparedStatement.java
PreparedStatement pstmt = conn.prepareStatement(
"INSERT INTO publishers (publName) VALUES (?)");
pstmt.setString(1, "O'Reilly"); // inserts O'Reilly
pstmt.executeUpdate();
pstmt.setString(1, "\\abc\"efg"); // inserts \abc"efg
pstmt.executeUpdate();
Transactions
JDBC supports transactions via the Connection object. Of course, transactions are possible only if
your MySQL tables are in a format that supports transactions (generally InnoDB).
By default, JDBC is in AutoCommit mode; that is, every SQL command is considered a separate
transaction and is executed immediately. You can determine the mode with getAutoCommit and
change it with setAutoCommit. At the same time, the starting point for the first transaction is speci-
fied by setAutoCommit(false), which you can either confirm with commit or abort with rollback.
These two commands simultaneously start the next transaction.
The following lines show a simple application. Several INSERT commands are executed within
a try block. If an error occurs, the entire transaction is aborted:
// no AutoCommit after every command
conn.setAutoCommit(false);
// execute several commands
try {
stmt.executeUpdate("INSERT INTO table1 ...");
stmt.executeUpdate("INSERT INTO table2 ...");
conn.commit();
}
catch(Exception e) {
conn.rollback();
}
CHAPTER 17 ■JAVA (JDBC AND CONNECTOR/J)522
5351c17_final.qxd 8/26/05 7:36 PM Page 522
www.it-ebooks.info

Batch Commands
JDBC offers the possibility of executing several SQL commands as a block. Such command blocks
are called batches in the database community. The advantage over the individual execution of SQL
commands is somewhat greater efficiency (depending on the application).
Batch commands are formed in two parts: First, all commands to be executed are passed with
addBatch to a Statement or PreparedStatement command. Then the commands thus collected are
executed with executeBatch.
The method executeBatch returns an int field, which for each SQL command specifies how many
records were changed (a number greater than or equal to 0). If this number could not be determined,
but the command was executed without error, then the return value is SUCCESS_NO_INFO. If an error
did occur, then the return value is EXECUTE_FAILED. (Note, however, that with syntax errors, the exe-
cution of the batch command is broken off with an exception.)
The following lines show the execution of a simple batch command:
int i;
stmt = conn.createStatement();
stmt.addBatch("INSERT INTO publishers (publName) VALUES ('publ1')");
stmt.addBatch("INSERT INTO publishers (publName) VALUES ('publ2')");
stmt.addBatch("INSERT INTO publishers (publName) VALUES " +
"('publ3'), ('publ4')");
int[] n = stmt.executeBatch();
for(i=0; i < n.length; i++)
System.out.println(
"Recordsets changed by batch command no " + (i+1) + ": " + n[i]);
If no errors occur during execution, the following text appears in the console window:
Recordsets changed by batch command no 1: 1
Recordsets changed by batch command no 2: 1
Recordsets changed by batch command no 3: 2
■Note Do not confuse batches with transactions. Batches are appropriate only if you do not need to read in your
altered data in the confines of the batch. Thus you can execute a series of
INSERT
or
UPDATE
commands within a
batch only if you do not determine any
AUTO_INCREMENT
values or execute any
SELECT
queries in between. More-
over, batches offer no mechanism for error handling. If an error occurs within a batch, then all SQL commands
executed to that point remain valid, while all further commands will be rejected.
Batches are thus a simple aid in executing a large number of
INSERT
or
UPDATE
commands efficiently. The
goal of a transaction, on the other hand, is to obtain greater data security. For example, transactions ensure that
either all commands of a transaction are correctly executed, or none of them.
Of course, a batch can be executed within a transaction.
Working with Binary Data (BLOBs)
JDBC offers several ways of dealing with binary data:
• When the task at hand is to read data from a file or to store data to a file, the methods
ResultSet.getBinaryStream and PreparedStatement.setBinaryStream are to be recommended.
In the first case, you can read the binary data from the database with the aid of an
InputStream. In the second case, you pass an existing InputStream object (e.g., that of a file)
to transfer its data into a parameter of an SQL command.
CHAPTER 17 ■JAVA (JDBC AND CONNECTOR/J) 523
5351c17_final.qxd 8/26/05 7:36 PM Page 523
www.it-ebooks.info

• With BLOBs that contain Unicode text you will find getCharacterStream and
setCharacterStream helpful. You can use java.io.Reader objects with them to select text at
the character level.
• If you wish to process data as a byte array, you can use the methods getBytes and setBytes.
• Finally, JDBC offers the interfaces Blob and Clob (character large object): With Blob objects
you can conveniently read and edit data byte by byte with the methods getBytes and setBytes.
Clob objects offer a character-oriented approach with methods such as getAsciiStream and
getCharacterStream. The passing of Blob/Clob objects takes place with the methods getClob,
setBlob, setClob, and getBlob.
An Example
The following example shows the application of the methods getBinaryStream and setBinaryStream.
The program loads the content of the file test.jpg, stores it in a new record in the database exceptions
(table a_blob), reads it from there, and stores the data thus obtained in the new file test-copy.jpg.
Then the new record in a_blob is deleted.
The SQL commands are executed with PreparedStatement objects that are created at the
beginning of the program excerpt reproduced here. For transferring the file into the a_blob
table, a FileInputStream object with setBinaryStream as parameter is simply passed to the first
PreparedStatement object.
It is somewhat more complicated to read the data from the a_blob table and store it in a file.
The BinaryStream object obtained from the ResultSet object via getBinaryStream must be read in
a loop and copied with the help of a buffer into a fileOutputStream object:
// example SampleBlob.java
import java.sql.*;
import java.io.*;
...
// make connection
Connection conn = DriverManager.getConnection(
"jdbc:mysql://uranus/exceptions", "root", "uranus");
// create three PreparedStatement objects
PreparedStatement pstmt1, pstmt2, pstmt3;
pstmt1 = conn.prepareStatement(
"INSERT INTO test_blob (a_blob) VALUES(?)");
pstmt2 = conn.prepareStatement(
"SELECT a_blob FROM test_blob WHERE id=?");
pstmt3 = conn.prepareStatement(
"DELETE FROM test_blob WHERE id=?");
// read file test.jpg and store in a BLOB field
File readfile = new File("test.jpg");
FileInputStream fis = new FileInputStream(readfile);
pstmt1.setBinaryStream(1, fis, (int)readfile.length());
pstmt1.executeUpdate();
fis.close();
// determine id of the new records
long id = ((com.mysql.jdbc.Statement)pstmt1).getLastInsertID();
CHAPTER 17 ■JAVA (JDBC AND CONNECTOR/J)524
5351c17_final.qxd 8/26/05 7:36 PM Page 524
www.it-ebooks.info

// create new, empty file copy-test.jpg
File writefile = new File("copy-test.jpg");
if(writefile.exists()) {
writefile.delete();
writefile.createNewFile(); }
FileOutputStream fos = new FileOutputStream(writefile);
// read BLOB field from the database
pstmt2.setLong(1, id);
ResultSet res = pstmt2.executeQuery();
res.next();
InputStream is = res.getBinaryStream(1);
// store binary data in the new file
final int BSIZE = 2^15;
int n;
byte[] buffer = new byte[BSIZE];
while((n=is.read(buffer, 0, BSIZE))>0)
fos.write(buffer, 0, n);
// close open objects
is.close();
fos.close();
res.close();
// delete the new record
pstmt3.setLong(1, id);
pstmt3.executeUpdate();
Peculiarities of Large BLOBs
BLOBs are always transferred in their entirety between MySQL and the Java program. Connector/J
is incapable of piecewise transfer. For this reason, the Java virtual machine (JVM) must be so con-
figured that it can reserve enough space to hold the entire BLOB in local memory.
Moreover, the MySQL server must allow the transfer of large data packets (variable
max_allowed_packet; see Chapter 22). If necessary, you can increase the value of the variable
on the client side by executing the following command:
SET max_allowed_packet=16000000
CHAPTER 17 ■JAVA (JDBC AND CONNECTOR/J) 525
5351c17_final.qxd 8/26/05 7:36 PM Page 525
www.it-ebooks.info


C
This chapter gives a first introduction to programming MySQL applications with the programming
languages C. In particular, we will introduce the client library libmysqlclient, which is a part of
MySQL. This chapter considers programming only under Unix/Linux, and not under Windows.
As test system for this chapter I have used SUSE Linux Professional 9.2 with the compiler gcc 3.3
and the MySQL package (version 5.0.n) downloaded from mysql.com. If you are working under another
Linux distribution or operating system, you will require different paths and other settings.
The C API (libmysqlclient)
The C application programming interface (API) is the most elementary interface to MySQL. All
other APIs, such as those for PHP, Perl, and C++, are based on the C API. Thus a knowledge of the
C API will facilitate learning about the other APIs. The API functions constitute a component of the
library libmysqlclient. Every C program that wishes to use MySQL functions must therefore have
access to this library.
Please note that there are several versions of libmysqlclient in use: version 10 for MySQL
3.23.n, version 12 of MySQL 4.0.n, and finally, version 14 for MySQL 4.1.nand beyond. (This chapter
is based on version 14.)
These libraries are largely compatible in their basic functions and differ primarily in the supple-
mentary functions that have been added to newer versions. However, there is an important exception:
beginning with MySQL 4.1, the internal encryption of MySQL passwords has changed. That necessi-
tated changes in the C API, which were instituted in version 14. For communication with a MySQL
server from version 4.1 on, libmysqlclient is necessary. (An emergency solution to difficulties is to
start the server with the option --old-passwords; then the older libmysqlclient version can be used.)
■Tip An extensive syntax reference for the data structures and functions from the library libmysqlclient
mentioned in this chapter appears in Chapter 23.
Hello, World!
Assumptions
For developing C programs under Linux or a comparable Unix system, you will need, of course, the
usual equipment, in particular, a C compiler (generally gcc) and the program make. Furthermore, all
the necessary include and library files for compiling and linking must be installed. With many dis-
tributions (such as SUSE, Red Hat), certain packages must be installed as well, ending with -devel 527
CHAPTER 18
■ ■ ■
5351c18_final.qxd 8/26/05 7:42 PM Page 527
www.it-ebooks.info
(e.g., glicb-devel). It might be a good idea to test out your installation by executing a very simple
C program.
For the development of MySQL programs you will need, in addition, the MySQL developer files,
consisting of include files and libraries. These files usually are located in the package MySQL-Devel-n.
This chapter assumes that the developer files are located in the following places: include files at
/usr/include/mysql, and libraries at /usr/lib/mysql.
If these files are located elsewhere on your system, then the compile and link options will have
to be changed accordingly.
Introductory Example
Perhaps a small and simple program will help develop some intuition in the direction of MySQL pro-
gramming with C. The following example assumes that the database mylibrary has been installed on
the local computer (see Appendix B). Furthermore, in the code you must change, in the function call
mysql_real_connect, the user name (“root”) and password (“XXX”). The code is documented to the
extent that it should give at least some idea of what is going on. Details on the use of MySQL func-
tions appear later.
// example file hellow/main.c
#include <stdio.h>
#include <mysql.h> // functions from libmysqlclient
int main(int argc, char *argv[])
{
int i;
MYSQL *conn; // connection
MYSQL_RES *result; // result of the SELECT query
MYSQL_ROW row; // a record of the SELECT query
// create connection to MySQL
conn = mysql_init(NULL);
if(mysql_real_connect(
conn, "localhost", "root", "XXX",
"mylibrary", 0, NULL, 0) == NULL) {
fprintf(stderr, "sorry, no database connection ...\n");
return 1;
}
// only if Unicode output (utf8) is desired
mysql_query(conn, "SET NAMES 'utf8'");
// create list of all pulishers and number of titles published for each pulisher
const char *sql="SELECT COUNT(titleID), publName \
FROM publishers, titles \
WHERE publishers.publID = titles.publID \
GROUP BY publishers.publID \
ORDER BY publName";
if(mysql_query(conn, sql)) {
fprintf(stderr, "%s\n", mysql_error(conn));
fprintf(stderr, "%s\n", sql);
return 1;
}
CHAPTER 18 ■C528
5351c18_final.qxd 8/26/05 7:42 PM Page 528
www.it-ebooks.info

// process result
result = mysql_store_result(conn);
if(result==NULL) {
if(mysql_error(conn))
fprintf(stderr, "%s\n", mysql_error(conn));
else
fprintf(stderr, "%s\n", "unknown error\n");
return 1;
}
printf("%i records found \n", (int)mysql_num_rows(result));
// loop over all records
while((row = mysql_fetch_row(result)) != NULL) {
for(i=0; i < mysql_num_fields(result); i++) {
if(row[i] == NULL)
printf("[NULL]\t");
else
printf("%s\t", row[i]);
}
printf("\n");
}
// release memory, sever connection
mysql_free_result(result);
mysql_close(conn);
return 0;
}
If you execute the program, you should get the following result:
uranus:~/hellow-c $ ./hellow
13 records found
23 Addison-Wesley
4 Apress
1 Bonnier Pocket
1 Diogenes Verlag
1 dpunkt
1 Galileo
1 Hanser
2 Markt und Technik
2 New Riders
3 O'Reilly & Associates
2 Ordfront förlag AB
1 Sybex
1 Zsolnay
Compiling and Linking
To compile and link the example program just presented under Linux or comparable Unix system,
execute the following command:
$ gcc -o hellow -I/usr/include/mysql -lmysqlclient main.c
CHAPTER 18 ■C529
5351c18_final.qxd 8/26/05 7:42 PM Page 529
www.it-ebooks.info

In detail, the components of the command have the following meaning:
gcc The GNU C and C++ compiler
-o hellow The name of the executable
-I/usr/include/mysql The location of the MySQL include files (in particular mysql.h)
-lmysqlclient Link the executable to the MySQL client library
main.c The code file
Depending on the system configuration, the location of the MySQL include files can be different
from those presented here (e.g., /usr/local/include/mysql).
Makefile
Assembling the input for the command for compiling and linking a program is generally rather
labor-intensive (especially when a project consists of several files). Therefore, it is a good idea to
create a file with the name Makefile that contains all necessary instructions in the syntax of the make
command. To compile, you simply input make, which decides on its own which parts of the program
need to be recompiled.
As starting point for creating your own projects, you can use the following example. Note that
the make syntax for the indentation requires tabs (not spaces):
# example file hellow/Makefile
CC = gcc
INCLUDES = -I/usr/include/mysql
LIBS = -lmysqlclient
all:hellow
main.o: main.c
$(CC) -c $(INCLUDES) main.c
hellow: main.o
$(CC) -o hellow main.o $(LIBS)
clean:
rm -f hellow main.o
Static Binding of MySQL Functions
With the Makefile presented here, the library libmysqlclient is linked to the program dynamically
if the shared library libmysqlclient.so can be found in one of the usual places (under Linux in the
directory /lib or /usr/lib).
If this fails (because the library was not found) or if you wish that all MySQL API functions should
be integrated directly into the executable (static instead of dynamic binding), you must specify the
location of the static library variant libmysqlclient.a. This is generally in the directory /usr/lib/mysql.
Furthermore, you must now specify the additional option -lz. This permits the library libz to
be consulted during linking. It contains functions accessed by libmyssqlclient for compressing
data exchange between client and server (when that is desired):
$ gcc main.c -I/usr/include/mysql -L/usr/lib/mysql -lmysqlclient \
-lz -o hellow
CHAPTER 18 ■C530
5351c18_final.qxd 8/26/05 7:42 PM Page 530
www.it-ebooks.info

If you are using make, you need to change only the LIBS variable:
LIBS = -L/usr/lib/mysql -lmysqlclient -lz
It can happen (depending on the Unix system and on which libmysqlclient functions you use)
that in addition to libz, you will require other libraries. Table 18-1 summarizes the options that might
be necessary:
Table 18-1. Options for Static Linking of MySQL Programs
Option Meaning
-L/usr/lib/mysql location of the static MySQL libraries (libmysqlclient.a)
-lc basic libraries with basic functions (libc)
-lcrypt library with cryptographic functions (libcrypt)
-lm library with mathematical functions (libm)
-lnsl library with name service functions (libnsl)
-lnss_files and -lnss_dns library with name service switch functions; further information
from man nsswitch.conf
-lz library with compression functions (libz)
The static variant has the advantage that all libmysqlclient functions that the program uses
are compiled directly into the executable. This allows the program to run on a computer that does
not have the libmysqlclient library installed.
However, this advantage is paid for by a larger executable than that in the dynamic version.
The difference in size depends on how many functions you use from libmysqlclient. In our “Hello
World’’ program, the dynamic executable is only 11KB, while the static variant weighs in at around
1MB. (Note that only the MySQL functions are statically bound, not all functions from all other
libraries.)
You can easily determine which dynamic libraries a program must access during execution
with the command ldd. In the static variant of the “Hello World’’ program, the result looked as fol-
lows on my test system:
$ ldd hellow
linux-gate.so.1 => (0xffffe000)
libz.so.1 => /lib/libz.so.1 (0x4002b000)
libc.so.6 => /lib/tls/libc.so.6 (0x4003c000)
/lib/ld-linux.so.2 => /lib/ld-linux.so.2 (0x40000000)
In the dynamic variant, the list of libraries is much longer. It contains, in addition to
libmysqlclient, all libraries that are accessed by libmysqlclient:
$ ldd hellow
(0xffffe000)
libmysqlclient.so.14 => /usr/lib/libmysqlclient.so.14 (0x4002b000)
libc.so.6 => /lib/tls/libc.so.6 (0x4012d000)
libcrypt.so.1 => /lib/libcrypt.so.1 (0x40243000)
libnsl.so.1 => /lib/libnsl.so.1 (0x40275000)
libm.so.6 => /lib/tls/libm.so.6 (0x4028b000)
libz.so.1 => /lib/libz.so.1 (0x402ae000)
libnss_files.so.2 => /lib/libnss_files.so.2 (0x402bf000)
libnss_dns.so.2 => /lib/libnss_dns.so.2 (0x402c9000)
libresolv.so.2 => /lib/libresolv.so.2 (0x402d0000)
/lib/ld-linux.so.2 => /lib/ld-linux.so.2 (0x40000000)
CHAPTER 18 ■C531
5351c18_final.qxd 8/26/05 7:42 PM Page 531
www.it-ebooks.info

Establishing the Connection
Before establishing a connection, you must initialize a data structure of type MYSQL with mysql_init.
The connection is then established with mysql_real_connect, where a parameter, a pointer to the
MYSQL structure, as well as the usual connection data must be specified: the host name (or “localhost”)
or the IP number of the server, the user name, password, name of the default database, the socket num-
ber (or 0 for the default value), the name of the socket file (or NULL for the default socket file), as well as
certain flags that describe particular properties of the connection.
A flag such as CLIENT_COMPRESS is involved if the data should be transmitted in compressed
form. CLIENT_MULTI_STATEMENTS makes it possible to execute several commands at a time; such
commands must be separated by semicolons. CLIENT_MULTI_RESULTS enables the processing of
several SELECT results, which is required when a stored procedure is called. (A list of more constants
can be found in Chapter 23.)
MYSQL *conn;
unsigned long flags;
flags = CLIENT_MULTI_STATEMENTS | ...;
conn = mysql_init(NULL);
if(mysql_real_connect(conn, "hostname", "username", "password",
"databasename", 0, NULL, flags) == NULL) {
fprintf(stderr, "error messages ...\n");
Once the connection is no longer needed, it should be closed with mysql_close:
mysql_close(conn);
Evaluation of the Configuration File my.cnf
If in establishing the connection you wish to have the settings in the configuration file my.cnf auto-
matically evaluated (e.g., connecting over a nonstandard port number or socket file), then add a call
to the function mysql_options between mysql_init and mysql_real_connect. The following instruc-
tion yields the result that all configuration settings of the group [client] are considered, to the extent
that NULL or 0 is passed for the corresponding parameters in the following mysql_real_connect call.
(This holds for user name and password as well.)
conn = mysql_init(NULL);
mysql_options(conn, MYSQL_READ_DEFAULT_GROUP, "");
mysql_real_connect(...);
If in addition to the [client] options, you also want a further options group to be considered,
then you should give its name in the last parameter of mysql_options:
mysql_options(conn, MYSQL_READ_DEFAULT_GROUP, "mygroup");
Evaluation of Options in the Command Line
With many standard MySQL programs (such as mysql, mysqladmin, mysqldump), you can send a con-
nection parameter in a uniform format in the command line, for example, -hname or --host==name.
An evaluation of this command parameter is especially sensible if you are developing administra-
tion programs in C that are to be applied to arbitrary databases. Unfortunately, the MySQL library
does not offer a convenient means of doing so like mysql_options. Instead, it must be done by hand.
The following points sketch the way to proceed:
CHAPTER 18 ■C532
5351c18_final.qxd 8/26/05 7:42 PM Page 532
www.it-ebooks.info

• Instead of mysql_options, you call the unfortunately undocumented MySQL function
load_defaults to read the settings from my.cnf and to copy them into the field of the com-
mand parameters (argc and argv of main). This has the advantage that all settings, whether
they come from my.cnf or were passed as parameters, can be processed uniformly. Also, the
string field groups specifies which options groups from my.cnf should be read and copied
into argv:
const char *groups[] = {"mygroup", "client", NULL};
load_defaults("my", groups, &argc, &argv);
• Now create a loop and evaluate, with the standard function getopt_long (include file
getopt.h), all parameters from argv and initialize variables for the host name, user name,
etc. If a password is to be passed in the command line, you should overwrite it with blank
characters for reasons of security. For interactive input of a password you can use the func-
tion get_tty_password.
• Finally, pass the values thus determined to mysql_real_connect.
■Tip This way of proceeding is described in full in the chapter
“
The MySQL C API’’ in the book
MySQL
by
Paul DuBois. This chapter can also be found as a sample chapter on the author’s website, most recently at the
following address: http://www.kitebird.com/mysql-book/.
Executing SQL Commands
Simple Commands
To execute an SQL command, pass it as a character string to the function mysql_query. The string
must generally contain only one SQL command, and it may not end with a semicolon. There is more
information on executing several commands at once in Chapter 18.
The function mysql_query returns 0 if the SQL command was accepted by the server. (The return
value allows one to draw conclusions only about whether the command was syntactically correct, not
about whether the command changed data or whether, say, a SELECT command returned results.)
After DELETE, INSERT, or UPDATE commands, you can use mysql_affected_rows to determine
how many records were changed as a result of the command. The result has the data type
my_ulonglong. This data type is defined in the MySQL library; it describes a 64-bit unsigned integer.
If you have inserted a new record—perhaps with INSERT—into a table with an
AUTO_INCREMENT column, you can determine the value of the AUTO_INCREMENT field with the
function mysql_insert_id. This function also returns a result in the form of a my_ulonglong integer:
mysql_query(conn, "INSERT INTO publishers (publName) \
VALUES ('publisher')");
printf("publID = %i\n", (int)mysql_insert_id(conn));
Evaluating SELECT Results
After a SELECT command executed with mysql_query, you can process the expected results with
either mysql_store_result or mysql_use_result. Both functions return a MYSQL_RES structure, from
which you will be able to read out all the records with mysql_fetch_row one after another. The fol-
lowing lines show the general way of proceeding:
CHAPTER 18 ■C533
5351c18_final.qxd 8/26/05 7:42 PM Page 533
www.it-ebooks.info

MYSQL_RES *result; // result of a SELECT query
MYSQL_ROW row; // a record of the result
...
result = mysql_store_result(conn);
if(result==NULL)
fprintf(stderr, "%error ...\n");
else {
while((row = mysql_fetch_row(result)) != NULL) {
// process each record
}
mysql_free_result(result); // release result
}
The MYSQL_RES structure for the results should then be released as soon as possible with
mysql_free_result in order to keep memory requirements in the client (mysql_store_result) and
resource demands on the server (mysql_use_result) as small as possible.
As Table 18-2 shows, mysql_store_result and mysql_use_result differ fundamentally inter-
nally. If you expect smaller rather than larger SELECT results, then mysql_store_result is the
better choice. It makes less of a demand on the server and offers more convenience for client
programming. Only when you expect large quantities of data (in the megabyte quantity) should
you consider mysql_use_result.
Table 18-2. Internal Management of SELECT Results
mysql_store_result mysql_use_result
All found records are immediately transmitted At first, no records are transmitted; that is, the
to client memory. With large record lists, this data remain on the server. This means that the
can result in large memory requirements for server is responsible for record management.
the client. Until this process is complete, resources on the
server are occupied.
The records can be addressed in any order and The records must be processed one at a time,
as often as desired (function mysql_data_seek). and can be read only once.
The number of records found by SELECT can be The number of found records is known only
determined immediately with mysql_num_rows. after all records have been run through with
mysql_fetch_row.
Once you have read a record with mysql_fetch_row into a MYSQL_ROW structure, you can
access the individual fields (columns) easily with row[n]. All results are passed as 0-terminated
strings (including numbers, dates, TIMESTAMPs, etc.). For fields that are empty in the database
(NULL), row[n] also contains NULL. One must be careful in the evaluation of binary data, as we
shall discuss a bit later.
The following loop runs through all records and outputs the individual columns, separated
by tab characters, in the console window:
int i;
while((row = mysql_fetch_row(result)) != NULL) {
for(i=0; i < mysql_num_fields(result); i++) {
if(row[i] == NULL)
printf("[NULL]\t");
else
printf("%s\t", row[i]);
}
printf("\n");
}
CHAPTER 18 ■C534
5351c18_final.qxd 8/26/05 7:42 PM Page 534
www.it-ebooks.info

If you are developing a program to read arbitrary tables, that is, if you do not know in advance
how many columns the result will include and what data types were originally in the MySQL data-
base, you can use mysql_num_fields to determine the number of columns, and mysql_fetch_fields
to get metainformation about each column (data type, maximum number of characters and digits,
etc.). These functions are described in greater detail in Chapter 23.
Executing Several Commands at a Time
Normally, you can execute only a single SQL command with mysql_query. A semicolon can appear
in such a command only when it is syntactically allowed, and that is normally not the case! In par-
ticular, SQL does not allow for a command to end in a semicolon. (The C API will raise an error if
you attempt to do so.)
The commands CREATE PROCEDURE, CREATE FUNCTION, CREATE TRIGGER, and the like are
exceptions when they define a stored procedure or trigger: In such commands the semicolon serves
as a separator between the SQL instructions that are part of the stored procedure or trigger. Such
commands can be executed without problem.
MULTI_STATEMENTS Mode
Starting with MySQL version 4.1, the C API offers the additional option of executing several SQL
commands at a time. To do so, you must explicitly activate the MULTI_STATEMENTS mode. There
are two ways of doing this:
• Pass to mysql_real_connect the option CLIENT_MULTI_STATEMENTS in the last parameter:
mysql_real_connect(conn, "localhost", "username", "xxx",
"dbname", 0, NULL, CLIENT_MULTI_STATEMENTS);
• Set MULTI_STATEMENTS mode after the fact with mysql_set_server_option. Note that the
MULTI_STATEMENTS constant has another name here.
mysql_set_server_option(conn, MYSQL_OPTION_MULTI_STATEMENTS_ON);
You are then allowed to send several SQL commands at a time to mysql_query. The commands
must be separated by semicolons:
mysql_query("command1; command2; command3");
Status information: If you wish to determine after an INSERT, UPDATE, or DELETE command
how many records were changed, you can execute as the first command mysql_affected_rows as usual.
For the additional commands you must first execute mysql_next_result (see below).
Error handling: If an error occurs in the execution of the first command, MySQL ignores the rest
of the commands; mysql_query returns an error number, while mysql_error and mysql_errno provide
any necessary additional information on the underlying problem.
It is more difficult to detect an error that occurs in the SQL commands after the first: mysql_query
returns 0 (OK) as return value even when execution ended with an invalid SQL command. You can tell
that an error occurred only if you run through all the results with mysql_next_result (see below). An
error number is returned by mysql_next_results for the invalid command. Then you can obtain the
related error text with mysql_error.
MULTI_RESULTS Mode (Evaluating Several SELECT Results)
It is permissible in stored procedures to execute SELECT multiple times. A single command (CALL
spname) can thereby return several results. For the results to be processed, MULTI_RESULTS mode
CHAPTER 18 ■C535
5351c18_final.qxd 8/26/05 7:42 PM Page 535
www.it-ebooks.info

must be activated. To do so, pass to mysql_real_connect the option CLIENT_MULTI_RESULTS. More-
over, MULTI_RESULTS mode is automatically activated when MULTI_STATEMENTS mode is used.
In MULTI_RESULTS mode you can immediately, as usual, evaluate the first SELECT result after
the execution of an SQL command (mysql_store_result, etc.). You can test whether there are addi-
tional results with mysql_more_results. If that is the case, you can activate the next result with
mysql_next_result, which can return three different types of value:
0 (OK, there are additional results);
-1 (OK, there are no additional results);
> 0 (error number).
After the execution of mysql_next_result you can evaluate the SELECT result with mysql_use_result
or mysql_store_result. Furthermore, functions such as mysql_error, mysql_warning_count, and mysql_
affected_rows provide status information on the command in question.
Example
The following example shows the execution of several commands and the evaluation of the results.
The SQL command was divided over several lines with a backslash to increase the readability of the
code.
// example file multi/main.c
#include <stdio.h>
#include <mysql.h>
int main(int argc, char *argv[])
{
int i, next;
MYSQL *conn; // connection to the MySQL server
MYSQL_RES *result; // manage SELECT results
MYSQL_ROW row; // process data record
// create connection
conn = mysql_init(NULL);
mysql_options(conn, MYSQL_READ_DEFAULT_GROUP, "");
if(mysql_real_connect(
conn, "localhost", "root", "uranus",
"mylibrary", 0, NULL, 0) == NULL) {
fprintf(stderr, "sorry, no database connection ...\n");
return 1;
}
mysql_set_server_option(conn, MYSQL_OPTION_MULTI_STATEMENTS_ON);
// execute SQL commands
const char *sql="SELECT * FROM categories LIMIT 5;\
INSERT INTO categories (catName) \
VALUES ('test1'), ('test2');\
SELECT 1+2+dummy;\
DELETE FROM categories WHERE catName LIKE 'test%';\
DROP TABLE IF EXISTS dummy";
if(mysql_query(conn, sql)) {
fprintf(stderr, "MySQL error: %s\n", mysql_error(conn));
fprintf(stderr, "MySQL error number: %i\n", mysql_errno(conn));
}
CHAPTER 18 ■C536
5351c18_final.qxd 8/26/05 7:42 PM Page 536
www.it-ebooks.info

do // loop over all results
{
printf("\n-----------------------------------------------\n\n");
printf("Affected rows: %i\n", mysql_affected_rows(conn));
if(mysql_warning_count(conn))
fprintf(stderr, "MySQL warnings: %i\n", mysql_warning_count(conn));
result= mysql_store_result(conn);
if(result) {
// display SELECT results
while((row = mysql_fetch_row(result)) != NULL) {
printf("result: ");
for(i=0; i < mysql_num_fields(result); i++) {
if(row[i] == NULL)
printf("[NULL]\t");
else
printf("%s\t", row[i]);
}
printf("\n");
}
mysql_free_result(result);
} else
printf("no result\n");
// read next result
next = mysql_next_result(conn);
if(next>0) {
printf("\n-----------------------------------------------\n\n");
printf("mysql_next_result error code: %i\n", next);
if(mysql_errno(conn))
fprintf(stderr, "MySQL error: %s\n", mysql_error(conn));
}
} while (!next);
// close connection
mysql_close(conn);
return 0;
}
When you execute the program, you obtain the following output:
user:~/c/multi> ./multi
-----------------------------------------------
Affected rows: -1
result: 1 Computer books 11 2004-12-02 18:37:20
result: 2 Databases 1 2004-12-02 18:37:20
result: 3 Programming 1 2004-12-02 18:37:20
result: 4 Relational Databases 2 2004-12-02 18:37:20
result: 5 Object-oriented databases 2 2004-12-02 18:37:20
-----------------------------------------------
Affected rows: 2
no result
-----------------------------------------------
Affected rows: -1
result: 3
-----------------------------------------------
CHAPTER 18 ■C537
5351c18_final.qxd 8/26/05 7:42 PM Page 537
www.it-ebooks.info

Affected rows: 2
no result
-----------------------------------------------
Affected rows: 0
MySQL warnings: 1
no result
Prepared Statements
In many applications, a number of similar queries must be executed that differ only in the values
of certain parameters. For such cases, MySQL since version 4.1 has offered prepared statements: The
entire SQL command is transported to the MySQL server only once, and thereafter only the varying
parameter values need to be sent. This not only reduces somewhat the amount of data to be trans-
ported, it also makes the processing of the command more efficient, since the MySQL server needs
to analyze the structure of the command only once.
An additional advantage of prepared statements is that numbers, times, and dates are passed
not as strings, but as buffer variables in a suitable C data type (e.g., int for MySQL INT numbers).
However, this requires a relatively complex initialization of various data structures, which must take
place before execution of the first command.
Executing a Command Multiple Times
In the following example, the command INSERT INTO titles (title, subtitle, langID) VALUES (?, ?, ?) is
to be executed several times with varying parameters. To accomplish this, first create a MYSQL_STMT
data structure with mysql_stmt_init and initialize it with mysql_stmt_prepare. You simply pass a string
with the SQL command to this function, where each parameter is represented by a question mark.
The three parameters (two strings, one integer) are described by a MYSQL_BIND field, whose
elements are overwritten with zeros before initialization (memset). At least the data type and a buffer
variable must be specified for each parameter. In executing the SQL command the data are read from
the buffer. A reference to all allowable data types (buffer_type) can be found in Chapter 23. After ini-
tialization of the field elements, these are appended to the command with mysql_bind_param.
Now the command can be executed as often as you like with mysql_stmt_execute, with the
parameters being set first. If the value NULL is to be passed in a parameter, the variable to which
bind[n].is_null points must be set to 1. This is demonstrated in the following code, in the second
execution of the command for the parameter langID. With character strings, the actual number of
characters must be specified. (For this, the variables strlen_title and strlen_subtitle were bound to
the length element of the MYSQL_BIND structure.)
// example file prepare1/main.c
#include <stdio.h>
#include <mysql.h>
int main(int argc, char *argv[])
{
MYSQL *conn; // connection to MySQL server
MYSQL_STMT *stmt; // data structure for the prepared statement
MYSQL_BIND bind[3]; // description of the parameters
char *insert =
"INSERT INTO titles (title, subtitle, langID) VALUES (?, ?, ?)";
char title_buf[256];
char subtitle_buf[256];
unsigned long title_len, subtitle_len;
int langID;
CHAPTER 18 ■C538
5351c18_final.qxd 8/26/05 7:42 PM Page 538
www.it-ebooks.info

// connection to MySQL
conn = mysql_init(NULL);
mysql_options(conn, MYSQL_READ_DEFAULT_FILE, "");
if(mysql_real_connect(
conn, "localhost", "root", "uranus",
"mylibrary", 0, NULL, 0) == NULL) {
fprintf(stderr, "sorry, no database connection ...\n");
return 1;
}
// create statement structure
stmt = mysql_stmt_init(conn);
// initialize prepared statement
mysql_stmt_prepare(stmt, insert, strlen(insert));
// define parameters of the prepared statement
memset(bind, 0, sizeof(bind));
bind[0].buffer_type = FIELD_TYPE_STRING;
bind[0].buffer = title_buf;
bind[0].buffer_length = 256;
bind[0].length = &title_len;
bind[1].buffer_type = FIELD_TYPE_STRING;
bind[1].buffer = subtitle_buf;
bind[1].buffer_length = 256;
bind[1].length = &subtitle_len;
bind[2].buffer_type = FIELD_TYPE_LONG;
bind[2].buffer = (gptr) &langID;
bind[2].is_null = &langID_is_null;
mysql_stmt_bind_param(stmt, bind);
// execute command for the first time
strcpy(title_buf, "title1");
title_len = strlen(title_buf);
strcpy(subtitle_buf, "test prepared statements");
subtitle_len = strlen(subtitle_buf);
langID=1;
langID_is_null = 0;
mysql_stmt_execute(stmt);
printf("new title with titleId=%d has been inserted\n",
(int) mysql_insert_id(conn));
// execute again
strcpy(title_buf, "title2");
title_len = strlen(title_buf);
strcpy(subtitle_buf, "test prepared statements");
subtitle_len = strlen(subtitle_buf);
langID_is_null = 1; // langID = NULL
mysql_stmt_execute(stmt);
printf("new title with titleId=%d has been inserted\n",
(int) mysql_insert_id(conn));
// close statement and connection
mysql_stmt_close(stmt);
mysql_close(conn);
return 0;
CHAPTER 18 ■C539
5351c18_final.qxd 8/26/05 7:42 PM Page 539
www.it-ebooks.info

Evaluate SELECT Results
When you execute SELECT commands as prepared statements, you must correlate the buffer vari-
ables to the columns of a SELECT result. In this way, mechanisms similar to those for parameter
passing can also be used in reading results. The advantage over the previously described functions
mysql_store_result and mysql_fetch_row is that you receive numbers and dates not in the form of
character strings, but as int variables, MYSQL_TIME structures, etc. This greatly simplifies further
processing.
The following example reads some records from the titles table (columns title, titleID, catID,
and ts). The connection between the result columns and corresponding C variables is again via a
MYSQL_BIND field, which this time is processed with mysql_stmt_bind_result. Note that this func-
tion can be called only after mysql_stmt_prepare.
After execution of the SQL command via mysql_stmt_execute, you can transfer all the resulting
records to the client using mysql_stmt_store_result. Calling this function is optional, but it simplifies
evaluation of the result, since you now can use functions such as mysql_stmt_num_rows and
mysql_stmt_data_seek. (If you call mysql_stmt_store_result, MySQL behaves as with the function
mysql_store_result. Avoid mysql_stmt_store_result, whose behavior is like that of mysql_use_result.
Further details can be read in Table 18-2.)
Now the individual records are transferred via mysql_stmt_fetch into the variables specified
in the MYSQL_BIND field. The function returns zero if there are no more results. mysql_stmt_fetch
functions independently of whether mysql_stmt_result was previously executed. In one case the
records are read from the local buffer, in the other case from the server.
You can determine the number of result records with mysql_stmt_num_rows. If you want to
read the records in any order, call the function mysql_stmt_data_seek before mysql_stmt_fetch.
Metadata on the results can be obtained with mysql_stmt_result_metadata.
You must always check in the output of results whether the value is NULL. In such a case, the
variable to which bind[n].is_null refers contains the value 0. In the following example, such a test
is carried out for catID, since this is the only column of the SELECT command for which NULL is
a permissible value.
This example also demonstrates the use of date and time values. The column titles.ts contains
the TIMESTAMP value of the most recent change. The corresponding data type for MYSQL_BIND is
FIELD_TYPE_TIMESTAMP. The time value is transferred into a MYSQL_TIME variable, from which
the individual components can easily be read out (.year, .month, etc.).
// example file prepare2/main.c
#include <stdio.h>
#include <mysql.h>
int main(int argc, char *argv[])
{
MYSQL *conn; // connection to MySQL server
MYSQL_STMT *stmt; // prepared statement
char *cmd =
"SELECT title, titleID, catID, ts \
FROM titles ORDER BY RAND() LIMIT 5";
MYSQL_BIND bind[4]; // result column
char title_buf[256];
unsigned long title_len;
int titleID, catID;
my_bool catID_is_null;
MYSQL_TIME ts;
int err; // for the return value of the mysql functions
CHAPTER 18 ■C540
5351c18_final.qxd 8/26/05 7:42 PM Page 540
www.it-ebooks.info

// create connection to MySQL
.. see the previous example
// for UTF-8 outputs
mysql_query(conn, "SET NAMES 'utf8'");
// initialize and prepare prepared statement
stmt = mysql_stmt_init(conn);
mysql_stmt_prepare(stmt, cmd, strlen(cmd));
// declare result columns
memset(bind, 0, sizeof(bind));
bind[0].buffer_type = FIELD_TYPE_VAR_STRING; // title
bind[0].buffer = title_buf;
bind[0].buffer_length = 256;
bind[0].length = &title_len;
bind[1].buffer_type = FIELD_TYPE_LONG; // titleID
bind[1].buffer = (gptr) &titleID;
bind[2].buffer_type = FIELD_TYPE_LONG; // catID
bind[2].buffer = (gptr) &catID;
bind[2].is_null = &catID_is_null;
bind[3].buffer_type = FIELD_TYPE_TIMESTAMP; // ts
bind[3].buffer = (gptr) &ts;
// bind result columns to variables
mysql_stmt_bind_result(stmt, bind);
// execute command
err = mysql_stmt_execute(stmt);
if(err) {
fprintf(stderr, "sorry, an error happened ...\n");
return 1; }
// read all results of the MySQL command
mysql_stmt_store_result(stmt);
// loop through all result records
while(!mysql_stmt_fetch(stmt)) {
printf("titleID=%d \t", titleID);
if(catID_is_null)
printf("catID=NULL \t");
else
printf("catID=%d \t", catID);
printf("timestamp=%d-%02d-%02d %02d-%02d-%02d\t",
ts.year, ts.month, ts.day,
ts.hour, ts.minute, ts.second);
printf("title=%s\n", title_buf);
}
// end
mysql_stmt_close(stmt);
mysql_close(conn);
return 0;
}
CHAPTER 18 ■C541
5351c18_final.qxd 8/26/05 7:42 PM Page 541
www.it-ebooks.info

Character Set Settings (Unicode)
As a programming language, C does not distinguish among the various character sets. Any string
that ends with a zero byte is considered a character string. The meaning of the individual bytes is
of no interest to the C program. It simply transmits the sequence of bytes further.
If you execute your program in a console window, then it is necessary for correct processing
of character strings that in communication with the MySQL server, the character set be used that
is valid in the console window. Normally, the client program uses the default character set of the
MySQL server, generally latin1. If you wish to use a different character set, then set it using SET
NAMES:
mysql_query(conn, "SET NAMES 'utf8'");
Of course, instead of ‘utf8’ you could use any other character set supported by MySQL, for
example ‘latin1’. If you want your programs to be compatible with a variety of character sets, you
can control the setting of SET NAMES with an option or evaluate the Unix/Linux environment
variables LANG and LC_xxx.
Note that only the character set for communication between MySQL and your C program is
governed by SET NAMES. SET NAMES has no influence over which character set is used for the
storage of data in MySQL tables. (This character set is determined when the table is defined with
CREATE TABLE.) MySQL converts all character strings from the table character set to the processing
character set automatically. But watch out! If characters appear in one character set that cannot be
represented in the other, they are replaced by question marks. (This can lead to loss of information.)
Working with Binary Data and Special Characters
Particular care needs to be taken in executing SQL commnds that contain 0 bytes or special charac-
ters (such as the processing of BLOBs) or in situations in which you expect such data as the result of
a SELECT query.
The function mysql_real_escape_string serves to mark problematic characters with a backslash
(\0,\b,\t,\”,\’, etc.). This is accomplished by copying the starting character string into a new string,
for which sufficient memory must be reserved in advance:
// char *s1 target string
// char *s2 initial string (may contain 0 bytes)
// unsigned long len2 the length of s2
mysql_real_escape_string(conn, s1, s2, len2);
The function mysql_real_escape_string should be used in assembling SQL commands when
individual strings can contain special characters. The following lines give an example of how an
INSERT command can be correctly assembled. (The resulting command looks like this: INTO
publishers(publName) VALUES (‘O\’Reilly’).)
The example also shows the use of the auxiliary function strmov, which is also available from
the MySQL library. It does the same thing as strcpy, but it returns a pointer that points to the end of
the copied character string. Thus strmov is particularly well suited for assembling strings piece by
piece (which under C is a particularly tiresome chore). To use strmov, it is necessary that include
instructions for my_global.h and m_string.h be added (and in fact, in the order given below).
If you alter the code given below, you should ensure that the string buffer tmp is large enough
for your requirements. Insert the requisite checks:
#include <my_global.h> // necessary so that strmov works
#include <m_string.h> // necessary so that strmov works
#include <mysql.h>
...
CHAPTER 18 ■C542
5351c18_final.qxd 8/26/05 7:42 PM Page 542
www.it-ebooks.info

char tmp[1000], *tmppos;
char *publname = "O'Reilly";
tmppos = strmov(tmp, "INSERT INTO publishers (publName) VALUES ('");
tmppos += mysql_real_escape_string(
conn, tmppos, publname, strlen(publname));
tmppos = strmov(tmppos, "')");
*tmppos++ = (char)0;
mysql_query(conn, tmp);
To execute SQL commands that contain 0 bytes, instead of mysql_query, you must use the func-
tion mysql_real_query. The difference is that the length of the SQL string is no longer determined by
the first 0 byte, but is given explicitly:
// sql points to the string with the SQL command
// n gives the length of the string
mysql_real_query(conn, sql, n);
The reading of binary data also poses problems, since the string functions usually used assume
that the data in row[i] end with the first 0 byte. If it is not certain that such is the case with your data,
then you must determine the actual size of the data with a call to the function mysql_fetch_lengths. This
function returns an unsigned long field whose values specify the size for every column of the current
record. The following example shows how the function is used.
■Tip You can also transfer binary data within the framework of a prepared statement. While this increases the
effort in initialization, it saves on burdensome composition of SQL commands using
mysql_real_escape_string
.
An additional advantage of prepared statements is in the function
mysql_stmt_send_long_data
. It allows you
to transfer BLOBs piece by piece to the server, thereby minimizing storage requirements for the client.An example
of the use of this function can be found at http://dev.mysql.com/doc/mysql/en/mysql-stmt-send-➥
long-data.html. Unfortunately, there is no equivalent function for reading BLOBs piece by piece.
Storing Binary Data in a Database and Reading It
With the following lines, the content of the file test.jpg from the current directory is stored in the
table test_blob of the database exception (see Chapter 8). Then this record is read from the table and
the result stored in a new file, test-copy.jpg. The new record can now be deleted. (Note that for the
sake of simplicity, the program uses a fixed buffer of 512KB for transferring data to the database.
There is no check whether test.jpg is smaller than this buffer. In a real application, you should, of
course, adapt the memory size dynamically.)
// example file blob/main.c
#include <stdio.h>
#include <my_global.h> // for strmov
#include <m_string.h> // for strmov
#include <mysql.h>
int main(int argc, char *argv[])
{
int id;
FILE *f;
MYSQL *conn; // connection to MySQL
MYSQL_RES *result; // SELECT result
MYSQL_ROW row; // a record of the SELECT result
size_t fsize;
char fbuffer[512 * 1024]; // file size maximum 512 kByte
char tmp[1024 * 1024], *tmppos;
CHAPTER 18 ■C543
5351c18_final.qxd 8/26/05 7:42 PM Page 543
www.it-ebooks.info

// create connection
conn = mysql_init(NULL);
if(mysql_real_connect(
conn, "localhost", "root", "uranus",
"exceptions", 0, NULL, 0) == NULL) {
fprintf(stderr, "sorry, no database connection ...\n");
return 1;
}
// read file test.jpg and store in exceptions.test_blob
f = fopen("test.jpg", "r");
fsize = fread(fbuffer, 1, sizeof(fbuffer), f);
fclose(f);
tmppos = strmov(tmp, "INSERT INTO test_blob (a_blob) VALUES ('");
tmppos += mysql_real_escape_string(
conn, tmppos, fbuffer, fsize);
tmppos = strmov(tmppos, "')");
*tmppos++ = (char)0;
mysql_query(conn, tmp);
id = (int)mysql_insert_id(conn);
// read the new record and store the data in the
// new file test-copy.jpg
f = fopen("test-copy.jpg", "w");
sprintf(tmp, "SELECT a_blob FROM test_blob WHERE id = %i", id);
mysql_query(conn, tmp);
result = mysql_store_result(conn);
row = mysql_fetch_row(result);
lengths = mysql_fetch_lengths(result);
fwrite(row[0], 1, lengths[0], f);
fclose(f);
// delete the new record
sprintf(tmp, "DELETE FROM test_blob WHERE id = %i", id);
mysql_query(conn, tmp);
// release resources
mysql_free_result(result);
mysql_close(conn);
return 0;
}
Error Handling
Most MySQL functions return an error number, or else 0 if no error occurred. With some functions
that return data structures (e.g., mysql_store_result, mysql_fetch_row) it is the other way around.
Now the return value NULL means that there were problems during execution.
The functions return respectively zero and an empty string “” if no error occurred.
if(mysql_query(conn, sql)) {
fprintf(stderr, "%s\n", mysql_error(conn));
fprintf(stderr, "Fehlernummer %i\n", mysql_errno(conn));
...
}
Many SQL commands can also return warnings. The number of warnings can be determined
after execution of the command with mysql_warning_count. To see the warnings themselves, you
must execute the command SHOW WARNINGS and process its result as you would a SELECT result.
CHAPTER 18 ■C544
5351c18_final.qxd 8/26/05 7:42 PM Page 544
www.it-ebooks.info

Visual Basic 6/VBA
This chapter concerns itself with the programming of MySQL applications with the program-
ming languages Visual Basic 6 and VBA (the latter is part of all Microsoft Office components). The
central feature is the application of the database library ADO in combination with the MySQL
driver Connector/ODBC. In addition to a number of small examples, this chapter introduces
the program mssql2mysql, which translates databases from Microsoft SQL Server to MySQL.
In certain speed-critical applications it can be useful to use VBMySQLDirect instead of ODBC
and ADO. This library will therefore be briefly introduced.
Fundamentals and Terminology
ODBC (Open Database Connectivity) is a popular mechanism under Windows for standardized
access to a great variety of database systems. The only condition on ODBC for it to be used to access
MySQL is the installation of Connector/ODBC, the ODBC driver for MySQL. (In earlier versions,
Connector/ODBC was called MyODBC.)
■Tip This chapter is based on the assumption that you have installed Connector/ODBC as described in Chap-
ter 7. There is extensive documentation for Connector/ODBC, and most recently it was available at http://
dev.mysql.com/doc/mysql/en/odbc.html. There is also a Connector/ODBC mailing list, which can be found
at http://lists.mysql.com/myodbc.
Determining the Connector/ODBC Version Number
To determine whether Connector/ODBC is installed on your computer (and in what version), exe-
cute START | SETTINGS | CONTROL PANEL | ADMINISTRATIVE TOOLS | DATA SOURCES (ODBC) and search in the
DRIVERS dialog sheet of the ODBC dialog for the Connector/ODBC driver.
This chapter is based on Connector/ODBC 3.51.n. (I ran my tests using version 3.51.11.) Note that
you will need at least Connector/ODBC version 3.41 for database connections to the MySQL server 4.1
or later. Older versions of the ODBC driver do not support the new passwords of MySQL 4.1/5.0.
A new and greatly revised version 3.52.nhas been announced for over a year, but in March 2005
it was not yet available even in a beta version.
A Small Glossary from the World of Microsoft Databases
If you are new to the world of Microsoft databases, then ODBC is not the only abbreviation that is
going to confuse you. Here is a brief overview:
545
CHAPTER 19
■ ■ ■
5351c19_final.qxd 8/26/05 7:57 PM Page 545
www.it-ebooks.info
ODBC (Open Database Connectivity): ODBC is a popular, primarily Windows, mechanism for
integrated access to a variety of database systems. ODBC is rather old, but it is supported by
countless old and new database systems and libraries and will therefore likely be the most
important producer-independent standard for communication and programming with data-
base systems under Windows for a long time to come. ODBC is also available under Unix, but
is seldom used in that context.
DSN (Data Source Name): With many programs with an ODBC interface (e.g., Access, Excel)
you cannot directly select a database. Instead, you must first define a DSN for the database
in the ODBC manager (see Chapter 7).
If you access MySQL via a programming language, you can set up database access without
a DSN. Later in this chapter we will look at both variants (access with and without a DSN) in
the context of ADO programming.
OLE-DB: OLE-DB was designed as the successor to ODBC, but it never achieved such an
important role in the database world. Since Microsoft in the meantime has developed a new
database technology (ADO.NET as part of the .NET framework), OLE-DB has lost even more
significance, while ODBC continues to be considered a standard.
OLE-DB was developed primarily with a view to working with ADO (see the next glossary
entry). For MySQL there is at present no mature OLE-DB driver. However, there is an ODBC
interface for OLE-DB, by means of which all ODBC-compatible databases without their own
OLE-DB drivers can be addressed.
ADO (ActiveX Data Objects): ADO is a collection of objects that are used in the programming
languages Visual Basic, VBA, Delphi, etc., for creating database programs. ADO stands between
the programming language and OLE-DB. For programmers, the object-oriented ADO library
offers much more convenience than direct access to the database via OLE-DB functions. Later
in the chapter, we provide information on ADO programming with Visual Basic for accessing
MySQL databases.
ADO.NET: ADO.NET is the database interface of the new Microsoft .NET Framework. (This
framework is an enormous class library that can be used only by .NET-compatible program-
ming languages such as Visual Basic .NET and C#.) ADO.NET has a name similar to that of
ADO, but internally it has little in common with it; the two are completely incompatible.
If you wish to develop applications with ADO.NET-MySQL, you can use Connector/ODBC, since
ADO.NET ODBC is also compatible. However the use of a direct ADO.NET driver for MySQL is
more efficient. There are several such drivers available. One of these, Connector.NET, which
is officially supported by MySQL, will be described in detail in the next chapter.
MDAC (Microsoft Data Access Components): MDAC is the general term for the countless Micro-
soft database components and libraries (including ADO and OLE-DB). Various MDAC versions
are installed as parts of Windows, Office, Internet Explorer, etc. The most current versions can
be found (at no cost) at the following address: http://msdn.microsoft.com/data/downloads/
updates/default.aspx.
DAO, RDO: DAO and RDO are similar to the ADO libraries for database programming. These
are precursors to ADO and are now supported by Microsoft only half-heartedly. DAO and RDO
are not discussed further in this book.
Connector/ODBC Options
The behavior of an ODBC connection to the MySQL server can be controlled by a number of options.
These options can be selected in the ODBC-DSN dialog (see Figure 19-1) or as a numerical value in
CHAPTER 19 ■VISUAL BASIC 6/VBA546
5351c19_final.qxd 8/26/05 7:57 PM Page 546
www.it-ebooks.info
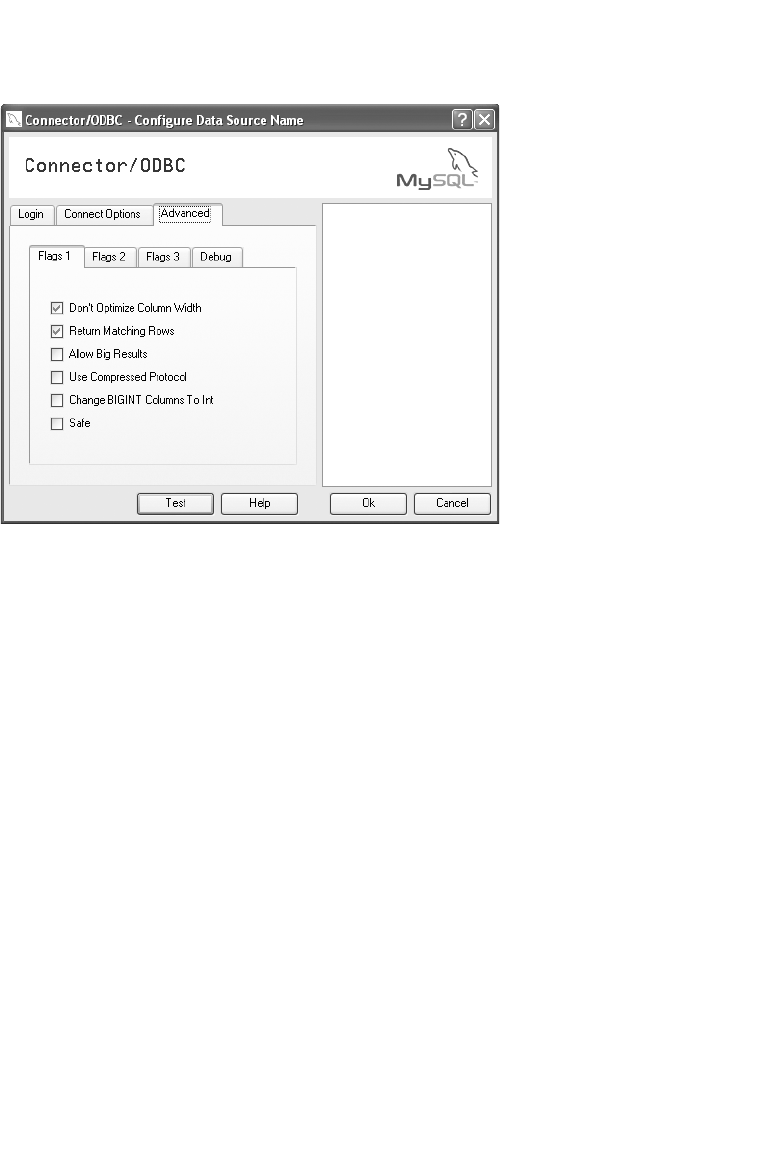
ADO program code. For this reason, the numerical values of the options are placed in parentheses
in the following list, which describes the most important options, presented in the order of the
DSN dialog.
Don’t Optimize Column Width (1): If the query SELECT col FROM table returns character
strings with a maximal length of ncharacters, and nis smaller than the maximal string length
for this column, then Connector/ODBC returns nas the optimal column width. The option
Don’t Optimize Column Width avoids such problems.
Return Matching Rows (2):With many commands (e.g., UPDATE), the MySQL server can
return the number of affected data records (affected rows). However, many ODBC clients are
incapable of interpreting this information correctly. If this option is used, Connector/ODBC
returns found rows instead of affected rows (thus 0 in the case of UPDATE commands). This
option must be set for Connector/ODBC to be able to function in combination with a number
of programs (including Microsoft Access and Visual Basic/VBA with ADO).
Allow Big Results (8): With this option, the size of packets that are transmitted between an
ODBC program and the server is unlimited. This option must be used if large SELECT com-
mands are anticipated or large BLOB fields are to be processed.
Use Compressed Protocol (2048): Data transmission between the ODBC program and MySQL
is in compressed form, thus reducing the amount of network traffic. However, the cost is more
CPU time on both client and server, since all data must be compressed and decompressed.
Change BIGINT Columns to Int (16384): Most Microsoft libraries are unable to deal with 64-bit
integers. This option has the effect that MySQL BIGINT fields are automatically reduced to
32 bits upon transmittal. This option is necessary in particular for ADO programming with
Visual Basic/VBA. Be thou warned, however: The most-significant 32 bits will be lost.
Safe (131072): This option has the effect that Connector/ODBC makes some additional checks.
This option should be used when an ODBC client experiences problems in the processing of
e precise description.)
CHAPTER 19 ■VISUAL BASIC 6/VBA 547
Figure 19-1. Setting Connector/ODBC options in the DSN dialog
5351c19_final.qxd 8/26/05 7:57 PM Page 547
www.it-ebooks.info

Don’t Prompt Upon Connect (16): This option prevents the DSN dialog from being displayed
during the establishment of a connection due to the lack of relevant information. (Even if this
option is activated, the dialog will appear if the database login is unsuccessful on account of
an incorrect or missing user name or password.)
Enable Dynamic Cursor (32): With this option, Connector/ODBC supports the cursor type
Dynamic. The cursor is made available by the ODBC driver, not directly by the MySQL server.
By default, the Dynamic option is deactivated for the sake of efficiency. (In this connection, a
cursor describes the internal management of SELECT results. Further details are available in
the ADO documentation of the properties CursorLocation and CursorType.)
Don’t Cache Results (1048576): Normally, all results of a SELECT command are transmitted as
a block from server to client. This option prevents that. It makes sense only when huge (millions
of records) SELECT results are being processed. This option takes effect only if in ADO program-
ming a forward only cursor is used.
Force Use of Named Pipes (8192): This option results in named pipes (instead of TCP/IP) being
used in communication between client and server. This is possible only under Windows NT/
2000/XP, and only if the MySQL server supports named pipes, which is not the default behavior.
Force Use of Forward Only Cursors (2097152): This option has the effect that the driver always
returns a forward only cursor (even when another cursor type is requested by ADO).
Trace Driver Calls To myodbc.log (4): This option has the effect that a log of all called ODBC
functions is saved to the file C:\myodbc.log. This is often helpful in debugging.
Save Queries To myodbc.log (524288): This option results in a log of all executed SQL com-
mands being saved to the file C:\myodbc.sql.
In many cases it suffices to activate only the options Don’t Optimize Column Width and Return
Matching Rows.
■Tip A complete list of all options and further information on Connector/ODBC can be found at http://
dev.mysql.com/doc/mysql/en/connection-parameters.html.
ADO Programming and Visual Basic/VBA
Introduction
In this section we describe access to MySQL databases via program code, where we use Visual Basic 6
or VBA as our programming language. We use ADO as our database library. The actual access to the
database is effected by means of Connector/ODBC, where between ADO and Connector/ODBC we
have OLE-DB and the ODBC driver for OLE-DB. Thus communication takes place in the following
way: VB/VBA ➤ADO ➤OLE-DB ➤ODBC driver for OLE-DB ➤Connector/ODBC ➤MySQL.
If MySQL is running on a computer as a Visual Basic program, then the first five stages of this
communication chain take place on the client computer. It is Connector/ODBC that first communi-
cates over the network with the MySQL server.
CHAPTER 19 ■VISUAL BASIC 6/VBA548
5351c19_final.qxd 8/26/05 7:57 PM Page 548
www.it-ebooks.info

■Tip In this book we are assuming that the reader has basic knowledge of ADO. If you know nothing much about
ADO, what
Connection
and
Recordset
objects are, or the purpose of bound controls, then you should consult the liter-
ature on ADO programming before you read further, since we are not making much ado about nothing.
The code presented here was tested with Connector/ODBC 3.51.11, Visual Basic 6, and ADO 2.8. The code should
function as well with VBA 6 and older versions of ADO (e.g.,ADO 2.1, which is installed together with Office 2000),
except as it involves ADO controls.
Of course, you can also work with a scripting variant of Visual Basic, for example, if you wish to develop Active
Server Pages (ASP) or programs for the Windows Scripting Host (WSH). In that case you must leave out
As typename
in the variable declaration and create ADO objects according to
Set conn = CreateObject(``ADODB.Connection’’)
.
Assumptions and Limitations
MySQL tables: Tables that you wish to alter via ADO Recordsets or in bound controls (Insert,
Update, Delete) must have a primary index and a TIMESTAMP column.
Connector/ODBC options: In the configuration of a DSN, the options Don’t optimize column
width, Return matching rows, and Change BIGINT into INT must be selected. If the connec-
tion is made without a DSN, then instead, the equivalent setting Options=16387 (1 + 2 + 16384)
must be specified. If you wish to use a dynamic server cursor in your ADO program (CursorType=
adOpenDynamic, CursorLocation=adUseServer), then the correct Options setting is 16419
(1 + 2 + 32 + 16384).
Changing data with Recordsets and bound controls: If the above conditions have been satis-
fied, you can use Recordsets and bound controls to read, display, and alter data.
This last point can often cause problems. Storing altered data (whether via a Recordset object or
a bound control) functions properly in many simple cases, but in more complex applications it
often leads to problems that are difficult to resolve. These problems do not always have to do
with MySQL or Connector/ODBC, but with the vagaries of OLE-DB/ADO. Many experienced
ADO programmers therefore do without bound controls, even if a Microsoft database system
is used as the data source.
For this reason you will continually find in MySQL newsgroups and mailing lists the recom-
mendation to use Recordsets and bound controls exclusively for reading or displaying data.
If you wish to alter data, then you should formulate a traditional SQL command (UPDATE …)
and execute it with conn.Execute. Even if both methods are demonstrated in this chapter (both
the convenient editing of data with a Recordset object and the variant with SQL commands),
the second variant is nonetheless recommended.
Speed: Because of the many layers and libraries between Visual Basic and MySQL, and also
because of the lower speed in the processing of character strings with Visual Basic, solutions
using Visual Basic and MySQL tend to be comparatively slow. Better performance is promised
by the VBMySQLDirect library, which establishes a direct connection between Visual Basic and
MySQL (without ODBC).
Example Programs
As with the other chapters in this book, there are extensive examples available at www.apress.com.
These examples assume that you have Visual Basic 6. Most of the examples also assume previous
installation of the mylibrary database.
Note that at the beginning of the program (usually in Form_Load), you must set the connection
parameters (computer name, user name, password) in accord with the settings of your system. In the
example programs, the computer name is localhost, the user name is root, and the password is uranus.
CHAPTER 19 ■VISUAL BASIC 6/VBA 549
5351c19_final.qxd 8/26/05 7:57 PM Page 549
www.it-ebooks.info

Establishing the Connection
Establishing the Connection with a DSN
The following lines show a code outline for establishing a connection to MySQL based on a DSN
and for executing a simple SELECT query. The resulting record list can then be processed with the
properties and methods of the rec object:
Dim conn As Connection
Dim rec As Recordset
Set conn = New Connection
conn.ConnectionString = "DSN=mysql-mylibrary"
conn.Open
Set rec = New Recordset
rec.CursorLocation=adUseClient
rec.Open "SELECT * FROM tablename", conn
... 'process record list
rec.Close 'close record list
conn.Close 'close connection
The only really interesting code line is the one for setting the ConnectionString property. In the
simplest case you specify the DSN. Optionally, you can also specify the user name and password.
These parameters must be separated by semicolons. The ConnectionString character string looks
like this:
conn.ConnectionString = "DSN=mysql-mylibrary;UID=root;PWD=xxx"
The UID and PWD settings have precedence over the DSN settings.
Table 19-1 shows the ConnectionString parameters for establishing a connection with a DSN.
Table 19-1. ConnectionString Parameters (Connection with DSN)
Parameter Meaning
DSN=name Name of the data source (Data Source Name)
UID=name User name for the MySQL connection
PWD=password Password for the MySQL connection
Establishing a Connection Without a DSN
With Visual Basic you can also establish a connection to a MySQL database without previously
having defined a DSN. (This is particularly practical if you wish to develop a program to access
an arbitrary MySQL database.) The ConnectionString character string looks like this:
conn.ConnectionString = "Provider=MSDASQL;" + _
"DRIVER={MySQL ODBC 3.51 Driver};" + _
"Server=localhost;UID=username;PWD=xxx;" + _
"database=databasename;Option=16387"
Table 19-2 shows the ConnectionString parameters for establishing a connection without a DSN.
CHAPTER 19 ■VISUAL BASIC 6/VBA550
5351c19_final.qxd 8/26/05 7:57 PM Page 550
www.it-ebooks.info

Table 19-2. ConnectionString Parameters (Connection Without DSN)
Parameter Meaning
Provider=MSDASQL Name of the ODBC driver for OLE-DB (Microsoft Data Access
SQL)
Driver=MySQL ODBC 3.51 Driver Name of the MySQL-ODBC driver
Server=name Name or IP address of the computer on which the MySQL
server is running
Port=n IP port of the MySQL server (by default 3306)
UID=name User name for the MySQL connection
PWD=password Password for the MySQL connection
Database=name Name of the database
Prompt=noprompt/complete Display Connector/ODBC dialog if the connection fails
Option=n Connector/ODBC options
Prompt=complete leads to the program automatically displaying the ODBC connection dialog
depicted in Figure 7-2. This dialog can be used, for example, to provide a missing or an incorrect
password. Moreover, an arbitrary character string must be specified in the field WINDOWS DSN NAME
so that the dialog can be exited.
Since the dialog is not particularly user-friendly (the many choices are more confusing than
helpful), it is better to do without Prompt=complete. (The default setting is noprompt.)
Instead, execute On Error Resume Next before establishing the connection and test after estab-
lishing the connection whether an error has occurred. If this is the case, display your own dialog, in
which the user can input other connection parameters as necessary and from which the program
can then construct a new ConnectionString character string.
Options enables the setting of a number of Connector/ODBC connection options. The required
value is determined from the sum of the values of the individual options. For Visual Basic/ADO pro-
grams, the value 16387 = 1 + 2 + 16384 must generally be specified, corresponding to the options
Don’t optimize column width, Return matching rows, and Change BIGINT into INT.
Establishing the Connection with the DataEnvironment
If you are working with Visual Basic Professional or Enterprise version 6, then you have
DataEnvironment available for setting connection properties.
In the properties dialog for the Connection object, in the dialog sheet PROVIDER, the entry
MICROSOFT OLE-DB PROVIDER FOR ODBC DRIVERS. You can then choose, in the dialog sheet CON-
NECTION (see Figure 19-2), an already defined DSN or assemble an equivalent character string
with the required connection properties with the button BUILD. (This button leads to the familiar
ODBC dialogs. However, the result of the setting is copied as a character string into the
DataEnvironment dialog, where it can be edited as necessary.)
CHAPTER 19 ■VISUAL BASIC 6/VBA 551
5351c19_final.qxd 8/26/05 7:57 PM Page 551
www.it-ebooks.info
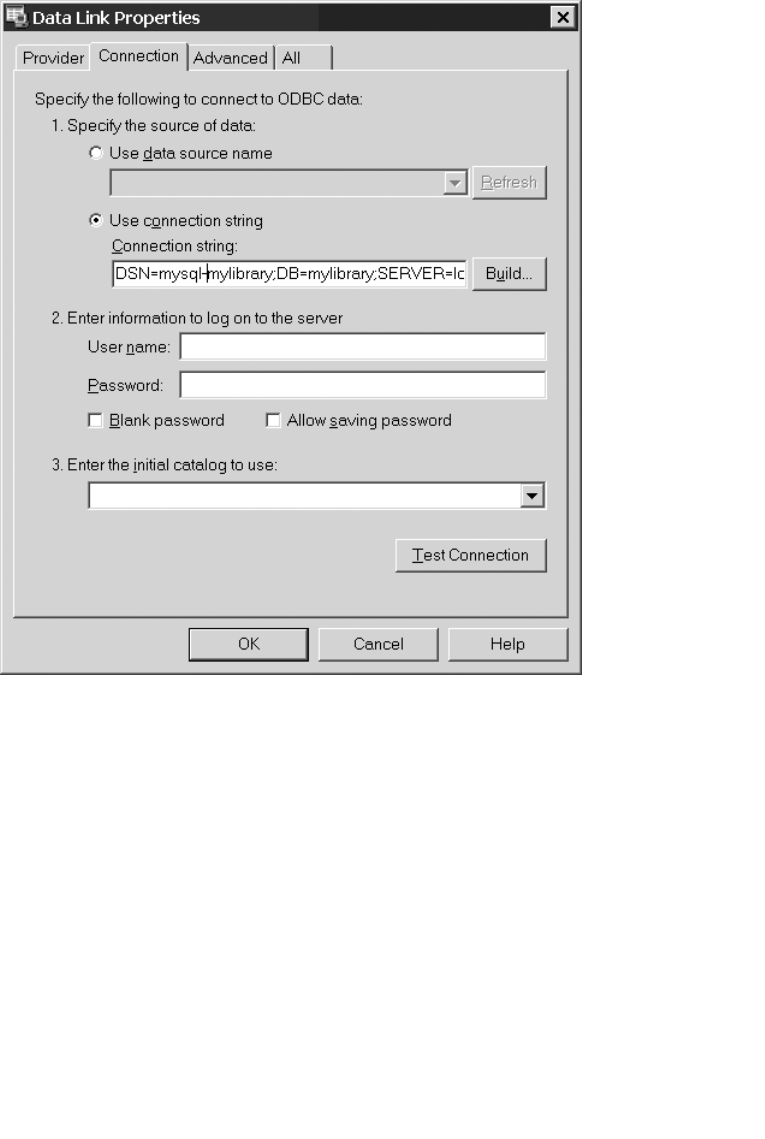
In the further program code you can now access the Connection object. (The following lines
assume that the DataEnvironment object has the name DE and the Connection the name Conn.)
Dim rec As Recordset
Set rec = New Recordset
If DE.Conn.State = adStateClosed Then
DE.Conn.Open
End If
rec.CursorLocation=adUseClient
rec.Open "SELECT * FROM database", DE.Conn
...
The DataEnvironment helps not only in setting the connection data, but also in the develop-
ment of SQL queries. With the SQL generator you have a convenient tool for this purpose. You can
then access the query in code via the Command object.
CHAPTER 19 ■VISUAL BASIC 6/VBA552
Figure 19-2. DataEnvironment dialog for setting connection properties
5351c19_final.qxd 8/26/05 7:57 PM Page 552
www.it-ebooks.info

Connection Properties
The ConnectionString parameters described in this section represent only a small part of the avail-
able parameters. For those parameters that are not specified, ADO/ODBC simply uses various
default settings.
Sometimes, it is useful to know how these parameters are set. The property ConnectionString,
which is changed in establishing the connection (and then no longer contains the character string
originally set), provides our first overview. Here most of the parameters are collected into a sort of
superparameter called Extended Properties:
conn.ConnectionString = "Provider=MSDASQL;Driver=MySQL;Server=..."
conn.Open
Debug.Print conn.ConnectionString
Provider=MSDASQL.1;Extended Properties=
"DRIVER={MySQL ODBC 3.51 Driver};DESC=;DATABASE=mylibraryodbc;
SERVER=localhost;UID=root;PASSWORD=uranus;PORT=;
OPTION=16387;STMT=;"
Considerably more information is provided by the Properties enumeration of the Connection
object. Moreover, the values saved there can be more easily extracted:
Debug.Print conn.Properties("Max Columns in Index")
32
A complete list of all properties and their values can be obtained with the following loop:
Dim p As Property
For Each p In conn.Properties
Debug.Print p.Name & " = " & p.Value
Next
ADO Programming Techniques
Recordsets with Client-Side Cursors
Recordset objects are opened on the basis of an existing Connection object (see the previous section).
In all the examples in this chapter the variable name for this object is conn.
Since ADO provides a server-side cursor as the default cursor position, a client-side cursor must
be set before the Open method. The following lines demonstrate how this is done:
Dim rec As Recordset
rec.CursorLocation = adUseClient 'client-side cursor
rec.Open "SELECT ... FROM ... WHERE ...", _
conn, adOpenStatic, adLockReadOnly
We note the following about the parameters of Open: In the first parameter, the SQL code is
expected; in the second, the Connection variable. The third parameter describes the desired cursor
type. Since for client-side cursors only the type adOpenStatic is supported, it doesn’t matter what is
given here. The fourth parameter specifies whether the data in the Recordset are read-only (adLock-
ReadOnly) or whether changes are permitted (adLockOptimistic). ADO provides the locking types
adLockPessimistic and adLockBatchOptimistic as well, which, however, I have not tested.
With the Open method, all the data encompassed by the SQL query are transmitted to the pro-
gram. (This can take considerable time with large data sets.) You can then apply all Recordset properties
and methods to run through the data (MoveNext, etc.), to search (Find), to sort locally (Sort), to change
(column=”new value”: rec.Update), etc.
CHAPTER 19 ■VISUAL BASIC 6/VBA 553
5351c19_final.qxd 8/26/05 7:57 PM Page 553
www.it-ebooks.info

Recordsets with Server-Side Cursor
You can open a Recordset with a server-side cursor with the property CursorType = adForwardOnly.
You can thereby move through and read all the records of the query with MoveNext, and also change
them (unless you are operating with LockType = adLockReadOnly):
Dim rec As Recordset
rec.CursorLocation = adUseServer
rec.Open "SELECT ... FROM ... WHERE ...", _
conn, adOpenForwardOnly, adLockOptimistic
The only navigation method allowed is MoveNext. You cannot use Bookmarks. You cannot
determine the number of records without running through all of them. (You would do better to use
a separate query with SELECT COUNT(*) FROM ….)
In spite of all these restrictions, in a few cases it can make sense to use a server-side cursor,
namely, when large quantities of data are to be read sequentially. The drawbacks of the client-side
cursor are thereby avoided (namely, that all the records are transmitted at once to the client).
Possible Recordset Properties
ADO provides for an almost endless number of combinations of properties of a Recordset. But the
Recordset does not always contain the properties requested by Open. If a given driver does not sup-
port a particular cursor type, then ADO automatically chooses another.
As a way of testing which properties a Recordset actually possesses, you can use the program
Cursortypes.vbp (see Figure 19-3). With a click of the mouse you can set the desired properties. The
program then opens the Recordset, determines the actual properties, and then displays them. (Note,
please, that the results of the program are not always correct for a server-side cursor. In particular,
the Recordset method Supports(…) sometimes returns completely incorrect results.)
In sum, ADO + Connector/ODBC supports the following cursor combinations:
CursorLocation = Client
CursorType = Static
LockType = ReadOnly or Optimistic or BatchOptimistic
CursorLocation = Server
CursorType = ForwardOnly/Static/Dynamic
LockType = all
In the case of CursorLocation=Server, the ODBC option Enable dynamic cursor (32) determines
whether you obtain a dynamic or static cursor.
CHAPTER 19 ■VISUAL BASIC 6/VBA554
5351c19_final.qxd 8/26/05 7:57 PM Page 554
www.it-ebooks.info
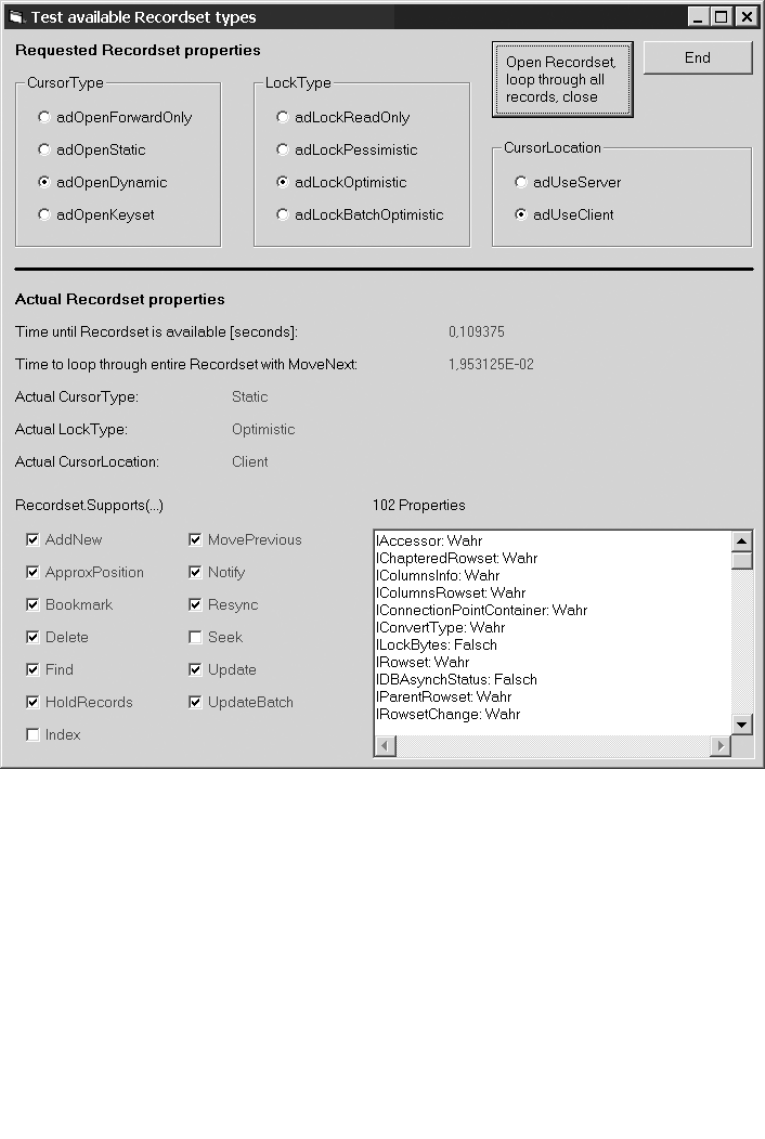
Opening a Variable Recordset Object
If you don’t bother to set the cursor properties, you receive by default an invariable Recordset object
(CursorLocation = Server, CursorType = ForwardOnly, LockType = ReadOnly). If you wish to change
data in the Recordset, you must specify the desired cursor properties explicitly. Typically, the code
for opening a variable Recordset object looks like this:
Dim rec As New Recordset
rec.CursorLocation = adUseClient
rec.Open "SELECT cola, colb FROM table", conn, _
adOpenStatic, adLockOptimistic
CHAPTER 19 ■VISUAL BASIC 6/VBA 555
Figure 19-3. Visual Basic program for testing Recordset properties
5351c19_final.qxd 8/26/05 7:57 PM Page 555
www.it-ebooks.info

Behavior of Recordsets with Null, Dates and Times, and Suchlike
The following list describes how various MySQL data types are represented in ADO Recordsets:
Null: The value Null in a column of a Recordset can be determined with IsNull(rec!column).
Date/Time: Columns in the MySQL formats DATE, TIME, DATETIME, and TIMESTAMP are
automatically transformed into the Visual Basic data type Date. Please exercise caution with
TIME values: These values are supplemented with the current date. (For example, from 9:00
you may get 2005/3/17 9:00.)
BLOBs: BLOBs are transformed into Byte arrays. Access to individual bytes is effected in the
manner rec!a_blob(n), here n=0 addresses the first byte.
A Byte array can be interpreted by Visual Basic as a character string. However, again caution is
advised: Since internally, Visual Basic works with Unicode, a BLOB with 512 bytes corresponds
in Visual Basic to a character string with 256 Unicode characters. For bytewise evaluation of the
character string, the Visual Basic functions AscB, ChrB, LenB, MidB, LeftB, RightB, InStrB, etc.,
must be used.
Decimal: Columns in the MySQL format DECIMAL are metamorphosed into the Visual Basic
data type Decimal, which is not to be confused with Currency. It is to be thought of more as a
subtype of Variant.
Sets/Enums: Columns in the MySQL formats SET and ENUM are transformed into garden-
variety character strings.
Character strings: MySQL-specific special characters in strings (\, ‘, “, and 0-byte) are correctly
handled automatically.
Character Strings
Within Visual Basic, character strings are represented in Unicode. Connector/ODBC and the MySQL
server automatically take care of converting character strings into the appropriate character set for
a given table.
Storing and Reading BLOBs from Variables (AppendChunk and GetChunk Methods)
If you wish to store binary data, then you must use BLOB columns in the MySQL table. You can use
the method AppendChunk to store data contained in the variable bin, as shown in the following
code segment. (This works only if you are using client-side cursors.)
Dim rec As New Recordset
rec.CursorLocation = adUseClient
rec.Open "SELECT * FROM test LIMIT 1", conn, adOpenStatic, _
adLockPessimistic
rec.AddNew
rec!blobcolumn.AppendChunk bin
rec.Update
With GetChunk you can read the data. You have to use ActualSize to determine the size of the data:
bin = rec!blobcolumn.GetChunk(rec!blobcolumn.ActualSize)
You can also transmit the data piecewise (by executing AppendChunk and GetChunk repeat-
edly. This is of particular utility in managing large data sets.
CHAPTER 19 ■VISUAL BASIC 6/VBA556
5351c19_final.qxd 8/26/05 7:57 PM Page 556
www.it-ebooks.info

Storing and Reading BLOBs as Files
The Stream class from the ADO library (version 2.5 and higher) offers an elegant way to store and
read BLOBs directly to and from files. The following lines show how you can open a file with Load-
FromFile as a binary stream and store it in the field rec!pic (rec is a Recordset object, and pic is a
BLOB column of the previously executed SELECT query):
Dim st As New Stream
st.Type = adTypeBinary
st.Open
st.LoadFromFile "C:\test1.gif"
rec!pic = st.Read
Conversely, you can read a BLOB field from the table and store it in a file with SaveToFile:
Dim st As New Stream
st.Type = adTypeBinary
st.Open
st.Write rec!pic
st.SaveToFile "C:\test2.gif", adSaveCreateOverWrite
A complete example showing the use of these methods appears later in this chapter.
Determining the AUTO_INCREMENT Number After the Insertion of a Data Record
It often happens that after the insertion of a new data record into a table, you require the ID number
of that record (that is, the value of the AUTO_INCREMENT column for the primary index). Unfortu-
nately, this cannot be read from the Recordset with which the record was inserted. The solution to
this conundrum is to determine the ID number via SELECT LAST_INSERT_ID(). To accomplish this,
you would do well to add the following function to your program:
Private Function LastInsertedID() As Long
Dim rec As New Recordset
rec.CursorLocation = adUseClient
rec.Open "SELECT LAST_INSERT_ID()", conn
LastInsertedID = rec.Fields(0)
End Function
Bound Database Controls
Visual Basic offers several controls that can be bound directly to database queries (to Recordset
objects). Within the control, the contents of the Recordset (or perhaps only of the currently active
data record) are displayed. Such controls offer a great savings in effort in the representation of data-
base queries. Some controls even offer the possibility of altering data directly. In the ideal case, one
can program a database interface with a minimal amount of code (see Figure 19-4).
CHAPTER 19 ■VISUAL BASIC 6/VBA 557
5351c19_final.qxd 8/26/05 7:57 PM Page 557
www.it-ebooks.info
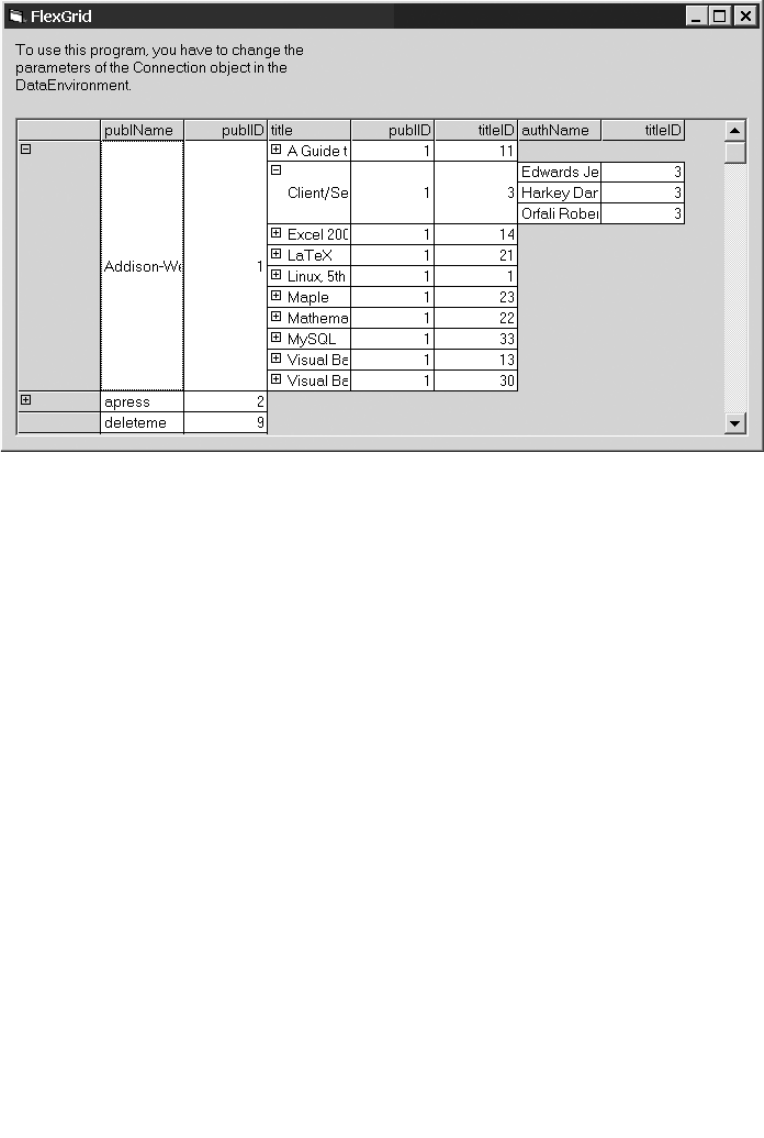
In reality, things do not always go so smoothly. In general, you must take care in your work with
Connector/ODBC that for bound controls, too, you work with a client-side cursor. Furthermore, the
alteration of data does not always function reliably, so that (except in well-tested special cases) one
is advised not to use this feature.
Apart from that, the use of bound controls is independent of whether you use a Microsoft data-
base system or MySQL as the data source. Additional information on using bound controls can be
found in any book on database programming with Visual Basic.
Executing SQL Commands Directly
ADO Recordsets can simplify your dealings with query results, but it is often necessary to execute
SQL commands directly. To do this, use the Execute method of the Connection object:
conn.Execute "INSERT INTO table (a, b) VALUES ('x', 'y')"
As with other programming languages, with Visual Basic you also run into the problem that
you have to format various data in conformity with the rules of MySQL. In the following, you will
find some auxiliary functions to help you in this task:
Floating-Point Numbers:With floating-point numbers you must take into account that Visual
Basic normally formats such numbers according to the country for which the language has been
customized (for example, in Germany one refers to Pi as 3,14159265 instead of 3.14159265). If
your program is to function equally well everywhere in the known universe, you should trans-
form your floating-point numbers into character strings with the Visual Basic function Str.
Date: The following Format instruction formats the date contained in xin accord with MySQL
conventions:
CHAPTER 19 ■VISUAL BASIC 6/VBA558
Figure 19-4. Visual Basic example program with the MSHFlexGrid for representing data from the
mylibrary database
5351c19_final.qxd 8/26/05 7:57 PM Page 558
www.it-ebooks.info

Format(x, "'yyyy-mm-dd Hh:Nn:Ss'")
Character Strings: Quote places a backslash character before the backslash and before the sin-
gle- and double-quote characters, and it replaces the byte code 0 with \0:
Function Quote$(tmp$)
tmp = Replace(tmp, "\", "\\")
tmp = Replace(tmp, """", "\""")
tmp = Replace(tmp, "'", "\'")
Quote = Replace(tmp, Chr(0), "\0")
End Function
Binary Data: HexCode transforms a byte array of arbitrary length into a hexadecimal character
string of the form 0x0102031232:
Function HexCode(bytedata() As Byte) As String
Dim i As Long
Dim tmp As String
tmp = ""
For i = LBound(bytedata) To UBound(bytedata)
If bytedata(i) <= 15 Then
tmp = tmp + "0" + Hex(bytedata(i))
Else
tmp = tmp + Hex(bytedata(i))
End If
Next
HexCode = "0x" + tmp
End Function
You might use this function in the following way:
conn.Execute "INSERT INTO table (col) VALUES (" + HexCode(...) + ")"
HexCodeStr functions in principle like Hexcode, except that it expects data bytewise in a char-
acter string. Note, however, that Visual Basic character strings are UTF16 encoded, and not in
the form UTF8, which is more usual under Unix:
Function HexCodeStr(bytedata As String) As String
Dim i As Long, b As Long
Dim tmp As String
tmp = ""
For i = 1 To LenB(bytedata)
b = AscB(MidB(bytedata, i, 1))
If b <= 15 Then
tmp = tmp + "0" + Hex(b)
Else
tmp = tmp + Hex(b)
End If
Next
HexCodeStr = "0x" + tmp
End Function
Example: authors Column for the titles Table
If you want to obtain a list of all books and their authors from the mylibrary database, it is necessary to
formulate a relatively complex query with two JOINs, a grouping, and the use of the GROUP_CONCAT
aggregation function:
CHAPTER 19 ■VISUAL BASIC 6/VBA 559
5351c19_final.qxd 8/26/05 7:57 PM Page 559
www.it-ebooks.info
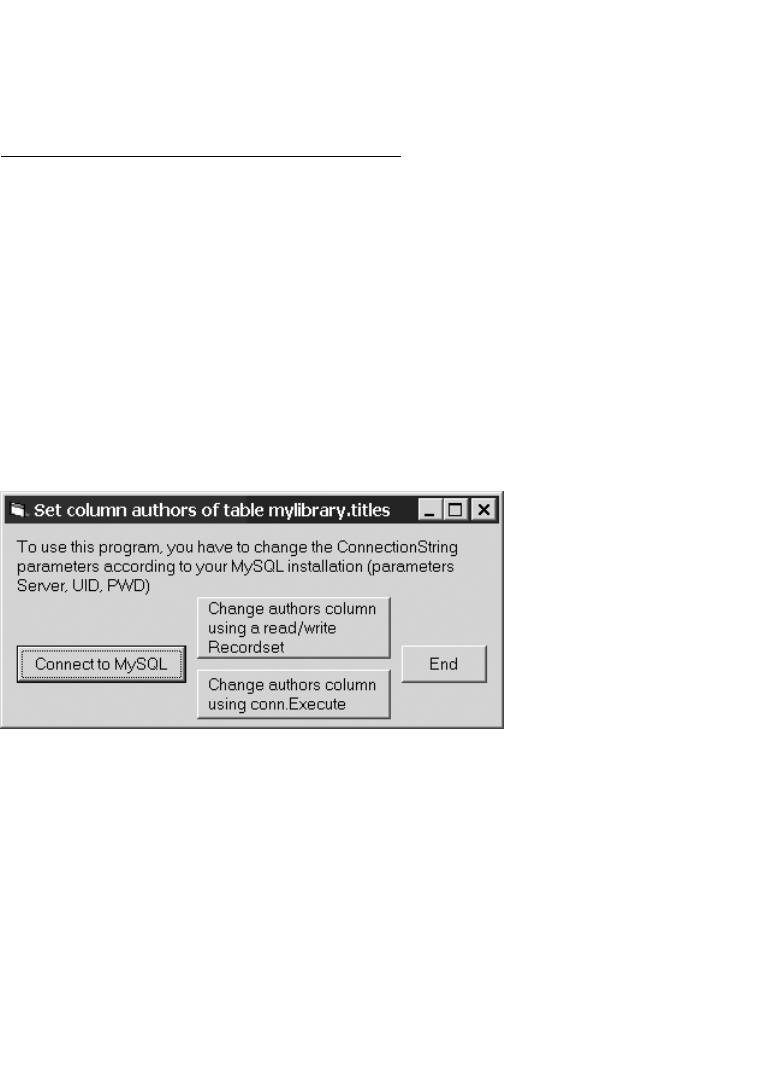
USE mylibrary
SELECT title,
GROUP_CONCAT(authname ORDER BY authname SEPARATOR '; ') AS authors
FROM authors, titles, rel_title_author
WHERE authors.authID = rel_title_author.authID
AND titles.titleID = rel_title_author.titleID
GROUP BY titles.titleID ORDER BY title
title authors
A Guide to the SQL Standard Darween Hugh; Date Chris
A Programmer's Introduction to PHP 4.0 Gilmore W.J.
Alltid den där Annette Pohl Peter
...
If you need such queries frequently, it would be worthwhile to enlarge the titles table with a
column authors containing the author names. Of course, this column contains redundant data, but
it would simplify and speed up access to the database.
ALTER TABLE titles ADD authors VARCHAR(255)
The example program presented here (see Figure 19-5) shows how the authors column can be
filled with data. For this, we simply run through all the titles records, determine the authors for each
book, combine the authors into a character string, and store them. (The program assumes that the
titles table has been extended to include the column authors.)
Variant 1: Changing Data with Read/Write Recordsets
All of the code is contained in the event procedure Command2a_Click. This procedure assumes that
the global variable conn creates the connection to the database (Connection object).
In the program, two Recordsets are opened. One of them, titles, refers directly to the like-named
table and enables changes to it (LockingType=adLockOptimistic). The second, authors, contains a
list of all titleID values and their authors. The Recordset is sorted locally after being read in (property
Sort), and apart from the database, in order not to put unnecessary demands on resources.
The following loop runs through all the titleID values of the titles Recordset. With Find, the associ-
ated authors in the authors Recordset are determined and joined into the character string authors_str.
This character string is then stored:
CHAPTER 19 ■VISUAL BASIC 6/VBA560
Figure 19-5. Visual Basic example program for changing the titles table
5351c19_final.qxd 8/26/05 7:57 PM Page 560
www.it-ebooks.info

' Example vb6\authors_for_titles\form1.frm
Private Sub Command2a_Click()
Dim authors_str As String
Dim titles As New Recordset
Dim authors As New Recordset
' titles Recordset: read/write
titles.CursorLocation = adUseClient
titles.Open "SELECT titleID, authors FROM titles", _
conn, adOpenStatic, adLockOptimistic
' authors Recordset: readonly, disconnected
authors.CursorLocation = adUseClient
authors.Open "SELECT titleID, authname " _
"FROM authors, rel_title_author " & _
"WHERE authors.authID=rel_title_author.authID", _
conn, adOpenStatic, adLockReadOnly
authors.Sort = "titleID, authname"
Set authors.ActiveConnection = Nothing
' loop over all titles
While Not titles.EOF
authors_str = ""
' loop over all authors of this title
authors.MoveFirst
authors.Find "titleID=" & titles!titleID
While Not authors.EOF
If authors_str <> "" Then authors_str = authors_str + "; "
authors_str = authors_str & authors!authName
authors.MoveNext
authors.Find "titleID=" & titles!titleID
Wend
' save author list
If authors_str <> "" Then
titles!authors = authors_str
titles.Update
End If
titles.MoveNext
Wend
End Sub
Variant 2: Changing Data with conn.Execute
In our second variant, the authors Recordset is opened just as in variant 1. The structure of the loop
is a bit different in how it finds all the authors of the current titleID value. The authors are stored
temporarily in the variable authors_str.
What is new in comparison to variant 1 is the instruction conn.Execute, with which the list of
authors is stored in the titles table with the help of an UPDATE command. The function Quote is
necessary to ensure that the SQL command is correct even when the author name has special char-
acters such as '.
Private Sub Command2b_Click()
Dim authors_str, titleID
Dim authors As New Recordset
CHAPTER 19 ■VISUAL BASIC 6/VBA 561
5351c19_final.qxd 8/26/05 7:57 PM Page 561
www.it-ebooks.info

' authors Recordset: client-side, readonly, disconnected
authors.CursorLocation = adUseClient
authors.Open "SELECT titleID, authname " & _
"FROM authors, rel_title_author " & _
"WHERE authors.authID=rel_title_author.authID " & _
"ORDER BY titleID, authName", _
conn, adOpenStatic, adLockReadOnly
authors.Sort = "titleID, authname"
Set authors.ActiveConnection = Nothing
' loop over all titles (titleID)
While Not authors.EOF
titleID = authors!titleID
authors_str = ""
' search for all authors associated with current titleID value
authors_str = ""
Do While Not authors.EOF
' jump to the next titleID from the inner loop
If authors!titleID <> titleID Then
Exit Do
End If
' add author name to authors_str
If Not IsNull(authors!authName) Then
If authors_str <> "" Then authors_str = authors_str + "; "
authors_str = authors_str & authors!authName
End If
authors.MoveNext
Loop
' save author list
If authors_str <> "" Then
conn.Execute "UPDATE titles " & _
"SET authors = '" & Quote(authors_str) & "'" & _
"WHERE titleID=" & titleID
End If
Wend
End Sub
' place \ before ' " and \, replace Chr(0) by \0
Private Function Quote(tmp)
tmp = Replace(tmp, "\", "\\")
tmp = Replace(tmp, """", "\""")
tmp = Replace(tmp, "'", "\'")
Quote = Replace(tmp, Chr(0), "\0")
End Function
Example: Adding a New Book Title
With the following example program you can store a new book title in the mylibrary database. The
book title consists of the title itself, one or more authors, and a publisher (see Figure 19-6). The pro-
gram does not test whether the authors or publisher already exists in the database. The goal of this
program is simply to demonstrate the principal methods of inserting data into linked tables.
CHAPTER 19 ■VISUAL BASIC 6/VBA562
5351c19_final.qxd 8/26/05 7:57 PM Page 562
www.it-ebooks.info

Variant 1: Changing Data with Read/Write Recordsets
At the beginning of the procedure, four Recordset objects are opened, with whose help the data are to
be stored. Without LIMIT 1, the SELECT statement would retrieve all matching Recordsets. But we are
not interested in these (we want only to change data here), so this would be a waste of time. What we
want is an ADO object pointing to this table, and to get one, we have to execute a SELECT statement.
The use of LIMIT 1 thus speeds things up for us. (If you would like to improve the efficiency of the code,
you should define the four Recordset variables globally and open them in Form_Load. You thereby
avoid the Recordsets having to be opened for each storage event.)
The commands for storing the data from the three text fields txtPublisher, txtTitle, and txtAuthors
are easy to understand. Worthy of note is the use of the auxiliary function LastInsertedID(), described
above, for determining the most recently added AUTO_INCREMENT value:
' example vb6\insert_new_title\form1.frm
Private Sub SaveData_WithRecordsets()
Dim i&, titleID&, authID&, publID&
Dim authors_array
Dim authors As New Recordset, titles As New Recordset
Dim publishers As New Recordset, rel_title_author As New Recordset
' open Recordsets
authors.CursorLocation = adUseClient
titles.CursorLocation = adUseClient
publishers.CursorLocation = adUseClient
rel_title_author.CursorLocation = adUseClient
authors.Open "SELECT * FROM authors LIMIT 1", _
conn, adOpenStatic, adLockOptimistic
titles.Open "SELECT * FROM titles LIMIT 1", _
conn, adOpenStatic, adLockOptimistic
publishers.Open "SELECT * FROM publishers LIMIT 1", _
conn, adOpenStatic, adLockOptimistic
rel_title_author.Open "SELECT * FROM rel_title_author LIMIT 1", _
conn, adOpenStatic, adLockOptimistic
CHAPTER 19 ■VISUAL BASIC 6/VBA 563
Figure 19-6. Visual Basic example program for inserting a new book title
5351c19_final.qxd 8/26/05 7:57 PM Page 563
www.it-ebooks.info

' save publisher (if given)
If Trim(txtPublisher) <> "" Then
publishers.AddNew
publishers!publName = Trim(txtPublisher)
publishers.Update
publID = LastInsertedID()
End If
' save book title (perhaps with publID reference)
titles.AddNew
titles!Title = Trim(txtTitle)
If publID <> 0 Then titles!publID = publID
titles.Update
titleID = LastInsertedID()
' save authors and make entries to rel_title_author table
authors_array = Split(txtAuthor, ";")
For i = LBound(authors_array) To UBound(authors_array)
authors.AddNew
authors!authName = Trim(authors_array(i))
authors.Update
authID = LastInsertedID()
rel_title_author.AddNew
rel_title_author!titleID = titleID
rel_title_author!authID = authID
rel_title_author.Update
Next
End Sub
Private Function LastInsertedID() ... see earlier code
Variant 2: Changing Data with conn.Execute
In our second variant, the code is more like that to which you are accustomed in MySQL programming
with languages such as PHP or Perl: You need to cobble together the SQL commands painstakingly, tak-
ing care to treat special characters correctly. (For this, the auxiliary function Quote will be used.) The
structure of the code is otherwise like that of the first variant:
Private Sub SaveData_WithSQLCommands()
Dim i&, titleID&, authID&, publID&
Dim authors_array
' save publisher (if specified)
If Trim(txtPublisher) <> "" Then
conn.Execute "INSERT INTO publishers (publName) " & _
"VALUES ('" & Quote(Trim(txtPublisher)) & "')"
publID = LastInsertedID()
End If
' save book title (with any publID reference)
conn.Execute "INSERT INTO titles (title, publID) " & _
"VALUES ('" & Quote(Trim(txtTitle)) & "', " & _
IIf(publID <> 0, publID, "NULL") & ")"
titleID = LastInsertedID()
CHAPTER 19 ■VISUAL BASIC 6/VBA564
5351c19_final.qxd 8/26/05 7:57 PM Page 564
www.it-ebooks.info

' save authors and make any entries in the rel_title_author table
authors_array = Split(txtAuthor, ";")
For i = LBound(authors_array) To UBound(authors_array)
conn.Execute "INSERT INTO authors (authName) " & _
"VALUES ('" & Quote(Trim(authors_array(i))) & "')"
authID = LastInsertedID()
conn.Execute "INSERT INTO rel_title_author " & _
" (titleID, authID) " & _
"VALUES (" & titleID & ", " & authID & ")"
Next
End Sub
Private Function Quote$(tmp$) ... see earlier code
Example: Storing an Image File in BLOB Format and
Then Reading It
The following example program reads the file test.jpg from the current directory and stores it in
a table (Command2_Click). In a second step, the binary data are read from the table and stored
in the file test1.jpg (Command3_Click). As a visual check whether everything worked as it should
have, the new file will be displayed in a Picture control (see Figure 19-7). For storing the image, at
the beginning of the program a table is created as shown in the following code and then deleted
at the end of the program.
CHAPTER 19 ■VISUAL BASIC 6/VBA 565
Figure 19-7. A photo is loaded from a BLOB field and displayed.
5351c19_final.qxd 8/26/05 7:57 PM Page 565
www.it-ebooks.info

' example vb6\blob\form1.frm
Option Explicit
Dim conn As Connection
Dim id As Long
' create connection to MySQL
Private Sub Command1_Click()
Set conn = New Connection
'Options: 16395 = 16384 + 8 + 2 + 1
' Don't Optimize Column Width + Return Matching Rows +
' Allow Big Results + Change BIGINT Columns to INT
conn.ConnectionString = "Provider=MSDASQL;" + _
"DRIVER={MySQL ODBC 3.51 Driver};" + _
"Server=localhost;UID=root;PWD=uranus;" + _
"database=mylibraryodbc;Option=16395"
conn.Open
' create table
conn.Execute "CREATE TABLE IF NOT EXISTS testpic " + _
"(id INT NOT NULL AUTO_INCREMENT, pic MEDIUMBLOB, PRIMARY KEY (id))"
Command2.Enabled = True
End Sub
' load file into a Stream object
' and store in the table testpic
Private Sub Command2_Click()
Dim rec As New Recordset
Dim fname As String
Dim st As New Stream
' open file
fname = App.Path + "\test.jpg"
st.Type = adTypeBinary
st.Open
st.LoadFromFile fname
' store file in table
rec.CursorLocation = adUseClient
rec.Open "SELECT * FROM testpic LIMIT 1", conn, adOpenKeyset, _
adLockOptimistic
rec.AddNew
rec!pic = st.Read
rec.Update
rec.Close
st.Close
' note id (AUTO_INCREMENT number)
id = LastInsertedID()
Command3.Enabled = True
End Sub
' read BLOB from table and store in new file
Private Sub Command3_Click()
Dim rec As New Recordset
Dim fname As String
Dim st As New Stream
' Stream object for the new file
fname = App.Path + "\test1.jpg"
st.Type = adTypeBinary
st.Open
CHAPTER 19 ■VISUAL BASIC 6/VBA566
5351c19_final.qxd 8/26/05 7:57 PM Page 566
www.it-ebooks.info

' read BLOB into the Stream object
rec.CursorLocation = adUseClient
rec.Open "SELECT pic FROM testpic WHERE id = " & id, conn, _
adOpenKeyset, adLockReadOnly
st.Write rec!pic
rec.Close
' store Stream in file
st.SaveToFile fname, adSaveCreateOverWrite
st.Close
' display file in picture control element
Picture1.Picture = LoadPicture(fname)
End Sub
Converter: Microsoft SQL Server to MySQL
If up to now you have managed a database with the Microsoft SQL Server (or the MSDE, that is, the
Microsoft Data Engine) and are considering porting it to MySQL, there are two main ways of bring-
ing your data into a MySQL database.
• Summon Access to your assistance. First, import the table into an empty Access database,
and then export it to MySQL.
• Use the VBA/Visual Basic script mssql2mysql (developed in its first version by me). The pro-
gram should generally enable a more exact copy of the database structure, since there is no
intermediate Access step. The remainder of this section is related to this program. The pro-
gram can also be seen as a further example of ADO database programming with MySQL,
although for reasons of space we omit the source code.
■Tip The current version of mssql2mysql can be found at http://www.kofler.cc/mysql/
mssql2mysql.html. Various other converters, both commercial and free of charge, between MySQL and
a number of other databases can be found at http://solutions.mysql.com/software/. A worthwhile
article on migration from Microsoft SQL Server to MySQL can be found at http://dev.mysql.com/
tech-resources/articles/migrating-from-microsoft.html.
Properties of mssql2mysql
• Freely obtainable (GPL)
• Copies an entire database, that is, all user-defined tables (structure, indexes, data)
• Automatically changes the name of a table or column if the name is not allowable in MySQL
(for example, My table becomes My_table)
• Generates either a text file with SQL commands or executes the required commands directly
on the MySQL server
Assumptions
• To execute the script, either a current VBA interpreter (e.g., in all components of Microsoft
Office since Office 2000) or the programming language Visual Basic 6 must be available.
CHAPTER 19 ■VISUAL BASIC 6/VBA 567
5351c19_final.qxd 8/26/05 7:57 PM Page 567
www.it-ebooks.info

• The program requires the libraries ADO and SQLDMO. (SQLDMO allows the control of the
Microsoft SQL server. The library is installed together with the SQL server.)
• If the converted database is not to be written into a text file (*.sql), but transmitted directly
to a running MySQL server, then Connector/ODBC must also be installed.
The converter was most recently tested with SQL Server 2000, MySQL server 5.0.2, ADO 8, and
Connector/ODBC 3.51.11.
Restrictions
• The converter ignores the following database characteristics: integrity rules, views, stored
procedures, user-defined data type, and access privileges.
• MySQL allows only one AUTO_INCREMENT column per table, and that column must be
defined as PRIMARY KEY. The converter does not check this condition. You must therefore
change your SQL server as necessary before starting the script.
• SQL server TIMESTAMPs are incompatible with MySQL TIMESTAMPs and are therefore
transformed into TINYBLOBs.
How to Use It
The text file mssql2mysql is available over the Internet at http://www.kofler.cc/mysql/
mssql2mysql.html. To execute the code, use either Visual Basic 6 or a program with VBA 6
support (for example, Excel 2000, Word 2000, Access 2000).
Visual Basic 6: If you are working with Visual Basic 6, begin a new standard project and insert
the entire code into the code window of a form. Then start the program by pressing F5.
VBA: If you are working with a VBA 6 compatible program, switch with Alt+F11 into the VBA
development environment, insert a new, empty module, and copy the code into this module.
Then with F5 open the dialog for macro execution and execute the procedure main.
Setting Parameters
All the parameters of the conversion process are controlled by a number of constants, which can be
found at the beginning of the code. The first five constants describe the database on the Microsoft
SQL server. The login to the database can be effected either via the security system integrated into
Windows 2000/XP or by the explicit specification of user name and password:
Const MSSQL_SECURE_LOGIN = True 'login type (True for 2000/XP Security)
Const MSSQL_LOGIN_NAME = "" 'user name ("" for 2000/XP Security)
Const MSSQL_PASSWORD = "" 'password ("" for 2000/XP Security)
Const MSSQL_HOST = "mars" 'computer ("(local)" for localhost)
Const MSSQL_DB_NAME = "pubs" 'database name
OUTPUT_TO_FILE specifies whether the program should generate a text file with SQL com-
mands or whether the commands should be executed at once. The file variant has the advantage
that if problems arise, the text file can be directly edited. However, it has a drawback: The resulting
text file uses the Windows character set cp850 (corresponds mostly to latin1). If there are Unicode
strings in the Microsoft SQL database that contain characters that are not latin1 compatible, these
characters are lost.
Const OUTPUT_TO_FILE = 0 '1 write file,
'0 execute SQL commands at once
CHAPTER 19 ■VISUAL BASIC 6/VBA568
5351c19_final.qxd 8/26/05 7:57 PM Page 568
www.it-ebooks.info

If you have decided for OUTPUT_TO_FILE=1, you must specify the name of the resulting file in
OUTPUT_FILENAME:
Const OUTPUT_FILENAME = "C:\export.sql"
With OUTPUT_TO_FILE=0 you must specify all parameters so that a connection to MySQL can
be created. For this there must be sufficient access privileges so that CREATE DATABASE, etc., can
be executed:
Const MYSQL_USER_NAME = "root" 'user name
Const MYSQL_PASSWORD = "uranus" ' password
Const MYSQL_HOST = "localhost" ' computer name or "localhost"
Const MYSQL_PORT = 3306 'MySQL port
Which of the following two commands is necessary depends on whether you are using Connector/
ODBC 3.51 or 2.51:
Const MyODBCVersion = "MySQL ODBC 3.51 Driver"
Const MyODBCVersion = "MySQL" 'for 2.50.n
Finally, we mention a few conversion options:
NEW_DB_NAME enables the name of the new MySQL database to be given. If the constant
remains empty, the new database keeps the same name as the SQL server database.
DROP_DATABASE specifies whether at the beginning of the conversion any existing MySQL
database with the same name should be deleted.
MAX_RECORDS specifies how many records per table should be converted. Here 0 means that
all data records should be converted. This option is practical for first carrying out a quick test
and, for example, converting only ten records per table. Only after it is working without error is
the entire database converted. (Otherwise, it could happen that after half an hour an error
might occur on the last table.)
VARCHAR_MAX specifies the maximal length of VARCHAR columns. Columns with more char-
acters are changed into TEXT columns. VARCHAR_MAX should have the value 255 for MySQL
server versions up to 5.0.2. Newer MySQL server versions support longer VARCHAR columns
up to 65,535 bytes. The maximum number of characters depends on the character set. If you
use UTF8, then 32,000 is a sensible limit.
TABLE_ENGINE specifies the table type of the MySQL tables (InnoDB or MyISAM).
CHARSET gives the character set for the text columns in the tables.
COLLATION gives the desired sort order. If the field is empty, the default order of the selected
character set is used.
Const NEW_DB_NAME = "" 'MySQL database name
Const UNICODE_TO_BLOB = False 'Unicode --> BLOBs?
Const DROP_DATABASE = True 'begin with DROP database?
Const MAX_RECORDS = 0 '0: convert all data
Const VARCHAR_MAX = 255 ' larger values only for MySQL-Server >= 5.0.3
Const TABLE_ENGINE = "InnoDB" 'MyISAM or InnoDB
Const CHARSET = "utf8" 'desired character set in the MySQL tables
Const COLLATION = "" 'empty for default sort order
CHAPTER 19 ■VISUAL BASIC 6/VBA 569
5351c19_final.qxd 8/26/05 7:57 PM Page 569
www.it-ebooks.info

VBMySQLDirect
The ADO programming based on Connector/ODBC introduced in the previous sections works,
but it is not particularly efficient. If processing speed is more important to you than ADO com-
patibility, then you will find the library VBMySQLDirect introduced in this section an interesting
alternative. This library offers Visual Basic programmers more direct access to MySQL. The
classes MYSQL_CONNECTION, MYSQL_RS, MYSQL_FIELD, and MYSQL_ERR offer functionality
similar to that of the ADO objects Connection, Recordset, Field, and Error, without, however,
being compatible with them.
VBMySQLDirect itself consists of Visual Basic code and comes from the discontinued project
MyVbQL. For this book, VBMySQLDirect 1.0.2 was tested.
VBMySQLDirect builds on the MySQL client library libmySQL.dll. Access to the MySQL server
via MyVbQL takes place according to the following scheme: Visual Basic ➤VBMySQLDirect object
library ➤libmySQL.dll ➤MySQL.
In comparison to ADO + Connector/ODBC, VBMySQLDirect code is generally faster. A further
considerable advantage is thatVBMySQLDirect is much less complex than ADO +
Connector/ODBC. In other words, there are fewer functions, and they are generally less likely to
cause errors. It is also quite practical that in distributing VBMySQLDirect programs, one does not
have to include ADO libraries, which inflate the setup files considerably. Unfortunately, there are
some drawbacks as well:
•VBMySQLDirect is not ADO compatible. It therefore takes some effort to convert existing
ADO code to VBMySQLDirect.
• The MYSQL_RS object cannot be used as the data basis for bound database controls, which
makes the use of ADO database controls in combination with VBMySQLDirect impossible.
(On the VBMySQLDirect website you can find an additional library that creates a connection
between VBMySQLDirect and the program Crystal Reports. This allows you to use this popu-
lar reporting tool with VBMySQLDirect.)
VBMySQLDirect is available free of charge under the GNU Library General Public License.
However, VBMySQLDirect uses the library libmysql.dll, for which the stricter GPL holds. Thus for
commercial applications the same rules hold as for Connector/ODBC programs: If you develop a
program based on VBMySQLDirect that is not open source in the sense of GPL, then your customers
must obtain a commercial license for the MySQL server.
Installation
An installation program for VBMySQLDirect is available at http://www.vbmysql.com/projects/
vbmysqldirect/. During installation, the source code for VBMySQLDirect as well as some example proj-
ects are copied to the directory Programs\VBMySQLDirect. Furthermore, the libraries vbmysqldirect.dll
and libmysql.dll are installed in the directory Windows/System32. Moreover, vbmysqldirect.dll is
entered into the Windows registration database. Unfortunately, the version of libmysql.dll delivered
with VBMySQLDirect 1.0.2 is relatively old (MySQL 4.1.n).
CHAPTER 19 ■VISUAL BASIC 6/VBA570
5351c19_final.qxd 8/26/05 7:57 PM Page 570
www.it-ebooks.info

■Caution The installation of
VBMySQLDirect
can lead to incompatibilities with other programs that use
libmysql.dll. For example, if you have installed PHP as described in Chapter 2, there are now two
libmysql.dll files, one in the Windows directory, the other in Windows\System32.
The next time Apache is launched, it gives the DLL in Windows/System32 precedence over the one in
the Windows directory. Since PHP 5 requires a current version of libmysql.dll and not the old version of
VBMySQLDirect
, an error results.
The solution to the problem is to shut down Apache and rename the file Windows\System32\libmysql.dll or
delete the file. After a restart of Apache, PHP again uses Windows\libmysql.dll. However, now
VBMySQLDirect
also uses this library. According to a posting in the
VBMySQLDirect
forum, the combination of
VBMySQLDirect
with
recent versions of libmysql.dll has not been tested, but it should work. In my tests, no problems occurred.
Application
In order to use VBMySQLDirect in your own Visual Basic project you must simply create a reference
to the library. You will find the library under the name VBMySQL Direct v1.0 in the dialog PROJECT |
REFERENCES. You can then use the four MYSQL_xxx objects as you would normal Visual Basic objects.
Example
Again we shall use as an example the program that stores a character string with all the authors
belonging to a given book title in the authors column of the titles table.
For establishing the connection you create an object of type MYSQL_CONNECTION and pass
the computer name, user name, password, and database name to the method OpenConnection:
' authors_for_titles_VBMySQLDirect\form1.frm
' create connection to MySQL
Dim conn As New MYSQL_CONNECTION
Private Sub Command1_Click()
conn.OpenConnection "localhost", "root", "xxx", "mylibrary"
Command2.Enabled = True
End Sub
MYSQL_RS objects are derived with the method Execute from the MYSQL_CONNECTION object.
Access to individual fields of the current record is effected with rs.Fields(“columnName”).Value (instead
of rs!columnName, as with ADO).
To alter data in MYSQL_RS objects, simply assign a new value to the Value property of the
affected column and store the changes with the Update method. (You can also insert a new record
with AddNew or delete one with Delete, but these are not demonstrated in our example.)
■Caution Be sure to close every
MYSQL_RS
object explicitly with
Close
after you are through with it. If you
forget this, then the piece of memory for storing the object will never be released.
CHAPTER 19 ■VISUAL BASIC 6/VBA 571
5351c19_final.qxd 8/26/05 7:57 PM Page 571
www.it-ebooks.info

' change the titles table
Private Sub Command2_Click()
Dim authors_str, titleID
Dim titles As MYSQL_RS
Dim authors As MYSQL_RS
' titles Recordset for a loop over all titles
' and for changing the authors column
Set titles = conn.Execute( _
"SELECT titleID, authors FROM titles")
' loop over all book titles
While Not titles.EOF
titleID = titles.Fields("titleID").Value
' authors recordset to read the authors of a title
Set authors = conn.Execute( _
"SELECT authname FROM authors, rel_title_author " & _
"WHERE authors.authID=rel_title_author.authID " & _
" AND rel_title_author.titleID = " & titleID & " " & _
"ORDER BY authName")
' loop over all authors
authors_str = ""
Do While Not authors.EOF
' assemble string with the author names
If Not IsNull(authors.Fields("authName").Value) Then
If authors_str <> "" Then authors_str = authors_str + "; "
authors_str = authors_str & authors.Fields("authName").Value
End If
authors.MoveNext
Loop
authors.CloseRecordset
' save authors field in the titles recordset object
If Len(authors_str) > 254 Then _
authors_str = Left(authors_str, 254)
titles.Fields("authors").Value = authors_str
titles.Update
titles.MoveNext
Wend
titles.CloseRecordset
End Sub
CHAPTER 19 ■VISUAL BASIC 6/VBA572
5351c19_final.qxd 8/26/05 7:57 PM Page 572
www.it-ebooks.info

Visual Basic .NET and C#
This chapter deals with programming MySQL applications with the languages Visual Basic 2005
(alias VB.NET 2) and C#. In both cases one uses the database library ADO.NET in combination with
the MySQL driver Connector/Net.
■Note The examples presented in this chapter use, with few exceptions,VB.NET as the programming language.
Friends of C# will find equivalent C# projects to most of these examples in the source code (www.apress.com).
All examples were developed with the VS.NET development environment; that is, we have used the usual
default settings for libraries and imports.
It is basically true that MySQL programming with ADO.NET is not particularly MySQL-specific. Once the con-
nection has been made, the rest is like any other ADO.NET program. The only major difference is that instead of
the classes
OleDbXxx
and
SqlXxx
described in all the ADO.NET books, the largely equivalent classes
OdbcXxx
and
MySQLXxx
must be used.
Communication Between ADO.NET and MySQL
Many roads lead from ADO.NET to MySQL, regardless of whether you prefer to work with C# or
VB.NET. The following list gives an overview:
Connector/ODBC + ODBC data provider: In this variant, communication takes place via
ODBC. The interface between MySQL and ODBC is provided by Connector/ODBC. As data
provider for ADO.NET, the ODBC data provider (name space Microsoft.Data.Odbd) is used.
This data provider has been an integral component of ADO.NET since .NET 1.1 (Visual Studio
2003).
VB.NET/C# ➤ADO.NET ➤ODBC data provider ➤Connector/ODBC ➤MySQL
Connector/ODBC + OLEDB data provider: In this variant as well, communication takes place
via ODBC. However, the access route to MySQL is now extended by an additional component,
the OLEDB provider for ODBC.
VB.NET/C# ➤ADO.NET ➤OLEDB data provider ➤OLEDB provider for ODBC ➤
Connector/ODBC ➤MySQL
Managed data provider for ADO.NET: For efficient communication between ADO.NET and
MySQL, it is best to use a special provider for ADO.NET.
VB.NET/C# ➤ADO.NET ➤MySQL data provider ➤MySQL
The obvious advantage of such a provider is that the communication path is the shortest.
This represents fewer compatibility problems between the individual layers and greater efficiency.
573
CHAPTER 20
■ ■ ■
5351c20_final.qxd 8/26/05 8:01 PM Page 573
www.it-ebooks.info

Moreover, such providers can provide MySQL-specific functions (such as support of the compressed
communication protocol). These additional functions have the drawback of making difficult a later
change of provider (or even the database system).
Fortunately, there is now a host of such providers. In February 2003 I found the following drivers
on the Internet:
Connector/Net (GPL): This driver is the official .Net provider of the MySQL company. It is
derived from the former ByteFX Provider: http://dev.mysql.com/.
MySQLDriverCS (Open Source, GPL): This driver is an open-source alternative to the official
driver of MySQL: http://sourceforge.net/projects/mysqldrivercs/.
MySQLDirect .NET from CoreLab: This is yet another commercial driver: http://crlab.com/
mysqlnet/.
It was impossible to test in full all the variants introduced here. I have tried out connections with
the provider Connector/Net as well as with the combination Connector/ODBC + ODBC provider (see
the following two sections).
■Note An additional option is to use, in place of ADO.NET, the old ADO library in VB.NET or C#. Thanks to the
COM compatibility layer, this is possible in principle. ADO, however, is less efficient and secure than ADO.NET and
does not fit in well with the .NET framework. For this reason we will not pursue this variant further.
Establishing a Connection with Connector/Net
Installing Connector/Net
The driver Connector/Net is an offshoot of the former ByteFX driver and is the official ADO.NET
driver for MySQL supported by the firm MySQL. If you are unsure which driver to use, this one
should be your first choice. The driver can be used free of charge under the GPL license, and can
be downloaded from http://dev.mysql.com. If you are developing commercial projects, your cus-
tomers must possess a commercial license for the MySQL server.
The ZIP archive contains a *.msi file that installs the driver together with various example
files in the directory Programs\MySQL\MySQL Connector Net n.n. The actual driver—the library
MySql.Data.dll—is then registered in the global assembly cache (GAC), which currently works
only for the .NET framework 1.0 and 1.1.
Using the Connector/Net Library
In order to use Connector/Net in your project, you must create a reference to the libraries
System.Data.dll and MySql.Data.dll with PROJECT | ADD REFERENCE. With the tested program ver-
sion Visual Studio 2005 Beta 1 and Connector/Net 1.0.4, the registration of MySql.Data.dll in the
GAC of the .NET framework 2.0 did not function. Therefore, the library MySql.Data.dll does not
appear in the .NET dialog sheet. To establish a reference to the library, switch into the dialog sheet
BROWSE and open the following file: Programs\MySQL\MySQL Connector Net 1.0.4\bin\.NET 1.1\
MySql.Data.dll.
To avoid having to specify MySql.Data.MySQLClient.xxx repeatedly, you should place an
Imports or using instruction at the beginning of your code:
Imports MySql.Data.MySqlClient ' VB.NET
using MySql.Data.MySqlClient; // C#
CHAPTER 20 ■VISUAL BASIC .NET AND C#574
5351c20_final.qxd 8/26/05 8:01 PM Page 574
www.it-ebooks.info

Establishing the Connection
The connection is now made with a MySQLConnection object. The string with connection data is made
up of several pieces, which are separated by semicolons. Table 20-1 describes the most important
parameters. Note that many parameters are accepted in various forms (e.g., User Id or Uid or Username
or User name). A complete reference of all parameters in all forms together with the default values can
be found in the online help for Connector/Net under the key word ConnectionString.
Table 20-1. Connection Parameters of Connector/Net
Parameter Meaning
Data Source or Hostname Hostname or IP address of the MySQL server.
Initial Catalog or Database Name of the database.
User Id or Username User name.
Password Password.
Connection Timeout Maximum time for connection creation before error is triggered
(default 15 seconds).
Allow Batch Tells whether more than one SQL command at a time can be exe-
cuted (default true); commands must be separated by semicolons.
The code for creating a connection looks something like this:
Dim myconn As New MySqlConnection( _
"Data Source=localhost;Initial Catalog=mylibrary;" + _
"User ID=root;PWD=xxxxxx")
myconn.Open()
■Note An additional parameter is allowed in the connection string, one that is not mentioned in the official doc-
umentation and is apparently a relic of the ByteFX past history of the driver:
UseCompression=true
has the effect
that communication between the program and the MySQL server is compressed. That can be useful with a very
slow network connection. However,
UseCompression=true
assumes that the program contains a reference to the
library ICSharpCode.SharpZipLib.dll. This library can be found in the installation of Connector/Net in the direc-
tory Programs\MySQL\MySQL Connector Net n.n.n\src.
Project Transfer (Setup Project)
In transferring a project to others, you must see to it that the library MySql.Data.dll is installed on
the target computer (best is in the program’s local directory).
VB.NET Example
The following example program creates a connection to the local MySQL server, obtains a sorted list
of all publishers (publishers table from the mylibrary database), and displays it in a text field (see
Figure 20-1).
CHAPTER 20 ■VISUAL BASIC .NET AND C# 575
5351c20_final.qxd 8/26/05 8:01 PM Page 575
www.it-ebooks.info

' example code vbnet\connector_net_intro
Imports MySql.Data.MySqlClient
Public Class Form1
Dim myconn As MySqlConnection
' create connection
Private Sub Button1_Click(...) Handles Button1.Click
Try
myconn = New MySqlConnection( _
"Data Source=localhost;Initial Catalog=mylibrary;" + _
"User ID=root;PWD=xxxxx")
myconn.Open()
Catch myerror As MySqlException
MsgBox("Database connection error: " & myerror.Message)
Me.Close()
End Try
Button2.Enabled = True
End Sub
' execute SQL query, display result in text box
Private Sub Button2_Click(...) Handles Button2.Click
Dim com As MySqlCommand
Dim dr As MySqlDataReader
com = New MySqlCommand( _
"SELECT publID, publName FROM publishers ORDER BY publName", _
myconn)
dr = com.ExecuteReader()
While dr.Read()
TextBox1.AppendText("id = " & dr!publID & _
", name = " & dr!publName & vbCrLf)
End While
dr.Close()
End Sub
' program end
Private Sub Button3_Click(...) Handles Button3.Click
Me.Close()
End Sub
End Class
CHAPTER 20 ■VISUAL BASIC .NET AND C#576
Figure 20-1. Connector/Net example program
5351c20_final.qxd 8/26/05 8:01 PM Page 576
www.it-ebooks.info

C# Example
The equivalent C# code looks like this:
// example code csharp\connector_net_intro
using ...;
using MySql.Data.MySqlClient;
namespace connector_net_intro {
partial class Form1 : Form {
MySqlConnection myconn;
public Form1() {
InitializeComponent();
}
// create connection
private void button1_Click(object sender, EventArgs e) {
try {
myconn = new MySqlConnection(
"Data Source=localhost;Initial Catalog=mylibrary;" +
"User ID=root;PWD=uranus");
myconn.Open();
}
catch (MySqlException myerror) {
MessageBox.Show("MySQL connection error: " + myerror.Message);
this.Close();
}
button2.Enabled = true;
}
// execute SQL query, display result in text box
private void button2_Click(object sender, EventArgs e) {
MySqlCommand com;
MySqlDataReader dr;
com = new MySqlCommand(
"SELECT publID, publName FROM publishers ORDER BY publName",
myconn);
dr = com.ExecuteReader();
while (dr.Read())
textBox1.AppendText("id = " + dr["publID"] +
", name = " + dr["publName"] + Environment.NewLine);
dr.Close();
}
// program end
private void button3_Click(object sender, EventArgs e) {
this.Close();
}
}
}
CHAPTER 20 ■VISUAL BASIC .NET AND C# 577
5351c20_final.qxd 8/26/05 8:01 PM Page 577
www.it-ebooks.info
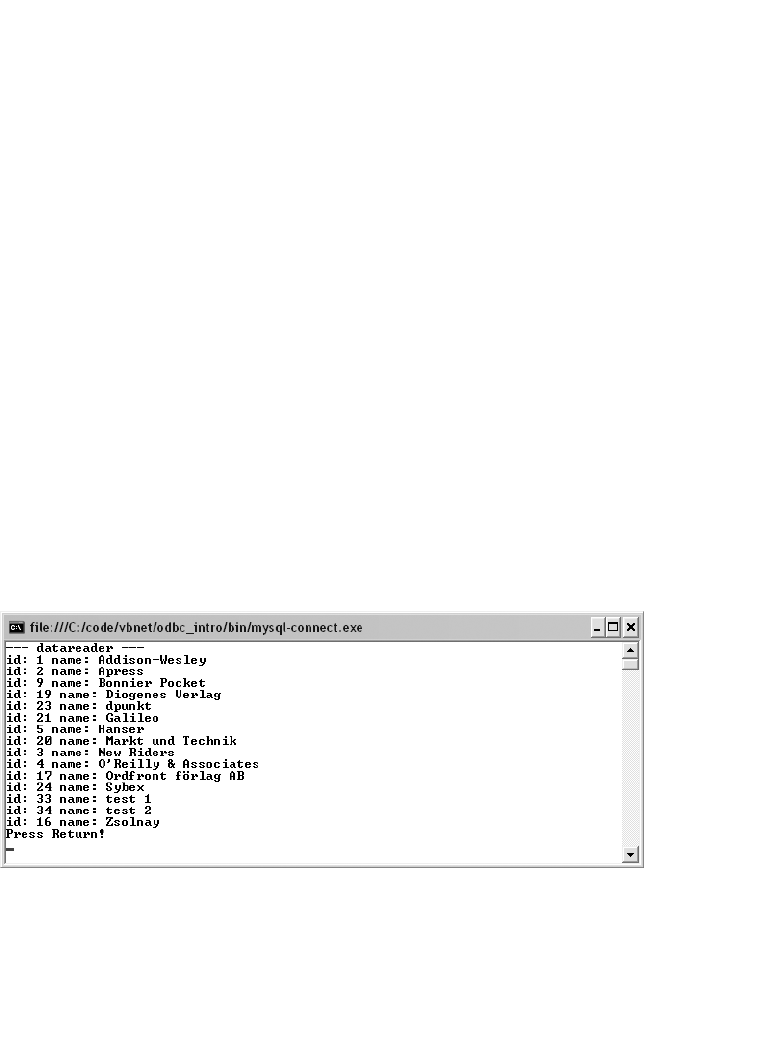
Establishing the Connection with the ODBC Data Provider
Establishing the Connection
The connection looks very much as it did with ADO (see the previous chapter). The main difference
is that now an OdbcConnection object is used, and the connection string can be passed to the con-
structor. The connection string is exactly the same as with ADO.
As a rule, the Options setting should be 3. This corresponds to the options Don’t optimize col-
umn width (1) and Return matching rows (2). The option Change BIGINT into INT (16384) is not
required with ADO.NET.
' VB.NET
Dim odbcconn As New System.Data.Odbc.OdbcConnection( _
"Driver={MySQL ODBC 3.51 Driver};Server=localhost;" + _
"Database=mylibraryodbc;UID=root;PWD=uranus;Options=3")
odbcconn.Open()
// C#
OdbcConnection odbcconn = new System.Data.Odbc.OdbcConnection(
"Driver={MySQL ODBC 3.51 Driver};Server=localhost;" +
"Database=mylibraryodbc;UID=root;PWD=uranus;Options=3");
odbcconn.Open();
VB.NET Example
The following small program displays an alphabetic list of all publishers in mylibrary.publishers in a
console window (see Figure 20-2). After the connection is established with OdbcCommand, a SELECT
query is executed. The result is evaluated with an OdbdDataReader object in a loop.
' example vbnet/odbc_connectintro/module1.vb
Option Strict On
Imports System.Data
Imports MicrosoftSystem.Data.Odbc
CHAPTER 20 ■VISUAL BASIC .NET AND C#578
Figure 20-2. ODBC example program
5351c20_final.qxd 8/26/05 8:01 PM Page 578
www.it-ebooks.info

Module Module1
Dim odbcconn As OdbcConnection
Sub Main()
odbcconn = New OdbcConnection( _
"Driver=MySQL ODBC 3.51 Driver;Server=localhost;" + _
"Database=mylibrary;UID=root;PWD=xxxxx;Options=16387")
odbcconn.Open()
read_publishers_datareader()
odbcconn.Close()
End Sub
' example for OdbcDataReader
Sub read_publishers_datareader()
Dim com As OdbcCommand
Dim dr As OdbcDataReader
com = New OdbcCommand( _
"SELECT publID, publName FROM publishers ORDER BY publName", _
odbcconn)
dr = com.ExecuteReader()
While dr.Read()
Console.WriteLine("id: {0} name: {1}", dr!publID, dr!publName)
End While
dr.Close()
End Sub
End Module
C# Example
The equivalent C# code looks like this:
// example csharp\odbc_connect\Class1.cs
using System;
using System.Data.Odbc;
namespace odbc_connect {
class mainclass {
[STAThread]
static void Main(string[] args) {
Odbctest tst = new Odbctest();
tst.ReadPublishersDataset();
Console.WriteLine("Return drücken");
Console.ReadLine();
}
}
class Odbctest {
OdbcConnection odbcconn;
public Odbctest() { // use constructor to connect
odbcconn = new OdbcConnection(
"Driver={MySQL ODBC 3.51 Driver};Server=localhost;" +
"Database=mylibrary;UID=root;PWD=xxxxx;Options=16387");
odbcconn.Open();
}
CHAPTER 20 ■VISUAL BASIC .NET AND C# 579
5351c20_final.qxd 8/26/05 8:01 PM Page 579
www.it-ebooks.info

public void ReadPublishersDataset() {
OdbcCommand com = new OdbcCommand(
"SELECT publID, publName FROM publishers ORDER BY publName",
odbcconn);
OdbcDataReader dr = com.ExecuteReader();
while(dr.Read()) {
Console.WriteLine("id: {0} name: {1}",
dr["publID"], dr["publName"]);
}
dr.Close();
}
}
}
Programming Techniques
As I have already mentioned, all the remaining examples in this chapter assume that the MySQL
connection has been made with Connector/Net. myconn is an open MySqlConnection object that
refers to a suitable MySQL database.
If you use another provider, you must establish a reference to the appropriate library, change
the Imports/using instruction, replace MySqlXxx by OdbcXxx or the class name of the provider, and
adapt the connection string according to the provider’s required syntax. Depending on the provider,
you may also have to make minor changes in the code (e.g., cast operators, parameter syntax in SQL
commands).
Executing SQL Commands (MySqlCommand)
To execute SQL commands, you need an MySqlCommand object. The basic MySqlConnection object
and the SQL command can be passed to the constructor or handled separately. (The latter is espe-
cially useful if you wish to execute several SQL commands with a single MySqlCommand object.)
There are three ways to execute SQL commands:
ExecuteNonQuery is used for all commands that do not immediately return a result (e.g.,
UPDATE, INSERT, DELETE):
Dim com As New MySqlCommand()
com.Connection = myconn
com.CommandText = "INSERT INTO table (colname) VALUES ('abc')"
com.ExecuteNonQuery()
ExecuteReader is used if you wish to execute a SELECT query and read the result with
MySqlDataReader (see the example somewhat later in this chapter).
ExecuteScalar is used when the command returns a single value (e.g., SELECT COUNT(*)
FROM table); an example follows shortly.
If an error occurs during the execution of an SQL command, a MySqlException occurs, which
can be caught with Try/Catch:
Try
com.ExecuteNonQuery()
Catch e As MySqlException
MsgBox(e.Message)
Stop
End Try
CHAPTER 20 ■VISUAL BASIC .NET AND C#580
5351c20_final.qxd 8/26/05 8:01 PM Page 580
www.it-ebooks.info

In formulating an SQL command, you must heed the MySQL syntax rules: In character strings,
the characters ‘, “, \, and 0-byte must be indicated by \’, \”, \\, and \0. Dates must also be correctly
formatted (2005-12-31 23:59:59). You can save effort with INSERT and DELETE commands by using
commands with parameters.
AUTO_INCREMENT Column (LAST_INSERT_ID)
The ID number of the last record inserted with INSERT can be determined with the command
SELECT LAST_INSERT_ID(). The method ExecuteScalar just mentioned returns the ID number
as a Long integer.
Dim n As Long
Dim com As New MySqlCommand()
com.Connection = myconn
com.CommandText = "INSERT INTO table (columns ...) VALUES (...)"
com.ExecuteNonQuery()
com.CommandText = "SELECT LAST_INSERT_ID()"
n = CLng(com.ExecuteScalar())
Commands with Parameters (MySql Parameters)
Parameters in SQL commands are indicated by ?name. There are two variants. The first is to give the
values directly with Add(“?name”, data) and then execute the command. This variant is especially
well suited for commands that are to be executed only once:
Dim com1 As MySqlCommand
com1 = myconn.CreateCommand()
com1.CommandText = _
"INSERT INTO authors (authName, authID, ts) VALUES(?name, ?id, ?ts)"
com1.Parameters.Add("?name", "authorname")
com1.Parameters.Add("?id", 12345)
com1.Parameters.Add("?ts", DateTime.Now())
com1.ExecuteNonQuery()
In the second variant, all the parameters are defined with their type. Here all the MySQL data
types are available as elements of the MySqlDbType enumeration. Then the command is prepared
for execution with Prepare. The assignment of a value takes place only in the second step, when the
Value property of the MySqlParameter object is set.
This variant is good for commands that are to be executed more than once with maximum effi-
ciency. If you have at least version 4.1 of the MySQL server, the SQL commands will be executed as
prepared statements. This offers several advantages: somewhat greater speed, type checking of all
passed data, and an optimal conversion of data into the relevant MySQL format. This works in par-
ticular for binary data (BLOBs).
' prepare command
Dim com2 As MySqlCommand
Dim pname, pid, pts As MySqlParameter
com2 = myconn.CreateCommand()
com2.CommandText = _
"INSERT INTO authors (authName, authID, ts) VALUES(?name, ?id, ?ts)"
pname = com2.Parameters.Add("?name", MySqlDbType.VarChar)
pid = com2.Parameters.Add("?id", MySqlDbType.Int32)
pts = com2.Parameters.Add("?ts", MySqlDbType.Timestamp)
CHAPTER 20 ■VISUAL BASIC .NET AND C# 581
5351c20_final.qxd 8/26/05 8:01 PM Page 581
www.it-ebooks.info

com2.Prepare()
' execute command for the first time
pname.Value = "test 124"
pid.Value = 124
pts.Value = DateTime.Now
com2.ExecuteNonQuery()
' execute command a second time
pname.Value = "test 125"
pid.Value = 125
pts.Value = DateTime.Now
com2.ExecuteNonQuery()
If you wish to pass the value NULL to a parameter, then use DBNull.Value:
com.Parameters(0).Value = DBNull.Value
The equivalent C# code to the listing above looks like this:
// prepare command
MySqlCommand com2;
MySqlParameter pname, pid, pts;
com2 = myconn.CreateCommand();
com2.CommandText =
"INSERT INTO authors (authName, authID, ts) VALUES(?name, ?id, ?ts)";
pname = com2.Parameters.Add("?name", MySqlDbType.VarChar);
pid = com2.Parameters.Add("?id", MySqlDbType.Int32);
pts = com2.Parameters.Add("?ts", MySqlDbType.Timestamp);
com2.Prepare();
// execute command for first time
pname.Value = "test 124";
pid.Value = 124;
pts.Value = DateTime.Now;
com2.ExecuteNonQuery();
// execute command for second time
pname.Value = "test 125";
pid.Value = 125;
pts.Value = DateTime.Now;
com2.ExecuteNonQuery();
Evaluating Individual SELECT Results (ExecuteScalar)
Queries such as SELECT COUNT(*) FROM ... are a special case. They return a single record with only a
single column. In this case, you can avoid the use of a DataReader. Instead, execute the SQL command
specified in the MySqlCommand object with the method ExecuteScalar, which returns the result as an
Object. In VB.NET you obtain with CInt the associated Integer. For strings, use the analogous CStr, and
for dates and times, Cdate, etc.
Dim n As Integer
Dim com As New MySqlCommand("SELECT COUNT(*) FROM table", myconn)
n = CInt(com.ExecuteScalar())
In C# you have to use casting operators instead of these functions, for example, (int), (string),
or (DateTime):
DateTime dt;
com = new MySqlCommand("SELECT MAX(ts) FROM authors ", myconn);
CHAPTER 20 ■VISUAL BASIC .NET AND C#582
5351c20_final.qxd 8/26/05 8:01 PM Page 582
www.it-ebooks.info

In many cases in C# it is necessary to use two casting operators: com.ExecuteScalar() in the fol-
lowing example returns an object, behind which, however, a long value is hiding. If you wish to store
this value in an int variable, you must first convert object into long and then long into int. (The first
casting operator, here (long), is responsible for what in C# is called unboxing.)
int id;
com = new MySqlCommand("SELECT LAST_INSERT_ID()");
id = (int)(long)com.ExecuteScalar();
Reading SELECT Results (MySqlDataReader)
The MySqlDataReader class offers the simplest way of reading SELECT results. The MySqlDataReader
does not support free navigation in the result list (hence only forward only). Nor are changes possi-
ble. In return, MySqlDataReader is frugal with resources and offers the most efficient path to SELECT
results.
You obtain a MySqlDataReader when you execute an SQL command with the method
ExecuteReader. Read reads the first, or next, record, and returns True or False depending on whether
a record was found. The MySqlDataReader object should be explicitly closed with Close as soon as it
is no longer needed. (Otherwise, it takes up memory.)
The following lines show how all records can be run through in a loop. The results are stored
temporarily in a StringWriter object and then output to the console window.
Dim sstr As New IO.StringWriter
Dim com As New MySqlCommand( _
"SELECT publID, publName FROM publishers", myconn)
Dim dr As MySqlDataReader = com.ExecuteReader()
While dr.Read()
sstr.WriteLine("id: {0} name: {1}", dr!publID, dr!publName)
End While
Console.WriteLine(sstr)
sstr.Close()
dr.Close()
The MySqlDataReader offers no way of determining the number of records in advance. Thus
you must count along as you read all the records, or else execute a SELECT COUNT(*) … query.
Access to data fields: In VB.NET, access to data fields takes place in the form dr!columnname.
As result you obtain Object data that you must convert into the actual data format with functions
such as CStr, CInt.
In C#, the syntax is dr[“columnname”]. The object results must be converted with casting oper-
ators into the actual data format.
As an alternative, you can read data with GetByte(n), GetDateTime(n), GetInt32(n), etc., where
nis the column number (0 for the first column).
Access to metadata: With the functions GetName(n) and GetDataTypeName(n) you can deter-
mine the column name and data type for each column. If you wish to know whether a query has
returned any results at all, evaluate the property dr.HasRows. The number of columns in the result
is returned by dr.FieldCount.
Special Data Types
NULL: Data fields that in the database contain NULL have in ADO.NET the value
System.DBNull. There are various methods for testing for NULL:
If Convert.IsDBNull(dr!column) Then ...
If dr!column Is DBNull.Value Then ...
If dr.IsDBNull(columnnumber) Then ...
CHAPTER 20 ■VISUAL BASIC .NET AND C# 583
5351c20_final.qxd 8/26/05 8:01 PM Page 583
www.it-ebooks.info

In using SELECT results (e.g., stringvar = CStr(dr!textcolumn)), you must always consider the
case that the data field contains NULL: Then the VB.NET method CStr or the C# cast operator
(string) leads to an error.
Dates: Date information (DATE, TIMESTAMP) is automatically transformed in ADO.NET into
Date objects.
Times: Times (TIME) are transformed in ADO.NET into TimeSpan objects.
The MySqlDateTime data type: You can also process MySQL dates and times directly in the
form of MySqlDateTime objects. To do so, use the DataReader method GetMySqlDateTime. From
the resulting object you can then evaluate the components of the date and time with the prop-
erties Day, Hour, etc. The property IsValidDate tells whether the date is valid. (MySQL allows the
storage of invalid dates, depending on the configuration, such as 31.2.2005.)
Fixed-point numbers: Fixed-point numbers (DECIMAL) are represented in ADO.NET by
Decimal objects.
BIGINTs: In contrast to ADO, ADO.NET has no problems with 64-bit integers (BIGINT). Such
numbers are represented in ADO.NET as Long numbers.
BLOBs: Binary data are represented in ADO.NET by Byte fields.
Character strings: In VB.NET and C#, character strings are coded in UTF16 (aka UCS2), a Uni-
code format in which each character is represented by 2 bytes. In transfer between ADO.NET
and MySQL, the conversion takes place automatically into the character set of table.
Several SELECT Results
If you execute more than one SQL command at a time (“SELECT 1;SELECT 2”) or if you are using stored
procedures, it can happen that you obtain several SELECT results. The MySqlDataReader gives by default
access to only the first result. You can activate the additional results with the method NextResult, which
returns False if there are no more results.
The following lines form a loop over all results (Do), over all records of each result (While), and
over all columns of each record (For), and then the data are returned as a character string in the
console window.
Dim i As Integer
Dim com As New MySqlCommand( _
"SELECT * FROM authors LIMIT 3;SELECT COUNT(*) FROM authors;SELECT 1+2", _
myconn)
Dim dr As MySqlDataReader = com.ExecuteReader()
Do
Console.WriteLine("-----")
While dr.Read()
For i = 0 To dr.FieldCount - 1
If dr.IsDBNull(i) Then
Console.Write("NULL ")
Else
Console.Write(dr.GetString(i) + " ")
End If
Next
Console.WriteLine()
End While
Loop While dr.NextResult()
dr.Close()
CHAPTER 20 ■VISUAL BASIC .NET AND C#584
5351c20_final.qxd 8/26/05 8:01 PM Page 584
www.it-ebooks.info

DataSet, DataTable, MySqlDataAdapter
If you wish to navigate at will (backward as well as forward) through SELECT results and alter, delete,
or insert new records, then you need a DataSet object and at least one DataTable contained therein.
ADataSet helps in managing one or more DataTables. A DataTable is simply a table with data, usually
the result of SELECT queries. DataSet and DataTable are general ADO.NET classes, and are independ-
ent of the provider. For this reason, there are no independent MySqlDataTables, MySqlDataSets, etc.
However, for communication between the DataSet and the provider, a connection class is necessary,
and it is precisely this task that is taken over by the MySqlDataAdapter object.
All the data contained in a DataSet are located in the memory of the ADO.NET program. When
a DataTable contained in a DataSet is created on the basis of a SELECT query, all resulting records
from the query are transmitted to the ADO.NET program. From this point on, you are processing
the local copy of the data. The data stored on the MySQL server are updated only when the Update
method for the MySqlDataAdapter is executed.
The following commands show how to fill a DataTable with the results of a SELECT query. As usual,
you first create an MySqlCommand object for your SQL command. This object will be passed to an
MySqlDataAdapter. The SELECT query is executed by the method Fill of the MySqlDataAdapter. The
results are stored in the DataSet. For this, a new DataTable is created in the DataSet, which in this
example is given the name “test”. You can now access this DataTable via ds.Tables(“name”).
Dim com As New MySqlCommand("SELECT * FROM tablename", myconn)
Dim da As New MySqlDataAdapter(com)
Dim ds As New DataSet() 'currently empty DataSet ds
da.Fill(ds, " dtname") 'create DataTable "dtname" in ds
Dim dt As DataTable = ds.Tables("dtname") 'access to the DataTable
You can now access the data of the DataTable in the form of dt.Row(rowno)!columnname. Here,
Row(n) returns a single record (class DataRow), and Rows.Count gives the number of records. A loop
over all records can be formulated thus:
Dim row As DataRow
For Each row In dt.Rows 'loop over all records
row!columnname = ... 'change data
Next
With datarow.Delete you can delete individual records. It is somewhat more complex to insert
new records. For that, you first create a new record with datatable.NewRow, change its contents, and
finally add it with datatable.Rows.Add to the DataTable:
Dim newrow As DataRow
newrow = dt.NewRow()
newrow!a_big_int = 12345
dt.Rows.Add(newrow)
As already mentioned, all changes in the DataSet are valid initially only locally (that is, in
memory of the ADO.NET program). For the changes to be carried out in the MySQL database, you
must execute the method Update for the MySqlDataAdapter. The update is carried out in a series
of INSERT, UPDATE, and DELETE commands, which the MySqlDataAdapter sends to MySQL.
However, the MySqlDataAdapter is not able to generate these commands. Therefore, first, before
the Update method, a MySqlCommandBuilder object must be generated to take over this task. The
following lines demonstrate how that is done:
CHAPTER 20 ■VISUAL BASIC .NET AND C# 585
5351c20_final.qxd 8/26/05 8:01 PM Page 585
www.it-ebooks.info

' ... Code to change data in dt
Dim cb As New MySqlCommandBuilder(da)
Try
da.Update(ds, "test")
Catch e As Exception
Stop
End Try
If you wish to know which UPDATE, INSERT, and DELETE commands are being executed, you
can find this out with cb.GetInsert/Update/DeleteCommand().
What looks great in theory, is in practice hemmed in with limitations:
• Changes can be stored only if the DataTables contained in the DataSet come directly from
a MySQL table. DataTables based on SELECT commands that include several tables (JOIN)
or use aggregating functions (GROUP BY) cannot be updated. In this case, the
MySqlCommandBuilder is incapable of determining the appropriate SQL commands.
This limitation is not one of ADO.NET, but has to do with the fact that changes in such tables
can often be interpreted in more than one way, and ADO.NET and the CommandBuilder are
not clairvoyant.
• The change in a DataSet is strongly provider-dependent. While I have had good experiences
with Connector/J, the ODBC provider often causes problems. The strong provider-depend-
ence also means that you cannot count on your code functioning after a change of provider.
■Tip Not everything that looks technologically appealing is ready to be used in the real world. You should carry
out exhaustive testing before using
DataSet
s for changing data. You will be safe if you use
DataSet
s primarily for
reading data. To alter data, you should create the necessary SQL commands yourself and execute them with
MySqlCommand
objects (preferably using parameters).
An Example
In the following lines of code a DataTable is created in a DataSet with the results of the query
SELECT * FROM authors. In the For loop, all the records whose author name begins with test are
deleted.
Dim com As New MySqlCommand("SELECT * FROM authors", myconn)
Dim da As New MySqlDataAdapter(com) 'interface MySQL<-->DataSet
Dim cb As New MySqlCommandBuilder(da) 'necessary for updates
Dim ds As New DataSet() 'currently empty DataSet
da.Fill(ds, "authors") 'creates DataTable "authors" in ds
Dim dt As DataTable = ds.Tables("authors") 'access to the DataTable
Dim row As DataRow
For Each row In dt.Rows 'loop over all records
If LCase(Left(CStr(row!authName), 4)) = "test" Then 'alter data
Console.WriteLine("delete author " & row!authName.ToString)
row.Delete()
End If
Next
Try
da.Update(ds, "authors")
Catch e As Exception
MsgBox(e.Message)
End Try
CHAPTER 20 ■VISUAL BASIC .NET AND C#586
5351c20_final.qxd 8/26/05 8:01 PM Page 586
www.it-ebooks.info

In C# the code looks like this:
MySqlCommand com;
MySqlDataAdapter da;
DataSet ds;
DataTable dt;
MySqlCommandBuilder cb;
com = new MySqlCommand("SELECT * FROM authors", myconn);
da = new MySqlDataAdapter(com);
cb = new MySqlCommandBuilder(da);
ds = new DataSet();
da.Fill(ds, "authors");
dt = ds.Tables["authors"];
foreach (DataRow row in dt.Rows) {
if (row["authName"].ToString().Substring(0, 4).ToLower() == "test") {
Console.WriteLine("delete author " + row["authName"].ToString());
row.Delete();
}
}
try {
da.Update(ds, "authors"); }
catch (Exception e) {
Console.WriteLine(e.Message); }
Auxiliary Methods
The class MySqlHelper contains some methods that make your work with Connector/Net simpler
and more efficient:
ExecuteDataRow creates a connection to the MySQL server, executes a SELECT command,
returns the first record of the SELECT result, and closes the connection to the MySQL server.
ExecuteReader creates a connection to the MySQL server, executes a SELECT command,
returns the result as a DataReader object, and closes the connection to the MySQL server.
UpdateDataSet saves changes to a DataSet in the underlying database of the MySQL server.
As with the two previous methods, a new connection to the MySQL server is created and then
closed.
ExecuteScalar executes a SELECT command and returns the scalar result as an Object. This
method can use an existing connection to the MySQL server or create a new connection and
then close it.
ExecuteDataSet executes a SELECT command and returns the result as a DataSet object.
As with ExecuteScalar, either an existing connection can be used or a new one created.
ExecuteNonQuery executes an SQL command that does not return a list of records as result.
As with ExecuteScalar, either an existing connection can be used or a new one created.
Error-Handling
When errors occur in the execution of ADO.NET methods and properties, Exceptions are triggered.
Such exceptional situations are usually processed with Try-Catch constructions.
If Connector/Net classes are directly responsible for the error, a MySqlException object is passed
to the Catch block. In the case of errors for which the general classes of the System.Data namespace
are responsible, the Catch block receives a System.Data.DataException object. In both cases the
Message property provides more precise information about the error.
CHAPTER 20 ■VISUAL BASIC .NET AND C# 587
5351c20_final.qxd 8/26/05 8:01 PM Page 587
www.it-ebooks.info
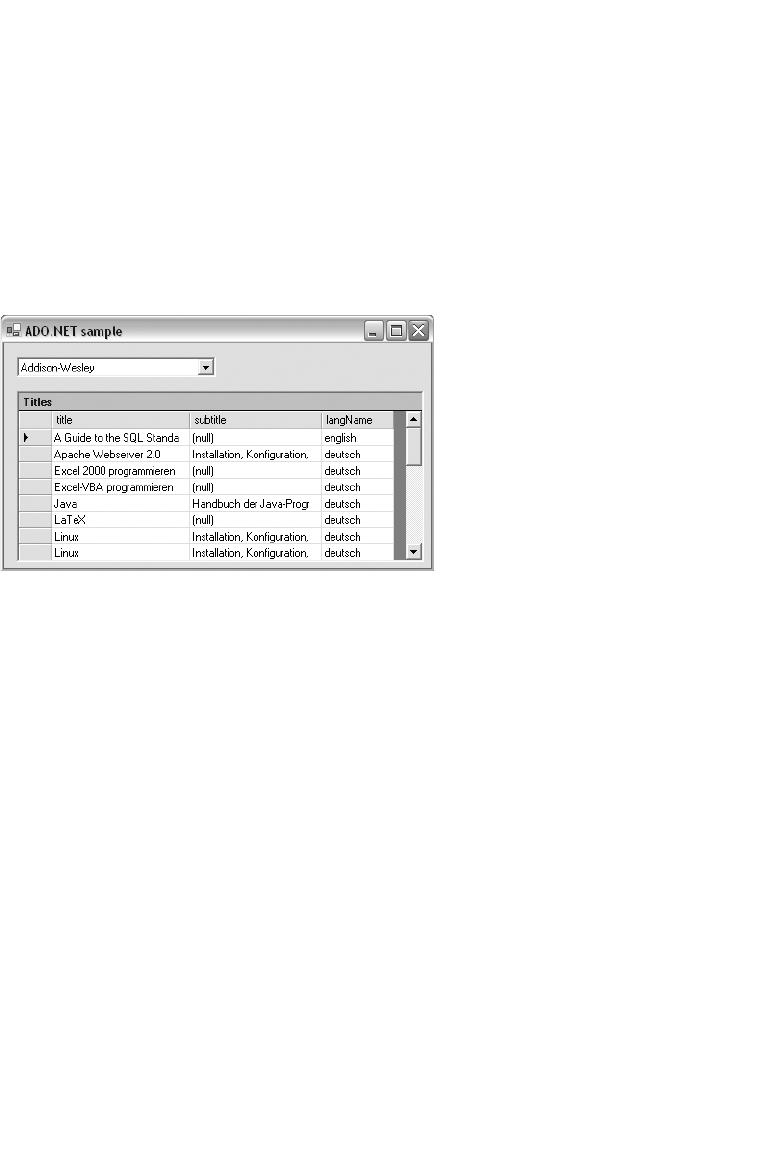
Windows.Forms and ASP.NET Controls
The .NET Framework offers a great number of controls for Windows and Internet applications
(ASP.NET) that can be bound to DataSets. This simplifies the representation and processing of lists
and tables on the basis of query results.
A basic rule is that as long as you display only data with the controls, and don’t try to alter the
data, you may expect few problems. However, if you permit data updating, then you should test
extensively what is possible. (Internally, data bound controls use DataSets almost exclusively, and
I have already referred to their possible Update problems.)
Space here does not suffice to introduce data bound controls and go into the details of their
deployment. The following example program should at least provide a first impression of what can
be done with them. The program contains a listbox with all publishers. When one is selected, a table
field displays that publisher’s titles (see Figure 20-3).
' example program vbnet\datacontrols
Imports MySql.Data.MySqlClient
Public Class Form1
Inherits System.Windows.Forms.Form
' Windows Forms Designer generated code ...
Dim myconn As MySqlConnection
Dim titlecommand As MySqlCommand
Dim publparam As MySqlParameter
Private Sub Form1_Load(...) Handles MyBase.Load
' create connection to database
myconn = New MySqlConnection( _
"Data Source=localhost;Initial Catalog=mylibrary;" + _
"User ID=root;PWD=uranus")
myconn.Open()
'prepare command and parameters for title query and Parameter
titlecommand = New MySqlCommand( _
"SELECT title, subtitle, langName FROM titles, languages " + _
"WHERE publID = ?publ AND titles.langID = languages.langID " + _
"ORDER BY title", _
myconn)
publparam = titlecommand.Parameters.Add("?publ", MySqlDbType.Int32)
CHAPTER 20 ■VISUAL BASIC .NET AND C#588
Figure 20-3. ADO.NET example program
5351c20_final.qxd 8/26/05 8:01 PM Page 588
www.it-ebooks.info

'fill ComboBox with a list of all publishers
Dim com As New MySqlCommand( _
"SELECT publID, publName FROM publishers ORDER BY publName", _
myconn)
Dim da As New MySqlDataAdapter(com)
Dim ds As New DataSet()
da.Fill(ds, "publishers")
ComboBox1.DisplayMember = "publName"
ComboBox1.ValueMember = "publID"
ComboBox1.DataSource = ds.Tables("publishers")
End Sub
' nw publisher selected --> create new DataSet with titles
Private Sub ComboBox1_SelectedIndexChanged(...) _
Handles ComboBox1.SelectedIndexChanged
publparam.Value = ComboBox1.SelectedValue
Dim ds As New DataSet()
Dim da As New MySqlDataAdapter(titlecommand)
da.Fill(ds, "titles")
DataGrid1.DataSource = ds.Tables("titles")
End Sub
End Class
Transactions
At the beginning of a transaction, execute the method BeginTransaction for the MySqlConnection
object. As result, you obtain an MySqlTransaction object, with whose method Commit or Rollback you
can end the transaction. For all commands that are executed within the confines of the transaction,
the Transaction property must be set, either through the third parameter of the MySqlCommand con-
structor or through an explicit allocation of the Transaction property. The following lines show the
usual way of proceeding:
Dim tr As MySqlTransaction
tr = myconn.BeginTransaction()
Dim com As New MySqlCommand("UPDATE ...", myconn, tr)
com.ExecuteNonQuery()
' ... additional commands of the transaction
tr.Commit()
Example: Storing New Titles in mylibrary
The example program of this section consists of a simple input mask in which you can input new
book titles together with their authors and publishers. In the author field you may input more than
one name, separated by semicolons. The publisher field is allowed to remain empty (in which case,
the title is stored without a publisher). (See Figure 20-4.) In storing a new title, a check is made
whether the authors and publisher are already known to the database, in which case the records
already stored are used. There are no other plausibility checks or error-checking.
CHAPTER 20 ■VISUAL BASIC .NET AND C# 589
5351c20_final.qxd 8/26/05 8:01 PM Page 589
www.it-ebooks.info

The program code is broken into two procdures. In Form1_Load, a number of MySqlCommand
objects are initialized with INSERT and SELECT commands. These commands are then used when
the procedure btnSave_Click is called for storing input:
' example vbnet\newtitleform
Option Strict On
Imports MySql.Data.MySqlClient
Public Class Form1
Inherits System.Windows.Forms.Form
' Windows Forms Designer generated code ...
Dim mysqlConn As MySqlConnection
Dim insertPublisherCom, insertAuthorCom, _
insertTitleCom, insertRelAuthTitleCom, _
selectPublisherCom, selectAuthorCom, _
lastIDCom As MySqlCommand
' initialization tasks
Private Sub Form1_Load(...) Handles MyBase.Load
' create connection to database
mysqlConn = New MySqlConnection( _
"Data Source=localhost;Initial Catalog=mylibrary;" + _
"User ID=root;PWD=uranus")
mysqlConn.Open()
' command for storing an author
insertAuthorCom = New MySqlCommand( _
"INSERT INTO authors (authName) VALUES (?authName)", mysqlConn)
insertAuthorCom.Parameters.Add("?authName", MySqlDbType.VarChar)
insertAuthorCom.Prepare()
' command for author search
selectAuthorCom = New MySqlCommand( _
"SELECT authID FROM authors WHERE authName = ?authName LIMIT 1", _
mysqlConn)
selectAuthorCom.Parameters.Add("?authName", MySqlDbType.VarChar)
selectAuthorCom.Prepare()
' command for storing a title
insertTitleCom = New MySqlCommand( _
"INSERT INTO titles (title, publID) VALUES (?title, ?publID)", _
mysqlConn)
insertTitleCom.Parameters.Add("?title", MySqlDbType.VarChar)
insertTitleCom.Parameters.Add("?publID", MySqlDbType.Int32)
insertTitleCom.Prepare()
CHAPTER 20 ■VISUAL BASIC .NET AND C#590
Figure 20-4. Form for storing a new book title
5351c20_final.qxd 8/26/05 8:01 PM Page 590
www.it-ebooks.info

' command for storing a publisher
insertPublisherCom = New MySqlCommand( _
"INSERT INTO publishers (publName) VALUES (?publName)", mysqlConn)
insertPublisherCom.Parameters.Add("?publName", MySqlDbType.VarChar)
insertTitleCom.Prepare()
' command for publisher search
selectPublisherCom = New MySqlCommand( _
"SELECT publID FROM publishers WHERE publName = ?publName LIMIT 1", _
mysqlConn)
selectPublisherCom.Parameters.Add("?publName", MySqlDbType.VarChar)
selectPublisherCom.Prepare()
' command for storing rel_title_author enries
insertRelAuthTitleCom = New MySqlCommand( _
"INSERT INTO rel_title_author (titleID, authID) " + _
"VALUES (?titleID, ?authId)", _
mysqlConn)
insertRelAuthTitleCom.Parameters.Add("?titleID", MySqlDbType.Int32)
insertRelAuthTitleCom.Parameters.Add("?authID", MySqlDbType.Int32)
insertRelAuthTitleCom.Prepare()
' command for determining LAST_INSERT_ID
lastIDCom = New MySqlCommand( _
"SELECT LAST_INSERT_ID()", mysqlConn)
End Sub
Private Sub btnSave_Click(...) Handles btnSave.Click
Dim publID, titleID As Integer
Dim result As Object
Dim author, authors() As String
' Test whether input complete
txtTitle.Text = Trim(txtTitle.Text)
txtAuthors.Text = Trim(txtAuthors.Text)
txtPublisher.Text = Trim(txtPublisher.Text)
If txtTitle.Text = "" Or txtAuthors.Text = "" Then
MsgBox("Please specify title and authors!")
Exit Sub
End If
' search for publisher or store new publisher
If txtPublisher.Text <> "" Then
' does publisher already exist?
selectPublisherCom.Parameters("?publName").Value = txtPublisher.Text
result = selectPublisherCom.ExecuteScalar()
If result Is Nothing Then
insertPublisherCom.Parameters("?publName").Value = txtPublisher.Text
insertPublisherCom.ExecuteNonQuery()
publID = CInt(lastIDCom.ExecuteScalar())
Else
publID = CInt(result)
End If
End If
CHAPTER 20 ■VISUAL BASIC .NET AND C# 591
5351c20_final.qxd 8/26/05 8:01 PM Page 591
www.it-ebooks.info

' store title
insertTitleCom.Parameters("?title").Value = txtTitle.Text
If publID > 0 Then
insertTitleCom.Parameters("?publID").Value = publID
Else
insertTitleCom.Parameters("?publID").Value = DBNull.Value
End If
insertTitleCom.ExecuteNonQuery()
titleID = CInt(lastIDCom.ExecuteScalar())
' store authors
authors = Split(txtAuthors.Text, ";")
insertRelAuthTitleCom.Parameters("?titleID").Value = titleID
For Each author In authors
' does the author exist already?
selectAuthorCom.Parameters("?authName").Value = author
result = selectAuthorCom.ExecuteScalar()
If result Is Nothing Then
' no, store new author
insertAuthorCom.Parameters("?authName").Value = author
insertAuthorCom.ExecuteNonQuery()
insertRelAuthTitleCom.Parameters("?authID").Value = _
CInt(lastIDCom.ExecuteScalar())
Else
' yes, determine authID
insertRelAuthTitleCom.Parameters("?authID").Value = CInt(result)
End If
'store rel_title_authors entry
insertRelAuthTitleCom.ExecuteNonQuery()
Next
MsgBox("Your input has been saved")
txtTitle.Text = ""
txtAuthors.Text = ""
txtPublisher.Text = ""
End Sub
End Class
Example: Storing an Image File in a BLOB
and Then Reading It
The following example program reads the file test.jpg from the current directory and stores it in
a table (btnSave_Click). In a second step, the binary data are read from the table, displayed in a
PictureBox control element (see Figure 20-5), and saved to a second file test1.jpg (btnLoad_Click).
CHAPTER 20 ■VISUAL BASIC .NET AND C#592
5351c20_final.qxd 8/26/05 8:01 PM Page 592
www.it-ebooks.info

The program shows various programming techniques for reading and writing binary data from
and to a database. For storing the image, the following table is created at the beginning of the pro-
gram and then deleted at the end:
CREATE TABLE IF NOT EXISTS testpic
(id INT NOT NULL AUTO_INCREMENT, pic MEDIUMBLOB, PRIMARY KEY (id))
Here is the program code:
' example code vbnet/blob_test
Option Strict On
Imports MySql.Data.MySqlClient
Imports System.IO
Public Class Form1
Dim myconn As MySqlConnection
Dim com As MySqlCommand
Dim id As Integer
' create connection to MySQL server, create testpic table
Private Sub btnConnect_Click(...) Handles btnConnect.Click
Try
myconn = New MySqlConnection( _
"Data Source=192.168.80.128;Initial Catalog=mylibrary;" + _
"User ID=root;PWD=uranus")
myconn.Open()
CHAPTER 20 ■VISUAL BASIC .NET AND C# 593
Figure 20-5. Example of using images and binary data
5351c20_final.qxd 8/26/05 8:01 PM Page 593
www.it-ebooks.info

com = New MySqlCommand( _
"CREATE TABLE IF NOT EXISTS testpic " + _
" (id INT NOT NULL AUTO_INCREMENT, " + _
" pic MEDIUMBLOB, PRIMARY KEY (id))", _
myconn)
com.ExecuteNonQuery()
btnSave.Enabled = True
Catch myerror As MySqlException
MsgBox("Database connection error: " & myerror.Message)
Me.Close()
End Try
End Sub
' load file test.jpg and store in the table testpic
Private Sub btnSave_Click(...) Handles btnSave.Click
Dim fs As FileStream
Dim bindata As Byte()
Dim picpara As MySqlParameter
' prepare INSERT command
com = New MySqlCommand( _
"INSERT INTO testpic (pic) VALUES(?pic)", myconn)
picpara = com.Parameters.Add("?pic", MySqlDbType.MediumBlob)
com.Prepare()
' read file into the byte field
fs = New FileStream("test.jpg", FileMode.Open, FileAccess.Read)
ReDim bindata(CInt(fs.Length))
fs.Read(bindata, 0, CInt(fs.Length))
fs.Close()
' execute INSERT, bindata as parameter
picpara.Value = bindata
com.ExecuteNonQuery()
' determine ID of the new record in testpic
com.CommandText = "SELECT LAST_INSERT_ID()"
id = CInt(com.ExecuteScalar())
btnLoad.Enabled = True
End Sub
' read BLOB, store as file test1.jpg and display in PictureBox1
Private Sub btnLoad_Click(...) Handles btnLoad.Click
Dim fs As FileStream
Dim bindata As Byte()
Dim ms As New MemoryStream
' execute SELECT command
com = New MySqlCommand("SELECT pic FROM testpic WHERE id=" & id, myconn)
bindata = CType(com.ExecuteScalar(), Byte())
' write Byte field in MemoryStream,
' create from this a new bitmap object
ms.Write(bindata, 0, bindata.Length)
PictureBox1.Image = New Bitmap(ms)
CHAPTER 20 ■VISUAL BASIC .NET AND C#594
5351c20_final.qxd 8/26/05 8:01 PM Page 594
www.it-ebooks.info

' write MemoryStream in FileStream as file test1.jpg
fs = New FileStream("test1.jpg", FileMode.Create, FileAccess.Write)
ms.WriteTo(fs)
fs.Close()
End Sub
' delete testpic table
Private Sub btnEnd_Click(...) Handles btnEnd.Click
com = New MySqlCommand( _
"DROP TABLE IF EXISTS testpic ", myconn)
com.ExecuteNonQuery()
Me.Close()
End Sub
End Class
CHAPTER 20 ■VISUAL BASIC .NET AND C# 595
5351c20_final.qxd 8/26/05 8:01 PM Page 595
www.it-ebooks.info


SQL Reference
This chapter gives an overview of the SQL operators, functions, and commands available under
MySQL 5.0. My goal in organizing the information in this chapter was to give you, dear reader, a
compact overview of the most important and useful syntactic variants.
This chapter is no substitute for the MySQL documentation, which provides not only the
MySQL source code, but also the best, most complete, and most up-to-date reference for MySQL.
No book could supersede this online reference. The great advantage of the MySQL documentation,
its huge amount of information, is also its greatest drawback: important commands and syntax
variants get lost amid the countless details, which for 90 percent of the cases are irrelevant. See
http://dev.mysql.com/doc/mysql/en/index.html.
Please note that MySQL boasts countless extensions as well as, alas, certain shortcomings with
respect to the ANSI-SQL/92 standard.
Syntax
We begin with a brief section describing the syntax of object names, character strings, dates and
times, and binary data.
Object Names
Names of objects—databases, tables, columns, etc.—can be at most 64 characters in length. Permit-
ted characters are all the alphanumeric characters of the character set used by MySQL as well as the
characters _ and $. For practical reasons, however, it makes sense to restrict oneself to the alphanu-
meric ASCII characters together with the underscore character. There are two reasons for this:
• The coding of special characters depends on the character set. If the client and server are not
in agreement on the character set, then access to objects might become problematic.
• The names of databases and tables can be stored in files, and it is not MySQL, but the oper-
ating system that is responsible for the naming rules for files. This can be yet another source
of conflict (especially if databases must be exchanged among various operating systems).
Names with special characters and reserved words: Object names are normally not permitted
to be the same as reserved SQL key words (select, from, etc.). Also, most special characters are not
permitted in a name (-!%, etc.). Both restrictions can be gotten around, however, by putting the
name in backward single quotes:
CREATE TABLE `special name` (`from` INT, `a!%` INT)
Compound names: Table names that do not refer to the current database must have the data-
base name prefixed to them. Likewise, the name of a column must be extended by the name of the 599
CHAPTER 21
■ ■ ■
5351c21_final.qxd 8/26/05 8:06 PM Page 599
www.it-ebooks.info

table and that of the database if the column name alone fails to provide a unique identification
(such as in queries in which several like-named columns in different tables appear):
Table names: tablename or db.tablename
Column names: colname or tblname.colname or dbname.tblname.colname
Case Sensitivity
The following objects are listed according to whether they exhibit case sensitivity:
Case Sensitivity: Database names (except under Windows), table names (except under Win-
dows), alias names, variable names through MySQL 4.1.
No Case Sensitivity: SQL commands and functions, column names, index names, variable
names since MySQL 5.0.
Under Windows, MySQL is flexible with respect to case in the naming of databases and tables.
The reason is that the operating system does not distinguish case in the naming of directories and
files. Note, however, that case must be consistent within an SQL command. The following com-
mand will not function properly: SELECT * FROM authors WHERE Authors.authName = “xxx”.
Since MySQL 4.0, MySQL under Windows uses exclusively lowercase names in the creation of
new databases and tables (regardless of how it is written in the CREATE command). This should
simplify the migration of databases from Windows to Unix/Linux. This automatic transformation
is the result of the option lower_case_table_names, which is set to 1 under Windows by default.
Character Strings
Character strings can be enclosed in single or double quotes. The following two expressions are
equivalent in MySQL, though only the single-quote variant conforms to the ANSI-SQL/92 standard.
'character string'
"character string"
If a quotation mark should happen to be part of the character string, then there are various ways of
expressing this:
"abc'abc" means abc'abc
"abc""abc" means abc"abc
"abc\'abc" means abc'abc
"abc\"abc" means abc"abc
'abc"abc' means abc"abc
'abc''abc' means abc'abc
'abc\"abc' means abc"abc
'abc\'abc' means abc'abc
Within a character string, the special characters provided by the prevailing character set are
allowed, for example, äöüß if you are working with the default character set ISO-8859-1 (latin1).
However, some special characters must be specially coded:
CHAPTER 21 ■SQL REFERENCE600
5351c21_final.qxd 8/26/05 8:06 PM Page 600
www.it-ebooks.info

Quoting of Special Characters Within a String
\0 0 byte (Code 0).
\b Backspace character (Code 8).
\t Tab character (Code 9).
\n Newline character (Code 10).
\r Carriage return character (Code 13).
\" Double quote (Code 34).
\' Single quote (Code 39).
\\ Backslash (Code 92).
If xis not one of the above-mentioned special characters, then \x simply returns the character
x. Even if a character string is to be stored as a BLOB (binary object), then the 0 character as well as
the single quote, double quote, and backslash must be given in the form \0, \’, \”, and \\.
Instead of indicating special characters in character strings or BLOBs by the backslash escape
character, it is often easier simply to specify the entire object using hexadecimal notation. MySQL
accepts hex codes of arbitrary length in SQL commands in the following form:
0x4142434445464748494a.
However, MySQL is incapable of returning the result of a query in this form. (If you are working
with PHP, then that programming language offers a convenient function for this purpose: bin2hex.)
■Tip If two character strings are to be concatenated, then you must use the function
CONCAT
. (The operators +
and | | from other SQL dialects or programming languages will not serve the purpose.) In general, MySQL provides
a broad range of functions for working with character strings.
Character Set and Sort Order
• The character string and sort order (collation) will be set independently of each other.
• Each table, and indeed each column within a table, can have its own character set and its
own sort order.
• Unicode is now a possible choice for the character set (in formats UTF8 and UCS2 = UTF16).
In SQL commands one can specify the character set for every string. For this, you can use the
function CONVERT or the cast operator _characterset. Here are two equivalent examples, demon-
strating the internal Unicode encoding in the format UTF8:
SELECT HEX(CONVERT('ABCäöü' USING utf8))
414243C3A4C3B6C3BC
SELECT HEX(_utf8 'ABCäöü')
414243C3A4C3B6C3BC
In many cases, it can be necessary to specify the sort order as well as the character set. (This
determines which characters are considered equivalent and how character strings are to be sorted.)
For this, one has the syntax _characterset ‘abc’ COLLATE collname. Here is an example:
SELECT _latin1 'a' = _latin1 'ä'
0
SELECT _latin1 'a' COLLATE latin1_german1_ci =
_latin1 'ä' COLLATE latin1_german1_ci
CHAPTER 21 ■SQL REFERENCE 601
5351c21_final.qxd 8/26/05 8:06 PM Page 601
www.it-ebooks.info

Numbers
Decimal numbers are written with a period for the decimal point and without a thousands separa-
tor (thus 27345 or 2.71828). One may also use scientific notation (6.0225e23 or 6.626e-34) for very
large or very small numbers.
MySQL can also process hexadecimal numbers prefixed by 0x or in the form x’1234’. Depend-
ing on the context, the number is interpreted as a character string or as a 64-bit integer:
SELECT 0x4142434445464748494a, x'4142434445464748494a'
ABCDEFGHIJ ABCDEFGHIJ
SELECT 0x41 + 0
66
Automatic Transformation of Numbers and Character Strings
In carrying out an operation on two different data types, MySQL makes every attempt to find a
compatible data type. Integers are automatically changed into floating-point numbers if one of the
operators is a floating-point number. Character strings are automatically changed into numbers if
the operation involves a calculation. (If the beginning of the character string cannot be interpreted
as a number, then MySQL calculates with 0.)
SELECT '3.14abc' + 1
4.14
Date and Time
MySQL represents dates as character strings of the form 2005-12-31, and times in the form
23:59:59. With the data type DATETIME both formats are simply concatenated, yielding, for
example, 2005-12-31 23:59:59.
USE exceptions
SELECT * FROM test_date
id a_date a_time a_datetime a_timestamp
1 2005-12-07 09:06:29 2005-12-07 09:06:29 2005-12-07 09:06:29
■Caution Beginning with MySQL 4.1, the default setting of
TIMESTAMP
s has changed. They are returned from
the server in the format
YYYY-MM-DD HH:MM:DD
. Through MySQL 4.0, the usual form was
YYYYMMDDHHMMDD
.
Add a zero if you wish to use the old format (
SELECT ts+0 FROM table
).
Version 5.0 has introduced another important change. In
DATE
and
DATETIME
columns only valid dates are
now accepted. (Older versions of MySQL made only a cursory validity check, which recognized
2005-02-45
as
invalid, but not
2005-02-31
.) The date
‘0000-00-00’
is a special case. This value is officially permitted in MySQL
as a date.
In storing dates, MySQL is quite flexible: Both numbers (e.g., 20051231) and character strings
are accepted. Hyphens are allowed in character strings, or they can simply be done without. If a
year is given but no century is specified, then MySQL automatically uses the range 1970—2069.
Therefore, MySQL accepts the following character strings for a DATETIME column: ‘2005 12 31’,
‘20051231’, ‘2005.12.31’, and ‘2005&12&31’.
CHAPTER 21 ■SQL REFERENCE602
5351c21_final.qxd 8/26/05 8:06 PM Page 602
www.it-ebooks.info

Binary Data
Binary data that are to be stored in BLOB fields are dealt with in SQL commands like character
strings. (However, there are differences in sorting.)
Binary Numbers
Since version 5.0.3, MySQL supports the data type BIT. Binary numbers can be written in the form
b’110010’.
Comments
There are three ways of supplying comments in SQL commands:
SELECT 1 # comment
SELECT 1 /* comment */
SELECT 1 -- comment
Comments that begin with # or with — (there must be a space after the —) hold until the end of
the line. Comments between /* and */ can extend over several lines, as in C. Nesting is not allowed.
If you wish to write SQL code that makes use of some of the peculiarities of MySQL yet remains
compatible as much as possible with other dialects, a particular variant of the comment is often
useful:
SELECT /*! STRAIGHT_JOIN */ col FROM table ...
With the MySQL-specific SELECT extension, STRAIGHT_JOIN will be executed only by MySQL;
all other SQL dialects will consider this a comment.
A variant of this enables differentiation among various MySQL dialects:
CREATE /*!32302 TEMPORARY */ TABLE ...
In this case, the key word TEMPORARY is processed only if the command is executed by
MySQL 3.23.02 or a more recent version.
Semicolons at the End of SQL Commands
Neither ANSI-SQL nor the SQL dialect of MySQL allows semicolons at the end of an instruction.
This syntax rule holds as well for MySQL when a single command is to be executed. However, there
are cases in which semicolons are necessary:
• If you execute commands with the MySQL command interpreter (that is, the program
mysql), you must terminate commands with a semicolon.
• In defining stored procedures and triggers, commands must be separated by semicolons.
• Since MySQL 4.1 the client library has allowed for the execution of several commands at once,
and here as well the commands must be separated by semicolons. PHP also provides for the
mysqli method multi_query. With other APIs a MULTI_STATEMENT mode must be explicitly
activated, in C, for example, with mysql_real_connect(…, CLIENT_MULTI_STATEMENTS).
CHAPTER 21 ■SQL REFERENCE 603
5351c21_final.qxd 8/26/05 8:06 PM Page 603
www.it-ebooks.info

Operators
MySQL Operators
Arithmetic Operators
+ - * / Basic calculation.
% Modulo (remainder on integer division).
DIV Alternative division operator (from MySQL 4.1).
MOD Alternative modulo operator (from MySQL 4.1).
Bit Operators
| Binary OR.
& Binary AND.
~ Binary negation (inverts all bits).
<< Shifts all bits left (implies multiplication by 2n).
>> Shifts all bits right (implies division by 2n).
Comparison Operators
= Equality operator.
<=> Equality operator that permits a NULL comparison.
!= <> Inequality operator.
< > <= >= Comparison operators.
IS [NOT] NULL NULL comparison.
BETWEEN Range comparison (e.g., x BETWEEN 1 AND 3).
IN Set comparison (e.g., x IN (1, 2, 3) or x IN (‘a’, ‘b’, ‘c’)).
NOT IN Set comparison (e.g., x NOT IN (‘a’, ‘b’, ‘c’)).
Pattern Comparison
[NOT] LIKE Simple pattern comparison (e.g., x LIKE ‘m%’).
[NOT] REGEXP Extended pattern comparison (e.g., x REGEXP ‘.*x$’).
SOUNDS LIKE Corresponds to SOUNDEX(a) = SOUNDEX(b), since MySQL 4.1.
Binary Comparison
BINARY Marks the operands as binary (e.g., BINARY x = y).
Logical Operators
!, NOT Negation.
||, OR Logical OR.
&&, AND Logical AND.
XOR Logical exclusive OR (new since MySQL 4.0).
Casting Operators (Since MySQL 4.1)
_charset ‘abc’ The character set charset holds for ‘abc’.
_charset ‘abc’COLLATE col The character set charset and sort order col hold for ‘abc’.
CHAPTER 21 ■SQL REFERENCE604
5351c21_final.qxd 8/26/05 8:06 PM Page 604
www.it-ebooks.info

Arithmetic Operators, Bit Operators
Arithmetic operators for which one of the operands is NULL generally return NULL as result. In
MySQL, a division by zero also returns the result NULL (in contrast to many other SQL dialects).
Comparison Operators
Comparison operators normally return 1 (corresponding to TRUE) or 0 (FALSE). Comparisons with
NULL return NULL. The two exceptions are the operators <=> and IS NULL, which even in compari-
son with NULL return 0 or 1:
SELECT NULL=NULL, NULL=0
NULL, NULL
SELECT NULL<=>NULL, NULL<=>0
1, 0
SELECT NULL IS NULL, NULL IS 0
1, 0
In the case of string comparisons with <, <=, >, and >= with BETWEEN (and of course with all
sort operators), the character set and sort order of the affected column come into play. For strings in
quotes, the character set and sort order must be given explicitly. Comparisons of strings in different
character sets is not permitted.
Pattern Matching with LIKE
MySQL offers two operators for pattern matching. The simpler, and ANSI-compatible, of these is
LIKE. As with normal character string comparison, there is no case distinction. In addition, there
are two wild cards:
LIKE Search Pattern
_ Placeholder for an arbitrary character.
% Placeholder for arbitrarily many (including 0) characters (but not for NULL).
\_ The underscore character _.
\% The percent sign %.
Pattern Matching with REGEXP
Considerably wider scope in the formulation of a pattern is offered by REGEXP and the equivalent
command RLIKE. The relatively complicated syntax for the pattern corresponds to the Unix com-
mands grep and sed.
REGEXP Search Patterns
Definition of the Pattern
abc The string abc.
(abc) The string abc (formed into a group) .
[abc] One of the characters a, b, c.
[a-z] A character in the range a to z.
[^abc] None of these characters (but any other).
.Any character.
CHAPTER 21 ■SQL REFERENCE 605
5351c21_final.qxd 8/26/05 8:06 PM Page 605
www.it-ebooks.info

REGEXP Search Patterns
(Continued)
Appearance of the Pattern
xThe expression xmust appear once.
x|y The expression xor ymust appear once.
x? The expression xmay appear once (or not at all) .
x* The expression xmay appear arbitrarily often (or not at all).
x+ The expression xmay appear arbitrarily often, but at least once.
x{n} The expression xmust appear exactly ntimes.
x{,n} The expression xmay appear at most ntimes.
x{n,} The expression xmust appear at least ntimes.
x{n,m} The expression xmust appear at least nand at most mtimes.
^Placeholder for the beginning of the string.
$Placeholder for the end of the string.
\x Special character x(e.g., \$ for $).
As with LIKE, there is no case distinction. Please note that REGEXP is successful when the
search pattern is found somewhere within the character string. The search pattern is thus not
required to describe the entire character string, but only a part of it. If you wish to encompass the
entire character string, then you must use ^ and $ in the search pattern.
■Tip The above table contains only the most important elements of
REGEXP
patterns. A complete description
can be obtained under Unix/Linux with man 7 regex. This can also be found on the Internet, for example, at
http://linux.ctyme.com/man/alpha7.htm.
Binary Character String Comparison
Character strings are normally compared without case being taken into consideration. Thus ‘a’ = ‘A’
returns 1(true). If you wish to execute a binary comparison, then you must place BINARY in front of
one of the operands. BINARY is a cast operator; that is, it alters the data type of one of the operands
(in this case it changes a number or character string into a binary object). BINARY can be used both
for ordinary character string comparison and for pattern matching with LIKE and REGEXP:
SELECT 'a'='A', BINARY 'a' = 'A', 'a' = BINARY 'A'
1, 0, 0
Logical Operators
Logical operators likewise return 0 or 1, or NULL if one of the operands is NULL. This holds also for
NOT; that is, NOT NULL again returns NULL.
CHAPTER 21 ■SQL REFERENCE606
5351c21_final.qxd 8/26/05 8:06 PM Page 606
www.it-ebooks.info

Variables and Constants
MySQL supports a variety of variable types:
Ordinary variables (user variables): Such variables are identified by a prefixed @ character.
They lose their definition at the end of the MySQL session.
System and server variables: Such variables contain states or attributes of the MySQL server.
These variables are identified by two prefixed @ characters (e.g., @@binlog_cache_size).
Many system variables exist in two versions: one specific to the current connection (e.g.,
@@session.wait_timeout) and one global for the MySQL server (e.g., @@global.wait_timeout,
with the default value for this variable).
Structured variables: These are a special case of system variables. MySQL uses such variables
at this time only for defining additional MyISAM index caches.
Local variables and parameters within stored procedures: These variables are declared within
stored procedures and are valid only there. They have no identifier, and so must have a name
that makes them uniquely distinguishable from table and column names.
Through MySQL 4.1, MySQL variable names were case sensitive. However, starting with MySQL
5.0, these names are case insensitive. Thus @name, @Name, and @NAME all denote the same variable.
Variable Assignment
The following examples show several syntax variants for assigning values to variables. Note that SET
uses the assignment operator =, while SELECT uses :=. The last variant, the assignment of several
columns of a record to several variables, has been possible only since MySQL 5.0, and there only if
the SELECT command returns exactly one record.
SET @varname = 3
SELECT @varname := 3
SELECT @varname := COUNT(*) FROM tabelle
SELECT COUNT(*) FROM tabelle INTO @varname
SELECT title, subtitle FROM titles WHERE titleID=... INTO @t, @st
Evaluating and Displaying Variables
Most variables can be evaluated with SELECT:
SELECT @varname
3
SELECT @@binlog_cache_size
@@binlog_cache_size
32768
In the case of system variables, you can use SHOW VARIABLES in addition to SELECT. This com-
mand has the advantage that it can display a list of variables all at once. The @@ identifier is absent.
SHOW VARIABLES LIKE 'b%'
Variable_name Value
back_log 50
basedir C:\Programs\MySQL\MySQL Server 5.0
binlog_cache_size 32768
bulk_insert_buffer_size 8388608
Remarkably, there exist system variables that can be evaluated only with SELECT (e.g.,
@@autocommit) or only with SHOW VARIABLES (e.g., system_time_zone).
CHAPTER 21 ■SQL REFERENCE 607
5351c21_final.qxd 8/26/05 8:06 PM Page 607
www.it-ebooks.info

Global System Variables versus
System Variables at the Connection Level
In its system variables, MySQL distinguishes between SESSION and GLOBAL variables. SESSION
variables are valid only for the current session (connection), while GLOBAL variables hold for the
entire server.
SELECT @@wait_timeout -- Session (connection level)
SELECT @@session.wait_timeout -- Session (connection level)
SELECT @@global.wait_timeout -- Global
System variables can also be changed. According to whether the change is only for the current
connection or should be valid globally, the following syntax variants are available. Note that with
SET, you may omit the two @ symbols. One cannot change system variables with SELECT.
SET @@wait_timeout = 10000 -- Session (connection level)
SET @@session.wait_timeout = 10000 -- Session (connection level)
SET SESSION wait_timeout = 10000 -- Session (connection level)
SET @@global.wait_timeout = 10000 -- Global
SET GLOBAL wait_timeout = 10000 -- Global
Variables at the global level can be changed by users possessing the Super privilege. When a
global variable is changed, the new value holds for all new connections, but not for those already
in existence.
Changes in SESSION variables, on the other hand, hold only until the end of the current con-
nection. When a new connection is made, the global default value again holds.
■Tip This book does not contain a complete description of all MySQL system variables. A complete list of
GLOBAL
and
SESSION
variables can be found in the MySQL documentation. You may end up at the key word
LOCAL
, which has the same meaning in this context as
SESSION
:http://dev.mysql.com/doc/mysql/en/
system-variables.html.
Enlightenment on the contents of the variables can be found in the MySQL documentation at the following
pages: http://dev.mysql.com/doc/mysql/en/server-parameters.html,http://dev.mysql.com/
doc/mysql/en/set-option.html, and http://dev.mysql.com/doc/mysql/en/show-variables.html.
SET PASSWORD
The command SET can also be used to change the connection passwords. However, PASSWORD
is not a variable!
SET PASSWORD = PASSWORD('xxx')
SET PASSWORD FOR user@hostname = PASSWORD('xxx')
SET has some special forms, which are described later in this chapter under the heading SET.
Structured Variables
With many system variables there is the possibility of creating more than one instance.
The MySQL documentation calls these structured variables. They are addressed in the form
instancename.variablenname. Indeed, an entire group of variables can be related to an instance. (In
the nomenclature of object-oriented programming, one speaks simply of objects and properties.)
At present there is only one group of structured variables in MySQL, which serves for control of
cache storage for MyISAM indexes: key_buffer_size, key_cache_block_size, key_cache_division_limit,
CHAPTER 21 ■SQL REFERENCE608
5351c21_final.qxd 8/26/05 8:06 PM Page 608
www.it-ebooks.info

and key_cache_age_threshold. These four variables determine the size and management of RAM in
which indexes of MyISAM tables are temporarily stored.
After the start of the MySQL server there automatically exists an instance of this cache object,
which has the name default. Using SET @@default.key_buffer_size = … you can set the size of the
default cache. The shorthand SET @@key_buffer_size=… automatically refers to the instance default.
With the following command you can create an additional cache area:
SET @@mycache.key_buffer_size = n
Now mycache is a new instance of the cache. With SET @@mycache.key_cache_xxx you can set
additional properties of the cache. Then you can assign individual indexes to the new cache with
the command CACHE INDEX. To deactivate the cache, set its size to zero:
SET @@mycache.key_buffer_size = 0
■Tip The use of several index caches is useful only rarely for speed optimization. Further background information
is available at http://dev.mysql.com/doc/mysql/en/myisam-key-cache.html,http://dev.mysql.com/
doc/mysql/en/multiple-key-caches.html, and http://dev.mysql.com/doc/mysql/en/
structured-system-variables.html.
Constants
Starting with version 4.1, MySQL recognizes the constants TRUE (1) and FALSE (0).
MySQL Data Types
MySQL Data Types
Integers
TINYINT(m) 8-bit integer (1 byte); the optional value mgives the desired column width
in SELECT results (maximum display width), but has no influence on the
allowable range of numeric values.
SMALLINT(m) 16-bit integer (2 bytes).
MEDIUMINT(m) 24- bit integer (3 bytes).
INT(m), INTEGER(m) 32- bit integer (4 bytes).
BIGINT(m) 64- bit integer (8 bytes).
Floating-Point Numbers
FLOAT(m, d) Floating-point number, 8-place precision (4 bytes); the optional values m
and dspecify the desired number of places before and after the decimal
point in SELECT results; the values have no influence over the way the
number is stored.
DOUBLE(m, d) Floating-point number, 16-place precision (8 bytes).
REAL(m, d) Synonym for DOUBLE.
DECIMAL(p, s) Fixed-point number, stored as string; arbitrary number of places (1 byte
per digit + 2 bytes overhead); pspecifies the entire number of places, where
sis the number of places after the decimal point; default is DECIMAL(10,0).
NUMERIC, DEC Synonyms for DECIMAL.
Continued
CHAPTER 21 ■SQL REFERENCE 609
5351c21_final.qxd 8/26/05 8:06 PM Page 609
www.it-ebooks.info

MySQL Data Types
(Continued)
Date,Time
DATE Date in the form ‘2005-12-31’, range 1000-01-01 to 9999-12-31 (3 bytes).
TIME Time in the form ‘23:59:59’, range +/-838:59:59 (3 bytes).
DATETIME Combination of DATE and TIME in the form ‘2005-12-31 23:59:59’
(8 bytes).
YEAR Year in the range 1900–2155 (1 byte).
TIMESTAMP(m) Date and time in the form 20051231235959 for times between 1970 und
2038 (4 bytes); the optional value mspecifies the number of places in
SELECT results; m=8, for example, has the effect that only year, month,
and day are displayed.
Character Strings
CHAR(n) String with prescribed length, maximum 255 characters.
NATIONAL CHAR(n) Unicode string (corresponds to CHAR(n) CHARSET utf8 or NCHAR(n)).
VARCHAR(n) String with variable length; maximum 255 characters through MySQL 4.1,
and maximum 65,535 bytes since MySQL 5.0.3 for MyISAM tables, where
the maximum number of characters depends on the character set.
NATIONAL VARCHAR(n) Unicode string with variable length (corresponds to NCHAR
VARCHAR(n), VARCHAR(n) CHARSET utf8).
TINYTEXT String with variable length, maximum 255 characters.
TEXT String with variable length, maximum 216-1 characters.
MEDIUMTEXT String with variable length, maximum 224-1 characters.
LONGTEXT String with variable length, maximum 232-1 characters.
Binary Data
TINYBLOB Binary data with variable length, maximum 255 bytes.
BLOB Binary data with variable length, maximum 216-1 bytes.
MEDIUMBLOB Binary data with variable length, maximum 224-1 bytes.
LONGBLOB Binary data with variable length, maximum 232-1 bytes.
Geometric Data (Since MySQL 4.1)
GEOMETRY A general geometric object; further geometric types are listed later in
this chapter.
Miscellaneous
ENUM Enumeration of at most 65,535 strings (1 or 2 bytes).
SET Enumeration of at most 255 strings (1 to 8 bytes).
BIT Individual bits (since MySQL 5.0.3).
BOOL Synonym for TINYINT(1).
In the definition of columns (CREATE TABLE, ALTER TABLE), different options can be used for
different columns. The following table summarizes these options. Note that not all options are suit-
able for all data types.
CHAPTER 21 ■SQL REFERENCE610
5351c21_final.qxd 8/26/05 8:06 PM Page 610
www.it-ebooks.info

Attributes (Options) of the MySQL Data Types
NULL Specifies that the column may contain the value
NULL; this setting holds by default.
NOT NULL Forbids the value NULL.
DEFAULT xxx Specifies the default value xxx to be used if no other
input value is specified. Even if you do not specify an
explicit default value, MySQL itself uses one in many
cases: NULL when it is permitted, otherwise 0 in
numeric columns, an empty string with VARCHAR, the
date 0000-00-00 with dates, the year 0000 with YEAR as
well as the first element of an ENUM enumeration.
DEFAULT CURRENT_TIMESTAMP Has the effect on TIMESTAMP columns that the cur-
rent time is automatically stored when new records
are inserted.
ON UPDATE CURRENT_TIMESTAMP Has the effect on TIMESTAMP columns that when
changes are made (UPDATE) the current time is auto-
matically stored.
PRIMARY KEY Defines the column as primary key.
AUTO_INCREMENT Results in an automatically increasing number being
inserted in the column; it can be used for only one col-
umn, with integer values; moreover, the options NOT
NULL and PRIMARY KEY must be specified (instead of
PRIMARY KEY, the column can be given a UNIQUE
index).
UNSIGNED Integers are stored without a sign; note that calcula-
tions are also made without signs.
ZEROFILL Integers in SELECT results are left-filled with zeros to
fill out their length (thus five-digit numbers such as
00123 and 01234).
BINARY With CHAR and VARCHAR columns, comparison and
sort operations are executed in binary. Hence upper-
case letters are sorted before lowercase ones. This is
more efficient, but less practical when results are to be
displayed in alphabetical order.
CHARACTER SET name, [COLLATE sort] With strings, gives the character set and optional sort
order.
COMMENT text Stores text as a comment on the column (since
MySQL 4.1).
SERIAL Since MySQL 4.1 is a synonym for BIGINT NOT NULL
AUTO_INCREMENT UNIQUE.
Command Overview (Thematic)
In the section following this one, SQL commands will be listed in alphabetical order. As a supple-
mentary aid to orientation, we provide here a systematic overview:
CHAPTER 21 ■SQL REFERENCE 611
5351c21_final.qxd 8/26/05 8:06 PM Page 611
www.it-ebooks.info

Database Queries, Data Manipulation
SELECT Queries existing record (data search).
INSERT Inserts new record.
REPLACE Replaces existing record.
UPDATE Changes existing record.
DELETE Deletes selected records.
TRUNCATE TABLE Deletes all records of a table.
LOAD DATA Inserts records from a text file.
HANDLER Reads records more efficiently than SELECT (since MySQL 4.0).
Transactions (Only with InnoDB Tables)
BEGIN or START TRANSACTION Begins a group of SQL commands.
COMMIT Confirms all executed commands.
ROLLBACK Aborts executed commands.
SAVEPOINT Places a marker within a running transaction.
Create Databases/Tables/Views, Change Database Schema
ALTER DATABASE Makes changes to the database (since MySQL 4.1).
ALTER TABLE Changes individual columns of a table, adds indexes, etc.
ALTER VIEW Changes a view (since MySQL 5.0).
CREATE DATABASE Creates a new database.
CREATE INDEX Creates a new index for a table.
CREATE TABLE Creates a new table.
CREATE VIEW Creates a view (since MySQL 5.0).
DROP DATABASE Deletes an entire database.
CREATE FUNCTION or PROCEDURE Deletes a stored procedure (since MySQL 5.0).
DROP INDEX Deletes an index.
DROP TABLE Deletes an entire table.
DROP VIEW Deletes a view (since MySQL 5.0).
RENAME TABLE Renames a table.
Administration of Tables (General)
ANALYZE TABLE Returns information on internal index management.
CHECK TABLE Tests table file for consistency errors.
FLUSH TABLES Closes all table files and then opens them.
LOCK TABLE Blocks tables for (write) access by other users.
OPTIMIZE TABLE Optimizes memory use in tables.
UNLOCK TABLES Releases tables locked with LOCK.
CHAPTER 21 ■SQL REFERENCE612
5351c21_final.qxd 8/26/05 8:06 PM Page 612
www.it-ebooks.info

Administration of MyISAM Tables
BACKUP TABLE Copies table files into a backup directory.
CACHE INDEX Assigns individual caches to table indexes.
LOAD INDEX INTO CACHE Loads table indexes into the cache.
REPAIR TABLE Attempts to repair defective table files.
RESTORE TABLE Restores tables backed up with BACKUP.
Administration and Execution of Stored Procedures and Triggers (Since MySQL 5.0)
ALTER FUNCTION | PROCEDURE Changes a stored procedure.
CALL Calls a stored procedure.
CREATE FUNCTION | PROCEDURE | TRIGGER Creates a stored procedure or trigger.
DROP FUNCTION | PROCEDURE | TRIGGER Deletes a stored procedure or trigger.
SHOW CREATE FUNCTION | PROCEDURE Displays the code of a stored procedure.
SHOW FUNCTION | PROCEDURE STATUS Returns a list of all defined stored procedures.
Information on the Database Schema, Other Administrative Information
DESCRIBE Same as SHOW COLUMNS.
EXPLAIN Explains how a SELECT is executed internally.
SHOW Displays information about databases, tables, views, fields, stored procedures, etc.
Administration, Access Privileges, etc.
FLUSH Empties MySQL temporary storage and reads it in again.
GRANT Grants additional privileges.
KILL Ends a process.
REVOKE Restricts access privileges.
RESET Deletes the query cache or logging files.
SET Changes the content of MySQL system variables.
SHOW Displays the MySQL status, system variables, processes, etc.
USE Changes the active database.
Replication (Master)
PURGE MASTER LOGS Deletes old logging files.
RESET MASTER Deletes all logging files.
SET SQL_LOG_BIN=0/1 Deactivates/activates binary logging.
SHOW BINLOG EVENTS Returns a list of all entries in the active logging file (since MySQL 4.0).
SHOW MASTER LOGS Returns a list of all logging files.
SHOW MASTER STATUS Specifies the currently active logging file.
SHOW SLAVE HOSTS Returns a list of all registered slaves (since MySQL 4.0).
CHAPTER 21 ■SQL REFERENCE 613
5351c21_final.qxd 8/26/05 8:06 PM Page 613
www.it-ebooks.info

Replication (Slave)
CHANGE MASTER TO Changes replication settings in master.info.
LOAD DATA FROM Copies all tables from master to slave (since MySQL 4.0).
LOAD TABLE FROM Copies a table from master to slave.
RESET SLAVE Reinitializes master.info.
SHOW SLAVE STATUS Displays content of master.info.
SLAVE START/STOP Starts and stops replication.
Command Reference (Alphabetical)
In the following reference section, the following syntax is in force:
[option]: Optional parts of a command are shown in square brackets.
variant1 | variant2 | variant3: Alternatives are separated by the | character.
ALTER DATABASE [dbname] actions
Since MySQL 4.1, with ALTER DATABASE you can change global database attributes. The settings
are stored in the file dbname/db.opt. Instead of ALTER DATABASE you can use the equivalent com-
mand ALTER SCHEMA. If dbname is missing, the command applies to the current database.
actions: Currently, two actions commands have been implemented.
[DEFAULT] CHARACTER SET charset specifies which character set the database should use by
default. (In the definition of tables and columns a different character set can be specified.)
[DEFAULT] COLLATE collname specifies the default sort order.
ALTER FUNCTION/PROCEDURE name options
ALTER FUNCTION/PROCEDURE since MySQL 5.0 changes details of a stored procedure (SP). How-
ever, the command is incapable of changing the code of an SP; for that, you need to delete the SP
(DROP FUNCTION/PROCEDURE) and then re-create it (CREATE FUNCTION/PROCEDURE).
options: NAME newname renames the stored procedure.
SQL SECURITY DEFINER/INVOKER changes the security mode of the SP (see CREATE FUNCTION).
COMMENT ‘newcomment’ changes the comment stored with the SP.
ALTER TABLE tblname tbloptions
ALTER TABLE can be used to change various details of the structure of a table. In the following, we
present an overview of the syntactic variants.
In the syntactically simplest form that we shall show here, ALTER TABLE changes the table
options. The possible options are described in CREATE TABLE. The command can be used, for
example, to change the type of a table (e.g., from MyISAM to InnoDB).
CHAPTER 21 ■SQL REFERENCE614
5351c21_final.qxd 8/26/05 8:06 PM Page 614
www.it-ebooks.info

Note that with many ALTER TABLE variants, the table must be re-created. To do this, MySQL
creates a new table Xwith the new table properties, and then copies all the records into this new
table. Then the existing table is renamed Y, and table Xis renamed tblname. Finally, Yis deleted.
On large tables, this can take considerable time and temporarily use a great deal of hard-disk space.
ALTER TABLE tblname ADD newcolname coltype coloptions [FIRST | AFTER existingcolumn]
This command adds a new column to a table. The definition of the new column takes place as with
CREATE TABLE. If the position of the new column is not specified with FIRST or AFTER, then the
new column will be the last column of the table.
The following example adds a new column ts with data type TIMESTAMP to the authors table:
ALTER TABLE authors ADD ts TIMESTAMP
ALTER TABLE tblname ADD INDEX [indexname] (indexcols ...)
ALTER TABLE tblname ADD FULLTEXT [indexname] (indexcols ...)
ALTER [IGNORE] TABLE tblname ADD UNIQUE [indexname] (indexcols ...)
ALTER [IGNORE] TABLE tblname ADD PRIMARY KEY (indexcols ...)
ALTER TABLE tblname ADD SPATIAL INDEX (indexcol)
These commands create a new index for a table. If no indexname is specified, then MySQL simply
uses the name of the indexed column.
The optional key word IGNORE comes into play if several identical fields are discovered in the
creation of a UNIQUE or primary index. Without IGNORE, the command will be terminated with an
error, and the index will not be generated. With IGNORE, such duplicate records are simply deleted.
A spatial index for geometric data can be created starting with MySQL 4.1. The column indexcol
must have data type GEOMETRY and the attribute NOT NULL.
ALTER TABLE tblname ADD [CONSTRAINT [fr_keyname]]
FOREIGN KEY [c1_keyname]
(column1) REFERENCES table2 (column2)
[ON DELETE {CASCADE | SET NULL | NO ACTION | RESTRICT}]
[ON UPDATE {CASCADE | SET NULL | NO ACTION | RESTRICT}]
This command defines a foreign key constraint. This means that the foreign key tblname.column1
refers to table2.column2, and the table driver should ensure that no references point to nowhere.
This command results in two new indexes being created: the foreign key index for linking col-
umn1 and column2, and, if it doesn’t exist already, an ordinary index for tablename.column1.
Optionally, you can give these indexes names (ci_keyname and fr_keyname). If you are using a
replication system, you should definitely do this; otherwise, it could happen that MySQL uses dif-
ferent names for the original and replicating databases. That can lead later to problems if you wish
to delete the foreign key rules.
The optional ON DELETE and ON UPDATE clauses specify how the table driver is to react to
damage to integrity on DELETE and UPDATE commands (see Chapter 8 for details). By default, the
condition is STRICT, meaning that potential damage to integrity results in the command not being
issued and an error message being triggered.
Currently (MySQL 5.0.n), foreign key constraints can be applied only to InnoDB tables.
column2 must be given an index and must be of the same data type as column1.
CHAPTER 21 ■SQL REFERENCE 615
5351c21_final.qxd 8/26/05 8:06 PM Page 615
www.it-ebooks.info

ALTER TABLE tblname ALTER colname SET DEFAULT value
ALTER TABLE tblname ALTER colname DROP DEFAULT
This command changes the default value for a column or table or deletes an existing default value.
ALTER TABLE tblname CHANGE oldcolname newcolname coltype coloptions
This command changes the default value for a column in a table or deletes an existing default value.
The description of the column proceeds as with CREATE TABLE, which you may refer to. If the col-
umn name is to remain unchanged, then it must be given twice (that is, oldcolname and newcolname
are identical). Even if ALTER TABLE is used only to change the name of a column, both coltype and
coloptions must be completely specified.
ALTER TABLE tblname CONVERT TO
CHARACTER SET charset [COLLATE collname]
This command changes the character set and the optional sort order of all text columns of a table.
This change affects not only the formal definition of the table, but its content as well: all text fields
of the records are converted.
If you want to change only the definition of the table, and not its content, then you must change
the affected column to a BLOB and then back into the desired text data type with the associated charac-
ter set and sort order. This results in no change to the data, since MySQL leaves BLOB data untouched:
ALTER TABLE tblname CHANGE colname colname BLOB
ALTER TABLE tblname CHANGE colname colname VARCHAR(100) CHARACTER SET ...
If the text column is equipped with an index, you must first delete the index before the first
ALTER TABLE command and then re-create it after the second ALTER TABLE command.
ALTER TABLE tblname DISABLE KEYS
ALTER TABLE tblname ENABLE KEYS
Since MySQL 4.0, ALTER TABLE … DISABLE KEYS has the effect that all nonunique indexes are no
longer automatically updated with INSERT, UPDATE, and DELETE commands. ALTER TABLE …
ENABLE KEYS restores activation and updating of indexes.
The two commands should be used for carrying out extensive revisions to tables in the most
efficient manner possible. (The reconstruction of indexes with ENABLE KEYS costs considerably
less time than the constant updating with each altered record.)
ALTER TABLE dbname.tblname DISCARD TABLESPACE
ALTER TABLE dbname.tblname IMPORT TABLESPACE
These two commands are suitable only for InnoDB tables whose data are located in their own files
(MySQL server option innodb_file_per_table). In MySQL 5.0 it is not permitted to copy such files
from one database directory into another or from one MySQL installation to another. The two
ALTER TABLE variants enable, under certain circumstances, a tablespace file to be deactivated and
later reactivated.
ALTER TABLE dbname.tblname DISCARD TABLESPACE deletes the table tblname and the under-
lying file dbname/tblname.ibd. The file tblname.frm is preserved. ALTER TABLE dbname.tblname
CHAPTER 21 ■SQL REFERENCE616
5351c21_final.qxd 8/26/05 8:06 PM Page 616
www.it-ebooks.info

IMPORT TABLESPACE reactivates the file dbname/tblname.ibd. The file must be the result of a backup
of the running MySQL installation that was carried out before the DISCARD TABLESPACE command.
Further details on these commands, for which there is hardly any useful practical application,
can be found at http://dev.mysql.com/doc/mysql/en/multiple-tablespaces.html.
ALTER TABLE tblname DROP colname
ALTER TABLE tblname DROP INDEX indexname
ALTER TABLE tblname DROP PRIMARY KEY
ALTER TABLE tblname DROP FOREIGN KEY foreign_key_name
The first three commands delete a column, an index, or the primary index. The fourth command,
since MySQL 4.0.13, deletes the specified foreign key constraint. You can determine with SHOW
CREATE TABLE the foreign_key_name of the index to be deleted.
If you are using replication, you should avoid deleting FOREIGN KEY rules. The reason is that
MySQL creates a special index when a FOREIGN KEY rule is defined. If you do not name this index
explicitly, it can happen that different names are used for the original and replicated database.
ALTER TABLE tblname ENGINE tabletype
This command changes the type of the table (the table driver). Allowed table types include InnoDB
and MyISAM. Note that a type change is possible only if the new table driver supports all the prop-
erties of the table. For example, the InnoDB table driver supports at present no full-text indexes. If
you wish to transform a MyISAM table into an InnoDB table, you must first delete the full-text index
(ALTER TABLE tblname DROP indexname).
ALTER TABLE tblname MODIFY colname coltype coloptions
This command functions like ALTER TABLE … CHANGE (see above). The only difference is that the
column cannot be changed, and thus the name needs to be given only once.
ALTER TABLE tblname ORDER BY colname
This command re-creates the table and orders the data records by colname. If you frequently read
records from the table ordered colname, this can increase efficiency a bit. The command has no
influence over new or changed records, and is therefore useful only if few future changes to the
table are expected.
ALTER TABLE tblname RENAME AS newtblname
This command renames the table (see also RENAME TABLE).
ALTER TABLE tblname TYPE tabletype
This command corresponds to ALTER TABLE tblname ENGINE tabletype.
ALTER [algoption] VIEW viewname [(columns)] AS command [chkoption]
ALTER VIEW changes the properties of a view. It has the same syntax as CREATE VIEW. ALTER VIEW
offers no way to change the name of a view.
CHAPTER 21 ■SQL REFERENCE 617
5351c21_final.qxd 8/26/05 8:06 PM Page 617
www.it-ebooks.info

ANALYZE TABLE tablename1, tablename2, …
ANALYZE TABLE performs an analysis of the indexed values of a column. The results are stored, and
in the future, this speeds up index access to data records a bit.
With MyISAM tables, the external program myisamchk -a tblfile can be used.
BACKUP TABLE tblname TO '/backup/directory'
BACKUP TABLE copies the files for the specified MyISAM table into a backup directory. The table
can be re-created with RESTORE TABLE.
Under Unix/Linux, the backup directory for the account under which MySQL is executed must
be writable.
BACKUP and RESTORE do not work for InnoDB tables. Both commands are considered depre-
cated and are best not used. Alternatives are external backup tools such as mysqldump, mysqlhotcopy
or the InnoDB backup utility.
BEGIN
If you are working with transaction-capable tables, then BEGIN introduces a new transaction. The
following SQL commands can then be confirmed with COMMIT or revoked with ROLLBACK. (All
changes to tables are executed only via COMMIT.) Further information and examples on the topic
of transactions can be found in Chapter 10.
Since MySQL 4.0.11, you can use the ANSI-conforming command START TRANSACTION
instead of BEGIN.
CACHE INDEX indexspec1, indexspec2 … IN cachename
Since MySQL 4.1, CACHE INDEX determines in which cache area a MyISAM index is placed. The
command can be used effectively only if first an additional cache area is created (see also the infor-
mation on structured variables in this chapter).
indexspec: Specifies which MyISAM indexes are to have their caches changed. The following
syntax is used for the index specification:
tablename [[INDEX|KEY] (indexname1, indexname2 …)]
If no index name is given, the command holds for all indexes in tablename.
cachename: denotes the cache instance in which the indexes are to be placed. Such an area
must first be set up with SET @@cachename.key_buffer_size=n (nis the reserved area size in
bytes).
CALL spname [parameter1, parameter2 …]
This command calls a stored procedure. CALL is designed only for user-defined procedures, not for
user-defined functions, which must be called with ordinary SQL commands (e.g., with SELECT).
CHAPTER 21 ■SQL REFERENCE618
5351c21_final.qxd 8/26/05 8:06 PM Page 618
www.it-ebooks.info

CHANGE MASTER TO variable1=value1, variable2=value2, …
With this command, the replication settings for slave are carried out. The settings are stored in the
file master.info. The command can be used only for slave computers in a replication system, and
it requires the Super privilege. It recognizes the following variable names:
MASTER_HOST specifies the hostname or IP number of the master computer.
MASTER_USER specifies the user name used for communication with the master computer.
MASTER_PASSWORD specifies the associated password.
MASTER_PORT specifies the port number of the master computer (normally 3306).
MASTER_LOG_FILE specifies the current logging file on the master computer.
MASTER_LOG_POS specifies the current read position within the logging file on the master
computer.
CHECK TABLE tablename1, tablename2 … [ TYPE=QUICK ]
CHECK TABLE tests the internal integrity of the database file for the specified table. Any errors that
are discovered are not corrected. With MyISAM tables, instead of this command, the external pro-
gram myisamchk -m tblfile can be used.
COMMIT
COMMIT ends a transaction and stores all changes in the database. (Instead of executing COMMIT,
you can cancel the pending changes with ROLLBACK.) BEGIN/COMMIT/ROLLBACK function only
if you are working with transaction-capable tables. Further information and examples on trans-
actions can be found in Chapter 10.
CREATE DATABASE [IF NOT EXISTS] dbname [options]
CREATE DATABASE generates the specified database. (More precisely, an empty directory is created
in which tables belonging to the new database can be stored.) Note that database names are case
sensitive. This command can be executed only if the user has sufficient access privileges to create
new databases. Instead of CREATE DATABASE the equivalent command CREATE SCHEMA can be
used.
options: Since MySQL 4.1, you can specify the default character set for a table:
[DEFAULT] CHARACTER SET charset [COLLATE collname].
The optional key word DEFAULT has no function (that is, it does not matter whether you specify
it or not). With COLLATE you can select the sort order if there is more than one for the character
set in question. If you do not specify the CHARACTER SET, then the default character set of the
server is used.
CHAPTER 21 ■SQL REFERENCE 619
5351c21_final.qxd 8/26/05 8:06 PM Page 619
www.it-ebooks.info

CREATE FUNCTION name ([parameters]) RETURNS datatype [options] code
Since MySQL 5.0, CREATE FUNCTION creates a user-defined function (stored procedure) in the
current database. Defining stored procedures requires the Super privilege and executing them
requires the Execute privilege.
name: Specifies the function name. It is allowed for a function and a procedure within a single
database to have the same name (see CREATE PROCEDURE).
parameters: Several parameters may be specified, separated by commas. Each parameter must
be followed by its data type, e.g., para1 INT, para2 BIGINT.
datatype: Gives the data type of the function’s return value. All MySQL data types are allowed,
e.g., INT, DOUBLE, VARCHAR(n).
options: The following options can be used in function definition:
LANGUAGE SQL: Specifies the language of the stored procedure code. The only permissible
LANGUAGE setting is currently SQL. This setting holds by default. Future versions of MySQL
will offer the option of defining SPs in other programming languages (e.g., PHP).
[NOT] DETERMINISTIC: An SP is considered deterministic if it always returns the same results
with the same parameters. (SPs whose result depends on the content of the database are not
deterministic.) By default, SPs are nondeterministic. Deterministic SPs can be executed partic-
ularly efficiently. (For example, it is possible to store the result for particular parameters in a
cache.) Currently, however, the DETERMINISTIC option is ignored by the MySQL optimization
functions.
SQL SECURITY DEFINER/INVOKER: The SECURITY mode specifies the access privileges under
which the SP should be executed. SPs that are defined with SQL SECURITY DEFINER have the
same privileges as the MySQL user who defined the SP. This is the default security mode. SPs
defined with the option SQL SECURITY INVOKER have the access privileges of the MySQL user
who executed the SP.
COMMENT ‘text’: The comment text is stored together with the SP.
code: The actual SP code is usually given in the form of an SQL command. If the SP consists of
more than one command, they must be placed between BEGIN and END and separated by
semicolons (details are in Chapter 13).
Here is an example:
CREATE FUNCTION half(a INT) RETURNS INT
BEGIN
RETURN a/2;
END
CREATE FUNCTION name RETURNS datatype SONAME libraryname
CREATE FUNCTION makes possible not only the definition of SPs, but also the binding of a func-
tion to an external library into MySQL. Such functions are called user-defined functions, or UDFs for
short. Programming such functions in C or C++ requires a degree of background knowledge about
how functions work in MySQL (and, of course, the requisite tools, like compilers). Further informa-
tion can be found at http://dev.mysql.com/doc/mysql/en/extending-mysql.html and http://
mysql-udf.sourceforge.net/.
CHAPTER 21 ■SQL REFERENCE620
5351c21_final.qxd 8/26/05 8:06 PM Page 620
www.it-ebooks.info

CREATE [UNIQUE|FULLTEXT] INDEX indexname ON tablename (indexcols …)
CREATE INDEX enlarges an existing database to include an index. As indexname, the name of the
column is generally used. CREATE INDEX is not a freestanding command, but merely an alternative
form of ALTER TABLE ADD INDEX/UNIQUE, which you should see for details.
CREATE PROCEDURE name ([parameters]) [options] code
CREATE PROCEDURE creates, since MySQL 5.0, a user-defined procedure (stored procedure) in the
current database. The definition of stored procedures requires the Super privilege, while execution
requires the Execute privilege.
The syntax of this command is very similar to that of CREATE FUNCTION. However, unlike a
function, a procedure cannot return a result directly. However, a SELECT command can be executed
and parameters changed. For this reason, the syntax for the parameter list is a bit different from that
of CREATE FUNCTION.
parameters: More than one parameter can be defined, and they are separated by commas. Each
parameter is defined as follows:
[IN or OUT or INOUT] parametername datatype
The key words IN, OUT, and INOUT specify whether the parameter is only for input, only for
output, or for data transport in both directions (default is IN). All MySQL data types are
allowed, such as INT, VARCHAR(n), DOUBLE.
Here is an example:
CREATE PROCEDURE half(IN a INT, OUT b INT)
BEGIN
SET b=a/2;
END
CREATE [TEMPORARY] TABLE [IF NOT EXISTS] tblname
(colname1 coltype coloptions reference,
colname2 coltype coloptions reference...
[ , index1, index2 ...]
)
[tbloptions]
CREATE TABLE generates a new table in the current database. If a database other than the current
one is to be used, the table name can be specified in the form dbname.tblname. If the table already
exists, an error message results. There is no error message if IF NOT EXISTS is used, but in this case,
the existing table is not affected, and no new table is created.
With the key word TEMPORARY a temporary table is created. If a temporary table is created
and a like-named, but not temporary, table already exists, the temporary table is created without an
error message. The old table is preserved, but it is masked by the temporary table. If you want your
temporary table to exist only in RAM (for increased speed), you must also specify ENGINE = HEAP.
The creation of regular tables requires the Create privilege. Since version 4.0, the creation of
temporary tables requires the Create Temporary Table privilege.
colname: Name of the column.
coltype: Data type of the column. A list of all MySQL data types (INT, TEXT, etc.) appears earlier
in this chapter.
CHAPTER 21 ■SQL REFERENCE 621
5351c21_final.qxd 8/26/05 8:06 PM Page 621
www.it-ebooks.info

coloptions: Here certain attributes (options) can be specified:
NOT NULL | NULL
UNSIGNED
ZEROFILL
BINARY
DEFAULT defaultval | DEFAULT CURRENT_TIMESTAMP
ON UPDATE CURRENT_TIMESTAMP
AUTO_INCREMENT | IDENTITY
PRIMARY KEY
CHARACTER SET charset [COLLATE collname]
COMMENT text
reference: MySQL provides various key words for the declaration of foreign keys in keeping track
of referential integrity, e.g., REFERENCES tblname (idcolumn). These key words are currently
ignored, however (and with no error message). Even if you use InnoDB tables, the foreign key
constraints for such tables must be specified within the confines of the index definition.
index: KEY or INDEX defines a usual index spanning one or more columns. UNIQUE defines a
unique index (that is, in the column or columns, no identical values or groups of values can be
stored). With both variants an arbitrary index name may be given for the internal management
of the index. PRIMARY KEY likewise defines a UNIQUE index. Here, however, the index name is
predefined: It is, not surprisingly, PRIMARY. With FULLTEXT, an index is declared for full-text
search (in MySQL 4.0, only with MyISAM tables). Since MySQL 4.1, an index for GEOMETRY
data can be created with SPATIAL INDEX; indexcol must be defined with the attribute NOT NULL.
KEY | INDEX [indexname] (indexcols ...)
UNIQUE [INDEX] [indexname] (indexcols ...)
PRIMARY KEY (indexcols ...)
FULLTEXT [indexname] (indexcols ...)
SPATIAL INDEX [indexname] (indexcol)
Foreign key constraints: If you are using InnoDB tables, here you can formulate foreign key con-
straints. The syntax is as follows:
[CONSTRAINT [fr_keyname]]
FOREIGN KEY [c1_keyname] (column1) REFERENCES table2 (column2)
[ON DELETE {CASCADE | SET NULL | NO ACTION | RESTRICT}]
[ON UPDATE {CASCADE | SET NULL | NO ACTION | RESTRICT}]
This means that tblname.column1 is a foreign key that refers to table2.column2. More details
can be found under ALTER TABLE … ADD FOREIGN KEY.
tbloptions: Here various table options can be specified, though here we shall exhibit only the
most important of them. Not all options are possible with every table type. Information on the
different table types and their variants can be found in Chapter 8.
ENGINE = MYISAM | HEAP | INNODB
ROW_FORMAT= default | dynamic | static | compressed
CHAPTER 21 ■SQL REFERENCE622
5351c21_final.qxd 8/26/05 8:06 PM Page 622
www.it-ebooks.info

AUTO_INCREMENT gives the initial value for the counter of an AUTO_INCREMENT column
(e.g., 100000 if you wish to have six-digit integers). CHECK_SUM=1 has the effect that a check
sum is stored for each data record, which helps in reconstruction if the database is damaged.
PACK_KEYS=1 results in a smaller index file. This speeds up read access, but slows down
changes. DELAY_KEY_WRITE = 1 results in indexes not being updated each time a change
to a record is made. Rather, they are updated every now and then.
AUTO_INCREMENT = n
CHECKSUM = 0 | 1
PACK_KEYS = 0 | 1
DELAY_KEY_WRITE = 0 | 1
With COMMENT you can save a brief text, for example, to describe the purpose of the table.
The comment can be read with SHOW CREATE DATABASE dbname:
COMMENT= ‘comment’.
Since MySQL 4.1, you can specify the character set and sort order for a table. (You can also set
these parameters for a single column.) If no character set is specified, then the default charac-
ter set for the table or that of the MySQL server is used:
[DEFAULT] CHARACTER SET charset [COLLATE collname].
The CREATE TABLE syntax contains some duplication. For example, a primary index can be
declared in two different ways, either as an attribute of a column (coloptions) or as an independent
index (index). The result is, of course, the same. It is up to you to decide which form you prefer.
MySQL has the property that in many cases changes the definition of a column, for example by
providing a suitable DEFAULT value if none is specified (silent column changes; see also Chapter 9).
For this reason it is recommended that after you create a table, you take a look at the actual MySQL
table definition with SHOW CREATE TABLE name.
Here is an example:
CREATE TABLE test (id INT NOT NULL AUTO_INCREMENT,
data INT NOT NULL,
txt VARCHAR(60),
PRIMARY KEY (id))
CREATE [TEMPORARY] TABLE [IF NOT EXISTS] tblname
[(newcolname1 coltype coloptions reference,
newcolname2 coltype coloptions reference …
[ , key1, key2 …]
)]
[tbloptions]
[IGNORE | REPLACE] SELECT …
With this variant of the CREATE TABLE command, a table is filled with the result of a SELECT com-
mand. The individual columns of the new table take their types from the data types of the SELECT
command and thus do not have to be (and may not be!) declared explicitly.
Unfortunately, neither indexes nor attributes such as AUTO_INCREMENT are carried over
from the old table. There can also be changes in column types, such as VARCHAR columns turning
into CHAR.
If an index is to be created in the new table for individual columns (e.g., PRIMARY KEY (id)),
then this can be specified. Moreover, there is the option of defining new columns (e.g., an AUTO
INCREMENT column.
CHAPTER 21 ■SQL REFERENCE 623
5351c21_final.qxd 8/26/05 8:06 PM Page 623
www.it-ebooks.info

The key words IGNORE and REPLACE specify how MySQL should behave if several records with
the same value are placed by the command into a UNIQUE column. With IGNORE, the existing record
is retained, and new records are ignored. With REPLACE existing records are replaced by the new ones.
If neither option is used, an error message results.
If a table is to be copied one to one, it is better to create the new table with CREATE TABLE
table2 LIKE table1 (since MySQL 4.1) and then copy in the data with INSERT INTO table2 SELECT *
FROM table1.
Here is an example:
CREATE TEMPORARY TABLE tmp
SELECT id, authName FROM authors WHERE id<20
CREATE [TEMPORARY] TABLE [IF NOT EXISTS] newtable LIKE oldtable
This command, since MySQL 4.1, creates a new, empty table newtable corresponding to the decla-
ration of the existing table oldtable.
CREATE TRIGGER name time event
ON tablename
FOR EACH ROW code
CREATE TRIGGER defines SQL code that in the future will be executed automatically before or after
particular database commands for the affected table. For each event only one trigger procedure is
allowed. The execution of CREATE TRIGGER requires the Super privilege.
name: Specifies the name of the trigger. Currently (MySQL 5.0.3) like-named triggers are allowed
within a single database if they are defined for different tables. In future MySQL versions a trig-
ger name must be unique for the entire database.
time: BEFORE | AFTER
Specifies whether the trigger code is to be executed before or after the trigger event.
event: INSERT | UPDATE | DELETE
Specifies for what database operations the trigger code is to be executed.
tablename: Specifies for which table the trigger is defined.
code: Gives the trigger code. The syntax is the same as for a stored procedure.
Here is an example:
CREATE TRIGGER test_before_insert
BEFORE INSERT ON test FOR EACH ROW
BEGIN
IF NEW.percent < 0.0 OR NEW.percent > 1.0 THEN
SET NEW.percent = NULL;
END IF;
END
CREATE [algoption] VIEW viewname [(columns)] AS command [chkoption]
CREATE VIEW creates, since MySQL 5.0, a View. This is a virtual table based on a SELECT command.
If you wish to replace an existing View, execute the command in the form CREATE OR REPLACE ….
The command requires the Create View privilege.
CHAPTER 21 ■SQL REFERENCE624
5351c21_final.qxd 8/26/05 8:06 PM Page 624
www.it-ebooks.info

algoption: ALGORITHM = UNDEFINED | MERGE | TEMPTABLE
ALGORITHM tells how the View is to be represented internally. This option was not documented
as this book was being completed. By default, MySQL always uses UNDEFINED (can be deter-
mined with SHOW CREATE TABLE viewname).
viewname: Specifies the name of the View. The same rules hold as for table names. The name
of the View may not be the same as that of the table.
columns: The columns of a View have as a rule the same names and data types as the columns
of the underlying table. With columns you can specify different names and data types. The syn-
tax is the same as for CREATE TABLE.
command: Here you give a SELECT command. The data in the View are the result of this command.
chkoption:WITH [CASCADED | LOCAL] CHECK OPTION
WITH CHECK OPTION means that changes to the View records are allowed only if the WHERE
conditions of the SELECT command are satisfied. WITH CHECK OPTION is of course relevant
only if the View is changeable.
The variant WITH LOCAL CHECK OPTION affects Views that have been derived from other
Views. LOCAL means that only the WHERE conditions of the CREATE VIEW command are con-
sidered, and not the WHERE conditions of higher-level Views.
The opposite effect is achieved with WITH CASCADED CHECK OPTION: Now the WHERE con-
ditions of all higher-level Views are considered. If you specify neither CASCADED nor LOCAL,
the default is CASCADED.
Here is an example:
CREATE VIEW v1 AS
SELECT titleID, title, subtitle FROM titles
ORDER BY title, subtitle
DELETE [deleteoptions] FROM tablename
[WHERE condition]
[ORDER BY ordercolumn [DESC]]
[ LIMIT maxrecords ]
DELETE deletes the records in a table encompassed by condition.
deleteoptions:LOW_PRIORITY, QUICK, IGNORE
LOW_PRIORITY has the effect that the data records are deleted only when all read operations
are complete. (The goal of this option is to avoid having SELECT queries unnecessarily delayed
due to DELETE operations.)
QUICK has the effect that during deletion, an existing index is not optimized. This speeds up
the DELETE command, but it can lead to a somewhat inefficient index.
IGNORE has the effect since MySQL 4.1 that the DELETE command is continued even if errors
occur. All errors are converted to warnings, which can be read with SHOW WARNINGS.
condition: This condition specifies which records are to be deleted. For the syntax of condition,
see SELECT.
ordercolumn: With ORDER BY you can first sort the data to be deleted. This makes sense only in
combination with LIMIT, in order, for example, to delete the first or last ten records (according
to some sort criterion).
maxrecords: With LIMIT, the maximum number of records that may be deleted is specified.
CHAPTER 21 ■SQL REFERENCE 625
5351c21_final.qxd 8/26/05 8:06 PM Page 625
www.it-ebooks.info

If DELETE is executed without conditions, then all records of the table are deleted (so be care-
ful!). DELETE without conditions cannot be part of a transaction. If a transaction is open, it is closed
with COMMIT before the DELETE command is executed. If you wish to delete large tables com-
pletely, it is more efficient to use the command TRUNCATE.
DELETE [deleteoptions] table1, table2 … FROM table1, table2, table3 …
[USING columns]
WHERE conditions
This variant of DELETE (available since version 4.0) deletes records from tables table1, table2, etc.,
where the data of additional tables (table3, etc.) are considered in the search criteria.
After DELETE, all tables from which data are to be deleted must be specified. After FROM, all
DELETE tables must appear, as well as any additional tables that serve only in formulating the
search criteria.
deleteoptions: Here you can specify options as in a usual DELETE command.
columns: Here fields that link the tables can be specified (see also SELECT). This assumes that
the linking field has the same name in both tables.
conditions: In addition to the usual delete criteria, here one may specify linking conditions
(e.g., WHERE table1.id = table2.forgeinID).
DESCRIBE tablename [ columnname ]
DESCRIBE returns information about the specified table in the current database (or about a partic-
ular column of this table). Instead of columnname, a pattern with the wild cards _ and % can be
given. In this case, DESCRIBE displays information about those columns matching the pattern.
DESCRIBE returns the same information as EXPLAIN or SHOW TABLE or SHOW COLUMN.
DO selectcommand
DO is a variant of SELECT and has basically the same syntax. The difference between the two is that
DO returns no results. For example, DO can be used for variable assignment, for which it is some-
what faster than SELECT (thus, for example, DO @var:=3).
DROP DATABASE [IF EXISTS] dbname
DROP DATABASE deletes an existing database with all of its data. This cannot be undone, so be
careful! If the database does not exist, then an error is reported. This error can be avoided with an
IF EXISTS.
In the execution of this command, all files in the directory dbname with the following endings
are deleted, among others: .BAK, .DAT, .HSH, .ISD, .ISM, .MRG, .MYD, .MYI, .db, .frm, as well as the file
db.opt.
DROP FUNCTION fnname
DROP FUNCTION deletes the specified stored procedure or deactivates an external auxiliary func-
tion that was made available to MySQL earlier with CREATE FUNCTION.
CHAPTER 21 ■SQL REFERENCE626
5351c21_final.qxd 8/26/05 8:06 PM Page 626
www.it-ebooks.info

DROP INDEX indexname ON tablename
DROP INDEX removes an index from the specified table. Usually, indexname is the name of the
indexed column, or else PRIMARY for the primary index.
DROP PROCEDURE prname
DROP PROCEDURE deletes the specified stored procedure.
DROP [TEMPORARY] TABLE [IF EXISTS] tablename1, tablename2 … [options]
DROP TABLE deletes the specified (temporary) tables irrevocably. The option IF EXISTS avoids an
error message if the tables do not exist.
Note that DROP TABLE automatically ends a running transaction (COMMIT).
DROP TEMPORARY TABLE (available since MySQL 4.1) deletes only temporary tables. In con-
trast to the ordinary DROP TABLE command, this one has no influence over running transactions.
options:RESTRICT | CASCADE
The two options RESTRICT und CASCADE are currently nonfunctional. They currently should
simplify the porting of SQL code to other database systems.
DROP TRIGGER tablename.triggername
DROP TRIGGER deletes the specified trigger.
DROP VIEW [IF EXISTS] viewname1, viewname2 … [options]
DROP VIEW deletes the specified Views irrevocably. The same options are available as for DROP TABLE.
EXPLAIN tablename
EXPLAIN returns a table with information about all the columns of a table (field name, field type,
index, default value, etc.). The same information can be determined as well with SHOW COLUMNS
or DESCRIBE, or via an external program such as mysqlshow.
EXPLAIN SELECT selectcommand
EXPLAIN SELECT returns a table with information about how the specified SELECT command was
executed. These data can help in speed optimization of queries, and in particular in deciding which
columns of a table should be indexed. (The syntax of selectcommand was described under SELECT.
An example of the use of EXPLAIN SELECT and a brief description of the resulting table can be found
in Chapter 8.)
FLUSH flushoptions
FLUSH empties the MySQL internal intermediate storage. Any information not stored already is
thereby stored in the database. The execution of FLUSH requires the RELOAD privilege.
CHAPTER 21 ■SQL REFERENCE 627
5351c21_final.qxd 8/26/05 8:06 PM Page 627
www.it-ebooks.info

flushoptions: Here one may specify which cache(s) should be emptied. Multiple options should
be separated by commas.
DES_KEY_FILE: Reloads the key files for the functions DES_ENCRYPT and DES_DECRYPT.
HOSTS: mpties the host cache table. This is necessary especially if in the local network the
arrangement of IP numbers has changed.
LOGS: Closes all logging files and then reopens them. In the case of update logs, a new logging file
is created, whereby the number of the file ending is increased by 1 (name.000003 ➤name.00004).
With error logs the existing file is renamed to name.old and a new error log file is created.
QUERY CACHE: Defragments the query cache so that it can use its memory more efficiently.
The cache is not emptied. (If you wish to do this, execute RESET QUERY CACHE.)
PRIVILEGES: Reloads the privileges database mysql (corresponds to mysqladmin reload).
STATUS: Sets most status variables to 0.
TABLES: Closes all open tables.
TABLE[S] tblname1, tblname2, …: Closes the specified tables.
TABLES WITH READ LOCK: As above, except that additionally, LOCK is executed for all tables,
which remains in force until the advent of a corresponding UNLOCK table.
USER_RESOURCES: Resets the counters for MAX_QUERIES_PER_HOUR,
MAX_UPDATES_PER_HOUR, and MAX_CONNECTIONS_PER_HOUR (see maxlimits
under GRANT).
Most FLUSH operations can also be executed through the auxiliary program mysqladmin.
GRANT privileges ON objects
TO users [IDENTIFIED BY 'password']
[REQUIRE ssloptions ]
[WITH GRANT OPTION | maxlimits ]
GRANT helps in the allocation of access privileges to database objects.
ALTER, CREATE, CREATE TEMPORARY TABLES, CREATE VIEW, DELETE, DROP, EXECUTE, FILE,
INDEX, LOCK TABLE, PROCESS, REFERENCES, RELOAD, REPLICATION CLIENT, REPLICATION
SLAVE, SELECT, SHOW DATABASE, SHOW VIEW, SHUTDOWN, SUPER, UPDATE
If you wish to set all (or no) privileges, then specify ALL (or USAGE). (The second variant is use-
ful if you wish to create a new MySQL user to whom as of yet no privileges have been granted.)
The Grant privilege can be set only via WITH GRANT OPTION; that is, ALL does not include the
Grant privilege.
If the privileges are to hold only for certain columns of a table, then specify the columns in
parentheses. For example, you may specify GRANT SELECT(columnA, columnB).
objects: Here databases and tables are specified. The following syntactic variants are available:
databasename.tablename only this table in this database
databasename.spname only this stored procedure
databasename.* all tables in this database
tablename only this table in the current database
* all tables of the current database
*.* global privileges
CHAPTER 21 ■SQL REFERENCE628
5351c21_final.qxd 8/26/05 8:06 PM Page 628
www.it-ebooks.info

Wild cards may not be used in the database names.
users: Here one or more (comma-separated) users may be specified. If these users are not yet
known to the user table, they are created. The following variants are allowed:
username@hostname only this user at hostname
‘username’@’hostname’ as above, with special characters
username this user at all computers
‘’@hostname all users at hostname
‘’ all users at all computers
password: Optionally, with IDENTIFIED BY, a password in plain text can be specified. GRANT
encrypts this password with the function PASSWORD before it is entered in the user table. If
more than one user is specified, then more than one password may be given:
TO user1 IDENTIFIED BY ‘pw1’, user2 IDENTIFIED BY ‘pw2’, …
ssloptions: If access to MySQL is to be SSL encrypted or if user identification is to take place
with X509, you can specify the required information for establishing the connection here. The
syntax is as follows:
REQUIRE SSL | X509 [ISSUER ‘iss’ ] [SUBJECT ‘subj’] [CIPHER ‘ciph’]
REQUIRE SSL means that the connection must be SSL encrypted (thus a normal connection is
not permitted). REQUIRE X509 means that the user must possess a valid certificate for identifi-
cation that meets the X509 standard.
ISSUER specifies the required issuer of the certificate. (Without ISSUER, the origin of the cer-
tificate is not considered.)
SUBJECT specifies the required content of the certificate’s subject field. (Without SUBJECT, the
content is not considered.)
CIPHER specifies the required SSL encryption algorithm. (SSL supports various algorithms.
Without this specification, all algorithms are allowed, including older ones that may have secu-
rity loopholes.)
maxlimits: Here you can specify how many connections per hour the user is allowed to estab-
lish, as well as the number of SELECT and INSERT/UPDATE/DELETE commands. The default
setting for all three values is 0 (no limit):
MAX_QUERIES_PER_HOUR n
MAX_UPDATES_PER_HOUR n
MAX_CONNECTIONS_PER_HOUR n
If the specified user does not yet exist and GRANT is executed without IDENTIFIED BY, then
the new user has no password (which represents a security risk). On the other hand, if the user
already exists, then GRANT without IDENTIFIED BY does not alter the password. (There is thus no
danger that a password can be accidentally deleted by GRANT.)
It is impossible with GRANT to delete privileges that have already been granted (for example,
by executing the command again with a smaller list of privileges). If you wish to take away privi-
leges, you must use REVOKE.
GRANT may be used only by users with the Grant privilege. The user that executes GRANT may
bestow only those privileges that he himself possesses. If the MySQL server is started with the option
safe-user-create, then to create a new user, a user needs the Insert privilege for the table mysql.user
in addition to the Grant privilege.
Since MySQL 5.0.3 GRANT can be used to create new users only by those with the Create User
CHAPTER 21 ■SQL REFERENCE 629
5351c21_final.qxd 8/26/05 8:06 PM Page 629
www.it-ebooks.info

HANDLER tablename OPEN [AS aliasname]
HANDLER tablename READ FIRST|NEXT [ WHERE condition LIMIT n, m ]
HANDLER tablename READ indexname FIRST|NEXT|PREV|LAST [ WHERE … LIMIT …]
HANDLER tablename CLOSE
Since MySQL 4.0.3, HANDLER enables direct access to MyISAM and InnoDB tables. This command
can be used as a more efficient substitute for simple SELECT commands. This is particularly true if
records are to be processed one at a time or in small groups.
The command is easy to use: First, access to a table is achieved with HANDLER OPEN. Then,
HANDLER READ may be executed as often as you like, generally the first time with FIRST, and there-
after with NEXT, until no further results are forthcoming. The command returns results as with
SELECT * (that is, all columns). HANDLER CLOSE terminates access.
HANDLER tablename READ reads the records in the order in which they were stored. On the
other hand, the variant HANDLER tablename READ indexname uses the specified index. If you wish
to use a primary index, you must use the form `primary`.
HANDLER was not conceived for use with typical MySQL applications, if for no other reason
than that the code would be completely incompatible with every other database server. HANDLER
is suitable for programming low-level tools (e.g., backup tools or drivers that simulate simple data
access with a cursor). Note that HANDLER does not block tables (no locking), and therefore, the
table can change while its data are being read.
HANDLER should not be used in stored procedures. Instead, use a cursor. HANDLER also has
nothing to do with the command DECLARE HANDLER, which is used for error-handling in stored
procedures.
HELP
HELP contents
HELP functionname
Since MySQL 4.1, HELP returns a brief help text. Instead of HELP the abbreviation ?can be used.
INSERT [options1] [INTO] tablename [(columnlist)]
VALUES (valuelist1), (…), … [options2]
INSERT [options1] [INTO] tablename
SET column1=value1, column2=value2 … [options2]
INSERT [options1] [INTO] tablename [ (columnlist) ]
SELECT …
The INSERT command has the job of inserting new records into an existing table. There are three
main syntax variants. In the first (and most frequently used) of these, new data records are specified
in parentheses. Thus a typical INSERT command looks like this:
INSERT INTO tablename (columnA, columnB, columnC)
VALUES ('a', 1, 2), ('b', 7, 5)
The result is the insertion of two new records into the table. Columns that are allowed to be
NULL, for which there is a default value, or which are automatically filled in by MySQL via AUTO_IN
do not have to be specified. If the column names (i.e., in columnlist) are not given, then in VALUES
all values must be given in the order of the columns.
CHAPTER 21 ■SQL REFERENCE630
5351c21_final.qxd 8/26/05 8:06 PM Page 630
www.it-ebooks.info

With the second variant, only one record can be changed (not several simultaneously). Such a
command looks like this:
INSERT INTO tablename SET columnA='a', columnB=1, columnC=2
For the third variant, the data to be inserted come from a SELECT instruction.
options1: The behavior of this command can be controlled with options:
IGNORE has the effect that the insertion of records with existing values is simply ignored for
UNIQUE KEY columns. (Without this option, the result would be an error message.)
LOW_PRIORITY | DELAYED | HIGH_PRIORITY have influence over when the insertion opera-
tion is carried out.
In LOW_PRIORITY and DELAYED, MySQL delays its storage operation until there are no pend-
ing read accesses to the table. The advantage of DELAYED is that MySQL returns OK at once,
and the client does not need to wait for the end of the saving operation. However, DELAYED
cannot be used if then an AUTO_INCREMENT value with LAST_INSERT_ID( ) is to be deter-
mined. DELAYED should also not be used if a LOCK was placed on the table. (The reason is
this: For executing INSERT DELAYED, a new MySQL thread is started, and table locking uses
threads in its operation.)
The records to be inserted are stored in RAM until the insertion operation has actually been
carried out. If MySQL should be terminated for some reason (crash, power outage), then the
data are lost.
HIGH_PRIORITY normally has no effect; that is, INSERT inserts the data at once. HIGH_PRIORITY
is designed only for the case that the server was started with the option low-priority-updates.
This option has the effect that INSERT commands are stored in LOW_PRIORITY mode.
HIGH_PRIORITY overwrites this default setting.
options2:ON DUPLICATE KEY UPDATE column1=value1, column2=value2 …
When a UNIQUE or PRIMARY index is violated during the insertion of new data, this option
has the effect since MySQL 4.1 of replacing the existing record. If id is a PRIMARY column and
an entry with id=1 already exists, then
INSERT INTO tablename (id, data) VALUES (1, 10)
ON DUPLICATE KEY UPDATE data=data+10
has the same effect as
UPDATE tablename SET data=data+10 WHERE id=1.
Here VALUE(columnname) can be used in the column allocation. This function returns the
value of the affected column. It is useful when a general UPDATE instruction is to be formu-
lated for several records:
INSERT INTO tablename (id, data) VALUES (1, 10), (2, 15)
ON DUPLICATE KEY UPDATE data=data+VALUE(data)
Note that in using default values, there are special rules for TIMESTAMP and
AUTO_INCREMENT values. (These rules hold for UPDATE commands as well.)
Columns with default values: If you want MySQL to use the default value for a column, then
either do not specify this column in your INSERT command, or pass an empty character string
(not NULL) as the value:
INSERT INTO table (col1, col2_with_default_value) VALUES ('abc', '')
CHAPTER 21 ■SQL REFERENCE 631
5351c21_final.qxd 8/26/05 8:06 PM Page 631
www.it-ebooks.info

TIMESTAMP columns: If you want MySQL to insert the current time in the column, then either
omit this column in your INSERT command, or pass the value NULL (not an empty character
string). It is also allowed to pass a character string with a timestamp value if you wish to store
a particular value.
AUTO_INCREMENT columns: Here as well, either you don’t pass the column, or you pass the
value NULL if MySQL is to determine the AUTO_INCREMENT value itself. You may pass any
other value that is not otherwise in use.
JOIN
JOIN is not actually an SQL command. This key word is mostly used as part of a SELECT command,
to link data from several tables. JOIN will be described under SELECT.
KILL threadid
This command terminates a specified thread (subprocess) of the MySQL server. It is allowed only
to those users who possess the Super privilege. A list of running threads can be obtained via SHOW
PROCESSLIST (where again, this command assumes the Process privilege). Threads can also be ter-
minated via the external program mysqladmin.
LOAD DATA [ loadoptions ] INFILE 'filename' [ duplicateopt ]
INTO TABLE tablename
[ importopt ]
[ IGNORE ignorenr LINES ]
[ (columnlist) ]
LOAD DATA reads a text file and inserts the data contained therein line by line into a table as data
records. LOAD DATA is significantly faster then inserting data by multiple INSERT commands.
Normally, the file filename is read from the server’s file system, on which MySQL is running.
(For this, the FILE privilege is required. For security reasons, the file must either be located in the
directory of the database or be readable by all users of the computer.)
If the text file to be imported has characters outside the ASCII character set, you must set the
character set of the text with SET NAMES before the command LOAD DATA.
loadoptions:LOCAL has the effect that the file filename on the local client computer is read
(that is, the computer on which the command LOAD DATA is executed, not on the server com-
puter). For this, no FILE privilege is necessary. (The FILE privilege relates only to the file system
of the MySQL server computer.) Note that LOAD DATA LOCAL can be deactivated, depending
on how the MySQL server was compiled and configured (option local-infile).
LOW PRIORITY has the effect that the data are inserted into the table only if no other user is
reading the table.
CONCURRENT makes it possible in many cases for data to be inserted into a table and read out
at the same time (by other clients). However, this works only for MyISAM tables and only when
the new records are inserted exclusively at the end of the table file. The table file is not allowed
to contain any free memory (holes). You can ensure this via OPTIMIZE TABLE.
filename: If a file name is given without the path, then MySQL searches for this file in the direc-
tory of the current database (e.g., ‘bulk.txt’).
If the file name is given with a relative path, then the path is interpreted by MySQL relative to
the data directory (e.g., ‘mydir/bulk.txt’).
CHAPTER 21 ■SQL REFERENCE632
5351c21_final.qxd 8/26/05 8:06 PM Page 632
www.it-ebooks.info

File names with absolute paths are taken without alteration (for example, ‘/tmp/mydir/bulk.txt’).
duplicateoptions: IGNORE | REPLACE determine the behavior of MySQL when a new data record
has the same UNIQUE or PRIMARY KEY value as an existing record. With IGNORE, the existing
record is preserved, and the new records are ignored. With REPLACE, existing records are replaced
by the new ones. If neither of these options is used, then the result is an error message.
importoptions: Here is specified how the data should be formatted in the file to be imported.
The entire importoptions block looks like this:
[ FIELDS
[ TERMINATED BY ‘fieldtermstring’ ]
[ ENCLOSED BY ‘enclosechar’ ]
[ ESCAPED BY ‘escchar’ ] ]
[ LINES TERMINATED BY ‘linetermstring’ ]
fieldtermstring specifies the character string that separates the individual columns within the
row (e.g., a tab character).
enclosechar specifies the character that should stand before and after individual entries in the
text file (usually the single or double quote character for character strings). If an entry begins
with this character, then that character is removed from the beginning and end. Entries that do
not begin with the enclosechar character will still be accepted. The use of the character in the
text file is thus to some extent optional.
escchar specifies which character is to be used to mark special characters (usually the back-
slash). This is necessary if special characters appear in character strings in the text file that are
also used to separate columns or rows. Furthermore, MySQL expects the zero-byte in the form
\0, where the backslash is to be replaced as necessary by escchar if a character has been speci-
fied for escchar).
linetermstring specifies the character string with which rows are to be terminated. With
DOS/Windows text files this must be the character string ‘ \r\n’.
In these four character strings, the following special characters can be specified:
\0 0 byte
\b backspace
\n newline
\r carriage return
\s space
\t tab
\’ single quote (‘)
\” double quote (“)
\\ backslash
Furthermore, the character strings can be given in hexadecimal form (e.g., 0x22 instead of ‘\’’).
If no character strings are given, then the following is the default setting:
FIELDS TERMINATED BY ‘\t’ ENCLOSED BY ‘’ ESCAPED BY ‘\\’
LINES TERMINATED BY ‘\n’
ignorenr: This value specifies how many lines should be ignored at the beginning of the text
file. This is particularly useful if the first lines contain table headings.
CHAPTER 21 ■SQL REFERENCE 633
5351c21_final.qxd 8/26/05 8:06 PM Page 633
www.it-ebooks.info

columnlist: If the order of the columns in the text file does not exactly correspond to that in
the table, then here one may specify which file columns correspond with which table columns.
The list of columns must be set in parentheses: for example, (firstname, lastname, birthdate).
If TIMESTAMP columns are not considered during importation or if NULL is inserted, then MySQL
inserts the actual time. MySQL exhibits analogous behavior with AUTO_INCREMENT columns.
LOAD DATA displays as result, among other things, an integer representing the number of
warnings.
Starting with MySQL 4.1 you will can display all warnings and errors caused by LOAD DATA
with the commands SHOW WARNINGS and SHOW ERRORS.
Instead of LOAD DATA, you can also use the program mysqlimport. This program creates a link
to MySQL and then uses LOAD DATA. The inverse of LOAD DATA is the command SELECT … INTO
OUTFILE. With it you can export a table into a text file. Further information and concrete examples
can be found in Chapter 14.
LOAD DATA FROM MASTER
This command since MySQL 4.0 copies all MyISAM tables from master to slave of a replication sys-
tem. The tables of the mysql database are not copied. After copying, replication is begun on the slave
(that is, the variables MASTER_LOG_FILE and MASTER_LOG_POS are set, which normally must be
set with CHANGE MASTER TO).
This command can be used in many cases, in particular when no InnoDB tables are being used,
for a convenient setting up of a replication system. It assumes that the replication user possesses the
privileges Select, Reload, and Super.
LOAD INDEX INTO CACHE indexspec1, indexspec2 …
This command loads all specified indexes of MyISAM tables into the cache. This makes sense only
in rare cases, such as carrying out repeatable benchmark tests.
indexspec: Specifies the MyISAM tables to be loaded. The following syntax is used:
tablename [[INDEX|KEY] (indexname1 …)] [IGNORE LEAVES]
Currently, the command loads all indexes of the table into the cache. Thus the specification of
individual indexes will make sense only in the future. IGNORE LEAVES means that only a part
of the index is to be loaded.
LOAD TABLE dbname.tablename FROM MASTER
This command copies a table in a replication system from master to slave, if the table does not yet
exist there. The purpose of the command is actually to simplify debugging for MySQL developers.
However, the command can possibly also be used for repairing a replication system after errors
have been detected. The execution of the command requires that the replication user possess the
privileges Select, Reload, and Super. LOAD TABLE works only for MyISAM tables.
LOCK TABLE table1 [ AS aliasname ] locktype, table2 [ AS alias2 ] locktype, …
LOCK TABLE prevents other MySQL users from executing write or read operations on the specified
tables. If a table is already blocked by another user, then the command waits (unfortunately, with-
out a timeout value, thus theoretically forever) until that block is released.
CHAPTER 21 ■SQL REFERENCE634
5351c21_final.qxd 8/26/05 8:06 PM Page 634
www.it-ebooks.info

Table LOCKs ensure that during the execution of several commands no data are changed by other
users. Typically, LOCKs are necessary when first a SELECT query is executed and then tables are changed
with UPDATE, where the results of the previous query are used. (For a single UPDATE command, on the
other hand, no LOCK is necessary. Individual UPDATE commands are always completely executed by
the MySQL server without giving other users the opportunity to change data.)
LOCK TABLE should not be used on InnoDB tables, for which you can achieve much more effi-
cient locking using transactions and the commands SELECT … IN SHARE MODE and SELECT … FOR
UPDATE.
Note that LOCK TABLE commands end a running transaction as with COMMIT. For future ver-
sions of MySQL there are InnoDB-specific LOCK variants planned that will be able to be executed
outside of transactions.
locktype: In MySQL 5.0 there are four LOCK types available:
READ: All MySQL users may read the table, but no one may change anything (including the
user who executed the LOCK command). A READ LOCK is allocated only when the table is not
blocked by other WRITE LOCKs. (Existing READ LOCKs, on the other hand, are no hindrance
for new READ LOCKs. It is thus possible for several users to have simultaneous READ LOCKs on
the same table.)
READ LOCAL: Like READ, except that INSERTs are allowed if they do not change existing data
records.
WRITE: The current user may read and change the table. All other users are completely blocked.
They may neither change data in the blocked table nor read it. A WRITE LOCK is allocated only
if the table is not blocked by other LOCKs (READ or WRITE). Until the WRITE LOCK is lifted,
other users can obtain neither a READ LOCK nor a WRITE LOCK.
LOW PRIORITY WRITE: Like WRITE, except that during the waiting time (that is, until all other
READ and WRITE LOCKs have been ended) other users may obtain on demand a new READ
LOCK. However, this means as well that the LOCK will be allocated only when there is no other
user who wishes a READ LOCK.
In future versions of MySQL there will presumably be two additional LOCK variants especially
for InnoDB tables. These two variants are not yet officially documented, and so it is possible
that the following description is inaccurate.
IN SHARE MODE: This LOCK type will have the same effect as SELECT * FROM table and will
protect the entire table from changes by other connections. (INSERT, UPDATE, and DELETE
commands of other connections are thus blocked until the end of the lock.)
There are two advantages over the SELECT command: The InnoDB table driver can execute
locking more efficiently, and the LOCK command is compatible with other database systems
(Oracle, PostgreSQL, etc.).
IN EXCLUSIVE MODE: This LOCK type is even more restrictive and blocks SELECT commands
of other connections if this option is executed with the option LOCK IN SHARE MODE or LOCK
FOR UPDATE.
Table LOCKs can increase the speed with which several database commands can be executed
one after the other (of course, at the cost that other users are blocked during this time).
MySQL manages table LOCKs by means of a thread, where each connection is associated with its
own thread. Only one LOCK command is considered per thread. (But several tables may be included.)
As soon as UNLOCK TABLES or LOCK is executed for any other table, then all previous locks become
invalid.
CHAPTER 21 ■SQL REFERENCE 635
5351c21_final.qxd 8/26/05 8:06 PM Page 635
www.it-ebooks.info

For reasons of efficiency, it should definitely be attempted to keep LOCKs as brief as possible
and to end them as quickly as possible by UNLOCK. LOCKs end automatically when the current
process ends (that is, for example, when the connection between server and client is broken).
OPTIMIZE TABLE tablename
OPTIMIZE TABLE removes, since MySQL 4.1.3, unused storage space from MyISAM and InnoDB
tables and ensures that associated data in a data record are stored together.
OPTIMIZE TABLE should be regularly executed for tables whose contents are continually being
changed (many UPDATE and DELETE commands). This speeds up data access. With MyISAM tables
the database file is also made smaller. The table space of InnoDB tables, on the other hand, cannot
in principle be made smaller.
PROCEDURE procname
MySQL can be extended with external procedures. Their code must be formulated in the C++ pro-
gramming language. To use such functions in SELECT commands, the key word PROCEDURE must
be used.
As an example of such a procedure, the MySQL program code contains the function ANALYSE.
This procedure can be used to analyze the contents of a table in the hope of determining a better
table definition. The function is called thus:
SELECT * FROM tablename PROCEDURE ANALYSE()
As with the creation of user-defined functions (UDFs; see CREATE FUNCTION), the program-
ming of procedures requires a great deal of MySQL background knowledge. Further information can
be found in the MySQL documentation: http://dev.mysql.com/doc/mysql/en/extending-mysql.html.
An elegant and much simpler alternative to UDFs is stored procedures, which have been avail-
able since MySQL 5.0.
PURGE MASTER LOGS TO 'hostname-bin.n'
This command deletes all binary logging files that are older than the file specified. Execute this
command only when you are sure that the logging files are no longer needed, that is, when all slave
computers have synchronized their databases. This command can be executed only on the master
computer of a replication system, and only if the Super privilege has been granted. See also RESET
MASTER.
RENAME TABLE oldtablename TO newtablename
RENAME TABLE gives a new name to an existing table. It is also possible to rename several tables,
e.g., a TO b, c TO d, etc.
There is no command for giving a new name to an entire database. If you are using MyISAM
tables, then to do so, you can stop the MySQL server, rename the database directory and then restart
the server. Note that you may have to change access privileges in the mysql database. With InnoDB
tables, you must make a backup (mysqldump) and then import the tables into a new database.
CHAPTER 21 ■SQL REFERENCE636
5351c21_final.qxd 8/26/05 8:06 PM Page 636
www.it-ebooks.info

REPAIR TABLE tablename1, tablename2, … [ TYPE = QUICK ]
REPAIR TABLE attempts to repair a defective table file. With the option TYPE = QUICK only the index
is re-created.
REPAIR TABLE can be used only with MyISAM tables. Instead of this command, you may also
use the external program myisamchk -r tblfile. (If REPAIR TABLE does not return OK as result, then
you might try myisamchk -o. This program offers more repair possibilities than REPAIR TABLE.)
REPLACE [INTO]
REPLACE is a variant of INSERT. The only difference relates to new records whose key word is the
same as that of an existing record. In this case, the existing record is deleted and the new one is
stored in the table. Since the behavior with duplicates is so clearly defined, REPLACE does not have
the IGNORE option possessed by the INSERT command.
RESET MASTER
This command deletes all binary logging files including the index file hostname-bin.index. With this
command, replication can be restarted at a particular time. For this, RESET SLAVE must be exe-
cuted on all slave systems. Before the command is executed it must be ensured that the databases
on all slave systems are identical to those of the master system. This command assumes the reload
privilege.
If you wish to delete only old (no longer needed) logging files, then use PURGE MASTER LOGS.
RESET QUERY CACHE
This command deletes all entries from the query cache. It assumes the reload privilege.
RESET SLAVE
This command reinitializes the slave system. The contents of master.info (and with it the current
logging file and its position) are deleted. The command assumes the reload privilege.
This command makes sense only if after some problems the databases are to be set up on the
slave based on previous snapshots so that the slave system then can synchronize itself by replication, or
when RESET MASTER was executed on the master system (so that all logging files are deleted there). In
this case, first SLAVE STOP and then SLAVE START should be executed on the slave system.
RESTORE TABLE tblname FROM '/backup/directory'
RESTORE TABLE copies the files of the specified table from a backup directory into the data direc-
tory of the current database. RESTORE TABLE is the inverse of BACKUP TABLE.
BACKUP and RESTORE do not work for InnoDB tables. Both commands are considered
deprecated and should not be used if possible. Alternatives are external backup tools such as
mysqldump, mysqlhotcopy, and the InnoDB backup utility.
CHAPTER 21 ■SQL REFERENCE 637
5351c21_final.qxd 8/26/05 8:06 PM Page 637
www.it-ebooks.info

REVOKE privileges ON objects FROM users
REVOKE is the inverse of GRANT. With this command you can remove individual privileges previ-
ously granted. The syntax for the parameters privileges, objects, and users can be read about under
the GRANT command. The only difference relates to the Grant privilege: To revoke this privilege
from a user, REVOKE can be used in the following form: REVOKE GRANT OPTION ON … FROM ….
Although GRANT inserts new users into the mysql.user table, REVOKE is incapable of deleting
this user. You can remove all privileges from this user with REVOKE, but you cannot prevent this user
from establishing a connection to MySQL. (If you wish to take that capability away as well, you must
explicitly remove the entries from the user database with the DELETE command.)
Please note that in the MySQL access system you cannot forbid what is allowed at a higher level.
If you allow xaccess to database d, then you cannot exclude table d.t with REVOKE. If you wish to
allow xaccess to all tables of the database dwith the exception of table t, then you must forbid access
to the entire database and then allow access to individual tables of the database (with exception of
d). REVOKE is not smart enough to carry out such operations on its own.
ROLLBACK
ROLLBACK undoes the most recent transaction. (Instead of ROLLBACK, you can confirm the pend-
ing changes with COMMIT and thereby finalize their execution.) BEGIN/COMMIT/ROLLBACK work
only if you are working with transaction-capable tables. Further information and examples on
transactions can be found in Chapter 10.
ROLLBACK TO SAVEPOINT name
ROLLBACK ends the current transaction. All SQL commands executed since the specified SAVEPOINT
are canceled. Commands before the SAVEPOINT are accepted. The command has been available since
version 4.0.14.
SAVEPOINT name
This command sets, since MySQL version 4.0.14, a mark within the running transaction. With
ROLLBACK TO SAVEPOINT the transaction can be aborted beyond this point. SAVEPOINTs are
valid only within a transaction. They are deleted at the end of the transaction.
SELECT [selectoptions] column1 [[AS] alias1], column2 [[AS] alias2] ...
[ FROM tablelist ]
[ WHERE condition ]
[ GROUP BY groupfield [ASC |DESC] ]
[ HAVING condition ]
[ ORDER BY ordercolumn1 [DESC], ordercolumn2 [DESC] ... ]
[ LIMIT [offset,] rows ]
[ PROCEDURE procname]
[ LOCK IN SHARE MODE | FOR UPDATE ]
SELECT serves to formulate database queries. It returns the query result in tabular form. SELECT is
usually implemented in the following form:
SELECT column1, column2, column3 FROM table ORDER BY column1
CHAPTER 21 ■SQL REFERENCE638
5351c21_final.qxd 8/26/05 8:06 PM Page 638
www.it-ebooks.info

However, there are countless syntactic variants, thanks to which SELECT can be used also, for
example, for processing simple expressions.
SELECT HOUR(NOW( ))
Note that the various parts of the SELECT command must be given in the order presented here.
selectoptions: The behavior of this command can be controlled by a number of options:
DISTINCT | DISTINCTROW specify how MySQL should behave when a query returns several
identical records. DISTINCT and DISTINCTROW mean that identical result records should be
displayed only once. ALL means that all records should be displayed (the default setting).
Since MySQL 4.1, the sort order can also be specified for DISTINCT (which is also the basis
for determining equivalence of character strings): The syntax is DISTINCT column COLLATE
collname.
HIGH_PRIORITY has the effect that a query with higher priority than change or insert commands
will be executed. HIGH_PRIORITY should be used only for queries that need to be executed very
quickly.
SQL_SMALL_RESULT | SQL_BIG_RESULT specify whether a large or small record list is expected
as result, and they help MySQL in optimization. Both options are useful only with GROUP BY
and DISTINCT queries.
SQL_BUFFER_RESULT has the effect that the result of a query is stored in a temporary table.
This option should be used when the evaluation of the query is expected to range over a long
period of time and locking problems are to be avoided during this period.
SQL_CACHE and SQL_NO_CACHE specify whether the results of the SELECT command should be
stored in the query cache or whether such storage should be prevented. By default, SQL_CACHE
usually holds, unless the query cache is executed in demand mode (QUERY_CACHE_TYPE=2).
SQL_CALC_FOUND_ROWS has the effect that MySQL determines the total number of found
records even if you limit the result with LIMIT. The number can then be determined with a
second query SELECT FOUND_ROWS( ).
STRAIGHT_JOIN has the effect that data collected from queries extending over more than one
table should be joined in the order of the FROM expression. (Without STRAIGHT_JOIN, MySQL
attempts to find the optimal order on its own. STRAIGHT_JOIN bypasses this optimization
algorithm.)
column: Here column names are normally given. If the query encompasses several tables, then
the format is table.column. If a query is to encompass all the columns of the tables specified by
FROM, then you can save yourself some typing and simply specify *. (Note, however, that this
is inefficient in execution if you do not need all the columns.)
However, instead of column names, you may also use general expressions or functions, e.g., for
formatting a column (DATE_FORMAT(…)) or for calculating an expression (COUNT(…)).
With AS, a column can be given a new name. This is practical in using functions such as
HOUR(column) AS hr. The use of AS is optional. That is, HOUR(column) hr is syntactically
correct (but not as readable).
Such an alias name can then be used in most of the rest of the SELECT command (e.g., ORDER
BY hr). The alias name cannot, however, be placed in a WHERE clause.
Since MySQL 4.1, the desired sort order can be specified with COLLATE (e.g., column COLLATE
collname AS alias).
CHAPTER 21 ■SQL REFERENCE 639
5351c21_final.qxd 8/26/05 8:06 PM Page 639
www.it-ebooks.info

tablelist: In the simplest case, there is simply a list (separated by commas) of all tables that are
to be considered in the query. If no relational conditions (further below with WHERE) are for-
mulated, then MySQL returns a list of all possible combinations of data records of all affected
tables.
There is the possibility of specifying here a condition for linking the tables, for example in the
following forms:
table1 LEFT [OUTER] JOIN table2 ON table1.xyID = table2.xyID
table1 LEFT [OUTER] JOIN table2 USING (xyID)
table1 NATURAL [LEFT [OUTER]] JOIN
An extensive list of the many syntactic synonyms can be found in Chapter 9, where the topic
of links among several tables is covered in great detail.
Within tablelist an alias can be given for every table name. The key word AS is optional:
table1 [AS] t1, table2 [AS] t2
condition: Here is where conditions that the query results must fulfill can be formulated. Con-
ditions can contain comparisons (column1>10 or column1=column2) or pattern expressions
(column LIKE ‘%xy’), for example. Several conditions can be joined with AND, OR, and NOT.
MySQL allows selection conditions with IN:
WHERE id IN(1, 2, 3) is equivalent to WHERE id=1 OR id=2 OR id=3.
WHERE id NOT IN (1,2) is equivalent to WHERE NOT (id=1 OR id=2).
Full-text search: Conditions can also be formulated with MATCH(col1, col2) AGAINST(‘word1
word2 word3’). Thereby a full-text search is carried out in the columns col1 and col2 for the
words word1, word2, and word3. (This assumes that a full-text index for the columns col1 and
col2 has been created.)
AGAINST also supports Boolean search expressions, for example, in the form AGAINST(‘+word1
+word2 -word3’ IN BOOLEAN MODE). Here the plus sign represents a logical AND operation,
while the minus sign means that the specified word may not appear in the record. The full
syntax for search expressions can be found in Chapter 10.
WHERE versus HAVING:Conditions can be formulated with WHERE or HAVING. WHERE con-
ditions are applied directly to the columns of the tables named in FROM.
HAVING conditions, on the other hand, are applied only after the WHERE conditions to the
intermediate result of the query. The advantage of HAVING is that conditions can also be speci-
fied for function results (for example, SUM(column1) in a GROUP BY query). Alias names can
be used in HAVING conditions (AS xxx), which is not possible in WHERE.
Conditions that can be equally well formulated with WHERE or HAVING should be expressed
with WHERE, because in that case, better optimization is possible.
groupfield: With GROUP BY, you can specify a group column. If the query returns several records
with the same values for the group column, then these records are collected into a single new
record. Along with GROUP BY, in the column part of the query so-called aggregate functions are
usually placed, with which calculations can be made over grouped fields (e.g., COUNT, SUM,
MIN, MAX).
By default, grouped results are sorted as though ORDER BY had been specified for the columns.
Optionally, the sort order can be determined with ASC or DESC.
Since MySQL 4.1, the desired sort order can be given with COLLATE (e.g., GROUP BY column
COLLATE collname).
CHAPTER 21 ■SQL REFERENCE640
5351c21_final.qxd 8/26/05 8:06 PM Page 640
www.it-ebooks.info

ordercolumn: With ORDER BY several columns or expressions can be specified according to
which the query result should be sorted. Sorting normally proceeds in increasing order (A, B, C,
… or 1, 2, 3, …). With the option DESC (for descending) you have decreasing order.
[offset,] row: With LIMIT the query results can be reduced to an arbitrary selection. This is to be
recommended especially when the results are to be displayed pagewise or when the number of
result records is to be limited. The position at which the results are to begin is given by offset (0
for the first data record), while row determines the maximum number of result records.
procname: This enables the call of a user-defined procedure (see the description of PROCEDURE).
MySQL does not support the formulation SELECT … INTO table, which is recognized in many
other SQL dialects. In most cases you can get around this lack with INSERT INTO … SELECT … or
CREATE TABLE tablename … SELECT ….
Locking (InnoDB Tables)
If you use transactions, then the addition of LOCK IN SHARE MODE has the effect that all records
found by the SELECT command will be blocked by a shared lock until the end of the transaction.
This has two consequences: First, your SELECT query will not be executed until there is no running
transaction that could change the result. Second, the affected records cannot now be changed by
other connections (though they can be read with SELECT) until your transaction has ended.
FOR UPDATE is even more restrictive, blocking the found records with an exclusive lock. In
contrast to a shared lock, other connections that execute SELECT … LOCK IN SHARE MODE must
now wait until the end of your transaction (of course, only if the same records are affected by
SELECT queries).
SubSELECTs
Beginning with version 4.1, MySQL supports so-called subSELECTs. This means that the results of
one query can flow into a condition of another. Examples of the use of subSELECTs can be found in
Chapter 10. Here are the syntactic variants:
SELECT … WHERE col = [ANY|ALL|SOME] (SELECT …)
In this variant the second SELECT query must return a single value (one row and one column).
This value is used for the comparison col = …. Other comparison operators are allowed as well,
such as col > … and col <= … and col <> ….
SELECT … WHERE col = ANY|SOME (SELECT …)
Here the second SELECT query can return more than one value. ANY or the equivalent key
word SOME results in all suitable values being considered. Then the entire query returns more
than one result. col = ANY … is the same as col IN … (see below).
SELECT … WHERE col = ALL (SELECT …)
The expression comparisonoperator ALL has the value TRUE if the comparison is true for all the
results of the second SELECT query or if the second SELECT query returns no results at all.
SELECT … WHERE col [NOT] IN (SELECT …)
With this variant, the second SELECT query can return a list of individual values. This list is
then processed in the form SELECT ...WHERE col IN (n1, n2, n3). In place of IN one may also
use NOT IN.
CHAPTER 21 ■SQL REFERENCE 641
5351c21_final.qxd 8/26/05 8:06 PM Page 641
www.it-ebooks.info

SELECT ROW(value1, value2 …) = [ANY] (SELECT col1, col2 …)
This query tests whether there exists a record that satisfies certain criteria. The result can be
either 1 (true) or NULL (false). As comparison criterion there is not a single value, but a group
of values. If the result record agrees with the ROW record, the entire query returns 1, otherwise
NULL.
If the optional key word ANY or its synonym SOME is used, the second SELECT query can return
more than one result. If at least one of these agrees with the ROW record, then the entire query
returns 1.
SELECT … WHERE [NOT] EXISTS (SELECT …)
With this variant, the second query is executed for each record found from the first SELECT
query. Only if this returns a result (at least one record) does the record from the first SELECT
query remain in the result list. EXISTS constructions are as a rule useful only if the records of
the two SELECT commands are linked with a WHERE condition.
SELECT … FROM (SELECT …) AS name WHERE …
With this variant first the SELECT command in parentheses is executed. It returns a table that
serves as the basis for the outer SELECT query. The outer SELECT command thus does not access
a preexisting table, but instead the table that was the result of the previous SELECT command.
Such tables are called derived tables. The SQL syntax prescribes that these tables must be named
using AS name.
SELECT commands can be nested within one another. Such commands are difficult to read and
understand, however. SELECT commands can also be placed in the WHERE condition of UPDATE or
DELETE commands to decide which records should be altered or deleted.
SELECT [selectoptions] columnlist
INTO @var1, @var2 …
[ FROM … WHERE … GROUP BY … HAVING … ORDER BY … LIMIT … ]
With this variant of the SELECT command, all columns of the result record are stored, since MySQL 5.0,
in the variables var1, var2, etc. This works only if the query returns exactly one record. (If necessary use
LIMIT 1.)
INTO @var1, @var2 … can also be placed at the end of the instruction. The following two exam-
ples are therefore equivalent:
SELECT title, subtitle INTO @mytitle, @mysub FROM titles WHERE titleID=1
SELECT title, subtitle FROM titles WHERE titleID=1 INTO @mytitle, @mysub
SELECT [selectoptions] columnlist
INTO OUTFILE 'filename' exportopt
[ FROM … WHERE … GROUP BY … HAVING … ORDER BY … LIMIT … ]
With this variant of the SELECT command, the records are written into a text file. Here we describe
only those options that are specific to this variant. All other points of syntax can be found under
SELECT.
filename: The file is generated in the file system of the MySQL server. For security reasons, the
file should not already exist. Moreover, you must have the FILE privilege to be able to execute
this SELECT variant.
CHAPTER 21 ■SQL REFERENCE642
5351c21_final.qxd 8/26/05 8:06 PM Page 642
www.it-ebooks.info

exportoptions: Here it is specified how the text file is formatted. The entire option block looks
like this:
[ FIELDS
[ TERMINATED BY ‘fieldtermstring’ ]
[ [OPTIONALLY] ENCLOSED BY ‘enclosechar’ ]
[ ESCAPED BY ‘escchar’ ] ]
[ LINES TERMINATED BY ‘linetermstring’ ]
fieldtermstring specifies the character string that separates columns within a line (e.g., a tab
character).
enclosechar specifies a character that is placed before and after every entry, e.g., ‘123’ with
ENCLOSED BY ‘ \’’. With OPTIONALLY, the character is used only on CHAR, VARCHAR, TEXT,
BLOB, TIME, DATE, SET, and ENUM columns (and not for every number format, such as
TIMESTAMP).
escchar specifies the character to be used to mark special characters (usually the backslash).
This is especially necessary when in character strings of a text file special characters appear
that are also used for separating data elements.
If escchar is specified, then the escape character is always used for itself (\\) as well as for ASCII
code 0 (\0). If enclosechar is empty, then the escape character is also used as identifier of the first
character of fieldtermstring and linetermstring (e.g., \t and \n). On the other hand, if enclosechar
is not empty, then escchar is used only for enclosechar (e.g., \” ), and not for fieldtermstring and
linetermstring. (This is no longer necessary, since the end of the character string is uniquely
identifiable due to enclosechar.)
linetermstring specifies the character string with which lines are to be terminated. With
DOS/Windows text files this must be the character string ‘ \r\n’.
In the four character strings, special characters can be specified, for example, \b for backspace.
The list of permissible special characters can be found at the command LOAD DATA. Moreover,
character strings can be given in hexadecimal notation (such as 0x22 instead of ‘ \’’).
As with LOAD DATA the following is the default setting:
FIELDS TERMINATED BY ‘\t’ ENCLOSED BY ‘’ ESCAPED BY ‘\\’
LINES TERMINATED BY ‘\n’
If you wish to input files generated with SELECT … INTO OUTFILE again into a table, then use
LOAD DATA. This command is the inverse of SELECT … INTO OUTFILE. Further information and
concrete application examples for both commands can be found in Chapter 14.
SELECT [selectoptions] column
INTO DUMPFILE 'filename'
[ FROM … WHERE … GROUP BY … HAVING … ORDER BY … LIMIT … ]
SELECT … INTO DUMPFILE has, in principle, the same function as SELECT … INTO OUTFILE (see
above). The difference is that here data are stored without any characters to indicate column or row
division.
SELECT … INTO DUMPFILE is designed for saving a single BLOB object into a file. The SELECT
query should therefore return precisely one column and one row as result. Should that not be the case,
that is, if the query returns more than one data element, then usually (and for some strange reason
not always) one receives an error message: ERROR 1172:Result consisted of more than one row.
CHAPTER 21 ■SQL REFERENCE 643
5351c21_final.qxd 8/26/05 8:06 PM Page 643
www.it-ebooks.info

(SELECT selectoptions) UNION [ALL] (SELECT selectoptions) unionoptions
Since MySQL 4.0 you can use UNION to unite the results of two or more SELECT queries. You thereby
obtain a result table in which the results of the individual queries are simply strung together. The indi-
vidual queries can affect different tables, though you must ensure that the number of columns and
their data types are the same.
The optional key word ALL has the effect that duplicates (that is, results that arise in more than
one SELECT query) appear in the end result with their corresponding multiplicity. Without ALL,
duplicates are eliminated (as with DISTINCT in SELECT).
With SELECT commands, all options described earlier for selecting columns, setting sort order,
etc., are permitted. With unionoptions you can also specify how the final result is to be sorted (ORDER
BY) and reduced (LIMIT).
SET @variable1 = expression1, @variable2 = expression2 …
MySQL permits the management of one’s own user variables. These variables are indicated by the @
symbol before the name. These variables are managed separately for each client connection, so that
no naming conflicts can arise among clients. The content of such variables is lost at the end of the
connection.
Instead of SET, one may also use SELECT for the assignment of user variables. The syntax is
SELECT @variable:=expression (note that := must be used instead of =).
SET [options] [@@]systemvariable = expression
If the variable name has either no @ prefixed or two of them (@@), then SET is setting system variables.
options: MySQL distinguishes two levels of validity among system variables: GLOBAL (valid for
the entire MySQL server) and SESSION (valid only for the current connection). The default set-
ting is SESSION.
Instead of the options GLOBAL and SESSION you can prefix global. or session. to the variable
names. Thus SET GLOBAL name = … is equivalent to SET global.name = ….
Variables at the global level can be changed only by users with the Super privilege. Global changes
are valid only for new connections, not those already in existence.
SET [OPTION] option=value
SET can also be used to modify certain MySQL options as well as the password. Although the syntax
looks the same as that for variable assignment, most of the options described here cannot be evalu-
ated with SHOW VARIABLES. However, SELECT @@name works in most cases.
For example, with
SET SQL_LOW_PRIORITY_UPDATES = 0 / 1
it is possible to determine the order in which MySQL executes queries and change commands. The
default behavior (1) gives priority to change commands. (This has the effect that a lengthy SELECT
command will not block change commands, which are usually executed quickly.) With the setting 0,
on the other hand, changes are executed only when no SELECT command is waiting to be executed.
CHAPTER 21 ■SQL REFERENCE644
5351c21_final.qxd 8/26/05 8:06 PM Page 644
www.it-ebooks.info

Important SET Options
Here are the most important SET syntax variants, presented in alphabetical order:
SET AUTOCOMMIT = 0 or SET AUTOCOMMIT = 1 switches the autocommit mode for transac-
tions off or on. Autocommit mode holds only for transaction-capable tables (see Chapter 10).
SET CHARACTER SET ‘csname’ assigns the character set csname to the two session variables
character_set_client and character_set_result and to the session variable character_set_connection
the value of character_set_database. SET CHARACTER SET DEFAULT resets the three variables to
their default settings. A description of character_set_xxx variables appears in Chapter 10.
SET FOREIGN_KEY_CHECKS = 0 or 1deactivates or activates the checking of foreign key con-
straints (see also Chapter 8).
If you use replication, you can temporarily interrupt binary logging on the master system with
SET SQL_LOG_BIN =0 in order to make manual changes that should not be replicated. SET
SQL_LOG_BIN=1 resumes logging.
SET NAMES ‘csname’ is a variant of SET CHARACTER SET. The difference is that the character
set csname is assigned to all three session variables character_set_client, character_set_result,
and character_set_connection.
SET PASSWORD offers a convenient way of changing one’s own password, sparing the compar-
atively difficult manipulation of the access tables in the mysql database:
SET PASSWORD = PASSWORD('some password')
If you have sufficient privileges, you can also set another user’s password with SET.
SET PASSWORD FOR username@hostname = PASSWORD('newPassword')
SET SQL_QUERY_CACHE = 0|1|2|ON|OFF|DEMAND sets the mode of the query cache (see
Chapter 14).
SET TRANSACTION ISOLATION LEVEL sets the isolation level for transactions. The setting
holds for transaction-capable tables. Here is the syntax:
SET [SESSION|GLOBAL] TRANSACTION ISOLATION LEVEL
READ UNCOMMITTED | READ COMMITTED |
REPEATABLE READ | SERIALIZABLE
SET SESSION changes the transaction degree for the current connection, and SET GLOBAL for
all future connections (but not the current one). If neither SESSION nor GLOBAL is specified,
then the setting is valid only for the coming transaction. (Note that SESSION and GLOBAL in
SET TRANSACTION have a somewhat different effect from that of SET [@@]systemvariable.)
The four isolation degrees are described in Chapter 10. With InnoDB tables, the default is
REPEATABLE READ. The isolation degree can also be read from the variable
@@[global.]tx_isolation.
Additional SET Options
The following list presents all the options that can be changed with SET:
SET BIG_TABLES = 0 | 1
SET CHARACTER SET character_set_name | DEFAULT
SET IDENTITY = #
SET INSERT_ID = #
SET LAST_INSERT_ID = #
SET LOW_PRIORITY_UPDATES = 0 | 1
CHAPTER 21 ■SQL REFERENCE 645
5351c21_final.qxd 8/26/05 8:06 PM Page 645
www.it-ebooks.info

SET MAX_JOIN_SIZE = value | DEFAULT
SET QUERY_CACHE_TYPE = 0 | 1 | 2
SET QUERY_CACHE_TYPE = OFF | ON | DEMAND
SET SQL_AUTO_IS_NULL = 0 | 1
SET SQL_BIG_SELECTS = 0 | 1
SET SQL_BUFFER_RESULT = 0 | 1
SET SQL_LOG_OFF = 0 | 1
SET SQL_LOG_UPDATE = 0 | 1
SET SQL_QUOTE_SHOW_CREATE = 0 | 1
SET SQL_SAFE_UPDATES = 0 | 1
SET SQL_SELECT_LIMIT = value | DEFAULT
SET TIMESTAMP = timestamp_value | DEFAULT
An explanation of these (mostly seldom used) setting options can be found in the MySQL
documentation in the description of the SET command: http://dev.mysql.com/doc/mysql/en/
set-option.html.
SHOW BINLOG EVENTS [IN logname] [FROM pos] [LIMIT offset, rows]
If this command is executed without options, then it returns the complete contents of the currently
active binary logging file. The options allow for the specification of other logging files or for limiting
the output. Note that this command can also be used to read the logging file of an external MySQL
server.
SHOW CHARACTER SET [ LIKE pattern ]
Since MySQL 4.1, SHOW CHARACTER SET returns a list of all available character sets and their
default sort orders.
SHOW COLLATION[ LIKE pattern ]
Since MySQL 4.1, SHOW COLLATION returns a list of all available sort orders.
SHOW COLUMN TYPES
In the future, SHOW COLUMN TYPES will return a list of all data types available for column defini-
tion in a table. (In the tested version 5.0.2 the resulting list was incomplete.)
SHOW [FULL] COLUMNS FROM tablename
[ FROM databasename ] [ LIKE pattern ]
SHOW COLUMNS returns a table with information on all columns of a table (field name, field type,
index, default value, etc.). With LIKE the list of columns can be filtered with a search pattern with
the wild cards _ and %. The optional key word FULL has the effect that the access privileges of the
current user are also displayed on the columns. The same information can be obtained with SHOW
FIELDS FROM tablename, EXPLAIN tablename, or DESCRIBE tablename, as well as with the exter-
nal program mysqlshow. More detailed information can be found in the virtual table
information_schema.columns (since MySQL 5.0).
CHAPTER 21 ■SQL REFERENCE646
5351c21_final.qxd 8/26/05 8:06 PM Page 646
www.it-ebooks.info

SHOW CREATE DATABASE tablename
Since MySQL 4.1, SHOW CREATE DATABASE displays the SQL command with which the specified
database can be re-created.
SHOW CREATE FUNCTION/PROCEDURE name
SHOW CREATE FUNCTION/PROCEDURE displays since MySQL 5.0 the SQL command with which
the specified stored procedure can be re-created.
SHOW CREATE TABLE name
SHOW CREATE TABLE displays the SQL command with which the specified table or view can be
re-created.
In the result of the command, all object names are set between backward single quotes, for
example `tablename` or `columnname`. If you don’t want this, then execute SET
SQL_QUOTE_SHOW_CREATE=0 beforehand.
SHOW CREATE VIEW name
SHOW CREATE VIEW displays the SQL command with which the specified view can be re-created.
The command assumes the Create View privilege.
SHOW DATABASES [ LIKE pattern ]
SHOW DATABASES returns a list of all databases that the user can access. The list can be filtered
with a search pattern with the wild cards _ and %. The same information can also be obtained with
the external program mysqlshow.
For users possessing the Show Databases privilege, SHOW DATABASES returns a list of all data-
bases, including those to which the user does not have access.
SHOW [STORAGE] ENGINES
Since MySQL 4.1, SHOW ENGINES displays a list of all table drivers (MyISAM, InnoDB, etc.) includ-
ing information as to whether the driver is supported by the current MySQL version.
SHOW [COUNT(*)] ERRORS [LIMIT [offset, ] count]
Since MySQL 4.1, SHOW ERRORS returns a list of errors that were triggered by the execution of the
most recent command. With LIMIT the result can be limited as with a SELECT command.
SHOW FIELDS
See SHOW COLUMNS.
CHAPTER 21 ■SQL REFERENCE 647
5351c21_final.qxd 8/26/05 8:06 PM Page 647
www.it-ebooks.info

SHOW FUNCTION STATUS [LIKE 'pattern']
This command returns since MySQL 5.0 a list of all functions (SPs). The list covers all databases.
Optionally, the list can be reduced to all functions whose names satisfy a search pattern (where the
SQL wild cards % and _ are allowed). A list of all procedures can be determined with SHOW
PROCEDURE STATUS.
SHOW GRANTS FOR user@host
SHOW GRANTS displays a list of all access privileges for a particular user. It is necessary that user
and host be specified exactly as these character strings are stored in the various mysql access tables.
Wild cards are not permitted.
SHOW INDEX FROM table
SHOW INDEX returns a table with information about all indexes of the given table.
SHOW INNODB STATUS
SHOW INNODB STATUS returns information about various internal workings of the InnoDB table
driver. The data can be used for speed optimization. More information can be found at http://
dev.mysql.com/doc/mysql/en/innodb-tuning.html.
SHOW KEYS
See SHOW INDEX.
SHOW [BDB] LOGS
This command shows which BDB logging files are currently being used. (If you are not using BDB
tables, the command returns no result.)
SHOW MASTER LOGS
This command returns a list of all binary logging files. It can be executed only on the master com-
puter of a replication system.
SHOW MASTER STATUS
This command shows which logging file is the current one, as well as the current position in this file and
which databases are excepted from logging (configuration settings binlog-do-db and binlog-ignore-db).
This command can be used only on the master computer of a replication system.
SHOW PRIVILEGES
Since MySQL 4.1, this command returns a list of all available privileges with a brief description.
CHAPTER 21 ■SQL REFERENCE648
5351c21_final.qxd 8/26/05 8:06 PM Page 648
www.it-ebooks.info

SHOW PROCEDURE STATUS [LIKE 'pattern']
This command returns, since MySQL 5.0, a list of all procedures (SPs). The list comprises SPs from
all databases. Optionally, the list can be reduced to all procedures whose names match the pattern
pattern (where the SQL wild cards % and _ are allowed). A list of all functions can be determined
with SHOW FUNCTION STATUS.
SHOW [ FULL ] PROCESSLIST
This command returns a list of all running threads (subprocesses) of the MySQL server. If the PROCESS
privilege has been granted, then all threads are shown. Otherwise, only the user’s threads are displayed.
The option FULL has the effect that for each thread, the complete text of the most recently exe-
cuted command is displayed. Without this option, only the first 100 characters are shown.
The process list can also be determined with the external command mysqladmin.
SHOW SLAVE HOSTS
This command returns a list of all slaves that replicate the master’s databases. The command can be
used only by the master computer of a replication system. It functions only for slaves for which the
host name is specified in the configuration file explicitly in the form report-host = hostname.
SHOW SLAVE STATUS
This command provides information on the state of replication, including the display of all infor-
mation about the file master.info. This command can be executed only on a slave computer in a
replication system.
SHOW STATUS
This command returns a list of various MySQL variables that provide information on the current
state of MySQL (for example, Connections, Open_files, Uptime). This same information can also be
determined with the external program mysqladmin. A description of all variables can be found in the
MySQL documentation under the command SHOW STATUS: http://dev.mysql.com/doc/mysql/en/
show-status.html.
SHOW TABLE STATUS [FROM database] [LIKE pattern]
SHOW TABLE STATUS returns information about all tables of the currently active or specified data-
base: table type, number of records, average record length, Create_time, Update_time, etc. The same
information can also be determined with the external program mysqlshow. With pattern the list of
tables can be limited; the SQL wild cards % and _ are permitted in pattern.
SHOW TABLE TYPES see also SHOW ENGINES
Since MySQL 4.1, SHOW TABLE TYPES returns a list of all available table types (MyISAM, HEAP,
InnoDB, etc.).
CHAPTER 21 ■SQL REFERENCE 649
5351c21_final.qxd 8/26/05 8:06 PM Page 649
www.it-ebooks.info

SHOW TABLES [FROM database] [LIKE pattern]
SHOW TABLES returns a list of all tables and Views of the current (or specified) database. Optionally,
the list of all tables can be reduced to those matching the search pattern pattern (where the SQL
wild cards % and _ are allowed). More information on the construction of individual tables can be
obtained with DESCRIBE TABLE and SHOW COLUMNS. The list of tables can also be retrieved with
the external program mysqlshow.
SHOW [options] VARIABLES [LIKE pattern]
This command returns a seemingly endless list of all system variables defined by MySQL together
with their values (e.g., ansi_mode, sort_buffer, tmpdir, wait_timeout, to name but a very few). To
limit the list, a pattern can be given (e.g., LIKE ‘char%’).
Many of these variables can be set at launch of MySQL or afterwards with SET. The list of vari-
ables can also be recovered with the external command mysqladmin.
options: Here you can specify GLOBAL or SESSION. GLOBAL has the effect that the default val-
ues valid at the global level are displayed. SESSION, on the other hand, results in the values
being displayed that are valid for the current connection. The default is SESSION.
An extensive description of the variables can be found in the MySQL documentation: http://
dev.mysql.com/doc/mysql/en/server-system-variables.html.
SHOW [COUNT(*)] WARNINGS [LIMIT [offset, ] count]
Since MySQL 4.1, this command returns a list of all warnings that arose from the execution of the
most recent command.
SLAVE START/STOP [IO_THREAD | SQL_THREAD]
These commands start and stop replication (we leave it to the reader to determine which is which).
They can be executed only on the slave computer of a replication system.
By default, two threads are started for replication: the IO thread (copies the binary logging data
from the master to the slave) and the SQL thread (executes the logging file’s SQL command). With
the optional specification of IO_THREAD or SQL_THREAD, these two threads can be started or
stopped independently (which makes sense only for debugging).
START TRANSACTION
If you are working with transaction-capable tables (InnoDB), START TRANSACTION initiates a new
transaction. The command is ANSI-99 conforming, but it has been available only since MySQL 4.0.11.
In older versions, you must use the equivalent command BEGIN.
TRUNCATE TABLE tablename
TRUNCATE has the same functionality as DELETE without a WHERE condition; that is, the effect is
that all records in the table are deleted. This is accomplished by deleting the entire table and then
re-creating it. (This is considerably faster than deleting each record individually.)
TRUNCATE cannot be part of a transaction. TRUNCATE functions like COMMIT; that is, all
ROLLBACK.
CHAPTER 21 ■SQL REFERENCE650
5351c21_final.qxd 8/26/05 8:06 PM Page 650
www.it-ebooks.info

UNION see also SELECT UNION
With UNION, you can assemble the results of several SELECT queries.
UNLOCK TABLES
UNLOCK TABLES removes all of the user’s LOCKs. This command holds for all databases (that is, it
doesn’t matter which database is the current one).
UPDATE [updateoptions] tablename SET col1=value1, col2=value2 ..
[ WHERE condition ]
[ ORDER BY columns ]
[ LIMIT maxrecords ]
UPDATE changes individual fields of the table records specified by WHERE. Those fields not speci-
fied by SET remain unchanged. In value one can refer to existing fields. For example, an UPDATE
command may be of the following form:
UPDATE products SET price = price + 5 WHERE productID=3
Warning: Without a WHERE condition, all data records in the table will be changed. (In the
above example, the prices of all products would be increased by 5.)
updateoptions: Here the options LOW PRIORITY and IGNORE may be given. The effect is the
same as with INSERT.
condition: This condition specifies which records are affected by the change. For the syntax of
condition see SELECT.
columns: With ORDER BY, you can sort the record list before making changes. This makes
sense only in combination with LIMIT, for example, to change the first or last ten records
(ordered according to some criterion). This possibility has existed since MySQL 4.0.
maxrecords: With LIMIT, the maximum number of records that may be changed is specified.
UPDATE [updateoptions] table1, table2, table3
SET table1.col1=table2.col2 ...
[ WHERE condition ] [ ORDER BY columns ] [ LIMIT maxrecords ]
Since MySQL 4.0, UPDATE commands can include more than one table. All tables included in the
query must be specified after UPDATE. The only tables that are changed are those whose fields were
specified by SET. The link between the tables must be set with WHERE conditions.
USE databasename
USE turns the specified database into the default database for the current connection to MySQL.
Until the end of the connection (or until the next USE command), all table names are automatically
assigned to the database databasename.
CHAPTER 21 ■SQL REFERENCE 651
5351c21_final.qxd 8/26/05 8:06 PM Page 651
www.it-ebooks.info

Function Reference
The functions described here can be used in SELECT queries as well as in other SQL commands.
We begin with a few examples. In our first example, we shall join two table columns with CONCAT
to create a new character string. In the second example, the function PASSWORD will be used to
store an encrypted password in a column. In the third example, the function DATE_FORMAT will
be summoned to help us format a date:
SELECT CONCAT(firstname, ' ', lastname) FROM users
Peter Smith
...
INSERT INTO logins (username, userpassword)
VALUES ('smith', PASSWORD('xxx'))
SELECT DATE_FORMAT(a_date, '%Y %M %e')
FROM exceptions.test_date
2005 December 7
■Tip This section aims to provide only a compact overview of the functions available. Extensive information on
these functions can be found in the MySQL documentation. Some of these functions have been introduced at vari-
ous places in this book by way of example. See the Index for page numbers.
Arithmetic Functions
Arithmetic Functions
ABS(x) Calculates the absolute value (nonnegative number).
ACOS(x), ASIN(x) Calculates the arcsin and arccos.
ATAN(x), ATAN2(x, y) Calculates the arctangent.
CEILING(x) Rounds up to the least integer greater than or equal to x.
COS(x) Calculates the cosine; xis given in radians.
COT(x) Calculates the cotangent.
DEGREES(x) Converts radians to degrees (multiplication by 180/pi).
EXP(x) Returns ex.
FLOOR(x) Rounds down to the greatest integer less than or equal to x.
LOG(x) Returns the natural logarithm (i.e., to base e).
LOG10(x)& Returns the logarithm to base 10.
MOD(x, y) Returns the mod function, equivalent to x % y.
PI( ) Returns 3.1415927.
POW(x, y) Returns xy.
POWER(x, y) Equivalent to POW(x, y).
RADIANS(x) Converts degrees into radians (multiplication by Pi/180).
RAND( ) Returns a random number between 0.0 and 1.0.
RAND(n) Returns a reproducible (thus not quite random) number.
ROUND(x) Rounds to the nearest integer.
ROUND(x, y) Rounds to ydecimal places.
SIGN(x) Returns -1, 0, or 1 depending on the sign of x.
CHAPTER 21 ■SQL REFERENCE652
5351c21_final.qxd 8/26/05 8:06 PM Page 652
www.it-ebooks.info

Arithmetic Functions
SIN(x) Calculates the sine.
SQRT(x) Calculates the square root.
TAN(x) Calculates the tangent.
TRUNCATE(x) Removes digits after the decimal point.
TRUNCATE(x, y) Retains ydigits after the decimal point (thus TRUNCATE(1.236439, 2)
returns 1.23).
In general, all functions return NULL if provided with invalid parameters (e.g., SQRT(-1)).
Comparison Functions,Tests, Branching
Comparison Functions
COALESCE(x, y, z, …) Returns the first parameter that is not NULL.
GREATEST(x, y, z, …) Returns the greatest value or greatest character string.
IF(expr, val1, val2) Returns val1 if expr is true; otherwise, val2.
IFNULL(expr1, expr2) Returns expr2 if expr1 is NULL; otherwise, expr1.
INTERVAL(x, n1, n2, …) Returns 0 if x<n1; 1 if x< n2, etc.; all parameters must be integers, and
n1 < n2 < … must hold.
ISNULL(x) Returns 1 or 0, according to whether x IS NULL holds.
LEAST(x, y, z, …) Returns the smallest value or smallest character string.
STRCMP(s1, s2) Returns 0 if s1=s2 in sort order, -1 if s1<s2, 1 if s1>s2. Since MySQL 4.0
the function takes into account the valid character set. By default the
function no longer distinguished uppercase and lowercase (which is dif-
ferent from MySQL 3.32).
Tests, Branching
IF(expr, result1, result2) Returns result1 if expr is true; otherwise, result2.
CASE expr Returns result1 if expr=val1, returns result2 if expr=val2.
WHEN val1 THEN result1 If no condition is satisfied, then the result is resultn.
WHEN val2 THEN result2
ELSE resultn.
CASE Returns result1 if condition cond1 is true, etc.
WHEN cond1 THEN result1
WHEN cond2 THEN result2
ELSE resultn
END
Type Conversion (Cast)
Type Conversion
CAST(x AS type) Changes xinto the specified type. CAST works with the following types:
BINARY, CHAR, DATE, DATETIME, SIGNED [INTEGER], TIME, and
UNSIGNED [INTEGER].
CONVERT(x, type) Equivalent to CAST(x AS type).
acter set cs (since MySQL 4.1).
CHAPTER 21 ■SQL REFERENCE 653
5351c21_final.qxd 8/26/05 8:06 PM Page 653
www.it-ebooks.info

String Processing
Most character string functions can also be used for processing binary data. Since MySQL 4.1 (with
Unicode support), the position and length specification functions such as LEFT and MID apply to
characters, not bytes. MID(column, 3, 1) thus returns the third character, regardless of the character
set that is defined for column.
Processing Character Strings
CHAR_LENGTH(s) Returns the number of characters in s; CHAR_LENGTH works also for
multibyte character sets (e.g., Unicode).
CONCAT(s1, s2, s3, …) Concatenates the strings.
CONCAT_WS(x, s1, s2,…) Functions like CONCAT, except that xis inserted between each string;
CONCAT_WS(‘, ‘, ‘a’, ‘b’, ‘c’) returns ‘a, b, c’.
ELT(n, s1, s2, …) Returns the nth string; ELT(2, ‘a’, ‘b’, ‘c’) returns ‘b’.
EXPORT_SET(x, s1, s2) Creates a string from s1 and s2 based on the bit coding of x; xis inter-
preted as a 64-bit integer.
FIELD(s, s1, s2, …) Compares swith strings s1, s2 and returns the index of the first match-
ing string; FIELD(‘b’, ‘a’, ‘b’, ‘c’) returns 2.
FIND_IN_SET(s1, s2) Searches for s1 in s2; s2 contains a comma-separated list of strings;
FIND_IN_SET(‘b’, ‘a,b,c’) returns 2.
INSERT(s1, pos, 0, s2) Inserts s2 into position pos in s1; INSERT(‘ABCDEF’, 3, 0, ‘abc’) returns
‘ABabcDEF’.
INSERT(s1, pos, len, s2) Inserts s2 at position pos in s1 and replaces len characters of s2 with the
new characters; INSERT(‘ABCDEF’, 3, 2, ‘abc’) returns ‘ABabcEF’.
INSTR(s, sub) Returns the position of sub in s; INSTR(‘abcde’, ‘bc’) returns 2.
LCASE(s) Changes uppercase characters to lowercase.
LEFT(s, n) Returns the first ncharacters of s.
LENGTH(s) Returns the number of bytes necessary to store the string s; if multibyte
character sets are used (e.g., Unicode), then CHAR_LENGTH must be
used to determine the number of characters.
LOCATE(sub, s) Returns the position of sub in s; LOCATE(‘bc’, ‘abcde’) returns 2.
LOCATE(sub, s, n) As above, but the search for sub begins only at the nth character of s.
LOWER(s) Transforms uppercase characters to lowercase.
LPAD(s, len, fill) Inserts the fill character fill into s, so that sends up with length len;
LPAD(‘ab’, 5, ‘*’) returns ‘***ab’.
LTRIM(s) Removes spaces at the beginning of s.
MAKE_SET(x, s1, s2 …) Forms a new string in which all strings sn appear for which in xthe bit
nis set; MAKE_SET(1+2+8, ‘a’, b’, ‘c’, ‘d’) returns ‘a,b,d’.
MID(s, pos, len) Reads len characters from position pos from the string s; MID(‘abcde’, 3,
2) returns ‘cd’.
POSITION(sub IN s) Equivalent to LOCATE(sub, s).
QUOTE(s) Since MySQL 4.0, returns a string suitable for SQL commands; special
characters such as ‘, “, \are prefixed with a backspace.
REPEAT(s, n) Joins sto itself ntimes; REPEAT(‘ab’, 3) returns ‘ababab’.
REPLACE(s, fnd, rpl) Replaces in sall fnd strings by rpl; REPLACE(‘abcde’, ‘b’, ‘xy’) returns
‘axycde’.
REVERSE(s) Reverses the string.
RIGHT(s, n) Returns the last ncharacters of s.
CHAPTER 21 ■SQL REFERENCE654
5351c21_final.qxd 8/26/05 8:06 PM Page 654
www.it-ebooks.info

Processing Character Strings
RPAD(s, len, fill) Inserts the fill character fill at the end of s, so that shas length len;
RPAD(‘ab’, 5, ‘*’) returns ‘ab***’.
RTRIM(s) Removes spaces from the end of s.
SPACE(n) Returns nspace characters.
SUBSTRING(s, pos) Returns the right part of sfrom position pos.
SUBSTRING(s, pos, len) As above, but only len characters (equivalent to MID(s, pos, len)).
SUBSTRING_INDEX(s, f, n) Searches for the nth appearance of fin sand returns the left part of
the string up to this position (exclusive); for negative n, the search
begins at the end of the string, and the right part of the string is
returned;
SUBSTRING_INDEX(‘abcabc’, ‘b’, 2) returns ‘abca’
SUBSTRING_INDEX(‘abcabc’, ‘b’, -2) returns ‘cabc’
TRIM(s) Removes spaces from the beginning and end of s.
TRIM(f FROM s) Removes the character ffrom the beginning and end of s.
UCASE(s) / UPPER(s) Transforms lowercase characters to uppercase.
Converting Numbers and Character Strings
ASCII(s) Returns the byte code of the first character of s: thus ASCII(‘A’) returns 65;
see also ORD.
BIN(x) Returns the binary code of x; BIN(12) returns ‘1010’.
CHAR(x, y, z, …) Returns the string formed from the code x, y, …; CHAR(65, 66) returns
‘AB’.
CHARSET(s) Since MySQL 4.1, returns the name of the character set in which sis
represented.
CONV(x, from, to) Transforms xfrom number base from to base to; CONV(25, 10, 16)
returns the hexadecimal ‘19’.
CONVERT(s USING cs) Since MySQL 4.1, represents the string sin the character set cs.
FORMAT(x, n) Formats xwith commas for thousands separation and ndecimal places;
FORMAT(12345.678, 2) returns ‘12,345.68’.
HEX(x) Returns the hexadecimal code for x; xcan be a 64-bit integer or (since
MySQL 4.0) a character string; in the second case, each character is
transformed into an 8-bit hex code; HEX(‘abc’) returns ‘414243’.
INET_NTOA(n) Transforms ninto an IP address with at least four groups;
INET_NTOA(1852797041) returns ‘110.111.112.113’ INET_ATON(ipadr)
transforms an IP address into the corresponding 32- or 64-bit integer;
INET_ATON(‘110.111.112.113’) returns 1852797041.
OCT(x) Returns the octal code of x.
ORD(s) Like ASCII(s), returns the code of the first character, but functions also
for multibyte character sets.
SOUNDEX(s) Returns a string that should match similar-sounding English words;
SOUNDEX(‘hat’) and SOUNDEX(‘head’) both return ‘H300’; extensive
information on the SOUNDEX algorithm can be found in the book SQL
for Smarties by Joe Celko.
CHAPTER 21 ■SQL REFERENCE 655
5351c21_final.qxd 8/26/05 8:06 PM Page 655
www.it-ebooks.info

Encryption of Character Strings and Password Management
AES_DECRYPT(crypt, key) Decrypts crypt with the AES algorithm (Rijndael) and uses
key for decryption.
AES_ENCRYPT(str, key) Encrypts str using key for encryption.
DES_ENCRYPT(str [, keyno | keystr]) Encrypts str using the DES algorithm; available since MySQL
4.0 and only when MySQL is compiled with SSL functions;
without the optional second parameter, the first key from the
DES key file is used for encryption; optionally, the number or
name of the key can be specified.
DES_DECRYPT(crypt [, keyno | keystr]) Decrypts crypt using the DES algorithm.
DECODE(crypt, pw) Decrypts crypt using the password pw.
ENCODE(str, pw) Encrypts str using pw as password; the result is a binary
object that can be decrypted with DECODE.
ENCRYPT(pw) Encrypts the password with the UNIX crypt function; if this
function is unavailable, returns ENCRYPT NULL.
PASSWORD(pw) Encrypts the password with the algorithm that was used for
storing passwords in the USER table; the result is a 16-
character string; note that since MySQL 4.1, PASSWORD uses
stronger encryption and returns a string of 45 characters.
OLD_PASSWORD(pw) Encrypts the password as for PASSWORD under
MySQL 3.23.nand 4.0.n; available since MySQL 4.1.
Calculation of Check Sums
CRC32(s) Since MySQL 4.1, computes a check (cyclic redundancy check value) for
the string s.
MD5(str) Computes the MD5 check sum for the string str.
SHA(str), SHA1(str) Since MySQL 4.0, computes a 160-bit check sum using the SHA1 algorithm
(defined in RFC 3174). SHA is considered more secure than MD5. The
result is returned as a string containing a 40-digit hexadecimal code; SHA
and SHA1 are synonyms.
Date and Time
Some of the following functions have been available only since MySQL 4.0 or 4.1.
Determining the Current Time
CURDATE() Returns the current date, e.g., ‘2005-12-31’.
Synonym: CURRENT_DATE()
CURTIME() Returns the current time as a string or an integer, depending on the con-
text, e.g., ‘23:59:59’ or 235959 (integer).
Synonym: CURRENT_TIME()
NOW() Returns the current time in the form ‘2005-12-31 23:59:59’.
Synonyms: CURRENT_TIMESTAMP(), LOCALTIME(), LOCALTIME-
STAMP(), SYSDATE()
UNIX_TIMESTAMP() Returns the current system time as a Unix timestamp (32-bit integer).
UTC_DATE() Returns the date in Coordinated Universal Time.
UTC_TIME() Returns the time in Coordinated Universal Time.
oordinated Universal Time.
CHAPTER 21 ■SQL REFERENCE656
5351c21_final.qxd 8/26/05 8:06 PM Page 656
www.it-ebooks.info

Calculating, Formatting, and Transformation Functions
ADDDATE(d, n) Adds ndays to the starting time d.
ADDDATE(...) Adds a time interval to the starting time d(see below).
Synonym: DATE_ADD()
ADDTIME(d, t) Adds the time t(TIME) to the starting time d(DATETIME).
CONVERT_TZ(d, tz1, tz2) Converts the time dfrom the time zone tz1 into the time
zone tz2. The syntax for the given time zone depends on the
operating system. Under Windows the time difference from
UTC must be given (e.g., ‘+2:00’), while under Linux, after a
configuration, you may use the name of the time zone (e.g.,
‘America/New_York’; see Chapter 10).
DATE(d) Returns only the date portion of a DATETIME expression.
(That is, the function removes the time portion.)
DATEDIFF(d1, d2) Returns the number of days between d1 and d2. The time
portion is ignored in the calculation.
DATE_FORMAT(d, form) Formats daccording to formatting string f; see below.
DAYNAME(date) Returns ‘Monday’, ‘Tuesday’, etc.
DAYOFMONTH(date) Returns the day of the month (1 to 31).
DAYOFWEEK(date) Returns the day of the week (1 = Sunday through 7 =
Saturday).
DAYOFYEAR(date) Returns the day in the year (1 to 366).
EXTRACT(i FROM date) Returns a number for the desired interval.
EXTRACT(YEAR FROM ‘2003-12-31’) Returns 2003.
FROM_DAYS(n) Returns the date ndays after the year 0.
FROM_DAYS(3660) Returns ‘0010-01-08’.
FROM_UNIXTIME(t) Transforms the Unix timestamp number tinto a date.
FROM_UNIXTIME(0) Returns ‘1970-01-01 01:00:00’.
FROM_UNIXTIME(t, f) As above, but with formatting as in DATE_FORMAT.
GET_FORMAT(…) Returns predefined formatting code for DATE_FORMAT
(see the table further below).
HOUR(time) Returns the hour (0 to 23).
LAST_DAY(d) Returns the last day of the month specified by the date d.
LAST_DAY(‘2005-02-01’) returns ‘2005-02-28’.
MAKEDATE(y, dayofyear) Creates a DATE expression from the input of year and day.
MAKETIME(h, m, s) Creates a TIME expression from the input for hours, min-
utes, and seconds.
MICROSECOND(d) Returns the number of microseconds (0 to 999999).
MINUTE(time) Returns the minute (0 to 59).
MONTH(date) Returns the month (1 to 12).
MONTHNAME(date) Returns the name of the month (‘January’, etc.).
PERIOD_ADD(s, n) Adds nmonths to the start date, which must be specified in
the form ‘YYYYMM’ (e.g., ‘200512’ for December 2005).
PERIOD_DIFF(s, e) Returns the number of months between the start and end
dates. Both times must be given in the form ‘YYYYMM’.
QUARTER(date) Returns the quarter (1 to 4).
Continued
CHAPTER 21 ■SQL REFERENCE 657
5351c21_final.qxd 8/26/05 8:06 PM Page 657
www.it-ebooks.info

Calculating, Formatting, and Transformation Functions
(Continued)
SECOND(time) Returns the second (0 to 59).
SEC_TO_TIME(n) Returns the time nseconds after midnight.
SEC_TO_TIME(3603) Returns ‘01:00:03’.
STR_TO_DATE(s, form) Interprets the string saccording to the formatting code in form.
STR_TO_DATE is the inverse function of DATE_FORMAT.
SUBDATE(d, n) Subtracts ndays from the starting time d.
SUBDATE(d, ) Subtracts a time interval from the starting time d(see below).
Synonym: DATE_ADD()
SUBTIME(d, t) Subtracts the time t(TIME) from the starting time d(DATETIME).
TIMESTAMP(s) Returns the starting time given in the string as a TIMESTAMP value.
TIMESTAMP(‘2005-12-31’) returns ‘2005-12-31 00:00:00’.
TIMESTAMP(s, time) Returns s + time as a TIMESTAMP value.
TIMESTAMPADD(i, n, s) Adds ntimes the interval i(e.g., MONTH) to the starting time s.
TIMESTAMPDIFF(i, s, e) Returns the number of intervals ibetween the start time sand the end
time e. TIMESTAMPDIFF(HOUR, ‘2005-12-31’, ‘2006-01-01’) returns 24.
TIME_FORMAT(time, f) Like DATE_FORMAT, but for times only. TIME_TO_SEC(time) returns
the number of seconds since midnight.
TO_DAYS(date) Returns the number of days since the year 0.
UNIX_TIMESTAMP(d) Returns the timestamp number for the given date.
WEEK(date) Returns the week number (1 for the week beginning with the first
Sunday in the year).
WEEK(date, mode) Returns the week number (0 to 53 or 1 to 53). The parameter mode
determines the first day of the week and how a week is defined. For
example, mode=0 means that weeks begin on Sunday and that 1 is the
first week in the new year. If mode is not specified, the server default
setting holds (default_week_format in my.cnf/my.ini). A description
of modes can be found at http://dev.mysql.com/doc/mysql/en/
date-and-time-functions.html.
WEEKDAY(date) Returns the day of the week (0 = Monday, 1 = Tuesday, etc.).
WEEKOFYEAR(date) Returns the calendar week (1 to 53).
YEAR(date) Returns the year.
YEARWEEK(date, mode) Returns an integer or string, depending on context, that consists of the
year number and week number. mode is set as in WEEK. YEAR-
WEEK(‘2005-12-31’) returns 200552.
The functions for dates and times generally assume that the initial data are valid. Do not expect
a sensible return value for input such as ‘2005-02-31’.
With all functions that return a time or a date (or both), the format of the result depends on the
context. Normally, the result is a character string (e.g., ‘2005-12-31 23:59:59’). However, if the func-
tion is used within a numeric calculation, for example NOW()+0, then the result is an integer of the
form 20051231235959.
Intervals with
ADDDATE
,
SUBDATE
,
EXTRACT
,
TIMESTAMPADD
, etc.
ADDDATE (date, INTERVAL n i) adds ntimes the interval ito the starting date date. The permitted
interval names are collected in the table following some examples. The third example shows how
intelligently the function deals with ends of months (31.12 or 28.2):
CHAPTER 21 ■SQL REFERENCE658
5351c21_final.qxd 8/26/05 8:06 PM Page 658
www.it-ebooks.info

ADDDATE(‘2005-12-31’, INTERVAL 3 DAY) returns ‘2006-01-03’.
ADDDATE(‘2005-12-31’, INTERVAL ‘3:30’ HOUR_MINUTE) returns ‘2005-12-31 03:30:00’.
ADDDATE (‘2005-12-31’, INTERVAL 2 month) returns ‘2006-02-28’.
SUBDATE is like ADDDATE, but it subtracts the given interval ntimes.
EXTRACT extracts the given interval from the time: EXTRACT(MONTH FROM ‘2005-12-31’)
returns 12.
TIMESTAMPADD is like ADDDATE, but it uses a different syntax for specifying the interval:
TIMESTAMPADD(DAY, 5, ‘2005-12-31’) returns ‘2006-01-05’.
TIMESTAMPDIFF returns the difference between two times as a multiple of the given interval:
TIMESTAMPDIFF(DAY, ‘2005-12-31’, ‘2006-02-15’) returns 46.
Intervals for ADDDATE, SUBDATE, EXTRACT, TIMESTAMPADD
MICROSECOND n
SECOND n
MINUTE n
HOUR n
DAY n
MONTH n
YEAR n
SECOND_MICROSECOND ‘ss.mmmmmm’
MINUTE_SECOND ‘mm:ss’
HOUR_MINUTE ‘hh:mm’
HOUR_SECOND ‘hh:mm:ss’
DAY_HOUR ‘dd hh’
DAY_MINUTE ‘dd hh:mm’
DAY_SECOND ‘dd hh:mm:ss’
YEAR_MONTH ‘yy-mm’
Formatting Dates and Times
DATE_FORMAT(date, format) helps in representing dates and times in other formats than the usual
MySQL format. Two examples illustrate the syntax:
DATE_FORMAT(‘2003-12-31’, ‘%M %d %Y’) returns ‘December 31 2003’.
DATE_FORMAT(‘2003-12-31’, ‘%D of %M’) returns ‘31st of December’.
Names of days of the week, months, etc., are always given in English, regardless of the MySQL
language setting (language option).
STR_TO_DATE is the inverse function to DATE_FORMAT: SELECT STR_TO_DATE(‘December 31
2005’, ‘%M %d %Y’) returns ‘2005-12-31’.
CHAPTER 21 ■SQL REFERENCE 659
5351c21_final.qxd 8/26/05 8:06 PM Page 659
www.it-ebooks.info

Date Symbols in DATE_FORMAT, TIME_FORMAT, and FROM_UNIXTIME
%W day of week Monday to Sunday
%a day of week abbreviated Mon to Sun
%e day of month 1to 31
%d day of month two-digit 01 to 31
%D day of month with ending 1st, 2nd, 3rd, 4th, …
%w day of week as number 0(Sunday) to 6(Saturday)
%j day in year, three-digit 001 to 366
%U week number, two-digit (Sunday) 00 to 52
%u week number, two-digit (Monday) 00 to 52
%M name of month January to December
%b name of month abbreviated Jan to Dec
%c month number 1to i
%m month number, two-digit 01 to 12
%Y year, four-digit 2002, 2003, …
%y year, two-digit 00, 01, …
%% the symbol % %
A few remarks about the week number are in order: %U returns 0 for the days from before the
first Sunday in the year. From the first Sunday until the following Saturday, it returns 1, then 2, etc.
With %u you get the same thing, with the first Sunday replaced by the first Monday.
Time Symbols in DATE_FORMAT, TIME_FORMAT, and FROM_UNIXTIME
%f microseconds 000000 to 99999
%S or %s seconds, two-digit 00 to 59
%i minutes, two-digit 00 to 59
%k hours (24-hour clock) 0 to 23
%H hours, two-digit, 0 to 23 o’clock 00 to 23
%l hours (12-hour clock) 1 to 12
%h or %I hours, two-digit, to 12 o’clock 01 to 12
%T 24-hour clock 00:00:00 to 23:59:59
%r 12-hour clock 12:00:00 AM to 11:59:59 PM
%p AM or PM AM, PM
In order to avoid having to re-create frequently used formatting strings, since MySQL 4.1 you
can get help from the function GET_FORMAT.
SELECT DATE_FORMAT(NOW(), GET_FORMAT(DATE, 'EUR'))
31.12.2005
The following table summarizes the results of these functions and gives examples of the result-
ing formatting of dates and times.
CHAPTER 21 ■SQL REFERENCE660
5351c21_final.qxd 8/26/05 8:06 PM Page 660
www.it-ebooks.info

GET_FORMAT Formatting Codes
GET_FORMAT(DATE, ‘USA’) ‘%m.%d.%Y’ 12.31.2005
GET_FORMAT(DATE, ‘EUR’) ‘%d.%m.%Y’ 31.12.2005
GET_FORMAT(DATE, ‘ISO’) ‘%Y-%m-%d’ 2005-12-31
GET_FORMAT(DATE, ‘JIS’) ‘%Y-%m-%d’ 2005-12-31
GET_FORMAT(DATE, ‘INTERNAL’) ‘%Y%m%d’ 20051231
GET_FORMAT(TIME,‘USA’) ‘%h:%i:%s %p’ 11:59:59 PM
GET_FORMAT(TIME, ‘EUR’) ‘%H:%i:%s’ 23:59:59
GET_FORMAT(TIME, ‘ISO’) ‘%H:%i:%s’ 23:59:59
GET_FORMAT(TIME, ‘JIS’) ‘%H:%i:%s’ 23:59:59
GET_FORMAT(TIME, ‘INTERNAL’) ‘%H%i%s’ 235959
GET_FORMAT(DATETIME,‘USA’) ‘%h:%i:%s %p %h:%i:%s %p’
GET_FORMAT(DATETIME,‘EUR’) ‘%H:%i:%s %H:%i:%s’
GET_FORMAT(DATETIME,‘ISO’) ‘%H:%i:%s %H:%i:%s’
GET_FORMAT(DATETIME,‘JIS’) ‘%H:%i:%s %H:%i:%s’
GET_FORMAT(DATETIME, ‘INTERNAL’) ‘%H%i%s%H%i%s’
GROUP BY Functions
The following functions can be used in SELECT queries (frequently in combination with GROUP BY):
USE mylibrary
SELECT catName, COUNT(titleID) FROM titles, categories
WHERE titles.catID=categories.catID
GROUP BY catName
ORDER BY catName
catName COUNT(titleID)
Children's books 3
Computer books 5
Databases 2
...
Since MySQL 4.1, the desired sort order can be specified in some aggregate functions, as in
MAX(column COLLATE collname).
CHAPTER 21 ■SQL REFERENCE 661
Aggregate Functions
AVG(expr) Computes the average of expr.
BIT_AND(expr) Performs a bitwise AND of expr.
BIT_OR(expr) Performs a bitwise OR of expr.
BIT_XOR(expr) Performs a bitwise XOR of expr.
COUNT(expr) Returns the number of expressions expr.
COUNT(DISTINCT expr) Returns the number of different expr expressions.
GROUP_CONCAT(expr) Concatenates the strings (since MySQL 4.1). Here is the complete syntax for expr:
[DISTINCT] expr1, expr2 … [ORDER BY column [DESC]] [SEPARATOR ‘…’].
ORDER BY sorts the strings before concatenating them. SEPARATOR specifies
the separator character (by default a comma). Examples of GROUP_CONCAT
can be found in Chapter 9.
Continued
5351c21_final.qxd 8/26/05 8:06 PM Page 661
www.it-ebooks.info

Aggregate Functions
(Continued)
MAX(expr) Returns the maximum of expr.
MIN(expr) Returns the minimum of expr.
STD(expr) Computes the standard deviation of expr.
STDDEV(expr) Like STD(expr).
SUM(expr) Computes the sum of expr.
VARIANCE(expr) Computes the variance of expr (since MySQL 4.1).
Additional Functions
Miscellaneous
BIT_COUNT(x) Returns the number of set bits.
COALESCE(list) Returns the first element of the list that is not NULL.
LOAD_FILE(filename) Loads a file from the local file system.
Administrative Functions
BENCHMARK(n, expr) Executes expr a total of ntimes and measures the time elapsed.
CONNECTION_ID( ) Returns the ID number of the current database connection.
CURRENT_USER( ) Returns the name of the current user in the form in which authentica-
tion takes place (that is, with the IP number instead of the host name,
e.g., “radha@127.0.0.1”).
DATABASE( ) Returns the name of the current database.
FOUND_ROWS( ) Returns since MySQL 4.0 the number of records found by a SELECT
LIMIT query if in the SELECT command, the option
SQL_CALC_FOUND_ROWS was used.
GET_LOCK(name, time) Defines a lock with the name name for the time time (in seconds); see
also Chapter 10.
IDENTITY( ) Since MySQL 4.0 equivalent to LAST_INSERT_ID( ).
IS_FREE_LOCK(name) Tests whether the lock name is available; returns 0 if the lock is cur-
rently in use (thus before GET_LOCK was executed), otherwise, 1.
LAST_INSERT_ID( ) Returns the AUTO_INCREMENT number most recently generated
within the current connection to the database.
RELEASE_LOCK(name) Releases the lock name.
SESSION_USER( ) Equivalent to USER( ).
SYSTEM_USER( ) Equivalent to USER( ).
USER( ) Returns the name of the current user and associated host name (e.g.,
“root@localhost”).
VERSION( ) Returns the MySQL version number as a string.
CHAPTER 21 ■SQL REFERENCE662
5351c21_final.qxd 8/26/05 8:06 PM Page 662
www.it-ebooks.info

GIS Data Types and Functions
The GIS data types and functions described here have been available since MySQL 4.1. The GIS data
types collected in the following table can be used in the declaration of a table column (such as INT
or VARCHAR). At present, these data types can be used only in MyISAM tables, and not in InnoDB
tables. Optionally, geometric columns can be equipped with a SPATIAL INDEX, which is independ-
ent of the GIS data type used.
GIS Data Types
GEOMETRY Can accept any of the following data types.
POINT Stores a single point. Example: POINT(10 10).
MULTIPOINT Stores a list of points. Example: MULTIPOINT(10 10, 0 20, -3 2).
LINESTRING Stores a line segment. Example: LINESTRING(0 0, 1 1, 3 3).
MULTILINESTRING Stores several line strings. Example: MULTILINESTRING((0 0, 5 5),
(10 10, 20 20, 40 20), (10 10, 2 0) ).
POLYGON Stores a closed polygon, which is permitted to have holes. Example:
POLYGON((1 1, 9 1, 9 9, 1 9, 1 1), (3 3, 3 6, 6 6, 6 3, 3 3)).
MULTIPOLYGON Stores several polygons. Example: MULTIPOLYGON(((0 0, 5 0, 5 5,
0 5, 0 0)), ((10, 10, 30 30, 30 10, 10 10)) ).
GEOMETRYCOLLECTION Stores a list of arbitrary geometric objects. Example: GEOME-
TRYCOLLECTION(POINT(100 100), POINT(10 10), LINESTRING
(1 1, 100 1, 100 100)).
Conversion Functions
ASTEXT(geom) Returns a geometric object as well-known text.
ASBINARY(geom) Returns a geometric object as well-known binary.
GEOMFROMTEXT(txt [, srid]) Creates the MySQL-internal geometric format out of a well-known
text (WKT) string. Optionally, an identifier for the coordinate system
can be given, which is stored by MySQL but otherwise ignored.
GEOMFROMWKB(bindata) Creates the MySQL-internal geometry format from binary data in
WKB format.
General Geometric Functions (for All GIS Data Types)
DIMENSION(g) Returns the dimension of the object. Possible results are:
1 for empty objects,
0 for points (length = 0, area = 0),
1 for lines (length > 0, area = 0),
2 for polygons, etc. (length > 0, area > 0).
ENVELOPE(g) Returns the bounding box of the geometric object (see below). The result
has the data type POLYGON.
GEOMETRYTYPE(g) Returns the type of the geometric object as a string: (POINT, LINESTRING,
POLYGON, …).
SRID(g) Returns the identifier of the coordinate system. (MySQL stores a coordi-
nate system identifier for all geometric objects, but it does evaluate this
information.)
CHAPTER 21 ■SQL REFERENCE 663
5351c21_final.qxd 8/26/05 8:06 PM Page 663
www.it-ebooks.info

POINT Functions
X(pt) Returns the X coordinate.
Y(pt) Returns the Y coordinate.
LINESTRING Functions (in Part Also MULTILINESTRING)
GLENGTH(ls) Returns the length of the line as a floating-point number.
ISCLOSED(ls) Returns 1 if the starting point is equal to the endpoint, otherwise 0.
NUMPOINTS(ls) Returns the number of points that the line consists of.
STARTPOINT(ls) Returns the first point (POINT object).
ENDPOINT(ls) Returns the last point.
POINTN(ls, n) Returns the nth point.
POLYGON Functions (in Part Also
MULTIPOLYGON
)
AREA(p) Returns the area of the polygon as a floating-point number.
EXTERIORRING(p) Returns the exterior ring of the polygon as a LINESTRING object.
INTERIORRINGN(p, n) Returns the interior ring of the polygon as a LINESTRING object.
NUMINTERIORRINGS(p) Returns the number of interior rings (holes).
GEOMETRYCOLLECTION Functions
GEOMETRYN(gc, n) Returns the geometric object at location n.
NUMGEOMETRIES(gc) Returns the number of objects in a collection.
The OpenGIS specification provides for the following analysis functions in two variants. The
fast variant takes into account only the bounding box of the geometric object (MBRname, where
MBR stands for minimum bounding rectangle). The precise variant, on the other hand, calculates
with the complete geometric data (name). MySQL formally recognizes both variants, but internally
they are identical, and only the bounding box is considered.
Analysis Functions for GIS Data Types
[MBR]CONTAINS(g1, g2) Returns TRUE, if g2 is completely contained in g1.
[MBR]WITHIN(g1, g2) Returns TRUE, if g1 is completely contained within g2.
(CONTAINS(a, b) is equivalent to WITHIN(b, a).)
[MBR]EQUAL(g1, g2) Returns TRUE if g1 and g2 are equal.
[MBR]INTERSECTS(g1, g2) Returns TRUE if g1 and g2 intersect.
[MBR]OVERLAPS(g1, g2) Returns TRUE if g1 and g2 overlap.
[MBR]TOUCHES(g1, g2) Returns TRUE if g1 and g2 touch each other.
[MBR]DISJOINT(g1, g2) Returns TRUE if g1 and g2 neither overlap nor touch.
CHAPTER 21 ■SQL REFERENCE664
5351c21_final.qxd 8/26/05 8:06 PM Page 664
www.it-ebooks.info

Language Elements for
Stored Procedures and Triggers
You can place almost any SQL command or function described in this chapter in the code of a
stored procedure or trigger. Furthermore, MySQL provides some additional language elements with
which you can declare system variables and cursors, form loops and queries, and so on. The syntax
of these language elements is summarized in the following tables.
Summary of Commands, Loops, and Queries
[blockname:] BEGIN BEGIN introduces a block of commands; END ends
DECLARE variables, cursors, the block. First, variables, cursors, etc., can be
conditions, handlers etc.; commands …; declared within a block, followed by the SQL com-
END [blockname]; mands and additional language elements.
LEAVE blockname; If the block has a name (blockname), then it can be
exited early with LEAVE. Code execution is contin-
ued after END blockname.
RETURN result; With functions, a result can be returned with
RETURN. At the same time, code execution ends.
Queries
IF condition1 THEN IF/END IF creates a simple branch. Arbitrarily many ELSE-IF
commands ...; clauses are allowed, but only one terminating ELSE branch.
[ELSE IF condition2 THEN
commands ...; ]
[ELSE
commands ...; ]
END IF;
CASE expression CASE/END CASE helps to formulate case decisions with several
WHEN value1 THEN variants in a more understandable manner. Arbitrarily many
commands ...; WHEN branches are allowed. (Each CASE can be formulated
[ELSE equivalently with IF/END IF.)
commands ...; ]
END CASE;
Loops
[loopname:] REPEAT REPEAT loops are executed until the condition is satisfied
commands ...; (at least once).
UNTIL condition
END REPEAT [loopname];
[loopname:] WHILE condition DO WHILE loops are executed while the condition is satisfied.
commands ...; If the condition is FALSE (0) before the first execution of the
END WHILE [lpname]; loop, the loop is not executed at all.
loopname: LOOP LOOP/END LOOP creates an infinite loop. It must be ended
commands ...; with BREAK.
END LOOP loopname;
LEAVE loopname; Ends a loop prematurely.
ITERATE loopname; Repeats the commands of the loop body one more time.
CHAPTER 21 ■SQL REFERENCE 665
5351c21_final.qxd 8/26/05 8:06 PM Page 665
www.it-ebooks.info

The following DECLARE instructions must be executed at the beginning of a code block and in
the order given (that is, first variable declaration, then cursors, then conditions and handlers).
Variables, Cursors , Conditions, Handlers (DECLARE)
DECLARE varname1, Declares the local variables varname1, varname2, etc. with a par-
varname2, … datatype ticular data type (e.g., INT). Optionally, a default value can be
[DEFAULT value]; assigned. The variables can be used only within the block in which
they are defined. Their names cannot coincide with those of a
table or column.
DECLARE cursorname Declares a cursor for step-by-step processing of the results of a
CURSOR SELECT command.
FOR select-command;
DECLARE name Names one or more error conditions. There are several possibilities
CONDITION for specifying the error conditions:
FOR condition1, c2, c3 …; SQLSTATE ‘code’
n (MySQL error number)
SQLWARNING
NOT FOUND
SQLEXCEPTION
DECLARE CONTINUE | EXIT Declares a handler for error-handling. With CONTINUE the code is
HANDLER simply continued, while with EXIT the current code block is exited.
FOR condition1, c2, c3 … First, any command is executed. In addition to the above variants,
command; for the error conditions a CONDITION is allowed.
The following table shows the application of a cursor.
Cursor Application
DECLARE done INT DEFAULT 0; Defines the variable for the handler.
DECLARE var1, var2 … datatype; Declares the variables for the SELECT command.
DECLARE mycursor CURSOR Declares the cursor.
FOR select command;
DECLARE CONTINUE HANDLER Declares a handler that becomes active after the last
FOR NOT FOUND SET done=1; record is read.
OPEN mycursor; Activates the cursor.
myloop: LOOP
FETCH mycursor INTO var1, var2 …;
IF done=1 THEN LEAVE myloop; END IF;
END LOOP myloop; Within the loop, reads the records of the SELECT
command into the variables var1, var2, etc. If there
are no further records, the handler assigns the value
1, and the loop is ended.
CLOSE mycursor; Closes the cursor.
CHAPTER 21 ■SQL REFERENCE666
5351c21_final.qxd 8/26/05 8:06 PM Page 666
www.it-ebooks.info

MySQL Tools and Options
This chapter is a reference for the options and functions of the most important MySQL tools. We
discuss the server mysqld, the command interpreter mysql, and the administration tools mysqladmin,
myisamchk, etc.
These tools have a number of common options, and they evaluate configuration files in the same
manner. For this reason, the chapter begins with a section describing these common properties.
Overview
The common feature exhibited by the commands introduced in this section is that they are launched
as external programs in a command window (Windows) or in a command shell (Unix/Linux). The
entire operation of these programs is carried out in text mode and is therefore not what one would
term excessively convenient. However, these commands are very well suited for execution in scripts
in the automation of administrative tasks.
The following table provides an overview of the commands discussed in this section.
MySQL Server and Included Administrative Tools
mysqld Is the actual MySQL server. The program is usually not started directly, but under
Windows as a system service, under Unix/Linux via an Init-V script with the help
of mysqld_safe.
mysqld_safe Should be used under Unix/Linux for a secure server launch.
mysql Enables interactive execution of SQL commands.
mysqladmin Assists in various administrative tasks (display status, reinput privileges, execute
shutdown, etc.).
mysqldump Saves contents of a MySQL database in a text file.
mysqlimport Inputs data into a table from a text file.
mysqlshow Displays information on databases, tables, and columns.
myisamchk Checks the integrity of MyISAM table files and repairs them as necessary.
myisampack Compresses MyISAM table files for more efficient read-only access.
Common Options and Configuration Files
A common feature of the programs described in this chapter is that there are certain options that
can be used by almost all of the commands, and these options can be preset in a common config-
uration file, so as to save typing when the commands are invoked.
667
CHAPTER 22
■ ■ ■
5351c22_final.qxd 8/26/05 8:10 PM Page 667
www.it-ebooks.info

Common Options
Various options can be passed to all commands when they are executed. As is usual with Unix/
Linux, commands can be prefixed with a hyphen (short form) or two hyphens (full option name).
Please note that the short forms of options are case-sensitive.
Common Options of the MySQL Server (mysqld) and the MySQL Client Tools
(mysql, mysqladmin, mysqldump, mysqlimport, etc.)
--help Displays a brief operation introduction.
--print-defaults Displays default values for options; default values can come
from configuration files or system variables.
--nodefaults Causes no configuration files to be read at startup.
--defaults-file=filename Causes only this configuration file to be read at startup.
--defaults-extra-file=filename First the global configuration file is read, and then filename,
and finally (only under Unix/Linux), the user-specific config-
uration file.
--port=n Specifies the TCP/IP port over which communication takes
place (usually 3306).
--socket=filename Specifies which socket file should be used for local commu-
nication between client and server (only under Unix/Linux;
by default usually /var/lib/mysql/mysql.sock). If named pipes
are used under Windows, then socket specifies the name of the
named pipe (by default MySQL).
--version Displays the version number of the program.
Common Options of the MySQL Client Tools
-u un --user=username Determines the user name for registration with
MySQL.
-p --password Asks for input of password immediately after start of
the command.
-pxxx --password=xxx Passes the password directly; in contrast to other
options, there can be no space after -p; this is more
convenient than interactive input of the password,
but it represents a considerable security risk and thus
should generally be avoided; under some operating
systems, any user can see the password by looking at
the process list.
-h hn --host=hostname Gives the name or IP number of the computer on
which the server is running (assumed by default to
be localhost, that is, the local computer).
--protocol=name Determines which protocol should be used for com-
munication between client and server. Permissible
settings are tcp, socket, pipe, and memory.
-W --pipe Uses a named pipe for communication with the
MySQL server. Named pipes are available only for
local connections under Windows 2000/XP if my.ini
contains the option enable-named-pipes.
-C --compress Minimizes the data flow between client and server by
making use of data compression.
CHAPTER 22 ■MYSQL TOOLS AND OPTIONS668
5351c22_final.qxd 8/26/05 8:10 PM Page 668
www.it-ebooks.info

Common Options of the MySQL Client Tools
(Continued)
--default-character-set=name Specifies the character set for communication with
the MySQL server (e.g., latin1 or utf8).
--character-sets-dir="dir" Specifies the directory in which the character set files
are located (e.g., "C:/Programs/MySQL/MySQL Server
5.0/share/charsets"). This option is necessary only
for the few character sets that were not precompiled
into the client program.
For a connection to the MySQL server to be at all possible, the following two options must
generally be used at the start of each client command:
> mysql -u username -p
Enter Password: xxxxxx
If MySQL is not yet password-secured, then this will work, of course, without a password being
specified. Information on user and privilege management in MySQL can be found in Chapter 11.
■Caution If you execute MySQL commands under Windows and create a directory with options, then instead of
the backslash you should use the forward slash (/). If the file name contains space characters, then put the entire
path in quotation marks, as in the following example: --basedir="C:/Programs/MySQL/MySQL Server 5.0/".
Setting Options in Configuration Files
If you observe that you are using particular options over and over, you can save these in options
files for many of the commands covered in this section. The options are used by mysql, mysqladmin,
mysqld, mysqldump, mysqlimport, myisamchk, myisampack, and mysqld_safe.
The following table collects the locations where the options files must be stored. At startup, all
options files—those that exist already—are read in the order in which they are listed below. In the
case of contradictory settings, the most recently read options file takes precedence. (Whether and
what configuration files will be read depends on the options --no-defaults, --defaults-file, and
--defaults-extra-file; see above.)
Validity Windows Unix/Linux
Global options Current MySQL versions: C:\Programs\MySQL\ /etc/my.cnf
MySQL Server n.n\my.ini
Old MySQL versions: C:\my.cnf or Windows\
my.ini
User-specific options ~/.my.cnf
(only for client programs)
Server-specific options DATADIR\my.cnf DATADIR/my.cnf
(only for mysqld)
The directory DATADIR is the default directory, which during compilation of MySQL is provided
as data directory. Under Windows, this is normally C:\mysql\data, while under Unix/Linux, it is gen-
erally /var/lib/mysql. Note that DATADIR need not be the directory in which MySQL actually stores
the database files. This directory is usually set when the MySQL server is launched with the option
--datadir. However, access to the configuration file takes place before this option is evaluated.
CHAPTER 22 ■MYSQL TOOLS AND OPTIONS 669
5351c22_final.qxd 8/26/05 8:10 PM Page 669
www.it-ebooks.info

The syntax of the file is based on the following pattern:
# Comment
[program name]
option1 # equivalent to: —option1
option2=abc # equivalent to: --option2=abc
These options are divided into groups for each program. Instead of program name, you should
specify the name of the program:
• Settings that are to be used by all programs other than mysqld are assigned to the group [client].
• Settings that relate only to the server are assigned to the group [mysqld]. (The group [server]
is also used by mysqld.)
• Settings special to the program xyz are assigned to the group [xyz].
Here, option is the option name in long form, but without hyphens. (So, for example, the option
—host in the configuration file becomes simply host.) If options expect parameters, then these are
specified with =.
Let us see, finally, a concrete example of a configuration file:
# configuration file /etc/my.cnf (Unix/Linux) or my.ini (Windows)
# options for all MySQL tools
[client]
user=username
password=xxx
host=uranus.sol
# options for mysqldump
[mysqldump]
force
# options for mysql (command interpreter)
[mysql]
safe-updates
select_limit=100
■Caution Changes to configuration files are effective only after a restart of the program in question. This holds
in particular for the MySQL server (thus for options in the group [mysqld]).
Please be sure that the options specified in the [client] section are truly supported by all MySQL tools. If
a MySQL tool finds an unknown option in the [client] section, then the command is terminated with an error
message.
If you wish under Unix/Linux to execute user-specific options settings in ~/.my.cnf and possibly specify pass-
words there, then ensure that no other users are able to read this file.
user$ chmod 600 ~/.my.cnf
If you specify Windows paths or directories in a configuration file, then you must use /or \\ instead of the back-
slash \. (In the Windows version of MySQL, the backslash is used as an escape character.)
Paths cannot be placed in quotation marks within a configuration file (even if the path contains space charac-
ters): basedir=C:/Programs/MySQL/MySQL Server 5.0/.
Please note that these rules are different from those that obtain a direct setting of options with --option =....
You can use the program my_print_defaults grp to determine the options set for [grp] in the
configuration file. The program is particularly suited for use in custom scripts.
CHAPTER 22 ■MYSQL TOOLS AND OPTIONS670
5351c22_final.qxd 8/26/05 8:10 PM Page 670
www.it-ebooks.info

Memory Specifications
For options and variables that expect a memory specification, the letters K, M, and G may be used
to denote kilobytes (1024 bytes), megabytes, and gigabytes. Thus the settings key_buffer_size=16M,
key_buffer_size=16384K, and key_buffer_size=16777216 are equivalent.
Options in Environment Variables (aka System Variables)
An additional possibility for specifying options are environment variables at the level of the operat-
ing system. (Under Windows, these variables are usually known as system variables.)
The following table names the most important of these variables. To set such variables under
Windows, you use the dialog for system control (see Figure 4-1). Under Linux you can define such
variables in script files (e.g., in /etc/profile or ~/.profile) with export. Depending on which shell
you use, you may use the command declare -x or setenv instead of export.
Import and Environment Variables for mysql, mysqladmin, mysqld, mysqldump
MYSQL_TCP_PORT Specifies the port number for the TCP/IP connection to MySQL (generally 3306).
MYSQL_UNIX_PORT Specifies the socket file for local communication under Linux/Unix (e.g.,
/var/mysql.lock).
TMPDIR Specifies the directory to be used for temporary files; this directory is also used
for temporary tables.
USER Specifies the user name.
Precedence
Option settings are read in the following order: environment variables, configuration files, options
at program startup. In the case of contradictory settings, the last setting read takes precedence. For
example, options at program startup supersede settings in environment variables.
Rules for Specifying Options
The following rules hold in the setting of options:
• A hyphen may replace an underscore in variable names (thus --variable-name=123 instead
of --variable_name=123).
• Several forms are permitted for options that activate a particular function: A function is
activated by --option, --option=1, --enable-option, and deactivated by --option=0,
--disable-option, --skip-option.
Note, however, that there are options like --skip-grant-tables for which skip is an integral
part of the operator name. In this case, --enable-grant-tables and --grant-tables=0 do not
function.
• There are MySQL server variables that can be changed by the user at run time specifically
for the currently active connection. To do this, the user simply executes an SQL command
like SET read_buffer_size=16M. For such variable names, an upper bound can be set at
server start by prefixing --maximum, as in --maximum-read_buffer_size=32M.
• Every new version of MySQL offers new options. If you are writing a script and do not wish to
prescribe a particular version of MySQL, you may use the new option --loose as a prefix (e.g.,
--loose-optionname=3). If the option exists, it will be properly set. On the other hand, if the
program does not recognize the option, then the setting is ignored without an error message.
CHAPTER 22 ■MYSQL TOOLS AND OPTIONS 671
5351c22_final.qxd 8/26/05 8:10 PM Page 671
www.it-ebooks.info

mysqld (Server)
The following lists, organized by topic, summarize the most-used mysqld options.
■Tip A complete reference to the long list of mysqld options can be obtained in mysqld --verbose --help.
In the MySQL documentation there is unfortunately no unified description of all options. Instead, it is distributed
among a number of sections (e.g., replication options, InnoDB options). The following addresses will lead you to
the most important of these:
http://dev.mysql.com/doc/mysql/en/server-options.html
http://dev.mysql.com/doc/mysql/en/command-line-options.html
http://dev.mysql.com/doc/mysql/en/privileges-options.html
http://dev.mysql.com/doc/mysql/en/replication-options.html
http://dev.mysql.com/doc/mysql/en/innodb-start.html
The MySQL server is generally started as a service (Windows 2000/XP) or in an Init-V script via
the script mysqld_safe (Unix/Linux). In such a case, it is impossible to specify options directly. There-
fore, mysqld options are specified almost exclusively in configuration files. For this reason, in the
following tables, the options are given in the manner in which they would appear in a configuration
file (that is, without the prefixed --).
Two exceptions are the options --defaults-extra-file and --user:
• With --defaults-extra-file=filename, an additional configuration file can be specified that
is read after all other configuration files.
•user=name specifies the Unix/Linux account under which mysqld is to be executed. For a
change of account to take place at the start of MySQL, mysqld must be started by root. Nor-
mally, mysqld is started by the script mysqld_safe with --user =mysql.
Both options must be passed directly to mysqld or to the start script mysqld_safe. They cannot
be specified in a configuration file.
Basic Settings
mysqld — Directories and Files
basedir=path Uses the given directory as base directory (installation directory).
character-sets-dir=path Specifies the directory for the character set files.
datadir=path Reads database files from the specified directory.
pid-file=filename Specifies the file in which the process ID number should be stored
(under Unix/Linux only); the file is evaluated by the Init-V script to
terminate mysqld.
socket=filename Specifies under Unix/Linux the file name mysql.sock generally
/var/lib/mysql/mysql.sock. Under Windows, socket can be used
to set the name of a named pipe (by default MySQL).
lower_case_table_names=1/0 Specifies whether in the creation of new directories and tables,
lowercase should be used exclusively; under Windows the default
setting is 1.
CHAPTER 22 ■MYSQL TOOLS AND OPTIONS672
5351c22_final.qxd 8/26/05 8:10 PM Page 672
www.it-ebooks.info

mysqld — Language Setting
character-set-server=name Specifies the default character set for creating new databases
and tables. The character set can also be set with the option
default-character-set to ensure compatibility with older versions
of MySQL. However, this option is considered deprecated.
collation-server=name Specifies the default sort order for the creation of new databases
and tables.
language=name Specifies the language in which error messages, etc., are to be
output.
mysqld — Communication, Network, Security
enable-named-pipes Enables a connection under Windows 2000/XP between
client and server with named pipes. The name of the
named pipe is MySQL by default. It can be set with the
option socket.
local-infile[=0] Activates/deactivates the ability to process local files with
LOAD DATA LOCAL.
myisam-recover[=opt1, opt2, ...] Has the effect that at startup, all damaged MyISAM tables
are automatically restored; the possible options are
DEFAULT, BACKUP, QUICK, and FORCE; they correspond
to the myisamchk options.
old-passwords Passwords in the mysql database are encrypted as in
MySQL 3.23 and 4.0 (by default, a new, more secure
encryption is used since MySQL 4.1).
port=n Specifies the port for TCP/IP communication (default is
3306).
safe-user-create A user can create a new user with GRANT only if he has
the Insert privilege for the table mysql.user; this is a supple-
mentary security mechanism (the user also needs the Grant
privilege to be able to execute GRANT).
shared-memory Enables communication over shared memory (only under
Windows).
shared_memory_base_name = name Gives the shared memory storage block a name (by default
MYSQL).
skip-grant-tables Omits input of mysql database with access information;
(caution: anyone can change any database).
skip-host-cache A cache is not used to store the association between com-
puter names and IP numbers.
skip-name-resolve Suppresses the resolution of IP numbers into the corres-
ponding host names, resulting in access control (table
mysql.user) exclusively via IP numbers.
skip-networking Permits only local connections over a socket file (Unix/
Linux) or over named pipes and shared memory (Windows),
not over TCP/IP; this increases security but excludes external
connections over a network and excludes all Java clients
(which use TCP/IP even in a local connection).
user=name Specifies the Unix/Linux account under which mysqld is
to be executed; for the switch to work after startup, mysqld
must be started up from root; normally, mysqld is started via
the script mysqld_safe with user=mysql.
CHAPTER 22 ■MYSQL TOOLS AND OPTIONS 673
5351c22_final.qxd 8/26/05 8:10 PM Page 673
www.it-ebooks.info

mysqld — Memory Usage, Tuning, Query Cache
bulk_insert_buffer_size=n Specifies how much memory is allocated for executing INSERT
commands in which many records are simultaneously inserted
(default 8MB).
key_buffer_size=n Specifies how much RAM is reserved for index blocks (default
8MB).
join_buffer_size=n Specifies how much memory is to be allocated for JOIN operations
when there is no index for the JOIN columns (default 128KB).
max_heap_table_size=n Specifies the maximum size of HEAP tables (default 16MB); if this
size is exceeded, the table is stored in a temporary file instead of
in RAM.
max_connections=n Specifies the maximum number of simultaneous database connec-
tions (default 100).
query_cache_limit=n Specifies the maximum size of a query result to be stored in the
query cache (default 1MB).
query_cache_size=n Specifies the size of the query cache (by default 0, meaning that the
query cache is inactive).
query_cache_type=0/1/2 Specifies the mode in which query cache runs: 0, query cache is off;
1, query cache is on (default mode); 2, demand mode only for
SELECT SQL_CACHE.
read_buffer_size=n Specifies how much memory is reserved for each thread for reading
sequential data from tables (default 128KB); the parameter can be
set as needed with SET SESSION read_buffer_size=n.
read_rnd_buffer_size=n Similar to read_buffer_size, but holds for the case that the records
are to be output in a particular order, e.g., with ORDER BY (default
256KB).
sort_buffer=n Specifies the size of the buffer for sorting (default 2MB); if the
buffer is too small, a temporary file must be used.
table_cache=n Specifies the maximum number of open tables (default 64).
tmp_table_size=n Specifies the maximum size of temporary HEAP tables (default
32MB); if this size is exceeded, the tables are transformed to MyISAM
tables and stored in a temporary file.
Logging, Replication
mysqld — Logging
log[=file] Logs every connection as well as all SQL commands (general
query log); if no file name is specified, then MySQL uses the
file name hostname.log in the database directory.
log-slow-queries[=file] Logs queries whose execution takes longer than the time
specified in the variable long_query_time (slow query log).
long_query_time=n Specifies the time limit for slow queries (default 10 seconds).
log-queries-not-using-indexes Logs not only slow queries, but also all queries that are carried
out without the use of an index (holds for log-slow-queries).
log-bin[=filename] Logs all SQL commands that make a change in the data, in
particular, all INSERT, UPDATE, and DELETE commands; a
binary format is used (binary update log); as file name,
filename.n or the default hostname.n is used, where nis a six-
digit integer (the logging files are sequentially numbered).
CHAPTER 22 ■MYSQL TOOLS AND OPTIONS674
5351c22_final.qxd 8/26/05 8:10 PM Page 674
www.it-ebooks.info

mysqld — Logging
(Continued)
log-bin-index=filename Specifies the file name for the index file for binary logging. By
default, the file has the same name as the binary logging files,
but with ending .index instead of .nnnnnn.
max_binlog_size=n Specifies the maximal size of a binary logging file (default 1GB).
Before the size is exceeded, the MySQL server automatically
provides a new file.
binlog-do-db=dbname Limits binary logging to the specified database; changes in
other databases are not logged; to specify more than one
database, the option must be repeated in the configuration
file, one database in each line.
binlog-ignore-db=dbname Excludes the database from binary logging; changes in this
database are not logged.
sync-binlog=n Specifies how often the logging file should be written to the
hard drive (synchronized). Here ngives the number of log write
operations after which synchronization is to take place; n=1 is
the most secure setting, but it makes binary logging very slow.
By default the setting is n=0. The operating system looks after
synchronization of the file.
log-update[=file] Enables up through MySQL 4.1 an update log in text format.
Beginning with MySQL 5.0 this form of logging is no longer
supported. Use binary logging.
log-error=file Specifies the file name for the error logging file (error log); this
logging variant cannot be deactivated; if the option is not
specified, MySQL uses the file name hostname.err.
mysqld — Replication (Master)
server-id=n Assigns the server a unique ID number; ncan be between 1 and 231.
log-bin=name Activates binary logging. The logging files receive the specified
names, to which a six-digit running integer is appended.
binlog-do/ignore-db=dbname Logs only the specified databases or ignores the specified
databases in logging.
mysqld — Replication (Slave)
server-id=n Assigns a unique ID number to the server.
log-slave-updates Executes logging on the slave so that the com-
puter can be used to continue a replication chain
(A➤B➤C).
master-host=hostname Specifies the host name or IP address of the rep-
lication master; this setting is ignored once
replication is set up if the file master.info exists.
master-user=replicusername Specifies the user name for replication com-
munication; ignored once master.info exists.
master-password=pword Specifies the associated password; ignored if
master.info exists.
master-port=n Specifies the port number of the master server
(default 3306); ignored if master.info exists.
Continued
CHAPTER 22 ■MYSQL TOOLS AND OPTIONS 675
5351c22_final.qxd 8/26/05 8:10 PM Page 675
www.it-ebooks.info

mysqld — Replication (Slave)
(Continued)
master-connect-retry=n Specifies after how many seconds an attempt to
reestablish a broken connection to the master
can be made (default 60); ignored if master.info
exists.
master-ssl-xxx=xxx Enables the configuration of SSL communication
between master and slave.
read-only=0/1 Specifies whether the slave server is also permit-
ted to execute SQL commands independently
(default setting 0) or whether it can execute SQL
commands only from the master (1).
relay-log-purge=0/1 Specifies whether processed SQL commands are
removed at once from the relay log files (default
setting 1) or not (0).
replicate-do-table=dbname.tablename Replicates only this table; to specify more than
one table, the option must be repeated (each
table requires its own line in the configuration
file).
replicate-wild-do-table=dbname.tablename Functions like replicate-do-table except that
the wild card %is allowed to form a pattern (e.g.,
test%.% to replicate all tables of all databases
whose name begins with test).
replicate-do-db=dbname Replicates only this database.
replicate-ignore-table=dbname.tablename Excludes this table from replication.
replicate-wild-ignore-table=dbn.tablen Excludes these tables from replication.
replicate-do-db=dbname Excludes this database from replication.
replicate-rewrite-db=db1name->db2name Replicates the database db1name on the master
under the name db2name on the slave.
report-host=hostname Specifies the host name of the slave; this infor-
mation is relevant only for the command SHOW
SLAVE HOSTS, which allows on the master sys-
tem the creation of a list of all slaves.
slave_compressed_protocol=1 Enables compressed communication between
master and slave if both servers are capable of it.
slave-skip-errors=n1,n2,… or all Continues replication even if errors n1, n2, etc.,
have occurred, or (with all regardless of any
errors being triggered; under a correct
configuration, no errors should occur on the
slave due to SQL commands being executed (if
an error occurs on the master, the command is
not replicated); without slave-skip-errors,
replication is stopped by an error and must be
manually resumed.
CHAPTER 22 ■MYSQL TOOLS AND OPTIONS676
5351c22_final.qxd 8/26/05 8:10 PM Page 676
www.it-ebooks.info

InnoDB Configuration
mysqld — InnoDB — General Settings, Tablespace Files
skip-innodb Specifies that the InnoDB table driver should not be loaded;
useful to save memory when no InnoDB tables are to be used.
innodb_file_per_table Creates an individual tablespace file for each new table instead
of storing the table in the central tablespace (holds by default).
This option has been available since MySQL 4.1.
innodb_open_files=n Specifies the maximum number of files that the InnoDB table
driver may have open at once (by default 300). If you use
innodb_file_per_table and very many tables are open at once,
this value should be increased.
innodb_data_home_dir=p Specifies the InnoDB directory; all additional directory or file
specifications are relative to the path p; by default, the InnoDB
driver uses the MySQL data directory.
innodb_data_file_path=ts Specifies the tablespace for all InnoDB tables; can involve more
than one file; the size of each file must be specified in bytes,
megabytes (M), or gigabytes (G); the names of the tablespace
files are separated by semicolons; for the last of the tablespace
files, the attribute autoextend and a maximal size (max:n) can be
specified (e.g., ibdata1:1G;ibdata2:1G:autoextend:max:2G, by
which ibdata1 has size 1GB, ibdata2 is set up with the same
size and can grow as large as 2GB); instead of a file, the device
name of a hard-drive partition can be given; in this case, the
key word newraw must follow the exact size for initialization,
and for further use, the key word raw (e.g., /dev/hdb1:20Gnewraw
or /dev/hdb1:20Graw); the default setting since MySQL 4.0 is
ibdata1:10M:autoextend.
innodb_autoextend_increment=n Specifies by how many megabytes autoextend files should be
enlarged (default 8MB). The setting does not hold for individual
tablespace files, which in any case grow by smaller steps.
innodb_lock_wait_timeout=n Specifies how long (in seconds) should be waited for the release
of locks; after this time, the transaction is broken off with
ROLLBACK; the setting is especially important when deadlocks
develop that the InnoDB driver does not recognize; the default
value is 50 seconds.
innodb_fast_shutdown=0/1 Specifies whether InnoDB should shut down as quickly as pos-
sible; in the default setting 1, InnoDB does not transfer the
INSERT buffer into the tables; this process is repeated at the
next start of the MySQL server (the setting 1does not represent
a risk, since the INSERT buffer is a component of the tablespace;
thus no data can be lost; the setting 0is more dangerous, since
in a computer shutdown it could happen that InnoDB would
not have enough time for its synchronization work and would
be stopped in its tracks by the operating system).
CHAPTER 22 ■MYSQL TOOLS AND OPTIONS 677
5351c22_final.qxd 8/26/05 8:10 PM Page 677
www.it-ebooks.info

mysqld — InnoDB — Logging
innodb_log_group_home_dir=lp Specifies the directory for InnoDB logging files
(ib_logfile0, 1, etc.); by default, the InnoDB driver
uses the MySQL data directory.
innodb_log_files_in_group=n Specifies how many logging files should be used
(default is 2); the InnoDB table driver fills these files
sequentially; when all files are full, the first is over-
written with data, etc.
innodb_log_file_size=n Specifies how large each logging file should be (default
5MB); the size specification uses M for megabytes and
G for gigabytes.
innodb_flush_log_at_trx_commit=0/1/2 Determines when data should be written to the logging
file and when these files should be synchronized (that
is, when changes should be physically stored to the
hard disk); the setting 0 means that the data are written
and synchronized about once per second; the default
setting 1 is more secure (save and synchronize after
each COMMIT); a compromise is the setting 2, with
writing after COMMIT and synchronization only about
once per second.
innodb_flush_method=x Under Unix/Linux, specifies how logging files are
synchronized (i.e., how they are stored on the hard
drive); choices are fdatasync, synchronization with
fsync( ) and O_DSYNC, synchronize with O_SYNC( ).
innodb_log_archive=1 Activates archive logging in the files ib_arch_log_n;
this type of logging does not make sense when InnoDB
is used together with MySQL (instead, use binary
logging of the MySQL server).
mysqld — InnoDB — Buffer Settings and Tuning
innodb_buffer_pool_size=n Specifies how much RAM should be used for table data and
indexes (default 8MB); this parameter has considerable
influence on speed and should be up to 80% of available
RAM on computers used exclusively as MySQL/InnoDB
database servers.
innodb_log_buffer_size=n Specifies how much RAM should be used for writing the
transaction logging files (default 1MB).
innodb_additional_mem_pool_size=n Specifies how much RAM should be used for various
internal management structures (default 1MB).
innodb_file_io_threads=n Specifies how many threads for I/O operations, that is, for
access to the hard drive, should be used (default 4).
innodb_thread_concurrency=n Specifies how many threads InnoDB should use altogether
(default 8).
CHAPTER 22 ■MYSQL TOOLS AND OPTIONS678
5351c22_final.qxd 8/26/05 8:10 PM Page 678
www.it-ebooks.info

Miscellaneous
mysqld — Miscellaneous
bind-address=ipadr Specifies the IP address that MySQL should use; this option is
important if the computer is so configured that it uses several IP
addresses.
default-storage-engine=type Specifies the table type that new tables are to use if the type is
not explicitly given (default is MyISAM). The default table type
can also be set with default-table-type.
default-timezone=name Sets the time zone for the MySQL server if it is to differ from the
time zone of the local computer (see Chapter 14).
ft_min_word_len=n Specifies the minimal word length for a full-text index; in the
default setting 4, words with three or fewer letters are not
included.
max-allowed-packet=n Specifies the maximum packet size for data exchange between
client and server; max-allowed-packet must be at least as large
as the largest BLOB to be processed by client programs; default
is 1MB.
sql-mode=mode1,mode2,... Specifies the SQL mode in which the MySQL server should be
run. This permits greater compatibility with other database
systems to be achieved. Allowable settings include ansi, db2,
oracle, no_zero_date, pipes_as_concat (see also Chapter 14).
■Caution If you specify an option in a configuration file that mysqld does not know about (for example, due to a
silly typo), then the server cannot start up. So watch out!
mysqld_safe (Server Start)
Under Unix/Linux, the MySQL server is usually started by an Init-V script (e.g., /etc/init.d/mysqld
or /etc/init.d/mysql). This script is automatically executed at the startup of the operating system.
It does not directly launch the server, but instead, executes the script mysqld_safe. It is this script
that starts the MySQL server.
The script mysqld_safe is started with root privileges. The MySQL server, on the other hand, is
started with the privileges of a user designed for this purpose (normally with the name mysql).
After the start of the MySQL server, mysqld_safe continues to run until it is explicitly ended
(e.g., with mysqladmin shutdown). If the MySQL server is ended unexpectedly due to a crash, then it
is immediately restarted by mysqld_safe.
Usually, only a few options are passed to mysqld_safe (e.g., --data-dir and --pid-file), which
transmit the script to the MySQL server mysqld. There are also some options specifically for
mysqld_safe.
CHAPTER 22 ■MYSQL TOOLS AND OPTIONS 679
5351c22_final.qxd 8/26/05 8:10 PM Page 679
www.it-ebooks.info

mysqld_safe — Options
--core-file-size=n Limits the size of the core file, which contains an image of the server
after a crash and makes debugging possible; nmust be given in bytes.
--ledir=dirname Specifies the directory in which the MySQL server is located (by
default /usr/sbin).
--mysqld=filename Specifies the name of the MySQL server that is to be started (default
mysqld).
--mysqld-version=suffix Specifies an extension to the server name (e.g., max if mysqld-max
should be started instead of mysqld).
--nice=n Specifies the priority in which the mysqld process should be executed
(man nice provides further information).
mysql_install_db (New Installation of the
mysql Database)
Under Unix/Linux, the mysql database can be freshly installed with the script mysql_install_db. For
this, the server must be stopped (the script then starts the server itself with the option --bootstrap)
and the database mysql deleted.
root# /etc/init.d/mysql stop
root# rm -r /usr/lib/mysql/mysql
root# mysql_install_db
Among other things, the script must be executed in the same account as is used for executing
the MySQL server (usually mysql). You can also execute mysql_install_db as root, in which case you
must subsequently change the owner of the database directory mysql and the files contained therein:
root# mysql_install_db
root# chown mysql -R /var/lib/mysql/mysql
The script is generally executed automatically as a component of a new MySQL installation.
The script is also suited to recreating the default state of the mysql database. Under Windows
mysql_install_db is unavailable.
■Caution Depending on the network configurarion, the script enters the local host name without the domain
name into the table
mysql.user
. The use of an abbreviated computer name can lead to login problems. It may be
necessary to place the complete computer name manually in the
mysql.user
table (see also Chapter 11).
mysql_fix_privileges (Updating the
mysql Database)
The mysql database for managing MySQL access privileges is being continually extended and
improved. If you carry out a MySQL update and use the mysql database from a previous installation
(see Chapter 14), you should execute the script mysql_fix_privileges, which updates the database,
inserts new columns as necessary, etc. The single parameter that must be passed to the script is the
MySQL root password.
CHAPTER 22 ■MYSQL TOOLS AND OPTIONS680
5351c22_final.qxd 8/26/05 8:10 PM Page 680
www.it-ebooks.info

After the script has been executed, there is generally some work that has to be done by hand,
because the script does not always know whether certain new privileges should be set. In case of
doubt, the script elects not to set, which is more secure, but for some MySQL users, it reduces their
privileges with respect to previous versions of MySQL.
The script is available only under Unix/Linux. Under Windows you will find instead in the
directory scripts a like-named *.sql file, which you can execute with mysql.
mysql_fix_extensions (Renaming MyISAM Files)
In transferring database directories with MyISAM tables from Windows to Unix/Linux, the problem
sometimes occurs that the case (upper/lower) of the file identifier is incorrect. (Unix/Linux is case-
sensitive, while Windows could use some case-sensitivity training.) MySQL expects, for example,
*.frm, but *.MYI and *.MYD.
The Perl script mysql_fix_extensions solves this problem. The single parameter passed to the
script is the name of the MySQL data directory, e.g., /var/lib/mysql or C:\mysql\data. There are no
options.
mysql (SQL Command Interpreter)
The command interpreter mysql allows interactive execution of SQL commands. This program can
also be run in batch mode for many administrative tasks, including the generation of HTML tables.
The commands are input from a file with < file. All SQL commands can be used in this file. The
commands must be followed by a semicolon. Comments are introduced with the character #. (All
additional characters to the end of the line are then ignored.)
At the launch of mysql, numerous options can be specified. Furthermore, an optional database
name can be given, in which case this database becomes the default database (corresponds to the
command USE databasename).
mysql — Syntax
mysql [options] [databasename] [ < commands.sql]
mysql — General Options
-e cmd --execute=cmd Executes the given command(s); commands must be
separated by semicolons and placed in quotation marks;
then mysql is ended.
-i --ignore-space Recognizes functions even if there are spaces between
function names and their parameters; with -i, for example,
SUM (price) is allowed, while without the option it must be
written SUM(price).
-L --skip-line-numbers Displays error messages without line numbers; the line
numbers otherwise displayed refer to the location at which
the faulty SQL command is located in a batch file and is
generally an aid in debugging.
-U --i-am-a-dummy or Permits UPDATE and DELETE commands only if the
--safe-updates effective range is limited with WHERE or LIMIT; further-
more, there is a maximum number of query results from
SELECT commands as well as a maximum number of JOINs.
Continued
CHAPTER 22 ■MYSQL TOOLS AND OPTIONS 681
5351c22_final.qxd 8/26/05 8:10 PM Page 681
www.it-ebooks.info

mysql — General Options
(Continued)
-V --version Displays the version of mysql; mysql is then terminated.
--tee=filename Copies all input and output into the specified logging file;
this option is allowed only if mysql is used in interactive
mode (not in batch mode).
--no-tee Does not use logging (the default).
mysql — Formatting and Output Options
-B --batch Separates columns in tables by tab characters (instead of by
spaces and lines); moreover, only results of queries are dis-
played, and no status information.
-E --vertical Lists the results of queries with columns displayed horizontally,
one below the next (instead of with vertical columns, one next
to the other); this option is particularly to be recommended if a
query returns many columns but few rows (ideally only one); as
with --batch, only results of queries are shown, and no status
information.
-H --html Formats the results of queries as HTML tables; as with --batch,
only results of queries are shown, and no status information.
-N --skip-column-names Leaves off column titles in the output of tables.
-r --raw In query results, outputs the characters 0-byte, tab, newline,
and \ unchanged (normally, these characters are output as \0,
\t, \n, and \\); this option is effective only in combination with
--batch.
-s --silent Displays less status information than in normal mode; does not
use costly table formatting.
-t --table Formats tables with lines and spaces (default setting).
-v --verbose Displays extensive status information, more than in normal
mode.
-X --xml Formats the results of queries as an XML document.
mysql — Commands for Interactive Mode
\c clear Interrupts input of a command; \c can be given at the end of a
command and leads to the entire input being simply ignored.
\e edit Calls the external editor named in the environment variable
EDITOR and there enables a change in the command; this works
only under Unix/Linux; after the return to mysql, the command
given in the editor is not displayed in mysql, which makes this
option somewhat confusing to use.
\g go Executes the command (equivalent to ; and Return).
\h help Displays a list of commands.
\p print Displays the entire current command on the screen.
\q exit or quit Terminates mysql (under Unix/Linux, this works also with Ctrl+D).
\r connect Terminates the current connection to MySQL and creates a new
connection; optionally, a database name and host name of the
MySQL server can be given (in that order).
CHAPTER 22 ■MYSQL TOOLS AND OPTIONS682
5351c22_final.qxd 8/26/05 8:10 PM Page 682
www.it-ebooks.info

mysql — Commands for Interactive Mode
(Continued)
\s status Displays status information about the MySQL server.
\T [fn] tee [filename] Logs all input and output into the specified file; if no file name is
given, then the file name used in the previous tee command is used;
if the file already exists, then the input and output are appended
to the end of the file.
\t notee Ends tee; logging can be resumed at any time with tee or \T.
\u db use database Makes the given database the default database.
\# rehash Creates (only under Unix/Linux) an internal list of all mysql com-
mands, the most important SQL key words, and all table and column
names of the current database; in the sequel, the input of the initial
letters suffices; with Tab the abbreviation is extended to the full
key word.
\. fn source filename Executes the SQL commands contained in the file; the commands
must be separated by semicolons.
mysqladmin (Administration)
Various administrative tasks can be accomplished with mysqladmin, such as creating new databases
and changing passwords. There are several commands that can be passed to mysqladmin, which are
then executed sequentially.
The names of mysqladmin commands can be abbreviated to the point where the name remains
unique (e.g., flush-l instead of flush-logs, or kinstead of kill).
Most mysqladmin commands can also be executed as SQL commands, for example, by CREATE
DATABASE, DROP DATABASE, FLUSH, KILL, SHOW. These commands are given in parentheses in
the lists below. There is additional information in the SQL reference in Chapter 21.
mysqladmin — Syntax
mysqladmin [options] command1 command2 …
mysqladmin — Options
-f --force No warnings are displayed (e.g., with drop database); further commands
are executed even after errors.
-i n --sleep=n Repeats the command every nseconds (for example, for regular display of
status or for ping); mysqladmin now runs endlessly; under Unix/Linux, it can
be terminated with Ctrl+C, under Windows, only by closing the command
window.
-r --relative Displays, in combination with -i and the command extended-status, a
change in the previous status.
-E --vertical Has the same effect as --relative, but changes are displayed in a single,
very long, line.
-t n --timeout=n Sets the timeout time for establishing a connection to the server; if after n
seconds no connection has been established, then mysqladmin is terminated.
-w n --wait=n Attempts ntimes to establish a connection to the MySQL server.
CHAPTER 22 ■MYSQL TOOLS AND OPTIONS 683
5351c22_final.qxd 8/26/05 8:10 PM Page 683
www.it-ebooks.info

mysqladmin — Commands
create dbname Generates a new database (corresponds to CREATE DATABASE).
drop dbname Deletes an existing database irrevocably (corresponds to DROP
DATABASE).
extended-status Displays countless status variables of the server (SHOW STATUS).
flush-hosts Empties the host cache table (FLUSH HOSTS).
flush-logs Closes all logging files and then reopens them (FLUSH LOGS); with
update logs, a new file is created, where the number of the file ter-
minator is increased by 1 (e.g., file.003 ➤file.004).
flush-status Resets many status variables to 0 (FLUSH STATUS).
flush-tables Closes all open tables (FLUSH TABLES).
flush-threads Empties the thread cache.
flush-privileges Reinputs the privileges database mysql (FLUSH PRIVILEGES).
kill id1, id2, … Terminates the specified threads (KILL).
password newpassw Changes the password of the current user; under Windows, this com-
mand often causes problems; one could use instead the SQL command
SET PASSWORD (see Chapter 14).
ping Tests whether a connection to the server can be established.
processlist Displays all threads (SHOW THREADS).
reload Reinputs the privileges database mysql.
refresh Closes all tables and log files and then reopens them.
shutdown Terminates the SQL server.
start-slave / stop-slave Starts/stops a slave process for replication.
status Displays some server status variables.
variables Displays the system variables of the SQL server (SHOW VARIABLES).
version Determines the version of the MySQL server.
mysqldump (Backup/Export)
With mysqldump, you get a long list of all SQL commands that are necessary to re-create a database
exactly as it was. There are three syntax variants of mysqldump, depending on whether a database,
several enumerated databases, or all databases managed by MySQL are to be stored. Only with the
first variant can the output be limited to particular tables. As a rule, the output of mysqldump is sent
to a file with > backupfile.sql.
mysqldump — Syntax
mysqldump [options] dbname [tables]
mysqldump [options] --databases [moreoptions] dbname1 [dbname2 ...]
mysqldump [options] --all-databases [moreoptions]
CHAPTER 22 ■MYSQL TOOLS AND OPTIONS684
5351c22_final.qxd 8/26/05 8:10 PM Page 684
www.it-ebooks.info

mysqldump — Options
-- --add-drop-table Inserts a DROP TABLE command before every
CREATE TABLE; when tables are read in, existing
tables are deleted. This option is part of --opt and
holds by default.
-- --add-locks Inserts LOCK TABLE before the first INSERT command
and UNLOCK after the last INSERT command; gener-
ally speeds up reading in a database; this option is part
of --opt and holds by default. However, the option
should not be used with InnoDB tables.
-- --all Specifies all MySQL-specific options in the CREATE
TABLE command.
-A --all-databases Saves all databases managed by MySQL; CREATE
DATABASE and USE are placed in the backup file.
-B --databases Stores several databases.
—--compatible=name Determines with what database system or standard
the backup should be compatible. Allowable settings
are ansi, mysql323, mysql40, postgresql, oracle, mssql,
db2, maxdb, no_key_options, no_table_options,
no_field_options. It is allowed to have more than
one key word, separated by commas.
-- --complete-inserts Generates for each data record a separate INSERT
command.
—--create-options Includes all MySQL-specific options in CREATE com-
mands. This option is part of --opt and holds by default.
—--default-character-set=name Specifies the character set in which the backup file is
to be created (by default UTF8).
-- --delayed-inserts Creates INSERT commands with the option DELAYED.
-K --disable-keys Inserts ALTER TABLE … DISABLE KEYS or … ENABLE
KEYS before or after INSERT commands; indexes are
thereby not updated until the end of the insertion
process, which is faster.
-e --extended-insert Generates few INSERT commands with which several
records can be inserted simultaneously (more effi-
cient and reduces the size of the backup file). This
option is part of --opt and holds by default.
-F --flush-logs Updates the logging files before the backup is begun.
-f --force Continues even after errors.
—--hex-blob Outputs the content of binary fields (BLOBs) in
hexadecimal format.
-x --lock-all-tables Executes LOCK TABLE READ for the entire database.
This ensures that during the entire backup no table
can be changed. Note that --lock-tables does not
offer this protection, but prevents changes only during
the time in which a table is locked. At this time another
table can be changed.
Continued
CHAPTER 22 ■MYSQL TOOLS AND OPTIONS 685
5351c22_final.qxd 8/26/05 8:10 PM Page 685
www.it-ebooks.info

mysqldump — Options
(Continued)
-l --lock-tables Executes a LOCK TABLE READ for every table before
the data are read; this ensures that no data can be
changed while mysqldump is running. This option is
part of --opt and holds by default. The obvious draw-
back is that all write processes are blocked until
mysqldump is done, which can take a while with large
databases (with InnoDB tables, you should use
--single-transaction instead of --lock-tables).
--master-data [=n] Adds a comment at the end of the output containing
aCHANGE MASTER command. This command is suit-
able for replication on a slave system. If n=1 is passed
as parameter, then the CHANGE MASTER command
is added in a normal fashion (not as a comment), so
that it is automatically executed when the backup is
restored. This option also activates --lock-all-tables
if --single-transaction is not used at the same time.
--no-create-db Creates no CREATE DATABASES commands. (These
commands are created only if the option
--all-databases or --databases is used.)
--no-create-info Creates no CREATE TABLE commands, but only the
INSERT commands.
--no-data Creates no INSERT commands (but only CREATE
TABLE commands in order to restore the database
schema).
--opt Shorthand for the following options:
--add-drop-table, --create-options, --add-locks,
--disable-keys, --extended-insert, --lock-tables,
--quick, --set-charset. In most cases, this is an
optimal setting, for which reason it holds by default.
If you don’t wish this, you must use --skip-opt.
-q --quick Outputs results record by record without internal
intermediate storage. This option is part of --opt and
holds by default. Without this option, first the entire
table is moved into RAM and then output; the advan-
tage of --quick is the lower memory requirement; the
disadvantage is that the MySQL server is generally
blocked for a longer period of time; --quick should
definitely be used for very large tables (when the entire
table cannot be held in RAM of the local computer).
-Q --quote-names Encloses table and column names in single quotes
(e.g., 'name').
--set-charset Changes the active character set at the start of
mysqldump output, and at the end, the previously valid
character set is restored. This option is part of --opt
and holds by default. It can be deactivated with
--skip-char-set.
--skip-opt Deactivates the default option --opt.
--single-transaction Results in all tables being read within a single trans-
action; this makes sense only when InnoDB tables are
used, in which case this option ensures that no data
are changed during output. This option deactivates
--lock-tables.
CHAPTER 22 ■MYSQL TOOLS AND OPTIONS686
5351c22_final.qxd 8/26/05 8:10 PM Page 686
www.it-ebooks.info

mysqldump — Options
(Continued)
-T dir --tab=dir Writes the result directly into the specified directory,
whereby for each table two files are created, one with
the table structure (*.sql) and the second with the
stored data in the format of the command SELECT …
INTO OUTFILE (*.txt).
-w cnd --where=condition Considers only data records that satisfy the WHERE
condition cnd or condition; the entire option must
be placed in quotation marks, e.g., "-wprice>5" or
“--where=ID=3".
-X --xml Creates an XML file with the contents of the table
(without information on the table structure).
mysqldump — Formatting Options (Only in Combination with —tab)
--fields-terminated-by See Chapter 21: SELECT … INTO OUTFILE.
--fields-enclosed-by
--fields-optionally-enclosed-by
--fields-escaped-by
--lines-terminated-by
If you are using --tab, then the second file (tablename.txt) contains the contents of the table
directly (that is, not in the form of INSERT commands). This has several advantages: The resulting
file is somewhat more compact, and a later importation can be executed significantly more quickly.
(However, the operation is more complex, and only a single table can be handled.)
The options --fields and --lines should each be set in quotation marks. The following exam-
ple shows how you can pass the double quote itself as a character to the option:
> mysqldump -u root -p --tab /tmp "--fields-enclosed-by=\"" ...
To reinput the file thus generated (*.txt) with mysqldump, you can use either the program
mysqlimport, discussed in the following section, or the SQL command LOAD DATA.
mysqlimport (Text Import, Bulk Import)
With mysqlimport, it is possible to import specially formatted text files into MySQL tables. Here,
mysqlimport represents merely an interface to the command LOAD DATA, described in detail in
Chapter 14.
mysqlimport — Syntax
mysqlimport [options] databasename filename
CHAPTER 22 ■MYSQL TOOLS AND OPTIONS 687
5351c22_final.qxd 8/26/05 8:10 PM Page 687
www.it-ebooks.info

mysqlimport — Options
-d --delete Deletes all existing records in the table before
importation.
-i --ignore Ignores new records with an existing value for
aUNIQUE or PRIMARY KEY column.
-L --local Reads the file from the local file system (not
from that of the MySQL server).
-l --lock-tables Blocks the tables for all other clients during
importation.
-r --replace Overwrites existing records with the same value
in a UNIQUE or PRIMARY KEY column.
--fields-terminated-by Affects special characters; see LOAD DATA in
--fields-enclosed-by Chapter 21.
--fields-----optionally-enclosed-by
--fields-escaped-by
--lines-terminated-by
mysqlshow (Displaying Information)
With mysqlshow, you can quickly obtain an overview of the databases, tables, and columns managed
by MySQL. Without parameters, the command returns a list of all databases managed by MySQL.
With parameters, the command displays information on the specified database, table, or column.
mysqlshow — Syntax
mysqlshow [options] [databasename [tablename [columnname]]]
mysqlshow — Options
-i --status Displays additional status for tables (table type, average record length, etc.).
Example
> mysqlshow -u root -p
Enter password: xxx
Databases:
books
myforum
mylibrary
mysql
test
...
> mysqlshow -u root -p mysql
Enter password: xxx
Database: mysql
Tables:
columns_priv
db
host
...
CHAPTER 22 ■MYSQL TOOLS AND OPTIONS688
5351c22_final.qxd 8/26/05 8:10 PM Page 688
www.it-ebooks.info

> mysqlshow -u root -p mylibrary authors
Enter password: xxx
Database: mylibrary Table: authors Rows: 0
Field Type Collation Null Key Default Extra Privileges
authID int(11) PRI ... ...
authName varchar(60) latin1_german1_ci MUL ...
ts timestamp YES ... ...
myisamchk (Repairing MyISAM Files)
With myisamchk you can check the integrity of MyISAM database files (name.MYD and name.MYI).
Damaged files and indexes can be repaired as required.
The parameters of myisamchk are tables names. Here the complete file name is given (either
without the ending or with the ending *.MYI). Depending on the options specified, however, both
MyISAM files, that is, name.MYD and name.MYI, are analyzed or changed.
Please note that with myisamchk there are several options whose significance depends on
whether the program is used simply for checking (without -r, -o, --recover, --saferecover) or for
changing table files (with one of these options).
myisamchk — Syntax
myisamchk [options] tablename1 tablename2 …
myisamchk — Options (Analyze Table File Without -r or -o)
-c --check Checks the integrity of the table files; -c is the default option if no
options are specified.
-e --extend-check Checks most thoroughly (and slowly).
-F --fast Checks only tables whose files were not properly closed.
-C --check-only-changed Checks only tables that were changed since the last check.
-f --force Restarts myisamchk with the option -r if errors are discovered.
-i --information Displays statistical information about the tables.
-m --medium-check Checks more thoroughly (and slowly) than with -c.
-U --update-state Marks a file as damaged if errors are discovered.
-T --read-only Does not change the file.
myisamchk — Options (Repair and Change Table File with -r or -o)
-B --backup Creates the backup file name.bak for name.myi.
-e --extend-check Attempts to re-create every data record; however, this usually leads to
many records with incorrect or deleted data; moreover, the repair
takes a long time; this option should be used seldom.
-f --force Overwrites temporary files.
-l --no-symlinks Follows no symbolic links (that is, only those files are repaired that
are found under the actual file name; available only under Unix/
Linux).
-o --safe-recover Like -r, but a different algorithm is used.
Continued
CHAPTER 22 ■MYSQL TOOLS AND OPTIONS 689
5351c22_final.qxd 8/26/05 8:10 PM Page 689
www.it-ebooks.info

myisamchk — Options (Repair and Change Table File with -r or -o)
(Continued)
-q --quick Only an index file is repaired; the actual file is left untouched.
-q -q Has almost the same effect as -q, but the data file is unchanged if key
fields are not unique.
-r --recover Attempts to re-create defective files.
-t p --tmpdir=path Uses the specified directory for temporary files.
-u --unpack Decompresses table files that were compressed with myisampack.
myisamchk — Other Options
-a --analyze Analyzes and stores the distribution of key fields in the
indexes; this can speed up table access somewhat.
-A n --set-auto-increment[=n] Uses as start value for AUTO INCREMENT a number that is
one greater than the highest value used so far, or else n
(whichever is greater).
-d --description Displays various information about the table (record format
and length, character set, indexes, etc.).
-R --sort-records=idxnr Sorts the records in the table file according to the specified
index; the index is specified as a number (where this num-
ber can be determined first with -d); then nearby records
in the index are located near each other in the table file as
well; this can speed up access if records are frequently read
in the order defined by the index.
-S --sort-index Sorts the blocks of the index file.
myisamchk — Variables for Memory Management
-O key_buffer_size=n Specifies the size of the key buffer (default 512KB).
-O read_buffer_size=n Specifies the size of the read buffer (default 256KB).
-O sort_buffer_size=n Specifies the size of the sort buffer (default 2MB).
-O write_buffer_size=n Specifies the size of the write buffer (default 256KB).
myisampack (Compressing MyISAM Files)
MyISAM database files (name.MYD) are compressed with myisampack. Thereby one can achieve drastic
reductions in storage requirements for tables (often considerably more than one-half) and under
some circumstances increased access speed to the data. However, the data can now no longer be
changed.
myisampack — Syntax
myisampack [options] tablename1 tablename2 …
CHAPTER 22 ■MYSQL TOOLS AND OPTIONS690
5351c22_final.qxd 8/26/05 8:10 PM Page 690
www.it-ebooks.info

myisampack — Options
-b --backup Creates a backup name.old of the table file.
-f --force Executes the operation even if the resulting file is bigger than
the original.
-j --join='new_table_name' Unites all tables specified into a single, large file; the tables
must all have exactly the same column definitions.
-t --test Executes myisampack provisionally without actually changing
any data.
-T p --tmpdir=path Uses the specified directory for temporary files.
CHAPTER 22 ■MYSQL TOOLS AND OPTIONS 691
5351c22_final.qxd 8/26/05 8:10 PM Page 691
www.it-ebooks.info

API Reference
This chapter contains a reference to the APIs (application programming interfaces) that were
introduced in this book for the programming languages PHP, Perl, Java, and C.
PHP API (mysql Interface)
Since PHP 5 two interfaces have been available for interacting with MySQL: the mysql functions and
the mysqli classes and methods. This section gives a compact overview of the mysql functions and
their parameters for access to MySQL databases. In the next section follows a reference to the
mysqli interface.
First a few formal remarks to the following explanation of syntax:
• Square brackets in the left column indicate optional parameters.
• For all functions for which there is an enumeration over an index n, this index is in the range
0 to nmax -1.
• Examples of the application of these functions can be found particularly in Chapters 3 and
15. Further references can be found in the Index.
Establishing a Connection
$id = mysql_connect($host, $user, $pw); Establishes a connection.
$id = mysql_connect($host, $user, $pw, As above, except that new_link specifies whether a new
$new_link, $client_flags); connection should be made if a similar connection
already exists (default false); client_flags specifies
whether particular connection properties should be
used (e.g., MYSQL_CLIENT_COMPRESS); these two
optional parameters have been available only since
PHP 4.3.
$id = mysql_pconnect($host, $user, $pw Establishes a persistent connection or attempts to reuse
[, $new_link [, $client_flags]]); a still open connection of another PHP page.
mysql_change_user($newuser, $passw); Changes the user name for the connection.
mysql_select_db($dbname); Determines the default database.
mysql_close([$id]); Closes the connection.
Generally, the specification id can be omitted as long as there is only one connection to MySQL
and thus no possibility of confusion.
693
CHAPTER 23
■ ■ ■
5351c23_final.qxd 8/26/05 8:12 PM Page 693
www.it-ebooks.info

Administration
$result = mysql_list_dbs([$id]); Determines a list of all known databases; the eval-
uation is like that of SELECT queries.
$result = mysql_list_tables($dbname [,$id]); Determines a list of all tables of the database; the
evaluation is like that of SELECT queries.
$result = mysql_list_fields($dbn, $tbln [,$id]); Determines a list of all fields of the table; the evalu-
ation is like that of SELECT queries.
mysql_create_db($dbname [,$id]); Creates a new database.
mysql_drop_db($dbname [,$id]); Deletes a database.
Error Evaluation
$n = mysql_errno([$id]); Determines the number of the most recent error.
$txt = mysql_error([$id]); Determines the error message.
Information Functions
$txt = mysql_get_client_info([$id]); Returns a character string with the version number of the
client library.
$txt = mysql_get_host_info([$id]); Returns a character string that describes the connection
with the server (including host name, e.g., “localhost via
TCP/IP”).
$n = mysql_get_proto_info([$id]); Returns an integer with the number of the communication
protocol in use (e.g., 10).
$txt = mysql_get_server_info([$id]); Returns a character string with the version number of the
server (e.g., “5.0.2-alpha-standard”).
$n = mysql_thread_id([$id]); Returns an integer with the thread number of the given
connection.
$txt = mysql_stat([$id]); Returns a character string with a brief status report on the
server (e.g., “Uptime: 24763 Threads: 1 Questions: 65 …”).
Executing SQL Commands
[$result =] mysql_query($sql [, $id]) Executes an SQL command for the default database; if
it is a SELECT command, the found records can be
evaluated with $result.
[ $result = ] mysql_db_query( $db, $sql Executes a command for the database db (which
[, $id]); becomes the default database for all further queries).
$result = mysql_unbuffered_query( $sql Functions in principle like mysql_query, but is
[, $id]); designed only for SELECT queries; the difference
between this and mysql_query is that found records
remain at first on the server and are transferred only
as needed; the number of found records can be
determined only by running through all of them;
mysql_num_rows cannot be used.
$sql = addslashes($s); Replaces 0-bytes and the characters ‘, “, and \in $s
with the strings \0, \', \", and \\.
$sql = mysql_escape_string($s); Functions like addslashes, but also replaces carriage
return, line feed, and Ctrl+Z with the strings \n, \r,
and \z.
$sql = mysql_real_escape_string( $s [,$id]); Functions like mysql_escape_string, but also considers
acter set of the MySQL connection.
CHAPTER 23 ■API REFERENCE694
5351c23_final.qxd 8/26/05 8:12 PM Page 694
www.it-ebooks.info

Output of
SELECT
Query Results
mysql_data_seek($result, $rownr); Determines the active data record within the result.
$row = mysql_fetch_array($result); Returns the next record of the result (or false);
access to individual fields takes place with row[n] or
row[‘fieldname’], where case sensitivity is enforced.
$row = mysql_fetch_assoc($result); Functions like mysql_fetch_array, except that field
access must be by column name; row[n] is not
permitted.
$row = mysql_fetch_row($result); Returns the next record of the result (or false);
access to individual fields is via row[n].
$row = mysql_fetch_object($result); Returns the next record of the result (or false);
access to individual fields is via row->fieldname.
$data = mysql_result($result, $rownr, $colnr); Returns the contents of the field in row rownr and
column colnr; this function is slower than the other
functions in this list and should therefore be used
only in particular cases (such as to read a single
value, e.g., SELECT COUNT(*)).
mysql_free_result($result); Frees the query result immediately (otherwise, not
until the end of the script).
All of the above functions except for mysql_treat_result() treat result as a value that enables
access to the list of data records from a SELECT query. Usually, all records are output one after the
other with mysql_fetch_array, mysql_fetch_row, or mysql_fetch_object, with each subsequent execu-
tion of the function setting the next record as the active one. The active record can also be set with
mysql_data_seek.
The three functions mysql_fetch_array, mysql_fetch_row, and mysql_fetch_object differ only in the
way in which individual fields of a record are accessed: row[‘fieldname’], row[n], or row->fieldname. Of
the three functions, mysql_fetch_row is the most efficient, but the difference in speed is negligible.
Metainformation on Query Results
$n = mysql_num_rows($result); Determines the number of result records (SELECT).
$n = mysql_num_fields($result); Determines the number of result columns (SELECT).
$n = mysql_affected_rows([$id]); Determines the number of records that were changed by the
last SQL command (INSERT, UPDATE, DELETE, CREATE, …,
SELECT).
$autoid = mysql_insert_id([$id]); Determines the AUTO_INCREMENT value generated by the last
INSERT command.
$txt = mysql_info([$id]); Returns status information on the last command, e.g., “Rows
matched: 65 Changed: 65 Warnings: 0”; mysql_info is designed
only for commands that usually affect large numbers of records
(INSERT INTO, UPDATE, ALTER TABLE, etc.).
CHAPTER 23 ■API REFERENCE 695
5351c23_final.qxd 8/26/05 8:12 PM Page 695
www.it-ebooks.info

Metainformation on the Fields (Columns) of Query Results
$fname = mysql_field_name($result, $n); Returns the field name of column n.
$tblname = mysql_field_table($result, $n); Returns the table name for column n.
$typename = mysql_field_type($result, $n); Returns the data type of column n(e.g., “TINYINT”).
$length = mysql_field_len($result, $n); Returns the maximum length of the column.
$lengths = mysql_fetch_length($result); Returns a field with length information for all fields
of the last-read data record (access with lengths[n]).
$flags = mysql_field_flags($result, $n); Returns the attribute properties of a column as a
character string (e.g., “not_null primary_key”); the
properties are separated by spaces; evaluation is
done most easily with explode.
$info = mysql_fetch_field($result, $n); Returns information on column nas an object; eval-
uation proceeds with info->name (see the list below);
note that info may contain, in part, properties other
than flags.
Attributes of mysql_field_flags
auto_increment Attribute AUTO_INCREMENT.
binary Attribute BINARY.
blob Data type BLOB, TINYBLOB, etc.
enum Data type ENUM.
multiple_key The field is part of a nonunique index.
not_null Attribute NOT NULL.
primary_key Attribute PRIMARY KEY.
timestamp Attribute TIMESTAMP.
unique_key Attribute UNIQUE.
unsigned Attribute UNSIGNED.
zerofill Attribute ZEROFILL.
Field Information for mysql_fetch_field
info->name column name (field name).
info->table name of the table from which the field
comes.
info->max_length maximum length of the field.
info->type name of the data type of the field (e.g.,
“TINYINT”).
info->numeric 1 or 0, depending on whether the field
contains numeric data.
info->blob,not_null,multiple_key, primary_key, 1 or 0; see list above for interpretation.
unique_key, unsigned, zerofill
CHAPTER 23 ■API REFERENCE696
5351c23_final.qxd 8/26/05 8:12 PM Page 696
www.it-ebooks.info

PHP-API (mysqli Interface)
In addition to the mysql interface described in the previous section, since PHP 5 the new mysqli
interface has been available. Among its advantages are object-oriented programming, greater
functionality, and support for new MySQL features (e.g., prepared statements).
The mysqli interface offers three classes:
mysqli: Objects of this class manage the connection to the MySQL server.
mysqli_result: Objects of this class contain the results of SELECT queries.
mysqli_stmt: Objects of this class enable the definition and execution of prepared statements.
The following syntax tables describe the most important properties and methods of the three
classes. Here $mysqli is an object of the mysqli class, $result an object of the mysqli_result class, and
$stmt an object of the mysqli_stmt class.
The mysqli Class
Establishing a Connection
$mysqli = new mysqli(“servername”, Connection variant 1: The mysqli constructor creates the
“user”, “pw”, “dbname”); connection.
$mysqli = mysqli_init(); Connection variant 2: The mysqli object is created with
$mysqli->options(...); mysqli_init. Then you can set options, for example, in the
$mysqli->ssl_set(“key”, “cert”, “ca”, form $mysqli->options(MYSQLI_OPT_CONNECT_
“capath”, “cipher”); TIMEOUT, 10). The actual creation of the connection
$mysqli->real_connect(“servername”, finally takes place via real_connect, where the last three
“user”, “pw”, “dbname”, portno, parameters are optional. Allowable flags include
“socketfile”, flags); MYSQLI_CLIENT_COMPRESS and MYSQL_CLIENT_SSL.
$err = mysqli_connect_errno(); Tests whether an error has occurred during creation of
the connection. The return value 0 means that the
connection has succeeded.
mysqli — Executing SQL Commands
[$result =] $mysqli->query($sqlstring); Executes an SQL command. With queries (SELECT),
moreover, the entire result is transferred to the client and
returned as a mysqli_result object.
$mysqli->real_query($sqlstring); Executes an SQL command without transferring the
result.
$sql = “sqlcmd1;cmd2;cmd3”; Executes several SQL commands. The first SELECT result
$ok = $mysqli->multi_query($sql); can be determined at once with store_result. If there is
if($ok) more than one result, these must be activated with
do { next_result. This method returns 0 if there are no more
$result = $mysqli->store_result(); results or if an error occurred.
... process result
while($mysqli->next_result());
$stmt = $mysqli->prepare($sqlstring); Prepares a parameterized SQL command and returns a
mysqli_stmt object; the execution of the command and
the evaluation of the result take place via the mysqli_stmt
methods (see below).
CHAPTER 23 ■API REFERENCE 697
5351c23_final.qxd 8/26/05 8:12 PM Page 697
www.it-ebooks.info

mysqli — Important Methods
$mysqli->autocommit(0 / 1); Sets the autocommit mode.
$mysqli->close(); Closes the connection.
$mysqli->commit(); Ends a transaction.
$str = $mysqli->escape_string($str); Places a backslash in front of special characters in strings or
replaces them with SQL-conforming character
combinations.
$mysqli->rollback(); Aborts a transaction.
mysqli — Important Properties
$n = $mysqli->affected_rows; Returns the number of records that were altered by the most
recent SQL command (INSERT, UPDATE, DELETE, etc.).
$n = $mysqli->errno; Returns the number of the last-occurring error.
$str = $mysqli->error; Returns the most recent error message.
$str = $mysqli->info; Returns a string with information about the last-executed SQL
command (e.g., after an UPDATE command: Rows matched:
nnn Changed: nnn Warnings: nnn).
$n = $mysqli->insert_id; Determines the AUTO_INCREMENT value created by the last
INSERT command.
$n = $mysqli->warning_count; Returns the number of warnings that were triggered by the last
SQL command.
mysqli_result Classes
mysqli_result — Important Methods
$result->close(); Releases memory occupied by an object.
$result->data_seek(n); Makes record nthe active record (n=0 for the first record). This
does not work if query was executed with the optional
parameter MYSQLI_USE_RESULT.
$row = $result->fetch_array(); Returns the next record of the result (or FALSE). Access to
individual fields takes place via $row[n] or $row[‘fieldname’],
where case sensitivity is in force.
$row = $result->fetch_assoc(); Like fetch_array, except that access to fields can take place only
in the form $row[‘fieldname’].
$meta = $result->fetch_fields(); Returns an array of objects that contain metadata on the
columns. For example, $meta[$n]->name gives the name of
a column.
$row = $result->fetch_row(); Like fetch_array, except that field access can take place only in
the form $row[n].
$row = $result->fetch_object(); Returns the next record of the result (or FALSE). Access to
individual fields is via $row->fieldname, where case sensitivity
is in force.
CHAPTER 23 ■API REFERENCE698
5351c23_final.qxd 8/26/05 8:12 PM Page 698
www.it-ebooks.info

mysqli_result — Important Properties
$n = $result->affected_rows; Returns the number of records that were most recently changed
with INSERT, DELETE, or UPDATE.
$n = $result->field_count; Returns the number of columns of the SELECT result.
$lenarray = $result->lengths; Returns an array whose elements contain the number of characters
of all columns of the record most recently read with fetch_xxx.
$n = $result->num_rows; Returns the number of records in a SELECT result.
mysqli_stmt Class
mysqli_stmt — Important Methods
$stmt->bind_param(‘idsb...’, $var1, $var2 ...); Binds the parameters of an SQL command with the
associated variables. For each variable the data type
must be specified with a character: i = integer,
d = double, s = string, b = binary (BLOB).
$stmt->bind_result($var1, $var2 ...); Binds the columns of a SELECT result and the asso-
ciated PHP variables. The method must be executed
after execute.
$stmt->close(); Releases an object’s memory.
$stmt->execute(); Executes an SQL command, where the parameters
are passed via $var1, $var2, etc.
$stmt->fetch(); Transfers the next record of a SELECT result into the
variables previously specified with bind_result. fetch
returns FALSE if all records have been processed.
fetch normally transfers each record individually
from the server to the client, unless store_result was
executed first.
$stmt->store_result(); Transfers all SELECT results to the client.
mysqli_stmt — Important Properties
$n = $stmt->affected_rows; Returns the number of records that were changed by INSERT,
DELETE, or UPDATE.
$n = $stmt->num_rows; Returns the number of records in a SELECT result; this property can
be used only if store_result was previously executed.
Perl DBI
This reference does not contain an exhaustive list of all DBI methods, functions, and attributes. We
have included only those key words that are most relevant for everyday MySQL programming with
Perl. A complete reference can be found in the perldoc documentation.
In this book we generally place Perl methods in parentheses to improve readability. However,
Perl syntax allows the execution of methods without parentheses, as in $dbh->disconnect.
CHAPTER 23 ■API REFERENCE 699
5351c23_final.qxd 8/26/05 8:12 PM Page 699
www.it-ebooks.info

The following lines show the principles for building a Perl script file:
#!/usr/bin/perl -w
use DBI; # database access
use CGI qw(:standard); # required only with CGI scripts
use CGI::Carp qw(fatalsToBrowser); # only with CGI scripts
... # here follows the actual code
Common Variable Names
The Perl DBI module is object-oriented. Thus the key words introduced in this section relate in part
to methods that can be applied to specific objects (which in Perl are generally called handles). In
this reference the following variable names will be used for such objects:
Common Variable Names for
DBI
Handles
$dbh (database handle) Represents the connection to the database.
$sth (statement handle) Enables evaluation of query results (with SELECT queries).
$h (handle) General handles, used in this section with methods that are
available to $dbh, $sth, and DBI.
$drh (driver handle) Enables access to many administrative functions.
Establishing the Connection
The Connection
use DBI(); Activates the DBI module.
$datasource = “DBI:mysql:dbname;” . Specifies database names and computer names; the
“host=hostname”; database name may be omitted, but then at least the
colon must be given.
$dbh = DBI->connect($datasource, Creates the connection to the database.
$username, $password [, %attributes]);
Within the datasource character string, further parameters—separated by semicolons—may be
given. Details on these parameters can be found in Chapter 22.
Optional Parameters in the
datasource
Character String
host=hostname Specifies the name of the computer with the MySQL
server (default localhost).
port=n Specifies the IP port (default 3306).
mysql_compression=0/1 Compresses communication (default 0).
mysql_read_default_file=filename Specifies the file name of the MySQL configuration file.
mysql_read_default_group=mygroup Reads the group [mygroup] within the configuration
(default group [client]).
A list with attributes can be passed as an optional fourth parameter of connect. You can supply
these attributes either directly or in the form of an array variable:
$dbh = DBI->connect($source, $user, $pw, {Attr1=>val1, Attr2=>val2});
%attr = (Attr1=>val1, Attr2=>val2);
$dbh = DBI->connect($source, $user, $pw, \%attr);
CHAPTER 23 ■API REFERENCE700
5351c23_final.qxd 8/26/05 8:12 PM Page 700
www.it-ebooks.info

To a great extent, these attributes can be read and changed with $dbh after the connection has
been established:
$dbh->{'LongReadLen'} = 1000000;
The following table describes the most important connect attributes.
Optional
connect
Attributes ($
dbh
Attributes)
RaiseError=>0/1 Displays an error message and ends the program if the connection is not
properly established (default 0)
PrintError=>0/1 Displays an error message but continues execution if the connection is not
properly established (default 1)
LongReadLen=>n Determines the maximum size of an individual data field in bytes (0: do not
even read long fields)
LongTruncOK=>0/1 Specifies whether data fields that are too long should be truncated (1) or
whether an error should be triggered (0)
Terminate the Connection
$dbh->disconnect(); Terminates connection to the database.
Executing SQL Commands, Evaluating SELECT Queries
Execute Queries Without Return of Data Records
$n = $dbh->do(“INSERT ...”); Executes an SQL query without returning records; $n
contains the number of records that were changed, 0E0
if no records were changed, -1 if the number is unknown,
or undef if an error has occurred.
$n = $dbh->do($sql, \%attr, @values); Executes a parameterized query; @values contains values
for the wild card expressed in the SQL command by ?;
these values are handled automatically with quote(); %attr
can contain optional attributes (otherwise, specify undef).
$id = $dbh->{‘mysql_insertid’}; Returns the AUTO_INCREMENT value of the last record to
be inserted (caution: the attribute mysql_insertid is
MySQL-specific).
Execute Queries with Return of Data Records
$sth = $dbh->prepare(“SELECT …”); Prepares an SQL query (generally SELECT queries); all
further operations proceed with the help of the statement
handle.
$sth->execute(); Executes the query.
$sth->execute(@values); Executes a parameterized query; @values contains values
for the wild card expressed in the SQL command by ?.
$sth->fetchxxx(); Evaluates the results (see below).
$sth->finish(); Releases the resources of the statement handle.
If a query was executed with prepare and execute and a list of records was returned as result,
then this list can be evaluated with a number of fetch methods.
CHAPTER 23 ■API REFERENCE 701
5351c23_final.qxd 8/26/05 8:12 PM Page 701
www.it-ebooks.info

Evaluating Lists of Data Records
@row = $sth->fetchrow_array(); Reads the next record into the array @row; if the end of the
list is reached or if an error occurs, then @row contains an
empty array; access to individual elements proceeds with
$row[n] (where for the first column, n=0).
@row = $sth->fetch(); Equivalent to fetchrow_array().
$rowptr = $sth->fetchrow_arrayref(); Equivalent to fetchrow_array(), but returns pointers to
arrays (or undef if the end of the list of records is reached
or an error occurs).
$row = $sth->fetchrow_hashref(); Reads the next record into the associated array $row; if the
end of the list of records is reached or if an error occurs,
then $row contains the value undef; access to individual
elements proceeds with $row->{‘columnname’}, where case
sensitivity is enforced.
$result = $sth->fetchall_arrayref(); Reads all records and returns a pointer to an array of
pointers to the individual records; access to individual
elements proceeds with $result->[$row][$col].
$result = $sth->fetchall_arrayref({}); As above, but the records are now associative arrays; access
is via $result->[$row]->{‘columnname’}.
Bind Variables to Columns (for
fetchrow_array
)
$sth->bind_col($n, \$var); Binds the column nto the variable $var (where for the
first column we have, exceptionally, n=1); the variable
is automatically updated when the next record is read;
bind_col must be executed after execute; the function
returns false if an error occurs.
$sth->bind_columns(\$var1, \$var2, ...); Equivalent to bind_col, except that variables are
assigned to all columns of the query; make sure you
have the correct number of variables.
Metainformation on SQL Commands
$n = $sth->{‘NUM_OF_FIELDS’}; Returns the number of result columns (after SELECT).
$n = $sth->{‘NUM_OF_PARAMS’}; Returns the number of parameters in queries with wild cards.
$sql = $sth->{‘Statement’}; Returns the underlying SQL command.
Determine Column Names, Data Types, etc., of
SELECT
Results
$array_ref = $sth->{‘NAME’}; Returns a pointer to an array with the names of all columns
evaluation takes place with @{$array_ref}[$n], where nranges
from 0 to $sth->{‘NUM_OF_FIELDS’}-1.
$array_ref = $sth->{‘NAME_lc’}; As above, but names in lowercase.
$array_ref = $sth->{‘NAME_uc’}; As above, but names in uppercase.
$array_ref = $sth->{‘NULLABLE’}; Specifies for each column whether NULL may be stored there
(1) or not (0); if this information cannot be determined, then
the array contains the value 2 for this column.
$array_ref = $sth->{‘PRECISION’}; Specifies the precision in the sense of ODBC (the maximum
column width).
CHAPTER 23 ■API REFERENCE702
5351c23_final.qxd 8/26/05 8:12 PM Page 702
www.it-ebooks.info

Determine Column Names, Data Types, etc., of
SELECT
Results
(Continued)
$array_ref = $sth->{‘SCALE’}; Specifies the number of decimal places for floating-point
numbers.
$array_ref = $sth->{‘TYPE’}; Specifies the data type of all columns in the form of numerical
values; the values relate to the ODBC standard; tests deter-
mined the following values: CHAR:12, INT: 4, TEXT/BLOB: -1,
DATE: 9, TIME: 10, TIMESTAMP: 11, FLOAT: 7, DECIMAL: 3,
ENUM/SET: 1.
Shorthand Notation
@row = $dbh->selectrow_array($sql); Corresponds to a combination of prepare, execute, and
fetchrow_array; the result is an array of the first result
data record; access to further records is not possible.
$result = $dbh->selectrow_array($sql); As above, but $result contains the value of the first
column of the first result record.
$result = $dbh->selectall_arrayref($sql); Corresponds to prepare, execute, and fetchall_arrayref;
for evaluation of $result, see fetchall_arrayref.
Marking Special Characters in Character Strings and BLOBs with the Backslash
$dbh->quote($data); Prefixes the contents of $data between single quotes, prefixes \ and ‘ with
\, and replaces 0-bytes with \0; if $data is empty (undef), then quote()
returns the character string NULL.
Transactions
$dbh->{‘AutoCommit’} = 0; Deactivates autocommit mode. From now on, all SQL commands
form transactions.
$dbh->commit(); Confirms a transaction.
$dbh->rollback(); Aborts a transaction.
Error Handling
Methods for Error Handling
$h->err(); Returns the error number of the last error (0: no error).
$h->errstr(); Describes the last error (empty string: no error).
DBI->trace($n [, $filename]); Logs all internal data accesses and redirects output to STDERR
or the given file; nspecifies the degree of detail to be logged
(0 deactivates logging, 1 gives a good idea, 15 logs everything).
CHAPTER 23 ■API REFERENCE 703
5351c23_final.qxd 8/26/05 8:12 PM Page 703
www.it-ebooks.info

Auxiliary Functions
DBI
Functions
@bool = DBI::looks_like_a_number(@data); Tests for each element in the array @data
whether it is a number and returns true or
undef in the result array.
$result = DBI::neat($data [, $maxlen]); Formats the character string contained in
$data in a form suitable for output; character
strings are placed in single quotes; non-ASCII
characters are replaced by a period; if the char-
acter string is longer than $maxlen characters
(default 400), then it is truncated and termi-
nated with … .
$result = DBI::neat_list(\@listref, $maxlen, $sep); As above, but for an entire array of data; the
individual elements are separated by $sep
(default “,”).
$dbh
Methods
$ok = $dbh->ping(); Tests whether the connection to MySQL still exists and returns true or false
accordingly.
MySQL-Specific Extension of the DBD::mysql Driver
If you use the DBI module for access to MySQL databases, then there are some supplementary
functions available via DBI methods and attributes, of which we shall now describe some of the
most important. The use of these functions can simplify programming and can make Perl programs
more efficient. However, the code will no longer be portable; that is, a later change to another data-
base system will require additional work.
Administrative Functions Based on a Separated Connection
$drh = DBI->install_driver(‘mysql’); Returns a driver handle.
$drh->func(‘createdb’, $database, $host, Creates a new database; a new connection is used for
$user, $password, ‘admin’); this.
$drh->func(‘dropdb’, $database, $host, Deletes a database.
$user, $password, ‘admin’);
$drh->func(‘shutdown’, $host, $user, Shuts down the MySQL server.
$password, ‘admin’);
$drh->func(‘reload’, $host, $user, Reinputs all MySQL tables (including the mysql tables
$password, ‘admin’); with privilege management).
Administrative Functions Within the Current Connection
$dbh->func(‘createdb’, $database, ‘admin’); Creates a new database.
$dbh->func(‘dropdb’, $database, ‘admin’); Deletes a database.
$dbh->func(‘shutdown’, ‘admin’); Shuts down the MySQL server.
$dbh->func(‘reload’, ‘admin’); Reinputs all MySQL tables.
CHAPTER 23 ■API REFERENCE704
5351c23_final.qxd 8/26/05 8:12 PM Page 704
www.it-ebooks.info

$dbh
Attributes
$info = $dbh->{‘mysql_hostinfo’}; Returns a string with the connection data for the MySQL
server (e.g., 192.168.80.128 via TCP/IP).
$info = $dbh->{‘mysql_info’}; After certain special SQL commands returns a character
string with information about the command (e.g., after
an UPDATE command: Rows matched: 13 Changed: 13
Warnings: 0).
$id = $dbh->{‘mysql_insertid’}; Returns the AUTO_INCREMENT value of the last
inserted record.
$n = $dbh->{‘mysql_protoinfo’}; Returns the version number of the MySQL connection
protocol (e.g., 10).
$info = $dbh->{‘mysql_serverinfo’}; Returns a string with the version number of the MySQL
server (e.g., 5.0.2-alpha-standard).
$info = $dbh->{‘mysql_stat’}; Returns a string with the server status (number of
threads, open tables, etc.).
$threadid = $dhb->{‘mysql_thread_id’}; Returns the thread ID number of the current connection
to MySQL.
$sth
Methods and Attributes
$sth->rows(); Returns after SELECT queries the number of data records found by
SELECT; caution: this does not work if $sth->{‘mysql_use_result’}=1
holds.
$sth->{‘mysql_store_result’}=1; Activates mysql_store_result, so that with SELECT queries all
results are stored temporarily on the client computer (default
setting).
$sth->{‘mysql_use_result’}=1; Activates mysql_use_result, so that with SELECT queries only
a single record is stored temporarily on the client.
$sth
Attributes for Determining Metadata on
SELECT
Results
$ar_ref = $sth->{‘mysql_is_auto_increment’}; Tells whether for the columns the AUTO_
INCREMENT attribute holds. This and all additional
attributes return a pointer to an array whose values
give the status. Evaluation is with @{$ar_ref}[$n],
where nranges from 0 to $sth->{‘NUM_OF_FIELDS’}-1.
$ar_ref = $sth->{‘mysql_is_blob’}; Tells whether the columns contain BLOBs.
$ar_ref = $sth->{‘mysql_is_key’}; Specifies whether the columns are indexed.
$ar_ref = $sth->{‘mysql_is_not_null’}; Specifies whether the attribute NOT NULL holds for
the columns.
$ar_ref = $sth->{‘mysql_is_num’}; Specifies whether numerical data are stored in the
columns.
$ar_ref = $sth->{‘mysql_is_pri_key’}; Specifies which columns are part of the primary
index.
$ar_ref = $sth->{‘mysql_max_length’}; Specifies the maximum column width of the query
results.
$ar_ref = $sth->{‘mysql_table’}; Specifies the underlying table names for all columns.
$ar_ref = $sth->{‘mysql_type_name’}; Specifies the names of the data types for all columns.
CHAPTER 23 ■API REFERENCE 705
5351c23_final.qxd 8/26/05 8:12 PM Page 705
www.it-ebooks.info

JDBC (Connector/J)
In order to be able to access MySQL under Java, a JDBC driver for MySQL must be installed. This
book assumes that you are using Connector/J version 3.n. If this assumption is satisfied, you can use
numerous classes and methods of JDBC (Java Database Connectivity) with the names java.sql.* and
javax.sql.*. The following tables assemble only the most important classes and methods of JDBC.
There is simply no room for a complete reference to this complex database programming library.
Establishing a Connection
Connection with
DriverManager
import java.sql.*; Enables direct access to the JDBC
base classes.
Class.forName(“com.mysql.jdbc.Driver”).newInstance(); Loads and registers Connector/J, the
MySQL driver for JDBC.
Connection conn = DriverManager.getConnection
(“jdbc:mysql://hostname/dbname”, “username”, “password”); Creates a connection to the database
dbname on the computer hostname;
in the connection string, a large num-
ber of additional optional parameters
may be passed, the most important
of which appear in two tables in
Chapter 17.
Connection with DataSource (Since Java 2, Version 1.4)
import java.sql.*; Enables direct access to the JDBC base and extension
import javax.sql.*; classes.
com.mysql.jdbc.jdbc2.optional. Creates an object of the class com.mysql.jdbc.jdbc2.
MysqlDataSource ds = optional.MysqlDataSource, sets the host and database
new com.mysql.jdbc.jdbc2.optional. names, and finally establishes the connection.
MysqlDataSource();
ds.setServerName(“hostname”);
ds.setDatabaseName(“dbname”);
Connection conn =
ds.getConnection(
“username”, “password”);
ds.setUrl(“...”); To be used instead of setServerName and
setDatabaseName for setting various connection
parameters; the syntax of the connection string (URL)
is the same as for DriverManager.getConnection.
CHAPTER 23 ■API REFERENCE706
5351c23_final.qxd 8/26/05 8:12 PM Page 706
www.it-ebooks.info

Executing SQL Commands
SQL Commands (
Statement
)
Statement stmt = Creates a Statement object, necessary to execute an SQL
conn.createStatement(); command.
Statement stmt = Defines a Statement object for forward only ResultSets.
conn.createStatement(
java.sql.ResultSet.
TYPE_FORWARD_ONLY,
java.sql.ResultSet.
CONCUR_READ_ONLY);
stmt.setFetchSize(
Integer.MIN_VALUE);
Statement stmt = Defines a Statement object for a variable ResultSet.
conn.createStatement(
java.sql.ResultSet.
TYPE_SCROLL_SENSITIVE,
java.sql.ResultSet.
CONCUR_UPDATABLE);
int n = stmt.executeUpdate( Executes INSERT, UPDATE, and DELETE commands.
“INSERT ...”); The return value gives the number of changed records.
stmt.getWarnings(); With getWarnings you can determine the warnings issued
when the command was executed (equivalent to SHOW
WARNINGS). This method returns an SQLWarning object
until all warnings have been processed.
ResultSet res = stmt.executeQuery( Executes a SELECT query and returns as result a
“SELECT ...”); ResultSet object.
stmt.addBatch(“INSERT ...”); Collects a number of SQL commands and executes them
stmt.addBatch(“INSERT ...”); as a group; executeBatch returns an int field that specifies
int[] n = stm.executeBatch(); the number of changed records.
Determining
AUTO_INCREMENT
IDs After
INSERT
Commands
stmt.executeUpdate(“INSERT ...”); The starting point for the following three variants.
ResultSet newid = getGeneratedKeys returns a ResultSet object with the most
stmt.getGeneratedKeys(); recently generated ID number(s); normally, that is, after
if(newid.next()) { a usual INSERT command, res contains exactly one ID num-
int id = newid.getInt(1); } ber that is read with next() and getInt(1); getGeneratedKeys is
available since Java 2, version 1.4.
long id = ((com.mysql.jdbc. getLastInsertID also returns the ID number; however, the
Statement)stmt).getLastInsertID(); method is Connector/J-specific and not portable.
ResultSet newid = Here the ID number is returned with a separate SQL com-
stmt.executeQuery( mand; note that the command is executed in the same
“SELECT LAST_INSERT_ID()”); transaction.
if(newid.next()) {
id = newid.getInt(1); }
CHAPTER 23 ■API REFERENCE 707
5351c23_final.qxd 8/26/05 8:12 PM Page 707
www.it-ebooks.info

Executing
PreparedStatment
s
PreparedStatement pstmt = Declares an SQL command with two parameters indicated
conn.prepareStatement( by question marks.
“INSERT ... (?, ?)”);
pstmt.setString(1, “O’Reilly”); Passes the parameter; there are numerous methods in
pstmt.setInt(2, 7878); addition to setString and setInt, e.g., setNull, setDate,
setTime, setFloat, setBinaryStream; to these methods are
passed the parameter number (beginning with 1) and the
actual data.
int n = pstmt.executeUpdate(); Executes the command(s); the methods have the same
ResultSet res = pstmt.executeQuery(); meaning as for the Statement class.
pstmt.addBatch();
int n pstmt.executeBatch();
Processing SELECT Results (ResultSet Class)
Changing
ResultSet
s
res.deleteRow(); Deletes the active record.
res.updateXxx(n, data); First changes the specified columns of the active record and then stores
res.updateRow(); the changes.
res.moveToInsertRow(); Inserts a new record, changes its columns, and then stores the changes.
res.updateXxx(n, data);
res.insertRow();
Evaluating
ResultSet
res.getInt(n); Returns the data field of column nof the currently active record;
res.getString(n); instead of the column number (1 for the first column), the name of
res.getBytes(n); the column may be specified, e.g., getDate(“birthdate”).
...
res.wasNull(); Tests whether the most recently read data field was NULL; this test is
necessary with elementary Java data types that cannot store the value
NULL and instead contain 0; wasNull offers the only way of distin-
guishing between 0 and NULL.
res.getBinaryStream(n); Returns an InputStream object for bytewise reading of binary data.
res.getCharacterStream(n); Returns a Reader object for characterwise reading of binary data.
res.getBlob(n); Returns a Blob object for reading binary data.
res.getClob(n); Returns a Clob object for reading binary data.
CHAPTER 23 ■API REFERENCE708
5351c23_final.qxd 8/26/05 8:12 PM Page 708
www.it-ebooks.info

ResultSet
Navigation
res.next(); Makes the next record in ResultSet the active record; the method returns
false if there are no more records.
res.first(); Activates the first record; the method returns false if the ResultSet contains
no records.
res.previous(); Activates the previous record.
res.last(); Activates the last record.
res.beforeFirst(); Places the record cursor before the first record; the ResultSet object is
thereby in the same condition as immediately after executeQuery; now
the first record can be activated with next.
res.afterLast(); Places the record cursor after the last record; previous activates the last
record.
res.isFirst(); Tests whether the current record is the first/last.
res.isLast();
int n = res.getRow(); Returns the number of the active record (1 for the first record).
res.absolute(n); Activates record n.
Metadata on
ResultSet
ResultSetMetaData meta = res.getMetaData(); Returns a ResultSetMetaData object that gives
information about the SELECT result.
meta.getColumnCount(); Returns the number of columns.
meta.getColumnName(i); Returns the name (String) of column i.
meta.getColumnType(i); Returns the data type of column i; the result is an
int with one of the constants from java.sql.Types.
meta.getColumnTypeName(i); Returns the name (String) of the data type of
column i.
meta.IsNullable(i); Tells whether the column may contain NULL.
meta.IsAutoIncrement(i); Tells whether it is an AUTO_INCREMENT column.
Transactions
Transactions
conn.setAutoCommit(false); Enables transactions (of course only if the MySQL tables are
transaction-capable).
conn.commit(); Confirms all SQL commands executed in the current transaction
and begins the next transaction.
conn.rollback(); Aborts the commands of the current transaction and begins a
new one.
CHAPTER 23 ■API REFERENCE 709
5351c23_final.qxd 8/26/05 8:12 PM Page 709
www.it-ebooks.info

ADO.NET (Connector/Net)
The following tables summarize the most important classes and methods provided by Connector/J
(that is, the library MySql.Data.dll). Visual Basic syntax is used.
Establishing a Connection, Connection Properties
Creating the Connection
Imports MySql.Data.MySqlClient Enables convenient access to the Connector/Net classes.
Dim myconn As MySqlConnection Creates a connection to the MySQL server.
myconn = New MySqlConnection( _
“Data Source=localhost;
Initial Catalog=mylibrary;
User ID=root;PWD=xxxxxx”)
myconn.Open()
Methods and Properties of the
MySqlConnection
Class
BeginTransaction Begins a transaction and returns a MySqlTransaction object (see below).
Close Ends the connection.
ConnectionString Contains the connection properties as a character string.
CreateCommand Creates a MySqlCommand object.
Dispose Releases memory used by the connection.
Ping Tests whether the connection is active.
ServerThread Contains the MySQL server thread number for the connection.
ServerVersion Contains the MySQL version number as a string (e.g.,
5.0.2-alpha-standard-log).
State Provides information about the state of the connection (data type
System.Data.ConnectionState).
Executing and Evaluating SQL Commands
Executing SQL Commands (
MySqlCommand
Class)
Dim com As MySqlCommand Creates a MySqlCommand object in two different ways.
com = myconn.CreateCommand(“sql”)
com = New MySqlCommand(“sql”, _
myconn)
com.ExecuteNonQuery() Executes an SQL command that returns no result (e.g.,
UPDATE or INSERT).
obj = com.ExecuteScalar() Returns a single result (a scalar). ExecuteScalar is suitable
only for SELECT queries that return exactly one row and
one column. The return value of ExecuteScalar has the
data type Object and must be transformed with a
conversion function (e.g., CInt) or a cast operator (e.g.,
(int)) into the desired data format.
dr = com.ExecuteReader() Returns a MySqlDataReader object (see below).
Dim n As Long Returns the ID number (AUTO_INCREMENT column)
com.CommandText = of the last record inserted with INSERT.
“SELECT LAST_INSERT_ID()”
n = CLng(com.ExecuteScalar())
CHAPTER 23 ■API REFERENCE710
5351c23_final.qxd 8/26/05 8:12 PM Page 710
www.it-ebooks.info

Executing SQL Commands with Parameters (
MySqlParameter
Class)
Dim com As MySqlCommand Prepares an SQL command with parameters. Each
Dim p1, p2, p3 As MySqlParameter parameter is specified in the form ?name. Then an
com = myconn.CreateCommand() associated MySqlParameter object must be created in
com.CommandText = _ which the desired data type of the parameter is specified.
“INSERT ...VALUES(?a, ?b, ?c)” Prepare prepares the command for later execution.
p1 = com.Parameters.Add(“?a”, _
MySqlDbType.VarChar)
p2 = com.Parameters.Add(“?b”, _
MySqlDbType.Int32)
...
com.Prepare()
p1.Value = ... Assigns values to the Value properties of the
p2.Value = ... MySqlParameter object and then executes the command
com.ExecuteXxx() with the method Execute described above.
Evaluating SELECT Results (
MySqlDataReader
Class)
Dim dr As MySqlDataReader Executes a SELECT command and returns the result as a
dr = com.ExecuteReader() MySqlDataReader object. Access to the SELECT results takes
place under forward-only and read-only.
dr.HasRows Tests whether the DataReader contains any data.
dr.FieldCount Returns the number of columns of the DataReader.
While dr.Read() Outputs the DataReader row by row. Read returns False if there
n = CInt(dr!publID) are no more records. Access to the columns of the current record
s = CStr(dr!publName) takes place in VB.NET in the form dr!columnname, and in C# in
End While the form dr[“columnname”]. The return values have the data type
Object and must be transformed into the actual data format using
Cdatatype functions (VB.NET) or (datatype) cast operators.
dr.GetName(n) Returns the name of column n(0 for the first column).
dr.GetDataTypeName(n) Returns the name of the column’s data type.
dr.IsDBNull(n) Tests whether column nof the current record contains NULL.
dr.GetByte(n) Reads the data of column ndirectly. These methods are suitable
dr.GetBytes(n, ...) in particular for processing binary data.
dr.GetChar(n)
dr.GetDateTime(n)
...
bool = dr.NextResult() Activates the next SELECT result. The method returns False if
there are no further results.
dr.Close() Closes the DataReader and releases the data.
CHAPTER 23 ■API REFERENCE 711
5351c23_final.qxd 8/26/05 8:12 PM Page 711
www.it-ebooks.info

Altering Data in DataSet/DataTable
Application of
MySqlDataAdapter
and
MySqlCommandBuilder
Dim da As New _ Creates a DataTable on the basis of the SQL command com
MySqlDataAdapter(com) (MySqlCommand) and makes it available under the name
Dim ds As New DataSet() dtname in a DataSet.
da.Fill(ds, “dtname”)
Dim dt As DataTable = _
ds.Tables(“dtname”)
n = dt.Count Determines the number of records in the DataTable.
Dim row As DataRow Creates a loop over all records of a DataTable. In C# column
For Each row In dt.Rows access is in the form dt[“columnname”].
var = row!columnname
Next
row.Delete() Deletes the current record in DataSet.
row!columname = ... Changes the current record in DataSet.
row.Update()
Dim newrow As DataRow Creates a new record and stores it in DataSet.
newrow = dt.NewRow()
newrow!columnname = ...
dt.Rows.Add(newrow)
Dim cb As New _ Stores the changes made locally in the DataSet permanently on
MySqlCommandBuilder(da) the MySQL server. The MySqlCommandBuilder object provides
da.Update(ds, “dtname”) the necessary SQL change commands.
cb.GetDeleteCommand() Returns the DELETE, INSERT, or UPDATE commands created
cb.GetInsertCommand() by MySqlCommandBuilder as MySqlCommand objects. (The
cb.GetUpdateCommand() actual SQL code can be read from the property CommandText.)
Transactions
Transactions
Dim tr As MySqlTransaction Creates a MySqlTransaction object.
tr = myconn.BeginTransaction()
Dim com As New MySqlCommand( _ Creates a MySqlCommand object and executes it in
“UPDATE ...”, myconn, tr) the framework of this transaction.
com.ExecuteNonQuery()
... further commands of the transaction
tr.Commit() Confirms the transaction.
tr.Rollback() Aborts the transaction.
CHAPTER 23 ■API REFERENCE712
5351c23_final.qxd 8/26/05 8:12 PM Page 712
www.it-ebooks.info

C API
The following tables assemble the most important functions and structures of the C API.
Data Structures
Data Structures
MYSQL *conn; Structure with connection data.
MYSQL_RES *result; Structure with the results of a SELECT query.
MYSQL_ROW row; Pointer to the results of a row (i.e., of a data record).
MYSQL_ROW_OFFSET roffset; Pointer to a record within the result list.
MYSQL_FIELD *field; Structure for describing a column (column name, data type,
number of digits, etc.); details in the next table.
MYSQL_FIELD_OFFSET foffset; Offset within a record (0 for the first column, 1 for the second, etc.).
MYSQL_STMT *stmt; Structure for processing prepared statements.
MYSQL_BIND bind[n]; Structure for describing the parameters of prepared statements.
MYSQL_TIME mytime; Structure for passing date and time values in prepared
statements.
my_ulonglong n; 64-bit integer; some of the MySQL functions described below
return results of this data type.
In the further syntax tables, the variables conn, result, row, field, roffset, foffset, etc., will be used
as if they had been declared in the above table. Note that MYSQL_ROW is already a pointer and is
therefore declared without *.
Elements of the
MYSQL_FIELD
Structure
char *name; Name of the column.
char *table; Name of the table from which the column comes; if the column
was computed or an ALIAS was used, then table points to a char-
acter string with the formula or the ALIAS name.
char *def; Default value of the column or NULL.
enum enum_field_types type; Data type of the column; these are the choices:
FIELD_TYPE_BLOB,
FIELD_TYPE_DATE,
FIELD_TYPE_DATETIME,
FIELD_TYPE_DECIMAL,
FIELD_TYPE_DOUBLE,
FIELD_TYPE_ENUM,
FIELD_TYPE_FLOAT,
FIELD_TYPE_INT24,
FIELD_TYPE_LONG,
FIELD_TYPE_LONGLONG,
FIELD_TYPE_NULL,
FIELD_TYPE_SET,
FIELD_TYPE_SHORT,
FIELD_TYPE_STRING,
FIELD_TYPE_TIME,
FIELD_TYPE_TIMESTAMP,
FIELD_TYPE_TINY,
FIELD_TYPE_VAR_STRING,
FIELD_TYPE_YEAR.
Continued
CHAPTER 23 ■API REFERENCE 713
5351c23_final.qxd 8/26/05 8:12 PM Page 713
www.it-ebooks.info

Elements of the
MYSQL_FIELD
Structure
(Continued)
unsigned int length; Length of the column according to the column definition.
unsigned int max_length; Maximal length of a column within the query result; the value is
always 0 if you use mysql_use_result().
unsigned int flags; Additional information for describing the column:
AUTO_INCREMENT_FLAG,
BINARY_FLAG,
MULTIPLE_KEY_FLAG,
NOT_NULL_FLAG,
PRI_KEY_FLAG,
UNIQUE_KEY_FLAG,
UNSIGNED_FLAG,
ZEROFILL_FLAG.
unsigned int decimals; Number of places after the decimal point in DECIMAL columns
(e.g., 5 for DECIMAL(10,5)).
Data Structures for Prepared Statements
Elements of the
MYSQL_BIND
Structure
enum enum_field_types buffer_type; Data type of the parameter; possible values are collected in
the following table.
void *buffer; Pointer to the buffer variable in which the data are passed.
unsigned long buffer_length; Maximal buffer size (for strings/BLOBs).
unsigned long *length; Actual length of the data passed (for strings/BLOBs).
my_bool *is_null; Specifies whether NULL should be passed; in this case the
contents of the buffer variable are not evaluated. Caution:
is_null cannot be directly read; it is a pointer to the variable
that contains the relevant information.
my_bool is_unsigned; For integer data types specifies whether the value is to be
interpreted as unsigned.
my_bool error; Specifies whether an error has occurred in data transport
(e.g., exceeding the maximum buffer size).
The following table summarizes the allowable settings for buffer_type in a MYSQL_BIND struc-
ture. The second column gives the matching MySQL data type and the best-fitting C data type.
enum_field_types
(Settings)
MYSQL_TYPE_TINY For MySQL TINYINT values (C-Typ char).
MYSQL_TYPE_SHORT For SMALLINT values (short int).
MYSQL_TYPE_LONG For INT values (int).
MYSQL_TYPE_LONGLONG For BIGINT values (long long int).
MYSQL_TYPE_FLOAT For FLOAT values (float).
MYSQL_TYPE_DOUBLE For DOUBLE values (double).
MYSQL_TYPE_TIME For TIME values (MYSQL_TIME).
MYSQL_TYPE_DATE For DATE values (MYSQL_TIME).
MYSQL_TYPE_DATETIME For DATETIME values (MYSQL_TIME).
CHAPTER 23 ■API REFERENCE714
5351c23_final.qxd 8/26/05 8:12 PM Page 714
www.it-ebooks.info

enum_field_types
(Settings)
(Continued)
MYSQL_TYPE_TIMESTAMP For TIMESTAMP values (MYSQL_TIME).
MYSQL_TYPE_STRING For CHAR strings (char *).
MYSQL_TYPE_VAR_STRING For VARCHAR strings (char *).
MYSQL_TYPE_TINY_BLOB For TINY_BLOBs (char *).
MYSQL_TYPE_BLOB For BLOBs (char *).
MYSQL_TYPE_MEDIUM_BLOB For MEDIUM_BLOBs (char *).
MYSQL_TYPE_LONG_BLOB For LONG_BLOBs (char *).
Elements of the
MYSQL_TIME
Structure
unsigned int year; Year.
unsigned int month; Months.
unsigned int day; Days.
unsigned int hour; Hours.
unsigned int minute; Minutes.
unsigned int second; Seconds.
my_bool neg; Boolean value that tells whether a negative value is involved (such
as with a result of the function TIME_DIFF).
unsigned long second_part; Microseconds; not used in MySQL 5.0.
Connection and Administration
Establishing a Connection
MYSQL *conn;
conn = mysql_init(NULL); Initializes the MYSQL data structure.
mysql_options(conn, option, “value”); Sets additional options for the connection; an option
with one of the following values is passed:
MYSQL_OPT_CONNECT_TIMEOUT,
MYSQL_OPT_LOCAL_INFILE,
MYSQL_OPT_NAMED_PIPE,
MYSQL_INIT_COMMAND,
MYSQL_READ_DEFAULT_FILE,
MYSQL_READ_DEFAULT_GROUP.
Many additional options are documented at
http://dev.mysql.com/doc/mysql/en/mysql_options.html.
With some options, “value” can be used to specify the
desired value; for setting several options, the function
must be called repeatedly; mysql_options must be
exectued before mysql_real_connect.
Continued
CHAPTER 23 ■API REFERENCE 715
5351c23_final.qxd 8/26/05 8:12 PM Page 715
www.it-ebooks.info

Establishing a Connection
(Continued)
mysql_real_connect(conn, “hostname”, Makes a connection to the database and returns NULL
“username”, “password”, “dbname”, in case of error; flags can contain a combination of the
portnum, “socketname”, flags); following values:
CLIENT_COMPRESS,
CLIENT_FOUND_ROWS,
CLIENT_IGNORE_SPACE,
CLIENT_INTERACTIVE,
CLIENT_LOCAL_FILES,
CLIENT_MULTI_STATEMENTS,
CLIENT_MULTI_RESULTS,
CLIENT_NO_SCHEMA,
CLIENT_ODBC,
CLIENT_SSL.
mysql_set_server_option(conn, option); Changes server options for a long-term connection.
Currently, only two values are accepted for server
options:
MYSQL_OPTION_MULTI_STATEMENTS_ON,
MYSQL_OPTION_MULTI_STATEMENTS_OFF.
mysql_change_user(conn, “username”,
“password”, “dbname”); Changes the user and the default database for an
existing connection.
mysql_change_db(conn, “dbname”); Changes the default database; the function assumes that
the user has access to the database.
mysql_ping(conn); Tests whether the connection still exists; if not, the
connection is recreated; returns 0 as result if an active
connection exists.
mysql_close(conn); Closes the connection.
Acquiring Information on the Current Connection
mysql_characterset_name(conn); Returns a character string with the default character set of the
connection.
mysql_get_client_info(); Returns a character string with information on the version of
the client library in use (e.g., “5.0.2”).
mysql_get_server_info(conn); Returns a string with the version of the server (e.g.,
“5.0.2-alpha-standard”).
mysql_get_host_info(conn); Returns a string with information on the connection to the
server (e.g., “localhost via UNIX socket”).
mysql_get_proto_info(conn); Returns the version number (unsigned int) of the connection
protocol, e.g., 10.
mysql_info(conn); Returns a string with information on the execution of the last
INSERT, UPDATE, LOAD DATA, or ALTER TABLE command
(e.g., “Rows matched: 3 Changed: 3 Warnings: 0”).
mysql_stat(conn); Returns a string with the server status (number of threads,
number of open tables, etc.).
mysql_thread_id(conn); Returns the number (unsigned long) of the thread that the
current connection is processing on the server.
CHAPTER 23 ■API REFERENCE716
5351c23_final.qxd 8/26/05 8:12 PM Page 716
www.it-ebooks.info

Adminstrative Functions
mysql_kill(conn, n); Ends the thread specified by n(requires the Process privilege).
mysql_shutdown(conn); Shuts down the server (execution requires the Shutdown privilege).
Error-Handling
mysql_errno(conn); Returns the error number (unsigned int) for the most recently
executed command (or 0 if there was no error).
mysql_error(conn); Returns a string with the error message (or an empty string “”
if there was no error).
mysql_warning_count(conn); Returns the number of warnings that the last command returned.
To read the actual warnings, you must execute the command
SHOW WARNINGS.
Executing and Evaluating SQL Commands
Execution of SQL Commands
mysql_query(conn, “SELECT …”); Executes the specified command and returns 0 if the
server accepts the command without triggering an
error.
mysql_real_query(conn,“SELECT … “, len); Like mysql_query, except that the SQL command
may now contain the 0-byte (e.g., to store BLOBs);
for this, the length of the string must be specified
explicitly.
mysql_affected_rows(conn); Returns the number (data type my_ulonglong) of
changed records after a DELETE, INSERT, or UPDATE
command; the function does not return the number
of results of a SELECT command.
mysql_insert_id(conn); Returns the AUTO_INCREMENT value (data type
my_ulonglong) of the last record created via INSERT.
Processing
SELECT
Results
result = mysql_store_result(conn); Transfers all results from the server to the client and stores
them in the MYSQL_RES structure.
result = mysql_use_result(conn); Represents an alternative to mysql_store_result; the transfer
of individual records is only prepared; no data are actually
transferred.
mysql_num_fields(result); Returns the number of columns of the result.
row = mysql_fetch_row(result); Transfers the next record to a MYSQL_ROW structure; the
function returns NULL if there are no further records avail-
able, i.e., if all records have already been processed.
row[n]; Returns a 0-terminated string with the content of column nof
the current record; note that row[n] can contain NULL; if you
are processing binary data with zero bytes, you must make
the call with mysql_fetch_lengths to determine the size of the
data field.
mysql_free_result(result); Releases the result structure; if you are working with
mysql_use_result, the result is only now released by the server.
CHAPTER 23 ■API REFERENCE 717
5351c23_final.qxd 8/26/05 8:12 PM Page 717
www.it-ebooks.info

Processing
SELECT
Results: Metainformation on Columns and Fields
mysql_fetch_lengths(result); Returns for the current record an unsigned long field
with the length of the result string in row[n].
field = mysql_fetch_field(result); Returns a description (MYSQL_FIELD structure) of
the data type of a column; the first call returns the data
for the first column, the next for the second column,
etc.; the function returns NULL after all columns have
been run through; the elements of the MYSQL_FIELD
structure were described previously.
field = mysql_fetch_field_direct(result, n); Returns a description of column n(0 for the first
column, etc.).
mysql_fetch_fields(result); Returns a description of all columns as a
MYSQL_FIELD field.
The following functions can be used only if you are using mysql_store_result (and are not work-
ing with mysql_use_result).
Processing
SELECT
Results: Additional Functions for
mysql_store_result
mysql_num_rows(result); Returns the number of found records.
mysql_data_seek(result, n); Moves the row cursor to record n(0 for the first record); then
mysql_fetch_row must be executed to reinput data.
roffset = mysql_row_tell(result); Returns a pointer (a sort of bookmark) to the current record.
mysql_row_seek(result, roffset); Moves the row cursor to a particular location within the result
list; then mysql_fetch_row must be executed to reinput data;
roffset must be determined earlier with mysql_row_tell.
MULTI_STATEMENTS
and
MULTI_RESULTS
Mode
mysql_real_connect(…, CLIENT_MULTI_STATEMENTS); Activates the two MULTI modes at con-
nection time.
mysql_set_server_option(conn, MYSQL_OPTION_
MULTI_-STATEMENTS_ON); Activates the two MULTI modes at a
later time.
mysql_query(“command1; command2; command3”); Executes several commands separated
by semicolons. The result of the first
command can be processed as usual
(mysql_affected_rows,
mysql_store_result, etc.).
n = mysql_more_results(conn); Tests whether there are more results
(n=1).
n = mysql_next_result(conn); Activates the next result. This can then
be processed with the usual functions.
The possible return values are these:
n=0 OK, there are more results,
n=-1 OK, but there are no more results,
n>0 error number.
CHAPTER 23 ■API REFERENCE718
5351c23_final.qxd 8/26/05 8:12 PM Page 718
www.it-ebooks.info

Auxiliary Functions
n = mysql_real_escape_string Copies the string src into the string dest while replacing the
(conn, dest, src, srclen); special characters with \ character combinations (\0, \b, \t,
\”, \’, etc.); dest is terminated with a 0-byte; srclen specifies
the number of characters in src; dest must be previously
initialized with a string of the appropriate length; to be able
to copy a string full of special characters without error, dest
must offer place for srclen*2+1 characters; the function
returns the number of characters in dest (without the
0-byte). If “O’Reilly” is copied, then afterward, src contains
the string O\’Reilly, and nthe value 9.
n = mysql_hex_string(to, from, len); Changes every character of the string from into hexa-
decimal code and writes it to the buffer to. The resulting
string in to ends with a 0-byte. It does not contain the
characters 0x, which in MySQL indicate hexadecimal strings.
You must insert 0x yourself when preparing the SQL
command.
len gives the length of the string in from. The buffer to must
have length len*2+1 characters.
The function returns the length of the resulting string
without the closing 0-byte.
destpt = strmov(dest, src); Like strcpy, copies the string src to the string dest; the differ-
ence is in the return value, which points to the end of the
string in dest; this makes it easy to construct a string from
several pieces; to be able to use strmov, the files my_global.h
and m_string.h must be included before mysql.h.
Prepared Statements
Preparing and Executing Prepared Statements
stmt = mysql_stmt_init(conn); Returns a MYSQL_STMT structure.
mysql_stmt_prepare(stmt, sqlcmd, strlen(sqlcmd)); Initializes the MYSQL_STMT structure; sqlcmd
is the string (char[]) with the SQL command
to be executed.
mysql_stmt_bind_param(stmt, bind); Declares the parameters for the SQL command;
bind is a MYSQL_BIND field, where each field
element describes a parameter.
mysql_stmt_execute(stmt); Executes the SQL command. The parameters
are read from the buffer variables given in bind
and written there as well (SELECT results).
mysql_stmt_close(stmt); Releases the memory for the MYSQL_STMT
structure.
CHAPTER 23 ■API REFERENCE 719
5351c23_final.qxd 8/26/05 8:12 PM Page 719
www.it-ebooks.info

Evaluating
SELECT
Results of Prepared Statements
stmt = mysql_stmt_init(conn); Returns a MYSQL_STMT structure.
mysql_stmt_prepare(stmt, sqlcmd, strlen(sqlcmd)); Initializes the MYSQL_STMT structure.
mysql_stmt_bind_result(stmt, bind); Declares the result columns of the SELECT
command; bind is a MYSQL_BIND field,
where each field element describes a column.
mysql_stmt_execute(stmt); Executes the SQL command.
mysql_stmt_store_result(stmt); Transfers all results to the client and stores
them in a buffer. Calling this function is
optional. If you do not do so, the records
remain on the server until the last record
is read with mysql_stmt_fetch. Then
mysql_stmt_data_seek is not available, and
mysql_stmt_num_rows is available only after
all records have been processed.
n = mysql_stmt_num_rows(stmt); Returns the number of result records; nhas
the data type my_ulonglong.
mysql_stmt_fetch(stmt); Reads the next record into the variables given
by the MYSQL_BIND field. The function
returns 0 if there are no further results.
mysql_stmt_data_seek(stmt, n); Activates record n. The next call to
mysql_stmt_fetch reads this record into the
variables.
result = mysql_stmt_result_metadata(stmt); Returns metainformation on the SELECT
result. Details can then be determined with
mysql_num_fields, mysql_fetch_field, etc.
CHAPTER 23 ■API REFERENCE720
5351c23_final.qxd 8/26/05 8:12 PM Page 720
www.it-ebooks.info


Glossary
This appendix contains a brief description of the most important notions from the world of data-
bases and related areas.
Character Set: A character set is a specification that determines the set of codes used to repre-
sent the characters of a particular language or set of languages. Among the oldest character
sets is the ASCII (American Standard Code for Information Interchange) character set, in which
the letter A is coded by the integer 65.
Client: A client is a program that accesses a central service. In connection with databases, a
client denotes a program that accesses a central database. The database is managed by another
program, the database server.
Client/Server Architecture: Most modern database systems are based on a server that man-
ages the data and executes SQL commands, and an arbitrary number of clients that access the
server over a network. This concept is called client/server architecture. Alternatives to this
model are file-server databases such as dBase and Access, in which all clients access the data-
base file directly through a common file system. (This is quite inefficient when many users are
trying to edit data simultaneously.)
Cluster: In information theory a cluster usually refers to a group of networked computers that
work together on a common task. A database cluster is therefore a database system in which
several computers provide a common database (particularly a large or fast or secure one).
Cursor: In MySQL a cursor enables step-by-step processing of query results (particularly in
stored procedures). In the ADO library, cursor properties determine what processing options
exist for the records of a Recordset object.
Data Dictionary: The MySQL Data Dictionary enables one to use SELECT queries to obtain
information about the structure of databases and tables as well as other administrative data
about the MySQL server. The MySQL server provides, since version 5.0, virtual INFORMATION_
SCHEMA tables.
Data Record: A data record, or simply record, is a row of a table.
Database: Generally speaking, a database is an ordered collection of data. In connection with
MySQL, a database consists of a number of tables. In common usage, a database can also refer
to an entire database system, that is, the program that manages the data. In MySQL, this pro-
gram is called the database server (MySQL server).
Database Server: A database server is a program that permits access to databases over a net-
work. The server is responsible for the management of the data and for the execution of SQL
commands.
723
APPENDIX A
■ ■ ■
5351appA_final.qxd 8/26/05 8:17 PM Page 723
www.it-ebooks.info

Derived Tables: These are tables that do not exist as such but are merely the result of a SELECT
command. Derived tables are in fact nothing more than a variant of subSELECTs, that is, nested
SELECT commands.
Domain Name: The domain name denotes an entire network. A local network might consist of
computers with the names mars.sol, uranus.sol, and jupiter.sol, in which case mars, uranus, and
jupiter are computer names (hostnames), and sol is the domain name.
Domain Name Server (DNS): Internally, communication within a network takes place on the
basis of IP numbers (e.g., 192.168.0.27). Since mere mortals do not keep track of such numbers
very well, each computer also has a computer name, composed of host name and domain name
(e.g., uranus.sol).
Whenever such a name is used, the running program must determine the associated IP num-
ber. Sometimes, the converse case arises, and for a given IP number, the computer name is
required. In both situations, the domain name server provides the answer. (Small networks can
get by without a DNS. In that case, the association between IP numbers and computer names
is determined from static tables, under Unix/Linux in the file /etc/hosts.)
Foreign Key: A foreign key is a unique value (usually an integer) that refers to a particular col-
umn of another table. A foreign key thus creates a link (relation) between two tables.
Full-Text Index: A full-text index enables the search for several words in arbitrary order within
a text. To make full-text search efficient, a special index is required, known as a full-text index.
Global Assembly Cache (GAC): This notion is specific to Microsoft. It describes a central direc-
tory of all *.dll files for .NET programs. In contrast to the Windows system directory, in the
GAC, several different versions of a library can be installed simultaneously without leading to
a conflict.
Host Name: The host name is the name of a computer valid over a network. If the complete
name of the computer is jupiter.sol, then jupiter is the host name and sol the domain name.
Hot Backup: What makes a hot backup hot is that during the backup process, the database
server can continue to run almost completely undisturbed. (During a normal backup, on the
other hand, no changes in the data may be made.) Hot backups can currently be made in
MySQL only with a commercial auxiliary program that works only for InnoDB tables.
Include File: An include file is a part of program code. It is read by the compiler (e.g., C) or
during code execution (e.g., PHP).
Index: In database-speak, an index, or its synonym key, is an ordered list of the content of a
table. An index serves primarily to speed up access to individual records: Instead of searching
through all records, it suffices to search the index. Then, the desired record can be read directly.
The use of an index is comparable to that of an index in a book.
InnoDB Tables: In MySQL, tables can be stored on the hard drive in more than one format,
including MyISAM and InnoDB. InnoDB tables possess some additional functionality over
MyISAM tables, such as transactions and foreign key constraints. The name InnoDB is derived
from the name of the company Innobase, with DB being short for database.
Internet Service Provider (ISP): An ISP is a company that provides technical support and host-
ing of web sites. ISPs are used by commercial enterprises and private individuals who wish to
maintain web sites on the Internet but do not themselves possess a permanent or sufficiently
high-speed Internet connection. Be careful in your choice of ISP that it supports the programs
presented in this book (Apache, PHP, MySQL, etc.). There are, of course, ISPs that offer
Microsoft products instead.
Key: A key is an ordered index of a table. See also the entry of the synonym Index.
APPENDIX A ■GLOSSARY724
5351appA_final.qxd 8/26/05 8:17 PM Page 724
www.it-ebooks.info

Logging: Logging refers to the recording of SQL commands in a file. The motivation for logging
is usually to have available all the changes to the database made since the last backup so that
the database can be re-created in the event of disaster. With MySQL, logging is also a prerequi-
site for replication.
MyISAM Tables: The MySQL server can store tables in various formats. The most important
such format is called MyISAM, which stands for indexed sequential access method, referring
to the method of access to data records within a file with the aid of an index. An alternative to
MyISAM tables is InnoDB tables.
Named Pipes: Named pipes represent a mechanism whereby two programs can communicate
under Windows 2000/XP. Data exchange takes place according to the principle of first in, first
out (FIFO).
Normal Form: A database generally consists of a number of tables. A goal in the design of tables
is to avoid redundancy. This goal is supported by particular rules. When the first nsuch rules are
adhered to, the database is said to be in nth normal form.
Normalization: This term refers to the optimization of the database design to avoid redundancy.
The goal is generally to achieve third normal form.
PHP: PHP is a script language for programming dynamic web sites. The program code is
located in *.php files. These files are executed by the PHP interpreter at each access over the
web server. The resulting HTML document is passed on to the web server.
Port: Network packets that are sent using the TCP/IP protocol are always addressed to a partic-
ular port. The port number is thus part of the address to which the packet is sent. Ports help in
categorizing network traffic. For example, for data exchange between web browsers and web
servers, port 80 is used. MySQL uses port 3306 by default.
Prepared Statements: These provide for a particularly efficient processing of SQL commands
that differ only in the values of parameters. The entire SQL command is sent only once to the
MySQL server, and thereafter only the varying parameters. This not only reduces the quantity
of data that has to be transferred, but also spares the server the repeated analysis of the SQL
command.
Primary Index (Primary Key): The primary index identifies each record of a table uniquely.
Normally, the primary key field is an integer column. Whenever a new record is inserted, the
database server determines a new, unique value for this column.
Privilege: In MySQL nomenclature, a privilege is a right to execute particular database opera-
tions (e.g., read or change data in a particular table).
Query: In database language, a query is generally a SELECT command. The syntax of this com-
mand is part of the language SQL (structured query language). SQL specifies how commands
to the database server must be structured.
Query Cache: In many database applications, it happens that the same queries must be exe-
cuted over and over. To speed up such queries, MySQL possesses, since version 4.0, a query cache,
that is, temporary storage in which queries and their results can be stored. Queries thus stored
can be answered much more rapidly than otherwise. However, this temporary storage must be
deleted at each change in the underlying table.
Referential Integrity: Referential integrity holds if between linked tables, no reference points
to nowhere. (For example, if referential integrity is satisfied for a library database, then there
cannot exist a book title whose associated publisher does not exist in the database. On the
other hand, if referential integrity has been damaged, then there might well be a publisher
number in the titles table that does not exist in the publisher table.)
APPENDIX A ■GLOSSARY 725
5351appA_final.qxd 8/26/05 8:17 PM Page 725
www.it-ebooks.info

Many database systems can automatically check referential integrity when changes to a data-
base are made. This requires the setting up of foreign key constraints, otherwise known as
integrity rules. MySQL currently supports foreign key constraints only for InnoDB tables.
Relations: The most characteristic feature of relational databases is that a number of tables in
a database can be linked based on their contents. These links are also called relations. The links
are referenced in SQL commands by the JOIN operator or with WHERE conditions.
Replication: Through the process of replication, all changes to a database are carried out not
on one, but on several database servers. Thus the same database exists on several servers. The
advantages are increased security (if one server goes down) and greater speed (all servers can
answer SQL queries, even if only one can make changes).
Schema: The schema (or database schema) describes the layout of a database, that is, the
tables, their columns and data types, indexes, links between tables, etc.
Server: A server is a central program that provides services or data to other programs (called
clients). Examples of servers are the MySQL server (a database server) and Apache (a web
server).
Socket File: A socket file enables communication under Unix/Linux between two programs.
A socket file is not a real file, in that it contains no data and has length zero.
Local connections between a MySQL client and the MySQL server generally take place under
Unix/Linux over a socket file, since this type of communication is more efficient than the net-
work protocol TCP/IP. (An exception is Java clients, which do not support socket files.) The
usual file name is /var/lib/mysql/mysql.sock. This file name can be set via the configuration
file /etc/my.cnf.
Stored Procedures: A stored procedure is program code that is executed directly by the data-
base server. Often, stored procedures are formulated in a programming language that extends
SQL through the use of control structures (loops, branching, etc.). MySQL has supported stored
procedures since version 5.0.
SubSELECTs: The nesting of several SELECT commands to form a query is called a subSELECT.
MySQL has supported such commands since version 4.1.
Tables: A table is a part of a database. The properties of a table are determined by its columns
or fields (name and data type) and indexes. The rows of a table are also called data records. The
MySQL server can store tables in several formats (e.g., MyISAM, InnoDB).
Timestamps: The data type TIMESTAMP is characterized by the fact that columns of this type
store the current date and time each time a change is made.
Transactions: A transaction is a group of logically related SQL commands. Transaction-capable
database systems are able to confirm all the commands of a transaction together or to abort
them as a group. That is, a transaction is never only partially completed. Transactions thereby
contribute to data security.
Transactions can also improve efficiency in that there is no longer the need to lock entire tables
with LOCK during the execution of several SQL commands.
MySQL currently supports transactions only for InnoDB tables.
Triggers: This term refers to SQL code (stored procedures) that is automatically executed as a
result of particular actions (e.g., upon an UPDATE or INSERT command). Triggers can be used,
for example, to ensure that certain rules are followed in changing data. MySQL has supported
triggers since version 5.0.
APPENDIX A ■GLOSSARY726
5351appA_final.qxd 8/26/05 8:17 PM Page 726
www.it-ebooks.info

Unicode: Unicode is a character set in which every character is represented by a 16-bit integer.
Thus almost all the special characters of the world’s languages can be represented in this char-
acter set. MySQL supports the storage of Unicode character sets since version 4.1.
Within Unicode, there are various formats that specify the byte order of the 16-bit integer.
Common formats are UTF8 (1 to 3 bytes, depending on the character code, avoids code 0) and
UTF16 alias UCS2 (2 bytes for each character code).
Uniform Resource Locator (URL): This unwieldy term denotes Internet addresses (e.g.,
http://www.kofler.cc/mysql/ or ftp://ftp.mysql.com). Additional information can be
provided in a URL, such as variables or user names: http://my.company/page.html?var=123,
ftp://username.company/directory.
Views: A view is an SQL query that enables a special view of several tables of a database. Views
are used, for example, to enable simple access to particular parts of a table (e.g., for reasons of
security if only part of a table is to be processed). MySQL has supported views since version 5.0.
Web Server: A web server is a program that makes HTML pages available over the Internet. The
most popular web server today (current market share about 60 percent) is Apache.
APPENDIX A ■GLOSSARY 727
5351appA_final.qxd 8/26/05 8:17 PM Page 727
www.it-ebooks.info

The Files for this Book
The example files for this book are available as compressed files for download at the website
www.apress.com. To decompress them under Windows, you can use, for example, WinZip (http://
www.winzip.com/), while under Unix/Linux, you use the command unzip.
Trying Out the Example Programs
■Note All the example programs will work only if the databases described in this book are activated and if you
change the user names and passwords in the code so that they are accepted by your MySQL installation.
Additional information can be found in the various chapters of this book as well as in the readme file for the
relevant example directories.
If you are having problems with PHP, test whether your PHP installation has the necessary
mysql
or
mysqli
interface available (see the first two sections of Chapter 15). Tips on error-handling are also to be found in those
sections. Most of the examples assume PHP 5 and at least MySQL 4.1.
Updates, Errata, Links, Discussion Forum
A collection of MySQL links, a discussion forum for this book, and any updates and errata that
come to my attention can be found at my web site: http://www.kofler.cc.
729
APPENDIX B
■ ■ ■
5351appB_final.qxd 8/26/05 8:18 PM Page 729
www.it-ebooks.info


Bibliography
Rich Bowen et al. Apache Server Unleashed. SAMS, 2000.
Chris Date, Hugh Darwen. A Guide to the SQL Standard. Addison-Wesley Longman, 1998.
Paul DuBois. MySQL, second edition. Sams, 2003.
Paul DuBois. MySQL Cookbook. O’Reilly, 2002.
W. Jason Gilmore. Beginning PHP 5 and MySQL. Apress, 2004.
Cay S. Horstmann, Gary Cornell. Core Java 2, Volume II. Sun Microsystems Press/Prentice Hall,
1997.
Michael Kofler. Definitive Guide to Excel VBA, second edition. Apress, 2003.
Michael Kofler. Linux: Installation, Configuration, and Use, second edition. Addison-Wesley,
1999.
Michael Kofler. Visual Basic Database Programming. Addison-Wesley, 2001.
Laura Lemay. Teach Yourself Perl in 21 Days, third edition. SAMS, 1999.
Robert Orfali, Dan Harkey, Jeri Edwards. Client/Server Survival Guide, third edition. John Wiley
& Sons, 1999.
Tobias Ratschiller, Till Gerken. Web Application Development with PHP 4.0. New Riders, 2000.
David Sceppa. Microsoft ADO.NET (Core Reference). Microsoft Press, 2002.
Carsten Thomsen. Database Programming with Visual Basic .NET. Apress, 2002.
Luke Welling, Laura Thomson. PHP and MySQL Web Development. SAMS, 2001.
731
APPENDIX C
■ ■ ■
5351appC_final.qxd 8/26/05 8:19 PM Page 731
www.it-ebooks.info


■Symbols
@ (variables) , 230, 607, 644
@@ (system variables), 607, 644
# (comments), 603
/*… */ (comments), 603
— (comments), 326, 603
$_FILES field (PHP), 466
■Numbers
.001 files, 369
3306 (port number), 294, 297, 513
■A
access control lists, 265
Access denied for user … to database (error),
294
access privileges, 265
changing with UPDATE, 272
first aid, 268
restricting with REVOKE, 289
two-tiered security, 273
MySQL update from 4.n to 5.0, 359
viewing, 289
Access, 120
ACID, 255
ACL, 265
ActivePerl, 25
ActualSize property (ADO), 556
Add method (ADO.NET), 585
addBatch method (Java), 523
AddDefaultCharset (Apache option), 39
AddType (Apache option), 23, 35, 39
administration, 345
access privileges, 265
backups, 352
configuration files, 347, 669
database migration, 358
InnoDB, 386
with ISP, 397
logging, 368
MyISAM, 383
replication, 374
security, 265
text import/export, 360
user interfaces, 61
ADO, 546, 548, 556
ADO.NET, 546, 573
affected_rows (PHP), 413
AGAINST, 248
aggregate functions, 661
Alias (SQL), 163
All privilege, 274
ALL, 238, 639, 641, 644
allow_invalid_dates mode, 351
AllowOverride (Apache option), 40
alpha version, 9
ALTER DATABASE, 614
ALTER FUNCTION/PROCEDURE, 323
ALTER SCHEMA, 614
ALTER TABLE, 212, 243, 614
ANALYSE, 636
ANALYZE TABLE, 383, 618
anonymous user, 278
ansi mode, 351
ansi_quotes mode, 351
ANY, 238, 641
Apache
configuring, 38
DBI module, 483
directory protection, 40
.htaccess files, 40, 462
installing
Red Hat, 31
SUSE, 27
Windows, 19
PHP module loading
Linux, 35
Windows, 23
starting/stopping (Windows), 19
AppendChunk method (ADO), 556
ARCHIVE tables, 141
AREA, 306
arithmetic operators, 605
array_item (PHP), 429
AS, 163, 201, 639
ASBINARY, 303
ASTEXT, 303
atomicity (ACID), 255
attributes, of table columns, 622
authentication, 290
auto commit mode
SQL, 257
PHP, 418
AUTO_INCREMENT, 143, 622
access the last value, 207
ADO, 557
ADO.NET, 581
INSERT, UPDATE, 631
Java, 517
Perl, 484, 492
PHP (mysql), 405, 413
AVG, 661
CKUP TABLE, 618
Index
733
5351idx_final.qxd 8/26/05 11:37 PM Page 733
www.it-ebooks.info
■B
backups, 205, 352
creating
MySQL Administrator, 78
phpMyAdmin, 106
mysqldump, 70
importing (phpMyAdmin), 107
reading in
mysql, 69
MySQL Administrator, 80
restoring, 355
stored procedures, 325
with ISP, 397
Base (OpenOffice/StarOffice), 128
basedir (mysqld), 672
basic administration, 345
batch commands (Java), 523
batch mode (mysql), 366
BDB tables, 141, 648
BEGIN, 256, 329, 618
BeginTransaction method (ADO.NET), 589
beta version, 9
BIGINT, 142
BINARY
binary comparison, 221, 606
CHAR/VARCHAR, 148
binary comparison, 221, 606
binary data, 151, 542
binary logging, 377, 369
bind-address (mysqld), 679
bind_col (Perl), 486
bind_param (PHP), 416
bind_result (PHP), 417
binlog-do-db (mysqld), 675
binlog-ignore-db (mysqld), 675
BIT, 151
Bitkeeper, 37
BIT_AND, 661
BIT_OR, 661
BLOBs, 151, 425
ADO, 556
ADO.NET, 584
Java, 523
max-allowed-packet (mysqld), 679
Perl, 491
PHP, 464
special characters, 601
storing in file, 643
books-database (design), 154
BOOL, 144
bounding box, 304
branching SPs, 331
buffer configuration, 394
build_href (PHP example), 438
bulk insert, 360, 632
bulk_insert_buffer_size (mysqld), 395
ByteFX.Data provider (ADO.NET), 574
■C
C, 542, 527
C API, 527, 713
C#, 573
CACHE INDEX, 618
CALL, 327, 618
Can’t connect to local MySQL server through
socket (error), 292
Can’t connect to MySQL server (error), 292
Can’t create table name (error), 172
CASCADE, 171
CASE, 232, 331
case sensitivity, 600
categories table, 162
Certified Server, 14
CGI scripts (Perl), 497
CHANGE MASTER TO, 378, 619
CHAR, 147
character sets
ADO, 556
C, 542
convert table, 616
Java, 519
LOAD DATA, 361
mysql (command interpreter), 67, 68
MySQL, 149
Perl, 493
PHP, 461
setting default, 349
VB, 556
CHARACTER SET, 149, 614, 619, 622
character-set server (mysqld), 349, 673
character set variables (MySQL), 219
character-sets-dir (mysql), 69
character string functions (SQL), 217
character strings, 147, 600
CHCP (Windows command), 69
CHECK TABLE, 383, 619
CHECK_SUM, 623
chkconfig command (Red Hat), 32
CIPHER (GRANT), 629
Classic version, 14
Client does not support authentication
protocol (error), 290
client license, 13
client-side cursor (ADO), 553
clients, 4
Clob class (Java), 523
close (PHP), 412, 414
close method (Java), 514, 521
Cluster databases, 141
cmd.exe, 67
.cnf files, 347, 669
Codd, E.F., 159
COLLATE, 149, 194, 614, 619, 622
collation server (mysqld), 349, 673
columns
altering, 616
attributes, 622
enabling access, 289
■INDEX734
5351idx_final.qxd 8/26/05 11:37 PM Page 734
www.it-ebooks.info
columns_priv table, 286
command interpreter (mysql), 49, 61–70
COMMENT, 623
comments, 326, 603
commercial MySQL license, 12
COMMIT, 256, 619
commit method
Java, 522
Perl, 494
PHP, 418
Commit method (ADO.NET), 589
Community Edition, 14
comparison operators, 605
compatibility, 6, 350
compiling C, 529
compressed MyISAM tables, 138
compressed tables, 141
CONCAT, 163, 217
conditions
SQL, 195, 640
stored procedures, 333
config.inc.php file, 89
configuration files, 347, 669
conformity to standard, 350
connect method, 481–483
Connection class
ADO, 550
Java, 513
connection options (PHP), 412
connection problems, 292, 515
ConnectionString property (ADO), 550
Connector/J, 127, 509, 710
Connector/Net, 574
Connector/ODBC, 545
configuring (via DSN), 118
installation, 117
consistency (ACID), 255
constants, 609
CONTAINS, 308
CONVERT TO, 616
converter
Access to MySQL, 123
Microsoft SQL to MySQL, 567
MySQL to Access, 124
CONVERT_TZ, 228
cookie authentication (phpMyAdmin), 91
Coordinated Universal Time (UTC), 227, 656
CoreLab, 574
COUNT, 191, 201, 661
Count property (ADO.NET), 585
CREATE DATABASE, 210, 619
CREATE FUNCTION, 323, 620
CREATE INDEX, 211, 621
Create privilege, 621
CREATE PROCEDURE, 323
CREATE SCHEMA, 619
CREATE TABLE, 210, 243, 621
from SELECT result, 233, 623
LIKE oldtable, 624
CREATE TABLE…SELECT, 211
Create Temporary Table privilege, 621
CREATE TRIGGER, 342, 624
CREATE VIEW, 624
Create View privilege, 179
Create User privilege, 274
CROSS JOIN, 199
CROSSES, 308
CSS, 432
CSV files
importing data, 363
phpMyAdmin, 107
CSV tables, 141
CURDATE, 656
CURRENT_DATE, 656
CURRENT_TIME, 656
CURRENT_TIMESTAMP, 656
Cursor (ADO/ODBC)
client-side cursor, 553
dynamic cursor, 548
server-side cursor, 554
testing types, 554
cursors (stored procedures), 334
CURTIME, 656
■D
Data Control Language, 190
Data Definition Language (DDL), 189, 190
Data Manipulation Language (DML), 189, 190
data records, 4
altering, 207
deleting, 208, 625
inserting into tables, 206, 630
random selection, 246
search (SELECT), 638
update, 651
data source names (DSNs), 118, 546
data source view (OpenOffice/StarOffice), 133
data types
MySQL, 142
reference, 609, 610
Data Warehouse, 234
databases, 3–5
altering global attributes, 614
backing up, 352–356, 397
creating, 270, 619
default, 651
deleting, 213, 626
enabling access, 288
migration, 358
normalization, 154
renaming, 636
restoring, 355–357, 371
uploading to ISP, 397
database design, 137
indexes, 173
keys, 168
normal forms, 154
optimization, 162
referential integrity, 170
relations, 166
■INDEX 735
5351idx_final.qxd 8/26/05 11:37 PM Page 735
www.it-ebooks.info
database migration, 358
database model, 4
database schema, 180–184
datadir (mysqld), 672
DataEnvironment (VB), 551
DataRow class (ADO.NET, 585
DataSet class (ADO.NET), 585
DataSource class (Java), 514
DataTable class (ADO.NET), 585
date and time, 145, 222, 556, 602
DATE_ADD, 658
DATE_FORMAT, 146, 222, 426, 659
db2 mode, 351
.db files, 142
db.opt file, 614
db table (access protection), 284
DBD-MySQL, 26, 481, 492
DBI, 26, 481
logging, 495
reference, 700
DBNull (ADO.NET), 583
DDL (Data Definition Language), 189, 190
deadlock, 260
decimals, 144, 556, 602
DECLARE, 333, 334
DEFAULT, 152, 622
default-character-set (mysql), 64, 67, 69
default-character-set (mysqld), 349, 673
default_charset (PHP option), 43
default database, 651
default security settings, 267
default-storage-engine (mysqld), 349, 679
default-table-type (mysqld), 679
default-time-zone (mysqld), 349
DELAYED, 631
DELAY_KEY_WRITE, 174, 623
DELETE, 208, 496, 625
delete first or last n records, 209
delete-invalid-entries.pl sample script, 496
Delete method (ADO.NET), 585
deleteRow method (Java), 521
delimiter character, 319
demand mode (query cache), 396
derived tables, 240
DESC, 641
DESCRIBE, 626
design. See database design
DETERMINISTIC, 323
DIMENSION, 304
Directory (Apache option), 39
DirectoryIndex (Apache option), 40
DISABLE KEYS, 616
disable-xxx (mysqld), 671
DISCARD TABLESPACE, 616
disconnect (Perl), 483
discussion threads, 184
DISJOINT, 308
display_errors (PHP option), 43
DISTANCE, 308
DISTINCT, 191, 198, 639
examples illustrating, 165, 243
DISTINCTROW, 639
division by 0, 351
DML (Data Manipulation Language), 189, 190
do (Perl), 483, 502
DO, 626
DocumentRoot (Apache option), 39
DOUBLE, 144
double hyphen (—) comments, 326, 603
DriverManager class (Java), 512
DROP, 617
DROP DATABASE, 213, 626
DROP FUNCTION/PROCEDURE, 323
DROP FUNCTIONS, 626
DROP INDEX, 627
DROP PROCEDURE, 627
DROP TABLE, 213, 627
DROP TRIGGER, 627
DROP VIEW, 627
DSNs (data source names), 118, 546
DUMPFILE, 643
duplicates, searching for, 242
durability (ACID), 255
dynamic cursor (ADO/ODBC), 548
dynamic MyISAM tables, 138
■E
efficient database design, 162
empty cache (FLUSH), 627
ENABLE KEYS, 616
enable-named-pipes (mysqld), 348, 673
enable-xxx (mysqld), 671
ENCLOSED BY, 365, 633, 643
END, 329
ENDPOINT, 305
ENUM, 151, 229, 491
ENVELOPE, 304
environment variables, 671
err (Perl), 494
.err files, 372
errno (PHP), 413
error (PHP), 413
error 2002/error 2003, 292
error handling, 172, 290–293
Perl scripts, 494
PHP, 409, 418
stored procedures, 333, 630
error logging, 372
error messages, in regional languages, 350
errors in connecting, 292
error_for_division_by_zero mode, 351
error_reporting (PHP option), 43
errstr (Perl), 494
escape (PHP example), 437
ESCAPED BY, 365, 633, 643
/etc/hosts file, 282
/etc/my.cnf file, 669
Excel, 125
■INDEX736
5351idx_final.qxd 8/26/05 11:37 PM Page 736
www.it-ebooks.info
exceptions (sample database)
design, 185
import/export, 362
exclusive lock, 259
execute
Perl, 484
PHP, 416
Execute (ADO), 558
Execute privilege, 325
executeBatch method (Java), 523
ExecuteDataRow method (ADO.NET), 587
ExecuteDataSet method (ADO.NET), 587
ExecuteNonQuery method (ADO.NET), 580, 587
executeQuery method (Java), 518
ExecuteReader method (ADO.NET), 580, 587
ExecuteScalar method (ADO.NET), 580, 582,
587
executeUpdate method (Java), 516
EXISTS, 239
EXPLAIN, 627
EXPLAIN SELECT, 176, 309, 627
exporting
Access tables, 120
databases/tables, 105
text files, 360
exportsql.txt converter, 123
extensions (PHP), 44
EXTERIORRING, 310, 306
external tables, 141
■F
FALSE, 609
FEDERATED tables, 141
Fedora, localhost problems with, 282
fetch
Perl, 485
PHP, 417
FETCH, 334
fetchall_arrayref (Perl), 488
fetchrow_array (Perl), 485
fetchrow_arrayref (Perl), 488
fetchrow_hashref (Perl), 488
fetch_array (PHP), 414
fetch_assoc (PHP), 414
fetch_fields (PHP), 414
fetch_object (PHP), 414
fetch_row (PHP), 414
field_count (PHP), 413
fields, 4
FIELDS TERMINATED BY, 365, 633, 643
file DSNs, 118
File privilege, 275
file_uploads (PHP option), 44
$_FILES field (PHP), 466
files for this book, 729
Fill method (ADO.NET), 585
FIND_IN_SET, 230
finish (Perl), 484
Firebird, 16
firewalls, 297
FLOAT, 144
floating-point numbers, 144, 602
FLOSS license exception, 14
FLUSH LOGS, 371, 374
FLUSH, 627
FOR UPDATE, 259
foreign key, 156, 169
foreign_key_checks variable, 173, 393
A foreign key constraint fails (error), 172
FOREIGN KEY … REFERENCES, 170
forward only ResultSets (Java), 520
FOSS license exception, 14
FOUND_ROWS, 192
.frm files, 142
FROM, 190
DELETE, 208, 626
FROM_UNIXTIME, 225, 426, 489
ft_min_word_len (mysqld), 250
full-text index, 175, 248–251
full-text search, 248–251
FULLTEXT, 248, 622
functions, 652–664
aggregate, 201–203
mysql, 403–410
stored procedures, 325
■G
gamma version, 9
gap locks, 259, 261
gcc, 529
general query log, 372
generally available (GA), 9
geographic information system. See GIS
Geometric functions, 303
GEOMETRY, 302
GEOMETRYCOLLECTION, 302
GEOMETRYN, 306
GEOMETRYTPYE, 304
GEOMFROMTEXT, 303
GEOMFROMWBK, 303
getAutoCommit method (Java), 522
getBinaryStream method (Java), 523
getBlob/-Clob method (Java), 523
getBytes method (Java), 523
getCharacterStream method (Java), 523
GetChunk method (ADO), 556
getColumnCount method (Java), 520
getColumnName method (Java), 520
getColumnType method (Java), 520
getConnection method (Java), 512
getGeneratedKeys method (Java), 517
getLastInsertID method (Java), 517
getMetaData method (Java), 520
getWarnings method (Java), 517
getXxx method (Java), 518
GET_LOCK, 254
GIS (geographic information system), 299–315
conversion functions, 303
geometric functions, 304
spatial indexes, 308
■INDEX 737
5351idx_final.qxd 8/26/05 11:37 PM Page 737
www.it-ebooks.info
glacier database, 309
GLENGTH, 305
GLOBAL, 608, 644
global privileges, 275
global variables, 608
glossary, 723–727
GPL, 11
GRANT, 288, 628
Grant-Option privilege, 275
grant tables, 276
GROUP BY, 201
functions, 661
GROUP BY WITH ROLLUP, 204
GROUP_CONCAT, 202
GUIs, 61
■H
HANDLER, 630
handlers (stored procedures), 333
hard drive partitions used directly (InnoDB),
388
HAVING, 196
headers (PHP) , 462, 467, 477
HEAP, 622
HEAP tables, 140, 674
Hello World
C, 527, 531
Java, 508
Perl, 26
stored procedures, 318
HELP, 630
hexadecimal numbers
BLOB, 601
SQL, 602
HexCode function (VB), 559
HexCodeStr function (VB), 559
hierarchies, 160–166
logical order, 162
managing data with PHP, 446
among messages (myforum sample
database), 184
stored procedures, 338
realization with tables, 167
HIGH_PRIORITY, 639
host (Unix/Linux command), 283
Host n.n.n.n is not allowed to connect …
(error), 293
host name, 266
user table, 278
with or without domain name, 281
host table, 285
hostname (Unix/Linux command), 283
hostname bin.index file, 370
hostname bin.nnn file, 370
hostname relay files, 381
hostname slow.log file, 373
hostname.err file, 372
hostname.log file, 372
hot backup, 8
.htaccess files (Apache), 40, 462
HTML create tables (mysql), 367
htmlentities (PHP), 425
htmlspecialchars (PHP), 422, 425
htpasswd, 41
http authentication (phpMyAdmin), 91
httpd.conf file, 38, 462
■I
ib_arch_log_n file, 392
ib_logfilen file, 390
iconv functions (PHP), 461
IF, 218, 232, 234
IF-THEN, 331
IGNORE (INSERT), 631
IGNORE (SELECT), 624
IGNORE INDEX, 308
IGNORE … LINES, 633
ignore_space mode, 351
images
displaying with PHP, 467
storing in MySQL (PHP), 464
importing
Access tables, 120
CSV files, 363
databases/tables, 105
mysqlimport, 364
phpMyAdmin, 105
text files, 360, 632
IMPORT TABLESPACE, 616
IN, 196, 239, 328, 640
IN BOOLEAN MODE, 249
INDEX, 622
indexes, 5, 173
add (ALTER TABLE), 212
analyze table, 618
creating, 211, 621
deactivating temporarily, 616
deleting, 627
displaying list of, 648
full-text, 248
InnoDB tables, 174
primary, 168
spatial (GIS), 308
UNIQUE, 175
.ini files, 347, 669
INFILE, 632
information_schema tables, 215
INNER JOIN, 199
INNODB, 622
InnoDB tables, 139, 174, 345
locking, 253–255, 258–260
managing, 386–393
options, 677
replication, 382
status, 648
transactions, 255–261
tuning, 392
■INDEX738
5351idx_final.qxd 8/26/05 11:37 PM Page 738
www.it-ebooks.info
innodb_additional_mem_pool_size (mysqld
configuration), 393
innodb_buffer_pool_size (mysqld), 392
innodb_data_file_path (mysqld), 387
innodb_data_home (mysqld), 387
innodb_fast_shutdown configuration, 677
innodb_file_io_threads configuration, 678
innodb_file_per_table (mysqld), 387
innodb_flush_log_at_trx_commit (mysqld), 391
innodb_flush_method (mysqld), 392
innodb_log_archive (mysqld), 392
innodb_log_buffer_size (mysqld configuration),
393
innodb_log_files_in_group (mysqld), 391
innodb_log_file_size (mysqld), 391
innodb_log_group_home_dir (mysqld), 391
innodb_open_files (mysqld), 677
innodb_thread_concurrency configuration, 678
INOUT, 328
INSERT, 206, 630, 631
INSERT INTO … SELECT, 234, 631
INSERT INTO SELECT, 205
INSERT SELECT, 243
insertRow method (Java), 521
insert_id (PHP), 413
insserv command (SUSE), 29
installing
Apache
Red Hat, 31
SUSE, 27
Windows, 19
Connector/ODBC, 117
MySQL
Red Hat, 32
SUSE, 30
Windows, 20
Perl
Red Hat, 36
SUSE, 27
Windows, 25
PHP
Red Hat, 33
SUSE, 27
Windows, 23
INT, 142
integer types, 142
integrity rules, 172, 173
Interbase, 16
INTERIORRINGN, 306, 311
INTERSECT, 201
INTERSECTS, 308
invalid records, searching for, 241
IO_THREAD, 650
IS NULL, 605
ISAM, 622
isAutoIncrement method (Java), 520
ISCLOSED, 305
IsDBNull method (ADO.NET), 583
is_null (MYSQL_BIND), 538
ISNULL, 196
isNullable method (Java), 520
isolation (ACID), 255
isolation level, 260
ISP
administration, 397
backups, 398
database upload, 399
phpMyAdmin configuration, 88
ISSUER (GRANT), 629
ITERATE, 332
■J
Java, 127, 507
connection problems, 515
Unicode, 519
java.sql package, 512
javac, 509
javax.sql package, 514
JDBC, 127, 509, 706
JDK, 507
JOIN, 197
join_buffer_size (mysqld), 395
■K
keys. See indexes
KEY, 622
key_buffer_size (mysqld), 395
KILL, 632
■L
language (mysqld), 350, 673
LastInsertedID function (VB), 557
LAST_INSERT_ID, 143, 207, 581
ldd, 531
LEAVE, 332
LEFT JOIN, 197
LENGTH, 217
lengths (PHP), 414
libmySQL.dll library, 570
libmysqlclient (C API), 527
license (GPL), 11
LIKE, 220, 605
LIMIT, 192, 244, 641
DELETE, 209, 625
FOUND_ROWS, 192
limit access privileges with REVOKE, 638
LINES TERMINATED BY, 362, 633, 643
LINESTRING, 302
linked tables, 166
Access, 122
phpMyAdmin, 111
linking (C programming) 529
LOAD DATA, 361, 632
LOAD DATA FROM MASTER, 379, 634
LOAD DATA LOCAL, 632
LOAD INDEX INTO CACHE, 634
LOAD TABLE FROM MASTER, 634
LoadFromFile method (ADO), 557
LoadModule (Apache option), 23, 35, 39
■INDEX 739
5351idx_final.qxd 8/26/05 11:37 PM Page 739
www.it-ebooks.info
load_defaults (C), 533
LOCAL, 608, 632
local-infile (mysqld), 673
localhost
host name, 278
problems in Unix/Linux, 282
LOCALTIMESTAMP, 656
LOCK TABLE, 254, 634
locking, 7, 253, 634
InnoDB tables, 253–255, 258–260
log (mysqld), 372
log-bin (mysqld), 369, 377
log-error (mysqld), 372
.log files, 372
log-queries-not-using-indexes (mysqld), 373
log-slow-queries (mysqld), 373
log-update (mysqld), 369
logging, 368
administration of logging files, 373
binary format, 369
deleting files, 636
errors, 372
InnoDB, 390
logins, 372
restoring databases, 371
login logging, 372
LONGBLOB, 151
LongReadLen (Perl), 491
LONGTEXT, 147
LongTruncOK (Perl), 701
long_query_time (mysqld), 373
LOOP, 332, 335, 341
loops, for SPs, 325, 331–335, 338
loose-xxx (mysqld), 671
LOW_PRIORITY, 631
LOW PRIORITY WRITE, 254, 635
lower_case_table_names (mysqld), 600, 672
■M
magic_quotes_gpc (PHP option), 43, 430
makefile (C programming), 530
many-to-many relations, 168
master.info file, 380, 619, 649
master/slave replication, 374
master system setup, 376
master-xxx (mysqld), 675
MATCH, 248
MAX, 661
max-allowed-packet (mysqld), 679
Max version, 14
maxdb mode, 351
maximum-xxx (mysqld), 671
max_binlog_size (mysqld), 371
max_connections (mysqld), 395
max_connections column (user table), 280
max_execution_time (PHP option), 44, 468
max_heap_table_size (mysqld), 674
max_input_time (PHP option), 44, 468
max_questions column (user table), 280
max_updates column (user table), 280
max_user_connections column (user table), 280
MBR, 304
MBRCONTAINS, 306, 315
MBRDISJOINT, 306
MBREQUALS, 306
MBRINTERSECT, 306
MBROERLAP, 306
MBRTOUCHES, 306
MBRWITHIN, 306
mbstring functions (PHP), 461
mbstring warning (phpMyAdmin), 90
MDAC, 546
MEDIUMBLOB, 151
MEDIUMINT, 142
MEDIUMTEXT, 147
memory management, 394
memory_limit (PHP option), 44, 468
MERGE, 622
metadata, 214, 520
microseconds, 146
Microsoft SQL Server, converting to MySQL, 567
microtime (PHP), 456
migration, 358
MIME file type (PHP example), 469
MIN, 661
MINUS, 201
MM.MySQL, 509
model (database), 4
MODIFY, 617
more_results (PHP), 415
moveToInsertRow method (Java), 521
MS Query, 125
mssql mode, 351
mssql2mysql, 568
MULTIPOINT, 302
MULTIPOLYGON, 302
multi_query (PHP), 415, 471
MULTI_RESULTS mode (C), 535
MULTI_STATEMENTS mode (C), 535
my.cnf file, 669
my.ini file, 669
mybackup, 355
.MYD files, 142, 689
MyDb class (PHP example), 419
myforum (sample database), 183
.MYI files, 142, 689
MyISAM tables, 138, 383–385, 622
myisam-recover (mysqld), 673
myisamchk, 383, 689
myisampack, 385, 690
mylibrary (sample database), 137, 154
ADO/VB example, 559
author/title search (PHP), 439
category management (PHP), 446
CGI-Perl example, 497–505
deleting invalid records, 496
schema, 180
storing book titles (PHP), 427
stored procedures, 336
VBMySQLDirect example, 571
■INDEX740
5351idx_final.qxd 8/26/05 11:37 PM Page 740
www.it-ebooks.info
mylibrary-find.pl sample script, 497
mylibrary-simpleinput.pl sample script, 500
MyODBC. See Connector/ODBC
MySQL, 5–16, 49
character set variables, 219
cluster, 141
compilation (Linux), 36
configuration assistant, 20
configuration files, 669
installing
Red Hat, 32
SUSE, 30
Windows, 20
license, 11, 12
logging, 368
memory management, 394
options reference, 672
security (configuration assistant), 21
service (Windows 2000/XP), 22
starting/stopping/restarting, 347
tuning, 393
update from 4.n to 5.0, 359
versions of, 8, 9, 14, 36, 141
mysql (command interpreter), 49, 61–70
backup file, reading in, 69
batch mode, 366
character set problems, 67, 68
configuration file, 669
HTML create tables, 367
interactive mode, 64
options, 63
restore backup files, 355
SQL processing files, 69
syntax, 681
tips, 66, 67
MySQL Adminstrator, 71, 73
MySQL Control Center, 71
mysql db, 276
mysql interface (PHP), 403
MySQL operators, 605
MySQL Query Browser, 71, 82, 320
MySQL tools, 667–691
MySql.Data.dll file, 574
mysql323 mode, 351
mysql40 mode, 351
mysqladmin, 70, 346
changing password, 290
syntax, 683
mysqlbinlog, 370
MySqlCommand class (ADO.NET), 580
MySqlCommandBuilder class (ADO.NET), 585
MySqlConnection class (Connector/Net), 575
mysqld. See MySQL
MySqlDataAdapter class (ADO.NET, 585
MySqlDataReader class (ADO.NET), 583
MySqlDateTime data type (ADO.NET), 584
MySQLDirect. NET provider (ADO.NET), 574
MySQLDriverCS provider (ADO.NET), 574
mysqldump, 70, 352, 366
creating a backup, 205
example, 398
syntax, 684
mysqld_safe, 679
MySqlException class (ADO.NET), 580
mysqlhotcopy, 356
mysqli class (PHP), 411, 697
mysqli interface (PHP), 410
mysqlimport, 364, 687
mysqli_connect_error (PHP), 412
mysqli_init (PHP), 412
mysqli_result class (PHP), 413
mysqli_stmt class (PHP), 416
MySQLNet provider (ADO.NET), 574
MySqlParameter class (ADO.NET), 581
mysqlshow, 688
MySqlTransaction class (ADO.NET), 589
mysql_affected_rows (C), 533
mysql_affected_rows (PHP), 405, 695
MYSQL_BIND (C), 538
mysql_bind_param (C), 538
mysql_change_db (C), 715, 716
mysql_change_user (C), 715, 716
mysql_change_user (PHP), 693
mysql_characterset_name (C), 716
mysql_client_encoding (PHP), 694
mysql_close (C), 532
mysql_close (PHP), 405, 693
mysql_connect (PHP), 404, 693
mysql_convert_table_format, 213
mysql_create_db (PHP), 693
mysql_data_seek (C), 718
mysql_data_seek (PHP), 695
mysql_db_query (PHP), 405, 694
mysql_drop_db (PHP), 693
mysql_errno (C), 544
mysql_errno (PHP), 693
mysql_error (C), 544
mysql_error (PHP), 693
mysql_execute (C), 538
mysql_fetch_array (PHP), 406, 695
mysql_fetch_assoc (PHP), 406
mysql_fetch_field (PHP), 408, 696
mysql_fetch_length (PHP), 696
mysql_fetch_lengths (C), 543
mysql_fetch_object (PHP), 406, 695
mysql_fetch_row (C), 533
mysql_fetch_row (PHP), 406, 695
mysql_field_flags (PHP), 408, 696
mysql_field_len (PHP), 696
mysql_field_name (PHP), 408, 696
mysql_field_table (PHP), 696
mysql_field_type (PHP), 696
mysql_fix_extensions, 681
mysql_fix_privileges, 680
mysql_fix_privilege_tables, 359
mysql_free_result (C), 534
mysql_free_result (PHP), 407, 695
■INDEX 741
5351idx_final.qxd 8/26/05 11:37 PM Page 741
www.it-ebooks.info
mysql_get_client_info (C), 716
mysql_get_host_info (C), 716
mysql_get_proto_info (C), 716
mysql_get_server_info (C), 716
mysql_get_xxx_info (PHP), 694
mysql_hex_string (C), 719
mysql_info (PHP), 405
mysql_init (C), 532
mysql_insertid (Perl), 484, 492
mysql_insert_id (C), 533
mysql_insert_id (PHP), 405, 695
mysql_install_db, 37, 268, 281, 680
mysql_kill (C), 717
mysql_list_dbs (PHP), 693
mysql_list_fields (PHP), 693
mysql_list_tables (PHP), 693
mysql_more_results (C), 536
mysql_next_result (C), 536
mysql_num_fields (PHP), 406, 695
mysql_num_rows (C), 718
mysql_num_rows (PHP), 40, 6956
mysql_options (C), 532
mysql_pconnect (PHP), 693
mysql_ping (C), 715, 716
mysql_query (C), 533
mysql_query (PHP), 694
mysql_query_test (PHP example), 409
mysql_query_unbuffered (PHP), 694
mysql_read_default_file (Perl), 482
mysql_read_default_group (Perl), 482
mysql_real_connect (C), 532
mysql_real_escape_string (C), 542
mysql_real_query (C), 543
MYSQL_RES (C), 533
mysql_result (PHP), 406, 695
mysql_row_seek (C), 718
mysql_row_tell (C), 718
mysql_select_db (PHP), 405, 693
mysql_set_server_option (C), 535
mysql_shutdown (C), 717
mysql_stat (C), 716
mysql_stat (PHP), 694
MYSQL_STMT (C), 538
mysql_stmt_bind_result (C), 540
mysql_stmt_data_seek (C), 540
mysql_stmt_fetch, 540
mysql_stmt_init (C), 538
mysql_stmt_num_rows (C), 540
mysql_stmt_prepare (C), 538
mysql_stmt_result_metadata (C), 540
mysql_stmt_store_result (C), 540
mysql_store_result (C), 533
mysql_store_result (Perl), 492
mysql_thread_id (C), 716
mysql_thread_id (PHP), 694
MYSQL_TIME (C), 540
mysql_unbuffered_query (PHP), 408
mysql_use_result (C), 533
mysql_use_result (Perl), 492
mysql_warning_count (C), 544
my_print_defaults, 671
my_ulonglong (C), 533
■N
named pipes, 264, 348, 673
naming rules, 599
NATURAL JOIN, 200
NDB tables, 141
net (Windows command), 22
NEW (trigger code), 342
NewRow method (ADO.NET), 585
next key locks, 259, 261
next method (Java), 518
NextResult method (ADO.NET), 584
next_result (PHP), 415
NO ACTION, 171
normal forms, 154, 155, 243
normalization, 154, 162
NOT NULL, 622
notee (mysql), 682
NOW, 656
no_zero_date mode, 351
no_zero_in_date mode, 351
NULL, 622
ADO, 556
ADO.NET, 583
C programming, 534
comparison, 196
import/export, 361
Java, 519
operators, 605
Perl, 490, 491
numbers, 602
NUMERIC, 144
NUMGEOMETRIES, 306
NUMINTERIORRINGS, 306
NUMPOINTS, 305
num_or_NULL (PHP example), 437
num_rows (PHP), 413
■O
object-oriented databases, 4
object names, 599
object privileges, 275
ODBC, 117, 545
ODBC data provider (ADO.NET), 573
OdbcCommand class (ADO.NET), 578
OdbcConnection class (ADO.NET), 578
OdbcDataReader class (ADO.NET), 578
OGC, 300
OLAP, 234
OLD (trigger code), 342
old-passwords (mysqld), 291, 673
OLE-DB, 546
ON DELETE, 171
ON DUPLICATE KEY UPDATE, 631
ON UPDATE, 171
one-to-one relations, 166
■INDEX742
5351idx_final.qxd 8/26/05 11:37 PM Page 742
www.it-ebooks.info
only_full_group_by mode, 351
Open method (ADO), 553
open source, 11
OPEN, 334
opengeodb database, 312
OpenGIS, 300
OpenOffice
Base, 128
data source view, 133
optimization
database design, 162
queries, 176
server, 393
speed
InnoDB, 392
MySQL, 393
PHP, 455
replication, 375
tables, 636
OPTIMIZE TABLE, 383, 636
Options Indexes (Apache option), 40
oracle mode, 351
ORDER BY, 193, 641
UPDATE, 208, 651
DELETE, 209, 625
ORDER BY … COLLATE, 194
ORDER BY RAND, 246
OUT, 328
OUTFILE, 642
OVERLAPS, 308
■P
PACK_KEYS, 623
parameters (SPs), 328
passwords, 266
changing, 290
encryption since Version 4.1, 290
forgotten root password, 272
setting root password, 269
user table, 278
password file (MySQL access), 418
password protection for web directories, 40
pattern matching, 220, 605
performance
estimating, 176
InnoDB, 392, 394
replication, 375
tables, 173
Perl, 481
backups at ISP, 399
DBI, 481, 700
error-handling, 494
establishing database connection, 482
evaluating record list, 485
executing SQL commands, 483
installing
Red Hat, 36
SUSE, 27
Windows, 25
persistent connection, 483
Unicode, 493
upload to ISP, 399
persistent connections, 483, 693
PHP
API reference, 693, 697
backup at ISP, 398
character strings and BLOBs, 424
configuring, 43
create form, 433
date and time, 425
error search (MyDb class), 421
extensions, 44
file download, 477
file upload, 466, 478
insert linked records, 427
installing
Red Hat, 33
SUSE, 27
Windows, 23
Magic Quotes, 43, 430
mylibrary store title (example), 427
MySQL extension configuration (Windows),
24
mysql interface, 403, 410
NULL, 426
pagewise representation of results, 439
random server selection (replication), 382
recursion example, 449
self-compilation (Red Hat), 33
speed optimization, 455
stored procedures, 471
storing images, 464
Unicode, 461
upload to ISP, 399
php.ini file, 43
configuration for file transfer, 468
Unicode, 462
phpinfo (PHP), 24, 29
PHPIniDir (Apache option), 39
phpMyAdmin, 87–116
administration, 109, 398
authentication variants, 88
auxiliary functions, 110
configuring, 88-91
creating new users, 95
database creation and editing, 98
executing SQL commands, 104
foreign key rules, 100
importing/exporting databases, 105
installing, 88
PDF diagram, 113
security, 90
text import, 108
transformations, 115
user management, 94
viewing and editing data, 102
ping (mysqladmin), 346
pipes_as_concat mode, 351
pivot tables, 234
■INDEX 743
5351idx_final.qxd 8/26/05 11:37 PM Page 743
www.it-ebooks.info
POINT, 302
POINTN, 305
POLYGON, 302
port (mysqld), 348
port 3306, 294, 297, 513
postal codes (opengeodb database), 312
postgresql mode, 351
PostgreSQL, 16
post_max_size (PHP option), 44, 468
POW (example), 314
ppm (Perl package manager), 26
Prepare method (ADO.NET), 581
prepare statements
ADO.NET, 581
C, 538
Java, 522
Perl, 484
PHP, 415
prepareStatement method (Java), 522
primary index, 5, 155 168
primary key, 5 , 155, 168, 175
PRIMARY KEY, 622
PrintError (Perl), 494
privileges
global vs. object-related, 275
list of, 273
user table, 280
Pro version, 14
proc table, 322
PROCEDURE, 636
Process privilege, 275
PROCESSLIST, 649
procs_priv table, 287
Production version, 9
programming (SQL), 230
Prompt (ODBC option), 551
PURGE MASTER LOGS, 636
■Q
qq (Perl), 490
queries, 5
analysis of execution, 627
distinct values only, 191
logging slow, 373
optimization, 176
SELECT, 190, 638
SQL conditions, 195
subSELECT, 237, 238
query cache, 396
query method (PHP), 413
query optimization, 176
QUICK option (DELETE), 625
quoting character strings
Perl, 490
PHP, 424
SQL, 600
VB, 559
■R
R-tree index, 308
radial search, 313
RaiseError (Perl), 494
RAND, 246
random numbers, 246
random sort order, 246
RDBMS, 4
READ COMMITTED, 260
READ LOCAL LOCK, 254, 635
READ LOCK, 254, 635
Read method (ADO.NET), 583
READ UNCOMMITTED, 260
read-only (mysqld), 378
readline library, 66
read_buffer_size (mysqld), 395
read_rnd_buffer_size (mysqld), 395
REAL, 144
real_as_float mode, 351
real_connect (PHP), 412
records. See data records
Recordset class (ADO), 553, 554
record_buffer (mysqld), 395
recursion, 328
recursive relations, 167
Red Hat, localhost problems with, 282
Red Hat Enterprise Linux, 31
REFERENCES, 622
referential integrity, 170
REGEXP, 221, 605
rehash (mysql), 682
relational databases, 3
relations, 111, 166, 167
relay files, 381
relay-log-purge (mysqld), 381
RELEASE_LOCK, 254
RELATED, 308
remove (mysqld), 22
RENAME AS, 617
RENAME TABLE, 636
REPAIR TABLE, 383, 637
REPEAT-UNTIL, 331
REPEATABLE READ, 260
REPLACE, 624, 637
replicate-xxx (mysqld), 675
replication, 374–383, 636, 648–650
alter slave configuration, 619
InnoDB tables, 382
interrupt logging, 645
REQUIRE (GRANT), 629
RESET MASTER, 637
RESET QUERY CACHE, 397, 637
RESET SLAVE, 637
RESTORE TABLE, 637
RESTRICT, 171
ResultSet class (Java) , 512, 518, 520
ResultSetMetaData class (Java), 520
RETURNS, 329
REVOKE, 288, 638
■INDEX744
5351idx_final.qxd 8/26/05 11:37 PM Page 744
www.it-ebooks.info
RLIKE, 221, 605
ROLLBACK, 256, 638
rollback method
PHP, 418, 494
Java, 522
Rollback method (ADO.NET), 589
ROLLBACK TO SAVEPOINT, 257, 638
ROLLUP (GROUP BY), 204
root password
forgotten, 272
setting, 269
ROUND, 237, 314
rows (Perl), 487, 492
runtime environment (Java), 127
■S
safe_mysqld, 679
safe-user-create (mysqld), 673
SAP DB, 16
SAVEPOINT, 638
SaveToFile method (ADO), 557
schema (database), 180–184. See also database
design
security, 265, 288, 628
default settings, 267
first aid, 268
operating-system-level, 295
replication, 375
restoring default state (Unix/Linux), 268
secure installation, 269
two-tiered access control, 273
MySQL update from 4.n to 5.0, 359
SECURITY DEFINER, 325
SECURITY INVOKER, 325
SEC_TO_TIME, 224
SELECT, 638–644
analysis of query execution, 627
example, 190
EXPLAIN, 627
FOR UPDATE, 259
INTO, 642
INTO DUMPFILE, 643
INTO OUTFILE, 364, 642
LOCK IN SHARE MODE, 259
pagewise results (PHP), 439
SQL_CALC_FOUND_ROWS, 192
storing result in table, 233, 623
subSELECTs, 237, 238, 315
UNION, 200, 644
selection conditions (SQL), 640
selectrow_array (Perl), 486, 502
SELinux
MySQL server, 33
PHP, 404, 411, 482
semicolon (mysql), 603
SERIAL, 611
SERIALIZABLE, 260
server. See MySQL
server id (mysqld), 377
server tuning, 393
server-side cursor (ADO), 554
ServerName (Apache option), 39
SESSION, 608, 644
SET, 151, 229, 330, 491, 644
SET AUTOCOMMIT, 257, 645
SET CHARACTER SET, 220, 645
SET FOREIGN_KEY_CHECKS, 645
SET NAMES, 67, 68, 220, 645
SET PASSWORD, 645
SET SQL_LOG_BIN, 645
SET SQL_QUERY_CACHE, 645
SET TRANSACTION ISOLATION LEVEL, 260,
645
setAutoCommit method (Java), 522
setBinaryStream method (Java), 523
setBlob/-Clob method (Java), 523
setBytes method (Java), 523
setCharacterStream method (Java), 523
setDatabaseName method (Java), 514
setServerName method (Java), 514
setURL method (Java), 514
setXxx method (Java), 522
SHARE MODE, 259
shared lock, 259
shared memory, 264, 3481
SHOW, 214
SHOW BINLOG EVENTS, 646
SHOW CHARACTER SET, 194, 646
SHOW COLLATION, 149, 194, 646
SHOW COLUMNS TYPES, 646
SHOW COLUMNS, 214, 646
SHOW CREATE DATABASE, 647
SHOW CREATE FUNCTION, 324, 647
SHOW CREATE PROCEDURE, 324, 647
SHOW CREATE TABLE, 210, 647
SHOW CREATE VIEW, 180, 647
SHOW DATABASES, 214, 647
SHOW ENGINES, 647
SHOW ERRORS, 647
SHOW FIELDS, 646
SHOW FUNCTION STATUS, 324, 648
SHOW GRANTS, 289, 648
SHOW INDEX, 648
SHOW INNODB STATUS, 648
SHOW KEYS, 214
SHOW LOGS, 648
SHOW MASTER LOGS, 648
SHOW MASTER STATUS, 648
SHOW PRIVILEGES, 648
SHOW PROCEDURE STATUS, 324, 649
SHOW PROCESSLIST, 649
SHOW SLAVE HOSTS, 649
SHOW SLAVE STATUS, 649
SHOW STATUS, 649
SHOW TABLE STATUS, 386, 649
SHOW TABLE TYPES, 649
SHOW TABLES, 214, 650
SHOW VARIABLES, 607, 650
■INDEX 745
5351idx_final.qxd 8/26/05 11:37 PM Page 745
www.it-ebooks.info
Show View privilege, 180
SHOW WARNINGS, 362, 650
skip-grant-tables (mysqld), 272, 295, 673
skip-host-cache (mysqld), 295, 673
skip-name-resolve (mysqld), 673
skip-networking (mysqld), 293, 297, 348, 673
skip-show-database (mysqld), 673
skip-xxx (mysqld), 671
slave_compressed_protocol (mysqld), 675
slave-skip-errors (mysqld), 675
SLAVE START, 650
SLAVE STOP, 650
slave system setup, 378
slow query log, 373
SMALLINT, 142
snapshot, 377
socket (mysqld), 348, 667, 672
socket files, 264, 292, 348
SOME, 238, 641
sort_buffer (mysqld), 395
sorting records, 193, 246
source (mysql), 65, 682
SP Administrator (PHP example), 472
SPACE, 163, 655
SPATIAL INDEX, 308, 622
spatial search, 313
special characters, 600
speed optimization
InnoDB, 392
MySQL, 393
PHP, 455
replication, 375
SPs. See stored procedures
SQL (Structured Query Language), 5, 189–216
character strings, 217
command overview, 611
command reference, 614
compatibility, 6, 350
functions reference, 652
programming, 230
syntax, 599
SQL mode, 145, 350
SQL SECURITY DEFINER, 325
SQL SECURITY INVOKER, 325
SQL Server (Microsoft), converting to MySQL
converter, 567
SQL variables, 231
SQL_BIG_RESULT, 639
SQL_BUFFER_RESULT, 639
SQL_CACHE, 639
SQL_CALC_FOUND_ROWS, 192, 639
SQL_LOG_BIN variable, 381, 645
SQL_NO_CACHE, 639
SQL_QUOTE_SHOW_CREATE, 647
SQL_SMALL_RESULT, 639
sql_string (PHP example), 437
SQL_THREAD, 650
SQRT, 314
SRID, 304
SSL encryption, 629
ssl_set (PHP), 412
Standard version, 14
StarOffice, 128, 133
START TRANSACTION, 650
STARTPOINT, 305
Statement class (Java), 512, 516
static MyISAM tables, 138
status (mysql), 65
STATUS, 649
STD, 661
STDDEV, 661
stored procedures (SPs), 6, 317–340
administration, 322
backup/restore, 325, 355, 474, 477
calling, 327
changing, 323
creating/ deleting, 323
determining code, 324
examples, 336
implementation, 322
language elements, 325
listing, 324
mysqldump, 355
parameters, 328
PHP, 471
recursion, 328
security, 325
SQL mode, 351
syntax, 325
store_result (PHP), 415, 417
STRAIGHT_JOIN, 199, 639
Stream class (ADO), 557
streaming ResultSet (Java), 520
strict_all_tables mode, 351
strict_transactions_tables mode, 351
strmov (C), 542
structure. See database design
Structured Query Language. See SQL
structured variables, 608
STR_TO_DATE, 659
SUBJECT (GRANT), 629
subSELECTs, 237, 238, 314, 641
SUBSTRING, 217
SUM, 234, 661
Super privilege, 342, 275
support, 15
SUSE Linux
localhost problems with, 282
test environment installation, 27
sync-binlog (mysqld), 675
SYSDATE, 656
system DSNs, 118
system security, 295
system variables, 607, 650, 671
■T
tables
altering, 212, 614–618
adding/deleting columns, 212
backing up, 205, 618
■INDEX746
5351idx_final.qxd 8/26/05 11:37 PM Page 746
www.it-ebooks.info
change type (table driver), 617
check internal errors, 619
compressing, 385
copying, 233
creating, 210, 621
deleting, 213, 627
enabling access, 289
importing/exporting, 120, 360
locking, 634
optimizing, 636
options, 622
renaming, 617, 636
repairing, 385, 637
restoring backups, 637
table files, 142, 383
shrinking, 385
types, 138
tablespace files, 377, 386–391, 393
tables_priv table, 286
table_cache (mysqld), 395
TCP/IP protocol, 282, 264, 348
tee (mysql), 682
TEMPORARY, 621
temporary tables, 141, 246, 621
test databases, created by users, 268
TEXT, 147
text files, importing, 360, 632
threads (discussion forums), 184
threads (MySQL subprocesses) , 632, 649
time, 145, 222, 556, 602, 656
time zones, 227, 349
TIMESTAMP, 145
ADO, 556
avoiding changes with UPDATE, 226
INSERT, UPDATE, 631
Perl, 489, 490
Unix, 225
TIME_FORMAT, 222
TINYBLOB, 151
TINYINT, 142
TINYTEXT, 147
tmp_table_size (mysqld), 395
TOUCHES, 308, 311
trace (Perl), 495
transactions, 6, 255
ADO.NET, 589
isolation level, 260
Java, 522
logging, 390
Perl, 494
PHP, 409, 418
replication, 382
TRIGGER, 341
triggers, 6, 318, 341–343
TRUE, 609
TRUNCATE, 650
tuning (server tuning), 393
tx_isolation variable, 261
TYPE, 622
■U
UCS-2 character set, 148
UDFs, 296, 620
Unicode, 6
ADO, 556
C, 542
Java, 519
LOAD DATA, 361
mysql (command interpreter), 67, 68
MySQL, 149
Perl, 493
PHP, 461
UTF-8 vs. UCS-2, 148
VB, 55, 5596
UNION, 200, 644
UNIQUE, 175, 622
unique_checks variable, 393
UNIX_TIMESTAMP, 225, 490, 656
UNLOCK TABLES, 254, 651
UNSIGNED, 152
updatable_views_with_limit (mysqld), 179
UPDATE, 207
default values, 631
DELETE, 208, 651
LIMIT, 208, 651
ORDER BY, 208, 651
several tables, 208, 243, 651
syntax, 651
update log, 369
Update method (ADO.NET), 585
UpdateDataSet method (ADO.NET), 587
updateXxx method (Java), 521
upload_max_filesize (PHP option), 44, 468
uploading to ISP, 397
Usage privilege, 274
USE, 651
use_result (PHP), 415
users
creating, 271, 288
mysql.user table, 277
test databases created by, 268
user-defined functions, 296, 620
user DSNs, 118
user interface, 61
user name, 265, 278
user table (access protection), 277
user variables, 607, 644
USING (DELETE command), 626
UTC (Coordinated Universal Time), 227, 656
utf8_decode (PHP), 461
utf8_encode (PHP), 461
UTM format, 300
■V
VALUES, 630, 631
VARCHAR, 147
variables, 230, 329, 607, 644
VARIABLES, 650
VB (Visual Basic), 548, 556, 559
■INDEX 747
5351idx_final.qxd 8/26/05 11:37 PM Page 747
www.it-ebooks.info
VB.NET (Visual Basic.NET), 573
VBA, 548
VBMySQLDirect library, 570
version number, 8
views, 178
Visual Basic.NET (VB.NET), 573
Visual Basic (VB), 548, 556, 559
■W
wasNull method (Java), 519
web directory protection (.htaccess), 40
Well-Known Text format, 300, 301
WHERE, 195
WHILE-DO, 332
Windows installation, 18
Windows service (MySQL), 22
WinMySQLadmin, 71
WITHIN, 308
WKB format, 300, 301
WKT format, 300, 301
WRITE LOCK, 254, 635
■X
X function (GIS), 304
X509 standard, 629
XML files
creating with mysqldump, 687
exporting, 366, 368
■Y
Y function (GIS), 304
■Z
zip codes (opengeodb database), 312
■INDEX748
5351idx_final.qxd 8/26/05 11:37 PM Page 748
www.it-ebooks.info

forums.apress.com
FOR PROFESSIONALS BY PROFESSIONALS™
JOIN THE APRESS FORUMS AND BE PART OF OUR COMMUNITY. You’ll find discussions that cover topics
of interest to IT professionals, programmers, and enthusiasts just like you. If you post a query to one of our
forums, you can expect that some of the best minds in the business—especially Apress authors, who all write
with The Expert’s Voice™—will chime in to help you. Why not aim to become one of our most valuable partic-
ipants (MVPs) and win cool stuff? Here’s a sampling of what you’ll find:
DATABASES
Data drives everything.
Share information, exchange ideas, and discuss any database
programming or administration issues.
INTERNET TECHNOLOGIES AND NETWORKING
Try living without plumbing (and eventually IPv6).
Talk about networking topics including protocols, design,
administration, wireless, wired, storage, backup, certifications,
trends, and new technologies.
JAVA
We’ve come a long way from the old Oak tree.
Hang out and discuss Java in whatever flavor you choose:
J2SE, J2EE, J2ME, Jakarta, and so on.
MAC OS X
All about the Zen of OS X.
OS X is both the present and the future for Mac apps. Make
suggestions, offer up ideas, or boast about your new hardware.
OPEN SOURCE
Source code is good; understanding (open) source is better.
Discuss open source technologies and related topics such as
PHP, MySQL, Linux, Perl, Apache, Python, and more.
PROGRAMMING/BUSINESS
Unfortunately, it is.
Talk about the Apress line of books that cover software
methodology, best practices, and how programmers interact with
the “suits.”
WEB DEVELOPMENT/DESIGN
Ugly doesn’t cut it anymore, and CGI is absurd.
Help is in sight for your site. Find design solutions for your
projects and get ideas for building an interactive Web site.
SECURITY
Lots of bad guys out there—the good guys need help.
Discuss computer and network security issues here. Just don’t let
anyone else know the answers!
TECHNOLOGY IN ACTION
Cool things. Fun things.
It’s after hours. It’s time to play. Whether you’re into LEGO®
MINDSTORMS™ or turning an old PC into a DVR, this is where
technology turns into fun.
WINDOWS
No defenestration here.
Ask questions about all aspects of Windows programming, get
help on Microsoft technologies covered in Apress books, or
provide feedback on any Apress Windows book.
HOW TO PARTICIPATE:
Go to the Apress Forums site at http://forums.apress.com/.
Click the New User link.
5351idx_final.qxd 8/26/05 11:37 PM Page 752
www.it-ebooks.info
