Tutorial 1 Instructions 02
User Manual:
Open the PDF directly: View PDF ![]() .
.
Page Count: 8
CIT 171: Web Page Scripting Tutorial 2: Working with Operators and Expressions
1
Tutorial 2: Working with Operators and Expressions
Instructions
I. Complete the Tutorial
A. Complete the tutorial named Tutorial 2, Working with Operators and Expressions,
in your New Perspectives on JavaScript and AJAX textbook on pages
JVS 53 - 91.
B. Windows Users: If you haven’t done so already change the setting in Microsoft
Windows to display file name extensions.
C. If you haven’t done so already, download a free text-based HTML editor from
Blackboard’s Software button.
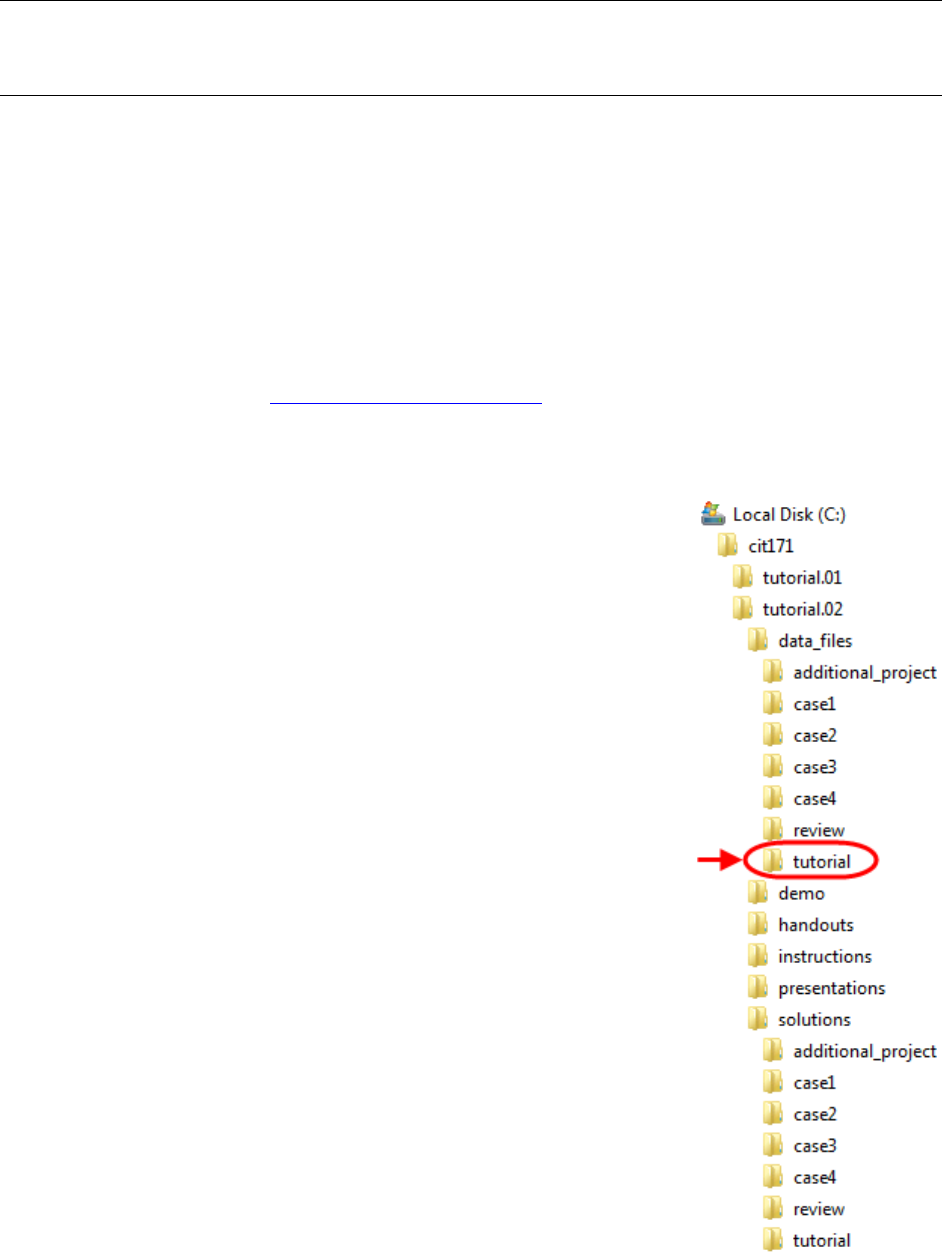
D. Here is a list of all of the data files that you will
need in order to begin working on Tutorial 2.
These files are located in the course files folder
named \cit171\tutorial.02\data_files\tutorial\
as shown on the right.
clock.jpg – an image that is used in clock.htm
clocktxt.htm – a Web page that you will rename
from clocktxt.htm to clock.htm
functxt.js – an external JavaScript file used in
clock.htm that you will rename from
functxt.js to functions.js
logo.jpg – an image that is used in clock.htm
newyear.css – an external style sheet used in clock.htm
photo.jpg – an image that is used in clock.htm
E. This tutorial will instruct you to rename the Web page
clocktxt.htm to clock.htm and the external JavaScript
file functxt.js to functions.js.
Important: The Web page must be named clock.htm.
It cannot be named clock.html, Clock.htm, Clock.html,
CLOCK.htm, CLOCK.html, CLOCK.HTM, or
CLOCK.HTML. The external style sheet must be named
functions.js. It cannot be named Functions.js,
FUNCTIONS.js, or FUNCTIONS.JS
If you rename the files to something other than
clock.htm and functions.js you will not be able to
view your Web page from your home page on the CLC
Web server.
CIT 171: Web Page Scripting Tutorial 2: Working with Operators and Expressions
2
I. Complete the Tutorial (continued from previous page)
F. Students do not need to complete any of the Quick Checks, like the ones on pages
JVS 65 and JVS 90. If you still want to complete them anyway, the publisher has
provided the answers to these questions on pages JVS 102.
G. Students do not need to complete the Review Assignments on pages JVS 92 - 94.
H. Students do not need to complete the Case Problems on pages JVS 94 - 102.
II. Upload your Completed Tutorial to the CLC Web Server for Grading
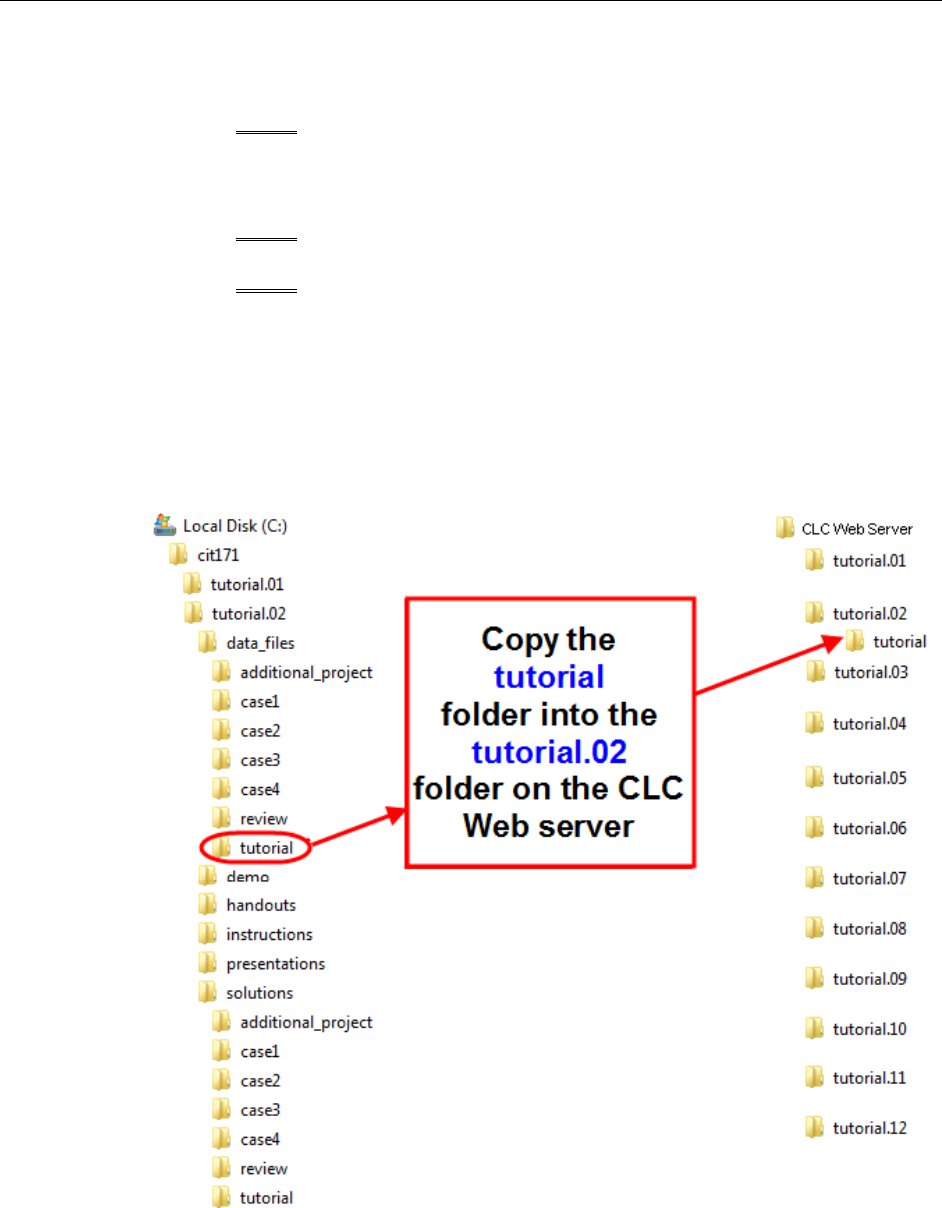
A. After you have completed the tutorial, use an FTP client to upload (copy) the
folder named tutorial from your home computer or flash drive into (inside of and
as a child of) the folder named tutorial.02 on the CLC Web server.

CIT 171: Web Page Scripting Tutorial 2: Working with Operators and Expressions
3
II. Upload your Completed Tutorial to the CLC Web Server for Grading
(continued from previous page)
B. Important: Only upload the tutorial folder to the
CLC Web server. Do not upload all of the
folders.
C. If you have difficulty uploading your Tutorial 2 see
please see to the document named
tutorial_02_upload_help.pdf located in the course
files \cit171\tutorial.02\instructions/ folder.
D. Here is a list of the completed Tutorial 2 tutorial
file names*:
1. clock.htm
2. clock.jpg
3. functions.js
4. logo.jpg
5. newyear.css
6. photo.jpg
* Web page file names and folder names are always
lower case and never contain spaces.
E. If you did not receive an FTP username and
password in your CLC student e-mail account during
the first week of class contact your instructor.
Only upload
this folder
CIT 171: Web Page Scripting Tutorial 2: Working with Operators and Expressions
4
II. Upload your Completed Tutorial to the CLC Web Server for Grading
(continued from previous page)
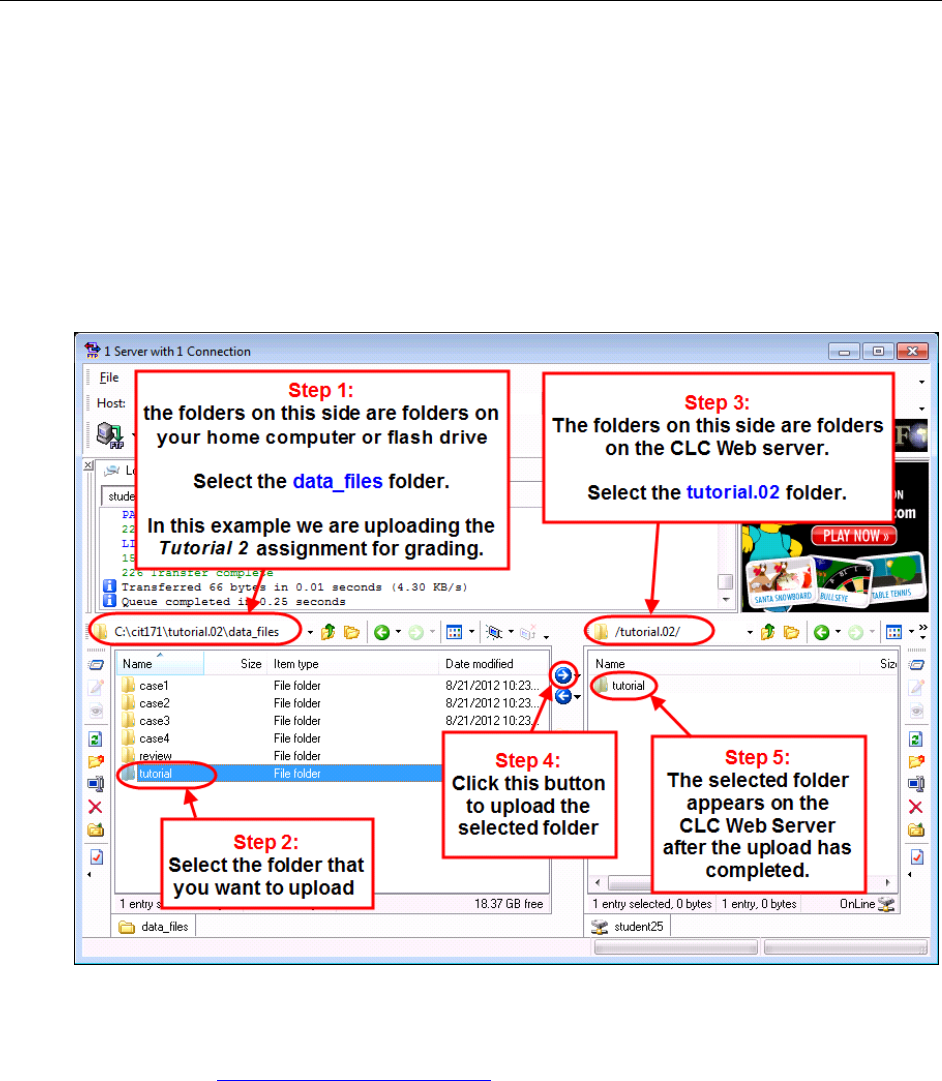
F. Here is a screen shot of the Tutorial 2 upload using the FTP client named
AceFTP Freeware.
Apple Users: FTP clients across all operating systems have similar interfaces. If
you are an Apple user the image below can help you to setup your FTP client for
the Tutorial 2 upload.
G. If you have difficulty uploading your Tutorial 2 see please see to the document
named tutorial_02_upload_help.pdf located in the course files
\cit171\tutorial.02\instructions\ folder.
CIT 171: Web Page Scripting Tutorial 2: Working with Operators and Expressions
5
III. Verify That Your Tutorial Displays Correctly on the CLC Web Server
A. After you have uploaded your completed tutorial to the CLC Web server, you
need to test it from your home page to see that it displays correctly by following
these steps:
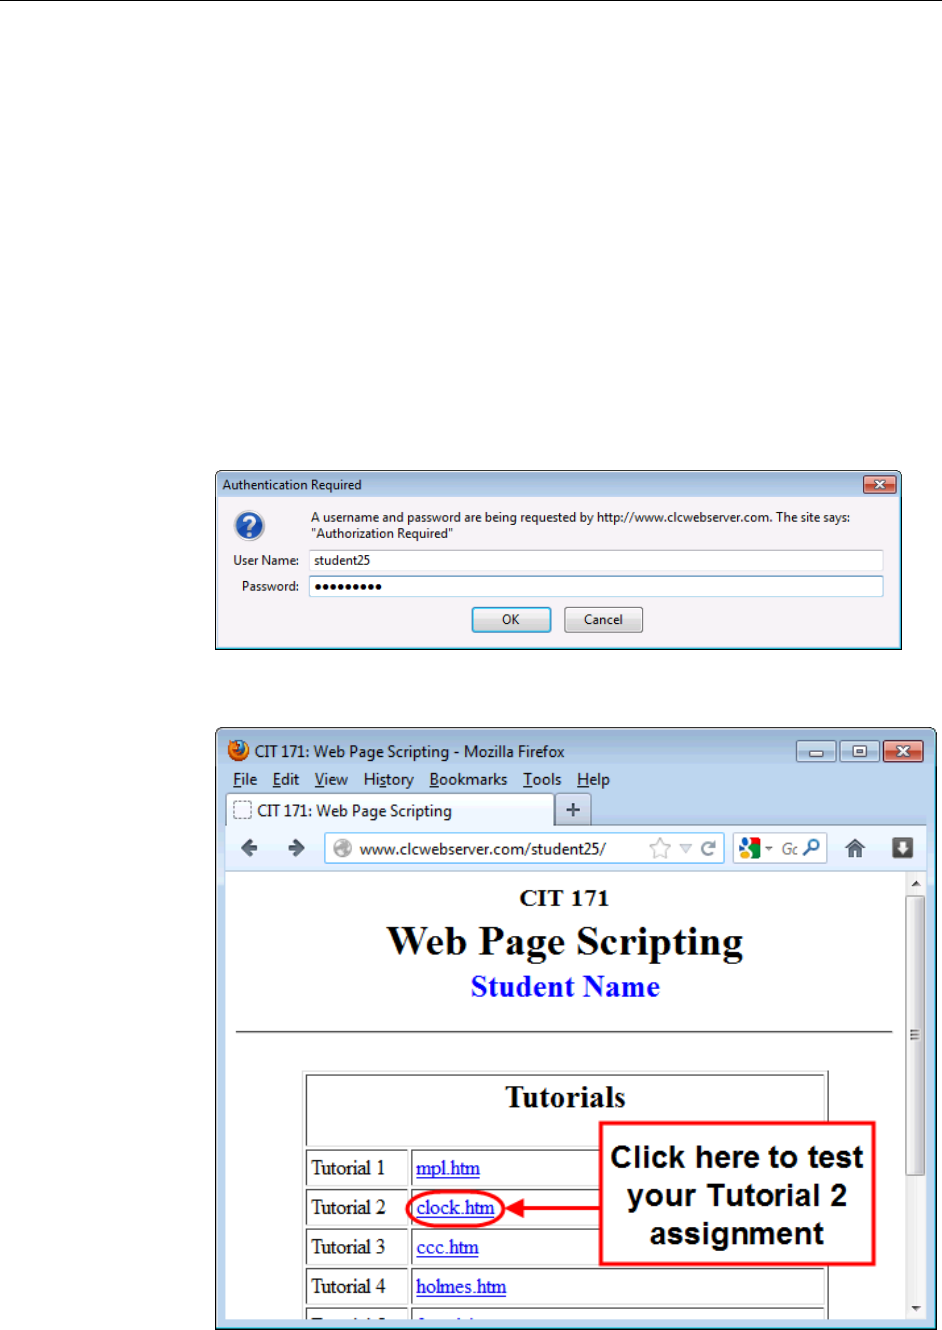
1. Open your Web browser and enter the address
http://www.clcwebserver.com/ftp_username/
where ftp_username is your FTP username.
For example, if your FTP username is student25, then the address that you
would enter is http://www.clcwebserver.com/student25/
2. You will be presented with an authentication dialog box. Type in your
FTP username and FTP password here.
3. Here is a screen shot of your home page on the CLC Web server:

CIT 171: Web Page Scripting Tutorial 2: Working with Operators and Expressions
6
III. Verify That Your Tutorial Displays Correctly on the CLC Web Server
(continued from previous page)
B. If you uploaded your tutorial correctly then you will see your Tutorial 2 Web page
when you click on the clock.htm link.
If you don’t see your Tutorial 2 Web page when you click on the clock.htm link
then the tutorial was not uploaded correctly. To solve this issue please refer to the
document named tutorial_02_upload_help.pdf located in your
/cit171/tutorial.02/instructions/ folder.
C. Important: Always verify that your tutorials display correctly through your home
page on the CLC Web server before e-mailing your instructor to grade them.
IV. Send a “Tutorial 2 Completed” E-mail to Your Instructor
A. Important: After you have completed, uploaded, and tested your tutorial on the
CLC Web server, send your instructor a “Tutorial 2 Completed” e-mail.
B. The subject line of the e-mail you send your instructor should read:
CIT 171: YourLastName - Tutorial 2 Completed
where YourLastName is your last name
If you want to submit more than one tutorial for grading at the same time use this
e-mail subject line format:
CIT 171: YourLastName – Tutorials 1 - 2 Completed
CIT 171: YourLastName – Tutorials 1 - 3 Completed
C. This e-mail is the way you let your instructor know that your tutorial is ready to
be graded.
D. Tutorials should be submitted for grading at least two days before the due date.
E. Your tutorial will not be graded if your instructor doesn’t receive this e-mail.
F. The instructor will not contact students to inform then that this e-mail was not
received.
G. It is the student’s responsibility to check their Blackboard gradeboook to verify
that their tutorial(s) were graded before the due date.
H. No points will be awarded for tutorials that were not graded before the due date

CIT 171: Web Page Scripting Tutorial 2: Working with Operators and Expressions
7
V. Your Instructor Will Grade Your Tutorial
A. Within 24 hours of receiving your “Tutorial 2 Completed” e-mail your tutorial
will be graded and your instructor will enter a score into your Blackboard
gradebook.
B. Allow at least 24 hours for your instructor to grade your tutorial from the time
you send your “Tutorial 2 Completed” e-mail.
C. Tutorials that can’t be accessed through the links on your home page located on
the CLC Web server will not be graded.
D. Your tutorial will not be graded if the “Tutorial 2 Completed” e-mail is not
received by your instructor.
VI. Follow-Up to Make Sure that Your Tutorial Has Been Graded Before the Due Date
A. Very Important: After you have sent your “Tutorial 2 Completed” e-mail, follow
up before the due date to make sure that your tutorial has been graded.
1. Follow up to make sure that your tutorial was graded by checking to see
that a Tutorial 2 score was posted in your Blackboard gradebook.
The Blackboard gradebook can be accessed by clicking on the Grades
button in the main menu of the Blackboard course.
2. If after 24 hours of sending your “Tutorial 2 Completed” e-mail you don’t
see an assignment score entered in the Blackboard gradebook then:
Check your CLC student e-mail account for an e-mail from your
instructor with information on why the tutorial could not be graded
and what you need to fix before the tutorial can be graded.
If there isn’t an e-mail from your instructor indicating there was a
problem grading your tutorial and you have verified that you tutorial
displays from the links on your home page located on the CLC Web
server, then send your instructor another “Tutorial 2 Completed”
e-mail immediately.
B. It is the student’s responsibility to follow up to make sure that their tutorial has
been graded before the due date.

CIT 171: Web Page Scripting Tutorial 2: Working with Operators and Expressions
8
VI. Follow-Up to Make Sure that Your Tutorial Has Been Graded Before the Due Date
(continued from previous page)
C. If your tutorial has not been graded before the due date you will not receive any
points for the tutorial.
1. Tutorials should be submitted for grading at least two days before the due
date.
2. To earn credit for a tutorial it is not enough to simply upload your tutorial
to the CLC Web server on or before the due date. It is also not enough to
upload your tutorial and send a “Tutorial 2 Completed” e-mail to your
instructor on or before the due date. You also need to follow up before the
due date to verify that your tutorial has been graded.
3. The assignment policy in this class is something new to most students.
Many students like to send assignments in for grading on the due date, but
that isn't how this course is structured. Because late work is not accepted
in this class it is in the best interest of the student to submit their tutorials
at least a couple of days before the actual due date. This way if a tutorial is
incomplete or is unable to be graded for some reason, the student still has
time to correct the problem and re-submit it again for grading before the
due date. In this class, if a student submits an tutorial for grading on the
date and it is incomplete or unable to be graded, there isn't enough time for
the student to re-submit it again before the due date. Submitting tutorials
for grading at least two days before the due date provides the student with
a safety buffer.
4. For additional information, please see the Tutorials - Late Policy section
of the syllabus. You can find the syllabus by clicking on the Syllabus
button in the CIT 171 Blackboard course main menu.
VII. Take the Tutorial 2 Practice Test
A. Using the LockDown Browser take the Tutorial 2 Practice Test a few times.
VIII. Take the Tutorial 2 Test
A. Using the LockDown Browser Web browser take the Tutorial 2 Test.
