Oracle White Paper 133704 Twp Security Best Practices
User Manual: 133704
Open the PDF directly: View PDF ![]() .
.
Page Count: 22
1
An Oracle White Paper
June 2010
Oracle Enterprise Manager Grid Control 11g
Release 1 Security Deployment – Best
Practices
2
Introduction
The dynamic and complex nature of today‟s IT environments, the potential fallout of security
breaches in terms of the financial implications and loss of goodwill coupled with stringent
regulatory requirements make security a critical area of consideration for both business and IT
managers. Whilst security considerations are important for standalone applications, the
introduction of distributed system management applications can make it yet more challenging.
Further, while standardized security best practices are available for databases and application
servers, there aren‟t any standardized security benchmarks specifically for system
management products.
This document presents best practices for managing the security of Oracle Enterprise
Manager Grid Control deployments. The recommendations in this document are based on our
experience with both customer deployments and Oracle‟s own internal usage of Oracle
Enterprise Manager. Some of the recommendations are based on the CIS (Center for Internet
Security) Benchmark.
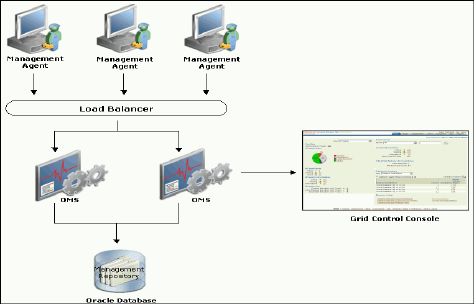
The diagram below presents a schematic of Oracle Enterprise Manager architecture.
Figure 1 – Oracle Enterprise Manager Grid Control Architecture
3
The best practices presented in this document are divided in 7 categories based on the major
components of Oracle Enterprise Manager architecture The categories are
1. Securing the Oracle Management Repository (OMR)
2. Securing the Oracle Management Service (OMS)
3. Securing the Oracle Management Agents(OMA)
4. Securing the communication between Enterprise Manager Components
5. Grid Control User Authentication
6. Grid Control Privilege/Role Management
7. Preferred Credentials and Target Access
8. Encryption/Decryption
9. Auditing
.

4
Securing the OMR
Securing your Oracle Enterprise Manager (EM) deployment involves securing all layers
of the stack starting with the underlying operating system (OS) on which the OMS and
Repository reside all the way up to the EM components themselves. Since the Oracle
Management Repository resides within an Oracle database, a number of the best
practices for securing the Oracle database itself are applicable to securing the Repository
as well. For best practices on Oracle database security, please refer to the Oracle
Database Security Checklist available at the following location –
http://www.oracle.com/technetwork/database/security/twp-security-checklist-database-1-
132870.pdf
The above document also covers certain Operating System level steps that need to be
performed to secure the database. Additionally, we offer the following recommendations
specially to further secure the Repository
1. Audit all SYS (SYS is the username for the account that owns the schema)
operations at the database level.
a. Set AUDIT_SYS_OPERATIONS to TRUE
b. Use syslog audit trail to minimize the risk that a privileged user, such as
a database administrator, can modify or delete audit records stored in an
operation system trail if the database version of Repository is 10gR2 or
after
i. For 10gR2 DB, please refer to the doc to obtain more information
about syslog audit trail:

5
http://download.oracle.com/docs/cd/B19306_01/network.102/b14
266/auditing.htm#CEGJJHJH
ii. For 11g DB, set AUDIT_SYS_LEVEL initialization parameter
appropriately to use syslog audit trail. Please refer to the
following to obtain details:
http://download.oracle.com/docs/cd/B28359_01/network.111/b28
531/auditing.htm#CEGBIIJD
2. Special privileges should be revoked from the PUBLIC profile that all database
users are granted by default. Revoke the following from PUBLIC (please see the
Oracle Database Security Checklist document referenced above for more details
on these privileges)
a. EXECUTE on UTL_FILE
b. EXECUTE on UTL_TCP
c. EXECUTE on UTL_HTTP
d. EXECUTE on UTL_SMTP
e. SELECT with GRANT OPTION with ALL_TABLES
f. SELECT with GRANT OPTION with ALL_TAB_PRIVS
g. EXECTUE with GRANT OPTION on DBMS_JOB
h. EXECUTE with GRANT OPTION on DBMS_SCHEDULER
3. Restrict network access to the host on which the Repository resides.
a. Put the repository behind a firewall

6
b. Check Network IP Address: The Listener should be configured to accept
requests only from OMS nodes by adding the following parameters into
$TNS_ADMIN/protocol.ora file
iii. tcp.validnode_checking =YES
iv. tcp.excluded_nodes = (list of IP addresses)
v. tcp.invited_nodes = (list of IP addresses)
The first parameter turns on the feature whereas the latter parameters
respectively deny and allow specific client IP addresses from making
connections to the Oracle listener.
Please refer to the guideline of Secure the Network Connection for more
information:
http://download.oracle.com/docs/cd/B28359_01/network.111/b28531/guidelines.
htm#CHDJFEFF
4. Enable Connection Rate Limiter feature of Oracle listener for OMR to reduce
Denial-of-Service attacks on the listener. Please refer to the following link for
detailed information:
http://www.oracle.com/technetwork/database/enterprise-
edition/oraclenetservices-connectionratelim-133050.pdf
Securing the OMS
The OMS runs on top of the Oracle WebLogic Application Server. Most best practices for
securing the Oracle WebLogic Server are applicable for securing the OMS as well.
Security aspects that are unique to OMS are presented in this document.
Please refer to the following documentation for securing the Oracle WebLogic Server.
http://download.oracle.com/docs/cd/E12839_01/web.1111/e13705/practices.htm#i11340
09
Here are the additional recommendations that we offer to secure OMSs:

7
1. Harden all Oracle homes of all the OMS installations
a. Restrict OS access by supporting only indirect or impersonation-based
access to these Oracle homes by using utilities such as sudo or
PowerBroker.
b. Consider protecting the software running in these Oracle homes through
protecting the host using a firewall
2. Make sure that all the Oracle homes are patched up to the latest CPU (Critical
Patch Update) level. Setup your My Oracle Support credentials to detect new
Security Alerts and CPUs. EM will download new Security Alerts and CPUs
automatically and place them in the Patch Cache. Security Alerts and CPUs that
are downloaded but not yet applied will trigger EM Alerts. Look specifically for
alerts related to OMS. This recommendation is also applicable for securing the
Repository and the Agents.
3. Change all the passwords used during the installation, for example, SYS,
SYSMAN and My Oracle Support credential‟s password. For SYSMAN password
change, please refer to Securing the Repository Section 2.b
4. Harden the OMS machines themselves by removing all unsecure services such
as rsh, rlogin, telnet, and rexec on Linux platform (For the list of unsecure
services and how to remove them on different platforms, please refer to CIS
benchmarks at www.cisecurity.org ). This recommendation is also applicable to
the machine that hosts the Repository. We also recommend that you stop non-
essential services, this minimizes the „attack footprint‟ of the host but reduces
resource consumption by services that are not required, freeing up system
resources to deliver the best performance from the OMS.
5. Put OMSs behind firewall to restrict network access. Please refer to Chapter 19
of Advanced Installation and Configuration Guide for detailed information of
firewall setup.
8
Securing the OMA
1. Install the agents via Grid Control‟s Agent Deploy which uses the secure SSH
protocol.
2. To protect against the possibility of users installing unauthorized agents, use
one-time registration passwords that have a reasonable expiry date instead of
persistent registration passwords.
3. Install the latest CPUs. For more details on this, please see recommendation #2
in the Securing the OMS section above.
4. Install the agent as a separate user from OMS installation and support only
impersonation based access to this account such as sudo or PowerBroker post
installation.
Securing the communication between Enterprise Manager
Components
1. All OMSs should run in “secure-lock” mode. “secure-lock” mode means that the
communication can be only through HTTPS port (HTTP port is locked).
a. This ensures that the OMS-Agent communication is always encrypted
and mutually authenticated. All requests from un-secure agents are
rejected by the OMS. Similarly, any un-secure request from the OMS is
rejected by the agent. This helps safe-guard the management system
from any malicious „man-in-the-middle‟ attack happening from within the
infrastructure. Brand new EM Grid Control (EMGC) 11g Release 1
installations are secure locked by default. In cases where you upgrade
your installation to EMGC 11 Release 1, if the pre-upgrade environment
is secured, the upgrade retains the secure but does not secure-lock
OMS. If the pre-upgrade environment is already secure-locked,the
upgrade retains the secure-lock mode between OMS and Agent.
9
To check the status if OMS is run in secure mode, run the following
command:
emctl status oms –details
Run the following command to check if the agent is run in secure mode:
emctl status agent –secure
To secure lock the communication between OMS and agent run the
command:
emctl secure lock [-upload]
Note that once OMSs are running in secure-lock mode, unsecure agents
are not be able to upload any data to the OMSs.
b. This also ensures the console access from browser is secure over
SSL/TSL. Brand new EM Grid Control (EMGC) 11g Release 1
installations are secure locked by default. In cases the pre-upgrade
environment is not secure-lokced, after you upgrade your installation to
EMGC 11g Release 1, you need to run the following command to
secure-lock the console access:
emctl secure lock [-console]
c. Please configure OMS and agents to support only TLS v1 protocol,
which is the successor of SSL v3, for the communication.
i. Please follow the following steps to configure OMS for TLS v1
protocol only
1. Stop the OMS by entering the following command:
emctl stop oms
2. Enter the following command:
emctl secure oms -protocol TLSv1
3. Append -Dweblogic.security.SSL.protocolVersion=TLS1
to JAVA_OPTIONS in
Domain_Home/bin/startEMServer.sh. If this property
already exists, update the value to TLS1.
10
4. Restart the OMS with the following command:
emctl start oms
ii. To configure an agent to support only TLS v1 protocol while the
agent listens as a server, please update the following entry in
$AGENT_HOME/sysman/config/emd.properties file as
1. allowTLSOnly=true
d. Please enable the strong cipher suites for the communication between
OMS and agent.
i. By default, if not specified, the following cipher suites will be
allowed for the communication
1. SSL_RSA_WITH_RC4_128_MD5
2. SSL_RSA_WITH_RC4_128_SHA
3. SSL_RSA_WITH_3DES_EDE_CBC_SHA
ii. You can edit the parameter in SSLCipherSuites
$AGENT_HOME/sysman/configure/emd.properties to configure
the strong cipher suites to be used for agent SSL/TLS
communication. The following are supported strong cipher
suites.
1. SSL_RSA_WITH_AES_128_CBC_SHA
2. SSL_RSA_WITH_AES_256_CBC_SHA
3. SSL_DH_anon_WITH_3DEC_EDE_CBC_SHA
4. SSL_DH_anon_WITH_RC4_128_MD5
5. SSL_DH_anon_WITH_DES_CBC_SHA
6. SSL_RSA_WITH_RC4_128_MD5
7. SSL_RSA_WITH_RC4_128_SHA
8. SSL_RSA_WITH_3DES_EDE_CBC_SHA
iii. To restrict the strong cipher suites used by OMS, please edit
SSLCipherSuite parameter in
$INSTANCE_HOME/WebTierIH1/config/OHS/ohs1/httpd_em.co
nf and ssl.conf files with the appropriate values. Here are the
default values:
1. SSL_RSA_WITH_RC4_128_MD5

11
2. SSL_RSA_WITH_RC4_128_SHA
3. SSL_RSA_WITH_3DES_EDE_CBC_SHA
4. SSL_RSA_WITH_DES_CBC_SHA
5. TLS_RSA_WITH_AES_128_CBC_SHA
6. TLS_RSA_WITH_AES_256_CBC_SHA
2. Use a certificate from well-known Certificate Authority (CA) to secure OMS-Agent
communication and console access to take advantage of the well-known trusted
certificates with different expiry and key size. Please refer to Section “Configuring
Third Party Certificates” in Chapter 2 of Administrator‟s Guide for detailed
information.
3. Enable Advanced Security Option (ASO) between OMS and Repository. ASO
ensures that the data between OMS and Repository is secure both from
confidentiality and integrity standpoints.
a. Issue command “emctl set property –name <Property Name> -value
<Value>” to set the following properties with the values
i. oracle.sysman.emRep.dbConn.enableEncryption=true
ii. oracle.net.encryption_client=REQUESTED
iii. oracle.net.encryption_types_client={DES40C}
iv. oracle.net.crypto_checksum_client=REQUESTED
v. oracle.net.crypto_checksum_types_client={MD5}
b. Add the following to the Repository Oracle home, for example
TNS_ADMIN/sqlnet.ora
i. SQLNET.ENCRYPTION_SERVER = REQUESTED
Please refer to the following link to obtain detailed information about the
parameters listed above.
http://download.oracle.com/docs/cd/B28359_01/network.111/b28530/asoappa.ht
m#i634533

12
Grid Control User Authentication
1. Oracle Enterprise Manager Authentication
a. Use Oracle Single Sign-on (SSO) or Enterprise User Security (EUS)
based authentication to take advantage of centralized identity
management across the enterprise
Please refer to the following links for detailed information about how to
configure SSO andEUS with EM authentication respectively.
http://download.oracle.com/docs/cd/E11857_01/em.111/e16790/security3.htm
#BABFIACG
http://download.oracle.com/docs/cd/E11857_01/em.111/e16790/security3.htm
#BABCEGII
2. Disable SYSMAN logging into console. SYSMAN is the schema owner and is
hence more privileged than EM Super Administrators. SYSMAN should be
treated as the schema owner instead as an EM Super user. Create a separate
super administrator and prevent SYSMAN from logging into console by executing
the following SQL statement on the Repository:
UPDATE MGMT_CREATED_USERS
SET SYSTEM_USER=’-1’
WHERE user_name=’SYSMAN’
After disabling SYSMAN from logging into console, you can enable it by
executing:
UPDATE MGMT_CREATED_USERS
SET SYSTEM_USER=’1’
WHERE user_name=’SYSMAN’
3. Reduce the number of Super users. EM Super Administrators have FULL
privileges on targets/reports/templates/jobs and these are the only users who can
create other users and Super Administrators, and grant/revoke privileges to/from
other users. So Super user privilege should be granted with caution. Using the
13
following query to get the list of super users:
SELECT grantee FROM MGMT_PRIV_GRANTS WHERE PRIV_NAME =
‘SUPER_USER’
5. Use password profiles to enforce the password control of EM Administrators
while Repository-based authentication is used:
a. There is an out-of-box password profile
MGMT_ADMIN_USER_PROFILE with the following parameter settings
for EM Administrators:
i. FAILED_LOGIN_ATTEMPTS=10
ii. PASSWORD_LIFE_TIME=180
iii. PASSWORD_REUSE_TIME=UNLIMITED
iv. PASSWORD_REUSE_MAX=UNLIMITED
v. PASSWORD_LOCK_TIME=1
vi. PASSWORD_GRACE_TIME=7
vii. PASSWORD_VERIFY_FUNCTION=MGMT_PASS_VERIF
Y
The out-of-box password verification function MGMT_PASS_VERIFY will
ensure that the password cannot be same as username, its minimum
length is 8, and it must have at least one alphabet, digit and punctuation
character.
You can create customized password profiles with different values to
meet your special requirements, for example, a new password
verification function to meet a stricter password complexity requirement.
14
6. Change SYSMAN and MGMT_VIEW users‟ password on a regular basis.
a. The following command helps you change the SYSMAN password.
emctl config oms –change_repos_pwd [-change_in_db] [-old_pwd
<old_pwd> [-new_pwd <new_pwd> [-use_sys_pwd [-sys_pwd
<sys_pwd>]]
Parameter change_in_db controls if the password in Repository will be
changed. Without this parameter, the command only updates SYSMAN
password in OMS‟s credential store.
In a single OMS instance environment, run the following command to
change SYSMAN password in both Repository and OMS configuration
file. You will be prompted for the old and new SYSMAN passwords.
emctl config oms –change_repos_pwd -change_in_db
In multiple OMS instances environment, run the command above at
least at one OMS instance and run the following command at all other
OMS instances to just update the SYSMAN password in OMS‟s
configuration file.
emctl config oms –change_repos_pwd
You are prompted for old and new SYSMAN passwords.
b. Use the following command to change MGMT_VIEW‟s password
emctl config oms –change_view_user_pwd [-sysman_pwd
<sysman_pwd>][-user_pwd <user_pwd>][-auto_generate]
In multiple OMS instance environment, you only need to run the
command at one OMS instance.
Please note that if “-auto_generate” is chosen, a random password will
be generated for MGMT_VIEW and no one knows the password.
c. To avoid the service interruption due to the lockout of internal users:
SYSMAN and MGMT_VIEW, out-of-box both users are associated with
MGMT_INTERNAL_USER_PROFILE, whose password parameters are
all set to UNLIMITED. In addition, to avoid sessions hanging or taking a
15
long time due to resource consumption limit,
MGMT_INTERNAL_USER_PROFILE‟s kernel parameters are set to
default, which is unlimited as well.
Grid Control Privilege/Role Management
1. Grant roles to users instead of granting privileges to enable Role Based Access
Control (RBAC). Managing role grants is simpler than managing privilege grants.
Create Meaningful roles and only grant roles instead of privileges
2. Use Privilege Propagation Group to simplify the privilege assignment, revocation,
and administration along with group management.
3. Follow the Principle of Least Privilege to grant only the minimum set of privileges
a user needs for carrying out his/her responsibilities by granting the fine-grained
privileges/roles only when needed.
4. Monitor the privileges grants on a regular basis and also keep track of which
users are exercised what privileges by enabling audit.
a. Grant role
b. Grant target privilege
c. Revoke role
d. Revoke target privilege
e. Grant system privilege
f. Revoke system privilege
g. Grant job privilege
h. Revoke job privilege
Preferred Credentials and Target Access
1. Use privilege delegation utilities such as sudo or PowerBroker to access targets,
run jobs and collect user-defined metrics.
16
2. Do not set preferred credentials for group/common accounts, e.g., SYSMAN. If
preferred credentials are set for common accounts, then the accountability of the
use of these credentials is lost. The following SQL statement can be used to
report the list of users who have the preferred credentials set:
SELECT t.target_name,tc.user_name,tc.credential_set_name
FROM MGMT_TARGET_CREDENTIALS tc, MGMT_TARGETS t
WHERE tc.target_guid=t.target_guid
3. Take advantage of the benefits such as centralized identity storage and
administration brought by LDAP,RADIUS or Kerberos authentication for host
target access via Pluggable Authentication Module(PAM). Note 422073.1 shows
how to configure Agent for PAM and LDAP.
Encryption/Decryption
1. Secure the encryption key: Encryption key is the master key that is used to
encrypt/decrypt sensitive data, such as passwords and preferred credentials,
which is stored in the Repository. The key itself is originally stored in the
Repository and it is removed automatically from the Repository once the
installation is done. And it only needs to be in the Repository when the
Repository is upgraded. By storing the key separately from EM schema, we
ensure that the sensitive data such as Preferred Credentials in the Repository
remain inaccessible to the schema owner and other SYSDBA users (Privileged
users who can perform maintenance tasks on the database) in the Repository.
Moreover, keeping the key from EM schema will ensure that sensitive data
remain inaccessible while Repository backups are accessed. Further, the EM
schema owner should not have access to the OMS/Repository Oracle homes.
Follow the process outlined below to secure the encryption key:
a. Backup the encryption key to a file by running the following command
and keep the encryption file on a separate machine securely. If the
encryption key is lost or corrupted, the encrypted data in the repository is
unusable.
17
emctl config emkey –copy_to_file_from_credstore –emkey_file
emkey.ora
2. While emkey is required to be existing in the Repository for some operations, if
the operation does not automatically copy the emkey back to Repository (or
remove it from the Repository afterwards), please copy it back to the Repository
and after the operation remove it from the Repository by following the procedure
below:
a. Copy the encryption key back into the Repository by using the following
command:
emctl config emkey –copy_to_repos
You will be prompted for SYSMAN password.
b. Remove the key from the Repository once the opeation is done.
emctl config emkey –remove_from_repos
You will be prompted for SYSMAN password.
Auditing
2. Enable audit for all security critical operations by issuing the following EMCLI
verb:
emcli enable_audit
Please note that you have to restart OMSs if your GC is 10g Release 5. For 11g
Release 1, restarting is not needed.
3. To enable audit for a subset of audited operations, please use the following
EMCLI verb:
emcli update_audit_settings -audit_switch="ENABLE/DISABLE" -
operations_to_enable="name of the operations to enable,for all oprtations use
ALL" -operations_to_disable="name of the operations to disable, for all oprtations
use ALL"
18
Please refer to section “Setting up for Auditing System for Enterprise Manager” in
Chapter 2 of Administrator‟s Guide for the list of operations that are audited by
Enterprise Manager.
The following command will show you the list of operations that can be audited
by Enterprise Manager
emcli show_operations_list
And the following command will only enable Enterprise Manager to audit user
login and logoff opeations in Grid Control.
emcli update_audit_settings –audit_switch=”ENABLE” –
operations_to_enable=”LOGIN;LOGOUT”
4. Once audit is enabled, the audit records are kept in MGMT$AUDITLOG table in
the Repository. Please use GUI tool in Grid control to monitor audit data. Here
are the steps to monitor audit data in Grid Control:
a. Login in to Grid Control as a Super Administrator
b. Go to “Setup”
c. Click Tab “Management Services and Repository”
d. Scroll down the page to “Audit” section and click the link “Audit Data”
then you will be directed to the page to monitor audit data.
5. Configure the externalization service via EMCLI verb update_audit_settings to
externalize the audit data from the Repository to an external file system on a
regular basis. Please also make sure there is enough space in the directory for
the audit log files

19
emcli update_audit_settings -file_prefix=<file_prefix> -
directory_name=<directory_name> -file_size = <file size> -
data_retention_period=<period in days>
file_prefix: The prefix of the file which contains the audit data.
directory_name: The name of the database directory that is mapped to
the OS directory.
file_size: The size of the file the data is written to.
data_retention_period: The period for which the audit data is to be
retained inside the repository.
The following example shows that the audit data will retained in the Repository
for 60 days and once expurged the data will be stored in the OS directory that
corresponds to database directory EM_DIR with filenames prefixed with
emgc_audit, and the file size will be 1M bytes each..
emcli update_audit_setting -directory="EM_DIR"
-file_prefix="emgc_audit"
-file_size="1000000"
-data_retention_period="60"
6. Achieve Separation of Duties by restricting the access to the directory where the
externalized audit data is stored; No EM users should have access to the
externalized audit data.
Please refer to the Chapter 2 of Administrator‟s Guide for more information about
Oracle Enterprise Manager Auditing.
http://download.oracle.com/docs/cd/E11857_01/em.111/e16790/security3.htm#insert
edID8
Conclusion
It is difficult to overstate the importance of security. This is particularly true for EM given
its wide-reaching nature. Oracle Enterprise Manager provides a robust set of security
features and capabilities starting with secure framework level communication to a secure
user model. Wherever possible, we attempt to incorporate best practices learned in the
field into the product itself. The rich set of target security policies shipped out-of-box are
an example of this effort. Yet, the entire system is as vulnerable as its weakest link. The
20
best practices presented above are designed to help you systematically enhance the
overall security of your EM deployments. We encourage you to take advantage of these
recommendations to make your EM Deployments robust from a security standpoint.

Oracle Enterprise Manager Grid Control 11g
Release 1 Security Deployment – Best Pracitces
June 2010
Author: Huaqing Wang
Contributing Authors: Ravi Pinnamaneni
Andrew Bulloch, Werner De Gruyter
Oracle Corporation
World Headquarters
500 Oracle Parkway
Redwood Shores, CA 94065
U.S.A.
Worldwide Inquiries:
Phone: +1.650.506.7000
Fax: +1.650.506.7200
oracle.com
Copyright © 2010, Oracle and/or its affiliates. All rights reserved.
This document is provided for information purposes only and the contents hereof are subject to change without notice. This
document is not warranted to be error-free, nor subject to any other warranties or conditions, whether expressed orally or implied in
law, including implied warranties and conditions of merchantability or fitness for a particular purpose. We specifically disclaim any
liability with respect to this document and no contractual obligations are formed either directly or indirectly by this document. This
document may not be reproduced or transmitted in any form or by any means, electronic or mechanical, for any purpose, without our
prior written permission.
Oracle and Java are registered trademarks of Oracle and/or its affiliates. Other names may be trademarks of their respective
owners.
AMD, Opteron, the AMD logo, and the AMD Opteron logo are trademarks or registered trademarks of Advanced Micro Devices. Intel
and Intel Xeon are trademarks or registered trademarks of Intel Corporation. All SPARC trademarks are used under license and are
trademarks or registered trademarks of SPARC International, Inc. UNIX is a registered trademark licensed through X/Open
Company, Ltd. 0110
