PDF United States Army Fm 21 20 1 October 1998
united_states_army_fm_21-20 - 1_october_1998 united_states_army_fm_21-20 - 1_october_1998
User Manual: PDF T E X T F I L E S
Open the PDF directly: View PDF ![]() .
.
Page Count: 241 [warning: Documents this large are best viewed by clicking the View PDF Link!]
- FM 21-20, W/ Chg 1
- Cover
- Change 1
- Table of Contents
- Preface
- Chapter 1 Introduction
- Chapter 2 Cardiorespiratory Fitness
- Chapter 3 Muscular Endurance and Strength
- Chapter 4 Flexibility
- Chapter 5 Body Composition
- Chapter 6 Nutrition and Fitness
- Chapter 7 Circuit Training and Exercise Drills
- Chapter 8 Obstacle Courses and Additional Drills
- Chapter 9 Competitive Fitness Activities
- Chapter 10 Developing the Unit Program
- Chapter 11 Physical Training During Initial Entry Training
- Chapter 12 Environmental Considerations
- Chapter 13 Injuries
- Chapter 14 Army Physical Fitness Test
- Appendix A Physiological Differences Between the Sexes
- Appendix B Positive Profile Form
- Appendix C Physical Fitness Log
- Appendix D Stationary Bicycle Test
- Appendix E Selecting the Right Running Shoe
- Appendix F Calculation of VO2max
- Appendix G Perceived Exertion
- Appendix H The Major Skeletal Muscles of the Human Body
- Glossary
- References
- Index
- Authorization Letter
FM 21-20
C1
HEADQUARTERS
CHANGE 1 DEPARTMENT OF THE ARMY
Washington, DC, 1 October 1998
PHYSICAL FITNESS TRAINING
1. Change FM 21-20, 30 September 1992, as follows:
REMOVE OLD PAGES INSERT NEW PAGES
14-3 to 14-8 14-3 to 14-8.2
14-21 to 14-22 14-21 to 14-22
2. A star (*) marks new or changed material.
3. File this transmittal sheet in front of this publication.
DISTRIBUTION RESTRICTION: proved for public release; distribution is unlimited.


CHAPTER 13
CHAPTER 14
APPENDIX A
TABLE OF CONTENTS (CONT.)
PAGE
INJURIES
Typical Injuries Associated with
Physical Training . . . . . . . . . . . . . . . . . . . . . . . . . . . . . . . . . . . . . . . . . . . . ..13-1
Other Factors . . . . . . . . . . . . . . . . . . . . . . . . . . . . . . . . . . . . . . . . . . . . . . . . . . ..13-2
ARMY PHYSICAL FITNESS TEST
Methods of Evaluation . . . . . . . . . . . . . . . . . . . . . . . . . . . . . . . . . . .14-1
Over-Forty Cardiovascular Screening
Program
. . . . . . . . . . . . . . . . . . . . . . . . . . . . . . . . . . . . . . . . . . . . . . . . . . . . . . . . . . . ..14-l
Overview . . . . . . . . . . . . . . . . . . . . . . . . . . . . . . . . . . . . . . . . . . . . . . . . . . . . . . . . . . ..l4-2
Test Administration . . . . . . . . . . . . . . . . . . . . . . . . . . . . . . . . . . . . . . . . ..l4-2
Duties of Test Personnel
. . . . . . . . . . . . . . . . . . . . . . . . . . . . . ...14-8
Test Site
. . . . . . . . . . . . . . . . . . . . . . . . . . . . . . . . . . . . . . . . . . . . . . . . . . . . . . . . . . ..i4-9
Test Procedures
. . . . . . . . . . . . . . . . . . . . . . . . . . . . . . . . . . . . . . . . . . . ..l4-10
Test Sequence
. . . . . . . . . . . . . . . . . . . . . . . . . . . . . . . . . . . . . . . . . . ..l4-11
Test Results
. . . . . . . . . . . . . . . . . . . . . . . . . . . . . . . . . . . . . . . . . . . . . . . . . . ..l4-18
Scores Above Maximum
. . . . . . . . . . . . . . . . . . . . . . . . . . . . . . ..14-19
Temporary Profiles . . . .
. . . . . . . . . . . . . . . . . . . . . . . . . . . . . . . . . . . ...14-20
Permanent Profiles . . .
. . . . . . . . . . . . . . . . . . . . . . . . . . . . . . . . . . . . ...14-20
Alternate Events . . . . . .
. . . . . . . . . . . . . . . . . . . . . . . . . . . . . . . . . . . . . ...14-20
PHYSIOLOGICAL DIFFERENCES
BETWEEN THE SEXES . . . . . . . . . . . . . . . . . . . . . . . . . . . . . . . . . . . ..A-O
APPENDIX B
APPENDIX C
APPENDIX D
APPENDIX E
APPENDIX F
APPENDIX G
APPENDIX H
PAGE
POSITIVE PROFILE FORM . . . . . . . . . . . . . . . . . . .. B-0
PHYSICAL FITNESS LOG . . . . . . . . . . . . . . . . . . . .. C-I
STATIONARY BICYCLE TEST . . . . . . . . . . .. D-O
SELECTING THE RIGHT
RUNNING SHOE
. . . . . . . . . . . . . . . . . . . .
. . . . . . . . . . . . . . . ..E-1
CALCULATION OF V02MAX . . . . . . . . . . . . . . .. F-1
PERCEIVED EXERTION
.
. . . . . . . . . . . . . . . . . . . . . .G-1
THE MAJOR SKELETAL MUSCLES
OF THE HUMAN BODY . . . . . . . . . . . . . . . . . . . . . .. H-O
GLOSSARY . . . . . . . . . . . . . . .
. . . . . . . . . . . . . . . . . . . . . . . . . . . . . . . . . . . . . . . . . . ..
Glossary-1
REFERENCES . . . . . . . . . . . . . . . . . . . . . . . . . . . . . . . . . . . . . . . . . . . . . . . . ..
References-O
INDEX
. . . . . . . . . . . . . . . . . . . . . . . . . . . . . . . . . . . . . . . . . . . . . . . . . . . . . . . . . . . .
Index-O
ii
Preface
On 5 July 1950, U.S. troops, who were unprepared
for the physical demands of war, were sent to battle. The
early days of the Korean war were nothing short of
disastrous, as U.S. soldiers were routed by a poorly
equipped, but well-trained, North Korean People’s Army.
As American soldiers withdrew, they left behind
wounded comrades and valuable equipment their
training had not adequately prepared them to carry
heavy loads.
The costly lessons learned by Task Force Smith in
Korea are as important today as ever. If we fail to
prepare our soldiers for their physically demanding
wartime tasks, we are guilty of paying lip service to the
principle of “Train as you fight.” Our physical training
programs must do more for our soldiers than just get
them ready for the semiannual Army Physical Fitness
Test (APFT’).
FM 21 -20 is directed at leaders who plan and
conduct physical fitness training. It provides guidelines
for developing programs which will improve and maintain physical fitness levels for all Army personnel.
These programs will help leaders prepare their soldiers to meet the physical demands of war. This manual can
also be used as a source book by all soldiers. FM 21-20 was written to conform to the principles outlined in
FM 25-100, Training the Force.
The benefits to be derived from a good physical fitness program are many. It can reduce the number of
soldiers on profile and sick call, invigorate training, and enhance productivity and mental alertness. A good
physical fitness program also promotes team cohesion and combat survivability. It will improve soldiers’
combat readiness.
The proponent of this publication is HQ TRADOC. Send comments and recommendations on DA Form
2028 (Recommended Changes to Publications and Blank Forms) directly to Headquarters, US Army Infantry
Center, US Army Physical Fitness School (ATZB-PF), Fort Benning, GA31905-5000.
Unless this publication states otherwise, masculine nouns and pronouns do not refer exclusively to men.
iii

A soldier’s level of physical fitness'
has a direct impact on his combat
readiness. The many battles in which
American troops have fought under-
score the important role physical fit-
ness plays on the battlefield. The
renewed nationwide interest in fitness
has been accompanied by many re-
search studies on the effects of regular
participation in sound physical fitness
programs. The overwhelming conclu-
sion is that such programs enhance a
person’s quality of life, improve pro-
ductivity, and bring about positive
physical and mental changes. Not only
are physically fit soldiers essential to
the Army, they are also more likely to
have enjoyable, productive lives.
This chapter provides an overview
of fitness. It defines physical fitness,
outlines the phases of fitness, and
discusses various types of fitness pro-
grams and fitness evaluation. Com-
manders and leaders can use this infor-
mation to develop intelligent, combat-
related, physical fitness programs.
Physical fitness, the emphasis of
this manual, is but one component of
total fitness. Some of the “others are
weight control, diet and nutrition,
stress management, dental health, and
spiritual and ethical fitness, as well as
the avoidance of hypertension, sub-
stance abuse, and tobacco use. This
manual is primarily concerned with
issues relating directly to the develop-
ment and maintenance of the five
components of physical fitness.
The Army’s physical fitness train-
ing program extends to all branches of
the total Army. This includes the
USAR and ARNG and encompasses all
ages and ranks and both sexes.
Its
purpose is to physically condition all
soldiers throughout their careers be-
ginning with initial entry training (IET).
It also includes soldiers with limiting
physical profiles who must also par-
ticipate in physical fitness training.
Commanders and leaders must en-
sure that all soldiers in their units
maintain the highest level of physical
fitness in accordance with this manual
and with AR 350-15 which prescribes
policies, procedures, and responsibili-
ties for the Army physical fitness
program.
Leadership Responsibilities
Components of physical
fitness include weight
control, diet, nutrition,
stress management, and
spiritual and ethical
fitness.
Effective leadership is critical to
the success of a good physical training
program. Leaders, especially senior
leaders, must understand and practice
the new Army doctrine of physical fit-
ness. They must be visible and active
participants in physical training pro-
grams. In short, leaders must lead PT!
Their example will emphasize the
importance of physical fitness training
and will highlight it as a key element
of the unit’s training mission.
Leaders must emphasize the value
of physical training and clearly ex-
plain the objectives and benefits of the
program. Master Fitness Trainers
(MFTs), graduates of a special course
taught by the U.S. Army Physical
Fitness School, can help commanders
do this. However, regardless of the
level of technical experience MFTs
have, the sole responsibility for good
programs rests with leaders at every
level.
A poorly designed and executed
physical fitness program hurts morale.
A good program is well planned and
organized, has reasonable yet chal-
lenging requirements, and is competi-
tive and progressive. It also has
command presence at every level with
leaders setting the example for their
soldiers.
Leaders should also continually as-
sess their units to determine which
specific components of fitness they
lack. Once they identify the short-
comings, they should modify their
programs to correct the weaknesses.
Leaders should not punish soldiers
who fail to perform to standard.
Punishment, especially excessive repe-
titions or additional PT, often does
more harm than good. Leaders must
1-1

plan special training to help soldiers
who need it. The application of sound
leadership techniques is especially
important in bringing physically defi-
cient soldiers up to standard.
‘COMMAND FUNCTIONS
Commanders must evaluate the ef-
fectiveness of physical fitness training
and ensure that it is focused on the
unit’s missions. They can evaluate its
effectiveness by participating in and
observing training, relating their fit-
ness programs to the unit’s missions,
and analyzing individual and unit APFT
performance.
Leaders should regularly measure
the physical fitness level of every
soldier to evaluate his progress and de-
termine the success of the unit’s pro-
gram.
Commanders should assure that
qualified leaders supervise and con-
duct fitness training and use their
MFTs, for they have received compre-
hensive training in this area.
Commanders must
ensure that the time
alloted for physical
fitness training is used
effectively.
Training times is wasted by the fol-
lowing:
• Unprepared or unorganized lead-
ers.
• Assignment fo a group which us too
large for one leader.
• Insufficient training intensity: it
will result in no improvement.
• Rates of progression that are too
slow or too fast.
• Extreme faomality that usually
emphasizes form over substance.
An example would be too many
units runs at slow paces or "daily
dozen" activities that look impres-
sive but do not result in impove-
ment.
• Inadequate facilities which cause
long waiting periods between exer-
cises during a workout and/or be-
tween workouts.
• Long rest periods which interfere
with progress.
Leaders can learn about fitness train-
ing in the following ways:
• Attend the four-week MFT course
or one-week Exercise Leaders
Course.
• Request a fitness workshop from
the Army Physical Fitness School.
• Become familiar with the Army's
fitness publications. Important ex-
amples include this manual, AR
350-15, and DA Pamphlets 350-15,
350-18, and 350-22.
Commanders must provide adequate
facilities and funds to support a pro-
gram which will improve each soldier’s
level of physical fitness. They must
also be sure that everyone participates,
since all individuals, regardless of rank,
age, or sex, benefit from regular exer-
cise. In some instances, leaders will
need to make special efforts to over-
come recurring problems which inter-
fere with regular training.
Leaders must also make special ef-
forts to provide the correct fitness
training for soldiers who are physi-
cally substandard. “Positive profiling”
(DA Form 3349) permits and encour-
ages profiled soldiers to do as much as
they can within the limits of their
profiles. Those who have been away
from the conditioning process because
of leave, sickness, injury, or travel
may also need special consideration.
Commanders must ensure that the
time allotted for physical fitness train-
ing is used effectively.
To foster a positive attitude, unit
leaders and instructors must be knowl-
edgeable, understanding, and fair, but
demanding. They must recognize
individual differences and motivate
soldiers to put forth their best efforts.
However, they must also emphasize
training to standard. Attaining a high
level of physical fitness cannot be
done simply by going through the mo-
tions. Hard training is essential.
Commanders must ensure that lead-
ers arefamiliar with approved
1-2

techniques, directives, and publica-
tions and that they use them. The ob-
jective of every commander should be
to incorporate the most effective meth-
ods of physical training into a balanced
program. This program should result
in the improved physical fitness of
their soldiers and an enhanced ability
to perform mission-related tasks.
MFTs can help commanders formu-
late sound programs that will attain
their physical training goals, but com-
manders must know and apply the
doctrine. However, since the respon-
sibility for physical training is the
commander’s, programs must be based
on his own training objectives. These
he must develop from his evaluation of
the unit’s mission-essential task list
(METL). Chapter 10 describes the
development of the unit’s program.
The components of physical fitness
are as follows:
• Cardiorespiratory (CR) endurance-
the efficiency with which the
body delivers oxygen and nutrients
needed for muscular activity and
transports waste products from the
cells.
• Muscular strength - the greatest
amount of force a muscle or muscle
group can exert in a single effort.
• Muscular endurance - the ability of
a muscle or muscle group to per-
form repeated movements with a
sub-maximal force for extended
periods of times.
• Flexibility-the ability to move the
joints (for example, elbow, knee) or
any group of joints through an
entire, normal range of motion.
• Body composition-the amount of
body fat a soldier has in compari-
son to his total body mass.
MASTER FITNESS TRAINERS
A Master Fitness Trainer (MFT) is
a soldier who has completed either the
four-week active-component, two-
week reserve-component, or U.S.
Military Academy’s MFT course work.
Although called “masters,” MFTs are
simply soldiers who know about all as-
pects of physical fitness training and
how soldiers’ bodies function. Most
importantly, since MFTs are taught to
design individual and unit programs,
they should be used by commanders as
special staff assistants for this purpose.
Components of Fitness
Physical fitness is the ability to func-
tion effectively in physical work, train-
ing, and other activities and still have
enough energy left over to handle any
emergencies which may arise.
MFTs can do the following:
• Assess the physical fitness levels of
individuals and units.
• Analyze the unit's mission-related
tasks and develop sound fitness
training programs to support those
tasks.
• Train other trainers to conduct sound,
safe physical training.
• Understand the structure and func-
tion of the human body, especially
as it relates to exercise.
Improving the first three compo-
nents of fitness listed above will have
a positive impact on body composition
and will result in less fat. Excessive
body fat detracts from the other fit-
ness components, reduces perform-
ance, detracts from appearance, and
negatively affects one’s health.
Factors such as speed, agility, muscle
power, eye-hand coordination, and
eye-foot coordination are classified as
components of “motor” fitness. These
factors affect a soldier’s survivability
on the battlefield. Appropriate train-
ing can improve these factors within
the limits of each soldier’s potential.
The Army’s fitness program seeks to
improve or maintain all the compo-
nents of physical and motor fitness
1-3

through sound, progressive, mission-
specific physical training for indi-
viduals and units.
Principles of Exercise
Adherence to certain basic exercise
principles is important for developing
an effective program. The principles
of exercise apply to everyone at all
levels of physical training, from the
Olympic-caliber athlete to the week-
end jogger. They also apply to fitness
training for military personnel.
These basic principles of exercise
must be followed:
Factors for a successful
training program are
Frequency, Intensity,
Time, and Type;
"FITT".
●
●
e
●
●
●
Regularity. To achieve a training
effect, a person must exercise of
ten. One should strive to exercise
each of the first four fitness com-
ponents at least three times a week.
Infrequent exercise can do more
harm than good. Regularity is
also important in resting, sleeping,
and following a good diet.
Progression. The intensity (how
hard) and/or duration (how long)
of exercise must gradually in-
crease to improve the level of fit-
ness.
Balance. To be effective, a pro-
gram should include activities that
address all the fitness compo-
nents, since overemphasizing any
one of them may hurt the others.
Variety. Providing a variety of ac-
tivities reduces boredom and in-
creases motivation and progress.
Specificity. Training must be
geared toward specific goals. For
example, soldiers become better
runners if their training empha-
sizes running. Although swim-
ming is great exercise, it does not
improve a 2-mile-run time as
much as a running program does.
Recovery. A hard day of training
for a given component of fitness
should be followed by an easier
training day or rest day for that
component and/or muscle group(s)
to help permit recovery. Another
●
way to allow recovery is to alternate
the muscle groups exercised every
other day, especially when training
for strength and/or muscle endur-
ance.
Overload. The work load of each
exercise session must exceed the
normal demands placed on the body
in order to bring about a training
effect.
FITT Factors
Certain factors must be part of any
fitness training program for it to be
successful. These factors are Fre-
quency, Intensity, Time, and Type.
The acronym FITT makes it easier to
remember them. (See Figure 1- 1.)
FREQUENCY
Army Regulation 350-15 specifies
that vigorous physical fitness training
will be conducted 3 to 5 times per
week. For optimal results, command-
ers must strive to conduct 5 days of
physical training per week. Ideally, at
least three exercise sessions for CR
fitness, muscle endurance, muscle
strength, and flexibility should be
performed each week to improve fit-
ness levels. Thus, for example, to
obtain maximum gains in muscular
strength, soldiers should have at least
three strength-training sessions per
week. Three physical activity periods
a week, however, with only one session
each of cardiorespiratory, strength,
and flexibility training will not im-
prove any of these three components.
With some planning, a training pro-
gram for the average soldier can be
developed which provides fairly equal
emphasis on all the components of
physical fitness. The following train-
ing program serves as an example.
In the first week, Monday, Wednes-
day, and Friday are devoted to CR
fitness, and Tuesday and Thursday are
devoted to muscle endurance and
strength. During the second week, the
1-4
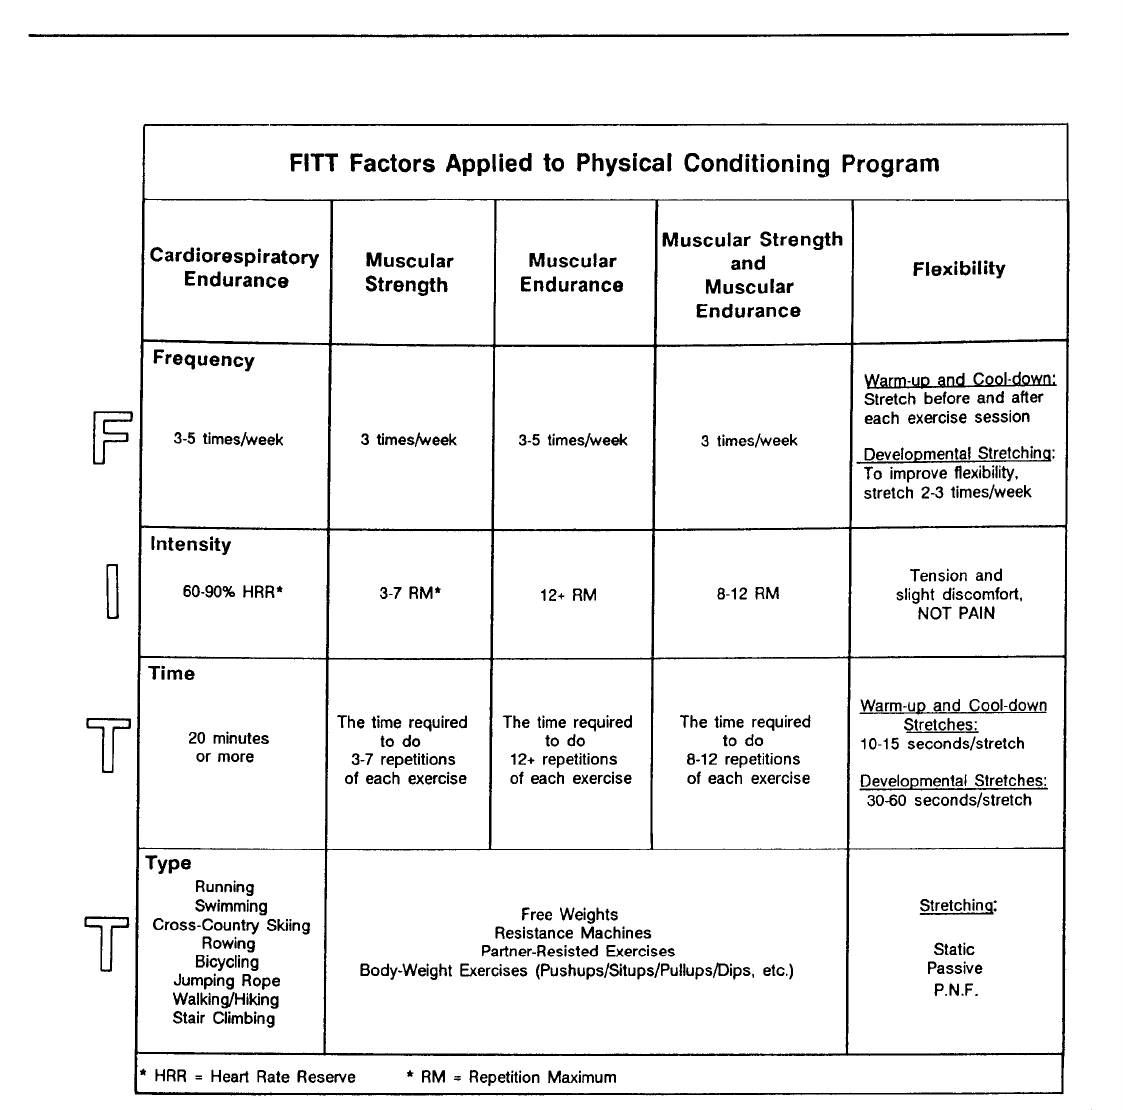
Figure 1-1
training days are flip-flopped: muscle
endurance and strength are trained on
Monday, Wednesday, and Friday, and
CR fitness is trained on Tuesday and
Thursday. Stretching exercises are
done in every training session to en-
hance flexibility. By training continu-
ously in this manner, equal emphasis
can be given to developing muscular
endurance and strength and to CR
fitness while training five days per
week.
If the unit’s mission requires it,
some muscular and some CR training
can be done during each daily training
session as long as a “hard day/recovery
1-5

day” approach is used. For example, if
a unit has a hard run on Monday,
Wednesday, and Friday, it may also
choose to run on Tuesday and Thurs-
day. However, on Tuesday and Thurs-
day the intensity and/or distance/time
should be reduced to allow recovery.
Depending on the time available for
each session and the way training
sessions are conducted, all components
of fitness can be developed using a
three-day-per-week schedule. How-
ever, a five-day-per-week program is
much better than three per week. (See
Training Program in Chapter 10.)
Numerous other approaches can be
taken when tailoring a fitness program
to meet a unit’s mission as long as the
principles of exercise are not violated.
Such programs, when coupled with
good nutrition, will help keep soldiers
fit to win.
!NTENSITY
Training at the right intensity is the
biggest problem in unit programs. The
intensity should vary with the type of
exercise being done. Exercise for CR
development must be strenuous enough
to elevate the heart rate to between 60
and 90 percent of the heart rate reserve
(HRR). (The calculation of percent
HRR is explained in Chapter 2.) Those
with low fitness levels should start
exercising at a lower training heart
rate (THR) of about 60 percent of
HRR.
For muscular strength and endur-
ance, intensity refers to the percentage
of the maximum resistance that is used
for a given exercise. When determin-
ing intensity in a strength-training
program, it is easier to refer to a
“repetition maximum” or “RM.” For
example, a 1O-RM is the maximum
weight that can be correctly lifted 10
times. An 8-12 RM is the weight that
can be lifted 8 to 12 times correctly.
Doing an exercise “correctly” means
moving the weight steadily and with
proper form without getting help from
other muscle groups by jerking, bend-
ing, or twisting the body. For the
average person who wants to improve
both muscular strength and endurance,
an 8-12 RM is best.
The person who wants to concen-
trate on muscular strength should use
weights which let him do three to seven
repetitions before his muscles fatigue.
Thus, for strength development, the
weight used should be a 3-7 RM. On
the other hand, the person who wants
to concentrate on muscular endurance
should use a 12+ RM. When using a 12+
RM as the training intensity, the more
repetitions performed per set, over
time, the greater will be the improve-
ment in muscular endurance. Con-
versely, the greater the number of
repetitions performed, the smaller will
be the gains in strength. For example,
a person who regularly trains with a
weight which lets him do 100 repeti-
tions per exercise (a 1OO-RM) greatly
increases his muscular endurance but
minimally improves his muscular
strength. (See Chapter 3 for informa-
tion on resistance training.)
All exercise sessions should include
stretching during the warm-up and
cool-down. One should stretch so
there is slight discomfort, but no
pain, when the movement is taken
beyond the normal range of motion.
(See Chapter 4 for information on
stretching.)
All exercises sessions
should include
stretching during
the warm-up and cool-
down.
TIME
Like intensity, the time spent exer-
cising depends on the type of exercise
being done. At least 20 to 30 continu-
ous minutes of intense exercise must be
used in order to improve cardiorespi-
ratory endurance.
For muscular endurance and strength,
exercise time equates to the number of
repetitions done. For the average
soldier, 8 to 12 repetitions with enough
resistance to cause muscle failure
improves both muscular endurance and
strength. As soldiers progress, they
1-6

will make better strength gains by
doing two or three sets of each resis-
tance exercise.
Flexibility exercises or stretches
should be held for varying times de-
pending on the objective of the session.
For warming-up, such as before a run,
each stretch should be held for 10 to 15
seconds. To improve flexibility, it is
best to do stretching during the cool-
down, with each stretch held for 30 to
60 seconds. If flexibility improvement
is a major goal, at least one session per
week should be devoted to developing
it.
TYPE
Type refers to the kind of exercise
performed. When choosing the type,
the commander should consider the
principle of specificity. For example,
to improve his soldiers’ levels of CR
fitness (the major fitness component in
the 2-mile run), he should have them
do CR types of exercises. These are
discussed in Chapter 2.
Ways to train for muscular strength
and endurance are addressed in Chap-
ter 3, while Chapter 4 discusses flexi-
bility. These chapters will help com-
manders design programs which are
tailor-made to their soldiers’ needs.
The basic rule is that to improve
performance, one must practice the
particular exercise, activity, or skill he
wants to improve. For example, to be
good at push-ups, one must do push-
ups. No other exercise will improve
push-up performance as effectively.
Warm-up and Cool-Down
One must prepare the body before
taking part in organized PT, unit sports
competition, or vigorous physical ac-
tivity. A warm-up may help prevent
injuries and maximize performance.
The warm-up increases the body’s
internal temperature and the heart rate.
The chance ofgetting injured
decreases when the heart, muscles,
ligaments, and tendons are properly
prepared for exertion. A warm-up
should include some running-in-place
or slow jogging, stretching, and calis-
thenics. It should last five to seven
minutes and should occur just before
the CR or muscular endurance and
strength part of the workout. After a
proper warm-up, soldiers are ready
for a more intense conditioning activ-
ity.Soldiers should cool down properly
after each exercise period, regardless
of the type of workout. The cool-
down serves to gradually slow the
heart rate and helps prevent pooling of
the blood in the legs and feet. During
exercise, the muscles squeeze the blood
through the veins. This helps return
the blood to the heart. After exercise,
however, the muscles relax and no
longer do this, and the blood can
accumulate in the legs and feet. This
can cause a person to faint. A good
cool-down will help avoid this possi-
bility.
Soldiers should walk and stretch
until their heart rates return to less
than 100 beats per minute (BPM) and
heavy sweating stops. This usually
happens five to seven minutes after
the conditioning session.
Phases of
Fitness Conditioning
The physical fitness training pro-
gram is divided into three phases:
preparatory, conditioning, and main-
tenance. The starting phases for
different units or individuals vary
depending on their age, fitness levels,
and previous physical activity.
Young, healthy persons may be able
to start with the conditioning phase,
while those who have been exercising
regularly may already be in the main-
tenance phase. Factors such as ex-
tended field training, leave time, and
illness can cause soldiers to drop from
a maintenance to a conditioning phase.
1-7

Persons who have not been active,
especially if they are age 40 or older,
should start with the preparatory phase.
Many soldiers who fall into this cate-
gory may be recovering from illness or
injury, or they may be just out of high
school. Most units will have soldiers in
all three phases of training at the same
time.
PREPARATORY PHASE
The preparatory phase helps both
the cardiorespiratory and muscular
systems get used to exercise, preparing
the body to handle the conditioning
phase. The work load in the beginning
must be moderate. Progression from a
lower to a higher level of fitness
should be achieved by gradual, planned
increases in frequency, intensity, and
time.
Initially, poorly conditioned sol-
diers should run, or walk if need be,
three times a week at a comfortable
pace that elevates their heart rate to
about 60 percent HRR for 10 to 15
minutes. Recovery days should be
evenly distributed throughout the week,
and training should progress slowly.
Soldiers should continue at this or an
appropriate level until they have no
undue fatigue or muscle soreness the
day following the exercise. They
should then lengthen their exercise
session to 16 to 20 minutes and/or
elevate their heart rate to about 70
percent HRR by increasing their pace.
To be sure their pace is faster, they
should run a known distance and try to
cover it in less time. Those who feel
breathless or whose heart rate rises
beyond their training heart rate (THR)
while running should resume walking
until the heart rate returns to the cor-
rect training level. When they can
handle an intensity of 70 percent HRR
for 20 to 25 minutes, they should be
ready for the next phase. Chapter 2
shows how to determine the THR, that
is, the right training level during aero-
bic training.
The preparatory phase for improv-
ing muscular endurance and strength
through weight training should start
easily and progress gradually. Begin-
ning weight trainers should select about
8 to 12 exercises that work all the
body’s major muscle groups. They
should use only very light weights the
first week (that is, the first two to three
workouts). This is very important, as
they must first learn the proper form
for each exercise. Light weights will
also help minimize muscle soreness and
decrease the likelihood of injury to the
muscles, joints, and ligaments. During
the second week, they should use pro-
gressively heavier weights on each
resistance exercise. By the end of the
second week (four to six workouts),
they should know how much weight
will let them do 8 to 12 repetitions to
muscle failure for each exercise.
this point the conditioning phase
gins.
CONDITIONING PHASE
At
be-
To reach the desired level of fitness,
soldiers must increase the amount of
exercise and/or the workout intensity
as their strength and/or endurance
increases.
To improve cardiorespiratory en-
durance, for example, they must in-
crease the length of time they run.
They should start with the preparatory
phase and gradually increase the run-
ning time by one or two minutes each
week until they can run continuously
for 20 to 30 minutes. At this point,
they can increase the intensity until
they reach the desired level of fitness.
They should train at least three times a
week and take no more than two days
between workouts.
For weight trainers, the condition-
ing phase normally begins during the
third week. They should do one set of
8 to 12 repetitions for each of the
selected resistance exercises.
When
they can do more than 12 repetitions of
any exercise, they should increase the
Soldiers and units
should be encouraged to
progress beyond
minimum requirements.
1-8

weight used on that exercise by about
five percent so they can again do only
8 to 12 repetitions. This process
continues throughout the conditioning
phase. As long as they continue to
progress and get stronger while doing
only one set of each exercise, it is not
necessary for them to do more than one
set per exercise. When they stop
making progress with one set, they
should add another set on those exer-
cises in which progress has slowed. As
training progresses, they may want to
increase the sets to three to help pro-
mote further increases in strength and/
or muscle mass.
For maximum benefit, soldiers should
do strength training three times a week
with 48 hours of rest between workouts
for any given muscle group. It helps to
periodically do a different type of
exercise for a given muscle or muscle
group. This adds variety and ensures
better strength development.
The conditioning phase ends when a
soldier is physically mission-capable
and all personal, strength-related goals
and unit-fitness goals have been met.
MAINTENANCE PHASE
The maintenance phase sustains the
high level of fitness achieved in the
conditioning phase. The emphasis here
is no longer on progression. A well-
designed, 45- to 60-minute workout
(including warm-up and cool-down) at
the right intensity three times a week
is enough to maintain almost any ap-
propriate level of physical fitness. These
workouts give soldiers time to stabalize
their flexibility, CR endurance, and
muscular endurance and strength.
However, more frequent training may
be needed to reach and maintain peak
fitness levels.
Soldiers and units should always be
encouraged to progress beyond mini-
mum requirements. Maintaining an
optimal level of fitness should become
part of every soldier’s life-style and
should be continued throughout his
life.
An effective program uses a variety
of activities to develop muscular en-
durance and strength, CR endurance,
and flexibility, and to achieve good
body composition. It should also pro-
mote the development of coordination
as well as basic physical skills. (See
Chapter 10 for guidance in construct-
ing a unit program.)
Types of Fitness Programs
The Army has too many types of
units with different missions to have
one single fitness program for every-
one. Therefore, only broad categories
of programs and general considera-
tions are covered here. They are
classified as unit, individual, and special
programs.
UNIT PROGRAMS
Unit programs must support unit
missions. A single unit may require
several types of programs. Some units,
such as infantry companies, have gen-
erally the same types of soldiers and
MOSS.
On the other hand, certain
combat--service-support units have
many different types of soldiers, each
with unique needs. Commanders can
develop programs for their own unit
by following the principles in this
chapter. MFTs know how to help
commanders develop programs for their
units/soldiers.
Commanders of units composed of
both men and women must also under-
stand the physiological differences
between the sexes. These are summa-
rized in Appendix A. Although women
are able to participate in the same
fitness programs as men, they must
work harder to perform at the same
absolute level of work or exercise.
The same holds true for poorly-con-
ditioned soldiers running with well-
conditioned soldiers.
To overcome this problem in the
case of running, for example, the unit
1-9

should use ability group runs rather
than unit runs. Soldiers in a given
ability group will run at a set pace,
with groups based on each soldier’s
most recent 2-mile-run time. Three
to six groups per company-sized unit
are usually enough. Within each
group, each soldier’s heart rate while
running should be at his own THR.
When the run is not intense enough to
bring one or more of the soldiers to
THR, it is time for those soldiers to
move up to the next ability group.
Ability group running does two
things more effectively than unit runs:
1) it lets soldiers improve to their
highest attainable fitness level; and, 2)
it more quickly brings subpar per-
formers up to minimum standards.
Additional training should not be
used as punishment for a soldier's
inability to perform well.
It also allows soldiers to train to
excel on the APFT which, in turn,
helps promotion opportunities. Hold-
ing a fit soldier back by making him
run at a slow, unit-run pace (normally
less than his minimum pace for the 2-
mile run on the APFT) hurts his
morale and violates the principle of
training to challenge.
initial Entry Training (lET)
The training program in basic train-
ing (BT) brings soldiers up to the level
of physical fitness they need to do
their jobs as soldiers. However, the
program requires good cadre leader-
ship to ensure that it is appropriate,
demanding, and challenging.
Trainees report to active duty at
various levels of physical fitness and
ability. During basic training they
pass through the preparatory into the
conditioning phase. During “fill” pe-
riods and the first week of training,
the focus is on learning and develop-
ing the basics of physical fitness.
Training emphasizes progressive
conditioning of the whole body. To
minimize the risk of injury, exercises
must be done properly, and the inten-
sity must progress at an appropriate
rate. Special training should be consid-
ered for soldiers who fail to maintain
the unit’s or group’s rate of progres-
sion.
Commanders should evaluate
each basic trainee who falls below
standard and give him individualized,
special assistance to improve his defi-
ciencies.
More PT is not necessarily better.
Chapter 11 describes how to develop
physical training programs in IET units.
Advanced Individual Training (AIT)
Although AIT focuses on technical
and MOS-oriented subjects, physical
fitness must be emphasized throughout.
Most soldiers arriving from basic train-
ing are already well into the condition-
ing phase. Therefore, AIT unit training
should focus on preparing soldiers to
meet the physical requirements of their
initial duty assignments. (See TRA-
DOC Reg. 350-6, Chapter 4.)
Walking, running, and climbing
during unit training contribute to
physical fitness, but they are not enough.
Physical training in AIT requires con-
tinued, regular, vigorous exercise which
stresses the whole body and addresses
all the components of fitness.
By the end of AIT, soldiers must
meet APFT standards. With good pro-
grams and special training, all healthy
AIT graduates should easily be able to
demonstrate that they, possess the re-
quired level of physical fitness.
By the end of AIT,
soldiers must meet
APFT standards.
1-10

At least three groups of soldiers may
need special PT programs. They are as
follows:
• Those who fail the APFT and do
not have medical profiles.
• Those who are overweight/overfat
according to AR 600-9
• Those who have either permanent
or temporary medical profiles.
There must be a
positive approach to
all special fitness
training.
TOE and TDA Units–Active
Component
There are many types of units in the
Army, and their missions often require
different levels of fitness. TOE and
TDA units must emphasize attaining
and maintaining the fitness level re-
quired for the mission.
The unit’s standards may exceed the
Army’s minimums. By regulation
(AR 350- 15), the unit’s standards can
be established by the unit’s commander,
based on mission requirements.
TOE and TDA Units--Reserve
Components
The considerations for the active
component also apply to reserve com-
ponents (RCS). However, since mem-
bers of RC units cannot participate
together in collective physical training
on a regular basis, RC unit programs
must focus on the individual’s fitness
responsibilities and efforts. Com-
manders, however, must still ensure
that the unit’s fitness level and indi-
vidual PT programs are maintained.
MFTs can give valuable assistance to
RC commanders and soldiers.
INDIVIDUAL PROGRAMS
Many soldiers are assigned to duty
positions that offer little opportunity
to participate in collective unit PT
programs. Examples are HQDA,
MACOM staffs, hospitals, service school
staff and faculty, recruiting, and ROTC.
In such organizations, commanders must
develop leadership environments that
encourage and motivate soldiers to
accept individual responsibility for their
own physical fitness. Fitness require-
ments are the same for these personnel
as for others. Section chiefs and indi-
vidual soldiers need to use the funda-
mental principles and techniques out-
lined in this manual to help them attain
and maintain a high level of physical
fitness. MFTs can help develop
vidual fitness programs.
SPECIAL PROGRAMS
indi -
The day-to-day unit PT program
conducted for most soldiers may not
be appropriate for all unit members.
Some of them may not be able to ex-
ercise at the intensity or duration best
suited to their needs.
Leaders must also give special con-
sideration to soldiers who are age 40 or
older and to recent arrivals who cannot
meet the standards of their new unit.
Special programs must be tailored
to each soldier’s needs, and trained,
knowledgeable leaders should develop
and conduct them. This training
should be conducted with the unit, If
this is impossible, it should at least
occur at the same time.
There must be a positive approach
to all special fitness training. Soldiers
who lack enough upper body strength
to do a given number of push-ups or
enough stamina to pass the 2-mile run
should not be ridiculed. Instead, their
shortcomings should be assessed and
the information used to develop indi-
vidualized programs to help them
remedy their specific shortcomings. A
company-sized unit may have as many
as 20 soldiers who need special atten-
tion. Only smart planning will pro-
duce good programs for all of them.
Commanders must counsel soldiers,
explaining that special programs are
being developed in their best interests.
They must make it clear that standards
1-11

will be enforced. Next, they should
coordinate closely with medical per-
sonnel to develop programs that fit the
capabilities of soldiers with medical
limitations. Each soldier should then
begin an individualized program based
on his needs.
MFTs know how to assess CR en-
durance, muscular strength and
endurance, flexibility, and body
composition. They can also develop
thorough, tailor-made programs for
all of a unit’s special population.
APFT Failures
Although it is not the heart of the
Army’s physical fitness program, the
APFT is the primary instrument for
evaluating the fitness level of each
soldier. It is structured to assess the
muscular endurance of specific muscle
groups and the functional capacity of
the CR system.
Soldiers with reasonable levels of
overall physical fitness should easily
pass the APFT. Those whose fitness
levels are substandard will fail. Sol-
diers who fail the APFT must receive
special attention. Leaders should ana-
lyze their weaknesses and design pro-
grams to overcome them. For ex-
ample, if the soldier is overweight,
nutrition and dietary counseling may
be needed along with a special exercise
program. DA Pam 350-22 outlines
several ways to improve a soldier’s
performance on each of the APFT
events.
When trying to improve APFT per-
formances, leaders must ensure that
soldiers are not overloaded to the point
where the fitness training becomes
counterproductive. They should use
ability groups for their running pro-
gram and, in addition to a total-body
strength-training program, should in-
clude exercises designed for push-up
and sit-up improvement. When deal-
ing with special populations, two very
important principles are overload and
recovery. The quality, not just the
quantity, of the workout should be
emphasized. Two-a-day sessions, un-
less designed extremely well, can be
counter-productive. More PT is not
always better.
Overweight Soldiers
Designers of weight loss and physi-
cal training programs for overweight
soldiers should remember this: even
though exercise is the key to sensible
weight loss, reducing the number of
calories consumed is equally impor-
tant. A combination of both actions is
best.
The type of exercise the soldier does
affects the amount and nature of the
weight loss. Both running and walking
burn about 100 calories per mile. One
pound of fat contains 3,500 calories.
Thus, burning one pound of fat through
exercise alone requires a great deal of
running or walking. On the other hand,
weight lost through dieting alone in-
cludes the loss of useful muscle tissue.
Those who participate in an exercise
program that emphasizes the develop-
ment of strength and muscular endur-
ance, however, can actually increase
their muscle mass while losing body
fat. These facts help explain why
exercise and good dietary practices
must be combined.
Unit MFTs can help a soldier deter-
mine the specific caloric requirement
he needs to safely and successfully lose
excess fat. They can devise a sound,
individualized plan to arrive at that
reduced caloric intake. Likewise, unit
MFTs can also develop training pro-
grams which will lead to fat loss
without the loss of useful muscle tissue.
Generally, overweight soldiers should
strive to reduce their fat weight by two
pounds per week. When a soldier loses
weight, either by diet or exercise or
both, a large initial weight loss is not
unusual. This may be due to water loss
associated with the using up of the
body’s carbohydrate stores. Although
these losses may be encouraging to the
1-12

soldier, little of this initial weight loss
is due to the loss of fat.
Soldiers should be weighed under
similar circumstances and at the same
time each day. This helps avoid false
measurements due to normal fluctua-
tions in their body weight during the
day. As a soldier develops muscular
endurance and strength, lean muscle
mass generally increases. Because muscle
weighs more per unit of volume than
fat. caution is advised in assessing his
progress. Just because a soldier is not
losing weight rapidly does not neces-
sarily mean he is not losing fat. In fact,
a good fitness program often results in
gaining muscle mass while simultane-
ously losing fat weight. If there
reasonable doubt, his percentage
body fat should be determined.
Soldiers with Profiles
is
of
This manual stresses what soldiers
can do while on medical profile rather
than what they cannot do.
DOD Directive 1308.1 requires that,
“Those personnel identified with medi-
cally limiting defects shall be placed in
a physical fitness program consistent
with their limitations as advised by
medical authorities.”
AR 350-15 states, “For individuals
with limiting profiles, commanders
will develop physical fitness programs
in cooperation with health care per-
sonnel.”
The Office of the Surgeon General
has developed DA Form 3349 to ease
the exchange of information between
health care personnel and the units. On
this form, health care personnel list,
along with limitations, those activities
that the profiled soldier can do to
maintain his fitness level. With this
information, the unit should direct
profiled soldiers to participate in the
activities they can do. (An example of
DA Form 3349 is in Appendix B.)
All profiled soldiers should take
part in as much of the regular fitness
program as they can. Appropriate ac-
tivities should be substituted to re-
place those regular activities in which
they cannot participate.
Chapter 2 describes some aerobic
activities the soldier can do to main-
tain cardiorespiratory fitness when he
cannot run. Chapter 3 shows how to
strengthen each body part. Applying
this information should allow some
strength training to continue even
when body parts are injured. The
same principle applies to flexibility
(Chapter 4).
Medical treatment and rehabilita-
tion should be aimed at restoring the
soldier to a suitable level of physical
fitness. Such treatment should use
appropriate, progressive physical ac-
tivities with medical or unit supervi-
sion.
MFTs can help profiled soldiers by
explaining alternative exercises and
how to do them safely under the
limitations of their profile. MFTs are
not, however, trained to diagnose in-
juries or prescribe rehabilitative exer-
cise programs. This is the domain of
qualified medical personnel.
The activity levels of soldiers usu-
ally decrease while they are recovering
from sickness or injury. As a result,
they should pay special attention to
their diets to avoid gaining body fat.
This guidance becomes more impor-
tant as soldiers grow older.
With
medical supervision, proper diet, and
the right PT programs, soldiers should
be able to overcome their physical
profiles and quickly return to their
normal routines and fitness levels.
Age as a Factor in Physical
Fitness
All profiled soldiers
should do as much of
the regular fitness
program as they can,
along with substitute
activities.
Soldiers who are age 40 and older
represent the Army’s senior leader-
ship. On the battlefield, they must
lead other soldiers under conditions of
severe stress. To meet this challenge
1-13

and set a good example, these leaders
must maintain and demonstrate a high
level of physical fitness. Since their
normal duties may be stressful but
nonphysical, they must take part regu-
larly in a physical fitness program. The
need to be physically fit does not
decrease with increased age.
People undergo many changes as
they grow older. For example, the
amount of blood the heart can pump
per beat and per minute decreases
during maximal exercise, as does the
maximum heart rate. This lowers a
person’s physical ability, and per-
formance suffers. Also, the percent of
body weight composed of fat generally
increases, while total muscle mass de-
creases. The result is that muscular
strength and endurance, CR endur-
ance, and body composition suffer. A
decrease in flexibility also occurs.
Men tend to maintain their peak
levels of muscular strength and endur-
ance and CR fitness until age 30.
After 30 there is a gradual decline
throughout their lives. Women tend to
reach their peak in physical capability
shortly after puberty and then undergo
a progressive decline.
Although a decline in performance
normally occurs with aging, those who
stay physically active do not have the
same rate of decline as those who do
not. Decreases in muscular strength
and endurance, CR endurance, and
flexibility occur to a lesser extent in
those who regularly train these fitness
components.
Soldiers who are fit at age 40 and
continue to exercise show a lesser
decrease in many of the physiological
functions related to fitness than do
those who seldom exercise. A trained
60-year-old, for example, may have
the same level of CR fitness as a
sedentary 20-year-old. In short, regu-
lar exercise can help add life to your
years and years to your life.
The assessment phase of a program
is especially important for those age 40
and over. However, it is not necessary
or desirable to develop special fitness
programs for these soldiers. Those who
have been exercising regularly may
continue to exercise at the same level as
they did before reaching age 40. A
program based on the principles of ex-
ercise and the training concepts in this
manual will result in a safe, long-term
conditioning program for all soldiers.
Only those age 40 and over who have
not been exercising regularly may need
to start their exercise program at a
lower level and progress more slowly
than younger soldiers. Years of inac-
tivity and possible abuse of the body
cannot be corrected in a few weeks or
months.
As of 1 January 1989, soldiers reach-
ing age 40 are no longer required to get
clearance from a cardiovascular screen-
ing program before taking the APFT.
Only a medical profile will exempt
them from taking the biannual record
APFT. They must, however, have
periodic physical examinations in ac-
cordance with AR 40-501 and NGR
40-501. These include screening for
cardiovascular risk factors.
Evaluation
To evaluate their physical fitness
and the effectiveness of their physical
fitness training programs, all military
personnel are tested biannually using
the APFT in accordance with AR 350-
15. (Refer to Chapter 14.) However,
commanders may evaluate their physi-
cal fitness programs more frequently
than biannually.
SCORING CATEGORIES
There are two APFT categories of
testing for all military personnel Ini-
tial Entry Training (IET) and the Army
Standard.
1-14

IET
Standard
The APFT standard for basic train-
ing is a minimum of 50 points per
event and no less than 150 points
overall by the end of basic
Graduation requirements for
One Station Unit Training
require 60 points per event.
Army Standard
training.
AIT and
(OSUT)
Safety is a major
consideration when
planning and evaluating
physical training
programs
Safety is a major consideration
when planning and evaluating physi-
cal training programs. Commanders
must ensure that the programs do not
place their soldiers at undue risk of
injury or accident. They should ad-
dress the following items:
•Environmental conditions (heat/
cold/traction).
• Soldiers' levels of conditioning ( low/
high/age/sex).
•Facilities (availability/instruction/
repair).
•Traffic (routes/procedures/forma-
tions).
•Emergency procedures (medical/
communication/transport).
All other Army personnel (active
and reserve) who are non-IET soldiers
must attain the minimum Army stan-
dard of at least 60 points per event. To
get credit for a record APFT, a medic-
cally profiled soldier must, as a mini-
mum, complete the 2-mile run or one
of the alternate aerobic events.
SAFETY
The objective of physical training
in the Army is to enhance soldiers’
abilities to meet the physical demands
of war. Any physical training which
results in numerous injuries or acci-
dents is detrimental to this goal. As in
most training, common sense must
prevail. Good, sound physical training
should challenge soldiers but should
not place them at undue risk nor lead
to situations where accidents or inju-
ries are likely to occur.
1-15
Cardiorespiratory (CR) fitness,
sometimes called CR endurance, aero-
bic fitness, or aerobic capacity, is one
of the five basic components of physi-
cal fitness. CR fitness is a condition in
which the body’s cardiovascular (cir-
culatory) and respiratory systems
function together, especially during
exercise or work, to ensure that ade-
quate oxygen is supplied to the work-
ing muscles to produce energy. CR
fitness is needed for prolonged, rhyth-
mic use of the body’s large muscle
groups. A high level of CR fitness
permits continuous physical activity
without a decline in performance and
allows for rapid recovery following
fatiguing physical activity.
Activities such as running, road
marching, bicycling, swimming, cross-
country skiing, rowing, stair climbing,
and jumping rope place an extra demand
on the cardiovascular and respiratory
systems. During exercise, these sys-
tems attempt to supply oxygen to the
working muscles. Most of this oxygen
is used to produce energy for muscular
contraction. Any activity that con-
tinuously uses large muscle groups for
20 minutes or longer taxes these sys-
tems. Because of this, a wide variety
of training methods is used to improve
cardiorespiratory endurance.
To provide enough energy-producing
oxygen to the muscles, the following
events occur:
• Greater movement of air through
the lungs.
• Increased movement of oxygen from
the lungs into the blood stream.
• Increased delivery of oxygen-laden
blood to the working muscles by the
heart's accelerated pumping action.
• Regulation of the blood vessel's size
to distribute blood away from inac-
tive tissue to working muscle.
• Greater movemen t of oxygen from
the blood into the muscle tissue.
• Accelerated return of veinous blood
to the heart.
CR fitness is needed for
prolonged, rhythmic use
of the body's large
muscle groups.
Physiology of Aerobic Training
Aerobic exercise uses oxygen to
produce most of the body’s energy
needs. It also brings into play a fairly
complex set of physiological events.
2-0

Aerobic exercise is the
best type of activity for
attaining and
maintaining a low
percentage of body fat.
The best way to determine aerobic
capacity is to measure it in the labora-
tory. It is much easier, however, to es-
timate maximum oxygen uptake by
using other methods.
It is possible to determine a soldier’s
CR fitness level and get an accurate
estimate of his aerobic capacity by us-
ing his APFT 2-mile-run time.
(Appendix F explains how to do this.)
Other tests - the bicycle, walk, and step
tests - may also be used to estimate
one’s aerobic capacity and evaluate
one’s CR fitness level.
In the presence of oxygen, muscle
cells produce energy by breaking down
carbohydrates and fats. In fact, fats
are only used as an energy source when
oxygen is present. Hence, aerobic
exercise is the best type of activity for
attaining and maintaining a low per-
centage of body fat.
A person’s maximum aerobic capac-
ity can be modified through physical
training. To reach very high levels of
aerobic fitness, one must train hard.
The best way to improve CR fitness is
to participate regularly in a demanding
aerobic exercise program.
Many factors can negateively affect
one's ability to perform well aerobi-
cally. These include the following:
• Age.
• Anemia.
• Carbon monoxide from tobacco smoke
or pollution.
• High altitude (reduced oxygen pres-
sure).
• Illness (heart disease).
• Obesity.
• Sedentary life-style.
Any condition that reduces the body’s
ability to bring in, transport, or use
oxygen reduces a person’s ability to
perform aerobically. Inactivity causes
much of the decrease in physical fit-
ness that occurs with increasing age.
Some of this decrease in aerobic fitness
can be slowed by taking part in a
regular exercise program.
Certain medical conditions also
impair the transport of oxygen. They
include diseases of the lungs, which
interfere with breathing, and dis-
abling heart conditions. Another is
severe blocking of the arteries which
inhibits blood flow to the heart and
skeletal muscles.
Smoking can lead to any or all of the
above problems and can, in the long
and short term, adversely affect one’s
ability to do aerobic exercise.
FITT Factors
As mentioned in Chapter 1, a person
must integrate several factors into any
successful fitness training program to
improve his fitness level. These fac-
tors are summarized by the following
words which form the acronym FITT.
Frequency, Intensity, Time, and Type.
They are described below as they
pertain to cardiorespiratory fitness. A
warm-up and cool-down should also
be part of each workout. Information
on warming up and cooling down is
given in Chapters 1 and 4.
FREQUENCY
Frequency refers to how often one
exercises. It is related to the intensity
and duration of the exercise session.
Conditioning the CR system can best
be accomplished by three adequately
intense workouts per week. Soldiers
should do these on alternate days. By
building up gradually, soldiers can get
even greater benefits from working
out five times a week. However,
leaders should recognize the need for
recovery between hard exercise peri-
ods and should adjust the training in-
tensity accordingly. They must also be
aware of the danger of overtraining
and recognize that the risk of injury
increases as the intensity and duration
of training increases.
2-1
INTENSITY
Intensity is related to how hard one
exercises. It represents the degree of
effort with which one trains and is
probably the single most important
factor for improving performance. Un-
fortunately, it is the factor many units
ignore.
Changes in CR fitness are directly
related to how hard an aerobic exercise
is performed. The more energy ex-
pended per unit of time, the greater
the intensity of the exercise. Signifi-
cant changes in CR fitness are brought
about by sustaining training heart
rates in the range of 60 to 90 percent
of the heart rate reserve (HRR). In-
tensities of less than 60 percent HRR
are generally inadequate to produce a
training effect, and those that exceed
90 percent HRR can be dangerous.
Soldiers should gauge the intensity
of their workouts for CR fitness by
determining and exercising at their
training heart rate (THR). Using the
THR method lets them find and pre-
scribe the correct level of intensity
during CR exercise. By determining
one’s maximum heart rate, resting
heart rate, and relative conditioning
level, an appropriate THR or intensity
can be prescribed.
One’s ability to monitor the heart
rate is the key to success in CR
training. (Note: Ability-group run-
ning is better than unit running be-
cause unit running does not accommo-
date the individual soldier’s THR. For
example, some soldiers in a formation
may be training at 50 percent HRR
and others at 95 percent HRR. As a
result, the unit run will be too intense
for some and not intense enough for
others.)
The heart rate during work or exer-
cise is an excellent indicator of how
much effort a person is exerting.
Keeping track of the heart rate lets one
gauge the intensity of the CR exercise
being done. With this information,
one can be sure that the intensity is
enough to improve his CR fitness level.
Percent MHR Method
With this method, the THR is fig-
ured using the estimated maximal heart
rate. A soldier determines his esti-
mated maximum heart rate by sub-
tracting his age from 220. Thus, a 20-
year-old would have an estimated
maximum heart rate (MHR) of 200
beats per minute (220 -20 = 200).
When using the MHR method, one
must compensate for its built-in weak-
ness. A person using this method may
exercise at an intensity which is not
high enough to cause a training effect.
To compensate for this, a person who
is in poor shape should exercise at 70
percent of his MHR; if he is in
relatively good shape, at 80 percent
MHR; and, if he is in excellent shape,
at 90 percent MHR.
2-2
Percent HRR Method
A more accurate way to calculate
THR is the percent HRR method. The
range from 60 to 90 percent HRR is the
THR range in which people should
exercise to improve their CR fitness
levels. If a soldier knows his general
level of CR fitness, he can determine
which percentage of HRR is a good
starting point for him. For example, if
he is in excellent physical condition, he
could start at 85 percent of his HRR; if
he is in reasonably good shape, at 70
percent HRR; and, if he is in poor
shape, at 60 percent HRR.
Most CR workouts should be con-
ducted with the heart rate between 70
to 75 percent HRR to attain, or main-
tain, an adequate level of fitness. Soldiers
who have reached a high level of
fitness may derive more benefit from
working at a higher percentage of
HRR, particularly if they cannot find
more than 20 minutes for CR exercise.
Exercising at any lower percentage of
HRR does not give the heart, muscles,
and lungs an adequate training stimu-
lus.
Before anyone begins aerobic train-
ing, he should know his THR (the heart
rate at which he needs to exercise to get
a training effect).
2-3
As shown, the percentage (70 per-
cent in this example) is converted to
the decimal form (0.70) before it is
multiplied by the HRR. The result is
then added to the resting heart rate
(RHR) to get the THR. Thus, the
product obtained by multiplying 0.70
and 131 is 91.7. When 91.7 is added to
the RHR of 69, a THR of 160.7 results.
When the calculations produce a frac-
tion of a heart beat, as in the example,
the value is rounded off to the nearest
whole number. In this case, 160.7
BPM is rounded off to give a THR of
161 BPM. In summary, a reasonably
fit 20-year-old soldier with a resting
heart rate of 69 BPM has a training
heart rate goal of 161 BPM. To de-
termine the RHR, or to see if one is
within the THR during and right after
exercise, place the tip of the third
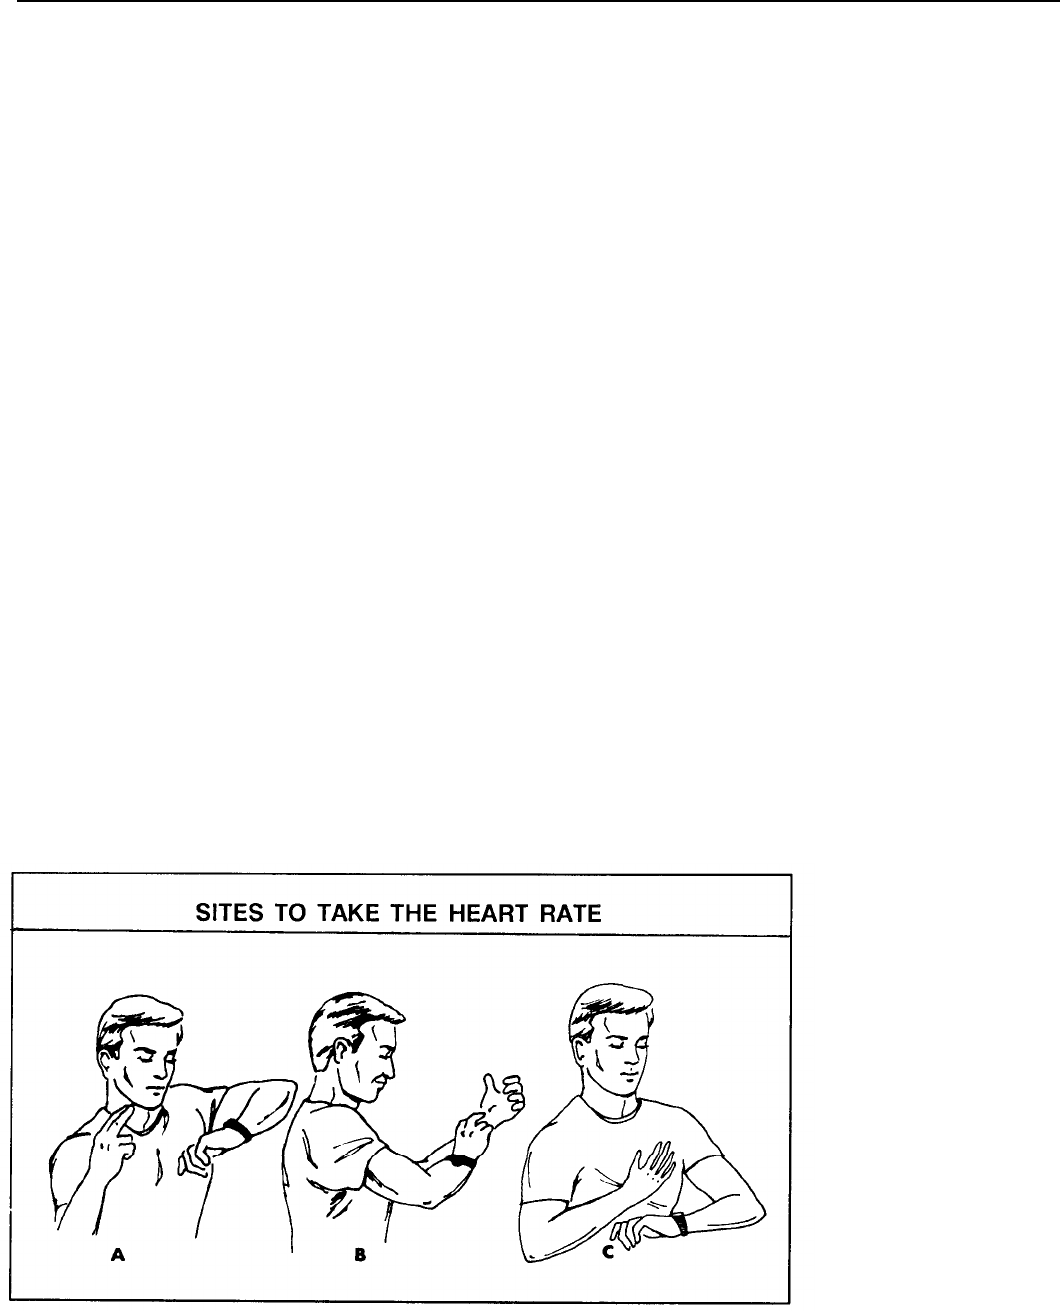
finger lightly over one of the carotid
arteries in the neck. These arteries are
located to the left and right of the
Adam’s apple. (See Figure 2-1A.)
Another convenient spot from which
to monitor the pulse is on the radial
artery on the wrist just above the base
of the thumb. (See Figure 2-lB.) Yet
another way is to place the hand over
the heart and count the number of
heart beats. (See Figure 2-1 C.)
I
During aerobic exercise, the body
will usually have reached a "Steady
State" after five minutes of exercise,
and the heart rate will have leveled off.
At this time, and immediately after ex-
ercising, the soldier should monitor his
heart rate.
He should count his pulse for 10
seconds, then multiply this by six to get
his heart rate for one minute. This will
let him determine if his training inten-
sity is high enough to improve his CR
fitness level.
For example, use the THR of 161
BPM figured above. During the 10-
second period, the soldier should get a
count of 27 beats (161/6= 26.83 or 27)
if he is exercising at the right intensity.
If his pulse rate is below the THR, he
must exercise harder to increase his
pulse to the THR. If his pulse is above
the THR, he should normally exercise
at a lower intensity to reduce the pulse
rate to the prescribed THR. He should
count as accurately as possible, since
one missed beat during the 10-second
count, multiplied by six, gives an error
of six BPM.
Figure 2-1
2-4
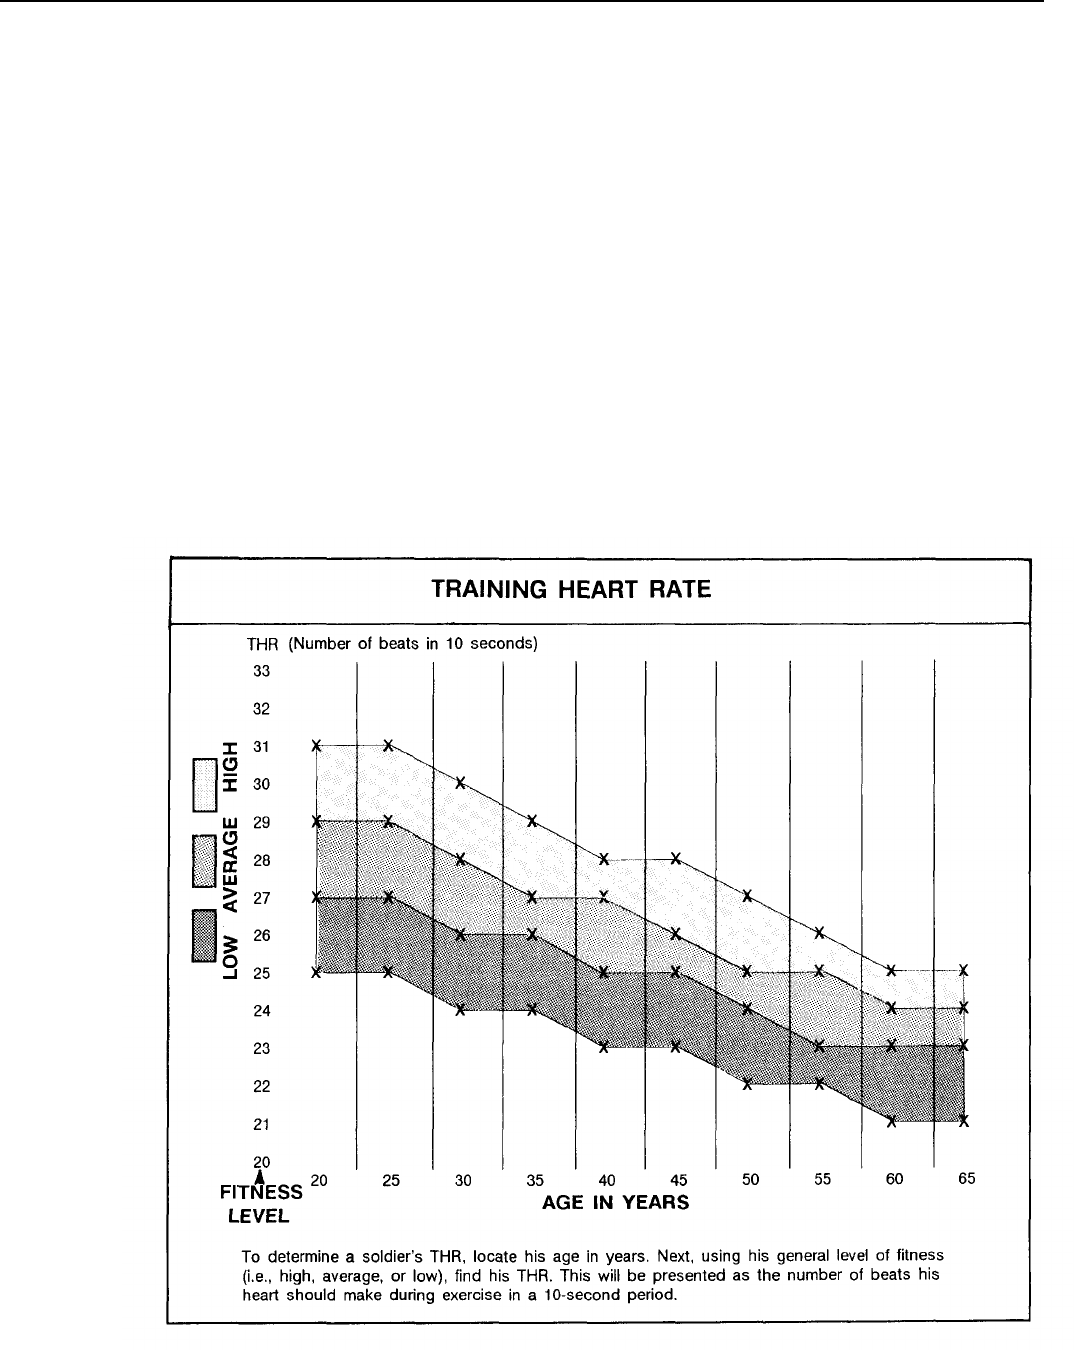
A soldier who maintains his THR exercise. have a THR of 23 beats in 10
A soldier who maintains
throughout a 20- to 30-minute exercise seconds. He can determine this from
his THR throughout a period is doing well and can expect im- the table by locating his age and then
20-30-minute exercise
provement in his CR fitness level. He tracking upward until he reaches the
should check his exercise and post-
period is doing well and percent HRR for his fitness level.
exercise pulse rate at least once each Again, those with a low fitness level
can expect improvement
workout. If he takes only one pulse
in his CR fitness level. should work at about 60 percent HRR
check, he should do it five minutes into and those with a good fitness level at
the workout.
Figure 2-2 is a chart that makes it
easy to determine what a soldier’s THR
should be during a 10-second count.
Using this figure, a soldier can easily
find his own THR just by knowing his
age and general fitness level. For
example, a 40-year-old soldier with a
low fitness level should, during aerobic
70 percent HRR. Those with a high
level of fitness may benefit most by
training at 80 to 90 percent HRR.
Another way to gauge exercise in-
tensity is “perceived exertion.” This
method relies on how difficult the
exercise seems to be and is described
in Appendix G.
Figure 2-2
2-5

TIME
Time, or duration, refers to how
long one exercises. It is inversely
related to intensity. The more intense
the activity, the shorter the time needed
to produce or maintain a training
effect; the less intense the activity, the
longer the required duration. To
improve CR fitness, the soldier must
train for at least 20 to 30 minutes at his
THR.
TYPE
Only aerobic exercises that require
breathing in large volumes of air
improve CR fitness. Worthwhile aero-
bic activities must involve the use of
large muscle groups and must be rhyth-
mic. They must also be of sufficient
duration and intensity (60 to 90 per-
cent HRR). Examples of primary and
secondary exercises for improving CR
fitness are as follows:
PRIMARY
• Running.
• Rowing.
• Jogging.
• Skiing (cross-country).
• Walking (vigorous).
• Exercising to music.
• Road marching.
• Rope skipping.
• Bicycling (stationary).
•Swimming.
• Bicycling (road/street).
• Stair climbing.
SECONDARY (Done with partners or
opponents of equal or greater ability.)
•Racquetball (singles).
•Basketball (full court).
•Handball (singles).
•Tennis (singles).
Important information
on safety factors and
common running
injuries is presented in
C hapter 13 and
Appendix E
.
The primary exercises are more ef-
fective than the secondary exercises in
producing positive changes in CR fit-
ness.
The secondary activities may briefly
elevate the heart rate but may not keep
it elevated to the THR throughout the
entire workout.
Every activity has its advantages and
Every activity has its
disadvantages. Trainers must weigh
advantages and
these and design programs that fit the
disadvantages. Trainers
unit’s needs.
must design programs
that fit the unit’s needs.
Running
Running enables the body to im-
prove the transport of blood and oxy-
gen to the working muscles and brings
about positive changes in the muscles’
ability to produce energy. Running
fits well into any physical training pro-
gram ‘because a training effect can be
attained with only three 20-minute
workouts per week.
Some soldiers may need instruction
to improve their running ability. The
following style of running is desired.
The head is erect with the body in a
straight line or slightly bent forward at
the waist. The elbows are bent so the
forearms are relaxed and held loosely
at waist level. The arms swing natu-
rally from front to rear in straight
lines. (Cross-body arm movements
waste energy. The faster the run, the
faster the arm action.) The toes point
straight ahead, and the feet strike on
the heel and push off at the big toe.
Besides learning running techniques,
soldiers need information on ways to
prevent running injuries. The most
common injuries associated with PT in
the Army result from running and
occur to the feet, ankles, knees, and
legs. Proper warm-up and cool-down,
along with stretching exercises and
wearing appropriate clothing and well-
fitting running shoes, help prevent
injuries. Important information on
safety factors and common running in-
juries is presented in Chapter 13 and
Appendix E.
Failure to allow recovery between
hard bouts of running cannot only lead
to overtraining, but can also be a major
2-6

cause of injuries. A well-conditioned
soldier can run five to six times a week.
However, to do this safely, he should
do two things: 1) gradually buildup to
running that frequently; and, 2) vary
the intensity and/or duration of the
running sessions to allow recovery
between them.
ABILITY GROUP RUNNING
Traditionally, soldiers have run in
unit formations at a pace prescribed by
the PT leader. Commanders have used
unit runs to improve unit cohesion and
fitness levels. Unfortunately, too many
soldiers are not challenged enough by
the intensity or duration of the unit
run, and they do not receive a training
benefit. For example, take a company
that runs at a nine-minute-per-mile
pace for two miles. Only soldiers who
cannot run two miles in a time faster
than 18 minutes will receive a signifi-
cant training effect. Therefore, in
terms of conditioning, most soldiers
who can pass the 2-mile-run test are
wasting their time and losing the chance
to train hard to excel. Ability group
running (AGR) is the best way to
provide enough intensity so each sol-
dier can improve his own level of CR
fitness.
AGR lets soldiers train in groups of
near-equal ability. Each group runs at
a pace intense enough to produce a
training effect for that group and each
soldier in it. Leaders should program
these runs for specific lengths of time,
not miles to be run. This procedure lets
more-fit groups run a greater distance
than the less-fit groups in the same
time period thus enabling every soldier
to improve.
The best way to assign soldiers to
ability groups is to make a list, in
The best way to assign order, of the unit’s most recent APFT
soldiers to ability 2-mile-run times. The number of
groups is to, make a list, groups depends on the unit size, num-
in order, of the unit’s
ber of leaders available to conduct the
most recent APFT runs, and range of 2-mile-run times.
2-mile-run times. A company-sized unit broken down
into four to six ability groups, each
with a leader, is best for aerobic
training, For activities like circuits,
strength training, and competitive
events, smaller groups are easier to
work with than one large group.
Because people progress at different
rates, soldiers should move to faster
groups when they are ready. To help
them train at their THR and enhance
their confidence, those who have a
hard time keeping up with a group
should be placed in a slower group. As
the unit’s fitness level progresses, so
should the intensity at which each
group exercises. Good leadership will
prevent a constant shifting of soldiers
between groups due to lack of effort.
AGR is best conducted at the right
intensity at least three times a week.
As explained, the CR system should
not be exercised “hard” on consecutive
days. If AGR is used on hard CR-
training days, unit runs at lower inten-
sities are good for recovery days.
Using this rotation, soldiers can gain
the desired benefits of both unit and
ability-group runs. The problem comes
when units have a limited number of
days for PT and there is not enough
time for both. In this case, unit runs
should seldom, if ever, be used and
should be recognized for what they
are -- runs to build unit cohesion.
Leaders can use additional methods
to achieve both goals. The unit can
begin in formation and divide into
ability groups at a predetermined re-
lease point. The run can also begin
with soldiers divided into ability groups
which join at a link-up point. Alter-
nately, ability groups can be started
over the same route in a stagger, with
the slowest group first. Link-ups
occur as each faster group overtakes
slower groups.
With imagination and planning, AGR
will result in more effective training
workouts for each soldier. The argu-
ment that ability-group running de-
tracts from unit cohesion is invalid.
Good leadership and training in all
2-7

areas promote unit cohesion and team
spirit; training that emphasizes form
over substance does not.
INTERVAL TRAINING
Interval training also works the car-
diorespiratory system. It is an ad-
vanced form of exercise training which
helps a person significantly improve
his fitness level in a relatively short
time and increase his running speed.
In interval training, a soldier exer-
cises by running at a pace that is
slightly faster than his race pace for
short periods of time. This may be
faster than the pace he wants to main-
tain during the next APFT 2-mile run.
He does this repeatedly with periods of
recovery placed between periods of
fast running. In this way, the energy
systems used are allowed to recover,
and the exerciser can do more fast-
paced running in a given workout than
if he ran continuously without resting.
This type of intermittent training can
also be used with activities such as
cycling, swimming, bicycling, rowing,
and road marching.
The following example illustrates
how the proper work-interval times
and recovery times can be calculated
for interval training so that it can be
used to improve a soldier’s 2-mile-run
performance.
The work-interval time (the speed
at which a soldier should run each
440-yard lap) depends on his actual
race pace for one mile. If a soldier’s
actual 1-mile-race time is not known,
it can be estimated from his last APFT
by taking one half of his 2-mile-run
time. Using a 2-mile-run time of
1600 minutes as an example, the pace
for an interval training workout is cal-
culated as follows:
Step 1. Determine (or estimate) the
actual 1-mile-race pace. The soldier's
2-mile-run time is 16:00 minutes, and
his estimated pace for 1 mile is one half
of this or 8:00 minutes.
Step 2. Using the time from Step 1,
determine the time it took to run 440
yards by dividing the 1-mile-race pace
by four. (8:00 minutes/4 = 2:00 min-
utes per 440 yards.)
Step 3. Subtract one to four seconds
from the 440-yard time in Step 2 to
find the time each 440-yard lap should
be run during an interval training
session. (2:00 minutes - 1 to 4 seconds
= 1:59 to 1:56.)
Thus, each 440-yard lap should be
run in 1 munute, 56 seconds to 1
minute, 59 seconds during interval
training based on the soldier's 16:00, 2-
mile run time. Recovery periods,
twice the length of the work-interval
periods. These recovery peri-
ods, therefore, will be 3 minutes, 52
seconds long (1:56 + 1:56 = 3:52).
Using the work-interval time for
each 440-yard lap from Step 3, the
soldier can run six to eight repetitions
of 440 yards at a pace of 1 minute, 56
seconds (1:56) for each 440-yard run.
This can be done on a 440-yard track
(about 400 meters) as follows:
1. Run six to eight 440-yard repeti-
tions with each interval run at a 1:56
pace.
2. Follow each 440-yard run done in
1 minute, 56 secons by an easy jog of
440 yards for recovery. Each 440-yard
jog should take twice as much time as
the work interval (that is, 3:52). For
each second of work, there are two
seconds of recovery. Thus, the work-
to-rest ratio is 1:2.
2-8
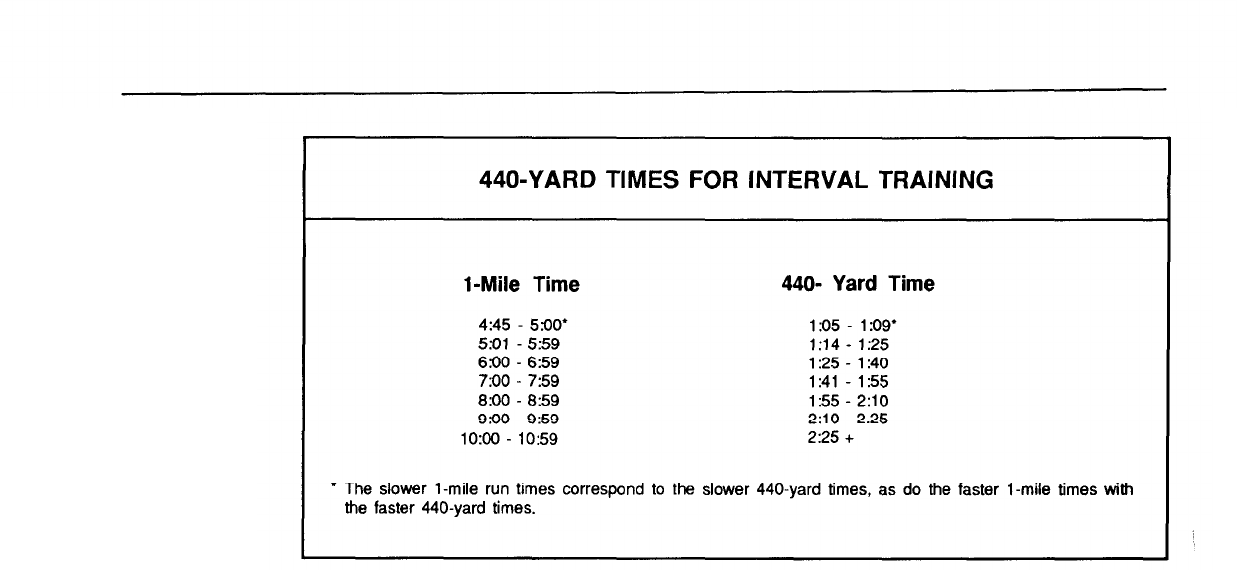
Table 2-1
To help determine the correct time
intervals for a wide range of fitness
levels, refer to Table 2-1. It shows
common 1 -mile times and the corre-
sponding 440-yard times.
Monitoring the heart-rate response
during interval training is not as im-
portant as making sure that the work
intervals are run at the proper speed.
Because of the intense nature of inter-
val training, during the work interval
the heart rate will generally climb to 85
or 90 percent of HRR. During the
recovery interval, the heart rate usu-
ally falls to around 120 to 140 beats per
minute. Because the heart rate is not
the major concern during interval train-
ing, monitoring THR and using it as a
training guide is not necessary.
As the soldier becomes more condi-
tioned, his recovery is quicker. As a
result, he should either shorten the re-
covery interval (jogging time) or run
the work interval a few seconds faster.
After a soldier has reached a good
CR fitness level using the THR method,
he should be ready for interval train-
ing. As with any other new training
method, interval training should be
introduced into his training program
gradually and progressively. At first,
he should do it once a week. If he
responds well, he may do it twice a
week at the most, with at least one
recovery day in between. He may also
do recovery workouts of easy jogging
on off days. It is recommended that
interval training be done two times a
week only during the last several
weeks before an APFT. Also, he should
rest the few days before the test by
doing no, or very easy, running.
As with any workout, soldiers should
start intervaI workouts with a warm-
up and end them with a cool-down.
FARTLEK TRAINING
In Fartlek training, another type of
CR training sometimes called speed
play, the soldier varies the intensity
(speed) of the running during the
workout. Instead of running at a con-
stant speed, he starts with veryslow
jogging. When ready, he runs hard for
a few minutes until he feels the need
to slow down. At this time he recovers
by jogging at an easy pace. This process
of alternating fast and recovery run-
ning (both of varying distances) gives
the same results as interval training.
However, neither the running nor re-
covery interval is timed, and the run-
ning is not done on a track. For these
reasons, many runners prefer Fartlek
training to interval training.
In Fartlek training, the
soldier varies the
intensity (speed) of the
running throughout the
workout.
2-9

LAST-MAN-UP RUNNING
This type of running, which in-
cludes both sprinting and paced run-
ning, improves CR endurance and
conditions the legs. It consists of 40-
to 50-yard sprints at near-maximum
effort. This type of running is best
done by squads and sections. Each
squad leader places the squad in an
evenly-spaced, single-file line on a
track or a smooth, flat course. During
a continuous 2- to 3-mile run of
moderate intensity, the squad leader,
running in the last position, sprints to
the front of the line and becomes the
leader. When he reaches the front, he
resumes the moderate pace of the
whole squad. After he reaches the
front, the next soldier, who is now at
the rear, immediately sprints to the
front. The rest of the soldiers continue
to run at a moderate pace. This pattern
of sprinting by the last person contin-
ues until each soldier has resumed his
original position in line. This pattern
of sprinting and running is repeated
several times during the run. The dis-
tance run and number of sprints per-
formed should increase as the soldiers’
conditioning improves.
CROSS-COUNTRY RUNNING
Cross-country running conditions
the leg muscles and develops CR en-
durance. It consists of running a
certain distance on a course laid out
across fields, over hills, through woods,
or on any other irregular terrain. It
can be used as both a physical condi-
tioning activity and a competitive
event. The object is to cover the
distance in the shortest time.
The unit is divided into ability
groups using 2-mile-run times. Each
group starts its run at the same time.
This lets the better-conditioned groups
run farther and helps ensure that they
receive an adequate training stimulus.
The speed and distance can be
increased gradually as the soldiers’
conditioning improves. At first, the
distance should be one mile or less,
depending on the terrain and fitness
level. It should then be gradually in-
creased to four miles. Cross-country
runs have several advantages: they
provide variety in physical fitness train-
ing, and they can accommodate large
numbers of soldiers. Interest can be
stimulated by competitive runs after
soldiers attain a reasonable level of
fitness. These runs may also be com-
bined with other activities such as
compass work (orienteering).
Cross-country runs can
accommodate large
numbers of soldiers.
Road Marches
The road or foot march is one of the
best ways to improve and maintain
fitness. Road marches are classified as
either administrative or tactical, and
they can be conducted in garrison or in
the field. Soldiers must be able to move
quickly, carry a load (rucksack) of
equipment, and be physically able to
perform their missions after extended
marching.
BENEFITS OF ROAD MARCHES
Road marches are an excellent aero-
bic activity. They also help develop
endurance in the muscles of the lower
body when soldiers carry a heavy load.
Road marches offer several benefits
Road marches help
when used as part of a fitness program.
They are easy to organize, and large
troops acclimatize to
numbers of soldiers can participate. In
new
environments,
addition, when done in an intelligent,
systematic, and progressive manner,
they produce relatively few injuries.
Many soldier-related skills can be
integrated into road marches. They can
also help troops acclimatize to new
environments. They help train leaders
to develop skills in planning, prepara-
tion, and supervision and let leaders
make first-hand observations of the
soldiers’ physical stamina. Because
road marches are excellent fitness-
training activities, commanders should
make them a regular part of their unit’s
PT program.
2-10

TYPES OF MARCHES
The four types of road marches -
day, limited visibility, forced, and
shuttle - are described below. For
more information on marches, see
FM 21-18.
Day Marches
Day marches, which fit easily into
the daily training plan, are most con-
ducive to developing physical fitness.
They are characterized by dispersed
formations and ease of control and re-
connaissance.
Any plan to conduct a road march to
improve physical fitness should con-
sider the following:
•Load to be carried.
•Discipline and supervision.
•Distance to be marched.
•Route reconnaissance.
•Time allotted for movement.
•Water stops.
•Present level of fitness.
•Rest stops.
•Intensity of the march.
•Provisions for injuries.
•Terrain an weather conditions.
•Safety precautions.
Limited Visibility Marches
Limited visibility marches require
more detailed planning and supervi-
sion and are harder to control than day
marches. Because they move more
slowly and are in tighter formations,
soldiers may not exercise hard enough
to obtain a conditioning effect. Lim-
ited visibility marches do have some
advantages, however. They protect
soldiers from the heat of the day,
challenge the ability of NCOS and of-
ficers to control their soldiers, and
provide secrecy and surprise in tactical
situations.
Forced Marches
Soldiers should receive
advance notcie before
going on a march, to
help morale and give
them time to prepare.
Forced marches require more than
the normal effort in speed and exer-
tion. Although they are excellent con-
ditioners, they may leave soldiers too
fatigued to do other required training
tasks.
Shuttle Marches
Shuttle marches alternate riding and
marching, usually because there are
not enough vehicles to carry the entire
unit. These marches may be modified
and used as fitness activities. A shuttle
march can be planned to move troops
of various fitness levels from one point
to another, with all soldiers arriving at
about the same time. Soldiers who
have high fitness levels can generally
march for longer stretches than those
who are less fit.
PLANNING A ROAD MARCH
Soldiers should usually receive ad-
vance notice before going on a march.
This helps morale and gives them time
to prepare. The leader should choose
an experienced soldier as a pacesetter
to lead the march. The pacesetter
should carry the same load as the other
soldiers and should be of medium
height to ensure normal strides. The
normal stride for a foot march, ac-
cording to FM 21-18, is 30 inches.
This stride, and a cadence of 106 steps
per minute, results in a speed of 4.8
kilometers per hour (kph). When a 10-
minute rest is taken each hour, a net
speed of 4 kph results.
The pacesetter should keep in mind
that ground slope and footing affect
stride length. For example, the length
decreases when soldiers march up hills
or down steep slopes. Normal stride
and cadence are maintained easily on
moderate, gently rolling terrain unless
the footing is muddy, slippery, or
rough.
Personal hygiene is important in
preventing unnecessary injuries. Be-
fore the march, soldiers should cut
their toenails short and square them
2-11
off, wash and dry their feet, and
lightly apply foot powder. They should
wear clean, dry socks that fit well and
have no holes. Each soldier should
take one or more extra pair of socks
depending on the length of the march.
Soldiers who have had problems with
blisters should apply a thin coating of
petroleum jelly over susceptible areas.
Leaders should check soldiers’ boots
before the march to make sure that
they fit well, are broken in and in good
repair, with heels that are even and not
worn down.
During halts soldiers should lie down
and elevate their feet. If time permits,
they should massage their feet, apply
powder, and change socks. Stretching
for a few minutes before resuming the
march may relieve cramps and sore-
ness and help prepare the muscles to
continue exercising. To help prevent
lower back strain, soldiers should help
each other reposition the rucksacks
and other loads following rest stops.
Soldiers can relieve swollen feet by
slightly loosening the laces across their
arches.
After marches, soldiers should again
care for their feet, wash and dry
socks, and dry their boots.
PROGRAMS TO IMPROVE
LOAD-CARRYING ABILITY
their
The four generalized programs de-
scribed below can be used to improve
the soldiers’ load-carrying ability. Each
program is based on a different num-
ber of days per week available for a PT
program.
If only two days are available for PT,
both should include exercises for
improving CR fitness and muscular
endurance and strength. Roughly equal
emphasis should be given to each of
these fitness components.
If there are only three days available
for PT, they should be evenly dis-
persed throughout the week. Two of
the days should stress the development
of muscular endurance and strength
for the whole body. Although all of the
major muscle groups of the body should
be trained, emphasis should be placed
2-12

on the leg (hamstrings and quadriceps),
hip (gluteal and hip flexors), low back
(spinal erector), and abdominal (rectus
abdominis) muscles. These two days
should also include brief (2-mile) CR
workouts of light to moderate intensity
(65 to 75 percent HRR). On the one
CR fitness day left, soldiers should
take a long distance run (4 to 6 miles)
at a moderate pace (70 percent HRR),
an interval workout, or an aerobic
circuit. They should also do some
strength work of light volume and
intensity. If four days are available, a
road march should be added to the
three-day program at least twice
monthly. The speed, load, distance,
and type of terrain should be varied.
If there are five days, leaders should
devote two of them to muscular strength
and endurance and two of them to CR
fitness. One CR fitness day will use
long distance runs; the other can stress
more intense workouts including in-
terval work, Fartlek running, or last-
man-up running. At least two times
per month, the remaining day should
include a road march.
Soldiers can usually begin road-
march training by carrying a total load
equal to 20 percent of their body
weight. This includes all clothing and
equipment. However, the gender make-
up and/or physical condition of a unit
may require using a different starting
load. Beginning distances should be
between five and six miles, and the
pace should be at 20 minutes per mile
over flat terrain with a hard surface.
Gradual increases should be made in
speed, load, and distance until soldiers
can do the anticipated, worst-case,
mission-related scenarios without ex-
cessive difficulty or exhaustion. Units
should take maintenance marches at
least twice a month. Distances should
vary from six to eight miles, with loads
of 30 to 40 percent of body weight.
The pace should be 15 to 20 minutes
per mile.
A recent Army study showed that
road-march training two times a month
and four times a month produced
similar improvements in road-march-
ing performance. Thus, twice-monthly
road marches appear to produce a
favorable improvement in soldiers’
abilities to road march if they are
supported by a sound PT program
(five days per week)
Commanders must establish realis-
tic goals for road marching based on
assigned missions. They should also
allow newly assigned soldiers and those
coming off extended profiles to gradu-
ally build up to the unit’s fitness level
before making them carry maximum
loads. This can be done with ability
groups.
Road marching should be integrated
into all other training. Perhaps the best
single way to improve Ioad-earring
capacity is to have a regular training
program which systematically increases
the load and distance. It must also let
the soldier regularly practice carrying
heavy loads over long distances.
As much as possible, leaders at all
levels must train and march with their
units. This participation enhances
leaders’ fitness levels and improves
team spirit and confidence, both vital
elements in accomplishing difficult
and demanding road marches.
Alternate Forms of
Aerobic Exercise
Some soldiers cannot run. In such
cases, they may use other activities as
supplements or alternatives. Swim-
ming, bicycling, and cross-country
skiing are all excellent endurance ex-
ercises and are good substitutes for
running. Their drawback is that they
require special equipment and facili-
ties that are not always available. As
with all exercise, soldiers should start
slowly and progress gradually. Those
who use non-running activities to
Leaders must train and
march with their units
as much as possible.
Units should do
maintenance marches
at least twice a month.
2-13

such training may not improve run-
ning ability. To prepare a soldier for
the APFT 2-mile run, there is no sub-
stitute for running.
SWIMMING
Swimming is a good alternative to
running. Some advantages of swim-
ming include the following:
o Involvement of all the major muscle
groups.
o Body position that enhances the
blood’s return to the heart.
o Partial support of body weight by
the water, which minimizes lower
body stress in overweight soldiers.
Swimming may be used to improve
one’s CR fitness level and to maintain
and improve CR fitness during recov-
ery from an injury. It is used to
supplement running and develop upper
body endurance and limited strength.
The swimmer should start slowly with
a restful stroke. After five minutes, he
should stop to check his pulse, com-
pare it with his THR and, if needed,
adjust the intensity.
Compared with all the other modes
of aerobic exercise presented in this
manual (e.g., running, walking, cy-
cling, cross-country skiing, rope
jumping, etc.) in swimming alone,
one’s THR should be lower than while
doing the other forms of aerobic exer-
cise. This is because, in swimming, the
heart does not beat as fast as when
doing the other types of exercise at the
same work rate. Thus, in order to
effectively train the CR system during
swimming, a soldier should set his
THR about 10 bpm lower than while
running. For example, a soldier whose
THR while running is 150 bpm should
have a THR of about 140 bpm while
swimming. By modifying their THRs
in this manner while swimming, sol-
diers will help to ensure that they are
working at the proper intensity.
Non-swimmers can run in waist-to
chest-deep water, tread water, and do
pool-side kicking for an excellent
aerobic workout. They can also do
calisthenics in the water. Together
these activities combine walking and
running with moderate resistance work
for the upper body.
For injured soldiers, swimming and
aerobic water-training are excellent
for improving CR fitness without plac-
ing undue stress on injured weight-
bearing parts of the body.
CYCLING
Cycling is an excellent exercise for
developing CR fitness. Soldiers can
bicycle outdoors or on a stationary
cycling machine indoors. Road cycling
should be intense enough to allow the
soldier to reach and maintain THR at
least 30 minutes.
Soldiers can alter the cycling inten-
sity by changing gears, adding hill
Cycling should be
work, and increasing velocity. Dis-
intense enough to let the
tance can also be increased to enhance
soldier reach and
CR fitness, but the distance covered is maintain THR at least
not as important as the amount of time
30
minutes.
spent training at THR. The intensity
of a workout can be increased by in-
creasing the resistance against the wheel
or increasing the pedaling cadence
(number of RPM), For interval train-
ing, the soldier can vary the speed and
resistance and use periods of active For swimming, a soldier
recovery at low speed and/or low should set his THR at
resistance. about 10 beats per
minute lower then when
WALKING
running.
Walking is another way to develop
cardiorespiratory fitness. It is enjoy-
able, requires no equipment, and causes
few injuries. However, unless walking
is done for a long time at the correct
intensity, it will not produce any sig-
nificant CR conditioning.
Sedentary soldiers with a low degree
of fitness should begin slowly with 12
minutes of walking at a comfortable
pace. The heart rate should be moni-
tored to determine the intensity. The
soldier should walk at least four times
a week and add two minutes each week
2-14

to every workout until the duration
reaches 45 to 60 minutes per workout.
He can increase the intensity by adding
hills or stairs.
As the walker’s fitness increases, he
should walk 45 to 60 minutes at a faster
pace. A simple way to increase walk-
ing speed is to carry the arms the same
way as in running. With this technique
the soldier has a shorter arm swing and
takes steps at a faster rate. Swinging
the arms faster to increase the pace is
a modified form of race walking (power
walking) which allows for more upper-
body work. This method may also be
used during speed marches. After
about three months, even the most
unfit soldiers should reach a level of
conditioning that lets them move into
a running program.
CROSS-COUNTRY SKIING
Cross-country or Nordic skiing is
another excellent alternative to the
usual CR activities. It requires vigor-
ous movement of the arms and legs
Cross-country skiing
which develops muscular and CR
requires vigorous endurance and coordination. Some of
movement of the arms the highest levels of aerobic fitness
and legs, developing ever measured have been found in
muscular and CR cross-country skiers.
endurance.
Although some regions lack snow,
one form or another of cross-country
skiing can be done almost anywhere--
on country roads, golf courses, open
fields, and in parks and forests.
Cross-country skiing is easy to learn.
The action is similar to that used in
brisk walking, and the intensity may be
varied as in running. The work load is
determined by the difficulty of ter-
rain, the pace, and the frequency and
duration of rest periods. Equipment is
reasonably priced, with skis, boots,
and poles often obtainable from the
outdoor recreation services.
ROPE SKIPPING
Rope skipping is also a good exer-
cise for developing CR fitness. It
requires little equipment, is easily
learned, may be done almost any-
where, and is not affected by weather.
Some runners use it as a substitute for
running during bad weather.
A beginner should select a jump
rope that, when doubled and stood on,
reaches to the armpits. Weighted
handles or ropes may be used by
better-conditioned soldiers to improve
upper body strength. Rope skippers
should begin with five minutes of
jumping rope and then monitor their
heart rate. They should attain and
maintain their THR to ensure a train-
ing effect, and the time spent jumping
should be increased as the fitness level
improves.
Rope jumping, however, may be
stressful to the lower extremities and
therefore should be limited to no more
than three times a week.
Soldiers
should skip rope on a cushioned sur-
face such as a mat or carpet and should
wear cushioned shoes.
HANDBALL AND
RACQUET SPORTS
Handball and the racquet sports
(tennis, squash, and racquetball) in-
volve bursts of intense activity for
short periods. They do not provide the
same degree of aerobic training as
exercises of longer duration done at
lower intensities. However, these
sports are good supplements and can
provide excellent aerobic benefits
depending on the skill of the players.
If played vigorously each day, they
may be an adequate substitute for low-
level aerobic training. Because run-
ning increases endurance, it helps
2-15

improve performance in racket sports,
but the reverse is not necessarily true.
EXERCISE TO MUSIC
Aerobic exercise done to music is
another excellent alternative to run-
ning. It is a motivating, challenging
activity that combines exercise and
rhythmic movements. There is no
prerequisite skill, and it can be totally
individualized to every fitness level by
varying the frequency, intensity, and
duration. One can move to various
tempos while jogging or doing
jumping jacks, hops, jumps, or many
other calisthenics.
Workouts can be done in a small
space by diverse groups of varying
fitness levels. Heart rates should be
taken during the conditioning phase to
be sure the workout is sufficiently
intense. If strengthening exercises are
included, the workout addresses every
component of fitness. Holding rela-
tively light dumbbells during the work-
out is one way to increase the intensity
for the upper body and improve mus-
cular endurance. Warm-up and cool-
down stretches should be included in
the aerobic workout.
2-16

On today's battlefield, in addition to
cardiorespiratory fitness, soldiers need
a high level of muscular endurance and
strength. In a single day they may
carry injured comrades, move equip-
ment, lift heavy tank or artillery rounds,
push stalled vehicles, or do many other
strength-related tasks. For example,
based on computer-generated scenar-
ios of an invasion of Western Europe,
artillerymen may have to load from 300
to 500, 155mm-howitzer rounds (95-lb
rounds) while moving from 6 to 10
times each day over 8 to 12 days. In-
fantrymen may need to carry loads
exceeding 100 pounds over great dis-
tances, while supporting units will
deploy and displace many times. In-
deed, survival on the battlefield may,
in large part, depend on the muscular
endurance and strength of the individ-
ual soldier.
Muscular Fitness
Muscular fitness has two compo-
nents: muscular strength and muscular
endurance.
Muscular strength is the greatest
amount of force a muscle or muscle
group can exert in a single effort.
Muscular endurance is the ability of
a muscle or muscle group to do re-
peated contractions against a less-than-
maximum resistance for a given time.
Although muscular endurance and
strength are separate fitness compo-
nents, they are closely related. Pro-
gressively working against resistance
will produce gains in both of these
components.
Muscular Contractions
Isometric, isotonic, and isokinetic
muscular endurance and strength are
best produced by regularly doing each
specific kind of contraction. They are
described here.
Isometric contraction produces con-
traction but no movement, as when
pushing against a wall. Force is pro-
duced with no change in the angle of
the joint.
Isotonic contraction causes a joint
to move through a range of motion
against a constant resistance. Common
examples are push-ups, sit-ups, and
the lifting of weights.
Isokinetic contraction causes the
angle at the joint to change at a
constant rate, for example, at 180
degrees per second. To achieve a
constant speed of movement, the load
or resistance must change at different
joint angles to counter the varying
forces produced by the muscle(s) at
different angles. This requires the use
of isokinetic machines. There are
other resistance-training machines
which, while not precisely controlling
the speed of movement, affect it by
varying the resistance throughout the
range of motion. Some of these
devices are classified as pseudo-isoki-
netic and some as variable-resistance
machines.
Isotonic and isokinetic contractions
have two specific phases - the concen-
tric or “positive” phase and the eccen-
tric or “negative” phase. In the concen-
tric phase (shortening) the muscle
contracts, while in the eccentric phase
(elongation) the muscle returns to its
normal length. For example, on the
upward phase of the biceps curl, the
biceps are shortening. This is a con-
centric (positive) contraction. During
the lowering phase of the curl the
biceps are lengthening. This is an
eccentric (negative) contraction.
A muscle can control more weight
in the eccentric phase of contraction
than it can lift concentrically. As a
result, the muscle may be able to
handle more of an overload eccentri-
cally. This greater overload, in return,
may produce greater strength gains.
3-1

The nature of the eccentric contrac-
tion, however, makes the muscle and
connective tissue more susceptible to
damage, so there is more muscle sore-
ness following eccentric work.
When a muscle is overloaded, whether
by isometric, isotonic, or isokinetic
contractions, it adapts by becoming
stronger. Each type of contraction has
advantages and disadvantages, and each
will result in strength gains if done
properly.
The above descriptions are more
important to those who assess strength
than to average people trying to de-
velop strength and endurance. Actu-
ally, a properly designed weight train-
ing program with free weights or
resistance machines will result in
improvements in all three of these
categories.
To understand the principle of over-
load, it is important to know the
following strength-training terms:
• Full range of motion. To obtain
optimal gains, the overload must be
applied thoughout the full range of
motion. Exercise a joint and its as-
sociated muscles through its com-
plete range starting from the pre-
stretched position (stretched past
the relaxed position) and ending in
a fully contratcted position. This is
crucial to strength development.
• Repetition. When an exercise has
progressed through one complete
range of motion and back to the
beginning, one repetition has been
completed.
• One-repetition maximum (1-RM).
This is a repetition performed against
the greatest possible resistance (the
maximum weight a person can lift
one time). A 10-RM is the maxi-
mum weight one can lift correctly
10 times. Similarly, an 8-12 RM is
that weight which allows a person
to do from 8 to 12 correct repeti-
tions. The intensity for muscular
endurance and strength training is
often expressed as a percentage of.
the 1-RM.
• Set. This is a series of repetitions
done without rest.
• Muscle Failure. This is the inabil-
ity of a person to do another correct
repetition in a set.
When a muscle is
overloaded by isometric,
isotonic, or isokinetic
contractions, it adapts by
becoming stronger.
Principles of Muscular
Training
To have a good exercise program,
the seven principles of exercise, de-
scribed in Chapter 1, must be applied
to all muscular endurance and strength
training. These principles are over-
load, progression, specificity, regular-
ity, recovery, balance, and variety.
OVERLOAD
The overload principle is the basis
for all exercise training programs. For
a muscle to increase in strength, the
workload to which it is subjected
during exercise must be increased
beyond what it normally experiences.
In other words, the muscle must be
overloaded. Muscles adapt to in-
creased workloads by becoming larger
and stronger and by developing greater
endurance.
The minimum resistance needed to
obtain strength gains is 50 percent of
the 1 -RM. However, to achieve enough
overload, programs are designed to
require sets with 70 to 80 percent of
one’s 1 -RM. (For example, if a sol-
dier’s 1 -RM is 200 pounds, multiply
200 pounds by 70 percent [200 X 0.70
= 140 pounds] to get 70 percent of the
1 -RM.)
3-2
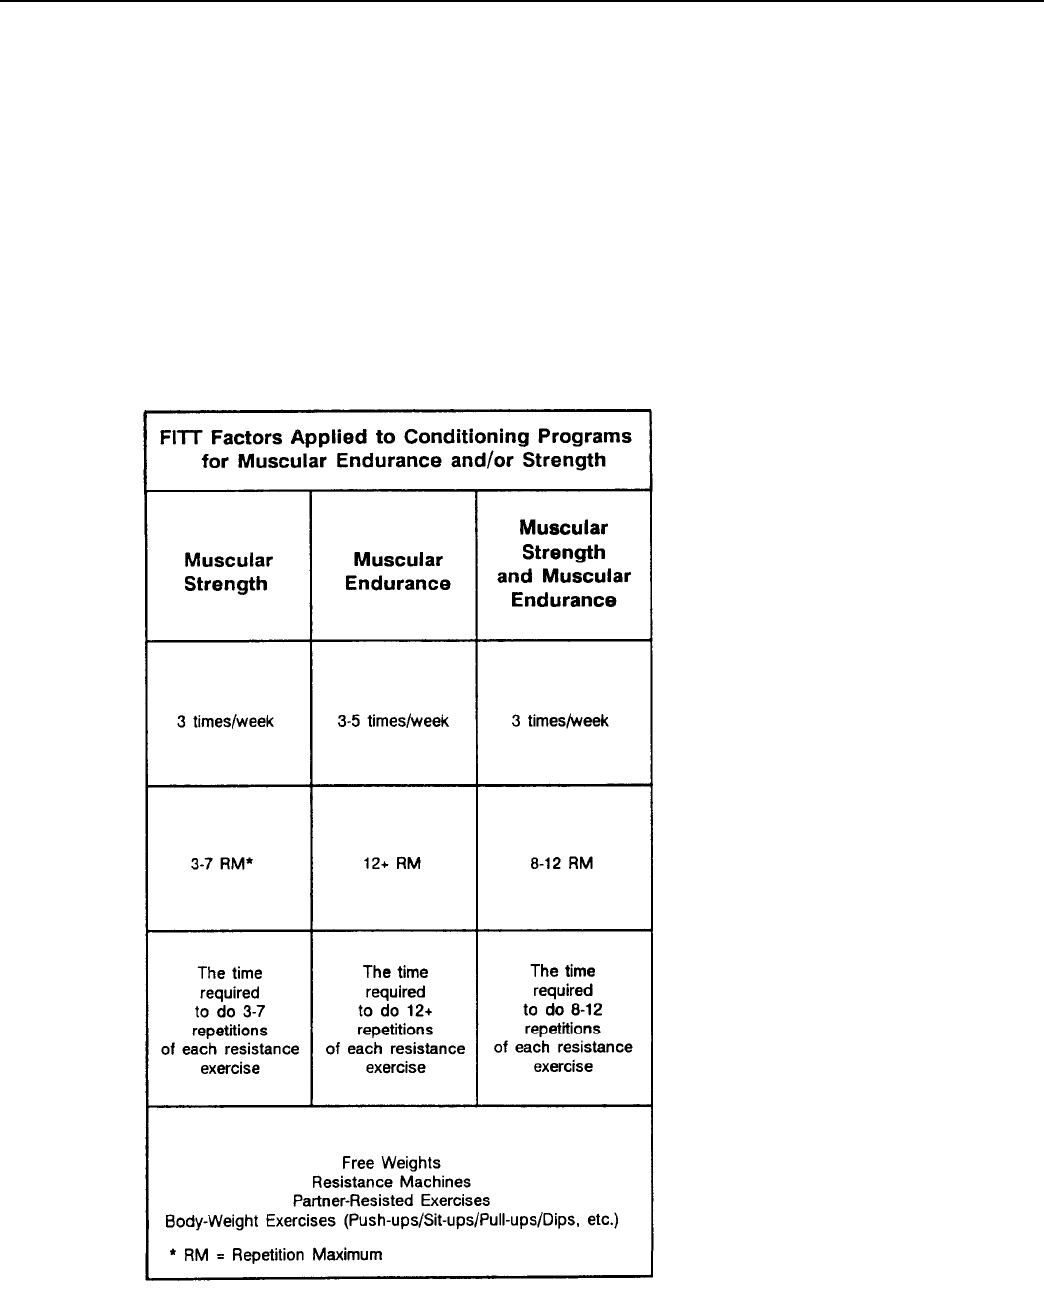
A better and easier method is the
repetition maximum (RM) method. The
exerciser finds and uses that weight
which lets him do the correct number
of repetitions. For example, to develop
both muscle endurance and strength, a
soldier should choose a weight for each
exercise which lets him do 8 to 12 repe-
titions to muscle failure. (See Figure
3-1.) The weight should be heavy
enough so that, after doing from 8 to 12
Figure 3-1
repetitions, he momentarily cannot
correctly do another repetition. This
weight is the 8-12 RM for that exer-
cise.
MUSCULAR ENDURANCE/
STRENGTH DEVELOPMENT
To develop muscle strength, the
weight selected should be heavier and
the RM will also be different. For ex-
ample, the soldier should find that
weight for each exercise which lets
him do 3 to 7 repetitions correctly.
This weight is the 3-7 RM for that
exercise. Although the greatest im-
provements seem to come from resis-
tances of about 6-RM, an effective
range is a 3-7 RM. The weight should
be heavy enough so that an eighth
repetition would be impossible be-
cause of muscle fatigue.
The weight should also not be too
heavy. If one cannot do at least three
repetitions of an exercise, the resis-
tance is too great and should be re-
duced. Soldiers who are just begin-
ning a resistance-training program
should not start with heavy weights.
They should first build an adequate
foundation by training with an 8-12
RM or a 12+ RM.
To develop muscular endurance,
the soldier should choose a resistance
that lets him do more than 12 repeti-
tions of a given exercise. This is his
12+ repetition maximum (12+ RM).
With continued training, the greater
the number of repetitions per set, the
greater will be the improvement in
muscle endurance and the smaller the
gains in strength. For example, when
a soldier trains with a 25-RM weight,
gains in muscular endurance will be
greater than when using a 15-RM
weight, but the gain in strength will
not be as great. To optimize a soldier’s
performance, his RM should be deter-
mined from an analysis of the critical
tasks of his mission. However, most
soldiers will benefit most from a resis-
tance-training program with an 8-12
RM.
3-3

Whichever RM range is selected,
the soldier must always strive to over-
load his muscles. The key to overload-
ing a muscle is to make that muscle
exercise harder than it normally does.
An overload may be achieved by any
of the following methods:
• Increasing the resistance.
• Increasing the number of repeti-
tions per set.
• Increasing the number of sets.
• Reducing the rest time between
sets.
• Increasing the speed of movement
in the concentric phase.
(Good form is more important than
the speed of movement.)
• Using any combination of the above.
PROGRESSION
When an overload is applied to a
muscle, it adapts by becoming stronger
and/or by improving its endurance.
Usually significant increases in strength
can be made in three to four weeks of
proper training depending on the in-
dividual. If the workload is not pro-
gressively increased to keep pace with
newly won strength, there will be no
further gains. When a soldier can cor-
rectly do the upper limit of repetitions
for the set without reaching muscle
failure, it is usually time to increase
the resistance. For most soldiers, this
upper limit should be 12 repetitions.
For example, if his plan is to do 12
repetitions in the bench press, the
soldier starts with a weight that causes
muscle failure at between 8 and 12
repetitions (8- 12 RM). He should
continue with that weight until he can
do 12 repetitions correctly. He then
should increase the weight by about 5
percent but no more than 10 percent.
In a multi-set routine, if his goal is to
do three sets of eight repetitions of an
exercise, he starts with a weight that
causes muscle failure before he com -
pletes the eighth repetition in one or
more of the sets. He continues to work
with that weight until he can complete
all eight repetitions in each set, then
increases the resistance by no more
than 10 percent.
SPECIFICITY
A resistance-training program should
provide resistance to the specific muscle
groups that need to be strengthened.
These groups can be identified by
doing a simple assessment. The soldier
slowly does work-related movements
he wants to improve and, at the same
time, he feels the muscles on each side
of the joints where motion occurs.
Those muscles that are contracting or
becoming tense during the movement
are the muscle groups involved. If the
soldier’s performance of a task is not
adequate or if he wishes to improve,
strength training for the identified
muscle(s) will be beneficial. To im-
prove his muscular endurance and
strength. in a given task, the soldier
must do resistance movements that are
as similar as possible to those of doing
the task. In this way, he ensures
maximum carryover value to his sol-
diering tasks.
REGULARITY
Exercise must be done regularly to
produce a training effect. Sporadic
exercise may do more harm than good.
Soldiers can maintain a moderate level
of strength by doing proper strength
workouts only once a week, but three
workouts per week are best for optimal
gains. The principle of regularity also
applies to the exercises for individual
muscle groups. A soldier can work out
three times a week, but when different
muscle groups are exercised at each
workout, the principle of regularity is
violated and gains in strength are
minimal.
Exercise must be done
regularly to produce a
training effect.
3-4

RECOVERY
There should be at
least a 48-hour recovery
period between workouts
for the same muscle
group.
Consecutive days of hard resistance
training for the same muscle group can
be detrimental. The muscles must be
allowed sufficient recovery time to
adapt. Strength training can be done
every day only if the exercised muscle
groups are rotated, so that the same
muscle or muscle group is not exercised
on consecutive days. There should be
at least a 48-hour recovery period
between workouts for the same muscle
groups. For example, the legs can be
trained with weights on Monday,
Wednesday, and Friday and the upper
body muscles on Tuesday, Thursday,
and Saturday.
Recovery is also important within a
workout. The recovery time between
different exercises and sets depends, in
part, on the intensity of the workout.
Normally, the recovery time between
sets should be 30 to 180 seconds.
BALANCE
When developing a strength training
program, it is important to include
It is important to exercises that work all the major muscle
include exercises that groups in both the upper and lower
work all the major
body. One should not work just the
muscle groups in both
upper body, thinking that running will
the upper and lower
strengthen the legs.
body.
Most muscles are organized into
opposing pairs. Activating one muscle
results in a pulling motion, while acti-
vating the opposing muscle results in
the opposite, or pushing, movement.
When planning a training session, it is
best to follow a pushing exercise with
a pulling exercise which results in
movement at the same joint(s). For
example, follow an overhead press
with a lat pull-down exercise. This
technique helps ensure good strength
balance between opposing muscle groups
which may, in turn, reduce the risk of
injury. Sequence the program to exer-
cise the larger muscle groups first, then
the smaller muscIes. For example, the
lat pull-down stresses both the larger
latissimus dorsi muscle of the back and
the smaller biceps muscles of the arm.
If curls are done first, the smaller
muscle group will be exhausted and
too weak to handle the resistance
needed for the lat pull-down. As a
result, the soldier cannot do as many
repetitions with as much weight as he
normally could in the lat pull-down.
The latissimus dorsi muscles will not
be overloaded and, as a result, they
may not benefit very much from the
workout.
The best sequence to follow for a
total-body strength workout is to first
exercise the muscles of the hips and
legs, followed by the muscles of the
upper back and chest, then the arms,
abdominal, low back, and neck. As
long as all muscle groups are exercised
at the proper intensity, improvement
will occur.
VARIETY
A major challenge for all fitness
training programs is maintaining en-
thusiasm and interest. A poorly de-
signed strength- training program can
be very boring. Using different equip-
ment, changing the exercises, and al-
tering the volume and intensity are
good ways to add variety, and they
may also produce better results. The
soldier should periodically substitute
different exercises for a given muscle
group(s). For example, he can do
squats with a barbell instead of leg
presses on a weight machine. Also, for
variety or due to necessity (for ex-
ample, when in the field), he can
switch to partner-resisted exercises or
another form of resistance training.
However, frequent wholesale changes
should be avoided as soldiers may
become frustrated if they do not have
enough time to adapt or to see im-
provements in strength.
3-5

Workout Techniques
Workouts for improving muscular
endurance or strength must follow the
principles just described. There are
also other factors to consider, namely,
safety, exercise selection, and phases
of conditioning.
SAFETY FACTORS
Major causes of injury when strength
training are improper lifting tech-
niques combined with lifting weights
that are too heavy. Each soldier must
understand how to do each lift cor-
rectly before he starts his strength
training program.
The soldier should always do weight
training with a partner, or spotter,
who can observe his performance as he
exercises. To ensure safety and the
best results, both should know how to
use the equipment and the proper
spotting technique for each exercise.
A natural tendency in strength train-
ing is to see how much weight one can
lift. Lifting too much weight forces a
compromise in form and may lead to
injury. All weights should be selected
so that proper form can be maintained
for the appropriate number of repeti-
tions.
Correct breathing is another safety
factor in strength training. Breathing
should be constant during exercise.
The soldier should never hold his
breath, as this can cause dizziness and
even loss of consciousness. As a
general rule, one should exhale during
the positive (concentric) phase of
contraction as the weight or weight
stack moves away from the floor, and
inhale during the negative (eccentric)
phase as the weight returns toward the
floor.
The three phases of
conditioning are
preparatory, conditioning,
and maintenance.
EXERCISE SELECTION
When beginning a resistance-train-
ing program, the soldier should choose
about 8 to 16 exercises that work all of
the body’s major muscle groups. Usu-
ally eight well-chosen exercises will
serve as a good starting point. They
should include those for the muscles of
the leg, low back, shoulders, and so
forth. The soldier should choose exer-
cises that work several muscle groups
and try to avoid those that isolate single
muscle groups. This will help him train
a greater number of muscles in a given
time. For example, doing lat pull-
downs on the “lat machine” works the
latissimus dorsi of the back and the
biceps muscles of the upper arm. On
the other hand, an exercise like con-
centration curls for the biceps muscles
of the upper arm, although an effective
exercise, only works the arm flexor
muscles. Also, the concentration curl
requires twice as much time as lat pull-
downs because only one arm is worked
at a time.
Perhaps a simpler way to select an
exercise is to determine the number of
joints in the body where movement oc-
curs during a repetition. For most
people, especially beginners, most of
the exercises in the program should be
“multi-joint” exercises. The exercise
should provide movement at more than
one joint. For example, the pull-down
exercise produces motion at both the
shoulder and elbow joints. The con-
centration curl, however, only involves
the elbow joint.
PHASES
OF CONDITIONING
There are three phases of condition-
ing:
preparatory, conditioning, and
maintenance. These are also described
in Chapter 1.
Preparatory Phase
The soldier should use very light
weights during the first week (the
preparatory phase) which includes the
first two to three workouts. This is
very important, because the beginner
must concentrate at first on learning
3-6

the proper form for each exercise.
Using light weights also helps mini-
mize muscle soreness and decreases the
likelihood of injury to the muscles,
joints, and ligaments. During the
second week, he should use progres-
sively heavier weights. By the end of
the second week (4 to 6 workouts), he
should know how much weight on each
exercise will allow him to do 8 to 12
repetitions to muscle failure. If he can
do only seven repetitions of an exer-
cise, the weight must be reduced; if he
can do more than 12, the weight should
be increased.
Conditioning Phase
The third week is normally the start
of the conditioning phase for the be-
ginning weight trainer. During this
phase, the soldier should increase the
amount of weight used and/or the
intensity of the workout as his muscu-
lar strength and/or endurance increases.
He should do one set of 8 to 12
repetitions for each of the heavy-
resistance exercises. When he can do
more than 12 repetitions of any exer-
cise, he should increase the weight
until he can again do only 8 to 12 repe-
titions. This usually involves an in-
crease in weight of about five percent.
This process continues indefinitely. As
long as he continues to progress and get
stronger, he does not need to do more
than one set per exercise. If he stops
making progress with one set of 8 to 12
repetitions per exercise, he may bene-
fit from adding another set of 8 to 12
repetitions on those exercises in which
progress has slowed. As time goes on
and he progresses, he may increase the
number to three sets of an exercise to
get even further gains in strength and/
or muscle mass. Three sets per exer-
cise is the maximum most soldiers will
ever need to do.
Maintenance Phase
Once the soldier reaches a high
level of fitness, the maintenance phase
is used to maintain that level. The
emphasis in this phase is no longer on
progression but on retention. Al-
though training three times a week for
muscle endurance and strength gives
the best results, one can maintain them
by training the major muscle groups
properly one or two times a week.
More frequent training, however, is
required to reach and maintain peak
fitness levels. Maintaining the optimal
level of fitness should become part of
each soldier’s life-style and training
routine. The maintenance phase should
be continued throughout his career
and, ideally, throughout his life.
As with aerobic training, the sol-
dier should do strength training three
times a week and should allow at least
48 hours of rest from resistance train-
ing between workouts for any given
muscle group.
TIMED SETS
Timed sets refers to a method of
physical training in which as many
repetitions as possible of a given exer-
cise are performed in a specified pe-
riod of time. After an appropriate
period of rest, a second, third, and so
on, set of that exercise is done in an
equal or lesser time period. The
exercise period, recovery period, and
the number of sets done should be
selected to make sure that an overload
of the involved muscle groups occurs.
The use of timed sets, unlike exer-
cises performed in cadence or for a
specific number of repetitions, helps
to ensure that each soldier does as
many repetitions of an exercise as pos-
sible within a period of time. It
does not hold back the more capable
3-7
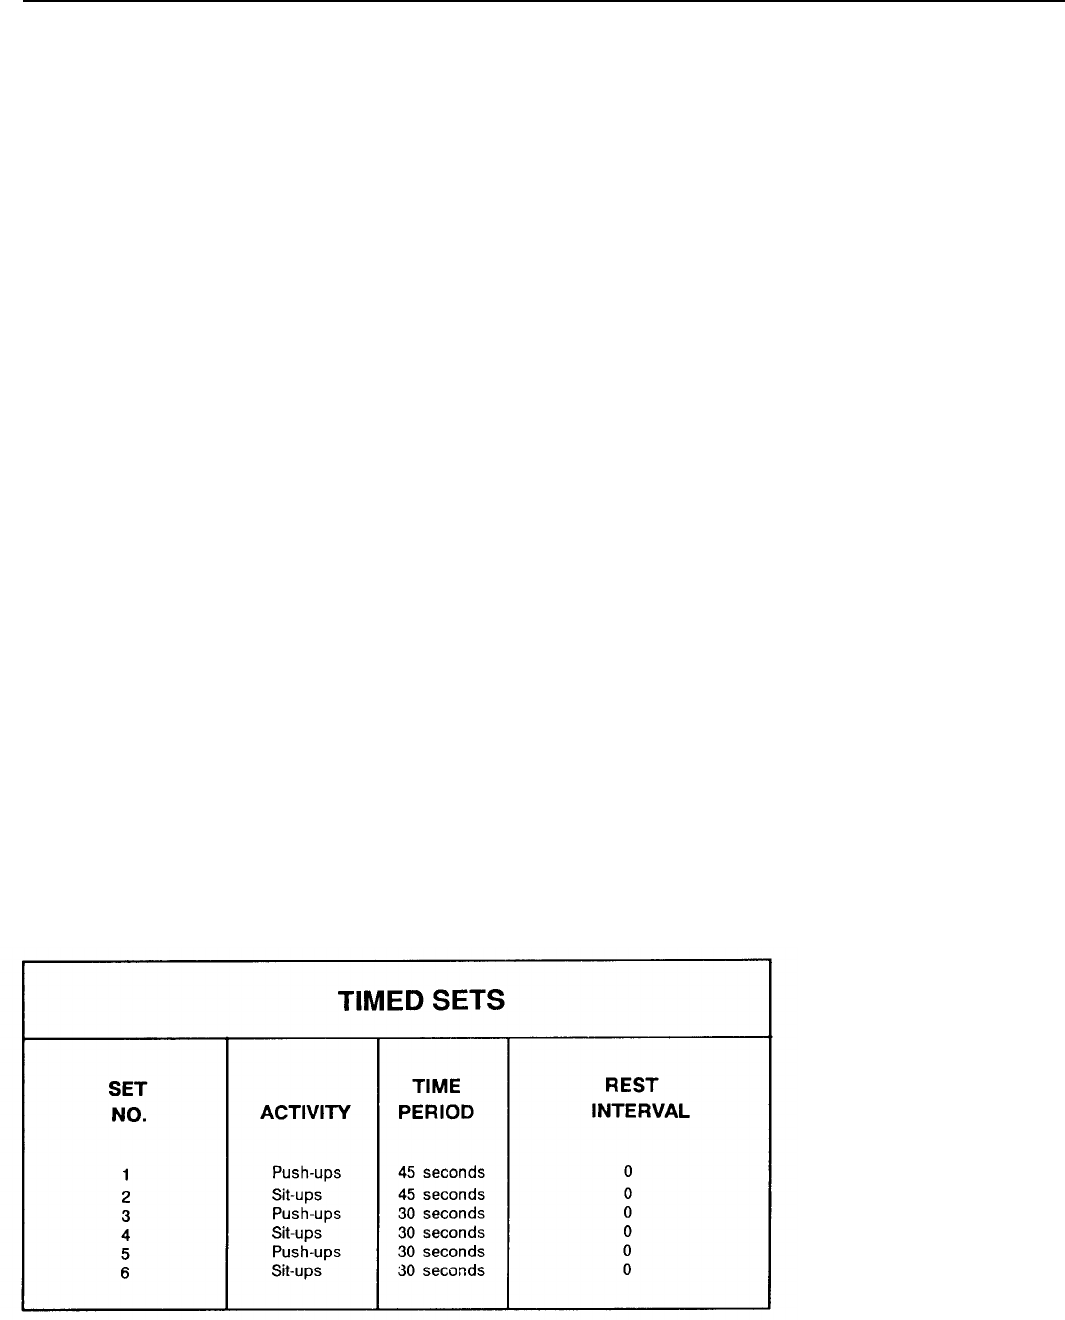
performer by restricting the number
of repetitions he may do. Instead, sol-
diers at all levels of fitness can indi-
vidually do the number of repetitions
they are capable of and thereby be
sure they obtain an adequate training
stimulus.
In this FM, timed sets will be
applied to improving soldier’s sit-up
and push-up performance. (See Fig-
ures 3-2 and 3-3. ) Many different
but equally valid approaches can be
taken when using timed sets to im-
prove push-up and sit-up perform-
ance. Below, several of these will be
given.
It should first be stated that im-
proving sit-up and push-up perform-
ance, although important for the APFT,
should not be the main goal of an
Army physical training program. It
must be to develop an optimal level of
physical fitness which will help sol-
diers carry out their mission during
combat. Thus, when a soldier per-
forms a workout geared to develop
muscle endurance and strength, the
goal should be to develop sufficient
strength and/or muscle endurance in
all the muscle groups he will be called
upon to use as he performs his mission.
To meet this goal, and to be assured
that all emergencies can be met, a
training regimen which exercises all
be developed and followed. Thus, as
a general rule, a muscle endurance or
strength training workout should not
be designed to work exclusively, or
give priority to, those muscle groups
worked by the sit-up or push-up event.
For this reason, the best procedure
to follow when doing a resistance
exercise is as follows. First, perform a
workout to strengthen all of the body’s
major muscles. Then, do timed sets to
improve push-up and sit-up perform-
ance. Following this sequence ensures
that all major muscles are worked. At
the same time, it reduces the amount of
time and work that must be devoted to
push-ups and sit-ups. This is because
the muscles worked by those two exer-
cises will already be pre-exhausted.
The manner in which timed sets for
push-ups and sit-ups are conducted
should occasionally be varied. This
ensures continued gains and minimizes
boredom. This having been said, here
is a very time-efficient way of con-
ducting push-up/sit-up improvement.
Alternate timed sets of push-ups and
timed sets of sit-ups with little or no
time between sets allowed for recov-
ery. In this way, the muscle groups
used by the push-up can recover while
the muscles used in the sit-up are
exercised, and vice versa. The follow-
ing is an example of this type of
the body’s major muscle groups must approach:
Figure 3-2
3-8

If all soldiers exercise at the same
time, the above activity can be finished
in about 3.5 minutes. As the soldiers’
levels of fitness improve, the difficulty
of the activity can be increased. This
is done by lengthening the time period
of any or all timed sets, by decreasing
any rest period between timed sets, by
increasing the number of timed sets
performed, or by any combination of
these.
To add variety and increase the
overall effectiveness of the activity,
different types of push-ups (regular,
feet-elevated, wide-hand, close-hand,
and so forth) and sit-ups (regular,
abdominal twists, abdominal curls, and
so forth) can be done. When perform-
ing this type of workout, pay attention
to how the soldiers are responding, and
make adjustments accordingly. For
example, the times listed in the chart
above may prove to be too long or too
short for some soldiers. In the same
way, because of the nature of the sit-
up, it may become apparent that some
soldiers can benefit by taking slightly
more time for timed sets of sit-ups
than for push-ups.
When using timed sets for push-up
and sit-up improvement, soldiers can
before doing the other. For example,
several timed sets of push-ups can be
done followed by several sets of sit-
ups, or vice versa. With this approach,
rest intervals must be placed between
timed sets. The following example can
be done after the regular strength
workout and is reasonable starting
routine for most soldiers.
During a timed set of push-ups, a
soldier may reach temporary muscle
failure at any time before the set is
over. If this happens, he should
immediately drop to his knees and
continue doing modified push-ups on
his knees.
Finally, as in any endeavor, soldiers
must set goals for themselves. This
applies when doing each timed set and
when planning for their next and
future APFTs.
Major Muscle Groups
In designing a workout it is impor-
tant to know the major muscle groups,
where they are located, and their pri-
mary action. (See Figure 3-4.)
To ensure a good, balanced work-
out, one must do at least one set of
exercises for each of the major muscle
also perform all sets of one exercise groups.
Figure 3-3
3-9
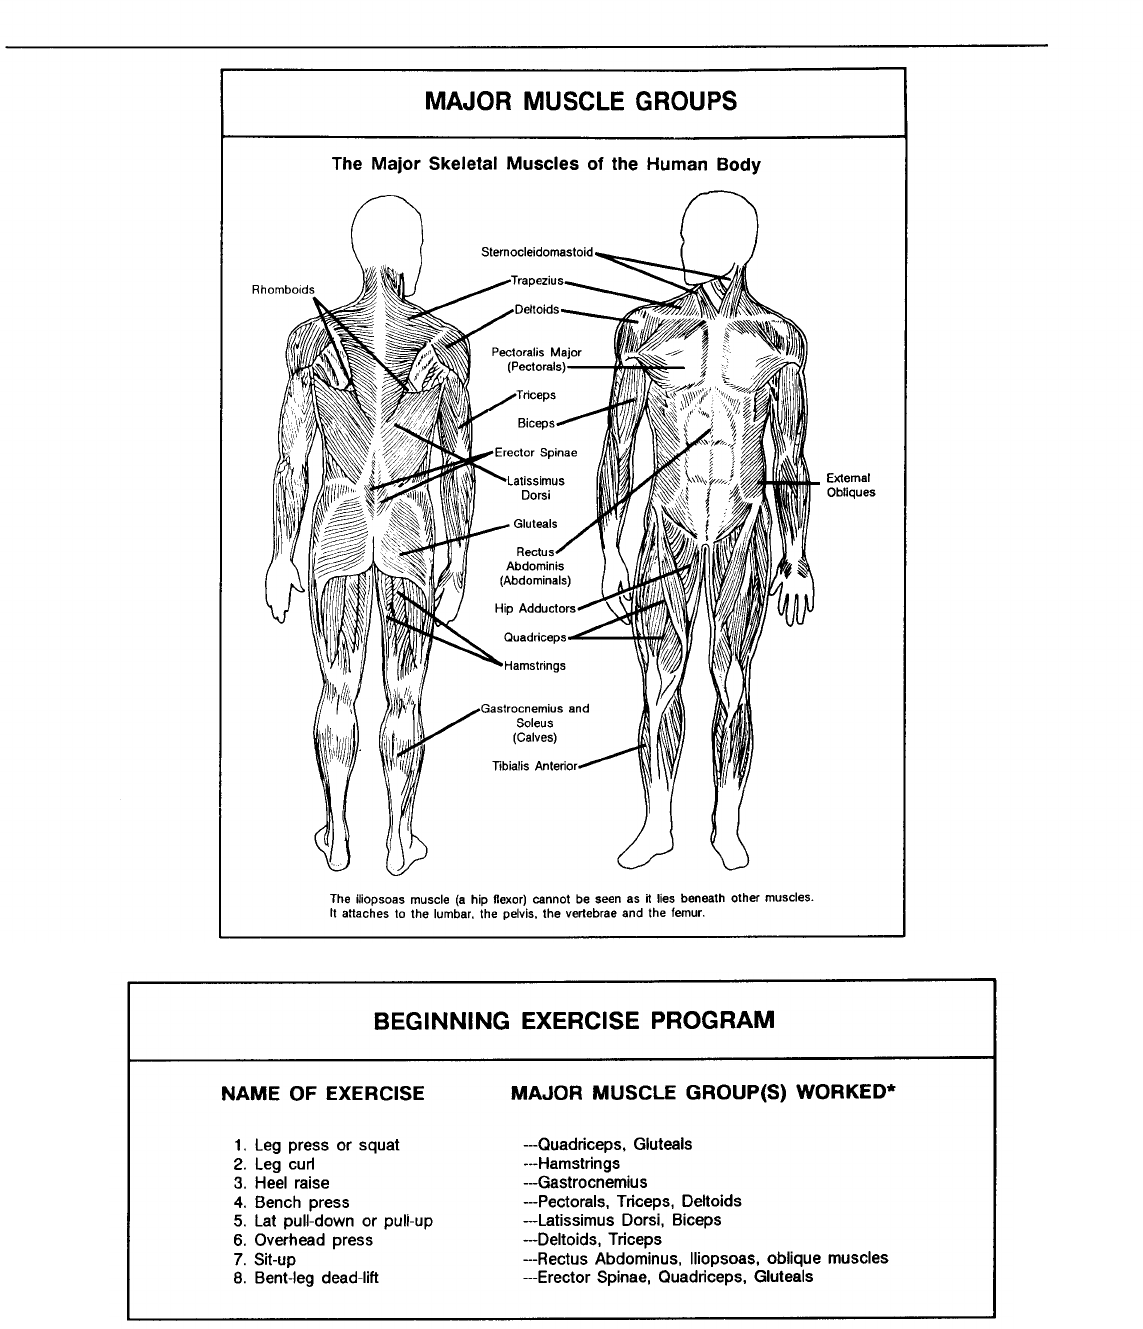
Figure 3-4
Figure 3-5
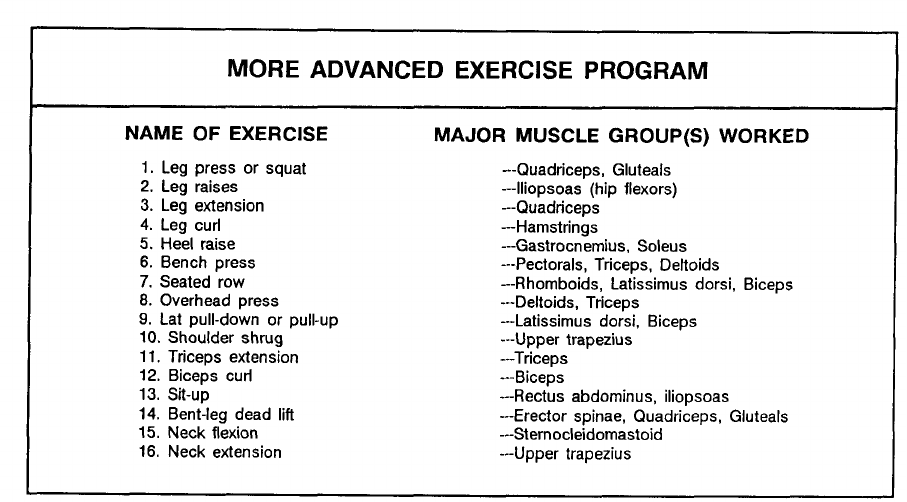
The beginning weight-training pro-
gram shown at Figure 3-5 will work
most of the important, major muscle
groups. It is a good program for begin-
ners and for those whose time is
limited. The exercises should be done
in the order presented.
The weight-training program shown
at Figure 3-6 is a more comprehensive
program that works the major muscle
groups even more thoroughly. It has
some duplication with respect to the
lat pull-down, and biceps curl. Thus,
for the beginner, this program may
overwork some muscle groups. How-
ever, for the more advanced lifter, it
will make the muscles work in differ-
ent ways and from different angles
thereby providing a better over-all
development of muscle strength. This
program also includes exercises to
strengthen the neck muscles.
When doing one set of each exercise
to muscle failure, the average soldier
.
muscles that are worked. For example, should be able to complete this routine
the quadriceps are worked by the leg and do a warm-up and cool-down
press/squat and leg extensions, and the within the regular PT time.
biceps are worked by the seated row,
Figure 3-6
3-11

Key Points to Emphasize
Some key points to emphasize when
doing resistance training tire as fol-
lows
● Train with a partner if possible,
This helps to increase motivation,
the intensity of the workout, and
safety,
● Always breathe when lifting. Exhale
during the concentric (positive] phase
of contraction, and inhale during
the eccentric (negative) phase,
● Accelerate the weight through the
concentric phase of contraction,
and return the weight to the starting
position in a controlled manner
during the eccentric phase,
● Exercise the large muscle groups
first, then the smaller ones.
● Perform all exercises through their
full range of motion. Begin from a
fully extended, relaxed position (pre-
stretched), and end the concentric
phase in a fully contracted position,
● Always use strict form. Do not
twist, lurch, lunge, or arch the
body, This can cause serious in-
jury. These motions also detract
from the effectiveness of the exer-
cise because they take much of the
stress off the targeted muscle groups
and place it on other muscles.
● Rest from 30 to 180 seconds be-
tween different exercises and sets
of a given exercise.
● Allow at least 48 hours of recovery
between workouts, but not more
than 96 hours, to let the body re-
cover and help prevent over train-
ing and injury.
● Progress slowly, Never increase the
resistance used by more than 10
percent at a time.
● Alternate pulling and pushing exer-
cises. For example, follow triceps
extensions with biceps curls.
● Ensure that every training program
is balanced. Train the whole body,
not just specific areas. Concentrat-
ing on weak areas is all right, but
the rest of the body must also be
trained.
Exercise Programs
When developing strength programs
for units, there are limits to the type of
training that can be done. The availa-
bility of facilities is always a major
concern. Although many installations
have excellent strength-training fa-
cilities, it is unreasonable to expect that
all units can use them on a regular
basis. However, the development of
strength does not require expensive
equipment. All that is required is for
the soldier, three times a week, to
progressively overload his muscles.
TRAINING WITHOUT SPECIAL
EQUIPMENT
Muscles do not care what is supply-
ing the resistance. Any regular resis-
tance exercise that makes the muscle
work harder than it is used to causes it
to adapt and become stronger. Whether
the training uses expensive machines,
sandbags, or partners, the result is
largely the same.
Sandbags are convenient for train-
ing large numbers of soldiers, as they
are available in all military units. The
weight of the bags can be varied
depending on the amount of fill.
Sandbag exercises are very effective in
strength-training circuits. Logs, ammo
boxes, dummy rounds, or other equip-
ment that is unique to a unit can also
be used to provide resistance for strength
training. Using a soldier’s own body
weight as the resistive force is another
excellent alternative method of strength
training. Pull-ups, push-ups, dips, sit-
ups, and single-leg squats are examples
of exercises which use a person’s body
weight. They can improve an un-
trained soldier’s level of strength.
Partner-resisted exercises (PREs) are
another good way to develop muscular
strength without equipment, especially
when training large numbers of sol-
diers at one time. As with all training,
safety is a critical factor. Soldiers
should warm up, cool down, and follow
the principles of exercise previously
outlined.
3-12
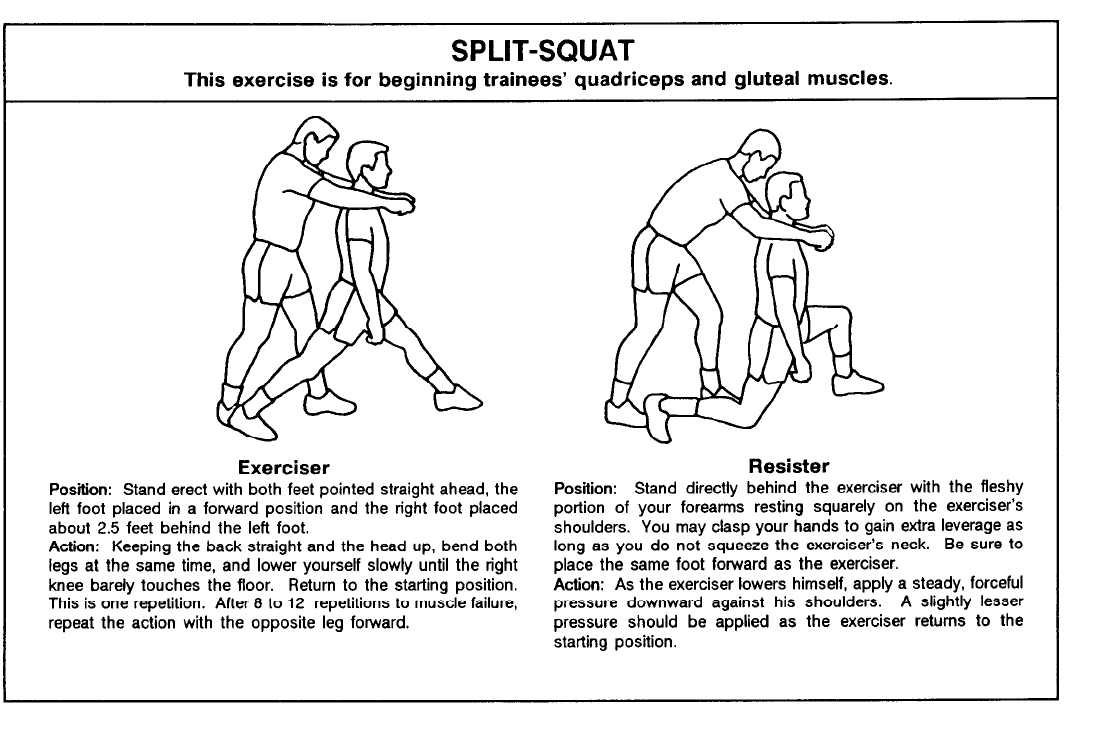
PARTNER-RESISTED EXERCISE
In partner-resisted exercises (PREs)
a person exercises against a partner’s
opposing resistance. The longer the
partners work together, the more
effective they should become in pro-
viding the proper resistance for each
exercise. They must communicate with
each other to ensure that neither too
much nor too little resistance is ap-
plied. The resister must apply enough
resistance to bring the exerciser to
muscle failure in 8 to 12 repetitions.
More resistance usual] y can and should
be applied during the eccentric (nega-
tive) phase of contraction (in other
words, the second half of each repe-
tition as the exerciser returns to the
starting position). The speed of move-
ment for PREs should always be slow
and controlled. As a general rule, the
negative part of each exercise should
take at least as long to complete as
the positive part. Proper exercise
form and regularity in perform-
ance are key ingredients when
using PREs for improving strength.
Following are descriptions and
illustrations of several PREs. They
should be done in the order given
to ensure that the exercising sol-
dier is working his muscle groups
from the largest to the smallest.
More than one exercise per muscle
group may be used. The PT leader
can select exercises which meet the
unit’s specific goals while consid-
ering individual limitations:
A 36-to 48-inch stick or bar one
inch in diameter may be used for
some of the exercises. This gives
the resister a better grip and/or
leverage and also provides a feel
similar to that of free weights and
exercise machines.
3-13
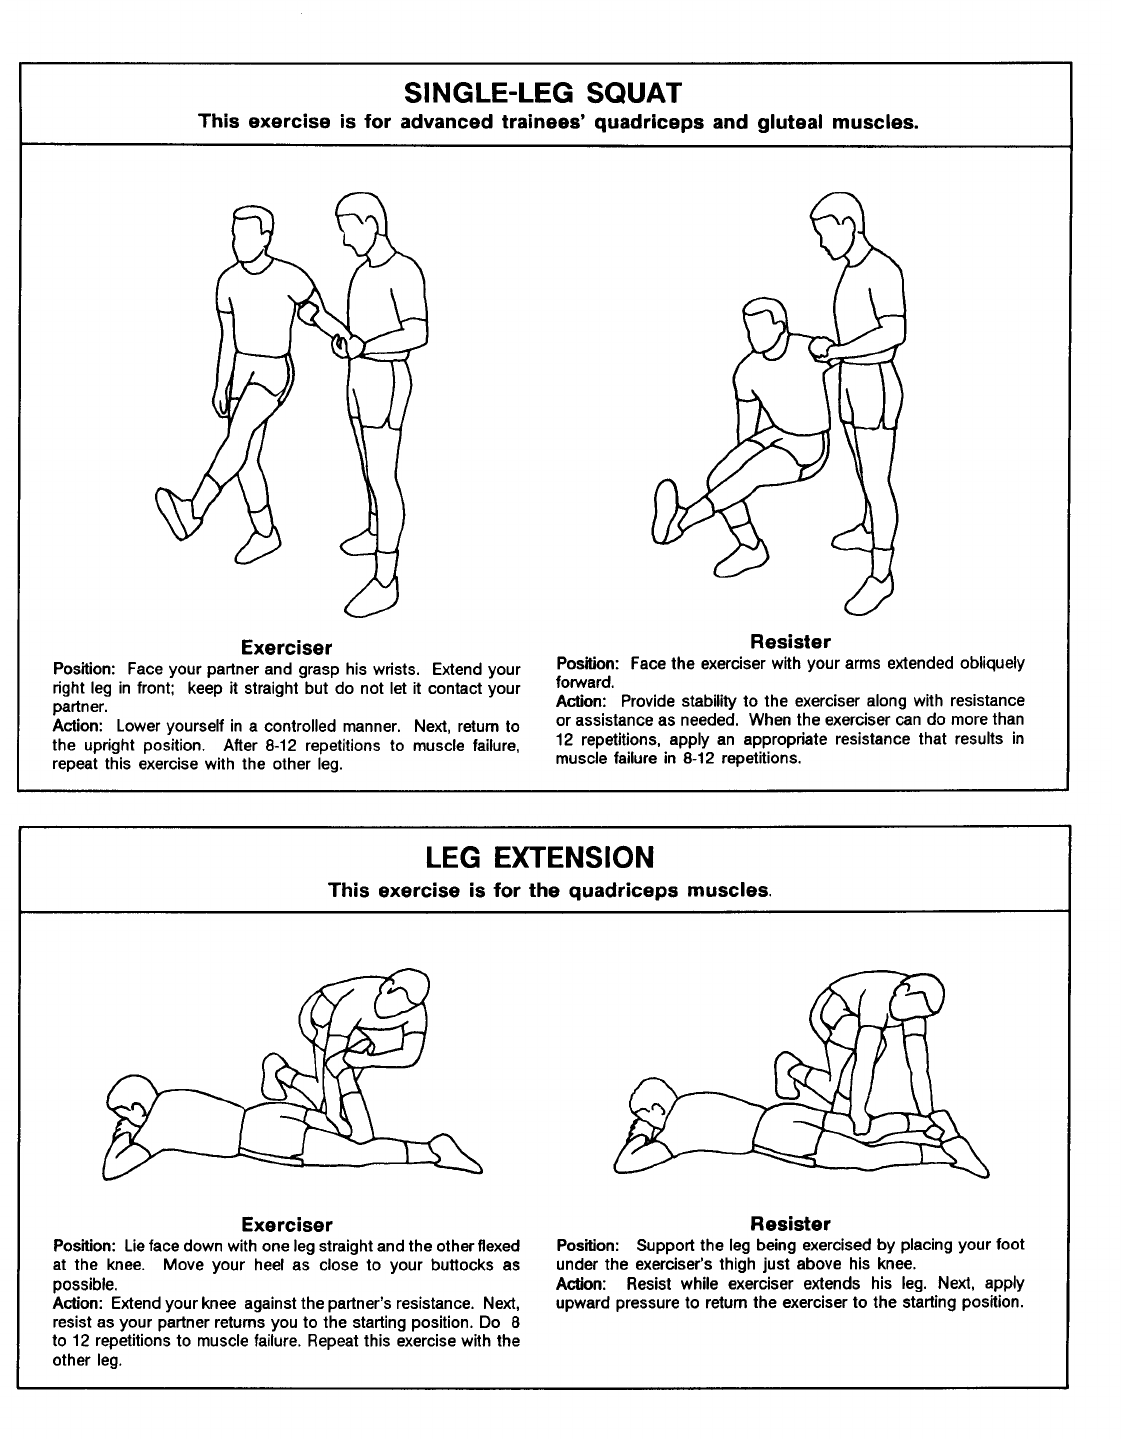
3-14
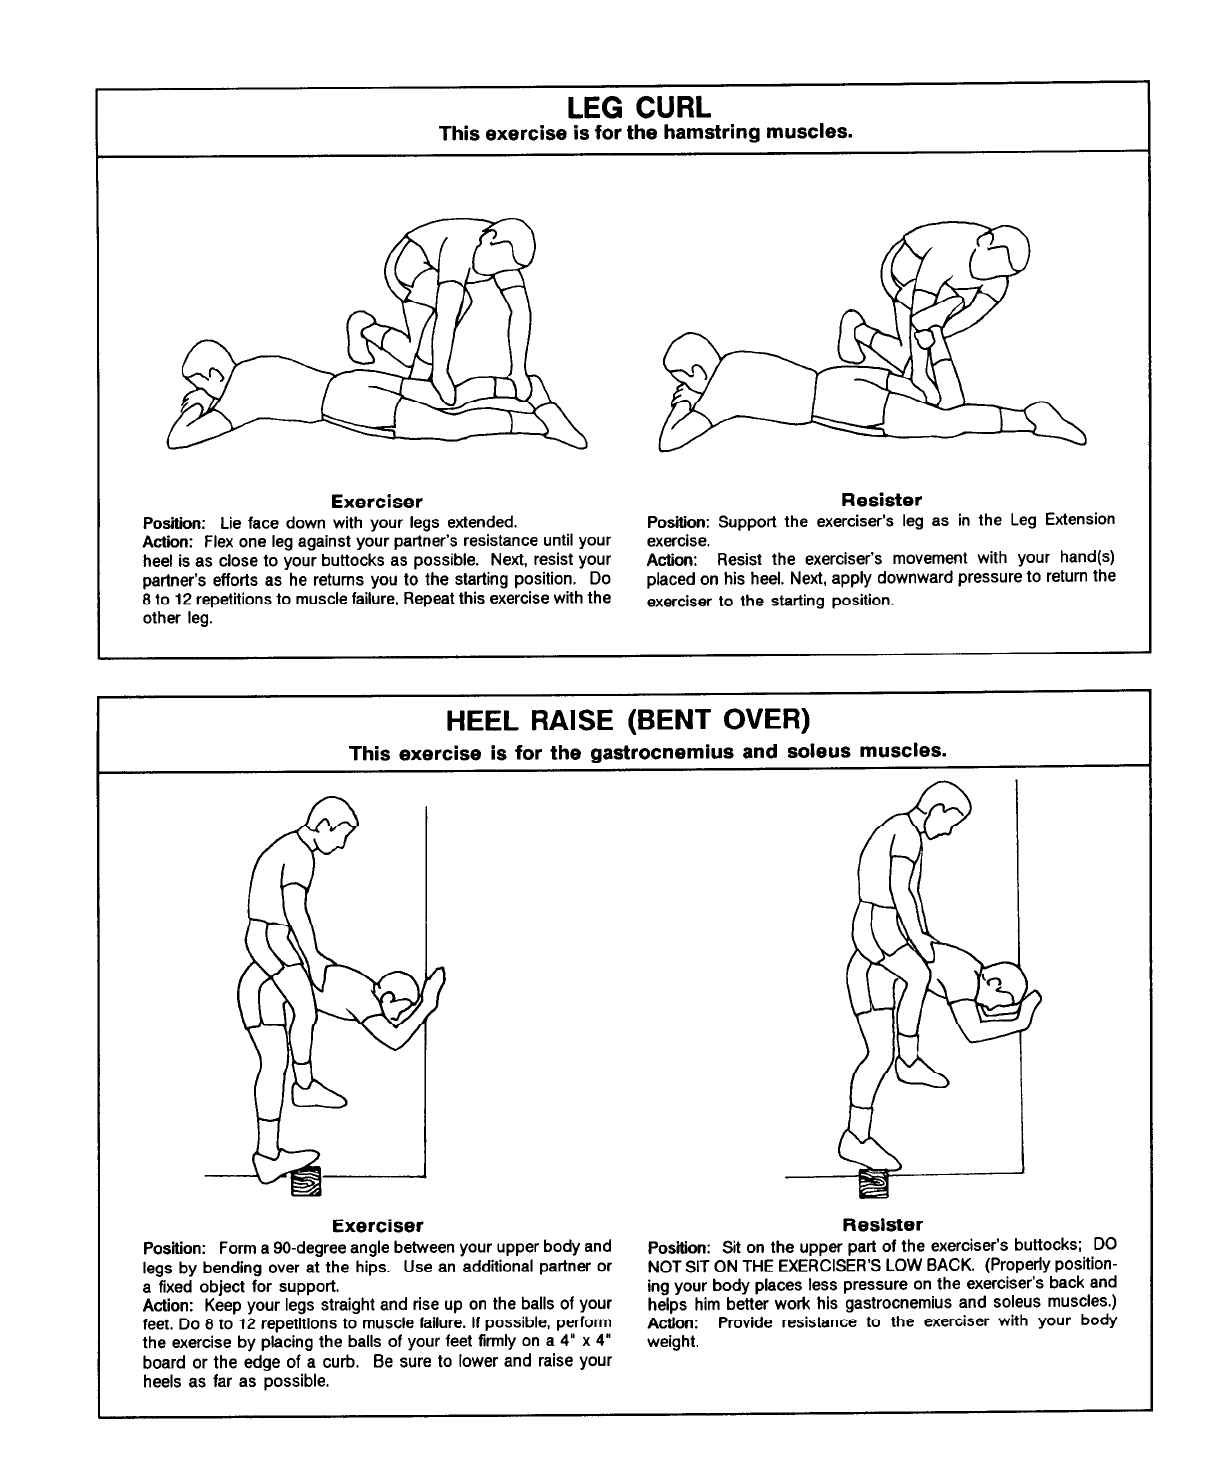
3-15
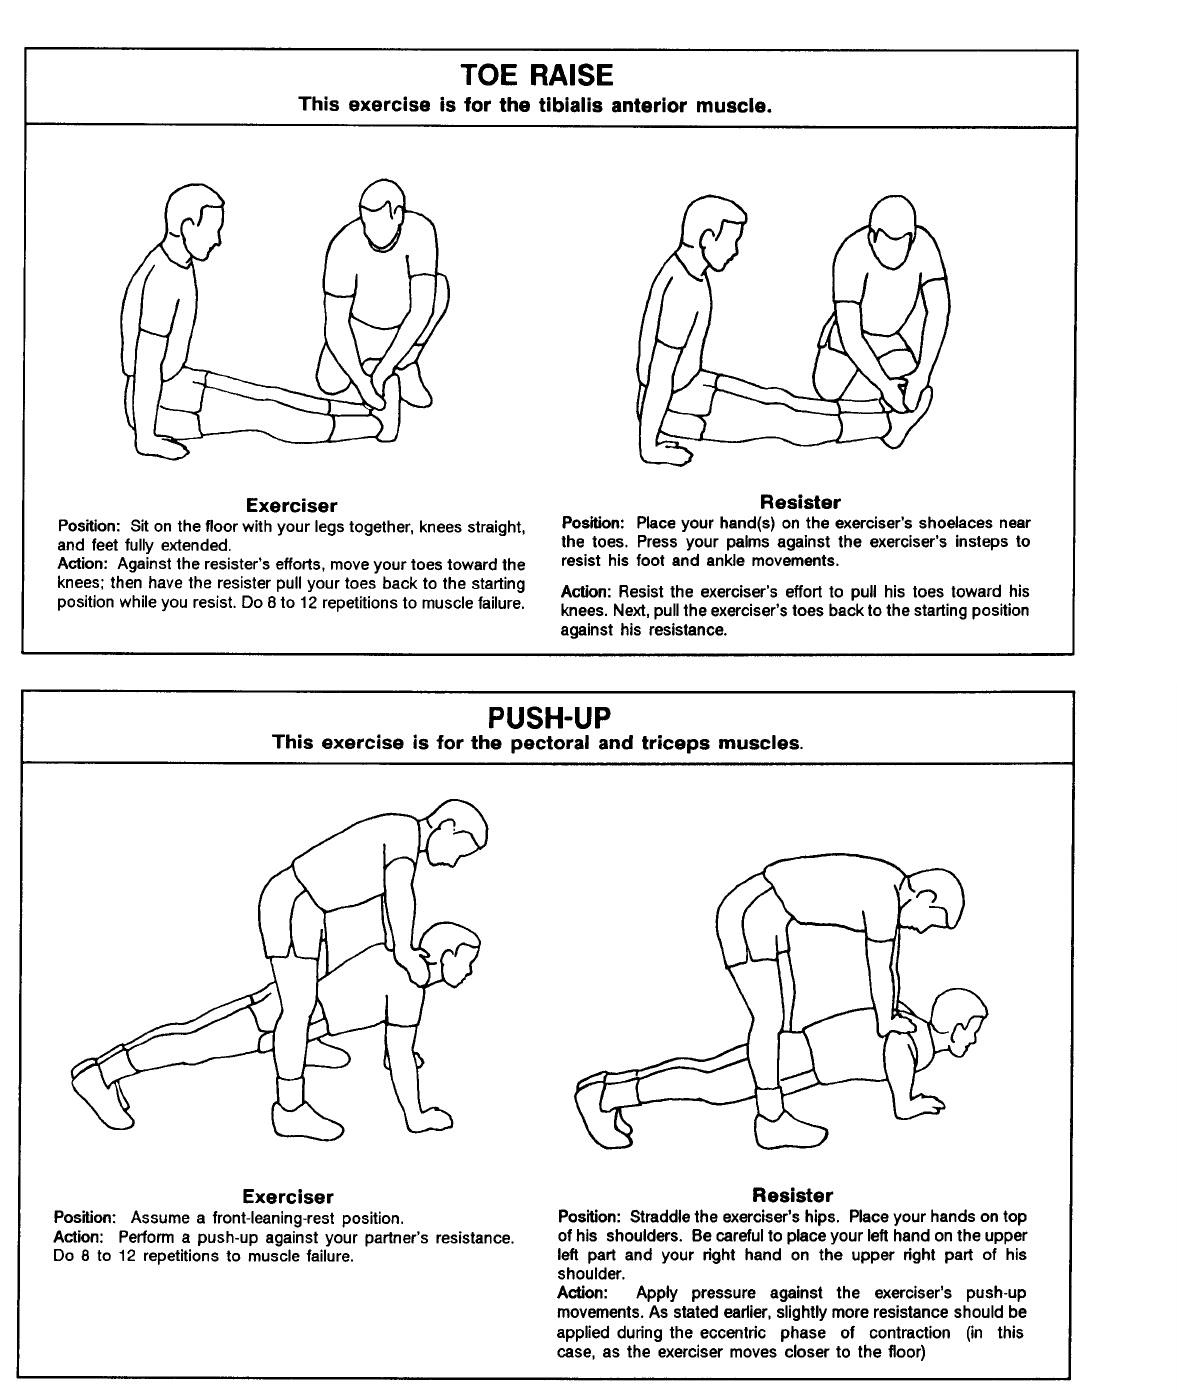
3-16
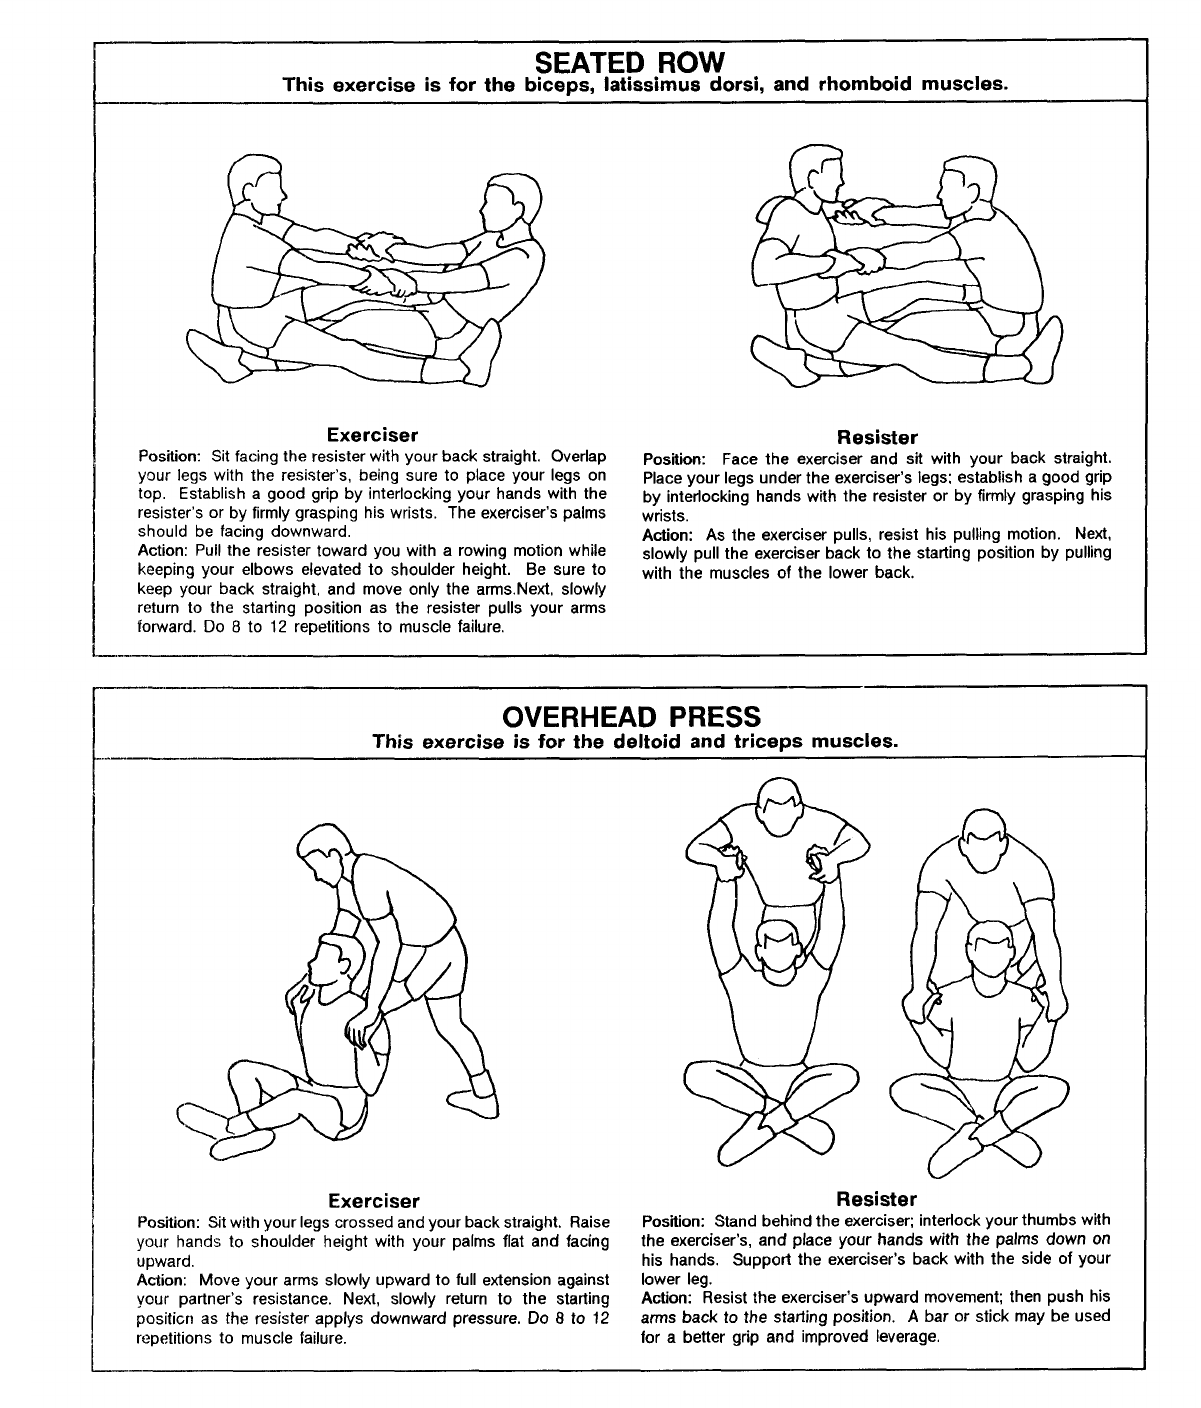
3-17
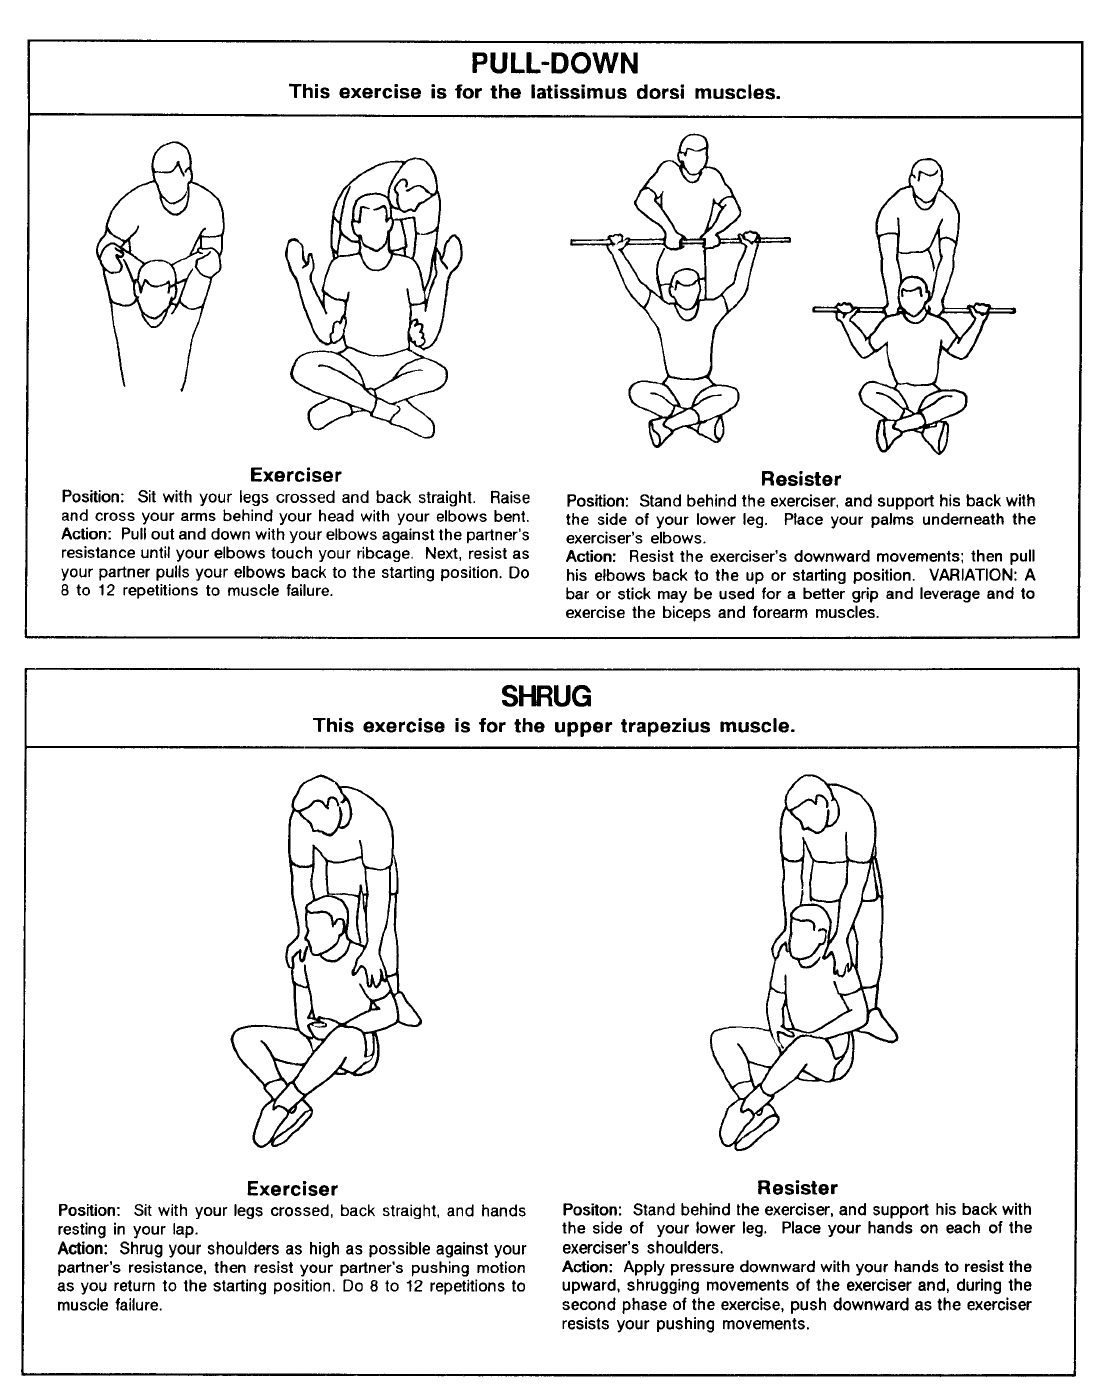
3-18
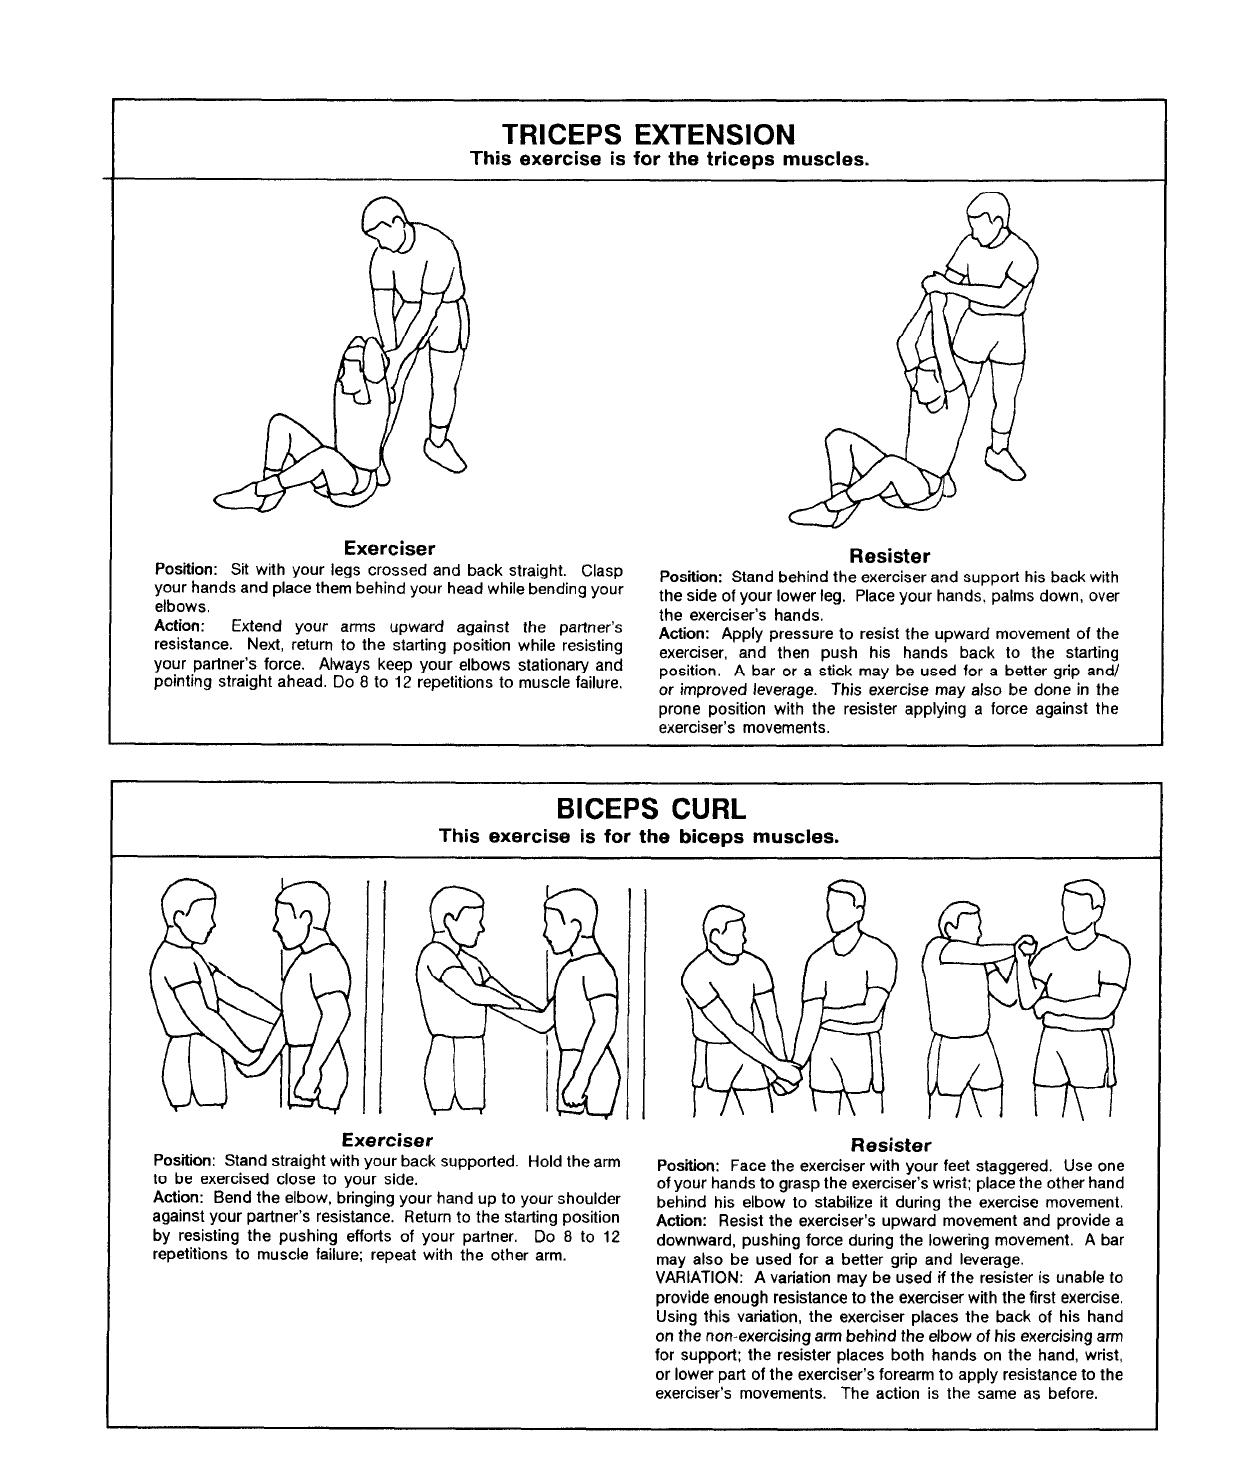
3-19
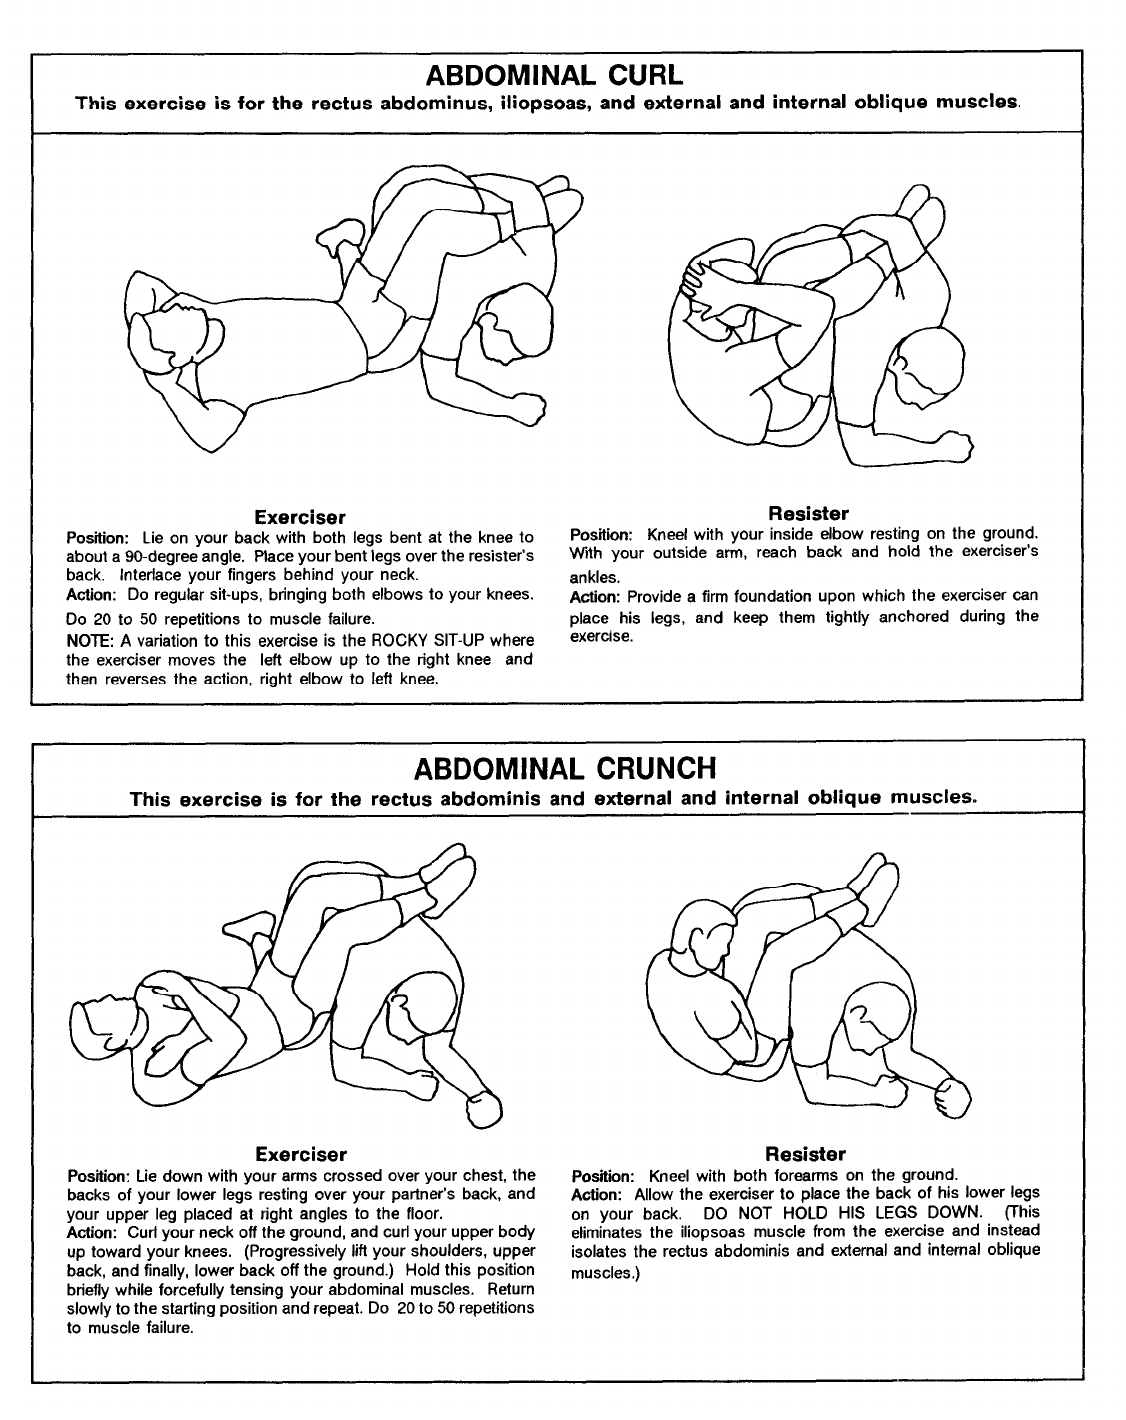
3-20
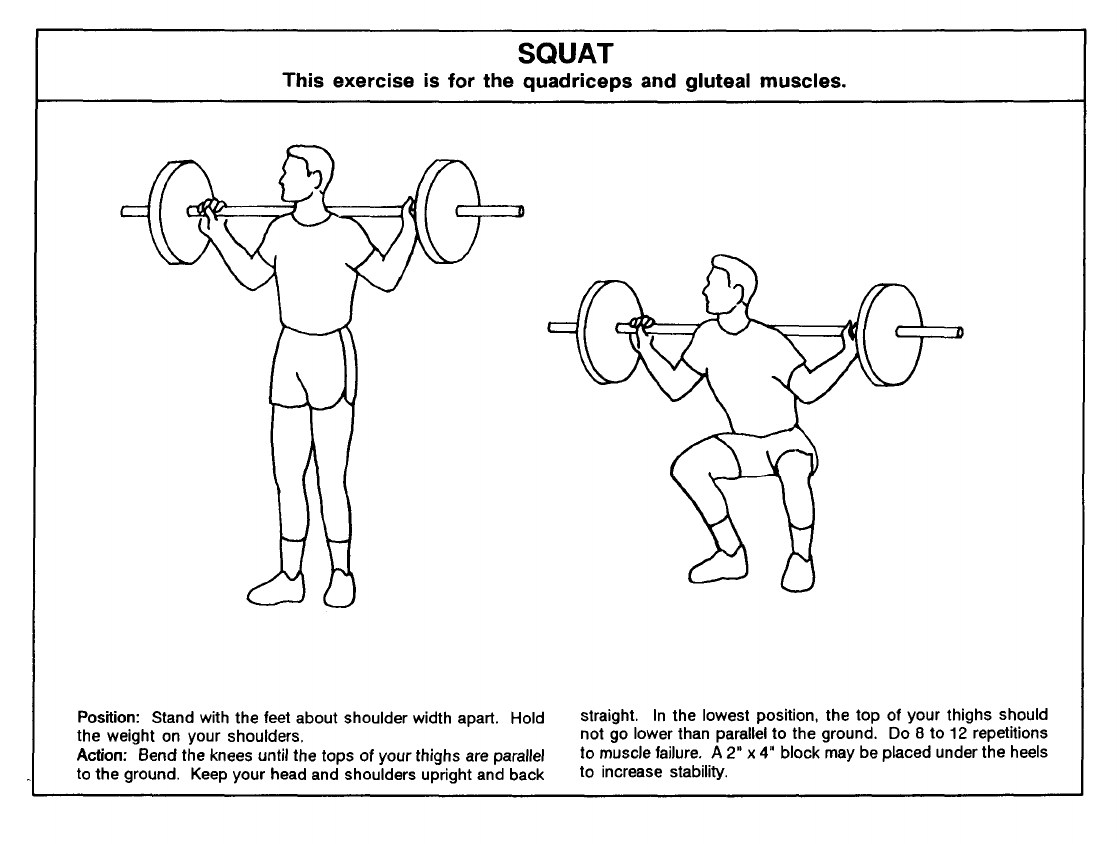
TRAINING WITH EQUIPMENT
Units in garrison usually have access to
weight rooms with basic equipment for
resistance-training exercises. The ex-
ercises described here require free
weights and supporting equipment.
Although not shown below for the sake
of simplicity, all exercises done with
free weights require a partner, or
spotter, to ensure proper form and the
safety of the lifter.
Free-Weight Exercises
3-21
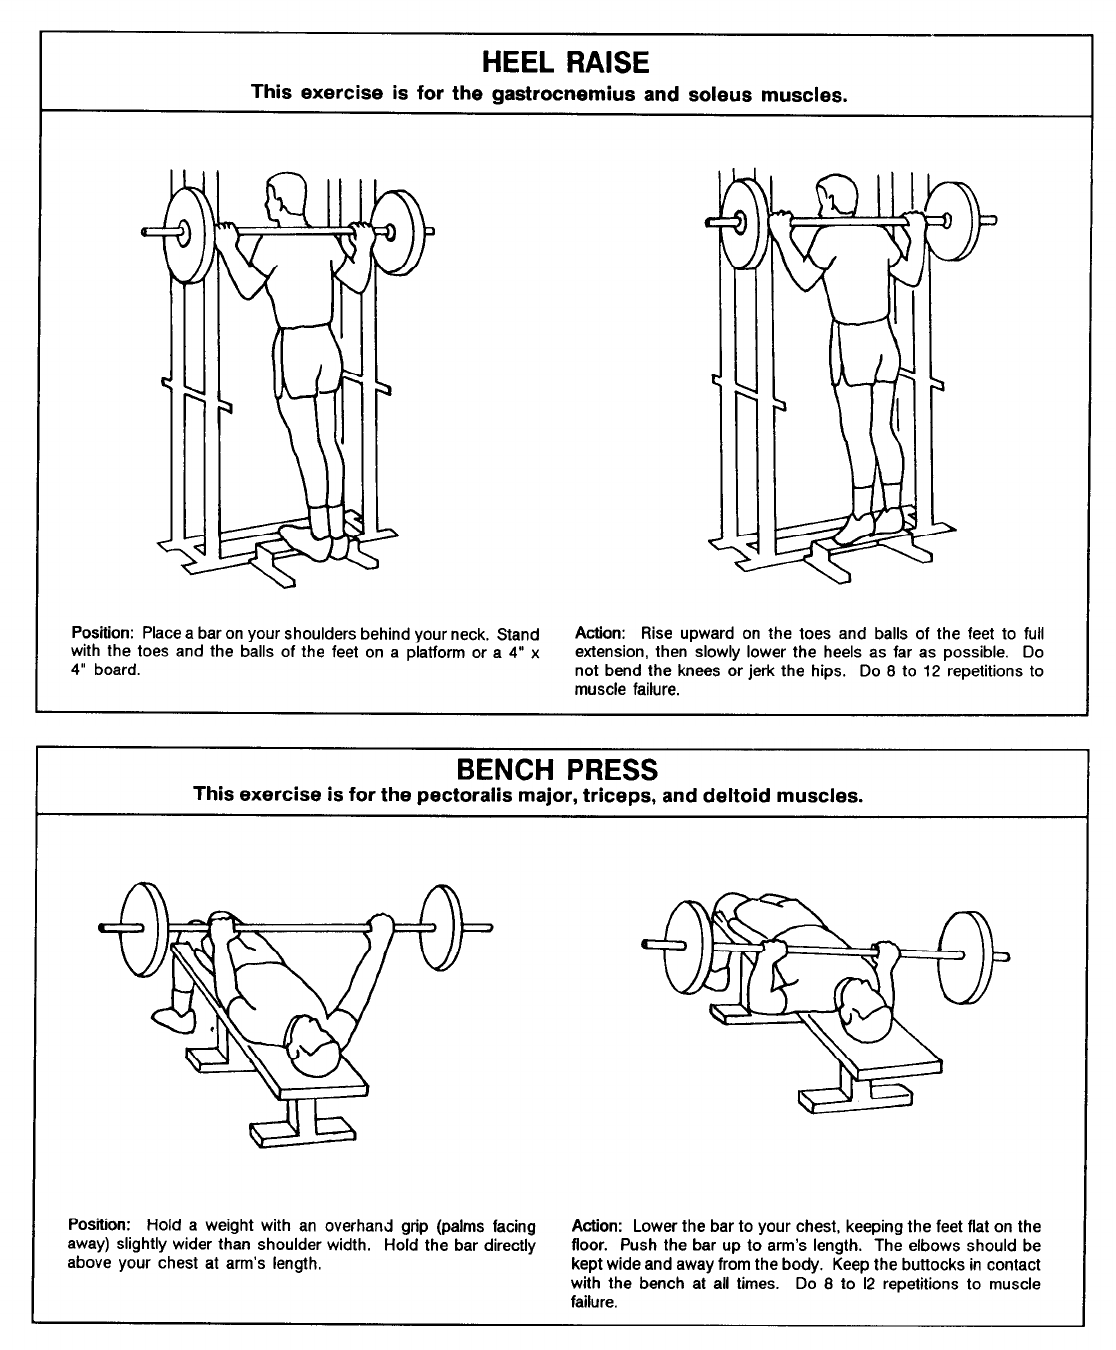
3-22

3-23
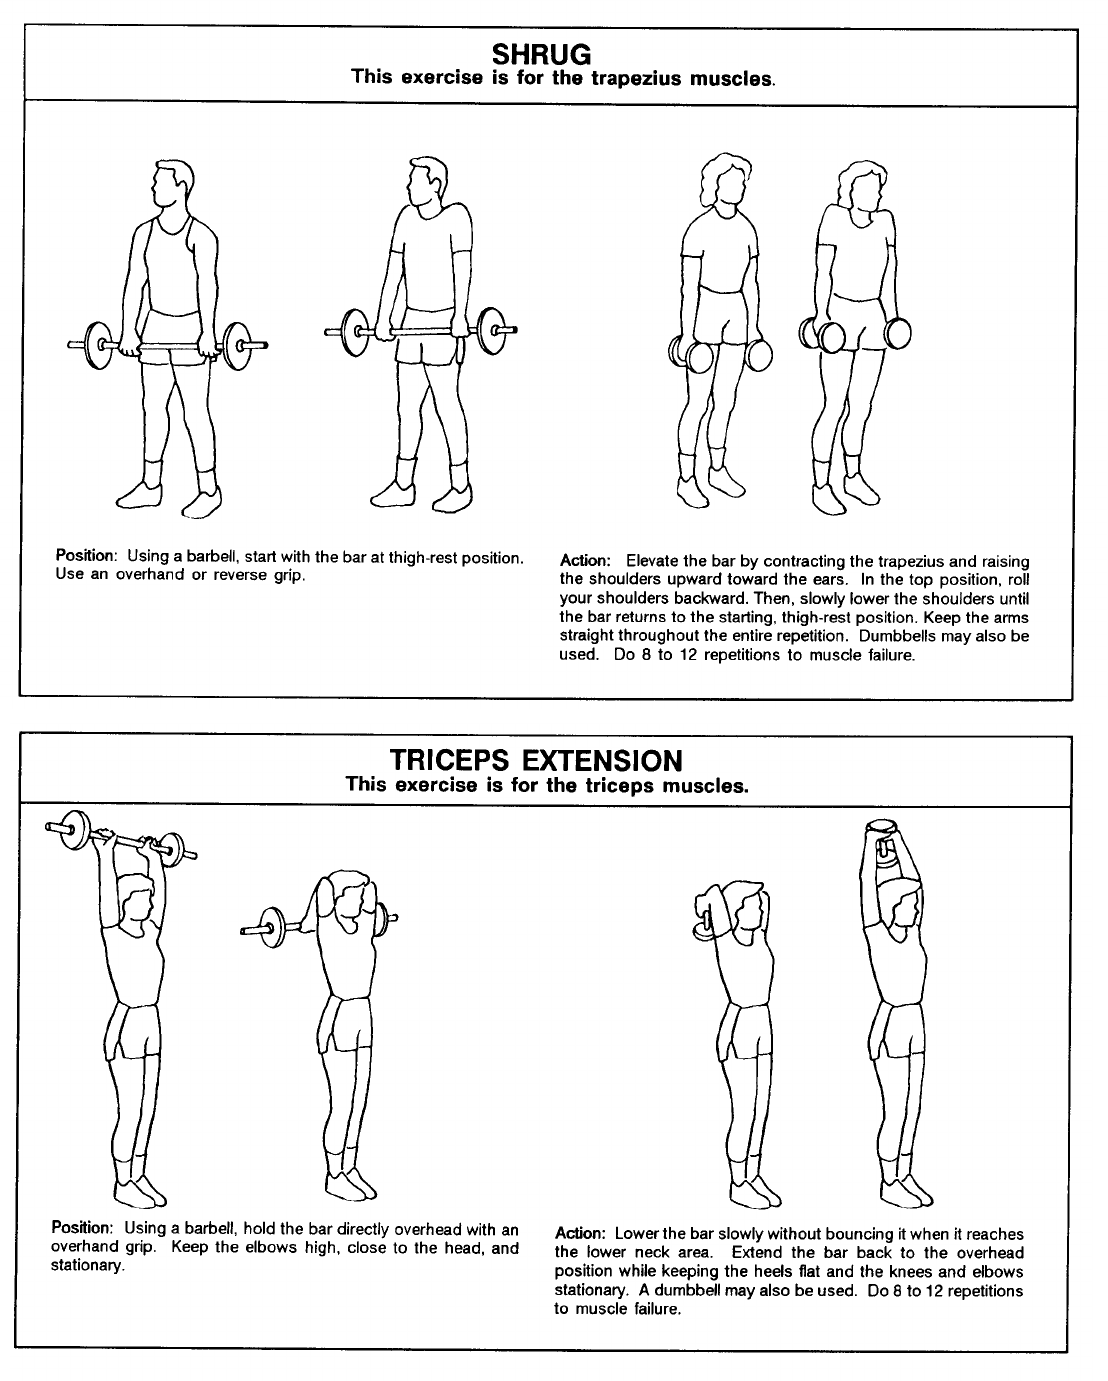
3-24
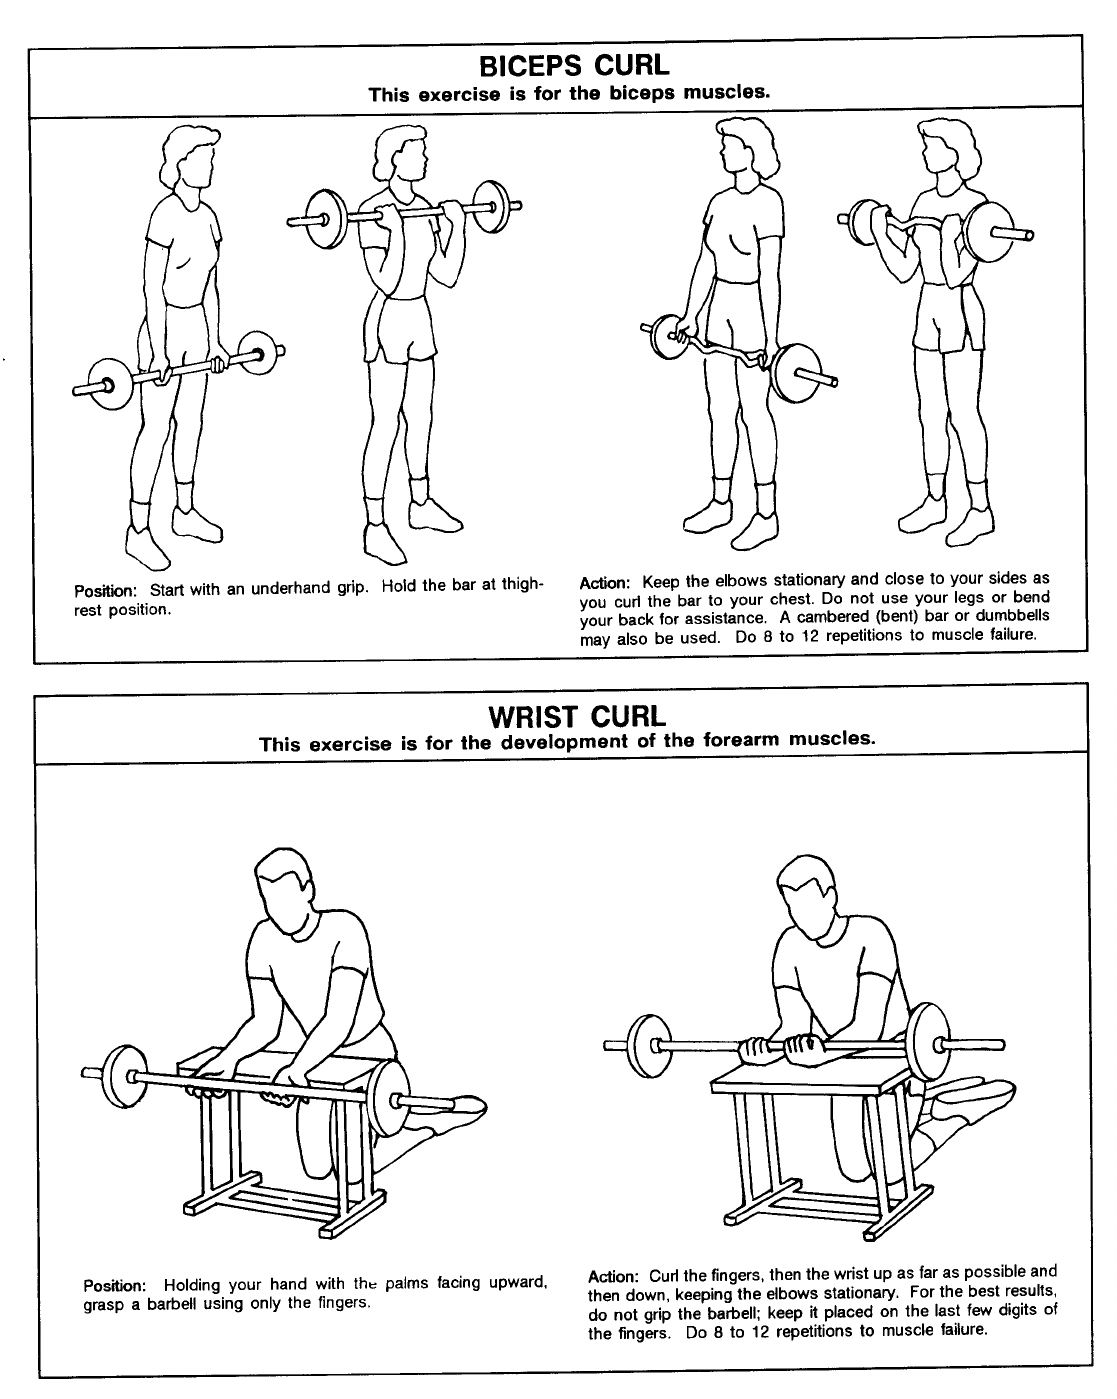
3-25
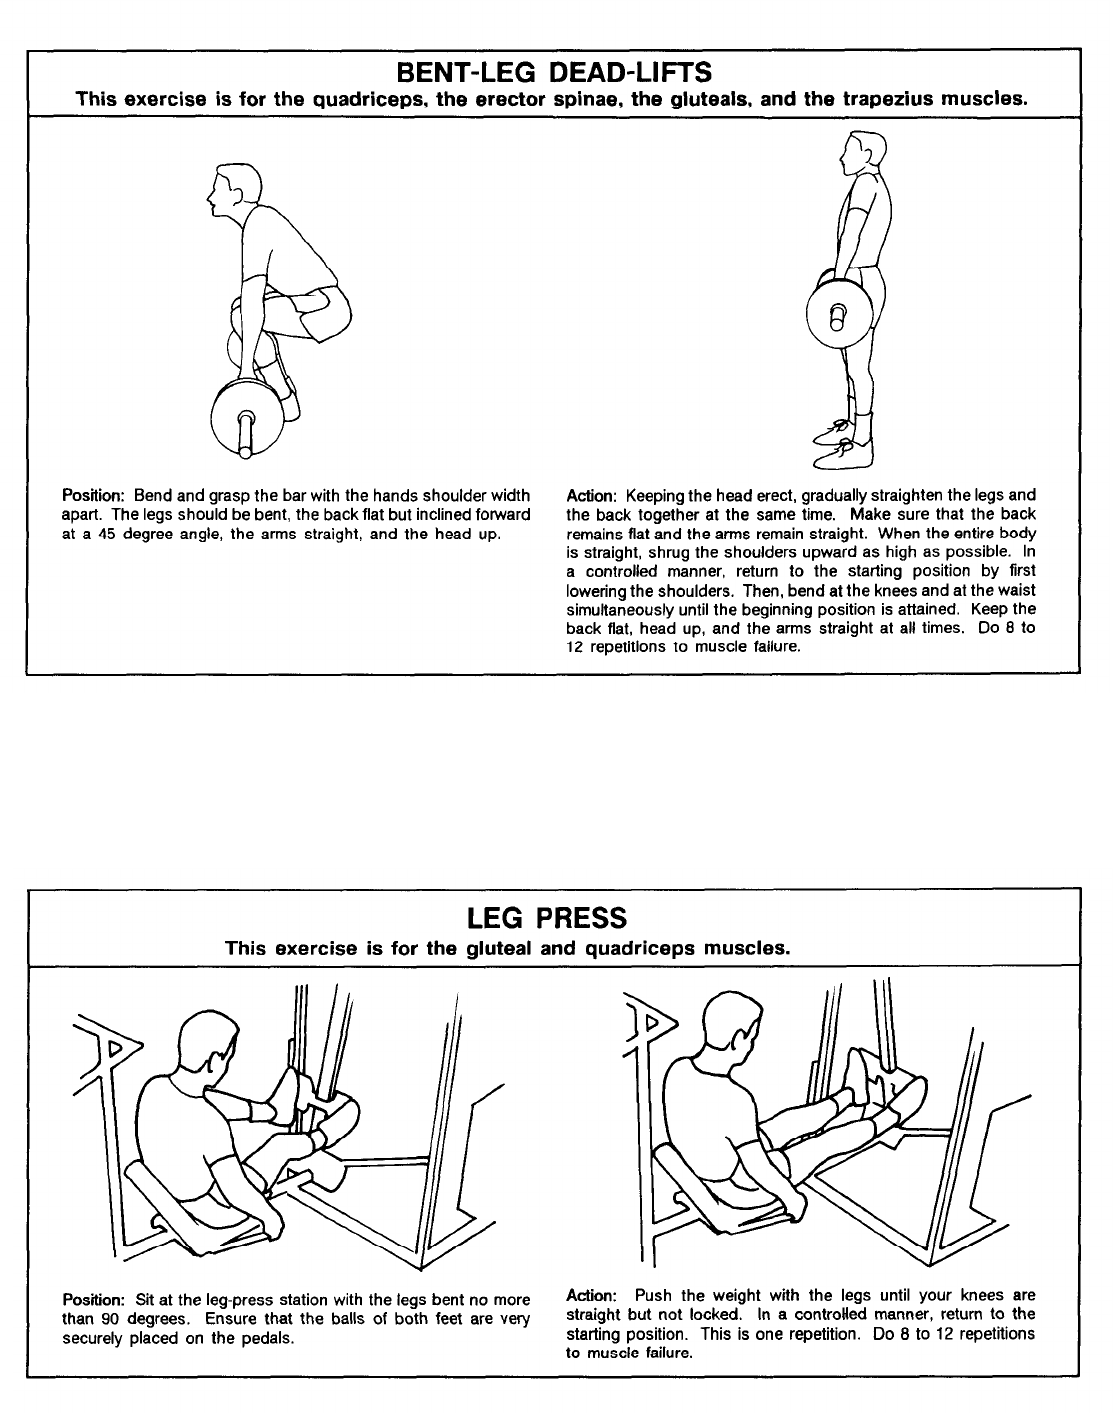
Exercises Performed with an
Exercise Machine
If exercise machines are available,
eccentric (negative) phase of con-
the exercises described below are
traction, should be done in a delib-
also good for strength training. All
crate, controlled manner.
movements, particularly during the
3-26
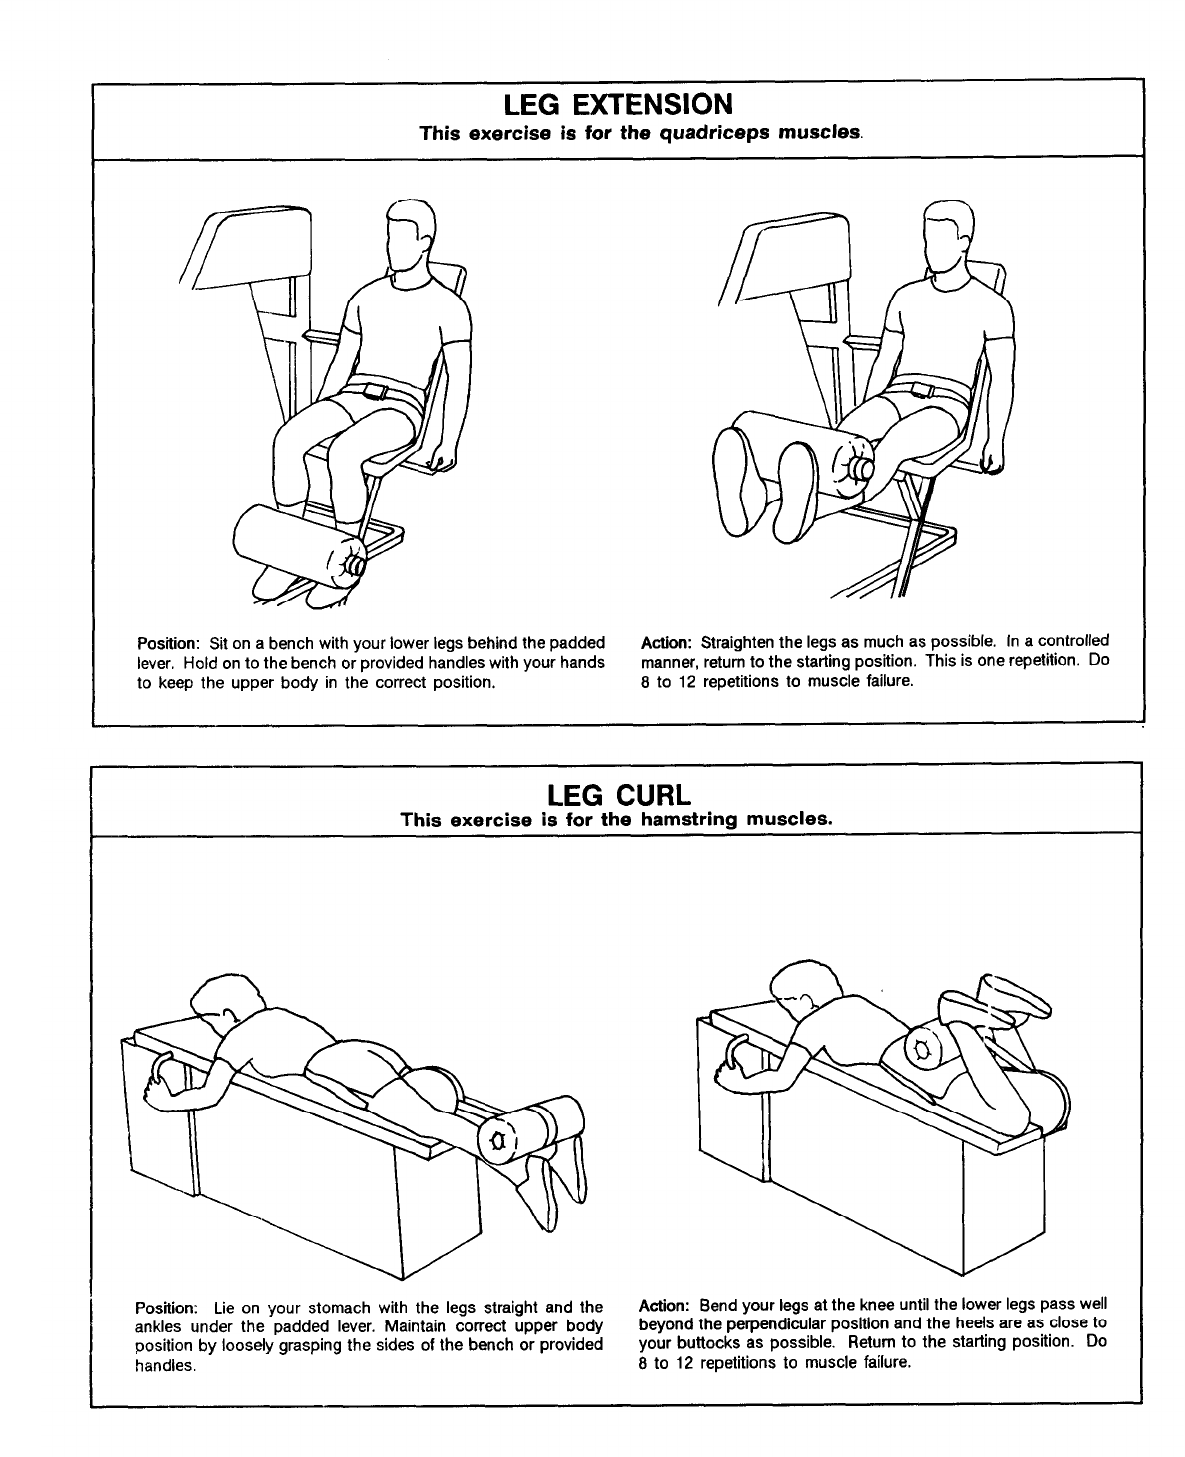
3-27
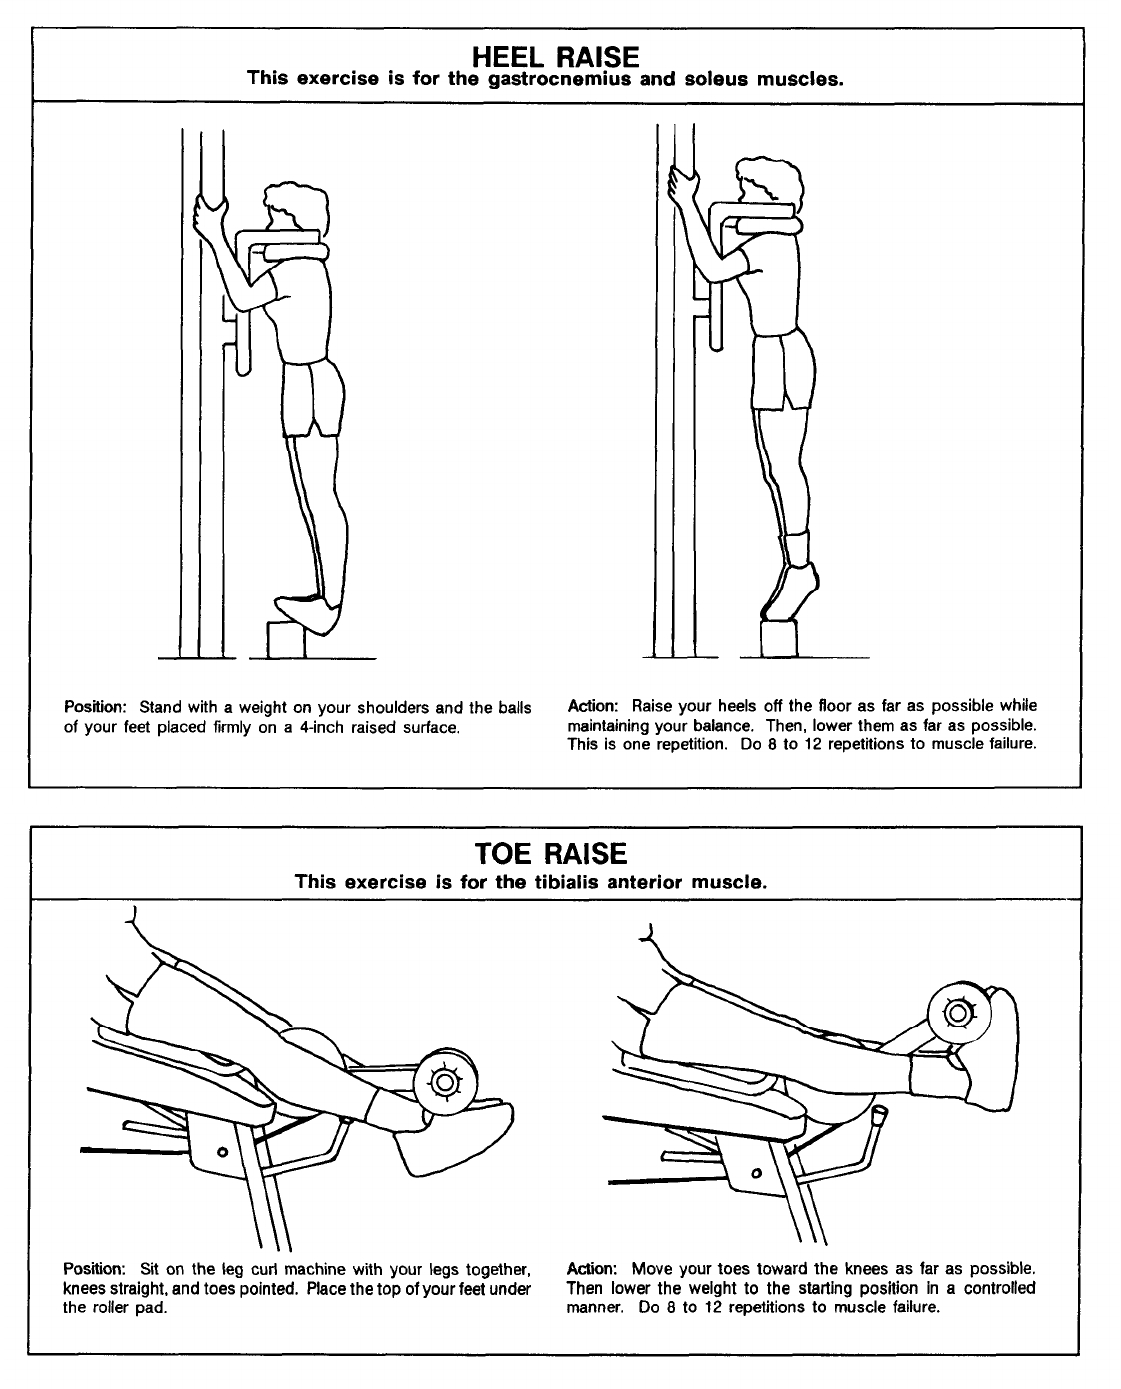
3-28
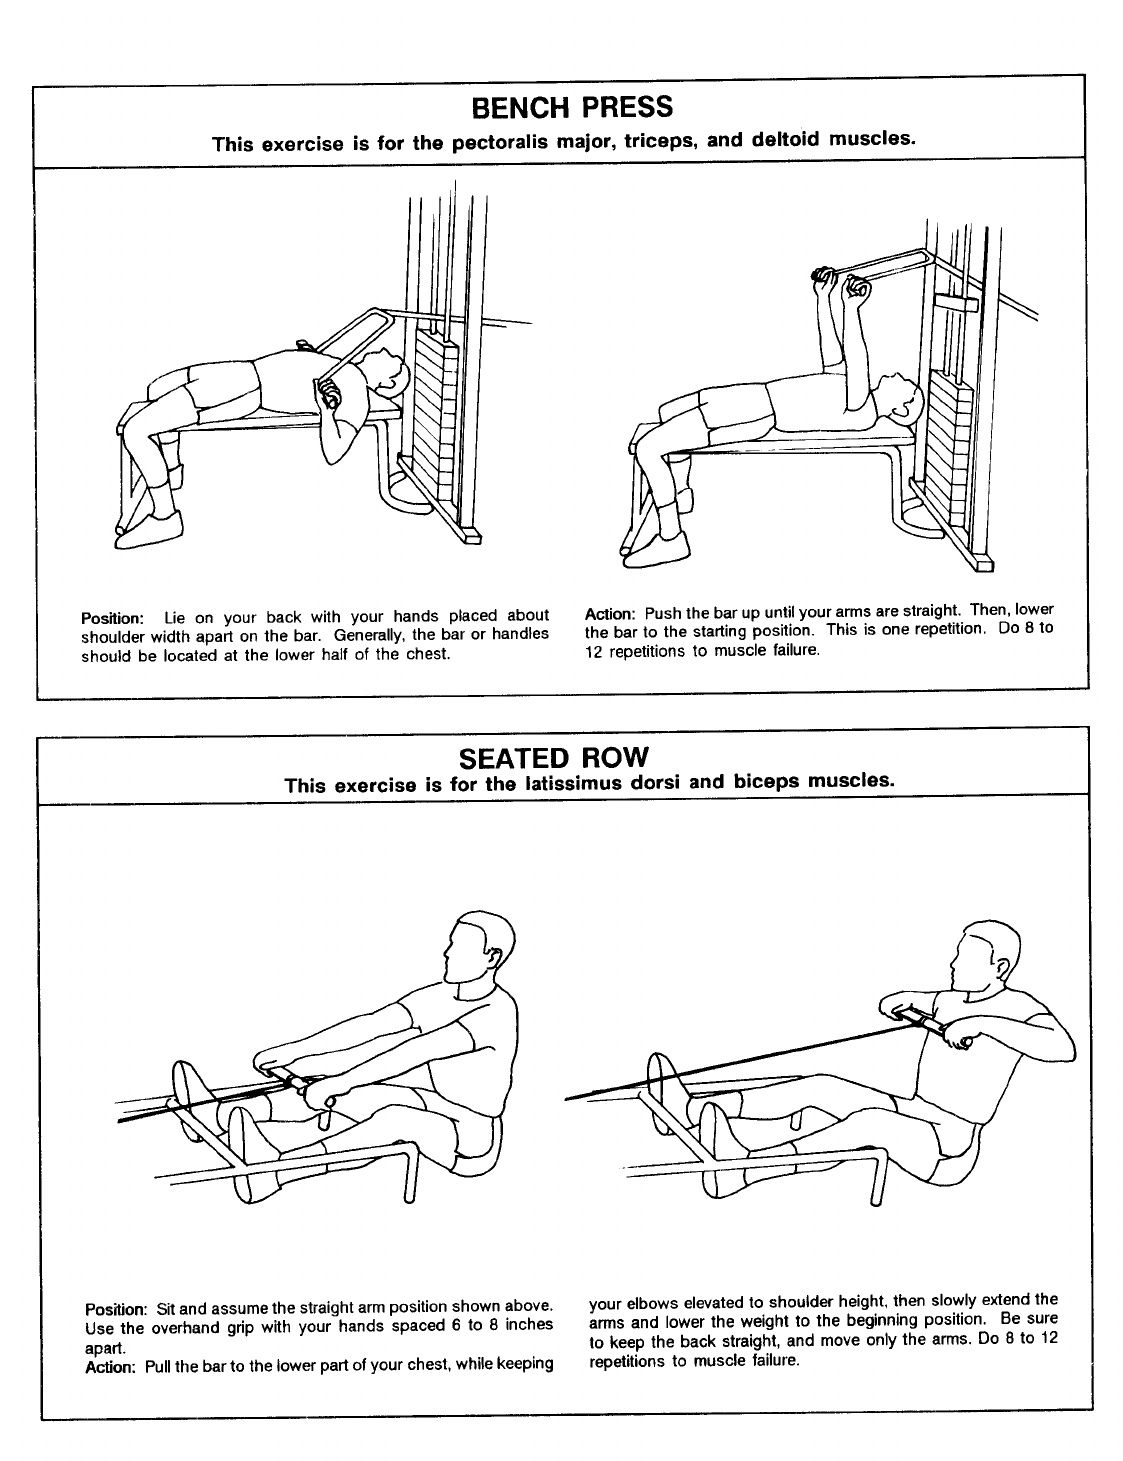
3-29
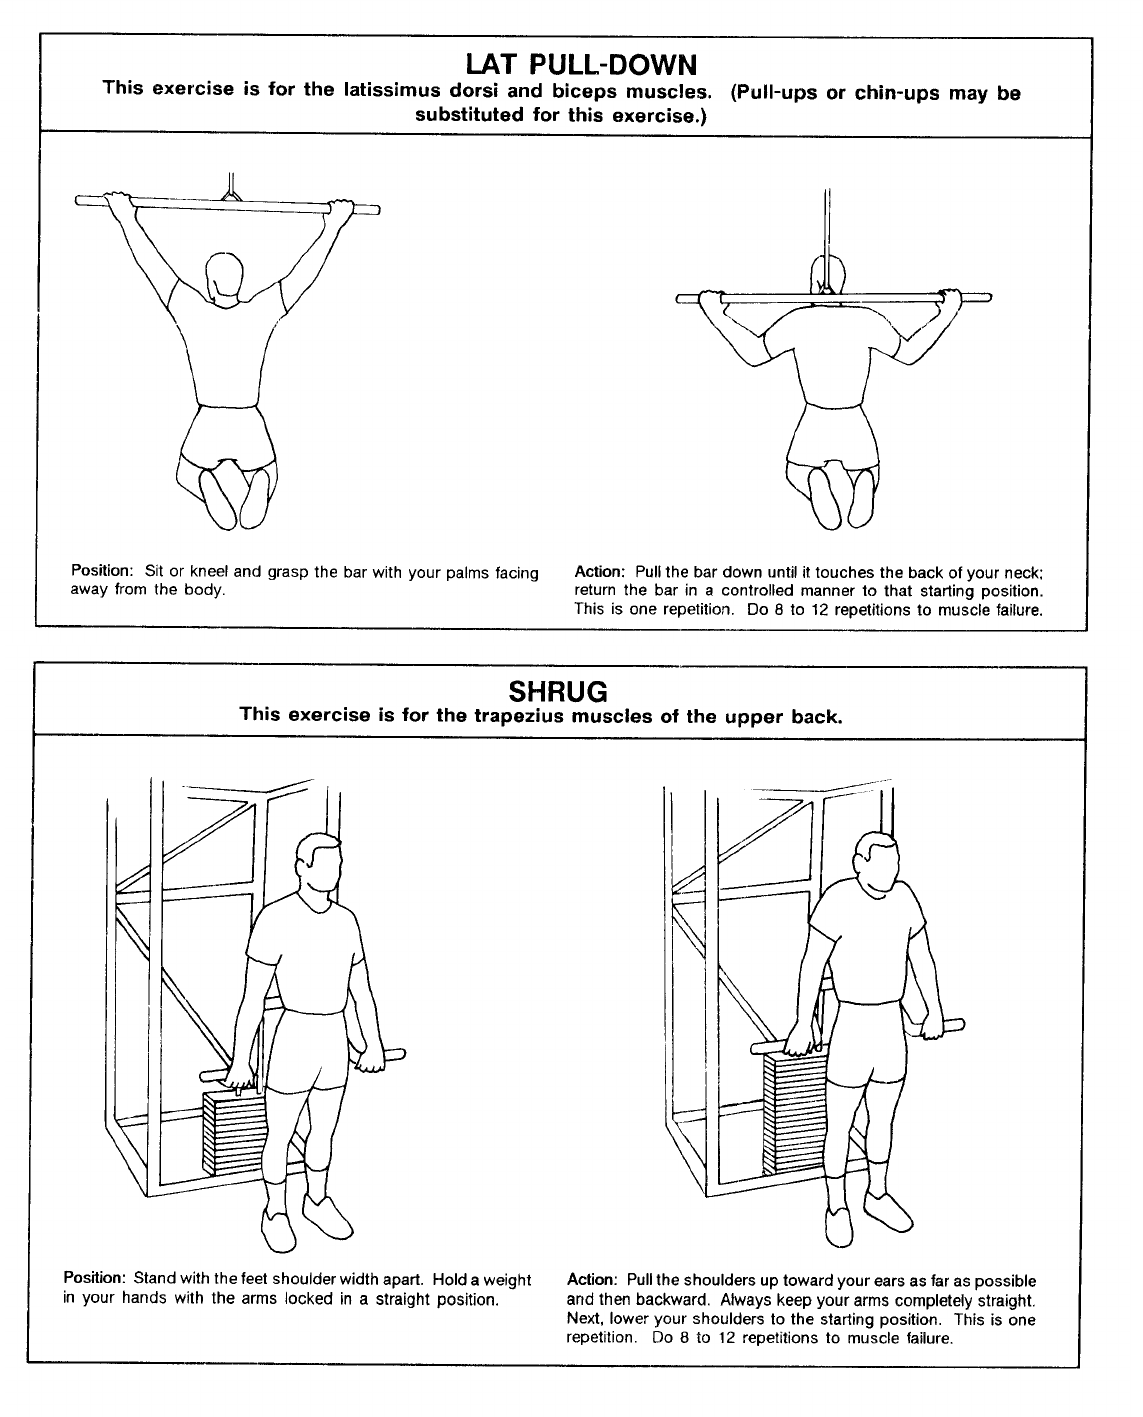
3-30
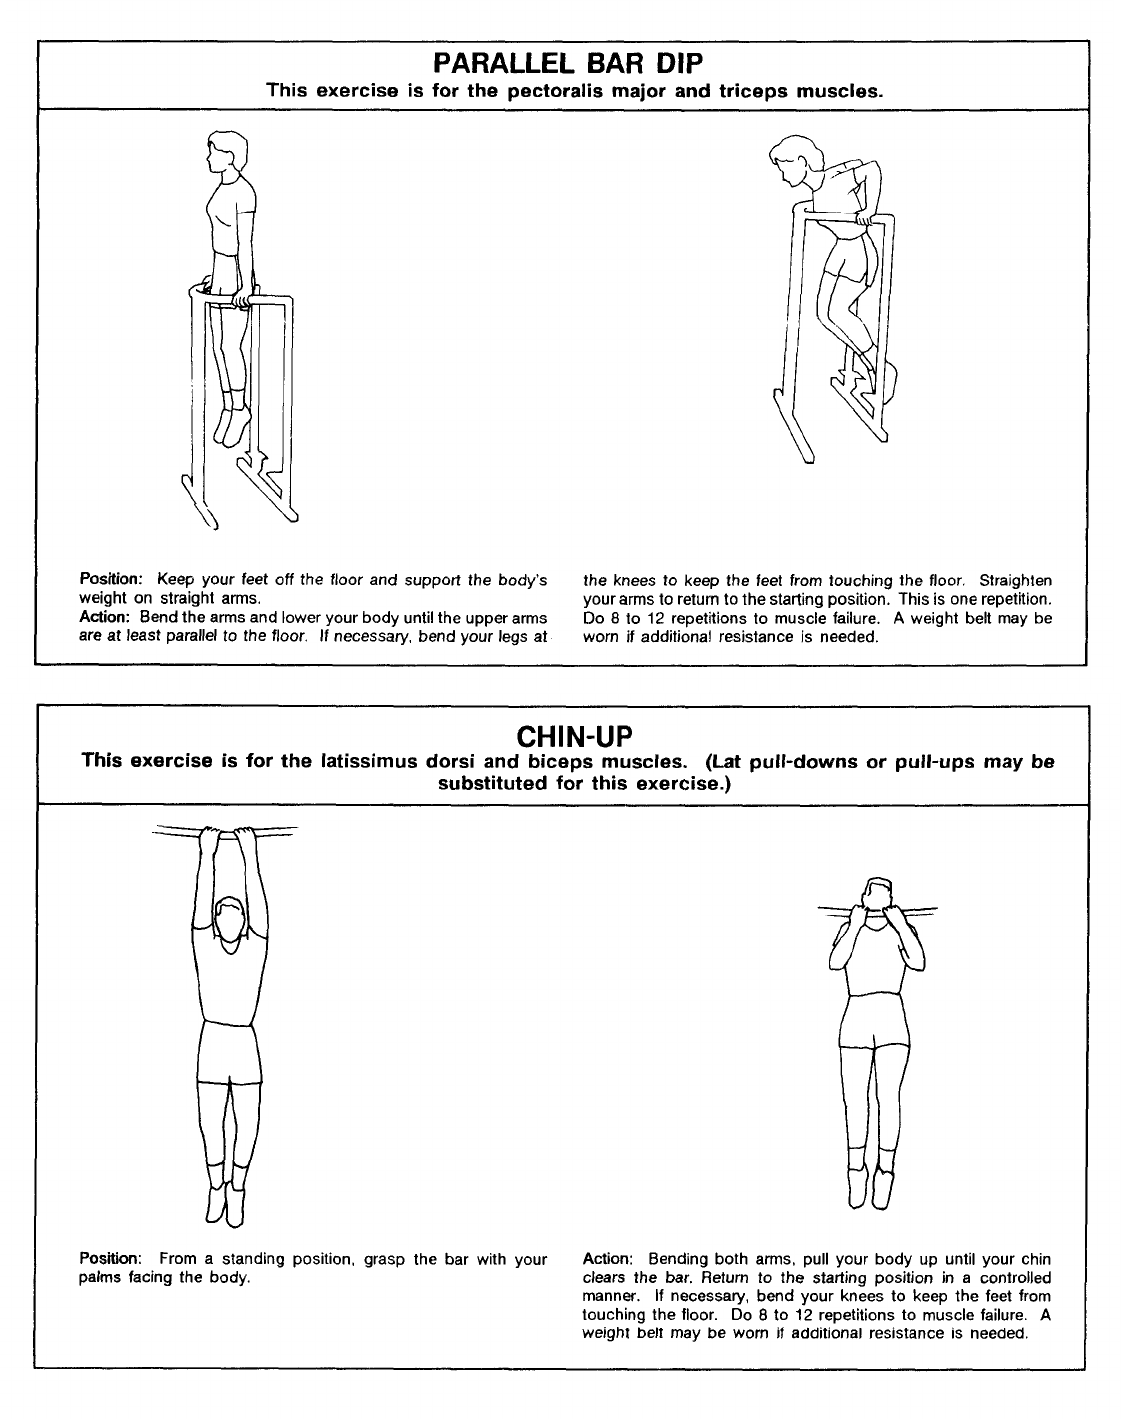
3-31
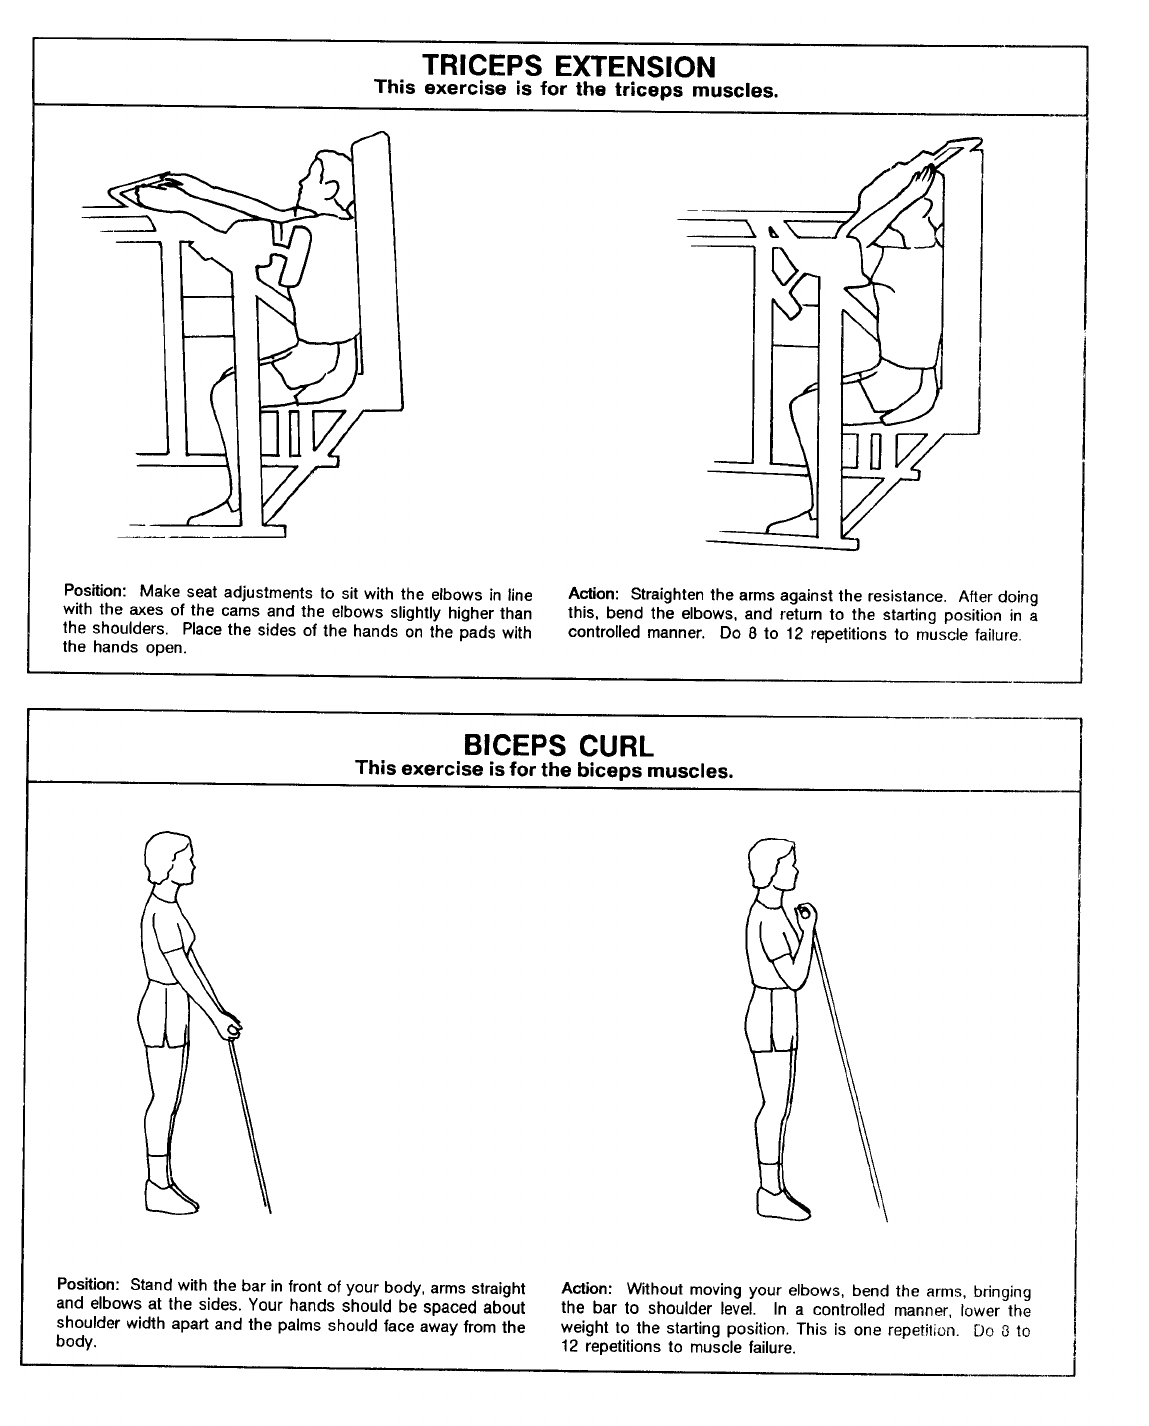
3-32
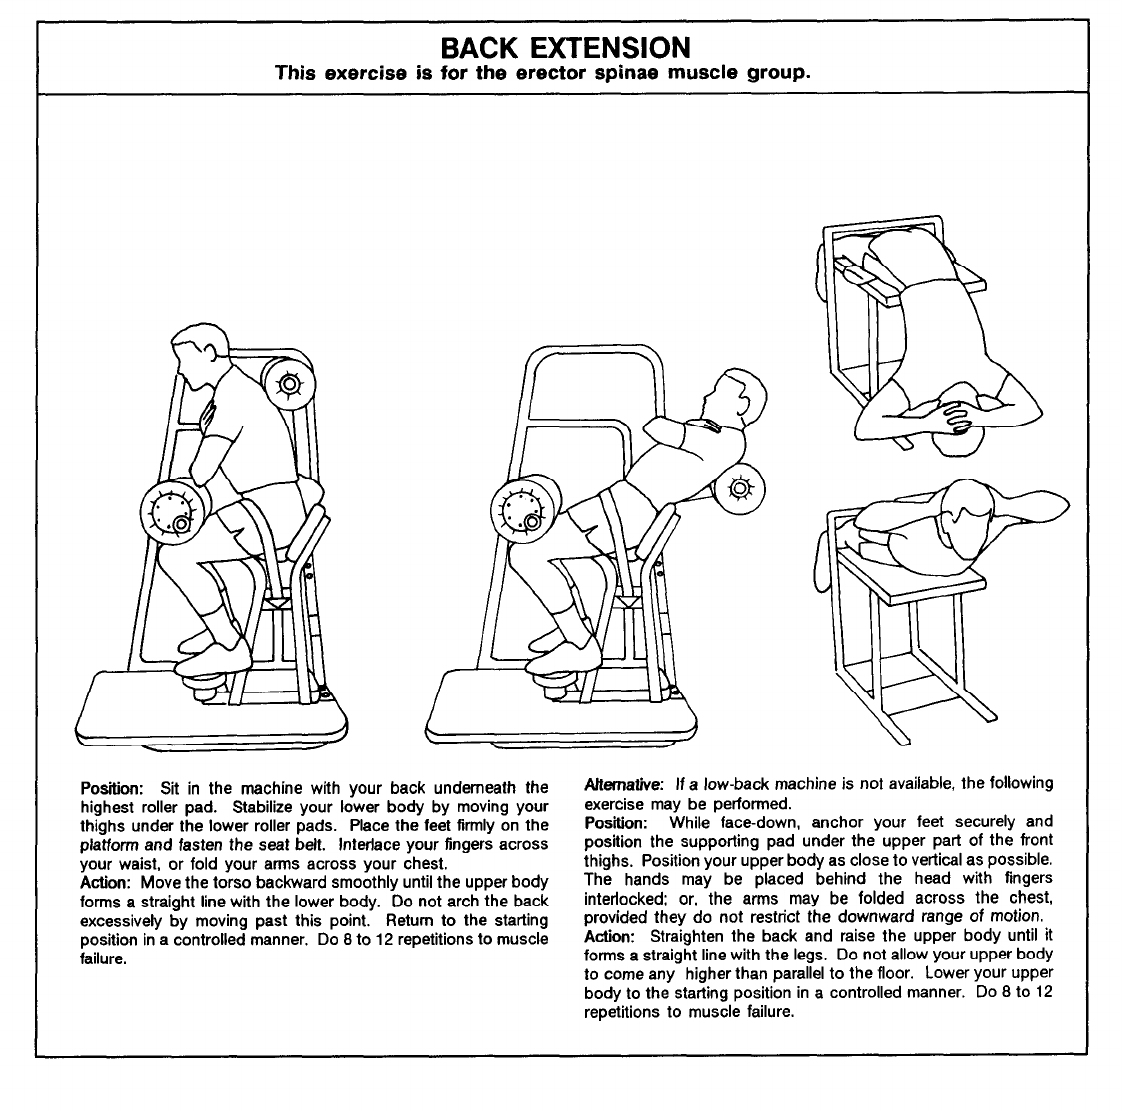
The following exercises can be per- obliques). As the soldier becomes
formed to condition the muscles of the more conditioned on these exer-
mid-section (erector spinae, rectus cises, resistance can be added.
abdominus and external and internal
3-33
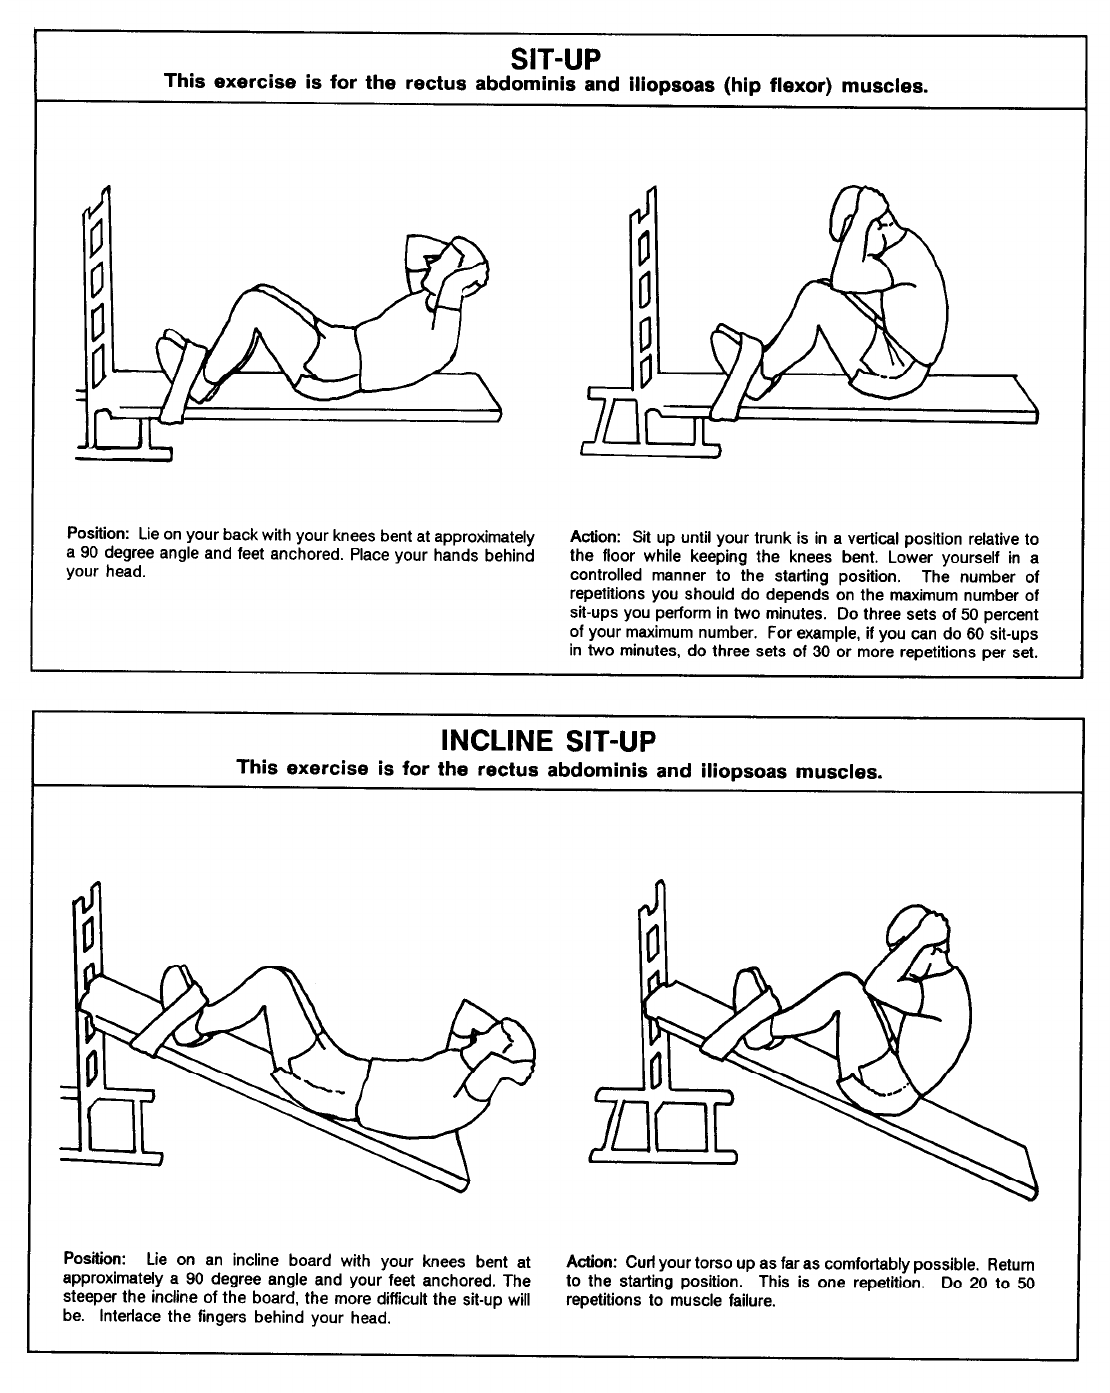
3-34
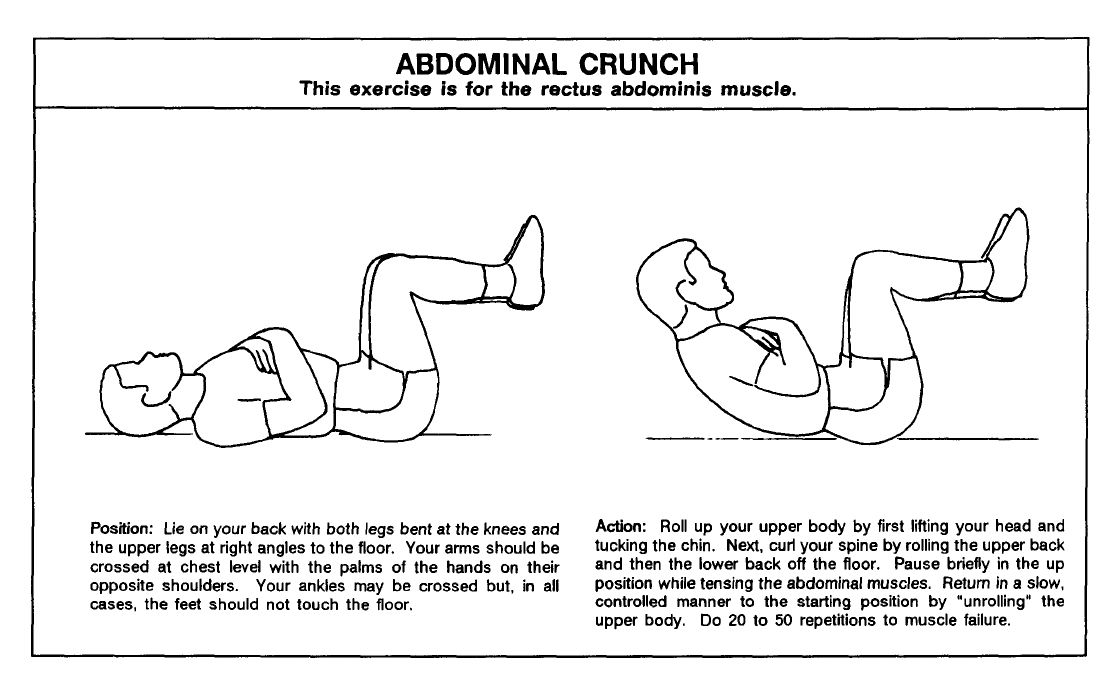
Exercise Chart
The chart labeled Figure 3-5 will help the
soldier select appropriate exercises for use in
developing a good muscular endurance and strength
workout. For example, if the soldier wants to
develop his upper leg muscles, he has several
options. He may choose from the following: 1)
PREs, concentrating on the split- or single-leg
squat; 2) exercises with equipment, doing free
weight squats; or, 3) exercises with a machine,
doing leg presses, leg curls, and leg extensions.
3-35
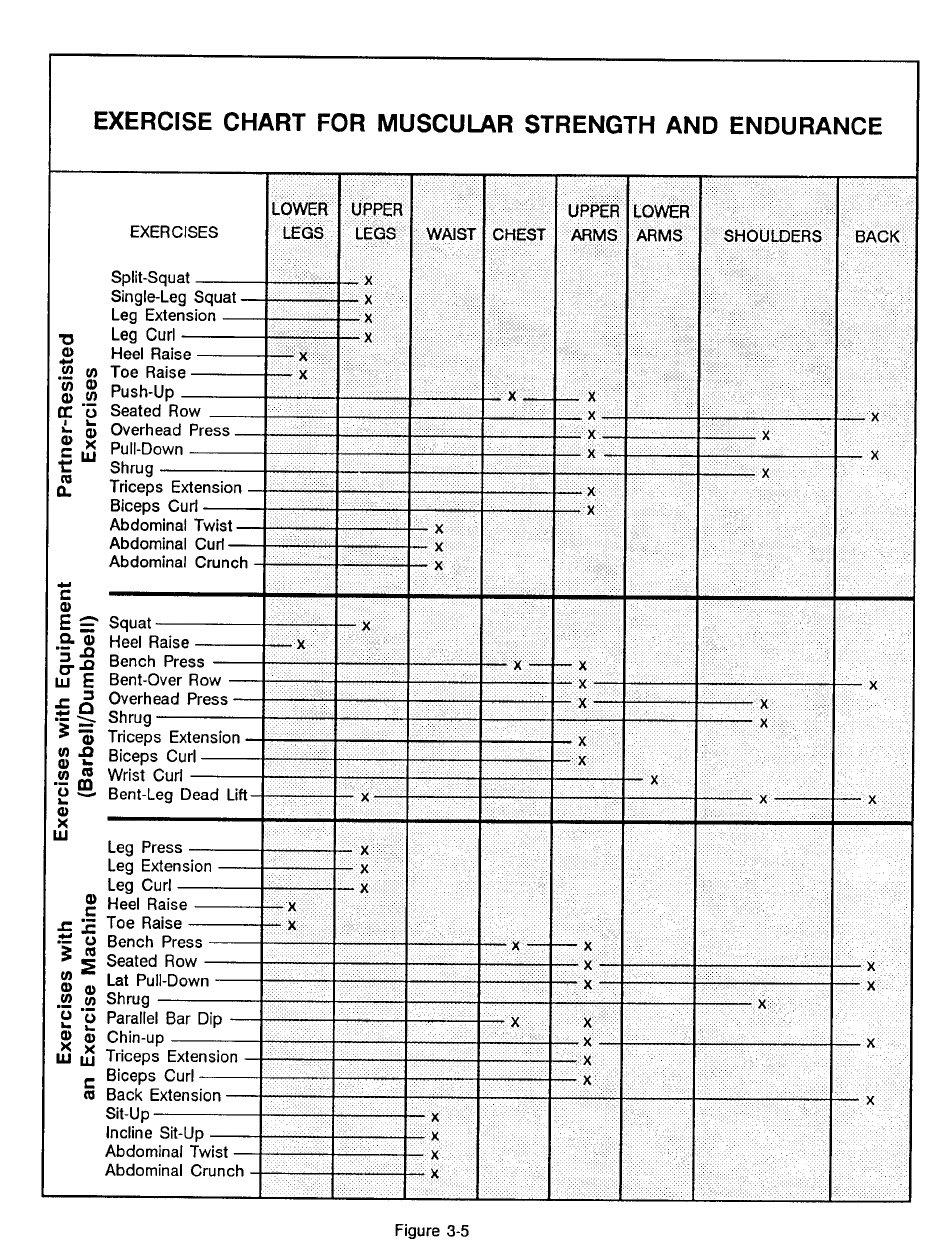
3-36

Flexibility refers to the
range of movement of a
joint.
Flexibility is a component of physi-
cal fitness. Developing and maintain-
ing it are important parts of a fitness
program. Good flexibility can help a
soldier accomplish such physical tasks
as lifting, loading, climbing, parachut-
ing, running, and rappelling with greater
efficiency and less risk of injury.
Flexibility is the range of movement
of a joint or series of joints and their
associated muscles. It involves the
ability to move a part of the body
through the full range of motion al-
lowed by normal, disease-free joints.
No one test can measure total-body
flexibility. However, field tests can be
used to assess flexibility in the ham-
string and low-back areas. These areas
are commonly susceptible to injury
due, in part, to loss of flexibility. A
simple toe-touch test can be used.
Soldiers shouId stand with their legs
straight and feet together and bend
forward slowly at the waist. A soldier
who cannot touch his toes without
bouncing or bobbing needs work to
improve his flexibility in the muscle
groups stretched by this test. The
unit’s Master Fitness Trainer can help
him design a stretching program to
improve his flexibility.
Stretching during the warm-up and
cool-down helps soldiers maintain
overall flexibility. Stretching should
not be painful, but it should cause some
discomfort because the muscles are
being stretched beyond their normal
length. Because people differ some-
what anatomically, comparing one
person’s flexibility with another’s should
not be done. People with poor flexi-
bility who try to stretch as far as others
may injure themselves.
The four categories of
stretching techniques are
static,passive,
proprioceptive
neuromuscular
facilitation (PNF), and
ballistic.
Stretching Techniques
Using good stretching techniques
can improve flexibility. There are four
commonly recognized categories of
stretching techniques: static, passive,
proprioceptive neuromuscular facili-
tation (PNF), and ballistic. These are
described here and shown later in this
chapter.
STATIC STRETCHING
Static stretching involves the grad-
ual lengthening of muscles and ten-
dons as a body part moves around a
joint. It is a safe and effective method
for improving flexibility. The soldier
assumes each stretching position slowly
until he feels tension or tightness. This
lengthens the muscles without causing
a reflex contraction in the stretched
muscles. He should hold each stretch
for ten seconds or longer. This lets the
lengthened muscles adjust to the stretch
without causing injury.
The longer a stretch is held, the
easier it is for the muscle to adapt to
that length. Static stretching should
not be painful. The soldier should feel
slight discomfort, but no pain. When
pain results from stretching, it is a sig-
nal that he is stretching a muscle or
tendon too much and may be causing
damage.
PASSIVE STRETCHING
Passive stretching involves the sol-
dier’s use of a partner or equipment,
such as a towel, pole, or rubber tubing,
to help him stretch. This produces a
safe stretch through a range of motion
he could not achieve without help. He
should talk with his partner to ensure
that each muscle is stretched safely
through the entire range of motion.
PNF STRETCHING
PNF stretching uses the neuromus-
cular patterns of each muscle group to
help improve flexibility. The soldier
performs a series of intense contrac-
tions and relaxations using a partner or
equipment to help him stretch. The
PNF technique allows for greater muscle
relaxation following each contraction
and increases the soldier’s ability to
stretch through a greater range of
motion.
4-1

BALLISTIC STRETCHING
Ballistic, or dynamic, stretching in-
volves movements such as bouncing or
bobbing to attain a greater range of
motion and stretch. Although this
method may improve flexibility, it
often forces a muscle to stretch too far
and may result in an injury. Individu-
als and units should not use ballistic
stretching.
FITT Factors
Commanders should include stretch-
ing exercises in all physical fitness
programs.
The following FITT factors apply
when developing a flexibility program.
Frequency: Do flexibility exercises
daily. Do them during the warm-up
to help prepare the muscles for vig-
orous activity and to help reduce in-
jury. Do them during the cool-
down to help maintain flexibility.
Intensity: Stretch a muscle beyond its
normal length to the point of tension
or slight discomfort, not pain.
Time: Hold stretches for 10 to 15 sec-
onds for warming up and cooling
down and for 30 seconds or longer
to improve flexibility.
Type: Use static stretches, assumed
slowly and gradually, as well as pas-
sive stretching and/or PNF stretch-
ing.
A recommended sequence of warm-
up activities follows. Soldiers should
do these for five to seven minutes
before vigorous exercise.
• Slow joggin-in-place or walking
for one to two minutes. This causes
a gradual increase in the heart rate,
blood pressure, circulation, and in-
creases the temperature of the ac-
tive muscles.
• Slow joint rotation exercises (for
example, arm circles, knee/ankle
rotations) to gradually increase the
joint's range of motion. Work each
major joint for 5 to 10 seconds.
• Slow, static stretching of the muscles
to be used during the upcoming ac-
tivity. This will "loosen up" muscles
and tendons so they can achieve
greater ranges of motion with less
risk of injury. Hold each stretch
position for 10 to 15 seconds, and
do not bounce or bob.
• Calisthenic exerciese, as described
in Chapter 7, to increase the inten-
sity level before the activity or con-
ditioning period.
• Slowly mimic the activities to be
performed. For example, lift a
lighter weight to warm-up before
lifting a heavier one. This helps
prepare the neuromuscular path-
ways.
Warm-Up and Cool-Down
The warm-up and cool-down are
very important parts of a physical
training session, and stretching exer-
cises should be a major part of both.
THE WARM-UP
Before beginning any vigorous The warm-up warms the
muscIes, increasing the
physical activity, one should prepare flow of blood and
the body for exercise. The warm-up reducing the risk of
increases the flow of blood to the injury.
muscles and tendons, thus helping
reduce the risk of injury. It also
increases the joint’s range of motion
and positively affects the speed of
muscular contraction.
4-2
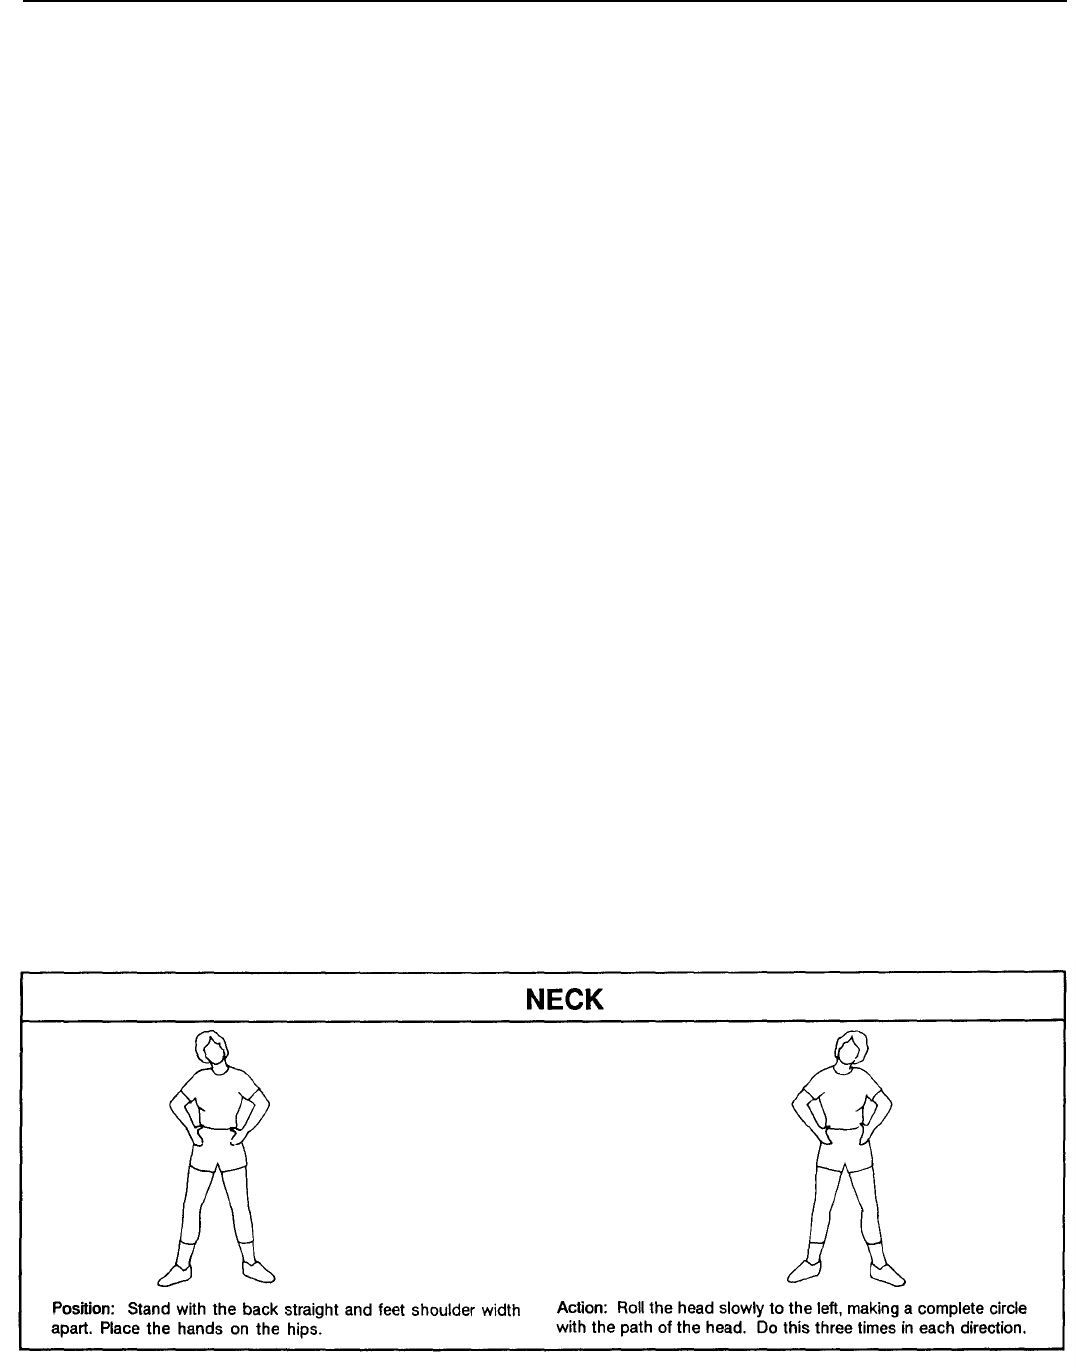
THE COOL-DOWN
The soldier should not limit flexi-
bility training to just the warm-up and
The following information explains
the importance of cooling down and
how to do it correctly.
• Do not stop suddenly after vigorous
exercise, as this can be very danger-
ous. Gradually bring the body back
to its resting state by slowly de-
creasing the intensity of the activ-
ity. After running, for example,
one should walk for one to two min-
utes. Stopping exercise suddenly
can cause blood to pool in the
muscles, thereby reducing blood
flow to the heart and brain. This
may cause fainting or abnormal
rhythms in the heart which could
lead to serious complications.
• Repeat the stretches done in the
warm-up to help ease muscle ten-
sion and any immediate feeling of
muscle soreness. Be careful not
to overstretch. The muscles are
warm from activity and can possibly
be overstretched to the point of
injury.
• Hold stretches 30 seconds or more
during the cool-down to improve
flexiblity. Use partner-assisted or
PNF techniques, if possible.
cool-down periods. He should some-
times use an entire PT session on a
"recovery" or "easy"training day to
work on flexibility improvement. He
may also work on it at home. Stretch-
ing is one form of exercise that takes
very little time relative to the benefits
gained.
Rotation Exercises
Rotation exercises are used to gen-
tly stretch the tendons, ligments, and
muscles associated with a joint and to
stimulate lubrication of the joint with
synovial fluid. This may provide
better movement and less friction in
the joint.
The following exercises should be
performed slowly.
4-3
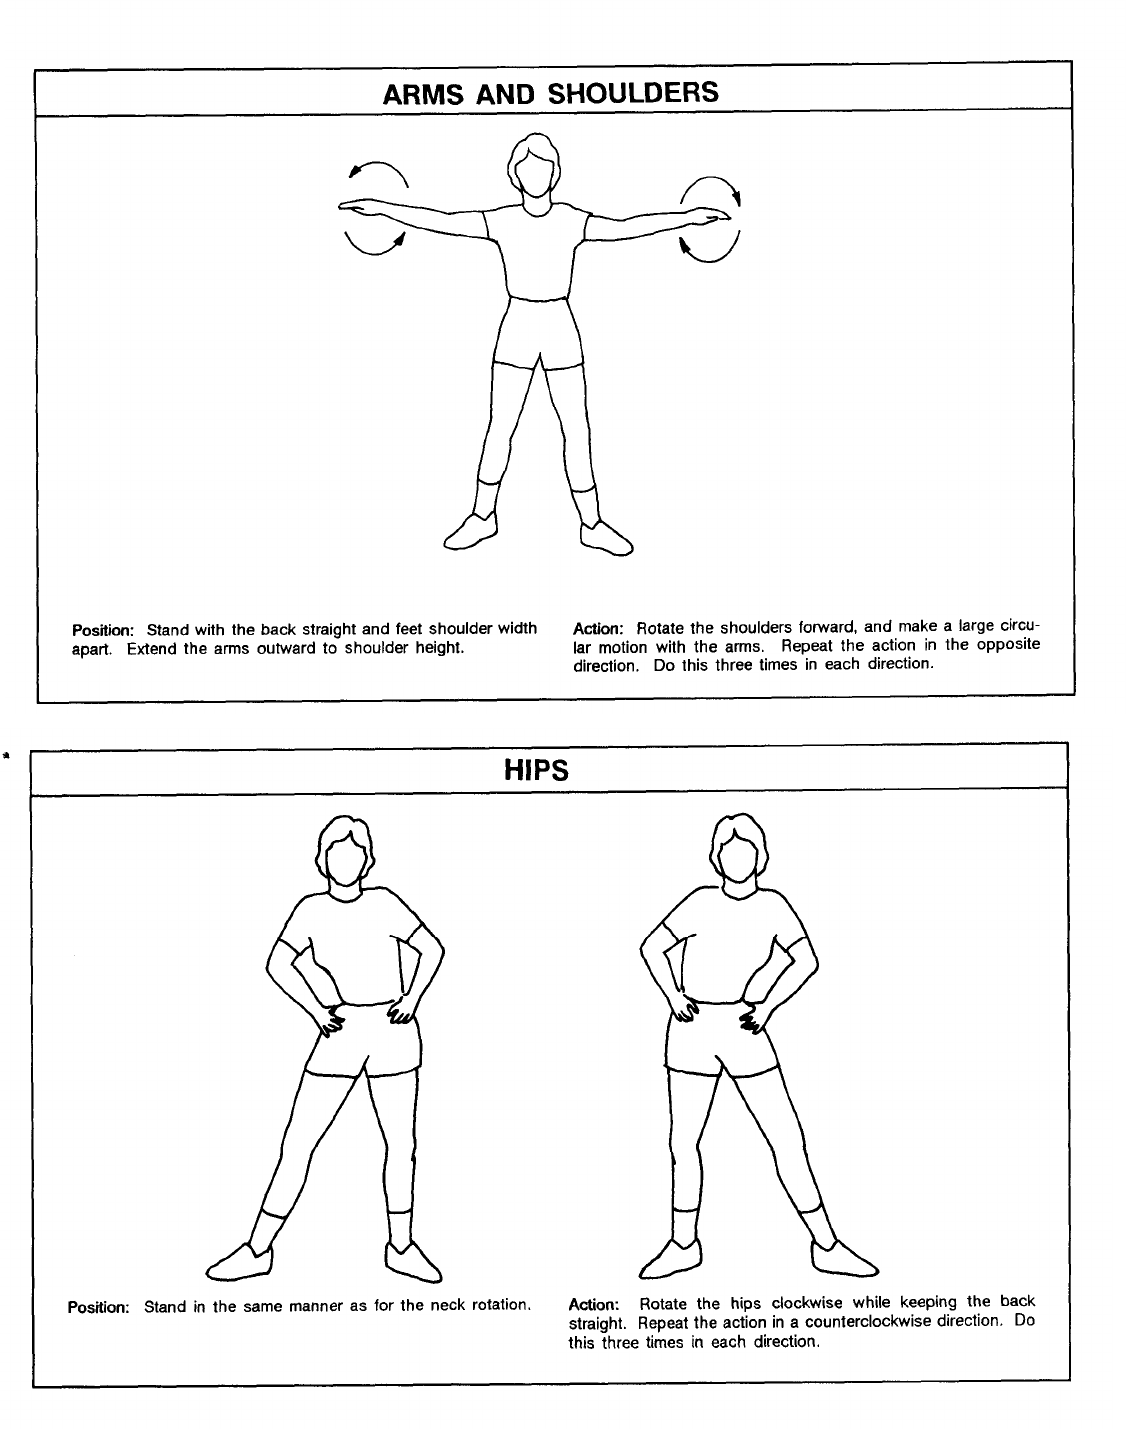
4-4
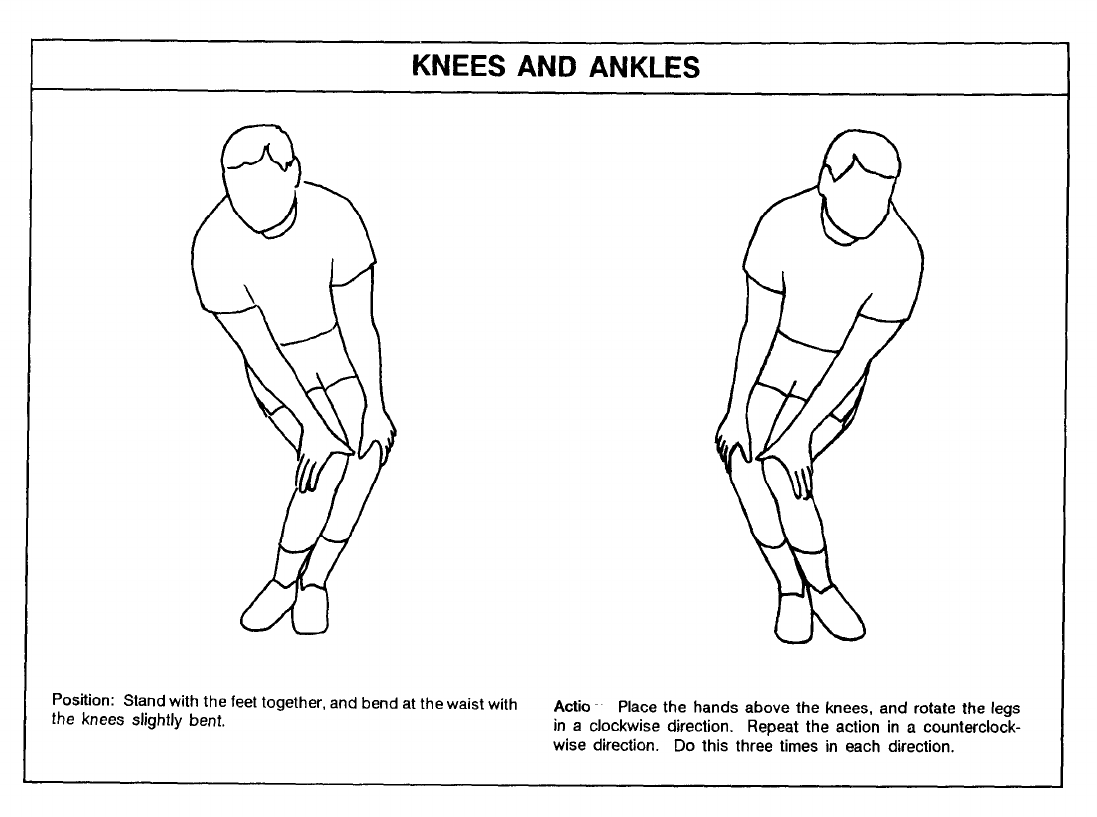
Common Stretching Exercises
The following exercises improve
flexibility when performed slowly,
regularly, and with gradual progres-
sion. Static, passive and PNF stretches
are shown.
CAUTION Some of these exercises
may be difficult or too strenuous for
unfit or medically limited soldiers.
Common sense should be used ;n se-
lecting stretching exercises.
STATIC STRETCHES
Assume all stretching positions
slowly until you feel tension or slight
discomfort. Hold each position for at
least 10 to 15 seconds during the
warm-up and cool-down. Develop-
mental stretching to improve flexibil-
ity requires holding each stretch for
30 seconds or longer.
Choose the appropriate stretch for
the muscle groups which you will be
working.
4-5
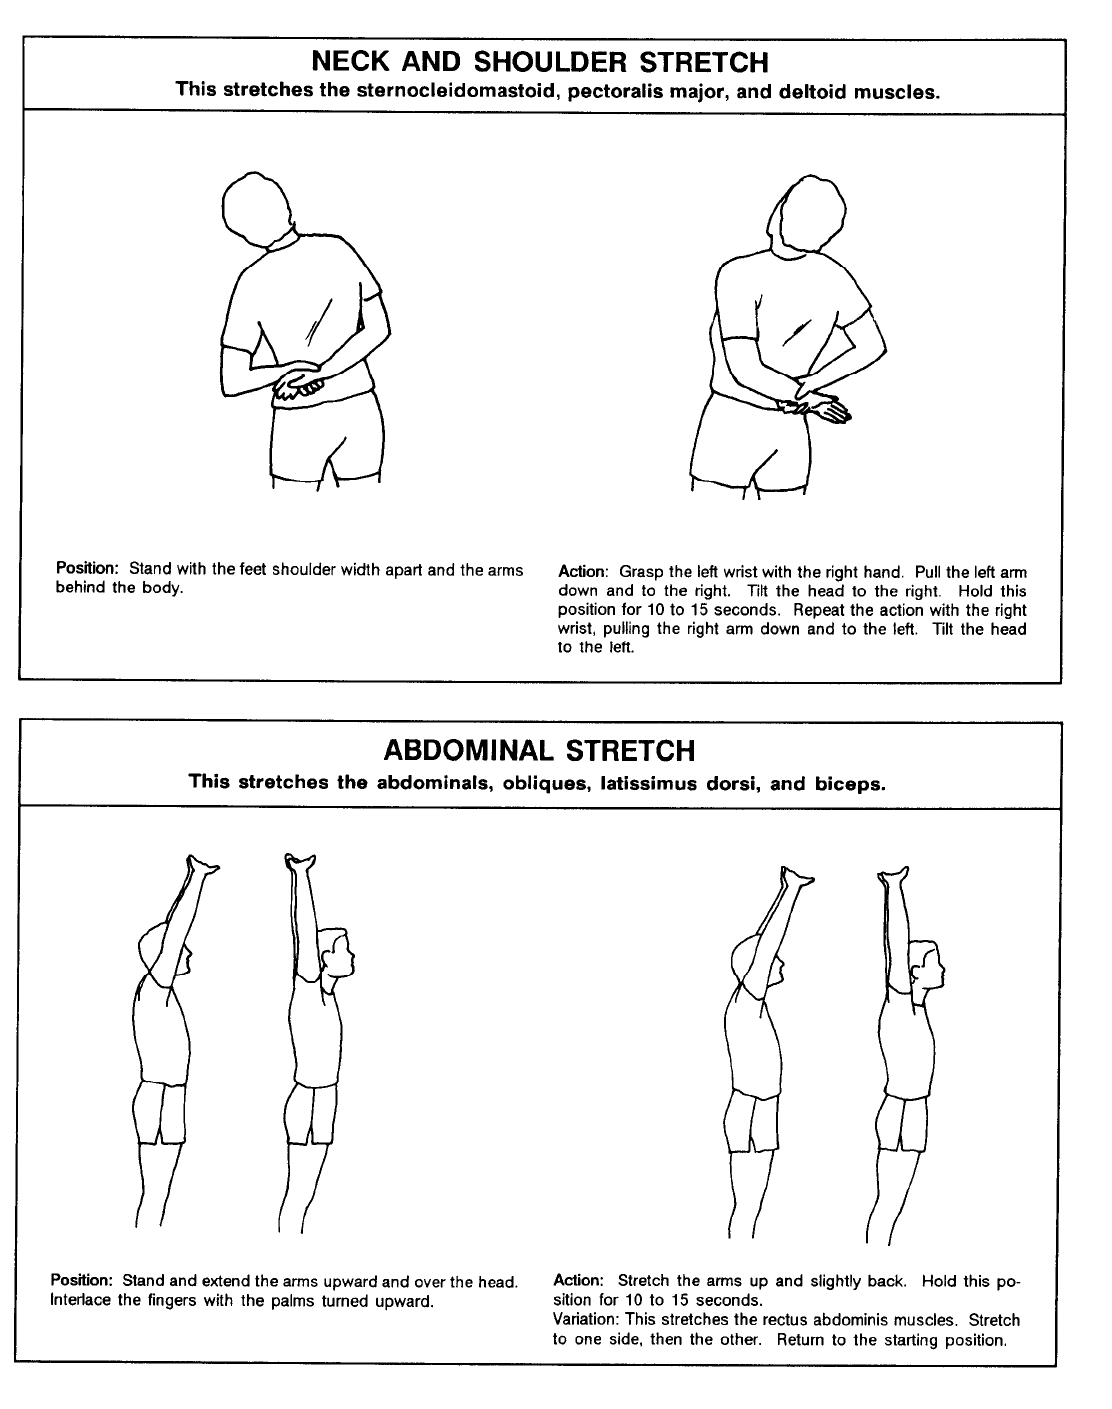
4-6
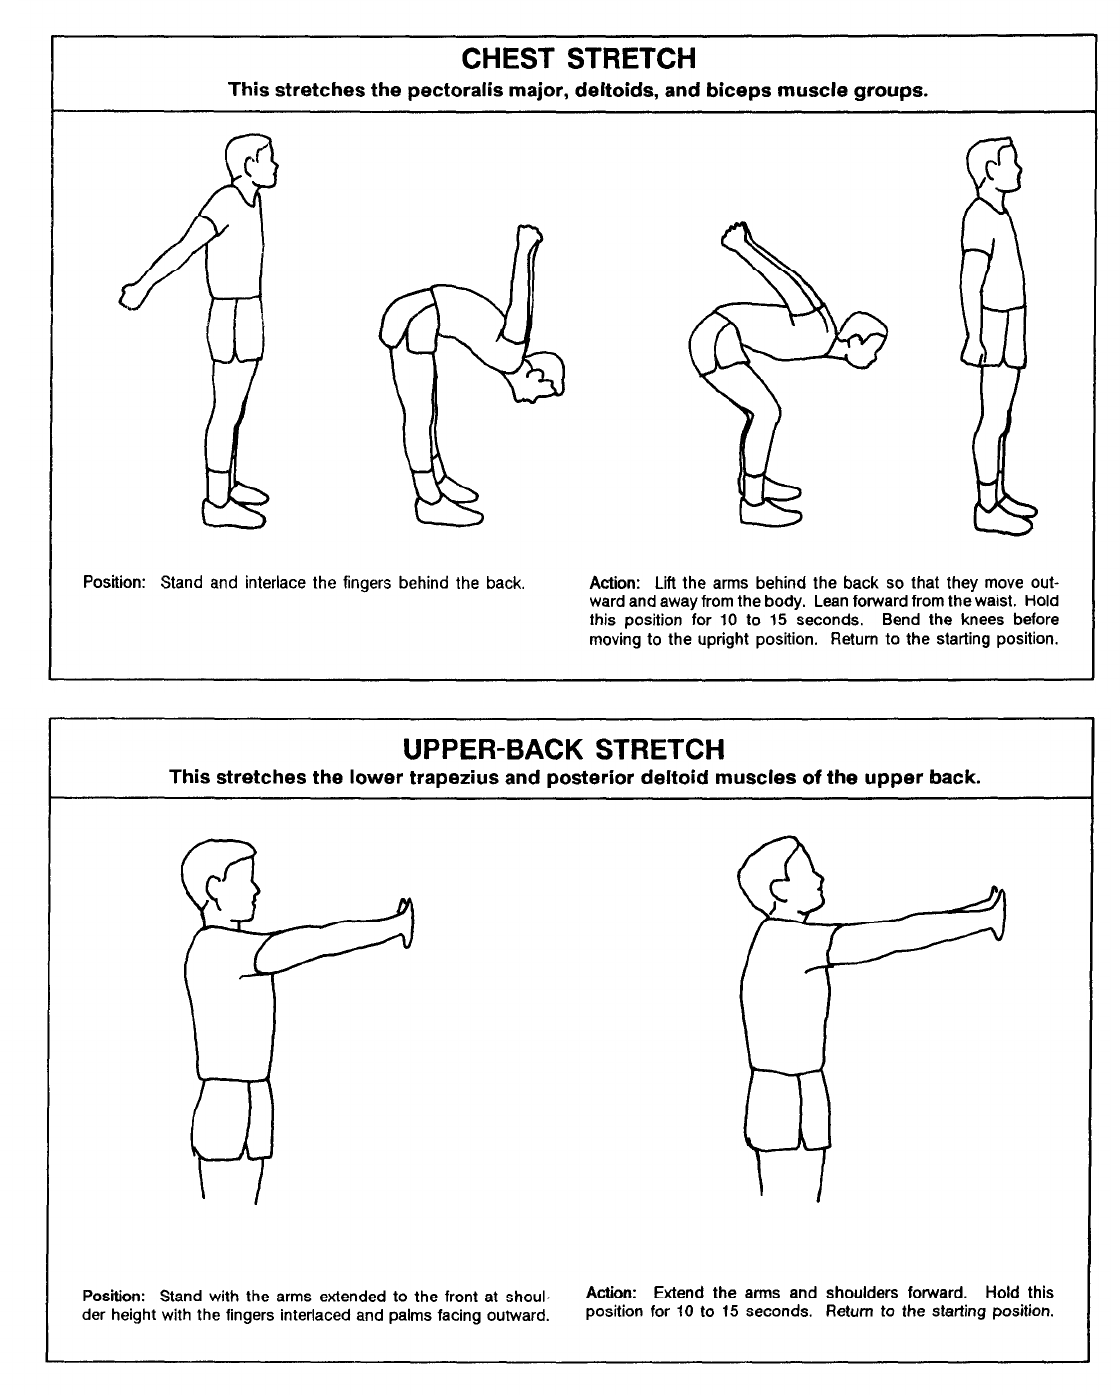
4-7
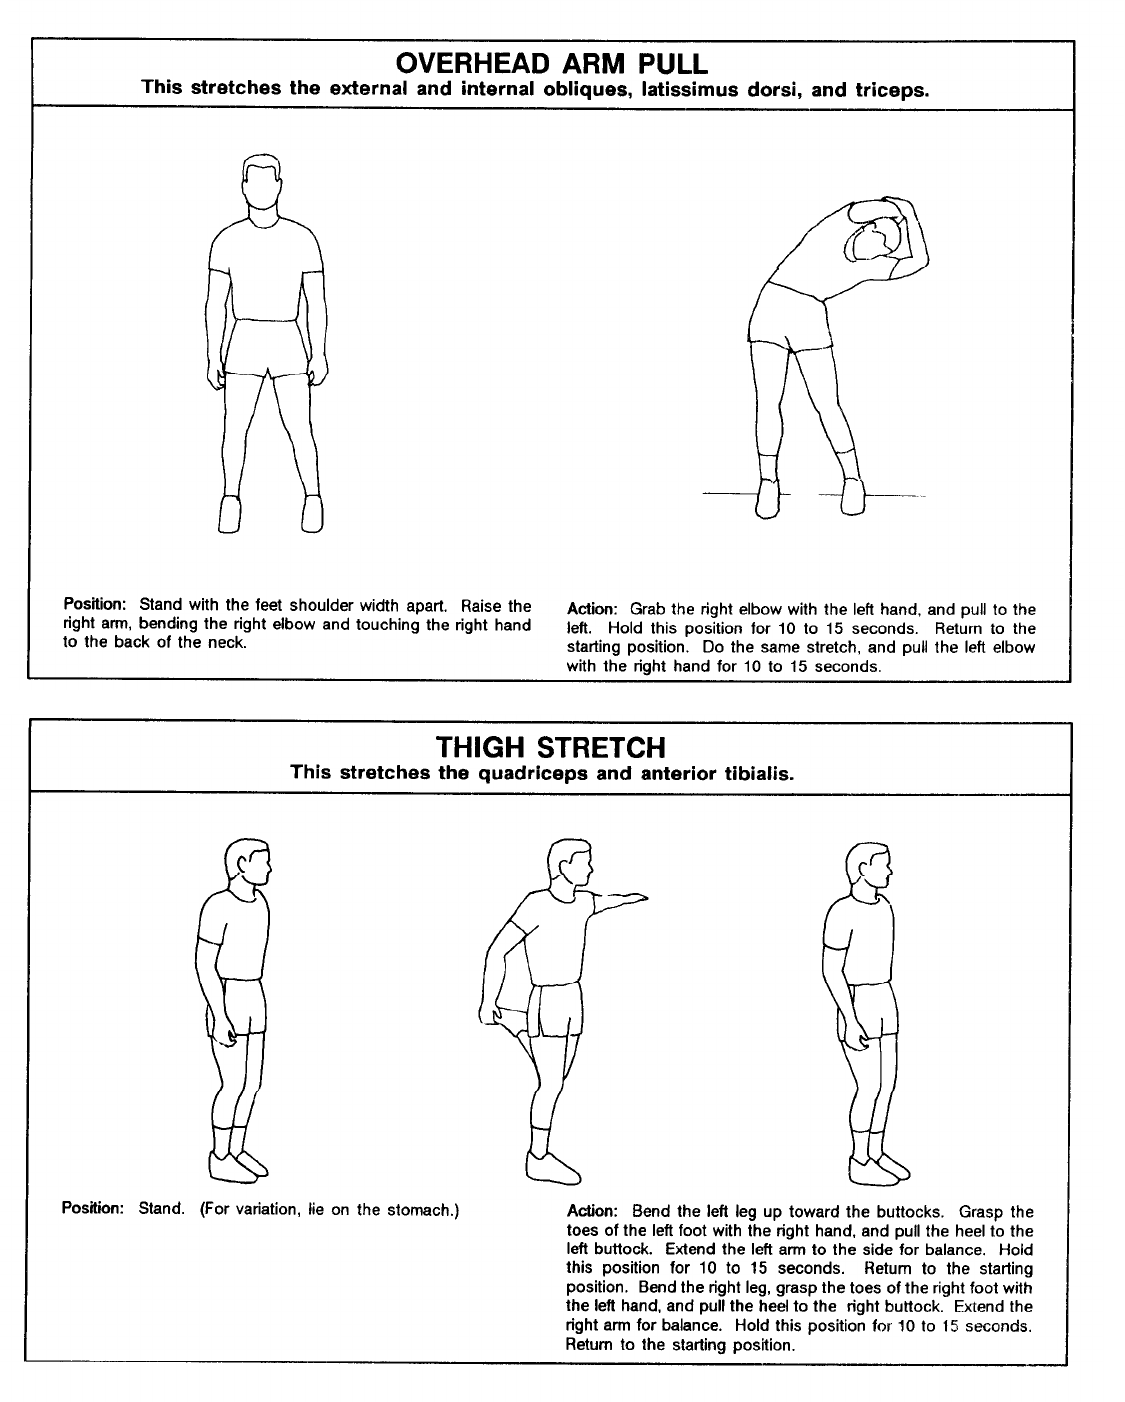
4-8
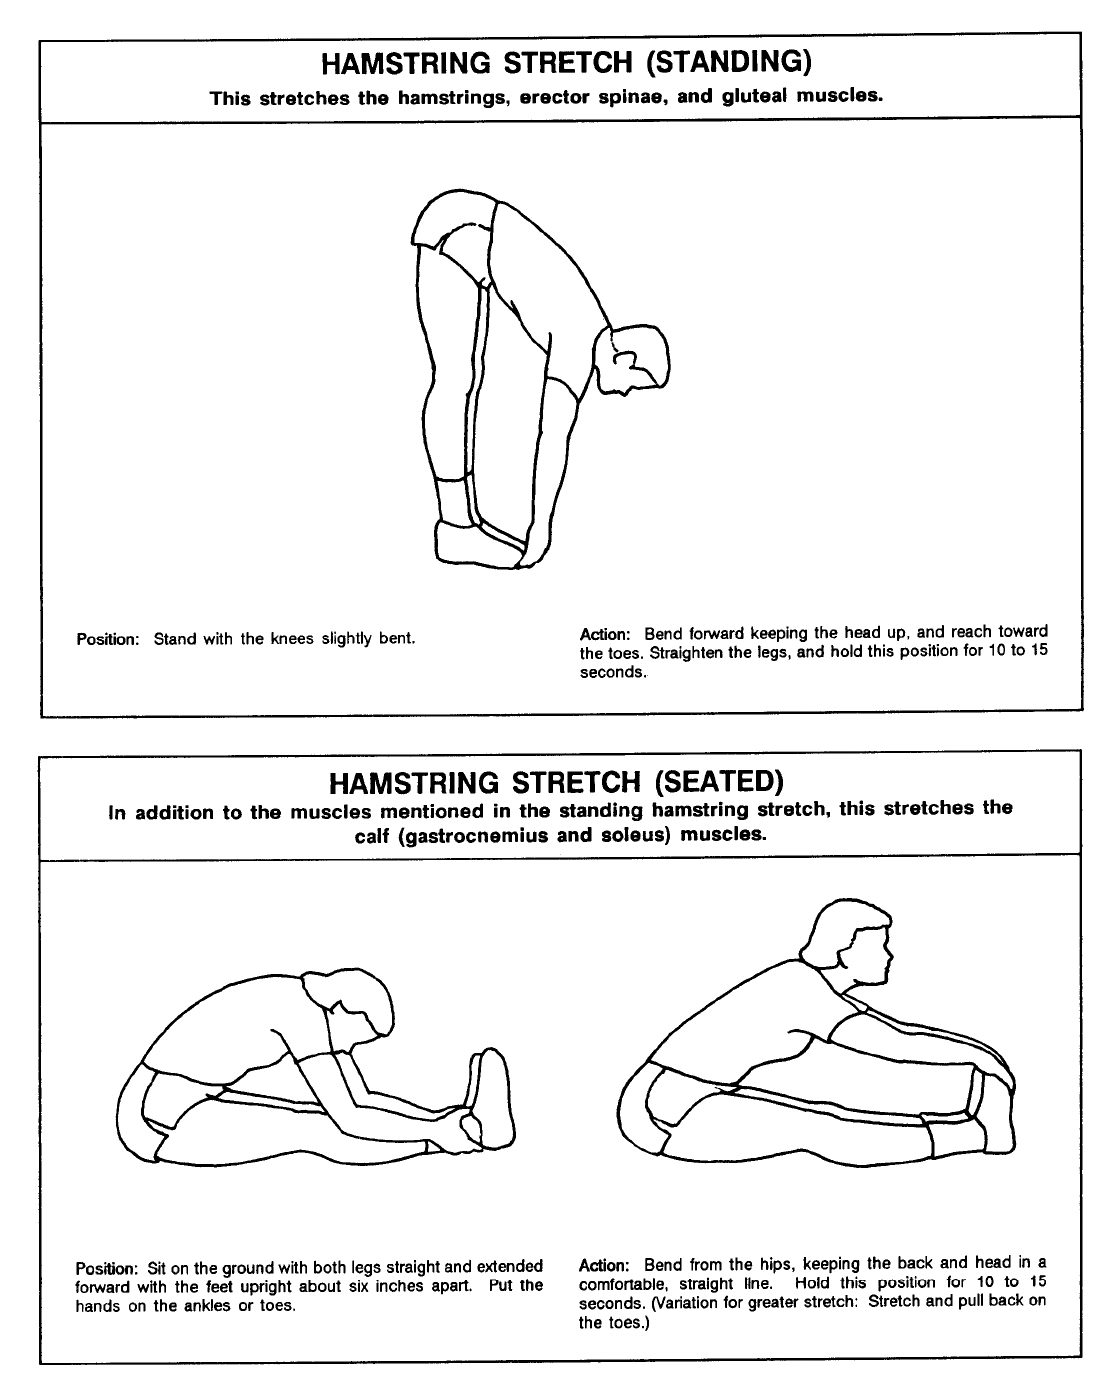
4-9
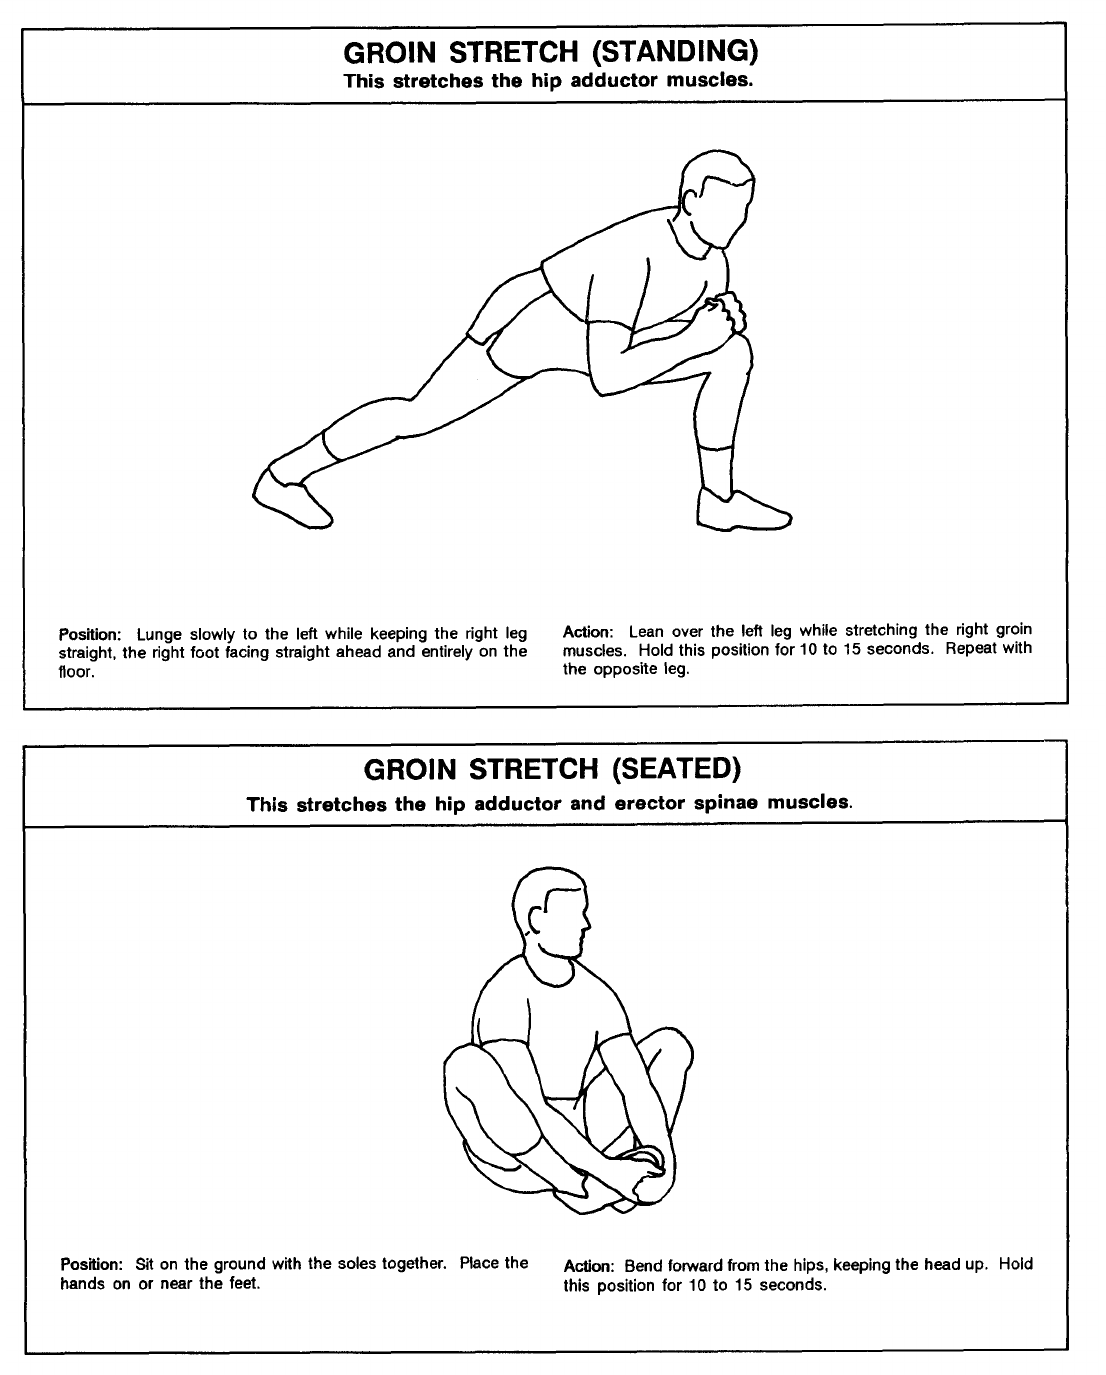
4-10
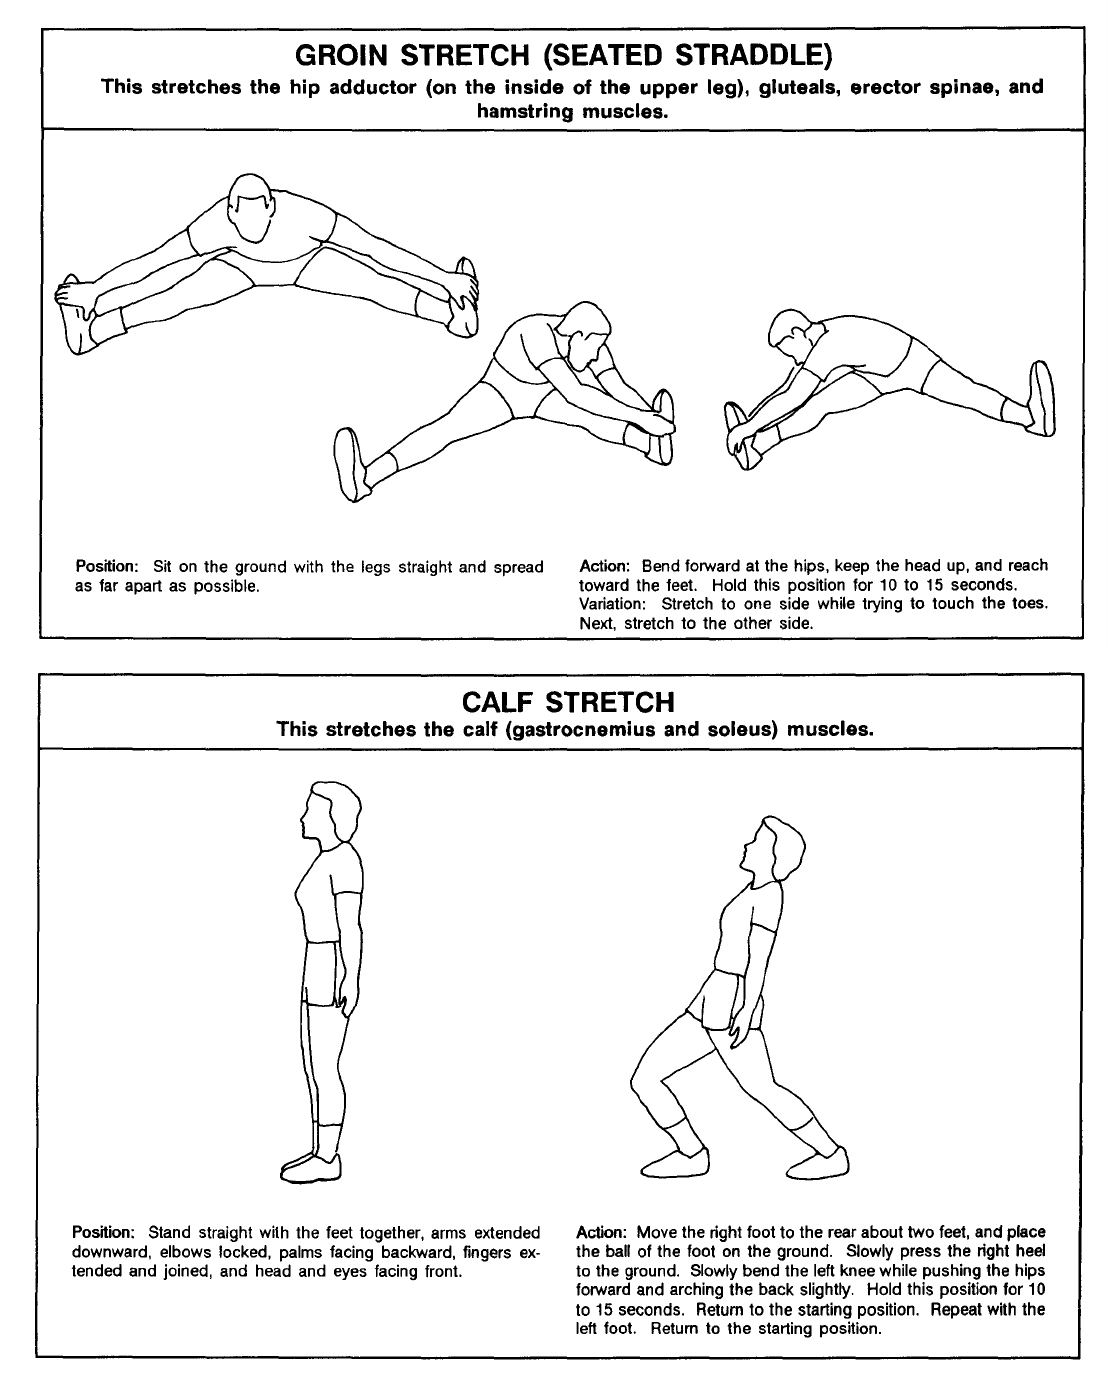
4-11
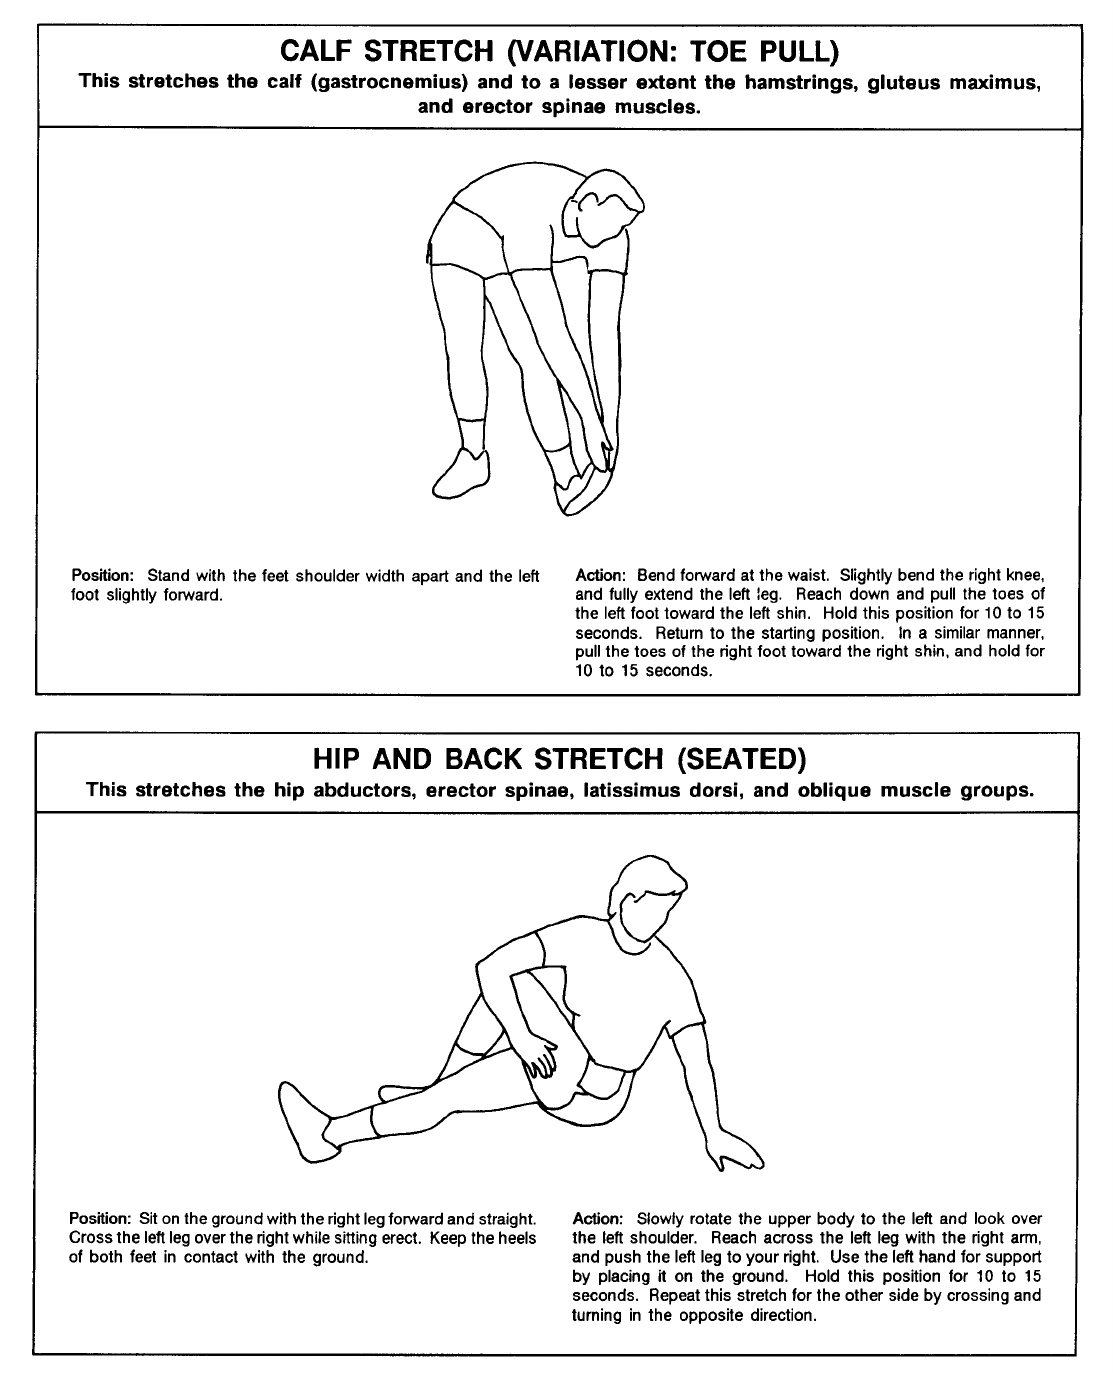
4-12
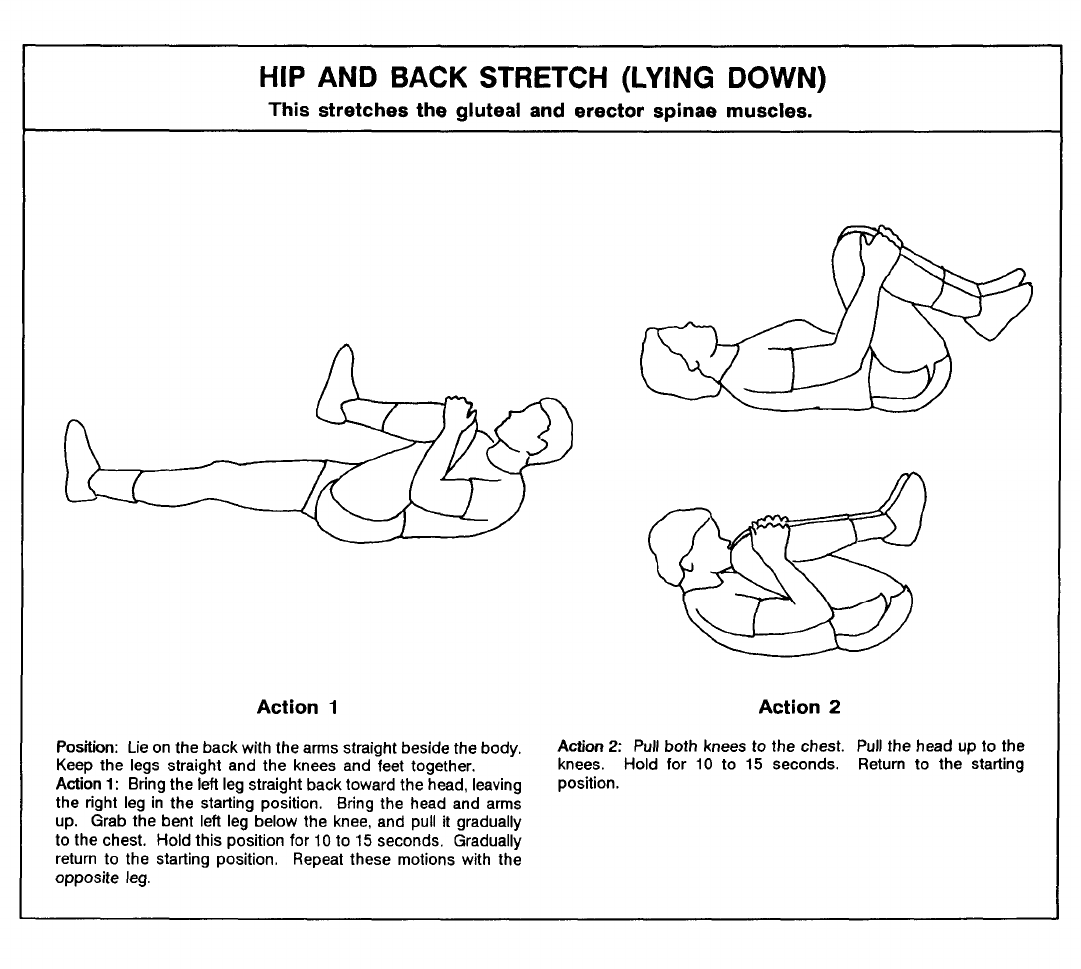
4-13

PASSIVE STRETCHES
Passive stretching is done with the help of a with a partner. When stretching alone, using a
partner or equipment. The examples in this chap- towel may help the exerciser achieve a greater
ter show passive stretching done with a towel or range of motion.
4-14
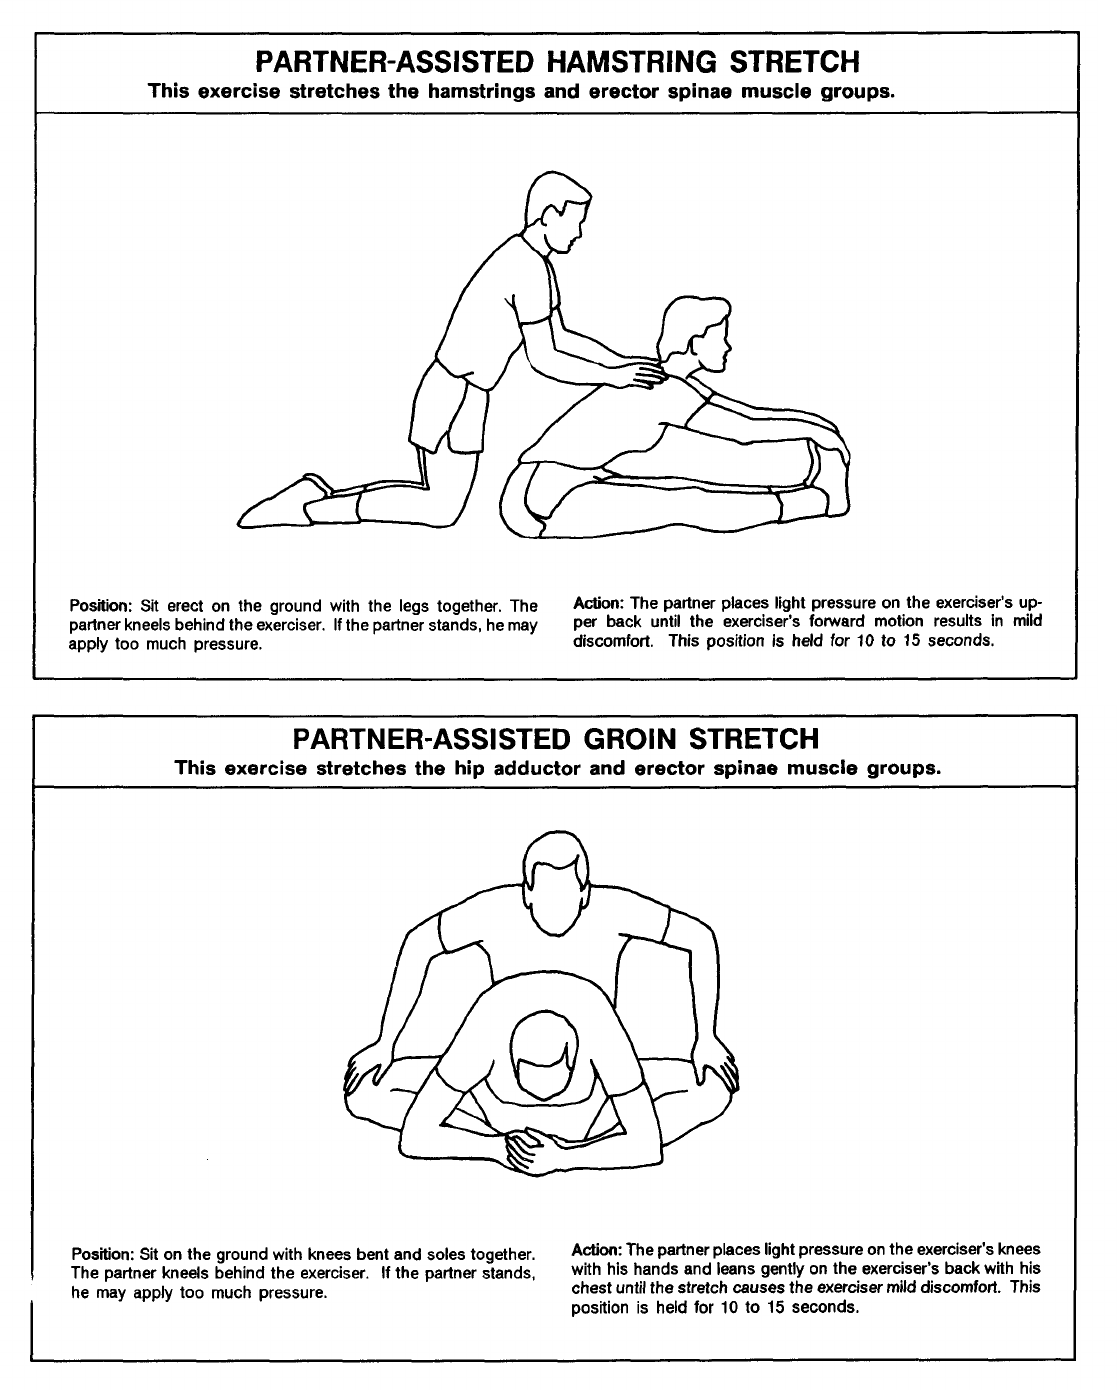
4-15
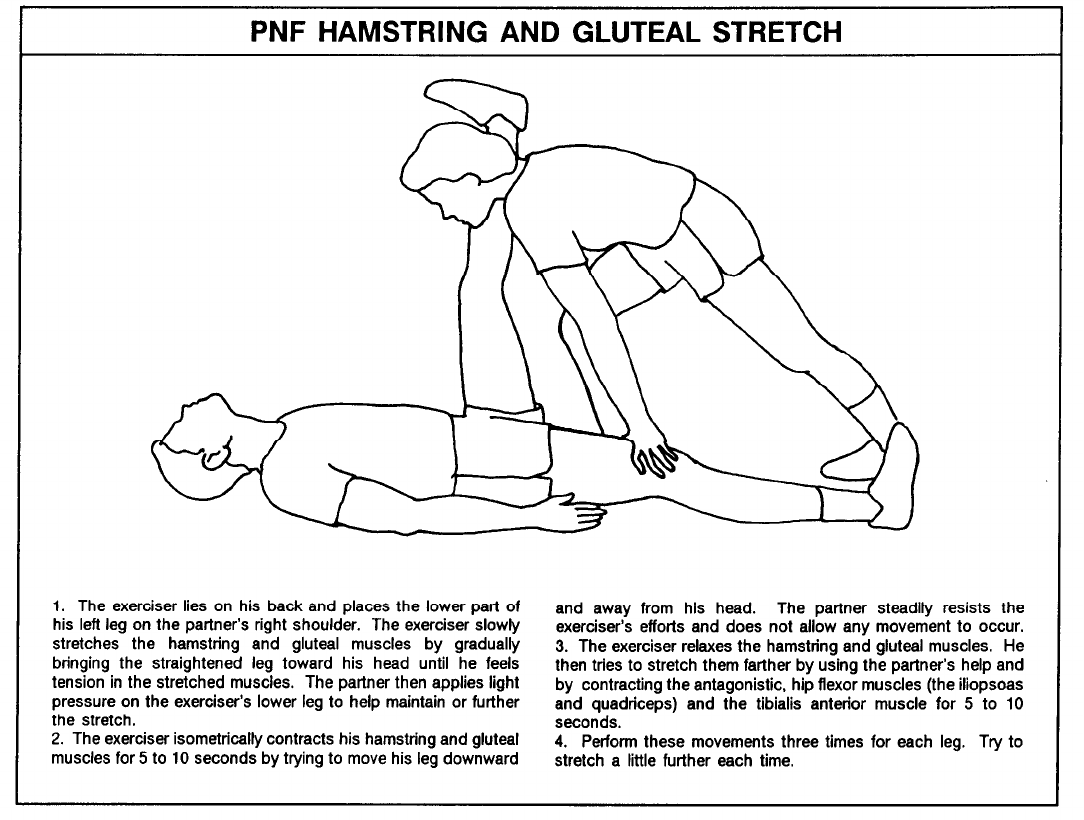
Soldiers can do PNF (Propriocep-
tive Neuromuscular Facilitation)
stretches for most major muscle groups.
PNF stretches use a series of contrac-
tions, done against a partner’s resis-
tance, and relaxations.
Obtaining a safe stretch beyond the
muscle’s normal length requires a part-
ner’s assistance. The following four
steps provide general guidance as to
how PNF stretches are done. Both the
exerciser and partner should follow
these instructions:
1. Assume the stretch position slowly
with the partner’s help.
2. Isometrically contract the muscles
to be stretched. Hold the contraction
for 5 to 10 seconds against the partner’s
unyielding resistance.
3. Relax. Next, contract the antago-
nistic muscles for 5 to 10 seconds while
the partner helps the exerciser obtain a
greater stretch.
4. Repeat this sequence three times,
and try to stretch a little further each
time. (Caution: The exerciser should
not hold his breath. He should breathe
out during each contraction.)
Several examples of PNF stretches
are provided below in a stepwise fash-
ion. The numbers given above for each
step correspond to the general descrip-
tion listed below.
4-16
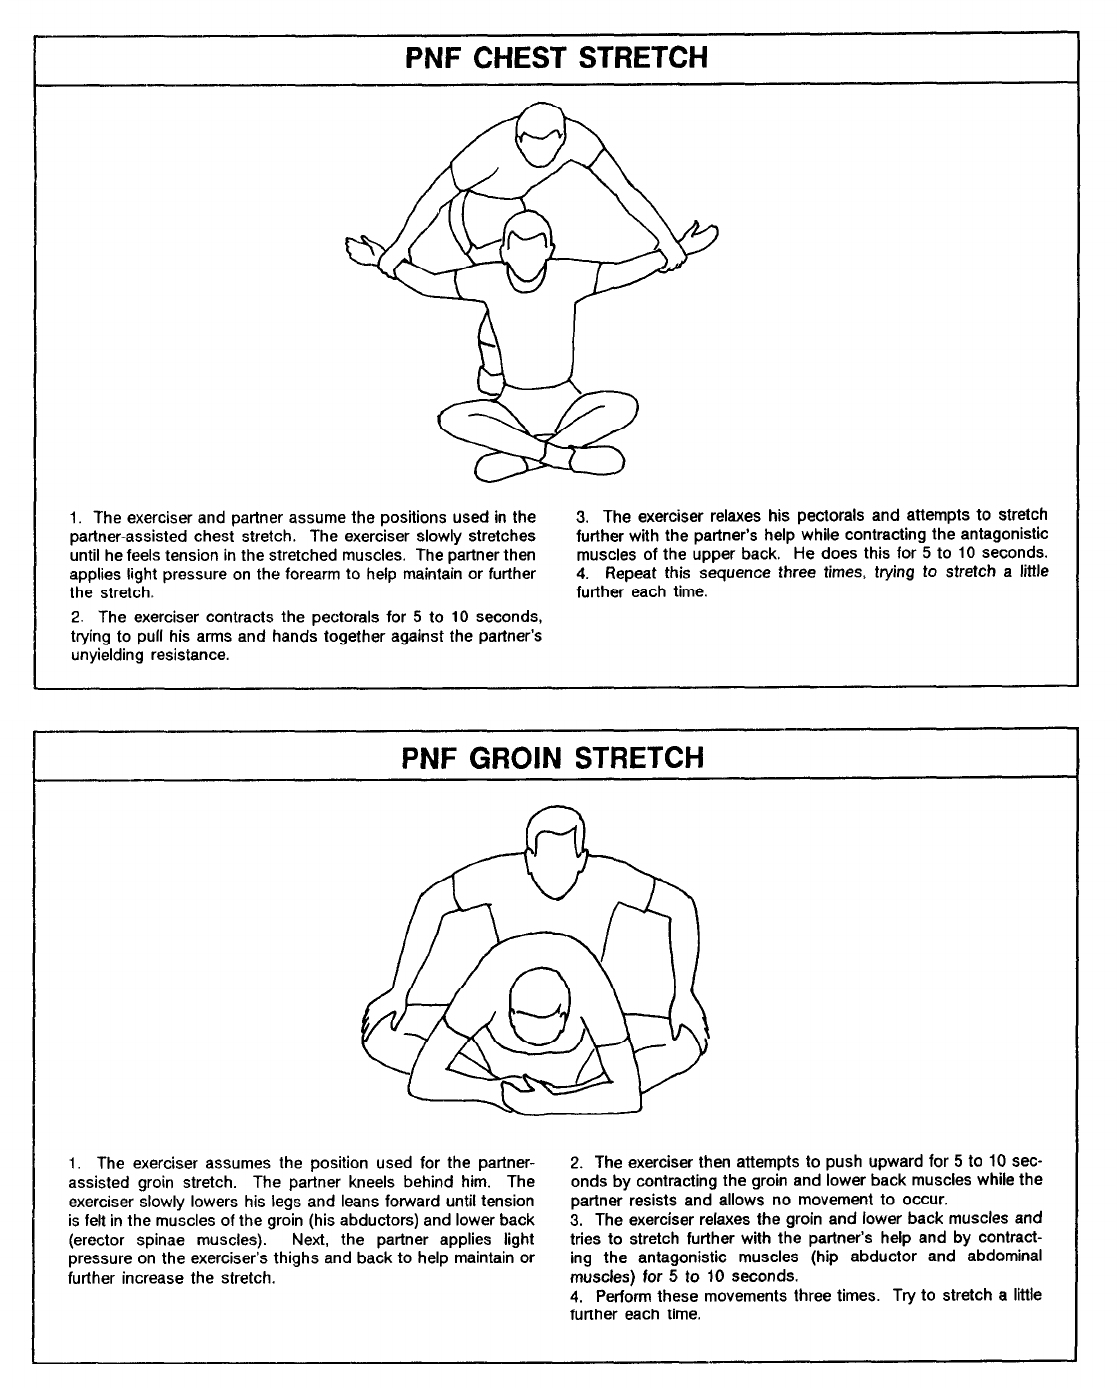
4-17

Body composition, which refers to
the body’s relative amounts of fat and
lean body mass (organs, bones, muscles),
is one of the five components of
physical fitness. Good body composi-
tion is best gained through proper diet
and exercise. Examples of poor body
composition are underdeveloped mus-
culature or excessive body fat. Being
overweight (that is, overly fat) is the
more common problem.
Poor body composition causes prob-
lems for the Army. Soldiers with
inadequate muscle development can-
not perform as well as soldiers with
good body composition. As a soldier
gets fat, his ability to perform physi-
cally declines, and his risk of develop-
ing disease increases. Soldiers with
high percentages of body fat often
have lower APFT scores than those
with lower percentages. Poor body
composition, especially obesity, has a
negative effect on appearance, self-
-esteem, and negatively influences at-
titude and morale.
The Army’s weight control pro-
gram is described in AR 600-9. It ad-
dresses body composition standards,
programs for the overly fat, and re-
lated administrative actions.
The amount of fat on the body,
when expressed as a percentage of
total body weight, is referred to as the
percent body fat. The Army’s maxi-
mum allowable percentages of body
fat, by age and sex, are listed in Figure
5-1.
Evaluation Methods
The Army determines body fat
percentage using the girth method.
(This is described in AR 600-9, pages
12 to 21.)
Body composition is influenced by
age, diet, fitness level, and genetic
factors (gender and body type). The
Army’s screening charts for height and
weight (shown in AR 600-9) make al-
lowances for these differences. A
soldier whose weight exceeds the stan-
dard weight shown on the charts may
not necessarily be overfat. For ex-
ample, some well-muscled athletes have
body weights that far exceed the values
for weight listed on the charts for their
age, gender, and height. Yet, only a
small percentage of their total body
mass may be fat. In such cases, the lean
body mass accounts for a large share of
their total body composition, while
only a small percentage of the total
body mass is composed of fat.
Soldiers who do not meet the weight
standards for their height and/or sol-
diers whose appearance suggests that
they have excessive fat are to be
evaluated using the circumference (girth
measurement) method described in
AR 600-9.
Body composition is
influenced by age,
fitness level, and
genetic factors.
Figure 5-1
5-0

A more accurate way to determine
body composition is by hydrostatic or
underwater weighing. However, this
method is very time-consuming and
expensive and usually done only at
hospitals and universities.
Soldiers who do not meet Army
body fat standards are placed on for-
mal, supervised weight (fat) loss pro-
grams as stipulated in AR 600-9. Such
programs include sensible diet and ex-
ercise regimens.
Diet and Exercise
A combination of exercise and diet
is the best way to lose excessive body
fat. Losing one to two pounds a week
is a realistic goal which is best accom-
plished by reducing caloric intake and
increasing energy expenditure. In
other words, one should eat less and
exercise more. Dieting alone can cause
the body to believe it is being starved.
In response, it tries to conserve its fat
reserves by slowing down its metabolic
rate and, as a result, it loses fat at a
slower rate.
Soldiers must consume a minimum
number of calories from all the major
food groups, with the calories distrib-
uted over all the daily meals including
snacks. This ensures an adequate con-
sumption of necessary vitamins and
A combination of
exercise and diet is the
best way to lose
unwanted body fat.
minerals. A male soldier who is not
under medical supervision when diet-
ing requires a caloric intake of at least
1 ,500; women require at least 1,200
calories. Soldiers should avoid diets
that fail to meet these criteria.
Trying to lose weight with fad diets
and devices or by skipping meals does
not work for long-term fat loss, since
weight lost through these practices is
mostly water and lean muscle tissue,
not fat. Losing fat safely takes time
and patience. There is no quick and
easy way to improve body composi-
tion.
The soldier who diets and does not
exercise loses not only fat but muscle
tissue as well. This can negatively
affect his physical readiness. Not only
does exercise burn calories, it helps the
body maintain its useful muscle mass,
and it may also help keep the body’s
metabolic rate high during dieting.
Fat can only be burned during
exercise if oxygen is used. Aerobic
exercise, which uses lots of oxygen, is
the best type of activity for burning
fat. Aerobic exercises include jog-
ging, walking, swimming, bicycling,
cross-country skiing, rowing, stair
climbing, exercise to music, and jump-
ing rope. Anaerobic activities, such as
sprinting or lifting heavy weights,
burn little, if any, fat.
Exercise alone is not the best way to
lose body fat, especially in large
amounts. For an average-sized per-
son, running or walking one mile
burns about 100 calories. Because
there are 3,500 calories in one pound
of fat, he needs to run or walk 35 miles
if pure fat were being burned. In re-
ality, fat is seldom the only source of
energy used during aerobic exercise.
Instead, a mixture of both fats and
carbohydrates is used. As a result,
most people would need to run or walk
over 50 miles to burn one pound of fat.
A combination of proper diet and
aerobic exercise is the proven way to
lose excessive body fat. Local dieti-
tians and nutritionists can help soldiers
who want to lose weight by suggesting
safe and sensible diet programs. In
addition, the unit’s MFT can design
tailored exercise programs which will
help soldiers increase their caloric
expenditure and maintain their lean
body mass.
Aerobic exercise is best
for burning fat.
examples include
jogging, walking, swim-
ming, bicycling, cross-
country skiing, and
rowing.
5-1
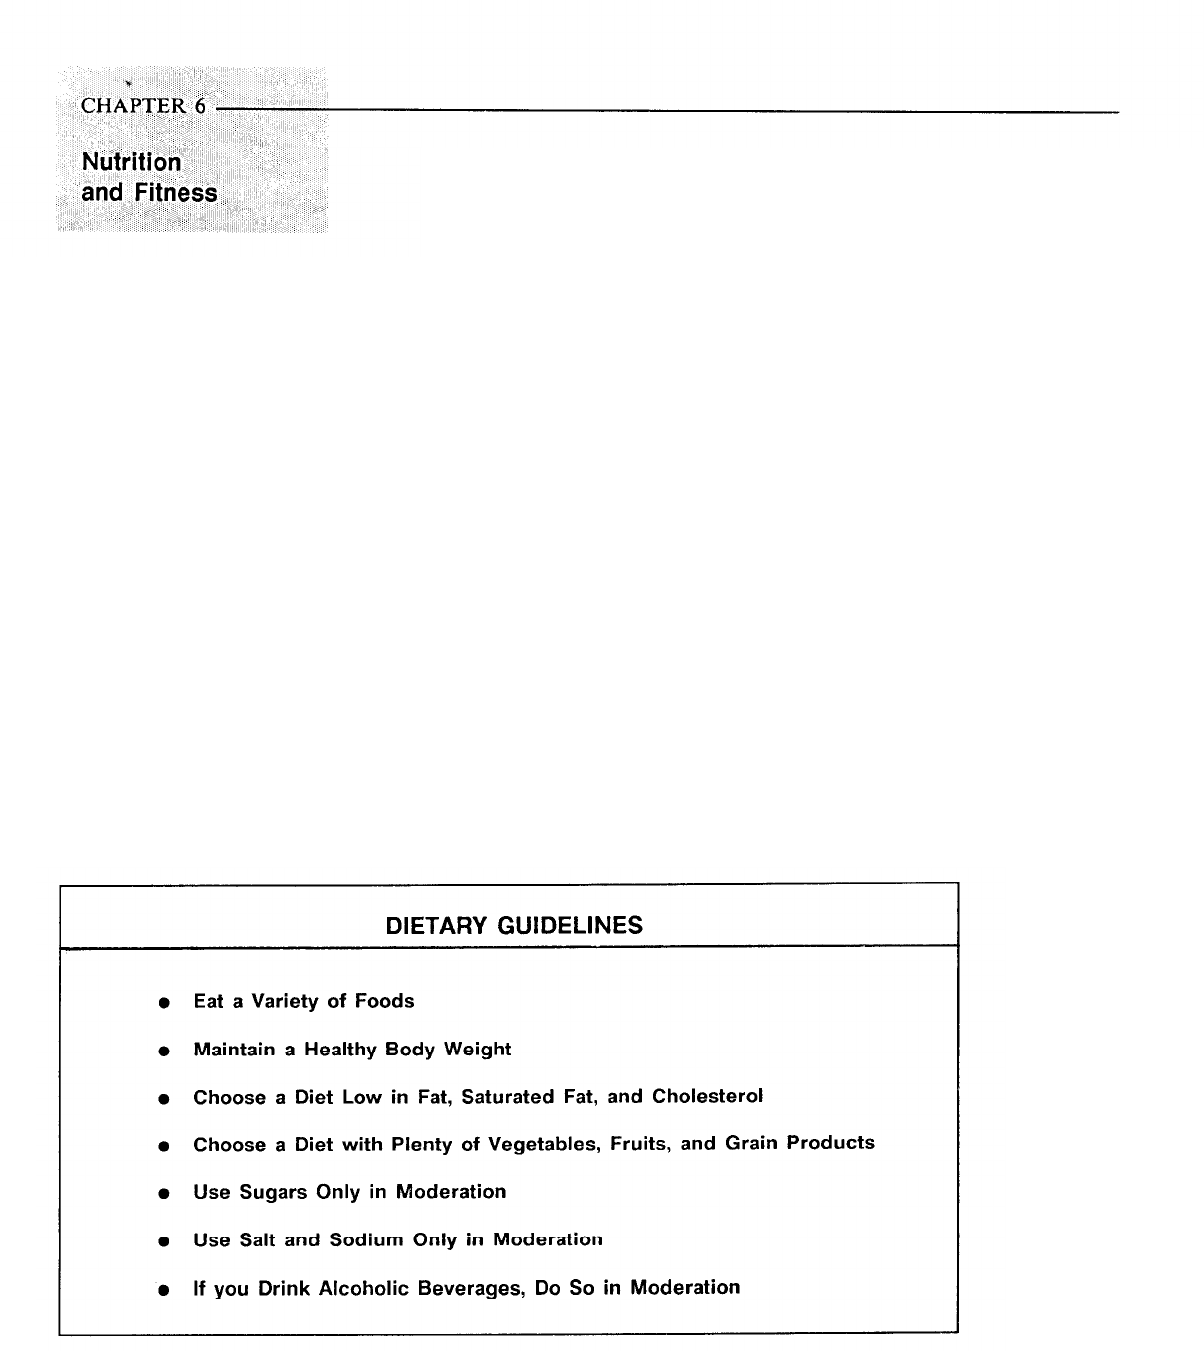
In addition to exercise, proper nu-
trition plays a major role in attaining
and maintaining total fitness. Good
dietary habits (see Figure 6-1 ) greatly
enhance the ability of soldiers to per-
form at their maximum potential. A
good diet alone, however, will not
make up for poor health and exercise
habits. This chapter gives basic nutri-
tional guidance for enhancing physical
performance. Soldiers must know and
follow the basic nutrition principles if
they hope to maintain weight control
as well as achieve maximum physical
fitness, good health, and mental alert-
ness.
Guidelines for Healthy Eating
Eating a variety of foods and main-
taining an energy balance are basic
guidelines for a healthy diet. Good
nutrition is not complicated for those
who understand these dietary guide-
lines.
To be properly nourished, soldiers
should regularly eat a wide variety of
foods fro-m the major food groups,
selecting a variety of foods from within
each group. (See Figure 6-2.) A well-
balanced diet provides all the nutrients
needed to keep one healthy.
Most healthy adults do not need
vitamin or mineral supplements if they
eat a proper variety of foods. There
are no known advantages in consuming
excessive amounts of any nutrient, and
there may be risks in doing so.
For soldiers to get enough fuel from
the food they eat and to obtain the
variety of foods needed for nutrient
balance, they should eat three meals a
day. Even snacking between meals can
contribute to good nutrition if the
right foods are eaten.
Another dietary guideline is to
consume enough calories to meet one’s
energy needs. Weight is maintained as
long as the body is in energy balance,
Figure 6-1
6-0

Figure 6-2
that is, when the number of calories
used equals the number of calories
consumed.
The most accurate way to control
caloric intake is to control the size of
food portions and thus the total amount
of food ingested. One can use standard
household measuring utensils and a
small kitchen scale to measure portions
of foods and beverages. Keeping a
daily record of all foods eaten and
physical activity done is also helpful.
Figure 6-3 shows the number of
calories burned during exercise periods
of different types, intensities, and
durations. For example, while partici-
pating in archery, a person will burn
0.034 calories per pound per minute.
Thus, a 150-pound person would burn
5.1 calories per minute (150 lbs. x 0.034
calories/minute/lb. = 5.1 calories/
minute) or about 305 calories/hour, as
shown in Figure 6-4. Similarly, a
person running at 6 miles per hour
(MPH) will burn 0.079 cal./min./lb.
and a typical, 150-pound male will
burn 11.85 calories/minute (150 lbs. x
0.079 cal./lb./min. = 11.85) or about
710 calories in one hour, as shown in
Figure 6-3.
To estimate the number of calories
you use in normal daily activity, multi-
ply your body weight by 13 if you are
sedentary, 14 if somewhat active, and
15 if moderately active. The result is
a rough estimate of the number of
calories you need to maintain your
present body weight. You will need
still more calories if you are more than
moderately active. By comparing
caloric intake with caloric expendi-
ture, the state of energy balance (posi-
tive, balanced, or negative) can be
determined.
6-1
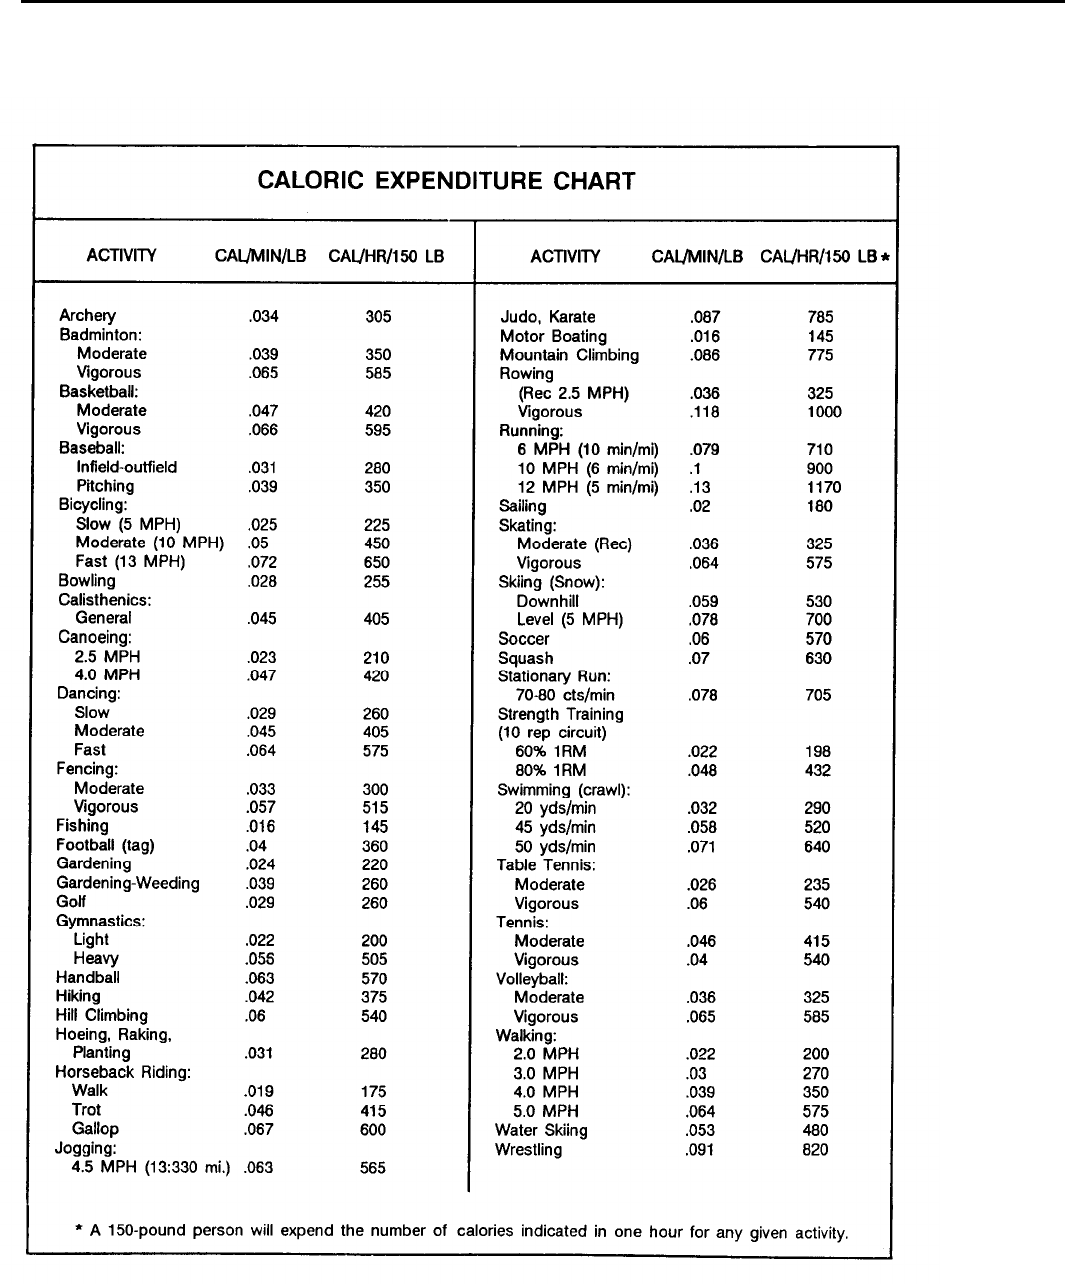
Figure 6-3
6-2

Avoiding an excessive
intake of fats is an
important fundamental
of nutrition.
Avoiding an excessive intake of fats
is another fundamental dietary guide-
line. A high intake of fats, especially
saturated fats and cholesterol, has been
associated with high levels of blood
cholesterol.
The blood cholesterol level in most
Americans is too high. Blood choles-
terol levels can be lowered by reducing
both body fat and the amount of fat in
the diet. Lowering elevated blood
cholesterol levels reduces the risk of
developing coronary artery disease
(CAD) and of having a heart attack.
CAD, a slow, progressive disease, re-
sults from the clogging of blood vessels
in the heart. Good dietary habits help
reduce the likelihood of developing
CAD.
It is recommended that all persons
over the age of two should reduce their
fat intake to 30 percent or less of their
total caloric intake. The current na-
tional average is 38 percent. In addi-
tion, we should reduce our intake of
saturated fat to less than 10 percent of
the total calories consumed. We should
increase our intake of polyunsaturated
fat, but to no more than 10 percent of
our total calories. Finally, we should
reduce our daily cholesterol intake to
300 milligrams or less. Figure 6-4 sug-
gests actions commanders can take to
support sound dietary guidelines. Most
of these actions concern dining-facil-
ity management.
Concerns for Optimal
Physical Performance
Carbohydrates, in the form of gly -
cogen (a complex sugar), are the pri-
mary fuel source for muscles during
short-term, high-intensity activities.
Repetitive, vigorous activity can use
up most of the carbohydrate stores in
the exercised muscles.
The body uses fat to help provide
energy for extended activities such as
a one-hour run. Initially, the chief
fuel burned is carbohydrates, ‘but as
the duration increases, the contribu-
tion from fat gradually increases.
The intensity of the exercise also
influences whether fats or carbohy-
drates are used to provide energy.
Very intense activities use more car-
bohydrates. Examples include weight
training and the APFT sit-up and
push-up events.
Eating foods rich in carbohydrates
helps maintain adequate muscle-gly -
cogen reserves while sparing amino
acids (critical building-blocks needed
for building proteins). At least 50
percent of the calories in the diet
should come from carbohydrates.
Individual caloric requirements vary,
depending on body size, sex, age, and
training mission. Foods rich in com-
plex carbohydrates (for example, pasta,
rice, whole wheat bread, potatoes) are
the best sources of energy for active
soldiers.
Carbohydrates are the
primary fuel source for
muscles during short-
term, high-intensity
activities.
6-3
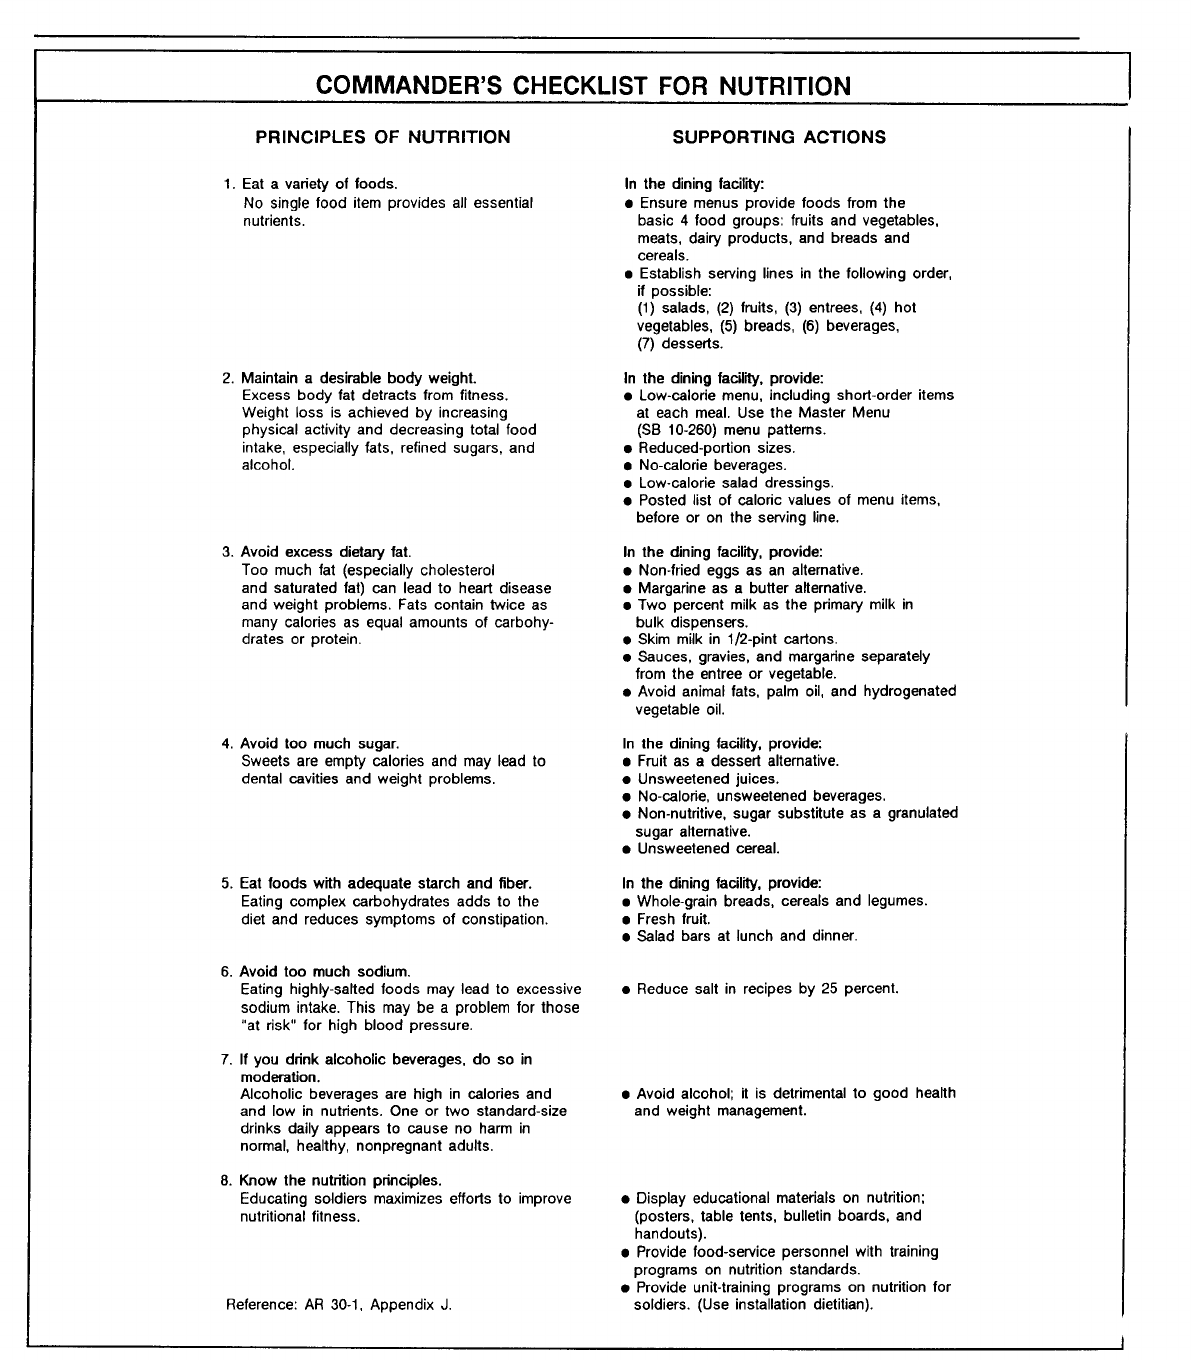
Figure 6-4
6-4
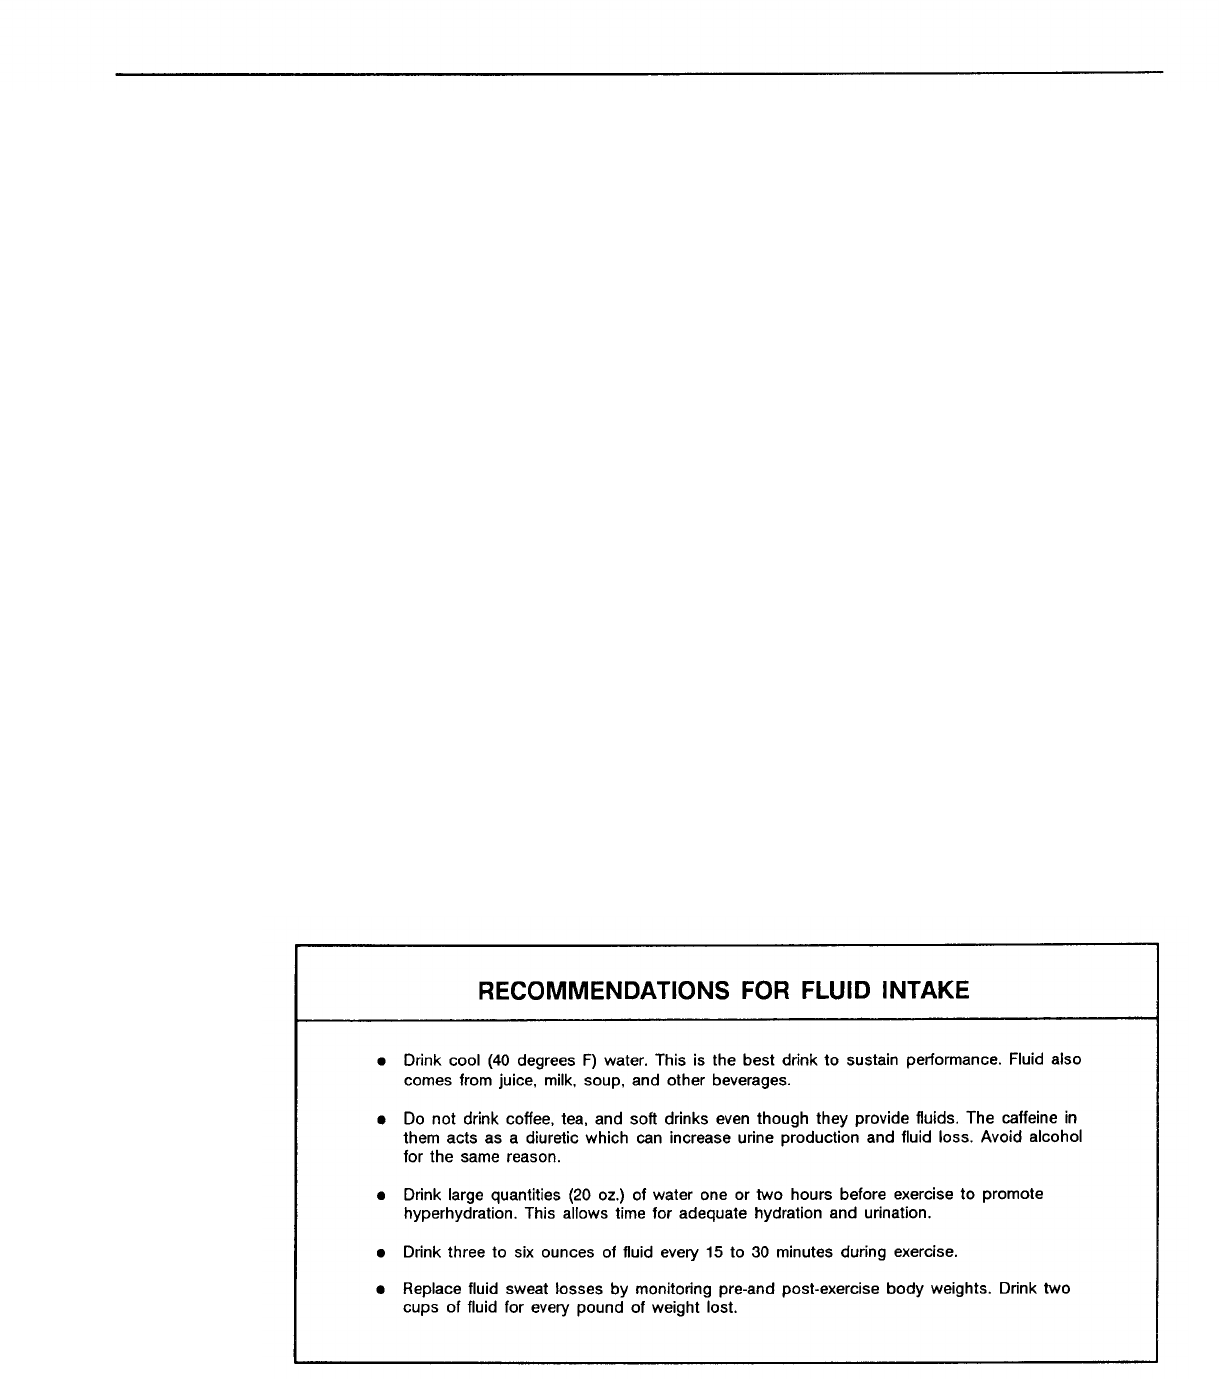
Because foods eaten one to three
days before an activity provide part of
the fuel for that activity, it is impor-
tant to eat foods every day that are rich
in complex carbohydrates. It is also
important to avoid simple sugars, such
as candy, up to 60 minutes before ex-
ercising, because they can lead to low
blood sugar levels during exercise.
Soldiers often fail to drink enough
water, especially when training in the
heat. Water is an essential nutrient that
is critical to optimal physical perform-
ance. It plays an important role in
maintaining normal body temperature.
The evaporation of sweat helps cool the
body during exercise. As a result, wa-
ter lost through sweating must be
replaced or poor performance, and
possibly injury, can result. Sweat
consists primarily of water with small
quantities of minerals like sodium.
Cool, plain water is the best drink to
use to replace the fluid lost as sweat.
Soldiers should drink water before,
during, and after exercise to pre-
vent dehydration and help en-
hance performance. Figure 6-5 shows
recommendations for fluid intake when
exercising.
Sports drinks, which are usually
simple carbohydrates (sugars) and
electrolytes dissolved in water, are
helpful under certain circumstances.
There is evidence that solutions con-
taining up to 10 percent carbohydrate
will enter the blood fast enough to de-
liver additional glucose to the active
muscles. This can improve endurance.
During prolonged periods of exer-
cise (1.5+ hours) at intensities over 50
percent of heart rate reserve, one can
benefit from periodically drinking
sports drinks with a concentration of 5
to 10 percent carbohydrate. Soldiers
on extended road marches can also
benefit from drinking these types of
glucose-containing beverages. During
intense training, these beverages can
provide a source of carbohydrate for
working muscles. On the other hand,
drinks that exceed levels of 10 percent
carbohydrate, as do regular soda pops
and most fruit juices, can lead to ab-
dominal cramps, nausea, and diarrhea.
Therefore, these drinks should be used
with caution during intense endurance
training and other similar activities.
Many people believe that body
builders need large quantities of
Figure 6-5
6-5

protein to promote better muscle
growth. The primary functions of
protein are to build and repair body
tissue and to form enzymes. Protein is
believed to contribute little, if any, to
the total energy requirement of heavy-
resistance exercises. The recommended
dietary allowance of protein for adults
is 0.8 grams per kilogram of body
weight. Most people meet this level
when about 15 percent of their daily
caloric intake comes from protein.
During periods of intense aerobic train-
ing, one’s need for protein might be
somewhat higher (for example, 1.0 to
1.5 grams per kilogram of body weight
per day). Weight lifters, who have a
high proportion of lean body mass, can
easily meet their protein requirement
with a well-balanced diet which has 15
to 20 percent of its calories provided
by protein. Recent research suggests
that weight trainers may need no more
protein per kilogram of body weight
than average, nonathletic people. Most
Americans routinely consume these
levels of protein, or more. The body
converts protein consumed in excess
of caloric needs to fat and stores it in
the body.
Nutrition in the Field
Soldiers in the field must eat enough
food to provide them with the energy
they need. They must also drink plenty
of water or other non-alcoholic bever-
ages. The “meal, ready to eat” (MRE)
supplies the needed amount of carbo-
hydrates, protein, fat, vitamins, and
minerals. It is a nutritionally adequate
ration when all of its components are
eaten and adequate amounts of water
are consumed. Because the foods are
enriched and fortified with vitamins
and minerals, each component is a
major source of nutrients. Soldiers
must eat all the components in order to
get the daily military recommended
dietary allowances (MRDA) and have
an adequate diet in the field. Soldiers
who are in weight control programs or
who are trying to lose weight can eat
part of each MRE item, as recom-
mended by dietitians.
6-6
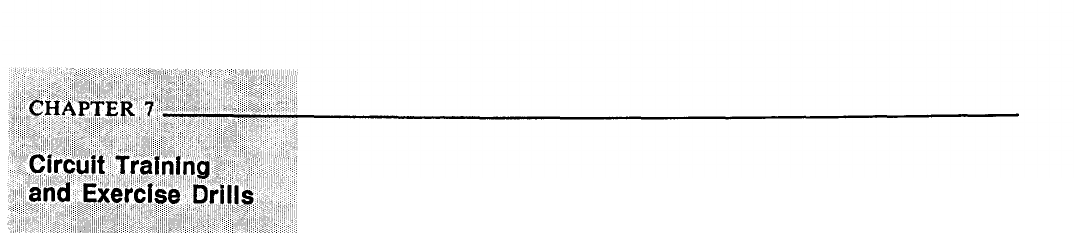
This chapter gives commanders and
trainers guidance in designing and
using exercise circuits. It describes
calisthenic exercises for developing
strength, endurance, coordination, and
flexibility. It also describes grass drills
and guerilla exercises which are closely
related to soldiering skills and should
be regularly included in the unit’s
physical fitness program.
Circuit training is a term associated
with specific training routines. Com-
manders with a good understanding of
the principles of circuit training may
apply them to a wide variety of train-
ing situations and environments.
Circuits
A circuit is a group of
stations or areas where
specific tasks or
exercises are performed.
A circuit is a group of stations or
areas where specific tasks or exercises
are performed. The task or exercise
selected for each station and the ar-
rangement of the stations is deter-
mined by the objective of the circuit.
Circuits are designed to provide ex-
ercise to groups of soldiers at intensi-
ties which suit each person’s fitness
level. Circuits can promote fitness in
a broad range of physical and motor
fitness areas. These include CR endur-
ance, muscular endurance, strength,
flexibility, and speed. Circuits can also
be designed to concentrate on sports
skills, soldiers’ common tasks, or any
combination of these. In addition,
circuits can be organized to exercise all
the fitness components in a short pe-
riod of time. A little imagination can
make circuit training an excellent
addition to a unit’s total physical fit-
ness program. At the same time, it can
provide both fun and a challenge to
soldiers’ physical and mental abilities.
Almost any area can be used, and any
number of soldiers can exercise for
various lengths of time.
TYPES OF CIRCUITS
The two basic types of circuits are
the free circuit and the fixed circuit.
Each has distinct advantages.
Free Circuit
In a free circuit, there is no set time
for staying at each station, and no
signal is given to move from one
station to the next. Soldiers work at
their own pace, doing a fixed number
of repetitions at each station. Progress
is measured by the time needed to
complete a circuit. Because soldiers
may do incomplete or fewer repeti-
tions than called for to reduce this
time, the quality and number of the
repetitions done should be monitored.
Aside from this, the free circuit re-
quires little supervision.
Fixed Circuit
In a fixed circuit, a specific length
of time is set for each station. The
time is monitored with a stopwatch,
and soldiers rotate through the stations
on command.
There are three basic ways to increase
the intensity or difficulty of a fixed
circuit:
• Keep the time for completion the
same, but increase the number of
repetitions.
• Increase the time per station along
with the number of repetitions.
• Increase the number of times sol-
diers go through the circuit.
VARIABLES IN CIRCUIT TRAINING
Several variables in circuit training
must be considered. These include the
time, number of stations, number of
7-1

time, number of stations, number of
soldiers, number of times the circuit is
completed, and sequence of stations.
These are discussed below.
Time
One of the first things to consider is
how long it should take to complete the
circuit. When a fixed circuit is run, the
time at each station should always be
the same to avoid confusion and help
maintain control. Consider also the
time it takes to move from one station
to the next. Further, allow from five
to seven minutes both before and after
running a circuit for warming up and
cooling down, respectively.
Number of Stations
The objective of the circuit and
time and equipment available strongly
influence the number of stations. A
circuit geared for a limited objective
(for example, developing lower-body
strength) needs as few as six to eight
stations. On the other hand, circuits to
develop both strength and CR fitness
may have as many as 20 stations.
Number of Soldiers
If there are 10 stations and 40
soldiers to be trained, the soldiers
should be divided into 10 groups of
four each. Each station must then be
equipped to handle four soldiers. For
example, in this instance a rope jump-
ing station must have at least four jump
ropes. It is vital in a free circuit that
no soldier stand around waiting for
equipment. Having enough equipment
reduces bottlenecks, slowdowns, and
poor results.
Number of Times a Circuit is
Completed
To achieve the desired training effect,
soldiers may have to repeat the same
circuit several times. For example, a
circuit may have ten stations. Soldiers
may run through the circuit three
times, exercising for 30 seconds at
each station, and taking 15 seconds to
move between stations. The exercise
time at each station may be reduced to
20 seconds the second and third time
through. The whole workout takes less
than 45 minutes including warm-up
and cool-down. As soldiers become
better conditioned, exercise periods
may be increased to 30 seconds or
longer for all three rotations. Another
option is to have four rotations of the
circuit.
Sequence of Stations
Stations should be arranged in a se-
quence that allows soldiers some re-
covery time after exercising at strenu-
ous stations. Difficult exercises can be
alternated with less difficult ones.
After the warm-up, soldiers can start
a circuit at any station and still achieve
the objective by completing the full
circuit.
DESIGNING A CIRCUIT
The designer of a circuit must
consider many factors. The six steps
below cover the most important
pects of circuit development.
Determine Objectives
The designer must consider
specific parts of the body and
as-
the
the
components of fitness on which sol-
diers need to concentrate. For ex-
ample, increasing muscular strength
may be the primary objective, while
muscular endurance work may be
secondary. On the other hand, im-
proving cardiorespiratory endurance
may be the top priority. The designer
The designer must
consider the specific
parts of the body and
the components of
fitness on which soldiers
need to concentrate.
must first identify the training objec-
tive in order to choose the appropriate
exercises.
7-2

Select the Activities
The circuit designer should list all
the exercises or activities that can help
meet the objectives. Then he should
look at each item on the list and ask the
following questions:
● Will equipment be needed? Is it
available?
● Will supervision be needed? Is it
available?
● Are there safety factors to consider?
Answering these questions helps the
designer decide which exercises to use.
He can choose from the exercises,
calisthenics, conditioning drills, grass
drills, and guerrilla drills described in
this chapter. However, he should not
limit the circuit to only these activities.
Imagination and field expediency are
important elements in developing cir-
cuits that hold the interest of soldiers.
(See Figures 7-1 through 7-3.)
Arrange the Stations
A circuit usually has 8 to 12 stations,
but it may have as many as 20. After
deciding how many stations to include,
the designer must decide how to ar-
range them. For example, in a circuit
for strength training, the same muscle
group should not be exercised at con-
secutive stations.
One approach is to alternate “push-
ing” exercises with “pulling” exercises
which involve movement at the same
joint(s). For example, in a strength
training circuit, exercisers may follow
the pushing motion of a bench press
with the pulling motion of the seated
row. This could be followed by the
pushing motion of the overhead press
which could be followed by the pulling
motion of the lat pull-down. Another
approach might be to alternate be-
tween upper and lower body exercises.
By not exercising the same muscle
group twice in a row, each muscle has
a chance to recover before it is used in
another exercise. If some exercises are
harder than others, soldiers can alter-
nate hard exercises with easier ones.
The choice of exercises depends on the
objectives of the circuit.
Select the Training Sites
Circuits may be conducted out-
doors or indoors. If the designer wants
to include running or jogging a certain
distance between stations, he may do
this in several ways. In the gymna-
sium, soldiers may run five laps or for
20 to 40 seconds between stations.
Outdoors, they may run laps or run
between spread-out stations if space is
available. However, spreading the
stations too far apart may cause prob-
lems with control and supervision.
Prepare a Sketch
The designer should draw a simple
sketch that shows the location of each
station in the training area. The sketch
should include the activity and length
of time at each station, the number of
stations, and all other useful informa-
tion.
Lay Out the Stations
The final step is to lay out the
stations which should be numbered
and clearly marked by signs or cards.
In some cases, instructions for the
stations are written on the signs. The
necessary equipment is placed at each
station.
The choice of exercises
for circuit training
depends on the objectives
of the circuit.
Sample Conditioning Circuits
Figures 7-1, 7-2, and 7-3 show
different types of conditioning cir-
cuits. Soldiers should work at each
station 45 seconds and have 15 seconds
to rotate to the next station.
7-3
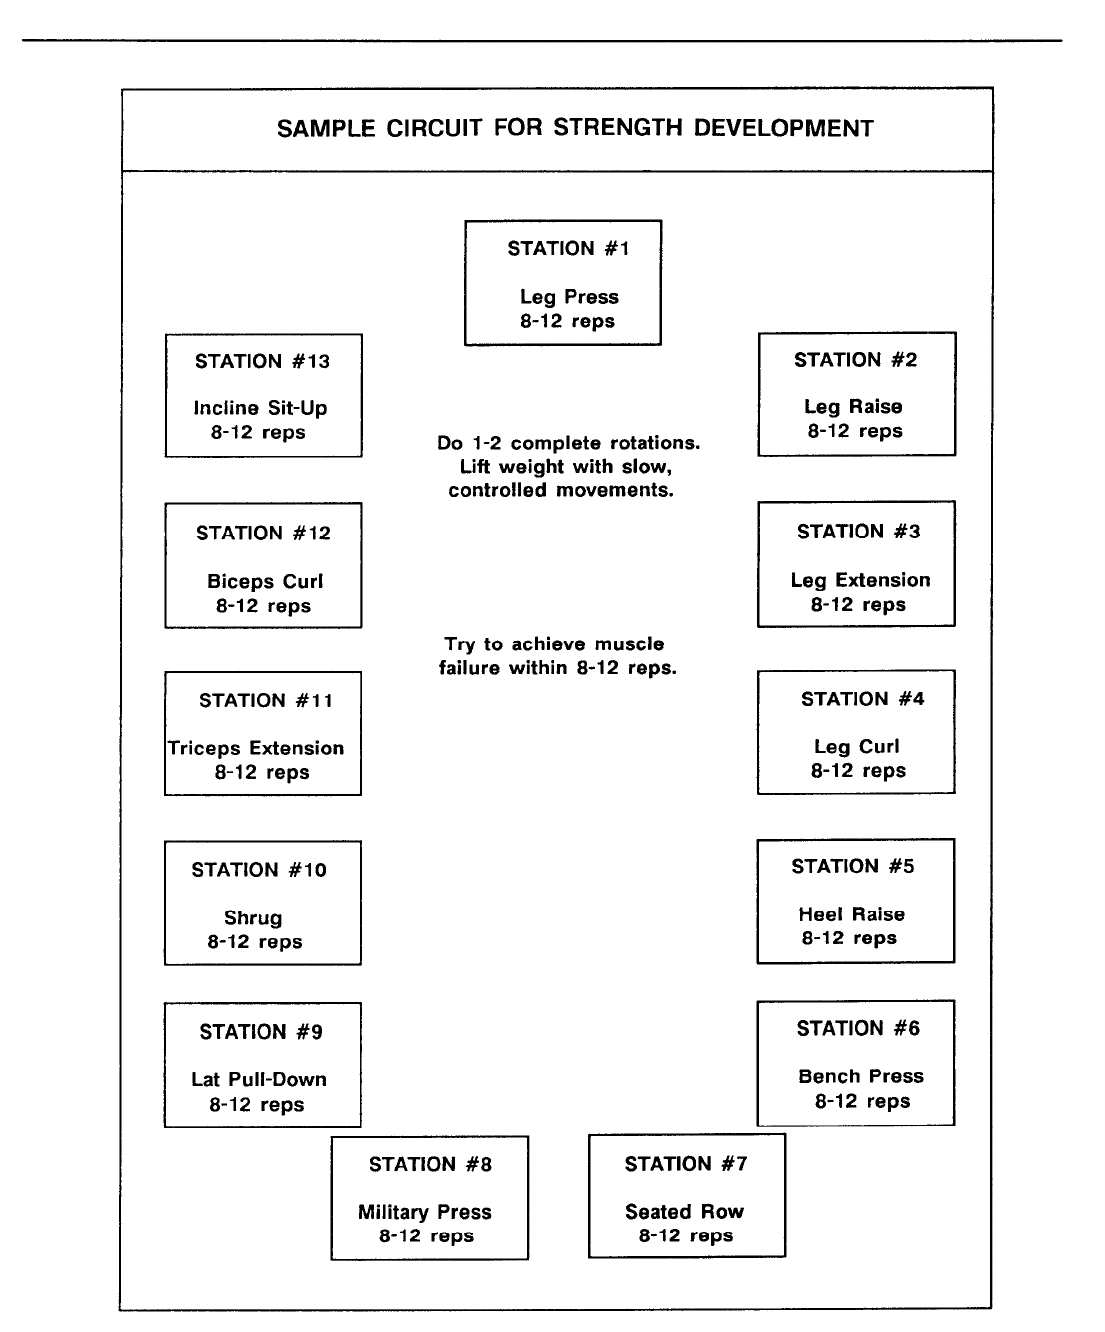
Figure 7-1
7-4
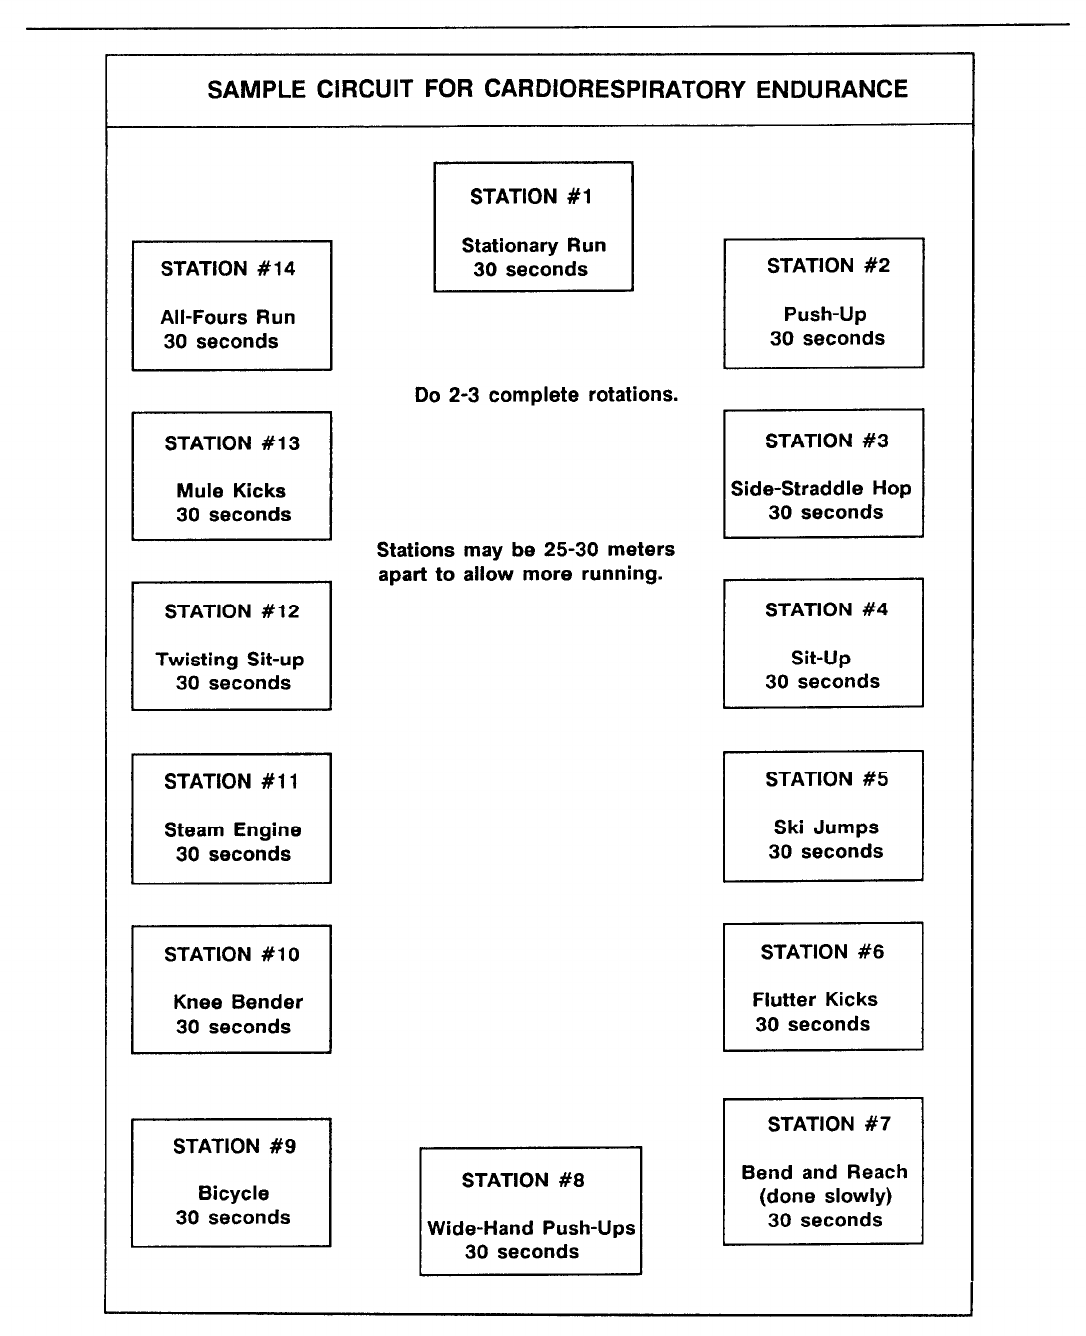
Figure 7-2
7-5
Figure 7-3
7-6

Calisthenics
Calisthenics can be
used to help develop
coordination. CR and
muscular encurance,
flexibility, and strength.
Calisthenics can be used to exercise
most of the major muscle groups of the
body. They can help develop coordi-
nation, CR and muscular endurance,
flexibility, and strength. Poorly-coor-
dinated soldiers, however, will derive
the greatest benefit from many of these
exercises
Although calisthenics have some
value when included in a CR circuit or
when exercising to music, for the
average soldier, calisthenics such as the
bend and reach, squat bender, lunger,
knee bender, and side-straddle hop can
best be used in the warm-up and cool-
down periods. Exercises such as the
push-up, sit-up, parallel bar dip, and
chin-up/pull-up, on the other hand,
can effectively be used in the condi-
tioning period to develop muscular en-
durance or muscular strength.
Please note that exercises such as the
bend and reach, lunger, and leg spreader,
which were once deleted from FM 21-
20 because of their potential risk to the
exerciser, have been modified and re-
introduced in this edition. All modi-
fications should be strictly adhered to.
Few exercises are inherently unsafe.
Nonetheless, some people, because of
predisposing conditions or injuries,
may find certain exercises less safe
than others. Leaders must consider
each of their soldier’s physical limita-
tions and use good judgment before
letting a soldier perform these exer-
cises. However, for the average soldier
who is of sound body, following the
directions written below will produce
satisfactory results with a minimum
risk of injury.
Finally, some of the calisthenics
listed below may be done in cadence.
These calisthenics are noted, and di-
rections are provided below with re-
spect to the actions and cadence. When
doing exercises at a moderate cadence,
use 80 counts per minute. With a slow
cadence, use 50 counts per minute
unless otherwise directed.
SAFETY FACTORS
While injury is always possible in
any vigorous physical activity, few
calisthenic exercises are really unsafe
or dangerous. The keys to avoiding
injury while gaining training benefits
are using correct form and intensity.
Also, soldiers with low fitness levels,
such as trainees, shouId not do the ad-
vanced exercises highly fit soldiers can
do. For example, with the lower back
properly supported, flutter kicks are
an excellent way to condition the hip
flexor muscles. However, without sup-
port, the possibility of straining the
lower back increases. It is not sensible
to have recruits do multiple sets of
flutter kicks because they probably are
not conditioned for them. On the other
hand, a conditioned Ranger company
may use multiple sets of flutter’ kicks
with good results.
The key to doing calisthenic exer-
cises safely is to use common sense.
Also, ballistic (that is, quick-moving)
exercises that combine rotation and
bending of the spine increase the risk
of back injury and should be avoided.
This is especially true if someone has
had a previous injury to the back. If
this type of action is performed, slow
stretching exercises, not conditioning
drills done to cadence, should be used.
Some soldiers complain of shoulder
problems resulting from rope climb-
ing, horizontal ladder, wheelbarrow,
and crab-walk exercises. These exer-
cises are beneficial when the soldier is
fit and he does them in a regular,
progressive manner. However, a cer-
tain level of muscular strength is
needed to do them safely. Therefore,
soldiers should progressively train to
build up to these exercises. Using such
exercises for unconditioned soldiers
increases the risk of injury and acci-
dent.
7-7

Progression and Recovery
Other important principles for avoid-
ing injury are progression and recov-
ery. Programs that try to do too much
too soon invite problems. The day
after a “hard” training day, if soldiers
are working the same muscle groups
and/or fitness components, they should
work them at a reduced intensity to
minimize stress and permit recovery.
The best technique is to train alter-
nate muscle groups and/or fitness
components on different days. For
example, if the Monday-Wednesday-
Friday (M-W-F) training objective is
CR fitness, soldiers can do ability
group running at THR with some light
calisthenics and stretching. If the
Tuesday-Thursday (T-Th) objective
is muscular endurance and strength,
soldiers can benefit from doing part-
ner-resisted exercises followed by a
slow run. To ensure balance and
regularity in the program, the next
week should have muscle endurance
and strength development on M-W-F
and training for CR endurance on T-
Th. Such a program has variety,
develops all the fitness components,
and follows the seven principles of
exercise while, at the same time, it
minimizes injuries caused by overuse.
Leaders should plan PT sessions to
get a positive training effect, not to
conduct “gut checks.” They should
know how to correctly do all the exer-
cises in their program and teach their
soldiers to train using good form to
help avoid injuries.
Key Points for Safety
Doing safe exercises correctly im-
proves a soldier’s fitness with a mini-
mum risk of injury.
The following are key points for en-
suring safety during stretching and
calisthenic exercises:
• Stretch slowly and without pain and
unnatural stress to a joint. Use
static (slow and sustained) stretch-
ing for warming up, cooling down,
ballistic (bouncy or jerky) stretch-
ing movements.
• Do not allow the angle formed by
the upper and lower legs to become
less than 90 degrees when the legs
are bearing weight.
• A combination of spinal rotation
and bending should generally be
avoided. However, if done, use
only slow, controlled movements
with little or no extra weight.
Leaders must be aware of the vari-
ety of methods they may use to attain
their physical training goals. The
unit’s Master Fitness Trainer is schooled
to provide safe, effective training meth-
ods and answer questions about train-
ing techniques.
CALISTHENIC EXERCISES
The following are some common
calisthenic exercises.
7-8
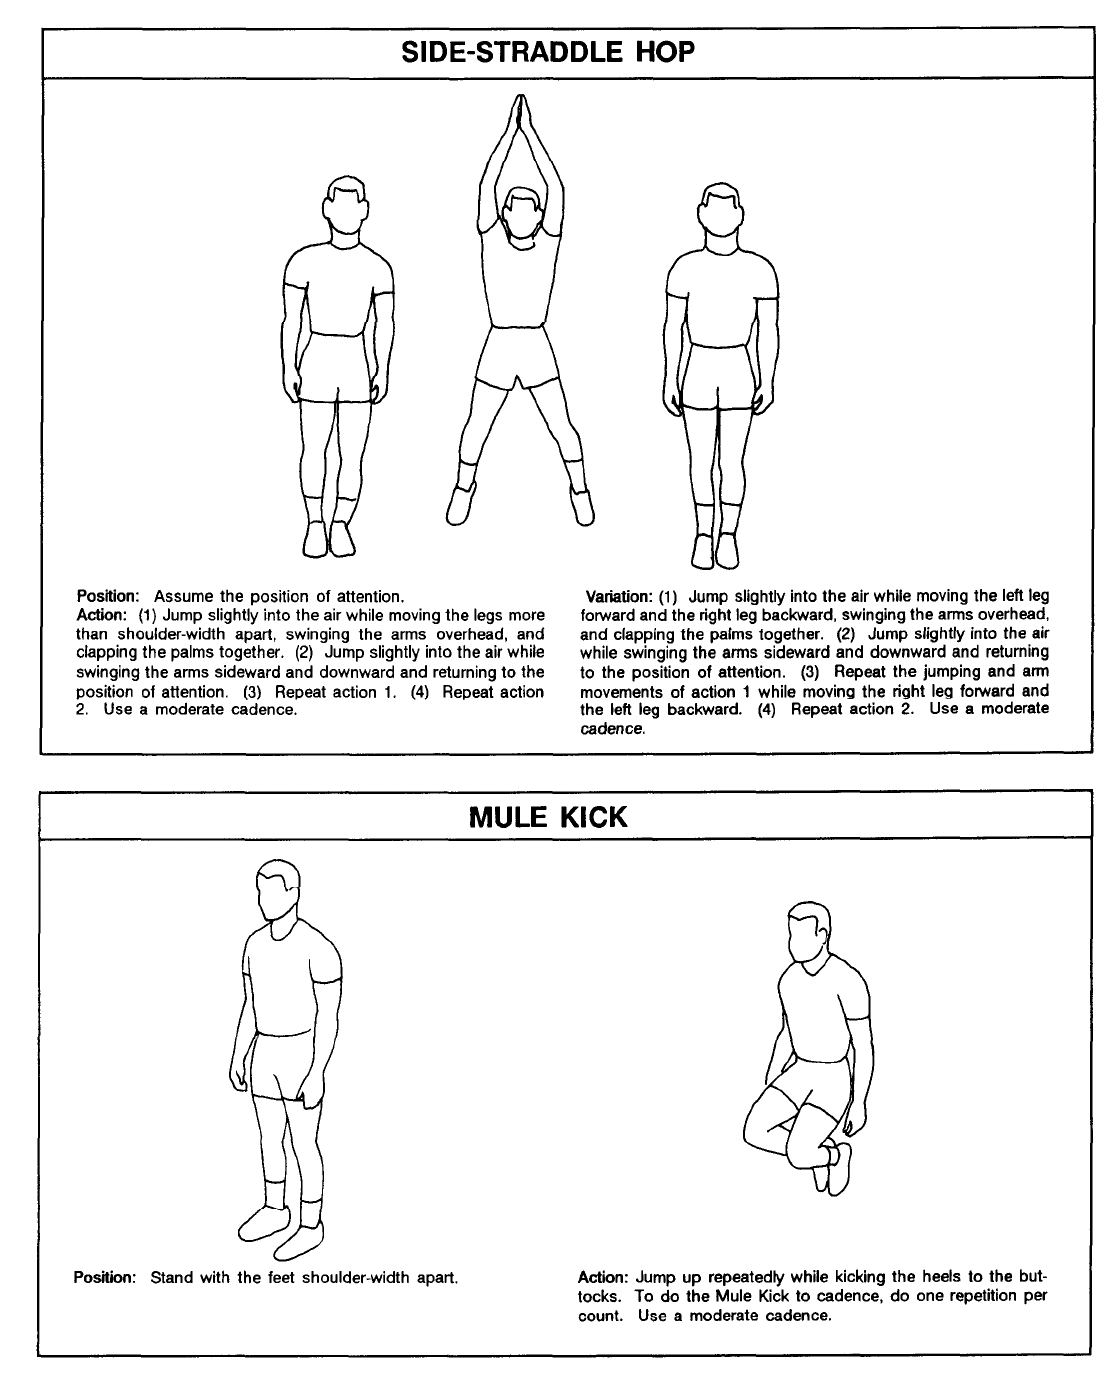
7-9
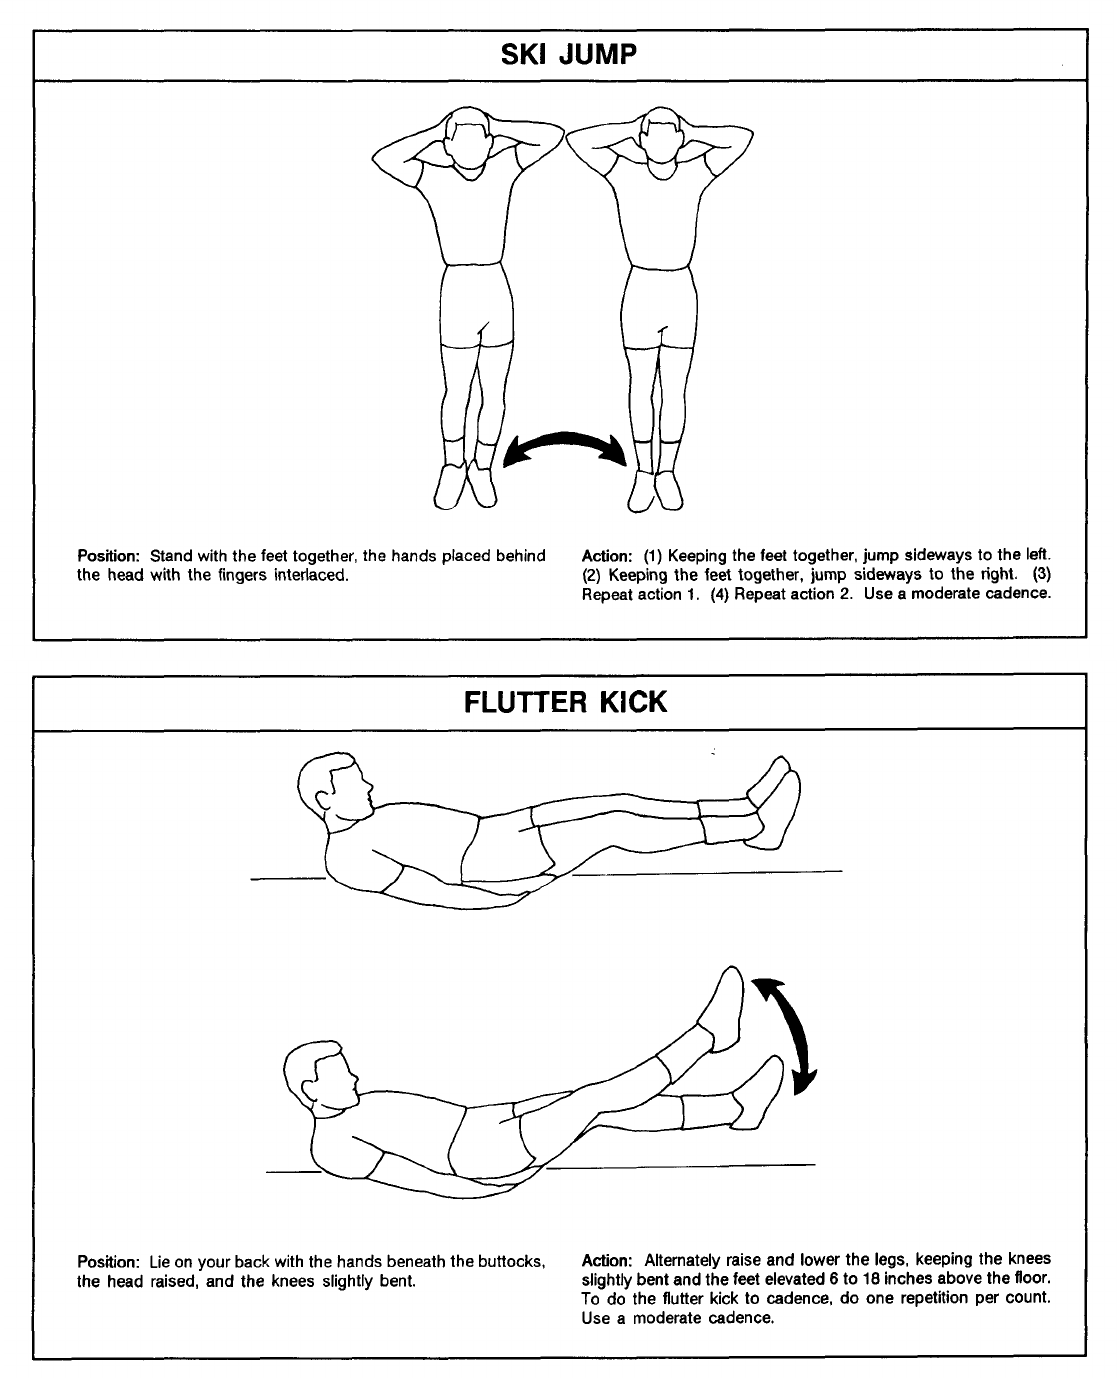
7-10
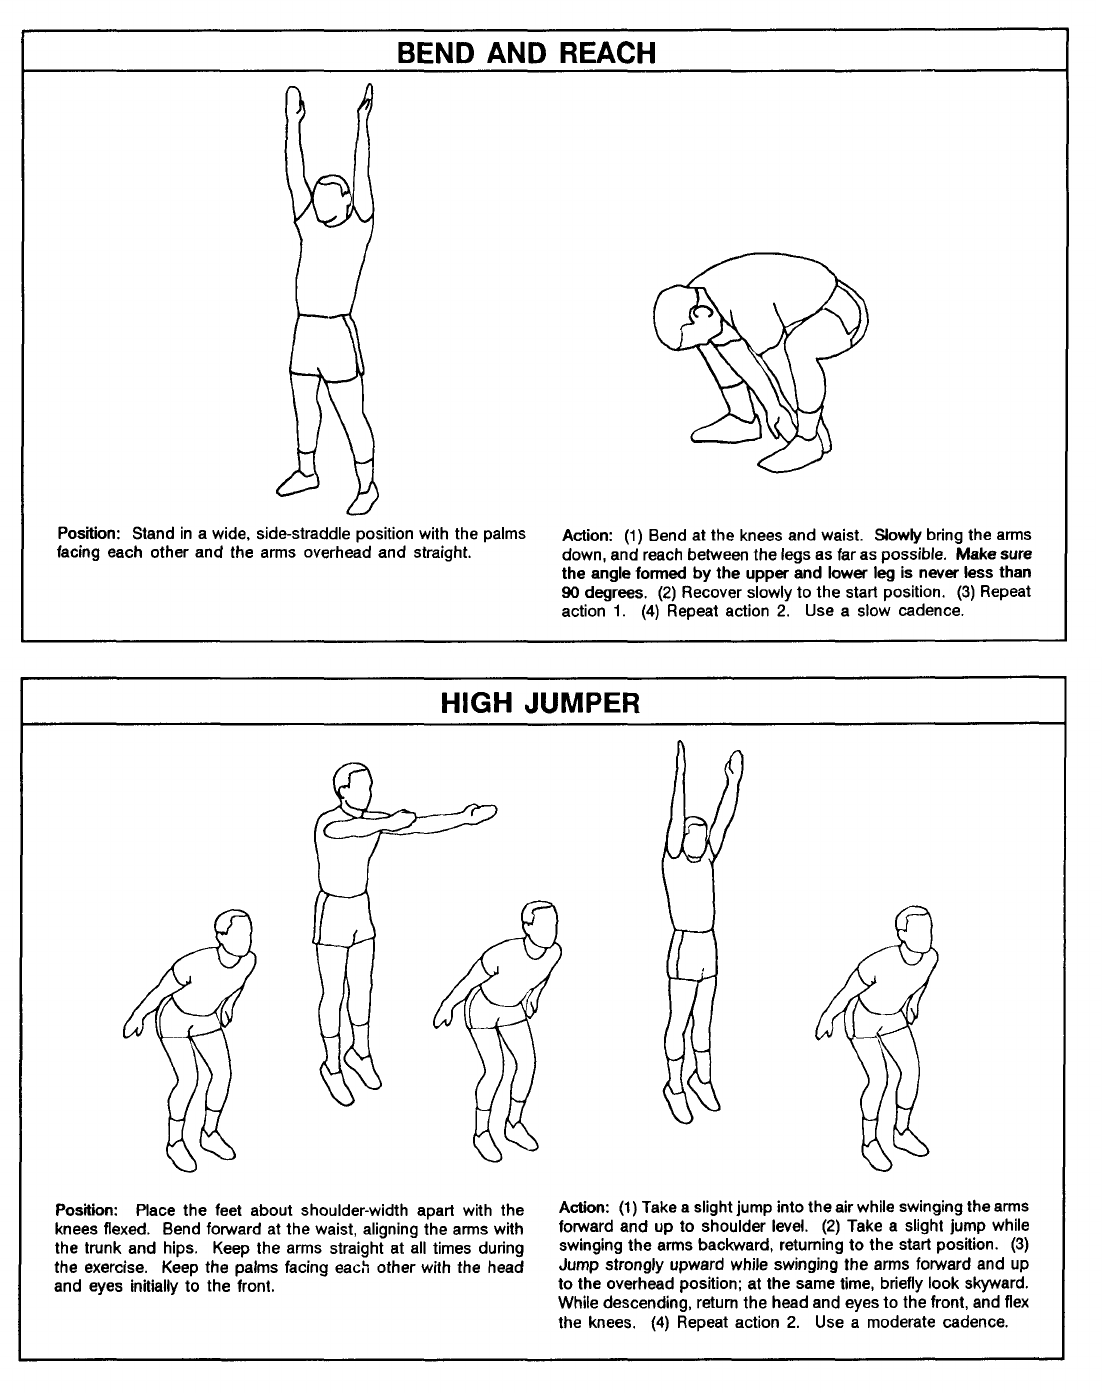
7-11
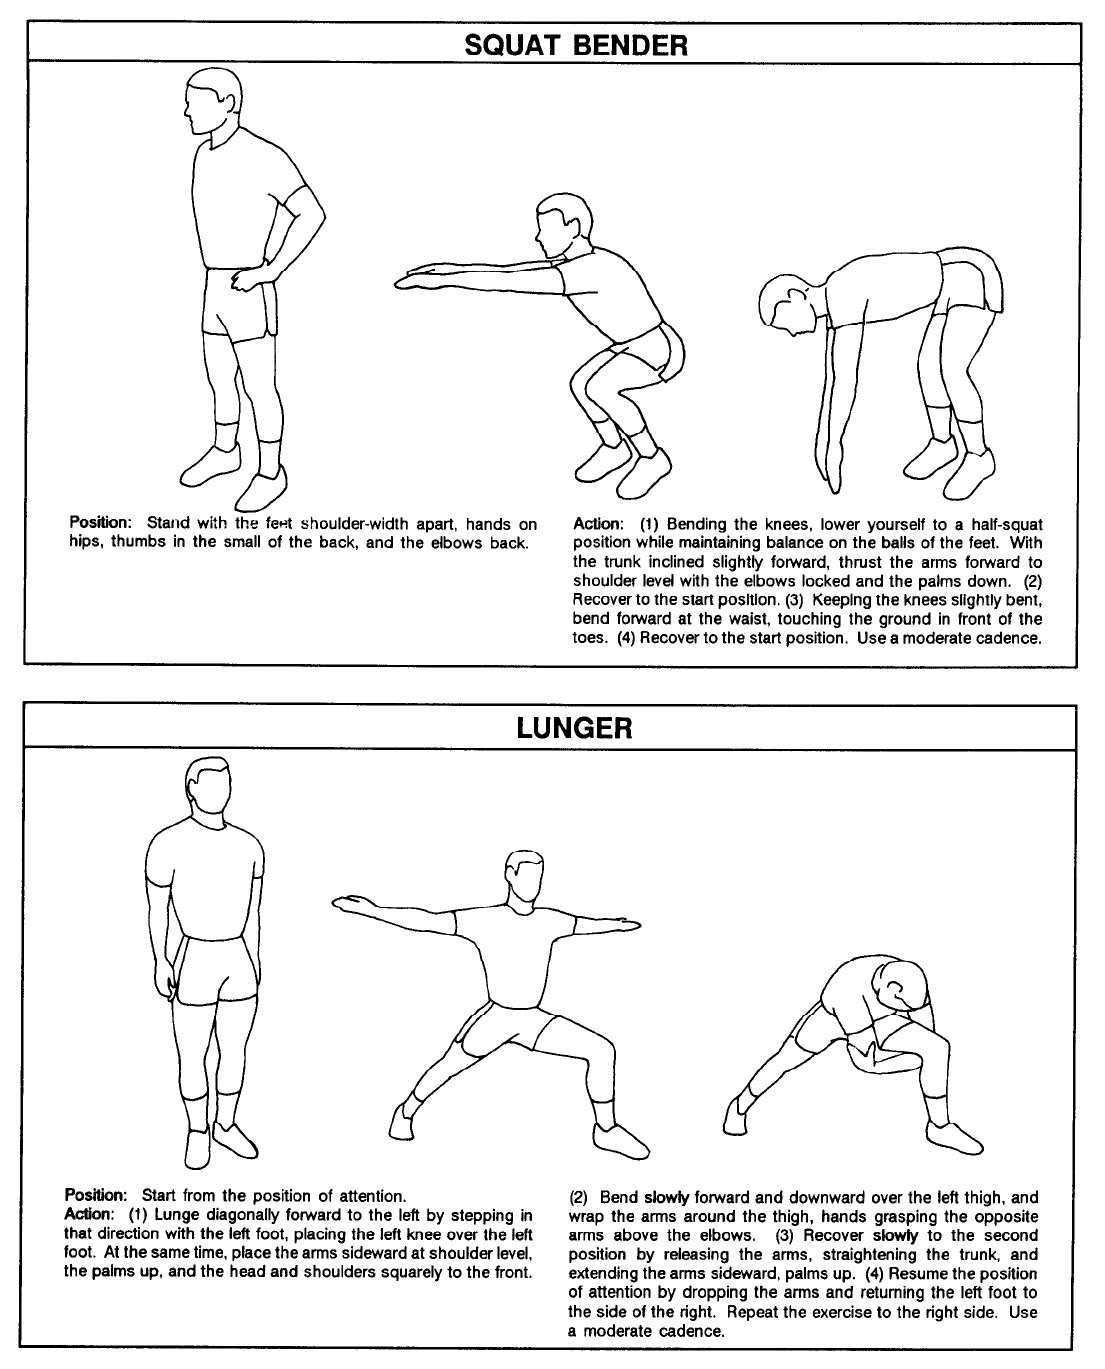
7-12
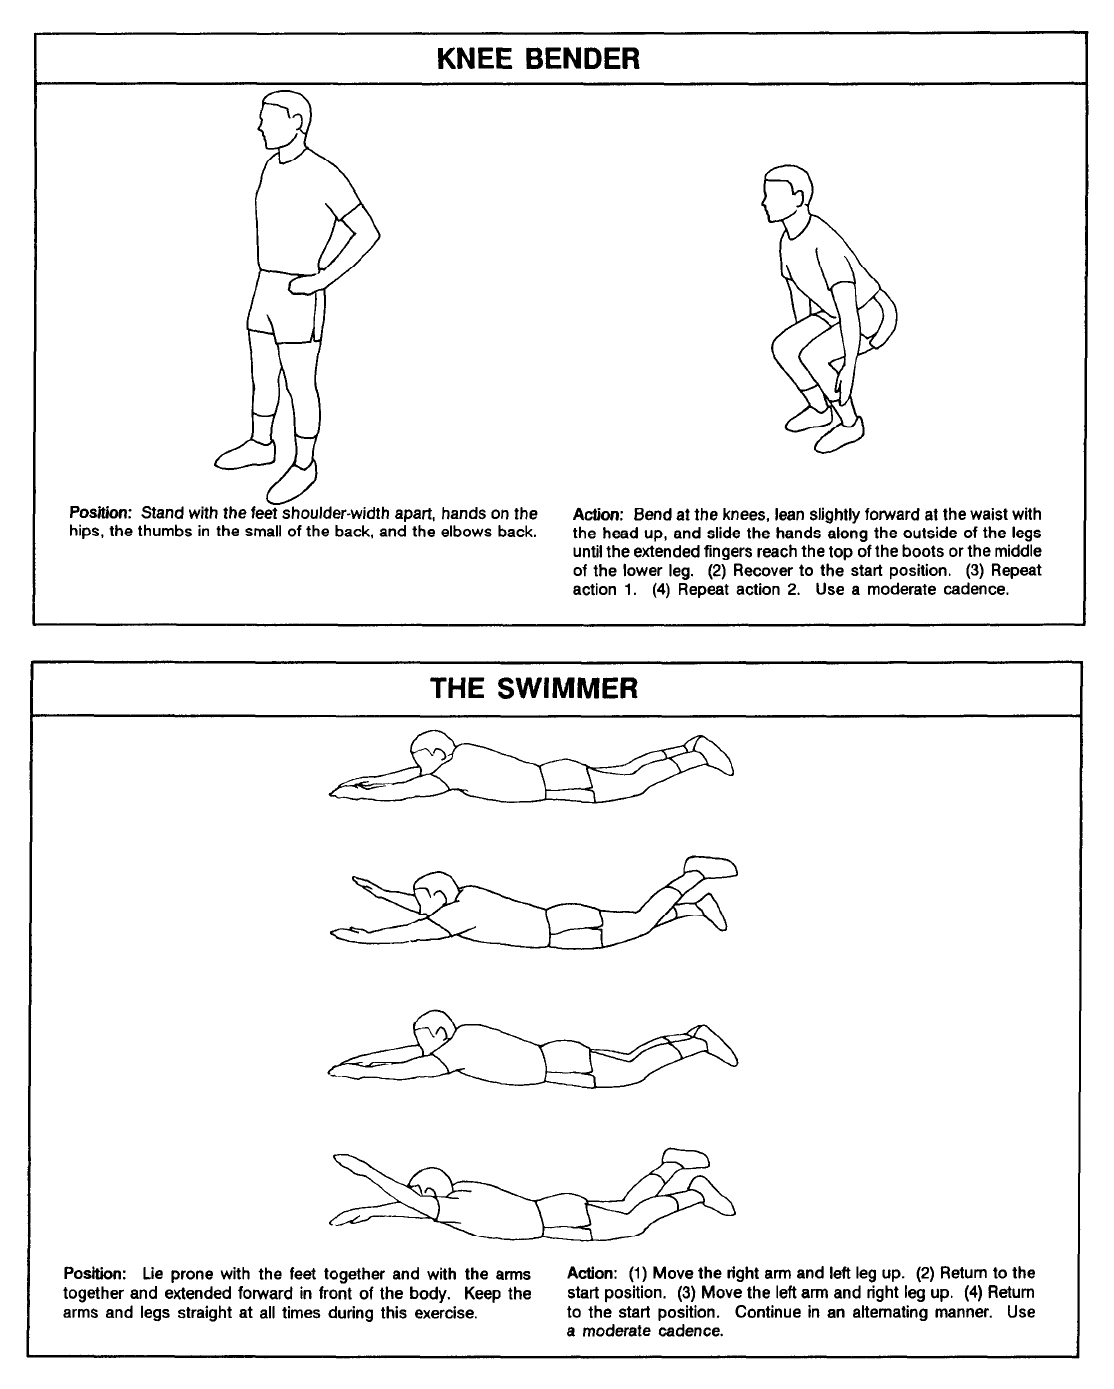
7-13
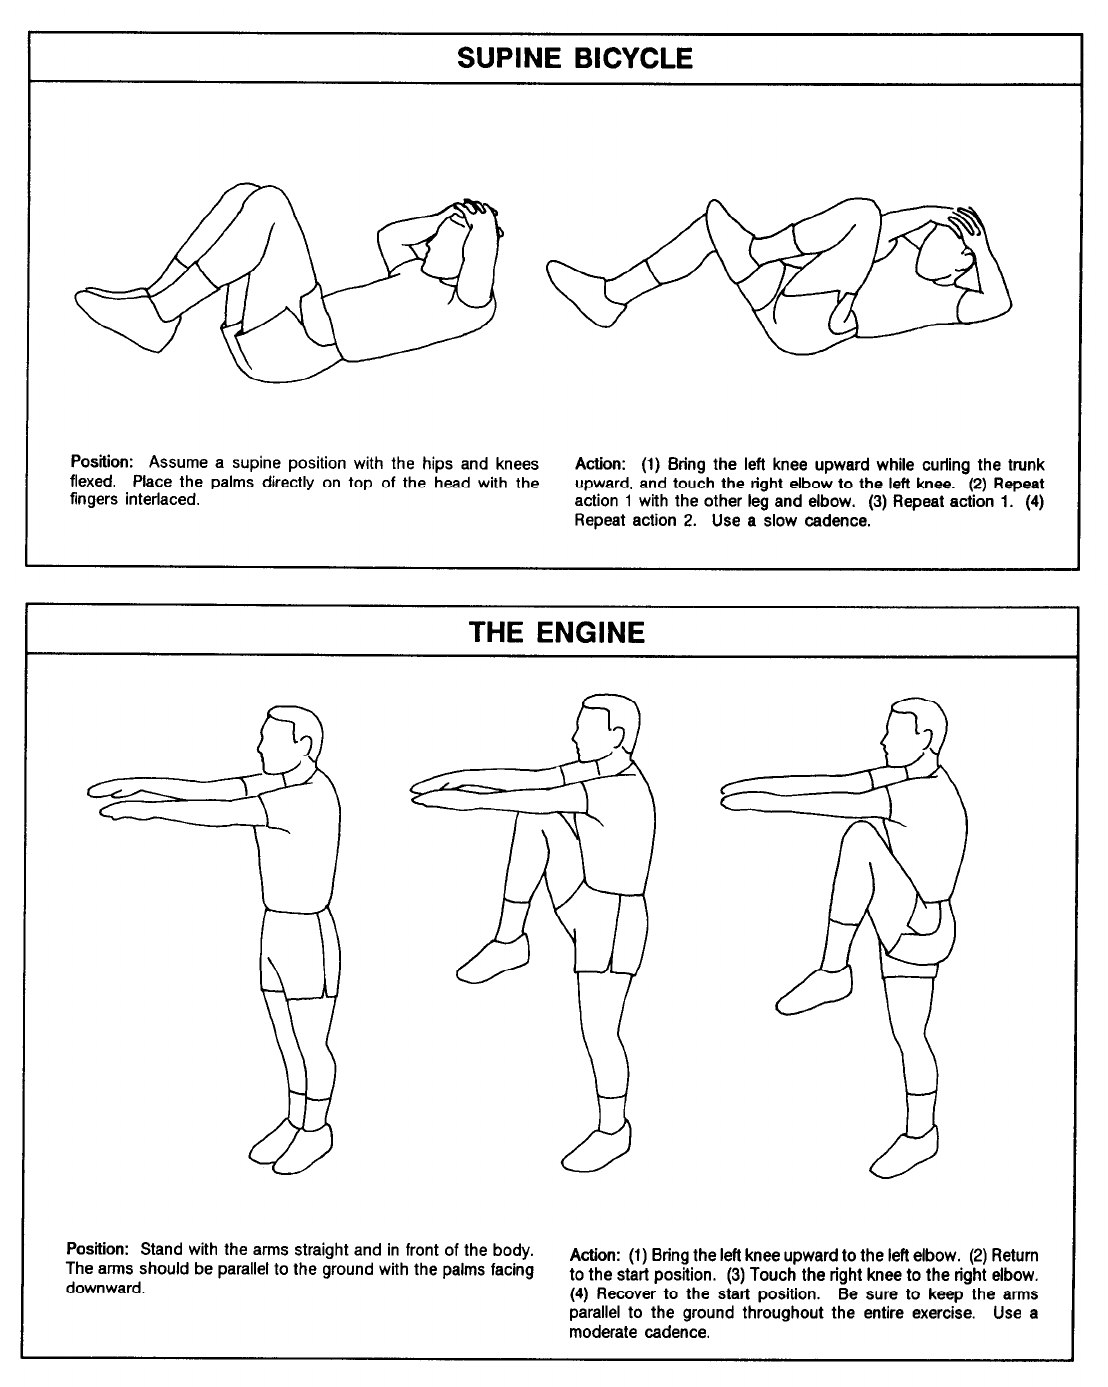
7-14
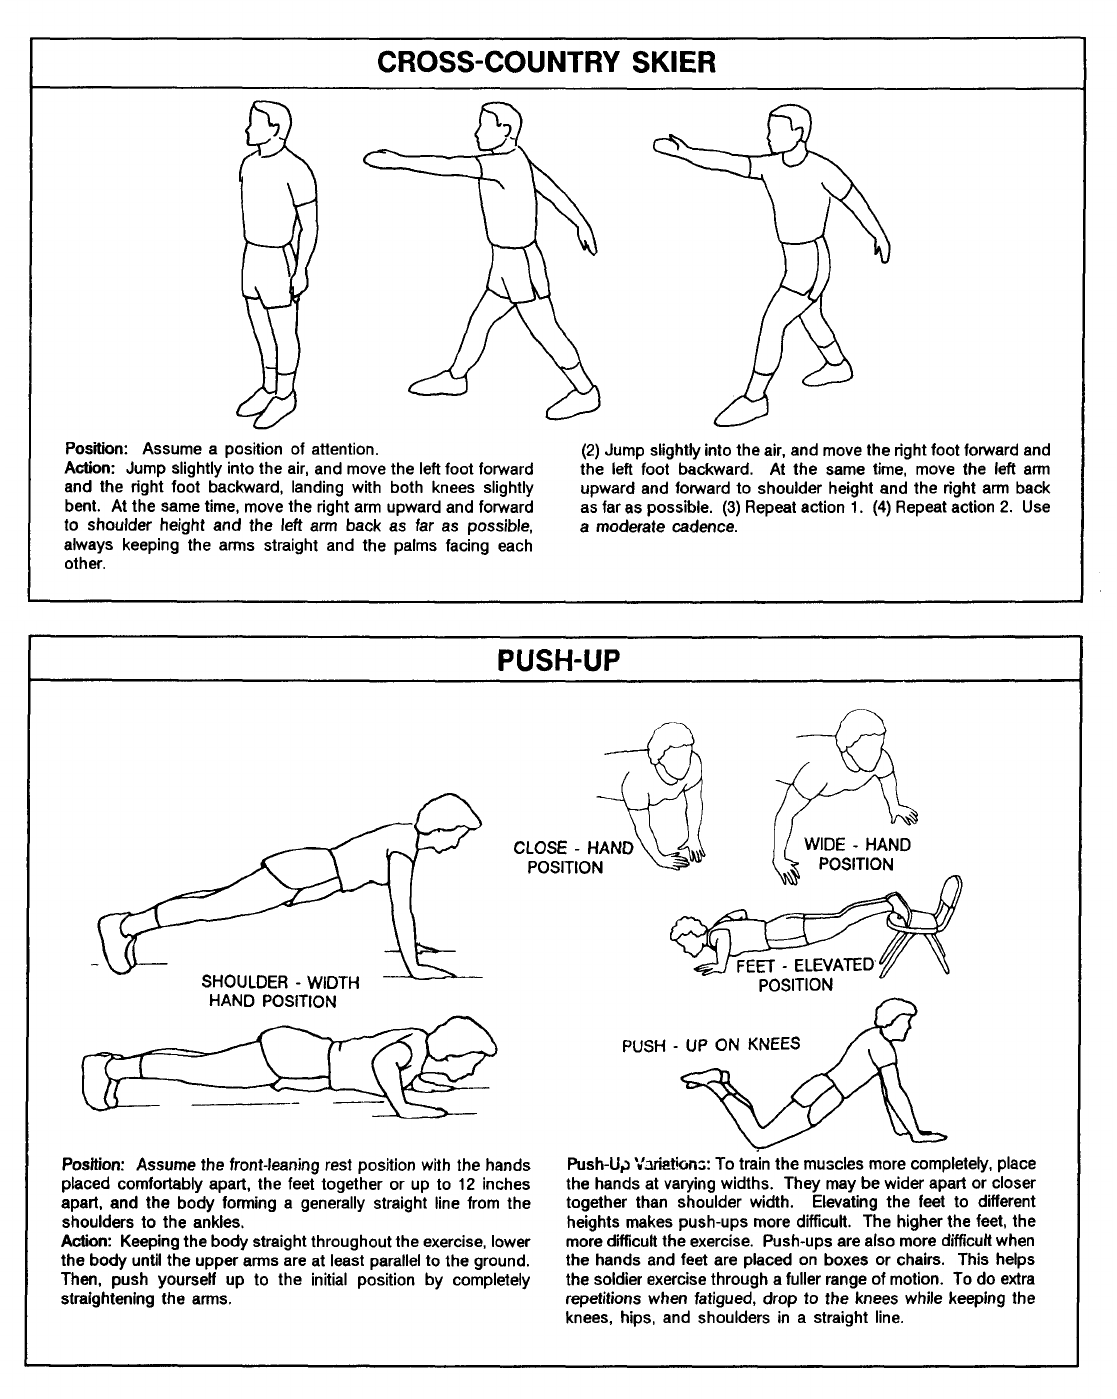
7-15
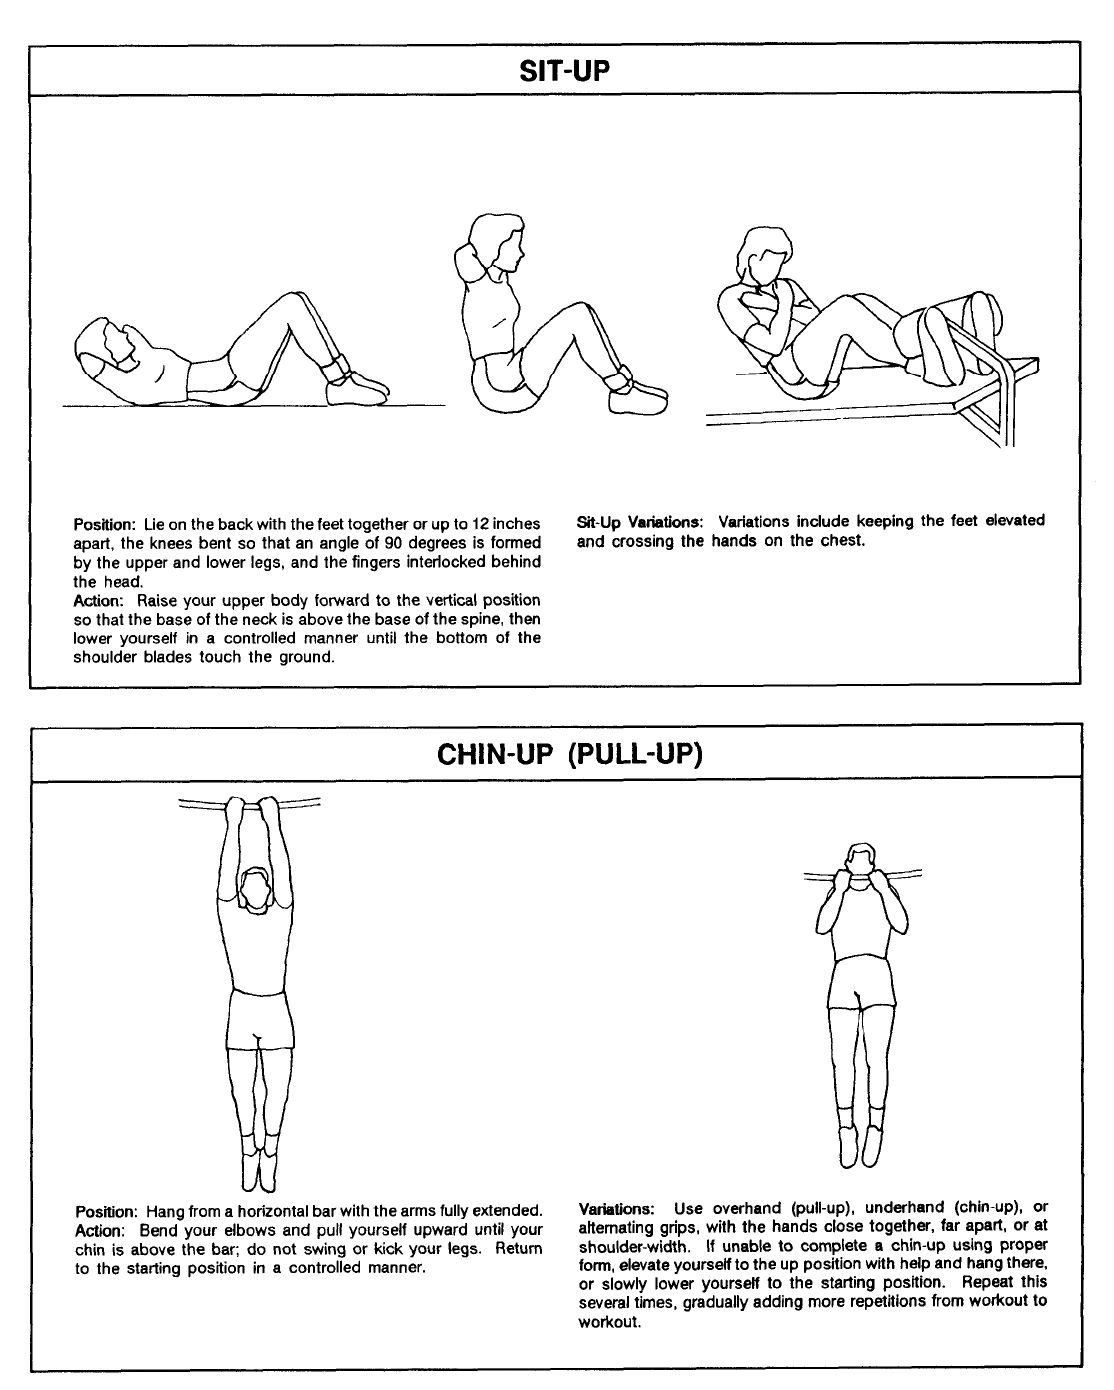
7-16
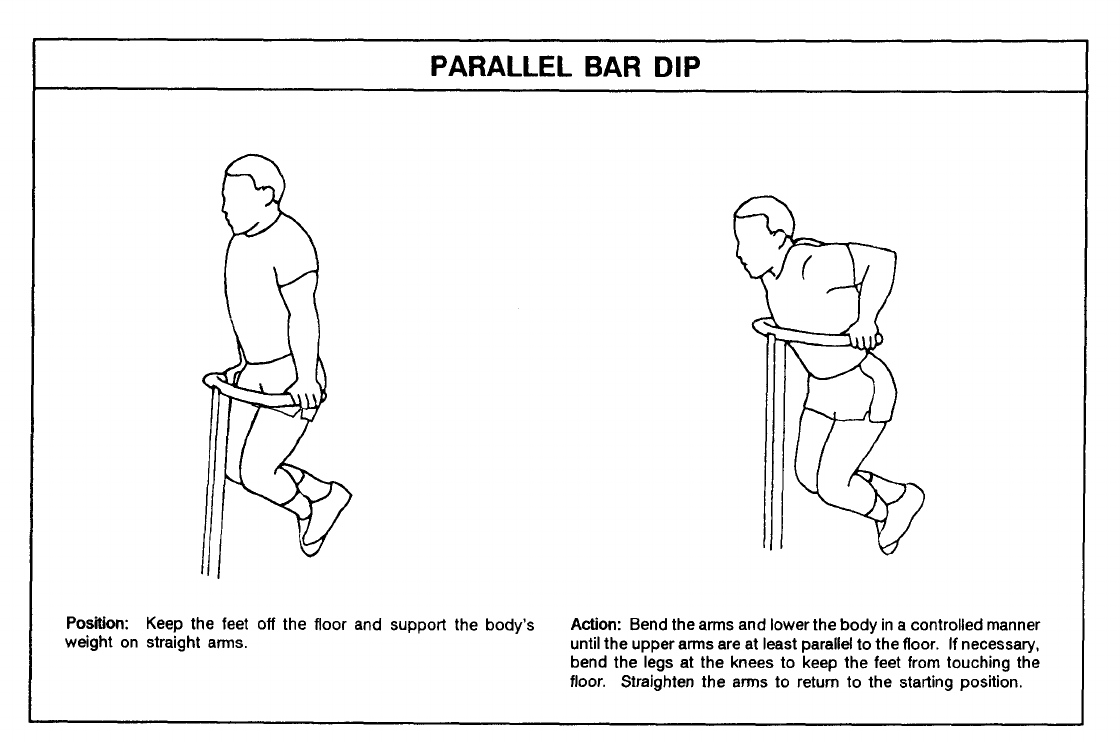
CONDITIONING DRILLS
Some large units prefer to use sets of sets, soldiers do as many repetitions of
calisthenic exercises as part of their PT an exercise as possible in the allowed
Conditioning drills are
intended to supplement
muscular strength and
endurance training
sessions.
sessions. Figure 7-4 shows three cal-
isthenic conditioning drills for both
the poorly conditioned and physically
fit soldiers. The drills are designed to
be done progressively and are intended
to supplement muscular strength and
endurance training sessions.
Leaders can mix the exercises to
provide greater intensity, based on the
fitness level of the soldiers being trained.
However, they should choose and
sequence them to alternate the muscle
groups being worked. Soldiers should
do each exercise progressively from 15
to 40 or more repetitions (20 to 60 sec-
onds for timed sets) based on their
level of conditioning. They may also
do each exercise in cadence unless
timed sets are specified. For timed
time. Using timed sets, both the well-
conditioned and less-fit soldiers can
work themselves to their limits.
The following conditioning drills
(Figure 7-4) are arranged according to
the phase of training.
Grass Drills
Grass drills are exercise movements
that feature rapid changes in body
position. These are vigorous drills
which, when properly done, exercise
all the major muscle groups. Soldiers
should respond to commands as fast as
possible and do all movements at top
speed. They continue to do multiple
repetitions of each exercise until the
next command is given. No cadence is
counted.
7-17

Figure 7-4
Performing grass drills can improve does all the activities so that he can
CR endurance, help develop muscular gauge the intensity of the session. The
endurance and strength, and speed up commands for grass drills are given in
reaction time. Since these drills are rapid succession without the usual
extremely strenuous, they should last preparatory commands. To prevent
for short periods (30 to 45 seconds per confusion, commands are given sharply Grass drills are exercise
exercise). The two drills described to distinguish them from comments or
movements that feature
here each have four exercises. Leaders words of encouragement.
rapid changes in
can develop additional drills locally. As soon as the soldiers are familiar
body position.
The soldiers should do a warm-up with the drill, they do all the exercises
before performing the drills and do a as vigorously and rapidly as possible,
cool-down afterward. The instructor and they do each exercise until the
7-18

next command is given. Anything less
than a top-speed performance de-
creases the effectiveness of the drills.
Once the drills start, soldiers do not
Soldiers should do a have to resume the position of atten-
warm
-
-up before
tion. The instructor uses the command
performing grass “Up” to halt the drill for instructions or
drills and do a cool- rest. At this command, soldiers assume
down afterward.
a relaxed, standing position.
Grass drills can be done in a short
time. For example, they may be used
when only a few minutes are available
for exercise or when combined with
another activity. Sometimes, if time is
limited, they are a good substitute for
running.
Most movements are done in place.
The extended-rectangular formation is
best for a platoon- or company-sized
unit. The circle formation is more
suitable for squad- or section-sized
groups.
When soldiers are starting an exer-
cise program, a 10- to 15-minute
workout may be appropriate. Progres-
sion is made by a gradual increase in
the time devoted to the drills. As the
fitness of the soldiers improves, the
times should be gradually lengthened
to 20 minutes. The second drill is
harder than the first. Therefore, as
soldiers progress in the first drill, the
instructor should introduce the second.
If he sees that the drill needs to be
longer, he can repeat the exercises or
combine the two drills.
STARTING POSITIONS
After the warm-up, bring the sol-
diers to a position of ATTENTION.
Progression with grass
The drills begin with the command
drills is made by a GO. Other basic commands are FRONT,
gradual increase in
BACK, and STOP. (See Figure 7-5 for
the time devoted to
the positions and actions associated
the drills. with these commands. )
● ATTENTION: The position of at
tention is described in FM 22-5,
Drill and Ceremonies.
●
●
●
GO This involves running in place
at top speed on the balls of the feet.
The soldier raises his knees high,
pumps his arms, and bends forward
slightly at the waist.
FRONT The soldier lies prone
with elbows bent and palms di-
rectly under the shoulders as in the
down position of the push up. The
legs are straight and together with
the head toward the instructor.
BACK: The soldier lies flat on his
back with his arms extended along
his sides and his palms facing down
ward. His legs are straight and to
gether; his feet face the instructor.
STOP The soldier assumes the stance
of a football lineman with feet
spread and staggered. His left arm
is across his left thigh; his right arm
is straight. His knuckles are on the
ground; his head is up, and his back
is roughly parallel to the ground.
To assume the FRONT or BACK
position from the standing GO or
STOP positions, the soldier changes
positions vigorously and rapidly. (See
Figure 7-5.)
To change from the FRONT to the
BACK position (Figure 7-5), the sol-
dier does the following:
●
●
Takes several short steps to the
right or left.
Lifts his arm on the side toward
which his feet move.
Thrusts his legs vigorously to the
front.
To change from the BACK to the
FRONT position, the soldier sits up
quickly. He places both hands on the
ground to the right or left of his legs.
He takes several short steps to the rear
on the side opposite his hands. When
his feet are opposite his hands, he
thrusts his legs vigorously to the rear
and lowers his body to the ground.
(See Figure 7-5.)
7-19
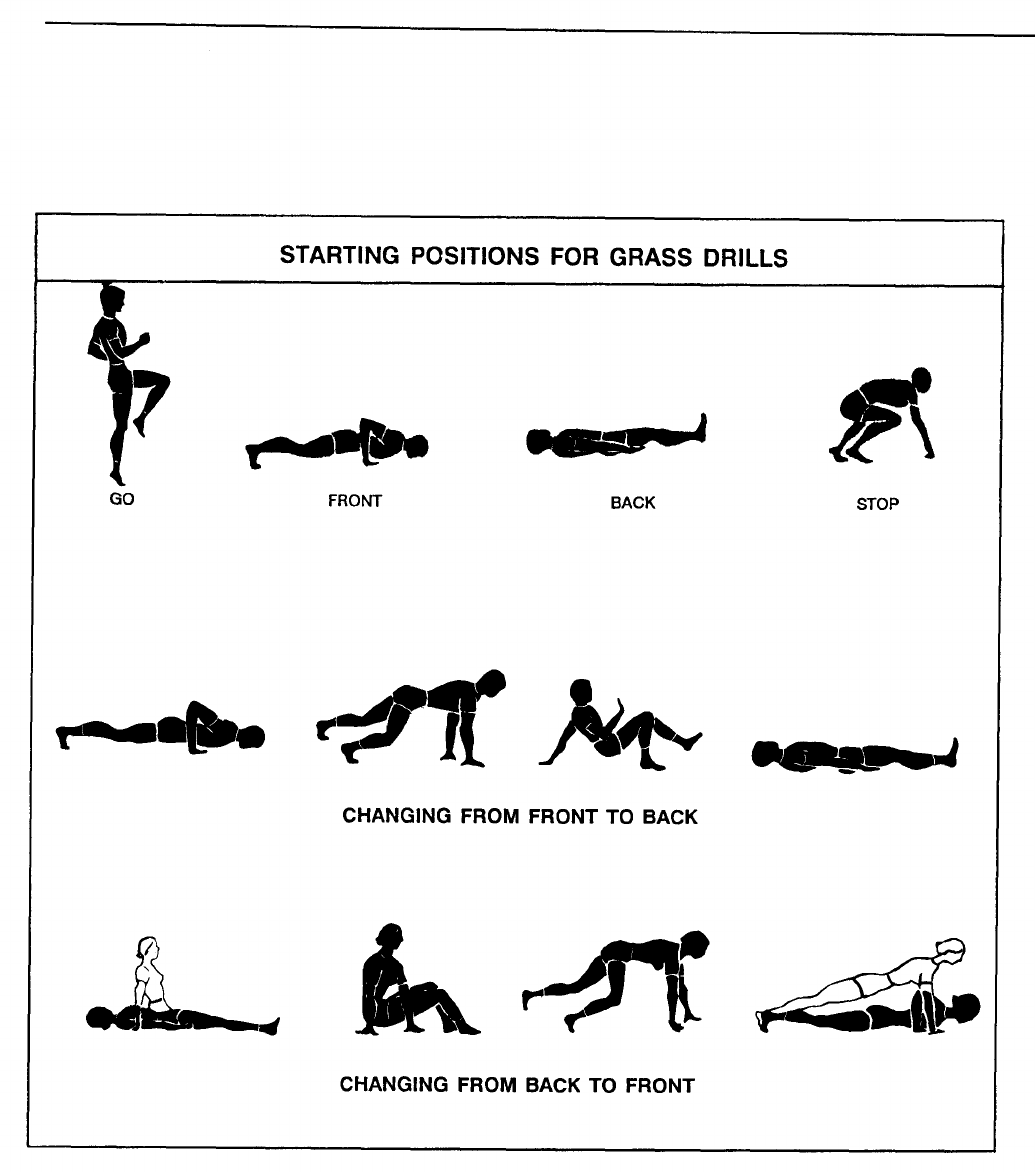
Figure 7-5
7-20

GRASS DRILL ONE
Exercises for grass drill one are
described below and shown
in
Figure 7-6.
Bouncing Ball
From the FRONT position, push up
and support the body on the hands
(shoulder-width apart) and feet. Keep
the back and legs generally in line and
the knees straight. Bounce up and
down in a series of short, simultaneous,
upward springs from the hands, hips,
and feet.
Supine Bicycle
From the BACK position, flex the
hips and knees. Place the palms
directly on top of the head, and inter-
lace the fingers. Bring the knee of one
leg upward toward the chest. At the
same time, curl the trunk and head
upward while touching the opposite
elbow to the elevated knee. Repeat
with the other leg and elbow. Continue
these movements as opposite legs and
arms take turns.
Knee Bender
From the position of ATTENTION,
do half-knee bends with the feet in
line and the hands at the sides. Make
sure the knees do not bend to an angle
less than 90 degrees.
Roll Left and Right
From the FRONT position, con-
tinue to roll in the direction com-
manded until another command is
given. Then, return to the FRONT
position.
GRASS DRILL TWO
Exercises for grass drill two are
described below and shown in Figure
7-6.
The Swimmer
From the FRONT position, extend
the arms forward. Move the right arm
and left leg up and down; then, move
the left arm and right leg up and down.
Continue in an alternating manner.
Bounce and Clap Hands
The procedure is almost the same as
for the bouncing ball in grass drill one.
However, while in the air, clap the
hands. This action requires a more
vigorous bounce or spring. The push-
up may be substituted for this exercise.
Leg Spreader
From the BACK position, raise the
legs until the heels are no higher than
six inches off the ground. Spread the
legs apart as far as possible, then put
them back together. Keep the head off
the ground. Throughout, place the
hands under the upper part of the but-
tocks, and slightly bend the knees to
ease pressure on the lower back. Open
and close the legs as fast as possible.
The curl-up may be substituted for
this exercise.
Forward Roll
From the STOP position, place both
hands on the ground, tuck the head,
and roll forward. Keep the head
tucked while rolling.
Stationary Run
From the position of ATTENTION,
start running in place at the GO
command by lifting the left foot first.
Follow the instructor as he counts two
repetitions of cadence. For example,
“One, two, three, four; one, two, three,
four.” The instructor then gives infor-
mal commands such as the following:
“Follow me,” “Run on the toes and balls
of your feet,” “Speed it up,” “Increase
to a sprint, raise your knees high, lean
7-21
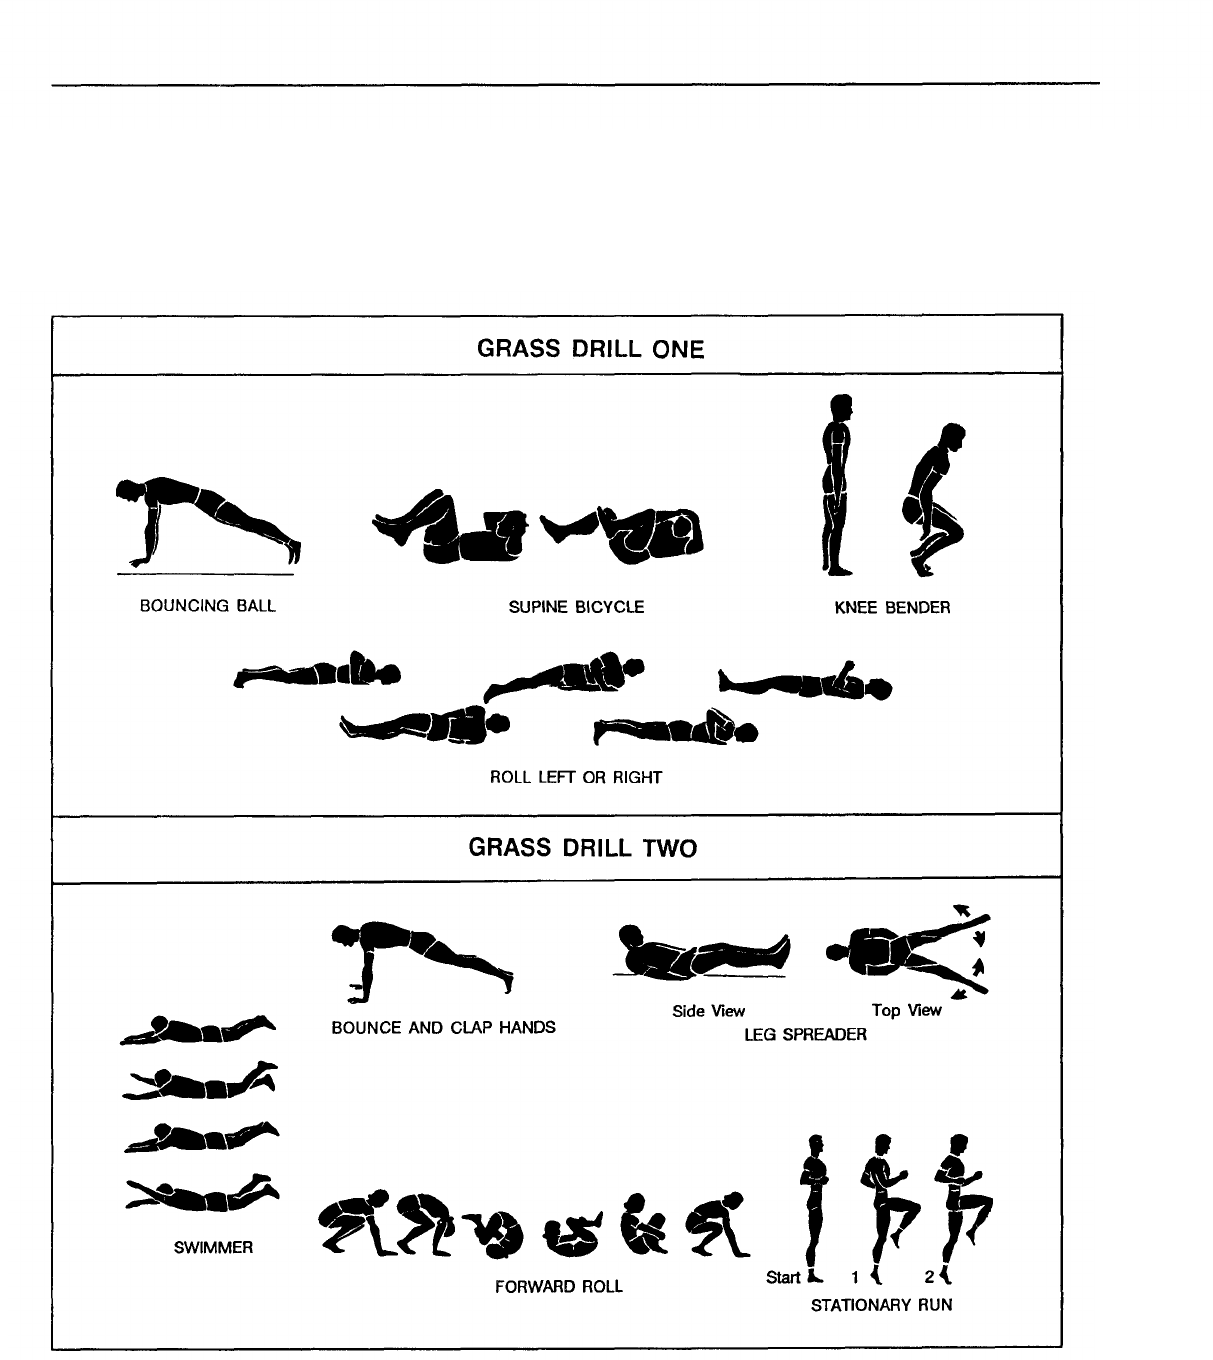
forward at your waist, and pump your the left foot strikes the ground: “One,
arms vigorously,” and “Slow it down.” two, three, four, one, two, three,
To halt the exercise, the instructor HALT.”
counts two repetitions of cadence as
Figure 7-6
7-22
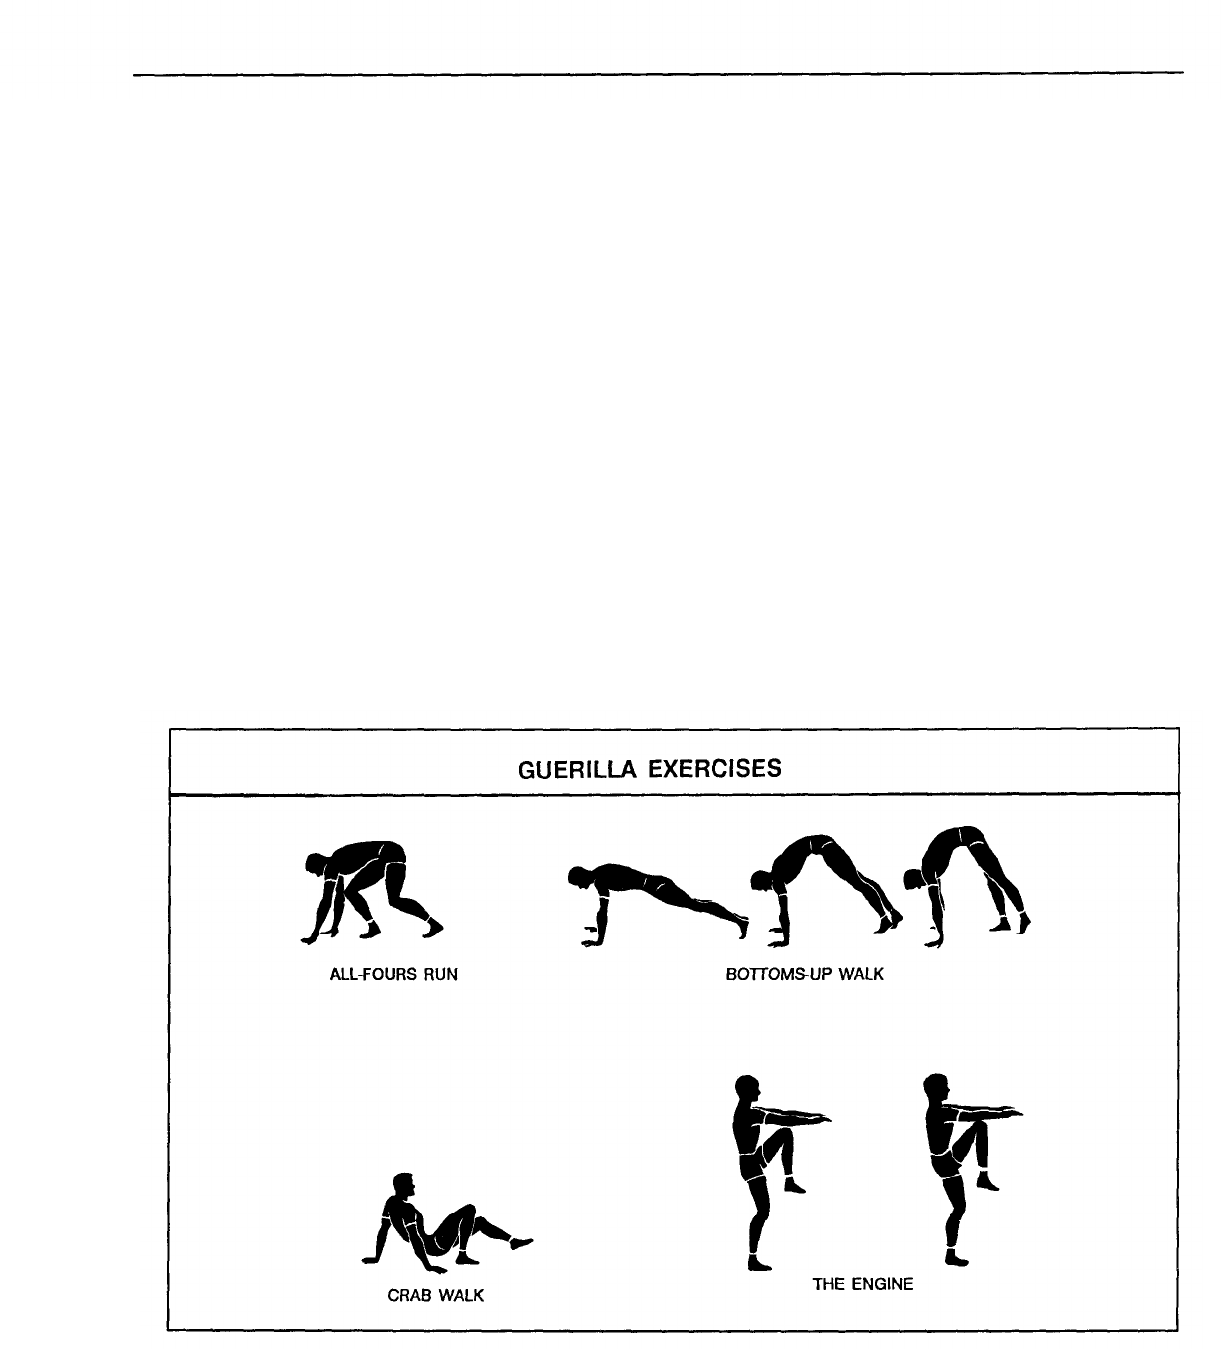
Guerilla Exercises
Guerrilla exercises, which can be
used to improve agility, CR endur-
ance, muscular endurance, and to some
degree muscular strength, combine
individual and partner exercises. These
drills require soldiers to change their
positions quickly and do various basic
skills while moving forward. Figures
7-7 and 7-8 show these exercises.
The instructor decides the duration
Soldiers progress with
for each exercise by observing its
guerilla exercises by
effect on the soldiers. Depending on
shortening the quick-
how vigorously it is done, each exer-
time marching periods
cise should be continued for 20 to 40
between exercises and
seconds.
by doing all the The group moves in circle forma-
exercises a second time.
tion while doing the exercises. If the
platoon exceeds 30 soldiers, concen-
tric circles may be used. A warm-up
instructor steps into the center and
issues commands.
EXERCISE AND PROGRESSION
Soldiers progress by shortening the
quick-time marching periods between
exercises and by doing all exercises a
second time. This produces an over-
load that improves fitness.
Many soldiers have not had a chance
to do the simple skills involved in
guerrilla exercises. However, they can
do these exercises easily and quickly in
almost any situation.
The preparatory command is always
the name of the exercise, and the
command of execution is always “March.”
The command “Quick time, march”
ends each exercise.
For the double guerrilla exercises (in
activity should precede these exer- circle formation) involving two sol-
cises, and a cool-down should follow diers, the commands for pairing are as
them. After the circle is formed, the
follows:
Figure 7-7
7-23

● “Platoon halt.”
● “From (soldier is designated), by
twos, count off.” (For example: 1-
2, 1-2, 1-2.)
● “Even numbers, move up behind
odd numbers.” (Pairs are adjusted
according to height and weight.)
● “You are now paired up for double
guerrillas.” The command “Change”
is given to change the soldiers’
positions.
After the exercises are completed,
the instructor halts the soldiers and
positions the base soldier or platoon
guide by commanding, “Base man (or
platoon guide), post.” He then com-
mands “Fall out and fall in on the base
man (or platoon guide).”
EXERCISE DESCRIPTIONS
Brief explanations of guerrilla ex-
ercises follow.
All-Fours Run
Face downward, supporting the body
on the hands and feet. Advance
forward as fast as possible by moving
the arms and legs forward in a coordi-
nated way.
Bottoms-Up Walk
Take the front-leaning rest posi-
tion, and move the feet toward the
hands in short steps while keeping the
knees locked. When the feet are as
close to the hands as possible, walk
forward on the hands to the front-
leaning-rest position.
Crab Walk
Assume a sitting position with the
hips off the ground and hands and feet
supporting the body’s weight. Walk
forward, feet first.
The Engine
Stand with the arms straight and in
front of the body. The arms should be
parallel to the ground with the palms
facing downward. While walking
forward, bring the left knee upward to
the left elbow. Return to the start
position. Continuing to walk forward,
touch the right knee to the right elbow.
Recover to the start position. Be sure
to keep the arms parallel to the ground
throughout the entire exercise.
Double Time
Do a double-time run while main-
taining the circle formation.
Broad Jump
Jump forward on both feet in a
series of broad jumps. Swing the arms
vigorously to help with the jumps.
Straddle Run
Run forward, leaping to the right
with the left foot and to the left with
the right foot.
Hobble Hopping
Hold one foot behind the back with
the opposite hand and hop forward.
On the command “Change,” grasp the
opposite foot with the opposite hand
and hop forward.
Two-Man Carry
For two-man carries, soldiers are
designated as number one (odd-num-
bered) and number two (even-num-
bered). A number-one and number-
two soldier work as partners.
7-24

Fireman’s Carry
Two soldiers do the carry. On com-
mand, number-two soldier bends at
the waist, with feet apart in a balanced
stance. Number-one soldier moves
toward his partner. He places himself
by his partner’s left shoulder and bends
himself over his partner’s shoulders
and back. When in position, number-
two soldier, with his left hand, reaches
between his partner’s legs and grasps
his left wrist. On command, they move
forward until the command for change-
over. They then change positions. The
fireman’s carry can also be done from
the other side.
Single-Shoulder Carry
Two soldiers do the carry. On com-
mand, number-two soldier bends at the
waist with feet apart in a balanced
stance. At the same time, number-one
soldier moves toward his partner. He
places his abdominal area onto his part-
ner’s right or left shoulder and leans
over. Number-two soldier puts his
arms around the back of his partner’s
knees and stands up. On command,
they move forward until the command
for changeover. They then change
positions.
Cross Carry
On command, number-two soldier
bends over at the waist. He twists
slightly to the left with feet spread
apart in a balanced position. At the
same time, number-one soldier moves
toward his partner’s left side and leans
over his partner’s back. Number two
soldier, with his left arm, reaches
around his partner’s legs. At the same
time, he reaches around his partner’s
back with his right arm, being careful
not to grab his partner’s neck or head.
He then stands up straight, holding his
partner on his back. On command,
they move forward until the command
for changeover. They then change
positions.
Saddle-Back (Piggyback) Carry
On command, number-two soldier
bends at the waist and knees with his
hand on his knees and his head up. To
assume the piggyback position, num-
ber-one soldier moves behind his part-
ner, places his hands on his partner’s
shoulders, and climbs carefully onto
his partner’s hips. As number-one
soldier climbs on, number-two soldier
grasps his partner’s legs to help support
him. Number-one soldier places his
arms over his partner’s shoulders and
crosses his hands over his partner’s
upper chest. They move forward until
the command for changeover is given.
They then change positions.
7-25

Figure 7-8
7-26

This chapter describes obstacle
courses as well as rifle drills, log drills,
and aquatic exercises. These are not
designed to develop specific compo-
nents of physical fitness. Commanders
should use them to add variety to their
PT programs and to help soldiers de-
velop motor fitness including speed,
agility, coordination, and related skills
and abilities. Many of these activities
also give soldiers the chance to plan
strategy, make split-second decisions,
learn teamwork, and demonstrate lead-
ership.
When planning and building such fa-
cilities, designers should, at a mini-
mum, consider the following guid-
ance:
● Secure approval from the local in-
stallation's commander.
● Prepare a safety and health-risk as-
sessment to support construction
of each obstacle.
● Coordinate approval for each ob-
stacle with the local or supporting
safety office. Keep a copy of the
approval in the permanent records.
● Monitor and analyze all injuries.
● Inspect all existing safety precau-
tions on-site to verify their effec-
tiveness.
● Review each obstacle to determine
the need for renewing its approval.
Obstacle Courses
There are two types of
obstacle courses-
conditioning and
confidence.
Physical performance and success in
combat may depend on a soldier’s
ability to perform skills like those
required on the obstacle course. For
this reason, and because they help
develop and test basic motor skills,
obstacle courses are valuable for physi-
cal training.
There are two types of obstacle
courses--conditioning and confidence.
The conditioning course has low ob-
stacles that must be negotiated quickly.
Running the course can be a test of the
soldier’s basic motor skills and physical
condition. After soldiers receive in-
struction and practice the skills, they
run the course against time.
A confidence course has higher,
more difficult obstacles than a condi-
tioning course. It gives soldiers confi-
dence in their mental and physical
abilities and cultivates their spirit of
daring. Soldiers are encouraged, but
not forced, to go through it. Unlike
conditioning courses, confidence courses
are not run against time.
NONSTANDARD COURSES AND
OBSTACLES
SAFETY PRECAUTIONS
Instructors must always be alert to
safety. They must take every precau-
tion to minimize injuries as soldiers go
through obstacle courses.
Soldiers
must do warm-up exercises before
they begin. This prepares them for the
physically demanding tasks ahead and
helps minimize the chance of injury.
A cool-down after the obstacle course
is also necessary, as it helps the body
recover from strenuous exercise.
Commanders should use ingenuity
in building courses, making good use
of streams, hills, trees, rocks, and
other natural obstacles. They must
inspect courses for badly built ob-
stacles, protruding nails, rotten logs,
unsafe landing pits, and other safety
hazards.
There are steps which designers can
take to reduce injuries. For example,
at the approach to each obstacle, they
should post an instruction board or
sign with text and pictures showing
how to negotiate it. Landing pits for
jumps or vaults, and areas under or
around obstacles where soldiers may
fall from a height, should be filled
with loose sand or sawdust,
All
Commanders may build obstacles
and courses that are nonstandard (that
is, not covered in this manual) in order
to create training situations based on
their unit's METL.
8-1

landing areas should be raked and
refilled before each use. Puddles of
water under obstacles can cause a false
sense of security. These could result in
improper landing techniques and seri-
ous injuries. Leaders should postpone
training on obstacle courses when wet
weather makes them slippery.
Units should prepare their soldiers
to negotiate obstacle courses by doing
conditioning exercises beforehand. Sol-
diers should attain an adequate level of
conditioning before they run the con-
fidence course, Soldiers who have not
practiced the basic skills or run the
conditioning course should not be al-
lowed to use the confidence course.
Instructors must explain and dem-
onstrate the correct ways to negotiate
all obstacles before allowing soldiers to
run them. Assistant instructors should
supervise the negotiation of higher,
more dangerous obstacles. The em-
phasis is on avoiding injury. Soldiers
should practice each obstacle until they
are able to negotiate it. Before they run
the course against time, they should
make several slow runs while the in-
structor watches and makes needed
corrections. Soldiers should never be
allowed to run the course against time
until they have practiced on all the
obstacles.
CONDITIONING OBSTACLE COURSES
If possible, an obstacle course should
be shaped like a horseshoe or figure
eight so that the finish is close to the
start. Also, signs should be placed to
show the route.
A course usually ranges from 300 to
450 yards and has 15 to 25 obstacles
that are 20 to 30 yards apart. The
obstacles are arranged so that those
which exercise the same groups of
muscles are separated from one an-
other.
The obstacles must be solidly built.
Peeled logs that are six to eight inches
wide are ideal for most of them. Sharp
points and corners should be elimi-
nated, and landing pits for jumps or
vaults must be filled with sand or saw-
dust. Courses should be built and
marked so that soldiers cannot sidestep
obstacles or detour around them.
Sometimes, however, courses can pro-
vide alternate obstacles that vary in
difficulty.
Each course should be wide enough
for six to eight soldiers to use at the
same time, thus encouraging competi-
tion. The lanes for the first few
obstacles should be wider and the
obstacles easier than those that follow.
In this way, congestion is avoided and
soldiers can spread out on the course.
To minimize the possibility of falls
and injuries due to fatigue, the last
two or three obstacles should not be
too difficult or involve high climbing.
Trainers must always be aware that
falls from the high obstacles could
cause serious injury. Soldiers must be
in proper physical condition, closely Instructors must explain
supervised, and adequately instructed. and demonstrate the
The best way for the timer to time correct ways to
the runners is to stand at the finish and negotiate all obstacles
call out the minutes and seconds as before allowing soldiers
each soldier finishes. If several watches to run them.
are available, each wave of soldiers is
timed separately. If only one watch is
available, the waves are started at
regular intervals such as every 30
seconds. If a soldier fails to negotiate
an obstacle, a previously determined
penalty is imposed.
When the course is run against time,
stopwatches, pens, and a unit roster
are needed. Soldiers may run the
course with or without individual
equipment.
Obstacles for Jumping
These obstacles are ditches to clear
with one leap, trenches to jump into,
heights to jump from, or hurdles. (See
Figure 8-l.)
8-2
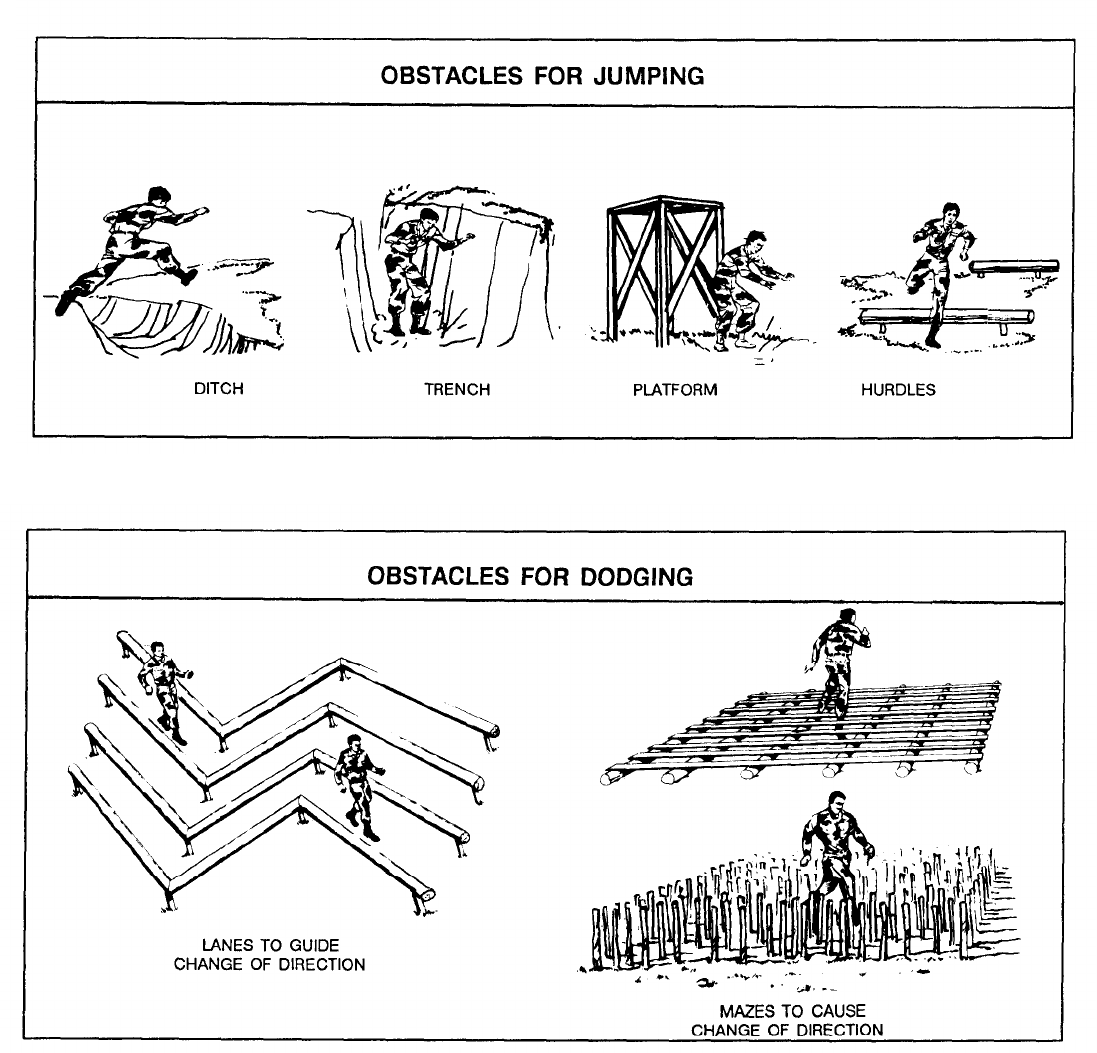
Obstacles for Dodging
between the posts are narrow so that
soldiers must pick their way carefully
These obstacles are usually mazes of through and around them. Lane guides
posts set in the ground at irregular are built to guide soldiers in dodging
intervals. (See Figure 8-2.) The spaces and changing direction.
Figure 8-1
Figure 8-2
8-3

Obstacles for Vertical Climbing and Obstacles for Horizontal Traversing
Surmounting
Horizontal obstacles may be ropes,
These obstacles are shown at Figure pipes, or beams. (See Figure 8-4.)
8-3 and include the following:
● Climbing ropes that are 1 1/2 inches
wide and either straight or knotted.
● Cargo nets.
● Walls 7 or 8 feet high.
● Vertical poles 15 feet high and 6 to
8 inches wide.
Figure 8-3
Figure 8-4
8-4

Obstacles for Crawling Obstacles for Vaulting
These obstacles may be built of These obstacles should be 3 to
large pipe sections, low rails, or wire. 3 1/2 feet high. Examples are fences
(See Figure 8-5.) and low walls. (See Figure 8-6.)
Figure 8-5
Figure 8-6
8-5
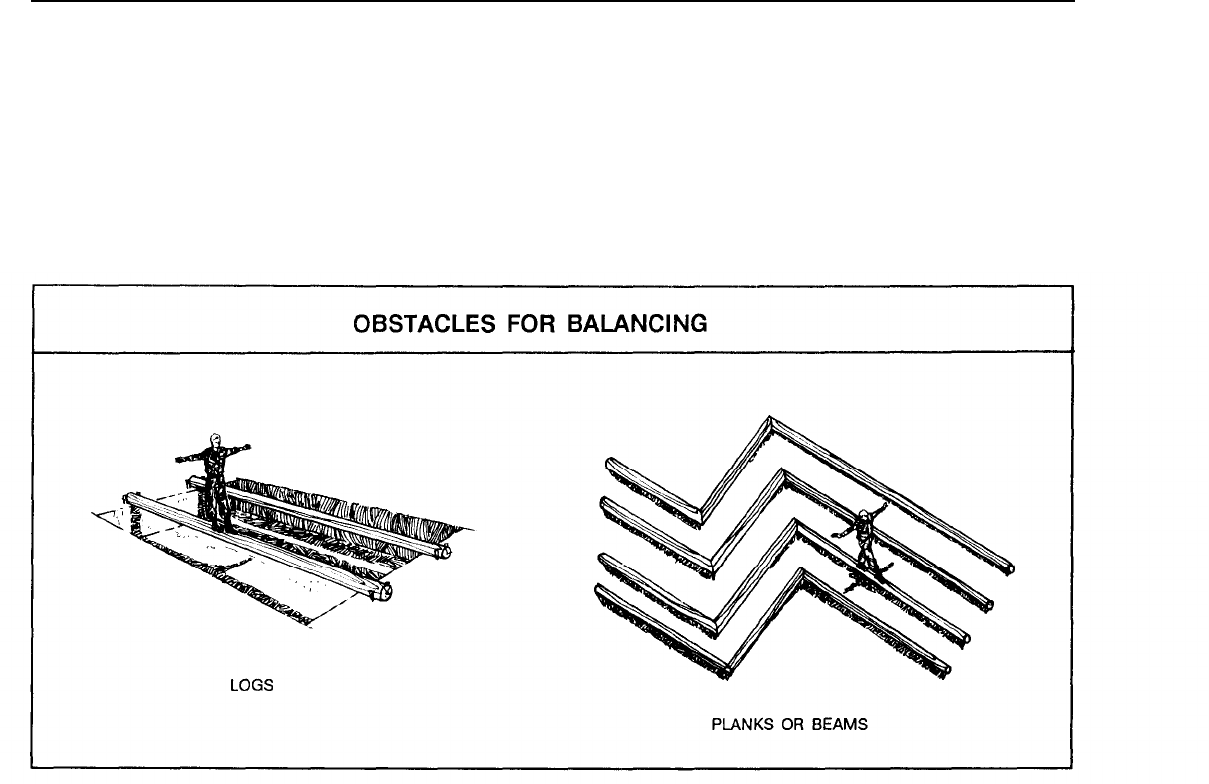
Obstacles for Balancing
Beams, logs, and planks may be
used. These may span water obstacles
and dry ditches, or they may be raised
off the ground to simulate natural de-
pressions. (See Figure 8-7.)
CONFIDENCE OBSTACLE COURSES
Confidence obstacle courses must
be built in accordance with Folio No.
1, “Training Facilities,” Corps of En-
gineers Drawing Number 28-13-95.
You can obtain this publication from
the Directorate of Facilities Engineer-
ing at most Army installations.
Confidence courses can develop
confidence and strength by using ob-
stacles that train and test balance and
muscular strength. Soldiers do not ne-
gotiate these obstacles at high speed or
against time. The obstacles vary from
fairly easy to difficult, and some are
high. For these, safety nets are pro-
vided. Soldiers progress through the
course without individual equipment.
Only one soldier at a time negotiates an
Figure 8-7
obstacle unless it is designed for use by
more than one.
Confidence courses should accom-
modate four platoons, one at each
group of six obstacles. Each platoon
begins at a different starting point. In
the example below, colors are used to
group the obstacles. Any similar method
may be used to spread a group over the
course. Soldiers are separated into
groups of 8 to 12 at each obstacle. At
the starting signal, they proceed through
the course.
Soldiers may skip any obstacle they
are unwilling to try. Instructors should
encourage fearful soldiers to try the
easier obstacles first. Gradually, as
their confidence improves, they can
8-6
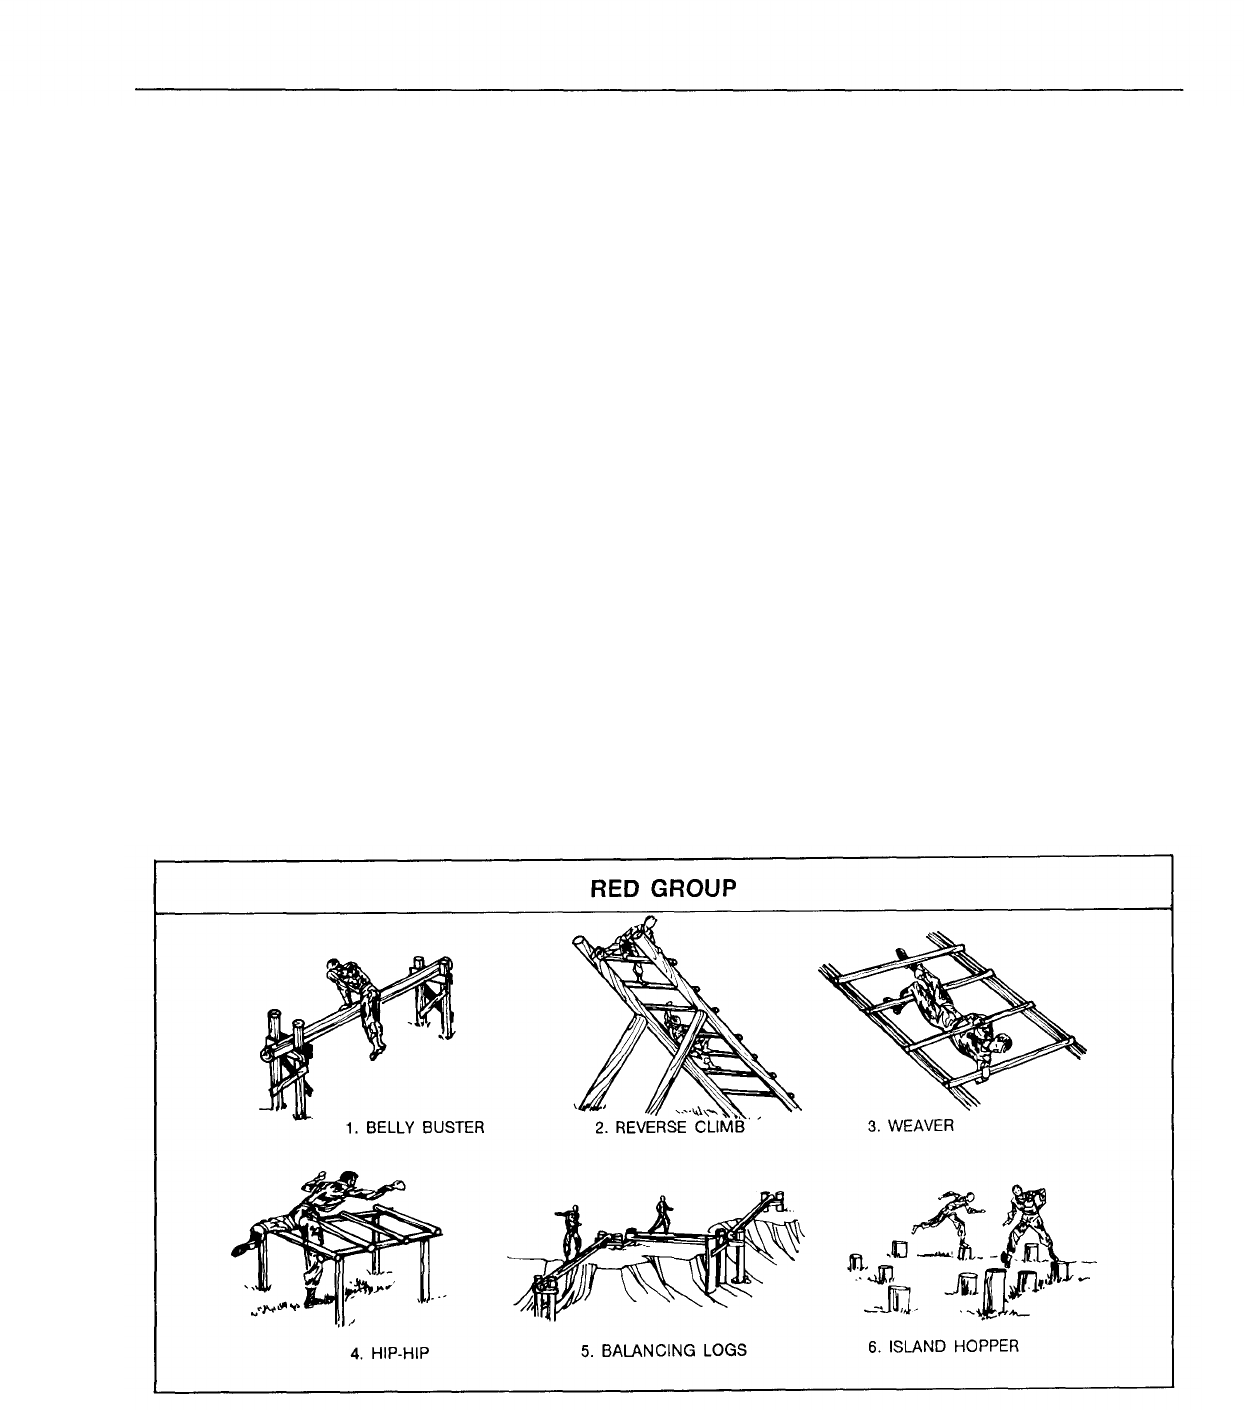
take their places in the normal rotation.
Soldiers proceed from one obstacle to
the next until time is called. They then
assemble and move to the next group of
obstacles.
Rules for the Course
Supervisors should encourage, but
not force, soldiers to try every obstacle.
Soldiers who have not run the course
before should receive a brief orienta-
tion at each obstacle, including an ex-
planation and demonstration of the
best way to negotiate it. Instructors
should help those who have problems.
Trainers and soldiers should not try to
make obstacles more difficult by shak-
ing ropes, rolling logs, and so forth.
Close supervision and common sense
must be constantly used to enhance
safety and prevent injuries.
Soldiers need not conform to any
one method of negotiating obstacles,
but there is a uniformity in the general
approach. Recommended ways to ne-
Red Group
This group contains the first six ob-
stacles. These are described below and
numbered 1 through 6 in Figure 8-8.
Belly Buster. Soldiers vault, jump, or
climb over the log. They must be
warned that it is not stationary. There-
fore, they should not roll or rock the
log while others are negotiating it.
Reverse Climb. Soldiers climb the re-
verse incline and go down the other
side to the ground.
Weaver. Soldiers move from one end
of the obstacle to the other by weav-
ing their bodies under one bar and
over the next.
Hip-Hip. Soldiers step over each bar;
they either alternate legs or use the
same lead leg each time.
Balancing Logs. Soldiers step up on a
log and walk or run along it while
keeping their balance.
Island Hopper. Soldiers jump from
one log to another until the obstacle is
gotiate obstacles are described below. negotiated.
Figure 8-8
8-7
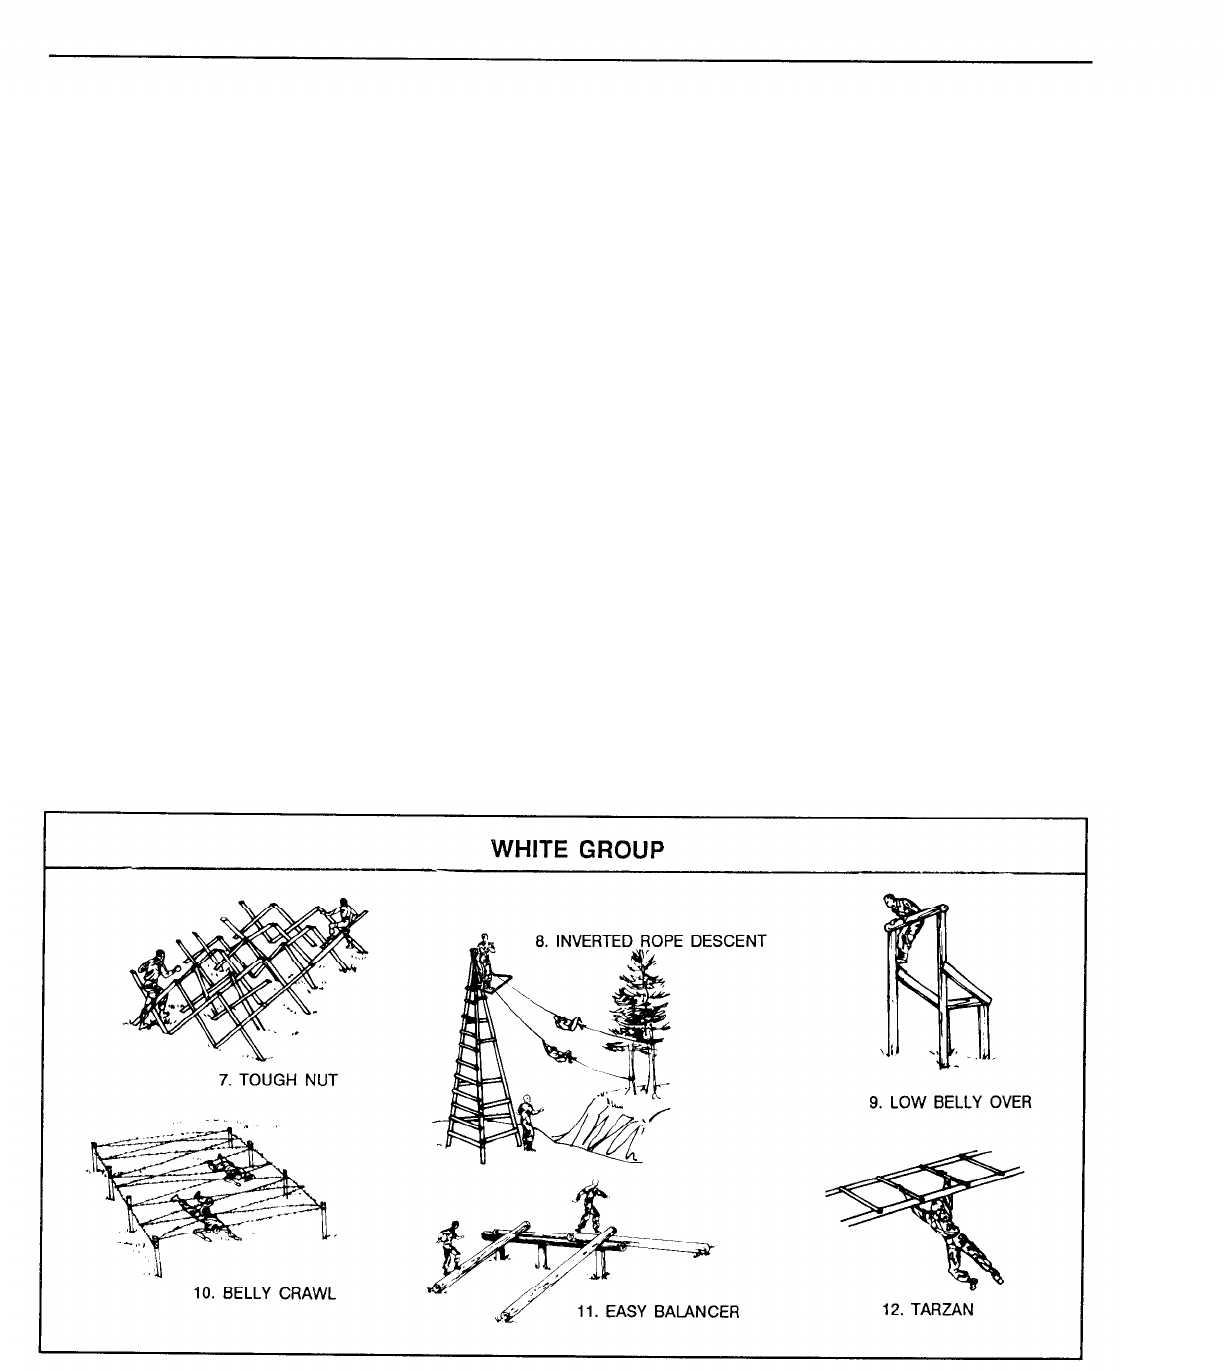
White Group
This group contains the second six
obstacles. These are described below
and numbered 7 through 12 in Figure
8-9.
Tough Nut. Soldiers step over each X
in the lane.
Inverted Rope Descent. Soldiers climb
the tower, grasp the rope firmly, and
swing their legs upward. They hold the
rope with their legs to distribute the
weight between their legs and arms.
Braking the slide with their feet and
legs, they proceed down the rope. Sol-
diers must be warned that they may get
rope burns on their hands. This ob-
stacle can be dangerous when the rope
is slippery. Soldiers leave the rope at
a clearly marked point of release.
Only one soldier at a time is allowed on
the rope. Soldiers should not shake or
bounce the ropes. This obstacle re-
quires two instructors--one on the
platform and the other at the base.
Low Belly-Over. Soldiers mount the
low log and jump onto the high log.
They grasp over the top of the log with
both arms, keeping the belly area in
contact with it. They swing their legs
over the log and lower themselves to
the ground.
Belly Crawl. Soldiers move forward
under the wire on their bellies to the
end of the obstacle. To reduce the ten-
dency to push the crawling surface, it
is filled with sand or sawdust to the far
end of the obstacle. The direction of
negotiating the crawl is reversed from
time to time.
Easy Balancer. Soldiers walk up one
inclined log and down the one on the
other side to the ground.
Tarzan. Soldiers mount the lowest log,
walk the length of it, then each higher
log until they reach the horizontal lad-
der. They grasp two rungs of the
ladder and swing themselves into the
air. They negotiate the length of the
ladder by releasing one hand at a time
and swinging forward, grasping a more
distant rung each time.
Figure 8-9
8-8
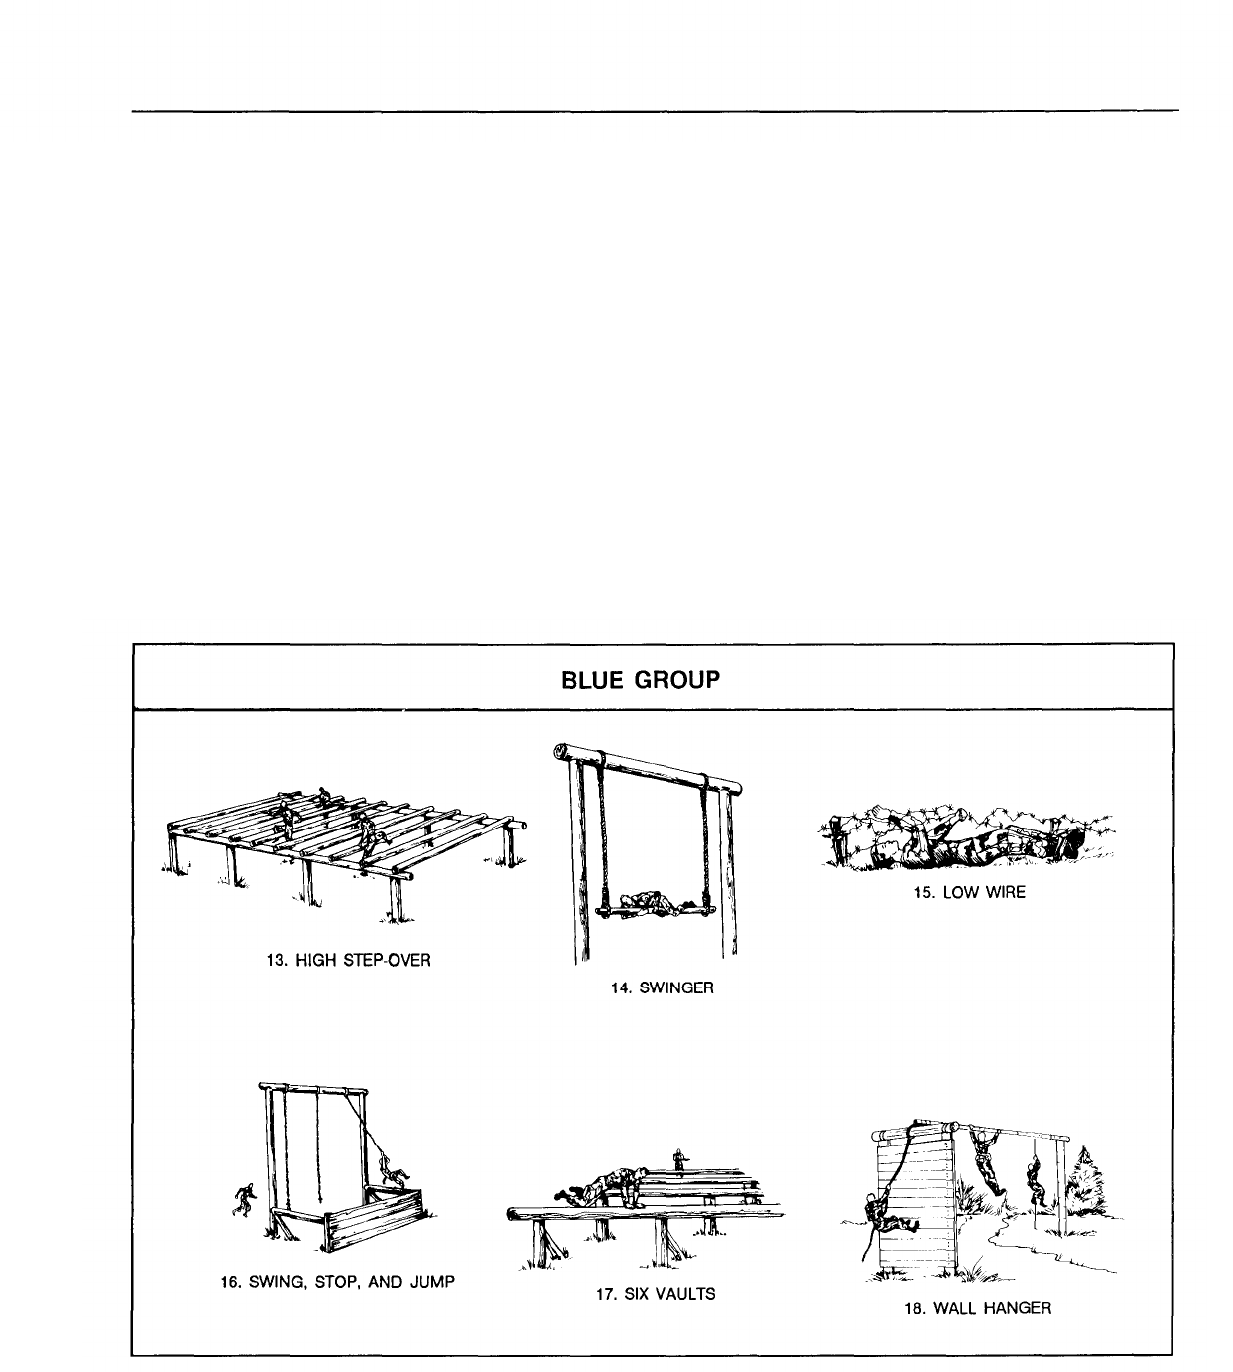
Blue Group
This group contains the third six
obstacles. These are described below
and numbered 13 through 18 in Figure
8-10.
High Step-over.
Soldiers step over
each log while alternating their lead
foot or using the same one.
Swinger. Soldiers climb over the swing
log to the ground on the opposite side.
Low Wire. Soldiers move under the
wire on their backs while raising the
wire with their hands to clear their
bodies. To reduce the tendency to push
the crawling surface, it is filled with
obstacle. The direction of negotiating
the obstacle is alternated.
Swing, Stop, and Jump. Soldiers gain
momentum with a short run, grasp the
rope, and swing their bodies forward
to the top of the wall. They release the
rope while standing on the wall and
jump to the ground.
Six Vaults.
Soldiers vault over the logs
using one or both hands.
Wall Hanger. Soldiers walk up the
wall using the rope. From the top of
the wall, they grasp the bar and go
hand-over-hand to the rope on the op-
posite end. They use the rope to de-
sand or sawdust to the far end of the scend,
Figure 8-10
8-9
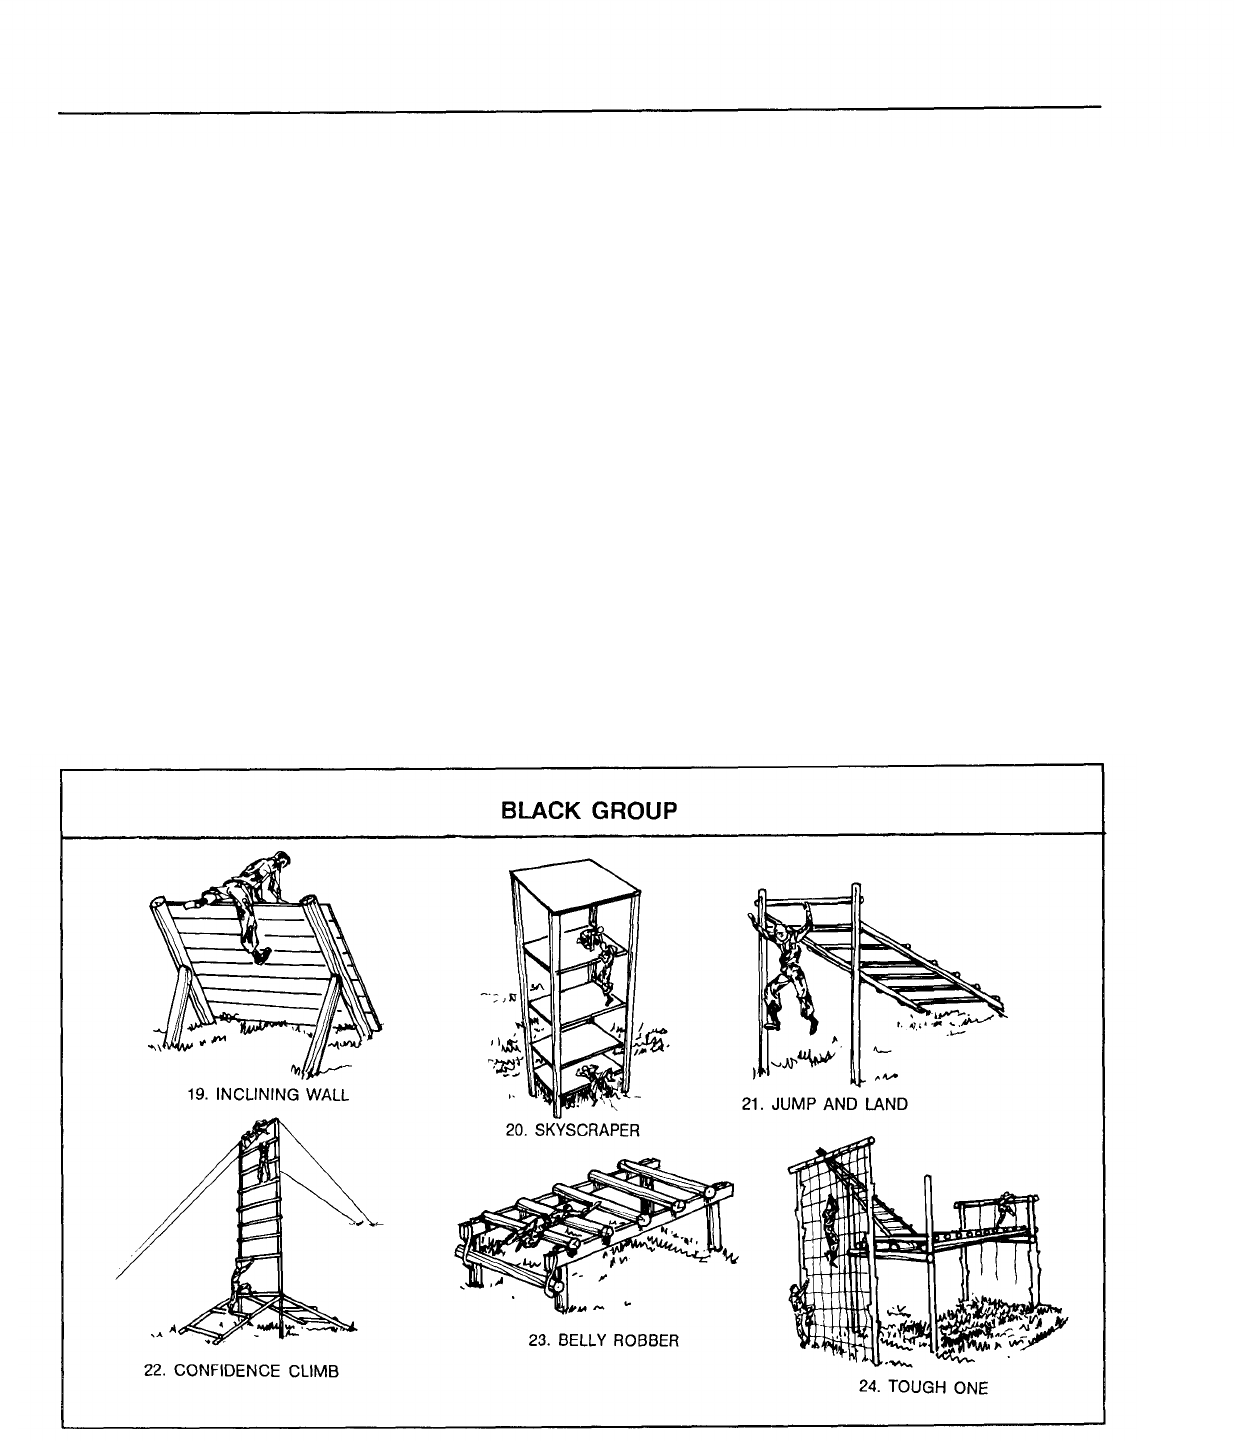
Black Group
This group contains the last six ob-
stacles. These are described below and
numbered 19 through 24 in Figure 8-
11.
Inclining Wall. Soldiers approach the
underside of the wall, jump up and
grasp the top, and pull themselves up
and over. They slide or jump down the
incline to the ground.
Skyscraper. Soldiers jump or climb to
the first floor and either climb the
corner posts or help one another to the
higher floors. They descend to the
ground individually or help one an-
other down. The top level or roof is
off limits, and the obstacle should not
be overloaded. A floor must not be-
come so crowded that soldiers are
bumped off. Soldiers should not jump
to the ground from above the first
level.
Jump and Land. Soldiers climb the
ladder to the platform and jump to the
ground.
Confidence Climb. Soldiers climb the
inclined ladder to the vertical ladder.
they go to the top of the vertical ladder,
then down the other side to the ground.
Belly Robber. Soldiers step on the
lower log and take a prone position on
the horizontal logs. They crawl over
the logs to the opposite end of the
obstacle. Rope gaskets must be tied to
the ends of each log to keep the hands
from being pinched and the logs from
falling.
The Tough One. Soldiers climb the
rope or pole on the lowest end of the
obstacle. They go over or between the
logs at the top of the rope. They move
across the log walkway, climb the
ladder to the high end, then climb
down the cargo net to the ground.
Figure 8-11
8-10
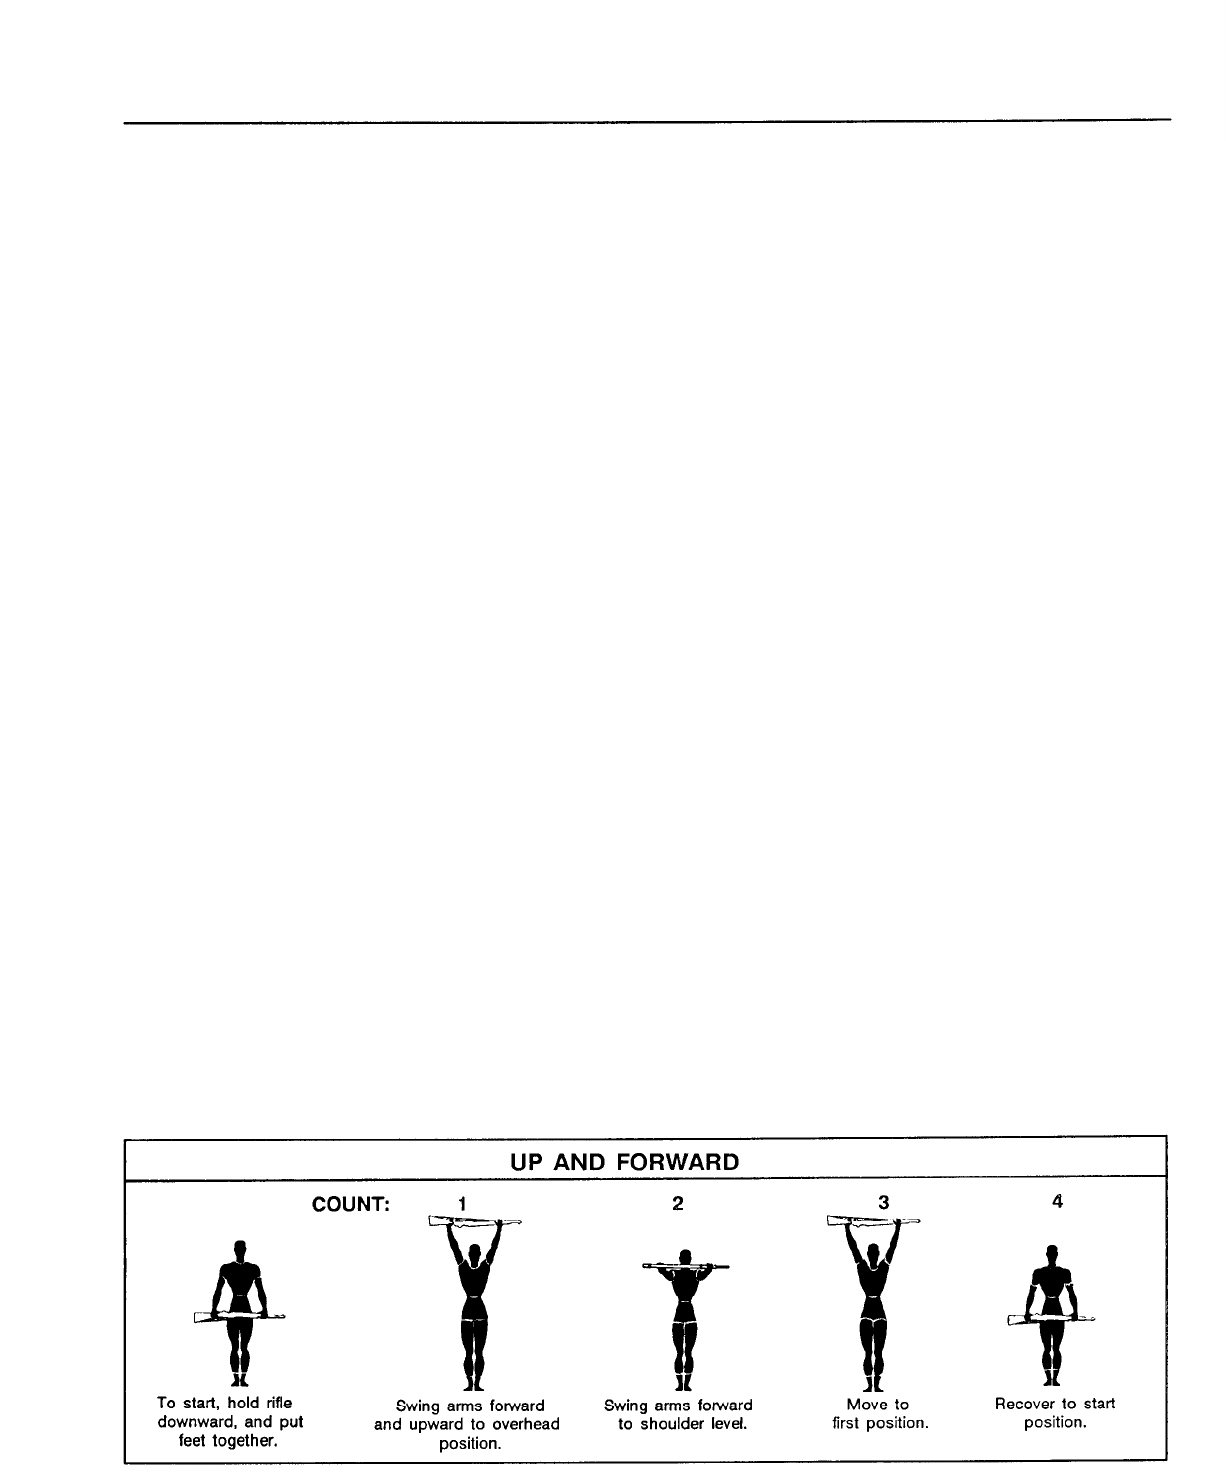
Rifle Drills
Rifle drills are suitable activities for
fitness training while bivouacking or
during extended time in the field. In
most situations, the time consumed in
drawing weapons makes this activity
cumbersome for garrison use. How-
ever, it is a good conditioning activity,
and the use of individual weapons in
training fosters a warrior’s spirit.
There are four rifle-drill exercises
that develop the upper body. They are
numbered in a set pattern. The main
muscle groups strengthened by rifle
drills are those of the arms, shoulders,
and back.
Rifle drill is a fast-moving method
of exercising that soldiers can do in as
little as 15 minutes. With imagination,
the number of steps and/or rifle exer-
cises can be expanded beyond those
described here.
EXERCISE PROGRESSION
The rifle-drill exercise normally
begins with six repetitions and in-
creases by one repetition for each three
periods of exercise. This rate contin-
ues until soldiers can do 12 repetitions.
However, the number of repetitions
can be adjusted as the soldiers im-
prove.
In exercises that start from the rifle-
downward position, on the command
“Move,” soldiers execute port arms and
assume the starting position. At the
end of the exercise, the command to
return soldiers to attention is “Position
of attention, move.”
In exercises that end in other than
the rifle-downward position, soldiers
assume that position before executing
port arms and order arms.
These movements are done without
command and need not be precise.
Effective rifle exercises are strenuous
enough to tire the arms. When the
arms are tired, moving them with
precision is difficult.
RIFLE DRILL EXERCISES
The following exercises are for use
in rifle drills.
Up and Forward
This is a four-count exercise done
at a fast cadence. (See Figure 8-12.)
Fore-Up, Squat
This is a four-count exercise done
at a moderate cadence. (See Figure
8-13.)
Fore-Up, Behind Back
This is a four-count exercise done
at a moderate cadence. (See Figure 8-
14.)
Fore-Up, Back Bend
This is a four-count exercise done at
moderate cadence. (See Figure 8- 15.)
Figure 8-12
8-11

Figure 8-13
Figure 8-14
Figure 8-15
8-12

Log Drills
Log drills are excellent
for developing strength
and muscular endurance,
because they require the
muscles to contract
under heavy loads.
Log drills are team-conditioning
exercises. They are excellent for de-
veloping strength and muscular endur-
ance because they require the muscles
to contract under heavy loads. They
also develop teamwork and add variety
to the PT program.
Log drills consist of six different
exercises numbered in a set pattern.
The drills are intense, and teams should
complete them in 15 minutes. The
teams have six to eight soldiers per
team. A principal instructor is re-
quired to teach, demonstrate, and lead
the drill. He must be familiar with
leadership techniques for conditioning
exercises and techniques peculiar to log
drills.
AREA AND EQUIPMENT
Any level area is good for doing log
drills. All exercises are done from a
standing position. If the group is larger
than a platoon, an instructor’s stand
may be needed.
The logs should be from six to eight
inches thick, and they may vary from
14 to 18 feet long for six and eight sol-
diers, respectively. The logs should be
stripped, smoothed, and dried. The
14-foot logs weigh about 300 pounds,
the 18-foot logs about 400 pounds.
Rings should be painted on the logs to
show each soldier’s position. When not
in use, the logs are stored on a rack
above the ground.
FORMATION
All soldiers assigned to a log team
should be about the same height at the
shoulders. The best way to divide a
platoon is to have them form a single
file or column with short soldiers in
front and tall soldiers at the rear. They
take their positions in the column ac-
cording to shoulder height, not head
height. When they are in position, they
are divided into teams of six or eight.
The command is “Count off by sixes
(or eights), count off.” Each team, in
turn, goes to the log rack, shoulders a
log, and carries it to the exercise area.
The teams form columns in front of
the instructor. Holding the logs in
chest position, they face the instructor
and ground the log. Ten yards should
separate log teams within the columns.
If more than one column is used, 10
yards should separate columns.
STARTING DOSAGE AND
PROGRESSION
The starting session is six repeti-
tions of each exercise. The progres-
sion rate is an increase of one repeti-
tion for each three periods of exercise.
Soldiers continue this rate until they
do 12 repetitions with no rest between
exercises. This level is maintained un-
til another drill is used.
START POSITIONS
The soldiers fall in facing their log,
with toes about four inches away.
Figure 8-16 shows the basic starting
positions and commands.
Right-Hand Start Position, Move
On the command “Move,” move the
left foot 12 inches to the left, and
lower the body into a flatfooted squat.
Keep the back straight, head up, and
arms between the legs. Encircle the
far side of the log with the left hand.
Place the right hand under the log.
(See 1, Figure 8-16.)
Left-Hand Start Position, Move
This command is done the same
way as the preceding command.
However, the left hand is under the
log, and the right hand encircles its far
side. (See 2, Figure 8-16.)
8-13
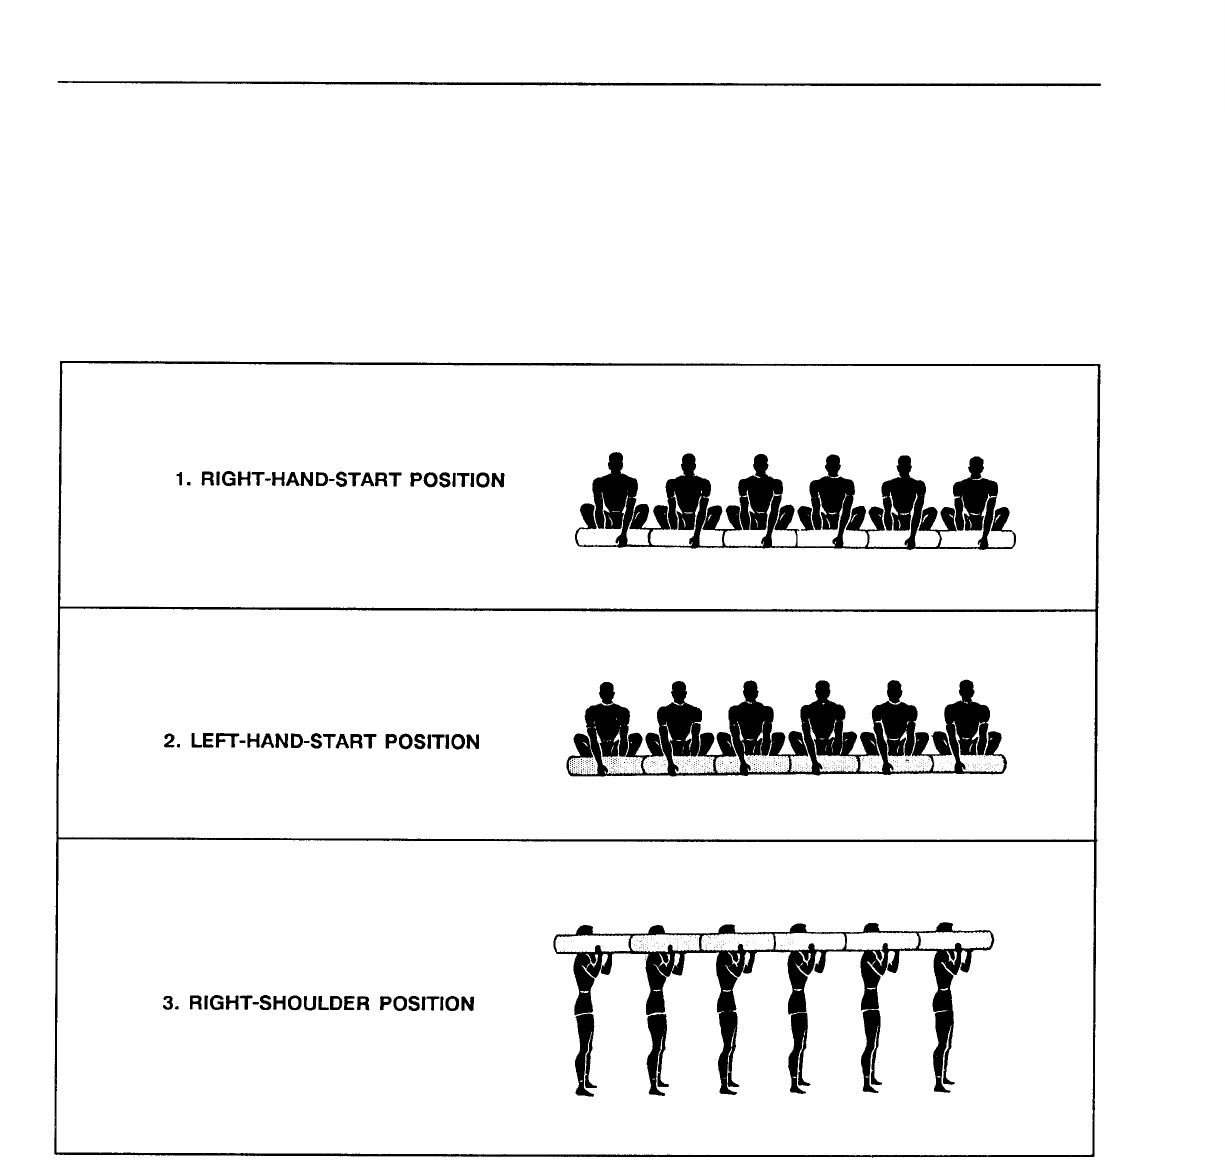
Right-Shoulder Position, Move
left foot to the rear and stand up,
facing left. Balance the log on the right
This command is given from the shoulder with both hands. (See 3,
right-hand-start position. On the Figure 8-16.) This movement cannot
command “Move,” pull the log upward be done from the left-hand-start posi-
in one continuous motion to the right tion because of the position of the
shoulder. At the same time, move the hands.
Figure 8-16
8-14
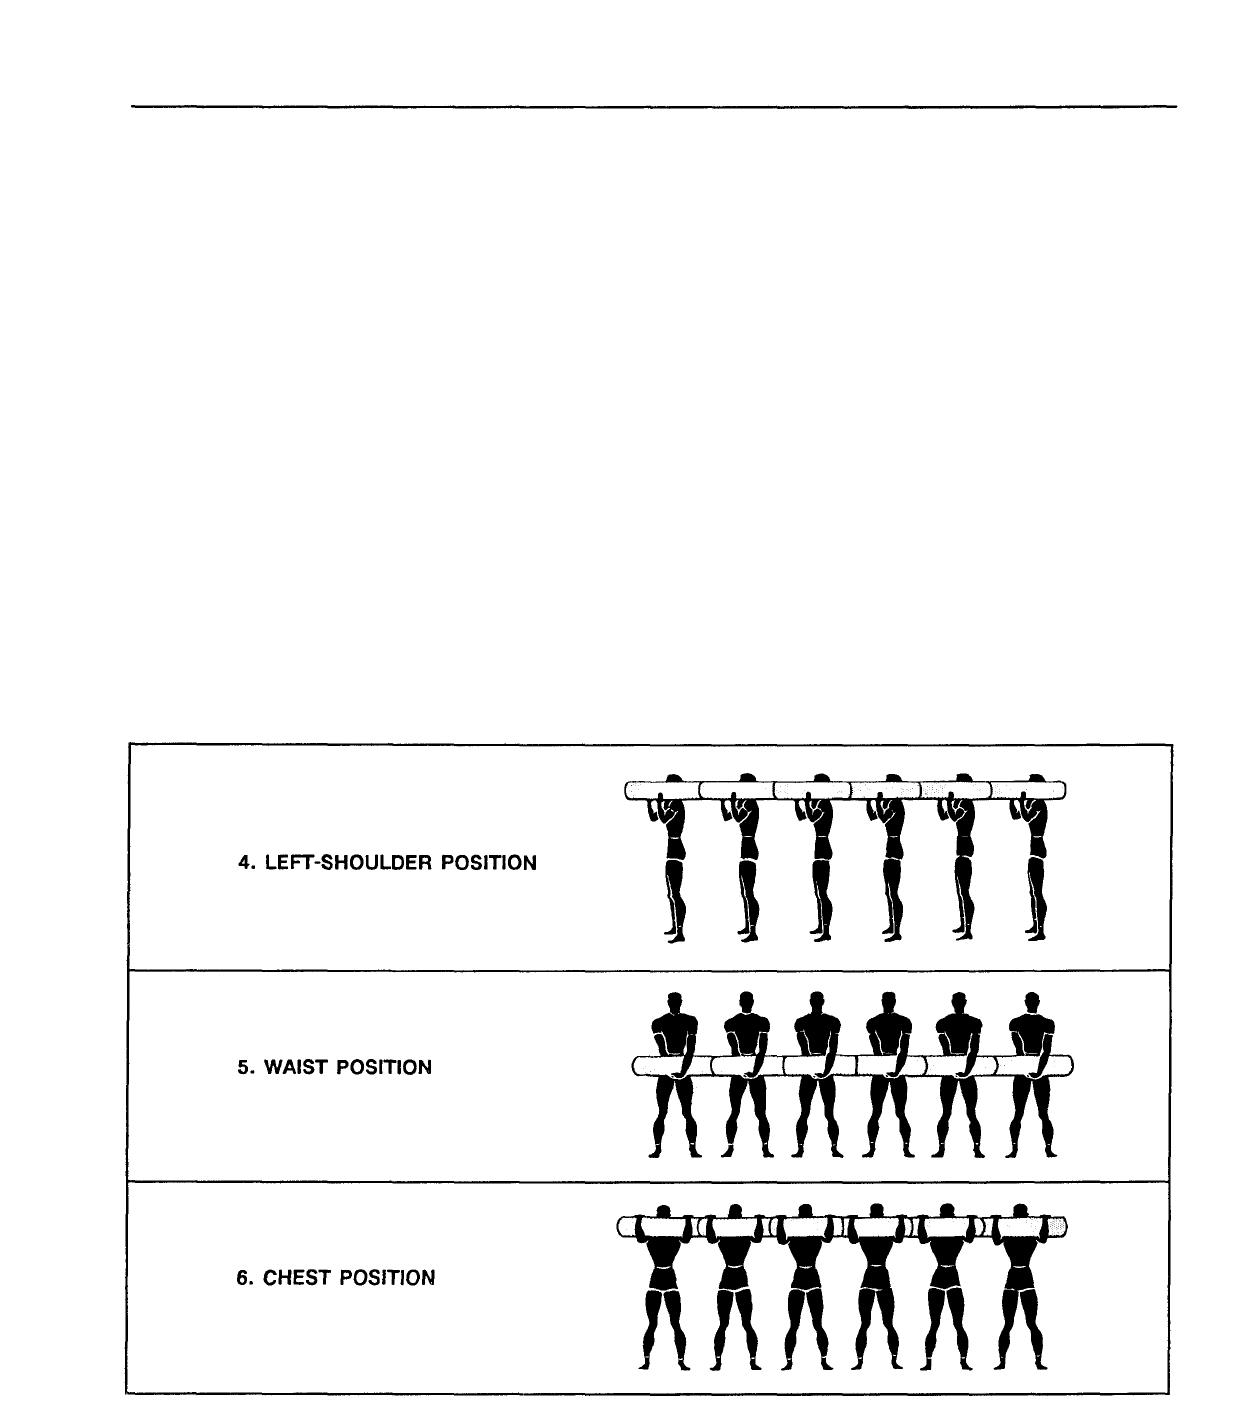
Left-Shoulder Position, Move
This command is given from the
left-hand-start position. On the com-
mand “Move, ” pull the log upward to
the left shoulder in one continuous
motion. At the same time, move the
right foot to the rear, and stand up
facing right. Balance the log on the left
shoulder with both hands. (See 4,
Figure 8-17.) This movement cannot
be done from the right-hand-start
position.
Waist Position, Move
From the right-hand-start position,
pull the log waist high. Keep the arms
straight and fingers laced under the
log. The body is inclined slightly to the
rear, and the chest is lifted and arched.
(See 5, Figure 8-17.)
Chest Position, Move
This command is given after taking
the waist position. On the command
“Move,” shift the log to a position high
on the chest, bring the left arm under
the log, and hold the log in the bend of
the arms. (See 6, figure 8-17.) Keep
the upper arms parallel to the ground.
To move the log from the right to
the left shoulder, the command is
“Left-shoulder position, move.” Push
the log overhead, and lower it to the
opposite shoulder.
To return the log to the ground
from any of the above positions, the
command is “Start position, move.” At
the command “Move,” slowly lower the
log to the ground. Position the hands
and fingers so they are not under the
log.
Figure 8-17
8-15
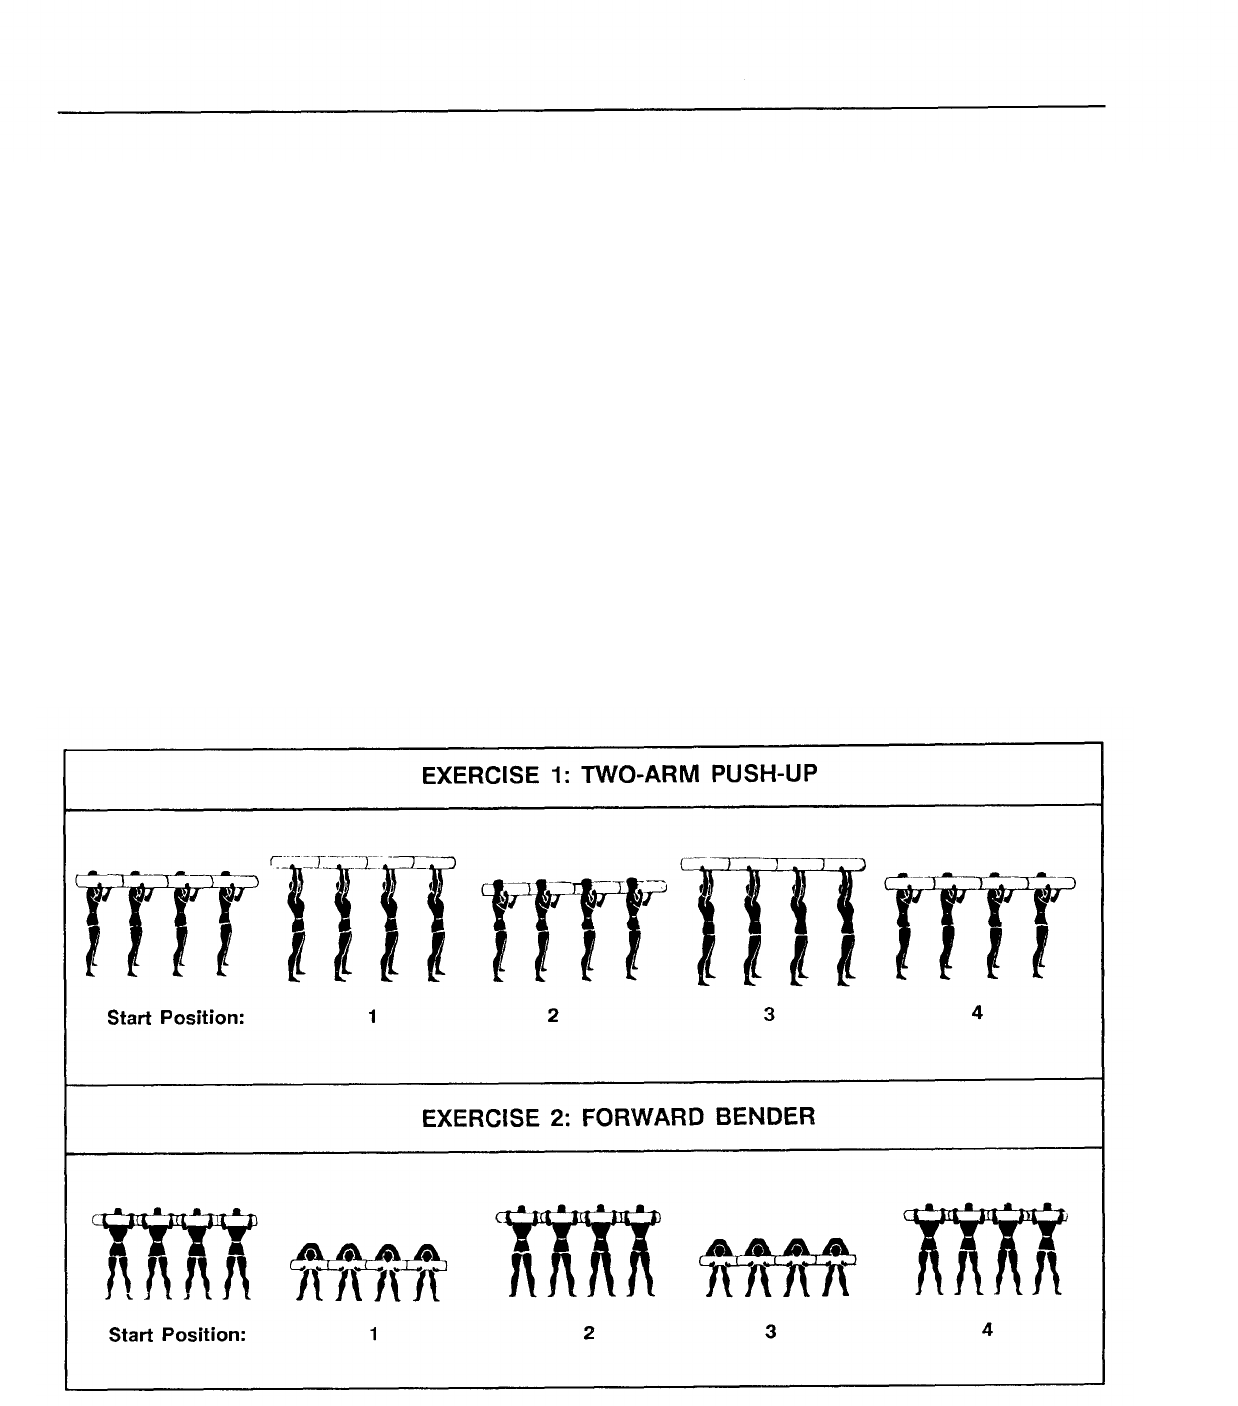
LOG-DRILL EXERCISES
The following are log-drill
cises.
Exercise 2. Forward Bender
Start Position: Chest position, with
exer- feet about shoulder-width apart.
(See 2, Figure 8-18.)
Cadence: Moderate.
Exercise 1. Two-Arm Push-Up Movement A four-count exercise;
Start Position: Right- or left-
shoulder position, with feet about
shoulder-width apart. (See 1, Fig-
ure 8-18.)
Cadence: Moderate.
Movement: A four-count exercise;
at the count of --
“One’’-Push the log overhead until
the elbows lock.
“Two’’-Lower the log to the op-
posite shoulder.
“Three’’-Repeat the action of count
one.
“Four’’-Recover to the start posi-
tion.
at the count of --
“One’’-Bend forward at the waist
while keeping the back straight
and the knees slightly bent.
“Two’’-Recover to the start posi-
tion.
‘Three’’-Repeat the action of count
one.
“Four’’-Recover to the start posi-
tion.
Figure 8-18
8-16
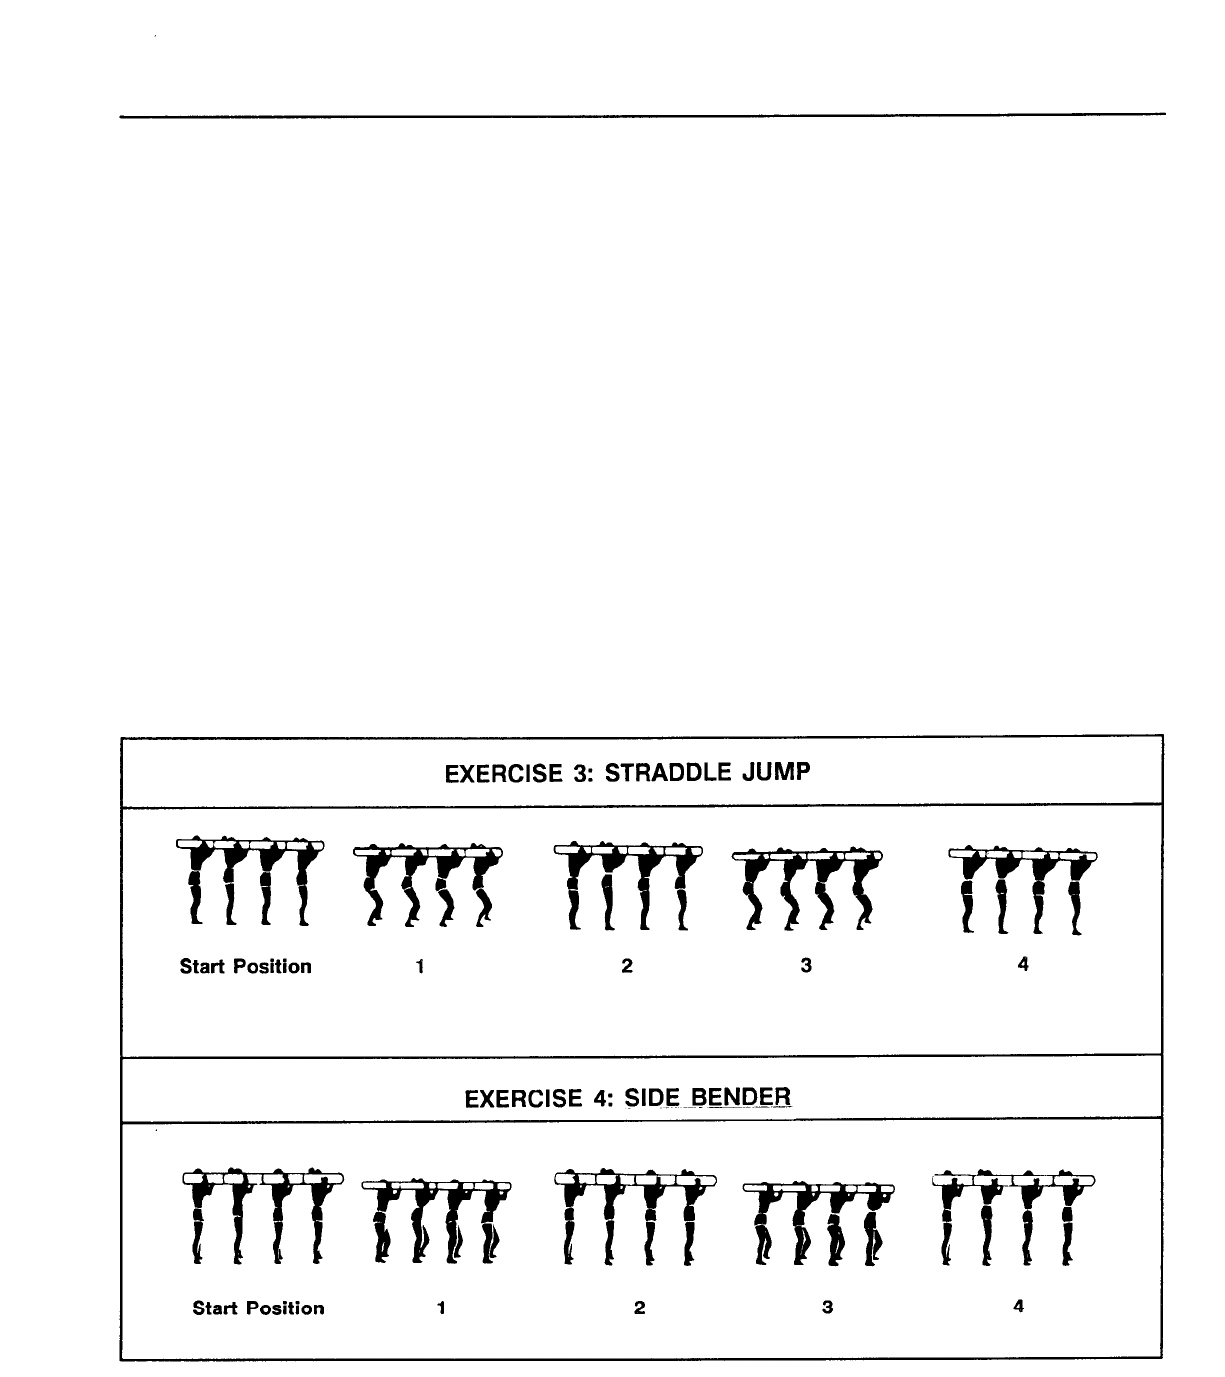
Exercise 3. Straddle Jump
Start Position Right- or left-shoul-
der position, with feet together,
and fingers locked on top of the log.
Pull the log down with both hands to
keep it from bouncing on the shoul-
der. (See 3, Figure 8-19.)
Cadence: Moderate.
Movement A four-count exercise;
at the count of--
“One’’-Jump to a side straddle.
“Two’’-Recover to the start posi-
tion.
‘Three’’-Repeat the action of count
one.
“Four’’-Recover to the start posi-
tion.
Exercise 4. Side Bender
Start Position: Right-shoulder po-
sition with the feet about shoul-
der-width apart. (See 4, Figure
8- 19.)
Cadence Moderate.
Movement: A four-count exercise;
at the count of--
“One’’-Bend sideward to the left
as far as possible, bending the
left knee.
“Two’’-Recover to the start posi-
tion.
“Three’’-Repeat the action of
count one.
“Four’’-Recover to the start posi-
tion.
NOTE: After doing the required
number of repetitions, change shoul-
ders and do an equal number to the
right side.
Figure 8-19
8-17
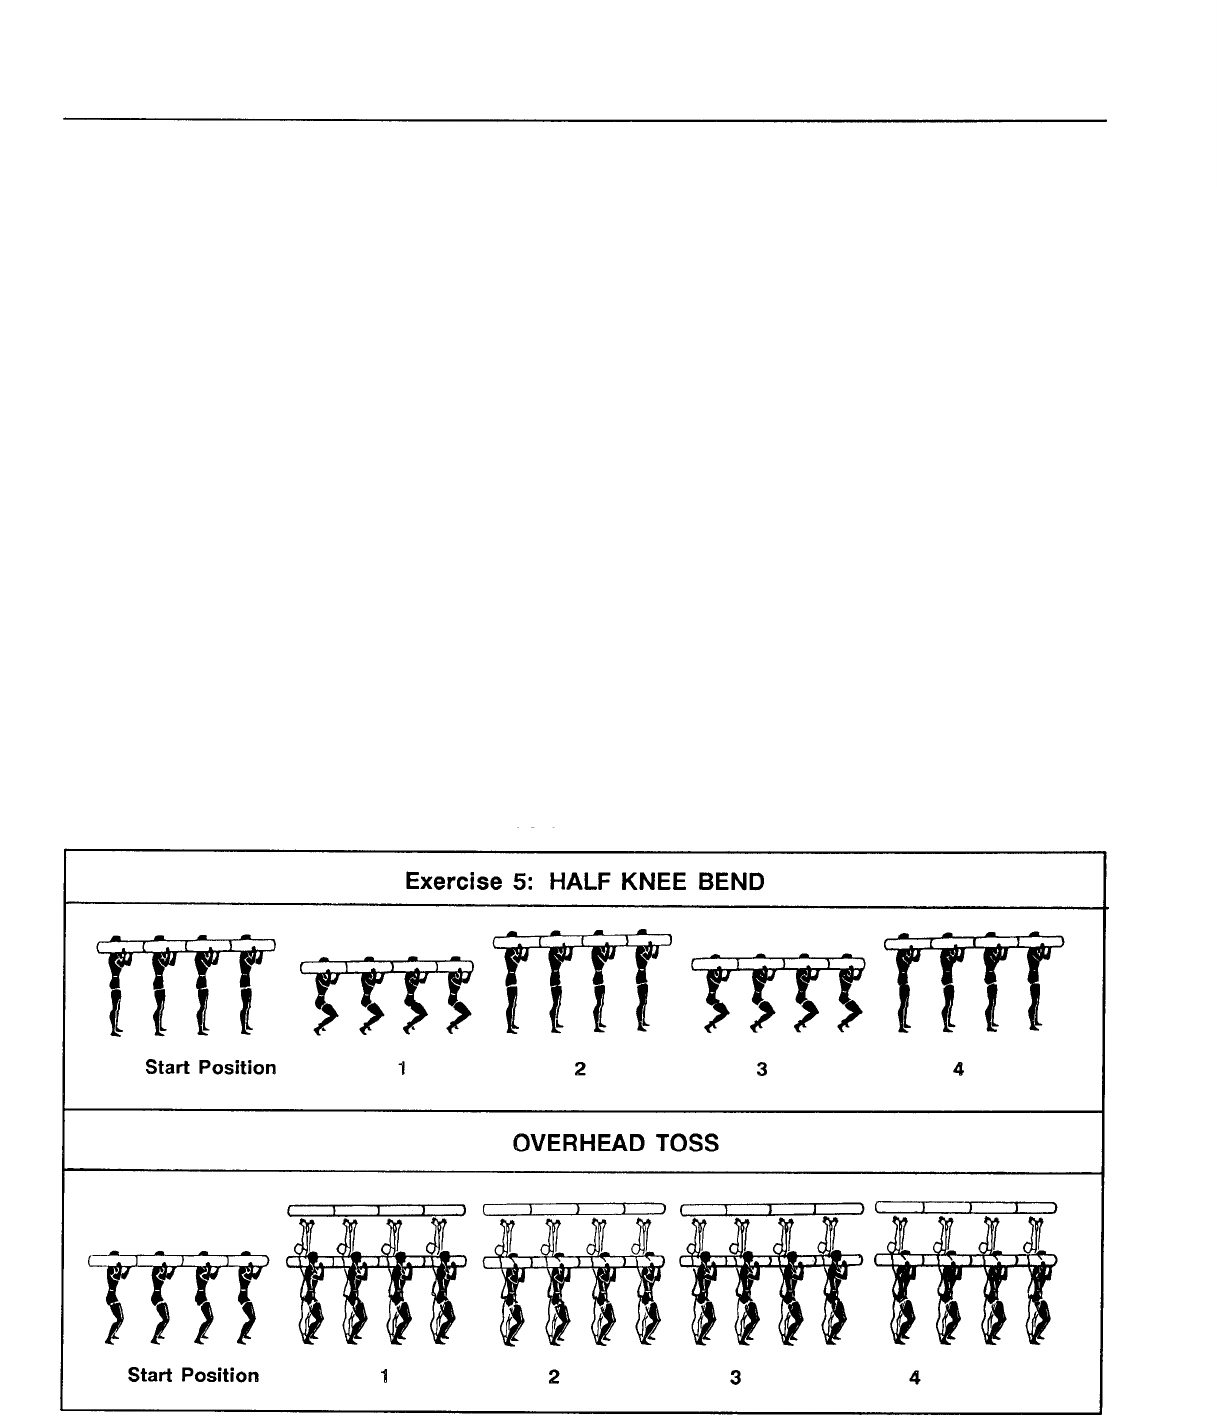
Exercise 5. Half-Knee Bend
Start Position: Right- or left-
shoulder position, with feet about
shoulder-width apart, and fingers
locked on top of the log. (See 5,
Figure 8-20.)
Cadence: Slow.
Movement: A four-count exercise;
at the count of --
“One’’-Flex the knees to a half-
knee bend.
“Two’’-Recover to the start posi-
tion.
“Three’’-Repeat the action of
count one.
“Four’’-Recover to the start po-
sition.
(NOTE: Pull forward and down-
ward on the log throughout the exer-
cise. )
Exercise 6. Overhead Toss (NOTE:
Introduce this exercise only after
soldiers have gained experience and
strength by doing the other exercises
for several sessions.)
Start Position: Right-shoulder po-
sition with the feet about shoul-
der-width part. The knees are at a
quarter bend. (See 6, Figure 8-20.)
Cadence: Moderate.
Movement: A four-count exercise;
at the count of --
“One’’-Straighten the knees and
toss the log about 12 inches
overhead. Catch the log with
both hands, and lower it toward
the opposite shoulder. As the log
is caught, lower the body into a
quarter bend.
“Two’’-Again, toss the log into
the air and, when caught, return
it to the original shoulder.
“Three’’-Repeat the action of count
one.
“Four’’-Recover to the start posi-
tion.
Figure 8-20
8-18

Aquatic Exercise
SAMPLE TRAINING PROGRAM
Aquatics is a mode of physical
training which helps one attain and
maintain physical fitness through ex-
ercises in the water. It is sometimes
called slimnastics. Aquatic training
can improve muscular endurance, CR
endurance, flexibility, coordination,
and muscular strength.
Because of its very low impact to the
body, an aquatic exercise program is
ideal for soldiers who are overweight
and those who are limited due to
painful joints, weak muscles, or pro-
files. The body’s buoyancy helps
minimize injuries to the joints of the
lower legs and feet. It exercises the
whole body without jarring the bones
and muscles. Leaders can tailor the
variety and intensity of the exercises to
the needs of all the soldiers in the unit.
Aquatic training is a good supple-
ment to a unit’s PT program. Not only
is it fun, it exposes soldiers to water
and can make them more comfortable
around it. Most Army installations
have swimming pools for conducting
aquatic, physical training sessions.
SAFETY CONSIDERATIONS
One qualified lifeguard is needed
for every 40 soldiers at all aquatic
training sessions. Nonswimmers must
remain in the shallow end of the pool.
They should never exercise in the deep
end with or without flotation devices.
EQUIPMENT
Soldiers normally wear swim suits
for aquatics, but they can wear boots
and fatigues to increase the intensity of
the activities. The following equip-
ment is optional for training:
● Goggles.
● Kickboard.
● Pull buoy.
● Ear/nose plugs.
● Fins.
● Hand paddles.
‘Warm-Up
As in any PT session, a warm-up is
required. It can be done in the water
or on the deck. Allow five to seven
minutes for the warm-up.
Conditioning Phase
Soldiers should exercise vigorously
to get a training effect. Energetic
music may be used to keep up the
tempo of the workout. The following
are some exercises that can be used in
an aquatic workout. (See Figure 8-21.)
Side Leg-Raises. Stand in chest to
shoulder-deep water with either side
of the body at arm’s length to the wall
of the pool, and grasp the edge with
the nearest hand. Raise the outside leg
sideward and upward from the hip.
Next, pull the leg down to the starting
position. Repeat these actions. Then,
turn the other side of the body to the
wall, and perform the exercise with
the other leg. DURATION: 30 seconds
(15 seconds per leg).
Leg-Over. Stand in chest-to shoul-
der-deep water, back facing the wall
of the pool. Reach backward with the
arms extended, and grasp the pool’s
edge. Next, raise one leg in front of
the body away from the wall, and
move it sideward toward the other leg
as far as it can go. Then, return the leg
to the front-extended position, and
lower it to the starting position. Repeat
these actions with the other leg, and
continue to alternate legs. DURA-
TION: 30 seconds ( 15 seconds per leg).
Rear Leg Lift. Stand in chest-to
shoulder-deep water with hands on
the pool’s edge, chest to the wall. Raise
one leg back and up from the hip,
extend it, and point the foot. Then,
pull the leg back to the starting posi-
tion. Alternate these actions back and
forth with each leg. DURATION: 20
seconds (10 seconds each leg).
8-19
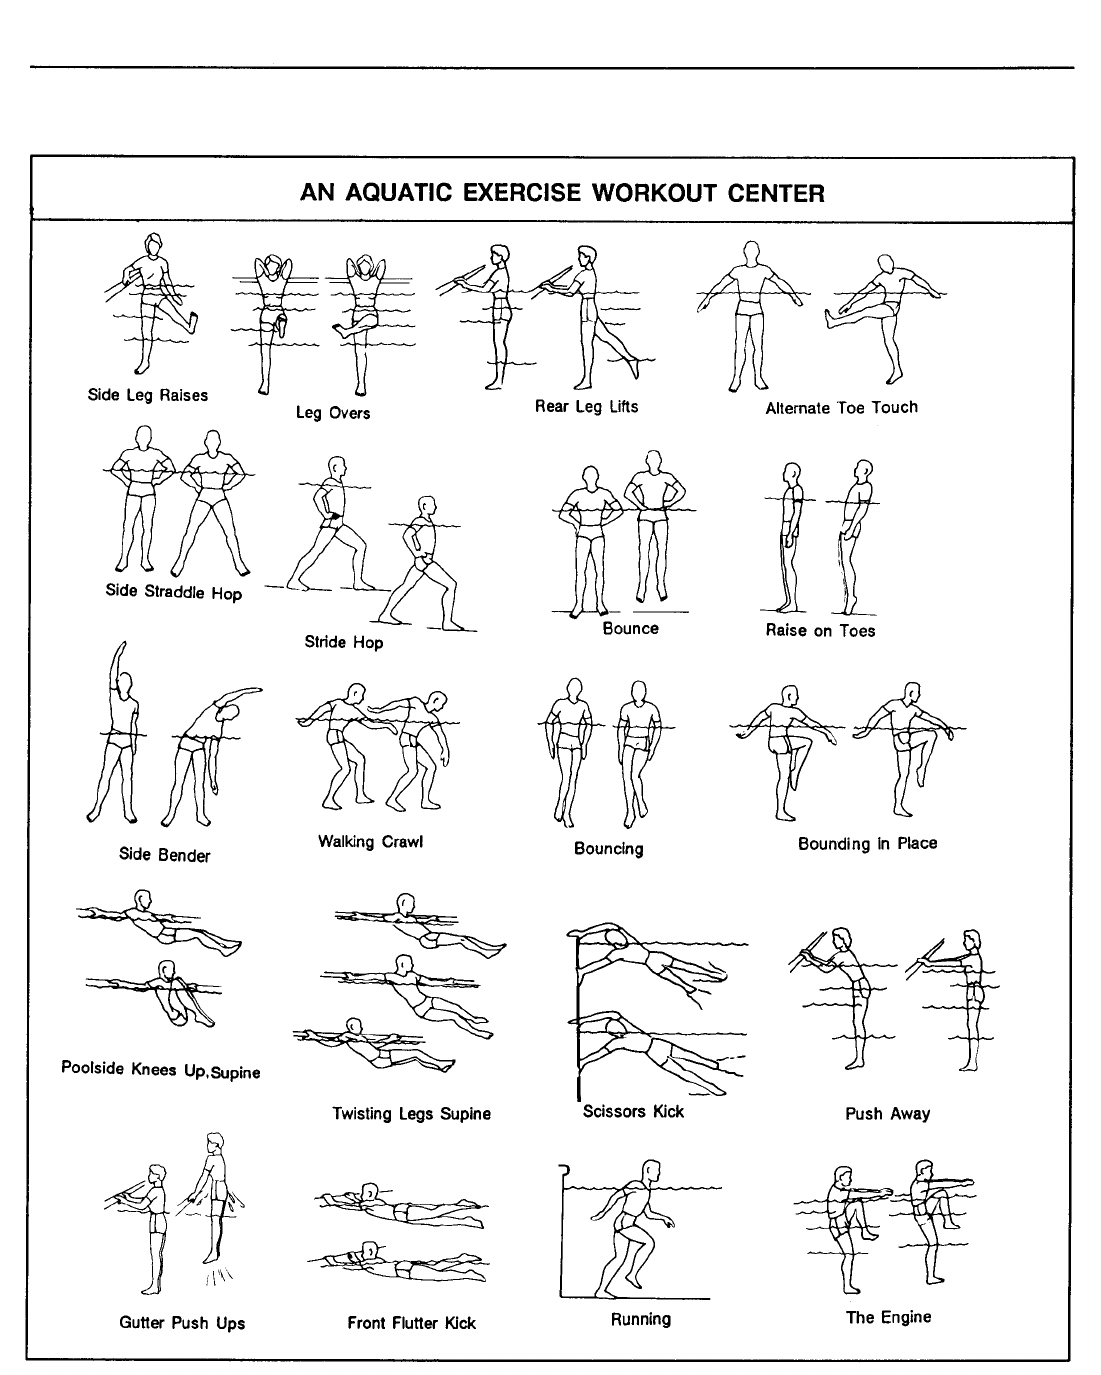
Figure 8-21
8-20

Alternate Toe Touch. Stand in
waist-deep water. Raise the left leg as
in kicking while touching the elevated
toe with the right hand. At the same
time, rotate the head toward the left
shoulder, and push the left arm back-
ward through the water. Alternate
these actions back and forth with each
leg and opposite hand. DURATION 2
minutes.
Side Straddle Hop. Stand in waist-
deep water with hands on hips and feet
together. Jump sideward and land with
feet about two feet apart. Then, return
to the starting position, and repeat the
jumping action. DURATION 2 min-
utes.
Stride Hop. Stand in waist-deep
water with hands on hips and feet
together. Jump, moving the left leg
forward and right leg backward. Then,
jump again moving the right leg for-
ward and left leg backward. Repeat
these actions. DURATION 2 minutes.
The Bounce. Stand in waist-deep
water with hands on hips and feet
together. Jump high with feet together.
Upon landing, use a bouncing motion,
and repeat the action. DURATION: 1
minute.
Rise on Toes. Stand in chest-to
shoulder-deep water with arms at sides
and feet together. Rise up using the
toes. Then, lower the body to the
starting position. Repeat the action.
DURATION: 1 minute.
Side Bender. Stand in waist-deep
water with the left arm at the side and
the right arm extended straight over-
head. Stretch slowly, bending to the
left. Recover to the starting position,
and repeat the action. Next, reverse to
the right arm at the side and the left
arm extended straight overhead. Re-
peat the stretching action to the right
side. DURATION: 1 minute.
Walking Crawl. Walk in waist- to
chest-deep water. Simulate the over-
hand crawl stroke by reaching out with
the left hand cupped and pressing the
water downward to the thigh. Repeat
the action with the right hand. Alter-
nate left and right arm action. DURA-
TION: 2 minutes.
Bouncing. Stand in chest-deep
water, arms at sides. Bounce on the left
foot while pushing down vigorously
with both hands. Repeat the action
with the right foot. Alternate bounc-
ing on the left and right foot. DURA-
TION: 2 minutes.
Bounding in Place with Alternate
Arm Stretch, Forward. Bound in
place in waist-deep water using high
knee action. Stretch the right arm far
forward when the left knee is high and
the left arm is stretched backward.
When the position of the arm is re-
versed, simulate the action of the
crawl stroke by pulling down and
through the water with the hand.
DURATION 1 minute.
Poolside Knees Up, Supine. Stand
in chest-to shoulder-deep water, back
against the wall of the pool. Extend
the arms backward, and grasp the
pool’s edge. With feet together, ex-
tend the legs in front of the torso, and
assume a supine position. Then with
the legs together, raise the knees to
the chin. Return to the starting posi-
tion, and repeat the action. DURA-
TION: 2 minutes (maximum effort).
Twisting Legs, Supine. Stand in
chest-to shoulder-deep water, back
against the wall of the pool. Extend the
arms backward, and grasp the pool’s
edge. With feet together, extend the
legs in front of the torso, and assume
a supine position. Then, twist the legs
slowly to the left, return to the starting
position, and twist the legs slowly to
the right. Repeat this twisting action.
DURATION: 1 minute (2 sets, 30
seconds each).
Scissor Kick. Float in chest- to
shoulder- deep water on either side of
the body with the top arm extended,
hand holding the pool’s edge. Brace
the bottom hand against the pool’s wall
with feet below the water’s surface.
Next, assume a crouching position by
gringing the heels toward the hips by
8-21

bending the knees. Then, straighten
and spread the legs with the top leg
extending backward. When the legs are
extended and spread, squeeze them
back together (scissoring). Pull with
the top hand, and push with the
bottom hand. The propulsive force of
the kick will tend to cause the body to
rise to the water’s surface. DURA-
TION 1 minute (2 sets, 30 seconds
each, maximum effort).
Push Away. Stand in chest-to
shoulder-deep water facing the pool’s
wall and at arm’s length from it. Grasp
the pool’s edge, and bend the arms so
that the body is leaning toward the
wall of the pool. Vigorously push the
chest back from the wall by straight-
ening the arms. Then, with equal
vigor, pull the upper body back to the
wall. Repeat these actions. DURA-
TION: 2 minutes (maximum effort).
Gutter Push-Ups. Stand in chest-
to shoulder- deep water facing the
pool’s wall. Place the hands on the edge
or gutter of the pool. Then, raise the
body up and out of the water while ex-
tending the arms. repeat this action.
DURATION: 2 minutes (4 sets, 30
seconds each with 5-second rests be-
tween sets).
Front Flutter Kick. Stand in chest-
to shoulder-deep water facing the pool’s
wall. Grasp the pool’s edge or gutter
and assume a prone position with legs
extended just below the water’s sur-
face. Then, kick flutter style, toes
pointed, ankles flexible, knee joint
loose but straight. The Iegs should
simulate a whip’s action. DURATION
1 minute (2 sets, 30 seconds each).
Running.
Move in a running gait
in chest-to shoulder-deep water with
arms and hands under the water’s
surface. This activity can be stationary,
or the exerciser may run from poolside
to poolside. Runners must concentrate
on high knee action and good arm
movement. DURATION 10 to 20
The Engine. Stand in chest-to
shoulder-deep water, arms straight and
in front of the body and parallel to the
water with the palms facing down-
ward. While walking forward, raise
the left knee to the left elbow, then
return to the starting position. Con-
tinuing to walk forward, touch the
right knee to the right elbow, and
return to the starting position. Be sure
to keep the arms parallel to the water
throughout the exercise. DURATION
1 to 2 minutes (2 sets).
Cool-Down
This is required to gradually bring
the body back to its pre-exercise state.
It should last from five to seven min-
utes.
minutes.
8-22

Factors that affect the content of
the sports program differ at every
Army installation and unit. Initiative
and ingenuity in planning are the most
vital assets. They are encouraged in
the conduct of every program.
OBJECTIVES
A well-organized and executed
intramural program yields the follow-
ing:
• Team spirit, the will to win, confi-
dence, aggressiveness, and team-
work. All are vital to combat effec-
tiveness.
• A change from the routine PT pro-
gram.
• The chance for all soldiers to take
part in organized athletics.
Competitive fitness
activities help in the
development of
assets that are vital to
combat effectiveness.
Physical fitness is one of the foun-
dations of combat readiness, and main-
taining it must be an integral part of
every soldier’s life. This chapter dis-
cusses competitive fitness activities
and athletic events that commanders
can use to add variety to a unit’s
physical fitness program. There is also
a section on developing a unit intramu-
ral program. Athletic and competi-
tive fitness activities are sports events
which should only be used to supple-
ment the unit’s PT program. They
should never replace physical training
and conditioning sessions but, rather,
should exist to give soldiers a chance
for healthy competition. Only through
consistent, systematic physical condi-
tioning can the fitness components be
developed and maintained.
Crucial to the success of any pro-
gram is the presence and enthusiasm of
the leaders who direct and participate
in it. The creativity of the physical
training planners also plays a large role.
Competitive fitness and athletic activi-
ties must be challenging. They must be
presented in the spirit of fair play and
good competition.
It is generally accepted that com-
petitive sports have a tremendous posi-
tive influence on the physical and
emotional development of the partici-
pants. Sports competition can enhance
a soldier’s combat readiness by pro-
moting the development of coordina-
tion, agility, balance, and speed. Com-
petitive fitness activities also help de-
velop assets that are vital to combat ef-
fectiveness. These include team spirit,
the will to win, confidence, toughness,
aggressiveness, and teamwork.
Intramural
The Army’s sports mission is to give
all soldiers a chance to participate in
sports activities. A unit-level intra-
mural program can help achieve this
important goal. DA Pam 28-6 de-
scribes how to organize various unit-
level intramural programs.
ORGANIZATION
The command level best suited to
organize and administer a broad intra-
mural program varies according to a
unit’s situation. If the objective of
maximum participation is to be
achieved, organization should start at
company level and then provide com-
petition up through higher unit levels.
Each command level should have its
own program and support the next
higher program level.
To successfully organize and con-
duct an intramural program, develop-
ers should consider the following fac-
tors and elements.
Authority
The unit commander should pub-
lish and endorse a directive giving au-
thorization and guidance for a sports
program. A detailed SOP should also
be published.
Personnel
Leaders at all levels of the intramu-
ral program should plan, organize, and
supervise it. Appointments at all
9-1

echelons should be made for at least
one year to provide continuity. The
commander must appoint a qualified
person to be the director, regardless of
the local situation, type, and size of the
unit. The director must be a good or-
ganizer and administrator and must
have time to do the job correctly. He
should also have a sense of impartial-
ity and some athletic experience.
Commanders should form an intra-
mural sports council in units of battal-
ion size or larger and should appoint
members or require designated unit
representatives. The council should
meet at least once a month or as often
as the situation requires. The council
serves as an advisory body to the unit
commander and intramural director. It
gives guidance about the organization
and conduct of the program.
Facilities and Equipment
Adequate facilities and equipment
must be available. When facilities are
limited, leaders must plan activities to
ensure their maximum use. In all
cases, activities must be planned to
ensure the safety of participants and
spectators.
Funds and Budget
Adequate funds are essential to
successfully organize and operate a
sports program. Therefore, before-
hand, organizers must determine how
much money is available to support it.
To justify requests for funds they must
prepare a budget in which they justify
each sports activity separately. The
budget must include special equip-
ment, supplies, awards, pay for offi-
cials, and other items and services.
Units can reduce many of their costs
by being resourceful.
Commanders can
stimulate soldiers to
participate in
competitive athletics by
using an award system.
AWARD SYSTEM
Commanders can stimulate units
and soldiers to participate in competi-
tive athletics by using an award sys-
tem. One type is a point-award system
where teams get points based on their
win/loss records and/or final league
standings. This reflects the unit’s
standings in the overall intramural
sports program. The recognition will
help make units and individuals par-
ticipate throughout the year. Trophies
can then be given for overall perform-
ance and individual activities.
PROGRAM PLANNING
A successful program depends on
sound plans and close coordination
between the units involved. The
intramural director should meet with
subordinate commanders or a sports
representative to determine what pro-
gram of activities is compatible with
the mission and training activities of
each unit. Unless they resolve this
issue, they may not get command
support which, in turn, could result in
forfeitures or lack of participation.
The less-popular activities may not be
supported because of a lack of interest.
9-2

Evaluations
Before the program is developed,
leaders must study the training and
availability situation at each unit level.
They should include the following
items in a survey to help them deter-
mine the scope of the program and to
develop plans:
●
●
●
●
●
General. Evaluate the commander’s
attitude, philosophy, and policy
about the sports program. Under
stand the types of units to be
served, their location, the climate,
and military responsibilities.
Troops. Determine the following:
1) number and types of personnel;
2) training status and general duty
assignment; 3) special needs, inter-
ests, and attitudes.
Time available. Coordinate the
time available for the sports pro-
gram with the military mission.
Determine both the on-duty and
off-duty time soldiers have for taking
part in sports activities.
Equipment. Consider the equip-
ment that will be needed for each
sport.
Facilities. Determine the number,
type, and location of recreational
facilities both within the unit and in
those controlled by units at higher
levels.
• Funds. Determine how much each
unit can spend on the intramural
program.
• Personnel. Assess how many people
are needed to run the program. The
list should include a director and as
sistants, sports council, officials,
and team captains, as well as volun
teers for such tasks as setting up a
playing field.
• Coordination. Coordinate with the
units’ operations sections to avoid
conflict with military training sched
ules.
• Activities. The intramural director
should plan a tentative program of
activities based on the season, local
situation, and needs and interests of
the units. Both team and individual
sports should be included.
Some
team sports are popular at all levels
and need little promotional effort
for success. Among these are vol-
leyball, touch football, basketball,
and softball. Some individual com-
petitive sports have direct military
value. They include boxing, wres-
tling, track and field, cross country,
triathlon, biathlon, and swimming.
While very popular, these sports are
harder to organize than team sports.
See Figures 9-1 and 9-2 for a list of
sports activities.
9-3
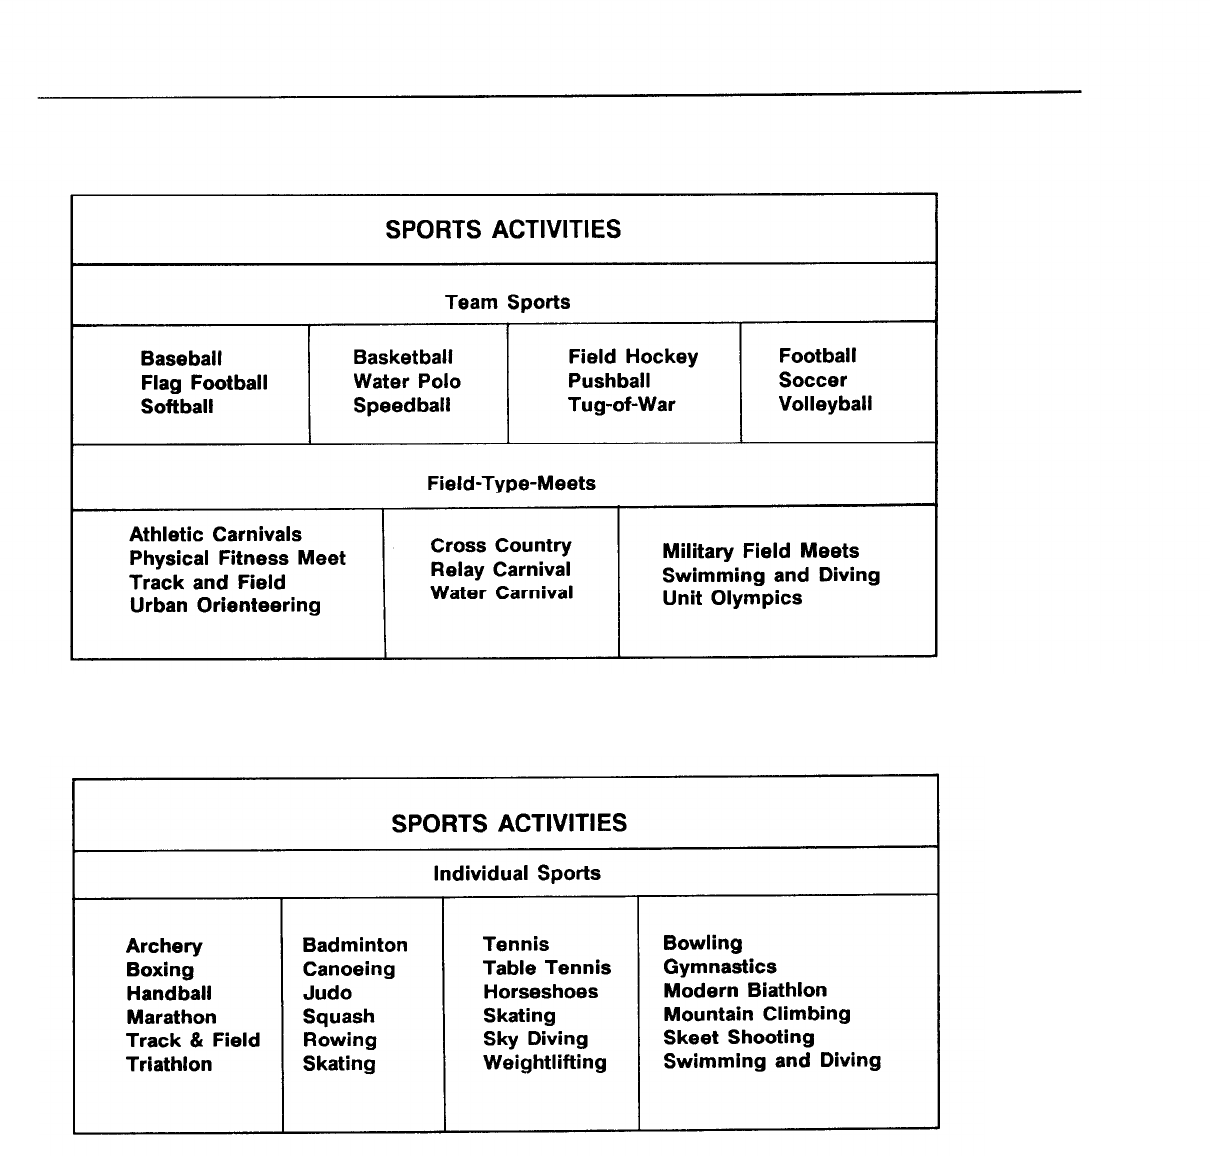
Figure 9-1
Figure 9-2
9-4
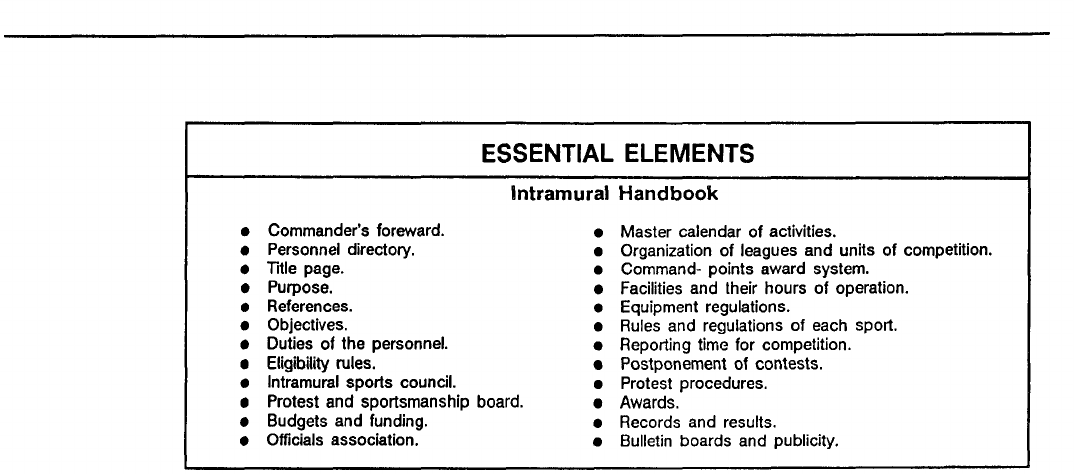
Table 9-1
Functions
Once the evaluations have been
made, the following functions should
be performed:
●
●
●
Make a handbook. An intramural
handbook should be published at
each level of command from instal-
lation to company to serve as a
standing operating procedure (SOP).
This handbook should include the
essential elements listed in Table
9-1 above.
Plan the calendar. Local situations
and normal obstacles may conflict
with the intramural program. How
ever, a way can be found to provide
a scheduled program for every sea-
son of the year.
Choose the type of competition.
Intramural directors should be able
to choose the type of competition
best suited for the sport and local
circumstances. They should also
know how to draw up tournaments.
Unless the competition must take
place in a short time, elimination
tournaments should not be used.
The round-robin tournament has
the greatest advantage because indi-
viduals and teams are never elimi-
nated. This type of competition is
adaptable to both team and individ-
ual play. It is appropriate for small
numbers of entries and league play
in any sport.
●
Make a printed schedule. Using
scheduling forms makes this job
easier. The form should include
game number, time, date, court or
field, and home or visiting team.
Space for scores and officials is also
helpful. Championship games or
matches should be scheduled to
take place at the best facility.
Unit Activities
The following games and activities
may be included in the unit’s PT
program, They are large-scale activi-
ties which can combine many compo-
nents of physical and motor fitness. In
addition, they require quick thinking
and the use of strategy. When played
vigorously, they are excellent activi-
ties for adding variety to the program.
NINE-BALL SOCCER
The object of this game is for
of a team’s five goalies to have
ball.
Players
each
one
There are 25 to 50 players on each
team, five of whom are goalies. The
other players are divided into four
equal groups. The goalies play be-
tween the goal line and 5-yard line of
9-5
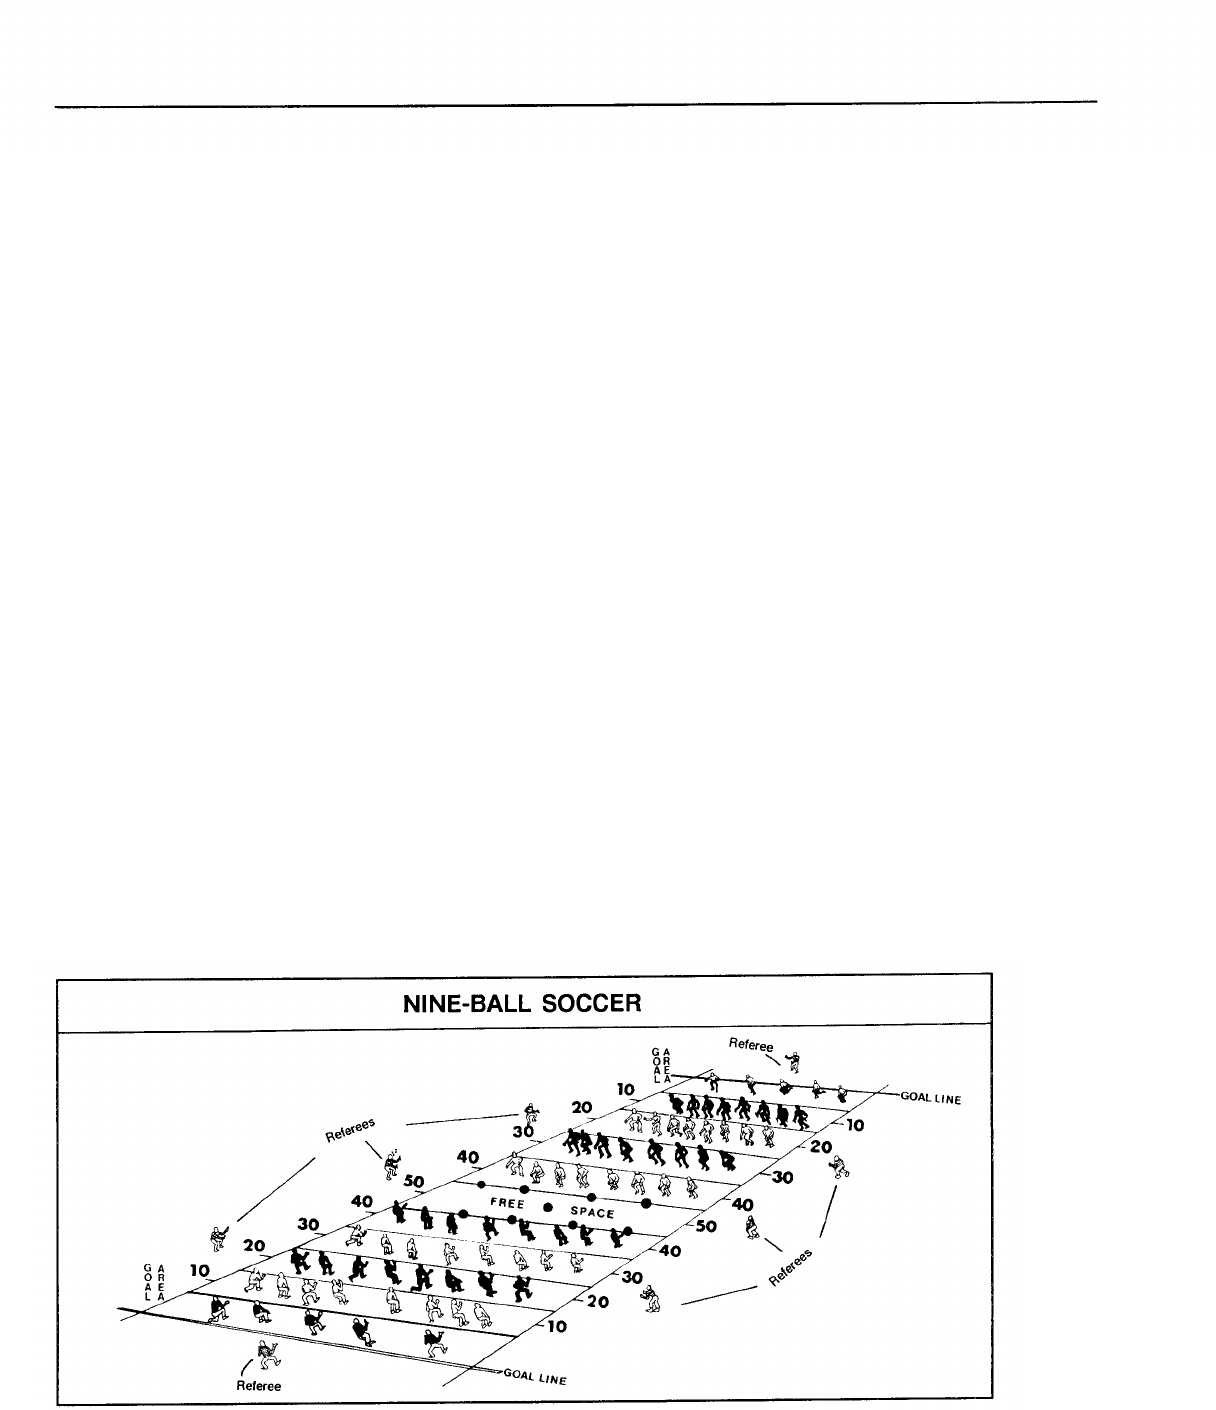
a standard football field. The other
four groups start the game between the
designated 10-yard segments of the
field. (See Figure 9-3.) The goalies
and all other players must stay in their
assigned areas throughout the game.
The only exceptions are midfielder
who stand between the 35- and 45-
yard lines. These players may occupy
both their assigned areas and the 10-
yard free space at the center of the
field.
The Game
The game starts with all players
inside their own areas and midfielder
on their own 40-yard line. The nine
balls are placed as follows. Four are on
each 45-yard line with at least five
yards between balls. One is centered
on the 50-yard line. The signal to start
play is one long whistle blast. Players
must pass the balls through the oppos-
ing team’s defenses into the goal area
using only their feet or heads. The
first team whose goalies have five balls
wins a point. The game then stops, and
the balls are placed for the start of a
new set. The first team to score five
points wins.
There are no time-outs except in
case of injury, which is signaled by two
sharp whistle blasts. The teams change
positions on the field after each set.
Team members move to different zones
after the set.
Rules
A ball is played along the ground or
over any group or groups of players.
The ball may travel any distance if it is
played legally.
Goalies may use their hands in
playing the ball and may give a ball to
other goalies on their team. For a set
to officially end, each goalie must have
a ball.
If players engage in unnecessary
roughness or dangerous play, the refe-
ree removes them from the game for
the rest of the set and one additional
set. He also removes players for the
rest of the set if they step on or over a
boundary or sideline or use their hands
outside the goal area.
If a goalie steps on or over a
boundary or sideline, the referee takes
the ball being played plus another ball
from the goalie’s team and gives these
balls to the nearest opposing player. If
Figure 9-3
9-6
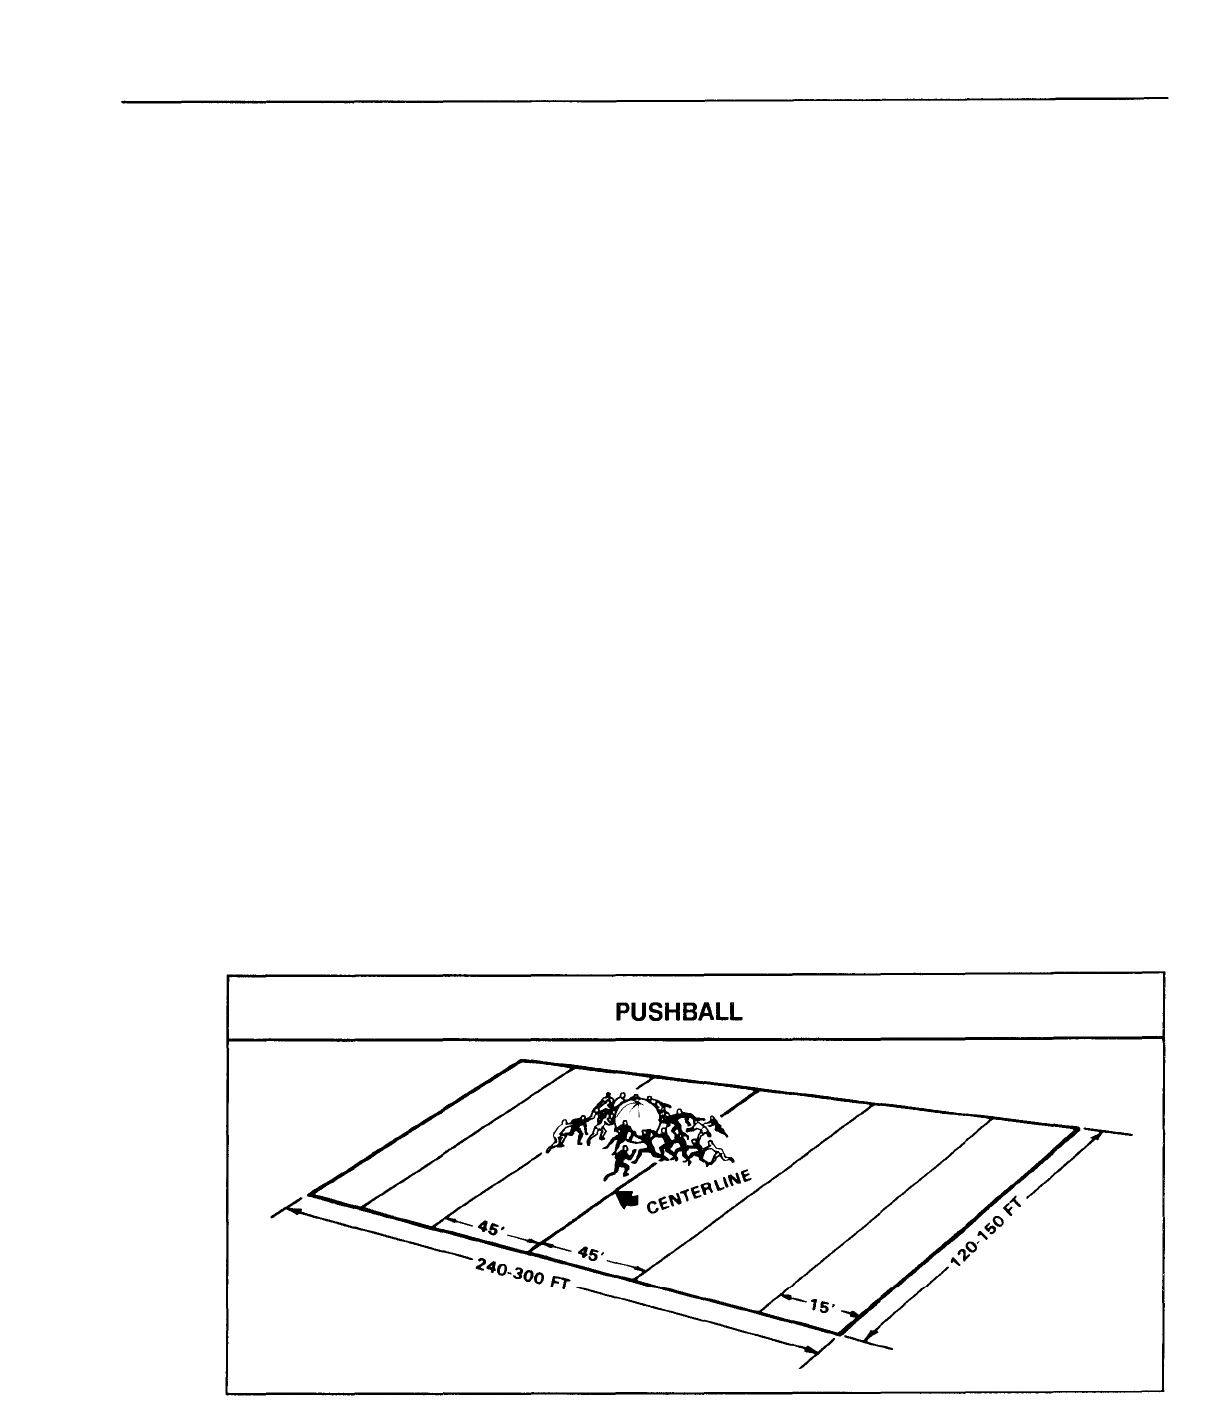
the team has no other ball in the goal
area, the referee limits the penalty to
the ball that is being played.
If a ball goes out of bounds, the
referee retrieves it. The team that
caused it to go out of bounds or over
the goal line loses possession. The
referee puts the ball back into play by
rolling it to the nearest opposing player.
PUSHBALL
This game requires a large pushball
that is five to six feet in diameter. It
also requires a level playing surface
that is 240 to 300 feet long and 120 to
150 feet wide. The length of the field
is divided equally by a center line.
Two more lines are marked 15 feet
from and parallel to the end lines and
extending across the entire field. (See
Figure 9-4.)
Players
There are 10 to 50 soldiers on each
of two teams.
The Game
The object of the game is to send
the ball over the opponent’s goal line
by pushing, rolling, passing, carrying,
or using any method other than kick-
ing the ball.
The game begins when the ball is
placed on the centerline with the op-
posing captains three feet away from
it. The other players line up 45 feet
from the ball on their half of the field.
At the referee’s starting whistle, the
captains immediately play the ball,
and their teams come to their aid.
At quarter time, the ball stays dead
for two minutes where it was when the
quarter ended. At halftime, the teams
exchange goals, and play resumes as if
the game were beginning.
A team scores a goal when it sends
the ball across the opposing team’s end
line. A goal counts five points. The
team that scores a goal may then try
for an extra point. For the extra point,
the ball is placed on the opposing
team’s 5-yard line, and the teams line
Figure 9-4
9-7

up across the field separated by the
width of the ball. Only one player may
place his hands on the ball. The player
who just scored is directly in front of
the ball. At the referee’s signal, the
ball is put into play for one minute. If
any part of the ball is driven across the
goal line in this period, the offense
scores one point. The defense may not
score during the extra point attempt.
The game continues until four 10-
minute quarters have been played.
Rest periods are allowed for two min-
utes between quarters and five min-
utes at halftime.
Rules
Players may use any means of
interfering with the opponents’ prog-
ress except striking and clipping.
Clipping is throwing one’s body across
the back of an opponent’s legs as he is
running or standing. Force may le-
gally be applied to all opponents whether
they are playing the ball or not. A
player who strikes or clips an opponent
is removed from the game, and his
team is penalized half the distance to
its goal.
When any part of the ball goes out
of bounds, it is dead. The teams line
up at right angles to the sidelines.
They should be six feet apart at the
point where the ball went out. The
referee tosses the ball between the
teams.
When, for any reason, the ball is
tied up in one spot for more than 10
seconds, the referee declares it dead.
He returns the ball into play the same
way he does after it goes out of
bounds.
STRATEGY PUSHBALL
Strategy pushball is similar to push-
ball except that it is played on two
adjacent fields, and opposing teams
supply soldiers to the games on both
fields. Team commanders assess the
situation on the fields and distribute
their soldiers accordingly. The com-
mander decides the number of soldiers
used, within limits imposed by the
rules. This number may be adjusted
throughout the game. Play on both
fields occurs at the same time, but each
game progresses independently. At the
end of play, a team’s points from both
fields are added together to determine
the overall winner.
This game requires two pushballs
that are five to six feet in diameter.
Pull-over vests or jerseys of two dif-
ferent colors are used by each team for
a total of four different colors. Start-
ers and reserves should be easily dis-
tinguishable. Starters and substitutes
should wear vests of one color, while
the team commander and reserves wear
vests of the second color.
Players may wear any type of ath-
letic shoes except those with metal
cleats. Combat boots may be worn, but
extra caution must be used to prevent
injuries caused by kicking or stepping
on other players. Soldiers wearing
illegal equipment may not play until
the problem has been corrected.
The playing area is two lined-off
fields. These are 240 to 300 feet long
by 120 to 150 feet wide. They are
separated lengthwise by a 20-foot-
wide divider strip. The length of each
field is divided equally by a centerline
that is parallel to the goal lines. Lines
are also marked 45 feet from each side
of the centerline and parallel to it. The
lines extend across both fields. Di-
mensions may be determined locally
based on available space and the number
of players. The space between the
fields is the team area. Each team
occupies the third of the team space
that immediately adjoins its initial
playing field.
Time periods should be adjusted to
suit weather conditions and soldiers’
fitness levels.
9-8
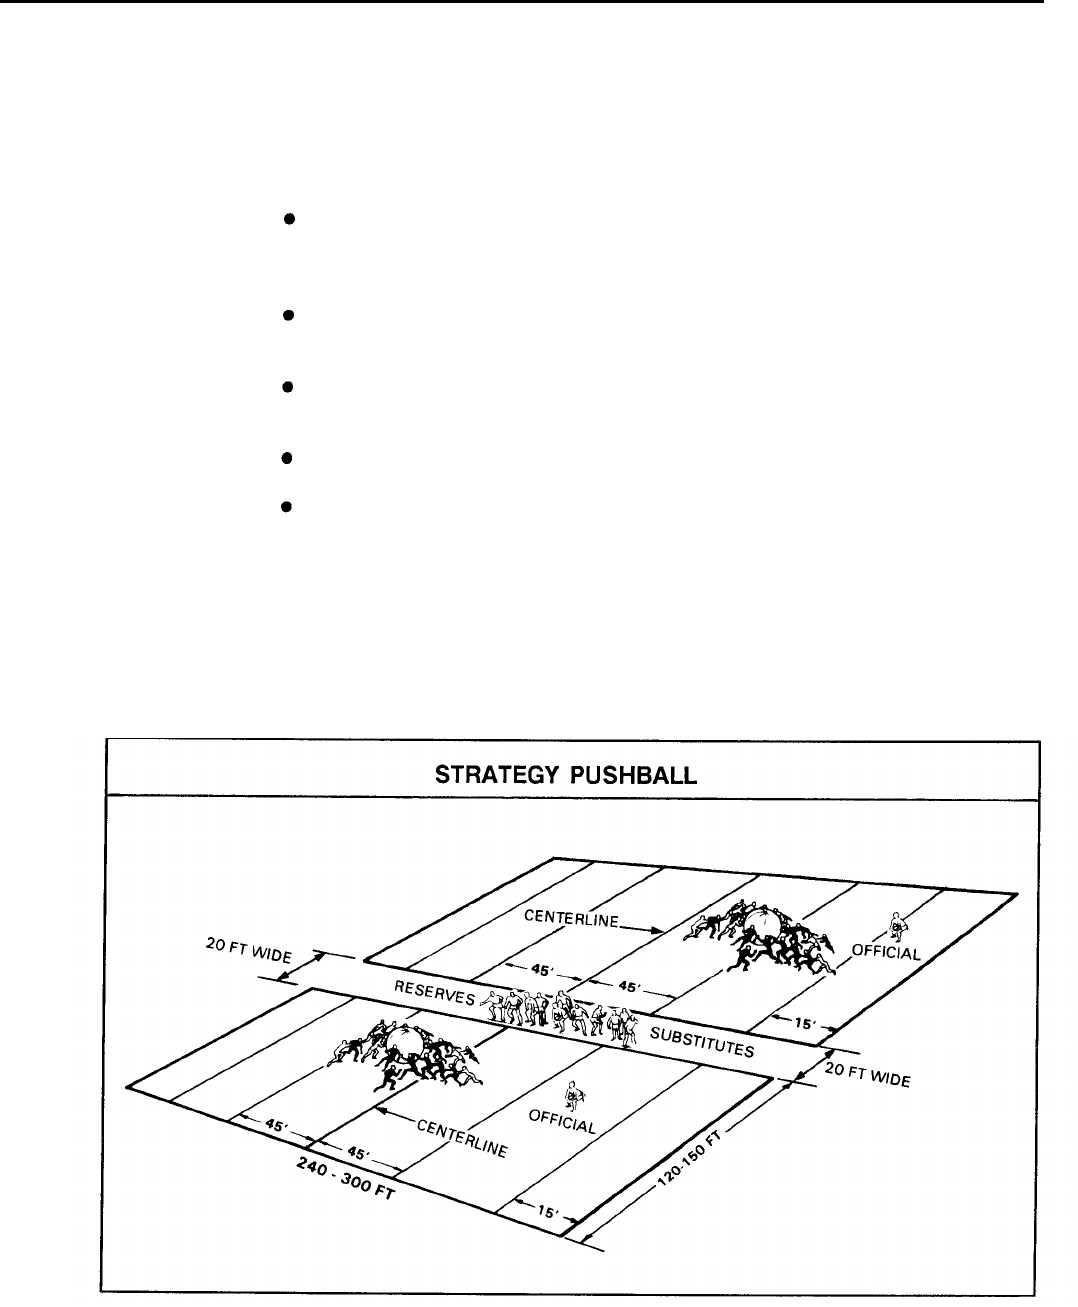
Players
Runners serve at least one period;
they may not play during that period.
There are 25 to 40 soldiers on each They are allowed on the field only
team. A typical, 25-member team has during breaks in play after a dead ball
the following: or goal.
One team commander. He is respon-
sible for overall game strategy and
for determining the number and po-
sitions of players on the field.
Sixteen starting members. Eight are
on each field at all times; one is
appointed field captain.
Four reserve members. These are
players the team commander des-
ignates as reinforcements.
Three substitutes. These are re-
placements for starters or reserves.
One runner. He is designated to
convey messages from the team
commander to field captains.
The proportion of soldiers in each
category stays constant regardless of
the total number on a team. Before the
event, game organizers must coordi-
nate with participating units and agree
on the number on each team.
Reserves are used at any point in
the game on either field and are com-
mitted as individuals or groups. They
may enter or leave the playing field at
any time whether the ball is in play or
not. Team commanders may enter the
game as reserves if they see the need
for such action.
Reserves, substitutes, and starting
members may be redesignated into any
of the other components on a one-for-
one basis only during dead balls, in-
jury time-outs, or quarter- and half-
time breaks. A reserve may become
a starter by switching vests with an
original starter, who then becomes a
reserve.
When possible, senior NCOS and
officers from higher headquarters or
other units should be used as officials.
Players must not question an official’s
Figure 9-5
9-9

authority during play. Otherwise, the
game can quickly get out of control.
Chain-of-command personnel
should act as team commanders and
field captains whenever possible.
The Game
The object is to propel the ball over
the opponent’s goal line by pushing,
rolling, passing, carrying, or using any
means other than kicking.
The game is officiated by two refe-
rees on each field, a chief umpire, and
a scorekeeper. Referees concentrate
on player actions so that they can
quickly detect fouls and assess penal-
ties.
The chief umpire and score-
keeper occupy any area where they
can best officiate the games. The chief
umpire monitors the use of substitutes
and reserves and ensures smooth prog-
ress of the games on both fields. The
number of officials may be increased
if teams have more than 25 players.
Referees use their whistles to stop and
start play except at the start and end of
each quarter. The scorekeeper, who
times the game with a stopwatch, starts
and ends each quarter and stops play
for injuries with some noisemaker
other than a whistle. He may use such
devices as a starter’s pistol, klaxon, or
air horn.
The game begins after the ball is
placed on each field’s center mark.
Opposing field captains are three feet
from the ball (six feet from the center-
line). The rest of the starters are lined
up 45 feet from the ball on their half
of the field. (See Figure 9-5.) At the
scorekeeper’s signal, field captains
immediately play the ball, and their
teams come to their aid.
Starters may be exchanged between
the fields if the minimum number of
starters or substitutes per field is
maintained.
Substitutes may enter the game only
during breaks in play after a dead
ball, goal, or time-out for injury.
A substitute may not start to play until
the player being replaced leaves the
field.
When any part of the ball goes out
of bounds, it is dead. The teams line
up at right angles to the sidelines; they
are 10 feet apart at the point where the
ball went out of bounds. The referee
places the ball between the teams at a
point 15 feet inside the sideline. Play
resumes when the referee blows the
whistle.
When the ball gets tied up in one
spot for more than 10 seconds for any
reason, the referee declares it dead. He
restarts play as with an out-of-bounds
dead ball, except that he puts the ball
on the spot where it was stopped.
Time does not stop for dead balls or
goals.
Play continues on one field
while dead balls are restarted on the
other.
At each quarter break, the ball stays
on the spot where it was when the
quarter ended. The next quarter, sig-
naled by the scorekeeper, starts as it
does after a ball goes out of bounds. At
halftime the teams exchange goals, and
play resumes as if the game were
beginning.
A goal is scored when any part of
the ball breaks the plane of the goal
line between the sidelines. A goal
counts one point. At the end of the
fourth quarter, the points of each team
from both fields are added together to
determine the winner.
If there is a tie, a three-minute
overtime is played. It is played the
same as in regulation play, but only one
field is used, with starting squads from
both teams opposing each other. For
control purposes, no more than 15
players per team are allowed on the
field at once. The team with more
points at the end of the overtime wins
the game. If the game is still tied when
time expires, the winner is the team
that has gained more territory.
The game continues until four 10-
minute quarters have been played.
There is a 10-minute halftime between
9-10

the second and third quarters. The
clock stops at quarter breaks and
halftime. Time-out is allowed only for
serious injury. Play is then stopped on
both fields.
Rules
Players may use any means of inter-
fering with their opponents’ progress,
but they are penalized for striking or
clipping opponents or throwing them
to the ground. These penalties are
enforced by the referees. Force maybe
legally applied to any opponent whether
or not they are playing the ball. Block-
ing is allowed if blockers stay on their
feet and limit contact to the space
between waist and shoulders. Blockers
may not swing, throw, or flip their
elbows or forearms. Tackling opposing
soldiers who are playing the ball is
allowed. The chief umpire or any
referee may call infractions and im-
pose penalties for unsportsmanlike
conduct or personal fouls on either
field. Penalties may also be called for
infractions committed on the field or
sidelines during playing time, quarter-
and halftime breaks, and time-outs.
Personal fouls are called for the fol-
lowing:
● Illegal blocking (below an oppo-
nent’s waist).
● Clipping (throwing the body across
the back of the opponent’s legs as he
is running or standing).
● Throwing an opponent to the ground
(that is, lifting and dropping or
slamming a player to the ground in
stead of tackling cleanly).
● Spearing, tackling, or piling on an
opponent who is already on the
ground.
● Striking or punching with closed
fist(s).
● Grasping an opponent’s neck or
head.
● Kicking.
● Butting heads.
Unsportsmanlike conduct is called
for abusive or insulting language that
the referee judges to be excessive and
blatant. It is also called against a
player on the sidelines who interferes
with the ball or with his opponents on
the field. A player who violates these
rules should be removed from the
game and made to run one lap around
both playing fields. A penalized
player leaves the team shorthanded
until he completes the penalty lap and
the next break in play occurs on the
field from which he was removed.
The penalized player or a substitute
then enters the game. Referees and
the chief umpire may, at their discre-
tion, eject any player who is a chronic
violator or who is judged to be danger-
ous to other players, Once ejected, the
player must leave both the field of
play and team area. Substitutes for
ejected players may enter during the
next break in play that follows a goal
scored by either team. They enter on
the field from which the players were
ejected.
BROOM-BALL HOCKEY
This game is played on ice or a
frozen field using hockey rules. Play-
ers wear boots with normal soles and
carry broom-shaped sticks with which
they hit the ball into the goals.
The object of this game is for teams
to score goals through the opponent’s
defenses. Using only brooms, players
pass the ball through the opposing
team to reach its goal. The first team
to score five points wins. Broom ball
provides a good cardiorespiratory work-
out.
Players
There are 15 to 20 players on each
team. One is a goalie and the others are
divided into three equal groups. The
goalie plays in the goal area of a
standard soccer or hockey field or
along the goal line if the two opposing
goals are the same size. One soccer
ball, or some other type of inflated
9-11
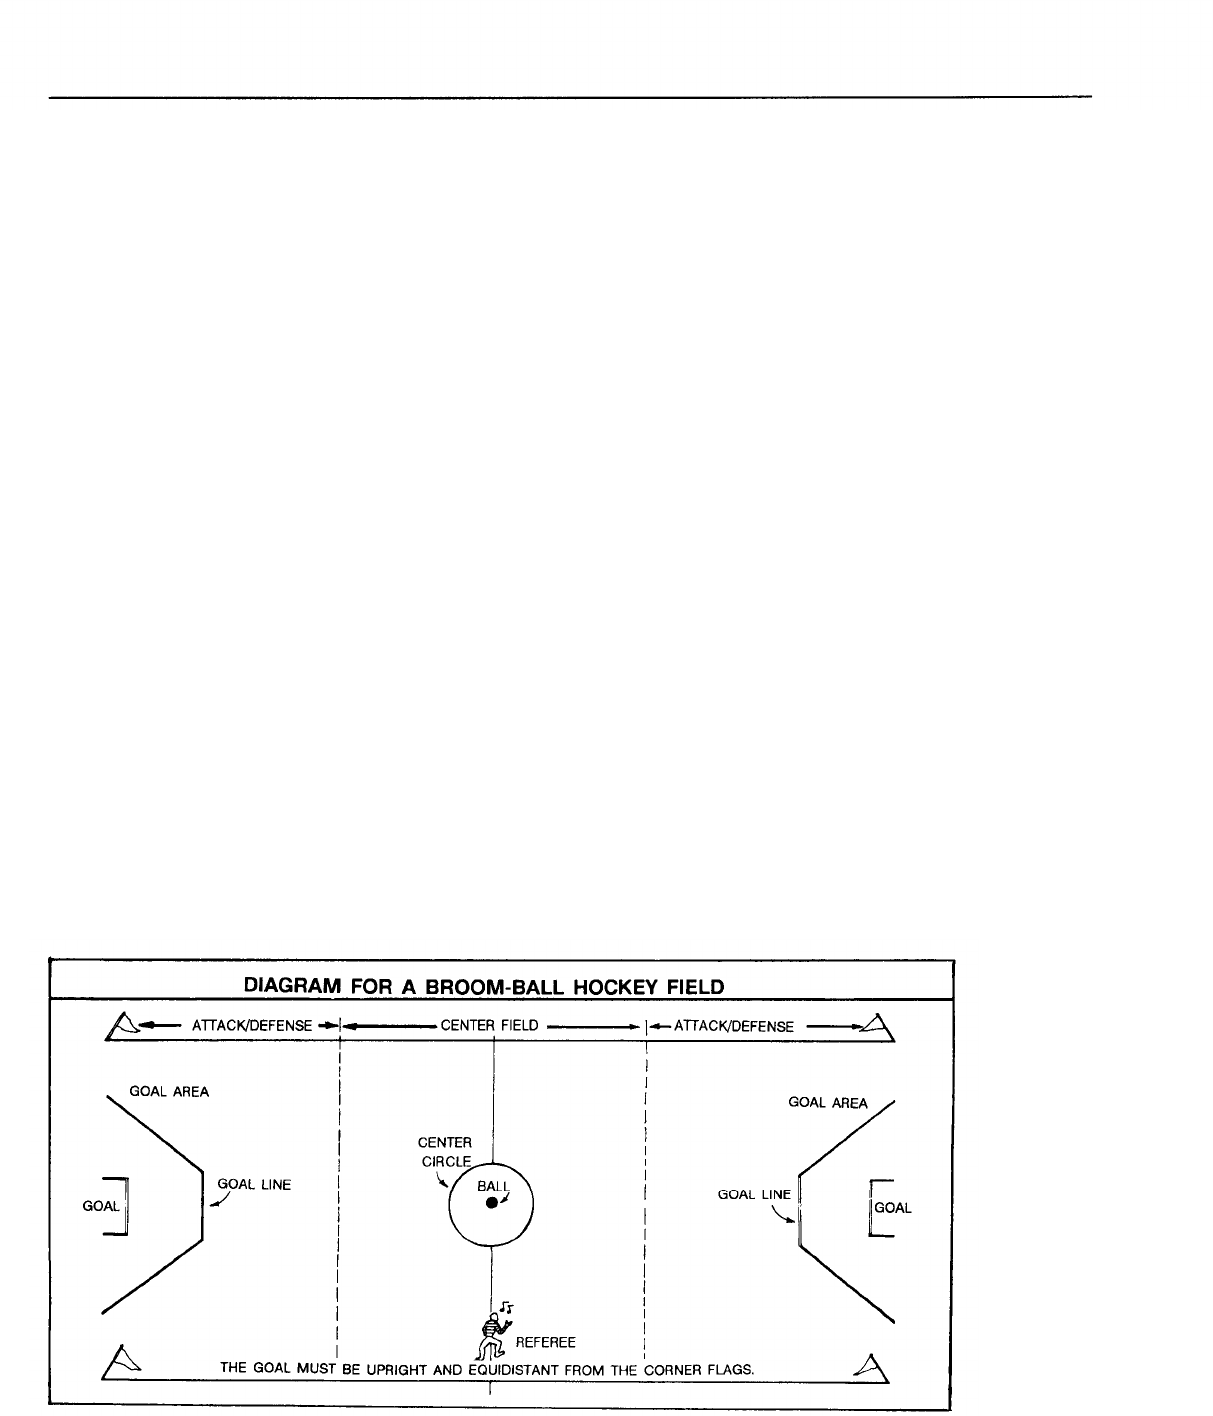
ball, is used. The players need no
padding.
The three groups begin the game in
center field. All players must stay in
their designated space throughout the
game. A diagram of the field is shown
at Figure 9-6.
The Game
The face-off marks the start of the
game, the second half, and the restart
of play after goals. Each half lasts 15
minutes. For the face-off, each player
is on his own half of the field. All
players, except the two centers, are
outside the center circle. The referee
places the ball in the center of the
circle between the two centers. The
signal to begin play is one long blast on
the whistle. The ball must travel
forward and cross the center circle
before being played by another player.
There are no time-outs except for
injury. The time-out signal is two
sharp whistle blasts.
Rules
All players, including goalies, must
stay inside their legal boundaries at all
times. Only goalies may use their
hands to play the ball, but they must
always keep control of their sticks.
Other players must stay in their re-
spective zones of play (Attack, De-
fense, Centerfield). The ball is played
along the ground or over one or more
groups of players. It may travel any
distance as long as it is legally played.
The referee calls infractions and
imposes penalties. Basic penalties are
those called for the following:
● Unnecessary roughness or danger-
ous play. (The player is removed
from the game; he stays in the
penalty box for two minutes.)
● Ball out-of-bounds. (The team that
caused it to go out loses posses-
sion, and the opposing team puts the
ball back into play by hitting it to
the nearest player.)
● Use of hands by a player other than
a goalie. (The player must stay in
the penalty box one minute.)
● Improper crossing of boundaries.
(When a member of the team in pos-
session of the ball crosses the bound
ary line of his zone of play, posses-
sion will be awarded to the other
team.)
Figure 9-6
9-12

Orienteering
Orienteering combines
map reading, compass
use, and terrain study
with strategy,
competition, and
exercise.
Orienteering is a competitive form
of land navigation. It combines map
reading, compass use, and terrain study
with strategy, competition, and exer-
cise. This makes it an excellent activity
for any training schedule.
An orienteering course is set up by
placing control points or marker signs
over a variety of terrain. The orienteer
or navigator uses a detailed topogra-
phical map and a compass to negotiate
the course. The map should be 1:25,000
scale or larger. A liquid-filled orien-
teering compass works best. The base
of the compass is transparent plastic,
and it gives accurate readings on the
run. The standard military, lensatic
compass will work even though it is not
specifically designed for the sport.
The best terrain for an orienteering
course is woodland that offers varied
terrain. Several different courses can
be setup in an area 2,000 to 4,000 yards
square. Courses can be short and
simple for training beginners or longer
and more difficult to challenge the
advanced competitors.
The various types of orienteering
are described below.
CROSS-COUNTRY ORIENTEERING
This popular type of orienteering is
used in all international and champi-
onship events. Participants navigate to
a set number of check or control points
in a designated order. Speed is impor-
tant since the winner is the one who
reaches all the control points in the
right order and returns to the finish
area in the least time.
SCORE ORIENTEERING
Quick thinking and strategy are
major factors in score orienteering. A
competitor selects the check-points to
find based on point value and location.
Point values throughout the course are
high or low depending on how hard the
markers are to reach. Whoever collects
the most points within a designated
time is the winner. Points are de-
ducted for returning late to the finish
area.
LINE ORIENTEERING
Line orienteering is excellent for
training new orienteers. The route is
premarked on the map, but check-
points are not shown. The navagator
tries to walk or run the exact map
route. While negotiating the course, he
looks for checkpoints or control-marker
signs. The winner is determined by
the time taken to run the course and
the accuracy of marking the control
points when they are found.
ROUTE ORIENTEERING
This variation is also excellent for
beginners. The navigator follows a
route that is clearly marked with signs
or streamers. While negotiating the
course, he records on the map the
route being taken. Speed and accuracy
of marking the route determine the
winner.
NIGHT ORIENTEERING
Competitors in this event carry
flashlights and navigate with map and
compass. The night course for cross-
country orienteering is usually shorter
than the day course. Control points are
marked with reflective material or dim
lights. Open, rolling terrain, which is
poor for day courses, is much more
challenging at night.
URBAN ORIENTEERING
Urban orienteering is very similar
to traditional types, but a compass,
topographical map, and navigation skills
are not needed. A course can be set up
on any installation by using a map of
the main post or cantonment area.
Soldiers run within this area looking
9-13
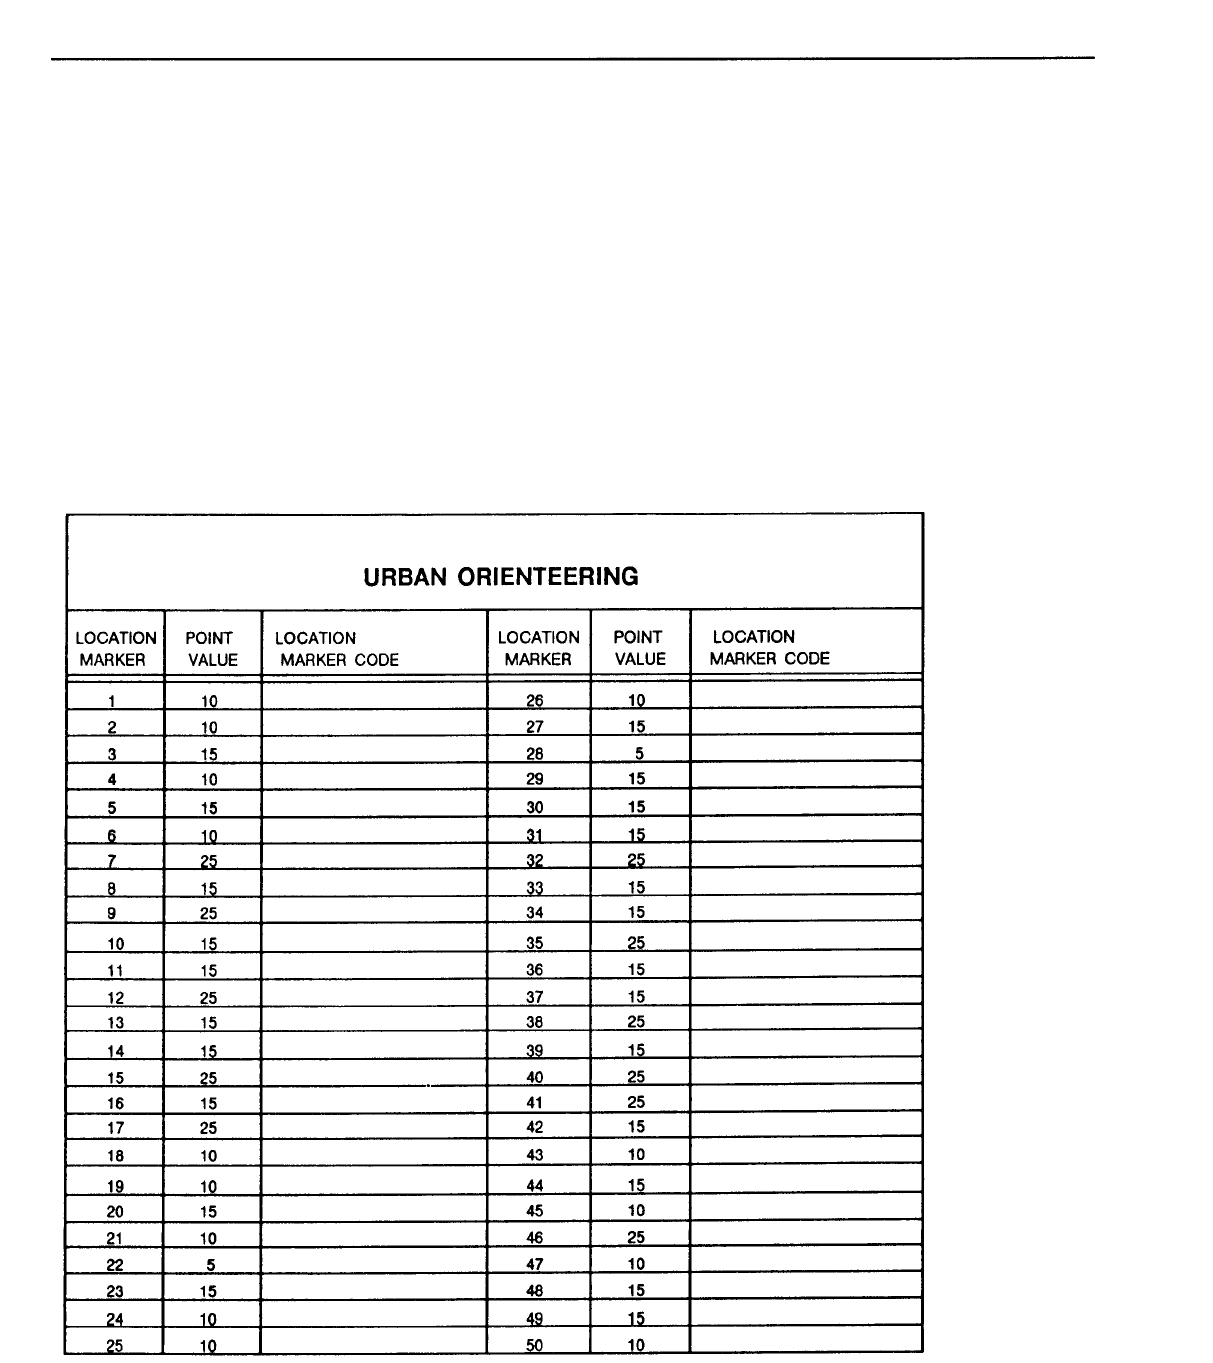
for coded location markers, which are
numbered and marked on the map
before the start. This eliminates the
need for a compass. Soldiers only need
a combination map-scorecard, a watch,
and a pencil. (Figure 9-7 shows a
sample scorecard.)
Urban orienteering adds variety
and competition to a unit’s PT pro-
gram and is well suited for an intra-
mural program. It also provides a good
cardiovascular workout.
Participants and Rules
Urban orienteering is conducted
during daylight hours to ensure safety
and make the identification of check-
point markers easy. Soldiers form two-
man teams based on their APFT 2-
mile-run times. Team members should
have similar running ability. A handi-
cap is given to slower teams. (See Fig-
ure 9-8.) At the assembly area, each
team gets identical maps that show the
Figure 9-7
9-14
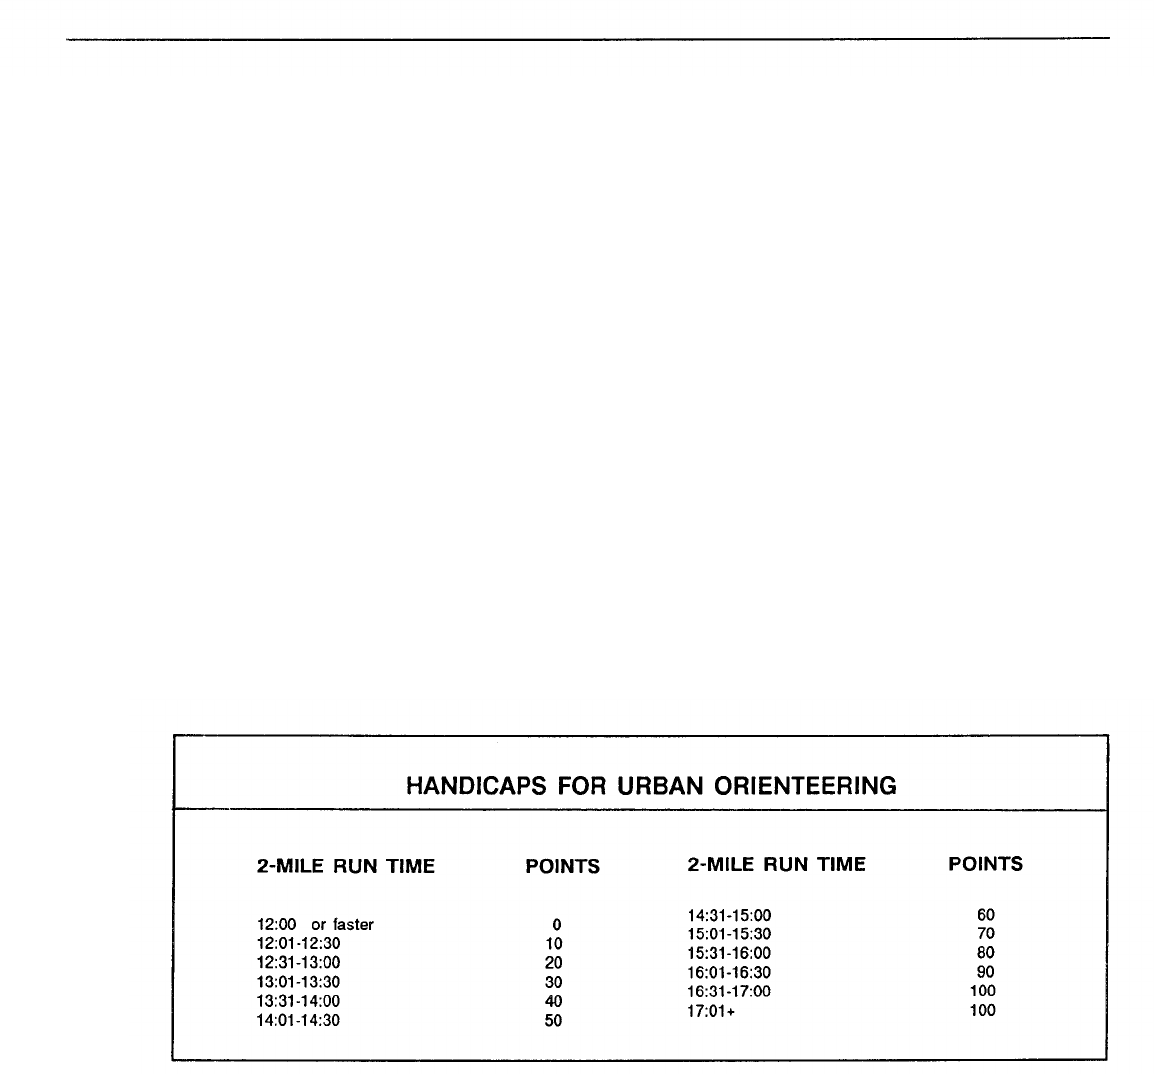
location of markers on the course.
Location markers are color-coded on
the map based on their point value.
The markers farthest from the assem-
bly area have the highest point values.
The maps are labeled with a location
number corresponding to the location
marker on the course. A time limit is
given, and teams finishing late are
penalized. Five points are deducted
for each minute a team is late. While
on the course, team members must stay
together and not separate to get two
markers at once. A team that separates
is disqualified. Any number of sol-
diers may participate, the limiting fac-
tors being space and the number of
points on the course.
Playing the Game
Once the soldiers have been as-
signed a partner, the orienteering
marshal briefs them on the rules and
objectives of the game. He gives them
their time limitations and a reminder
about the overtime penalty. He also
gives each team a combination map/
scorecard with a two-digit number on
it to identify their team. When a team
reaches a location marker, it records
on the scorecard the letters that corre-
spond to its two-digit number.
Point values of each location marker
are also annotated on the scorecard.
When the orienteering marshal signals
the start of the event, all competitors
Figure 9-8
9-15
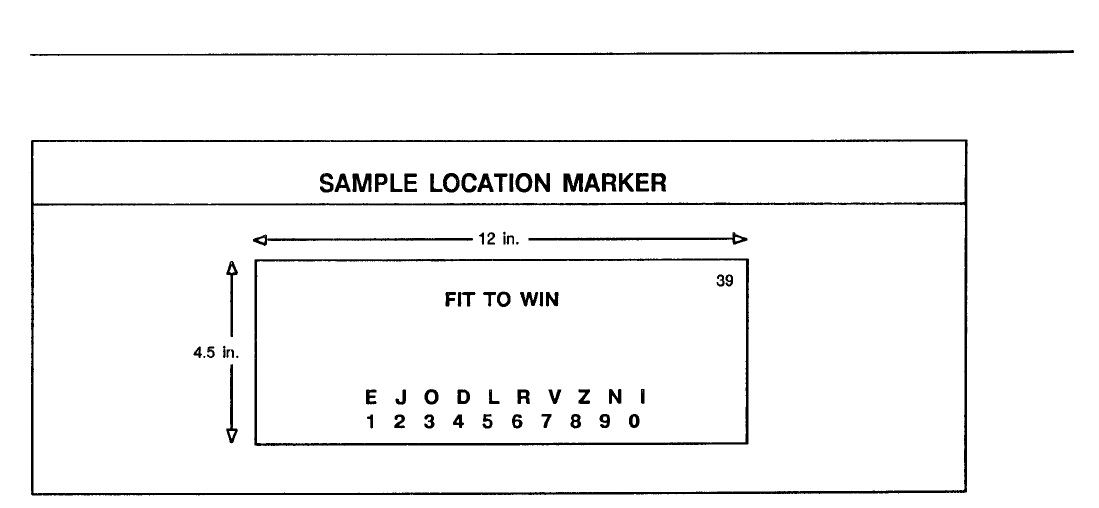
Figure 9-9
leave the assembly area at the same
time. One to two hours is the optimal
time for conducting the activity. A
sample location marker is shown at
Figure 9-9.
For this example, team number 54
found the marker. The letters corre-
sponding to 54 are LD, so they place
“LD” on line 39 of their scorecard.
This line number corresponds to the
location’s marker number. When the
location marker code is deciphered,
the team moves on to the next marker
of its choice. Each team goes to as
many markers as possible within the
allotted time. After all teams have
found as many location markers as
possible and have turned in their map/
scorecards, the points are computed by
the orienteering marshal to determine
the teams’ standings. He has the key
to all the points and can determine
each team’s accuracy. Handicap points
are then added. Each soldier gets
points if his 2-mile-run time is slower
than 12 minutes. (See Figure 9-8.)
The teams’ standings are displayed
shortly after the activity ends.
Safety Briefing
The orienteering marshal gives a
safety briefing before the event starts.
He reminds soldiers to be cautious
while running across streets and to
emphasize that team members should
always stay together.
Set Up and Materials
The course must be well thought out
and set up in advance. Setting up
requires some man-hours, but the course
can be used many times. The major
tasks are making and installing location
markers and preparing map/scorecard
combinations. Once the location marker
numbers are marked and color coded
on the maps, they are covered with
combat acetate to keep them useful for
a long time. Combat acetate (also
called plastic sheet) can be purchased
in the self-service supply center store
under stock number 9330-00-618-7214.
The course organizer must decide
how many location markers to make
and where to put them. He should use
creativity to add excitement to the
course. Suggestions for locations to put
point markers are as follows: at inter-
sections, along roads in the tree line, on
building corners, and along creek beds
and trails. They should not be too hard
to find. To help teams negotiate the
course, all maps must be precisely
marked to correspond with the place-
ment of the course-location markers.
9-16

Unit Olympics
The unit olympics is a multifaceted
event that can be tailored to any unit to
provide athletic participation for all
soldiers. The objective is to incorpo-
Unit olympics rate into a team-level competition
incorporate athletic
athletic. events that represent all five
events that represent all
fitness components. The competition
five fitness components. can be within a unit or between com-
peting units. When conducted with en-
thusiasm, it promotes team spirit and
provides a good workout. It is a good
diversion from the regular PT session.
A unit olympics, if well promoted
from the top and well staged by the
project NCO or officer, can be a good
precursor to an SDT or the EIB test.
TYPES OF EVENTS
The olympics should include events
that challenge the soldiers’ muscular
strength and endurance, aerobic en-
durance, flexibility, agility, speed, and
related sports skills.
Events can be held for both indi-
viduals and teams, and they should be
designed so that both male and female
soldiers can take part. Each soldier
should be required to do a minimum
number of events. Teams should wear
a distinctively marked item such as a
T-shirt or arm band. This adds char-
acter to the event and sets teams apart
from each other. A warm-up should
precede and a cool-down should follow
the events.
The following are examples of ath-
letic events that could be included in a
unit olympics:
Push-Up Derby
This is a timed event using four-
member teams. The objective is for the
team to do as many correct push-ups as
possible within a four-minute time
limit. Only one team member does
push-ups at a time. The four team
members may rotate as often as de-
sired,
Sandbag Relay
This event uses four-man teams for
a running relay around a quarter-mile
track carrying sandbags. One player
from each team lines up at the starting
line with a full sandbag in each hand.
He hands the sandbags off to a team-
mate when he finishes his part of the
race. This continues until the last team
player crosses the finish line. Placings
are determined by the teams’ order of
finish.
Team Flexibility
In this event, if teams are numeri-
cally equal, all members of each team
should participate. If not, as many
team members should participate as
possible. Each team’s anchor person
places his foot against a wall or a curb.
He stretches his other foot as far away
as possible as in doing a split. The next
team member puts one foot against the
anchor man’s extended foot and does a
split-stretch. This goes on until all
team members are stretched. They
cover as much distance as possible
keeping in contact with each other.
The team that stretches farthest from
the start point without a break in their
chain is the winner.
Medicine-Ball Throw
This event uses four-member teams.
The teams begin by throwing the ball
from the same starting line. When it
lands, the ball is marked for each team
thrower, and the next team player
throws from this spot. This is repeated
until all the team’s players have thrown.
The team whose combined throws
cover the most distance is the winner.
Job-Related Events
The organizer should use his imagi-
nation when planning activities. He
may incorporate soldier skills required
of an MOS. For instance, he could
9-17

devise a timed land-navigation event
geared toward soldiers with an MOS of
11 C. The team would carry an 81 -mm
mortar (tube, tripod, and baseplate) to
three different locations, each a mile
apart, and set it up in a firing configu-
ration. This type of event is excellent
for fine-tuning job skills and is also
physically challenging.
OPENING CEREMONY
The commander, ranking person,
or ceremony host gives an inspira-
tional speech before the opening cere-
monies, welcoming competitors and
wishing them good luck. The olympics
is officially opened with a torch light-
ing.
This is followed by a short
symbolic parade of all the teams. The
teams are then put back into forma-
tion, and team captains lead motivat-
ing chants. The master of ceremonies
(MC) announces the sequence of events
and rules for each event. The games
then begin.
JUDGING AND SCORING
The MC should have one assistant
per team who will judge that one team
during each event. Assistants give
input on events that need a numerical
count. The MC monitors the point
accumulation of each team. Points are
awarded for each event as follows:
• First = 4 points.
• Second = 3 points.
• Third = 2 points.
• Fourth = 1 point.
When two teams tie an event, the
points are added together and split
equally between them. After the
competition ends, the totaled point
scores for each team are figured. The
first- through fourth-place teams are
then recognized.
9-18

Commanders must
develop prgrams that
train soldiers to
maximize their physical
performance.
The goal of the Army’s physical
fitness program is to improve each
soldier’s physical ability so he can
survive and win on the battlefield.
Physical fitness includes all aspects of
physical performance, not just per-
formance on the APFT. Leaders must
understand the principles of exercise,
the FITT factors, and know how to
apply them in order to develop a sound
PT program that will improve all the
fitness components. To plan PT suc-
cessfully, the commander and MFT
must know the training management
system. (See FM 25-100.)
Commanders should not be satisfied
with merely meeting the minimum
requirements for physical training which
is having all of their soldiers pass the
APFT. They must develop programs
that train soldiers to maximize their
physical performance. Leaders should
use incentives. More importantly, they
must set the example through their own
participation.
The unit PT program is the com-
mander’s program. It must reflect his
goals and be based on sound, scientific
principles. The wise commander also
uses his PT program as a basis for
building team spirit and for enhancing
other training activities. Tough, real-
istic training is good. However, leaders
must be aware of the risks involved
with physical training and related ac-
tivities. They should, therefore, plan
wisely to minimize injuries and acci-
dents.
Steps in Planning
STEP 1: ANALYZE THE MISSION
When planning a physical fitness
program, the commander must con-
sider the type of unit and its mission.
Missions vary as do the physical re-
quirements necessary to complete them.
As stated in FM 25-100, “The wartime
mission drives training.” A careful
analysis of the mission, coupled with
the commander’s intent, yields the
mission-essential task list (METL) a
unit must perform.
Regardless of the unit’s size or
mission, reasonable goals are essential.
According to FM 25-100, the goals
should provide a common direction
for all the commander’s programs and
systems. An example of a goal is as
follows because the exceptional physi-
cal fitness of the soldier is a critical
combat-multiplier in the division, it
must be our goal to ensure that our
soldiers are capable of roadmarching
12 miles with a 50-pound load in less
than three hours.
STEP 2: DEVELOP FITNESS
OBJECTIVES
Objectives direct the unit’s efforts
by prescribing specific actions. The
commander, as tactician, and the MFT,
as physical fitness advisor, must ana-
lyze the METL and equate this to
specific fitness objectives. Examples
of fitness objectives are the following:
● Improve the unit’s overall level of
strength by ensuring that all sol-
diers in the unit can correctly per-
form at least one repetition with 50
percent of their bodyweight on the
overhead press using a barbell.
● Improve the unit’s average APFT
score through each soldier obtain-
ing a minimum score of 80 points
on the push-up and sit-up events
and 70 points on the 2-mile run.
● Decrease the number of physical
training injuries by 25 percent
through properly conducted train-
ing.
The commander and MFT identify
and prioritize the objectives.
STEP 3: ASSESS THE UNIT
With the training objectives estab-
lished, the commander and MFT are
ready to find the unit’s current fitness
level and measure it against the desired
level.
10-1

Giving a diagnostic APFT is one
way to find the current level. Another
way is to have the soldiers road march
a certain distance within a set time
while carrying a specified load. Any
quantifiable, physically demanding,
mission-essential task can be used as an
assessment tool. Training records and
reports, as well as any previous
ARTEP, EDREs, and so forth, can also
provide invaluable information.
STEP 4: DETERMINE TRAINING
REQUIREMENTS
By possessing the unit’s fitness capa-
bilities and comparing them to the
standards defined in training objec-
tives, leaders can determine fitness
training requirements. When, after
extensive training, soldiers cannot reach
the desired levels of fitness, training
requirements may be too idealistic.
Once training requirements are deter-
mined, the commander reviews higher
headquarters’ long- and short-range
training plans to identify training events
and allocations of resources which will
affect near-term planning.
STEP 5: DEVELOP FITNESS TASKS
Fitness tasks provide the framework
for accomplishing all training require-
ments. They identify what has to be
done to correct all deficiencies and
sustain all proficiencies. Fitness tasks
establish priorities, frequencies, and
the sequence for training requirements.
They must be adjusted for real world
constraints before they become a part
of the training plan. The essential
elements of fitness tasks can be cata-
loged into four groups:
(1) Collective tasks
(2) Individual tasks
(3) Leader tasks
(4) Resources required for training
Collective tasks. Collective tasks are
the training activities performed by
the unit. They are keyed to the unit’s
specific fitness objectives. An ex-
ample would be to conduct training to
develop strength and muscular endur-
ance utilizing a sandbag circuit.
Individual tasks. Individual tasks are
activities that an individual soldier
must do to accomplish the collective
training task. For example, to improve
CR endurance the individual soldier
must do ability-group running, road
marching, Fartlek training, interval
training, and calculate/monitor his
THR when appropriate.
Leader tasks. Leader tasks are the
specific tasks leaders must do in order
for collective and individual training
to take place. These will involve pro-
curing resources, the setting up of
training, education of individual sol-
diers, and the supervision of the actual
training.
Resources. Identifying the necessary
equipment, facilities, and training aids
during the planning phase gives the
trainer ample time to prepare for the
training. The early identification and
acquisition of resources is necessary to
fully implement the training program.
The bottom line is that training pro-
grams must be developed using re-
sources which are available.
STEP 6: DEVELOP A TRAINING
SCHEDULE
The fitness training schedule re-
sults from leaders’ near-term plan-
ning. Leaders must emphasize the
development of all the fitness compo-
nents and follow the principles of
exercise and the FITT factors. The
training schedule shows the order, in-
tensity, and duration of activities for
PT. Figure 10-1 illustrates a typical
PT session and its component parts.
10-2
There are three distinct steps in
planning a unit's daily physical train-
ing activities. They are as follows:
1. Determine the minimum frequency
of training. Ideally, it should in-
include three cardiorespiratory and
three muscular conditioning ses-
sions each weeks. (See the FITT
factors in Chapter 1.)
2. Determine the type of activity. This
depends on the specific purpose of
the training session. (See Figure 10-
2.) For more information on this
topic, see Chapters 1, 2, and 3.
3. Determine the intensity and time of
the selected activity. (See the FITT
factors in Chapter 1.)
Each activity period should include
a warm-up, a workout that develops
cardiorespiratory fitness and/or mus-
cular endurance and strength, and a
cool-down. (See Figure 10-1).
At the end of a well-planned and
executed PT session, all soldiers should
feel that they have been physically
stressed. They should also understand
the objective of the training session
and how it will help them improve
their fitness levels.
STEP 7: CONDUCT AND
EVALUATE TRAINING
The commander and MFT now
begin managing and supervising the
day-to-day training. They evaluate
how the training is performed by
monitoring its intensity, using THR or
muscle failure, along with the duration
of the daily workout.
The key to evaluating training is to
determine if the training being con-
ducted will result in improvements in
physical conditioning. If not, the
training needs revision. Leaders should
Figure 10-1
10-3
Figure 10-2
not be sidetracked by PT that is all intervals. Local “Fit to Win” coordina-
form and little substance. Such train-
ing defeats the concept of objective-
based training and results in little
benefit to soldiers.
Education
Teaching soldiers about physical
fitness is vital. It must be an ongoing
effort that uses trained experts like
MFTs. Soldiers must understand why
the program is organized the way it is
and what the basic fitness principles
are. When they know why they are
training in a certain way, they are
more likely to wholeheartedly take
part. This makes the training more ef-
fective.
Education also helps the Army
develop its total fitness concept. To-
tal fitness should be reinforced through-
out each soldier’s career. Classroom
instruction in subjects such as prin-
ciples of exercise, diet and nutrition,
tobacco cessation, and stress manage-
ment should be held at regular
tors (AR 600-63) can help develop
classes on such subjects.
Common Errors
There are some common errors in
unit programs. The most common
error concerns the use of unit runs.
When all soldiers must run at the same
pace as with a unit run, many do not
receive a training effect because they
do not reach their training heart rate
(THR). The least-fit soldiers of the
unit may be at risk because they may
be training at heart rates above their
THR. Another error is exclusively
using activities such as the “daily dozen.”
These exercises emphasize form over
substance and do little to improve
fitness.
Yet another error is failing to strike
a balance in a PT program between CR
endurance training and muscular en-
durance and strength training. In
addition, imbalances often stem from a
lack of variety in the program which
Total fitness should be
reinforced throughout
each soldier's career by
classroom instruction.
10-4

leads to boredom. The principles of
exercise are described in Chapter 1,
and their application is shown in the
sample program below.
A Sample Program
The following sample program shows
a commander’s thought processes as he
develops a 12-week fitness training
program for his unit.
Captain Frank Jones’s company has
just returned from the field where it
completed an ARTEP. Several injuries
occurred including a broken foot, re-
sulting from a dropped container, and
three low back strains. After evaluat-
ing his unit during this ARTEP, CPT
Jones concluded that its level of physi-
cal fitness was inadequate. He thought
this contributed to the injuries and
poor performance. The soldiers’ flexi-
bility was poor, and there was an
apparent lack of prior emphasis on,
and training in, good lifting tech-
niques. This, combined with poor
flexibility in the low back and ham-
strings, may have contributed to the
unacceptably high number of low back
strains. Captain Jones decided to ask
the battalion’s MFT to help him
velop a good unit program for
company. They went through
following steps.
7-STEP PLANNING PROCESS
ANALYZE THE MISSION
DEVELOP FITNESS OBJECTIVES
ASSESS THE UNIT
DETERMINE TRAINING REQUIREMENTS
DESIGN FITNESS TASKS
DEVELOP A TRAINING SCHEDULE
CONDUCT AND EVALUATE TRAINING
ANALYZE THE MISSION
de-
the
the
ARTEP manual to find the most physi-
cally demanding, mission-oriented tasks
the unit performs. The analysis showed
that, typically, the company does a
tactical road march and then occupies
a position. It establishes a perimeter,
improves its positions, and selects and
prepares alternate positions. One of
the most demanding missions while in
position requires soldiers to move by
hand, for 15 to 30 minutes, equipment
weighing up to 95 pounds. If his unit
received artillery fire, it would need to
be able to move to alternate positions
as quickly as possible. This requires
much lifting, digging, loading, un-
loading, and moving of heavy equip-
ment. All of these tasks require good
muscular endurance and strength and
a reasonable level of cardiorespiratory
endurance.
DEVELOP FITNESS OBJECTIVES
Next, CPT Jones reviewed his bat-
talion commander’s physical training
guidance. It showed that the com-
mander was aware that the unit’s tasks
require muscular endurance and
strength and cardiorespiratory fitness.
The guidance and objectives issued are
as follows:
a. Units will do PT five days a week
(0600-0700) when in garrison. In the
field, organized PT will beat the com-
mander’s discretion.
Captain Jones determined that the
major PT emphasis should be to im-
prove muscular endurance and strength.
He based this on his unit’s mission,
training schedule, available resources,
and on his commander’s guidance and
objectives. With this information and
the MIT’s recommendations, CPT Jones
developed the following fitness objec-
tives.
●
●
●
Improve the unit’s overall level of
muscular endurance and strength.
Improve the unit’s overall level of
flexibility.
Improve the unit’s average APFT
score. Each soldier will score at
least 80 points on the push-up and
First, they analyzed the recently
completed ARTEP and reviewed the
10-5

sit-up events and 70 points on the
2-mile run.
● Improve the unit’s road marching
capability so that 100 percent of the
unit can complete a 12-mile road
march with a 35-pound load in at
least 3.5 hours.
● Decrease the number of profiles.
● Reduce tobacco use.
ASSESS THE UNIT
The next step CPT Jones accom-
plished was to assess his unit.
The MFT studied the results of the
unit’s latest APFT and came up with
the following information:
● The average push-up score was 68
points.
● The average sit-up score was 72
points.
● The average number of points scored
on the 2-mile run was 74.
● There were six failures, two on the
2-mile run and four on the push-
up.
The MFT also recommended that
the unit be assessed in the following
areas:
road march performance,
strength, flexibility, substance abuse,
and profiled soldiers.
Following the MFT’s recommenda-
tions, subordinate leaders made the
following assessments/determinations:
● Eighty-eight percent of the com-
pany finished the 12-mile road
march with a 35-pound load in
under 3 hours 30 minutes.
● A formation toe-touch test revealed
that over half the company could
not touch their toes while their
knees were extended.
● Thirty percent of the unit uses to-
bacco.
● Two soldiers are in the overweight
program.
● Eight percent of the unit is now on
temporary profile, most from back
problems.
DETERMINE TRAINING
REQUIREMENTS
The next step CPT Jones accom-
plished was to determine the training
requirements.
Training requirements are deter-
mined by analyzing the training results
and the data obtained from the unit as-
sessment. The next step is to compare
this data to the standards identified in
the training objectives. When per-
formance is less than the established
standard, the problem must be ad-
dressed and corrected.
Captain Jones established the fol-
lowing training requirements.
Units will do flexibility exercises
during the warm-up and cool-down
phase of every PT session. During the
cool-down, emphasis on will be placed
on developing flexibility in the low
back, hamstrings, and hip extensor
muscle groups.
Each soldier will do 8 to 12 repeti-
tions of bent-leg, sandbag dead-lifts at
least two times a week to develop
strength. The section leader will su-
pervise lifts.
Each soldier will do heavy resis-
tance/weight training for all the muscle
groups of the body two to three times
a week.
Each soldier will perform timed sets
of push-ups and sit-ups.
Each soldier will train at least 20 to
30 minutes at THR two to three times
a week.
Road marches will be conducted at
least once every other week.
Tobacco cessation classes will be es-
tablished to reduce the number of
tobacco users.
DESIGN FITNESS TASKS
Once all training requirements are
identified, the next step is to use them
to design fitness tasks which relate to
10-6
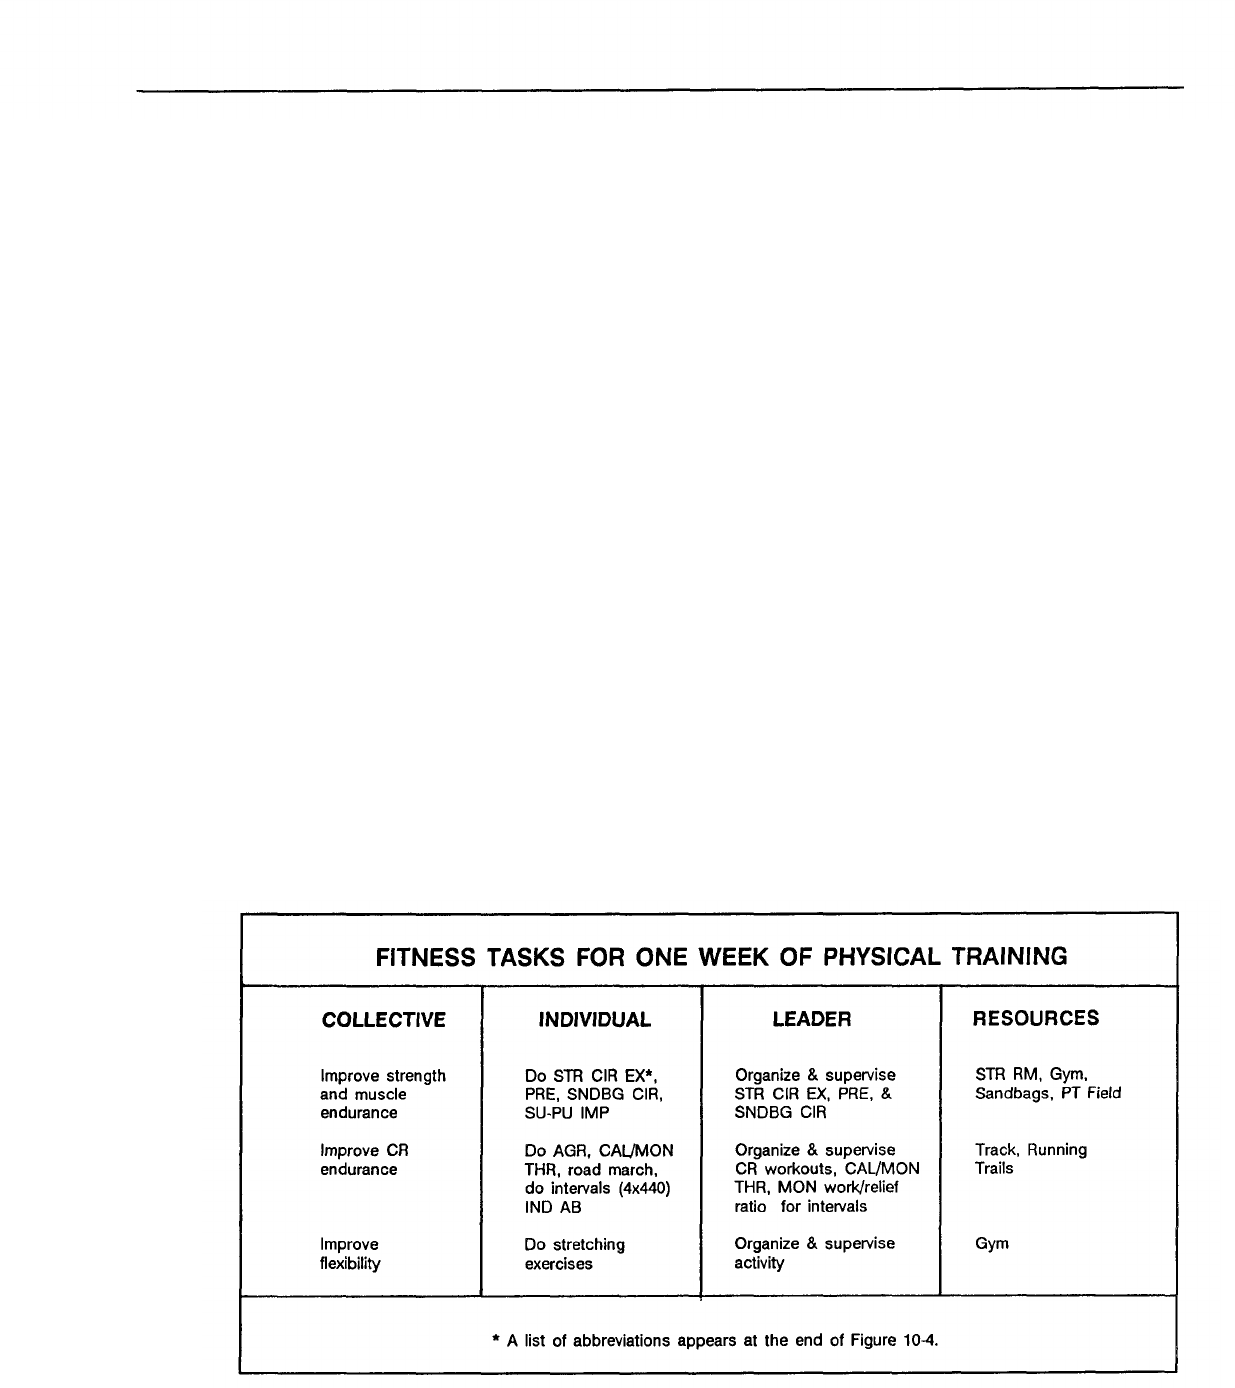
the fitness objectives. In developing
the fitness tasks, CPT Jones must
address collective, individual, and leader
tasks as well as resources required.
Fitness tasks provide the framework
for accomplishing the training require-
ments. By accurately listing the fitness
tasks that must be done and the re-
sources required to do them, the sub-
sequent step of developing a training
schedule is greatly facilitated.
An example of designing fitness
tasks is provided in Figure 10-3 by
using the activities which might occur
during one week of physical training.
The collective tasks for the unit are
to perform the following: develop
muscular endurance and strength, im-
prove CR endurance, and improve
flexibility.
The individual tasks all soldiers
must perform during the week are as
follows. For developing strength and
muscular endurance, they must per-
form appropriate strength circuit exer-
cises, PREs, sandbag circuits, to in-
clude performing bent-leg dead lifts
exercises, and training for push-up/
sit-up improvement. To improve
cardiorespiratory endurance, they must
do ability-group runs, interval train-
ing, road marching, and they must cal-
culate their THR and monitor THR
when appropriate. To improve their
flexibility, they must do stretching ex-
ercises during their daily warm-up
and cool-down.
The leader’s tasks are to organize
and supervise all strength- and muscle
endurance-training sessions and CR
training sessions so as to best meet all
related fitness objectives. Similarly,
the leader must organize and supervise
all warm-up and cool-down sessions
to best meet the fitness objectives for
the development and maintenance of
flexibility.
To provide specific examples of
leaders tasks in the area of training for
strength and muscle endurance, the
leader will ensure the following:
● Each strength- and/or muscle en-
durance-training session works all
the major muscle groups of the
body.
● High priority is given to training
those muscles and muscle groups
used in mission-essential tasks.
● Areas where weaknesses exist,
with respect to strength/muscle
Figure 10-3
10-7
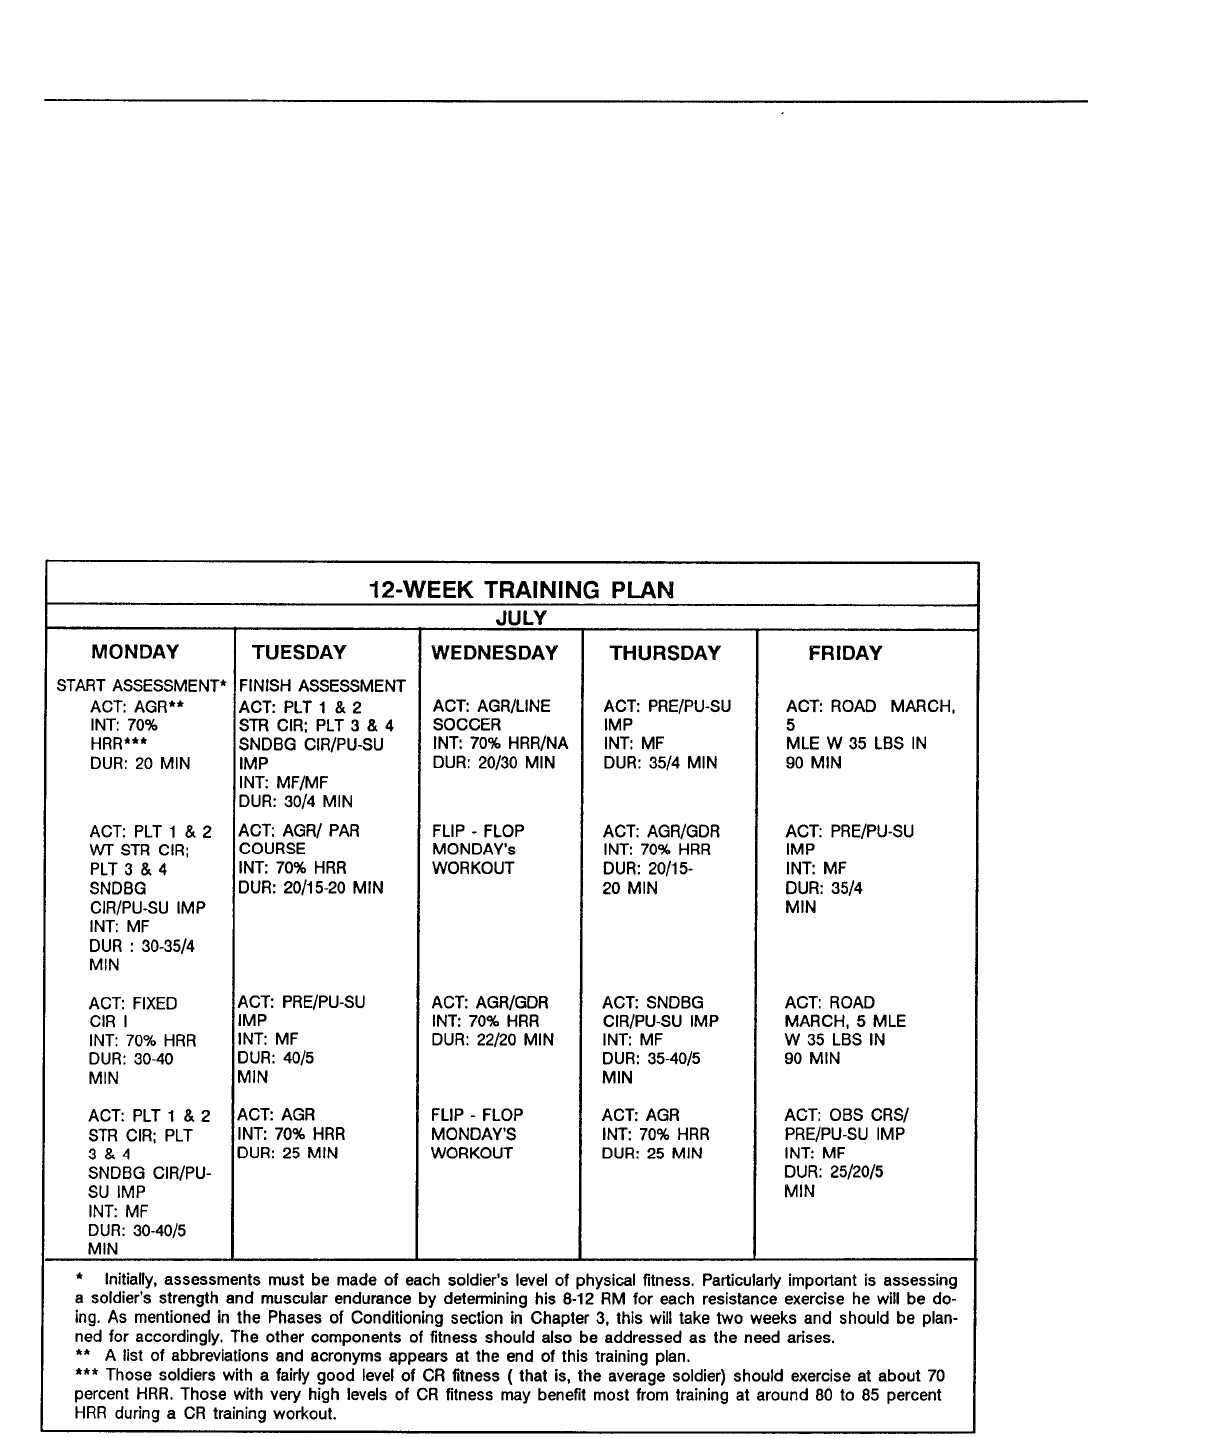
endurance, are targeted in all work- chapters are used to organize training
outs.
sessions for improving CR endurance
●
●
●
●
Problem areas related to APFT per- and flexibility.
formance are addressed in appro- The resources needed for the one-
priate workouts. week period are as follows: a strength
The duration of each strength train- room, a gym, a PT field, a running
ing session is 20-40 minutes. track and/or running trails, and sand-
Soldiers train to muscle failure.
bags.
All the principles of exercise, to
include regularity, overload, re- DEVELOP A TRAINING SCHEDULE
covery, progression, specificity, bal-
ance are used. The next step was to develop a
In a similar manner, the leader fitness training schedule (shown at
would ensure that the guidelines and Figure 10-4). It lists the daily activi-
principles outlined in this and earlier ties and their intensity and duration.
Figure 10-4
10-8
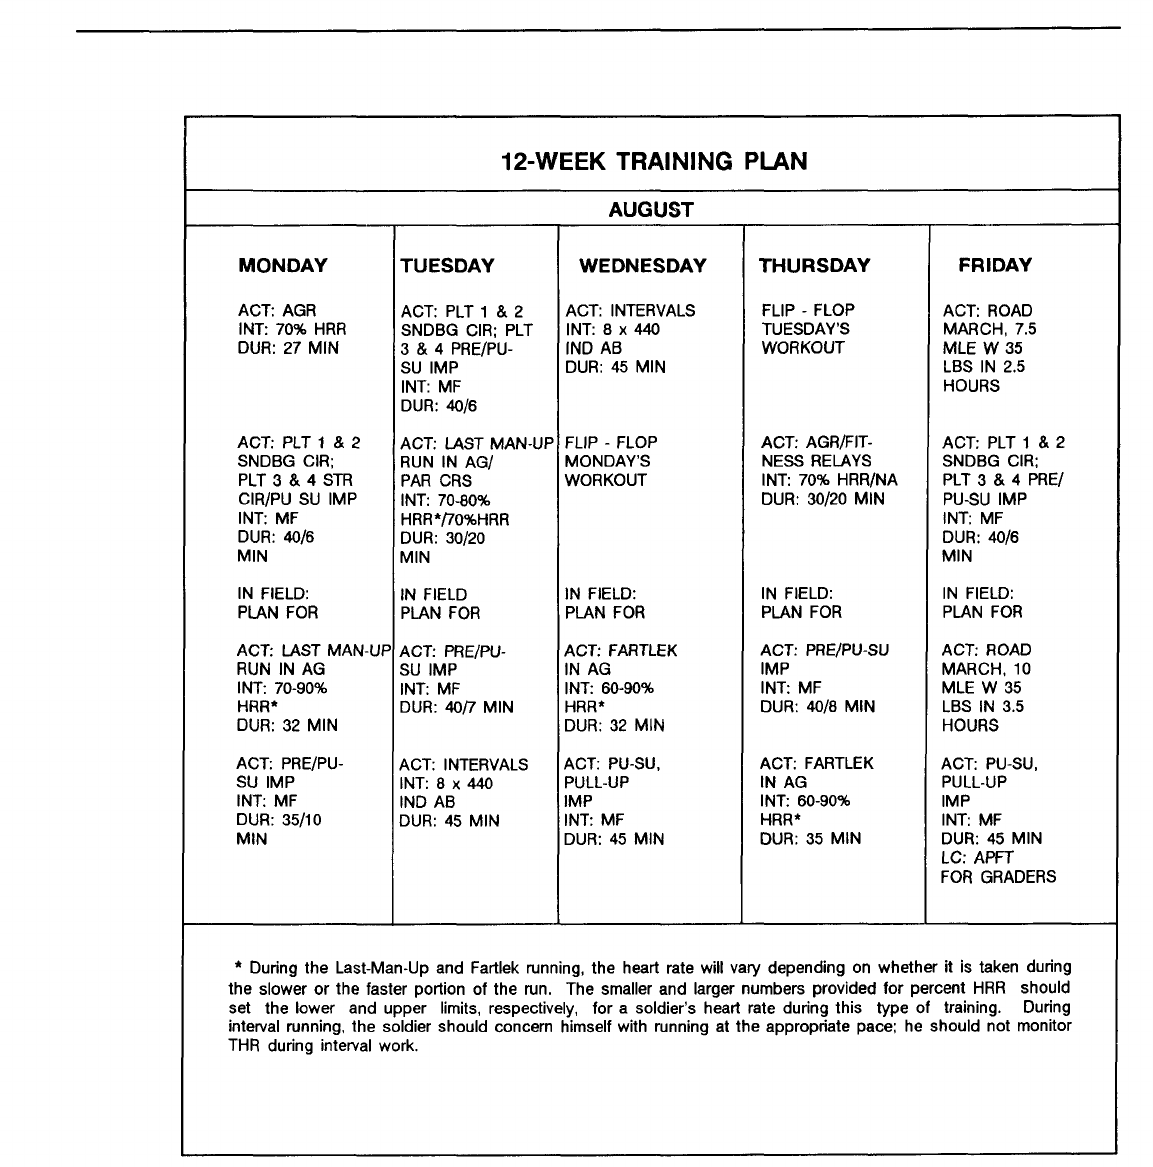
Figure 10-4 (continued)
10-9
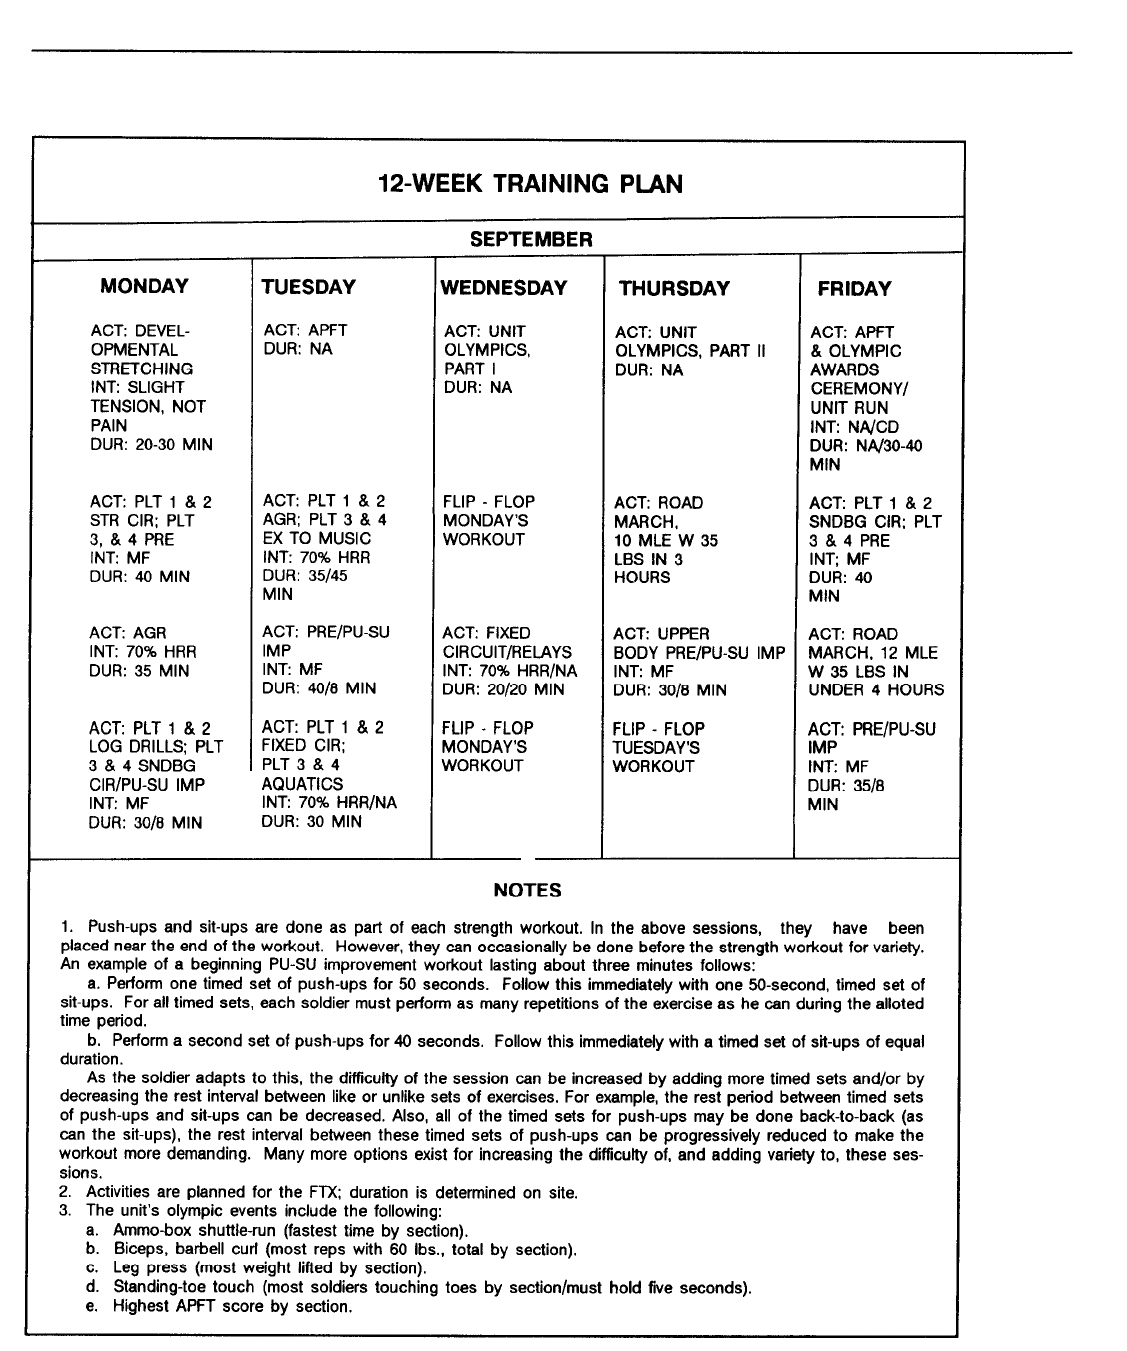
Figure 10-4 (continued)
10-10
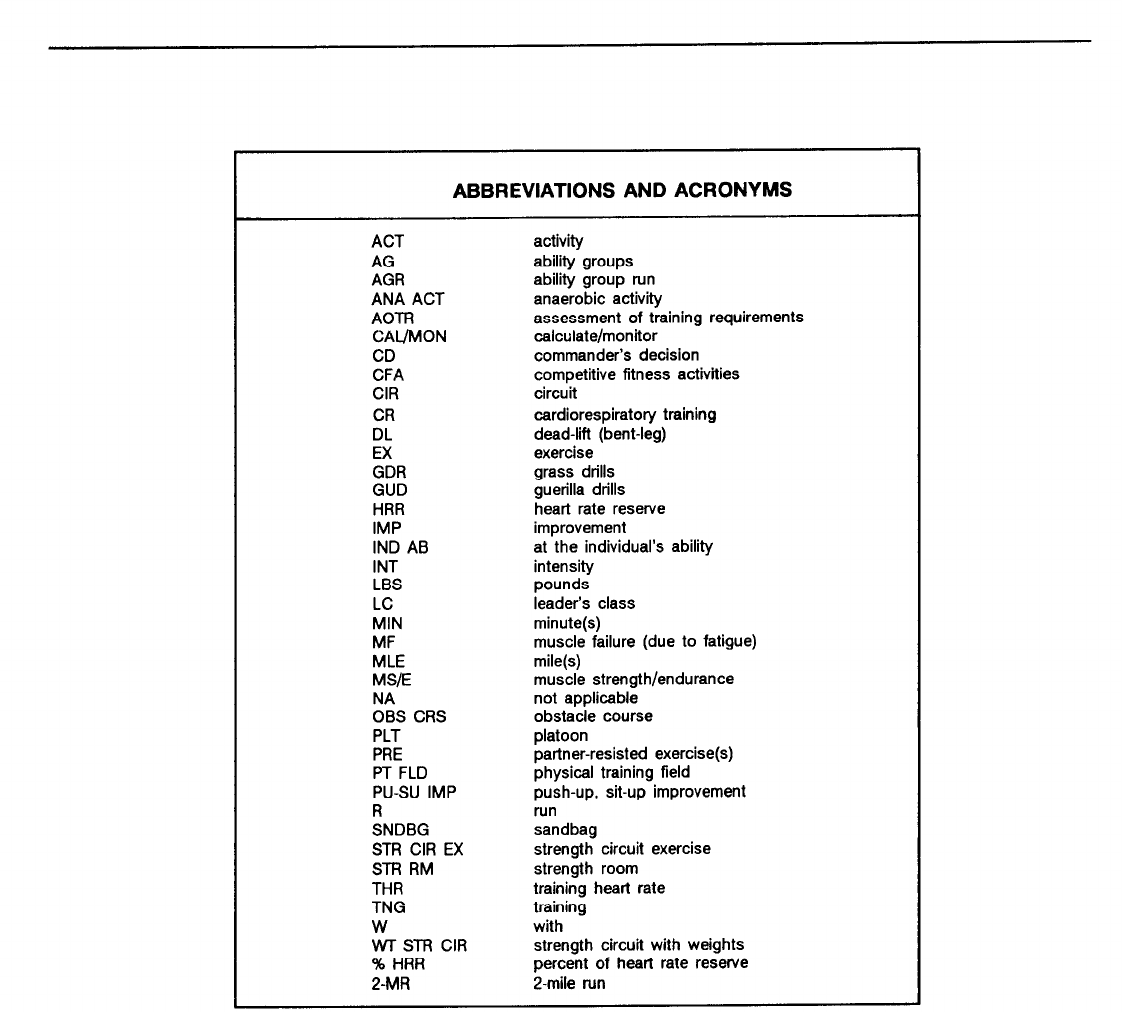
Figure 10-4 (continued)
10-11

CONDUCT AND EVALUATE
TRAINING
Conducting and evaluating training
is the final phase of the training
process. This phase includes the evalu-
ation of performance, assessment of
capabilities, and feedback portions of
the training management cycle. These
portions of the cycle must be simulta-
neous and continuous. To be effec-
tive, the evaluation process must ad-
dress why weaknesses exist, and it
must identify corrective actions to be
taken. Evaluations should address the
following:
● Assessment of proficiency in mis-
sion-essential tasks.
● Status of training goals and objec-
tives.
● Status of training in critical indi-
vidual and collective tasks.
● Shortfalls in training.
● Recommendations for next training
cycle (key in on correcting weak-
nesses).
● Results of educational programs.
Using the Principles of
Exercise
As CPT Jones developed his pro-
gram, he made sure he used the seven
principles of exercise. He justified his
program as follows:
● Balance. This program is balanced
because all the fitness components
are addressed. The emphasis is on
building muscular endurance and
strength in the skeletal muscular
system because of the many lifting
tasks the unit must do. The pro-
gram also trains cardiorespiratory
endurance and flexibility, and warm-
up and cool-down periods are in-
cluded in every workout.
● Specificity. The unit’s fitness goals
are met. The sand-bag lifting and
weight training programs help
develop muscular endurance and
strength. The movements should,
when possible, stress muscle groups
used in their job-related lifting tasks.
Developmental stretching should help
reduce work-related back injuries. The
different types of training in running
will help ensure that soldiers reach a
satisfactory level of CR fitness and
help each soldier score at least 70
points on the APFT’s 2-mile run.
Soldiers do push-ups and sit-ups at
least two or three times a week to
improve the unit’s performance in
these events. The competitive fitness
activities will help foster teamwork
and cohesion, both of which are essen-
tial to each section’s functions.
● Overload. Soldiers reach overload
in the weight circuit by doing each
exercise with an 8- to 12-RM lift
for a set time and/or until they
reach temporary muscle failure. For
the cardiorespiratory workout, THR
is calculated initially using 70 per-
cent of the HRR. They do push-ups
and sit-ups in multiple, timed sets
with short recovery periods to en-
sure that muscle failure is reached.
They also do PREs to muscle fail-
ure.
● Progression. To help soldiers reach
adequate overload as they improve,
the program is made gradually more
difficult. Soldiers progress in their
CR workout by increasing the time
they spend at THR up to 30 to 45
minutes per session and by main-
taining THR. They progress on the
weight training circuit individually.
When a soldier can do an exercise
for a set time without reaching
muscle failure, the weight is in-
creased so that the soldier reaches
muscle failure between the 8th and
12th repetition again. Progression
in push-ups and sit-ups involves
slowly increasing the duration of
the work intervals.
● Variety. There are many different
activities for variety. For strength
and muscular endurance training
the soldiers use weight circuits,
sandbag circuits, and PREs. Ability
group runs, intervals, Par courses,
10-12

Fartlek running, and guerrilla drills are
all used for CR training. Varied
stretching techniques, including static,
partner-assisted, and contract-relax,
are used for developmental stretching.
● Regularity. Each component of
fitness is worked regularly. Soldiers
will spend at least two to three days
a week working each of the major
fitness components. They will also
do push-ups and sit-ups regularly to
help reach their peak performance
on the APFT.
● Recovery. The muscular and cardi-
orespiratory systems are stressed in
alternate workouts. This allows one
system to recover on the day the
other is working hard.
Conclusion
CPT Jones’s step-by-step process
of developing a sound PT program for
his unit is an example of what each
commander should do in developing
his own unit program.
Good physical training takes no
more time to plan and execute than
does poor training. When commanders
use a systematic approach to develop
training, the planning process bears
sound results and the training will
succeed.
10-13
Soldiers report to initial entry train-
ing (IET) ranging widely in their levels
of physical fitness. Because of this,
there are special considerations when
designing a physical training program
for IET soldiers. Physical training
involves safely training and challeng-
ing all soldiers while improving their
fitness level to meet required stan-
dards. The regulations which govern
the conduct of physical training in IET
and explain the graduation require-
ments are TRADOC Reg. 350-6 and
AR 350-15.
The mission of physical training in
IET is twofold: to safely train soldiers
to meet the graduation requirements
of each course and to prepare soldiers
to meet the physical demands of their
future assignments.
Program Development
All physical training programs in
IET must do the following: 1 ) progres-
sively condition and toughen soldiers
for military duties; 2) develop soldiers’
self-confidence, discipline, and team
spirit; 3) develop healthy life-styles
through education; and, 4) improve
physical fitness to the highest levels
possible in all five components of
physical fitness (cardiorespiratory
endurance, muscular strength, muscu-
lar endurance, flexibility, and body
composition).
Because each IET school is some-
what different, commanders must
examine the graduation requirements
for the course and establish appropri-
ate fitness objectives. They can then
design a program that attains these ob-
jectives. The seven principles of
exercise outlined in Chapter 1 are
universal, and they apply to all PT
programs including those in IET.
Commanders of initial entry training
should look beyond the graduation
requirements of their own training
course to ensure that their soldiers are
prepared for the physical challenges
of their future assignments. This
means developing safe training pro-
grams which will produce the maxi-
mum physical improvement possible.
MFTs are skilled at assessing sol-
diers’ capabilities. They use the five
components of physical fitness in de-
signing programs to reach the training
objectives established by the com-
mander. They also know how to
conduct exercise programs that are
effective and safe. MFTs are not,
however, trained to diagnose or treat
injuries.
The commander’s latitude in pro-
gram development varies with the
length and type of the IET course.
For example, commanders of basic
combat training (BCT) may do a
standard PT program at one installa-
tion, while AIT commanders may
design their own programs. Regard-
less of the type of course, all leaders
must strive to train their soldiers to
attain the highest level of physical
fitness possible. This means using the
established principles of exercise to
develop a safe physical training pro-
gram.
Safety Considerations
Overuse injuries are common in
IET. However, they can be avoided by
carefully following the exercise prin-
ciples of “recovery” and “progression.”
Research suggests that soldiers are
more prone to injuries of the lower
extremities after the third week of
IET. High-impact activities, such as
road marching and running on hard
surfaces, should be carefully moni-
tored during at this time. During this
period, fixed circuits and other activi-
ties that develop CR fitness are good,
low-impact alternatives.
Properly fitted, high-quality run-
ning shoes are important, especially
when PT sessions require running
on hard surfaces. Court shoes, like
basketball or tennis shoes, are not
11-0
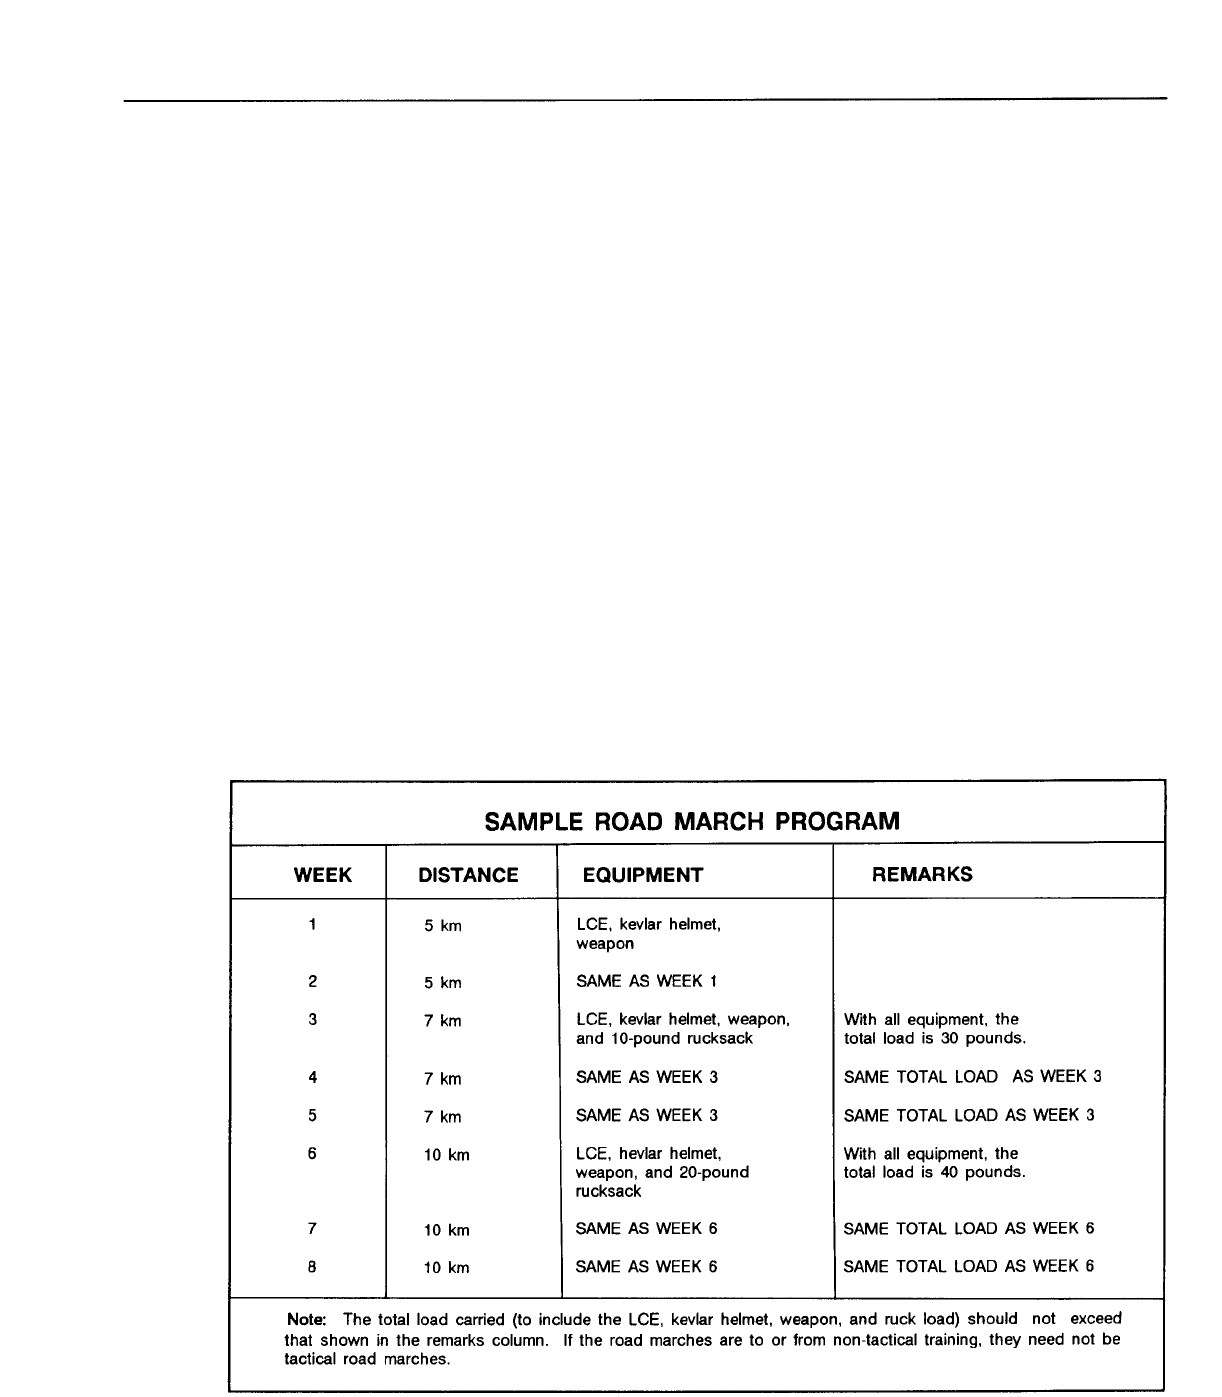
designed to absorb the repetitive shock
of running. Activities such as running
obstacle courses and road marching
require combat boots to protect and
support the feet and ankles. Naturally,
common sense dictates a reasonable
break-in period for new combat boots,
especially before long marches.
Examples of recommended PT ses-
sions and low-risk exercises are in
Chapter 7. Specific health and safety
considerations are in TRADOC Reg.
350-6, paragraph 4-2.
Road Marching
One road march should be con-
ducted weekly with the difficulty of
the marches progressing gradually
throughout IET.
In the first two weeks of IET,
up to 5 kilometers with light loads.
Loads should be restricted to the
standard LCE, kevlar helmet, and
weapon. Bones, ligaments, and ten-
dons respond slowly to training and
may be injured if the load and/or
duration are increased too quickly.
After the initial adaptations in the
early weeks of IET, soldiers can be
expected to carry progressively heav-
ier loads including a rucksack. By he
start of the fourth week, they should
be accustomed to marching in boots,
and their feet should be less prone to
blistering. By the sixth week, the load
may be increased to 40 pounds includ-
ing personal clothing and equipment.
At no time during IET or one-station
unit training (OSUT) should loads ex-
ceed 40 pounds.
A sample regimen for road marches
soldiers can be expected to road march during IET is at Figure 11-1.
Figure 11-1
11-1

In today’s Army, soldiers may deploy
anywhere in the world. They may go
into the tropical heat of Central
America, the deserts of the Middle
East, the frozen tundra of Alaska, or
the rolling hills of Western Europe.
Each environment presents unique
problems concerning soldiers’ physical
performance. Furthermore, physical
exertion in extreme environments can
be life-threatening. While recogniz-
ing such problems is important, pre-
venting them is even more important.
This requires an understanding of the
environmental factors which affect
physical performance and how the
body responds to those factors.
Temperature Regulation
The body constantly produces heat,
especially during exercise. To main-
tain a constant normal temperature, it
must pass this heat on to the environ-
ment. Life-threatening circumstances
can develop if the body becomes too
hot or too cold. Body temperature
must be maintained within fairly nar-
row limits, usually between 74 and 110
degrees Fahrenheit. However, hy-
pothermia and heat injuries can occur
within much narrower limits. There-
fore, extreme temperatures can have a
devastating effect on the body’s ability
to control its temperature.
Overheating is a serious threat to
health and physical performance.
During exercise, the body can produce
heat at a rate 10 to 20 times greater
than during rest. To survive, it must
get rid of the excess heat.
The four ways in which the body
can gain or lose heat are the following:
• Conduction-the transfre of heat
from a warm object to a cool one
that is touching it. (Warming boots
by putting them on is an example.)
• Convection-the transfer of heat by
circulation or movement
of air. (Using a fan on a hot day is
an example.)
• Radiation-the transfer of heat by
electromagnetic waves. (Sitting un-
der a heat lamp is an example.)
• Evaporation- the transfer of heat
by changing a liquid into a gas.
(Evaporating sweat cooling the skin
is an example.)
Heat moves from warm to cool
areas. During exercise, when the body
is extremely warm, heat can be lost by
a combination of the four methods.
Sweating, however, is the body’s most
important means for heat loss, espe-
cially during exercise. Any condition
that slows or blocks the transfer of heat
from the body by evaporation causes
heat storage which results in an in-
crease in body temperature.
The degree to which evaporative
cooling occurs is also directly related to
the air’s relative humidity (a measure
of the amount of water vapor in the
air). When the relative humidity is 100
percent, the air is completely saturated
at its temperature. No more water can
evaporate into the surrounding air. As
a result, sweat does not evaporate, no
cooling effect takes place, and the
body temperature increases. This causes
even more sweating. During exercise
in the heat, sweat rates of up to two
quarts per hour are not uncommon.
12-0

If the lost fluids are not replaced, de-
hydration can occur. This condition,
in turn, can result in severe heat
injuries.
Thus, in hot, humid conditions when
a soldier’s sweat cannot evaporate,
there is no cooling effect through the
process of evaporation. High relative
humidities combined with high tem-
peratures can cause serious problems.
Weather of this type occurs in the
tropics and equatorial regions such as
Central America and southern Asia.
These are places where soldiers have
been or could be deployed.
To prevent heat injuries, the fol-
lowing hydration guidelines should be
used:
● Type of drink: cool water (45 to 55
degrees F).
● Before the activity: drink 13 to 20
ounces at least 30 minutes before.
● During the activity: drink 3 to 6
ounces at 15 to 30 minute intervals.
● After the activity: drink to satisfy
thirst, then drink a little more.
Heat Injuries and Symptoms
The following are common types of
heat injuries and their symptoms.
● Heat cramps-muscles cramps of the
abdomen, legs, or arms.
● Heat exhaustion-headache, exces-
sive sweating, dizziness, nausea,
clammy skin.
● Heat stroke-hot, dry skin, cessa-
tion of sweating, rapid pulse, men-
tal confusion, unconsciousness.
Adapting to differing
environmental conditions
is called acclimatization.
To prevent heat injuries while exer-
cising, trainers must adjust the inten-
sity to fit the temperature and humid-
ity. They must ensure that soldiers
drink enough water before and during
the exercise session. Body weight is a
good gauge of hydration. If rapid
weight loss occurs, dehydration should
be suspected. Plain water is the best
replacement fluid to use. Highly con-
centrated liquids such as soft drinks
and those with a high sugar content
may hurt the soldier’s performance
because they slow the absorption of
water from the stomach.
Acclimatization to Hot, Humid
Environments
Adapting to differing environmental
conditions is called acclimatization.
Soldiers who are newly introduced to
a hot, humid climate and are moder-
ately active in it can acclimatize in 8 to
14 days. Soldiers who are sedentary
take much longer. Until they are ac-
climatized, soldiers are much more
likely to develop heat injuries.
A soldier’s ability to perform ef-
fectively in hot, humid conditions
depends on both his acclimatization
and level of fitness. The degree of
heat stress directly depends on the
relative workload. When two soldiers
do the same task, the heat stress is less
for the soldier who is in better physical
condition, and his performance is likely
to be better. Therefore, it is important
to maintain high levels of fitness.
Increased temperatures and humid-
ity cause increased heart rates. Con-
sequently, it takes much less effort to
elevate the heart rate into the training
zone, but the training effect is the
same. These facts underscore the need
to use combat-development running
12-1
and to monitor heart rates when run-
ning, especially in hot, humid condi-
tions.
Some important changes occur as a
result of acclimatization to a hot cli-
mate. The following physical adapta-
tions help the body cope with a hot
environment
●
●
●
●
Sweating occurs at a lower body
temperature.
Sweat production is increased.
Blood volume is increased.
Heart rate is less at any given work
rate.
Exercising in Cold
Environments
Contrary to popular belief, there are
few real dangers in exercising at tem-
peratures well below freezing. Since
the body produces large amounts of
heat during exercise, it has little trouble
maintaining a normal temperature.
There is no danger of freezing the
lungs. However, without proper pre-
cautions, hypothermia, frostbite, and
dehydration can occur.
HYPOTHERMIA
If the body’s core temperature drops
below normal, its ability to regulate its
temperature can become impaired or
lost. This condition is called hypother-
mia. It develops because the body
cannot produce heat as fast as it is losing
it. This can lead to death. The chance
of a soldier becoming hypothermic is a
major threat any time he is exposed to
the cold.
Some symptoms of hypothermia are
shivering, loss of judgment, slurred
speech, drowsiness, and muscle weak-
ness.
During exercise in the cold, people
usually produce enough heat to maintain
normal body temperature. As they get
Hypothermia develops
when the body cannot
produce heat as fast as
it is losing it.
fatigued, however, they slow down and
their bodies produce less heat. Also,
people often overdress for exercise in
the cold. This makes the body sweat.
The sweat dampens the clothing next to
the skin making it a good conductor of
heat. The combination of decreased heat
production and increased heat loss can
cause a rapid onset of hypothermia.
Some guidelines for dressing for cold
weather exercise are shown in Figure
12-1.
GUIDELINES FOR DRESSING FOR EXERCISE IN THE COLD
Clothing
for cold weather should protect,
insulate, and ventilate.
40% HEAT LOSS THROUGH HEAD
ti$
J:q(([l’
AND NECK WHEN UNCOVERED =
●
●
●
Protect by covering as large an area of
the body as possible.
Insulation will occur by trapping air
which has been warmed by the body
and holding it near the skin.
Ventilate by allowing a two-way
exchange of air through the various
layers of clothing.
LIGHIWEIGHT
WARM-UPS
(NOT WATERPROOF)
Clothing should leave your body slightly \
cool rather than hot.
ill
/ “
Clothing should also be loose enough to /
allow movement.
Clothing soaked with perspiration should
FEET SHOULD
be removed if reasonably possible.
BE KEPT DRY
J!!!!
Figure 12-1
12-2
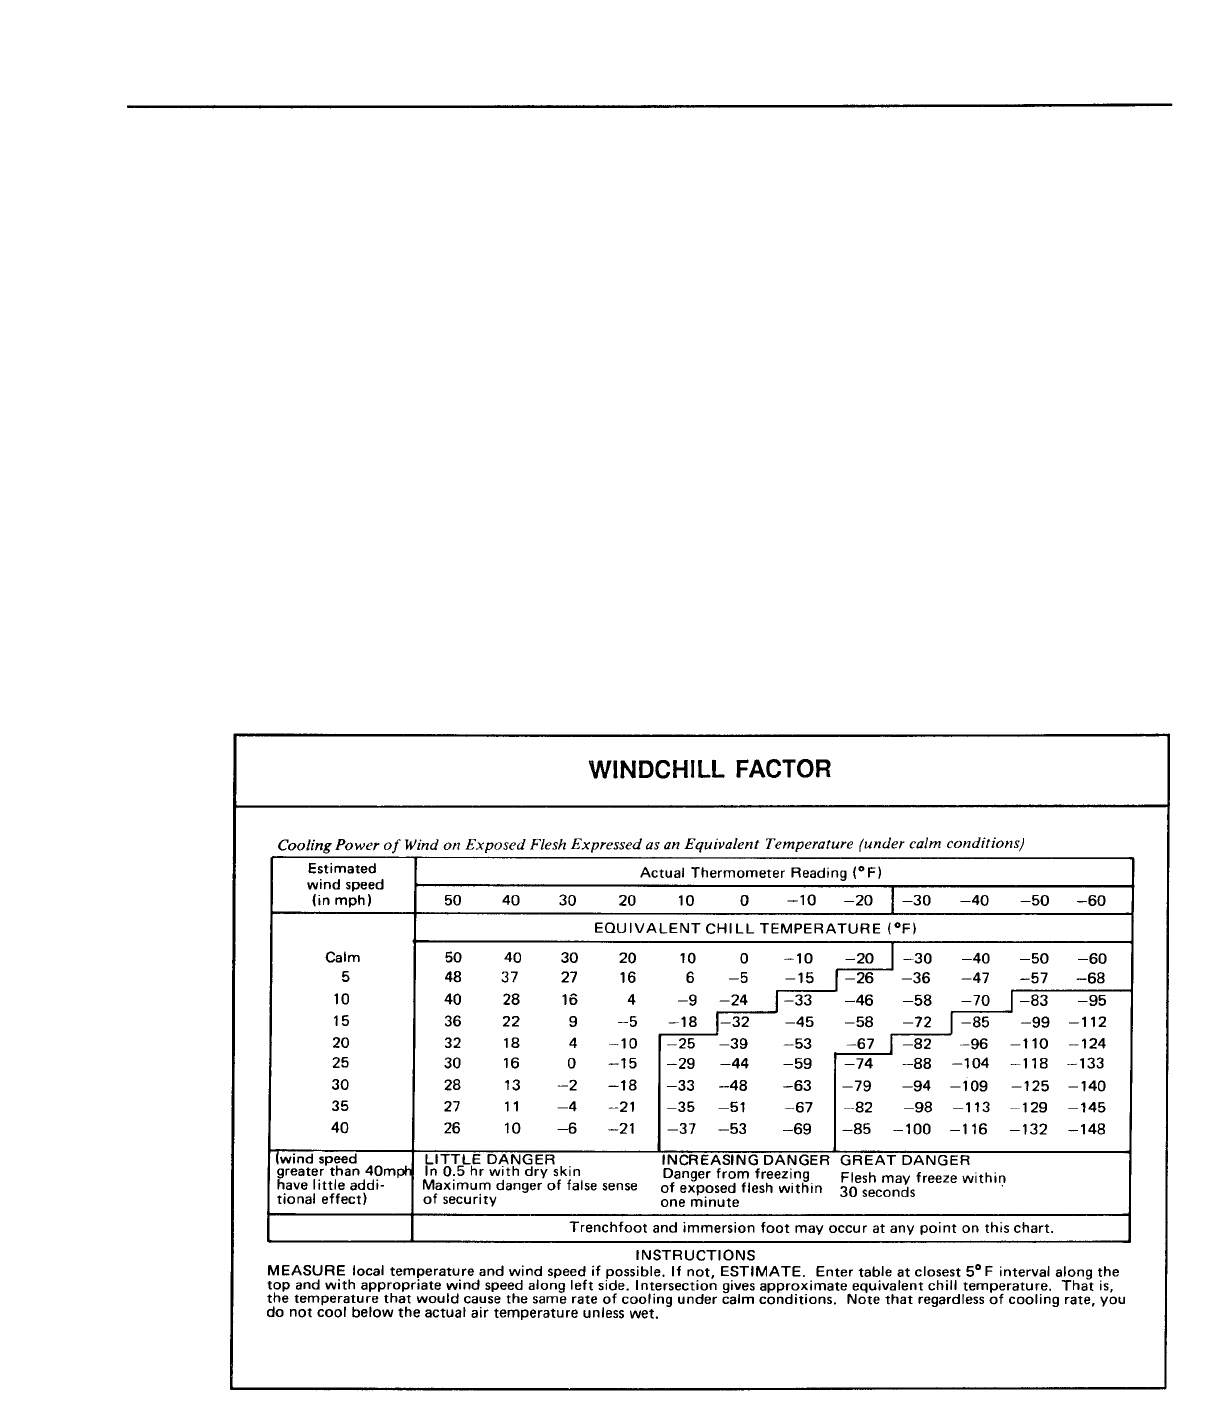
FROSTBITE
Frostbite is the freezing of body
tissue. It commonly occurs in body
parts located away from the core and
exposed to the cold such as the nose,
ears, feet, hands, and skin. Severe
cases of frostbite may require amputa-
tion.
Factors which lead to frostbite are
cold temperatures combined with windy
conditions. The wind has a great
cooling effect because it causes rapid
convective heat transfer from the body.
For a given temperature, the higher the
wind speed, the greater the cooling
effect. Figure 12-2 shows how the
wind can affect cooling by providing
information on windchill factors.
A person’s movement through the
air creates an effect similar to that
mph is the same as standing in a 15-
mph wind. If, in addition, there is a
5-mph headwind, the overall effect is
equivalent to a 20-mph wind. There-
fore, an exercising soldier must be
very cautious to avoid getting frost-
bite. Covering exposed parts of the
body will substantially reduce the
risks.
DEHYDRATION
Dehydration can result from losing
body fluids faster than they are re-
placed. Cold environments are often
dry, and water may be limited. As a
result, soldiers may in time become
dehydrated. While operating in ex-
tremely cold climates, trainers should
check the body weights of the soldiers
regularly and encourage them to drink
caused by wind. Riding a bicycle at 15 liquids whenever possible.
Figure 12-2
12-3

Acclimatization to High
Altitudes
Elevations below 5,000 feet have
little noticeable effect on healthy people.
However, at higher elevations the
atmospheric pressure is reduced, and
the body tissues get less oxygen. This
means that soldiers cannot work or
exercise as well at high altitudes. The
limiting effects of high elevation are
often most pronounced in older sol-
diers and persons with low levels of
fitness.
Due to acclimatization, the longer a
soldier remains at high altitude, the
better his performance becomes.
Generally, however, he will not per-
form as well as at sea level and should
not be expected to. For normal activi-
ties, the time required to acclimatize
depends largely on the altitude. In
order to insure that soldiers who are
newly assigned to altitudes above 5,000
feet are not at a disadvantage, it is
recommended that 30 days of acclima-
tization, including regular physical
activity, be permitted before they are
administered a record APFT.
Before acclimatization is complete,
people at high altitudes may suffer
acute mountain sickness. This in-
cludes such symptoms as headache,
rapid pulse, nausea, loss of appetite,
and an inability to sleep. The primary
treatment is further acclimatization or
returning to a lower altitude.
Once soldiers are acclimatized to
altitudes above 5,000 feet, deacclima-
tization will occur if they spend 14 or
more days at lower altitudes. For this
reason, soldiers should be permitted
twice the length of their absence, not
to exceed 30 days, to reacclimatize
before being required to take a record
APFT. A period of 30 days is adequate
for any given reacclimatization.
Pollutants can irritate
the respiratory tract
and make the person
less able to perform
aerobically.
The following are some ways to deal
with air pollution while exercising:
• Avoid exposure to pollutants before
and during exercise, if possible.
• In areas of high ozone concentra-
tion, train early in the day and after
dark.
• Avoid exercising near heavily trav-
eled streets and highways during
rush hours.
• Consult your supporting preven-
tive-medicine activity for advice
in identifying or defining training
restrictions during periods of heavy
air pollution.
Air Pollution and Exercise
Pollutants are substances in the en-
vironment which lower the environ-
ment’s quality. Originally, air pollut-
ants were thought to be only by-
products of the industrial revolution.
However, many pollutants are pro-
duced naturally. For example, volca-
noes emit sulfur oxides and ash, and
lightning produces ozone.
There are two classifications of air
pollutants - primary and secondary.
Primary pollutants are produced di-
rectly by industrial sources. These
include carbon monoxide (CO), sulfur
oxides (SO), hydrocarbons, and par-
ticulate (ash). Secondary pollutants
are created by the primary pollutant’s
interaction with the environment. Ex-
amples of these include ozone (03),
aldehydes, and sulfates. Smog is a
combination of primary and secondary
pollutants.
Some pollutants have negative ef-
fects on the body. For example, car-
bon monoxide binds to hemoglobin in
the red blood cells and reduces the
amount of oxygen carried in the blood.
Ozone and the oxides irritate the air
passageways in the lungs, while other
pollutants irritate the eyes.
When exercisers in high-pollution
areas breathe through the mouth, the
nasal mucosa’s ability to remove impu-
rities is bypassed, and many pollutants
can be inhaled. This irritates the
respiratory tract and makes the person
less able to perform aerobically.
12-4

Most injuries can be
prevented by designing
a well-balanced PT
program.
Injuries are not an uncommon oc-
currence during intense physical train-
ing.
It is, nonetheless, a primary
responsibility of all leaders to mini-
mize the risk of injury to soldiers.
Safety is always a major concern.
Most injuries can be prevented by
designing a well-balanced PT program
that does not overstress any body parts,
allows enough time for recovery, and
includes a warm-up and cool-down.
Using strengthening exercises and soft,
level surfaces for stretching and run-
ning also helps prevent injuries. If,
however, injuries do occur, they should
be recognized and properly treated in
a timely fashion. If a soldier suspects
that he is injured, he should stop what
he is doing, report the injury, and seek
medical help.
Many common injuries are caused
by overuse, that is, soldiers often
exercise too much and too often and
with too rapid an increase in the work-
load.
Most overuse injuries can be
treated with rest, ice, compression, and
elevation (RICE). Following any re-
quired first aid, health-care personnel
should evaluate the injured soldier.
Typical Injuries Associated
with Physical Training
Common injuries associated with
exercise are the following:
Abrasion (strawberry) - the rubbing
off of skin by friction.
Dislocation - “the displacement of
one or more bones of a joint from
their natural positions.
Hot spot - a hot or irritated feeling
of the skin which occurs just before
a blister forms. These can be pre-
vented by using petroleum jelly
over friction-prone areas.
Blister - a raised spot on the skin
filled with liquid. These can gener-
ally be avoided by applying lubri-
cants such as petroleum jelly to
areas of friction, keeping footwear
●
●
●
●
●
●
●
●
●
●
●
(socks, shoes, boots) in good repair,
and wearing the proper size of
boot or shoe.
Shinsplints - a painful injury to the
soft tissues and bone in the shin
area. These are generally caused
by wearing shoes with inflexible
soles or inadequate shock absorp-
tion, running on the toes or on hard
surfaces, and/or having calf muscles
with a limited range of motion.
Sprain - a stretching or tearing of
the ligament(s) at a joint.
Muscle spasm (muscle cramp) - a
sudden, involuntary contraction of
one or more muscles.
Contusion - a bruise with bleeding
into the muscle tissue.
Strain - a stretching or tearing of
the muscles.
Bursitis - an inflammation of the
bursa (a sack-like structure where
tendons pass over bones). This
occurs at a joint and produces pain
when the joint is moved or touched.
Sometimes swelling occurs.
Tendinitis - an inflammation of a
tendon that produces pain when the
attached muscle contracts. Swelling
may not occur.
Stress fractures of the feet.
Tibial stress fractures - overuse
injuries which seem like shinsplints
except that the pain is in a specific
area.
Knee injuries -
caused by running
on uneven surfaces or with worn
out shoes, overuse, and improper
body alignment. Soldiers who have
problems with their knees can bene-
fit from doing leg exercises
that strengthen the front (quadri-
ceps) and rear (hamstrings) thigh
muscles.
Low back problems - caused by
poor running, sitting, or lifting
techniques, and by failing to stretch
the back and hip-flexor muscles
and to strengthen the abdominal
muscles.
The most common running injuries
occur in the feet, ankles, knees, and
13-1

legs.
Although they are hard to
eliminate, much can be done to keep
them to a minimum. Preventive meas-
ures include proper warm-up and cool-
down along with stretching exercises.
Failure to allow recovery between hard
bouts of running can lead to overtrain-
ing and can also be a major cause of in-
juries. A well-conditioned soldier can
run five to six times a week. However,
to do this safely, he should do two
things: gradually build up to running
that frequently and vary the intensity
of the running sessions to allow recov-
ery between them.
Many running injuries can be pre-
vented by wearing proper footwear.
Soldiers should train in running shoes.
These are available in a wide range of
prices and styles. They should fit
properly and have flexible, multi-
layered soles with good arch and heel
support. Shoes made with leather and
nylon uppers are usually the most
comfortable. See Appendix E for more
information on running shoes.
Since injuries can also be caused by
running on hard surfaces, soldiers
should, if possible, avoid running on
concrete. Soft, even surfaces are best
for injury prevention. Whenever pos-
sible, soldiers should run on grass
paths, dirt paths, or park trails. How-
ever, with adequate footwear and re-
covery periods, running on roads and
other hard surfaces should pose no
problem.
Common running injuries include
the following:
Many running injuries
can be prevented by
wearing proper
footwear.
●
●
●
●
●
Black toenails.
Ingrown toenails.
Stress fractures of the feet.
Ankle sprains and fractures.
Achilles tendinitis (caused by im-
proper stretching and shoes that do
not fit.
● Upper leg and groin injuries (which
can usually be prevented by using
good technique in stretching and
doing strengthening exercises).
Tibial stress fractures, knee inju-
ries, low back problems, shinsplints,
and blisters, which were mentioned
earlier, are also injuries which com-
monly occur in runners.
Other Factors
Proper clothing can also help pre-
vent injuries. Clothes used for physi-
cal activity should be comfortable and
fit loosely. A T-shirt or sleeveless
undershirt and gym shorts are best in
warm weather. In cold weather, cloth-
ing may be layered according to per-
sonal preference. For example, sol-
diers can wear a BDU, sweat suit,
jogging suit, or even Army-issued
long underwear. In very cold weather,
soldiers may need gloves or mittens
and ear-protecting caps. Rubberized
or plastic suits should never be worn
during exercise. They cause excessive
sweating which can lead to dehydra-
tion and a dangerous increase in body
temperature.
Army Regulation 385-55 (para-
graph B- 12, C) prohibits the use of
headphones or earphones while walk-
ing, jogging, skating, or bicycling on
the roads and streets of military instal-
lations. However, they may be worn
on tracks and running trails.
Road safety equipment is required
on administative-type walks, marches,
or runs which cross highways, roads,
or tank trails or which are conducted
on traffic ways. If there is reduced
visibility, control personnel must use
added caution to ensure the safety of
their soldiers.
13-2
The APFT is a three-
event physical
performance test used to
assess muscular
endurance and
cardiorespiratory
(CR) fitness .
All soldiers in the Active Army,
Army National Guard, and Army
Reserve must take the Army Physical
Fitness Test (APFT) regardless of their
age.
The APFT is a three-event
physical performance test used to as-
sess muscular endurance and cardi-
orespiratory (CR) fitness. It is a simple
way to measure a soldier’s ability to ef-
fectively move his body by using his
major muscle groups and CR system.
Performance on the APFT is strongly
linked to the soldier’s fitness level and
his ability to do fitness-related tasks.
An APFT with alternate test events is
given to soldiers with permanent pro-
files and with temporary profiles greater
than three months’ duration.
While the APFT testing is an impor-
tant tool in determining the physical
readiness of individual soldiers and
units, it should not be the sole basis for
the unit’s physical fitness training.
Commanders at every level must en-
sure that fitness training is designed to
develop physical abilities in a balanced
way, not just to help soldiers do well on
the APFT.
Commanders should use their unit’s
APFT results to evaluate its physical
fitness level. APFT results may indi-
cate a need to modify the fitness
programs to attain higher fitness levels.
However, mission-essential tasks, not
the APFT, should drive physical train-
ing.
Additional physical performance tests
and standards which serve as prerequi-
sites for Airborne/Ranger/Special
Forces/SCUBA qualification are pro-
Performance on the
APFT is strongly linked
to the soldier's fitness
level and his ability to
do fitness-related tasks.
vided in DA Pam 351-4.
Methods of Evaluation
Commanders are responsible for
ensuring that their soldiers are physi-
cally fit (AR 350- 15). There are
several ways they can assess fitness
including the following
● Testing. This is an efficient way
to evaluate both the individual’s
●
●
●
and the unit’s physical performance
levels.
Inspection. This evaluates training
procedures and indicates the sound
ness of the unit’s physical fitness
program.
Observation. This is an ongoing
way to review training but is not as
reliable as testing as an indicator of
the unit’s level of fitness.
Medical examination. This detects
individual disabilities, health-re-
related problems, and physical prob-
lems.
Over-Forty Cardiovascular
Screening Program
The Army’s over-40 cardiovascular
screening program (CVSP) does the
following:
●
●
●
●
Identifies soldiers with a risk of
coronary heart disease.
Provides guidelines for safe, regu-
lar CR exercise.
Gives advice and help in control-
ling heart-disease risk factors.
Uses treadmill testing only for high-
risk soldiers who need it. -
All soldiers, both active and reserve
component, must take the APFT for
record regardless of age unless prohib-
ited by a medical profile. For soldiers
who reached age 40 on or after 1
January 1989, there is no requirement
for clearance in the cardiovascular
screening program before taking a
record APFT. Soldiers who reached
age 40 before 1 January 1989 must be
cleared through the cardiovascular
screening program before taking a
record APFT. Prior to their CVSP
evaluation, however, they may still
take part in physical training to in-
clude diagnostic APFTs unless pro-
filed or contraindications to exercise
exist. All soldiers must undergo peri-
odic physical examinations in accor-
dance with AR 40-501 and NGR 40-
501.
These include screening for
cardiovascular risk factors.
14-1

Overview
As stated, APFT events assess mus-
cular endurance and CR fitness. The
lowest passing APFT standards reflect
the minimum acceptable fitness level
for all soldiers, regardless of MOS or
component. When applied to a com -
mand, APFT results show a unit’s
overall level of physical fitness. How-
ever, they are not all-inclusive, overall
measures of physical-combat readi-
ness.
To assess this, other physical
capabilities must be measured. The
APFT does, however, give a com-
mander a sound measurement of the
general fitness level of his unit.
Service schools, agencies, and units
may set performance goals which are
above the minimum APFT standards in
accordance with their missions (AR
350- 15). Individual soldiers are also
encouraged to set for themselves a
series of successively higher APFT
performance goals. They should al-
ways strive to improve themselves
physically and never be content with
meeting minimum standards. Compe-
tition on the APFT among soldiers or
units can also be used to motivate them
to improve their fitness levels.
Testing is not a substitute for a
regular, balanced exercise program.
Diagnostic testing is important in moni-
toring training progress but, when
done too often, may decrease motiva-
tion and waste training time.
The test period is defined as the
period of time which elapses from
starting to finishing the three events. It
must not take more than two hours.
Soldiers must do all three events in the
same test period.
Test Administration
The APFT must be administered
properly and to standard in order to
accurately evaluate a soldier’s physical
fitness and to be fair to all soldiers.
(Test results are used for personnel
actions.)
Individual soldiers are not author-
ized to administer the APFT to them-
selves for the purpose of satisfying a
unit’s diagnostic or record APFT re-
quirement.
REQUIRED EQUIPMENT
The OIC or NCOIC at the test site
must have a copy of FM 21-20 on
hand. The supervisor of each event
must have the event instructions and
standards. Scorers should have a
clipboard and an ink pen to record the
results on the soldiers’ scorecards.
Two stopwatches are needed. They
must be able to measure time in both
minutes and seconds.
Runners must wear numbers or
some other form of identification for
the 2-mile run. The numbers may be
stenciled or pinned onto pullover vests
or sleeveless, mesh pullovers or at-
tached to the runners themselves.
Soldiers should wear clothing that is
appropriate for PT such as shorts, T-
shirts, socks, and running shoes (not
tennis shoes). They should not wear
basketball shoes or other types of court
shoes. BDUs may be worn but may be
a hindrance on some events.
Anything that gives a soldier an
unfair advantage is not permitted during
the APFT. Wearing devices such as
weight belts or elastic bandages may or
may not provide an advantage. How-
ever, for standardization, such addi-
tional equipment is not authorized
unless prescribed by medical person-
nel.
The only exception is gloves.
They may be worn in cold weather
when approved by the local com-
mander.
Each soldier needs a DA Form 705,
Army Physical Fitness Test Scorecard.
The soldier fills in his name, social
security number, grade, age, and sex.
14-2
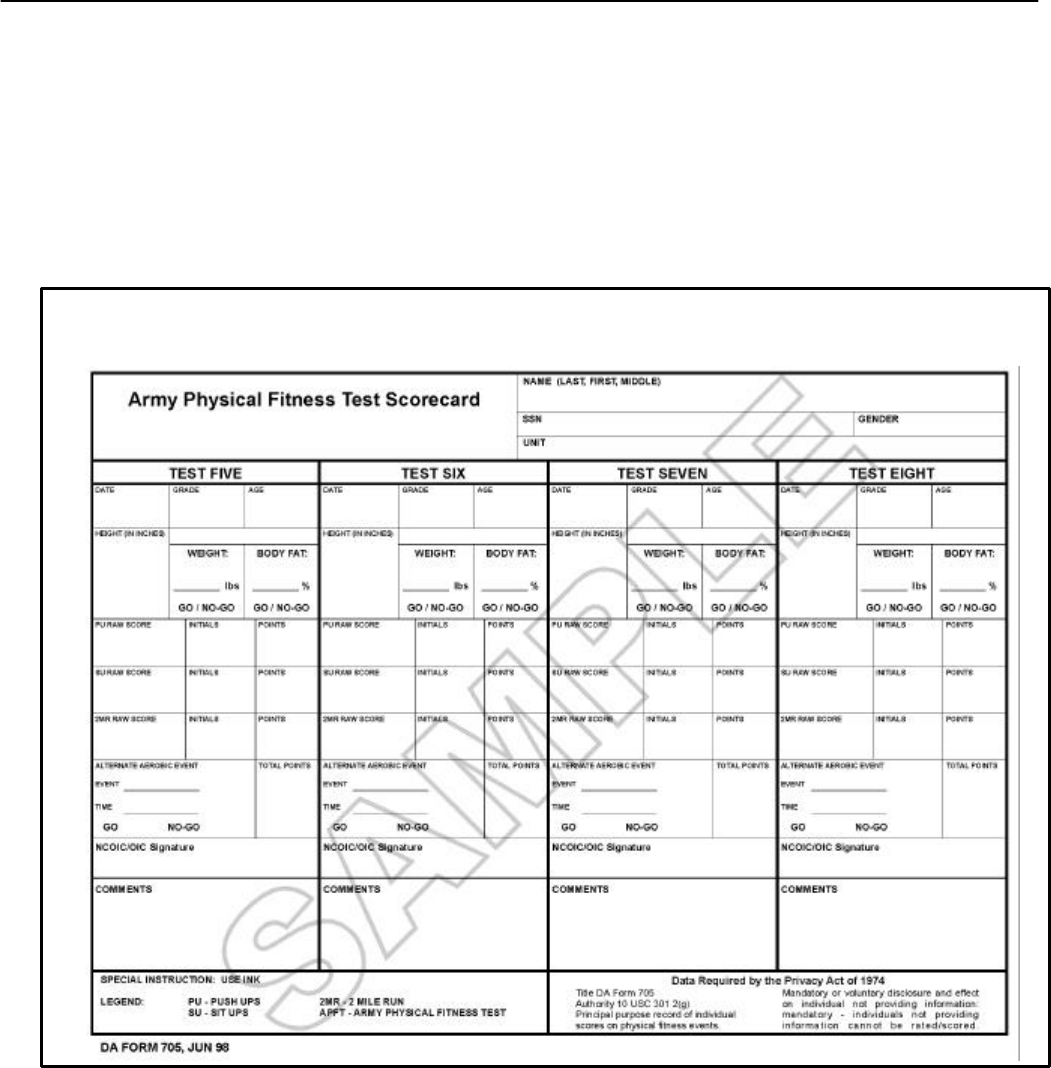
14-3
(See Figure 14-1.) The unit will complete the
height and weight data.
Scorers record the raw score for each
event and initial the results. If a soldier fails
an event or finds it difficult to perform, the
scorer should write down the reasons and
other pertinent information in the comment
block. After the entire APFT has been
completed, the event scorer will convert raw
scores to point scores using the scoring
standards on the back of the scorecards. (See
Figure 14-1.)
See page 14-8.1 for instructions on completing DA Form 705.
ARMY PHYSICAL FITNESS TEST SCORECARD
*Figure 14-1
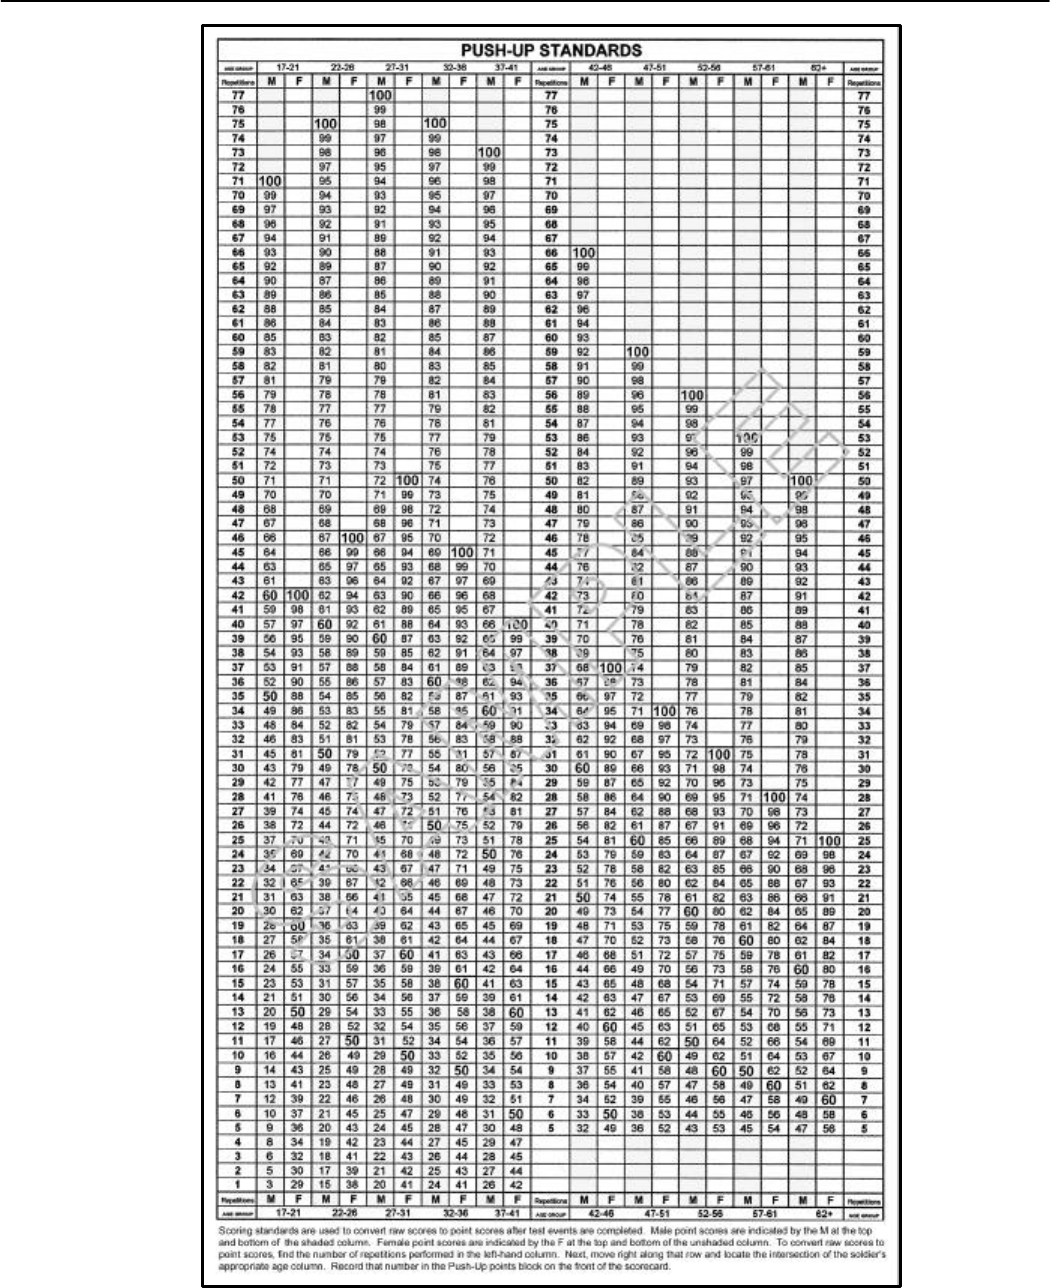
14-4
*Figure 14-1 (continued)
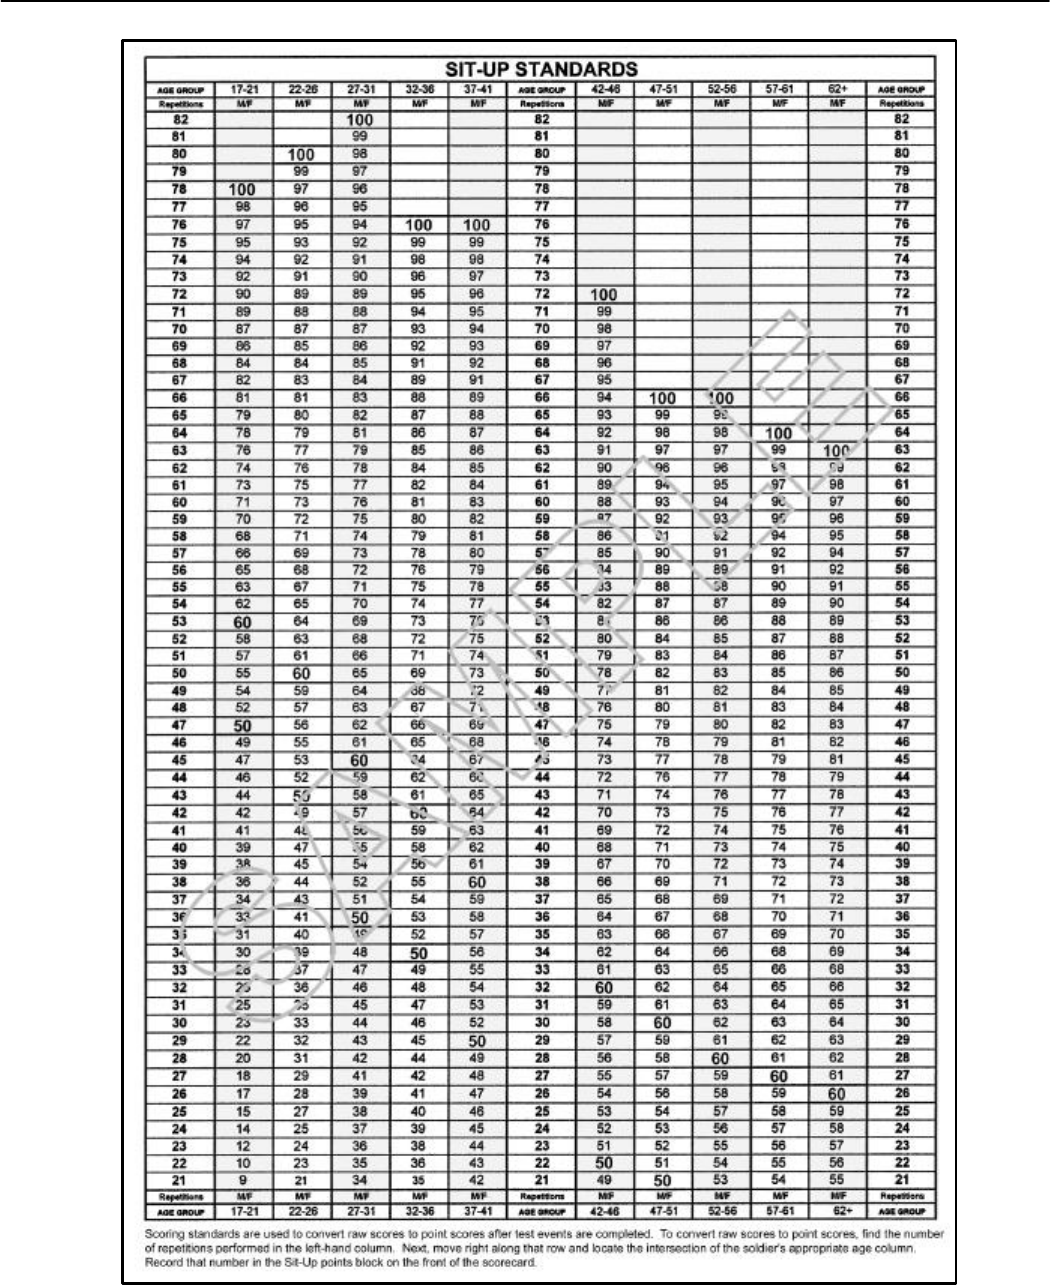
14-5
*Figure 14-1 (continued)
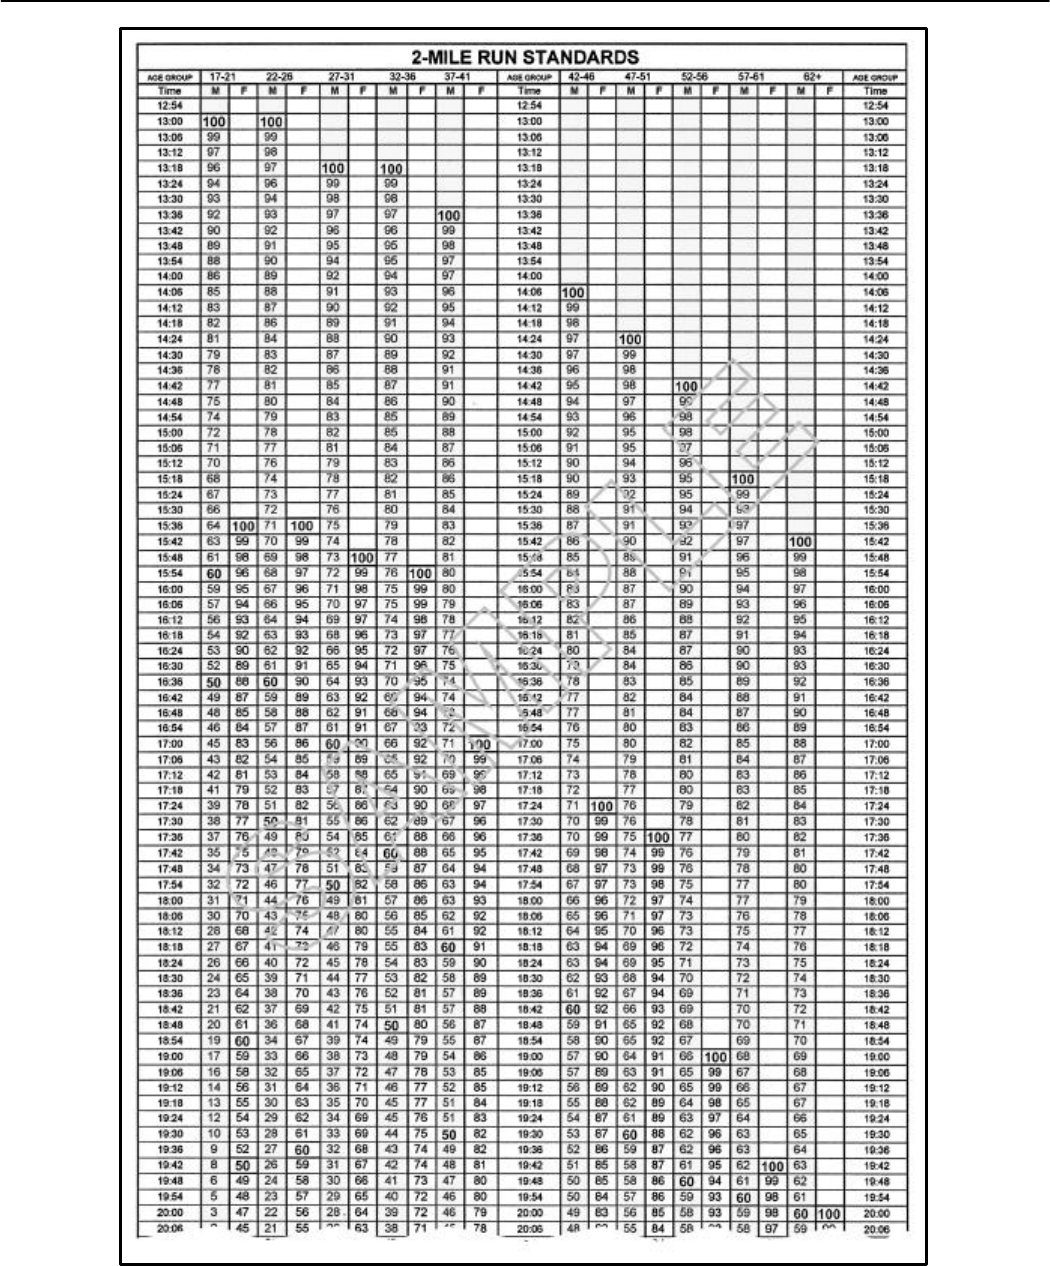
14-6
*Figure 14-1 (continued)
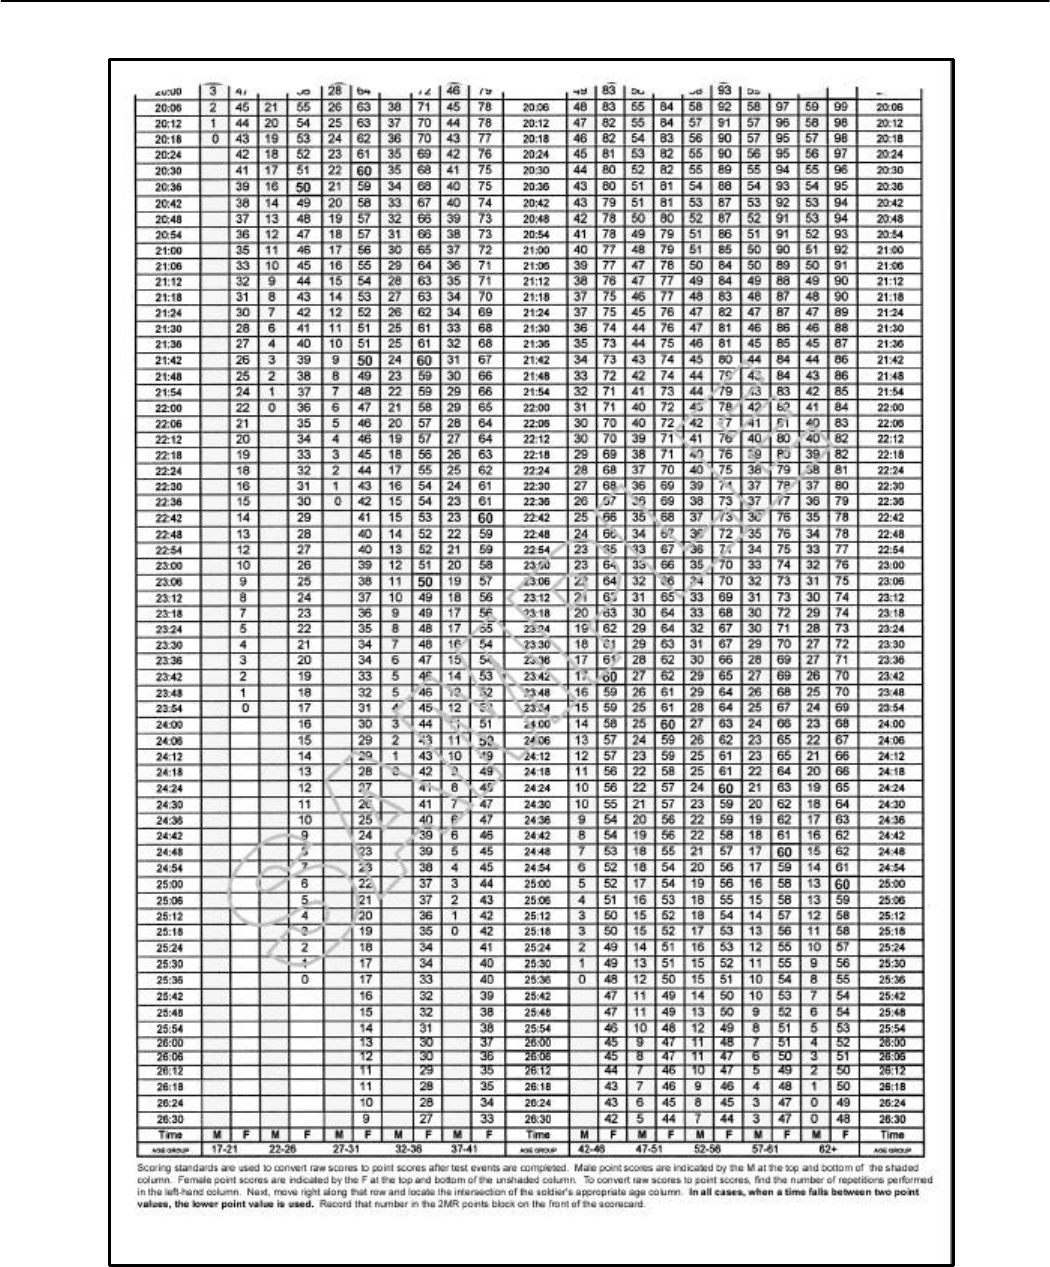
14-7
*Figure 14-1 (continued)

14-8
SUPERVISION
The APFT must be properly
supervised to ensure that its
objectives are met. Proper
supervision ensures uniformity
in the following:
• Scoring the test.
• Training of supervisors and
scorers.
• Preparing the test and
controlling performance
factors.
The goal of the APFT is to
get an accurate evaluation of the
soldiers’ fitness levels.
Preparations for administering
an accurate APFT include the
following:
• Selecting and training
supervisors and scorers.
• Briefing and orienting
administrators and partici-
pants.
• Securing a location for the
events.
Commanders must strictly
control those factors which
influence test performance.
They must ensure that events,
scoring, clothing, and equip-
ment are uniform. Com-
manders should plan testing
which permits each soldier to
perform to his maximal level.
They should also ensure the
following:
• Soldiers are not tested when
fatigued or ill.
• Soldiers do not have tiring
duties just before taking the
APFT.
• Weather and environ-
mental conditions do not
inhibit performance.
• Safety is the first consid-
eration.
Duties of Test Personnel
Testers must be totally familiar
with the instructions for each event
and trained to administer the tests.
Correctly supervising testees and
laying out the test area are essential
duties. The group administering the
test must include the following:
• OIC or NCOIC.
• Event supervisor, scorers, and a
demonstrator for each event.
• Support personnel (safety,
control, and medical as
appropriate). There should be no
less than one scorer for each 15
soldiers tested. Twelve to 15
scorers are required when a
company-sized unit is tested.
OIC OR NCOIC
The OIC or NCOIC does the
following:
• Administers the APFT.
• Procures all necessary equipment
and supplies.
• Arranges and lays out the test
area.
• Trains the event supervisors,
scorers, and demonstrators.
(Training video tape No. 21-191
should be used for training those
who administer the APFT.)
• Ensures the test is properly
administered and the events are
explained, demonstrated, and
scored according to the test
standards in this chapter.
• Reports the results after the test.
EVENT SUPERVISORS
Event supervisors do the
following:
• Administer the test events.
• Ensure that necessary equipment
is on hand.
• Read the test instructions, and
have the events demonstrated.
• Supervise the scoring of events,
and ensure that they are done
correctly.
• Rule on questions and scoring
discrepancies for their event.
SCORERS
Scorers do the following:
• Supervise the performance of
testees.
• Enforce the test standards in this
chapter.
• Count the number of correctly
performed repetitions aloud.
• Record the correct, raw score on
each soldier’s scorecard, and
initial the scorecard block.
• Perform other duties assigned by
the OIC or NCOIC.
Scorers must be thoroughly
trained to maintain uniform scoring
standards. They do not participate in
the test.
The goal of the APFT is to
get an accurate evaluation of the
soldier’s fitness levels.

14-8.1
*Instructions for Completing DA Form 705, Army Physical Fitness Scorecard, June 1998.
NAME Print soldier’s last name, first name and middle initial in NAME block.
SSN Print soldier’s social security number in SSN block.
GENDER Print M for male or F for female in GENDER block.
UNIT Print soldier’s unit designation in UNIT block.
DATE Print date the APFT is administered in DATE block.
GRADE Print soldier’s grade in GRADE block.
AGE Print soldier’s age on the date the APFT is administered in AGE block.
HEIGHT Print soldier’s height in HEIGHT block. Height will be rounded to the nearest inch. If the height fraction is less than 1/2
inch, round down to the nearest whole number in inches. If the height fraction is greater than 1/2 inch, round up to the next highest
whole number in inches.
WEIGHT Print soldier’s weight in WEIGHT block. Weight will be recorded to the nearest pound. If the weight fraction is less than
1/2 pound, round down to the nearest pound. If the weight fraction is 1/2 pound or greater, round up to the nearest pound. Circle
GO if soldier meets screening table weight IAW AR 600-9. Circle NO-GO if soldier exceeds screening table weight IAW AR 600-9.
BODY FAT If soldier exceeds screening table weight, print the soldier’s body fat in the BODY FAT block. Percent body fat is
recorded from DA Form 5500-R, Body Fat Content Worksheet, Dec 85, for male soldiers and DA Form 5501-R, Body Fat Content
Worksheet, Dec 85, for female soldiers. Circle GO if soldier meets percent body fat for their age and gender IAW AR 600-9. Circle
NO-GO if soldier exceeds percent body fat for their age and gender IAW AR 600-9. If soldier does not exceed screening table
weight or does not appear to have excessive body fat IAW AR 600-9, print N/A (not applicable) in the BODY FAT block.
PU RAW SCORE The event scorer records the number of correctly performed repetitions of the push-up in the PU RAW SCORE
block and prints his or her initials in the INITIALS block.
SU RAW SCORE The event scorer records the number of correctly performed repetitions of the sit-up in the SU RAW SCORE
block and prints his or her initials in the INITIALS block.
2MR RAW SCORE The event scorer records the two-mile run time in the 2MR RAW SCORE block. The time is recorded in
minutes and seconds. The event scorer then determines the point value for the two-mile run using the scoring standards on the
reverse side of the scorecard. The point value is recorded in the 2MR POINTS block and the event scorer prints his or her initials in
the INITIALS block. In all cases when a point value falls between two point values, the lower point value is used and recorded.
The two-mile run event scorer also determines the point value for push-ups and sit-ups using the scoring standards on the reverse
side of the scorecard. The point values are recorded in the appropriate push-up and sit-up POINTS block and the event scorer
prints his or her initials in the INITIALS block. The two-mile run event scorer totals the points from the three events and records the
total APFT score in the TOTAL POINTS block.
ALTERNATE AEROBIC EVENT The event scorer prints the alternate aerobic event administered (800-yard swim, 6.2-mile-
stationary bicycle ergometer, 6.2-mile-bicycle test or 2.5-mile walk) in the ALTERNATE AEROBIC EVENT block. The time the
soldier completes the alternate aerobic event is recorded in minutes and seconds in the ALTERNATE AEROBIC EVENT block.
The standards for the alternate aerobic event tests are listed in FM 21-20, Chapter 14, Figure 14-9. Scoring for all alternate aerobic
events is on a GO or NO-GO basis. No point values are awarded. Circle GO if the soldier completes the alternate aerobic event
within the required time or less. Circle NO-GO if the soldier fails to complete the alternate aerobic event within the required time.
The alternate aerobic event scorer also determines the point value for push-ups and or sit-ups using the scoring standards on the
reverse side of the scorecard. The point values are recorded in the appropriate push-up and or sit-up POINTS block and the event
scorer prints his or her initials in the 2MR INITIALS block. The alternate aerobic event scorer totals the points from the push-up and
or sit-up events and records the total APFT score in the TOTAL POINTS block.
NCOIC/OIC Signature The NCOIC/OIC checks all test scores for accuracy and signs their name in the NCOIC/OIC Signature
block.
COMMENTS The event supervisor, event scorer, NCOIC, or OIC may record comments appropriate to the APFT in the
COMMENTS block. Appropriate comments may include: weather conditions, injury during APFT and or appeals.

14-8.2
(THIS PAGE INTENTIONALLY LEFT BLANK.)
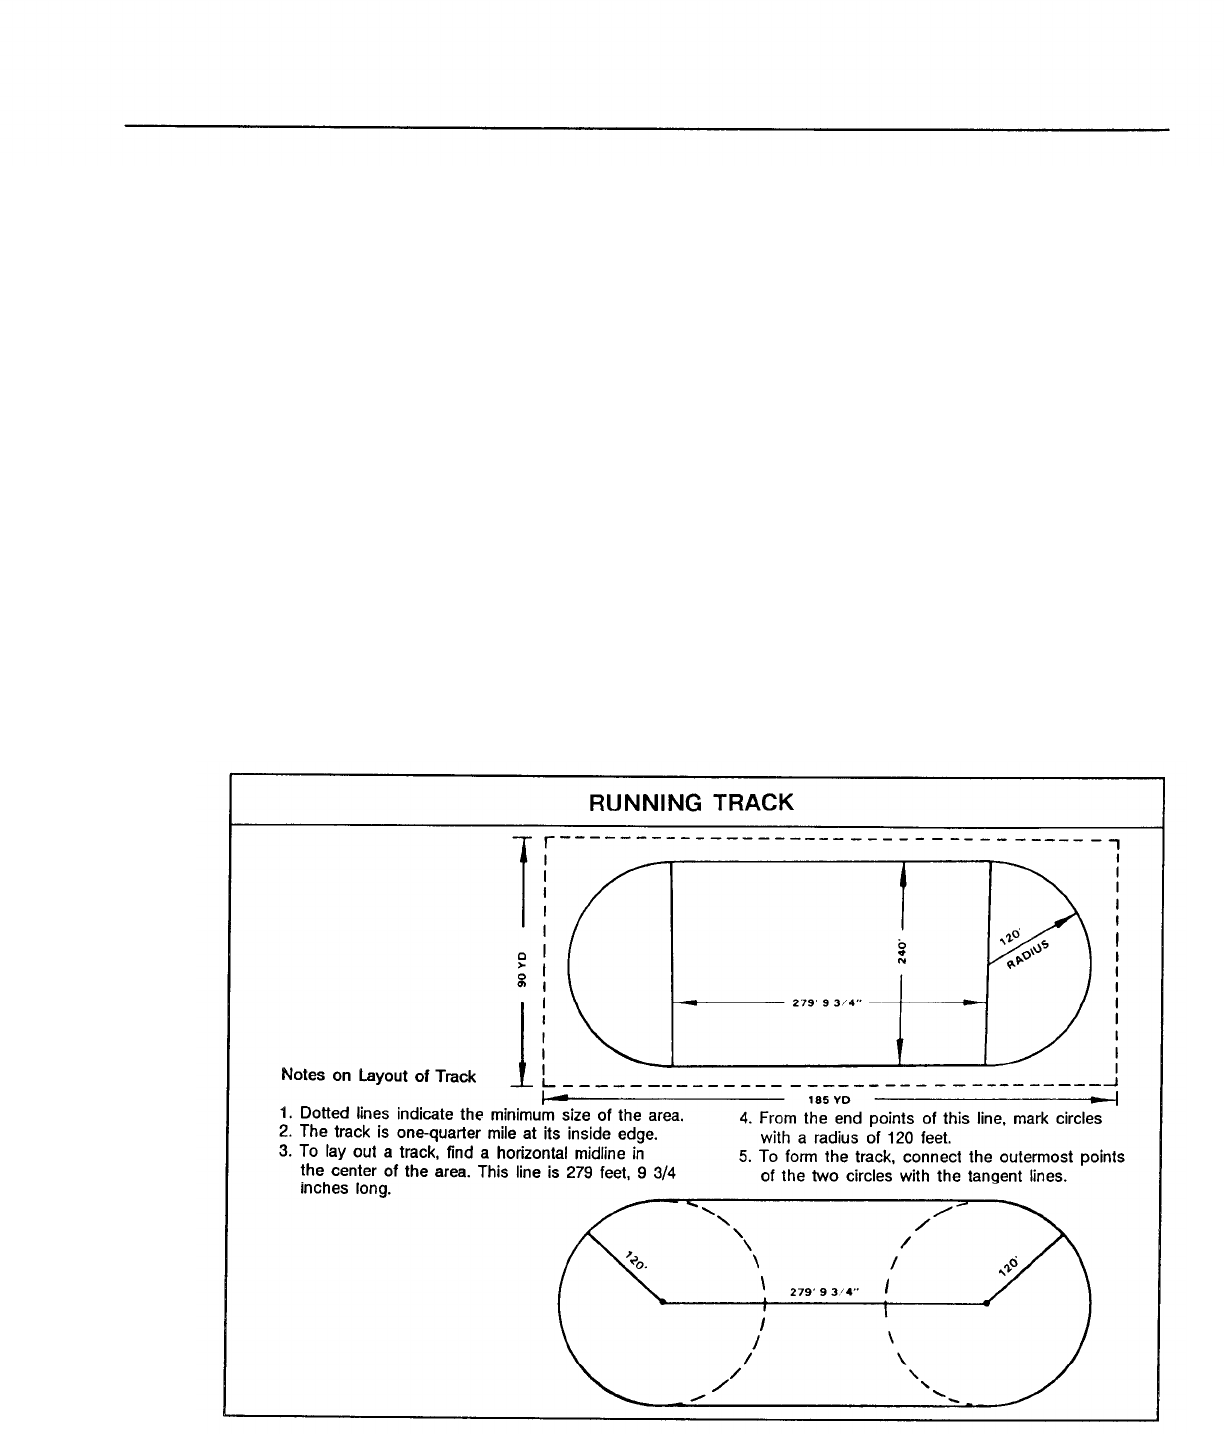
SUPPORT PERSONNEL
Safety and control people should be
at the test site, depending on local
policy and conditions. Medical per-
sonnel may also be there. However,
they do not have to be on site to have
the APFT conducted. At a minimum,
the OIC or NCOIC should have a plan,
known to all test personnel, for getting
medical help if needed.
Test Site
The test site should be fairly flat and
free of debris. It should have the fol-
lowing:
● An area for stretching and warming
up.
● A soft, flat, dry area for perform-
ing push-ups and sit-ups.
●
●
A flat, 2-mile running course with
a solid surface and no more than a
three-percent grade. (Commanders
must use good judgement; no one is
expected to survey terrain.)
No significant hazards, (for ex-
ample, traffic, slippery road sur-
faces, heavy pollution).
When necessary or expedient, a
quarter-mile running track can “be
used. It can be marked with a series of
stakes along the inside edge. When the
track is laid out, a horizontal midline
279 feet, 9 3/4 inches long must be
marked in the center of a clear area. A
120-foot circle is marked at both ends
of this line. The track is formed when
the outermost points of the two circles
are connected with tangent lines. (See
Figure 14-2.)
Figure 14-2
14-9

A 400-meter track may be used in
place of the standard quarter-mile
(440-yard) track for the 2-mile run,
However, one lap run on a 400-meter
track is 92 inches shorter than one lap
on a 440-yard track. Eight laps on a
400-meter track is 736 inches shorter
than eight laps (2 miles) on a 440-yard
track. Therefore, soldiers who run the
2-mile event on a 400-meter track
must run eight laps plus an additional
61 feet, 4 inches.
Test Procedures
On test day, soldiers are assembled
in a common area and briefed by the
test OIC or NCOIC about the purpose
and organization of the test. The OIC
or NCOIC then explains the scorecard,
scoring standards, and sequence of
events.
The instructions printed here in
large type must be read to the soldiers:
“YOU ARE ABOUT TO TAKE THE
ARMY PHYSICAL FITNESS TEST,
A TEST THAT WILL MEASURE
YOUR MUSCULAR ENDURANCE
AND CARDIORESPIRATORY FIT-
NESS.
THE RESULTS OF THIS
TEST WILL GIVE YOU AND YOUR
COMMANDERS AN INDICATION
OF YOUR STATE OF FITNESS AND
WILL ACT AS A GUIDE IN DETER-
MINING YOUR PHYSICAL TRAIN-
ING NEEDS. LISTEN CLOSELY TO
THE TEST INSTRUCTIONS, AND
DO THE BEST YOU CAN ON EACH
OF THE EVENTS.”
If scorecards have not already been
issued, they are handed out at this
time. The OIC or NCOIC then says the
following:
“IN THE APPROPRIATE
SPACES, PRINT IN INK THE PER-
SONAL INFORMATION REQUIRED
ON THE SCORECARD.” (If score-
cards have been issued to the soldiers
and filled out before they arrive at the
test site, this remark is omitted.)
The OIC or NCOIC pauses briefly to
give the soldiers time to check the
information. He then says the follow-
ing:
“YOU ARE TO CARRY THIS
CARD WITH YOU TO EACH EVENT.
BEFORE YOU BEGIN, HAND THE
CARD TO THE SCORER. AFTER
YOU COMPLETE THE EVENT, THE
SCORER WILL RECORD YOUR RAW
SCORE, INITIAL THE CARD, AND
RETURN IT TO YOU.” (At this
point, the scoring tables are explained
so everyone understands how raw scores
are converted to point scores.) Next,
the OIC or NCOIC says the following
“EACH OF YOU WILL BE ASSIGNED
TO A GROUP. STAY WITH YOUR
TEST GROUP FOR THE ENTIRE
TEST, WHAT ARE YOUR QUES-
TIONS ABOUT THE TEST AT THIS
POINT?”
Groups are organized as required
and given final instructions including
what to do after the final event. The
test is then given.
RETAKING OF EVENTS
Soldiers who start an event incor-
rectly must be stopped by the scorer
before they complete 10 repetitions
and told what their errors are. They
are then sent to the end of the line to
await their turn to retake the event.
A soldier who has problems such as
muscle cramps while performing an
event may rest if he does not assume an
illegal position in the process. If he
continues, he receives credit for all
correctly done repetitions within the
two-minute period. If he does not
continue, he gets credit for the number
of correct repetitions he has performed
up to that time. If he has not done 10
correct repetitions, he is sent to the end
of the line to retake that event. He may
not retake the event if he has exceeded
10 repetitions. Soldiers who are unable
to perform 10 correct repetitions be-
cause of low fitness levels may not
retake an event.
14-10

TEST FAILURES
Soldiers who stop to rest in an au-
thorized rest position continue to re-
ceive credit for correct repetitions per-
formed after their rest. Soldiers who
rest in an unauthorized rest position
will have their performance in that
event immediately terminated.
The records of soldiers who fail a
record APFT for the first time and
those who fail to take the APFT within
the required period (AR 350-15, para-
graph 11) must be flagged IAW AR
600-8-2 (Reference B).
RETESTING
Soldiers who fail any or all of the
events must retake the entire APFT. In
case of test failure, commanders may
allow soldiers to retake the test as soon
as the soldiers and commanders feel
they are ready. Soldiers without a
medical profile will be retested not-
later-than three months following the
initial APFT failure in accordance
with AR 350-15, paragraph 11.
Test Sequence
The test sequence is the push-up,
sit-up, and 2-mile run (or alternate,
aerobic event). The order of events
cannot be changed. There are no
exceptions to this sequence.
Soldiers should be allowed no less
than 10 minutes, but ideally no more
than 20 minutes, to recover between
each event. The OIC or NCOIC deter-
mines the time to be allotted between
events, as it will depend on the total
number of soldiers who are participat-
ing in the APFT. If many soldiers are
to be tested, staggered starting times
should be planned to allow the proper
intervals between events. Under no
circumstances is the APFT valid if a
soldier cannot begin and end all three
events in two hours or less.
The following paragraphs describe
the equipment, facilities, personnel,
instructions, administration, timing
techniques, and scorers’ duties for the
pushup, sit-up, and 2-mile-run events.
PUSH-UPS
Push-ups measure the endurance of
the chest, shoulder, and triceps muscles.
(See Figure 14-3.)
Equipment
One stopwatch is needed along with
one clipboard and pen for each scorer.
The event supervisor must have the
following the instructions in this chap-
ter on how to conduct the event and
one copy of the push-up scoring stan-
dards (DA Form 705).
Facilities
There must be at least one test
station for every 15 soldiers to be
tested. Each station is 6 feet wide and
15 feet deep.
Personnel
One event supervisor must beat the
test site and one scorer at each station.
The event supervisor may not be the
event scorer.
Instructions
The event supervisor must read the
following: “THE PUSH-UP EVENT
MEASURES THE ENDURANCE OF
THE CHEST, SHOULDER, AND
TRICEPS MUSCLES. ON THE
COMMAND ‘GET SET,’ ASSUME
THE FRONT-LEANING REST PO-
SITION BY PLACING YOUR HANDS
WHERE THEY ARE COMFORT-
ABLE FOR YOU. YOUR FEET
MAY BE TOGETHER OR UP TO 12
INCHES APART. WHEN VIEWED
FROM THE SIDE, YOUR BODY
SHOULD FORM A GENERALLY
STRAIGHT LINE FROM YOUR
SHOULDERS TO YOUR ANKLES.
14-11
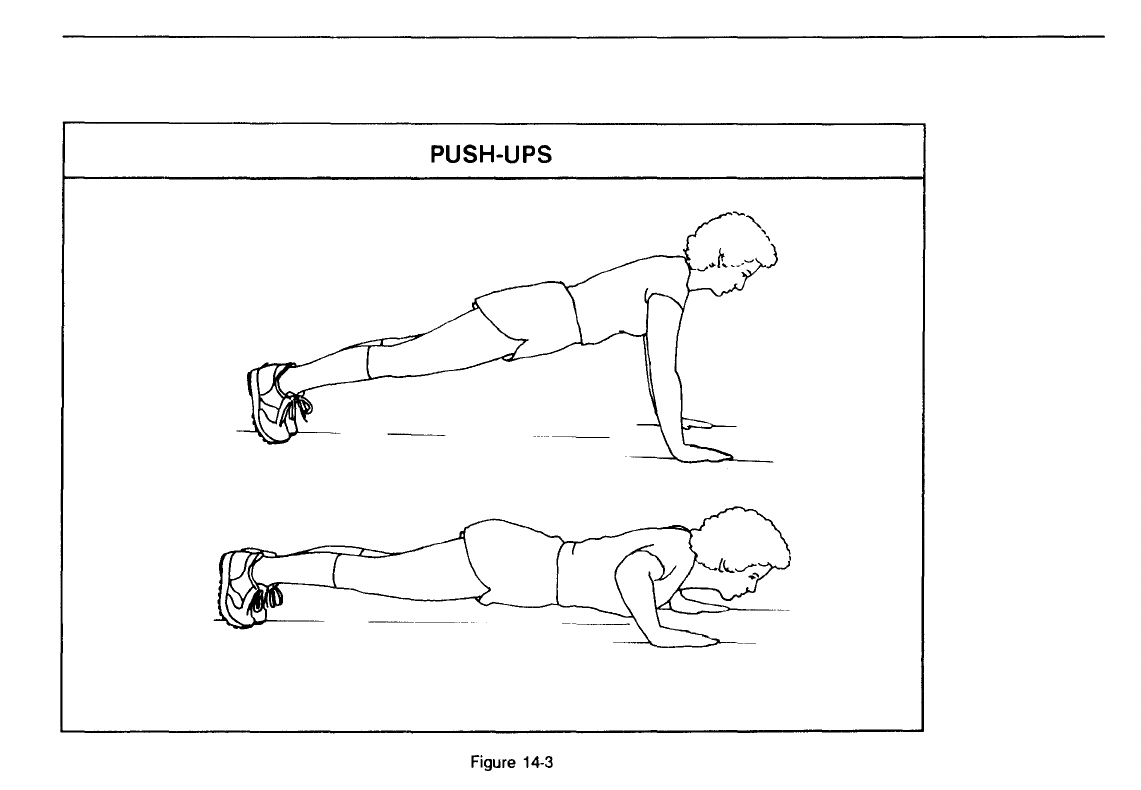
ON THE COMMAND ‘GO,’ BEGIN
THE PUSH-UP BY BENDING YOUR
ELBOWS AND LOWERING YOUR
ENTIRE BODY AS A SINGLE UNIT
UNTIL YOUR UPPER ARMS ARE
AT LEAST PARALLEL TO THE
GROUND. THEN, RETURN TO
THE STARTING POSITION BY
RAISING YOUR ENTIRE BODY
UNTIL YOUR ARMS ARE FULLY
EXTENDED. YOUR BODY MUST
REMAIN RIGID IN A GENERALLY
STRAIGHT LINE AND MOVE AS A
UNIT WHILE PERFORMING EACH
REPETITION. AT THE END OF
EACH REPETITION, THE SCORER
WILL STATE THE NUMBER OF
REPETITIONS YOU HAVE COM-
PLETED CORRECTLY. IF YOU
FAIL TO KEEP YOUR BODY GEN-
ERALLY STRAIGHT, TO LOWER
YOUR WHOLE BODY UNTIL YOUR
UPPER ARMS ARE AT LEAST PAR-
ALLEL TO THE GROUND, OR TO
EXTEND YOUR ARMS COM-
PLETELY, THAT REPETITION WILL
NOT COUNT, AND THE SCORER
WILL REPEAT THE NUMBER OF
THE LAST CORRECTLY PER-
FORMED REPETITION. IF YOU
FAIL TO PERFORM THE FIRST
TEN PUSH-UPS CORRECTLY, THE
SCORER WILL TELL YOU TO GO
TO YOUR KNEES AND WILL EX-
PLAIN TO YOU WHAT YOUR MIS-
TAKES ARE. YOU WILL THEN BE
SENT TO THE END OF THE LINE
TO BE RETESTED. AFTER THE
FIRST 10 PUSH-UPS HAVE BEEN
PERFORMED AND COUNTED,
HOWEVER, NO RESTARTS ARE
ALLOWED. THE TEST WILL CON-
TINUE, AND ANY INCORRECTLY
PERFORMED PUSH-UPS WILL NOT
BE COUNTED. AN ALTERED,
FRONT-LEANING REST POSITION
IS THE ONLY AUTHORIZED REST
POSITION. THAT IS, YOU MAY
14-12
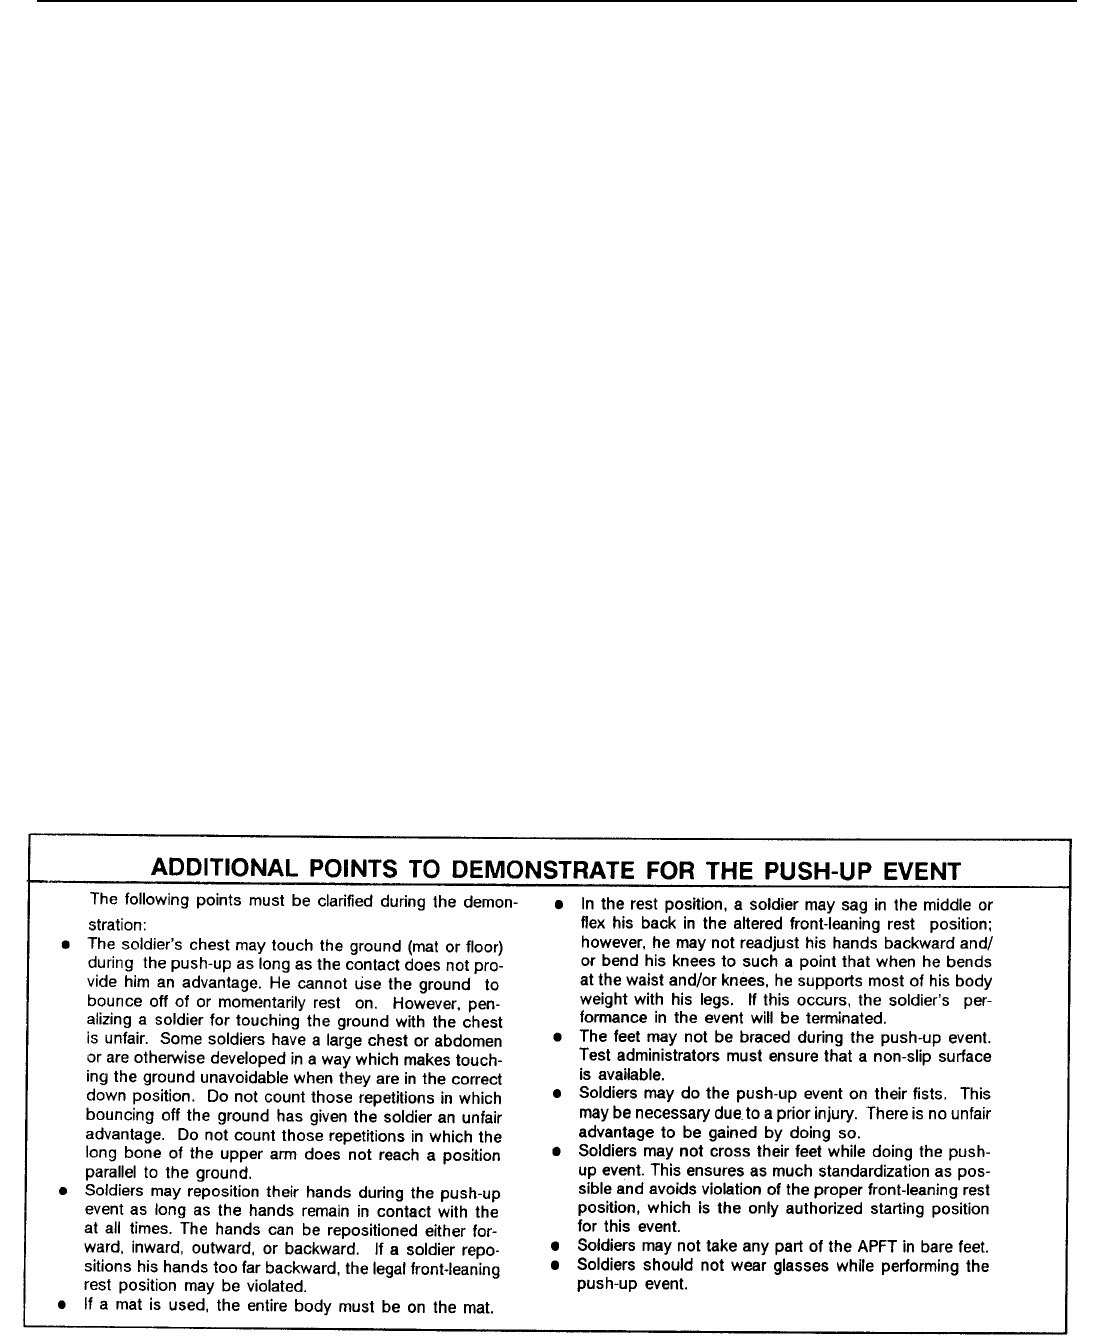
SAG IN THE MIDDLE OR FLEX
YOUR BACK. WHEN FLEXING
YOUR BACK, YOU MAY BEND
YOUR KNEES, BUT NOT TO SUCH
AN EXTENT THAT YOU ARE
SUPPORTING MOST OF YOUR
BODY WEIGHT WITH YOUR LEGS.
IF THIS OCCURS, YOUR PERFORM-
ANCE WILL BE TERMINATED. YOU
MUST RETURN TO, AND PAUSE
IN, THE CORRECT STARTING
POSITION BEFORE CONTINUING.
IF YOU REST ON THE GROUND
OR RAISE EITHER HAND OR FOOT
FROM THE GROUND, YOUR
PERFORMANCE WILL BE TERMI-
NATED. YOU MAY REPOSITION
YOUR HANDS AND/OR FEET
DURING THE EVENT AS LONG AS
THEY REMAIN IN CONTACT WITH
THE GROUND AT ALL TIMES.
CORRECT PERFORMANCE IS IM-
PORTANT. YOU WILL HAVE TWO
MINUTES IN WHICH TO DO AS
MANY PUSH-UPS AS YOU CAN.
WATCH THIS DEMONSTRATION.”
(The exercise is then demonstrated.
See Figure 14-4 for a list of points that
need to be made during the demonstra-
Administration
After reading the instructions, the
supervisor answers questions. Then he
moves the groups to their testing sta-
tions. The event supervisor cannot be
ready to begin. Successive groups do
the event until all soldiers have com-
pleted it.
Timing Techniques
The event supervisor is the timer.
He calls out the time remaining every
30 seconds and every second for the
last 10 seconds of the two minutes. He
ends the event after two minutes by
the command “Halt!”
Scorers’ Duties
Scorers must allow for differences
in the body shape and structure of
each soldier. The scorer uses each
soldier’s starting position as a guide
throughout the event to evaluate each
repetition. The scorer should talk to
the soldier before the event begins and
have him do a few repetitions as a
warm-up and reference to ensure he is
tion.) “WHAT ARE-YOUR QUES- doing the exercise correctly.
TIONS?”
Figure 14-4
14-13
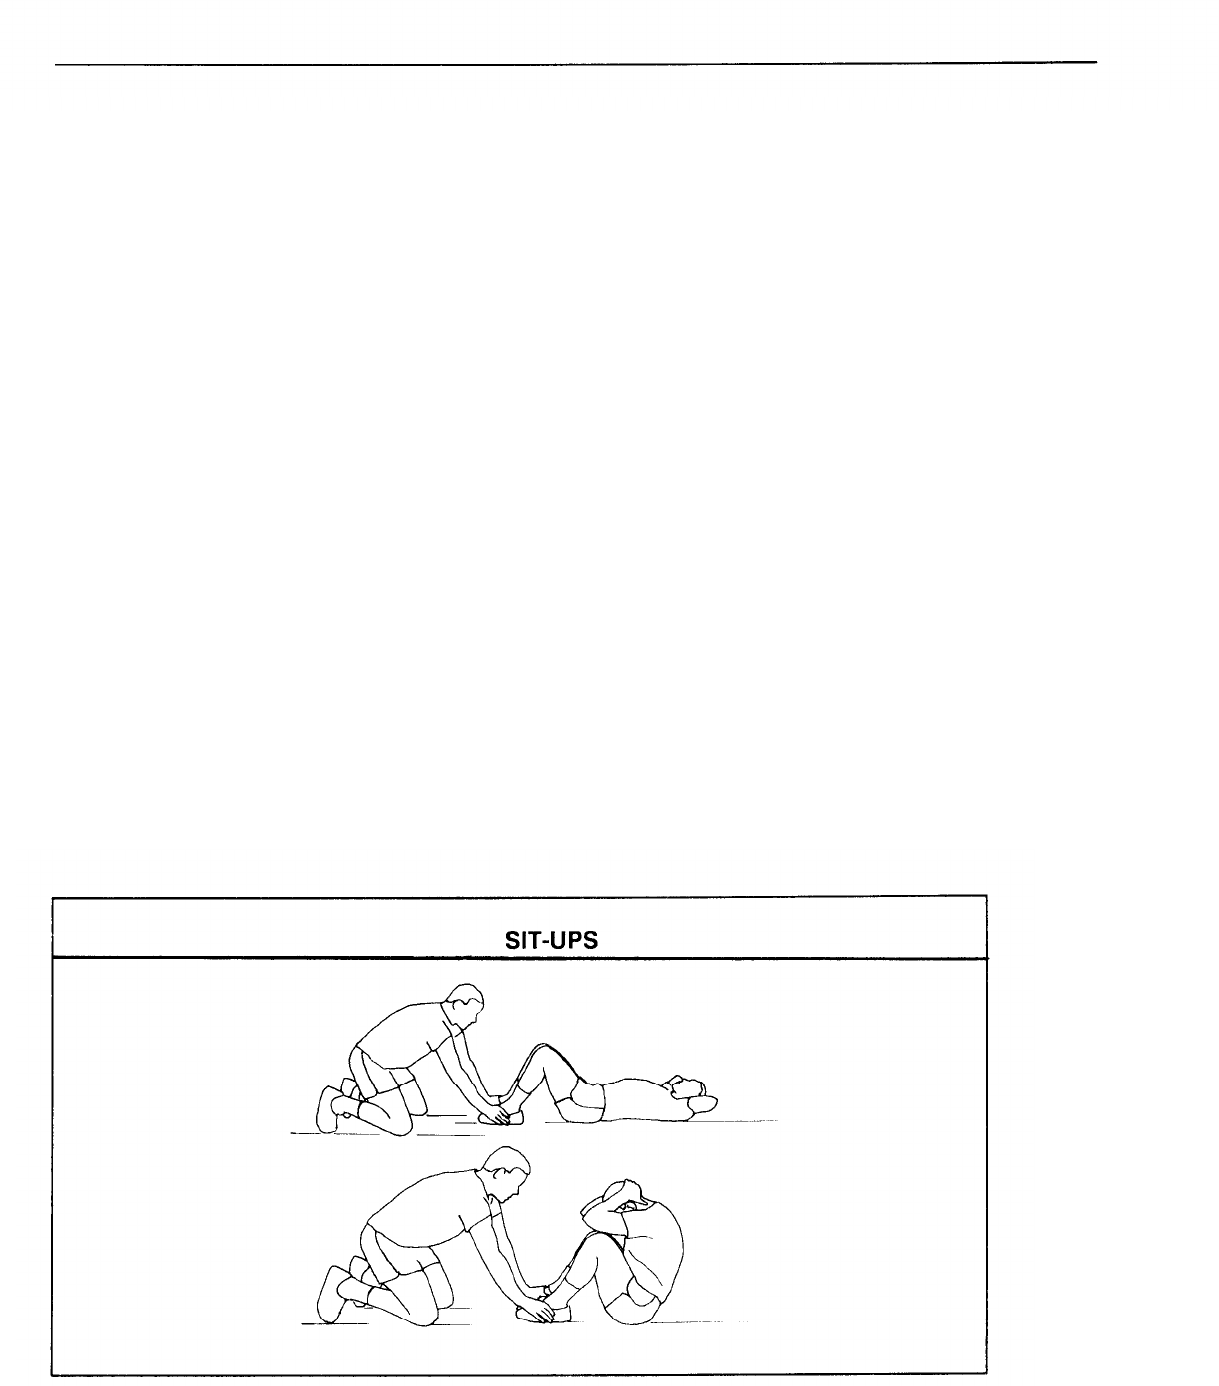
The scorer may either sit or kneel
about three feet from the testee’s
shoulder at a 45-degree angle in front
of it. The scorer’s head should be
about even with the testee’s shoulder
when the latter is in the front-leaning
rest position. Each scorer determines
for himself if he will sit or kneel when
scoring. He may not lie down or stand
while scoring. He counts out loud the
number of correct repetitions com-
pleted and repeats the number of the
last correct push-up if an incorrect
one is done. Scorers tell the testees
what they do wrong as it occurs dur-
ing the event. A critique of the
performance is done following the
test.
When the soldier completes the
event, the scorer records the number
of correctly performed repetitions,
initials the scorecard, and returns it to
the soldier.
SIT-UPS
This event measures the endurance
of the abdominal and hip-flexor
muscles. (See Figure 14-5.)
Equipment
One stopwatch is needed along with
one clipboard and pen for each scorer.
The event supervisor must have the
following: the instructions in this chap-
ter on how to conduct the event and
one copy of the sit-up scoring stan-
dards (DA Form 705).
Facilities
Each station is 6 feet wide and 15 feet
deep. Ensure that no more than 15
soldiers are tested at a station.
Personnel
One event supervisor must be at the
test site and one scorer at each station.
The event supervisor may not be the
event scorer.
Instructions
The event supervisor must read the
following: “THE SIT-UP EVENT
MEASURES THE ENDURANCE OF
THE ABDOMINAL AND HIP-
FLEXOR MUSCLES. ON THE
Figure 14-5
14-14
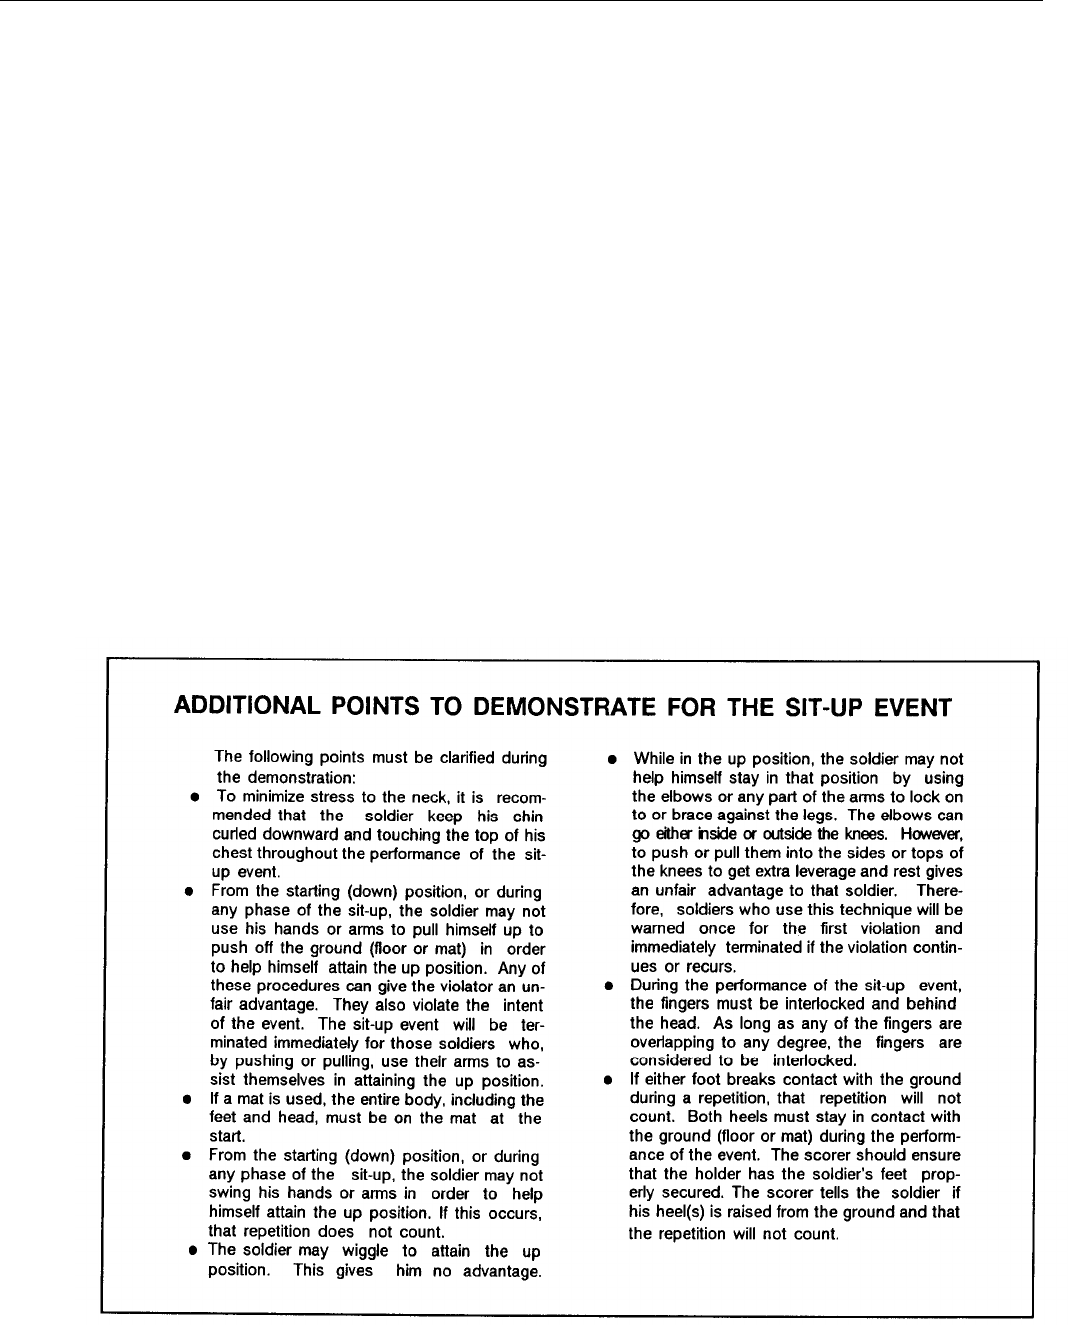
COMMAND “GET SET”, ASSUME
THE STARTING POSITION BY
LYING ON YOUR BACK WITH
YOUR KNEES BENT AT A 90-
DEGREE ANGLE. YOUR FEET MAY
BE TOGETHER OR UP TO 12 INCHES
APART. ANOTHER PERSON WILL
HOLD YOUR ANKLES WITH THE
HANDS ONLY. NO OTHER METHOD
OF BRACING OR HOLDING THE
FEET IS AUTHORIZED. THE HEEL
IS THE ONLY PART OF YOUR
FOOT THAT MUST STAY IN CON-
TACT WITH THE GROUND. YOUR
FINGERS MUST BE INTERLOCKED
BEHIND YOUR HEAD AND THE
BACKS OF YOUR HANDS MUST
TOUCH THE GROUND. YOUR
ARMS AND ELBOWS NEED NOT
TOUCH THE GROUND. ON THE
COMMAND “GO”, BEGIN RAIS-
ING YOUR UPPER BODY FOR-
WARD TO, OR BEYOND, THE
VERTICAL POSITION. THE VER-
TICAL POSITION MEANS THAT
THE BASE OF YOUR NECK IS
ABOVE THE BASE OF YOUR SPINE.
AFTER YOU HAVE REACHED OR
SURPASSED THE VERTICAL POSI-
TION, LOWER YOUR BODY UNTIL
THE BOTTOM OF YOUR SHOUL-
DER BLADES TOUCH THE
GROUND. YOUR HEAD, HANDS,
ARMS, OR ELBOWS DO NOT HAVE
TO TOUCH THE GROUND. AT
THE END OF EACH REPETITION,
THE SCORER WILL STATE THE
NUMBER OF SIT-UPS YOU HAVE
CORRECTLY COMPLETED. A
REPETITION WILL NOT COUNT IF
YOU FAIL TO REACH THE VER-
TICAL POSITION, FAIL TO KEEP
YOUR FINGERS INTERLOCKED
BEHIND YOUR HEAD, ARCH OR
BOW YOUR BACK AND RAISE
YOUR BUTTOCKS OFF THE
Figure 14-6
14-15

GROUND TO RAISE YOUR UPPER
BODY, OR LET YOUR KNEES
EXCEED A 90-DEGREE ANGLE.
IF A REPETITION DOES NOT
COUNT, THE SCORER WILL RE-
PEAT THE NUMBER OF YOUR
LAST CORRECTLY PERFORMED
SIT-UP. THE UP POSITION IS THE
ONLY AUTHORIZED REST POSI-
TION. IF YOU STOP AND REST IN
THE DOWN (STARTING) POSITION,
THE EVENT WILL BE TERMI-
NATED. AS LONG AS YOU MAKE
A CONTINUOUS PHYSICAL EF-
FORT TO SIT UP, THE EVENT
WILL NOT BE TERMINATED. YOU
MAY NOT USE YOUR HANDS OR
ANY OTHER MEANS TO PULL OR
PUSH YOURSELF UP TO THE UP
(RESTING) POSITION OR TO HOLD
YOURSELF IN THE REST POSI-
TION. IF YOU DO SO, YOUR PER-
FORMANCE IN THE EVENT WILL
BE TERMINATED. CORRECT PER-
FORMANCE IS IMPORTANT. YOU
WILL HAVE TWO MINUTES TO
PERFORM AS MANY SIT-UPS AS
YOU CAN. WATCH THIS DEMON-
STRATION.” (The exercise is then
demonstrated. See Figure 14-6 for a
list of points that need to be made
during the demonstration.) “WHAT
ARE YOUR QUESTIONS?”
Administration
After reading the instructions, the
supervisor answers questions. He then
moves the groups to their testing sta-
tions. The event supervisor cannot be
a scorer. At this point, the testing is
ready to begin. Successive groups do
the event until all soldiers have com-
pleted it.
Timing Techniques
The event supervisor is the timer.
He calls out the time remaining every
30 seconds and every second for the
last 10 seconds of the two minutes. He
ends the event after two minutes by the
command “Halt!”
Scorers’ Duties
The scorer may either kneel or sit
about three feet from the testee’s hip.
The scorer’s head should be about even
with the testee’s shoulder when the
latter is in the vertical (up) position.
Each scorer decides for himself whether
to sit or kneel down when scoring. He
may not lie down or stand while
scoring. The scorer counts aloud the
number of correctly performed sit-ups
and repeats the number of the last
correctly performed repetition if an
incorrect one is done. Scorers tell the
testees what they are doing wrong as it
occurs during the event. A critique of
his performance is given to each sol-
dier after the event. When the soldier
completes the event, the scorer records
the number of correctly performed sit-
ups, initials the scorecard, and returns
it to the soldier.
When checking for correct body
position, the scorer must be sure that at
a 90-degree angle is formed at each
knee by the soldier’s upper and lower
leg. The angle to be measured is not the
one formed by the lower leg and the
ground. If, while performing the sit-
up event, this angle becomes greater
than 90 degrees, the scorer should
instruct the testee and holder to repo-
sition the legs to the proper angle and
obtain compliance before allowing the
testee’s performance to continue. The
loss of the proper angle does not
terminate the testee’s performance in
the event. When the soldier comes to
the vertical position, the scorer must be
sure that the base of the soldier’s neck
is above or past the base of the spine.
A soldier who simply touches his knees
with his elbows may not come to a
completely vertical position. The scorer
must ensure that the holder uses only
his hands to brace the exerciser’s feet.
14-16
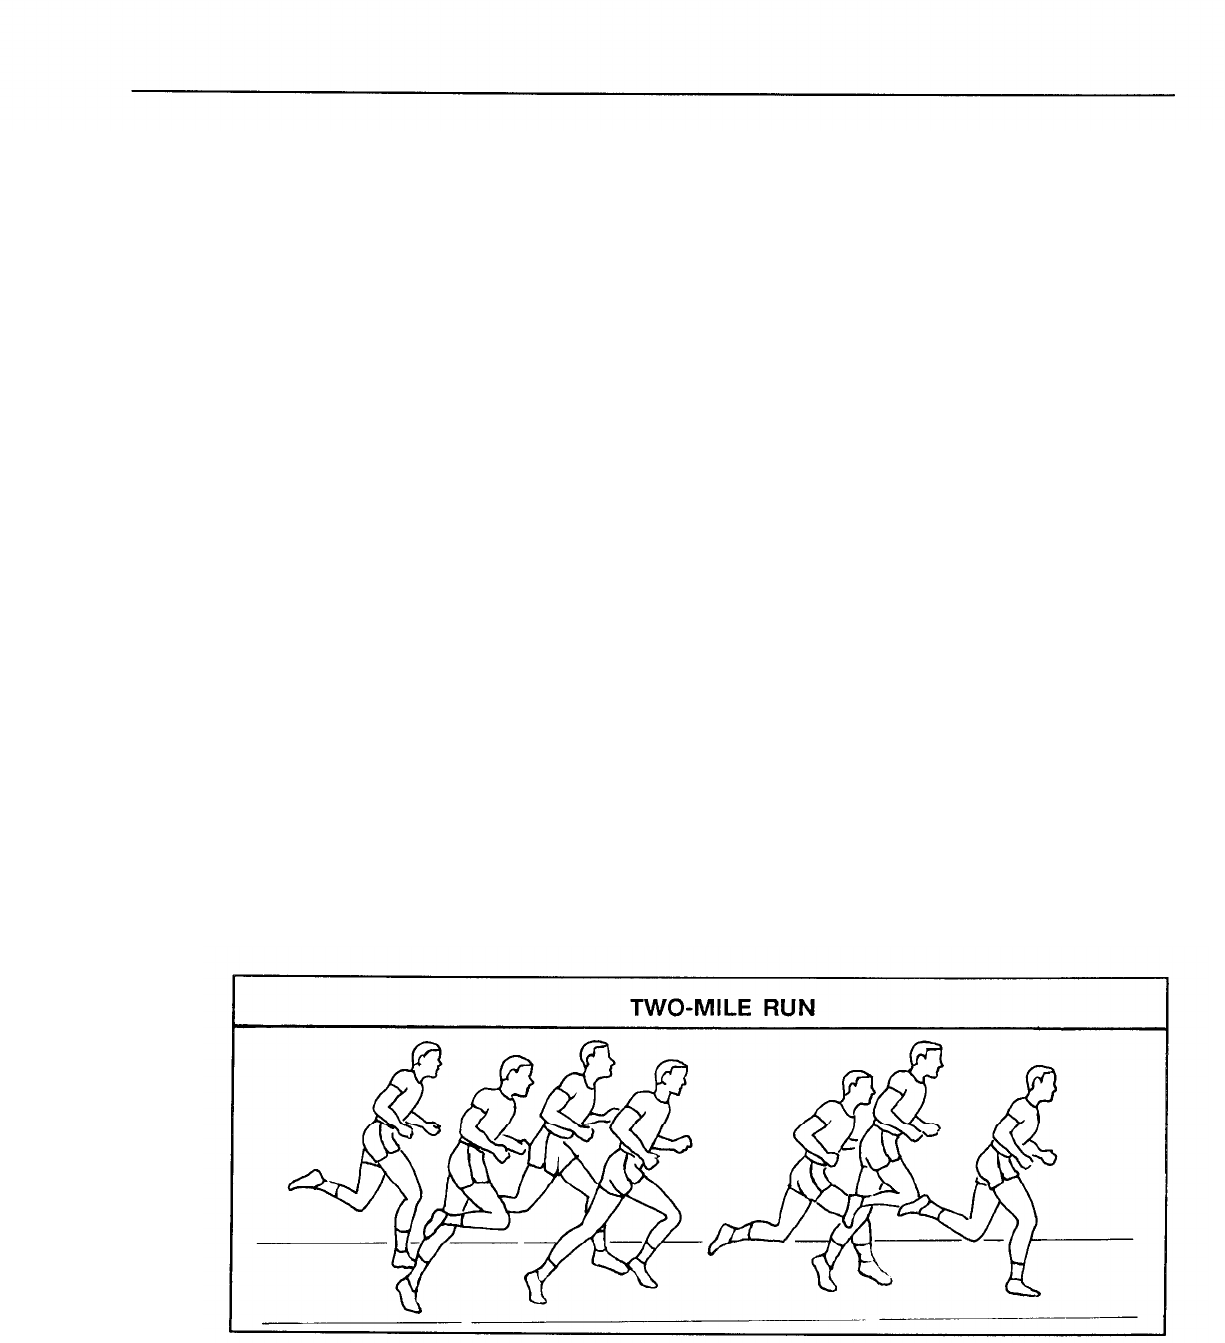
TWO-MILE RUN
This event tests cardiorespiratory
(aerobic) endurance and the endurance
of the leg muscles. (See Figure 14-7.)
Equipment
Two stopwatches for the event
supervisor, one clipboard and pen for
each scorer, copies of the event’s in-
structions and standards, and numbers
for the testees are needed.
Facilities
There must be a level area with no
more than a three-degree slope on
which a measured course has been
marked. An oval-shaped track of
known length may be used. If a road
course is used, the start and finish and
one-mile (half way) point must be clearly
marked.
Personnel
One event supervisor and at least
one scorer for every 15 runners are
required.
Instructions
The event supervisor must read the
following: “THE TWO-MILE RUN IS
USED TO ASSESS YOUR AEROBIC
FITNESS AND YOUR LEG
MUSCLES’ ENDURANCE. You
MUST COMPLETE THE RUN WITH-
OUT ANY PHYSICAL HELP. AT
THE START, ALL SOLDIERS WILL
LINE UP BEHIND THE STARTING
LINE. ON THE COMMAND ‘GO,’
THE CLOCK WILL START. YOU
WILL BEGIN RUNNING AT YOUR
OWN PACE. TO RUN THE RE-
QUIRED TWO MILES, YOU MUST
COMPLETE (describe the number of
laps, start and finish points, and course
layout). YOU ARE BEING TESTED
ON YOUR ABILITY TO COMPLETE
THE 2-MILE COURSE IN THE
SHORTEST TIME POSSIBLE. AL-
THOUGH WALKING IS AUTHOR-
IZED, IT IS STRONGLY DISCOUR-
AGED. IF YOU ARE PHYSICALLY
HELPED IN ANY WAY (FOR EX-
AMPLE,PULLED,PUSHED,
PICKED UP, AND/OR CARRIED)
OR LEAVE THE DESIGNATED
RUNNING COURSE FOR ANY
Figure 14-7
14-17

REASON, YOU WILL BE DISQUALI-
FIED. (IT IS LEGAL TO PACE A
SOLDIER DURING THE 2-MILE
RUN. AS LONG AS THERE IS NO
PHYSICAL CONTACT WITH THE
PACED SOLDIER AND IT DOES
NOT PHYSICALLY HINDER OTHER
SOLDIERS TAKING THE TEST, THE
PRACTICE OF RUNNING AHEAD
OF, ALONG SIDE OF, OR BEHIND
THE TESTED SOLDIER, WHILE
SERVING AS A PACER, IS PER-
MITTED. CHEERING OR CALL-
ING OUT THE ELAPSED TIME IS
ALSO PERMITTED.) THE NUM-
BER ON YOUR CHEST IS FOR
IDENTIFICATION. YOU MUST
MAKE SURE IT IS VISIBLE AT ALL
TIMES. TURN IN YOUR NUMBER
WHEN YOU FINISH THE RUN.
THEN, GO TO THE AREA DESIG-
NATED FOR THE COOL-DOWN
AND STRETCH. DO NOT STAY
NEAR THE SCORERS OR THE
FINISH LINE AS THIS MAY IN-
TERFERE WITH THE TESTING.
WHAT ARE YOUR QUESTIONS ON
THIS EVENT?”
Administration
After reading the instructions, the
supervisor answers questions. He then
organizes the soldiers into groups of no
more than 10. The scorer for each
group assigns a number to each soldier
in the group. At the same time, the
scorer collects the scorecards and rec-
ords each soldier’s number.
Timing Techniques
The event supervisor is the timer.
He uses the commands “Get set” and
“Go.”
Two stopwatches are used in
case one fails. As the soldiers near the
finish line, the event supervisor calls
off the time in minutes and seconds
(for example, “Fifteen-thirty, fifteen-
thirty-one, fifteen-thirty -two,” and
so on).
Scorers’ Duties
The scorers observe those runners in
their groups, monitor their laps (if
appropriate), and record their times as
they cross the finish line. (It is often
helpful to record the soldiers’ numbers
and times on a separate sheet of paper
or card. This simplifies the recording
of finish times when large groups of
soldiers are simultaneously tested.) After
all runners have completed the run, the
scorers determine the point value for
each soldier’s run time, record the
point values on the scorecards, and
enter their initials in the scorers’ blocks.
In all cases, when a time falls between
two point values, the lower point value
is used and recorded. For example, if
a female soldier, age 17 to 21, runs the
two miles in 15 minutes and 19 sec-
onds, the score awarded is 95 points.
At this time, the scorers for the 2-
mile run also convert the raw scores for
the push-up and sit-up events by using
the scoring standards on the back side
of the scorecard. They enter those
point values on the scorecards and
determine the total APFT score for
each soldier before giving the score-
cards to the test’s OIC or NCOIC.
After the test scores have been checked,
the test’s OIC or NCOIC signs all
scorecards and returns them to the
unit’s commander or designated repre-
sentative.
Test Results
The soldier’s fitness performance
for each APFT event is determined by
converting the raw score for each event
to a point score.
Properly interpreted, performance
on the APFT shows the following:
●
●
●
●
Each soldier’s level of physical fit-
ness.
The entire unit’s level of physical
fitness.
Deficiencies in physical fitness.
Soldiers who need special attention.
14-18
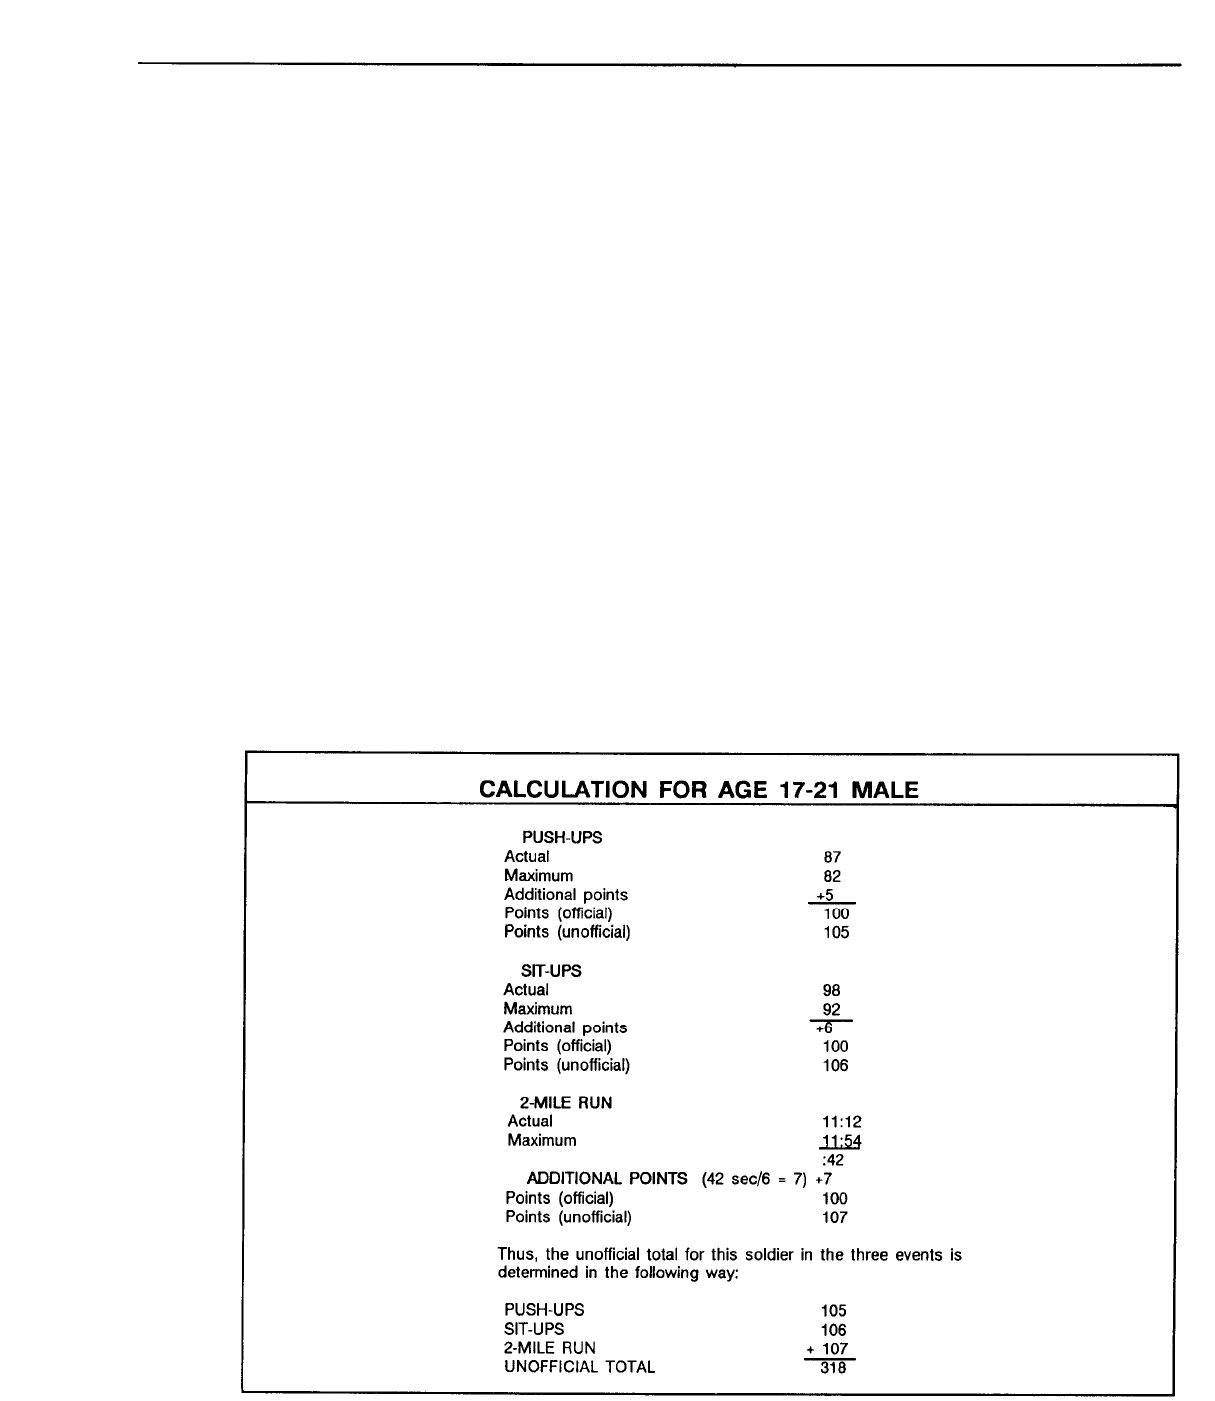
(Leaders must develop special pro-
grams to improve the performance
of soldiers who are below the re-
quired standards.)
Commanders should not try to de-
termine the individual’s or the unit’s
strengths and weaknesses in fitness by
using only the total scores. A detailed
study of the results on each event is
more important. For a proper analysis
of the unit’s performance, event scores
should be used. They are corrected for
age and sex. Therefore, a female’s 80-
point push-up score should be con-
sidered the same as a male’s 80-point
push-up score. Using the total point
value or raw scores
interpretation.
Scores Above
APFT events, the official, maximum
score on the APFT must remain at 300
(100 points per event). Some com-
manders, however, want to know
unofficial point scores to reward sol-
diers for their extra effort.
Only those soldiers who score 100
points in all three events are eligible to
determine their score on an extended
scale. To fairly determine the points
earned, extra points are awarded at the
same rate as points obtained for scores
at or below the 100 point level. Each
push-up and sit-up beyond the maxi-
mum is worth one point as is every six-
second decrease in the run time. Take,
may distort the for example, the following case shown
in Figure 14-8. A male soldier per-
forms above the maximum in the 17-21
Maximum age group by doing 87 push-ups and
98 sit-ups and by running the two
miles in 11 minutes and 12 seconds.
Even though some soldiers exceed His score would be calculated as fol-
the maximum score on one or more
lows:
Figure 14-8
14-19

The calculations on the previous
page, give the soldier a total score of
318 points. This method lets the com-
mander easily determine the scores for
performances that are above the maxi-
mum. He may recognize soldiers for
their outstanding fitness achievements,
not only on the APFT but also for
other, unofficial fitness challenges.
Using this method ensures that each
soldier has an equal chance to be
recognized for any of the tested fitness
components. Commanders may also
establish their own incentive programs
and set their own unit’s standards (AR
350-15).
Temporary Profiles
A soldier with a temporary profile
must take the regular three-event APFT
after the profile has expired. (Soldiers
with temporary profiles of more than
three months may take an alternate test
as determined by the commander with
input from health-care personnel. )
Once the profile is lifted, the soldier
must be given twice the time of the
profile (but not more than 90 days) to
train for the APFT. For example, if
the profile period was 7 days, the
soldier has 14 days to train for the
APFT after the profile period ends. If
a normally scheduled APFT occurs
during the profile period, the soldier
should be given a mandatory make-up
date.
Permanent Profiles
A permanently profiled soldier is
given a physical training program by
the profiling officer using the positive
profile form DA 3349 (see Appendix
B).
The profiling officer gives the
unit’s commander a list of physical
activities that are suitable for the
profiled soldier. He also indicates the
events and/or alternate aerobic event
that the soldier will do on the APFT.
This recommendation, made after
consultation with the profiled soldier,
should address the soldier’s abilities
and preference and the equipment
available. (See DA Form 3349, Physi-
cal Profile, referenced in AR 40-501.)
The profiled soldier must perform
all the regular APFT events his medi-
cal profile permits. Each soldier must
earn at least 60 points on the regular
events to receive a “go.” He must also
complete the alternate event in a time
equal to or less than the one listed for
his age group. For example, a soldier
whose profile forbids only running will
do the push-up and sit-up events and
an alternate aerobic event. He must get
at least a minimum passing score on
each event to earn a “go” for the test. A
soldier whose profile prevents two or
more APFT events must complete the
2-mile run or an alternate aerobic
event to earn a “go” on the test. Soldiers
who cannot do any of the aerobic
events due to a profile cannot be tested.
Such information will be recorded in
their official military record.
The standards for alternate events
are listed in Figure 14-9. Scoring for
all alternate events is on a go/no go
basis. Soldiers who do push-up and
sit-up events but who take an alternate
aerobic event are not awarded promo-
tion points for APFT performance.
Alternate Events
Alternate APFT events assess the
aerobic fitness and muscular endur-
ance of soldiers with permanent medi-
cal profiles or long-term (greater than
three months) temporary profiles who
cannot take the regular, three-event
APFT.
The alternate aerobic APFT events
are the following:
● 800-yard-swim test.
● 6.2-mile-stationary- bicycle ergome-
ter test with a resistance setting
of 2 kiloponds (2 kilograms) or
20 newtons.
● 6.2-mile-bicycle test on a conven-
tional bicycle using one speed.
● 2.5-mile-walk test.
14-20

14-21
ALTERNATE TEST STANDARDS BY EVENT, SEX, AND AGE
AGE
EVENT SEX 17-21 22-26 27-31 32-36 37-41 42-46 47-51 52-56 57-61 62+
800-YARD
SWIM Men
Women 20:00
21:00 20:30
21:30 21:00
22:00 21:30
22:30 22:00
23:00 22:30
23:30 23:00
24:00 24:00
25:00 24:30
25:30 25:00
26:00
6.2-MILE
BIKE
(Stationary
and track)
Men
Women 24:00
25:00 24:30
25:30 25:00
26:00 25:30
26:30 26:00
27:00 27:00
28:00 28:00
30:00 30:00
32:00 31:00
33:00 32:00
34:00
2.5-MILE
WALK Men
Women 34:00
37:00 34:30
37:30 35:00
38:00 35:30
38:30 36:00
39:00 36:30
39:30 37:00
40:00 37:30
40:30 38:00
41:00 38:30
41:30
*Figure 14-9
800-YARD-SWIM TEST
This event is used to assess cardio-
respiratory (aerobic) fitness. (See
Figure 14-10.)
Equipment
Two stopwatches, one clipboard and pen
for each scorer, one copy each of the test
instructions and standards, and appropriate
safety equipment are needed.
Facilities
A swimming pool at least 25 yards long
and 3 feet deep, or an approved facility, is
needed.
Personnel
One event supervisor and at least one
scorer for every soldier to be tested are
required. Appropriate safety, control, and
medical personnel must also be present.
Instructions
The event supervisor must read the
following statement: “THE 800-YARD
SWIM IS USED TO ASSESS YOUR
LEVEL OF AEROBIC FITNESS. YOU
WILL BEGIN IN THE WATER; NO
DIVING IS ALLOWED. AT THE START,
YOUR BODY MUST BE IN CONTACT
WITH THE WALL OF THE POOL. ON
THE COMMAND ‘GO,’ THE CLOCK
WILL START. YOU SHOULD THEN
BEGIN SWIMMING AT YOUR OWN
PACE, USING ANY STROKE OR
COMBINATION OF STROKES YOU
WISH. YOU MUST SWIM (tell the
number) LAPS TO COMPLETE THIS
DISTANCE. YOU MUST TOUCH THE
WALL OF THE POOL AT EACH END
OF THE POOL AS YOU TURN. ANY
TYPE OF TURN IS AUTHORIZED. YOU
WILL BE SCORED ON YOUR ABILITY
TO COMPLETE THE SWIM IN A TIME
EQUAL TO, OR LESS THAN, THAT
LISTED FOR YOUR AGE AND SEX.
WALKING ON THE BOTTOM TO
RECUPERATE IS AUTHORIZED.
SWIMMING GOGGLES ARE PER-
MITTED, BUT NO OTHER EQUIP-
MENT IS AUTHORIZED. WHAT ARE
YOUR QUESTIONS ABOUT THIS
EVENT?”

14-22
Figure 14-10
Administration
After reading the instructions, the event
supervisor answers only related questions.
He assigns one soldier to each lane and tells
the soldiers to enter the water. He gives
them a short warm-up period to acclimate to
the water temperature and loosen up. Above
all, the event supervisor must be alert to the
safety of the testees throughout the test.
Timing Techniques
The event supervisor is the timer. He
uses the commands “Get set” and “Go.”
Two stopwatches are used in case one fails.
As the soldiers near the finish, the event
supervisor begins calling off the elapsed
time in minutes and seconds (for example,
“Nineteen-eleven, nineteen-twelve,
nineteen-thirteen,” and so on). The time is
recorded when each soldier touches the end
of the pool on the final lap or crosses a line
set as the 800-yard mark.
Scorers’ Duties
Scorers must observe the swimmers
assigned to the. They must be sure that each
swimmer touches the bulkhead at every
turn. The scorers record each soldier’s time
in the 2-mile-run block on the scorecard
and use the comment block to identify the
time as an 800-yard-swim time. If the pool
length is measured in meters, the scorers
convert the exact distance to yards. To
convert meters to yards, multiply the
number of meters by 39.37 and divide the
product by 36; that is, (meters x 39.37)/36
= yards. For example, 400 meters equals
437.4 yards; that is, (400 x 39.37)/36 =
437.4 yards.
6.2-MILE STATIONARY-BICYCLE
ERGOMETER TEST
This event is used to assess the soldier’s
cardiorespiratory and leg-muscle
endurance. (See Figure 14-11.)
Equipment
Two stopwatches, one clipboard and
pen for each scorer, a copy of the test
instructions and standards, and one
stationary bicycle ergometer are
needed. The ergometers should measure
resistance in kiloponds or newtons. The
bicycle should be one that can be used
for training and testing. Its seat and
800-YARD SWIM
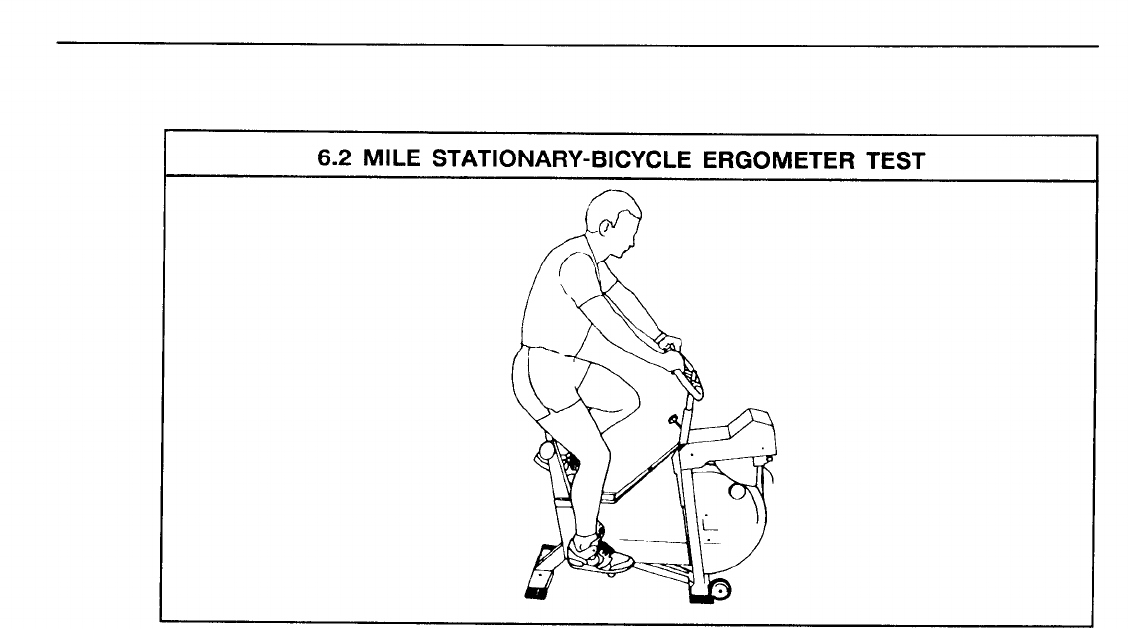
Figure 14-11
handlebars must be adjustable to let the
Instructions
soldier fully extend his legs when
pedaling. It should have an adjustable
tension setting and an odometer. The
resistance is usually set by a tension
strap on a weighted pendulum con-
nected to the flywheel. See Appendix
D for guidance on using various types
of stationary bikes.
Facilities
The test site can be any place where
there is an approved bicycle ergometer.
This could be the post’s fitness facility
or the hospital’s therapy clinic. Each
test station must be two yards wide and
four yards deep.
Personnel
One event supervisor and at least
one scorer for every three soldiers to be
tested are required. Appropriate safety,
control, and medical personnel should
also be present.
The event supervisor must read the
following: “THE 6.2-MILE STA-
TIONARY-BICYCLE ERGOMETER
EVENT TESTS YOUR CARDI-
ORESPIRATORY FITNESS AND LEG
MUSCLE ENDURANCE. THE
ERGOMETER’S RESISTANCE MUST
BE SET AT TWO KILOPOUNDS (20
NEWTONS). ON THE COMMAND
‘GO,’ THE CLOCK WILL START,
AND YOU WILL BEGIN PEDAL-
ING AT YOUR OWN PACE WHILE
MAINTAINING THE RESISTANCE
INDICATOR AT TWO POUNDS.
YOU WILL BE SCORED ON YOUR
ABILITY TO COMPLETE 6.2 MILES
(10 KILOMETERS), AS SHOWN ON
THE ODOMETER, IN A TIME
EQUAL TO OR LESS THAN THAT
LISTED FOR YOUR AGE AND SEX.
WHAT ARE YOUR QUESTIONS
ABOUT THIS EVENT?”
14-23

Administration
After reading the instructions, the
event supervisor answers any related
questions. Each soldier is given a short
warm-up period and allowed to adjust
the seat and handlebar height.
Timing Techniques
The event supervisor is the timer.
He uses the commands “Get set” and
“Go.”
Two stopwatches are used in
case one fails. As the soldiers pedal the
last two-tenths of the test distance, the
event supervisor should start calling
off the time in minutes and seconds
(for example, “Twenty-thirty-one,
twenty -thirty -two, twenty-thirty-
three,” and so on). He calls the time
remaining every 30 seconds for the last
two minutes of the allowable time and
every second during the last ten sec-
onds.
Scorers’ Duties
Scorers must ensure that the bicycle
ergometer is functioning properly. They
must then make sure that the bicycle
ergometers’ tension settings have been
calibrated and are accurate and that
the resistance of the ergometers has
been set at two kiloponds (20 new-
tons).
The scorers must observe the
soldiers throughout the event. From
time to time the scorer may need to
make small adjustments to the resis-
tance control to ensure that a continu-
ous resistance of exactly 2 kiloponds
(20 newtons) is maintained throughout
the test. At the end of the test, they
record each soldier’s time on the score-
card in the 2-mile-run block, initial
the appropriate block, and note in the
comment block that the time is for a
6.2-mile stationary-bicycle ergometer
test.
6.2-MILE BICYCLE TEST
This event is used to assess the
soldier’s cardiorespiratory and leg-
muscle endurance.
Equipment
Two stopwatches, one clipboard and
pen for each scorer, a copy of the test
instructions and standards, and num-
bers are needed. Although one-speed
bicycles are preferred for this event,
multispeed bicycles may be used. If a
multispeed bicycle is used, measures
must be taken to ensure that only one
gear is used throughout the test. (This
can usually be done by taping the gear
shifters at the setting preferred by the
testee.)
Facilities
A relatively flat course with a uni-
form surface and no obstacles must be
used. It must also be clearly marked.
Soldiers should not be tested on a
quarter-mile track, and they should
never be out of the scorers’ sight. The
course should be completely free of
runners and walkers.
Personnel
One event supervisor and at least
one scorer for every 10 soldiers are re-
quired. Safety, control, and medical
personnel should also be present as
appropriate.
instructions
The event supervisor must read the
following: “THE 6.2-MILE BICYCLE
TEST IS USED TO ASSESS YOUR
CARDIORESPIRATORY FITNESS
AND LEG MUSCLES’ ENDURANCE.
YOU MUST COMPLETE THE 6.2
14-24
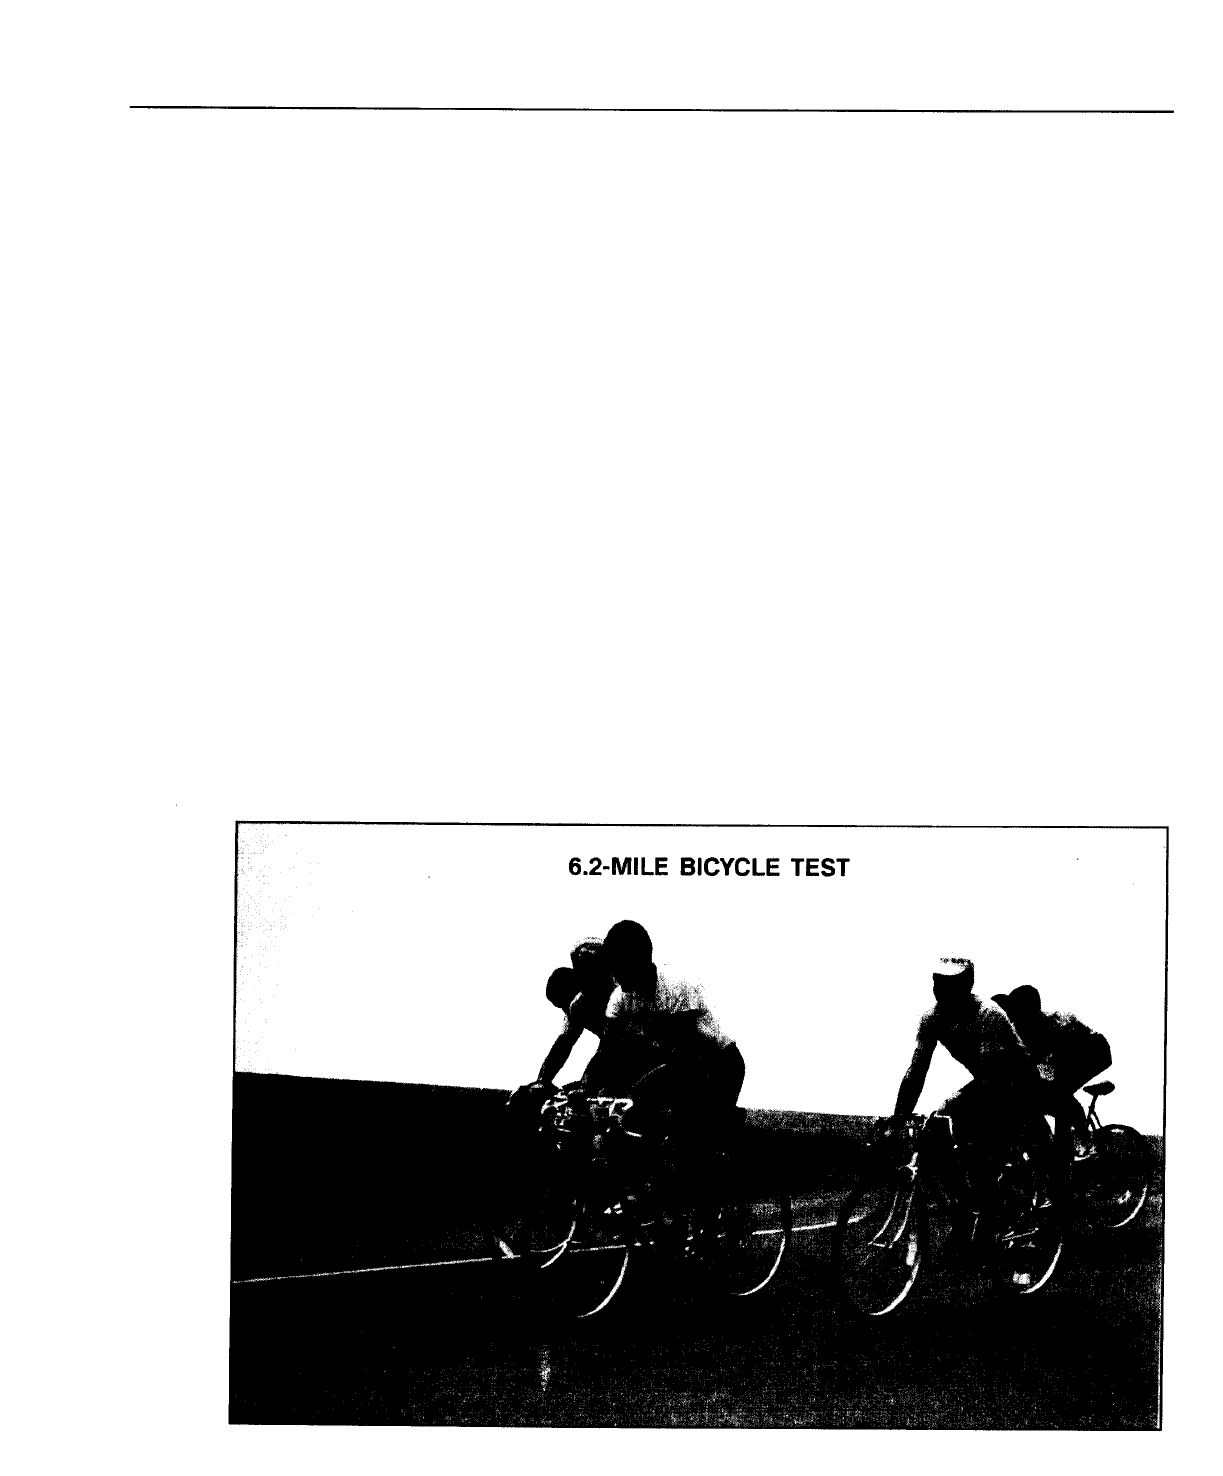
MILES WITHOUT ANY PHYSICAL
HELP FROM OTHERS. YOU MUST
KEEP YOUR BICYCLE IN ONE
GEAR OF YOUR CHOOSING FOR
THE ENTIRE TEST. CHANGING
GEARS IS NOT PERMITTED AND
WILL RESULT IN DISQUALIFICA-
TION. TO BEGIN, YOU WILL LINE
UP BEHIND THE STARTING LINE.
ON THE COMMAND ‘GO,’ THE
CLOCK WILL START, AND YOU
WILL BEGIN PEDALING AT YOUR
OWN PACE. TO COMPLETE THE
REQUIRED DISTANCE OF 6.2
MILES, YOU MUST COMPLETE
(describe the number of laps, start and
finish points, and course layout). YOU
WILL BE SCORED ON YOUR ABIL-
ITY TO COMPLETE THE DISTANCE-
OF 6.2 MILES ( 10 KILOMETERS) IN
A TIME EQUAL TO OR LESS THAN
THAT LISTED FOR YOUR AGE
AND SEX. IF YOU LEAVE THE
DESIGNATED COURSE FOR ANY
REASON, YOU WILL BE DISQUALI-
FIED. WHAT ARE YOUR QUES-
TIONS ABOUT THIS EVENT?”
Administration
After reading the instructions, the
event supervisor answers any related
questions. He then organizes the sol-
diers into groups of no more than ten
and assigns each group to a scorer.
Scorers assign numbers to the soldiers
in their groups and record each sol-
dier’s number on the appropriate score-
card.
Timing Techniques
The event supervisor is the timer.
He uses the commands “Get set” and
“Go.”
Two stopwatches are used in
case one fails. As soldiers near the end
of the 6.2-mile ride, the event super-
visor starts calling off the time in
14-25
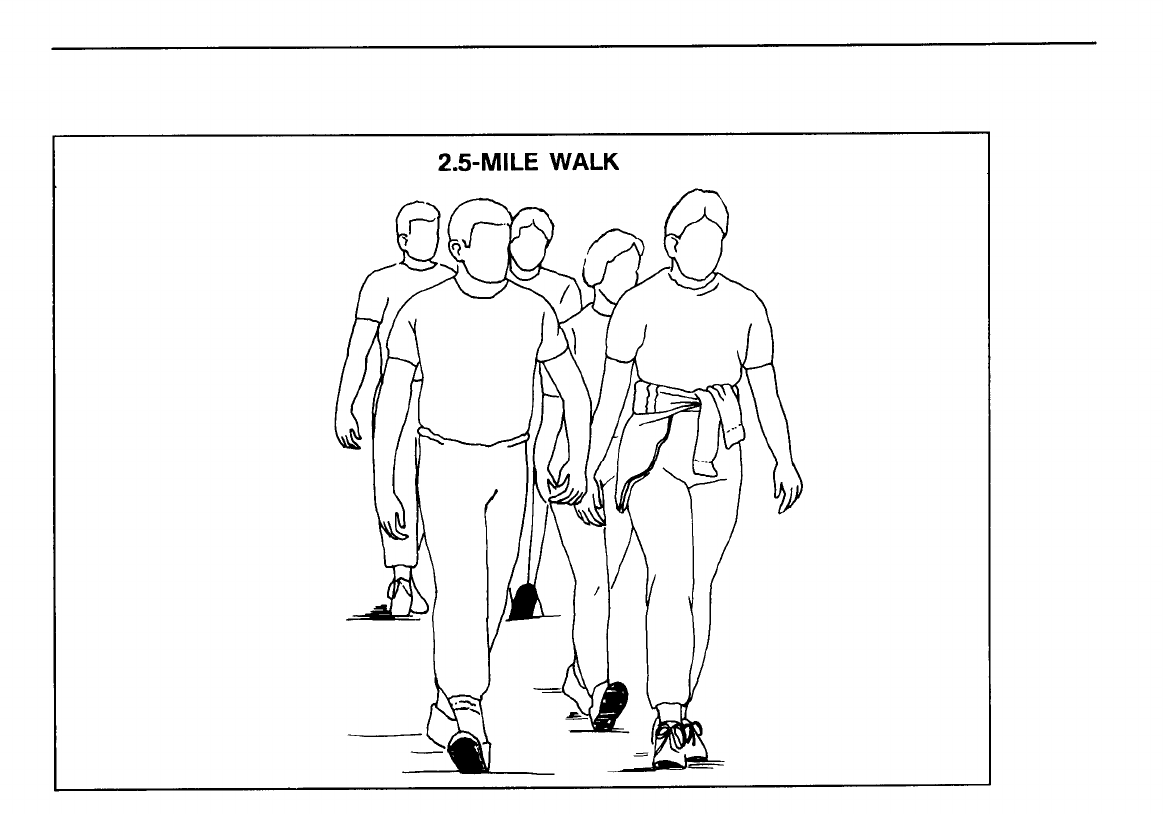
minutes and seconds (for example,
“Thirty-twenty-one, thirty- twenty-
two, thirty -twenty-three,” and so on).
Scorers’ Duties
When the event is over, scorers
record each soldier’s time in the 2-
mile-run block. They initial the ap-
propriate block and note in the
comment block that the time is for a
6.2-mile-bicycle test and whether or
not the testee met the required stan-
dards for his age and sex.
2.5-MILE WALK
This event serves to assess cardi-
orespiratory and leg-muscle endur-
ance.
Equipment
Two stopwatches, one clipboard and
pen for each scorer, numbers, and
copies of the test instructions and
standards are needed.
Facilities
This event uses the same course as
the 2-mile run.
Personnel
One event supervisor and at least
one scorer for every three soldiers to be
tested are required. Appropriate safety,
control, and medical personnel should
be present.
14-26

Instructions
The event supervisor must read the
following: “THE 2.5-MILE WALK IS
USED TO ASSESS YOUR CARDI-
ORESPIRATORY FITNESS AND
LEG-MUSCLE ENDURANCE. ON
THE COMMAND ‘GO,’ THE CLOCK
WILL START, AND YOU WILL
BEGIN WALKING AT YOUR OWN
PACE. YOU MUST COMPLETE
(describe the number of laps, start and
finish points, and course layout). ONE
FOOT MUST BE IN CONTACT WITH
THE GROUND AT ALL TIMES. IF
YOU BREAK INTO A RUNNING
STRIDE AT ANY TIME OR HAVE
BOTH FEET OFF THE GROUND AT
THE SAME TIME, YOUR PERFORM-
ANCE IN THE EVENT WILL BE
TERMINATED. YOU WILL BE
SCORED ON YOUR ABILITY TO
COMPLETE THE 2.5-MILE COURSE
IN A TIME EQUAL TO OR LESS
THAN THAT LISTED FOR YOUR
AGE AND SEX. WHAT ARE YOUR
QUESTIONS ABOUT THIS EVENT?”
Administration
After reading the instructions, the
event supervisor answers any related
questions. He then divides the soldiers
into groups of no more than three and
assigns each group to a scorer. Each
soldier is issued a number which the
scorer records on the scorecard.
Timing Techniques
The event supervisor is the
timer. He uses the commands “Get set”
and “Go.” Two stopwatches are used in
case one fails. As the soldiers near the
end of the 2.5-mile walk, the event
supervisor starts calling off the elapsed
time in minutes and seconds (for
example,"Thirty-three-twenty-two,
thirty -three -twenty -three, thirty-
three-twenty -four,” and so on).
Scorers’ Duties
Scorers must observe the soldiers
during the entire event and must en-
sure that the soldiers maintain a walk-
ing stride. Soldiers who break into any
type of running stride will be termi-
nated from the event and given a “no
go.”
When the event is over, scorers
record the time in the 2-mile-run
block on the scorecard, initial the ap-
propriate block, and note in the com-
ment block that the time is for a 2.5-
mile walk and whether or not the
testee received a "go" or "no go."
14-27

APPENDIX A
PHYSIOLOGICAL DIFFERENCES BETWEEN THE SEXES
Soldiers vary in their physical makeup. Each body reacts differently to varying degrees of physical stress,
and no two bodies react exactly the same way to the same physical stress. For everyone to get the maximum
benefit from training, leaders must be aware of these differences and plan the training to provide maximum
benefit for everyone. They must also be aware of the physiological differences between men and women.
While leaders must require equal efforts of men and women during the training period, they must also realize
that women have physiological limitations which generally preclude equal performance. The following
paragraphs describe the most important physical and physiological differences between men and women.
SIZE
The average 18- year-old man is 70.2 inches tall and weighs 144.8 pounds, whereas the average woman
of the same age is 64.4 inches tall and weighs 126.6 pounds. This difference in size affects the absolute
amount of physical work that can be performed by men and women.
MUSCLES
Men have 50 percent greater total muscle mass, based on weight, than do women. A woman who is the
same size as her male counterpart is generally only 80 percent as strong. Therefore, men usually have an
advantage in strength, speed, and power over women.
FAT
Women carry about 10 percentage points more body fat than do men of the same age. Men accumulate
fat primarily in the back, chest, and abdomen; women gain fat in the buttocks, arms, and thighs. Also,
because the center of gravity is lower in women than in men, women must overcome more resistance in
activities that require movement of the lower body.
BONES
Women have less bone mass than men, but their pelvic structure is wider. This difference gives men an
advantage in running efficiency.
HEART SIZE AND RATE
The average woman’s heart is 25 percent smaller than the average man’s. Thus, the man’s heart can pump
more blood with each beat. The larger heart size contributes to the slower resting heart rate (five to eight
beats a minute slower) in males. This lower rate is evident both at rest and at any given level of submaximal
exercise. Thus, for any given work rate, the faster heart rate means that most women will become fatigued
sooner than men.
FLEXIBILITY
Women generally are more flexible than men.
A-O

LUNGS
The lung capacity of men is 25 to 30 percent greater than that of women. This gives men still another
advantage in the processing of oxygen and in doing aerobic work such as running.
RESPONSE TO HEAT
A woman’s response to heat stress differs somewhat from a man’s. Women sweat less, lose less heat through
evaporation, and reach higher body temperatures before sweating starts. Nevertheless, women can adapt
to heat stress as well as men. Regardless of gender, soldiers with a higher level of physical fitness generally
better tolerate, and adapt more readily to, heat stress than do less fit soldiers.
OTHER FACTORS
Knowing the physiological differences between men and women is just the first step in planning physical
training for a unit. Leaders need to understand other factors too.
Women can exercise during menstruation; it is, in fact, encouraged. However, any unusual discomfort,
cramps, or pains while menstruating should be medically evaluated.
Pregnant soldiers cannot be required to exercise without a doctor’s approval. Generally, pregnant women
may exercise until they are close to childbirth if they follow their doctors’ instructions. The Army agrees
with the position of the American College of obstetricians and Gynecologists regarding exercise and
pregnancy. This guidance is available from medical authorities and the U.S. Army Physical Fitness School
(USAPFS). The safety and health of the mother and fetus are primary concerns when dealing with exercise
programs.
Vigorous activity does not harm women’s reproductive organs or cause menstrual problems. Also, physical
fitness training need not damage the breasts. Properly fitted and adjusted bras, however, should be worn
to avoid potential injury to unsupported breast tissue that may result from prolonged jarring during exer-
cise.
Although female soldiers must sometimes be treated differently from males, women can reach high levels
of physical performance. Leaders must use common sense to help both male and female soldiers achieve
acceptable levels of fitness. For example, ability-group running alleviates gender-based differences between
men and women. Unit runs, however, do not.
A-1

APPENDIX B
POSITIVE PROFILE FORM
Figure B-1
B-1
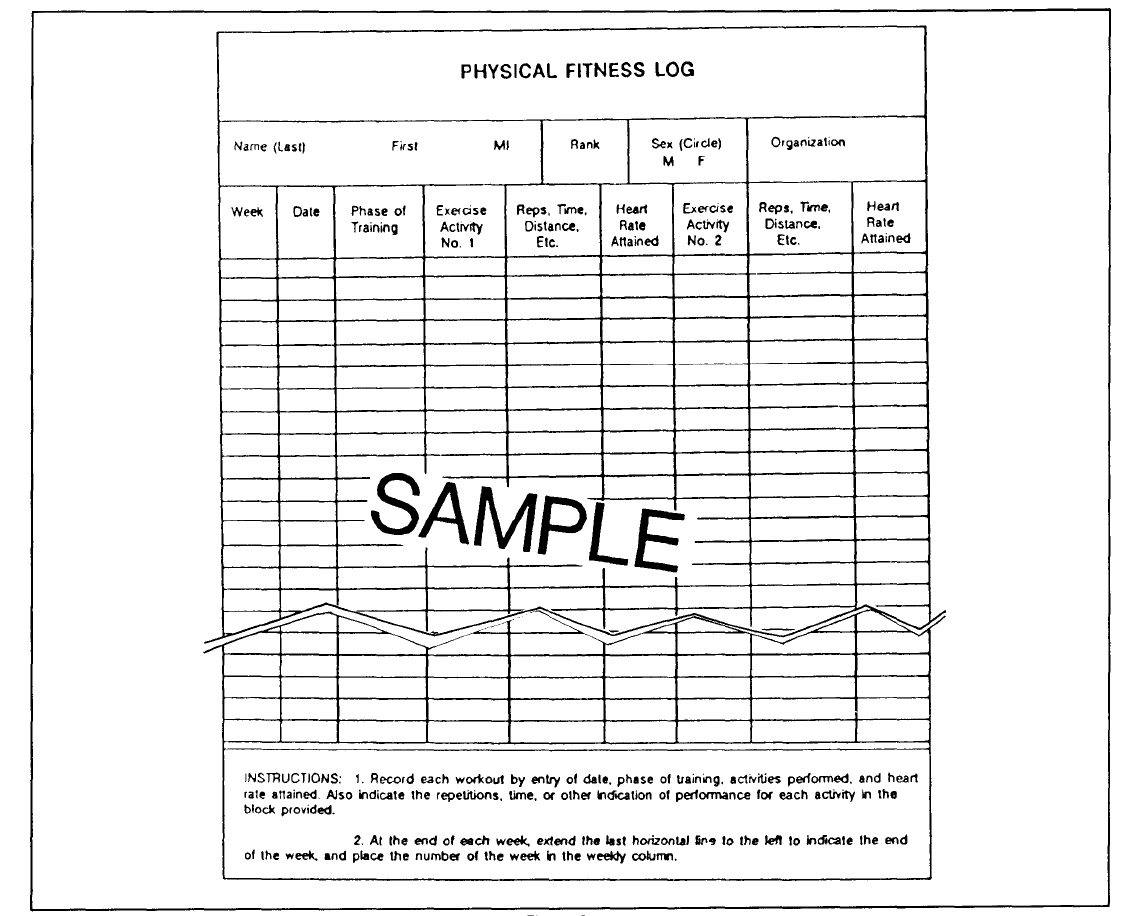
APPENDIX C
PHYSICAL FITNESS LOG
a diary of
Soldiers can use a physical fitness log to record their fitness goals. The log will serve as
how well they achieve them. Fitness goals are determined before the training begins. The results should
closely parallel or exceed the unit’s goals. While this is not a requirement, the log may also be used by
commanders and supervisors as a record of physical fitness training. Figure C-1 shows an example of a
physical fitness log that could be reproduced locally.
Figure C-1
C-1

APPENDIX D
STATIONARY BICYCLE TEST
Only stationary bicycles which can be calibrated and which have mechanically adjustable resistances may
be used to test profiled soldiers on the 6.2-mile (l O-kilometer), alternate APFT event. Therefore, the event
supervisor or scorer must be sure that the stationary bicycle can be accurately adjusted to ensure that the
soldier pedals against the correct resistance (force) of 2 kiloponds or 20 newtons. If the stationary bicycle
cannot be properly calibrated and adjusted, the soldier may end up pedalling against a resistance which is
too great or not great enough. In either case, the test would not provide an accurate indication of the soldier’s
level of cardiorespiratory fitness.
The best type of stationary bicycle for testing has the following features:
• Calibration adjustment.
• Adjustable resistance displayed in kiloponds or newtons.
• Odometer which accurately measures the distance traveled in either miles or tenths of miles or in
kilometers and tenths of kilometers.
Examples of stationary bicycles which meet the above criteria are the mechanically braked Bodyguard
990 and Monark 868. Such bicycles can be used to accurately measure a person’s rate of work or the total
amount of work. They are often called bicycle ergometers.
If the stationary bicycle has an odometer, the soldier must pedal 6.2 miles (10.0 kilometers or 10,000
meters) against a resistance set at 2 kiloponds or 20 newtons. The test is completed when the soldier pedals
6.2 miles (10.0 kilometers). He receives a “Go” if he is below or at the time allotted for his particular age
group and gender. Care should be taken to ensure that, when using a stationary bicycle which measures
distance in kilometers, the test is ended at 10 kilometers, not 6.2 kilometers.
There are many electrically operated, stationary bicycles (EOSBS) on the market and in gymnasiums on
Army installations. Most of them are designed for physical fitness training. Only a limited number of EOSB
models are designed to accurately assess a person’s energy expenditure during exercise. Such EOSBS are
relatively expensive and are generally found in medical and scientific laboratories. Very few, if any, are
found in gymnasiums on Army installations.
Because most of the more common training EOSBS were not designed to accurately assess energy
expenditure, they should not be used for the alternate, cardiorespiratory APFT event.
For the sake of accuracy and ease of administration, soldiers designated to be tested on either of the two
bicycle protocols should be tested using a moving bicycle IAW the guidelines provided elsewhere in this field
manuel. If the mechanical y- braked Bodyguard 990 or Monark 868 is used, however, the tester must ensure
that the equipment has been properly calibrated prior to each test.
D-1
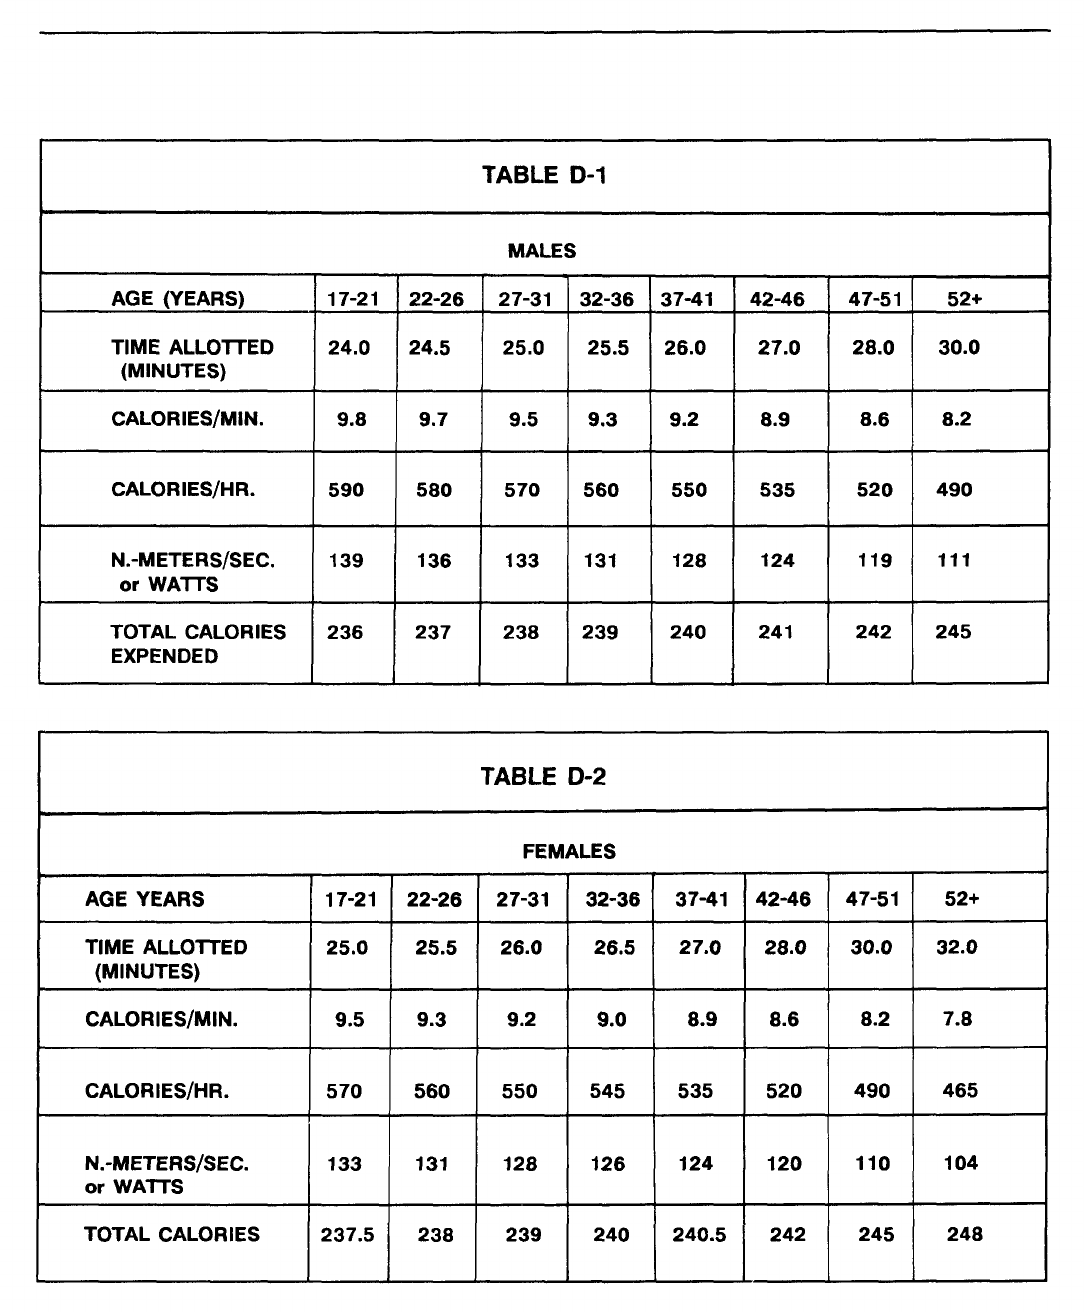
D-2

APPENDIX E
SELECTING THE RIGHT RUNNING SHOE
Choosing a running shoe that is suitable for your particular type of foot can help you avoid some common
running- related injuries. It can also make running more enjoyable and let you get more mileage out of your
shoes.
Shoe manufacturers are aware that, anatomically, feet usually fall into one of three categories. Some
people have “floppy” feet that are very “loose- jointed.” Because feet like this are too mobile, they “give”
when they hit the ground. These people need shoes that are built to control the foot’s motion. At the other
extreme are people with “rigid” feet. These feet are very tight-jointed and do not yield enough upon impact.
To help avoid impact-related injuries, these people need shoes that cushion the impact of running. Finally,
the third type, or normal foot, falls somewhere between mobile and rigid. This type of foot can use any
running shoe that is stable and properly cushioned. Use the chart at Figure E-1 to help you determine what
kind of foot you have. Then, read the information on special features you should look for in a shoe.
When shopping for running shoes, keep the following in mind:
• Expect to spend between $30 and $100 for a pair of good shoes.
• Discuss your foot type, foot problems, and shoe needs with a knowledgeable salesperson.
• Check the PX for available brands and their prices before shopping at other stores.
• Buy a training shoe, not a racing shoe.
• When trying on shoes, wear socks that are as similar as possible to those in which you will run.
Also, be sure to try on both shoes.
• Look at more than one model of shoe.
• Choose a pair of shoes that fit both feet well while you are standing.
• Ask if you can try running in the shoes on a non-carpeted surface. This gives you a feel for the
shoes.
• Carefully inspect the shoes for defects that might have been missed by quality control. Do the
following:
-Place the shoes on a flat surface and check the heel from behind to see that the heel cup
is perpendicular to the sole of the shoe.
-Feel the seams inside the shoe to determine if they are smooth, even, and well-stitched.
-Check for loose threads or extra glue spots; they are usually signs of poor construction.
The shoes' ability to protect you from injury decreases as the mileage on them increases. Record the
number of miles you run with them on a regular basis, and replace the shoes when they have accumulated
500 to 700 miles even if they show little wear.
E-1

Figure E-1
E-2
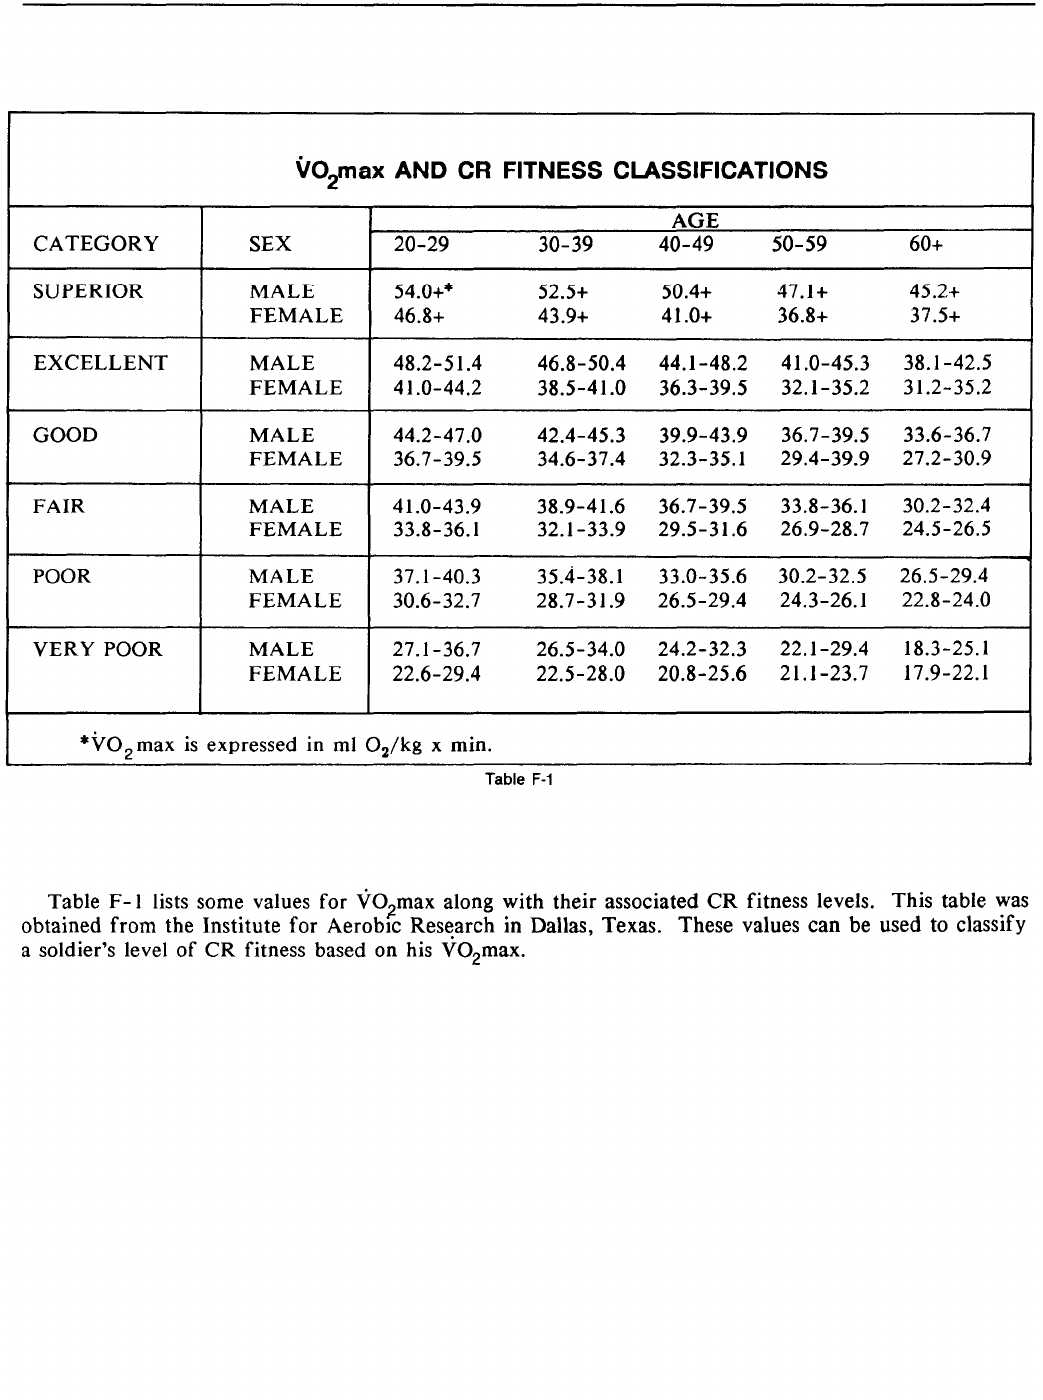
F-2
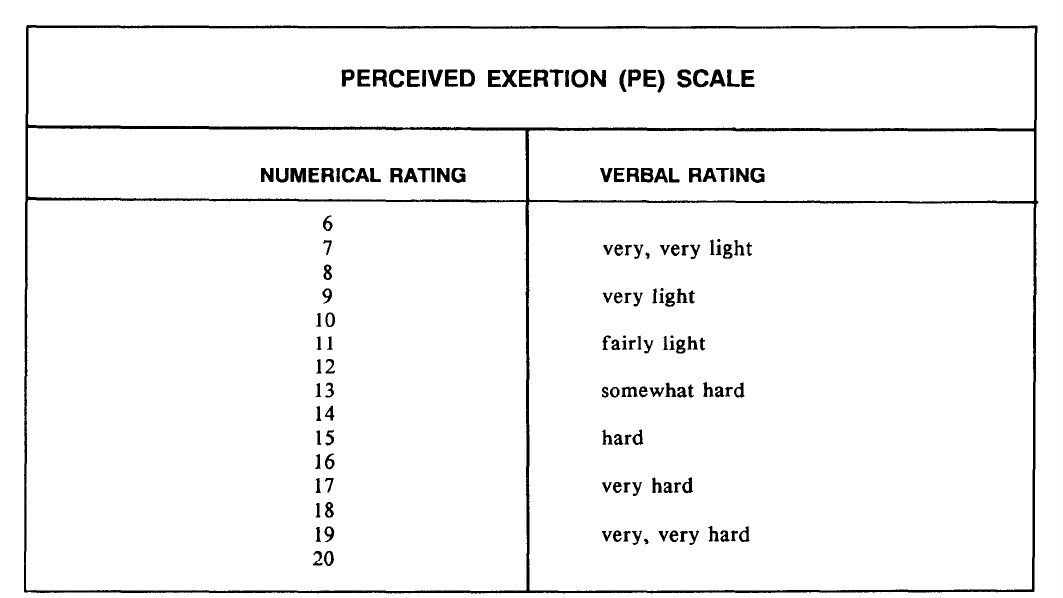
APPENDIX G
PERCEIVED EXERTION
The heart rate has traditionally been used to estimate exercise intensity. However, evidence shows that
a person’s own perception of the intensity of his exercise can often be just as accurate as the heart rate in
gauging his exercise intensity.
The scale in Figure G-1 lets a soldier rate his degree of perceived exertion (PE). This scale consists of
. .
numerical ratings for physical exercise followed by their associated descriptive ratings.
Figure G-1
To judge perceived exertion, estimate how difficult it feels to do the exercise. Do not be concerned
with any one single factor such as shortness of breath or work intensity. Instead, try to concentrate on
the total inner feeling of exertion.
Multiplying the rating of perceived exertion by 10 roughly approximates the heart rate during exercise.
For example, a PE of 14, when multiplied by 10, equals 140.
Most soldiers with THRs between 130 and 170 BPM would exercise between a PE of 13 (somewhat
hard) and 17 (very hard).
Although either percent of maximum heart rate or perceived exertion may be used during exercise,
the most valid method for calculating THR is percent HRR.
G-1
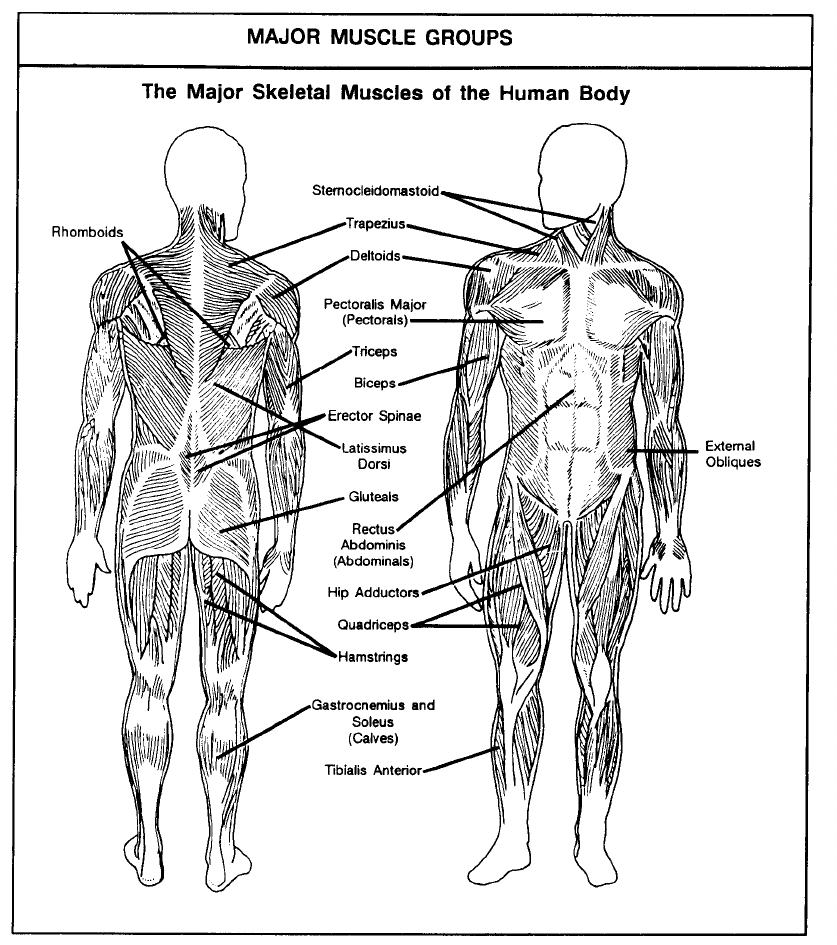
APPENDIX H
THE MAJOR SKELETAL MUSCLES OF THE HUMAN BODY
Figure H-1
The iliopoas muscle (a hip flexor) cannot be seen as it lies beneath other muscles. It attaches to the
lumbar vertebrae and the femur.
H-1

GLOSSARY
AC
AGR
A IT
APFT
AR
ARNG
ARTEP
ATP
BCT
BDU
BPM
BT
BTMS
c
CAD
CPR
CPT
CR
CVSP
DA
DOD
EDRE
EIB
EOSB
F
FITT
FM
FTX
HDL
HQ
HQDA
HRR
ID
IET
IG
kph
Section 1: Acronyms and Abbreviations
Active Component
ability group run
advanced individual training
Army Physical Fitness Test
Army regulation
Army National Guard
Army Training and Evaluation Program
adenosine triphosphate
basic combat training
battle dress uniform
beats per minute
basic training
Battalion Training Management System
centigrade
coronary artery disease
cardiopulmonary resuscitation
captain
cardiorespiratory
cardiovascular screening program
Department of the Army
Department of Defense
emergency deployment readiness exercise
Expert Infantryman Badge
electrically operated, stationary bicycle
Fahrenheit
frequency, intensity, time, type
field manual
field training exercise
high-density lipoprotein
headquarters
Headquarters, Department of the Army
heart rate reserve
identification
initial entry training
inspector general
kilometers per hour
Glossary-1

lat
LCE
LDL
MACOM
MEDDAC
METL
MFT
MHR
min
MOS
MPH
MRDA
MRE
NCO
NCOIC
NGR
No.
OIC
OST
OSUT
Pam
PE
PNF
PRE
PT
pts
PU
RC
rep
RHR
RICE
RM
ROTC
sec
SCUBA
SDT
SOP
SU
TB med
TDA
THR
TM
TOE
TRADOC
TS
TSP
latissimus dorsi
load-carrying equipment
low-density lipoprotein
major Army command
medical department activity
mission-essential task list
master fitness trainer
maximum heart rate
minute(s)
military occupational specialty
miles per hour
military recommended dietary allowance
meal, ready to eat
noncommissioned officer
noncommissioned officer in charge
National Guard regulation
number
officer in charge
one-station training
one-station unit training
pamphlet
perceived exertion
proprioceptive neuromuscular facilitation
partner-resisted exercise
physical training
points
push-up
Reserve Component
repetition
resting heart rate
rest, ice, compression, elevation
repetition maximum
Reserve Officers’ Training Corps
second(s)
self-contained underwater breathing apparatus
self development test
standing operating procedure
sit-up
technical bulletin, medical
table of distribution and allowances
training heart rate
technical manual
table of organization and equipment
U.S. Army Training and Doctrine Command
timed set
training support package
Glossary-2

U.S.
United States
USAPFS United States Army Physical Fitness School
USAR United States Army Reserve
V02maxmaximum oxygen consumption per minute
WBGTI
wet bulb globe temperature index
WCF
windchill factor
Section II: Terms
extension
An increase in the angle between two bones in which a straightening movement occurs; the opposite
of flexion. For example, extension of the elbow involves an increase in the angle formed by the upper
and lower arm as the arm straightens at the elbow.
flexion
A decrease in the angle between two bones in which a bending movement occurs; the opposite of extension.
For example, flexion of the elbow involves a decrease in the angle formed by the lower and upper arm as
the arm bends at the elbow.
Glossary-3

REFERENCES
SOURCES USED
These are the sources quoted or paraphrased in this publication.
ARMY REGULATIONS (ARs)
15-6 Procedures for Investigating Officers and Boards of Officers. May 1988.
30-1 The Army Food Service Program. January 1985.
350-15 Army Physical Fitness Program. November 1989.
385-55 Prevention of Motor Vehicle Accidents. March 1987.
OTHER ARMY PUBLICATIONS
DOD Directive 1308.1 Physical Fitness and Weight Control Program. April 1981.
FM 21-18 Foot Marches. June 1990.
DOCUMENTS NEEDED
These documents must be available to the intended users of this publication.
ARMY REGULATIONS (ARs)
40-501 Standards of Medical Fitness. July 1987.
600-8-2 Suspension of Favorable Personnel Actions (Flags). October 1987.
600-9 The Army Weight Control Program. September 1986.
600-63
Army Health Promotion. November 1987.
OTHER ARMY PUBLICATIONS
FM 25-100 Training the Force. November 1988.
NGR 40-501 Medical Examination for Members of the Army National Guard. October 1981.
TRADOC Reg 350-6 Initial Entry Training (IET) Policies and Administration. August 1989.
READINGS RECOMMENDED
These readings contain relevant supplemental information.
DEPARTMENT OF THE ARMY PAMPHLETS (DA Pares)
28-9 Unit Level Recreational Sports. June 1973.
350-15
Commander’s Handbook on Physical Fitness. October 1982.
350-18 The Individual’s Handbook on Physical Fitness. May 1983.
350-22 You and the Army Physical Fitness Test (APFT). September 1987.
351-4 Army Formal Schools Catalog. August 1991.
References-1

FIELD MANUALS (FMs)
21-150 Combative. December 1971.
22-5 Drill and Ceremonies. December 1986.
31-70 Basic Cold Weather Manual. April 1968.
OTHER ARMY PUBLICATIONS AND MATERIALS
AR 215-1 Administration of Army Morale, Welfare, and Recreation. February 1984.
DA Form 705 Army Physical Fitness Test Scorecard. May 1987.
DA Form 3349 Physical Profile. May 1986.
Folio No. 1 “Training Facilities,” Corps of Engineers Drawing No. 28-13-95. Directorate of
Facilities Engineering.
SB 10-260 Master Menu. December 1989.
TB Med 507 Occupational and Environmental Health Prevention, Treatment, and Control of
Heat Injury. July 1980.
TSP Physical Fitness Training - Total Fitness. July 1987.
TRAINING VIDEO TAPES (TVTS)
8-103 Standards for Determining Body Fat. 1986.
21-76 Army Physical Fitness Test (APFT). 1986.
21-191
Administration of the APFT. 1988.
21-192 Partner-Resisted Exercises (PRE). 1987.
21-218 Flexibility: The Truth About Stretching. 1989.
21-203 Push-up/Sit-up Improvement. 1988.
References-2

INDEX
This is a topical index organized alphabetically. Citations are to paragraph numbers.
ability group running
advanced individual training, 1-10
aerobic exercises; see exercises, aerobic
aerobic fitness; see fitness, cardiorespiratory
aquatic exercise, 8-19 through 8-22
Army Physical Fitness Test (APFT), 14-1 through 14-27
ability group running to prepare for, 1-10
administration of, 14-2 through 14-8
alternate events for, 14-20 through 14-27
cardiovascular screening program for, 14-1
command functions relating to, 1-2, 3
duties of test personnel for, 14-8, 9
evaluation of, 1-14, 15; 14-1
failures, 1-12
procedures for testing, 14-10, 11
profiles in regard to, 14-20; see also profile
push-up as an event in, 14-11 through 14-14
results of, 14-18, 19
scorecard for, 14-3 through 14-7
scores above maximum in, 14-19
sequence of, 14-11 through 14-18
site of, 14-9, 10
sit-up as an event in, 14-14 through 14-16
two-mile run as an event in, 14-17, 18
bicycle test (APFT event), 14-24 through 14-26
bicycle ergometer test, stationary (APFT event), 14-22 through 14-24; D-O
bicycling; see cycling
body composition, 1-3; 5-0, 1; see also overweight soldiers
broom-ball hockey, 9-11, 12
calisthenics, 7-7 through 7-17
cardiorespiratory fitness; see fitness, cardiorespiratory
circuits designing of, 7-2, 3
types of, 7-1
circuit training, 7-1 through 7-6
sample circuits for, 7-3 through 7-6
variables in, 7-1, 2
competitive fitness activities, 9-1 through 9-18
cool-down, 1-7; 4-3; 8-22
cross-country skiing, 2-15
cycling, 2-14
Index-1

dehydration, 6-5; 12-3
diet; see weight, diet and exercise
drills conditioning, 7-17
grass, 7-17 through 7-22
guerilla, 7-23 through 7-26
log, 8-13 through 8-18
rifle, 8-11, 12
endurance
cardiorespiratory; see fitness, cardiorespiratory
muscular; see muscular endurance and strength
environmental considerations, 12-0 through 12-4
air pollution, 12-4
altitude, 12-4
cold environments, 12-2, 3
dehydration, 12-3
frostbite, 12-3
heat injuries and symptoms, 12-1
hot, humid environments, 12-1, 2
hydration guidelines, 12-2
hypothermia, 12-2
temperature regulation, 12-0, 1
windchill factor, 12-3
exercise principles, 1-4; 10-12, 13
exercises; see also drills
acquatic, 8-19 through 8-22
aerobic, 2-0, 2-6 through 2-16
aerobic (alternate forms), 2-13 through 2-13
calisthenic, 7-7 through 7-17
conditioning drills; see drills, conditioning
cool-down after, 1-7; 4-3
flexibility, 1 -3; 4-1 through 4-17
guerilla; see drills, guerilla
injuries related to, 13-1, 2
muscle strengthening, 3-3 through 3-9
muscular training chart, 3-36
partner-resisted, 3-13 through 3-20
rhythmic (with music), 2-15, 16
warm-up before, 1-7; 4-2
with equipment, 3-21 through 3-35
without special equipment, 3-12
Fartlek training; see running, Fartlek training
fat body, 1-12, 13; 5-0, 1; see also overweight soldiers
saturated, 6-3
Index-2

fitness cardiorespiratory (aerobic), 1 -3; 2-0 through 2-16
components of, 1-3, 4
conditioning phases for, 1-7 through 1 -9; 3-6, 7
muscular, 3-1
fitness programs; see unit program
fitness programs, types of
advanced individual training (AIT), 1-10
individual, 1-11
initial entry training (IET), 1-10; 11-0, 1
special, 1-11, 12
TOE and TDA units, 1-11
unit, 1-9, 10
FITT factors, 1-4 through l-7; 2-1 through 2-6; 4-2
flexibility, 1-3; 4-1 through 4-17
flexibility exercises; see exercises, flexibility
fluid intake, 6-5, 6; 12-1
frequency, intensity, time, type; see FITT factors
grass drills; see drills, grass
guerilla drills; see drills, guerilla
handball and racquet sports, 2-15
heart rate, components of
heart rate reserve (HRR), 1-6, 8; 2-3 through 2-6
maximum heart rate (MHR), 2-2
resting heart rate (RHR), 2-3, 4
training heart rate (THR), 1-6, 8; (calculation) 2-2 through 2-6
initial entry training (IET), 1-1, 10, 15; 11-0, 1
injuries, 2-6, 7; 7-7, 8; 13-1, 2
interval training; see running, interval training
intramural, 9- I through 9-5
log drills; see drills, log
master fitness trainer (MFT), 1-1, 2, 3, 9, 12, 13
maximum heart rate; see heart rate, maximum
muscle groups, 3-9 through 3-11
muscle contractions (types), 3-1, 2
muscular endurance and strength, 1-3; 3-1 through 3-36
age as a factor in, 1-13, 14
exercise programs for, 3-12 through 3-36
exercise selection for, 3-6
principles of, 3-2 through 3-5
key points regarding, 3-12
training for, 1-5 through 1-7, 9, 13; 3-1 through 3-36
nine-ball soccer, 9-5 through 9-8
nutrition
and fitness, 6-0 through 6-6
for optimal physical performance, 6-3 through 6-6
guidelines, 6-0 through 6-3
in the field, 6-6
Index-3

obstacle courses, types of
conditioning, 8-2 through 8-6
confidence, 8-6 through 8-10
safety precautions for using, 8-1, 2
olympics; see unit olympics
orienteering, 9-13 through 9-16
overweight soldiers, 1-12, 13; see also fat, body
partner-resisted exercise; see exercises, partner-resisted
perceived exertion, G-1
phases of conditioning; see fitness, conditioning phases
physical fitness log, C-O
positive profile form, B-1
principles of exercise; see exercise principles
profiles, 1-13; 14-20; B-1
push-up; see APFT, push-up
pushball, 9-7, 8
pushball (strategy), 9-8 through 9-11
resistance training; see strength training
rest, ice, compression, and elevation (RICE), 13-1
resting heart rate; see heart rate, resting
rifle drills; see drills, rifle
road marches, 2-11, 12; 11-1
rope skipping, 2-15
runningcross-country, 2-10
Fartlek training, 2-9
injuries; see injuries
interval training, 2-8, 9
last-man-up, 2-10
shoes; see shoes, running
technique, 2-6
safety, 1-15; 3-6; 7-7; 8-1, 2; 9-16; 11-0, 1
sexual differences, A-1, 2
shoes, running (how to select), E-1, 2
sit-up; see APFT, sit-up
soccer; see nine-ball soccer
speed play; see running, Fartlek training
strategy pushball; see pushball (strategy)
strength training; see muscular endurance and strength, training
stretching; see flexibility and exercises, flexibility
swim test (APFT event), 14-21, 22
swimming, 2-14; see also exercise, aquatic
training heart rate; see heart rate, training
two-mile run; see APFT, two-mile run
Index-4

unit olympics, 9-17, 18
unit program
activities and games for, 9-5 through 9-16
development of, 10-1 through 10-13
evaluation of, 1-14, 15
sample of, 10-5 through 10-12
types of, 1-10, 11
VO2max, calculation of, F-1, 2
walk (APFT event), 14-26, 27
walking, 2-14, 15
warm-up, 1-7; 4-2; 8-19
weight (body); see also nutrition and fitness
Army standards for, 5-0, 1
diet and exercise for proper, 5-1
methods for evaluating, 5-0, 1
programs for overweight soldiers, 1-12, 13
Index-5

FM 21-20
30 SEPTEMBER 1992
By Order of the Secretary of the Army
GORDON R. SULLIVAN
General, United States Army
Chief of Staff
Official:
MILTON H. HAMILTON
Administrative Assistant to the
Secretary of the Army
02361
DISTRIBUTION:
Active Arm y, USAR and ARNG: To be distributed In accordance with DA Form 12-11E,
requirements for FM 21-20, Physical Fitness Training (Qty rqr block no. 0165).
•U.S. Government Printing Office: 1994 — 300-421/82850
PIN: 007192-001
