User Guide
User Manual:
Open the PDF directly: View PDF ![]() .
.
Page Count: 16

Electronic Medical Report
GP Guide
V1.1!
!
© 2018 MediData Exchange Limited
! of !1 16

Copyright
Copyright © 2018 by MediData Exchange Limited
All rights reserved. No part of this document may be reproduced, distributed, or transmitted in any form or by
any means, including photocopying, recording, or other electronic or mechanical methods, without the prior
written permission of the MediData Exchange Limited.
For permission requests, contact MediData at:
MediData Exchange Limited"
https://medi2data.net
GPstudy@medi2data.org
Note: All Patient information in this document is fictitious test data - Names, addresses, conditions and other
patient data has been developed specifically for use in the test version of the eMR application. Any
resemblance to actual persons, living or dead, or actual events is purely coincidental.
!
© 2018 MediData Exchange Limited
! of !2 16

Contents
1. Product Overview
2. GP / Practice User Guide
2.1 EMIS Data Sharing Agreement
2.2 Logging into eMR
2.3 Viewing trial Patient full records
2.4 Instructions homepage
2.5 Report status
2.7 Starting a new Instruction via an email notification
2.8 Starting a new Instruction from the ‘Instruction’ homepage
2.9 Select the matching Patient
2.10 Provisional report contents
2.11 Updating & viewing draft report
2.12 Final report
2.13 Viewing submitted reports
!
© 2018 MediData Exchange Limited
! of !3 16

Product Overview
Over 2.5 million consented requests for Patient Medical Reports are received by GP Practices every year from
3rd parties outside the NHS. This additional work on already busy GP Practice, brings unnecessary pressures
and the use of costly processes, long completion times and more often non-compliant data-structured reports
being released to 3rd parties. eMR is an accredited FREE to use secure Web App, compatible with your
existing operating system.
Delivering VALUE to your Practice:
•Seconds to generate an auto-redacted clinical coded medical report.
•At a ‘click’ produce GDPR compliant copies of a Patient records.
•Complete reports on your tablet or phone within our secure data encryption environment.
•Generate more fee income c. £300 per hour.
•Provide a better service to your Patients.
•Instructions include viewable Patient consent.
Delivering ADDITIONAL services:
•An automated electronic payment service providing Automated electronic payment service to improve
cashflow and reduce administration costs.
•Intuitive dashboard process for ALL 3rd party requests.
•‘Create, Save and Submit’ feature allows Practice staff to prepare reports prior to GP sign-off.
•Re-direct ALL requests through your eMR App.
!
© 2018 MediData Exchange Limited
! of !4 16
GP/Practice User Guide
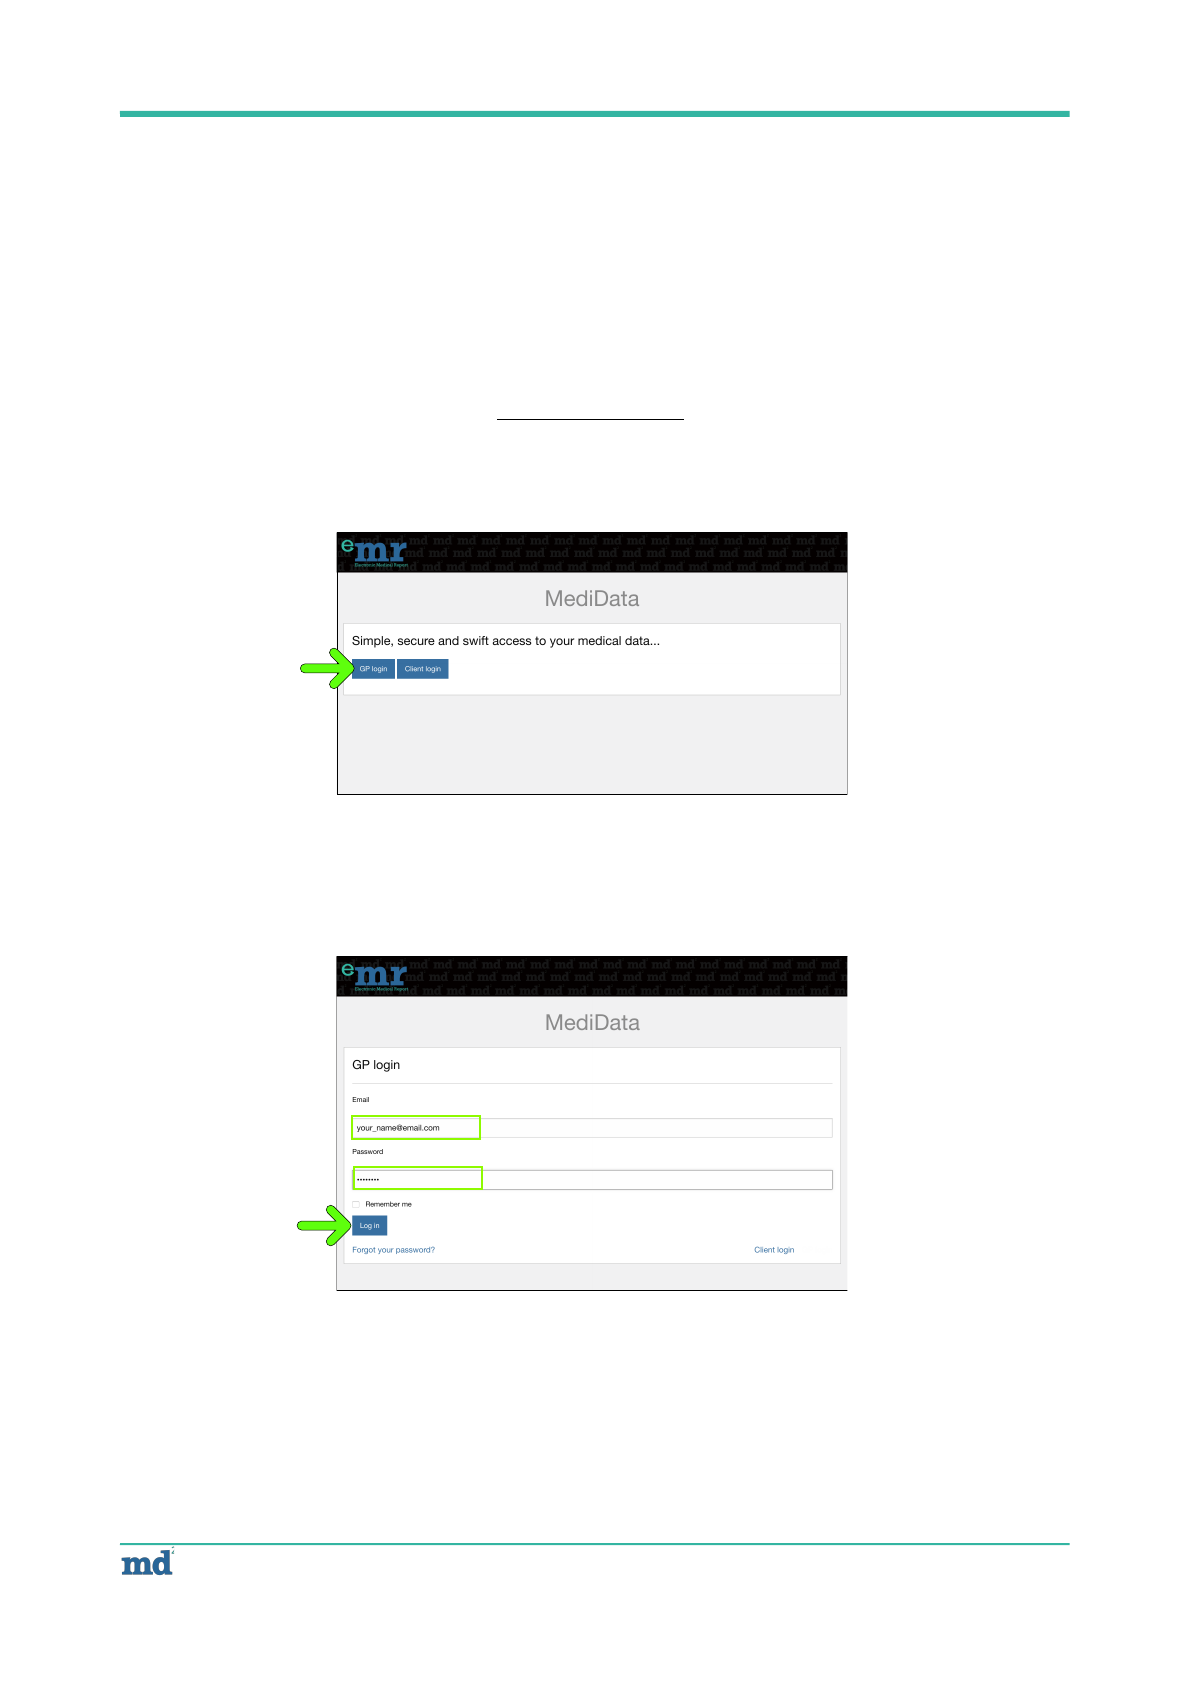
2.1 Logging into eMR
2.1.1 Once registered with MediData you will be provided with a login and password to access the application.
Access the MediData application by visiting https://medi2data.net
Click the ‘GP login’ button as indicated [Fig 1]
2.1.1 Enter login information and click log in [Fig 2]
!
© 2018 MediData Exchange Limited
! of !5 16
[Fig 2]
[Fig 1]
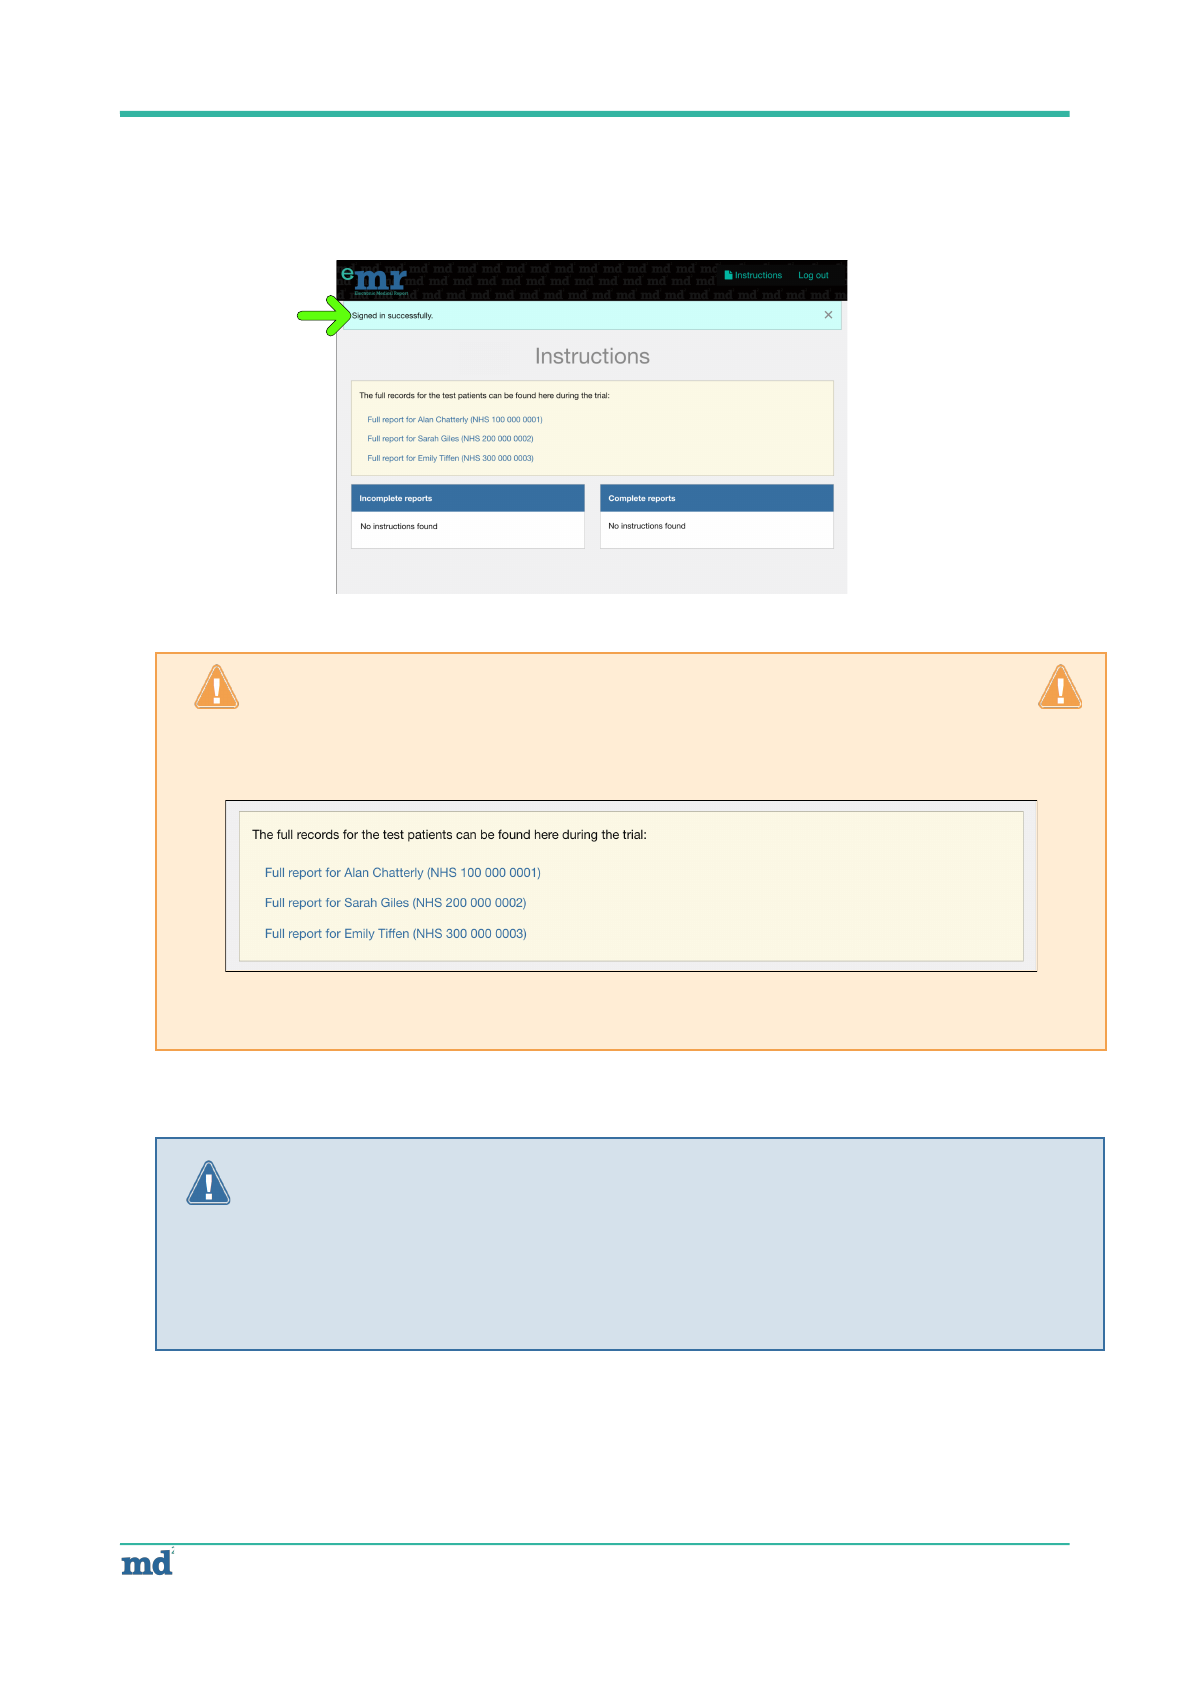
2.1.3 A successful login confirmation will be displayed if login details have been entered correctly - You will
now be looking at the ‘Instructions’ homepage for your Practice [Fig 3]
!
!
© 2018 MediData Exchange Limited
! of !6 16
Trial Instructions Only
NOTE: During the trial, GPs will have have access to 3 complete Patient record exports from the EMIS Test
database. These Patient records can be viewed by clicking the Patient links shown below:
These Patient records contain static information to enable GPs to compare the eMR report builder against
the original Patient data.
[Fig 3]
Secure automatic account log out
NOTE: If your account is left inactive for 20 minutes you will be logged out of the application and will have
to log back in if you need to access the application.

2.2 Viewing trial Patient full records
The test Patient records are stored as PDFs and contain the complete, unrelated medical records for the test
Patients - these reports provide a means to compare against the redacted reports you will be creating with the
eMR application.
To view a Patient record click the link of Patient you want to view, a new browser window will open containing
the Patient record [Fig 4] - To return to the eMR application, click on the ‘MediData’ tab.
2.3 Instructions homepage
When logged into eMR you will be on the ‘Instructions’ homepage [Fig 5] - This page is your dashboard
displaying key information for all outstanding Instruction request for your surgery. and the starting point for
navigating through the eMR application.
The Instruction homepage displays the following information, their location is shown below:
1. Test Patient data (trial version of eMR only)
2. Access to incomplete or new reports
3. Access to completed reports
!
© 2018 MediData Exchange Limited
! of !7 16
[Fig 4]
1
2
3
[Fig 5]
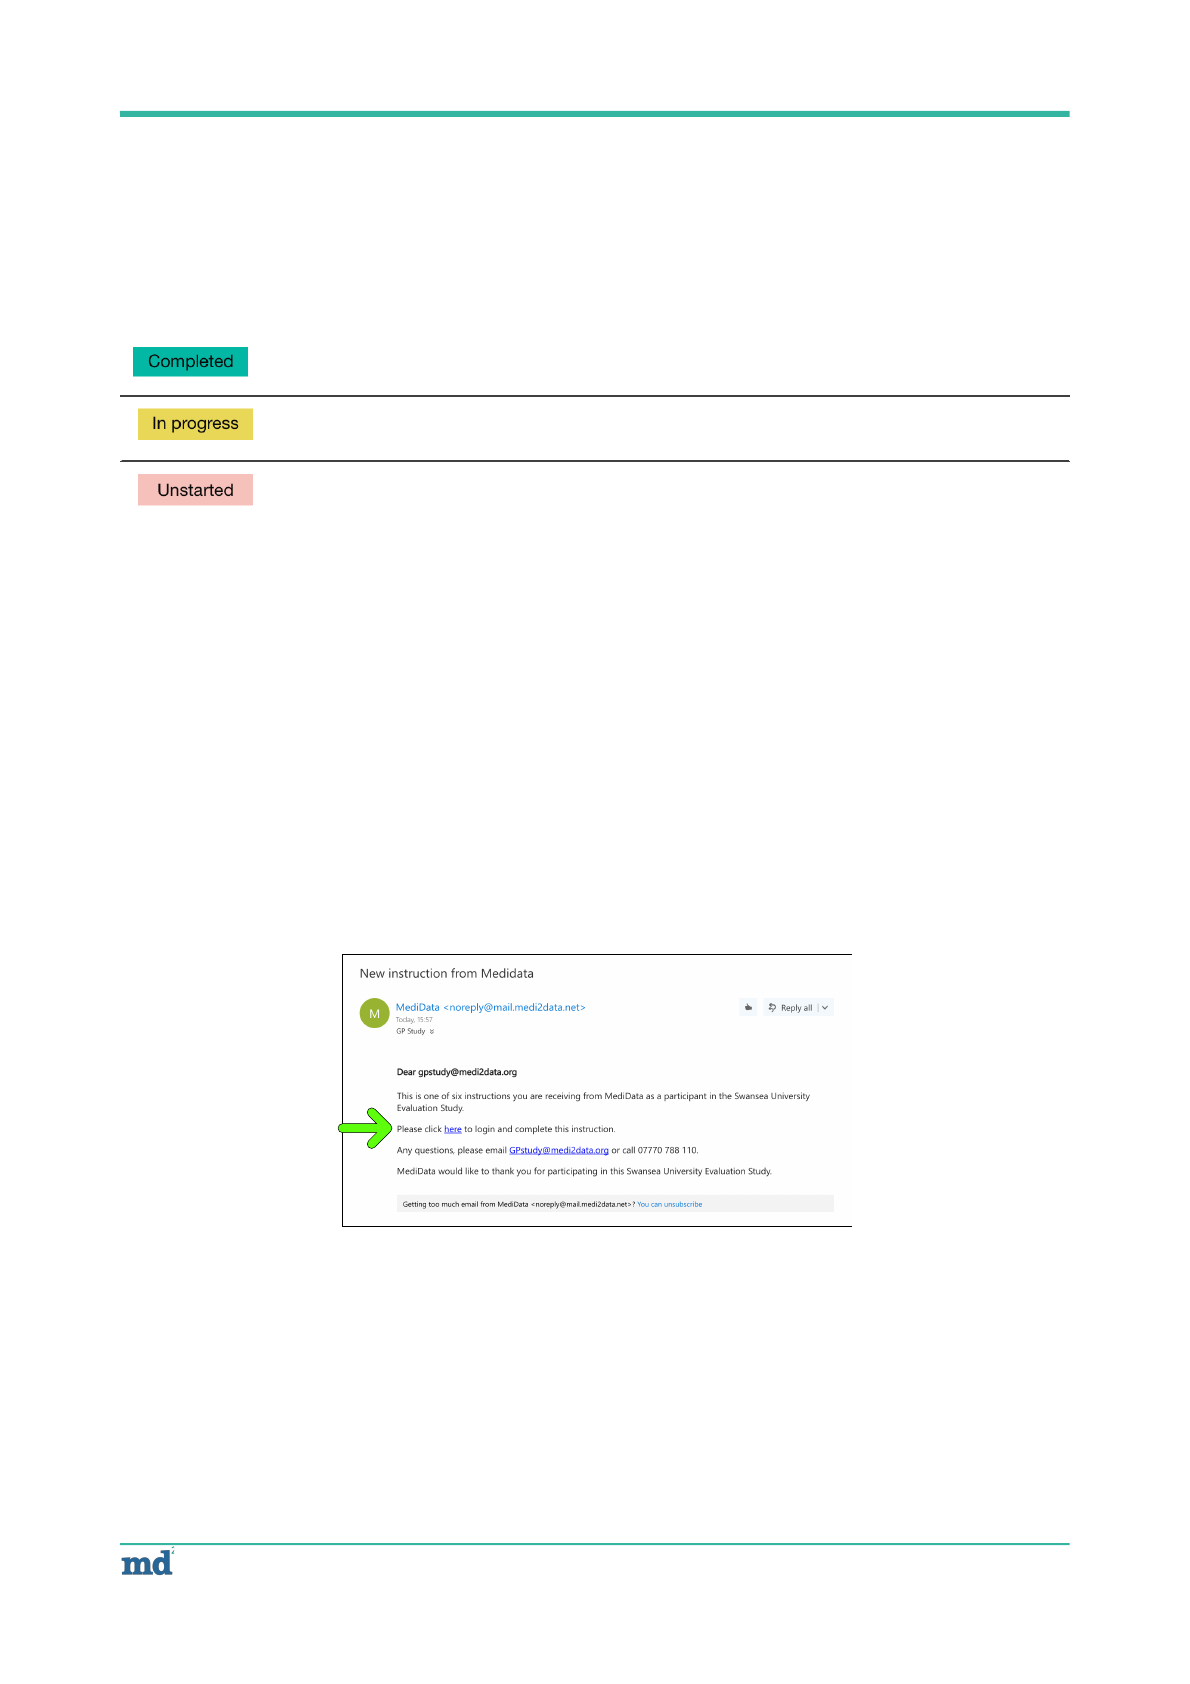
2.4 Report status
Once a client has created an Instruction request, the Practice associated with the Patient will be made aware
that there is an unstated Instruction waiting for them in eMR. As a GP works through the report the status will
change - the three status levels are explained below:
The status levels are:
2.5 Starting new Instruction
A new Instruction can be started by either clicking the link in a notification email or by selecting an ‘unstarted’
Instruction from the ‘Instruction homepage’
2.6 Starting a new Instruction via an email notification
Email notifications will be sent to your Practice whenever eMR creates a new Instruction for your Practice.
An example email notification is shown below [Fig 6] - the notification emails contain a link to which will direct you
to the eMR application log-in screen.
Completed reports have been created, reviewed and signed off by a Practice. Once
completed these reports become viewable to the Client that requested them.
In progress reports are Instruction requests that have been opened by a Practice and
work is underway in completing the report - they are not viewable by the Client.
Unstarted reports are Instruction requests that have been sent to a Practice (including
an email notification) however the Practice is yet to open the request - they are not
viewable by the Client
!
!
!
!
© 2018 MediData Exchange Limited
! of !8 16
[Fig 6]
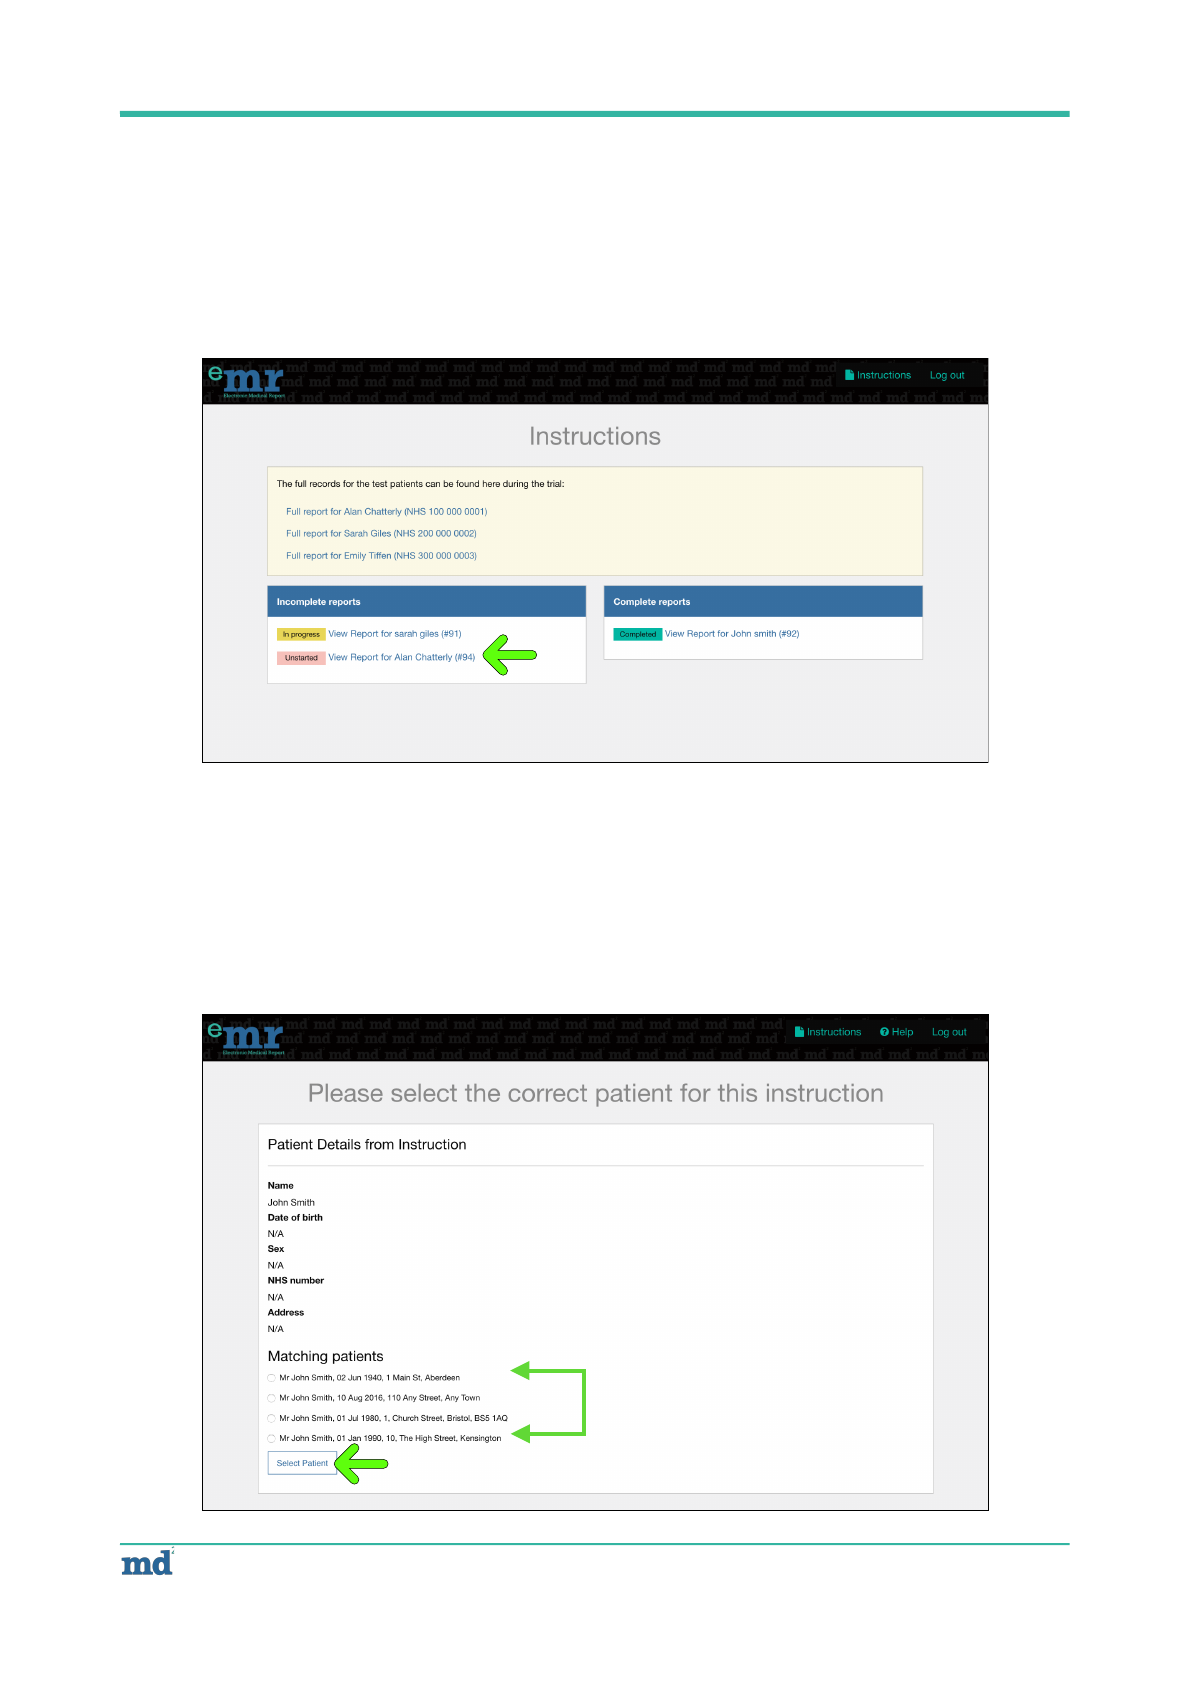
2.7 Starting a new Instruction from the ‘Instruction’ homepage
2.7.1 An unstarted Instruction can be started from the ‘Instruction’ homepage without the need to click the link
in the notification email - This is useful if you delete the email or if you are already logged into eMR when the
new Instruction comes in.
2.7.2 To pick up a new unstarted report, click the name next to the unstarted status box [Fig 7]
2.8 Select the matching Patient
The first step in starting a new report is to select the correct Patient record - depending on how much
information has been supplied by the Client, there could be multiple potential matches. Select the correct
Patient for your Practice and click ‘Select Patient’ [Fig 8]
!
© 2018 MediData Exchange Limited
! of !9 16
[Fig 7]
Choose from
matching Patients
[Fig 8]
2.9 Provisional report contents
The ‘Provisional Report Contents’ page is a powerful report builder that enables GPs to quickly create a
Patient report containing the necessary information to fulfil a Client Instruction.
The eMR tool extracts relevant information from the Patient record and presents it in a user friendly way that
enables speedy redaction and comprehensive report generation in PDF format.
The different “Provisional Report Contents’ sections are explained below:
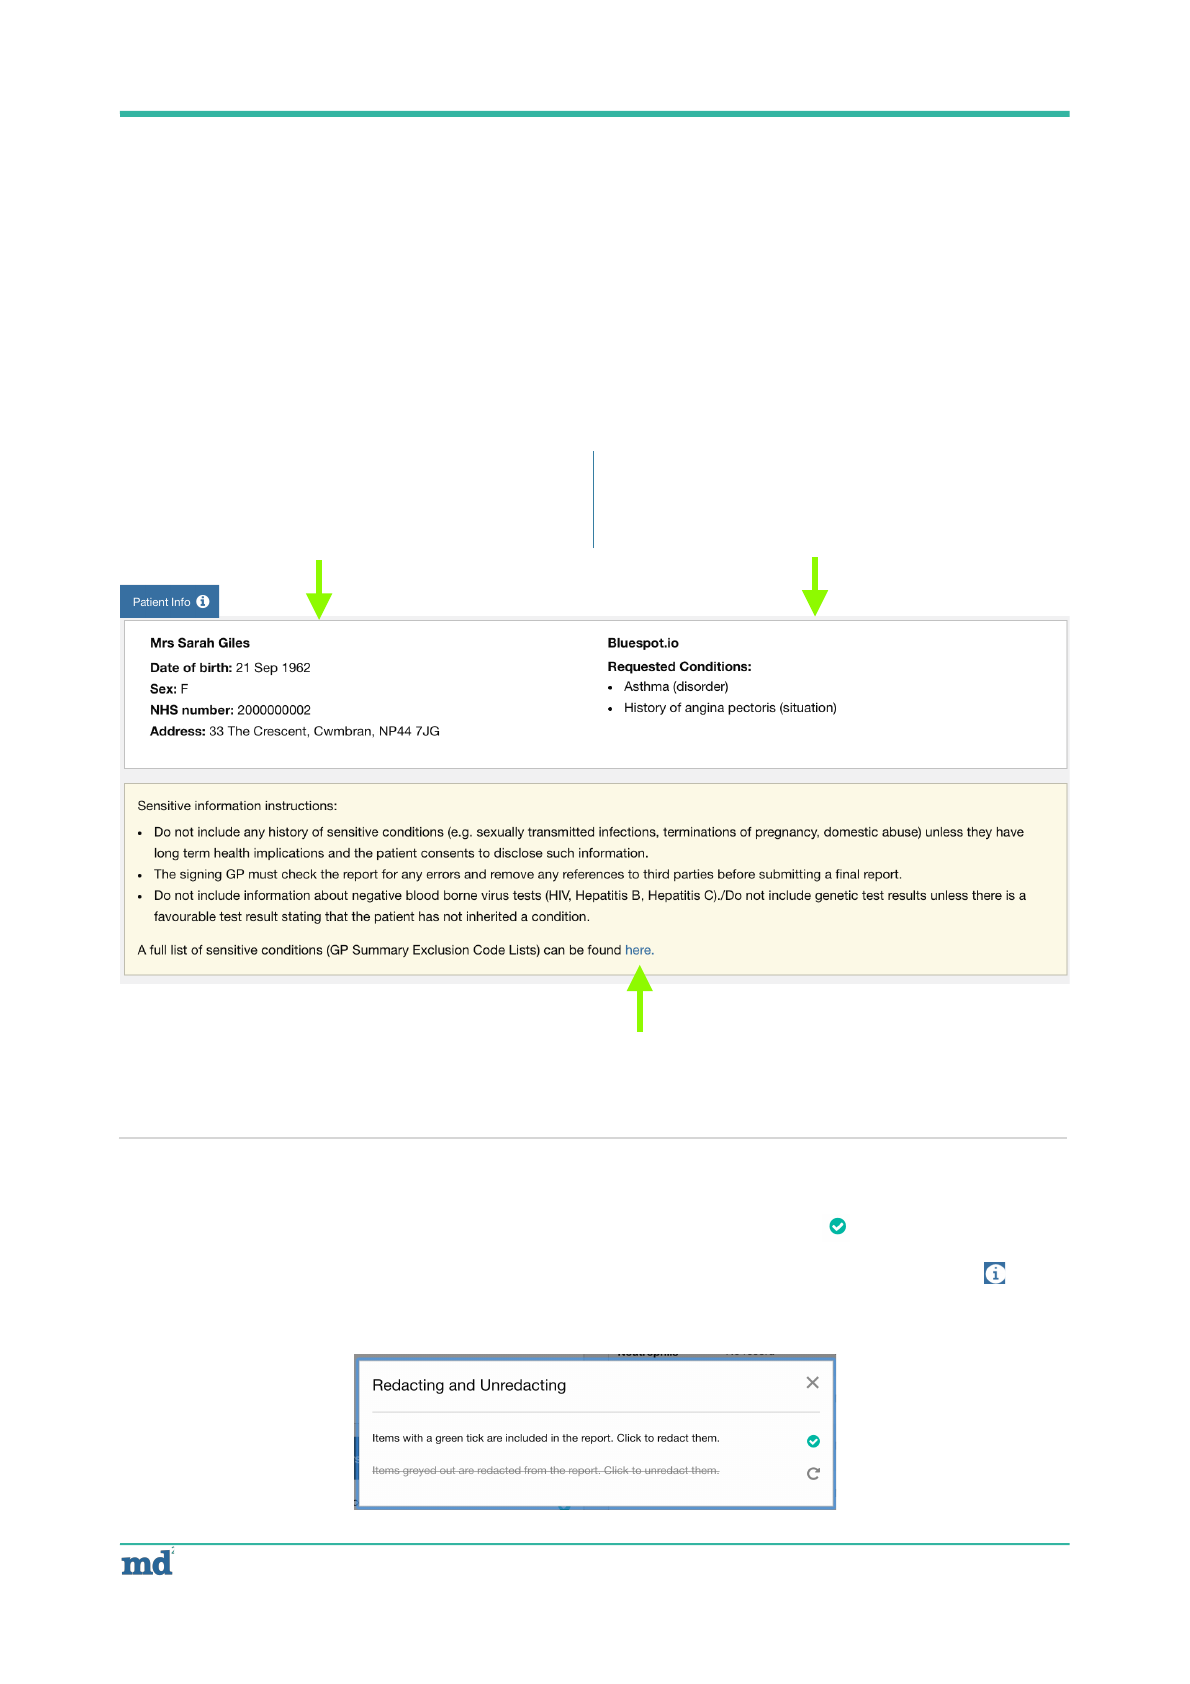
Redacting Information
Throughout the report builder, redact-able information is indicated with this icon -
Instructions on how to redact and un-redact can be viewed at any time by clicking on the ‘info’ icon: - to
display the following Instructions [Fig 9]!
!
© 2018 MediData Exchange Limited
! of !10 16
Patient Info
Patient identification information is displayed
at the top of the screen - and is always
accessible by via the ‘Patient Info’ button on
the left of the screen
Client Info
Client name and the conditions included in
Instructions are also always accessible by the
‘Patient info’ button.
Sensitive Information Instructions
Please be sure to follow the advice and guidance concerning sensitive conditions - a link to the NHS SP
summary code list is also provided.
[Fig 9]
!
© 2018 MediData Exchange Limited
! of !11 16
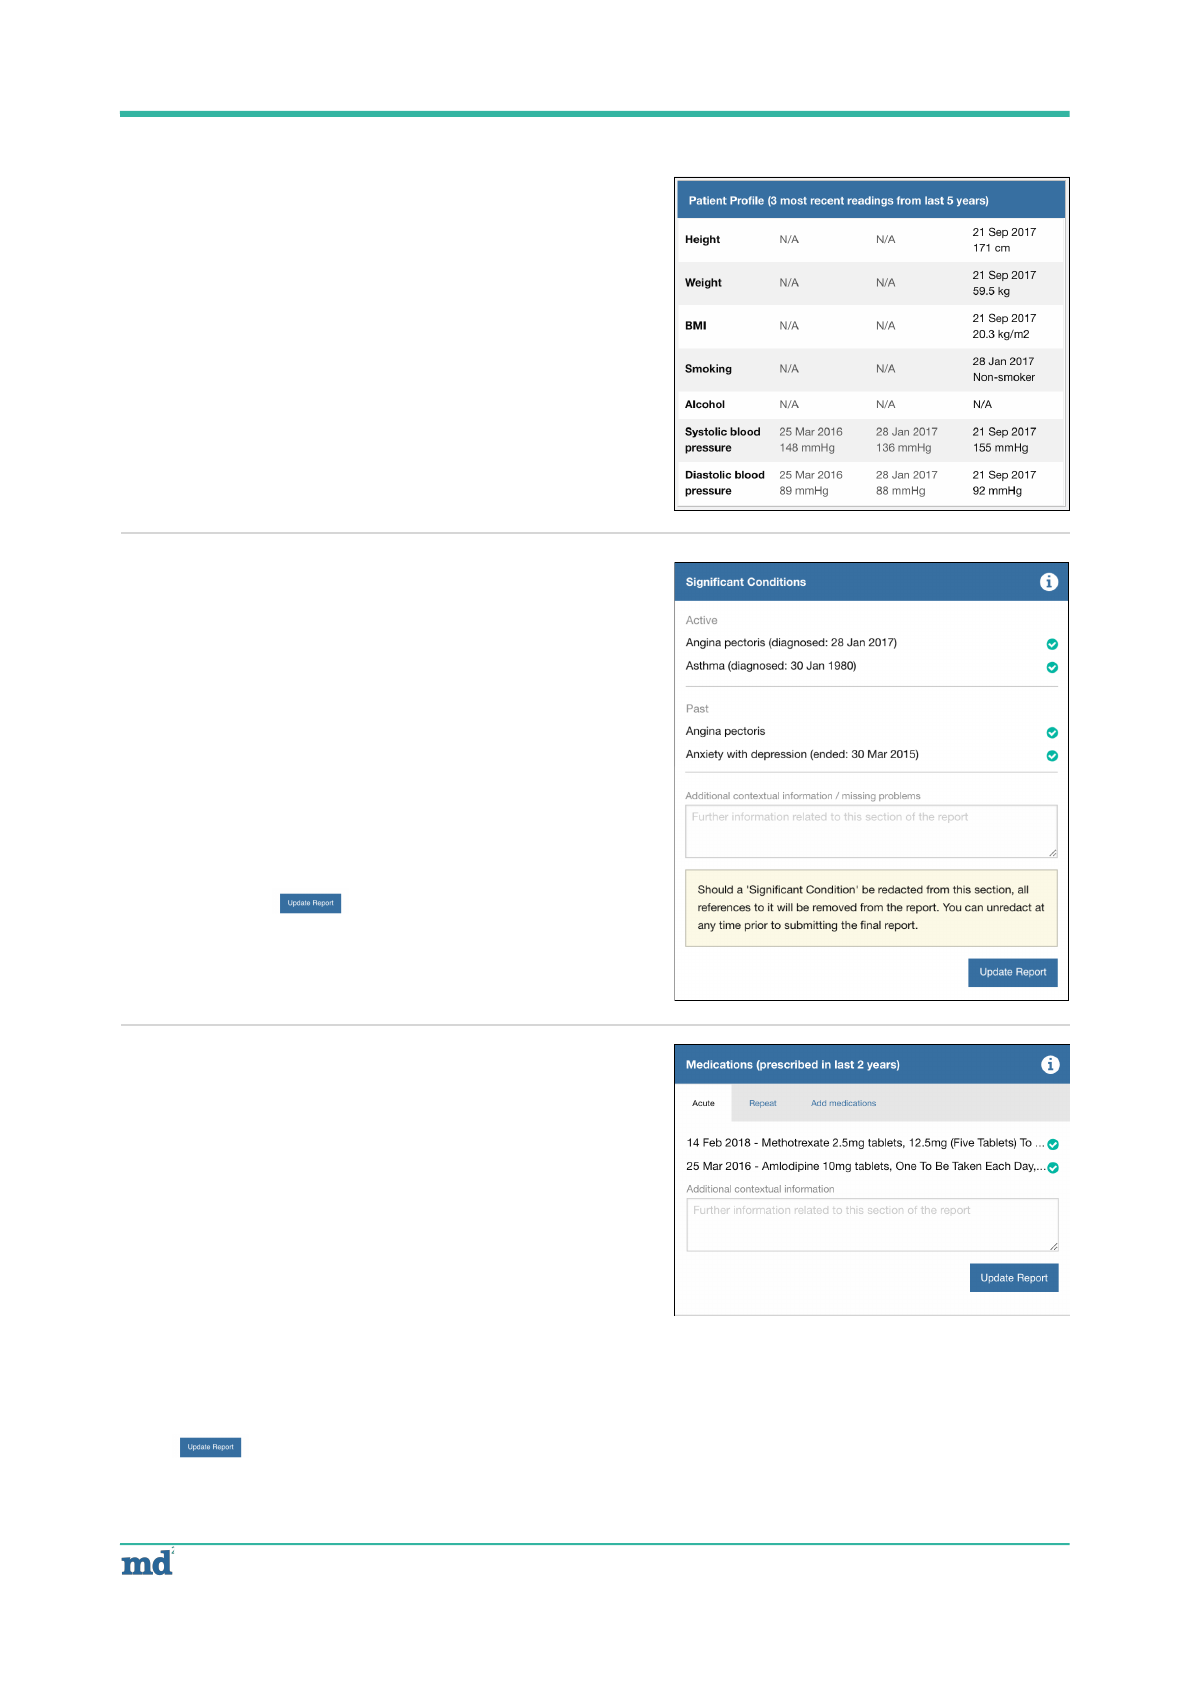
Patient profile
•The Patient profile is not redact-able.
•Contain the 3 most recent readings for each section from the
past 5 years.
Significant Conditions
•Significant conditions are redact-able
•Any condition from the Patient history that matches the
conditions included in the Instruction will be listed here
•Significant conditions are split into ‘Active’ and ‘Past’ with
dates supplied for both
•Redacting a significant condition automatically removes all
associated (by coding in EMIS) information from the other
sections of the report
•Additional information can be added in the notes field -
Please use the button to add these notes to the final
report
Medications
•Medications are redact-able
•Redacting a significant condition automatically removes all
associated (by coding in EMIS) information from the other
sections of the report
•Medications are split into ‘Acute’ and ‘Repeat’ and are
viewable on different tabs in this section.
•Any missing medications can be manually added via the ‘Add
Medications’ tab - mandatory fields are marked with an *
•Additional information can be added in the notes field - use
the button to add these notes to the final report
!
© 2018 MediData Exchange Limited
! of !12 16
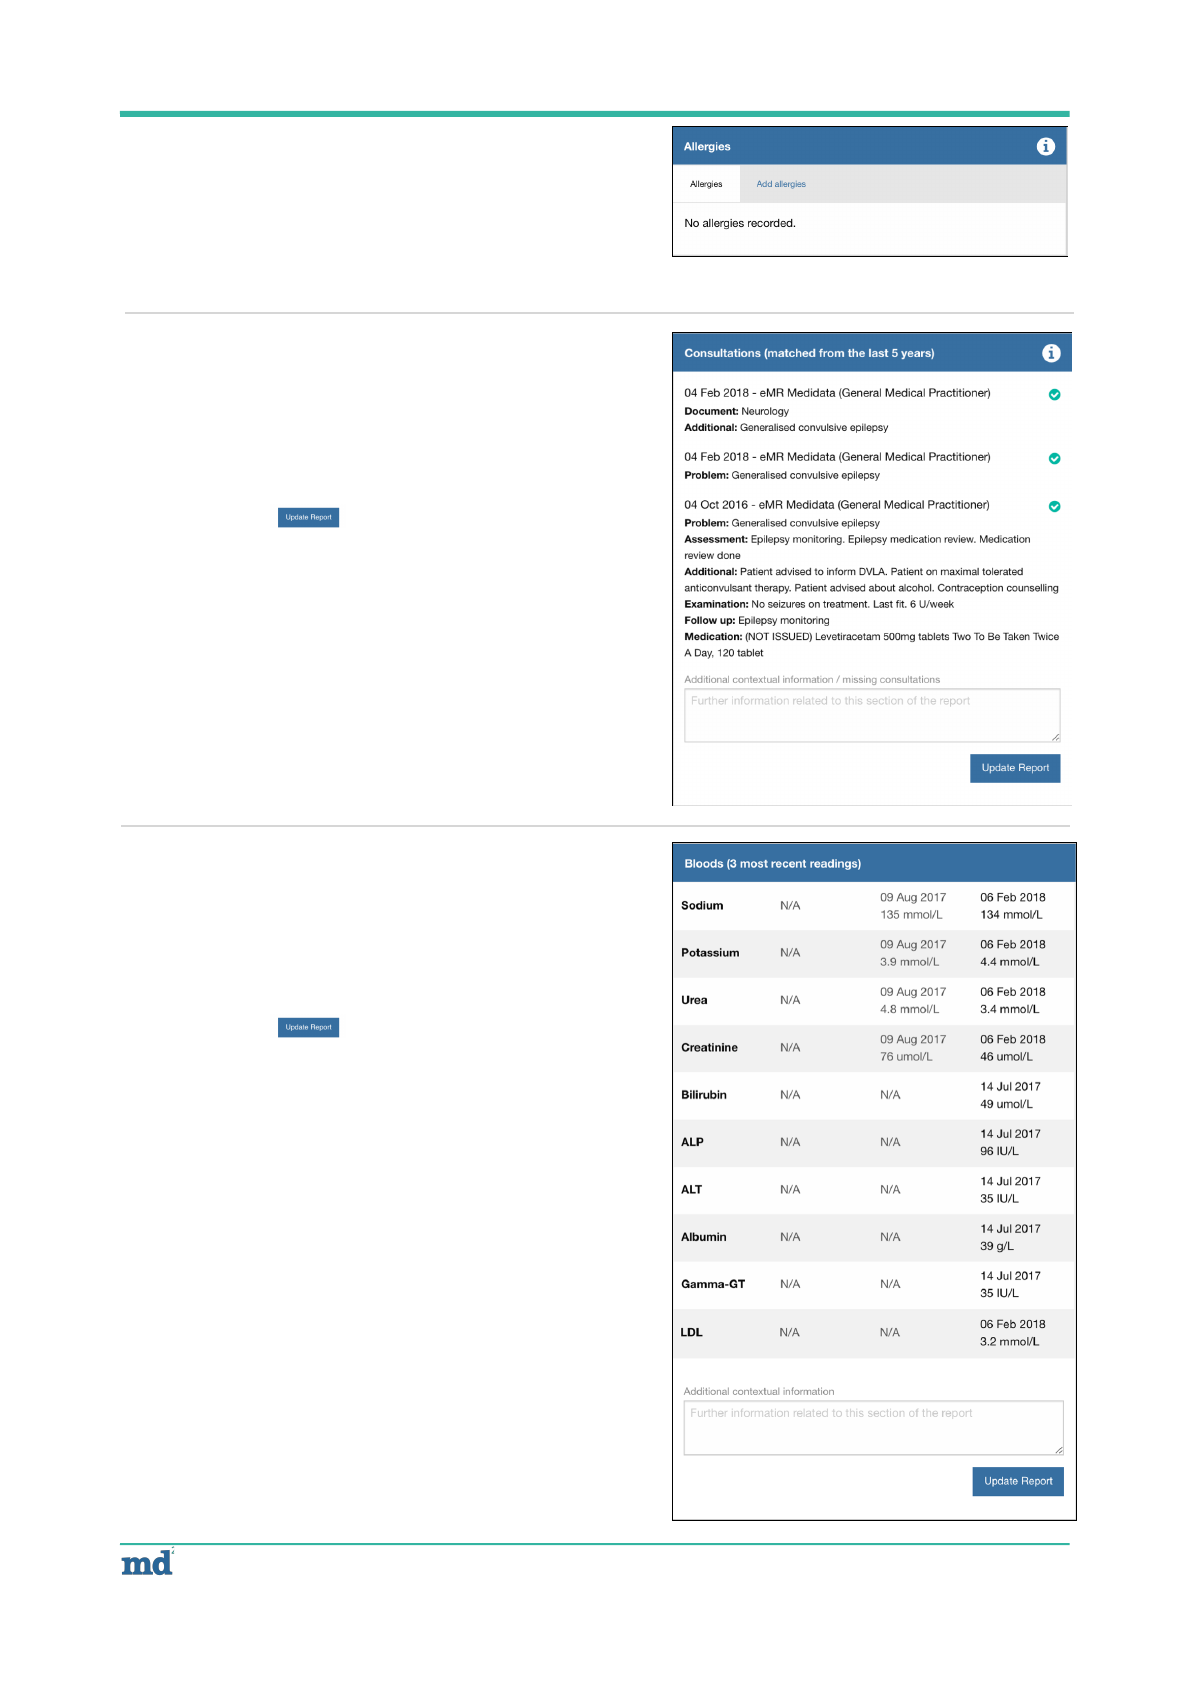
Allergies
•Allergies are redact-able
•All active allergies from the Patient record are included
•Any missing allergies can be manually added via the ‘Add
Allergies’ tab - mandatory fields are marked with an *
Consultations
•Consultations are redact-able
•Any consultation from the Patient history that match the
conditions included in the Instruction will be listed here
•Additional information can be added in the notes field -
Please use the button to add these notes to the final
report
Bloods
•Bloods are not redact-able
•All available blood test results - 3 most recent readings - will
be displayed.
•Additional information can be added in the notes field -
Please use the button to add these notes to the final
report
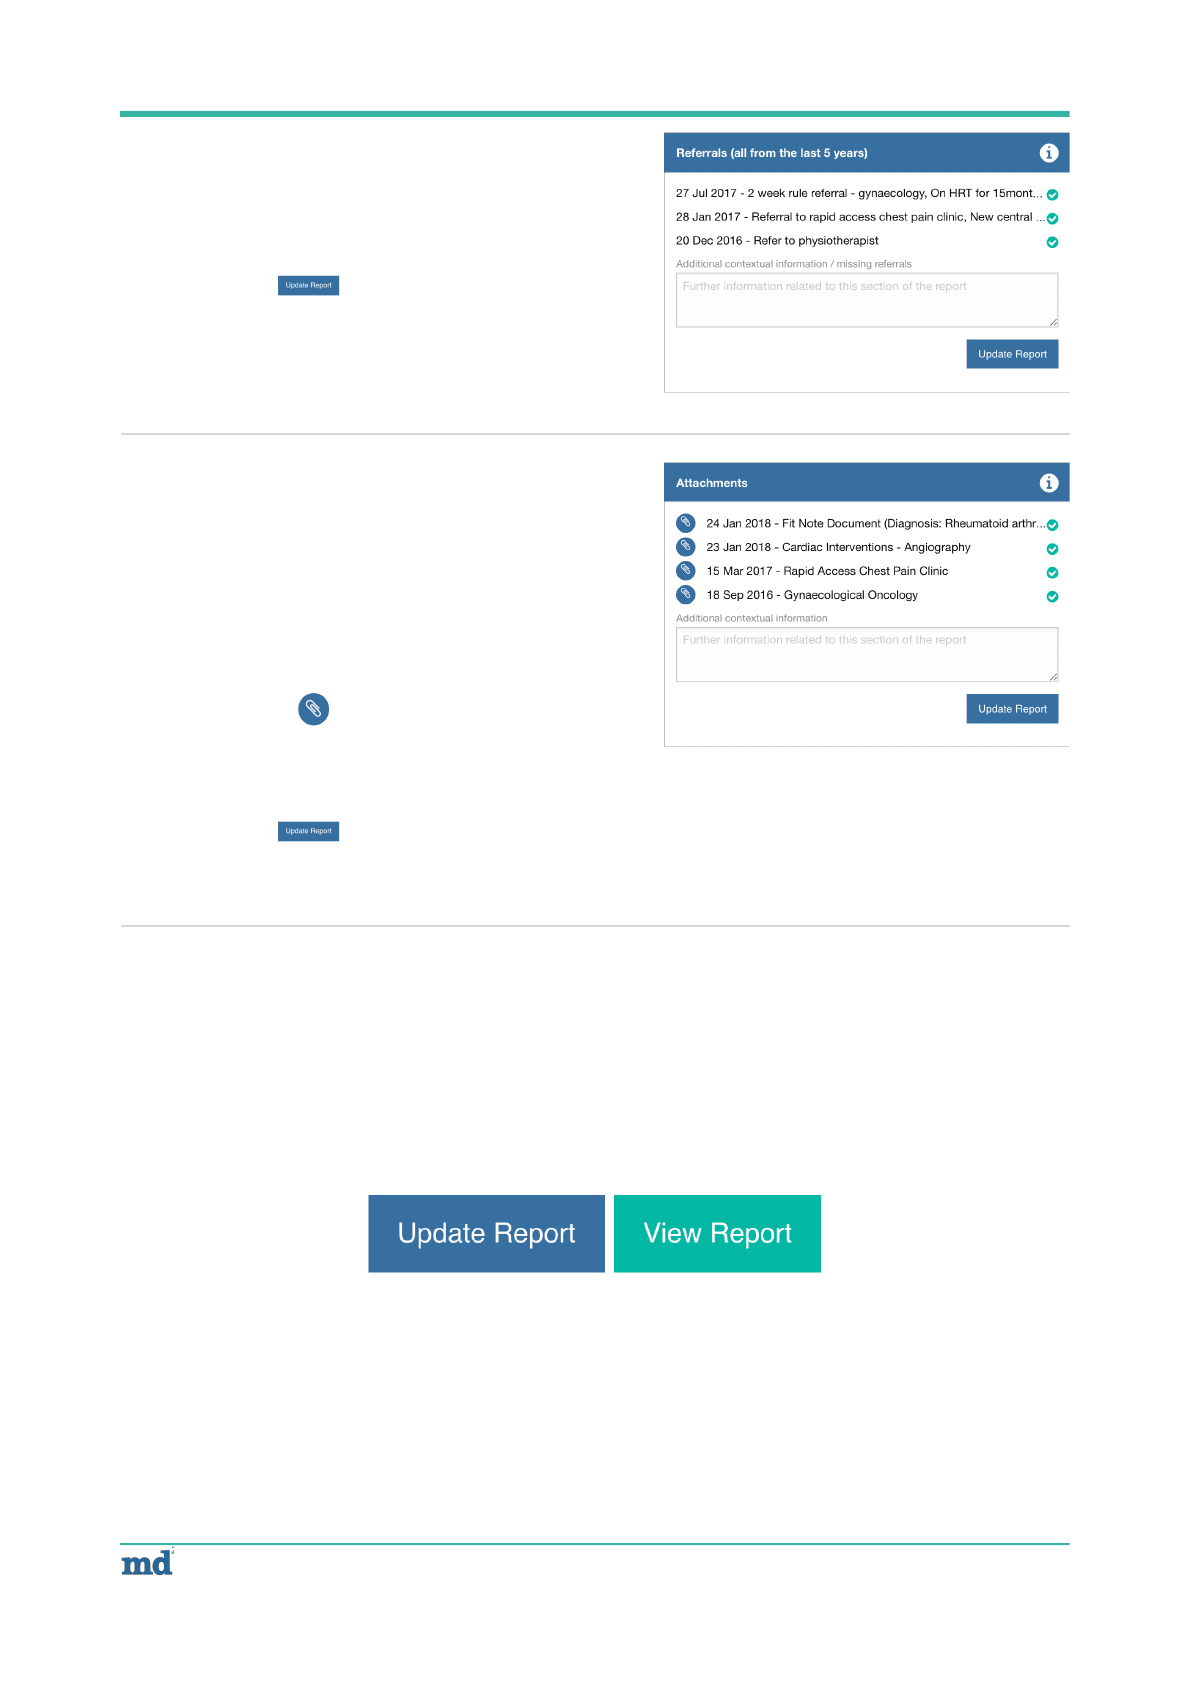
2.10 Updating & viewing draft report
Once you have redacted all irrelevant information and added any additional information you are ready to view
the final (draft) report - being viewing the report, click the ‘Update Report’ button, then click the ‘View Report’
button [Fig 10] to be taken from the Provisional report to the Final report
!
© 2018 MediData Exchange Limited
! of !13 16
Referrals
•Referrals are redact-able
•All available referrals from the last 5 years will be displayed.
•Additional information can be added in the notes field -
Please use the button to add these notes to the final
report
Attachments
•Attachments are redact-able
•All attachments from the Patient history that match the
conditions included in the Instruction will be listed here
•Attachments that are not redacted will be included in the
final record as appendices
•The attachments can be viewed in full by clicking on the
attachment icon:
•Viewing attachments will either open a new browser window
or download them directly to your PC
•Additional information can be added in the notes field -
Please use the button to add these notes to the final
report
[Fig 10]
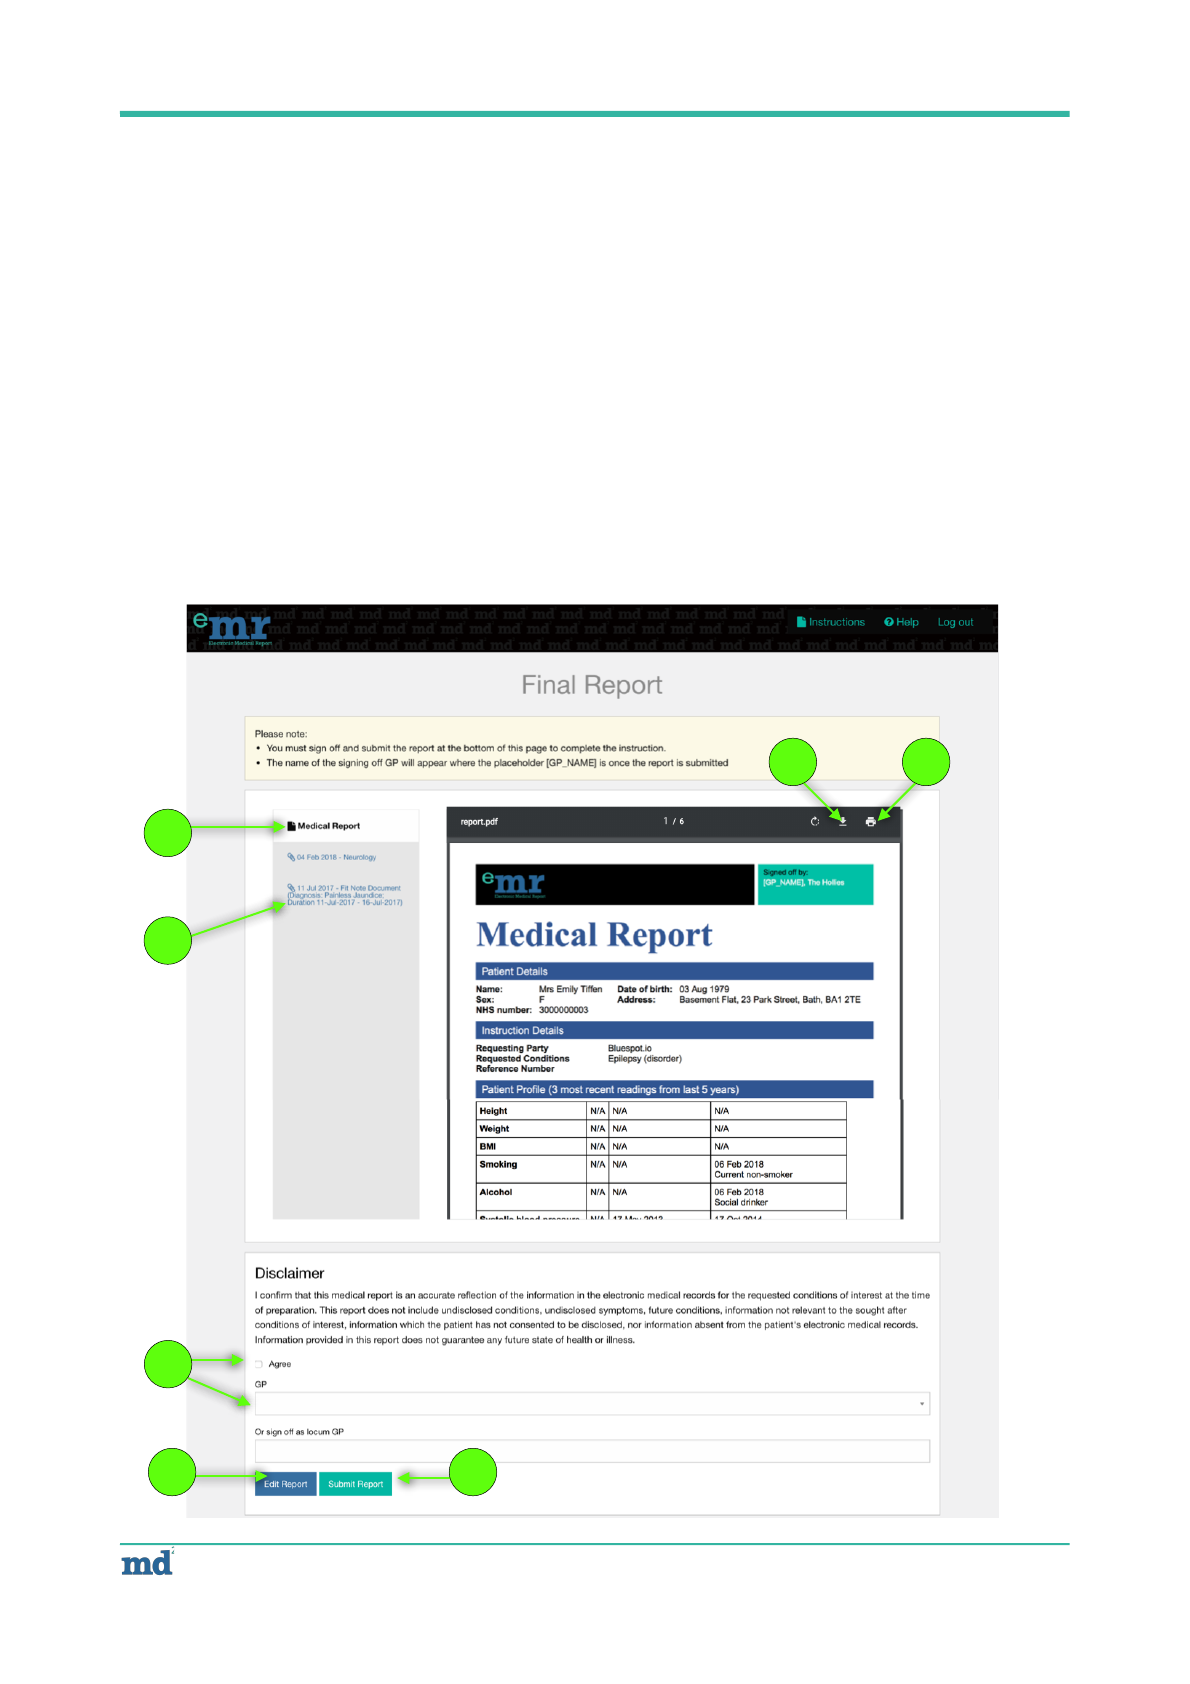
2.11 Final medical report
4.12.1 The final medical report is still viewable inside the application along with any additional attachments as
appendices.
The report viewer has the following functionality shown below [Fig 11]
1. Return to full medical report (if viewing additional attachment)
2. View individual attachments
3. Disclaimer - this must be completed before the report can be submitted - tick ‘agree’ and add name
of person completing the report
4. Edit report button - takes you back to the ‘Provisional Report Contents’ page
5. Submit button - send the finished medical report to the Client
6. Download PDF medical report
7. Print medical report
!
© 2018 MediData Exchange Limited
! of !14 16
1
2
[Fig 11]
3
4
5
6
7
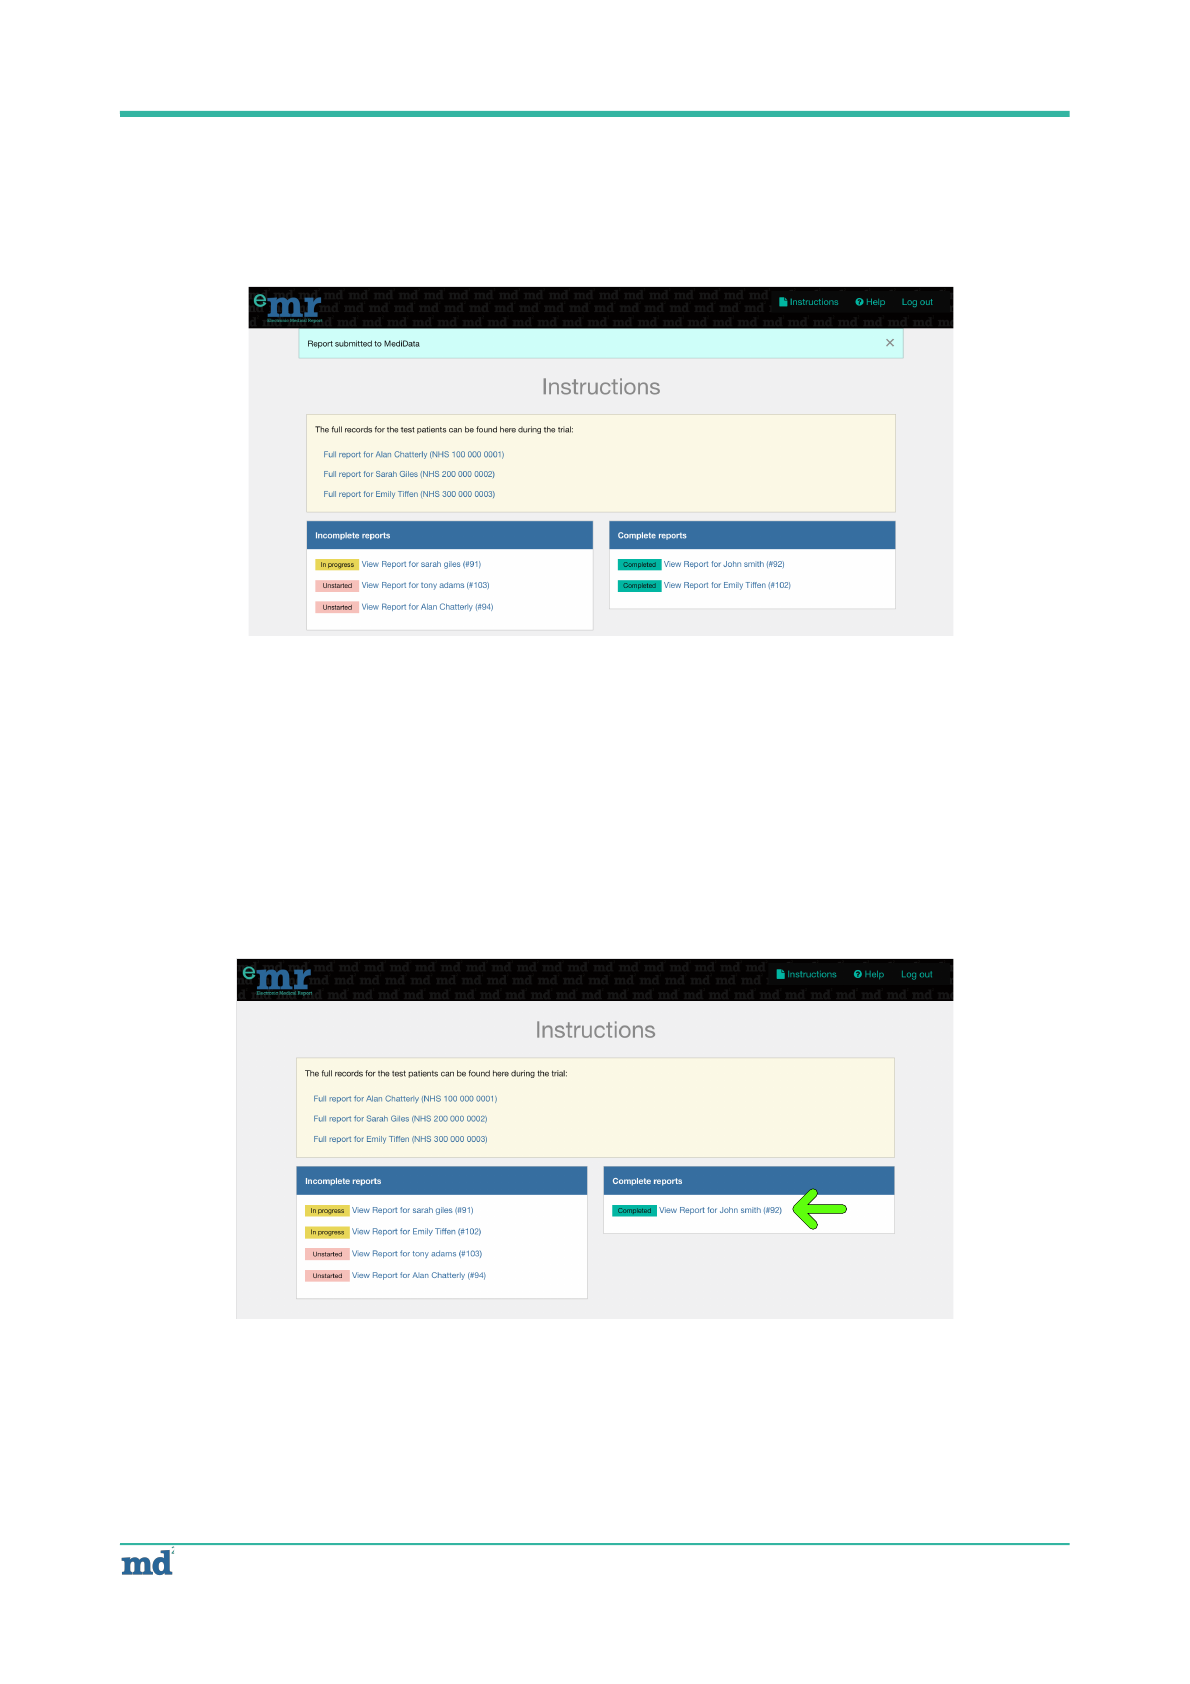
4.12.2 Following a submission of a completed medical report you will be redirect back to the ‘Instruction’
homepage and a ‘Report submitted to MediData’ confirmation message will be displayed. The submitted
medical report will be listed in the ‘Completed Reports’ section [Fig 12]
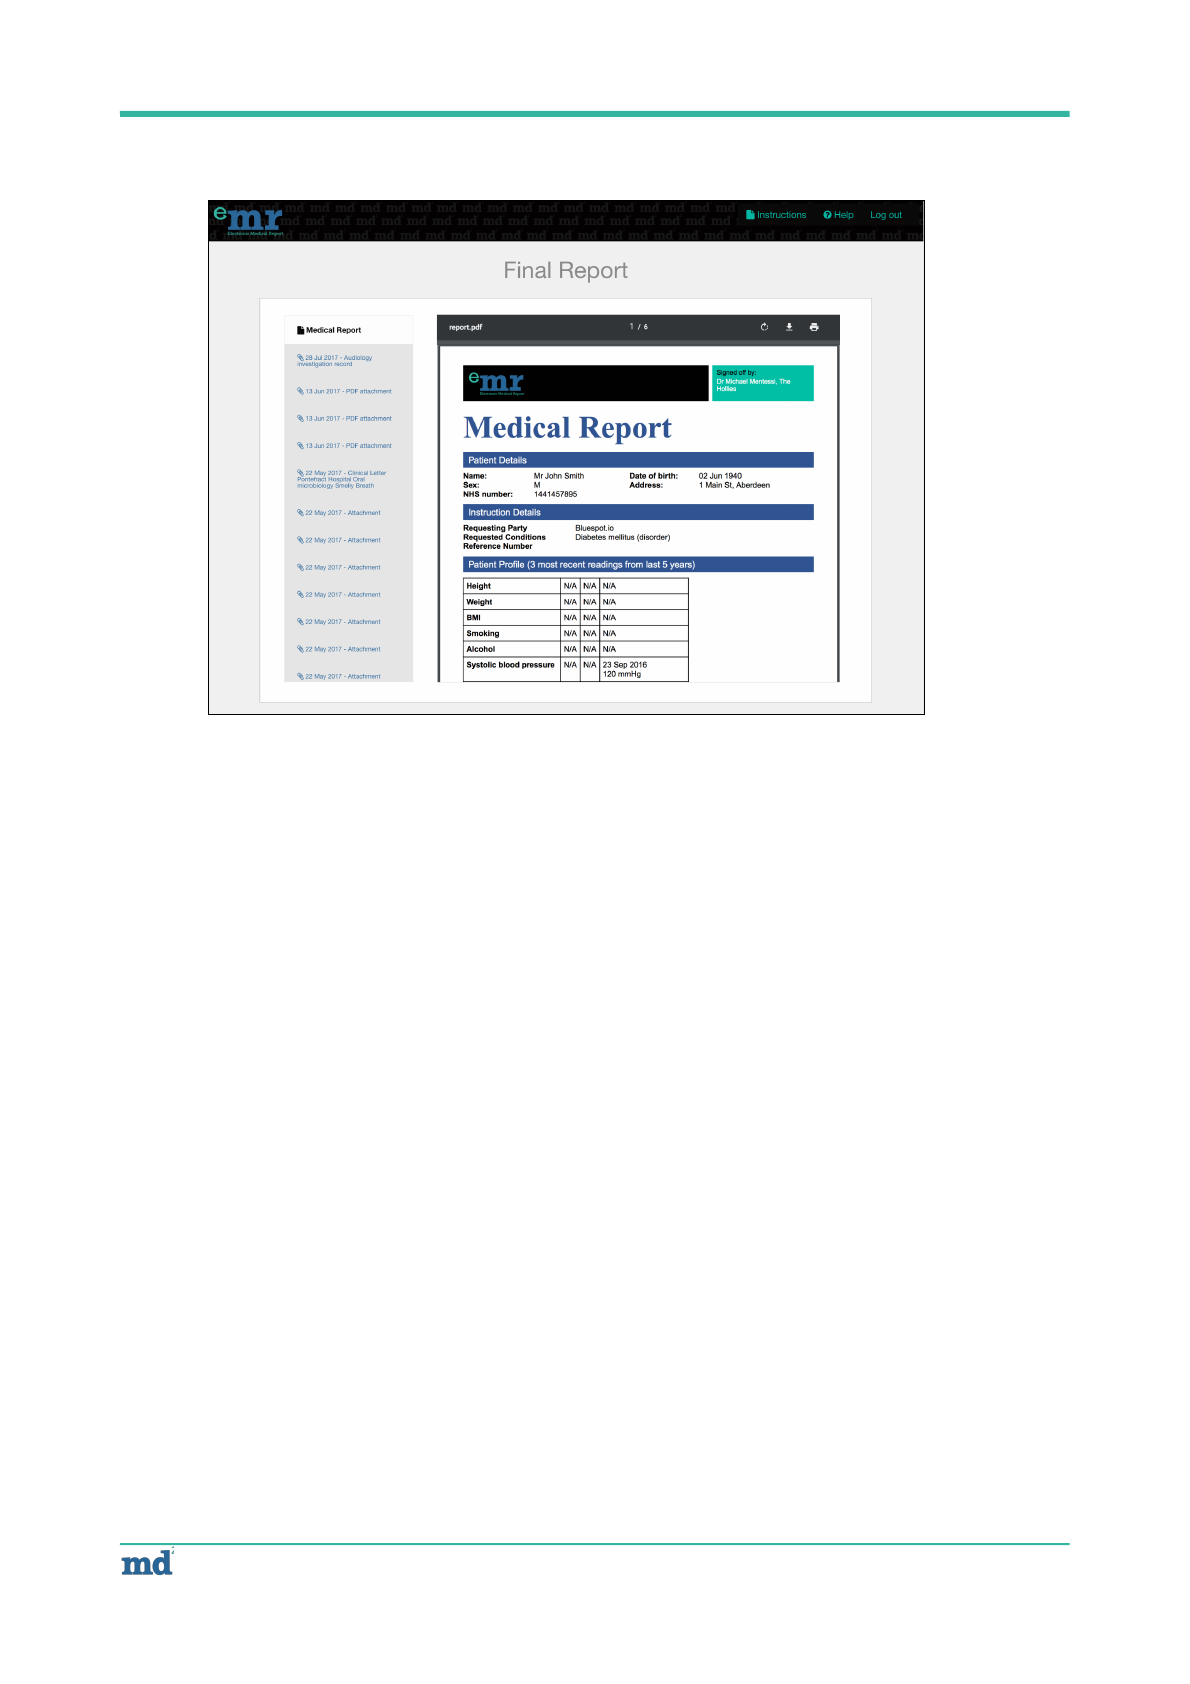
2.12 Viewing submitted medical reports
Although a medical report can still be viewed by a GP after it has has been completed, as the disclaimer has
been signed and the final report has been submitted to the Medidata, it will no longer be in a editable format.
To view completed medical reports, visit and click the Patient name in the ‘Completed Reports’ section [Fig 13],
this will take you to the report view page [Fig 14]
!
© 2018 MediData Exchange Limited
! of !15 16
[Fig 13]
[Fig 12]
!
© 2018 MediData Exchange Limited
! of !16 16
[Fig 14]
