Cisco Prime Access Registrar 6.1 User Guide 4.2
User Manual: Cisco Access Registrar 4.2
Open the PDF directly: View PDF ![]() .
.
Page Count: 922 [warning: Documents this large are best viewed by clicking the View PDF Link!]
- Cisco Prime Access Registrar 6.1 User Guide
- Contents
- Obtaining Documentation and Submitting a Service Request
- Overview
- Using the aregcmd Commands
- Using the Graphical User Interface
- Launching the GUI
- Common Methodologies
- Dashboard
- Configuring Cisco Prime Access Registrar
- Network Resources
- Administration
- Read-Only GUI
- Cisco Prime Access Registrar Server Objects
- Radius
- UserLists
- UserGroups
- Policies
- Clients
- Vendors
- Scripts
- Services
- Session Managers
- Resource Managers
- Profiles
- Translations
- TranslationGroups
- Remote Servers
- Rules
- Advanced
- Using the radclient Command
- Configuring Local Authentication and Authorization
- Configuring a Local Service and UserList
- Troubleshooting the Local Service and UserList Configuration
- aregcmd Command Performance
- UserDefined1 Property
- Access-Request Logging
- RADIUS Accounting
- Diameter
- Diameter with EAP Support
- Diameter Server Startup Log
- Diameter Stack Level Messages
- Configuring Authentication and Authorization for Diameter
- Configuring Diameter Accounting
- Configuring the Diameter Application in Prime Access Registrar
- Writing Diameter Application in Prime Access Registrar
- Translation Framework for Diameter
- Managing Diameter Sessions
- Support for SCTP including Multihoming
- Extensible Authentication Protocols
- EAP-AKA
- EAP-AKA-Prime (EAP-AKA’)
- EAP-FAST
- EAP-GTC
- EAP-LEAP
- EAP-MD5
- EAP-Negotiate
- EAP-MSChapV2
- EAP-SIM
- EAP-Transport Level Security (TLS)
- EAP-TTLS
- radclient Command Reference
- Protected EAP
- How to Configure Oracle, Mysql Accounting with the Buffering Option Enabled
- How Suffix and Prefix Rules Work with Prime Access Registrar
- CRL Support for Cisco Prime Access Registrar
- Using WiMAX in Cisco Prime Access Registrar
- WiMAX - An Overview
- WiMAX in Cisco Prime Access Registrar
- Direct Interaction Between the ASN GW and Cisco Prime Access Registrar
- Interaction Between ASN GW and Cisco Prime Access Registrar Through HA
- Prepaid and Hot-Lining
- Configuring WiMAX in Cisco Prime Access Registrar
- WiMAX - OMA-DM Provisioning Support with BEK Key
- WiMax Lawful Interception (LI) Support in Prime Access Registrar
- Using Extension Points
- Determining the Goal of the Script
- Writing the Script
- Adding the Script Definition
- About the Tcl/Tk 8.3 Engine
- Cisco Prime Access Registrar Scripts
- ACMEOutgoingScript
- AltigaIncomingScript
- AltigaOutgoingScript
- ANAAAOutgoing
- AscendIncomingScript
- AscendOutgoingScript
- AuthorizePPP
- AuthorizeService
- AuthorizeSLIP
- AuthorizeTelnet
- CabletronIncoming
- CabletronOutgoing
- CiscoIncoming
- CiscoOutgoing
- CiscoWithODAPIncomingScript
- ExecCLIDRule
- ExecDNISRule
- ExecFilterRule
- ExecNASIPRule
- ExecRealmRule
- ExecTimeRule
- LDAPOutage
- MapSourceIPAddress
- ParseAAARealm
- ParseAAASRealm
- ParseAARealm
- ParseAASRealm
- ParseProxyHints
- ParseServiceAndAAARealmHints
- ParseServiceAndAAASRealmHints
- ParseServiceAndAARealmHints
- ParseServiceAndAASRealmHints
- ParseServiceAndProxyHints
- ParseServiceHints
- ParseTranslationGroupsByCLID
- ParseTranslationGroupsByDNIS
- ParseTranslationGroupsByRealm
- UseCLIDAsSessionKey
- USRIncomingScript
- USRIncomingScript-IgnoreAccountingSignature
- USROutgoingScript
- Internal Scripts
- Using Replication
- Using On-Demand Address Pools
- Using Identity Caching
- Using Trusted ID Authorization with SESM
- Using Prepaid Billing
- Using Cisco Prime Access Registrar Server Features
- Incoming Traffic Throttling
- Backing Store Parsing Tool
- Configurable Worker Threads Enhancement
- Session-Key Lookup
- Query-Notify
- Support for Windows Provisioning Service
- Command Completion
- Service Grouping Feature
- SHA-1 Support for LDAP-Based Authentication
- Dynamic Attributes
- Tunneling Support Feature
- xDSL VPI/VCI Support for Cisco 6400
- Apply Profile in Cisco Prime Access Registrar Database to Directory Users
- Directory Multi-Value Attributes Support
- MultiLink-PPP (ML-PPP)
- Dynamic Updates Feature
- NAS Monitor
- Automatic Information Collection (arbug)
- Simultaneous Terminals for Remote Demonstration
- Support for RADIUS Check Item Attributes
- User-Specific Attributes
- Packet of Disconnect
- Configuring Change of Authorization Requests
- Dynamic DNS
- Dynamic Service Authorization Feature
- Remote Session Management
- Wx Interface Support for SubscriberDB Lookup
- Smart Grid Solution Management
- TACACS+ Support for AAA
- Directing RADIUS Requests
- Using FastRules to Process Packet Flow
- Wireless Support
- Mobile Node-Home Agent Shared Key
- 3GPP2 Home Agent Support
- Session Correlation Based on User-Defined Attributes
- Managing Multiple Accounting Start/Stop Messages
- NULL Password Support
- 3GPP Compliance
- Using LDAP
- Using Open Database Connectivity
- Oracle Software Requirements
- Configuring ODBC/OCI
- MySQL Support
- SIGTRAN-M3UA
- Using SNMP
- Enforcement of Licensing Models
- Backing Up the Database
- Using the REX Accounting Script
- Logging Syslog Messages
- Troubleshooting Cisco Prime Access Registrar
- Gathering Basic Information
- Troubleshooting Quick Checks
- aregcmd and Cisco Prime Access Registrar Configuration
- RADIUS Request Processing
- Other Troubleshooting Techniques and Resources
- Checking Prime Access Registrar Server Health Status
- Cisco Prime Access Registrar Tcl, REX and Java Dictionaries
- Tcl Attribute Dictionaries
- REX Attribute Dictionary
- Java Attribute Dictionary
- Environment Dictionary
- Cisco Prime Access Registrar Environment Dictionary Variables
- Accepted-Profiles
- Accounting-Service
- Acquire-Dynamic-DNS
- Acquire-Group-Session-Limit
- Acquire-Home-Agent
- Acquire-IP-Dynamic
- Acquire-IPX-Dynamic
- Acquire-IP-Per-NAS-Port
- Acquire-Subnet-Dynamic
- Acquire-User-Session-Limit
- Acquire-USR-VPN
- Allow-Null-Password
- Authentication-Service
- Authorization-Service
- AuthorizationInfo
- BackingStore-Env-Vars
- Blacklisted-IMSI
- Broadcast-Accounting-Packet
- Cache-Attributes-In-Session
- Current-Group-Count
- Cache-Outer-Identity
- Destination-IP-Address
- Destination-Port
- Dest-Translation-Type
- Dest-Numbering-Plan
- Dest-Encoding-Scheme
- Dest-Nature-Of-Address
- Dest-GT-Format
- Diameter-Application-Id
- Diameter-Command-Code
- Disable-Accounting-On-Off-Broadcast
- DSA-Response-Cache
- Dynamic-DNS-HostName
- Dynamic-Search-Filter
- Dynamic-Search-Path
- Dynamic-Search-Scope
- Dynamic-Service-Loop-Limit
- Dynamic-User-Password-Attribute
- EAP-Actual-Identity
- EAP-Authentication-Mode
- Enforce-Traffic-Throttling
- FetchAuthorizationInfo
- Generate-BEK
- Group-Session-Limit
- HLR-GlobalTitle-Address
- HLR-GlobalTitle-Cached
- HLR-Translated-IMSI
- Ignore-Accounting-Signature
- IMSI
- Incoming-Translation-Groups
- Master-URL-Fragment
- Misc-Log-Message-Info
- MSISDN
- Outgoing-Translation-Groups
- Pager
- Query-Service
- Re-Accounting-Service
- Re-Authentication-Service
- Re-Authorization-Service
- Realm
- Reject-Reason
- Remote-Server
- Remove-Session-On-Acct-Stop
- Remote-Servers-Tried
- Request-Authenticator
- Request-Type
- Require-User-To-Be-In-Authorization-List
- Response-Type
- Retrace-Packet
- Send-PEAP-URI-TLV
- Session-Key
- Session-Manager
- Session-Notes
- Session-Service
- Set-Session-Mgr-And-Key-Upon-Lookup
- Skip-Session-Management
- Skip-Overriding-Username-With-LDAP-UID
- Skip-Overriding-UserName-With-PEAPIdentity
- Source-IP-Address
- Source-Port
- SQL-Sequence
- Subnet-Size-If-No-Match
- Trace-Level
- Unavailable-Resource
- Unavailable-Resource-Type
- UserDefined1
- User-Authorization-Script
- User-Group
- User-Group-Session-Limit
- User-Name
- User-Profile
- User-Session-Limit
- Virtual-Server-Outgoing-Script
- Windows-Domain-Groups
- X509- Subject-Name
- Internal Variables
- Cisco Prime Access Registrar Environment Dictionary Variables
- RADIUS Attributes
- Glossary
- Index

THE SPECIFICATIONS AND INFORMATION REGARDING THE PRODUCTS IN THIS MANUAL ARE SUBJECT TO CHANGE WITHOUT NOTICE. ALL
STATEMENTS, INFORMATION, AND RECOMMENDATIONS IN THIS MANUAL ARE BELIEVED TO BE ACCURATE BUT ARE PRESENTED WITHOUT
WARRANTY OF ANY KIND, EXPRESS OR IMPLIED. USERS MUST TAKE FULL RESPONSIBILITY FOR THEIR APPLICATION OF ANY PRODUCTS.
THE SOFTWARE LICENSE AND LIMITED WARRANTY FOR THE ACCOMPANYING PRODUCT ARE SET FORTH IN THE INFORMATION PACKET THAT
SHIPPED WITH THE PRODUCT AND ARE INCORPORATED HEREIN BY THIS REFERENCE. IF YOU ARE UNABLE TO LOCATE THE SOFTWARE LICENSE
OR LIMITED WARRANTY, CONTACT YOUR CISCO REPRESENTATIVE FOR A COPY.
The Cisco implementation of TCP header compression is an adaptation of a program developed by the University of California, Berkeley (UCB) as part of UCB’s public
domain version of the UNIX operating system. All rights reserved. Copyright © 1981, Regents of the University of California.
NOTWITHSTANDING ANY OTHER WARRANTY HEREIN, ALL DOCUMENT FILES AND SOFTWARE OF THESE SUPPLIERS ARE PROVIDED “AS IS” WITH
ALL FAULTS. CISCO AND THE ABOVE-NAMED SUPPLIERS DISCLAIM ALL WARRANTIES, EXPRESSED OR IMPLIED, INCLUDING, WITHOUT
LIMITATION, THOSE OF MERCHANTABILITY, FITNESS FOR A PARTICULAR PURPOSE AND NONINFRINGEMENT OR ARISING FROM A COURSE OF
DEALING, USAGE, OR TRADE PRACTICE.
IN NO EVENT SHALL CISCO OR ITS SUPPLIERS BE LIABLE FOR ANY INDIRECT, SPECIAL, CONSEQUENTIAL, OR INCIDENTAL DAMAGES, INCLUDING,
WITHOUT LIMITATION, LOST PROFITS OR LOSS OR DAMAGE TO DATA ARISING OUT OF THE USE OR INABILITY TO USE THIS MANUAL, EVEN IF CISCO
OR ITS SUPPLIERS HAVE BEEN ADVISED OF THE POSSIBILITY OF SUCH DAMAGES.
Cisco and the Cisco logo are trademarks or registered trademarks of Cisco and/or its affiliates in the U.S. and other countries. To view a list of Cisco trademarks, go to this
URL: www.cisco.com/go/trademarks. Third-party trademarks mentioned are the property of their respective owners. The use of the word partner does not imply a partnership
relationship between Cisco and any other company. (1110R)
Any Internet Protocol (IP) addresses used in this document are not intended to be actual addresses. Any examples, command display output, and figures included in the
document are shown for illustrative purposes only. Any use of actual IP addresses in illustrative content is unintentional and coincidental.
Cisco Prime Access Registrar 6.1 User Guide
© 2013 Cisco Systems, Inc. All rights reserved.

iii
Cisco Prime Access Registrar 6.1 User Guide
OL-29756-01
CONTENTS
Preface xxxiii
Document Organization xxxiii
Related Documentation xxxv
Obtaining Documentation and Submitting a Service Request xxxv
Notices xxxv
OpenSSL/Open SSL Project xxxv
License Issues xxxv
CHAPTER
1Overview 1-1
Prime Access Registrar Hierarchy 1-2
UserLists and Groups 1-3
Profiles 1-3
Scripts 1-3
Services 1-3
Session Management Using Resource Managers 1-4
Prime Access Registrar Directory Structure 1-5
Program Flow 1-6
Scripting Points 1-6
Client Scripting 1-7
Client or NAS Scripting Points 1-7
Authentication and/or Authorization Scripting Points 1-8
Session Management 1-8
Failover by the NAS and Session Management 1-9
Cross Server Session and Resource Management 1-9
Script Processing Hierarchy 1-11
RADIUS Protocol 1-12
Steps to Connection 1-13
Types of RADIUS Messages 1-14
Packet Contents 1-14
The Attribute Dictionary 1-15
Proxy Servers 1-15
Service and Ports Used in Prime Access Registrar 1-16
Secure Shell Service 1-16
Ports 1-16

Contents
iv
Cisco Prime Access Registrar 6.1 User Guide
OL-29756-01
CHAPTER
2Using the aregcmd Commands 2-1
General Command Syntax 2-1
View-Only Administrator Mode 2-2
ViewOnly Property 2-3
Configuration Objects 2-3
aregcmd Command Performance 2-3
RPC Bind Services 2-4
aregcmd Commands 2-4
add 2-5
cd 2-5
delete 2-6
exit 2-6
filter 2-6
find 2-6
help 2-7
insert 2-7
login 2-7
logout 2-7
ls 2-8
next 2-8
prev 2-8
pwd 2-9
query-sessions 2-9
quit 2-9
release-sessions 2-9
reload 2-10
reset-stats 2-10
save 2-10
set 2-11
start 2-12
stats 2-12
status 2-14
stop 2-14
tacacs-stats 2-14
tacacs-reset-stats 2-15
dia-stats 2-15
trace 2-16
trace-file-count 2-17
unset 2-18

Contents
v
Cisco Prime Access Registrar 6.1 User Guide
OL-29756-01
validate 2-18
OpenSSL Commands 2-18
ecparam 2-18
req 2-19
ca 2-19
aregcmd Command Logging 2-19
aregcmd Command Line Editing 2-20
aregcmd Error Codes 2-20
CHAPTER
3Using the Graphical User Interface 3-1
Launching the GUI 3-1
Disabling HTTP 3-2
Disabling HTTPS 3-2
Login Page 3-3
Logging In 3-3
Logging Out 3-4
Common Methodologies 3-4
Filtering Records 3-4
Editing Records 3-5
Deleting Records 3-5
Setting Record Limits per Page 3-6
Performing Common Navigations 3-6
Relocating Records 3-7
Dashboard 3-8
Sessions 3-8
Configuring Cisco Prime Access Registrar 3-9
RADIUS 3-10
Setting Up or Changing the Radius Properties 3-11
Profiles 3-11
Adding Profile Details 3-12
UserGroups 3-12
Adding UserGroup Details 3-14
UserList 3-14
Adding UserList Details 3-15
Users 3-15
Adding User Details 3-17
Scripts 3-17
Adding Script Details 3-21
Policies 3-21

Contents
vi
Cisco Prime Access Registrar 6.1 User Guide
OL-29756-01
Adding Policy Details 3-22
Services 3-22
Simple Services 3-23
ServiceWithRS 3-30
PEAP Service 3-34
EAP Service 3-37
Diameter Service 3-46
Adding Diameter Service Details 3-50
CommandSets 3-51
Adding a Command Set 3-51
DeviceAccessRules 3-52
Adding a Device Access Rule 3-52
FastRules 3-53
Adding a Fast Rule 3-53
Replication 3-54
Adding Replication Details 3-55
Adding the Replication Member Details 3-55
RADIUSDictionary 3-56
Adding RADIUS Dictionary Details 3-56
VendorDictionary 3-57
Adding Vendor Dictionary Details 3-58
Vendor Attributes 3-58
Adding Vendor Attributes 3-59
Vendors 3-59
Adding Vendor Details 3-60
Translations 3-61
Adding Translation Details 3-62
TranslationGroups 3-62
Adding Translation Group Details 3-63
Diameter 3-63
General 3-64
Session Management 3-65
Applications 3-67
Commands 3-68
DiameterAttributes 3-69
Advanced 3-70
Default 3-71
BackingStore/ServerParam 3-75
RemoteSessionServer 3-79
SNMP 3-81

Contents
vii
Cisco Prime Access Registrar 6.1 User Guide
OL-29756-01
DDNS 3-84
ODBC DataSources 3-85
Log 3-86
Ports 3-88
Interfaces 3-89
Attribute Groups 3-90
Rules 3-91
Setting Rules 3-92
SessionManagers 3-92
Adding Session Manager Details 3-95
ResourceManager 3-95
Adding Resource Manager Details 3-103
Network Resources 3-104
Clients 3-104
Adding Client Details 3-107
Remote Servers 3-107
LDAP 3-108
LDAP Accounting 3-112
Domain Authentication 3-115
ODBC/OCI 3-117
ODBC/OCI-Accounting 3-119
Diameter 3-121
Others 3-123
Administration 3-128
Administrators 3-128
Adding Administrator Details 3-129
Statistics 3-129
Resetting Server Statistics 3-132
DiameterStatistics 3-132
TACACSStatistics 3-136
Back Up and Restore 3-137
LicenseUpload 3-137
Read-Only GUI 3-138
CHAPTER
4Cisco Prime Access Registrar Server Objects 4-1
Radius 4-2
UserLists 4-3
Users 4-4
HiddenAttributes Property 4-4

Contents
viii
Cisco Prime Access Registrar 6.1 User Guide
OL-29756-01
UserGroups 4-5
Policies 4-5
Clients 4-6
Vendors 4-10
Scripts 4-11
Services 4-12
Types of Services 4-13
Domain Authentication 4-13
EAP Services 4-14
File 4-14
Group 4-15
Java 4-17
LDAP 4-17
Local 4-18
ODBC 4-19
ODBC-Accounting 4-20
Prepaid Services 4-20
RADIUS 4-20
Radius Query 4-21
RADIUS-Session 4-25
Rex 4-25
WiMAX 4-26
Diameter 4-26
M3UA 4-32
Session Managers 4-33
Session Creation 4-37
Session Notes 4-37
Soft Group Session Limit 4-38
Session Correlation Based on User-Defined Attributes 4-39
Resource Managers 4-39
Types of Resource Managers 4-40
Gateway Subobject 4-41
Group-Session-Limit 4-41
Home-Agent 4-41
Home-Agent-IPv6 4-41
IP-Dynamic 4-42
IP-Per-NAS-Port 4-42
IPX-Dynamic 4-42
Session-Cache 4-43

Contents
ix
Cisco Prime Access Registrar 6.1 User Guide
OL-29756-01
Subnet-Dynamic 4-43
User-Session-Limit 4-44
USR-VPN 4-44
Dynamic-DNS 4-44
Remote-IP-Dynamic 4-45
Remote-User-Session-Limit 4-45
Remote-Group-Session-Limit 4-45
Remote-Session-Cache 4-45
Profiles 4-45
Attributes 4-46
Translations 4-46
TranslationGroups 4-47
Remote Servers 4-47
Types of Protocols 4-48
Domain Authentication 4-49
Dynamic DNS 4-50
LDAP 4-51
Map-Gateway 4-54
Sigtran 4-55
ODBC 4-56
ODBC-Accounting 4-58
OCI 4-58
OCI-Accounting 4-59
Prepaid-CRB 4-59
Prepaid-IS835C 4-59
RADIUS 4-59
SIGTRAN-M3UA 4-60
Rules 4-60
Advanced 4-60
RemoteODBCSessionServer 4-72
Using the RequireNASsBehindProxyBeInClientList Property 4-73
Advance Duplicate Detection Feature 4-74
Invalid EAP Packet Processing 4-74
Ports 4-75
Interfaces 4-75
Reply Messages 4-75
Attribute Dictionary 4-77
Types 4-77
Vendor Attributes 4-78

Contents
x
Cisco Prime Access Registrar 6.1 User Guide
OL-29756-01
SNMP 4-78
Diameter 4-79
Configuring Diameter Transport Management Properties 4-80
Configuring Diameter Session Management 4-82
Configuring Diameter Application 4-83
Configuring Diameter Commands 4-84
Configuring Diameter Dictionary 4-90
CHAPTER
5Using the radclient Command 5-1
radclient Command Syntax 5-1
Working with Packets 5-2
Creating Packets 5-2
Creating CHAP Access-Request Packets 5-3
Viewing Packets 5-3
Sending Packets 5-3
Creating Empty Packets 5-4
Setting Packet Fields 5-4
Reading Packet Fields 5-5
Deleting Packets 5-5
Attributes 5-5
Creating Attributes 5-5
Setting Multivalued Attributes 5-6
Viewing Attributes 5-6
Getting Attribute Information 5-7
Deleting Attributes 5-7
Using the radclient Command 5-7
Example 1 5-7
Example 2 5-8
Example 3 5-9
Using radclient Test Commands 5-10
radclient Variables 5-10
Using timetest 5-10
Using callsPerSecond 5-11
Additional radclient Variables 5-12
CHAPTER
6Configuring Local Authentication and Authorization 6-1
Configuring a Local Service and UserList 6-1
Configuring a Local Service 6-2
Configuring a Userlist 6-3

Contents
xi
Cisco Prime Access Registrar 6.1 User Guide
OL-29756-01
Configuring Cisco Prime Access Registrar to Use the Local Service For AA 6-3
Activating the Configuration 6-4
Troubleshooting the Local Service and UserList Configuration 6-4
Verifying the Configuration 6-4
Configuring Return Attributes and Check-Items 6-6
Configuring Per User Return Attributes 6-6
Configuring Per User Check-Items 6-7
Verifying the Per User Return Attributes and Check-Items Configuration 6-7
Configuring Profiles to Group Attributes 6-8
Configuring Return Attributes and Check-Items Using UserGroup 6-9
Return Attribute Precedence 6-10
aregcmd Command Performance 6-10
UserDefined1 Property 6-11
Access-Request Logging 6-11
CHAPTER
7RADIUS Accounting 7-1
Understanding RADIUS Accounting 7-1
Setting Up Accounting 7-2
Accounting Log File Rollover 7-2
FilenamePrefix 7-3
MaxFileSize 7-3
MaxFileAge 7-4
RolloverSchedule 7-4
UseLocalTimeZone 7-5
Oracle Accounting 7-5
Configuring Oracle Accounting 7-6
ODBC-Accounting Service 7-6
ODBC RemoteServers 7-6
Configuration Examples 7-8
Packet Buffering 7-9
When Using Packet Buffering 7-10
With Packet Buffering Disabled 7-10
Dynamic SQL Feature 7-10
LDAP Accounting 7-11
Configuring LDAP Accounting 7-11
LDAP-Accounting Service 7-11
LDAP RemoteServers 7-12
Configuration Examples 7-14
Configuring the LDAP Service for Accounting 7-15

Contents
xii
Cisco Prime Access Registrar 6.1 User Guide
OL-29756-01
Configuring an LDAP-Accounting RemoteServer 7-16
Setting LDAP-Accounting As Accounting Service 7-18
MySQL Support 7-19
Configuring MySQL 7-19
Example Configuration 7-20
Proxying Accounting Records 7-20
Configuring the Local Cisco Prime Access Registrar Server 7-21
Configuring the Local Accounting Service 7-21
Configuring the Remote Accounting Service 7-21
Configuring the Group Accounting Service 7-22
Configuring the RemoteServer Object 7-22
Accounting Log Examples 7-23
Accounting-Start Packet 7-23
Accounting Stop Packet 7-23
Trace of Successful Accounting 7-23
Sample Error Messages 7-24
CHAPTER
8Diameter 8-1
Diameter with EAP Support 8-2
Advertising Application Support 8-2
Diameter EAP Conversation Flow 8-2
Diameter Server Startup Log 8-3
Diameter Stack Level Messages 8-4
Capabilities Exchange Message 8-5
Watchdog Message 8-6
Terminating Diameter User Session 8-6
Configuring Authentication and Authorization for Diameter 8-6
Configuring Local Authentication and Authorization 8-6
Configuring a Local Service and UserList 8-7
Configuring External Authentication Service 8-9
Configuring Diameter Accounting 8-9
Understanding Diameter Accounting 8-9
Setting Up Local Accounting 8-9
Setting Up Oracle Accounting 8-9
Diameter Accounting Log Examples 8-9
Accounting Event Packet 8-10
Accounting Start Packet 8-10
Account Interim Packet 8-10
Accounting Stop Packet 8-10

Contents
xiii
Cisco Prime Access Registrar 6.1 User Guide
OL-29756-01
Trace of Successful Accounting 8-11
Configuring the Diameter Application in Prime Access Registrar 8-11
Configuring the Transport Management Properties 8-12
Registering Applications IDs 8-13
Configuring the Diameter Peers 8-14
Configure the Diameter Service 8-15
Writing Diameter Application in Prime Access Registrar 8-19
Configuring rex script/service for Diameter 8-19
Scripting in Diameter 8-20
Diameter Environment Variables 8-20
Sample rex script/service 8-21
Traces/Logs 8-22
Translation Framework for Diameter 8-23
Managing Diameter Sessions 8-24
Support for SCTP including Multihoming 8-25
CHAPTER
9Extensible Authentication Protocols 9-1
EAP-AKA 9-2
Configuring EAP-AKA 9-2
Testing EAP-AKA with radclient 9-5
EAP-AKA-Prime (EAP-AKA’) 9-6
Configuring EAP-AKA’ 9-6
Testing EAP-AKA’ with radclient 9-7
EAP-FAST 9-7
Configuring EAP-FAST 9-8
EAP-FAST Keystores 9-12
Testing EAP-FAST with radclient 9-12
PAC Provisioning 9-13
Authentication 9-14
Parameters Used for Certificate-Based Authentication 9-14
radclient Command Reference 9-15
PAC—Credential Export Utility 9-17
PAC Export 9-17
PAC Display 9-18
Syntax Summary 9-18
EAP-GTC 9-18
Configuring EAP-GTC 9-18
Testing EAP-GTC with radclient 9-19

Contents
xiv
Cisco Prime Access Registrar 6.1 User Guide
OL-29756-01
EAP-LEAP 9-20
Configuring EAP-LEAP 9-20
EAP-MD5 9-21
Configuring EAP-MD5 9-21
EAP-Negotiate 9-22
Configuring EAP-Negotiate 9-22
Negotiating PEAP Tunnel Services 9-23
Testing EAP-Negotiate with radclient 9-23
EAP-MSChapV2 9-23
Configuring EAP-MSChapV2 9-23
Testing EAP-MSChapV2 with radclient 9-24
EAP-SIM 9-25
Configuring EAP-SIM 9-25
Quintets to Triplets Conversion 9-29
EAP-Transport Level Security (TLS) 9-29
Configuring EAP-TLS 9-29
Testing EAP-TLS with RSA or ECC Certificate using radclient 9-32
Testing EAP-TLS with Client Certificates 9-32
EAP-TTLS 9-32
Configuring EAP-TTLS 9-33
Creating an EAP-TTLS Service 9-33
Configuring an EAP-TTLS Authentication Service 9-37
Testing EAP-TTLS with radclient 9-40
Testing EAP-TTLS Using Legacy Methods 9-41
Testing EAP-TTLS Using EAP Methods 9-41
rehash-ca-certs Utility 9-42
radclient Command Reference 9-42
eap-trace 9-43
tunnel 9-43
Protected EAP 9-44
PEAP Version 0 9-44
Configuring PEAP Version 0 9-44
Testing PEAP Version 0 with radclient 9-48
Testing PEAP Version 0 with Client Certificates 9-48
PEAP Version 1 9-49
Configuring PEAP Version 1 9-49
Testing PEAP Version 1 with radclient 9-51
Testing PEAP Version 1 with Client Certificates 9-52
How to Configure Oracle, Mysql Accounting with the Buffering Option Enabled 9-52

Contents
xv
Cisco Prime Access Registrar 6.1 User Guide
OL-29756-01
To Select the SQL Statement in Run Time Accounting 9-52
Query 9-52
Insert 9-53
Update 9-53
Delete 9-53
Configuring Oracle, Mysql Accounting 9-54
How Suffix and Prefix Rules Work with Prime Access Registrar 9-55
Configuring Prefix and Suffix Policies 9-55
CRL Support for Cisco Prime Access Registrar 9-56
Configuring Certificate Validation Using CRL 9-57
Using Intermediate Certificates in Prime Access Registrar 9-57
CHAPTER
10 Using WiMAX in Cisco Prime Access Registrar 10-1
WiMAX - An Overview 10-1
WiMAX in Cisco Prime Access Registrar 10-2
Direct Interaction Between the ASN GW and Cisco Prime Access Registrar 10-3
Interaction Between ASN GW and Cisco Prime Access Registrar Through HA 10-6
Prepaid and Hot-Lining 10-7
Configuring WiMAX in Cisco Prime Access Registrar 10-7
Configuring the Resource Manager for WiMAX 10-8
Configuring the Session Manager for WiMAX 10-9
Configuring the Query Service for WiMAX 10-9
Configuring WiMAX 10-10
WiMAX - OMA-DM Provisioning Support with BEK Key 10-11
WiMax Lawful Interception (LI) Support in Prime Access Registrar 10-13
Configuring WiMax-Lawful Intercept 10-16
CHAPTER
11 Using Extension Points 11-1
Determining the Goal of the Script 11-1
Writing the Script 11-2
Choosing the Type of Script 11-3
Request Dictionary Script 11-3
Response Dictionary Script 11-4
Environment Dictionary Script 11-4
Adding the Script Definition 11-4
Adding the Example Script Definition 11-5
Choosing the Scripting Point 11-6
Testing the Script 11-6
About the Tcl/Tk 8.3 Engine 11-6

Contents
xvi
Cisco Prime Access Registrar 6.1 User Guide
OL-29756-01
Cisco Prime Access Registrar Scripts 11-6
ACMEOutgoingScript 11-8
AltigaIncomingScript 11-8
AltigaOutgoingScript 11-8
ANAAAOutgoing 11-8
AscendIncomingScript 11-8
AscendOutgoingScript 11-8
AuthorizePPP 11-8
AuthorizeService 11-9
AuthorizeSLIP 11-9
AuthorizeTelnet 11-9
CabletronIncoming 11-9
CabletronOutgoing 11-9
CiscoIncoming 11-9
CiscoOutgoing 11-9
CiscoWithODAPIncomingScript 11-9
ExecCLIDRule 11-10
ExecDNISRule 11-10
ExecFilterRule 11-10
ExecNASIPRule 11-10
ExecRealmRule 11-10
ExecTimeRule 11-10
LDAPOutage 11-11
MapSourceIPAddress 11-11
ParseAAARealm 11-11
ParseAAASRealm 11-11
ParseAARealm 11-11
ParseAASRealm 11-12
ParseProxyHints 11-12
ParseServiceAndAAARealmHints 11-12
ParseServiceAndAAASRealmHints 11-12
ParseServiceAndAARealmHints 11-12
ParseServiceAndAASRealmHints 11-12
ParseServiceAndProxyHints 11-13
ParseServiceHints 11-13
ParseTranslationGroupsByCLID 11-13
ParseTranslationGroupsByDNIS 11-13
ParseTranslationGroupsByRealm 11-13
UseCLIDAsSessionKey 11-13
USRIncomingScript 11-14

Contents
xvii
Cisco Prime Access Registrar 6.1 User Guide
OL-29756-01
USRIncomingScript-IgnoreAccountingSignature 11-14
USROutgoingScript 11-14
Internal Scripts 11-14
CHAPTER
12 Using Replication 12-1
Replication Overview 12-1
How Replication Works 12-2
Replication Data Flow 12-3
Master Server 12-3
Slave Server 12-3
Security 12-4
Replication Archive 12-4
Ensuring Data Integrity 12-4
Transaction Data Verification 12-4
Transaction Order 12-5
Automatic Resynchronization 12-5
Full Resynchronization 12-5
Understanding Hot-Configuration 12-6
Replication’s Impact on Request Processing 12-6
Replication Configuration Settings 12-6
RepType 12-7
RepTransactionSyncInterval 12-7
Master 12-7
Slave 12-7
RepTransactionArchiveLimit 12-8
RepIPAddress 12-8
RepPort 12-8
RepSecret 12-8
RepIsMaster 12-9
RepMasterIPAddress 12-9
RepMasterPort 12-9
Rep Members Subdirectory 12-9
Rep Members/Slave1 12-9
Name 12-9
IPAddress 12-9
Port 12-10
Setting Up Replication 12-10
Configuring The Master 12-10
Configuring The Member 12-11

Contents
xviii
Cisco Prime Access Registrar 6.1 User Guide
OL-29756-01
Verifying the Configuration 12-12
Replication Example 12-13
Adding a User 12-13
Master Server’s Log 12-13
Member Server’s Log 12-13
Verifying Replication 12-14
Master Server’s Log 12-14
Member Server’s Log 12-14
Using aregcmd -pf Option 12-14
Master Server’s Log 12-15
Member Server’s Log 12-15
An Automatic Resynchronization Example 12-16
Master Server’s Log 12-16
Member Server’s Log 12-17
Full Resynchronization 12-17
Replication Setup with More Than One Slave 12-19
Frequently Asked Questions 12-19
Replication Log Messages 12-21
Information Log Messages 12-21
Warning Log Messages 12-22
Error Log Messages 12-23
Log Messages You Should Never See 12-25
CHAPTER
13 Using On-Demand Address Pools 13-1
Cisco-Incoming Script 13-3
How the Script Works 13-3
CiscoWithODAPIncomingScript 13-3
Vendor Type CiscoWithODAP 13-4
Configuring Cisco Prime Access Registrar to Work with ODAP 13-5
Configuring Prime Access Registrar to work with ODAP 13-5
Configuring the ODAP Detailed Instructions 13-5
Setting Up an ODAP UserList 13-5
Adding ODAP Users 13-6
Setting Up an ODAP-Users Service 13-7
Setting Up an ODAP Accounting Service 13-8
Adding Session Managers 13-8
Setting Up Resource Managers 13-9
Configuring Session Managers 13-14
Configure Clients 13-15

Contents
xix
Cisco Prime Access Registrar 6.1 User Guide
OL-29756-01
Save Your Configuration 13-16
CHAPTER
14 Using Identity Caching 14-1
Overview 14-1
Identity Caching Features 14-2
Configuring Cisco Prime Access Registrar for Identity Caching 14-3
Starting Identity Caching 14-6
XML Interface 14-8
CHAPTER
15 Using Trusted ID Authorization with SESM 15-1
Trusted ID Operational Overview 15-1
Configuration Overview 15-2
Request Processing 15-2
Session Cache Life Cycle 15-3
Configuration Restrictions 15-3
Software Requirements 15-4
Installing Cisco Prime Access Registrar 15-4
Running the TrustedIdInstall Program 15-4
Using the TrustedIdInstall.bin GUI 15-4
Using the TrustedIdInstall Command Line 15-8
Configuring Cisco Prime Access Registrar for Trusted Identity with SESM 15-12
Configuring the RADIUS Ports 15-12
Configuring NAS Clients 15-13
Configuring AAA and SPE Services 15-13
Configuration Imported by TrustedIdInstall Program 15-14
/Radius 15-14
/radius/services/spe 15-14
/radius/services/trusted-id 15-14
/Radius/SessionManagers/session-cache/ 15-14
/radius/ResourceManagers/session-cache 15-14
/radius/advanced/ 15-15
/Radius/Scripts/ChangeServiceType 15-15
Configuring EAP-MD5 Authentication 15-15
Creating the CheckEap.tcl Script 15-15
Adding the CheckEap.tcl Script 15-16
Using the CheckEap.tcl Script 15-16
Adding the EAP-MD5 Authentication Service 15-17
Adding an LDAP Remote Server 15-17

Contents
xx
Cisco Prime Access Registrar 6.1 User Guide
OL-29756-01
Adding an LDAP Service 15-18
Saving the Configuration and Reloading the Server 15-19
Cisco SSG VSAs in Cisco Prime Access Registrar Dictionary 15-20
CHAPTER
16 Using Prepaid Billing 16-1
Overview 16-2
IS835C Prepaid Billing 16-2
Configuring IS835C Prepaid Billing 16-3
Setting Up a Prepaid Billing RemoteServer 16-3
Setting Up an IS835C Prepaid Service 16-4
Setting Up Local Authentication 16-5
Setting Up an Authentication Group Service 16-5
CRB Prepaid Billing 16-7
Configuring CRB Prepaid Billing 16-8
Setting Up a Prepaid Billing RemoteServer 16-8
Setting Up a CRB Prepaid Service 16-9
Setting Up a Local Accounting Service 16-11
Setting Up a Local Authentication Service 16-12
Setting Up a Prepaid Accounting Group Service 16-13
Setting Up an Authentication Group Service 16-14
Configuring CRB Prepaid Billing for SSG 16-15
Generic Call Flow 16-18
Access-Request (Authentication) 16-19
Access-Accept (Authentication) 16-20
Access-Request (Authorization) 16-20
Access-Accept (Authorization) 16-21
Accounting-Start 16-22
Data Flow 16-22
Access-Request (Quota Depleted) 16-22
Accept-Accept (Quota Depleted) 16-23
Accounting Stop (Session End) 16-23
Accounting Response (Final Status) 16-23
Vendor-Specific Attributes 16-25
Implementing the Prepaid Billing API 16-27
CHAPTER
17 Using Cisco Prime Access Registrar Server Features 17-1
Incoming Traffic Throttling 17-2
MaximumIncomingRequestRate 17-2
MaximumOutstandingRequests 17-2

Contents
xxi
Cisco Prime Access Registrar 6.1 User Guide
OL-29756-01
Backing Store Parsing Tool 17-3
Configurable Worker Threads Enhancement 17-4
Session-Key Lookup 17-5
Query-Notify 17-6
Call Flow 17-7
Configuration Examples 17-8
Memory and Performance Impact 17-9
Support for Windows Provisioning Service 17-9
Call Flow 17-10
Example Configuration 17-10
Environment Variables 17-11
Master URL Fragments 17-11
Unsupported Features 17-12
Account Expiration and Renewal 17-12
Password Changing and Force Update 17-13
Command Completion 17-13
Service Grouping Feature 17-14
Configuration Example - AccountingGroupService 17-14
Summary of Events 17-17
Configuration Example 2 - AuthenticationGroupService 17-17
Summary of Events 17-20
SHA-1 Support for LDAP-Based Authentication 17-21
Remote LDAP Server Password Encryption 17-21
Dynamic Password Encryption 17-22
Logs 17-23
Dynamic Attributes 17-23
Object Properties with Dynamic Support 17-23
Dynamic Attribute Format 17-25
Tunneling Support Feature 17-25
Configuration 17-26
Example 17-26
Notes 17-26
Validation 17-26
xDSL VPI/VCI Support for Cisco 6400 17-27
Using User-Name/User-Password for Each Cisco 6400 Device 17-27
Format of the New User-Name Attribute 17-27
Apply Profile in Cisco Prime Access Registrar Database to Directory Users 17-28
User-Profile 17-28

Contents
xxii
Cisco Prime Access Registrar 6.1 User Guide
OL-29756-01
User-Group 17-29
Example User-Profile and User-Group Attributes in Directory User Record 17-29
Directory Multi-Value Attributes Support 17-29
MultiLink-PPP (ML-PPP) 17-30
Dynamic Updates Feature 17-31
NAS Monitor 17-32
Automatic Information Collection (arbug) 17-33
Running arbug 17-33
Files Generated 17-33
Simultaneous Terminals for Remote Demonstration 17-34
Support for RADIUS Check Item Attributes 17-34
Configuring Check Items 17-34
User-Specific Attributes 17-35
Packet of Disconnect 17-36
Configuring Packet of Disconnect 17-36
Configuring the Client Object 17-36
Configuring a Resource Manager for POD 17-37
Proxying POD Requests from External Servers 17-38
CLI Options for POD 17-38
query-sessions 17-38
release-sessions 17-39
Configuring Change of Authorization Requests 17-39
Configuring the Client Object 17-40
Dynamic DNS 17-41
Configuring Dynamic DNS 17-42
Testing Dynamic DNS with radclient 17-43
Dynamic Service Authorization Feature 17-44
Configuring Dynamic Service Authorization Feature 17-44
Setting Up the Environment Variable 17-45
Remote Session Management 17-47
Wx Interface Support for SubscriberDB Lookup 17-48
Configuration Examples 17-48
Smart Grid Solution Management 17-50
TACACS+ Support for AAA 17-50
CHAPTER
18 Directing RADIUS Requests 18-1
Configuring Policies and Rules 18-1
Configuring Policies 18-1

Contents
xxiii
Cisco Prime Access Registrar 6.1 User Guide
OL-29756-01
Configuring Rules 18-2
Wildcard Support 18-2
Script and Attribute Requirements 18-3
Validation 18-4
Known Anomalies 18-4
Routing Requests 18-4
Routing Requests Based on Realm 18-4
Routing Requests Based on DNIS 18-5
Routing Requests Based on CLID 18-6
Routing Requests Based on NASIP 18-7
Routing Requests Based on User-Name Prefix 18-8
Attribute Translation 18-9
Translations 18-9
TranslationGroups 18-9
Parsing Translation Groups 18-10
Time of Day Access Restrictions 18-11
Setting Time Ranges in ExecTimeRule 18-12
ExecTimeRule Example Configuration 18-12
Reducing Overhead Using Policies to Group Rules 18-13
Standard Scripts Used with Rules 18-15
ExecRealmRule 18-15
ExecDNISRule 18-16
ExecCLIDRule 18-16
ExecNASIPRule 18-17
ExecPrefixRule 18-17
ExecSuffixRule 18-18
Configuring Suffix and Prefix Policies 18-19
ExecTimeRule 18-20
ParseTranslationGroupsByRealm 18-20
ParseTranslationGroupsByDNIS 18-20
ParseTranslationGroupsByCLID 18-21
ParseTranslationGroupsByDNIS 18-21
CHAPTER
19 Using FastRules to Process Packet Flow 19-1
Configuring FastRules 19-2
CHAPTER
20 Wireless Support 20-1
Mobile Node-Home Agent Shared Key 20-1
Use Case Example 20-1

Contents
xxiv
Cisco Prime Access Registrar 6.1 User Guide
OL-29756-01
Configuring User Attributes 20-2
3GPP2 Home Agent Support 20-3
Home-Agent Resource Manager 20-3
Load Balancing 20-3
Querying and Releasing Sessions 20-4
Access Request Requirements 20-5
New 3GPP2 VSAs in the Cisco Prime Access Registrar Dictionary 20-5
Session Correlation Based on User-Defined Attributes 20-5
Managing Multiple Accounting Start/Stop Messages 20-6
NULL Password Support 20-6
3GPP Compliance 20-7
SWa Access Authentication and Authorization 20-8
STa Access Authentication and Authorization 20-8
SWm Access Authentication and Authorization 20-9
SWd Access Authentication and Authorization 20-9
SWx Authentication Procedure 20-10
HSS Initiated Update of User Profile 20-10
S6b Authentication and Authorization Procedure 20-10
3GPP Call Flows 20-11
CLI for 3GPP Authorization 20-12
CLI for 3GPP Reverse Authorization 20-12
CHAPTER
21 Using LDAP 21-1
Configuring LDAP 21-1
Configuring the LDAP Service 21-2
MultipleServersPolicy 21-2
RemoteServers 21-3
Configuring an LDAP RemoteServer 21-3
DNS Look Up and LDAP Rebind Interval 21-6
LDAPToRadiusMappings 21-7
LDAPToEnvironmentMappings 21-7
LDAPToCheckItemMappings 21-7
Setting LDAP As Authentication and Authorization Service 21-7
Saving Your Configuration 21-7
CHAP Interoperability with LDAP 21-8
Allowing Special Characters in LDAP Usernames 21-8
Dynamic LDAP Search Base 21-8
Analyzing LDAP Trace Logs 21-9
Successful Bind Message 21-9

Contents
xxv
Cisco Prime Access Registrar 6.1 User Guide
OL-29756-01
Bind Failure Messages 21-9
Login Failure Messages 21-10
Bind-Based Authentication for LDAP 21-11
CHAPTER
22 Using Open Database Connectivity 22-1
Oracle Software Requirements 22-2
Configuring ODBC/OCI 22-2
Configuring an ODBC/OCI Service 22-6
Configuring an ODBC/OCI RemoteServer 22-7
ODBC Data Source 22-9
SQL Definitions 22-9
SQL Syntax Restrictions 22-10
Specifying More Than One Search Key 22-10
ODBCToRadiusMappings/OCIToRadiusMappings 22-11
ODBCToEnvironmentMappings/OCIToEnvironmentMappings 22-11
ODBCToCheckItemMappings/OCIToCheckItemMappings 22-11
Configuring an ODBC DataSource 22-11
Setting ODBC/OCI As Authentication and Authorization Service 22-12
Setting ODBC/OCI As Accounting Service 22-13
Saving Your Configuration 22-13
Oracle Stored Procedures 22-13
MySQL Support 22-15
MySQL Driver 22-15
Configuring a MySQL Datasource 22-15
Example Configuration 22-17
CHAPTER
23 SIGTRAN-M3UA 23-1
Prerequisites to SIGTRAN-M3UA 23-2
Configuring EAP-AKA/EAP-SIM with SIGTRAN-M3UA 23-4
Blacklisting IMSI Values 23-11
Configuring M3UA Service 23-12
Configuring M3UA Service with Map Restore Data Authorization 23-13
Map Restore Data Authorization Flow 23-13
CS Insert Subscriber Data Structure 23-14
CLI Configuration for Map-Restore-Data 23-15
Support for SCTP Multihoming in SIGTRAN-M3UA 23-21
SIGTRAN-M3UA Logs 23-22

Contents
xxvi
Cisco Prime Access Registrar 6.1 User Guide
OL-29756-01
CHAPTER
24 Using SNMP 24-1
Overview 24-1
Supported MIBs 24-1
RADIUS-AUTH-CLIENT-MIB 24-2
RADIUS-AUTH-SERVER-MIB 24-2
RADIUS-ACC-CLIENT-MIB 24-2
RADIUS-ACC-SERVER-MIB 24-2
CISCO-DIAMETER-BASE-PROTOCOL-MIB 24-2
Diameter SNMP and Statistics Support 24-3
TACACS+ SNMP and Statistics Support 24-3
SNMP Traps 24-3
Supported Traps 24-4
carServerStart 24-4
carServerStop 24-4
carInputQueueFull 24-4
carInputQueueNotVeryFull 24-5
carOtherAuthServerNotResponding 24-5
carOtherAuthServerResponding 24-5
carOtherAccServerNotResponding 24-6
carOtherAccServerResponding 24-6
carAccountingLoggingFailure 24-6
carLicenseUsage 24-7
carDiameterPeerDown 24-7
carDiameterPeerUp 24-7
Configuring Traps 24-7
SNMP Configuration 24-7
Configuring Trap Recipient 24-7
Community String 24-8
CHAPTER
25 Enforcement of Licensing Models 25-1
TPS Licensing Features 25-1
Enforcement Rules 25-1
Notification Logs 25-2
Notification - SNMP Traps 25-2
TPS Logging Feature 25-3
Concurrent Session License Features 25-3
Sessions Enforcement Rules 25-4
Notification Logs 25-4
Notification - SNMP Traps 25-5

Contents
xxvii
Cisco Prime Access Registrar 6.1 User Guide
OL-29756-01
Session Logging Feature 25-5
CHAPTER
26 Backing Up the Database 26-1
Configuration 26-1
Command Line Utility 26-1
Recovery 26-2
mcdshadow Command Files 26-2
CHAPTER
27 Using the REX Accounting Script 27-1
Building and Installing the REX Accounting Script 27-1
Configuring the Rex Accounting Script 27-2
Specifying REX Accounting Script Options 27-4
Example Script Object 27-5
CHAPTER
28 Logging Syslog Messages 28-1
Syslog Messages 28-1
Example 1 28-2
Example 2 28-2
Configuring Message Logging (Solaris) 28-3
Configuring Message Logging (Linux) 28-4
Changing Log Directory 28-4
Configuring Syslog Daemon (syslogd) 28-5
Managing the Syslog File 28-5
Using a cron Program to Manage the Syslog Files 28-6
Server Up/Down Status Change Logging 28-6
Header Formats 28-6
Example Log Messages 28-7
CHAPTER
29 Troubleshooting Cisco Prime Access Registrar 29-1
Gathering Basic Information 29-1
Troubleshooting Quick Checks 29-2
Disk Space 29-2
Resource Conflicts 29-2
No Co-Existence With Cisco Network Registrar 29-2
Port Conflicts 29-3
Server Running Sun SNMP Agent 29-3
Cisco Prime Access Registrar Log Files 29-3

Contents
xxviii
Cisco Prime Access Registrar 6.1 User Guide
OL-29756-01
Modifying File Sizes for Agent Server and MCD Server Logs 29-4
Using xtail to Monitor Log File Activity 29-4
Modifying the Trace Level 29-4
Installation and Server Process Start-up 29-5
aregcmd and Cisco Prime Access Registrar Configuration 29-5
Running and Stopped States 29-5
RADIUS Request Processing 29-7
Other Troubleshooting Techniques and Resources 29-7
aregcmd Stats Command 29-7
Core Files 29-8
radclient 29-8
Cisco Prime Access Registrar Replication 29-8
Checking Prime Access Registrar Server Health Status 29-8
APPENDIX
ACisco Prime Access Registrar Tcl, REX and Java Dictionaries A-1
Tcl Attribute Dictionaries A-1
Attribute Dictionary Methods A-1
Tcl Environment Dictionary A-4
REX Attribute Dictionary A-5
Attribute Dictionary Methods A-5
REX Environment Dictionary A-11
REX Environment Dictionary Methods A-11
Java Attribute Dictionary A-13
Java Attribute Dictionary Methods A-13
Java Environment Dictionary A-16
Java Environment Dictionary Methods A-16
Interface Extension A-17
Interface Extension Methods A-18
Interface ExtensionforSession A-18
Interface Extensionforsession Methods A-19
Interface Extensionwithinitialization A-19
Interface Extensionwithinitialization Methods A-20
Interface ExtensionforSessionwithinitialization A-20
Interface Extensionforsessionwithinitialization Methods A-20
Interface MarkerExtension A-20
Variables in the Marker Extension Interface A-21
Class Sessionrecord A-24
Session Record Methods A-24

Contents
xxix
Cisco Prime Access Registrar 6.1 User Guide
OL-29756-01
APPENDIX
BEnvironment Dictionary B-1
Cisco Prime Access Registrar Environment Dictionary Variables B-1
Accepted-Profiles B-1
Accounting-Service B-2
Acquire-Dynamic-DNS B-2
Acquire-Group-Session-Limit B-2
Acquire-Home-Agent B-2
Acquire-IP-Dynamic B-2
Acquire-IPX-Dynamic B-2
Acquire-IP-Per-NAS-Port B-2
Acquire-Subnet-Dynamic B-3
Acquire-User-Session-Limit B-3
Acquire-USR-VPN B-3
Allow-Null-Password B-3
Authentication-Service B-3
Authorization-Service B-3
AuthorizationInfo B-3
BackingStore-Env-Vars B-4
Blacklisted-IMSI B-4
Broadcast-Accounting-Packet B-4
Cache-Attributes-In-Session B-4
Current-Group-Count B-4
Cache-Outer-Identity B-4
Destination-IP-Address B-4
Destination-Port B-4
Dest-Translation-Type B-5
Dest-Numbering-Plan B-5
Dest-Encoding-Scheme B-5
Dest-Nature-Of-Address B-6
Dest-GT-Format B-6
Diameter-Application-Id B-6
Diameter-Command-Code B-6
Disable-Accounting-On-Off-Broadcast B-7
DSA-Response-Cache B-7
Dynamic-DNS-HostName B-7
Dynamic-Search-Filter B-7
Dynamic-Search-Path B-7
Dynamic-Search-Scope B-7
Dynamic-Service-Loop-Limit B-7

Contents
xxx
Cisco Prime Access Registrar 6.1 User Guide
OL-29756-01
Dynamic-User-Password-Attribute B-7
EAP-Actual-Identity B-8
EAP-Authentication-Mode B-8
Enforce-Traffic-Throttling B-8
FetchAuthorizationInfo B-8
Generate-BEK B-8
Group-Session-Limit B-8
HLR-GlobalTitle-Address B-8
HLR-GlobalTitle-Cached B-8
HLR-Translated-IMSI B-9
Ignore-Accounting-Signature B-9
IMSI B-9
Incoming-Translation-Groups B-9
Master-URL-Fragment B-9
Misc-Log-Message-Info B-10
MSISDN B-10
Outgoing-Translation-Groups B-10
Pager B-10
Query-Service B-10
Re-Accounting-Service B-10
Re-Authentication-Service B-10
Re-Authorization-Service B-11
Realm B-11
Reject-Reason B-11
Remote-Server B-11
Remove-Session-On-Acct-Stop B-11
Remote-Servers-Tried B-11
Request-Authenticator B-11
Request-Type B-12
Require-User-To-Be-In-Authorization-List B-12
Response-Type B-13
Retrace-Packet B-13
Send-PEAP-URI-TLV B-13
Session-Key B-13
Session-Manager B-13
Session-Notes B-13
Session-Service B-14
Set-Session-Mgr-And-Key-Upon-Lookup B-14
Skip-Session-Management B-14
Skip-Overriding-Username-With-LDAP-UID B-14

Contents
xxxi
Cisco Prime Access Registrar 6.1 User Guide
OL-29756-01
Skip-Overriding-UserName-With-PEAPIdentity B-14
Source-IP-Address B-14
Source-Port B-15
SQL-Sequence B-15
Subnet-Size-If-No-Match B-15
Trace-Level B-15
Unavailable-Resource B-15
Unavailable-Resource-Type B-15
UserDefined1 B-15
User-Authorization-Script B-16
User-Group B-16
User-Group-Session-Limit B-16
User-Name B-16
User-Profile B-16
User-Session-Limit B-16
Virtual-Server-Outgoing-Script B-16
Windows-Domain-Groups B-16
X509- Subject-Name B-17
Internal Variables B-17
APPENDIX
CRADIUS Attributes C-1
RADIUS Attributes C-1
Cisco Prime Access Registrar Attributes C-1
RADIUS Attributes Numeric List C-4
Vendor-Specific Attributes C-13
3GPP VSAs C-13
3GPP2 VSAs C-15
ACC VSAs C-22
Altiga VSAs C-27
Ascend VSAs C-30
Bay Networks VSAs C-45
Cabletron VSAs C-46
Cisco Prime Access Registrar Internal VSAs C-46
Cisco VSAs C-48
Compatible VSAs C-51
Microsoft VSAs C-51
Nomadix VSAs C-53
RedBack VSAs C-53
RedCreek VSAs C-56


xxxiii
Cisco Prime Access Registrar 6.1 User Guide
OL-29756-01
Preface
The Cisco Prime Access Registrar 6.1 User Guide provides information about how to use
Cisco Prime Access Registrar (known as Prime Access Registrar hereafter) 6.1. This preface contains
the following sections:
•Document Organization, page xxxiii
•Related Documentation, page xxxv
•Obtaining Documentation and Submitting a Service Request, page xxxv
•Notices, page xxxv
Document Organization
The Prime Access Registrar User Guide is organized as follows:
Chapter 1, “Overview,” provides an overview of Prime Access Registrar.
Chapter 2, “Using the aregcmd Commands,” provides information about using aregcmd commands.
Chapter 3, “Using the Graphical User Interface,” provides information about using the
Prime Access Registrar GUI.
Chapter 4, “Cisco Prime Access Registrar Server Objects,” provides information about
Prime Access Registrar server objects.
Chapter 5, “Using the radclient Command,” provides information about using radclient commands to
test Prime Access Registrar.
Chapter 6, “Configuring Local Authentication and Authorization,” provides information about how to
configure local authentication and authorization and helpful examples.
Chapter 7, “RADIUS Accounting,” provides information about RADIUS accounting and how to
configure Prime Access Registrar to perform accounting.
Chapter 8, “Diameter” provides information about how to configure Prime Access Registrar to perform
diameter authentication and authorization, and also provides information about Diameter Accounting.
Chapter 9, “Extensible Authentication Protocols,” provides information about Prime Access Registrar
support of EAP authentication methods.
Chapter 10, “Using WiMAX in Cisco Prime Access Registrar,” provides information about
Prime Access Registrar support for the WiMAX feature.
Chapter 11, “Using Extension Points,” provides information about how to use Prime Access Registrar
scripting to customize your RADIUS server.

xxxiv
Cisco Prime Access Registrar 6.1 User Guide
OL-29756-01
Chapter 12, “Using Replication,” provides information about how to use the replication feature.
Chapter 13, “Using On-Demand Address Pools,” provides information about using On-Demand Address
Pools.
Chapter 14, “Using Identity Caching,” provides information about using the Identity Caching feature.
Chapter 15, “Using Trusted ID Authorization with SESM,” describes how to use Prime Access Registrar
with SESM, and how to configure Prime Access Registrar to use the Trusted ID feature.
Chapter 16, “Using Prepaid Billing,” provides information about how to use the Prime Access Registrar
prepaid billing feature.
Chapter 17, “Using Cisco Prime Access Registrar Server Features,” provides information about using
Prime Access Registrar features.
Chapter 18, “Directing RADIUS Requests,” provides information about using the
Prime Access Registrar Policy Engine.
Chapter 19, “Using FastRules to Process Packet Flow,” provides information about using FastRules for
processing packet flow.
Chapter 20, “Wireless Support,” provides information about Prime Access Registrar support for
wireless features.
Chapter 21, “Using LDAP,” provides information about using an LDAP remote server with
Prime Access Registrar.
Chapter 22, “Using Open Database Connectivity,” provides information about a new type of
RemoteServer object and a new service to support ODBC.
Chapter 23, “SIGTRAN-M3UA,” provides information about SIGTRAN-M3UA remote server and a
service to support EAP-AKA/EAP-SIM authentication.
Chapter 24, “Using SNMP,” provides information about the SNMP MIB and Trap support offered by
Prime Access Registrar.
Chapter 25, “Enforcement of Licensing Models,” provides information on the enforcement of
Prime Access Registrar’s new license model—transactions per second (TPS) Licensing.
Chapter 26, “Backing Up the Database,” describes the Prime Access Registrar shadow backup facility,
which ensures a consistent snapshot of Prime Access Registrar’s database for backup purposes.
Chapter 27, “Using the REX Accounting Script,” describes how to use the REX Accounting scripts.
Chapter 28, “Logging Syslog Messages,” provides information about logging messages via syslog and
centralized error reporting for Prime Access Registrar.
Chapter 29, “Troubleshooting Cisco Prime Access Registrar,” provides information about techniques
used when troubleshooting Prime Access Registrar and highlights common problems.
Appendix A, “Cisco Prime Access Registrar Tcl, REX and Java Dictionaries,” describes the Tcl and
REX dictionaries that are used when writing Incoming or Outgoing scripts for use with
Prime Access Registrar.
Appendix B, “Environment Dictionary,” describes the environment variables the scripts use to
communicate with Prime Access Registrar or to communicate with other scripts.
Appendix C, “RADIUS Attributes,” lists the RFC 2865 RADIUS attributes with their names and values.
Glossary and index are also provided.

xxxv
Cisco Prime Access Registrar 6.1 User Guide
OL-29756-01
Obtaining Documentation and Submitting a Service Request
Related Documentation
For a complete list of Prime Access Registrar 6.1 documentation, see the Cisco Prime Access Registrar
6.1 Documentation Overview.
Note We sometimes update the documentation after original publication. Therefore, you should also review
the documentation on Cisco.com for any updates.
Obtaining Documentation and Submitting a Service Request
For information on obtaining documentation, using the Cisco Bug Search Tool (BST), submitting a
service request, and gathering additional information, see What’s New in Cisco Product Documentation
at: http://www.cisco.com/c/en/us/td/docs/general/whatsnew/whatsnew.html.
Subscribe to What’s New in Cisco Product Documentation, which lists all new and revised
Cisco technical documentation, as an RSS feed and deliver content directly to your desktop using a
reader application. The RSS feeds are a free service.
Notices
The following notices pertain to this software license.
OpenSSL/Open SSL Project
This product includes software developed by the OpenSSL Project for use in the OpenSSL Toolkit
(http://www.openssl.org/).
This product includes cryptographic software written by Eric Young (eay@cryptsoft.com).
This product includes software written by Tim Hudson (tjh@cryptsoft.com).
License Issues
The OpenSSL toolkit stays under a dual license, i.e. both the conditions of the OpenSSL License and the
original SSLeay license apply to the toolkit. See below for the actual license texts. Actually both licenses
are BSD-style Open Source licenses. In case of any license issues related to OpenSSL please contact
openssl-core@openssl.org.
OpenSSL License:
Copyright © 1998-2007 The OpenSSL Project. All rights reserved.
Redistribution and use in source and binary forms, with or without modification, are permitted provided
that the following conditions are met:
1. Redistributions of source code must retain the copyright notice, this list of conditions and the
following disclaimer.
2. Redistributions in binary form must reproduce the above copyright notice, this list of conditions, and
the following disclaimer in the documentation and/or other materials provided with the distribution.

xxxvi
Cisco Prime Access Registrar 6.1 User Guide
OL-29756-01
Obtaining Documentation and Submitting a Service Request
3. All advertising materials mentioning features or use of this software must display the following
acknowledgment: “This product includes software developed by the OpenSSL Project for use in the
OpenSSL Toolkit (http://www.openssl.org/)”.
4. The names “OpenSSL Toolkit” and “OpenSSL Project” must not be used to endorse or promote
products derived from this software without prior written permission. For written permission, please
contact openssl-core@openssl.org.
5. Products derived from this software may not be called “OpenSSL” nor may “OpenSSL” appear in
their names without prior written permission of the OpenSSL Project.
6. Redistributions of any form whatsoever must retain the following acknowledgment:
“This product includes software developed by the OpenSSL Project for use in the OpenSSL Toolkit
(http://www.openssl.org/)”.
THIS SOFTWARE IS PROVIDED BY THE OpenSSL PROJECT “AS IS”' AND ANY EXPRESSED OR
IMPLIED WARRANTIES, INCLUDING, BUT NOT LIMITED TO, THE IMPLIED WARRANTIES
OF MERCHANTABILITY AND FITNESS FOR A PARTICULAR PURPOSE ARE DISCLAIMED. IN
NO EVENT SHALL THE OpenSSL PROJECT OR ITS CONTRIBUTORS BE LIABLE FOR ANY
DIRECT, INDIRECT, INCIDENTAL, SPECIAL, EXEMPLARY, OR CONSEQUENTIAL DAMAGES
(INCLUDING, BUT NOT LIMITED TO, PROCUREMENT OF SUBSTITUTE GOODS OR
SERVICES; LOSS OF USE, DATA, OR PROFITS; OR BUSINESS INTERRUPTION) HOWEVER
CAUSED AND ON ANY THEORY OF LIABILITY, WHETHER IN CONTRACT, STRICT
LIABILITY, OR TORT (INCLUDING NEGLIGENCE OR OTHERWISE) ARISING IN ANY WAY
OUT OF THE USE OF THIS SOFTWARE, EVEN IF ADVISED OF THE POSSIBILITY OF SUCH
DAMAGE.
This product includes cryptographic software written by Eric Young (eay@cryptsoft.com). This product
includes software written by Tim Hudson (tjh@cryptsoft.com).
Original SSLeay License:
Copyright © 1995-1998 Eric Young (eay@cryptsoft.com). All rights reserved.
This package is an SSL implementation written by Eric Young (eay@cryptsoft.com).
The implementation was written so as to conform with Netscapes SSL.
This library is free for commercial and non-commercial use as long as the following conditions are
adhered to. The following conditions apply to all code found in this distribution, be it the RC4, RSA,
lhash, DES, etc., code; not just the SSL code. The SSL documentation included with this distribution is
covered by the same copyright terms except that the holder is Tim Hudson (tjh@cryptsoft.com).
Copyright remains Eric Young’s, and as such any Copyright notices in the code are not to be removed.
If this package is used in a product, Eric Young should be given attribution as the author of the parts of
the library used. This can be in the form of a textual message at program startup or in documentation
(online or textual) provided with the package.
Redistribution and use in source and binary forms, with or without modification, are permitted provided
that the following conditions are met:
1. Redistributions of source code must retain the copyright notice, this list of conditions and the
following disclaimer.
2. Redistributions in binary form must reproduce the above copyright notice, this list of conditions and
the following disclaimer in the documentation and/or other materials provided with the distribution.
3. All advertising materials mentioning features or use of this software must display the following
acknowledgement:
“This product includes cryptographic software written by Eric Young (eay@cryptsoft.com)”.

xxxvii
Cisco Prime Access Registrar 6.1 User Guide
OL-29756-01
Obtaining Documentation and Submitting a Service Request
The word ‘cryptographic’ can be left out if the routines from the library being used are not
cryptography-related.
4. If you include any Windows specific code (or a derivative thereof) from the apps directory
(application code) you must include an acknowledgement: “This product includes software written
by Tim Hudson (tjh@cryptsoft.com)”.
THIS SOFTWARE IS PROVIDED BY ERIC YOUNG “AS IS” AND ANY EXPRESS OR IMPLIED
WARRANTIES, INCLUDING, BUT NOT LIMITED TO, THE IMPLIED WARRANTIES OF
MERCHANTABILITY AND FITNESS FOR A PARTICULAR PURPOSE ARE DISCLAIMED. IN NO
EVENT SHALL THE AUTHOR OR CONTRIBUTORS BE LIABLE FOR ANY DIRECT, INDIRECT,
INCIDENTAL, SPECIAL, EXEMPLARY, OR CONSEQUENTIAL DAMAGES (INCLUDING, BUT
NOT LIMITED TO, PROCUREMENT OF SUBSTITUTE GOODS OR SERVICES; LOSS OF USE,
DATA, OR PROFITS; OR BUSINESS INTERRUPTION) HOWEVER CAUSED AND ON ANY
THEORY OF LIABILITY, WHETHER IN CONTRACT, STRICT LIABILITY, OR TORT
(INCLUDING NEGLIGENCE OR OTHERWISE) ARISING IN ANY WAY OUT OF THE USE OF
THIS SOFTWARE, EVEN IF ADVISED OF THE POSSIBILITY OF SUCH DAMAGE.
The license and distribution terms for any publicly available version or derivative of this code cannot be
changed. i.e. this code cannot simply be copied and put under another distribution license [including the
GNU Public License].

xxxviii
Cisco Prime Access Registrar 6.1 User Guide
OL-29756-01
Obtaining Documentation and Submitting a Service Request

CHAPTER
1-1
Cisco Prime Access Registrar 6.1 User Guide
OL-29756-01
1
Overview
The chapter provides an overview of the RADIUS server, including connection steps, RADIUS message
types, and using Cisco Prime Access Registrar (Prime Access Registrar) as a proxy server.
Prime Access Registrar is a 3GPP-compliant RADIUS (Remote Authentication Dial-In User
Service)/Diameter server that enables multiple dial-in Network Access Server (NAS) devices to share a
common authentication, authorization, and accounting database.
Prime Access Registrar handles the following tasks:
•Authentication—determines the identity of users and whether they can be allowed to access the
network
•Authorization—determines the level of network services available to authenticated users after they
are connected
•Accounting—keeps track of each user’s network activity
•Session and resource management—tracks user sessions and allocates dynamic resources
Using a RADIUS server allows you to better manage the access to your network, as it allows you to store
all security information in a single, centralized database instead of distributing the information around
the network in many different devices. You can make changes to that single database instead of making
changes to every network access server in your network.
Prime Access Registrar also allows you to manage the complex interconnections of the new network
elements in order to:
•adequately manage the traffic
•perform appropriate load balancing for desired load distribution
•allow binding of different protocol interfaces corresponding to a subscriber/network element
Service providers transform their 3G and 4G wireless networks with complex services, tiered charging,
converged billing, and more by introducing increasing numbers and types of Diameter-based network
elements. LTE and IMS networks are the most likely to implement these new network
elements—including Policy and Charging Rules Functions (PCRF), Home Subscriber Servers (HSS),
Mobility Management Entities (MME), Online Charging Systems (OCS), and others. As a result, as the
traffic levels grow, these wireless networks are becoming more difficult to manage and scale without the
Prime Access Registrar infrastructure.
Note Solaris support is available for Prime Access Registrar Version 6.0. Solaris support for Version 6.1 will
be provided in a future maintenance release.

1-2
Cisco Prime Access Registrar 6.1 User Guide
OL-29756-01
Chapter 1 Overview
Prime Access Registrar Hierarchy
This chapter contains the following sections:
•Prime Access Registrar Hierarchy
•Prime Access Registrar Directory Structure
•Program Flow
•RADIUS Protocol
•Service and Ports Used in Prime Access Registrar
Prime Access Registrar Hierarchy
Prime Access Registrar’s operation and configuration is based on a set of objects. These objects are
arranged in a hierarchical structure much like the Windows 95 Registry or the UNIX directory structure.
Prime Access Registrar’s objects can themselves contain subobjects, just as directories can contain
subdirectories. These objects include the following:
•Radius— the root of the configuration hierarchy
•UserLists—contains individual UserLists which in turn contain users
•UserGroups—contains individual UserGroups
•Users—contains individual authentication or authorization details of a user
•Clients—contains individual Clients
•Vendors—contains individual Vendors
•Scripts—contains individual Scripts
•Policies—contains a set of rules applied to an Access-Request
•Services—contains individual Services
•CommandSets—contains commands and the action to perform during Terminal Access Controller
Access-Control System Plus (TACACS+) command authorization
•DeviceAccessRules—contains conditions or expressions and the applicable command sets for
TACACS+ command authorization
•FastRules—provides a mechanism to easily choose the right authentication, authorization,
accounting, and query service(s), drop, reject, or break flows, choose session manager or other rules
required for processing a packet
•SessionManagers—contains individual Session Managers
•ResourceManagers—contains individual Resource Managers
•Profiles—contains individual Profiles
•RemoteServers—contains individual RemoteServers
•Advanced—contains Ports, Interfaces, Reply Messages, and the Attribute dictionary
This section contains the following topics:
•UserLists and Groups
•Profiles
•Scripts
•Services
•Session Management Using Resource Managers

1-3
Cisco Prime Access Registrar 6.1 User Guide
OL-29756-01
Chapter 1 Overview
Prime Access Registrar Hierarchy
UserLists and Groups
Prime Access Registrar lets you organize your user community through the configuration objects
UserLists, users, and UserGroups.
•Use UserLists to group users by organization, such as Company A and Company B. Each list
contains the actual names of the users.
•Use Users to store information about particular users, such as name, password, group membership,
base profile, and so on.
•Use UserGroups to group users by function, such as PPP, Telnet, or multiprotocol users. Groups
allow you to maintain common authentication and authorization requirements in one place, and have
them referenced by many users.
For more information about UserLists and UserGroups, see UserLists and Groups in Chapter 4, “Cisco
Prime Access Registrar Server Objects.”
Profiles
Prime Access Registrar uses Profiles that allow you to group RADIUS attributes to be included in an
Access-Accept packet. These attributes include values that are appropriate for a particular user class,
such as PPP or Telnet user. The user’s base profile defines the user’s attributes, which are then added to
the response as part of the authorization process.
Although you can use Group or Profile objects in a similar manner, choosing whether to use one rather
than the other depends on your site. If you require some choice in determining how to authorize or
authenticate a user session, then creating specific profiles, and specifying a group that uses a script to
choose among the profiles is more flexible. In such a situation, you might create a default group and then
write a script that selects the appropriate profile based on the specific request. The benefit to this
technique is each user can have a single entry, and use the appropriate profile depending on the way they
log in.
For more information about Profiles, see Profiles in Chapter 4, “Cisco Prime Access Registrar Server
Objects.”
Scripts
Prime Access Registrar allows you to create scripts you can execute at various points within the
processing hierarchy.
•Incoming scripts—enable you to read and set the attributes of the request packet, and set or change
the Environment dictionary variables. You can use the environment variables to control subsequent
processing, such as specifying the use of a particular authentication service.
•Outgoing scripts—enable you to modify attributes returned in the response packet.
For more information about Scripts, see Scripts in the Chapter 4, “Cisco Prime Access Registrar Server
Objects.”
Services
Prime Access Registrar uses Services to let you determine how authentication, authorization, and/or
accounting are performed.

1-4
Cisco Prime Access Registrar 6.1 User Guide
OL-29756-01
Chapter 1 Overview
Prime Access Registrar Hierarchy
For example, to use Services for authentication:
•When you want the authentication to be performed by the Prime Access Registrar RADIUS server,
you can specify the local service. In this, case you must specify a specific UserList.
•When you want the authentication performed by another server, which might run an independent
application on the same or different host than your RADIUS server, you can specify either a radius,
ldap, or tacacs-udp service. In this case, you must list these servers by name.
When you have specified more than one authentication service, Prime Access Registrar determines
which one to use for a particular Access-Request by checking the following:
•When an incoming script has set the Environment dictionary variable Authentication-Service with
the name of a Service, Prime Access Registrar uses that service.
•Otherwise, Prime Access Registrar uses the default authentication service. The default
authentication service is a property of the Radius object.
Prime Access Registrar chooses the authentication service based on the variable
Authentication-Service, or the default. The properties of that Service, specify many of the details of
that authentication service, such as, the specific user list to use or the specific application (possibly
remote) to use in the authentication process.
For more information about Services, see Services in the Chapter 4, “Cisco Prime Access Registrar
Server Objects.”
Session Management Using Resource Managers
Prime Access Registrar lets you track user sessions, and/or allocate dynamic resources to users for the
lifetime of their session. You can define one or more Session Managers, and have each one manage the
sessions for a particular group or company.
Session Managers use Resource Managers, which in turn manage resources of a particular type as
described below.
•IP-Dynamic—manages a pool of IP addresses and allows you to dynamically allocate IP addresses
from that pool
•IP-Per-NAS-Port—allows you to associate ports to specific IP addresses, and thus ensure each NAS
port always gets the same IP address
•IPX-Dynamic—manages a pool of IPX network addresses
•Subnet-Dynamic—manages a pool of subnet addresses
•Group-Session-Limit—manages concurrent sessions for a group of users; that is, it keeps track of
how many sessions are active and denies new sessions after the configured limit has been reached
•User-Session-Limit—manages per-user concurrent sessions; that is, it keeps track of how many
sessions each user has and denies the user a new session after the configured limit has been reached
•Home-Agent—manages a pool of on-demand IP addresses
•USR-VPN—manages Virtual Private Networks (VPNs) that use USR NAS Clients
•Home-Agent-IPv6—manages a pool of on-demand IPv6 addresses
•Remote-IP-Dynamic—manages a pool of IP addresses that allows you to dynamically allocate IP
addresses from a pool of addresses. It internally works with a remote ODBC database.
•Remote-User-Session-Limit—manages per-user concurrent sessions; that is, it keeps track of how
many sessions each user has and denies the user a new session after the configured limit has been
reached. It internally works with a remote ODBC database.

1-5
Cisco Prime Access Registrar 6.1 User Guide
OL-29756-01
Chapter 1 Overview
Prime Access Registrar Directory Structure
•Remote-Group-Session-Limit—manages concurrent sessions for a group of users; that is, it keeps
track of how many sessions are active and denies new sessions after the configured limit has been
reached. It internally works with a remote ODBC database.
•Session Cache—allows you to define the RADIUS attributes to store in cache.
•Dynamic-DNS—manages the DNS server.
•Remote-Session-Cache—allows you to define the RADIUS attributes to store in cache. It should be
used with session manager of type 'remote'.
•3GPP—allows you to define the attribute for 3GPP authorization.
For more information about Session Managers, see Session Managers in Chapter 4, “Cisco Prime Access
Registrar Server Objects.”
If necessary, you can create a complex relationship between the Session Managers and the Resource
Managers.
When you need to share a resource among Session Managers, you can create multiple Session Managers
that refer to the same Resource Manager. For example, if one pool of IP addresses is shared by two
departments, but each department has a separate policy about how many users can be logged in
concurrently, you might create two Session Managers and three Resource Managers. One dynamic IP
Resource Manager that is referenced by both Session Managers, and two concurrent session Resource
Managers, one for each Session Manager.
In addition, Prime Access Registrar lets you pose queries about sessions. For example, you can query
Prime Access Registrar about which session (and thus which NAS-Identifier, NAS-Port and/or
User-Name) owns a particular resource, as well as query Prime Access Registrar about how many
resources are allocated or how many sessions are active.
Prime Access Registrar Directory Structure
The installation process populates the /opt/CSCOar directory with the subdirectories listed in Table 1-1.
Table 1-1 /opt/CSCOar Subdirectories
Subdirectory Description
.system Contains ELFs, or binary SPARC executables that should not be run directly.
bin Contains shell scripts and programs frequently used by a network
administrator; programs that can be run directly.
conf Contains configuration files.
data Contains the radius directory, which contains session backing files; and the
db directory, which contains configuration database files.
examples Contains documentation, sample configuration scripts, and shared library
scripts.
lib Contains Prime Access Registrar software library files.
logs Contains system logs and is the default directory for RADIUS accounting.
odbc Contains Prime Access Registrar ODBC files.
scripts Contains sample scripts that you can modify to automate configuration, and
to customize your RADIUS server.
temp Used for temporary storage.

1-6
Cisco Prime Access Registrar 6.1 User Guide
OL-29756-01
Chapter 1 Overview
Program Flow
Program Flow
When a NAS sends a request packet to Prime Access Registrar with a name and password,
Prime Access Registrar performs the following actions. Table 1-2 describes the flow without regard to
scripting points.
Prime Access Registrar supports Diameter with Extensible Authentication Protocol (EAP) functionality
to enable authentication between NAS and a backend NAS Diameter authentication server. For more
information, see Diameter with EAP Support, page 8-2.
Prime Access Registrar also support 3GPP compliance by implementing a set of protocols. To
understand more about the 3GPP AAA server support and the call flow, see 3GPP Compliance,
page 20-7.
Scripting Points
Prime Access Registrar lets you invoke scripts you can use to affect the Request, Response, or
Environment dictionaries. This section contains the following topics:
ucd-snmp Contains the UCD-SNMP software Prime Access Registrar uses.
usrbin Contains a symbolic link that points to bin.
Table 1-1 /opt/CSCOar Subdirectories (continued)
Subdirectory Description
Table 1-2 From Access-Request to Access-Accept
Prime Access Registrar Server
Action Explanation
Receives an Access-Request The Prime Access Registrar server receives an Access-Request
packet from a NAS.
Determines whether to accept
the request
The Prime Access Registrar server checks to see if the client’s IP
address is listed in /Radius/Clients/<Name>/<IPAddress>.
Invokes the policy SelectPolicy
if it exists
The Prime Access Registrar Policy Engine provides an interface to
define and configure a policy and to apply the policy to the
corresponding access-request packets.
Performs authentication and/or
authorization
Directs the request to the appropriate service, which then performs
authentication and/or authorization according to the type specified
in /Radius/Services/<Name>/<Type>.
Performs session management Directs the request to the appropriate Session Manager.
Performs resource management
for each Resource Manager in
the SessionManager
Directs the request to the appropriate resource manager listed in
/Radius/SessionManagers/<Name>/<ResourceManagers>/<Na
me>, which then allocates or checks the resource according to the
type listed in /Radius/<ResourceManagers>/<Name>/<Type>.
Sends an Access-Accept Creates and formats the response, and sends it back to the client
(NAS).

1-7
Cisco Prime Access Registrar 6.1 User Guide
OL-29756-01
Chapter 1 Overview
Program Flow
•Client Scripting
•Client or NAS Scripting Points
•Authentication and/or Authorization Scripting Points
Client Scripting
Though Prime Access Registrar allows external code (Tcl/C/C++/Java) to be used by means of a script,
custom service, policy engine, and so forth, while processing request, response, or while working with
the environment dictionaries, it shall not be responsible for the scripts used and will not be liable for any
direct, indirect, incidental, special, exemplary, or consequential damages (including, but not limited to,
procurement of substitute goods or services; loss of use, data, or profits; or business interruption)
however caused and on any theory of liability, whether in contract, strict liability, or tort (including
negligence or otherwise) arising in any way out of the use of the script.
Prime Access Registrar also allows you to define internal scripts, by which you can add, modify, or
delete attributes in the request, response, and environment dictionaries for RADIUS, Diameter, and
TACACS+.
Client or NAS Scripting Points
Table 1-3 shows the location of the scripting points within the section that determines whether to accept
the request from the client or NAS. Note, the scripting points are indicated with the asterisk (*) symbol.
Table 1-3 Client or NAS Scripting Points
Action Explanation
Receives an Access-Request. The Prime Access Registrar RADIUS server receives an
Access-Request packet from a NAS.
Determines whether to accept the
request.
The client’s IP address listed in
/Radius/Clients/<Name>/IPAddress.
*Executes the server’s incoming
script.
A script referred to in /Radius/IncomingScript.
*Executes the vendor’s incoming
script.
The vendor listed in /Radius/Clients/Name/Vendor, and is a script
referred to in /Radius/Vendors/<Name>/IncomingScript.
*Executes the client’s incoming
script.
A script referred to in
/Radius/Clients/<Name>/IncomingScript.
Determines whether to accept requests from this specific NAS.
/Radius/Advanced/RequireNASsBehindProxyBeInClientList
set to TRUE.
The NAS’s Identifier listed in /Radius/Clients/<Name>, or its
NAS-IP-Address listed in /Radius/Clients/<Name>/IPAddress.
If the client’s IP address listed in /Radius/Clients/<Name>/IPAddress is different:
*Executes the vendor’s incoming
script.
The vendor listed in /Radius/Clients/Name/Vendor, and is a
script referred to in /Radius/Vendors/<Name>/IncomingScript.
*Executes the client’s incoming
script.
The client listed in the previous /Radius/Clients/Name, and is a
script referred to in /Radius/Clients/Name/IncomingScript.

1-8
Cisco Prime Access Registrar 6.1 User Guide
OL-29756-01
Chapter 1 Overview
Program Flow
Authentication and/or Authorization Scripting Points
Table 1-4 shows the location of the scripting points within the section that determines whether to
perform authentication and/or authorization.
Session Management
The Session Management feature requires the client (NAS or proxy) to send all RADIUS accounting
requests to the Prime Access Registrar server performing session management. (The only exception is if
the clients are USR/3Com Network Access Servers configured to use the USR/3Com RADIUS resource
management feature.) This information is used to keep track of user sessions, and the resources allocated
to those sessions.
When another accounting RADIUS server needs this accounting information, the
Prime Access Registrar server performing session management might proxy it to this second server.
The count-sessions /radius all command helps to count the total sessions in Prime Access Registrar.
The options are similar to the query-session command options. The query-session command displays
cached attributes in addition to session details.
Table 1-5 describes how Prime Access Registrar handles session management.
Table 1-4 Authentication and Authorization Scripting Points
Action Explanation
Determines Service to use for
authentication and/or
authorization.
The Service name defined in the Environment dictionary variable
Authentication-Service, and is the same as the Service defined
in the Environment dictionary variable Authorization-Service.
The Service name referred to by
/Radius/DefaultAuthenticationService, and is the same as the
Service defined in /Radius/DefaultAuthorizationService.
Performs authentication and/or
authorization.
If the Services are the same, perform authentication and
authorization.
If the Services are different, just perform authentication.
*Executes the Service’s incoming
script.
A script referred to in
/Radius/Services/<Name>/IncomingScript.
Performs authentication and/or
authorization.
Based on the Service type defined in
/Radius/Services/<Name>/<Type>.
*Executes the Service’s outgoing
script.
A script referred to in
/Radius/Services/<Name>/OutgoingScript.
Determines whether to perform
authorization.
The Service name defined in
/Radius/DefaultAuthorizationService, if different than the
Authentication Service.
*Executes the Service’s incoming
script.
A script referred to in
/Radius/Services/<Name>/IncomingScript.
Performs authorization. Checks that the Service type is defined in
/Radius/Services/<Name>/<Type>.
*Executes the Service’s outgoing
script.
A script referred to in
/Radius/Services/<Name>/OutgoingScript.

1-9
Cisco Prime Access Registrar 6.1 User Guide
OL-29756-01
Chapter 1 Overview
Program Flow
This section contains the following topics:
•Failover by the NAS and Session Management
•Cross Server Session and Resource Management
Failover by the NAS and Session Management
When a Network Access Server’s primary RADIUS server is performing session management, and the
NAS determines the server is not responding and begins sending requests to its secondary RADIUS
server, the following occurs:
•The secondary server will not know about the current active sessions that are maintained on the
primary server. Any resources managed by the secondary server must be distinct from those
managed by the primary server, otherwise it will be possible to have two sessions with the same
resources (for example, two sessions with the same IP address).
•The primary server will miss important information that allows it to maintain a correct model of
what sessions are currently active (because the authentication and accounting requests are being sent
to the secondary server). This means when the primary server comes back online and the NAS begins
using it, its knowledge of what sessions are active will be out-of-date and the resources for those
sessions are allocated even if they are free to allocate to someone else.
For example, the user-session-limit resource might reject new sessions because the primary server
does not know some of the users using the resource logged out while the primary server was offline.
It might be necessary to release sessions manually using the aregcmd command release-session.
Note It might be possible to avoid this situation by having a disk drive shared between two
systems with the second RADIUS server started up once the primary server has been
determined to be offline. For more information on this setup, contact Technical Support.
Cross Server Session and Resource Management
Prime Access Registrar can manage sessions and resources across AAA Server boundaries. A session
can be created by an Access-Request sent to Prime AR1, and it can be removed by an Accounting-Stop
request sent to Prime AR2, as shown in Figure 1-1. This enables accurate tracking of User and Group
session limits across multiple AAA Servers, and IP addresses allocated to sessions are managed in one
place.
Table 1-5 Session Management Processing
Action Explanation
Determines whether to perform
session management.
The session management defined in the Environment dictionary
variable Session-Manager.
The session management name referred to in
/Radius/DefaultSessionManager.
Performs session management. Selects Session Manager as defined in
/Radius/SessionManagers/<Name>.

1-10
Cisco Prime Access Registrar 6.1 User Guide
OL-29756-01
Chapter 1 Overview
Program Flow
Figure 1-1 Multiple Prime Access Registrar Servers
All resources that must be shared cross multiple front line Prime Access Registrars are configured in the
Central Resource Prime Access Registrar. Resources that are not shared can still be configured at each
front line Prime Access Registrar.
When the front line Prime Access Registrar receives the access-request, it does the regular AA
processing. If the packet is not rejected and a Central Resource Prime Access Registrar is also
configured, the front line Prime Access Registrar will proxy the packet1 to the configured Central
Resource Prime Access Registrar. If the Central Resource Prime Access Registrar returns the requested
resources, the process continues to the local session management (if local session manager is configured)
for allocating any local resources. If the Central Resource Prime Access Registrar cannot allocate the
requested resource, the packet is rejected.
When the Accounting-Stop packet arrives at the frontline Prime Access Registrar,
Prime Access Registrar does the regular accounting processing. Then, if the front line
Prime Access Registrar is configured to use Central Resource Prime Access Registrar, a proxy packet
will be sent to Central Resource Prime Access Registrar for it to release all the allocated resources for
this session. After that, any locally allocated resources are released by the local session manager.
Session-Service Service Step and Radius-Session Service
A new Service step has been added in the processing of Access-Request and Accounting packets. This
is an additional step after the AA processing for Access packet or Accounting processing for Accounting
packet, but before the local session management processing. The Session-Service should have a service
type of radius-session.
An environment variable Session-Service is introduced to determine the Session-Service dynamically.
You can use a script or the rule engine to set the Session-Service environment variable.
Configure Front Line Cisco Prime Access Registrar
To use a Central Resource server, the DefaultSessionService property must be set or the Session-Service
environment variable must be set through a script or the rule engine. The value in the Session-Service
variable overrides the DefaultSessionService.
The configuration parameters for a Session-Service service type are the same as those for configuring a
radius service type for proxy, except the service type is radius-session.
The configuration for a Session-Service Remote Server is the same as configuring a proxy server.
[ //localhost/Radius ]
Name = Radius
Description =
Version = 6.1
IncomingScript =
OutgoingScript =
DefaultAuthenticationService = local-users
1. The proxy packet is actually a resource allocation request, not an Access Request.
Cisco Prime AR1
Cisco Prime AR2
Cisco Prime AR3
Central Resource
Cisco Prime AR
320370

1-11
Cisco Prime Access Registrar 6.1 User Guide
OL-29756-01
Chapter 1 Overview
Program Flow
DefaultAuthorizationService = local-users
DefaultAccountingService = local-file
DefaultSessionService = Remote-Session-Service
DefaultSessionManager = session-mgr-1
[ //localhost/Radius/Services ]
Remote-Session-Service/
Name = Remote-Session-Service
Description =
Type = radius-session
IncomingScript =
OutgoingScript =
OutagePolicy = RejectAll
OutageScript =
MultipleServersPolicy = Failover
RemoteServers/
1. central-server
[ //localhost/Radius/RemoteServers ]
central-server/
Name = central-server
Description =
Protocol = RADIUS
IPAddress = 209.165.200.224
Port = 1645
ReactivateTimerInterval = 300000
SharedSecret = secret
Vendor =
IncomingScript =
OutgoingScript =
MaxTries = 3
InitialTimeout = 2000
AccountingPort = 1646
Configure Central Prime Access Registrar
Resources at the Central Resource server are configured the same way as local resources are configured.
These resources are local resources from the Central Resource server’s point of view.
Script Processing Hierarchy
For request packets, the script processing order is from the most general to the most specific. For
response packets, the processing order is from the most specific to the most general.
Table 1-6, Table 1-7, and Table 1-8 show the overall processing order and flow:
(1-6) Incoming Scripts, (7-11) Authentication/Authorization Scripts, and (12-17) Outgoing Scripts.
Note The client and the NAS can be the same entity, except when the immediate client is acting
as a proxy for the actual NAS.

1-12
Cisco Prime Access Registrar 6.1 User Guide
OL-29756-01
Chapter 1 Overview
RADIUS Protocol
RADIUS Protocol
Prime Access Registrar is based on a client/server model, which supports AAA (authentication,
authorization, and accounting). The client is the Network Access Server (NAS) and the server is
Prime Access Registrar. The client passes user information on to the RADIUS server and acts on the
response it receives. The server, on the other hand, is responsible for receiving user access requests,
authenticating and authorizing users, and returning all of the necessary configuration information the
client can then pass on to the user.
The protocol is a simple packet exchange in which the NAS sends a request packet to the
Prime Access Registrar with a name and a password. Prime Access Registrar looks up the name and
password to verify it is correct, determines for which dynamic resources the user is authorized, then
returns an accept packet that contains configuration information for the user session (Figure 1-2).
Table 1-6 Prime Access Registrar Processing Hierarchy for Incoming Scripts
Overall Flow Sequence Incoming Scripts
1) Radius.
2) Vendor of the immediate client.
3) Immediate client.
4) Vendor of the specific NAS.
5) Specific NAS.
6) Service.
Table 1-7 Prime Access Registrar Processing Hierarchy for Authentication/Authorization
Scripts
Overall Flow Sequence Authentication/Authorization Scripts
7) Group Authentication.
8) User Authentication.
9) Group Authorization.
10) User Authorization.
11) Session Management.
Table 1-8 Prime Access Registrar Processing Hierarchy for Outgoing Script
Overall Flow Sequence Outgoing Scripts
12) Service.
13) Specific NAS.
14) Vendor of the specific NAS.
15) Immediate client.
16) Vendor of the immediate client.
17) Radius.
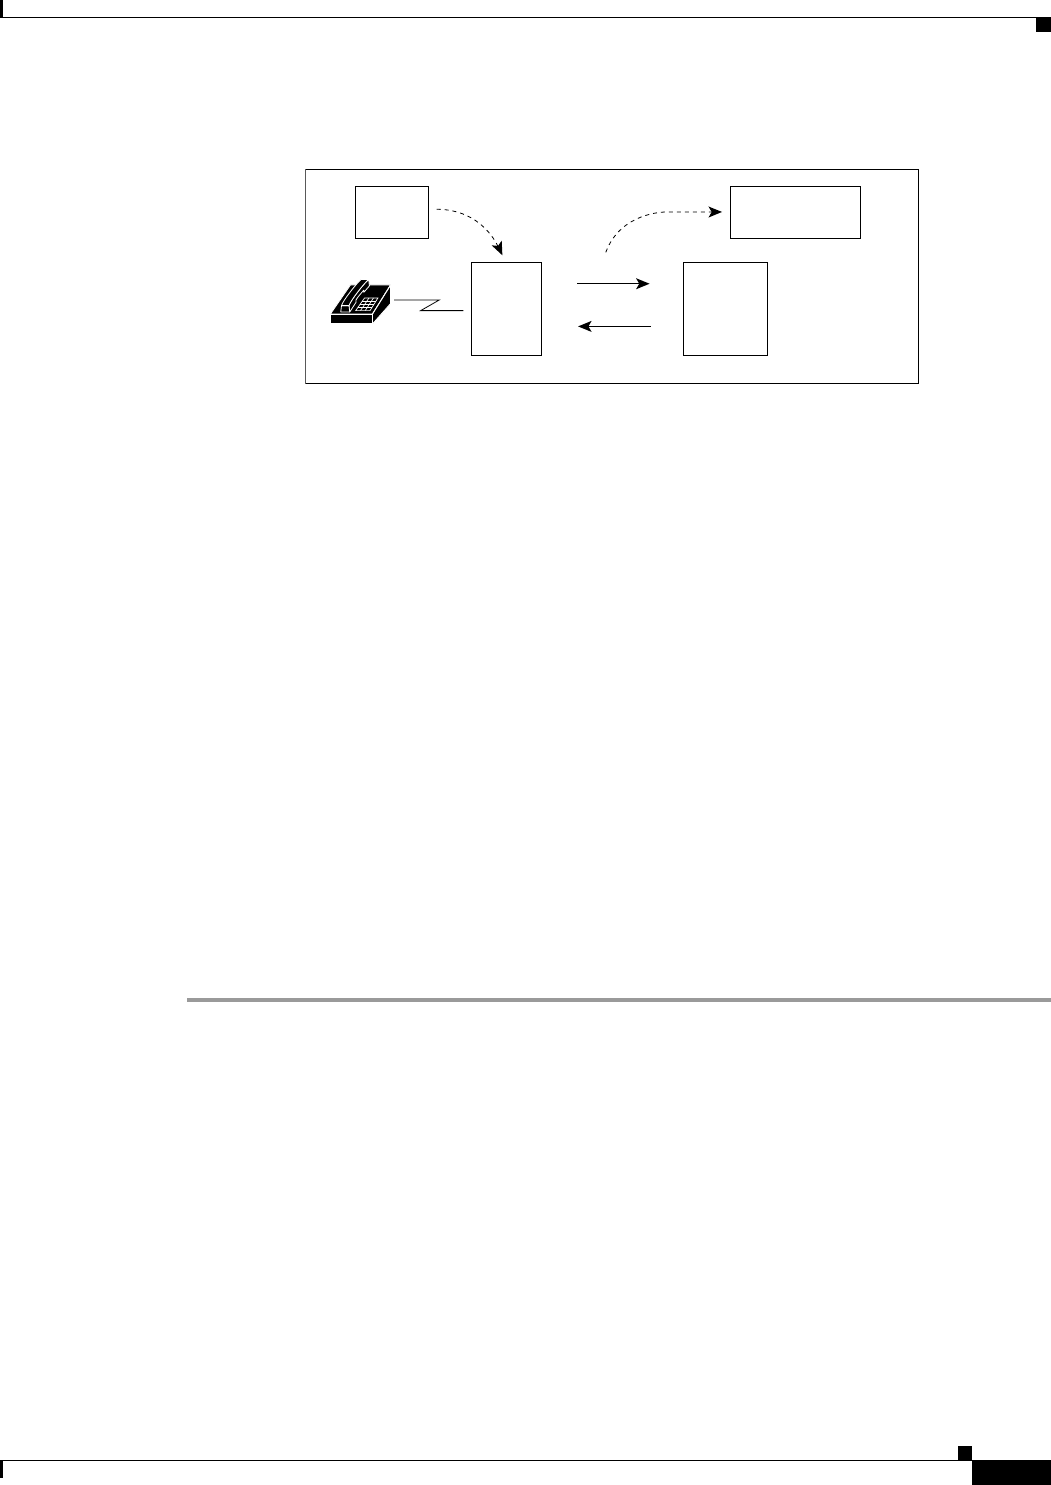
1-13
Cisco Prime Access Registrar 6.1 User Guide
OL-29756-01
Chapter 1 Overview
RADIUS Protocol
Figure 1-2 Packet Exchange Between User, NAS, and RADIUS
Prime Access Registrar can also reject the packet if it needs to deny network access to the user. Or,
Prime Access Registrar can issue a challenge that the NAS sends to the user, who then creates the proper
response and returns it to the NAS, which forwards the challenge response to Prime Access Registrar in
a second request packet.
In order to ensure network security, the client and server use a shared secret, which is a string they both
know, but which is never sent over the network. User passwords are also encrypted between the client
and the server to protect the network from unauthorized access.
This section contains the following topics:
•Steps to Connection
•Types of RADIUS Messages
•Proxy Servers
Steps to Connection
Three participants exist in this interaction: the user, the NAS, and the RADIUS server.
Setting Up the Connection
To describe the receipt of an access request through the sending of an access response:
Step 1 The user, at a remote location such as a branch office or at home, dials into the NAS, and supplies a name
and password.
Step 2 The NAS picks up the call and begins negotiating the session.
a. The NAS receives the name and password.
b. The NAS formats this information into an Access-Request packet.
c. The NAS sends the packet on to the Prime Access Registrar server.
Step 3 The Prime Access Registrar server determines what hardware sent the request (NAS) and parses the
packet.
a. It sets up the Request dictionary based on the packet information.
b. It runs any incoming scripts, which are user-written extensions to Prime Access Registrar. An
incoming script can examine and change the attributes of the request packet or the environment
variables, which can affect subsequent processing.
N
A
S
Radius
22036
Jane
xyz
request
response
Name=Jane
Password=xyz

1-14
Cisco Prime Access Registrar 6.1 User Guide
OL-29756-01
Chapter 1 Overview
RADIUS Protocol
c. Based on the scripts or the defaults, it chooses a service to authenticate and/or authorize the user.
Step 4 Prime Access Registrar’s authentication service verifies the username and password is in its database.
Or, Prime Access Registrar delegates the authentication (as a proxy) to another RADIUS server, an
LDAP, or TACACS server.
Step 5 Prime Access Registrar’s authorization service creates the response with the appropriate attributes for
the user’s session and puts it in the Response dictionary.
Step 6 If you are using Prime Access Registrar session management at your site, the Session Manager calls the
appropriate Resource Managers that allocate dynamic resources for this session.
Step 7 Prime Access Registrar runs any outgoing scripts to change the attributes of the response packet.
Step 8 Prime Access Registrar formats the response based on the Response dictionary and sends it back to the
client (NAS).
Step 9 The NAS receives the response and communicates with the user, which might include sending the user
an IP address to indicate the connection has been successfully established.
Types of RADIUS Messages
The client/server packet exchange consists primarily of the following types of RADIUS messages:
•Access-Request—sent by the client (NAS) requesting access
•Access-Reject—sent by the RADIUS server rejecting access
•Access-Accept—sent by the RADIUS server allowing access
•Access-Challenge—sent by the RADIUS server requesting more information in order to allow
access. The NAS, after communicating with the user, responds with another Access-Request.
When you use RADIUS accounting, the client and server can also exchange the following two types of
messages:
•Accounting-Request—sent by the client (NAS) requesting accounting
•Accounting-Response—sent by the RADIUS server acknowledging accounting
This section contains the following topics:
•Packet Contents
•The Attribute Dictionary
Packet Contents
The information in each RADIUS message is encapsulated in a UDP (User Datagram Protocol) data
packet. A packet is a block of data in a standard format for transmission. It is accompanied by other
information, such as the origin and destination of the data.
Table 1-9 lists a description of the five fields in each message packet.

1-15
Cisco Prime Access Registrar 6.1 User Guide
OL-29756-01
Chapter 1 Overview
RADIUS Protocol
The Attribute Dictionary
The Attribute dictionary contains a list of preconfigured authentication, authorization, and accounting
attributes that can be part of a client’s or user’s configuration. The dictionary entries translate an attribute
into a value Prime Access Registrar uses to parse incoming requests and generate responses. Attributes
have a human-readable name and an enumerated equivalent from 1-255.
Sixty three standard attributes exist, which are defined in RFC 2138 and 2139. There also are additional
vendor-specific attributes that depend on the particular NAS you are using.
Some sample attributes include:
•User-Name—the name of the user
•User-Password—the user’s password
•NAS-IP-Address—the IP address of the NAS
•NAS-Port—the NAS port the user is dialed in to
•Framed Protocol—such as SLIP or PPP
•Framed-IP-Address—the IP address the client uses for the session
•Filter-ID—vendor-specific; identifies a set of filters configured in the NAS
•Callback-Number—the actual callback number.
Proxy Servers
Any one or all of the RADIUS server’s three functions: authentication, authorization, or accounting can
be subcontracted to another RADIUS server. Prime Access Registrar then becomes a proxy server.
Proxying to other servers enables you to delegate some of the RADIUS server’s functions to other
servers.
Table 1-9 RADIUS Packet Fields
Fields Description
Code Indicates message type: Access-Request, Access-Accept, Access-Reject,
Access-Challenge, Accounting-Request, or Accounting-Response.
Identifier Contains a value that is copied into the server’s response so the client can
correctly associate its requests and the server’s responses when multiple
users are being authenticated simultaneously.
Length Provides a simple error-checking device. The server silently drops a packet
if it is shorter than the value specified in the length field, and ignores the
octets beyond the value of the length field.
Authenticator Contains a value for a Request Authenticator or a Response Authenticator.
The Request Authenticator is included in a client’s Access-Request. The
value is unpredictable and unique, and is added to the client/server shared
secret so the combination can be run through a one-way algorithm. The NAS
then uses the result in conjunction with the shared secret to encrypt the
user’s password.
Attribute(s) Depends on the type of message being sent. The number of attribute/value
pairs included in the packet’s attribute field is variable, including those
required or optional for the type of service requested.
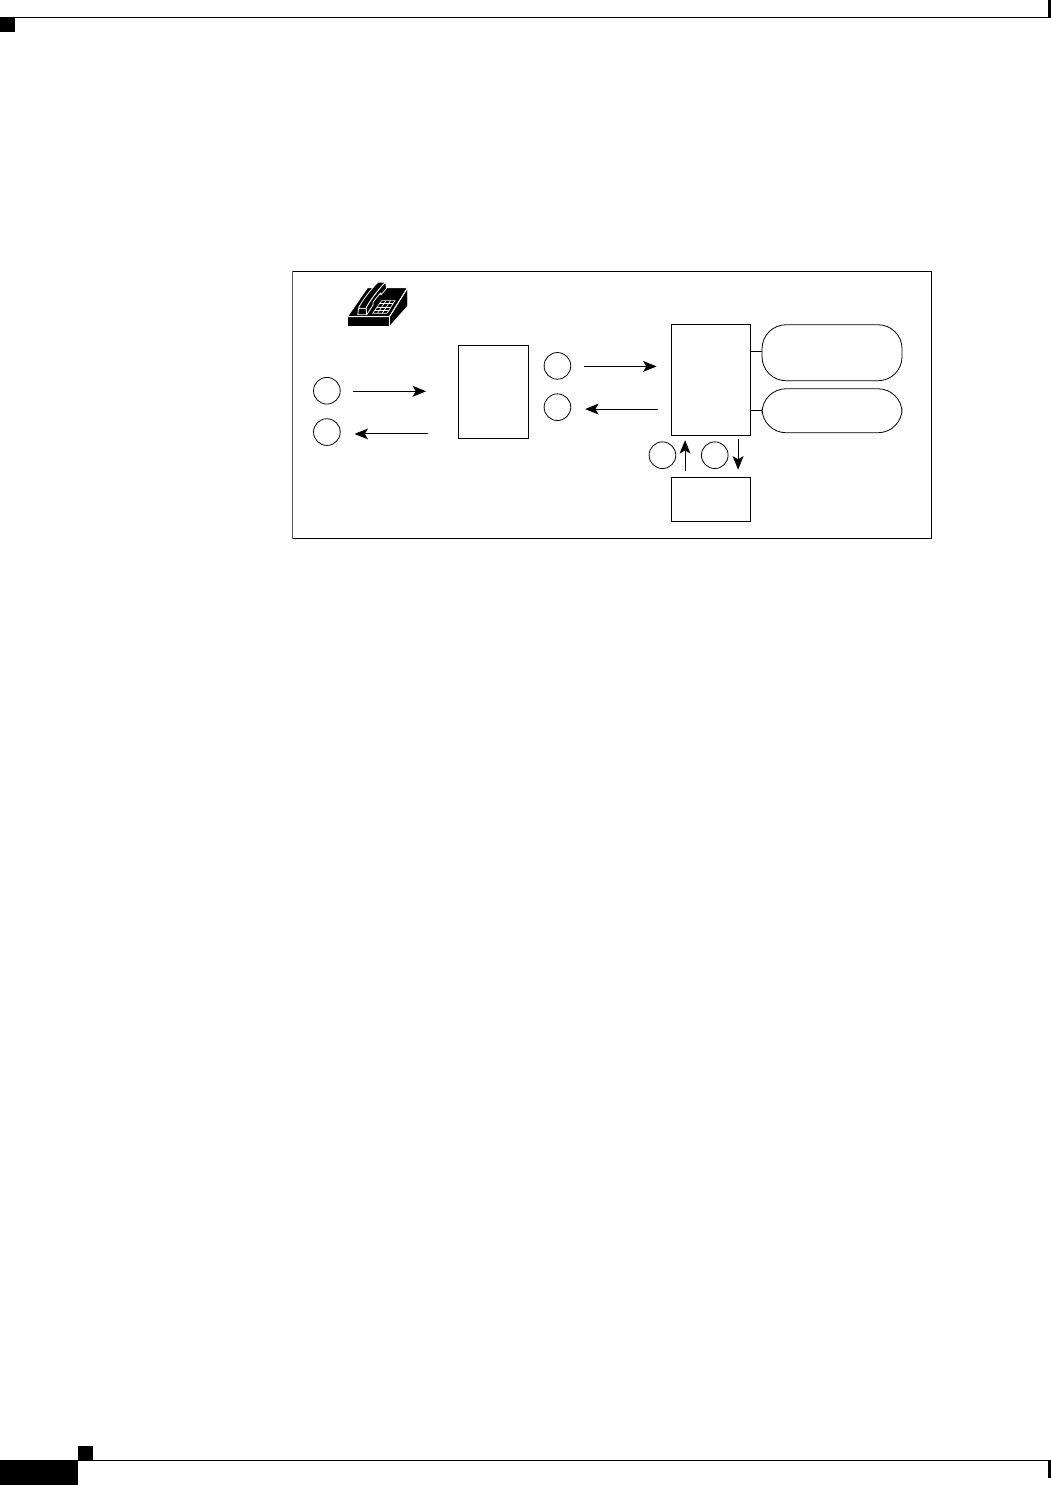
1-16
Cisco Prime Access Registrar 6.1 User Guide
OL-29756-01
Chapter 1 Overview
Service and Ports Used in Prime Access Registrar
You could use Prime Access Registrar to “proxy” to an LDAP server for access to directory information
about users in order to authenticate them. Figure 1-3 shows user joe initiating a request, the
Prime Access Registrar server proxying the authentication to the LDAP server, and then performing the
authorization and accounting processing in order to enable joe to log in.
Figure 1-3 Proxying to an LDAP Server for Authentication
Service and Ports Used in Prime Access Registrar
Secure Shell Service
SSH Daemon(SSHD) is the daemon program which is used for ssh(1). It provides secure shell encrypted
communications between two hosts over network.
In case of Prime Access Registrar, SSH is used to connect to Prime Access Registrar server and
configure Prime Access Registrar using CLI.
Ports
The following table lists the port numbers that are used for various services in Prime Access Registrar
for AAA.
NAS
Access
registrar
LDAP
22035
user=joe
password=xyz request
response
1
6
2
5
34
Authorization
accounting
Authentication

1-17
Cisco Prime Access Registrar 6.1 User Guide
OL-29756-01
Chapter 1 Overview
Service and Ports Used in Prime Access Registrar
Table 1-10 Ports Used in Prime Access Registrar
Names Description
Port
Numbers
Service of the
Ports
Access from
Network Node
Configuration
Setting
Protocol
Name and
Reference
AR AAA Service The RADIUS
packet listener uses
these ports by
default.
Solaris:
1645-udp
Linux:
1812-udp
RADIUS AA Network Access
Server
You can change the
default or define
new RADIUS port
numbers under
/Radius/Advanced/
Ports in the CLI
and Configuration
> Advanced >
Ports in the GUI.
RADIUS AA
(Authenticati
on, and
Authorizatio
n) service.
Solaris:
1646-udp
radacct
Linux:
1813-udp
radacct
RADIUS
Accounting
Network Access
Server
You can change the
default or define
new RADIUS port
numbers under
/Radius/Advanced/
Ports in the CLI
and Configuration
> Advanced >
Ports in the GUI.
RADIUS
Accounting
service.
Refer to RFC
6733 for
more
information.
3799/udp RADIUS
Dynamic
Authorizatio
n (CoA/PoD)
Network Access
Server
N/A RADIUS
Dynamic
authorization
which is used
with
(CoA/PoD)
packet types.
AR AAA Service The TACACS+
packet listener uses
this port by default.
49/tcp TACACS+ Network Access
Server
You can change the
default or define
new RADIUS port
numbers under
/Radius/Advanced/
Ports in the CLI
and Configuration
> Advanced >
Ports in the GUI.
TACACS+
based on
AAA service
(Authenticati
on,
Authorizatio
n, and
Accounting).
Refer to RFC
1491 for
more
information.

1-18
Cisco Prime Access Registrar 6.1 User Guide
OL-29756-01
Chapter 1 Overview
Service and Ports Used in Prime Access Registrar
AR AAA Service The DIAMETER
packet listener uses
these ports by
default.
3868/tcp DIAMETER Network Access
Server
You can enable or
disable this service
in
Radius/Advanced/
Diameter/IsDiamet
erEnabled.
DIAMETER
AA Service
(Authenticati
on, and
Authorizatio
n) by tcp
protocol.
Refer to RFC
4005 for
more
information.
3868/sctp DIAMETER Network Access
Server
You can enable or
disable this service
in
Radius/Advanced/
Diameter/IsDiamet
erEnabled.1
DIAMETER
AA Service
(Authenticati
on, and
Authorizatio
n) by SCTP
protocol.
AR MCD Server MCD is used to
store Prime Access
Registrar
configuration.
2786/tcp MCD
database
Server
This service can
be accessed
from local host
by Prime Access
Registrar radius
and server agent
process.
N/A Proprietary
IPC
mechanism.
AR Server Agent AR Server Agent is
used to log all the
activities of
Prime Access Regi
strar processes.
2785/tcp Internal IPC
mechanism
This service can
be accessed
from local host
by Prime Access
Registrar radius
and server agent
process.
N/A Proprietary
IPC
mechanism.
Table 1-10 Ports Used in Prime Access Registrar (continued)
Names Description
Port
Numbers
Service of the
Ports
Access from
Network Node
Configuration
Setting
Protocol
Name and
Reference

1-19
Cisco Prime Access Registrar 6.1 User Guide
OL-29756-01
Chapter 1 Overview
Service and Ports Used in Prime Access Registrar
AR GUI Service Prime Access
Registrar GUI
processes use these
ports by default.
8080/tcp AR HTTP
service
This service is
accessible from
any end user
desktop browser
using http
protocol.
You can change the
default port
numbers in editing
the server.xml file.
Standard
HTTP
protocol
8443/tcp AR HTTPS
service
This service is
accessible from
any end user
desktop browser
using https
protocol.
You can change the
default port
numbers in editing
the server.xml file.
Standard
HTTPS
protocol
8005/tcp Internally
used by
Apache
Tomcat
container
Local host You can change the
default port
numbers in editing
the server.xml file..
To shutdown
Tomcat JVM
service
instance.
8009/tcp Apache
Tomcat
container
AJP 1.3
Connector
Local host You can change the
default port
numbers in editing
the server.xml file.
Apache JServ
protocol.
AJP 1.3
Connector.
SNMP Master
Agent
SNMP Packet
listener supports
these ports by
default.
161/udp Simple Net
Management
Protocol
This service is
accessible from
any network
management
host.
Refer to net-snmp
documentation for
more information.
SNMP MIBs
server
162/udp Traps for
SNMP
This service is
accessible to
any SNMP trap
client when you
want to use
net-snmp
snmptrap
daemon as a
SNMP trap
server.
Refer to
Configuring Traps
for more
information.
SNMP trap
server
Table 1-10 Ports Used in Prime Access Registrar (continued)
Names Description
Port
Numbers
Service of the
Ports
Access from
Network Node
Configuration
Setting
Protocol
Name and
Reference

1-20
Cisco Prime Access Registrar 6.1 User Guide
OL-29756-01
Chapter 1 Overview
Service and Ports Used in Prime Access Registrar
CPAR SIGTRAN
Stack (radius)
Listen on these
ports for internal
configuration from
stack manager
events
9041/TCP Stack
Manager
Configuratio
n/Event
Listener
This service can
be accessed
from local host
by Prime Access
Registrar –
Radius Process.
N/A CPAR
Specific IPC
Protocol
implementati
on
9041/UDP Stack
Manager
Configuratio
n/Event
Listener
This service can
be accessed
from local host
by Prime Access
Registrar –
Radius Process.
N/A CPAR
Specific IPC
Protocol
implementati
on
CPAR SIGTRAN
stack
manager(m3ua-sta
ckmgr)
Configure stack
and receive
configuration from
m3ua-cliclient
9100/TCP SIGTRAN
Stack
Manager
This service can
be accessed
from local host
by Prime Access
Registrar –
Radius Process
and
m3ua-cliclient
Process.
N/A CPAR
Specific IPC
Protocol
implementati
on
9100/UDP SIGTRAN
Stack
Manager
This service can
be accessed
from local host
by Prime Access
Registrar –
Radius Process
and
m3ua-cliclient
Process.
N/A CPAR
Specific IPC
Protocol
implementati
on
1. If an error occurs while starting the Diameter SCTP interface, add install sctp /bin/true to /etc/modprobe.conf. Then, configure port 3868 with Type
Diameter-TCP using aregcmd in /Radius/Advanced/Ports.
Table 1-10 Ports Used in Prime Access Registrar (continued)
Names Description
Port
Numbers
Service of the
Ports
Access from
Network Node
Configuration
Setting
Protocol
Name and
Reference

CHAPTER
2-1
Cisco Prime Access Registrar 6.1 User Guide
OL-29756-01
2
Using the aregcmd Commands
This chapter describes how to use each of the aregcmd commands. The Cisco Prime Access Registrar
aregcmd command is a command-line based configuration tool. It allows you to set any Cisco Prime
Access Registrar (Prime Access Registrar) configurable option, as well as, start and stop the server and
check statistics.
This chapter contains the following sections:
•General Command Syntax
•aregcmd Commands
•aregcmd Command Logging
•aregcmd Command Line Editing
•aregcmd Error Codes
General Command Syntax
Prime Access Registrar stores its configuration information in a hierarchy. Using the aregcmd command
cd (change directory), you can move through this information in the same manner as you would through
any hierarchical file system. Or you can supply full pathnames to these commands to affect another part
of the hierarchy, and thus avoid explicitly using the cd command to change to that part of the tree.
•aregcmd command parsing is case insensitive, which means you can use upper or lowercase letters
to designate elements. In addition, when you reference existing elements in the configuration, you
need only specify enough of the element’s name to distinguish it from the other elements at that
level. For example, instead of entering cd Administrators, you can enter cd ad when no other
element at the current level begins with ad.
•aregcmd command parsing is command-line order dependent; that is, the arguments are interpreted
based on their position on the command line. To indicate an empty string as a place holder on the
command line, use either single (') or double quotes (""). In addition, when you use any arguments
that contain spaces, you must quote the arguments. For example, when you use the argument, “Local
Users,” you must enclose the phrase in quotes.
The aregcmd command can contain a maximum of 255 characters when specifying a parameter and 511
characters for the entire command.
The aregcmd command syntax is:
aregcmd [-C <clustername>] [-N <adminname>] [-P <adminpassword>] [-V]
[-f <scriptfile>] [-l <directoryname> ] [-n] [<command> [<args>]] [-p] [-q] [-v]
•-C—Specifies the name of the cluster to log into by default

2-2
Cisco Prime Access Registrar 6.1 User Guide
OL-29756-01
Chapter 2 Using the aregcmd Commands
General Command Syntax
•-N—Specifies the name of the administrator
•-P—Specifies the password
•-V—Specifies view-only mode
•-f—Specifies a file that can contain a series of commands
•-l—Specifies a directory where the Prime Access Registrar license file is stored and returns
information about licensed components
•-n—Turns off prefix mode
•-p—Specifies prefix mode
•-q—Turns off verbose mode
•-v—Specifies verbose mode
Note The verbose (-v) and prefix (-p) modes are on by default when you run aregcmd interactively (for
example, not entered on the command line or not running commands from a script file). Otherwise,
verbose and prefix modes are off.
When you include a command (with the appropriate arguments) on the command line, aregcmd runs
only that one command and saves any changes.
This section contains the following topics:
•View-Only Administrator Mode
•Configuration Objects
•aregcmd Command Performance
View-Only Administrator Mode
Previous releases of Prime Access Registrar provided only super-user administrative access. If you were
able to log into aregcmd, you could do anything to the system, including starting and stopping the
system and changing the configuration. Prime Access Registrar provides view-only administrative
access. View-only access restricts an administrator to only being able to observe the system and prevents
that user from making changes.
View-only access can be encountered in three ways:
•Specific administrators can be restricted to view-only access whenever they log in.
•Administrators not restricted to view-only access can choose to start aregcmd in a view-only mode.
This might be used when an administrator wants to ensure that he or she does not make any changes.
•When an administrator who is not view-only logs in to a slave server, they will be unable to make
changes to any parts of the configuration other than /Radius/Replication,
/Radius/Advanced/Ports, /Radius/Advanced/Interfaces or the properties in /Radius/Advanced.
This is because the rest of the configuration is replicated from the master server and changes directly
to the slave will cause problems.
Note When a user logs in, the system determines whether a user’s session is view-only or not. If the
configuration is changed after a user has logged in, that change does not take effect until the affected
user logs out and logs back in.

2-3
Cisco Prime Access Registrar 6.1 User Guide
OL-29756-01
Chapter 2 Using the aregcmd Commands
General Command Syntax
ViewOnly Property
The ViewOnly property has been added to the Administrators configuration. The default setting for the
ViewOnly property is FALSE. The following shows the default setting for the admin user:
cd /Administrators/admin
[ //localhost/Administrators/admin ]
Name = admin
Description =
Password = <encrypted>
ViewOnly = FALSE
You can designate specific administrators to be view-only administrators by setting the new ViewOnly
property to TRUE.
•If that property is set to TRUE, any time the administrator logs in to aregcmd the session will be in
view-only mode.
•If set to FALSE, when the administrator logs in to a master server, the session will be full super-user
capability.
If the administrator logs in to a slave, they only part of the configuration they will be able to modify is
that part under /Radius/Replication, /Radius/Advanced/Ports, /Radius/Advanced/Interfaces or the
properties in /Radius/Advanced.
When in a view-only session, the following commands will cause an error: add, delete, set, unset,
insert, validate, save, start, stop, reload, reset-stats, release-sessions, and trace. The following error
message will be displayed:
316 Command failed: session is ViewOnly
When in a slave server session, the following commands will cause an error when the object or property
being operated on is not under /Radius/Replication, /Radius/Advanced/Ports,
/Radius/Advanced/Interfaces or the properties in /Radius/Advanced: add, delete, set, unset, and
insert. The following error message will be displayed:
317 Command failed: session is ViewOnly
Configuration Objects
The Prime Access Registrar aregcmd command lets you manipulate configuration objects, that define
properties or the behavior of the RADIUS server, such as valid administrators and types of services. For
descriptions of those objects, see Chapter 4, “Cisco Prime Access Registrar Server Objects.”
aregcmd Command Performance
You can impact aregcmd command performance and server response time by having
Prime Access Registrar userlists that contain more than 10,000 users. Prime Access Registrar userlists
were not designed to contain 10,000 users in any one list.
If you must provide service for groups greater than 10000 users, we recommend that you use an external
data store such as an LDAP directory or an Oracle database. If you are unable to use an external data
store, create multiple userlists instead, keeping each userlist under 10,000 users.

2-4
Cisco Prime Access Registrar 6.1 User Guide
OL-29756-01
Chapter 2 Using the aregcmd Commands
aregcmd Commands
Multiple userlists require multiple services (one for each userlist), because a service cannot reference
more than one userlist. The multiple services can then be combined using the Service Grouping feature
with ResultRule, OR, as follows:
[ //localhost/Radius/Services/GroupService ]
Name = GroupService
Description =
Type = group
IncomingScript~ =
OutgoingScript~ =
ResultRule = OR
GroupServices/
1. UserService1
2. UserService2
3. UserService3
RPC Bind Services
The Prime Access Registrar server and the aregcmd CLI requires RPC services to be running before the
server is started. If the RPC services are stopped, you must restart RPC services, then restart the
Prime Access Registrar server.
Use the following commands to restart RPC services:
arserver stop
/etc/init.d/rpc start
arserver start
If RPC services are not running, the following message is displayed when you attempt to start aregcmd:
Login to aregcmd fails with the message:
400 Login failed
aregcmd Commands
This section contains the complete list of aregcmd commands. You can use them on the command line
or insert them into scripts. The commands are listed alphabetically.
This section contains the following topics:
•add
•cd
•delete
•exit
•filter
•find
•help
•insert
•login
•logout

2-5
Cisco Prime Access Registrar 6.1 User Guide
OL-29756-01
Chapter 2 Using the aregcmd Commands
aregcmd Commands
•ls
•next
•prev
•pwd
•query-sessions
•quit
•release-sessions
•reload
•reset-stats
•save
•set
•start
•stats
•status
•stop
•tacacs-stats
•tacacs-reset-stats
•dia-stats
•trace
•trace-file-count
•unset
•validate
add
Use the aregcmd command add to create new elements in the configuration. The add command is
context sensitive, which means the type of element added is determined by the current context, or the
path specified as the first parameter. The add command has one required argument; the name of the
element you wish to add. You can also provide other parameters, or you can supply this information after
aregcmd has added the new element. The optional second argument is a description of the element.
The syntax is:
add [<path>/]<name> [...]
cd
Use the aregcmd command cd to change the working context, or level in the configuration hierarchy.
When you use the cd command without any parameters, it returns you to the root of the tree. When you
use the optional path argument, you can specify a new context. To change to a higher level in the tree
hierarchy, use the “..” syntax (as you would in a UNIX file system). When you change to a new context,
aregcmd displays the contents of the new location, when you are using the command in interactive
mode, or if verbose mode is on.

2-6
Cisco Prime Access Registrar 6.1 User Guide
OL-29756-01
Chapter 2 Using the aregcmd Commands
aregcmd Commands
The syntax is:
cd [<path>]
delete
Use the aregcmd command delete to remove an element from the configuration hierarchy. You cannot
remove properties on an element; you can only remove entire elements. The delete command is
recursive; that is, it will remove any subelements contained within an element being removed. When the
element is in the current context, you need only provide the name of the element to be deleted. You can
optionally provide a complete path to an element elsewhere in the configuration hierarchy.
The syntax is:
delete [<path>/]<name>
exit
Use the aregcmd command exit to terminate your aregcmd session. If you have any unsaved
modifications, Prime Access Registrar asks if you want to save them before exiting. Any modifications
you don’t choose to save are lost.
The syntax is:
exit
filter
Use the aregcmd command filter to display a selected view of a list. You can use the filter command to
present only the elements of a list that have properties equal to the value you specify. You can also use
the filter command to restore the view of the list after it has been filtered.
When using the filter command, you must provide a property name and a value, and you can optionally
provide the path to the list. Prime Access Registrar displays a list with only those elements that have a
value equal to the specified value. When you want to filter the current context, you can omit the path
argument.
The filter command is sticky, in that, after you have filtered a list, you must explicitly unfilter it before
you can view the complete list again. To restore the unrestricted view of the list, use the filter command
and specify the string all. To restore the list in current context, you can omit the pathname.
The syntax is:
filter [<path>] <property> <value>
or
filter [<path>] all
find
Use the aregcmd command find to locate a specific item in a list. The find command takes one required
argument, which is a full or partial pathname. After you use the command, Prime Access Registrar
displays a page beginning with the entry that most closely matches the pathname you provided.

2-7
Cisco Prime Access Registrar 6.1 User Guide
OL-29756-01
Chapter 2 Using the aregcmd Commands
aregcmd Commands
The syntax is:
find <path>
help
Use the aregcmd command help (with no argument specified) to display a brief overview of the
command syntax. When you specify the name of a command, Prime Access Registrar displays help for
only that command.
The syntax is:
help [<command>]
insert
Use the aregcmd command insert to add an item anywhere in ordered list. The required parameters are
the numeric index of the position in the list in which you want to insert the new item, and the item value.
When the list to which you are adding is not the current context, you can specify the complete path to
the position in the list by prepending the path for the list to the numeric index. After the new value has
been inserted into the list, Prime Access Registrar appropriately renumbers the list.
The syntax is:
insert [<path>/]<index> <value>
This command applies to lists of servers by index and the Resource Managers list in Session Managers.
login
Use the aregcmd command login to connect to a cluster, which contains the RADIUS server and
definition of the authorized administrators. When you do not specify the cluster, admin name, and
password, aregcmd prompts you for them.
When you are currently logged in to a cluster, the login command allows you to connect to another
cluster. When you have changes in the current cluster that you have not saved, aregcmd asks if you want
to save them before logging into another cluster. Any changes you do not save are lost.
After you successfully log in, and if the server is running, Prime Access Registrar displays the cluster
server’s health. Note, to log into a cluster, the Prime Access Registrar Server Agent for that cluster must
be running.
The syntax is:
login [<cluster> [<name> [<password>]]]
logout
Use the aregcmd command logout to log out of the current cluster. After you log out, you have to log
into make any modifications to the configuration hierarchy, or to manage the server(s). When you have
any unsaved modifications, Prime Access Registrar asks if you want to save them before logging out.
Any modifications you do not choose to save are lost.

2-8
Cisco Prime Access Registrar 6.1 User Guide
OL-29756-01
Chapter 2 Using the aregcmd Commands
aregcmd Commands
The syntax is:
logout
ls
Use the aregcmd command ls to list the contents of a level in the configuration hierarchy. This command
works much like the UNIX ls command. When you use it without any parameters, it lists the items in the
current context. When you specify a path, it lists the elements found in that context. When you use the
-R argument, it recursively lists all of the elements in and below the specified (or current) context.
For similar commands, refer to the next and prev commands.
The syntax is:
ls [-R] [<path>]
next
Use the aregcmd next command to review the remaining pages produced from the ls command. Every
time you use the cd command, it automatically invokes the ls command to display the contents of the
location. When the output from the ls command is more than one page (a page is about 24 lines) in
length, Prime Access Registrar displays only the first page.
Note ls command retrieves only user-added objects such as Users, UserLists, and attributes.
The next command takes an optional path and count. The path specifies the context in which you wish
to see the next page and the count specifies the number of lines you wish to see. When you use the next
command without the path, Prime Access Registrar uses the current context. When you do not specify a
count, Prime Access Registrar uses the last count value you used with the next or prev command. If you
never specify a count, Prime Access Registrar uses the default value, which is 20.
Note, the current page for a context is sticky. This means, for example, when you use the next command
to view entries 20 through 30, until you use the next or prev command on the same context, you will
continue to see these entries even if you use the cd command to change to a different context, then return
to the original.
The syntax is:
next [<path>] [<count>]
prev
Use the aregcmd command prev to page backwards through the output of the ls command. It behaves
much like the next command, in that it takes an optional path identifying a context to display and a count
parameter indicating how many lines to display.
The syntax is:
prev [<path>] [<count>]

2-9
Cisco Prime Access Registrar 6.1 User Guide
OL-29756-01
Chapter 2 Using the aregcmd Commands
aregcmd Commands
pwd
Use the aregcmd command pwd to display the absolute pathname of the current context (level in the
configuration hierarchy).
The syntax is:
pwd
query-sessions
Use the aregcmd command query-sessions to query the server about the currently active user sessions.
You can request information about all of the active sessions or just those sessions that match the type
you specify.
The syntax is:
query-sessions <path> [all]
or
query-sessions <path> with-<type> <value> [send-CoA [with-profile <profile name>] ]
or
query-sessions <path> with-Attribute <name> <value> [send-CoA [with-profile <profile
name>] ]
Where <path> is the path to the server, Session Manager, or Resource Manager to query and
with-<type> is one of the following: with-NAS, with-User, with-IP-Address, with-IPX-Network,
with-USR-VPN, with-Key, with-ID or with-Age. The optional [with-profile <profile name>]
parameter indicates a profile name as configured in /Radius/Profiles.
The query-sessions command with an optional [send-CoA] at the end causes the
Prime Access Registrar server to send a Change of Authorization (CoA) request to the client. The CoA
request includes the CoA attributes configured for the client. When the optional profile name is also
included in the command, the Prime Access Registrar server includes the attribute-value (AV) pairs from
the corresponding profile in /Radius/Profiles in the CoA request.
quit
Use the aregcmd command quit to terminate your aregcmd session. You can use it interchangeably with
the exit command.
The syntax is:
quit
When you quit the aregcmd command, if you have made changes, the Prime Access Registrar server
asks if you want to save the changes. Any unsaved changes are lost.
release-sessions
Use the aregcmd command release-sessions to request the server to release one or more currently active
user sessions. This command might be useful, for example, in the case where you have taken a NAS
offline, however, the server believes user sessions for that NAS are still active.

2-10
Cisco Prime Access Registrar 6.1 User Guide
OL-29756-01
Chapter 2 Using the aregcmd Commands
aregcmd Commands
The syntax is one of:
release-sessions <path> all
or
release-sessions <path> with- <type> <value> [send-pod] [send-notification]
or
release-sessions <path> with-Attribute <name> <value> [send-pod] [send-notification]
Where <path> is the path to the server, Session Manager, or Resource Manager to query and
with-<type> is one of the following: with-NAS, with-User, with-IP-Address, with-IPX-Network,
with-USR-VPN, with-Key, or with-ID.
The optional [send-pod <send notification>] parameter sends the disconnect packet to the NAS to clear
sessions and an Accounting-Stop notification to the client listed in the session record.
The optional with-Attribute parameter enables release a session based on a specific attribute and value.
reload
Use the aregcmd command reload to stop the server (when it is running), and then immediately start
the server, forcing it to reread its configuration information. When you have modified the configuration
hierarchy, Prime Access Registrar asks you if you want to save your changes before restarting the server.
You must save your changes in order for the reloaded server to be able to use them.
The syntax is:
reload
reset-stats
Use the aregcmd command reset-stats to reset all server statistics displayed with the stats command.
The reset-stats command also resets SNMP counters.
The reset-stats command provides a way of resetting the server statistics without having to reload or
restart the server.
The syntax is:
reset-stats
save
Use the aregcmd command save to validate the changes you made and commit them to the configuration
database, if no errors are found.
Note Using the save command does not automatically update the running server. To update the server, you
must use the reload command.
The syntax is:
save
Table 2-1 lists the RADIUS server objects and the effect of Dynamic Updates upon them.

2-11
Cisco Prime Access Registrar 6.1 User Guide
OL-29756-01
Chapter 2 Using the aregcmd Commands
aregcmd Commands
set
Use the aregcmd command set to provide values for properties on existing configuration elements. You
only need to provide the set command with the name of the property you wish to set (or just enough of
the name to distinguish it from other properties) and the new value for that property. It also applies to
the Profiles attribute list, the Rules attributes list, the enumeration list in the Attribute dictionary, and
the LDAPtoRadiusMappings and LDAPtoEnvironmentMappings mappings.
The set command can also be used to order servers in a list. To specify a new position in a list for a server,
use the set command and provide the numeric position of the server and the server’s name.
The syntax is:
set [<path>/]<property> <value>
When the list is a list of servers by index, the syntax is:
set [<path>/]<index> <server name>
Note If the index is already in use, the old server name will be replaced by the new server name.
Table 2-1 Dynamic Updates Effect on RADIUS Server Objects
Object Add
Modify or
Delete
Radius Yes Yes
UserLists Yes Yes
UserGroups Yes Yes
Policies Yes Yes
Clients Yes Yes
Vendors Yes Yes
Scripts Yes Yes
Services Yes Yes
SessionManagers Yes No
ResourceManagers Yes No
Profiles Yes Yes
Rules Yes Yes
Translations Yes Yes
TranslationGroups Yes Yes
RemoteServers Yes No
Replication Yes Yes
Advanced Yes Yes
SNMP No No
Ports No No
Interfaces No No

2-12
Cisco Prime Access Registrar 6.1 User Guide
OL-29756-01
Chapter 2 Using the aregcmd Commands
aregcmd Commands
To remove a value from a property (make a property equal to NULL), use a pair of single or double
quotes as the value, as shown below:
set <property> ""
When you need to set an attribute to a value that includes a space, you must double-quote the value, as
in the following:
set Framed-Route "192.168.1.0/24 192.168.1.1"
start
Use the aregcmd command start to enable the server to handle requests. When the configuration
hierarchy has been modified, Prime Access Registrar asks you if you want to save the changes before
starting the server.
The syntax is:
start
stats
Use the aregcmd command stats to provide statistical information on the specified server. You can only
issue this command when the server is running.
Note that aregcmd supports the PAGER environment variable. When the aregcmd stats command is
used and the PAGER environment variable is set, the stats command output is displayed using the
program specified by the PAGER environment variable.
The syntax is:
stats
The following is an example of the statistical information provided after you issue the stats command:
RemoteServer statistics for:ServerA, 209.165.201.1, port 1645
active = TRUE
maxTries = 3
RTTAverage = 438ms
RTTDeviation = 585ms
TimeoutPenalty = 0ms
totalRequestsPending = 0
totalRequestsSent = 14
totalRequestsOutstanding = 0
totalRequestsTimedOut = 0
totalRequestsAcknowledged = 14
totalResponsesDroppedForNotInCache = 0
totalResponsesDroppedForSignatureMismatch = 0
totalRequestsDroppedAfterMaxTries = 0
lastRequestTime = Mon Feb 18 17:19:46 2013
lastAcceptTime = Mon Feb 18 17:18:11 2013

2-13
Cisco Prime Access Registrar 6.1 User Guide
OL-29756-01
Chapter 2 Using the aregcmd Commands
aregcmd Commands
Table 2-2 lists the statistics displayed by the stats command and the meaning of the values.
Table 2-2 aregcmd stats Information
Stats Value Meaning
RemoteServer statistics for: Provides server’s type, name, IP address, and
port used
active Indicates whether the server was active (not in
a down state)
maxTries Number of retry attempts to be made by the
RemoteServer Object based on the
RemoteServer’s maxTries property setting
RTTAverage Average round trip time since the last server
restart
RTTDeviation Indicates a standard deviation of the
RTTAverage
TimeoutPenalty Indicates any change made to the initial
timeout default value
totalRequestsPending Number of requests currently queued
totalRequestsSent Number of requests sent since the last server
restart
Note totalRequestsSent should equal the
sum of totalRequestsOutstanding and
totalRequestsAcknowledged.
totalRequestsOutstanding Number of requests currently proxied that
have not yet returned
totalRequestsTimedOut Number of requests that have timed out since
last server restart or number requests not
returned from proxy server within the
[configured] initial timeout interval
totalRequestsAcknowledged Number of responses received since last
server restart
totalResponsesDroppedForNotInCache Number of responses dropped because their
ID did not match the ID of any Pending
requests
totalResponsesDroppedForSignatureMismatch Number of responses dropped because their
response authenticator did not decode to the
correct shared secret
totalRequestsDroppedAfterMaxTries Number of requests dropped because no
response was received after retrying the
configured number of times. This value is
different from totalRequestsTimedOut
because using the default configuration
values, no response within 2000 ms bumps the
TimedOut counter, but it waits 14000 ms
(2000 + 4000 + 8000) to bump this counter.

2-14
Cisco Prime Access Registrar 6.1 User Guide
OL-29756-01
Chapter 2 Using the aregcmd Commands
aregcmd Commands
status
Use the aregcmd command status to learn whether or not the specified server has been started. When
the server is running, Prime Access Registrar displays its health.
The syntax is:
status
stop
Use the aregcmd command stop to cause the server to no longer accept requests.
The syntax is:
stop
tacacs-stats
Use the aregcmd command tacacs-stats to provide statistical information of TACACS+.
The syntax is:
tacacs-stats
The following is an example of the statistical information provided after you issue the tacacs-stats
command:
Global Tacacs+ Statistics
serverStartTime = Mon Apr 15 01:17:34 2013
serverResetTime = Mon Apr 15 01:17:34 2013
serverState = Running
totalPacketsReceived = 60
totalPacketsSent = 60
totalRequests = 60
totalResponses = 60
totalAuthenticationRequests = 2
totalAuthenticationAccepts = 2
totalAuthenticationRejects = 0
totalAuthenticationChallengeRequests = 0
totalAuthenticationResponses = 2
totalAuthorizationRequests = 56
totalAuthorizationAccepts = 38
totalAuthorizationRejects = 18
totalAuthorizationResponses = 56
totalAccountingRequests = 2
totalAccountingAccepts = 2
totalAccountingRejects = 0
totalAccountingResponses = 2
totalPacketsInUse = 0
lastRequestTime Date and time of last proxy request
lastAcceptTime Date and time of last ACCEPT response to a
client
Table 2-2 aregcmd stats Information (continued)
Stats Value Meaning

2-15
Cisco Prime Access Registrar 6.1 User Guide
OL-29756-01
Chapter 2 Using the aregcmd Commands
aregcmd Commands
totalPacketsDropped = 0
See TACACSStatistics for more information.
tacacs-reset-stats
Use the aregcmd command tacacs-reset-stats to reset TACACS+ statistics displayed with the stats
command. The tacacs-reset-stats command also resets SNMP counters.
The tacacs-reset-stats command provides a way of resetting the TACACS+ statistics without having to
reload or restart the server.
The syntax is:
tacacs-reset-stats
dia-stats
Use the aregcmd command dia-stats to provide statistical information of Diameter.
The syntax is:
dia-stats
The following is an example of the statistical information provided after you issue the following
command:
dia-stats /Radius/RemoteServers/dia
Diameter Remote server statistics for: dia, 10.81.79.76, port 3868
active = TRUE
cDiaRemSvrRTTAverage = 25ms
cDiaRemSvrRTTDeviation = 0ms
cDiaRemSvrServerType = Diameter
cDiaRemSvrTotalRequestsPending = 0
cDiaRemSvrTotalRequestsOutstanding = 0
cDiaRemSvrStatsState = Closed
cDiaRemSvrStatsASRsIn= 0
cDiaRemSvrStatsASRsOut= 0
cDiaRemSvrStatsASAsIn = 0
cDiaRemSvrStatsASAsOut = 0
cDiaRemSvrStatsACRsIn = 0
cDiaRemSvrStatsACRsOut = 0
cDiaRemSvrStatsACAsIn = 0
cDiaRemSvrStatsACAsOut = 0
cDiaRemSvrStatsCERsIn = 0
cDiaRemSvrStatsCERsOut = 0
cDiaRemSvrStatsCEAsIn = 0
cDiaRemSvrStatsCEAsOut = 0
cDiaRemSvrStatsDWRsIn = 0
cDiaRemSvrStatsDWRsOut = 0
cDiaRemSvrStatsDWAsIn = 0
cDiaRemSvrStatsDWAsOut = 0
cDiaRemSvrStatsDPRsIn = 0
cDiaRemSvrStatsDPRsOut = 0
cDiaRemSvrStatsDPAsIn = 0
cDiaRemSvrStatsDPAsOut = 0
cDiaRemSvrStatsRARsIn = 0
cDiaRemSvrStatsRARsOut = 0
cDiaRemSvrStatsRAAsIn = 0
cDiaRemSvrStatsRAAsOut = 0

2-16
Cisco Prime Access Registrar 6.1 User Guide
OL-29756-01
Chapter 2 Using the aregcmd Commands
aregcmd Commands
cDiaRemSvrStatsSTRsIn= 0
cDiaRemSvrStatsSTRsOut = 0
cDiaRemSvrStatsSTAsIn = 0
cDiaRemSvrStatsSTAsOut = 0
cDiaRemSvrStatsRedirectEvents = 0
cDiaRemSvrStatsAccDupRequests = 0
cDiaRemSvrStatsMalformedRequests = 0
cDiaRemSvrStatsAccsNotRecorded = 0
cDiaRemSvrStatsWhoInitDisconnect = 0
cDiaRemSvrStatsAccRetrans = 0
cDiaRemSvrStatsTotalRetrans= 0
cDiaRemSvrStatsAccPendRequestsOut = 0
cDiaRemSvrStatsAccReqstsDropped = 0
cDiaRemSvrStatsHByHDropMessages = 0
cDiaRemSvrStatsEToEDupMessages= 0
cDiaRemSvrStatsUnknownTypes= 0
cDiaRemSvrStatsProtocolErrors = 0
cDiaRemSvrStatsTransientFailures = 0
cDiaRemSvrStatsPermanentFailures = 0
cDiaRemSvrStatsDWCurrentStatus= 0
cDiaRemSvrStatsTransportDown = 0
cDiaRemSvrStatsTimeoutConnAtmpts = 5
trace
Use the aregcmd command trace to set the trace level in the specified server to a new value. The trace
level governs how much information is displayed about the contents of a packet. When the trace level is
zero, no tracing is performed. The higher the trace level, the more information displayed. The highest
trace level currently used by the Prime Access Registrar server is trace level 5.
Note Although the highest trace level supported by the Prime Access Registrar server is trace level 5, an
extension point script might use a higher level. There is no harm in setting the trace to a level higher
than 5. However, increasing the trace level impacts the system performance.
The trace levels are inclusive, meaning that if you set trace to level 3, you will also get the information
reported for trace levels 1 and 2. If you set trace level 4, you also get information reported for trace
levels 1, 2, and 3.
When you do not specify a server, Prime Access Registrar sets the trace level for all of the servers in the
current cluster. When you do not specify a value for the trace level, Prime Access Registrar displays the
current value of the trace level. The default is 0.
The syntax for setting the trace level is:
trace [<server>] [<level>]
Table 2-3 lists the different trace levels and the information returned.
Table 2-3 Trace Levels and Information Returned
Trace Level Information Returned by Trace Command
0 No trace performed.
1 Reports when a packet is sent or received or when there is a change in a
remote server’s status.

2-17
Cisco Prime Access Registrar 6.1 User Guide
OL-29756-01
Chapter 2 Using the aregcmd Commands
aregcmd Commands
trace-file-count
Use the aregcmd command trace-file-count to change the trace log file count dynamically without
requiring a server reload. The syntax is:
trace-file-count n
Where n is a number that specifies the number of trace log files. This function is helpful for debugging
situations when you do not want to perform a reload.
2 Indicates the following:
•Which services and session managers are used to process a packet
•Which client and vendor objects are used to process a packet
•Detailed remote server information for LDAP and RADIUS, such as
sending a packet and timing out
•Details about poorly formed packets
•Details included in trace level 1
3 Indicates the following:
•Error traces in TCL scripts when referencing invalid RADIUS attributes.
•Which scripts have been executed
•Details about local UserList processing
•Details included in trace levels 1 and 2
4 Indicates the following:
•Information about advanced duplication detection processing
•Details about creating, updating, and deleting sessions
•Trace details about all scripting APIs called
•Details included in trace levels 1, 2, and 3
5 Indicates the following:
•Details about use of the policy engine including:
–
Which rules were run
–
What the rules did
–
If the rule passed or failed
–
Detailed information about which policies were called
•Details included in trace levels 1, 2, 3, and 4
Table 2-3 Trace Levels and Information Returned (continued)
Trace Level Information Returned by Trace Command

2-18
Cisco Prime Access Registrar 6.1 User Guide
OL-29756-01
Chapter 2 Using the aregcmd Commands
OpenSSL Commands
unset
Use the aregcmd command unset to remove items from an ordered list. Specify the numeric index of
the element to remove. When the ordered list is not the current context, specify the path to the list before
specifying the numeric index.
When you remove an item from the list, Prime Access Registrar renumbers the list.
The syntax is:
unset [<path>/]<index>
This command applies to lists of servers by index, the Profiles attribute list, the Rules Attributes list, the
enumeration list in the Attribute dictionary, and the LDAPtoRadiusMappings and
LDAPtoEnvironmentMappings mappings.
validate
Use the aregcmd command validate to check the consistency and validity of the specified server’s
configuration. If Prime Access Registrar discovers any errors, it displays them.
The syntax is:
validate
OpenSSL Commands
This section contains a list of OpenSSL commands. You can use them on the command line or insert
them into scripts.
This section contains the following topics:
•ecparam
•req
•ca
ecparam
Use the OpenSSL command ecparam to manipulate or generate ellipitical curve (EC) parameter files.
The syntax is:
ecparam

2-19
Cisco Prime Access Registrar 6.1 User Guide
OL-29756-01
Chapter 2 Using the aregcmd Commands
aregcmd Command Logging
req
Use the OpenSSL command req to create and process certificate requests.
The syntax is:
req
ca
Use the OpenSSL command ca used to sign certificate requests and generate CRLs it also maintains a
text database of issued certificates and their status.
The syntax is:
ca
aregcmd Command Logging
aregcmd now records the commands that are either entered interactively, on the command line, or
executed in batch mode. The recorded commands are saved in the aregcmd_log file, which resides in
the logs directory within the Prime Access Registrar installation directory.
For security reasons, aregcmd blocks out the actual password that is entered as part of the command and
replaces it with <passwd>.
In interactive mode, aregcmd logs the actions that are taking place in the exit/logout dialog box. The
action can be save or not save if the configuration database has been modified after the last execution
of the save command.
In non-interactive (batch or command-line) mode, aregcmd replaces the empty field with a NULL
string.
aregcmd is now installed as a setgid program where the group is set to staff. This allows a non-root user
to run aregcmd while still being able to write to the aregcmd_log log file. During the installation of the
Prime Access Registrar software, you are prompted whether you want to install aregcmd with
setuid/setgid permissions. You must reply “yes” unless you only run aregcmd as user root.
The following is the format of an entry in the exit/logout dialog box when not save has been specified:
mm/dd/yyyy HH:MM:SS aregcmd Info Configuration 0 [<clustername> <username>] ( exit )
mm/dd/yyyy HH:MM:SS aregcmd Info Configuration 0 [<clustername> <username>] ( *** New
config is not saved! ...proceed to logout.)
The following is sample output of an entry in the exit/logout dialog box when not save has been
specified:
10/12/2013 16:18:56 aregcmd Info Configuration 0 [localhost admin] --> quit
10/12/2013 16:19:02 aregcmd Info Configuration 0 [localhost admin] --> *** New config is
not saved! ...proceed to logout.
The following is the format of an entry in the exit/logout dialog box when save has been specified:
mm/dd/yyyy HH:MM:SS aregcmd Info Configuration 0 [<clustername> <username>] ( exit )
mm/dd/yyyy HH:MM:SS aregcmd Info Configuration 0 [<clustername> <username>] ( *** New
config saved!...proceed to logout.)

2-20
Cisco Prime Access Registrar 6.1 User Guide
OL-29756-01
Chapter 2 Using the aregcmd Commands
aregcmd Command Line Editing
aregcmd Command Line Editing
Commands entered at the aregcmd prompt can be edited with a subset of the standard EMACS-style
keystrokes. In addition, the command history can be accessed using the arrow keys on the keyboard. Use
the Up arrow to retrieve the previous command and the Down arrow to retrieve the next command. A
description of the supported key strokes are shown in Table 2-4.
aregcmd Error Codes
Table 2-5 lists the error codes used in aregcmd.
Table 2-4 aregcmd Command Line Editing Keystrokes
Key Stroke Description
Ctrl A Go to the beginning of the line.
Ctrl B Move back one character.
Ctrl D Delete the character at the cursor.
Ctrl E Go to the end of the line.
Ctrl F Move forward one character.
Ctrl N Retrieve the next line.
Ctrl P Retrieve the previous line.
Table 2-5 aregcmd Error Codes
Error
Code Meaning
200 OK
300 Command failed to parse; usually an unbalanced quotation
301 Unknown command; usually caused by a misspelled command
302 Ambiguous command; characters you have entered select more than one command
303 Not logged in; you have logged out of aregcmd and attempted another aregcmd
command
304 Too few arguments
305 Too many arguments
306 Invalid argument
307 Object not found or path ambiguous; you have tried to set an unknown object or
provided a partial name that matches multiple objects
308 Object already exists
309 Confirmation password did not match; when setting a user password, the re-entered
password did not match the initial entry
310 Command failed; a generic response for a command that failed for a reason other than
those listed here
311 Command is interactive; possibly due to attempting to batch mode with an interactive
command
312 Validation failed; a new or modified object is not valid

2-21
Cisco Prime Access Registrar 6.1 User Guide
OL-29756-01
Chapter 2 Using the aregcmd Commands
aregcmd Error Codes
313 Failed to reread; an error occurred while synchronizing changes from another
aregcmd session; occurs only when using multiple aregcmd instances
314 Failed to open the pager; the PAGER environment variable is set to something that
does not exist and the stats command is entered
315 Property is not modifiable; an administrator has attempted to modify a read-only
property
316 Command failed: session is ViewOnly; an view-only administrator has attempted to
modify a property
317 Command failed: server is a Replication Slave; an administrator has attempted to
modify a replicated property on a slave of an SMDBR network
400 Login failed; an incorrect username or password was given during aregcmd log in
401 Unable to access server; aregcmd was unable to communicate with the radius
process usually because the process is not running or is otherwise unresponsive
402 Login failed: version of aregcmd is incompatible with server; a new version of
aregcmd has tried to connect with an older version of Prime Access Registrar
500 Internal error; a generic aregcmd error
Table 2-5 aregcmd Error Codes (continued)
Error
Code Meaning

2-22
Cisco Prime Access Registrar 6.1 User Guide
OL-29756-01
Chapter 2 Using the aregcmd Commands
aregcmd Error Codes

CHAPTER
3-1
Cisco Prime Access Registrar 6.1 User Guide
OL-29756-01
3
Using the Graphical User Interface
Cisco Prime Access Registrar (Prime Access Registrar) is a Remote Authentication Dial-In User Service
(RADIUS) / Diameter server that enables multiple dial-in Network Access Server (NAS) devices to
share a common authentication, authorization, and accounting database.
This chapter describes how to use the standalone graphical user interface (GUI) of
Prime Access Registrar to:
•Configure Cisco Prime Access Registrar
•Manage Network Resources managed by Prime Access Registrar
•Administer Prime Access Registrar related activities
The following topics help you to work with and understand the Prime Access Registrar GUI:
•Launching the GUI
•Common Methodologies
•Dashboard
•Configuring Cisco Prime Access Registrar
•Network Resources
•Administration
•Read-Only GUI
Launching the GUI
Prime Access Registrar requires you to use Microsoft Internet Explorer 8.0 SP1 (Windows 2000 and
Windows XP). You start the GUI by pointing your browser to the Prime Access Registrar server and port
8080, as in the following:
http://ar_server_name:8080
Note You can also use Mozilla Firefox 16.0 and Google Chrome 23.0 browsers to launch the
Prime Access Registrar GUI. It can be launched using IPv6 address also.
To start a secure socket layer (SSL) connection, use https to connect to the Prime Access Registrar
server and port 8443, as in the following:
https://ar_servr_name:8443

3-2
Cisco Prime Access Registrar 6.1 User Guide
OL-29756-01
Chapter 3 Using the Graphical User Interface
Launching the GUI
By default, both HTTP and HTTPS are enabled. The following sections describe how to disable HTTP
and HTTPS:
•Disabling HTTP
•Disabling HTTPS
Note For proper function of Prime Access Registrar GUI, the DNS name resolution for the server's hostname
should be defined precisely.
Disabling HTTP
To disable HTTP access, you must edit the server.xml file in the /cisco-ar/apache-tomcat-7.0.42/conf
directory. You must have root privileges to edit this file.
Use a text editor such as vi to open the server.xml file, and comment out lines 96-99. Use the <!--
character sequence to begin a comment. Use the --> character sequence to end a comment.
The following are lines 93-99 of the server.xml file:
<!-- Define a non-SSL HTTP/1.1 Connector on port 8080 -->
<!-- CHANGE MADE: Note: to disable HTTP, comment out this Connector -->
<Connector port="8080" maxHttpHeaderSize="8192"
maxThreads=”150 minSpare/Threads=”25” maxSpareThreads=”75”
enableLookups="false" redirectPort="8443" acceptCount="100"
connectionTimeout="20000" disableUploadTimeout="true" />
The following example shows these lines with beginning and ending comment sequences to disable
HTTP:
<!-- Define a non-SSL HTTP/1.1 Connector on port 8080 -->
<!-- CHANGE MADE: Note: to disable HTTP, comment out this Connector -->
<!--
<Connector className="org.apache.catalina.connector.http.HttpConnector"
port="8080" minProcessors="5" maxProcessors="75"
enableLookups="true" redirectPort="8443"
acceptCount="10" debug="0" connectionTimeout="60000"/>
-->
After you modify the server.xml file, you must restart the Prime Access Registrar server for the changes
to take effect. Use the following command line to restart the server:
/opt/CSCOar/bin/arserver restart
Disabling HTTPS
To disable HTTPS access, you must edit the server.xml file in the /cisco-ar/apache-tomcat-7.0.42/conf
directory. You must have root privileges to edit this file.
Use a text editor such as vi to open the server.xml file, and comment out lines 116-121. Use the <!--
character sequence to begin a comment. Use the --> character sequence to end a comment.
The following are lines 111-121 of the server.xml file:
<!-- Define an SSL HTTP/1.1 Connector on port 8443 -->
<!-- CHANGE MADE: enabled HTTPS.

3-3
Cisco Prime Access Registrar 6.1 User Guide
OL-29756-01
Chapter 3 Using the Graphical User Interface
Launching the GUI
Note: to disable HTTPS, comment out this Connector -->
<Connector port="8443" maxHttpHeaderSize="8192"
maxThreads="150" minSpareThreads="25" maxSpareThreads=”75”
enableLookups="true" disableUploadTimeout="true"
acceptCount="100" scheme="https" secure="true"
clientAuth="false"
keystoreFile="/cisco-ar/certs/tomcat/server-cert.p12"
keystorePass="cisco" keystoreType="PKCS12" sslProtocol="TLS" />
</Connector>
The following example shows these lines with beginning and ending comment sequences to disable
HTTPS.
<!-- Define an SSL HTTP/1.1 Connector on port 8443 -->
<!-- CHANGE MADE: enabled HTTPS.
Note: to disable HTTPS, comment out this Connector -->
<!--
<Connector className="org.apache.catalina.connector.http.HttpConnector"
port="8443" minProcessors="5" maxProcessors="75"
enableLookups="true"
acceptCount="10" debug="0" scheme="https" secure="true">
<Factory className="org.apache.catalina.net.SSLServerSocketFactory"
keystoreFile="/cisco-ar/certs/tomcat/server-cert.p12"
keystorePass="cisco" keystoreType="PKCS12"
clientAuth="false" protocol="TLS"/>
</Connector>
-->
After you modify the server.xml file, you must restart the Prime Access Registrar server for the changes
to take effect. Use the following command line to restart the server:
/opt/CSCOar/bin/arserver restart
Login Page
The login page has fields for a username and password. This page displays when you first attempt to log
into the system, if a session times out, or after you log out of the system.
Logging In
Users who are configured as Administrators can log into the Prime Access Registrar server.
Logging in
To log into the Prime Access Registrar GUI:
Step 1 Enter the relevant url in the browser. The Prime Access Registrar Login page is displayed.
Step 2 Enter the credentials in the provided fields.
Step 3 Click Login. The Prime Access Registrar main page is displayed.

3-4
Cisco Prime Access Registrar 6.1 User Guide
OL-29756-01
Chapter 3 Using the Graphical User Interface
Common Methodologies
Note After installation of Prime Access Registrar server, when you log into the application for the first time,
the application redirects to the change password page.
Refreshing the pages using the GUI
To stop the server (when it is running), and then immediately start the server, click the Reload link.
Restarting the GUI
To restart the Prime Access Registrar server, click the Restart link.
Note If aregcmd interface is active, then it needs to be closed for restarting the Prime Access Registrar
server.
Logging Out
To log out of the Prime Access Registrar GUI, click Logout in the upper right portion of the
Prime Access Registrar GUI window.
Common Methodologies
This section explains the operations that are common across the GUI interface of
Prime Access Registrar. The functions explained in this section are referred throughout to this help
system.
This section describes the following:
•Filtering Records
•Deleting Records
•Setting Record Limits per Page
•Performing Common Navigations
•Relocating Records
Filtering Records
To filter a record:
Step 1 Navigate to the required page. For example, choose Configuration > Profiles. The Profile page is
displayed.
Step 2 Enter the known details of the record in the Filter text box.
Step 3 Click Go. The matching records are displayed in the search criteria below.

3-5
Cisco Prime Access Registrar 6.1 User Guide
OL-29756-01
Chapter 3 Using the Graphical User Interface
Common Methodologies
Step 4 Click Clear Filter to clear the performed filter.
You can also perform the following:
•Deleting Records
•Editing Records
•Setting Record Limits per Page
•Performing Common Navigations
•Relocating Records
Editing Records
To edit the required records:
Step 1 Navigate to the required page.
Step 2 Search for a record using the filter option, if required.
Step 3 Choose the required record that you want to edit.
Step 4 Click Edit. The selected record details are displayed in the appropriate page.
Step 5 Make the necessary changes.
Step 6 Click Submit or Update to save the details. The page is displayed with the updated details and a message
is prompted. Otherwise click Cancel to return to the page without saving the details.
You can also perform the following:
•Filtering Records
•Deleting Records
•Setting Record Limits per Page
•Performing Common Navigations
•Relocating Records
Deleting Records
To delete a record:
Step 1 Navigate to the required page. For example, choose Configuration > Profiles. The Profile page is
displayed.
Step 2 Search for a record using the filter option, if required.
Step 3 Check the check box against the record that you want to delete.

3-6
Cisco Prime Access Registrar 6.1 User Guide
OL-29756-01
Chapter 3 Using the Graphical User Interface
Common Methodologies
Step 4 Click Delete. A message is displayed on successful deletion of the record.
You can also perform the following:
•Filtering Records
•Editing Records
•Setting Record Limits per Page
•Performing Common Navigations
•Relocating Records
Setting Record Limits per Page
To set the numbers of records to be displayed per page, select the record limit from the list available and
click the Go button. The available denominations are 10, 25, 50, 100, and All.
You can also perform the following:
•Filtering Records
•Editing Records
•Deleting Records
•Performing Common Navigations
•Relocating Records
Performing Common Navigations
On existence of more records that cannot be accommodated in a page, the records are displayed in
multiple pages. Table 3-1 describes the icons used for page navigation.
.
You can also perform the following:
Table 3-1 Page Navigation Icons
Icons Description
To view the next page
To return back to previous page
To view the last page
To return to the first page
3-7
Cisco Prime Access Registrar 6.1 User Guide
OL-29756-01
Chapter 3 Using the Graphical User Interface
Common Methodologies
•Filtering Records
•Editing Records
•Deleting Records
•Setting Record Limits per Page
•Relocating Records
Relocating Records
Table 3-2 describes the icons used for relocating records.
You can also perform the following:
•Filtering Records
•Editing Records
•Deleting Records
•Setting Record Limits per Page
•Performing Common Navigations
Table 3-2 Icons for Relocating Records
Icons Description
To move a record from the Available List to the Selected List
To move a record from the Selected List to the Available List
To move all the records from the Available List to the Selected List
To move all the records from the Selected List to the Available List
To move the selected record one step above
To move the selected record one step below
To move the selected record to the first position
To move the selected record to the last position

3-8
Cisco Prime Access Registrar 6.1 User Guide
OL-29756-01
Chapter 3 Using the Graphical User Interface
Dashboard
Dashboard
The dashboard of the Prime Access Registrar GUI shows you the overview on the status on the server
and user session details. It consists of the three tabs: Server Status, User Sessions, and System
Information.
The Server Status provides the following details:
•AAA Server status— includes the AAA Process, Process ID, and Status.
•Health status of the AAA Server— the status of the AAA Server with respect to the performance
condition is displayed.
The User Sessions consists of two graphs.
•Number of Sessions versus Duration in Days
•Number of Sessions versus Duration in Weeks
The Number of Sessions vs Duration in Weeks report provides the session details with respect to the
number of weeks for which it is queried. The Number of Sessions vs Duration in Days report provides
the session details with respect to the number of days for which it is queried. The Time(mins) vs
Username report provides the accumulated time with respect to the selected username. This report can
also be viewed in the form of chart and grid. Click the relevant icons below the graph to view the details
in the respective formats.
The System Information section consists of two graphs:
•Disk Availability for Prime Access Registrar Directory
•CPU Utilization
The Disk Availability for Prime Access Registrar Directory report provides the details of the available
disk space and used disk space in the Prime Access Registrar directory. When you hover the mouse on
the pie chart, the details of the disk space are displayed. The CPU Utilization report provides the
utilization of the CPU for a specific time. The CPU usage is represented in kilobits per seconds.
Sessions
The Sessions feature of the dashboard helps you in viewing the records based on session id. Table 3-3
lists and describes the various session views in the page.
Table 3-3 Different Session Views
Fields Description
Release Click to release the selected session details.
Release All Click to release all the records from the list.
Send CoA Click to send the CoA packet to the client device.
SendPoD Click to send the disconnect packet to the NAS to clear sessions and
an Accounting-Stop notification to the client listed in the session
record.
Query All Sessions Click to query all the sessions in the server.

3-9
Cisco Prime Access Registrar 6.1 User Guide
OL-29756-01
Chapter 3 Using the Graphical User Interface
Configuring Cisco Prime Access Registrar
To view sessions details:
Step 1 Choose Dashboard > Sessions. The Sessions page appears.
Step 2 Choose the required session id to view Release, Release All, Send CoA, Send PoD, and Query All
Session details. The session details are displayed as described in the above table.
Note You can locate the session id using the filter option. See Filtering Records for more details.
Configuring Cisco Prime Access Registrar
Prime Access Registrar’s operation and configuration are based on a set of objects. On configuring the
Prime Access Registrar major components, the server objects can be created. These objects include the
following:
•RADIUS— the root of the configuration hierarchy
•Profiles—contains individual Profiles
•UserGroups—contains individual UserGroups
•UserList—contains individual UserLists which in turn contain users
•Users—contains individual authentication or authorization details of a user
•Scripts—contains individual Scripts
•Policies—contains a set of rules applied to an Access-Request
•Services—contains individual Services
•CommandSets—contains commands and the action to perform during Terminal Access Controller
Access-Control System Plus (TACACS+) command authorization
•DeviceAccessRules—contains conditions or expressions and the applicable command sets for
TACACS+ command authorization
•FastRules—provides a mechanism to easily choose the right authentication, authorization,
accounting, and query service(s), drop, reject, or break flows, choose session manager or other rules
required for processing a packet
•Replication—maintains identical configurations on multiple machines simultaneously
•RADIUSDictionary—passes information between a script and the RADIUS server, or between
scripts running on a single packet
•VendorDictionary—allows to maintain the attributes of the vendor with respect to vendor id, vendor
type and the attributes required to support the major NAS
•Vendor Attributes—communicates prepaid user balance information from the
Prime Access Registrar server to the AAA client, and actual usage, either interim or total, between
the NAS and the Prime Access Registrar server
•Vendors—contains individual Vendors

3-10
Cisco Prime Access Registrar 6.1 User Guide
OL-29756-01
Chapter 3 Using the Graphical User Interface
Configuring Cisco Prime Access Registrar
•Translations—adds new attributes to a packet or change an existing attribute from one value to
another.
•TranslationGroups—add translation groups for different user groups
•SessionManagers—contains individual Session Managers
•ResourceManager—contains individual Resource Managers
•Remote Servers—contains individual Remote Servers
•Diameter—contains Session Management, Applications, Commands, Diameter Attributes
•Rules—allows to set rules for service selection
RADIUS
The Radius object is the root of the hierarchy. For each installation of the Cisco Prime Access Registrar
server, there is one instance of the Radius object. You reach all other objects in the hierarchy from the
Radius.
Table 3-4 lists and describes the fields in the Radius Properties page.
Note Fields which are represented with the term “required” in the windows of the Prime Access Registrar
GUI, denote mandatory input.
Table 3-4 Radius Properties
Fields Description
Name Required; must be unique in the list of servers in the cluster.
Version Required; the currently installed version of Prime Access Registrar.
Description Optional; description of the server.
DefaultSessionManager Optional; Cisco Prime Access Registrar uses this property if none
of the incoming scripts sets the environment dictionary variable
Session-Manager.
IncomingScript Optional; if there is a script, it is the first script
Cisco Prime Access Registrar runs when it receives a request from
any client and/or for any service.
OutgoingScript Optional; if there is a script, it is the last script
Cisco Prime Access Registrar runs before it sends a response to any
client.
DefaultAuthenticationService Optional; Cisco Prime Access Registrar uses this property when
none of the incoming scripts sets the environment dictionary
variable Authentication-Service.
DefaultAuthorizationService Optional; Cisco Prime Access Registrar uses this property when
none of the incoming scripts sets the environment dictionary
variable Authorization-Service.

3-11
Cisco Prime Access Registrar 6.1 User Guide
OL-29756-01
Chapter 3 Using the Graphical User Interface
Configuring Cisco Prime Access Registrar
Setting Up or Changing the Radius Properties
To set or change the Radius properties:
Step 1 Choose Configuration > Radius. The Radius Properties page appears.
Step 2 Specify the relevant details.
Step 3 Click Save to save the changes made to the Radius properties page.
On successful setting up of the RADIUS, a message is displayed.
Profiles
You use Profiles to group RADIUS attributes that belong together, such as attributes that are appropriate
for a particular class of PPP or Telnet user. You can reference profiles by name from either the
UserGroup or the User properties. Thus, if the specifications of a particular profile change, you can
make the change in a single place and have it propagated throughout your user community.
Although you can use UserGroups or Profiles in a similar manner, choosing whether to use one rather
than the other depends on your site. When you require some choice in determining how to authorize or
authenticate a user session, then creating specific profiles, and creating a group that uses a script to
choose among them is more flexible.
In such a situation, you might create a default group, and then write a script that selects the appropriate
profile based on the specific request. The benefit to this technique is each user can have a single entry,
and use the appropriate profile depending on the way they log in.
Table 3-5 lists and describes the fields in the Add Profiles page.
DefaultAccountingService Optional; Cisco Prime Access Registrar uses this property when
none of the incoming scripts sets the environment dictionary
variable Accounting-Service.
DefaultSessionService Optional; Cisco Prime Access Registrar uses this property when
none of the incoming scripts sets the environment dictionary
variable Session-Service.
Table 3-4 Radius Properties (continued)
Fields Description
Table 3-5 Profile Properties
Fields Description
Name Required; must be unique in the Profiles list.
Description Optional; description of the profile.
RADIUS Optional; set Radius, if the attribute and value needs to be defined
for RADIUS.
VENDOR Optional; set Vendor, if the attribute and value needs to be defined
for Vendor.

3-12
Cisco Prime Access Registrar 6.1 User Guide
OL-29756-01
Chapter 3 Using the Graphical User Interface
Configuring Cisco Prime Access Registrar
You can use the Profiles page for the following:
•Filtering Records
•Adding Profile Details
•Editing Records
•Deleting Records
Adding Profile Details
To add new profile details:
Step 1 Choose Configuration > Profiles. The Profiles page is displayed.
Step 2 Click Add. The Add Profile page is displayed.
Step 3 Specify the required details.
Step 4 Click Submit to save the specified details in the Profiles page. Otherwise click Cancel to return to the
Profiles page without saving the details. On successful creation of the profiles, the Profiles page is
displayed else a respective error message is displayed.
UserGroups
The UserGroups objects allow you to maintain common authentication and authorization attributes in
one location, and then have many users reference them. By having a central location for attributes, you
can make modifications in one place instead of having to make individual changes throughout your user
community.
For example, you can use several UserGroups to separate users by the services they use, such as a group
specifying PPP and another for Telnet.
Table 3-6 lists and describes the fields in the Add User Groups page.
Attribute Name Optional; based on the Attribute Type selected, the attribute name is
automated. Set the relevant name for the attribute type selected.
Value Attribute Optional; set the value for the selected attribute. Click the Add
button to save the details and list it in Radius and Value list. To
navigate between the listed attributes, use the navigation option
available adjacent to the list. See Relocating Records for more
details. To delete the available attributes, select the relevant
attribute and click the Delete button below.
Table 3-5 Profile Properties (continued)
Fields Description

3-13
Cisco Prime Access Registrar 6.1 User Guide
OL-29756-01
Chapter 3 Using the Graphical User Interface
Configuring Cisco Prime Access Registrar
You can use the User Groups page for the following:
•Filtering Records
•Adding UserGroup Details
Table 3-6 UserGroups Properties
Fields Description
General Properties tab
UserGroup Name Required; must be unique in the UserGroup list.
Description Optional; description of the group.
BaseProfile Optional; when you set this to the name of a profile,
Cisco Prime Access Registrar adds the properties in the Profile to the
response dictionary as part of the authorization.
AuthenticationScript Optional; when you set this property to the name of a script, you can use
the Script to perform additional authentication checks to determine
whether to accept or reject the user.
AuthorizationScript Optional; when you set this property to the name of a script, you can use
the script to add, delete, or modify the attributes of the Response
dictionary.
Attribute List tab
RADIUS Optional; set Radius, if the attribute and value needs to be defined for
RADIUS.
VENDOR Optional; set Vendor, if the attribute and value needs to be defined for
Vendor.
Attribute Name Optional; based on the Attribute Type selected, the attribute name is
automated. Set the relevant name for the attribute type selected.
Attribute Value Optional; set the value for the selected attribute. Click the Add button to
save the details and list it in Name and Value list. To navigate between
the listed attributes, use the navigation option available adjacent to the
list. See Relocating Records for more details. To delete the available
attributes, select the relevant attribute and click the Delete button below.
CheckItems List tab
RADIUS Optional; set Radius, if the attribute and value needs to be defined for
RADIUS.
VENDOR Optional; set Vendor, if the attribute and value needs to be defined for
Vendor.
Attribute Name Optional; based on the Attribute Type selected, the attribute name is
automated. Set the relevant name for the attribute type selected.
Attribute Value Optional; set the value for the selected attribute. Click the Add button to
save the details and list it in Check Name and Check Value list. To
navigate between the listed attributes, use the navigation option available
adjacent to the list. See Relocating Records for more details. To delete
the available attributes, select the relevant attribute and click the Delete
button below.

3-14
Cisco Prime Access Registrar 6.1 User Guide
OL-29756-01
Chapter 3 Using the Graphical User Interface
Configuring Cisco Prime Access Registrar
•Editing Records
•Deleting Records
Adding UserGroup Details
To add new user groups details:
Step 1 Choose Configuration > UserGroups. The User Groups page is displayed.
Step 2 Click Add to add new user group details. The Add UserGroup page is displayed.
Step 3 Specify the required details.
Step 4 Click Submit to save the specified details in the User Groups page. Otherwise click Cancel to return to
the User Groups page without saving the details.
On successful creation of the user groups, the User Groups page is displayed else a respective error
message is displayed.
UserList
The UserLists object contains all of the individual UserLists, which in turn, contain the specific users
stored within Prime Access Registrar. Prime Access Registrar references each specific UserList by
name from a Service whose type is set to local. When Prime Access Registrar receives a request, it
directs it to a Service. When the Service has its type property set to local, the Service looks up the user’s
entry in the specific UserList and authenticates and/or authorizes the user against that entry.
You can have more than one UserList in the UserLists object. Therefore, use the UserLists object to
divide your user community by organization. For example, you might have separate UserLists objects
for Company A and B, or you might have separate UserLists objects for different departments within a
company.
Using separate UserLists objects allows you to have the same name in different lists. For example, if
your company has three people named Bob and they work in different departments, you could create a
UserList for each department, and each Bob could use his own name. Using UserLists lets you avoid the
problem of Bob1, Bob2, and so on.
If you have more than one UserList, Prime Access Registrar can run a script in response to requests. The
script chooses the Service, and the Service specifies the actual UserList which contains the user. The
alternative is dynamic properties.
Note The attributes defined for a user list must match the protocol of the incoming packet. For example, if the
incoming packet is a Diameter packet, the attributes defined must be specific to Diameter or common to
both RADIUS and Diameter. Similarly, if the incoming packet is a RADIUS packet, the attributes
defined must be specific to RADIUS or common to both RADIUS and Diameter. Otherwise, the
incoming packet will not be processed.
Table 3-7 lists and describes the fields in the Add User List page.

3-15
Cisco Prime Access Registrar 6.1 User Guide
OL-29756-01
Chapter 3 Using the Graphical User Interface
Configuring Cisco Prime Access Registrar
You can use the User List page for the following:
•Filtering Records
•Adding UserList Details
•Editing Records
•Deleting Records
Adding UserList Details
To add new user list details:
Step 1 Choose Configuration > UserList. The User List page is displayed.
Step 2 Click Add to add new user list details. The Add UserList page is displayed.
Step 3 Enter the required details.
Step 4 Click Submit to save the specified details in the User List page. Otherwise click Cancel to return to the
User List page without saving the details.
On successful creation of the user list, the User List page is displayed else a respective error message is
displayed.
Note After adding a new user list, you can add users to the user list. See Adding User Details for more
information.
Users
The user objects are created to hold the necessary details to authenticate or authorize a user. These users
form the component of User Lists, where their details are stored within Prime Access Registrar. The
users in local Userlist can have multiple profiles.
Note Usernames might not include the forward slash (/) character. If the Prime Access Registrar server
receives an access request packet with a Username attribute containing a forward slash character and the
Prime Access Registrar server uses an internal UserList to look up users, the server produces an error
(AX_EINVAL) and might fail. If usernames require a forward slash, use a script to translate the slash to
an acceptable, unused character.
Table 3-7 User List Properties
Fields Description
UserList Name Required; must be unique.
Description Optional; description of the user.

3-16
Cisco Prime Access Registrar 6.1 User Guide
OL-29756-01
Chapter 3 Using the Graphical User Interface
Configuring Cisco Prime Access Registrar
Table 3-8 lists and describes the fields in the Add Users page.
Table 3-8 Users Properties
Fields Description
General Properties tab
Name Required; must be unique.
Enabled Required; must be checked to allow user access. If Enabled is not checked,
user is denied access.
Allow Null Pwd During authentication, if the Allow NULL Password environment variable is
set to TRUE, user authentication is bypassed. By default, the Allow NULL
Password environment variable is not set.
UserGroup Use the drop-down list to select a UserGroup and use the properties specified
in the UserGroup to authenticate and/or authorize the user. The default is none.
Password Required; length must be between 0-253 characters.
Base Profile Optional; use the drop-down list to select a Profile. If the service-type is not
equal to Authenticate Only, Prime Access Registrar adds the properties in the
Profile to the Response dictionary as part of the authorization. This field is
optional for the CLI, but required for the GUI. Use the menu to select a profile
other than the default None.
Confirm Password Required; must match password.
User Defined Optional; you can use this property to store notational information which you
can then use to filter the UserList. This property also sets the environment
variable for UserDefined.
Authentication Script Optional; use the drop-down list to select the name of a script to perform
additional authentication checks to determine whether to accept or reject the
user. This field is optional for the CLI, but required for the GUI. Use the menu
to select an Authentication Script other than the default None.
Authorization Script Optional; use the drop-down list to select the name of a script to add, delete,
or modify the attributes of the Response dictionary. This field is optional for
the CLI, but required for the GUI. Use the menu to select an Authorization
Script other than the default None.
Description Optional; description of the user.
Attribute List tab
RADIUS Optional; set Radius, if the attribute and value needs to be defined for
RADIUS.
VENDOR Optional; set Vendor, if the attribute and value needs to be defined for Vendor.
Attribute Name Optional; based on the Attribute Type selected, the attribute name is
automated. Set the relevant name for the attribute type selected.
Attribute Value Optional; set the value for the selected attribute. Click the Add button to save
the details and list it in Name and Value list. To navigate between the listed
attributes, use the navigation option available adjacent to the list. See
Relocating Records for more details. To delete the available attributes, select
the relevant attribute and click the Delete button below.

3-17
Cisco Prime Access Registrar 6.1 User Guide
OL-29756-01
Chapter 3 Using the Graphical User Interface
Configuring Cisco Prime Access Registrar
You can use the Users page for the following:
•Filtering Records
•Adding User Details
•Editing Records
•Deleting Records
Adding User Details
To add new user details:
Step 1 Choose Configuration > UserList. The User List page is displayed.
Step 2 Click the user list name link. The Users page is displayed.
Step 3 Click Add to add new user details. The Add Users page is displayed.
Step 4 Specify the required details.
Step 5 Click Submit to save the specified details in the Users page. Otherwise click Cancel to return to the
Users page without saving the details.
On successful creation of the user details, the Users page is displayed else a respective error message is
displayed.
Scripts
The Script objects define the function Cisco Prime Access Registrar invokes whenever the Script is
referenced by name from other objects in the configuration.
There are four types of scripts:
CheckItems List tab
RADIUS Optional; set Radius, if the attribute and value needs to be defined for
RADIUS.
VENDOR Optional; set Vendor, if the attribute and value needs to be defined for Vendor.
Attribute Name Optional; based on the Attribute Type selected, the attribute name is
automated. Set the relevant name for the attribute type selected.
Attribute Value Optional; set the value for the selected attribute. Click the Add button to save
the details and list it in Check Name and Check Value list. To navigate between
the listed attributes, use the navigation option available adjacent to the list. See
Relocating Records for more details. To delete the available attributes, select
the relevant attribute and click the Delete button below.
Table 3-8 Users Properties (continued)
Fields Description

3-18
Cisco Prime Access Registrar 6.1 User Guide
OL-29756-01
Chapter 3 Using the Graphical User Interface
Configuring Cisco Prime Access Registrar
•REX (RADIUS EXtension) scripts are written in C or C++, and thus are compiled functions that
reside in shared libraries
•TCL scripts are written in TCL, and are interpreted functions defined in source files.
•Java scripts
•Internal scripts, which allow you to add, modify, or delete attributes in the request, response, and
environment dictionaries for RADIUS, Diameter, and TACACS+. For more information about
internal scripts, see Internal Scripts, page 11-14.
When you use a Prime Access Registrar file service, Prime Access Registrar automatically closes any
opened files. However, if you write scripts that manipulate files, you are responsible for closing them.
If you have more than one extension point script (defined under /Radius/Scripts) using the same Java
class, only one instance of the class is created and used for all the extension point scripts.
For more information about scripts, see Chapter 11, “Using Extension Points.”
Table 3-9 lists and describes the fields in the Add Scripts page.
Table 3-9 Script Object Properties
Fields Description
Script Name Required; must be unique in the Scripts list.
Language Required; specify either REX, Tcl, Java, or Internal.
Description Optional; description of the script.
File/Class Name Required; specifies either a relative or absolute path. When you specify
a relative path, the path must be relative to the
$INSTALL/scripts/radius/$Language directory. When you specify an
absolute path, the server must be able to reach it.
For Java language scripts, the name of the class that implements the
extension interface; the .class file should be placed in
/cisco-ar/scripts/radius/java
Entry Point Required; when not set, Prime Access Registrar uses the value specified
in the Name property.
Init Entry Point Optional; if set, it must be the name of the global symbol
Prime Access Registrar should call when it initializes the shared library
at system start up, and just before it unloads the shared library.
Init Entry Point
Arg
Optional; when set, it provides the arguments to be passed to the
InitEntryPoint in the environmental variable Arguments.
Note The InitEntryPoint properties allow you to perform
initialization before processing and then cleanup before stopping
the server. For example, when Prime Access Registrar unloads
the script (when it stops the RADIUS server) it calls the
InitEntryPoint again to allow it to perform any clean-up
operations as a result of its initialization. One use of the function
might be to allow the script to close an open Accounting log file
before stopping the RADIUS server.
The following fields appear if the language is set as Internal
Protocol Required; select RADIUS or Diameter to indicate the protocol for which
the attributes are to be modified.

3-19
Cisco Prime Access Registrar 6.1 User Guide
OL-29756-01
Chapter 3 Using the Graphical User Interface
Configuring Cisco Prime Access Registrar
ActionStatements Select one of following the options:
•Simple Attribute Operation—allows you to add, modify, or delete an
attribute value to the request, response, or environment dictionary
•Copy an Attribute—allows you to copy an attribute value from one
dictionary to another
•Concatenate Operation—allows you to concatenate an attribute
value from one dictionary to another
•Replace Operation—allows you to replace an attribute value from
one dictionary to another
•Value Based Manipulations—allows you to manipulate attribute
values in a dictionary based on a given text
•Log or Trace Messages—allows you to create different levels of log
or trace messages
•I can do it myself—allows you to create your own script for the
selected protocol
Left Side of Statement
Operation Choose the operation to perform as Add, Modify, or Delete.
Dictionary Choose Request, Response, or Environment to specify the RADIUS
dictionary to apply the action to.
Attr Type Applicable for RADIUS protocol; select RADIUS or VENDOR to
indicate the attribute type.
Group AVP Applicable for Diameter protocol; select the group AVP and its level to
apply the action to.
Attribute Based on the attribute type/group AVP selected, choose the appropriate
attribute to apply the action to.
Env Attribute Enter the environment attribute to apply the action to.
This field is available only if the Dictionary chosen is Environment.
Right Side of Statement
Text Enter the text that needs to be added, modified, or deleted to/from the
given attribute in the selected dictionary.
Only this field is available if the action statement is Simple Attribute
Operation or Replacement Operation.
This field is also available under the following circumstances:
•If the action statement is Copy an Attribute, Concatenate
Operation, or Value Based Manipulations, and if the type is
chosen as Custom Text
Type Select Radius, Diameter, or Custom Text.
Dictionary If the type is set as Radius or Diameter, choose Request, Response, or
Environment to specify the dictionary to apply the action to.
Attr Type Applicable for RADIUS protocol; select RADIUS or VENDOR to
indicate the attribute type.
Table 3-9 Script Object Properties (continued)
Fields Description

3-20
Cisco Prime Access Registrar 6.1 User Guide
OL-29756-01
Chapter 3 Using the Graphical User Interface
Configuring Cisco Prime Access Registrar
Group AVP Applicable for Diameter protocol; select the group AVP and its level to
apply the action to.
Attribute Based on the attribute type/group AVP selected, choose the appropriate
attribute to apply the action to.
Env Attribute Enter the environment attribute to apply the action to.
This field is available only if the Dictionary chosen is Environment.
Concatenate / Replace Options
This section is available if the Action Statements field is set to Concatenate Operation or
Replace Operation.
Type Select Radius, Diameter, or Custom Text.
Text Enter the text to concatenate to or replace the given attribute value in the
selected dictionary.
Only this field is available if the action statement is Replace Operation.
This field is also available if the action statement is Concatenate
Operation and if the type is chosen as Custom Text
Dictionary If the type is Radius, choose Request, Response, or Environment to
specify the RADIUS dictionary to apply the action to.
Attr Type Applicable for RADIUS protocol; select RADIUS or VENDOR to
indicate the attribute type.
Group AVP Applicable for Diameter protocol; select the group AVP and its level to
apply the action to.
Attribute Based on the attribute type/group AVP selected, choose the appropriate
attribute to apply the action to.
Env Attribute Enter the environment attribute to apply the action to.
This field is available only if the Dictionary chosen is Environment.
Text Manipulations
This section is available if the Action Statements field is set to Value Based Manipulations.
Operation Select one of the following options:
•Begins With—to manipulate the attribute value beginning with the
given text
•Contains—to manipulate the attribute value that contains the given
text
•Ends With—to manipulate the attribute value that ends with the
given text
•Strip Text—to strip the given text from the attribute value
Text The text you need to manipulate the attribute value with.
This following fields are available if the Action Statements field is set to Log or Trace
Messages.
Table 3-9 Script Object Properties (continued)
Fields Description

3-21
Cisco Prime Access Registrar 6.1 User Guide
OL-29756-01
Chapter 3 Using the Graphical User Interface
Configuring Cisco Prime Access Registrar
You can use the Scripts page for the following:
•Filtering Records
•Adding Script Details
•Editing Records
•Deleting Records
Adding Script Details
To add new script details:
Step 1 Choose Configuration > Scripts. The Scripts page is displayed.
Step 2 Click Add to add new scripts details. The Script Details page is displayed.
Step 3 Enter the required details.
Step 4 Click Save to save the specified details in the Scripts page. Otherwise click Cancel to return to the
Scripts page without saving the details.
On successful creation of the scripts, the Scripts page is displayed else a respective error message is
displayed.
Policies
A Policy is a set of rules applied to an Access-Request.
Table 3-10 lists and describes the fields in the Add Policies page.
Log Type Select one of the following options:
•log—to add a log message
•trace—to add a trace message
Level Applicable only for logs; level of the log message to add.
Message The log or trace message to add.
This following field is available if the Action Statements field is set to I can do it myself.
Statement Enter the action statement as a free text.
Table 3-9 Script Object Properties (continued)
Fields Description
Table 3-10 Policies Properties
Fields Description
Name Required; must be unique in the Policies list
Description Optional; description of the Policy

3-22
Cisco Prime Access Registrar 6.1 User Guide
OL-29756-01
Chapter 3 Using the Graphical User Interface
Configuring Cisco Prime Access Registrar
You can use the Policies page for the following:
•Filtering Records
•Adding Policy Details
•Editing Records
•Deleting Records
Adding Policy Details
To add new policy details:
Step 1 Choose Configuration > Policies. The Policies page is displayed.
Step 2 Click Add to add new policy details. The Policy Details page is displayed.
Step 3 Specify the required details.
Step 4 Click Submit to save the specified details in the Policies page. Otherwise click Cancel to return to the
Policies page without saving the details.
On successful creation of the policies, the Policies page is displayed else a respective error message is
displayed.
Services
Cisco Prime Access Registrar supports authentication, authorization, and accounting (AAA) services. In
addition to the variety of built-in AAA services (specified in the Type property),
Cisco Prime Access Registrar also enables you to add new AAA services through custom shared
libraries.
This section lists the types of services available in Prime Access Registrar with their required and
optional properties. The service you specify determines what additional information you must provide.
The various types of services are:
•Simple Services
•ServiceWithRS
•PEAP Service
•EAP Service
Rules/Policies Required; set the rules/polices to be grouped.
Operators Required; set the operators to be grouped along with selected rules/policies. The
selected rules and operators will be grouped and listed in the Grouping Box. To
delete the available groups, select the relevant group from the Grouping list and
click the Delete button below.
Table 3-10 Policies Properties (continued)
Fields Description

3-23
Cisco Prime Access Registrar 6.1 User Guide
OL-29756-01
Chapter 3 Using the Graphical User Interface
Configuring Cisco Prime Access Registrar
•Diameter Service
Simple Services
Prime Access Registrar provides the following simple services:
•Rex
•File
•Trusted-ID
•Group
•Local
•Java
•WiMAX
•RADIUS-Query
•Dyn-Authz
•Diameter-RADIUS
•RADIUS-Diameter
•Diameter-Query
•3GPPAuthorization
•3GPP-Reverse-Authorization
Rex
Select rex service when a custom service needs to be created and a script for authentication,
authorization, or accounting has to be used.
File
Select File type when local accounting is to be performed using a specific file. The files under the
configuration will be saved in the configured name when the server is invoked even if the service is not
being invoked by any request packets.
Prime Access Registrar flushes the accounting record to disk before it acknowledges the request packets.
Based on the specified maximum file size and age, it closes the accounting file, moves it to a new name,
and reopens the file as a new file. The file names are based on its creation and modification dates.
Trusted-ID
Select the trusted-id service type to authorize and authenticate a user based on a Trusted ID. Using SSG's
Transparent Auto-Login (TAL) feature, a TAL access-request packet contains a Trusted ID, such as a
MAC address, that identifies the user without the user's real username and password. If
Prime Access Registrar knows the user associated with the Trusted ID, it uses the Trusted ID to
authenticate and authorize the user. For more information, see Chapter 15, “Using Trusted ID
Authorization with SESM.”

3-24
Cisco Prime Access Registrar 6.1 User Guide
OL-29756-01
Chapter 3 Using the Graphical User Interface
Configuring Cisco Prime Access Registrar
Group
A group service contains a list of references to other services and specifies whether the responses from
each of the services should be handled as a logical AND or OR function, which is specified in the
Result-Rule attribute of Group Services. The default value is AND.
When the Result-Rule attribute is set to AND or OR, each referenced service is accessed sequentially,
and the Group Service waits for a response from the first referenced service before moving on to the next
service (if necessary).
The ResultRule settings parallel-and and parallel-or are similar to the AND and OR settings except that
they ask each referenced service to process the request simultaneously instead of asking each referenced
server sequentially, thereby saving processing time.
Local
Select local services when authentication and authorization needs to be performed by
Prime Access Registrar server using a specific UserList.
Java
Select Java service type when a custom service needs to be created and to use an extension point script
to provide the service’s functionality and handle both RADIUS and TACACS requests for
authentication, authorization, or accounting.
WiMAX
Prime Access Registrar uses the Extensible Authentication Protocol (EAP) to enable the WiMAX
feature. It captures the IP attributes and Mobility Keys that are generated during network access
authentication.
RADIUS-Query
Select this service type to query cached data through RADIUS Packets. It contains the list of session
managers to be queried from and a list of (cached) attributes to be returned in the Access-Accept packet
in response to a RADIUS Query request. It is initiated through an extension point script or through the
Rule and Policy Engine by setting it to a new environment variable named Query-Service.
Dyn-Authz
Select this service type to process dynamic authorization requests. This involves Change of
Authorization (COA) and Packet of Disconnect (POD) features. For more information about these
features, see Chapter 17, “Using Cisco Prime Access Registrar Server Features.”
Diameter-RADIUS
Select this service for Diameter to RADIUS translation to translate incoming RADIUS request to a
Diameter request. Prime Access Registrar provides scripting points, which operate on the original
packet and on the newly translated packet based on request and response mapping. For more information,
see Chapter 8, “Diameter.”

3-25
Cisco Prime Access Registrar 6.1 User Guide
OL-29756-01
Chapter 3 Using the Graphical User Interface
Configuring Cisco Prime Access Registrar
RADIUS-Diameter
Select this service for RADIUS to Diameter translation to translate incoming Diameter request to a
RADIUS request. Prime Access Registrar provides scripting points, which operate on the original packet
and on the newly translated packet based on request and response mapping. For more information, see
Chapter 8, “Diameter.”
Diameter-Query
Select this service type to query cached data through Diameter Packets. It contains the list of session
managers to be queried from and a list of (cached) attributes to be returned in the Access-Accept packet
in response to a Diameter Query request. It is initiated through an extension point script or through the
Rule and Policy Engine by setting it to a new environment variable named Query-Service.
3GPPAuthorization
Select this service to enable 3GPP authorization of subscribers. For more information about 3GPP
authorization, see Chapter 20, “Wireless Support.”
3GPP-Reverse-Authorization
Select this service to enable 3GPP reverse authorization of subscribers. For more information about
3GPP reverse authorization, see Chapter 20, “Wireless Support.”
Table 3-11 lists and describes the fields in the Services Details page. The fields listed below are the entire
list of all the available types. The fields are displayed based on the type selected.
Table 3-11 Simple Service Properties
Fields Description
Service Name Required; must be unique in the Services list.
Incoming Script Optional; name of script to run when the service starts.
Type Required; must set it to a valid Prime Access Registrar service.
Outgoing Script Name of script to run when the service ends.
Description Optional; description of the service.
Outage Script Optional; if you set this property to the name of a script,
Cisco Prime Access Registrar runs it when an outage occurs. This property
allows you to create a script that notifies you when the RADIUS server
detects a failure.
Outage Policy Required; the default is DropPacket. This property defines how
Cisco Prime Access Registrar handles requests if all servers listed in the
RemoteServers properties are unavailable (that is, all remote RADIUS
servers are not available). You must set it to one of the following:
AcceptAll, DropPacket, or RejectAll.
The following properties appear for the job type rex.
Filename Required; must be either a relative or an absolute path to the shared library
containing the Service. When the pathname is relative, it must be relative to
$INSTALL/Scripts/Radius/rex.

3-26
Cisco Prime Access Registrar 6.1 User Guide
OL-29756-01
Chapter 3 Using the Graphical User Interface
Configuring Cisco Prime Access Registrar
EntryPoint Required; must be set to the function’s global symbol.
InitEntryPoint Required; must be the name of the global symbol
Cisco Prime Access Registrar should call when it initializes the shared
library and just before it unloads the shared library.
A rex service must have an InitEntryPoint even if the service only returns
REX_OK.
InitEntryPointArgs Optional; when set, it provides the arguments to be passed to the
InitEntryPoint in the environmental variable Arguments.
The following properties appear for the job type file.
FilenamePrefix Required; a string that specifies where Cisco Prime Access Registrar writes
the account records. It must be either a relative or absolute path. When you
specify a relative path, it must be relative to the $INSTALL/logs directory.
When you specify an absolute path, the server must be able to reach it. The
default is Accounting.
MaxFileAge Optional; stored as a string, but is composed of two parts, a number and a
units indicator (<n> <units>) in which the unit is one of: H, Hour, Hours,
D, Day, Days, W, Week, Weeks. The default is one day.
RolloverSchedule Indicates the exact time including the day of the month or day of the week,
hour and minute to roll over the accounting log file.
MaxFileSize Optional; stored as a string, but is composed of two parts, a number and a
units indicator (<n> <units>) in which the unit is one of: K, kilobyte, or
kilobytes, M, megabyte, or megabytes, or G, gigabyte, or gigabytes. The
default is ten megabytes.
UseLocalTimeZone When set to TRUE, indicates the accounting records' TimeStamp is in local
time. When set to FALSE, the default, accounting records' TimeStamp is in
GMT.
The following properties appear for the job type trusted-id.
UserService Required; name of service that can be used to authenticate.
SessionManager Required; select the required session manager from the available list.
The following properties appear for the job type group.
Result Rule When set to AND (the default), the response from the GroupService is
positive if each of the services referenced return a positive result. The
response is negative if any of the services reference return a negative result.
When set to OR, the response from the GroupService is positive if any of
the services referenced return a positive result. The response is negative if
all the referenced services return a negative result.
The settings parallel-AND or parallel-OR are similar to AND and OR
settings, except that each referenced service processes requests
simultaneously instead of asking each reference service sequentially to save
processing time.
Table 3-11 Simple Service Properties (continued)
Fields Description

3-27
Cisco Prime Access Registrar 6.1 User Guide
OL-29756-01
Chapter 3 Using the Graphical User Interface
Configuring Cisco Prime Access Registrar
GroupServices Optional; use the GroupServices subdirectory to specify the subservices in
an indexed list to provide specific ordering control of which services to
apply first. Each subservice listed must be defined in the Services section
of the RADIUS configuration and cannot be a of type group, eap-leap, or
eap-md5.
To navigate between the listed attributes, use the navigation option
available adjacent to the list. See Relocating Records for more details.
The following properties appear for the job type local.
UserList Required; this object contains all of the individual UserLists, which in turn,
contain the specific users stored within Prime Access Registrar.
Cisco Prime Access Registrar references each specific UserList by name
from a Service whose type is set to local.
When Cisco Prime Access Registrar receives a request, it directs it to a
Service. When the Service has its type property set to local, the Service
looks up the user’s entry in the specific UserList and authenticates and/or
authorizes the user against that entry.
Enable Device Access Check the box to enable TACACS+ command authorization.
Note Device Access Rules are applicable for TACACS+ command
authorization. For more information on TACACS+ command
authorization, see TACACS+ Support for AAA.
Device Access Rule Select a device access rule and click Add. The selected access rule is
displayed in the Device Access Rules list box.
Default Device Access
Action
Select the default action to perform on the commands for all the access rules
in the authorization service. Options are PermitAll and DenyAll.
The following properties appear for the job type java.
Class name Optional; set to the name of a class that implements the Extension interface.
InitializeArg Optional; set to a string to be passed to the Initialize method if the class
implements the optional ExtensionWithInitialization interface.
The following properties appear for the job type wimax.
HARKKey Required; used as the base key to generate random HARKKey for all the
HAs that are configured in Prime Access Registrar.
By default, the value is cisco112.You can change this value.
WimaxAuthenticationS
ervice
Required; a valid EAP service which can be used for WiMAX
authentication. By default, this value is none.
HARKLifeTime Required; used as time (in minutes) to regenerate the HARKKeys based on
its lifetime.
WimaxSessionManager Required; set a valid session manager which has HA and HA Cache as
resource managers. By default, this value is none.
WimaxQueryService Required; set a valid RADIUS query service which is configured with
WiMAX session manager. By default, this value is none.
WimaxPrepaidService Optional; set a valid prepaid service to carry out the prepaid functionality
of WiMAX. Otherwise this value is set to none.
Table 3-11 Simple Service Properties (continued)
Fields Description

3-28
Cisco Prime Access Registrar 6.1 User Guide
OL-29756-01
Chapter 3 Using the Graphical User Interface
Configuring Cisco Prime Access Registrar
AllowAAAToIncludeKe
ys
Optional; If this is set, the HAAA will include the hHA-RK-Key,
hHA-RK-SPI and hHA-RK-Lifetime in the Access-Accept.
Otherwise, those attributes will not be in the Access-Accept. By default this
value is True.
RequiredMSK Optional; If this is set, the MSK will be provided by the AAA server as a
result of successful EAP-Authentication. By default, this value is False.
The following properties appear for the job type radius-query.
Attribute List tab
Attribute type Select either RADIUS or VENDOR. If Vendor is selected, specify the
vendor type from the drop-down list. Select the attributes from the available
list. To navigate between the listed attributes, use the navigation option
available adjacent to the list. See Relocating Records for more details.
Session Manager tab
Session Manager Select the required session manager from the available list. To navigate
between the listed attributes, use the navigation option available adjacent to
the list. See Relocating Records for more details.
The following property appears for the job type dyn-auth.
Session Cache Query
Service
Select the session cache query service to use for dynamic authorization.
The following properties appear for the job type diameter-radius or radius-diameter.
ProxyServiceName Select the Diameter proxy service name.
DiameterApplicationID Select the Diameter service application ID. This field appears only for
radius-diameter service type.
UseFor3GPPReverseAu
thorizationService
Check the box to enable 3GPP authorization service in the translation
framework. This field appears only for radius-diameter service type.
PreRequestTranslationS
cript
Select the scripting point to be called on the original request packet.
PostRequestTranslation
Script
Select the scripting point to be called on the translated request packet.
PreResponseTranslation
Script
Select the scripting point to be called on the response packet.
PostResponseTranslatio
nScript
Select the scripting point to be called on the translated response packet.
ResultCodeMappings This tab allows you to map result codes.
RequestAVPMappings This tab allows you to map request AVPs.
RequestAVPsToBeAdde
d
This tab allows you to map request AVPs to be added.
RequestEnvironmentMa
ppings
This tab allows you to map request environment variables.
ResponseAVPMappings This tab allows you to map response AVPs.
Table 3-11 Simple Service Properties (continued)
Fields Description

3-29
Cisco Prime Access Registrar 6.1 User Guide
OL-29756-01
Chapter 3 Using the Graphical User Interface
Configuring Cisco Prime Access Registrar
You can use the Simple Services List page for the following:
•Filtering Records
•Adding Simple Service Details
•Editing Records
•Deleting Records
Adding Simple Service Details
To add new simple service details:
Step 1 Choose Configuration > Services > Simple. The Services List(REX, FILE, LOCAL, GROUP, JAVA...)
page is displayed.
Step 2 Click Add to add new simple service details. The Services Details page is displayed.
Step 3 Enter the required details.
Step 4 Click Submit to save the specified details in the Services List(REX, FILE, LOCAL, GROUP, JAVA...)
page. Otherwise click Cancel to return to the Services List(REX, FILE, LOCAL, GROUP, JAVA...) page
without saving the details.
ResponseAVPsToBeAd
ded
This tab allows you to map response AVPs to be added.
ResponseEnvironment
Mappings
This tab allows you to map response environment variables.
The following properties appear for the job type diameter-query.
Attribute List tab
Attribute type Select either RADIUS or VENDOR. If Vendor is selected, specify the
vendor type from the drop-down list. Select the attributes from the available
list. To navigate between the listed attributes, use the navigation option
available adjacent to the list. See Relocating Records for more details.
Session Manager tab
Session Manager Select the required session manager from the available list. To navigate
between the listed attributes, use the navigation option available adjacent to
the list. See Relocating Records for more details.
The following property appears for the job type 3gpp-authorization.
Protocol Required; select RADIUS or Diameter to indicate the protocol to use for
3GPP authorization.
TranslationService Required if the protocol selected is RADIUS; translation service to use
during 3GPP authorization.
DiameterProxyService Required if the protocol selected in Diameter; diameter proxy service to use
during 3GPP authorization.
The following properties appear for the job type 3gpp-reverse-authorization.
TranslationService Required; the translation service to use for 3GPP reverse authorization.
Table 3-11 Simple Service Properties (continued)
Fields Description

3-30
Cisco Prime Access Registrar 6.1 User Guide
OL-29756-01
Chapter 3 Using the Graphical User Interface
Configuring Cisco Prime Access Registrar
On successful creation of the simple service properties, the Services List(REX, FILE, LOCAL, GROUP,
JAVA...) page is displayed else a respective error message is displayed.
ServiceWithRS
The RemoteServers directory lists one or more remote servers to process access requests. The servers
must also be listed in order under /Radius/RemoteServers. The order of the RemoteServers list
determines the sequence for directing access requests when MultipleServersPolicy is set to RoundRobin
mode. The first server in the list receives all access requests when MultipleServersPolicy is set to
Failover mode.
The RemoteServers object can be used to specify the properties of the remote servers to which Services
proxy requests. RemoteServers are referenced by name from the RemoteServers list in either the
RADIUS, LDAP or TACACS-UDP Services.
Table 3-12 lists and describes the fields in the Services Details page.
Table 3-12 Remote Server Service Properties
Fields Description
Service Name Required; name of the remote server service
Incoming Script Optional; name of script to run when the service starts
Type Required; Remote service Type must be set to one of the following: domain-auth,
ldap, ldap-accounting, odbc-accounting, odbc, oci-accounting, oci, prepaid,
radius, radius-session, or m3ua.
Outgoing Script Optional; name of script to run when the service ends.
Outage Script Optional; if you set this property to the name of a script, Prime Access Registrar
runs it when an outage occurs. This property allows you to create a script that
notifies you when the RADIUS server detects a failure.
Outage Policy The default is DropPacket. This property defines how Prime Access Registrar
handles requests if all servers listed in the RemoteServers properties are
unavailable (that is, all remote RADIUS servers are not available). You must set it
to one of the following: AcceptAll, DropPacket, or RejectAll.
Description
(optional)
Optional; description of the remote server service
MultipleServersPo
licy
Required; must be set to either Failover or RoundRobin.
When you set it to Failover, Prime Access Registrar directs requests to the first
server in the list until it determines the server is offline. At which time,
Prime Access Registrar redirects all requests to the next server in the list until it
finds a server that is online.
When you set it to RoundRobin, Prime Access Registrar directs each request to
the next server in the RemoteServers list to share the resource load across all of
the servers listed in the RemoteServers list.
RemoteServers Select the required remote server from the available list. To navigate between the
listed attributes, use the navigation option available adjacent to the list. See
Relocating Records for more details.

3-31
Cisco Prime Access Registrar 6.1 User Guide
OL-29756-01
Chapter 3 Using the Graphical User Interface
Configuring Cisco Prime Access Registrar
AuthorizationInfo
LookUp
Applicable only for the m3ua service type. Choose one of the following from the
drop-down list:
•MSISDN-IMSI—To fetch MSISDN in the request and send IMSI in the
response to the HLR.
•IMSI-MSISDN—To fetch IMSI in the request and send MSISDN in the
response to the HLR.
•MAP-RESTORE—To fetch the profile information of a subscriber from the
HLR. For more information on configuring the M3UA service with Map
Restore Data authorization, see Configuring M3UA Service with Map Restore
Data Authorization, page 23-13.
MapVersion Applicable only for the m3ua service type; select the map version that HLR
supports.
Device Access Rules
This section is applicable for TACACS+ command authorization and is available only for service types
local-user, oci, odbc, and ldap. For more information on TACACS+ command authorization, see
TACACS+ Support for AAA.
Enable Device
Access
Check the box to enable TACACS+ command authorization.
Device Access
Rule
Select a device access rule and click Add. The selected access rule is displayed in
the Device Access Rules list box.
Default Device
Access Action
Select the default action to perform on the commands for all the access rules in the
authorization service. Options are PermitAll and DenyAll.
Restore Data Mappings Section
IMSI IMSI received in the response from HLR.
Naea-Preferred CI North American Equal Access preferred Carrier ID List. A list of the preferred
carrier identity codes that are subscribed to.
Roaming
Restricted In Sgsn
Due To
Unsupported
Feature
Indicates that a subscriber is not allowed to roam in the current Service GPRS
Support Node (SGSN) or Cisco Mobility Management Entity (MME) area.
Network Access
Mode
The Network Access Mode (NAM) defines if the subscriber is registered to get
access to the CS (non-GPRS/EPS network), to the PS (GPRS/EPS) network, or to
both networks. NAM describes the first level of the subscriber data pseudo-tree
below the IMSIroot. It is permanent subscriber data stored in the HSS / HLR and
the SGSN with the Gs interface option, and the MME with the SGs interface
option.
LMU Indicator Indicates the presence of an LMU.
IST Alert Timer Indicates the IST alert timer value that must be used in the Mobile Switching
Center (MSC) to inform the HLR about the call activities that the subscriber
performs.
Super Charger
Supported In HLR
Indicates whether super charger concept is supported in HLR.
Table 3-12 Remote Server Service Properties (continued)
Fields Description

3-32
Cisco Prime Access Registrar 6.1 User Guide
OL-29756-01
Chapter 3 Using the Graphical User Interface
Configuring Cisco Prime Access Registrar
CS Allocation
Retention Priority
Allocation-retention priority for Circuit Switched (CS). This parameter specifies
relative importance to compare with other bearers about allocation and retention
of bearer.
ChargingCharacte
ristics
Subscribed charging characteristics.
Access Restriction
Data
Allowed Recipient Access Table (RAT) according to subscription data.
UE Reachability
Request Indicator
Indicates that the Home Subscriber Server (HSS) is awaiting a notification of user
equipment (UE) reachability.
Category Calling party category
LSA Information These parameters refer to one or more localized service areas (LSAs) a subscriber
may be a member of, together with the priority, the preferential access indicator,
the active mode support indicator and active mode indication of each localized
service area. The access right outside these localized service areas is also
indicated.
Subscriber Data
MSISDN MSISDN value in the subscriber data.
Subscriber Status Barring status of the subscriber, which could be Service Granted or Operator
Determined Barring.
Roaming
Restriction Due To
Unsupported
Feature
Indicates that the subscriber is not allowed to roam in the current MSC area.
Bearer Service
List
List of extensible bearer services subscribed.
Configure the index value to fetch only the required bearer services.
TeleService List List of extensible teleservices subscribed.
Configure the index value to fetch only the required teleservices.
Provisioned SS List of supplementary services provisioned.
Configure the index value to fetch only the required supplementary services.
ODB-Data Operator Determined Barring (ODB) general data and ODB Home Public Land
Mobile Network (HPLMN) specific data.
Regional
Subscription Data
List of regional subscription areas (zones) in which the subscriber is allowed to
roam.
Configure the index value to fetch only the required zones.
VBS Subscription
Data
List of Voice Broadcast Services (VBS) subscribed.
Configure the index value to fetch only the required VBS.
VGCS
Subscription Data
List of Voice Group Call Services (VGCS) subscribed.
Configure the index value to fetch only the required VGCS.
LCS Information
Live Communication Server (LCS) related information for the subscriber.
Table 3-12 Remote Server Service Properties (continued)
Fields Description

3-33
Cisco Prime Access Registrar 6.1 User Guide
OL-29756-01
Chapter 3 Using the Graphical User Interface
Configuring Cisco Prime Access Registrar
You can use the ServiceWithRS List page for the following:
•Filtering Records
•Adding Remote Server Service Details
•Editing Records
•Deleting Records
Adding Remote Server Service Details
To add new remote server service details:
Step 1 Choose Configuration > Services > ServiceWithRS. The Services List (..with Remote Servers) page
is displayed.
GMLC-List List of Gateway Mobile Location Centers (GMLCs) that are permitted to issue a
call/session unrelated or call/session related MT-LR request.
Configure the index value to fetch only the required GMLCs.
LCS-Privacy
Exception List
Classes of LCS client that are allowed to locate any target Mobile Station (MS).
Configure the index value to fetch only the required classes.
MOLR-List Code and status of Mobile Originating Location Request (MO-LR) subscribed.
Configure the index value to fetch only the required requests.
MC-SS-Info
Parameters identifying Multicall (MC) supplementary services (SS) that are subscribed.
MC-SS-Code Code of the MC SS.
MC-SS-Status Status of the MC SS.
NbrSB Maximum number of parallel bearers that may be used as defined by the user’s
subscription.
NbrUser Maximum number of parallel bearers that may be used as defined by the user at
registration of the MC SS.
SGSN-CAMEL-Subscription Info
Parameters identifying the subscribers as having Customized Application for Mobile Enhanced Logic
(CAMEL) services that are invoked in the SGSN.
GPRS-CSI Identifies the subscriber as having GPRS originating SMS CAMEL services.
MO-SMS-CSI Identifies the subscriber as having mobile originating SMS CAMEL services.
MT-SMS-CSI Identifies the subscriber as having mobile terminating SMS CAMEL services.
ProfileMappings
Attribute Select an RADIUS attribute to map the fetched profile data.
Value:Profile Enter a value for the attribute.
ProfileList Select one of the profile lists and click Add. The entered profile details are
displayed in the list box in the ProfileMappings section. You can delete a profile
attribute from the list as required.
Table 3-12 Remote Server Service Properties (continued)
Fields Description

3-34
Cisco Prime Access Registrar 6.1 User Guide
OL-29756-01
Chapter 3 Using the Graphical User Interface
Configuring Cisco Prime Access Registrar
Step 2 Click Add to add new remote server service details. The Services Details page is displayed.
Step 3 Enter the required details.
Step 4 Click Submit to save the specified details in the Services List (..with Remote Servers) page. Otherwise,
click Cancel to return to the Services List (..with Remote Servers) List page without saving the details.
On successful creation of the properties, the Services List (..with Remote Servers) page is displayed else
a respective error message is displayed.
PEAP Service
Protected EAP (PEAP) is an authentication method designed to mitigate several weaknesses of EAP.
PEAP leverages Industry standard authentication of the server using certificates TLS (RFC 2246) and
creation of a secure session that can then be used to authenticate the client.
The PEAP protocol consists of two phases, an authentication handshake phase and a tunnel phase where
another complete EAP authentication exchange takes place protected by the session keys negotiated by
phase one. Prime Access Registrar supports the tunneling of other EAP methods within the PEAP phase
two exchange.
Prime Access Registrar supports the two major existing variants of PEAP:
•PEAP Version 0 (Microsoft PEAP)
•PEAP Version 1 (Cisco Prime PEAP)
PEAP Version 0
PEAP Version 0 also called as Microsoft PEAP is described in IETF drafts
(draft-kamath-pppext-peapv0-00.txt and draft-josefsson-pppext-eap-tls-eap-02.txt). This version of
PEAP uses either EAP-MSChapV2 or EAP-SIM as an authentication method. The testing method used
for this version of PEAP is radclient.
PEAP Version 1
PEAP Version 1 also called as Cisco Prime PEAP is described by IETF draft
(draft-zhou-pppext-peapv1-00.txt). This version can use either EAP-GTC or EAP-SIM as an
authentication method. The testing method used for this version of PEAP is radclient.
Table 3-13 lists and describes the fields in the PEAP Services Details page. The fields listed below are
the entire list of all the available types. The fields are displayed based on the type selected.
Table 3-13 PEAP Service Properties
Fields Description
Service Name Required; service name
Incoming Script Optional; script Prime Access Registrar server runs when it receives a request
from a client.
Type Required; must set it to a valid Prime Access Registrar service.
Outgoing Script Optional; script Prime Access Registrar server runs before it sends a response to
a client.

3-35
Cisco Prime Access Registrar 6.1 User Guide
OL-29756-01
Chapter 3 Using the Graphical User Interface
Configuring Cisco Prime Access Registrar
Maximum
Message Size
Indicates the maximum length in bytes that a PEAP or EAP-TLS message can
have before it is fragmented.
Server
Certificate File
Required; the full pathname of the file containing the server’s certificate or
certificate chain used during the TLS exchange. The pathname can be optionally
prefixed with a special string that indicates the type of encoding used for the
certificate. The two valid encoding prefixes are PEM and DER. If an encoding
prefix is not present, the file is assumed to be in PEM format.
The following example assumes that the subdirectory pki under /cisco-ar
contains the server’s certificate file. The file server-cert.pem is assumed to be in
PEM format; note that the file extension .pem is not significant.
set ServerCertificateFile PEM:/cisco-ar/pki/server-cert.pem
Private Key
Password
Required; the password used to protect the server’s private key.
Server RSA Key
File
Required; the full pathname of the file containing the server’s RSA private key.
CRL
Distribution
URL
Optional; The URL that Prime Access Registrar should use to retrieve the
CRL.You can specify a URL that uses HTTP or LDAP.
The following is an example for an HTTP URL:
<http://crl.verisign.com/pca1.1.1.crl>.
The following is an example for an LDAP URL:
ldap://209.165.200.225:388/CN=development-CA,CN=acs-westcoast2,CN=CD
P,CN=Public Key
Services,CN=Services,CN=Configuration,DC=cisco,DC=com
CA Certificate
File
Optional; the full pathname of the file containing trusted CA certificates used for
client verification. The file can contain more than one certificate, but all
certificates must be in PEM format. DER encoding is not allowed.
Certificate
Veri fica t i on
Mode
Optional; specifies the type of verification used for client certificates. Must be set
to one of RequireCertificate, None, or Optional.
•RequireCertificate causes the server to request a client certificate and
authentication fails if the client refuses to provide one.
•None will not request a client certificate.
Optional causes the server to request a client certificate but the client is allowed
to refuse to provide one.
Table 3-13 PEAP Service Properties (continued)
Fields Description

3-36
Cisco Prime Access Registrar 6.1 User Guide
OL-29756-01
Chapter 3 Using the Graphical User Interface
Configuring Cisco Prime Access Registrar
CA Certificate
Path
Optional; the name of a directory containing trusted CA certificates (in PEM
format) used for client verification. This parameter is optional, and if it is used
there are some special preparations required for the directory it references.
Each certificate file in this directory must contain exactly one certificate in PEM
format. The server looks up the certificate files using the MD5 hash value of the
certificate’s subject name as a key. The directory must therefore also contain a set
of symbolic links each of which points to an actual certificate file. The name of
each symbolic link is the hash of the subject name of the certificate.
For example, if a certificate file name ca-cert.pem is located in the
CACertificatePath directory, and the MD5 hash of the subject name contained in
ca-cert.path.pem is 1b96dd93, then a symbolic link named 1b96dd93 must point
to the ca-cert.pem file.
If there are subject name collisions such as multiple certificates with the same
subject name, each link name must be indexed with a numeric extension as in
1b96dd93.0 and 1b96dd93.1.
Veri fica t i on
Depth
Optional; specifies the maximum length of the certificate chain used for client
verification.
Enable Session
Cache
Optional; specifies whether TLS session caching (fast reconnect) is enabled or
not. Set to True to enable session caching; otherwise set to False.
Tunnel Service Required; must be the name of an existing EAP-MSCHAPv2 or EAP-SIM
service.
Authentication
Timeout
Required; specifies time (in seconds) to wait before an authentication request
times out; defaults to 120.
Description
(optional)
Optional; description of the PEAP service.
Session Timeout Optional; if TLS session caching (fast reconnect) is enabled, SessionTimeout
specifies the maximum lifetime of a TLS session. Expired sessions are removed
from the cache and will require a subsequent full authentication.
SessionTimeout is specified as a string consisting of pairs of numbers and units,
where units might be one of the following: M, Minute, Minutes, H, Hour, Hours,
D, Day, Days, W, Week, Weeks, as in the following:
Set SessionTimeout “1 Hour 45 Minutes”
Enable WPS Optional; When set to TRUE, enables Windows Provisioning Service (WPS) and
provides two other properties, MasterURL and WPSGuestUserProfile. The
default value is FALSE.
Master URL Optional; when using WPS, specifies the URL of the provisioning server which is
modified with the appropriate fragment and sent to the client.
WPS Guest User
Profile
Optional; when using WPS, specifies a profile to be used as a guest user profile;
must be a valid profile under /Radius/Profiles.
This profile is used for guests and users whose account has expired. This profile
normally contains attributes denoting the VLAN-id of the guest network (which
has the provisioning server alone) and might contain IP-Filters that would restrict
the access of the guest (to only the provisioning server).
Table 3-13 PEAP Service Properties (continued)
Fields Description

3-37
Cisco Prime Access Registrar 6.1 User Guide
OL-29756-01
Chapter 3 Using the Graphical User Interface
Configuring Cisco Prime Access Registrar
You can use the PEAP Services List page for the following:
•Filtering Records
•Adding PEAP Service Details
•Editing Records
•Deleting Records
Adding PEAP Service Details
To add new PEAP service details:
Step 1 Choose Configuration > Services > PEAP. The PEAP Services List page is displayed.
Step 2 Click Add to add new PEAP service details. The PEAP Services Details page is displayed.
Step 3 Specify the relevant PEAP service details.
Step 4 Click Submit to save the specified details in the PEAP Services List page. Otherwise click Cancel to
return to the PEAP Services List page without saving the details.
On successful creation of the PEAP service properties, the PEAP Services List page is displayed else a
respective error message is displayed.
EAP Service
Prime Access Registrar supports the Extensible Authentication Protocol (EAP) to provide a common
protocol for differing authentication mechanisms. It provides dynamic selection of the authentication
mechanism at the time of authentication based on information transmitted in the Access-Request.
Prime Access Registrar supports the following EAP authentication methods:
•EAP-AKA
•EAP-AKA-Prime
•EAP-FAST
•EAP-GTC
•EAP-LEAP
•EAP-MD5
•EAP-Negotiate
•EAP-MSChapV2
•EAP-SIM
•EAP-Transport Level Security (TLS)
•EAP-TTLS
EAP-AKA
Authentication and Key Agreement (AKA) is an EAP mechanism for authentication and session key
distribution. It is used in the 3rd generation mobile networks Universal Mobile Telecommunications
System (UMTS) and CDMA2000. AKA is based on symmetric keys, and typically runs in a UMTS

3-38
Cisco Prime Access Registrar 6.1 User Guide
OL-29756-01
Chapter 3 Using the Graphical User Interface
Configuring Cisco Prime Access Registrar
Subscriber Identity Module (USIM), or a (Removable) User Identity Module ((R) UIM), similar to a
smart card. EAP-AKA (Extensible Authentication Protocol Method for UMTS Authentication and Key
Agreement) includes optional identity privacy support, optional result indications, and an optional fast
reauthentication procedure. The EAP-AKA authentication service is extended to generate a Diameter
message Multimedia-Authentication-Request (MAR), with the subscriber identity (IMSI), to the Home
Subscriber Server (HSS) when it requires the authentication vectors. The HSS sends a Diameter
Mutlimedia-Authentication-Answer (MAA) back containing the number of quintuplets.
EAP-AKA-Prime
EAP-AKA-Prime (EAP-AKA') is an EAP authentication method, with a small revision to the existing
EAP-AKA method. EAP- AKA' has a new key derivation function, which binds the keys derived within
the method to the name of the access network. This limits the effects of compromised access network
nodes and keys. EAP-AKA’ supports SHA-256 instead of SHA-1.
EAP-FAST
EAP-FAST is an authentication method which uses the EAP-MSChapV2 method for credential
provisioning and EAP-GTC for authentication. Credential provisioning typically occurs only during the
client’s initial EAP-FAST authentication. Subsequent authentications rely on the provisioned credential
and will usually omit the provisioning step.
This authentication protocol is designed to address the performance shortcomings of prior TLS-based
EAP methods while retaining features such as identity privacy and support for password-based
protocols. The EAP-FAST protocol is described by the IETF draft (draft-cam-winget-eap-fast-00.txt).
EAP-GTC
This method defined in RFC 2284, is used for transmitting a username and password to an authentication
server.
Note It should not be used except as an authentication method for PEAP Version 1 because the password is
not protected.
EAP-LEAP
The new AAA Cisco-proprietary protocol called Light Extensible Authentication Protocol (LEAP)
supported by Prime Access Registrar, is a proprietary Cisco authentication protocol designed for use in
IEEE 802.11 wireless local area network (WLAN) environments. Important features of LEAP include:
•Mutual authentication between the network infrastructure and the user
•Secure derivation of random, user-specific cryptographic session keys
•Compatibility with existing and widespread network authentication mechanisms (e.g., RADIUS)
Note Prime Access Registrar supports a subset of EAP to support LEAP. This is not a general implementation
of EAP for Prime Access Registrar.
The Cisco-Wireless or LEAP is an EAP authentication mechanism where the user password is hashed
based on an MD4 algorithm.

3-39
Cisco Prime Access Registrar 6.1 User Guide
OL-29756-01
Chapter 3 Using the Graphical User Interface
Configuring Cisco Prime Access Registrar
EAP-MD5
This is another EAP authentication exchange. In EAP-MD5 there is a CHAP-like exchange and the
password is hashed by a challenge from both client and server to verify the password. On successful
verification, the connection proceeds, although the connection is periodically rechallenged (per RFC
1994).
EAP-Negotiate
This is a special service used to select at runtime the EAP service to be used to authenticate the client.
It is configured with a list of candidate EAP services that represent the allowable authentication methods
in preference order.
EAP-Negotiate is useful when the client population has deployed a mix of different EAP methods that
must be simultaneously supported by Prime Access Registrar. EAP-Negotiate solves the problem of
distinguishing client requirement by using the method negotiation feature of the EAP protocol.
EAP-MSChapV2
EAP-MSChapv2 encapsulates the MSChapV2 protocol (specified by RFC 2759) and can be used either
as an independent authentication mechanism or as an inner method for PEAP Version 0 (recommended).
This is based on draft-kamath-pppext-eap-mschapv2-00.txt, an informational IETF draft document.
EAP-SIM
An access point uses the Prime Access Registrar RADIUS server to perform EAP-SIM authentication of
mobile clients. Prime Access Registrar must obtain authentication information from the HLR.
Prime Access Registrar contacts the MAP gateway that performs the MAP protocol over SS7 to the
HLR, or alternately it can contact the HLR (through STP in some cases) using the SIGTRAN-M3UA
interface. The EAP-SIM authentication service is extended to generate a Diameter message
Multimedia-Authentication-Request (MAR), with the subscriber identity(IMSI), to the HSS when it
requires the authentication vectors. The HSS sends a Diameter Mutlimedia-Authentication-Answer
(MAA) back containing the number of triplets.
EAP-Transport Level Security (EAP-TLS)
This is an authentication method (described in RFC 2716) which leverages TLS, described in RFC 2246,
to achieve certificate-based authentication of the server and the client (optionally). It provides many of
the same benefits as PEAP but differs in the lack of support for legacy authentication methods.
EAP-Transport Level Security (TLS)
This is an authentication method (described in RFC 2716) which leverages TLS, described in RFC 2246,
to achieve certificate-based authentication of the server and the client (optionally). It provides many of
the same benefits as PEAP but differs in the lack of support for legacy authentication methods.
EAP-TTLS
The Extensible Authentication Protocol Tunneled TLS (EAP-TTLS) is an EAP protocol that extends
EAP-TLS. EAP- TTLS extends the authentication negotiation EAP-TLS by using the secure connection
established by the TLS handshake to exchange additional information between client and server. It
leverages TLS (RFC 2246) to achieve certificate-based authentication of the server (and optionally the
client) and creation of a secure session that can then be used to authenticate the client using a legacy
mechanism.
EAP-TTLS is a two-phase protocol. Phase 1 conducts a complete TLS session and derives the session
keys used in Phase 2 to securely tunnel attributes between the server and the client. The attributes
tunneled during Phase 2 can be used to perform additional authentication(s) via a number of different
mechanisms.

3-40
Cisco Prime Access Registrar 6.1 User Guide
OL-29756-01
Chapter 3 Using the Graphical User Interface
Configuring Cisco Prime Access Registrar
The authentication mechanisms used during Phase 2 include PAP, CHAP, MS-CHAP, MS-CHAPv2, and
EAP. If the mechanism is EAP, then several different EAP methods are possible.
Table 3-14 lists and describes the fields in the EAP Services Details page. The fields listed below are the
entire list of all the available types. The fields are displayed based on the type selected.
Table 3-14 EAP Service Properties
Fields Description
Service Name Required; service name
Incoming Script Optional script Prime Access Registrar server runs when it receives
a request from a client.
Type Required; must set it to a valid Prime Access Registrar service
Outgoing Script Optional script Prime Access Registrar server runs before it sends
a response to a client
Description (optional) Optional; description of the PEAP service.
Authentication Timeout Mandatory; specifies time (in seconds) to wait before an
authentication request times out; defaults to 120.
UserService Required; name of service that can be used to authenticate using
cleartext passwords.
ServiceList List of preconfigured EAP authentication services. To navigate
between the listed attributes, use the navigation option available
adjacent to the list. See Relocating Records for more details.
Maximum Message Size Required; indicates the maximum length in bytes that a PEAP
message can have before it is fragmented.
Server Certificate File Required; the full pathname of the file containing the server’s
certificate or certificate chain used during the TLS exchange. The
pathname can be optionally prefixed with a special string that
indicates the type of encoding used for the certificate. The two valid
encoding prefixes are PEM and DER. If an encoding prefix is not
present, the file is assumed to be in PEM format.
Private Key Password Required; the password used to protect the server’s private key.
Server RSA Key File Required; the full pathname of the file containing the server’s RSA
private key. The pathname can be optionally prefixed with a special
string that indicates the type of encoding used for the certificate.
The two valid encoding prefixes are “PEM” and “DER”. If an
encoding prefix is not present, the file is assumed to be in PEM
format.
The following example assumes that the subdirectory pki under
/cisco-ar contains the server’s certificate file. The file
server-key.pem is assumed to be in PEM format. The file extension
.pem is not significant.
set ServerRSAKeyFile PEM:/cisco-ar/pki/server-key.pem

3-41
Cisco Prime Access Registrar 6.1 User Guide
OL-29756-01
Chapter 3 Using the Graphical User Interface
Configuring Cisco Prime Access Registrar
CRL Distribution URL Optional; enter the URL that Prime Access Registrar should use to
retrieve the CRL.You can specify a URL that uses HTTP or LDAP.
The following is an example for an HTTP URL:
<http://crl.verisign.com/pca1.1.1.crl>.
The following is an example for an LDAP URL:
ldap://209.165.200.225:388/CN=development-CA,CN=acs-west
coast2,CN=CDP,CN=Public Key
Services,CN=Services,CN=Configuration,DC=cisco,DC=com
CA Certificate File Optional; the full pathname of the file containing trusted CA
certificates used for client verification. The file can contain more
than one certificate, but all certificates must be in PEM format.
DER encoding is not allowed.
Certificate Verification Mode The value is set to optional by default. If set to RequireCertificate,
the client certificate will always be verified. If set to optional, client
certificate verification happens optionally.
CA Certificate Path The name of a directory containing trusted CA certificates (in PEM
format) used for client verification. This parameter is optional and
if it is used there are some special preparations required for the
directory it references.
Each certificate file in this directory must contain exactly one
certificate in PEM format. The server looks up the certificate files
using the MD5 hash value of the certificate’s subject name as a key.
The directory must therefore also contain a set of symbolic links
each of which points to an actual certificate file. The name of each
symbolic link is the hash of the subject name of the certificate.
For example, if a certificate file named ca-cert.pem is located in
the CACertificatePath directory, and the MD5 hash of the subject
name contained in ca-cert.path.pem is 1b96dd93, then a symbolic
link named 1b96dd93 must point to ca-cert.pem.
If there are subject name collisions such as multiple certificates
with the same subject name, each link name must be indexed with
a numeric extension as in 1b96dd93.0 and 1b96dd93.1.
Verification Depth Optional; specifies the maximum length of the certificate chain
used for client verification.
Enable Session Cache Optional; specifies whether TLS session caching (fast reconnect) is
enabled or not. Set to True to enable session caching; otherwise set
to False.
Table 3-14 EAP Service Properties (continued)
Fields Description

3-42
Cisco Prime Access Registrar 6.1 User Guide
OL-29756-01
Chapter 3 Using the Graphical User Interface
Configuring Cisco Prime Access Registrar
Session Timeout Required; if TLS session caching (fast reconnect) is enabled,
SessionTimeout specifies the maximum lifetime of a TLS session.
Expired sessions are removed from the cache and will require a
subsequent full authentication.
SessionTimeout is specified as a string consisting of pairs of
numbers and units, where units might be one of the following: M,
Minute, Minutes, H, Hour, Hours, D, Day, Days, W, Week, Weeks,
as in the following:
Set SessionTimeout “1 Hour 45 Minutes”
UseECCCertificate Determines the applicability of the authentication mechanism in
SmartGrid Solutions.
When you check this check box, it can use the ECC, RSA, or
combination of both certificate for certificate based verification.
When you uncheck this check box, it can only use the RSA
certificate for certificate based verification. The default location to
fetch the certificate file is /cisco-ar/pki.
Authentication Service Specifies the name of the EAP-GTC service used for
authentication. The named service must have the UseLabels
parameter set to True.
User Prompt Optional string the client might display to the user; default is Enter
password:” Use the set command to change the prompt, as in the
following:
set UserPrompt “Admin Password:”
UseLabels Required; must be set to TRUE for EAP-FAST authentication and
set to FALSE for PEAP authentication. Set to FALSE by default.
SystemID Optional; string that identifies the sender of the MSChapV2
challenge message.
IsWindows7Client Optional; must be set to TRUE for EAP-MSChapV2
authentication. Set to FALSE by default.
Authority Identifier Required; a string that uniquely identifies the credential (PAC)
issuer. The client uses this value to select the correct PAC to use
with a particular server from the set of PACs it might have stored
locally.
Authority Information Required; a string that provides a descriptive text for this credential
issuer. The value can be displayed to the client for identification
purposes and might contain the enterprise or server names.
Credential Life Time Optional; specifies the maximum lifetime of a Protected Access
Credential (PAC). Clients that successfully authenticate with an
expired PAC will be reprovisioned with a new PAC.
CredentialLifetime is specified as a string consisting of pairs of
numbers and units, where units might be one of the following: M,
Minute, Minutes, H, Hour, Hours, D, Day, Days, W, Week, Weeks.
Credentials that never expire should be specified as Forever.
Table 3-14 EAP Service Properties (continued)
Fields Description

3-43
Cisco Prime Access Registrar 6.1 User Guide
OL-29756-01
Chapter 3 Using the Graphical User Interface
Configuring Cisco Prime Access Registrar
Provision Service Required; specifies the name of the EAP-MSChapV2 service used
for provisioning.
Provision Mode Required; specifies the TLS mode used for provisioning. Clients
only support the default Anonymous mode.
Always Authenticate Optional; indicates whether provisioning should always
automatically rollover into authentication without relying on a
separate session. Most environments, particularly wireless, will
perform better when this parameter is set to True, the default value.
SubscriberDBLookup Specifies the type of communication with the HLR/HSS server.
Based on the type selected, the communication happens with the
HLR/HSS server using the diameter Wx interface, MAP protocol,
or SIGTRAN-M3UA protocol.
This field is displayed when you select the eap-sim option in the
Type field.
Subscriber_DBLookup Specifies the type of communication with the HLR/HSS server.
Based on the type selected, the communication happens with the
HLR/HSS server using the diameter Wx interface, SIGTRAN
protocol, or SIGTRAN-M3UA protocol.
This field is displayed when you select the eap-sim, eap-aka, or
eap-aka’ option in the Type field.
DestinationRealm Required. Need to configure the Diameter Remote Server for the
Realm. The role of the remote server should be Relay.
PreRequestTranslationScript Optional. Prime Access Registrar server runs before sending the
request to the Diameter remote server. The script can modify the
RADIUS packet dictionaries.
PostRequestTranslationScript Optional. Prime Access Registrar server runs before sending the
request to the Diameter remote server. The script can modify the
Diameter packet dictionaries.
PreResponseTranslationScript Optional. Prime Access Registrar server runs after receiving the
response from the Diameter remote server. The script can modify
the Diameter packet dictionaries.
PostResponseTranslationScript Optional. Prime Access Registrar server runs after receiving the
response from the Diameter remote server. The script can modify
the RADIUS packet dictionaries.
FetchAuthorizationInfo When you check this check box, it fetches MSISDN from HLR.
Table 3-14 EAP Service Properties (continued)
Fields Description

3-44
Cisco Prime Access Registrar 6.1 User Guide
OL-29756-01
Chapter 3 Using the Graphical User Interface
Configuring Cisco Prime Access Registrar
General tab
The details in the tab is displayed based on the eap-sim or eap-aka option you select in the Type field.
MultipleServersPolicy Required. Must be set to either Failover or RoundRobin.
When set to Failover, Prime Access Registrar directs requests to
the first server in the list until it determines the server is offline. At
that time, Prime Access Registrar redirects all requests to the next
server in the list until it finds a server that is online.
When set to RoundRobin, Prime Access Registrar directs each
request to the next server in the RemoteServers list to share the
resource load across all of the servers listed in the RemoteServers
list.
NumberOfTriplets Required; number of triplets (1, 2, or 3) to use for authentication;
default is 2.
PseudonymSecret Required; the secret string that is used as the basis for protecting
identities when identity privacy is enabled. This should be at least
16 characters long and have a value that is impossible for an
outsider to guess. The default value is secret.
Note It is very important to change PseudonymSecret from its
default value to a more secure value when identity privacy
is enabled for the first time.
PseudonymRenewtime Required; specifies the maximum age a pseudonym can have before
it is renewed. When the server receives a valid pseudonym that is
older than this, it generates a new pseudonym for that subscriber.
The value is specified as a string consisting of pairs of numbers and
units, where the units might be of the following: M, Minute,
Minutes, H, Hour, Hours, D, Day, Days, W, Week, Weeks. The
default value is “24 Hours”.
Examples are: “8 Hours”, “10 Hours 30 Minutes”, “5 D 6 H 10 M”
PseudonymLifetime Required; specifies the maximum age a pseudonym can have before
it is rejected by the server, forcing the subscriber to authenticate
using it’s permanent identity. The value is specified as a string
consisting of pairs of numbers and units, where the units might be
one of the following: M, Minute, Minutes, H, Hour, Hours, D, Day,
Days, W, Week, Weeks. It can also be Forever, in which case,
pseudonyms do not have a maximum age. The default value is
“Forever”.
Examples are: “Forever”, “3 Days 12 Hours 15 Minutes”, “52
Weeks”
ReauthenticationTimeout Required; specifies the time in seconds that reauthentication
identities are cached by the server. Subscribers that attempt to
reauthenticate using identities that are older than this value will be
forced to use full authentication instead. The default value is 3600
(one hour).
EnableReauthentication Optional; when True, the fast reauthentication option is enabled.
The default value is False.
Table 3-14 EAP Service Properties (continued)
Fields Description

3-45
Cisco Prime Access Registrar 6.1 User Guide
OL-29756-01
Chapter 3 Using the Graphical User Interface
Configuring Cisco Prime Access Registrar
UseProtectedResults Optional; enables or disables the use of protected results messages.
Results messages indicate the state of the authentication but are
cryptographically protected.
ReauthenticationRealm Optional; this information will be supplied later.
MaximumReauthentications Required; specifies the maximum number of times a
reauthentication identity might be reused before it must be
renewed. The default value is 16.
TripletCacheTimeout Required for eap-sim service; time in seconds an entry remains in
the triplet cache. A zero (0) indicates that triplets are not cached.
The maximum is 28 days; the default is 0 (no caching).
QuintetCacheTimeout Required for eap-aka or eap-aka’ service; time in seconds an entry
remains in the quintet cache. A zero (0) indicates that quintets are
not cached. The maximum is 28 days; the default is 0 (no caching).
QuintetGenerationScript Available for eap-aka or eap-aka’ service; script required for
quintet generation.
Authentication Timeout Required; time in seconds to wait for authentication to complete.
The default is 2 minutes; range is 10 seconds to 10 minutes.
UseSimDemoTriplets Optional; set to TRUE to enable the use of demo triplets. This must
be disabled for release builds.
AlwaysRequestIdentity Optional; when True, enables the server to obtain the subscriber’s
identity via EAP/SIM messages instead of relying on the EAP
messages alone. This might be useful in cases where intermediate
software layers can modify the identity field of the
EAP-Response/Identity message. The default value is False.
EnableIdentityPrivacy Optional; when True, the identity privacy feature is enabled. The
default value is False.
Generate3GPPCompliantPseudo
nym
Optional; the value is set to False by default. If set to TRUE then
Prime Access Registrar generates a 12 octet 3GPP compliant
pseudonym identity. The Pseudonym username identities are used
to protect the privacy of subscriber identities.
SendReAuthIDInAccept Optional; the value is set to False by default. When set to True,
Prime Access Registrar sends SN-Fast-ReAuth-UserName (Starent
VSA) in access-accept message.
Outage Script Optional; if you set this property to the name of a script,
Prime Access Registrar runs it when an outage occurs. This
property allows you to create a script that notifies you when the
RADIUS server detects a failure.
NetworkName Required for eap-aka-prime service type. Name of the access
network for which the authentication is performed. This attribute is
captured to ensure that the peer and the server know the name of the
access network for performing the EAP authentication.
MapVersion Required for SIGTRAN-M3UA remote server; select the map
version HLR supports.
Table 3-14 EAP Service Properties (continued)
Fields Description

3-46
Cisco Prime Access Registrar 6.1 User Guide
OL-29756-01
Chapter 3 Using the Graphical User Interface
Configuring Cisco Prime Access Registrar
You can use the EAP Services List page for the following:
•Filtering Records
•Adding EAP Service Details
•Editing Records
•Deleting Records
Adding EAP Service Details
To add new EAP service details:
Step 1 Choose Configuration > Services > EAP. The EAP Services List page is displayed.
Step 2 Click Add to add new EAP service details. The EAP Services Details page is displayed.
Step 3 Enter the relevant details.
Step 4 Click Submit to save the specified details in the EAP Services List page. Otherwise click Cancel to
return to the EAP Services List page without saving the details.
On successful creation of the EAP Service properties, the EAP Services List page is displayed else a
respective error message is displayed.
Diameter Service
Proxy agents assist in routing Diameter messages using the Diameter routing table. Diameter proxy
service works in tandem with the rule policy engine to perform the routing for multiple realms or
applications. The following are the multiple peer policies supported by the proxy service:
•RoundRobin
•FailOver
•IMSI Range Based.
Table 3-15 lists and describes the fields in the Diameter-Services page. The fields listed below are the
entire list of all the available roles. The fields are displayed based on the role selected.
DiameterInterface Select SWx or Wx to indicate the Diameter protocol to use for the
service.
ProxyService Select the diameter proxy service to use.
Remote Servers tab
Attribute Optional; list of remote RADIUS servers which are map gateways.
The remote server type must be set to map-gateway. To navigate
between the listed attributes, use the navigation option available
adjacent to the list. See Relocating Records for more details.
Table 3-14 EAP Service Properties (continued)
Fields Description

3-47
Cisco Prime Access Registrar 6.1 User Guide
OL-29756-01
Chapter 3 Using the Graphical User Interface
Configuring Cisco Prime Access Registrar
Table 3-15 Diameter Service Properties
Fields Description
Name Required; name of the Diameter server.
Description Optional; description of the Diameter server.
Realm Required; realm of the route. Must be unique for a route table.
Role Required; specifies the role that the Diameter entity will play in
resolving messages matching the realm.
The role can be any one of the following:
Relay - Application acting as a Relay Agent.
Redirect - Application acting as a Redirect Agent.
Proxy - Application acting as a Proxy Agent. When the role is set
to Proxy, the IncomingScript and OutgoingScript points are
enabled.
Local - Application processes the requests locally. When the role is
set to Local, the AuthenticationService and AccountingService are
enabled.
By default, the Proxy option is selected. However, you can select
another option from the drop-down list.
Incoming Script Optional; enabled when role is set to Proxy or Local. When set,
must be the name of a known incoming script.
Prime Access Registrar runs the IncomingScript before proxying
the Diameter packet to the remote Diameter server.
Outgoing Script Optional; enabled when role is set to Proxy or Local. When set,
must be the name of a known outgoing script.
Prime Access Registrar runs the OutgoingScript after it receives
the response from the remote Diameter server.
Authentication Service Required; used when service is configured to process the Diameter
requests locally. Set to valid service of type (local/ldap/odbc) to
authenticate the user. This field is displayed when you select the
role type as ‘Local’ in the Role field.
AccountingService Required; used when service is configured to process the
accounting requests locally. Set to valid accounting service of
type(file/odbc-accounting) to write the accounting records. This
field is displayed when you select the role type as ‘Local’ in the
Role field.
Type Required; specifies the service type.The service type ‘Diameter’ is
automatically displayed in this field.
PEER Statements
This is displayed when you select the ‘Local’, ‘Relay’, or ‘Redirect’option in the Role field.
Name Required; name of the peer.
Host Name Required; the hostname or IP address of the peer. The hostname
must exist in the client list for the route to be active.
Metric Required; metric value for the peer entry. The higher the value the
lower the preference. The highest value of preference is 0.

3-48
Cisco Prime Access Registrar 6.1 User Guide
OL-29756-01
Chapter 3 Using the Graphical User Interface
Configuring Cisco Prime Access Registrar
VendorSpecific Required; the default is FALSE. If set to FALSE, the application is
ordinary application and user is prompted to enter the
ApplicationID. If set to TRUE, the application is a VendorSpecific
Application. User is prompted to enter
VendorSpecificApplicationID and VendorID.
VendorID Required; specifies the VendorID for the application.
Example:
DIAMETER 3GPP Cx APPLICATION
VendorSpecificApplicationID 16777216
VendorID 10415
VendorSpecificApplicationID Required; specifies the integer value for the vendor specific
application.
ApplicationID Required; application used in the route. The application Id should
be available in /Advanced/Diameter/Applications.
Applications
This is displayed when you select the ‘Proxy’ option in the Role field.
Name Required; name of the application.
Description The description of the application.
ApplicationID Required; specifies the unique integer value for the application. It
represents the application id of the Application used for load
balancing the Diameter messages.
EnableSticky Required; default is FALSE. If set to True, the sticky entries for
load balancing is enabled and the user is prompted to enter the
values for StickySessionKey, StickyCreationCmdList, and
StickyDeletionCmdList.
MultiplePeersPolicy Required; must be set to RoundRobin, FailOver, or
IMSIRangeBased. Policy used by the Prime Access Registrar
server to load balance the peers.
StickySessionKey Required; used as the sticky key for mapping the sticky sessions.
Set the value to a valid attribute-value pair (AVP) in order to use the
sticky key for maintaining Diameter sessions. This ensures that
Prime Access Registrar maps the request to the same server for all
the subsequent messages using the sticky key. For example, set
StickyAVP “Session-Id”.
When the Prime Access Registrar server receives the CCR-I
request, Prime Access Registrar extracts the Session-Id from the
request packet, maps the Session to the peer configured in the list,
and forwards the request to the chosen peer.
Prime Access Registrar chooses the same peer for all the
subsequent messages(CCR-Update/CCR-Terminate) with same
Session-Id.
Table 3-15 Diameter Service Properties (continued)
Fields Description

3-49
Cisco Prime Access Registrar 6.1 User Guide
OL-29756-01
Chapter 3 Using the Graphical User Interface
Configuring Cisco Prime Access Registrar
StickyCreationCmdList Required; specifies the command list to create the sticky entries.
Specify the list of ‘||’ separated command code, AVP name, and its
value to create the sticky sessions.
The following is the StickyCreationCmdList format:
<commandcode1>::<AVPName1=Value1> ||
<commandcode2<::<AVPName2=Value2>||<commandcode3>
For example, if the sticky session entries need to created based on
command code ‘265’or based on command code ‘271’ with
Accounting-Record-Type value as 2, use the format below:
Set StickyCreationCmdList “265||271::
Accounting-Record-Type=2”
StickyDeletionCmdList Required; specifies the command list to delete the sticky
entries.Specify the list of ‘||’ separated command code, AVP name,
and its value to delete the sticky sessions.
The following is the StickyDeletionCmdList format:
<commandcode1>::<AVPName1=Value1> ||
<commandcode2<::<AVPName2=Value2>||<commandcode3>
For example, if the sticky session entries need to deleted based on
command code ‘271’ with Accounting-Record-Type value as 4, use
the format below:
Set StickyDeletionCmdList “271::
Accounting-Record-Type=4”
PEER Definitions Proxy
Name Required; name of the peer.
Host Name Required; hostname or IP address of the peer. The HostName must
exist in the client list for the route to be active.
Metric Required; metric value for this peer entry. The higher the value the
lower the preference. The highest value of preference is 0.
Weight Required; default value is 0. Specifies the weight percentage for
which the service needs to load balance the peer.
Note When you set the weight to a value other than 0, the weight
should be in multiples of 10 and the sum of the weights
configured in the peer list should be equal to 100.
IMSIRanges Required; used for load balancing. The value is set to comma
separated values of IMSI Ranges.
For example, set IMSIRanges
“112156000000001-112156001000000,112156010000001-11215
6011000000”
Note Prime Access Registrar uses the AVP configured in
StickyAVP property to check whether the IMSI is in valid
range.
IsActive Optional; if this is set to true, the new sessions will not go to the
peer server. By default, this is set as false.
Table 3-15 Diameter Service Properties (continued)
Fields Description

3-50
Cisco Prime Access Registrar 6.1 User Guide
OL-29756-01
Chapter 3 Using the Graphical User Interface
Configuring Cisco Prime Access Registrar
You can use the Diameter Services List page for the following:
•Filtering Records
•Adding Diameter Service Details
•Editing Records
•Deleting Records
Adding Diameter Service Details
To add a new Diameter Service details:
Step 1 Choose Configuration > Services > Diameter. The Diameter Services page is displayed.
Step 2 Click Add to add new Diameter service details. The DIAMETER Services Details page is displayed.
Step 3 Specify the required details in the PEER Statements, Applications, and PEER Definitions Proxy
specific sections.
Step 4 Click Save DIAMETER Service to save the specified details in the Diameter Services page. Otherwise
click Cancel to return to the Diameter Services page without saving the details.
On successful creation of the Diameter Service properties, the Diameter Services page is displayed else
a respective error message is displayed.
Note You may need to enter PEER Statements, Applications, and PEER Definitions Proxy details based on
the Role that you select in the DIAMETER-Services page.
Adding the PEER Statements Details
To add new PEER Statement details:
Step 1 Click Add to add new PEER Statements details section. The fields specific to PEER Statements are
displayed.
Step 2 Specify the required details.
Step 3 Click Save to save the specified details in the PEER Statements section. Otherwise click Cancel to return
to the PEER Statements section without saving the details.
On successful creation of the Diameter Service properties, the Diameter Services page is displayed else
a respective error message is displayed.
Adding the Applications Details
To add new Application details:
Step 1 Click Add to add new Applications details in the Application List section. The fields specific to
Applications are displayed.
Step 2 Specify the required details.

3-51
Cisco Prime Access Registrar 6.1 User Guide
OL-29756-01
Chapter 3 Using the Graphical User Interface
Configuring Cisco Prime Access Registrar
Step 3 Click Save Appln to save the specified details in the Application List section. Otherwise click Cancel
Appln to return to the Application List section without saving the details.
Adding the PEER Definitions Proxy Details
To add PEER Definitions Proxy details:
Step 1 Click Add to add new Proxy PEER Statements in the PEER Definitions Proxy section. The fields
specific to Proxy PEER Statements are displayed.
Step 2 Specify the required details.
Step 3 Click Save to save the specified details in the Proxy PEER Statements section. Otherwise click Cancel
to return to the Proxy PEER Statements section without saving the details.
CommandSets
A command set consists of commands and the action to perform during TACACS+ command
authorization. For more information on TACACS+ command authorization, see TACACS+ Support for
AAA, page 17-50.
Adding a Command Set
To add a new command set:
Step 1 Choose Configuration > Command Sets. Prime Access Registrar lists all the command sets available
in the system. You can edit or delete an existing command set.
Step 2 Click Add to add a new command set.
Step 3 Enter a name and description for the command set.
Step 4 Provide the Command Set parameters. Table 3-16 lists the parameters in the Add Command section.
Table 3-16 Command Set Parameters
Field Field Description
Action Select Permit or Deny to indicate the action to be performed on the command
during TACACS+ command authorization.
Command The command to add in the set. Example:
show
Arguments The arguments for the command. Example:
~/serial*/
Note Prime Access Registrar supports POSIX Extended Regular
Expression (ERE) for command arguments.

3-52
Cisco Prime Access Registrar 6.1 User Guide
OL-29756-01
Chapter 3 Using the Graphical User Interface
Configuring Cisco Prime Access Registrar
Step 5 Click Add to add the new command to the set. The command details are displayed in the Commands
section. You can edit or delete a command from the list as required.
Step 6 Click Submit to save the command set details.
You can use the Command Sets page to perform the following as well:
•Filtering Records
•Editing Records
•Deleting Records
DeviceAccessRules
A device access rule consists of conditions or expressions and the applicable command sets for
TACACS+ command authorization. For more information on TACACS+ command authorization, see
TACACS+ Support for AAA, page 17-50.
Adding a Device Access Rule
To add a new device access rule:
Step 1 Choose Configuration > Device Access Rules. Prime Access Registrar lists all the device access rules
available in the system. You can edit or delete an existing device access rule.
Step 2 Click Add to add a new device access rule.
Step 3 Enter a name and description for the device access rule.
Step 4 Choose the default device access action to perform on all commands in the device access rule. Options
are Permit All or Deny All.
Step 5 In the Conditions field, include the expressions with AND or OR conditional operator.
Step 6 Select a command set from the drop-down list box and click Add. The selected command set is displayed
in the Command Set Names list box available. Click Delete to remove any command set from the list.
Step 7 Provide the expression details for the device access rule. Table 3-17 lists the parameters for adding
expressions.
Table 3-17 Expression Parameters
Field Field Description
Name Name of the expression to include in the device access rule.
Description Description of the expression.
Attribute Parameter to apply the condition on.
Value Value of the parameter.
Note Prime Access Registrar supports POSIX Extended Regular
Expression (ERE) for condition expression value property.

3-53
Cisco Prime Access Registrar 6.1 User Guide
OL-29756-01
Chapter 3 Using the Graphical User Interface
Configuring Cisco Prime Access Registrar
Step 8 Click Add to add the expression to the list-box available in the Condition Expressions section. You can
edit or delete the expression from the list as required.
Step 9 Click Submit to save the device access rule details.
FastRules
FastRules provides a mechanism to easily choose the right authentication, authorization, accounting, and
query service(s), drop, reject, or break flows, run a script, choose a session manager and/or a chain of
fast rules required for processing a packet.
FastRules has the following capabilities:
•Provides maximum flexibility and ease in matching information in the incoming packets for
choosing the appropriate service to apply
•Provides an option to match values in AVPs based on value ranges, exact match, and simple string
comparisons using regex
•Provides easy and efficient alternative to rule/policy engine and scripting points for most common
use cases—reduces the use of external scripts to choose an appropriate service
For more information about FastRules and the workflow, see Chapter 19, “Using FastRules to Process
Packet Flow.”
Adding a Fast Rule
To add a new fast rule:
Step 1 Choose Configuration > FastRules. Prime Access Registrar lists fast rules available for RADIUS,
Diameter, and TACACS in the respective tabs. You can edit or delete an existing fast rule.
Step 2 Click Add to add a new fast rule. Table 3-18 provides the list of parameters in the FastRules Details
page.
Table 3-18 FastRules Details
Field Field Description
Name Required; name of the fast rule.
Description Optional; description of the fast rule.
Protocol Required; select the type of packet that the fast rule is applicable for from one
of the following options:
•Radius
•Diameter
•Tacacs
Condition Condition based on which the fast rule will be run on the incoming packet.
If the condition is success, enter the action to be performed in the Success
field. If the condition is failure, enter the action to be performed in the Failure
field.

3-54
Cisco Prime Access Registrar 6.1 User Guide
OL-29756-01
Chapter 3 Using the Graphical User Interface
Configuring Cisco Prime Access Registrar
Step 3 Add Success and Failure attribute values to the Success Mapping and Failure Mapping fields in the
respective sections.
Step 4 Click Save to save the fast rules details.
Replication
The replication feature of Prime Access Registrar allows you to maintain identical configurations on
multiple machines simultaneously. It eliminates the need to have administrators with multiple Prime
Access Registrar installations, make the same configuration changes at each of their installations.
Instead, only the master's configuration must be changed and the slave is automatically configured
eliminating the need to make repetitive, error-prone configuration changes for each individual
installation. In addition to enhancing server configuration management, using replication eliminates the
need for a hot-standby machine.
Employing Prime Access Registrar's replication feature, both servers can perform RADIUS request
processing simultaneously, eliminating wasted resources. It focuses on configuration maintenance only,
not session information or installation-specific information.
Table 3-19 lists and describes the fields in the Replication Details page.
Attributes
Name Name of the attribute to include in the condition.
Description Description of the attribute.
Dictionary Select type of the dictionary variable as Environment, Request, or Response
to map the attribute to.
Table 3-18 FastRules Details
Field Field Description
Table 3-19 Replication Properties
Fields Description
General Properties tab
Replication Type Indicates the type of replication
Transaction Sync Interval (in
ms)
Duration between periodic transmission of the TransactionSync
message expressed in milliseconds. The default is 60000 or 1
minute.
Transaction Archive Limit The default setting is 100.
The value set for RepTransactionArchiveLimit should be the same
on the master and the slave.
Replication Secret The value of this setting must be identical on both the master and
the slave.
Is Master On the master, set RepIsMaster to TRUE. On the slave, set it to
FALSE.
Master IP Address Specifies the IP Address of the master.
Master Port Specifies the port to be used to send replication messages to the
master.

3-55
Cisco Prime Access Registrar 6.1 User Guide
OL-29756-01
Chapter 3 Using the Graphical User Interface
Configuring Cisco Prime Access Registrar
You can use the Replication Details page for the following:
•Filtering Records
•Adding Replication Details
•Adding the Replication Member Details
•Editing Records
•Deleting Records
Adding Replication Details
To add new replication details:
Step 1 Choose Configuration > Replication. The Replication Details page is displayed.
Step 2 Specify the replication details.
Step 3 Enter the Replication Member Details, if needed.
Step 4 Click Save to save the new replication details. Otherwise click Reset to restore the default values.
On successful creation of the replication details, a success message is displayed else a respective error
message is displayed.
Adding the Replication Member Details
To add new replication member details:
Step 1 Click the Replication Members tab. The List of Replication Members section is displayed.
Step 2 Enter the required details.
Step 3 Click Submit to save the new replication member details.
Replication IP Address The value is set to the IP Address of the machine containing the
Prime Access Registrar installation.
Replication Port Defaults to port1645.
Replication Members tab
Name Name of the slave. The name must be unique.
IP Address Indicates the IP Address of the slave.
Port Port upon which the master will send replication messages to the
slave.
Table 3-19 Replication Properties (continued)
Fields Description

3-56
Cisco Prime Access Registrar 6.1 User Guide
OL-29756-01
Chapter 3 Using the Graphical User Interface
Configuring Cisco Prime Access Registrar
RADIUSDictionary
The RADIUS dictionary passes information between a script and the RADIUS server, or between scripts
running on a single packet.
Table 3-20 lists and describes the fields in the Add Radius Attributes page. The fields listed below are
the entire list of all the available types. The fields are displayed based on the type selected.
You can use the Radius Attributes page for the following:
•Filtering Records
•Adding RADIUS Dictionary Details
•Editing Records
•Deleting Records
Adding RADIUS Dictionary Details
To add new RADIUS dictionary details:
Step 1 Choose Configuration > Radius Dictionary. The Radius Attributes page is displayed.
Step 2 Click Add to add new RADIUS dictionary details. The Add RADIUS Dictionary page is displayed.
Step 3 Enter the required details.
Table 3-20 RADIUS Dictionary Properties
Fields Description
Name Required; must be unique in the RADIUS dictionary list
Description Optional; description of the attribute
Attribute Required; must be a number between 1-255. It must be unique
within the Attribute dictionary list.
Type Required; type governs how the value is interpreted and printed.
Minimum Set to zero
Maximum Set to 253
Enum Number Enums allow you to specify the mapping between the value and the
strings. After you have established this mapping,
Prime Access Registrar then replaces the number with the
appropriate string. The min/max properties represent the lowest to
highest values of the enumeration.
Enum Equivalent The value can range from 1 through 255. Click the Add button to
save the details and list it in the Enums list. To navigate between the
listed attributes, use the navigation option available adjacent to the
list. See Relocating Records for more details. To delete the available
attributes, select the relevant attribute and click the Delete button
below.
Tag The tag number value can range from 0 through 31. The default
value is zero.

3-57
Cisco Prime Access Registrar 6.1 User Guide
OL-29756-01
Chapter 3 Using the Graphical User Interface
Configuring Cisco Prime Access Registrar
Step 4 Click Submit to save the specified details in the Radius Attributes page. Otherwise click Cancel to
return to the Radius Attributes page without saving the details.
On successful creation of the Radius Attributes, the Radius Attributes page is displayed else a respective
error message is displayed.
VendorDictionary
The vendor dictionary allows the user to maintain the attributes of the vendor with respect to vendor id,
vendor type and the attributes required to support the major NAS.
Table 3-21 lists and describes the fields in the Add Vendor Dictionary page. The fields listed below are
the entire list of all the available types. The fields are displayed based on the type selected.
You can use the Vendor Dictionary page for the following:
•Filtering Records
•Adding Vendor Dictionary Details
Table 3-21 Vendor Dictionary Properties
Fields Description
Name Required; must be unique in the Vendor dictionary list
Description Optional; description of the attribute
Vendor ID Required; must be a valid number and unique within the entire
attribute dictionary
Type Required; type governs how the value is interpreted and printed.
Minimum Optional; set to zero
Maximum Optional; set to 253
Enum Number Optional; enums allow you to specify the mapping between the
value and the strings. After you have established this mapping,
Prime Access Registrar then replaces the number with the
appropriate string. The min/max properties represent the lowest to
highest values of the enumeration.
Enum Equivalent Optional; the value can range from 1 through 255. Click the Add
button to save the details and list it in the Enums list. To navigate
between the listed attributes, use the navigation option available
adjacent to the list. See Relocating Records for more details. To
delete the available attributes, select the relevant attribute and click
the Delete button below.
Tag Optional; the tag number value can range from 0 through 31. The
default value is zero.
Vendor Size Optional; set the vendor size to 8, 16, or 32 bit
HasSubAttributeLengthField Optional; indicates that the value field of the attribute has the length
field for the sub attribute.

3-58
Cisco Prime Access Registrar 6.1 User Guide
OL-29756-01
Chapter 3 Using the Graphical User Interface
Configuring Cisco Prime Access Registrar
•Editing Records
•Deleting Records
Adding Vendor Dictionary Details
To add new vendor dictionary details:
Step 1 Choose Configuration > Vendor Dictionary. The Vendor Attributes page is displayed.
Step 2 Click Add to add new Vendor dictionary details. The Add Vendor Dictionary page is displayed.
Step 3 Enter the required details.
Step 4 Click Submit to save the specified details in the Vendor Attributes page. Otherwise click Cancel to
return to the Vendor Attributes page without saving the details.
On successful creation of the vendor dictionary details, the Vendor Attributes page is displayed else a
respective error message is displayed.
Note After adding new vendor dictionary details, you can add vendor attributes details. Or you can
also add vendor attributes details by clicking the link in the vendor dictionary list, see Adding
Vendor Attributes for details.
Vendor Attributes
Vendor-specific attributes are included in specific RADIUS packets to communicate prepaid user
balance information from the Prime Access Registrar server to the AAA client, and actual usage, either
interim or total, between the NAS and the Prime Access Registrar server.
Table 3-22 lists and describes the fields in the Add Vendor Attributes page.
Table 3-22 Vendor Attribute Properties
Fields Description
Name Required; must be unique in the Vendor attribute list
Description Optional; description of the attribute
Attribute Required; must be a valid number and unique within the entire
attribute dictionary
Type Required; type governs how the value is interpreted and printed.
Minimum Optional; set to zero
Maximum Optional; set to 253

3-59
Cisco Prime Access Registrar 6.1 User Guide
OL-29756-01
Chapter 3 Using the Graphical User Interface
Configuring Cisco Prime Access Registrar
You can use the Vendor Attributes page for the following:
•Filtering Records
•Adding Vendor Attributes
•Editing Records
•Deleting Records
Adding Vendor Attributes
To add new Vendor attributes:
Step 1 Choose Configuration > Vendor Dictionary. The Vendor Attributes page is displayed.
Step 2 Click the Vendor name link. The Vendor Attributes page is displayed.
Step 3 Click Add to add new Vendor attributes. The Add Vendor Attributes page is displayed.
Step 4 Enter the required details.
Step 5 Click Submit to save the specified details in the Vendor Attributes page. Otherwise click Cancel to
return to the Vendor Attributes page without saving the details.
On successful creation of the vendor attributes, the Vendor Attributes page is displayed else a respective
error message is displayed.
Enum Number Optional; enums allow you to specify the mapping between the
value and the strings. After you have established this mapping,
Prime Access Registrar then replaces the number with the
appropriate string. The min/max properties represent the lowest to
highest values of the enumeration.
Enum Equivalent Optional; the value can range from 1 through 255. Click the Add
button to save the details and list it in the Enums list. To navigate
between the listed attributes, use the navigation option available
adjacent to the list. See Relocating Records for more details. To
delete the available attributes, select the relevant attribute and click
the Delete button below.
Tag Optional; the tag number value can range from 0 through 31. The
default value is zero.
Table 3-22 Vendor Attribute Properties (continued)
Fields Description

3-60
Cisco Prime Access Registrar 6.1 User Guide
OL-29756-01
Chapter 3 Using the Graphical User Interface
Configuring Cisco Prime Access Registrar
Vendors
The Vendor object provides a central location for specifying all of the request and response processing
a particular NAS or Proxy vendor requires. Depending on the vendor, it might be necessary to map
attributes in the request from one set to another, or to filter out certain attributes before sending the
response to the client. For more information about standard RADIUS attributes, see Chapter C,
“RADIUS Attributes.”
Note When you have also set /Radius/IncomingScript, Cisco Prime Access Registrar runs that script before
the vendor’s script. Conversely, when you have set a /Radius/Outgoing script,
Cisco Prime Access Registrar runs the vendor’s script before that script.
Table 3-23 lists and describes the fields in the Add Vendor page.
You can use the Vendors page for the following:
•Filtering Records
•Adding Vendor Details
•Editing Records
•Deleting Records
Adding Vendor Details
To add new Vendor details:
Step 1 Choose Configuration > Vendors. The Vendors page is displayed.
Step 2 Click Add to add new Vendor details. The Add Vendor page is displayed.
Step 3 Enter the required details.
Step 4 Click Submit to save the specified details in the Vendors page. Otherwise click Cancel to return to the
Vendors page without saving the details.
On successful creation of the vendor details, the Vendors page is displayed else a respective error
message is displayed.
Table 3-23 Vendor Properties
Fields Description
Name Required; must be unique in the Vendors list.
IncomingScript Optional; when you specify an IncomingScript,
Cisco Prime Access Registrar runs the script on all requests from clients
that specify that vendor.
Description Optional; description of the vendor.
OutgoingScript Optional; when you specify an OutgoingScript,
Cisco Prime Access Registrar runs the script on all responses to the
Client.

3-61
Cisco Prime Access Registrar 6.1 User Guide
OL-29756-01
Chapter 3 Using the Graphical User Interface
Configuring Cisco Prime Access Registrar
Translations
Translations add new attributes to a packet or change an existing attribute from one value to another.
The Translations subdirectory lists all definitions of Translations the RADIUS server can apply to
certain packets.
Under the /Radius/Translations directory, any translation to insert, substitute, or translate attributes can
be added. The following is a sample configuration under the /Radius/Translations directory:
cd /Radius/Translations
Add T1
cd T1
Set DeleAttrs Session-Timeout,Called-Station-Id
cd Attributes
Set Calling-Station-Id 18009998888
DeleAttrs is the set of attributes to be deleted from the packet. Each attribute is comma separated and
no spaces are allowed between attributes. All attribute value pairs under the attributes subdirectory are
the attributes and values that are going to be added or translated to the packet.
Under the /Radius/Translations/T1/Attributes directory, inserted or translated attribute value pairs can
be set. These attribute value pairs are either added to the packet or replaced with the new value.
If a translation applies to an Access-Request packet, by referencing the definition of that translation, the
Prime Access Registrar server modifies the Request dictionary and inserts, filters, and substitutes the
attributes accordingly. You can set many translations for one packet and the Prime Access Registrar
server applies these translations sequentially.
Note Later translations can overwrite previous translations.
Table 3-24 lists and describes the fields in the Add Translations page.
Table 3-24 Translations Properties
Fields Description
General Properties tab
Name Required; must be unique in the Translations list.
Description Optional; description of the Translation
Attribute Type Optional; select either RADIUS or VENDOR. If Vendor is selected, specify
the vendor type from the drop-down list. Select the attributes from the
available list. To navigate between the listed attributes, use the navigation
option available adjacent to the list. See Relocating Records for more details.
Attributes tab
Attribute Type Optional; select either RADIUS or VENDOR. If Vendor is selected, specify
the vendor type from the drop-down list.

3-62
Cisco Prime Access Registrar 6.1 User Guide
OL-29756-01
Chapter 3 Using the Graphical User Interface
Configuring Cisco Prime Access Registrar
You can use the Translations page for the following:
•Filtering Records
•Adding Translation Details
•Editing Records
•Deleting Records
Adding Translation Details
To add new translation details:
Step 1 Choose Configuration > Translations. The Translations page is displayed.
Step 2 Click Add to add new translations details. The Add Translations page is displayed.
Step 3 Enter the required details.
Step 4 Click Add Translation to save the specified details in the Translations page. Otherwise click Cancel to
return to the Translations page without saving the details.
On successful creation of the translation details, the Translations page is displayed else a respective error
message is displayed.
TranslationGroups
You can add translation groups for different user groups under TranslationGroups. All Translations
under the Translations subdirectory are applied to those packets that fall into the groups. The groups are
integrated with the Prime Access Registrar Rule engine.
The Prime Access Registrar Administrator can use any RADIUS attribute to determine the Translation
Group. The incoming and outgoing translation group can be different translation groups. For example,
you can set one translation group for incoming translations and one for outgoing translations.
Under the /Radius/TranslationGroups directory, translations can be grouped and applied to certain sets
of packets, which are referred to in a rule. The following is a sample configuration under the
/Radius/TranslationGroups directory:
Attribute Name Optional; based on the Attribute Type selected, the attribute name is
automated. Set the relevant name for the attribute type selected.
Attribute Value Optional; set the value for the selected attribute. Click the Add button to save
the details and list it in Radius and Value list. To navigate between the listed
attributes, use the navigation option available adjacent to the list. See
Relocating Records for more details. To delete the available attributes, select
the relevant attribute and click the Delete button below.
Table 3-24 Translations Properties (continued)
Fields Description

3-63
Cisco Prime Access Registrar 6.1 User Guide
OL-29756-01
Chapter 3 Using the Graphical User Interface
Configuring Cisco Prime Access Registrar
cd /Radius/TranslationGroups
Add CiscoIncoming
cd CiscoIncoming
cd Translations
Set 1 T1
The translation group is referenced through the Prime Access Registrar Policy Engine in the
/Radius/Rules/<RuleName>/Attributes directory. Incoming-Translation-Groups are set to a
translation group (for example CiscoIncoming) and Outgoing-Translation-Groups to another
translation group (for example CiscoOutgoing).
Table 3-25 lists and describes the fields in the Add Translation Groups page.
You can use the Translation Groups page for the following:
•Filtering Records
•Adding Translation Group Details
•Editing Records
•Deleting Records
Adding Translation Group Details
To add new translation group details:
Step 1 Choose Configuration > TranslationGroups. The Translation Groups page is displayed.
Step 2 Click Add to add new translation group details. The Add TranslationGroup page is displayed.
Step 3 Enter the required details.
Step 4 Click Add TranslationGroup to save the specified details in the Translation Groups page. Otherwise
click Cancel to return to the Translation Groups page without saving the details.
On successful creation of the translation group details, the Translation Groups page is displayed else a
respective error message is displayed.
Table 3-25 TranslationGroups Properties
Fields Description
Name Required; must be unique in the Translations list.
Description Optional; description of the Translation Group.
Translations Optional; lists of translation. To navigate between the listed attributes, use
the navigation option available adjacent to the list. See Relocating Records
for more details.

3-64
Cisco Prime Access Registrar 6.1 User Guide
OL-29756-01
Chapter 3 Using the Graphical User Interface
Configuring Cisco Prime Access Registrar
Diameter
Diameter is a computer networking protocol for Authentication, Authorization and Accounting (AAA).
It is a successor to RADIUS or an enhanced version of the RADIUS protocol. It includes numerous
enhancements in all aspects, such as error handling and message delivery reliability. It extracts the
essence of the AAA protocol from RADIUS and defines a set of messages that are general enough to be
the core of the Diameter Base protocol. The various applications that require AAA functions can define
their own extensions on top of the Diameter base protocol, and can benefit from the general capabilities
provided by the Diameter base protocol.
The following sections can be used to configure Diameter transport management properties, session
management properties, add new application, commands associated with it and application specific
AV P s :
•General
•Session Management
•Applications
•Commands
•DiameterAttributes
General
This section explains how to set Diameter general configuration such as product name, version, and
transport management properties.
Setting General Diameter Parameters
Table 3-26 lists and describes the fields in the General Diameter Properties page.
Table 3-26 General Diameter Properties
Fields Description
General section
Product Optional; name of the product.
AuthApplicationIdList Specifies the list of AuthApplications that the
Prime Access Registrar server registers to Diameter Base
stack during start up. It is a combination of Auth Applica-
tionId's separated by a colon.
Version Optional; version number.
AcctApplicationIdList Specifies the list of AcctApplications that the
Prime Access Registrar server registers to Diameter Base
stack during start up. It is a combination of Acct Applica-
tionId's separated by a colon.
Transport Management section
Identity Required; identity of the system on which Diameter appli-
cation is running. Must be set to a valid resolvable string.
Realm Required; must be set to a valid Realm in the domain.

3-65
Cisco Prime Access Registrar 6.1 User Guide
OL-29756-01
Chapter 3 Using the Graphical User Interface
Configuring Cisco Prime Access Registrar
Setting Up the General Diameter Parameters
To set up the general Diameter parameters:
Step 1 Choose Configuration > Diameter > General. The General Diameter page is displayed.
EnableIPV6 Required; if set to TRUE it enables IPV6 for the Diameter
application.
WatchdogTimeout Required; specifies the time interval between watch dog
messages.
TCPListenPort Required; port number on which the
Prime Access Registrar server listens for TCP peer con-
nections.
SCTPListenPort Required; port number on which the
Prime Access Registrar server listens for SCTP peer con-
nections.
ValidateIncomingMessages Check the box to validate incoming messages.
ValidateOutgoingMessages Check the box to validate outgoing messages.
MaximumNumberofDiameterPackets Required; the maximum number of Diameter packets that
can be processed.
DiameterPacketSize Required; the Diameter packet size that can be processed.
ReconnectInterval Required; specifies the time interval between which
Prime Access Registrar server attempts to connect to a dis-
connected peer. If set to 0, then no attempt will be made to
connect to a disconnected peer.
MaxReconnections Required; specifies the number of times
Prime Access Registrar server tries to make a reconnection
attempt. If set to 0, then no attempt will be made to recon-
nect.
RequestRetransmissionInterval Required; the time for which retransmission of pending
requests will be done. If set to 0, then no attempt will be
made to retransmit.
MaxRequestRetransmissionCount Required, maximum number of times
Prime Access Registrar server tries to retransmit a pending
request. If set to 0, then no attempt will be made to retrans-
mit.
Receive BufferSize Required; initial size of buffer that is preallocated for
message reception.
AdvertisedHostName Optional, specifies the local hostname address that will be
advertised by the Prime Access Registrar server to other
peers during CER/CEA exchange.
For example:
AdvertisedHostNames = toby-ar1.cisco.com
Table 3-26 General Diameter Properties (continued)
Fields Description

3-66
Cisco Prime Access Registrar 6.1 User Guide
OL-29756-01
Chapter 3 Using the Graphical User Interface
Configuring Cisco Prime Access Registrar
Step 2 Specify the required details.
Step 3 Click Set to save the specified details.
On successful creation of the general Diameter parameters, a success message is displayed else a
respective error message is displayed.
Session Management
Diameter Base protocol stack provides the functionality of Session Management. Base Stack maintains
sessions separately for authentication and accounting messages. Session-Id AVP is used to identify the
user session.
Table 3-27 lists and describes the fields in the Session Management page.
Table 3-27 Session Management Properties
Fields Description
Session Management section
MaxNumberOfSessions Required; specifies the maximum number of concurrent
Diameter sessions the Prime Access Registrar server will
maintain. These sessions include both Auth and Acct
sessions.
AuthSessions section
EnableStatefulSessions If set to TRUE, the server will enforce stateful sessions and
the client will hint for stateful sessions. Default Value is
TRUE. Set the property to FALSE to disable stateful
sessions.
AuthSessionTimeout Required; specifies the timeout in seconds before a session
requires reauthentication.
LifeTimeTimeout Required; specifies the timeout in seconds before a session
is terminated regardless of whether the session has been re-
authenticated.
GracePeriodTimeout Required; specifies the grace period after the life timeout
and before the full termination of the session.
AbortRetryTimeout Required; specifies the timeout between the subsequent
Abort Session Request (ASR) messages if the initial
attempt fails.
AcctSessions section
AcctSessionTimeout Required; specifies the timeout in seconds before a session
requires reauthentication.
InterimInterval Required; specifies the interim interval dictated to the
client if the entity is a server or hint to the server if the
entity is a client.
RealTime Required; RealTime value dictated to the client.

3-67
Cisco Prime Access Registrar 6.1 User Guide
OL-29756-01
Chapter 3 Using the Graphical User Interface
Configuring Cisco Prime Access Registrar
Setting Session Management Properties
To set up the session management properties:
Step 1 Choose Configuration > Diameter>SessionManagement. The Session Management page is displayed.
Step 2 Enter the required details and click Set.
On successful creation of the parameters, a success message is displayed else a respective error message
is displayed.
Applications
A Diameter application is not a software application, but a protocol based on the Diameter base protocol
(defined in RFC 6733). Each application is defined by an application identifier and can add new
command codes and/or new mandatory AVPs.
When you click the Add button in the Applications page, the Application Details page is displayed.
Table 3-28 lists and describes the fields in the Application Details page.
Table 3-28 Diameter Application Properties
Fields Description
Name Required; name of the application.
Description Optional; description of the application.
VendorSpecific Required; the default is FALSE. If set to FALSE, the application is
ordinary application and user is prompted to enter the ApplicationID.
If set to TRUE, the application is a VendorSpecific Application. User
is prompted to enter VendorSpecificApplicationID and VendorID.
AuthApplication Required; if set to TRUE the application represents AuthApplication
else it represents Accounting Application.
Application ID Required; specifies the unique integer value for the application.
The following are examples of Diameter application:
NASREQ 1
Mobile-IP 2
Diameter Base Accounting 3
Note ApplicationId property must be set to 0 for Base Protocol.
VendorSpecificApplicationID Required; specifies the integer value for the vendor specific applica-
tion.
VendorID Required; specifies the VendorID for the application.
Example:
DIAMETER 3GPP Cx APPLICATION
VendorSpecificApplicationID 16777216
VendorID 10415

3-68
Cisco Prime Access Registrar 6.1 User Guide
OL-29756-01
Chapter 3 Using the Graphical User Interface
Configuring Cisco Prime Access Registrar
You can use the Applications page for the following:
•Filtering Records
•Adding Diameter Application Details
•Commands
•Editing Records
•Deleting Records
Adding Diameter Application Details
To add new Diameter application details:
Step 1 Choose Configuration > Diameter > Applications. The Applications page is displayed.
Step 2 Click Add. The Application Details page is displayed.
Step 3 Enter the relevant details.
Step 4 Click Add Application to save the specified details in the Application Details page. Otherwise click
Cancel to return to the Applications page without saving the details.
On successful creation of the Applications details, a success message is displayed else a respective error
message is displayed.
Commands
Each command in Diameter is associated with a command code. The command can be a request
command or an answer command which is identified by the 'R' bit in the Command Flags field of the
Diameter header.
When you click the Add button in the commands page, the Command Details page is displayed.
Table 3-29 lists and describes the fields in the Command Details page.
ApplicationURI Optional; specifies the URI of the Application.
Eg: "ftp://ftp.ietf.org/internet-drafts/draft-ietf-aaa-diameter-nasreq-
12.txt"
Commands Required; an indexed list from 1 to <n>. Each entry in the list is the
name of the command. It specifies the list of commands associated
with the application.
To navigate between the listed attributes, use the navigation option
available adjacent to the list. See Relocating Records for more
details.
Table 3-28 Diameter Application Properties (continued)
Fields Description

3-69
Cisco Prime Access Registrar 6.1 User Guide
OL-29756-01
Chapter 3 Using the Graphical User Interface
Configuring Cisco Prime Access Registrar
You can click the Add button in the Command Details page to add the AVP details. Table 3-30 lists and
describes the fields displayed on clicking the Add button.
Adding Diameter Commands
To add the Diameter commands:
Step 1 Choose Configuration > Diameter > Commands. The Commands page is displayed.
Step 2 Click Add. The Add Commands page is displayed.
Step 3 Enter the relevant details.
Step 4 Click the required tab and click Add to enter the AVP details.
Table 3-29 Diameter Commands Properties
Fields Description
Name Required; name of the command.
Description Optional; description of the command.
Command Code Required; specifies the integer code of the command.
EnableProxyBit Required; default is TRUE. When enabled it represents the message
is proxiable.
RequestFixed tab Defines the fixed position of AVP in a request message.
RequestRequired tab The AVP must be present and can appear anywhere in the request
message.
RequestOptional tab The AVP name in optional cannot evaluate to any avp name which is
included in a fixed or required directory. The avp can appear
anywhere in the request message.
AnswerFixed tab Defines the fixed position of AVP in the answer message.
AnswerRequired tab The AVP must present and can appear anywhere in the answer
message.
AnswerOptional tab The AVP name in optional cannot evaluate to any avp name which is
included in a fixed or required directory. The avp can appear
anywhere in the answer message.
Table 3-30 Request/Answer Msg AVP Properties
Fields Description
Name Required; name of the AVP.
Description Optional; description of the AVP.
Min Specifies the minimum number of times AVP element may be present
in a request. The default value is 0.
Max Specifies the maximum number of times the element may present in
a request. A value of zero implies AVP is not present in the request.

3-70
Cisco Prime Access Registrar 6.1 User Guide
OL-29756-01
Chapter 3 Using the Graphical User Interface
Configuring Cisco Prime Access Registrar
Step 5 Click Save to save the AVP details or click Cancel to exit the page without saving the details.
Step 6 Click Add Command to save the specified details in the Add Commands page. Otherwise click Cancel
to return to the Commands page without saving the details.
The Commands page is displayed with the newly added details or a respective error message is
displayed.
DiameterAttributes
You can define the attributes to use in the Diameter EAP application.
Table 3-31 lists and describes the fields in the DiameterAttributes page.
Adding Diameter Attributes
To add the Diameter attributes:
Step 1 Choose Configuration > Diameter > DiameterAttributes. The DiameterAttributes page is displayed.
Step 2 Click Add.
Step 3 Provide the relevant details as explained in Table 3-31.
Step 4 Click Add DiameterAttributes to save the specified details. Otherwise click Cancel to return to the
previous page without saving the details.
The DiameterAttributes page is displayed with the newly added details or a respective error message is
displayed.
Table 3-31 Diameter Attributes Properties
Fields Description
Name Required; name of the attribute.
Description Optional; description of the attribute.
Attribute Required; attribute value.
VendorID Required; Vendor ID of the Diameter application.
Mandatory Indicates whether the attribute is mandatory or not. Options are May,
Must, and MustNot.
May-Encrypt Choose Yes or No to indicate whether the attribute value can be
encrypted or not.
Protected Indicates whether the attribute value is protected or not. Options are
May, Must, and MustNot.
Type Choose the type of the attribute.
Minimum Minimum value for the attribute.
Maximum Maximum value for the attribute.

3-71
Cisco Prime Access Registrar 6.1 User Guide
OL-29756-01
Chapter 3 Using the Graphical User Interface
Configuring Cisco Prime Access Registrar
Advanced
Advanced objects allow configuring system-level properties and the Attribute dictionary. Under normal
system operation, the system-level properties should not be changed.
The following list helps you in defining the system-level properties and attribute dictionary:
•Default
•BackingStore/ServerParam
•RemoteSessionServer
•SNMP
•DDNS
•ODBC DataSources
•Log
•Ports
•Interfaces
•Attribute Groups
Default
This feature of GUI allows you in configuring the default values for other functionalists of GUI. The
configurations set in this feature reflects on all the other features.
Table 3-32 lists and describes the fields in the Default Advanced Details page.
Table 3-32 Default Configuration Details
Fields Description
Default section
AAAFileServiceSyncInterval Required; specified in milliseconds, the default is 75. This property
governs how often the file AAA service processes accounting
requests and writes the accounting records to the file. You can lower
the number to reduce the delay in acknowledging the Account-Re-
quest at the expense of more frequent flushing of the accounting file
to disk. You can raise the number to reduce the cost of flushing to
disk, at the expense of increasing the delays in acknowledging the
Accounting-Requests. The default value was determined to provide
a reasonable compromise between the two alternatives.
RemoteRadiusServerInterface When set, specifies the local interface to bind to when creating the
RemoteRadiusServer socket. If not set, the Prime Access Registrar
binds to IPADDR_ANY.
MaximumNumberOfXML-
Packets
Required when using identity caching. Indicates the maximum
number of XML packets to be sent or received. The minimum value
is 1 and the maximum is a 32-bit unsigned integer. The default is
1024.

3-72
Cisco Prime Access Registrar 6.1 User Guide
OL-29756-01
Chapter 3 Using the Graphical User Interface
Configuring Cisco Prime Access Registrar
MaximumODBCResultSize Required; specifies maximum size in bytes for an ODBC mapping.
This parameter affects both ODBC result sizes and the trace log
buffer for tracing script calls that access any of the dictionaries.
(Default value is 256.)
XMLUDPPacketSize Required when using identity caching. Indicates the maximum size
of XML packets to be sent or received. The minimum value is 1 and
the maximum is a 32-bit unsigned integer. The default is 4096.
InitialBackgroundTim-
erSleepTime
Required; the default is 5. This property specifies the amount of time
the time queue should initially sleep before beginning processing.
This property is only used for initial synchronization and should not
be changed.
RemoteLDAPServerThread-
TimerInterval
Required; specified in milliseconds, the default is 10. This property
governs how often the ldap RemoteServer thread checks to see if any
results have arrived from the remote LDAP server. You can modify it
to improve the throughput of the server when it proxies requests to a
remote LDAP server.
AdvancedDuplicateDetec-
tionMemoryInterval
Required when the Advanced Duplicate Detection feature is enabled.
This property specifies how long (in milliseconds)
Cisco Prime Access Registrar should remember a request. You must
specify a number greater than zero. The default is 10,000.
RollingEncryptionKey-
ChangePeriod
Used in conjunction with the session-cache ResourceManager, this
property specifies the length of time a given EncryptionKey will be
used before a new one is created. When the session-cache Resource-
Manager caches User-Password attributes, Prime Access Registrar
encrypts the User-Password so it is not stored in memory or persisted
on disk in clear text. Prime Access Registrar uses up to 255 encryp-
tion keys, using a new one after each RollingEncryptionKeyChange-
Period expires. If RollingEncryptionKeyChangePeriod is set to 2
days, Prime Access Registrar will create and begin using a new En-
cryptionKey every two days. The oldest key will be retired, and
Prime Access Registrar will re-encrypt any User-Passwords that used
the old key with the new key. This way, if the RollingEncryptionKey-
ChangePeriod is set to 1 day, no key will be older than 255 days.
DefaultReturnedSubnetSi-
zeIfNoMatch
Optional; used with the ODAP feature and reflects the returned size
of the subnet if no matched subnet is found. There are three options
to select if an exactly matched subnet does not exist: Bigger, Smaller,
and Exact. The default is Bigger.
ODBCEnvironmentMultiVal-
ueDelimiter
Optional; allows you to specify a character that separates multivalued
attributes in the marker list when using Oracle (or ODBC) accounting
RemoteSigtranServerThread-
TimerInterval
Required; specified in milliseconds, the default is 10. This property
governs how often the sigtran RemoteServer thread checks to see if
any results have arrived from the remote HLR/AuC server. You can
modify it to improve the throughput of the server when it proxies
requests to a remote sigtran server.
AdditionalNativeOracleEr-
rors
Optional; 5 digit Oracle native error in order to disconnect the
ODBC/OCI remote servers.
Table 3-32 Default Configuration Details (continued)
Fields Description

3-73
Cisco Prime Access Registrar 6.1 User Guide
OL-29756-01
Chapter 3 Using the Graphical User Interface
Configuring Cisco Prime Access Registrar
AR Flags section
HideSharedSecretAndPri-
vateKeys
Optional; the default value is TRUE.
The HideSharedSecretAndPrivateKeys property hides:
•The secret that is shared between a RADIUS Client and a
RADIUS Server or between two RADIUS servers in a RADIUS
proxy scenario.
•The PrivateKeyPassword under the certificate-based EAP
services.
When this property is set to TRUE, the following properties are
displayed as <encrypted>:
•PrivateKeyPasswords in:
–
peap-v0 service
–
peap-v1 service
–
eap-tls service
–
eap-ttls service
–
eap-fast service
•SharedSecret in:
–
RemoteServers of type RADIUS
–
RemoteServers of type map-gateway
–
Clients object
–
Resource Manager of type usr-vpn under Gateway subobject
•PseudonymSecret in eap-sim service
•DynamicAuthSecret under DynamicAuthorizationServer subject
in Clients object
•RepSecret under Replication
•Secret in /radius/advanced/DDNS/TSIGKeys
When the value for this property is set to FALSE, all the above prop-
erties are displayed in clear text.
ListenForDynamicAuthoriza-
tionRequests
Must be set to TRUE when using the Change of Authorization (CoA)
feature or Packet of Disconnect (POD) feature. Default is FALSE.
RequireNASsBehindProxy-
BeInClientList
Optional; the default is FALSE. If you accept the default,
Cisco Prime Access Registrar only uses the source IP address to
identify the immediate client that sent the request. Leaving it FALSE
is useful when this RADIUS Server should only know about the
proxy server and should treat requests as if they came from the proxy
server. This might be the case with some environments that buy bulk
dial service from a third party and thus do not need to, or are unable
to, list all of the NASs behind the third party’s proxy server. When
you set it to TRUE, you must list all of the NASs behind the Proxy in
the Clients list.
Table 3-32 Default Configuration Details (continued)
Fields Description

3-74
Cisco Prime Access Registrar 6.1 User Guide
OL-29756-01
Chapter 3 Using the Graphical User Interface
Configuring Cisco Prime Access Registrar
UseAdvancedDuplicateDe-
tection
Required; the default is FALSE. Set this property to TRUE when you
want Cisco Prime Access Registrar to use a more robust duplicate
request filtering algorithm.
DetectOutOfOrderAccount-
ingPackets
Optional; used to detect accounting packets that arrive out of sequen-
tial order. The default is FALSE. This property is useful when using
accounting and session management in a RADIUS proxy service.
When the DetectOutOfOrderAccountingPacket property is enabled
(set to TRUE), a new Class attribute is included in all outgoing
Accept packets. The value for this Class attribute will contain the
session magic number. The client will echo this value in the account-
ing packets, and this will be used for comparison.
The session magic number is a unique number created for all sessions
when the session is created or reused and the DetectOutOfOrderAc-
countingPacket property is set to TRUE. The DetectOutOfOrderAc-
countingPacket property is used to detect out-of-order
Accounting-Stop packets in roaming scenarios by comparing the
session magic number value in the session with the session magic
number value contained in the Accounting packet.
The value of 0xffffffff is considered by the Prime Access Registrar
server to be a wild card magic number. If any accounting stop packets
contain the value of 0xffffffff, it will pass the session magic valida-
tion even if the session’s magic number is something else.
The format of the class attribute is as follows:
<4-byte Magic Prefix><4-byte server IP address><4-byte Magic
value>
Java and EAP Parameters section
ClasspathForJavaExtensions A string which is the classpath to be used to locate Java classes and
jar files containing the classes required for loading the Java exten-
sions, either Java extension points or services.
Note The classpath will always contain the directory $INSTALL-
DIR/scripts/radius/java and all of the jar files in that direc-
tory.
JavaVMOptions A string that can contain options to be passed to the JRE upon startup.
JavaVMOptions should be used only when requested by Cisco TAC.
Table 3-32 Default Configuration Details (continued)
Fields Description

3-75
Cisco Prime Access Registrar 6.1 User Guide
OL-29756-01
Chapter 3 Using the Graphical User Interface
Configuring Cisco Prime Access Registrar
Setting Default Configuration
To set up the default configuration details:
Step 1 Choose Configuration > Advanced > Default. The Default Advanced Details page is displayed.
Step 2 Enter the relevant details.
Step 3 Click Set to save the specified details in the Default Advanced Details page. Otherwise, click Reset to
restore the default values. On successful creation of the default configurations, a success message is
displayed else a respective error message is displayed.
BackingStore/ServerParam
The Backing Store is a Parsing Tool which helps you in analyzing the session backing store files. It
retrieves the information on RADIUS sessions, clears phantom sessions details manually and processes
the binary log files information to user-readable format.
The Server parameters are set to configure objects to remote server using the relevant aregcmd
commands.
EapBadMessagePolicy Set to one of two values: SilentDiscard (the default) or RejectFailure.
When set to SilentDiscard, the Prime Access Registrar server silently
discards and ignores bad EAP messages unless the protocol specifi-
cation explicitly requires a failure message.
When set to RejectFailure, the Prime Access Registrar server sends
RADIUS Access-Rejects messages with embedded EAP-Failure in
response to bad EAP messages as described in Internet RFC 3579.
CertificateDBPath Required if you are using an LDAP RemoteServer and you want
Prime Access Registrar to use SSL when communicating with that
LDAP RemoteServer. This property specifies the path to the
directory containing the client certificates to be used when establish-
ing an SSL connection to an LDAP RemoteServer. This directory
must contain the cert7.db and cert5.db certificates and the key3.db
and key.db files database used by Netscape Navigator 3.x (and
above) or the ServerCert.db certificate database used by Netscape
2.x servers.
Table 3-32 Default Configuration Details (continued)
Fields Description

3-76
Cisco Prime Access Registrar 6.1 User Guide
OL-29756-01
Chapter 3 Using the Graphical User Interface
Configuring Cisco Prime Access Registrar
Table 3-33 lists and describes the fields in the Backing/ServerParam Advanced Details page.
Table 3-33 BackingStore/ServerParameter Properties
Fields Description
Backing Store section
SessionBackingStoreSyncInterval Sessions will be written to the backing store at this interval
PacketBackingStoreSyncInterval The minimum value is 1 and the maximum is a 32-bit
unsigned integer. The default is 75.
SessionBackingStorePruneInterval Required; specifies the sleep time interval of the session
backing store pruning thread. The recommended and
default value is 6 hours, but you can modify this based on
the traffic patterns you experience.
With SessionBackingStorePruneInterval set to 6 hours,
pruning will occur 6 hours after you restart or reload the
Prime Access Registrar server and recur every 6 hours.
You can set a very low value for this property to make
pruning continuous, but there might not be enough data ac-
cumulated for the pruning to occur and pruning might be
less effective compared to the default setting.
PacketBackingStorePruneInterval Required; specifies the sleep time interval of the packet
backing store pruning thread. The recommended value is 6
hours, but you can modify this based on the traffic patterns
you experience.
When PacketBackingStorePruneInterval is set to 6 hours,
pruning will occur 6 hours after you restart or reload the
Prime Access Registrar server and recur every 6 hours.
You can set a very low value for this property to make
pruning continuous, but there might not be enough data ac-
cumulated for the pruning to occur and pruning might be
less effective compared to the default setting.
BackingStoreDiscThreshold Required; the default is 10 gigabytes. The value of Back-
ingStoreDisc-
Threshold is made up of a number of units which can be K,
kilobyte, or kilobytes, M, megabyte, or megabytes, or G,
gigabyte, or gigabytes.
BackingStoreDiscThreshold is used with session manage-
ment and ODBC accounting and ensures that any data log
files generated will not cross the BackingStoreDiscThresh-
old.

3-77
Cisco Prime Access Registrar 6.1 User Guide
OL-29756-01
Chapter 3 Using the Graphical User Interface
Configuring Cisco Prime Access Registrar
SessionPurgeInterval Optional; the SessionPurgeInterval property determines
the time interval at which to check for timed-out sessions.
If no value is set, the session timeout feature is disabled.
The checks are performed in the background when system
resources are available, so checks might not always occur
at the exact time set.
The minimum recommended value for SessionPurgeInter-
val is 60 minutes. The SessionPurgeInterval value is
comprised of a number and a units indicator, as in n units,
where a unit is one of minutes, hours, days, or weeks.
StaleSessionTimeout Required; the default value is “1 hour.” Specifies the time
interval to maintain a session when a client does not
respond to Accounting-Stop notification.
When the Prime Access Registrar server does not receive
an Accounting-Response from a client after sending an Ac-
counting-Stop packet, Prime Access Registrar maintains
the session for the time interval configured in this property
before releasing the session.
This property is stored as a string composed of two parts: a
number and a unit indicator (<n> <units>) similar to the
MaxFileAge property where the unit is one of: M, Minute,
Minutes, H, Hour, Hours, D, Day, Days, W, Week, or
Weeks.
NumberOfRadiusIdentifiersPerSocket This represents the number of RADIUS Identifiers that
Prime Access Registrar can use per source port, while
proxying requests to remote servers.
To use a different source port for every request that is
proxied, you need to set the value of this property to one.
EnableStickySessionCount Required; either True or False and the default value is True.
When set to True, Prime Access Registrar displays the peer
specific stats showing the number of sticky sessions asso-
ciated with a peer for Diameter proxy service in name_ra-
dius_log file.
StickySessionCountInterval Required; specified in milliseconds and the default is
60000. When the EnableStickySessionCount is set to True,
this field specifies how often the Diameter proxy service
will display the number of sticky sessions associated with
a peer.
StickySessionSyncInterval Required; specified in milliseconds and the default value is
500. Specifies how often the Diameter proxy service will
write the sticky sessions to a file located in /cis-
co-ar/temp/__sticky_sessions_store location.
Table 3-33 BackingStore/ServerParameter Properties (continued)
Fields Description

3-78
Cisco Prime Access Registrar 6.1 User Guide
OL-29756-01
Chapter 3 Using the Graphical User Interface
Configuring Cisco Prime Access Registrar
Server Parameters section
MaximumNumberOfRadiusPackets Required; the default is 8192. This is a critical property
you should set high enough to allow for the maximum
number of simultaneous requests. When more requests
come in than there are packets allocated,
Cisco Prime Access Registrar will drop those additional
requests.
NumberOfRemoteUDPServerSocket Required; the default value for this property is 4.
The NumberOfRemoteUDPServerSockets property allows
you to configure the number of source ports used while
proxying requests to a remote RADIUS server. If the Num-
berOfRemoteUDPServerSockets property is set to a value
n, all remote servers share and use n sockets.
The NumberOfRemoteUDPServerSockets value comprises
a number, as in n, where n should be less than or equal to
the current process file descriptor limit divided by 4.
Note By default, the RADIUS process supports up to
1024 file descriptors. To increase the file descrip-
tors, stop the arserver; in the arserver script,
specify the required value to "NUMBER_OF_-
FILE_DESCRIPTORS" and restart the server. The
value for "NUMBER_OF_FILE_DESCRIPTORS"
should be in the range between 1024 to 65535.
MemoryLimitForRadiusProcess This property is used to avoid crashing of the RADIUS
process.
UDPPacketSize Required; the default is 4096. RFC 2138 specifies the
maximum packet length can be 4096 bytes. Do not change
this value.
PerPacketHeapSize Required; the default is 6500. This property sets the size of
the initial heap for each packet. The heap is the dynamic
memory a request can use during its lifetime. By preallo-
cating the heap size at the beginning of request processing,
we can minimize the cost of memory allocations. If Per-
PacketHeapSize is too low, Prime Access Registrar will
ask the system for memory more often. If PerPacketHeap-
Size is too high, Prime Access Registrar will allocate too
much memory for the request causing the system to use
more memory than required.
MinimumSocketBufferSize Required; the default is 65536 (64 K). This property
governs how deep the system’s buffer size is for queueing
UDP datagrams until Cisco Prime Access Registrar can
read and process them. The default is probably sufficient
for most sites. You can, however, raise or lower it as neces-
sary.
Table 3-33 BackingStore/ServerParameter Properties (continued)
Fields Description

3-79
Cisco Prime Access Registrar 6.1 User Guide
OL-29756-01
Chapter 3 Using the Graphical User Interface
Configuring Cisco Prime Access Registrar
Setting Server Parameters
To set up new server parameters:
Step 1 Choose Configuration > Advanced > Backing/ServerParam. The Backing/ServerParam Advanced
Details page is displayed.
Step 2 Specify the relevant details.
Step 3 Click Set to save the specified details in the Backing/ServerParamAdvanced Details page.
On successful creation of the server parameters, a success message is displayed else a respective error
message is displayed.
RemoteSessionServer
Prime Access Registrar sessions can also be stored on a remote database. This improves the overall
scalability of the number of sessions that Prime Access Registrar can simultaneously handle.
MaximumOutstandingRequests Optional; the default value for this property is 0.
The MaximumOutstandingRequests property is used to
limit the incoming traffic in terms of “requests processed”.
Serves as a hard limit.
The MaximumOutstandingRequests property comprises a
number n, where n can be any nonzero value.
MaximumIncomingRequests Optional; the default value for this property is 0.
ARIsCaseInsensitive When set to FALSE, requires that you provide exact
pathnames with regard to upper and lower case for all
objects, subobjects, and properties. The default setting,
TRUE, allows you to enter paths such as /rad/serv instead
of /Rad/Serv.
Note Prime Access Registrar always authenticates the
RADIUS attribute User-Name with regard to upper
and lower case, regardless of the setting of this
flag.
EnableDiameter Optional; Either TRUE or FALSE; default is TRUE. Set to
True when you want to use the Diameter protocol in
Prime Access Registrar.
KeyStores -> EAP-FAST section
NumberOfKeys Number (from 1-1024) that specifies the maximum number
of keys stored for EAP-FAST.
RolloverPeriod Specifies the amount of time between key updates.
Table 3-33 BackingStore/ServerParameter Properties (continued)
Fields Description

3-80
Cisco Prime Access Registrar 6.1 User Guide
OL-29756-01
Chapter 3 Using the Graphical User Interface
Configuring Cisco Prime Access Registrar
The remote session manager internally uses the following two ODBC remote servers:
•Internal-ODBC-Read-Server
•Internal-ODBC-Write-Server.
Configurations pertaining to these internal remoteservers can be done under the RemoteSessionServer
section.
Note Ensure that the length of fields such as Username, Session/Resource Manager name Session-Key,
Query-Key and so on are limited to the value specified in the schema, while it is configured. Although
the field length of entire session record is 3KB it is limited to 2KB. This is practically sufficient to hold
all the session parameters as well as the cached attributes (if any). For more information about the
schema, see Remote Session Management, page 17-47.
Note Remote session manager will work only with Oracle database.
Table 3-34 lists and describes the fields in the RemoteSessionServer Advanced Details page.
Table 3-34 RemoteSessionServer Properties
Fields Description
RemoteSessionServer section
ReactivateTimerInterval Mandatory time interval (in milliseconds) to activate an inactive
server; defaults to 300000 ms.
Timeout Mandatory time interval (in seconds) to wait for SQL operation to
complete; defaults to 15 seconds
DataSourceConnections Mandatory number of connections to be established; defaults to 8
ODBCDataSource Name of the ODBCDataSource to use and must refer to one entry in
the list of ODBC datasources configured under /Radius/Ad-
vanced/ODBCDataSources. Mandatory; no default.
KeepAliveTimerInterval Mandatory time interval (in milliseconds) to send a keepalive to keep
the idle connection active; defaults to zero (0) meaning the option is
disabled
MaximumBufferFileSize Mandatory if BufferAccountingPackets is set to TRUE, determines
the maximum buffer file size, defaults to 10 Megabyte)
CacheLimit Default is 250000; This represents the overall limit on cache of all
'remote' session managers. This value is interpreted as the maximum
number of packets that can be present in cache. When the number of
sessions hits this limit, sessions will be 'cached out'. This cache out
operation will continue, until the cache is at least 20% free.

3-81
Cisco Prime Access Registrar 6.1 User Guide
OL-29756-01
Chapter 3 Using the Graphical User Interface
Configuring Cisco Prime Access Registrar
Setting RemoteSessionServer Details
To set a new RemoteSessionServer details:
Step 1 Choose Configuration > Advanced > RemoteSessionServer. The RemoteSessionServer Advanced
Details page appears.
Step 2 Specify the relevant details.
Step 3 Click Set to save the specified details in the RemoteSessionServer Advanced Details page.
On successful creation of the RemoteSessionServer details, a success message is displayed else a
respective error message is displayed.
SNMP
Prime Access Registrar provides SNMP MIB for users of network management systems. The supported
MIBs enable the network management station to collect state and statistic information from a
Prime Access Registrar server. It enables a standard SNMP management station to check the current
state of the server as well as the statistics on each client or each proxy remote server. These messages
contain information indicating that either the server was brought up or down or that the proxy remote
server is down or has come back online.
Table 3-35 lists and describes the fields in the SNMP Advanced Details page.
BufferAccountingPackets Mandatory, TRUE or FALSE, determines whether to buffer the ac-
counting packets to local file, defaults to TRUE which means that
packet buffering is enabled.
Note When set to TRUE, a constant flow of incoming accounting
packets can fill the buffer backing store files in /cisco-ar/da-
ta/odbc beyond the size configured in MaximumBufferFile-
Size. Configure BackingStoreDiscThreshold in
/Radius/Advanced when using ODBC accounting.
UseCacheIndex Mandatory; If set to 1, it enables a fast cache based lookup index for
the items in the database. This optimizes the number of queries to the
database hence will improve performance, but limits the number of
sessions that can be scaled.
If set to 0, it disables fast cache based lookup index.
Table 3-34 RemoteSessionServer Properties (continued)
Fields Description

3-82
Cisco Prime Access Registrar 6.1 User Guide
OL-29756-01
Chapter 3 Using the Graphical User Interface
Configuring Cisco Prime Access Registrar
Table 3-35 SNMP Properties
Fields Description
SNMP Info section
InputQueueHighThreshold Percentage that indicates the upper limit of the packet input queue
usage. Default is 90.
Prime Access Registrar supports traps to indicate input queue usage.
When the input buffer exceeds the given high threshold value,
Prime Access Registrar generates a carInputQueueFull trap.
InputQueueLowThreshold Percentage that indicates the lower limit of the packet input queue
usage. Default is 60.
After reaching the high threshold, if the buffer usage drops below a
low threshold value, Prime Access Registrar generates a carInput-
QueueNotVeryFull trap.
Enabled Check the box to enable SNMP settings.
TracingEnabled Check the box to enable all possible tracing in SNMP agent. Tracing
is used for debugging purposes.
MasterAgentEnabled To use SNMP, enable the master agent. Prime Access Registrar
responds to SNMP queries through the SNMP master agent.
RFC Compliance Info section
AllowRejectAttrs When AllowRejectAttrs is set to FALSE, Reply-Message attributes
will not be passed in an Access Reject packet. When AllowRejectAt-
trs is set to TRUE, attributes will be allowed to pass in an Access
Reject packet.
AllowEAPRejectAttrs When AllowEAPRejectAttrs is set to FALSE, Reply-Message attri-
butes will not be passed in an Access Reject packet if the packet
contains EAP-Message attribute. When AllowEAPRejectAttrs is set
to TRUE, attributes will be allowed to pass in an Access Reject
packet even if the packet contains EAP-Message attribute.
Reply Messages section
Default Optional; when you set this property, Cisco Prime Access Registrar
sends this value when the property corresponding to the reject reason
is not set.
UnknownUser Optional; when you set this property, Cisco Prime Access Registrar
sends back this value in the Reply-Message attribute whenever
Cisco Prime Access Registrar cannot find the user specified by Us-
er-Name.
UserNotEnabled Optional; when you set this property, Cisco Prime Access Registrar
sends back this value in the Reply-Message attribute whenever the
user account is disabled.
UserPasswordInvalid Optional; when you set this property, Cisco Prime Access Registrar
sends back this value in the Reply-Message attribute whenever the
password in the Access-Request packet did not match the password
in the database.

3-83
Cisco Prime Access Registrar 6.1 User Guide
OL-29756-01
Chapter 3 Using the Graphical User Interface
Configuring Cisco Prime Access Registrar
Setting SNMP Details
To set up new SNMP details:
Step 1 Choose Configuration > Advanced > SNMP. The SNMP Advanced Details page is displayed.
Step 2 Specify the relevant details.
UnableToAcquireResource Optional; when you set this property, Cisco Prime Access Registrar
sends back this value in the Reply-Message attribute whenever one
of the Resource Managers was unable to allocate the resource for this
request.
ServiceUnavailable Optional; when you set this property, Cisco Prime Access Registrar
sends back this value in the Reply-Message attribute whenever a
service the request needs (such as a RemoteServer) is unavailable.
InternalError Optional; when you set this property, Cisco Prime Access Registrar
sends back this value in the Reply-Message attribute whenever an
internal error caused the request to be rejected.
MalformedRequest Optional; when you set this property, Cisco Prime Access Registrar
sends back this value in the Reply-Message attribute whenever a
required attribute (such as User-Name) is missing from the request.
ConfigurationError Optional; when you set this property, Cisco Prime Access Registrar
sends back this value in the Reply-Message attribute whenever the
request is rejected due to a configuration error. For example, if a
script sets an environment variable to the name of an object such as
Authentication-Service, and that object does not exist in the config-
uration, the reason reported is ConfigurationError.
IncomingScriptFailed Optional; when you set this property, Cisco Prime Access Registrar
sends back this value in the Reply-Message attribute whenever one
of the IncomingScripts fails to execute.
OutgoingScriptFailed Optional; when you set this property, Cisco Prime Access Registrar
sends back this value in the Reply-Message attribute whenever one
of the OutgoingScripts fails to execute.
IncomingScriptRejectedRe-
quest
Optional; when you set this property, Cisco Prime Access Registrar
sends back this value in the Reply-Message attribute whenever one
of the IncomingScripts rejects the Access-Request.
TerminationAction Optional; when you set this property, Cisco Prime Access Registrar
sends back this value in the Reply-Message attribute whenever
Cisco Prime Access Registrar processes the Access-Request as a
Termination-Action and is being rejected as a safety precaution.
OutgoingScriptRejectedRe-
quest
Optional; when you set this property, Cisco Prime Access Registrar
sends back this value in the Reply-Message attribute whenever one
of the OutgoingScripts rejects the Access-Request.
Table 3-35 SNMP Properties (continued)
Fields Description

3-84
Cisco Prime Access Registrar 6.1 User Guide
OL-29756-01
Chapter 3 Using the Graphical User Interface
Configuring Cisco Prime Access Registrar
Step 3 Click Set to save the specified details in the SNMP Advanced Details page.
On successful creation of the SNMP details, a success message is displayed else a respective error
message is displayed.
DDNS
Prime Access Registrar supports Dynamic DNS Remote server. It is a method, protocol, or network that
notifies the server to change the active DNS configuration of its configured hostnames, addresses or
other information stored in DNS.
You can click the Add button in the DDNS Details page to enter the TSIGKeys details in the TSIGKeys
Details section.
Table 3-36 lists and describes the fields in the TSIGKeys Details section.
You can use the DDNS Details page for the following:
•Filtering Records
•Setting DDNS Details
•Adding the TSIGKeys for DDNS
•Editing Records
•Deleting Records
Setting DDNS Details
To set up new DDNS details:
Step 1 Choose Configuration > Advanced > DDNS. The DDNS Details page is displayed.
Step 2 Check the SynthesizeReverseZone check box, and click Set DDNS.
Adding the TSIGKeys for DDNS
To add TSIGKeys details for DDNS:
Step 1 Choose Configuration > Advanced > DDNS. The DDNS Details page is displayed.
Step 2 Click Add. The TSIGKeys details section is displayed.
Step 3 Enter the relevant details.
Step 4 Click Add to save the specified details in the TSIGKeys Details section.
Table 3-36 TSIGKeys Properties
Fields Description
Name Name of the TSIG Key.
Secret Set to the same base64-encoded string as defined in the DNS server.
Description Description of the TSIG Key

3-85
Cisco Prime Access Registrar 6.1 User Guide
OL-29756-01
Chapter 3 Using the Graphical User Interface
Configuring Cisco Prime Access Registrar
On successful creation of the TSIGKeys details, a success page is displayed else a respective error
message is displayed.
ODBC DataSources
Prime Access Registrar uses ODBC as the datasource name to be used by the remote server. Multiple
remote servers can use the same ODBCDataSource. Under the ODBCDataSource object definition, a list
defines ODBC.ini filename/value pairs for a connection. The list includes a Type field and a Driver field,
different for each Driver and Data Source, to indicate its Driver and Data Source. Prime Access Registrar
supports only the Easysoft Open Source Oracle Driver.
Table 3-37 lists and describes the fields in the Add ODBC DataSources page.
You can use the ODBC DataSources page for the following:
•Filtering Records
•Adding ODBC Data Source
•Log
•Editing Records
•Deleting Records
Adding ODBC Data Source
To add new ODBC dta source details:
Step 1 Choose Configuration > Advanced > ODBC DataSources. The ODBC DataSources page is displayed.
Step 2 Click Add to add new ODBC data source details. The ODBC DataSources Details page is displayed.
Step 3 Entre the relevant details.
Table 3-37 ODBCDataSource Properties
Fields Description
Name Name of the ODBCDataSource
Description Optional; Description of the ODBC Data Source
Type Required; must be Oracle_es
Driver Required; liboarodbc.so (default value)
Note This attribute is supported only for OBDC.
UserID Required; database username (no default value)
Password Optional; user password; shown encrypted
DataBase Required; Oracle Client configuration database name (no default
value)
Server Set the name of the server
Port Set the port details.

3-86
Cisco Prime Access Registrar 6.1 User Guide
OL-29756-01
Chapter 3 Using the Graphical User Interface
Configuring Cisco Prime Access Registrar
Step 4 Click Submit to save the specified details. Otherwise click Cancel to return to the ODBC DataSources
page without saving the details.
The ODBC DataSources page is displayed with the newly added details and a success message is
displayed else a respective error message is displayed.
Log
The log files defined in Prime Access Registrar assist you in identifying the issues related to it.
Prime Access Registrar holds sets of log files to store information relevant to server agent processes,
monitoring arserver utility, execution of aregcme commands, mcd internal database details, RADIUS
server processes and debug details of RADIUS request process.
Table 3-38 lists and describes the fields in the Log Files page.
Table 3-38 Log Details
Fields Description
GUI Log Settings section
LOG LEVEL Select either debug level or Error.
MaxFileSize Set the maximum size of the log file.
Advance Details section
LogFileSize Required; the default is 1 megabyte. This property specifies the
maximum size of the RADIUS server log file. The value for the Log-
FileSize field is a string composed of two parts; a number, and a units
indicator (<n> <units>) in which the unit is one of: K, kilobyte, kilo-
bytes, M, megabyte, megabytes, G, gigabyte, or gigabytes.
The LogFileSize property does not apply to the config_mcd_1_log
or agent_server_1_log files.
Note This does not apply to the trace log.
LogFileCount Required; the default is 2. This property specifies the number of log
files to be kept on the system. A new log file is created when the log
file size reaches LogFileCount.
The LogFileCount property does not apply to the config_mc-
d_1_log or agent_server_1_log files.
TraceFileSize Required; the default is 1 GB. This property specifies the size of the
trace files to be kept on the system. A new trace file is created when
the trace file size reaches TraceFileSize. The value for the Trace-
FileSize field is a string composed of two parts; a number, and a units
indicator (<n> <units>) in which the unit is one of: K, kilobyte, kilo-
bytes, M, megabyte, megabytes, G, gigabyte, or gigabytes.
TraceFileCount Required; this value can be set from 1–100, and the default is 2. This
property specifies the number of trace files to maintain. A value of 1
indicates that no file rolling occurs.

3-87
Cisco Prime Access Registrar 6.1 User Guide
OL-29756-01
Chapter 3 Using the Graphical User Interface
Configuring Cisco Prime Access Registrar
You can use the Log Files page for the following:
•Filtering Records
•Viewing Log Details
LogServerActivity Required; the default is FALSE, which means
Cisco Prime Access Registrar logs all responses except Access-Ac-
cepts and Access-Challenges. Accepting the default reduces the load
on the server by reducing that amount of information it must log.
Note, the client is probably sending accounting requests to an ac-
counting server, so the Access-Accept requests are being indirectly
logged. When you set it to TRUE, Cisco Prime Access Registrar logs
all responses to the server log file.
TraceLevel Set the trace level.
LogTPSActivity When set to TRUE, this property enables to log the TPS usage in a
CSV file.The TPS is logged in the following format:
<mm-dd-yyyy>, <hh:mm:ss>, <tps-value>
For example,
04-01-2013, 12:00:01, 102
The default is False.
TPSLogFileCount Required only if you check the LogTPSActivity check box; the
number of TPS Sampling log files to maintain in the repository. The
default value is 2.
TPSLogFileNamePrefix Required only if you check the LogTPSActivity check box; this
represents the prefix of the CSV file which will be available in the
logs directory of Prime Access Registrar. The following represents
the CSV filename format:
<user-prefix>-<mm-dd-yyyy>.csv
tps-04-01-2013.csv
TPSSamplingPeriodInSecs Required only if you check the LogTPSActivity check box; this
represents the TPS sampling period in seconds. The minimum
sampling period is set to 5. The default is 30.
LogSessionActivity When set to TRUE, this property enables Prime Access Registrar to
log the session count in the server.
SessionLogFileCount Required only if you check the LogSessionActivity check box; the
number of session log files to maintain in the repository. The default
value is 2.
SessionLogFileNamePrefix Required only if you check the LogSessionActivity check box; this
represents the prefix of the session log file which will be available in
the logs directory of Prime Access Registrar.
SessionSamplingPeriodIn-
Secs
Required only if you check the LogSessionActivity check box; this
represents the session sampling period in seconds. The minimum
sampling period is set to 5. The default is 30.
Table 3-38 Log Details (continued)
Fields Description

3-88
Cisco Prime Access Registrar 6.1 User Guide
OL-29756-01
Chapter 3 Using the Graphical User Interface
Configuring Cisco Prime Access Registrar
•Downloading Log Details
•Setting Log Details
Viewing Log Details
To view the log files:
Step 1 Choose Configuration > Advanced > Log. The Log Files page is displayed.
Step 2 Choose the appropriate radio button and click View to view the file.
Downloading Log Details
To download the log files:
Step 1 Choose Configuration > Advanced > Log. The Log Files page is displayed.
Step 2 Choose the appropriate radio button and click Download to download the file.
Setting Log Details
To set the log details:
Step 1 Choose Configuration > Advanced > Log. The Log Files page is displayed.
Step 2 Enter the relevant details and click Set to save the specified details.
Ports
The Ports list specifies which ports to listen to for requests. When you specify a port,
Prime Access Registrar makes no distinction between the port used to receive Access-Requests and the
port used to receive Accounting-Requests. Either request can come in on either port.
Most NASs send Access-Requests to port 1645 and Accounting-Requests to 1646, however,
Prime Access Registrar does not check.
When you do not specify any ports, Prime Access Registrar reads the /etc/services file for the ports to
use for access and accounting requests. If none are defined, Prime Access Registrar uses the standard
ports (1645 and 1646).
Table 3-39 lists and describes the fields in the Ports page.

3-89
Cisco Prime Access Registrar 6.1 User Guide
OL-29756-01
Chapter 3 Using the Graphical User Interface
Configuring Cisco Prime Access Registrar
You can use the Ports page for the following:
•Filtering Records
•Adding Port Details
•Interfaces
•Editing Records
•Deleting Records
Adding Port Details
To add new port details:
Step 1 Choose Configuration > Advanced > Port. The Ports page is displayed.
Step 2 Enter the relevant details and click Add. The new port details will be listed in the Ports page.
Interfaces
The Interfaces list specifies the interfaces on which the RADIUS server receives and sends requests. You
specify an interface by its IP address.
•When you list an IP address, Prime Access Registrar uses that interface to send and receive
Access-Requests.
•When no interfaces are listed, the server performs an interface discover and uses all interfaces of the
server, physical and logical (virtual).
Note The IP address format is enhanced to support both IPv4 and IPv6.
You can use the interfaces page for the following:
•Filtering Records
•Adding IP Addressing Interface
•Deleting Records
Table 3-39 Port Properties
Fields Description
Port Required; allows you to use ports other than the default, 1645 and
1646. You can use this option to configure Prime Access Registrar to
use other ports,. If you add additional ports, however,
Prime Access Registrar will use the added ports and no longer use
ports 1645 and 1646. These ports can still be used by adding them to
the list of ports to use.
Type Set the port type.
Description Optional; description of the port.

3-90
Cisco Prime Access Registrar 6.1 User Guide
OL-29756-01
Chapter 3 Using the Graphical User Interface
Configuring Cisco Prime Access Registrar
Adding IP Addressing Interface
To add a new IP address interface to define an interface:
Step 1 Choose Configuration > Advanced > Interfaces. The Interfaces page is displayed.
Step 2 Enter the IP Address and click Add.
The Interfaces page is displayed with the newly added details and a success message is displayed else a
respective error message is displayed.
Attribute Groups
The Attributes can be grouped using Prime Access Registrar Profile object. The attributes for a
particular user group can be grouped under a profile and the attributes contained in the profiles will be
returned in their access-accepts.
Table 3-40 lists and describes the fields in the Attribute Groups Details page.
You can use the Attribute Groups page for the following:
•Filtering Records
•Adding Attribute Group Details
•Rules
•Editing Records
•Deleting Records
Adding Attribute Group Details
To add new attribute groups details:
Step 1 Choose Configuration > Advanced > Attributes Groups. The Attribute Groups page is displayed.
Step 2 Click Add to add new attribute group details. The Attribute Group Details page is displayed.
Table 3-40 AttributeGroups Properties
Fields Description
Name Name of the attribute group.
Description Optional; description of the attribute group.
Attribute type Select either RADIUS or VENDOR. If Vendor is selected, specify
the vendor type from the drop-down list.
Attribute Name Optional; based on the Attribute Type selected, the attribute name is
automated. Set the relevant name for the attribute type selected. Click
the Add button to save the details and list it in Attribute list. To
navigate between the listed attributes, use the navigation option
available adjacent to the list. See Relocating Records for more
details. To delete the available attributes, select the relevant attribute
and click the Delete button below.

3-91
Cisco Prime Access Registrar 6.1 User Guide
OL-29756-01
Chapter 3 Using the Graphical User Interface
Configuring Cisco Prime Access Registrar
Step 3 Enter the relevant details.
Step 4 Click Submit to save the specified details in the Attribute Groups Details page. Otherwise click Cancel
to return to the Attribute Groups page without saving the details.
The Attribute Groups page is displayed with the newly added details or a respective error message is
displayed.
Rules
A Rule is a function that selects services based on all input information used by the function.
Table 3-41 lists and describes the fields in the Add Rules List page.
You can use the Rules List page for the following:
•Filtering Records
•Setting Rules
•SessionManagers
•Editing Records
•Deleting Records
Table 3-41 Rule Properties
Fields Description
General Properties tab
Name Required; must be unique in the Rule list.
Description Optional; description of the rule.
Type Required; specifies the type of the rule which can be Radius or
Diameter.
Script Name Name of the script.
Attribute Details tab
These fields are displayed based on the type of the rule selected in the Type field.
RADIUS Optional; set Radius, if the attribute and value needs to be defined for
RADIUS.
VENDOR Optional; set Vendor, if the attribute and value needs to be defined for
Vendor.
AttributeName Optional; based on the Attribute Type selected, the attribute name is
automated. Set the relevant name for the attribute type selected.
AttributeValue Optional; set the value for the selected attribute. Click the Add button
to save the details and list it in Name and Value list. To navigate
between the listed attributes, use the navigation option available
adjacent to the list. See Relocating Records for more details. To
delete the available attributes, select the relevant attribute and click
the Delete button below.

3-92
Cisco Prime Access Registrar 6.1 User Guide
OL-29756-01
Chapter 3 Using the Graphical User Interface
Configuring Cisco Prime Access Registrar
Setting Rules
To set new rules:
Step 1 Choose Configuration > Rules. The List of Rules page is displayed.
Step 2 Click Add. The Rules Details page is displayed.
Step 3 Enter the relevant details.
Step 4 Click Submit to save the specified details in the Rules Details page. Otherwise click Cancel to return to
the List of Rules page without saving the details.
The List of Rules page is displayed with the newly added details or a respective error message is
displayed.
SessionManagers
You can use Session Managers to track user sessions. The Session Managers monitor the flow of requests
from each NAS and detect the session state. When requests come through to the Session Manager, it
creates sessions, allocates resources from appropriate Resource Managers, and frees and deletes sessions
when users log out.
The Session Manager enables you to allocate dynamic resources to users for the lifetime of their session.
You can define one or more Session Managers and have each one manage the sessions for a particular
group or company.
Note Session record size is limited by the operating system (OS) paging size (8 KB in Solaris and 4 KB in
Linux). If a request triggers creation of a session that exceeds the OS paging size, the request will be
dropped and the session will not be created.
Note In this release of Prime Access Registrar, the memory capacity is enhanced to store more than 4 million
active session's by storing the active session records in database server instead of storing it in the main
memory. The capacity is dependent on the number of attributes that are being captured for each session.
Note If the disk partition where Prime Access Registrar stores session backing store data (usually the disk
partition where Prime Access Registrar is installed, such as /opt/CSCOar) is full, the subsequent
packets that try to create sessions will be dropped and no sessions will be created due to lack of disk
space.
Session Managers use Resource Managers, which in turn, manage a pool of resources of a particular
type.
Table 3-42 lists and describes the fields in the Session Manager Details page.

3-93
Cisco Prime Access Registrar 6.1 User Guide
OL-29756-01
Chapter 3 Using the Graphical User Interface
Configuring Cisco Prime Access Registrar
Table 3-42 Session Manager Properties
Fields Description
Name Required; must be unique in the Session Managers list.
Description Optional description of the Session Manager.
Type Required; set to local or remote. Local is the traditional session manager
that maintains sessions in memory and has good performance. The remote
session manager operates on a remote ODBC database, and its perfor-
mance is highly dependent on the performance of the ODBC database.
EnableDiameter Optional; check the box if you want to use the session manager for
Diameter services.
SessionKey SessionKey property is used to set the sessionkey value for the Session
Manager.
The SessionManager checks whether the environmental variable Ses-
sion-Key is set or not. If the environmental variable is set, the server uses
it as the sessionkey. If environmental variable Session-Key is not set then
SessionManager gets the value configured in the SessionKey property
under SessionManager.
SessionKey can be a combination of attributes separated by a colon. The
values for those attributes are obtained from the RequestDictionary. If any
one of the attribute that is configured for the sessionkey is not present in
the RequestDictionary, Prime Access Registrar will drop the request.
However, if Session-Key is not set, SessionManager uses NAS-Identifier
and NAS-Port to create the sessionkey. An example configuration,
--> set SessionKey "User-Name:NAS-Port"
The following shows the sample configuration of sessionkey for Session
Manager:
[ //localhost/Radius/SessionManagers/session-mgr-1 ]
Name = session-mgr-1
Description =
Type = local
EnableDiameter = FALSE
IncomingScript =
OutgoingScript =
AllowAccountingStartToCreateSession = TRUE
SessionTimeOut =
PhantomSessionTimeOut =
SessionKey =
ResourceManagers/
AllowAccountingStartTo-
CreateSession
Set to TRUE by default; start the session when the
Prime Access Registrar server receives an Access Accept or an Account-
ing-Start.
When set to FALSE, start the session when the Prime Access Registrar
server receives an Access Accept.
IncomingScript Optional; name of script to run when the service starts. This script is run
as soon as the session is acquired in Prime Access Registrar.
OutgoingScript Optional; script to be run just before the session is written to backing
store.

3-94
Cisco Prime Access Registrar 6.1 User Guide
OL-29756-01
Chapter 3 Using the Graphical User Interface
Configuring Cisco Prime Access Registrar
SessionTimeOut The SessionTimeOut property is optional; no value for this property
means the session timeout feature is disabled.
Used in conjunction with /Radius/Advanced/SessionPurgeInterval for
the session timeout feature. Enables the session timeout feature for a
Session Manager. If the SessionTimeOut property is set to a value under
a session manager, all sessions that belong to that session manager will
be checked for timeouts at each SessionPurgeInterval. If any sessions
have timed out, they will be released, and all resources associated with
those sessions are also released.
The SessionTimeOut property determines the timeout for a session. If the
time difference between the current time and the last update time is
greater than this property’s value, the session is considered to be stale.
The last update time of the session is the time at which the session was
created or updated.
The SessionTimeOut value is comprised of a number and a units indica-
tor, as in n units, where a unit is one of minutes, hours, days, or weeks.
The default unit is ‘days’.
PhantomSessionTimeOut Optional; no value for this property means the phantom session timeout
feature is disabled.
The PhantomSessionTimeOut property is used in conjunction with /Ra-
dius/Advanced/SessionPurgeInterval to enable the phantom session
timeout feature for Session Manager.
If the PhantomSessionTimeOut property is set to a value under a session
manager, all sessions that belong to that session manager will be checked
for receipt of an Accounting-Start packet. Sessions that do not receive an
Accounting-Start packet from creation until its timeout will be released.
The PhantomSessionTimeOut value comprises a number and a units indi-
cator, as in n units, where a unit is one of minutes, hours, days, or weeks.
The default unit is ‘days’
SessionCreation Available only if you check the EnableDiameter check box; session
created for the configured application, command code, and AVP.
SessionDeletion Available only if you check the EnableDiameter check box; session
deleted for the configured application, command code, and AVP.
Resource Managers List Ordered list of Resource Managers. To navigate between the listed attri-
butes, use the navigation option available adjacent to the list. See Relo-
cating Records for more details.
Table 3-42 Session Manager Properties (continued)
Fields Description

3-95
Cisco Prime Access Registrar 6.1 User Guide
OL-29756-01
Chapter 3 Using the Graphical User Interface
Configuring Cisco Prime Access Registrar
You can use the Session Managers page for the following:
•Filtering Records
•Adding Session Manager Details
•Editing Records
•Deleting Records
Adding Session Manager Details
To add new session manager details:
Step 1 Choose Configuration > Session Managers. The Session Managers page is displayed.
Step 2 Click Add. The Session Manager Details page is displayed.
Step 3 Enter the required details.
Step 4 Click Add to save the specified details in the Session Manager Details page. Otherwise click Cancel to
return to the Session Managers page without saving the details.
The Session Managers page is displayed with the newly added details or a respective error message is
displayed.
ResourceManager
Resource Managers allow you to allocate dynamic resources to user sessions. The following lists the
different types of Resource Managers.
•IP-Dynamic—manages a pool of IP addresses that allows you to dynamically allocate IP addresses
from a pool of addresses
•IP-Per-NAS-Port—allows you to associate ports to specific IP addresses, and thus ensure each NAS
port always gets the same IP address
MemoryLimitForRadius-
Process
This property is used to avoid crashing of the RADIUS process. The
default value is 3500 Megabytes. This property is under /radius/ad-
vanced. When the RADIUS process uses memory more than the config-
ured limit, further sessions are not created and Prime Access Registrar
rejects further incoming requests.
MemorySizeCheckInter-
val
This property is used to avoid crashing of the RADIUS process. This is
used in conjunction with MemoryLimitForRadiusProcess. The default
value is 5 minutes. MemorySizeCheckInterval is a hidden parameter in
mcd database. To modify the default value, you need to export the mcd
database. Typically, a separate thread is created to monitor the RADIUS
process memory usage for every 5 minutes.
Table 3-42 Session Manager Properties (continued)
Fields Description

3-96
Cisco Prime Access Registrar 6.1 User Guide
OL-29756-01
Chapter 3 Using the Graphical User Interface
Configuring Cisco Prime Access Registrar
•IPX-Dynamic—manages a pool of IPX network addresses
•Subnet-Dynamic—manages a pool of subnet addresses
•Group-Session-Limit—manages concurrent sessions for a group of users; that is, it keeps track of
how many sessions are active and denies new sessions after the configured limit has been reached
•User-Session-Limit—manages per-user concurrent sessions; that is, it keeps track of how many
sessions each user has and denies the user a new session after the configured limit has been reached
•Home-Agent—manages a pool of on-demand IP addresses
•USR-VPN—manages Virtual Private Networks (VPNs) that use USR NAS Clients.
•Home-Agent-IPv6—manages a pool of on-demand IPv6 addresses
•Remote-IP-Dynamic—manages a pool of IP addresses that allows you to dynamically allocate IP
addresses from a pool of addresses. It internally works with a remote ODBC database.
•Remote-User-Session-Limit—manages per-user concurrent sessions; that is, it keeps track of how
many sessions each user has and denies the user a new session after the configured limit has been
reached. It internally works with a remote ODBC database.
•Remote-Group-Session-Limit—manages concurrent sessions for a group of users; that is, it keeps
track of how many sessions are active and denies new sessions after the configured limit has been
reached. It internally works with a remote ODBC database.
•Session Cache—allows you to define the RADIUS attributes to store in cache.
•Dynamic-DNS—manages the DNS server.
•Remote-Session-Cache—allows you to define the RADIUS attributes to store in cache. It should
be used with session manager of type 'remote'.
•3GPP—allows you to define the attribute for 3GPP authorization.
Each Resource Manager is responsible for examining the request and deciding whether to allocate a
resource for the user, do nothing, or cause Cisco Prime Access Registrar to reject the request.
Table 3-43 lists and describes the fields in the Resource Manager Details page.
The fields displayed in the Resource Manager Details page changes based on the option selected in the
Type field. The following tables describe the fields in the Resource Manager Details page.
DYNAMIC-DNS
Table 3-44 lists and describes the fields in the Resource Manager Details page.
Table 3-43 Resource Manager Properties
Fields Description
Resource Manager Name Required; must be unique in the Resource Managers list.
Description (optional) Optional; description of the Resource Manager.
Type Required; must be either Dynamic-DNS, IP-Dynamic,
IP-Per-NAS-Port, IPX-Dynamic, Session Cache, Subnet-Dynam-
ic, Group-Session-Limit, Home-Agent, User-Session-Limit,
USR-VPN, Home-Agent-IPv6, Remote-IP-Dynamic, Remote-Us-
er-Session-Limit, Remote-Group-Session-Limit, Remote-Ses-
sion-Cache, or 3GPP. Based on the option selected, the fields
displayed in the Resource Manager Details page varies.

3-97
Cisco Prime Access Registrar 6.1 User Guide
OL-29756-01
Chapter 3 Using the Graphical User Interface
Configuring Cisco Prime Access Registrar
GROUP-SESSION-LIMIT
Table 3-45 lists and describes the fields in the Resource Manager Details page.
REMOTE-GROUP-SESSION-LIMIT
Table 3-46 lists and describes the fields in the Resource Manager Details page.
HOME-AGENT
Table 3-47 lists and describes the fields in the Resource Manager Details page.
Table 3-44 DYNAMIC-DNS Properties
Fields Description
General tab
Max DNS TTLS Set the maximum TTL of the DNS record.
DNS Host bytes Set the number of bytes to be used to construct the reverse zone entry.
Forward Zone Name Set the name of the forward zone. For a given Resource Manager you
must decide which forward zone you will be updating for sessions the
resource manager will manage.
Reverse Zone Name Set the name of the reverse zone.
Forward Zone Server Set the Server IP of the forward zone
Reverse Zone Server Set the Server IP of the reverse zone
Forward Zone TSIG KeyS Server-wide security key to process all forward zone dynamic DNS
updates. This is used if a ForwardZoneTSIGKey was not specified on
the Resource Manager.
Reverse Zone TSIG Keys Server-wide security key to process all reverse zone dynamic DNS
updates. This is used if a ReverseZoneTSIGKey was not specified on
the Resource Manager
Table 3-45 GROUP-SESSION-LIMIT Properties
Fields Description
Group Session Limit Set the GroupSessionLimit property to the maximum number of con-
current sessions for all users.
Table 3-46 REMOTE-GROUP-SESSION-LIMIT Properties
Fields Description
Group Session Limit Set the GroupSessionLimit property to the maximum number of con-
current sessions for all users.
Table 3-47 HOME-AGENT Properties
Fields Description
HomeAgentIPAddresses tab

3-98
Cisco Prime Access Registrar 6.1 User Guide
OL-29756-01
Chapter 3 Using the Graphical User Interface
Configuring Cisco Prime Access Registrar
Click the Add button to save the details and list it in Start and End IP list. To navigate between the listed
attributes, use the navigation option available adjacent to the list. See Relocating Records for more
details. To delete the available attributes, select the relevant attribute and click the Delete button below.
HOME-AGENT-IPv6
Table 3-48 lists and describes the fields in the Resource Manager Details page.
Click the Add button to save the details and list it in Start and End IPv6 list. To navigate between the
listed attributes, use the navigation option available adjacent to the list. See Relocating Records for more
details. To delete the available attributes, select the relevant attribute and click the Delete button below.
IP-DYNAMIC
Table 3-49 lists and describes the fields in the Resource Manager Details page.
Click the Add button to save the details and list it in Start and End IP list. To navigate between the listed
attributes, use the navigation option available adjacent to the list. See Relocating Records for more
details. To delete the available attributes, select the relevant attribute and click the Delete button below.
REMOTE-IP-DYNAMIC
Table 3-50 lists and describes the fields in the Resource Manager Details page.
Start Required; must be an IP address.
End Required; must be an IP address.
Table 3-47 HOME-AGENT Properties (continued)
Fields Description
Table 3-48 HOME-AGENT-IPv6 Properties
Fields Description
HomeAgentIPv6Addresses tab
Start Required; must be an IPv6 address.
End Required; must be an IPv6 address.
Table 3-49 IP-DYNAMIC Properties
Fields Description
General tab
Reuse IP for same SessionKey
and User
When set to TRUE, this property supports overlapping IP addresses
between session managers for VPN users. Default value is FALSE.
Net Mask Required; must be set to a valid net mask.
Allow Overlapped IP
Addresses
When set to TRUE, this property supports overlapping IP addresses
between session managers for VPN users. Default value is FALSE.
IP Addresses tab
Start Required; must be an IP address.
End Required; must be an IP address.

3-99
Cisco Prime Access Registrar 6.1 User Guide
OL-29756-01
Chapter 3 Using the Graphical User Interface
Configuring Cisco Prime Access Registrar
Click the Add button to save the details and list it in Start and End IP list. To navigate between the listed
attributes, use the navigation option available adjacent to the list. See Relocating Records for more
details. To delete the available attributes, select the relevant attribute and click the Delete button below.
IP-PER-NAS-PORT
Table 3-51 lists and describes the fields in the Resource Manager Details page.
Click the Add button to save the details and list it in Start and End IP list. To navigate between the listed
attributes, use the navigation option available adjacent to the list. See Relocating Records for more
details. To delete the available attributes, select the relevant attribute and click the Delete button below.
IPX-DYNAMIC
Table 3-52 lists and describes the fields in the Resource Manager Details page.
Table 3-50 REMOTE-IP-DYNAMIC Properties
Fields Description
General tab
Reuse IP for same SessionKey
and User
When set to TRUE, this property supports overlapping IP addresses
between session managers for VPN users. Default value is FALSE.
Net Mask Required; must be set to a valid net mask.
Allow Overlapped IP
Addresses
When set to TRUE, this property supports overlapping IP addresses
between session managers for VPN users. Default value is FALSE.
IP Addresses tab
Start Required; must be an IP address.
End Required; must be an IP address.
Table 3-51 IP-PER-NAS-PORT Properties
Fields Description
General tab
Net Mask Required; if used, must be set to a valid net mask.
Allow Overlapped IP
Addresses
When set to TRUE, this property supports overlapping IP addresses
between session managers for VPN users. Default value is FALSE.
NAS Required; must be the name of a known Client.This value must be the
same as the NAS-Identifier attribute in the Access-Request packet.
IP Config tab
Start Required; must be an IP address.
End Required; must be an IP address.
Port Config tab
Start Required; set the NAS port
End Required; set the NAS port

3-100
Cisco Prime Access Registrar 6.1 User Guide
OL-29756-01
Chapter 3 Using the Graphical User Interface
Configuring Cisco Prime Access Registrar
Click the Add button to save the details and list it in Start and End IP list. To navigate between the listed
attributes, use the navigation option available adjacent to the list. See Relocating Records for more
details. To delete the available attributes, select the relevant attribute and click the Delete button below.
SESSION-CACHE
Table 3-53 lists and describes the fields in the Resource Manager Details page.
Table 3-52 IPX-DYNAMIC Properties
Fields Description
Networks tab
Start Required; must be an IP address.
End Required; must be an IP address.
Table 3-53 SESSION-CACHE Properties
Fields Description
General tab
Overwrite Attributes Specifies whether to overwrite the existing attributes if there are any
in the session record.
Query Key Required; set the QueryKey to the a RADIUS attribute you want to
key on, such as Framed-IP-Address.
A change made in Prime Access Registrar requires that this attribute
not be an XML attribute, even if this session-cache resource manager
is being used for an XML query.
Note Any existing session-cache resource managers using an XML
attribute for the Query Key must be changed to a RADIUS
attribute that this XML attribute is mapped to under Query-
Mappings.
Pending Removal Delay Required; length of time information remains in the cache after the
session ends (defaults to 10 seconds)
Query Mapping tab
XML Attribute Set the QueryKey property to the XML attribute you want to key on
such as XML-Address-format-IPv4 and list all attributes to be cached
in the AttributesToBeCached subdirectory.
Radius Attribute Required; list of attribute pairs, mapping the XML attributes on the
left-hand side to the RADIUS attribute on the right-hand side.
AttributeToBeCached tab
RADIUS Optional; set Radius, if the attribute needs to be defined for RADIUS.
VENDOR Optional; set Vendor, if the attribute needs to be defined for Vendor.
If Vendor is selected, specify the vendor type from the drop-down
list.
Attribute Name Required; use this subdirectory to provide a list of RADIUS attri-
butes you want to store in cache

3-101
Cisco Prime Access Registrar 6.1 User Guide
OL-29756-01
Chapter 3 Using the Graphical User Interface
Configuring Cisco Prime Access Registrar
Click the Add button to save the details and list it in Start and End IP list. To navigate between the listed
attributes, use the navigation option available adjacent to the list. See Relocating Records for more
details. To delete the available attributes, select the relevant attribute and click the Delete button below.
SUBNET-DYNAMIC
Table 3-54 lists and describes the fields in the Resource Manager Details page.
Click the Add button to save the details and list it in Start and End IP list. To navigate between the listed
attributes, use the navigation option available adjacent to the list. See Relocating Records for more
details. To delete the available attributes, select the relevant attribute and click the Delete button below.
USER-SESSION-LIMIT
Table 3-55 lists and describes the fields in the Resource Manager Details page.
REMOTE-USER-SESSION-LIMIT
Table 3-56 lists and describes the fields in the Resource Manager Details page.
USR-VPN
Table 3-57 lists and describes the fields in the Resource Manager Details page.
Table 3-54 SUBNET-DYNAMIC Properties
Fields Description
Subnet Dynamic tab
Net Mask Required; must be set to the size of the managed subnets
Start Required; must be an IP addresses
End Required; must be an IP addresses
Table 3-55 USER-SESSION-LIMIT Properties
Fields Description
User Session Limit Set the user session limit property to the maximum number of con-
current sessions for a particular user
Table 3-56 REMOTE-USER-SESSION-LIMIT Properties
Fields Description
User Session Limit Set the user session limit property to the maximum number of con-
current sessions for a particular user
Table 3-57 USR-VPN Properties
Fields Description
General tab
Identifier Required; must be set to the VPN ID the USR NAS will use to
identify a VPN.

3-102
Cisco Prime Access Registrar 6.1 User Guide
OL-29756-01
Chapter 3 Using the Graphical User Interface
Configuring Cisco Prime Access Registrar
To edit the gateway details, check the appropriate check box and click the Edit button. Enter new
information in the editable fields and click the Save button. You can also delete the record using Delete
button.
REMOTE-SESSION-CACHE
Table 3-58 lists and describes the fields in the Resource Manager Details page.
Neighbor Optional; if set, should be the IP address of the next hop router for
the VPN.
Framed Routing Optional; if set, should be RIP V2 Off or RIP V2 On if the USR
NAS is to run RIP Version 2 for the user.
Gateway tab
Name of Gateway Required; name of the gateway.
Description (optional) Optional; description of the gateway.
IP Address Required; IP address of the gateway
Shared Secret Required; must match the shared secret of the gateway.
Tunnel Refresh Optional; if specified it is the number of seconds the tunnel stays
active before a secure “keepalive” is exchanged between the tunnel
peers in order to maintain the tunnel open.
Location ID Optional; if specified it is a string indicating the physical location of
the gateway. Click the Save button, to save the details.
Table 3-57 USR-VPN Properties (continued)
Fields Description
Table 3-58 REMOTE-SESSION-CACHE Properties
Fields Description
General tab
Overwrite Attributes Specifies whether to overwrite the existing attributes if there are any
in the session record.
Query Key Required; set the QueryKey to the a RADIUS attribute you want to
key on, such as Framed-IP-Address.
A change made in Prime Access Registrar requires that this attribute
not be an XML attribute, even if this session-cache resource manager
is being used for an XML query.
Note Any existing session-cache resource managers using an XML
attribute for the Query Key must be changed to a RADIUS
attribute that this XML attribute is mapped to under Query-
Mappings.
Pending Removal Delay Required; length of time information remains in the cache after the
session ends (defaults to 10 seconds)
Remote Query Mapping tab
XML Attribute Set the QueryKey property to the XML attribute you want to key on
such as XML-Address-format-IPv4 and list all attributes to be cached
in the AttributesToBeCached subdirectory.

3-103
Cisco Prime Access Registrar 6.1 User Guide
OL-29756-01
Chapter 3 Using the Graphical User Interface
Configuring Cisco Prime Access Registrar
3GPP
Table 3-59 lists and describes the 3GPP properties in the Resource Manager Details page.
You can use the Resource Manager List page for the following:
•Filtering Records
•Adding Resource Manager Details
•Network Resources
•Editing Records
•Deleting Records
Adding Resource Manager Details
To add new resource manager details:
Step 1 Choose Configuration > Resource Manager. The Resource Manager List page is displayed.
Step 2 Click Add. The Resource Manager Details page is displayed.
Step 3 Enter the required details.
Step 4 Click Submit to save the specified details in the Resource Manager Details page. Otherwise click
Cancel to return to the Resource Manager List page without saving the details.
Radius Attribute Required; list of attribute pairs, mapping the XML attributes on the
left-hand side to the RADIUS attribute on the right-hand side.
RemoteAttributeToBeCached tab
RADIUS Optional; set Radius, if the attribute needs to be defined for RADIUS.
VENDOR Optional; set Vendor, if the attribute needs to be defined for Vendor.
If Vendor is selected, specify the vendor type from the drop-down
list.
Attribute Name Required; use this subdirectory to provide a list of RADIUS attri-
butes you want to store in cache
Table 3-58 REMOTE-SESSION-CACHE Properties (continued)
Fields Description
Table 3-59 3GPP Properties
Fields Description
EnableRegistrationFlow Check the box to enable registration flow during 3GPP authorization.
EnableSessionTermination Check the box to enable session termination during 3GPP
authorization.
ReuseExistingSession Check the box to reuse existing session during 3GPP authorization.
HSSProxyService Required; the HSS proxy service to use in the 3GPP authorization
flow.

3-104
Cisco Prime Access Registrar 6.1 User Guide
OL-29756-01
Chapter 3 Using the Graphical User Interface
Network Resources
The Resource Manager List page is displayed with the newly added details or a respective error message
is displayed.
Note Resource Manager supports the following remote type session managers: remote-ip-dynamic,
remote-session-cache, home-agent, remote-user-session-limit, home-agent-ipv6 and
remote-group-session-limit.
Network Resources
Network Resources constitutes the maintenance and management of the details of the clients and remote
servers. The clients IP address and shared secret details are maintained under clients, The management
of server directory with use of remote server protocols details are maintained in remote server.
This section describes the following:
•Clients
•Remote Servers
Clients
All NASs and proxy clients that communicate directly with Prime Access Registrar must have an entry
in the Clients list. This is required because NAS and proxy clients share a secret with the RADIUS server
which is used to encrypt passwords and to sign responses.
Table 3-60 lists and describes the fields in the Client Details page.
Table 3-60 Client Properties
Fields Description
Name Required and should match the Client identifier specified in the standard RADIUS
attribute, NAS-Identifier. The name must be unique within the Clients list.
IncomingScript Optional; you can use this property to specify a Script you can use to determine the
services to use for authentication, authorization, and/or accounting.
OutgoingScript Optional; you can use this property to specify a Script you can use to make any Cli-
ent-specific modifications when responding to a particular Client.
Protocol Required; set it to Radius, Diameter, or Tacacs-and-Radius.
Description Optional description of the client.
Vendor Optional; displayed when the protocol is set to Diameter. When set, must be the
name of a known Vendor.
Server Identity Optional; displayed when the protocol is set to Diameter. While exchanging the
CER information in the client, Prime Access Registrar sends the configured server
identity value as the origin-host value. When set, it takes precedence over the /Ra-
dius/Advance/Diameter/TransportManagement configuration.

3-105
Cisco Prime Access Registrar 6.1 User Guide
OL-29756-01
Chapter 3 Using the Graphical User Interface
Network Resources
HostName Required; hostname or IP address of the Diameter client.
Port Required; port on which client connects with the Prime Access Registrar server.
SCTP-Enabled Required; displays when the protocol is set to Diameter and indicates whether the
connection will be an SCTP. If set to TRUE, SCTP will be used. If set to FALSE,
TCP will be used.
Server Realm Optional; displays when the protocol is set to Diameter. While exchanging the CER
information in the client, Prime Access Registrar sends the configured server realm
value as the origin-realms value. it takes precedence over the /Radius/Advance/Di-
ameter/TransportManagement configuration.
General Properties tab
The tabs are available if the protocol is set to Radius or Tacacs-and-Radius.
IPAddress Required; must be a valid IP address and unique in the Clients list.
Prime Access Registrar uses this property to identify the Client that sent the
request, either using the source IP address to identify the immediate sender or using
the NAS-IP-Address attribute in the Request dictionary to identify the NAS
sending the request through a proxy.
When a range is configured for a Client’s IPAddress property, any incoming
requests whose source address belongs to the range specified, will be allowed for
further processing by the server. Similarly when a wildcard (an asterisk ‘*’ in this
case) is specified, any incoming requests whose source address matches the
wildcard specification will be allowed. In both the cases, the configured client prop-
erties like SharedSecret, and Vendor are used to process the requests.
You can specify a range of IP addresses using a hyphen as in:
100.1.2.11-20
You can use an asterisk wildcard to match all numbers in an IP address octet as in:
100.1.2.*
You can specify an IPAddress and a subnet mask together using Classless Inter-Do-
main Routing (CIDR) notation as in:
100.1.2.0/24
You can use the IPAddress property to set a base address and use the NetMask
property to specify the number of clients in the subnet range.
Shared Secret Required; must match the secret configured in the Client.
Type Required; accept the default (NAS), or set it to ATM, Proxy, or NAS+Proxy.
Vendor Optional; you can use this property when you need special processing for a specific
vendor’s NAS. To use this property, you must configure a Vendor object and
include a script. Prime Access Registrar provides five Scripts you can use: one for
Ascend, Cisco, Cabletron, Altiga, and one for USR. You can also provide your own
Script.
Table 3-60 Client Properties (continued)
Fields Description

3-106
Cisco Prime Access Registrar 6.1 User Guide
OL-29756-01
Chapter 3 Using the Graphical User Interface
Network Resources
NetMask Specifies the subnet mask used with the network address setting configured for the
IPAdress property when configuring a range of IP addresses.
This property is not used for a single client with an IP address only. The NetMask
property is used to configure multiple clients when you configure a base IP address
in the IPAddress property. You can set the NetMask property for a range of 256
clients using the following example:
set NetMask 255.255.255.0
Note If you set the NetMask property, validation will fail if you attempt to specify
a subnet mask using CIDR notation with the IPAddress property (described
above).
Enforce Traffic
Throttling
By default, the value is set to FALSE. When set to TRUE, the traffic throttling check
for the packet will be executed.
Dynamic Authorization tab
Enable
Dynamic Au-
thorization
Optional; when set to TRUE, this property enables Change of Authorization (CoA)
and Packet of Disconnect (PoD) features.
Shared Secret Located under the DynamicAuthorizationServer subdirectory, this is the shared
secret used for communicating CoA and PoD packets with the client.
Port Located under the DynamicAuthorizationServer subdirectory, the default port is
3799.
InitialTimeout Located under the DynamicAuthorizationServer subdirectory, the default is 5000.
MaxTries Located under the DynamicAuthorizationServer subdirectory, the default is 3.
COA Attribute This property is found under the DynamicAuthorizationServer subdirectory and
points to a group of attributes to be included in a CoA request sent to this client.
These attribute groups are created and configured under the AttributeGroups subdi-
rectory in /Radius/Advanced.
POD Attribute This property is found under the DynamicAuthorizationServer subdirectory and
points to a group of attributes to be included in a POD request sent to this client.
These attribute groups are created and configured under the AttributeGroups subdi-
rectory in /Radius/Advanced.
Notification Properties tab
Enable Notifi-
cations
Required; the default value is FALSE and indicates the client is not capable of
receiving Accounting-Stop notifications from the Prime Access Registrar server.
When set to TRUE, the client can receive Accounting-Stop notifications from the
Prime Access Registrar server and additional properties must be configured under
a new sub-directory named NotificationProperties.
InitialTimeout Located under the NotificationProperties subdirectory, specifies the timeout value
in milliseconds the Prime Access Registrar server waits for an Accounting-Re-
sponse packet before attempting a retry (sending another Accounting-Stop packet
to the client).
Required when EnableNotifications is set to TRUE; the default value is 5000.
Table 3-60 Client Properties (continued)
Fields Description

3-107
Cisco Prime Access Registrar 6.1 User Guide
OL-29756-01
Chapter 3 Using the Graphical User Interface
Network Resources
You can use the Clients page for the following:
•Filtering Records
•Adding Client Details
•Editing Records
•Deleting Records
Adding Client Details
To add new Client details:
Step 1 Choose Network Resources > Clients. The Clients page is displayed.
Step 2 Click Add to add new client details. The Client Details page is displayed.
Step 3 Enter the required details in the General Properties, Dynamic Authorization, and Notification Properties
tabs.
Step 4 Click Save to save the specified details in the Client Details page. Otherwise click Cancel to return to
the Client page without saving the details.
The Client page is displayed with the newly added details or a respective error message is displayed.
Remote Servers
You can use the RemoteServers object to specify the properties of the remote servers to which Services
proxy requests.
Port Located under the NotificationProperties subdirectory, specifies the port used by
the Prime Access Registrar server to receive Accounting-Stop packets. Required
when EnableNotifications is set to TRUE; the default value is 1813.
MaxTries Located under the NotificationProperties subdirectory, specifies the number of
times the Prime Access Registrar server sends an Accounting-Stop packet to a
client.
Required when EnableNotifications is set to TRUE; the default value is 3.
Notification-
Properties
When the EnableNotifications property is set to TRUE, this subdirectory contains
additional properties required to support the Query-Notify feature.
NotificationAt-
tributeGroup
Located under the NotificationProperties subdirectory, specifies the name of an
attribute group under /Radius/Advanced/AttributeGroups that contains the attri-
butes to be included when sending an the Accounting-Stop packet to this client.
Required when EnableNotifications is set to TRUE; there is no default value. You
must provide the name of a valid AttributeGroup and the named AttributeGroup
must contain at least one valid attribute, or validation will fail.
Table 3-60 Client Properties (continued)
Fields Description

3-108
Cisco Prime Access Registrar 6.1 User Guide
OL-29756-01
Chapter 3 Using the Graphical User Interface
Network Resources
Prime Access Registrar provides the following RemoteServer protocol types:
•LDAP
•LDAP Accounting
•Domain Authentication
•ODBC/OCI
•ODBC/OCI-Accounting
•Diameter
•Others
Note You must not configure a remote server with an IP address, which is same as that of the client. This is
applicable for all types of remote servers.
LDAP
Specify the ldap service type when you want to use a particular LDAP remote server for authentication
and/or authorization.When using LDAP for authentication and a local database for authorization, ensure
that the usernames in both locations are identical with regard to case-sensitivity.
Table 3-61 lists and describes the fields in the Add LDAP-RemoteServers Details page.
Table 3-61 LDAP Server Properties
Fields Description
LDAP Properties tab
Name Required; name of the LDAP server.
Host Name Required; the LDAP server’s hostname or IP address.
Prime Access Registrar supports IPv4 and IPv6 addresses for the
hostname.
Note To use IPv6 addresses, you must have Next Generation (NG)
license of Prime Access Registrar. For LDAP, IPv6 addresses
must be enclosed in square brackets, as in
[2001:420:27c1:420:250:56ff:fe99:3dfd].
Port Required; defaults to port 389.
Description Description of the LDAP server.
Timeout Required; the default is 15. The timeout property indicates how many
seconds the RADIUS server will wait for a response from the LDAP
server.
Note Use InitialTimeout from above as a template, except this is
timeout is specified in seconds.
Reactivate Time Interval Required; the amount of time (in milliseconds) to wait before retrying a
remote server that was offline. You must specify a number greater than
zero. The default is 300,000 (5 minutes).

3-109
Cisco Prime Access Registrar 6.1 User Guide
OL-29756-01
Chapter 3 Using the Graphical User Interface
Network Resources
MaxReferrals Required; must be a number equal to or greater than zero. This property
indicates how many referrals are allowed when looking up user informa-
tion. When you set this property to zero, no referrals are allowed.
Cisco Prime Access Registrar manages referrals by allowing the
RADIUS server’s administrator to indicate an LDAP “referral attribute,”
which might or might not appear in the user information returned from
an LDAP query. When this information is returned from a query,
Cisco Prime Access Registrar assumes it is a referral and initiates
another query based on the referral. Referrals can also contain referrals.
Note This is an LDAP v2 referral property.
Referral Attribute Required when you have specified a MaxReferrals value. This property
specifies which LDAP attribute, returned from an LDAP search, to check
for referral information.
Note This is an LDAP v2 referral property.
Referral Filter Required when you have specified a MaxReferral value. This is the
filter Cisco Prime Access Registrar uses when processing referrals.
When checking referrals, the information Cisco Prime Access Registrar
finds in the referral itself is considered to be the search path and this
property provides the filter. The syntax is the same as that of the Filter
property.
Note This is an LDAP v2 referral property.
Bind Name Optional; the distinguished name (dn) to use when establishing a connec-
tion between the LDAP and RADIUS servers.
Bind Password Optional; the password associated with the BindName.
Search Path Required; the path that indicates where in the LDAP database to start the
search for user information.
Limit Outstanding
Requests
Required; the default is FALSE. Cisco Prime Access Registrar uses this
property in conjunction with the MaxOutstandingRequests property to
tune the RADIUS server’s use of the LDAP server.
When you set this property to TRUE, the number of outstanding requests
for this RemoteServer is limited to the value you specified in MaxOut-
standingRequests. When the number of requests exceeds this number,
Cisco Prime Access Registrar queues the remaining requests, and sends
them as soon as the number of outstanding requests drops to this number.
User Password Attribute Required; this specifies which LDAP field the RADIUS server should
check for the user’s password.
Escape Spl.Character in
UserName
FALSE by default
Datasource Connections Specifies the number of concurrent connections to the LDAP server. The
default value is 8.
Table 3-61 LDAP Server Properties (continued)
Fields Description

3-110
Cisco Prime Access Registrar 6.1 User Guide
OL-29756-01
Chapter 3 Using the Graphical User Interface
Network Resources
Use SSL A boolean field indicating whether you want
Cisco Prime Access Registrar to use SSL (Secure Socket Layer) when
communicating with this RemoteServer. When you set it to TRUE, be
sure to specify the CertificateDBPath field in the Advanced section,
and be sure the port you specified for this RemoteServer is the SSL port
used by the LDAP server.
EnableKeepAlive Default is FALSE. This is enabled to send a TCP keepalive to keep the
idle connection active.
Filter Required; this specifies the search filter Cisco Prime Access Registrar
uses when querying the LDAP server for user information. When you
configure this property, use the notation “%s” to indicate where the user
ID should be inserted. For example, a typical value for this property is
“(uid=%s),” which means that when querying for information about user
joe, use the filter uid=joe.
Max Outstanding Requests Required when you have set the LimitOutstandingRequests to TRUE.
The number you specify, which must be greater than zero, determines the
maximum number of outstanding requests allowed for this remote server.
Password Encryption Style The default is None. You can also specify crypt, dynamic, SHA-1, and
SSHA-1.
DNSLookup and LDAP
RebindInterval
Specifies the timeout period after which the Prime Access Registrar
server will attempt to resolve the LDAP hostname to IP address (DNS
resolution); 0 by default
Search Scope Specifies how deep to search within a search path; default is SubTree
which indicates a search of the base object and the entire subtree of
which the base object distinguished name is the highest object.
Base indicates a search of the base object only.
OneLevel indicates a search of objects immediately subordinate to the
base object, but does not include the base object.
Use Binary Password Com-
parison
A boolean field that enables binary password comparison for authentica-
tion. This property when set to TRUE, enables binary password compar-
ison. By default, this property is set to FALSE.
Use Bind Based Authenti-
cation
A boolean field that enables bind-based authentication with LDAP
server. By default, this property is set to FALSE. When set to FALSE, it
uses existing legacy authentication method.
On setting this property to TRUE, the mappings LDAPToRadius, LDAP-
ToEnvironment, and LDAPToCheckItem will not work.
LDAPToRadiusMappings tab
LDAPAttribute Set the value for the LDAP attribute
Table 3-61 LDAP Server Properties (continued)
Fields Description

3-111
Cisco Prime Access Registrar 6.1 User Guide
OL-29756-01
Chapter 3 Using the Graphical User Interface
Network Resources
RadiusAttribute A list of name/value pairs in which the name is the name of the ldap
attribute to retrieve from the user record, and the value is the name of the
RADIUS attribute to set to the value of the ldap attribute retrieved.
For example, when the LDAPToRadiusMappings has the entry: Fra-
medIPAddress = Framed-IP-Address, the RemoteServer retrieves the
FramedIPAddress attribute from the ldap user entry for the specified
user, uses the value returned, and sets the Response variable
Framed-IP-Address to that value.
Click the Add button to save the details and list it in the attribute list. To
navigate between the listed attributes, use the navigation option available
adjacent to the list. See Relocating Records for more details. To delete
the available attributes, select the relevant attribute and click the Delete
button below.
LDAPToCheckItems Mappings tab
Attribute Type Select either RADIUS or VENDOR. If Vendor is selected, specify the
vendor type from the drop-down list.
LDAPAttribute Set the value for the LDAP attribute
CheckedItems A list of LDAP attribute/value pairs which must be present in the
RADIUS access request and must match, both name and value, for the
check to pass.
For example, when the LDAPToCheckItemMappings has the entry:
group = User-Group, the Access Request must contain the attribute
group, and it must be set to User-Group.
Click the Add button to save the details and list it in the attribute list. To
navigate between the listed attributes, use the navigation option available
adjacent to the list. See Relocating Records for more details. To delete
the available attributes, select the relevant attribute and click the Delete
button below.
LDAPToEnvironmentalMappings tab
LDAPAttribute Set the value for the LDAP attribute
EnvironmentalAttribute A list of name/value pairs in which the name is the name of the ldap
attribute to retrieve from the user record, and the value is the name of the
Environment variable to set to the value of the ldap attribute retrieved.
For example, when the LDAPToEnvironmentMappings has the entry:
group = User-Group, the RemoteServer retrieves the group attribute
from the ldap user entry for the specified user, uses the value returned,
and sets the Environment variable User-Group to that value.
Click the Add button to save the details and list it in the attribute list. To
navigate between the listed attributes, use the navigation option available
adjacent to the list. See Relocating Records for more details. To delete
the available attributes, select the relevant attribute and click the Delete
button below.
Table 3-61 LDAP Server Properties (continued)
Fields Description

3-112
Cisco Prime Access Registrar 6.1 User Guide
OL-29756-01
Chapter 3 Using the Graphical User Interface
Network Resources
You can use the LDAP-RemoteServers page for the following:
•Filtering Records
•Adding LDAP Details
•LDAP Accounting
•Editing Records
•Deleting Records
Adding LDAP Details
To add new LDAP details:
Step 1 Choose Network Resources > RemoteServers > LDAP. The LDAP-RemoteServers page is displayed.
Step 2 Click Add to add LDAP details. The LDAP-RemoteServers Details page is displayed.
Step 3 Enter the required details in the tabs.
Step 4 Click Save LDAP Server to save the specified details in the LDAP-RemoteServers Details page. The
LDAP-RemoteServers page is displayed with the newly added details or a respective error message is
displayed. Otherwise click Cancel to return to the LDAP-RemoteServers page without saving the
details.
LDAP Accounting
Previous releases of Prime Access Registrar supported accessing user data from an LDAP server, but this
feature was limited to performing authentication and authorization (AA). You could only write the
accounting records to local file or oracle database or proxy to another RADIUS server.
Prime Access Registrar supports writing accounting records into LDAP server enabling integration
between billing systems and LDAP.
Table 3-62 lists and describes the fields in the LDAPAcct RemoteServer Details page.
Table 3-62 LDAP Accounting Server Properties
Fields Description
LDAP Acct Properties tab
Name Name of the remote server; this property is mandatory, and there is no
default.
Description Optional description of server.
HostName Required; the LDAP server's hostname or IP address.
Port Required; the default value is 389. Port the LDAP server is listening on.
Timeout Mandatory time interval (in seconds) to wait for LADP-write operation
to complete; defaults to 15 seconds.
ReactivateTimerInterval Mandatory time interval (in milliseconds) to activate an inactive server;
defaults to 300000 ms.

3-113
Cisco Prime Access Registrar 6.1 User Guide
OL-29756-01
Chapter 3 Using the Graphical User Interface
Network Resources
BindName Optional; the distinguished name (dn) to use when establishing a connec-
tion between the LDAP and RADIUS servers.
BindPassword Optional; the password associated with the BindName.
EnableKeepAlive Required; default is FALSE. This is enabled to send a TCP keepalive to
keep the idle connection active.
Delimiter Character used to separate the values of the attributes given in Attribute-
List property.
LDAPEnvironmentMul-
tiValueDelimiter
Optional; allows you to specify a character that separates multi-valued
attribute lists when using ldap-accounting.
DnPath Required; the path that indicates where in the LDAP database to start the
write for user information.
EntryName Required; this specifies the write entry name Prime Access Registrar
uses when insetting the LDAP server for user information. When you
configure this property, use the notation "%s" to indicate where the user
ID should be inserted. For example, a typical value for this property is
"(uid=%s)," which means that when insetting for information about user
joe, use the fentry name uid=joe.
LimitOutstandingRequests Required; the default is FALSE. Prime Access Registrar uses this
property in conjunction with the MaxOutstandingRequests property to
tune the RADIUS server's use of the LDAP server.
When you set this property to TRUE, the number of outstanding requests
for this RemoteServer is limited to the value you specified in MaxOut-
standingRequests. When the number of requests exceeds this number,
Prime Access Registrar queues the remaining requests, and sends them
as soon as the number of outstanding requests drops to this number.
MaxOutstandingRequests Required when you have set the LimitOutstandingRequests to TRUE.
The number you specify, which must be greater than zero, determines the
maximum number of outstanding requests allowed for this remote server.
ObjectClass Required; list of object classes which are all schemas defined in LDAP
server. These schemas define required attributes and allowed attributes
for an entry which is inserted from Prime Access Registrar.
DNSLookup and
LDAPAcct RebindInterval
Specifies the timeout period after which the Prime Access Registrar
server will attempt to resolve the LDAP hostname to IP address (DNS
resolution).
Escape Spl.Character in
UserName
FALSE by default.
AttributeList List of comma-separated attribute names.
Datasource Connections Mandatory number of connections to be established; defaults to 8.
UseLocalTimeZone Optional; the default is FALSE. It determines the timezone of accounting
records TimeStamp.
Table 3-62 LDAP Accounting Server Properties (continued)
Fields Description

3-114
Cisco Prime Access Registrar 6.1 User Guide
OL-29756-01
Chapter 3 Using the Graphical User Interface
Network Resources
You can use the LDAP Acct-RemoteServers page for the following:
•Filtering Records
•Adding LDAP Accounting Details
•Editing Records
•Deleting Records
Adding LDAP Accounting Details
To add new LDAP accounting details:
Step 1 Choose Network Resources > RemoteServers > LDAP Accounting. The LDAPAcct-RemoteServers
page is displayed.
Step 2 Click Add to add LDAP accounting details. The LDAPAcct RemoteServer Details page is displayed.
Step 3 Enter the required details in the tabs.
Step 4 Click Save LDAP Acct Server to save the specified details in the LDAPAcct RemoteServer Details
page. Otherwise click Cancel to return to the LDAPAcct-RemoteServers page without saving the details.
The LDAPAcct-RemoteServers page is displayed with the newly added details or a respective error
message is displayed.
UseSSL A boolean field indicating whether you want Prime Access Registrar to
use SSL (Secure Socket Layer) when communicating with this Remote-
Server. When you set it to TRUE, be sure to specify the CertificateDB-
Path field in the Advanced section, and be sure the port you specified
for this RemoteServer is the SSL port used by the LDAP server.
AttributestoWrite tab
LDAPAcctAttribute Set the LDAP Accounting attribute.
EnvironmentalAttribute A list of name and value pairs in which the name is the name of the data
store attribute to retrieve from the user record, and the value is the name
of the RADIUS attribute to set to the value of the data store attribute re-
trieved. The data store attributes must match those defined in the external
SQL file.
Click the Add button to save the details and list it in the Attributes list.
To navigate between the listed attributes, use the navigation option
available adjacent to the list. See Relocating Records for more details. To
delete the available attributes, select the relevant attribute and click the
Delete button below.
Table 3-62 LDAP Accounting Server Properties (continued)
Fields Description

3-115
Cisco Prime Access Registrar 6.1 User Guide
OL-29756-01
Chapter 3 Using the Graphical User Interface
Network Resources
Domain Authentication
The Domain Authentication service type, domain-auth, is used with a Remote Server of the same type
to provide support for authentication against Windows Domain Controller/Active Directory (WDC/AD).
You can click the Add button in the Domain Authentication-RemoteServers page to add new domain
authentication details in the Domain Authentication-RemoteServers Details page. Table 3-63 lists and
describes the fields in the Domain Authentication-RemoteServers Details page.
Table 3-63 Domain Authentication Server Properties
Fields Description
General Properties tab
Name Required; name of the domain authentication server.
Host Name Required; hostname or IP address of the remote server.
Port Required; port used for communication with WDC/AD; defaults to 2004.
Default Domain Species the default domain for authentication if the user does not include
a domain during log in. Otherwise, authentication is performed on the
local domain.
Agent Connections Required; default is 15. Represents the total number of connections
Prime Access Registrar can open with the CSRA.
Description Optional; description of the domain authentication server.
Timeout Required; defaults to 15.
Reactivate Time Interval Required; default is 300,000 milliseconds. Specifies the length of time to
wait before attempting to reconnect if a thread is not connected to a data
source.
Workstation Optional; if a user has this workstation property set to some value, in
Active Directory, then during authentication, AD will check with the CLI
workstation value of Prime Access Registrar. Only if they match authen-
tication will succeed.
If this workstation value is not set in AD, no comparison with CLI work-
station field happens.
Default Usergroup User group to be used when no mapping is found in the list of maps in
the GroupMap property or when there is no hit in the groups listed in
GroupMaps. The DefaultUserGroup is used to authorize users that are
authenticated by this domain-auth RemoteServer.
GroupMaps tab

3-116
Cisco Prime Access Registrar 6.1 User Guide
OL-29756-01
Chapter 3 Using the Graphical User Interface
Network Resources
You can use the Domain Authentication-RemoteServers page for the following:
•Filtering Records
•Adding Domain Authentication Details
•ODBC/OCI
•Editing Records
•Deleting Records
Adding Domain Authentication Details
To add new domain authentication details:
Step 1 Choose Network Resources > RemoteServers > Domain Authentication. The Domain
Authentication-RemoteServers page is displayed.
Step 2 Click Add to add domain authentication details. The Domain Authentication-RemoteServers Details
page is displayed.
Step 3 Enter the required details in the tabs.
Step 4 Click Add Domain-Auth Server to save the specified details in the Domain
Authentication-RemoteServers Details page. Otherwise click Cancel to return to the Domain
Authentication-RemoteServers page without saving the details.
The Domain Authentication-RemoteServers page is displayed with the newly added details or a
respective error message is displayed.
AR UserGroup Select a user group from the drop-down list.
AD UserGroups A list of groups to which the user belongs in the WDC/AD mapped to an
internal group in the Prime Access Registrar server. Entries are of the
form:
1. “InternalGroup1 = ExternalGroup1, ExternalGroup2, ...”
2. “InternalGroup2 = ExternalGroup3, ExternalGroup4, ...”
To configure group mappings, use the following syntax:
set 1 “Group1 = ExternalGroup1,ExternalGroup2, ExternalGroup3”
Click the Add button to save the details and list it in the attribute list. To
navigate between the listed attributes, use the navigation option available
adjacent to the list. See Relocating Records for more details. To delete
the available attributes, select the relevant attribute and click the Delete
button below.
Table 3-63 Domain Authentication Server Properties (continued)
Fields Description

3-117
Cisco Prime Access Registrar 6.1 User Guide
OL-29756-01
Chapter 3 Using the Graphical User Interface
Network Resources
ODBC/OCI
Specify odbc or oci when you want to use an ODBC or OCI service for authentication, authorization and
accounting through an ODBC or OCI data store respectively. Use an ODBC or OCI service to
authenticate and authorize an access requests by querying user information through ODBC or OCI and
to insert accounting records into a data store through ODBC or OCI.
Note The ODBC service supports MYSQL and Oracle database service and OCI supports Oracle with 10.2.0
to 11.2.0 Oracle client.
Table 3-64 lists and describes the fields in the ODBC/OCI-RemoteServers Details page.
Table 3-64 ODBC/OCI Server Properties
Fields Description
Name Required; name of the ODBC/OCI Server.
Protocol The type of remote server. You select the option ODBC or OCI
from the drop-down list.
Datasource Connections Required; default is 8. This represents the total number of connec-
tions Prime Access Registrar can open with the ODBC server;
total number of threads Prime Access Registrar can create for the
ODBC server.
ODBC Datasource Name Required; name of the ODBCDataSource to use and must refer to
one entry in the list of ODBC datasources configured under /Ra-
dius/Advanced/ODBCDataSources.
User Password Attribute Set the user password.
SNMPTrapIP The SNMP trap IP for the remote servers.
Prime Access Registrar supports IPv4 and IPv6 addresses for the
SNMP trap IP.
Note To use IPv6 addresses, you must have Next Generation
(NG) license of Prime Access Registrar.
Description Description of the ODBC Server
Timeout Required; the default is 15. The timeout property indicates how
many seconds the RADIUS server will wait for a response from the
ODBC server.
Note Use InitialTimeout from above as a template, except this is
timeout is specified in seconds.
Reactivate Time Interval Required; default is 300,000 milliseconds. Length of time to wait
before attempting to reconnect if a thread is not connected to a data
source.
Keep Alive Timer Interval Mandatory time interval (in milliseconds) to send a keepalive to
keep the idle connection active; defaults to zero (0) meaning the
option is disabled
SNMPTrapPort The SNMP trap port for the remote server; defaults to 1521.
SQL Definitions tab
Name SQLDefinition properties define the SQL you want to execute.

3-118
Cisco Prime Access Registrar 6.1 User Guide
OL-29756-01
Chapter 3 Using the Graphical User Interface
Network Resources
You can use the ODBC/OCI-RemoteServers page for the following:
Description Description of the SQL
Type Prime Access Registrar supports only type query.
SQL SQL query used to add, update or delete a record from a database
Execution SequenceNumber Sequence number for SQLStatement execution, must be greater
than zero (mandatory, no default)
Marker List Defines all markers for the query. MarkerList uses the format Us-
erName/SQL_DATA_TYPE.
RadiusMappings tab
ODBC/OCI Attribute Set the ODBC or OCI attribute
RADIUS Attribute A list of name and value pairs in which the name is the name of the
data store attribute to retrieve from the user record, and the value
is the name of the RADIUS attribute to set to the value of the data
store attribute retrieved. The data store attributes must match those
defined in the external SQL file.
Click the Add button to save the details and list it in the Attributes
list. To navigate between the listed attributes, use the navigation
option available adjacent to the list. See Relocating Records for
more details. To delete the available attributes, select the relevant
attribute and click the Delete button below.
CheckItemsMappings tab
Attribute Type Select either RADIUS or VENDOR. If Vendor is selected, specify
the vendor type from the drop-down list.
ODBC/OCI Attribute Set the ODBC or OCI attribute
CheckItem A list of ODBC attribute/value pairs.
Click the Add button to save the details and list it in the Attributes
list. To navigate between the listed attributes, use the navigation
option available adjacent to the list. See Relocating Records for
more details. To delete the available attributes, select the relevant
attribute and click the Delete button below.
EnvironmentalMappings tab
ODBC/OCI Attribute Set the ODBC or OCI attribute
Environmental Attribute A list of name/value pairs in which the name is the name of the data
store attribute to retrieve from the user record, and the value is the
name of the Environment variable to set to the value of the ODBC
attribute retrieved.
Click the Add button to save the details and list it in the Attributes
list. To navigate between the listed attributes, use the navigation
option available adjacent to the list. See Relocating Records for
more details. To delete the available attributes, select the relevant
attribute and click the Delete button below.
Table 3-64 ODBC/OCI Server Properties (continued)
Fields Description

3-119
Cisco Prime Access Registrar 6.1 User Guide
OL-29756-01
Chapter 3 Using the Graphical User Interface
Network Resources
•Filtering Records
•Adding ODBC/OCI Details
•ODBC/OCI-Accounting
•Editing Records
•Deleting Records
Adding ODBC/OCI Details
To add new ODBC or OCI details:
Step 1 Choose Network Resources > RemoteServers > ODBC/OCI. The ODBC/OCI-RemoteServers page is
displayed.
Step 2 Click Add to add ODBC or OCI details. The ODBC/OCI-RemoteServers Details page is displayed.
Step 3 Enter the required details.
Step 4 Click Add to enter the SQL details in the SQL Definitions tab.
Step 5 Click Save to save the specified details in the SQL Definitions tab or click Cancel to cancel the action.
Step 6 Enter the required details in the tabs.
Step 7 Click Add Server to save the specified details in the ODBC/OCI-RemoteServers Details page.
Otherwise click Cancel to return to the ODBC/OCI-RemoteServers page without saving the details.
The ODBC/OCI-RemoteServers page is displayed with the newly added details or a respective error
message is displayed.
ODBC/OCI-Accounting
If you use the Oracle Accounting feature, you must configure an ODBC/OCI-Accounting RemoteServer
object.
Table 3-65 lists and describes the fields in the Add ODBC/OCI Accounting-RemoteServers page.
Table 3-65 ODBC/OCI Accounting Server Properties
Fields Description
General Properties tab
Name Name of the remote server; this property is mandatory, and there is
no default.
Protocol The type of Accounting remote server. You can select the option
odbc-accounting or oci-accounting from the drop-down list.
Datasource Connections Mandatory number of connections to be established; defaults to 8
ODBC Datasource Name Name of the ODBCDataSource to use and must refer to one entry
in the list of ODBC datasources configured under /Radius/Ad-
vanced/ODBCDataSources. Mandatory; no default

3-120
Cisco Prime Access Registrar 6.1 User Guide
OL-29756-01
Chapter 3 Using the Graphical User Interface
Network Resources
Buffer Accounting Packets Mandatory, TRUE or FALSE, determines whether to buffer the ac-
counting packets to local file, defaults to TRUE which means that
packet buffering is enabled.
Note When set to TRUE, a constant flow of incoming account-
ing packets can fill the buffer backing store files in /cis-
co-ar/data/odbc beyond the size configured in
MaximumBufferFileSize. Configure BackingStoreDisc-
Threshold in /Radius/Advanced when using ODBC ac-
counting.
Max. Buffer Filesize Mandatory if BufferAccountingPackets is set to TRUE, determines
the maximum buffer file size, defaults to 10 Megabyte)
Backing Store Environment
Vari a b les
Optional; when BufferAccountingPackets is set to TRUE, contains
a comma-separated list of environment variable names to be stored
into a local file along with buffered packet. No default. BackingS-
toreEnvironmentVariables can also be specified in scripts using the
BackingStoreEnvironmentVariables environment variable.
Attribute List List of comma-separated attribute names.
SNMPTrapIP Optional; when set to a valid IP address, the traps (responding/not
responding traps) for the ODBC/OCI Accounting server will have
this IP address. This is used to identify the server. If the value is
not set, SNMP traps use 255.255.255.255 as the IP address.
Description Optional; description of server.
Timeout Mandatory time interval (in seconds) to wait for SQL operation to
complete; defaults to 15 seconds.
Reactivate Time Interval Mandatory time interval (in milliseconds) to activate an inactive
server; defaults to 300000 ms.
Keep Alive Timer Interval Mandatory time interval (in milliseconds) to send a keepalive to
keep the idle connection active; defaults to zero (0) meaning the
option is disabled.
No. of Retries for Buffered
Packet
Mandatory if BufferAccountingPackets is set to TRUE. A number
greater than zero determines the number of attempts to be made to
insert the buffered packet into Oracle. Defaults to 3.
Use Local Timezone Set to TRUE or FALSE, determines the timezone of accounting
records' TimeStamp (defaults to FALSE).
Delimiter Character used to separate the values of the attributes given in At-
tributeList property.
SNMPTrapPort Optional; when set to a valid port, the traps (responding/not re-
sponding traps) for the ODBC/OCI Accounting server will have
this port. If the value is not set, SNMP traps use 1521 as the IP port.
SQL Definitions tab
Name Required; SQLDefinition properties define the SQL you want to
execute.
Description Description of the SQL
Table 3-65 ODBC/OCI Accounting Server Properties (continued)
Fields Description

3-121
Cisco Prime Access Registrar 6.1 User Guide
OL-29756-01
Chapter 3 Using the Graphical User Interface
Network Resources
You can use the ODBC/OCI Accounting-RemoteServers page for the following:
•Filtering Records
•Adding ODBC/OCI Accounting Details
•Others
•Editing Records
•Deleting Records
Adding ODBC/OCI Accounting Details
To add new ODBC or OCI accounting details:
Step 1 Choose Network Resources > RemoteServers > ODBC/OCI Accounting. The ODBC/OCI
Accounting-RemoteServers page is displayed.
Step 2 Click Add to add ODBC or OCI accounting details. The ODBC/OCI Accounting-RemoteServers Details
page is displayed.
Step 3 Enter the required details in the tabs.
Step 4 Click Add Accounting Server to save the specified details in the ODBC/OCI
Accounting-RemoteServers Details page. The ODBC/OCI Accounting-RemoteServers page is displayed
with the newly added details or a respective error message is displayed. Otherwise click Cancel to return
to the ODBC/OCI Accounting-RemoteServers page without saving the details.
Diameter
Diameter is a networking protocol which is derived from RADIUS protocol.
You can click the Add button in the Diameter-RemoteServers page to add a new Diameter remote server.
Table 3-66 lists and describes the Diameter remote server properties.
Type Required; Prime Access Registrar supports insert, update and
delete options.
SQL Required; SQL query used to acquire the password
Execution SequenceNumber Required; sequence number for SQLStatement execution, must be
greater than zero (mandatory, no default)
Marker List Required; defines all markers for the query. MarkerList uses the
format UserName/SQL_DATA_TYPE.
Table 3-65 ODBC/OCI Accounting Server Properties (continued)
Fields Description

3-122
Cisco Prime Access Registrar 6.1 User Guide
OL-29756-01
Chapter 3 Using the Graphical User Interface
Network Resources
You can use the Domain Authentication-RemoteServers page for the following:
•Filtering Records
•Adding Domain Authentication Details
•ODBC/OCI
•Editing Records
•Deleting Records
Adding Diameter Remote Server Details
To add new Diameter remote server details:
Table 3-66 Diameter Remote Server Properties
Fields Description
Name Required; name of the Diameter server.
Description Optional; description of the Diameter server.
Protocol Required; protocol used by the Diameter server.
MaxTries Number of retry attempts to be made by the Diameter server for request
and response.
Host Name Host name of the server.
Initial Timeout Specifies the timeout value in milliseconds the Prime Access Registrar
server waits for an Accounting-Response packet before attempting a
retry.
This value must be less than the DWatchDogTimeout value.
Port Port used by the server.
DWatchDogTimeout Time interval between watch dog messages.
IncomingScript Optional; if there is a script, it is the first script Prime Access Registrar
runs when it receives a request from any client and/or for any service.
OutgoingScript Optional; if there is a script, it is the last script Prime Access Registrar
runs before it sends a response to any client.
SCTP-Enabled Indicates whether the connection will be an SCTP. If set to TRUE , SCTP
will be used. If set to FALSE, TCP will be used.
AdvHostName Optional; specifies the local hostname address that will be advertised by
the Prime Access Registrar server to other peers during CER/CEA
exchange.
AdvRealm Advertising realm.
ActivateTimerInterval Mandatory time interval, in milliseconds, to activate an inactive server.
Vendor Select a valid vendor.
SCTPAdvHostName Section
Local SCTP advertising host name of the local server.
Remote SCTP advertising host name of the remote server.

3-123
Cisco Prime Access Registrar 6.1 User Guide
OL-29756-01
Chapter 3 Using the Graphical User Interface
Network Resources
Step 1 Choose Network Resources > RemoteServers > Diameter. The Diameter-Remote Servers page is
displayed.
Step 2 Click Add to add Diameter remote server details.
Step 3 Enter the required details as described in Table 3-66.
Step 4 Click Add Diameter Server to save the details. Click Cancel to return to the previous page without
saving the details.
The Diameter-Remote Servers page is displayed with the newly added details or a respective error
message is displayed.
Others
This feature of GUI allows you to set other specifications. The various types of protocols are:
•Radius
•Dynamic DNS
•Map-Gateway
•Prepaid-CRB
•Prepaid IS 835C
•Sigtran
•Sigtran-m3ua
Table 3-67 lists and describes the fields in the Remote Server Details page. The fields listed below are
the entire list of all the available protocols. The fields are displayed based on the type of protocol
selected.
Table 3-67 Other Server Properties
Fields Description
Remote Server Details
Name Required; name of the server.
Description Optional; description of the server.
Protocol Required; type of the remote server. Choose from one of the
following options:
•Radius
•Dynamic DNS
•Map-Gateway
•Prepaid-CRB
•Prepa-IS835C
•Sigtran
•Sigtran-m3ua

3-124
Cisco Prime Access Registrar 6.1 User Guide
OL-29756-01
Chapter 3 Using the Graphical User Interface
Network Resources
IP Address Required; this property specifies where to send the proxy request.
It is the address of the remote server. You must set it to a valid IP
address.
Port By default, Prime Access Registrar listens on ports 1645.
ReactivateTimerInterval Mandatory time interval (in milliseconds) to activate an inactive
server; defaults to 300000 ms.
MaxTries Number of times the server tries to send dynamic updates to a
server.
Initial Timeout Time, in milliseconds, that the server waits for a response before
retrying a request.
SharedSecret Required; the secret shared between the remote server and the
RADIUS server.
Vendor Optional; when set, must be the name of a known Vendor.
IncomingScript Optional; when set, must be the name of a known incoming script.
Prime Access Registrar runs the IncomingScript after it receives
the response.
OutGoingScript Optional; when set, must be the name of a known outgoing script.
Prime Access Registrar runs the OutgoingScript just before it
sends the proxy request to the remote server.
AccountingPort Port where the RADIUS server sends accounting packets.
AcknowledgeAccounting When ACKAccounting is TRUE, the Prime Access Registrar
server waits for the Accounting-Response from the remote
RADIUS server before sending the corresponding Accounting-Re-
sponse to the client.
When ACKAccounting is FALSE, the Prime Access Registrar
server does not wait for the Accounting-Response and immediate-
ly returns an Accounting-Response to the client.
Accept Dynamic Authorization
Requests
The value is set to False, by default.
MaxRename Retries Number of times that the resource managers can try to add a host
even if it detects that the host's name is already present. This
controls the number of times Prime Access Registrar tries to
modify a host's name to resolve a conflict on each failed update.
Trim HostName Controls whether Prime Access Registrar trims the hostname
string to the first period character. If this attribute is enabled, the
hostname is truncated before the period. If disabled, the server
retains the period characters in the hostname.
FwdZoneTSIG Server-wide security key to process all forward zone dynamic
DNS updates. This is used if a ForwardZoneTSIGKey was not
specified on the Resource Manager.
ReverseZoneTSIG Server-wide security key to process all reverse zone dynamic DNS
updates. This is used if a ReverseZoneTSIGKey was not specified
on the Resource Manager.
Table 3-67 Other Server Properties (continued)
Fields Description

3-125
Cisco Prime Access Registrar 6.1 User Guide
OL-29756-01
Chapter 3 Using the Graphical User Interface
Network Resources
File Name Name of the shared library provided by the billing server vendor,
such as libprepaid.so
Connections Number of threads the prepaid service and billing server can each
use (default is 8).
HostName Required; hostname of the remote server.
Local Sub System Number Required; the default value for this property is 0. This represents
the subsystem number used by SUA user.
CgPA Global Title Address Required; represents the Global Title Address of CallingPartyAd-
dress.
Set OPC In CgPA Required; if it is set to TRUE, OPC will be used in CallingPar-
tyAddress.
CdPANumberingPlan Required; used to specify the numbering plan of the called party.
The default value is 7.
CgPANumberingPlan Required; used to specify the numbering plan of the calling party.
The default value is 7.
Global Title Translation Script This is used to specify the name of script which is responsible for
translating IMSI to GTA.
SUA Configuration Filename Required; used to specify the name of configuration file for SUA
stack initialization.
Max Outstanding Requests This represents the maximum outstanding request to HLR.
Timeout Required; represents the how long the remote server should wait
before marking the request as timedout.
Limit Outstanding Requests Limits the outstanding request to HLR when it is set to TRUE.
SourceIPAddress Required; name of the local IP address.
SourcePort Required; specify the port number in which
Prime Access Registrar is installed for M3UA transactions.
LocalSubSystemNumber Required; the local sub system number is set as 149 by default.
DestinationPort Required; specify the destination port number to which
Prime Access Registrar connects.
IMSITranslationScript Specify the scripting point that is used to modify the IMSI based
on the requirement before sending the request to STP/HLR.
Timeout Required; specify the time (in seconds) to wait before an authenti-
cation request times out; defaults to 120.
ReactivateTimerInterval Required; specify the time interval (in milliseconds) to activate an
inactive server; defaults to 300000 ms (which is 5 minutes).
Table 3-67 Other Server Properties (continued)
Fields Description

3-126
Cisco Prime Access Registrar 6.1 User Guide
OL-29756-01
Chapter 3 Using the Graphical User Interface
Network Resources
Limit Outstanding Requests Prime Access Registrar uses this property in conjunction with the
MaxOutstandingRequests property to tune the RADIUS server's
use of the HLR. The default is FALSE.
When you set this property to TRUE, the number of outstanding
requests for this RemoteServer is limited to the value you specified
in MaxOutstandingRequests. When the number of requests
exceeds this number, Prime Access Registrar queues the
remaining requests, and sends them as soon as the number of out-
standing requests drops to this number.
MaxOutstandingRequests Required; specify the maximum number of outstanding requests
allowed for this remote server.
MAP-Version Required; specify the MAP version as 2 or 3 that HLR supports.
NetworkVariant Required; select the network variant switch.
Note Prime Access Registrar supports only ITU value.
SubServiceField Required; specify the type of network to which this SAP belongs.
The possible options are INT and NAT which represents interna-
tional network and national network respectively.
TCAPVariant Required; specify the name of the tcap network variant switch. The
possible options are ITU88, ITU92, or ITU96.
NetworkAppearance Required; specify the network appearance code which ranges from
0-2147483647.
This field is optional for SIGTRAN-M3UA remote servers as per
the RFC 4666 (http://tools.ietf.org/html/rfc4666.) You can set the
value to 0 to remove network appearance from the data packet.
NetworkIndicator Required; specify the network indicator used in SCCP address.
The possible options are NAT and INT which represents interna-
tional network and national network respectively.
RoutingIndicator Required; specify the routing indicator. The possible options are
RTE_GT or RTE_SSN which is used to route the packets for HLR.
MLCNumber Required; specify the MLC number which is required for M3UA
service for fetching the MSISDN from the HLR. This is the map
layer network node number by which the HLR identifies the
Prime Access Registrar in the network. The MLC number is con-
figured in E.164 format.
Note MLC is a max-15 digit number.
TrafficMode Required; specify the traffic mode values for the HLR.
LoadShareMode Required; specify the load share mode for the HLR.
When there is more than one associations with HLR, then the load
sharing is set as Signaling Link Selection (SLS). SLS is done based
on a simple round-robin basis.
Table 3-67 Other Server Properties (continued)
Fields Description

3-127
Cisco Prime Access Registrar 6.1 User Guide
OL-29756-01
Chapter 3 Using the Graphical User Interface
Network Resources
You can use the RemoteServers page allows for the following:
•Filtering Records
•Setting Other Specifications
•Editing Records
•Deleting Records
Setting Other Specifications
To set up other specifications:
Step 1 Select Network Resources > RemoteServers > Others. The RemoteServers page is displayed.
Step 2 Click Add to add other specifications. The Remote Server Details page is displayed.
Step 3 Enter the required details.
Step 4 Click Add Radius Server to save the specified details in the Remote Server Details page. Otherwise
click Cancel to return to the RemoteServers page without saving the details.
RoutingParameters
OriginPointCode Required; specify the originating point of a message in a signalling
network. The value ranges from 0 - 16777215.
DestinationPointCode Required; specify the destination address of a signalling point in a
SS7 network.
RemoteSubSystemNumber Required; specify the sub system number of the remote server. The
RemoteSubSystemNumber is set as 6 by default.
OPCMask Required; specify the wild card mask for the origin point code. The
value ranges from 0 - 16777215.
DPCMask Specify the wild card mask for the destination point code. The
value ranges from 0 - 16777215.
ServiceIndicatorOctet Specify the service identifier octet. The value ranges from 0 - 255.
RoutingContext Required; specify the routing context which ranges from 0 -
16777215.
Source & Destination IP Addresses
SourceIPAddresses Applicable only for Sigtran-m3ua protocol type. Enter the source
IP address to be configured on the remote server and then click
Add. The entered IP address is displayed in the SourceIPAddresses
list box. Click Delete to remote the IP address from the list.
DestinationIPAddresses Applicable only for Sigtran-m3ua protocol type. Enter the destina-
tion IP address to be configured on the remote server and then click
Add. The entered IP address is displayed in the DestinationIPAd-
dresses list box. Click Delete to remote the IP address from the list.
Table 3-67 Other Server Properties (continued)
Fields Description

3-128
Cisco Prime Access Registrar 6.1 User Guide
OL-29756-01
Chapter 3 Using the Graphical User Interface
Administration
The RemoteServers page is displayed with the newly added details or a respective error message is
displayed.
Administration
Administration constitutes the maintenance and management of details specific administrator, various
statistical data respective to the administrators, backing up and restoring server details, and license
management of the server.
This section describes the following:
•Administrators
•Statistics
•DiameterStatistics
•TACACSStatistics
•Back Up and Restore
•LicenseUpload
Administrators
Prime Access Registrar provided super-user administrative access in which administrator can perform
all tasks including starting and stopping the system and changing the configuration.
Prime Access Registrar also provides view-only administrative access. View-only access restricts an
administrator to only being able to observe the system and prevents that user from making changes.
Table 3-68 lists and describes the fields in the Administrator Details page.
You can use the Administrators page for the following:
•Filtering Records
•Adding Administrator Details
Table 3-68 Administrator Properties
Fields Description
Name Required; administrator’s user ID.
Description Optional; description of the administrator.
New Password Required; encrypted password of the administrator.
Confirm New Password Required; encrypted password of the administrator and must
match Password.
View Only Default value (FALSE) indicates that the administrator is able to
modify the configuration. When set to TRUE, the administrator
can only view the server configuration and set the change the
server trace level.

3-129
Cisco Prime Access Registrar 6.1 User Guide
OL-29756-01
Chapter 3 Using the Graphical User Interface
Administration
•Statistics
•Editing Records
•Deleting Records
Adding Administrator Details
To add new Administrator details:
Step 1 Choose Administration > Administrators. The Administrators page is displayed.
Step 2 Click Add to add administrator details. The Administrator Details page is displayed.
Step 3 Specify the required details.
Step 4 Click Submit to save the specified details in the Administrator Details page. Otherwise click Cancel to
return to the Administrators page without saving the details.
The Administrators page is displayed with the newly added details or a respective error message is
displayed.
Statistics
This feature provides statistical information on the specified server.
Table 3-69 lists the statistics information and the meaning of the values.
Table 3-69 aregcmd stats Information
Stats Value Meaning
serverStartTime Indicates the start time of the server.
serverResetTime Indicates the time when the server was
reloaded.
serverStat Indicates if the server is running or stopped.
totalPacketsInPool Number of packets that can be accommodated
in the pool.
totalPacketsReceived Number of packets that are received by
RADIUS server.
totalPacketsSent Number of packets that are sent by RADIUS
server.
totalRequests Number of requests received by RADIUS
server. This includes access requests and ac-
counting requests.
totalResponses Number of responses sent by RADIUS server.
This includes access accepts/rejects and ac-
counting responses.

3-130
Cisco Prime Access Registrar 6.1 User Guide
OL-29756-01
Chapter 3 Using the Graphical User Interface
Administration
totalAccessRequests Number of access requests received/pro-
cessed by RADIUS server.
totalAccessAccepts Number of access accepts sent by RADIUS
server.
totalAccessChallenges Number of access challenges sent by
RADIUS server.
totalAccessRejects Number of access rejects sent by RADIUS
server.
totalAccessResponses Number of access responses sent by RADIUS
server.
totalAccountingRequests Number of accounting requests received by
RADIUS server.
totalAccountingResponses Number of accounting responses sent by
RADIUS server.
totalStatusServerRequests Number of status server request received by
RADIUS server.
totalAscendIPAAllocateRequests Number of requests received related to
Ascend IP address allocation.
totalAscendIPAAllocateResponses Number of responses sent related to Ascend
IP Address Allocation.
totalAscendIPAReleaseRequests Number of requests received related to
Ascend IP Address release.
totalAscendIPAReleaseResponses Number of responses sent related to Ascend
IP Address release.
totalUSRNASRebootRequests Number of user NAS reboot request received
by RADIUS server.
totalUSRNASRebootResponses Number of user NAS reboot response sent by
RADIUS server.
totalUSRResourceFreeRequests Number of user resource free request received
by RADIUS server.
totalUSRResourceFreeResponses Number of user resource free response sent by
RADIUS server.
totalUSRQueryResourceRequests Number of user query resource request
received by RADIUS server.
totalUSRQueryResourceResponses Number of user query resource response sent
by RADIUS server.
totalUSRQueryReclaimRequests Number of user query reclaim request
received by RADIUS server.
totalUSRQueryReclaimResponses Number of user query reclaim response sent
by RADIUS server.
totalPacketsInUse Number of packets that are being used.
totalPacketsDrained Number of packets that are drained.
Table 3-69 aregcmd stats Information (continued)
Stats Value Meaning

3-131
Cisco Prime Access Registrar 6.1 User Guide
OL-29756-01
Chapter 3 Using the Graphical User Interface
Administration
totalPacketsDropped Number of packets that are dropped.
totalPayloadDecryptionFailures Number of failures due to payloads decryp-
tion.
RemoteServer statistics for: Provides server’s type, name, IP address, and
port used.
active Indicates whether the server was active (not in
a down state).
maxTries Number of retry attempts to be made by the
RemoteServer Object based on the Remote-
Server’s maxTries property setting.
RTTAverage Average round trip time since the last server
restart.
RTTDeviation Indicates a standard deviation of the RTTAv-
erage.
TimeoutPenalty Indicates any change made to the initial
timeout default value.
totalRequestsPending Number of requests currently queued.
totalRequestsSent Number of requests sent since the last server
restart.
Note totalRequestsSent should equal the
sum of totalRequestsOutstanding and
totalRequestsAcknowledged.
totalRequestsOutstanding Number of requests currently proxied that
have not yet returned
totalRequestsTimedOut Number of requests that have timed out since
last server restart or number requests not
returned from proxy server within the [config-
ured] initial timeout interval.
totalRequestsAcknowledged Number of responses received since last
server restart
totalResponsesDroppedForNotInCache Number of responses dropped because their
ID did not match the ID of any Pending
requests.
totalResponsesDroppedForSignatureMismatch Number of responses dropped because their
response authenticator did not decode to the
correct shared secret.
Table 3-69 aregcmd stats Information (continued)
Stats Value Meaning

3-132
Cisco Prime Access Registrar 6.1 User Guide
OL-29756-01
Chapter 3 Using the Graphical User Interface
Administration
Resetting Server Statistics
To reset server statistics:
Step 1 Choose Administration > Statistics. The Radius Server Statistics page is displayed.
Step 2 Click Reset to reset all the RADIUS server statistics.
DiameterStatistics
Prime Access Registrar supports statistic of Diameter messages through the CLI/GUI and SNMP. The
existing ‘stats’ module has been extended to include additional counters related to Diameter. The
Diameter statistics includes peer statistics and global summary statistics details on the specified server.
Table 3-70 and Table 3-71 lists the statistics information and the meaning of the values. The statistical
information in Table 3-71 is displayed based on the peer selected.
totalRequestsDroppedAfterMaxTries Number of requests dropped because no
response was received after retrying the con-
figured number of times. This value is
different from totalRequestsTimedOut
because using the default configuration
values, no response within 2000 ms bumps the
TimedOut counter, but it waits 14000 ms
(2000 + 4000 + 8000) to bump this counter.
lastRequestTime Date and time of last proxy request.
lastAcceptTime Date and time of last ACCEPT response to a
client.
Table 3-69 aregcmd stats Information (continued)
Stats Value Meaning
Table 3-70 Diameter stats Information
Metric Value
Diameter Statistics
serverStartTime The start time of the server.
serverResetTime The reset time of the server.
serverState The state of the server.
cdbpLocalStatsTotalUpTime The total time for which the Diameter server
is up.
cdbpLocalResetTime The time elapsed since a server was reset.
cdbpLocalStatsTotalPacketsIn The total number of packets received by a
Diameter Base protocol.

3-133
Cisco Prime Access Registrar 6.1 User Guide
OL-29756-01
Chapter 3 Using the Graphical User Interface
Administration
cdbpLocalStatsTotalPacketsOut The total number of packets transmitted by a
Diameter Base protocol.
Peer The name of the peer. You can select a peer
from the drop-down list.
Table 3-71 Diameter peer stats Information
Metric Value
Diameter Peers
Stats for the Remote Server The name of the selected peer.
ipaddress The IP address of the peer.
port The port of the peer.
cdbpPeerStatsState Indicates the connection state in the Peer State
Machine of the peer with which the Diameter
server is communicating.
cdbpPeerStatsASAsOut Number of Abort-Session-Answer messages
that are sent to the peer.
cdbpPeerStatsACRsIn Number of Accounting-Request messages
that are received from the peer
cdbpPeerStatsACRsOut Number of Accounting-Request messages
that are sent to the peer.
cdbpPeerStatsACAsIn Number of Accounting-Answer messages that
are received from the peer.
cdbpPeerStatsACAsOut Number of Accounting-Answer messages that
are sent to the peer.
cdbpPeerStatsCERsIn Number of Capabilities-Exchange-Request
messages received from the peer.
cdbpPeerStatsCERsOut Number of Capabilities-Exchange-Request
messages sent to the peer.
cdbpPeerStatsCEAsIn Number of Capabilities-Exchange-Answer
messages received from the peer.
cdbpPeerStatsCEAsOut Number of Capabilities-Exchange-Answer
messages sent to the peer.
cdbpPeerStatsDWRsIn Number of Device-Watchdog-Request
messages received from the peer.
cdbpPeerStatsStateDuration Represents the Peer state duration.
cdbpPeerStatsDWRsOut Number of Device-Watchdog-Request
messages sent to the peer.
cdbpPeerStatsDWAsIn Number of Device-Watchdog-Answer
messages received from the peer.
Table 3-70 Diameter stats Information (continued)
Metric Value

3-134
Cisco Prime Access Registrar 6.1 User Guide
OL-29756-01
Chapter 3 Using the Graphical User Interface
Administration
cdbpPeerStatsDWAsOut Number of Device-Watchdog-Answer
messages sent to the peer.
cdbpPeerStatsDPRsIn Number of Disconnect-Peer-Request
messages received from the peer.
cdbpPeerStatsDPRsOut Number of Disconnect-Peer-Request
messages sent to the peer.
cdbpPeerStatsDPAsIn Number of Disconnect-Peer-Answer
messages received from the peer.
cdbpPeerStatsDPAsOut Number of Disconnect-Peer-Answer
messages sent to the peer.
cdbpPeerStatsRARsIn Number of Re-Auth-Request messages that
are received from the peer.
cdbpPeerStatsRARsOut Number of Re-Auth-Request messages that
are sent to the peer.
cdbpPeerStatsRAAsIn Number of Re-Auth-Answer messages that
are received from the peer.
cdbpPeerStatsRAAsOut Number of Re-Auth-Answer messages that
are sent to the peer.
cdbpPeerStatsSTRsIn Number of Session-Termination-Request
messages that are received from the peer.
cdbpPeerStatsSTRsOut Number of Session-Termination-Request
messages that are sent to the peer.
cdbpPeerStatsSTAsIn Number of Session-Termination-Answer
messages that are received from the peer.
cdbpPeerStatsSTAsOut Number of Session-Termination-Answer
messages that are sent to the peer.
cdbpPeerStatsDWReqTimer The interval between the packets that are sent
to the peers.
cdbpPeerstatsRedirectEvents Number of redirects that are sent from a peer.
cdbpPeerStatsAccDupRequests Number of duplicate Diameter Account-
ing-Request packets.
cdbpPeerStatsMalformedReqsts Number of malformed Diameter packets that
are received.
cdbpPeerStatsAccsNotRecorded Number of Diameter Accounting-Request
packets that are received and responded but
not recorded.
cdbpPeerStatsWhoInitDisconnect Indicates whether the host or peer initiated the
disconnect.
cdbpPeerStatsAccRetrans Number of Diameter Accounting-Request
packets that are retransmitted to the Diameter
server.
Table 3-71 Diameter peer stats Information (continued)
Metric Value

3-135
Cisco Prime Access Registrar 6.1 User Guide
OL-29756-01
Chapter 3 Using the Graphical User Interface
Administration
Select the required peer from the Client drop-down list and click the Show Peer Stats button to view the
Diameter statistics of the peer. Click the Reset button, to reset all the Diameter statistics of the peer.
cdbpPeerStatsTotalRetrans Number of Diameter packets that are retrans-
mitted to the Diameter server. This does not
include the Diameter Accounting-Request
packets that are retransmitted.
cdbpPeerStatsAccPendReqstsOut Number of Diameter Accounting-Request
packets that are sent to the peer which have
not yet timed out or received a response. This
variable is incremented when an Account-
ing-Request is sent to the server and decre-
mented due to receipt of an
Accounting-Response, a timeout or a retrans-
mission.
cdbpPeerStatsAccReqstsDropped Number of Accounting-Requests to the server
that are dropped.
cdbpPeerStatsHByHDropMessages An answer message that is received with an
unknown hop-by-hop identifier. This does not
include the accounting requests that are
dropped.
cdbpPeerStatsEToEDupMessages The duplicate answer messages that are
locally consumed. This does not include
duplicate accounting requests that are
received.
cdbpPeerStatsUnknownTypes Number of Diameter packets of unknown type
that are received from the peer.
cdbpPeerStatsProtocolErrors Number of protocol errors that are returned to
peer, but not including the redirects.
cdbpPeerStatsTransientFailures Indicates the transient failure count.
cdbpPeerStatsDWCurrentStatus Indicates the connection status of the peer.
cdbpPeerStatsTransportDown Number of unexpected transport failures.
cdbpPeerStatsTimeoutConnAtmpts Number of times the server attempts to
connect to a peer when there is no transport
connection with the peer. This is reset on dis-
connection.
cdbpPeerStatsASRsIn Number of Abort-Session-Request messages
that are received from the peer.
cdbpPeerStatsASRsOut Number Abort-Session-Request messages
that are sent to the peer.
cdbpPeerStatsASAsIn Number of Abort-Session-Answer messages
that are received from the peer.
Table 3-71 Diameter peer stats Information (continued)
Metric Value

3-136
Cisco Prime Access Registrar 6.1 User Guide
OL-29756-01
Chapter 3 Using the Graphical User Interface
Administration
TACACSStatistics
Prime Access Registrar supports CISCO-AAA-SERVER-MIB to describe the statistics of TACACS+
protocol. This is supported through CLI/GUI and SNMP.
Table 3-72 lists the statistics information and the meaning of the values.
Table 3-72 TACACS stats Information
Metric Value
TACACS Statistics
serverStartTime The start time of the server.
serverResetTime The reset time of the server.
serverState The state of the server.
totalPacketsReceived Number of packets that are received by a
TACACS+ protocol irrespective of the type of
Authentication and Accounting.
totalPacketsSent Number of packets that are sent by a
TACACS+ protocol irrespective of the type of
Authentication and Accounting.
totalRequests Number of packet requests that are received
by a TACACS+ protocol irrespective of the
type of Authentication and Accounting.
totalResponses Number of packet responses that are sent by a
TACACS+ protocol irrespective of the type of
Authentication and Accounting.
totalAuthenticationRequests Number of authentication requests that are
received by Prime Access Registrar.
totalAuthenticationAccepts Number of authentication requests that are
accepted by Prime Access Registrar.
totalAuthenticationRejects Number of authentication requests that are
rejected by Prime Access Registrar.
totalAuthenticationChallenges Number of authentication challenges that are
faced by Prime Access Registrar.
totalAuthenticationResponses Number of authentication responses that are
sent by Prime Access Registrar.
totalAuthorizationRequests Number of authorization requests that are
received by Prime Access Registrar.
totalAuthorizationAccepts Number of authorization requests that are
accepted by Prime Access Registrar.
totalAuthorizationRejects Number of authorization requests that are
rejected by Prime Access Registrar.
totalAuthorizationResponses Number of authorization responses that are
sent by Prime Access Registrar.
totalAccountingRequests Number of accounting requests that are
received by Prime Access Registrar.

3-137
Cisco Prime Access Registrar 6.1 User Guide
OL-29756-01
Chapter 3 Using the Graphical User Interface
Administration
Back Up and Restore
To back up and restore the server details, Choose Administration > Backup&Restore. The Backup
page is displayed with the list of recently backed up details of the server with the date and time. This
option allows you to take a backup of the database, sessions, and scripts, and stores it in
/cisco-ar/backup directory.
Backup Server Details
To back up the server details:
Step 1 Choose Administration > Backup & Restore. The Backup page is displayed.
Step 2 Click Backup to take a backup of the database, sessions, and scripts, and stores it in /cisco-ar/backup
directory. The details will be backed up and appended to the backup list and displayed in the Backup
page.
Restoring Server Details
To restore the backed-up server details:
Step 1 Choose Administration > Backup & Restore. The Backup page is displayed.
Step 2 Choose the record from the backup list.
Step 3 Click Restore. The details of the selected back up file will be restored successfully.
LicenseUpload
Prime Access Registrar license information are uploaded using the Upload feature. To upload the license
file,
totalAccountingAccepts Number of accounting requests that are
accepted by Prime Access Registrar.
totalAccountingRejects Number of accounting requests that are
rejected by Prime Access Registrar.
totalAccountingResponses Number of accounting requests that are sent
by Prime Access Registrar.
totalPayloadDecryptionFailures Number of packets that are not decrypted by
Prime Access Registrar.
totalPacketsDropped Number of packets that are dropped by
Prime Access Registrar. The packets are
dropped, which are invalid and do not fulfill
the parsing conditions.
Table 3-72 TACACS stats Information (continued)
Metric Value

3-138
Cisco Prime Access Registrar 6.1 User Guide
OL-29756-01
Chapter 3 Using the Graphical User Interface
Read-Only GUI
Uploading License File
To upload the Prime Access Registrar license file:
Step 1 Choose Administration > LicenseUpload. The Prime Access Registrar License-Upload page is
displayed.
Step 2 Click Browse to locate the license file. The File Upload dialog box is displayed.
Step 3 Choose the required file.
Step 4 Click Upload. The selected file will be uploaded in /cisco-ar/license directory.
Note You need to ensure that the license file that you want to upload should be in .lic format.
Step 5 Click Reset to clear the text in the Select the File field, if you want to clear the selected path.
Read-Only GUI
Prime Access Registrar provides a read-only GUI that enables an administrator to observe the system
but prevents that administrator from making changes.
When you configure a user to be an administrator, check the View-Only check box to limit the
administrator to view-only operation. You can also use the CLI by setting the View-Only property to
TRUE under /Administrator/admin_name.
When using the Read-Only GUI, the Configuration, Network Resources and Administration sections are
displayed as same as a fully-enabled administrator. The details of these sections are displayed in text
format and cannot be edited.

CHAPTER
4-1
Cisco Prime Access Registrar 6.1 User Guide
OL-29756-01
4
Cisco Prime Access Registrar Server Objects
This chapter describes the objects you use to configure and operate your Cisco Prime Access Registrar
(Prime Access Registrar) RADIUS server.
Prime Access Registrar is configured and operated through a set of objects. These objects are arranged
in a hierarchy, with some of the objects containing subobjects; just as in a UNIX file system, in which
directories can contain subdirectories. All of the objects, except those that are merely lists, contain
properties that define the attributes or behavior of the object.
This chapter describes the following Prime Access Registrar objects:
•Radius— root of the configuration hierarchy
•UserLists—contains individual UserLists, which in turn contain users
•UserGroups—contains individual UserGroups
•Policies—contains individual Policies
•Clients—contains individual Clients
•Vendors—contains individual Vendors
•Scripts—contains individual Scripts
•Services—contains individual Services
•Session Managers—contains individual Session Managers
•Resource Managers—contains individual Resource Managers
•Profiles—contains individual Profiles
•Rules—contains individual Rules
•FastRules—contains attributes to add, modify, and delete in the request, response, and environment
dictionaries.
•Translations—contains individual Translations
•TranslationGroups—contains individual Translation Groups
•Remote Servers—contains individual RemoteServers
•Advanced—contains advanced properties, Ports, Interfaces, Reply Messages, and the Attribute
dictionary

4-2
Cisco Prime Access Registrar 6.1 User Guide
OL-29756-01
Chapter 4 Cisco Prime Access Registrar Server Objects
Radius
Radius
The Radius object is the root of the hierarchy. For each installation of the Cisco Prime Access Registrar
server, there is one instance of the Radius object. You reach all other objects in the hierarchy from the
Radius.
The following is a listing of the RADIUS server object:
[ //localhost/Radius ]
Name = Radius
Description =
Version = 6.1.0.0
IncomingScript~ = uery
OutgoingScript~ =
DefaultAuthenticationService~ = local-users
DefaultAuthorizationService~ = local-users
DefaultAccountingService~ = local-file
DefaultSessionService~ =
DefaultSessionManager~ = mgr-rad
UserLists/
UserGroups/
Policies/
Clients/
Vendors/
Scripts/
Services/
SessionManagers/
ResourceManagers/
Profiles/
Rules/
Translations/
TranslationGroups/
RemoteServers/
CommandSets/
DeviceAccessRules/
FastRules/
Advanced/
Replication/
Table 4-1 lists the Radius properties. You you can set or change Radius properties using the
Cisco Prime Access Registrar aregcmd commands.
Note When a field is listed as required, it means a value must be supplied; that is, the value must be set. You
can use the default (if it is supplied) or you can change it to something else, but you cannot unset it. You
must supply values for the required fields and for which no defaults exist.
.Table 4-1 Radius Properties
Property Description
Name Required; must be unique in the list of servers in the cluster
Description Optional description of the server
Version Required; the currently installed version of Prime Access Registrar
IncomingScript Optional; if there is a script, it is the first script
Cisco Prime Access Registrar runs when it receives a request from
any client and/or for any service

4-3
Cisco Prime Access Registrar 6.1 User Guide
OL-29756-01
Chapter 4 Cisco Prime Access Registrar Server Objects
UserLists
The remaining Cisco Prime Access Registrar objects are sub-objects of the Radius object.
UserLists
The UserLists object contains all of the individual UserLists, which in turn, contain the specific users
stored within Cisco Prime Access Registrar. Cisco Prime Access Registrar references each specific
UserList by name from a Service whose type is set to local. When Cisco Prime Access Registrar
receives a request, it directs it to a Service. When the Service has its type property set to local, the
Service looks up the user’s entry in the specific UserList and authenticates and/or authorizes the user
against that entry.
Note Usernames might not include the forward slash (/) character. If the Cisco Prime Access Registrar server
receives an access request packet with a User-Name attribute containing a forward slash character and
the Prime Access Registrar server uses an internal UserList to look up users, the server produces an error
(AX_EINVAL) and might fail. If usernames require a forward slash, use a script to translate the slash to
an acceptable, unused character.
You can have more than one UserList in the UserLists object. Therefore, use the UserLists object to
divide your user community by organization. For example, you might have separate UserLists objects
for Company A and B, or you might have separate UserLists objects for different departments within a
company.
Using separate UserLists objects allows you to have the same name in different lists. For example, if
your company has three people named Bob and they work in different departments, you could create a
UserList for each department, and each Bob could use his own name. Using UserLists lets you avoid the
problem of Bob1, Bob2, and so on.
OutgoingScript Optional; if there is a script, it is the last script
Cisco Prime Access Registrar runs before it sends a response to any
client
DefaultAuthenticationService Optional; Cisco Prime Access Registrar uses this property when
none of the incoming scripts sets the environment dictionary
variable Authentication-Service
DefaultAuthorizationService Optional; Cisco Prime Access Registrar uses this property when
none of the incoming scripts sets the environment dictionary
variable Authorization-Service
DefaultAccountingService Optional; Cisco Prime Access Registrar uses this property when
none of the incoming scripts sets the environment dictionary
variable Accounting-Service
DefaultSessionService Optional; Cisco Prime Access Registrar uses this property when
none of the incoming scripts sets the environment dictionary
variable Session-Service.
DefaultSessionManager Optional; Cisco Prime Access Registrar uses this property if none
of the incoming scripts sets the environment dictionary variable
Session-Manager.
Table 4-1 Radius Properties (continued)
Property Description

4-4
Cisco Prime Access Registrar 6.1 User Guide
OL-29756-01
Chapter 4 Cisco Prime Access Registrar Server Objects
UserLists
If you have more than one UserList, you can have a script Cisco Prime Access Registrar can run in
response to requests. The script chooses the Service, and the Service specifies the actual UserList which
contains the user. The alternative is dynamic properties.
The subobjects are the Users listed by name. Table 4-2 lists the UserLists object properties.
Users
The Users object contains all of the information necessary to authenticate a user or authorize a user.
Users in local UserLists can have multiple profiles. Table 4-3 lists the Users object properties.
HiddenAttributes Property
The HiddenAttributes property in the user object provides a concatenation of all user-level reply
attributes. The Prime Access Registrar server uses the HiddenAttributes property to construct and
populate a virtual attributes directory.
Table 4-2 UserLists Properties
Property Description
Name Required; must be unique in UserLists.
Description Optional description of the UserList.
Table 4-3 Users Properties
Property Description
Name Required; must be unique in the specific UserList.
Description Optional description of the user.
Password Required; length must be between 0-253 characters.
Enabled Required; default is TRUE, which means the user is allowed access. Set to
FALSE to cause Cisco Prime Access Registrar to deny the user access.
Group
(Overridden by
User-Group)
Optional; when you set this to the name of a UserGroup,
Cisco Prime Access Registrar uses the properties specified in that UserGroup
to authenticate and/or authorize the user.
BaseProfile
(Overridden by
User-Profile)
Optional; when you set this to the name of a Profile and the service-Type is
not equal to Authenticate Only, Cisco Prime Access Registrar adds the
properties in the Profile to the Response dictionary as part of the authorization.
AuthenticationScript Optional; when you set this property to the name of a script, you can use the
script to perform additional authentication checks to determine whether to
accept or reject the user.
AuthorizationScript Optional; when you set this property to the name of a script, you can use the
script to add, delete, or modify the attributes of the Response dictionary.
UserDefined1 Optional; you can use this property to store notational information which you
can then use to filter the UserList. This property also sets the environment
variable for UserDefined1.

4-5
Cisco Prime Access Registrar 6.1 User Guide
OL-29756-01
Chapter 4 Cisco Prime Access Registrar Server Objects
UserGroups
The HiddenAttributes property is, in fact, hidden. It is not displayed and cannot be set or modified using
aregcmd, but when an administrator issues a save, all values from the user’s Attributes directory go into
the HiddenAttributes property and the persistent storage.
The attributes are added in a replace-if-present-add-if-not manner as used in the UserGroup-Base-Profile
and User-Base-Profile.
The order of application of the attributes is as follows:
•UserGroup Base Profile
•UserGroup Attributes
•User Base Profile
•User Attributes
UserGroups
The UserGroups objects allow you to maintain common authentication and authorization attributes in
one location, and then have many users reference them. By having a central location for attributes, you
can make modifications in one place instead of having to make individual changes throughout your user
community.
For example, you can use several UserGroups to separate users by the services they use, such as a group
specifying PPP and another for Telnet.
Table 4-4 lists the UserGroups properties.
Policies
A Policy is a set of rules applied to an Access-Request. If you are using Policies, the first one that must
be created is SelectPolicy.
Table 4-5 lists the properties required for a given Policy.
Table 4-4 UserGroups Properties
Property Description
Name Required; must be unique in the UserGroup list.
Description Optional description of the group.
BaseProfile Optional; when you set this to the name of a Profile,
Cisco Prime Access Registrar adds the properties in the Profile to the
response dictionary as part of the authorization.
AuthenticationScript Optional; when you set this property to the name of a Script, you can use
the Script to perform additional authentication checks to determine
whether to accept or reject the user.
AuthorizationScript Optional; when you set this property to the name of a Script, you can use
the Script to add, delete, or modify the attributes of the Response
dictionary.

4-6
Cisco Prime Access Registrar 6.1 User Guide
OL-29756-01
Chapter 4 Cisco Prime Access Registrar Server Objects
Clients
Clients
All NASs and proxy clients that communicate directly with Cisco Prime Access Registrar must have an
entry in the Clients list. This is required because NAS and proxy clients share a secret with the RADIUS
server which is used to encrypt passwords and to sign responses. Table 4-6 lists the Client object
properties.
Table 4-5 Policies Properties
Property Description
Name Required; must be unique in the Policies list
Description Optional description of the Policy
Grouping Optional grouping of rules
Table 4-6 RADIUS Client Properties
Property Description
Name Required and should match the Client identifier specified in the
standard RADIUS attribute, NAS-Identifier. The name must be
unique within the Clients list.
Description Optional description of the client.
Protocol Required; specifies the client protocol which can be Radius,
Diameter, or Tacacs-and-Radius.

4-7
Cisco Prime Access Registrar 6.1 User Guide
OL-29756-01
Chapter 4 Cisco Prime Access Registrar Server Objects
Clients
IPAddress Required; must be a valid IP address and unique in the Clients list.
Cisco Prime Access Registrar uses this property to identify the
Client that sent the request, either using the source IP address to
identify the immediate sender or using the NAS-IP-Address or
NAS-IPv6-Address attribute in the Request dictionary to identify the
NAS sending the request through a proxy.
When a range is configured for a Client’s IPAddress property, any
incoming requests whose source address belongs to the range
specified, will be allowed for further processing by the server.
Similarly when a wildcard (an asterisk ‘*’ in this case) is specified,
any incoming requests whose source address matches the wildcard
specification will be allowed. In both the cases, the configured client
properties like SharedSecret, and Vendor are used to process the
requests.
You can specify a range of IP addresses using a hyphen as in:
100.1.2.11-20
You can use an asterisk wildcard to match all numbers in an IP
address octet as in:
100.1.2.*
You can specify an IPAddress and a subnet mask together using
Classless Inter-Domain Routing (CIDR) notation as in:
100.1.2.0/24
You can use the IPAddress property to set a base address and use the
NetMask property to specify the number of clients in the subnet
range.
The IP address format is enhanced to support IPv6 apart from IPv4.
You can use an asterisk wildcard to match all numbers in an IP
address octet as in:
1124:1124:1124:1124:*:*:*:*
Note The IPv6 address must be in standard notation.
SharedSecret Required; must match the secret configured in the Client.
Type Required; accept the default (NAS), or set it to ATM, Proxy, or
NAS+Proxy.
Vendor Optional; you can use this property when you need special processing
for a specific vendor’s NAS. To use this property, you must configure
a Vendor object and include a Script. Cisco Prime Access Registrar
provides five Scripts you can use: one for Ascend, Cisco, Cabletron,
Altiga, and one for USR. You can also provide your own Script.
IncomingScript Optional; you can use this property to specify a Script you can use to
determine the services to use for authentication, authorization, and/or
accounting.
Table 4-6 RADIUS Client Properties (continued)
Property Description

4-8
Cisco Prime Access Registrar 6.1 User Guide
OL-29756-01
Chapter 4 Cisco Prime Access Registrar Server Objects
Clients
OutgoingScript Optional; you can use this property to specify a Script you can use to
make any Client-specific modifications when responding to a
particular Client.
EnableDynamicAuthorization Optional; when set to TRUE, this property enables Change of
Authorization and Packet of Disconnect features.
DynamicAuthorizationServer This subdirectory is only present in a client with
EnableDynamicAuthorization set to TRUE and contains properties
required for CoA and PoD requests.
Port Located under the DynamicAuthorizationServer subdirectory, the
default port is 3799.
InitialTimeout Located under the DynamicAuthorizationServer subdirectory, the
default is 5000.
MaxTries Located under the DynamicAuthorizationServer subdirectory, the
default is 3.
DynamicAuthSharedSecret Located under the DynamicAuthorizationServer subdirectory, this is
the shared secret used for communicating CoA and PoD packets with
the client.
PODAttributeGroup This property is found under the DynamicAuthorizationServer
subdirectory and points to a group of attributes to be included in a
POD request sent to this client. These attribute groups are created and
configured under the AttributeGroups subdirectory in
/Radius/Advanced.
COAAttributeGroup This property is found under the DynamicAuthorizationServer
subdirectory and points to a group of attributes to be included in a
CoA request sent to this client. These attribute groups are created and
configured under the AttributeGroups subdirectory in
/Radius/Advanced.
NetMask Specifies the subnet mask used with the network address setting
configured for the IPAdress property when configuring a range of IP
addresses.
This property is not used for a single client with an IP address only.
The NetMask property is used to configure multiple clients when you
configure a base IP address in the IPAddress property. You can set the
NetMask property for a range of 256 clients using the following
example:
set NetMask 255.255.255.0
When the NetMask property indicates a pool of 256 address
(255.255.255.0), the range of addresses reserved for clients is 0-255,
as in 100.1.1.0-100.1.1.255.
Note If you set the NetMask property, validation will fail if you
attempt to specify a subnet mask using CIDR notation with
the IPAddress property (described above).
Table 4-6 RADIUS Client Properties (continued)
Property Description

4-9
Cisco Prime Access Registrar 6.1 User Guide
OL-29756-01
Chapter 4 Cisco Prime Access Registrar Server Objects
Clients
Table 4-7 describes the Diameter client properties.
EnableNotifications Required; the default value is FALSE and indicates the client is not
capable of receiving Accounting-Stop notifications from the
Prime Access Registrar server.
When set to TRUE, the client can receive Accounting-Stop
notifications from the Prime Access Registrar server and additional
properties must be configured under a new sub-directory named
NotificationProperties.
NotificationProperties When the EnableNotifications property is set to TRUE, this
subdirectory contains additional properties required to support the
Query-Notify feature.
Port Located under the NotificationProperties subdirectory, specifies the
port used by the Prime Access Registrar server to receive
Accounting-Stop packets. Required when EnableNotifications is set
to TRUE; the default value is 1813.
InitialTimeout Located under the NotificationProperties subdirectory, specifies the
timeout value in milliseconds the Prime Access Registrar server
waits for an Accounting-Response packet before attempting a retry
(sending another Accounting-Stop packet to the client).
Required when EnableNotifications is set to TRUE; the default value
is 5000.
MaxTries Located under the NotificationProperties subdirectory, specifies the
number of times the Prime Access Registrar server sends an
Accounting-Stop packet to a client.
Required when EnableNotifications is set to TRUE; the default value
is 3.
NotificationAttributeGroup Located under the NotificationProperties subdirectory, specifies the
name of an attribute group under
/Radius/Advanced/AttributeGroups that contains the attributes to
be included when sending an the Accounting-Stop packet to this
client.
Required when EnableNotifications is set to TRUE; there is no
default value. You must provide the name of a valid AttributeGroup
and the named AttributeGroup must contain at least one valid
attribute, or validation will fail.
EnforceTrafficThrottling Required; the default value is TRUE and indicates enforce traffic
throttling for this client. This property is under /Radius/Advanced/
MaximumOutstanding/IncomingRequests.
When set to FALSE, the traffic throttling for the packet coming from
this client is bypassed.
Table 4-6 RADIUS Client Properties (continued)
Property Description

4-10
Cisco Prime Access Registrar 6.1 User Guide
OL-29756-01
Chapter 4 Cisco Prime Access Registrar Server Objects
Vendors
Vendors
The Vendor object provides a central location for specifying all of the request and response processing
a particular NAS or Proxy vendor requires. Depending on the vendor, it might be necessary to map
attributes in the request from one set to another, or to filter out certain attributes before sending the
response to the client. For more information about standard RADIUS attributes, see Appendix C,
“RADIUS Attributes.”
Note When you have also set /Radius/IncomingScript, Cisco Prime Access Registrar runs that script before
the vendor’s script. Conversely, when you have set a /Radius/Outgoing script,
Cisco Prime Access Registrar runs the vendor’s script before that script.
Table 4-8 lists the Vendor object properties.
Table 4-7 Diameter Client Properties
Property Description
Name Required; must be unique in the client list.
Description Optional; description of the client.
Protocol Required; specifies the client protocol which can be Radius or Diameter.
HostName Required; hostname or IP address of the Diameter client.
Vendor Optional; you can use this property when you need special processing for
a specific vendor’s peer.
IncomingScript Optional; specifies a script that you can use to make client-specific
modifications when a request is received from a client.
OutgoingScript Optional; specifies a script that you can use to make any client-specific
modifications when responding to a particular client.
Port Required; port on which the client connects with Prime Access Registrar
server.
SCTP-Enabled Required, default value is False. If set to TRUE, SCTP will be used to
establish the connection with the peer else TCP will be used.
Table 4-8 Vendor Properties
Property Description
Name Required; must be unique in the Vendors list.
Description Optional description of the vendor.
IncomingScript Optional; when you specify an IncomingScript, Cisco Prime Access Registrar
runs the script on all requests from clients that specify that vendor.
OutgoingScript Optional; when you specify an OutgoingScript, Cisco Prime Access Registrar
runs the script on all responses to the Client.

4-11
Cisco Prime Access Registrar 6.1 User Guide
OL-29756-01
Chapter 4 Cisco Prime Access Registrar Server Objects
Scripts
Scripts
The Script objects define the function Cisco Prime Access Registrar invokes whenever the Script is
referenced by name from other objects in the configuration.
You can write three types of scripts:
•REX (RADIUS EXtension) scripts are written in C or C++, and thus are compiled functions that
reside in shared libraries
•Tcl scripts are written in Tcl, and are interpreted functions defined in source files.
•Java scripts
Note For more information about how to write scripts and how to incorporate them into
Cisco Prime Access Registrar, see Chapter 11, “Using Extension Points.”
Note Cisco is not liable for scripts developed by clients. See Client Scripting in Chapter 1, “Overview.”
Table 4-9 lists the Script object properties.
The InitEntryPoint properties allow you to perform initialization before processing and then cleanup
before stopping the server. For example, when Prime Access Registrar unloads the script (when it stops
the RADIUS server) it calls the InitEntryPoint again to allow it to perform any clean-up operations as
a result of its initialization. One use of the function might be to allow the script to close an open
Accounting log file before stopping the RADIUS server.
Table 4-9 Script Object Properties
Property Description
Name Required; must be unique in the Scripts list.
Description Optional description of the script.
Language Required; specify either REX, Tcl, or Java.
Filename Required; specifies either a relative or absolute path. When you specify a relative
path, the path must be relative to the $INSTALL/scripts/radius/$Language
directory. When you specify an absolute path, the server must be able to reach it.
EntryPoint Optional; when not set, Prime Access Registrar uses the value specified in the
Name property.
InitEntryPoint Optional; if set, it must be the name of the global symbol Prime Access Registrar
should call when it initializes the shared library at system start up, and just before
it unloads the shared library.
InitEntryPointArg Optional; when set, it provides the arguments to be passed to the InitEntryPoint
in the environmental variable Arguments.
ClassName For Java language scripts, the name of the class that implements the extension
interface; the .class file should be placed in /cisco-ar/scripts/radius/java
InitializeArg Optional for Java language scripts; set to a string to be passed to the Initialize
method if the class implements the optional ExtensionWithInitialization
interface.

4-12
Cisco Prime Access Registrar 6.1 User Guide
OL-29756-01
Chapter 4 Cisco Prime Access Registrar Server Objects
Services
Note When you use a Prime Access Registrar file service, Prime Access Registrar automatically closes any
opened files. However, if you write scripts that manipulate files, you are responsible for closing them.
Note If you have more than one extension point script (defined under /Radius/Scripts) using the same Java
class, only one instance of the class is created and used for all the extension point scripts.
Services
Cisco Prime Access Registrar supports authentication, authorization, and accounting (AAA) services. In
addition to the variety of built-in AAA services (specified in the Type property),
Cisco Prime Access Registrar also enables you to add new AAA services through custom shared
libraries.
Table 4-10 lists the common Services properties. There are additional properties depending on the type
of service.
Note OutagePolicy also applies to Accounting-Requests. If an Accounting-Request is directed to an
unavailable Service, then the values in Table 4-11 apply.
Table 4-10 Common Service Properties
Property Description
Name Required; must be unique in the Services list.
Description Optional description of the service.
Type Required, must set it to a valid Prime Access Registrar service.
OutagePolicy Required; the default is DropPacket. This property defines how
Cisco Prime Access Registrar handles requests if all servers listed in the
RemoteServers properties are unavailable (that is, all remote RADIUS servers
are not available). You must set it to one of the following: AcceptAll,
DropPacket, or RejectAll.
OutageScript Optional; if you set this property to the name of a script,
Cisco Prime Access Registrar runs it when an outage occurs. This property allows
you to create a script that notifies you when the RADIUS server detects a failure.

4-13
Cisco Prime Access Registrar 6.1 User Guide
OL-29756-01
Chapter 4 Cisco Prime Access Registrar Server Objects
Services
Types of Services
This section lists the types of services available in Prime Access Registrar with their required and
optional properties. The service you specify determines what additional information you must provide.
This section contains the following topics:
•Domain Authentication
•EAP Services
•File
•Group
•Java
•LDAP
•Local
•ODBC
•ODBC-Accounting
•Prepaid Services
•RADIUS
•Radius Query
•RADIUS-Session
•Rex
•WiMAX
•Diameter
•M3UA
Table 4-11 OutagePolicy Request Packets
Property Description Accounting-Request Description
AcceptAll Continues processing the packet
as if the Service was successful.
The Accounting-Request will
continue through the server and a
response will be sent.
DropPacket Immediately drops the packet,
no further processing, and does
not send any response to the
client for this packet.
The packet will be discarded and
it will not be processed any
further.
RejectAll Rejects the packet, but continues
processing it and sends the client
a reject response.
The request will be dropped and
no more processing will be done.

4-14
Cisco Prime Access Registrar 6.1 User Guide
OL-29756-01
Chapter 4 Cisco Prime Access Registrar Server Objects
Services
Domain Authentication
The Domain Authentication service type, domain-auth, is used with a Remote Server of the same type
to provide support for authentication against Windows Domain Controller/Active Directory (WDC/AD).
The following example lists the default configuration for a domain-auth service which are all common
service properties described in Table 4-10:
[ //localhost/Radius/Services/wdc ]
Name = wdc
Description =
Type = domain-auth
IncomingScript~ =
OutgoingScript~ =
OutagePolicy~ = RejectAll
OutageScript~ =
MultipleServersPolicy = Failover
RemoteServers/
EAP Services
Prime Access Registrar supports Extensible Authentication Protocol (EAP) and Protected EAP (PEAP)
to provide a common protocol for differing authentication mechanisms. EAP enables the dynamic
selection of the authentication mechanism at authentication time based on information transmitted in the
Access-Request. Prime Access Registrar provides the following EAP services:
•EAP-FAST
•EAP-GTC
•EAP-LEAP
•EAP-MD5
•EAP-MSChapV2
•EAP-Negotiate
•EAP-SIM
•EAP-Transport Level Security (TLS)
•EAP-Tunneled TLS (TTLS)
•PEAP Version 0 (Microsoft PEAP)
•PEAP Version 1 (Cisco PEAP)
See Chapter 9, “Extensible Authentication Protocols,” for detailed information about properties used in
EAP-type services.
File
Specify the file service when you want Cisco Prime Access Registrar’s RADIUS Server to perform local
accounting using a specific file. Every file Service in your configuration will cause a file with the
configured name to be created when the server is started, even if the service is not being invoked by any
request packets. Table 4-12 lists the properties used for a file service.

4-15
Cisco Prime Access Registrar 6.1 User Guide
OL-29756-01
Chapter 4 Cisco Prime Access Registrar Server Objects
Services
Cisco Prime Access Registrar opens the file when it starts the RADIUS server and closes the file when
you stop the server. Prime Access Registrar flushes the accounting record to disk before it acknowledges
the request.
Based on the maximum file size and age you have specified, Prime Access Registrar closes the
accounting file, moves it to a new name, and reopens the file as a new file. The name
Prime Access Registrar gives this accounting file depends on its creation and modification dates.
•If the file was created and modified on the same date, the filename is
FileNamePrefix-<yyyymmdd>-<n>.log. The date is displayed as year, month, day, number.
•If the file was created on one day and modified on another, the filename is
FileNamePrefix-<yyyymmdd>-<yyyymmdd>-<n>.log. The dates are creation, modification, and
number.
Table 4-12 File Service Properties
Property Description
Type Required; must be set to group for a group service.
IncomingScript Name of script to run when the service starts.
OutgoingScript Name of script to run when the service ends.
OutagePolicy Required; the default is DropPacket. This property defines how
Cisco Prime Access Registrar handles requests if all servers listed in the
RemoteServers properties are unavailable (that is, all remote RADIUS
servers are not available). You must set it to one of the following: AcceptAll,
DropPacket, or RejectAll.
OutageScript Optional; if you set this property to the name of a script,
Cisco Prime Access Registrar runs it when an outage occurs. This property
allows you to create a script that notifies you when the RADIUS server
detects a failure.
FilenamePrefix Required; a string that specifies where Cisco Prime Access Registrar writes
the account records. It must be either a relative or absolute path. When you
specify a relative path, it must be relative to the $INSTALL/logs directory.
When you specify an absolute path, the server must be able to reach it. The
default is Accounting.
MaxFileSize Optional; stored as a string, but is composed of two parts, a number and a
units indicator (<n> <units>) in which the unit is one of: K, Kilobyte,
Kilobytes, M, Megabyte, Megabytes, G, Gigabyte, Gigabytes. The default is
ten megabytes.
MaxFileAge Optional; stored as a string, but is composed of two parts, a number and a
units indicator (<n> <units>) in which the unit is one of: H, Hour, Hours,
D, Day, Days, W, Week, Weeks. The default is one day.
RolloverSchedule Indicates the exact time including the day of the month or day of the week,
hour and minute to roll over the accounting log file.
UseLocalTimeZone When set to TRUE, indicates the accounting records' TimeStamp is in local
time. When set to FALSE, the default, accounting records' TimeStamp is in
GMT.

4-16
Cisco Prime Access Registrar 6.1 User Guide
OL-29756-01
Chapter 4 Cisco Prime Access Registrar Server Objects
Services
Group
A group service contains a list of references to other services and specifies whether the responses from
each of the services should be handled as a logical AND or a logical OR function. You specify AND or
OR in the Result-Rule attribute of Group Services. The default value is AND.
Table 4-13 lists the properties used to configure a group service.
If Result-Rule is set to AND, the response from the Group Service is positive if each of the services
referenced return a positive result. The response is negative if any of the services reference return a
negative result. If Result-Rule is set to OR, the response from the Group Service is positive if any of the
services referenced return a positive result. The response is negative if all the referenced services return
a negative result.
When the Result-Rule attribute is set to AND or OR, each referenced service is accessed sequentially,
and the Group Service waits for a response from the first referenced service before moving on to the next
service (if necessary). If a service takes a long time to respond, that causes a delay in sending the request
to the next referenced server.
The ResultRule settings parallel-and and parallel-or are similar to the AND and OR settings except that
they ask each referenced service to process the request simultaneously instead of asking each referenced
server sequentially, thereby saving processing time.
A parallel-and setting might respond with its own reply as soon as it receives a negative response, but
otherwise must wait for all responses before it can respond with a positive reply. Likewise, a parallel-or
might respond as soon as it receives a positive response, but otherwise must wait for all responses before
it can reply with a negative response.
If a service referenced from a Group Service is of type RADIUS and if Accounting-Requests are being
processed by the Group Service, setting the AckAccounting property in the remote server will affect the
behavior of the parallel-or Group Service. This is because if AckAccounting is set to FALSE, the
RADIUS Remote Server will not wait for the response from the remote server but returns a response
immediately. Since the Group Service is set to parallel-or, after it receives the response from the
Table 4-13 Group Service Properties
Property Description
Type Required; must set it to group.
IncomingScript Optional; name of script to run when the service starts.
OutgoingScript Optional; name of script to run when the service ends.
ResultRule When set to AND (the default), the response from the GroupService is positive
if each of the services referenced return a positive result. The response is
negative if any of the services reference return a negative result.
When set to OR, the response from the GroupService is positive if any of the
services referenced return a positive result. The response is negative if all the
referenced services return a negative result.
The settings parallel-AND or parallel-OR are similar to AND and OR settings,
except that each referenced service processes requests simultaneously instead
of asking each reference service sequentially to save processing time.
GroupServices Use the GroupServices subdirectory to specify the subservices in an indexed
list to provide specific ordering control of which services to apply first. Each
subservice listed must be defined in the Services section of the RADIUS
configuration and cannot be a of type group, eap-leap, or eap-md5.

4-17
Cisco Prime Access Registrar 6.1 User Guide
OL-29756-01
Chapter 4 Cisco Prime Access Registrar Server Objects
Services
RADIUS service, it is free to send a response itself. This will have the effect that a response is sent very
quickly from the Group Service acknowledging the Accounting-Request and responses from the other
referenced services are handled as the arrive.
Note that since AckAccounting was set to FALSE, there is no guarantee that the Remote Server
successfully processed the request. Since it is a RADIUS Remote Server, the Prime Access Registrar
server attempts for MaxTries to send the request to the server and to get back an acknowledgement, but
if that fails, there will be no indication to the client about that event. The acknowledgement to the client
has been sent long before.
Java
Specify the java service type when you want to create a custom service and use a script for
authentication, authorization, or accounting. Table 4-14 lists the properties required to configure a java
service.
A java service uses an extension point script to provide the service’s functionality and handles both
RADIUS and TACACS requests for authentication, authorization, and accounting.
LDAP
Specify the ldap service type when you want to use a particular LDAP remote server for authentication
and/or authorization. Table 4-15 lists the properties used to configure an LDAP service.
When using LDAP for authentication and a local database for authorization, ensure that the usernames
in both locations are identical with regard to case sensitivity.
Table 4-14 Java Service Properties
Property Description
Type Required; must set it to java.
IncomingScript Name of script to run when the service starts.
OutgoingScript Name of script to run when the service ends.
OutagePolicy Required; the default is DropPacket. This property defines how
Cisco Prime Access Registrar handles requests if all servers listed in the
RemoteServers properties are unavailable (that is, all remote RADIUS
servers are not available). You must set it to one of the following: AcceptAll,
DropPacket, or RejectAll.
OutageScript Optional; if you set this property to the name of a script,
Cisco Prime Access Registrar runs it when an outage occurs. This property
allows you to create a script that notifies you when the RADIUS server detects
a failure.
ClassName Set to the name of a class that implements the Extension interface.
InitializeArg Optional; set to a string to be passed to the Initialize method if the class
implements the optional ExtensionWithInitialization interface.

4-18
Cisco Prime Access Registrar 6.1 User Guide
OL-29756-01
Chapter 4 Cisco Prime Access Registrar Server Objects
Services
Local
Specify local when you want the Cisco Prime Access Registrar server to perform the authentication and
authorization using a specific UserList. For more information, see the “UserLists” section on page 4-3.
Table 4-16 lists the properties used to configure a local service.
Table 4-15 LDAP Service Properties
Property Description
Type Required, must set it to ldap
IncomingScript Name of script to run when the service starts.
OutgoingScript Name of script to run when the service ends.
OutagePolicy Required; the default is DropPacket. This property defines how
Cisco Prime Access Registrar handles requests if all servers listed in the
RemoteServers properties are unavailable (that is, all remote RADIUS
servers are not available). You must set it to one of the following:
AcceptAll, DropPacket, or RejectAll.
OutageScript Optional; if you set this property to the name of a script,
Cisco Prime Access Registrar runs it when an outage occurs. This
property allows you to create a script that notifies you when the RADIUS
server detects a failure.
MultipleServersPolicy Required; must be set to either Failover or RoundRobin.
When you set it to Failover, Cisco Prime Access Registrar directs
requests to the first server in the list until it determines the server is
offline. At which time, Cisco Prime Access Registrar redirects all
requests to the next server in the list until it finds a server that is online.
When you set it to RoundRobin, Cisco Prime Access Registrar directs
each request to the next server in the RemoteServers list to share the
resource load across all of the servers listed in the RemoteServers list.
RemoteServers Required; an indexed list from 1 to <n>. Each entry in the list is the name
of a RemoteServer.
Table 4-16 Local Service Properties
Property Description
Type Required, must set it to local.
IncomingScript Optional; name of script to run when the service starts.
OutgoingScript Optional; name of script to run when the service ends.
OutagePolicy Required; the default is DropPacket. This property defines how
Cisco Prime Access Registrar handles requests if all servers listed in the
RemoteServers properties are unavailable (that is, all remote RADIUS
servers are not available). You must set it to one of the following: AcceptAll,
DropPacket, or RejectAll.

4-19
Cisco Prime Access Registrar 6.1 User Guide
OL-29756-01
Chapter 4 Cisco Prime Access Registrar Server Objects
Services
ODBC
Specify odbc when you want to use an ODBC service for authentication, authorization and accounting
through an ODBC data store. Use an ODBC service to authenticate and authorize an access requests by
querying user information through ODBC and to insert accounting records into a data store through
ODBC. Table 4-17 lists the properties used to configure an ODBC service.
OutageScript Optional; if you set this property to the name of a script,
Cisco Prime Access Registrar runs it when an outage occurs. This property
allows you to create a script that notifies you when the RADIUS server
detects a failure.
UserLists Required; this object contains all of the individual UserLists, which in turn,
contain the specific users stored within Prime Access Registrar.
Cisco Prime Access Registrar references each specific UserList by name
from a Service whose type is set to local.
When Cisco Prime Access Registrar receives a request, it directs it to a
Service. When the Service has its type property set to local, the Service looks
up the user’s entry in the specific UserList and authenticates and/or authorizes
the user against that entry.
Table 4-16 Local Service Properties (continued)
Property Description
Table 4-17 ODBC Service Properties
Property Description
Type Required; must set it to odbc.
IncomingScript Optional; name of script to run when the service starts.
OutgoingScript Optional; name of script to run when the service ends.
OutagePolicy Required; the default is DropPacket. This property defines how
Cisco Prime Access Registrar handles requests if all servers listed in
the RemoteServers properties are unavailable (that is, all remote
RADIUS servers are not available). You must set it to one of the
following: AcceptAll, DropPacket, or RejectAll.
OutageScript Optional; if you set this property to the name of a script,
Cisco Prime Access Registrar runs it when an outage occurs. This
property allows you to create a script that notifies you when the
RADIUS server detects a failure.
MultipleServersPolicy Required; must be set to either Failover or RoundRobin.
When you set it to Failover, Cisco Prime Access Registrar directs
requests to the first server in the list until it determines the server is
offline. At which time, Cisco Prime Access Registrar redirects all
requests to the next server in the list until it finds a server that is online.
When you set it to RoundRobin, Cisco Prime Access Registrar directs
each request to the next server in the RemoteServers list to share the
resource load across all of the servers listed in the RemoteServers list.
RemoteServers Required; an indexed list from 1 to <n>. Each entry in the list is the
name of a RemoteServer.

4-20
Cisco Prime Access Registrar 6.1 User Guide
OL-29756-01
Chapter 4 Cisco Prime Access Registrar Server Objects
Services
ODBC-Accounting
If you use the Oracle Accounting feature, you must configure an ODBC-Accounting RemoteServer
object. See Configuring an ODBC/OCI RemoteServer, page 22-7, for more information on
ODBC-Accounting RemoteServer.
Prepaid Services
Cisco Prime Access Registrar (Prime Access Registrar) supports two types of prepaid billing, IS835C
and Cisco Real-time Billing (CRB), a Cisco proprietary solution. See IS835C Prepaid Billing, page 16-2
for more information on Prepaid -IS835C. See CRB Prepaid Billing, page 16-7 for more information on
Prepaid-CRB.
RADIUS
Specify the radius service type when you want to use a particular RADIUS remote server for
authentication and authorization. Table 4-18 lists the properties used to configure a RADIUS service.
Table 4-18 RADIUS Service Properties
Property Description
Type Required; must set it to radius.
IncomingScript Optional; name of script to run when the service starts.
OutgoingScript Optional; name of script to run when the service ends.
OutagePolicy Required; the default is DropPacket. This property defines how
Cisco Prime Access Registrar handles requests if all servers listed in the
RemoteServers properties are unavailable (that is, all remote RADIUS
servers are not available). You must set it to one of the following:
AcceptAll, DropPacket, or RejectAll.
OutageScript Optional; if you set this property to the name of a script,
Cisco Prime Access Registrar runs it when an outage occurs. This property
allows you to create a script that notifies you when the RADIUS server
detects a failure.
MultipleServersPolicy Required; must be set to either Failover or RoundRobin.
When you set it to Failover, Cisco Prime Access Registrar directs requests
to the first server in the list until it determines the server is offline. At which
time, Cisco Prime Access Registrar redirects all requests to the next server
in the list until it finds a server that is online.
When you set it to RoundRobin, Cisco Prime Access Registrar directs
each request to the next server in the RemoteServers list to share the
resource load across all of the servers listed in the RemoteServers list.
RemoteServers Required; an indexed list from 1 to <n>. Each entry in the list is the name
of a RemoteServer.

4-21
Cisco Prime Access Registrar 6.1 User Guide
OL-29756-01
Chapter 4 Cisco Prime Access Registrar Server Objects
Services
Radius Query
Prime Access Registrar supports a new service type called radius-query that can be used to query cached
data through RADIUS packets. This radius-query service contains a list of session managers to be
queried from and a list of (cached) attributes to be returned in the Access-Accept packet in response to
a RADIUS Query request. Prime Access Registrar also supports caching and querying of multivalued
attributes.
The RADIUS Query service should be selected through an extension point script or through the Rule and
Policy Engine by setting it to a new environment variable named Query-Service. The reason for this is
that the RADIUS Query request comes in as an Access-Request and the server has no way of knowing
whether it is a RADIUS Query request or normal authentication request. Setting the Query-Service
environment variable tells the Prime Access Registrar server that the request is a RADIUS Query request
so the Prime Access Registrar server can process the request with the radius-query service set in the
Query-Service environment variable.
When a RADIUS Query service is selected to process an Access-Request, it queries the configured list
of Session Managers for a matching record using the QueryKey value configured in the session-cache
Resource Manager referenced under these Session Managers as key. If a matching record is found, an
Access-Accept containing a list of cached attributes present (based on the configuration) in the matched
record is sent back to the client. If the session cache contains a multivalued attribute, all values of that
attribute are returned in the response as a multivalued attribute. If there is no matching record, an
Access-Reject packet is sent to the client.
Prime Access Registrar introduces scripting points at the Session Manager level along with automated
programmable interfaces (APIs) to access cached information present in the session record. You can use
these scripting points and APIs to write extension point scrips to modify the cached information.
The following example shows the default configuration of a radius-query service:
[ //localhost/Radius/Services/radius-query ]
Name = radius-query
Description =
Type = radius-query
IncomingScript~ =
OutgoingScript~ =
SessionManagersToBeQueried/
AttributesToBeReturned/
Table 4-19 lists the properties used to configure a RADIUS Query service.
Table 4-19 RADIUS Query Service Properties
Property Description
Type Required; must set it to radius query.
IncomingScript Optional; name of script to run before this service starts
processing on the request.
OutgoingScript Optional; name of script to run after this service completes
processing on the request.

4-22
Cisco Prime Access Registrar 6.1 User Guide
OL-29756-01
Chapter 4 Cisco Prime Access Registrar Server Objects
Services
When an Access-Request packet is received by the Prime Access Registrar server, the session-cache
Resource Manager caches the configured attributes in the session with the configured QueryKey as the
key to the cached data. In the TAL solution, the QueryKey will usually be Framed-IP-Address. If an
Accounting-Requestor Accounting-Start packet is received for the same session, the cached data is
updated if necessary. If there is a multivalued attribute in the Access-Request packet or
Accounting-Request packet, the Prime Access Registrar server caches all the values of that attributes.
In TAL, when the SSG receives an IP packet originating from a user unknown to the SSG, it sends an
Access-Request packet to the Prime Access Registrar server in which the User-Name and
Framed-IP-Address attributes both contain the user’s source IP address, and the Service-Type is set to
Outbound, among other attributes. These attributes and their values distinguish RADIUS Query requests
from normal authentication requests in TAL.
Note In solutions other than TAL, the criterion that distinguishes RADIUS Query requests from normal
authentication requests might be different.
A new environment variable, Query-Service, can be set to the name of a radius-query service, in an
extension point script, or through the Rule and Policy engine so the Prime Access Registrar server knows
the current request is a RADIUS Query request and processes it with the radius-query service value set
in the Query-Service environment variable.
API Calls
Prime Access Registrar provides several new API calls you can use to get, put, and delete the cached
attributes present in the session record.
The entry point function changes slightly to take a fifth argument which is a pointer to a structure
containing the new API calls:
typedef int (REXAPI * RexEntryPointFunction)
(
SessionManagersToBeQueried Lists Session Managers to be queried for the target record. If this
list is empty, all Session Managers having session-cache
Resource Managers will be queried for the target record.
Otherwise, only those SessionManagers configured under
SessionManagerToBeQueried are queried. If the targeted record
is found in a Session Manager, the query stops and the response
is returned to the client.
AttributesToBeReturned Lists attributes to be returned if present in a matched record. If
this list is empty, all attributes cached in a matched session are
returned. If a configured attribute is not present in the matched
record, that attribute is ignored.
Note The User-Password attribute will not be returned in query
responses and cannot be configured under
AttributesToBeReturned.
Table 4-19 RADIUS Query Service Properties (continued)
Property Description

4-23
Cisco Prime Access Registrar 6.1 User Guide
OL-29756-01
Chapter 4 Cisco Prime Access Registrar Server Objects
Services
int iScriptingPoint,
rex_AttributeDictionary_t* pRequest,
rex_AttributeDictionary_t* pResponse,
rex_EnvironmentDictionary_t* pRadius,
rex_SessionRecord_t* pSession
);
However, you can continue to write extension point scripts with four arguments as well, for example
without the pSession argument.
The following are API calls and their functionality. All these API calls fail gracefully when they are
invoked from any scripting point other than the Session Manager scripting points.
const char* get
const char* get(
rex_SessionRecord_t* pSession,
const char* pszAttribute,
int <iIndex>,
abool_t* <pbMore>
)
This API returns the value of the <iIndex>'d instance of the attribute cached in the session, represented
as a string. When the session does not contain the attribute, an empty string is returned. When <pbMore>
is non-zero, this method sets <pbMore> to TRUE when more instances of the same attribute exist after
the one returned and to FALSE otherwise. This can be used to determine whether another call to get()
method should be made to retrieve other instances of the same attribute.
abool_t put
abool_t put(
rex_SessionRecord_t* pSession,
const char* pszAttribute,
const char* <pszValue>,
int <iIndex>
)
When <iIndex> equals the special value REX_REPLACE, this method replaces any existing instances
of <pszAttribute> with a single value in the session. When <iIndex> equals the special value
REX_APPEND, it appends a new instance of <pszAttribute> to the end of the list of existing instances
of <pszAttribute>. When <iIndex> equals the special value REX_AUGMENT, this method only puts
<pszAttribute> when it does not already exist. Otherwise, a new instance of <pszAttribute> is
inserted/replaced at the position indicated. This method returns TRUE if it is able to cache the attribute
successfully and FALSE otherwise.
abool_t remove
abool_t remove(
rex_SessionRecord_t* pSession,
const char* pszAttribute,
int <iIndex>
)
This method removes the <pszAttribute> from the session. When <iIndex> equals the special value
REX_REMOVE_ALL, this method removes any existing instances of <pszAttribute>. Otherwise, it
removes the instance of <pszAttribute> at the position indicated. It returns FALSE when <pszAttribute>
is not present at any index in the session record and returns TRUE otherwise.
rex_SessionInfo_t*
rex_SessionInfo_t* getSessionInfo(rex_SessionRecord_t* pSession )
This method returns the pointer to a structure that contains the other session-related information, like
Session Id, Session Start time, Session Last Accessed Time, present in the session record. The structure
that holds this information will appear as follows:

4-24
Cisco Prime Access Registrar 6.1 User Guide
OL-29756-01
Chapter 4 Cisco Prime Access Registrar Server Objects
Services
typedef struct rex_SessionInfo_s
{
auint32_t iSessionId;
auint32_t tSessionStartTime;
auint32_t tSessionLastAccessedTime;
} rex_SessionInfo_t;
Tcl API calls
To use the extension point scripts written in Tcl, define the procedure at the session manager level as
shown below:
proc test { request response environ session } {
}
There is a fourth argument session that needs to be passed to the Tcl procedure and the API calls that are
intended to operate on the session record need to use this session dictionary.
API calls in Tcl have the same meaning with same number arguments and return values as described in
Rex. The only difference is that the API getSessionInfo will not return a structure as in Rex but it will
return the info as a string, as in the following example:
Session-ID=1, Session-Start-Time=1102099334, Session-Last-Accessed-Time=1102099334
Java API calls
There are two new interfaces ExtensionForSession and ExtensionForSessionWithInitialization and the
customers whishing to use the extension point scripts written in Java at the session manager level needs
to implement one of these interfaces.
The runExtension method of these interfaces will look as below:
public int runExtension
( int iExtensionPoint,
AttributeDictionary request,
AttributeDictionary response,
EnvironmentDictionary environment,
SessionRecord session
);
API calls that are intended to operate on session record needs to use this ‘session’ dictionary.
API calls in Java have the same meaning with same number arguments and return values as described in
Rex. The only difference is that the API getSessionInfo will not return a structure as in Rex but it will
return the info as a string. For example:
Session-ID=1, Session-Start-Time=1102099334, Session-Last-Accessed-Time=1102099334
Existing scripts written in any of these three languages will not be affected with the introduction of the
new ‘session dictionary’ argument. And the customers can use a script with any number of arguments
(i.e with or without the last ‘session dictionary’ argument) at any extension point script. If there is no
session to operate on, for example when the customer is trying to use session dictionary argument at an
extension point other than session manager’s, the Prime Access Registrar gracefully returns an error
logging the appropriate message.
The simple replace or add if it does not exist model can still be used for simple modifications as before
without the need to write a script. If the cached attributes are updated in the IncomingScript and if
customers do not want them to be touched or updated again when the processing reaches session-cache
resource manager, they can set the OverwriteAttributes property of the session-cache resource manager
to FALSE so that the session-cache resource manager will not operate on this packet.

4-25
Cisco Prime Access Registrar 6.1 User Guide
OL-29756-01
Chapter 4 Cisco Prime Access Registrar Server Objects
Services
RADIUS-Session
A new Service step has been added in the processing of Access-Request and Accounting packets. This
is an additional step after the AA processing for Access packet or Accounting processing for Accounting
packet, but before the local session management processing. The Session-Service should have a service
type of radius-session.
An environment variable Session-Service is introduced to determine the Session-Service dynamically.
You can use a script or the rule engine to set the Session-Service environment variable. See Cross Server
Session and Resource Management, page 1-9 for more information on RADIUS-Session.
Rex
Specify the rex service type when you want to create a custom service and use a script for authentication,
authorization, or accounting. Table 4-20 lists the properties required to configure a rex service.
For more information about scripting, see Chapter 11, “Using Extension Points.” For more information
about using the REX Attribute dictionary, see Appendix A, “Cisco Prime Access Registrar Tcl, REX and
Java Dictionaries.”
Table 4-20 rex Service Properties
Property Description
Type Required; must be set to rex.
IncomingScript Optional; name of script to run when the service starts.
OutgoingScript Optional; name of script to run when the service ends.
OutagePolicy Required; the default is DropPacket. This property defines how
Cisco Prime Access Registrar handles requests if all servers listed in the
RemoteServers properties are unavailable (that is, all remote RADIUS
servers are not available). You must set it to one of the following: AcceptAll,
DropPacket, or RejectAll.
OutageScript Optional; if you set this property to the name of a script,
Cisco Prime Access Registrar runs it when an outage occurs. This property
allows you to create a script that notifies you when the RADIUS server
detects a failure.
Filename Required; must be either a relative or an absolute path to the shared library
containing the Service. When the pathname is relative, it must be relative to
$INSTALL/Scripts/Radius/rex.
EntryPoint Required; must be set to the function’s global symbol.
InitEntryPoint Required; must be the name of the global symbol
Cisco Prime Access Registrar should call when it initializes the shared
library and just before it unloads the shared library.
Note A rex service must have an InitEntryPoint even if the service only
returns REX_OK.
InitEntryPointArgs Optional; when set, it provides the arguments to be passed to the
InitEntryPoint in the environmental variable Arguments.

4-26
Cisco Prime Access Registrar 6.1 User Guide
OL-29756-01
Chapter 4 Cisco Prime Access Registrar Server Objects
Services
WiMAX
Prime Access Registrar uses the Extensible Authentication Protocol (EAP) to enable the WiMAX
feature. It also caches the IP attributes and Mobility Keys that are generated during network access
authentication. To enable caching of the WiMAX attributes, you must configure the respective resource
managers. See WiMAX in Cisco Prime Access Registrar, page 10-2, for more information on WiMAX.
Diameter
Diameter works with the rule policy engine to perform the routing for multiple peers. The following are
the multiple peer policies supported with the proxy service to route the traffic:
•RoundRobin
•FailOver
•IMSI Range Based
The following configuration is used to add Diameter proxy without Sticky session configuration:
[ //localhost/Radius/Services/dia-proxy ]
Name = dia-proxy
Description =
Type = diameter
IncomingScript~ =
OutgoingScript~ =
EnableSticky = FALSE
MultiplePeersPolicy = RoundRobin
PeerTimeOutPolicy = SendError
DiaRemoteServers/
Entries 1 to 2 from 2 total entries
Current filter: <all>
proxy_rm/
Name = proxy_rm
Metric = 1
Weight = 0
IsActive = TRUE
proxy_rm1/
Name = proxy_rm1
Metric = 2
Weight = 0
IsActive = TRUE
The following configuration is used to add Diameter proxy with Sticky session configuration:
[ //localhost/Radius/Services/dia-proxy ]
Name = dia-proxy
Description =
Type = diameter
IncomingScript~ =
OutgoingScript~ =
EnableSticky = TRUE
StickySessionKey = User-Name#1
StickyCreationCmdList = 265
StickyDeletionCmdList = 275
MultiplePeersPolicy = RoundRobin
PeerTimeOutPolicy = SendError
DiaRemoteServers/
Entries 1 to 2 from 2 total entries
Current filter: <all>

4-27
Cisco Prime Access Registrar 6.1 User Guide
OL-29756-01
Chapter 4 Cisco Prime Access Registrar Server Objects
Services
proxy_rm/
Name = proxy_rm
Metric = 1
Weight = 0
IsActive = TRUE
proxy_rm1/
Name = proxy_rm1
Metric = 2
Weight = 0
IsActive = TRUE
The following configuration is used to add Diameter proxy with IMSI range based load balancing
configuration:
[ //localhost/Radius/Services/dia-proxy ]
Name = dia-proxy
Description =
Type = diameter
IncomingScript~ =
OutgoingScript~ =
EnableSticky = TRUE
StickySessionKey = User-Name#1
StickyCreationCmdList = 265
StickyDeletionCmdList = 275
MultiplePeersPolicy = IMSIRangeBased
PeerTimeOutPolicy = SendError
IMSIRanges/
Entries 1 to 1 from 1 total entries
Current filter: <all>
112156000000001-112156001000000/
Name = 112156000000001-112156001000000
Description =
Start = 112156000000001
End = 112156001000000
MultiplePeersPolicy = Failover
DiaRemoteServers/
Entries 1 to 2 from 2 total entries
Current filter: <all>
proxy_rm/
Name = proxy_rm
Metric = 1
Weight = 0
IsActive = TRUE
proxy_rm1/
Name = proxy_rm1
Metric = 2
Weight = 0
IsActive = TRUE
The following configuration is used to add Diameter local:
[ //localhost/Radius/Services/dia-local ]
Name = dia-local
Description =
Type = diameter
Realm = abc.com
Role = Local
IncomingScript~ =
OutgoingScript~ =
AuthenticationService = local-users
AccountingService = local-file

4-28
Cisco Prime Access Registrar 6.1 User Guide
OL-29756-01
Chapter 4 Cisco Prime Access Registrar Server Objects
Services
DiaRemoteServers/
Entries 1 to 1 from 1 total entries
Current filter: <all>
murdcoh-ar1/
Name = murdcoh-ar1
HostName = murdoch-ar1
IsVendorSpecific = FALSE
ApplicationID = 1
Metric = 2
The following configuration is used to add Diameter relay:
[ //localhost/Radius/Services/dia-relay ]
Name = dia-relay
Description =
Type = diameter
Realm = abc.com
Role = relay
DiaRemoteServers/
Entries 1 to 1 from 1 total entries
Current filter: <all>
hss1/
Name = hss1
HostName = 10.77.240.69
IsVendorSpecific = FALSE
ApplicationID = 1
Metric = 2
The following configuration is used to add Diameter redirect:
[ //localhost/Radius/Services/dia-redirect ]
Name = dia-relay
Description =
Type = diameter
Realm = abc.com
Role = redirect
DiaRemoteServers/
Entries 1 to 1 from 1 total entries
Current filter: <all>
redirectserver/
Name = redirectserver
HostName = 10.77.240.69
IsVendorSpecific = FALSE
ApplicationID = 1
Metric = 2

4-29
Cisco Prime Access Registrar 6.1 User Guide
OL-29756-01
Chapter 4 Cisco Prime Access Registrar Server Objects
Services
Table 4-21 describes the Diameter Service properties.
Table 4-21 Diameter Service Properties
Property Description
Name Required; name of the Diameter server.
Realm Required; realm of the route. Must be unique for a route table.
Incoming Script Optional; enabled when role is set to Proxy or Local. When set, must be
the name of a known incoming script. Prime Access Registrar runs the
IncomingScript before proxying the diameter packet to the remote
diameter server.
Outgoing Script Optional; enabled when role is set to Proxy or Local. When set, must be
the name of a known outgoing script. Prime Access Registrar runs the
OutgoingScript after it receives the response from the remote Diameter
server.
Description Optional; description of the Diameter server.
Role Required; specifies the role that the diameter entity will play in resolving
messages matching the realm.
The role can be any one of the following:
Relay - Application acting as a Relay Agent.
Redirect - Application acting as a Redirect Agent.
Proxy - Application acting as a Proxy Agent. When the role is set to
Proxy, the IncomingScript and OutgoingScript points are enabled.
Local - Application processes the requests locally. When the role is set
to Local, the AuthenticationService and AccountingService are enabled.
By default, the Proxy option is selected. However, you can select another
option from the drop-down list.
AuthenticationService Required; used when service is configured to process the diameter
requests locally. Set to valid service of type (local/ldap/odbc) to
authenticate the user. This field is displayed when you select the role type
as ‘Local’ in the Role field.
AccountingService Required; used when service is configured to process the accounting
requests locally. Set to valid accounting service of type
(file/odbc-accounting) to write the accounting records. This field is
displayed when you select the role type as ‘Local’ in the Role field.
Type Required; specifies the service type.The service type ‘Diameter’ is
automatically displayed in this field.
Peer Definitions tab
This tab is displayed when you select the ‘Local’, ‘Relay’, or ‘Redirect’option in the Role field.
Name Required; name of the peer.
Host Name Required; the hostname or IP address of the peer. The hostname must
exist in the client list for the route to be active.
Metric Required; metric value for the peer entry. The higher the value the lower
the preference. The highest value of preference is 0.

4-30
Cisco Prime Access Registrar 6.1 User Guide
OL-29756-01
Chapter 4 Cisco Prime Access Registrar Server Objects
Services
VendorSpecific Required; the default is FALSE. If set to FALSE, the application is
ordinary application and user is prompted to enter the ApplicationID. If
set to TRUE, the application is a VendorSpecific Application. User is
prompted to enter VendorSpecificApplicationID and VendorID.
VendorID Required; specifies the VendorID for the application.
Example:
DIAMETER 3GPP Cx APPLICATION
VendorSpecificApplicationID 16777216
VendorID 10415
VendorSpecificApplicatio
nID
Required; specifies the integer value for the vendor specific application.
ApplicationID Required; application used in the route. The application Id should be
available in /Advanced/Diameter/Applications.
Applications tab
This tab is displayed when you select the ‘Proxy’ option in the Role field.
Name Required; name of the application.
Description The description of the application.
ApplicationID Required; specifies the unique integer value for the application. It
represents the applicationid of the Application used for load balancing
the diameter messages.
EnableSticky Required; default is FALSE. If set to True, the sticky entries for load
balancing is enabled and the user is prompted to enter the values for
StickySessionKey, StickyCreationCmdList, and
StickyDeletionCmdList.
DeMultiplexCCTerminate
Request
Optional; default is FALSE. If set to True, Prime Access Registrar
generates and sends multiple Credit Control Update (CCR-U) requests
corresponding to an incoming diameter Credit Control Termination
(CCR-T) request, while proxying Gy messages between the Gateway
GPRS Support Node (GGSN) and Online charging system (OCS).
The CCR-U requests are generated based on the number of RGs present
in CCR-T message.
MultiplePeersPolicy Required; must be set to RoundRobin, FailOver, or IMSIRangeBased.
Policy used by the Prime Access Registrar server to load balance the
peers.
Table 4-21 Diameter Service Properties (continued)
Property Description

4-31
Cisco Prime Access Registrar 6.1 User Guide
OL-29756-01
Chapter 4 Cisco Prime Access Registrar Server Objects
Services
StickySessionKey Required; used as the sticky key for mapping the sticky sessions. Set the
value to a valid AVP in order to use the sticky key for maintaining
diameter sessions. This ensures that Prime Access Registrar maps the
request to the same server for all the subsequent messages using the
sticky key. For example, set StickyAVP “Session-Id”.
When the Prime Access Registrar server receives the CCR-I request,
Prime Access Registrar extracts the Session-Id from the request packet,
maps the Session to the peer configured in the list, and forwards the
request to the chosen peer. Prime Access Registrar chooses the same
peer for all the subsequent messages (CCR-Update/CCR-Terminate)
with same Session-Id.
StickyCreationCmdList Required; specifies the command list to create the sticky entries.Specify
the list of ‘||’ separated command code, AVP name, and its value to create
the sticky sessions.
The following is the StickyCreationCmdList format:
<commandcode1>::<AVPName1=Value1> ||
<commandcode2<::<AVPName2=Value2>||<commandcode3>
For example, if the sticky session entries need to created based on
command code ‘265’or based on command code ‘271’ with
Accounting-Record-Type value as 2, use the format below:
Set StickyCreationCmdList “265||271::
Accounting-Record-Type=2”
StickyDeletionCmdList Required; specifies the command list to delete the sticky entries.Specify
the list of ‘||’ separated command code, AVP name, and its value to delete
the sticky sessions.
The following is the StickyDeletionCmdList format:
<commandcode1>::<AVPName1=Value1> ||
<commandcode2<::<AVPName2=Value2>||<commandcode3>
For example, if the sticky session entries need to deleted based on
command code ‘271’ with Accounting-Record-Type value as 4, use the
format below:
Set StickyDeletionCmdList “271:: Accounting-Record-Type=4”
Peer Definitions Proxy tab
Name Required; name of the peer.
Host Name Required; hostname or IP address of the peer. The HostName must exist
in the client list for the route to be active.
Metric Required; metric value for this peer entry. The higher the value the lower
the preference. The highest value of preference is 0.
Table 4-21 Diameter Service Properties (continued)
Property Description

4-32
Cisco Prime Access Registrar 6.1 User Guide
OL-29756-01
Chapter 4 Cisco Prime Access Registrar Server Objects
Services
M3UA
Prime Access Registrar supports the M3UA service, which is used to fetch MSISDN from IMSI through
RADIUS Packets. The M3UA service sends a SendRoutingInfoForLCS(SRIForLCS) request that
contains the IMSI information to the remote HLR. The HLR sends the MSISDN in response. To fetch
the MSISDN information from IMSI, you need to configure the SIGTRAN-M3UA remote server where
Prime Access Registrar is installed, see Configuring M3UA Service for more information.
The M3UA service checks for IMSI environment variable to fetch the MSISDN information. If there is
no IMSI environment variable set, then the User-Name in the Radius Access-Request is used as IMSI
to fetch the MSISDN information. The fetched MSISDN is copied to the AuthorizationInfo environment
variable where you can write a script to copy the environment variable to any attribute of your choice.
Note M3UA service supports fetching the MSISDN only through SIGTRAN-M3UA interface.
The following shows an example configuration of M3UA service:
[ //localhost/Radius/Services/FetchMSISDN ]
Name = FetchMSISDN
Description =
Type = m3ua
IncomingScript~ =
OutgoingScript~ =
OutageScript~ =
OutagePolicy~ = RejectAll
RemoteServers/
Weight Required; default value is 0. Specifies the weight percentage for which
the service needs to load balance the peer.
Note When you set the weight to a value other than 0, the weight
should be in multiples of 10 and the sum of the weights
configured in the peer list should be equal to 100.
IMSIRanges Required; used for load balancing. The value is set to comma separated
values of IMSI Ranges.
For example, set IMSIRanges
“112156000000001-112156001000000,112156010000001-1121560110
00000”
Note Prime Access Registrar uses the AVP configured in StickyAVP
property to check whether the IMSI is in valid range.
Table 4-21 Diameter Service Properties (continued)
Property Description
Table 4-22 M3UA Properties
Property Description
Type Required; must set to M3UA service.
IncomingScript Optional; when set, must be the name of a known incoming script.
Cisco Prime Access Registrar runs the IncomingScript after it receives the
response.

4-33
Cisco Prime Access Registrar 6.1 User Guide
OL-29756-01
Chapter 4 Cisco Prime Access Registrar Server Objects
Session Managers
Session Managers
You can use Session Managers to track user sessions. The Session Managers monitor the flow of requests
from each NAS and detect the session state. When requests come through to the Session Manager, it
creates sessions, allocates resources from appropriate Resource Managers, and frees and deletes sessions
when users log out.
The Session Manager enables you to allocate dynamic resources to users for the lifetime of their session.
You can define one or more Session Managers and have each one manage the sessions for a particular
group or company.
Note Session record size is limited by the operating system (OS) paging size (8 KB in Solaris and 4 KB in
Linux). If a request triggers creation of a session that exceeds the OS paging size, the request will be
dropped and the session will not be created.
Note In this release of Prime Access Registrar, the memory capacity is enhanced to store more than 4 million
active sessions by storing the active session records in database server instead of storing it in the main
memory. The capacity is dependent on the number of attributes that are being captured for each session.
Note If the disk partition where Prime Access Registrar stores session backing store data (usually the disk
partition where Prime Access Registrar is installed, such as /opt/CSCOar) is full, the subsequent
packets that try to create sessions will be dropped and no sessions will be created due to lack of disk
space.
Session Managers use Resource Managers, which in turn, manage a pool of resources of a particular
type. Table 4-23 lists the Session Manager properties.
OutgoingScript Optional; when set, must be the name of a known outgoing script.
Cisco Prime Access Registrar runs the OutgoingScript just before it sends
the proxy request to the remote server.
OutagePolicy Required; the default is DropPacket. This property defines how
Prime Access Registrar handles requests if all servers listed in the
RemoteServers properties are unavailable (that is, all remote RADIUS
servers are not available). You must set it to one of the following:
AcceptAll, DropPacket, or RejectAll.
OutageScript Optional; set this property to the name of a script. Prime Access Registrar
runs the script when an outage occurs. It allows you to create a script that
notifies you when the RADIUS server detects a failure.
RemoteServers Required; an indexed list from 1 to <n>. Each entry in the list is the name
of a RemoteServer of type SIGTRAN-M3UA.
Table 4-22 M3UA Properties (continued)
Property Description

4-34
Cisco Prime Access Registrar 6.1 User Guide
OL-29756-01
Chapter 4 Cisco Prime Access Registrar Server Objects
Session Managers
Prime Access Registrar adds IncomingScript, OutGoingScript, and SessionKey properties. The
IncomingScript is run as soon as the session is acquired. The OutGoingScript is run just before the
session is written to backing store. The SessionKey property sets the session key value for the Session
Manager.
Table 4-23 Session Manager Properties
Property Description
Name Required; must be unique in the Session Managers list.
Description Optional description of the Session Manager.
Type Set to local or remote. Local is the traditional session manager that
maintains sessions in memory and has good performance. The remote
session manager operates on a remote ODBC database, and its
performance is highly dependent on the performance of the ODBC
database.
IncomingScript Optional; name of script to run when the service starts. This script is run
as soon as the session is acquired in Prime Access Registrar.
OutgoingScript Optional; script to be run just before the session is written to backing
store.
SessionTimeOut The SessionTimeOut property is optional; no value for this property
means the session timeout feature is disabled.
Used in conjunction with /Radius/Advanced/SessionPurgeInterval for
the session timeout feature. Enables the session timeout feature for a
Session Manager. If the SessionTimeOut property is set to a value under
a session manager, all sessions that belong to that session manager will
be checked for timeouts at each SessionPurgeInterval. If any sessions
have timed out, they will be released, and all resources associated with
those sessions are also released.
The SessionTimeOut property determines the timeout for a session. If the
time difference between the current time and the last update time is
greater than this property’s value, the session is considered to be stale.
The last update time of the session is the time at which the session was
created or updated.
The SessionTimeOut value is comprised of a number and a units
indicator, as in n units, where a unit is one of minutes, hours, days, or
weeks. The default unit is ‘days’.
AllowAccountingStartToC
reateSession
Set to TRUE by default; start the session when the
Prime Access Registrar server receives an Access Accept or an
Accounting-Start.
When set to FALSE, start the session when the Prime Access Registrar
server receives an Access Accept.
Resource Managers Ordered list of Resource Managers.

4-35
Cisco Prime Access Registrar 6.1 User Guide
OL-29756-01
Chapter 4 Cisco Prime Access Registrar Server Objects
Session Managers
PhantomSessionTimeOut Optional; no value for this property means the phantom session timeout
feature is disabled.
The PhantomSessionTimeOut property is used in conjunction with
/Radius/Advanced/SessionPurgeInterval to enable the phantom session
timeout feature for Session Manager.
If the PhantomSessionTimeOut property is set to a value under a session
manager, all sessions that belong to that session manager will be checked
for receipt of an Accounting-Start packet. Sessions that do not receive an
Accounting-Start packet from creation until its timeout will be released.
The PhantomSessionTimeOut value comprises a number and a units
indicator, as in n units, where a unit is one of minutes, hours, days, or
weeks. The default unit is ‘days’
MemoryLimitForRadiusPr
ocess
This property is used to avoid crashing of the radius process. The default
value is 3500 Megabytes. This property is under /radius/advanced.
When the radius process uses memory more than the configured limit,
further sessions are not created and Prime Access Registrar rejects
further incoming requests.
Table 4-23 Session Manager Properties (continued)
Property Description

4-36
Cisco Prime Access Registrar 6.1 User Guide
OL-29756-01
Chapter 4 Cisco Prime Access Registrar Server Objects
Session Managers
You can manage sessions with the two aregcmd session management commands: query-sessions and
release-sessions. For more information about these two commands, see the query-sessions, page 2-9 and
the release-sessions, page 2-9.
This section contains the following topics:
•Session Creation
•Session Notes
•Soft Group Session Limit
•Session Correlation Based on User-Defined Attributes
MemorySizeCheckInterva
l
This property is used to avoid crashing of the radius process. This is used
in conjunction with MemoryLimitForRadiusProcess. The default value
is 5 minutes. MemorySizeCheckInterval is a hidden parameter in mcd
database. To modify the default value, you need to export the mcd
database. Typically, a separate thread is created to monitor the radius
process memory usage for every 5 minutes.
SessionKey SessionKey property is used to set the sessionkey value for the Session
Manager.
The SessionManager checks whether the environmental variable
Session-Key is set or not. If the environmental variable is set, the server
uses it as the sessionkey. If environmental variable Session-Key is not set
then SessionManager gets the value configured in the SessionKey
property under SessionManager.
SessionKey can be a combination of attributes separated by a colon. The
values for those attributes are obtained from the RequestDictionary. If any
one of the attribute that is configured for the sessionkey is not present in
the RequestDictionary, Prime Access Registrar will drop the request.
However, if Session-Key is not set, SessionManager uses NAS-Identifier
and NAS-Port to create the sessionkey. An example configuration,
--> set SessionKey "User-Name:NAS-Port"
The following shows the sample configuration of sessionkey for Session
Manager:
[ //localhost/Radius/SessionManagers/session-mgr-1 ]
Name = session-mgr-1
Description =
Type = local
EnableDiameter = FALSE
IncomingScript =
OutgoingScript =
AllowAccountingStartToCreateSession = TRUE
SessionTimeOut =
PhantomSessionTimeOut =
SessionKey =
ResourceManagers/
Table 4-23 Session Manager Properties (continued)
Property Description

4-37
Cisco Prime Access Registrar 6.1 User Guide
OL-29756-01
Chapter 4 Cisco Prime Access Registrar Server Objects
Session Managers
Session Creation
Cisco Prime Access Registrar Sessions can be created by two types of RADIUS packets:
•Access-Requests
•Accounting-Requests with an Acct-Status-Type attribute with a value of Start.
This allows Cisco Prime Access Registrar to monitor Sessions even when it is not allocating resources.
For example, when Cisco Prime Access Registrar is being used as an “Accounting-Only” server (only
receiving Accounting requests), it can create a Session for each Accounting “Start” packet it successfully
processes. The corresponding Accounting “Stop” request will clean up the Session. Note, if a Session
already exists for that NAS/NAS-Port/User (created by an Access-Request),
Cisco Prime Access Registrar will not create a new one.
When you do not want Cisco Prime Access Registrar to create Sessions for Accounting “Start” requests,
simply set the AllowAccountingStartToCreateSession property on the SessionManager to FALSE.
Session Notes
Session Notes are named text messages attached to a Session and are stored with the Session data,
including resources allocated for a specific user session. This data, including Session Notes, can be
retrieved and viewed using the aregcmd command query-sessions.
--> query-sessions /Radius/SessionManagers/session-mgr-2
sessions for /Radius/SessionManagers/session-mgr-2:
S257 NAS: localhost, NAS-Port:1, User-Name: user1, Time: 00:00:08,
IPX 0x1, GSL 1, USL 1, NOTES: "Date" "Today is 12/14/98.", "Requested
IP Address" "1.2.3.4", "Framed-IP-Address" "11.21.31.4"
Session Notes can be created by Scripts using the Environment dictionary passed into each or by the
Cisco Prime Access Registrar server. When more than one Session Note is added, the Session-Notes
entry should be a comma-separated list of entry names.
Performing a TCL Script
To perform a TCL script:
Step 1 The Script should create an Environment dictionary entry using the Session Note name as the entry
name, and the Session Note text as the entry value. For example:
$environ put "Date" "Today is 12/15/08"
$environ put "Request IP Address" "1.2.3.4"
Step 2 The Script should create or set an Environment dictionary entry with the name Session-Notes with a
value that contains the name of the entries created. For example:
$environ put "Session-Notes" "Date, Requested_IP_Address"
Performing a REX Script
To perform a REX script:
Step 1 The Script should create an Environment dictionary entry using the Session Note name as the entry
name, and the Session Note text as the entry value. For example:

4-38
Cisco Prime Access Registrar 6.1 User Guide
OL-29756-01
Chapter 4 Cisco Prime Access Registrar Server Objects
Session Managers
pEnviron-->put(pEnviron, Date, "Today is 12/15/08.");
pEnviron-->put(pEnviron, Request_IP_Address, "1.2.3.4");
Step 2 The Script should create/set an Environment dictionary entry with the name Session-Notes with a value
that contains the name of the first entry created. For example:
pEnviron-->put(pEnviron, "Session-Notes", "Date, Requested_IP_Address”);
Note Scripts creating Session Notes must be executed before the Session Management step takes place while
processing a packet.
Cisco Prime Access Registrar will automatically create a Session Note if a packet is passed to a
SessionManager and it already contains a Framed-IP-Address attribute in the packet’s Response
dictionary. This IP address could come from a Profile, RemoteServer response, or from a previously
executed script. For example, a Session output containing Session Notes when using the aregcmd
command query-session would be as follows:
sessions for /Radius/SessionManagers/session-mgr-2:
S257 NAS: localhost, NAS-Port:1, User-Name: user1, Time: 00:00:08,
IPX 0x1, GSL 1, USL 1, NOTES: "Date" "Today is 12/14/08.", "Requested
IP Address" "1.2.3.4", "Framed-IP-Address" "11.21.31.4"
Session Notes are also copied into the Environment dictionary after Session Management. The
Session-Notes Environment dictionary entry will contain the names of all the Environment dictionary
entries containing Session Notes.
In Prime Access Registrar, a major command is introduced—count-sessions. The
count-sessions /radius all command helps to count the total sessions in Prime Access Registrar. The
options are similar to the query-session command options. The query-session command displays cached
attributes in addition to session details.
Soft Group Session Limit
Two new environment variables, Group-Session-Limit and Current-Group-Count (see rex.h), are set
if the group session limit resource is allocated for a packet. These variables allow a script to see how
close the group is to its session limit; one way to use this information is to implement a script-based soft
limit. For example, you could use the Class attribute to mark sessions that have exceeded a soft limit of
80% -- as hard coded in the script (in a Tcl script called from /Radius/OutgoingScript):
set softlimit [ expr 0.8 * [ $environ get Group-Session-Limit ] ]
if { [ $environ get Current-Group-Count ] < $softlimit } {
$response put Class 0
} else {
$response put Class 1
}
Note The soft limit itself is hard coded in the script; soft limits are not directly supported in the server. The
action to be taken when the soft limit is exceeded (for example, Class = 1, and then the accounting
software branches on the value of Class) is also the responsibility of the script and/or external software.

4-39
Cisco Prime Access Registrar 6.1 User Guide
OL-29756-01
Chapter 4 Cisco Prime Access Registrar Server Objects
Resource Managers
Session Correlation Based on User-Defined Attributes
All the session objects are maintained in one dictionary keyed by a string. You can define the keying
material to the session dictionary through a newly introduced environment variable, Session-Key.
If the Session-Key is presented at the time of session manager process, it will be used as the key to the
session object for this session. The Session-Key is of type string. By default, the Session-Key is not set.
Its value should come from attributes in the incoming packet and is typically set by scripts. For example,
CLID can be used to set the value of Session-Key.
Use the function UseCLIDAsSessionKey as defined in the script rexscript.c to specify that the
Calling-Station-Id attribute that should be used as the session key to correlate requests for the same
session. This is a typical case for 3G mobile user session correlation. You can provide your own script
to define other attributes as the session key.
In the absence of the Session-Key variable, the key to the session will be created based on the string
concatenated by the value of the NAS-Identifier and the NAS-Port.
There is a new option with-key available in aregcmd for query-sessions and release-sessions to access
sessions by Session-Key.
Resource Managers
Resource Managers allow you to allocate dynamic resources to user sessions. The following lists the
different types of Resource Managers.
•IP-Dynamic—manages a pool of IP addresses that allows you to dynamically allocate IP addresses
from a pool of addresses
•IP-Per-NAS-Port—allows you to associate ports to specific IP addresses, and thus ensure each NAS
port always gets the same IP address
•IPX-Dynamic—manages a pool of IPX network addresses
•Subnet-Dynamic—manages a pool of subnet addresses
•Group-Session-Limit—manages concurrent sessions for a group of users; that is, it keeps track of
how many sessions are active and denies new sessions after the configured limit has been reached
•User-Session-Limit—manages per-user concurrent sessions; that is, it keeps track of how many
sessions each user has and denies the user a new session after the configured limit has been reached
•Home-Agent—manages a pool of on-demand IP addresses
•USR-VPN—manages Virtual Private Networks (VPNs) that use USR NAS Clients.
•Home-Agent-IPv6—manages a pool of on-demand IPv6 addresses
•Remote-IP-Dynamic—manages a pool of IP addresses that allows you to dynamically allocate IP
addresses from a pool of addresses. It internally works with a remote ODBC database.
•Remote-User-Session-Limit—manages per-user concurrent sessions; that is, it keeps track of how
many sessions each user has and denies the user a new session after the configured limit has been
reached. It internally works with a remote ODBC database.
•Remote-Group-Session-Limit—manages concurrent sessions for a group of users; that is, it keeps
track of how many sessions are active and denies new sessions after the configured limit has been
reached. It internally works with a remote ODBC database.
•3GPP—allows you to define the attribute for 3GPP authorization.

4-40
Cisco Prime Access Registrar 6.1 User Guide
OL-29756-01
Chapter 4 Cisco Prime Access Registrar Server Objects
Resource Managers
Each Resource Manager is responsible for examining the request and deciding whether to allocate a
resource for the user, do nothing, or cause Cisco Prime Access Registrar to reject the request.
Table 4-24 lists the Resource Manager properties.
Types of Resource Managers
A number of different types of Resource Managers exist that allow you to manage IP addresses
dynamically or statically, limit sessions on a per group or per user basis, or manage a Virtual Private
Network. See Appendix A, “Cisco Prime Access Registrar Tcl, REX and Java Dictionaries,” for
information on how to override these individual Resource Managers.
Note Resource Manager supports the following remote type session managers: remote-ip-dynamic,
remote-session-cache, home-agent, remote-user-session-limit, home-agent-ipv6 and
remote-group-session-limit.
This section contains the following topics:
•Gateway Subobject
•Group-Session-Limit
•Home-Agent
•Home-Agent-IPv6
•IP-Dynamic
•IP-Per-NAS-Port
•IPX-Dynamic
•Session-Cache
•Subnet-Dynamic
•User-Session-Limit
•USR-VPN
•Dynamic-DNS
•Remote-IP-Dynamic
•Remote-User-Session-Limit
•Remote-Group-Session-Limit
Table 4-24 Resource Manager Properties
Property Description
Name Required; must be unique in the Resource Managers list.
Description Optional; description of the Resource Manager.
Type Required; must be either Dynamic-DNS, IP-Dynamic,
IP-Per-NAS-Port, IPX-Dynamic, Session Cache, Subnet-Dynamic,
Group-Session-Limit, Home-Agent, User-Session-Limit, USR-VPN,
Home-Agent-IPv6, Remote-IP-Dynamic,
Remote-User-Session-Limit, Remote-Group-Session-Limit or
Remote-Session-Cache.

4-41
Cisco Prime Access Registrar 6.1 User Guide
OL-29756-01
Chapter 4 Cisco Prime Access Registrar Server Objects
Resource Managers
•Remote-Session-Cache
Gateway Subobject
The Gateway subobject includes a list of names of the Frame Relay Gateways for which to encrypt the
session key.
If you use this Resource Manager, supply the information listed in Table 4-25.
Group-Session-Limit
Group-Session-Limit allows you to manage concurrent sessions for a group of users; that is, it keeps
track of how many sessions are active and denies new sessions after the configured limit has been
reached.
When you use this Resource Manager, you must set the GroupSessionLimit property to the maximum
number of concurrent sessions for all users.
Home-Agent
Home-Agent is a new resource manager that supports dynamic HA assignment. You configure the
home-agent resource manager with a list of IP addresses. The Prime Access Registrar server assigns
those addresses to clients whose request dictionary has the right attributes to indicate that an assignment
should be done. This is similar to the ip-dynamic resource manager.
Unlike the ip-dynamic resource manager, HAs are not exclusively allocated to an individual session but
are shared among a set of sessions.
Detailed configuration information for the Home-Agent resource manager is found in Chapter 20,
“Wireless Support.” When you use this Resource Manager, you must set the Home-Agent-IPAddresses
property to a single IP address or a range of IP addresses.
Home-Agent-IPv6
Home-Agent-Ipv6 is a new resource manager used to configure IPv6 address.
Table 4-25 Gateway Properties
Property Description
Name Required; must be unique in the Gateways list.
Description Optional description of the gateway.
IPAddress Required; IP address of the gateway.
SharedSecret Required; must match the shared secret of the gateway.
TunnelRefresh Optional; if specified it is the number of seconds the tunnel stays active
before a secure “keepalive” is exchanged between the tunnel peers in
order to maintain the tunnel open.
LocationID Optional; if specified it is a string indicating the physical location of the
gateway.

4-42
Cisco Prime Access Registrar 6.1 User Guide
OL-29756-01
Chapter 4 Cisco Prime Access Registrar Server Objects
Resource Managers
IP-Dynamic
IP-Dynamic allows you to manage a pool of IP addresses from which you dynamically allocate IP
addresses.
When you use the IP-Dynamic Resource Manager, provide values for the properties listed in Table 4-26.
IP-Per-NAS-Port
IP-Per-NAS-Port allows you to associate specific IP addresses with specific NAS ports and thus ensures
each NAS port always gets the same IP address.
When you use this Resource Manager, provide values for the properties listed in Table 4-27.
Note You must have the same number of IP addresses and ports.
IPX-Dynamic
An IPX-Dynamic Resource Manager allows you to dynamically manage a pool of IPX networks. When
you use the IPX-Dynamic Resource Manager, you must set the Networks property to a valid set of
numbers which correspond to your networks.
Note You cannot use IPX network number 0x0. If you attempt to configure a Resource Manager with an IPX
network number of 0x0, validation will fail.
Table 4-26 IP-Dynamic Properties
Property Description
NetMask Required; must be set to a valid net mask.
IPAddresses Required; must be a list of IP address ranges.
AllowOverlappedIPAddresses When set to TRUE, this property supports overlapping IP
addresses between session managers for VPN users. Default
value is FALSE.
ReuseIPForSameSessionKeyAndUser When set to FALSE, this property does not reuse IP address
resources for a session. Default value is TRUE.
Table 4-27 IP-Per-NAS-Port Properties
Property Description
NetMask Required; if used, must be set to a valid net mask.
NAS Required; must be the name of a known Client.This value must be the
same as the NAS-Identifier attribute in the Access-Request packet.
IPAddresses Required; must be a list of IP address ranges.
NASPorts Required list of NAS ports.

4-43
Cisco Prime Access Registrar 6.1 User Guide
OL-29756-01
Chapter 4 Cisco Prime Access Registrar Server Objects
Resource Managers
Session-Cache
The session-cache Resource Manager supports the Identity Cache feature. You use session-cache
Resource Managers to define the RADIUS attributes to store in cache. Set the QueryKey property to the
XML attribute you want to key on such as XML-Address-format-IPv4 and list all attributes to be cached
in the AttributesToBeCached subdirectory. Use the QueryMappings subdirectory to map XML attributes
to RADIUS attributes.
Note Session record size is limited by the operating system (OS) paging size (8 KB in Solaris and 4 KB in
Linux). If a request triggers creation of a session that exceeds the OS paging size, the request will be
dropped and the session will not be created.
If the disk partition where Prime Access Registrar stores session backing store data (usually the disk
partition where Prime Access Registrar is installed, such as /opt/CSCOar) is full, the subsequent
packets that try to create sessions will be dropped and no sessions will be created due to lack of disk
space.
Subnet-Dynamic
The subnet-dynamic Resource Manager supports the On Demand Address Pool feature. You use
subnet-dynamic resource managers to provide pools of subnet addresses. Following is an example of the
configuration of a subnet dynamic resource manager:
/Radius/ResourceManagers/newResourceMgr
Name = newResourceMgr
Description =
Type = subnet-dynamic
Subnet-Mask = 255.255.255.0
SubnetAddresses/
10.1.0.0-10.1.10.0
11.1.0.0-11.1.10.0
Table 4-28 Session-Cache Resource Manager Properties
Property Description
QueryKey Required; set the QueryKey to the a RADIUS attribute you want to key
on, such as Framed-IP-Address.
A change made in Prime Access Registrar requires that this attribute not
be an XML attribute, even if this session-cache resource manager is being
used for an XML query.
Note Any existing session-cache resource managers using an XML
attribute for the Query Key must be changed to a RADIUS
attribute that this XML attribute is mapped to under
QueryMappings.
PendingRemovalDelay Required; length of time information remains in the cache after the
session ends (defaults to 10 seconds)
AttributesToBeCached Required; use this subdirectory to provide a list of RADIUS attributes
you want to store in cache
QueryMappings Required; list of attribute pairs, mapping the XML attributes on the
left-hand side to the RADIUS attribute on the right-hand side.

4-44
Cisco Prime Access Registrar 6.1 User Guide
OL-29756-01
Chapter 4 Cisco Prime Access Registrar Server Objects
Resource Managers
When you use the subnet-dynamic Resource Manager, provide values for the properties listed in
Table 4-29.
User-Session-Limit
User-Session-Limit allows you to manage per-user concurrent sessions; that is, it keeps track of how
many sessions each user has and denies the user a new session after the configured limit has been
reached.
When you use the user-session-limit Resource Manager, set the user-session-limit property to the
maximum number of concurrent sessions for a particular user.
USR-VPN
USR-VPN allows you to set up a Virtual Private Network (VPN) using a US Robotics NAS.
When you use this Resource Manager, provide values for the properties listed in Table 4-30.
Dynamic-DNS
Prime Access Registrar supports the Dynamic DNS protocol providing the ability to update DNS
servers.
When you use this Resource Manager, provide values for the properties listed in Table 4-31.
Table 4-29 Subnet-Dynamic Properties
Property Description
Type Required
Subnet mask Required; must be set to the size of the managed subnets
SubnetAddresses Required; must be a valid range of IP addresses
Table 4-30 USR-VPN Properties
Property Description
Identifier Required; must be set to the VPN ID the USR NAS will use to identify a
VPN.
Neighbor Optional; if set, should be the IP address of the next hop router for the
VPN.
FramedRouting Optional; if set, should be RIP V2 Off or RIP V2 On if the USR NAS is
to run RIP Version 2 for the user.
Gateways Required to set up a tunnel between the NAS and the Gateways.
Table 4-31 DYNAMIC-DNS Properties
Fields Description
Max DNS TTLS Set the maximum TTL of the DNS record.
DNS Host bytes Set the number of bytes to be used to construct the reverse zone entry.

4-45
Cisco Prime Access Registrar 6.1 User Guide
OL-29756-01
Chapter 4 Cisco Prime Access Registrar Server Objects
Profiles
Remote-IP-Dynamic
The configuration is same as IP-Dynamic but internally it works with a remote ODBC database.
Remote-User-Session-Limit
The configuration is same as User-Session-Limit but internally it works with a remote ODBC database.
Remote-Group-Session-Limit
The configuration is same as Group-Session-Limit but internally it works with a remote ODBC database.
Remote-Session-Cache
The configuration is same as Session-Cache but it should be used with session manager of type remote.
Profiles
You use Profiles to group RADIUS attributes that belong together, such as attributes that are appropriate
for a particular class of PPP or Telnet user. You can reference profiles by name from either the
UserGroup or the User properties. Thus, if the specifications of a particular profile change, you can
make the change in a single place and have it propagated throughout your user community.
Although you can use UserGroups or Profiles in a similar manner, choosing whether to use one rather
than the other depends on your site. When you require some choice in determining how to authorize or
authenticate a user session, then creating specific profiles, and creating a group that uses a script to
choose among them is more flexible.
In such a situation, you might create a default group, and then write a script that selects the appropriate
profile based on the specific request. The benefit to this technique is each user can have a single entry,
and use the appropriate profile depending on the way they log in.
Forward Zone Name Set the name of the forward zone. For a given Resource Manager you
must decide which forward zone you will be updating for sessions the
resource manager will manage.
Reverse Zone Name Set the name of the reverse zone.
Forward Zone Server Set the Server IP of the forward zone
Reverse Zone Server Set the Server IP of the reverse zone
Forward Zone TSIG KeyS Server-wide security key to process all forward zone dynamic DNS
updates. This is used if a ForwardZoneTSIGKey was not specified on
the Resource Manager.
Reverse Zone TSIG Keys Server-wide security key to process all reverse zone dynamic DNS
updates. This is used if a ReverseZoneTSIGKey was not specified on
the Resource Manager
Table 4-31 DYNAMIC-DNS Properties (continued)
Fields Description

4-46
Cisco Prime Access Registrar 6.1 User Guide
OL-29756-01
Chapter 4 Cisco Prime Access Registrar Server Objects
Translations
Table 4-32 lists the Profile properties.
Attributes
Attributes are specific RADIUS components of requests and responses defined in the Request and
Response Attribute dictionaries. Use the aregcmd command set to assign values to attributes.
For a complete list of the attributes, see Appendix C, “RADIUS Attributes.” When setting a value for a
STRING-type attribute such as Connect-Info (which starts with an integer), you must use the
hexadecimal representation of the integer. For example, to set the attribute Connect-Info to a value of
7:7, use a set command like the following:
set Connect-Info 37:3A:37
Translations
Translations add new attributes to a packet or change an existing attribute from one value to another.
The Translations subdirectory lists all definitions of Translations the RADIUS server can apply to
certain packets.
Under the /Radius/Translations directory, any translation to insert, substitute, or translate attributes can
be added. The following is a sample configuration under the /Radius/Translations directory:
cd /Radius/Translations
Add T1
cd T1
Set DeleAttrs Session-Timeout,Called-Station-Id
cd Attributes
Set Calling-Station-Id 18009998888
DeleAttrs is the set of attributes to be deleted from the packet. Each attribute is comma separated and
no spaces are allowed between attributes. All attribute value pairs under the attributes subdirectory are
the attributes and values that are going to be added or translated to the packet.
Under the /Radius/Translations/T1/Attributes directory, inserted or translated attribute value pairs can
be set. These attribute value pairs are either added to the packet or replaced with the new value.
If a translation applies to an Access-Request packet, by referencing the definition of that translation, the
Prime Access Registrar server modifies the Request dictionary and inserts, filters and substitutes the
attributes accordingly. You can set many translations for one packet and the Prime Access Registrar
server applies these translations sequentially.
Note Later translations can overwrite previous translations.
Table 4-32 Profile Properties
Property Description
Name Required; must be unique in the Profiles list.
Description Optional; description of the profile.
Attributes Profiles include specific RADIUS attributes that
Cisco Prime Access Registrar returns in the Access-Accept response.

4-47
Cisco Prime Access Registrar 6.1 User Guide
OL-29756-01
Chapter 4 Cisco Prime Access Registrar Server Objects
TranslationGroups
Table 4-33 lists the Translation properties.
TranslationGroups
You can add translation groups for different user groups under TranslationGroups. All Translations
under the Translations subdirectory are applied to those packets that fall into the groups. The groups are
integrated with the Prime Access Registrar Rule engine.
The Prime Access Registrar Administrator can use any RADIUS attribute to determine the Translation
Group. The incoming and outgoing translation group can be different translation groups. For example,
you can set one translation group for incoming translations and one for outgoing translations.
Under the /Radius/TranslationGroups directory, translations can be grouped and applied to certain sets
of packets, which are referred to in a rule. The following is a sample configuration under the
/Radius/TranslationGroups directory:
cd /Radius/TranslationGroups
Add CiscoIncoming
cd CiscoIncoming
cd Translations
Set 1 T1
The translation group is referenced through the Prime Access Registrar Policy Engine in the
/Radius/Rules/<RuleName>/Attributes directory. Incoming-Translation-Groups are set to a
translation group (for example CiscoIncoming) and Outgoing-Translation-Groups to another
translation group (for example CiscoOutgoing). Table 4-34 lists the Translation Group properties.
Remote Servers
You can use the RemoteServers object to specify the properties of the remote servers to which Services
proxy requests. RemoteServers are referenced by name from the RemoteServers list in either the
radius, ldap or tacacs-udp Services.
Note You must not configure a remote server with an IP address, which is same as that of the client. This is
applicable for all types of remote servers.
Table 4-33 Translations Properties
Property Description
Name Required; must be unique in the Translations list.
Description Optional; description of the Translation
DeleteAttrs Optional; lists attributes to be filtered out
Table 4-34 TranslationGroups Properties
Property Description
Name Required; must be unique in the Translations list.
Description Optional; description of the Translation Group
Translations Lists of translation

4-48
Cisco Prime Access Registrar 6.1 User Guide
OL-29756-01
Chapter 4 Cisco Prime Access Registrar Server Objects
Remote Servers
Table 4-35 lists the common RemoteServers properties.
Types of Protocols
The Remote Server protocol you specify determines what additional information you must provide. The
following are the protocols available in Prime Access Registrar with their required and optional fields.
Prime Access Registrar provides the following RemoteServer protocol types:
•Domain Authentication
•Dynamic DNS
•LDAP
•Map-Gateway
•Sigtran
•ODBC
•ODBC-Accounting
•OCI
•OCI-Accounting
•Prepaid-CRB
Table 4-35 Common RemoteServer Properties
Property Description
Name Required; must be unique in the RemoteServers list.
Description Optional; description of the remote server.
Protocol Required; specifies the remote server protocol which can be radius, ldap, or
tacacs-udp.
IPAddress Required; this property specifies where to send the proxy request. It is the address
of the remote server. You must set it to a valid IP address.
The IP address format is enhanced to support IPv6 apart from IPv4 only for the
RADIUS type remote server.
Port Required; the port to which Cisco Prime Access Registrar sends proxy requests.
You must specify a number greater than zero. If there is no default port number,
you must supply the correct port number for your remote server.
If you set a port to zero, Prime Access Registrar sets the port to the default value
for the type of remote server being configured. For example, the following remote
servers have these default port values:
dynamic-dns—53
radius—1645
ldap—389
accounting—1646
ReactivateTimerI
nterval
Required; the amount of time (in milliseconds) to wait before retrying a remote
server that was offline. You must specify a number greater than zero. The default
is 300,000 (5 minutes).

4-49
Cisco Prime Access Registrar 6.1 User Guide
OL-29756-01
Chapter 4 Cisco Prime Access Registrar Server Objects
Remote Servers
•Prepaid-IS835C
•RADIUS
•SIGTRAN-M3UA
•Rules
Domain Authentication
The domain-auth Remote Server is used with the Windows Domain Authentication feature.
Prime Access Registrar supports the Windows Domain Controller/Active Directory (WDC/AD) and
enables you to authenticate users present in a WDC/AD using the CiscoSecure Remote Agent (CSRA).
Note To get the CiscoSecure Remote Agent software package, please send an e-mail to ar-tme@cisco.com.
During authentication, the user credentials are sent to the CSRA, which authenticates the credentials
with the WDC/AD. The user optionally can specify the domain name along with their UserID when they
log in. If the domain is not specified, authentication is first performed with the local WDC/AD (default
domain as specified in the remote server configuration), then with all the other trusted domain
controllers, one by one until the user is found in any of the trusted WDC/ADs.
This failover to other domains is taken care by the local (default) WDC/AD. The local WDC/AD
maintains a list of trusted domains and when the user is not found in the local AD, the WDC queries the
trusted WDC/ADs, to see if any one those had the user in it. If any of the WDC/ADs has the user, those
credentials would be used to authenticate the user.
The WDC/AD authentication stops at the first hit and does not check other domains even if the user
credentials do not match (resulting in an authentication failure). When a domain is specified,
authentication is performed only on that domain. This domain should be either the local WDC/AD or
one of the trusted WDC/ADs.
A 128-bit Blowfish (variant) encryption algorithm secures the communication between the
Prime Access Registrar and CSRA. The session key for this encryption is negotiated when the
connection is established.
The following is the default configuration of a domain-auth Remote Server.
[ //localhost/Radius/RemoteServers/domain-auth ]
Name = newone
Description =
Protocol = domain-auth
HostName =
Port = 2004
ReactivateTimerInterval = 300000
DefaultDomain =
Timeout = 15
AgentConnections = 15
DefaultUserGroup =
GroupMaps/
Table 4-36 lists and defines the domain-auth RemoteServer properties.

4-50
Cisco Prime Access Registrar 6.1 User Guide
OL-29756-01
Chapter 4 Cisco Prime Access Registrar Server Objects
Remote Servers
Users can optionally be authorized using WDC/AD using a list of groups the user belongs to in
WDC/AD. This list of groups is mapped to an internal group in the Prime Access Registrar server using
the GroupMaps property. An optional default group can also be configured using the DefaultUserGroup
property.
When a hit is made, the corresponding group is taken, even if there might be a better match further down
the list. For example, if the user is part of groups A, B, C, and D, and if a map for Groups A, B, and C
is listed before a map for Groups A, B, C, and D, the map for Groups A, B, and C will be taken. This
requires the administrator to configure more specific mapping before the general mapping.
The list of groups from the WDC/AD is copied to a new environment variable named
Windows-Domain-Groups to permit mapping to a more appropriate group at the next relevant scripting
point.
Dynamic DNS
The dynamic-dns RemoteServer is used with the Dynamic DNS feature. The following is the default
configuration of a dynamic-dns RemoteServer.
[ //localhost/Radius/RemoteServers/ddns ]
Name = ddns
Description =
Table 4-36 Domain Authentication RemoteServer Properties
Property Description
HostName Required; hostname or IP address of the remote server.
Port Required; port used for communication with WDC/AD; defaults to 2004.
ReactivateTimerInterval Required; default is 300,000 milliseconds. Specifies the length of time to
wait before attempting to reconnect if a thread is not connected to a data
source.
DefaultDomain Species the default domain for authentication if the user does not include
a domain during log in. Otherwise, authentication is performed on the
local domain.
Timeout Required; defaults to 15.
AgentConnections Required; default is 15. Represents the total number of connections
Prime Access Registrar can open with the CSRA.
DefaultUserGroup User group to be used when no mapping is found in the list of maps in
the GroupMap property or when there is no hit in the groups listed in
GroupMaps. The DefaultUserGroup is used to authorize users that are
authenticated by this domain-auth RemoteServer.
GroupMaps A list of groups to which the user belongs in the WDC/AD mapped to an
internal group in the Prime Access Registrar server. Entries are of the
form:
1. “InternalGroup1 = ExternalGroup1, ExternalGroup2, ...”
2. “InternalGroup2 = ExternalGroup3, ExternalGroup4, ...”
To configure group mappings, use the following syntax:
set 1 “Group1 = ExternalGroup1,ExternalGroup2,
ExternalGroup3”

4-51
Cisco Prime Access Registrar 6.1 User Guide
OL-29756-01
Chapter 4 Cisco Prime Access Registrar Server Objects
Remote Servers
Protocol = dynamic-dns
IPAddress =
Port = 53
MaxTries = 3
InitialTimeout = 2000
MaxDNSRenamingRetries = 3
TrimHostName = TRUE
ForwardZoneTSIGKey =
ReverseZoneTSIGKey =
Table 4-37 lists and defines the dynamic-dns RemoteServer properties.
LDAP
ldap specifies an LDAP server. When you specify the ldap protocol, provide the information listed in
Table 4-38.
For any LDAP remote service, the server might perform the environment mappings at any time. This
means that if the service is set to either authentication and authorization, authentication-only, or
authorization-only, environment mappings will take place. RADIUS mappings will take place only if the
service is set to perform authorization. Checkitem mappings will take place only if the service is set to
perform authentication. Previously environment mappings only occurred when the service was set for
both authentication and authorization. RADIUS mappings, environment mappings, and checkitem
mappings will not take place, if bind-based authentication is enabled.
Table 4-37 Dynamic-DNS RemoteServer Properties
Property Description
IPAddress The IPAddress address of the DNS server
Port Port 53 is the port that most DNS servers will use as a default
MaxTries Number of times the server tries to send dynamic updates to a DNS server
InitialTimeout Time, in milliseconds, that the server waits for a response before retrying
a dynamic DNS request
MaxRenamingRetries Number of times that the dynamic-dns resource managers can try to add
a host in DNS even if it detects that the host's name is already present.
This controls the number of times Prime Access Registrar tries to modify
a host's name to resolve a conflict on each failed update.
TrimHostName Controls whether Prime Access Registrar trims the hostname string to the
first period character (used to update dynamic DNS update records and to
return the hostname option to clients). If this attribute is enabled, the
hostname is truncated before the period. If disabled, the server retains the
period characters in the hostname.
ForwardZoneTSIGKey Server-wide security key to process all forward zone dynamic DNS
updates. This is used if a ForwardZoneTSIGKey was not specified on the
Resource Manager.
ForwardZoneTSIGKey Server-wide security key to process all forward zone dynamic DNS
updates. This is used if a ForwardZoneTSIGKey was not specified on the
Resource Manager.
ReverseZoneTSIGKey Server-wide security key to process all reverse zone dynamic DNS
updates. This is used if a ReverseZoneTSIGKey was not specified on the
Resource Manager.

4-52
Cisco Prime Access Registrar 6.1 User Guide
OL-29756-01
Chapter 4 Cisco Prime Access Registrar Server Objects
Remote Servers
Table 4-38 ldap RemoteServer Properties
Property Description
Port Required; defaults to port 389.
Timeout Required; the default is 15. The timeout property indicates how
many seconds the RADIUS server will wait for a response from the
LDAP server.
Note Use InitialTimeout from above as a template, except this is
timeout is specified in seconds.
HostName Required; the LDAP server’s hostname or IP address.
BindName Optional; the distinguished name (dn) to use when establishing a
connection between the LDAP and RADIUS servers.
BindPassword Optional; the password associated with the BindName.
SearchPath
(Overridden by Search-Path
environment variable)
Required; the path that indicates where in the LDAP database to
start the search for user information.
Filter Required; this specifies the search filter
Cisco Prime Access Registrar uses when querying the LDAP
server for user information. When you configure this property, use
the notation “%s” to indicate where the user ID should be inserted.
For example, a typical value for this property is “(uid=%s),” which
means that when querying for information about user joe, use the
filter uid=joe.
UserPasswordAttribute Required; this specifies which LDAP field the RADIUS server
should check for the user’s password.
LimitOutstandingRequests Required; the default is FALSE. Cisco Prime Access Registrar
uses this property in conjunction with the
MaxOutstandingRequests property to tune the RADIUS server’s
use of the LDAP server.
When you set this property to TRUE, the number of outstanding
requests for this RemoteServer is limited to the value you specified
in MaxOutstandingRequests. When the number of requests
exceeds this number, Cisco Prime Access Registrar queues the
remaining requests, and sends them as soon as the number of
outstanding requests drops to this number.
MaxOutstandingRequests Required when you have set the LimitOutstandingRequests to
TRUE. The number you specify, which must be greater than zero,
determines the maximum number of outstanding requests allowed
for this remote server.

4-53
Cisco Prime Access Registrar 6.1 User Guide
OL-29756-01
Chapter 4 Cisco Prime Access Registrar Server Objects
Remote Servers
MaxReferrals Required; must be a number equal to or greater than zero. This
property indicates how many referrals are allowed when looking
up user information. When you set this property to zero, no
referrals are allowed.
Cisco Prime Access Registrar manages referrals by allowing the
RADIUS server’s administrator to indicate an LDAP “referral
attribute,” which might or might not appear in the user information
returned from an LDAP query. When this information is returned
from a query, Cisco Prime Access Registrar assumes it is a referral
and initiates another query based on the referral. Referrals can also
contain referrals.
Note This is an LDAP v2 referral property.
ReferralAttribute Required when you have specified a MaxReferrals value. This
property specifies which LDAP attribute, returned from an LDAP
search, to check for referral information.
Note This is an LDAP v2 referral property.
ReferralFilter Required when you have specified a MaxReferral value. This is
the filter Cisco Prime Access Registrar uses when processing
referrals. When checking referrals, the information
Cisco Prime Access Registrar finds in the referral itself is
considered to be the search path and this property provides the
filter. The syntax is the same as that of the Filter property.
Note This is an LDAP v2 referral property.
PasswordEncryptionStyle The default is None. You can also specify crypt, dynamic,
SHA-1, and SSHA-1.
EscapeSpecialCharInUserName FALSE by default
DNSLookupAndLDAPRebindIn
terval
Specifies the timeout period after which the
Prime Access Registrar server will attempt to resolve the LDAP
hostname to IP address (DNS resolution); 0 by default
DataSourceConnections Specifies the number of concurrent connections to the LDAP
server. The default value is 8.
SearchScope Specifies how deep to search within a search path; default is
SubTree which indicates a search of the base object and the entire
subtree of which the base object distinguished name is the highest
object.
Base indicates a search of the base object only.
OneLevel indicates a search of objects immediately subordinate to
the base object, but does not include the base object.
Table 4-38 ldap RemoteServer Properties (continued)
Property Description

4-54
Cisco Prime Access Registrar 6.1 User Guide
OL-29756-01
Chapter 4 Cisco Prime Access Registrar Server Objects
Remote Servers
Map-Gateway
The following is the default configuration of a map gateway RemoteServer.
[ //localhost/Radius/RemoteServers/map-gateway ]
Name = map-gateway
Description =
Protocol = map-gateway
IPAddress =
Port = 0
LDAPToRadiusMappings Optional; a list of name/value pairs in which the name is the name
of the ldap attribute to retrieve from the user record, and the value
is the name of the RADIUS attribute to set to the value of the ldap
attribute retrieved.
For example, when the LDAPToRadiusMappings has the entry:
FramedIPAddress = Framed-IP-Address, the RemoteServer
retrieves the FramedIPAddress attribute from the ldap user entry
for the specified user, uses the value returned, and sets the
Response variable Framed-IP-Address to that value.
LDAPToEnvironmentMappings Optional; a list of name/value pairs in which the name is the name
of the ldap attribute to retrieve from the user record, and the value
is the name of the Environment variable to set to the value of the
ldap attribute retrieved.
For example, when the LDAPToEnvironmentMappings has the
entry: group = User-Group, the RemoteServer retrieves the
group attribute from the ldap user entry for the specified user, uses
the value returned, and sets the Environment variable User-Group
to that value.
LDAPToCheckItemMappings Optional; a list of LDAP attribute/value pairs which must be
present in the RADIUS access request and must match, both name
and value, for the check to pass.
For example, when the LDAPToCheckItemMappings has the
entry: group = User-Group, the Access Request must contain the
attribute group, and it must be set to User-Group.
UseSSL A boolean field indicating whether you want
Cisco Prime Access Registrar to use SSL (Secure Socket Layer)
when communicating with this RemoteServer. When you set it to
TRUE, be sure to specify the CertificateDBPath field in the
Advanced section, and be sure the port you specified for this
RemoteServer is the SSL port used by the LDAP server.
UseBinaryPasswordComparison A boolean field that enables binary password comparison for
authentication. This property when set to TRUE, enables binary
password comparison. By default, this property is set to FALSE.
UseBindBasedAuthentication A boolean field that enables bind-based authentication with LDAP
server. This property when set to TRUE, enables bind-based
authentication. By default, this property is set to FALSE. When set
to FALSE, it uses existing legacy authentication method.
Table 4-38 ldap RemoteServer Properties (continued)
Property Description

4-55
Cisco Prime Access Registrar 6.1 User Guide
OL-29756-01
Chapter 4 Cisco Prime Access Registrar Server Objects
Remote Servers
ReactivateTimerInterval = 300000
SharedSecret =
MaxTries = 3
InitialTimeout = 2000
Sigtran
The following is the default configuration of a Sigtran RemoteServer.
[ //localhost/Radius/RemoteServers/rs ]
Name = rs
Description =
Protocol = sigtran
HostName =
LocalSubSystemNumber =
CgPAGlobalTitleAddress =
SetOPCInCgPA =
GlobalTitleTranslationScript~ =
SUAConfigurationFilename =
ReactivateTimerInterval =
Timeout = 5000
LimitOutstandingRequests = FALSE
MaxOutstandingRequests = 0
Note The RPM packages such as lksctp-tools-1.0.10-1, lksctp-tools-doc-1.0.10-1 and
lksctp-tools-devel-1.0.10-1 should be installed in Linux 5.3 before configuring sigtran remote server
which eventually adds the sctp libs (libsctp.so.1.0.10).
The following files can be downloaded from http://lksctp.sourceforge.net/
•lksctp-tools-1.0.10-1.i386.rpm
•lksctp-tools-devel-1.0.10-1.i386.rpm
•lksctp-tools-doc-1.0.10-1.i386.rpm
Prime Access Registrar supports only:
•one object of Remoteserver with protocol type "sigtran"
•MAP version 3 (3GPP TS 29.002 V6.4.0 (2003-12) ) and ITU Q.773 TCAP
Only one Quintets is fetched from HLR. The ITU TCAP continue message is not supported.
Table 4-39 lists and defines the Sigtran RemoteServer properties.
Table 4-39 Sigtran RemoteServer Properties
Property Description
HostName Required; represents the IP address of remote Signalling Gateway
specified in the SUAConfiguration file.
LocalSubSystemNumber Required; the default value for this property is 0. This represents
the subsystem number used by SUA user.
CgPAGlobalTitleAddress Required; represents the Global Title Address of
CallingPartyAddress.
SetOPCInCgPA Required; if it is set to TRUE, OPC will be used in
CallingPartyAddress.

4-56
Cisco Prime Access Registrar 6.1 User Guide
OL-29756-01
Chapter 4 Cisco Prime Access Registrar Server Objects
Remote Servers
Note You should restart the Prime Access Registrar server, if you change any SIGTRAN related
configuration.
ODBC
odbc specifies an ODBC server. Cisco Prime Access Registrar provides a RemoteServer object (and a
service) to support Open Database Connectivity (ODBC), an open specification that provides application
developers a vendor-independent API with which to access data sources. Table 4-40 lists the odbc server
attributes.
For any ODBC remote service, the server might perform the environment mappings at any time. This
means that if the service is set to either authentication and authorization, authentication-only, or
authorization-only, environment mappings will take place. RADIUS mappings will take place only if the
service is set to perform authorization. Checkitem mappings will take place only if the service is set to
perform authentication. Previously environment mappings only occurred when the service was set for
both authentication and authorization.
Global TitleTranslationScript This is used to specify the name of script which is responsible for
translating IMSI to GTA.
SUAConfigurationFilename Required; used to specify the name of configuration file for SUA
stack initialization.
ReactivateTimerInterval Required; represents the reactivate time interval to re-connect after
failure.
Timeout Required; represents the how long the remote server should wait
before marking the request as timedout.
LimitOutstandingRequests Limits the outstanding request to HLR when it is set to TRUE.
MaxOutstandingRequests This represents the maximum outstanding request to HLR.
Table 4-39 Sigtran RemoteServer Properties (continued)
Property Description
Table 4-40 odbc Properties
Property Description
Timeout Required; the default is 15. The timeout property indicates
how many seconds the RADIUS server will wait for a
response from the LDAP server.
Note Use InitialTimeout from above as a template, except
this is timeout is specified in seconds.
Protocol Must be set to odbc.
ReactivateTimerInterval Required; default is 300,000 milliseconds. Length of time to
wait before attempting to reconnect if a thread is not
connected to a data source.

4-57
Cisco Prime Access Registrar 6.1 User Guide
OL-29756-01
Chapter 4 Cisco Prime Access Registrar Server Objects
Remote Servers
Data Source Connections Required; default is 8. This represents the total number of
connections Prime Access Registrar can open with the ODBC
server; total number of threads Prime Access Registrar can
create for the ODBC server.
ODBCDataSource Required; defines all items required for the odbc.ini file. The
Prime Access Registrar server automatically creates the
odbc.ini file based on these settings.
SQLDefinition SQLDefinition properties define the SQL you want to
execute.
Type—query (Prime Access Registrar supports only type
query).
SQL—SQL query used to acquire the password
UserPasswordAttribute—Defines the database column
name for the user’s password.
MarkerList—Defines all markers for the query.
MarkerList uses the format
UserName/SQL_DATA_TYPE.
ODBCToRadiusMappings Optional; a list of name/value pairs in which the name is the
name of the odbc attribute to retrieve from the user record,
and the value is the name of the RADIUS attribute to set to the
value of the odbc attribute retrieved.
For example, when the ODBCToRadiusMappings has the
entry: FramedIPAddress = Framed-IP-Address, the
RemoteServer retrieves the FramedIPAddress attribute from
the odbc user entry for the specified user, uses the value
returned, and sets the Response variable Framed-IP-Address
to that value.
ODBCToEnvironmentMappings Optional; a list of name/value pairs in which the name is the
name of the odbc attribute to retrieve from the user record,
and the value is the name of the Environment variable to set to
the value of the odbc attribute retrieved.
For example, when the ODBCToEnvironmentMappings has
the entry: group = User-Group, the RemoteServer retrieves
the group attribute from the odbc user entry for the specified
user, uses the value returned, and sets the Environment
variable User-Group to that value.
ODBCToCheckItemMappings Optional; a list of ODBC attribute/value pairs which must be
present in the RADIUS access request and must match, both
name and value, for the check to pass.
For example, when the ODBCToCheckItemMappings has
the entry: group = User-Group, the Access Request must
contain the attribute group, and it must be set to User-Group.
Table 4-40 odbc Properties (continued)
Property Description

4-58
Cisco Prime Access Registrar 6.1 User Guide
OL-29756-01
Chapter 4 Cisco Prime Access Registrar Server Objects
Remote Servers
ODBC-Accounting
If you use the Oracle Accounting feature, you must configure an ODBC-Accounting RemoteServer
object. Table 4-41 lists and defines the ODBC-Accounting RemoteServer properties.
OCI
OCI service can be used to authenticate and authorize an access request by querying user information
through OCI and to insert accounting records into a data store through OCI. For more information on
OCI server properties, see ODBC/OCI, page 3-117.
Table 4-41 ODBC-Accounting RemoteServer Properties
Property Description
Name Name of the remote server; this property is mandatory, and there is no
default
Description Optional description of server
Protocol Must be set to odbc-accounting
ReactivateTimerInterval Mandatory time interval (in milliseconds) to activate an inactive
server; defaults to 300000 ms.
Timeout Mandatory time interval (in seconds) to wait for SQL operation to
complete; defaults to 15 seconds
DataSourceConnections Mandatory number of connections to be established; defaults to 8
ODBCDataSource Name of the ODBCDataSource to use and must refer to one entry in
the list of ODBC datasources configured under
/Radius/Advanced/ODBCDataSources. Mandatory; no default
KeepAliveTimerInterval Mandatory time interval (in milliseconds) to send a keepalive to keep
the idle connection active; defaults to zero (0) meaning the option is
disabled
BufferAccountingPackets Mandatory, TRUE or FALSE, determines whether to buffer the
accounting packets to local file, defaults to TRUE which means that
packet buffering is enabled.
Note When set to TRUE, a constant flow of incoming accounting
packets can fill the buffer backing store files in
/cisco-ar/data/odbc beyond the size configured in
MaximumBufferFileSize. Configure
BackingStoreDiscThreshold in /Radius/Advanced when
using ODBC accounting. See Advanced, page 4-60 for
information about how to configure
BackingStoreDiscThreshold.
MaximumBufferFileSize Mandatory if BufferAccountingPackets is set to TRUE, determines the
maximum buffer file size, defaults to 10 Megabyte)
NumberOfRetriesForBuffer
dPacket
Mandatory if BufferAccountingPackets is set to TRUE. A number
greater than zero determines the number of attempts to be made to
insert the buffered packet into Oracle. Defaults to 3.

4-59
Cisco Prime Access Registrar 6.1 User Guide
OL-29756-01
Chapter 4 Cisco Prime Access Registrar Server Objects
Remote Servers
OCI-Accounting
If you use the Oracle Accounting feature, you must configure an OCI-Accounting RemoteServer object.
For more information, see ODBC/OCI-Accounting, page 3-119.
Prepaid-CRB
The following is the default configuration of a prepaid-crb RemoteServer. The Filename property is the
name of the required shared library provided by the billing vendor. See CRB Prepaid Billing, page 16-7
for more information on Prepaid -CRB.
[ //localhost/Radius/RemoteServers/prepaid-crb ]
Name = prepaid-crb
Description =
Protocol = prepaid-crb
IPAddress =
Port = 0
Filename =
Connections = 8
Prepaid-IS835C
The following is the default configuration of a prepaid-is835c RemoteServer. The Filename property is
the name of the required shared library provided by the billing vendor. See IS835C Prepaid Billing,
page 16-2 for more information on Prepaid -IS835C.
[ //localhost/Radius/RemoteServers/prepaid-is835c ]
Name = prepaid-is835c
Description =
Protocol = prepaid-is835c
IPAddress =
Port = 0
Filename =
Connections = 8
RADIUS
radius specifies a RADIUS server. When you specify the radius protocol, supply the information in
Table 4-42.
Table 4-42 RADIUS Properties
Property Description
SharedSecret Required; the secret shared between the remote server and the RADIUS
server.
IncomingScript Optional; when set, must be the name of a known incoming script.
Cisco Prime Access Registrar runs the IncomingScript after it receives the
response.
OutgoingScript Optional; when set, must be the name of a known outgoing script.
Cisco Prime Access Registrar runs the OutgoingScript just before it sends
the proxy request to the remote server.
Vendor Optional; when set, must be the name of a known Vendor.

4-60
Cisco Prime Access Registrar 6.1 User Guide
OL-29756-01
Chapter 4 Cisco Prime Access Registrar Server Objects
Rules
SIGTRAN-M3UA
Prime Access Registrar supports SIGTRAN-M3UA to fetch the authentication vectors from HLR, which
is required for EAP-AKA/EAP-SIM authentication. For more information on SIGTRAN-M3UA
protocol, see Chapter 23, “SIGTRAN-M3UA”.
Rules
A Rule is a function that selects services based on all input information used by the function.
Advanced
Advanced objects let you configure system-level properties and the Attribute dictionary. Under normal
system operation, you should not need to change the system-level properties.
Note The notation required means Cisco Prime Access Registrar needs a value for this property. For most of
these properties, you can use system defaults.
Table 4-43 lists the Advanced properties.
MaxTries Required; the number of times to send a proxy request to a remote server
before deciding the server is offline. You must specify a number greater
than zero. The default is 3.
InitialTimeout Required: represents the number of milliseconds used as a timeout for the
first attempt to send a specific packet to a remote server. For each
successive retry on the same packet, the previous timeout value used is
doubled. You must specify a number greater than zero. The default value is
2000 (or 2 seconds).
ACKaccounting When ACKAccounting is TRUE, the Prime Access Registrar server waits
for the Accounting-Response from the remote RADIUS server before
sending the corresponding Accounting-Response to the client.
When ACKAccounting is FALSE, the Prime Access Registrar server does
not wait for the Accounting-Response and immediately returns an
Accounting-Response to the client.
Table 4-42 RADIUS Properties (continued)
Property Description

4-61
Cisco Prime Access Registrar 6.1 User Guide
OL-29756-01
Chapter 4 Cisco Prime Access Registrar Server Objects
Advanced
Table 4-43 Advanced Object Properties
Property Description
LogServerActivity Required; the default is FALSE, which means
Cisco Prime Access Registrar logs all responses except
Access-Accepts and Access-Challenges. Accepting the
default reduces the load on the server by reducing that
amount of information it must log. Note, the client is
probably sending accounting requests to an accounting
server, so the Access-Accept requests are being indirectly
logged. When you set it to TRUE,
Cisco Prime Access Registrar logs all responses to the
server log file.
MaximumNumberOfRadiusPackets Required; the default is 8192. This is a critical property you
should set high enough to allow for the maximum number
of simultaneous requests. When more requests come in
than there are packets allocated,
Cisco Prime Access Registrar will drop those additional
requests.
PerPacketHeapSize Required; the default is 6500. This property sets the size of
the initial heap for each packet. The heap is the dynamic
memory a request can use during its lifetime. By
preallocating the heap size at the beginning of request
processing, we can minimize the cost of memory
allocations. If PerPacketHeapSize is too low,
Prime Access Registrar will ask the system for memory
more often. If PerPacketHeapSize is too high,
Prime Access Registrar will allocate too much memory for
the request causing the system to use more memory than
required.
UDPPacketSize Required; the default is 4096. RFC 2138 specifies the
maximum packet length can be 4096 bytes. Do not change
this value.
RequireNASsBehindProxyBeInClientLi
st
Required; the default is FALSE. If you accept the default,
Cisco Prime Access Registrar only uses the source IP
address to identify the immediate client that sent the
request. Leaving it FALSE is useful when this RADIUS
Server should only know about the proxy server and should
treat requests as if they came from the proxy server. This
might be the case with some environments that buy bulk
dial service from a third party and thus do not need to, or
are unable to, list all of the NASs behind the third party’s
proxy server. When you set it to TRUE, you must list all of
the NASs behind the Proxy in the Clients list. For more
information about this property, see Using the
RequireNASsBehindProxyBeInClientList Property,
page 4-73.

4-62
Cisco Prime Access Registrar 6.1 User Guide
OL-29756-01
Chapter 4 Cisco Prime Access Registrar Server Objects
Advanced
AAAFileServiceSyncInterval Required; specified in milliseconds, the default is 75. This
property governs how often the file AAA service processes
accounting requests and writes the accounting records to
the file. You can lower the number to reduce the delay in
acknowledging the Account-Request at the expense of
more frequent flushing of the accounting file to disk. You
can raise the number to reduce the cost of flushing to disk,
at the expense of increasing the delays in acknowledging
the Accounting-Requests. The default value was
determined to provide a reasonable compromise between
the two alternatives.
SessionBackingStoreSynchronizationIn
terval
Required; specified in milliseconds, the default is 100. If
you change this value it must be a number greater than zero.
This property governs how often the Session Manager
backing store writes updated session information to disk.
You can lower the number to reduce the delay in
acknowledging requests at the expense of more frequent
flushing of the file containing the session data to disk. You
can raise the number to reduce the cost of flushing to disk
at the expense of increasing delays in acknowledging
requests. The default value was determined to provide a
reasonable compromise between the two alternatives.
BackingStoreDiscThreshold Required; the default is 10 gigabytes. The value of
BackingStoreDisc-
Threshold is made up of a number of units which can be K,
kilobyte, or kilobytes, M, megabyte, or megabytes, or G,
gigabyte, or gigabytes.
BackingStoreDiscThreshold is used with session
management and ODBC accounting and ensures that any
data log files generated will not cross the
BackingStoreDiscThreshold.
SessionBackingStorePruneInterval Required; specifies the sleep time interval of the session
backing store pruning thread. The recommended and
default value is 6 hours, but you can modify this based on
the traffic patterns you experience.
With SessionBackingStorePruneInterval set to 6 hours,
pruning will occur 6 hours after you restart or reload the
Prime Access Registrar server and recur every 6 hours.
You can set a very low value for this property to make
pruning continuous, but there might not be enough data
accumulated for the pruning to occur and pruning might be
less effective compared to the default setting.
Table 4-43 Advanced Object Properties (continued)
Property Description

4-63
Cisco Prime Access Registrar 6.1 User Guide
OL-29756-01
Chapter 4 Cisco Prime Access Registrar Server Objects
Advanced
PacketBackingStorePruneInterval Required; specifies the sleep time interval of the packet
backing store pruning thread. The recommended value is 6
hours, but you can modify this based on the traffic patterns
you experience.
When PacketBackingStorePruneInterval is set to 6 hours,
pruning will occur 6 hours after you restart or reload the
Prime Access Registrar server and recur every 6 hours.
You can set a very low value for this property to make
pruning continuous, but there might not be enough data
accumulated for the pruning to occur and pruning might be
less effective compared to the default setting.
RemoteLDAPServiceThreadTimerInter
val
Required; specified in milliseconds, the default is 10. This
property governs how often the ldap RemoteServer thread
checks to see if any results have arrived from the remote
LDAP server. You can modify it to improve the throughput
of the server when it proxies requests to a remote LDAP
server.
InitialBackgroundTimerSleepTime Required; the default is 5. This property specifies the
amount of time the time queue should initially sleep before
beginning processing. This property is only used for initial
synchronization and should not be changed.
MinimumSocketBufferSize Required; the default is 65536 (64 K). This property
governs how deep the system’s buffer size is for queueing
UDP datagrams until Cisco Prime Access Registrar can
read and process them. The default is probably sufficient
for most sites. You can, however, raise or lower it as
necessary.
CertificateDBPath Required if you are using an LDAP RemoteServer and you
want Prime Access Registrar to use SSL when
communicating with that LDAP RemoteServer. This
property specifies the path to the directory containing the
client certificates to be used when establishing an SSL
connection to an LDAP RemoteServer. This directory must
contain the cert7.db and cert5.db certificates and the
key3.db and key.db files database used by Netscape
Navigator 3.x (and above) or the ServerCert.db certificate
database used by Netscape 2.x servers.
Table 4-43 Advanced Object Properties (continued)
Property Description

4-64
Cisco Prime Access Registrar 6.1 User Guide
OL-29756-01
Chapter 4 Cisco Prime Access Registrar Server Objects
Advanced
LogFileSize Required; the default is 1 Megabyte. This property
specifies the maximum size of the RADIUS server log file.
The value for the LogFileSize field is a string composed of
two parts; a number, and a units indicator (<n> <units>) in
which the unit is one of: K, kilobyte, kilobytes, M,
megabyte, megabytes, G, gigabyte, or gigabytes.
The LogFileSize property does not apply to the
config_mcd_1_log or agent_server_1_log files. See
Modifying File Sizes for Agent Server and MCD Server
Logs, page 29-4 to configure these files.
Note This does not apply to the trace log.
LogFileCount Required; the default is 2. This property specifies the
number of log files to be kept on the system. A new log file
is created when the log file size reaches LogFileCount.
The LogFileCount property does not apply to the
config_mcd_1_log or agent_server_1_log files. See
Modifying File Sizes for Agent Server and MCD Server
Logs, page 29-4 to configure these files.
TraceFileSize Required; the default is 1 GB. This property specifies the
size of the trace files to be kept on the system. A new trace
file is created when the trace file size reaches
TraceFileSize. The value for the TraceFileSize field is a
string composed of two parts; a number, and a units
indicator (<n> <units>) in which the unit is one of: K,
kilobyte, kilobytes, M, megabyte, megabytes, G, gigabyte,
or gigabytes.
TraceFileCount Required; this value can be set from 1-100, and the default
is 2. This property specifies the number of trace files to
maintain. A value of 1 indicates that no file rolling occurs.
UseAdvancedDuplicateDetection Required; the default is FALSE. Set this property to TRUE
when you want Cisco Prime Access Registrar to use a more
robust duplicate request filtering algorithm. For more
information on this property, see Advance Duplicate
Detection Feature, page 4-74.
AdvancedDuplicateDetectionMemoryIn
terval
Required when the Advanced Duplicate Detection feature
is enabled. This property specifies how long (in
milliseconds) Cisco Prime Access Registrar should
remember a request. You must specify a number greater
than zero. The default is 10,000.
Table 4-43 Advanced Object Properties (continued)
Property Description

4-65
Cisco Prime Access Registrar 6.1 User Guide
OL-29756-01
Chapter 4 Cisco Prime Access Registrar Server Objects
Advanced
DetectOutOfOrderAccountingPackets Optional; used to detect accounting packets that arrive out
of sequential order. The default is FALSE. This property is
useful when using accounting and session management in a
RADIUS proxy service.
When the DetectOutOfOrderAccountingPacket property is
enabled (set to TRUE), a new Class attribute is included in
all outgoing Accept packets. The value for this Class
attribute will contain the session magic number. The client
will echo this value in the accounting packets, and this will
be used for comparison.
The session magic number is a unique number created for
all sessions when the session is created or reused and the
DetectOutOfOrderAccountingPacket property is set to
TRUE. The DetectOutOfOrderAccountingPacket property
is used to detect out-of-order Accounting-Stop packets in
roaming scenarios by comparing the session magic number
value in the session with the session magic number value
contained in the Accounting packet.
The value of 0xffffffff is considered by the
Prime Access Registrar server to be a wild card magic
number. If any accounting stop packets contain the value of
0xffffffff, it will pass the session magic validation even if
the session’s magic number is some thing else.
The format of the class attribute is as follows:
<4-byte Magic Prefix><4-byte server IP
address><4-byte Magic value>
DefaultReturnedSubnetSizeIfNoMatch Optional; used with the ODAP feature and reflects the
returned size of the subnet if no matched subnet is found.
There are three options to select if an exactly matched
subnet does not exist: Bigger, Smaller, and Exact. The
default is Bigger.
ClasspathForJavaExtensions A string which is the classpath to be used to locate Java
classes and jar files containing the classes required for
loading the Java extensions, either Java extension points or
services.
Note The classpath will always contain the directory
$INSTALLDIR/scripts/radius/java and all of the
jar files in that directory.
JavaVMOptions A string that can contain options to be passed to the JRE
upon startup. JavaVMOptions should be used only when
requested by Cisco TAC.
MaximumODBCResultSize Specifies maximum size in bytes for an ODBC mapping.
This parameter affects both ODBC result sizes and the trace
log buffer for tracing script calls that access any of the
dictionaries. (Default value is 256.)
Table 4-43 Advanced Object Properties (continued)
Property Description

4-66
Cisco Prime Access Registrar 6.1 User Guide
OL-29756-01
Chapter 4 Cisco Prime Access Registrar Server Objects
Advanced
ARIsCaseInsensitive When set to FALSE, requires that you provide exact
pathnames with regard to upper and lower case for all
objects, subobjects, and properties. The default setting,
TRUE, allows you to enter paths such as /rad/serv instead
of /Rad/Serv.
Note Prime Access Registrar always authenticates the
RADIUS attribute User-Name with regard to upper
and lower case, regardless of the setting of this flag.
RemoteRadiusServerInterface When set, specifies the local interface to bind to when
creating the RemoteRadiusServer socket. If not set, the
Prime Access Registrar binds to IPADDR_ANY.
ODBCEnvironmentMultiValueDelimite
r
Optional; allows you to specify a character that separates
multivalued attributes in the marker list when using Oracle
(or ODBC) accounting
PacketBackingStoreSyncInterval The minimum value is 1 and the maximum is a 32-bit
unsigned integer. The default is 75.
ListenForDynamicAuthorizationReques
ts
Must be set to TRUE when using the Change of
Authorization (CoA) feature or Packet of Disconnect
(POD) feature. Default is FALSE.
MaximumNumberOfXMLPackets Required when using identity caching. Indicates the
maximum number of XML packets to be sent or received.
The minimum value is 1 and the maximum is a 32-bit
unsigned integer. The default is 1024.
XMLUDPPacketSize Required when using identity caching. Indicates the
maximum size of XML packets to be sent or received. The
minimum value is 1 and the maximum is a 32-bit unsigned
integer. The default is 4096.
RollingEncryptionKeyChangePeriod Used in conjunction with the session-cache
ResourceManager, this property specifies the length of time
a given EncryptionKey will be used before a new one is
created. When the session-cache ResourceManager caches
User-Password attributes, Prime Access Registrar encrypts
the User-Password so it is not stored in memory or persisted
on disk in clear text. Prime Access Registrar uses up to 255
encryption keys, using a new one after each
RollingEncryptionKeyChangePeriod expires. If
RollingEncryptionKeyChangePeriod is set to 2 days,
Prime Access Registrar will create and begin using a new
EncryptionKey every two days. The oldest key will be
retired, and Prime Access Registrar will re-encrypt any
User-Passwords that used the old key with the new key.
This way, if the RollingEncryptionKeyChangePeriod is set
to 1 day, no key will be older than 255 days.
Table 4-43 Advanced Object Properties (continued)
Property Description

4-67
Cisco Prime Access Registrar 6.1 User Guide
OL-29756-01
Chapter 4 Cisco Prime Access Registrar Server Objects
Advanced
SessionPurgeInterval Optional; the SessionPurgeInterval property determines the
time interval at which to check for timed-out sessions. If no
value is set, the session timeout feature is disabled. The
checks are performed in the background when system
resources are available, so checks might not always occur
at the exact time set.
The minimum recommended value for
SessionPurgeInterval is 60 minutes. The
SessionPurgeInterval value is comprised of a number and a
units indicator, as in n units, where a unit is one of minutes,
hours, days, or weeks.
EapBadMessagePolicy Set to one of two values: SilentDiscard (the default) or
RejectFailure.
When set to SilentDiscard, the Prime Access Registrar
server silently discards and ignores bad EAP messages
unless the protocol specification explicitly requires a
failure message.
When set to RejectFailure, the Prime Access Registrar
server sends RADIUS Access-Rejects messages with
embedded EAP-Failure in response to bad EAP messages
as described in Internet RFC 3579.
StaleSessionTimeout Required; the default value is “1 hour.” Specifies the time
interval to maintain a session when a client does not
respond to Accounting-Stop notification.
When the Prime Access Registrar server does not receive
an Accounting-Response from a client after sending an
Accounting-Stop packet, Prime Access Registrar
maintains the session for the time interval configured in
this property before releasing the session.
This property is stored as a string composed of two parts: a
number and a unit indicator (<n> <units>) similar to the
MaxFileAge property where the unit is one of: M, Minute,
Minutes, H, Hour, Hours, D, Day, Days, W, Week, or
Weeks.
Ports Optional; allows you to use ports other than the default,
1645 and 1646. You can use this option to configure
Prime Access Registrar to use other ports,. If you add
additional ports, however, Prime Access Registrar will use
the added ports and no longer use ports 1645 and 1646.
These ports can still be used by adding them to the list of
ports to use. For more information, see Ports, page 4-75.
Interfaces Optional; see Interfaces, page 4-75
ReplyMessages Optional; see Reply Messages, page 4-75.
AttributeDictionary Optional; see Attribute Dictionary, page 4-77.
SNMP Optional; see SNMP, page 4-78.
Table 4-43 Advanced Object Properties (continued)
Property Description

4-68
Cisco Prime Access Registrar 6.1 User Guide
OL-29756-01
Chapter 4 Cisco Prime Access Registrar Server Objects
Advanced
RFC Compliance Optional; enables you to modify the
Prime Access Registrar server to behave in a way that
might deviate from RFC compliance in a special use case
scenario.
When AllowRejectAttrs is set to FALSE, Reply-Message
attributes will not be passed in an Access Reject packet.
When AllowRejectAttrs is set to TRUE, attributes will be
allowed to pass in an Access Reject packet.
When AllowEAPRejectAttrs is set to FALSE,
Reply-Message attributes will not be passed in an Access
Reject packet if the packet contains EAP-Message
attribute. When AllowEAPRejectAttrs is set to TRUE,
attributes will be allowed to pass in an Access Reject packet
even if the packet contains EAP-Message attribute.
Note Changing the state of either of these properties
requires you to reload the Prime Access Registrar
server.
DDNS This subdirectory holds the SynthesizeReverseZone
property and a list of Transaction Signatures (TSIG) keys.
SynthesizeReverseZone This property exists under DDNS and controls whether
Prime Access Registrar automatically generates the name
of the reverse zone (in-addr.arpa) that is updated with PTR
records. If this attribute is enabled and the resource
manager does not have an explicit ReverseZoneName
property configured, the server uses the IP address and
DNSHostBytes property to generate the reverse zone name.
The default value is TRUE.
ODBCDataSources A list of ODBC data sets and their associated environments
including operating system, DBMS, and network platform
used to access the DBMS an application wants to access.
Required when using Oracle (or ODBC) accounting.
AttributeGroups Includes a Default subdirectory with an Attributes
subdirectory that contains commonly-used attributes for
Change of Authorization (CoA) and Packet of Disconnect
(POD). You can add new attributes to the default group or
create a new group as necessary.
KeyStores Used to protect the security and integrity of the PACs it
issues.
•NumberOfKeys—Number (from 1-1024) that specifies
the maximum number of keys stored for EAP-FAST.
•RolloverPeriod—Specifies the amount of time
between key updates.
Table 4-43 Advanced Object Properties (continued)
Property Description

4-69
Cisco Prime Access Registrar 6.1 User Guide
OL-29756-01
Chapter 4 Cisco Prime Access Registrar Server Objects
Advanced
NumberOfRemoteUDPServerSockets Required; the default value for this property is 4.
The NumberOfRemoteUDPServerSockets property allows
you to configure the number of source ports used while
proxying requests to a remote radius server. If the
NumberOfRemoteUDPServerSockets property is set to a
value n, all remote servers share and use n sockets.
The NumberOfRemoteUDPServerSockets value comprises
a number, as in n, where n should be less than or equal to
the current process file descriptor limit divided by 4.
Note By default, the RADIUS process supports up to
1024 file descriptors. To increase the file
descriptors, stop the arserver; in the arserver script,
specify the required value to
"NUMBER_OF_FILE_DESCRIPTORS" and
restart the server. The value for
"NUMBER_OF_FILE_DESCRIPTORS" should
be in the range between 1024 to 65535.
NumberofRadiusIdentifiersPerSocket This represents the number of RADIUS Identifiers that
Prime Access Registrar can use per source port, while
proxying requests to remote servers.
To use a different source port for every request that is
proxied, you need to set the value of this property to one.
MaximumIncomingRequestRate Optional; the default value for this property is 0.
The MaximumIncomingRequestRate property is used to
limit the incoming traffic in terms of “allowed requests per
second”. Serves as a soft limit.
The MaximumIncomingRequestRate property comprises a
number n, where n can be any nonzero value.
Table 4-43 Advanced Object Properties (continued)
Property Description

4-70
Cisco Prime Access Registrar 6.1 User Guide
OL-29756-01
Chapter 4 Cisco Prime Access Registrar Server Objects
Advanced
HideSharedSecretAndPrivateKeys Required; the default value is TRUE.
The HideSharedSecretAndPrivateKeys property hides:
•The secret that is shared between a RADIUS Client and
a RADIUS Server or between two radius servers in a
radius proxy scenario.
•The PrivateKeyPassword under the certificate-based
EAP services.
When this property is set to TRUE, the following properties
are displayed as <encrypted>:
•PrivateKeyPasswords in:
–
peap-v0 service
–
peap-v1 service
–
eap-tls service
–
eap-ttls service
–
eap-fast service
•SharedSecret in:
–
RemoteServers of type radius
–
RemoteServers of type map-gateway
–
Clients object
–
Resource Manager of type usr-vpn under Gateway
subobject
•PseudonymSecret in eap-sim service
•DynamicAuthSecret under
DynamicAuthorizationServer subbject in Clients
object
•RepSecret under Replication
•Secret in /radius/advanced/DDNS/TSIGKeys
When the value for this property is set to FALSE, all the
above properties are displayed in clear text.
MaximumOutstandingRequests Optional; the default value for this property is 0.
The MaximumOutstandingRequests property is used to
limit the incoming traffic in terms of “requests processed”.
Serves as a hard limit.
The MaximumOutstandingRequests property comprises a
number n, where n can be any nonzero value.
Diameter Required; See Diameter, page 4-79
Table 4-43 Advanced Object Properties (continued)
Property Description

4-71
Cisco Prime Access Registrar 6.1 User Guide
OL-29756-01
Chapter 4 Cisco Prime Access Registrar Server Objects
Advanced
TPSSamplingPeriodInSecs This represents the sampling period in seconds. The
minimum sampling period is set to 5. The default is 30.
LogTPSActivity When set to true this property enables to log in the TPS
usage in a CSV file.The TPS is logged in the following
format:
<mm-dd-yyyy>, <hh:mm:ss>, <tps-value>,
<sigtran-m3ua traffic value>
For example,
04-24-2014,18:36:30,2998,1000
The default is False.
TPSLogFilenamePrefix This represents the prefix of the CSV file which will be
available in the logs directory of Prime Access Registrar.
The following represents the CSV filename format:
<user-prefix>-<mm-dd-yyyy>.csv
tps-04-01-2013.csv
TPSLogFileCount Configures the number of TPS Sampling log files to be
maintained in the repository. The default value is 2.
AdditionalNativeOracleErrors Optional; used to disconnect ODBC Remote Servers when
configured native Oracle Error has occurred (which are not
considered as connection errors). You must specify Native
Errors as comma (,) separated integer values.
For example,
04/14/2013 11:06:43.692: Log: ODBC client (DataSource
'CVOracleAcctDb', Connection 6): SQLExecute failed:
SQLState:HY000 NativeError:12152
ErrorText:[Easysoft][Oracle]ORA-12152: TNS:unable to
send break message
04/14/2013 10:44:59.388: Log: ODBC client (DataSource
'CVOracleAcctDb', Connection 3): SQLExecute failed:
SQLState:HY000 NativeError:3114
ErrorText:[Easysoft][Oracle]ORA-03114: not connected to
ORACLE
For the above examples, the Native Errors need to be
configured as follows:
--> set AdditionalNativeOracleErrors 12152,3114
When any one of the Native Errors 12152 or 3114 occurs,
Prime Access Registrar disconnects the ODBC Remote
Server.
Table 4-43 Advanced Object Properties (continued)
Property Description

4-72
Cisco Prime Access Registrar 6.1 User Guide
OL-29756-01
Chapter 4 Cisco Prime Access Registrar Server Objects
Advanced
This section contains the following topics:
•RemoteODBCSessionServer
•Using the RequireNASsBehindProxyBeInClientList Property
•Advance Duplicate Detection Feature
•Invalid EAP Packet Processing
•Ports
•Interfaces
•Reply Messages
•Attribute Dictionary
•SNMP
•Diameter
RemoteODBCSessionServer
The following is an example of theRemoteODBCSessionServer configuration:
--> cd /Radius/Advanced/RemoteODBCSessionServer/
[ //localhost/Radius/Advanced/RemoteODBCSessionServer ]
ReactivateTimerInterval = 300000
Timeout = 15
DataSourceConnections = 8
ODBCDataSource =
KeepAliveTimerInterval = 0
BufferAccountingPackets = TRUE
MaximumBufferFileSize = "10 Megabytes"
CacheLimit = 250000
UseCacheIndex = 0
Table 4-44 lists and defines the RemoteODBCSessionServer properties.
Table 4-44 RemoteODBCSesionServer Properties
Property Description
ReactivateTimerInterval Mandatory time interval (in milliseconds) to activate an inactive
server; defaults to 300000 ms
Timeout Mandatory time interval (in seconds) to wait for SQL operation to
complete; defaults to 15 seconds
DataSourceConnections Mandatory number of connections to be established; defaults to 8
ODBCDataSource Name of the ODBCDataSource to use and must refer to one entry in
the list of ODBC datasources configured under
/Radius/Advanced/ODBCDataSources. Mandatory; no default
KeepAliveTimerInterval Mandatory time interval (in milliseconds) to send a keepalive to keep
the idle connection active; defaults to zero (0) meaning the option is
disabled

4-73
Cisco Prime Access Registrar 6.1 User Guide
OL-29756-01
Chapter 4 Cisco Prime Access Registrar Server Objects
Advanced
Note Remote session manager will work only with Oracle database.
Using the RequireNASsBehindProxyBeInClientList Property
You can use the property RequireNASsBehindProxyBeInClientList to require NASs that send requests
indirectly through a proxy to be listed in the Clients list or to allow the proxy to represent them all.
•When you want to ensure the proxy is only sending requests from NASs known to this server, set
the property to TRUE, and list all of the NASs using this proxy. This increases memory usage.
•When it is impossible to know all of the NASs using this proxy or when you do not care, set the
property to FALSE. Cisco Prime Access Registrar will use the proxy’s IP address to identify the
origin of the request.
BufferAccountingPackets Mandatory, TRUE or FALSE, determines whether to buffer the
accounting packets to local file, defaults to TRUE which means that
packet buffering is enabled.
Note When set to TRUE, a constant flow of incoming accounting
packets can fill the buffer backing store files in
/cisco-ar/data/odbc beyond the size configured in
MaximumBufferFileSize. Configure
BackingStoreDiscThreshold in /Radius/Advanced when
using ODBC accounting. See Advanced, page 4-60 for
information about how to configure
BackingStoreDiscThreshold.
MaximumBufferFileSize Mandatory if BufferAccountingPackets is set to TRUE, determines the
maximum buffer file size, defaults to 10 Megabyte)
CacheLimit Default is 250000; This represents the overall limit on cache of all
'remote' session managers. This value is interpreted as the maximum
number of packets that can be present in cache. When the number of
sessions hits this limit, sessions will be 'cached out'. This cache out
operation will continue, until the cache is at least 20% free.
UseCacheIndex If set to 1, it enables a fast cache based lookup index for the items in
the database. This optimizes the number of queries to the database
hence will improve performance, but limits the number of sessions that
can be scaled.
If set to 0, it disables fast cache based lookup index.
Table 4-44 RemoteODBCSesionServer Properties (continued)
Property Description

4-74
Cisco Prime Access Registrar 6.1 User Guide
OL-29756-01
Chapter 4 Cisco Prime Access Registrar Server Objects
Advanced
Advance Duplicate Detection Feature
Prime Access Registrar automatically detects and handles duplicate requests it is currently working on.
It also provides an optional, more complex mechanism to handle duplicate requests that can be received
by the server after it has completed processing the original request. These duplicate requests can
consume extra processing power, and, if received out of order (as RADIUS is a UDP-based protocol)
might cause Session Management problems.
One solution is the Advanced Duplicate Detection feature which causes Prime Access Registrar to
remember requests it has seen, as well as the response sent to that request, for a configurable amount of
time.
To enable this feature, perform the following:
•Set the UseAdvancedDuplicateDetection property in the /Radius/Advanced section of the
configuration to TRUE.
•Set the AdvancedDuplicateDetectionMemoryInterval in the /Radius/Advanced section to
specify how long (in milliseconds) Prime Access Registrar should remember a request.
Note Enabling this feature causes Cisco Prime Access Registrar to keep more of its preallocated packet
buffers in use for a longer period of time. The number of preallocated buffers is controlled by the
MaximumNumberOfRadiusPackets property in the /Radius/Advanced section of the configuration.
This property might need to be increased (which will increase the amount of memory used by
Cisco Prime Access Registrar) when the Advanced Duplicate Detection feature is enabled.
Invalid EAP Packet Processing
Prime Access Registrar has been enhanced to implement fatal error packet handling for Extensible
Authentication Protocol (EAP) messages as described in section 2.2 of Internet RFC 3579 which states
the following:
A RADIUS server determining that a fatal error has occurred must send an Access-Reject containing
an EAP-Message attribute encapsulating EAP-Failure.
Because this enhancement is a deviation from various EAP specifications, you must explicitly enable
this feature through a new configuration property in /Radius/Advanced named EapBadMessagePolicy.
You can set the EapBadMessagePolicy property to one of two values: SilentDiscard (the default) or
RejectFailure. When set to SilentDiscard, the Prime Access Registrar server silently discards and
ignores bad EAP messages unless the protocol specification explicitly requires a failure message. When
set to RejectFailure, the Prime Access Registrar server sends RADIUS Access-Rejects messages with
embedded EAP-Failure in response to bad EAP messages as described in Internet RFC 3579.
The implementation of EAP authentication methods in Prime Access Registrar behaves as described in
Internet RFC 2284 (EAP) and related EAP method specifications. These specify silent discard as the
standard way to handle all EAP error conditions. Any EAP response message from the client that
contains an error or is received in an invalid authenticator state is discarded and there is no error
response.
In a configuration where EAP requests are proxied between RADIUS servers using RADIUS messages
(EAP over RADIUS), the silent discard of an EAP message means that no RADIUS response message
is sent back to the originating RADIUS server. Because of this, the RADIUS server originating the
request eventually declares the destination RADIUS server dead and fails over to a backup server (if so
configured).

4-75
Cisco Prime Access Registrar 6.1 User Guide
OL-29756-01
Chapter 4 Cisco Prime Access Registrar Server Objects
Advanced
Ports
The Ports list specifies which ports to listen to for requests. When you specify a port,
Cisco Prime Access Registrar makes no distinction between the port used to receive Access-Requests
and the port used to receive Accounting-Requests. Either request can come in on either port.
Most NASs send Access-Requests to port 1645 and Accounting-Requests to 1646, however,
Cisco Prime Access Registrar does not check.
When you do not specify any ports, Cisco Prime Access Registrar reads the /etc/services file for the
ports to use for access and accounting requests. If none are defined, Prime Access Registrar uses the
standard ports (1645 and 1646).
Interfaces
The Interfaces list specifies the interfaces on which the RADIUS server receives and sends requests. You
specify an interface by its IP address.
•When you list an IP address, Cisco Prime Access Registrar uses that interface to send and receive
Access-Requests.
•When no interfaces are listed, the server performs an interface discover and uses all interfaces of the
server, physical and logical (virtual).
Note The IP address format is enhanced to support both IPv4 and IPv6.
Reply Messages
The Reply Messages list allows you to choose the reply message based on the reason the request was
rejected. Each of the following properties (except Default) corresponds to a reason why the packet was
rejected. The Reply Message properties allows you to substitute your own text string for the defined
errors. After you set the property (with the set command) and the reason occurs,
Cisco Prime Access Registrar sends the NAS that message in the Access-Reject packet as a
Reply-Message attribute.
You might want to substitute your own messages to prevent users from getting too much information
about why their requests failed. For example, you might not want users to know the password was invalid
to prevent hackers from accessing your system. In such a case, you might specify the text string
“unauthorized access” for the property UserPasswordInvalid.
Table 4-45 lists the Reply Message properties.

4-76
Cisco Prime Access Registrar 6.1 User Guide
OL-29756-01
Chapter 4 Cisco Prime Access Registrar Server Objects
Advanced
Table 4-45 Reply Message Properties
Property Description
Default Optional; when you set this property, Cisco Prime Access Registrar
sends this value when the property corresponding to the reject reason
is not set.
UnknownUser Optional; when you set this property, Cisco Prime Access Registrar
sends back this value in the Reply-Message attribute whenever
Cisco Prime Access Registrar cannot find the user specified by
User-Name.
UserNotEnabled Optional; when you set this property, Cisco Prime Access Registrar
sends back this value in the Reply-Message attribute whenever the
user account is disabled.
UserPasswordInvalid Optional; when you set this property, Cisco Prime Access Registrar
sends back this value in the Reply-Message attribute whenever the
password in the Access-Request packet did not match the password in
the database.
UnableToAcquireResource Optional; when you set this property, Cisco Prime Access Registrar
sends back this value in the Reply-Message attribute whenever one of
the Resource Managers was unable to allocate the resource for this
request.
ServiceUnavailable Optional; when you set this property, Cisco Prime Access Registrar
sends back this value in the Reply-Message attribute whenever a
service the request needs (such as a RemoteServer) is unavailable.
InternalError Optional; when you set this property, Cisco Prime Access Registrar
sends back this value in the Reply-Message attribute whenever an
internal error caused the request to be rejected.
MalformedRequest Optional; when you set this property, Cisco Prime Access Registrar
sends back this value in the Reply-Message attribute whenever a
required attribute (such as User-Name) is missing from the request.
ConfigurationError Optional; when you set this property, Cisco Prime Access Registrar
sends back this value in the Reply-Message attribute whenever the
request is rejected due to a configuration error. For example, if a script
sets an environment variable to the name of an object such as
Authentication-Service, and that object does not exist in the
configuration, the reason reported is ConfigurationError.
IncomingScriptFailed Optional; when you set this property, Cisco Prime Access Registrar
sends back this value in the Reply-Message attribute whenever one of
the IncomingScripts fails to execute.
OutgoingScriptFailed Optional; when you set this property, Cisco Prime Access Registrar
sends back this value in the Reply-Message attribute whenever one of
the OutgoingScripts fails to execute.
IncomingScriptRejectedRequ
est
Optional; when you set this property, Cisco Prime Access Registrar
sends back this value in the Reply-Message attribute whenever one of
the IncomingScripts rejects the Access-Request.

4-77
Cisco Prime Access Registrar 6.1 User Guide
OL-29756-01
Chapter 4 Cisco Prime Access Registrar Server Objects
Advanced
Attribute Dictionary
The Attribute dictionary allows you to specify the attributes to the RADIUS server.
Cisco Prime Access Registrar comes with the standard RADIUS attributes (as defined by the RFC 2865)
as well as the attributes required to support the major NASs. For more information about the standard
attributes, see Appendix C, “RADIUS Attributes.”
All RADIUS requests and responses consist of one or more attributes, such as the user’s name, the user’s
password, the type of service the NAS should provide to the user, or the IP address the user should use
for the session.
In the request and response packets, an attribute is composed of a number (between 1-255) that specifies
the type of attribute to use, a length that specifies the entire attribute length, and a value. How the value
is interpreted depends on its type. When it is a username, the value is a string. When it is the NAS’s IP
address, the value is an IP address, and so on.
Table 4-46 lists the Attribute dictionary properties.
Types
Types are required and must be one of the following listed in Table 4-47.
OutgoingScriptRejectedRequ
est
Optional; when you set this property, Cisco Prime Access Registrar
sends back this value in the Reply-Message attribute whenever one of
the OutgoingScripts rejects the Access-Request.
TerminationAction Optional; when you set this property, Cisco Prime Access Registrar
sends back this value in the Reply-Message attribute whenever
Cisco Prime Access Registrar processes the Access-Request as a
Termination-Action and is being rejected as a safety precaution.
Table 4-45 Reply Message Properties (continued)
Property Description
Table 4-46 Attribute Dictionary Properties
Property Description
Name Required; must be unique in the Attribute dictionary list within the same context.
Although it should be an attribute defined in the RFC, the name can be any attribute
defined by your client. The NAS typically comes with a list of attributes it uses.
Attributes are referenced in the Profile and by Scripts by this name. The accounting
file service also uses this name when printing the attribute.
Description Optional description of the attribute.
Attribute Required; must be a number between 1-255. It must be unique within the Attribute
dictionary list.
Type Required; must be set to one of the types listed in Table 4-47. The type governs how
the value is interpreted and printed.

4-78
Cisco Prime Access Registrar 6.1 User Guide
OL-29756-01
Chapter 4 Cisco Prime Access Registrar Server Objects
Advanced
Vendor Attributes
Table 4-48 lists the Vendor properties.
SNMP
Table 4-49 lists the five properties of the SNMP directory.
Table 4-47 Types Attributes
Property Description
UNDEFINED Treated as a sting of binary bytes.
UINT32 Unsigned 32-bit integer.
STRING Character string.
IPADDR A valid IP address in dotted-decimal format.
CHAP_PASS
WORD
17-byte value representing the password.
ENUM Enums allow you to specify the mapping between the value and the strings. After you
have established this mapping, Cisco Prime Access Registrar then replaces the
number with the appropriate string. The min/max properties represent the lowest to
highest values of the enumeration.
VENDOR_SP
ECIFIC
Vendor Specific Attribute (VSAs) are a special class of attribute. VSAs were created
to extend the standard 256 attributes to include attributes required by specific
manufacturers. VSAs add new capabilities for the value field in an attribute. Rather
than being a simple integer string, or IP address, the value of a VSA can be one or
more subattributes whose meaning depends on the vendor’s definition. The Vendors
list allows you to add, delete, or modify the definitions of the vendors and the
subattributes they specify.
Table 4-48 Vendor Properties
Property Description
Name Required; must be unique in the Vendors attribute list.
Description Optional; description of the subattribute list.
VendorID Required; must be a valid number and unique within the entire attribute
dictionary.
Type Required; must be one of the following: UNDEFINED, UINT32, STRING,
IPADDR, CHAP_PASSWORD, ENUM, or SUB_ATTRIBUTES.
Table 4-49 SNMP Properties
Property Description
Enabled Either TRUE or FALSE; default is FALSE
TracingEnabled Either TRUE or FALSE; default is FALSE
InputQueueHighThreshold An integer; default is 90

4-79
Cisco Prime Access Registrar 6.1 User Guide
OL-29756-01
Chapter 4 Cisco Prime Access Registrar Server Objects
Advanced
If Enabled and MasterAgentEnabled are both TRUE, arservagt will start and stop the SNMP daemon
(snmpd). If either of these properties is FALSE, if the Prime Access Registrar server is not using SNMP
or if your site uses a different master agent, arservagt will not start your master agent.
Diameter
This section explains how to configure Diameter general configuration and transport management.
Change the directory to /Radius/Advanced/Diameter.
//localhost/Radius/Advanced/Diameter
General/
TransportManagement/
The following configuration is used to configure Diameter general configuration like Product name and
Vers i o n .
[ //localhost/Radius/Advanced/Diameter/General ]
Product = Cisco Prime Access Registrar
Version = 6.1
AuthApplicationIdList = 1
AcctApplicationIdList = 3
Table 4-50 describes the Diameter general properties.
InputQueueLowThreshold An integer; default is 60
MasterAgentEnabled Either TRUE or FALSE; default is TRUE
Table 4-49 SNMP Properties (continued)
Property Description
Table 4-50 Diameter General Properties
Property Description
Product Optional; name of the product.
Version Optional; version number.

4-80
Cisco Prime Access Registrar 6.1 User Guide
OL-29756-01
Chapter 4 Cisco Prime Access Registrar Server Objects
Advanced
Configuring Diameter Transport Management Properties
The following example shows the Diameter transport management configuration:
[ //localhost/Radius/Advanced/Diameter/TransportManagement ]
Identity = toby-ar1.cisco.com
Realm = cisco.com
TCPListenPort = 3868
SCTPListenPort = 3868
EnableIPV6 = FALSE
WatchdogTimeout = 500
ReconnectInterval = 500
MaxReconnections = 3
RequestRetransmissionInterval = 100
MaxRequestRetransmissionCount = 3
ReceiveBufferSize = 2048
AdvertisedHostNames = toby-ar1.cisco.com
AuthApplicationIdList Specifies the list of AuthApplications that the Prime Access Registrar
server registers to Diameter Base stack during start up. It is a
combination of Auth ApplicationId's separated by a colon.
For example:
For Registering NASREQApplication,
--> set AuthApplicationIdList 1
For Registering applications with id's 1 and 5,
--> set AuthApplicationIdList 1:5
Note T h e A u t h A p p l i c a t i o n I d s t h a t a r e c o n f i g u r e d s h o u l d b e p r e s e n t i n
/Radius/Advanced/Diameter/Applications section.
AcctApplicationIdList Specifies the list of AcctApplications that the Prime Access Registrar
server registers to Diameter Base stack during start up. It is a
combination of Acct ApplicationId's separated by a colon.
For example:
For Registering BaseAccountingApplication,
--> set AcctApplicationIdList 3
Note T h e A c c t A p p l i c a t i o n I d ' s t h a t a r e c o n f i g u r e d s h o u l d b e p r e s e n t i n
/Radius/Advanced/Diameter/Applications section.
Table 4-50 Diameter General Properties (continued)
Property Description

4-81
Cisco Prime Access Registrar 6.1 User Guide
OL-29756-01
Chapter 4 Cisco Prime Access Registrar Server Objects
Advanced
Table 4-51 describes the Diameter transport management properties.
Table 4-51 Diameter Transport Management Properties
Property Description
Identity Required; identity of the system on which Diameter application
is running. Must be set to a valid resolvable string.
Realm Required; must be set to a valid Realm in the domain.
TCPListenPort Required; port number on which Prime Access Registrar server
listens for TCP peer connections.
SCTPListenPort Required; port number on which Prime Access Registrar server
listens for SCTP peer connections.
EnableIPv6 Required; if set to TRUE it enables IPV6 for the Diameter
application.
WatchdogTimeout Required; specifies the time interval between watch dog
messages.
ReconnectInterval Required; specifies the time interval between which
Prime Access Registrar server attempts to connect to a
disconnected peer. If set to 0, then no attempt will be made to
connect to a disconnected peer.
MaxReconnections Required; specifies the number of times Prime Access Registrar
server tries to Make a reconnection attempt. If set to 0, then no
attempt will be made to reconnect.
RequestRetransmissionInterval Required; the time for which retransmission of pending requests
will be done. If set to 0, then no attempt will be made to
retransmit.
MaxRequestRetransmissionCount Required, maximum number of times Prime Access Registrar
server tries to retransmit a pending request. If set to 0, then no
attempt will be made to retransmit.
ReceiveBufferSize Required; initial size of buffer that is preallocated for message
reception.
AdvertisedHostNames Optional; specifies the local hostname address that will be
advertised by the Prime Access Registrar server to other peers
during CER/CEA exchange.
For example:
AdvertisedHostNames = toby-ar1.cisco.com

4-82
Cisco Prime Access Registrar 6.1 User Guide
OL-29756-01
Chapter 4 Cisco Prime Access Registrar Server Objects
Advanced
Configuring Diameter Session Management
The following example shows the Diameter session management configuration:
//localhost/Radius/Advanced/Diameter/SessionManagement ]
MaxSessions = 10000
AuthSessions/
AcctSessions/
AuthSessions/
EnableStatefulSessions = TRUE
AuthSessionTimeout = 5
LifeTimeTimeout = 360
GracePeriodTimeout = 30
AbortRetryTimeout = 20
AcctSessions/
AcctSessionTimeOut = 30
InterimInterval = 5
RealTime = 0
Table 4-52 describes the Diameter Session Management properties.
Table 4-52 Diameter Session Management Properties
Property Description
MaxSessions Required; specifies the maximum number of concurrent Diameter
sessions Prime Access Registrar server will maintain. These sessions
include both Auth and Acct sessions.
AuthSessions/EnableState
fulSessions
If set to TRUE, the server will enforce stateful sessions and the client will
hint for stateful sessions. Default Value is TRUE. Set the property to
FALSE to disable stateful sessions.
AuthSessionTimeout Required; specifies the timeout in seconds before a session requires
reauthentication.
LifeTimeTimeout Required; specifies the timeout in seconds before a session is terminated
regardless of whether the session has been reauthenticated.
GracePeriodTimeout Required; specifies the grace period after the life timeout and before the
full termination of the session.
AbortRetryTimeout Required; specifies the timeout between the subsequent Abort Session
Request (ASR) messages if the initial attempt fails.
AcctSessions/AcctSession
TimeOut
Required; specifies the timeout in seconds before a session requires
reauthentication.
InterimInterval Required; specifies the interim interval dictated to the client if the entity
is a server or hint to the server if the entity is a client.
RealTime Required; RealTime value dictated to the client.

4-83
Cisco Prime Access Registrar 6.1 User Guide
OL-29756-01
Chapter 4 Cisco Prime Access Registrar Server Objects
Advanced
Configuring Diameter Application
Table 4-53 describes the Diameter Application properties.
Configuring the Diameter Application
To configure the Diameter application:
Step 1 Move to //localhost/Radius/Advanced/Diameter/Applications directory:
Step 2 Add the application you want to add ( eg: NASREQ ).
add NASREQ
Added NASREQ
Table 4-53 Diameter Application Properties
Property Description
Name Required; name of the application.
Description Optional; description of the application.
IsVendorSpecific Required; the default is FALSE. If set to FALSE, the application is
ordinary application. If set to TRUE, the application is a VendorSpecific
Application.
IsAuthApplication Required; if set to TRUE the application represents AuthApplication else
it represents Accounting Application.
Application ID Required; specifies the unique integer value for the application.
The following are examples of Diameter application:
NASREQ 1
Mobile-IP 2
Diameter Base Accounting 3
Note ApplicationId property must be set to 0 for Base Protocol.
VendorSpecificApplicatio
nID
Required; specifies the integer value for the vendor specific application.
VendorID Required; specifies the VendorID for the application.
Example:
DIAMETER 3GPP Cx APPLICATION
VendorSpecificApplicationID 16777216
VendorID 10415
ApplicationURI Optional; specifies the URI of the Application.
Eg: "ftp://ftp.ietf.org/internet-drafts/draft-ietf-aaa-diameter-nasreq-
12.txt"
Commands Required; an indexed list from 1 to <n>. Each entry in the list is the name
of the command. It specifies the list of commands associated with the
application.

4-84
Cisco Prime Access Registrar 6.1 User Guide
OL-29756-01
Chapter 4 Cisco Prime Access Registrar Server Objects
Advanced
cd NASREQ
[ //localhost/Radius/Advanced/Diameter/Applications/NASREQ ]
Name = NASREQ
Description =
IsAuthApplication = TRUE
IsVendorSpecific = FALSE
ApplicationID =
ApplicationURI =
Commands/
Step 3 Set the ApplicationId and ApplicationURI .
set ApplicationId 1
Set ApplicationId 1
set ApplicationURL "ftp://ftp.ietf.org/internet-drafts/draft-ietf-aaa-diameter-nasreq-12.txt"
Step 4 Add the list of commands for this application.
cd commands/
Set 1 AA
Configuring Diameter Commands
Table 4-54 describes the Diameter command properties.
Table 4-54 Diameter Command Properties
Property Description
Name Required; name of the command.
CommandCode Required; specifies the integer code of the command.
EnableProxyBit Required; default is TRUE. When enabled it represents the message is
proxiable.

4-85
Cisco Prime Access Registrar 6.1 User Guide
OL-29756-01
Chapter 4 Cisco Prime Access Registrar Server Objects
Advanced
Configuring the Diameter Commands
To configure the Diameter commands:
Step 1 Change to /Radius/Advanced/Diameter/Commands.
Step 2 Add AA command.
add AA
[ //localhost/Radius/Advanced/Diameter/Commands ]
cd AA/
cd AA/
RequestMsgAVPs / The RequestMsgAVPs define the placement of AVPs within the request
command. This contains three sub directories: Fixed, Required and
Optional.
Fixed - Defines the fixed position of AVP in a request message
Required - The AVP must be present and can appear anywhere in the
request message.
Optional - The AVP name in optional cannot evaluate to any avp name
which is included in a fixed or required directory. The avp can appear
anywhere in the request message.
For example:
cd Fixed/
Add Session-Id
cd Session-Id/
Name = Session-Id
Description =
Min = 0
Max = 1
where:
Min is the minimum number of times AVP element may be present in a
request. The default value is 0.
Max is the maximum number of times the element may present in a
request. A value of zero implies AVP is not present in the request.
AnswerMsgAVPs/ The AnswerMsgAVPs define the placement of AVP's within the answer
command. This contains three sub directories: Fixed, Required and
Optional.
Fixed - Defines the fixed position of AVP in the answer message.
Required - The AVP must present and can appear anywhere in the
answer message.
Optional - The AVP name in optional cannot evaluate to any avp name
which is included in a fixed or required directory. The avp can appear
anywhere in the answer message.
Table 4-54 Diameter Command Properties (continued)
Property Description

4-86
Cisco Prime Access Registrar 6.1 User Guide
OL-29756-01
Chapter 4 Cisco Prime Access Registrar Server Objects
Advanced
Step 3 Set the properties for AA command.
[ //localhost/Radius/Advanced/Diameter/Commands/AA ]
Name = AA
Description =
CommandCode =
EnableProxyBit = TRUE
RequestMsgAVPs/
AnswerMsgAVPs/
set CommandCode 265
Set CommandCode 265
set EnableProxyBit TRUE
Set EnableProxyBit TRUE
Step 4 Configure the RequestMsgAVP's for the command.
cd RequestMsgAVPs/
[ //localhost/Radius/Advanced/Diameter/Commands/AA/RequestMsgAVPs ]
Fixed/
Required/
Optional/
Add Fixed AVP's for the request message.
Add Fixed AVP's
cd Fixed/
add Session-Id
Added Session-Id
cd Session-Id/
[ //localhost/Radius/Advanced/Diameter/Commands/AA/RequestMsgAVPs/Fixed/Session-Id ]
Name = Session-Id
Description =
Min = 0
Max =
Maximum and Minimum property specifies the multiplicity of the AVP Inside a request (or response).
Similarly add the required and Optional AVP's.
Step 5 Configure AnswerMsgAVP's similar to step 3.
cd AnswerMsgAVPs/
[ //localhost/Radius/Advanced/Diameter/Commands/AA/AnswerMsgAVPs ]
Fixed/
Required/
Optional/

4-87
Cisco Prime Access Registrar 6.1 User Guide
OL-29756-01
Chapter 4 Cisco Prime Access Registrar Server Objects
Advanced
The following shows an example of NASREQ application configuration:
[ //localhost/Radius/Advanced/Diameter/Applications/NASREQ ]
Name = NASREQ
Description =
IsAuthApplication = TRUE
IsVendorSpecific = FALSE
ApplicationID = 1
ApplicationURI =
ftp://ftp.ietf.org/internet-drafts/draft-ietf-aaa-diameter-nasreq-12.txt
Commands/
1. AA
The following shows an example of the AA command configuration:
[ //localhost/Radius/Advanced/Diameter/Commands ]
Entries 1 to 1 from 1 total entries
Current filter: <all>
[ //localhost/Radius/Advanced/Diameter/Commands/AA ]
Name = AA
Description =
CommandCode = 265
EnableProxyBit = TRUE
RequestMsgAVPs/
Fixed/
Entries 1 to 1 from 1 total entries
Current filter: <all>
Session-Id/
Name = Session-Id
Description =
Min = 1
Max = 1
Required/
Entries 1 to 7 from 7 total entries
Current filter: <all>
Auth-Application-Id/
Name = Auth-Application-Id
Description =
Min = 1
Max = 1
Auth-Request-Type/
Name = Auth-Request-Type
Description =
Min = 1
Max = 1
Destination-Realm/
Name = Destination-Realm
Description =
Min = 1
Max = 1
Origin-Host/
Name = Origin-Host
Description =
Min = 1
Max = 1
Origin-Realm/
Name = Origin-Realm
Description =
Min = 1
Max = 1
User-Name/
Name = User-Name

4-88
Cisco Prime Access Registrar 6.1 User Guide
OL-29756-01
Chapter 4 Cisco Prime Access Registrar Server Objects
Advanced
Description =
Min = 0
Max = 1
User-Password/
Name = User-Password
Description =
Min = 0
Max = 1
Optional/
Entries 1 to 42 from 42 total entries
Current filter: <all>
ARAP-Password/
Name = ARAP-Password
Description =
Min = 0
Max = 1
ARAP-Security/
Name = ARAP-Security
Description =
Min = 0
Max = 1
ARAP-Security-Data/
Name = ARAP-Security-Data
Description =
Min = 0
Max = 100
Auth-Grace-Period/
Name = Auth-Grace-Period
Description =
Min = 0
Max = 1
Auth-Session-State/
Name = Auth-Session-State
Description =
Min = 0
Max = 1
Authorization-Lifetime/
Name = Authorization-Lifetime
Description =
Min = 0
Max = 1
AnswerMsgAVPs/
Fixed/
Entries 1 to 1 from 1 total entries
Current filter: <all>
Session-Id/
Name = Session-Id
Description =
Min = 1
Max = 1
Required/
Entries 1 to 5 from 5 total entries
Current filter: <all>
Auth-Application-Id/
Name = Auth-Application-Id
Description =
Min = 1
Max = 1
Auth-Request-Type/
Name = Auth-Request-Type
Description =

4-89
Cisco Prime Access Registrar 6.1 User Guide
OL-29756-01
Chapter 4 Cisco Prime Access Registrar Server Objects
Advanced
Min = 1
Max = 1
Origin-Host/
Name = Origin-Host
Description =
Min = 1
Max = 1
Origin-Realm/
Name = Origin-Realm
Description =
Min = 1
Max = 1
Result-Code/
Name = Result-Code
Description =
Min = 1
Max = 1
Optional/
Entries 1 to 59 from 59 total entries
Current filter: <all>
Acct-Interim-Interval/
Name = Acct-Interim-Interval
Description =
Min = 0
Max = 1
ARAP-Challenge-Response/
Name = ARAP-Challenge-Response
Description =
Min = 0
Max = 1
ARAP-Features/
Name = ARAP-Features
Description =
Min = 0
Max = 1
ARAP-Security/
Name = ARAP-Security
Description =
Min = 0
Max = 1
ARAP-Security-Data/
Name = ARAP-Security-Data
Description =
Min = 0
Max = 100
ARAP-Zone-Access/
Name = ARAP-Zone-Access
Description =
Min = 0
Max = 1
Auth-Grace-Period/
Name = Auth-Grace-Period
Description =
Min = 0
Max = 1

4-90
Cisco Prime Access Registrar 6.1 User Guide
OL-29756-01
Chapter 4 Cisco Prime Access Registrar Server Objects
Advanced
Auth-Session-State/
Name = Auth-Session-State
Description =
Min = 0
Max = 1
Authorization-Lifetime/
Name = Authorization-Lifetime
Description =
Min = 0
Max = 1
Configuring Diameter Dictionary
The Diameter dictionary contains a list of application specific AVPs.
Table 4-55 describes the Diameter BaseProtocol AVP Properties.
Table 4-55 Diameter BaseProtocol AVP Properties
Property Description
Name Required; name of the application specific AVPs.
Description Optional; description of the application specific AVPs.
IsVendorSpecific Required; default is FALSE. If set to FALSE, the application is ordinary
application and user is prompted to enter ApplicationID. If set to TRUE,
t he ap pl i ca ti on is a Ve nd or S pe c ifi c A p pl ic at io n. U se r i s
prompted to enter VendorSpecificApplicationID and VendorID.
ApplicationID Required; specifies the unique integer value for the application.
Note The Application ID must be set to 0 for BaseProtocol AVPs.
VendorSpecificApplicatio
nID
Required, Specifies the integer value for the vendor specific application.
VendorID Required, specifies the VendorID for the application.
AVPS/ Specifies the list of application specific avps.
Example:
Accounting-Realtime-Required/
Name = Accounting-Realtime-Required
Description =
Attribute = 483
Mandatory = Must
May-Encrypt = Yes
Protected = MustNot
Type = UINT32
Min = 0
Max = 253
Refer to Table 4-56 for the description of AVP properties.

4-91
Cisco Prime Access Registrar 6.1 User Guide
OL-29756-01
Chapter 4 Cisco Prime Access Registrar Server Objects
Advanced
Table 4-56 lists the application specific AVP properties.
Configure the Diameter Dictionary
To configure the Diameter Dictionary:
Step 1 Change to /Radius/Advanced/Diameter/Diameter Dictionary.
Step 2 Add BaseProtocolAVPs.
add BaseProtocolAVPs
[ //localhost/Radius/Advanced/Diameter/Diameter Dictionary ]
cd BaseProtocolAVPs/
Step 3 Set the properties for BaseProtocolAVPs.
[ //localhost/Radius/Advanced/Diameter/Diameter Dictionary/BaseProtocolAVPs ]
Name = BaseProtocolAVPs
Description =
IsVendorSpecific = FALSE
ApplicationID = 0
AVPs/
set IsVendorSpecific "FALSE"
set IsVendorSpecific "FALSE"
set ApplicationID 0
set ApplicationID 0
Step 4 Configure the application specific AVPs.
cd AVPs/
add User-Name
Table 4-56 AVP Properties
Property Description
Attribute Specifies the integer value for the AVP.
Mandatory Specifies whether the mandatory bit of this AVP should or should not be
set.
May-Encrypt If set to 'yes' then the AVP will be sent encrypted if the connection uses
CMS security.
Protected Specifies whether the protected bit of this AVP should or should not be
set.
Type Specifies the type of the Diameter AVP.

4-92
Cisco Prime Access Registrar 6.1 User Guide
OL-29756-01
Chapter 4 Cisco Prime Access Registrar Server Objects
Advanced
Step 5 Configure User-Name AVP type and number
--> cd User-Name/
[ //localhost/Radius/Advanced/Diameter/Diameter Dictionary/BaseProtocolAVPs/AVPs/User-Name
]
Name = User-Name
Description =
Attribute = 1
Mandatory = MustNot
May-Encrypt = No
Protected = MustNot
Type = UTF8_STRING
Min = 0
Max = 253
set Attribute 1
set Attribute 1
set Type UTF8_STRING
set Type UTF8_STRING
The following is an example of Diameter BaseProtocol AVPs:
[ //localhost/Radius/Advanced/Diameter/Diameter Dictionary/BaseProtocolAVPs ]
Name = BaseProtocolAVPs
Description =
IsVendorSpecific = FALSE
ApplicationID = 0
AVPs/
Entries 1 to 55 from 55 total entries
Current filter: <all>
Accounting-Realtime-Required/
Name = Accounting-Realtime-Required
Description =
Attribute = 483
Mandatory = Must
May-Encrypt = Yes
Protected = MustNot
Type = UINT32
Min = 0
Max = 253
Accounting-Record-Number/
Name = Accounting-Record-Number
Description =
Attribute = 485
Mandatory = Must
May-Encrypt = Yes
Protected = MustNot
Type = UINT32
Min = 0
Max = 253
Accounting-Record-Type/
Name = Accounting-Record-Type
Description =
Attribute = 480
Mandatory = Must
May-Encrypt = Yes
Protected = MustNot
Type = ENUM

4-93
Cisco Prime Access Registrar 6.1 User Guide
OL-29756-01
Chapter 4 Cisco Prime Access Registrar Server Objects
Advanced
Min = 0
Max = 253
Enums/
1 = "Event Record"
2 = "Start Record"
3 = "Interim Record"
4 = "Stop Record"
Accounting-Session-Id/
Name = Accounting-Session-Id
Description =
Attribute = 44
Mandatory = Must
May-Encrypt = Yes
Protected = May
Type = STRING
Min = 0
Max = 253
Accounting-Sub-Session-Id/
Name = Accounting-Sub-Session-Id
Description =
Attribute = 287
Mandatory = Must
May-Encrypt = Yes
Protected = May
Type = UINT64
Min = 0
Max = 253

4-94
Cisco Prime Access Registrar 6.1 User Guide
OL-29756-01
Chapter 4 Cisco Prime Access Registrar Server Objects
Advanced

CHAPTER
5-1
Cisco Prime Access Registrar 6.1 User Guide
OL-29756-01
5
Using the radclient Command
This chapter describes how to use radclient, a RADIUS server test tool you run from the command line
to test your Cisco Prime Access Registrar RADIUS server. You can use radclient to create packets, send
them to a specific server, and examine the response.
Because the radclient command is Tcl-based, you can use it interactively or you can execute it as a Tcl
script file.
To run the radclient command, enter:
radclient
After you enter the radclient command, you must log into the RADIUS server and provide an
administrator’s username, such as admin, and the administrator’s password.
This chapter contains the following sections:
•radclient Command Syntax
•Working with Packets
•Attributes
•Using radclient Test Commands
radclient Command Syntax
The radclient command syntax is:
radclient [-C <clustername>] [-N <adminname>] [-P <adminpassword>] [-i] [-n]
[-p <load_path>] [-v] [-z debug_flags] [-I flag]
Valid flags are:
•-C <clustername>
•-N <adminname>
•-P <adminpassword>
•-i—Forces interactive mode
•-n—Skips loading radclient.tcl
•-p <path>—Specifies the load_path
•-s—Uses default cluster, admin user, and password
If you delete the admin user or modify the admin user’s password, this option will no longer work.

5-2
Cisco Prime Access Registrar 6.1 User Guide
OL-29756-01
Chapter 5 Using the radclient Command
Working with Packets
•-S <file>—Sources specified file
•-v—Prints version and exits
•-I <0 or 1>—Enables to set as IPv4 or IPv6 client. 0 specifies IPv4 client and 1 specifies IPv6 client
-z debug_flags—Specify debug levels. Debug flags must be of the format X=n, where X is the letter
corresponding to the type of debug information you want to see, and n is the value. The higher the
value, the more output. X can also be a string or a range of letters.
For example, the following command line sets the debug levels for A, B, and C to 3:
radclient -z ABC=3
The following example command line sets the debug levels for everything between A and Z
inclusive and l to 5:
radclient -z A-Zl=5
Working with Packets
Using the radclient command, you can create packets (default or specific packets), view packets, send
packets, read the value of packets, and delete packets.
This section contains the following topics:
•Creating Packets
•Creating CHAP Access-Request Packets
•Viewing Packets
•Sending Packets
•Creating Empty Packets
•Setting Packet Fields
•Reading Packet Fields
•Deleting Packets
Creating Packets
To create a basic RADIUS Access-Request packet, use the radclient command simple. This function
creates a packet and fills in basic attributes. The syntax of the simple command is:
simple <user_name> <user_password>
For example, to create an Access-Request packet for user bob whose password is bigDog, enter:
simple bob bigDog
p001
The radclient command responds with p001, which is the identifier (name) of the newly created packet.

5-3
Cisco Prime Access Registrar 6.1 User Guide
OL-29756-01
Chapter 5 Using the radclient Command
Working with Packets
Creating CHAP Access-Request Packets
To create a CHAP Access-Request packet, use the radclient command simple_chap. The syntax of the
simple_chap command is:
simple_chap <user_name> <user_password> <use_challenge>
<use_challenge> is a boolean that indicates whether to use the CHAP-Challenge attribute.
For example, to create a CHAP packet and use a <use_challenge>, enter:
simple_chap bob bigDog 1
p002
Viewing Packets
To view a packet or any other object, enter the object identifier at the radclient prompt. For example, to
display packet p001, enter:
p001
Packet: code=Access-Request,id=0,length=0, attributes =
User-Name = bob
User-Password = bigDog
NAS-Identifier = localhost
NAS-Port = 0
Sending Packets
To send a packet, specify the packet identifier and enter the word send.
p001 send
You can optionally specify the host and port to which to send the packet. The default host is localhost,
and the default port is 1645.
When you want to send a packet to a different host and different port, you must specify them on the
command line. For example, to send a packet to the RADIUS server amazon, at port number 1812, enter:
p001 send amazon 1812
p002
When Prime Access Registrar receives a response to the packet you sent, it prints the response packet’s
object identifier before the radclient prompt returns.
The TCL variable tries determines how many times radclient retries to send the packet.

5-4
Cisco Prime Access Registrar 6.1 User Guide
OL-29756-01
Chapter 5 Using the radclient Command
Working with Packets
Creating Empty Packets
You can use radclient to create empty packets, them modify the packets to contain the appropriate fields.
To create an empty packet, the syntax is:
packet <packet-type>
The optional <packet-type> argument can be the numerical RADIUS packet type identifier, such as 2,
or the string representation, such as Access-Accept:
packet 2
p00d
p00d
Packet: code = Access-Accept, id = 0, length = 0, attributes =
Setting Packet Fields
You can modify the value of a packet field using the following syntax:
<packet-identifier> set <field> <value>
<packet-identifier> is the packet number, such as p001.
<field > is the packet field you want to modify and can be one of the following:
•attrib—Set attributes in the packet; <value> is the attribute identifier.
•code— The packet type (such as Access-Request); <value> is either a numeric packet-type or the
string representation (for example, 1 or Access Request).
•identifier— Set the packet ID; <value> is the numeric ID.
•length—Set the packet length; <value> is the numeric length.
•requestAuthenticator—Set the request authenticator; <value> is a hex string with a colon separating
each byte.
<value> is either a numeric packet-type, the string representation, or the hex string with a colon
separating each byte.
For example, to set the identifier field to 99, enter:
p001 set identifier 99
99
p001
Packet: code = Access-Request, id = 99, length = 0, attributes =
User-Name = bob
User-Password = bigDog
NAS-Identifier = localhost
NAS-Port = 0

5-5
Cisco Prime Access Registrar 6.1 User Guide
OL-29756-01
Chapter 5 Using the radclient Command
Attributes
Reading Packet Fields
You c a n re a d (get) the value of any of the packet fields by using the syntax:
<packet-identifier> get <attrib>
For example, to get the identifier field, enter:
p001 get identifier
99
Deleting Packets
When you are writing long-running or iterating scripts, you might want to conserve memory by deleting
packets when you are finished with them.
To delete a packet, enter:
<packet-identifier> delete
To delete all resources referred to by the packet p001, enter:
p001 delete
Attributes
Using the radclient command you can create specific RFC-defined attributes of requests and responses.
This section contains the following topics:
•Creating Attributes
•Setting Multivalued Attributes
•Viewing Attributes
•Getting Attribute Information
•Deleting Attributes
•Using the radclient Command
Creating Attributes
To create an attribute object, the syntax is:
<attrib> name <value>
<attrib> is a recognized RADIUS attribute name. <value> is the value of the attribute.
For example, to create the attribute User-Name and set its value to bob, enter:
attrib User-Name bob
a001

5-6
Cisco Prime Access Registrar 6.1 User Guide
OL-29756-01
Chapter 5 Using the radclient Command
Attributes
Note a001 is the object identifier for the newly created attribute.
Setting Multivalued Attributes
Prime Access Registrar supports setting multivalued attributes (MVAs) in radclient. Use the set mattrib
command to set multivalued attributes, as shown in the following example:
simple bob bob
p001
attrib cisco-avpair blah
a005
attrib cisco-avpair boo
a006
p001 set mattrib a005
p001
Packet: code = Access-Request, id = 0, length = 0, attributes =
User-Name = bob
User-Password = bob
NAS-Identifier = localhost
NAS-Port = 1
Cisco-AVPair = blah
p001 set mattrib a006
p001
Packet: code = Access-Request, id = 0, length = 0, attributes =
User-Name = bob
User-Password = bob
NAS-Identifier = localhost
NAS-Port = 1
Cisco-AVPair = blah
Cisco-AVPair = boo
Viewing Attributes
To view an attribute, or any other object, type the object identifier at the radclient prompt. For example,
to display attribute a001 created in the example above, enter:
a001
User-Name = bob

5-7
Cisco Prime Access Registrar 6.1 User Guide
OL-29756-01
Chapter 5 Using the radclient Command
Attributes
Getting Attribute Information
You can get the name and value of an attribute in various formats:
•get name—gets the name as a string
•get value—gets the value as a string
•get type—gets the name as an integer
•get valueAsInt—gets the value as an integer
•get valueAsIPAddress—gets the value as an IP address.
The following examples show how to get an attribute’s name, type, value, and value as integer:
a001 get name
User-Name
a001 get type
1
a001 get value
bob
a001 get valueAsInt
a001: the value is not an int
Deleting Attributes
When you are writing long running or iterating scripts, you might want to conserve memory by deleting
attributes when you are finished with them (be sure not to delete attributes being referred to by other
objects, like packets.)
To delete all resources referred to by the attribute a001, enter:
a001 delete
Using the radclient Command
The following three examples show how to use radclient to create, send, and modify packets.
Example 1
This example creates an Access-Request packet for user jane with password jane, and sends it to the
default RADIUS server (localhost).
simple jane jane

5-8
Cisco Prime Access Registrar 6.1 User Guide
OL-29756-01
Chapter 5 Using the radclient Command
Attributes
p001
The command simple jane jane creates the packet; the packet object identifier is p001. When you enter
the packet object identifier, radclient displays the contents of the packet.
p001
Packet: code = Access-Request, id = 0, length = 0, attributes =
User-Name = jane
User-Password = jane
NAS-Identifier = localhost
NAS-Port = 0
When you enter the packet identifier and the command send, radclient sends the packet to the RADIUS
server and prints the response packet object identifier.
p001 send
p002
When you enter the packet object identifier of the response, radclient displays the contents of the
response packet.
p002
Packet: code = Access-Accept, id = 1, length = 38, attributes =
Login-IP-Host = 204.253.96.3
Login-Service = Telnet
Login-TCP-Port = 541
Example 2
The following example creates a simple Access-Request packet, then adds other attributes to it.
simple jane jane
p003
The command line above shows creation of the packet p003 using user-ID jane and password jane.
attrib Service-Type Framed
a00c
The line above shows creating the Service-Type attribute (with the object identifier a00c).
a00c
Service-Type = Framed
Entering the attribute object identifier a00c displays the attribute object.
p003 set attrib a00c
The line above adds the newly set attribute to the packet. The following line creates another attribute.
attrib NAS-Port 99

5-9
Cisco Prime Access Registrar 6.1 User Guide
OL-29756-01
Chapter 5 Using the radclient Command
Attributes
a00d
a00d
NAS-Port = 99
p003 set attrib a00d
The same steps add the NAS-Port attribute to the packet, and finally, the packet contents are displayed.
p003
Packet: code = Access-Request, id = 0, length = 0, attributes =
User-Name = jane
User-Password = jane
NAS-Identifier = localhost
Service-Type = Framed
NAS-Port = 99
Example 3
Example 3 performs the same tasks as Example 2 using the command substitution feature of Tcl which
allows you to use the results of one command as an argument to another command. Square brackets
invoke command substitution. The statement inside the brackets is evaluated, and the result is used in
place of the bracketed command.
simple jane jane
p004
p004 set attrib [ attrib Service-Type Framed ]
p004 set attrib [ attrib NAS-Port 99 ]
p004
Packet: code = Access-Request, id = 0, length = 0, attributes =
User-Name = jane
User-Password = jane
NAS-Identifier = localhost
Service-Type = Framed
NAS-Port = 99

5-10
Cisco Prime Access Registrar 6.1 User Guide
OL-29756-01
Chapter 5 Using the radclient Command
Using radclient Test Commands
Using radclient Test Commands
You can use the radclient commands timetest and callsPerSecond to test the RADIUS server.
This section contains the following topics:
•radclient Variables
•Using timetest
•Using callsPerSecond
•Additional radclient Variables
radclient Variables
You control how timetest and callsPerSecond work using radclient variables. To set a radclient
variable, use the set command as follows:
set variable value
Table 5-1 lists the radclient variables used in timetest and callsPerSecond and their description.
Using timetest
The timetest command sends a number of requests to the RADIUS server then waits for a response.
When a response arrives, timetest immediately sends another request. timetest can keep up to 256
requests outstanding all the time.
The syntax of the timetest command is:
timetest <testtype> [<cycles> [<repetitions> [<starting user number> [<increment user
number>]]]]
Table 5-2 lists the applicable test types.
Table 5-1 radclient Variables
Variable Description
host Destination host to send the packets (default is localhost)
num_packets Number of packets to send at once (default is 256)
num_users Modulus for the username pattern (default is 10000)
port Port where radclient sends access-request packets (default is 1645).
Changing this port does not affect the accounting_port.
retry_timeout Length of time to wait after a timeout occurs before retrying
secret Shared secret configured on the RADIUS server for the client (default is
secret)
timeout Length of time to wait before a timeout occurs
tries Number of times to attempt to send
UserNamePattern Pattern of the usernames (default is user%d%%PPP)
UserPasswordPattern Pattern of the user passwords (default is user%d)

5-11
Cisco Prime Access Registrar 6.1 User Guide
OL-29756-01
Chapter 5 Using the radclient Command
Using radclient Test Commands
Consider this timetest example with radclient variables set to the following:
host—1.1.1.2
port—1812
secret—cisco
UserNamePattern—user%d
UserPasswordPattern—puser%d
num_users—100,000
num_packets—128
In this example, timetest sends packets directly to the host at IP address 1.1.1.2 on port 1812 with a
shared secret cisco. There are 100,000 users in the server’s user database with the name pattern user#
and password pattern puser#, where # ranges from 0-99,999, inclusive. The number of outstanding
requests are limited to 128.
Before starting the timing test, timetest sends an Accounting-On packet to the AAA Server and waits
for a response to make sure that any session management being performed on the AAA Server is reset
before running the test. After a response is received, the timetest can begin.
Using callsPerSecond
The callsPerSecond command is a smart throttle that sends packets at a rate you set. If you set
callsPerSecond to two transactions per second (TPS), callsPerSecond sends a packet every 0.5 seconds.
The syntax of the callsPerSecond command is:
callsPerSecond <callsPerSecond> <testtype> [<cycles> [<repetitions> [<starting user number>
[<increment user number>]]]]
Ta b l e 5 - 2 Te s t Ty p e s
Test Type Description
1 Access-Request
2 Access-Request + Accounting-Start + Accounting-Stop
3 Accounting-Start + Accounting-Stop
4 Ascend-IPA-Allocate + Ascend-IPA-Release
5 Access-Request + Ascend-IPA-Allocate + Ascend-IPA-Release
6 Access-Request + Ascend-IPA-Allocate + Accounting-Start + Ascend-IPA-Release +
Accounting-Stop
7 Access-Request + USR-Resource-Free-Request
8 LEAP Identity + LEAP-Challenge Response + LEAP Challenge
9 LEAP Identity + LEAP-Challenge Response + LEAP Challenge + Accounting-Start +
Accounting-Stop
10 Access-Request + Accounting-Start + Accounting-Stop with Home-Agent request
11 Access-Request + Accounting-Start + Accounting-Stop with ODAP request

5-12
Cisco Prime Access Registrar 6.1 User Guide
OL-29756-01
Chapter 5 Using the radclient Command
Using radclient Test Commands
Additional radclient Variables
Table 5-3 lists additional radclient variables and their description.
Table 5-3 Additional radclient Variables
Variable Description
accounting_port Port where the RADIUS server sends accounting packets (default is
1646).
Note Changing accounting_port value does not affect the
authentication port.
host Name of host where Prime Access Registrar is installed
ignore_signature_errs Causes server to ignore signature in the response
load_path Search path to load source files with user processes
NASIdentifier Value to set NAS-Identifier attribute
NASIPAddress Value to set NAS-IP-Address attribute
NASPort Value to set NAS-Port attribute
num_packets Number of packets to send at once (default is 256)
num_users Modulus for the username pattern (default is 10000)
port Port where radclient sends access-request packets (default is 1645).
Changing this port does not affect the accounting_port.
retry_timeout Length of time to wait before attempting a retry
secret Shared secret configured on the RADIUS server for the client (default is
secret)
tclDefaultLibrary Tclsh default library
tcl_patchLevel Tclsh version with patch level
tcl_pkgPath Tclsh install path
tcl_traceExec Tclsh boolean to activate tracing
tcl_platform Tclsh platform array
tcl_version Tclsh version
tries Number of retry attempts
UserNamePattern Pattern of the usernames (default is user%d%%PPP)
UserPasswordPattern Pattern of the user passwords (default is user%d)
verbose Verbose flag for Tclsh

CHAPTER
6-1
Cisco Prime Access Registrar 6.1 User Guide
OL-29756-01
6
Configuring Local Authentication and
Authorization
Cisco Prime Access Registrar (Prime Access Registrar) allows user information to be stored in its own
internal database or external stores such as an LDAP directory or Oracle database. This chapter describes
how to configure Prime Access Registrar to perform authentication and authorization using the
Prime Access Registrar internal database and how to verify and troubleshoot a local service and userlist
configuration.
In RADIUS, an Access Request packet is a request for authentication and authorization (AA).
Authentication checks username and password credentials, while authorization typically involves
returning the correct information to allow the service a user is authorized to have.
Prime Access Registrar performs AA and returns the appropriate RADIUS attributes in an Access
Accept packet.
This chapter contains the following sections:
•Configuring a Local Service and UserList
•Troubleshooting the Local Service and UserList Configuration
•aregcmd Command Performance
•UserDefined1 Property
•Access-Request Logging
Configuring a Local Service and UserList
Prime Access Registrar uses services configured under /Radius/Services to process RADIUS requests.
To process RADIUS access requests locally, you must configure a service and set its type to local. A
local service references an Prime Access Registrar userlist.
The following sections show the commands you enter and the expected responses from the
Prime Access Registrar server to do the following:
•Configuring a Local Service
•Configuring a Userlist
•Configuring Cisco Prime Access Registrar to Use the Local Service For AA
•Activating the Configuration

6-2
Cisco Prime Access Registrar 6.1 User Guide
OL-29756-01
Chapter 6 Configuring Local Authentication and Authorization
Configuring a Local Service and UserList
Throughout this chapter, the aregcmd commands you enter are shown in bold font, and the server
responses are shown in smaller plain font as shown in the following:
command you enter
server response
Configuring a Local Service
Prime Access Registrar maintains Services under /Radius.
To configure a local service:
Step 1 Use the add command at /Radius/Services to create a Service.
cd /Radius/Services
[ //localhost/Radius/Services ]
add SouthBay
Added SouthBay
Step 2 Change directory to the new service and set its type to local.
cd SouthBay
[ //localhost/Radius/Services/SouthBay ]
set type local
Set Type local
Step 3 Use the set command to associate a userlist with the service.
set userlist SouthUsers
Set UserList SouthUsers

6-3
Cisco Prime Access Registrar 6.1 User Guide
OL-29756-01
Chapter 6 Configuring Local Authentication and Authorization
Configuring a Local Service and UserList
Configuring a Userlist
Prime Access Registrar maintains UserLists under /Radius.
To configure a userlist:
Step 1 Use the add command at /Radius/UserLists to create a userlist.
cd /Radius/UserLists
[ //localhost/Radius/UserLists ]
add SouthUsers
Added SouthUsers
Step 2 Change directory to the userlist and add users.
cd SouthUsers
[ //localhost/Radius/UserLists/SouthUsers ]
add user1
Added user1
Step 3 Change directory to each user you add and set the user’s password.
cd user1
[ //localhost/Radius/UserLists/SouthUsers/user1 ]
set Password test
Retype password to confirm:
Set Password <encrypted>
Configuring Cisco Prime Access Registrar to Use the Local Service For AA
To configure Prime Access Registrar to use the local service for authentication and authorization, enter
commands to set the DefaultAuthenticationService and DefaultAuthenticationService to the service you
created, as shown in the following:
cd /Radius
[ //localhost/Radius ]

6-4
Cisco Prime Access Registrar 6.1 User Guide
OL-29756-01
Chapter 6 Configuring Local Authentication and Authorization
Troubleshooting the Local Service and UserList Configuration
set DefaultAuthenticationService SouthBay
Set DefaultAuthenticationService SouthBay
set DefaultAuthorizationService SouthBay
Set DefaultAuthorizationService SouthBay
Activating the Configuration
To activate the configuration changes you have made, enter the save command:
save
Validating //localhost...
Saving //localhost...
After you issue the save command, Prime Access Registrar attempts to validate the configuration,
checks for all required properties, and ensures there are no logic errors. If the validation is successful,
Prime Access Registrar saves the configuration to the MCD database.
Troubleshooting the Local Service and UserList Configuration
Before you begin troubleshooting, ensure that the current configuration is valid and active. To ensure
that any configuration changes you have made are valid and stored in the database, you must issue the
save command.
save
Validating //localhost...
Saving //localhost...
To ensure that the current configuration is active, issue the reload command.
reload
Reloading Server 'Radius'...
Server 'Radius' is Running, its health is 10 out of 10
Verifying the Configuration
To verify the configuration changes you have made:
Step 1 Check to see that the UserList exists under the service.
ls /Radius/Services/SouthBay

6-5
Cisco Prime Access Registrar 6.1 User Guide
OL-29756-01
Chapter 6 Configuring Local Authentication and Authorization
Troubleshooting the Local Service and UserList Configuration
[ /Radius/Services/SouthBay ]
Name = SouthBay
Description =
Type = local
IncomingScript~ =
OutgoingScript~ =
OutagePolicy~ = RejectAll
OutageScript~ =
UserList = SouthUsers
Step 2 Check to see that user user1 exists under the SouthUsers userlist.
ls /Radius/UserLists/SouthUsers
[ /Radius/UserLists/SouthUsers ]
Entries 1 to 1 from 1 total entries
Current filter: <all>
Name = SouthUsers
Description =
user1/
Step 3 Turn on debugging.
trace /r 5
Traced "/Radius: Trace level is set to 5"
Step 4 Use radclient to send an Access-Request for user user1.
simple user1 test
The debugging output will be sent to the file name_radius_1_log in the /opt/CSCOar/ logs directory.
The following example shows items you should expect in a successful Access-Request.
Note Lines of interest are in bold font.
11/12/2013 18:34:35: P1144: Packet received from 127.0.0.1
11/12/2013 18:34:35: P1144: Trace of Access-Request packet
11/12/2013 18:34:35: P1144: identifier = 4
11/12/2013 18:34:35: P1144: length = 62
11/12/2013 18:34:35: P1144: reqauth = f5:37:f7:04:99:85:c7:63:8f:bc:f4:44:ab:03:4e:1a
11/12/2013 18:34:35: P1144: User-Name = user1
11/12/2013 18:34:35: P1144: User-Password = 59:fb:2e:a9:34:de:0e:15:60:8d:4b:64:77:6a:57:d8
11/12/2013 18:34:35: P1144: NAS-Port = 2
11/12/2013 18:34:35: P1144: NAS-Identifier = localhost
11/12/2013 18:34:35: P1144: Using Client: localhost (127.0.0.1)
11/12/2013 18:34:35: P1144: Using NAS: localhost (127.0.0.1)
11/12/2013 18:34:35: P1144: Request is directly from a NAS: TRUE
11/12/2013 18:34:35: P1144: Authenticating and Authorizing with Service SouthBay
11/12/2013 18:34:35: P1144: Getting User user1's UserRecord from UserList SouthUsers
11/12/2013 18:34:35: P1144: User user1's password matches
11/12/2013 18:34:35: P1144: No default Remote Session Service defined.
11/12/2013 18:34:35: P1144: Trace of Access-Accept packet
11/12/2013 18:34:35: P1144: identifier = 4
11/12/2013 18:34:35: P1144: length = 20
11/12/2013 18:34:35: P1144: reqauth = 36:88:34:0c:cc:ea:9e:d8:6d:f5:14:f7:ab:26:e7:f6
11/12/2013 18:34:35: P1144: Sending response to 127.0.0.1
11/12/2013 18:34:35: Log: Request from localhost (127.0.0.1): User user1 accepted

6-6
Cisco Prime Access Registrar 6.1 User Guide
OL-29756-01
Chapter 6 Configuring Local Authentication and Authorization
Troubleshooting the Local Service and UserList Configuration
The following example shows a trace for an unsuccessful Access-Request due to an invalid password.
Note Lines of interest are in bold font.
11/12/2013 19:05:13: P1527: Packet received from 127.0.0.1
11/12/2013 19:05:13: P1527: Trace of Access-Request packet
11/12/2013 19:05:13: P1527:11/12/2013 19:05:13: P1527:11/12/2013 19:05:13: P1527:
11/12/2013 19:05:13: P1527:11/12/2013 19:05:13: P1527:
11/12/2013 19:05:13: P1527:11/12/2013 19:05:13: P1527:11/12/2013 19:05:13: P1527: Using Client: localhost
(127.0.0.1)
11/12/2013 19:05:13: P1527: Using NAS: localhost (127.0.0.1)
11/12/2013 19:05:13: P1527: Request is directly from a NAS: TRUE
11/12/2013 19:05:13: P1527: Authenticating and Authorizing with Service SouthBay
11/12/2013 19:05:13: P1527: Getting User user1's UserRecord from UserList SouthUsers
11/12/2013 19:05:13: P1527: User user1's password does not match
11/12/2013 19:05:13: P1527: Rejecting request
11/12/2013 19:05:13: P1527: Rejecting request
11/12/2013 19:05:13: P1527: Trace of Access-Reject packet
11/12/2013 19:05:13: P1527:11/12/2013 19:05:13: P1527:11/12/2013 19:05:13: P1527:
11/12/2013 19:05:13: P1527:11/12/2013 19:05:13: P1527: Sending response to 127.0.0.1
11/12/2013 19:05:13: Log: Request from localhost (127.0.0.1): User user1 rejected (UserPasswordInvalid)
If a user’s password is invalid, reset the password to ensure it was entered correctly. Also check that the
shared secret being used by the RADIUS client and the Prime Access Registrar server match.
Configuring Return Attributes and Check-Items
Prime Access Registrar supports RADIUS check item attributes at the user and group levels. You can
configure Prime Access Registrar to check for attributes that must be present or attributes that must not
be present in the Access-Request packet for successful authentication. For a complete list of attributes
supported in Prime Access Registrar, see Appendix C, “RADIUS Attributes”.
When using check item attributes, Prime Access Registrar rejects Access-Requests if either of the
following conditions exist:
•Any configured check item attributes are not present in the Access-Request packet
•Any Access-Request packet's check item attribute values do not match with those configured check
item attribute values
This section contains the following topics:
•Configuring Per User Return Attributes
•Configuring Per User Check-Items
•Verifying the Per User Return Attributes and Check-Items Configuration
•Configuring Return Attributes and Check-Items Using UserGroup
Configuring Per User Return Attributes
User return attributes are attributes that are specific for a given user each time they log in. To configure
a user’s return attributes, change directory to the user’s Attributes subdirectory and configure the desired
attributes.
cd /Radius/UserLists/SouthUsers/User1/Attributes

6-7
Cisco Prime Access Registrar 6.1 User Guide
OL-29756-01
Chapter 6 Configuring Local Authentication and Authorization
Troubleshooting the Local Service and UserList Configuration
[ //localhost/Radius/UserLists/SouthUsers/user1/Attributes ]
set Session-Timeout 60
Set Session-Timeout 60
set Callback-Number 5551124
Set Callback-Number 5551124
Configuring Per User Check-Items
Check Items are a way to check that certain attribute/values exist in a user‘s access-request. If the
attribute/values are not present in the access-request, the Prime Access Registrar server rejects the
access-request.
To check that an access-request for user1 has the Calling-Station-Id attribute set to 5555678, enter the
following:
cd /Radius/UserLists/SouthUsers/User1/CheckItems
[ //localhost/Radius/UserLists/SouthUsers/user1/CheckItems ]
set Calling-Station-Id 5555678
Set Calling-Station-Id 5555678
Be sure to save your configuration to preserve your changes.
Verifying the Per User Return Attributes and Check-Items Configuration
A successful request will produce a trace similar to the following:
11/12/2013 14:08:07: P1539: Packet received from 127.0.0.1
11/12/2013 14:08:07: P1539: Trace of Access-Request packet
11/12/2013 14:08:07: P1539: identifier = 1
11/12/2013 14:08:07: P1539: length = 71
11/12/2013 14:08:07: P1539: reqauth = d6:86:c5:1e:0e:a0:20:4f:9a:1a:2c:35:27:16:12:36
11/12/2013 14:08:07: P1539: User-Name = user1
11/12/2013 14:08:07: P1539: User-Password = 99:dc:4a:22:ef:f6:8b:90:a2:3a:50:f0:a6:03:6e:b3
11/12/2013 14:08:07: P1539: NAS-Port = 1
11/12/2013 14:08:07: P1539: Calling-Station-Id = 5555678
11/12/2013 14:08:07: P1539: NAS-Identifier = localhost
11/12/2013 14:08:07: P1539: Using Client: localhost (127.0.0.1)
11/12/2013 14:08:07: P1539: Using NAS: localhost (127.0.0.1)
11/12/2013 14:08:07: P1539: Request is directly from a NAS: TRUE
11/12/2013 14:08:07: P1539: Authenticating and Authorizing with Service SouthBay
11/12/2013 14:08:07: P1539: Getting User user1's UserRecord from UserList SouthUsers
11/12/2013 14:08:07: P1539: User user1's password matches
11/12/2013 14:08:07: P1539: Processing User user1's check items
11/12/2013 14:08:07: P1539: Merging User user1's Attributes into response Dictionary
11/12/2013 14:08:07: P1539: Merging attributes into the Response Dictionary:
11/12/2013 14:08:07: P1539: Adding attribute Callback-Number, value = 5551124
11/12/2013 14:08:07: P1539: Adding attribute Session-Timeout, value = 60

6-8
Cisco Prime Access Registrar 6.1 User Guide
OL-29756-01
Chapter 6 Configuring Local Authentication and Authorization
Troubleshooting the Local Service and UserList Configuration
11/12/2013 14:08:07: P1539: No default Remote Session Service defined.
11/12/2013 14:08:07: P1539: Trace of Access-Accept packet
11/12/2013 14:08:07: P1539: identifier = 1
11/12/2013 14:08:07: P1539: length = 35
11/12/2013 14:08:07: P1539: reqauth = cc:2d:51:71:b5:49:0e:e6:f1:eb:1c:61:51:7a:f1:cb
11/12/2013 14:08:07: P1539: Callback-Number = 5551124
11/12/2013 14:08:07: P1539: Session-Timeout = 60
11/12/2013 14:08:07: P1539: Sending response to 127.0.0.1
11/12/2013 14:08:07: Log: Request from localhost (127.0.0.1): User user1 accepted
Configuring Profiles to Group Attributes
You can use thePrime Access Registrar profile object to group attributes. For example, you might want
to group attributes for all PPP users. All PPP users could then be assigned the profile and the attributes
contained in the profile would be returned in their access-accepts.
To configure profiles to group attributes:
Step 1 Change directory to /Radius/Profiles and add a profile.
cd /Radius/Profiles
[ //localhost/Radius/Profiles ]
add PPP-Profile
Added PPP-Profile
Step 2 Change directory to the new profile, then change directory to the profile’s Attributes subdirectory.
cd PPP-Profile
[ //localhost/Radius/Profiles/PPP-Profile ]
cd Attributes
[ //localhost/Radius/Profiles/PPP-Profile/Attributes ]
Step 3 Configure the desired attributes for the profile.
set Service-Type Framed
Set Service-Type Framed
set Framed-Protocol PPP
Set Framed-Protocol PPP

6-9
Cisco Prime Access Registrar 6.1 User Guide
OL-29756-01
Chapter 6 Configuring Local Authentication and Authorization
Troubleshooting the Local Service and UserList Configuration
Note When you need to set an attribute to a value that includes a space, you must double-quote the value, as
in the following: set Framed-Route “192.168.1.0/24 192.168.1.1”
Step 4 Assign the profile to a user by setting the user’s BaseProfile attribute to the desired profile.
cd /Radius/UserLists/SouthUsers/User1
[ //localhost/Radius/UserLists/SouthUsers/user1 ]
set BaseProfile PPP-Profile
Set BaseProfile PPP-Profile
Configuring Return Attributes and Check-Items Using UserGroup
A profile can also be assigned to a UserGroup. You assign a profile to a group by setting the group’s
BaseProfile attribute to the desired profile.
To configure return attributes and check-items using usergroup:
Step 1 Change directory to /Radius/UserGroups and add a UserGroup.
cd /Radius/UserGroups
[ //localhost/Radius/UserGroups ]
add PPP-Group
Added PPP-Group
Step 2 Change directory to the new UserGroup and add Return Attributes.
cd PPP-Group
[ //localhost/Radius/UserGroups/PPP-Group ]
cd Attributes
[ //localhost/Radius/UserGroups/PPP-Group/Attributes ]
set Service-Type Outbound
Set Service-Type Outbound
Step 3 Change directory to the UserGroups’ Check-Items subdirectory and add CheckItems.

6-10
Cisco Prime Access Registrar 6.1 User Guide
OL-29756-01
Chapter 6 Configuring Local Authentication and Authorization
aregcmd Command Performance
cd ../CheckItems/
[ //localhost/Radius/UserGroups/PPP-Group/CheckItems ]
set Service-Type Framed
Set Service-Type Framed
Step 4 Assign the UserGroup to a User.
cd /Radius/UserLists/SouthUsers/User2
[ //localhost/Radius/UserLists/SouthUsers/user2 ]
set Group PPP-Group
Set Group PPP-Group
Return Attribute Precedence
Because there are multiple ways of returning attributes, you might at some time have an attribute clash.
In case of an attribute clash, the attribute precedence is as follows (from highest to lowest):
1. User attribute
2. User profile
3. UserGroup attribute
4. UserGroup profile
aregcmd Command Performance
You can impact aregcmd command performance and server response time by having
Prime Access Registrar userlists that contain more than 10,000 users. Prime Access Registrar userlists
were not designed to contain 10,000 users in any one list.
If you must provide service for groups greater than 10000 users, we recommend that you use an external
data store such as an LDAP directory or an Oracle database. If you are unable to use an external data
store, create multiple userlists instead, keeping each userlist under 10,000 users.
Multiple userlists require multiple services (one for each userlist), because a service cannot reference
more than one userlist. The multiple services can then be combined using the Service Grouping feature
with ResultRule, OR, as follows:
[ //localhost/Radius/Services/GroupService ]
Name = GroupService
Description =
Type = group
IncomingScript~ =
OutgoingScript~ =
ResultRule = OR

6-11
Cisco Prime Access Registrar 6.1 User Guide
OL-29756-01
Chapter 6 Configuring Local Authentication and Authorization
UserDefined1 Property
GroupServices/
1. UserService1
2. UserService2
3. UserService3
UserDefined1 Property
The UserDefined1 property of a user object is a free text field. You can use the UserDefined1 property
to store additional user information much like the Description property, but its most powerful use is to
pass information to an extension point script. The value set in the UserDefined1 property is
automatically set to the environment variable of the same name during authentication. Any extension
point script that subsequently runs has access the value in that property.
[ //localhost/Radius/UserLists/Default/bob ]
Name = bob
Description =
Password = <encrypted>
AllowNullPassword = FALSE
Enabled = TRUE
Group~ =
BaseProfile~ =
AuthenticationScript~ =
AuthorizationScript~ =
UserDefined1 =
Attributes/
CheckItems/
Access-Request Logging
By default, Prime Access Registrar logs all dropped and rejected requests in the name_radius_1_log file.
The following are examples of log entries for dropped or rejected requests.
11/12/2013 17:38:11 name/radius/1 Warning Protocol 0 Request from localhost (127.0.0.1):
User user1 rejected (UserPasswordInvalid)
11/12/2013 18:05:12 name/radius/1 Warning Protocol 0 Packet from 128.107.132.106: that
address is not in the Clients list <unknown user>
To log all accepted requests as well, set the LogServerActivity advanced property to TRUE:
set /Radius/Advanced/LogServerActivity TRUE
Set /Radius/Advanced/LogServerActivity TRUE
save
Validating //localhost...
Saving //localhost...

6-12
Cisco Prime Access Registrar 6.1 User Guide
OL-29756-01
Chapter 6 Configuring Local Authentication and Authorization
Access-Request Logging
reload
Reloading Server 'Radius'...
Server 'Radius' is Running, its health is 10 out of 10
Access-Accept packets are now logged as well:
11/12/2013 18:22:32 name/radius/1 Activity Protocol 0 Request from localhost (127.0.0.1):
User user2 accepted

CHAPTER
7-1
Cisco Prime Access Registrar 6.0.1 User Guide
OL-29189-01
7
RADIUS Accounting
This chapter describes RADIUS Accounting in Cisco Prime Access Registrar (Prime Access Registrar)
as defined in Internet RFC 2866.
This chapter contains the following sections:
•Understanding RADIUS Accounting
•Setting Up Accounting
•Oracle Accounting
•LDAP Accounting
•MySQL Support
•Proxying Accounting Records
•Accounting Log Examples
•Sample Error Messages
Understanding RADIUS Accounting
RADIUS accounting is the process of collecting and storing the information contained in
•Accounting-Start and
•Accounting-Stop messages.
Internet RFC 2866 describes the protocol for sending accounting information between a Network Access
Server (NAS) and a RADIUS server (or shared accounting server).
Note Prime Access Registrar uses UDP port number 1646 as its default port for RADIUS accounting
messages. RFC 2866 defines UDP port number 1813 as the accounting port number.
When a NAS that uses accounting begins a session, it sends an Accounting-Start packet describing the
type of service and the user being connected to the Prime Access Registrar server. When the session
ends, the NAS sends the RADIUS server an Accounting Stop packet describing the type of service that
was delivered. The Accounting Stop packet might also contain statistics such as elapsed time, input and
output octets, or input and output packets.

7-2
Cisco Prime Access Registrar 6.0.1 User Guide
OL-29189-01
Chapter 7 RADIUS Accounting
Setting Up Accounting
Setting Up Accounting
To configure Prime Access Registrar to perform accounting, you must do the following:
1. Create a service
2. Set the service type to file
3. Set the DefaultAccountingService field in /Radius to the name of the service you created
After you save and reload the Prime Access Registrar server configuration, the Prime Access Registrar
server writes accounting messages to the accounting.log file in the /opt/CSCOar/logs directory. The
Prime Access Registrar server stores information in the accounting.log file until a rollover event occurs.
A rollover event is caused by the accounting.log file exceeding a pre-set size, a period of time
transpiring, or on a scheduled date.
When the rollover event occurs, the data in accounting.log is stored in a file named by the prefix
accounting, a date stamp (yyyymmdd), and the number of rollovers for that day. For example,
accounting-20131107-14 would be the 14th rollover on November 07, 2013.
The following shows the properties for a service called CiscoAccounting:
[ //localhost/Radius/Services/CiscoAccounting ]
Name = CiscoAccounting
Description =
Type = file
IncomingScript~ =
OutgoingScript~ =
OutagePolicy~ = RejectAll
OutageScript~ =
FilenamePrefix = accounting
MaxFileSize = "10 Megabytes"
MaxFileAge = "1 Day"
RolloverSchedule =
UseLocalTimeZone = FALSE
Accounting Log File Rollover
The Prime Access Registrar accounting functionality provides flexibility in managing the accounting
log. You can configure the Prime Access Registrar server to rollover the accounting log using any
combination of the following Prime Access Registrar accounting service properties:
•MaxFileSize—Indicates the maximum size of the accounting log file in KB, MB, or GB
•MaxFileAge—Indicates the maximum age of the log file in minutes, hours, days, or weeks
•RolloverSchedule—Indicates the exact time including the day of the month or day of the week, hour
and minute to roll over the accounting log file
You can configure an accounting service using any combination of MaxFileSize, MaxFileAge, and
RolloverSchedule. For example, you might configure RolloverSchedule and MaxFileAge at the same
time. This would be useful if you wanted to have an age-based rollover, but also synchronize to an
absolute clock at specified times. The following would set a rollover every twelve hours at 11:59 and
12:59.
set MaxFileAge “12 H”
set RolloverSchedule “59 11,12 * * *”

7-3
Cisco Prime Access Registrar 6.0.1 User Guide
OL-29189-01
Chapter 7 RADIUS Accounting
Setting Up Accounting
You might also consider scheduling MaxFileAge to be six minutes and set RolloverSchedule to the top
of the hour. The following would create ten six-minute long files starting anew every hour.
set MaxFileAge “6 Minutes”
set RolloverSchedule “0 * * * *”
Although you specify an exact time with the RolloverSchedule property, the Prime Access Registrar
server only checks the rollover schedule when an accounting event occurs. If your
Prime Access Registrar server receives a steady flow of packets (at least one per minute), the times you
specify are accurate. However, if the Prime Access Registrar server does not receive any packets for a
period of time, no rollovers will occur until the next packet is received. The same is true for MaxFileAge
and MaxFileSize.
Based on the maximum file size and the age specified, Prime Access Registrar closes the accounting file,
moves it to a new name, and reopens the file as a new file. The name given to this accounting file depends
on its creation and modification dates.
For example, if the file was created and modified on the same date, the filename will be of the format
FileNamePrefix-<yyyymmdd>-<n>.log, and the suffix will have year, month, day, and number. If the file
was created on some day and modified on another, the filename will be of the format
FileNamePrefix-<yyyymmdd>-<yyyymmdd>-<n>.log, and the suffix will have creation date,
modification date, and number.
This section contains the following topics:
•FilenamePrefix
•MaxFileSize
•MaxFileAge
•RolloverSchedule
•UseLocalTimeZone
FilenamePrefix
The FileNamePrefix property enables you to specify a path to the file system in which you store the log
files. If you do not manage your log files regularly, they might use the system resources, which will affect
the performance of the Prime Access Registrar server.
We recommend that you store the log files in a file system different from the file system where you
installed the Prime Access Registrar software by specifying the path in the FilenamePrefix property. By
doing so the Prime Access Registrar server continues to run, even if the accounting logs fill the file
system.
The following example specifies the /usr/arlogs/accounting as the FilenamePrefix:
set /Radius/Services/CiscoAccounting/FilenamePrefix /usr/arlogs/accounting
You can also set up a cron job to check the size of the log files and mail the administrator if the file
system is full.
MaxFileSize
Use MaxFileSize to indicate the maximum size of the accounting.log file in minutes, hours, days, or
weeks. MaxFileAge measures the age of the accounting.log file from the time the previous file rollover
occurred.

7-4
Cisco Prime Access Registrar 6.0.1 User Guide
OL-29189-01
Chapter 7 RADIUS Accounting
Setting Up Accounting
You can specify the following (case insensitive) file sizes:
•K, Kilobytes, Kilobytes
•M, Megabyte, Megabytes
•G, Gigabyte, Gigabytes
The following are examples of valid commands to set MaxFileSize:
set MaxFileSize “500 kilobytes”
The example above sets a MaxFileSize of 500 kilobytes
set maxfilesize “1 G”
The example above sets a MaxFileSize of one gigabyte
set maxfilesize “200 megabyte”
The example above sets a MaxFileSize of 200 megabytes
MaxFileAge
Use MaxFileAge to indicate the maximum age of the log file in minutes, hours, days, or weeks.
MaxFileAge measures the age of the accounting.log file from the time the previous file rollover
occurred.
You can specify the following (case insensitive) periods of time:
•M, Minute, or Minutes preceded by a number from 0 to 59
•H, Hour, or Hours preceded by a number from 0 to 12
•D, Day, or Days preceded by a number from 1 to 31
•W, Week, or Weeks preceded by a number from 1 to 52
The following are examples of valid commands to set MaxFileAge:
set MaxFileAge “6 Minutes”
The example above sets a MaxFileAge of 6 minutes.
set maxfileage “2 d”
The example above sets a MaxFileAge of two days.
set maxfileage “1 H”
The example above sets a MaxFileAge of one hour.
RolloverSchedule
You set RolloverSchedule using the following crontab-style time format:
minute hour "day of month" "month of year" "day of week"
Where:
•Minute is a value from 0-59

7-5
Cisco Prime Access Registrar 6.0.1 User Guide
OL-29189-01
Chapter 7 RADIUS Accounting
Oracle Accounting
•Hour is a value from 0-12
•Day (of the month) is a value from 1-31
•Month is a value from 1-12
•Day (of the week) is a value from 0-6, where 0 is Sunday
UseLocalTimeZone
When set to TRUE, the Prime Access Registrar server stores the accounting records in the log using the
local system time. When set to FALSE (the default), Prime Access Registrar stores the accounting
records in the log using Greenwich Mean Time (GMT).
Oracle Accounting
Previous releases of Prime Access Registrar supported accessing user data from an Oracle database
using Open Database Connectivity (ODBC), but this feature was limited to performing authentication
and authorization (AA). You could only write the accounting records to local file or proxy to another
RADIUS server.
Prime Access Registrar supports writing accounting records into Oracle database enabling integration
between billing systems and Oracle.
•Prime Access Registrar adds a new type of service and remote server called odbc-accounting that
enables inserting accounting records into Oracle.
•You can write accounting records into Oracle by referring this service in
/Radius/DefaultAccountingService or in the Accounting-Service environment variable.
There is no specified schema structure to use the Oracle accounting feature. You can use your own table
design and configure insert statements using standard SQL in the Prime Access Registrar configuration.
The Prime Access Registrar server executes the insert statements to write the accounting record into
Oracle. This feature is similar to the existing ODBC feature which performs authentication and
authorization.
To improve latency for writing accounting records into database, packet buffering can be used. This
option is enabled using the BufferAccountingPackets property under the odbc-accounting remote server
definition.
Note Prime Access Registrar supports Oracle 10g client and 11g server.
Note For more information about dynamic SQL feature, see Dynamic SQL Feature, page 7-10.
This section contains the following topics:
•Configuring Oracle Accounting
•Packet Buffering
•Dynamic SQL Feature

7-6
Cisco Prime Access Registrar 6.0.1 User Guide
OL-29189-01
Chapter 7 RADIUS Accounting
Oracle Accounting
Configuring Oracle Accounting
To use the Oracle accounting feature,
•you must configure a service of type odbc-accounting under /Radius/Services.
•you must also configure at least one remote servers of type odbc-accounting under
/Radius/RemoteServers.
This section contains the following topics:
•ODBC-Accounting Service
•Configuring Oracle Accounting
•ODBC RemoteServers
•Configuration Examples
•Packet Buffering
•Dynamic SQL Feature
ODBC-Accounting Service
The following is an example of an ODBC-Accounting service:
[ //localhost/Radius/Services/oracle_accounting ]
Name = oracle_accounting
Description =
Type = odbc-accounting
IncomingScript~ =
OutgoingScript~ =
OutagePolicy~ = RejectAll
OutageScript~ =
MultipleServersPolicy = Failover
RemoteServers/
1. accounting_server
ODBC RemoteServers
Create a remote server under /Radius/RemoteServers, and set its protocol to odbc-accounting. The
following is an example of an ODBC-Accounting RemoteServer’s configuration:
[ //localhost/Radius/RemoteServers/accounting_server ]
Name = accounting_server
Description =
Protocol = odbc-accounting
ReactivateTimerInterval = 300000
Timeout = 15
DataSourceConnections = 8
ODBCDataSource =
KeepAliveTimerInterval = 0
BufferAccountingPackets = TRUE
MaximumBufferFileSize = "10 Megabytes"
NumberOfRetriesForBufferedPacket = 3
BackingStoreEnvironmentVariables =
UseLocalTimeZone = FALSE
AttributeList =
Delimiter =
SQLDefinition/

7-7
Cisco Prime Access Registrar 6.0.1 User Guide
OL-29189-01
Chapter 7 RADIUS Accounting
Oracle Accounting
Table 7-1 describes the ODBC RemoteServer properties.
It is mandatory to set MaximumBufferFileSize property if BufferAccountingPackets property is set to
TRUE. MaximumBufferFileSize can be specified in Kilobytes, Megabytes and Gigabytes. All values
"512 kilobytes", "512 k", "512 KB" are valid for specifying 512 kilobytes.
If buffering is enabled, incoming packets will be accepted and logged to local file until the configured
buffer file size is reached even if the database is offline. Attempts to insert them into Oracle will be made
when database becomes available. This remote server will be marked as down only when the buffer gets
Table 7-1 ODBC RemoteServer Properties
Property Description
Name Name of the remote server; this property is mandatory, and there is no
default
Description Optional description of server
Protocol Must be set to odbc-accounting
ReactivateTimerInterval Mandatory time interval (in milliseconds) to activate an inactive server;
defaults to 300000 ms.
Timeout Mandatory time interval (in seconds) to wait for SQL operation to
complete; defaults to 15 seconds
DataSourceConnections Mandatory number of connections to be established; defaults to 8
ODBCDataSource Name of the ODBCDataSource to use and must refer to one entry in the
list of ODBC datasources configured under
/Radius/Advanced/ODBCDataSources. Mandatory; no default
KeepAliveTimerInterval Mandatory time interval (in milliseconds) to send a keepalive to keep the
idle connection active; defaults to zero (0) meaning the option is disabled
BufferAccountingPackets Mandatory, TRUE or FALSE, determines whether to buffer the
accounting packets to local file, defaults to TRUE which means that
packet buffering is enabled
MaximumBufferFileSize Mandatory if BufferAccountingPackets is set to TRUE, determines the
maximum buffer file size, defaults to 10 Megabyte)
NumberOfRetriesForBuffe
redPacket
Mandatory if BufferAccountingPackets is set to TRUE. A number
greater than zero determines the number of attempts to be made to insert
the buffered packet into Oracle. Defaults to 3.
BackingStoreEnvironment
Vari a b les
Optional; when BufferAccountingPackets is set to TRUE, contains a
comma-separated list of environment variable names to be stored into a
local file along with buffered packet. No default.
BackingStoreEnvironmentVariables can also be specified in scripts using
the BackingStoreEnvironmentVariables environment variable.
UseLocalTimeZone Set to TRUE or FALSE, determines the timezone of accounting records'
TimeStamp (defaults to FALSE).
AttributeList List of comma-separated attribute names.
Delimiter Character used to separate the values of the attributes given in
AttributeList property.
SQLDefinition List of insert, update and delete statements to be executed to insert,
update and delete the accounting record.

7-8
Cisco Prime Access Registrar 6.0.1 User Guide
OL-29189-01
Chapter 7 RADIUS Accounting
Oracle Accounting
full. So, having two odbc-accounting remote servers in the service, first one with buffering enabled and
multiple server policy of FailOver will make the other remote servers to receive packets only when the
first remote server's buffer gets full.
AttributeList is to specify the list of attribute names separated with comma. When this 'AttributeList' is
given in the MarkerList, these attributes' values will be appended together with delimiter specified in
'Delimiter' property and will be supplied as input to that marker.
Attributes from the Prime Access Registrar environment and request dictionaries can be specified in the
MarkerList. Request dictionary will be looked up first for the attributes. Other than the standard
attributes in the Prime Access Registrar dictionaries, two new marker variables are supported inside the
marker list. They are,
•TimeStamp—Used to insert the timestamp into Oracle from Prime Access Registrar. Specifying
this will supply the timestamp of that accounting record as a value to the insert statement. Time zone
of this timestamp will be local if UseLocalTimeZone property is set to TRUE, otherwise GMT. This
functionality could also be achieved by employing a trigger on the accounting table in the database.
However, using this marker variable is recommended because the use of triggers negatively affects
performance.
The format of the timestamp marker variable supplied by Prime Access Registrar is
YYYYMMDDHH24MMSS. For example, a timestamp of 20131107211050 represents 21:10:50,
November 07, 2013.
•RawAcctRecord—Used to insert the entire accounting record into the database as a single text
field. Contents of this will be whatever is sent by the NAS in the accounting packet and the format
is name=value pairs delimited with the string specified in Delimiter property. If the delimiter
property is not set, the default delimiter is a new line character. RawAcctRecord can be used with
the other marker variables.
If multivalued attributes are specified in the marker list, the multiple values are concatenated together
with delimiters, and the resulting value will be passed to the insert statement. This delimiter can be
specified using the ODBCEnvironmentMultiValueDelimiter property under /Radius/Advanced.
Configuration Examples
This section provides common Oracle accounting configuration examples most likely to be used.
This section contains the following topics:
•Inserting Selected Attributes into Separate Columns
•Inserting Complete Accounting Packets into One Column
•Inserting Selected Attributes into One Column
•Updating Selected Attributes
•Deleting Selected Attributes
Inserting Selected Attributes into Separate Columns
Use the following SQL and MarkerList properties statement to insert selected attributes into separate
Oracle columns. The Oracle table definition will have separate columns for each attribute.
SQL: “insert into ar_acct (username,nasinfo,packet_type,timestamp) values (?,?,?,?)”
MarkerList: “UserName/SQL_CHAR NAS-Identifier/SQL_CHAR Acct-Status-Type/SQL_CHAR
TimeStamp/SQL_TIMESTAMP”

7-9
Cisco Prime Access Registrar 6.0.1 User Guide
OL-29189-01
Chapter 7 RADIUS Accounting
Oracle Accounting
In this example, all the column data types are CHAR/VARCHAR except the timestamp which is DATE.
If packet buffering option is disabled, instead of TimeStamp marker, you can also use Oracle's sysdate
as a value for the timestamp column. The insert statement will look like the following:
“insert into ar_acct (username,nasinfo,packet_type,timestamp) values (?,?,?,sysdate)”
Inserting Complete Accounting Packets into One Column
Use SQL and MarkerList properties in the SQLStatement like the following to insert the complete
accounting packet into one Oracle column.
SQL: “insert into ar_acct (timestamp,raw_packet) values (?,?)”
MarkerList: “TimeStamp/SQL_TIMESTAMP RawAcctRecord/SQL_VARCHAR”
Inserting Selected Attributes into One Column
To insert selected attribute values into one Oracle column delimited by a comma (,), you must configure
the AttributeList and Delimiter properties of the odbc-accounting RemoteServer object like the
following:
AttributeList = "NAS-Identifier,NAS-Port,Acct-Status-Type,Acct-Session-Id"
Delimiter = ,
The SQL and MarkerList properties in the SQLStatement will look like the following:
SQL: “insert into ar_acct (username,timestamp,attributes) values (?,?,?)”
MarkerList: “UserName/SQL_CHAR TimeStamp/SQL_TIMESTAMP AttributeList/SQL_VARCHAR”
Updating Selected Attributes
Use the following SQL and MarkerList properties statement to update the selected attributes:
SQL: “update arusers_acct set acct_status_type='stop' where username=? and
acct_status_type=?”
MarkerList: "UserName/SQL_CHAR Acct-Status-Type/SQL_CHAR"
Deleting Selected Attributes
Use the following SQL and MarkerList properties statement to delete the selected attributes:
SQL = "delete from arusers_acct where username=?"
MarkerList = UserName/SQL_CHAR
Packet Buffering
You can optionally use packet buffering to improve latency when writing accounting records into the
database. To enable packet buffering,
•set the BufferAccountingPackets property in the odbc-accounting remote server to TRUE.
This section contains the following topics:
•When Using Packet Buffering
•With Packet Buffering Disabled

7-10
Cisco Prime Access Registrar 6.0.1 User Guide
OL-29189-01
Chapter 7 RADIUS Accounting
Oracle Accounting
When Using Packet Buffering
When BufferAccountingPackets is set to TRUE, the Prime Access Registrar server’s
Accounting-Response is returned as soon as the accounting record is successfully written to the local
file. To accomplish the queuing of accounting records to a local file, a variant of the existing session
backing store is used.
•Buffered packets will be inserted into Oracle by a set of background worker threads. The
Prime Access Registrar server tries to insert the buffered packet into Oracle for the number of retries
configured in the NumberOfRetriesForBufferedPacket property (remote odbc accounting server
definition). After the configured number of retries, the buffered packets are discarded from the local
file.
•Incoming packets will be buffered to local file until the configured MaximumBufferFileSize is
reached. After this limit is reached, no more packets will be addressed. When the database is offline,
this remote server will continue to take incoming packets until MaximumBufferFileSize reaches.
Prime Access Registrar tries to insert these buffered packets when database becomes available.
When using packet buffering, the Prime Access Registrar server can process more incoming packets and
can reduce the bottleneck that could occur if the number of simultaneous incoming packets is large and
the number of connections to the database is less.
With Packet Buffering Disabled
When BufferAccountingPackets is set to FALSE, Accounting-Response is returned after writing the
accounting record into Oracle. Oracle write timing is immediate.
•Incoming packets are acknowledged by the remote server only after completing the write into
Oracle.
•When the database is offline, no incoming packets are addressed. A slow database server impacts
the packet processing rate.
Dynamic SQL Feature
Using this feature, you can choose the list of SQL statements and the sequence in which the SQL
statements need to be executed during run time. This is done through the usage of scripting points.
The SQL-Sequence variable is provided in the Environment Dictionary and it takes the list of SQL
statement names and separates each statement name by a semicolon (;). For example, the SQL statement
names ‘sql3’, ‘sql4’, and ‘sql5’ are denoted as sql3;sql4;sql5;.
While being processed, the packet will be checked for the status of the SQL-Sequence variable. If the
variable is set, the list of SQL statements will be executed in the order specified. Even if one of the SQL
statements is not found in the configured list of SQL statements, the packet processing fails.
When configured for packet buffering, the BackingStore variable in the Environment Dictionary should
have the SQL-Sequence variable in order to buffer the SQL-Sequence variable along with the packet
information.

7-11
Cisco Prime Access Registrar 6.0.1 User Guide
OL-29189-01
Chapter 7 RADIUS Accounting
LDAP Accounting
LDAP Accounting
Previous releases of Prime Access Registrar, supported accessing user data from an LDAP server, but
this feature was limited to performing authentication and authorization (AA). You can only write the
accounting records to local file or Oracle database or proxy to another RADIUS server.
Prime Access Registrar supports writing accounting records into LDAP server enabling integration
between billing systems and LDAP.
•Prime Access Registrar adds a new type of service and remote server called ldap-accounting that
enables inserting accounting records into LDAP.
•You can write accounting records into LDAP by referring this service in
/Radius/DefaultAccountingService or in the Accounting-Service environment variable.
There is no specified schema structure to use the LDAP accounting feature. You can use your own object
class design and configure, insert data using AttributesToWrite object in the Prime Access Registrar
configuration. The Prime Access Registrar server inserts all configured attributes to write the accounting
record into LDAP server. This feature is similar to the existing LDAP feature which performs
authentication and authorization.
Note Prime Access Registrar supports LDAP version 3 client and LDAP version 3 server.
Configuring LDAP Accounting
To use the ldap accounting feature,
•you must configure a service of type ldap-accounting under /Radius/Services.
•You must also configure at least one remote servers of type ldap-accounting under
/Radius/RemoteServers.
This section contains the following topics:
•LDAP-Accounting Service
•LDAP RemoteServers
•Configuration Examples
•Configuring the LDAP Service for Accounting
•Configuring an LDAP-Accounting RemoteServer
•Setting LDAP-Accounting As Accounting Service
LDAP-Accounting Service
The following is an example of the LDAP-Accounting service:
[ //localhost/Radius/Services/ldap_accounting ]
Name = ldap_accounting
Description =
Type = ldap-accounting
IncomingScript~ =
OutgoingScript~ =
OutagePolicy~ = RejectAll

7-12
Cisco Prime Access Registrar 6.0.1 User Guide
OL-29189-01
Chapter 7 RADIUS Accounting
LDAP Accounting
OutageScript~ =
MultipleServersPolicy = Failover
RemoteServers/
1. accounting_server
LDAP RemoteServers
Create a remote server under /Radius/RemoteServers, and set its protocol to ldap-accounting. The
following is an example of an LDAP-Accounting RemoteServer’s configuration:
[ //localhost/Radius/RemoteServers/accounting_server ]
Name = accounting_server
Description =
Protocol = ldap-accounting
Port = 389
ReactivateTimerInterval = 300000
Timeout = 15
HostName =
BindName =
BindPassword =
UseSSL = FALSE
EnableKeepAlive = FALSE
DnPath~ =
EntryName~ = (uid=%s)
ObjectClass =
AttributeList =
Delimiter =
LDAPEnvironmentMultiValueDelimiter =
LimitOutstandingRequests = FALSE
MaxOutstandingRequests = 0
EscapeSpecialCharInUserName = FALSE
DNSLookupAndLDAPRebindInterval =
DataSourceConnections = 1
UseLocalTimeZone = FALSE
AttributesToWrite/
Table 7-2 lists the properties of LDAP-Accounting RemoteServer.
Table 7-2 LDAP-Accounting RemoteServer Properties
Fields Description
Name Name of the remote server; this property is mandatory and there is
no default.
Description Optional description of server.
Protocol Must be set to ldap-accounting .
ReactivateTimerInterval Mandatory time interval (in milliseconds) to activate an inactive
server; defaults to 300000 ms.
Timeout Mandatory time interval (in seconds) to wait for LADP-write
operation to complete; defaults to 15 seconds.
DataSourceConnections Mandatory number of connections to be established; defaults to 8.
EnableKeepAlive Required; default is FALSE. This is enabled to send a TCP
keepalive to keep the idle connection active.
HostName Required; the LDAP server's hostname or IP address.

7-13
Cisco Prime Access Registrar 6.0.1 User Guide
OL-29189-01
Chapter 7 RADIUS Accounting
LDAP Accounting
BindName Optional; the distinguished name (dn) to use when establishing a
connection between the LDAP and RADIUS servers.
BindPassword Optional; the password associated with the BindName.
DnPath Required; the path that indicates where in the LDAP database to
start the write for user information.
EntryName Required; this specifies the write entry name
Prime Access Registrar uses when insetting the LDAP server for
user information. When you configure this property, use the
notation "%s" to indicate where the user ID should be inserted. For
example, a typical value for this property is "(uid=%s)," which
means that when insetting for information about user joe, use the
fentry name uid=joe.
UseLocalTimeZone Optional; the default is FALSE. It determines the timezone of
accounting records TimeStamp.
AttributeList List of comma-separated attribute names.
Delimiter Character used to separate the values of the attributes given in
AttributeList property.
AttributesToWrite List of inserts to be executed to insert the accounting record.
ObjectClass Required; list of object classes which are all schemas defined in
LDAP server. These schemas define required attributes and allowed
attributes for an entry which is inserted from
Prime Access Registrar.
LDAPEnvironmentMultiValueD
elimiter
Optional; allows you to specify a character that separates
multi-valued attribute lists when using ldap-accounting.
LimitOutstandingRequests Required; the default is FALSE. Prime Access Registrar uses this
property in conjunction with the MaxOutstandingRequests
property to tune the RADIUS server's use of the LDAP server.
When you set this property to TRUE, the number of outstanding
requests for this RemoteServer is limited to the value you specified
in MaxOutstandingRequests. When the number of requests
exceeds this number, Prime Access Registrar queues the remaining
requests, and sends them as soon as the number of outstanding
requests drops to this number.
MaxOutstandingRequests Required when you have set the LimitOutstandingRequests to
TRUE. The number you specify, which must be greater than zero,
determines the maximum number of outstanding requests allowed
for this remote server.
EscapeSpecialCharInUserName FALSE by default.
UseSSL A boolean field indicating whether you want
Prime Access Registrar to use SSL (Secure Socket Layer) when
communicating with this RemoteServer. When you set it to TRUE,
be sure to specify the CertificateDBPath field in the Advanced
section, and be sure the port you specified for this RemoteServer is
the SSL port used by the LDAP server.
Table 7-2 LDAP-Accounting RemoteServer Properties (continued)
Fields Description

7-14
Cisco Prime Access Registrar 6.0.1 User Guide
OL-29189-01
Chapter 7 RADIUS Accounting
LDAP Accounting
AttributeList is to specify the list of attribute names separated with comma. When this 'AttributeList' is
given in the ‘AttributesToWrite’ object, these attribute values will be appended together with delimiter
specified in 'Delimiter' property and will be supplied as input to that ldap field name.
Attributes from the Prime Access Registrar environment and request dictionaries can be specified in the
‘AttributesToWrite’ object. Request dictionary will be looked up first for the attributes. Other than the
standard attributes in the Prime Access Registrar dictionaries, two new variables are supported inside the
‘AttributesToWrite’ object.
They are:
•TimeStamp—Used to insert the timestamp into LDAP server from Prime Access Registrar.
Specifying this will supply the timestamp of that accounting record as a value to the insert. Time
zone of this timestamp will be local if UseLocalTimeZone property is set to TRUE, otherwise GMT.
This functionality could also be achieved by employing a trigger on the accounting object class in
the server.
The format of the timestamp variable supplied by Prime Access Registrar is
YYYYMMDDHH24MMSS. For example, a timestamp of 20131107211050 represents 21:10:50,
November 07, 2013.
•RawAcctRecord—Used to insert the entire accounting record into the database as a single text
field. Contents of this will be whatever is sent by the NAS in the accounting packet and the format
is name=value pairs delimited with the string specified in Delimiter property. If the delimiter
property is not set, the default delimiter is a ‘,’ character. RawAcctRecord can be used with the other
variables.
If multivalued attributes are specified in the attribute list, the multiple values are concatenated together
with delimiters, and the resulting value will be passed to the insert statement. This delimiter can be
specified using the LDAPEnvironmentMultiValueDelimiter property.
Configuration Examples
This section provides common LDAP accounting configuration examples most likely to be used.
This section contains the following topics:
•Inserting Selected Attributes into Separate LDAP Field
•Inserting Complete Accounting Packets into One Field
•Inserting Selected Attributes into One Field
Inserting Selected Attributes into Separate LDAP Field
Use the following ObjectClass property and ‘AttribtuesToWrite’ object properties statement to insert
selected attributes into separate LDAP schema. The LDAP schema definition will have separate fields
for each attribute.
[//localhost/Radius/RemoteServers/accounting-server/AttributesToWrite ]
sn = timestamp
uid = username
Inserting Complete Accounting Packets into One Field
Use ObjectClass and ‘AttributesToWrite’ object properties in the ldap-accounting remote server like the
following to insert the complete accounting packet into one LDAP field.
[ //localhost/Radius/RemoteServers/accounting-server/AttributeWrites ]
seealso = rawacctrecord

7-15
Cisco Prime Access Registrar 6.0.1 User Guide
OL-29189-01
Chapter 7 RADIUS Accounting
LDAP Accounting
uid = username
Inserting Selected Attributes into One Field
To insert selected attribute values into one LDAP field delimited by a comma (,), you must configure the
AttributeList and Delimiter properties of the ldap-accounting RemoteServer object like the following:
AttributeList = User-Name,NAS-Port,Acct-Session-Id
Delimiter = ,
AttributeWrites/
telephonenumber = attributelist
uid = username
Configuring the LDAP Service for Accounting
You configure an LDAP-Accounting service under /Radius/Services. When you define an
LDAP-Accounting service under /Radius/Services, you must set its type to ldap-accounting.
[ //localhost/Radius/Services/AR-LDAP-ACCT ]
Name = AR-LDAP-ACCT
Description =
Type = ldap-accounting
IncomingScript~ =
OutgoingScript~ =
OutagePolicy~ = RejectAll
OutageScript~ =
MultipleServersPolicy = Failover
Remoteservers/
This section contains the following topics:
•MultipleServersPolicy
•RemoteServers
Table 7-3 LDAP-Accounting Service Properties
Fields Description
Name Required; inherited from the upper directory.
Description An optional description of the service.
Type Must be set to LDAP for LDAP service.
IncomingScript Optional.
OutgoingScript Optional.
OutagePolicy Required; must be set to AcceptAll, DropPacket, or RejectAll.
Default is DropPacket.
OutageScript Optional. if you set this property to the name of a script,
Prime Access Registrar runs it when an outage occurs. This
property allows you to create a script that notifies you when the
RADIUS server detects a failure.
MultipleServersPolicy Required; must be set to RoundRobin or defaults to Failover.
RemoteServers Required; list of one or more remote servers defined under
/Radius/Services/LDAP/RemoteServers. These servers must be
listed in.

7-16
Cisco Prime Access Registrar 6.0.1 User Guide
OL-29189-01
Chapter 7 RADIUS Accounting
LDAP Accounting
MultipleServersPolicy
Use the MultipleServersPolicy property to configure the LDAP remote servers in RoundRobin mode, or
the default Failover mode applies. When set to Failover, Prime Access Registrar directs requests to the
first server in the /Radius/Services/LDAP/RemoteServers list. If that server should fail or go offline,
Prime Access Registrar redirects all requests to the next server in the list. The process continues until
Prime Access Registrar locates an online server.
When set to RoundRobin, Prime Access Registrar directs each request to the next server in the
RemoteServers list to share the resource load across all listed servers.
RemoteServers
Use the RemoteServers directory to list one or more remote servers to process access requests. The
servers must also be listed in order under /Radius/RemoteServers.
The order of the RemoteServers list determines the sequence for directing access requests when
MultipleServersPolicy is set to RoundRobin mode. The first server in the list receives all access requests
when MultipleServersPolicy is set to Failover mode.
Configuring an LDAP-Accounting RemoteServer
Use the aregcmd command add to add LDAP servers under /Radius/RemoteServers. You must
configure an LDAP RemoteServer object for each RemoteServer object you list under
/Radius/Services/LDAP/RemoteServers.
The Name, Protocol, Port, HostName, BindName, BindPassword, DnPath, and EntryName properties
must be configured to use an LDAP remote server.
Table 7-4 LDAP Remote Server Properties
Fields Description
Name Name of the remote server; this property is mandatory and there is
no default.
Description Optional description of server.
Protocol Must be set to ldap-accounting.
ReactivateTimerInterval Mandatory time interval (in milliseconds) to activate an inactive
server; defaults to 300000 ms.
Timeout Mandatory time interval (in seconds) to wait for LADP-write
operation to complete; defaults to 15 seconds
DataSourceConnections Mandatory number of connections to be established; defaults to 8.
EnableKeepAlive Mandatory field which is enabled to send a TCP keepalive to keep
the idle connection active; defaults to FALSE meaning the option is
disabled.
HostName Required; the LDAP server's hostname or IP address.
BindName Optional; the distinguished name (dn) to use when establishing a
connection between the LDAP and RADIUS servers.
BindPassword Optional; the password associated with the BindName.
DnPath Required; the path that indicates where in the LDAP database to
start the write for user information.

7-17
Cisco Prime Access Registrar 6.0.1 User Guide
OL-29189-01
Chapter 7 RADIUS Accounting
LDAP Accounting
DNS Look Up and LDAP Rebind Interval
Prime Access Registrar provides a DNS Look-up and LDAP Rebind feature that enables you to use a
smart DNS server for LDAP hostname resolution, allows you to query a DNS server at set intervals to
resolve the LDAP hostname, and optionally rebind to the LDAP server, if necessary.
EntryName Required; this specifies the write entry name
Prime Access Registrar uses when insetting the LDAP server for
user information. When you configure this property, use the
notation "%s" to indicate where the user ID should be inserted. For
example, a typical value for this property is "(uid=%s)," which
means that when insetting for information about user joe, use the
fentry name uid=joe.
UseLocalTimeZone Set to TRUE or FALSE, determines the timezone of accounting
records' TimeStamp (defaults to FALSE).
AttributeList List of comma-separated attribute names.
Delimiter Character used to separate the values of the attributes given in
AttributeList property.
AttributesToWrite List of inserts to be executed to insert the accounting record.
ObjectClass Required; list of object classes which are all schemas defined in
LDAP server. These schemas define required attributes and allowed
attributes for an entry which is inserted from
Prime Access Registrar.
LDAPEnvironmentMultiValueD
elimiter
Optional; allows you to specify a character that separates
multi-valued attribute lists when using ldap-accounting.
LimitOutstandingRequests Required; the default is FALSE. Prime Access Registrar uses this
property in conjunction with the MaxOutstandingRequests
property to tune the RADIUS server's use of the LDAP server.
When you set this property to TRUE, the number of outstanding
requests for this RemoteServer is limited to the value you specified
in MaxOutstandingRequests. When the number of requests
exceeds this number, Prime Access Registrar queues the remaining
requests, and sends them as soon as the number of outstanding
requests drops to this number.
MaxOutstandingRequests Required when you have set the LimitOutstandingRequests to
TRUE. The number you specify, which must be greater than zero,
determines the maximum number of outstanding requests allowed
for this remote server.
EscapeSpecialCharInUserName FALSE by default.
UseSSL A boolean field indicating whether you want
Prime Access Registrar to use SSL (Secure Socket Layer) when
communicating with this RemoteServer. When you set it to TRUE,
be sure to specify the CertificateDBPath field in the Advanced
section, and be sure the port you specified for this RemoteServer is
the SSL port used by the LDAP server.
Table 7-4 LDAP Remote Server Properties (continued)
Fields Description

7-18
Cisco Prime Access Registrar 6.0.1 User Guide
OL-29189-01
Chapter 7 RADIUS Accounting
LDAP Accounting
When you configure Prime Access Registrar to use an LDAP directory server, you can specify the
hostname of the LDAP directory server. The hostname can be a qualified or an unqualified name. You
can also specify a timeout period after which Prime Access Registrar will again resolve the hostname.
If the IP address returned is different from the previous, Prime Access Registrar establishes a new LDAP
bind connection.
The DNSLookupAndLDAPRebindInterval property specifies the timeout period after which the
Prime Access Registrar server will attempt to resolve the LDAP hostname to IP address (DNS
resolution). When you do not modify DNSLookupAndLDAPRebindInterval, the default value zero
indicates the server will perform normal connection and binding only at start-up time or during a reload.
Unless you change the default to a value greater than zero, the server will not perform periodic DNS
lookups.
Prime Access Registrar maintains and uses the existing bind connection until a new one is established
to minimize any performance impact during the transfer. Prime Access Registrar ensures that no
requests are dropped or lost during the transfer to a new LDAP binding.
Set the DNSLookupAndLDAPRebindInterval using a numerical value and the letter H for hours or M
for minutes, such as in the following examples:
set DNSLookupAndLDAPRebindInterval 15M—performs DNS resolution every 15 minutes
Note We recommend that you do not set DNSLookupAndLDAPRebindInterval to a value less than 15 minutes
to minimize its effect on server performance.
set DNSLookupAndLDAPRebindInterval 1h—performs DNS resolution every hour
Configuring the DNS Look-up and LDAP Rebind
To configure the DNS Look-up and LDAP Rebind:
Step 1 Log into the Prime Access Registrar server, and use aregcmd to navigate to
//localhost/Radius/Remoteservers. If necessary, add the LDAP server, or change directory to it.
cd /Radius/RemoteServers/ldap-serv1/
Step 2 Set the DNSLookupAndLDAPRebindInterval property to the interval time desired.
set DNSLookupAndLDAPRebindInterval 30 M
LDAP Rebind Failures
Prime Access Registrar records any name resolution failures, bind successes and failures, and the
destination hostname and IP address in the log file. At trace level 3, Prime Access Registrar also logs
the time of any new bind connections and the closing of any old bind connections.
If either the name resolution or bind attempt fail, Prime Access Registrar continues using the existing
bind connection until the timeout has expired again. If there is no existing bind connection,
Prime Access Registrar marks the remote server object as down.
Setting LDAP-Accounting As Accounting Service
Use aregcmd to configure the LDAP-accounting Service as the default accounting service under
/Radius as in the following:

7-19
Cisco Prime Access Registrar 6.0.1 User Guide
OL-29189-01
Chapter 7 RADIUS Accounting
MySQL Support
set DefaultAccountingService AR-LDAP-ACCT
MySQL Support
Prime Access Registrar provides support for MySQL to query user records from a MySQL database
using odbc interface and enables you to write accounting records into MySQL database using
odbc-accounting. Prime Access Registrar has been tested with MySQL 5.0.90 and MyODBC 3.51.27
(reentrant).
For the Prime Access Registrar server to use MySQL, you must create and configure an
ODBCDataSource object of type myodbc and a RemoteServer object set to protocol odbc.
Note For more information about dynamic SQL feature, see Dynamic SQL Feature, page 7-10.
This section contains the following topics:
•Configuring MySQL
•Example Configuration
Configuring MySQL
To configure the Prime Access Registrar server to query records form a MySQL database:
Step 1 Log into the Prime Access Registrar server and launch aregcmd.
Log in as a user with administrative rights such as user admin.
Step 2 Change directory to the /Radius/Advanced/ODBCDataSources and add a new ODBCDataSource.
cd /Radius/Advanced/ODBCDataSources
add mysql
Step 3 Set the new ODBCDatasource type to myodbc.
cd mysql
set type myodbc
Step 4 Set the Driver property to the path of the MyODBC library.
Step 5 Set the UserID property to a valid username for the MyODBC database and provide a valid password for
this user.
Step 6 Provide a DataBase name and the name of the Prime Access Registrar RemoteServer object to associate
with the ODBCDataSource.
Step 7 Change directory to /Radius/RemoteServers and add a RemoteServer object to associate with the new
ODBCDatasource.
cd /Radius/RemoteServers
add mysql

7-20
Cisco Prime Access Registrar 6.0.1 User Guide
OL-29189-01
Chapter 7 RADIUS Accounting
Proxying Accounting Records
Step 8 Change directory to the new RemoteServer and set its protocol to odbc-accounting.
cd mysql
set protocol odbc-accounting
Step 9 Set the ODBCDataSource property to the name of the ODBCDataSource to associate with this
RemoteServer object.
set ODBCDataSource mysql
Example Configuration
The following shows an example configuration for a MySQL ODBC data source.
[ //localhost/Radius/Advanced/ODBCDataSources/mysql ]
Name = mysql
Type = myodbc
Driver = /tmp/libmyodbc3_r.so
UserID = mysql
Password = <encrypted>
DataBase = test
Server = mysql-a
Port = 3306
The following shows an example configuration for a RemoteServer
Name = odbc-accounting
Description =
Protocol = odbc-accounting
ReactivateTimerInterval = 300000
Timeout = 15
DataSourceConnections = 8
ODBCDataSource =
KeepAliveTimerInterval = 0
BufferAccountingPackets = TRUE
MaximumBufferFileSize = "10 Megabytes"
NumberOfRetriesForBufferedPacket = 3
BackingStoreEnvironmentVariables =
UseLocalTimeZone = FALSE
AttributeList =
Delimiter =
SQLDefinition/
ODBCToRadiusMappings/
ODBCToEnvironmentMappings/
ODBCToCheckItemMappings/
Proxying Accounting Records
You can configure Prime Access Registrar to store accounting records locally and to proxy the
accounting records to a remote RADIUS server thereby maintaining multiple accounting logs.
This section contains the following topics:
•Configuring the Local Cisco Prime Access Registrar Server

7-21
Cisco Prime Access Registrar 6.0.1 User Guide
OL-29189-01
Chapter 7 RADIUS Accounting
Proxying Accounting Records
•Configuring the RemoteServer Object
Configuring the Local Cisco Prime Access Registrar Server
This type of setup requires you to configure the following on the local Prime Access Registrar server:
•A local accounting service of type file
•A remote accounting service of type radius
•An accounting service of type group
•A RemoteServer object
This section contains the following topics:
•Configuring the Local Accounting Service
•Configuring the Remote Accounting Service
•Configuring the Group Accounting Service
Configuring the Local Accounting Service
The following example shows the configuration required for a local accounting service. This service
must be of type file.
[//localhost/Radius/Services/accserv1/ ]
Name = accserv1
Description =
Type = file
IncomingScript~ =
OutgoingScript~ =
OutagePolicy~ = RejectAll
OutageScript~ =
FilenamePrefix = accounting
MaxFileSize = "10 Megabytes"
MaxFileAge = "1 Day"
RolloverSchedule =
UseLocalTimeZone = FALSE
Configuring the Remote Accounting Service
The following example shows the configuration required for a remote accounting service. This service
must be of type radius, and the name of the remote server must be listed under the RemoteServers
subdirectory.
[//localhost/Radius/Services/accserv2/
Name = accserv2
Description =
Type = radius
IncomingScript~ =
OutgoingScript~ =
OutagePolicy~ = RejectAll
OutageScript~ =
MultipleServersPolicy = Failover
RemoteServers/
1. RemoteRADIUS

7-22
Cisco Prime Access Registrar 6.0.1 User Guide
OL-29189-01
Chapter 7 RADIUS Accounting
Proxying Accounting Records
Configuring the Group Accounting Service
The following example shows the configuration required for a grouping accounting service. This service
must be of type group and the local and remote accounting services, accserv1 and accserv2 in the
previous examples, should be added under the GroupServices subdirectory.
The CiscoAccounting service groups these two services. The type property should be set to group. The
services accserv1 and accserv2 should be added under GroupServices subdirectory of CiscoAccounting
service.
[//localhost/Radius/Services/GroupAccounting/
Name = GroupAccounting
Description =
Type = group
IncomingScript~ =
OutgoingScript~ =
RolloverSchedule =
ResultRule = AND
GroupServices/
1. accserv1
2. accserv2
Refer to Service Grouping Feature, page 17-14, for more information about the Prime Access Registrar
Service Grouping feature.
Configuring the RemoteServer Object
The following example shows the configuration required for the RemoteServer object in the local
Prime Access Registrar server.
[ //localhost/Radius/RemoteServers ]
Entries 1 to 1 from 1 total entries
Current filter: <all>
RemoteRADIUS/
Name = RemoteRADIUS
Description =
Protocol = radius
IPAddress = aa.bb.cc.dd
Port = 1645
ReactivateTimerInterval = 300000
SharedSecret = secret
Vendor =
IncomingScript~ =
OutgoingScript~ =
MaxTries = 3
InitialTimeout = 2000
AccountingPort = 1646
ACKAccounting = TRUE
If the ACKAccounting property is set to FALSE, Prime Access Registrar disregards the accounting
acknowledgement and continues with the packet processing rather than waiting for the accounting
acknowledgement from the Remote server.
The group service, CiscoAccounting in this example, should be defined as the default accounting service
for any accounting packets received by the local Prime Access Registrar server, as in the following:
set /Radius/DefaultAccountingService CiscoAccounting

7-23
Cisco Prime Access Registrar 6.0.1 User Guide
OL-29189-01
Chapter 7 RADIUS Accounting
Accounting Log Examples
Accounting Log Examples
This section provides examples of accounting log information recorded in an accounting log file.This
section contains the following topics:
•Accounting-Start Packet
•Accounting Stop Packet
•Trace of Successful Accounting
Accounting-Start Packet
The Accounting-Start packet describes the type of service and the user attempting to login.
Tue, 06 Dec 2013 12:32:17.036
User-Name = bob
NAS-Port = 1
Framed-IP-Address = 1.1.1.1
Class = yahoo.com
NAS-Identifier = localhost
Acct-Status-Type = Start
Acct-Session-Id = 1
Accounting Stop Packet
When the session ends, the NAS sends an Accounting Stop packet that describe the type of service that
was delivered. The Accounting Stop packet might also contain statistics such as elapsed time, input and
output octets, or input and output packets.
Tue, 06 Dec 2013 12:32:17.036
User-Name = bob
NAS-Port = 1
Framed-IP-Address = 1.1.1.1
Class = yahoo.com
NAS-Identifier = localhost
Acct-Status-Type = Stop
Acct-Session-Id = S209524
Trace of Successful Accounting
The following is a trace example of a successful accounting sequence.
11/12/2013 21:27:58: P6699: Packet received from 10.1.9.204
11/12/2013 21:27:58: P6699: Trace of Accounting-Request packet
11/12/2013 21:27:58: P6699: identifier = 127
11/12/2013 21:27:58: P6699: length = 45
11/12/2013 21:27:58: P6699: reqauth = ed:d6:a6:ae:57:09:b8:55:a8:d4:c4:0d:f7:be:06:2a
11/12/2013 21:27:58: P6699: User-Name = bob
11/12/2013 21:27:58: P6699: NAS-Identifier = localhost
11/12/2013 21:27:58: P6699: Acct-Status-Type = Start
11/12/2013 21:27:58: P6699: Acct-Session-Id = 1
11/12/2013 21:27:58: P6699: Using Client: cubone (10.1.9.204)
11/12/2013 21:27:58: P6699: Using NAS: localhost (127.0.0.1)
11/12/2013 21:27:58: P6699: Request is directly from a NAS: FALSE

7-24
Cisco Prime Access Registrar 6.0.1 User Guide
OL-29189-01
Chapter 7 RADIUS Accounting
Sample Error Messages
11/12/2013 21:27:58: P6699: Running NAS localhost (127.0.0.1) IncomingScript: Pa seServiceHints
11/12/2013 21:27:58: P6699: Rex: environ->get( "Request-Type" ) -> "Accounting-Request"
11/12/2013 21:27:58: P6699: Rex: environ->get( "User-Name" ) -> ""
11/12/2013 21:27:58: P6699: Rex: request->get( "User-Name", 0 ) -> "bob"
11/12/2013 21:27:58: P6699: Accounting with Service accserv1
11/12/2013 21:27:58: P6699: Trace of Accounting-Response packet
11/12/2013 21:27:58: P6699: identifier = 127
11/12/2013 21:27:58: P6699: length = 20
11/12/2013 21:27:58: P6699: reqauth = a6:40:45:02:4c:8b:6f:00:4f:18:4a:b8:fe:28:9d:f4
11/12/2013 21:27:58: P6699: Sending response to 10.1.9.204
Sample Error Messages
The following are sample accounting error messages:
Error message logged in name_radius_1_log file when the disk is full and AR is trying to
record an accounting request.
05/15/2013 2:52:29 name/radius/1 Error System 0 Failed to write records to the accounting
report file '/usr/accounting.log' - accounting records lost
Note An Accounting-Response packet is sent only if the accounting record is written to the file in the disk. If
the disk is full, an Accounting-Response packet is not sent.
Error message logged in name_radius_1_log file when the path specified in the
FilenamePrefix property is not valid.
05/15/2013 4:11:12 name/radius/1 Error Configuration 0 Error in property
/Radius/Services/CiscoAccounting/FilenamePrefix: Unable to write to the specified report
file prefix (/tmp/AR/accounting)

CHAPTER
8-1
Cisco Prime Access Registrar 6.1 User Guide
OL-29756-01
8
Diameter
Diameter is a networking protocol which is derived from RADIUS protocol. It is considered to be the
next generation Authentication, Authorization, and Accounting (AAA) protocol. This is the other core
protocol used in the IP Multimedia Subsystem (IMS) architecture for IMS Entities to exchange AAA
related information. Cisco Prime Access Registrar (Prime Access Registrar) supports Diameter
Applications based on the Diameter Base Protocol defined in RFC 6733.
Diameter is composed of a base protocol and a set of applications which allows it to extend its services
to new access technologies. The base protocol provides basic mechanisms for reliable transport, message
delivery, and error handling. Each application is defined by an application identifier and associated with
commands. Each command is defined with mandatory Attribute Value Pairs (AVPs) and non-mandatory
AVPs including vendor-specific AVPs.
The base protocol must be used in conjunction with a Diameter application. Each application relies on
the services of the base protocol to support a specific type of network access.
The following is the list of applications supported by Prime Access Registrar:
•Diameter Network Access Server Application (NASREQ, RFC 4005)
•Diameter Base Accounting (RFC 6733)
•Diameter Extensible Authentication Protocol (EAP) Application (RFC 4072)
This chapter contains the following sections:
•Diameter with EAP Support
•Diameter Server Startup Log
•Diameter Stack Level Messages
•Configuring Authentication and Authorization for Diameter
•Configuring Diameter Accounting
•Configuring the Diameter Application in Prime Access Registrar
•Writing Diameter Application in Prime Access Registrar
•Translation Framework for Diameter
•Managing Diameter Sessions, page 8-24

8-2
Cisco Prime Access Registrar 6.1 User Guide
OL-29756-01
Chapter 8 Diameter
Diameter with EAP Support
Diameter with EAP Support
The Extensible Authentication Protocol (EAP), is an authentication framework which supports multiple
authentication mechanisms. EAP may be used on dedicated links, switched circuits, and wired as well
as wireless links. For more information on EAP support in Prime Access Registrar, see Chapter 9,
“Extensible Authentication Protocols.”
Prime Access Registrar supports Diameter EAP application that carries EAP packets between a Network
Access Server (NAS) working as an EAP Authenticator and a back-end authentication server. The
Diameter EAP application is based on the Diameter Network Access Server Application [NASREQ] and
is intended for environments similar to NASREQ.
In the Diameter EAP application, authentication occurs between the EAP client and its home Diameter
server. This end-to-end authentication reduces the possibility for fraudulent authentication, such as
replay and man-in-the-middle attacks. End-to-end authentication also provides a possibility for mutual
authentication, which is not possible with PAP and CHAP in a roaming PPP environment.
This topic contains the following sections:
•Advertising Application Support, page 8-2
•Diameter EAP Conversation Flow, page 8-2
Advertising Application Support
Diameter nodes conforming to this specification must advertise support by including the Diameter EAP
Application ID value of 5 in the Auth-Application-Id AVP of the Capabilities-Exchange-Request and
Capabilities-Exchange-Answer command [BASE].
If the NAS receives a response with the Result-Code set to
DIAMETER_APPLICATION_UNSUPPORTED [BASE], it indicates that the Diameter server in the
home realm does not support EAP. If possible, the access device may attempt to negotiate another
authentication protocol, such as PAP or CHAP. An access device must be cautious when determining
whether a less secure authentication protocol will be used, since this could result from a downgrade
attack.
Diameter EAP Conversation Flow
The EAP conversation between the authenticating peer and the access device begins with the initiation
of EAP within a link layer, such as PPP [RFC1661] or IEEE 802.11i [IEEE-802.11i]. Once EAP has been
initiated, the access device will typically send a Diameter-EAP- Request message with an empty
EAP-Payload AVP to the Diameter server, signifying an EAP-Start. Prime Access Registrar routes the
message to the Diameter EAP service through the rules and policy engine (and/or client, server and
vendor scripting point) through which the packet is processed. The Diameter EAP Service forms a
Diameter-EAP-Answer message containing an EAP-Payload AVP that includes an encapsulated EAP
packet. The Result-Code AVP in the message will be set to DIAMETER_MULTI_ROUND_AUTH,
signifying that a subsequent request is expected.
Figure 8-1 describes the Diameter EAP request flow.

8-3
Cisco Prime Access Registrar 6.1 User Guide
OL-29756-01
Chapter 8 Diameter
Diameter Server Startup Log
Figure 8-1 Diameter EAP Request Flow
The access device issues the EAP-Request/Identity message to the EAP client, and forwards the
EAP-Response/Identity packet, encapsulated within the EAP-Payload AVP, as a Diameter-EAP-Request
to Prime Access Registrar as shown in Figure 8-2. This reduces the number of Diameter message round
trips.
Figure 8-2 Diameter EAP Response Flow
The conversation continues until the Diameter server sends a Diameter-EAP-Answer with a Result-Code
AVP indicating success or failure, and an optional EAP-Payload. The Result-Code AVP is used by the
access device to determine whether service is to be provided to the EAP client or not. The access device
must not rely on the contents of the optional EAP-Payload to determine whether service is to be provided
or not.
Diameter Server Startup Log
When Prime Access Registrar starts, Diameter server also starts.
The log file shows the following:
09/30/2013 6:38:47.419 name/radius/1 Info Server 0 Diameter Server Started
09/30/2013 6:38:47.437 name/radius/1 Info Protocol 0 Starting diameter core
User ServerNAS
(Initiate EAP)
Diameter-EAP-Request
EAP-Payload (EAP Start)
Diameter-EAP-Answer
Result-Code=DIAMETER_MULTI_ROUND_AUTH
EAP-Payload (EAP Request #1)
EAP Request #1
continues
361688
User ServerNAS
(Initiate EAP)
Diameter-EAP-Request
EAP-Payload (EAP Response)
EAP Request (Identity)
EAP Response (Identity)
continues
361689

8-4
Cisco Prime Access Registrar 6.1 User Guide
OL-29756-01
Chapter 8 Diameter
Diameter Stack Level Messages
09/30/2013 6:38:47.447 name/radius/1 Info Protocol 0 Product : Cisco Prime
Access Registrar
09/30/2013 6:38:47.447 name/radius/1 Info Protocol 0 Version : 6
09/30/2013 6:38:47.447 name/radius/1 Info Protocol 0 Vendor Id : 0
09/30/2013 6:38:47.447 name/radius/1 Info Protocol 0 Auth Application : 0
09/30/2013 6:38:47.447 name/radius/1 Info Protocol 0 Auth Application : 1
09/30/2013 6:38:47.447 name/radius/1 Info Protocol 0 Acct Application : 3
09/30/2013 6:38:47.447 name/radius/1 Info Protocol 0 Dictionary :
/cisco-ar/conf/diadictionary.xml
09/30/2013 6:38:47.447 name/radius/1 Info Protocol 0 Identity :
10.81.79.43
09/30/2013 6:38:47.447 name/radius/1 Info Protocol 0 Realm : abc.com
09/30/2013 6:38:47.447 name/radius/1 Info Protocol 0 TCP Listen : 3868
09/30/2013 6:38:47.447 name/radius/1 Info Protocol 0 SCTP Listen : 3868
09/30/2013 6:38:47.447 name/radius/1 Info Protocol 0 Watch-Dog timeout : 500
09/30/2013 6:38:47.447 name/radius/1 Info Protocol 0 Use IPv6 : 0
09/30/2013 6:38:47.447 name/radius/1 Info Protocol 0 Re-transmission Int : 8
09/30/2013 6:38:47.447 name/radius/1 Info Protocol 0 Max Re-trans Int : 3
09/30/2013 6:38:47.447 name/radius/1 Info Protocol 0 Recv Buffer Size : 20480
09/30/2013 6:38:47.448 name/radius/1 Info Protocol 0 Hostnames Used :
10.81.79.43
09/30/2013 6:38:47.448 name/radius/1 Info Protocol 0 Dumping Peer Table
09/30/2013 6:38:47.448 name/radius/1 Info Protocol 0 Expire Time 1
09/30/2013 6:38:47.448 name/radius/1 Info Protocol 0 Peer : Host = 10.77.240.54,
Port = 3868, AdvertiseHostName = , AdvertisedRealm = , TLS = 0
09/30/2013 6:38:47.448 name/radius/1 Info Protocol 0 Peer : Host = 10.77.240.53,
Port = 3868, AdvertiseHostName = , AdvertisedRealm= , TLS = 0
09/30/2013 6:38:47.448 name/radius/1 Info Protocol 0 Dumping Route Table
09/30/2013 6:38:47.448 name/radius/1 Info Protocol 0 Exp Time : 0
09/30/2013 6:38:47.448 name/radius/1 Info Protocol 0 Route : Realm =
dia.com, Action = 2, Redirect-Usage = 0
09/30/2013 6:38:47.448 name/radius/1 Info Protocol 0
Application Id=1, Vendor=0
09/30/2013 6:38:47.449 name/radius/1 Info Protocol 0 Server
= 10.77.240.53, metric = 2
09/30/2013 6:38:47.449 name/radius/1 Info Protocol 0 Auth Stateful Auth : stateful
09/30/2013 6:38:47.449 name/radius/1 Info Protocol 0 Auth Session(T) : 30
09/30/2013 6:38:47.449 name/radius/1 Info Protocol 0 Auth Lifetime(T) : 360
09/30/2013 6:38:47.449 name/radius/1 Info Protocol 0 Auth Grace(T) : 30
09/30/2013 6:38:47.450 name/radius/1 Info Protocol 0 Auth Abort(T) : 20
09/30/2013 6:38:47.450 name/radius/1 Info Protocol 0 Acct Session(T) : 30
09/30/2013 6:38:47.450 name/radius/1 Info Protocol 0 Acct Interim Int : 5
09/30/2013 6:38:47.450 name/radius/1 Info Protocol 0 Acct Real-Time : 0
09/30/2013 6:38:47.450 name/radius/1 Info Protocol 0 Debug Log : enabled
09/30/2013 6:38:47.450 name/radius/1 Info Protocol 0 Trace Log : enabled
09/30/2013 6:38:47.450 name/radius/1 Info Protocol 0 Info Log : enabled
09/30/2013 6:38:47.450 name/radius/1 Info Protocol 0 Console Log : enabled
09/30/2013 6:38:47.450 name/radius/1 Info Protocol 0 Syslog Log : disabled
Diameter Stack Level Messages
The following are the stack level messages that are exchanged between the diameter peers:
•Capabilities Exchange Message
•Watchdog Message

8-5
Cisco Prime Access Registrar 6.1 User Guide
OL-29756-01
Chapter 8 Diameter
Diameter Stack Level Messages
Capabilities Exchange Message
When Diameter peers establish a transport connection to Prime Access Registrar, they will exchange the
Capabilities Exchange messages. This message allows the discovery of a peer's identity and its
capabilities (protocol version number, supported Diameter applications, security mechanisms, etc.)
The log file shows the following:
12/03/2013 7:16:07.117 name/radius/1 Info Server 0 Starting Server
12/03/2013 7:16:07.308 name/radius/1 Info Server 0 RollingEncryption using new key 27
12/03/2013 7:16:07.329 name/radius/1 Info Server 0 Sticky Sessions BGwrite thread
activated
12/03/2013 7:16:07.491 name/radius/1 Info Server 0 RollingEncryption using new key 27
12/03/2013 7:16:07.535 name/radius/1 Info Server 0 Sticky Session Count BG thread
activated.
12/03/2013 7:16:07.564 name/radius/1 Info Server 0 Starting Interface 127.0.0.1, port
1812 (RADIUS Access)
12/03/2013 7:16:07.564 name/radius/1 Info Server 0 Starting Interface 127.0.0.1, port
1813 (RADIUS Accounting)
12/03/2013 7:16:07.564 name/radius/1 Info Server 0 Starting Interface 127.0.0.1, port
49 (TACACS+)
12/03/2013 7:16:07.564 name/radius/1 Info Server 0 Starting Interface 127.0.0.1, port
3868 (Diameter-TCP)
12/03/2013 7:16:07.564 name/radius/1 Info Server 0 Starting Interface 127.0.0.1, port
3868 (Diameter-SCTP)
12/03/2013 7:16:07.564 name/radius/1 Info Server 0 Starting Interface 10.77.247.110,
port 1812 (RADIUS Access)
12/03/2013 7:16:07.565 name/radius/1 Info Server 0 Starting Interface 10.77.247.110,
port 1813 (RADIUS Accounting)
12/03/2013 7:16:07.565 name/radius/1 Info Server 0 Starting Interface 10.77.247.110,
port 49 (TACACS+)
12/03/2013 7:16:07.565 name/radius/1 Info Server 0 Starting Interface 10.77.247.110,
port 3868 (Diameter-TCP)
12/03/2013 7:16:07.565 name/radius/1 Info Server 0 Starting Interface 10.77.247.110,
port 3868 (Diameter-SCTP)
12/03/2013 7:16:07.565 name/radius/1 Info Server 0 Starting IPv6 Interface ::1, port
1812 (RADIUS Access)
12/03/2013 7:16:07.565 name/radius/1 Info Server 0 Starting IPv6 Interface ::1, port
1813 (RADIUS Accounting)
12/03/2013 7:16:07.565 name/radius/1 Info Server 0 Starting IPv6 Interface ::1, port
49 (TACACS+)
12/03/2013 7:16:07.565 name/radius/1 Error Configuration 0 Interface
fe80::20c:29ff:fe0b:6ed0: af_bind() to port 1812 failed with -2147418090
12/03/2013 7:16:07.565 name/radius/1 Error Server 0 Failed to start IPv6 Interface
fe80::20c:29ff:fe0b:6ed0, port 1812 (RADIUS Access)
12/03/2013 7:16:07.565 name/radius/1 Info Server 0 Starting Replication Manager
12/03/2013 7:16:07.565 name/radius/1 Info Server 0 Replication Disabled
12/03/2013 7:16:07.566 name/radius/1 Info Server 0 SNMP is disabled
12/03/2013 7:16:07.567 name/radius/1 Info Server 0 Memory limit for Radius process is
activated
12/03/2013 7:16:07.567 name/radius/1 Info Server 0 Server Started Successfully (pid:
5889)
12/03/2013 7:16:50.235 name/radius/1 Info System 0 Trace level set to 5
12/03/2013 7:16:58.572 name/radius/1 Info Server 0 Received CER from 10.77.240.54
12/03/2013 7:16:58.572 name/radius/1 Info Server 0 CER is succeeded and CEA is sent
to 10.77.240.54

8-6
Cisco Prime Access Registrar 6.1 User Guide
OL-29756-01
Chapter 8 Diameter
Configuring Authentication and Authorization for Diameter
Watchdog Message
The Device-Watchdog-Request and Device-Watchdog-Answer messages are used to proactively detect
transport failures. Device Watchdog message time interval is configurable in Prime Access Registrar.
The log file shows the following:
10/07/2013 10:44:15.143: Log: Watchdog msg from [thomas.cisco.com.cisco1.com],
state=1254936955, time=1254937455.
Terminating Diameter User Session
In Prime Access Registrar, Diameter Session management is independent of Diameter accounting.
Session termination is conveyed by a specific Session-Termination message rather than an Accounting
Stop message.
The log file shows the following:
10/07/2013 10:37:39.299: Log: *** Session termination request received ***
10/07/2013 10:37:39.299: Log: Session id=thomas.cisco.com.cisco1.com;{;H;
10/07/2013 10:37:39.299: Log: From Host: thomas.cisco.com
10/07/2013 10:37:39.299: Log: From Realm: cisco1.com
10/07/2013 10:37:39.299: Log: From User: invaliduser
10/07/2013 10:37:39.299: Log: Termination Cause: 5003
10/07/2013 10:37:39.299: Log: Auth Application Id: 1
10/07/2013 10:37:39.300: Log: Session disconnect for Session-Id:
thomas.cisco.com.cisco1.com;1254936955;124122
Note In Prime Access Registrar, session management does not support Diameter messages. Diameter base
stack (RFC 6733) will maintain the session.
Configuring Authentication and Authorization for Diameter
This section describes how to configure Prime Access Registrar to perform authentication and
authorization and how to configure a local service and userlist.
See Table 4-7 for more information on Diameter client properties.
This section contains the following topics:
•Configuring Local Authentication and Authorization
•Configuring External Authentication Service
Configuring Local Authentication and Authorization
In Diameter, an AA-Request packet is a request for authentication and authorization. Authentication
checks username and password credentials, while authorization typically involves returning the correct
information to allow the service a user is authorized to have. Prime Access Registrar performs AA and
returns the appropriate Diameter attributes in an AA-Answer packet.

8-7
Cisco Prime Access Registrar 6.1 User Guide
OL-29756-01
Chapter 8 Diameter
Configuring Authentication and Authorization for Diameter
For adding a Diameter peer in Prime Access Registrar, configure a new entry in the clients (including
Policy and Charging Rules Functions (PCRF), Home Subscriber Servers (HSS), Mobility Management
Entities (MME), Online Charging Systems (OCS), and others) and remote server object.
The following shows an example configuration for adding a Diameter peer (NAS/Client) in
Prime Access Registrar.
[ //localhost/Radius/Clients/51dia ]
Name = 51dia
Description =
Protocol = diameter
HostName = 10.81.79.241
PeerPort = 3868
Vendor =
IncomingScript~ =
OutgoingScript~ =
AdvertisedHostName =
AdvertisedRealm =
WatchDogTimeout = 500000
SCTP-Enabled = FALSE
SCTPAdvertisedHostName/
[//localhost/Radius/Services/diaservice]
Name = diaservice
Description =
Type = diameter
IncomingScript~ =
OutgoingScript~ =
EnableSticky = FALSE
MultiplePeersPolicy = Failover
PeerTimeOutPolicy = FailOver
DiaRemoteServers/
Entries 1 to 1 from 1 total entries
Current filter:
65/
Name = 65
Metric = 2
Weight = 0
IsActive = TRUE
Note You should restart the Prime Access Registrar server if you change any Diameter specific configuration.
See Table 4-7 and Table 4-21 for more details.
Configuring a Local Service and UserList
See “Configuring a Local Service and UserList” section on page 6-1 for more information on how to
configure a local service and user list.
The following messages are logged in the trace file at the time of authenticating a valid user:
12/03/2013 7:32:42.395: P825: Packet received from 10.77.240.54
12/03/2013 7:32:42.395: P825: Application id: 1, Cmd code: 265, Flag: 0x80
12/03/2013 7:32:42.395: P825: Using Client: NAS
12/03/2013 7:32:42.395: P825: Trace of Diameter Packet
12/03/2013 7:32:42.395: P825: Destination-Realm = cisco.com
12/03/2013 7:32:42.395: P825: User-Name = bob
12/03/2013 7:32:42.395: P825: User-Password = <encrypted>
12/03/2013 7:32:42.395: P825: Auth-Request-Type = 3
12/03/2013 7:32:42.395: P825: Origin-Host = 10.77.240.54

8-8
Cisco Prime Access Registrar 6.1 User Guide
OL-29756-01
Chapter 8 Diameter
Configuring Authentication and Authorization for Diameter
12/03/2013 7:32:42.395: P825: Session-Id = .;2096298391;7
12/03/2013 7:32:42.395: P825: Auth-Application-Id = 1
12/03/2013 7:32:42.395: P825: Origin-Realm = xyz.com
12/03/2013 7:32:42.395: P825: Tracing the packet after running the rules and policies
12/03/2013 7:32:42.395: P825: Using Client: NAS
12/03/2013 7:32:42.395: P825: FastRule Engine called for packet
12/03/2013 7:32:42.395: P825: Fastrule return = 0
12/03/2013 7:32:42.395: P825: Authenticating and Authorizing with Service local-users
12/03/2013 7:32:42.395: P825: Getting User bob's UserRecord from UserList Default
12/03/2013 7:32:42.396: P825: user list user bob's password matches
12/03/2013 7:32:42.396: P825: Processing UserGroup PPP-users's check items
12/03/2013 7:32:42.396: P825: User bob is part of UserGroup PPP-users
12/03/2013 7:32:42.396: P825: Merging UserGroup PPP-users's BaseProfiles into
response dictionary
12/03/2013 7:32:42.396: P825: Merging BaseProfile default-PPP-users into response
dictionary
12/03/2013 7:32:42.396: P825: Merging attributes into the Response Dictionary:
12/03/2013 7:32:42.396: P825: Merging attributes into the InnerRadius Dictionary:
12/03/2013 7:32:42.396: P825: Adding attribute Service-Type, value = Framed
12/03/2013 7:32:42.396: P825: Adding attribute Framed-Protocol, value = PPP
12/03/2013 7:32:42.396: P825: Adding attribute Framed-Routing, value = None
12/03/2013 7:32:42.396: P825: Adding attribute Framed-MTU, value = 1500
12/03/2013 7:32:42.396: P825: Adding attribute Framed-Compression, value = VJ
TCP/IP header compression
12/03/2013 7:32:42.396: P825: Adding attribute Ascend-Idle-Limit, value = 1800
12/03/2013 7:32:42.396: P825: Merging UserGroup PPP-users's Attributes into response
Dictionary
12/03/2013 7:32:42.396: P825: Merging attributes into the Response Dictionary:
12/03/2013 7:32:42.396: P825: Merging attributes into the InnerRadius Dictionary:
12/03/2013 7:32:42.396: P825: Trace of Diameter Packet
12/03/2013 7:32:42.396: P825: User-Name = bob
12/03/2013 7:32:42.396: P825: Result-Code = 2001
12/03/2013 7:32:42.396: P825: Auth-Request-Type = 3
12/03/2013 7:32:42.396: P825: Origin-Host = 10.77.247.110
12/03/2013 7:32:42.396: P825: Session-Id = .;2096298391;7
12/03/2013 7:32:42.396: P825: Auth-Application-Id = 1
12/03/2013 7:32:42.396: P825: Origin-Realm = abc.com
12/03/2013 7:32:42.396: P825: Sending response to 10.77.240.54
The following messages are logged in the trace file at the time of authenticating an invalid user:
12/03/2013 7:17:00.625: P76: Packet received from 10.77.240.54
12/03/2013 7:17:00.625: P76: Application id: 1, Cmd code: 265, Flag: 0x80
12/03/2013 7:17:00.625: P76: Trace of Diameter Packet
12/03/2013 7:17:00.625: P76: Destination-Realm = cisco.com
12/03/2013 7:17:00.625: P76: User-Name = user.1
12/03/2013 7:17:00.626: P76: User-Password = <encrypted>
12/03/2013 7:17:00.626: P76: Auth-Request-Type = 3
12/03/2013 7:17:00.626: P76: Origin-Host = 10.77.240.54
12/03/2013 7:17:00.626: P76: Session-Id = .;2096298391;2
12/03/2013 7:17:00.626: P76: Auth-Application-Id = 1
12/03/2013 7:17:00.626: P76: Origin-Realm = xyz.com
12/03/2013 7:17:00.626: P76: Tracing the packet after running the rules and policies
12/03/2013 7:17:00.626: P76: Using Client: NAS
12/03/2013 7:17:00.626: P76: FastRule Engine called for packet
12/03/2013 7:17:00.626: P76: Fastrule return = 0
12/03/2013 7:17:00.626: P76: Authenticating and Authorizing with Service local-users
12/03/2013 7:17:00.626: P76: Getting User user.1's UserRecord from UserList Default
12/03/2013 7:17:00.626: P76: Failed to get User user.1's UserRecord from UserList
Default
12/03/2013 7:17:00.626: P76: Trace of Diameter Packet
12/03/2013 7:17:00.626: P76: User-Name = user.1
12/03/2013 7:17:00.626: P76: Result-Code = 4001
12/03/2013 7:17:00.626: P76: Auth-Request-Type = 3

8-9
Cisco Prime Access Registrar 6.1 User Guide
OL-29756-01
Chapter 8 Diameter
Configuring Diameter Accounting
12/03/2013 7:17:00.626: P76: Origin-Host = 10.77.247.110
12/03/2013 7:17:00.626: P76: Session-Id = .;2096298391;2
12/03/2013 7:17:00.626: P76: Auth-Application-Id = 1
12/03/2013 7:17:00.626: P76: Origin-Realm = abc.com
12/03/2013 7:17:00.626: P76: Sending response to 10.77.240.54
Configuring External Authentication Service
See Table 4-17 for more information on how to configure external authentication service.
Configuring Diameter Accounting
This section describes Diameter Accounting in Prime Access Registrar as defined in Internet RFC 6733.
This section explains the following:
•Understanding Diameter Accounting
•Setting Up Local Accounting
•Diameter Accounting Log Examples
Understanding Diameter Accounting
Diameter Accounting is the process of collecting and storing the information contained in
Accounting-Event, Accounting-Start, and Accounting-Interim and Accounting-Stop messages. Internet
RFC 6733 describes the protocol for sending accounting information between a Network Access Server
(NAS) and a DIAMETER server.
Note Prime Access Registrar uses TCP port number 3868 as its default port for Diameter accounting
messages. Accounting/Authentication port number is configurable in Prime Access Registrar.
Setting Up Local Accounting
See Chapter 7, “Setting Up Accounting” for more information.
Note Local accounting is done on a local file and cannot be used as ocs.
Setting Up Oracle Accounting
See Chapter 7, “Oracle Accounting” for more information.
Diameter Accounting Log Examples
This section provides examples of Diameter accounting information recorded in an accounting log file.

8-10
Cisco Prime Access Registrar 6.1 User Guide
OL-29756-01
Chapter 8 Diameter
Configuring Diameter Accounting
Accounting Event Packet
Tue, 20 Oct 2013 15:27:18.340
Session-Id = thomas.cisco.com.cisco1.com;1256052431;900083
Origin-Host = thomas.cisco.com
Origin-Realm = cisco1.com
Destination-Realm = cisco.com
Accounting-Record-Type = 1
Accounting-Record-Number = 1
Acct-Application-Id = 3
Accounting-Sub-Session-Id = 1
Acct-Interim-Interval = 5
Accounting-Realtime-Required = 0
Origin-State-Id = 1256052431
Accounting Start Packet
Tue, 20 Oct 2013 15:49:57.086
Session-Id = thomas.cisco.com.cisco1.com;1256053789;847161
Origin-Host = thomas.cisco.com
Origin-Realm = cisco1.com
Destination-Realm = cisco.com
Accounting-Record-Type = 2
Accounting-Record-Number = 1
Acct-Application-Id = 3
Accounting-Sub-Session-Id = 1
Acct-Interim-Interval = 5
Accounting-Realtime-Required = 0
Origin-State-Id = 1256053789
Account Interim Packet
Tue, 20 Oct 2013 15:50:12.338
Session-Id = thomas.cisco.com.cisco1.com;1256053789;847161
Origin-Host = thomas.cisco.com
Origin-Realm = cisco1.com
Destination-Realm = cisco.com
Accounting-Record-Type = 3
Accounting-Record-Number = 4
Acct-Application-Id = 3
Accounting-Sub-Session-Id = 1
Acct-Interim-Interval = 5
Accounting-Realtime-Required = 1
Origin-State-Id = 1256053789
Accounting Stop Packet
Tue, 20 Oct 2013 15:50:18.116
Session-Id = thomas.cisco.com.cisco1.com;1256053789;847161
Origin-Host = thomas.cisco.com
Origin-Realm = cisco1.com
Destination-Realm = cisco.com
Accounting-Record-Type = 4
Accounting-Record-Number = 6
Acct-Application-Id = 3
Accounting-Sub-Session-Id = 1
Acct-Interim-Interval = 5
Accounting-Realtime-Required = 1
Origin-State-Id = 1256053789

8-11
Cisco Prime Access Registrar 6.1 User Guide
OL-29756-01
Chapter 8 Diameter
Configuring the Diameter Application in Prime Access Registrar
Trace of Successful Accounting
The following is a trace example of a successful accounting sequence:
10/02/2013 12:05:03.146: P161: Trace of Diameter-Accounting-Request packet
10/02/2013 12:05:03.146: P161: Session-Id =
10.81.79.42.cisco5.com;1317577008;898336
10/02/2013 12:05:03.146: P161: Accounting-Record-Number = 1
10/02/2013 12:05:03.146: P161: Accounting-Record-Type = 2
10/02/2013 12:05:03.146: P161: Destination-Realm = abc.com
10/02/2013 12:05:03.146: P161: Origin-Host = 10.81.79.42
10/02/2013 12:05:03.146: P161: Origin-Realm = cisco5.com
10/02/2013 12:05:03.146: P161: Accounting-Realtime-Required = 0
10/02/2013 12:05:03.146: P161: Accounting-Sub-Session-Id = 1
10/02/2013 12:05:03.146: P161: Acct-Application-Id = 3
10/02/2013 12:05:03.146: P161: Acct-Interim-Interval = 5
10/02/2013 12:05:03.146: P161: Origin-State-Id = 1317577008
10/02/2013 12:05:03.146: P161: Tracing the packet after running the rules and policies
10/02/2013 12:05:03.146: P161: Trace of Diameter-Accounting-Request packet
10/02/2013 12:05:03.146: P161: Session-Id =
10.81.79.42.cisco5.com;1317577008;898336
10/02/2013 12:05:03.146: P161: Accounting-Record-Number = 1
10/02/2013 12:05:03.146: P161: Accounting-Record-Type = 2
10/02/2013 12:05:03.146: P161: Destination-Realm = abc.com
10/02/2013 12:05:03.147: P161: Origin-Host = 10.81.79.42
10/02/2013 12:05:03.147: P161: Origin-Realm = cisco5.com
10/02/2013 12:05:03.147: P161: Accounting-Realtime-Required = 0
10/02/2013 12:05:03.147: P161: Accounting-Sub-Session-Id = 1
10/02/2013 12:05:03.147: P161: Acct-Application-Id = 3
10/02/2013 12:05:03.147: P161: Acct-Interim-Interval = 5
10/02/2013 12:05:03.147: P161: Origin-State-Id = 1317577008
10/02/2013 12:05:03.147: P161: Using Client: murdoch
10/02/2013 12:05:03.147: P161: Accounting with Service dia-local
10/02/2013 12:05:03.147: P161: Calling Service local-file for accounting
10/02/2013 12:05:03.123: P161: Trace of Diameter-Accounting-Response packet
10/02/2013 12:05:03.123: P161: Session-Id =
10.81.79.42.cisco5.com;1317577008;898336
10/02/2013 12:05:03.123: P161: Result-Code = 2001
10/02/2013 12:05:03.123: P161: Origin-Host = 10.77.247.117
10/02/2013 12:05:03.123: P161: Origin-Realm = abc.com
10/02/2013 12:05:03.123: P161: Accounting-Record-Type = 2
10/02/2013 12:05:03.123: P161: Accounting-Record-Number = 1
10/02/2013 12:05:03.123: P161: Acct-Application-Id = 3
10/02/2013 12:05:03.123: P161: Accounting-Sub-Session-Id = 1
10/02/2013 12:05:03.123: P161: Error-Reporting-Host = 10.77.247.117
10/02/2013 12:05:03.123: P161: Accounting-Realtime-Required = 1
10/02/2013 12:05:03.123: P161: Acct-Interim-Interval = 5
10/02/2013 12:05:03.123: P161: Origin-State-Id = 1317576779
Configuring the Diameter Application in Prime Access Registrar
For proxying a diameter application message in Prime Access Registrar, ensure that you do the
following:
•Configuring the Transport Management Properties
•Registering Applications IDs
•Configuring the Diameter Peers

8-12
Cisco Prime Access Registrar 6.1 User Guide
OL-29756-01
Chapter 8 Diameter
Configuring the Diameter Application in Prime Access Registrar
•Configure the Diameter Service
Configuring the Transport Management Properties
You need to log into the aregcmd using the CLI interface and configure the Transport Management
properties in the Radius/Advanced/Diameter/.
/opt/CSCOar/bin/./aregcmd -s
Cisco Prime Access Registrar Configuration Utility
Copyright (C) 1995-2013 by Cisco Systems, Inc. All rights reserved. Logging in to
localhost
[ //localhost ]
LicenseInfo = AR-DRN-2000TPS 5.1(2000TPS:expires on 1-Feb-2013) Radius/
Administrators/
Server 'Radius' is Running, its health is 10 out of 10
--> cd Radius/Advanced/Diameter/
[ //localhost/Radius/Advanced/Diameter ]
IsDiameterEnabled = TRUE
General/
Product = CPAR
Version = 6.1
AuthApplicationIdList = 1
AcctApplicationIdList =
TransportManagement/
Identity = localhost
Realm = abc.com
WatchdogTimeout = 500
ValidateIncomingMessages = FALSE
ValidateOutgoingMessages = false
MaximumNumberofDiameterPackets = 8194
DiameterPacketSize = 1024
AdvertisedHostName/
SCTPOptions/
MaxInitRetry = 3
MaxInboundStream = 4
MaxOutboundstream = 5
EnableHeartbeat = FALSE
HeartbeatInterval = 500
You need to set the Identity and AdvertisedHostName properties to IP Address or hostname of the
machine in which Prime Access Registrar is installed.
--> set Identity 10.77.240.69
Set Identity 10.77.240.69
--> cd AdvertisedHostName
set 1 10.77.240.69
Set 1 10.77.240.69
Set the Realm in which Cisco Prime Access Registrar server is present.
--> set Realm cisco.com
Set Realm cisco.com
Save the configuration
--> save
Validating //localhost...
Saving //localhost...

8-13
Cisco Prime Access Registrar 6.1 User Guide
OL-29756-01
Chapter 8 Diameter
Configuring the Diameter Application in Prime Access Registrar
ls
Identity = 10.77.240.69
Realm = cisco.com
TCPListenPort = 3868
SCTPListenPort = 3868
EnableIPV6 = FALSE
WatchdogTimeout = 500
ReconnectInterval = 500
MaxReconnections = 3
RequestRetransmissionInterval = 100
MaxRequestRetransmissionCount = 3
ReceiveBufferSize = 2048
AdvertisedHostName/
1. 10.77.240.69
The description for these properties is available at:
http://www.cisco.com/en/US/docs/net_mgmt/access_registrar/5.1/user/guide/objects.html#wp1145662
Note Prime Access Registrar can only listen to one port for diameter connections. In the above configuration,
the port number is 3868. All of the diameter clients must use this port number to communicate with the
Prime Access Registrar.
Registering Applications IDs
You need to register the applications IDs for which Prime Access Registrar needs to route the Diameter
Messages.
Registering the Gy application to a diameter stack
To register the Gy application to a diameter stack,
Step 1 Move to the //localhost/Radius/Advanced/Diameter/General directory.
[ //localhost/Radius/Advanced/Diameter ]
IsDiameterEnabled = TRUE
General/
TransportManagement/
SessionManagement/
Applications/
Commands/
Diameter Dictionary/
--> cd General/
[ //localhost/Radius/Advanced/Diameter/General ]
Product = Cisco Prime Access Registrar
Version = 6.1
AuthApplicationIdList = 1
AcctApplicationIdList =
For description of these properties, see Diameter Service Properties.
Step 2 Set the AuthApplicationIdList to list of colon separated values of Application Ids.
--> set AuthApplicationIdList "4"

8-14
Cisco Prime Access Registrar 6.1 User Guide
OL-29756-01
Chapter 8 Diameter
Configuring the Diameter Application in Prime Access Registrar
Set AuthApplicationIdList 4
Configuring the Diameter Peers
You need to configure the Diameter Peers such as clients and servers in the /radius/clients and
/radius/remoteservers directories. The following is an example for configuring a Diameter client:
[ //localhost/Radius/Clients/51dia ]
Name = 51dia
Description =
Protocol = diameter
HostName = 10.81.79.241
PeerPort = 3868
Vendor =
IncomingScript~ =
OutgoingScript~ =
AdvertisedHostName =
AdvertisedRealm =
WatchDogTimeout = 500000
SCTP-Enabled = FALSE
SCTPAdvertisedHostName/
Local/
Remote/
The following is an example for configuring a Diameter remote server:
[ //localhost/Radius/RemoteServers/lap ]
Name = lap
Description =
Protocol = diameter
HostName = 10.77.144.34
Port = 3868
DestinationRealm = cisco.com
ReactivateTimerInterval = 300000
Vendor =
IncomingScript~ =
OutgoingScript~ =
MaxTries = 3
InitialTimeout = 500000
LimitOutstandingRequests = FALSE
MaxOutstandingRequests = 0
DWatchDogTimeout = 500000
SCTP-Enabled = FALSE
AdvertiseHostName =
AdvertiseRealm =
SCTPAdvertisedHostName/
Local/
Remote/
For description of these properties, see Diameter Service Properties.
Note In order to resolve the hostnames and get the IP addresses, the Prime Access Registrar should either be
configured with a DNS server IP, or the client's hostnames and IP addresses should be included in the
/etc/hosts file.
# Do not remove the following line, or various programs
# that require network functionality will fail.

8-15
Cisco Prime Access Registrar 6.1 User Guide
OL-29756-01
Chapter 8 Diameter
Configuring the Diameter Application in Prime Access Registrar
127.0.0.1 Prime Access Registrar localhost.localdomain localhost
172.16.29.7 GGSN-Gy
::1 localhost6.localdomain6 localhost6
Configure the Diameter Service
To configure the Diameter Service to route the Diameter Messages based on the Realm,
Step 1 Add a Service of type diameter in /Radius/Services/.
--> cd /Radius/Services/
--> add dia-proxy
Added dia-proxy
--> cd dia-proxy
[ //localhost/Radius/Services/dia-proxy ]
Name = dia-proxy
Description =
Type =
--> set Type diameter
Set Type diameter
Step 2 Set role as Proxy and realm to which Prime Access Registrar needs to route the diameter messages.
--> ls
[ //localhost/Radius/Services/dia-proxy ]
Name = dia-proxy
Description =
Type = diameter
Realm = abc.com
Role = Local
IncomingScript~ =
OutgoingScript~ =
AuthenticationService =
AccountingService =
DiaRemoteServers/
Set the Role as proxy
--> set Role Proxy
Set Role Proxy
--> set Realm mcprealm.com
Set Realm mcprealm.com
Step 3 Add a Gy application.
--> ls
[ //localhost/Radius/Services/dia-proxy ]
Name = dia-proxy

8-16
Cisco Prime Access Registrar 6.1 User Guide
OL-29756-01
Chapter 8 Diameter
Configuring the Diameter Application in Prime Access Registrar
Description =
Type = diameter
Realm = mcprealm.com
Role = Proxy
IncomingScript~ =
OutgoingScript~ =
Applications/
--> cd Applications/
[ //localhost/Radius/Services/dia-proxy/Applications ]
Entries 0 to 0 from 0 total entries
Current filter: <all>
--> add Gy
Added Gy
--> cd Gy/
[ //localhost/Radius/Services/dia-proxy/Applications/Gy ]
Name = Gy
Description =
ApplicationID =
DeMultiplexCCTerminateRequest = FALSE
EnableSticky = FALSE
MultiplePeersPolicy = Failover
DiaRemoteServers/
Step 4 Set the application ID as 4 for Gy application and configure the sticky properties.
--> set ApplicationID 4
Set ApplicationID 4
--> set EnableSticky TRUE
Set EnableSticky TRUE
--> ls
[ //localhost/Radius/Services/dia-proxy/Applications/Gy ]
Name = Gy
Description =
ApplicationID = 4
DeMultiplexCCTerminateRequest = FALSE
EnableSticky = TRUE
StickySessionKey =
StickyCreationCmdList =
StickyDeletionCmdList =
MultiplePeersPolicy = Failover
DiaRemoteServers/
--> set StickySessionKey Session-Id#1
Set StickySessionKey Session-Id#1
--> set StickyCreationCmdList 272
Set StickyCreationCmdList 272
--> set StickyDeletionCmdList 272::CC-Request-Type=3
Set StickyDeletionCmdList 272::CC-Request-Type=3

8-17
Cisco Prime Access Registrar 6.1 User Guide
OL-29756-01
Chapter 8 Diameter
Configuring the Diameter Application in Prime Access Registrar
--> set MultiplePeersPolicy RoundRobin
Set MultiplePeersPolicy RoundRobin
--> ls
[ //localhost/Radius/Services/dia-proxy/Applications/Gy ]
Name = Gy
Description =
ApplicationID = 4
DeMultiplexCCTerminateRequest = FALSE
EnableSticky = TRUE
StickySessionKey = Session-Id#1
StickyCreationCmdList = 272
StickyDeletionCmdList = 272::CC-Request-Type=3
MultiplePeersPolicy = RoundRobin
DiaRemoteServers/
Step 5 Add the OCS peers to which Prime Access Registrar needs to load balance the diameter Gy messages
matching the Destination-Realm mcprealm.com.
--> cd Peers/
[ //localhost/Radius/Services/dia-proxy/Applications/Gy/Peers ]
Entries 0 to 0 from 0 total entries
Current filter: <all>
--> add ocs1
Added ocs1
--> cd ocs1/
[ //localhost/Radius/Services/dia-proxy/Applications/Gy/Peers/ocs1 ]
Name = ocs1
HostName =
Metric = 2
Weight = 0
IMSIRanges =
--> set HostName 192.168.30.88
Set HostName 192.168.30.88
--> cd ..
[ //localhost/Radius/Services/dia-proxy/Applications/Gy/Peers ]
Entries 1 to 1 from 1 total entries
Current filter: <all>
ocs1/
--> add ocs2
Added ocs2
--> cd ocs2/
[ //localhost/Radius/Services/dia-proxy/Applications/Gy/Peers/ocs2 ]
Name = ocs2
HostName =
Metric = 2

8-18
Cisco Prime Access Registrar 6.1 User Guide
OL-29756-01
Chapter 8 Diameter
Configuring the Diameter Application in Prime Access Registrar
Weight = 0
IMSIRanges =
--> set HostName 192.168.30.86
Set HostName 192.168.30.86
Step 6 Save the configuration details.
--> save
Validating //localhost...
Saving //localhost...
Step 7 Set DefaultAuthenticationService and DefaultAuthorizationService in /Radius directory.
--> set DefaultAuthenticationService dia-proxy
Set DefaultAuthenticationService dia-proxy
--> set DefaultAuthorizationService dia-proxy
Set DefaultAuthorizationService dia-proxy
--> save
Validating //localhost...
Saving //localhost...
--> exit
--> exit
Logging out of localhost...
Step 8 Restart thePrime Access Registrar server.
/cisco-ar/bin/arserver restart
The following illustrates the diameter proxy service configuration for Gy application which load
balances the diameter Gy (App ID =4) messages to the remote peers ocs1(192.168.30.88) and
ocs2(192.168.30.86).
[ //localhost/Radius/Services/dia-proxy ]
Name = dia-proxy
Description =
Type = diameter
Realm = mcprealm.com
Role = proxy
IncomingScript~ =
OutgoingScript~ =
Applications/
Entries 1 to 1 from 1 total entries
Current filter: <all>
Gy/
Name = Gy
Description =
ApplicationID = 4
DeMultiplexCCTerminateRequest = FALSE
EnableSticky = TRUE
StickySessionKey = Session-Id#1
StickyCreationCmdList = 272
StickyDeletionCmdList = 272::CC-Request-Type=3
MultiplePeersPolicy = RoundRobin
DiaRemoteServers/

8-19
Cisco Prime Access Registrar 6.1 User Guide
OL-29756-01
Chapter 8 Diameter
Writing Diameter Application in Prime Access Registrar
Entries 1 to 2 from 2 total entries
Current filter: <all>
ocs1/
Name = ocs
HostName = 192.168.30.88
Metric = 2
Weight = 0
IMSIRanges =
ocs2/
Name = ocs2
HostName = 192.168.30.86
Metric = 3
Weight = 0
IMSIRanges =
For description of these properties, see Diameter Service Properties.
Writing Diameter Application in Prime Access Registrar
Prime Access Registrar supports extensibility by allowing users to create new:
•authentication/authorization applications
•accounting applications
•command codes
•AV P ’s
This section contains the following topics:
•Configuring rex script/service for Diameter
•Scripting in Diameter
•Diameter Environment Variables
•Sample rex script/service
•Traces/Logs
Configuring rex script/service for Diameter
To configure script/service for diameter using aregcmd:
Step 1 Add application specific AVPs in //localhost/Radius/Advanced/Diameter/Diameter Dictionary other
than Base stack AVPs.
[ //localhost/Radius/Advanced/Diameter/Diameter Dictionary/CiscoAVPS ]
Name = CiscoAVPS
Description =
IsVendorSpecific = FALSE
ApplicationID =
AVPs/
Step 2 Write a rex script (C/C++) and add it in the scripting point or rex service.
[ //localhost/Radius/Services/diaservice ]
Name = diaservice
Description =

8-20
Cisco Prime Access Registrar 6.1 User Guide
OL-29756-01
Chapter 8 Diameter
Writing Diameter Application in Prime Access Registrar
Type = rex
IncomingScript~ =
OutgoingScript~ =
OutagePolicy~ = RejectAll
OutageScript~ =
Filename = librexscript.so
EntryPoint = DiaService
InitEntryPoint =
InitEntryPointArgs =
Refer to Sample rex script/service, page 8-21.
Scripting in Diameter
Prime Access Registrar supports 'rex' scripts for Diameter protocol. The script can be configured only
as the server incoming script. The commands available for scripting are restricted to 'get' and 'put' on the
dictionaries. While setting a value to an attribute, the following convention needs to be followed "<type
number>,<value>". For example, if a 'Class' attribute needs to be added to the response dictionary with
value as "classvalue", then set it as follows in the script:
pResponse->put( pResponse, "Class", "1,classvalue", REX_REPLACE );
The following is the list of supported scripting types with the respective type numbers:
AVP_STRING_TYPE = 1
AVP_ADDRESS_TYPE = 2
AVP_INTEGER32_TYPE = 3
AVP_UINTEGER32_TYPE = 4
AVP_UTF8_STRING_TYPE = 6
AVP_ENUM_TYPE = 7
AVP_TIME_TYPE = 11
Setting response attributes via a script is the only mechanism to add authorization attributes for Diameter
requests.
Diameter Environment Variables
This section lists the environment variables that you can use in scripts for Diameter messages.
Table 8-1 lists the Diameter Environment variables and descriptions.

8-21
Cisco Prime Access Registrar 6.1 User Guide
OL-29756-01
Chapter 8 Diameter
Writing Diameter Application in Prime Access Registrar
Sample rex script/service
int REXAPI DiaService( int iScriptingPoint,
rex_AttributeDictionary_t* pRequest,
rex_AttributeDictionary_t* pResponse,
rex_EnvironmentDictionary_t* pEnviron )
{
if( iScriptingPoint == REX_START_SERVICE || iScriptingPoint == REX_STOP_SERVICE )
return REX_OK;
int iRetVal = REX_ERROR;
const char* pszRequestType = pEnviron->get( pEnviron, "Request-Type");
const char* pszAppId = pEnviron->get( pEnviron, "Diameter-Application-Id" );
const char* pszCmdCode= pEnviron->get( pEnviron, "Diameter-Command-Code" );
if(!( pszRequestType && pszAppId && pszCmdCode ))
return iRetVal;
// check the request type, Application id and command code
/*
Request / Response types
Diameter-Access-Request
Diameter-Access-Accept
Table 8-1 Diameter Environment Variables
Variable Description
Request-Type
Response-Type
String value.
Get/Set the request and response type for diameter packet.
Sample Values
Diameter-Access-Request
Diameter-Access-Accept
Diameter-Access-Reject
Diameter-Accounting-Request
Diameter-Accounting-Response
Diameter-Proxy-Request
Diameter-Proxy-Answer
Diameter-Applicat
ion-Id
String value.
Get the application id for the packet. For setting in response, need to use
Auth-Application-id or Acct-Application-id AVPs.
In Accounting type packet, use Acct-Application-Id AVP to get the application id.
Sample Values
1 ( NASREQ)
3 ( Base Accounting )
Diameter-Comma
nd-Code
String value.
Get command code for the diameter packet. It will work only for the
access-request packet, not for the accounting request.
Sample Values
265 ( AA-Request )

8-22
Cisco Prime Access Registrar 6.1 User Guide
OL-29756-01
Chapter 8 Diameter
Writing Diameter Application in Prime Access Registrar
Diameter-Access-Reject
Diameter-Accounting-Request
Diameter-Accounting-Response
*/
if( (strcmp( pszRequestType, "Diameter-Access-Request") == 0) && (strcmp(
pszAppId,"1") ==0 ) && (strcmp( pszCmdCode,"265\
" )== 0 ) )
{
// our application
// example how to get DiaAttrib from the packet.
const char* pszSessionId = pRequest ->get( pRequest,"Session-Id",0,0 );
// print in trace
if( pszSessionId )
pEnviron->trace( pEnviron, 5, "Diameter Session Id: %s", pszSessionId );
// example: how to add dia attrib in response packet
pResponse->put( pResponse, "Calling-Station-Id", "1,00-01-02-03-05", REX_APPEND );
pEnviron->put( pEnviron, "Response-Type", "Diameter-Access-Accept");
iRetVal = REX_OK;
}
return iRetVal;
}
Traces/Logs
09/30/2013 11:13:46.830: P88: Diameter Packet received from 10.81.79.59
09/30/2013 11:13:46.830: P88: Trace of Diameter-Access-Request packet
09/30/2013 11:13:46.830: P88: Session-Id = .;1096298391;15
09/30/2013 11:13:46.830: P88: Auth-Application-Id = 1
09/30/2013 11:13:46.830: P88: Origin-Host = 10.81.79.59
09/30/2013 11:13:46.830: P88: Origin-Realm = xyz.com
09/30/2013 11:13:46.830: P88: Destination-Realm = abc.com
09/30/2013 11:13:46.830: P88: Auth-Request-Type = 1
09/30/2013 11:13:46.830: P88: User-Name = bob
09/30/2013 11:13:46.830: P88: Tracing the packet after running the rules and policies
09/30/2013 11:13:46.830: P88: Trace of Diameter-Access-Request packet
09/30/2013 11:13:46.830: P88: Session-Id = .;1096298391;15
09/30/2013 11:13:46.830: P88: Auth-Application-Id = 1
09/30/2013 11:13:46.830: P88: Origin-Host = 10.81.79.59
09/30/2013 11:13:46.830: P88: Origin-Realm = xyz.com
09/30/2013 11:13:46.830: P88: Destination-Realm = abc.com
09/30/2013 11:13:46.830: P88: Auth-Request-Type = 1
09/30/2013 11:13:46.830: P88: User-Name = bob
09/30/2013 11:13:46.830: P88: Using Client: molly
09/30/2013 11:13:46.830: P88: Authenticating and Authorizing with Service
dia-rex-service
09/30/2013 11:13:46.830: P88: Rex: environ->get( "Request-Type" ) ->
"Diameter-Access-Request"
09/30/2013 11:13:46.830: P88: Rex: environ->get( "Diameter-Application-Id" ) ->
"1"
09/30/2013 11:13:46.830: P88: Rex: environ->get( "Diameter-Command-Code" ) ->
"265"
09/30/2013 11:13:46.830: P88: Rex: request->get( "Session-Id", 0 ) ->
".;1096298391;15"
09/30/2013 11:13:46.830: P88: Diameter Session Id: .;1096298391;15
09/30/2013 11:13:46.830: P88: Rex: response->put( "Calling-Station-Id",
"1,00-01-02-03-05", 0 ) -> TRUE
09/30/2013 11:13:46.831: P88: Rex: environ->put( "Response-Type",
"Diameter-Access-Accept" ) -> TRUE
09/30/2013 11:13:46.831: P88: Trace of Diameter-Access-Accept
09/30/2013 11:13:46.831: P88: Calling-Station-Id = 00-01-02-03-05
09/30/2013 11:13:46.831: P88: Auth-Application-Id = 1
09/30/2013 11:13:46.831: P88: User-Name = bob

8-23
Cisco Prime Access Registrar 6.1 User Guide
OL-29756-01
Chapter 8 Diameter
Translation Framework for Diameter
09/30/2013 11:13:46.831: P88: Auth-Request-Type = 3
09/30/2013 11:13:46.831: P88: Result-Code = 2001
Translation Framework for Diameter
Prime Access Registrar supports translation of an incoming RADIUS request to a Diameter request and
vice versa.
The following services are created to set up the translation framework:
•Radius-Diameter—For translation of incoming RADIUS request to a Diameter request.
•Diameter-Radius—For translation of incoming Diameter message to an equivalent RADIUS
message.
For RADIUS to Diameter translation, Prime Access Registrar provides scripting points
PreRequestTranslationScript and PostRequestTranslationScript, which operate on the original packet
and on the newly translated packet based on request and response mapping. This gives an option to
modify the AVPs before and after the translation. RADIUS to Diameter translation comes with 3GPP
reverse authorization, if the property is set as True. In that case, the request command mapping must not
be defined because the new diameter request is created from the radius request by the 3GPP reverse
authorization service. When the diameter response is received from the diameter proxy service, it
translates the Diameter response to RADIUS response based on the response mapping configuration and
sends radius response to the client.
Similarly, for Diameter to RADIUS translation (on the response), Prime Access Registrar provides
scripting points PreResponseTranslationScript and PostResponseTranslationScript, which are called on
the incoming Diameter message and the corresponding RADIUS response message respectively.
Both these translation services create and maintain appropriate states (with the necessary identifiers,
packet pointers, etc) to correlate Request to Response. The states will be cleared if present beyond the
‘Timeout’ property value and all the retries have been exhausted. You can configure the number of retries
under Diameter-RemoteServers.
For more information about the translation parameters, see Simple Services, page 3-23.
CLI for RADIUS-Diameter Translation
Following is the CLI for RADIUS to Diameter translation:
[ /Radius/Services/rad-dia ]
Name = rad-dia
Description =
Type = radius-diameter
DiameterApplicationId = 1
ProxyServiceName = dia-proxy
EnableCommandMappings = True
PreRequestTranslationScript~ =
PostRequestTranslationScript~ =
PreResponseTranslationScript~ =
PostResponseTranslationScript~ =
RequestMapping/
CommandMappings/
Radius-Access-Request = AA
AVPMappings/
NAS-Identifier = Origin-Host
User-Name = User-Name
AVPsToBeAdded/
Origin-Realm = cisco.com

8-24
Cisco Prime Access Registrar 6.1 User Guide
OL-29756-01
Chapter 8 Diameter
Managing Diameter Sessions
EnvironmentMappings/
ResponseMapping/
ResultCodeMappings/
Diameter-Success = Radius-Access-Accept
Diameter-Unable-To-Deliver = Radius-Access-Reject
AVPMappings/
AVPsToBeAdded/
EnvironmentMappings/
CLI for Diameter-RADIUS Translation
Following is the CLI for Diameter to RADIUS translation:
[ /Radius/Services/dia-rad ]
Name = dia-rad
Description =
Type = diameter-radius
ProxyServiceName = rad-proxy
PreRequestTranslationScript~ =
PostRequestTranslationScript~ = dia-rad-addpassword
PreResponseTranslationScript~ =
PostResponseTranslationScript~ = diareadwritetest
RequestMapping/
CommandMappings/
AA = Radius-Access-Request
AVPMappings/
Origin-Host = NAS-Identifier
User-Name = User-Name
AVPsToBeAdded/
NAS-Port = 1
EnvironmentMappings/
ResponseMapping/
ResultCodeMappings/
Radius-Access-Accept = Diameter-Success
Radius-Access-Reject = Diameter-Unable-To-Deliver
AVPMappings/
AVPsToBeAdded/
EnvironmentMappings/
Managing Diameter Sessions
Diameter provides two kinds of services namely authentication/authorization and accounting only
(optional). Diameter sessions can be created when an authentication/authorization request comes from
an access point or when an accounting start comes from an access point. When a Diameter client issues
an authentication request, Prime Access Registrar sends the packet with a Session-Id AVP, which can be
used to correlate a Diameter message with a user-session. When a Session Termination Request (STR)
message is received from the Diameter client, Prime Access Registrar releases the sessions. Also
Re-authentication requests must be mapped to the corresponding user session. In case of accounting
packets, the session is created when the accounting start is received from the Diameter client. The
session is deleted when the accounting stop message is received.
Prime Access Registrar creates a new session when it receives an authentication or accounting request
packet from a Diameter client and when a user session is not already present. It allocates the resources
for the particular session from the resource manager and stores the session in a session backing store.
This session backing store is a file where session information is written. When a session termination

8-25
Cisco Prime Access Registrar 6.1 User Guide
OL-29756-01
Chapter 8 Diameter
Support for SCTP including Multihoming
message or an accounting stop message comes from the Diameter client, the session data is deleted from
the backing store. Apart from this, Prime Access Registrar maintains the session state for every session
it creates. Session cache will be supported for grouped AVPs.
For more information on session manager and its support for Diameter client, see SessionManagers,
page 3-92.
Support for SCTP including Multihoming
Prime Access Registrar release enhances the diameter support to the more reliable transport mechanism
such as SCTP with multi-homing.
In a SCTP connection, each of the two endpoints during an SCTP association setup can specify multiple
points of attachment. Having multiple interfaces allows the data to be automatically sent to alternate
addresses when failures occur. Using this support, the Prime Access Registrar runs successfully even
when a failure occurs in any of the multiple interfaces.
[ //localhost/Radius/advanced/diameter/transportManagement ]
Identity = localhost
Realm = abc.com
TCPListenPort = 3868
SCTPListenPort = 3868
EnableIPV6 = FALSE
WatchdogTimeout = 500
ReconnectInterval = 500
MaxReconnections = 3
RequestRetransmissionInterval = 100
MaxRequestRetransmissionCount = 3
ReceiveBufferSize = 2048
AdvertisedHostName/
--> cd AdvertisedHostName
--> add 1 10.77.240.135
--> add 2 10.77.240.136
--> add 3 10.77.240.137
--> ls
[ //localhost/Radius/advanced/diameter/transportManagement/AdvertisedHostName ]
1. 10.77.240.135
2. 10.77.240.136
3. 10.77.240.137
Note The number of AVPs should be set greater than or equal to the number of AdvertisedHostName in order
to exchange the capabilities between peers.

8-26
Cisco Prime Access Registrar 6.1 User Guide
OL-29756-01
Chapter 8 Diameter
Support for SCTP including Multihoming

CHAPTER
9-1
Cisco Prime Access Registrar 6.1 User Guide
OL-29756-01
9
Extensible Authentication Protocols
Cisco Prime Access Registrar (Prime Access Registrar) supports the Extensible Authentication Protocol
(EAP) to provide a common protocol for differing authentication mechanisms. EAP enables the dynamic
selection of the authentication mechanism at authentication time based on information transmitted in the
Access-Request. (This type of EAP authentication mechanism is called an authentication exchange.)
Extensible Authentication Protocols (EAP) provide for support of multiple authentication methods.
Cisco Prime Access Registrar supports the following EAP authentication methods:
•EAP-AKA
•EAP-AKA-Prime (EAP-AKA’), page 9-6
•EAP-FAST
•EAP-GTC
•EAP-LEAP
•EAP-MD5
•EAP-Negotiate
•EAP-MSChapV2
•EAP-SIM
•EAP-Transport Level Security (TLS)
•EAP-TTLS
•Protected EAP
–
PEAP Version 0 (Microsoft PEAP)
–
PEAP Version 1 (Cisco PEAP)
In general, you enable each EAP method by creating and configuring a service of the desired type. Use
the radclient test tool to confirm that the EAP service has been properly configured and is operational.
Both versions of Protected EAP (PEAP) are able to use other EAP methods as the authentication
mechanism that is protected by PEAP encryption. For PEAP Version 0, the supported authentication
methods are EAP-MSChapV2, EAP-SIM, EAP-TLS and EAP-Negotiate. For PEAP Version 1, the
supported authentication methods are EAP-GTC, EAP-SIM, EAP-TLS and EAP-Negotiate.
The PEAP protocol consists of two phases: an authentication handshake phase and a tunnel phase where
another complete EAP authentication exchange takes place protected by the session keys negotiated by
phase one. Cisco Prime Access Registrar supports the tunneling of other EAP methods within the PEAP
phase two exchange.

9-2
Cisco Prime Access Registrar 6.1 User Guide
OL-29756-01
Chapter 9 Extensible Authentication Protocols
EAP-AKA
EAP-AKA
Authentication and Key Agreement (AKA) is an EAP mechanism for authentication and session key
distribution. It is used in the 3rd generation mobile networks Universal Mobile Telecommunications
System (UMTS) and CDMA2000. AKA is based on symmetric keys, and typically runs in a UMTS
Subscriber Identity Module (USIM), or a (Removable) User Identity Module ((R) UIM), similar to a
smart card. EAP-AKA (Extensible Authentication Protocol Method for UMTS Authentication and Key
Agreement) includes optional identity privacy support, optional result indications, and an optional fast
reauthentication procedure.
In support of EAP-AKA, the following features are supported:
•support of MAP protocol over SIGTRAN
•support of HLR and/or HSS (3GPP compliant)
•Wx interface
•Support M3UA-SIGTRAN over IP
For more information on Wx Interface Support, see the Wx Interface Support for SubscriberDB Lookup,
page 17-48.
Prime Access Registrar server supports migration to a converged IP Next Generation Networks (IP
NGN) by supporting SS7 and SIGTRAN (SS7 over IP) for HLR communication to enable the seamlessly
transition to next-generation IP-based signaling networks.
Prime Access Registrar supports M3UA-SIGTRAN to fetch the authentication vectors from HLR for
EAP-AKA authentication, See SIGTRAN-M3UA for more information.
EAP-AKA is based on rfc-4187 (http://www.ietf.org/rfc/rfc4187.txt). This document specifies the
details of the algorithms and messages.
This section contains the following topics:
•Configuring EAP-AKA, page 9-2
•Testing EAP-AKA with radclient, page 9-5
Configuring EAP-AKA
You can use aregcmd to create and configure a service of type eap-aka.
Table 9-1 lists and describes the EAP-AKA service properties.
Table 9-1 EAP-AKA Service Properties
Property Description
AlwaysRequestIdentity When True, enables the server to obtain the subscriber's identity via
EAP/AKA messages instead of relying on the EAP messages alone.
This might be useful in cases where intermediate software layers can
modify the identity field of the EAP-Response/Identity message. The
default value is False.
EnableIdentityPrivacy When True, the identity privacy feature is enabled. The default value is
False.

9-3
Cisco Prime Access Registrar 6.1 User Guide
OL-29756-01
Chapter 9 Extensible Authentication Protocols
EAP-AKA
PseudonymSecret The secret string that is used as the basis for protecting identities when
identity privacy is enabled. This should be at least 16 characters long
and have a value that is impossible for an outsider to guess. The default
value is secret.
Note It is very important to change PseudonymSecret from its default
value to a more secure value when identity privacy is enabled
for the first time.
PseudonymRenewtime Specifies the maximum age a pseudonym can have before it is renewed.
When the server receives a valid pseudonym that is older than this, it
generates a new pseudonym for that subscriber. The value is specified
as a string consisting of pairs of numbers and units, where the units
might be of the following: M, Minute, Minutes, H, Hour, Hours, D, Day,
Days, W, Week, Weeks. The default value is "24 Hours".
Examples are: "8 Hours", "10 Hours 30 Minutes", "5 D 6 H 10 M"
PseudonymLifetime Specifies the maximum age a pseudonym can have before it is rejected
by the server, forcing the subscriber to authenticate using it's permanent
identity. The value is specified as a string consisting of pairs of numbers
and units, where the units might be one of the following: M, Minute,
Minutes, H, Hour, Hours, D, Day, Days, W, Week, Weeks. It can also
be Forever, in which case, pseudonyms do not have a maximum age.
The default value is "Forever".
Examples are: "Forever", "3 Days 12 Hours 15 Minutes", "52 Weeks"
EnableReauthentication When True, the fast reauthentication option is enabled. The default
value is False.
MaximumReauthentica-
tions
Specifies the maximum number of times a reauthentication identity
might be reused before it must be renewed. The default value is 16.
ReauthenticationTimeout Specifies the time in seconds that reauthentication identities are cached
by the server. Subscribers that attempt to reauthenticate using identities
that are older than this value will be forced to use full authentication
instead. The default value is 3600 (one hour).
ReauthenticationRealm Optional. If you configure the realm, this value is appended to the Fas-
tReauthenticationUserId.
AuthenticationTimeout Time in seconds to wait for authentication to complete. The default is 2
minutes; range is 10 seconds to 10 minutes.
QuintetGenerationScript~ Optional. If the script is set, the custom scripting point can be used to
read the quintets from a flat file or generate quintets instead of fetching
the quintets from HLR.If the script is not set, the
Prime Access Registrar sends the request to HLR configured in remote
server to fetch the quintets.
UseProtectedResults Enables or disables the use of protected results messages. Results
messages indicate the state of the authentication but are cryptographi-
cally protected.
TripletCacheTimeout Required; timeout value of triplet cache.
Table 9-1 EAP-AKA Service Properties (continued)
Property Description

9-4
Cisco Prime Access Registrar 6.1 User Guide
OL-29756-01
Chapter 9 Extensible Authentication Protocols
EAP-AKA
To enable EAP-AKA authentication:
Step 1 Launch aregcmd and create an EAP-AKA service.
cd /Radius/Services
add eap-aka-service
Step 2 Change directory to the service and set its type to eap-aka.
cd eap-aka-service
set Type eap-aka
The following example shows the default configuration for an EAP-AKA service:
[ //localhost/Radius/Services/test ]
Name = test
Description =
Type = eap-aka
AlwaysRequestIdentity = False
EnableIdentityPrivacy = False
PseudonymSecret = <encrypted>
PseudonymRenewtime = "24 Hours"
PseudonymLifetime = Forever
Generate3GPPCompliantPseudonym = False
EnableReauthentication = False
Subscriber_DBLookup Required. Must be set to either DIAMETER or SIGTRAN-M3UA.
When set to DIAMETER, the HSS lookup happens using the Diameter
Wx Interface. You need to configure the DestinationRealm to send the
Diameter packets to the RemoteServer.
When set to SIGTRAN-M3UA, the HLR/HSS lookup happens using
the SIGTRAN protocol. You need to configure the SIGTRAN remote
server.
FetchAuthorizationInfo Required. When set True, it fetches MSISDN from HLR.
This field is displayed when you set Subscriber_DBLookup as SIG-
TRAN-M3UA.
IncomingScript~ Optional script Prime Access Registrar server runs when it receives a
request from a client for an EAP-AKA/EAP-SIM service.
OutgoingScript~ Optional script Prime Access Registrar server runs before it sends a
response to a client using an EAP-AKA/EAP-SIM service.
OutageScript~ Optional. If set to the name of a script, Prime Access Registrar runs the
script when an outage occurs. This property allows you to create a script
that notifies you when the server detects a failure.
RemoteServers Remote server which can provide the service.
Table 9-1 EAP-AKA Service Properties (continued)
Property Description

9-5
Cisco Prime Access Registrar 6.1 User Guide
OL-29756-01
Chapter 9 Extensible Authentication Protocols
EAP-AKA
MaximumReauthentications = 16
ReauthenticationTimeout = 3600
ReauthenticationRealm =
AuthenticationTimeout = 120
QuintetGenerationScript~ =
UseProtectedResults = False
SendReAuthIDInAccept = False
SubscriberDBLookup = SIGTRAN-M3UA
FetchAuthorizationInfo = FALSE
MultipleServersPolicy = Failover
IncomingScript~ =
OutgoingScript~ =
OutageScript~ =
RemoteServers/
The following example shows the default configuration for an EAP-AKA Wx service:
[ //localhost/Radius/Services/eap-aka-wx ]
Name = eap-aka-wx
Description =
Type = eap-aka
AlwaysRequestIdentity = False
EnableIdentityPrivacy = False
PseudonymSecret = <encrypted>
PseudonymRenewtime = "24 Hours"
PseudonymLifetime = Forever
Generate3GPPCompliantPseudonym = False
EnableReauthentication = False
MaximumReauthentications = 16
ReauthenticationTimeout = 3600
ReauthenticationRealm =
AuthenticationTimeout = 120
QuintetGenerationScript~ =
UseProtectedResults = False
SendReAuthIDInAccept = False
SubscriberDBLookup = Diameter
DestinationRealm = mpc.com
PreRequestTranslationScript~ =
PostRequestTranslationScript~ =
PreResponseTranslationScript~ =
PostResponseTranslationScript~ =
Testing EAP-AKA with radclient
To test the EAP-AKA service, launch radclient and use the simple_eap_aka_test command. The
simple_eap_aka_test command sends an Access-Request for the designated user with the user's secret
key and sequence number.
The response packet should indicate an Access-Accept if authentication was successful. View the
response packet to ensure the authentication was successful.
simple_eap_aka_test bob secret 2
To test from radclient, you have to configure /cisco-ar/conf/imsi.conf file on radius server and reload
the server. This file content should have imsi users in the format below:
<username>:<secret>:<sequence number>
For example:
bob:bob:1

9-6
Cisco Prime Access Registrar 6.1 User Guide
OL-29756-01
Chapter 9 Extensible Authentication Protocols
EAP-AKA-Prime (EAP-AKA’)
EAP-AKA-Prime (EAP-AKA’)
EAP-AKA-Prime (EAP-AKA') is a new EAP authentication method, with a small revision to the existing
EAP-AKA method. EAP- AKA' has a new key derivation function, which binds the keys derived within
the method to the name of the access network. This limits the effects of compromised access network
nodes and keys.
EAP- AKA' is similar to EAP-AKA in all aspects except the following:
•Key derivation involves an AT_KDF_INPUT attribute, which is mapped to the NetworkName
attribute, and an AT_KDF attribute, which takes the key derivation function in the configuration, to
ensure that the peer and the server know the name of the access network.
•EAP-AKA' employs SHA-256 (Secure Hash Algorithm) instead of SHA-1 as used in EAP-AKA, to
ensure more security.
EAP-AKA' is based on rfc-5448 (http://www.ietf.org/rfc/rfc5448.txt). This document specifies the
details of the algorithms and messages.
This section contains the following topics:
•Configuring EAP-AKA’, page 9-6
•Testing EAP-AKA’ with radclient, page 9-7
Configuring EAP-AKA’
You can use aregcmd to create and configure a service of type eap-aka-prime. EAP-AKA' service has
the following attribute in addition to the service properties listed in Table 9-1.
To enable EAP-AKA' authentication:
Step 1 Launch aregcmd and create an EAP-AKA' service.
cd /Radius/Services
add eap-aka-prime-service
Step 2 Change directory to the service and set its type to eap-aka-prime.
cd eap-aka-prime-service
set Type eap-aka-prime
The following example shows the default configuration for an EAP-AKA’ service:
//localhost/Radius/Services/eap-aka-prime ]
Property Description
NetworkName Required. Name of the access network for which the authentication is
performed. This attribute is captured to ensure that the peer and the
server know the name of the access network for performing the EAP au-
thentication.

9-7
Cisco Prime Access Registrar 6.1 User Guide
OL-29756-01
Chapter 9 Extensible Authentication Protocols
EAP-FAST
Name = eap-aka-prime
Description =
Type = eap-aka-prime
AlwaysRequestIdentity = False
EnableIdentityPrivacy = FALSE
PseudonymSecret = <encrypted>
PseudonymRenewtime = "24 Hours"
PseudonymLifetime = Forever
Generate3GPPCompliantPseudonym = False
EnableReauthentication = FALSE
MaximumReauthentications = 16
ReauthenticationTimeout = 3600
ReauthenticationRealm =
NetworkName = WAN
AuthenticationTimeout = 120
QuintetGenerationScript~ = aka
UseProtectedResults = TRUE
SendReAuthIDInAccept = False
Subscriber_DBLookup = sigtran
MultipleServersPolicy = Failover
IncomingScript~ =
OutgoingScript~ =
OutageScript~ =
RemoteServers/
1. sigtran
Testing EAP-AKA’ with radclient
To test the EAP-AKA’ service, launch radclient and use the simple_eap_aka_prime_test command.
The simple_eap_aka_prime_test command sends an Access-Request for the designated user with the
user's secret key and sequence number.
The response packet should indicate an Access-Accept if authentication was successful. View the
response packet to ensure the authentication was successful.
simple_eap_aka_prime_test bob secret 2
To test from radclient, you have to configure /cisco-ar/conf/imsi.conf file on radius server and reload
the server. This file content should have imsi users in the format below:
<username>:<secret>:<sequence number>
For example:
bob:bob:1
EAP-FAST
Cisco Prime Access Registrar supports the EAP-FAST authentication method. EAP-FAST uses the
EAP-MSChapV2 method for credential provisioning and EAP-GTC for authentication. Credential
provisioning typically occurs only during the client’s initial EAP-FAST authentication. Subsequent
authentications rely on the provisioned credential and will usually omit the provisioning step.

9-8
Cisco Prime Access Registrar 6.1 User Guide
OL-29756-01
Chapter 9 Extensible Authentication Protocols
EAP-FAST
EAP-FAST is an authentication protocol designed to address the performance shortcomings of prior
TLS-based EAP methods while retaining features such as identity privacy and support for
password-based protocols. The EAP-FAST protocol is described by the IETF draft
draft-cam-winget-eap-fast-00.txt.
The EAP-FAST credential is known as a Protected Access Credential (PAC) and contains information
used to secure the authentication operations. Parts of the PAC are encrypted by the server and are not
visible to other entities. Clients are expected to securely store PACs locally for use during authentication.
Configuring EAP-FAST involves creating and configuring the required EAP-MSChapV2 and EAP-GTC
services as well as the EAP-FAST service with the appropriate parameters.
You can use the radclient test tool to confirm that the EAP services are properly configured and
operational.
This section contains the following topics:
•Configuring EAP-FAST
•EAP-FAST Keystores
•Testing EAP-FAST with radclient
•Parameters Used for Certificate-Based Authentication
•PAC—Credential Export Utility
Configuring EAP-FAST
You can use aregcmd to create and configure a service of type eap-fast.
To enable EAP-FAST:
Step 1 Launch aregcmd and create an EAP-FAST service.
cd /Radius/Services
add eap-fast-service
Step 2 Change directory to the service and set its type to eap-fast.
cd eap-fast-service
set type eap-fast
Step 3 Set the AuthorityIdentifier:
set AuthorityIdentifier authority-identifier
Step 4 : Set the AuthorityInformation:
set AuthorityInformation authority-information
Step 5 : Set the AuthentitcationService:
set AuthenticationService eap-gtc-service
Step 6 :Set the ProvisionService:

9-9
Cisco Prime Access Registrar 6.1 User Guide
OL-29756-01
Chapter 9 Extensible Authentication Protocols
EAP-FAST
set ProvisionService eap-mschapv2-service
The follow example shows the default configuration for an EAP-FAST service:
[ //localhost/Radius/Services/eap-fast-service ]
Name = eap-fast-service
Description =
Type = eap-fast
IncomingScript~ =
OutgoingScript~ =
MaximumMessageSize = 1024
PrivateKeyPassword = <encrypted>
ServerCertificateFile = /opt/CSCOar/pki/server-cert.pem
ServerKeyFile = /opt/CSCOar/pki/server-key.pem
CACertificateFile = /opt/CSCOar/pki/root-cert.pem
CACertificatePath = /opt/CSCOar/pki
CRLDistributionURL =
ClientVerificationMode = Optional
VerificationDepth = 4
EnableSessionCache = true
UseECCCertificates = true
SessionTimeout = "5 Minutes"
AuthenticationTimeout = 120
Table 9-2 lists and describes the EAP-FAST service properties.
Table 9-2 EAP-FAST Service Properties
Property Description
IncomingScript Optional script Prime Access Registrar server runs when it receives a
request from a client for EAP-FAST service.
OutgoingScript Optional script Prime Access Registrar server runs before it sends a
response to a client using EAP-FAST.
AuthorityIdentifier A string that uniquely identifies the credential (PAC) issuer. The client
uses this value to select the correct PAC to use with a particular server
from the set of PACs it might have stored locally.
Ensure that the AuthorityIdentifier is globally unique and that it does
not conflict with identifiers used by other EAP-FAST servers or PAC
issuers.
AuthorityInformation A string that provides a descriptive text for this credential issuer. The
value can be displayed to the client for identification purposes and
might contain the enterprise or server names.
MaximumMessageSize Indicates the maximum length in bytes that a PEAP or EAP-TLS
message can have before it is fragmented.
PrivateKeyPassword The password used to protect the server’s private key.
ServerCertificateFile The full pathname of the file containing the server’s certificate or
certificate chain used during the TLS exchange. The pathname can be
optionally prefixed with a special string that indicates the type of
encoding used for the certificate. The two valid encoding prefixes are
PEM and DER. If an encoding prefix is not present, the file is assumed
to be in PEM format.

9-10
Cisco Prime Access Registrar 6.1 User Guide
OL-29756-01
Chapter 9 Extensible Authentication Protocols
EAP-FAST
ServerKeyFile The full pathname of the file containing the server’s RSA or ECC
private key. The pathname can be optionally prefixed with a special
string that indicates the type of encoding used for the certificate. The
two valid encoding prefixes are “PEM” and “DER”. If an encoding
prefix is not present, the file is assumed to be in PEM format.
The following example assumes that the subdirectory pki under
/cisco-ar contains the server’s certificate file. The file server-key.pem
is assumed to be in PEM format. The file extension .pem is not
significant.
set ServerKeyFile PEM:/cisco-ar/pki/server-key.pem
CACertificateFile The full pathname of the file containing trusted CA certificates used for
client verification. The file can contain more than one certificate, but
all certificates must be in PEM format. DER encoding is not allowed.
CACertificatePath The name of a directory containing trusted CA certificates (in PEM
format) used for client verification. This parameter is optional, and if
it is used there are some special preparations required for the directory
it references.
Each certificate file in this directory must contain exactly one
certificate in PEM format. The server looks up the certificate files using
the MD5 hash value of the certificate’s subject name as a key. The
directory must therefore also contain a set of symbolic links each of
which points to an actual certificate file. The name of each symbolic
link is the hash of the subject name of the certificate.
For example, if a certificate file named ca-cert.pem is located in the
CACertificatePath directory, and the MD5 hash of the subject name
contained in ca-cert.path.pem is 1b96dd93, then a symbolic link
named 1b96dd93 must point to ca-cert.pem.
If there are subject name collisions such as multiple certificates with the
same subject name, each link name must be indexed with a numeric
extension as in 1b96dd93.0 and 1b96dd93.1.
CRLDistributionURL Optional. Enter the URL that Prime Access Registrar should use to
retrieve the CRL.You can specify a URL that uses HTTP or LDAP.
The following is an example for an HTTP URL: <
//crl.verisign.com/pca1.1.1.crl>.
The following is an example for an LDAP URL:
ldap://209.165.200.225:388/CN=development-CA,CN=acs-westcoa
st2,CN=CDP,CN=Public Key
Services,CN=Services,CN=Configuration,DC=cisco,DC=com
Table 9-2 EAP-FAST Service Properties (continued)
Property Description

9-11
Cisco Prime Access Registrar 6.1 User Guide
OL-29756-01
Chapter 9 Extensible Authentication Protocols
EAP-FAST
ClientVerificationMode Specifies the type of verification used for client certificates. Must be set
to one of RequireCertificate, None, or Optional.
•RequireCertificate causes the server to request a client certificate
and authentication fails if the client refuses to provide one.
•None will not request a client certificate.
•Optional causes the server to request a client certificate but the
client is allowed to refuse to provide one.
VerificationDepth Specifies the maximum length of the certificate chain used for client
verification.
UseECCCertificates Determines the applicability of the authentication mechanism in
SmartGrid Solutions, see the Smart Grid Solution Management,
page 17-50 for more information.
When UseECCCertificates is set to True, it can use the ECC, RSA, or
combination of both certificate for certificate based verification.
When UseECCCertificates is set to False, it can only use the RSA
certificate for certificate based verification. The default location to
fetch the certificate file is /cisco-ar/pki.
EnableSessionCache Specifies whether TLS session caching (fast reconnect) is enabled or
not. Set to True to enable session caching; otherwise set to False.
SessionTimeout If TLS session caching (fast reconnect) is enabled, SessionTimeout
specifies the maximum lifetime of a TLS session. Expired sessions are
removed from the cache and will require a subsequent full
authentication.
SessionTimeout is specified as a string consisting of pairs of numbers
and units, where units might be one of the following: M, Minute,
Minutes, H, Hour, Hours, D, Day, Days, W, Week, Weeks, as in the
following:
Set SessionTimeout “1 Hour 45 Minutes”
AuthenticationTimeout Mandatory; specifies time (in seconds) to wait before an authentication
request times out; defaults to 120.
CredentialLifetime Specifies the maximum lifetime of a Protected Access Credential
(PAC). Clients that successfully authenticate with an expired PAC will
be reprovisioned with a new PAC.
CredentialLifetime is specified as a string consisting of pairs of
numbers and units, where units might be one of the following: M,
Minute, Minutes, H, Hour, Hours, D, Day, Days, W, Week, Weeks.
Credentials that never expire should be specified as Forever.
AuthenticationService Specifies the name of the EAP-GTC service is used for authentication.
The named service must have the UseLabels parameter set to True.
ProvisionMode Specifies the TLS mode used for provisioning. Clients only support the
default Anonymous mode.
Table 9-2 EAP-FAST Service Properties (continued)
Property Description

9-12
Cisco Prime Access Registrar 6.1 User Guide
OL-29756-01
Chapter 9 Extensible Authentication Protocols
EAP-FAST
Note Prime Access Registrar verifies the certificate during the TLS-based authentication. CRL validation is
done before accepting a client certificate during the TLS authentication.
EAP-FAST Keystores
The EAP-FAST service manages a set of keys used to protect the security and integrity of the PACs it
issues. The keys are stored in/Radius/Advanced/KeyStores/EAP-FAST and are maintained
automatically requiring minimal administration. Administrators can specify the maximum number of
keys that are stored and the frequency of key updates.
The following is the default KeyStores settings:
[ //localhost/Radius/Advanced/KeyStores/EAP-FAST ]
NumberOfKeys = 256
RolloverPeriod = "1 Week"
Table 9-3 defines the KeyStores properties.
Testing EAP-FAST with radclient
There are two distinct phases to testing EAP-FAST: provisioning and authentication. In the instructions
below, Step 2 and Step 3 test provisioning and Steps 4 and Step 5 test authentication. At least one
successful provisioning phase must be completed prior to testing authentication. Testing EAP-FAST
with radclient requires that the EAP-MSChapV2 and EAP-GTC services be configured and functional.
The following instructions and examples assume that the AlwaysAuthenticate parameter has been set to
False for testing purposes. This permits the provisioning and authentication steps to be tested separately.
Most installations will set AlwaysAuthenticate to True for production use, and radclient works with that
setting, but might display extra error messages that you can ignore.
To test EAP-FAST using radclient:
ProvisionService Specifies the name of the EAP-MSChapV2 service used for
provisioning.
AlwaysAuthenticate Indicates whether provisioning should always automatically rollover
into authentication without relying on a separate session. Most
environments, particularly wireless, will perform better when this
parameter is set to True, the default value.
Table 9-2 EAP-FAST Service Properties (continued)
Property Description
Table 9-3 KeyStores Properties
Property Description
NumberOfKeys Number (from 1-1024) that specifies the maximum number of keys stored for
EAP-FAST.
RolloverPeriod Specifies the amount of time between key updates.

9-13
Cisco Prime Access Registrar 6.1 User Guide
OL-29756-01
Chapter 9 Extensible Authentication Protocols
EAP-FAST
Step 1 Start radclient.
cd /cisco-ar/usrbin
./radclient –s
Step 2 Specify the inner provisioning method
tunnel eap-mschapv2
The only allowable method for provisioning is eap-mschapv2.
Step 3 Provision a new PAC:
simple_eap_fast_test user-name password
Step 4 Specify the inner authentication method.
tunnel eap-gtc
The only allowable method for authentication is eap-gtc.
Step 5 Authenticate using the PAC.
simple_eap_fast_test user-name password
The simple_eap_fast_test command passes its arguments to the inner authentication mechanism which
in turn treats the arguments as a username and a password. The command in Step 3 should result in
provisioning a new PAC, and Step 5 should result in successful authentication using that PAC.
PAC Provisioning
The following example provisions a PAC for user bob.
pac show
No PAC(s) available to show
tunnel eap-mschapv2
PEAP tunnel method is eap-mschapv2
EAP-FAST tunnel method is eap-mschapv2
simple_eap_fast_test bob bob
EAP-FAST authentication status:
[0x0e07] TLS authentication succeeded
Response to EAP-FAST message was not an Access-Accept
p012
pac show
PAC 1 version 1 (219 bytes)

9-14
Cisco Prime Access Registrar 6.1 User Guide
OL-29756-01
Chapter 9 Extensible Authentication Protocols
EAP-FAST
A-ID : Prime AR
A-ID-Info : Cisco Prime Access Registrar
I-ID : bob
Expires : Never (0)
Key# : 12
TLV 1 : PAC-Key (1) mandatory (32 bytes)
TLV 2 : PAC-Opaque (2) mandatory (120 bytes)
TLV 3 : PAC-Info (9) mandatory (51 bytes)
In this example the simple_eap_fast_test command indicates that it did not receive an AccessAccept.
This is normal because the provisioning step always results in an AccessReject even when a new PAC
has been successfully provisioned. The last pac show command displayed some status information from
the new PAC and is used to verify that provisioning succeeded and authentication can now be tested. The
PAC information displayed will vary and depends on how EAP-FAST is configured.
Authentication
The following example authenticates user bob (continuing from the PAC Provisioning example).
tunnel eap-gtc
PEAP tunnel method is eap-gtc
EAP-FAST tunnel method is eap-gtc
simple_eap_fast_test bob bob
EAP-FAST authentication status :
[0x0e07] TLS authentication succeeded
SUCCESS : Correctly formatted Session Keys received from the server
p01e
In this example, the EAP_FAST authentication using the PAC from the previous provisioning step
succeeded. The AccessAccept packet received from Prime Access Registrar can be displayed to confirm
that it contains the expected attributes including the MS-MPPE session keys.
Parameters Used for Certificate-Based Authentication
EAP-FAST might optionally use RSA or ECC certificates to securely create the tunnel that is used for
PAC provisioning. However, the Cisco client does not support the use of certificates and the following
parameters will be ignored and should be left at their default values:
•PrivateKeyPassword
•ServerCertificateFile
•ServerKeyFile
•CACertificateFile
•CACertificatePath
•ClientVerificationMode
•VerificationDepth
•UseECCCertificates
•EnableSessionCache

9-15
Cisco Prime Access Registrar 6.1 User Guide
OL-29756-01
Chapter 9 Extensible Authentication Protocols
EAP-FAST
•SessionTimeout
The parameters for configuring certificate-based operation are identical to those used for PEAP and
EAP-TLS.
Table 9-4 describes the parameters used for certificate-based authentication.
radclient Command Reference
This section describes the radclient commands you can use to test EAP-FAST.
eap-trace
Use the eap-trace command to display additional client protocol trace information for EAP methods.
Level is a number from 1 to 5 inclusively. Level 5 shows detailed hex dumps of all messages, level 4
shows a message trace without hex dumps, and levels 3 and below show status and error information. To
turn off trace displays, set the level to 0.
Set the trace level for all EAP methods.
eap-trace level
Table 9-4 Certificate-Based Authentication Parameters
Parameter Description
AuthorityIdentifier A string that uniquely identifies the credential (PAC) issuer. The client uses
this value to select the correct PAC to use with a particular server from the
set of PACs it might have stored locally. Care should be taken to ensure that
the AuthorityIdentifier is globally unique, that is, is distinct from other PAC
issuers
AuthorityInformation A string that provides some descriptive text for this credential issuer. The
value can be displayed to the client for identification purposes. It can contain
the enterprise and/or server names.
MaximumMessageSize Indicates the maximum length in bytes that a EAP-FAST message can have
before it is fragmented. If certificates are not used for authentication,
fragmentation should not be an issue.
AuthenticationTimeout Indicates the maximum number of seconds before an authentication
operation times out and is rejected.
CredentialLifetime Specifies the maximum lifetime of a PAC (Protected Access Credential).
Clients that successfully authenticate with an expired PAC will be
reprovisioned with a new PAC.
AuthenticationService Specifies the name of the EAP-GTC service that is used for authentication.
The named service must have the UseLabels parameter set to True.
ProvisionMode Specifies the TLS mode that is used for provisioning. As of this writing,
clients only support the default Anonymous mode.
ProvisionService Specifies the name of the EAP-MSChapV2 service that is used for
provisioning.
AlwaysAuthenticate Indicates whether provisioning should always automatically rollover into
authentication without relying on a separate session. Most environments,
particularly wireless, will perform better when this parameter is set to True
(the default value).

9-16
Cisco Prime Access Registrar 6.1 User Guide
OL-29756-01
Chapter 9 Extensible Authentication Protocols
EAP-FAST
For example, the following command sets the trace level to 4 for all EAP methods.
eap-trace 4
Set the trace level for the specified EAP method.
eap-trace method level
The following example sets the trace level to 5 for EAP-FAST only. The trace level for other EAP
methods is not affected.
eap-trace eap-fast 5
Note The eap-trace command is for client-side trace information only and is independent of the server trace
level that can be set using aregcmd.
tunnel
The tunnel command is used to specify the inner provisioning and authentication methods for
EAP-FAST. The specified EAP method type must agree with the server’s configured methods or
authentication will fail.
tunnel eap-method
For EAP-FAST provisioning, the only allowable tunnel method is eap-mchavp2. For EAP-FAST
authentication, the only allowable tunnel method is eap-gtc.
simple_eap_fast_test
The arguments are passed to the inner authentication method as its authentication parameters. If a PAC
is not present, the tunnel method should be eap-mschapv2 and provisioning will occur. If a PAC is
present, the tunnel method should be eap-gtc and authentication will occur.
simple_eap_fast_test username password
There are also variants for the simple test command for other EAP methods as shown in the following
examples:
simple_eap_mschapv2_test bob bob
simple_eap_gtc_test bob bob
pac
The pac command is used display, save, and delete PACs that are received from the server during testing.
radclient maintains a cache of PACs that it knows about and that can be used for authentication testing.
The current PAC cache can be displayed with the pac show command. PACs created during a test session
can be stored to files with the pac save command, and reloaded in another session with the pac load
command. The contents of the PAC cache are completely deleted with pac delete. If the optional
parameter cache is included, PACs are also erased from disk.
pac load | save | show { hex } | delete { cache }

9-17
Cisco Prime Access Registrar 6.1 User Guide
OL-29756-01
Chapter 9 Extensible Authentication Protocols
EAP-FAST
The pac show command displays the currently cached PACs. If the optional parameter hex is included,
additional detailed information including hex dumps are included in the display output.
pac show { hex }
The pac load command loads any previously saved PACS from disk into the active cache.
The pac save command saves all PACs from the active cache to disk. Any previously existing PACS for
the same user will be over-written.
The pac delete command deletes all PACs from the active cache. If the optional cache parameter is
included then PACs are also erased from disk.
pac delete { cache }
PAC—Credential Export Utility
You can manually provision EAP-FAST PACs to clients and avoid the use of the protocol provisioning
phase. This might be desirable from a security perspective since the default provisioning protocol uses
an anonymous (unauthenticated) method to construct the tunnel used to download the PAC to the client.
Manual provisioning involves exporting a PAC from Prime Access Registrar to a file which is then
copied to the client machine and used by the import utility. After a PAC has been manually imported, the
client should be able to authenticate via EAP-FAST while bypassing the initial provisioning phase. Care
should be taken while storing and transporting PAC files since they contain information that potentially
allows a client to authenticate via EAP-FAST.
PACs are exported from Prime Access Registrar via the pac command which is a new utility for this
release. (Note that this pac command is a standalone executable which is different from the Radclient
pac command.) The pac command has two capabilities:
•Exports a PAC to a file
•Displays information about an existing PAC file
PAC Export
Use the pac export command to create a new PAC file. In the following example, eap-fast is the name
of the Prime Access Registrar service configured for EAP-FAST authentication, bob is the name of the
user this PAC will be used for, and password is the password used to derive a key for encrypting the
resulting file. (This password is not the same as the administrator’s password). The PAC file will be
named bob.pac by default. You can use the –f option to give the file a different name.
pac –s export eap-fast bob password
If you omit the password parameter, a default password will be used.
Note Using the default password is strongly discouraged for security reasons.

9-18
Cisco Prime Access Registrar 6.1 User Guide
OL-29756-01
Chapter 9 Extensible Authentication Protocols
EAP-GTC
PAC Display
Use the pac show command to display information about a PAC file. In the following example, bob.pac
is the name of the PAC file and password is the password used to decrypt the file contents.
pac –s show bob.pac password
Syntax Summary
The complete pac command syntax is as follows:
pac { options } export <service-name> <user-name> <file-password>
pac { options } show <file-name> file-<password>
Where:
-C <cluster>—Specifies the cluster to be used.
-N <user>—Specifies the user.
-P <user-password>—Specifies the password to be used.
-s —Logs in using defaults
-v—Enables verbose output
-f—Exports file name (default = {user-name}.pac)
EAP-GTC
EAP-GTC, defined in RFC 2284, is a simple method for transmitting a user’s name and password to an
authentication server. EAP-GTC should not be used except as an authentication method for PEAP
Version 1 because the password is not protected.
This section contains the following topics:
•Configuring EAP-GTC
•Testing EAP-GTC with radclient
Configuring EAP-GTC
Table 9-5 lists and describes the EAP-GTC specific properties for EAP-GTC authentication.
Table 9-5 EAP-GTC Properties
Property Description
UserService Required; name of service that can be used to authenticate using cleartext
passwords.

9-19
Cisco Prime Access Registrar 6.1 User Guide
OL-29756-01
Chapter 9 Extensible Authentication Protocols
EAP-GTC
To enable EAP-GTC, use aregcmd to create and configure a service of type eap-gtc
Step 1 Launch aregcmd and create an EAP-GTC service.
cd /Radius/Services
add eap-gtc-service
Step 2 Change directory to the service and set its type to eap-gtc.
cd eap-gtc-service
set type eap-gtc
The follow example shows the default configuration for an EAP-GTC service:
[ //localhost/Radius/Services/eap-gtc-service ]
Name = eap-gtc
Description =
Type = eap-gtc
IncomingScript~ =
OutgoingScript~ =
AuthenticationTimeout = 120
UserService =
UserPrompt = "Enter password:"
UseLabels = False
Step 3 Set the service’s UserService to local-users or another local authentication service that is able to
authenticate using clear-text passwords.
set UserService local-users
Step 4 If configuring for EAP-FAST, set the UseLabels property to TRUE.
Testing EAP-GTC with radclient
To test the EAP-GTC service, launch radclient and use the simple_eap_gtc_test command. The
simple_eap_gtc_test command sends an Access-Request for the designated user with the user’s
password.
UserPrompt Optional string the client might display to the user; default is Enter
password:” Use the set command to change the prompt, as in the following:
set UserPrompt “Admin Password:”
UseLabels Required; must be set to TRUE for EAP-FAST authentication and set to
FALSE for PEAP authentication. Set to FALSE by default.
Table 9-5 EAP-GTC Properties (continued)
Property Description

9-20
Cisco Prime Access Registrar 6.1 User Guide
OL-29756-01
Chapter 9 Extensible Authentication Protocols
EAP-LEAP
The response packet should indicate an Access-Accept if authentication was successful. View the
response packet to ensure the authentication was successful.
simple_eap_gtc_test bob bob
Packet: code = Access-Accept, id = 2, length = 104, attributes =
Service-Type = Framed
Framed-Protocol = PPP
Framed-IP-Address = 192.168.0.0
Framed-IP-Netmask = 255.255.255.0
Framed-Routing = None
Framed-MTU = 1500
Framed-Compression = VJ TCP/IP header compression
Framed-IPX-Network = 1
EAP-Message = 03:01:00:04
Ascend-Idle-Limit = 1800
Message-Authenticator = d3:4e:b1:7e:2d:0a:ed:8f:5f:72:e0:01:b4:ba:c7:e0
EAP-LEAP
Prime Access Registrar supports the new AAA Cisco-proprietary protocol called Light Extensible
Authentication Protocol (LEAP), a proprietary Cisco authentication protocol designed for use in IEEE
802.11 wireless local area network (WLAN) environments. Important features of LEAP include:
•Mutual authentication between the network infrastructure and the user
•Secure derivation of random, user-specific cryptographic session keys
•Compatibility with existing and widespread network authentication mechanisms (e.g., RADIUS)
•Computational speed
Note Prime Access Registrar supports a subset of EAP to support LEAP. This is not a general implementation
of EAP for Prime Access Registrar.
The Cisco-Wireless or Lightweight Extensible Authentication Protocol is an EAP authentication
mechanism where the user password is hashed based on an MD4 algorithm and verified by a challenge
from both client and server.
Configuring EAP-LEAP
You can use aregcmd to create and configure a service of type eap-leap. When you create an EAP-LEAP
service type, you must also specify a UserService to perform AAA service. The UserService can be any
configured authentication service.
To enable EAP-LEAP:
Step 1 Launch aregcmd and create an EAP-LEAP service.
cd /Radius/Services
add eap-leap-service

9-21
Cisco Prime Access Registrar 6.1 User Guide
OL-29756-01
Chapter 9 Extensible Authentication Protocols
EAP-MD5
Step 2 Set the service type to eap-leap.
cd eap-leap-service
set type eap-leap
[ //localhost/Radius/Services/eap-leap-service ]
Name = newone
Description =
Type =
IncomingScript~ =
OutgoingScript~ =
AuthenticationTimeout = 120
UserService =
Step 3 Set the UserService property to a configured authentication service.
EAP-MD5
Cisco Prime Access Registrar supports EAP-MD5, or MD5-Challenge, another EAP authentication
exchange. In EAP-MD5 there is a CHAP-like exchange and the password is hashed by a challenge from
both client and server to verify the password is correct. After verified correct, the connection proceeds,
although the connection is periodically re-challenged (per RFC 1994).
Configuring EAP-MD5
Specify type eap-md5 when you create an EAP-MD5 service. When you create an EAP-MD5 service
type, you must also specify a UserService to perform AAA service. The UserService can be any
configured authentication service.
You can use aregcmd to create and configure a service of type eap-md5. When you create an EAP-MD5
service type, you must also specify a UserService to perform AAA service. The UserService can be any
configured authentication service.
To enable EAP-MD5:
Step 1 Launch aregcmd and create an EAP-LEAP service.
cd /Radius/Services
add eap-md5-service
Step 2 Set the service type to eap-md5.
cd eap-md5-service
set type eap-md5
[ //localhost/Radius/Services/eap-md5-service ]
Name = newone
Description =
Type =
IncomingScript~ =

9-22
Cisco Prime Access Registrar 6.1 User Guide
OL-29756-01
Chapter 9 Extensible Authentication Protocols
EAP-Negotiate
OutgoingScript~ =
AuthenticationTimeout = 120
UserService =
Step 3 Set the UserService property to a configured authentication service.
EAP-Negotiate
EAP-Negotiate is a special service used to select at runtime the EAP service to be used to authenticate
the client. EAP-Negotiate is configured with a list of candidate EAP services that represent the allowable
authentication methods in preference order. When an EAP session begins, the EAP-Negotiate service
tires the first service in the list. If the client does not support that method, it will respond with an
EAP-Nak message which triggers EAP-Negotiate to try the next method on the list until a valid method
is found or the list is exhausted in which case authentication fails.
EAP-Negotiate is useful when the client population has deployed a mix of different EAP methods that
must be simultaneously supported by Prime Access Registrar. It can be difficult or impossible to reliably
distinguish which clients require which methods simply by examining RADIUS attributes or other
packet properties. EAP-Negotiate solves this problem by using the method negotiation feature of the
EAP protocol. Negotiation can be used to select the primary EAP method used for authentication and
also to select the inner method for PEAP.
This section contains the following topics:
•Configuring EAP-Negotiate
•Negotiating PEAP Tunnel Services
•Testing EAP-Negotiate with radclient
Configuring EAP-Negotiate
You may first use aregcmd to create and configure the EAP services that will be used for authentication,
then create and configure a service of type eap-negotiate.
To enable EAP-Negotiate:
Step 1 Launch aregcmd and create an EAP-LEAP service.
cd /Radius/Services
add eap-negotiate-service
Step 2 Set the service type to eap-negotiate.
cd eap-negotiate-service
set type eap-negotiate
[ //localhost/Radius/Services/negotiate ]
Name = negotiate
Description =
Type = eap-negotiate
IncomingScript~ =

9-23
Cisco Prime Access Registrar 6.1 User Guide
OL-29756-01
Chapter 9 Extensible Authentication Protocols
EAP-MSChapV2
OutgoingScript~ =
AuthenticationTimeout = 120
ServiceList =
Step 3 Set the ServiceList property to a list of preconfigured EAP authentication services.
The ServiceList property lists the names of the EAP services that can be negotiated with this instance of
EAP-Negotiate. The ServiceList property is a space-separated list and must consist of valid EAP service
name, not service types, in preference order from left to right. Each service and type on the list must be
unique; duplicates are not allowed.
set ServiceList “eap-leap-service eap-md5-service peap-v1-service”
Negotiating PEAP Tunnel Services
EAP-Negotiate can also be used to negotiate the inner tunnel service used for phase two of PEAP-V0 or
PEAP-V1. To do this, create and configure a service of type eap-negotiate. The ServiceList can only
contain services that are legal for the version of PEAP that it is used with. Set the PEAP service’s
TunnelService parameter to the name of the eap-negotiate service.
Note Not all supplicants support negotiation of the PEAP inner method. EAP-Negotiate can only be used with
supplicants that can use EAP-Nak to reject an unsupported inner method.
Testing EAP-Negotiate with radclient
You can test EAP-Negotiate using the same radclient commands used to test the other EAP services.
For example, you can use the commands for testing eap-leap and peap-v1.
EAP-MSChapV2
EAP-MSChapv2 is based on draft-kamath-pppext-eap-mschapv2-00.txt, an informational IETF draft
document. EAP-MSChapv2 encapsulates the MSChapV2 protocol (specified by RFC 2759) and can be
used either as an independent authentication mechanism or as an inner method for PEAP Version 0
(recommended).
This section contains the following topics:
•Configuring EAP-MSChapV2
•Testing EAP-MSChapV2 with radclient
Configuring EAP-MSChapV2
To enable EAP-MSChapv2, use aregcmd to create and configure a service of type eap-mschapv2
Step 1 Launch aregcmd and create an EAP-MSChapV2 service.

9-24
Cisco Prime Access Registrar 6.1 User Guide
OL-29756-01
Chapter 9 Extensible Authentication Protocols
EAP-MSChapV2
cd /Radius/Services
add eap-mschapv2
Note This example named the service eap-mschapv2, but you can use any valid name for your service.
Step 2 Set the service’s type to eap-mschapv2.
cd eap-mschapv2
set Type eap-mschapv2
[ //localhost/Radius/Services/eap-mschapv2 ]
Name = eap-mschapv2
Description =
Type = eap-mschapv2
IncomingScript~ =
OutgoingScript~ =
AuthenticationTimeout = 120
UserService =
SystemID =
Step 3 Set the service’s UserService to local-users or another local authentication service that is able to
authenticate using MSChapV2.
set UserService local-users
Step 4 You might (optionally) set a string for System ID that identifies the sender of the MSChapV2 challenge
message, as in the following:
set SystemID system_ID_string
Testing EAP-MSChapV2 with radclient
To test the EAP-MSChapVersion 2 service using radclient:
Step 1 Launch radclient.
Step 2 Use the simple_eap_mschapv2_test command to authenticate using EAP-MSChapV2, as in the
following:
simple_eap_mschapv2_test bob bob
p006
The simple_eap_mschapv2_test command above sends an Access-Request for user bob with the user’s
password. The response packet should indicate an Access-Accept if authentication was successful.
Step 3 View the response packet to ensure the authentication was successful.
p006
Packet: code = Access-Accept, id = 4, length = 104, attributes =

9-25
Cisco Prime Access Registrar 6.1 User Guide
OL-29756-01
Chapter 9 Extensible Authentication Protocols
EAP-SIM
Service-Type = Framed
Framed-Protocol = PPP
Framed-IP-Address = 192.168.0.0
Framed-IP-Netmask = 255.255.255.0
Framed-Routing = None
Framed-MTU = 1500
Framed-Compression = VJ TCP/IP header compression
Framed-IPX-Network = 1
EAP-Message = 03:01:00:04
Ascend-Idle-Limit = 1800
Message-Authenticator = 27:90:7e:20:78:34:43:2e:9d:cd:a8:75:82:53:03:65
EAP-SIM
Cisco Prime Access Registrar supports EAP-SIMv16. In a GSM network a subscriber is issued a smart
card called the subscriber identity module (SIM) that contains a secret key (Ki) and an International
Mobile Subscriber Identity (IMSI). The key (Ki) is also stored in the GSM authentication center located
with the Home Location Registry (HLR).
An access point uses the Prime Access Registrar RADIUS server to perform EAP-SIM authentication of
mobile clients. Prime Access Registrar must obtain authentication information from the HLR.
Prime Access Registrar contacts the MAP gateway that performs the MAP protocol over SS7 to the
HLR, see SIGTRAN-M3UA for more information.
In support of EAP-SIM, the Wx Interface feature will be supported. For more information on Wx
Interface Support, see the Wx Interface Support for SubscriberDB Lookup, page 17-48.
Configuring EAP-SIM
You can use aregcmd to create and configure a service of type eap-sim.
Table 9-6 lists and describes the EAP-SIM specific properties.
Table 9-6 EAP-SIM Service Properties
Property Description
AlwaysRequestIdentity When True, enables the server to obtain the subscriber's identity via
EAP/AKA messages instead of relying on the EAP messages alone.
This might be useful in cases where intermediate software layers can
modify the identity field of the EAP-Response/Identity message. The
default value is False.
EnableIdentityPrivacy When True, the identity privacy feature is enabled. The default value is
False.
PseudonymSecret The secret string that is used as the basis for protecting identities when
identity privacy is enabled. This should be at least 16 characters long
and have a value that is impossible for an outsider to guess. The default
value is secret.
Note It is very important to change PseudonymSecret from its default
value to a more secure value when identity privacy is enabled
for the first time.

9-26
Cisco Prime Access Registrar 6.1 User Guide
OL-29756-01
Chapter 9 Extensible Authentication Protocols
EAP-SIM
PseudonymRenewtime Specifies the maximum age a pseudonym can have before it is renewed.
When the server receives a valid pseudonym that is older than this, it
generates a new pseudonym for that subscriber. The value is specified
as a string consisting of pairs of numbers and units, where the units
might be of the following: M, Minute, Minutes, H, Hour, Hours, D, Day,
Days, W, Week, Weeks. The default value is "24 Hours".
Examples are: "8 Hours", "10 Hours 30 Minutes", "5 D 6 H 10 M"
PseudonymLifetime Specifies the maximum age a pseudonym can have before it is rejected
by the server, forcing the subscriber to authenticate using it's permanent
identity. The value is specified as a string consisting of pairs of numbers
and units, where the units might be one of the following: M, Minute,
Minutes, H, Hour, Hours, D, Day, Days, W, Week, Weeks. It can also
be Forever, in which case, pseudonyms do not have a maximum age.
The default value is "Forever".
Examples are: "Forever", "3 Days 12 Hours 15 Minutes", "52 Weeks"
EnableReauthentication When True, the fast reauthentication option is enabled. The default
value is False.
MaximumReauthentica-
tions
Specifies the maximum number of times a reauthentication identity
might be reused before it must be renewed. The default value is 16.
ReauthenticationTimeout Specifies the time in seconds that reauthentication identities are cached
by the server. Subscribers that attempt to reauthenticate using identities
that are older than this value will be forced to use full authentication
instead. The default value is 3600 (one hour).
ReauthenticationRealm Optional. If you configure the realm, this value is appended to the Fas-
tReauthenticationUserId.
AuthenticationTimeout Time in seconds to wait for authentication to complete. The default is 2
minutes; range is 10 seconds to 10 minutes.
QuintetGenerationScript~ Optional. If the script is set, the custom scripting point can be used to
read the quintets from a flat file or generate quintets instead of fetching
the quintets from HLR.If the script is not set, the
Prime Access Registrar sends the request to HLR configured in remote
server to fetch the quintets.
UseProtectedResults Enables or disables the use of protected results messages. Results
messages indicate the state of the authentication but are cryptographi-
cally protected.
TripletCacheTimeout Required; timeout value of triplet cache.
SubscriberDBLookup Required. Must be set to either DIAMETER or SIGTRAN-M3UA.
When set to DIAMETER, the HSS lookup happens using the Diameter
Wx Interface. You need to configure the DestinationRealm to send the
Diameter packets to the RemoteServer.
When set to SIGTRAN-M3UA, the HLR/HSS lookup happens using
the SIGTRAN protocol. You need to configure the SIGTRAN remote
server.
Table 9-6 EAP-SIM Service Properties (continued)
Property Description

9-27
Cisco Prime Access Registrar 6.1 User Guide
OL-29756-01
Chapter 9 Extensible Authentication Protocols
EAP-SIM
To enable EAP-SIM authentication using aregcmd:
Step 1 Launch aregcmd and create an EAP-SIM service.
cd /Radius/Services
add eap-sim-service
Step 2 Change directory to the service and set its type to eap-sim.
cd eap-sim-service
set Type eap-sim
[ //localhost/Radius/Services/EAP-SIM ]
Name = EAP-SIM
Description =
Type = eap-sim
NumberOfTriplets = 2
UseSimDemoTriplets = False
AlwaysRequestIdentity = False
EnableIdentityPrivacy = False
PseudonymSecret = <encrypted>
PseudonymRenewtime = "24 Hours"
PseudonymLifetime = Forever
Generate3GPPCompliantPseudonym = False
EnableReauthentication = False
MaximumReauthentications = 16
ReauthenticationTimeout = 3600
ReauthenticationRealm =
TripletCacheTimeout = 120
AuthenticationTimeout = 120
UseProtectedResults = False
SendReAuthIDInAccept = False
SubscriberDBLookup = SIGTRAN-M3UA
FetchAuthorizationInfo = FALSE
MultipleServersPolicy = Failover
IncomingScript~ =
OutgoingScript~ =
FetchAuthorizationInfo Required. When set True, it fetches MSISDN from HLR.
This field is dispayed when you set Subscriber_DBLookup as SIG-
TRAN-M3UA.
IncomingScript~ Optional script Prime Access Registrar server runs when it receives a
request from a client for an EAP-AKA/EAP-SIM service.
OutgoingScript~ Optional script Prime Access Registrar server runs before it sends a
response to a client using an EAP-AKA/EAP-SIM service.
OutageScript~ Optional. If set to the name of a script, Prime Access Registrar runs the
script when an outage occurs. This property allows you to create a script
that notifies you when the server detects a failure.
RemoteServers Remote server which can provide the service.
Table 9-6 EAP-SIM Service Properties (continued)
Property Description

9-28
Cisco Prime Access Registrar 6.1 User Guide
OL-29756-01
Chapter 9 Extensible Authentication Protocols
EAP-SIM
OutageScript~ =
RemoteServers/
[ //localhost/Radius/Services/eap-sim-wx ]
Name = eap-sim-wx
Description =
Type = eap-sim
NumberOfTriplets = 2
UseSimDemoTriplets = False
AlwaysRequestIdentity = False
EnableIdentityPrivacy = False
PseudonymSecret = <encrypted>
PseudonymRenewtime = "24 Hours"
PseudonymLifetime = Forever
Generate3GPPCompliantPseudonym = False
EnableReauthentication = False
MaximumReauthentications = 16
ReauthenticationTimeout = 3600
ReauthenticationRealm =
TripletCacheTimeout = 120
AuthenticationTimeout = 120
UseProtectedResults = False
SendReAuthIDInAccept = False
SubscriberDBLookup = DIameter
DestinationRealm = hss.com
PreRequestTranslationScript~ =
PostRequestTranslationScript~ =
PreResponseTranslationScript~ =
PostResponseTranslationScript~
Note The EAP-SIM property OutagePolicy present in earlier versions of Prime Access Registrar is no longer
part of the EAP-SIM configuration.
To enable EAP-SIM authentication using radclient:
Step 1 Create an EAP-SIM service.
Step 2 Change directory to the service and set its type to eap-sim.
Step 3 Execute the below command in radclient to set session keys in the server.
simple_eap_sim_test 987456321123654 secret
Note The IMSI number that is stored in HLR is used for EAP-SIM authentication.
Step 4 Enter the server name in which the session key is created to view the eap-sim service details.
p006
Packet: code = Access-Accept, id = 3, length = 207, attributes =
User-Name = 987456321123654

9-29
Cisco Prime Access Registrar 6.1 User Guide
OL-29756-01
Chapter 9 Extensible Authentication Protocols
EAP-Transport Level Security (TLS)
MS-MPPE-Send-Key =
9c:56:e5:36:9f:fe:84:a2:26:16:80:0a:13:74:fb:b7:87:30:00:5c:45:99:ea:78:af:7d:ae:37:0e
:b1:3a:2e:2b:b1:c8:4f:20:39:33:04:eb:dc:ba:27:e7:6f:56:08:21:56
EAP-Message = 03:02:00:04
Cisco-AVPair = auth-algo-type=eap-sim
MS-MPPE-Recv-Key =
8b:27:42:c5:47:79:ce:6a:41:ae:34:1f:15:2f:cf:b8:ee:18:e7:b5:1c:64:41:26:f7:4b:bc:53:bd
:54:57:70:a3:3b:df:78:9e:34:33:47:b3:a2:ff:4e:f1:fe:6f:8f:ee:aa
Message-Authenticator = 45:02:01:97:55:3d:bc:80:34:76:a4:5a:6b:29:ac:bc
Quintets to Triplets Conversion
Prime Access Registrar provides a configuration option in EAP-SIM service, which allows conversion
of quintets received from a Universal Mobile Telecommunications Service (UMTS) subscriber to
triplets. This feature facilitates backward compatibility by allowing to perform EAP-SIM authentication
from an EAP-AKA or EAP-AKA’ source.
EAP-Transport Level Security (TLS)
EAP-Transport Level Security (EAP-TLS), described in RFC 2716, is an authentication method
designed to mitigate several weaknesses of EAP. EAP-TLS leverages TLS, described in RFC 2246, to
achieve certificate-based authentication of the server and (optionally) the client. EAP-TLS provides
many of the same benefits as PEAP but differs from it in the lack of support for legacy authentication
methods.
This section contains the following topics:
•Configuring EAP-TLS
•Testing EAP-TLS with RSA or ECC Certificate using radclient
•Testing EAP-TLS with Client Certificates
Configuring EAP-TLS
You can use aregcmd to create and configure a service of type eap-tls. Table 9-7 describes the EAP-TLS
configuration properties:
Table 9-7 EAP-TLS Service Properties
Property Description
IncomingScript Optional script Prime Access Registrar server runs when it receives a
request from a client for EAP-TLS service
OutgoingScript Optional script Prime Access Registrar server runs before it sends a
response to a client using EAP-TLS
MaximumMessageSize Indicates the maximum length in bytes that a PEAP or EAP-TLS message
can have before it is fragmented.
PrivateKeyPassword The password used to protect the server’s private key.

9-30
Cisco Prime Access Registrar 6.1 User Guide
OL-29756-01
Chapter 9 Extensible Authentication Protocols
EAP-Transport Level Security (TLS)
ServerCertificateFile The full pathname of the file containing the server’s certificate or
certificate chain used during the TLS exchange. The pathname can be
optionally prefixed with a special string that indicates the type of
encoding used for the certificate. The two valid encoding prefixes are
PEM and DER. If an encoding prefix is not present, the file is assumed
to be in PEM format.
ServerKeyFile The full pathname of the file containing the server’s RSA or ECC private
key. The pathname can be optionally prefixed with a special string that
indicates the type of encoding used for the certificate. The two valid
encoding prefixes are “PEM” and “DER”. If an encoding prefix is not
present, the file is assumed to be in PEM format.
The following example assumes that the subdirectory pki under /cisco-ar
contains the server’s certificate file. The file server-key.pem is assumed
to be in PEM format. The file extension .pem is not significant.
set ServerKeyFile PEM:/cisco-ar/pki/server-key.pem
CACertificateFile The full pathname of the file containing trusted CA certificates used for
client verification. The file can contain more than one certificate, but all
certificates must be in PEM format. DER encoding is not allowed.
CACertificatePath The name of a directory containing trusted CA certificates (in PEM
format) used for client verification. This parameter is optional, and if it
is used there are some special preparations required for the directory it
references.
Each certificate file in this directory must contain exactly one certificate
in PEM format. The server looks up the certificate files using the MD5
hash value of the certificate’s subject name as a key. The directory must
therefore also contain a set of symbolic links each of which points to an
actual certificate file. The name of each symbolic link is the hash of the
subject name of the certificate.
For example, if a certificate file named ca-cert.pem is located in the
CACertificatePath directory, and the MD5 hash of the subject name
contained in ca-cert.path.pem is 1b96dd93, then a symbolic link named
1b96dd93 must point to ca-cert.pem.
If there are subject name collisions such as multiple certificates with the
same subject name, each link name must be indexed with a numeric
extension as in 1b96dd93.0 and 1b96dd93.1.
CRLDistributionURL Optional. The URL that Prime Access Registrar should use to retrieve the
CRL.You can specify a URL that uses HTTP or LDAP.
The following is an example for an HTTP URL:
<http://crl.verisign.com/pca1.1.1.crl>.
The following is an example for an LDAP URL:
ldap://209.165.200.225:388/CN=development-CA,CN=acs-westcoast
2,CN=CDP,CN=Public Key
Services,CN=Services,CN=Configuration,DC=cisco,DC=com
Table 9-7 EAP-TLS Service Properties (continued)
Property Description

9-31
Cisco Prime Access Registrar 6.1 User Guide
OL-29756-01
Chapter 9 Extensible Authentication Protocols
EAP-Transport Level Security (TLS)
To enable EAP-TLS authentication:
Step 1 Launch aregcmd and create an EAP-TLS service.
cd /Radius/Services
add eap-tls-service
Step 2 Change directory to the service and set its type to eap-tls.
cd eap-tls-service
set Type eap-tls
[ //localhost/Radius/Services/eap-tls-service ]
Name = eap-tls-service
ClientVerificationMode Specifies the type of verification used for client certificates. Must be set
to one of RequireCertificate, None, or Optional.
•RequireCertificate causes the server to request a client certificate and
authentication fails if the client refuses to provide one.
•None will not request a client certificate.
•Optional causes the server to request a client certificate but the client
is allowed to refuse to provide one.
VerificationDepth Specifies the maximum length (in bytes?) of the certificate chain used for
client verification.
UseECCCertificates Determines the applicability of the authentication mechanism in
SmartGrid Solutions, see the Smart Grid Solution Management,
page 17-50 for more information.
When UseECCCertificates is set to True, it can use the ECC, RSA, or
combination of both certificate for certificate based verification.
When UseECCCertificates is set to False, it can only use the RSA
certificate for certificate based verification. The default location to fetch
the certificate file is /cisco-ar/pki.
EnableSessionCache Specifies whether TLS session caching (fast reconnect) is enabled or not.
Set to True to enable session caching; otherwise set to False.
SessionTimeout If TLS session caching (fast reconnect) is enabled, SessionTimeout
specifies the maximum lifetime of a TLS session. Expired sessions are
removed from the cache and will require a subsequent full authentication.
SessionTimeout is specified as a string consisting of pairs of numbers and
units, where units might be one of the following: M, Minute, Minutes, H,
Hour, Hours, D, Day, Days, W, Week, Weeks, as in the following:
Set SessionTimeout “1 Hour 45 Minutes”
AuthenticationTimeout Mandatory; specifies time (in seconds) to wait before an authentication
request times out; defaults to 120.
Table 9-7 EAP-TLS Service Properties (continued)
Property Description

9-32
Cisco Prime Access Registrar 6.1 User Guide
OL-29756-01
Chapter 9 Extensible Authentication Protocols
EAP-TTLS
Description =
Type = eap-tls
IncomingScript~ =
OutgoingScript~ =
MaximumMessageSize = 1024
PrivateKeyPassword = <encrypted>
ServerCertificateFile = /opt/CSCOar/pki/server-cert.pem
ServerKeyFile = /opt/CSCOar/pki/server-key.pem
CACertificateFile = /opt/CSCOar/pki/root-cert.pem
CACertificatePath = /opt/CSCOar/pki
CRLDistributionURL =
ClientVerificationMode = Optional
VerificationDepth = 4
EnableSessionCache = true
UseECCCertificates = true
SessionTimeout = "5 Minutes"
AuthenticationTimeout = 120
Note Prime Access Registrar verifies the certificate during the TLS-based authentication. CRL validation is
done before accepting a client certificate during the TLS authentication.
Testing EAP-TLS with RSA or ECC Certificate using radclient
To test the EAP-TLS service, launch radclient and use the simple_eap_tls_test command, as in the
following:
simple_eap_tls_test arg1
The argument is arbitrary for the simple_eap_tls_test command and can be anything. You can either
select RSA or ECC client certificates using this argument.
Testing EAP-TLS with Client Certificates
You can test EAP-TLS using client certificates verified by the server during the TLS exchange. The
client certificate file and RSA or ECC key file must reside in /cisco-ar/pki and be named client-cert.pem
and client-key.pem respectively. Both files must be in PEM format.
EAP-TTLS
Prime Access Registrar supports the Extensible Authentication Protocol Tunneled TLS (EAP-TTLS).
EAP-TTLS is an EAP protocol that extends EAP-TLS. In EAP-TLS, a TLS handshake is used to
mutually authenticate a client and server. EAP- TTLS extends this authentication negotiation by using
the secure connection established by the TLS handshake to exchange additional information between
client and server.
EAP-TTLS leverages TLS (RFC 2246) to achieve certificate-based authentication of the server (and
optionally the client) and creation of a secure session that can then be used to authentication the client
using a legacy mechanism. EAP-TTLS provides several benefits:

9-33
Cisco Prime Access Registrar 6.1 User Guide
OL-29756-01
Chapter 9 Extensible Authentication Protocols
EAP-TTLS
•Industry standard authentication of the server using certificates (TLS)
•Standardized method for session key generation using TLS PRF
•Strong mutual authentication
•Identity privacy
•Fast reconnect using TLS session caching
•EAP message fragmentation
•Secure support for legacy client authentication methods
EAP-TTLS is a two-phase protocol. Phase 1 conducts a complete TLS session and derives the session
keys used in Phase 2 to securely tunnel attributes between the server and the client. The attributes
tunneled during Phase 2 can be used to perform additional authentication(s) via a number of different
mechanisms.
The authentication mechanisms that can be used during Phase 2 include PAP, CHAP, MS-CHAP,
MS-CHAPv2, and EAP. If the mechanism is EAP, then several different EAP methods are possible.
The Phase 2 authentication can be performed by the local AAA Server (the same server running
EAP-TTLS) or it can be forwarded to another server (known as the home AAA Server). In the latter case,
the home server has no involvement in the EAP-TTLS protocol and can be any AAA service that
understands the authentication mechanism in use and is able to authenticate the user. It is not necessary
for the home server to understand EAP-TTLS.
This section contains the following topics:
•Configuring EAP-TTLS
•Testing EAP-TTLS with radclient
Configuring EAP-TTLS
Configuring EAP-TTLS involves two major tasks:
1. Configuring the TLS parameters used for Phase 1
2. Selecting the Phase 2 authentication methods and specifying whether authentication is performed
locally or forwarded to the home server.
If authentication is forwarded, the configuration must include the identity of the remote home server and
its shared secret.
You configure EAP-TTLS using the aregcmd CLI to create the appropriate services and specify their
parameters. Use the radclient test tool to confirm that the services have been properly configured and
are operational.
Creating an EAP-TTLS Service
You can use aregcmd to create and configure a service of type eap-ttls. Table 9-8 describes the
EAP-TTLS configuration properties:

9-34
Cisco Prime Access Registrar 6.1 User Guide
OL-29756-01
Chapter 9 Extensible Authentication Protocols
EAP-TTLS
Table 9-8 EAP-TTLS Service Properties
Property Description
IncomingScript Optional script Prime Access Registrar server runs when it receives a
request from a client for EAP-TTLS service.
OutgoingScript Optional script Prime Access Registrar server runs before it sends a
response to a client using EAP-TTLS.
MaximumMessageSize Indicates the maximum length in bytes that a PEAP or EAP-TLS
message can have before it is fragmented.
PrivateKeyPassword The password used to protect the server’s private key.
ServerCertificateFile The full pathname of the file containing the server’s certificate or
certificate chain used during the TLS exchange. The pathname can be
optionally prefixed with a special string that indicates the type of
encoding used for the certificate. The two valid encoding prefixes are
PEM and DER. If an encoding prefix is not present, the file is assumed
to be in PEM format.
ServerKeyFile The full pathname of the file containing the server’s RSA or ECC private
key. The pathname can be optionally prefixed with a special string that
indicates the type of encoding used for the certificate. The two valid
encoding prefixes are “PEM” and “DER”. If an encoding prefix is not
present, the file is assumed to be in PEM format.
The following example assumes that the subdirectory pki under /cisco-ar
contains the server’s certificate file. The file server-key.pem is assumed
to be in PEM format. The file extension .pem is not significant.
set ServerKeyFile PEM:/cisco-ar/pki/server-key.pem
CACertificateFile The full pathname of the file containing trusted CA certificates used for
client verification. The file can contain more than one certificate, but all
certificates must be in PEM format.
Note DER encoding is not allowed.

9-35
Cisco Prime Access Registrar 6.1 User Guide
OL-29756-01
Chapter 9 Extensible Authentication Protocols
EAP-TTLS
CACertificatePath The name of a directory containing trusted CA certificates (in PEM
format) used for client verification. This parameter is optional, and if
used, there are some special preparations required for the directory it
references.
Each certificate file in this directory must contain exactly one certificate
in PEM format. The server looks up the certificate files using the MD5
hash value of the certificate’s subject name as a key. The directory must
therefore also contain a set of symbolic links each of which points to an
actual certificate file. The name of each symbolic link is the hash of the
subject name of the certificate.
For example, if a certificate file named ca-cert.pem is located in the
CACertificatePath directory, and the MD5 hash of the subject name
contained in ca-cert.path.pem is 1b96dd93, then a symbolic link named
1b96dd93 must point to ca-cert.pem.
If there are subject name collisions such as multiple certificates with the
same subject name, each link name must be indexed with a numeric
extension as in 1b96dd93.0 and 1b96dd93.1.
See rehash-ca-certs Utility, page 9-42 for information about how to
create the required certificate file hash links.
CRLDistributionURL Optional. The URL that Prime Access Registrar should use to retrieve
the CRL.You can specify a URL that uses HTTP or LDAP.
The following is an example for an HTTP URL:
<http://crl.verisign.com/pca1.1.1.crl>.
The following is an example for an LDAP URL:
ldap://209.165.200.225:388/CN=development-CA,CN=acs-westcoas
t2,CN=CDP,CN=Public Key
Services,CN=Services,CN=Configuration,DC=cisco,DC=com
ClientVerificationMode Specifies the type of verification used for client certificates. Must be set
to one of RequireCertificate, None, or Optional.
•RequireCertificate causes the server to request a client certificate
and authentication fails if the client refuses to provide one.
•None will not request a client certificate.
•Optional causes the server to request a client certificate but the client
is allowed to refuse to provide one.
VerificationDepth Specifies the maximum length of the certificate chain used for client
verification.
Table 9-8 EAP-TTLS Service Properties (continued)
Property Description

9-36
Cisco Prime Access Registrar 6.1 User Guide
OL-29756-01
Chapter 9 Extensible Authentication Protocols
EAP-TTLS
UseECCCertificates Determines the applicability of the authentication mechanism in
SmartGrid Solutions, see the Smart Grid Solution Management,
page 17-50 for more information.
When UseECCCertificates is set to True, it can use the ECC, RSA, or
combination of both certificate for certificate based verification.
When UseECCCertificates is set to False, it can only use the RSA
certificate for certificate based verification. The default location to fetch
the certificate file is /cisco-ar/pki.
EnableSessionCache Specifies whether TLS session caching (fast reconnect) is enabled or not.
Set to True to enable session caching; otherwise set to False.
SessionTimeout If TLS session caching (fast reconnect) is enabled, SessionTimeout
specifies the maximum lifetime of a TLS session. Expired sessions are
removed from the cache and require a subsequent full authentication.
SessionTimeout is specified as a string consisting of pairs of numbers
and units, where units might be one of the following: M, Minute,
Minutes, H, Hour, Hours, D, Day, Days, W, Week, Weeks, as in the
following:
Set SessionTimeout “1 Hour 45 Minutes”
AuthenticationTimeout Mandatory; specifies time (in seconds) to wait before an authentication
request times out. The default is 120.
AuthenticationService Mandatory; specifies the authentication service to use to authenticate
users. See Configuring an EAP-TTLS Authentication Service, page 9-37
for more information.
Note The authentication service must exist before you can save the
EAP-TTLS service configuration.
Table 9-8 EAP-TTLS Service Properties (continued)
Property Description

9-37
Cisco Prime Access Registrar 6.1 User Guide
OL-29756-01
Chapter 9 Extensible Authentication Protocols
EAP-TTLS
To enable EAP-TTLS authentication:
Step 1 Launch aregcmd and create an EAP-TTLS service.
cd /Radius/Services
add eap-ttls-service
Step 2 Change directory to the service and set its type to eap-ttls.
cd eap-ttls-service
set Type eap-ttls
[ //localhost/Radius/Services/eap-ttls-service ]
Name = eap-ttls-service
Description =
Type = eap-ttls
IncomingScript~ =
OutgoingScript~ =
MaximumMessageSize = 1024
PrivateKeyPassword = <encrypted>
ServerCertificateFile = /opt/CSCOar/pki/server-cert.pem
ServerKeyFile = /opt/CSCOar/pki/server-key.pem
CACertificateFile = /opt/CSCOar/pki/root-cert.pem
CACertificatePath = /opt/CSCOar/pki
CRLDistributionURL =
ClientVerificationMode = Optional
VerificationDepth = 4
EnableSessionCache = true
UseECCCertificates = true
SessionTimeout = "5 Minutes"
AuthenticationTimeout = 120
Note Prime Access Registrar verifies the certificate during the TLS-based authentication. CRL validation is
done before accepting a client certificate during the TLS authentication.
Configuring an EAP-TTLS Authentication Service
The EAP-TTLS service can authenticate users with either a legacy method such as PAP, CHAP,
MSCHAP, or MSCHAPv2 or with an EAP method such as EAP-MSCHAPv2 or EAP-GTC. The
authentication can be performed by the local server (the same server running EAP-TTLS) or it can be
forwarded to a remote AAA Server (the home server for the user’s domain).
This section provides examples of several different ways to configure an EAP-TTLS authentication
service. The following examples assume that you are using aregcmd and have already created the
EAP-TTLS service.
Note After you make a configuration change, you must save the configuration before it can be used.

9-38
Cisco Prime Access Registrar 6.1 User Guide
OL-29756-01
Chapter 9 Extensible Authentication Protocols
EAP-TTLS
Authenticating Local Users with a Legacy Method
You can use a service like the local-users service (created as part of the example configuration) to
authenticate users in the local UserList.
set AuthenticationService local-users
This service can be used to authenticate using PAP, CHAP, MSCHAP, and MSCHAPv2.
Authenticating Users with EAP-MSChapV2
This example uses a service named eap-mschapv2 for authentication. Attempts to authenticate using any
other method than EAP-MSChapV2 (assuming the service type is also eap-mschapv2) will fail.
set AuthenticationService eap-mschapv2
Authenticating Users with EAP Negotiate
You can use the EAP-negotiate method to authenticate using more than one EAP type. The following
example defines an EAP service named eap-negotiate that can negotiate EAP-MSChapV2 or EAP-GTC
then configures an EAP-TTLS service to authenticate using that service.
To configures an EAP-TTLS service to authenticate using eap-negotiate:
Step 1 Create a service of type eap-negotiate.
cd /Radius/Services
add eap-nego
cd eap-nego
set Type eap-negotiate
set ServiceList “eap-mschapv2 eap-gtc”
Step 2 Configure the EAP-TTLS AuthenticationService.
cd /Radius/Services/eap-ttls
set AuthenticationService eap-nego
Authenticating Users with Legacy and EAP Methods
You can configure EAP-TTLS to authenticate using both legacy and EAP methods with a Group service
using an OR result rule. A configuration like that shown in the following example first attempts to
authenticate with the eap-negotiate service. If that fails, the server attempts to authenticate with the
local-users service.

9-39
Cisco Prime Access Registrar 6.1 User Guide
OL-29756-01
Chapter 9 Extensible Authentication Protocols
EAP-TTLS
To authenticate with the eap-negotiate service;
Step 1 Create the Group service
cd /Radius/Services
add local-or-eap
cd local-or-eap
set Type group
set ResultRule OR
cd GroupServices
add 1 eap-negotiate
add 2 local-users
Step 2 Configure the EAP-TTLS AuthenticationService.
cd /Radius/Services/eap-ttls
set AuthenticationService local-or-eap
Authenticating Using a Remote AAA Server
You can configure an EAP-TTLS service to forward authentication to a remote AAA Server known (or
the home server). The following configures a RADIUS service to use a remote server, then configures
EAP-TTLS to use that service for authentication.
The first step in the following example configures a remote RADIUS server (aaa-remote) with its IP
address and the shared secret that it shares with the local server. You might also specify other important
parameters such as ports, timeouts, and maximum number of retries. See Services, page 4-12, for
information about configuring RADIUS services.
To configure a remote RADIUS server (aaa-remote) with its IP address and a shared secret:
Step 1 Configure a remote AAA Server.
cd /Radius/RemoteServers
add aaa-remote
cd aaa-remote
set Protocol Radius
set IPAddress 10.1.2.3
set SharedSecret secret

9-40
Cisco Prime Access Registrar 6.1 User Guide
OL-29756-01
Chapter 9 Extensible Authentication Protocols
EAP-TTLS
The following step configures a RADIUS service to use the remote server created in the previous step.
You might also configure other important parameters such as the failover strategy. See Services,
page 4-12, for information about configuring RADIUS services.
Step 2 Configure an AAA service.
cd /Radius/Services
add home
cd home
set Type Radius
cd RemoteServers
add 1 aaa-remote
Step 3 Configure the EAP-TTLS AuthenticationService:
cd /Radius/Services/eap-ttls
set AuthenticationService home
Other configurations are also possible. For example, a group service can be used to perform some
authentications locally and forward others to a remote server.
Testing EAP-TTLS with radclient
To test the EAP-TLS service, launch radclient and use the simple_eap_ttls_test command. The
simple_eap_ttls_test command has the following syntax:
simple_eap_ttls_test identity password { method }
Where:
identity is the user’s name.
password is the user’s password
method is one of: PAP, CHAP, MSChap, MSChapV2, or PEAP.
Note If the method parameter is EAP, the tunnel command must be used to specify the EAP method
type.

9-41
Cisco Prime Access Registrar 6.1 User Guide
OL-29756-01
Chapter 9 Extensible Authentication Protocols
EAP-TTLS
Testing EAP-TTLS Using Legacy Methods
To authenticate a user using EAP-TTLS with PAP:
Step 1 Launch radclient.
cd /cisco-ar/usrbin
./radclient –s
Step 2 Authenticate using EAP-TTLS PAP.
simple_eap_ttls_test bob bob pap
The following commands show how to test the other valid legacy methods.
simple_eap_ttls_test bob bob chap
simple_eap_ttls_test bob bob mschap
simple_eap_ttls_test bob bob mschapv2
Testing EAP-TTLS Using EAP Methods
The following example uses EAP-TTLS with EAP-MSChapV2 as the Phase 2 method to authenticate a
user named bob whose password is bob (from the example configuration). Issue the tunnel command to
specify the Phase 2 EAP method, then issue the simple_eap_ttls_test command with eap as a method
type.
To authenticate a user using EAP-TTLS with EAP-MSChapV2 as the Phase 2 method:
Step 1 Launch radclient
cd /cisco-ar/usrbin
./radclient –s
Step 2 Authenticate using EAP-TTLS and EAP-MSChapV2.
tunnel eap-mschapv2
simple_eap_ttls_test bob bob eap
To test with a different EAP method, use the tunnel command to specify the method as shown in the
following command to specify EAP-TLS.
tunnel eap-tls
simple_eap_ttls_test bob bob eap

9-42
Cisco Prime Access Registrar 6.1 User Guide
OL-29756-01
Chapter 9 Extensible Authentication Protocols
radclient Command Reference
rehash-ca-certs Utility
The rehash-ca-certs utility works with the CACertificatePath property and enables you to create the
required certificate file hash links (similar to those used with PEAP and EAP-TLS). The rehash-ca-certs
utility is only used when the server is validating certificates from the client (which is optional and not a
common case for EAP-TTLS).
The syntax for the rehash-ca-certs utility is:
rehash-ca-certs { -v } path1 { path2 … pathn }
Each directory path specified on the command line is scanned by the rehash-ca-certs utility for
filenames with the pem extension (such as ca-cert.pem) and the appropriate hash link is created as
described above. Before creating links, rehash-ca-certs first removes all existing links in the directory,
so each invocation creates fresh links. The –v option enables verbose output.
The following is an example of the rehash-ca-certs utility:
./rehash-ca-certs ../pki
start rehashing ../pki
client-key.pem does not contain a PEM certificate
finished rehashing
The rehash-ca-certs utility warns about PEM files that do not contain certificates. On Cisco Prime
Access Registrar, intermediate/chained certificates cannot be imported.
To run Prime Access Registrar on Solaris with PEAP authentication:
Step 1 Add both root and intermediate CA in the directory /opt/CSCOar/pki (as configured for
CACertificatePath in the service NYU-NetIDs-PEAPService).
Step 2 Change the directory to pki:
cd /opt/CSCOar/pki
Step 3 run /opt/CSCOar/bin/rehash-ca-certs
Step 4 Stop ARserver and restart.
radclient Command Reference
This section provides a summary of the radclient commands you can use to test PEAP and EAP-TLS.
It contains the following topics:
•eap-trace
•tunnel

9-43
Cisco Prime Access Registrar 6.1 User Guide
OL-29756-01
Chapter 9 Extensible Authentication Protocols
radclient Command Reference
eap-trace
Use the eap-trace command to display additional client protocol trace information for EAP methods.
Set the level to a number from 1 to 5 inclusively. Level 5 shows detailed hexadecimal dumps of all
messages. Level 4 shows a message trace without hexadecimal dumps. Levels 3 and below show status
and error information. To turn off trace displays, set the level to 0.
Use eap-trace level to set the trace level for all EAP methods. The following example command sets the
trace level to 4 for all EAP methods:
eap-trace 4
Use eap-trace method level to set the trace level for the specified EAP method. The following example
command sets the trace level to 5 for PEAP Version0 only. The trace level for other EAP methods is not
affected.
eap-trace peap-v0 5
Note The eap-trace command is for client-side trace information only and is independent of the server trace
level you set using aregcmd.
tunnel
Use the tunnel command to specify the inner authentication method for PEAP. The specified EAP
method type must agree with the server’s configured authentication method or authentication will fail.
tunnel eap-method
For PEAP Version 0, the allowable tunnel methods are EAP-MSCHAPV2 and EAP-SIM. For PEAP
Version 1, the allowable tunnel methods are EAP-GTC and EAP-SIM.
simple_eap_mschapv2_test username password
simple_eap_gtc_test username password
simple_eap_peapv0_test arg1 arg2
The arguments are passed to the inner authentication method as its authentication parameters. For
EAP-MSChapv2 the arguments are username and password; for EAP-SIM they are IMSI and key.
simple_eap_peapv1_test arg1 arg2
The arguments are passed to the inner authentication method as its authentication parameters. For
EAP-GTC the arguments are username and password; for EAP-SIM they are IMSI and key.
simple_eap_tls_test arg1

9-44
Cisco Prime Access Registrar 6.1 User Guide
OL-29756-01
Chapter 9 Extensible Authentication Protocols
Protected EAP
Protected EAP
Protected EAP (PEAP) is an authentication method designed to mitigate several weaknesses of EAP.
PEAP leverages TLS (RFC 2246) to achieve certificate-based authentication of the server (and
optionally the client) and creation of a secure session that can then be used to authenticate the client.
PEAP provides several benefits:
•Industry standard authentication of the server using certificates (TLS)
•Standardized method for session key generation using TLS PRF
•Strong mutual authentication
•Identity privacy
•Fast reconnect using TLS session caching
•EAP message fragmentation
•Secure support for legacy client authentication methods
Cisco Prime Access Registrar supports the two major existing variants of PEAP, PEAP Version 0
(Microsoft PEAP) and PEAP Version 1 (Cisco PEAP). PEAP Version 0 is described in IETF drafts,
draft-kamath-pppext-peapv0-00.txt and draft-josefsson-pppext-eap-tls-eap-02.txt. This version of
PEAP can use either EAP-MSChapV2 or EAP-SIM as an authentication method. PEAP Version 1 is
described by IETF draft draft-zhou-pppext-peapv1-00.txt. PEAP Version 1 can use either EAP-GTC
or EAP-SIM as an authentication method.
This section contains the following topics:
•PEAP Version 0
•PEAP Version 1
PEAP Version 0
This section describes configuring PEAP Version 0 and testing it with radclient.
Configuring PEAP Version 0
You can use aregcmd to create and configure a service of type peap-v0. Table 9-9 describes the PEAP
service properties for PEAP Version 0.
Table 9-9 PEAP Version 0 Service Properties
Property Description
IncomingScript Optional script Prime Access Registrar server runs when it receives a
request from a client for PEAP-v0 service.
OutgoingScript Optional script Prime Access Registrar server runs before it sends a
response to a client using PEAP-v0
MaximumMessageSize Indicates the maximum length in bytes that a PEAP or EAP-TLS
message can have before it is fragmented.
PrivateKeyPassword The password used to protect the server’s private key.

9-45
Cisco Prime Access Registrar 6.1 User Guide
OL-29756-01
Chapter 9 Extensible Authentication Protocols
Protected EAP
ServerCertificateFile The full pathname of the file containing the server’s certificate or
certificate chain used during the TLS exchange. The pathname can be
optionally prefixed with a special string that indicates the type of
encoding used for the certificate. The two valid encoding prefixes are
PEM and DER. If an encoding prefix is not present, the file is assumed
to be in PEM format.
The following example assumes that the subdirectory pki under
/cisco-ar contains the server’s certificate file. The file server-cert.pem
is assumed to be in PEM format; note that the file extension .pem is not
significant.
set ServerCertificateFile PEM:/cisco-ar/pki/server-cert.pem
CACertificateFile The full pathname of the file containing trusted CA certificates used for
client verification. The file can contain more than one certificate, but all
certificates must be in PEM format. DER encoding is not allowed.
CACertificatePath The name of a directory containing trusted CA certificates (in PEM
format) used for client verification. This parameter is optional, and if it
is used there are some special preparations required for the directory it
references.
Each certificate file in this directory must contain exactly one certificate
in PEM format. The server looks up the certificate files using the MD5
hash value of the certificate’s subject name as a key. The directory must
therefore also contain a set of symbolic links each of which points to an
actual certificate file. The name of each symbolic link is the hash of the
subject name of the certificate.
For example, if a certificate file name ca-cert.pem is located in the
CACertificatePath directory, and the MD5 hash of the subject name
contained in ca-cert.path.pem is 1b96dd93, then a symbolic link named
1b96dd93 must point to the ca-cert.pem file.
If there are subject name collisions such as multiple certificates with the
same subject name, each link name must be indexed with a numeric
extension as in 1b96dd93.0 and 1b96dd93.1.
CRLDistributionURL Optional. The URL that Prime Access Registrar should use to retrieve
the CRL.You can specify a URL that uses HTTP or LDAP.
The following is an example for an HTTP URL:
<http://crl.verisign.com/pca1.1.1.crl>.
The following is an example for an LDAP URL:
ldap://209.165.200.225:388/CN=development-CA,CN=acs-westcoas
t2,CN=CDP,CN=Public Key
Services,CN=Services,CN=Configuration,DC=cisco,DC=com
Table 9-9 PEAP Version 0 Service Properties (continued)
Property Description

9-46
Cisco Prime Access Registrar 6.1 User Guide
OL-29756-01
Chapter 9 Extensible Authentication Protocols
Protected EAP
ClientVerificationMode Specifies the type of verification used for client certificates. Must be set
to one of RequireCertificate, None, or Optional.
•RequireCertificate causes the server to request a client certificate
and authentication fails if the client refuses to provide one.
•None will not request a client certificate.
•Optional causes the server to request a client certificate but the
client is allowed to refuse to provide one.
VerificationDepth Specifies the maximum length of the certificate chain used for client
verification.
UseECCCertificates Determines the applicability of the authentication mechanism in
SmartGrid Solutions, see the Smart Grid Solution Management,
page 17-50 for more information.
When UseECCCertificates is set to True, it can use the ECC, RSA, or
combination of both certificate for certificate based verification.
When UseECCCertificates is set to False, it can only use the RSA
certificate for certificate based verification. The default location to fetch
the certificate file is /cisco-ar/pki.
EnableSessionCache Specifies whether TLS session caching (fast reconnect) is enabled or
not. Set to True to enable session caching; otherwise set to False.
SessionTimeout If TLS session caching (fast reconnect) is enabled, SessionTimeout
specifies the maximum lifetime of a TLS session. Expired sessions are
removed from the cache and will require a subsequent full
authentication.
SessionTimeout is specified as a string consisting of pairs of numbers
and units, where units might be one of the following: M, Minute,
Minutes, H, Hour, Hours, D, Day, Days, W, Week, Weeks, as in the
following:
Set SessionTimeout “1 Hour 45 Minutes”
AuthenticationTimeout Mandatory; specifies time (in seconds) to wait before an authentication
request times out; defaults to 120.
TunnelService Mandatory; must be the name of an existing EAP-MSCHAPv2 or
EAP-SIM service for PEAP Version 0.
EnableWPS When set to TRUE, enables Windows Provisioning Service (WPS) and
provides two other properties, MasterURL and WPSGuestUserProfile.
The default value is FALSE.
Table 9-9 PEAP Version 0 Service Properties (continued)
Property Description

9-47
Cisco Prime Access Registrar 6.1 User Guide
OL-29756-01
Chapter 9 Extensible Authentication Protocols
Protected EAP
To enable PEAP Version 0:
Step 1 Launch aregcmd and create a PEAP Version 0 service.
cd /Radius/Services
add peap-v0-service
Step 2 Set the service’s type to peap-v0.
cd peap-v0-service
set Type peap-v0
//localhost/Radius/Services/eap-peap-v0-service ]
Name = eap-peap-v0-service
Description =
Type = eap-peap-v0
IncomingScript~ =
OutgoingScript~ =
MaximumMessageSize = 1024
PrivateKeyPassword = <encrypted>
ServerCertificateFile = /opt/CSCOar/pki/server-cert.pem
ServerKeyFile = /opt/CSCOar/pki/server-key.pem
CACertificateFile = /opt/CSCOar/pki/root-cert.pem
CACertificatePath = /opt/CSCOar/pki
CRLDistributionURL =
ClientVerificationMode = Optional
VerificationDepth = 4
EnableSessionCache = true
UseECCCertificates = true
SessionTimeout = "5 Minutes"
AuthenticationTimeout = 120
EnableWPS = FALSE
Step 3 Set the service’s TunnelService property to the name of an existing EAP-MSCHAPV2 or EAP-SIM
service.
set TunnelService name_of_EAP-MSCHAPv2_service
or
MasterURL When using WPS, specifies the URL of the provisioning server which is
modified with the appropriate fragment and sent to the client.
WPSGuestUserProfile When using WPS, specifies a profile to be used as a guest user profile;
must be a valid profile under /Radius/Profiles.
This profile is used for guests and users whose account has expired. This
profile normally contains attributes denoting the VLAN-id of the guest
network (which has the provisioning server alone) and might contain
IP-Filters that would restrict the access of the guest (to only the
provisioning server).
Table 9-9 PEAP Version 0 Service Properties (continued)
Property Description

9-48
Cisco Prime Access Registrar 6.1 User Guide
OL-29756-01
Chapter 9 Extensible Authentication Protocols
Protected EAP
set TunnelService name_of_EAP-SIM_service
Note Prime Access Registrar verifies the certificate during the TLS-based authentication. CRL validation is
done before accepting a client certificate during the TLS authentication.
Testing PEAP Version 0 with radclient
To test the PEAP Version 0:
Step 1 Launch radclient.
Step 2 Specify the inner authentication method, eap-mschapv2 or eap-sim, as in the following.
tunnel eap-mschapv2
or
tunnel eap-sim
Step 3 Use the simple_eap_peapv0_test command to authenticate using PEAP Version 0, as in the following:
simple_eap_peapv0_test arg1 arg2
The simple_eap_peapv0_test command passes its arguments to the inner authentication mechanism
which treats the arguments as either a username and a password (for eap-mschapv2) or as an IMSI and
a key (for eap-sim).
The following example tests PEAP Version 0 with EAP-MSCHAPV2 as the inner authentication
mechanism using username bob and password bob:
tunnel eap-mschapv2
simple_eap_peapv0_test bob bob
The following example tests PEAP Version 0 with EAP-SIM as the inner authentication mechanism
using IMSI 1124567891 and key 0112456789ABCDEF:
tunnel eap-sim
simple_eap_peapv0_test 1124567891 0112456789ABCDEF
Testing PEAP Version 0 with Client Certificates
You can test PEAP Version 0 using client certificates verified by the server during the TLS exchange.
The client certificate file and RSA or ECC key file must reside in /cisco-ar/pki and be named
client-cert.pem and client-key.pem respectively. Both files must be in PEM format.

9-49
Cisco Prime Access Registrar 6.1 User Guide
OL-29756-01
Chapter 9 Extensible Authentication Protocols
Protected EAP
PEAP Version 1
This section describes configuring PEAP Version 1 and testing it with radclient.
Configuring PEAP Version 1
You can use aregcmd to create and configure a service of type peap-v1. Table 9-10 describes the PEAP
service properties for both PEAP Version 1.
Table 9-10 PEAP Version 1 Service Properties
Property Description
IncomingScript Optional script Prime Access Registrar server runs when it receives a
request from a client for PEAP-v1 service.
OutgoingScript Optional script Prime Access Registrar server runs before it sends a
response to a client using PEAP-v1.
MaximumMessageSize Indicates the maximum length in bytes that a PEAP or EAP-TLS message
can have before it is fragmented.
PrivateKeyPassword The password used to protect the server’s private key.
ServerCertificateFile The full pathname of the file containing the server’s certificate or
certificate chain used during the TLS exchange. The pathname can be
optionally prefixed with a special string that indicates the type of
encoding used for the certificate. The two valid encoding prefixes are
PEM and DER. If an encoding prefix is not present, the file is assumed
to be in PEM format.
CACertificateFile The full pathname of the file containing trusted CA certificates used for
client verification. The file can contain more than one certificate but all
certificates must be in PEM format. DER encoding is not allowed.
CACertificatePath The name of a directory containing trusted CA certificates (in PEM
format) used for client verification. This parameter is optional, and if it
is used there are some special preparations required for the directory it
references.
Each certificate file in this directory must contain exactly one certificate
in PEM format. The server looks up the certificate files using the MD5
hash value of the certificate’s subject name as a key. The directory must
therefore also contain a set of symbolic links each of which points to an
actual certificate file. The name of each symbolic link is the hash of the
subject name of the certificate.
For example, if a certificate file named ca-cert.pem is located in the
CACertificatePath directory, and the MD5 hash of the subject name
contained in ca-cert.path.pem is 1b96dd93, then a symbolic link named
1b96dd93 must point to the ca-cert.pem file.
If there are subject name collisions such as multiple certificates with the
same subject name, each link name must be indexed with a numeric
extension as in 1b96dd93.0 and 1b96dd93.1.

9-50
Cisco Prime Access Registrar 6.1 User Guide
OL-29756-01
Chapter 9 Extensible Authentication Protocols
Protected EAP
CRLDistributionURL Optional. The URL that Prime Access Registrar should use to retrieve the
CRL.You can specify a URL that uses HTTP or LDAP.
The following is an example for an HTTP URL:
<http://crl.verisign.com/pca1.1.1.crl>.
The following is an example for an LDAP URL:
ldap://209.165.200.225:388/CN=development-CA,CN=acs-westcoast
2,CN=CDP,CN=Public Key
Services,CN=Services,CN=Configuration,DC=cisco,DC=com
ClientVerificationMode Specifies the type of verification used for client certificates. Must be set
to one of RequireCertificate, None, or Optional.
•RequireCertificate causes the server to request a client certificate and
authentication fails if the client refuses to provide one.
•None will not request a client certificate.
•Optional causes the server to request a client certificate but the client
is allowed to refuse to provide one.
VerificationDepth Specifies the maximum length of the certificate chain used for client
verification.
UseECCCertificates Determines the applicability of the authentication mechanism in
SmartGrid Solutions, see the Smart Grid Solution Management,
page 17-50 for more information.
When UseECCCertificates is set to True, it can use the ECC, RSA, or
combination of both certificate for certificate based verification.
When UseECCCertificates is set to False, it can only use the RSA
certificate for certificate based verification. The default location to fetch
the certificate file is /cisco-ar/pki.
EnableSessionCache Specifies whether TLS session caching (fast reconnect) is enabled or not.
Set to True to enable session caching; otherwise set to False.
SessionTimeout If TLS session caching (fast reconnect) is enabled, SessionTimeout
specifies the maximum lifetime of a TLS session. Expired sessions are
removed from the cache and will require a subsequent full authentication.
SessionTimeout is specified as a string consisting of pairs of numbers and
units, where units might be one of the following: M, Minute, Minutes, H,
Hour, Hours, D, Day, Days, W, Week, Weeks, as in the following:
Set SessionTimeout “1 Hour 45 Minutes”
AuthenticationTimeout Mandatory; specifies time (in seconds) to wait before an authentication
request times out; defaults to 120.
TunnelService Mandatory; must be the name of an existing EAP-GTC or EAP-SIM
service for PEAP Version 0.
Table 9-10 PEAP Version 1 Service Properties (continued)
Property Description

9-51
Cisco Prime Access Registrar 6.1 User Guide
OL-29756-01
Chapter 9 Extensible Authentication Protocols
Protected EAP
To enable PEAP Version 1:
Step 1 Launch aregcmd and create a PEAP Version 1 service.
cd /Radius/Services
add peap-v1-service
Step 2 Set the service’s type to peap-v1.
cd peap-v1-service
set Type peap-v1
//localhost/Radius/Services/eap-peap-v1-service ]
Name = eap-peap-v1-service
Description =
Type = eap-peap-v1
IncomingScript~ =
OutgoingScript~ =
MaximumMessageSize = 1024
PrivateKeyPassword = <encrypted>
ServerCertificateFile = /opt/CSCOar/pki/server-cert.pem
ServerKeyFile = /opt/CSCOar/pki/server-key.pem
CACertificateFile = /opt/CSCOar/pki/root-cert.pem
CACertificatePath = /opt/CSCOar/pki
CRLDistributionURL =
ClientVerificationMode = Optional
VerificationDepth = 4
EnableSessionCache = true
UseECCCertificates = true
SessionTimeout = "5 Minutes"
AuthenticationTimeout = 120
Step 3 Set the service’s TunnelService property to the name of an existing EAP-GTC or EAP-SIM service.
set TunnelService name_of_EAP-GTC_service
or
set TunnelService name_of_EAP-SIM_service
Testing PEAP Version 1 with radclient
To test the PEAP Version 1:
Step 1 Launch radclient.
Step 2 Specify the inner authentication method, EAP-GTC or EAP-SIM, as in the following.
tunnel eap-gtc
or
tunnel eap-sim

9-52
Cisco Prime Access Registrar 6.1 User Guide
OL-29756-01
Chapter 9 Extensible Authentication Protocols
How to Configure Oracle, Mysql Accounting with the Buffering Option Enabled
Step 3 Use the simple_eap_peapv1_test command to authenticate using PEAP Version 1, as in the following:
simple_eap_peapv1_test arg1 arg2
The simple_eap_peapv1_test command passes its arguments to the inner authentication mechanism
which treats the arguments as either a username and a password (for EAP-GTC) or as an IMSI and a key
(for EAP-SIM).
Testing PEAP Version 1 with Client Certificates
You can test PEAP Version 1 using client certificates verified by the server during the TLS exchange.
The client certificate file and RSA or ECC key file must reside in /cisco-ar/pki and be named
client-cert.pem and client-key.pem respectively. Both files must be in PEM format.
How to Configure Oracle, Mysql Accounting with the Buffering
Option Enabled
Prime Access Registrar provides support for MySQL to query user records from Oracle database using
sql interface and enables you to write accounting records into Oracle database. You can use insert,
update, and delete queries to
•add new details into database.
•modify the existing details in the database.
•remove the outdated details from the database.
To Select the SQL Statement in Run Time Accounting
Prime Access Registrar provides support to query user account details from SQL database and enables
you to add, delete, and update accounting details into SQL when using Oracle accounting.
You can execute the following SQL statements to perform various actions:
•Query
•Insert
•Update
•Delete
•Configuring Oracle, Mysql Accounting
Query
You can query the accounting details from Oracle by referring this service in
/Radius/DefaultAuthenticationService and in /Radius/DefaultAuthorization.
The following example is an SQL statement used for Authentication and Authorization of the subscribed
users. You can use the SQL and MarkerList properties statement to query the selected attributes from
Oracle.

9-53
Cisco Prime Access Registrar 6.1 User Guide
OL-29756-01
Chapter 9 Extensible Authentication Protocols
How to Configure Oracle, Mysql Accounting with the Buffering Option Enabled
sql1/
Name = sql1
Description =
Type = query
SQL = "select password , username from arusers where username = ?"
ExecutionSequenceNumber = 1
MarkerList = UserName/SQL_CHAR
Insert
You can insert user details into SQL database by Oracle accounting. This service is used by referring the
/Radius/DefaultAccountingService or Accounting-Service environment variable.
For instance, you can use the following SQL and MarkerList properties statement to insert the selected
attributes:
sql1/
Name = sql1
Description =
Type = insert
SQL = "insert into sql_test (username,nas) values (?,?)"
ExecutionSequenceNumber = 1
MarkerList = "UserName/SQL_CHAR NAS-Identifier/SQL_CHAR"
Update
You can easily modify the details in an SQL table with the UPDATE statement.
For example, you can use the following SQL and MarkerList properties statement to update the selected
attributes:
sql2/
Name = sql2
Description =
Type = update
SQL = "update sql_test set packet='stop' where username=?"
ExecutionSequenceNumber = 2
MarkerList = UserName/SQL_CHAR
Delete
You can remove the unnecessary records from SQL database using DELETE statement.
For example, you can use the following SQL and MarkerList properties statement to delete the selected
attributes:
sql/
Name = sql
Description =
Type =delete
SQL = "delete from arusers_acct where username=?"
ExecutionSequenceNumber = 1
MarkerList = UserName/SQL_CHAR

9-54
Cisco Prime Access Registrar 6.1 User Guide
OL-29756-01
Chapter 9 Extensible Authentication Protocols
How to Configure Oracle, Mysql Accounting with the Buffering Option Enabled
Configuring Oracle, Mysql Accounting
The following script describes you how to configure Oracle, Mysql accounting with the buffering option
enabled:
[ //localhost/Radius/Services/oracle-acc ]
Name = oracle-acc
Description =
Type = oci-accounting
IncomingScript~ = sql
OutgoingScript~ =
OutagePolicy~ = RejectAll
OutageScript~ =
MultipleServersPolicy = Failover
RemoteServers/
[ //localhost/Radius/Services/oracle-acc/RemoteServers ]
1. oracle-acc
[ //localhost/Radius/RemoteServers/oracle-acc ]
Name = oracle-acc
Description =
Protocol = oci-accounting
ReactivateTimerInterval = 300000
Timeout = 15
DataSourceConnections = 8
ODBCDataSource = oracle
SNMPTrapIP =
SNMPTrapPort = 1521
KeepAliveTimerInterval = 0
BufferAccountingPackets = TRUE
MaximumBufferFileSize = "10 Megabytes"
NumberOfRetriesForBufferedPacket = 3
BackingStoreEnvironmentVariables =
UseLocalTimeZone = FALSE
AttributeList =
Delimiter =
SQLDefinition/
[ //localhost/Radius/Advanced/ODBCDataSources/oracle ]
Name = oracle
Description =
Type = oracle_oci
UserID = scott
Password = <encrypted>
DataBase = ORCL
[ //localhost/Radius/Scripts/sql ]
Name = sql
Description =
Language = tcl
Filename = sql.tcl
EntryPoint = sqltest
InitEntryPoint =
InitEntryPointArgs =
Script
The script statements are executed based on the IP address that you specified in the query. Here is a
sample script to select the SQL statements.
proc sqltest {request response environ} {

9-55
Cisco Prime Access Registrar 6.1 User Guide
OL-29756-01
Chapter 9 Extensible Authentication Protocols
How Suffix and Prefix Rules Work with Prime Access Registrar
set nas [ $request get NAS-Identifier ]
if { [ string compare $nas 1.1.1.1 ] == 0 } {
$environ put SQL-Sequence "sql1"
$environ put BackingStore-Env-Vars "SQL-Sequence"
}
if { [ string compare $nas 1.1.1.2 ] == 0 } {
$environ put SQL-Sequence "sql2"
$environ put BackingStore-Env-Vars "SQL-Sequence"
}
if { [ string compare $nas 1.1.1.3 ] == 0 } {
$environ put SQL-Sequence "sql3"
$environ put BackingStore-Env-Vars "SQL-Sequence"
}
if { [ string compare $nas 1.1.1.4 ] == 0 } {
$environ put SQL-Sequence "sql4"
$environ put BackingStore-Env-Vars "SQL-Sequence"
}
}
How Suffix and Prefix Rules Work with Prime Access Registrar
Prime Access Registrar includes several scripts that you can use with the rules. The following are the
most commonly used rules:
•Prefix Rule, See ExecPrefixRule, page 18-17 for more information
•Suffix Rule, See ExecSuffixRule, page 18-18 for more information
Configuring Prefix and Suffix Policies
To configure prefix and suffix policies in Prime Access Registrar in order to provide authentication and
authorization services for the subscribed users:
Step 1 Activate the Policy Engine by configuring SelectPolicy. This script explains you how to set a suffix and
prefix policy in the grouping list.
--> cd selectPolicy/
[ //localhost/Radius/Policies/SelectPolicy ]
Name = SelectPolicy
Description =
Grouping = suffixrule&prefixrule
Step 2 Run the configuration rules for Prefix and Suffix.
Step 3 Set Script = ExecSuffixRule in the prefix rule configuration.
[ //localhost/Radius/Rules ]
Entries 1 to 2 from 2 total entries
Current filter: <all>
prefixrule/
Name = prefixrule
Description =
Type = radius
Script~ = ExecPrefixRule
Attributes/
Authentication-Service = local-users
Authorization-Service = local-users

9-56
Cisco Prime Access Registrar 6.1 User Guide
OL-29756-01
Chapter 9 Extensible Authentication Protocols
CRL Support for Cisco Prime Access Registrar
Delimiters = @#%$/
Prefix = cisco
StripPrefix = no
Step 4 Specify Script = ExecRealmRule in the suffix configuration to scan.
suffixrule/
Name = suffixrule
Description =
Type = radius
Script~ = ExecRealmRule
Attributes/
Realm = @cisco.com
CRL Support for Cisco Prime Access Registrar
Prime Access Registrar checks for various certificates for validation purposes in its authentication
services. The client sends a certificate along with the access-challenge to Prime Access Registrar.
Prime Access Registrar verifies the validity of the certificate and approves the request if the certificate
is valid. For certificate validation, Prime Access Registrar uses an advanced verification mechanism,
which uses Certificate Revocation Lists (CRLs).
A CRL, which uses the X.509 certification format, is the signed data structure that the certificate
authority (CA) issues periodically. It contains a list of the serial numbers and the timestamp of the
revoked certificates. These revoked certificates are not valid and Prime Access Registrar rejects any
request that comes with these certificates. The CRLs are available in a public repository in
Prime Access Registrar.
A certificate can be revoked because of the following reasons:
•Expiration of the validity period.
•Change in the name of the user to whom the certificate is issued.
•Change in the association between the CA and the user.
•Loss of the private they that is associated with the certificate.
Prime Access Registrar uses the Lightweight Dynamic Authentication Protocol (LDAP) and HTTP for
validating the certificates using CRL. The CRLDistributionURL in the TLS based EAP authentication
services, is used for the CRL support in Prime Access Registrar. When you configure this property,
Prime Access Registrar fetches the CRL from the specified URL, at the startup. A background thread in
Prime Access Registrar keeps track of these CRLs. When any of the CRLs expires,
Prime Access Registrar fetches the latest version of CRL using the specified URL. Each CRL contain
the information related to its expiry.
Prime Access Registrar places all the CRLs in a CRL store. It uses these CRLs while it does a TLS
authentication for certificate validation. During an authentication service, the certificate verifier in
Prime Access Registrar checks for the validity of the certificate against the CRL issued by the CA that
signed the certificate. It looks for the serial number of the certificate in the list of revoked certificates in
the appropriate CRL. If it finds a match in the CRL, it compares the revocation time that is encoded in
the CRL against the current time. If the current time is later than the revocation time,
Prime Access Registrar considers the certificate invalid.
This section contains the following topics:
•Configuring Certificate Validation Using CRL
•Using Intermediate Certificates in Prime Access Registrar

9-57
Cisco Prime Access Registrar 6.1 User Guide
OL-29756-01
Chapter 9 Extensible Authentication Protocols
CRL Support for Cisco Prime Access Registrar
Note Prime Access Registrar uses the CRLDistributionURL property in the following services:
eap-tls
eap-ttls
eap-fast
peap-v0
peap-v1
Configuring Certificate Validation Using CRL
Prime Access Registrar uses the CRLDistributionURL property for the certificate validation using
CRLs. The following shows a sample configuration for the certificate verification using CRLs in
Prime Access Registrar:
//localhost/Radius/Services/eap-ttls-service ]
Name = eap-ttls-service
Description =
Type = eap-ttls
IncomingScript~ =
OutgoingScript~ =
MaximumMessageSize = 1024
PrivateKeyPassword = <encrypted>
ServerCertificateFile = /opt/CSCOar/pki/server-cert.pem
ServerKeyFile = /opt/CSCOar/pki/server-key.pem
CACertificateFile = /opt/CSCOar/pki/root-cert.pem
CACertificatePath = /opt/CSCOar/pki
CRLDistributionURL =
ClientVerificationMode = Optional
VerificationDepth = 4
EnableSessionCache = true
UseECCCertificates = true
SessionTimeout = "5 Minutes"
AuthenticationTimeout = 120
Table 9-8 describes the properties in this sample configuration.
Using Intermediate Certificates in Prime Access Registrar
The rehash-ca-certs utility can be used to import intermediate certificates in Prime Access Registrar.
See rehash-ca-certs Utility, page 9-42 for information about how to create the required certificate file
hash links.
To import intermediate certificates in Prime Access Registrar:
Step 1 Copy the Root CA, Intermediate CA of the client to a directory.
Step 2 Run /opt/CSCOar/bin/rehash-ca-certs –v <path of the client certificate store>
The utility creates the required hash links to maintain the chain between the Root CA certificate and
Intermediate CA certificates.
Step 3 Set the CACertificateFile property in EAP service to the path where Root CA Certificate of the client is
stored.

9-58
Cisco Prime Access Registrar 6.1 User Guide
OL-29756-01
Chapter 9 Extensible Authentication Protocols
CRL Support for Cisco Prime Access Registrar
Step 4 Restart the Prime Access Registrar server.
The following shows an example to import intermediate certificates in Prime Access Registrar:
Step 1 Copy the Client Root CA and Intermediate CA Certificate in /cisco-ar/certs/wimax/ directory.
cp /tmp/wimax_device_root.pem /cisco-ar/certs/wimax/
cp /tmp/wimax_device_root_ca1.pem /cisco-ar/certs/wimax/
/opt/CSCOar/bin/rehash-ca-certs –v /cisco-ar/certs/wimax/
Step 2 Enter in to aregcmd.
/opt/CSCOar/bin/aregcmd –s
a. Configure the eap service which uses these client certificates.
cd Radius/Services/eap-ttls
//localhost/Radius/Services/eap-ttls-service ]
Name = eap-ttls-service
Description =
Type = eap-ttls
IncomingScript~ =
OutgoingScript~ =
MaximumMessageSize = 1024
PrivateKeyPassword = <encrypted>
ServerCertificateFile = /opt/CSCOar/pki/server-cert.pem
ServerKeyFile = /opt/CSCOar/pki/server-key.pem
CACertificateFile = /opt/CSCOar/pki/root-cert.pem
CACertificatePath = /opt/CSCOar/pki
CRLDistributionURL =
ClientVerificationMode = Optional
VerificationDepth = 4
EnableSessionCache = true
UseECCCertificates = true
SessionTimeout = "5 Minutes"
AuthenticationTimeout = 120
set CACertificateFile PEM:/opt/CSCOar/pki/wimax_device_root.pem
Set CACertificateFile PEM:/opt/CSCOar/pki/wimax_device_root.pem
Step 3 Save the configuration.
save
Step 4 Restart the arserver.
/opt/CSCOar/bin/arserver restart

CHAPTER
10-1
Cisco Prime Access Registrar 6.1 User Guide
OL-29756-01
10
Using WiMAX in Cisco Prime Access Registrar
Cisco Prime Access Registrar (Prime Access Registrar) supports Worldwide Interoperability for
Microwave Access (WiMAX) technology. This feature support in Prime Access Registrar complies with
the WiMAX forum NWG_R1_V1.3.1-Stage-3 specifications.
This chapter contains the following sections:
•WiMAX - An Overview
•WiMAX in Cisco Prime Access Registrar
WiMAX - An Overview
WiMAX is a standards-based wireless technology that offers high throughput broadband connections
over long distances. WiMAX can be used for a number of applications, including “last mile” broadband
connections, fixed and mobile cellular service, hotspots and cellular backhaul, and high-speed enterprise
connectivity for business. WiMAX is based on the IEEE 802.16d standard for fixed wireless, and the
802.16e standard for mobile wireless. This standard is appealing to customers because it allows mass
production of chipsets that reduce CPE costs, ensures multi-vendor interoperability, and reduces
investment risk for operators.
The architectural framework of a WiMAX network consists of the Access Service Network (ASN), the
Connectivity Service Network (CSN), and a AAA Server. An Access Service Network is a set of network
functions that provide radio access to a WiMAX subscriber. The ASN typically provides functions such
as network discovery and selection, connectivity service between the MSS and CSN, Radio Resource
Management, Multicast and Broadcast Control, Intra-ASN mobility, Paging, and Location Management.
The WiMAX architecture consists of both mobile and fixed subscribers, as well as the ASN and CSN.
A CSN is defined as a set of network functions that provide IP connectivity services to the WiMAX
subscribers. CSN might comprise network elements such as Routers, Home Agent, AAA proxy/servers,
user databases, Policy Servers, Content Service Gateways, Service Selection Gateways, and
interworking gateway devices.
The Access Service Network is connected to a home network HCSN (Home Connectivity Service
Network) via at least one visited network (Visited Connectivity Service Network VCSN) or intermediate
network.
The Visited CSN plays the role of a AAA proxy. During all AAA interaction the VCSN AAA server acts
as a RADIUS proxy transporting RADIUS packets between the ASN and the HCSN.
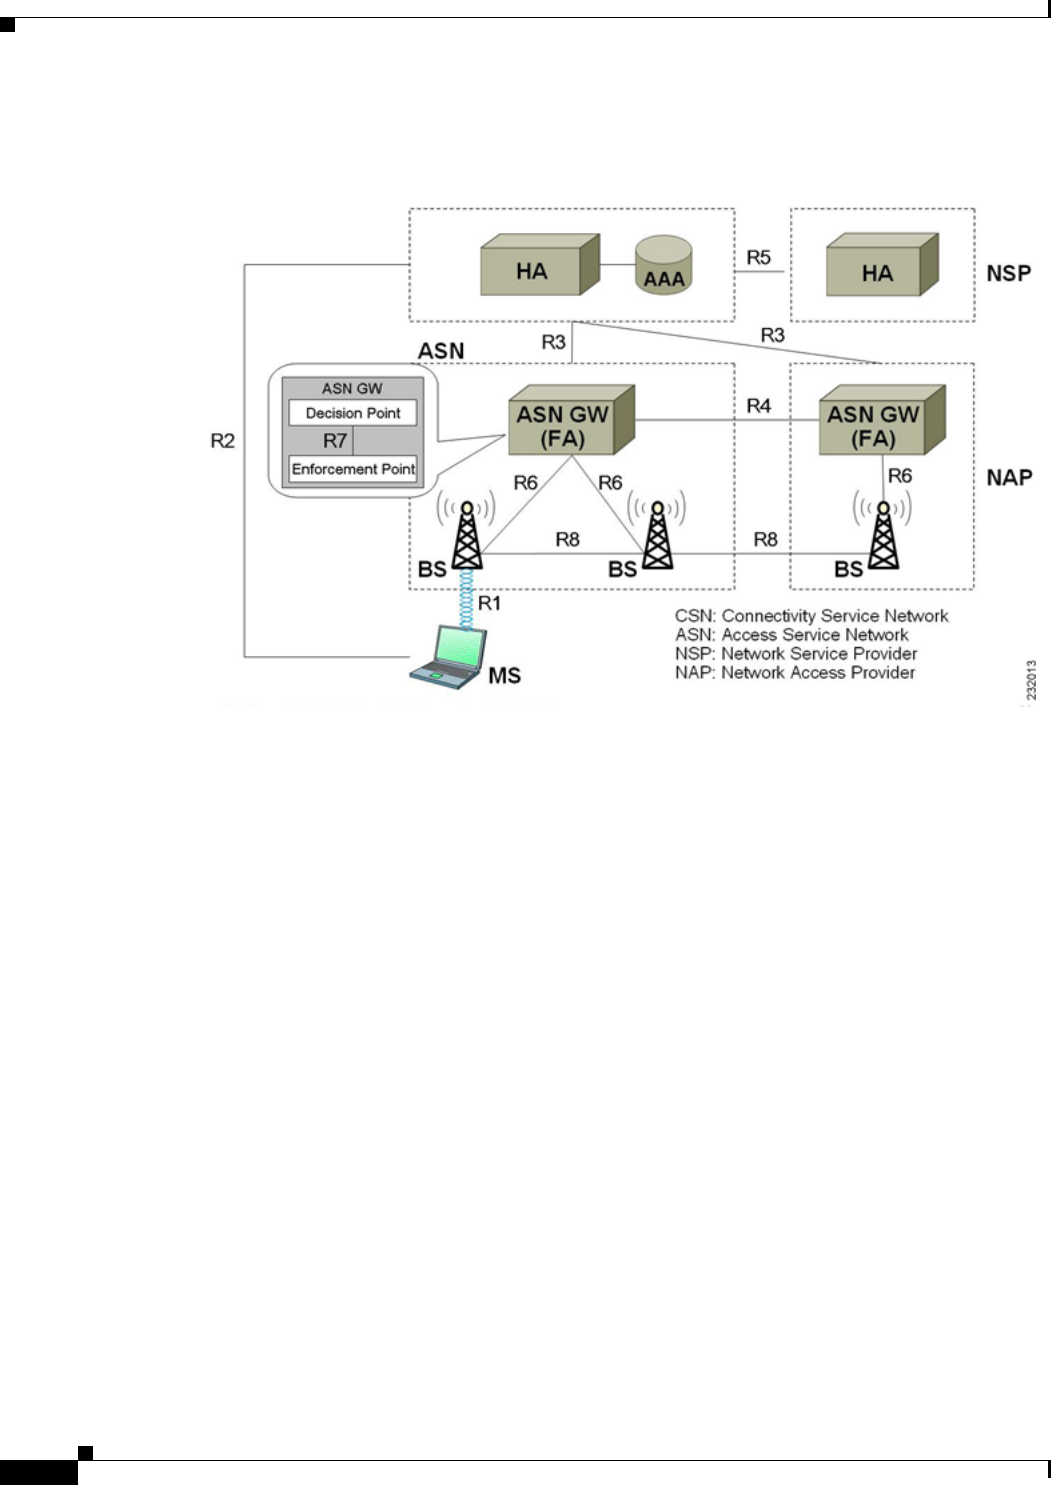
10-2
Cisco Prime Access Registrar 6.1 User Guide
OL-29756-01
Chapter 10 Using WiMAX in Cisco Prime Access Registrar
WiMAX in Cisco Prime Access Registrar
Figure 10-1 describes the network reference model of a typical WiMAX scenario.
Figure 10-1 WiMAX Network Reference Model
WiMAX in Cisco Prime Access Registrar
Prime Access Registrar uses the Extensible Authentication Protocol (EAP) to enable the WiMAX
feature. It also caches the IP attributes and Mobility Keys that are generated during network access
authentication. To enable caching of the WiMAX attributes, you must configure the respective resource
managers. See Configuring the Resource Manager for WiMAX, page 10-8, for information on
configuring resource manager. Figure 10-2 shows the WiMAX workflow in Prime Access Registrar.
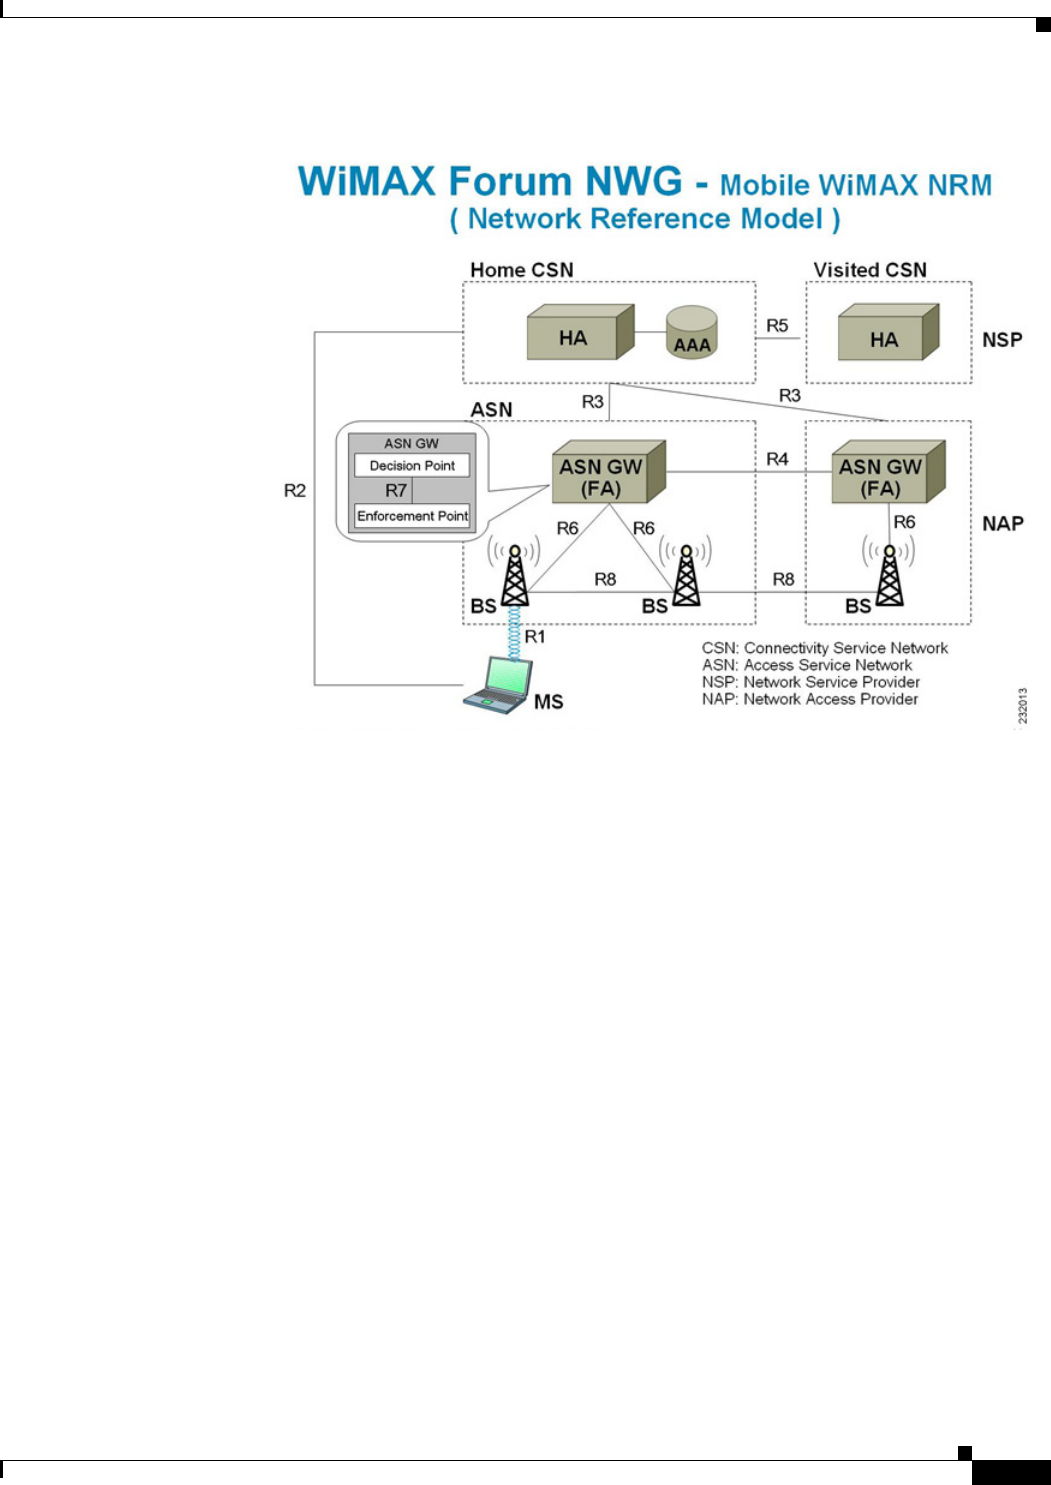
10-3
Cisco Prime Access Registrar 6.1 User Guide
OL-29756-01
Chapter 10 Using WiMAX in Cisco Prime Access Registrar
WiMAX in Cisco Prime Access Registrar
Figure 10-2 WiMAX Workflow
The WiMAX workflow in Prime Access Registrar includes:
•Direct interaction between the ASN GW and Prime Access Registrar
•Interaction between the ASN GW and Prime Access Registrar through the HA
This section contains the following topics:
•Direct Interaction Between the ASN GW and Cisco Prime Access Registrar
•Interaction Between ASN GW and Cisco Prime Access Registrar Through HA
•Prepaid and Hot-Lining
Direct Interaction Between the ASN GW and Cisco Prime Access Registrar
When the mobile node (MN) sends a RADIUS request to the ASN GW, it forwards this request to the
CSN. If it is VCSN, the VAAA proxies the request with Visited HA address in the Access Request to
HAAA. The HAAA initiates an authentication using the EAP service, for example, eap-ttls. The initial
Access-Request containing the WiMAX capability and NAS-Port-Type (Type:61) attributes indicate that
the specified flow is for a WiMAX request from ASN GW. Prime Access Registrar redirects this request
to the WiMAX service that you configure. The WiMAX service redirects the request to the EAP-based
Wimax-Authentication-Service for authentication. Upon successful authentication, the WiMAX service
redirects the request to Wimax-Session-Manager to allocate the home agent. Subsequently,
Prime Access Registrar generates the appropriate keys based on the Extended Master Session Key
(EMSK) and records the generated keys in the session cache resource manager as configured, before
sending Access-Accept to the ASN GW.

10-4
Cisco Prime Access Registrar 6.1 User Guide
OL-29756-01
Chapter 10 Using WiMAX in Cisco Prime Access Registrar
WiMAX in Cisco Prime Access Registrar
If there is no VCSN, then the HAAA will send the Access-Accept to ASNGW. Otherwise, the HAAA
sends the Access-Accept to VAAA. The VAAA then generates the visited HA-RK Key with SPI and
Lifetime and sends the access-accept to ASNGW.
The authentication methods followed by Prime Access Registrar are:
•User-only
•Device-only
•Single-EAP Device or User authentication
Note Prime Access Registrar 4.2 does not support Double-EAP authentication.
Prime Access Registrar uses the following values to identify the service-type:
•Framed—for initial authentication
•Authenticate-Only—for reauthentication
•Authorize-Only—for prepaid request
Note Prepaid attributes can also be sent in the initial authentication.
The attributes contained in this flow are listed in Table 10-1. For detailed information on the attributes
refer to the WiMAX forum NWG_R1_V1.3.1-Stage-3 specifications document.
Table 10-1 Attributes: ASN GW-Prime Access Registrar Flow
Attribute Description
User-Name Must be present. This attributes gets the NAI from
the EAP-Response/Identity.
Service-Type Must be present and the value is Framed,
Authenticate-Only or Authorize-Only.
WiMAX Capability This attribute is chosen by the ASN GW. The
request to the Prime Access Registrar is provided
through the WiMAX-Capability attribute. The
server might respond with the chosen WiMAX
Capability.
NAS-Port-Type The request must contain this attribute with the
value 27. This indicates Wireless IEEE 802.16
port when coming from a WiMAX ASN.
Calling-Station-ID The request must contain this attribute with the
value set to the MAC address of the device in
binary format.
Device-Authentication-Indicator The request might contain this attribute to
indicate whether the device authentication was
performed or not and the result of the action.
CUI The NAS might intimate the support for CUI by
sending the CUI attribute with the value ‘null’.
GMT-Time-Zone-Offset The request must contain the offsets in seconds
from the GMT at the NAS.

10-5
Cisco Prime Access Registrar 6.1 User Guide
OL-29756-01
Chapter 10 Using WiMAX in Cisco Prime Access Registrar
WiMAX in Cisco Prime Access Registrar
Prime Access Registrar generates a few more attributes upon successful authentication. These attributes
are described in Table 10-2.
Framed-IP-Address This is the CMIPv4 Home address to be assigned
to the MN. If this attribute is not present then the
Home address is derived by the ASN from MIP
procedures or through DHCP.
WiMax-Session-ID This attribute shall not be present in the initial
authentication. The value is a unique identifier in
the home realm for this session as set by the
HAAA(Prime Access Registrar) in the
Access-Accept, when the authentication is
successful and it will be included in all
subsequent requests from the NAS, such as online
accounting.
MSK The MSK shall be provided by the AAA Server as
a result of successful EAP-authentication.
MSK can be transmitted using either the
MS-MPPE-Keys or the MSK attribute.
Packet-Flow-Descriptor The pre-provisioned service flow which might be
present in the Access-Accept packet.
QoS-Descriptor The pre-provisioned service flow which might be
present in the Access-Accept packet, if
configured in Prime Access Registrar.
BS-ID Might be present in the Access-Request packet
which will identify NAP-ID base station. If both
NAP-ID and BS-ID are present, the NAP-ID will
be ignored.
Acct-Interim-Interval Sent in the Access-Accept packet. It indicates the
accounting update intervals.
Table 10-1 Attributes: ASN GW-Prime Access Registrar Flow (continued)
Attribute Description
Table 10-2 Additional Attributes: ASN-GW Prime Access Registrar Flow
Attribute Description
hHA-IP-MIP4 The IP address of the home HA allocated for the
incoming request.
vHA-IP-MIP4 The IP address of the visited HA. To be used by
the PMIP4 client.
MN-hHA-MIP4-KEY The MN-hHA key is used for MIP4 procedures.
MN-hHA-MIP4-SPI The SPI associated with the
MN-hHA-MIP4-KEY.
MN-vHA-MIP4-KEY The MN-vHA key is used for MIP4 procedures.

10-6
Cisco Prime Access Registrar 6.1 User Guide
OL-29756-01
Chapter 10 Using WiMAX in Cisco Prime Access Registrar
WiMAX in Cisco Prime Access Registrar
Note A policy engine can parse the NAI decoration and conclude the type of authentication method for the
incoming access-request for passing on to WiMAX service.
Interaction Between ASN GW and Cisco Prime Access Registrar Through HA
After Prime Access Registrar returns the Access-Accept to the ASN GW, the mobile node, which
initially sent the request, sends a registration request to the ASN GW. The ASN GW receives this request
and sends an Access-Request to the HA. A Query-Request will be sent to the Prime Access Registrar by
HA to receive the security context for authenticating the FA.
Prime Access Registrar identifies the request as HA query request, if:
•the WiMAX mobility attribute is present
•the NAS-Port-Type attribute is absent
Prime Access Registrar checks for a valid session in the session cache based on NAI and sends an
Access-Accept to the HA.
MN-vHA-MIP4-SPI The SPI associated with the
MN-vHA-MIP4-KEY.
FA-RK-KEY The FA-RK key will be used at ASN GW to derive
MN-FA for MIP4 procedures.
Table 10-2 Additional Attributes: ASN-GW Prime Access Registrar Flow (continued)
Attribute Description
Table 10-3 HAAA Cached Attributes
Attribute Description
Pseudo Identity As received from the MS in the NAI in the
EAP-Response/Identity. The HAAA is required to
correlate this to the true identity of the user.
NAS-ID/NAS-IP address One or both of these parameters are cached by the
HAAA. This is required to locate the serving
NAS.
Framed-IP Address The IP address allocated to the user session. This
information is useful in identifying the session
during AAA dynamic procedures.
MIP-RK, hHA-RK, FA-RK, MN-hHA Mobility keys generated during network access
authentication. These keys are cached and used by
the network for mobility authentication.
hHA-IP address The IP address of the home HA assigned to the
MS.

10-7
Cisco Prime Access Registrar 6.1 User Guide
OL-29756-01
Chapter 10 Using WiMAX in Cisco Prime Access Registrar
WiMAX in Cisco Prime Access Registrar
Note Prime Access Registrar responds with the correct keys back to the HA based on the NAI in User-Name
attribute. Prime Access Registrar returns an Access-Reject if it does not find a valid session for the NAI
during the user authentication and authorization or if there are other errors.
Prepaid and Hot-Lining
Prime Access Registrar supports prepaid and hot-lining flows for WiMAX. These are supported by the
existing mechanisms.
Configuring WiMAX in Cisco Prime Access Registrar
A new service type named wimax will be used for the WiMAX feature in Prime Access Registrar.
aregcmd command is used to configure WiMAX in Prime Access Registrar. WiMAX service
contains—Session Manager (with a session-cache resource manager and HA resource manager), Query
Service that is connected to the session manager configured for this service, and Prepaid Service, which
are required to connect all the flows appearing in Prime Access Registrar for WiMAX. This service will
be used as a container for the new key generation modules and the existing modules such as EAP
services.
Configuring WiMAX in Prime Access Registrar involves configuration of:
•Resource Manager for WiMAX
•Session Manager for WiMAX
•Query Service for WiMAX
•WiMAX properties
This section contains the following topics:
•Configuring the Resource Manager for WiMAX
•Configuring the Session Manager for WiMAX
•Configuring the Query Service for WiMAX
•Configuring WiMAX
•Configuring WiMAX
Table 10-4 VAAA Cached Attributes
Attribute Description
vHA-RK, vHA-RK-SPI, vHA-RK Lifetime,
MN-vHA
Mobility keys generated during network access
authentication. These keys are cached and used by
the network for mobility authentication.
vHA-IP address The IP address of the visited HA assigned to the
MS.

10-8
Cisco Prime Access Registrar 6.1 User Guide
OL-29756-01
Chapter 10 Using WiMAX in Cisco Prime Access Registrar
WiMAX in Cisco Prime Access Registrar
Configuring the Resource Manager for WiMAX
You must configure the following two Resource Managers:
•HA (home-agent or home-agent-ipv6)
•HA Cache (session-cache)
The HA Resource Manager must contain the IP ranges covering all the HA IP addresses that are to be
assigned in round-robin. You must configure the HA Cache Resource Manager to cache the mobility
keys (Table 10-3).
Note The HA Resource Manager allocates the IP addresses to the HA. If you do not configure the HA
Resource Manager properly, Prime Access Registrar will not generate some of the keys, which result in
an Access-Reject by the NAS.
The following shows the sample configuration for HA:
[ /Radius/ResourceManagers/HA ]
Name = HA
Description =
Type = home-agent
Home-Agent-IPAddresses/
Entries 1 to 1 from 1 total entries
Current filter: <all>
209.165.200.225-209.165.200.254/
The following shows the sample configuration for HA Cache in HAAA:
[ /Radius/ResourceManagers/HA-Cache ]
Name = HA-Cache
Description =
Type = session-cache
OverwriteAttributes = TRUE
QueryKey = User-Name
PendingRemovalDelay = 10
AttributesToBeCached/
1. WiMax-Session-ID
2. hHA-RK-Key
3. hHA-RK-SPI
4. MN-hHA-MIP4-Key
5. hHA-RK-Lifetime
6. MIP-RK
The following shows the sample configuration for HA Cache in VAAA:
[ /Radius/ResourceManagers/HA-Cache ]
Name = HA-Cache
Description =
Type = session-cache
OverwriteAttributes = TRUE
QueryKey = User-Name
PendingRemovalDelay = 10
AttributesToBeCached/
1. vHA-RK-Key
2. vHA-RK-SPI
3. MN-vHA-MIP4-Key
4. vHA-RK-Lifetime
When the OverwriteAttributes value is set as TRUE, the newly generated mobility keys will be cached
with the session record. By default, the value is FALSE.

10-9
Cisco Prime Access Registrar 6.1 User Guide
OL-29756-01
Chapter 10 Using WiMAX in Cisco Prime Access Registrar
WiMAX in Cisco Prime Access Registrar
The HA-RK-Lifetime attribute type must be of type STRING instead of UINT32 under
/Radius//advanced/attribute\ dictionary/vendor-Specific/vendors/wimAX/subAttribute\
Dictionary.
Note For generating RRQ-MN-HA key, we must configure MIP-RK in the AttributesToBeCached list.
Configuring the Session Manager for WiMAX
Before configuring WiMAX service, you must configure a session manager for WiMAX with a HA and
session cache resource manager. The following shows an example configuration of a session manager
with HA and session cache resource managers.
[ /Radius/SessionManagers/session-mgr-2 ]
Name = session-mgr-2
Description =
IncomingScript =
OutgoingScript =
AllowAccountingStartToCreateSession = FALSE
SessionTimeOut =
PhantomSessionTimeOut =
SessionKey =
ResourceManagers/
1. HA-Cache
2. HA
Note If a default session manager is configured with the same key as that of the WiMAX session manager, the
incoming WiMAX request will fail.
Configuring the Query Service for WiMAX
When you configure a query service for the WiMAX service in Prime Access Registrar, you must refer
it to the WiMAX Session Manager that you created. While configuring WiMAX, you must refer the
WiMAX-Query-Service parameter to a valid Query Service.
You must configure the Query key as the User-Name attribute, which contains the NAI. You must also
configure the query service to return all the relevant mobility keys as described in Table 10-5.
Table 10-5 Mobility Keys
Key Generated By Used At
MN-HA-CMIP4 MN and HAAA HA and MN
MN-HA-PMIP4 MN and HAAA HA and PMIP4 client
MN-HA-CMIP6 MN and HAAA MN and HA
FA-RK MN and HAAA MN and Authenticator
MN-FA MN and Authenticator FA and MN or PMIP4 client
HA-RK HAAA or VAAA HA and Authenticator
FA-HA HA and Authenticator HA and FA

10-10
Cisco Prime Access Registrar 6.1 User Guide
OL-29756-01
Chapter 10 Using WiMAX in Cisco Prime Access Registrar
WiMAX in Cisco Prime Access Registrar
The following shows a sample configuration for a WiMAX Query Service:
[../haQueryService ]
Name = haQueryService
Description =
Type = radius-query
IncomingScript~ =
OutgoingScript~ =
SessionManagersToBeQueried/
1. session-mgr-2
AttributesToBeReturned/
1. WiMax-Session-ID
2. HA-RK-Key
Note If AttributesToBeReturned is not configured, all the cached attributes will be returned.
Configuring WiMAX
When you configure the WiMAX service under /Radius/Services, you must set its type to wimax and
provide the following configuration options:
[ //localhost/Radius/Services/wimax ]
Name = WiMAX
Description =
Type = WiMAX
IncomingScript~ =
OutgoingScript~ =
OutagePolicy~ = RejectAll
OutageScript~ =
HA-RK-Key = cisco112
HA-RK-LifeTime = 60
WiMAX-Authentication-Service = None
WiMAX-Session-Manager = None
WiMAX-Query-Service = None
WiMAX-Prepaid-Service = None
Allow-HAAA-To-Include-Keys = TRUE
Require-MSK = False
The syntax to generate the a WiMAX request from radclient is
simple_wimax_asn_test bob(username) bob(password)
Table 10-6 WiMAX Service Parameters
Parameter Description
Name Required; inherited from the upper directory.
Description An optional description of the service.
Type Must be set to wimax for WiMAX service.
IncomingScript Optional.
OutgoingScript Optional.
OutagePolicy Required; must be set to AcceptAll, DropPacket,
or RejectAll. Default is DropPacket.

10-11
Cisco Prime Access Registrar 6.1 User Guide
OL-29756-01
Chapter 10 Using WiMAX in Cisco Prime Access Registrar
WiMAX in Cisco Prime Access Registrar
WiMAX - OMA-DM Provisioning Support with BEK Key
In addition to WiMax subscriber authentication, the Prime Access Registrar generates and caches the
Bootstrap Encryption Key (BEK) when it receives the authentication request from the unprovisioned
WiMax subscriber/device. Prime Access Registrar can identify the unprovisioned device either by
looking the special pattern in Access-Request or by performing explicit database lookup.
The BEK key derived from EMSK is calculated as follows:
OutageScript Optional. if you set this property to the name of a
script, Prime Access Registrar runs it when an
outage occurs. This property allows you to create
a script that notifies you when the RADIUS server
detects a failure.
HA-RK-Key Used as the base key to generate random
HA-RK-Key for all the HAs that are configured in
Prime Access Registrar.
By default, the value is cisco112.You can change
this value.
HA-RK-LifeTime Used as time (in minutes) to regenerate the
HA-RK-Keys based on its lifetime.
WiMAX-Authentication-Service A valid eap service which can be used for
WiMAX authentication. By default, this value is
none.
For VAAA, it should be configured with valid
radius proxy service.
WiMAX-Session-Manager A valid session manager which has HA and HA
Cache as resource managers. By default, this
value is none.
WiMAX-Query-Service A valid RADIUS query service configured with
WiMAX session manager. By default, this value is
none.
WiMAX-Prepaid-Service A valid prepaid service can be given to carry out
the prepaid functionality of WiMAX. Otherwise
this value is set to none.
Allow-HAAA-To-Include-Keys If this is set, the HAAA will include the
hHA-RK-Key, hHA-RK-SPI and
hHA-RK-Lifetime in the Access-Accept.
Otherwise, those attributes will not be in the
Access-Accept. By default this value is True.
Require-MSK If this is set, the MSK will be provided by the
AAA server as a result of successful
EAP-Authentication. By default, this value is
False.
Table 10-6 WiMAX Service Parameters (continued)
Parameter Description

10-12
Cisco Prime Access Registrar 6.1 User Guide
OL-29756-01
Chapter 10 Using WiMAX in Cisco Prime Access Registrar
WiMAX in Cisco Prime Access Registrar
BEK = the 16 most significant (leftmost) octets of HMAC-SHA256(EMSK,
“bek@wimaxforum.org”).
When Prime Access Registrar receives the accounting start packet for the unprovisioned device,
1. IP, MAC address, and BEK of the unprovisioned device notifies the OMA-DM server to initiate the
provisioning.
2. Prime Access Registrar maintains the IP address to MAC address association using web-service
until it receives the provisioning complete message from the OMA-DM server.
The Backend Portal queries the Prime Access Registrar web-service for this unprovisioned device MAC
address by giving the device IP address and also the OMA-DM server request the
Prime Access Registrar web-service to validate the MAC to IP address association
The communication between Prime Access Registrar and OMA-DM/Portal server is through
web-service by using SOAP over HTTPS. It is assumed that the OMA-DM server (or a mediation
function) will have a web-service using which AR can communicate.
Configuring the WiMax-Provisioning
To configure WiMax provisioning:
Step 1 Configure a script object, such as wimax-provision.
[ //localhost/Radius/Scripts/wimax-provision ]
Name = wimax-provision
Description =
Language = rex
--> set FileName to 'libProvisioning.so'
set FileName /cisco-ar/scripts/radius/rex/libProvisioning.so
--> set EntryPoint 'ProvisionedDeviceLookup'
set EntryPoint ProvisionedDeviceLookup
--> set InitEntryPoint 'InitializeProvisioning'
set InitEntryPoint InitializeProvisioning
--> set InitEntryPointArgs to 'ldap:wimax'
set InitEntryPointArgs ldap:wimax
ls
[ //localhost/Radius/Scripts/wimax-provision ]
Name = wimax-provision
Description =
Language = rex
Filename = /cisco-ar/scripts/radius/rex/libProvisioning.so
EntryPoint = ProvisionedDeviceLookup
InitEntryPoint = InitializeProvisioning
InitEntryPointArgs = ldap:wimax
The file libProvisioning.so is come up with Prime Access Registrar kit. You have to copy it into
/cisco-ar/scripts/radius/rex path. Entrypoint ProvisionedDeviceLookup literally looks up a datastore to
check if the user is provisioned. InitEntryPoint 'InitializeProvisioning' takes care of all initialization
work for entry point. InitEntryPointArgs 'ldap-wimax' says the user look up to be performed against ldap
datastore. Oracle datastore can also be used wherein you have to give this property to 'oracle:wimax'.

10-13
Cisco Prime Access Registrar 6.1 User Guide
OL-29756-01
Chapter 10 Using WiMAX in Cisco Prime Access Registrar
WiMAX in Cisco Prime Access Registrar
Step 2 Configure the configured script object to the server's incoming scripting point.
set IncomingScript wimax-provsion
ls
[ //localhost/Radius ]
Name = Radius
Description =
Version = 5.0.0
IncomingScript~ = provision
OutgoingScript~ =
Step 3 Webclient setup
Create a script object which calls the Prime Access Registrar's wimax-provisioning webservice.
[ //localhost/Radius/Scripts/WebServicecall ]
Name = WebServicecall
Description =
Language = rex
Filename = libProvisioning.so
EntryPoint = WebServiceCall
InitEntryPoint =
InitEntryPointArgs =
Entry point should be set to WebServiceCall.
Step 4 Save the configuration:
save
Step 5 Reload the configuration:
reload
WiMax Lawful Interception (LI) Support in Prime Access Registrar
Prime Access Registrar provides support for Intercept Access Point (IAP) for receiving the
intercept/monitoring request for the subscriber whose “Access Associated” Communications Identifying
Information (AA CmII) is to be intercepted and delivered to a Law Interception Server (LIS).

10-14
Cisco Prime Access Registrar 6.1 User Guide
OL-29756-01
Chapter 10 Using WiMAX in Cisco Prime Access Registrar
WiMAX in Cisco Prime Access Registrar
Prime Access Registrar supports the following intercept request from LIS:
•ProvisionTarget - To start monitoring the target user
•DeprovisionTarget - To stop monitoring the target user
•LinkUpdate - To query the target user in monitored list
•ListTarget – To list all the users that are currently being monitored
Initiating Monitoring Process
When the “ProvisionTarget” request is received from LIS, Prime Access Registrar adds the respective
user in monitoring list and starts monitoring the user events.
Table 10-7 lists the events of the target user that are reported to LIS:
Table 10-7 Targeted User Events
Events Attributes
Access Attempt •Case Identity (M)
•IAP System Identity (M)
•Time Stamp (M)
•Subscriber Identity (M)
•Access Method (C)
•Network Access Node Identity (C)
•Protocol Signal (O)
Access-Accept •Case Identity (M)
•IAP System Identity (M)
•Time Stamp (M)
•Subscriber Identity (M)
•Access Method (C)
•Network Access Node Identity (C)
•IP address (C)
•Access Session Identity (M)
•Access Session Characteristics (C)
•Location information (C)
•Protocol Signal (O)
Access-Failed •Case Identity (M)
•IAP System Identity (M)
•Time Stamp (M)
•Subscriber Identity (M)
•IP Address (C)
•Reason for Termination (C)
•Protocol Signal (O)

10-15
Cisco Prime Access Registrar 6.1 User Guide
OL-29756-01
Chapter 10 Using WiMAX in Cisco Prime Access Registrar
WiMAX in Cisco Prime Access Registrar
Note The attribute with (M) represents mandatory, (O) represents optional, (C) represents conditionally
available.
Stopping Monitoring Process
On receiving the DeprovisionTarget request from LIS, the target user is removed from the monitoring
list.
Querying Target User Events
On receiving the LinkUpdate request on target user from LIS, the target user details are checked in the
monitoring list and message is sent to LIS as listed below:
•If the specified user is not currently being monitored, a reply with reason-code indicating that the
user is currently not targeted is sent.
•If the specified user is currently being targeted and is not logged into the network, a reply with status
stating that the user is “inactive” in the network is sent.
Access-Session-Start •Case Identity (M)
•IAP System Identity (M)
•Time Stamp (M)
•Subscriber Identity (M)
•Access Session Identity (M)
•IP Address (C)
•Protocol Signal (O)
Access-Session-End •Case Identity (M)
•IAP System Identity (M)
•Time Stamp (M)
•Subscriber Identity (M)
•Access Session Identity (M)
•IP Address (C)
•Reason for Termination (C)
•Protocol Signal (O)
Access-Rejected •Case Identity (M)
•IAP System Identity (M)
•Time Stamp (M)
•Subscriber Identity (M)
•IP address(C)
•Reason for Termination(C)
•Protocol Signal (O)
Table 10-7 Targeted User Events (continued)
Events Attributes

10-16
Cisco Prime Access Registrar 6.1 User Guide
OL-29756-01
Chapter 10 Using WiMAX in Cisco Prime Access Registrar
WiMAX in Cisco Prime Access Registrar
•If the specified user is currently being targeted and is logged into the network, a reply with the
following attributes is sent:
–
Case Identity (M)
–
IAP System Identity (M)
–
Time Stamp (M)
–
Subscriber Identity (M)
–
Access Method (C)
–
Network Access Node Identity (C)
–
IP address (C)
–
Access Session Identity (M)
–
Access Session Characteristics (C)
–
Location information (C)
–
Protocol Signal (O)
Viewing Monitored Users
On receiving the ListTarget request from LIS, a list of users that are currently being monitored are sent
to LIS. The reply will contain a surveillance-target-count attribute indicating the count of the number of
users being targeted and multiple instances of surveillance-target-identifier attribute having the real
identifiers.
Each request from the LIS contains a transaction-id which is copied on to the reply from
Prime Access Registrar. For each request type there is an appropriate response type with appropriate
return data. They are as follows:
•ProvisionTargetResult - an acknowledgement for the ProvisionTarget request with the same
transaction id
•DeprovisionTargetResult - an acknowledgement for the DeprovisionTarget request with the same
transaction id
•LinkUpdateResult - for LinkUpdate, see Querying Target User Events
•ListTargetResult - for ListTarget, see Viewing Monitored Users
Configuring WiMax-Lawful Intercept
Two scripts which are LawfulIntercept and RexLiScript are to be configured to run LawfulIntercept
service in Prime Access Registrar. LawfulIntercept script should be configured in the server's incoming
scripting point which is used to check the provisioned status of the user in the incoming access request.
If the user is provisioned in the data store, Virtual-Server-Outgoing-Script will be executed after the
server's outgoingscripting point.
InitEntryPoint of LawfulIntercept script writes the targeted list of users to a file while the server is
stopping and reads the targeted users back to data store while the server is starting.
RexLiScript is configured in Virtual-Server-Outgoing-Script that sends events of the provisioned users
to the LI service client.

10-17
Cisco Prime Access Registrar 6.1 User Guide
OL-29756-01
Chapter 10 Using WiMAX in Cisco Prime Access Registrar
WiMAX in Cisco Prime Access Registrar
Configuring the WiMax-Lawful Intercept
To configure WiMax-Lawful Intercept:
Step 1 Create the RexLiScript script object that will be set in Virtual-Server-Outgoing-Script point.
[ //localhost/Radius/Scripts/virtual ]
Name = virtual
Description =
Language = rex
Filename = libLiScript.so
EntryPoint = RexLiScript
InitEntryPoint = InitRexLiScript
InitEntryPointArgs =
Step 2 Create the LawfulIntercept script object.
[ //localhost/Radius/Scripts/LiScript ]
Name = LiScript
Description =
Language = Rex
Filename = libLiScript.so
EntryPoint = LawfulIntercept
InitEntryPoint = RexInitialize
InitEntryPointArgs = virtual
Step 3 set LawfulIntercept script object to ServerIncoming scripting point;
[ //localhost/Radius ]
IncomingScript~ = LiScript
Note The file 'libLiScript.so' comes up with Prime Access Registrar kit. You have to copy it into
/cisco-ar/scripts/radius/rex/ path.
Step 4 Save the configuration:
save
Step 5 Reload the configuration:
reload

10-18
Cisco Prime Access Registrar 6.1 User Guide
OL-29756-01
Chapter 10 Using WiMAX in Cisco Prime Access Registrar
WiMAX in Cisco Prime Access Registrar

CHAPTER
11-1
Cisco Prime Access Registrar 6.1 User Guide
OL-29756-01
11
Using Extension Points
This chapter describes how to use Cisco Prime Access Registrar (Prime Access Registrar) scripting to
customize your RADIUS server. You can write scripts to affect the way Prime Access Registrar handles
and responds to requests and to change the behavior of Prime Access Registrar after a script is run.
All scripts reference the three dictionaries listed below, which are data structures that contain key/value
pairs.
•Request dictionary—contains all of the attributes from the access-request or other incoming
packets, such as the username, password, and service hints.
•Response dictionary—contains all of the attributes in the access-accept or other response packets.
As these are the attributes the server sends back to the NAS, you can use this dictionary to add or
remove attributes.
•Environment dictionary—contains well-known keys whose values enable scripts to communicate
with Prime Access Registrar or to communicate with other scripts.
This chapter contains the following sections:
•Determining the Goal of the Script
•Writing the Script
•Adding the Script Definition
•About the Tcl/Tk 8.3 Engine
•Cisco Prime Access Registrar Scripts
Note Cisco is not liable for scripts developed by clients. See Client Scripting, page 1-7 in “Overview”.
Determining the Goal of the Script
The goal of the script and its scripting point are tied together. For example, when you want to create a
script that performs some special processing of a username before it is processed by the
Prime Access Registrar server, you would reference this script as an incoming script.
When on the other hand, you would like to affect the response, such as setting a specific timeout when
there is not one, you would reference the script as an outgoing script.

11-2
Cisco Prime Access Registrar 6.1 User Guide
OL-29756-01
Chapter 11 Using Extension Points
Writing the Script
In order to be able to create a script, you need to understand the way Prime Access Registrar processes
client requests. Prime Access Registrar processes requests and responses in a hierarchical fashion;
incoming requests are processed from the most general to the most specific levels, whereas, outgoing
responses are processed from the most specific to the most general levels. Extension points are available
at each level.
An incoming script can be referenced at each of the following extension points:
•RADIUS server
•Vendor (of the immediate client)
•Client (individual NAS)
•NAS-Vendor-Behind-the-Proxy
•Client-Behind-the-Proxy
•Remote Server (of type RADIUS)
•Service
An authentication or authorization script can be referenced at each of the following extension points:
•Group Authentication
•User Authentication
•Group Authorization
•User Authorization
The outgoing script can be referenced at each of the following extension points:
•Service
•Client-Behind-the-Proxy
•NAS-Vendor-Behind-the-Proxy
•Client (individual NAS)
•NAS Vendor
•RADIUS server
Writing the Script
You can write scripts in Tcl, REX, Java, or as shared libraries using C or C++. In this section, the scripts
are shown in Tcl.
Writing the Script
To write a script:
Step 1 Create the Tcl source file using an editor.
Step 2 Give it a name.
Step 3 Define one or more procedures, using the following syntax:
proc name {request response environment}
{Body}
Step 4 Create the body of the script.

11-3
Cisco Prime Access Registrar 6.1 User Guide
OL-29756-01
Chapter 11 Using Extension Points
Writing the Script
Step 5 Save the file and copy it to the /opt/CSCOar/scripts/radius/tcl directory, or to the location you chose
when you installed Prime Access Registrar.
Note You can also use the Prime Access Registrar GUI or CLI to write internal scripts, by which you
can add, modify, or delete attribute in the request, response, and environment dictionaries for
RADIUS, Diameter, and TACACS+. For more information, see Internal Scripts, page 11-14.
Choosing the Type of Script
When you create a script, you can use any one or all of the three dictionaries: Request, Response, or
Environment. Here is what each dictionary does it for you,
•When you use the Request dictionary, you can modify the contents of a NAS request. Scripts that
use the Request dictionary are usually employed as incoming scripts.
•When you use the Response dictionary, you can modify what the server sends back to the NAS.
These scripts are consequently employed as outgoing scripts.
•When you use the Environment dictionary, you can do the following:
–
Affect the behavior of the server after the script is run. For example, you can use the
Environment dictionary to decide which of the multiple services to use for authorization,
authentication, and accounting.
–
Communicate among scripts, as the scripts all share these three dictionaries. For example, when
a script changes a value in the Environment dictionary, the updated value can be used in a
subsequent script.
The following sections show scripts examples of all the three dictionaries:
•Request Dictionary Script
•Response Dictionary Script
•Environment Dictionary Script
Request Dictionary Script
The Request Dictionary script is referenced from the server’s IncomingScript scripting point. It checks
to see whether the request contains a NAS-Identifier or a NAS-IP-Address. When it does not, it sets
the NAS-IP-Address from the request’s source IP address.
proc MapSourceIPAddress {request response environment}
{
if { ! ( [ $request containsKey NAS-Identifier ] ||
[ $request containsKey NAS-IP-Address ] ) } {
$request put NAS-IP-Address [ $environment get Source-IP-Address ]
}
Tcl scripts interpret $request arguments as active commands that can interpret strings from the Request
dictionary, which contains keys and values.
The containsKey method has the syntax: <$dict> containsKey <attribute>. In this example, <$dict>
refers to the Request dictionary and the attributes NAS-identifier and NAS-IP-Address. The
containsKey method returns 1 when the dictionary contains the attribute, and 0 when it does not. Using
the containsKey method prevents you from overwriting an existing value.

11-4
Cisco Prime Access Registrar 6.1 User Guide
OL-29756-01
Chapter 11 Using Extension Points
Adding the Script Definition
The put method has the syntax: <$dict> put <attribute value>[<index>]. In this example, <$request>
refers to the Request dictionary and the attribute is NAS-IP-Address. The put method sets the NAS’s
IP address attribute.
The get method has the syntax: <$dict> get <attribute>. In this example, <$dict> refers to the
Environment dictionary and <attribute> is the Source-IP-Address. The get method returns the value of
the attribute from the environment dictionary.
For a list of the methods you can use with scripts, see Appendix A, “Cisco Prime Access Registrar Tcl,
REX and Java Dictionaries.” They include get, put, and others.
Response Dictionary Script
This script is referenced from either the user record for users whose sessions are always PPP, or from
the script, AuthorizeService, which checks the request to determine which service is desired. The script
merges the Profile named default-PPP-users into the Response dictionary.
proc AuthorizePPP {request response environment}
{
$response addProfile default-PPP-users
The addProfile method has the syntax: <$dict> addProfile <profile>[<mode>]. In this example,
<$dict> refers to the Response dictionary and the profile is default-PPP-users. The script copies all of
the attributes of the Profile <profile> into the dictionary.
Environment Dictionary Script
This script is referenced from the NAS Incoming Script scripting point. It looks for a realm name on the
username attribute to determine which AAA services should be used for the request. When it finds
@radius, it selects a set of AAA services that will proxy the request to a remote RADIUS server. When
it finds @tacacs, it selects the Authentication Service that will proxy the request to a TACACS server for
authentication. For all of the remaining usernames, it uses the default Service (as specified in the
configuration by the administrator).
Note the function, regsub, is a Tcl function.
proc ParseProxyHints {request response environment} {
set userName [ $request get User-Name ]
if { [ regsub "@radius" $userName "" newUserName ] } {
$request put User-Name $newUserName
$radius put Authentication-Service “radius-proxy"
$radius put Authorization-Service “radius-proxy"
$radius put Accounting-Service “radius-proxy"
} else {
if { [ regsub "@tacacs" $userName "" newUserName ] } {
$request put User-Name
$radius put Authentication-Service “tacacs-client"
Adding the Script Definition
After you have written the script, you must add the script definition to the Prime Access Registrar’s
script Configuration directory so it can be referenced. Adding the script definition involves:
•Specifying the script definition; it must include the following:

11-5
Cisco Prime Access Registrar 6.1 User Guide
OL-29756-01
Chapter 11 Using Extension Points
Adding the Script Definition
–
Name—used in other places in the configuration to refer to the script. It must be unique among
all other scripts.
–
Language—can be either Tcl or REX (shared libraries)
–
Filename—the name you used when you created the file
–
EntryPoint—the function name.
The Name and the EntryPoint can be the same name, however they do not have to be.
•Choosing a scripting point; nine exist for incoming and outgoing scripts. These include:
–
the server
–
the vendor of the immediate client
–
the immediate client
–
the vendor of the specific NAS
–
the specific NAS
–
the service (rex or tcl)
–
the group (only AA scripts
–
the user record (only AA scripts)
–
remote server (only type RADIUS)
The rule of thumb to use in determining where to add the script is the most general scripts should be on
the outermost points, whereas the most specific scripts should be on the innermost points.
Note The client and the NAS are the same entity, unless the immediate client is acting as a proxy for the actual
NAS.
This section contains the following topics:
•Adding the Example Script Definition
•Choosing the Scripting Point
•Testing the Script
Adding the Example Script Definition
In the server configuration a Scripts directory exists. You must add the script you created to this
directory. To add the ParseProxyHints script to the Prime Access Registrar server, enter the following
command and supply the following information:
Name=ParseProxyHints
Description=ParseProxyHints
Language=tcl
Filename=ParseProxyHints
Entrypoint=ParseProxyHints
aregcmd add /Radius/Scripts/ParseProxyHints ParseProxyHints tcl ParseProxyHints
ParseProxyHints

11-6
Cisco Prime Access Registrar 6.1 User Guide
OL-29756-01
Chapter 11 Using Extension Points
About the Tcl/Tk 8.3 Engine
Choosing the Scripting Point
As the example script, ParseProxyHints, applies to a specific NAS (NAS1), the entry point should be
that NAS. To specify the script at this scripting point, enter:
aregcmd set /Radius/Clients/NAS1/IncomingScript ParseProxyHints
Testing the Script
To test the script, you can use the radclient command, which lets you create and send packets. For more
information about the radclient command, see Chapter 2, “Using the aregcmd Commands.”
About the Tcl/Tk 8.3 Engine
Prime Access Registrar uses Tcl engine is version Tcl/Tk8.3. Since the Tcl/Tk8.3 engine supports a
multi-threading application environment, it can achieve much better performance than Tcl/Tk7.6.
Tcl/Tk8.3 also performs byte-compile, so no runtime interpretation is required.
Cisco Prime Access Registrar Scripts
The Prime Access Registrar scripts are stored in /localhost/Radius/Scripts. Most of the scripts are
written in the RADIUS Extension language (REX). Some scripts are provided in both REX and Tcl. The
scripts written in Tcl all begin with the letter t followed by their functional name. The Tcl scripts are
listed below:
tACMEOutgoingScript
tAuthorizePPP
tAuthorizeService
tAuthorizeTelnet
tMapSourceIPAddress
tParseAARealm
tParseAASRealm
tParseProxyHints
tParseServiceAndAAARealmHints
tParseServiceAndAAASRealmHints
tParseServiceAndAARealmHints
tParseServiceAndAASRealmHints
tParstServiceAndProxyHints
tParseServiceHints
You can use the Prime Access Registrar GUI to write internal scripts, by which you can add, modify, or
delete attribute in the request, response, and environment dictionaries for RADIUS, Diameter, and
TACACS+. For more information about configuring internal scripts by using the GUI, see Scripts,
page 3-17.
This section contains the following topics:
•ACMEOutgoingScript
•AltigaIncomingScript
•AltigaOutgoingScript

11-7
Cisco Prime Access Registrar 6.1 User Guide
OL-29756-01
Chapter 11 Using Extension Points
Cisco Prime Access Registrar Scripts
•ANAAAOutgoing
•AscendIncomingScript
•AscendOutgoingScript
•AuthorizePPP
•AuthorizeService
•AuthorizeSLIP
•AuthorizeTelnet
•CabletronIncoming
•CabletronOutgoing
•CiscoIncoming
•CiscoOutgoing
•CiscoWithODAPIncomingScript
•ExecCLIDRule
•ExecDNISRule
•ExecFilterRule
•ExecNASIPRule
•ExecRealmRule
•ExecTimeRule
•LDAPOutage
•MapSourceIPAddress
•ParseAAARealm
•ParseAAASRealm
•ParseAARealm
•ParseAASRealm
•ParseProxyHints
•ParseServiceAndAAARealmHints
•ParseServiceAndAAASRealmHints
•ParseServiceAndAARealmHints
•ParseServiceAndAASRealmHints
•ParseServiceAndProxyHints
•ParseServiceHints
•ParseTranslationGroupsByCLID
•ParseTranslationGroupsByDNIS
•ParseTranslationGroupsByRealm
•UseCLIDAsSessionKey
•USRIncomingScript
•USRIncomingScript-IgnoreAccountingSignature
•USROutgoingScript

11-8
Cisco Prime Access Registrar 6.1 User Guide
OL-29756-01
Chapter 11 Using Extension Points
Cisco Prime Access Registrar Scripts
•Internal Scripts, page 11-14
ACMEOutgoingScript
ACMEOutgoingScript is referenced from Vendor ACME for the outgoing script. If the
Prime Access Registrar server accepts this Access-Request and the response does not yet contain a
Session-Timeout, set it to 3600 seconds.
AltigaIncomingScript
AltigaIncomingScript maps Altiga-proprietary attributes to Prime Access Registrar’s global attribute
space.
AltigaOutgoingScript
AltigaOutgoingScript maps Altiga attributes from Prime Access Registrar’s global attribute space to the
appropriate Altiga-proprietary attributes.
ANAAAOutgoing
ANAAAOutgoing can be referenced from either the client or vendor outgoing scripting point to be used
in HRPD/EV-DO networks where Prime Access Registrar is the Access Network (AN) AAA server.
ANAAAOutgoing checks to see if the response contains the Callback-Id attribute. If the response
contains the Callback-Id attribute and the value is less than 253 characters, ANAAAOutgoing prefixes a
zero (0) to the value. For example, it changes "112" into "0112." The ANAAAOutgoing script always
returns REX_OK.
AscendIncomingScript
AscendIncomingScript maps Ascend-proprietary attributes to Prime Access Registrar’s global attribute
space.
AscendOutgoingScript
AscendOutgoingScript maps Ascend attributes from Prime Access Registrar’s global attribute space to
the appropriate Ascend-proprietary attributes.
AuthorizePPP
AuthorizePPP is referenced from either the use record for users who’s sessions are always PPP or from
the from the script AuthorizeService, which checks the request to determine which service is desired.
This script merges in the Profile named "default-PPP-users" into the response dictionary.

11-9
Cisco Prime Access Registrar 6.1 User Guide
OL-29756-01
Chapter 11 Using Extension Points
Cisco Prime Access Registrar Scripts
AuthorizeService
AuthorizeService is referenced from user record for users who’s sessions might be PPP, SLIP or Telnet
depending on how they are connecting to the NAS. This script checks the request to determine which
service is desired. If it is telnet, it calls the script AuthorizeTelnet. If it is PPP, it calls the script
AuthorizePPP. If it is SLIP, it calls the script AuthorizeSLIP. If it is none of these, it rejects the request.
AuthorizeSLIP
AuthorizeSLIP is referenced from either the user record for users who’s sessions are always SLIP or
from the from the script AuthorizeService, which checks the request to determine which service is
desired. This script merges in the Profile named "default-SLIP-users" into the response dictionary.
AuthorizeTelnet
AuthorizeTelnet is referenced from either the user record for users who’s sessions are always telnet or
from the from the script AuthorizeService, which checks the request to determine which service is
desired. This script merges in the Profile named "default-Telnet-users" into the response dictionary.
CabletronIncoming
CabletronIncoming maps Cabletron-proprietary attributes to Prime Access Registrar’s global attribute
space.
CabletronOutgoing
Use CabletronOutgoing to map Cisco-proprietary attributes from Prime Access Registrar’s global
attribute space to the appropriate Cabletron-proprietary attributes.
CiscoIncoming
Use CiscoIncoming to map Cisco-proprietary attributes to Prime Access Registrar’s global attribute
space.
CiscoOutgoing
Use CiscoOutgoing to map Cisco-proprietary attributes from Prime Access Registrar’s global attribute
space to the appropriate Cabletron-proprietary attributes.
CiscoWithODAPIncomingScript
Use CiscoWithODAPIncomingScript to map Cisco-proprietary attributes to Prime Access Registrar’s
global attribute space and to map ODAP requests to the appropriate services and session managers.

11-10
Cisco Prime Access Registrar 6.1 User Guide
OL-29756-01
Chapter 11 Using Extension Points
Cisco Prime Access Registrar Scripts
CiscoWithODAPIncomingScript checks the incoming NAS-Identifier sent by the client. If the
NAS-Identifier does not equal odap-dhcp, the request is not an ODAP request. If the request is not an
ODAP request, the script does no more ODAP-specific processing, and calls CiscoIncomingScript to
allow it to process the request.
If the request is an ODAP request, CiscoWithODAPIncomingScript removes the NAS-Identifier
attribute because it is no longer required. The script then sets the Authentication-Service and the
Authorization-Service to odap-users and sets the Accounting-Service to odap-accounting.
ExecCLIDRule
ExecCLIDRule is referenced from the policy engine to determine the authentication and authorization
service and policy based on the CLID set in the policy engine.
ExecDNISRule
ExecDNISRule is referenced from the policy engine to determine the authentication and authorization
service and policy based on the DNIS set in the policy engine.
ExecFilterRule
ExecFilterRule is referenced from the policy engine to determine whether a user packet should be
rejected or not based on whether a special character like "*", "/", "\" or "?" shows up in the packet.
ExecNASIPRule
ExecNASIPRule is referenced from the policy engine to enable configuration of policies based on the
incoming NAS-IP-Address. You can configure two attributes, client-ip-address and subnetmask, to
match the incoming NAS-IP-Address and its subnet mask. If the attributes match, ExecNASIPrule sets
the environment variables (if they are configured in that rule).
ExecRealmRule
ExecRealmRule is referenced from the policy engine to determine the authentication and authorization
service and policy based on the realm set in the policy engine.
ExecTimeRule
ExecTimeRule either rejects or accepts Access Request packets based on the time range specified in a
user’s login profile. You can configure the TimeRange and AcceptedProfile attributes.
The format for the TimeRange is to set the allowable days followed by the allowable times, as in:
TimeRange = dateRange, timeRange
The dateRange can be in the form of a date, a range of allowable dates, a day, or a range of allowable
days. The timeRange should be in the form of hh:mm-hh:mm.

11-11
Cisco Prime Access Registrar 6.1 User Guide
OL-29756-01
Chapter 11 Using Extension Points
Cisco Prime Access Registrar Scripts
Here are a few examples:
mon-fri,09:00-17:00
Allows access Monday through Friday from 9 AM until 5 PM.
mon,09:00-17:00;tue-sat,12:00-13:00
Allows access on Monday from 9 AM until 5 PM and from 12 noon until 1 PM on Tuesday
through Saturday
mon,09:00-24:00;tue,00:00-06:00
Allows access on Monday from 9 AM until Tuesday at 6 AM
1-13,10-17:00; 15,00:00-24:00
Allows access from the first of the month until the thirteenth of the month from 10 AM until 5
PM and all day on the fifteenth of the month
LDAPOutage
LDAPOutage is referenced from LDAP Services as OutageScript. LDAPOutage logs when the LDAP
binding is lost.
MapSourceIPAddress
MapSourceIPAddress is referenced from the Prime Access Registrar server's IncomingScript scripting
point. MapSourceIPAddress checks to see if the request contains either a NAS-Identifier or a
NAS-IP-Address. If not, this script sets the NAS-IP-Address from the request's source IP address.
The Tcl version of this script is tMapSourceIPAddress.
ParseAAARealm
ParseAAARealm is referenced from the NAS IncomingScript scripting point. It looks for a realm name
on the username attribute as a hint of which AAA service should be used for this request. If @<realm>
is found, the AAA service is selected which has the same name as the realm.
ParseAAASRealm
ParseAAASRealm is referenced from the NAS incoming script extension point. ParseAAASRealm looks
for a realm name on the username attribute as a hint of which AAA service and which SessionManager
should be used for this request. If @<realm> is found, the AAA service and SessionManager which have
the same name as the realm are selected.
ParseAARealm
ParseAARealm is referenced from the NAS IncomingScript scripting point. It looks for a realm name on
the username attribute as a hint of which authentication and authorization service should be used for this
request. If @<realm> is found, it selects the AA service that has the same name as the realm and the
DefaultAccountingService (as specified in the configuration by the administrator).

11-12
Cisco Prime Access Registrar 6.1 User Guide
OL-29756-01
Chapter 11 Using Extension Points
Cisco Prime Access Registrar Scripts
The Tcl version of this script is named tParseAARealm.
ParseAASRealm
ParseAASRealm is referenced from the NAS IncomingScript scripting point. It looks for a realm name
on the username attribute as a hint of which AA service and which SessionManager should be used for
this request. If @<realm> is found, the AA service and the SessionManager which have the same name
as the realm are selected. The Accounting service will be the DefaultAccountingService (as specified in
the configuration by the administrator).
The Tcl version of this script is named tParseAASRealm.
ParseProxyHints
ParseProxyHints is referenced from the NAS IncomingScript scripting point. It looks for a realm name
on the username attribute as a hint of which AAA services should be used for this request. If @radius is
found, a set of AAA services is selected which will proxy the request to a remote radius server. If
@tacacs is found, the AuthenticationService is selected that will proxy the request to a tacacs server for
authentication. For any services not selected, the default service (as specified in the configuration by the
administrator) will be used.
The Tcl version of this script is named tParseProxyHints.
ParseServiceAndAAARealmHints
ParseServiceAndAAARealmHints is referenced from the NAS IncomingScript scripting point. It calls
both ParseServiceHints and ParseAAARealm.
The Tcl version of this script is named tParseServiceAndAAARealmHints.
ParseServiceAndAAASRealmHints
ParseServiceAndAAASRealmHints is referenced from the NAS IncomingScript scripting point. It calls
both ParseServiceHints and ParseAAASRealm.
The Tcl version of this script is named tParseServiceAndAAASRealmHints.
ParseServiceAndAARealmHints
ParseServiceAndAARealmHints is referenced from the NAS IncomingScript scripting point. It calls
both ParseServiceHints and ParseAARealm.
The Tcl version of this script is named tParseServiceAndAARealmHints.
ParseServiceAndAASRealmHints
ParseServiceAndAASRealmHints is referenced from the NAS IncomingScript scripting point. It calls
both ParseServiceHints and ParseAASRealm.

11-13
Cisco Prime Access Registrar 6.1 User Guide
OL-29756-01
Chapter 11 Using Extension Points
Cisco Prime Access Registrar Scripts
The Tcl version of this script is named tParseServiceAndAASRealmHints.
ParseServiceAndProxyHints
ParseServiceAndProxyHints is referenced from the NAS IncomingScript scripting point. It calls both
ParseServiceHints and ParseProxyHints.
The Tcl version of this script is named tParseServiceAndProxyHints.
ParseServiceHints
ParseServiceHints is referenced from the NAS IncomingScript scripting point. Check to see if we are
given a hint of the service type or the realm. If so, set the appropriate attributes in the request or radius
dictionary to record the hint and rewrite the username to remove the hint.
The Tcl version of this script is named tParseServiceHints.
ParseTranslationGroupsByCLID
ParseTranslationGroupsByCLID is referenced from the policy engine to determine the incoming and
outgoing translation groups based on CLID set in the policy engine so that the attributes can be added
and/or filtered out by the configuration data set in MCD.
ParseTranslationGroupsByDNIS
ParseTranslationGroupsByDNIS is referenced from the policy engine to determine the incoming and
outgoing translation groups based on realm set in the policy engine so that the attributes can be
added/filtered out by the configuration data set in MCD.
ParseTranslationGroupsByRealm
ParseTranslationGroupsByRealm is referenced from the policy engine to determine the incoming and
outgoing translation groups based on the realm set in the policy engine.
ParseTranslationGroupsByRealm allows the attributes to be added or filtered out by the configuration
data set in MCD.
UseCLIDAsSessionKey
UseCLIDAsSessionKey is used to specify that the Calling-Station-Id attribute should be used as the
session key to correlate requests for the same session. This is a typical case for 3G mobile user session
correlation.

11-14
Cisco Prime Access Registrar 6.1 User Guide
OL-29756-01
Chapter 11 Using Extension Points
Cisco Prime Access Registrar Scripts
USRIncomingScript
USRIncomingScript maps USR-proprietary attributes to Prime Access Registrar’s global attribute
space.
USRIncomingScript-IgnoreAccountingSignature
USRIncomingScript-IgnoreAccountingSignature maps USR-proprietary attributes to
Prime Access Registrar’s global attribute space and sets a flag to ignore the signature on
Accounting-Request packets. Earlier versions of the USR RADIUS client did not correctly sign
Accounting-Request packets.
USROutgoingScript
USROutgoingScript maps USR attributes from Prime Access Registrar’s global attribute space to the
appropriate USR-proprietary attributes.
Internal Scripts
Prime Access Registrar allows you to write internal scripts, by which you can add, modify, or delete
attributes in the request, response, and environment dictionaries for RADIUS, Diameter, and TACACS+.
You can use the Prime Access Registrar GUI or CLI to configure the internal scripts.
Prime Access Registrar allows you to create script statements for the following operations:
•Simple Attribute Operation—allows you to add, modify, or delete an attribute value to the request,
response, or environment dictionary
•Copy an Attribute—allows you to copy an attribute value from one dictionary to another
•Concatenate Operation—allows you to concatenate an attribute value from one dictionary to another
•Replace Operation—allows you to replace an attribute value from one dictionary to another
•Value Based Manipulations—allows you to manipulate attribute values in a dictionary based on a
given text
•Log or Trace Messages—allows you to create different levels of log or trace messages
•I can do it myself—allows you to create your own script for the selected protocol
You can also use internal scripts as part of the FastRules workflow. For more information about
FastRules, see Chapter 19, “Using FastRules to Process Packet Flow.”
To configure internal scripts using the Prime Access Registrar GUI, see Scripts, page 3-17.
CLI to Configure Internal Scripts
A sample CLI to configure internal script statements is given below:
--> cd /r/scripts/test
[ //localhost/Radius/Scripts/test ]
Name = test
Description =
Language = internal
Statements/

11-15
Cisco Prime Access Registrar 6.1 User Guide
OL-29756-01
Chapter 11 Using Extension Points
Cisco Prime Access Registrar Scripts
--> cd statements/
[ //localhost/Radius/Scripts/test/Statements ]
1. #req:User-Name=~(.*)(@[a-z]+.[a-z]+)~\1
[ //localhost/Radius/Scripts/test1 ]
Name = test1
Description =
Language = internal
Statements/
--> cd statements/
[ //localhost/Radius/Scripts/test1/Statements ]
1. -rsp:Framed-IP-Address=1.1.1.1
-->
[ //localhost/Radius/Scripts/test3/Statements ]
1. +rsp:Tacacs-AVpair=cmd=show running-config
2. +rsp:Tacacs-AVPair=aaa
3. -rsp:Tacacs-AVPair=aaa
-->
[ //localhost/Radius/Scripts/test4/Statements ]
1. -req:Cisco-AVPair=bbb
--> cd ../../test7/statements/
[ //localhost/Radius/Scripts/test7/Statements ]
1. #rsp:Framed-IPX-Network=2
2. +rsp:State=Delivered
3. -rsp:State
4. +req:Cisco-AVPair=aaaa
5. #req:Cisco-AVPair=5
6. #rsp:Framed-IPX-Network=req:Cisco-AVPair
7. -req:Cisco-AVPair

11-16
Cisco Prime Access Registrar 6.1 User Guide
OL-29756-01
Chapter 11 Using Extension Points
Cisco Prime Access Registrar Scripts

CHAPTER
12-1
Cisco Prime Access Registrar 6.1 User Guide
OL-29756-01
12
Using Replication
This chapter provides information about how to use the replication feature in
Cisco Prime Access Registrar (Prime Access Registrar).
This chapter contains the following sections:
•Replication Overview
•How Replication Works
•Replication Configuration Settings
•Setting Up Replication
•Replication Example
•Full Resynchronization
•Replication Setup with More Than One Slave
•Frequently Asked Questions
•Replication Log Messages
Note When using replication, use the aregcmd command-line interface to make configuration changes to the
Prime Access Registrar server. Replication is not supported when using the GUI.
Replication Overview
Prime Access Registrar replication feature can maintain identical configurations on multiple machines
simultaneously. When replication is properly configured, changes an administrator makes on the primary
or master machine are propagated by Prime Access Registrar to a secondary or slave machine.
Replication eliminates the need to have administrators with multiple Prime Access Registrar
installations make the same configuration changes at each of their installations. Instead, only the
master's configuration need be changed and the slave is automatically configured eliminating the need
to make repetitive, error-prone configuration changes for each individual installation. In addition to
enhancing server configuration management, using replication eliminates the need for a hot-standby
machine.
Using a hot-standby machine is a common practice to provide more fault-tolerance where a
fully-installed and configured system stands ready to takeover should the primary machine fail.
However, a system setup for hot-standby is essentially an idle machine only used when the primary

12-2
Cisco Prime Access Registrar 6.1 User Guide
OL-29756-01
Chapter 12 Using Replication
How Replication Works
system fails. Hot-standby or secondary servers are expensive resources. Employing
Prime Access Registrar's replication feature, both servers can perform RADIUS request processing
simultaneously, eliminating wasted resources.
The replication feature focuses on configuration maintenance only, not session information or
installation-specific information such as Administrator, Interface, Replication or Advanced
machine-specific configuration changes. These configuration items are not replicated because they are
specific to each installation and are not likely to be identical between master and slave. While changes
to Session Managers, Resource Manager, and Remote Servers are replicated to the slave and stored in
the slave's configuration database, they are not hot-configured on the slave (see Hot Configuration
Detailed below for more information)
Changes should be made only on the master server. Making changes on a slave server will not be
replicated and might result in an unstable configuration on the slave. Any changes made using
replication will not be reflected in existing aregcmd sessions. aregcmd only loads its configuration at
start up; it is not dynamically updated. For example, if aregcmd is running on the slave, and on the
master aregcmd is used to add a client, the new client, while correctly replicated and hot-configured,
will not be visible in the slave's aregcmd until aregcmd is exited and restarted.
When there is a configuration change, the master server propagates the change set to all member servers
over the network. All member servers have to update their configuration after receiving the change set
notifications from master server. Propagating the change set to a member serve involves multiple packet
transfer from the master server to the member because the master serve has to convey all the
configuration changes to the member. The number of packets to be transferred depends on the size of
the change set.
After receiving a change set notification, the member server will go offline before applying the change
set received from master server. This state is indicated by the log message Radius Server is offline
in name_radius_1_log file. When the change set is successfully applied, the member server goes up
automatically. This is indicated by the log message Radius Server is online in name_radius_1_log
file. When the member server goes offline to apply the change set, no incoming packets are processed.
Due to the number of packets to be transferred in the change set and the amount of time the member
server will be offline updating its databasepoints, we recommend that you use multiple save commands
rather than a large configuration change with one save command. You can also minimize the number of
changes that occur in a replication interval by modifying either the RepTransactionArchiveLimit or the
RepTransactionSyncInterval, or both of these properties. For example, instead of using the default value
of 100 for the RepTransactionArchiveLimit, you might change it to 20.
Note The IP address format is enhanced to support both IPv4 and IPv6.
How Replication Works
The following sections describe the flow of a simple replication as it occurs under normal conditions:
•Replication Data Flow
•Security
•Replication Archive
•Ensuring Data Integrity
•Full Resynchronization
•Understanding Hot-Configuration

12-3
Cisco Prime Access Registrar 6.1 User Guide
OL-29756-01
Chapter 12 Using Replication
How Replication Works
•Replication’s Impact on Request Processing
Replication Data Flow
The following sections describe data flow on the master server and the slave server:
•Master Server
•Slave Server
Master Server
The master server or primary server is the fully configured machine that is used to archive all the
transactions that taken place in Prime Access Registrar.
Performing the Data Flow for the Master Server
To perform data flow for the master server:
Step 1 The administrator makes a change to the master server’s configuration using the aregcmd command line
interface (CLI) and issues a save command.
Step 2 After the changes are successfully validated, the changes are stored in the Prime Access Registrar
database.
Step 3 aregcmd then notifies the Prime Access Registrar server executing on the master of the configuration
change.
Step 4 The Prime Access Registrar server then updates its version of the configuration stored in memory. (This
is called hot-config because it happens while the server is running and processing requests.)
Step 5 The Prime Access Registrar server first copies the changes pertaining to the aregcmd save, also known
as a transaction to its replication archive, then transmits the transaction to the slave server for processing.
Step 6 In aregcmd, the prompt returns indicating that the save has completed successfully, the transaction has
been archived, and the transaction has been transmitted to the slaves.
Slave Server
The slave server or secondary server is a fully-installed and configured system stands ready to takeover
when the primary machine fails.
Performing Data Flow for the Slave Server
To perform data flow for the slave server:
Step 1 When the slave server receives the transaction, its contents are verified.
Step 2 After verification, the changes are applied to the slave server's database.
Step 3 The changes are then applied (hot-configured) in the slave server's in-memory configuration.
Step 4 The transaction is written to the slave server's replication archive.

12-4
Cisco Prime Access Registrar 6.1 User Guide
OL-29756-01
Chapter 12 Using Replication
How Replication Works
Security
Replication has two primary security concerns:
1. Security of the transactions transmitted to the slave server
2. Storage of transactions in the replication archive
Both of these concerns use shared secret (MD5) encryption via the shared secret specified in the
replication configuration on both master and slave servers. Replication data transmitted between master
and slave is encrypted at the source and decrypted at the destination the same way as standard RADIUS
packets between Prime Access Registrar's clients and the Prime Access Registrar server. Transactions
written to the replication archive are also encrypted in the same manner and decrypted when read from
the replication archive.
Replication Archive
The replication archive serves two primary purposes:
•To provide persistent, or saved, information regarding the last successful transaction
•To persist transactions in case the slave server requires re synchronization (see Ensuring Data
Integrity below for more information on re synchronization).
The replication archive is simply a directory located in ../CSCOar/data/archive. Each transaction
replicated by the master is written to this directory as a single file. The name of each transaction file is
of the form txn########## where ########## is the unique transaction number assigned by the master
server. The replication archive size, that is the number of transaction files it might contain, is configured
in the Replication configuration setting of TransactionArchiveLimit. When the TransactionArchive limit
is exceeded, the oldest transaction file is deleted.
Ensuring Data Integrity
Prime Access Registrar's configuration replication feature ensures data integrity through transaction
data verification, transaction ordering, automatic resynchronization and manual full-resynchronization.
With the single exception of a manual full-resynchronization, each of the following techniques help to
automatically ensure that master and slave servers contain identical configurations. A detailed
description of each technique follows. This section contains the following topics:
•Transaction Data Verification
•Transaction Order
•Automatic Resynchronization
Transaction Data Verification
When the master prepares a transaction for replication to a slave, the master calculates a 2's complement
Cyclic Redundancy Check (CRC) for each element (individual configuration change) in the transaction
and for the entire transaction and includes these CRC values in the transmitted transaction. When the
slave receives the transaction, the slave calculates a CRC for each transaction element and for the entire
transaction and compares its own calculated values with those sent with the message. If a discrepancy
occurs from these comparisons, the transaction element or the entire transaction is discarded and a
re-transmission of that particular transaction element or the entire transaction is requested by the slave
from the master. This process is called automatic resynchronization. (described in more detail below)

12-5
Cisco Prime Access Registrar 6.1 User Guide
OL-29756-01
Chapter 12 Using Replication
How Replication Works
Transaction Order
When the master prepares a transaction for replication, it assigns the transaction a unique transaction
number. This number is used to ensure the transactions are processed by the slave in exactly the same
order as they were processed on the master. Transactions are order dependent. Since the functionality of
Prime Access Registrar's configuration replication feature is to maintain identical configurations
between master and slave, if transaction order were not retained, master and slave would not contain
identical configurations. Consider where two transactions modify the same thing (a defined client's IP
address for example). If the first transaction was a mistake and the second was the desired result, the
client configuration on the master would contain the second setting; however, if the transactions were
processed in the reverse order on the slave, the client configuration on the slave would contain the
mistaken IP Address. This example illustrates the critical need for transaction ordering to ensure data
integrity.
Automatic Resynchronization
Automatic Resynchronization is the most significant feature with respect to data integrity. This feature
ensures the configurations on both the master and slave are identical. If they are not, this feature
automatically corrects the problem.
When the master and slave start-up, they determine the transaction number of the last replication
transaction from their respective replication archives. The master immediately begins periodic
transmission of a TransactionSync message to the slave. This message informs the slave of the
transaction number of the transaction that the master last replicated.
If the transaction number in the TransactionSync message does not match the transaction number of the
last received transaction in the slave's archive, then the slave will request resynchronization from the
master. The resynchronization request sent by the slave will include the slave's last received transaction
number.
The master will respond by retransmitting each transaction since the last transaction number indicated
by the slave in the resynchronization request. The master obtains these transactions from its replication
archive.
Should the slave's last received transaction number be less than the lowest transaction number in the
master's replication archive, then automatic resynchronization cannot occur as the master's replication
archive does not contain enough history to synchronize the slave. In this case, the slave must be
resynchronized with a full-resynchronization.
Full Resynchronization
Full Resynchronization means that the slave has missed more transactions than are stored in the master's
replication archive and cannot be resynchronized automatically. There is no automatic
full-resynchronization mechanism in Prime Access Registrar's configuration replication feature. To
perform a full resynchronization, see Full Resynchronization.

12-6
Cisco Prime Access Registrar 6.1 User Guide
OL-29756-01
Chapter 12 Using Replication
Replication Configuration Settings
Understanding Hot-Configuration
Hot-Configuration is the process of reflecting configuration changes made to Prime Access Registrar's
internal configuration database in the in-memory configuration of the executing Prime Access Registrar
server. Hot-Configuration is accomplished without interruption of RADIUS request processing. For
example, if an administrator uses aregcmd to configure a new client and issues a save command, when
the prompt returns, the newly configured client can send requests to Prime Access Registrar.
Hot-Configuration minimizes the down-time associated with having to restart an Prime Access Registrar
server to put configuration changes into effect. With the Hot-Configuration feature, a restart is only
necessary when a Session Manager, Resource Manager or Remote Server configuration is modified.
These configuration elements might not be hot-configured because they maintain state (an active session,
for example) and cannot be modified without losing the state information they maintain. Changes to
these configuration elements require a restart of Prime Access Registrar to put them into effect.
Hot-Configuration is not associated with the replication feature. Hot-Configuration’s only connection to
the replication feature is that when a change is replicated to the slave, the slave is hot-configured to
reflect the replicated change as if an administrator had used aregcmd to make the changes directly on
the slave server.
Replication’s Impact on Request Processing
The replication feature was designed to perform replication of transactions with minimal impact on
RADIUS request processing. When a transaction is received by a slave, RADIUS requests are queued
while the transaction is applied to the slave. After the transaction is complete, RADIUS request
processing resumes.
The impact on RADIUS request processing is a direct result of the size of a transaction. The smaller the
transaction the lesser the impact, and the larger the transaction, the greater the impact. In other words,
when making changes to the master, frequent saves are better than making lots of changes and then
saving. Each change is one transaction element and all changes involved in a save comprise a single
transaction with one element per change. Since the replication feature only impacts RADIUS request
processing when changes are made, the impact under normal operation (when changes are not being
made) is virtually unmeasurable.
Replication Configuration Settings
This section describes each replication configuration setting. In aregcmd, replication settings are found
in //localhost/Radius/Replication. This section contains the following topics:
•RepType
•RepTransactionSyncInterval
•RepTransactionArchiveLimit
•RepIPAddress
•RepPort
•RepSecret
•RepIsMaster
•RepMasterIPAddress
•RepMasterPort

12-7
Cisco Prime Access Registrar 6.1 User Guide
OL-29756-01
Chapter 12 Using Replication
Replication Configuration Settings
•Rep Members Subdirectory
•Rep Members/Slave1
•Name
•IPAddress
•Port
RepType
RepType indicates the type of replication. The choices available are SMDBR and NONE.
When RepType is set to NONE, replication is disabled. To enable replication, set RepType to SMDBR
for Single Master DataBase Replication. RepType must be set to SMDBR on both the master and slave
servers.
RepTransactionSyncInterval
Master
On the master server, RepTransactionSyncInterval is the duration between periodic transmission of the
TransactionSync message expressed in milliseconds. The default is 60000 or 1 minute.
The purpose of RepTransactionSyncInterval is to indicate how frequently to check for an out-of -sync
condition between the master and slave servers. When the slave received the TransactionSync message,
it uses its contents to determine if it needs to resynchronize with the master.
The larger the setting for RepTransactionSyncInterval, the longer the period of time between out-of-sync
detection. However, if RepTransactionSyncInterval is set too small, the slave can frequently request
resynchronization when it is not really out of sync. If the duration is too small, the slave cannot
completely receive a transaction before it receives the TransactionSync message. In this case, the servers
will remain synchronized, but there will be unnecessary excess traffic that could affect performance.
Note We recommend that you use smaller values for the RepTransactionSyncInterval to limit the time a slave
server is offline applying change sets during automatic resynchronization.
Slave
On the slave, RepTransactionSyncInterval is used to determine if the slave has lost contact with the
master and to alert administrators of a possible loss of connectivity between the master an slave. If the
elapsed time since the last received TransactionSync message exceeds the setting of
RepTransactionSyncInterval, the slave writes a log message indicating that it might have lost contact
with the master. This log message is repeated each TransactionSyncInterval until a TransactionSync
message is received.

12-8
Cisco Prime Access Registrar 6.1 User Guide
OL-29756-01
Chapter 12 Using Replication
Replication Configuration Settings
RepTransactionArchiveLimit
On both master and slave, the RepTransactionArchiveLimit setting determines how many transactions
can be stored in the archive. The default setting is 100. When the limit is exceeded, the oldest transaction
file is deleted. If a slave requires resynchronization and the last transaction it received is no longer in the
archive, a full resynchronization will be necessary to bring the slave back in sync with the master.
Note The value set for RepTransactionArchiveLimit should be the same on the master and the slave.
An appropriate value for RepTransactionArchiveLimit depends upon how much hard disk space an
administrator can provide for resynchronization. If this value is large, say 10,000, then the last 10,000
transactions will be stored in the archive. This is like saying the last 10,000 saves from aregcmd will be
stored in the archive. Large values are best. The size of each transaction depends upon how many
configuration changes were included in the transaction, so hard disk space usage is difficult to estimate.
Note We recommend that you use smaller values for the RepTransactionArchiveLimit to limit the time a slave
server is offline applying change sets during automatic resynchronization.
If the slave should go down or otherwise be taken off line, the value of RepTransactionArchiveLimit and
the frequency of aregcmd saves will determine how long the slave can be offline before a
full-resynchronization will be required.
There are two reasons why a slave server should have an archive:
1. The slave must save the last received transaction for resynchronization purposes (at a minimum).
2. Should the master go down, the slave can then be configured as the master and provide
resynchronization services to other slaves.
RepIPAddress
The RepIPAddress value is set to the IP Address of the machine containing the Prime Access Registrar
installation.
Note The IP address format is enhanced to support both IPv4 and IPv6.
RepPort
The RepPort is the port used to receive of replication messages. In most cases, the default value (1645)
is sufficient. If another port is to be used, the interfaces must exist in the machine.
RepSecret
RepSecret is the replication secret shared between the master and slave. The value of this setting must
be identical on both the master and the slave.

12-9
Cisco Prime Access Registrar 6.1 User Guide
OL-29756-01
Chapter 12 Using Replication
Replication Configuration Settings
RepIsMaster
The RepIsMaster setting indicates whether the machine is a master or a slave. On the master, set
RepIsMaster to TRUE. On the slave set it to FALSE. Only the master can have this value set to TRUE
and there can be only one master.
RepMasterIPAddress
RepMasterIPAddress specifies the IP Address of the master. On the master, set RepMasterIPAddress to
the same value used in RepIPAddress above. On the slave, RepMasterIPAddress must be set to the IP
Address of the master.
Note The IP address format is enhanced to support both IPv4 and IPv6.
RepMasterPort
RepMasterPort is the port to use to send replication messages to the master. In most cases, the default
value (1645) is sufficient; however, if another is to be used, the interfaces must exist in the machine.
Rep Members Subdirectory
The Rep Members\ subdirectory contains the list of slaves to which the master will replicate
transactions.
Rep Members/Slave1
Each slave is added much like a client is added. Each slave must have a configuration in the Rep
Members directory to be considered part of the replication network by the master. The master will not
transmit any messages or replications to servers not in this list, and any communication received by a
server not in this list will be ignored.
Note Although it is possible to configure multiple slaves with the same master, we have only considered a
single-master/single-slave configuration. This is the recommended configuration.
Name
This is the name of the slave. The name must be unique.
IPAddress
This is the IP Address of the slave.

12-10
Cisco Prime Access Registrar 6.1 User Guide
OL-29756-01
Chapter 12 Using Replication
Setting Up Replication
Note The IP address format is enhanced to support both IPv4 and IPv6.
Port
This is the port upon which the master will send replication messages to the slave.
Setting Up Replication
This section provides step-by-step instructions about how to configure replication on both the master and
member servers. The “Replication Example” section on page 12-13, shows an example of replication
configuration.
If possible, open an xterm window on both the master and member. In each of these windows, change
directory to $INSTALL/logs and run xtail to watch the logs. This allows you to watch replication log
messages as they occur. If you are using a system which had a previous installation of
Prime Access Registrar, delete all files located in the $INSTALL/data/archive directory if it is present
on either the master or member systems. This section contains the following topics:
•Configuring The Master
•Configuring The Member
•Verifying the Configuration
Configuring The Master
On the master server, RepTransactionSyncInterval is the duration between periodic transmission of the
TransactionSync message expressed in milliseconds. The default is 60000 or 1 minute.
Configuring the Master Server for Replication
To configure the master server for replication:
Step 1 On the machine which is to be the master, using aregcmd, navigate to //localhost/Radius/Replication
Step 2 Set the RepType to SMDBR:
set RepType SMDBR
Step 3 Set the RepIPAddress to the IP address of the master:
set RepIPAddress 192.168.1.1
Step 4 Set the RepSecret to MySecret:
set RepSecret MySecret
Step 5 Set RepIsMaster to TRUE:
set RepIsMaster TRUE

12-11
Cisco Prime Access Registrar 6.1 User Guide
OL-29756-01
Chapter 12 Using Replication
Setting Up Replication
Step 6 Set RepMasterIPAddress to the same value used in step 3:
set RepMasterIPAddress 192.168.1.1
Step 7 Change directory to /Radius/Advanced and set the MaximumNumberOfRadiusPackets property to
8192:
cd /Radius/Advanced
set MaximumNumberOfRadiusPackets 8192
Step 8 Change directory to Rep Members:
cd “rep members”
Note You must enclose Rep Members in quotes due to the space in the name.
Step 9 Add member1:
add member1
Step 10 Change directory to member1:
cd member1
Step 11 Set the IPAddress to the IP Address of the machine to be the member:
set IPAddress 192.168.1.2
Note The RepPort and RepMasterPort properties on the Master must correspond to one of the ports
configured in /Radius/Advanced/Ports, if one is configured. Otherwise, the default values for
the RepPort and RepMasterPort properties are sufficient.
Step 12 Save the configuration:
save
Step 13 Reload the configuration:
reload
Configuring The Member
On the slave, RepTransactionSyncInterval is used to determine if the slave has lost contact with the
master and to alert administrators of a possible loss of connectivity between the master an slave.

12-12
Cisco Prime Access Registrar 6.1 User Guide
OL-29756-01
Chapter 12 Using Replication
Setting Up Replication
Configuring the Member Server for Replication
To configure the member server for replication:
Step 1 On the machine which is to be the member, using aregcmd, navigate to //localhost/Radius/Replication.
Step 2 Set the RepType to SMDBR.
set RepType SMDBR
Step 3 Set the RepIPAddress to the IP address of the member.
set RepIPAddress 192.168.1.2
Step 4 Set the RepSecret to MySecret.
set RepSecret MySecret
Step 5 Set RepMasterIPAddress to IP Address of the master (the same value used in Step 3 on page 8-1).
set RepMasterIPAddress 192.168.1.1
Step 6 Change directory to /Radius/Advanced and set the MaximumNumberOfRadiusPackets property to
8192.
cd /Radius/Advanced
set MaximumNumberOfRadiusPackets 8192
Step 7 If the Master has been configured to use a port other than the well-known (and default) RADIUS ports,
configure each Member to use the same port.
Note The RepPort and RepMasterPort properties on the Master must correspond to one of the ports
configured in /Radius/Advanced/Ports, if one is configured. Otherwise, the default values for
the RepPort and RepMasterPort properties are sufficient.
Step 8 Save the configuration:
save
Step 9 Reload the configuration:
reload
Verifying the Configuration
After both servers have successfully started, use aregcmd to make a small change to be replicated to the
member server which you can easily verify. We recommend setting the description in //localhost/Radius
to something like Tes t1 . After you issue an aregcmd save and the prompt returns, run aregcmd on the
member server and change directory to //localhost/Radius. Ensure that the description is set to Test1. If
this was successful, then replication is properly configured and functional.

12-13
Cisco Prime Access Registrar 6.1 User Guide
OL-29756-01
Chapter 12 Using Replication
Replication Example
Replication Example
This section provides an example of replication and shows the actions that occur.
Adding a User
The Users object contains all of the information necessary to authenticate a user or authorize a user.
Users in local UserLists can have multiple profiles. On the master server, use aregcmd to add a new user
to the default user list.
Adding a New User
To add a new user:
Step 1 Change directory to //localhost/Radius/UserLists/Default.
Step 2 Enter the following:
add testuser
Step 3 Change directory to testuser.
cd testuser
Step 4 Set the password for testuser.
set password testuser
Step 5 Confirm the password by entering testuser again.
Step 6 Enter save to save the configuration.
Master Server’s Log
The log on the master shows the following:
*** ./name_radius_1_log ***
10/23/2013 23:17:07 name/radius/1 Info Server 0 Initiating Replication of Transaction
1 with 2 Elements.
10/23/2013 23:17:07 name/radius/1 Info Server 0 Replication Transaction #1 With 2
Elements Initiated
Member Server’s Log
The log on the member shows the following:
*** ./name_radius_1_log ***
10/23/2013 23:15:18 name/radius/1 Info Server 0 Radius Server is On-Line
10/23/2013 23:17:12 name/radius/1 Info Server 0 Committing Replication of Transaction
1 with 2 Elements.
10/23/2013 23:17:16 name/radius/1 Info Server 0 Replication Transaction #1 With 2
Elements Committed.

12-14
Cisco Prime Access Registrar 6.1 User Guide
OL-29756-01
Chapter 12 Using Replication
Replication Example
Verifying Replication
You can use one of two methods to verify that the new user testuser was properly replicated to the
member:
•Run aregcmd on the member and look at the default userlist to see if it is there.
•Run radclient on the member and enter simple testuser testuser to create a simple access request
packet (p001).
Enter p001 send to send it. When it returns with p002, enter p002 to see if it is an Access Accept
packet or an Access Reject packet. If it is an Access Accept, the user was properly replicated to the
member. Using radclient is the recommended method to validate that a user was properly replicated.
On the Master, use aregcmd to delete the user from the default user list and save the user list.
Master Server’s Log
The log on the master shows the following:
*** ./name_radius_1_log ***
10/23/2013 23:20:48 name/radius/1 Info Server 0 Initiating Replication of Transaction
2 with 1 Elements.
10/23/2013 23:20:48 name/radius/1 Info Server 0 Replication Transaction #2 With 1
Elements Initiated
Member Server’s Log
The log on the member shows the following:
*** ./name_radius_1_log ***
10/23/2013 23:20:53 name/radius/1 Info Server 0 Committing Replication of Transaction
2 with 1 Elements.
10/23/2013 23:20:57 name/radius/1 Info Server 0 Replication Transaction #2 With 1
Elements Committed.
Repeat the validation procedure above to ensure the user testuser is no longer present on the member.
Using aregcmd -pf Option
Prime Access Registrar's replication feature works well using aregcmd input files. An aregcmd input
file contains a list of aregcmd commands. For example, if the initial configuration of
Prime Access Registrar were constructed in an input file, the master and member could be configured
for replication first, then the input file applied to the master will be automatically replicated to the
member.
Using aregcmd -pf Option
To illustrate replication using an aregcmd input file:
Step 1 Create a text file called add5users with the following commands:
add /Radius/UserLists/Default/testuser1
cd /Radius/UserLists/Default/testuser1

12-15
Cisco Prime Access Registrar 6.1 User Guide
OL-29756-01
Chapter 12 Using Replication
Replication Example
set password testuser1
add /Radius/UserLists/Default/testuser2
cd /Radius/UserLists/Default/testuser2
set password testuser2
add /Radius/UserLists/Default/testuser3
cd /Radius/UserLists/Default/testuser3
set password testuser3
add /Radius/UserLists/Default/testuser4
cd /Radius/UserLists/Default/testuser4
set password testuser4
add /Radius/UserLists/Default/testuser5
cd /Radius/UserLists/Default/testuser5
set password testuser5
save
Step 2 On the master server, run the following command:
aregcmd -pf add5users
Master Server’s Log
The log on the master shows the following:
*** ./name_radius_1_log ***
10/23/2013 23:27:08 name/radius/1 Info Server 0 Initiating Replication of Transaction
3 with 10 Elements.
10/23/2013 23:27:08 name/radius/1 Info Server 0 Replication Transaction #3 With 10
Elements Initiated
Member Server’s Log
The log on the member shows the following:
*** ./name_radius_1_log ***
10/23/2013 23:27:12 name/radius/1 Info Server 0 Committing Replication of Transaction
3 with 10 Elements.
10/23/2013 23:27:17 name/radius/1 Info Server 0 Replication Transaction #3 With 10
Elements Committed.
When the prompt returns, go to the member and use aregcmd to view the /radius/defaults/userlist.
There should be five users there named testuser1 through testuser5.

12-16
Cisco Prime Access Registrar 6.1 User Guide
OL-29756-01
Chapter 12 Using Replication
Replication Example
An Automatic Resynchronization Example
This example will illustrate resynchronization of the member. This will be accomplished by stopping the
member, making changes on the master, then restarting the member forcing a resynchronization.
Performing Resynchronization of the Member
To perform resynchronization of the member:
Step 1 At the member, stop the Prime Access Registrar server:
/etc/init.d/arservagt stop
At the master, run aregcmd and change directory to /radius/userlist/default.
cd /radius/userlist/default
Step 2 Enter the following:
add foouser
Step 3 Change directory to foouser.
cd foouser
Step 4 Set the password for foouser.
set password foouser
Step 5 Confirm the password by entering foouser again.
Step 6 Save the configuration:
save
Master Server’s Log
The log on the master shows the following:
*** ./name_radius_1_log ***
10/23/2013 23:31:02 name/radius/1 Info Server 0 Initiating Replication of Transaction
5 with 2 Elements.
10/23/2013 23:31:02 name/radius/1 Info Server 0 Replication Transaction #5 With2
Elements Initiated
On the member, run /etc/init.d/arservagt start. Notice the following log messages in the Master's log:
*** ./name_radius_1_log ***
10/23/2013 23:33:19 name/radius/1 Info Server 0 Resynchronizing member1.

12-17
Cisco Prime Access Registrar 6.1 User Guide
OL-29756-01
Chapter 12 Using Replication
Full Resynchronization
Member Server’s Log
The log on the member shows the following:
*** ./name_radius_1_log ***
11/07/2013 23:33:14 name/radius/1 Info Server 0 Radius Server is Off-Line
11/07/2013 23:33:14 name/radius/1 Info Server 0 Starting Replication Manager
11/07/2013 23:33:24 name/radius/1 Info Server 0 Master Selected As Partner (DEFAULT)
11/07/2013 23:33:24 name/radius/1 Info Server 0 Radius Server is Off-Line
11/07/2013 23:33:24 name/radius/1 Warning Server 0 Requesting resynchronization from
Master: Last Txn#3
11/07/2013 23:33:24 name/radius/1 Info Server 0 Resynchronization from Master in
progress.
11/07/2013 23:33:24 name/radius/1 Info Server 0 Committing Replication of Transaction
4 with 2 Elements.
11/07/2013 23:33:28 name/radius/1 Info Server 0 Replication Transaction #4 With 2
Elements Committed.
11/07/2013 23:33:28 name/radius/1 Info Server 0 Radius Server is On-Line
As the log above shows, when the member started up, it validated its last received transaction number
(#3) with the master's last replicated transaction number (#4). They did not match because a replication
was initiated by the master which was not received by the member (because the member was stopped).
When the member detected this discrepancy, the member made a resynchronization request to the master.
The master responded by transmitting the missed transaction (#4) to the member. After it received and
processed the retransmitted transaction, the member determined that it was then synchronized with the
master and placed itself in an online status.
Full Resynchronization
Full Resynchronization means that the member has missed more transactions than are stored in the
master's replication archive and can not be resynchronized automatically. There is no automatic
full-resynchronization mechanism in Prime Access Registrar's configuration replication feature. If a full
resynchronization is required, you must export the master server’s database and update the member
configuration.
Note Before beginning, ensure there are no aregcmd sessions logged into the master server.
Performing a Manual Full-resynchronization
To perform a manual full-resynchronization:
Step 1 On the master server, stop the Prime Access Registrar server agent using the following command:
/etc/init.d/arserver stop
Step 2 On the master server, change directory to $INSTALL/data/db.
Step 3 Create a tarfile made up of the three database files, mcddb.d01, mcddb.d02, and mcddb.d03.
tar cvf /tmp/db.tar mcddb.d0*
Step 4 Create a tarfile of the archive.
tar cvf /tmp/archive.tar $INSTALL/data/archive
Step 5 On the master server, start the Prime Access Registrar server agent using the following command:

12-18
Cisco Prime Access Registrar 6.1 User Guide
OL-29756-01
Chapter 12 Using Replication
Full Resynchronization
/etc/init.d/arserver start
Step 6 On each member server requiring resynchronization, perform the following:
a. On the member server, stop the Prime Access Registrar server agent using the following command:
/etc/init.d/arserver stop
b. Copy the tarfiles (db.tar and archive.tar) to /tmp.
c. Change directory to $INSTALL/data/db, then untar the compressed database files.
cd $INSTALL/data/db
tar xvf /tmp/db.tar
d. Rebuild the key files using the following command:
$INSTALL/bin/keybuild mcddb
Note This step might take several minutes.
e. Untar the archive.
cd $INSTALL/data/archive
tar xvf /tmp/archive.tar
f. As a safety check, run the following UNIX command to verify the integrity of the database.
$INSTALL/bin/dbcheck mcddb
Note You must be user root to run dbcheck.
No errors should be detected.
g. Start the Prime Access Registrar server agent using the following command:
/etc/init.d/arserver start
Note After you start the member server with the master server’s database, you will probably see
messages such as the following:
11/07/2013 23:21:23 name/radius/1 Error Server 0 TXN_SYNC: Failed to get master's
socket handle.
11/07/2013 23:21:49 name/radius/1 Warning Server 0 TXN_SYNC Received by Master from
unknown member 10.1.9.74. Validation Failed
These messages will likely continue until you complete steps h and i.
h. Change directory to //radius/replication and change the following attributes:
•Change the RepIPAddress to that of the member.
•Change RepIsMaster to FALSE.

12-19
Cisco Prime Access Registrar 6.1 User Guide
OL-29756-01
Chapter 12 Using Replication
Replication Setup with More Than One Slave
•Remove any entries under Rep Members.
i. Save and reload the configuration.
save
Validating //localhost...
Saving //localhost...
reload
The member will start up and show online status in the log after it has verified it is synchronized with
the master.
Replication Setup with More Than One Slave
When replication is set up with more than one slave, Prime Access Registrar’s replication feature
ensures that all the servers maintain identical configuration. This is done by forming a communication
mesh. This mesh is formed by every server choosing two partners for itself from the replication setup.
The servers tend to receive/send configuration updates from/to its partners. This ensures that all the
servers maintain identical configuration inspite of minimal communication failures.
When bringing up a replication setup, Prime Access Registrar server comes up first and then initiates a
partner sync request to all its replication members as visible from the configuration. So, a slave server
will initiate partner sync to its master only. This is because master server is the only server visible to the
slave server from the configuration. The master server will then broadcast the partner syncs that it has
received, to all its replication members (slaves). Based on the sync messages sent by the master to this
server, the evaluation of workload happens. The partner selection is based on the workload evaluation.
Choosing the partners based on workload, ensures that the workload is equally distributed across the
partner network.
The partners are selected based on the count of partner syncs received from the master:
•If partner syncs that have been received is one, choose the master as a partner.
•If partner syncs that have been received is two, choose the master and the other replication server as
partners.
•If partner syncs that have been received is greater than two, perform a workload evaluation on the
partners. Identify two servers that do not have two partners and choose them as partners.
Frequently Asked Questions
Question: When I do a save in aregcmd and the validation fails, is anything replicated?
Answer: No; replication does not occur until aregcmd successfully saves the changes.
Question: Can I specify multiple masters with the same members?
Answer: No; the replication feature was designed to be used with a single-master. Also, it is not
possible to specify more than one master in a member's configuration.
Question: Do I have to configure the master as a client on the member servers?

12-20
Cisco Prime Access Registrar 6.1 User Guide
OL-29756-01
Chapter 12 Using Replication
Frequently Asked Questions
Answer: No. In-fact, it would be erroneous to do so. With the exception of Administrators, Interfaces,
Replication, and Advanced machine-specific settings, the configuration between master and member
must be identical. The replication feature's purpose is to maintain that relationship. Altering
configuration settings on the member which are managed by the master will likely result in an unstable
and possibly non-operational server.
Question: What configuration elements are replicated and what are not?
Answer: With the exception of Administrators, Interfaces, Replication, and Advanced machine-specific
settings, all other settings are replicated.
Question: What configuration elements are hot-configured and what are not?
Answer: Session Managers, Resource Managers and Remote servers are not hot-configured because
they maintain state, such as an active session, and cannot be manipulated dynamically.
Question: What is an appropriate TransactionSyncInterval setting?
Answer: This depends upon how long you want to allow an out-of-sync condition to persist. The shorter
the interval, the more often an out-of-sync condition is checked. However, this results in added network
traffic, additional processing by Prime Access Registrar and, if the interval is too small, frequent
unnecessary resynchronization requests. The default value of 60,000 milliseconds (1 minute) is usually
sufficient; however, values of as little as 10,000 milliseconds (10 seconds) have been tested and have
worked well.
Question: What is an appropriate TransactionArchiveLimit setting?
Answer: This depends upon two things:
1. How much hard disk space you are willing to devote to transaction archive storage
2. How often your configuration is changed (a save is issued through Aregcmd).
If you have limited hard disk space, then perhaps smaller values (less than 1000) are appropriate;
however if you have sufficient hard disk space, values of 10,000 or greater are better. The primary reason
for this preference is to limit the possibility of a full-resynchronization being required. A
full-resynchronization is required when the member has missed so many transactions that the master no
longer contains all the transaction necessary to resynchronize the member. The greater the limit, the
longer the member can be down without requiring a full-resynchronization.
Question: Can I specify a member in the member configuration?
Answer: Yes, and this is recommended. In the member's replication configuration Rep Members list,
specify another server, perhaps one which can be used in-case of critical failure of the master. If the
master suffers a catastrophic failure (a hard disk crash, for example) the member can be reconfigured to
be the master simply by setting the RepIsMaster to TRUE and changing the MasterIPAddress to its own
IP Address and the member specified in its Rep Members list will perform as the member. Because the
member has an archive of transactions, the new member can be automatically resynchronized. If the
archive limit on the new master has been exceeded (the transaction file txn0000000001 is no longer
present in the new master's archive directory), then the new member will require a
full-resynchronization. Setting the member up in this manner prevents down-time if the master fails and
allows configuration changes to be made on the new master.
Question: How can I prevent a full-resynchronization from ever being necessary?
Answer: You can't, but you can limit the possibility by setting the TransactionArchiveLimit to a large
value (greater than 10000). Another technique is to periodically check the archive when the master and
member are synchronized. If the number of transaction files is approaching 10,000, then you can stop
the master and member servers, delete all files in the replication archive, and restart the master and
member. The only side effect is that if the master or member suffers a catastrophic failure, a full
resynchronization will be required.

12-21
Cisco Prime Access Registrar 6.1 User Guide
OL-29756-01
Chapter 12 Using Replication
Replication Log Messages
Question: Can I use the member to process RADIUS requests along with the master?
Answer: Yes, and this was one of the goals of the replication feature. Keep in mind that session
information is not replicated between master and member. To use session management in this
environment, use Prime Access Registrar's central session manager.
Replication Log Messages
This section contains typical replication log messages and explains what each means.
This section include the following topics:
•Information Log Messages
•Warning Log Messages
•Error Log Messages
•Log Messages You Should Never See
Information Log Messages
Info Message Starting Replication Manager
Displayed at start-up and indicates the Replication Manager is configured and enabled.
(RepType=SMDBR)
Info Message Replication Disabled
Displayed at start-up and indicates that Replication is not enabled. (RepType=NONE)
Info Message Radius Server is On-Line
Displayed by the member at start-up to indicate the member is synchronized with the master and
processing RADIUS requests. It is also displayed after a successfully completed resynchronization.
This message is never displayed on the master.
Info Message Radius Server is Off-Line
Displayed by the member at start-up to indicate the radius server is not processing RADIUS requests
until it can ensure synchronization with the master. When this is displayed after startup, it indicates
the member is no longer synchronized with the master and is directly associated with a
resynchronization request to the master. This message is never displayed on the master.
Info Message Resynchronizing <member name>
Displayed by the master to indicate that it is resynchronizing the specified member (member).
Info Message Resynchronization from Master in progress.
Displayed by the member to indicate the master is in the process of resynchronizing it.
Info Message Resynchronization complete.
Displayed by the member to indicate the resynchronization has completed successfully.
Info Message Resynchronization did not complete before timeout. Retrying.

12-22
Cisco Prime Access Registrar 6.1 User Guide
OL-29756-01
Chapter 12 Using Replication
Replication Log Messages
Indicates the master did not complete the resynchronization before the member expected it to
complete and that the member is re-requesting resynchronization from the master for the remaining
missed transactions.
Info Message Master Selected As Partner (DEFAULT)
Displayed by the member to indicate that it has selected the master as a partner after successfully
getting connected with the master. Partner selection is performed after analyzing the replication
workloads on other replication members.
Info Message Initiating Replication of Transaction <transaction #> with <# of elements>
Elements.
Displayed by the master to indicate that it is beginning replication of a transaction to the member.
Info Message Replication Transaction #<transaction #> With <# of elements> Elements
Initiated
Displayed by the master to indicate that it has completed sending the transaction to the member.
Info Message Committing Replication of Transaction <transaction #> with <# of elements>
Elements.
Displayed by the member to indicate that it has received a transaction and is processing it.
Info Message Replication Transaction #<transaction#> With <# of element> Elements
Committed
Displayed by the member to indicate that the transaction has been successfully processed.
Info Message Stopping Replication Manager
Displayed at shutdown by both the master and member to indicate the replication manager is being
shut down.
Info Message Stopping Replication Manager - waiting for replication to complete...
Displayed by the member when a shutdown is attempted while received replications are being
processed. After the replications are complete, the shutdown will complete.
Info Message Replication in progress. Please wait...
Periodically displayed while a shutdown is pending and replications are being completed.
Info Message Replication Manager Stopped
Displayed by both the master and member to indicate the replication manager has been successfully
shutdown.
Warning Log Messages
Warning Message Transaction Sync not received within configured TransactionSyncInterval.
Communication with the Master may not be possible.
The member displays this log messages to indicate that it has not received a TransactionSync
message from the master within its configured TransactionSync interval.
Warning Message TXN_SYNC Received by Master from unknown member <ip address>. Validation
Failed
Displayed by the master when a TransactionSync message is received by the master. Since there can
be only one configured master in a replication network, and the master is the only server who can
send a TransactionSync message, this indicates there is another configured master in the replication
network.

12-23
Cisco Prime Access Registrar 6.1 User Guide
OL-29756-01
Chapter 12 Using Replication
Replication Log Messages
Warning Message TXN_SYNC Received from unknown Master <ip address>. Validation Failed
Displayed by the member to indicate that a TransactionSync message was received from a server not
configured as its master.
Warning Message Requesting resynchronization from Master: Last Txn#<transaction#>
Displayed by the member to indicate that it is requesting resynchronization from the master. The
LastTxn# is the last transaction number the member received and processed successfully.
Warning Message Resynchronization Request received from unknown member.
Displayed by the master when a resynchronization request is received by a member who is not listed
in its /radius/replication/rep members configuration.
Warning Message Resynchronization of <member name> requires Full Resynchronization.
Displayed by the master to indicate that the member cannot be automatically resynchronized
because its last transaction number is not within the configured history length of the archive
(TransactionArchiveLimit). A manual resynchronization of the member is required to put the
member back in-sync.
Warning Message MEMBER_SYNC Received from unknown Master at <ip address>. Validation
Failed
Displayed by a member indicating that a master, other than its configured master, is requesting
partnership.
Warning Message MEMBER_SYNC Received by Master from unknown member <ip address>.
Validation Failed
Displayed by the master to indicate a member not listed in its /radius/replication/rep members
configuration has requested partnership.
Warning Message TXN_EXPECT Received by Master from unknown <ip address>.
Displayed by the master to indicate it has received a transaction which originated from another
illegal master.
Warning Message TXN_EXPECT Received from unknown Master <ip address>.
Displayed by the member to indicate it has received a transaction which originated from a master
other than its configured master.
Warning Message TXN_EXPECT Broadcast failed.
Indicates that the master could not initiate a replication.
Warning Message DATA_SYNC Received by Master from unknown <ip address>
Displayed by the master to indicate that it received a replication transaction from another illegal
master.
Warning Message DATA_SYNC Received from unknown <ip address>
Displayed by the member to indicate that a transaction was received from a server external to the
replication network.
Error Log Messages
Error Message DATA_SYNC Validation failed - CRC Mismatch
Displayed by the member to indicate a received transaction element is invalid.
Error Message TXN_SYNC: Failed To Get Member Socket Handle.
TXN_SYNC: Failed to get master's socket handle.
MEMBER_SYNC could not get socket handle
TXN_EXPECT: Failed to get socket handle.
DATA_SYNC could not get socket handle.
These messages indicate an invalid interface configuration in Cisco Access

12-24
Cisco Prime Access Registrar 6.1 User Guide
OL-29756-01
Chapter 12 Using Replication
Replication Log Messages
Registrar.
They could also be the result of specifying an invalid RepPort setting.
Failed To Create TXN_SYNC packet. (out of packets?)
Failed To Create TXN_SYNC packet.
MEMBER_SYNC Failed to create packet.(out of packets?)
MEMBER_SYNC Failed to create packet.
TXN_EXPECT Failed to create packet.(out of packets?)
TXN_EXPECT Failed to create packet.
DATA_SYNC Create packet failed.(out of packets?)
DATA_SYNC Create packet failed.
These message indicate that a packet could not be created. This could be the result of a low memory
condition or the result of the /Radius/Advanced/ MaximumNumberOfRadiusPackets setting being
set too low
Error Message TXN_SYNC validation failed - Internal error (pTxnSync=NULL).
MEMBER_SYNC validate failed - Internal Error (pMemberSync=NULL)
DATA_SYNC Validation Failed - Internal (pDataSync = NULL).
TXN_EXPECT Could not add new datablock to pending transaction queue.
Replication Member could not be added to member list.
Replication Member could not be added to member list.
These messages are the result of a failed memory allocation possibly due to an out of memory
condition.
Error Message DATA_SYNC Packet creation failed - Invalid ordinal.
Attempt To Replicate Transaction With Zero Elements.
Internal Error - Selected member not valid
Internal Replication Error ChangeType <change type> For <element path>
Internal error - Replication manager is invalid
These messages indicate an internal application failure.
Error Message Cannot archive transaction datablock
Could not archive transaction
These messages are the result of a failed archive attempt. This could be the result of a low disk space
condition.
Error Message Could not commit transaction to MCD
Cannot Get Value For Unsupported DataType <data type id>
MCD Replication Cannot Delete Value <element path>
MCD Replication Cannot Delete Directory <element path>
MCD Replication Cannot Delete Value For <element path> With Unsupported DataType
<data type id>
MCD Replication Cannot Create Dir For <element path>
MCD Replication Cannot Set Value For <element path>
MCD Replication Cannot Set Value For <element path>
MCD Replication Cannot Set Value For <element path>
MCD Replication Cannot Set Value For <element path>
MCD Replication Cannot Set Value For <element path> With Unsupported DataType

12-25
Cisco Prime Access Registrar 6.1 User Guide
OL-29756-01
Chapter 12 Using Replication
Replication Log Messages
<data type id>
MCD Replication Cannot Set Value For <element path> With UNKNOWN DataType <data
type id>
These messages are the result of a failed replication commit attempt.
Log Messages You Should Never See
The following list contains log messages which you should never see displayed in a log. If any of these
messages are displayed in the log, contact Prime Access Registrar technical support for assistance.
Error Message
DATA_SYNC Received from non-partner <ip address>
DATA_RE_SYNC CRC mismatch. Replying with NAK
DATA_RE_SYNC Commit Failed. Replying with NAK
EVAL_SYNC Validation failed. <ip address> is not a Master or Member of the
Replication network
EVAL_SYNC Received from unknown member.
PARTNER_SYNC Received from unknown member <ip address>.
PARTNER_SYNC Received from unknown member <ip address>.
EVAL_SYNC Cannot get socket handle.
EVAL_SYNC Failed to create packet.(out of packets?)
EVAL_SYNC Failed to create packet.
EVAL_SYNC Validation failed - Internal Error (pEvalSync=NULL).
PARTNER_SYNC Failed to get socket handle.
PARTNER_SYNC Failed to create packet. (out of packets?)
PARTNER_SYNC Failed to create packet.
DATA_RE_SYNC Can't get socket handle
DATA_RE_SYNC Failed to create packet (out of packets?)
DATA_RE_SYNC Failed to create packet
DATA_RE_SYNC Failed validation - Internal Error (pReSync = NULL)
DATA_RE_SYNC Cannot Set Value For <element path>
DATA_RE_SYNC Cannot Set Value For <element path>
DATA_RE_SYNC Cannot Set Value For <element path>
DATA_RE_SYNC Cannot Set Value For <element path>
DATA_RE_SYNC Cannot Set Value For <element path> With Unsupported DataType <data
type id>
DATA_RE_SYNC Cannot Set Value For <element path> With UNKNOWN DataType <data type
id>;
DATA_RE_SYNC Received by Master from unknown member <ip address>
DATA_RE_SYNC Received from unknown Master <ip address>DATA_RE_SYNC Reply received
by Master from unknown Member <ip address>
Could not replicate data element to partners.
Could not replicate to partners - Invalid Ordinal.

12-26
Cisco Prime Access Registrar 6.1 User Guide
OL-29756-01
Chapter 12 Using Replication
Replication Log Messages
CHAPTER
13-1
Cisco Prime Access Registrar 6.1 User Guide
OL-29756-01
13
Using On-Demand Address Pools
Cisco Prime Access Registrar (Prime Access Registrar) provides support for On-Demand Address Pools
(ODAP). Using ODAP, the Prime Access Registrar server manages pools of addresses. Each pool is
divided into subnets of various sizes, and the Prime Access Registrar server assigns the subnets to virtual
home gateways (VHG) and Provider Edge (PE) routers. The VHG/PE router has one On-Demand
Address Pool configured for each VPN supported by that VHG/PE.
Prime Access Registrar has been enhanced to make ODAP functionality more accessible and to enable
ODAP requests and normal user authentication to occur on the same Prime Access Registrar server. To
achieve this functionality, a new Cisco vendor script CiscoWithODAPIncomingScript was written to
direct ODAP requests to particular services and session managers. CiscoWithODAPIncomingScript
also provides the same functionality as the previous CiscoIncomingScript.
Additionally, Prime Access Registrar has a new vendor type, CiscoWithODAP which references
CiscoWithODAPIncomingScript as its IncomingScript and references the existing script,
CiscoOutgoingScript, as its Outgoing Script.
Figure 13-1 shows a simple MPLS VPN network with two VHG/PE routers, VHG-1 and VHG-2. The
Prime Access Registrar server allocates IP subnets to the VHGs by way of VRFs which contain the
subnets and addresses (address space) available.
Figure 13-1 MPLS Core
MPLS core
2-GHV
1-
G
HV
VRF ISP3.com
VRF ISP1.com
VRF ISP2.com
VRF ISP1.com
Cisco Prime Access
Registrar server
320371

13-2
Cisco Prime Access Registrar 6.1 User Guide
OL-29756-01
Chapter 13 Using On-Demand Address Pools
In Prime Access Registrar, the VRFs are configured as users in an ODAP-users list under
/Radius/UserLists. The VRF name is set in IOS for the ODAP pool. When a VRF requests a pool of
addresses, Prime Access Registrar directs the request to a Session-Manager configured with the name
odap-<VRF name>. Prime Access Registrar also directs ODAP accounting requests to the service
odap-accounting.
In the example network shown in Figure 13-1, the VRFs are configured with the following address
spaces:
•VRF-ISP1.com—consists of the address range 10.255.0.0 - 10.255.255.255 divided among the
following subnets:
–
10.255.0.0/24
–
10.255.1.0/24
–
...
–
10.255.255.0/24
•VRF-ISP2.com—consists of the address ranges 10.0.0.0 - 10.10.255.255 and 10.255.0.0 -
10.255.10.255 divided among the following subnets:
–
10.0.0.0/16
–
10.1.0.0/16
–
...
–
10.10.0.0/16
and:
–
10.255.0.0/24
–
10.255.1.0/24
–
...
–
10.255.10.0/24
Note VRF-ISPe.com requires two ResourceManagers because it has subnets of two different sizes.
•VRF-ISP3.com—consists of the address range 1172.21.0.0 - 172.21.255.255 divided among the
following subnets:
–
172.21.0.0/18
–
172.21.64.0/18
–
172.21.128.0/18
and
–
172.21.192.0/24
–
172.21.193.0/24
–
...
–
172.21.255.0/24
Note VRF-ISP3.com requires two ResourceManagers because it also has subnets of two different
sizes.

13-3
Cisco Prime Access Registrar 6.1 User Guide
OL-29756-01
Chapter 13 Using On-Demand Address Pools
Cisco-Incoming Script
This chapter contains the following sections:
•Cisco-Incoming Script
•Vendor Type CiscoWithODAP
•Configuring Cisco Prime Access Registrar to Work with ODAP
Cisco-Incoming Script
The CiscoWithODAPIncomingScript makes ODAP functionality more accessible. This script eases
the configuration required to enable ODAP requests and normal user authentication to occur on the same
Prime Access Registrar server. CiscoWithODAPIncomingScript also provides the functionality of the
original CiscoIncomingScript.
If the Prime Access Registrar server receives an ODAP request, the server sets the Session-Key from the
AcctSessionID and sets the services and session managers.
If the Prime Access Registrar server receives a non-ODAP request, other scripts, rules or policies that
you might already have in place on the Prime Access Registrar server handle these requests.
This section contains the following topics:
•How the Script Works
•CiscoWithODAPIncomingScript
How the Script Works
The following describes how the script CiscoWithODAPIncomingScript works:
1. The script examines the incoming NAS-Identifier sent by the client (VHG). If the NAS-Identifier
does not equal odap-dhcp then this request is not an ODAP request. Since this is not an ODAP
request, the script does not do any more ODAP-specific processing and just calls
CiscoIncomingScript to allow that script to process the request. If this is an ODAP request, this
script removes the NAS-Identifier attribute because it is no longer needed.
2. The script sets the Authentication-Service and the Authorization-Service to odap-users, and it sets
the Accounting-Service to odap-accounting.
3. The Prime Access Registrar server sends the request to the appropriate Session Manager based on
the username. Session Managers with odap-<username> must be created and configured in
Prime Access Registrar.
4. The script then uses Session IDs to identify each ODAP request. The script uses the Acct-Session-Id
attribute as the Session-Key.
CiscoWithODAPIncomingScript
The following is a Tcl script example of the script CiscoWithODAPIncomingScript.
Note CiscoWithODAPIncomingScript is written in C language. This example script is more easily
understood in Tcl.

13-4
Cisco Prime Access Registrar 6.1 User Guide
OL-29756-01
Chapter 13 Using On-Demand Address Pools
Vendor Type CiscoWithODAP
proc CiscoWithODAPIncomingScript {request response environ} {
set RequestType [ $environ get Request-Type ]
if { [ string compare $RequestType "Access-Request" ] == 0 ||
[ string compare $RequestType "Accounting-Request" ] == 0 } {
set NasID [ $request get NAS-Identifier ]
if { [ string compare $NasID "odap-dhcp" ] == 0 } {
# Remove the NAS-Identifier - it has done it's job
$request remove NAS-Identifier
set UserName [ $environ get User-Name ]
if { [ string length $UserName ] == 0 } { set UserName [ $request get
User-Name ] }
# ODAP SUBNET ASSIGNMENT
$environ put Authentication-Service "odap-users"
$environ put Authorization-Service "odap-users"
$environ put Accounting-Service "odap-accounting"
$environ put Session-Manager "odap-$UserName"
set AcctSessionId [ $request get Acct-Session-Id ]
if { [ string length $AcctSessionId ] != 0 } { $environ put Session-Key
$AcctSessionId
} else {
$environ log LOG_ERROR "Missing Acct-Session-Id attribute in request-unable
to set Session-Key"
}
}
}
CiscoIncomingScript $request $response $environ
}
Note The final line in the example above is not how the script really works because a Tcl script cannot call a
C script. This is one reason why CiscoWithODAPIncomingScript was written in C.
Vendor Type CiscoWithODAP
You must configure any Clients that might forward ODAP requests to the Prime Access Registrar server
as being of Vendor CiscoWithODAP.
This vendor type references the new script, CiscoWithODAPIncomingScript, as its IncomingScript
and references the existing script, CiscoOutgoingScript, as its OutgoingScript.
After setting Vendor to CiscoWithODAP, ODAP requests are directed to the AA service, set to
odap-users, the accounting service is set to odap-accounting, and the Session Manager is set to
odap-username, where username is filled from the request. The username received in the request is a
VRF name, the request is directed to the appropriate Session Manager.

13-5
Cisco Prime Access Registrar 6.1 User Guide
OL-29756-01
Chapter 13 Using On-Demand Address Pools
Configuring Cisco Prime Access Registrar to Work with ODAP
Configuring Cisco Prime Access Registrar to Work with ODAP
This section provides information about how to configure Prime Access Registrar to work with ODAP.
Configuring Prime Access Registrar to work with ODAP
You must configure any Clients that might forward ODAP requests to the Prime Access Registrar server
as being of Vendor CiscoWithODAP.
Configuring Prime Access Registrar to work with ODAP
To configure Prime Access Registrar to work with ODAP:
Step 1 Create and configure an ODAP-users UserList. All ODAP users are configured under this UserList.
Step 2 Add all ODAP users to the ODAP-users UserList. Usernames must be of the form <vrf name> with the
AllowNullPassword property set to TRUE.
Step 3 Create and configure a service for ODAP-users.
Step 4 Create and configure an ODAP accounting service. Set the accounting service Type to file and
FilenamePrefix odap-accounting.
Step 5 Create a Session Manager for each of the VRFs. There must be a separate Session Manager for each VRF
pool.
Step 6 Create and configure Resource Managers to be referenced by the Session Managers.
Note Subnet pools of different sizes (different subnet masks) require separate Resource Managers
Step 7 Configure the Session Managers with the Resource Managers.
Step 8 Configure any Clients that might send ODAP requests to Vendor type CiscoWithODAP.
Step 9 Save your configuration.
Configuring the ODAP Detailed Instructions
You must configure any Clients that might forward ODAP requests to the Prime Access Registrar server
as being of Vendor CiscoWithODAP.
Configuring the ODAP Detailed Instructions
To configure Prime Access Registrar to work with ODAP:
Setting Up an ODAP UserList
Step 1 Create a UserList for ODAP users.
--> cd /radius/userlists
[ //localhost/Radius/UserLists ]

13-6
Cisco Prime Access Registrar 6.1 User Guide
OL-29756-01
Chapter 13 Using On-Demand Address Pools
Configuring Cisco Prime Access Registrar to Work with ODAP
Entries 1 to 1 from 1 total entries
Current filter: <all>
Default/
--> add odap-users
Added odap-users
Adding ODAP Users
Step 2 Add the ODAP users to the ODAP UserList and set the AllowNullPassword property to TRUE.
Each user is a VRF name set for each ODAP client.
[ //localhost/Radius/UserLists/odap-users ]
Entries 0 to 0 from 0 total entries
Current filter: <all>
Name = odap-users
Description =
--> add vrf-ISP1.com
Added vrf-ISP1.com
--> add vrf-ISP2.com
Added vrf-ISP2.com
--> add vrf-ISP3.com
Added vrf-ISP3.com
--> ls
[ //localhost/Radius/UserLists/odap-users ]
Entries 1 to 3 from 3 total entries
Current filter: <all>
Name = odap-users
Description =
vrf-ISP1.com/
vrf-ISP2.com/
vrf-ISP3.com/
Step 3 Set the AllowNullPassword property to TRUE for each ODAP user.
--> cd vrf-ISP2.com
[ //localhost/Radius/UserLists/odap-users/vrf-ISP2.com ]
Name = vrf-ISP2.com
Description =
Password =
Enabled = TRUE

13-7
Cisco Prime Access Registrar 6.1 User Guide
OL-29756-01
Chapter 13 Using On-Demand Address Pools
Configuring Cisco Prime Access Registrar to Work with ODAP
Group~ =
BaseProfile~ =
AuthenticationScript~ =
AuthorizationScript~ =
UserDefined1 =
AllowNullPassword = FALSE
--> set AllowNullPassword TRUE
Setting Up an ODAP-Users Service
Step 4 Add and configure a service for ODAP Users.
--> cd /radius/services
[ //localhost/Radius/Services ]
Entries 1 to 2 from 2 total entries
Current filter: <all>
local-file/
local-users/
--> add odap-users
Added odap-users
--> cd odap-users
[ //localhost/Radius/Services/odap-users ]
Name = odap-users
Description =
Type =
IncomingScript~ =
OutgoingScript~ =
--> set type local
Set Type local
--> set userlist odap-users
Set UserList odap-users
--> ls
[ //localhost/Radius/Services/odap-users ]
Name = odap-users
Description =
Type = local
IncomingScript~ =
OutgoingScript~ =
OutagePolicy~ = RejectAll
OutageScript~ =
UserList = odap-users

13-8
Cisco Prime Access Registrar 6.1 User Guide
OL-29756-01
Chapter 13 Using On-Demand Address Pools
Configuring Cisco Prime Access Registrar to Work with ODAP
Setting Up an ODAP Accounting Service
Step 5 Add and configure an ODAP accounting service.
--> cd /radius/services
[ //localhost/Radius/Services ]
Entries 1 to 3 from 3 total entries
Current filter: <all>
local-file/
local-users/
odap-users/
--> add odap-accounting
Added odap-accounting
--> cd odap-accounting
[ //localhost/Radius/Services/odap-accounting ]
Name = odap-accounting
Description =
Type =
IncomingScript~ =
OutgoingScript~ =
--> set type file
Set Type file
--> ls
[ //localhost/Radius/Services/odap-accounting ]
Name = odap-accounting
Description =
Type = file
IncomingScript~ =
OutgoingScript~ =
OutagePolicy~ = RejectAll
OutageScript~ =
FilenamePrefix = accounting
MaxFileSize = "10 Megabytes"
MaxFileAge = "1 Day"
RolloverSchedule =
--> set FilenamePrefix odap-accounting
Set Filenameprefix odap-accounting
Adding Session Managers
Step 6 Create one Session Manager for each of the VRF pools.
Create one Session Manager for each of the users you specify in the odap-users UserList. The Session
Managers must be called odap-VRF_name to meet the requirements of
CiscoWithODAPIncomingScript.

13-9
Cisco Prime Access Registrar 6.1 User Guide
OL-29756-01
Chapter 13 Using On-Demand Address Pools
Configuring Cisco Prime Access Registrar to Work with ODAP
--> cd /radius/sessionmanagers
[ //localhost/Radius/SessionManagers ]
Entries 1 to 1 from 1 total entries
Current filter: <all>
session-mgr-1/
--> add odap-vrf-ISP1.com
Added odap-vrf-ISP1.com
--> add odap-vrf-ISP2.com
Added odap-vrf-ISP2.com
--> add odap-vrf-ISP3.com
Added odap-vrf-ISP3.com
Setting Up Resource Managers
Step 7 Set up subnet-dynamic Resource Managers that are to be referenced by the Session Managers.
Session Managers can manage multiple Resource Managers. One or more subnet pools can be set up of
varying sizes to allocate the ranges of subnet addresses you have available. Subnets of different sizes
require different Resource Managers.
--> cd /radius/resourcemanagers
[ //localhost/Radius/ResourceManagers ]
Entries 1 to 5 from 5 total entries
Current filter: <all>
IPA-Pool/
IPA-Pool-2/
IPX-Pool/
Per-Group/
Per-User/
--> add odap-vrf-ISP1.com
Note The names of Resource Managers do not have to be related to VRFs.
Added odap-vrf-ISP1.com
--> cd odap-vrf-ISP1.com
[ //localhost/Radius/ResourceManagers/odap-vrf-ISP1.com ]
Name = odap-vrf-ISP1.com
Description =
Type =
--> set type subnet-dynamic

13-10
Cisco Prime Access Registrar 6.1 User Guide
OL-29756-01
Chapter 13 Using On-Demand Address Pools
Configuring Cisco Prime Access Registrar to Work with ODAP
Set Type subnet-dynamic
--> ls
[ //localhost/Radius/ResourceManagers/odap-vrf-ISP1.com ]
Name = odap-vrf-ISP1.com
Description =
Type = subnet-dynamic
NetMask =
SubnetAddresses/
-> set netmask 255.255.255.0
Set NetMask 255.255.255.0
-> cd subnetaddresses
[ //localhost/Radius/ResourceManagers/odap-vrf-ISP1.com/SubnetAddresses ]
Entries 0 to 0 from 0 total entries
Current filter: <all>
--> add 10.255.0.0-10.255.255.255
Added 10.255.0.0-10.255.255.255
Note Two Resource Managers are required for VRF-ISP3.com and VRF-ISP2.com because their address
spaces are made up of subnets of the different sizes.
--> cd /radius/resourcemanagers
[ //localhost/Radius/ResourceManagers ]
Entries 1 to 5 from 5 total entries
Current filter: <all>
IPA-Pool/
IPA-Pool-2/
IPX-Pool/
odap-vrf-ISP1.com/
Per-Group/
Per-User/
--> add odap-vrf-ISP3-a.com
Added odap-vrf-ISP3-a.com
--> cd odap-vrf-ISP3-a.com
[ //localhost/Radius/ResourceManagers/odap-vrf-ISP3-a.com ]
Name = odap-vrf-ISP3-a.com
Description =
Type =
--> set type subnet-dynamic
Set Type subnet-dynamic

13-11
Cisco Prime Access Registrar 6.1 User Guide
OL-29756-01
Chapter 13 Using On-Demand Address Pools
Configuring Cisco Prime Access Registrar to Work with ODAP
--> ls
[ //localhost/Radius/ResourceManagers/odap-vrf-ISP3-a.com ]
Name = odap-vrf-ISP3-a.com
Description =
Type = subnet-dynamic
NetMask =
SubnetAddresses/
-> set netmask 255.255.192.0
Set NetMask 255.255.192.0
-> cd subnetaddresses
[ //localhost/Radius/ResourceManagers/odap-vrf-ISP3-a.com /SubnetAddresses ]
Entries 0 to 0 from 0 total entries
Current filter: <all>
--> add 171.21.0.0-172.21.191.255
Added 172.21.0.0-172.21.191.255
-> cd /radius/resourcemanagers
[ //localhost/Radius/ResourceManagers ]
Entries 1 to 10 from 10 total entries
Current filter: <all>
IPA-Pool/
IPA-Pool-2/
IPX-Pool/
odap-vrf-ISP1.com/
odap-vrf-ISP3-a.com /
Per-Group/
Per-User/
--> add odap-vrf-ISP3-b.com
Added odap-vrf-ISP3-b.com
--> cd odap-vrf-ISP3-b.com
[ //localhost/Radius/ResourceManagers/odap-vrf-ISP3-b.com ]
Name = odap-vrf-ISP3-b.com
Description =
Type =
--> set type subnet-dynamic
Set Type subnet-dynamic
--> ls
[ //localhost/Radius/ResourceManagers/odap-vrf-ISP3-b.com ]
Name = odap-vrf-ISP3-b.com
Description =
Type = subnet-dynamic

13-12
Cisco Prime Access Registrar 6.1 User Guide
OL-29756-01
Chapter 13 Using On-Demand Address Pools
Configuring Cisco Prime Access Registrar to Work with ODAP
NetMask =
SubnetAddresses/
-> set netmask 255.255.255.0
Set NetMask 255.255.255.0
-> cd subnetaddresses
[ //localhost/Radius/ResourceManagers/odap-vrf-ISP3-b.com /SubnetAddresses ]
Entries 0 to 0 from 0 total entries
Current filter: <all>
--> add 172.21.191.0-172.21.255.255
Added 172.21.191.0-172.21.255.255
-> cd /radius/resourcemanagers
[ //localhost/Radius/ResourceManagers ]
Entries 1 to 10 from 10 total entries
Current filter: <all>
IPA-Pool/
IPA-Pool-2/
IPX-Pool/
odap-vrf-ISP1.com/
odap-vrf-ISP3-a.com /
odap-vrf-ISP3-b.com /
Per-Group/
Per-User/
--> add odap-vrf-ISP2-a.com
Added odap-vrf-ISP2-a.com
--> cd odap-vrf-ISP2-a.com
[ //localhost/Radius/ResourceManagers/odap-vrf-ISP2-a.com ]
Name = odap-vrf-ISP2.com
Description =
Type =
--> set type subnet-dynamic
Set Type subnet-dynamic
--> ls
[ //localhost/Radius/ResourceManagers/odap-vrf-ISP2-a.com ]
Name = odap-vrf-ISP2-a.com
Description =
Type = subnet-dynamic
NetMask =
SubnetAddresses/
-> set netmask 255.255.0.0
Set NetMask 255.255.0.0

13-13
Cisco Prime Access Registrar 6.1 User Guide
OL-29756-01
Chapter 13 Using On-Demand Address Pools
Configuring Cisco Prime Access Registrar to Work with ODAP
-> cd subnetaddresses
[ //localhost/Radius/ResourceManagers/odap-vrf-ISP2-a.com /SubnetAddresses ]
Entries 0 to 0 from 0 total entries
Current filter: <all>
--> add 10.0.0.0-10.10.255.255
Added 10.0.0.0-10.255.255.255
-> cd /radius/resourcemanagers
[ //localhost/Radius/ResourceManagers ]
Entries 1 to 10 from 10 total entries
Current filter: <all>
IPA-Pool/
IPA-Pool-2/
IPX-Pool/
odap-vrf-ISP1.com/
odap-vrf-ISP3-a.com /
odap-vrf-ISP3-b.com /
odap-vrf-ISP2-a.com /
Per-Group/
Per-User/
--> add odap-vrf-ISP2-b.com
Added odap-vrf-ISP2-b.com
--> cd odap-vrf-ISP2-b.com
[ //localhost/Radius/ResourceManagers/odap-vrf-ISP2-b.com ]
Name = odap-vrf-ISP2-b.com
Description =
Type =
--> set type subnet-dynamic
Set Type subnet-dynamic
--> ls
[ //localhost/Radius/ResourceManagers/odap-vrf-ISP2-b.com ]
Name = odap-vrf-ISP2-b.com
Description =
Type = subnet-dynamic
NetMask =
SubnetAddresses/
-> set netmask 255.255.255.0
Set NetMask 255.255.255.0
-> cd subnetaddresses
[ //localhost/Radius/ResourceManagers/odap-vrf-ISP2-b.com /SubnetAddresses ]
Entries 0 to 0 from 0 total entries

13-14
Cisco Prime Access Registrar 6.1 User Guide
OL-29756-01
Chapter 13 Using On-Demand Address Pools
Configuring Cisco Prime Access Registrar to Work with ODAP
Current filter: <all>
--> add 10.255.0.0-10.255.10.255
Added 10.255.0.0-10.255.10.255
Configuring Session Managers
Note It is not necessary to configure Session Managers in two instances. All SessionManager configuration
can be done at one time before configuring the Resource Managers.
Step 8 Configure the Session Managers to be referenced by the Resource Managers.
--> cd/radius/sessionmanagers
[ //localhost/Radius/SessionManagers ]
Entries 1 to 4 from 4 total entries
Current filter: <all>
odap-vrf-ISP1.com/
odap-vrf-ISP2.com/
odap-vrf-ISP3.com/
session-mgr-1/
--> cd odap-vrf-ISP2.com
[ //localhost/Radius/SessionManagers/odap-vrf-ISP2.com ]
Name = odap-vrf-ISP2.com
Description =
AllowAccountingStartToCreateSession = FALSE
ResourceManagers/
--> cd resourcemanagers
--> set 1 odap-vrf-ISP2-a.com
Set 1 odap-vrf-ISP2-a.com
--> set 2 odap-vrf-ISP2-b.com
Set 2 odap-vrf-ISP2-b.com
--> cd/radius/sessionmanagers
[ //localhost/Radius/SessionManagers ]
Entries 1 to 4 from 4 total entries
Current filter: <all>
odap-vrf-ISP1.com/
odap-vrf-ISP2.com/
odap-vrf-ISP3.com /
session-mgr-1/
--> cd odap-vrf-ISP3.com

13-15
Cisco Prime Access Registrar 6.1 User Guide
OL-29756-01
Chapter 13 Using On-Demand Address Pools
Configuring Cisco Prime Access Registrar to Work with ODAP
[ //localhost/Radius/SessionManagers/odap-vrf-ISP3.com ]
Name = odap-vrf-ISP3.com
Description =
AllowAccountingStartToCreateSession = FALSE
ResourceManagers/
--> cd resourcemanagers
--> set 1 odap-vrf-ISP3-a.com
Set 1 odap-vrf-ISP3-a.com
--> set 2 odap-vrf-ISP3-b.com
Set 2 odap-vrf-ISP3-b.com
--> cd/radius/sessionmanagers
[ //localhost/Radius/SessionManagers ]
Entries 1 to 4 from 4 total entries
Current filter: <all>
odap-vrf-ISP1.com/
odap-vrf-ISP2.com/
odap-vrf-ISP3.com/
session-mgr-1/
--> cd odap-vrf-ISP1.com
[ //localhost/Radius/SessionManagers/odap-vrf-ISP1.com ]
Name = odap-vrf-ISP1.com
Description =
AllowAccountingStartToCreateSession = FALSE
ResourceManagers/
--> cd resourcemanagers
--> set 1 odap-vrf-ISP1.com
Set 1 odap-vrf-ISP1.com
Configure Clients
Step 9 For any client that might forward ODAP requests to the Prime Access Registrar server, set the Vendor
property to CiscoWithODAP.
--> cd /radius/clients
[ //localhost/Radius/Clients ]
Entries 1 to 2 from 2 total entries
Current filter: <all>
localhost/
vhg-1/
vhg-2/
--> cd vhg-1

13-16
Cisco Prime Access Registrar 6.1 User Guide
OL-29756-01
Chapter 13 Using On-Demand Address Pools
Configuring Cisco Prime Access Registrar to Work with ODAP
[ //localhost/Radius/Clients/vhg-1 ]
Name = vhg-1
Description =
IPAddress = 209.165.200.225
SharedSecret = secret
Type = NAS
Vendor =
IncomingScript~ =
OutgoingScript~ =
UseDNIS = FALSE
DeviceName = a_name
DevicePassword = password
--> set vendor CiscoWithODAP
Set Vendor CiscoWithODAP
Save Your Configuration
Step 10 After completing the configuration, save your changes.
--> save
Validating //localhost...
Saving //localhost...

CHAPTER
14-1
Cisco Prime Access Registrar 6.1 User Guide
OL-29756-01
14
Using Identity Caching
Cisco Prime Access Registrar (Prime Access Registrar) software includes the identity caching feature.
Prime Access Registrar runs as application layer software and can be used standalone or in conjunction
with other workstations running Prime Access Registrar.
Note The identity caching feature is available on Prime Access Registrar releases 3.5.2 and above.
Identity caching provides subscriber identity resolution services with fast access to associated subscriber
identity data for service providers, enabling them to offer new services to their customers based on
identity caching and context information management.
This chapter contains the following sections:
•Overview
•Identity Caching Features
•Configuring Cisco Prime Access Registrar for Identity Caching
•Starting Identity Caching
Overview
Identity caching enables Cisco equipment to gain context information about the operator’s subscribers
to support network functions or to enhance subscriber’s experience on the operator’s network.
Figure 14-1 on page 14-2, Prime Access Registrar System Overview, shows the network environment
where Prime Access Registrar identity caching might be used.
For example, Client Services Gateway (CSG) uses IP mapping information provided by identity caching
to support post-paid content billing. Identity caching acquires subscriber information from other devices
and information sources in the operator’s network. The type of information provided is limited by the
available information sources and is configurable by the operator, but might include information such as
IP address, MSISDN, and IMSI. Identity caching does not duplicate the operator’s persistent data stores.
Identity caching provides a protocol-based interface through which Cisco network elements
(Prime Access Registrar identity caching clients) can access subscriber information.
The Prime Access Registrar servers receive RADIUS flows from the Gateway GPRS support Node
(GGSN) which acts as a type of network access station (NAS). These flows perform full AAA
(authentication, authorization, and accounting). You can configure the Prime Access Registrar servers
to redirect the accounting information (only) to an identity caching server to be cached. The GGSN can
also be configured to direct only the RADIUS accounting information directly to the
Prime Access Registrar server.
14-2
Cisco Prime Access Registrar 6.1 User Guide
OL-29756-01
Chapter 14 Using Identity Caching
Identity Caching Features
Prime Access Registrar also receives XML identity query flows from the CSM which acts as a NAS. In
the event that a CSM should fail or lose its information, the information can be refreshed from the
information cached in the Prime Access Registrar server.
Prime Access Registrar acquires subscriber information such as the IP address, the mobile Subscriber
ISDN number (MSISDN), and the International Mobile System Identifier (IMSI) from AAA requests the
Prime Access Registrar server receives, typically from the GGSN. The types of information provided is
limited by the available information sources and is configurable by the operator.
Prime Access Registrar includes an XML Query Identity enhancement. Prime Access Registrar
previously supported User-Name lookup based on the Framed IP address of an existing session. The
XML Query Identity enhancement enables Framed IP address lookup based on the User-Name in an
existing session.
Figure 14-1 Prime Access Registrar System Overview
Identity Caching Features
Prime Access Registrar identity caching provides the following features:
•Supports GGSN subscriber data attributes from RADIUS authentication sequences
•Provides basic identity mapping services from IP address or username/APN to Mobile DN for one
network presence at a time.
•Provide session management support for Content Switch Module (CSM)
Prime Access Registrar enables the CSM to keep the data session and content correlated to the same
subscriber reconnecting, perhaps after an attach/detach sequence for a GPRS subscriber connecting
again. This is done through the MSISDN identity to IP mapping in the identity caching function.
Internet
122007
CE590s
RADIUS AAA flows
CNSAR
AAA
GGSN
PDSN/HA
RADIUS accounting flows
Bearer/content traffic flows
XML identity query flows
CNSAR
AAA
AAA
CNSAR
CSMs
Catalyst 6000s
with RLB/CSM Catalyst 6000s

14-3
Cisco Prime Access Registrar 6.1 User Guide
OL-29756-01
Chapter 14 Using Identity Caching
Configuring Cisco Prime Access Registrar for Identity Caching
•Enhance redundancy with stateful fail-over support for applications by finding the right connection
between subscriber identity and IP address using the Identity Cache function.
•Uses an XML interface to make it easier for any network function or application to use without
having to have detailed internal knowledge about the execution environment or programming
methods.
•Provides user identity resolution with fast access to associated subscriber data
•Establishes an identity and Access Management solution that can be used in and across multiple
network domains
•Provides a way to use identity resolution to manage the growth of 2.5G mobile data access services
(GSM/GPRS) and to provide always-on mobile data access including the following:
–
Ties various IP addresses to a unique subscriber identifier
–
Dynamically assigning and reusing IP addresses and controlling services with consistent
identification
–
Correlates previous content activity when a mobile subscriber reconnects
–
Correlates IP addresses, mobile numbers, username, and identifiers to support customer billing
–
Correlates and identifies subscribers using both 2.5G and WLAN services and provides a way
to control and manage operator network services
–
Provides subscriber privacy control
–
Provides a way to cache content with various customers and their networks
Configuring Cisco Prime Access Registrar for Identity Caching
Use the command line interface aregcmd to configure Prime Access Registrar to perform identity
caching.
Configuring the Identity Caching
To configure identity caching:
Step 1 Launch aregcmd.
Step 2 Define a client object for each client that will send either RADIUS or XML packets to the
Prime Access Registrar server performing identity caching.
There should be one client object for each GGSN, one for each CSM and one for each packet simulator
(if used in a test environment).
For example, if a packet simulator will be used on the same server where you perform identity caching,
add a client object as in the following:
cd /Radius/Clients
add xml-client
cd xml-client

14-4
Cisco Prime Access Registrar 6.1 User Guide
OL-29756-01
Chapter 14 Using Identity Caching
Configuring Cisco Prime Access Registrar for Identity Caching
[ //localhost/Radius/Clients/xml-client ]
Name = xml-client
Description =
IPAddress =
SharedSecret =
Type = NAS
Vendor =
IncomingScript~ =
OutgoingScript~ =
EnablePOD = FALSE
This client object is very similar to the localhost object defined in the example configuration. The
SharedSecret property will be ignored if the client is an XML client, but still must be set to a non-null
value. The Type property is also ignored for XML clients.
Step 3 Define a port object for each RADIUS port and each XML port to be used. Two RADIUS ports, the
second immediately following the first in numeric value, must be defined even if only one is needed. A
typical identity caching installation requires the following port configuration:
cd /Radius/Advanced/Ports
add 1645
add 1646
add 8080
Note Although ports 1645 and 1646 are the default ports for Prime Access Registrar, you must add them to
/Radius/Advanced/Ports to also add port 8080.
Step 4 Change directory to the 1645 port and set its type to Radius-Access.
cd /Radius/Advanced/Ports/1645
set Type Radius-Access
Step 5 Change directory to the 1646 port and set its type to Radius-Accounting.
cd /Radius/Advanced/Ports/1646
set Type Radius-Accounting
Step 6 Change directory to the 8080 port and set its type to XML.
-cd /Radius/Advanced/Ports/8080
set Type XML
Step 7 Define and configure an accounting service of type file and set it as the DefaultAccountingService.
An accounting service is required for Prime Access Registrar to cache identity information, even if no
accounting service is needed otherwise. If you added the example configuration during installation, a
local-file accounting service is already configured.
If you did not add the example configuration during software installation, see the Setting Up Accounting
section in Chapter 7, “RADIUS Accounting.”

14-5
Cisco Prime Access Registrar 6.1 User Guide
OL-29756-01
Chapter 14 Using Identity Caching
Configuring Cisco Prime Access Registrar for Identity Caching
Step 8 Define and configure a ResourceManager for identity caching.
cd /Radius/ResourceManagers
add cache
Step 9 Set the ResourceManager to type session-cache for identity caching.
cd cache
set type session-cache
The following shows the default properties of a session-cache ResourceManager:
[ //localhost/Radius/ResourceManagers/cache ]
Name = cache
Description =
Type = session-cache
OverwriteAttributes = FALSE
QueryKey =
PendingRemovalDelay = 10
AttributesToBeCached/
QueryMappings/
Step 10 Set the QueryKey to a RADIUS attribute you want to key on.
For example, use the following command to set the QueryKey to User-Name:
set QueryKey User-Name
The QueryKey must match the string on the right-hand side of one of the pairs you list in
QueryMappings. It is not necessary for the QueryKey to be configured under AttributesToBeCached
because the QueryKey will always be cached by default.
Note The QueryKey property must always be a RADIUS attribute. The Prime Access Registrar server forces
a NULL IP address (0.0.0.0) if it detects an incorrectly configured QueryKey.
Step 11 Change directory to AttributesToBeCached and use the set command to provide a list of RADIUS
attributes you want to store in cache.
cd AttributesToBeCached
set 1 Calling-Station-ID
Set 2 User-Name
Set 3 Framed-IP-Address
The attributes a session-cache resource manager caches can be queried through both RADIUS Query and
XML Query packets. When you cache attributes Framed-IP-Address or User-Name, or when you use
XML-Address-format-IPv4 or XML-UserId-id_type-subscriber_id as the QueryKey, you must map the
XML attributes to RADIUS attributes in the QueryMappings subdirectory.

14-6
Cisco Prime Access Registrar 6.1 User Guide
OL-29756-01
Chapter 14 Using Identity Caching
Starting Identity Caching
Step 12 Change directory to QueryMappings and use the set command to list the attribute pairs, mapping the
XML attributes on the left-hand side to the RADIUS attribute on the right-hand side.
set XML-Address-format-IPv4 Framed-IP-Address
set XML-UserId-id_type-subscriber_id User-Name
Step 13 Change directory to /Radius/SessionManagers and add a SessionManager for identity caching.
cd /Radius/SessionManagers
add IDcache
Step 14 Change directory to the new identity caching SessionManager, then change directory to the
ResourceManager list.
cd IDcache/ResourceManagers
Step 15 Use the set command to associate the identity caching ResourceManager with this SessionManager.
set 1 cache
Step 16 Change directory to /Radius and set the DefaultSessionManager to the identity caching
SessionManager.
cd /Radius
set DefaultSessionManager IDcache
Step 17 Run the save, reload, and exit commands:
save
reload
exit
Starting Identity Caching
To start identity caching, you must send an Accounting-Request to the specified accounting port (The
default accounting port is 1646.) A minimal Accounting-Request will contain the following attributes:
•NAS-Identifier or NAS-IP-Address
•NAS-Port
•Framed-IP-Address
•User-Name
•Acct-Status-Type
•Acct-Session-Id

14-7
Cisco Prime Access Registrar 6.1 User Guide
OL-29756-01
Chapter 14 Using Identity Caching
Starting Identity Caching
Starting Identity Caching
To start identity caching:
Step 1 Launch radclient:
cd /opt/CSCOar/bin
radclient -C localhost -N admin -P aicuser
Step 2 Enter the following radclient commands:
set p [ acct_request Start joeuser@cisco.com ]
$p set attrib [ attrib Framed-IP-Address 123.123.123.123 ]
$p send
This assumes that you are running radclient on the same server and using 1646 as the accounting port.
Step 3 Send XML requests to the specified XML port (Cisco suggests port 8080 as shown above). A typical
XML packet will look like the following:
<?xml version="1.0"?>
<Request>
<UserIdRequest>
<UserId id_type="subscriber_id">bob</UserId>
</UserIdRequest>
</Request>
To do this using xmlclient, put the XML text into a file, then enter the following command:
cd /opt/CSCOar/bin
./xmlclient -srd <file>
Note This assumes that xmlclient is running on the same server as identity caching and that 8080 is the XML
port. Use the command xmlclient -H for information about how to use a different port or how to run
xmlclient from a different server.
Note For a successful query, xml response will have the IPAddress associated with the requested user-name
and for failure query it returns 0.0.0.0 as the IPAddress.

14-8
Cisco Prime Access Registrar 6.1 User Guide
OL-29756-01
Chapter 14 Using Identity Caching
XML Interface
XML Interface
The XML interface is used for subscriber context information queries and responses to those queries.
The XML interface is on a UDP port (8080) and is configurable. Identity caching supports the XML
data-type definition (DTD) supported by the CSG.
The mapping from queries to replies can be one to many. For example, a UDP datagram might contain
several queries but each reply will be returned in a separate datagram. No single query or reply can
exceed the configured MTU of a datagram. Any that does results in an error.
If a query result is negative, the reply will consist of a null subscriber ID. All other error conditions cause
Prime Access Registrar to drop the request. Errors are logged locally using the Prime Access Registrar
logging mechanism.

CHAPTER
15-1
Cisco Prime Access Registrar 6.1 User Guide
OL-29756-01
15
Using Trusted ID Authorization with SESM
Cisco Prime Access Registrar (Prime Access Registrar) can be used in a Service Selection Gateway
(SSG) - Cisco Subscriber Edge Services Manager (SESM) deployment to enable the Trusted Identity
(Trusted ID) Authorization feature. This chapter describes how to use Prime Access Registrar with
SESM, and how to configure Prime Access Registrar to use the Trusted ID feature.
The Trusted ID feature provides transparent login capabilities for users based on a trusted ID instead of
the user's name, enabling end users of an SSG to maintain an always-on connection without the need to
authenticate on each connect. Using SSG's Transparent Auto-Login (TAL) feature, a TAL access-request
packet contains a Trusted ID, such as a MAC address, that identifies the user without the user's real
username and password.The SESM Profile Management Guide provides detailed information about
Trusted ID authorization in SESM.
If Prime Access Registrar knows the user associated with the Trusted ID, Prime Access Registrar uses
the Trusted ID to authenticate and authorize the user. If the authentication and authorization succeeds,
Prime Access Registrar returns the user’s username in the Access-Accept so the SSG can include the
user’s identity in subsequent Accounting-Requests.
If Prime Access Registrar does not know the user associated with the Trusted ID,
Prime Access Registrar returns an Access-Reject. The Access-Reject causes the SSG to redirect the user
to a SESM web portal login page. When the user explicitly authenticates, Prime Access Registrar
captures the Trusted ID and maps it to a user association so subsequent attempts to authenticate with the
Trusted ID succeed.
This chapter contains the following sections:
•Trusted ID Operational Overview
•Software Requirements
•Configuring Cisco Prime Access Registrar for Trusted Identity with SESM
•Configuration Imported by TrustedIdInstall Program
•Configuring EAP-MD5 Authentication
Trusted ID Operational Overview
This section describes the following operations of the Trusted ID Authentication feature:
•Configuration Overview
•Request Processing
•Session Cache Life Cycle

15-2
Cisco Prime Access Registrar 6.1 User Guide
OL-29756-01
Chapter 15 Using Trusted ID Authorization with SESM
Trusted ID Operational Overview
•Configuration Restrictions
Configuration Overview
The Trusted ID features require two objects in Prime Access Registrar, a UserService, a
SessionManager, and a ResourceManager. The UserService references another service called to perform
the authentication and authorization (AA). The SessionManager references a SessionManager that
contains a reference to a session-cache Resource Manager. These objects are imported into the
Prime Access Registrar server configuration when you run the TrustedIdInstall.bin program.
Configuration Imported by TrustedIdInstall Program, page 15-14 lists the configuration imported into
the Prime Access Registrar server by the TrustedIdInstall.bin program.
The Resource Manager is configured with the QueryKey property set to a RADIUS attribute that
contains the Trusted ID such as the Calling-Station ID. The Query Key should be set to an attribute
present in all appropriate AA requests that uniquely identifies the user such as Calling-Station ID. The
Query Key can be set to only one RADIUS attribute.
The Resource Manager is also configured to cache the attributes required to identify the user, username,
and the user’s credentials, password or CHAP-Password and CHAP-Challenge. The attributes
User-Name, User-Password, NAS-Identifier, NAS-Port, or NAS-Port-Type are not appropriate choices
for Query Key because they do not uniquely identify users.
The RollingEncryptionKeyChangePeriod specifies the length of time a given EncryptionKey will be
used before a new one is created. When the session-cache ResourceManager caches User-Password
attributes, Prime Access Registrar encrypts the User-Password so it is not stored in memory or persisted
on disk in clear text. Prime Access Registrar uses up to 255 encryption keys, using a new one after each
RollingEncryptionKeyChangePeriod expires. If RollingEncryptionKeyChangePeriod is set to 2 days,
Prime Access Registrar will create and begin using a new EncryptionKey every two days. The oldest key
will be retired, and Prime Access Registrar will re-encrypt any User-Passwords that used the old key
with the new key. This way, if the RollingEncryptionKeyChangePeriod is set to 1 day, no key will be
older than 255 days.
The encryption keys are indirectly connected to Trusted ID. Since User-Passwords might be stored for
a long time in memory and on disk, Prime Access Registrar uses the RollingEncryptionKey to encrypt
the User-Passwords. The RollingEncryptionKey makes it more difficult for someone to crack or decode
the User-Passwords because the key used changes frequently. If someone were to break one key, that
would only give them the ability to decrypt those User-Passwords that had been encrypted with that key.
All others, including those yet to be encrypted after the key change period expires would not be
vulnerable.
Request Processing
When the Trusted ID service processes Access-Requests, it queries the session-cache Resource Manager
for a cache entry associated with the Trusted ID. If found, the Resource Manager returns the cached
attributes. The Trusted ID service replaces the request’s existing attributes with the cached attributes.
After the Resource Manager is queried (and the request's existing attributes are replaced with the cached
attributes if the cache entry exists), the Trusted ID’s UserService authenticates and authorizes the
request. The UserService is always called whether the cache entry exists or not. The only attributes
cached in the Resource Manager are the ones listed in AttributesToBeCached. The user profile is usually
not cached and is retrieved each time by the UserService.

15-3
Cisco Prime Access Registrar 6.1 User Guide
OL-29756-01
Chapter 15 Using Trusted ID Authorization with SESM
Trusted ID Operational Overview
Whether the request succeeds or not, the request is passed on to the service referenced by the
UserService property. When that service completes authentication and authorization, control returns to
the Trusted ID service. The session-cache might be updated if AA is successful.
Session Cache Life Cycle
Session cache management comprises adding and deleting Trusted ID to user mapping to and from the
cache and is initiated from the Trusted ID service. The mapping is one-to-one mapping. For each Trusted
ID, there can be only one cache entry, and conversely for each cache entry, there can be only one Trusted
ID.
If a user is not presently in the session cache (the query failed), the AA done by the UserService
succeeded and the internal attribute (Implicit-Auth-Enabled) was returned with a value of true,
Prime Access Registrar adds the user to the cache. Since the AA succeeded, Prime Access Registrar
assumes this is an explicit authentication by the user and the attributes required by the session-cache are
present in the Access-Request.
If the user is already in the session cache (the query succeeded) and the AA done by the UserService
failed, the internal attributes Implicit-Auth-Enabled was not returned, or was returned with a value other
than true, Prime Access Registrar removes the user from the session cache.
If the user has enabled implicit authentication (and if that results in Implicit-Auth-Enabled being
returned as true), after the first Explicit Auth (from the login page), the user will be in the cache and will
always be implicitly authenticated and authorized. In this case, you can get them out of the cache three
ways:
•Have the user disable implicit authentication, then reconnect
•Have the system administrator release the session using aregcmd commands
•Use the SessionTimeout property in the Session Manager
If the user’s account becomes orphaned (the user no longer exists), the cache entry will persist until it is
removed using aregcmd.
If you have disabled implicit authentication, you are forced to authenticate each time and the cache is
not updated. If you subsequently enable implicit authentication, you must explicitly authenticate one
more time to create the user’s cache entry. After creating the user’s cache entry, they will not need to
explicitly authenticate again (with this instance of Prime Access Registrar) as long as implicit
authentication is enabled.
Configuration Restrictions
The Session Manager referenced by the TrustedID Service should not be used for general session
management. The Trusted ID Session Manager should be a separate Session Manager used only for the
Trusted ID session cache. The data in the session-cache must persist longer than the length of the session.
If the Trusted ID Session Manager was used for general session management, the cache would be
updated for the general session, overwriting the cache entry for the special session created for the
Trusted ID service. When the general session ended it would delete that data and subsequent queries for
implicit authentication would fail.

15-4
Cisco Prime Access Registrar 6.1 User Guide
OL-29756-01
Chapter 15 Using Trusted ID Authorization with SESM
Software Requirements
Software Requirements
The Trusted ID feature requires the following software to be installed:
•Cisco Subscriber Edge Services Manager (SESM) 3.3(1)
•Cisco Subscriber Policy Engine (SPE) 2.1.12
•Cisco Prime Access Registrar
In addition to the software listed above, you must run the TrustedIdInstall.bin standalone, Java
application that runs on the Solaris platform. TrustedIdInstall.rpm is an equivalent Java application
that runs on the Linux platform.
Note The disk space required to run the TrustedIdInstall program is about 1.3 MB.
The TrustedIdInstall program verifies the software prerequisites, installs the required jar files, and
extends the configuration for Prime Access Registrar. The TrustedIdInstall program is only available
on Cisco.com under the Prime Access Registrar download area at the following URL:
http://www.cisco.com/cgi-bin/tablebuild.pl/access-registrar-encrypted
This section contains the following topics:
•Installing Cisco Prime Access Registrar
•Running the TrustedIdInstall Program
Installing Cisco Prime Access Registrar
See the Cisco Prime Access Registrar 6.1 Installation and Configuration Guide. for detailed information
about how to install Prime Access Registrar software.
Note You must specify a Java Runtime Environment (JRE) when you install Prime Access Registrar software.
Running the TrustedIdInstall Program
Cisco provides a Java-based program called TrustedIdInstall that installs required jar files, the
configuration for Subscriber Policy Engine (SPE), and Prime Access Registrar. The TrustedIdInstall
program can be run as an InstallShield wizard using the graphical user interface (GUI) or from the
command line.
Note Before running the TrustedIDInstall program, ensure that the SPE 2.1.12 software has been installed
with SESM 3.3(1) (in SPE mode).
Using the TrustedIdInstall.bin GUI
You must run the TrustedIdInstall program on the workstation where Prime Access Registrar is
installed with a Java Runtime Environment (JRE) up to and including 1.4.2 in the path.
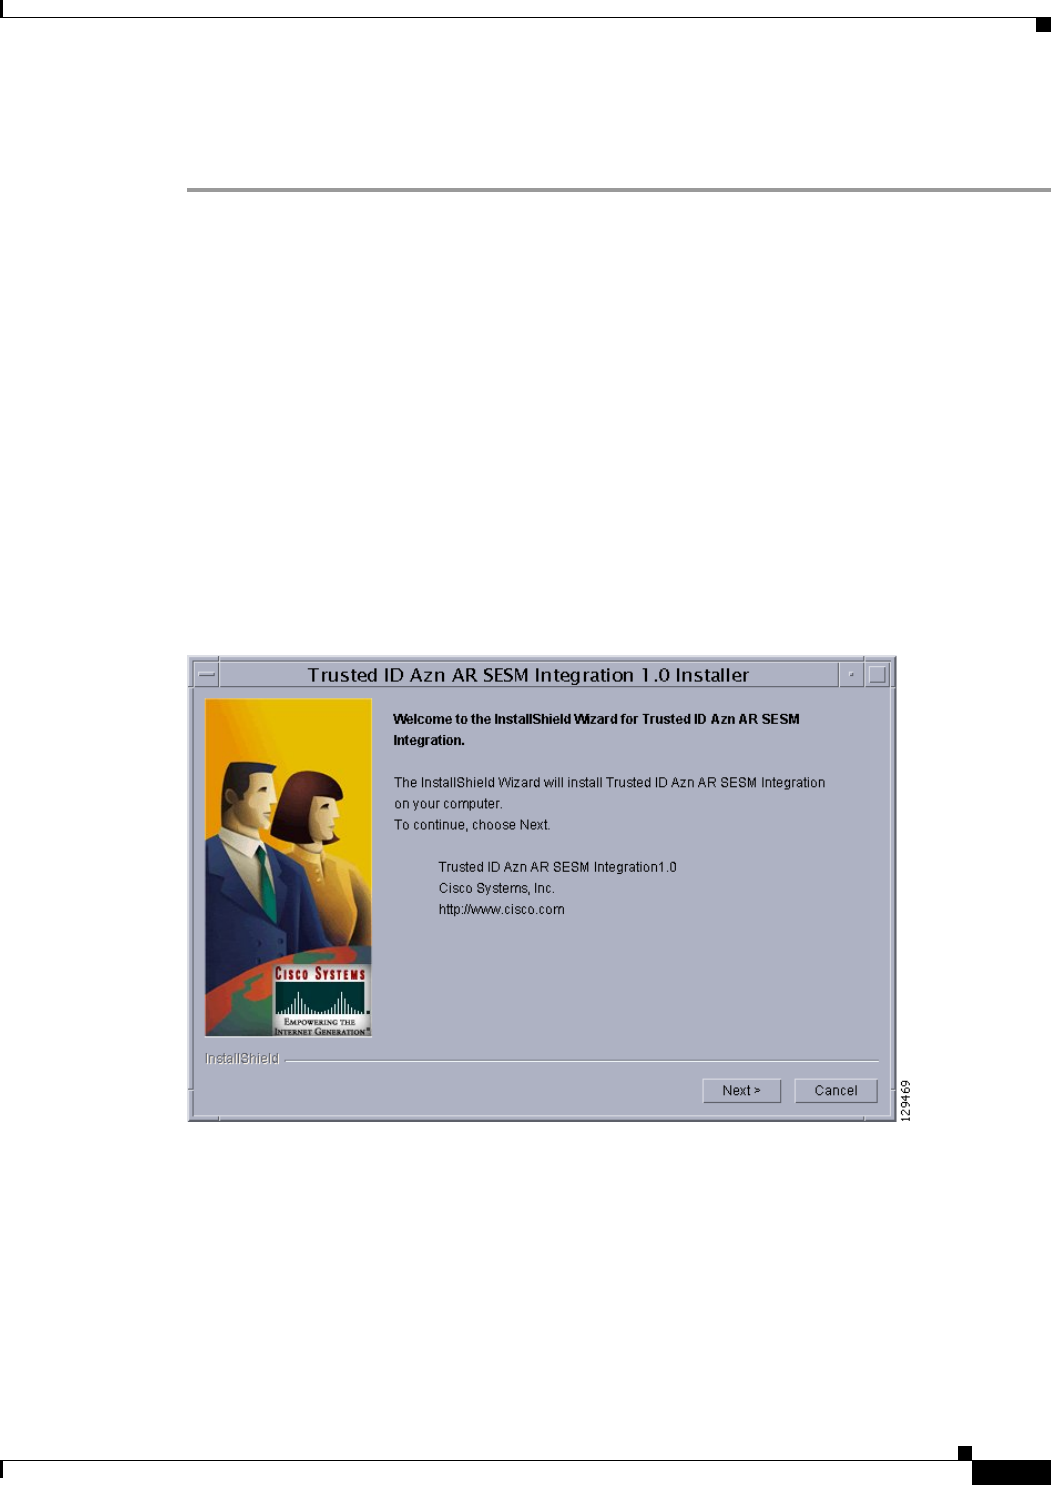
15-5
Cisco Prime Access Registrar 6.1 User Guide
OL-29756-01
Chapter 15 Using Trusted ID Authorization with SESM
Software Requirements
Installing the TrustedIdInstall
To install TrustedIdInstall:
Step 1 Log in as a user with root privileges.
Step 2 Enter the following from the Prime Access Registrar server’s command line:
TrustedIdInstall.bin (for the Solaris platform) or
TrustedIdInstall.rpm (for the Linux platform)
The following message appears after you enter the command line above:
# TrustedIdInstall.bin
InstallShield Wizard
Initializing InstallShield Wizard...
Searching for Java(tm) Virtual Machine...
.............running under 1.2
Figure 15-1 shows the welcome window of the Trusted ID Azn AR SESM Integration 1.0 Installer.
Figure 15-1 Trusted ID Azn AR SESM Integration 1.0 Installer Welcome
Step 3 Click Next to continue.
The InstallIdInstall.bin wizard displays the Prerequisites window.
Step 4 Check to ensure that Cisco SESM 3.3(1) is installed and available on the network, then click Next.
The InstallIdInstall.bin wizard checks for Prime Access Registrar 5.1 software. You will need the
SESM 3.3(1) configuration parameters later in this procedure.
Step 5 Select the vendor name of the LDAP data store you are using for SPE, then click Next.
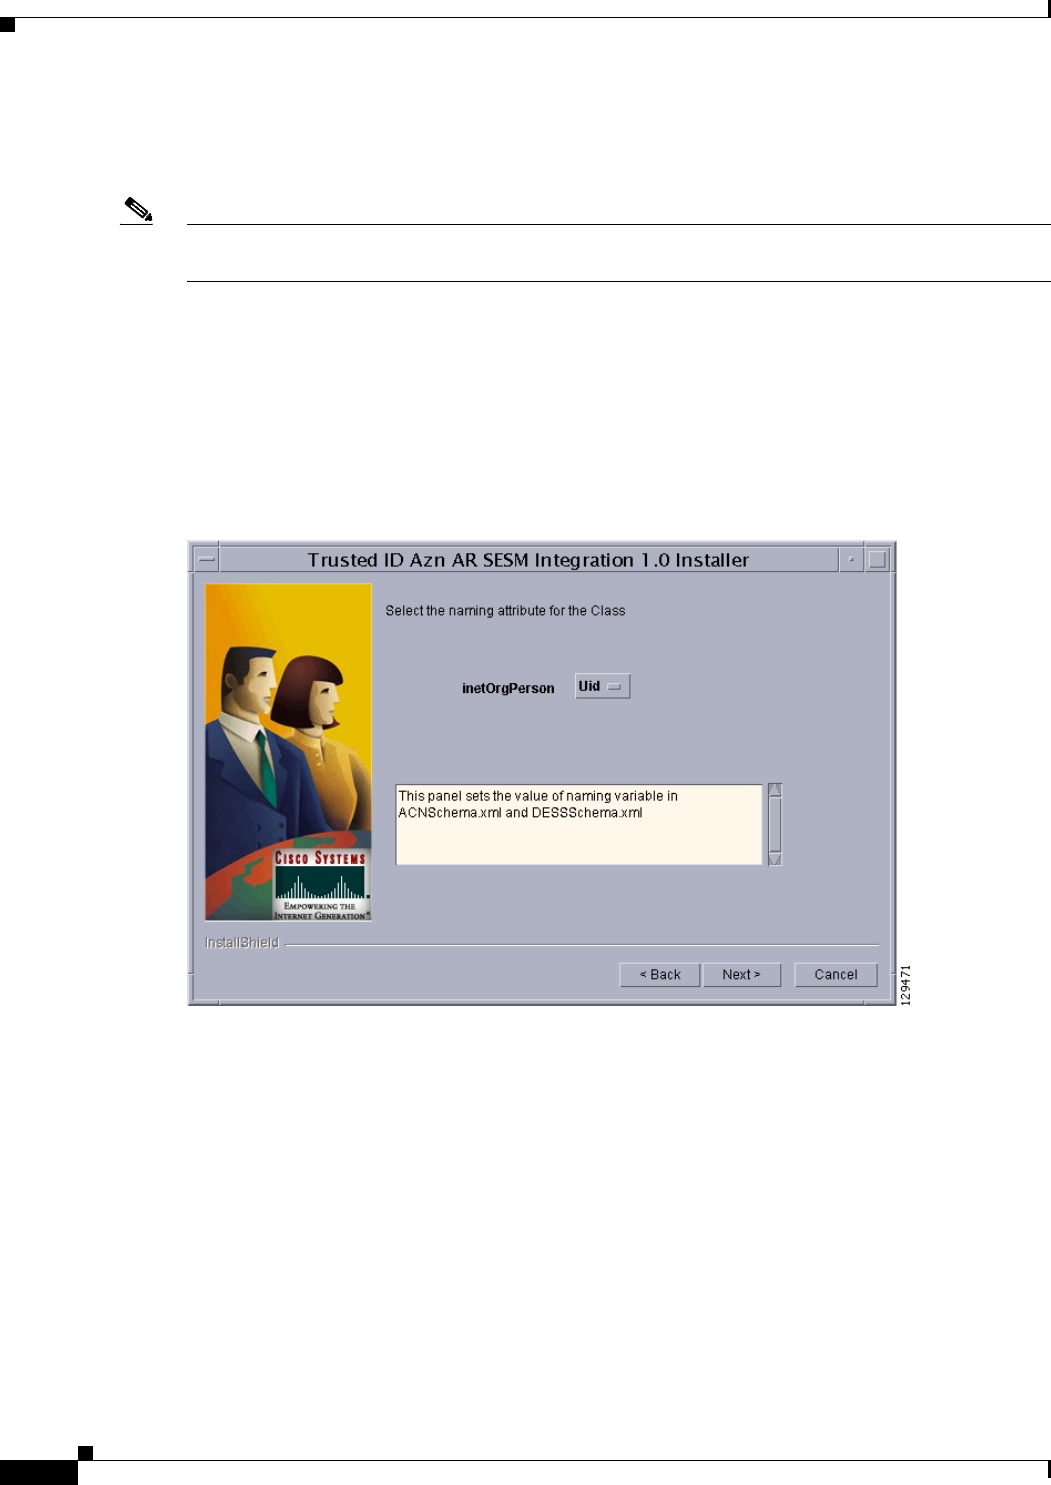
15-6
Cisco Prime Access Registrar 6.1 User Guide
OL-29756-01
Chapter 15 Using Trusted ID Authorization with SESM
Software Requirements
The InstallIdInstall.bin wizard displays the Password Encryption Panel. This panel prompts you for a
master password (entered twice to ensure accuracy) and a Password Encryption Algorithm which can be
None, SHA, or SHA-1.
Note If you plan to use EAP-MD5 authentication, choose None. See Configuring EAP-MD5 Authentication,
page 15-15 for information about configuring EAP-MD5 authentication.
Step 6 Enter the password in field provided, and select the password encryption type, then click Next.
Step 7 If in Step 5 you selected iPlanet as the Data Store Type, continue with Step 8. If you chose any other
Data Store Type, proceed to Step 9.
The iPlanet Data Store Type requires that you set the value for the naming variable in ACNSchema.xml
and DESSSchema.xml, either for Uid or Cn as shown in Figure 15-2. You can set the naming variable
to either Uid or Cn.
Figure 15-2 Selecting iPlanet Naming Variable
Step 8 Select either Uid or Cn as the inetOrgPerson naming variable, then click Next.
The InstallIdInstall.bin wizard displays the Service Type Selection panel.
Step 9 Accept the default Trusted ID Service Enable True or click to select False, then click Next.
The TrustedIdInstall program displays a panel that indicates the following:
•Location where the Trusted ID Authorization SESM Integration files will be stored (/cisco-ar)
•Features to be stored (Admin Tool)
•Amount of space required (about 1.3 MB)
The InstallIdInstall.bin wizard displays the Directory Information panel, requesting information about
the directory server required to extend the schema.
Step 10 Provide the requested Directory Server information as shown in Figure 15-3.
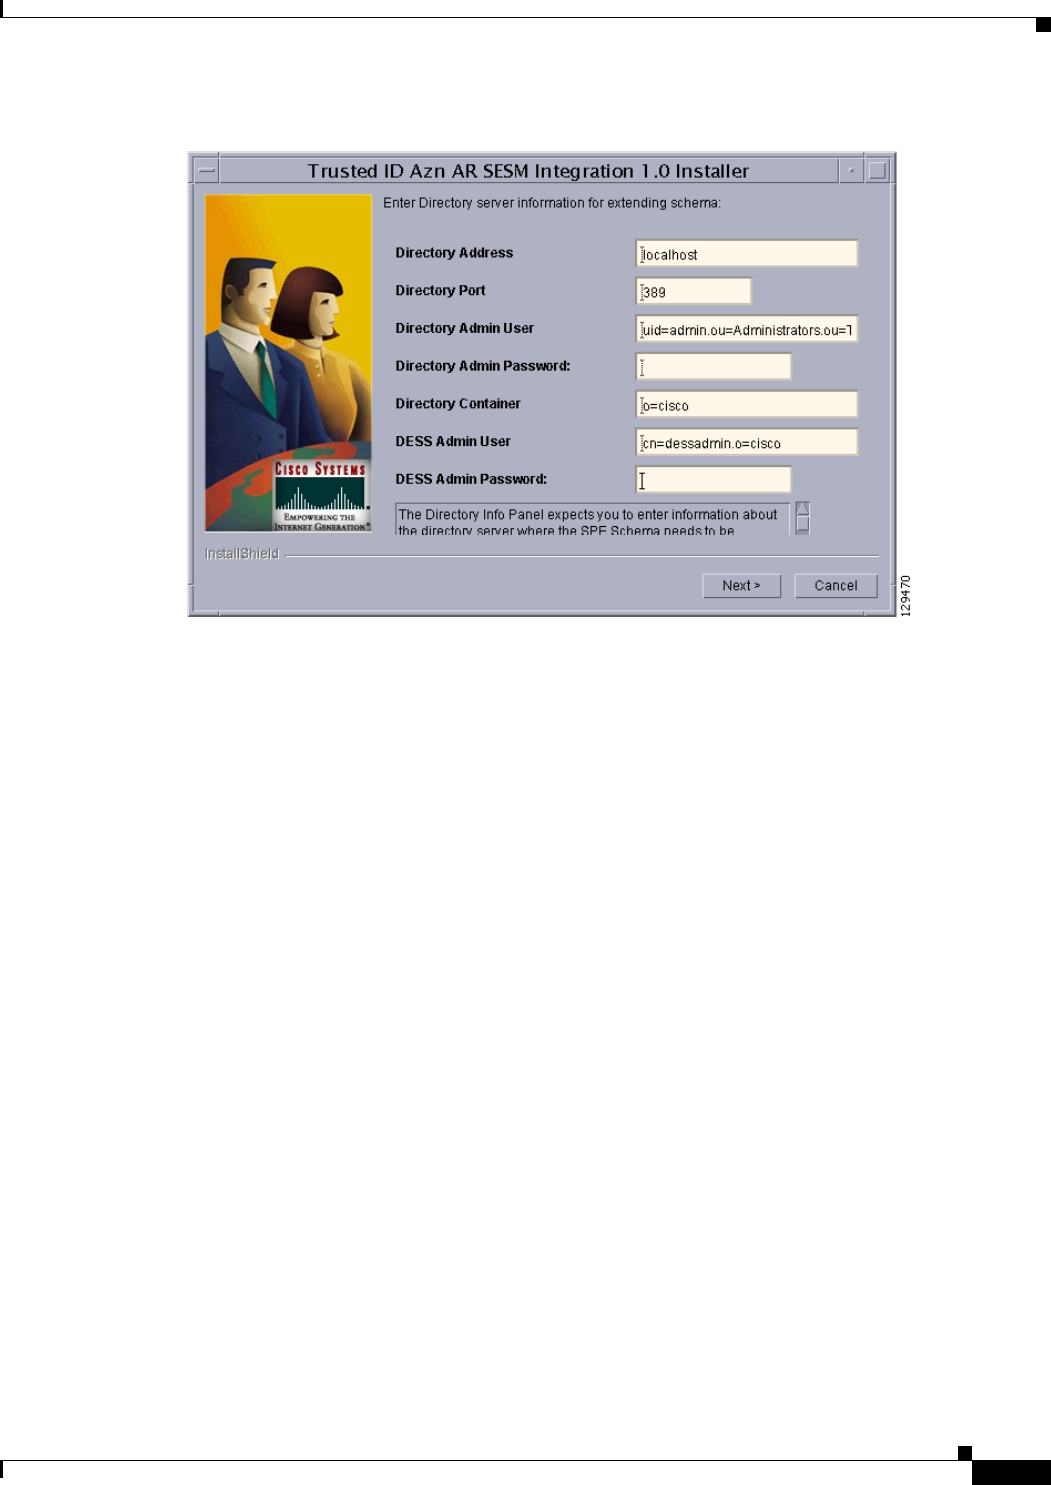
15-7
Cisco Prime Access Registrar 6.1 User Guide
OL-29756-01
Chapter 15 Using Trusted ID Authorization with SESM
Software Requirements
Figure 15-3 Directory Server Information
Contact the directory administrator if you are unsure about the information required.
a. Enter a Directory Address.
The Directory Address field requires the directory server IP address or DNS hostname.
b. Enter a Directory Port number.
Provide the TCP/IP port on which your directory server listens. (This is usually port 389.)
c. Enter a Directory Admin User.
Provide the User ID of the directory server administrator with permissions to extend the schema in
the form:
cn=admin
d. Enter a Directory Admin Password.
Provide the password for the directory administrator user.
e. Enter a Directory Container.
Provide the container in which the default RBAC objects should be created in the form:
ou=sesm,o=cisco
f. Enter a DESS Admin User.
Provide the User ID of the DESS administrator in the form:
uid=admin,ou=sesm,o=cisco
g. Enter a DESS Admin Password.
Provide the password for the DESS administrator.
Step 11 Click Next to continue.
The InstallIdInstall.bin wizard begins the installation and displays a progress bar. When the installation
completes, the wizard displays any warnings or errors it might have detected. Both boxes being empty
indications a successful install.

15-8
Cisco Prime Access Registrar 6.1 User Guide
OL-29756-01
Chapter 15 Using Trusted ID Authorization with SESM
Software Requirements
Step 12 Click Next to continue.
A final window indicates a successful installation of the Trusted ID Authorization AR SESM Integration
software.
Step 13 Click Finish.
Using the TrustedIdInstall Command Line
You can run the TrustedIdInstall program using the command line option on a workstation where
Prime Access Registrar is installed with a JRE up to and including 1.4.2 in the path. The command line
interface requires the same information as the GUI method.
Note You must be a root user to run the TrustedIdInstall program
Installing the TrustedIdInstall using Command Line
To install TrustedIdInstall using command line:
Step 1 To run the TrustedIdInstall program using the command line interface, enter the following from the
Prime Access Registrar server’s command line:
TrustedIdInstall.bin -console (for the Solaris platform)
TrustedIdInstall.rpm -console (for the Linux platform)
InstallShield Wizard
Initializing InstallShield Wizard...
Searching for Java (tm) Virtual Machine...
.............
-------------------------------------------------------------------------------
Welcome to the InstallShield Wizard for Trusted ID Azn AR SESM Integration.
The InstallShield Wizard will install Trusted ID Azn AR SESM Integration
on your computer.
To continue, choose Next.
Trusted ID Azn AR SESM Integration1.0
Cisco Systems, Inc.
http://www.cisco.com
Press 1 for Next panel, 3 to Cancel or 4 to Redisplay [1] 1
The line above provides a way for you to enter your selection. You can press Enter to go to the next
panel. Enter 3 to cancel the installation, or enter 4 to redisplay the current panel.
Step 2 Press Enter to go to the next panel.
-------------------------------------------------------------------------------
Please read the information below.
Cisco Systems
Prerequisites
Please ensure that minimally the following products are installed.
1 Check to ensure that Cisco SESM 3.3(1) is installed and available on the

15-9
Cisco Prime Access Registrar 6.1 User Guide
OL-29756-01
Chapter 15 Using Trusted ID Authorization with SESM
Software Requirements
network
2 Checking for Prime AR 6.0 or later
Please ensure the configuration parameter supplied during SESM installation
is used in this integration.
Press 1 for Next panel, 2 for Previous panel, 3 to Cancel or 4 to
Redisplay [1] 1
This panel lists prerequisites required for successful installation. Before continuing to the next panel,
ensure that SESM 3.3(1) is installed and available or the network. The program checks for
Prime Access Registrar 3.5.3 (or later).
Step 3 After insuring that SESM 3.3(1) is installed and available on the network, press Enter.
[X] 1 - Novell Directory Server
[ ] - iPlanet
[ ] - Data Communications Directory
[ ] - IBM Directory Server
[ ] - Active Directory Server
[ ] - Open LDAP
Choose the Vendor for Directory ,Select 0 to exit [0]
Press 1 for Next panel, 2 for Previous panel, 3 to Cancel or 4 to
Redisplay [1]
This panel requests the data store type selection and indicates the Novell Directory Server is the default
selection.
Step 4 Press Enter to select the Novell Directory Server.
You can press 2 to select iPlanet, 3 to select Data Communications Directory, 4 to select IBM Directory
Server, 5 to select Active Directory Server, or 6 to select Open LDAP.
-------------------------------------------------------------------------------
Enter the master password for SPE
Master Password []
This panel requests a master password for SPE.
Step 5 Enter a password to be used as the master password for SPE and press Enter.
You are asked to re-enter the master password. The following panel requests an encryption algorithm
and generates a secret key using the master password and selected algorithm.
[X] 1 - NONE
[ ] - SHA
[ ] - SSHA
Choose the installation type for SPE ,Select 0 to exit [0]
Press 1 for Next panel, 2 for Previous panel, 3 to Cancel or 4 to
Redisplay [1] 1
This panel indicates the default installation type as None. Enter “2” and press Enter to select SHA, or
enter “3” and press Enter to select SSHA.
Note If you plan to use EAP-MD5 authentication, choose None. See Configuring EAP-MD5 Authentication,
page 15-15 for information about configuring EAP-MD5 authentication.

15-10
Cisco Prime Access Registrar 6.1 User Guide
OL-29756-01
Chapter 15 Using Trusted ID Authorization with SESM
Software Requirements
Step 6 If in Step 4 you selected iPlanet as the Data Store Type, continue with Step 7. If you chose any other
Data Store Type, proceed to Step 8.
-------------------------------------------------------------------------------
[X] 1 - Uid
[ ] - Cn
-------------------------------------------------------------------------------
The iPlanet Data Store Type requires that you set the value for the naming variable in ACNSchema.xml
and DESSSchema.xml, either for Uid or Cn as shown above.
Step 7 Press Enter to use the naming variable to Uid, or press 2 to select Cn.
Service Type Selection panel
Trusted ID Service Enable
[X] 1 - True
[ ] 2 - False
To select a choice enter its number, or 0 when you are finished [0]:
Press 1 for Next panel, 2 for Previous panel, 3 to Cancel or 4 to
Redisplay [1] 1
The Service Type Selection panel asks if you want to enable the Trusted ID service. Enter 2 to choose
to not enable the Trusted ID service.
Step 8 Press Enter to enable the Trusted ID service.
Trusted ID Azn AR SESM Integration will be installed in the following
location:
/cisco-ar
with the following features:
Admin tool
for a total size:
1.3 MB
Press 1 for Next panel, 2 for Previous panel, 3 to Cancel or 4 to
Redisplay [1] 1
This panel indicates the location where the TrustedIdInstall program will write data and the amount of
storage required.
Step 9 Press Enter to begin writing data.
-------------------------------------------------------------------------------
Enter the IP Address (or) hostname of the system where the directory server is
running.
Please contact your directory administrator if you are not sure about this
information.
Please enter the host address [localhost]:
Step 10 Press Enter to use the current system as the directory server, or enter another directory server name or
IP address.
Enter the TCP/IP Port on which your directory server listens. Usually, the
port is 389.
Please contact your directory administrator if you are not sure about this
information.
Please enter the Port number [389]:

15-11
Cisco Prime Access Registrar 6.1 User Guide
OL-29756-01
Chapter 15 Using Trusted ID Authorization with SESM
Software Requirements
Step 11 Press Enter to use the default port, 389, or enter a different port number.
Note Contact your directory server administrator if you are not sure about which port to use or other
information required in the following steps.
Enter the User Id of the directory server with permissions to extend schema.
Please contact your directory administrator if you are not sure about this
information.
Please enter directory user
[uid=admin,ou=Administrators,ou=TopologyManagement,o=NetscapeRoot]:
Step 12 Enter the User ID of the directory server administrator with the necessary permissions to extend the
schema.
Enter the password for the above user.
Please contact your directory administrator if you are not sure about this
information.
Please enter the password []: cisco
Step 13 Enter the password for the user provided in the previous step.
Enter the container in which the default RBAC objects should be created.
Please contact your directory administrator if you are not sure about this
information.
Please enter the container [o=cisco]:
Step 14 Press Enter to use the default container, or enter a different container and press Enter.
Enter the User Id of the DESS user.
Please enter Dess user [cn=dessadmin,o=cisco]:
Step 15 Press Enter to use the default DESS user, or enter a different user ID and press Enter.
Enter the password of the DESS user.
Please contact your directory administrator if you are not sure about this
information.
Please enter the Dess user password []: cisco
Step 16 Enter the DESS user password, then press Enter.
Press 1 for Next panel, 3 to Cancel or 4 to Redisplay [1] 1
At this point, the software installation is ready to begin.

15-12
Cisco Prime Access Registrar 6.1 User Guide
OL-29756-01
Chapter 15 Using Trusted ID Authorization with SESM
Configuring Cisco Prime Access Registrar for Trusted Identity with SESM
Step 17 Press Enter to begin the software installation and extend the schema.
As the installation proceeds, status messages will be displayed.
When the installation completes successfully, the following message displays:
Trusted ID Azn AR SESM Integration 1.0 installation completed
The InstallShield Wizard has successfully installed Trusted ID Azn AR SESM
Integration. Choose Finish to exit the wizard.
Press 3 to Finish or 4 to Redisplay [3] 3
Step 18 Press Enter to end the program.
Configuring Cisco Prime Access Registrar for Trusted Identity
with SESM
Use the command line interface aregcmd to configure Prime Access Registrar to use Trusted ID
authorization in SSG-SESM deployments.
This section contains the following topics:
•Configuring the RADIUS Ports
•Configuring NAS Clients
•Configuring AAA and SPE Services
Configuring the RADIUS Ports
By default, Prime Access Registrar listens on ports 1645 and 1646 for any type of RADIUS request. It
might be necessary to change the port assignments in the case of a resource collision. For example, if
the RADIUS Directory Enabled Service Selection (DESS) Proxy (RDP) component of SPE is using ports
1645 and 1646, a port assignment change would be required.
The following command sequence causes Prime Access Registrar to listen on the explicitly defined
ports, 1812 and 1813, for all types of RADIUS requests.
cd /Radius/Advanced/Ports
add 1812 ""radius
Added 1812
add 1813 ""radius
Added 1813
After changing the port assignments, Prime Access Registrar no longer listens on the default ports. It
might be necessary to add ports 1645 and 1646 if you are also using Prime Access Registrar for other
AAA functionality.

15-13
Cisco Prime Access Registrar 6.1 User Guide
OL-29756-01
Chapter 15 Using Trusted ID Authorization with SESM
Configuring Cisco Prime Access Registrar for Trusted Identity with SESM
Note By default, Prime Access Registrar listens on ports 1645 and 1646 on Solaris platforms and on ports
1812 and 1813 for the Linux platform.
Configuring NAS Clients
Change directory to /Radius/Clients, then add and configure the NAS clients required by SESM
deployments:
cd /Radius/Clients
add SESM1 "" 10.3.3.2 cisco
Added SESM1
add SESM2 "" 10.3.3.101 cisco
Added SESM2
add SESM3 "" 10.3.3.102 cisco
Added SESM3
Configuring AAA and SPE Services
To configure AAA and SPE services:
Step 1 Change directory to /Radius/Services, then add and configure an accounting service.
cd /Radius/Services
add SESMaccounting "" file
Added SESMaccounting
Step 2 Change directory to /Radius, then configure a DefaultAccountingService.
cd /Radius
set DefaultAccountingService SESMaccounting
Set DefaultAccountingService SESMaccounting

15-14
Cisco Prime Access Registrar 6.1 User Guide
OL-29756-01
Chapter 15 Using Trusted ID Authorization with SESM
Configuration Imported by TrustedIdInstall Program
Configuration Imported by TrustedIdInstall Program
The following is a listing of the configuration imported into the Prime Access Registrar server when you
run the TrustedIdInstall program:
•/Radius
•/radius/services/spe
•/radius/services/trusted-id
•/Radius/SessionManagers/session-cache/
•/radius/ResourceManagers/session-cache
•/radius/advanced/
•/Radius/Scripts/ChangeServiceType
/Radius
DefaultAuthenticationService trusted-id
DefaultAuthorizationService trusted-id
/radius/services/spe
type java
ClassName com.cisco.cns.security.arspe.SPEExtension
/radius/services/trusted-id
type trusted-id
UserService spe
SessionManager session-cache
/Radius/SessionManagers/session-cache/
AllowAccountingStartToCreateSession FALSE
ResourceManagers/1 session-cache
/radius/ResourceManagers/session-cache
type session-cache
OverwriteAttributes TRUE
PendingRemovalDelay 10
QueryKey Calling-Station-ID
AttributesToBeCached/1 User-Name
AttributesToBeCached/2 User-Password
AttributesToBeCached/3 Calling-Station-ID

15-15
Cisco Prime Access Registrar 6.1 User Guide
OL-29756-01
Chapter 15 Using Trusted ID Authorization with SESM
Configuring EAP-MD5 Authentication
/radius/advanced/
ClasspathForJavaExtensions /cisco-ar/conf
/Radius/Scripts/ChangeServiceType
Language TCL
Filename ChangeServiceType.tcl
EntryPoint ChangeServiceType
IncomingScript ChangeServiceType
Configuring EAP-MD5 Authentication
EAP-MD5 authentication is an optional authentication configuration. The following configuration
changes are required to support EAP-MD5 authentication:
•Creating the CheckEap.tcl Script
•Adding the CheckEap.tcl Script
•Using the CheckEap.tcl Script
•Adding the EAP-MD5 Authentication Service
•Adding an LDAP Remote Server
•Adding an LDAP Service
•Saving the Configuration and Reloading the Server
•Cisco SSG VSAs in Cisco Prime Access Registrar Dictionary
Note If you configure Prime Access Registrar to use EAP-MD5 authentication with the Trusted ID feature,
you will not be able to use the Transparent Auto Login feature.
Creating the CheckEap.tcl Script
The CheckEap.tcl script must be created and stored in the file called
/cisco-ar/scripts/radius/tcl/CheckEap.tcl. Use a text editor and copy the following lines into the
CheckEap.tcl file:
proc CheckEap { request response environment } {
if { [ $request containsKey EAP-Message ] } {
$environ put Authentication-Service "EAP-MD5"
$environ put Authorization-Service "spe"
}
}

15-16
Cisco Prime Access Registrar 6.1 User Guide
OL-29756-01
Chapter 15 Using Trusted ID Authorization with SESM
Configuring EAP-MD5 Authentication
Adding the CheckEap.tcl Script
To add the CheckEap.tcl script:
Step 1 Start aregcmd, then change directory to /Radius/Scripts and add the CheckEap script.
cd /Radius/Scripts
add EapCheck
Step 2 Change directory to EapCheck.
cd EapCheck
[ //localhost/Radius/Scripts/EapCheck ]
Name = EapCheck
Description =
Language =
Step 3 Set the Language property to TCL.
set Language TCL
Set Language TCL
Step 4 Set the filename property to CheckEap.tcl.
set Filename CheckEap.tcl
Set Filename CheckEap.tcl
Step 5 Set the EntryPoint property to CheckEap.
set EntryPoint CheckEap
Set EntryPoint CheckEap
Note The following sections also require you to use aregcmd, the command line interface.
Using the CheckEap.tcl Script
This section describes how to configure Prime Access Registrar to use the CheckEap script by setting
the /Radius/IncomingScript property to CheckEap.
cd /Radius
set IncomingScript EapCheck

15-17
Cisco Prime Access Registrar 6.1 User Guide
OL-29756-01
Chapter 15 Using Trusted ID Authorization with SESM
Configuring EAP-MD5 Authentication
Adding the EAP-MD5 Authentication Service
To add and configure the EAP-MD5 service:
Step 1 Change directory to /Radius/Services and add an EAP-MD5 service.
cd /Radius/Services
add EAP-MD5
Step 2 Change directory to the EAP-MD5 service and set the Type and UserService properties as shown below:
cd EAP-MD5
Step 3 Change directory to the EAP-MD5 service.
cd EAP-MD5
Step 4 Set the service Type property to eap-md5 and the UserService property to LDAP.
set Type eap-md5
set UserService LDAP
The following example shows the configuration of the EAP-MD5 service:
[ //localhost/Radius/Services/EAP-MD5 ]
Name = EAP-MD5
Description =
Type = eap-md5
IncomingScript~ =
OutgoingScript~ =
AuthenticationTimeout = 120
UserService = LDAP
Adding an LDAP Remote Server
Prime Access Registrar adds a new type of service and remote server called ldap-accounting that enables
inserting accounting records into LDAP. You can write accounting records into LDAP by referring this
service in /Radius/DefaultAccountingService or in the Accounting-Service environment variable.
Adding and Configuring an LDAP Remote Server
To add and configure an LDAP remote server:
Step 1 Change directory to /Radius/RemoteServers and add a RemoteServer object.
cd /Radius/RemoteServers
add LDAP
Step 2 Change directory to the LDAP RemoteServer.

15-18
Cisco Prime Access Registrar 6.1 User Guide
OL-29756-01
Chapter 15 Using Trusted ID Authorization with SESM
Configuring EAP-MD5 Authentication
cd LDAP
[ //localhost/Radius/RemoteServers/LDAP ]
Name = LDAP
Description =
Protocol =
Step 3 Set the RemoteServer protocol property to ldap.
set Protocol ldap
The following example shows the default configuration of an LDAP remote server:
[ //localhost/Radius/RemoteServers/LDAP ]
Name = LDAP
Description =
Protocol = ldap
Port = 389
ReactivateTimerInterval = 300000
Timeout = 15
HostName =
BindName =
BindPassword =
UseSSL = FALSE
SearchPath~ =
Filter~ = (uid=%s)
UserPasswordAttribute = userpassword
LimitOutstandingRequests = FALSE
MaxOutstandingRequests = 0
MaxReferrals = 0
ReferralAttribute =
ReferralFilter =
PasswordEncryptionStyle = Dynamic
EscapeSpecialCharInUserName = FALSE
DNSLookupAndLDAPRebindInterval =
LDAPToRadiusMappings/
LDAPToEnvironmentMappings/
LDAPToCheckItemMappings/
Step 4 Set the HostName property to the SPE/DESS directory IP address or hostname.
Step 5 Set the BindName property to the SPE/DESS administrator name.
Step 6 Set the BindPassword property to the SPE/DESS administrator password.
Step 7 Set the SearchPath property to the SPE/DESS directory container.
Step 8 Set the UserPasswordAttribute property type to clearpassword.
Adding an LDAP Service
You must configure a service of type ldap-accounting under /Radius/Services using the ldap accounting
feature.
Adding and Configuring an LDAP Service
To add and configure an LDAP service:
Step 1 Change directory to /Radius/Service and add LDAP.

15-19
Cisco Prime Access Registrar 6.1 User Guide
OL-29756-01
Chapter 15 Using Trusted ID Authorization with SESM
Configuring EAP-MD5 Authentication
cd /Radius/Service
add LDAP
Step 2 Change directory to LDAP and set the type property to ldap.
cd LDAP
set Type ldap
The following shows the default configuration for an LDAP service:
[ //localhost/Radius/Services/LDAP ]
Name = LDAP
Description =
Type = ldap
IncomingScript~ =
OutgoingScript~ =
OutagePolicy~ = RejectAll
OutageScript~ =
MultipleServersPolicy = Failover
RemoteServers/
Step 3 Change directory to RemoteServers and associate the LDAP RemoteServer with the LDAP service.
cd RemoteServers
set 1 LDAP
Saving the Configuration and Reloading the Server
Use the save command to save the configuration, then reload the Prime Access Registrar server.
save
Validating //localhost...
Saving //localhost...
reload
Reloading Server 'Radius'...
Server 'Radius' is Running, its health is 10 out of 10

15-20
Cisco Prime Access Registrar 6.1 User Guide
OL-29756-01
Chapter 15 Using Trusted ID Authorization with SESM
Configuring EAP-MD5 Authentication
Cisco SSG VSAs in Cisco Prime Access Registrar Dictionary
The following vendor-specific attributes (VSAs) are defined by default in the attribute dictionary after
installing Prime Access Registrar software:
•Cisco-AVPair
•Cisco-SSG-Account-Info
•Cisco-SSG-Service-Info
•Cisco-SSG-Command-Code
•Cisco-SSG-Control-Info

CHAPTER
16-1
Cisco Prime Access Registrar 6.1 User Guide
OL-29756-01
16
Using Prepaid Billing
Cisco Prime Access Registrar (Prime Access Registrar) supports two types of prepaid billing, IS835C
and Cisco Real-time Billing (CRB), a Cisco proprietary solution. The IS835C version adheres to
industry standards and is the preferred version.
Three components are required to support a prepaid billing service, such as the following:
•AAA client
•Prime Access Registrar server
•External prepaid billing server
The most important factor for an effective prepaid billing service is in developing a shared library to be
configured under the prepaid RemoteServer object. The shared library should be developed to implement
all specified API functions. You will have to provide a shared library that meets the needs of your
environment. The shared library must implement the API functions to perform the various tasks required
for your specific implementation of the prepaid billing service.
Note Cisco works with you to develop the prepaid billing service and implement the API. For more
information, contact your Cisco systems engineer.
The chapter contains the following sections:
•Overview
•IS835C Prepaid Billing
•CRB Prepaid Billing
•Implementing the Prepaid Billing API

16-2
Cisco Prime Access Registrar 6.1 User Guide
OL-29756-01
Chapter 16 Using Prepaid Billing
Overview
Overview
When a subscriber uses a prepaid billing service, each call requires a set of data about the subscriber.
However, the AAA network has no previous knowledge of the subscriber’s usage behavior.
Prime Access Registrar uses an iterative authorization paradigm over multiple sessions to support the
prepaid billing solution.
Each time an authorization request is made, the billing server apportions a fraction of the subscriber’s
balance into a quota. When a subscriber uses multiple sessions, each session must obtain its own quota.
When a previously allocated quota is depleted, a session must be reauthorized to obtain a new quota.
Note The granularity and the magnitude of the quota is in the design and implementation of the prepaid billing
server and is beyond the scope of this document. In general, a smaller quota generates more network
traffic, but allows more sessions per subscriber. When the quota is equal to a subscriber’s total account
balance, there is minimal network traffic, but only one session can be supported.
When a subscriber’s current quota is depleted, the AAA client initiates a reauthorization request sending
Access-Request packets. After the Prime Access Registrar server receives the request, it forwards the
request to the billing server. The billing server then returns the next quota to use. The new quota might
not be the same as the previous, and the billing server might adjust the quota dynamically.
IS835C Prepaid Billing
Prime Access Registrar acts as a RADIUS protocol head for all the requirements specified in the
cdma2000 Wireless IP Network Standard: PrePaid Packet Data Service specification:
http://www.3gpp2.org/Public_html/specs/X.S0011-006-C-v1.0.pdf
As long as the prepaid client understands or accepts what the external billing server sends, the service
should work. The Prime Access Registrar server neither imposes nor is affected by the values of
attributes returned from the external billing server.
For additional information, see cdma2000 Wireless IP Network Standard: Accounting Services and
3GPP2 RADIUS VSAs at the following URL:
http://www.3gpp2.org/Public_html/specs/X.S0011-005-C-v1.0.pdf
The IS835C specification requires that the Prime Access Registrar server be able to determine that a
particular user is a prepaid billing user. A user is accepted as a valid prepaid user when the response
dictionary of the incoming packet contains the Prime Access Registrar internal subattribute named
prepaid.
The IS835C specification requires prepaid users to first be authenticated by the RADIUS server. This
requires the configuration of a group service with an authentication service first, followed by the prepaid
service that adds prepaid attributes as shown in Setting Up an Authentication Group Service, page 16-5.
The group service configuration enables the AA service to add the prepaid subattribute to the response
dictionary upon successful authentication, before the prepaid service is invoked.

16-3
Cisco Prime Access Registrar 6.1 User Guide
OL-29756-01
Chapter 16 Using Prepaid Billing
IS835C Prepaid Billing
Configuring IS835C Prepaid Billing
To configure an IS835C prepaid billing service, use the following sections to configure the required
Prime Access Registrar objects:
•Setting Up a Prepaid Billing RemoteServer
•Setting Up an IS835C Prepaid Service
•Setting Up Local Authentication
•Setting Up an Authentication Group Service
Setting Up a Prepaid Billing RemoteServer
Prime Access Registrar loads the library dynamically and registers the API functions, then calls out the
library initialization API once at startup. The call to initialize functions initializes various data structures
and connections with the billing server, as required.
Table 16-1 lists and describes the properties required for an IS835C RemoteServer object.
Setting Up a Prepaid Billing Remote Server
To set up a prepaid billing remote server:
Step 1 Use aregcmd to add a RemoteServer under /Radius/RemoteServers.
cd /radius/remoteserver
add prepaid-is835c
Step 2 Set remoteserver protocol to prepaid-is835c.
cd prepaid-is835c
set protocol prepaid-is835c
Set Protocol prepaid-is835c
The following is the default configuration of a prepaid-is835c RemoteServer.
[ //localhost/Radius/RemoteServers/prepaid-is835c ]
Name = prepaid-is835c
Description =
Protocol =
IPAddress =
Table 16-1 Prepaid-IS835C RemoteServer Properties
Property Description
Filename Name of the shared library provided by the billing server vendor, such as
libprepaid.so
IPAddress IP address of the billing server
Port Port used on the billing server, such as port 66
Connections Number of threads the prepaid service and billing server can each use (default
is 8).

16-4
Cisco Prime Access Registrar 6.1 User Guide
OL-29756-01
Chapter 16 Using Prepaid Billing
IS835C Prepaid Billing
Port = 0
Filename =
Connections = 8
Setting Up an IS835C Prepaid Service
Prime Access Registrar uses a service type prepaid to support the prepaid billing solution. The prepaid
service mediates between the client NAS and the external prepaid billing server.
Setting Up an IS835C Prepaid Service
To set up an IS835C prepaid service:
Step 1 Use aregcmd to add a prepaid service under /Radius/Services:
cd /radius/services
add prepaid
Added prepaid
Step 2 Set the service type to prepaid.
cd prepaid
set type prepaid
Set Type prepaid
A prepaid service has the following default properties:
[ //localhost/Radius/Services/prepaid ]
Name = prepaid
Description =
Type = prepaid
IncomingScript~ =
OutgoingScript~ =
OutagePolicy~ = RejectAll
OutageScript~ =
MultipleServersPolicy = Failover
RemoteServers/
Step 3 Add a reference to the is835c-prepaid RemoteServer.
cd RemoteServer
add 1 prepaid-is835c
Added 1

16-5
Cisco Prime Access Registrar 6.1 User Guide
OL-29756-01
Chapter 16 Using Prepaid Billing
IS835C Prepaid Billing
Setting Up Local Authentication
If you use the Prime Access Registrar server for authentication and authorization in your prepaid billing
solution, you should configure an AA service. For example, you might configure a service similar to
local-users (in the example configuration) for authentication and authorization of local users.
If some of the users are non-prepaid users or if the prepaid users need to have RADIUS authorization
attributes returned, you should configure an AA service to perform that authentication and authorization.
Setting Up a Local Authentication
To set up a local authentication:
Step 1 Use aregcmd to set up a local authentication service.
cd /radius/services
add Prepaid-LocalAuthentication
Added prepaid-LocalAuthentication
cd prepaid-LocalAuthentication
[ //localhost/Radius/Services/prepaid-LocalAuthentication ]
Name = prepaid-LocalAuthentication
Description =
Type =
Step 2 Set the service type to local.
set type local
Set Type local
Step 3 Set the UserList property to the userlist that contains IS835C prepaid users.
set UserList userlist_name
Set UserList userlist_name
Note You can use an LDAP or ODBC service in place of the local authentication service.
The authentication service must add the Prime Access Registrar internal attribute prepaid (subattribute
22) to the response upon successful authentication.
Setting Up an Authentication Group Service
Your prepaid billing solution usually requires a group service to tie together an AA service with a
prepaid service, a group service to tie together an accounting service with a prepaid service, or both.
If you are using an AA service with your prepaid billing solution, you must configure a group service,
for example prepaid-users, that ties the requests to the AA service (local-users in our example) with
the prepaid service.

16-6
Cisco Prime Access Registrar 6.1 User Guide
OL-29756-01
Chapter 16 Using Prepaid Billing
IS835C Prepaid Billing
If you are using Prime Access Registrar for an accounting service with your prepaid billing solution, you
must configure a group service, for example prepaid-file, that ties accounting requests to both the
regular accounting service (local-file in our example) and the prepaid service.
Setting Up an Authentication Group Service
To set up an authentication group service:
Step 1 Use aregcmd to add a prepaid authentication group service under /Radius/Services.
cd /radius/services
add prepaid-groupAuthentication
Added prepaid-groupAuthentication
cd prepaid-groupAuthentication
[ //localhost/Radius/Services/prepaid-groupAuthentication ]
Name = group-prepaidAuthentication
Description =
Type =
Step 2 Set the service type to group.
set type group
Set Type group
The group service requires the ResultRule to be set to AND, the default setting for a group service.
ls
[ //localhost/Radius/Services/group-prepaidAuthentication ]
Name = group-prepaidAuthentication
Description =
Type = group
IncomingScript~ =
OutgoingScript~ =
ResultRule = AND
GroupServices/
Step 3 Change directory to GroupServices and add references to the prepaid service and the authentication
service.
cd GroupServices
[ //localhost/Radius/Services/group-prepaidAuthentication/GroupServices ]
add 1 Prepaid-LocalAuthentication
Added 1
add 2 prepaid
Added 2

16-7
Cisco Prime Access Registrar 6.1 User Guide
OL-29756-01
Chapter 16 Using Prepaid Billing
CRB Prepaid Billing
CRB Prepaid Billing
Cisco Real-Time Billing (CRB) is a Cisco proprietary method of providing prepaid billing service.
Prime Access Registrar uses vendor-specific attributes (VSA) to extend the standard RADIUS protocol
to carry information not usually present in the standard RADIUS packet. Prime Access Registrar uses a
set of VSAs allocated to the Cisco VSA pool [26,9].
Prime Access Registrar required several different types of measurements to support a prepaid billing
solution. These measurements require the use of metering variables to perform usage accounting.
Table 16-2 lists the different measurements and what the AAA client, Prime Access Registrar server, and
billing server do with them.
Table 16-2 Measurements and Component Actions
Measurement Type Billing Server Action AAA Server Action AAA Client Action
Duration Return duration quota Convert duration quota
to VSAs and pass along
Compare running
duration quota with
quota returned by
Prime Access Registrar
server
Total volume Return volume quota Convert volume quota
to VSAs and pass along
Compare running
volume quota with
quota returned by
Prime Access Registrar
server
Uplink volume Return volume quota Convert volume quota
to VSAs and pass along
Compare running
volume quota with
quota returned by
Prime Access Registrar
server
Downlink volume Return volume quota Convert volume quota
to VSAs and pass along
Compare running
volume quota with
quota returned by
Prime Access Registrar
server
Total packets Return packet quota Convert packet quota to
VSAs and pass along
Compare running
packet quota with quota
returned by
Prime Access Registrar
server
Uplink packets Return packet quota Convert packet quota to
VSAs and pass along
Compare running
packet quota with quota
returned by
Prime Access Registrar
server

16-8
Cisco Prime Access Registrar 6.1 User Guide
OL-29756-01
Chapter 16 Using Prepaid Billing
CRB Prepaid Billing
Prime Access Registrar provides maximum flexibility to billing servers by allowing the metering
variable to be modified as the service is used. This requires network nodes to measure all parameters all
the time, but to report values only after receiving a reauthorization request.
Note If you have been using an earlier implementation of CRB prepaid billing (Cisco Access Registrar 3.5.2
or earlier), you must recompile the API implementation with the newer API due to the addition of the
parameter ebs_context as the first parameter to all API methods. Contact your Cisco systems engineer
for assistance with the new API.
This section contains the following topics:
•Configuring CRB Prepaid Billing
•Configuring CRB Prepaid Billing for SSG
•Generic Call Flow
•Vendor-Specific Attributes
Configuring CRB Prepaid Billing
To configure an CRB prepaid billing service, use the following sections to configure the required
Prime Access Registrar objects:
•Setting Up a Prepaid Billing RemoteServer
•Setting Up a CRB Prepaid Service
•Setting Up a Local Accounting Service
•Setting Up a Local Authentication Service
•Setting Up a Prepaid Accounting Group Service
•Setting Up an Authentication Group Service
If you are using CRB prepaid billing with Service Selection Gateway (SSG), you must also configure
extension point scripts and prepaid clients. See Configuring CRB Prepaid Billing for SSG, page 16-15.
Setting Up a Prepaid Billing RemoteServer
Table 16-3 lists and describes the properties required for an CRB RemoteServer object.
Downlink packets Return packet quota Convert packet quota to
VSAs and pass along
Compare running
packet quota with quota
returned by
Prime Access Registrar
server
Logical OR of two
measurements
Return quota of both
measurements
Convert both to VSA
and pass along
Monitor both quota and
issue reauthorization
packet when any one
trips
Table 16-2 Measurements and Component Actions (continued)
Measurement Type Billing Server Action AAA Server Action AAA Client Action

16-9
Cisco Prime Access Registrar 6.1 User Guide
OL-29756-01
Chapter 16 Using Prepaid Billing
CRB Prepaid Billing
Setting Up a Prepaid Billing Remote Server
To set up a prepaid billing remote server:
Step 1 Use aregcmd to add a RemoteServer under /Radius/RemoteServers.
cd /radius/remoteservers
add prepaid-crb
Added prepaid-crb
Step 2 Set the RemoteServer protocol to prepaid-crb.
cd prepaid-crb
set protocol prepaid-crb
Set Protocol prepaid-crb
The following is the default configuration of a prepaid-crb RemoteServer.
[ //localhost/Radius/RemoteServers/prepaid-crb ]
Name = prepaid-crb
Description =
Protocol =
IPAddress =
Port = 0
Filename =
Connections = 8
Setting Up a CRB Prepaid Service
Prime Access Registrar uses a service type prepaid to support the prepaid billing solution. The prepaid
service mediates between the client NAS and the external prepaid billing server.
The prepaid service must receive accounting requests to accurately charge the prepaid billing user. You
can also set the prepaid service in a group service to log accounting requests locally or to proxy the
accounting requests to another service or to both locations.
Table 16-3 Prepaid-CRB RemoteServer Properties
Property Description
Filename Name of the shared library provided by the billing server vendor, such as
libprepaid.so
IPAddress IP address of the billing server
Port Port used on the billing server, such as port 66
Connections Number of threads the prepaid service and billing server can each use (default
is 8).

16-10
Cisco Prime Access Registrar 6.1 User Guide
OL-29756-01
Chapter 16 Using Prepaid Billing
CRB Prepaid Billing
Setting Up a CRB Prepaid Service
To set up a CRB prepaid service:
Step 1 Use aregcmd to add a prepaid service under /Radius/Services:
cd /radius/services
add prepaid
Added prepaid
Step 2 Set the service type to prepaid.
cd prepaid
set type prepaid
Set Type prepaid
A prepaid service has the following default properties:
[ //localhost/Radius/Services/prepaid ]
Name = prepaid
Description =
Type = prepaid
IncomingScript~ =
OutgoingScript~ =
OutagePolicy~ = RejectAll
OutageScript~ =
MultipleServersPolicy = Failover
RemoteServers/
Step 3 Add a reference to the prepaid-crb RemoteServer.
cd RemoteServers
add 1 prepaid-crb
Added 1
Note The following steps are required only when using Prepaid-CRB with SSG.
Step 4 Set the IncomingScript to IncomingScript PPI-Parse-Prepaid-Incoming.
set IncomingScript PPI-Parse-Prepaid-Incoming
Set IncomingScript PPI-Parse-Prepaid-Incoming
Step 5 Set the OutgoingScript to OutgoingScript PPO-Parse-Prepaid-Outgoing.
set OutgoingScript PPO-Parse-Prepaid-Outgoing
Set OutgoingScript PPO-Parse-Prepaid-Outgoing

16-11
Cisco Prime Access Registrar 6.1 User Guide
OL-29756-01
Chapter 16 Using Prepaid Billing
CRB Prepaid Billing
Setting Up a Local Accounting Service
If you want to use the Prime Access Registrar server to record the accounting records locally or to
forward the accounting records to another RADIUS server, you must configure an accounting service.
You might configure a service similar to local-file (in the example configuration) for accounting
requests. Accounting requests can be logged locally (with an accounting service) or remotely (with a
RADIUS service).
If you use the prepaid billing server to generate the accounting records, an accounting service is not
necessary.
Setting Up a Local Accounting Service
To set up a local accounting service:
Step 1 Use aregcmd to add a local accounting service under /Radius/Services.
cd /radius/services
add prepaid-LocalFileAccounting
add prepaid-LocalFileAccounting
Step 2 Set the service type to file.
cd prepaid-LocalFileAccounting
set type file
Set Type file
The file type service has the following properties:
[ //localhost/Radius/Services/prepaid-LocalFileAccounting ]
Name = prepaid-LocalFileAccounting
Description =
Type = file
IncomingScript~ =
OutgoingScript~ =
OutagePolicy~ = RejectAll
OutageScript~ =
FilenamePrefix = accounting
MaxFileSize = "10 Megabytes"
MaxFileAge = "1 Day"
RolloverSchedule =
UseLocalTimeZone = FALSE
Step 3 Set the FilenamePrefix to Prepaid-Accounting.
set FilenamePrefix Prepaid-Accounting
Set FilenamePrefix Prepaid-Accounting
Step 4 Set the MaxFileAge to one hour.
set MaxFileAge "1 Hour"
Set MaxFileAge "1 Hour"
The MaxFileSize should remain at the default value of 10 megabytes.

16-12
Cisco Prime Access Registrar 6.1 User Guide
OL-29756-01
Chapter 16 Using Prepaid Billing
CRB Prepaid Billing
Step 5 Set UseLocalTimeZone to TRUE.
set UseLocalTimeZone TRUE
Set UseLocalTimeZone TRUE
Setting Up a Local Authentication Service
If you use the Prime Access Registrar server for authentication and authorization in your prepaid billing
solution, you should configure an AA service. For example, you might configure a service similar to
local-users (in the example configuration) for authentication and authorization of local users.
If some of the users are non-prepaid users or if the prepaid users need to have RADIUS authorization
attributes returned, you should configure an AA service to perform that authentication and authorization.
If all of the users in a realm are prepaid users and the prepaid billing client does not require normal
RADIUS authorization attributes, an AA service is not necessary.
Setting Up a Local Authentication Service
To set up a local authentication service:
Step 1 Use aregcmd to set up a local authentication service.
cd /radius/services
add Prepaid-LocalAuthentication
Added prepaid-LocalAuthentication
cd prepaid-LocalAuthentication
[ //localhost/Radius/Services/prepaid-LocalAuthentication ]
Name = prepaid-LocalAuthentication
Description =
Type =
Step 2 Set the service type to local.
set type local
Set Type local
Step 3 Set the UserList property to the userlist that contains IS835C prepaid users.
set UserList userlist_name
Set UserList userlist_name
Note You can use an LDAP or ODBC service in place of the local authentication service.

16-13
Cisco Prime Access Registrar 6.1 User Guide
OL-29756-01
Chapter 16 Using Prepaid Billing
CRB Prepaid Billing
Setting Up a Prepaid Accounting Group Service
A prepaid billing solution usually requires a group service to tie together an AA service with a prepaid
service, a group service to tie together an accounting service with a prepaid service, or both.
If you are using an AA service with your prepaid billing solution, you must configure a group service,
for example prepaid-users, that ties the requests to the AA service (local-users in our example) with
the prepaid service.
If you are using Prime Access Registrar for an accounting service with your prepaid billing solution, you
must configure a group service, for example prepaid-file, that ties accounting requests to both the
regular accounting service (local-file in our example) and the prepaid service.
Setting Up a Prepaid Accounting Group Service
To set up a prepaid accounting group service:
Step 1 Use aregcmd to create an accounting group service under /Radius/Services.
cd /radius/services
add Prepaid-Accounting
Added prepaid-accounting
Step 2 Set the service type to group.
cd prepaid-accounting
[ //localhost/Radius/Services/prepaid-accounting ]
Name = prepaid-accounting
Description =
Type =
set type group
Set Type group
The group service has the following properties:
[ //localhost/Radius/Services/prepaid-accounting ]
Name = prepaid-accounting
Description =
Type = group
IncomingScript~ =
OutgoingScript~ =
ResultRule = AND
GroupServices/
Step 3 Reference the Prepaid and Prepaid-LocalAccounting services under GroupServices.
cd GroupServices
[ //localhost/Radius/Services/prepaid-accounting/GroupServices ]
add 1 prepaid
Added 1

16-14
Cisco Prime Access Registrar 6.1 User Guide
OL-29756-01
Chapter 16 Using Prepaid Billing
CRB Prepaid Billing
add 2 prepaid-LocalFileAccounting
Added 2
Setting Up an Authentication Group Service
A prepaid billing solution usually requires a group service to tie together an AA service with a prepaid
service, a group service to tie together an accounting service with a prepaid service, or both.
If you are using an AA service with your prepaid billing solution, you must configure a group service,
for example prepaid-users, that ties the requests to the AA service with the prepaid service.
If you are using Prime Access Registrar for an accounting service with your prepaid billing solution, you
must configure a group service, for example prepaid-file, that ties accounting requests to both the
regular accounting service and the prepaid service.
Setting Up an Authentication Group Service
To set up an authentication group service:
Step 1 Use aregcmd to add a prepaid authentication group service under /Radius/Services.
cd /radius/services
add prepaid-groupAuthentication
Added group-prepaidAuthentication
cd group-prepaidAuthentication
[ //localhost/Radius/Services/group-prepaidAuthentication ]
Name = group-prepaidAuthentication
Description =
Type =
Step 2 Set the service type to group.
set type group
Set Type group
The group service requires the ResultRule to be set to AND, the default setting for a group service.
ls
[ //localhost/Radius/Services/group-prepaidAuthentication ]
Name = group-prepaidAuthentication
Description =
Type = group
IncomingScript~ =
OutgoingScript~ =
ResultRule = AND
GroupServices/

16-15
Cisco Prime Access Registrar 6.1 User Guide
OL-29756-01
Chapter 16 Using Prepaid Billing
CRB Prepaid Billing
Step 3 Change directory to GroupServices and add references to the prepaid service and the authentication
service.
cd GroupServices
[ //localhost/Radius/Services/group-prepaidAuthentication/GroupServices ]
add 1 Prepaid-LocalAuthentication
Added 1
add 2 prepaid
Added 2
Configuring CRB Prepaid Billing for SSG
In addition to the configuration described in CRB Prepaid Billing, page 16-7, when using CRB-Prepaid
billing with SSG, you must also perform the following:
•Setting Up an Outgoing Script
•Setting Up an Incoming Script
•Setting Up a Prepaid Outgoing Script
•Adding Prepaid Clients
Setting Up an Outgoing Script
To set up an outgoing script:
Step 1 Use aregcmd to add the PCO-Parse-Client-Outgoing outgoing script under /Radius/Scripts:
cd /radius/scripts
add PCO-Parse-Client-Outgoing
Added PCO-Parse-Client-Outgoing
cd PCO-Parse-Client-Outgoing
[ //localhost/Radius/Scripts/PCO-Parse-Client-Outgoing ]
Name = PCO-Parse-Client-Outgoing
Description =
Language =
Step 2 Set the language to tcl.
set language tcl
Set Language tcl
Step 3 Set the filename to PCO-parse.client-outgoing.tcl.
set filename PCO-parse.client-outgoing.tcl

16-16
Cisco Prime Access Registrar 6.1 User Guide
OL-29756-01
Chapter 16 Using Prepaid Billing
CRB Prepaid Billing
Set Filename PCO-parse.client-outgoing.tcl
Step 4 Set the EntryPoint to PCO-parse-client-outgoing.
set EntryPoint PCO-parse-client-outgoing
Set EntryPoint PCO-parse-client-outgoing
Setting Up an Incoming Script
To set up an incoming script:
Step 1 Use aregcmd to add the PPI-Parse-Prepaid-Incoming script under /Radius/Scripts.
cd /radius/scripts
add PPI-Parse-Prepaid-Incoming
Step 2 Set the language to tcl.
cd PPI-Parse-Prepaid-Incoming
set language tcl
Set Language tcl
Step 3 Set the filename to PPI-Parse-Prepaid-Incoming.tcl.
set filename PPI-Parse-Prepaid-Incoming.tcl
Set Filename PPI-Parse-Prepaid-Incoming.tcl
Step 4 Set the EntryPoint to PPO-Parse-Prepaid-Outgoing.
set EntryPoint PPO-Parse-Prepaid-Outgoing
Set EntryPoint PPO-Parse-Prepaid-Outgoing
Setting Up a Prepaid Outgoing Script
To set up a prepaid outgoing script:
Step 1 Use aregcmd to add the PPO-Parse-Prepaid-Outgoing outgoing script under /Radius/Scripts:
cd /radius/scripts
Step 2 Add the PPO-Parse-Prepaid-Outgoing outgoing script under /Radius/Scripts.
cd /radius/scripts
add PPO-Parse-Prepaid-Outgoing
Added PPO-Parse-Prepaid-Outgoing

16-17
Cisco Prime Access Registrar 6.1 User Guide
OL-29756-01
Chapter 16 Using Prepaid Billing
CRB Prepaid Billing
Step 3 Set the language to tcl.
cd PPO-Parse-Prepaid-Outgoing
set language tcl
Set Language tcl
Step 4 Set the filename to PPO-Parse-Prepaid-Outgoing.tcl.
set filename PPO-Parse-Prepaid-Outgoing.tcl
Set Filename PPO-Parse-Prepaid-Outgoing.tcl
Step 5 Set the EntryPoint to PPO-Parse-Prepaid-Outgoing.
set EntryPoint PPO-Parse-Prepaid-Outgoing
Set EntryPoint PPO-Parse-Prepaid-Outgoing
Adding Prepaid Clients
To add prepaid clients:
Step 1 Use aregcmd to add the prepaid clients under /Radius/Clients.
cd /radius/clients
add SSG
A RADIUS client has the following properties:
[ //localhost/Radius/Clients/ssg ]
Name = ssg
Description =
IPAddress =
SharedSecret =
Type = NAS
Vendor =
IncomingScript~ =
OutgoingScript~ =
EnableDynamicAuthorization = FALSE
NetMask =
Step 2 Set the IPAddress property to the client IP address.
set IPAddress aaa.bbb.ccc.ddd
Set IPAddress aaa.bbb.ccc.ddd
Step 3 Set the SharedSecret.
set sharedsecret cisco
Set SharedSecret cisco
Step 4 Set the OutgoingScript to PCO-Parse-Client-Outgoing.

16-18
Cisco Prime Access Registrar 6.1 User Guide
OL-29756-01
Chapter 16 Using Prepaid Billing
CRB Prepaid Billing
set out PCO-Parse-Client-Outgoing
Set OutgoingScript PCO-Parse-Client-Outgoing
Generic Call Flow
This section describes the generic call flow for the Prime Access Registrar CRB prepaid billing. The call
flow is controlled by the AAA client. The Prime Access Registrar server converts VSAs into calls to the
billing server. For information about call flows and attributes for IS835C, see IS835C Prepaid Billing,
page 16-2.
The packet flows presented in Figure 16-1 are specific to the Prime Access Registrar CRB prepaid
billing only. The headlines in the packet flows are general and do represent all data transferred. The
letters c, s, and b in Figure 16-1 designate the packet’s source of client, server, or billing server,
respectively.
Figure 16-1 Generic Call Flow Diagram
AAA client
75496
AAA server Billing server
Access-Request
CRB_AR_INIT_AUTHENTICATE
1c 1s aaa_ebs_init_authenticate()
CRB_AR_INIT_AUTHORIZE
Access-Accept 2s2bauthenticate result
4s4b
Access-Request3c3s aaa_ebs_init_authorize()
Access-Request+VSAsreturn quota array
8s 8b
6s
Accounting-Start5c
Accounting-Resp
Access-Request+VSAs7c 7s aaa_ebs_reauthorize()
Accounting-Stop+VSAs9c 9s aaa_ebs_return_quota()
Access-Accept+VSAsUpdated quota
10s10bAccounting-Resp Final status
Repeat step 7-8 as neccesary
Data Flow

16-19
Cisco Prime Access Registrar 6.1 User Guide
OL-29756-01
Chapter 16 Using Prepaid Billing
CRB Prepaid Billing
This section contains the following topics:
•Access-Request (Authentication)
•Access-Accept (Authentication)
•Access-Request (Authorization)
•Access-Accept (Authorization)
•Accounting-Start
•Data Flow
•Access-Request (Quota Depleted)
•Accept-Accept (Quota Depleted)
•Accounting Stop (Session End)
•Accounting Response (Final Status)
Access-Request (Authentication)
Flow 1c shows the client sending the Access-Request to AAA Server, part of a normal authentication
request. The exact nature of the message contents is dictated by the access technology, be it be
CDMA1X-RTT, GPRS, or another. The Access-Request might involve other messages such as
PAP/CHAP or another form of authentication.
The Flow 1c Access-Request might contain a prepaid specific VSA, CRB_AUTH_REASON. Table 16-4
lists the attributes included in the authentication Access-Request. This tells the Prime Access Registrar
server to authenticate the subscriber with the Prepaid server as well. If the value is
CRB_AR_INIT_AUTHENTICATE, the initial quota must be obtained for a single service prepaid
solution. If this VSA is not present, the Prime Access Registrar server will not authenticate with the
Prepaid billing server.
Table 16-4 Attributes Sent During Subscriber Authentication
Attribute
Number Attribute Name Description Notes
1 User-Name APPL: Mobile Node
Username
Required
2 NAS IP Address Accounting Node IP
Address
APPL: Required, POA
31 Calling-station-ID APPL:MSISDN or IMSI APPL: Conditional
26, 9 CRB_AUTH_REASON
CRB_AR_INIT_AUTHENTICATE
See VSA section Required
26, 9 CRB_USER_ID APPL:PDSN address or
SSG address
APPL: Required,
Address of the PDSN

16-20
Cisco Prime Access Registrar 6.1 User Guide
OL-29756-01
Chapter 16 Using Prepaid Billing
CRB Prepaid Billing
In Flow 1s, the Prime Access Registrar server sends a call to the billing server to authenticate the prepaid
user and possibly determine more information about the subscriber’s account. The
Prime Access Registrar server can be configured to generate this packet flow, using a subscriber profile
parameter, if the request is from a prepaid subscriber.
Access-Accept (Authentication)
Flow 2b shows the billing server returning the authentication result. The billing server returns a failure
if the prepaid subscriber has an inadequate balance.
Flow 2s shows the Prime Access Registrar server sending the Access-Accept to the AAA client. This
message flow contains at least one prepaid billing-specific VSA (listed in Table 16-5) and might contain
other access technology-specific attributes.
Access-Request (Authorization)
In Flow 3c, the AAA client sends another Access-Request, this time to authorize the subscriber.
Table 16-6 lists the attributes required by the Prime Access Registrar server to authorize the subscriber.
The session key ID used must be specified using a prepaid VSA pointing to the RADIUS attribute
(standard or VSA).
26, 9 CRB_SERVICE_ID APPL: Service ID such as
Simple IP service, Mobile
IP service, or VPN
service
26, 9 CRB_SESSION_ID This VSA contains the
session key ID
information
Required; the session
ID must be globally
unique across all clients
and across reboots of
the client
Table 16-4 Attributes Sent During Subscriber Authentication (continued)
Attribute
Number Attribute Name Description Notes
Table 16-5 Attributes Sent to AAA client in Access-Accept (Authentication)
Attribute
Number Attribute Name Description Notes
26, 9 CRB__USER_TYPE
CRB_AR_INIT_AUTHENTICATE
See Vendor-Specific
Attributes, page 16-25
Optional
Table 16-6 Attributes Sent During Subscriber Authorization
Attribute
Number Attribute Name Description Notes
1 User-Name APPL: Mobile Node
Username
Required
2 NAS IP Address Accounting Node IP Address APPL: Required, POA

16-21
Cisco Prime Access Registrar 6.1 User Guide
OL-29756-01
Chapter 16 Using Prepaid Billing
CRB Prepaid Billing
.In Flow 3s, the Prime Access Registrar server sends the Prepaid billing server to obtain a quota. The
quota might contain several values depending on the number of measurement parameters chosen.
Access-Accept (Authorization)
Flow 4b shows the billing server returning the quota array for the subscriber.
In Flow 4s, the Prime Access Registrar server converts the quota array received into VSAs and sends an
Access-Accept with the assembled VSAs to the AAA client. Table 16-7 lists the prepaid-specific VSAs
that might be included in the Access-Accept response message sent to the AAA client. For more detailed
information about the VSAs, see Vendor-Specific Attributes, page 16-25.
Flows 3c through 4s are repeated for every service started or restarted by the AAA client.
However, if the return parameters indicate that the authorization is rejected, an Access-Accept message
is generated and sent to the client as shown in Table 16-8. When this type of error condition occurs, no
other VSA is included in the Access-Accept message.
31 Calling-station-ID APPL:MSISDN or IMSI APPL: Conditional
26, 9 CRB_AUTH_REASON
CRB_AR_INIT_AUTHORIZE
See Vendor-Specific
Attributes, page 16-25
Required
26, 9 CRB_USER_ID APPL:PDSN address or SSG
address
APPL: Required,
Address of the PDSN
26, 9 CRB_SERVICE_ID APPL: Service ID such as
Simple IP service, Mobile IP
service, or VPN service
26, 9 CRB_SESSION_ID This VSA contains the
session key ID information
Required; the session
ID must be globally
unique across all clients
and across reboots of
the client
Table 16-6 Attributes Sent During Subscriber Authorization (continued)
Attribute
Number Attribute Name Description Notes
Table 16-7 Attributes Sent to AAA client in Access-Accept (Authorization)
Attribute
Number Attribute Name
26, 9 CRB_DURATION
26, 9 CRB_TOTAL_VOLUME
26, 9 CRB_UPLINK_VOLUME
26, 9 CRB_DOWNLINK_VOLUME
26, 9 CRB_TOTAL_PACKETS
26, 9 CRB_UPLINK_PACKETS
26, 9 CRB_DOWNLINK_PACKETS

16-22
Cisco Prime Access Registrar 6.1 User Guide
OL-29756-01
Chapter 16 Using Prepaid Billing
CRB Prepaid Billing
Accounting-Start
In Flow 5c, the AAA client sends the Accounting-Start. In Flow 6s, the Prime Access Registrar server
replies with the Accounting-Response.
Data Flow
At this point, the data transfer begins. The AAA client monitors the subscriber’s allocated quotas for
metering parameters. A subscriber’s Reauthorization request is generated when a quota for at least one
of the metering parameters, is depleted.
Access-Request (Quota Depleted)
Flow 7c shows the client sending an Access-Request to the Prime Access Registrar server because at
least one quota has been depleted. The Access-Request includes different measurements of how much
of the quotas were used in VSA format. This enables the billing server to account for the usage and
manage the subscriber’s balance before assigning a new quota. Table 16-9 lists the attributes returned to
the Prime Access Registrar server:
Table 16-8 Attribute Sent to Report Error Condition to AAA client
Attribute
Number Attribute Name Description Notes
26, 9 CRB_TERMINATE_CAUSE Identifies why a
subscriber failed
authentication:
1. Exceeded the balance
2. Exceeded the overdraft
3. Bad credit
4. Services suspended
5. Invalid User
Conditional; rejection
might be returned with
Access-Accept and zero
(0) quota
Table 16-9 Attributes Sent by NAS When Quota Depleted
Attribute
Number Attribute Name Description Notes
1 User-Name APPL: Mobile Node
Username
Conditional
2 NAS IP Address Accounting Node IP
Address
APPL: Required, POA
address, or Home Node
address
31 Calling-station-ID APPL:MSISDN or IMSI APPL: Conditional
26, 9 CRB_AUTH_REASON See VSA Required
26, 9 CRB_USER_ID APPL: PDSN address or
SSG address
APPL: Required,
address of SGSN

16-23
Cisco Prime Access Registrar 6.1 User Guide
OL-29756-01
Chapter 16 Using Prepaid Billing
CRB Prepaid Billing
Accept-Accept (Quota Depleted)
Flow 7s shows the Prime Access Registrar server returning the used quota array to the billing server. The
call includes aaa_ebs_reauthoriz(). The billing server sends an updated quota array for the next period
to the Prime Access Registrar server.
In Flow 8s, the Prime Access Registrar server converts the quota array into VSAs and sends them to the
AAA client.
Accounting Stop (Session End)
In Flow 9c, the client sends an Accounting-Stop to the Prime Access Registrar server to end the session.
The Accounting-Stop message includes an updated quota array with the usage adjustments since the
previous authorization in the VSA form.
Table 16-11 lists the attributes included in the Accounting-Stop message set to the
Prime Access Registrar server and forwarded to the billing server.
Accounting Response (Final Status)
In Flow 9s, the Prime Access Registrar server sends the used quota array to the billing server in an
Accounting-Stop message. Any values returned by the billing server in Flow 10b are discarded.
26, 9 CRB_DURATION See Vendor-Specific
Attributes, page 16-25
Required
26, 9 CRB_TOTAL_VOLUME Conditional
26, 9 CRB_UPLINK_VOLUME
26, 9 CRB_DOWNLINK_VOLUME
26, 9 CRB_TOTAL_PACKETS
26, 9 CRB_UPLINK_PACKETS
26, 9 CRB_DOWNLINK_PACKETS
Table 16-9 Attributes Sent by NAS When Quota Depleted (continued)
Attribute
Number Attribute Name Description Notes
Table 16-10 Attributes Sent to AAA Client in Access-Accept (Reauthorization)
Attribute
Number Attribute Name
26, 9 CRB_USER_TYPE
26, 9 CRB_DURATION
26, 9 CRB_TOTAL_VOLUME
26, 9 CRB_UPLINK_VOLUME
26, 9 CRB_DOWNLINK_VOLUME
26, 9 CRB_TOTAL_PACKETS
26, 9 CRB_UPLINK_PACKETS
26, 9 CRB_DOWNLINK_PACKETS

16-24
Cisco Prime Access Registrar 6.1 User Guide
OL-29756-01
Chapter 16 Using Prepaid Billing
CRB Prepaid Billing
Flow 10s shows the Prime Access Registrar server sending final Accounting-Response message to the
AAA client.
Table 16-11 Attributes Sent in Accounting-Stop Message
Attribute
Number Attribute Name Description Notes
1 User-Name APPL: Mobile Node Username Conditional
2 NAS IP Address Accounting Node IP Address APPL: Required, POA
31 Calling-station-ID APPL:MSISDN or IMSI APPL: Conditional
40, 2 Acct_status_type Indicates the accounting “Stop” for
the service
Required; this value (2)
indicates an
Accounting-Stop request
message
42 Acct-Input-Octets The number of octets sent by the
subscriber; uplink
Required
43 Acc_Output_Octets The number of octets received by
the subscriber; downlink
46 Acct-Session-Time Duration of the session
47 Acct-Input-Packets Number of packets sent by the
subscriber
48 Acct-Output-Packets Number of packets received by the
subscriber
49 Acct-Terminate-Cause This parameter, used for tracking,
should remain the same for all
accounting requests for a given
service.
26, 9 CRB_DURATION See Vendor-Specific Attributes,
page 16-25
Conditional
26, 9 CRB_TOTAL_VOLUM
E
26, 9 CRB_UPLINK_VOLU
ME
26, 9 CRB_DOWNLINK_VO
LUME
26, 9 CRB_TOTAL_PACKE
TS
26, 9 CRB_UPLINK_PACKE
TS
26, 9 CRB_DOWNLINK_PA
CKETS
26, 9 CRB_SESSION_ID Specifies the RADIUS attribute
carrying the session ID information
Optional

16-25
Cisco Prime Access Registrar 6.1 User Guide
OL-29756-01
Chapter 16 Using Prepaid Billing
CRB Prepaid Billing
Vendor-Specific Attributes
Vendor-specific attributes are included in specific RADIUS packets to communicate prepaid user
balance information from the Prime Access Registrar server to the AAA client, and actual usage, either
interim or total, between the NAS and the Prime Access Registrar Server.
Table 16-12 lists the VSAs that will be defined in the API. Table 16-12 also lists the string to be used
with Cisco-AVPair below the VSA.
Note VSAs that start with CRB are used for Cisco Radius Billing prepaid service.
Table 16-12 Vendor-Specific Attributes for the Cisco Prepaid Billing Solution
VSA Name Type
Source
(Call Flow) Description
CRB_AUTH_REASON
crb-auth-reason
Int8 1c, 7c, 7’c Passed with re-authorization:
1. Initial Authentication
2. Initial Authorization
3. Re-authorization
4. Return Quota
5. Query to EBS
CRB_USER_ID
crb-user-id
String 1c, 7c, 7’c APPL: In PDSN this can be
Address of the PDSN.
CRB_SERVICE_ID
crb-service-id
String 1c, 7c Identifies the subscriber’s
service
CRB_USER_TYPE
crb-entity-type
Int8 4s Type of user:
1. Prepaid user
2. Post-paid with no credit limit
3. Post-paid with credit limit
4. Invalid user
The source for this VSA value
could be from the Subscriber
profile or from the billing server

16-26
Cisco Prime Access Registrar 6.1 User Guide
OL-29756-01
Chapter 16 Using Prepaid Billing
CRB Prepaid Billing
CRB_DURATION
crb-duration
Int32 4s, 8s Downlink quota received by the
AAA client
CRB_TOTAL_VOLUME
crb-total-volume
Total Volume quota received by
the AAA client
CRB_UPLINK_VOLUME
crb-uplink-volume
Uplink volume quota received by
the AAA client
CRB_DOWNLINK_VOLUME
crb-downlink-volume
Uplink Volume quota received
by the AAA client
CRB_TOTAL_PACKETS
crb-total-packets
Downlink Packet quota received
by the AAA client
CRB_UPLINK_PACKETS
crb-uplink-packets
Uplink Packet quota received by
the AAA client
CRB_DOWNLINK_PACKETS
crb-downlink-packets
Uplink Volume quota received
by the AAA client
CRB_SESSION_ID
crb-session-id
String Additional field if session ID is
required. This VSA provides the
real time billing-specific session
ID. This VSA duplicates the
contents of the technology-
specific session ID or the
contents of RADIUS attributes
44 or 50. The NAS can use this
VSA to generate a unique
session ID. If this VSA is not
present, then RADIUS attribute
44 is used instead.
If this is a string AV Pair-type
attribute, the name is the string
attribute name.
Table 16-12 Vendor-Specific Attributes for the Cisco Prepaid Billing Solution (continued)
VSA Name Type
Source
(Call Flow) Description

16-27
Cisco Prime Access Registrar 6.1 User Guide
OL-29756-01
Chapter 16 Using Prepaid Billing
Implementing the Prepaid Billing API
Implementing the Prepaid Billing API
A shared library must implement the API functions to perform the various tasks given in the description
of each of the function. This needs to be compiled as a shared library and then specified as part of the
remote server configuration at the Filename property. See Setting Up a Prepaid Billing RemoteServer,
page 16-3 or Setting Up a Prepaid Billing RemoteServer, page 16-8.
At startup, Prime Access Registrar loads the library dynamically and registers the API functions, then
calls out the library initialization API once at startup. The call to initialize functions initializes various
data structures and connections with the billing server, as required.
Note Cisco works with you to develop the prepaid billing service and implement the API. For more
information, contact your Cisco systems engineer.
At various times, according to the call flow described in the Prepaid Call Flow Specification (CRB or
IS835C), Prime Access Registrar calls out appropriate API functions present in the shared library. The
values for the arguments passed to these API calls are purely derived from the incoming RADIUS packet
and Prime Access Registrar does not maintain any dynamic information related to the call flow. It is up
to the API function to make use of the information passed to it as C structures to contact the Billing
server, get appropriate data, and return the same to Prime Access Registrar using the designated
arguments.
Note See the API specifications for more details pertaining to the arguments and return values of the API.
CRB_TERMINATE_CAUSE
crb-terminate-cause
Int8 4se Identifies why a subscriber failed
authentication:
1. Exceeded the balance
2. Exceeded the overdraft
3. Bad credit
4. Services suspended
5. Invalid User
6. Invalid Password
7. System Error
8. Disabled
9. Expired
10. Valid in Future
11. Used up
12. No Parallel sessions
13. Session Already closed
14. Invalid session
CRB_PRIVATE
crb-private
String n/a Reserved for future use
Table 16-12 Vendor-Specific Attributes for the Cisco Prepaid Billing Solution (continued)
VSA Name Type
Source
(Call Flow) Description

16-28
Cisco Prime Access Registrar 6.1 User Guide
OL-29756-01
Chapter 16 Using Prepaid Billing
Implementing the Prepaid Billing API

CHAPTER
17-1
Cisco Prime Access Registrar 6.1 User Guide
OL-29756-01
17
Using Cisco Prime Access Registrar Server
Features
This chapter provides information about how to use the
Cisco Prime Access Registrar (Prime Access Registrar) server features.
This chapter contains the following sections:
•Incoming Traffic Throttling
•Backing Store Parsing Tool
•Configurable Worker Threads Enhancement
•Session-Key Lookup
•Query-Notify
•Support for Windows Provisioning Service
•Command Completion
•Service Grouping Feature
•SHA-1 Support for LDAP-Based Authentication
•Dynamic Attributes
•Tunneling Support Feature
•xDSL VPI/VCI Support for Cisco 6400
•Apply Profile in Cisco Prime Access Registrar Database to Directory Users
•Directory Multi-Value Attributes Support
•MultiLink-PPP (ML-PPP)
•Dynamic Updates Feature
•NAS Monitor
•Automatic Information Collection (arbug)
•Simultaneous Terminals for Remote Demonstration
•Support for RADIUS Check Item Attributes
•User-Specific Attributes
•Packet of Disconnect
•Dynamic DNS

17-2
Cisco Prime Access Registrar 6.1 User Guide
OL-29756-01
Chapter 17 Using Cisco Prime Access Registrar Server Features
Incoming Traffic Throttling
•Dynamic Service Authorization Feature
•Remote Session Management
•Wx Interface Support for SubscriberDB Lookup
•Smart Grid Solution Management
•TACACS+ Support for AAA
Incoming Traffic Throttling
Prime Access Registrar offers two options to tackle traffic bursts by limiting incoming traffic. You will
find two properties, MaximumIncomingRequestRate and MaximumOutstandingRequests, under
/Radius/Advanced to limit the incoming traffic.
This contains the following sections:
•MaximumIncomingRequestRate
•MaximumOutstandingRequests
MaximumIncomingRequestRate
You can use the MaximumIncomingRequestRate property to limit incoming traffic in terms of “allowed
requests per second”.
For example, if you set the MaximumIncomingRequestRate to n, then at any given second, only n
requests are accepted for processing. In the next second, another n requests are accepted regardless of
whether the requests accepted earlier are processed or not. This condition serves as a soft limit.
The MaximumIncomingRequestRate property by default is zero (disabled).
MaximumOutstandingRequests
You can use the MaximumOutstandingRequests property to limit incoming traffic in terms of “requests
processed”.
For example, if you set the MaximumOutstandingRequests to n, n requests are accepted for processing.
Further requests are accepted only after processing some of these requests and sending the replies back.
This condition serves as a hard limit.
The MaximumOutstandingRequests property by default is zero (disabled).
Note You can enable either of these properties independent of the other.
Configuring the MaximumOutstandingRequests
To configure the MaximumIncomingRequestRate or MaximumOutstandingRequests property:
Step 1 Log into aregcmd.
Step 2 Change directory to /Radius/Advanced.
Step 3 Set the MaximumIncomingRequestRate or MaximumOutstandingRequests property to non-zero values.

17-3
Cisco Prime Access Registrar 6.1 User Guide
OL-29756-01
Chapter 17 Using Cisco Prime Access Registrar Server Features
Backing Store Parsing Tool
set MaximumIncomingRequestRate n
or
set MaximumOutstandingRequests n
where n is any nonzero value.
Step 4 Save the configuration; enter:
save
Step 5 Reload the server; enter:
reload
Backing Store Parsing Tool
Prime Access Registrar tool, carbs.pl, helps to analyze the session backing store files. You will find this
tool under /cisco-ar/bin directory.
Using carbs.pl, you can:
•Get information about the active, stopped, and stale RADIUS sessions.
•Clear phantom sessions manually.
•Process the binary log files and get information in a user-readable format.
The syntax is:
carbs.pl [-a] [-d <dir>] [-f <logfile>] [-v] [p] [-o <output>] [-h]
-a—All session statistics (active, stale, stopped)
-d—<Directory> Default: .
-f—<Filename> Default: 00*.log
-v—verbose Default: off
-p—Clear phantom sessions
-o—<Filename> Output log to TEXT
-h—Help, usage
Table 17-1 lists the options available with carbs.pl and their description.

17-4
Cisco Prime Access Registrar 6.1 User Guide
OL-29756-01
Chapter 17 Using Cisco Prime Access Registrar Server Features
Configurable Worker Threads Enhancement
Configurable Worker Threads Enhancement
Prime Access Registrar provides a configurable variable you can use to increase the number of worker
threads to handle a greater number of RADIUS packets during peak operating periods. This variable
controls the processing of greater number of RADIUS packets than expected during peak operating
periods.
The variable, RADIUS_WORKER_THREAD_COUNT, is found in the arserver file under
/cisco-ar/bin/arserver and controls the number of worker threads the Prime Access Registrar server
creates. You can increase the number of worker threads to help make more efficient use of the server’s
CPU.
Note Before you increase the setting for RADIUS_WORKER_THREAD_COUNT , you should be certain that
you are running into a worker thread starvation issue. If you use scripts that consume a lot of processing
and memory, you might run out of memory if you create too many worker threads.
Increasing the number of worker threads also increases memory utilization.
Table 17-1 Carbs.pl Options and Description
Option Description
-d<directory> Optional. Accepts a directory as parameter with
no trailing slash. You can use this option to
change the default directory to scan for
BackingStore log files. Default is current
directory.
-f<logfile> Optional. Accepts a logfile as parameter with no
leading or trailing slashes. You can use this option
to change the default log files. Allows you to enter
individual logfile name as well as wildcard
characters surrounded by single quotes.
-v Optional. No parameters.You can use this option
to get total session count and phantom session
count.
-p Optional. No parameters. Generates a list of
phantom sessions. You can use this option to clear
the stale sessions.
-o Optional. Accepts <output file> as parameter. You
can use this option to convert BackingStore log
files to readable files and write the results to the
output file specified.
-a Optional. No parameters. You can use this option
to print all session statistics, such as per-NAS
stale session count, total active sessions, and total
stale sessions.
-h You can use this option to get help with usage of
carbs.pl.

17-5
Cisco Prime Access Registrar 6.1 User Guide
OL-29756-01
Chapter 17 Using Cisco Prime Access Registrar Server Features
Session-Key Lookup
The default value of RADIUS_WORKER_THREAD_COUNT for servers running a Solaris operating
system is 256. The default value for servers running Red Hat Enterprise Linux 5.3/5.4/5.5/6.0/6.1/6.2
32-bit /64-bit operating system (with 32-bit library is only for 64-bit operating system).
The purpose of this enhancement is to take advantage of spare CPU bandwidth which was not being used
in earlier releases of Prime Access Registrar due to a lower number of worker threads. At times, the
worker threads would be stuck doing work that took a long time to complete, like running a script.
Having more threads will help mitigate these situations and will help improve on the latency created due
to lack of free worker threads.
Note Before modifying the RADIUS_WORKER_THREAD_COUNT variable, consult with a TAC
representative to ensure that modifying the RADIUS_WORKER_THREAD_COUNT is warranted.
Modifying the RADIUS WORKER THREAD COUNT
To modify the RADIUS_WORKER_THREAD_COUNT variable:
Step 1 Log into the Prime Access Registrar server as a root user and change directory to /cisco-ar/bin.
Step 2 Use a text editor and open the arserver file.
Step 3 Locate the line with the RADIUS_WORKER_THREAD_COUNT variable.
#change this to configure number of worker threads
RADIUS_WORKER_THREAD_COUNT=256
Step 4 Modify the number of RADIUS worker threads to the number you choose.
Note There is no upper limit to the number of RADIUS worker threads you can enable in your
Prime Access Registrar server, but you should take care not to exceed your server’s memory
capacity.
Step 5 Save the file and restart the Prime Access Registrar server.
Session-Key Lookup
The Session-Key Lookup feature enables you to identify the Session Manager and Session Key of an
existing session based on certain attributes associated with that session, such as the Mobile Station
Integrated Services Digital Network (MSISDN) number.
The Session-Key Lookup feature requires the following enhancements to Prime Access Registrar
software:
•Enabling a query service to be invoked for Ascend-IP-Allocate packets
•Enabling the setting of the Session-Key and Session-Manager environment variables by a query
operation
•Performing session management after the query operation
•A new environment variable, Set-Session-Mgr-And-Key-Upon-Lookup, which when set to TRUE
causes a session-cache Resource Manager to set the Session-Manager and Session-Key environment
variables during the query lookup.

17-6
Cisco Prime Access Registrar 6.1 User Guide
OL-29756-01
Chapter 17 Using Cisco Prime Access Registrar Server Features
Query-Notify
The Session-Key Lookup feature is useful in a scenario where an existing session requires an update
from an incoming Ascend-IPA-Allocate packet (from a different NAS or device) with modified
authorization attributes. Note that this Ascend-IPA-Packet might not have the exact set of attributes as
the original packet that created the session. However, the Ascend-IPA-Allocate packet must contain at
least one attribute that can uniquely identify the session (such as the MSISDN number) and should
contain the same UserName of the original session.
The Session-Key Lookup feature works in tandem with the RADIUS Query feature, where a RADIUS
Query service is defined with the unique attribute (such as the MSISDN number) as the query-key and
is configured to query all session managers. The Query-Service environment variable is set to the defined
RADIUS Query service and the new environment variable (Set-Session-Mgr-And-Key-Upon-Lookup)
is set to TRUE for this Ascend-IPA-Allocate packet. This triggers a query operation on all the live
sessions. If there is a match, the Session-Manager and Session-Key of that session is used for subsequent
session management. During session management, the session cache is updated with the modified
authorization attributes.
The Session-Manager OutgoingScript (or any outgoing script that executes after the Session-Manager
Outgoing Script) should not reject the packet when doing a Session-Key lookup. Doing so causes the
session to be deleted.
Query-Notify
The Query-Notify feature enables you to store information about Wireless Application Protocol (WAP)
gateways that have queried for User Identity-IP Address mapping and send appropriate messages to the
WAP gateway when the subscriber logs out of the network.
Prime Access Registrar has been enhanced to update the session cache with the attribute-value pairs of
an interim accounting update packet. This ensures the Prime Access Registrar server provides updated
or current information to the WAP gateway during the proxy of interim records or query of the session
cache.
Prime Access Registrar has been enhanced to also notify the WAP gateways that have queried a session
with interim accounting update packets. If a WAP gateway does not respond to the Interim accounting
update packets, the Prime Access Registrar server times out and retries by notifying the WAP gateways
again. If there is no response after all the retries, the proxy packet is deleted and no change is made to
the session or the WAP gateway’s state in the Prime Access Registrar server. You can configure the
number of retries under /Radius/Clients/notificationproperties.
The accounting response packet from the Prime Access Registrar server to the GPRS Gateway Support
Node (GGSN) is independent of the proxy operation to the WAP gateways. The accounting response
packet is sent back immediately without waiting for responses from the WAP gateways.
The Query-Notify feature also enables you to quarantine IP addresses for a configurable amount of time
if a WAP gateway does not respond to Accounting-Stop packets sent by the Prime Access Registrar
server.
The Prime Access Registrar server stores information about clients (usually the IP address) that queried
for particular user information and sends RADIUS Accounting-Stop packets to those clients when the
Prime Access Registrar server receives the Accounting-Stop packet. There is no intermediate proxy
server between the Prime Access Registrar server and the WAP gateway.
To support the Query-Notify feature, the Prime Access Registrar server’s radius-query service has been
modified to also store information like the IP address about the clients queried for cached information.
The information is stored in the user session record along with the cached information so it is available
after a server reload.

17-7
Cisco Prime Access Registrar 6.1 User Guide
OL-29756-01
Chapter 17 Using Cisco Prime Access Registrar Server Features
Query-Notify
Configuring the Query-Notify feature
To configure the Query-Notify feature:
Step 1 Configure the Clients object under /Radius/Clients.
Step 2 Set the EnableNotifications property to TRUE.
The EnableNotifications property indicates that a client can receive Accounting-Stop notifications from
the Prime Access Registrar server. When EnableNotifications is set to TRUE, a sub-directory named
NotificationProperties appears in client object configuration.
Step 3 Configure the properties under the client’s NotificationProperties subdirectory.
See Clients, page 4-6, for information about how to configure these properties.
Step 4 Configure a list of attributes to store under /Radius/Advanced/Attribute Groups/<Notification
Group> where <notification group> is the name of an Attribute Group containing a list of attributes to
be stored.
This section contains the following topics:
•Call Flow
•Configuration Examples
•Memory and Performance Impact
Call Flow
This section describes the call flow of the Query-Notify feature.
1. The Prime Access Registrar server caches information from an from Accounting-Start.
This information is usually from a GGSN when a subscriber enters into the network.
2. When a WAP gateway receives a request to authenticate a subscriber, it queries the
Prime Access Registrar server using an Access-Request packet to retrieve the cached information
for that subscriber.
3. The Prime Access Registrar server responds with Access-Accept if an entry is found for the
subscriber in its cache; otherwise the server returns an Access-Reject.
The Prime Access Registrar server sends an Access-Accept packet to the WAP gateway. The list of
attributes sent in this Access-Accept will depends on radius-query service configuration.
Note Yo u u s e aregcmd to configure the attributes for the Access-Accept packet in the
AttributesToBeReturned subdirectory under a radius-query service type.
4. If the Prime Access Registrar server finds a cache entry for the subscriber and if the
EnableNotifications property is set to TRUE, the Prime Access Registrar server stores the client IP
address in the subscriber’s cache.
5. If the Prime Access Registrar server receives an Accounting-Interim-Update packet from the
GGSN, it responds by sending an Accounting-Response packet then sends the
Accounting-Interim-Update packets to all the queried clients of the WAP Gateways.

17-8
Cisco Prime Access Registrar 6.1 User Guide
OL-29756-01
Chapter 17 Using Cisco Prime Access Registrar Server Features
Query-Notify
If the WAP gateway queried clients do not respond to the Accounting-Interim-Update packets, the
Prime Access Registrar server times out and retries by notifying the WAP gateways again. If there
is no response after all the retries, the proxy packet is deleted and no change is made to the session
or the WAP gateway’s state in the Prime Access Registrar server. The StaleSessionTimeout property
under /Radius/Advanced is not applicable for Accounting-Interim-Update packets.
6. When the subscriber logs out of the network, the Prime Access Registrar server receives an
Accounting-Stop packet and responds by sending an Accounting-Response back to the client.
Before releasing the subscriber’s session, the Prime Access Registrar server looks for any client IP
addresses in the subscriber’s cache. If it finds any, the Prime Access Registrar server sends
Accounting-Stop packets to those clients with the attributes configured in the
NotificationAttributeGroup subdirectory for each client.
The Prime Access Registrar server forms the attributes with those attributes in the session cache and
from the Accounting-Stop packet. The Prime Access Registrar server uses the value configured for
the Port property in the NotificationProperties subdirectory as the destination port for the
Accounting-Stop packet and uses the client’s shared secret.
The Prime Access Registrar server then waits for Accounting-Response packets from each client to
which it has sent Accounting-Stop packets. The Prime Access Registrar server waits for the time
interval configured in the InitialTimeout property configured in the NotificationProperties
subdirectory before sending another Accounting-Stop packet. If it does not receive an
Accounting-Response packet, the Prime Access Registrar server sends additional Accounting-Stop
packets until the number of attempts reaches the value configured in the MaxTries property in the
NotificationProperties subdirectory.
7. When the Prime Access Registrar server receives an Accounting-Response packet from each client,
the server releases the subscriber session.
If the Prime Access Registrar server does not receive Accounting-Response packets from all clients
after the configured time and attempts, the server maintains the subscriber session for the time
interval configured in the StaleSessionTimeout property in /Radius/Advanced then releases the
subscriber session.
The Prime Access Registrar server maintains the subscriber session to address the quarantine IP
address requirement. The Prime Access Registrar server must quarantine IP addresses if a WAP
gateway does not respond to Accounting-Stop sent by the Prime Access Registrar server. The length
of time an IP address is quarantined depends on the value of the InitialTimeOut property under the
NotificationProperties subdirectory of /Radius/Clients/wap_gateway.
8. If the StaleSessionTimeout property is TRUE for a subscriber session, the Prime Access Registrar
server rejects any query requests from clients for this session cache. After the StaleSessionTimeout
expires, the Prime Access Registrar server will again send Accounting-Stop to all the clients listed
in the session and proceeds to delete this subscriber session regardless of the status of the
Accounting-Stop.
Configuration Examples
Note In addition to the following configuration, the StaleSessionTimeout property must be set in
/Radius/Advanced. This property has a default value of 1 hour.

17-9
Cisco Prime Access Registrar 6.1 User Guide
OL-29756-01
Chapter 17 Using Cisco Prime Access Registrar Server Features
Support for Windows Provisioning Service
The following shows an example configuration for a Query-Notify client:
[ //localhost/Radius/Clients/wap-gateway1 ]
Name = wap-gateway1
Description =
IPAddress = 10.100.10.1
SharedSecret = secret
Type = NAS
Vendor =
IncomingScript~ =
OutgoingScript~ =
EnableDynamicAuthorization = FALSE
NetMask =
EnableNotifications = TRUE
NotificationProperties/
Port = 1813
InitialTimeout = 5000
MaxTries = 3
NotificationAttributeGroup = notifyGroup
The following shows an example configuration for a Query-Notify AttributeGroup:
[ //localhost/Radius/Advanced/AttributeGroups/notifyGroup ]
Name = notifyGroup
Description =
Attributes/
1. User-Name
2. Acct-Session-Id
3. NAS-Identifier
4. NAS-Port
Memory and Performance Impact
Using the Query-Notify feature will have the following effects:
•There will be a memory impact because the Prime Access Registrar server caches IP addresses of
clients queried in the session record.
•There will be an impact on performance because the Prime Access Registrar server has to persist the
cached IP address information before responding to radius-query requests.
Support for Windows Provisioning Service
Prime Access Registrar supports Microsoft’s Windows Provisioning Service (WPS). WPS provides
hotspot users with seamless service to public WLAN hotspots by using Microsoft Windows-based
clients. The Microsoft WPS solution requires Microsoft-based software in the data center for the
RADIUS server and the provisioning server.
This section contains the following topics:
•Call Flow
•Example Configuration
•Unsupported Features

17-10
Cisco Prime Access Registrar 6.1 User Guide
OL-29756-01
Chapter 17 Using Cisco Prime Access Registrar Server Features
Support for Windows Provisioning Service
Call Flow
The following is the WPS process and Wireless Internet Service Provider (WISP) packet sequence for a
new wireless client login at a Wi-Fi hotspot location:
1. The client discovers the WISP network at a Wi-Fi hotspot.
2. The client authenticates as guest (with null username and credentials) to the Prime Access Registrar
server .
3. The client is provisioned and a new account is created.
4. The client is authenticated using the new account credentials and accesses the Internet.
The Prime Access Registrar server performs the following functions during WPS:
1. Detects the guest subscriber login from the null username and null credentials during PEAPv0
(MS-PEAP) authentication.
2. Grants a successful login and returns a sign-up URL of the provisioning server as a
PEAP-Type-Length-Value (TLV) in the next Access-Challenge Packet.
The following is an example value for the URL PEAP-TLV:
http://www.example.com/provisioning/master.xml#sign up
Where #sign up is the parameter for this action and is a required element of the value.
The sign-up URL value is passed when the user authenticates as guest. The sign-up URL is a
fragment within the Master URL. You can also configure other fragments to be returned in the
Master URL. See Master URL Fragments, page 17-11 for more information about the different
fragments.
3. Sends a VLAN-ID or IP filter (or both) in the final Access-Accept packet to restrict the guest user’s
accessibility to only the Provisioning server.
4. Authenticates using the user configuration in the user database after the client is provisioned and a
new account is created.
Example Configuration
The following shows an example configuration for the WPS feature:
[ //localhost/Radius/Services/peapv0 ]
Name = peapv0
Description =
Type = peap-v0
IncomingScript~ =
OutgoingScript~ =
MaximumMessageSize = 1024
PrivateKeyPassword = <password>
ServerCertificateFile = <path_to_ServerCertificateFile>
ServerRSAKeyFile = <path_to_ServerRSAKeyFile>
CACertificateFile = <path_to_CACertificateFile>
CACertificatePath =<path_to_CACertificatePath>
ClientVerificationMode = Optional
VerificationDepth = 4
EnableSessionCache = True
SessionTimeout = "5 Minutes"
AuthenticationTimeout = 120
TunnelService = eap-mschapv2
EnableWPS = True
MasterURL = http://www.example.com/provisioning/master.xml

17-11
Cisco Prime Access Registrar 6.1 User Guide
OL-29756-01
Chapter 17 Using Cisco Prime Access Registrar Server Features
Support for Windows Provisioning Service
WPSGuestUserProfile = WPS-Guest-User-Profile
When you set the EnableWPS property to TRUE, you must provide values for the properties MasterURL
and WPSGuestUserProfile. See Environment Variables, page 17-11 for more information.
Environment Variables
The following two environment variables are used to support WPS:
•Send-PEAP-URI-TLV
•Master-URL-Fragment
Send-PEAP-URI-TLV
Send-PEAP-URI-TLV property is a Boolean value used by the authenticating user service to make the
PEAP-V0 service include the URI PEAP-TLV in the protected success message. Under different
circumstances Prime Access Registrar might send back different fragments within the MasterURL to the
client, as described above.
The conditions under which this has to be sent is best known to the user authentication service (the
service that is specified within the eap-mschapv2 service, which in turn is the tunnel service for
PEAP-V0 service). So when it decides that it needs to send back the URL it can set this variable to
TRUE. The default value for this is FALSE.
Master-URL-Fragment
The Prime Access Registrar authenticating user service uses Master-URL-Fragment to set the fragment
within the Master URL that needs to be sent back. The Prime Access Registrar user authentication
service sets the fragment to different values under different circumstances. While the
Send-PEAP-URL-TLV indicates whether to send the URL or not, Master-URL-Fragment is used to
intimate which fragment within the URL needs to be sent. If this variable is not set and if it is required
to send the URL, ‘#signup’ will be sent by default.
Master URL Fragments
The following sections describe the different fragments the RADIUS server might send to the AP in the
Master URL:
•Sign up
•Renewal
•Password change
•Force update
Sign up
This value is passed when the user authenticates as guest. The following is an example value for the URL
PEAP-TLV:
http://www.example.com/provisioning/master.xml#sign up
where #sign up is the parameter for this action and a required element of the value.

17-12
Cisco Prime Access Registrar 6.1 User Guide
OL-29756-01
Chapter 17 Using Cisco Prime Access Registrar Server Features
Support for Windows Provisioning Service
Renewal
This value is passed when the user’s account is expired and needs renewal before network access can be
granted. The following is an example value for the URL PEAP-TLV:
http://www.example.com/provisioning/master.xml#renewal
where #renewal is the parameter for this action and a required element of the value.
Password change
This value is passed when the user is required to change the account password. An example value for the
URL PEAP-TLV is:
http://www.example.com/provisioning/master.xml#passwordchange
where #passwordchange is the parameter for this action and a required element of the value.
Force update
This value is passed when the WISP requires the Wireless Provisioning Services on the client to
download an updated XML master file. This method of updating the XML master file on the client
should be used only to correct errors; otherwise, the TTL expiry time in the XML master file is used to
provide background updates. The following is an example value for the URL PEAP-TLV:
http://www.example.com/provisioning/master.xml#forceupdate
where #forceupdate is the parameter for this action and a required element of the value.
Unsupported Features
The following features are part of the Microsoft WPS functionality, but are not supported in the
Prime Access Registrar:
•Account Expiration and Renewal
•Password Changing and Force Update
Account Expiration and Renewal
When the user creates an account and logs in with that account, the RADIUS server authenticates and
authorizes the request and sends back an Access-Accept with a Session-Timeout attribute. The Access
Point (AP) then forces the wireless client to reauthenticate for every timeout value. When there is one
timeout duration left in the user account, the RADIUS server needs to send back a renewal URL (a URL
fragment within the master URL) to the client for the user to renew the account.
Prime Access Registrar does not support this feature because the interface the Prime Access Registrar
server has with the AD (of the CiscoSecure Remote Agent) does not have provisions to get the expiration
information of user account. However, this release does provide an environment variable to copy the
URL fragment and to control whether or not to send the URL using another environment variable. This
can be used to send the renewal URL. There are some limitations, however.

17-13
Cisco Prime Access Registrar 6.1 User Guide
OL-29756-01
Chapter 17 Using Cisco Prime Access Registrar Server Features
Command Completion
Password Changing and Force Update
The Password Changing option is passed when the user is required to change the account password.
Force Update option is passed when the WISP requires the Wireless Provisioning Services on the client
to download an updated XML master file.
These functions are not possible in this release for the same reason mentioned above, the loose coupling
between Prime Access Registrar and the AD. Additionally, there is no known use case for this. As
mentioned above, you can use the newly added environment variables to trigger these options.
Command Completion
Prime Access Registrar’s command completion feature provides online help by listing possible entries
to the current command line when you press the Tab key after entering a partial command. The
Prime Access Registrar server responds based on:
•The location of the cursor including the current directory
•Any data you have entered on the command line prior to pressing the Tab key
The command completion feature emulates the behavior of Cisco IOS and Kermit. When you press the
Tab key after entering part of a command, the Prime Access Registrar server provides any identifiable
object and property names. For example, after you first issue aregcmd and log into
Prime Access Registrar, enter the following:
cd <Tab>
Administrators/ Radius/
Pressing the Tab key consecutively displays possible context-sensitive choices.
In the following example, after changing directory to /Radius/services/local-file an administrator wants
to see the possible types of authentication services that can set.
cd /Radius/services/local-file
//localhost/Radius/Services/local-file ]
Name = local-file
Description =
Type = file
IncomingScript~ =
OutgoingScript~ =
OutagePolicy~ = RejectAll
OutageScript~ =
FilenamePrefix = accounting
MaxFileSize = "10 Megabytes"
MaxFileAge = "1 Day"
RolloverSchedule =
set type <Tab>
eap-leap file local radius-session
eap-md5 group odbc rex
eap-sim ldap radius tacacs-udp

17-14
Cisco Prime Access Registrar 6.1 User Guide
OL-29756-01
Chapter 17 Using Cisco Prime Access Registrar Server Features
Service Grouping Feature
Values can also be tab-completed. For example, if you decide to set the local-file service’s type to file,
you can do the following:
set type f<Tab>
and the command line completes to:
set type file
Service Grouping Feature
The Service Grouping feature enables you to specify multiple services (called subservices) to be used
with authentication, authorization, or accounting requests. The general purpose is to enable multiple
Remote Servers to process requests.
Perhaps the most common use of this feature will be to send accounting requests to multiple Remote
Servers thus creating multiple accounting logs. Another common use might be to authenticate from more
than one Remote Server where, perhaps the first attempt is rejected, other Remote Servers can be
attempted and an Access-Accept obtained.
Clearly, in the accounting request example, each request must be successfully processed by each
subservice in order for the originator of the accounting request to receive a response. This is known as
a logical AND of each of the subservice results. In the authenticate example, the first subservice which
responds with an accept is returned to the client or if all subservices respond with reject, then a reject is
returned to the client. This is known as a logical OR of each of the subservice results.
A Service is specified as a Group Service by setting its type to group, specifying the ResultRule (AND
or OR) and specifying one or more subservices in the GroupServices subdirectory. The subservices are
called in numbered order and as such are in an indexed list similar to Remote Server specification in a
radius Service. Incoming and outgoing scripts for the Group Service can be optionally specified.
A subservice is any configured non-Group Service. When a Group Service is used, each subservice is
called in exactly the same manner as when used alone (such as if specified as the
DefaultAuthenticationService). Incoming and Outgoing scripts are executed if configured and Outage
Policies are honored.
This section contains the following topics:
•Configuration Example - AccountingGroupService
•Configuration Example 2 - AuthenticationGroupService
Configuration Example - AccountingGroupService
To configure an accounting Group Service to deliver accounting requests to multiple Remote Servers:
Step 1 The first task is to set up the subservices which are to be part of the AccountingGroupService. Since
subservices are merely configured Services which have been included in a service group, you need only
define two new Services.
For this example, we will define two new radius Services called OurAccountingService and
TheirAccountingService. A provider might want to maintain duplicate accounting logs in parallel with
their bulk customer's accounting logs.
Step 2 Change directory to /radius/services. At the command line, enter the following:

17-15
Cisco Prime Access Registrar 6.1 User Guide
OL-29756-01
Chapter 17 Using Cisco Prime Access Registrar Server Features
Service Grouping Feature
cd /radius/services
[ //localhost/Radius/Services ]
Entries 1 to 2 from 2 total entries
Current filter: <all>
local-file/
local-users/
Step 3 At the command line, enter the following:
add OurAccountingService
add TheirAccountingService
The configuration of these Services is very similar to standalone Radius accounting service.
Step-by-step configuration instructions are not provided, but the complete configuration is shown below:
[ //localhost/Radius/Services/OurAccountingService ]
Name = OurAccountingService
Description =
Type = radius
IncomingScript = OurAccountingInScript
OutgoingScript = OurAccountingOutScript
OutagePolicy = RejectAll
OutageScript =
MultipleServersPolicy = Failover
RemoteServers/
1. OurPrimaryServer
2. OurSecondaryServer
[ //localhost/Radius/Services/TheirAccountingService ]
Name = TheirAccountingService
Description =
Type = radius
IncomingScript = TheirAccountingInScript
OutgoingScript = TheirAccountingOutScript
OutagePolicy = RejectAll
OutageScript =
MultipleServersPolicy = Failover
RemoteServers/
1. TheirPrimaryServer
2. TheirSecondaryServer
The next step is to create the new AccountingGroupService. The purpose of this Service is to process
Accounting requests through both OurAccountingService and TheirAccountingService.
Step 4 At the command line, enter the following:
add AccountingGroupService
Added AccountingGroupService
cd AccountingGroupService
[ //localhost/Radius/Services/AccountingGroupService ]
Name = AccountingGroupService
Description =
Type =
IncomingScript =
OutgoingScript =

17-16
Cisco Prime Access Registrar 6.1 User Guide
OL-29756-01
Chapter 17 Using Cisco Prime Access Registrar Server Features
Service Grouping Feature
set type group
Set Type group
Step 5 Set the ResultRule to AND to ensure that both services process the accounting request successfully.
set ResultRule AND
Set ResultRule AND
ls
[ //localhost/Radius/Services/AccountingGroupService ]
Name = AccountingGroupService
Description =
Type = group
IncomingScript =
OutgoingScript =
ResultRule = AND
GroupServices/
set IncomingScript AcctGroupSvcInScript
set OutgoingScript AcctGroupSvcOutScript
Add OurAccountingService and TheirAccountingService as subservices of the Group Service.
Step 6 At the command line, enter the following:
cd GroupServices
[ //localhost/Radius/Services/AccountingGroupService/GroupServices ]
set 1 OurAccountingService
Set 1 OurAccountingService
Set 2 TheirAccountingService
Set 2 TheirAccountingService
ls
[ //localhost/Radius/Services/AccountingGroupService ]
Name = AccountingGroupService
Description =
Type = group
IncomingScript = AcctGroupSvcInScript
OutgoingScript = AcctGroupSvcOutScript
ResultRule = AND
GroupServices/
1. OurAccountingService
2. TheirAccountingService

17-17
Cisco Prime Access Registrar 6.1 User Guide
OL-29756-01
Chapter 17 Using Cisco Prime Access Registrar Server Features
Service Grouping Feature
This completes the setup of the AccountingGroupService. To use this Service simply set it as the
DefaultAccountingService and/or configure a policy/rule set which will select this Service. Essentially,
this can be used in the same manner as any other standalone service.
Summary of Events
The following describes the flow of what happens when a client sends an accounting request which is
processed by the AccountingGroupService:
1. ActGroupSvcInScript is executed.
2. OurAccountingService is called.
3. OurAccountingService's Incoming Script, OurAccountingInScript is called.
4. The request is sent to the Remote Server OurPrimaryServer and/or OurSecondaryServer, if
necessary.
5. If a response is not received, because we used the AND ResultRule, the request failed and no
response is sent to the client and the request is dropped. If a response is received, then the process
continues.
6. OurAccountingService's Outgoing Script, OurAccountingOutScript is called.
7. TheirAccountingService is called.
8. TheirAccountingService's Incoming Script, TheirAccountingInScript is called.
9. The request is sent to the Remote Server TheirPrimaryServer and/or TheirSecondaryServer, if
necessary.
10. If a response is not received, because we used the AND ResultRule, the request failed and no
response is sent to the client and the request is dropped. If a response is received, then the process
continues.
11. TheirAccountingService's Outgoing Script, TheirAccountingOutScript is called.
12. AcctGroupSvcOutScript is executed.
13. Standard processing continues.
Configuration Example 2 - AuthenticationGroupService
To configure a Group Service for the purposes of providing alternate Remote Servers for a single
authentication:
Note If Service A rejects the request, try Service B.
Step 1 The first task is to set up the subservices which are to be part of the AuthenticationGroupService. Since
subservices are merely configured Services which have been included in a service group, we will simply
define two new Services. For simplicity, we will define two new radius Services called
AuthenticationServiceA and AuthenticationServiceB.
Step 2 At the command line, enter the following:
cd /radius/services
[ //localhost/Radius/Services ]

17-18
Cisco Prime Access Registrar 6.1 User Guide
OL-29756-01
Chapter 17 Using Cisco Prime Access Registrar Server Features
Service Grouping Feature
Entries 1 to 2 from 2 total entries
Current filter: <all>
local-file/
local-users/
add AuthenticationServiceA
add AuthenticationServiceB
Step 3 The configuration of these Services is very similar to standalone Radius authentication service.
Step-by-step configuration instructions are not provided, but the complete configuration is shown below:
[ //localhost/Radius/Services/AuthenticationServiceA ]
Name = AuthentictionServiceA
Description =
Type = radius
IncomingScript = AuthAInScript
OutgoingScript = AuthAOutScript
OutagePolicy = RejectAll
OutageScript = AuthAOutageScript
MultipleServersPolicy = Failover
RemoteServers/
1. PrimaryServerA
2. SecondaryServerA
[ //localhost/Radius/Services/AuthenticationServiceB ]
Name = AuthentictionServiceB
Description =
Type = radius
IncomingScript = AuthBInScript
OutgoingScript = AuthBOutScript
OutagePolicy = RejectAll
OutageScript = AuthBOutageScript
MultipleServersPolicy = Failover
RemoteServers/
1. PrimaryServerB
2. SecondaryServerB
The next step is to create the new "AuthenticationGroupService". The purpose of this Service is to
process authentication requests through both AuthenticationServiceA and AuthenticationServiceB if
AuthenticationServiceA rejects the request.
Step 4 At the command line, enter the following:
add AuthenticationGroupService
Added AuthenticationGroupService

17-19
Cisco Prime Access Registrar 6.1 User Guide
OL-29756-01
Chapter 17 Using Cisco Prime Access Registrar Server Features
Service Grouping Feature
cd AuthenticationGroupService
[ //localhost/Radius/Services/AuthenticationGroupService ]
Name = AuthenticationGroupService
Description =
Type =
IncomingScript =
OutgoingScript =
set type group
Set Type group
Next set the ResultRule to OR because we want to ensure that if the first subservice rejects the request,
we then try the second subservice. If the second subservice rejects the request, then the response to the
client is a reject.
Step 5 At the command line, enter the following:
set ResultRule OR
Set ResultRule OR
Set IncomingScript AuthGroupSvcInScript
Set OutgoingScript AuthGroupSvcOutScript
Set IncomingScript AuthGroupSvcInScript
Set OutgoingScript AuthGroupSvcOutScript
ls
[ //localhost/Radius/Services/AuthenticationGroupService ]
Name = AuthenticationGroupService
Description =
Type = group
IncomingScript = AuthGroupSvcInScript
OutgoingScript = AuthGroupSvcOutScript
ResultRule = OR
GroupServices/
Now we must add the services we created "AuthenticationServiceA" and "AuthenticationServiceB" as
subservices of the Group Service.
Step 6 At the command line, enter the following:
cd GroupServices
[ //localhost/Radius/Services/AuthenticationGroupService/GroupServices ]

17-20
Cisco Prime Access Registrar 6.1 User Guide
OL-29756-01
Chapter 17 Using Cisco Prime Access Registrar Server Features
Service Grouping Feature
set 1 AuthenticationServiceA
Set 1 AuthenticationServiceA
Set 2 AuthenticationServiceB
Set 2 AuthenticationServiceB
ls
[ //localhost/Radius/Services/AuthenticationGroupService ]
Name = AuthenticationGroupService
Description =
Type = group
IncomingScript = AuthGroupSvcInScript
OutgoingScript = AuthGroupSvcOutScript
ResultRule = OR
GroupServices/
1. AuthenticationServiceA
2. AuthenticationServiceB
This completes the setup of the AuthenticationGroupService. To use this Service simply set it as the
DefaultAuthenticationService and/or configure a policy/rule set which will select this Service.
Essentially, this can be used in the same manner as any other standalone Service.
Summary of Events
The following describes the flow of what happens when a client sends an Authentication request which
is processed by the AuthenticationGroupService:
1. AuthGroupSvcInScript is executed.
2. AuthenticationServiceA is called.
3. AuthenticationServiceA's Incoming Script, AuthAInScript is called.
4. If the response is a reject or the request is dropped (due to an Outage Policy):
a. AuthenticationServiceA's Outgoing Script, AuthAOutScript is called.
b. Processing continues with the next service.
5. If the response is an Accept:
a. AuthenticationServiceA's Outgoing Script, AuthAOutScript is called.
b. Skip to step 9.
6. AuthenticationServiceB is called.
7. AuthenticationServiceB's Incoming Script, AuthBInScript is called.
8. Since this is the last subservice in our Group Service:
a. AuthenticationServiceB's Outgoing Script, AuthBOutScript is called.

17-21
Cisco Prime Access Registrar 6.1 User Guide
OL-29756-01
Chapter 17 Using Cisco Prime Access Registrar Server Features
SHA-1 Support for LDAP-Based Authentication
b. Regardless of whether the request is Accepted or Rejected, processing will continue at step 9.
9. AuthGroupSvcOutScript is executed.
10. Standard processing continues.
SHA-1 Support for LDAP-Based Authentication
The Prime Access Registrar server supports secure hash algorithm (SHA-1) for LDAP-based
authentication. This feature enables the Prime Access Registrar server to authenticate users whose
passwords are stored in LDAP servers and hashed using the SHA-1 encoding scheme.
SHA-1 support actually adds functionality for the following three features to Prime Access Registrar:
•Authentication of PAP access requests against an LDAP user entry that uses the SHA-algorithm to
the hash password attribute
•Authentication of PAP access requests against an LDAP user entry that uses the SSHA algorithm to
hash the password attribute
•Configuration of the Prime Access Registrar server to dynamically determine how password
attributes retrieved from LDAP are encrypted and process them accordingly
This enhancement is 100% backwards compatible. All previously supported values for the
PasswordEncryptionStyle property are still supported and still provide the same behavior. The only
noticeable change is that dynamic is now the default value for the PasswordEncryptionStyle property.
This section contains the following topics:
•Remote LDAP Server Password Encryption
•Dynamic Password Encryption
•Logs
Remote LDAP Server Password Encryption
Apart from the two values, none and crypt, of the PasswordEncryptionStyle property on a Remote
LDAP Server, SHA-1 supports adds three additional values for the PasswordEncryptionStyle property.
Table 17-2 lists the valid values for this property and describes the corresponding behavior.
Table 17-2 Remote LDAP Server Password Encryption Style Values
PasswordEncryptionStyle Cisco Prime Access Registrar Behavior
none All passwords retrieved from this LDAP server are assumed to be
returned to Prime Access Registrar as clear text. (There is no change in
this functionality.)
crypt All passwords retrieved from this LDAP server are assumed to be
returned to Prime Access Registrar as passwords encrypted using the
UNIX crypt algorithm. (There is no change in this functionality.)
Passwords can be preceded by the {crypt} prefix, which is stripped
before comparing passwords.

17-22
Cisco Prime Access Registrar 6.1 User Guide
OL-29756-01
Chapter 17 Using Cisco Prime Access Registrar Server Features
SHA-1 Support for LDAP-Based Authentication
Dynamic Password Encryption
When using the dynamic setting for the PasswordEncryptionStyle property on a Remote LDAP Server,
the Prime Access Registrar server looks for the prefixes listed in Table 17-3 to determine if encryption
or a hash algorithm should be used during password comparison.
Note Password prefixes are not case-sensitive.
The default value for the PasswordEncryptionStyle property on a Remote LDAP Server is dynamic.
SHA-1 All passwords retrieved from this LDAP server are assumed to be
returned to Prime Access Registrar as a Base64-encoded version of the
user’s password after it has been hashed using the SHA-1 mechanism
(as defined by Netscape).
Passwords can be preceded by the {sha} prefix, which is stripped
before comparing passwords.
SSHA-1 All passwords retrieved from this LDAP server are assumed to be
encrypted/hashed using the SSHA mechanism (as defined by
Netscape). Passwords can be preceded by the {ssha} prefix, which is
stripped before comparing passwords.
Note This is a Netscape/iPlanet-specific mechanism.
dynamic The value instructs Prime Access Registrar to choose the encryption
mechanism on a case-by-case basis after it determines the presence of
a known prefix, which the LDAP server prepends to the value of the
password attribute.
For example, if the following was returned from an LDAP server as a
password attribute:{SHA}qZk+NkcGgWq6PiVxeFDCbJzQ2J0=,
the password would be processed using the SHA-1 mechanism. This
value will be the new default for the PasswordEncryptionStyle
property.
Table 17-2 Remote LDAP Server Password Encryption Style Values (continued)
PasswordEncryptionStyle Cisco Prime Access Registrar Behavior
Table 17-3 Remote LDAP Server Password Prefix Values
Password Prefix Encryption/Hash Algorithm Used
none None; when no known prefix is found, the password attribute is assumed to be
in clear text.
{crypt} UNIX crypt algorithm
{sha} Secure Hash Algorithm, version 1 (SHA-1)
{ssha} SSHA-1, as defined by Netscape.

17-23
Cisco Prime Access Registrar 6.1 User Guide
OL-29756-01
Chapter 17 Using Cisco Prime Access Registrar Server Features
Dynamic Attributes
Note Using the dynamic setting for the PasswordEncryptionStyle property will require a bit more processing
for each password comparison. When using dynamic, the Prime Access Registrar server must examine
each password for a known prefix. This should have no visible impact on performance.
Logs
Turn on trace to level 4 to indicate (via the trace log) which password comparison method is being used.
Dynamic Attributes
Prime Access Registrar supports dynamic values for the configuration object properties listed below.
Dynamic attributes are similar to UNIX shell variables. With dynamic attributes, the value is evaluated
at run time. All of the objects that support dynamic attributes will have validation turned off in aregcmd.
This section contains the following topics:
•Object Properties with Dynamic Support
•Dynamic Attribute Format
•Configuration
•Example
•Notes
•Validation
Object Properties with Dynamic Support
The following object properties support dynamic values:
Radius
DefaultAuthenticationService
DefaultAuthorizationService
DefaultAccountingService
DefaultSessionManager
IncomingScript
OutgoingScript
Note Do not use the following environment variables:
Accounting-Service for the /Radius/DefaultAccountingService, Authentication-Service for
the /Radius/DefaultAuthenticationService, or Authorization-Service for the
/Radius/DefaultAuthorizationService
User-Profile for the BaseProfile, User-Group for the Group, User-Authorization for the
AuthorizationScript, Session-Manager for the DefaultSessionManager, or Session-Service
for the DefaultSessionService.

17-24
Cisco Prime Access Registrar 6.1 User Guide
OL-29756-01
Chapter 17 Using Cisco Prime Access Registrar Server Features
Dynamic Attributes
/Radius/Clients
client1/
IncomingScript
OutgoingScript
/Radius/Userlist/Default
user1/
Group
BaseProfile
AuthenticationScript
AuthorizationScript
/Radius/UserGroup
Group1/
BaseProfile
AuthenticationScript
AuthorizationScript
/Radius/Vendor
Vendor1/
IncomingScript
OutgoingScript
/Radius/Service
Service1/
IncomingScript
OutgoingScript
OutageScript
OutagePolicy
/Radius/RemoteServers
remoteserver1/
IncomingScript
OutgoingScript
Remoteldapserver1/
Searchpath
Filter
Note To differentiate the properties that support dynamic attributes, we place a tilde (~) after each
property, as in IncomingScript~. However, when the Prime Access Registrar administrator
is required to set values for those properties, continue to use the original property name, such
as set IncomingScript ${e|realm}{Test}. The tilde is only for visual effect, and including the
tilde will generate an error (“310 command Failed.”)

17-25
Cisco Prime Access Registrar 6.1 User Guide
OL-29756-01
Chapter 17 Using Cisco Prime Access Registrar Server Features
Tunneling Support Feature
Dynamic Attribute Format
The format of the dynamic attribute is:
${eqp|attribute-name}{default-name}
where e stands for environment dictionary, q stands for request dictionary, and p stands for response
dictionary. You can use e, q, and p in any order. The attribute name is the name for the attribute from
environment dictionary, request dictionary, or response dictionary.
For example,
/Radius
DefaultAuthenticationService = ${eq|realm}{local-users}
The default Authentication Service is determined at run time. Prime Access Registrar first checks to see
if there is one value of realm in the environment dictionary. If there is, it becomes the value of
DefaultAuthenticationService. If there is not, check the value of realm in the request dictionary. If there
is one value, it becomes the value of DefaultAuthenticationService. Otherwise, local-users is the
DefaultAuthenticationService. If we do not set local-users as the default value, the
DefaultAuthenticationService is null. The same concept applies to all other attribute properties.
The validation for the dynamic values of the object property will only validate the default value. In the
above example, Prime Access Registrar will do validation to check whether local-users is one of services
defined in the service subdirectory.
Note When setting specific property values, do not use the tilde (~) in the property name. Doing so generates
a 310 Command Failed error.
Tunneling Support Feature
Tunneling support is strictly based upon the IETF RFC: “RADIUS Attributes for Tunnel Protocol
Support” (http://www.ietf.org/rfc/rfc2868.txt).
Table 17-4 lists the tunneling attributes supported in this Prime Access Registrar release.
The tunneling attribute has the following format:
Table 17-4 Tunneling Attributes Supported by Prime Access Registrar
Attribute Number Attribute
64 Tunnel-Type
65 Tunnel-Medium-Type
66 Tunnel-Client-Endpoint
67 Tunnel-Server-Endpoint
69 Tunnel-Password
81 Tunnel-Private-Group-ID
82 Tunnel-Assignment-ID
83 Tunnel-Preference
90 Tunnel-Client-Auth-ID
91 Tunnel-Server-Auth-ID

17-26
Cisco Prime Access Registrar 6.1 User Guide
OL-29756-01
Chapter 17 Using Cisco Prime Access Registrar Server Features
Tunneling Support Feature
This section contains the following topics:
•Configuration
•Example
•Notes
•Validation
Configuration
1. Configure the tag attributes as untagged attributes under the /Radius/Advanced/Attribute
Dictionary directory (for example, Tunnel-Type).
2. Attach the “_tag” tag to these attributes when configuring the attributes under all of the other
directories as tagged attributes (for example, Tunnel-Type_tag10 under the /Radius/Profiles/test
directory). Without the tag number, the default value is (_tag = _tag0).
Example
/Radius/Advanced/Attribute Dictionary
/Tunnel-Client-ID
Name = Tunnel-Client-Endpoint
Description =
Attribute = 66
Type = STRING
Min = 0
Max = 253
/Radius/Profiles/test
Name = test
Description =
/Attributes
Tunnel-Client-Endpoint_tag3 = “129.56.112.1”
Notes
1. “_tag” is reserved for the tunneling attributes. No other attributes should include this suffix.
2. The tag number value can range from 0 through 31.
Validation
The Prime Access Registrar server checks whether the tag attributes are defined under the
/Radius/Advanced/Attribute Dictionary directory. The server also checks whether the tag number falls
within the range (0-31).
(1 byte) (1 byte) (1 byte) (variable number of bytes)
Type Length Tag Value

17-27
Cisco Prime Access Registrar 6.1 User Guide
OL-29756-01
Chapter 17 Using Cisco Prime Access Registrar Server Features
xDSL VPI/VCI Support for Cisco 6400
xDSL VPI/VCI Support for Cisco 6400
To provide this support, a distinction must be made between device authentication packets and regular
user authentication packets. This section contains the following topics:
•Using User-Name/User-Password for Each Cisco 6400 Device
•Format of the New User-Name Attribute
Using User-Name/User-Password for Each Cisco 6400 Device
This approach assumes that for every 6400 NAS, a device-name/device-password is created for each.
Following are the required changes:
For each NAS in Prime Access Registrar:
Name = test6400-1
Description =
IPAddress = 209.165.200.224
SharedSecret = secret
Type = NAS
Vendor =
IncomingScript =
OutgoingScript =
Device-Name = theDevice
Device-Password = thePassword
When the 6400 sends out the device authentication packet, it might have different
User-Name/User-Password attributes for each 6400 NAS. When Prime Access Registrar receives the
packet, it tries to obtain the Device-Name/Device-Password attributes from the NAS entry in the
Prime Access Registrar configuration database. When the User-Name/User-Password in the packet
match the configured Device-Name/Device-Password attribute values, Prime Access Registrar assumes
that it must get the device. The next step is to replace the User-Name attribute with the concatenated
<module>/<slot>/<port> string. From this point, the packet is treated as a regular packet.
Note A user record with the name of the concatenated string must be created.
Format of the New User-Name Attribute
After the device is identified, the User-Name attribute is replaced with the new value. This new value is
the concatenation of 6400 <module>/<slot>/<port> information from the NAS-Port attribute and the
packet is treated as a regular user authentication from this point on.
Note This format only supports NAS Port Format D. See Cisco IOS documentation for more information
about NAS port formats.
The format of the new User-Name attribute is the printf of “%s-%d-%d-%d-%d-%d” for the following
values:
NAS-IP—in dot format of the NAS-Ip-Address attribute. For example, 10.10.10.10.
slot—apply mask 0xF0000000 on NAS-Port attribute and shift right 28 bits. For example, NAS-Port is
0x10000000, the slot value is 1.

17-28
Cisco Prime Access Registrar 6.1 User Guide
OL-29756-01
Chapter 17 Using Cisco Prime Access Registrar Server Features
Apply Profile in Cisco Prime Access Registrar Database to Directory Users
module—apply mask 0x08000000 on NAS-Port attribute and shift right 27 bits. For example, NAS-Port
is 0x08000000, the module value is 1.
port—apply mask 0x07000000 on NAS-Port attribute and shift right 24 bits. For example, NAS-Port is
0x06000000, the port value is 6.
VPI—apply mask 0x00FF0000 on NAS-Port attribute and shift right 16 bits. For example, NAS-Port is
0x00110000, the VPI value is 3.
VCI—apply mask 0x0000FFFF on NAS-Port attribute. For example, NAS-Port is 0x00001001, the VCI
value is 9.
Apply Profile in Cisco Prime Access Registrar Database to
Directory Users
You can define the User-Profile and User-Group environment variables in the directory mapping and
Prime Access Registrar will apply the profiles defined in the Prime Access Registrar database to each
directory user having any of these two variables set.
This section contains the following topics:
•User-Profile
•User-Group
•Example User-Profile and User-Group Attributes in Directory User Record
User-Profile
This attribute is of type string with the format:
<Value1>::<Value2> …
The User-Profile attribute is intended to hold a list of profile names. <Value1> and <Value2> represent
the names of the profiles. They are separated by the “::” character, therefore, the “::” can not be part of
the profile name. The order of values in the string has significance, as the profiles are evaluated from left
to right. In this example, profile <Value2> is applied after profile <Value1>.
Assume the user record has a field called UserProfile that holds the name of the profile that applies to
this user. This field is mapped to the environment attribute User-Profile. Following is how the mapping
is done with aregcmd:
QuickExample/
Name = QuickExample
Description =
Protocol = ldap
IPAddress = 209.165.200.224
Port = 389
ReactivateTimerInterval = 300000
Timeout = 15
HostName = QuickExample.company.com
BindName =
BindPassword =
UseSSL = FALSE
SearchPath = "o=Ace Industry, c=US"
Filter = (uid=%s)
UserPasswordAttribute = password
LimitOutstandingRequests = FALSE

17-29
Cisco Prime Access Registrar 6.1 User Guide
OL-29756-01
Chapter 17 Using Cisco Prime Access Registrar Server Features
Directory Multi-Value Attributes Support
MaxOutstandingRequests = 0
MaxReferrals = 0
ReferralAttribute =
ReferralFilter =
PasswordEncryptionStyle = None
LDAPToEnvironmentMappings/
UserProfile = User-Profile
LDAPToRadiusMappings/
After Prime Access Registrar authenticates the user, it checks whether User-Profile exists in the
environment dictionary. If it finds User-Profile, for each value in User-Profile, Prime Access Registrar
looks up the profile object defined in the configuration database and adds all of the attributes in the
profile object to the response dictionary. If any attribute is included in more than one profile, the newly
applied profile overrides the attribute in the previous profile.
User-Group
You can use the User-Group environment variable to apply the user profile as well. In
Prime Access Registrar, a user can belong to a user group, and that user group can have a pointer to a
user profile. When Prime Access Registrar finds that a packet has User-Group set, it obtains the value
of the User-Profile within the user group, and if the User-Profile exists, it applies the attributes defined
in the user profile to that user.
Note that in Prime Access Registrar, every user can also directly have a pointer to a user profile.
Prime Access Registrar applies profiles in the following order:
1. If the user profile defined in the user group exists, apply it.
2. If the user profile defined in the user record exists, apply it.
The profile in User-Group is more generic than in User-Profile. Therefore, Prime Access Registrar
applies the profile from generic to more specific.
Example User-Profile and User-Group Attributes in Directory User Record
You can use an existing user attribute in the user record to store profile info. When this is a new attribute,
we suggest you create a new auxiliary class AR_UserRecord for whichever user class is used.
AR_User_Profile and AR_User_Group are two optional members in this class. They are of type string.
The mapping is as follows:
LDAPToEnvironmentMappings/
AR_User_Profile = User-Profile
AR_User_Group = User-Group
Directory Multi-Value Attributes Support
If any attributes mapped from the LDAP directory to the Prime Access Registrar response dictionary are
multivalued, the attributes are mapped to multiple RADIUS attributes in the packet.

17-30
Cisco Prime Access Registrar 6.1 User Guide
OL-29756-01
Chapter 17 Using Cisco Prime Access Registrar Server Features
MultiLink-PPP (ML-PPP)
MultiLink-PPP (ML-PPP)
Prime Access Registrar supports MultiLink-PPP (ML-PPP). ML-PPP is an IETF standard, specified by
RFC 1717. It describes a Layer 2 software implementation that opens multiple, simultaneous channels
between systems, providing additional bandwidth-on-demand, for additional cost. The ML-PPP standard
describes how to split, recombine, and sequence datagrams across multiple B channels to create a single
logical connection. The multiple channels are the ports being used by the Network Access Server (NAS).
During the AA process, Prime Access Registrar authenticates the user connection for each of its
channels, even though they belong to the same logical connection. The Authentication process treats the
multilink connection as if it is multiple, single link connections. For each connection,
Prime Access Registrar creates a session dedicated for management purposes. The session stays active
until you logout, which subsequently frees up all of the ports in the NAS assigned to each individual
session, or until the traffic is lower than a certain threshold so that the secondary B channels are
destroyed thereafter. Prime Access Registrar has the responsibility of maintaining the active session list
and discards any session that is no longer valid in the system, by using the accounting stop packet issued
from NAS. The multiple sessions that were established for a single logical connection must be destroyed
upon the user logging out.
In addition, the accounting information that was gathered for the sessions must be aggregated for the
corresponding logical connection by the accounting software. Prime Access Registrar is only
responsible for logging the accounting start and accounting stop times for each session. As those
sessions belong to the same bundle, IETF provides two standard RADIUS attributes to identify the
related multilink sessions. The attributes are Acct-Multi-Session-Id (attribute 50) and
Acct-Link-Count (attribute 51), where Acct-Multi-Session-Id is a unique Accounting identifier used
to link multiple related sessions in a log file, and Acct-Link-Count provides the number of links known
to have existed in a given multilink session at the time the Accounting record was generated. The
Accounting software is responsible for calculating the amount of the secondary B channel’s connection
time.
The secondary B channel can go up and down frequently, based upon traffic. The Ascend NAS supports
the Target-Util attribute, which sets up the threshold for the secondary channel. When the traffic is
above that threshold the secondary channel is up, and when the traffic is below that threshold, the
secondary B channel is brought down by issuing an Accounting stop packet to Prime Access Registrar.
On the other hand, if you bring down the primary channel (that is, log out), the secondary B channel is
also destroyed by issuing another Accounting stop packet to Prime Access Registrar.
Table 17-5 lists ML-PPP related attributes.
Following are sample configurations for ML-PPP:
/Radius
/Profile
/Default-ISDN-Users
Table 17-5 ML-PPP Attributes
Number Attribute Cisco NAS (IOS 11.3 Release) Ascend NAS
44 Acct-Session-Id Supported Supported
50 Acct-Multi-Session-Id Supported Supported
51 Acct-Link-Count Supported Supported
62 Port-Limit Supported Supported
124 Target-Util Not Supported Supported
125 Maximum-Channels Supported Supported

17-31
Cisco Prime Access Registrar 6.1 User Guide
OL-29756-01
Chapter 17 Using Cisco Prime Access Registrar Server Features
Dynamic Updates Feature
Name = Default-ISDN-Users
Description =
Attributes/
Port-Limit = 2
Target-Util = 70
Session-Timeout = 70
/Radius
/UserGroups
/ISDN-Users
Name = ISDN-Users
Description = “ Users who always use ISDN”
BaseProfile = Default-ISDN-Users
Authentication-Script =
Authorization-Script =
The Port-Limit attribute controls the number of concurrent sessions a user can have. The Target-Util
attribute controls the threshold level at which the second B channel should be brought up.
Dynamic Updates Feature
The Dynamic Updates feature enables changes to server configurations made using aregcmd to take
effect in the Prime Access Registrar server after issuing the save command, eliminating the need for a
server reload after making changes.
Table 17-6 lists the RADIUS object and its child objects. For each object listed, the Add and Modify or
Delete columns indicate whether a dynamic update occurs after adding, modifying, or deleting an object
or attribute. Entries in the Add and Modify or Delete columns also apply to child objects and child
attributes of the objects listed, unless the child object is explicitly listed below the object, such as
/Radius/Advanced/Ports or /Radius/Advanced/Interfaces.
Table 17-6 Dynamic Updates Effect on Radius Server Objects
Object Add
Modify or
Delete
Radius Yes Yes
UserLists Yes Yes
UserGroups Yes Yes
Policies Yes Yes
Clients Yes Yes
Vendors Yes Yes
Scripts Yes Yes
Services Yes Yes
SessionManagers Yes No
ResourceManagers Yes No
Profiles Yes Yes
Rules Yes Yes
Translations Yes Yes
TranslationGroups Yes Yes

17-32
Cisco Prime Access Registrar 6.1 User Guide
OL-29756-01
Chapter 17 Using Cisco Prime Access Registrar Server Features
NAS Monitor
The Dynamic Updates feature is subject to the following limitations:
•Changes to the Ports or Interfaces objects are not dynamically updated. An aregcmd reload
command must be issued for these changes to be propagated to the Prime Access Registrar server.
•Changes (modifications and deletions) to existing Session Manager and Resource Manager objects
are not dynamically updated. An aregcmd reload command must be issued for these changes to be
propagated to the Prime Access Registrar server. However, additions of new Session Manager and
Resource Manager objects are dynamically updated. Active sessions and allocated resources are
preserved in this case.
•Changes to the Prime Access Registrar configuration might not be immediately propagated to the
server. Dynamic updates are only carried out in a safe environment (that is, when packets are not
being processed and when packet processing can be delayed until the changes can be made on the
server safely). Dynamic updates will yield to packet processing when appropriate, thus not
significantly impacting server performance.
•Changes to SNMP require the Prime Access Registrar server to be restarted
(/etc/init.d/arservagt restart)
NAS Monitor
The ability to monitor when a NAS is down (really only unreachable from Prime Access Registrar) is
provided by nasmonitor. This program will repeatedly query a TCP port at the specified IP address until
the device (NAS) is reachable. If the NAS is not reachable after a period of time, a warning e-mail is
sent; if the NAS is still not reachable after another period of time, a message is sent to
Prime Access Registrar to release all sessions associated with that NAS. The port to query, the query
frequency, the first time interval, the back-off time interval, and the E-mail address to send to are all
configurable (with defaults); the only required parameter is the NAS IP address. This program will work
for any device that has a TCP port open; it can either be run by hand, when desired, or put in a cron job.
See nasmonitor -h for details.
Note You must have tclsh installed in /usr/local/bin to use nasmonitor. tclsh is part of the standard Tcl
installation that can be downloaded from http://www.scriptics.com.
RemoteServers Yes No
Replication No No
Advanced Yes Yes
SNMP No No
Ports No No
Interfaces No No
Table 17-6 Dynamic Updates Effect on Radius Server Objects (continued)
Object Add
Modify or
Delete

17-33
Cisco Prime Access Registrar 6.1 User Guide
OL-29756-01
Chapter 17 Using Cisco Prime Access Registrar Server Features
Automatic Information Collection (arbug)
Automatic Information Collection (arbug)
You can use the script arbug to collect information about your Prime Access Registrar server. The
results are collected into a tarball that can be e-mailed or ftped to Cisco as requested.
arbug collects all the relevant information needed to report a problem to Prime Access Registrar
support. The goal of the arbug script is to make sure all the necessary information is collected.
Note The arbug script neither updates nor replaces any system or Prime Access Registrar-related
configuration.
This section contains the following topics:
•Running arbug
•Files Generated
Running arbug
To run the arbug script, change directory to /cisco-ar/bin and enter the following:
./arbug
The following is a typical sequence.
Looking around...
Cluster:
User: admin
Password:
The report /tmp/arbug.10085/arbug.tar is ready to send; you
may want to compress it first using gzip or compress.
hostname user_name bin>
Files Generated
The arbug script generates five files that are compressed into a tarball. Table 17-7 provides a summary
of the information found in each of the files.
Table 17-7 Files Generated by arbug
File Description
car.de bug.tar.* Machine-specific information including OS type, RAM details, disk
space information, swap space information, patch information and open
file details.
car.config.tar.* Prime Access Registrar server configuration, server statistics, database
dump by taking the administrator username and password as the input.
car.confini.tar.* Information about ODBC .ini files and SNMP configuration
car.core.tar.* Core files if any are present
car.logcerscr.tar.* Information from scripts directory, certificate directory, license directory

17-34
Cisco Prime Access Registrar 6.1 User Guide
OL-29756-01
Chapter 17 Using Cisco Prime Access Registrar Server Features
Simultaneous Terminals for Remote Demonstration
Simultaneous Terminals for Remote Demonstration
Multiple people can view and interact in a single demonstration by using the share-access program, a
standard GNU release with a special configuration for use with Prime Access Registrar. To run screen,
a technical support specialist (CSE or DE) will telnet to your server and log in as cisco. While you run
/opt/CSCOar/bin/share-access (assuming /opt/CSCOar is the Prime Access Registrar path) as root,
the CSE or DE runs /opt/CSCOar/bin/share-access -r root. Now both people (or more) can see what
the other types, as well as the results of the commands entered. The special Prime Access Registrar
configuration only allows root and cisco to run screen. To end a share-access session, type Control-D.
Support for RADIUS Check Item Attributes
Prime Access Registrar supports RADIUS check item attributes configuration at the user and group
levels. You can configure the Prime Access Registrar server to check for attributes that must be present
or attributes that must not be present in the Access-Request packet for successful authentication.
When using check item attributes, the Prime Access Registrar server will reject Access-Requests if:
•Any of the configured check item attributes are not present in the Access-Request packet
•Any of the Access-Request packet’s check item attribute values do not match with those configured
check item attribute values
For remote servers using either LDAP or ODBC, Prime Access Registrar allows for mapping of certain
LDAP or ODBC fields to check item attributes. The mapped attributes can be used as check item
attributes while processing the Access-Request packets.
When you configure check item attributes at both the user and group levels, the Prime Access Registrar
server first checks the attributes of the user level before those of the group level. The
Prime Access Registrar server must first authenticate the user’s password in the Access-Request before
validating the check item attributes.
The Prime Access Registrar server logs details about any rejected Access-Requests as a result of check
items processing.
Configuring Check Items
You u s e aregcmd to configure check item attributes.
Configuring User Check Items
To configure UserList check item attributes:
Step 1 Log into the Prime Access Registrar server, and use aregcmd to navigate to
//localhost/Radius/UserLists/default/bob.
[ //localhost/Radius/UserLists/Default/bob ]
Name = bob
Description =
Password = <encrypted>
AllowNullPassword = FALSE
Enabled = TRUE
Group~ = PPP-users
BaseProfile~ =
AuthenticationScript~ =

17-35
Cisco Prime Access Registrar 6.1 User Guide
OL-29756-01
Chapter 17 Using Cisco Prime Access Registrar Server Features
User-Specific Attributes
AuthorizationScript~ =
UserDefined1 =
Attributes/
CheckItems/
Step 2 Change directory to CheckItems.
cd CheckItems
[ //localhost/Radius/UserLists/Default/bob/CheckItems ]
Step 3 Use set to add any attributes to be used as check items.
set calling-Station-Id 4085551212
save
Configuring Usergroup Check Items
To configure UserGroups check item attributes:
Step 1 Log into the Prime Access Registrar server, and use aregcmd to navigate to
//localhost/Radius/UserGroups/Default.
cd /Radius/UserGroups/Default
[ //localhost/Radius/UserGroups/Default ]
Name = Default
Description = "Users who sometimes connect using PPP and sometimes connect "
BaseProfile~ =
AuthenticationScript~ =
AuthorizationScript~ = AuthorizeService
Attributes/
CheckItems/
Step 2 Change directory to CheckItems.
cd CheckItems
[ //localhost/Radius/UserGroups/Default/CheckItems ]
Step 3 Use set to add any attributes to be used as check items.
set NAS-IP-Address 10.10.10.10
save
User-Specific Attributes
The Prime Access Registrar server supports user-specific attributes which enables the
Prime Access Registrar server to return attributes on a per-user or per-group basis without having to use
profiles.

17-36
Cisco Prime Access Registrar 6.1 User Guide
OL-29756-01
Chapter 17 Using Cisco Prime Access Registrar Server Features
Packet of Disconnect
The Prime Access Registrar server includes a property called HiddenAttributes to the User and
UserGroup object. The HiddenAttributes property contains a concatenation of all user-level reply
attributes. The HiddenAttributes property is not displayed, nor can the value be set or unset using the
command-line interface.
The order of application of attributes is as follows:
1. UserGroup Base Profile
2. UserGroup Attributes
3. User Base Profile
4. User Attributes
The value of the HiddenAttributes property is used dynamically to construct and populate a virtual
attributes directory in the User object. All values from the Attributes directory will go into the
HiddenAttributes property. This occurs transparently when the administrator issues a save command.
Packet of Disconnect
Prime Access Registrar supports the Packet of Disconnect (POD) feature that enables the
Prime Access Registrar server to send disconnect requests (PODs) to a NAS so that all the session
information and the resources associated with the user sessions can be released. Prime Access Registrar
can also determine when to trigger and send the POD.
For example, when a PDSN handoff occurs during a mobile session, the new PDSN sends out a new
access-request packet to Prime Access Registrar for the same user. Prime Access Registrar should detect
this handoff by the change in NAS-Identifier in the new request and trigger sending a POD to the old
PDSN if it supports POD. Prime Access Registrar also provides an option for administrator to initiate
sending POD requests through the command-line interface (CLI) for any user session.
Prime Access Registrar forwards POD requests from external servers to the destination NAS.
This section contains the following topics:
•Configuring Packet of Disconnect
•Proxying POD Requests from External Servers
•CLI Options for POD
Configuring Packet of Disconnect
This section describes how to configure the POD feature in the following:
•Configuring the Client Object
•Configuring a Resource Manager for POD
Configuring the Client Object
You should enable POD for each client object that might want to send disconnect requests to those
clients. You enable POD in a client object using the EnableDynamicAuthorization property. This
property is set to FALSE by default when you create a client object. The following example shows the
default configuration for a new client object, NAS1.

17-37
Cisco Prime Access Registrar 6.1 User Guide
OL-29756-01
Chapter 17 Using Cisco Prime Access Registrar Server Features
Packet of Disconnect
[ //localhost/Radius/Clients/NAS1 ]
Name = nas1
Description =
IPAddress =
SharedSecret =
Type = NAS
Vendor =
IncomingScript~ =
OutgoingScript~ =
EnableDynamicAuthorization = FALSE
If the Prime Access Registrar server might send a POD to this client, set the
EnableDynamicAuthorization property to TRUE. When you set this property to TRUE, the
Prime Access Registrar server creates a DynamicAuthorizationServer subdirectory under the client
object. The following example shows a newly created DynamicAuthorizationServer subdirectory:
[ //localhost/Radius/Clients/NAS1/DyanamicAuthorizationServer ]
Port = 3799
DynamicAuthSharedSecret =
InitialTimeout = 5000
MaxTries = 3
PODAttributeGroup =
COAAttributeGroup =
The default port is 3799. You can change the port, if desired.
The property DynamicAuthSharedSecret is initially set to the same as value as the client's SharedSecret
property when you set EnableDynamicAuthorization to TRUE. You can chose to configure a different
secret for POD in this subdirectory.
The InitialTimeout property represents the number of milliseconds used as a timeout for the first attempt
to send a POD packet to a remote server. For each successive retry on the same packet, the previous
timeout value used is doubled. You must specify a number greater than zero, and the default value is 5000
(or 5 seconds).
The MaxTries property represents the number of times to send a proxy request to a remote server before
deciding the server is offline. You must specify a number greater than zero, and the default is 3.
The PODAttributeGroup property points to a group of attributes to be included in a disconnect-request
packet sent to this client.
You can create and configure the PODAttributeGroup in the /Radius/Advanced/AttributeGroups/
directory. The default group contains commonly used POD attributes NAS-Port and Acct-Session-Id.
The COAAttributeGroup property is used with the Change of Authorization (CoA) feature, also known
as hot-lining.
Configuring a Resource Manager for POD
Prime Access Registrar provides a resource manager type called session-cache. When you set a resource
manager to session-cache, the resource manager’s configuration contains a subdirectory called
AttributesToBeCached. The following is an example Resource Manager set to type session-cache:
[ //localhost/Radius/ResourceManagers/PODresourceMgr ]
Name = PODresourceMgr
Description =
Type = session-cache
OverwriteAttributes = FALSE
AttributesToBeCached/
QueryMappings/

17-38
Cisco Prime Access Registrar 6.1 User Guide
OL-29756-01
Chapter 17 Using Cisco Prime Access Registrar Server Features
Packet of Disconnect
The attributes you configure under the AttributesToBeCached directory are cached in the session
record during session management. The cached attributes are then sent in the disconnect-request for this
session.
The OverwriteAttributes property indicates whether to overwrite the existing attributes if there are any
in the session record. Since this resource manager can be invoked during Access-Request as well as
Accounting-Start processing, the OverwriteAttributes can be used to control if the attributes cached
during Access-Request processing can be overwritten with the attributes available during
Accounting-Start processing.
The following is an example of a typical session-cache resource manager:
[ //localhost/Radius/ResourceManagers/RM-New ]
Name = RM-New
Description =
Type = session-cache
OverwriteAttributes = TRUE
AttributesToBeCached/
1. Framed-IP-Address
2. CDMA-Correlation-ID
QueryMappings/
The attributes used in the example can be added as an indexed list using add or set commands (in any
order).
Proxying POD Requests from External Servers
Prime Access Registrar can also proxy the disconnect requests received from external servers. To make
Prime Access Registrar listen for external POD requests, the ListenForDynamicAuthorizationRequests
property under /Radius/Advanced should be set to TRUE. The default value for this is FALSE. The
default POD listening port is 3799. However this can be changed by configuring a new port of type pod
under /Radius/Advanced/Ports and setting the new port number accordingly.
For security reasons, the source of a POD request should be configured as a remote server in
Prime Access Registrar and the remote server should be configured to accept PODs. Set the property
AcceptDynamicAuthorizationRequests to TRUE to do this. The default for this is FALSE. POD requests
from unauthorized sources are silently discarded.
CLI Options for POD
Prime Access Registrar has options for the query-sessions and release-sessions CLI commands that
enable querying or releasing sessions based on the session’s age. Another option enables querying or
releasing sessions based on any valid RADIUS attribute available in the user's session record. This
section contains the following topics:
•query-sessions
•release-sessions
query-sessions
The syntax for using query-sessions with-Age option is the following:
query-sessions <path> with-Age <value>

17-39
Cisco Prime Access Registrar 6.1 User Guide
OL-29756-01
Chapter 17 Using Cisco Prime Access Registrar Server Features
Configuring Change of Authorization Requests
Where <path> is the path to the server, session-manager or resource manager and <value> is the
minimum age of the session specified in minutes or hours with options M, Minutes, H or Hours. This
command returns all sessions that are older than the given age value.
The syntax for using query-sessions with-Attribute option is the following:
query-sessions <path> with-Attribute <name> <value>
Where <name> is the RADIUS attribute name and <value> is the value of the attribute to be matched.
This command returns the sessions where a session record contains and matches the attribute value
specified in <value> field.
release-sessions
The syntax for using release-sessions with-Age option is:
release-sessions <path> with-Age <value>
Where, <path> is the path to the server, session-manager or resource manager and <value> is the
minimum age of the session specified in minutes or hours with options M for Minutes, H for Hours. This
command returns all sessions that are older than the given age value.
The syntax for using release-sessions with-Attribute option is:
release-sessions <path> with-Attribute <name> <value>
Where, <name> is the RADIUS attribute name and <value> is the value of the attribute to be matched.
This command returns the sessions where a session record contains and matches the attribute value
specified in <value> field.
A new option is also available for release-sessions command to enable an administrator to trigger
sending a POD for a user after the session is released.
release-sessions <path> with-<type> <value> [send-pod]
Where, <path> is the path to the server, Session Manager, or Resource Manager and <type> is one of the
following: NAS, User, IP-Address ID, or Age. The release-sessions command with an optional
[send-pod] at the end results in Prime Access Registrar sending a POD request. The PoD requests are
directed to port number configured in /radius/clients/<client name>/DynamicAuthorizationServer/port.
By default it is set to 3799. To configure udp xxx, set the port value as:
/radius/clients/<client name>/DynamicAuthorizationServer/port = xxx
Configuring Change of Authorization Requests
Prime Access Registrar supports Change of Authorization (CoA) requests as defined in Internet RFC
3576 that provides a way to change authorization status of users already logged on to the network. The
CoA feature, also known as hot-lining, provides a wireless operator the ability to efficiently address
issues with users that might otherwise be unauthorized to access packet data services. When a problem
occurs that causes a user to be unauthorized to use the packet data service, a wireless operator can use
the CoA feature to resolve the problem and return the user’s packet data services.

17-40
Cisco Prime Access Registrar 6.1 User Guide
OL-29756-01
Chapter 17 Using Cisco Prime Access Registrar Server Features
Configuring Change of Authorization Requests
When a user is hot-lined, their packet data service is redirected to a hot-line application that notifies the
user of issues that might be blocking their access to normal packet data services. Hot-lining provides
users with a way to address the issues blocking their access, such as billing issues, a prepaid account that
has been depleted, or an expired credit card.
The CoA feature provides an option to the wireless operator administrator to send CoA packets to the
client device when a user needs to be hot-lined. When to send a CoA request to a user depends on the
wireless operator’s site-specific policies.
Configuring the Client Object
You should enable CoA for each client object that might want to send CoA requests to those clients. You
enable CoA in a client object using the EnableDynamicAuthorization property. This property is set to
FALSE by default when you create a client object. The following example shows the default
configuration for a new client object, NAS1.
[ //localhost/Radius/Clients/NAS1 ]
Name = nas1
Description =
IPAddress =
SharedSecret =
Type = NAS
Vendor =
IncomingScript~ =
OutgoingScript~ =
EnableDynamicAuthorization = FALSE
If the Prime Access Registrar server might send a CoA request to this client, set the
EnableDynamicAuthorization property to TRUE. When you set this property to TRUE, the
Prime Access Registrar server creates a DynamicAuthorizationServer subdirectory under the client
object. The following example shows a newly created DynamicAuthorizationServer subdirectory:
[ //localhost/Radius/Clients/NAS1/COA ]
Port = 3799
DynamicAuthSharedSecret =
InitialTimeout = 5000
MaxTries = 3
PODAttributeGroup =
COAAttributeGroup =
The default port is 3799. You can change the port, if desired.
The property DynamicAuthSharedSecret is initially set to the same as value as the client's SharedSecret
property when you set EnableDynamicAuthorization to TRUE. You can chose to configure a different
secret for CoA in this subdirectory.
The InitialTimeout property represents the number of milliseconds used as a timeout for the first attempt
to send a CoA packet to a remote server. For each successive retry on the same packet, the previous
timeout value used is doubled. You must specify a number greater than zero, and the default value is 5000
(or 5 seconds).
The MaxTries property represents the number of times to send a proxy request to a remote server before
deciding the server is offline. You must specify a number greater than zero, and the default is 3.
The COAAttributeGroup property points to a group of attributes to be included in a CoA request packet
sent to this client.

17-41
Cisco Prime Access Registrar 6.1 User Guide
OL-29756-01
Chapter 17 Using Cisco Prime Access Registrar Server Features
Dynamic DNS
You can create and configure the COAAttributeGroup in the /Radius/Advanced/AttributeGroups/
directory. The default group is not set to any value by default. When an attribute group is configured, the
Prime Access Registrar server includes the attributes in this group in a CoA request. The values for these
attributes are fetched from the user’s session record.
The CoA attribute group configuration can be used with a session-cache Resource Manager. For
example, any new attributes that are to be sent in a CoA request can be configured for caching by the
session-cache Resource Manager so they will be available in the session record when it is to be sent in
the CoA request.
The CoA request might also contain AV pairs from the optional profile name in the query-session CLI
command used to send the CoA request. In a 3GPP2 scenario, a profile containing the Filter-Id attribute
set to a value “Hot-Line Active” can be included when a user is to be hot-lined. This can be used as a
hot-line profile possibly containing other attributes as desired by the wireless operator. Another profile
might be defined containing the Filter-Id attribute with the value “Hot-Line Normal.” This profile can
be used with the query-session CLI command to bring the user back to normal.
The CoA request packet sent by the Prime Access Registrar server conforms to internet RFC 3756. In
response to a CoA request initiated by the Prime Access Registrar server, the client should respond with
a COA-ACK if it is able to hot-line the user based on credentials available in the CoA request. If the
client is unable to hot-line the user for any reason, the client can include an error-cause attribute with the
appropriate reason in a COA-NAK packet.
The Prime Access Registrar server logs all CoA responses. If the Prime Access Registrar server does not
receive a response to a CoA request within the timeout period, it will retransmit for the configured
number of retries, then logs an error if no response is received.
The Prime Access Registrar server forwards proxied CoA requests sent by external servers to the
destination NAS. The CoA requests are proxied based on the NAS-IP-Address in the incoming request.
The proxied CoA requests from external servers are forwarded to the destination NAS only if the source
IP address is configured to accept dynamic authorization requests. The responses received from the NAS
(either COA-ACK or COA-NAK) are forwarded back to the source where the Prime Access Registrar
server received the original proxy request.
Dynamic DNS
Prime Access Registrar supports the Dynamic DNS protocol providing the ability to update DNS
servers. The dynamic DNS updates contain the hostname/IP Address mapping for sessions managed by
Prime Access Registrar.
You enable dynamic DNS updates by creating and configuring new Resource Managers and new Remote
Servers, both of type dynamic-dns. The dynamic-dns Resource Managers specify which zones to use for
the forward and reverse zones and which Remote Servers to use for those zones. The dynamic-dns
Remote Servers specify how to access the DNS Servers.
This section contains the following topics:
•Configuring Dynamic DNS
•Testing Dynamic DNS with radclient

17-42
Cisco Prime Access Registrar 6.1 User Guide
OL-29756-01
Chapter 17 Using Cisco Prime Access Registrar Server Features
Dynamic DNS
Configuring Dynamic DNS
Before you configure Prime Access Registrar you need to gather information about your DNS
environment. For a given Resource Manager you must decide which forward zone you will be updating
for sessions the resource manager will manage. Given that forward zone, you must determine the IP
address of the primary DNS server for that zone. If the dynamic DNS updates will be protected with
TSIG keys, you must find out the name and the base64 encoded value of the secret for the TSIG key. If
the resource manager should also update the reverse zone (ip address to host mapping) for sessions, you
will also need to determine the same information about the primary DNS server for the reverse zone (IP
address and TSIG key).
If using TSIG keys, use aregcmd to create and configure the keys. You should set the key in the Remote
Server or the Resource Manager, but not both. Set the key on the Remote Server if you want to use the
same key for all of the zones accessed through that Remote Server. Otherwise, set the key on the
Resource Manager. That key will be used only for the zone specified in the Resource Manager.
Configuring the Dynamic DNS
To configure the dynamic-dns remote server:
Step 1 Launch aregcmd.
Step 2 Create the dynamic-dns TSIG Keys:
cd /Radius/Advanced/DDNS/TSIGKeys
add foo.com
This example named the TSIG Key, foo.com, which is related to name of the example DNS server we
use. You should choose a name for TSIG keys that reflects the DDNS client-server pair (for example,
foo.bar if the client is foo and the server is bar), but you should use the name of the TSIG Key as defined
in the DNS server.
Step 3 Configure the TSIG Key:
cd foo.com
set Secret <base64-encoded string>
The Secret should be set to the same base64-encoded string as defined in the DNS server. If there is a
second TSIG Key for the primary server of the reverse zone, follow these steps to add it, too.
Step 4 Use aregcmd to create and configure one or more dynamic-dns Remote Servers.
Step 5 Create the dynamic-dns remote server for the forward zone:
cd /Radius/RemoteServers
add ddns
This example named the remote server ddns which is the related to the remote server type. You can use
any valid name for your remote server.
Step 6 Configure the dynamic-dns remote server:
cd ddns
set Protocol dynamic-dns

17-43
Cisco Prime Access Registrar 6.1 User Guide
OL-29756-01
Chapter 17 Using Cisco Prime Access Registrar Server Features
Dynamic DNS
set IPAddress 10.10.10.1 (ip address of primary dns server for zone)
set ForwardZoneTSIGKey foo.com
set ReverseZoneTSIGKey foo.com
If the reverse zone will be updated and if the primary server for the reverse zone is different than the
primary server for the forward zone, you will need to add another Remote Server. Follow the previous
two steps to do so. Note that the IP Address and the TSIG Key will be different.
You can now use aregcmd to create and configure a resource manager of type dynamic-dns.
Step 7 Create the dynamic-dns resource manager:
cd /Radius/ResourceManagers
add ddns
This example named the service ddns which is the related to the resource manager type but you can use
any valid name for your resource manager.
Step 8 Configure the dynamic-dns resource manager.
cd ddns
set Type dynamic-dns
set ForwardZone foo.com
set ForwardZoneServer DDNS
Finally, reference the new resource manager from a session manager. Assuming that the example
configuration was installed, the following step will accomplish this. If you have a different session
manager defined you can add it there if that is appropriate.
Step 9 Reference the resource manager from a session manager:
cd /Radius/SessionManagers/session-mgr-1/ResourceManagers
set 5 DDNS
Note The Property AllowAccountingStartToCreateSession must be set to TRUE for dynamic DNS to work.
Step 10 Save the changes you have made.
Testing Dynamic DNS with radclient
After the Resource Manager has been defined it must be referenced from the appropriate Session
Manager. You can use radclient to confirm that dynamic DNS has been properly configured and is
operational.

17-44
Cisco Prime Access Registrar 6.1 User Guide
OL-29756-01
Chapter 17 Using Cisco Prime Access Registrar Server Features
Dynamic Service Authorization Feature
Testing the Dynamic DNS using Radclient
To test Dynamic DNS using radclient:
Step 1 Launch aregcmd and set the trace to level 4.
aregcmd
Login to the Prime Access Registrar server as an administrative user.
trace 4
Step 2 Launch radclient.
cd /opt/CSCOar/bin
radclient
Step 3 Create an Accounting-Start packet
acct_request Start username
Example:
set p [ acct_request Start bob ]
Step 4 Add a Framed-IP-Address attribute to the Accounting-Start packet
Step 5 Send the Accounting-Start packet
$p send
Step 6 Check the aregcmd trace log and the dns server to verify that the host entry was updated in both the
forward and reverse zones.
Dynamic Service Authorization Feature
Typically, Prime Access Registrar does not allow sending another Access-Request to the remote server
after the user is connected to the LDAP servers for user authentication. The Dynamic Service
Authorization feature allows you to access external databases such as LDAP and Oracle first to know
which remote servers authenticated services need to be relayed. This feature enables
Prime Access Registrar to determine whether to send access-accept back to the client or to send another
access-request to the remote server such as LDAP and Oracle. Prime Access Registrar is able to perform
this activity multiple times in a single access-request.
Configuring Dynamic Service Authorization Feature
Configuring the dynamic service authorization involves:
•Setting Up the Environment Variable
•Configuring the Script for the Dynamic Service Authorization

17-45
Cisco Prime Access Registrar 6.1 User Guide
OL-29756-01
Chapter 17 Using Cisco Prime Access Registrar Server Features
Dynamic Service Authorization Feature
Setting Up the Environment Variable
Before configuring the dynamic service authorization feature, you must set the following three
environment variables in Prime Access Registrar:
•Re-Authentication-Service
When the Re-Authentication-Service is set, the server directs the request to the specified
reauthentication service for processing.
•Re-Authorization-Service
When the Re-Authorization-Service is set, the server directs the request to the specified
reauthorization service for processing.
•Re-Accounting-Service
When the Re-Accounting-Service is set, the server directs the request to the specified
reaccounting service for processing.
You can set the environmental variable by using scripts. See Writing the Script, page 11-2 for more
information.
Note When using the same service for reauthentication and reauthorization, a loop can occur in these services.
The loop count, by default is 10. You can change the loop count using the Dynamic-Service-Loop-Limit
environment variable.
Following is a sample procedure for setting the environment variable:
proc dynamicservice { request response environ } {
$environ put Re-Authentication-Service "local-users"
$environ put Re-Authorization-Service "local-users"
}
You can append this procedure by copying it into tclscript.tcl that is located in
/opt/CSCOar/scripts/radius/tcl directory, or to the location that you chose when you installed
Prime Access Registrar. You can also use this procedure as a separate script file and configure the script
accordingly. See Adding the CheckEap.tcl Script, page 15-16 for more information on configuring the
TCL script.
Configuring the Script for the Dynamic Service Authorization
To configure the script for the dynamic service authorization:
Step 1 Launch aregcmd.
aregcmd
Step 2 Change directory to /Radius/Scripts.
cd /Radius/Scripts
Step 3 Enter dynamicservice.
Step 4 Change the directory to dynamicservice.
cd dynamicservice
You get the following output:
[ //localhost/Radius/Scripts/dynamicservice ]
Name = dynamicservice
Description =
Language =

17-46
Cisco Prime Access Registrar 6.1 User Guide
OL-29756-01
Chapter 17 Using Cisco Prime Access Registrar Server Features
Dynamic Service Authorization Feature
Step 5 Set the Language property to TCL.
Set Language TCL
Step 6 Set the filename property to tclscript.tcl.
Set Filename tclscript.tcl
Step 7 Set the EntryPoint property to dynamicservice.
Set EntryPoint dynamicservice
The following is an example of the script configuration:
cd /Radius
set IncomingScript dynamicservice
[ //localhost/Radius ]
IncomingScript~ = dynamicservice
DefaultAuthenticationService~ = local-users
DefaultAuthorizationService~ = local-users
Step 8 Enter Save to save the configuration.
The following shows a sample trace:
10/30/2013 12:32:02.258: P577: Packet received from 127.0.0.1
10/30/2013 12:32:02.259: P577: Packet successfully added
10/30/2013 12:32:02.259: P577: Trace of Access-Request packet
10/30/2013 12:32:02.259: P577: identifier = 9
10/30/2013 12:32:02.259: P577: length = 61
10/30/2013 12:32:02.259: P577: reqauth =
b6:89:41:52:6e:d4:86:37:4a:aa:9b:27:1f:74:ff:05
10/30/2013 12:32:02.259: P577: User-Name = bob
10/30/2013 12:32:02.259: P577: User-Password =
2b:4a:f0:c8:95:f1:ad:e5:52:d4:83:0f:45:2b:2b:70
10/30/2013 12:32:02.259: P577: NAS-Port = 2
10/30/2013 12:32:02.260: P577: NAS-Identifier = localhost
10/30/2013 12:32:02.260: P577: Running Server's IncomingScript: dynamicservice
10/30/2013 12:32:02.261: P577: Tcl: environ put Re-Authentication-Service local-users
-> OK
10/30/2013 12:32:02.261: P577: Tcl: environ put Re-Authorization-Service local-users
-> OK
10/30/2013 12:32:02.261: P577: Using Client: localhost
10/30/2013 12:32:02.262: P577: Using NAS: localhost (127.0.0.1)
10/30/2013 12:32:02.262: P577: Request is directly from a NAS: TRUE
10/30/2013 12:32:02.262: P577: Authenticating and Authorizing with Service local-users
10/30/2013 12:32:02.262: P577: Getting User bob's UserRecord from UserList Default
10/30/2013 12:32:02.263: P577: user list user bob's password matches
10/30/2013 12:32:02.263: P577: Processing UserGroup PPP-users's check items
10/30/2013 12:32:02.263: P577: User bob is part of UserGroup PPP-users
10/30/2013 12:32:02.263: P577: Merging UserGroup PPP-users's BaseProfiles into response
dictionary
10/30/2013 12:32:02.264: P577: Merging BaseProfile default-PPP-users into response
dictionary
10/30/2013 12:32:02.264: P577: Merging attributes into the Response Dictionary:
10/30/2013 12:32:02.264: P577: Adding attribute Service-Type, value = Framed
10/30/2013 12:32:02.264: P577: Adding attribute Framed-Protocol, value = PPP
10/30/2013 12:32:02.264: P577: Adding attribute Framed-Routing, value = None
10/30/2013 12:32:02.264: P577: Adding attribute Framed-MTU, value = 1500
10/30/2013 12:32:02.264: P577: Adding attribute Framed-Compression, value = VJ TCP/IP
header compression
10/30/2013 12:32:02.264: P577: Adding attribute Ascend-Idle-Limit, value = 1800
10/30/2013 12:32:02.265: P577: Merging UserGroup PPP-users's Attributes into response
Dictionary
10/30/2013 12:32:02.265: P577: Merging attributes into the Response Dictionary:

17-47
Cisco Prime Access Registrar 6.1 User Guide
OL-29756-01
Chapter 17 Using Cisco Prime Access Registrar Server Features
Remote Session Management
10/30/2013 12:32:02.265: P577: Authenticating and Authorizing with Service local-users
10/30/2013 12:32:02.265: P577: Getting User bob's UserRecord from UserList Default
10/30/2013 12:32:02.266: P577: user list user bob's password matches
10/30/2013 12:32:02.266: P577: Processing UserGroup PPP-users's check items
10/30/2013 12:32:02.266: P577: User bob is part of UserGroup PPP-users
10/30/2013 12:32:02.266: P577: Merging UserGroup PPP-users's BaseProfiles into response
dictionary
10/30/2013 12:32:02.266: P577: Merging BaseProfile default-PPP-users into response
dictionary
10/30/2013 12:32:02.266: P577: Merging attributes into the Response Dictionary:
10/30/2013 12:32:02.266: P577: Replacing attribute Service-Type, new value = Framed
10/30/2013 12:32:02.267: P577: Replacing attribute Framed-Protocol, new value = PPP
10/30/2013 12:32:02.267: P577: Replacing attribute Framed-Routing, new value = None
10/30/2013 12:32:02.267: P577: Replacing attribute Framed-MTU, new value = 1500
Remote Session Management
Prime Access Registrar sessions can also be stored on a remote database. This improves the overall
scalability of the number of sessions that Prime Access Registrar can simultaneously handle. The remote
session manager internally uses two ODBC remote servers, Internal-ODBC-Read-Server and
Internal-ODBC-Write-Server. Configurations pertaining to these internal remoteservers can be done
under /Radius/Advanced/RemoteODBCSessionServer
For more information on how to configure the Remote ODBC Session Server, refer to
“RemoteODBCSessionServer” section on page 4-72.
Note Ensure that the length of fields such as Username, Session/Resource Manager name Session-Key,
Query-Key and so on are limited to the value specified in the Table 17-8 while it is configured. Although
the field length of entire session record is 3KB it is limited to 2KB. This is practically sufficient to hold
all the session parameters as well as the cached attributes (if any).
Ta b l e 1 7- 8 S c h e m a D e t a i l s
Field Type
ID NUMBER(10)
SESSION_KEY VARCHAR2(20)
NAME VARCHAR2(20)
PER_USER_RM VARCHAR2(20)
PER_GROUP_RM VARCHAR2(20)
IP_RM VARCHAR2(20)
IP VARCHAR2(20)
SESSION_MANAGER VARCHAR2(20)
AC NUMBER(10)
NAS VARCHAR2(20)
CACHE_RM VARCHAR2(20)
Q_VALUE VARCHAR2(20)
17-48
Cisco Prime Access Registrar 6.1 User Guide
OL-29756-01
Chapter 17 Using Cisco Prime Access Registrar Server Features
Wx Interface Support for SubscriberDB Lookup
Note Remote session manager will work only with Oracle database.
Note In remote-session-manager, query-session with the 'with-age' option will not work.
Wx Interface Support for SubscriberDB Lookup
Prime Access Registrar supports Diameter Wx interface to fetch the authentication vectors from HSS
required for EAP-SIM/EAP-AKA authentication.
The EAP-SIM and EAP-AKA authentication service is extended to generate a Diameter message
Multimedia-Authentication-Request (MAR), with the subscriber identity (IMSI), to the HSS when it
requires the authentication vectors. The HSS sends a Diameter Mutlimedia-Authentication-Answer
(MAA) back containing the number of triplets/quintuplets.
The PreRequestTranslationScript, PostRequestTranslationScript, PreResponseTranslationScript, and
PostResponseTranslationScript are the available scripting points to modify the RADIUS and Diameter
packets while sending and receiving the packets to or from the HSS. For more information, see Table 9-1
for EAP-AKA and Table 10-6 for EAP-SIM details.
Figure 17-1 Wx Interface Support for SubscriberDB lookup
For more information on Wx interface, see the 3GPP TS 29.124 and TS 29.229 specifications.
Configuration Examples
The following shows an example configuration for EAP-AKA:
[ //localhost/Radius/Services/eap-aka-wx ]
Name = eap-aka-wx
Description =
Type = eap-aka
AlwaysRequestIdentity = False
EnableIdentityPrivacy = False
PseudonymSecret = <encrypted>
TS NUMBER(15)
SESSION_RECORD VARCHAR2(3072)
Table 17-8 Schema Details (continued)
Field Type
NAS AR HSS
EAP-SIM / EAP-AKA Request
EAP-SIM / EAP-AKA Response
Multimedia-Auth-Request
Multimedia-Auth-Answer
RADIUS DIAMETER
283908

17-49
Cisco Prime Access Registrar 6.1 User Guide
OL-29756-01
Chapter 17 Using Cisco Prime Access Registrar Server Features
Wx Interface Support for SubscriberDB Lookup
PseudonymRenewtime = "24 Hours"
PseudonymLifetime = Forever
Generate3GPPCompliantPseudonym = False
EnableReauthentication = False
MaximumReauthentications = 16
ReauthenticationTimeout = 3600
ReauthenticationRealm =
AuthenticationTimeout = 120
QuintetGenerationScript~ =
UseProtectedResults = False
SendReAuthIDInAccept = False
SubscriberDBLookup = Diameter
DestinationRealm = mpc.com
PreRequestTranslationScript~ =
PostRequestTranslationScript~ =
PreResponseTranslationScript~ =
PostResponseTranslationScript~ =
The following shows an example configuration for EAP-SIM:
[ //localhost/Radius/Services/eap-sim-wx ]
Name = eap-sim-wx
Description =
Type = eap-sim
NumberOfTriplets = 2
UseSimDemoTriplets = False
AlwaysRequestIdentity = False
EnableIdentityPrivacy = False
PseudonymSecret = <encrypted>
PseudonymRenewtime = "24 Hours"
PseudonymLifetime = Forever
Generate3GPPCompliantPseudonym = False
EnableReauthentication = False
MaximumReauthentications = 16
ReauthenticationTimeout = 3600
ReauthenticationRealm =
TripletCacheTimeout = 120
AuthenticationTimeout = 120
UseProtectedResults = False
SendReAuthIDInAccept = False
SubscriberDBLookup = DIameter
DestinationRealm = hss.com
PreRequestTranslationScript~ =
PostRequestTranslationScript~ =
PreResponseTranslationScript~ =
PostResponseTranslationScript~ =

17-50
Cisco Prime Access Registrar 6.1 User Guide
OL-29756-01
Chapter 17 Using Cisco Prime Access Registrar Server Features
Smart Grid Solution Management
Smart Grid Solution Management
Prime Access Registrar provides identity and access management for the smart grid solutions on IPv6
(and IPv4) networks. This is achieved using the Elliptic Curve Crytographic (ECC) based certificate
validation and SNMP support for TACACS+.
For EAP services, in addition to RSA certificates, Prime Access Registrar supports verification of ECC
certificates. ECC uses elliptic curves to encrypt data when creating keys which enables you to create
shorter and stronger keys for better efficiency. This is achieved using the Cisco SSL library APIs.
TACACS+ supports ASCII,PAP, and CHAP Authentication type, login and enable services, and LDAP,
OCI, and ODBC services in addition to Local service.
The client certificate files and RSA or ECC key file are available in /cisco-ar/pki as client-cert.pem and
client-key.pem respectively. Both the files must be in “.PEM” format, since the certificate validation is
done based on the extension of the files.
ECC certificate validation is used in the following authentication methods:
•EAP-FAST
•EAP-Transport Level Security (TLS)
•EAP-TTLS
•Protected EAP
TACACS+ Support for AAA
TACACS+ (Terminal Access Controller Access-Control System Plus) is a terminal access control
protocol for routers, switches, network access servers and other networked computing devices. The main
goal of TACACS+ is to provide separate authentication, authorization and accounting services.
In Prime Access Registrar, TACACS+ supports authentication, command authorization, and accounting.
The authentication support is available for login services with PAP, CHAP, and ASCII authentication
types. It also tracks and maintains the executed command details in the command accounting database.
Configuration is supported through the CLI/GUI and statistics are provided through CLI, GUI, and
SNMP. TACACS+ supports the following Prime Access Registrar services:
•Local-users and Local-file service
•OCI
•ODBC
•LDAP
The following shows an example configuration for TACACS+:
[ /Radius/Clients/mytac ]
Name = mytac
Description =
Protocol = tacacs-and-radius
IPAddress = 10.77.123.57
SharedSecret = <encrypted>
Type = NAS

17-51
Cisco Prime Access Registrar 6.1 User Guide
OL-29756-01
Chapter 17 Using Cisco Prime Access Registrar Server Features
TACACS+ Support for AAA
Vendor =
IncomingScript~ =
OutgoingScript~ =
EnableDynamicAuthorization = FALSE
NetMask =
EnableNotifications = FALSE
EnforceTrafficThrottling = TRUE
Prime Access Registrar provides command authorization support to authorize the cmd mode commands.
Command authorization is based on device access rules and the decision to authorize is based on
command sets and conditions or expressions defined for the access rules. They determine whether to
authorize a set of commands for the user or not.
If you enable TACACS+ command authorization for a service, you must define the following:
•Command sets—You must configure the list of commands with the arguments and the action to
perform: permit or deny.
•Device access rules—You must configure the conditions or expressions and the command sets that
are applicable to the access rule if the conditions are met.
•Service—You must enable the device access and associate the device access rules for the service.
When a packet enters the service, it selects the first device access rule and evaluates the condition. If the
condition is met, then the service applies the device access rule for the request. If the command that is
processed matches a command listed in the command set, the service decides on whether to permit the
command for the user or not based on the permissions set up. See the example below.
In the above example, if one of the conditions user-name = bob or nas-identifier = ~/PGW*/ is met, then
the service applies the device access rule. If the processed command with its arguments matches one of
the commands listed above, then the service permits or denies the command according to the setup.
Note Prime Access Registrar supports POSIX Extended Regular Expression (ERE) for command
arguments and condition expressions value property.
Figure 17-2 shows the transaction flow for TACACS+ command authorization.
Device Access
Rule Condition Command Set Command Arguments Action
NewAccessRule Expr1 OR Expr2
Where:
Expr1 = user-name=bob
Expr2 = nas-identifier=~/PGW*/
OR = Conditional operator
cmdset1 show * permit
enable ~/serial*/ deny
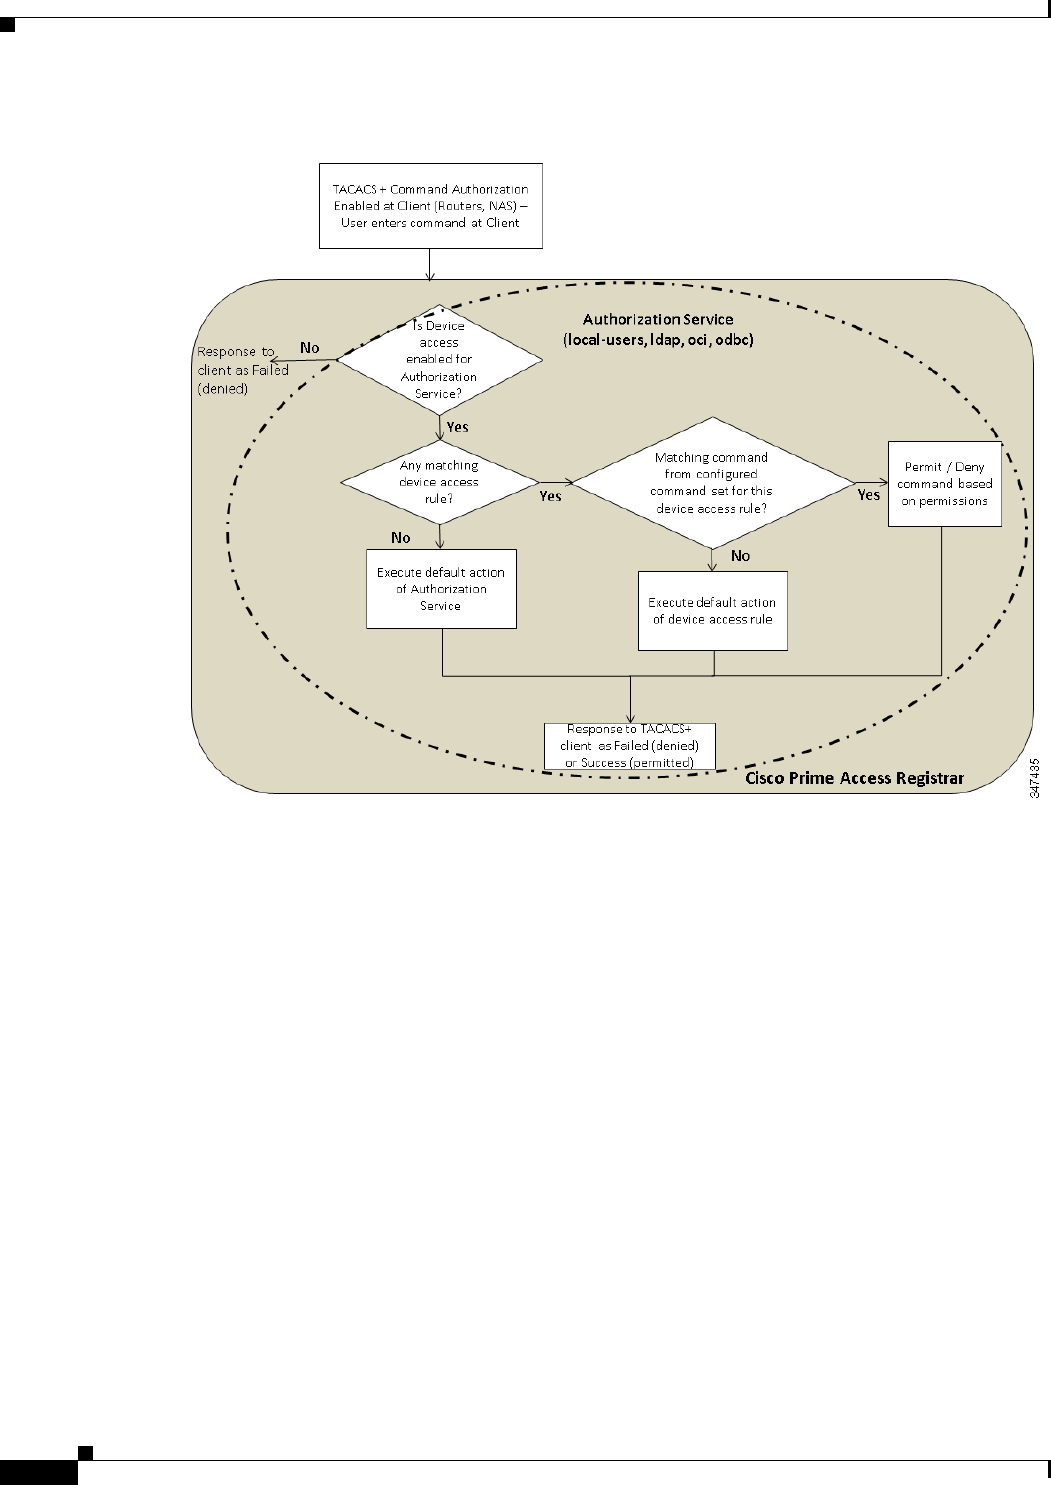
17-52
Cisco Prime Access Registrar 6.1 User Guide
OL-29756-01
Chapter 17 Using Cisco Prime Access Registrar Server Features
TACACS+ Support for AAA
Figure 17-2 TACACS+ Command Authorization Flow
The following is an example configuration of device access rules and command sets configured for a
local-users service:
[ //localhost/Radius ]
Name = Radius
Description =
Version = 6.1
IncomingScript~ =
OutgoingScript~ =
DefaultAuthenticationService~ = local-users
DefaultAuthorizationService~ = local-users
DefaultAccountingService~ = local-file
DefaultSessionService~ =
DefaultSessionManager~ = session-mgr-1
UserLists/
UserGroups/
Policies/
Clients/
Vendors/
Scripts/
Services/
SessionManagers/
ResourceManagers/
Profiles/
Rules/
Translations/
TranslationGroups/
RemoteServers/
CommandSets/

17-53
Cisco Prime Access Registrar 6.1 User Guide
OL-29756-01
Chapter 17 Using Cisco Prime Access Registrar Server Features
TACACS+ Support for AAA
DeviceAccessRules/
FastRules/
Advanced/
Replication/
--> cd /r/DeviceAccessRules/
[ //localhost/Radius/DeviceAccessRules ]
Entries 0 to 0 from 0 total entries
Current filter: <all>
--> add d2
Added d2
--> cd d2
[ //localhost/Radius/DeviceAccessRules/d2 ]
Name = d2
Description =
CommandSetNames =
Conditions =
DefaultDeviceAction = PermitAll
ConditionExpressions/
--> set Conditions "A1 and A2"
Set Conditions "A1 and A2"
--> SET CommandSetNames "cm1, CM2"
Set CommandSetNames "cm1, CM2"
--> CD ConditionExpressions/
[ //localhost/Radius/DeviceAccessRules/d2/ConditionExpressions ]
Entries 0 to 0 from 0 total entries
Current filter: <all>
--> add a1
Added a1
--> add a2
Added a2
--> cd a1
[ //localhost/Radius/DeviceAccessRules/d2/ConditionExpressions/a1 ]
Name = a1
Description =
Attribute =
Value =
--> Set Attribute user-name
Set Attribute user-name
--> Set Value user*
Set Value user*

17-54
Cisco Prime Access Registrar 6.1 User Guide
OL-29756-01
Chapter 17 Using Cisco Prime Access Registrar Server Features
TACACS+ Support for AAA
--> cd ..
[ //localhost/Radius/DeviceAccessRules/d2/ConditionExpressions ]
Entries 1 to 2 from 2 total entries
Current filter: <all>
a1/
a2/
--> cd a2
[ //localhost/Radius/DeviceAccessRules/d2/ConditionExpressions/a2 ]
Name = a2
Description =
Attribute =
Value =
--> Set Attribute user-group
Set Attribute user-group
--> Set Value ABC
Set Value ABC
--> cd /r/CommandSets/
[ //localhost/Radius/CommandSets ]
Entries 0 to 0 from 0 total entries
Current filter: <all>
--> add cm1
Added cm1
--> cd cm1
[ //localhost/Radius/CommandSets/cm1 ]
Name = cm1
Description =
Commands/
--> cd Commands/
[ //localhost/Radius/CommandSets/cm1/Commands ]
--> Set 1 "permit show *"
Set 1 "permit show *"
--> cd ..
[ //localhost/Radius/CommandSets/cm1 ]
Name = cm1
Description =
Commands/
--> cd ..
[ //localhost/Radius/CommandSets ]
Entries 1 to 1 from 1 total entries
Current filter: <all>

17-55
Cisco Prime Access Registrar 6.1 User Guide
OL-29756-01
Chapter 17 Using Cisco Prime Access Registrar Server Features
TACACS+ Support for AAA
cm1/
--> add cm2
Added cm2
--> cd cm2
[ //localhost/Radius/CommandSets/cm2 ]
Name = cm2
Description =
Commands/
--> cd commands/
[ //localhost/Radius/CommandSets/cm2/Commands ]
--> Set 1 "deny show all"
Set 1 "deny show all"
--> sav
Validating //localhost...
Saving //localhost...
For more information on configuring the command sets and device access rules in the GUI, see the
CommandSets, page 3-51 and DeviceAccessRules, page 3-52 sections in Chapter 3, “Using the
Graphical User Interface.”

17-56
Cisco Prime Access Registrar 6.1 User Guide
OL-29756-01
Chapter 17 Using Cisco Prime Access Registrar Server Features
TACACS+ Support for AAA

CHAPTER
18-1
Cisco Prime Access Registrar 6.1 User Guide
OL-29756-01
18
Directing RADIUS Requests
You can use the policy engine to determine the AAA services for processing a request packet based on
the User-Name suffix, User-Name prefix, Calling-Station-ID, Called-Station-ID and Nas-IP-Address.
You configure the policy Engine through policies and rules.
This chapter contains the following sections:
•Configuring Policies and Rules
•Routing Requests
•Standard Scripts Used with Rules
Configuring Policies and Rules
A policy is a group of rules. Each rule consists of a set of conditions and corresponding services. A rule
succeeds if all the conditions specified in the rule are satisfied. If a rule succeeds, the services indicated
by its service attributes are used to process the packet. However, Prime Access Registrar defers packet
processing until the policy succeeds.
This section contains the following topics:
•Configuring Policies
•Configuring Rules
•Wildcard Support
•Script and Attribute Requirements
•Validation
•Known Anomalies
Configuring Policies
You configure policies under /Radius/Policies. To enable the Prime Access Registrar server to use
policies, you must first configure policy named SelectPolicy.
[ //localhost/Radius/Policies/SelectPolicy ]
Name = SelectPolicy
Description =
Grouping = rule1|rule2

18-2
Cisco Prime Access Registrar 6.1 User Guide
OL-29756-01
Chapter 18 Directing RADIUS Requests
Configuring Policies and Rules
The Grouping property of a policy determines which rules are to be evaluated and in which order. Rules
are evaluated from left to right. Use the pipe (|) or ampersand (&) character to group rules.
Note Before you can provide rules in the Grouping property, the rules must first be added to the configuration
under /Radius/Rules.
The following are the Grouping property rules:
•If rules are grouped with the pipe character (rule1|rule2), all rules in the group are evaluated in
sequential order until one of the rules succeeds. If any one of the rules in the policy succeeds, the
policy succeeds.
•If rules are grouped with the ampersand character (rule1&rule2&tule3), all the rules listed are
evaluated until one of the rules fails. For the policy to succeed, all the rules in the policy must
succeed.
Configuring Rules
You configure rules under /Radius/Rules. When you add a rule, provide the script that should be
executed for the rule and the attributes to use if the rule succeeds. The script you specify must be defined
under /Radius/Scripts, as shown in the following:
[ //localhost/Radius/Rules/rule1 ]
Name = rule1
Description =
Script~ =
Attributes/
Authentication-service = local-users
Authorization-service = local-users
Realm = @cisco.com
[ //localhost/Radius/Scripts/ExecRealmRule ]
Name = ExecRealmRule
Description =
Language = Rex
Filename = librexscript.so
EntryPoint = ExecRealmRule
InitEntryPoint =
InitEntryPointArgs =
Wildcard Support
Prime Access Registrar supports limited wildcard functionality in rules for Realm, DNIS, and CLID
attributes, specifically the asterisk (*) and question mark (?) characters. The asterisk matches any
number of characters, including the null character. The question mark matches any single character, not
including the null character. Prime Access Registrar also supports both wildcard characters in one
pattern, as in CLID = 180098?87*.
Note The realms should start with either the @ or # character. For example, Realm=@cisco.com.
•For an exact matching of the realm, you should configure the rule with the exact realm. For example,
for an exact match to abc@cisco.com, you should use Realm=@cisco.com.

18-3
Cisco Prime Access Registrar 6.1 User Guide
OL-29756-01
Chapter 18 Directing RADIUS Requests
Configuring Policies and Rules
•If you use Realm=cisco.com (without any valid character), values such as xyz@us.cisco.com,
xyz@uk.cisco.com, abc#cisco.com, and so on can also match and return a success.
The following is an example using the asterisk wildcard character used in a Rule named rule1:
[ //localhost/Radius/Rules/rule1 ]
Name=rule1
Description =
ScriptName = ExecRealmRule
Attributes/
Authentication-Service = Local-Users
Authorization-Service = Local-Users
Realm = ~/@*cisco.com/
Rule rule1 succeeds when the domain of the username in an access request matches the @*cisco.com
pattern. Each of the following is a good match: @us.cisco.com, @eng.cisco.com, and @cisco.com. With
a match, the ExecRealmRule script sets Authentication-Service and Authorization-Service to
Local-Users in the environment dictionary.
The following is an example using the "?" wildcard character in a Rule named rule2:
[ //localhost/Radius/Rules/rule2 ]
Name = rule2
Description =
ScriptName = ExecDNISRule
Attributes/
Authentication-Service = Translation-Service
Authorization-Service = Translation-Service
DNIS = 1800345987?
Rule rule2 succeeds if the Called-Station-Id attribute (DNIS) in the packet matches 1800345987?. Each
of the following is a good match: 18003459876 and 18003459870, while 1800345987 is not. With a
match, the ExecDNISRule script sets Authentication-Service and Authorization-Service to
Translation-Service in the environment dictionary.
Script and Attribute Requirements
The following script and attribute requirements exist:
•/Radius/Policies/SelectPolicy is the first policy Prime Access Registrar applies.
•The characters "|" and "&" are reserved as logical operands in a Grouping definition; they cannot be
included in a /Radius/Rules name.
•A space is not permitted between the logical operands and the rules in a Grouping definition.
•The scripts included in the rules must be defined under the /Radius/Scripts directory.
•The attributes included in the rules must be defined under the /Radius/Advanced/Attribute
Dictionary directory.
•The rules included in the policies must be defined under the /Radius/Rules directory.

18-4
Cisco Prime Access Registrar 6.1 User Guide
OL-29756-01
Chapter 18 Directing RADIUS Requests
Routing Requests
Validation
When policies are configured, Prime Access Registrar performs the following validations:
•Ensures the scripts included in the rules are defined under the /Radius/Scripts directory.
•Ensures the attributes included in the rules are defined under the /Radius/Advanced/Attribute
Dictionary directory.
•Ensures the rules included in the policies are defined under the /Radius/Rule directory.
Known Anomalies
The following anomalies currently exist:
•Grouping expressions are not checked for validity.
•The use of parentheses to denote precedence is not supported in a Grouping definition.
•A check is not performed to determine whether a policy that is included within another policy is
defined under the /Radius/Policies directory.
Routing Requests
Using the policy engine, Prime Access Registrar enables you to route requests based on attributes in
access request packets. The following sections describe how to route requests based on different
attributes:
•Routing Requests Based on Realm
•Routing Requests Based on DNIS
•Routing Requests Based on CLID
•Routing Requests Based on NASIP
•Routing Requests Based on User-Name Prefix
•Attribute Translation
•Time of Day Access Restrictions
Routing Requests Based on Realm
The Prime Access Registrar policy engine can process request packets based on the realm in the
User-Name attribute.
In the following example, request packets with the User-Name attribute containing @abc.com as the
suffix should be processed locally and the request packets with User-Name attribute containing
@xyz.com should be proxied to a remote AAA Server.
[ //localhost/Radius/Policies ]
SelectPolicy/
Name = SelectPolicy
Description =
Grouping = abcrule|xyzrule

18-5
Cisco Prime Access Registrar 6.1 User Guide
OL-29756-01
Chapter 18 Directing RADIUS Requests
Routing Requests
The following SelectPolicy refers to two rules abcrule and xyzrule:
1. When a request packet arrives, Prime Access Registrar executes SelectPolicy beginning with
abcrule to determine if the User-Name attribute contains @abc.com as the realm. If so, the abcrule
is successful as is SelectPolicy, therefore the packet is processed locally.
2. If the User-Name attribute does not contain @abc.com as the realm,Prime Access Registrar
executes xyzrule to determine if the User-Name attribute contains @xyz.com. If so, xyzrule is
successful as is SelectPolicy. Hence the request is proxied to the remote server specified in
xyz-service.
In this example, the rules are grouped using the | (or) operator. So all the rules specified in the grouping
parameter will be executed until one of them succeeds.
[ //localhost/Radius/Rules ]
abcrule/
Name = abcrule
Description =
Script~ = ExecRealmRule
Attributes/
Authentication-Service = local-users
Authorization-Service = local-users
Realm = @abc.com
xyzrule/
Name = xyzrule
Description =
Script~ = ExecRealmRule
Attributes/
Authentication-Service = xyz-service
Authorization-Service = xyz-service
Realm = @xyz.com
The ExecRealmRule script matches the realm with the suffix in the User-Name attribute and sets the
appropriate service for processing the packet. This is a standard script available with
Prime Access Registrar. Prime Access Registrar can also be configured to set a particular kind of service
for multiple realms. For example, the following configuration can be used if packets with @pqr.com or
@klm.com should be processed using the same service klm-service.
[ //localhost/Radius/Rules ]
rulex/
Name = rulex
Description =
Script~ = ExecRealmRule
Attributes/
Authentication-Service = klm-service
Authorization-Service = klm-service
Realm = “@pqr.com” “@klm.com”
Routing Requests Based on DNIS
The Prime Access Registrar policy engine can process request packets differently based on the DNIS
(Called-Station-Id) attribute in the request packet.
In the following example, request packets with the Calling-Station-Id attribute that contain 1111111
should be processed by abc-service, while request packets with the Called-Station-Id attribute that
contain 2222222 or 3333333 should be processed using xyz-service.
[ //localhost/Radius/Policies ]
SelectPolicy/

18-6
Cisco Prime Access Registrar 6.1 User Guide
OL-29756-01
Chapter 18 Directing RADIUS Requests
Routing Requests
Name = SelectPolicy
Description =
Grouping = abcrule|xyzrule
The following SelectPolicy refers to two rules, abcrule and xyzrule:
1. When a request packet arrives, Prime Access Registrar executes SelectPolicy beginning with
abcrule to determine if the DNIS attribute contains 1111111. If so, the abcrule is successful as is
SelectPolicy, and the packet is processed using abc-service.
2. If the Called-Station-Id attribute does not contain 1111111, Prime Access Registrar executes the
xyzrule to determine if the Called-Station-Id attribute contains 2222222 or 3333333. If so, xyzrule
is successful as is SelectPolicy, and the packet is processed using xyz-service.
[ //localhost/Radius/Rules ]
abcrule/
Name = abcrule
Description =
Script~ = ExecDNISRule
Attributes/
Authentication-Service = abc-service
Authorization-Service = abc-service
DNIS = 1111111
xyzrule/
Name = xyzrule
Description =
Script~ = ExecDNISRule
Attributes/
Authentication-Service = xyz-service
Authorization-Service = xyz-service
DNIS = “2222222” “3333333”
The ExecDNISRule script matches the DNIS value configured in Prime Access Registrar with the value
in the Called-Station-Id attribute of the request packet and sets the appropriate service for processing the
packet. ExecDNISRule is a standard script available with Prime Access Registrar.
Routing Requests Based on CLID
The Prime Access Registrar policy engine can process request packets differently based on the CLID
value in arriving request packets.
In the following example, the request packets with a Calling-Station-Id (CLID) attribute value of
1111111 should be processed by abc-service and the request packets with the CLID attribute value of
2222222 or 3333333 should be processed using xyz-service.
[ //localhost/Radius/Policies ]
SelectPolicy/
Name = SelectPolicy
Description =
Grouping = abcrule|xyzrule
The following SelectPolicy refers to two rules, abcrule and xyzrule:
1. When a request packet arrives, Prime Access Registrar executes SelectPolicy beginning with
abcrule to determine if the CLID attribute contains 1111111. If so, the abcrule is successful as is
SelectPolicy, and the packet is processed using abc-service.
2. If the CLID attribute does not contain 1111111, Prime Access Registrar executes xyzrule to
determine if the CLID attribute contains 2222222 or 3333333. If so, xyzrule is successful and hence
SelectPolicy becomes successful and the packet is processed using xyz-service.

18-7
Cisco Prime Access Registrar 6.1 User Guide
OL-29756-01
Chapter 18 Directing RADIUS Requests
Routing Requests
[ //localhost/Radius/Rules ]
abcrule/
Name = abcrule
Description =
Script~ = ExecCLIDRule
Attributes/
Authentication-Service = abc-service
Authorization-Service = abc-service
CLID = 1111111
xyzrule/
Name = xyzrule
Description =
Script~ = ExecCLIDRule
Attributes/
Authentication-Service = xyz-service
Authorization-Service = xyz-service
CLID = “2222222” “3333333”
The ExecCLIDRule script matches the CLID value configured in Prime Access Registrar with the value
in the CLID attribute of the request packet and sets the appropriate service for processing the packet.
ExecCLIDRule is a standard script available with Prime Access Registrar.
Routing Requests Based on NASIP
The Prime Access Registrar policy engine can process request packets differently based on the client IP
address value in arriving request packets.
In the following example, arriving request packets with the NAS-IP-Address attribute value 1.1.1.1
should be processed by abc-service and arriving request packets with the NAS-IP-Address attribute
value 2.2.2.2 should be processed using xyz-service.
[ //localhost/Radius/Policies ]
SelectPolicy/
Name = SelectPolicy
Description =
Grouping = abcrule|xyzrule
The following SelectPolicy refers to two rules, abcrule and xyzrule:
1. When a request packet arrives, Prime Access Registrar executes SelectPolicy beginning with
abcrule to determine if the NAS-IP-Address attribute contains an IP address from the subnet
1.1.1.0/24. If so, the abcrule is successful as is SelectPolicy, and the packet is processed using
abc-service.
2. If the NAS-IP-Address attribute does not contain an IP address from the subnet 1.1.1.0/24,
Prime Access Registrar executes xyzrule to determine if the NAS-IP-Address attribute contains
2.2.2.2. If so, xyzrule is successful as is SelectPolicy, and the packet is processed using xyz-service.
[ //localhost/Radius/Rules ]s
abcrule/
Name = abcrule
Description =
Script~ = ExecNASIPRule
Attributes/
Authentication-Service = abc-service
Authorization-Service = abc-service
Client-IP-Address = 1.1.1.0
Subnet-mask = 255.255.255.0
xyzrule/

18-8
Cisco Prime Access Registrar 6.1 User Guide
OL-29756-01
Chapter 18 Directing RADIUS Requests
Routing Requests
Name = xyzrule
Description =
Script~ = ExecNASIPRule
Attributes/
Authentication-Service = xyz-service
Authorization-Service = xyz-service
Client-IP-Address = 2.2.2.2
The ExecNASIPRule script matches the Client IP address configured in Prime Access Registrar with
the value in the NAS-IP-Address attribute of the request packet and sets the appropriate service for
processing the packet. ExecNASIPRule is a standard script available with Prime Access Registrar.
Routing Requests Based on User-Name Prefix
You can use the Prime Access Registrar policy engine to select a service based on the prefix in the
User-Name attribute.
In the following example, request packets with a User-Name attribute that contains @abc.com as the
suffix and cisco as the prefix should be processed using the service abc-service. A request packet with
User-Name attribute containing cisco/bob@abc.com will be processed using abc-service.
[ //localhost/Radius/Policies ]
SelectPolicy/
Name = SelectPolicy
Description =
Grouping = suffixrule & prefixrule
The following SelectPolicy refers to two rules, suffixrule and prefixrule:
1. When a request packet arrives, Prime Access Registrar executes SelectPolicy beginning with
suffixrule to determine if the realm in the User-Name attribute contains @abc.com. If so, the
suffixrule is successful. Since there is an “&” operator between the rules, the prefixrule must also
succeed for the SelectPolicy to be successful.
2. The prefixrule is now processed to determine if the prefix in the User-Name attribute contains cisco.
If so, the prefixrule is successful which makes SelectPolicy successful, and the AA service is set to
the service specified in the prefixrule.
[ //localhost/Radius/Rules ]
abcrule/
Name = suffixrule
Description =
Script~ = ExecRealmRule
Attributes/
Realm = @abc.com
prefixrule/
Name = prefixrule
Description =
Script~ = ExecPrefixRule
Attributes/
Authentication-Service = abc-service
Authorization-Service = abc-service
Delimiters = @#%&/
Prefix = cisco
StripPrefix = No

18-9
Cisco Prime Access Registrar 6.1 User Guide
OL-29756-01
Chapter 18 Directing RADIUS Requests
Routing Requests
ExecPrefixRule script matches the prefix configured in Prime Access Registrar with the prefix in the
User-Name attribute of the request packet and sets the appropriate service for processing the packet.
ExecPrefixRule is a standard script available with Prime Access Registrar. See ExecPrefixRule for
more information.
Attribute Translation
The attribute translation feature supports the RADIUS proxy enabling you to customize attribute filters
so that RADIUS attribute value (AV) pairs can be inserted, deleted, or substituted.
For example, when a request is proxied from AAA Server on ISP A to AAA Server on ISP B, some AV
pairs might be substituted (such as IP address) because they might not be valid on the ISP B network.
Additionally, ISP B might return some vendor-specific attributes (VSAs) that are not applicable to ISP
A's network. Therefore, ISP A will substitute ISP B's VSA value pairs for ISP A's VSAs.
Two configuration points under the /Radius directory support this feature,
•Translations
•TranslationGroups
•Parsing Translation Groups
Translations
Under the /Radius/Translations directory, any translation to insert, substitute, or translate attributes can
be added. The following is a sample configuration under the /Radius/Translations directory:
[ //localhost/Radius/Translations/T1 ]
Name = T1
Description =
DeleteAttrs = Session-Timeout,Called-station-id
Attributes/
Calling-Station-id = 1232909
DeleteAttrs is the set of attributes to be deleted from the packet. Each attribute is comma separated and
no spaces are allowed between attributes.
Under the /Radius/Translations/T1/Attributes directory, the attributes that should be inserted and the
attributes that should be substituted are specified. These AV pairs are either added to the packet if not
present already or replaced with the configured value.
TranslationGroups
Under the /Radius/TranslationGroups directory, translations can be grouped and applied to certain sets
of packets, which are referred to in a rule.
The following is a sample configuration under the /Radius/TranslationGroups directory:
[ //localhost/Radius/TranslationGroups/CiscoIncoming ]
Name = CiscoIncoming
Description =
Translations/
1. T1
The translation group is referenced through the Prime Access Registrar policy engine in the
/Radius/Rules/<RuleName>/Attributes directory.
•Incoming-Translation-Groups are set to a translation group (for example CiscoIncoming).

18-10
Cisco Prime Access Registrar 6.1 User Guide
OL-29756-01
Chapter 18 Directing RADIUS Requests
Routing Requests
•Outgoing-Translation-Groups are to set to another translation group (for example CiscoOutgoing).
The following is an example of setting up a rule for a translation group.
[ //localhost/Radius/Rules/ciscotranslationrule ]
Name = ciscotranslationrule
Description =
Script~ = ParseTranslationGroupsByRealm
Attributes/
Incoming-Translation-Groups = CiscoIncoming
Outgoing-Translation-Groups = CiscoOutgoing
Realm = @cisco.com
The ciscoTranslationRule rule must be referred to in the /Radius/Policies directory, so the
Prime Access Registrar policy engine can invoke this rule. If the pattern of Realm, DNIS, or CLID
matches the one defined in the rule, Prime Access Registrar sets the environment variable
Incoming-Translation-Groups to CiscoIncoming. By looking up the definition of CiscoIncoming,
Prime Access Registrar applies all of the translations to the incoming packet (before it is proxied to the
other server).
When the proxied packet comes back to the RADIUS server, Prime Access Registrar sets the
environment variable, Outgoing-Translation-Groups to CiscoOutgoing.
DNIS, CLID, and Realm are supported for filtering packets. Prime Access Registrar provides the
following scripts to facilitate filtering based on DNIS, CLID and Realm.
Parsing Translation Groups
Prime Access Registrar provides three scripts that enable you to parse translation groups based on the
DNIS, CLID or Realm attribute in an incoming packet. These scripts are:
•ParseTranslationGroupsByDNIS
•ParseTranslationGroupsByCLID
•ParseTranslationGroupsByRealm
In the following example, request packets containing @abc.com as the realm should be proxied to the
remote server defined under abc-service. Before redirecting the request packet to the remote server, the
Calling-Station-Id of the packet should be changed to 111.
[ //localhost/Radius/Policies ]
SelectPolicy/
Name = SelectPolicy
Description =
Grouping = realmrule & translaterule
The following SelectPolicy refers to two rules, realmrule and translaterule:
1. When a request packet arrives, Prime Access Registrar executes SelectPolicy beginning with
“realmrule” to determine if the realm in the User-Name attribute contains 1.1.1.1. If so, the
realmrule is successful and the AA service is set to abc-service.
2. Next Prime Access Registrar executes the translaterule to change the CLID of the packet to 111.
[ //localhost/Radius/Rules/ciscotranslationrule ]
Name = ciscotranslationrule
Description =
Script~ = ParseTranslationGroupsByRealm
Attributes/
Incoming-Translation-Groups = CiscoIncoming
Realm = @cisco.com

18-11
Cisco Prime Access Registrar 6.1 User Guide
OL-29756-01
Chapter 18 Directing RADIUS Requests
Routing Requests
[ //localhost/Radius/Translations ]
Entries 1 to 1 from 1 total entries
Current filter: <all>
T1/
Name = T1
Description =
Attributes/
calling-station-id = 111
[ //localhost/Radius/TranslationGroups ]
Entries 1 to 1 from 1 total entries
Current filter: <all>
CiscoIncoming/
Name = CiscoIncoming
Description =
Translations/
1. T1
Time of Day Access Restrictions
You can use the Prime Access Registrar policy engine to implement access restriction on users based on
the time of day. The following are ExecTimeRule script that implements this functionality:
•ExecTimeRule can be used to check the time at which the request packet arrives and determine if
access should be granted based on the authorization parameters for the user.
•If the rule succeeds, ExecTimeRule sets the Acceptedprofiles Environment dictionary variable to a
profile or a set of profiles, as in the following:
Acceptedprofiles=Regularaccess::Highprivilegeaccess
Note If more than one profile is to be added to the Acceptedprofiles variable, use two colons to separate them
(::).
If the user is authenticated, the Baseprofile of the user is compared with the Acceptedprofiles. All the
profiles that are in the Baseprofile and in Acceptedprofiles will be used as profiles while sending the
response for the user.
For example, consider the following user configuration of user1:
[ //localhost/Radius/UserLists/new/user1 ]
Name = user1
Description =
Password = <encrypted>
AllowNullPassword = FALSE
Enabled = TRUE
Group~ = regularusers
BaseProfile~ =highprivilegeaccess::readonlyaccess::regularaccess
AuthenticationScript~ =
AuthorizationScript~ =
UserDefined1 =
Attributes/
CheckItems/
The Baseprofile of the user1 has highprivilegeaccess, readonlyaccess and regularaccess. If the
Acceptedprofiles of the user has regularaccess and highprivilegeaccess, the profiles regularaccess and
highprivilegeaccess will be used while sending the response packet.
This section contains the following topics:

18-12
Cisco Prime Access Registrar 6.1 User Guide
OL-29756-01
Chapter 18 Directing RADIUS Requests
Routing Requests
•Setting Time Ranges in ExecTimeRule
•ExecTimeRule Example Configuration
•Reducing Overhead Using Policies to Group Rules
•ParseTranslationGroupsByDNIS
Setting Time Ranges in ExecTimeRule
ExecTimeRule accepts time range in the following format.
Set timerange “* * * * *”
The first star indicates minutes and can be a value from 0-59. The second star indicates hours and can
be a value from 0-23. The third star indicates day of the month and can be a value from 1-31. The fourth
star indicates month and can be a value from 1-12. The fifth star indicates day of the week and can be a
value from 0-6 where 0 indicates Sunday, 1 indicates Monday, and so on.
For example, to schedule a particular action to occur every Sunday during the month of December, use
a command line like this:
Set timerange “* * * 12 0”
ExecTimeRule Example Configuration
This section provides a configuration example where a user, user1, is only authorized for PPP service
between 10 AM and 6 PM. If a login occurs at any other time, user1 will be authorized only for telnet
service.
Policies
[ //localhost/Radius/Policies ]
Entries 1 to 1 from 1 total entries
Current filter: <all>
SelectPolicy/
Name = SelectPolicy
Description =
Grouping = ppprule|telnetrule
Rules
[ //localhost/Radius/Rules ]
Entries 1 to 2 from 2 total entries
Current filter: <all>
ppprule/
Name = ppprule
Description =
Script~ = ExecTimeRule
Attributes/
acceptedprofiles = default-ppp-users
timerange = "* 10-18 * * * "
telnetrule/
Name = telnetrule
Description =
Script~ = ExecTimeRule
Attributes/
acceptedprofiles = default-telnet-users

18-13
Cisco Prime Access Registrar 6.1 User Guide
OL-29756-01
Chapter 18 Directing RADIUS Requests
Routing Requests
timerange = "* 0-10,18-23 * * * "
Profiles
[ //localhost/Radius/Profiles ]
Entries 1 to 5 from 5 total entries
Current filter: <all>
default-PPP-users/
Name = default-PPP-users
Description =
Attributes/
Ascend-Idle-Limit = 1800
Framed-Compression = "VJ TCP/IP header compression"
Framed-MTU = 1500
Framed-Protocol = PPP
Framed-Routing = None
Service-Type = Framed
default-Telnet-users/
Name = default-Telnet-users
Description =
Attributes/
Login-IP-Host = 204.253.96.3
Login-Service = Telnet
Login-TCP-Port = 541
User
[ //localhost/Radius/UserLists/new/user1 ]
Name = user1
Description =
Password = <encrypted>
AllowNullPassword = FALSE
Enabled = TRUE
Group~ = regularusers
BaseProfile~ = default-telnet-users::default-ppp-users
AuthenticationScript~ =
AuthorizationScript~ =
UserDefined1 =
Attributes/
CheckItems/
Reducing Overhead Using Policies to Group Rules
When you configure a large number of rules, the processing of request packets can be slow. For example,
if you have 50 rules and only the last rule succeeds, the Prime Access Registrar server will have to check
the preceding 49 rules before executing the rule that succeeds. You can reduce this overhead by using
policies to group rules.
The following sample configuration, Prime Access Registrar must choose the AA service to be used for
two domains, abc.com and xyz.com, based on the DNIS. You can do this by configuring different
policies for different domains.

18-14
Cisco Prime Access Registrar 6.1 User Guide
OL-29756-01
Chapter 18 Directing RADIUS Requests
Routing Requests
Policies
In the following configuration, SelectPolicy selects the policy to process packets with realm abc.com or
xyz.com. Based on the realm that arrives in the request packet, abcrealmrule and xyzrealmrule decide
whether to use abc-policy or xyz-policy to process the packets. abc-policy and xyz-policy are configured
with rules to check for DNIS numbers in the respective domains and set the AA services appropriately.
[ //localhost/Radius/Policies ]
Entries 1 to 3 from 3 total entries
Current filter: <all>
SelectPolicy/
Name = selectpolicy
Description =
Grouping = abcrealmrule|xyzrealmrule
abc-policy/
Name = abc-policy
Description =
Grouping = abcDNISrule1|abcDNISrule2
xyz-policy/
Name = xyz-policy
Description =
Grouping = xyzDNISrule1|xyzDNISrule2
Rules
[ //localhost/Radius/Rules ]
Entries 1 to 6 from 6 total entries
Current filter: <all>
abcrealmrule/
Name = abcrealmrule
Description =
Script~ = ExecRealmRule
Attributes/
policy = abc-policy
realm = @abc.com
xyzrealmrule/
Name = xyzrealmrule
Description =
Script~ = ExecRealmRule
Attributes/
policy = xyz-policy
realm = @xyz.com
abcDNISrule1/
Name = abcDNISrule1
Description =
Script~ = ExecDNISRule
Attributes/
Authentication-Service = abc1-service
Authorization-Service = abc1-service
DNIS = 1111111
abcDNISrule2/
Name = abcDNISrule2
Description =
Script~ = ExecRealmRule
Attributes/
Authentication-Service = abc2-service
Authorization-Service = abc2-service
DNIS = 2222222
xyzDNISrule1/
Name = xyzDNISrule1
Description =

18-15
Cisco Prime Access Registrar 6.1 User Guide
OL-29756-01
Chapter 18 Directing RADIUS Requests
Standard Scripts Used with Rules
Script~ = ExecRealmRule
Attributes/
Authentication-Service = xyz1-service
Authorization-Service = xyz2-service
DNIS = 6666666
xyzDNISrule2/
Name = xyzDNISrule2
Description =
Script~ = ExecRealmRule
Attributes/
Authentication-Service = xyz2-service
Authorization-Service = xyz2-service
DNIS = 7777777
Standard Scripts Used with Rules
Prime Access Registrar software includes the following scripts that you can use with the rules:
•ExecRealmRule
•ExecDNISRule
•ExecCLIDRule
•ExecNASIPRule
•ExecPrefixRule
•ExecSuffixRule
•ExecTimeRule
•ParseTranslationGroupsByRealm
•ParseTranslationGroupsByDNIS
•ParseTranslationGroupsByCLID
ExecRealmRule
Use the ExecRealmRule script to determine the Authentication service and Authorization service to be
used to process the request packet based on the suffix (Realm) in the User-Name attribute. You configure
the Realm for which the packet should be checked and the service to use in the Attributes subdirectory
of a rule. The ExecRealmRule script supports multivalued attributes with which you can configure to
check for multiple Realms.
For example, the following statement checks the request packet for three realms. If one of these three
realms is found in the request packet, the ExecRealmRule script sets the attributes to the values listed
in the Attributes subdirectory of the rule that references the ExecRealmRule script.
set Realm "@cisco.com" "@foo.com" "#bar.com"
Note Only the characters @ and # can be used as delimiters in ExecRealmRule.

18-16
Cisco Prime Access Registrar 6.1 User Guide
OL-29756-01
Chapter 18 Directing RADIUS Requests
Standard Scripts Used with Rules
Prior to Cisco Prime Access Registrar (Prime Access Registrar), ExecRealmRule was interpreted as a
regular expression pattern and was evaluated accordingly. ExecRealmRule now does a simple case
insensitive comparison by default of the value specified for the realm attribute for the realm of a
username and optionally performs regular expression matching.
You can now specify a pattern using the following notation:
~/pattern/
Where pattern is a string of alpha-numeric characters that might include wild card characters, as in
“@*cisco.com” to match patterns (realms) that end in cisco.com.
Note The question mark (?) should not be used without a character pattern preceding it. Specifying ? as the
first character might have undesirable results. (For regexp terminology, the question mark should be
preceded by an atom.)
The ExecRealmRule script checks the request packet for the Realm and applies the values set for the
following attributes:
•Authentication-Service
•Authorization-Service
•Policy
ExecDNISRule
Use the ExecDNISRule script to determine the Authentication service and Authorization service to be
used to process the request packet based on the Called-Station-Id (DNIS) attribute. The DNIS for which
the packet should be checked and the services can be configured through the Policy Engine. The
ExecDNISRule script supports multivalued attributes, by which you can configure multiple DNIS for
checking.
For example, the following statement checks for a Calling-Station-Id of 1111111, 2222222, or 3333333.
If one of the DNIS values is true, the script applies the values set for the Authentication-Service,
Authorization-Service, and Policy attributes.
set DNIS “1111111” “2222222” “3333333”
ExecCLIDRule
Use the ExecCLIDRule script with the Policy Engine to determine the Authentication service and
Authorization service to be used to process the request packet based on the Calling-Station-Id (CLID)
attribute. The CLID for which the packet should be checked and the services can be configured through
the Policy Engine. ExecCLIDRule supports multivalued attributes by which you can configure multiple
CLID for checking.
For example, the following statement checks for Calling-Station-ID and applies Authentication-Service,
Authorization-Service, and Policy.
set CLID “1111111” “2222222” “3333333”
The ExecCLIDRule script checks the request packet for the Calling-Station-Id and applies the values
set for the following attributes:

18-17
Cisco Prime Access Registrar 6.1 User Guide
OL-29756-01
Chapter 18 Directing RADIUS Requests
Standard Scripts Used with Rules
•Authentication-Service
•Authorization-Service
•Policy
ExecNASIPRule
The Policy Engine references the ExecNASIPRule script to determine the AAA Services, Policy and
Session Manager based on the Client-IP-Address and Subnet-Mask set in the Policy Engine. The
ExecNASIPRule script supports multi-value attributes by which multiple you can configure the
Client-IP-Address and Subnet-Mask in aregcmd for checking.
For example, the following statements check for Client-IP-Address and Subnet-Mask and applies
Authentication-Service, Authorization-Service, Accounting-Service, Policy, and Session-Manager.
set Client-IP-Address "1.1.1.1" "2.2.2.2" "3.3.3.3"
set Subnet-Mask "255.255.255.0" "255.255.0.0" "255.0.0.0"
The ExecNASIPRule script checks the request packet for the Client-IP-Address and Subnet-Mask and
applies the values set for the following attributes:
•Authentication-Service
•Authorization-Service
•Accounting-Service
•Policy
•Session Manager
ExecPrefixRule
The Policy Engine references the ExecPrefixRule to determine the authentication and authorization
services based on the prefix in the User-Name attribute of the request packet and assigns the appropriate
service for processing the packet.
Table 18-1 lists the ExecPrefixRule script attributes.
Table 18-1 ExecPrefixRule Attributes
Attribute Description
Delimiters A list of valid delimiters; you can use any
character as a delimiter, such as @#-/.
Prefix List of valid prefixes.
StripPrefix Option to strip or not to strip the prefix from the
User-Name. If you configure this attribute to
YES, the ExecPrefixRule strips the prefix from
the User-Name. If you configure this attribute to
NO, the ExecPrefixRule does not strip the prefix
from the User-Name. By default, this attribute is
set to YES.

18-18
Cisco Prime Access Registrar 6.1 User Guide
OL-29756-01
Chapter 18 Directing RADIUS Requests
Standard Scripts Used with Rules
For example, if cisco/bob@abc.com is the User-Name attribute, the ExecPrefixRule script sets the
Authentication-Service to abc-service and User-Name to:
•bob@abc.com when the StripPrefix attribute is set to YES.
•cisco/bob@abc.com when the StripPrefix attribute is set to NO.
You can configure the Prefix attribute in Prime Access Registrar using the aregcmd as follows:
set Prefix “cisco”
The Prime Access Registrar server does a case-insensitive comparison of the value specified for the
prefix attribute of a username.
You can configure the Prefix by specifying a pattern using the following notation:
~/pattern/
[ //localhost/Radius/Rules/prefix/Attributes ]
Delimiters = #@-/
Prefix = ~/cis*/
Where a pattern is a string of alpha-numeric characters that can include wild card characters, as in
“cis*” to match patterns (realms) that start with “cis”.
Note If you specify / as the delimiter while configuring ExecPrefix Rule, you must configure the prefix as
Prefix =~/pattern//.
Note The question mark (?) should not be used without a character pattern preceding it. Specifying ? as the
first character might have undesirable results. (For regexp terminology, the question mark should be
preceded by an atom.)
ExecSuffixRule
The Policy Engine references ExecSuffixRule to determine the AAA services, policy and session
managers based on the suffix (or realm) set in the Policy Engine. You can use aregcmd to configure
ExecSuffixRule to support multivalued attributes, as in the following:
set Suffix “cisco.com” “abc.com” “domain.com”
In the User-Name bob@abc.com, ExecSuffixRule first checks for any of the configured delimiters in
the User-Name. If there is a match, ExecSuffixRule checks for the configured suffix in the User-Name.
If the suffix matches, ExecSuffixRule checks for the value of the StripSuffix variable. If StripSuffix is
set to Yes, the suffix (including the delimiter) is stripped from the User-Name attribute of the Access
Request.
Table 18-2 lists the ExecSuffixRule script attributes.
Table 18-2 ExecSuffixRule Attributes
Attribute Description
Delimiters A list of valid delimiters; you can use any character as a
delimiter such as these: @#/

18-19
Cisco Prime Access Registrar 6.1 User Guide
OL-29756-01
Chapter 18 Directing RADIUS Requests
Standard Scripts Used with Rules
The Prime Access Registrar server does a case-insensitive comparison of the value specified for the
suffix attribute for the suffix of a username.
You can also specify a pattern using the following notation:
~/pattern/
Where pattern is a string of alpha-numeric characters that might include wild card characters, as in
“@*cisco.com” to match patterns (realms) that end in cisco.com.
Note The question mark (?) should not be used without a character pattern preceding it. Specifying ? as the
first character might have undesirable results. (For regexp terminology, the question mark should be
preceded by an atom.)
Configuring Suffix and Prefix Policies
Step 1 Activate the Policy Engine by configuring SelectPolicy.
For example, the following script explains you how to set a suffix and prefix policy in the Grouping list.
--> cd selectPolicy/
[ //localhost/Radius/Policies/SelectPolicy ]
Name = SelectPolicy
Description =
Grouping = suffixrule&prefixrule
Step 2 Run the configuration rules for Prefix and Suffix.
For example, the suffix and prefix rule configuration do the following:
•points to the ExecSuffixRule script
•specifies the delimiters for which to scan
•specifies the suffixes for which to scan
•indicates whether to strip the suffix from the User-Name
[ //localhost/Radius/Rules ]
Entries 1 to 2 from 2 total entries
Current filter: <all>
prefixrule/
Name = prefixrule
Description =
Type = radius
Script~ = ExecPrefixRule
Attributes/
Authentication-Service = local-users
Suffix List of valid suffixes to scan
StripSuffix The default value (No) does not strip the suffix from the
User-Name. When set to Yes, ExecSuffixRule does strip the
suffix.
Table 18-2 ExecSuffixRule Attributes (continued)
Attribute Description

18-20
Cisco Prime Access Registrar 6.1 User Guide
OL-29756-01
Chapter 18 Directing RADIUS Requests
Standard Scripts Used with Rules
Authorization-Service = local-users
Delimiters = @#%$/
Prefix = cisco
StripPrefix = no
suffixrule/
Name = suffixrule
Description =
Type = radius
Script~ = ExecRealmRule
Attributes/
Realm = @cisco.com
In this example, if bob@abc.com is the User-Name attribute, ExecSuffixRule strips the User-Name
bob@abc.com and sets the User-Name environment variable to bob because StripSuffix is configured as
yes.
ExecTimeRule
Use the ExecTimeRule script to implement access restriction on users based on time. The
ExecTimeRule script checks the time at which the request packet arrives and based on that the
authorization parameters for the user can be decided. Based on the time of the request packet if the rule
succeeds then ExecTimeRule sets the environment variable, Acceptedprofiles to a profile or a set of
profiles.
For example, the following statement checks for Timerange and applies AcceptedProfiles.
Acceptedprofiles=Regularaccess::Highprivilegeaccess
ParseTranslationGroupsByRealm
The Policy Engine references the ParseTranslationGroupsByReal script to determine the incoming and
outgoing translation groups based on realm set in the Policy Engine. Use the
ParseTranslationGroupsByReal script to add or filter attributes in request and response packets. The
ParseTranslationGroupsByReal script supports multi-value attributes enabling you to configure to check
for multiple Realms.
For instance, the following statement checks for three Realms. If True, the Policy Engine applies the
values set for the Incoming-Translation-Group and Outgoing-Translation-Groups attributes.
set Realm "@cisco.com" "@foo.com" "@bar.com"
ParseTranslationGroupsByDNIS
This script is referenced from the Policy Engine to determine the incoming and outgoing translation
groups based on DNIS set in the Policy Engine. This script can be used to add/filter attributes in
request/response packets. This script supports multi-value attributes, by which multiple DNIS can be
configured for checking.
For example, the following statement checks for Calling-Station-ID and applies
Incoming-Translation-Groups and Outgoing-Translation-Groups.
set DNIS "1111111" "2222222" "3333333"

18-21
Cisco Prime Access Registrar 6.1 User Guide
OL-29756-01
Chapter 18 Directing RADIUS Requests
Standard Scripts Used with Rules
ParseTranslationGroupsByCLID
The Policy Engine references the ParseTranslationGroupsByCLID script to determine the incoming and
outgoing translation groups based on CLID set in the Policy Engine. You can use the
ParseTranslationGroupsByCLID script to add and filter attributes in request and response packets. The
ParseTranslationGroupsByCLID script supports multi-value attributes, by which you can configure
multiple CLIDs for checking.
For example, the following statement checks for the Calling-Station-ID and applies
Incoming-Translation-Groups and Outgoing-Translation-Groups.
set CLID "1111111" "2222222" "3333333"
ParseTranslationGroupsByDNIS
The ParseTranslationGroupsByDNIS script is referenced from the policy engine to determine the
incoming and outgoing translation groups based on DNIS set in the policy engine. The
ParseTranslationGroupsByDNIS script can be used to add and/or filter attributes in request and
response packets. The ParseTranslationGroupsByDNIS script supports multi-value attributes, by
which multiple DNIS can be configured for checking.
For example, the following statement checks for the Calling-Station-ID and applies
Incoming-Translation-Groups and Outgoing-Translation-Groups.
set DNIS "1111111" "2222222" "3333333"

18-22
Cisco Prime Access Registrar 6.1 User Guide
OL-29756-01
Chapter 18 Directing RADIUS Requests
Standard Scripts Used with Rules

CHAPTER
19-1
Cisco Prime Access Registrar 6.1 User Guide
OL-29756-01
19
Using FastRules to Process Packet Flow
While using rule policy engine and scripting points to process packet flow, you need to be familiar with
programming languages, and create scripts to attach them to the Prime Access Registrar configuration.
FastRules concept is an easier and efficient alternative to rule policy engine and scripting points.
FastRules provides a mechanism to easily choose the right authentication, authorization, accounting, and
query service(s), drop, reject, or break flows, run a script, choose a session manager and/or a chain of
fast rules required for processing a packet.
FastRules has the following capabilities:
•Provides maximum flexibility and ease in matching information in the incoming packets for
choosing the appropriate service to apply
•Provides an option to match values in AVPs based on value ranges, exact match, and simple string
comparisons using regex
•Provides easy and efficient alternative to rule/policy engine and scripting points for most common
use cases—reduces the use of external scripts to choose an appropriate service
Figure 19-1 describes the workflow for FastRules.
FastRules also provides an option to use Internal Scripts as part of the workflow. Internal scripts allow
you to add, modify, or delete attributes in the request, response, and environment dictionaries for
RADIUS, Diameter, and TACACS+. For more information about internal scripts, see Internal Scripts,
page 11-14.

19-2
Cisco Prime Access Registrar 6.1 User Guide
OL-29756-01
Chapter 19 Using FastRules to Process Packet Flow
Configuring FastRules
Figure 19-1 FastRules Workflow
Configuring FastRules
FastRules can be configured either through the GUI or through a CLI. For more information on
configuring fast rules through the GUI, see FastRules, page 3-53.
A sample CLI for configuring fast rules is given below:
[ //localhost/Radius/Fastrules]
Ruledefintions\
radroot\
Name = radroot
Desc =
Protocol = Radius
Condition = A1 AND (A2 OR A3)
Success = Authen(mod1)-->fr2-->Author(oci)
Failure =
Attributes\
A1\
Name = A1
Attribute = Calling-station-id
Value = 1.2.3.4
A2\
Name = A2
Attribute = User-name
Value = bob
A3\
Name = A3
Attribute = User-name
Value = BEGINS_WITH(jane)
fr1\
Name = fr1
Type =
access-request
AND User-Name =
bob@xyz.com
Drop
Fail
Pass
Route-FastRule
FastRule-2
Pass Service_Type =
Framed
Fail
InternalScript
(re-auth service) Drop
OCIService
Local
service
InternalScript
(Strip realm)

19-3
Cisco Prime Access Registrar 6.1 User Guide
OL-29756-01
Chapter 19 Using FastRules to Process Packet Flow
Configuring FastRules
Desc =
Protocol = Radius
Condition = Attri1
Success = Authen(proxy)
Failure = DROP
Attributes\
Attri1\
Name = Attr1
Attribute = Calling-station-id
Value = 2.3.4.5
fr2\
Name = fr2
Desc =
Protocol = Radius
Condition = Attribute1
Success = Authen(local)
Failure =
Attributes\
Attribute1\
Name = Attribute1
Attribute = Status
Value = Failure
.
Order\
Radius\
1. radroot
2. fr1
Diameter\
1.
Tacacs\
1.
Services\
mod1\
Name = mod1
Desc =
Type = mod
Service = ldap
Dictionary\
+env:Calling = req:Calling-Station-Id
-req:Calling-Station-Id = ""
+req:Calling-Station-Id = "5.6.7.8"
+res:Calling-Station-Id = env:Calling
#res:Called-Station-Id = “123456789”

19-4
Cisco Prime Access Registrar 6.1 User Guide
OL-29756-01
Chapter 19 Using FastRules to Process Packet Flow
Configuring FastRules

CHAPTER
20-1
Cisco Prime Access Registrar 6.1 User Guide
OL-29756-01
20
Wireless Support
This chapter provides the following information about using Cisco Prime Access Registrar
(Prime Access Registrar) for wireless support:
•Mobile Node-Home Agent Shared Key, page 20-1
•3GPP2 Home Agent Support, page 20-3
•Session Correlation Based on User-Defined Attributes, page 20-5
•Managing Multiple Accounting Start/Stop Messages, page 20-6
•NULL Password Support, page 20-6
•3GPP Compliance, page 20-7
Mobile Node-Home Agent Shared Key
In a mobile wireless environment, a Home Agent (HA) can request a Mobile Node-Home Agent
(MN-HA) shared key from the home Prime Access Registrar RADIUS server during a mobile IP
registration request (RRQ) from a Packet Data Serving Node (PDSN). Prime Access Registrar supports
distribution of the shared key in this environment. Prime Access Registrar encrypts the shared key using
MD5 encryption before sending the key back to the HA in an Access-Accept packet.
When an HA receives an RRQ from a PDSN, the HA authenticates the RRQ using a MN-HA shared key.
If the HA does not have the MN-HA shared key, it retrieves the MN-HA shared key from the
Prime Access Registrar server by sending an Access-Request packet containing the 3GPP2 VSA
CDMA-MN-HA-SPI (SPI attribute). Prime Access Registrar then sends the
CDMA-MN-HA-Shared-Key corresponding to the user if the user has been successfully authenticated.
This section contains the following topics:
•Use Case Example
•Configuring User Attributes
Use Case Example
When HA receives an RRQ from a PDSN, it authenticates the RRQ by using a MN-HA shared key. If
the HA does not have the MN-HA shared key, it retrieves the MN-HA shared key from the
Prime Access Registrar server by sending an Access-Request packet containing the 3GPP2
vendor-specific attribute (VSA) CDMA-MN-HA-SPI, the Security Parameter Index (SPI attribute).

20-2
Cisco Prime Access Registrar 6.1 User Guide
OL-29756-01
Chapter 20 Wireless Support
Mobile Node-Home Agent Shared Key
The Prime Access Registrar server then sends the CDMA-MN-HA-Shared-Key corresponding to the
user if the user has successfully authenticated subject to the following rules:
1. If there is an incoming SPI and no configured SPI, the Prime Access Registrar server authenticates
the user as usual and does not include a configured shared-key (if there is one) in the reply.
2. If the incoming SPI does not match the configured SPI, the Prime Access Registrar server
authenticates the user as usual, but does not include the configured shared-key (if there is one) in
the reply.
3. If the incoming SPI matches the configured SPI, but there is no shared-key configured, the
Prime Access Registrar server proceeds with normal authentication. Since there is no shared-key, it
will not be included in the reply.
4. If the incoming SPI matches the configured SPI and a configured shared-key exists, the
Prime Access Registrar server proceeds to encrypt the MCD5 shared-key and include it in the
Access-Accept.
The key to including the shared key in an Access-Accept is in matching the values of the SPI attribute.
Configuring User Attributes
Prime Access Registrar server supports user-specific attributes which enables the
Prime Access Registrar server to return attributes on a per-user or per-group basis without having to use
profiles.
Configuring the User Attributes
To configure a user with the CDMA-MN-HA-SPI VSA to request a MN-HA shared key:
Step 1 Log into the Prime Access Registrar server and launch aregcmd.
Log in as a user with administrative rights such as user admin.
Step 2 Change directory to the attribute directory of the user.
cd /Radius/UserLists/Default/bob/Attributes
Step 3 Set the CDMA-MN-HA-SPI VSA to the appropriate shared-key value.
set CDMA-MN-HA-SPI 1124
set CDMA-MN-HA-SPI 1124
Step 4 Set the CDMA-MN-HA-SPI VSA to the appropriate shared-key value.
set CDMA-MN-HA-Shared-Key secret112
set CDMA-MN-HA-Shared-Key secret112
Step 5 Validate and save your changes.
validate
save

20-3
Cisco Prime Access Registrar 6.1 User Guide
OL-29756-01
Chapter 20 Wireless Support
3GPP2 Home Agent Support
3GPP2 Home Agent Support
The Prime Access Registrar server supports 3GPP2 home agents. This support enables mobile IP clients
that authenticate through a Prime Access Registrar RADIUS server to be told which home agent they
should use.
Every Mobile IP client has a home domain that is served by a group of Home Agents (HA). The Mobile
IP client sets up a tunnel to one (and only one) HA during a session while it roams. Typically, the domain
can be determined by the Mobile IP client's network access identifier (NAI).
Note The NAI is the userID submitted by the client during PPP authentication. In roaming, the purpose of the
NAI is to identify the user as well as to assist in the routing of the authentication request.
During the authentication and authorization phase for each Mobile IP client, the RADIUS server must
decide which HA from a group of HAs should be chosen to serve the client. This is called dynamic HA
assignment.
This section contains the following topics:
•Home-Agent Resource Manager
•Querying and Releasing Sessions
•Access Request Requirements
•New 3GPP2 VSAs in the Cisco Prime Access Registrar Dictionary
Home-Agent Resource Manager
Prime Access Registrar supports dynamic HA assignment with a new resource manager type called
home-agent. You configure the home-agent resource manager with a list of IP addresses. The
Prime Access Registrar server assigns those addresses to clients whose request dictionary has the right
attributes to indicate that an assignment should be done. This is similar to the ip-dynamic resource
manager.
Unlike the ip-dynamic resource manager, HAs are not exclusively allocated to an individual session but
are shared among a set of sessions.
Load Balancing
The goal of dynamic HA assignment is to have load balancing among HAs. The Prime Access Registrar
server achieves this by evenly distributing mobile clients among HAs. At the same time, the
Prime Access Registrar server ensures that the same HA is always assigned to the same Mobile IP client
for the same session.

20-4
Cisco Prime Access Registrar 6.1 User Guide
OL-29756-01
Chapter 20 Wireless Support
3GPP2 Home Agent Support
Configuring the Home Agent Resource Manager
To create a new resource manager using the aregcmd command:
Step 1 Use the cd command to change to the Radius /ResourceManagers level.
--> cd /Radius/ResourceManagers
[ //localhost/Radius/ResourceManagers ]
Entries 0 to 0 from 0 total entries
Current filter: <all>
Step 2 Use the add command to specify the name of a resource manager to create.
--> add home-agent-pool
--> Added home-agent-pool
Step 3 Use the cd command to change to the Radius /ResourceManagers/home-agent-pool level.
--> cd home-agent-pool
[ //localhost/Radius/ResourceManagers/home-agent-pool ]
Name = home-agent-pool
Description =
Type =
Step 4 Use the set command to set the resource manager type to home-agent.
--> set type home-agent
Step 5 Use the ls command to view the subdirectories under home-agent-pool.
--> ls
[ //localhost/Radius/ResourceManagers/home-agent-pool ]
Name = home-agent-pool
Description =
Type = home-agent
Home-Agent-IPAddresses/
Step 6 Use the cd command to change to the
Radius/ResourceManagers/home-agent-pool/Home-Agent-IPAddresses level.
--> cd Home-Agent-IPAddresses
[ //localhost/Radius/ResourceManagers/home-agent-pool/Home-Agent-IPAddresses ]
Step 7 Use the add command to add a single IP address or a range of IP addresses.
--> add 209.165.200.200-209.165.200.254
--> Added 209.165.200.200-209.165.200.254
Querying and Releasing Sessions
The aregcmd program has been modified to support a new filter for query-session and release-session.
You can use this filter to restrict a request (either query or release) to just the sessions with a given
home-agent IP address. For example, consider the following command line.

20-5
Cisco Prime Access Registrar 6.1 User Guide
OL-29756-01
Chapter 20 Wireless Support
Session Correlation Based on User-Defined Attributes
--> query-session /radius with-home-agent 10.10.10.1
This command line will return all sessions that have a home-agent resource equal to the IP address
10.10.10.1.
Querying sessions using aregcmd displays the home-agent resource in each session as:
HA ddd.ddd.ddd.ddd
where each ddd is a decimal number from 0-255.
Access Request Requirements
When the home-agent resource manager receives an Access-Request that contains a
CDMA-HA-IP-Addr attribute, the home-agent resource manager checks the response dictionary to see
if it already has a CDMA-HA-IP-Addr attribute. If it does, then the Mobile IP client has been assigned
a HA address already and the resource manager does not need to do anything.
If the value of the CDMA-HA-IP-Addr attribute in the request dictionary is 0.0.0.0, the home-agent
resource manager assigns a HA and puts a new CDMA-HA-IP-Addr attribute whose value is the IP
address of the HA in the response dictionary.
If the value of the CDMA-HA-IP-Addr attribute is not 0.0.0.0, the Mobile IP client has been assigned a
HA address already. The home-agent resource manager copies the attribute (with its value) from the
request dictionary into the response dictionary.
The Prime Access Registrar server might select the session manager based on the domain (using the rule
engine, dynamic properties, or scripting), and it allows each session manager to have its own home-agent
resource manager.
New 3GPP2 VSAs in the Cisco Prime Access Registrar Dictionary
Prime Access Registrar supports 3GPP2 vendor-specfic attributes (VSAs) in the vendor-specific
dictionary in /Radius/Advanced/Attribute Dictionary.
Note There is no planned support for the Accounting-Container (3GPP2/6) attribute because it
has different syntax than other vendor-specfic attributes (VSAs) and requires special
processing.
Session Correlation Based on User-Defined Attributes
All the session objects are maintained in one dictionary keyed by a string.
You can define the keying material to the session dictionary through a newly introduced environment
variable, Session-Key. If the Session-Key is presented at the time of session manager process, it will be
used as the key to the session object for this session. The Session-Key is of type string. By default, the
Session-Key is not set. It’s value should come from attributes in the incoming packet and is typically set
by scripts. For example, CLID can be used to set the value of Session-Key.

20-6
Cisco Prime Access Registrar 6.1 User Guide
OL-29756-01
Chapter 20 Wireless Support
Managing Multiple Accounting Start/Stop Messages
Use the script UseCLIDAsSessionKey as defined in the script rexscript.c to specify that the
Calling-Station-Id attribute that should be used as the session key to correlate requests for the same
session. This is a typical case for 3G mobile user session correlation. You can provide your own script
to define other attributes as the session key.
In the absence of the Session-Key variable, the key to the session will be created based on the string
concatenated by the value of the NAS and the NAS-Port.
There is a new option with-key available in aregcmd for query-sessions and release-sessions to access
sessions by Session-Key.
Managing Multiple Accounting Start/Stop Messages
Since the PDSN is aware when it sends a RADIUS stop followed by a start record, it inserts the new
Session Continue attribute (3GPP2/48) into the stop record. The existence of the Session Continue
attribute denotes that a start record will immediately be sent and the packet data session continues on the
PDSN.
When Prime Access Registrar receives an accounting stop packet, the following two conditions trigger
a release of a session and its resources:
•There is no 3GPP2/48 Session Continue attribute in the stop packet and the number of accounting
stops received is greater or equal to the starts received for this session
•The 3GPP2/48 Session Continue attribute is present in the stop packet, but its value is zero (0)
Note One of the conditions above must be true to release the session and its resources.
NULL Password Support
Prime Access Registrar introduced a new Prime Access Registrar environment variable,
Allow-NULL-Password. At authentication time, if the following three conditions are met, user
authentication is bypassed:
1. Allow-NULL-Password environment variable is set to TRUE.
2. The User-Password or CHAP-Password must be NULL in the incoming request. (If it is not NULL,
normal password checking will occur.)
3. A user record exists for this user.
By default, the Allow-NULL-Password environment variable is not set.
Note You should be aware of the security impact when using the NULL Password feature.

20-7
Cisco Prime Access Registrar 6.1 User Guide
OL-29756-01
Chapter 20 Wireless Support
3GPP Compliance
You can set this environment variable in three different ways:
1. For the user in local database, one new field AllowNullPassword is added in the user record. When
Prime Access Registrar fetches a user record for authentication, if this field is set to TRUE and
Allow-NULL-Password environment variable does not exist, it sets Allow-NULL-Password
environment variable to TRUE.
2. If the user record is in LDAP database, then the LDAPToEnvironmentMappings must be defined to
map an attribute in LDAP user record to Allow-NULL-Password environment variable.
3. Through scripting which allows the decision to be made based on runtime conditions, such as
attributes in the access-request or policies.
3GPP Compliance
Prime Access Registrar supports 3GPP compliance by implementing the following (refer to RFC
29.273):
•SWa reference point between an untrusted non-3GPP IP access and a 3GPP AAA server/proxy. See
SWa Access Authentication and Authorization, page 20-8.
•STa reference point between a trusted non-3GPP access and a 3GPP AAA server/proxy. See STa
Access Authentication and Authorization, page 20-8.
•SWm reference point between an Evolved Packet Data Gateway (ePDG) and a 3GPP AAA
server/proxy. See SWm Access Authentication and Authorization, page 20-9.
•SWd reference point between a 3GPP AAA server and a 3GPP AAA proxy. See SWd Access
Authentication and Authorization, page 20-9.
•SWx reference point between a Home Subscriber Server (HSS) and a 3GPP AAA server. See SWx
Authentication Procedure, page 20-10.
•S6b reference point between a PDN GW and a 3GPP AAA server/proxy. See S6b Authentication
and Authorization Procedure, page 20-10.
This topic also contains the following sections:
•3GPP Call Flows, page 20-11
•This topic contains the following sections:, page 20-11

20-8
Cisco Prime Access Registrar 6.1 User Guide
OL-29756-01
Chapter 20 Wireless Support
3GPP Compliance
Figure 20-1 depicts the various interfaces used for 3GPP compliance in a mobile network.
Figure 20-1 3GPP Interfaces
SWa Access Authentication and Authorization
The SWa reference point is defined between a non-3GPP IP access and a 3GPP AAA server or between
a non-3GPP IP access and a 3GPP AAA proxy.
The SWa access authentication and authorization procedure includes the following steps:
1. The 3GPP AAA server issues an unsolicited re-auth request towards the untrusted non-3GPP access,
indicating that both re-authentication and re-authorization of the user is needed.
2. Upon receipt of such a request, the untrusted non-3GPP access responds to the request and indicates
the disposition of the request. This procedure is mapped to the Diameter command codes
Re-Auth-Request and Re-Auth-Answer.
3. Upon receiving the re-auth request, the untrusted non-3GPP access immediately invokes the SWa
authentication and authorization procedure requesting the identity of the user through EAP and
using DER/DEA commands, with the same session-ID.
4. If the re-authentication of the user is not successful, the untrusted non-3GPP access detaches the
user.
STa Access Authentication and Authorization
The STa reference point is defined between a non-3GPP access network and a 3GPP AAA Server or
between a non-3GPP access network and a 3GPP AAA Proxy.
Prime Access Registrar decides whether a non-3GPP access network is trusted or untrusted by using the
access authentication and authorization procedure executed between the non-3GPP access network and
the 3GPP AAA server. This is implemented by the STa and SWa reference points sharing the same
Diameter application and partly sharing the same authentication and authorization procedure. The STa
HSS
SWx
ePDG
3GPP AAA
Server
3GPP AAA
Proxy
S6b
SWm
STa SWa
SWd
PDN
GW
Trusted non-3GPP
IP access
Access
GW
Untrusted non-3GPP
IP access
Access
GW
Home network
ePDG
S6b
SWm
STa SWa
PDN
GW
Trusted non-3GPP
IP access
Access
GW
Untrusted non-3GPP
IP access
Access
GW
Visited network

20-9
Cisco Prime Access Registrar 6.1 User Guide
OL-29756-01
Chapter 20 Wireless Support
3GPP Compliance
and SWa reference points are clearly distinguished after the exchange of the first authentication and
authorization messages, during which trusted/untrusted decision is made by the 3GPP AAA server and
this decision is communicated to the non-3GPP access network.
The trusted non-3GPP access authentication and authorization requires DiaEAP with EAP-AKA or
EAP-AKA`. Prime Access Registrar implements the STa access authentication and authorization
procedure based on the mobility parameters transported by the non-3GPP access network to the 3GPP
AAA server.
This procedure follows the SWa authentication and authorization procedure, with the following
differences:
•Information elements that reflect information about the user's service request and about the access
network are mandatorily included in the authentication and authorization request.
•The information elements that describe the user's subscription profile are downloaded to the
non-3GPP access network.
SWm Access Authentication and Authorization
The SWm reference point is defined between the ePDG and the 3GPP AAA server or between the ePDG
and the 3GPP AAA proxy. It is used to authenticate and authorize a UE by transporting mobility
parameters that are needed for the S2b interface. In particular this information may include the Packet
Data Network (PDN) GW identity(s) and Access Point Name (APN(s)) currently allocated to a UE
during a previous attach in a 3GPP access.
The SWm reference point performs authentication and authorization based on the reuse of the DER/DEA
command set defined in the Diameter EAP application. The SWm access authentication and
authorization procedure includes the following steps:
•The UE transmits a ‘tunnel establishment request’ message to the ePDG in order to establish a
connection to the PDN.
•The ePDG initiates access authentication and authorization request to the 3GPP AAA server.
•During the access authentication and authorization procedure, the ePDG provides mobility
parameters of the UE to the 3GPP AAA Server.
•The 3GPP AAA server performs IP mobility mode selection appropriately and upon successful
authorization, it returns mobilty mode information back to the ePDG.
SWd Access Authentication and Authorization
The SWd reference point is defined between a 3GPP AAA proxy and a 3GPP AAA server. The SWd
interface is used in roaming scenarios where the 3GPP AAA proxy is located in the visited network and
the 3GPP AAA server is located in the home network. The 3GPP AAA proxy acts as a Diameter proxy
agent and forwards Diameter commands between the Diameter client and the Diameter server.
When used in connection with an STa reference point, the SWd interface supports the trusted non-3GPP
access authentication and authorization procedure. For this procedure, the 3GPP AAA proxy forwards
the Diameter commands received from the 3GPP AAA server and the trusted non-3GPP access network
as a stateful Diameter proxy.
When used in connection with the SWm reference point, the SWd interface supports the untrusted
non-3GPP access authentication and authorization procedure. For this procedure, the 3GPP AAA proxy
forwards the Diameter commands received from the 3GPP AAA server and the ePDG as a stateful
Diameter proxy.

20-10
Cisco Prime Access Registrar 6.1 User Guide
OL-29756-01
Chapter 20 Wireless Support
3GPP Compliance
SWx Authentication Procedure
The SWx is a reference point defined between a HSS and a 3GPP AAA server. It is used in AAA server
registration of a new user.
The authentication procedure includes the following steps:
1. The 3GPP AAA server registers the current 3GPP AAA server address in the HSS for a given user
when a new subscriber has been authenticated by the 3GPP AAA server.
2. The 3GPP AAA server informs the HSS about the current PDN GW identity and APN being used
for a given UE, or that a certain PDN GW and APN pair is no longer used.
3. Accordingly, the 3GPP AAA server may de-register the currently registered 3GPP AAA server in
the HSS for a given user and purge any related non-3GPP user status data in the HSS. This occurs
if the UE for some reason has been disconnected from the non-3GPP access.
HSS Initiated Update of User Profile
The subscriber profile management procedures over SWx include the subscriber profile push and the
subscriber profile request. The SWx reference point enables the following:
•Indication to the 3GPP AAA server of change of non-3GPP subscriber profile within HSS.
•Activation and deactivation of the subscriber and equipment trace in the PDN GW.
This procedure is used between the 3GPP AAA Server and the HSS and is invoked by the HSS during
the following circumstances:
•When the subscriber profile has been modified and needs to be sent to the 3GPP AAA Server. This
may happen due to a modification in the HSS.
•To update the 3GPP AAA Server with the identity of a dynamically allocated PDN GW, which is
included in the APN-Configuration AVP in the user profile as a result of the first PDN connection
establishment associated with an APN over 3GPP access.
This procedure is mapped to the Diameter command codes Push-Profile-Request (PPR) and
Push-Profile-Answer (PPA). An IMSI Range based mechanism is provided to select the HSS server. In
the CLI, if the MultiplePeersPolicy is IMSIRangeBased, then the ranges are configured as a list and from
them the HSS server is selected.
S6b Authentication and Authorization Procedure
The S6b reference point is defined between a PDN GW and a 3GPP AAA server (for non-roaming case,
or roaming with home routed traffic to PDN GW in home network) and between a PDN GW and a 3GPP
AAA proxy.The S6b interface protocol is based on Diameter. It uses the Diameter base protocol and also
supports Diameter EAP application. The EAP methods EAP-AKA and EAP-AKA` are used.
The authentication and authorization procedure includes the following steps:
1. The S6b interface enables authentication and authorization between the UE and the 3GPP AAA
server/proxy.
2. When the UE performs the DSMIPv6 initial attach, it runs an IKEv2 exchange with the PDN GW.
In this exchange, EAP AKA is used for UE authentication over IKEv2. The PDN GW acts as an
IKEv2 responder and an EAP pass-through authenticator for this authentication.

20-11
Cisco Prime Access Registrar 6.1 User Guide
OL-29756-01
Chapter 20 Wireless Support
3GPP Compliance
3. The S6b authentication and authorization procedure is invoked by the PDN GW after receiving an
IKE_SA_AUTH message from the UE. The S6b reference point performs authentication based on
reuse of the DER/DEA command set defined in Diameter EAP.
3GPP Call Flows
When Prime Access Registrar receives an authentication or authorization request from any of the access
points, it sends the packet to the rules and policy engine for processing. The rules and policies are added
in the configuration of Prime Access Registrar. Client, vendor, and server scripting points are provided
in order to modify any AVPs in the packet or to decide upon the type of service that the packet requires.
For example, if the service is Radius-to-Diameter translation, Prime Access Registrar performs the
translation of Radius packet to Diameter packet and sends it to the remote server. The service also has
scripting points that can be used to modify the incoming packets. Once authentication or authorization
is done for the packet session management can be performed for the packet by storing the user sessions
in a session cache, if the authentication or authorization is successful. The server, client, vendor, and
service outgoing scripting points can be used to modify the response packet.
Figure 20-2 depicts the call flows implemented for 3GPP.
Figure 20-2 3GPP Call Flows
This topic contains the following sections:
•CLI for 3GPP Authorization, page 20-12
•CLI for 3GPP Reverse Authorization, page 20-12
NASHSSCPAR P-GW
NASHSSCPAR P-GW
EAP-SIM/EAP-AKA/EAP_AKA over RADIUS or DIAMETER
Authentication request
Authentication vector request (MAR)
APN-info, QOS-profile, P-GW identity
Authentication response
Session-Termination request
Session-Termination answer
Authentication vector answer (MAA)
User profile request (SAR)
User profile download (SAA)
Update location request (AAR)
Update P-GW identity (SAR)
Diameter STR
Diameter STA
361686
Update P-GW identity (SAA)
Update location request (AAA)

20-12
Cisco Prime Access Registrar 6.1 User Guide
OL-29756-01
Chapter 20 Wireless Support
3GPP Compliance
CLI for 3GPP Authorization
Following is the CLI for 3GPP authorization service:
[ //localhost/Radius/Services/3gpp-authz-diameter]
Name = 3gpp-authz-diameter
Description = STa to SWx authz (update-gw, get-profile , push-profile from HSS, de-reg
from HSS )
Type = 3gpp-authorization
Protocol = Diameter
IncomingScript~ =
OutgoingScript~=
SessionManager =
DiameterProxyService =
[ //localhost/Radius/Services/3gpp-authz-radius]
Name = 3gpp-authz-radius
Description = STa to SWx authz (update-gw, get-profile , push-profile from HSS, de-reg
from HSS )
Type = 3gpp-authorization
Protocol = Radius
SessionManager =
TranslationService =
[ //localhost/Radius/Services/3gpp-authz-radius]
Name = 3gpp-authz-radius
Description = STa to SWx authz (update-gw, get-profile , push-profile from HSS, de-reg
from HSS )
Type = 3gpp-reverse-authorization
Protocol = Radius
PreRequestTranslationScript~ =
PostRequestTranslationScript~ =
PreResponseTranslationScript~ =
PostResponseTranslationScript~ =
EnvMapping/
ForwardMapping/
ReverseMapping/
ResponseMapping/
[ //localhost/Radius/Services/3gpp-authz]
Name = 3gpp-authz-radius
Description = STa to SWx authz (update-gw, get-profile , push-profile from HSS, de-reg
from HSS )
Type = 3gpp-reverse-authorization
Protocol = Diameter
Incoming~ =
Outgoing~=
SessionManager =
RequestMapping/
EnvMapping/
ResponseMapping/
CLI for 3GPP Reverse Authorization
3GPP reverse authorization is used during RADIUS to Diameter translation. You can set the
corresponding parameter to TRUE during the RADIUS to Diameter conversion. In this case, the request
command mapping must not be defined because a new diameter request is created from the radius request
by the 3GPP reverse authorization service. For more information about RADIUS<->Diameter
translations, see Translation Framework for Diameter, page 8-23.
Following is the CLI for 3GPP reverse authorization service:

20-13
Cisco Prime Access Registrar 6.1 User Guide
OL-29756-01
Chapter 20 Wireless Support
3GPP Compliance
[ //localhost/Radius/Services/reverse ]
Name = reverse
Description =
Type = 3gpp-reverse-authorization
IncomingScript~ =
OutgoingScript~ =
SessionManager = cache
TranslationService = diatorad
ProxyService =
[ //localhost/Radius/Services/diatorad ]
Name = diatorad
Description =
Type = diameter-radius
ProxyServiceName = rad-proxy
PreRequestTranslationScript~ =
PostRequestTranslationScript~ =
PreResponseTranslationScript~ =
PostResponseTranslationScript~ =
RequestMapping/
CommandMappings/
PPR = Radius-Access-Request
RAR = Radius-CoA-Request
AVPMappings/
Auth-Session-State = Cisco-AVPair
user-name = user-name
AVPsToBeAdded/
EnvironmentMappings/
ResponseMapping/
ResultCodeMappings/
Radius-CoA-ACK = Diameter-Success
Radius-CoA-NAK = Diameter-Unable-To-Deliver
AVPMappings/
AVPsToBeAdded/
EnvironmentMappings/

20-14
Cisco Prime Access Registrar 6.1 User Guide
OL-29756-01
Chapter 20 Wireless Support
3GPP Compliance

CHAPTER
21-1
Cisco Prime Access Registrar 6.1 User Guide
OL-29756-01
21
Using LDAP
This chapter provides information about using Lightweight Directory Access Protocol (LDAP) with
Cisco Prime Access Registrar (Prime Access Registrar) to access information directories. You can use
Prime Access Registrar to authenticate and authorize access requests by querying user information
through LDAP.
Note Prime Access Registrar supports LDAP version 3 and LDAP version 2 directory servers.
This chapter contains the following sections:
•Configuring LDAP
•Analyzing LDAP Trace Logs
•Bind-Based Authentication for LDAP
Configuring LDAP
To use LDAP in Prime Access Registrar, use aregcmd to do the following:
1. Configuring the LDAP Service.
2. Configuring an LDAP RemoteServer.
3. Setting LDAP As Authentication and Authorization Service.
4. Saving Your Configuration.
After you issue the save command, Prime Access Registrar attempts to validate the configuration,
checks for all required properties, and ensures there is no logic error. If the validation is successful,
Prime Access Registrar saves the configuration to the MCD database. When Prime Access Registrar is
reloaded, it shuts down any current LDAP connections and builds new connections for the configured
LDAP remote servers.

21-2
Cisco Prime Access Registrar 6.1 User Guide
OL-29756-01
Chapter 21 Using LDAP
Configuring LDAP
Configuring the LDAP Service
You configure an LDAP service under /Radius/Services. When you define an LDAP service under
/Radius/Services, you must set its type to LDAP.
[ //localhost/Radius/Services/AR-LDAP ]
Name = AR-LDAP
Description =
Type = ldap
IncomingScript~ =
OutgoingScript~ =
OutagePolicy~ = RejectAll
OutageScript~ =
MultipleServersPolicy = Failover
RemoteServers/
Table 21-1 describes the LDAP service properties.
This section contains the following topics:
•MultipleServersPolicy
•RemoteServers
MultipleServersPolicy
Use the MultipleServersPolicy property to configure the LDAP remote servers in RoundRobin mode, or
the default Failover mode applies. When set to Failover, Prime Access Registrar directs requests to the
first server in the /Radius/Services/LDAP/RemoteServers list. If that server should fail or go offline,
Prime Access Registrar redirects all requests to the next server in the list. The process continues until
Prime Access Registrar locates an online server.
When set to RoundRobin, Prime Access Registrar directs each request to the next server in the
RemoteServers list to share the resource load across all listed servers.
Table 21-1 LDAP Service Properties
Parameter Description
Name Required; inherited from the upper directory
Description An optional description of the service
Type Must be set to LDAP for LDAP service
IncomingScript Optional
OutgoingScript Optional
OutagePolicy Required; must be set to AcceptAll or Drop Packet, or defaults to RejectAll
OutageScript Optional
MultipleServersPolicy Required; must be set to RoundRobin or defaults to Failover.
RemoteServers Required; list of one or more remote servers defined under
/Radius/Services/LDAP/RemoteServers. These servers must be listed in
order under /Radius/RemoteServers.

21-3
Cisco Prime Access Registrar 6.1 User Guide
OL-29756-01
Chapter 21 Using LDAP
Configuring LDAP
RemoteServers
Use the RemoteServers directory to list one or more remote servers to process access requests. The
servers must also be listed in order under /Radius/RemoteServers.
The order of the RemoteServers list determines the sequence for directing access requests when
MultipleServersPolicy is set to RoundRobin mode. The first server in the list receives all access requests
when MultipleServersPolicy is set to Failover mode.
Configuring an LDAP RemoteServer
Use the aregcmd command add to add LDAP servers under /Radius/RemoteServers. You must
configure an LDAP RemoteServer object for each RemoteServer object you list under
/Radius/Services/LDAP/RemoteServers.
The Name, Protocol, Port, HostName, BindName, BindPassword, SearchPath, and Filter properties must
be configured to use an LDAP remote server.
The Name, Protocol, Port, HostName, SearchPath, and Filter properties must be configured to enable
Bind-Based Authentication.
Note You can leave the BindName, BindPassword, UserPasswordAttribute, PasswordEncryptionStyle and
DNSLookupAndLDAPRebindInterval properties blank when you configure the Bind-Based
Authentication feature in Prime Access Registrar.
Table 21-2 describes the LDAP Remote Server properties.
Table 21-2 LDAP Remote Server Properties
Parameter Description
Name Required name you assign
Description Optional description of the server
Protocol Required and must be set to LDAP; no default value
Port Required; port on which LDAP server listens, default is port 389.
Note If port is not set or set to zero, LDAP remote server will
automatically be set to port 389.
ReactivateTimerInterval Required; default is 300000 (ms)
Timeout Required; specifies length of time Prime Access Registrar waits for a
response from the LDAP server before noting the server as down;
default is 15 (seconds)
HostName Required; specifies the hostname, FQDN, or IP address of the LDAP
server
BindName Specifies the distinguished name (DN) in the LDAP server for
Prime Access Registrar to bind with the LDAP server
BindPassword Specifies the password for the distinguished name
UseSSL FALSE by default

21-4
Cisco Prime Access Registrar 6.1 User Guide
OL-29756-01
Chapter 21 Using LDAP
Configuring LDAP
SearchPath~ Specifies search base to the organization and domain; for example:
o=cisco.com
Filter~ (uid=%s) by default
UserPasswordAttribute Should be set to the attribute in the directory server which stores users’
passwords; default is userpassword
LimitOutstandingRequests FALSE by default
MaxOutstandingRequests Limits the number of requests to the LDAP server; used to throttle the
request load when the LDAP server does not function well under high
TPS rates (default is 0)
MaxReferrals Limits the number of referrals Prime Access Registrar allows when
working with LDAPv2 (default is 0)
ReferralAttribute LDAP attribute that contains a referral for LDAPv2
ReferralFilter Filter used when following a referral for LDAPv2
PasswordEncryptionStyle Dynamic by default; must be set to one of the following depending on
the algorithm used by the LDAP server to encrypt passwords:
Dynamic
Crypt
None
SHA-1
SSHA-1
When set to Dynamic, Prime Access Registrar analyzes the password
and detects the encryption algorithm used.
None indicates that the LDAP server stores clear text passwords.
Note If CHAP authentication is used with LDAP backing store,
passwords in LDAP must be stored as clear text.
EscapeSpecialCharInUser
Name
FALSE by default
DNSLookupAndLDAPReb
indInterval
Specifies the timeout period after which the Prime Access Registrar
server will attempt to resolve the LDAP hostname to IP address (DNS
resolution); 0 by default
DataSourceConnections Specifies the number of concurrent connections to the LDAP server. The
default value is 8.
SearchScope Specifies how deep to search within a search path; default is SubTree
which indicates a search of the base object and the entire subtree of
which the base object distinguished name is the highest object.
Base indicates a search of the base object only.
OneLevel indicates a search of objects immediately subordinate to the
base object, but does not include the base object.
Table 21-2 LDAP Remote Server Properties (continued)
Parameter Description

21-5
Cisco Prime Access Registrar 6.1 User Guide
OL-29756-01
Chapter 21 Using LDAP
Configuring LDAP
This section contains the following topics:
•DNS Look Up and LDAP Rebind Interval
•LDAPToRadiusMappings
•LDAPToEnvironmentMappings
•LDAPToCheckItemMappings
LDAPToRadiusMappings Optional; a list of name/value pairs in which the name is the name of the
ldap attribute to retrieve from the user record, and the value is the name
of the RADIUS attribute to set to the value of the ldap attribute
retrieved.
For example, when the LDAPToRadiusMappings has the entry:
FramedIPAddress = Framed-IP-Address, the RemoteServer retrieves
the FramedIPAddress attribute from the ldap user entry for the
specified user, uses the value returned, and sets the Response variable
Framed-IP-Address to that value.
LDAPToEnvironmentMapp
ings
Optional; a list of name/value pairs in which the name is the name of the
ldap attribute to retrieve from the user record, and the value is the name
of the Environment variable to set to the value of the ldap attribute
retrieved.
For example, when the LDAPToEnvironmentMappings has the entry:
group = User-Group, the RemoteServer retrieves the group attribute
from the ldap user entry for the specified user, uses the value returned,
and sets the Environment variable User-Group to that value.
LDAPToCheckItemMappin
gs
Optional; a list of LDAP attribute/value pairs which must be present in
the RADIUS access request and must match, both name and value, for
the check to pass.
For example, when the LDAPToCheckItemMappings has the entry:
group = User-Group, the Access Request must contain the attribute
group, and it must be set to User-Group.
UseBindBasedAuthenticati
on
A boolean field that enables bind-based authentication with LDAP
server. By default, this property is set to FALSE that uses existing legacy
authentication method.
On setting this property to TRUE, the mappings LDAPToRadius,
LDAPToEnvironment, and LDAPToCheckItem will not work.
UseBinaryPasswordCompa
rison
A boolean value that enables binary-based password comparison to
authenticate. This property when set to TRUE, enables binary password
comparison. By default this property is set to FALSE.
Table 21-2 LDAP Remote Server Properties (continued)
Parameter Description

21-6
Cisco Prime Access Registrar 6.1 User Guide
OL-29756-01
Chapter 21 Using LDAP
Configuring LDAP
DNS Look Up and LDAP Rebind Interval
Prime Access Registrar provides a DNS Look-up and LDAP Rebind feature that enables you to use a
smart DNS server for LDAP hostname resolution, allows you to query a DNS server at set intervals to
resolve the LDAP hostname, and optionally rebind to the LDAP server, if necessary.
When you configure Prime Access Registrar to use an LDAP directory server, you can specify the
hostname of the LDAP directory server. The hostname can be a qualified or an unqualified name. You
can also specify a timeout period after which Prime Access Registrar will again resolve the hostname.
If the IP address returned is different from the previous, Prime Access Registrar establishes a new LDAP
bind connection.
The DNSLookupAndLDAPRebindInterval property specifies the timeout period after which the
Prime Access Registrar server will attempt to resolve the LDAP hostname to IP address (DNS
resolution). When you do not modify DNSLookupAndLDAPRebindInterval, the default value zero
indicates the server will perform normal connection and binding only at start-up time or during a reload.
Unless you change the default to a value greater than zero, the server will not perform periodic DNS
lookups.
Prime Access Registrar maintains and uses the existing bind connection until a new one is established
to minimize any performance impact during the transfer. Prime Access Registrar ensures that no
requests are dropped or lost during the transfer to a new LDAP binding.
Set the DNSLookupAndLDAPRebindInterval using a numerical value and the letter H for hours or M
for minutes, such as in the following examples:
set DNSLookupAndLDAPRebindInterval 15M—performs DNS resolution every 15 minutes
Note We recommend that you do not set DNSLookupAndLDAPRebindInterval to a value less than 15 minutes
to minimize its effect on server performance.
set DNSLookupAndLDAPRebindInterval 1h—performs DNS resolution every hour
Configure the DNS Look-up and LDAP Rebind
To configure the DNS Look-up and LDAP Rebind,
Step 1 Log into the Prime Access Registrar server, and use aregcmd to navigate to
//localhost/Radius/Remoteservers. If necessary, add the LDAP server, or change directory to it.
cd /Radius/RemoteServers/ldap-serv1/
Step 2 Set the DNSLookupAndLDAPRebindInterval property to the interval time desired.
set DNSLookupAndLDAPRebindInterval 30 M
LDAP Rebind Failures
Prime Access Registrar records any name resolution failures, bind successes and failures, and the
destination hostname and IP address in the log file. At trace level 3, Prime Access Registrar also logs
the time of any new bind connections and the closing of any old bind connections.

21-7
Cisco Prime Access Registrar 6.1 User Guide
OL-29756-01
Chapter 21 Using LDAP
Configuring LDAP
If either the name resolution or bind attempt fail, Prime Access Registrar continues using the existing
bind connection until the timeout has expired again. If there is no existing bind connection,
Prime Access Registrar marks the remote server object as down.
LDAPToRadiusMappings
Configure LDAPToRadiusMappings with a list of name/value pairs where name is the name of the data
store attribute to retrieve from the user record and the value is the name of the RADIUS attribute to set
to the value of the data store attribute retrieved.
Values stored in a multivalued field in the LDAP directory are mapped to multiple RADIUS attributes,
For example, if the LDAPToRadiusMappings has the following entry:
tunnel-info = Cisco-AVPair
The following LDAP fields in the user's record will create four Cisco-AVPair attributes in the user's
Access-Accept RADIUS packet:
tunnel-info: vpdn:tunnel-id=ssg001
tunnel-info: vpdn:tunnel-type=12tp
tunnel-info: vpdn:ip-addresses=10.2.2.2
tunnel-info: vpdn:12tp-tunnel-password=secret
LDAPToEnvironmentMappings
LDAPToEnvironmentMappings comprises a list of attribute name/value pairs or AV pairs where the
name is the name of the data store attribute to retrieve from the user record, and the value is the name of
the Environment variable to set to the value of the LDAP attribute retrieved.
For example, when the LDAPToEnvironmentMappings has the entry: group =User-Group, the
RemoteServer retrieves the attribute from the LDAP user entry for the specified user, uses the value
returned, and sets the Environment variable User-Group to that value.
LDAPToCheckItemMappings
LDAPToCheckItemMappings comprises a list of LDAP AV pairs which must be present in the RADIUS
access request and must match, both name and value, for the check to pass. Prime Access Registrar will
first authenticate the user's password in the Access-Request before validating the check item attributes.
Setting LDAP As Authentication and Authorization Service
Use aregcmd to configure the LDAP Service as the default authentication and authorization service
under /Radius as in the following:
set DefaultAuthenticationService AR-LDAP
set DefaultAuthorizationService AR-LDAP
Saving Your Configuration
When you use aregcmd to save your configuration, Prime Access Registrar does the following:
•Attempts to validate the configuration

21-8
Cisco Prime Access Registrar 6.1 User Guide
OL-29756-01
Chapter 21 Using LDAP
Configuring LDAP
•Checks for all required parameters
•Ensures there are no logic errors
If the validation is successful, Prime Access Registrar saves the configuration to the MCD database.
When you reload, Prime Access Registrar shuts down any current LDAP connections and builds new
connections for the configured LDAP servers.
This section contains the following topics:
•CHAP Interoperability with LDAP
•Allowing Special Characters in LDAP Usernames
•Dynamic LDAP Search Base
CHAP Interoperability with LDAP
If the you plan to use CHAP authentication with an LDAP backing store, the password in LDAP must
be stored as clear text. This is due to the one-way hash used by the CHAP, crypt, SHA-1, and SSHA
encryption algorithms.
Allowing Special Characters in LDAP Usernames
This feature allows you to use special characters in LDAP usernames. The allowable special characters
are *, (,), and \. These special characters can be included in the string passed to LDAP as the LDAP
username value (usually the RADIUS username attribute).
The default of EscapeSpecialCharInUserName is FALSE. To enable this feature, use aregcmd to set the
EscapeSpecialCharInUserName attribute in /Radius/RemoteServers/ldap-server to TRUE, as shown
in the following example.
cd /Radius/RemoteServers/ldap-server
set EscapeSpecialCharInUserName TRUE
/Radius/RemoteServers/Ldap-Server
EscapeSpecialCharinUserName = TRUE
Note This feature supports the LDAP V3 library.
Dynamic LDAP Search Base
A new environment variable, Dynamic-Search-Path (see rex.h), can be used to set the dynamic LDAP
search base. If this environment variable is defined for an LDAP service, it will override the default
LDAP search base defined in the LDAP Remote Server configuration. This allows the LDAP search base
to be configured on a per-user basis.
For example, you could match the search base to the organization and domain (in a Tcl script called from
/Radius/IncomingScript):
set user [ $request get User-Name ]
if { [ regexp {^[^@]+@([^\.]+)\.(.+)$} $user m org domain ] } {
$environ put Dynamic-Search-Path "ou=$org,ou=people,o=$domain"

21-9
Cisco Prime Access Registrar 6.1 User Guide
OL-29756-01
Chapter 21 Using LDAP
Analyzing LDAP Trace Logs
Analyzing LDAP Trace Logs
Prime Access Registrar records in the log files any name resolution failures, bind successes and failures,
and the destination hostname and IP address. At trace level 3, Prime Access Registrar logs the time of
any new bind connections and the closure of any old bind connections and also information about user
login requests and reply messages.
This section contains the following topics:
•Successful Bind Message
•Bind Failure Messages
•Login Failure Messages
Successful Bind Message
The following message is logged in the name_radius_1_trace file, when the Prime Access Registrar
server successfully binds to the LDAP server. In this case, spatula-u5 is the LDAP server listening on
port number 389.
10/12/2013 11:02:57: Log: Successfully bind to LDAP Server ldapserver (spatula-u5:389)
Bind Failure Messages
The following messages are logged in the name_radius_1_trace file, when Prime Access Registrar
server fails to bind to the LDAP server.
10/12/2013 11:10:50: Log: Write in LDAPClient returned an error (32)
10/12/2013 11:10:50: Log: Remote LDAP Server ldapserver (spatula-u5:387): Unable to
bind to LDAP Server: Can't contact LDAP server
10/12/2013 11:10:50: Log: Remote LDAP Server ldapserver (spatula-u5:387): Failed to
open the connection to the LDAP server
Messages like those above could indicate that the hostname specified does not resolve to the correct IP
address of the LDAP server or the configured port number might not be the port on which the LDAP
server listens.
The following messages are logged in the name_radius_1_trace file, when Prime Access Registrar
server fails to bind to the LDAP server.
10/12/2013 11:45:14: Log: Remote LDAP Server ldapserver (spatula-u5:389): Unable to
bind to LDAP Server: No such object ()
10/12/2013 11:45:14: Log: Remote LDAP Server ldapserver (spatula-u5:389): Failed to
open the connection to the LDAP server
The Distinguished Name (DN) provided in the BindName property was invalid. The DN provided in the
BindName property should contain the exact string used in the directory server to define the object.
The following messages are logged in the name_radius_1_trace file, when Prime Access Registrar
server fails to bind to the LDAP server.

21-10
Cisco Prime Access Registrar 6.1 User Guide
OL-29756-01
Chapter 21 Using LDAP
Analyzing LDAP Trace Logs
10/12/2013 11:51:55: Log: Remote LDAP Server ldapserver (spatula-u5:389): Unable to
bind to LDAP Server: Invalid credentials
10/12/2013 11:51:55: Log: Remote LDAP Server ldapserver (spatula-u5:389): Failed to
open the connection to the LDAP server
The messages above indicate that the password provided in the BindPassword property was incorrect.
Login Failure Messages
The following messages are logged in the name_radius_1_trace file, when user jane tries to login.
These messages indicate that user jane does not have a record in the directory server or the SearchPath
property has an incorrect value. The SearchPath property should have the directory where the user record
is stored in the directory server.
Notice how the messages specify the service, remote LDAP server, username, and contents of the
Access-Reject packet.
10/12/2013 11:24:17: P8457: Authenticating and Authorizing with Service AR-LDAP
10/12/2013 11:24:17: id = 5
10/12/2013 11:24:17: P8457: Remote LDAP Server ldapserver (spatula-u5: 389): Querying
LDAP server, id = 5.
10/12/2013 11:24:17: P8457: Remote LDAP Server ldapserver (spatula-u5: 389): GotLDAP
response, id = 5.
10/12/2013 11:24:17: P8457: Remote LDAP Server ldapserver (spatula-u5: 389): No
matching entries returned from LDAP query.
10/12/2013 11:24:17: P8457: User jane was not found in the LDAP store
10/12/2013 11:24:17: P8457: Rejecting request
10/12/2013 11:24:17: P8457: Rejecting request
10/12/2013 11:24:17: P8457: Trace of Access-Reject packet
10/12/2013 11:24:17: P8457: identifier = 4
10/12/2013 11:24:17: P8457: length = 35
10/12/2013 11:24:17: P8457: reqauth = 01:ad:cf:c7:4f:8e:a4:38:b0:d8:0a:e5:3d:9f:64:16
10/12/2013 11:24:17: P8457: Reply-Message = Access Denied
The following messages are logged in the name_radius_1_trace file, when user bob tries to login.
These messages indicate that user bob tried to login with an incorrect password.
10/12/2013 11:36:59: P8461: Authenticating and Authorizing with Service AR-LDAP
10/12/2013 11:36:59: id = 7
10/12/2013 11:36:59: P8461: Remote LDAP Server ldapserver (spatula-u5: 389): Querying
LDAP server, id = 7.
10/12/2013 11:36:59: P8461: Remote LDAP Server ldapserver (spatula-u5: 389): Got LDAP
response, id = 7.
10/12/2013 11:36:59: P8461: Remote Server ldapserver (spatula-u5:389): User bob's
password does not match
10/12/2013 11:36:59: P8461: User bob's password does not match
10/12/2013 11:36:59: P8461: Rejecting request
10/12/2013 11:36:59: P8461: Rejecting request
10/12/2013 11:36:59: P8461: Trace of Access-Reject packet
10/12/2013 11:36:59: P8461: identifier = 6
10/12/2013 11:36:59: P8461: length = 35
10/12/2013 11:36:59: P8461: reqauth = de:8d:4b:c4:f9:c0:06:a6:98:2d:8c:e9:f3:a9:a3:c2
10/12/2013 11:36:59: P8461: Reply-Message = Access Denied
The following messages are logged in the name_radius_1_trace file, when user bob tries to login.
These messages indicate the user record for user bob does not contain an attribute called pass. The
UserPasswordAttribute property has an incorrect value called pass. The UserPasswordAttribute property
should have the attribute name in the directory records where the user password is stored.
10/12/2013 12:02:09: P9865: Authenticating and Authorizing with Service AR-LDAP
10/12/2013 12:02:09: id = 2

21-11
Cisco Prime Access Registrar 6.1 User Guide
OL-29756-01
Chapter 21 Using LDAP
Bind-Based Authentication for LDAP
10/12/2013 12:02:09: P9865: Remote LDAP Server ldapserver (spatula-u5: 389): Querying
LDAP server, id = 2.
10/12/2013 12:02:09: P9865: Remote LDAP Server ldapserver (spatula-u5: 389): Got LDAP
response, id = 2.
10/12/2013 12:02:09: P9865: Remote LDAP Server ldapserver (spatula-u5: 389): LDAP
entry for user bob did not have a password (" pass") attribute
10/12/2013 12:02:09: P9865: User bob's password does not match
10/12/2013 12:02:09: P9865: Rejecting request
10/12/2013 12:02:09: P9865: Rejecting request
10/12/2013 12:02:09: P9865: Trace of Access-Reject packet
10/12/2013 12:02:09: P9865: identifier = 10
10/12/2013 12:02:09: P9865: length = 35
10/12/2013 12:02:09: P9865: reqauth = 0d:b6:83:f9:e8:3d:a4:ad:f1:c9:33:72:91:0b:29:1c
10/12/2013 12:02:09: P9865: Reply-Message = Access Denied
Note Remember to reload the Prime Access Registrar server after any changes to the LDAP server
configuration.
Bind-Based Authentication for LDAP
Prime Access Registrar supports most of the LDAP servers. But, a few of the LDAP servers do not
support the functionality of Prime Access Registrar, which gets the passwords from the LDAP and
matches them in Prime Access Registrar.
The bind-based authentication feature in Prime Access Registrar allows you to use any LDAP server; it
verifies the password in the LDAP database instead of the Prime Access Registrar database. When
Prime Access Registrar receives a request, it sends the username and password to the LDAP server. The
LDAP server searches for a match, and approves the request if it finds a matching user credential in its
database. It rejects the request if it does not find any matching credentials.
Configuring Bind-Based Authentication for LDAP
To configure the bind-based authentication for LDAP,
Step 1 Launch aregcmd.
Step 2 Create an LDAP service.
[ //localhost/Radius ]
cd Services/
add ldap
cd ldap
set Type ldap
[ //localhost/Radius/Services/ldap ]
Name = ldap
Description =
Type = ldap
IncomingScript~ =
OutgoingScript~ =
OutagePolicy~ = RejectAll
OutageScript~ =
MultipleServersPolicy = Failover
RemoteServers/

21-12
Cisco Prime Access Registrar 6.1 User Guide
OL-29756-01
Chapter 21 Using LDAP
Bind-Based Authentication for LDAP
cd RemoteServers
add 1 ldapserver
Step 3 Create the LDAP Remote Server Object.
[ //localhost/Radius ]
cd RemoteServers
add ldapserver
cd ldapserver
[ //localhost/Radius/RemoteServers/ldap ]
set Port <remote ldap server prt numer>
set HostName <remote ldap server name/ipaddress>
set SearchPath <configured in ldap server>
set UseBindBasedAuthentication TRUE
cd /Radius
set DefaultAuthenticationService <ldap service name>
set DefaultAuthorizationService <ldap service name>
Step 4 Save the configuration.
save
Step 5 Restart the application.
reload

21-13
Cisco Prime Access Registrar 6.1 User Guide
OL-29756-01
Chapter 21 Using LDAP
Bind-Based Authentication for LDAP

21-14
Cisco Prime Access Registrar 6.1 User Guide
OL-29756-01
Chapter 21 Using LDAP
Bind-Based Authentication for LDAP

CHAPTER
22-1
Cisco Prime Access Registrar 6.1 User Guide
OL-29756-01
22
Using Open Database Connectivity
Cisco Prime Access Registrar (Prime Access Registrar) supports Open Database Connectivity (ODBC)
, an open specification that provides application developers a vendor-independent API with which to
access data sources. In addition, Prime Access Registrar supports Oracle Call Interface (OCI). It
provides RemoteServer objects and services to support ODBC or OCI. You can use
Prime Access Registrar to authenticate and authorize access requests by querying user information
through ODBC or OCI.
ODBC or OCI is an application program interface (API). Real data exchange between an application and
data store is still carried out by SQL through ODBC or OCI. To achieve the most flexibility, you are
required to define your own SQL using aregcmd. Prime Access Registrar will register the SQL
statements and send them to the data store through ODBC or OCI when required. Because you can define
your own SQL, Prime Access Registrar supports sites that have their own data stores.
ODBC is configured using .ini files, specifically odbc.ini and odbcinst.ini. However, you cannot create
or modify these files directly. Prime Access Registrar creates the .ini files after you use aregcmd to
configure the ODBC connection. The SQL is stored in the local database (MCD). During execution, the
Prime Access Registrar server reads the local database, prepares the SQL statements, and sends the SQL
to the data source.
Note For OCI, the .ini files are not needed to connect to the database.
Note Prime Access Registrar uses its own ODBC driver manager and does not share existing ODBC drivers
(if you already have ODBC installed). If you are already using ODBC, you will have to maintain two
separate ODBC installations.
The ODBC or OCI memory requirement depends on your configuration. The more datasources you
configure, the more memory is required. Packet processing time might increase if you configure a large
number of SQL statements under SQLDefinition.
The Prime Access Registrar package includes some ODBC and OCIlib Drivers, and you should use the
included driver whenever possible. If a data store’s ODBC driver is not included with
Prime Access Registrar, you are required to install it. You configure the driver library using aregcmd to
modify the associated ini file.

22-2
Cisco Prime Access Registrar 6.1 User Guide
OL-29756-01
Chapter 22 Using Open Database Connectivity
Oracle Software Requirements
This chapter contains the following sections:
•Oracle Software Requirements
•Configuring ODBC/OCI
•MySQL Support
Oracle Software Requirements
The Prime Access Registrar ODBC feature requires that you have Oracle 9i and/or 10g client software
installed. The OCI feature requires that you have Oracle 10g or 11g client software installed. All Oracle
client software library files are expected under $ORACLE_HOME/lib.
When you install Prime Access Registrar software, the installation process prompts you for
ORACLE_HOME variable and sets it in the Prime Access Registrar start-up script, /etc/init.d/arserver.
Two other environment variables (ODBCINI and ODBCSYSINI) are also set in the arserver script. To
change any of these variables, modify the /etc/init.d/arserver script and restart the
Prime Access Registrar server.
The following changes have been made to support Oracle 9 for the ODBC feature:
•The file liboraodbc.so has been renamed to liboraodbc8.so.
•The file liboraodbc9.so has been added.
Note Install the Oracle 10g client for Solaris and Linux using 10gr2_client_sol.cpio.gz,
instantclient-basic-solaris32-10.1.0.5-20060502.zip, 10201_client_linux32.zip, and
instantclient-basic-linux32-10.1.0.5-20060511.zip respectively.
Note For OCI services, ensure that you have installed the Oracle client properly by using tnsping or sqlplus
utilities.
Configuring ODBC/OCI
You u s e aregcmd to define your ODBC configuration and SQL statements. The Prime Access Registrar
server automatically creates the ODBC.ini file for your driver manager and driver based on how you
configure ODBC.
Configuring the ODBC and ODBC-Accounting Remote Servers
To use ODBC in Prime Access Registrar for AA:
Step 1 Configure an ODBC DataSource.
Step 2 Configure an ODBC RemoteServer object with protocol type as ‘odbc’.
Step 3 Configure an ODBC Service with service type as ‘odbc’.
Step 4 Set ODBC service as the DefaultAuthenticationService and DefaultAuthorizationService.
Step 5 Save your configuration.

22-3
Cisco Prime Access Registrar 6.1 User Guide
OL-29756-01
Chapter 22 Using Open Database Connectivity
Configuring ODBC/OCI
To use ODBC in Prime Access Registrar for Accounting:
Step 1 Configure an ODBC DataSource.
Step 2 Configure an ODBC RemoteServer object with protocol type as ‘odbc-account’.
Step 3 Configure an ODBC Service with service type as ‘odbc-accounting’.
Step 4 Set ODBC service as the DefaultAccountingService.
Step 5 Save your configuration.
After you save and validate your configuration, it is saved in the MCD database. If you have configured
an ODBC service, Prime Access Registrar will query the MCD database and create or modify the
odbc.ini file before it builds a connection to the database. When you reload your configuration,
Prime Access Registrar shuts down any existing ODBC connections, then queries the MCD database to
create or modify the odbc.ini file and build a new connection for any configured ODBC Data Sources.
The following shows an example configuration for AA remote server:
[ //localhost/Radius/RemoteServers/oracle-access ]
Name = oracle-access
Description =
Protocol = odbc
ReactivateTimerInterval = 300000
Timeout = 15
DataSourceConnections = 8
ODBCDataSource = gordon
SNMPTrapIP =
SNMPTrapPort = 1521
KeepAliveTimerInterval = 0
SQLDefinition/
UserPasswordAttribute = password
SQLStatements/
Entries 1 to 1 from 1 total entries
Current filter: <all>
sql1/
Name = sql1
Description =
Type = query
SQL = "select password , username from arusers where username = ?"
ExecutionSequenceNumber = 1
MarkerList = UserName/SQL_CHAR
ODBCToRadiusMappings/
ODBCToEnvironmentMappings/
ODBCToCheckItemMappings/
The following shows an example configuration for AAA remote server:
[ //localhost/Radius/RemoteServers/ora_acc ]
Name = ora_acc
Description =
Protocol = odbc-accounting
ReactivateTimerInterval = 1000
Timeout = 15
DataSourceConnections = 8
ODBCDataSource = gordon
SNMPTrapIP =
SNMPTrapPort = 1521
KeepAliveTimerInterval = 1000
BufferAccountingPackets = TRUE

22-4
Cisco Prime Access Registrar 6.1 User Guide
OL-29756-01
Chapter 22 Using Open Database Connectivity
Configuring ODBC/OCI
MaximumBufferFileSize = "10 Megabytes"
NumberOfRetriesForBufferedPacket = 3
BackingStoreEnvironmentVariables =
UseLocalTimeZone = FALSE
AttributeList =
Delimiter =
SQLDefinition/
SQLStatements/
Entries 1 to 1 from 1 total entries
Current filter: <all>
sql/
Name = sql
Description =
Type = insert
SQL = "insert into accounting(username,acct_status_type) values (? , ?)"
ExecutionSequenceNumber = 1
MarkerList = "UserName/SQL_CHAR Acct-Status-Type/SQL_CHAR "
You u s e aregcmd to define your OCI configuration and SQL statements.
Configuring an OCI and OCI-Accounting Remote Servers
To use OCI in Prime Access Registrar for AA:
Step 1 Configure the DataSource type as oracle_oci.
Step 2 Configure an OCI RemoteServer object protocol type as ‘oci’.
Step 3 Configure an OCI Service with type as ‘oci’.
Step 4 Set OCI service as the DefaultAuthenticationService and DefaultAuthorizationService.
Step 5 Save your configuration.
To use OCI in Prime Access Registrar for Accounting:
Step 1 Configure the DataSource type as oracle_oci.
Step 2 Configure an OCI RemoteServer object protocol type as ‘oci-accounting’.
Step 3 Configure an OCI Service with type as ‘oci-accounting’.
Step 4 Set OCI service as the DefaultAccountingService.
Step 5 Save your configuration .
After you save and validate your configuration, it is saved in the MCD database.
The following shows an example configuration for AA remote server:
[ //localhost/Radius/RemoteServers/oracle-access ]
Name = oracle-access
Description =
Protocol = oci
ReactivateTimerInterval = 300000
Timeout = 15
DataSourceConnections = 8
ODBCDataSource = gordon
SNMPTrapIP =

22-5
Cisco Prime Access Registrar 6.1 User Guide
OL-29756-01
Chapter 22 Using Open Database Connectivity
Configuring ODBC/OCI
SNMPTrapPort = 1521
KeepAliveTimerInterval = 0
SQLDefinition/
UserPasswordAttribute = password
SQLStatements/
Entries 1 to 1 from 1 total entries
Current filter: <all>
sql1/
Name = sql1
Description =
Type = query
SQL = "select password , username from arusers where username = ?"
ExecutionSequenceNumber = 1
MarkerList = UserName/SQL_CHAR
OCIToRadiusMappings/
OCIToEnvironmentMappings/
OCIToCheckItemMappings/
The following shows an example configuration for AAA remote server:
[ //localhost/Radius/RemoteServers/ora_acc ]
Name = ora_acc
Description =
Protocol = oci-accounting
ReactivateTimerInterval = 1000
Timeout = 15
DataSourceConnections = 8
ODBCDataSource = gordon
SNMPTrapIP =
SNMPTrapPort = 1521
KeepAliveTimerInterval = 1000
BufferAccountingPackets = TRUE
MaximumBufferFileSize = "10 Megabytes"
NumberOfRetriesForBufferedPacket = 3
BackingStoreEnvironmentVariables =
UseLocalTimeZone = FALSE
AttributeList =
Delimiter =
SQLDefinition/
SQLStatements/
Entries 1 to 1 from 1 total entries
Current filter: <all>
sql/
Name = sql
Description =
Type = insert
SQL = "insert into accounting(username,acct_status_type) values (? , ?)"
ExecutionSequenceNumber = 1
MarkerList = "UserName/SQL_CHAR Acct-Status-Type/SQL_CHAR "
This section contains the following topics:
•Configuring an ODBC/OCI Service
•Configuring an ODBC/OCI RemoteServer
•Configuring an ODBC DataSource
•Setting ODBC/OCI As Authentication and Authorization Service
•Setting ODBC/OCI As Accounting Service
•Saving Your Configuration

22-6
Cisco Prime Access Registrar 6.1 User Guide
OL-29756-01
Chapter 22 Using Open Database Connectivity
Configuring ODBC/OCI
•Oracle Stored Procedures
Configuring an ODBC/OCI Service
You configure an ODBC or OCI service under /Radius/Services. When you define an ODBC or OCI
service under /Radius/Services, you must set its type to ODBC or OCI and provide the following
configuration options:
Note We will use ODBC or OCI as the ODBC or OCI service name in the following examples.
Example configuration for ODBC
[ //localhost/Radius/Services/ODBC ]
Name = ODBC
Description =
Type = odbc
IncomingScript~ =
OutgoingScript~ =
OutagePolicy~ = RejectAll
OutageScript~ =
MultipleServersPolicy = Failover
RemoteServers/
Example configuration for OCI
[ //localhost/Radius/Services/OCI ]
Name = OCI
Description =
Type = oci
IncomingScript~ =
OutgoingScript~ =
OutagePolicy~ = RejectAll
OutageScript~ =
MultipleServersPolicy = Failover
RemoteServers/
Table 22-1 describes the ODBC or OCI service parameters.
Table 22-1 ODBC/OCI Service Parameters
Parameter Description
Name Required; inherited from the upper directory
Description An optional description of the service
Type Must be set to ODBC for ODBC service or OCI for OCI service
IncomingScript Optional
OutgoingScript Optional
OutagePolicy Required; must be set to AcceptAll or Drop Packet, or defaults to RejectAll
OutageScript Optional

22-7
Cisco Prime Access Registrar 6.1 User Guide
OL-29756-01
Chapter 22 Using Open Database Connectivity
Configuring ODBC/OCI
Configuring an ODBC/OCI RemoteServer
Configuring an ODBC Remote Server
You must configure an ODBC RemoteServer object for each RemoteServer object you list under
/Radius/Services/ODBC/RemoteServers. Use the aregcmd command add to add ODBC servers under
/Radius/RemoteServers.
Configuring an OCI Remote Server
You must configure an OCI RemoteServer object for each RemoteServer object you list under
/Radius/Services/OCI/RemoteServers. Use the aregcmd command add to add OCI servers under
/Radius/RemoteServers.
Table 22-2 describes the ODBC or OCI service parameters. The fields that are displayed in the table
changes based on the protocol type selected.
MultipleServersPolicy Required; must be set to RoundRobin or defaults to Failover.
When set to Failover, Prime Access Registrar directs requests to the first
server in the list until it determines the server is offline. If so,
Prime Access Registrar redirects all requests to the next server in the list
until it finds an online server.
When set to RoundRobin, Prime Access Registrar directs each request to
the next server in the RemoteServers list to share the resource load across
all servers in the RemoteServers list.
RemoteServers Required list of remote servers defined under
/Radius/Services/ODBC/RemoteServers such as ODBC-Primary and
ODBC-Secondary
Table 22-1 ODBC/OCI Service Parameters (continued)
Parameter Description
Table 22-2 ODBC/OCI Remote Server Parameters
Parameter Description
Name Required; inherited from the upper directory
Description An optional description of the server
Protocol Required and must be set to ODBC or OCI for ODBC or OCI
service respectively; no default value
ReactivateTimerInterval Required; default is 300000 (ms)
Timeout Required; default is 15 (seconds)
DataSourceConnections Required; number of concurrent connections to data source
(default is 8)
ODBCDataSource Required; no default value

22-8
Cisco Prime Access Registrar 6.1 User Guide
OL-29756-01
Chapter 22 Using Open Database Connectivity
Configuring ODBC/OCI
SQLDefinition SQLDefinition/ (mandatory, no default);
UserPasswordAttribute = (mandatory, no default; data store field
for user password)
SQLStatements/
SQLStatement1/
SQLStatement2/
ODBCToRadiusMappings
(OCIToRadiusMappings)
Optional; a list of name/value pairs in which the name is the
name of the odbc attribute to retrieve from the user record, and
the value is the name of the RADIUS attribute to set to the value
of the odbc attribute retrieved.
For example, when the ODBCToRadiusMappings has the
entry: FramedIPAddress = Framed-IP-Address, the
RemoteServer retrieves the FramedIPAddress attribute from
the odbc user entry for the specified user, uses the value
returned, and sets the Response variable Framed-IP-Address to
that value.
Note When you select the protocol as OCI, the field name will
be displayed as OCIToRadiusMappings.
ODBCToEnvironmentMappings
(OCIToEnvironmentMappings)
Optional; a list of name/value pairs in which the name is the
name of the odbc attribute to retrieve from the user record, and
the value is the name of the Environment variable to set to the
value of the odbc attribute retrieved.
For example, when the ODBCToEnvironmentMappings has
the entry: group = User-Group, the RemoteServer retrieves the
group attribute from the odbc user entry for the specified user,
uses the value returned, and sets the Environment variable
User-Group to that value.
Note When you select the protocol as OCI, the field name will
be displayed as OCIToEnvironmentMappings.
ODBCToCheckItemMappings
(OCIToCheckItemMappings)
Optional; a list of ODBC attribute/value pairs which must be
present in the RADIUS access request and must match, both
name and value, for the check to pass.
For example, when the ODBCToCheckItemMappings has the
entry: group = User-Group, the Access Request must contain
the attribute group, and it must be set to User-Group.
Note When you select the protocol as OCI, the field name will
be displayed as OCIToCheckItemMappings.
Table 22-2 ODBC/OCI Remote Server Parameters (continued)
Parameter Description

22-9
Cisco Prime Access Registrar 6.1 User Guide
OL-29756-01
Chapter 22 Using Open Database Connectivity
Configuring ODBC/OCI
ODBC Data Source
ODBCDataSource is the name of the datasource to be used by the remote server. An ODBCDataSource
name can be reused by multiple remote servers. You configure ODBCDataSources under
/Radius/Advanced/ODBCDataSources. See Configuring an ODBC DataSource, page 22-11, for more
information.
Tuning $ORACLE_HOME/network/admin/sqlnet.ora file on the Oracle Client
For proper function of the reactivate timer interval, one or more of the following parameters in sqlnet.ora
file needs to be tuned:
•SQLNET.INBOUND_CONNECT_TIMEOUT
•SQLNET.SEND_TIMEOUT
•SQLNET.RECV_TIMEOUT
Ensure that the ReactivateTimerInterval of ODBC/ODBC-Accounting remoteservers should be greater
than the timeout values configured in sqlnet.ora.
SQL Definitions
SQLDefinitions lists the UserPasswordAttribute and one or more SQL statements, listed numerically in
the order to be run. The UserPasswordAttribute represents a column in the database that contains users’
password information. Individual SQLStatements are numbered SQL1 through SQLn under
SQLStatements, as shown in the following example:
SQLDefinition/
UserPasswordAttribute = asdfjkl
SQLStatements/
SQL1/
SQL2/
SQL3/
...
The following example is an SQL statement used for Authentication and Authorization:
SQLStatements/
SQL1
Name = SQL1
Type = query (mandatory, no default; must be query/procedure)
SQL = SQL statement (mandatory, no default)
ExecutionSequenceNumber = Sequence number for SQLStatement execution.(mandatory,
no default and must be greater than zero).
MarkerList = UserName/SQL_DATA_TYPE …… (mandatory, UserName must be defined)
For more information on stored procedures and stored functions, refer to Oracle Stored Procedures,
page 22-13.
Table 22-3 describes the SQL Statement parameters.
Table 22-3 SQL Statement Parameters
Parameter Description
Name Name/number of SQL statement
Type Query (mandatory, no default value)
SQL SQL query statement

22-10
Cisco Prime Access Registrar 6.1 User Guide
OL-29756-01
Chapter 22 Using Open Database Connectivity
Configuring ODBC/OCI
SQL Syntax Restrictions
You must observe the following SQL syntax restrictions in SQL queries for Prime Access Registrar.
1. The SQL statement must be in the format of SELECT ... FROM ... WHERE ..." (Statements might
be in lowercase.)
Note 'WHERE' is compulsory in the SQL statement.
2. Stored procedures with return value must be in the "begin ? := <Stored_procedure_name> (
<IN/OUT Parameters>); end;" format.
3. Stored procedures without return value can be in the " CALL <Stored_procedure_name> (
<IN/OUT Parameters>)" format.
4. Any arguments to Oracle functions like distinct, count must be given within braces, as shown in the
following example:
select distinct(attribute),password from profiles where username=?
The resulted column from distinct(attribute) will be put into attribute which can be used for ODBC
Mappings. The actual result set from Oracle for this column would be named distinct(attribute).
5. The column list in the SQL statement must be delimited with a comma (,) and any extra spaces
between statements are ignored. Aliasing for column names in SQL is not allowed. SQLDefinition
properties define the SQL you want to execute, as shown in the following example.
Specifying More Than One Search Key
You can specify more than one search key for a table in the SQL SELECT. To do so, add another search
criteria to the SQL statement and add the environment variable name to the MarkerList. For example,
the following query and MarkerList can be used to look up a username and CLID match.
select password from user_table where username = ? and clid = ?
In this case, the marker list would look like this:
UserName/SQL_CHAR clid/SQL_CHAR
To configure the multiple entries in the MarkerList list, surround the entire string in double quotes like
the following:
set MarkerList "UserName/SQL_CHAR CLID/SQL_CHAR"
To make this work, a variable called CLID must be in the environment dictionary. You can use a script
to copy the appropriate value into the variable.
ExecutionSequenceNumber Sequence number for SQLStatement execution, must be
greater than zero (mandatory, no default)
MarkerList Defines all markers for the query. MarkerList uses the
format UserName/SQL_DATA_TYPE.
Table 22-3 SQL Statement Parameters (continued)
Parameter Description

22-11
Cisco Prime Access Registrar 6.1 User Guide
OL-29756-01
Chapter 22 Using Open Database Connectivity
Configuring ODBC/OCI
ODBCToRadiusMappings/OCIToRadiusMappings
You configure ODBCToRadiusMappings or OCIToRadiusMappings with a list of name/value pairs
where name is the name of the data store attribute to retrieve from the user record and the value is the
name of the RADIUS attribute to set to the value of the data store attribute retrieved.
For example, use the following aregcmd command to set a value for the variable Framed-IP-Address:
set FramedIPAddress Framed-IP-Address
When the ODBCToRadiusMappings or OCIToRadiusMappings has this entry, the RemoteServer
retrieves the attribute from the data store user entry for the specified user, uses the value returned, and
sets the response variable Framed-IP-Address to that value.
When an SQL select statement returns more than one row for a column mapped under
ODBCToRadiusMappings or OCIToRadiusMappings, multiple Radius attributes are created.
For example, consider the following SQL select statement with ciscoavpair configured to Cisco-AVPair
under ODBCToRadiusMappings. The table.column syntax requires an SQL alias for the mapping to
work, as shown in the following example:
SQLStatements/
SQL1/
select table1.abc as t1abc, password from table2 where username = ?
Mapping: t1abc = my_mapping
If two rows are returned for ciscoavpair column, two Cisco-AVPair attributes will be created.
ODBCToEnvironmentMappings/OCIToEnvironmentMappings
Under ODBCToEnvironmentMappings or OCIToEnvironmentMappings there is a list of name and value
pairs in which the name is the name of the data store attribute to retrieve from the user record, and the
value is the name of the Environment variable to set to the value of the ODBC or OCI attribute retrieved.
For example, when the ODBCToEnvironmentMappings has the entry: group =User-Group, the
RemoteServer retrieves the attribute from the ODBC user entry for the specified user, uses the value
returned, and sets the environment variable User-Group to that value. When an SQL select statement
returns more than one row for a column mapped under ODBCToEnvironmentMappings, the value for all
rows is concatenated and assigned to the environment variable.
ODBCToCheckItemMappings/OCIToCheckItemMappings
A list of ODBC or OCI attribute/value pairs which must be present in the RADIUS access request and
must match, both name and value, for the check to pass.
For example, when the ODBCToCheckItemMappings or OCIToCheckItemMappings has the entry:
group = User-Group, the Access Request must contain the attribute group, and it must be set to
User-Group.
Configuring an ODBC DataSource
ODBCDataSource is the name of the datasource to be used by the remote server. You configure
ODBCDataSources under /Radius/Advanced/ODBCDataSources. Multiple remote servers can use the
same ODBCDataSource.

22-12
Cisco Prime Access Registrar 6.1 User Guide
OL-29756-01
Chapter 22 Using Open Database Connectivity
Configuring ODBC/OCI
Under the ODBCDataSource object definition, for ODBC a list defines ODBC.ini filename/value pairs
for a connection. The list includes a Type field and a Driver field, different for each Driver and Data
Source, to indicate its Driver and Data Source. Prime Access Registrar currently supports only the
Easysoft Open Source Oracle Driver.
For OCI services, ODBCDataSource type should be ‘oracle_oci’. The following is an example
configuration of ODBCDataSource for OCI services.
[ //localhost/Radius/Advanced/ODBCDataSources/gordon ]
Name = gordon
Description =
Type = oracle_oci
UserID = scott
Password = <encrypted>
DataBase = orcl.cisco.com
Table 22-4 describes the Easysoft Open Source Oracle Driver options for ODBC.
Table 22-5 describes the OCILib Open Source Oracle Driver options for OCI.
Setting ODBC/OCI As Authentication and Authorization Service
Use aregcmd to configure the ODBC Service as the default authentication and authorization service
under //localhost /Radius as in the following:
set DefaultAuthenticationService odbc-service
Table 22-4 Easysoft Open Source Oracle Driver Options for ODBC
Parameter Description
Name Name of the ODBCDataSource
Type Required; must be Oracle_es
Driver Required; liboarodbc.so (default value)
Database Required; Oracle Client configuration database name (no default value)
UserID Required; database username (no default value)
Password Optional user password; shown encrypted
Table 22-5 OCILib Open Source Oracle Driver Options for OCI
Parameter Description
Name Name of the ODBCDataSource
Type Required; must be Oracle_oci
Database Required; Oracle Client configuration database name (no default value)
UserID Required; database username (no default value)
Password Optional user password; shown encrypted

22-13
Cisco Prime Access Registrar 6.1 User Guide
OL-29756-01
Chapter 22 Using Open Database Connectivity
Configuring ODBC/OCI
set DefaultAuthorizationService odbc-service
Use aregcmd to configure the OCI Service as the default authentication and authorization service under
//localhost /Radius as in the following:
set DefaultAuthenticationService oci-service
set DefaultAuthorizationService oci-service
Note When you use an ODBC or OCI service, configure the BackingStoreDiscThreshold property under
/Radius/Advanced to ensure that the data generated by log files do not exceed the size limit configured.
Setting ODBC/OCI As Accounting Service
Use aregcmd to configure the ODBC Service as the default accounting service under //localhost
/Radius as in the following:
set DefaultAccountingService odbc-service
Use aregcmd to configure the OCI Service as the default authentication and authorization service under
//localhost /Radius as in the following:
set set DefaultAccountingService oci-service
Saving Your Configuration
When you use aregcmd to save your configuration, Prime Access Registrar attempts to validate the
configuration, checks for all required parameters, and ensures there is no logic error. If the validation is
successful, the configuration is saved to the MCD database. When you reload, Prime Access Registrar
shuts down any current ODBC/OCI connections and builds new connections for the configured ODBC
Data Sources.
Oracle Stored Procedures
A stored procedure is a database procedure similar to other programming language procedures, which is
contained within the database itself. A SQL Server stored procedure that contains one or more IN
parameters are used to pass data into the stored procedure.Similarly, one or more OUT parameters in the
stored procedure are used to return data back to the calling application. Prime Access Registrar supports
Oracle stored procedures/functions with IN and OUT parameters only over the OCI interface.
For Authentication and Authorization, Prime Access Registrar supports both Stored Procedures and
Stored Functions with the In/Out parameters and return value. In the configuration for the AA remote
server, the UserPasswordAttribute value must be in the marker list for procedures.
For Accounting, Prime Access Registrar supports both Stored Procedures and Stored Functions with
only the In parameters, and does not support return value and Out parameters.

22-14
Cisco Prime Access Registrar 6.1 User Guide
OL-29756-01
Chapter 22 Using Open Database Connectivity
Configuring ODBC/OCI
The following are the examples for stored functions and procedures calling inside
Prime Access Registrar:
Example format for stored functions with return value
SQL = "begin ? := stress (?);end;"
Example for stored procedures
SQL = " CALL Accounting_Request( ?,?,?)"
Note Prime Access Registrar does not support, return value with the "call" format for the stored procedures.
The following shows an example configuration for OCI AA remote server:
[ //localhost/Radius/RemoteServers ]
Entries 1 to 2 from 2 total entries
Current filter: <all>
oci-access/
Name = oci-access
Description =
Protocol = oci
ReactivateTimerInterval = 300000
Timeout = 15
DataSourceConnections = 8
ODBCDataSource = 54
SNMPTrapIP = 10.77.240.57
SNMPTrapPort = 1521
KeepAliveTimerInterval = 0
SQLDefinition/
UserPasswordAttribute = password
SQLStatements/
Entries 1 to 1 from 1 total entries
Current filter: <all>
sql1/
Name = sql1
Description =
Type = procedure
SQL = "begin ? := stress (?);end;"
ExecutionSequenceNumber = 1
MarkerList = "password/SQL_OUT UserName/SQL_CHAR"
OCIToRadiusMappings/
OCIToEnvironmentMappings/
OCIToCheckItemMappings/
The following shows an example configuration for OCI AA remote server:
oci-acc/
Name = oci-acc
Description =
Protocol = oci-accounting
ReactivateTimerInterval = 300000
Timeout = 15
DataSourceConnections = 8
ODBCDataSource = 54
SNMPTrapIP =
SNMPTrapPort = 1521
KeepAliveTimerInterval = 0
BufferAccountingPackets = TRUE
MaximumBufferFileSize = "10 Megabytes"
NumberOfRetriesForBufferedPacket = 3
BackingStoreEnvironmentVariables =

22-15
Cisco Prime Access Registrar 6.1 User Guide
OL-29756-01
Chapter 22 Using Open Database Connectivity
MySQL Support
UseLocalTimeZone = FALSE
AttributeList =
Delimiter =
SQLDefinition/
UserPasswordAttribute =
SQLStatements/
Entries 1 to 1 from 1 total entries
Current filter: <all>
sql/
Name = sql
Description =
Type = procedure
SQL = " CALL Accounting_Request( ?,?,?)"
ExecutionSequenceNumber = 1
MarkerList = "UserName/SQL_CHAR Acct-Status-Type/SQL_CHAR Calling-Station-Id/SQL_CHAR "
Note Prime Access Registrar supports Oracle stored procedures for OCI AA and OCI AAA remote servers.
MySQL Support
Prime Access Registrar provides support for MySQL to query user records from a MySQL database and
enables you to write accounting records into MySQL when using Oracle accounting.
Prime Access Registrar has been tested with MySQL 5.0.90 and MyODBC 3.51.27 (reentrant).
This section contains the following topics:
•MySQL Driver
•Configuring a MySQL Datasource
•Example Configuration
MySQL Driver
You can download the MySQL driver from the MySQL website at http://mysql.com. You can go directly
to the driver download page using the following URL:
http://dev.mysql.com/downloads/connector/odbc/3.51.html
Save the downloaded file to a temporary location such as /tmp. Use commands like the following to
unzip and install the driver:
gunzip -c mysql-connector-odbc-3.51.27-solaris10-sparc-32bit.pkg.gz
pkgadd -d /tmp mysql-connector-odbc-3.51.27-solaris10-sparc-32bit.pkg
ln -s mysql-connector-odbc-3.51.27-solaris10-sparc-32bit myodbc
Configuring a MySQL Datasource
You require the following to configure a MYSQL Datasource:
•ODBCDataSource object
•RemoteServer object

22-16
Cisco Prime Access Registrar 6.1 User Guide
OL-29756-01
Chapter 22 Using Open Database Connectivity
MySQL Support
•ODBC service
•Default AA services
Configuring a MYSQL datasource
To configure the Prime Access Registrar server to query records form a MySQL database:
Step 1 Log into the Prime Access Registrar server and launch aregcmd.
Log in as a user with administrative rights such as user admin.
Step 2 Change directory to the /Radius/Advanced/ODBCDataSources and add a new ODBCDataSource.
cd /Radius/Advanced/ODBCDataSources
add mysql
Step 3 Set the new ODBCDatasource type to myodbc.
cd mysql
[ //localhost/Radius/Advanced/ODBCDataSources/mysql ]
Name = mysql
Description =
Type =
set type myodbc
The following is the default configuration for an ODBCDataSource object of type myodbc:
[ //localhost/Radius/Advanced/ODBCDataSources/mysql ]
Name = mysql
Description =
Type = myodbc
Driver =
UserID =
Password =
DataBase =
Server =
Port = 3306
Step 4 Set the Driver property to the path of the MyODBC library. Use a command like the following:
set driver /scratch/myodbc/libmyodbc3_r.so
Step 5 Set the UserID property to a valid username for the MyODBC database and provide a valid password for
this user.
set userid ar-mysql-user
set password biscuit
Step 6 Provide a DataBase name and the name of the Prime Access Registrar RemoteServer object to associate
with the ODBCDataSource.
set database database_name
set server remote_server_name

22-17
Cisco Prime Access Registrar 6.1 User Guide
OL-29756-01
Chapter 22 Using Open Database Connectivity
MySQL Support
Step 7 Change directory to /Radius/RemoteServers and add a RemoteServer object to associate with the new
ODBCDatasource.
cd /Radius/RemoteServers
add mysql
Step 8 Change directory to the new RemoteServer and set its protocol to odbc.
cd mysql
set protocol odbc
Step 9 Set the ODBCDataSource property to the name of the ODBCDataSource to associate with this
RemoteServer object.
set ODBCDataSource mysql
Step 10 Change directory to /Radius/Services and add an ODBC service as described in Configuring an
ODBC/OCI Service, page 22-6.
Step 11 Change directory to /Radius and set the DefaultAuthenticationService and DefaultAuthorizationService
properties to the ODBC service added in the previous step.
Example Configuration
The following shows an example configuration for a MySQL ODBC data source. See Configuring an
ODBC DataSource, page 22-11 for more information.
[ //localhost/Radius/Advanced/ODBCDataSources/mysql ]
Name = mysql
Type = myodbc
Driver = /tmp/libmyodbc3_r.so
UserID = mysql
Password = <encrypted>
DataBase = test
Server = mysql-a
Port = 3306
The following shows an example configuration for a RemoteServer. See Configuring an ODBC/OCI
RemoteServer, page 22-7 for more information.
[ //localhost/Radius/RemoteServers/mysql-a ]
Name = mysql
Description =
Protocol = odbc
ReactivateTimerInterval = 300000
Timeout = 15
DataSourceConnections = 8
ODBCDataSource = mysql
KeepAliveTimerInterval = 0
SQLDefinition/
UserPasswordAttribute = asdfjkl
SQLStatements/
SQL1/
Name = SQL1
Type = query (mandatory, no default; must be query)

22-18
Cisco Prime Access Registrar 6.1 User Guide
OL-29756-01
Chapter 22 Using Open Database Connectivity
MySQL Support
SQL = SQL statement (mandatory, no default)
ExecutionSequenceNumber = Sequence number for SQLStatement
execution.(mandatory, no default and must be greater than zero).
MarkerList = UserName/SQL_DATA_TYPE …… (mandatory, UserName must be defined)
SQL2/
SQL3/
ODBCToRadiusMappings/
ODBCToEnvironmentMappings/
ODBCToCheckItemMappings/
The following shows an example configuration for an ODBC service. See Configuring an ODBC/OCI
Service, page 22-6 for more information.
[ //localhost/Radius/Services/ODBC ]
Name = ODBC
Description =
Type = ODBC
IncomingScript~ =
OutgoingScript~ =
OutagePolicy~ = RejectAll
OutageScript~ =
MultipleServersPolicy = Failover
RemoteServers/
1. mysql-a
The following shows an example configuration where the DefaultAuthenticationService and
DefaultAuthorizationService properties have been set to the ODBC service.
[ //localhost/Radius ]
Name = Radius
Description =
Version = 5.1
IncomingScript~ =
OutgoingScript~ =
DefaultAuthenticationService~ = ODBC
DefaultAuthorizationService~ = ODBC
CHAPTER
23-1
Cisco Prime Access Registrar 6.1 User Guide
OL-29756-01
23
SIGTRAN-M3UA
SIGTRAN, a working group of the Internet Engineering Task Force (IETF), has defined a protocol for
the transport of real-time signaling data over IP networks. Cisco Prime Access Registrar
(Prime Access Registrar) supports SS7 messaging over IP (SS7oIP) via SIGTRAN-M3UA, a new
transport layer which leverages Stream Control Transmission Protocol (SCTP). Prime Access Registrar
supports SIGTRAN-M3UA to fetch the authentication vectors from HLR, which is required for
EAP-AKA/EAP-SIM authentication.
Prime Access Registrar supports SIGTRAN-M3UA in both Linux and Solaris platforms.
Note You have SIGTRAN-M3UA interface support in addition to the existing SUA interface support.
The EAP-AKA and EAP-SIM authentication service is extended to use M3UA. When using M3UA
service for authentication, the subscriber identity (IMSI) is used to send a request to HLR and receives
information from HLR containing the authentication information for authenticating an user. The
authentication service initiates a request to the SIGTRAN server using IMSI, which retrieves the
configured number of authentication vectors from HLR, i.e Triplets or Quintets.
Figure 23-1 MAP Service
The Prime Access Registrar server initiates the MAP service. After enabling the MAP service, the
Prime Access Registrar server sends a sendAuthenticationInfo request that contains IMSI and the
number of requested authentication vectors to HLR. The HLR sends a response containing the requested
vectors information to Prime Access Registrar. Next, the Prime Access Registrar server sends a
sendRoutinginfoForLCS request that contains IMSI and the GMLC address to HLR. The HLR sends a
response containing the MSISDN information for authenticating the mobile subscribers.
Prime Access Registrar provides map-restore-data authentication support for m3ua services. For more
information, see Configuring M3UA Service with Map Restore Data Authorization, page 23-13.
HLR
320299
sendAuthenticationInfo (IMSI, n)
(K1:V1, K2:V2,....Kn:Vn)
(MSISDN)
sendRoutingInfoForLCS
(IMSI, GMLC Addr)
Cisco Prime AR

23-2
Cisco Prime Access Registrar 6.1 User Guide
OL-29756-01
Chapter 23 SIGTRAN-M3UA
Prerequisites to SIGTRAN-M3UA
Prime Access Registrar supports multiple remote servers with the protocol type, SIGTRAN-M3UA.
However, Prime Access Registrar validates and ensures the following when multiple remote servers are
available:
•The source port is different for all the remote servers.
•If Origin Point Code (OPC) is different, the routing context is also different for all the remote
servers.
•The Destination Point Code (DPC) is different for all the remote servers.
•The NetworkVariant, SubServiceField (SSF), TCAPVariant, NetworkAppearance, and
NetworkIndicator values are the same for all the remote servers.
This section describes the following:
•Prerequisites to SIGTRAN-M3UA
•Configuring EAP-AKA/EAP-SIM with SIGTRAN-M3UA
•Blacklisting IMSI Values, page 23-11
•Configuring M3UA Service
•Support for SCTP Multihoming in SIGTRAN-M3UA, page 23-21
•SIGTRAN-M3UA Logs, page 23-22
Prerequisites to SIGTRAN-M3UA
Before enabling the SIGTRAN-M3UA remote server, you must do the following:
•ensure that LKSCTP is not available in the Prime Access Registrar server.
•ensure to restart the Prime Access Registrar server whenever you make any configuration changes.
•ensure that you have the 32-bit rpm files for the relevant RHEL OS versions while installing the Cisco
Prime Access Registrar. For the list of required rpms for the relevant OS versions, see Required 32-bit
rpms for Relevant RHEL OS Versions.
Note You must install the rpm verions relevant to the RHEL OS versions while installing the
Prime Access Registrar.
•ensure that the ‘bc’ command (which is an arbitrary precision calculator language) is present while
installing Prime Access Registrar in a Linux machine. If the ‘bc’ command is not present, install the
relevant rpm such as bc-1.06.95-1.el6.x86_64 on that machine.
•ensure that you have the following packages while installing the Prime Access Registrar on Solaris:
–
gcc version-3.4.6
–
gdome-config-0.8.1
Note You need to build the gdome-config-0.8.1 package to make it available. For more
information, see Building gdome Package, page 23-3
–
xml2-config-2.6.23
–
pkg-config-0.15.0

23-3
Cisco Prime Access Registrar 6.1 User Guide
OL-29756-01
Chapter 23 SIGTRAN-M3UA
Prerequisites to SIGTRAN-M3UA
–
glib-2.30
–
gtk-2.41
–
libxml-2.2.6.20
Required 32-bit rpms for Relevant RHEL OS Versions
Building gdome Package
To build gdome-config-0.8.1 package:
Step 1 Download gdome2-0.8.1.tar.gz package from the location http://gdome2.cs.unibo.it/#downloads.
Step 2 Execute the following command:
gunzip gdome2-0.8.1.tar.gz
Step 3 Untar the package using the following command:
tar –xvf gdome2-0.8.1.tar
Step 4 Use the cd command to move into the package obtained from Step 3.
Step 5 Execute the following commands:
./configure --prefix=<GdomeInstallPath> --with-glib-prefix=<GlibInstalledDirectory>
make
make install
Where,
•GdomeInstallPath specifies where the Gdome libraries must be placed.
rpm
RHEL OS
Version 5.3
RHEL OS
Version 5.4
RHEL OS
Version 5.5
RHEL OS
Version 6.0
RHEL OS
Version 6.1
RHEL OS
Version 6.2
glibc Yes Yes Yes Yes Yes Yes
gdome2 Yes Yes Yes Yes Yes Yes
glib Ye s Yes Ye s Yes Yes Yes
glib2 Yes Yes Yes Yes Yes Yes
libgcc Yes Yes Yes Yes Yes Yes
libstdc++ Yes Yes Yes Yes Yes Ye s
libxml 2 Yes Ye s Yes Yes Yes Yes
ncurses Yes Yes Yes No No No
ns pr Yes Yes Yes Ye s Yes Yes
ns s Yes Yes Yes No No No
zl ib Yes Yes Yes Yes Yes Yes
nss-softokn-freebl No No No Yes Yes Yes
ncurses-libs No No No Yes Yes Yes
nss-util No No No Yes Yes Yes
gamin No No No Yes Yes Yes
libselinux No No No Yes Yes Yes

23-4
Cisco Prime Access Registrar 6.1 User Guide
OL-29756-01
Chapter 23 SIGTRAN-M3UA
Configuring EAP-AKA/EAP-SIM with SIGTRAN-M3UA
•GlibInstalledDirectory specifies which directory the Glib libraries reside in the filesystem.
Step 6 Now gdome libraries will be available in the location GdomeInstallPath.
Configuring EAP-AKA/EAP-SIM with SIGTRAN-M3UA
You can use aregcmd to create and configure the service of type eap-aka or eap-sim, see EAP-AKA or
EAP-SIM for more information.
To configure EAP-AKA service with SIGTRAN-M3UA remote server:
Step 1 Launch aregcmd.
Step 2 Create an EAP-AKA service.
cd /Radius/Services
add eap-aka-service
Step 3 Set type as eap-aka.
set eap-aka
Step 4 Add m3ua remote server in the remoteServers
cd remoteServers/
Set 1 m3ua
The following shows an example configuration for EAP-AKA service with SIGTRAN-M3UA remote
server support, see Table 9-1 to know more about EAP-AKA service properties.
[ //localhost/Radius/Services ]
Entries 1 to 2 from 2 total entries
Current filter: <all>
eap-aka/
Name = eap-aka
Description =
Type = eap-aka
AlwaysRequestIdentity = False
EnableIdentityPrivacy = False
PseudonymSecret = <encrypted>
PseudonymRenewtime = "24 Hours"
PseudonymLifetime = Forever
Generate3GPPCompliantPseudonym = False
EnableReauthentication = False
MaximumReauthentications = 16
ReauthenticationTimeout = 3600
ReauthenticationRealm =
AuthenticationTimeout = 120
QuintetGenerationScript~ =
UseProtectedResults = False
SendReAuthIDInAccept = False

23-5
Cisco Prime Access Registrar 6.1 User Guide
OL-29756-01
Chapter 23 SIGTRAN-M3UA
Configuring EAP-AKA/EAP-SIM with SIGTRAN-M3UA
Subscriber_DBLookup = SIGTRAN-M3UA
FetchAuthorizationInfo = FALSE
MultipleServersPolicy = Failover
IncomingScript~ =
OutgoingScript~ =
OutageScript~ =
RemoteServers/
To configure EAP-SIM service with SIGTRAN-M3UA remote server:
Step 1 Launch aregcmd.
Step 2 Create an EAP-SIM service.
cd /Radius/Services
add eap-sim-service
Step 3 Set type as eap-sim.
set eap-sim
Step 4 Add m3ua remote server in the remoteServers
cd remoteServers
Set 1 m3ua
The following shows an example configuration for EAP-SIM service with SIGTRAN-M3UA remote
server support, see Table 9-6 to know more about EAP-SIM service properties.
eap-sim/
Name = eap-sim
Description =
Type = eap-sim
NumberOfTriplets = 2
UseSimDemoTriplets = False
AlwaysRequestIdentity = False
EnableIdentityPrivacy = False
PseudonymSecret = <encrypted>
PseudonymRenewtime = "24 Hours"
PseudonymLifetime = Forever
Generate3GPPCompliantPseudonym = False
EnableReauthentication = False
MaximumReauthentications = 16
ReauthenticationTimeout = 3600
ReauthenticationRealm =
TripletCacheTimeout = 0
AuthenticationTimeout = 120
UseProtectedResults = False
SendReAuthIDInAccept = False
SubscriberDBLookup = SIGTRAN-M3UA
FetchAuthorizationInfo = FALSE
MultipleServersPolicy = Failover
IncomingScript~ =
OutgoingScript~ =
OutageScript~ =
RemoteServers/

23-6
Cisco Prime Access Registrar 6.1 User Guide
OL-29756-01
Chapter 23 SIGTRAN-M3UA
Configuring EAP-AKA/EAP-SIM with SIGTRAN-M3UA
Note After enabling the SIGTRAN-M3UA remote server, you must ensure to restart the
Prime Access Registrar server whenever you make any configuration changes.
Note If you set FetchAuthorizationInfo as TRUE for EAP-AKA or EAP-SIM service for SIGTRAN-M3UA
in Prime Access Registrar, it fetches the MSISDN information from HLR in response. The following is
an example script for reading the MSISDN information from the response,
proc MapMSISDN {request response environ} {
$environ get AuthorizationInfo
}
Configuring SIGTRAN-M3UA Remote Server
You can configure the SIGTRAN-M3UA remoteserver under /Radius/RemoteServers.
To configure the SIGTRAN-M3UA remote server:
Step 1 Launch aregcmd.
Step 2 Create sigtran-m3ua remote server.
cd /r/remoteServers/
add M3UA
cd M3UA
set protocol sigtran-m3ua
Step 3 Set the Subscriber_DBLookup.
set Subscriber_DBLookup SIGTRAN-M3UA
Step 4 Set the port of the HLR.
set DestinationPort 2905
Step 5 Set the port for the source.
set SourcePort 2905
Step 6 Set the reactivate timer interval for the remote server.
Set the reactivatetimerinterval.
Step 7 Set the subsystem number for the local.
set LocalSubSystemNumber 149

23-7
Cisco Prime Access Registrar 6.1 User Guide
OL-29756-01
Chapter 23 SIGTRAN-M3UA
Configuring EAP-AKA/EAP-SIM with SIGTRAN-M3UA
Note Prime Access Registrar supports the following local Sub System Numbers (SSNs) by
default:
SGSN (149)
VLR (7)
GMLC (145)
Step 8 Set routingindicator.
Set routingindicator rte_gt
Step 9 Set mlcnumber.
Set mlcnumber
Step 10 Set routingparameters.
cd routingparameters/
set OriginPointCode 2
set DestinationPointCode 4
set RemoteSubSystemNumber 6
set OPCMask 16383
set DPCMask 16383
set RoutingContext 11
Step 11 Set the source and destination gt parameters.
Step 12 Set the numbering plan, encoding scheme, format, and digits for source.
Step 13 Set the numbering plan, encoding scheme, format, and digits for destination.
The following shows an example configuration of SIGTRAN-M3UA remote server support:
[ //localhost/Radius/RemoteServers/m3ua ]
Name = m3ua
Description =
Protocol = sigtran-m3ua)
SourcePort = 2905
LocalSubSystemNumber = 149
DestinationPort = 2905
IMSITranslationScript~ =
GlobalTitleTranslationScript~ = setGT
Timeout = 15
ReactivateTimerInterval = 2000
LimitOutstandingRequests = FALSE
MaxOutstandingRequests = 0
MaxRetries = 3
MAPVersion = 2
NetworkVariant = ITU
SubServiceField = NAT
TCAPVariant = ITU96
NetworkAppearance = 1

23-8
Cisco Prime Access Registrar 6.1 User Guide
OL-29756-01
Chapter 23 SIGTRAN-M3UA
Configuring EAP-AKA/EAP-SIM with SIGTRAN-M3UA
NetworkIndicator = NAT
MLCNumber = 123456789012345
TrafficMode = LOADSHARE
LoadShareMode = SLS
RoutingIndicator = RTE_GT
RoutingParameters/
OriginPointCode = 2
DestinationPointCode = 4
RemoteSubSystemNumber = 6
OPCMask = 16383
DPCMask = 16383
ServiceIndicatorOctet = 0
RoutingContext = 11
SourceGTAddress/
SourceGTDigits = 919845071842
SourceGTFormat = GTFRMT_4
SourceNatureofAddress = INTNUM
SourceTranslationType = 0
SourceNumberingPlan = ISDN
SourceEncodingScheme = BCDEVEN
DestinationGTAddress/
DestGTDigits = 919845071842
DestGTFormat = GTFRMT_4
DestNatureofAddress = INTNUM
DestTranslationType = 0
DestNumberingPlan = ISDN
DestEncodingScheme = BCDEVEN
Table 23-1 describes SIGTRAN-M3UA remote server properties.
Table 23-1 SIGTRAN-M3UA Stack Properties
Property Description
Name Required; inherited from the upper directory.
Description An optional description of the service.
Protocol Represents the type of remote server. The value should be SIG-
TRAN-M3UA.
SourcePort The port number in which Prime Access Registrar is installed for M3UA
transactions.
LocalSubSystemNumber The local sub system number is set as 149 by default.
DestinationPort The destination port number to which Prime Access Registrar connects.
IMSITranslationScript The scripting point is used to modify the IMSI based on the requirement
before sending the request to STP/HLR.
GlobalTitleTranslationSc
ript
This is used to specify the name of the script which is responsible for
translating IMSI to Global Title Address (GTA).
Timeout Specifies the time (in seconds) to wait before an authentication request
times out; defaults to 15.
ReactivateTimerInterval Specifies the time interval (in milliseconds) to activate an inactive server;
defaults to 300000 ms (which is 5 minutes).

23-9
Cisco Prime Access Registrar 6.1 User Guide
OL-29756-01
Chapter 23 SIGTRAN-M3UA
Configuring EAP-AKA/EAP-SIM with SIGTRAN-M3UA
LimitOutstandingRe-
quests
Required; the default is FALSE. Prime Access Registrar uses this property
in conjunction with the MaxOutstandingRequests property to tune the
RADIUS server's use of the HLR.
When you set this property to TRUE, the number of outstanding requests
for this RemoteServer is limited to the value you specified in MaxOut-
standingRequests. When the number of requests exceeds this number,
Prime Access Registrar queues the remaining requests, and sends them as
soon as the number of outstanding requests drops to this number.
MaxOutstandingRe-
quests
Required when you have set the LimitOutstandingRequests to TRUE. The
number you specify, which must be greater than zero, determines the
maximum number of outstanding requests allowed for this remote server.
TrafficMode The mode of the traffic for the HLR. The possible values are
LOADSHARE or ACTSTANDBY.
LoadShareMode Required. The TrafficMode is set as LOADSHARE, which is a type of load
sharing scheme.
When there is more than one associations with HLR, then the load sharing
is set as Signaling Link Selection (SLS). SLS is done based on a simple
round-robin basis.
MAPVersion The version of the MAP. The possible values are 2 or 3. Specify the MAP
version that the HLR supports, i.e, 2 or 3 during the configuration.
NetworkVariant Required. Represents the network variant switch.
Note Prime Access Registrar supports only ITU value.
SubServiceField Specifies the type of network to which this SAP belongs. The possible
options are:
•INT—represents international network
•NAT—represents national network
•RESERVE—represents reserved network
•SPARE—represents spare network
TCAPVariant Required; represents the name of the tcap network variant switch. The
possible options are ITU88, ITU92, or ITU96.
NetworkAppearance Required. A parameter that represents network appearance in the M3UA
packet. Value ranges from 0-2147483647 and the default value is 1.
This is optional as per the RFC 4666 (http://tools.ietf.org/html/rfc4666.)
You can set this value to 0 to remove network appearance from the data
packet.
NetworkIndicator The network indicator used in SCCP address. The possible options are
NAT and INT which represents international network and national network
respectively.
Table 23-1 SIGTRAN-M3UA Stack Properties (continued)
Property Description

23-10
Cisco Prime Access Registrar 6.1 User Guide
OL-29756-01
Chapter 23 SIGTRAN-M3UA
Configuring EAP-AKA/EAP-SIM with SIGTRAN-M3UA
MLCNumber Required, if you select FetchAuthorizationInfo as True in EAP-AKA or
EAP-SIM services. Also, required for M3UA service for fetching the
MSISDN from the HLR. This is the map layer network node number by
which the HLR identifies the Prime Access Registrar in the network. The
MLC number is configured in E.164 format.
Note MLC is a max-15 digit number.
RoutingIndicator Required; represents the routing indicator. The possible values are Route
on Global Title (RTE_GT) or Route on Sub System Number (RTE_SSN).
You can use either RTE_GT or RTE_SSN value to route the packets for
HLR.
RoutingParameters
OriginPointCode Required; represents the originating point of a message in a signalling
network. The value ranges from 0-16777215.
DestinationPointCode Required; represents the destination address of a signalling point in a SS7
network.
RemoteSubSystemNum-
ber
Required; represents the sub system number of the remote server. The Re-
moteSubSystemNumber is set as 6 by default.
OPCMask Represents the wild card mask for the origin point code. The value ranges
from 0-16777215.
DPCMask Represents the wild card mask for the destination point code. The value
ranges from 0-16777215.
ServiceIndicatorOctet Represents the service identifier octet. The value ranges from 0-255.
RoutingContext Required; represents the routing context which ranges from 0-16777215.
SourceIPAddresses
add 1, add 2,... Represent the multiple source IP addresses configured on the remote
server.
DestinationIPAddresses
add 1, add 2,... Represent the multiple destination IP addresses configured on the remote
server.
SourceGTAddress
SourceGTDigits Required; an unique number to identify the source.
SourceGTFormat Required; represents the format of the global translation (GT) rule. The
possible values are GTFRMT_0, GTFRMT_1, GTFRMT_2, GTFRMT_3,
GTFRMT_4, or GTFRMT_5.
SourceNatureofAddress Required; represents the type of the source address. The possible values are
ADDR_NOTPRSNT (Address not present), SUBNUM (Subscriber
number), NATSIGNUM (National significant number), or INTNUM (In-
ternational number.)
SourceTranslationType Required; represents the type of translation. The possible values ranges
from 0-255.
Table 23-1 SIGTRAN-M3UA Stack Properties (continued)
Property Description

23-11
Cisco Prime Access Registrar 6.1 User Guide
OL-29756-01
Chapter 23 SIGTRAN-M3UA
Blacklisting IMSI Values
Blacklisting IMSI Values
Prime Access Registrar allows you to blacklist one or more IMSI values available in the EAP-SIM or
EAP-AKA requests forwarded to an HLR. A scripting point option is provided such that you can set an
environment dictionary variable Blacklisted-IMSI to TRUE or FAL SE to blacklist or whitelist IMSI
values respectively. An IMSI value marked as blacklisted is rejected and will not be forwarded to the
HLR.
To blacklist an IMSI value:
Step 1 Configure a SIGTRAN-M3UA remote server as described in Configuring SIGTRAN-M3UA Remote
Server, page 23-6.
SourceNumberingPlan Required; represents the numbering plan of the network that the subscriber
uses. For example, land mobile numbering plan, ISDN mobile numbering
plan, private or network specific numbering plan.
SourceEncodingScheme Required; represents the BCD encoding scheme. The possible values are
UNKN (Unknown), BCDODD (BCD Odd), BCDEVEN (BCD Even), or
NWSPEC (National specific). This must be set based on the length of the
GT.
DestinationGTAddress
The following fields are displayed only when you set RTE_GT as RoutingIndicator.
DestGTDigits Required; an unique number to identify the destination.
DestGTFormat Required; represents the format of the global translation (GT) rule. The
possible values are GTFRMT_0, GTFRMT_1, GTFRMT_2, GTFRMT_3,
GTFRMT_4, or GTFRMT_5.
DestNatureofAddress Required; represents the type of the destination address. The possible
values are ADDR_NOTPRSNT (Address not present), SUBNUM (Sub-
scriber number), NATSIGNUM (National significant number), or
INTNUM (International number.)
DestTranslationType Required; represents the type of translation. The possible values ranges
from 0-255.
DestNumberingPlan Required; represents the numbering plan of the network that the subscriber
uses. For example, Land mobile numbering plan, ISDN mobile numbering
plan, private or network specific numbering plan. Possible values are
DATA, GENERIC, ISDN, ISDNMOB, LANMOB, MARMOB, NWSPEC,
TEL, TELEX, and UNKN.
DestEncodingScheme Required; represents the BCD encoding scheme. The possible values are
UNKN (Unknown), BCDODD (BCD Odd), BCDEVEN (BCD Even), or
NWSPEC (National specific). This must be set based on the length of the
GT.
Table 23-1 SIGTRAN-M3UA Stack Properties (continued)
Property Description

23-12
Cisco Prime Access Registrar 6.1 User Guide
OL-29756-01
Chapter 23 SIGTRAN-M3UA
Configuring M3UA Service
Step 2 Configure an EAP-AKA or EAP-SIM service with the SIGTRAN-M3UA remote server. See
Configuring EAP-AKA/EAP-SIM with SIGTRAN-M3UA, page 23-4 for an example.
Step 3 Run the following script:
proc CheckBlackList {request response environ}
{
set imsi [ $environ get IMSI ]
if { [ string compare $imsi 984579621012345 ] == 0 }
{
$environ put Blacklisted-IMSI TRUE
$environ put Notification-Code 19384
}
}
Where, CheckBlackList is the entrypoint variable of the global title translation script checklist, as shown
in the example below:
[ //localhost/Radius/Scripts/checklist ]
Name = checklist
Description =
Language = tcl
Filename = tclscript.tcl
EntryPoint = CheckBlackList
InitEntryPoint =
InitEntryPointArgs =
If the environment variable Blacklisted-IMSI is set as TRUE and if the IMSI value available in the
incoming script matches the given string, then that IMSI is blacklisted and will not be forwarded to the
HLR. You can configure a notification code to represent failure. If no notification code is set, 16384
representing General Failure is sent upon rejection of an IMSI value.
Note Notification code is applicable only for EAP-SIM service.
Additionally, you can configure the script to compare the incoming IMSI against the configured IMSIs
and take appropriate action as to whether blacklist or whitelist the incoming IMSI.
Configuring M3UA Service
Prime Access Registrar supports the M3UA service, which is used to fetch MSISDN from IMSI or vice
versa through RADIUS packets, see Chapter 4, “M3UA,” for more information.
To configure the M3UA service with SIGTRAN-M3UA remote server:
Step 1 Launch aregcmd.
Step 2 Create an M3UA service.
cd /Radius/Services
add FetchAuthInfo
Step 3 Set the type as M3UA.
set type M3UA

23-13
Cisco Prime Access Registrar 6.1 User Guide
OL-29756-01
Chapter 23 SIGTRAN-M3UA
Configuring M3UA Service
Step 4 Set AuthorizationInfoLookUp to one of the following:
•MSISDN-IMSI—To fetch MSISDN in the request and send IMSI in the response to the HLR.
•IMSI-MSISDN—To fetch IMSI in the request and send MSISDN in the response to the HLR.
Note See Example Configuration, page 23-13 for a sample configuration with
•Map-Restore—To fetch the profile information of a subscriber from the HLR. For more information
on configuring the M3UA service with Map Restore Data authorization, see Configuring M3UA
Service with Map Restore Data Authorization, page 23-13.
set AuthorizationInfoLookUp IMSI-MSISDN
Step 5 Add M3UA remote server in the remoteServers.
cd remoteServers
Set 1 m3ua
Example Configuration
The following shows an example configuration of the M3UA service:
[ //localhost/Radius/Services/test ]
Name = test
Description =
Type = m3ua
IncomingScript~ =
OutgoingScript~ =
OutageScript~ =
OutagePolicy~ = RejectAll
AuthorizationInfoLookUp = IMSI-MSISDN
RemoteServers/
Configuring M3UA Service with Map Restore Data Authorization
Prime Access Registrar provides the Map Restore Data functionality to fetch the profile information of
a subscriber from the HLR.
This topic contains the following sections:
•Map Restore Data Authorization Flow, page 23-13
•CS Insert Subscriber Data Structure, page 23-14
•CLI Configuration for Map-Restore-Data, page 23-15
Map Restore Data Authorization Flow
Prime Access Registrar sends a MAP_SEND_AUTH_INFO request to HLR on receiving EAP-SIM /
EAP-AKA authentication request and fetches the authentication vectors in
MAP_SEND_AUTH_INFO_RES message. Prime Access Registrar checks the IMSI and if it is
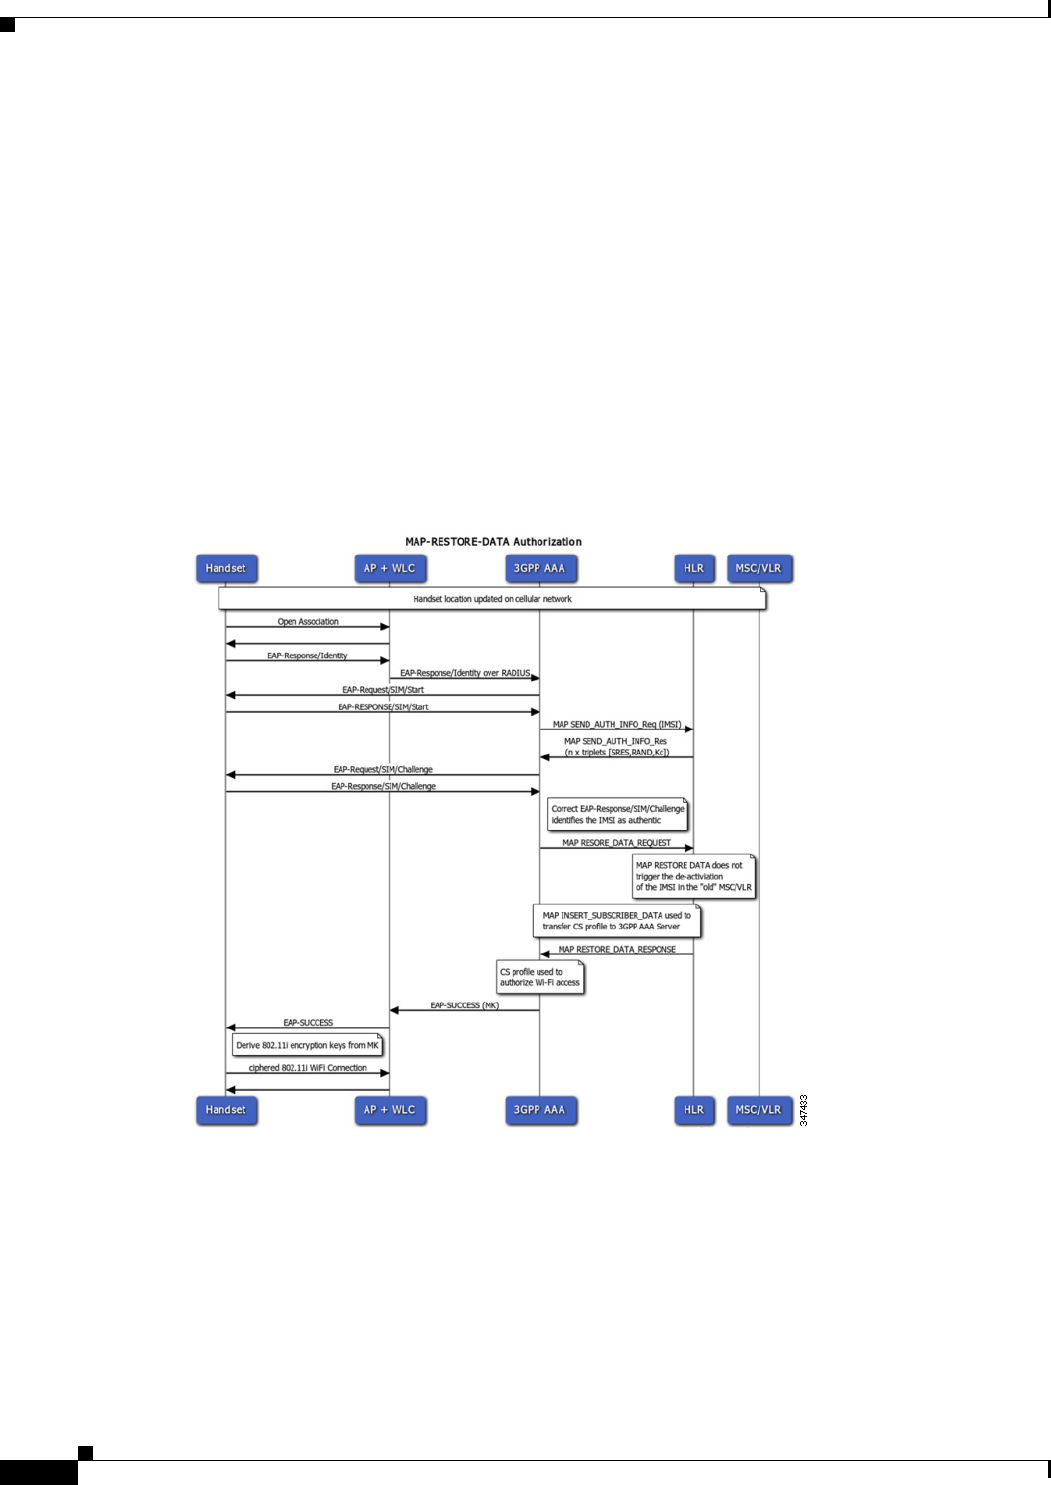
23-14
Cisco Prime Access Registrar 6.1 User Guide
OL-29756-01
Chapter 23 SIGTRAN-M3UA
Configuring M3UA Service
authentic, sends a MAP_RESTORE_DATA_REQUEST to fetch the profile information from the HLR.
HLR then responds with MAP_INSERT_SUBSCRIBER_DATA request to Prime Access Registrar. The
request contains the circuit switched (CS) profile information for a subscriber.
Prime Access Registrar server stores the profile information based on the ProfileInfo configuration and
sends a MAP_INSERT_SUBSCRIBER_DATA_RESPONSE to HLR. HLR responds with
MAP_RESTORE_DATA_RESPONSE to Prime Access Registrar. After successful acknowledgment of
MAP_RESTORE_DATA, Prime Access Registrar server maps the fetched profile through
RestoreDataMappings to any of the environment variables configured by the user. The CS profile used
to authorize WI-FI access which is fetched from HLR can be transported to access point in any of the
radius attribute.
The mapping of the values in the response to a profile is possible based on the configuration in the
profilemappings configuration.
Figure 23-2 represents the Map-Restore-Data message flow between Prime Access Registrar and HLR.
Figure 23-2 Map-Restore-Data Authorization Flow
CS Insert Subscriber Data Structure
Figure 23-3 shows the parameters fetched by Prime Access Registrar on receipt of the subscriber data
request.
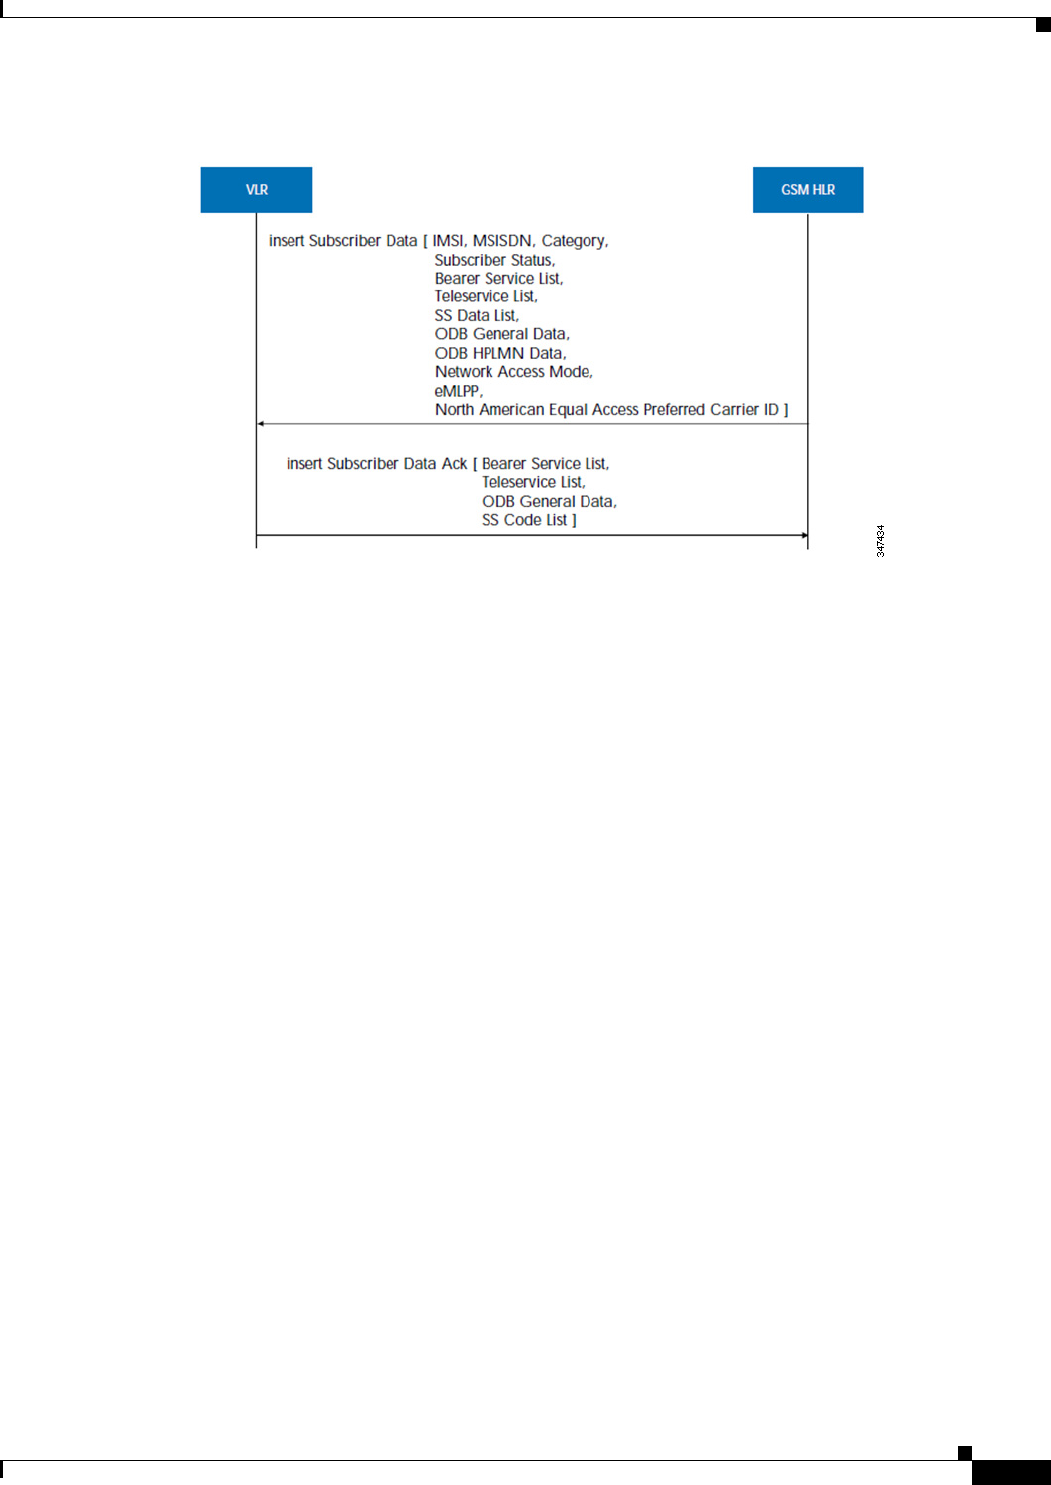
23-15
Cisco Prime Access Registrar 6.1 User Guide
OL-29756-01
Chapter 23 SIGTRAN-M3UA
Configuring M3UA Service
Figure 23-3 CS Insert Subscriber Data Structure
CLI Configuration for Map-Restore-Data
If you set AuthorizationInfoLookUp to Map-Restore, two additional properties ProfileMappings and
RestoreDataMappings are displayed.
The restore data mapping parameters include LSA information, LCS information, and subscriber data.
You can configure an index with a value or a range to fetch one or more properties from the subscriber
data.
The following is an example configuration of an M3UA service with Map-Restore-Data authorization:
[ //localhost/Radius/Services/serv1 ]
Name = serv1
Description =
Type = m3ua
IncomingScript~ =
OutgoingScript~ =
OutageScript~ =
OutagePolicy~ = RejectAll
AuthorizationInfoLookUp = MAP-RESTORE
RemoteServers/
1. server1
RestoreDataMappings/
IMSI = imsi
Naea-PreferredCI = naea
RoamingRestrictedInSgsnDueToUnsupportedFeature =
NetworkAccessMode =
LMUIndicator =
ISTAlertTimer =
SuperChargerSupportedInHLR =
CSAllocationRetentionPriority =
ChargingCharacteristics =
AccessRestrictionData =
UE-ReachabilityRequestIndicator =
Category =
LSAInformation/
CompleteDataListIncluded = completedatalist
LSAOnlyAccessIndicator =
LSADataList/

23-16
Cisco Prime Access Registrar 6.1 User Guide
OL-29756-01
Chapter 23 SIGTRAN-M3UA
Configuring M3UA Service
Index = 6
LSAIdentity = lsaid
LSAAttributes = lsaattrib
LSAActiveModeIndicator = activmode
SubscriberData/
MSISDN = msisdn
SubscriberStatus = substatus
RoamingRestrictionDueToUnsupportedFeature =
BearerServiceList/
Index = 6-10
BearerService = bearsrvc
TeleServiceList/
Index =
TeleService =
ProvisionedSS/
Index = 4-6
ForwardingInfo/
FI-SS-Code = fisscode
ForFeatureList/
Index = 7-10
FF-SS-Status = ffssstatus
ForwardedToNumber =
ForwardedToSubaddress =
ForwardingOptions =
NoReplyConditionTime =
LongForwardedToNumber =
BasicService/
BS-Ext-BearerService = bsextbsservice
BS-Ext-Teleservice = bsextteleservice
CallBarringInfo/
CB-SS-Code =
CallBarFeatureList/
Index =
CB-SS-Status =
BasicService/
CB-Ext-BearerService =
CB-Ext-Teleservice =
CugInfo/
CugSubList/
Index =
CugSubscription/
Cug-Index =
cug-Interlock =
IntraCUG-Options =
BasicServiceGroupList/
Index =
CUG-Ext-BearerService =
CUG-Ext-Teleservice =
CugInformation/
Cug-FeatureList/
Index =
CUG-Feature/
BasicService.Ext-BearerService =
PreferentialCUG-Indicator =
InterCUG-Restrictions =
SS-Data/
SSD-SS-Code =
SSD-SS-Status =
SS-SubscriptionOption/
CliRestrictionOption =
OverrideCategory =
BasicServiceGroupList/
Index =
BSG-Ext-BearerService =

23-17
Cisco Prime Access Registrar 6.1 User Guide
OL-29756-01
Chapter 23 SIGTRAN-M3UA
Configuring M3UA Service
BSG-Ext-Teleservice =
EMLPP-Info/
MaximumEntitledPriority =
DefaultPriority =
ODB-Data/
ODB-GeneralData =
ODB-HPLMN-Data =
RegionalSubscriptionData/
Index =
RegionalSubscriptionData =
VBSSubscriptionData/
Index =
VBS-GroupId =
BroadcastInitEntitlement =
VGCSSubscriptionData/
Index =
VGCS-GroupId =
AdditionalSubscriptions =
AdditionalInfo =
LongGroupId =
LCSInformation/
GMLC-List/
Index =
GMLC =
LCS-PrivacyExceptionList/
Index =
PE-SS-Code =
SS-Status =
LCSNotificationToMSUser =
ExternalClientList/
Index =
ClientIdentity.ExternalAddress =
ExtCliGMLC-Restriction =
ExtCliNotificationToMSUser =
PLMNClientList/
Index =
PLMNClient =
ServiceTypeList/
Index =
ServiceTypeIdentity =
SerTypeGMLC-Restriction =
SerTypeNotificationToMSUser =
MOLR-List/
Index =
MOLR-SS-Code =
MOLR-SS-Status =
MC-SS-Info/
MC-SS-Code =
MC-SS-Status =
NbrSB =
NbrUser =
SGSN-CAMEL-SubscriptionInfo/
GPRS-CSI/
GPRS-CamelCapabilityHandling =
GPRS-NotificationToCSE =
GPRS-CSI-Active =
GPRS-CamelTDPDataList/
Index =
GPRS-TriggerDetectionPoint =
GPRS-ServiceKey =
GPRS-GSMSCF-Address =
DefaultSessionHandling =
MO-SMS-CSI/
MOSMS-CamelCapabilityHandling =

23-18
Cisco Prime Access Registrar 6.1 User Guide
OL-29756-01
Chapter 23 SIGTRAN-M3UA
Configuring M3UA Service
MOSMS-NotificationToCSE =
MOSMS-CSI-Active =
SMS-CAMEL-TDP-DataList/
Index =
MO-SMS-TriggerDetectionPoint =
MO-ServiceKey =
MO-GSMSCF-Address =
MO-DefaultSMSHandling =
MT-SMS-CSI/
MTSMS-CamelCapabilityHandling =
MTSMS-NotificationToCSE =
MTSMS-CSI-Active =
SMS-CAMEL-TDP-DataList/
Index =
MT-SMS-TriggerDetectionPoint =
MT-ServiceKey =
MT-GSMSCF-Address =
MT-DefaultSMSHandling =
MT-SMSCAMELTDP-CriteriaList/
Index =
SMS-TriggerDetectionPoint =
TPDU-TypeCriterion =
MG-CSI/
MobilityTriggers =
MG-ServiceKey =
MG-GSMSCF-Address =
MG-NotificationToCSE =
MG-CSI-Active =
ProfileMappings/
imsi = 100,Profile1
naea = 20,Profile2
naea = 30,Profile3
[ //localhost/Radius/Profiles ]
Entries 1 to 6 from 6 total entries
Current filter: <all>
default-PPP-users/
default-SLIP-users/
default-Telnet-users/
Profile1/
Profile2/
Profile3/
Table 23-2 shows the restore data mapping parameters.
Table 23-2 Restore Data Mappings and Profile Mappings Parameters
Parameter Description
IMSI IMSI received in the response from HLR.
Naea-Preferred CI North American Equal Access preferred Carrier ID List. A list of the preferred
carrier identity codes that are subscribed to.
Roaming Restricted In
Sgsn Due To
Unsupported Feature
Indicates that a subscriber is not allowed to roam in the current Service GPRS
Support Node (SGSN) or Cisco Mobility Management Entity (MME) area.

23-19
Cisco Prime Access Registrar 6.1 User Guide
OL-29756-01
Chapter 23 SIGTRAN-M3UA
Configuring M3UA Service
Network Access Mode The Network Access Mode (NAM) defines if the subscriber is registered to get
access to the CS (non-GPRS/EPS network), to the PS (GPRS/EPS) network or
to both networks. NAM describes the first level of the subscriber data
pseudo-tree below the IMSIroot. It is permanent subscriber data stored in the
HSS / HLR and the SGSN with the Gs interface option, and the MME with the
SGs interface option.
LMU Indicator Indicates the presence of an LMU.
IST Alert Timer Indicates the IST alert timer value that must be used in the Mobile Switching
Center (MSC) to inform the HLR about the call activities that the subscriber
performs.
Super Charger
Supported In HLR
Indicates whether super charger concept is supported in HLR.
CS Allocation
Retention Priority
Allocation-retention priority for Circuit Switched (CS). This parameter
specifies relative importance to compare with other bearers about allocation
and retention of bearer.
ChargingCharacteristi
cs
Subscribed charging characteristics.
Access Restriction
Data
Allowed Recipient Access Table (RAT) according to subscription data.
UE Reachability
Request Indicator
Indicates that the Home Subscriber Server (HSS) is awaiting a notification of
user equipment (UE) reachability.
Category Calling party category
LSA Information These parameters refer to one or more localized service areas (LSAs) a
subscriber may be a member of, together with the priority, the preferential
access indicator, the active mode support indicator and active mode indication
of each localized service area. The access right outside these localized service
areas is also indicated.
Subscriber Data
MSISDN MSISDN value in the subscriber data.
Subscriber Status Barring status of the subscriber, which could be Service Granted or Operator
Determined Barring.
Roaming Restriction
Due To Unsupported
Feature
Indicates that the subscriber is not allowed to roam in the current MSC area.
Bearer Service List List of extensible bearer services subscribed.
Configure the index value to fetch only the required bearer services.
TeleService List List of extensible teleservices subscribed.
Configure the index value to fetch only the required teleservices.
Provisioned SS List of supplementary services provisioned.
Configure the index value to fetch only the required supplementary services.
ODB-Data Operator Determined Barring (ODB) general data and ODB Home Public
Land Mobile Network (HPLMN) specific data.
Table 23-2 Restore Data Mappings and Profile Mappings Parameters (continued)
Parameter Description

23-20
Cisco Prime Access Registrar 6.1 User Guide
OL-29756-01
Chapter 23 SIGTRAN-M3UA
Configuring M3UA Service
Configuring Environment Variables to Fetch Subscriber Data Values
You can configure an environment variable to fetch the required values from the subscriber data packets.
You can run a script to fetch the environment variable along with the values. See the example below:
proc FetchBearerService {request response environ} {
set bearerService [ $environ get bs-ext ]
$request trace 2 "BearerService value fetched is " $bearerService
}
In the above script bs-ext is the environment variable that is configured. If the values fetched from
BearerServiceList are 17,18,19,20 and 21, the above script returns the value 17:18:19:20:21.
Similarly we can run scripts to retrieve other environment variables as well.
Regional Subscription
Data
List of regional subscription areas (zones) in which the subscriber is allowed
to roam.
Configure the index value to fetch only the required zones.
VBS Subscription
Data
List of Voice Broadcast Services (VBS) subscribed.
Configure the index value to fetch only the required VBS.
VGCS Subscription
Data
List of Voice Group Call Services (VGCS) subscribed.
Configure the index value to fetch only the required VGCS.
LCS Information
Live Communication Server (LCS) related information for the subscriber.
GMLC-List List of Gateway Mobile Location Centers (GMLCs) that are permitted to issue
a call/session unrelated or call/session related MT-LR request.
Configure the index value to fetch only the required GMLCs.
LCS-Privacy
Exception List
Classes of LCS client that are allowed to locate any target Mobile Station
(MS).
Configure the index value to fetch only the required classes.
MOLR-List Code and status of Mobile Originating Location Request (MO-LR)
subscribed.
Configure the index value to fetch only the required requests.
MC-SS-Info Parameters identifying Multicall (MC) supplementary services (SS).
SGSN-CAMEL-Subscri
ption Info
Parameters identifying the subscribers as having Customized Application for
Mobile Enhanced Logic (CAMEL) services that are invoked in the SGSN.
ProfileMappings
Attribute The RADIUS attribute to map the fetched profile data.
Value:Profile Value of the attribute.
Table 23-2 Restore Data Mappings and Profile Mappings Parameters (continued)
Parameter Description

23-21
Cisco Prime Access Registrar 6.1 User Guide
OL-29756-01
Chapter 23 SIGTRAN-M3UA
Support for SCTP Multihoming in SIGTRAN-M3UA
Support for SCTP Multihoming in SIGTRAN-M3UA
Stream Control Transmission Protocol (SCTP) is an IP transport protocol that supports data exchange
between exactly two endpoints. Multihoming feature of SCTP provides the ability for a single SCTP
endpoint to support multiple IP addresses. With this feature, each of the two endpoints during an SCTP
association can specify multiple points of attachment. Each endpoint will be able to receive messages
from any of the addresses associated with the other endpoint. With the use of multiple interfaces, data
can be sent to alternate addresses when failures occur and thus Prime Access Registrar runs successfully
even during network failures.
Prime Access Registrar allows you to configure multiple source and destination addresses on the remote
server. The following shows an example configuration of SIGTRAN-M3UA remote server with multiple
source and destination addresses:
[ /Radius/RemoteServers/m3ua ]
Name = m3ua
Description =
Protocol = sigtran-m3ua
SourcePort = 2805
LocalSubSystemNumber = 149
DestinationPort = 2855
IMSITranslationScript~ =
GlobalTitleTranslationScript~ =
Timeout = 15
ReactivateTimerInterval = 300000
LimitOutstandingRequests = FALSE
MaxOutstandingRequests = 0
MAPVersion = 3
NetworkVariant = ITU
SubServiceField = NAT
TCAPVariant = ITU96
NetworkAppearance = 1
NetworkIndicator = NAT
MLCNumber = 123456789012345
TrafficMode = LOADSHARE
LoadShareMode = SLS
RoutingIndicator = RTE_SSN
RoutingParameters/
OriginPointCode = 2
DestinationPointCode = 4
RemoteSubSystemNumber = 6
OPCMask = 16383
DPCMask = 16383
ServiceIndicatorOctet = 0
RoutingContext = 11
SourceIPAddresses/
DestinationIPAddresses/
--> cd SourceIPAddresses
--> add 1 192.168.0.2
--> add 2 192.168.0.3
--> cd ../DestinationIPAddresses
--> add 1 192.168.0.5
--> add 2 192.168.0.6
In the above example, the link between IP addresses 192.168.0.2 and 192.168.0.5 acts as the primary
link and the link between IP addresses 192.168.0.3 and 192.168.0.6 acts as the secondary link. With the
Multihoming feature, if one of the interfaces in the primary link is down, the secondary link carries the
active traffic. On restoration of the IP address, the traffic switches back to the primary link.

23-22
Cisco Prime Access Registrar 6.1 User Guide
OL-29756-01
Chapter 23 SIGTRAN-M3UA
SIGTRAN-M3UA Logs
SIGTRAN-M3UA Logs
The following logs are applicable for SIGTRAN-M3UA:
•stack.log—Logs the interaction between Prime Access Registrar and STP/HLR.
•sm.log—Logs the internal debug information for SIGTRAN-M3UA stack manager.
•m3ua.log—Logs the inter-process communication between Prime Access Registrar and
SIGTRAN-M3UA stack.
•cliActivity.log—Logs the initialization and command interactions.

CHAPTER
24-1
Cisco Prime Access Registrar 6.1 User Guide
OL-29756-01
24
Using SNMP
This chapter provides the following information about Cisco
Prime Access Registrar (Prime Access Registrar) support for SNMP:
•Overview
•Supported MIBs
•SNMP Traps
Overview
Prime Access Registrar provides SNMP MIB and trap support for users of network management
systems. The supported MIBs enable the network management station to collect state and statistic
information from an Prime Access Registrar server. The traps enable Prime Access Registrar to notify
interested network management stations of failure or impending failure conditions.
Prime Access Registrar supports the MIBs defined in the following RFCs:
•RADIUS Authentication Client MIB for IPv6, RFC 4668
•RADIUS Authentication Server MIB for IPv6, RFC 4669
•RADIUS Accounting Client MIB for IPv6, RFC 4670
•RADIUS Accounting Server MIB for IPv6, RFC 4671
•CISCO Diameter Base Protocol MIB
Prime Access Registrar MIB support enables a standard SNMP management station to check the current
state of the server as well as the statistics on each client or each proxied remote server.
Prime Access Registrar Trap support enables a standard SNMP management station to receive trap
messages from an Prime Access Registrar server. These messages contain information indicating that
either the server was brought up or down, or that the proxied remote server is down or has come back
online.
Supported MIBs
The MIBs supported by Prime Access Registrar enable a standard SNMP management station to check
the current state of the server and statistics for each client or proxied remote server.

24-2
Cisco Prime Access Registrar 6.1 User Guide
OL-29756-01
Chapter 24 Using SNMP
Supported MIBs
This section contains the following topics:
•RADIUS-AUTH-CLIENT-MIB
•RADIUS-AUTH-SERVER-MIB
•RADIUS-ACC-CLIENT-MIB
•RADIUS-ACC-SERVER-MIB
•CISCO-DIAMETER-BASE-PROTOCOL-MIB
•Diameter SNMP and Statistics Support
•TACACS+ SNMP and Statistics Support
RADIUS-AUTH-CLIENT-MIB
The RADIUS-AUTH-CLIENT-MIB describes the client side of the RADIUS authentication protocol.
The information contained in this MIB is useful when an Prime Access Registrar server is used as a
proxy server.
RADIUS-AUTH-SERVER-MIB
The RADIUS-AUTH-SERVER-MIB describes the server side of the RADIUS authentication protocol.
The information contained in this MIB describes managed objects used for managing a RADIUS
authentication server.
RADIUS-ACC-CLIENT-MIB
The RADIUS-ACC-CLIENT-MIB describes the client side of the RADIUS accounting protocol. The
information contained in this MIB is useful when an Prime Access Registrar server is used for
accounting.
RADIUS-ACC-SERVER-MIB
The RADIUS-ACC-CLIENT-MIB describes the server side of the RADIUS accounting protocol. The
information contained in this MIB is useful when an Prime Access Registrar server is used for
accounting.
CISCO-DIAMETER-BASE-PROTOCOL-MIB
Prime Access Registrar uses the CISCO-DIAMETER-BASE-PROTOCOL-MIB as an interface to query
the Diameter statistics, though configuring the Diameter through SNMP is not possible.
Prime Access Registrar supports LocalStatistics and PeerStatiscics only. The LocalStats provides
statistical information about the local diameter server and the PeerStats provides statistical information
about the peers and the messages to/from the peers.

24-3
Cisco Prime Access Registrar 6.1 User Guide
OL-29756-01
Chapter 24 Using SNMP
SNMP Traps
Diameter SNMP and Statistics Support
Prime Access Registrar also supports Diameter SNMP MIB
(CISCO-DIAMETER-BASE-PROTOCOL-MIB) to describe the Diameter Base Protocol statistics.
Prime Access Registrar supports statistic of Diameter messages to include the additional counters. This
is supported through the CLI/GUI and SNMP. The diameter statistics includes peer statistics and global
summary statistics details.
TACACS+ SNMP and Statistics Support
Prime Access Registrar supports the CISCO-AAA-SERVER-MIB to describe the statistics of TACACS+
protocol.TACACS+ protocol is used to authenticate an user via various services such as login services
see TACACS+ Support for AAA for more information. This is supported through the CLI/GUI and
SNMP.
SNMP Traps
The traps supported by Prime Access Registrar enable a standard SNMP management station to receive
trap messages from an Prime Access Registrar server. These messages contain information indicating
whether a server was brought up or down, or that the proxied remote server is down or has come back
online.
A trap is a network message of a specific format issued by an SNMP entity on behalf of a network
management agent application. A trap is used to provide the management station with an asynchronous
notification of an event.
When a trap is generated, a single copy of the trap is transmitted as a trap PDU to each destination
contained within a list of trap recipients.
The list of trap recipients is shared by all events and is determined at server initialization time along with
other trap configuration information. The list of trap recipients dictates where Prime Access Registrar
traps are directed.
The configuration of any other SNMP agent on the host is ignored. By default, all traps are enabled but
no trap recipients are defined. By default, no trap is sent until trap recipients are defined.
Traps are configured using the command line interface (CLI). After configuring traps, the configuration
information is re initialized when a server reload or restart occurs.
Note SNMP queries and traps communication can be performed over IPv6.
When you configure traps, you must provide the following information:
•List of trap recipients (community string for each)
•Suppressing traps for any type of message
•Frequency of traps for any type of message
This section contains the following topics:
•Supported Traps

24-4
Cisco Prime Access Registrar 6.1 User Guide
OL-29756-01
Chapter 24 Using SNMP
SNMP Traps
•Configuring Traps
•Community String
Supported Traps
The traps supported by Prime Access Registrar enable the Prime Access Registrar server to notify
interested management stations of events, failure, or impending failure conditions. Traps are a network
message of a specific format issued by an SNMP entity on behalf of a network management agent
application. Traps are used to provide the management station with an asynchronous notification of an
event.
This section contains the following topics:
•carServerStart
•carServerStop
•carInputQueueFull
•carInputQueueNotVeryFull
•carOtherAuthServerNotResponding
•carOtherAuthServerResponding
•carOtherAccServerNotResponding
•carOtherAccServerResponding
•carAccountingLoggingFailure
•carLicenseUsage
•carDiameterPeerDown
•carDiameterPeerUp
carServerStart
carServerStart signifies that the server has started on the host from which this notification was sent.
This trap has one object, carNotifStartType, which indicates the start type. A firstStart indicates this is
the server process’ first start. reload indicates this server process has an internal reload. This typically
occurs after rereading some configuration changes, but reload indicates this server process did not quit
during the reload process.
carServerStop
carServerStop signifies that the server has stopped normally on the host from which this notification
was sent.
carInputQueueFull
carInputQueueFull indicates that the percentage of use of the packet input queue has reached its high
threshold. This trap has two objects:
•carNotifInputQueueHighThreshold—indicates the high limit percentage of input queue usage
•carNotifInputQueueLowThreshold—indicates the low limit percentage of input queue usage

24-5
Cisco Prime Access Registrar 6.1 User Guide
OL-29756-01
Chapter 24 Using SNMP
SNMP Traps
By default, carNotifInputQueueHighThreshold is set to 90% and carNotifInputQueueLowThreshold is
set to 60%.
Note The values for these objects cannot be changed at this time. You will be able to modify them in a future
release of Prime Access Registrar.
After this notification has been sent, another notification of this type will not be sent again until the
percentage usage of the input queue goes below the low threshold.
If the percentage usage reaches 100%, successive requests might be dropped, and the server might stop
responding to client requests until the queue drops down again.
carInputQueueNotVeryFull
carInputQueueNotVeryFull indicates that the percentage usage of the packet input queue has dropped
below the low threshold defined in carNotifInputQueueLowThreshold. This trap has two objects:
•carNotifInputQueueHighThreshold—indicates the high limit percentage of input queue usage
•carNotifInputQueueLowThreshold—indicates the low limit percentage of input queue usage
After this type of notification has been sent, it will not be sent again until the percentage usage goes back
up above the high threshold defined in carNotifInputQueueHighThreshold.
carOtherAuthServerNotResponding
carOtherAuthServerNotResponding indicates that an authentication server is not responding to a
request sent from this server. This trap has three objects:
•radiusAuthServerAddress—indicates the identity of the concerned server
•radiusAuthClientServerPortNumber—indicates the port number of the concerned server
•carAuthServerType—indicates the type of the concerned server
The index of these three objects identifies the entry in radiusAuthServerTable and carAccServerExtTable
which maintains the characteristics of the concerned server.
Note One should not rely solely on carOtherAuthServerNotResponding for server state. Several conditions,
including a restart of the Prime Access Registrar server, could result in either multiple
carOtherAuthServerNotResponding notifications being sent or in a carOtherAuthServerResponding
notification not being sent. NMS can query the carAuthServerRunningState in carAuthServerExtTable
for the current running state of this server.
carOtherAuthServerResponding
carOtherAuthServerResponding signifies that an authentication server which had formerly been in a
down state is now responding to requests from the Prime Access Registrar server. This trap has three
objects:
•radiusAuthServerAddress—indicates the identity of the concerned server
•radiusAuthClientServerPortNumber—indicates the port number of the concerned server
•carAuthServerType—indicates the type of the concerned server

24-6
Cisco Prime Access Registrar 6.1 User Guide
OL-29756-01
Chapter 24 Using SNMP
SNMP Traps
The index of these three objects identifies the entry in radiusAuthServerTable and carAccServerExtTable
which maintains the characteristics of the concerned server.
One should not rely on receiving this notification as an indication that all is well with the network.
Several conditions, including a restart of the Prime Access Registrar server, could result in either
multiple carOtherAuthServerNotResponding notifications being sent or in a
carOtherAuthServerResponding notification not being sent. The NMS can query the
carAuthServerRunningState in carAuthServerExtTable for the current running state of this server.
carOtherAccServerNotResponding
carOtherAuthServerNotResponding signifies that an accounting server is not responding to the
requests sent from this server. This trap has three objects:
•radiusAccServerAddress—indicates the identity of the concerned server
•radiusAccClientServerPortNumber—indicates the port number of the concerned server
•carAcchServerType—indicates the type of the concerned server
The index of these three objects identifies the entry in radiusAuthServerTable and arAccServerExtTable
which maintains the characteristics of the concerned server.
One should not solely rely on this for server state. Several conditions, including the restart of the
Prime Access Registrar server, could result in either multiple carOtherAccServerNotResponding
notifications being sent or in a carOtherAccServerResponding notification not being sent. The NMS can
query the carAccServerRunningState in carAccServerExtTable for current running state of this server.
carOtherAccServerResponding
carOtherAccServerResponding signifies that an accounting server that had previously sent a not
responding message is now responding to requests from the Prime Access Registrar server. This trap has
three objects:
•radiusAccServerAddress—indicates the identity of the concerned server
•radiusAccClientServerPortNumber—indicates the port number of the concerned server
•carAccServerType—indicates the type of the concerned server
The index of these three objects identifies the entry in radiusAuthServerTable and arAccServerExtTable
which maintains the characteristics of the concerned server.
One should not rely on the reception of this notification as an indication that all is well with the network.
Several conditions, including the restart of the Prime Access Registrar server, could result in either
multiple carOtherAccServerNotResponding notifications being sent or in a
carOtherAccServerResponding notification not being sent. The NMS can query the
carAccServerRunningState in carAccServerExtTable for the current running state of this server.
carAccountingLoggingFailure
carAccountingLoggingFailure signifies that this Prime Access Registrar server cannot record
accounting packets locally. This trap has two objects:
•carNotifAcctLogErrorReason—indicates the reason packets cannot be recorded locally
•carNotifAcctLogErrorInterval—indicates how long to wait until another notification of this type
might be sent. A value of 0 (zero) indicates no time interval checking, meaning that no new
notification can be sent until the error condition is corrected.

24-7
Cisco Prime Access Registrar 6.1 User Guide
OL-29756-01
Chapter 24 Using SNMP
SNMP Traps
carLicenseUsage
carLicenseUsage signifies the percentage of transaction per second(TPS) or session License Usage.
TPS
The TPS trap is generated when the Prime Access Registrar server reaches license usage slabs namely
80%, 90%, 100%, and 110%. These traps are generated only once for every slab during the increasing
steady state. Increasing steady state is a state when Prime Access Registrars’ incoming request rate
shows 80% of the license usage over a period of 20 minutes. These traps will be regenerated only if a
increasing steady state is observed after a decreasing steady state.
Concurrent Session
The concurrent session trap is generated when the Prime Access Registrar server reaches 80%. The
incoming traffic slabs defined for trap generation are 80%, 90%, 100%, and 110% of the licensed
Concurrent Sessions. These traps are generated once for every slab during the increasing steady state.
carDiameterPeerDown
carDiameterPeerDown signifies that a Diameter peer is down. The identity of the peer is given by
cdbpPeerIpAddress.
carDiameterPeerUp
carDiameterPeerUp signifies that a Diameter peer is up. The identity of the peer is given by
cdbpPeerIpAddress.
Configuring Traps
The Prime Access Registrar SNMP implementation uses various configuration files to configure its
applications.
This section contains the following topics:
•SNMP Configuration
•Configuring Trap Recipient
SNMP Configuration
A sample configuration file is available in /cisco-ar/ucd-snmp/share/snmp/snmpd.conf. This
configuration file is used to configure SNMP query permissions and trap recipients.
Configuring Trap Recipient
The following example shows the default configuration that sets up trap recipients for SNMP versions
v1 and v2c.
Note Most sites use a single NMS, not two as shown below.

24-8
Cisco Prime Access Registrar 6.1 User Guide
OL-29756-01
Chapter 24 Using SNMP
SNMP Traps
# -----------------------------------------------------------------------------
trapcommunity trapcom
trapsink zubat trapcom 162
trap2sink ponyta trapcom 162
###############################################################################
Note trapsink is used in SNMP version 1; trap2sink is used in SNMP version 2.
trapcommunity defines the default community string to be used when sending traps. This command
must appear prior to trapsink or trap2sink which use this community string.
trapsink and trap2sink are defined as follows:
trapsink hostname community port
trap2sink hostname community port
Community String
A community string is used to authenticate the trap message sender (SNMP agent) to the trap recipient
(SNMP management station). A community string is required in the list of trap receivers.

CHAPTER
25-1
Cisco Prime Access Registrar 6.1 User Guide
OL-29756-01
25
Enforcement of Licensing Models
This chapter describes the enforcement of transactions per second (TPS) based licensing and session
based licensing models introduced in Cisco Prime Access Registrar (Prime Access Registrar).
In TPS based licensing model, the license is based on the number of transactions per second that are
handled by the server. In session based licensing model, the license is managed based on the number of
sessions that resides in Prime Access Registrar. During Prime Access Registrar startup, you can either
load TPS based licensing or session based licensing, but not both at the same time.
This chapter contains the following sections:
•TPS Licensing Features
•Concurrent Session License Features
Note The type of licensing will determine the applicable features and its corresponding enforcement.
TPS Licensing Features
The following are the features of TPS licensing:
•License will enable features but with restriction enforced on the TPS.
•TPS is the number of packets flowing into Prime Access Registrar. This is accounted by
Prime Access Registrar irrespective of the feature being used.
This section contains the following topics:
•Enforcement Rules
•Notification Logs
•Notification - SNMP Traps
•TPS Logging Feature
Enforcement Rules
Any license enforcement is triggered only after Prime Access Registrar has observed increasing steady
state in TPS. Increasing steady state is marked by the steady increase in incoming traffic (measured in
TPS) beyond 80% of the licensed TPS for any 15 minutes of a 20 minute interval.

25-2
Cisco Prime Access Registrar 6.1 User Guide
OL-29756-01
Chapter 25 Enforcement of Licensing Models
TPS Licensing Features
The following are the enforcement rules applied on reaching increasing steady state:
•When the incoming traffic (measured in TPS) is greater than 80% of the licensed TPS, SNMP Trap
will be generated for the first time on reaching the increased steady state. The warning message on
the current license usage is logged for every 5 minutes.
•When the incoming traffic (measured in TPS) is greater than 90% of the licensed TPS, SNMP Trap
will be generated for the first time on reaching the increased steady state. Warning message on the
current license usage is logged for every 5 minutes.
•When the incoming traffic (measured in TPS) is greater than 100% of the licensed TPS, SNMP Trap
will be generated for the first time on reaching the increased steady state. Error message on the
current license usage is logged for every 5 minutes.
•When the incoming traffic (measured in TPS) is greater than 110% of the licensed TPS, SNMP Trap
will be generated for the first time on reaching the increased steady state.
Note Steady state denotes continuous increase or decrease in the TPS within a given TPS range. For the
purpose of enforcement of licensing in Prime Access Registrar, the range is always 80% and above. The
enforcement begins after TPS reaches and is greater than 80% for a steady state of 20 minutes.
Notification Logs
A warning message is logged for every 5 minutes when the TPS count reaches an increased steady state,
where, the TPS count is in the range of 80% to 100% of the licensed TPS.
An error message is logged for every 5 minutes when the TPS count reaches an increased steady state,
where, the TPS count is in the range of 100% to 110% of the licensed TPS.
Notification - SNMP Traps
The carLicenseUsage traps are generated only once in an increasing phase. The incoming traffic slabs
are defined as 80%, 90%, 100%, and 110% of the licensed TPS. When the incoming traffic slabs reaches
an increasing steady state of 80% or above for the first time, the respective trap is generated for the slab.
If the TPS count drops below 80% of the licensed TPS for a steady state period of 20 minutes,
Prime Access Registrar marks it as decreased or normal steady state. Traps will be regenerated again
only if Prime Access Registrar observes a decreased steady state followed by an increased steady state
of TPS falling under the slab (say 80%).

25-3
Cisco Prime Access Registrar 6.1 User Guide
OL-29756-01
Chapter 25 Enforcement of Licensing Models
Concurrent Session License Features
TPS Logging Feature
The properties in Advanced Object such as TPSSamplingPeriodInSecs, LogTPSActivity,
TPSLogFilenamePrefix and TPSLogFileCount enable logging of TPS in the Prime Access Registrar
server. TPS log file is located in /cisco-ar/logs. It creates one file per day to hold the TPS information
for the day. The TPS samples are collected for every TPSSamplingPeriodInSecs. The file is updated only
once for every 10* TPSSamplingPeriodInSecs. If there is no inflowing traffic, Prime Access Registrar
logs zero TPS once for every 10* TPSSamplingPeriodInSecs. See Table 4-43 Advanced Object
Properties for more information on TPSSamplingPeriodInSecs, LogTPSActivity,
TPSLogFilenamePrefix, and TPSLogFileCount properties.
The following is the sample configuration of tps license:
/cisco-ar/bin/aregcmd -s
set /Radius/Advanced/LogTPSActivity TRUE
set /Radius/Advanced/TPSLogFilenamePrefix tps
set /Radius/Advanced/TPSLogFileCount 5
set /Radius/Advanced/TPSSamplingPeriodInSecs 30
save
The following is the sample output of the log file:
bash-3.00# tail -f tps-04-24-2014.csv
04-24-2014,18:36:30,2998,1000
04-24-2014,18:36:51,2997,1000
04-24-2014,18:37:11,996,408
04-24-2014,18:37:32,3532,1263
04-24-2014,18:37:53,2763,1000
04-24-2014,18:38:14,4749,1669
In the above example, the first numerical value (2998) in the log entry denotes the total TPS traffic and
the second value (1000) denotes the SIGTRAN-M3UA traffic.
For TPS measurement in Prime Access Registrar server, you can run the TPS calculator script when you
want to monitor the TPS during the peak period or run the TPS for 24 hours. The TPS calculator script
is separately available for Linux and Solaris platforms.
Note Cisco BU provides the corresponding TPS calculator script based on Linux or Solaris platform.
Concurrent Session License Features
In Concurrent Session based license, the licensing is done based on the number of sessions that resides
in Prime Access Registrar.
Note During startup of the Prime Access Registrar, the default session manager must be enabled for RADIUS
and the EnableStickySession must be set to TRUE for Diameter. This is applicable only for session based
license.
The sticky sessions is enabled during the initialization of Prime Access Registrar for Diameter based
license to track the session counts in the diameter service. The server level count is calculated by adding
all the sessions maintained across all the session managers and the sticky sessions of all the diameter
services in the server. This session count is used by licensing module for license enforcement. The
session count is either increased or decreased based on the action performed.

25-4
Cisco Prime Access Registrar 6.1 User Guide
OL-29756-01
Chapter 25 Enforcement of Licensing Models
Concurrent Session License Features
This section contains the following topics:
•Sessions Enforcement Rules
•Notification Logs
•Notification - SNMP Traps
•Session Logging Feature
Sessions Enforcement Rules
The following are the enforcement rules applied on concurrent session based license:
•When the session count (measured in concurrent session) reaches 80% of the licensed sessions,
SNMP Trap will be generated for the first time on reaching the increased steady state. The warning
message on the current license usage is logged for every 5 minutes.
•When the session count (measured in concurrent session) reaches 90% of the licensed sessions,
SNMP Trap will be generated for the first time on reaching the state. The warning message on the
current license usage is logged for every 5 minutes.
•When the session count (measured in concurrent session) attains 100% of the licensed sessions,
SNMP Trap will be generated for the first time on reaching the state. The error message on the
current license usage is logged for every 5 minutes.
•When the session count (measured in concurrent session) attains 110% of the licensed sessions,
SNMP Trap will be generated for the first time on reaching the state.
Note The steady state period is not applicable for Concurrency Session based licensing.
Notification Logs
A warning message is logged for every 5 minutes when the session count reaches 80% and 90% of the
licensed Concurrent Session.
An error message is logged when the session count reaches the range of 100% to 110% of the licensed
Concurrent Session.

25-5
Cisco Prime Access Registrar 6.1 User Guide
OL-29756-01
Chapter 25 Enforcement of Licensing Models
Concurrent Session License Features
Notification - SNMP Traps
The carLicenseUsage trap is generated when the Prime Access Registrar server reaches 80%. The
incoming traffic slabs defined for trap generation are 80%, 90%, 100%, and 110% of the licensed
Concurrent Sessions. These traps are generated once for every slab during the increasing steady state.
Note Logging Feature is applicable for session based license as like TPS logging feature. The warning
messages are displayed corresponding to session logging feature. See TPS Logging Feature, page 25-3
for more information.
Session Logging Feature
The properties in Advanced Object such as SessionSamplingPeriodInSecs, LogSessionActivity,
SessionLogFilenamePrefix and SessionLogFileCount enable logging of session count in the
Prime Access Registrar server. The session log file is located in /cisco-ar/logs. It creates one file per day
to hold the session information for the day. The session samples are collected for every
SessionSamplingPeriodInSecs. The file is updated only once for every 10*
SessionSamplingPeriodInSecs. See Table 4-43 Advanced Object Properties for more information on
SessionSamplingPeriodInSecs, LogSessionActivity, SessionLogFilenamePrefix, and
SessionLogFileCount properties.
The following is a sample configuration of session license:
/cisco-ar/bin/aregcmd -s
set /Radius/Advanced/LogSessionActivity TRUE
set /Radius/Advanced/SessionLogFilenamePrefix sm
set /Radius/Advanced/SessionLogFileCount 5
set /Radius/Advanced/SessionSamplingPeriodInSecs 10
save
The following is the sample output of the log file:
bash-3.00# tail -f sm-08-09-2013.csv
08-09-2013, 5:18:52,73749
08-09-2013, 5:19:22,100001
08-09-2013, 5:19:52,100001
08-09-2013, 5:20:22,100001
08-09-2013, 5:20:52,100001
08-09-2013, 5:21:22,100001
08-09-2013, 5:21:52,100001

25-6
Cisco Prime Access Registrar 6.1 User Guide
OL-29756-01
Chapter 25 Enforcement of Licensing Models
Concurrent Session License Features

CHAPTER
26-1
Cisco Prime Access Registrar 6.1 User Guide
OL-29756-01
26
Backing Up the Database
This chapter describes the Cisco Prime Access Registrar (Prime Access Registrar) shadow backup
facility, which ensures a consistent snapshot of Prime Access Registrar’s database for backup purposes.
Because the Prime Access Registrar’s database (called MCD) does a variety of memory caching, and
might be active at any time, you cannot simply rely on doing system backups to protect the data in the
database. At the time you run a system backup, there could be Prime Access Registrar operations in
progress that cause the data copied to the system backup tape to be inconsistent and unusable as a
replacement database.
To ensure a consistent backup, Prime Access Registrar uses a shadow backup facility. Once a day, at a
configurable time, Prime Access Registrar suspends all activity to the database and takes a snapshot of
the critical files. This snapshot is guaranteed to be a consistent view of the database, and it is preserved
correctly on a system backup tape.
This chapter contains the following sections:
•Configuration
•Recovery
•mcdshadow Command Files
Configuration
The only configuration for this facility is through a single entry in the system Registry at
$INSTALL/conf/car.conf is the registry path to this item.
This entry is a string that represents the time-of-day at which the shadow backup is scheduled to occur
(in 24 hour HH:MM format). The default is 12:45.
When you remove this entry or set it to an illegal value (for example, anything that does not begin with
a digit), backups are suppressed.
Command Line Utility
In addition to being available at a scheduled time of day, you can also force a shadow backup by using
the mcdshadow utility located in the $INSTALL/bin directory. There are no command-line arguments.
This might take a few minutes to complete as a full copy of the database is created.

26-2
Cisco Prime Access Registrar 6.1 User Guide
OL-29756-01
Chapter 26 Backing Up the Database
Recovery
Recovery
When it is necessary to use the shadow backup to recover data, either because the regular working
database has been corrupted by a system crash, or because the disk on which it resides has become
corrupted.
Recovering the data using shadow backup
To use the shadow backup to recover data:
Step 1 Stop all Prime Access Registrar servers.
Step 2 Make sure three files (mcddb.d01, mcddb.d02, and mcddb.d03) exist in the $INSTALL/data/db.bak
directory.
Step 3 Copy the files into the $INSTALL/data/db directory. Do not move them because they might be needed
again.
Step 4 Change directory to the $INSTALL/data/db directory.
cd $INSTALL/data/db
Step 5 Rebuild the key files by entering the command:
$INSTALL/bin/keybuild mcddb
This might take several minutes.
Step 6 As a safety check, run $INSTALL/bin/dbcheck mcddb (UNIX) to verify the integrity of the database.
Note, you must be user root to run dbcheck.
No errors should be detected.
mcdshadow Command Files
The mcdshadow command uses the files listed in Table 26-1.
Table 26-1 mcdshadow Files
File Description
mcddb.dbd Template file that describes the low-level data schema for the Raima runtime
library.
mcddb.k01
mcddb.k02
mcddb.k03
Key files that contain the data that is redundant with the data files.
Prime Access Registrar does not back up these files because they can be
completely rebuilt with the keybuild command.
mcdcd.d01
mcdcd.d02
mcdcd.d03
Data files that contain the backup.
mcdConfig.txt Text file from which Prime Access Registrar configures the initial at-install-time
database.

26-3
Cisco Prime Access Registrar 6.1 User Guide
OL-29756-01
Chapter 26 Backing Up the Database
mcdshadow Command Files
mcdschema.txt Text file that contains a version number denoting the level of the schema
contained in the dbd file. Prime Access Registrar will not attempt to open the
database unless the number in this file matches a constant that is hard-coded in
the libraries. If the result of the mcdshadow command (which uses copies of the
data files) is divorced from its original mcdschema.txt, you will not be able to run
Prime Access Registrar.
vista.taf
vista.tcf
vista.tjf
Working files used by the Raima runtime library to ensure transactional integrity.
Table 26-1 mcdshadow Files (continued)
File Description

26-4
Cisco Prime Access Registrar 6.1 User Guide
OL-29756-01
Chapter 26 Backing Up the Database
mcdshadow Command Files

CHAPTER
27-1
Cisco Prime Access Registrar 6.1 User Guide
OL-29756-01
27
Using the REX Accounting Script
This chapter describes how to use the REX Accounting Script (RAS). The RAS writes RADIUS
Accounting requests to a local, flat file and is included as an option for Cisco Prime Access Registrar
(Prime Access Registrar). It is designed to be attached to a Prime Access Registrar IncomingScript or
OutgoingScript point. When used in conjunction with the Prime Access Registrar built-in proxy support,
the server will concurrently store a local copy of an Accounting request and proxy another copy to
another RADIUS server.
Note Unless you require log rotation at an exact time or when the accounting log reaches a specific file size,
we recommend that you use service grouping to log and proxy accounting packets.
RAS can be attached to more than one Prime Access Registrar extension point. For example, in a dial-up
resale scenario, you might configure Prime Access Registrar to proxy Accounting requests to many
different Remote Servers (by realm). For some subset of those, you might want to keep a local copy of
the Accounting requests. In this case, RAS could be installed as the IncomingScript on just the Services
for which a local copy is desired.
Note Also included is the DropAcctOnOff Script. This script causes Prime Access Registrar to drop all
Accounting-Requests with an Acct-Status-Type of Accounting-On or Accounting-Off.
This chapter contains the following sections:
•Building and Installing the REX Accounting Script
•Configuring the Rex Accounting Script
•Specifying REX Accounting Script Options
Building and Installing the REX Accounting Script
The RAS writes RADIUS Accounting requests to a local, flat file and is included as an option for
Prime Access Registrar. It is designed to be attached to a Prime Access Registrar IncomingScript or
OutgoingScript point.

27-2
Cisco Prime Access Registrar 6.1 User Guide
OL-29756-01
Chapter 27 Using the REX Accounting Script
Configuring the Rex Accounting Script
Building and Installing the REX Accounting Script
To build and install RAS:
Step 1 Change directory to $INSTALL/examples/rexacctscript.
Step 2 Modify the Makefile to ensure the AR_INSTALL_DIR variable points to the directory where the
Prime Access Registrar software was installed, and then choose a compiler (gcc or SUNPro CC).
Step 3 From the command line prompt, enter:
host% make
Step 4 Log in as user root.
Step 5 From the command line prompt, enter:
host# make install
Configuring the Rex Accounting Script
RAS can be attached to more than one Prime Access Registrar extension point. For example, in a dial-up
resale scenario, you might configure Prime Access Registrar to proxy Accounting requests to many
different Remote Servers (by realm).
Configuring the Rex Accounting Script
To configure RAS:
Step 1 Start the Prime Access Registrar aregcmd configuration utility and login:
> $INSTALL/usrbin/aregcmd -C localhost -N admin -P aicuser
Access Registrar Configuration Utility Version 1.3
Copyright (C) 1995-2013 by Cisco Systems, Inc. All rights reserved.
Logging in to localhost
[ //localhost ]
LicenseKey = xxxx-xxxx-xxxx-xxxx
Radius/
Administrators/
Server ‘Radius’ is Running, its health is 10 out of 10
-->
Step 2 Using aregcmd, create a new Prime Access Registrar Script object:
--> cd /Radius/Scripts
[ //localhost/Radius/Scripts ]
Entries 1 to 20 from 39 total entries
Current filter: <all>
ACMEOutgoingScript/
AscendIncomingScript/
<... other output deleted...>
--> add LocalAccounting
Added LocalAccounting

27-3
Cisco Prime Access Registrar 6.1 User Guide
OL-29756-01
Chapter 27 Using the REX Accounting Script
Configuring the Rex Accounting Script
Step 3 Using aregcmd, fill in the details of the new Prime Access Registrar Script object. See Chapter 4,
“Cisco Prime Access Registrar Server Objects,” for more details.
--> cd LocalAccounting
[ //localhost/Radius/Scripts/LocalAccounting ]
Name = LocalAccounting
Description =
Language =
Filename =
EntryPoint =
InitEntryPoint =
InitEntryPointArgs =
--> set Desc “Log Accounting requests to local file”
Set Description “Log Accounting requests to local file”
--> set lang REX
Set Language REX
--> set filename libRexAcctScript.so
Set Filename libRexAcctScript.so
--> set entry RexAccountingScript
Set EntryPoint RexAccountingScript
--> set initentrypoint InitRexAccountingScript
Set InitEntryPoint InitRexAccountingScript
--> set initentrypointargs “-f Accounting -t 1:15”
Set InitEntryPointArgs “-f Accounting -t 1:15”
--> ls
[ //localhost/Radius/Scripts/LocalAccounting ]
Name = LocalAccounting
Description = “Log Accounting requests to local file”
Language = REX
Filename = libRexAcctScript.so
EntryPoint = RexAccountingScript
InitEntryPoint = InitRexAccountingScript
InitEntryPointArgs = “-f Accounting -t 1:15”
-->
Step 4 Using aregcmd, attach the new Prime Access Registrar Script object to the appropriate
Prime Access Registrar Scripting point. See Chapter 4, “Cisco Prime Access Registrar Server Objects,”
for more details.
--> set /radius/IncomingScript LocalAccounting
Set /Radius/IncomingScript LocalAccounting
Step 5 Using aregcmd, save the configuration modifications:
--> save
Validating //localhost...
Saving //localhost...
Step 6 Using aregcmd, reload the server:

27-4
Cisco Prime Access Registrar 6.1 User Guide
OL-29756-01
Chapter 27 Using the REX Accounting Script
Specifying REX Accounting Script Options
--> reload
Reloading Server 'Radius'...
Server 'Radius' is Running, its health is 10 out of 10
Specifying REX Accounting Script Options
The REX Accounting Script supports the options shown in Table 27-1.
Table 27-1 REX Accounting Script Supported Options
Option Description
-f <filename> Required. Specify the name of the output file.
-t <HH:MM[:SS]> Specify a time of day to roll the output file. Note, this is time on the
24-hour clock, for example, 00:05 = 12:05am, 13:30 = 1:30pm. This option
can not be used with the -i option.
-i <seconds> Specify the number of seconds between rolling the output file, beginning
at start-up. This option can not be used with the -t option.
-s <size>[k|m|g] Specify the maximum size for an output file. When the file reaches this
size, it will be rolled.
When specifying the <size> option, a <unit> can be included. When a
<unit> is not included, the <size> is in bytes. Note, do not use a space
character between the <size> and <unit> options.
<unit> can be either:
k = 1K,
m = 1Meg,
g = 1Gig.
-g Use GMT when writing the date/time in the Accounting output file for each
record (default is local time).
-G Use GMT when naming rolled output files (default is local time).
-A Process all packets, not just Accounting-Requests.
-I Ignore errors when processing packets, always return successfully.
-a <buffer-count> Pre-allocate this many Accounting buffers to improve performance.
-T <trace-level> Set the trace level. This trace info appears in the output file (as its written
by the background thread which no longer has a packet to use for logging
or tracing.)
-O
<script-description>
Call another REX extension before calling the RexAcctScript.
-o
<script-description>
Call another REX extension after calling the RexAcctScript.

27-5
Cisco Prime Access Registrar 6.1 User Guide
OL-29756-01
Chapter 27 Using the REX Accounting Script
Specifying REX Accounting Script Options
Example Script Object
This is an example of what a Prime Access Registrar Script object using RAS might look like when
viewed in the Prime Access Registrar configuration utility, aregcmd:
[ //localhost/Radius/Scripts/REX-Accounting-Script ]
Name = REX-Accounting-Script
Description =
Language = REX
Filename = librexacctscript.so
EntryPoint = RexAccountingScript
InitEntryPoint = InitRexAccountingScript
InitEntryPointArgs = “-f Accounting -t 16:20 -s 100k -o
libRexAcctScript.so:DropAcctOnOff”
This example causes RAS to write to a file called Accounting.log (in the logs directory of the installation
tree). The file rolls every day at 4:20pm (local time), as well as whenever it grows larger than 100k in
size. RAS also runs the DropAcctOnOff script against every packet, after it has processed the packet.

27-6
Cisco Prime Access Registrar 6.1 User Guide
OL-29756-01
Chapter 27 Using the REX Accounting Script
Specifying REX Accounting Script Options

CHAPTER
28-1
Cisco Prime Access Registrar 6.1 User Guide
OL-29756-01
28
Logging Syslog Messages
Logging messages via syslog provides centralized error reporting for
Cisco Prime Access Registrar (Prime Access Registrar). Local logging and syslog logging can be turned
on or off at any time by modifying the control flags in the $INSTALLPATH/conf/car.conf file.
Logging syslog messages requires a UNIX host running a syslog daemon as a receiver for
Prime Access Registrar messages. Prime Access Registrar and the syslog daemon can be running on the
same host or different hosts.
This chapter contains the following sections:
•Syslog Messages
•Configuring Message Logging (Solaris)
•Configuring Message Logging (Linux)
•Changing Log Directory
•Configuring Syslog Daemon (syslogd)
•Managing the Syslog File
•Server Up/Down Status Change Logging
Syslog Messages
Messages sent to the following logs will be forwarded to syslog server in a slightly different format. The
logs are:
•aregcmd_log
•config_mcd_[1..n]_log
•name_radius_[1..n]_log
•agent_server_[1..n]_log
Messages less than 1024 bytes in length display in the following format:
MMM DD hh:mm:ss hostname %Prime AR-[severity]-[mnemonic]: [#n], [System|Server]:
message_description
Where:
MMM DD is the month and date that the message is received by the syslog server.
hh:mm:ss is the arrival time of the message.
hostname is the name of the syslog server.

28-2
Cisco Prime Access Registrar 6.1 User Guide
OL-29756-01
Chapter 28 Logging Syslog Messages
Syslog Messages
severity is one of the following levels:
0 - emergency
1 - alert
2 - critical
3 - error
4 - warning
5 - notification
6 - informational
7 - debugging
mnemonic can be aregcmd, name_radius, agent_server and config_mcd for the identification of
Prime Access Registrar-relative subsystems.
#n is the id for the components: name_radius, agent_server, and config_mcd
message_description provides detailed information of the message.
Messages greater than 1024 bytes in length display in multiple lines. At the end of each 1024 bytes line,
three dots indicate a continuation of the message as follows:
MMM DD hh:mm:ss hostname %Prime AR-[severity]-[mnemonic]: [#n], [System|Server]:
message_description: Configuration: text and more message text and more message text
and more message text and more message text and more message text and more message
text and more message text and more message text and more message text and more
message text and more message text and more message text and more message text and
more message text and more message text and more message text and more message text
and more message text and more message text and more message text and more message
text and more message text and more message text and more message text ...
The continuation of a message begins with three dots as follows:
MMM DD hh:mm:ss hostname %Prime AR-[severity]-[mnemonic]: [#n], [System|Server]:
message_description: Configuration: ... text and more message text and more message
text and more message text and more message text and more message text and more
message text and more message text and more message text and more message text and
more message text and more message text and more message text
Example 1
May 19 14:28:44 dwlau-ultra2.cisco.com
%Prime AR-3-name_radius: #1, System: Remote LDAP Server.Unable to bind.
Example 2
May 19 14:28:45 dwlau-ultra2.cisco.com
%Prime AR-6-name_radius: #1, Server: Stopping server

28-3
Cisco Prime Access Registrar 6.1 User Guide
OL-29756-01
Chapter 28 Logging Syslog Messages
Configuring Message Logging (Solaris)
Configuring Message Logging (Solaris)
Message logging is on by default, and all logs are stored in the $INSTALL/logs directory. To turn
logging off, or to change the location where logs are stored, you must modify the
$INSTALLPATH/conf/car.conf file.
In $INSTALLPATH/conf/car.conf file, the following lines control logging.
LOCAL_LOGGING [ON|OFF]
LOGDIR full_path
DATADIR full_path
SYSLOG_LOGGING [ON|OFF]
SERVER_IP_ADDRESS [ip_address]
FACILITY_LOCAL_NUMBER [0..7]
Where:
LOCAL_LOGGING enables (ON) or disables (OFF) the local logging function. (Local logging is
on by default.)
LOGDIR specifies a full pathname to a different local log directory.
DATADIR specifies a full pathname to a different data directory.
SYSLOG_LOGGING enables (ON) or disables (OFF) the syslog logging function. (syslog logging
is on by default.)
SERVER_IP_ADDRESS specifies the IP address of the host to which Prime Access Registrar will
send syslog messages.
FACILITY_LOCAL_NUMBER specifies the facility being used by the syslogd.
The following is an example:
LOCAL_LOGGING OFF
SYSLOG_LOGGING ON
SERVER_IP_ADDRESS 209.165.200.224
FACILITY_LOCAL_NUMBER 7
Note You must first stop the Prime Access Registrar server prior to changing the car.conf file, then restart the
server. If you change the directory location where logs or database data are stored, you should also copy
all log files or data files to that same directory before restarting the Prime Access Registrar server.

28-4
Cisco Prime Access Registrar 6.1 User Guide
OL-29756-01
Chapter 28 Logging Syslog Messages
Configuring Message Logging (Linux)
Configuring Message Logging (Linux)
To enable syslog logging in Linux, you must modify the syslog file in the /etc/sysconfig directory. The
following is the default syslog file.
# Options to syslogd
# -m 0 disables 'MARK' messages.
# -r enables logging from remote machines
# -x disables DNS lookups on messages recieved with -r
# See syslogd(8) for more details
SYSLOGD_OPTIONS="-m 0"
# Options to klogd
# -2 prints all kernel oops messages twice; once for klogd to decode, and
# once for processing with 'ksymoops'
# -x disables all klogd processing of oops messages entirely
# See klogd(8) for more details
KLOGD_OPTIONS="-x"
To enable logging of syslog messages, you must enable the syslog daemon to listen on port 514 by
adding the -r flag to the SYSLOGD_OPTIONS line as follows:
SYSLOGD_OPTIONS=”-m 0 -r”
Changing Log Directory
You can change the directory where local log messages are stored by adding the following line in the
$INSTALLPATH/conf/car.conf file.
LOGDIR full_path
Where full_path is a full path to the directory where you want to store the log messages. For example,
to store all system logs in /var/log/AICar1, add the following line in the
$INSTALLPATH/conf/car.conf file:
LOGDIR /var/log/AICar1
You must first stop the Prime Access Registrar server prior to changing the car.conf file. After changing
the car.conf file, copy all existing log files to the new directory, then restart the server.
Note Specifying a path for local logging does not affect the storage location of syslog messages.

28-5
Cisco Prime Access Registrar 6.1 User Guide
OL-29756-01
Chapter 28 Logging Syslog Messages
Configuring Syslog Daemon (syslogd)
Configuring Syslog Daemon (syslogd)
You must specify the facility from which syslogd will receive messages and the file into which the
messages will be deposited.
In the syslog server's /etc/syslog.conf file, the following line might be needed.
localn.info <tab> <tab> <tab> /var/log/filename.log
Note Use at least one <tab> as a field separator.
Where:
localn—is the facility being used for syslogd; n must be a value from 0-7 and match the
FACILITY_LOCAL_NUMBER used in Prime Access Registrar's car.conf file.
/var/log/—is the path to the file that stores syslogd messages.
filename.log—is the file that stores syslogd messages. You can give this file a name of your choice.
Creating a Syslog Log File
To create a syslog log file:
Step 1 Log in as user root.
Step 2 Enter the following command, where filename.log is a name you choose.
touch filename.log
Step 3 Change permissions on the syslog log file by entering the following:
chmod 664 filename.log
Restarting a syslog daemon
To restart the syslog daemon:
log in as user root and enter the following commands:
/etc/init.d/syslog stop
/etc/init.d/syslog start
Managing the Syslog File
Left unmanaged, the syslog file will grow in size over time and eventually fill all available disk space in
its partition. Prime Access Registrar writes log files and session data (to persist user sessions) in the
same disk partition where Prime Access Registrar is installed.
In normal operation, log files consume a large amount of disk space. If log files are not managed
regularly, Prime Access Registrar might not have sufficient disk space to write session data. To avoid
this, you should move the Prime Access Registrar log files directory to a different disk partition than the
one where Prime Access Registrar writes session data, as described in Changing Log Directory.

28-6
Cisco Prime Access Registrar 6.1 User Guide
OL-29756-01
Chapter 28 Logging Syslog Messages
Server Up/Down Status Change Logging
Using a cron Program to Manage the Syslog Files
We recommend that you use the cron program to manage the syslog files.
The following example crontab file performs a weekly archival of the existing syslog file (named
ar_syslog.log in this example). This scheme keeps the previous two week’s worth of syslog files.
#
# At 02:01am on Sundays:
# Move a weeks worth of 'ar_syslog.log' log messages to 'ar_syslog.log.1'.
# If there was a 'ar_syslog.log.1' move it to 'ar_syslog.log.2'.
# If there was a 'ar_syslog.log.2' then it is lost.
01 02 * * 0 cd /var/log;
if [ -f ar_syslog.log ];
then if [ -f ar_syslog.log.1 ];
then /bin/mv ar_syslog.log.1 ar_syslog.log.2;
fi;
/usr/bin/cp ar_syslog.log ar_syslog.log.1;
>ar_syslog.log;
fi
Note Consider using move (mv) or copy (cp) commands to store the previous week’s syslog files in a
different disk partition to reserve space for the current syslog file.
Using a cron Program to Manage the Syslog Files
To add this crontab segment to the existing cron facility in /usr/spool/cron/crontabs directory,
complete the following steps at the syslog server console:
Step 1 Log in as user root.
Step 2 Enter the following command:
crontab -e
Server Up/Down Status Change Logging
Prime Access Registrar supports RADIUS server up/down detection and logging. The information
messages are saved in the $INSTALL/logs/name_radius_1_log file where $INSTALL is the
Prime Access Registrar installation directory. Each message consists of a header and a message
description.
Header Formats
The format of a header entry is:
mm/dd/yyyy HH:MM:SS name/radius/n Error Server 0

28-7
Cisco Prime Access Registrar 6.1 User Guide
OL-29756-01
Chapter 28 Logging Syslog Messages
Server Up/Down Status Change Logging
Example Log Messages
Following are the descriptions and types of messages that can be found within the
<AR_install_dir>/logs/name_radius_1_log file:
1. Prime Access Registrar detects a Remote Server when it responds for the first time or after it is
reentered into Prime Access Registrar’s server pool for retry. The format of the message is:
Remote Server <hostname> (<ipaddress>:<port>) is UP!
The following is an example header and message:
10/12/2013 17:56:32 name/radius/1 Error Server 0
Remote Server dave-ultra (171.69.127.99:1645) is UP!
Prime Access Registrar detects the Remote Server is not responding to its request. The format of the
message is:
Remote Server <hostname> (<ipaddress>:<port>) is DOWN!
The following is an example header and message:
10/12/2013 17:57:12 name/radius/1 Error Server 0 Remote
server dave-ultra (171.69.127.99:1645) is DOWN!
2. Prime Access Registrar receives no response from the Remote Server after the server is reentered
into Prime Access Registrar’s server pool for retry. The format of the message is:
Remote Server <hostname> (<ipaddress>:<port>) remains DOWN!
The following is an example header and message:
10/12/2013 17:56:32 name/radius/1 Error Server 0 Remote
server dave-ultra (171.69.127.99:1645) remains DOWN!
3. The Remote Server is responding to the first retry but not the initial request. The format of the
message is:
Remote Server <hostname> (<ipaddress>:<port>) is UP but slow!
The following is an example header and message:
10/12/2013 17:56:32 name/radius/1 Error Server 0 Remote
server dave-ultra (171.69.127.99:1645) is UP but slow!
4. The Remote Server is responding to the second retry request but not the initial request or the first
retry request. The format of the message is:
Remote Server <hostname> (<ipaddress>:<port>) is UP but very slow!
The following is an example header and message:
10/12/2013 17:56:32 name/radius/1 Error Server 0 Remote
server dave-ultra (171.69.127.99:1645) is UP but very slow!
5. The Remote Server has been marked inactive and is being put back into Prime Access Registrar’s
server pool for later use. The format of the message is:
Remote Server <hostname> (<ipaddress>:<port>) is being reactivated for later use.
The following is an example header and message:
10/12/2013 17:56:32 name/radius/1 Error Server 0 Remote
server dave-ultra (209.165.200.224:1645) is being reactivated for later use.

28-8
Cisco Prime Access Registrar 6.1 User Guide
OL-29756-01
Chapter 28 Logging Syslog Messages
Server Up/Down Status Change Logging

CHAPTER
29-1
Cisco Prime Access Registrar 6.1 User Guide
OL-29756-01
29
Troubleshooting Cisco Prime Access Registrar
This chapter provides information about techniques used when troubleshooting
Cisco Access Registrar (Prime Access Registrar) and highlights common problems.
This chapter contains the following sections:
•Gathering Basic Information
•Troubleshooting Quick Checks
•aregcmd and Cisco Prime Access Registrar Configuration
•RADIUS Request Processing
•Other Troubleshooting Techniques and Resources
•Checking Prime Access Registrar Server Health Status
Gathering Basic Information
Table 29-1 lists UNIX commands that provide basic and essential information to help you understand
the Prime Access Registrar installation environment.
Table 29-1 UNIX Commands to Gather Information
UNIX Command Information Returned
/usr/bin/uname -r Solaris release level
/usr/bin/uname -i Machine hardware name
/usr/bin/uname -v Solaris version
/usr/bin/uname -a All system information including hostname,
operating system type and release, machine model
and type
/usr/sbin/prtconf System configuration information including
memory capacity, machine type, and peripheral
equipment
/usr/sbin/df -k File system disk space usage including partitions,
capacity, and space used
/usr/bin/ps -ef Currently running processes

29-2
Cisco Prime Access Registrar 6.1 User Guide
OL-29756-01
Chapter 29 Troubleshooting Cisco Prime Access Registrar
Troubleshooting Quick Checks
Note More information about these commands and their options is available using the man command in a
terminal window on the Sun workstation.
Troubleshooting Quick Checks
Many of the most common problems can be diagnosed by doing the following:
•Check disk space
•Check for resource conflicts
•Check the Prime Access Registrar log files
Disk Space
Running out of disk space can cause a number of problems including:
•Failure to process RADIUS requests
•Parts of the Prime Access Registrar configuration disappearing in aregcmd
•Failure to log into aregcmd
Check that the Prime Access Registrar installation partition ($INSTALL) and /tmp are not at capacity.
Resource Conflicts
Resource conflicts are a common reason for the Cisco Prime Access Registrar server failing to start. The
most common resource conflicts are the following:
•Cisco Network Registrar is running on the Prime Access Registrar server
•Another application is also using ports 1645 and 1646
•A network management application is using the Sun SNMP Agent
No Co-Existence With Cisco Network Registrar
Cisco Network Registrar cannot coexist on a machine running Prime Access Registrar for this reason.
You can determine if CNR is running by entering the following command line in a terminal window:
pkginfo | grep -i “network registrar”
/usr/sbin/psinfo -v Information about processors
/usr/bin/pkginfo -l CSCOar Software package information about
Prime Access Registrar version number and
installation directory
Table 29-1 UNIX Commands to Gather Information (continued)
UNIX Command Information Returned

29-3
Cisco Prime Access Registrar 6.1 User Guide
OL-29756-01
Chapter 29 Troubleshooting Cisco Prime Access Registrar
Troubleshooting Quick Checks
Port Conflicts
The default ports used by the Prime Access Registrar server are ports 1645 and 1646. You should check
to determine that no other applications are listening on the same ports as Prime Access Registrar.
You can check to see which TCP ports are in use by entering the following command line:
netstat -aP tcp
You can check to see which UDP ports are in use by entering the following command line:
netstat -aP udp
Note If you configure the Prime Access Registrar server to use ports other than the default, you will have to
specifically add ports 1645 and 1646 if you want to also use those ports.
Server Running Sun SNMP Agent
If you plan to use the Prime Access Registrar server’s SNMP agent, you cannot use the Sun
Microsystems SNMP agent that comes with the Solaris operating system.
Cisco Prime Access Registrar Log Files
Examining the Prime Access Registrar log files can help you diagnose most Prime Access Registrar
issues. By default, the Prime Access Registrar log files are located in /opt/CSCOar/logs. Table 29-2
lists the Prime Access Registrar log files and the information stored in each log.
Table 29-2 Prime Access Registrar Log Files
Log File Information Recorded
agent_server_1_log Log of the server agent process
ar-status Log of Prime Access Registrar stop and start
using the arserver utility
aregcmd_log Log of commands executed in aregcmd (very
useful for tracing the steps that took place before
a problem occurred)
config_mcd_1_log Log of the mcd internal database
name_radius_1_log Log of the radius server process
name_radius_1_trace Debugging output of RADIUS request processing
(only generated when the trace level, set in
aregcmd, is greater than zero)
m3ua System logs related to stack including m3ua client
and stack manager; and radius communication
logs related to m3ua stack.
These are typically low level debug logs

29-4
Cisco Prime Access Registrar 6.1 User Guide
OL-29756-01
Chapter 29 Troubleshooting Cisco Prime Access Registrar
Troubleshooting Quick Checks
Modifying File Sizes for Agent Server and MCD Server Logs
The two parameters added to the car.conf file under $BASEDIR/conf affect the agent_server_logs and
config_mcd_server_logs logs files:
•AGENT_SERVER_LOG_SIZE (10 MB by default)
•AGENT_SERVER_LOG_FILES (2 by default)
You will find these new parameters at the beginning of the car.conf file. When the log file size reaches
the value set in AGENT_SERVER_LOG_SIZE, a rollover of the agent_server_log_file occurs. The
value set in AGENT_SERVER_LOG_FILES specifies the number of log files to be created.
Using xtail to Monitor Log File Activity
A useful way of monitoring all of the log files is to run xtail, a utility provided with
Prime Access Registrar. The xtail program monitors one or more files and displays all data written to a
file since command invocation.
Run xtail in a dedicated terminal window. It is very useful for monitoring multiple logfiles
simultaneously, such as with a command line like the following:
xtail $INSTALL/logs/*
Note Cisco AR 4.1.5 and later include the millisecond field in the logs’ timestamp.
Modifying the Trace Level
By modifying the trace level, you can gather more detailed information in the log files about what is
happening in the Prime Access Registrar server. There are five different trace levels. Each higher trace
level also includes the information logged using lower trace levels. The different trace levels provide the
following information:
•Level 0—No tracing occurs
•Level 1—Indicates when a packet is sent or received and when a status change occurs in a remote
server (RADIUS Proxy and LDAP)
•Level 2—Information includes the following:
–
Which services and session managers are used to process
–
Which client and vendor objects are being used to process a packet
–
More details about remote servers (RADIUS Proxy and LDAP), packet transmission, and
timeouts
–
Details about poorly-formed packets.
•Level 3—Information includes the following:
–
Tracing of errors in Tcl scripts when referencing invalid RADIUS attributes
–
Which scripts have been run
–
Details about local userlist processing
•Level 4—Information includes the following:
–
Advanced duplication detection processing

29-5
Cisco Prime Access Registrar 6.1 User Guide
OL-29756-01
Chapter 29 Troubleshooting Cisco Prime Access Registrar
aregcmd and Cisco Prime Access Registrar Configuration
–
Details about creating, updating, and deleting sessions
–
Tracing of all APIs called during the running of a script
•Level 5—Provides information about policy engine operations
Installation and Server Process Start-up
The installation process installs the Prime Access Registrar software to the specified installation
directory and then starts the server processes. This process rarely fails but the following checks should
always be performed:
•Ensure that there is an installation success message at the end of the pkgadd dialog, otherwise
check the dialog for the problem
•Follow the installation instructions carefully especially when performing an upgrade. For example,
when upgrading to 1.6R1, 1.6R2, or 1.6R3, a post-installation upgrade script needs to be run
•Pay attention to the information included in README files
At the end of a successful installation, arstatus should show the following four server processes:
> $INSTALL/usrbin/arstatus
AR RADIUS server running (pid: 6285)
AR MCD lock manager running (pid: 6284)
AR MCD server running (pid: 6283)
AR Server Agent running (pid: 6277)
If any of the above processes are not displayed, check the log file of the failed process to determine the
reason. The MCD processes might fail to start if Cisco Network Registrar is installed on the same
machine.
The manual method of starting and stopping the Prime Access Registrar processes is using the arserver
utility.
To start Prime Access Registrar processes: arserver start
To stop Prime Access Registrar processes: arserver stop
To restart Prime Access Registrar processes: arserver restart
aregcmd and Cisco Prime Access Registrar Configuration
While troubleshooting, you should always use the aregcmd command trace to turn on tracing. With
tracing active, Prime Access Registrar generates debugging output to the log file
name_radius_1_trace.The syntax is:
trace [<server>] [<level>]
When you do not specify a server, Prime Access Registrar sets the trace level for all servers in the current
cluster. When you do not specify a trace level, the currently set level is used. The default trace level is 0.
Running and Stopped States
Prime Access Registrar can be in two states, running or stopped. In either state, all four
Prime Access Registrar processes remain running. The state of Prime Access Registrar will be displayed
when logging into aregcmd or by using the aregcmd status command:

29-6
Cisco Prime Access Registrar 6.1 User Guide
OL-29756-01
Chapter 29 Troubleshooting Cisco Prime Access Registrar
aregcmd and Cisco Prime Access Registrar Configuration
status
Server 'Radius' is Running, its health is 10 out of 10\
The start and stop commands allow Prime Access Registrar to move between states. Reload is
equivalent to a stop followed by a start if Prime Access Registrar is already running, and just a start if
it is already stopped.
stop
Stopping Server 'Radius'...
Server 'Radius' is Stopped
start
Starting Server 'Radius'...
Server 'Radius' is Running, its health is 10 out of 10
reload
Reloading Server 'Radius'...
Server 'Radius' is Running, its health is 10 out of 10
During the transition from running to stopped, Prime Access Registrar stops processing new RADIUS
requests and releases resources such memory, network and database connections and open files.
During the transition from stopped to running, Prime Access Registrar reverses this process by opening
a connection with its internal database, reading configuration data, claiming memory, establishing
network connections, opening files, and initializing scripts. During this transition, problems can occur.
Prime Access Registrar might fail to start and display the following:
reload
Reloading Server 'Radius'...
310 Command failed
Prime Access Registrar failed to move from stopped state to running:
status
Server 'Radius' is Stopped
This might occur for a number of reasons including the following:
•An invalid configuration
•Insufficient memory
•Listening ports already in use by another application
•Unable to open files
•Unable to initialize scripts
Check the name_radius_1_log file for the one of these indications.

29-7
Cisco Prime Access Registrar 6.1 User Guide
OL-29756-01
Chapter 29 Troubleshooting Cisco Prime Access Registrar
RADIUS Request Processing
RADIUS Request Processing
The main technique for troubleshooting RADIUS request processing in Prime Access Registrar is to
examine the name_radius_1_trace log file with the trace level set to 5. Most issues are fairly
self-explanatory. Some issues that can arise are as follows:
•Prime Access Registrar has marked a remote server as down
•A resource manager has run out of resources (for example, user or group session limit has been
reached or no more IP addresses are available)
•A configuration error (such as an accounting service not being set)
•A run time error in a script
Some issues are not immediately evident from the log files though, such as the following:
•Failure to save or reload Prime Access Registrar after a configuration change
•Prime Access Registrar is not listening on the correct UDP ports for RADIUS requests
Other Troubleshooting Techniques and Resources
aregcmd Stats Command
The aregcmd command stats provides statistics on request processing.
--> stats
Global Statistics for Radius:
serverStartTime = Tue Oct 2 10:28:02 2013
serverResetTime = Tue Oct 2 20:25:12 2013
serverState = Running
totalPacketsInPool = 1024
totalPacketsReceived = 0
totalPacketsSent = 0
totalRequests = 0
totalResponses = 0
totalAccessRequests = 0
totalAccessAccepts = 0
totalAccessChallenges = 0
totalAccessRejects = 0
totalAccessResponses = 0
totalAccountingRequests = 0
totalAccountingResponses = 0
totalStatusServerRequests = 0
totalAscendIPAAllocateRequests = 0
totalAscendIPAAllocateResponses = 0
totalAscendIPAReleaseRequests = 0
totalAscendIPAReleaseResponses = 0
totalUSRNASRebootRequests = 0
totalUSRNASRebootResponses = 0
totalUSRResourceFreeRequests = 0
totalUSRResourceFreeResponses = 0

29-8
Cisco Prime Access Registrar 6.1 User Guide
OL-29756-01
Chapter 29 Troubleshooting Cisco Prime Access Registrar
Checking Prime Access Registrar Server Health Status
totalUSRQueryResourceRequests = 0
totalUSRQueryResourceResponses = 0
totalUSRQueryReclaimRequests = 0
totalUSRQueryReclaimResponses = 0
totalPacketsInUse = 0
totalPacketsDrained = 0
totalPacketsDropped = 0
totalPayloadDecryptionFailures = 0
Global Statistics for Radius:
serverStartTime = Sat Dec 7 07:37:52 2013
serverResetTime = Sat Dec 7 07:37:52 2013
serverState = Running
cdbpLocalStatsTotalUpTime = 1486 seconds
cdbpLocalResetTime = 1486 seconds
cdbpLocalStatsTotalPacketsIn = 30
cdbpLocalStatsTotalPacketsOut = 30
cdbpLocalStatsTotalPacketsInUse = 0
Core Files
A core file in the Prime Access Registrar installation directory is an indication that
Prime Access Registrar has crashed and restarted. Check that the radius server process generated the
core file using the UNIX file command:
> file core
core: ELF 32-bit MSB core file SPARC Version 1, from 'radius'
Check the timestamp on the core file and look for corresponding log messages in the
name_radius_1_log file in $INSTALL/logs. The word assertion commonly appears in core messages.
Try to establish what caused the problem and contact Cisco TAC.
radclient
The Prime Access Registrar package provides a utility called radclient that allows RADIUS requests to
be generated. Use radclient to test configurations and troubleshoot problems.
Cisco Prime Access Registrar Replication
For more information about using Prime Access Registrar replication, see Chapter 12, “Using
Replication.”
Checking Prime Access Registrar Server Health Status
To check the server’s health, use the aregcmd command status. The following issues decrement the
server’s health:
•Multiple occurrences of Access-Request rejection

29-9
Cisco Prime Access Registrar 6.1 User Guide
OL-29756-01
Chapter 29 Troubleshooting Cisco Prime Access Registrar
Checking Prime Access Registrar Server Health Status
Note One of the parameters in the calculation of the Prime Access Registrar server’s health is the
percentage of responses to Access-Accepts that are rejections. In a healthy environment, the
rejection percentage will be fairly low. An extremely high percentage of rejections could be an
indication of a Denial of Service attack.
•Configuration errors
•Running out of memory
•Errors reading from the network
•Dropping packets that cannot be read (because the server ran out of memory)
•Errors writing to the network.
Prime Access Registrar logs all of these conditions. Sending multiple successful responses to any
packet, increments the server’s health.

29-10
Cisco Prime Access Registrar 6.1 User Guide
OL-29756-01
Chapter 29 Troubleshooting Cisco Prime Access Registrar
Checking Prime Access Registrar Server Health Status

A-1
Cisco Prime Access Registrar 6.1 User Guide
OL-29756-01
APPENDIX
A
Cisco Prime Access Registrar Tcl, REX and Java
Dictionaries
This appendix describes the Tcl and REX dictionaries that are used when writing Incoming or Outgoing
scripts.
A dictionary is a data structure that contains key/value pairs. Two types of dictionaries exist: the
Attribute dictionaries (used by the Request and Response dictionaries), and the Environment dictionary.
This section contains the dictionaries you reference when writing a Tcl script and the dictionaries you
reference when you write a script using the shared libraries (REX—RADIUS EXtension).
This appendix section also describes the following Java attribute dictionary:
•Tcl Attribute Dictionaries
•REX Attribute Dictionary
•Java Attribute Dictionary
Tcl Attribute Dictionaries
An Attribute dictionary is a dictionary in which the keys are constrained to be the names of attributes as
defined in the Prime Access Registrar server configuration, and the values are the string representation
of the legal values for that particular attribute. For example, IP addresses are specified by the
dotted-decimal string representation of the address, and enumerated values are specified by the name of
the enumeration. This means numbers are specified by the string representation of the number.
Attribute dictionaries have the unusual feature that there can be more than one instance of a particular
key in the dictionary. These instances are ordered, with the first instance at index zero. Some of the
methods of an Attribute dictionary allow an index to be specified to indicate a particular instance or
position in the list of instances to be referenced. This section contains the following topics:
•Attribute Dictionary Methods
•Tcl Environment Dictionary
Attribute Dictionary Methods
Attribute dictionaries use active commands, called methods, that allow you to change and access the
values in the dictionaries. Table A-1 lists of all of the methods you can use with the Request and
Response dictionaries.

A-2
Cisco Prime Access Registrar 6.1 User Guide
OL-29756-01
Appendix A Cisco Prime Access Registrar Tcl, REX and Java Dictionaries
Tcl Attribute Dictionaries
Table A-1 Tcl Attribute Dictionary Methods
Name Syntax Description
addProfile $dict addProfile <profile>
[<mode>]
Copies all of the attributes in the profile
<profile> into the dictionary. Note, <profile>
must be the name of one of the profiles listed
in the server configuration. When <mode> is
not provided or when <mode> equals the
special value REPLACE, any duplicate
instances of the attributes in the dictionary are
replaced with the attribute from <profile>.
When <mode> is provided and equals the
special value APPEND, new instances of the
attributes are appended to the attributes
already in the dictionary. When <mode> is
provided and equals the special value
AUGMENT, only add the attribute when it
does not already exist.
clear $dict clear Removes all entries from the dictionary.
containsKey $dict containsKey <attribute> Returns 1 when the dictionary contains the
attribute <attribute>, otherwise returns 0.
firstKey $dict firstKey Returns the name of the first attribute in the
dictionary. Note, the attributes are not stored
in a sorted order of name.
get $dict get <attribute> [<index>
[bMore]]
Returns the value of the <attribute> attribute
from the dictionary, represented as a string.
When the dictionary does not contain the
<attribute>, an empty string is returned.
When <index> is provided, return the
<index>’th instance of the attribute. Some
attributes can appear more than once in the
request (or response) packet. The <index>
argument is used to select which instance to
return.
When bMore is provided, the get method sets
bMore to 1 when more attributes exist after
the one returned, and to 0 otherwise. You can
use this to determine whether another call to
get should be made to retrieve other instances
of the attribute.
isEmpty $dict isEmpty Returns 1 when the dictionary has no entries,
otherwise returns 0.
log $dict log <level> <message> … Outputs a message into the RADIUS server’s
logging system. The <level> should be either
LOG_ERROR, LOG_WARNING, or
LOG_INFO. The remaining arguments are
concatenated together and sent to the logging
system at the specified level.

A-3
Cisco Prime Access Registrar 6.1 User Guide
OL-29756-01
Appendix A Cisco Prime Access Registrar Tcl, REX and Java Dictionaries
Tcl Attribute Dictionaries
nextKey $dict nextKey Returns the name of the next attribute in the
dictionary that follows the attribute returned
in the last call to firstKey or nextKey.
put $dict put <attribute> <value>
[<index>]
Associates <value> with the attribute
<attribute> in the dictionary. When <index>
is not provided or when <index> equals the
special value REPLACE, any existing
instances of <attribute> are replaced with the
single value. When <index> is provided and
equals the special value APPEND, a new
instance of <attribute> is appended to the end
of the list of instances of the <attribute>.
When <index> is provided and is a number, a
new instance of <attribute> is inserted at the
position indicated. When <index> is provided
and equals the special value AUGMENT,
only put the attribute when it does not already
exist.
remove $dict remove <attribute> [<index>] Removes the <attribute> attribute from the
dictionary. When <index> is not provided or
when <index> equals the special value
REMOVE_ALL, remove any existing
instances of <attribute>. When <index> is
provided and is a number, remove the instance
of <attribute> at the position indicated.
Always returns 1, even when the dictionary
did not contain the <attribute> at that
<index>.
size $dict size Returns the number of entries in the
dictionary.
trace $dict trace <level> <message> ... Outputs a message into the packet tracing
system used by the RADIUS server. At level 0,
no tracing occurs. At level 1, only an
indication the server received the packet and
sent a reply is output. As the number gets
higher, the amount of information output
increases, until at level 4, where everything is
traced as output. The remaining arguments are
concatenated and sent to the tracing system at
the specified level.
Table A-1 Tcl Attribute Dictionary Methods (continued)
Name Syntax Description

A-4
Cisco Prime Access Registrar 6.1 User Guide
OL-29756-01
Appendix A Cisco Prime Access Registrar Tcl, REX and Java Dictionaries
Tcl Attribute Dictionaries
Tcl Environment Dictionary
A dictionary is a data structure that contains key/value pairs. An Environment dictionary is a dictionary
in which the keys and values are constrained to be strings. The Tcl Environment dictionary is used to
communicate information from the script to the server and from script to script within the processing of
a particular request. Note, there can be only one instance of a key in the Environment dictionary.
Table A-2 lists of all the methods you can use with the Request and Response dictionaries.
Table A-2 Tcl Environment Dictionary Methods
Name Syntax Description
clear $dict clear Removes all entries from the dictionary.
containsKey $dict containsKey <key> Returns 1 when the dictionary contains the <key>
key, otherwise returns 0.
firstKey $dict firstKey Returns the name of the first key in the dictionary.
Note, the keys are not stored sorted by name.
get $dict get <key> Returns the value of <key> from the dictionary.
When the dictionary does not contain the <key>,
an empty string is returned.
isEmpty $dict isEmpty Returns 1 when the dictionary has no entries,
otherwise returns 0.
log $dict log <level> <message> … Outputs a message into the logging system used
by the RADIUS server. <level> should be one of
LOG_ERROR, LOG_WARNING, or
LOG_INFO. The remaining arguments are
concatenated together and sent to the logging
system at the specified level.
nextKey $dict nextKey Returns the name of the next key in the dictionary
that follows the key returned in the last call to
firstKey or nextKey.
put $dict put <key> <value> Associates <value> with the <key> key in the
dictionary, replacing an existing instance of
<key> with the new value.
remove $dict remove <key> Removes the <key> key from the dictionary.
Always returns 1, even when the dictionary did
not contain the <key>.
size $dict size Returns the number of entries in the dictionary.
trace $dict <level> <message> … Outputs a message into the packet tracing system
used by the RADIUS server. At level 0, no tracing
occurs. At level 1, only an indication the server
received the packet and sent a reply is output. As
the number gets higher, the amount of information
output is greater, until at level 4, where everything
the is traced as output. The remaining arguments
are concatenated together and sent to the tracing
system at the specified level.

A-5
Cisco Prime Access Registrar 6.1 User Guide
OL-29756-01
Appendix A Cisco Prime Access Registrar Tcl, REX and Java Dictionaries
REX Attribute Dictionary
REX Attribute Dictionary
A dictionary is a data structure that contains key/value pairs. An Attribute dictionary is a dictionary in
which the keys are constrained to be the attributes as defined in the RADIUS server configuration and
the values are constrained to be legal values for that particular attribute. Attribute dictionaries have the
unusual feature that there can be more than one instance of a particular key in the dictionary. These
instances are ordered, with the first instance at index 0. Some of the methods of an Attribute dictionary
allow an index to be specified to indicate a particular instance or position in the list of instances to be
referenced.
When writing REX scripts, you can specify keys as the string representation of the name of the attribute
or by type, which is a byte sequence defining the attribute. The values can also be specified as the string
representation of the value or as the byte sequence, which is the attribute. These options mean some of
these access methods have four different variations that are the combinations of string or type for the
key, and string or bytes for the value. This section contains the following topics:
•Attribute Dictionary Methods
•REX Environment Dictionary
Attribute Dictionary Methods
Attribute dictionaries use active commands, called methods, that allow you to change and access the
values in the dictionaries.
Table A-3 lists all of the methods you can use with the Request and Response dictionaries.
Table A-3 REX Attribute Dictionary Methods
Name Syntax Description
addProfile abool_t
pDict->addProfile(rex_AttributeDi
ctionary_t* pDict, const char*
<pszProfile>, int <iMode>)
Copies all of the attributes in the
<pszProfile> profile into the dictionary.
Note, <pszProfile> must be the name of
one of the profiles listed in the server
configuration. When <iMode> equals the
special value REX_REPLACE, it
replaces any duplicate instances of the
attributes in the dictionary with the
attribute from the profile. When
<iMode> equals the special value
REX_APPEND, it appends a new
instance of the attributes to any attributes
already in the dictionary. When <iMode>
equals the special value.
When the mode is REX_AUGMENT, it
adds the attribute in the dictionary, if it
does not already exist in the dictionary.
allocateMemory void*
pDict->allocateMemory(rex_Attrib
uteDictionary_t* pDict, unsigned
int <iSize>)
Allocates memory for use in scripts that
persist only for the lifetime of this
request. This memory is released when
processing for this request is complete.

A-6
Cisco Prime Access Registrar 6.1 User Guide
OL-29756-01
Appendix A Cisco Prime Access Registrar Tcl, REX and Java Dictionaries
REX Attribute Dictionary
clear void
pDict->clear(rex_AttributeDiction
ary_t* pDict)
Removes all entries from the dictionary.
containsKey abool_t
pDict->containsKey(rex_Attribute
Dictionary_t* pDict, const char*
<pszAttribute>)
Returns TRUE when the dictionary
contains <pszAttribute>, otherwise
returns FALSE.
containsKeyBy
Type
abool_t
pDict->containsKeyByType(rex_At
tributeDictionary_t* pDict, const
abytes_t* <pAttribute>)
Returns TRUE when the dictionary
contains <pAttribute>, otherwise returns
FALSE.
firstKey const char*
pDict->firstKey(rex_AttributeDicti
onary_t* pDict)
Returns the name of the first attribute in
the dictionary. Note, the attributes are not
stored in a sorted order of name.
firstKeyByType const abytes_t*
pDict->firstKeyByType
(rex_AttributeDictionary_t* pDict)
Returns a pointer to the byte sequence
defining the first attribute in the
dictionary. Note, attributes are not stored
sorted by name.
get const char*
pDict->get(rex_AttributeDictionar
y_t* pDict, const char*
pszAttribute, int <iIndex>, abool_t*
<pbMore>)
Returns the value of the <iIndex>'d
instance of the attribute from the
dictionary, represented as a string. When
the dictionary does not contain the
attribute (or that many instances of the
attribute), an empty string is returned.
When <pbMore> is non-zero, the get
method sets <pbMore> to TRUE when
more instances of the attribute exist after
the one returned, and to FALSE
otherwise. This can be used to determine
whether another call to get should be
made to retrieve other instances of the
attribute.
Table A-3 REX Attribute Dictionary Methods (continued)
Name Syntax Description

A-7
Cisco Prime Access Registrar 6.1 User Guide
OL-29756-01
Appendix A Cisco Prime Access Registrar Tcl, REX and Java Dictionaries
REX Attribute Dictionary
getBytes const abytes_t*
pDict->getBytes(rex_AttributeDict
ionary_t* pDict, const char*
pszAttribute, int <iIndex>, abool_t*
<pbMore>)
Returns the value of the <iIndex>'d
instance of the attribute from the
dictionary, as a sequence of bytes. When
the dictionary does not contain the
attribute (or that many instances of the
attribute), 0 is returned.
When <pbMore> is non-zero, the
getBytes method sets <pbMore> to
TRUE when more instances of the
attribute exist after the one returned, and
to FALSE otherwise. This can be used to
determine whether another call to
getBytes should be made to retrieve other
instances of the attribute.
getBytesByType const abytes_t*
pDict->getBytesByType
(rex_AttributeDictionary_t* pDict,
const abytes_t* pAttribute, int
<iIndex>, abool_t* <pbMore>)
Returns the value of the <iIndex>'d
instance of the attribute from the
dictionary, as a sequence of bytes. When
the dictionary does not contain the
attribute (or that many instances of the
attribute), 0 is returned instead.
When <pbMore> is non-zero, sets the
variable pointed to TRUE when more
instances of the attribute exist after the
one returned, and to FALSE otherwise.
This can be used to determine whether
another call to get should be made to
retrieve other instances of the attribute.
getByType const char*
pDict->get(rex_AttributeDictionar
y_t* pDict, const abytes_t*
<pszAttribute>, int <iIndex>,
abool_t* <pbMore>)
Returns the value of the <iIndex>'d
instance of the attribute from the
dictionary, as represented as a string.
When the dictionary does not contain the
attribute (or that many instances of the
attribute), returns an empty string.
When <pbMore> is non-zero, the
getByType method sets <pbMore> to
TRUE when more instances of the
attribute exist after the one returned, and
to FALSE otherwise. This can be used to
determine whether another call to
getByType should be made to retrieve
other instances of the attribute.
getType const char*
pDict->getByType(rex_AttributeDi
ctionary_t* pDict, const abytes_t*
<pAttribute>)
Returns a pointer to the byte sequence
defining the attribute, when the attribute
name matches a configured attribute, zero
otherwise.
Table A-3 REX Attribute Dictionary Methods (continued)
Name Syntax Description

A-8
Cisco Prime Access Registrar 6.1 User Guide
OL-29756-01
Appendix A Cisco Prime Access Registrar Tcl, REX and Java Dictionaries
REX Attribute Dictionary
isEmpty abool_t
pDict->isEmpty(rex_AttributeDicti
onary_t* pDict)
Returns TRUE when the dictionary has 0
entries, FALSE otherwise.
log abool_t
pDict->log(rex_AttributeDictionar
y_t* pDict, int <iLevel>, const
char* <pszFormat>, ...)
Outputs a message into the logging
system used by the RADIUS server.
<iLevel> should be one of
REX_LOG_ERROR,
REX_LOG_WARNING, or
REX_LOG_INFO. The pszFormat
argument is treated as a printf-style
format string, and it, along with the
remaining arguments, are formatted and
sent to the logging system at the specified
level.
nextKey const char*
pDict->nextKey(rex_AttributeDicti
onary_t* pDict)
Returns the name of the next attribute in
the dictionary that follows the attribute
returned in the last call to firstKey or
nextKey.
nextKeyByType const abytes_t* pDict->
nextKeyByType(rex_AttributeDicti
onary_t* pDict)
Returns a pointer to the byte sequence
defining the next attribute in the
dictionary that follows the attribute
returned in the last call to
firstKeyByType or nextKeyByType.
put abool_t
pDict->put(rex_AttributeDictionar
y_t* pDict, const char*
<pszAttribute>, const char*
<pszValue>, int <iIndex>)
Converts <pszValue> to a sequence of
bytes, according to the definition of
<pszAttribute> in the server
configuration. Associates that sequence
of bytes with <pszAttribute> in the
dictionary. When <iIndex> equals the
special value REX_REPLACE, it
replaces any existing instances of
<pszAttribute> with a single value. When
<iIndex> equals the special value
REX_APPEND, it appends a new
instance of <pszAttribute> to the end of
the list of existing instances of
<pszAttribute>. Otherwise, a new
instance of <pszAttribute> is inserted at
the position indicated. This method
returns TRUE unless <pszAttribute>
does not match any configured attributes
or the value could not be converted to a
legal value. When <iIndex> equals the
special value REX_AUGMENT, only
put <pszAttribute> when it does not
already exist.
Table A-3 REX Attribute Dictionary Methods (continued)
Name Syntax Description

A-9
Cisco Prime Access Registrar 6.1 User Guide
OL-29756-01
Appendix A Cisco Prime Access Registrar Tcl, REX and Java Dictionaries
REX Attribute Dictionary
putBytes abool_t
pDict->putBytes(rex_AttributeDict
ionary_t* pDict, const char*
<pszAttribute>, const abytes_t*
<pValue>, int <iIndex>)
Associates <pValue> with the attribute
<pszAttribute> in the dictionary. When
<iIndex> equals the special value
REX_REPLACE, it replaces any
existing instances of the <pszAttribute>
with a single new value. When <iIndex>
equals the special value REX_APPEND,
it appends a new instance of
<pszAttribute> to the end of the list of
existing instances of <pszAttribute>.
When <iIndex> equals the special value
REX_AUGMENT, only put the
<pszAttribute> when it does not already
exist. Otherwise, a new instance of
<pszAttribute> is inserted at the position
indicated.
This method returns TRUE unless the
attribute name does not match any
configured attributes.
putBytesByType abool_t
pDict->putBytesByType(rex_Attri
buteDictionary_t* pDict, const
abytes_t* <pAttribute>, const
abytes_t* <pValue>, int <iIndex>)
Associates <pValue> with the attribute
<pAttribute> in the dictionary. When
<iIndex> equals the special value
REX_REPLACE, it replaces any
existing instances of <pAttribute> with
the new value. When <iIndex> equals the
special value REX_APPEND, it appends
a new instance of <pAttribute> to the end
of the list of existing instances of
<pAttribute>. When <iIndex> equals the
special value REX_AUGMENT, only
put <pAttribute> when it does not
already exist. Otherwise, insert a new
instance of <pAttribute> at the position
indicated.
This method returns TRUE unless the
attribute name does not match any
configured attributes.
Table A-3 REX Attribute Dictionary Methods (continued)
Name Syntax Description

A-10
Cisco Prime Access Registrar 6.1 User Guide
OL-29756-01
Appendix A Cisco Prime Access Registrar Tcl, REX and Java Dictionaries
REX Attribute Dictionary
putByType abool_t
pDict->putByType(rex_AttributeD
ictionary_t* pDict, const abytes_t*
<pszAttribute>, const char*
<pszValue>, int <iIndex>)
Converts <pszValue> to a sequence of
bytes, according to the definition of
<pszAttribute> in the server
configuration. Associates that sequence
of bytes with <pszAttribute> in the
dictionary. When <iIndex> equals the
special value REX_REPLACE, it
replaces any existing instances of
<pszAttribute> with a single new value.
When <iIndex> equals the special value
REX_APPEND, it appends a new
instance of <pszAttribute> to the end of
the list of existing instances of
<pszAttribute>. Otherwise, it inserts a
new instance of <pszAttribute> at the
position indicated. This method returns
TRUE unless <pszAttribute> does not
match any configured attributes, or the
value could not be converted to a legal
value.
remove abool_t
pDict->remove(rex_AttributeDicti
onary_t* pDict, const char*
<pszAttribute>, int <iIndex>)
Removes the <pszAttribute> from the
dictionary. When <iIndex> equals the
special value REX_REMOVE_ALL,
removes any existing instances of
<pszAttribute>. Otherwise, it removes
the instance of <pszAttribute> at the
position indicated. Returns TRUE, even
when the dictionary did not contain
<pszAttribute> at the <iIndex>, unless
<pszAttribute> does not match any
configured attribute.
removeByType abool_t
pDict->removeByType(rex_Attribu
teDictionary_t* pDict, const
abytes_t* <pAttribute>, int
<iIndex>)
Removes the <pAttribute> from the
dictionary. When <iIndex> equals the
special value REX_REMOVE_ALL, it
removes any existing instances of
<pszAttribute>. Otherwise, the instance
of <pAttribute> at the position indicated
is removed. Always returns TRUE, even
when the dictionary did not contain
<pAttribute> at the <iIndex>.
reschedule abool_t
pDict->reschedule(rex_AttributeDi
ctionary_t* pDict)
Enables control over asynchronous
activities. It enables you to collect similar
activities and mark them as pending. You
can then process them and reschedule
them. You can only use this attribute with
multithreaded services. Use caution when
employing this method.
Table A-3 REX Attribute Dictionary Methods (continued)
Name Syntax Description

A-11
Cisco Prime Access Registrar 6.1 User Guide
OL-29756-01
Appendix A Cisco Prime Access Registrar Tcl, REX and Java Dictionaries
REX Attribute Dictionary
REX Environment Dictionary
A dictionary is a data structure that contains key/value pairs. An Environment dictionary is a dictionary
in which the keys and values are constrained to be strings. The REX Environment dictionary is used to
communicate information from the script to the server and from script to script within the processing of
a particular request. Note, there can be only one instance of a key in the Environment dictionary.
REX Environment Dictionary Methods
The Environment dictionary uses active commands, called methods, to allow you to change and access
the values in the dictionary. Table A-4 lists all of the methods you can use with the REX Environment
dictionary.
size int
pDict->size(rex_AttributeDictionar
y_t* pDict)
Returns the number of entries in the
dictionary.
trace abool_t
pDict->trace(rex_AttributeDiction
ary_t* pDict, int <iLevel>, const
char* <pszFormat>, ...)
Outputs a message into the packet tracing
system used by the RADIUS server. At
level 0, no tracing occurs. At level 1, only
an indication the packet was received and
a reply was sent is output. As the number
gets higher, the amount of information
output is greater, until at level 4, where
everything traceable is output. The
remaining arguments are formatted and
sent to the tracing system at the specified
level.
Table A-3 REX Attribute Dictionary Methods (continued)
Name Syntax Description
Table A-4 REX Environment Dictionary Methods
Name Syntax Description
allocateMemory void*
pDict->allocateMemory(rex_Environ
mentDictionary_t* pDict, unsigned int
<iSize>)
Allocate memory for use in scripts
that persist only for the lifetime of this
request. This memory is released
when processing for this request is
complete.
clear void
pDict->clear(rex_EnvironmentDiction
ary_t* pDict)
Removes all entries from the
dictionary.
containsKey abool_t
pDict->containsKey(rex_Environment
Dictionary_t* pDict, const char*
<pszKey>)
Returns TRUE when the dictionary
contains <pszKey>, otherwise returns
FALSE.
firstKey const char*
pDict->firstKey(rex_EnvironmentDict
ionary_t* pDict)
Returns the name of the first key in the
dictionary. Note, the keys are not
stored sorted by name.

A-12
Cisco Prime Access Registrar 6.1 User Guide
OL-29756-01
Appendix A Cisco Prime Access Registrar Tcl, REX and Java Dictionaries
REX Attribute Dictionary
get const char*
pDict->get(rex_EnvironmentDictiona
ry_t* pDict, const char* <pszKey>)
Returns the value associated with
<pszKey> from the dictionary. When
the dictionary does not contain
<pszKey>, an empty string is
returned.
isEmpty abool_t
pDict->isEmpty(rex_EnvironmentDict
ionary_t* pDict)
Returns TRUE when the dictionary
has 0 entries, FALSE otherwise.
log abool_t
pDict->log(rex_EnvironmentDictiona
ry_t* pDict, int <iLevel>, const char*
<pszFormat>, ...)
Outputs a message into the logging
system used by the RADIUS server.
<iLevel> should be one of
REX_LOG_ERROR,
REX_LOG_WARNING, or
REX_LOG_INFO. The
<pszFormat> argument is treated as a
printf-style format string, and it,
along with the remaining arguments,
are formatted and sent to the logging
system at the specified level.
nextKey const char*
pDict->nextKey(rex_EnvironmentDict
ionary_t* pDict)
Returns the name of the next key in
the dictionary that follows the key
returned in the last call to firstKey or
nextKey.
put abool_t
pDict->put(rex_EnvironmentDictiona
ry_t* pDict, const char* <pszValue>,
const char* <pszKey>)
Associates the value with <pszKey>
in the dictionary, replacing any
existing instance of <pszKey> with
the new <pszValue>.
remove abool_t
pDict->remove(rex_EnvironmentDicti
onary_t* pDict, const char* <pszKey>)
Removes <pszKey> and the
associated value from the dictionary.
Always returns TRUE, even when the
dictionary did not contain <pszKey>
reschedule abool_t
pDict->reschedule(rex_AttributeDicti
onary_t* pDict)
Enables control over asynchronous
activities. It enables you to collect
similar activities and mark them as
pending. You can then process them
and reschedule them. You can only
use this attribute with multithreaded
services. Use caution when employing
this method.
Table A-4 REX Environment Dictionary Methods (continued)
Name Syntax Description

A-13
Cisco Prime Access Registrar 6.1 User Guide
OL-29756-01
Appendix A Cisco Prime Access Registrar Tcl, REX and Java Dictionaries
Java Attribute Dictionary
Java Attribute Dictionary
The AttributeDictionary is a dictionary of attributes, where the keys are the attribute types and the values
are the data fields in the attribute. Both keys and values must conform to the definition of attributes in
the server's Attribute Dictionary. Keys (types) can be either strings or byte arrays. If strings, they are the
names of attributes. If byte arrays, they are the binary type. The type associated with a name can be
retrieved by calling the static method getType(java.lang.String). Using byte arrays is slightly more
efficient - methods that take String keys must do the mapping from String to byte array in the course of
executing the method. Similarly, values can be strings or byte arrays. Again, string values are converted
to the appropriate binary representation when stored in an AttributeDictionary and back again when
retrieved into a string variable.
Keys in an AttributeDictionary can be associated with multiple values. Each of the values associated
with a key is ordered with an integer index denoting its position in the list of values. Given an
AttributeDictionary, a key and an index, each value associated with a key can be looked up. This section
contains the following topics:
•Java Environment Dictionary Methods
•Interface Extension Methods
•Interface Extensionforsession Methods
•Interface Extensionwithinitialization Methods
•Interface Extensionforsessionwithinitialization Methods
•Variables in the Marker Extension Interface
•Session Record Methods
Java Attribute Dictionary Methods
Attribute dictionaries use active commands called methods, that allow you to change and access the
values in the dictionaries.
size int
pDict->size(rex_EnvironmentDictiona
ry_t* pDict)
Returns the number of entries in the
dictionary.
trace abool_t
pDict->trace(rex_EnvironmentDiction
ary_t* pDict, int <iLevel>, const char*
<pszFormat>, ...)
Outputs a message into the packet
tracing system used by the RADIUS
server. At level 0, no tracing occurs.
At level 1, only an indication the
packet was received and a reply was
sent is output. As the number gets
higher, the amount of information
output is greater, until at level 4,
where everything traceable is output.
The remaining arguments are
formatted and sent to the tracing
system at the specified level.
Table A-4 REX Environment Dictionary Methods (continued)
Name Syntax Description

A-14
Cisco Prime Access Registrar 6.1 User Guide
OL-29756-01
Appendix A Cisco Prime Access Registrar Tcl, REX and Java Dictionaries
Java Attribute Dictionary
Table A-5 lists all of the methods you can use with the Request and Response dictionaries.
Table A-5 Java Attribute Dictionary Methods
Name Syntax Description
size public int size() Returns the number of distinct keys in the
dictionary.
isEmpty public boolean isEmpty() Tests if the dictionary contains any entries.
clear public void clear() Removes all entries from the dictionary.
containsKey public boolean
containsKey(java.lang.String
key)
Returns true if an entry exists for key.
get public java.lang.String
get(java.lang.String key)
Returns the first value associated with the key.
get public java.lang.String
get(java.lang.String key, int
index)
Returns the value at position index associated
with the key.
put public boolean
put(java.lang.String key,
java.lang.String value)
Associates key with a value. Any existing values
associated with the key are removed before
adding this association.
put public boolean
put(java.lang.String key,
java.lang.String value, int index)
Associates key with a value depending on the
value of index.
If index equals Extension.EXT_REPLACE,
any existing values are removed before adding
this new association. If index equals
Extension.EXT_APPEND, a new value is
added at the end of the list of existing values. If
index equals Extension.EXT_AUGMENT, the
new association is only made if the dictionary
does not already have an entry for key. If index is
a number greater than or equal to 0 and less than
the number of entries in the list, the value is
inserted at that position in the list. Otherwise, the
value is appended at the end of the list.
getBytes public byte[]
getBytes(java.lang.String key)
Returns the first value associated with the key.
getBytes public byte[]
get B y tes(java.lang.Str i n g key,
int index)
Returns the value at position index associated
with key.
putBytes public boolean
putBytes(java.lang.String key,
byte[] value)
Associates key with value. Any existing values
associated with key are removed before adding
this association.

A-15
Cisco Prime Access Registrar 6.1 User Guide
OL-29756-01
Appendix A Cisco Prime Access Registrar Tcl, REX and Java Dictionaries
Java Attribute Dictionary
putBytes public boolean
putBytes(java.lang.String key,
byte[] value, int index)
Associates key with a value depending on the
value of index.
If index equals Extension.EXT_REPLACE,
any existing values are removed before adding
this new association. If index equals
Extension.EXT_APPEND, a new value is
added at the end of the list of existing values. If
index equals Extension.EXT_AUGMENT, the
new association is only made if the dictionary
does not already have an entry for key. If index is
a number greater than or equal to 0 and less than
the number of entries in the list, the value is
inserted at that position in the list. Otherwise, the
value is appended at the end of the list.
remove public void
remove(java.lang.String key)
Removes key (and all corresponding values)
from the dictionary. This method does nothing if
key is not in the dictionary.
remove public void
remove(java.lang.String key, int
index)
Removes value at the position index that is
associated with key. If the index equals
Extension.EXT_REMOVE_ALL or if the
value being removed is the last value associated
with key, the key is removed from the dictionary.
This method does nothing if key is not in the
dictionary.
addProfile public boolean
addProfile(java.lang.String
profileName)
Adds all the attributes contained in the specified
profile into the dictionary. Any existing
attributes that have the same keys as attributes in
the profile are removed before adding the new
attributes.
Addprofile boolean
addProfile(java.lang.String
profileName, int mode)
Adds all the attributes contained in the specified
profile into the dictionary. Any existing
attributes that have the same keys as attributes in
the Profile will be treated depending on the mode
value. For each attribute in the Profile, if mode
equals Extension.EXT_REPLACE, any values
associated with the attribute in the dictionary are
removed before adding the attribute. If index
equals Extension.EXT_APPEND, a new value
is added at the end of the list of existing values.
If index equals Extension.EXT_AUGMENT, a
new value is added only if the dictionary does not
already have an entry for the given key.
getType public static byte[]
getType(java.lang.String key)
Takes the name of the attribute (as a string) and
returns the binary form of key.
Table A-5 Java Attribute Dictionary Methods (continued)
Name Syntax Description

A-16
Cisco Prime Access Registrar 6.1 User Guide
OL-29756-01
Appendix A Cisco Prime Access Registrar Tcl, REX and Java Dictionaries
Java Attribute Dictionary
Java Environment Dictionary
The Environment Dictionary can be used to store information between Extensions invoked subsequently
on a given request or can be used to pass information between the Extension and the server properly.
The Environment Dictionary maps keys to values, where the keys and values are strings. In any one
instance of the Environment Dictionary, every key is associated with at most one value. Given an
Environment Dictionary and a key, the associated value can be looked up. Any non-null string can be
used as a key and value.
Java Environment Dictionary Methods
The Environment dictionary uses active commands called methods, to allow you to change and access
the values in the dictionary. Table A-6 lists all of the methods you can use with the java Environment
dictionary.
keys public java.util.Enumeration
keys()
Returns an enumeration of the keys in the
dictionary. The general contract for the keys
method is that an Enumeration object is returned
that will generate all the keys for which the
dictionary contains entries.
elements public java.util.Enumeration
elements()
Returns an enumeration of the entries in the
dictionary. The general contract for the elements
method is that an Enumeration object is returned
that will generate all the elements contained in
entries in the dictionary. Keys with multiple
values will result in multiple elements being
returned.
keysByType public java.util.Enumeration
keysByType()
Returns an enumeration of the keys in the
dictionary. The general contract for the keys
method is that an Enumeration object is returned
that will generate all the keys for which the
dictionary contains entries.
Table A-5 Java Attribute Dictionary Methods (continued)
Name Syntax Description
Table A-6 Java Environment Dictionary Methods
Name Syntax Description
size public int size() Returns the number of entries (distinct
keys) in the dictionary.
isEmpty public boolean isEmpty() Tests if the dictionary contains no entries.
clear public void clear() Removes all entries from the dictionary.
containsKey public boolean
containsKey(java.lang.String key)
Returns true if the dictionary contains an
entry for key.
get public java.lang.String
get(java.lang.String key)
Returns the value associated with key in the
dictionary.

A-17
Cisco Prime Access Registrar 6.1 User Guide
OL-29756-01
Appendix A Cisco Prime Access Registrar Tcl, REX and Java Dictionaries
Java Attribute Dictionary
Interface Extension
Classes that are going to be used as scripts or services from Access Registrar must implement the
Extension interface. When a Java scripting point or service is encountered during the processing of a
request, the server will call the runExtension method defined in this interface and implemented by the
appropriate class.
put public boolean put(java.lang.String
key, java.lang.String value)
Associates key with value.
remove public void remove(java.lang.String
key)
Removes key (and its corresponding value)
from this dictionary. This method does
nothing if key is not in the dictionary.
keys public java.util.Enumeration keys() Returns an enumeration of the keys in the
dictionary. The general contract for the
keys method is that an Enumeration object
is returned that will generate all the keys
for which the dictionary contains entries.
elements public java.util.Enumeration
elements()
Returns an enumeration of the entries in the
dictionary. The general contract for the
elements method is that an Enumeration
object is returned that will generate all the
elements contained in entries in the
dictionary.
log public static void log(int
level,java.lang.String message)
Prints a message in the server log at the
specified level.
trace public void trace(int level,
java.lang.String message)
Prints a message in the server trace file at
the specified level.
reschedule public void reschedule() Informs the server that it should take back
ownership of the request associated with
the dictionary and continue processing it.
Table A-6 Java Environment Dictionary Methods (continued)
Name Syntax Description

A-18
Cisco Prime Access Registrar 6.1 User Guide
OL-29756-01
Appendix A Cisco Prime Access Registrar Tcl, REX and Java Dictionaries
Java Attribute Dictionary
Interface Extension Methods
Table A-7 lists the methods you can use for interface extension
Interface ExtensionforSession
Classes that are going to be used as scripts at Session Manager level from Cisco Prime Access Registrar
must implement the ExtensionForSession interface. When a Java scripting point or service is
encountered during the processing of a request, the server will call the runExtension method defined in
this interface and implemented by the appropriate class.
Table A-7 Interface Extension Methods
Name Syntax Description
runExtension int
runExtension(int
iExtensionPoint,
AttributeDictiona
ry request,
AttributeDictiona
ry
response,Environ
mentDictionary
environment)
This method is called whenever a Java scripting point or service
is encountered during the processing of a request.
When runExtension is used as a script, it should process
requests as quickly as possible, without blocking. This is
because the server has a limited number of threads that it is
using to process requests and if any one extension takes too
long to run, it is likely that many requests will be delayed as
each one calls the extension. runExtension must return either
EXT_OK to indicate that processing of this request should
continue or EXT_ERROR to indicate that an error occurred
while processing this request and that the request should be
dropped. Extensions should always log an error before
returning EXT_ERROR so that the administrator has a way to
determine the problem that was encountered.
When runExtension is used as a service, it will be called once
before requests start coming in (with the iExtensionPoint
parameter set to EXT_START_SERVICE) to give the
extension the opportunity to initialize resources needed to
process requests, and once after the last request has been
received (with the iExtensionPoint parameter set to
EXT_STOP_SERVICE) to give the extension the opportunity
to release those resources before stopping. runExtension must
return one of the following values: EXT_OK, EXT_ERROR
or EXT_PENDING. EXT_PENDING should be returned to
inform the server that the extension has taken ownership of the
request, will process the request on a background thread, and
will inform the server when it is time to continue processing the
request by calling reschedule() on one of the request's
dictionaries.

A-19
Cisco Prime Access Registrar 6.1 User Guide
OL-29756-01
Appendix A Cisco Prime Access Registrar Tcl, REX and Java Dictionaries
Java Attribute Dictionary
Interface Extensionforsession Methods
Table A-8 lists the methods you can use for interface extensionforsession
Interface Extensionwithinitialization
Classes that are going to be used as scripts or services from Access Registrar implements the
ExtensionWithInitialization interface. ExtensionWithInitialization extends the Extension interface with
methods to initialize and destroy the extension. initialize(java.lang.String) is called when the extension
is first loaded, with the string argument being set from the InitializeArg property that was defined in the
server configuration when the extension was defined (either as a Script or a Service). Destroy() is called
before the extension is unloaded.
Table A-8 Interface Extensionforsession Methods
Name Syntax Description
runExtension int
runExtension(int
iExtensionPoint,
AttributeDictionar
y request,
AttributeDictionar
y response,
EnvironmentDictio
nary environment,
SessionRecord
session)
This method is called whenever a Java scripting point or
service is encountered during the processing of a request.
When runExtension is used as a script, it should process
requests as quickly as possible, without blocking. This is
because the server has a limited number of threads that it is
using to process requests and if any one extension takes too
long to run, it is likely that many requests will be delayed
as each one calls the extension. runExtension must return
either EXT_OK to indicate that processing of this request
should continue or EXT_ERROR to indicate that an error
occurred while processing this request and that the request
should be dropped. Extensions should always log an error
before returning EXT_ERROR so that the administrator
has a way to determine the problem that was encountered.
When runExtension is used as a service, it will be called
once before requests start coming in (with the
iExtensionPoint parameter set to
EXT_START_SERVICE) to give the extension the
opportunity to initialize resources needed to process
requests, and once after the last request has been received
(with the iExtensionPoint parameter set to
EXT_STOP_SERVICE) to give the extension the
opportunity to release those resources before stopping.
runExtension must return one of the following values:
EXT_OK, EXT_ERROR or EXT_PENDING.
EXT_PENDING should be returned to inform the server
that the extension has taken ownership of the request, will
process the request on a background thread, and will
inform the server when it is time to continue processing the
request by calling reschedule() on one of the request's
dictionaries.

A-20
Cisco Prime Access Registrar 6.1 User Guide
OL-29756-01
Appendix A Cisco Prime Access Registrar Tcl, REX and Java Dictionaries
Java Attribute Dictionary
Interface Extensionwithinitialization Methods
Table A-9 lists the methods you can use for Interface Extensionwithinitialization.
Interface ExtensionforSessionwithinitialization
Classes that are going to be used as scripts from Access Registrar at Session Manager level implement
the ExtensionForSessionWithInitialization interface. ExtensionForSessionWithInitialization extends the
ExtensionForSession interface with methods to initialize and destroy the extension.
initialize(java.lang.String) is called when the extension is first loaded, with the string argument being set
from the InitializeArg property that was defined in the server configuration when the extension was
defined (either as a script or a service). Destroy () is called before the extension is unloaded.
Interface Extensionforsessionwithinitialization Methods
Table A-10 lists the methods you can use for Interface Extensionforsessionwithinitialization.
Interface MarkerExtension
This is just going to be a marker interface containing various member variables which can be used in
interfaces/classes extending from this interface. Extension and ExtensionForSession interfaces will
extend this interface.
Table A-9 Interface Extensionwithinitialization Methods
Name Syntax Description
initialize void
initialize(java.lang.
String
initializeArg)
This method is called by the server when the
extension is first loaded.
destroy void destroy() This method is called by the server when the
extension is going to be unloaded.
Table A-10 Interface Extensionforsessionwithinitialization Methods
Name Syntax Description
initialize void
initialize(java.la
ng.String
initializeArg)
This method is called by the server when the
extension is first loaded.
destroy void destroy() This method is called by the server when the
extension is going to be unloaded.

A-21
Cisco Prime Access Registrar 6.1 User Guide
OL-29756-01
Appendix A Cisco Prime Access Registrar Tcl, REX and Java Dictionaries
Java Attribute Dictionary
Variables in the Marker Extension Interface
Table A-11 lists the variables in the marker extension interface.
Table A-11 Marker Extension Interface Variables
Name Syntax Description
EXT_OK static final int EXT_OK Returns EXT_OK by implementation of
runExtension() to indicate that the extension operated
correctly and processing of the request should
continue.
EXT_ERROR static final int
EXT_ERROR
Returns EXT_ERROR by implementation of
runExtension() to indicate that the extension failed in
some way and processing of the request should NOT
continue.
EXT_PENDING static final int
EXT_PENDING
Returns EXT_PENDING by implementations of
runExtension() to indicate that the extension operated
correctly and the extension wants to take ownership of
the request for a while. Further processing of the
request by the server will be postponed until the
extension indicates that it can do so by calling the
reschedule method on any of the dictionaries.
EXT_LOG_ERR
OR
static final int
EXT_LOG_ERROR
Indicates that the message should be logged with a
severity of ERROR, when passed to log() in the level
parameter.
EXT_LOG_WA
RNING
static final int
EXT_LOG_WARNING
Indicates that the message should be logged with a
severity of WARNING, when passed to log() in the
level parameter.
EXT_LOG_INF
O
static final int
EXT_LOG_INFO
Indicates that the message should be logged with a
severity of INFO, when passed to log() in the level
parameter.
EXT_REMOVE
_ALL
static final int
EXT_REMOVE_ALL
Indicates that all values associated with the specified
key should be removed, when passed to
AttributeDictionary::remove() in the index parameter.
EXT_REPLACE static final int
EXT_REPLACE
Indicates that all existing values associated with the
specified key(s) should be removed before adding the
new value(s), when passed to
AttributeDictionary::put() (and its variants) in the
index parameter or to
AttributeDictionary::addProfile() in the mode
parameter.
EXT_APPEND static final int
EXT_APPEND
Indicates that the new value(s) should be appended to
the end of the list of any existing values associated with
the specified key(s), when passed to
AttributeDictionary::put() (and its variants) in the
index parameter or to
AttributeDictionary::addProfile() in the mode
parameter.

A-22
Cisco Prime Access Registrar 6.1 User Guide
OL-29756-01
Appendix A Cisco Prime Access Registrar Tcl, REX and Java Dictionaries
Java Attribute Dictionary
EXT_AUGMEN
T
static final int
EXT_AUGMENT
Indicates that the new association(s) should only be
added if the dictionary does not already have an entry
for the given key(s), when passed to
AttributeDictionary::put() (and its variants) in the
index parameter or to
AttributeDictionary::addProfile() in the mode
parameter.
EXT_START_SE
RVICE
static final int
EXT_START_SERVIC
E
Indicates that the extension should do whatever is
necessary to prepare to offer service, when passed to
extensions used as services. This may include starting
background threads, opening database connections,
and so on.
EXT_AUTHENT
ICATION_SERV
ICE
static final int
EXT_AUTHENTICAT
ION_SERVICE
Indicates that the extension should authenticate the
current request, when passed to extensions used as
services. To indicate whether the request was
authenticated or not, the extension should set the
EnvironmentDictionary entry for "Response-Type" to
either "Access-Accept" or "Access-Reject".
EXT_AUTHORI
ZATION_SERVI
CE
static final int
EXT_AUTHORIZATI
ON_SERVICE
Indicates that the extension should authorize the
current request, when passed to extensions used as
services.
EXT_AUTHENT
ICATION_AND_
AUTHORIZATI
ON_SERVICE
static final int
EXT_AUTHENTICAT
ION_AND_AUTHORI
ZATION_SERVICE
Indicates that the extension should both authenticate
and authorize the current request, when passed to
extensions used as services. To indicate whether the
request was authenticated or not, the extension should
set the EnvironmentDictionary entry for
"Response-Type" to either "Access-Accept" or
"Access-Reject".
EXT_ACCOUN
TING_SERVICE
static final int
EXT_ACCOUNTING_
SERVICE
Indicates that the extension should produce an
accounting record for the current request, when passed
to extensions used as services.
EXT_STOP_SE
RVICE
static final int
EXT_STOP_SERVICE
Indicates that the extension should do whatever is
necessary to shut down, when passed to extensions
used as services. This may include stopping
background threads, closing database connections and
so on.
EXT_NAS_STA
RTED_ACCOU
NTING_SERVI
CE
static final int
EXT_NAS_STARTED_
ACCOUNTING_SERV
ICE
Indicates that the NAS identified in the
EnvironmentDictionary (by either the
"NAS-Identifier" or "NAS-IP-Address" entries) has
indicated that it is starting up, when passed to
extensions used as services. This may be used by
extensions to prepare to receive requests from this
particular NAS if the extension treats requests from
different NASs differently.
Table A-11 Marker Extension Interface Variables (continued)
Name Syntax Description

A-23
Cisco Prime Access Registrar 6.1 User Guide
OL-29756-01
Appendix A Cisco Prime Access Registrar Tcl, REX and Java Dictionaries
Java Attribute Dictionary
EXT_NAS_STO
PPED_ACCOUN
TING_SERVICE
static final int
EXT_NAS_STOPPED_
ACCOUNTING_SERV
ICE
Indicates that the NAS identified in the
EnvironmentDictionary (by either the
"NAS-Identifier" or "NAS-IP-Address" entries) has
indicated that it is shutting down, when passed to
extensions used as services. This may be used by
extensions to recover any resources associated with
this NAS if the extension treats requests from different
NASs differently.
EXT_INCOMIN
G_SERVER_SC
RIPTING_POIN
T
static final int
EXT_INCOMING_SE
RVER_SCRIPTING_P
OINT
Indicates that the extension is being called from the
script /Radius/IncomingScript, when passed to
extensions used as scripts.
EXT_INCOMIN
G_VENDOR_SC
RIPTING_POIN
T
static final int
EXT_INCOMING_VE
NDOR_SCRIPTING_P
OINT
Indicates that the extension is being called from the
script /Radius/Vendors/<vendor>/IncomingScript.
when passed to extensions used as scripts.
EXT_INCOMIN
G_CLIENT_SC
RIPTING_POIN
T
static final int
EXT_INCOMING_CL
IENT_SCRIPTING_P
OINT
Indicates that the extension is being called from the
script /Radius/Clients/<client>/IncomingScript or
from the script
/Radius/RemoteServers/<server>/IncomingScript,
when passed to extensions used as scripts.
EXT_INCOMIN
G_SERVICE_SC
RIPTING_POIN
T
static final int
EXT_INCOMING_SE
RVICE_SCRIPTING_
POINT
Indicates that the extension is being called from the
script /Radius/Services/<service>/IncomingScript,
when passed to extensions used as scripts.
EXT_USERGRO
UP_AUTHENTI
CATION_SCRIP
TING_POINT
static final int
EXT_USERGROUP_A
UTHENTICATION_S
CRIPTING_POINT
Indicates that the extension is being called from the
script
/Radius/UserGroups/<group>/AuthenticationScrip
t, when passed to extensions used as scripts.
EXT_USERREC
ORD_AUTHEN
TICATION_SCR
IPTING_POINT
static final int
EXT_USERRECORD_
AUTHENTICATION_
SCRIPTING_POINT
Indicates that the extension is being called from the
script
/Radius/UserLists/<userlist>/<user>/Authenticatio
nScript, when passed to extensions used as scripts.
EXT_USERGRO
UP_AUTHORIZ
ATION_SCRIPT
ING_POINT
static final int
EXT_USERGROUP_A
UTHORIZATION_SC
RIPTING_POINT
Indicates that the extension is being called from the
script
/Radius/UserGroups/<group>/AuthorizationScript,
when passed to extensions used as scripts.
EXT_USERREC
ORD_AUTHORI
ZATION_SCRIP
TING_POINT
static final int
EXT_USERRECORD_
AUTHORIZATION_S
CRIPTING_POINT
Indicates that the extension is being called from the
script
/Radius/UserLists/<userlist>/<user>/Authorization
Script, when passed to extensions used as scripts.
EXT_OUTGOIN
G_SERVICE_SC
RIPTING_POIN
T
static final int
EXT_OUTGOING_SE
RVICE_SCRIPTING_
POINT
Indicates that the extension is being called from the
script /Radius/Services/<service>/OutgoingScript,
when passed to extensions used as scripts.
Table A-11 Marker Extension Interface Variables (continued)
Name Syntax Description

A-24
Cisco Prime Access Registrar 6.1 User Guide
OL-29756-01
Appendix A Cisco Prime Access Registrar Tcl, REX and Java Dictionaries
Java Attribute Dictionary
Class Sessionrecord
Each request processed by an Extension will have a corresponding session. The methods present in this
class operate on the attributes cached in that session record. Group of attributes are cached as an
AttributeDictionary in the session record.
Session Record Methods
Table A-12 lists the methods you can use for Session record.
EXT_OUTGOIN
G_CLIENT_SC
RIPTING_POIN
T
static final int
EXT_OUTGOING_CL
IENT_SCRIPTING_P
OINT
Indicates that the extension is being called from the
script /Radius/Clients/<client>/OutgoingScript or
from the script
/Radius/RemoteServers/<server>/OutgoingScript,
when passed to extensions used as scripts.
EXT_OUTGOIN
G_VENDOR_SC
RIPTING_POIN
T
static final int
EXT_OUTGOING_VE
NDOR_SCRIPTING_P
OINT
Indicates that the extension is being called from the
script /Radius/Vendors/<vendor>/OutgoingScript.
when passed to extensions used as scripts.
EXT_OUTGOIN
G_SERVER_SC
RIPTING_POIN
T
static final int
EXT_OUTGOING_SE
RVER_SCRIPTING_P
OINT
Indicates that the extension is being called from the
script /Radius/OutgoingScript, when passed to
extensions used as scripts.
EXT_REMOTE_
SERVER_OUTA
GE_SCRIPTIN
G_POINT
static final int
EXT_REMOTE_SERV
ER_OUTAGE_SCRIP
TING_POINT
Indicates that the extension is being called from the
script /Radius/Services/<service>/OutageScript,
when passed to extensions used as scripts.
EXT_INCOMIN
G_SESSIONMA
NAGER_SCRIP
TING_POINT
static final int
EXT_INCOMING_SE
SSIONMANAGER_SC
RIPTING_POINT
Indicates that the extension is being called from the
script
/Radius/SessionManagers/<sessionmgr>/Incoming
Script, when passed to extensions used as scripts.
EXT_OUTGOIN
G_SESSIONMA
NAGER_SCRIP
TING_POINT
static final int
EXT_OUTGOING_SE
SSIONMANAGER_SC
RIPTING_POINT
Indicates that the extension is being called from the
script
/Radius/SessionManagers/<sessionmgr>/Outgoing
Script, when passed to extensions used as scripts.
Table A-11 Marker Extension Interface Variables (continued)
Name Syntax Description
Table A-12 Session Record Methods
Name Syntax Description
get public java.lang.String
get(java.lang.String key)
Returns the first value associated with key.
get public java.lang.String
get(java.lang.String
key,int index)
Returns the value at position index associated with key.

A-25
Cisco Prime Access Registrar 6.1 User Guide
OL-29756-01
Appendix A Cisco Prime Access Registrar Tcl, REX and Java Dictionaries
Java Attribute Dictionary
Note A sample java script is available in the following path “/cisco-ar/examples/java” after the installation of
AR.
put public boolean
put(java.lang.String
key,java.lang.String
value)
Associates key with value and stores it to the session record.
Any existing values associated with key are removed before
adding this association.
The value can be retrieved by calling the get method with a
key that is equal to the original key.
put public boolean
put(java.lang.String
key,java.lang.String
value, int index)
Associates key with value depending on the value of index
and stores it in the session record. If index equals
ExtensionForSession.EXT_REPLACE, any existing
values are removed before adding this new association. If
index equals ExtensionForSession.EXT_APPEND, the
new value is added at the end of the list of existing values.
If index equals ExtensionForSession.EXT_AUGMENT,
the new association is only made if the session record does
not already have an entry for key. If index is a number
greater than or equal to 0 and less than the number of entries
in the list, the value is inserted at that position in the list.
Otherwise, the value is appended at the end of the list.
The value can be retrieved by calling the get method with a
key that is equal to the original key and the appropriate
index.
remove public boolean
remove(java.lang.String
key)
Removes key (and all corresponding values) from the
session record. This method does nothing if key is not in the
session record.
remove public boolean
remove(java.lang.String
key, int index)
Removes value at the position index that is associated with
key. If the index equals
ExtensionForSession.EXT_REMOVE_ALL or if the
value being removed is the last value associated with key,
the key is removed from the session record. This method
does nothing if key is not in the session record.
getSessionI
nfo
public java.lang.String
getSessionInfo()
Returns Session-ID, Session-Start-Time and
Session-Last-Accessed-Time of the session record.
Table A-12 Session Record Methods (continued)
Name Syntax Description

A-26
Cisco Prime Access Registrar 6.1 User Guide
OL-29756-01
Appendix A Cisco Prime Access Registrar Tcl, REX and Java Dictionaries
Java Attribute Dictionary

B-1
Cisco Prime Access Registrar 6.1 User Guide
OL-29756-01
APPENDIX
B
Environment Dictionary
This appendix describes the environment variables the scripts use to communicate with Cisco
Prime Access Registrar (Prime Access Registrar) or to communicate with other scripts.
Prime Access Registrar sets the arguments variable in the Environment dictionary, before calling the
InitEntryPoint of each script. The arguments variable is set to the value of the InitEntryPointArgs
property corresponding to that script, and it allows the administrator to pass (possibly unique)
information to each script initialization function.
Environment variables that are set and read for resource management override provide scripts further
control over session management. These environment variables, including the following
Acquire-User-Session-Limit, Acquire-Group-Session-Limit, Acquire-IP-Dynamic,
Acquire-IP-Per-NAS-Port, Acquire-IPX-Dynamic, and Acquire-USR-VPN, can be set at any point
before session management is invoked. These environment variables are read as the packet flows through
each Resource Manager that the chosen Session Manager calls. The default setting for these environment
variables is TRUE. See the “Resource Managers” section on page 4-39 for additional information about
Resource Managers.
This appendix has the following major sections:
•Cisco Prime Access Registrar Environment Dictionary Variables
This section lists environment variables you can use in scripts to communicate with
Prime Access Registrar or to communicate with other scripts.
•Internal Variables
This section lists environment variables used by the Prime Access Registrar server for internal
operations. The environment variables listed in this section must not be modified by scripts.
Cisco Prime Access Registrar Environment Dictionary Variables
The following variables are text strings stored in the Environment dictionary passed to each scripting
point.
Accepted-Profiles
Accepted-Profiles is read during authorization after calling server and client incoming scripts (not set
by Prime Access Registrar code). If set, the authorization done by local user lists checks to see if the
given user's profile as specified in the user record is one of those in the separated list of profiles. If it is
not in the separated list of profiles, the request is rejected.

B-2
Cisco Prime Access Registrar 6.1 User Guide
OL-29756-01
Appendix B Environment Dictionary
Cisco Prime Access Registrar Environment Dictionary Variables
Accounting-Service
Accounting-Service is set after calling server and client incoming scripts and is used to determine which
accounting service is used for this request. If set, the server directs the request to be processed by the
specified accounting service.
When Accounting-Service is not set, the DefaultAccountingService (as defined in the server
configuration) is used instead.
Acquire-Dynamic-DNS
Acquire-Dynamic-DNS is set and read for resource management override. Acquire-Dynamic-DNS is
set to FALSE to skip DNS updating during resource management processing.
Acquire-Group-Session-Limit
Acquire-Group-Session-Limit is set and read for resource management override.
Acquire-Group-Session-Limit is set to FALSE to override the use of group session limit resource
management.
Acquire-Home-Agent
Acquire-Home-Agent is set and read for resource management override. Acquire-Home-Agent is set
to FALSE to override the allocation of the home agent IP address during resource management
processing.
Acquire-IP-Dynamic
Acquire-IP-Dynamic is set and read for resource management override. Acquire-IP-Dynamic is set to
FALSE to override the use of a managed pool of IP addresses resource management.
Acquire-IPX-Dynamic
Acquire-IPX-Dynamic is set and read for resource management override. Acquire-IPX-Dynamic is set
to FALSE to override the use of a managed pool of IPX addresses resource management.
Acquire-IP-Per-NAS-Port
Acquire-IP-Per-NAS-Port is set and read for resource management override.
Acquire-IP-Per-NAS-Port is set to FALSE to override the use of ports associated with specific IP
addresses resource management.

B-3
Cisco Prime Access Registrar 6.1 User Guide
OL-29756-01
Appendix B Environment Dictionary
Cisco Prime Access Registrar Environment Dictionary Variables
Acquire-Subnet-Dynamic
Acquire-Subnet-Dynamic is not always used. If set to FALSE, subnet-dynamic resource managers are
skipped.
Acquire-User-Session-Limit
Acquire-User-Session-Limit set and read for resource management override.
Acquire-User-Session-Limit is set to FALSE to override the use of user session limit resource
management.
Acquire-USR-VPN
Acquire-USR-VPN is set and read for resource management override. Acquire-USR-VPN is set to
FALSE to override the use of Virtual Private Networks (VPNs) that use USR NAS Clients resource
management.
Allow-Null-Password
Allow-Null-Password is read during password matching and set in local userlist password matching if
not set prior. If Allow-Null-Password is set to TRUE, the Prime Access Registrar server accepts
requests with null passwords.
Authentication-Service
Authentication-Service is set and read for authentication service selection and is used to determine
which service is used to authenticate the user. If set, the server directs the request to be processed by the
specified authentication service. When Authentication-Service is not set, the
DefaultAuthenticationService is used instead.
Authorization-Service
Authorization-Service is set and read for authorization service selection and is used to determine which
service to use to authorize the user. If set, the server directs the request to be processed by the specified
authorization service. When Authorization-Service is not set, the DefaultAuthorizationService is used
instead.
AuthorizationInfo
The MSISDN information is copied to AuthorizationInfo that is fetched by M3UA service.

B-4
Cisco Prime Access Registrar 6.1 User Guide
OL-29756-01
Appendix B Environment Dictionary
Cisco Prime Access Registrar Environment Dictionary Variables
BackingStore-Env-Vars
BackingStore-Env-Vars overrides the BackingStoreEnvironmentVariables property of remote servers
of type odbc-accounting only when the property BufferAccountingPackets is set to TRUE. The value is
a comma separated list of environment variables to be stored along with the packet contents in the local
disk.
Blacklisted-IMSI
This variable is configured on a SIGTRAN-M3UA remote server. For any incoming request with an
IMSI value, if the variable is set as TRUE, then that IMSI value is blacklisted and will not forwarded to
the HLR. For more information, see Blacklisting IMSI Values, page 23-11.
Broadcast-Accounting-Packet
If set to TRUE, Broadcast-Accounting-Packet enables broadcasting of Accounting-on or
Accounting-off packets to all remote servers of type radius.
Cache-Attributes-In-Session
Cache-Attributes-In-Session is set and read for resource management override. Cache-Attributes-
In-Session is set to FALSE to override the caching of attributes by the session-cache type of resource
manager.
Current-Group-Count
Current-Group-Count is set and read for group session management. If set, the group-session-limit
resource manager sets Current-Group-Count to be the new value of the group-session-limit counter.
Cache-Outer-Identity
Cache-Outer-Identity value is set to enable identifying session of an user. If it is set to TRUE, WiMAX
session manager will cache the outer identity. If it is set to FALSE, the WiMAX session manager will
cache the inner identity. The value is set to FALSE by default.
Destination-IP-Address
Destination-IP-Address is a read only value which is set to the receiver IP address.
Destination-IP-Address contains the IP address of the request packet receiver.
Destination-Port
Destination-port is a read only value which is set to the receiving port number. Destination-port
contains the port number of the receiver of the request.

B-5
Cisco Prime Access Registrar 6.1 User Guide
OL-29756-01
Appendix B Environment Dictionary
Cisco Prime Access Registrar Environment Dictionary Variables
Dest-Translation-Type
Dest-Translation-Type is configured through the GlobalTitleTranslationScript. When the
RoutingIndicator is set to RTE_GT, Prime Access Registrar server reads the value that is set in
Dest-Translation-Type and sets the TranslationType field of the Called Party Address. The value in this
environment variable overrides the value that is configured in the
DestinationGTAddress/DestTranslationType property of a remote server, SIGTRAN-M3UA.
Dest-Numbering-Plan
Dest-Numbering-Plan is configured through the GlobalTitleTranslationScript. When the
RoutingIndicator is set to RTE_GT, Prime Access Registrar server reads the value that is set in
Dest-Numbering-Plan and sets the NumberingPlan field of the Called Party Address. The value in this
environment variable overrides the value that is configured in the
DestinationGTAddress/Dest-Numbering-Plan property of a remote server, SIGTRAN-M3UA.
The following are the only values that are used for Dest-Numbering-Plan environment variable:
•DATA
•GENERIC
•ISDN
•ISDNMOB
•LANMOB
•MARMOB
•NWSPEC
•TEL
•TELEX
•UNKN
If you set any variable other than the above ones, Prime Access Registrar server sets the NumberingPlan
that is configured in DestinationGTAddress/Dest-Numbering-Plan property of a remote server of type
SIGTRAN-M3UA.
Dest-Encoding-Scheme
Dest-Encoding-Scheme is configured through the GlobalTitleTranslationScript. When the
RoutingIndicator is set to RTE_GT, Prime Access Registrar server reads the value that is set in
Dest-Encoding-Scheme environment variable and sets the EncodingScheme field of the Called Party
Address. The value in this environment variable overrides the value that is configured in the
DestinationGTAddress/ DestEncodingScheme property of a remote server, SIGTRAN-M3UA.
The following are the only values that are used for Dest-Encoding-Scheme environment variable:
•BCDEVEN
•BCDODD
If you set any variable other than the above ones, Prime Access Registrar server sets the
EncodingScheme that is configured in the DestinationGTAddress/ DestEncodingScheme property of a
remote server of type SIGTRAN-M3UA.

B-6
Cisco Prime Access Registrar 6.1 User Guide
OL-29756-01
Appendix B Environment Dictionary
Cisco Prime Access Registrar Environment Dictionary Variables
Dest-Nature-Of-Address
Dest-Nature-Of-Address is configured through the GlobalTitleTranslationScript. When the
RoutingIndicator is set to RTE_GT, Prime Access Registrar server reads the value that is set in
Dest-Nature-Of-Address environment variable and sets the NatureOfAddress field of the Called Party
Address. The value in this environment variable overrides the value that is configured in the
DestinationGTAddress/ DestNatureofAddress property of a remote server, SIGTRAN-M3UA.
The following are the only values that are used for Dest-Nature-Of-Address environment variable:
•ADDR_NOTPRSNT
•INTNUM
•NATSIGNUM
•SUBNUM
If you set any variable other than the above ones, Prime Access Registrar server sets the
NatureOfAddress that is configured in the DestinationGTAddress/ DestNatureofAddress property of a
remote server of type SIGTRAN-M3UA.
Dest-GT-Format
Dest-GT-Format configured through the GlobalTitleTranslationScript. When the RoutingIndicator is
set to RTE_GT, Prime Access Registrar server reads the value that is set in Dest-GT-Format
environment variable and uses this format specified for the Global Title Digits(Address Information).
The value in this environment variable overrides the value that is configured in the
DestinationGTAddress/ DestGTFormat property of a remote server, SIGTRAN-M3UA.
The following are the only values that are used for Dest-GT-Format environment variable:
•GTFRMT_0
•GTFRMT_1
•GTFRMT_2
•GTFRMT_3
•GTFRMT_4
•GTFRMT_5
If you set any variable other than the above ones, Prime Access Registrar server sets the GTFormat that
is configured in the DestinationGTAddress/ DestGTFormat property of a remote server of type
SIGTRAN-M3UA.
Diameter-Application-Id
Diameter-Application-Id is set to get the application ID in the Diameter packet.
Diameter-Command-Code
Diameter-Command-Code is set to get the command codes in the Diameter packet.

B-7
Cisco Prime Access Registrar 6.1 User Guide
OL-29756-01
Appendix B Environment Dictionary
Cisco Prime Access Registrar Environment Dictionary Variables
Disable-Accounting-On-Off-Broadcast
If set to TRUE, Disable-Accounting-On-Off-Broadcast disables broadcasting of Accounting-On and
Accounting-Off packets to all remote servers of type 'radius'.
DSA-Response-Cache
DSA-Response-Cache is used while performing DSA( Dynamic Service Authorization) feature in
Prime Access Registrar. It is FALSE by default, which will clear the response dictionary before
Re-Authentication. If DSA-Response-Cache is set to TRUE, Prime Access Registrar will not clear the
response dictionary before Re-Authenticating with next service configured.
Dynamic-DNS-HostName
Dynamic-DNS-HostName is read while constructing the forward hostname during resource
management processing to update DNS entries. If set, the name will be used as forward hostname instead
of constructing one.
Dynamic-Search-Filter
Dynamic-Search-Filter overrides the Filter property in remote servers of type ldap. The format of the
value set for Dynamic-Search-Filter should be similar to that of the Filter property.
Dynamic-Search-Path
Dynamic-Search-Path is read for LDAP searching. If set, the server uses it as its LDAP search path
rather than the value set in the remote server configuration.
Dynamic-Search-Scope
Dynamic-Search-Scope is used to dynamically set the SearchScope property of an LDAP remote server
configuration on a per-packet basis.
Dynamic-Service-Loop-Limit
Dynamic-Service-Loop-Limit variable is used to change loop counts. When using the same service for
reauthentication and reauthorization, a loop can occur in these services. The loop count, by default is 10.
You can change the loop count using this variable.
Dynamic-User-Password-Attribute
Dynamic-User-Password-Attribute is read for LDAP authentication and overrides the
UserPasswordAttribute. If set, the server uses it to retrieve the password field as its LDAP UserPassword
attribute instead of the value set in the remote server configuration.

B-8
Cisco Prime Access Registrar 6.1 User Guide
OL-29756-01
Appendix B Environment Dictionary
Cisco Prime Access Registrar Environment Dictionary Variables
EAP-Actual-Identity
EAP-Actual-Identity is a read-only variable that contains the International Mobile Subscriber Identity
(IMSI) of the user after a successful EAP-SIM authentication.
EAP-Authentication-Mode
EAP-Authentication-Mode is a read-only variable, set after a successful EAP-SIM authentication, that
indicates whether the EAP-SIM authentication was a reauthentication or a full authentication.
Enforce-Traffic-Throttling
By default, the value is set to FALSE. When set to TRUE, the traffic throttling check for the packet will
be executed.
FetchAuthorizationInfo
When set to TRUE, this variable fetches MSISDN value from the HLR.
Do not use FetchAuthorizationInfo for authorization. We recommend that you use the authorization
service of m3ua instead.
Generate-BEK
Generate-BEK is read when WiMax provisioning service is enabled. If this is set,
Prime Access Registrar will generate the Bootstrap Encryption Key in the WiMax flow.
Group-Session-Limit
Group-Session-Limit is set and read for group session management. The group-session-limit resource
manager sets this environment variable to be the limit of the group-session-limit counter as set by the
configuration.
HLR-GlobalTitle-Address
HLR-GlobalTitle-Address is configured through the GlobalTitleTranslationScript. When the
RoutingIndicator is set to RTE_GT in SIGTRAN-M3UA remote server, Prime Access Registrar server
reads the value that is set in HLR-GlobalTitle-Address and sets the Destination GT Digits(Address
Information field) of the Called Party Address.
HLR-GlobalTitle-Cached
HLR-GlobalTitle-Cached is set as TRUE to indicate the HLR GT is cached.

B-9
Cisco Prime Access Registrar 6.1 User Guide
OL-29756-01
Appendix B Environment Dictionary
Cisco Prime Access Registrar Environment Dictionary Variables
The Home Location Registry (HLR) Global Title address (GT address in calling party address (CgPA))
from the SendAuthenticationInfo (SAI) response is cached and used for subsequent authorization
request. This cached HLR GT is added to the environment dictionary of the packet to be available for
the authorization flow.
The cached HLR GT overrides both the configured destination GT values and GT script provided GT
values. The HLR GT caching works by default for RTE_GT. The cached HLR GT can be overridden by
updating the environment variable HLR-GlobalTitle-Cached to FALSE (or anything other than TRUE)
in the GT script.
This HLR GT will not be cached for:
•reauthentication flow
•authorize only flow when authentication vectors are already available in cache (as there will not be
SAI request.
HLR-Translated-IMSI
HLR-Translated-IMSI is configured through the IMSITranslationScript. Prime Access Registrar
server reads the value in HLR-Translated-IMSI and sets the value as IMSI before sending the request to
STP/HLR. The value that is configured in the HLR-Translated-IMSI environment variable overrides the
IMSI received in EAP-AKA/EAP-SIM request packet.
Ignore-Accounting-Signature
Ignore-Accounting-Signature is set after calling server and client incoming scripts and is used to
ignore missing or incorrect accounting signatures from NASs. If set, Prime Access Registrar does not
check whether the account request packet has been signed with the same shared secret as the NAS.
Ignore-Accounting-Signature is used to work with RADIUS implementations that did not sign
Accounting-Requests. A script was provided in the distribution (for USR NASs) that could be set in the
IncomingScript extension point for the USR Vendor that simply set this environment variable.
IMSI
International Mobile System Identifier (IMSI) that is fetched from the response from HLR.
Incoming-Translation-Groups
Incoming-Translation-Groups is read for authentication while processing responses from a remote
RADIUS server. If set, Incoming-Translation-Groups specifies the translation groups to be used to
filter attributes on requests.
Master-URL-Fragment
Used with the Windows Provisioning Service feature, Master-URL-Fragment specifies the fragment
within the Master URL to be sent back to the provisioning server. Master-URL-Fragment can be set to
any of the following four values: signup, renewal, passwordchange, and forceupdate. If
Master-URL-Fragment is not set and is required to send the URL, signup will be sent by default.

B-10
Cisco Prime Access Registrar 6.1 User Guide
OL-29756-01
Appendix B Environment Dictionary
Cisco Prime Access Registrar Environment Dictionary Variables
The environmental variable Send-PEAP-URL-TLV indicates whether or not to send the URL.
Misc-Log-Message-Info
Misc-Log-Message-Info is read for packet event logging. If a log message is generated, the value of
Misc-Log-Message-Info is inserted into the middle of the log message.
MSISDN
The Mobile Subscriber ISDN Number (MSISDN) that is fetched from the response from HLR.
Outgoing-Translation-Groups
Outgoing-Translation-Groups is read while proxying to a remote radius server. If set,
Outgoing-Translation-Groups specifies the translation groups to be used to filter attributes.
Pager
The aregcmd command supports the Pager environment variable. When the aregcmd command stats
is used and the Pager environment variable is set, the output of the stats command is displayed using
the program specified by the Pager environment variable.
Query-Service
The Query-Service variable is set and read for the radius-query service selection type. The
Query-Service variable must be set before authentication phase begins at the server, vendor, or client
incoming scripting point or using the policy engine. If set, the server directs requests to be processed by
the specified radius-query service. After the Query-Service variable is set, no AAA processing will be
done.
Re-Accounting-Service
Re-Accounting-Service is configured, through script, for dynamic service authorization. When the
Re-Accounting-Service is set, the server directs the request to the specified reaccounting service for
processing.
Re-Authentication-Service
Re-Authentication-Service is configured, through script, for dynamic service authorization. When the
Re-Authentication-Service is set, the server directs the request to the specified reauthentication service
for processing.

B-11
Cisco Prime Access Registrar 6.1 User Guide
OL-29756-01
Appendix B Environment Dictionary
Cisco Prime Access Registrar Environment Dictionary Variables
Re-Authorization-Service
Re-Authorization-Service is configured, through script, for dynamic service authorization. When the
Re-Authorization-Service is set, the server directs the request to the specified reauthorization service for
processing.
Realm
The Realm variable is set for domain-auth type of service and is used as the domain name for windows
authentication.
Reject-Reason
Reject-Reason is set when a request is being rejected and contains the Reject-Reason.
Prime Access Registrar uses the value of Reject-Reason to look up the reject reason in the reply
message table.
If Reject-Reason is set to one of: UnknownUser, UserNotEnabled, UserPasswordInvalid,
UnableToAcquireResource, ServiceUnavailable, InternalError, MalformedRequest, ConfigurationError,
IncomingScriptFailed, OutgoingScriptFailed, IncomingScriptRejectedRequest,
OutgoingScriptRejectedRequest, or TerminationAction, then the value set in the configuration under
/Radius/Advanced/ReplyMessages will be returned.
Remote-Server
Remote-Server is set and read for logging a rejected packet from a remote server. Remote-Server
records the name and IP address of the remote server to which the request has been forwarded.
Remove-Session-On-Acct-Stop
When set to TRUE, server removes the session on receiving an accounting stop packet.
Remote-Servers-Tried
Remote-Servers-Tried contains a list of remote servers that were tried before a request was accepted or
rejected (in the case of a Failover multiple remoteserver policy). The list of servers is a comma-separated
list of remote server names.
Request-Authenticator
Request-Authenticator is set for every packet upon reception. Getting the Request-Authenticator
from a script returns the value of the request authenticator.

B-12
Cisco Prime Access Registrar 6.1 User Guide
OL-29756-01
Appendix B Environment Dictionary
Cisco Prime Access Registrar Environment Dictionary Variables
Request-Type
Request-Type is set when a request is first received to the type of request, such as one of
Access-Request, Access-Accept, Access-Reject, Accounting-Request, Accounting-Response, or
Access-Challenge before calling any extension points.
The request contains a string representation of the RADIUS packet type (code). When
Prime Access Registrar does not recognize the packet type, it is represented as
“Unknown-Packet-Type-<N>, where <N> is the numeric value of the packet type (for example
“Unknown-Packet-Type-9). The known packet types are listed in Table B-1.
Note Request-Type is to be used as a read-only variable by scripts.
Require-User-To-Be-In-Authorization-List
Require-User-To-Be-In-Authorization-List is read for authorization. If we are authorizing with a
different service than we authenticated with (not usually done) and the user is not known by the
authorization service, the default is to continue on unless this environment variable is set, in which case
we reject the request with a cause of Unknown-user.
Table B-1 Request-Type Packets
String Packet Code
Access-Request (1)
Access-Accept (2)
Access-Reject (3)
Accounting-Request (4)
Accounting-Response (5)
Access-Challenge (11)
Status-Server (12)
Status-Client (13)
USR-Resource-Free-Request (21)
USR-Resource-Free-Response (22)
USR-Resource-Query-Request (12)
USR-Resource-Query-Response (24)
USR-NAS-Reboot-Request (26)
USR-NAS-Reboot-Response (27)
Ascend-IPA-Allocate (50)
Ascend-IPA-Release (51)
USR-Enhanced-Radius (254)

B-13
Cisco Prime Access Registrar 6.1 User Guide
OL-29756-01
Appendix B Environment Dictionary
Cisco Prime Access Registrar Environment Dictionary Variables
Response-Type
Response-Type is set and read throughout processing and used to determine whether the request should
be accepted, rejected, or challenged. When Response-Type is set to “Access-Reject at any time during
the processing of a request, no more processing of the request is done, and an Access-Reject response is
sent. For other valid values for Response-Type, see Table B-1.
Retrace-Packet
If set, Retrace-Packet causes a trace of the packet to be displayed during the incoming and outgoing
scripts. If set, will cause a second trace of the request packet's contents after running all the incoming
scripts and/or a second trace of the response packet's contents before running the outgoing scripts.
Send-PEAP-URI-TLV
When set to TRUE, the URI PEAP-TLV is included along with the Result PEAP-TLV in the
access-challenge packet. The authenticating user service (of type userlist, LDAP, or WDA) can set this
to TRUE using an extension point script or attribute mapping so that the PEAP-v0 service can send the
URI PEAP-TLV. The default value for this is FALSE.
Note This variable is used with the Windows Provisioning Service (WPS) feature.
Session-Key
Session-Key is read for session management. If set, the server uses it as the key to look up the session
associated with the current request, if any. If not set, the server uses the NAS IP Address and NAS Port
to create a session key.
Session-Manager
Session-Manager is read after user authorization and determines which dynamic resources to allocate
for this user, when one is needed. If set, the server directs the request to be processed by the specified
session manager. When not set, the SessionManager (as defined in DefaultSessionManager) is used
when needed.
Session-Notes
Session-Notes is a comma-separated list set to make session information available to scripts.
Session-Notes contains the names of other environment variables. If set, these variables are stored on a
Session as notes.

B-14
Cisco Prime Access Registrar 6.1 User Guide
OL-29756-01
Appendix B Environment Dictionary
Cisco Prime Access Registrar Environment Dictionary Variables
Session-Service
Session-Service is set and read during session management. If set, the server will direct the request to
be processed by the specified session service.
Set-Session-Mgr-And-Key-Upon-Lookup
When Set-Session-Mgr-And-Key-Upon-Lookup is set to TRUE, a session-cache resource manager
sets the session-manager and session-key environment variable during a query-lookup, and the
Prime Access Registrar server does not cache the response dictionary attributes.
Set-Session-Mgr-And-Key-Upon-Lookup is set to TRUE by a query-service IncomingScript.
Skip-Session-Management
When set to TRUE in a request, Skip-Session-Management causes session management to be skipped
for the request, even if session management might normally occur.
Skip-Overriding-Username-With-LDAP-UID
Skip-Overriding-Username-With-LDAP-UID is used to decide if the username should be replaced with
the UID from the LDAP server. When Skip-Overriding-Username-With-LDAP-UID is set to TRUE, the
username is not replaced with the UID from the LDAP server.
You can use Skip-Overriding-Username-With-LDAP-UID to retain case sensitivity in usernames when
the username given logging into the network is in a different case that the UID in the LDAP server
database, such as User1 and user1.
Skip-Overriding-UserName-With-PEAPIdentity
Skip-Overriding-Username-With-PEAPIdentity is used to decide if the username should be replaced
with the PEAP Identity. When Skip-Overriding-Username-With-PEAPIdentity is set to TRUE, the
username is not replaced with the PEAP Identity.
Source-IP-Address
Source-IP-Address is set when a request is first received to the IP address from which the IP request
was received before calling any extension points. Source-IP-Address contains the IP address of the
NAS or proxy server that sent the request to this server.
Note Source-IP-Address is to be used as a read-only variable by scripts.

B-15
Cisco Prime Access Registrar 6.1 User Guide
OL-29756-01
Appendix B Environment Dictionary
Cisco Prime Access Registrar Environment Dictionary Variables
Source-Port
Source-Port is set when a request is first received to the port from which the request was received.
Source-Port is set for each request before calling any extension points and contains the port on the NAS
or proxy server that was used to send the request to this server.
Note Source-Port is to be used as a read-only variable by scripts.
SQL-Sequence
SQL-Sequence variable is set with a list of SQL statement names, separated by a semicolon (;). For
example, the SQL statement names ‘sql3’, ‘sql4’, and ‘sql5’ are denoted as sql3;sql4;sql5. If the variable
is set, Prime Access Registrar picks the SQL statements and executes them in the order specified.
Subnet-Size-If-No-Match
Subnet-Size-If-No-Match is set to one of BIGGER, SMALLER or EXACT, determines the behavior of
the subnet-dynamic resource manager if a pool of the requested size is not available.
Trace-Level
Trace-Level is set for each request before calling any extension points. Trace-Level is set to the current
trace level as specified through aregcmd. If set by a script, Trace-Level changes the trace level used to
determine what level of information is traced.
Unavailable-Resource
Unavailable-Resource is set during session management. If the request is being rejected because one of
the resource managers failed to allocate a resource, Unavailable-Resource is set to the name of the
resource manager that failed.
Unavailable-Resource-Type
Unavailable-Resource-Type is set during session management. If the request is being rejected because
one of the resource managers failed to allocate a resource, Unavailable-Resource-Type is set to the type
of the resource manager that failed.
UserDefined1
UserDefined1 is set to the value of the UserDefined1 property of the user from a local user list during
password matching of local users.

B-16
Cisco Prime Access Registrar 6.1 User Guide
OL-29756-01
Appendix B Environment Dictionary
Cisco Prime Access Registrar Environment Dictionary Variables
User-Authorization-Script
User-Authorization-Script is read in local services during authorization. If set, the server calls the
specified script to do additional user authorization after authentication succeeds.
User-Group
User-Group is read in local services during authorization. If set, species the UserGroup to which the
current user belongs.
User-Group-Session-Limit
User-Group-Session-Limit is read during session management. If set, User-Group-Session-Limit
overrides the limit specified for the group-session-limit resource manager.
User-Name
User-Name is read by a local service during authentication. When User-Name is set, it is the name used
to authenticate or authorize the request and overrides the User-Name in the Request dictionary.
User-Profile
User-Profile is read in local services during authorization. If set, User-Profile specifies the Profile from
which the current user should receive attributes.
User-Session-Limit
User-Session-Limit is read during session management. If set, User-Session-Limit overrides the limit
specified for the user-session-limit resource manager.
Virtual-Server-Outgoing-Script
Virtual-Server-Outgoing-Script is read when LawfulIntercept script object is enabled to use virtual script
object. If this is set, the configured script will be executed after server outgoing script.
Windows-Domain-Groups
The Windows-Domain-Groups variable is a read-only variable that contains a comma separated list of
group names to which the user belongs in the Active Directory. The Windows-Domain-Groups variable
is set after a successful authentication using a domain-auth type of service.

B-17
Cisco Prime Access Registrar 6.1 User Guide
OL-29756-01
Appendix B Environment Dictionary
Internal Variables
X509- Subject-Name
X509- Subject-Name reads the value of the subject in the SSL certificate. This is read while processing
the access request.
Internal Variables
The following environment variables are used by the server for internal operation. The values for these
environment variables must not be modified.
•Add-Message-Authenticator
•Calling-Service-Name
•Cleartext-Password
•Current-Service-Name
•Dynamic-Search-UID
•Duplicate-Req
•EAP-Internal-Services
•Group-Service
•Group-Service-State-ID
•Hidden-Attrib
•IMSI
•Local-Port-type
•Message-Authenticator-Present
•MSCHAP-Account-Name
•MS-ChapV2-Message
•NAS-Name-And-IPAddress
•Notify-Service-Session-Key
•Notify-Service-State-ID
•Number-Requested-Quintets
•Number-Requested-Triplets
•Proxied-Dynamic-Auth (named Proxied-POD in earlier releases)
•Provider-Identifier
•Rcd-NT-Password-Hash-Hash (named Rcd-NT-Password-Hash in earlier releases)
•Remote-Session
•Return-Data
•Roaming
•Script-Level
•Session-ID
•Session-Accounting-Counter

B-18
Cisco Prime Access Registrar 6.1 User Guide
OL-29756-01
Appendix B Environment Dictionary
Internal Variables
•Session-Generation-Tag
•Session-Last-Accessed-Time
•Session-Manager-Key
•Session-NAS-Identifier
•Session-NAS-Port
•Session-Resource-Count
•Session-Resource-%d
•Session-Reuse
•Session-Start-Time
•Session-Survives-NAS-Reboot
•Session-User-Name
•User-Name-Used-For-Lookup
•WiMax-Authentication
•WiMax-SessionManager-Exists

C-1
Cisco Prime Access Registrar 6.1 User Guide
OL-29756-01
APPENDIX
C
RADIUS Attributes
This appendix lists the attributes Cisco Prime Access Registrar (Prime Access Registrar) supports with
their names and values. RADIUS attributes carry the specific authentication, authorization information,
and configuration details for requests and replies. For more detailed information about specific
attributes, see the appropriate RFC as listed Table C-1.
This appendix has two sections:
•RADIUS Attributes—This section provides an alphabetic list of all RADIUS attributes
Prime Access Registrar supports and a list of all RADIUS attributes in numeric order.
•Vendor-Specific Attributes—This section provides lists of RADIUS vendor-specific attributes
(VSAs).
RADIUS Attributes
This section lists the RADIUS attributes supported in Prime Access Registrar. RADIUS attributes carry
specific authentication, authorization, information, and configuration details in the Access-Request and
the RADIUS server response.
Cisco Prime Access Registrar Attributes
Table C-2 provides an alphabetical list of all attributes used in Prime Access Registrar and the attribute
number.
Table C-1 RFCs for RADIUS Attributes
RFC Subject RFC Number
Standard RADIUS Attributes 2865
RADIUS Accounting Attributes 2866
Accounting Modifications for Tunnel Protocol
Support
2867
Attributes for Tunnel Protocol Support 2868
RADIUS Extensions 2869

C-2
Cisco Prime Access Registrar 6.1 User Guide
OL-29756-01
Appendix C RADIUS Attributes
RADIUS Attributes
Table C-2 RADIUS Attributes Alphabetical List
Attribute Name Attribute Number
Acct-Authentic 45
Acct-Delay-Time 41
Acct-Input-Gigawords 52
Acct-Input-Octets 42
Acct-Input-Packets 47
Acct-Interim-Interval 85
Acct-Link-Count 51
Acct-Multi-Session-Id 50
Acct-Output-Gigawords 53
Acct-Output-Octets 43
Acct-Output-Packets 48
Acct-Session-Id 44
Acct-Session-Time 46
Acct-Status-Type 40
Acct-Terminate-Cause 49
Acct-Tunnel-Connection 68
Acct-Tunnel-Packets-Lost 86
Acquire-Group-Session-Limit 280
ARAP-Challenge-Response 84
ARAP-Features 71
ARAP-Password 70
ARAP-Security 73
ARAP-Security-Data 74
ARAP-Zone-Access 72
Callback-Id 20
Callback-Number 19
Called-Station-Id 30
Calling-Station-Id 31
Change-Password 17
CHAP-Challenge 60
CHAP-Password 3
Class 25
Configuration-Token 78
Connect-Info 77
Digest-Attributes 207
Digest-Response 206

C-3
Cisco Prime Access Registrar 6.1 User Guide
OL-29756-01
Appendix C RADIUS Attributes
RADIUS Attributes
EAP-Message 79
Error-Cause 101
Event-Timestamp 55
Filter-Id 11
Framed-AppleTalk-Link 37
Framed-AppleTalk-Network 38
Framed-AppleTalk-Zone 39
Framed-Compression 13
Framed-Interface-Id 96
Framed-IP-Address 8
Framed-IP-Netmask 9
Framed-IPv6-Pool 100
Framed-IPv6-Prefix 97
Framed-IPv6-Route 99
Framed-IPX-Network 12
Framed-MTU 12
Framed-Pool 88
Framed-Protocol 7
Framed-Route 22
Framed-Routing 10
Idle-Timeout 28
Login-IP-Host 14
Login-IPv6-Host 98
Login-LAT-Group 36
Login-LAT-Node 35
Login-LAT-Port 63
Login-LAT-Service 34
Login-Service 15
Login-TCP-Port 16
Message-Authenticator 80
NAS-Identifier 32
NAS-IP-Address 4
NAS-IPv6-Address 95
NAS-Port 5
NAS-Port-ID 87
NAS-Port-Type 61
Table C-2 RADIUS Attributes Alphabetical List (continued)
Attribute Name Attribute Number

C-4
Cisco Prime Access Registrar 6.1 User Guide
OL-29756-01
Appendix C RADIUS Attributes
RADIUS Attributes
RADIUS Attributes Numeric List
Table C-3 lists all RFC-defined RADIUS attributes in numeric order.
Originating-Line-Info 94
Password-Expiration 21
Password-Retry 75
Port-Limit 62
Prompt 76
Proxy-State 33
Reply-Message 18
Service-Type 6
Session-Timeout 27
State 24
Termination-Action 29
Text-Ascend-Data-Filter 225
Tunnel-Assignment-ID 82
Tunnel-Client-Auth-ID 90
Tunnel-Client-Endpoint 66
Tunnel-Medium-Type 65
Tunnel-Password 69
Tunnel-Preference 83
Tunnel-Private-Group-ID 81
Tunnel-Server-Auth-ID 91
Tunnel-Server-Endpoint 67
Tunnel-Type 64
User-Name 1
User-Password 2
Vendor-Specific Attributes 26
Table C-2 RADIUS Attributes Alphabetical List (continued)
Attribute Name Attribute Number
Table C-3 RADIUS Attributes Numeric List
Number Attribute Name
1User-Name
2 User-Password
3 CHAP-Password
4 NAS-IP-Address

C-5
Cisco Prime Access Registrar 6.1 User Guide
OL-29756-01
Appendix C RADIUS Attributes
RADIUS Attributes
5 NAS-Port
6 Service-Type
7 Framed-Protocol
8 Framed-IP-Address
9 Framed-IP-Netmask
10 Framed-Routing
11 Filter-Id
12 Framed-MTU
13 Framed-Compression
14 Login-IP-Host
15 Login-Service
16 Login-TCP-Port
17 Change-Password
18 Reply-Message
19 Callback-Number
20 Callback-Id
21 Password-Expiration
22 Framed-Route
12 Framed-IPX-Network
24 State
25 Class
Table C-3 RADIUS Attributes Numeric List (continued)
Number Attribute Name

C-6
Cisco Prime Access Registrar 6.1 User Guide
OL-29756-01
Appendix C RADIUS Attributes
RADIUS Attributes
26 Vendor-Specific Attributes (VSAs)
See Vendor-Specific Attributes,
page C-13 or the specific vendor’s
VSA list:
•3GPP VSAs
•3GPP2 VSAs
•ACC VSAs
•Altiga VSAs
•Ascend VSAs
•Bay Networks VSAs
•Cabletron VSAs
•Cisco Prime Access Registrar
Internal VSAs
•Cisco VSAs
•Compatible VSAs
•Microsoft VSAs
•Nomadix VSAs
•RedBack VSAs
•RedCreek VSAs
•Telebit VSAs
•Unisphere VSAs
•USR VSAs
•WiMax
•WISPr
•XML
27 Session-Timeout
28 Idle-Timeout
29 Termination-Action
30 Called-Station-ID (DNIS)
31 Calling-Station-ID (CLID)
32 NAS-Identifier
33 Proxy-State
34 Login-LAT-Service
35 Login-LAT-Node
36 Login-LAT-Group
37 Framed-AppleTalk-Link
Table C-3 RADIUS Attributes Numeric List (continued)
Number Attribute Name

C-7
Cisco Prime Access Registrar 6.1 User Guide
OL-29756-01
Appendix C RADIUS Attributes
RADIUS Attributes
38 Framed-AppleTalk-Network
39 Framed-AppleTalk-Zone
40 Acct-Status-Type
41 Acct-Delay-Time
42 Acct-Input-Octets
43 Acct-Output-Octets
44 Acct-Session-Id
45 Acct-Authentic
46 Acct-Session-Time
47 Acct-Input-packets
48 Acct-Output-packets
49 Acct-Terminate-Cause
50 Acct-Multi-Session-Id
51 Acct-Link-Count
52 Acct-Input-Gigawords
53 Acct-Output-Gigawords
54 unassigned
55 Event-Timestamp
56 unassigned
57 unassigned
58 unassigned
59 unassigned
60 CHAP-Challenge
61 NAS-Port-Type
62 Port-Limit
63 Login-LAT-PortNo
64 Tunnel-Type
65 Tunnel-Medium-Type
66 Tunnel-Client-Endpoint
67 Tunnel-Server-Endpoint
68 Acct-Tunnel-Connection
68 Tunnel-ID
69 Tunnel-Password
70 ARAP-Password
71 ARAP-Features
72 ARAP-Zone-Access
Table C-3 RADIUS Attributes Numeric List (continued)
Number Attribute Name

C-8
Cisco Prime Access Registrar 6.1 User Guide
OL-29756-01
Appendix C RADIUS Attributes
RADIUS Attributes
73 ARAP-Security
74 ARAP-Security-Data
75 Password-Retry
76 Prompt
77 Connect-Info
78 Configuration-Token
79 EAP-Message
80 Message-Authenticator
81 Tunnel-Private-Group-ID
81 Ascend-Auth-Type
82 Tunnel-Assignment-ID
83 Tunnel-Preference
84 ARAP-Challenge-Response
85 Acct-Interim-Interval
85 Ascend-IP-Pool-Chaining
86 Acct-Tunnel-Packets-Lost
87 NAS-Port-ID
88 Framed-Pool
88 Ascend-IP-TOS
89 Ascend-IP-TOS-Precedence
90 Tunnel-Client-Auth-ID
90 Ascend-IP-TOS-Apply-To
91 Tunnel-Server-Auth-ID
91 Ascend-Filter
92 Ascend-Dsl-Rate-Type
93 Ascend-Redirect-Number
94 Originating-Line-Info
95 Ascend-ATM-Vci
96 Ascend-Source-IP-Check
97 Ascend-Dsl-Rate-Mode
98 Ascend-Dsl-Upstream-Limit
99 Ascend-Dsl-Downstream-Limit
100 Ascend-Dsl-CIR-Recv-Limit
101 Error-Cause
102 EAP-Key-Name
103 Ascend-Source-Auth
Table C-3 RADIUS Attributes Numeric List (continued)
Number Attribute Name

C-9
Cisco Prime Access Registrar 6.1 User Guide
OL-29756-01
Appendix C RADIUS Attributes
RADIUS Attributes
104 Ascend-Private-Route
105 unassigned
106 Ascend-FR-Link-Status-DLCI
107 unassigned
108 Ascend-Callback-Delay
109 unassigned
110 unassigned
111 Ascend-Multicast-GLeave-Delay
112 Ascend-CBCP-Enable
113 Ascend-CBCP-Mode
114 unassigned
115 Ascend-CBCP-Trunk-Group
116 Ascend-Appletalk-Route
117 Ascend-Appletalk-Peer-Mode
118 Ascend-Route-Appletalk
119 unassigned
120 Ascend-Modem-PortNo
121 Ascend-Modem-SlotNo
122 unassigned
112 unassigned
124 unassigned
125 Ascend-Maximum-Call-Duration
126 Ascend-Preference
127 Tunneling-Protocol
128 Ascend-Shared-Profile-Enable
129 Ascend-Primary-Home-Agent
130 Ascend-Secondary-Home-Agent
131 Ascend-Dialout-Allowed
132 Ascend-Client-Gateway
133 Ascend-BACP-Enable
134 Ascend-DHCP-Maximum-Leases
135 Ascend-Client-Primary-DNS
136 Ascend-Client-Secondary-DNS
137 Ascend-Client-Assign-DNS
138 Ascend-User-Acct-Type
139 Ascend-User-Acct-Host
Table C-3 RADIUS Attributes Numeric List (continued)
Number Attribute Name

C-10
Cisco Prime Access Registrar 6.1 User Guide
OL-29756-01
Appendix C RADIUS Attributes
RADIUS Attributes
140 Ascend-User-Acct-Port
141 Ascend-User-Acct-Key
142 Ascend-User-Acct-Base
143 Ascend-User-Acct-Time
144 Ascend-Assign-IP-Client
145 Ascend-Assign-IP-Server
146 Ascend-Assign-IP-Global-Pool
147 Ascend-DHCP-Reply
148 Ascend-DHCP-Pool-Number
149 Ascend-Expect-Callback
150 Ascend-Event-Type
151 Ascend-Session-Svr-Key
152 Ascend-Multicast-Rate-Limit
153 Ascend-IF-Netmask
154 Ascend-Remote-Addr
155 Ascend-Multicast-Client
156 Ascend-FR-Circuit-Name
157 Ascend-FR-LinkUp
158 Ascend-FR-Nailed-Grp
159 Ascend-FR-Type
160 Ascend-FR-Link-Mgt
161 Ascend-FR-N391
162 Ascend-FR-DCE-N392
163 Ascend-FR-DTE-N392
164 Ascend-FR-DCE-N393
165 Ascend-FR-DTE-N393
166 Ascend-FR-T391
167 Ascend-FR-T392
168 Ascend-Bridge-Address
169 Ascend-TS-Idle-Limit
170 Ascend-TS-Idle-Mode
171 Ascend-DBA-Monitor
172 Ascend-Base-Channel-Count
173 Ascend-Minimum-Channels
174 Ascend-IPX-Route
175 Ascend-FT1-Caller
Table C-3 RADIUS Attributes Numeric List (continued)
Number Attribute Name

C-11
Cisco Prime Access Registrar 6.1 User Guide
OL-29756-01
Appendix C RADIUS Attributes
RADIUS Attributes
176 Ascend-backup
177 Ascend-Call-Type
178 Ascend-Group
179 Ascend-FR-DLCI
180 Ascend-FR-Profile-Name
181 Ascend-Ara-PW
182 Ascend-IPX-Node-Addr
183 Ascend-Home-Agent-IP-Addr
184 Ascend-Home-Agent-Password
185 Ascend-Home-Network-Name
186 Ascend-Home-Agent-UDP-Port
187 Ascend-Multilink-ID supported
188 Ascend-Num-In-Multilink
189 Ascend-First-Dest (Not supported)
190 Ascend-Pre-Input-Octets
191 Ascend-Pre-Output-Octets
192 Ascend-Pre-Input-packets
193 Ascend-Pre-Output-packets
194 Ascend-Maximum-Time
195 Ascend-Disconnect-Cause
196 Ascend-Connect-Progress
197 Ascend-Data-Rate
198 Ascend-PreSession-Time
199 Ascend-Token-Idle
200 Ascend-Token-Immediate
201 Ascend-Require-Auth
202 Ascend-Number-Sessions
203 Ascend-Authen-Alias
204 Ascend-Token-Expiry
205 Ascend-Menu-Selector
206 Digest-Response
207 Digest-Attributes
208 Ascend-PW-Lifetime
209 Ascend-IP-Direct
210 Ascend-PPP-VJ-Slot-Comp
211 Ascend-PPP-VJ-1172
Table C-3 RADIUS Attributes Numeric List (continued)
Number Attribute Name

C-12
Cisco Prime Access Registrar 6.1 User Guide
OL-29756-01
Appendix C RADIUS Attributes
RADIUS Attributes
212 Ascend-PPP-Async-Map
213 Ascend-Third-Prompt
214 Ascend-Send-Secret
215 Ascend-Receive-Secret
216 Ascend-IPX-Peer-Mode
217 Ascend-IP-Pool-Definition
218 Ascend-Assign-IP-Pool
219 Ascend-FR-Direct
220 Ascend-FR-Direct-Profile
221 Ascend-FR-Direct-DLCI
222 Ascend-Handle-IPX
212 Ascend-Netware-timeout
224 Ascend-IPX-Alias
225 Ascend-Metric
226 Ascend-PRI-Number-Type
227 Ascend-Dial-Number
228 Ascend-Route-IP
229 Ascend-Route-IPX
120 Ascend-Bridge
121 Ascend-Send-Auth
122 Ascend-Send-Passwd
123 Ascend-Link-Compression
124 Ascend-Target-Util
125 Ascend-Maximum-Channels
126 Ascend-Inc-Channel-Count
127 Ascend-Dec-Channel-Count
128 Ascend-Seconds-Of-History
129 Ascend-History-Weigh-Type
240 Ascend-Add-Seconds
241 Ascend-Remove-Seconds
242 Ascend-Data-Filter
243 Ascend-Call-Filter
244 Ascend-Idle-Limit
245 Ascend-Preempt-Limit
246 Ascend-Callback
247 Ascend-Data-Svc
Table C-3 RADIUS Attributes Numeric List (continued)
Number Attribute Name

C-13
Cisco Prime Access Registrar 6.1 User Guide
OL-29756-01
Appendix C RADIUS Attributes
Vendor-Specific Attributes
Vendor-Specific Attributes
This section lists all vendor-specific attributes (VSAs) supported by Prime Access Registrar.
3GPP VSAs
Table C-4 lists the 3GPP VSAs. The vendor ID for 3GPP VSAs is 10415.
248 Ascend-Force-56
249 Ascend-Billing-Number
250 Ascend-Call-By-Call
251 Ascend-Transit-Number
252 Ascend-Host-Info
253 Ascend-PPP-Address
254 Ascend-MPP-Idle-Percent
255 Ascend-Xmit-Rate
256 HNB Parameters
257 Macro-Coverage-Information
258 Geographical Location
259 HNB Internet Information
260 Reject Cause
270 White-List
Table C-3 RADIUS Attributes Numeric List (continued)
Number Attribute Name
Table C-4 3GPP VSAs
SubAttr VSA Name Type Min-Max Value
1 3GPP-IMSI String 0-15
2 3GPP-Charging-Id UINT 0-65535
3 3GPP-PDPType ENUM 0-2
0 = IPv4
1 = PPP
2 = IPv6
4 3GPP-OG-Address IP Address
5 3GPP-GPRS-QoS-
Profile
String 0-31
6 3GPP-SGSN-Addr
ess
IP Address
7 3GPP-GGSN-Addr
ess
IP Address

C-14
Cisco Prime Access Registrar 6.1 User Guide
OL-29756-01
Appendix C RADIUS Attributes
Vendor-Specific Attributes
8 3GPP-IMSI-MCC-
MNC
String 6-6
9 3GPP-GGSN-MCC
-MNC
String 6-6
10 3GPP-NSAPI String 1-1
11 3GPP-Session-Stop
-Indicator
String 2-2
12 3GPP-Selection-M
ode
String 1-1
13 3GPP-Charging-Ch
aracteristics
String 4-4
14 3GPP-CG-IPv6-Ad
dress
String 16-16
15 3GPP-SGSN-IPv6-
Address
String 16-16
16 3GPP-GGSN-IPv6-
Address
String 6-6
17 3GPP-IPv6-DNS-S
ervers
String 16-253
18 3GPP-SGSN-MCC
-MNC
String 0-1
19 3GPP-Teardown-In
dicator
UINT32 0-1
20 3GPP-IMEISV String 16-16
21 3GPP-RAT-Type String 1-1
22 3GPP-User-Locati
on-Info
String 0-253
12 3GPP-MS-Timezo
ne
String 2-2
24 3GPP-Camel-Char
ging-Info
String 0-253
25 3GPP-Packet-Filter String 0-253
26 3GPP-Negotiated-
DSCP
String 1-1
Table C-4 3GPP VSAs (continued)
SubAttr VSA Name Type Min-Max Value

C-15
Cisco Prime Access Registrar 6.1 User Guide
OL-29756-01
Appendix C RADIUS Attributes
Vendor-Specific Attributes
3GPP2 VSAs
Table C-5 lists the 3GPP2 VSAs. The vendor ID for 3GPP2 VSAs is 5535 with 8-bit VendorTypeSize.
Table C-5 3GPP2 VSAs
SubAttr VSA Name Type Min-Max Value
1 CDMA-IKE-Pre-Shared-Secret-Request ENUM 1-2;
1 = The PDSN requests a
pre-shared secret for IKE
2 = The PDSN does not request a
pre-shared secret for IKE
2 CDMA-Security-Level ENUM 1-4;
1 = IPSec for registration
messages
2 = IPSec for tunnels
3= IPSec for tunnels and
registration messages
4 = No IPSec security
3 CDMA-Pre-Shared-Secret String 0-24
4 CDMA-Reverse-Tunnel-Spec ENUM 0-1;
0 = Reverse tunneling is not
required
1 = Reverse tunneling is required
5 CDMA-Diff-Svc-Class-Opt ENUM 0-46;
0 = Best Effort
10 = AF11
12 = AF12
14 = AF13
18 = AF21
20 = AF22
22 = AF12
26 = AF31
28 = AF32
30 = AF33
34 = AF41
36 = AF42
38 = AF43
46 = EF
6 CDMA-Container String 0-253
7 CDMA-HA-IP-Addr IPADD
R
8 CDMA-KeyID-Attribute String 0-28
9 CDMA-PCF-IP-Addr IP
Addres
s
10 CDMA-BS-MSC-Addr String 0-253

C-16
Cisco Prime Access Registrar 6.1 User Guide
OL-29756-01
Appendix C RADIUS Attributes
Vendor-Specific Attributes
11 CDMA-User-ID UINT3
2
0-0
12 CDMA-Forward-MUX UINT3
2
0-0
13 CDMA-Reverse-MUX UINT3
2
0-0
14 CDMA-Forward-Rate UINT3
2
0-0
15 CDMA-Reverse-Rate UINT3
2
0-0
16 CDMA-Service-Option UINT3
2
0-0
17 CDMA-Forward-Type ENUM 0-1;
0 = Primary
1 = Secondary
18 CDMA-Reverse-Type ENUM 0-1;
0 = Primary
1 = Secondary
19 CDMA-Frame-Size ENUM 0-2;
0 = No Fundamental
1 = 5 ms Frame and 20ms Mixed
Frame
2 = 20 ms Frame
20 CDMA-Forward-RC UINT3
2
0-0
21 CDMA-Reverse-RC UINT3
2
0-0
22 CDMA-IP-Technology ENUM 1-3;
1 = Simple-IP
2 = Mobile-IP
3 = Proxy-Mobile-IP
12 CDMA-Comp-Flag ENUM 0-2;
0 = None
1 = Non-secure
2 = Secure
Table C-5 3GPP2 VSAs (continued)
SubAttr VSA Name Type Min-Max Value

C-17
Cisco Prime Access Registrar 6.1 User Guide
OL-29756-01
Appendix C RADIUS Attributes
Vendor-Specific Attributes
24 CDMA-Release-Ind ENUM 0-14;
0 = Unknown
1 = PPP/Service timeout
2 = Handoff
3 = PPP termination
4 = Mobile IP registration failure
5 = Abnormal Terminations
6 = Termination due to Resource
management
7 = Service instance released
8 = Volume Quota reached, service
instance released
9 = Duration Quota reached,
Service instance released
10 = Incompatible PrePaid
accounting information
11 = Airlink Parameter Change
12 = Time of Day Timer expiration
13 = Dormant by Accounting-
Stop-triggered-by-Active-Stop
14 = Hot-Line status changed
25 CDMA-Dropped-Octets UINT3
2
0-0
26 CDMA-Start-Date String 0-253
27 CDMA-Start-Time String 0-253
28 CDMA-Stop-Date String 0-253
29 CDMA-Stop-Time String 0-253
30 CDMA-Num-Active UINT3
2
0-0
31 CDMA-SDB-Input-Octets UINT3
2
0-0
32 CDMA-SDB-Output-Octets UINT3
2
0-0
33 CDMA-NumSDB-Input UINT3
2
0-0
34 CDMA-NumSDB-Output UINT3
2
0-0
35 CDMA-Alt-Billing UINT3
2
0-0
Table C-5 3GPP2 VSAs (continued)
SubAttr VSA Name Type Min-Max Value

C-18
Cisco Prime Access Registrar 6.1 User Guide
OL-29756-01
Appendix C RADIUS Attributes
Vendor-Specific Attributes
36 CDMA-IP-QoS UINT3
2
0-0
37 CDMA-Interconnect-IP UINT3
2
0-0
38 CDMA-Interconnect-QoS UINT3
2
0-0
39 CDMA-Air-QoS UINT3
2
0-0
40 CDMA-Airlink-Record-Type ENUM 1-4;
1 = Connection Setup
2 = Active Start
3 = Active Stop
4 = SDB Record
41 CDMA-R-P-Link-ID UINT3
2
0-0
42 CDMA-Airlink-Record-Type UINT3
2
0-0
43 CDMA-PPP-Bytes-Received UINT3
2
0-0
44 CDMA-Correlation-ID String 0-253
45 CDMA-Mobile-Terminate-Originated-I
nd
UINT3
2
0-0
46 CDMA-Inbound-Mobile-IP-Signalling-
Octets
UINT3
2
0-0
47 CDMA-Outbound-Mobile-IP-Signalling
-Octets
UINT3
2
0-0
48 CDMA-Session-Continue ENUM 0-1;
0 = False
1 = True
49 CDMA-Active-Time UINT3
2
0-0
50 CDMA-DCCH-Frame-Format UINT3
2
0-3
51 CDMA-Beginning-Session ENUM 0-1;
0 = False
1 = True
52 CDMA-ESN String 0-253
54 CDMA-S-Attribute String 0-253
55 CDMA-S-Request-Attribute ENUM 0-1;
0 = The HA does not request a S
secret for IKE
1 = The HA requests a S secret for
IKE
Table C-5 3GPP2 VSAs (continued)
SubAttr VSA Name Type Min-Max Value

C-19
Cisco Prime Access Registrar 6.1 User Guide
OL-29756-01
Appendix C RADIUS Attributes
Vendor-Specific Attributes
56 CDMA-S-Lifetime-Attribute UINT3
2
0-0
57 CDMA-MN-HA-SPI String 0-4
58 CDMA-MN-HA-Shared-Key String 0-253
59 CDMA-Remote-IPv4-Address String 12-253
60 CDMA-HRPD-Access-Authentication ENUM 1-1;
1 = HRPD Access Authentication
70 CDMA-Remote-IPv6-Address String 68-253
71 CDMA-Remote-Address-Table-Index UINT3
2
0-253
72 CDMA-Remote-IPv4-Address-Octet-C
ount
String 24-253
73 CDMA-Allowed-Differentiated-Service
-Marking
String 12-253
74 CDMA-Service-Option-Profile String 8-253
75 CDMA-DNS-Update-Required ENUM 0-1;
0 = HA does not need to send DNS
Update
1 = HA does need to send DNS
Update
78 CDMA-Always-On ENUM 0-1;
0 = Inactive
1 = Active
79 CDMA-Foreign-Agent-Address IP
Addres
s
80 CDMA-Last-User-Activity UINT3
2
0-0
81 CDMA-MN-AAA-Removal-Indication ENUM 1-1;
1 = MN-AAA not required
82 CDMA-RN-Packet-Data-Inactivity-Tim
er
UINT3
2
0-0
83 CDMA-Forward-PDCH-RC UINT3
2
0-0
84 CDMA-Forward-DCCH-Mux-Option UINT3
2
0-0
85 CDMA-Reverse-DCCH-Mux-Option UINT3
2
0-0
86 CDMA-Forward-DCCH-RC UINT3
2
0-0
87 CDMA-Reverse-DCCH-RC UINT3
2
0-0
Table C-5 3GPP2 VSAs (continued)
SubAttr VSA Name Type Min-Max Value

C-20
Cisco Prime Access Registrar 6.1 User Guide
OL-29756-01
Appendix C RADIUS Attributes
Vendor-Specific Attributes
88 CDMA-Session-Termination-Capability UINT3
2
0-0
89 CDMA-Allowed-Persistent-TFTs UINT3
2
0-0
90 CDMA-PrePaid-Accounting-Quota String 0-253
91 CDMA-PrePaid-Accounting-Capability String 0-253
92 CDMA-MIP-Lifetime String 0-253
93 CDMA-Accounting-Stop-Triggered-By
-Active-Stop-Indication
ENUM 1-1;
1 = Accounting report at active/
dormant transitions
94 CDMA-Service-Reference-ID String 0-253
95 CDMA-DNS-Update-Capability ENUM 1-1:
1 = HA is capable of dynamic DNS
Update
96 CDMA-Disconnect-Reason ENUM 1-1:
1 = MS Mobility Detection
97 CDMA-Remote-IPv6-Address-Octet-C
ount
String 36-253
98 CDMA-PrePaid-Tariff-Switching String 0-253
99 CDMA-Authorization-Parameters String 0-253
100 CDMA-BCMCS-Flow-ID String 0-253
101 CDMA-BCMCS-Capability String 0-253
102 CDMA-Common-Session-Info String 0-253
103 CDMA-BSN-Session-Info String 0-253
104 CDMA-RN-Session-Info String 0-253
105 CDMA-Reason-Code String 0-253
106 CDMA-Physical-Channel String 0-253
107 CDMA-BCMCS-Flow-Transmission-Ti
me
String 0-253
108 CDMA-Subnet String 0-253
109 CDMA-Multicast-IP-Address String 0-253
110 CDMA-Port String 0-253
111 CDMA-Auth-Key String 0-253
112 CDMA-TK-Info String 0-253
113 CDMA-BAK-ID String 0-253
114 CDMA-Reverse-PDCH-RC UINT3
2
0-0
115 CDMA-Acq-Info-Timestamp UINT3
2
0-0
Table C-5 3GPP2 VSAs (continued)
SubAttr VSA Name Type Min-Max Value

C-21
Cisco Prime Access Registrar 6.1 User Guide
OL-29756-01
Appendix C RADIUS Attributes
Vendor-Specific Attributes
116 CDMA-MEID String 0-16
117 CDMA-DNS-Server-IP-Address String 0-22
118 CDMA-MIP6-Home-Agent-from-BU String 0-18
119 CDMA-MIP6-CoA String 0-22
120 CDMA-MIP6-HoA-Not-Authorized ENUM 1-1;
1 = The HoA is not authorized
121 CDMA-MIP6-Session-Key String 0-253
122 CDMA-Hot-Line-Accounting-Indicatio
n
String 0-253
112 CDMA-Hot-Line-Profile-ID String 0-253
124 CDMA-Filter-Rule String 0-253
125 CDMA-HTTP-Redirection-Rule String 0-253
126 CDMA-IP-Redirection-Rule String 0-253
127 CDMA-Hot-Line-Capability UINT3
2
0-0
128 CDMA-MIP6-Home-Link-Prefix String 0-253
129 CDMA-MIP6-Home-Address String 0-253
130 CDMA-Maximum-Authorized-Aggrega
te-Bandwidth-for-Best-Effort-Traffic
UINT3
2
0-0
131 CDMA-Authorized-QoS-Profile-IDs-fo
r-the-User
String 0-253
132 CDMA-Granted-QoS-Parameters String 0-253
133 CDMA-Maximum-Per-Flow-Priority-fo
r-the-User
UINT3
2
0-15
134 CDMA-MIP6-Authenticator String 0-253
135 CDMA-Source-IPv6-Address String 0-253
136 CDMA-Program-ID String 0-253
137 CDMA-Program-Name String 0-253
138 CDMA-MIP6-MAC-Mobility-Data String 0-253
139 CDMA-Inter-User-Priority UINT3
2
0-3
140 CDMA-MIP6-Home-Agent-Attribute-B String 0-253
141 CDMA-MIP6-HoA String 0-253
142 CDMA-Carrier-ID String 0-8
143 CDMA-GMT-Time-Zone-Offset String 0-253
Table C-5 3GPP2 VSAs (continued)
SubAttr VSA Name Type Min-Max Value

C-22
Cisco Prime Access Registrar 6.1 User Guide
OL-29756-01
Appendix C RADIUS Attributes
Vendor-Specific Attributes
ACC VSAs
Table C-6 lists the ACC VSAs. The vendor ID for ACC VSAs is 5.
Table C-6 ACC VSAs
SubAttr VSA Name Type
Min-Max
Value
1 Acc-Reason-Code ENUM:
no reason given/no failure
resource shortage
protocol error
invalid attribute
invalid service type
invalid framed protocol
invalid attribute value
invalid user information
invalid IP address
invalid integer syntax
invalid NAS port
0-56
1 Acc-Reason-Code (Continued) ENUM:
requested by user
session already open
network disconnect
service interruption
physical port error
idle timeout
session timeout
administrative reset
NAS reload or reset
NAS error
NAS request
0-56
1 Acc-Reason-Code (Continued) ENUM:
undefined reason given
too many RADIUS users
conflicting attributes
port limit exceeded
facility not available
internal configuration error
bad route specification
0-56

C-23
Cisco Prime Access Registrar 6.1 User Guide
OL-29756-01
Appendix C RADIUS Attributes
Vendor-Specific Attributes
1 Acc-Reason-Code (Continued) Access Partition bind failure
security violation
request type conflict
configuration disallowed
missing attribute
no authentication server
invalid request
missing parameter
invalid parameter
call cleared with cause
inopportune config request
invalid config parameter
missing config parameter
incompatible service profile
administrative reset
0-56
1 Acc-Reason-Code (Continued) administrative reload
no authentication response
port unneeded
port preempted
port suspended
service unavailable
callback
user error
host request
no accounting server
no accounting response
access denied
temporary buffer shortage
0-56
2 Acc-Ccp-Option ENUM:
Disabled
Enabled
1-2
3 Acc-Input-Errors UINT32 0-253
4 Acc-Output-Errors UINT32 0-253
5 Acc-Access-Partition String 0-253
6 Acc-Customer-Id String 0-253
7 Acc-Ip-Gateway-Pri IPADDR 0-253
8 Acc-Ip-Gateway-Sec IPADDR 0-253
9 Acc-Route-Policy ENUM :
Funnel
Direct
1-2
10 Acc-ML-MLX-Admin-State ENUM:
Enabled
Disabled
1-2
11 Acc-ML-Call-Threshold UINT32 0-253
Table C-6 ACC VSAs (continued)
SubAttr VSA Name Type
Min-Max
Value

C-24
Cisco Prime Access Registrar 6.1 User Guide
OL-29756-01
Appendix C RADIUS Attributes
Vendor-Specific Attributes
12 Acc-ML-Clear-Threshold UINT32 0-253
13 Acc-ML-Damping-Factor UINT32 0-253
14 Acc-Tunnel-Secret String 0-253
15 Acc-Clearing-Cause ENUM:
cause unspecified
unassigned number
invalid information element c
message incompatible with sta
recovery on timer expiration
mandatory information element
protocol error
interworking
normal clearing
user busy
no user responding
user alerted no answer
0-127
15 Acc-Clearing-Cause
(Continued)
ENUM:
no route to transit network
call rejected
number changed
non selected user clearing
destination out of order
invalid or incomplete number
facility rejected
no route to destination
response to status inquiry
normal unspecified cause
no circuit or channel availab
network out of order
0-127
15 Acc-Clearing-Cause
(Continued)
ENUM:
temporary failure
switching equipment congestio
access information discarded
circuit or channel unavailabl
circuit or channel preempted
resources unavailable
quality of service unavailabl
facility not subscribed
outgoing calls barred
incoming calls barred
bearer capability unauthorize
bearer capability not availab
0-127
Table C-6 ACC VSAs (continued)
SubAttr VSA Name Type
Min-Max
Value

C-25
Cisco Prime Access Registrar 6.1 User Guide
OL-29756-01
Appendix C RADIUS Attributes
Vendor-Specific Attributes
15 Acc-Clearing-Cause
(Continued)
ENUM:
channel unacceptable
service not available
bearer capability not impleme
channel type not implemented
facility not implemented
call awarded being delivered
restricted digital informatio
service not implemented
invalid call reference
identified channel does not e
call identity does not exist
call identity in use
no call suspended
0-127
15 Acc-Clearing-Cause
(Continued)
ENUM:
suspended call cleared
incompatible destination
invalid transit network selec
invalid message
mandatory information element
message not implemented
inopportune message
information element not imple
0-127
16 Acc-Clearing-Location ENUM:
local or remote user
private network serving local
beyond interworking point
public network serving local
transit network
private network serving remot
public network serving remote
international network
0-10
17 Acc-Service-Profile String 0-253
18 Acc-Request-Type ENUM:
Ring Indication
Dial Request
User Authentication
Tunnel Authentication
User Accounting
Tunnel Accounting
1-6
19 Acc-Framed-Bridge ENUM :
Disabled
Enabled
0-1
20 Acc-Vpsm-Oversubscribed ENUM :
False
True
1-2
Table C-6 ACC VSAs (continued)
SubAttr VSA Name Type
Min-Max
Value

C-26
Cisco Prime Access Registrar 6.1 User Guide
OL-29756-01
Appendix C RADIUS Attributes
Vendor-Specific Attributes
21 Acc-Acct-On-Off-Reason ENUM :
NAS Reset
NAS Reload
Configuration Reset
Configuration Reload
Enabled
Disabled
0-5
22 Acc-Tunnel-Port UINT32 0-253
12 Acc-Dns-Server-Pri IPADDR 0-253
24 Acc-Dns-Server-Sec IPADDR 0-253
26 Acc-Nbns-Server-Sec IPADDR 0-253
27 Acc-Dial-Port-Index
28 Acc-Ip-Compression ENUM:
Disabled
Enabled
0-1
29 Acc-Ipx-Compression ENUM:
Disabled
Enabled
0-1
30 Acc-Connect-Tx-Speed UINT32 0-253
31 Acc-Connect-Rx-Speed UINT32 0-253
32 Acc-Modem-Modulation-Type String 0-253
33 Acc-Modem-Error-Protocol String 0-253
34 Acc-Callback-Delay UINT32 0-253
35 Acc-Callback-Num-Valid String 0-253
36 Acc-Callback-Mode ENUM:
User-Auth
User-Specified-E-164
CBCP-Callback
CLI-Callback
0-7
37 Acc-Callback-CBCP-Type ENUM:
CBCP-None
CBCP-User-Specified
CBCP-Pre-Specified
1-3
38 Acc-Dialout-Auth-Mode ENUM:
PAP
CHAP
CHAP-PAP
NONE
1-4
39 Acc-Dialout-Auth-Password String 0-253
40 Acc-Dialout-Auth-UserName String 0-253
Table C-6 ACC VSAs (continued)
SubAttr VSA Name Type
Min-Max
Value

C-27
Cisco Prime Access Registrar 6.1 User Guide
OL-29756-01
Appendix C RADIUS Attributes
Vendor-Specific Attributes
Altiga VSAs
Table C-7 lists the Altiga VSAs. The vendor ID for Altiga VSAs is 3076.
42 Acc-Access-Community ENUM:
PUBLIC
NETMAN
1-2
43 Acc-Vpsm-Reject-Cause ENUM:
No-Access-Partition
Access-Partition-Disabled
Partition-Portlimit-Exceeded
License-Portlimit-Exceeded
Home-Server-Down
Rejected-By-Home-Server
NAS-Administratively-Disabled
1-7
44 Acc-Ace-Token String 0-253
45 Acc-Ace-Token-Ttl UINT 0-253
46 Acc-Ip-Pool-Name String 0-253
47 Acc-Igmp-Admin-State ENUM :
Enabled
Disabled
1-2
48 Acc-Igmp-Version ENUM :
V1
V2
1-2
Table C-6 ACC VSAs (continued)
SubAttr VSA Name Type
Min-Max
Value
Table C-7 Altiga VSAs
SubAttr VSA Name Type
Min-Max
Value
1 Altiga-General-Acces-Hours String 0-253
2 Altiga-General-Simultaneous-Logic UINT32 0-253
3 Altiga-General-Minimum-Password-Length UINT32 0-253
4 Altiga-General-All-Alphabetic-Only-Passwords ENUM 0-1
5 Altiga-General-Primary-DNS IP Address 0-253
6 Altiga-General-Secondary-DNS IP Address 0-253
8 Altiga-General-Secondary-WINS IP Address 0-253
9 Altiga-General-SEP-Card-Assignment UINT32 0-253
10 Altiga-General-Priority-On-SEP UINT32 0-253
11 Altiga-General-Tunneling-Protoco UNIT32 0-253
12 Altiga-IPSec-Security-Associatio String 0-253

C-28
Cisco Prime Access Registrar 6.1 User Guide
OL-29756-01
Appendix C RADIUS Attributes
Vendor-Specific Attributes
13 Altiga-IPSec-Authentication ENUM:
None
RADIUS
LDAP
NT Domain
SDI
Internal
0-5
15 Altiga-IPSec-Banner String 0-253
16 Altiga-IPSec-Allow-Password-Storage-On-Client ENUM:
False
True
0-1
17 Altiga-PPTP-L2TP-Use-Client-Specified-Addres
s
ENUM:
False
True
0-1
18 Altiga-PPTP-Minimal-Authentication-Protocol UINT32 0-253
19 Altiga-L2TP-Minimal-Authentication UINT32 0-253
20 Altiga-PPTP-Encryption UINT32 0-253
21 Altiga-L2TP-Encryption UINT32 0-253
22 Altiga-Argument-Authentication-Server-Type ENUM:
First Active
Server
RADIUS
LDAP
NT
SDI
Internal
0-5
12 Altiga-Argument-Authentication-Server-Passwor
d
String 0-253
24 Altiga-Argument-Request-Authenticatior-Vector String 0-253
25 Altiga-IPSec-LTL-Keepalives ENUM:
False
True
0-1
26 Altiga-Argument-IPSec-Group-Name String 0-253
27 Altiga-IPSec-Split-Tunneling String 0-253
28 Altiga-IPSec-Default-Domain String 0-253
28 Altiga-IPSec-Secondary-Domain-List String 0-253
30 Altiga-IPSec-Tunnel-Type ENUM:
LAN to
LAN
Remote
Access
1-2
Table C-7 Altiga VSAs (continued)
SubAttr VSA Name Type
Min-Max
Value

C-29
Cisco Prime Access Registrar 6.1 User Guide
OL-29756-01
Appendix C RADIUS Attributes
Vendor-Specific Attributes
31 Altiga-IPSec-Mode-Configuration ENUM:
False
True
0-1
32 Altiga-Argument-Authentication-Server-Priority UINT32 0-253
33 Altiga-IPSec-Group-Lock-Of-User ENUM:
False
True
0-1
34 Altiga-IPSec-IPSec-Over-UDP ENUM:
False
True
0-1
35 Altiga-IPSec-UDP-Port-For-IPSec UINT32 0-253
128 Altiga-Partitioning-Primary-DHCP
129 Altiga-Partitioning-Secondary-DHCP IP Address 0-253
131 Altiga-Partitioning-Premise-Rout IP Address 0-253
132 Altiga-Partitioning-Partition-Max-Sessions String 0-253
133 Altiga-Partitioning-Mobile-IP-Key String 0-253
134 Altiga-Partitioning-Mobile-IP-Address IP Address 0-253
135 Altiga-Partitioning-Mobile-IP-SPI IP Address 0-253
136 Altiga-Partitioning-Strip-Realm ENUM:
False
True
0-1
137 Altiga-Partitioning-Group-ID UINT32 0-253
250 Altiga-Group-Name String 0-253
Table C-7 Altiga VSAs (continued)
SubAttr VSA Name Type
Min-Max
Value

C-30
Cisco Prime Access Registrar 6.1 User Guide
OL-29756-01
Appendix C RADIUS Attributes
Vendor-Specific Attributes
Ascend VSAs
Table C-8 lists the Ascend VSAs. The vendor ID for Ascend VSAs is 529.
Table C-8 Ascend VSAs
SubAttr VSA Name Type
Min-Max
Value
17 Ascend-Change-Password String 0 - 253
18 Ascend-Session-Type ENUM:
Unused
Unknown
G711-Ulaw
G711-Alaw
G712
G729
G712-64KPS
G728
RT24
0 - 8
19 Ascend-H312-Gatekeeper IP Address 0 - 253
21 Ascend-H312-Conference-ID String 0-253
22 Ascend-H312-Destination-NAS-ID IP Address 0-65535
12 Ascend-H312-Dialed-Time UINT32 0-253
24 Ascend-H312-Dialed-Number String 0-253
25 Ascend-Inter-Arrival-Jitter UINT32 0-253
26 Ascend-Dropped-Octets UINT32 0-253
27 Ascend-Dropped-Packets UINT32 0-253
48 Ascend-Call-Direction ENUM:
Incoming
Outgoing
0-1

C-31
Cisco Prime Access Registrar 6.1 User Guide
OL-29756-01
Appendix C RADIUS Attributes
Vendor-Specific Attributes
49 Ascend-Service-Type ENUM 0 - 12;
NotUsed
None
EuUi
Telnet
TelnetBi
n
RawTcp
TermSer
ver
MP
VirtualC
onn
X25DCh
an
PseuTun
PPP
IpFax
Other
ATM
HdlcNrm
Vo I p
Visa2
PPP
Slip
MPP
X25
Combine
t
FR
EuRaw
68 Ascend-Tunnel-ID String 0 - 253
126 Ascend-Route-Preference ENUM:
Interface,
OSPF-Internal
,
RIP,
Down-WAN,
OSPF-ASE,
Infinite,
ICMP
0-225
132 Ascend-Client-Gateway IP Address 0 - 253
144 Ascend-Assign-IP-Client IP Address 0-0
145 Ascend-Assign-IP-Server IP Address 0-0
152 Ascend-Multicast-Rate-Limit UINT32 0-65535
162 Ascend-FR-DCE-N392 UINT32 0-65535
Table C-8 Ascend VSAs (continued)
SubAttr VSA Name Type
Min-Max
Value

C-32
Cisco Prime Access Registrar 6.1 User Guide
OL-29756-01
Appendix C RADIUS Attributes
Vendor-Specific Attributes
163 Ascend-FR-DTE-N392 UINT32 0-65535
164 Ascend-FR-DCE-N393 UINT32 0-65535
165 Ascend-FR-DTE-N393 UINT32 0-65535
166 Ascend-FR-T391 UINT32 0-65535
167 Ascend-FR-T392 UINT32 0-65535
168 Ascend-Bridge-Address UINT32 1-253
169 Ascend-TS-Idle-Limit UINT32 0-65535
170 Ascend-TS-Idle-Mode ENUM;
TS-Idle-None
TS-Idle-Input
TS-Idle-Input-
Output
0-2
171 Ascend-DBA-Monitor ENUM;
Transmit
Transmit-Rece
ive
None
0-2
172 Ascend-Base-Channel-Count UINT32 0-65535
173 Ascend-Minimum-Channels UINT32 0-65535
174 Ascend-IPX-Route String 1-253
175 Ascend-FT1-Caller ENUM;
FT1-No
FT1-Yes
0-1
176 Ascend-Backup String 1-253
177 Ascend-Call-Type ENUM;
Nailed
Nailed/MPP
Perm/Switche
d
0-2
178 Ascend-Group String 1-253
179 Ascend-FR-DLCI UINT32 0-65535
180 Ascend-FR-Profile-Name String 1-253
181 Ascend-Ara-PW String 1-253
182 Ascend-IPX-Node-Address String 1-253
183 Ascend-Home-Agent-IP-Addr IP Address 0-0
184 Ascend-Home-Agent-Password String 1-253
185 Ascend-Home-Network-Name String 1-253
186 Ascend-Home-Agent-UDP-Port UINT32 0-65535
187 Ascend-Multilink-ID UINT32 0-65535
Table C-8 Ascend VSAs (continued)
SubAttr VSA Name Type
Min-Max
Value

C-33
Cisco Prime Access Registrar 6.1 User Guide
OL-29756-01
Appendix C RADIUS Attributes
Vendor-Specific Attributes
188 Ascend-Num-In-Multilink UINT32 0-65535
189 Ascend-First-Dest IP Address 0-0
190 Ascend-Pre-Input-Octets UINT32 0-65535
191 Ascend-Pre-Output-Octets UINT32 0-65535
192 Ascend-Pre-Input-Packets UINT32 0-65535
193 Ascend-Pre-Output-Packets UINT32 0-65535
194 Ascend-Maximum-Time UINT32 0-65535
Table C-8 Ascend VSAs (continued)
SubAttr VSA Name Type
Min-Max
Value

C-34
Cisco Prime Access Registrar 6.1 User Guide
OL-29756-01
Appendix C RADIUS Attributes
Vendor-Specific Attributes
195 vAscend-Pre-Output-Packets
(continued)
ENUM:
No-Reason,
Not-Applicabl
e,
Modem-No-D
CD,
Session-Timeo
ut,
Invalid-Incomi
ng-User,
Disconnect-D
ue-To-Callbac
k,
DCD-Detected
-Then-Inactive
,
Modem-Invali
d-Result-Code
s,
Protocol-Disa
bled-Or-Unsup
por,
Disconnect-Re
q-By-RADIUS
,
Disconnect-Re
q-By-Local-A
dmin,
V110-Timeout
-Or-Sync-Retr
y-Ex,
PPP-Auth-Tim
eout-Exceeded
,
User-Executed
-Do-Hangup,
Remote-End-
Hung-Up,
Resource-Has-
Been-Quiesce
d,
Max-Call-Dur
ation-Reached,
Unknown,
(continued)
0-195
Table C-8 Ascend VSAs (continued)
SubAttr VSA Name Type
Min-Max
Value

C-35
Cisco Prime Access Registrar 6.1 User Guide
OL-29756-01
Appendix C RADIUS Attributes
Vendor-Specific Attributes
195 vAscend-Pre-Output-Packets ENUM:
TermSrv-User-
Quit,
TermSrv-Idle-
Timeout,
TermSrv-Exit-
Telnet,
TermSrv-No-I
Paddr,
TermSrv-Exit-
Raw-TCP,
TermSrv-Exit-
Login-Failed,
TermSrv-Exit-
Raw-TCP-Dis
abled,
TermSrv-CTR
L-C-In-Login,
TermSrv-Destr
oyed,
TermSrv-User-
Closed-VCon,
Call-Disconne
cted,
TermSrv-VCo
n-Destroyed,
TermSrv-Exit-
Rlogin,
TermSrv-Bad-
Rlogin-Option
,
TermSrv-Not-
Enough-Resou
rces,
MPP-No-NUL
L-Msg-Timeo
ut,
CLID-Authent
ication-Failed,
(continued)
0-195
Table C-8 Ascend VSAs (continued)
SubAttr VSA Name Type
Min-Max
Value

C-36
Cisco Prime Access Registrar 6.1 User Guide
OL-29756-01
Appendix C RADIUS Attributes
Vendor-Specific Attributes
195 vAscend-Pre-Output-Packets ENUM:
PPP-LCP-Tim
eout,
PPP-LCP-Neg
otion-Failed,
PPP-PAP-Aut
h-Failed,
PPP-CHAP-A
uth-Failed,
PPP-Rmt-Auth
-Failed,
PPP-Rcv-Term
inate-Req,
PPP-Rcv-Clos
e-Event,
PPP-No-NCPs
-Open,
PPP-MP-Bund
le-Unknown,.
PPP-LCP-Clos
e-MP-Add-Fai
l,
CLID-RADIU
S-Timeout
(continued)
0-195
Table C-8 Ascend VSAs (continued)
SubAttr VSA Name Type
Min-Max
Value

C-37
Cisco Prime Access Registrar 6.1 User Guide
OL-29756-01
Appendix C RADIUS Attributes
Vendor-Specific Attributes
195 vAscend-Pre-Output-Packets
(continued)
Out-Of-Resou
rces,
Invalid-IP-Ad
dress,
Hostname-Res
olution-Failed,
Bad-Or-Missin
g-Port-Numbe
r, Host-Reset,
Connection-R
efused,
Connection-Ti
meout,
Connection-Cl
osed,
Network-Unre
achable,
Host-Unreach
able,
Network-Unre
achable-Admi
n,
Host-Unreach
able-Admin,
Port-Unreacha
ble,
Table C-8 Ascend VSAs (continued)
SubAttr VSA Name Type
Min-Max
Value

C-38
Cisco Prime Access Registrar 6.1 User Guide
OL-29756-01
Appendix C RADIUS Attributes
Vendor-Specific Attributes
196 Ascend-Connect-Progress ENUM:
No-Progress,
unknown1,
Call-Up,
unknown2,
Modem-Up,
Modem-Awaiti
ng-DCD,
Modem-Awaiti
ng-Codes,
TermSrv-Start
ed,
TermSrv-Raw-
TCP-Started,
TermSrv-Telne
t-Started,
TermSrv-Raw-
TCP-Connecte
d,
TermSrv-Telne
t-Connected,
TermSrv-Rlogi
n-Started,
TermSrv-Rlogi
n-Connected,
TermSrv-Auth
entication-Beg
in,
Modem-Outdi
al-Call-Up
0-94
Table C-8 Ascend VSAs (continued)
SubAttr VSA Name Type
Min-Max
Value

C-39
Cisco Prime Access Registrar 6.1 User Guide
OL-29756-01
Appendix C RADIUS Attributes
Vendor-Specific Attributes
196 Ascend-Connect-Progress ENUM:
LAN-Session-
Up,
LCP-Opening,
CCP-Opening,
IPNCP-Openi
ng,
NCP-Opening,
LCP-Opened,
CCP-Opened,
IPNCP-Opene
d,
BNCP-Opened
,
LCP-State-Init
ial,
LCP-State-Sta
rting,
LCP-State-Clo
sed,
LCP-State-Sto
pped,
BACP-Opened
,
LCP-State-Sto
pping,
LCP-State-Re
quest-Sent,
LCP-State-Ac
k-Received,
LCP-State-Ac
k-Sent,
IPXNCP-Open
ed,
ATN C P - Op e n
ed,
BACP-Openin
g,
V110-Up,
V110-State-O
pened,
V110-State-Ca
rrier,
V110-State-Re
set,
V110-State-Cl
osed
0-94
197 Ascend-Data-Rate UINT32 0-65535
Table C-8 Ascend VSAs (continued)
SubAttr VSA Name Type
Min-Max
Value

C-40
Cisco Prime Access Registrar 6.1 User Guide
OL-29756-01
Appendix C RADIUS Attributes
Vendor-Specific Attributes
198 Ascend-PreSession-Time UINT32 0-65535
199 Ascend-Token-Idle UINT32 0-65535
200 ENUM:
Tok-Imm-No,
Tok-Imm-Yes
0-1
201 Ascend-Require-Auth ENUM:
Not-Require-
Auth
Require-Auth
Pap-Only
Pap-Only
Pap-Login-Onl
y
Pap-Framed-O
nly
Pap-Outbound
-Only
CHAP-Only
CHAP-Only
CHAP-Login-
Only
CHAP-Framed
-Only
CHAP-Outbou
nd-Only
MS-CHAP-On
ly
MS-CHAP-On
ly
MS-CHAP-Lo
gin-Only
MS-CHAP-Fr
amed-Only
MS-CHAP-Ou
tbound-Only
0-55
210 Ascend-PPP-VJ-Slot-Comp ENUM:
VJ-Slot-Comp
-No
1-1
211 Ascend-PPP-VJ-1172 ENUM:
PPP-VJ-1172
1-1
212 Ascend-PPP-Async-Map UINT32 0-65535
213 Ascend-Third-Prompt String 1-253
214 Ascend-Send-Secret String 1-253
215 Ascend-Receive-Secret String 1-253
Table C-8 Ascend VSAs (continued)
SubAttr VSA Name Type
Min-Max
Value

C-41
Cisco Prime Access Registrar 6.1 User Guide
OL-29756-01
Appendix C RADIUS Attributes
Vendor-Specific Attributes
216 Ascend-IPX-Peer-Mode ENUM:
IPX-Peer-Rout
er,
IPX-Peer-Dial
in
1-1
217 Ascend-IP-Pool-Definition String 1-253
218 Ascend-Assign-IP-Pool UINT32 0-65535
219 Ascend-FR-Direct ENUM:
FR-Direct-No,
FR-Direct-Yes
1-1
220 Ascend-FR-Direct-Profile String 1-253
221 Ascend-FR-Direct-DLCI UINT32 0-65535
222 Ascend-Handle-IPX ENUM:
Handle-IPX-N
one,
Handle-IPX-C
lient,
Handle-IPX-S
erver
0-2
212 Ascend-Netware-timeout UINT32 0-65535
224 Ascend-IPX-Alias UINT32 0-65535
225 Ascend-Metric UINT32 0-65535
226 Ascend-PRI-Number-Type ENUM:
Unknown-Nu
mber,
Intl-Number,
National-Num
ber,
Local-Number
Abbrev-Numb
er
0-5
227 Ascend-Dial-Number String 1-253
228 Ascend-Route-IP ENUM:
Unknown-Nu
mber,
Intl-Number,
National-Num
ber,
Local-Number
,
Abbrev-Numb
er
0-5
Table C-8 Ascend VSAs (continued)
SubAttr VSA Name Type
Min-Max
Value

C-42
Cisco Prime Access Registrar 6.1 User Guide
OL-29756-01
Appendix C RADIUS Attributes
Vendor-Specific Attributes
229 Ascend-Route-IPX ENUM:
Route-IPX-No
Route-IPX-Ye
s
0-1
120 Ascend-Bridge ENUM:
Bridge-No,
Bridge-Yes
0-1
121 Ascend-Send-Auth ENUM:
Send-Auth-No
ne,
end-Auth-PAP,
Send-Auth-CH
AP
0-2
122 Ascend-Send-Passwd String 1-253
123 Ascend-Link-Compression ENUM:
Link-Comp-N
one,
Link-Comp-St
ac,
Link-Comp-St
ac-Draft-9,
Link-Comp-M
S-Stac
0-3
124 Ascend-Target-Util UINT32 0-65535
125 Ascend-Maximum-Channels UINT32 0-65535
126 Ascend-Inc-Channel-Count UINT32 0-65535
127 Ascend-Dec-Channel-Count UINT32 0-65535
128 Ascend-Seconds-Of-History UINT32 0-65535
129 Ascend-History-Weigh-Type ENUM:
History-Const
ant,
History-Linear
,
History-Quadr
atic
0-2
240 Ascend-Add-Seconds UINT32 0-65535
241 Ascend-Remove-Seconds UINT32 0-65535
242 Ascend-Data-Filter String 1-253
243 Ascend-Call-Filter String 1-253
244 Ascend-Idle-Limit UINT32 0-65535
245 Ascend-Idle-Limit UINT32 0-65535
Table C-8 Ascend VSAs (continued)
SubAttr VSA Name Type
Min-Max
Value

C-43
Cisco Prime Access Registrar 6.1 User Guide
OL-29756-01
Appendix C RADIUS Attributes
Vendor-Specific Attributes
246 Ascend-Callback ENUM:
Callback-No,
Callback-Yes
0-1
Table C-8 Ascend VSAs (continued)
SubAttr VSA Name Type
Min-Max
Value

C-44
Cisco Prime Access Registrar 6.1 User Guide
OL-29756-01
Appendix C RADIUS Attributes
Vendor-Specific Attributes
247 Ascend-Data-Svc ENUM:
Switched-Voic
e-Bearer,
Switched-56K
R,
Switched-192
K,
Switched-256
K,
Switched-320
K,
Switched-384
K-MR,
Switched-448
K,
Switched-512
K,
Switched-566
K,
Switched-640
K,
Switched-704
K,
Switched-768
K,
Switched-64K,
Switched-832
K,
Switched-896
K,
Switched-960
K,
Switched-102
4K,
Switched-108
8K,
Switched-115
2K,
Switched-121
6K,.
Switched-128
0K,
Switched-134
4K,
Switched-140
8K,
Switched-64K
R,
Switched-147
2K,
Switched-160
0K,
Switched-166
4K,
Switched-172
0-43
Table C-8 Ascend VSAs (continued)
SubAttr VSA Name Type
Min-Max
Value

C-45
Cisco Prime Access Registrar 6.1 User Guide
OL-29756-01
Appendix C RADIUS Attributes
Vendor-Specific Attributes
Bay Networks VSAs
Table C-9 lists the Bay Networks VSAs. The vendor ID for Bay Networks VSAs is 1584.
248 Ascend-Force-56 ENUM:
Force-56-No,
Force-56-Yes
0-1
249 Ascend-Billing-Number String 1-253
250 Ascend-Call-By-Call UINT32 0-65535
251 Ascend-Transit-Number String 1-253
252 Ascend-Host-Info String 1-253
253 Ascend-PPP-Address IP Address 0-0
254 Ascend-MPP-Idle-Percent UINT32 0-65535
Table C-8 Ascend VSAs (continued)
SubAttr VSA Name Type
Min-Max
Value
Table C-9 Bay Networks VSAs
SubAttr VSA Name Type
Min-Max
Value
28 Annex-Filter String 1-253
29 Annex-CLI-Command String 1-253
30 Annex-CLI-Filter String 1-253
31 Annex-Host-Restrict String 1-253
32 Annex-Host-Allow String 1-253
33 Annex-Product-Name String 1-253
34 Annex-SW-Version String 1-253
35 Annex-Local-IP-Address IPADDR 1-253
36 Annex-Callback-Portlist UINT32 0-0
44 Annex-System-Disc-Reason UINT32 0-0
45 Annex-Modem-Disc-Reason UINT32 0-0
46 Annex-Disconnect-Reason UINT32 0-0
50 Annex-Transmit-Speed UINT32 0-0
51 Annex-Receive-Speed UINT32 0-0

C-46
Cisco Prime Access Registrar 6.1 User Guide
OL-29756-01
Appendix C RADIUS Attributes
Vendor-Specific Attributes
Cabletron VSAs
Table C-10 lists the Cabletron VSAs. The vendor ID for Cabletron VSAs is 52.
Cisco Prime Access Registrar Internal VSAs
Table C-11 lists the Prime Access Registrar Internal VSAs. The vendor ID for Prime Access Registrar
internal VSAs is 1760.
Table C-10 Cabletron VSAs
SubAttr VSA Name Type
Min-Max
Value
192 Cabletron-Framed-Data-Rate ENUM:
Rate-56KB
Rate-64KB
Rate-112KB
Rate-128KB
0-4
193 Cabletron-Phone-Number String 0-253
194 Cabletron-Caller-Id String 0-253
196 Cabletron-Connection-Reference UINT32 0-253
198 Cabletron-Initial-Rate UINT32 0-253
199 Cabletron-Maximum-Rate UINT32 0-253
192 Cabletron-Framed-Data-Rate Enum:
Rate-56KB
Rate-64KB
Rate-112KB
Rate-128KB
192
Table C-11 Prime Access Registrar Internal VSAs
SubAttr VSA Name Type
Min-M
ax
Value
1 Realm String 1-253
2 Incoming-Translation-Groups String 1-253
3 Client-IP-Address IP Address 1-253
4 Subnet-Mask IP Address 1-253
5 Outgoing-Translation-Groups String 1-253
6 Authentication-Service String 1-253
7 Authorization-Service String 1-253
8DNIS String1-253
9CLID String1-253
10 UserFilterMask String 1-253

C-47
Cisco Prime Access Registrar 6.1 User Guide
OL-29756-01
Appendix C RADIUS Attributes
Vendor-Specific Attributes
11 Session-Manager String 1-253
12 Accounting-Service String 1-253
13 TimeRange String 1-253
14 AcceptedProfiles String 1-253
15 Policy String 1-253
16 Prefix String 1-253
17 Delimiters String 1-253
18 StripPrefix String 1-253
19 ODBC-Reply-Attribs String 1-253
20 ODBC-Check-Attribs String 1-253
21 Session-Service String 1-253
22 Prepaid ENUM:
0 = False
1 = True
1-2
12 Suffix String 0-253
12 Implicit-Auth-Enabled ENUM:
0 = False
1 = True
0-1
24 StripSuffix ENUM:
0 = False
1 = True
0-1
24 Query-Service String 0-253
92 RepSourceIP String 1-253
93 RepTargetIP String 1-253
94 RepTxnNum String 1-253
95 RepTxnCRC String 1-253
96 RepTxnElementCount String 1-253
97 RepNeedsFullSync UINT32 0-253
98 RepNeedsReSync UINT32 0-253
99 RepLastRxTxnNum UINT32 0-253
100 RepLastRxTxnCRC UINT32 0-253
101 RepNeedsMember UINT32 0-253
102 RepMemberName String 1-253
103 RepMemberIP IP Address 0-253
104 RepMemberPort UINT32 0-253
105 RepMemberOrdinal UINT32 0-253
Table C-11 Prime Access Registrar Internal VSAs (continued)
SubAttr VSA Name Type
Min-M
ax
Value

C-48
Cisco Prime Access Registrar 6.1 User Guide
OL-29756-01
Appendix C RADIUS Attributes
Vendor-Specific Attributes
Cisco VSAs
Table C-12 lists the Cisco VSAs. The vendor ID for Cisco VSAs is 9.
106 RepWorkLoad UINT32 0-253
107 RepTxTime UINT32 0-253
108 RepElementPath String 1-253
109 RepElementValue String 1-253
110 RepElementOrdinal UINT32 0-253
111 RepElementCRC UINT32 0-253
112 RepElementType UINT32 0-253
113 RepElementMode UINT32 0-253
114 RepPartialElement Undefined 0-253
Table C-11 Prime Access Registrar Internal VSAs (continued)
SubAttr VSA Name Type
Min-M
ax
Value
Table C-12 Cisco VSAs
SubAttr VSA Name Type
Min-Max
Value
1 Cisco-AVPair String 0-253
2 Cisco-NAS-Port String 0-253
3 Cisco-Fax-Account-ID-Origin String 0-253
4 Cisco-Fax-Message-ID String 0-253
5 Cisco-Fax-Pages String 0-253
6 Cisco-FAX Cover Page Flag String 0-253
7 Cisco-Fax-Modem-Time String 0-253
8 Cisco-Fax-Connect-Speed String 0-253
9 Cisco-Fax-Recipient-Count String 0-253
10 Cisco-Fax-Process-Abort-Fla
g
String 0-253
11 Cisco-Fax-DSN-Address String 0-253
12 Cisco-Fax-DSN-Flag String 0-253
13 Cisco-Fax-MDN-Address String 0-253
14 Cisco-Fax-MDN-Flag String 0-253
15 Cisco-Fax-Auth-Status String 0-253
16 Cisco-Email-Server-Address IP
Addres
s

C-49
Cisco Prime Access Registrar 6.1 User Guide
OL-29756-01
Appendix C RADIUS Attributes
Vendor-Specific Attributes
17 Cisco-Email-Server-ACK
Flag
String 0-253
18 Cisco-Gateway-ID String 0-253
19 Cisco-Call-Type String 0-253
20 Cisco-Port-Used String 0-253
21 Cisco-Abort-Cause String 0-253
22 Cisco-CRS-Info String 0-253
12 Cisco-h312-Remote-Address String 0-253
24 Cisco-h312-Conf-ID String 0-253
25 Cisco-h312-Setup-Time String 0-253
26 Cisco-h312-Call-Origin String 0-253
27 Cisco-h312-Call-Type String 0-253
28 Cisco-h312-Connect-Time String 0-253
29 Cisco-h312-Disconnect-Time String 0-253
30 Cisco-h312-Disconnect-Cause String 0-253
31 Cisco-h312-Voice-Quality String 0-253
32 Cisco-h312-Generic-IVR-Out String 0-253
33 Cisco-h312-Gateway-ID String 0-253
34 Cisco-3GPP2-AVPair String 0-253
35 Cisco Connection
ID-h312-incoming-connection
-ID
String 0-253
100 Cisco-h312-Generic-IVR-In String 0-253
101 Cisco-h312-Amount-Balance
102 Cisco-h312-Time-Balance String 0-253
103 Cisco-h312-Return-Code String 0-253
104 Cisco-h312-Prompt-ID String 0-253
105 Cisco-h312-Time-of-Day String 0-253
106 Cisco-h312-Redirect-Number String 0-253
107 Cisco-h312-Preferred-Langua
ge
String 0-253
108 Cisco-h312-Redirect-IP-Addr
ess
String 0-253
109 Cisco-h312-Billing-Model ENUM:
postpai
d
prepaid
0-1
110 Cisco-h312-Currency String 0-253
Table C-12 Cisco VSAs (continued)
SubAttr VSA Name Type
Min-Max
Value

C-50
Cisco Prime Access Registrar 6.1 User Guide
OL-29756-01
Appendix C RADIUS Attributes
Vendor-Specific Attributes
128 Cisco-UCP-IP-Pool-ID String 0-253
129 Cisco-UCP-User-Max-Sessio
ns
String 0-253
130 Cisco-UCP-User-Session-Cou
nt
String 0-253
131 Cisco-UCP-Next-Session-ID String 0-253
132 Cisco-UCP-VPDN-Max-Sessi
ons
String 0-253
133 Cisco-UCP-VPDN-Session-C
ount
String 0-253
134 Cisco-UCP-B-Channel-Max-
Sessions
String 0-253
135 Cisco-UCP-B-Channel-Sessio
n-Coun
String 0-253
136 Cisco-UCP-Status String 0-253
137 Cisco-UCP-BLOB-Attribute-
Length
String 0-253
138 Cisco-UCP-Disable-Statu String 0-253
139 Cisco-UCP-Block-Access-Ra
nge
String 0-253
140 Cisco-UCP-Home-POP-ID String 0-253
175 Cisco-UCP-IP-Addresses IP
Addres
s
0-253
176 Cisco-UCP-Session-Info String 0-253
211 Cisco-Ascend AV pairs String 0-253
250 Cisco-SSG-Account-Info String 0-253
251 Cisco-SSG-Service-Info String 0-253
252 Cisco-SSG-Command-Code String 0-253
253 Cisco-SSG-Control-Info String 0-253
Table C-12 Cisco VSAs (continued)
SubAttr VSA Name Type
Min-Max
Value

C-51
Cisco Prime Access Registrar 6.1 User Guide
OL-29756-01
Appendix C RADIUS Attributes
Vendor-Specific Attributes
Compatible VSAs
Table C-13 lists the Compatible VSAs. The vendor ID for Compatible VSAs is 255.
Microsoft VSAs
Table C-14 lists the Microsoft VSAs. The vendor ID for Microsoft VSAs is 311.
Table C-13 Compatible VSAs
SubAttr VSA Name Type
Min-Max
Value
0 Compatible-Tunnel-Delay UNIT32 0-253
1 Compatible-Tunnel-Throughput UNIT32 0-253
3 Compatible-Tunnel-Server-Endpoint IP Address 0-253
4 Compatible-Tunnel-Group-Info String 0-253
5 Compatible-Tunnel-Password String 0-253
6 Compatible-Echo UNIT32 0-253
7 Compatible-Tunnel-Client-IPX UNIT32 0-253
Table C-14 Microsoft VSAs
SubAttr VSA Name Type
Min-Max
Value
1 MS-CHAP-Response String 50-50
2 MS-CHAP-Error String 0-253
3 MS-CHAP-CPW1 String 70-70
4 MS-CHAP-CPW2 String 84-84
5 MS-CHAP-LM-Enc-PW String 4-253
6 MS-CHAP-NT-Enc-PW String 4-253
7 MS-MPPE-Encryption-
Policy
ENUM:
Encryption-Allowed
Encryption-Required
1-2
8 MS-MPPE-Encryption-
Types
String 0-4
9 MS-RAS-Vendor UINT32 0-253
10 MS-CHAP-Domain String 0-253
11 MS-CHAP-Challenge String 0-253
12 MS-CHAP-MPPE-Keys String 32-32
13 MS-BAP-Usage ENUM:
Not allowed
Allowed
Required
0-2

C-52
Cisco Prime Access Registrar 6.1 User Guide
OL-29756-01
Appendix C RADIUS Attributes
Vendor-Specific Attributes
14 MS-Link-Utilization-Th
reshold
UINT32 0-253
15 MS-Link-Drop-Time-Li
mit
String 0-253
16 MS-MPPE-Send-Key String 0-253
17 MS-MPPE-Recv-Key String 0-253
18 MS-RAS-Version String 0-253
19 MS-Old-ARAP-Passwor
d
String 0-253
20 MS-New-ARAP-Passwo
rd
String 0-253
21 MS-ARAP-Password-C
hange-Reason
ENUM:
Just-Change-Passwor
d
Expired-Password
Admin-Requires-Pas
sword-Chang
Password-Too-Short
1-4
22 MS-Filter String 0-253
12 MS-Acct-Auth-Type ENUM:
PAP
CHAP
MS-CHAP-1
MS-CHAP-2
EAP
1-5
26 MS-CHAP2-Success String 43-43
27 MS-CHAP2-CPW8 String 68-68
29 MS-Secondary-DNS-Se
rver
IP Address 68-68
31 MS-Secondary-NBNS-S
erver
IP Address 70-70
33 MS-ARAP-Challenge String 8-8
Table C-14 Microsoft VSAs (continued)
SubAttr VSA Name Type
Min-Max
Value

C-53
Cisco Prime Access Registrar 6.1 User Guide
OL-29756-01
Appendix C RADIUS Attributes
Vendor-Specific Attributes
Nomadix VSAs
Table C-15 lists the Nomadix VSAs. The vendor ID for Nomadix VSAs is 3309.
RedBack VSAs
Table C-16 lists the RedBack VSAs. The vendor ID for RedBack VSAs is 1252.
Table C-15 Nomadix VSAs
SubAttr VSA Name Type Min-Max Value
1 Nomadix-Bw-Up 0 253 UINT32 0-253
2 Nomadix-Dw-Down UINT32 0-253
Table C-16 RedBack VSAs
SubAttr VSA Name Type
Min-Max
Value
1 RedBack-Client-DNS-Pri String 0-253
2 RedBack-Client-DNS-Sec String 0-253
3 RedBack-DHCP-Max-Leases String 0-253
4 RedBack-Context-Name String 0-253
5 RedBack-Bridge-Group String 0-253
6 RedBack-BG-Aging-Time String 0-253
7 RedBack-BG-Path-Cost String 0-253
8 RedBack-BG-Span-Dis String 0-253
9 RedBack-BG-Trans-BPDU String 0-253
10 RedBack-Rate-Limit-Rate String 0-253
11 RedBack-Rate-Limit-Burst String 0-253
12 RedBack-Police-Rate String 0-253
13 RedBack-Police-Burst String 0-253
14 RedBack-Source-Validation String 0-253
15 RedBack-Tunnel-Domain String 0-253
16 RedBack-Tunnel-Local-Name String 0-253
17 RedBack-Tunnel-Remote-Name String 0-253
18 RedBack-Tunnel-Function String 0-253
21 RedBack-Tunnel-Max-Sessions String 0-253
22 RedBack-Tunnel-Max-Tunnels String 0-253
12 RedBack-Tunnel-Session-Auth String 0-253
24 RedBack-Tunnel-Window String 0-253
25 RedBack-Tunnel-Retransmit String 0-253

C-54
Cisco Prime Access Registrar 6.1 User Guide
OL-29756-01
Appendix C RADIUS Attributes
Vendor-Specific Attributes
26 RedBack-Tunnel-Cmd-Timeout String 0-253
27 RedBack-PPPOE-URL String 0-253
28 RedBack-PPPOE-MOTM String 0-253
29 RedBack-Tunnel-Group String 0-253
30 RedBack-Tunnel-Context String 0-253
31 RedBack-Tunnel-Algorithm String 0-253
32 RedBack-Tunnel-Deadtime String 0-253
33 RedBack-Mcast-Send String 0-253
34 RedBack-Mcast-Receive String 0-253
35 RedBack-Mcast-MaxGroups String 0-253
36 RedBack-Ip-Address-Pool-Name String 0-253
37 RedBack-Tunnel-DNIS String 0-253
38 RedBack-Medium-Type String 0-253
39 RedBack-PVC-Encapsulation-Ty
pe
String 0-253
40 RedBack-PVC-Profile-Name String 0-253
41 RedBack-PVC-Circuit-Padding String 0-253
42 RedBack-Bind-Type String 0-253
43 RedBack-Bind-Auth-Protocol String 0-253
44 RedBack-Bind-Auth-Max-Sessio
ns
String 0-253
45 RedBack-Bind-Bypass-Bypass String 0-253
46 RedBack-Bind-Auth-Context String 0-253
47 RedBack-Bind-Auth-Service-Grp String 0-253
48 RedBack-Bind-Bypass-Context String 0-253
49 RedBack-Bind-Int-Context String 0-253
50 RedBack-Bind-Tun-Context String 0-253
51 RedBack-Bind-Ses-Context String 0-253
52 RedBack-Bind-Dot1q-Slot String 0-253
53 RedBack-Bind-Dot1q-Port String 0-253
54 RedBack-Bind-Dot1q-Vlan-Tag-I
d
String 0-253
55 RedBack-Bind-Int-Interface-Nam
e
String 0-253
56 RedBack-Bind-L2TP-Tunnel-Na
me
String 0-253
Table C-16 RedBack VSAs (continued)
SubAttr VSA Name Type
Min-Max
Value

C-55
Cisco Prime Access Registrar 6.1 User Guide
OL-29756-01
Appendix C RADIUS Attributes
Vendor-Specific Attributes
57 RedBack-Bind-L2TP-Flow-Contr
ol
String 0-253
58 RedBack-Bind-Sub-User-At-Con
text
String 0-253
59 RedBack-Bind-Sub-Password String 0-253
60 RedBack-Ip-Host-Addr String 0-253
61 RedBack-IP-TOS-Field String 0-253
62 RedBack-NAS-Real-Port String 0-253
63 RedBack-Tunnel-Session-Auth-C
tx
String 0-253
64 RedBack-Tunnel-Session-Auth-S
ervice-Grp
String 0-253
65 RedBack-Tunnel-Rate-Limit-Rat
e
String 0-253
66 RedBack-Tunnel-Rate-Limit-Bur
st
String 0-253
67 RedBack-Tunnel-Police-Rate String 0-253
68 RedBack-Tunnel-Police-Burst String 0-253
69 RedBack-Tunnel-L2F-Second-Pa
ssword
String 0-253
128 RedBack-Acct-Input-Octets-64 String 0-253
129 RedBack-Acct-Output-Octets-64 String 0-253
130 RedBack-Acct-Input-Packets-64 String 0-253
131 RedBack-Acct-Output-Packets-6
4
String 0-253
132 RedBack-Assigned-IP-Address String 0-253
133 RedBack-Acct-Mcast-In-Octets String 0-253
134 RedBack-Acct-Mcast-Out-Octets String 0-253
135 RedBack-Acct-Mcast-In-Packets String 0-253
136 RedBack-Acct-Mcast-Out-Packet
s
String 0-253
137 RedBack-LAC-Port String 0-253
138 RedBack-LAC-Real-Port String 0-253
139 RedBack-LAC-Port-Type String 0-253
140 RedBack-LAC-Real-Port-Type String 0-253
Table C-16 RedBack VSAs (continued)
SubAttr VSA Name Type
Min-Max
Value

C-56
Cisco Prime Access Registrar 6.1 User Guide
OL-29756-01
Appendix C RADIUS Attributes
Vendor-Specific Attributes
RedCreek VSAs
Table C-17 lists the RedCreek VSAs. The vendor ID for RedCreek VSAs is 1958.
TACACS+ VSAs
Table C-18 lists the TACACS+ VSAs. The vendor ID for TACACS+ VSAs is 268435456.
Table C-17 RedCreek VSAs
SubAttr VSA Name Type
Min-Max
Value
6 RedCreek-Tunneled-IP-Netmask IP Address 0-253
7 RedCreek-Tunneled-Gateway IP Address 0-253
9 RedCreek-Tunneled-WINS-Server1 String 0-253
10 RedCreek-Tunneled-WINS-Server2 String 0-253
11 RedCreek-Tunneled-HostName String 0-253
12 RedCreek-Tunneled-DomainName String 0-253
13 RedCreek-Tunneled-Search-List String 0-253
Table C-18 TACACS+ VSAs
SubAttr VSA Name Type
Min-Max
Value
1 Tacacs-Version ENUM:
192 = 12.0
193 = 12.1
0-255
2 Tacacs-Type ENUM:
1 = Authentication
2 = Authorization
3 = Accounting
1-3
3 Tacacs-Sequence-Number UINT32 0-1
4 Tacacs-Session-Id UINT32 0-2147483
647
5 Tacacs-Action ENUM:
1 = Login
2 = ChPass
3 = SendPass
4 = SendAuth
0-253
6 Tacacs-Privilege-Level UINT32 0-15
7 Tacacs-Authentication-Type ENUM:
1 = ASCII
2 = PAP
3 = CHAP
4 = ARAP
5 = MSCHAP
1-5

C-57
Cisco Prime Access Registrar 6.1 User Guide
OL-29756-01
Appendix C RADIUS Attributes
Vendor-Specific Attributes
8 Tacacs-Service ENUM:
1 = Login
2 = Enable
3 = PPP
4 = ARAP
5 = PT
6 = RCMD
7 = X25
8 = NASI
9 = FWPROXY
1-9
9 Tacacs-User-Name String 0-253
10 Tacacs-Port String 0-253
11 Tacacs-Remote-Address String 0-253
12 Tacacs-Data String 0-253
13 Tacacs-User-Message String 0-253
14 Tacacs-User-Data String 0-253
15 Tacacs-Authentication-Conti
nue-Flag
ENUM:
0 = Continue
1 = Abort
0-1
16 Tacacs-Authentication-Repl
y-Flag‘
ENUM:
0 = Echo
1 = NoEcho
0-1
17 Tacacs-Authentication-Repl
y-Status
ENUM:
1 = Pass
2= Fail
3 = GetData
4 = GetUser
5 = GetPass
6 = Restart
7 = Error
33 = Follow
0-33
18 Tacacs-Authorization-Reply
-Status
ENUM:
1 = PassAdd
2 = PassRepl
16 = Fail
17 = Error
33 = Follow
0-33
19 Tacacs-Server-Message String 0-253
Table C-18 TACACS+ VSAs (continued)
SubAttr VSA Name Type
Min-Max
Value

C-58
Cisco Prime Access Registrar 6.1 User Guide
OL-29756-01
Appendix C RADIUS Attributes
Vendor-Specific Attributes
20 Tacacs-Authentication-Meth
od
ENUM:
0 = NotSet
1 = None
2 = KRB5
3 = Line
4 = Enable
5 = Local
6 = TacacsPlus
7 = Guest
16 = Radius
17 = KRB4
32 = RCMD
0-32
21 Tacacs-AVPair String 0-253
22 Tacacs-Accounting-Reply-St
atus
ENUM:
1 = Success
2 = Fail
33 = Follow
0-33
12 Tacacs-Header-Flag ENUM:
0 = Encrypted
1 = Unencrypted
4 = Encrypted +
ReuseConnection
5 = Unencrypted +
ReuseConnection
0-5
24 Tacacs-User-Password String 0-253
25 Tacacs-Accounting-Request-
Flag
ENUM:
1 = More
2 = Start
3 = Start
4 = Stop
5 = Stop
6 = Start
7 = Start
8 = Update
9 = More
10 = Start
11 = Start
12 = Stop
13 = Stop
14 = Start
15 = Start
0-33
26 Tacacs-CHAP-Password CHAP_PASSWOR
D
17-17
27 Tacacs-CHAP-Challenge String 0-253
Table C-18 TACACS+ VSAs (continued)
SubAttr VSA Name Type
Min-Max
Value

C-59
Cisco Prime Access Registrar 6.1 User Guide
OL-29756-01
Appendix C RADIUS Attributes
Vendor-Specific Attributes
Telebit VSAs
Table C-19 lists the Telebit VSAs. The vendor ID for Telebit VSAs is 117.
Unisphere VSAs
Table C-20 lists the Unisphere VSAs. The vendor ID for RedBack VSAs is 4874.
28 Tacacs-MSCHAP-Response String 50-50
29 Tacacs-MSCHAP-Challenge String 0-253
Table C-18 TACACS+ VSAs (continued)
SubAttr VSA Name Type
Min-Max
Value
Table C-19 Telebit VSAs
SubAttr VSA Name Type
Min-Max
Value
1 Telebit-Login-Command String 0-253
2 Telebit-Port-Name String 0-253
3 Telebit-Activate-Comma
nd
String 0-253
4 Telebit-Accounting-Info String 0-253
5 Telebit-Login-Option String 0-253
Table C-20 Unisphere VSAs
SubAttr VSA Name Type
Min-Max
Value
1 Unisphere-Virtual-Router String 0-253
2 Unisphere-Local-Address-Pool String 0-253
3 Unisphere-Local-Interface String 0-253
4 Unisphere-Primary-DNS String 0-253
5 Unisphere-Secondary-DNS String 0-253
6 Unisphere-Primary-WINS String 0-253
7 Unisphere-Secondary-WINS String 0-253
8 Unisphere-Tunnel-Virtual-Rout
er
String 0-253
9 Unisphere-Tunnel-Password String 0-253
10 Unisphere-Ingress-Policy-Nam
e
String 0-253
11 Unisphere-Egress-Policy-Name String 0-253

C-60
Cisco Prime Access Registrar 6.1 User Guide
OL-29756-01
Appendix C RADIUS Attributes
Vendor-Specific Attributes
USR VSAs
Table C-21 lists the USR VSAs. The vendor ID for USR VSAs is 429.
12 Unisphere-Ingress-Statistics String 0-253
13 Unisphere-Egress-Statistics String 0-253
14 Unisphere-Service-Category String 0-253
15 Unisphere-PCR String 0-253
16 Unisphere-SCR String 0-253
17 Unisphere-MBS String 0-253
18 Unisphere-Init-CLI-Access-Le
vel
String 0-253
19 Unisphere-Allow-All-VR-Acce
ss
String 0-253
20 Unisphere-Alt-CLI-Access-Lev
el
String 0-253
21 Unisphere-Alt-CLI-VRouter-N
ame
String 0-253
22 Unisphere-SA-Validate String 0-253
12 Unisphere-IGMP-enable String 0-253
24 Unisphere-PPPoE-Description String 0-253
25 Unisphere-Redirect-VRouter-N
ame
String 0-253
Table C-20 Unisphere VSAs (continued)
SubAttr VSA Name Type
Min-Max
Value

C-61
Cisco Prime Access Registrar 6.1 User Guide
OL-29756-01
Appendix C RADIUS Attributes
Vendor-Specific Attributes
Table C-21 USR VSAs
SubAttr VSA Name Type
Min-Max
Value
1 USR-DTE-Data-Idle-Timeout UINT32 0-0
2 USR-Default-DTE-Data-Rate ENUM:
110_BPS
300_BPS
600_BPS
1200_BPS
2400_BPS
4800_BPS
7200_BPS
9600_BPS
12K_BPS
14.4K_BPS
16.8_BPS
19.2K_BPS
38.4K_BPS
75_BPS
450_BPS
UNKNOWN_BPS
57.6K_BPS
21.6K_BPS
24K_BPS
26K_BPS
28K_BPS
115K_BPS
31K_BPS
33K_BPS
25333_BPS
110_BPS
300_BPS
600_BPS
1200_BPS
2400_BPS
26666_BPS
28000_BPS
29333_BPS
30666_BPS
32000_BPS
1-54

C-62
Cisco Prime Access Registrar 6.1 User Guide
OL-29756-01
Appendix C RADIUS Attributes
Vendor-Specific Attributes
2 USR-Default-DTE-Data-Rate 33333_BPS
34666_BPS
36000_BPS
37333_BPS
38666_BPS
40000_BPS
41333_BPS
42666_BPS
44000_BPS
45333_BPS
46666_BPS
48000_BPS
49333_BPS
50666_BPS
52000_BPS
53333_BPS
54666_BPS
56000_BPS
57333_BPS
58666_BPS
60000_BPS
61333_BPS
62666_BPS
64000_BPS
3 USR-Last-Number-Dialed-Out String 1-253
4 USR-Sync-Async-Mode ENUM:
Asynchronous
Synchronous
1-2
5 USR-Originate-Answer-Mode ENUM:
Originate_in_Originate_Mode
Originate_in_Answer_Mode
Answer_in_Originate_Mode
Answer_in_Answer_Mode
1-4
6 USR-Failure-to-Connect-Reaso
n
ENUM: 1-67
Table C-21 USR VSAs (continued)
SubAttr VSA Name Type
Min-Max
Value

C-63
Cisco Prime Access Registrar 6.1 User Guide
OL-29756-01
Appendix C RADIUS Attributes
Vendor-Specific Attributes
7 USR-Initial-Tx-Link-Data-Rat
e
ENUM:
110_BPS
14.4K_BPS
16.8_BPS
19.2K_BPS
38.4K_BPS
75_BPS
450_BPS
UNKNOWN_BPS
57.6K_BPS
21.6K_BPS
24K_BPS
300_BPS
26K_BPS
28K_BPS
115K_BPS
31K_BPS
33K_BPS
25333_BPS
26666_BPS
28000_BPS
29333_BPS
30666_BPS
600_BPS
32000_BPS
33333_BPS
34666_BPS
36000_BPS
37333_BPS
38666_BPS
40000_BPS
41333_BPS
42666_BPS
44000_BPS
1200_BPS
45333_BPS
46666_BPS
48000_BPS
49333_BPS
50666_BPS
52000_BPS
53333_BPS
54666_BPS
56000_BPS
57333_BPS
2400_BPS
58666_BPS
60000_BPS
1-54
Table C-21 USR VSAs (continued)
SubAttr VSA Name Type
Min-Max
Value

C-64
Cisco Prime Access Registrar 6.1 User Guide
OL-29756-01
Appendix C RADIUS Attributes
Vendor-Specific Attributes
7 USR-Initial-Tx-Link-Data-Rat
e (continued)
61333_BPS
62666_BPS
64000_BPS
4800_BPS
7200_BPS
9600_BPS
12K_BPS
8 USR-Final-Tx-Link-Data-Rate ENUM:
110_BPS
14.4K_BPS
16.8_BPS
19.2K_BPS
38.4K_BPS
75_BPS
450_BPS
UNKNOWN_BPS
57.6K_BPS
21.6K_BPS
24K_BPS
300_BPS
26K_BPS
28K_BPS
115K_BPS
31K_BPS
33K_BPS
25333_BPS
26666_BPS
28000_BPS
29333_BPS
30666_BPS
600_BPS
1-54
Table C-21 USR VSAs (continued)
SubAttr VSA Name Type
Min-Max
Value

C-65
Cisco Prime Access Registrar 6.1 User Guide
OL-29756-01
Appendix C RADIUS Attributes
Vendor-Specific Attributes
8 USR-Final-Tx-Link-Data-Rate 32000_BPS
33333_BPS
34666_BPS
36000_BPS
37333_BPS
38666_BPS
40000_BPS
41333_BPS
42666_BPS
44000_BPS
1200_BPS
45333_BPS
46666_BPS
48000_BPS
49333_BPS
50666_BPS
52000_BPS
53333_BPS
1-54
8 USR-Final-Tx-Link-Data-Rate 54666_BPS
56000_BPS
57333_BPS
2400_BPS
58666_BPS
60000_BPS
61333_BPS
62666_BPS
64000_BPS
4800_BPS
7200_BPS
9600_BPS
Table C-21 USR VSAs (continued)
SubAttr VSA Name Type
Min-Max
Value

C-66
Cisco Prime Access Registrar 6.1 User Guide
OL-29756-01
Appendix C RADIUS Attributes
Vendor-Specific Attributes
9 USR-Modulation-Type ENUM:
usRoboticsHST
bell208b
v21FaxClass1
v27FaxClass1
v29FaxClass1
v17FaxClass1
v21FaxClass2
v27FaxClass2
v29FaxClass2
v17FaxClass2
v32Terbo
ccittV32
v34
vFC
v34plus
x2
v110
v120
x75
ayncSyncPPP
clearChannel
ccittV22bis
bell103
ccittV21
bell212
ccittV32bis
ccittV12
negotiationFailed
1-28
9 USR-Modulation-Type ENUM:
10 USR-Equalization-Type ENUM:
Long
Short
1-2
112 USR-Characters-Sent UINT32 0-0
13 USR-Characters-Received UINT32 0-0
14 USR-Blocks-Sent UINT32 0-0
15 USR-Blocks-Received 0 UINT32 0-0
16 USR-Blocks-Resent UINT32 0-0
17 USR-Retrains-Requested UINT32 0-0
18 USR-Retrains-Granted UINT32
19 USR-Line-Reversals UINT32
20 USR-Number-Of-Characters-L
ost0
UINT32 0-0
Table C-21 USR VSAs (continued)
SubAttr VSA Name Type
Min-Max
Value

C-67
Cisco Prime Access Registrar 6.1 User Guide
OL-29756-01
Appendix C RADIUS Attributes
Vendor-Specific Attributes
21 USR-Back-Channel-Data-Rate ENUM :
450BPS
300BPS
None
1-3
22 USR-Number-of-Blers UINT32 0-0
12 USR-Number-of-Link-Timeout
s
UINT32 0-0
24 USR-Number-of-Fallbacks UINT32 0-0
25 USR-Number-of-Upshifts UINT32 0-0
26 USR-Number-of-Link-NAKs UINT32 0-0
27 USR-Simplified-MNP-Levels ENUM:
Unknown
NON_ARQ
MNP10ec
LAPMAC
V42ETC2
V42SREJ
PIAFS
V120
X75
MNP3
MNP4
V42
HST
synchronous
MNP2
MNP10(Cellular)
V42ETC
0-16
Table C-21 USR VSAs (continued)
SubAttr VSA Name Type
Min-Max
Value

C-68
Cisco Prime Access Registrar 6.1 User Guide
OL-29756-01
Appendix C RADIUS Attributes
Vendor-Specific Attributes
28 USR-Connect-Term-Reason ENUM:
dtrDrop
retransmitLimit
linkDisconnectMsgReceived
noLoopCurrent
invalidSpeed
unableToRetrain
managementCommand
noDialTone
keyAbort
lineBusy
noAnswer
escapeSequence
voice
noAnswerTone
noCarrier
undetermined
v42SabmeTimeout
v42BreakTimeout
v42DisconnectCmd
v42IdExchangeFail
v42BadSetup
v42InvalidCodeWord
athCommand
v42StringToLong
v42InvalidCommand
none
v32Cleardown
dialSecurity
1-67
Table C-21 USR VSAs (continued)
SubAttr VSA Name Type
Min-Max
Value

C-69
Cisco Prime Access Registrar 6.1 User Guide
OL-29756-01
Appendix C RADIUS Attributes
Vendor-Specific Attributes
28 USR-Connect-Term-Reason remoteAccessDenied
loopLoss
ds0Teardown
promptNotEnabled
noPromptingInSync
carrierLoss
nonArqMode
modeIncompatible
noPromptInNonARQ
dialBackLink
linkAbort
autopassFailed
pbGenericError
pbLinkErrTxPreAck
pbLinkErrTxTardyACK
pbTransmitBusTimeout
inactivityTimout
pbReceiveBusTimeout
pbLinkErrTxTAL
pbLinkErrRxTAL
pbTransmitMasterTimeout
pbClockMissing
pbReceivedLsWhileLinkUp
pbOutOfSequenceFrame
pbBadFrame
pbAckWaitTimeout
pbReceivedAckSeqErr
mnpIncompatible
pbReceiveOvrflwRNRFail
pbReceiveMsgBufOvrflw
rcvdGatewayDiscCmd
tokenPassingTimeout
dspInterruptTimeout
mnpProtocolViolation
28 USR-Connect-Term-Reason class2FaxHangupCmd
hstSpeedSwitchTimeout
undefined
remotePassword
linkPassword
29 USR-DTR-False-Timeout UINT32 0-0
30 USR-Fallback-Limit UINT32 0-0
31 USR-Block-Error-Count-Limit UINT32 0-0
32 USR-Simplified-V42bis-Usage ENUM:
None
ccittV42bis
mnpLevel5
1-3
Table C-21 USR VSAs (continued)
SubAttr VSA Name Type
Min-Max
Value

C-70
Cisco Prime Access Registrar 6.1 User Guide
OL-29756-01
Appendix C RADIUS Attributes
Vendor-Specific Attributes
33 USR-DTR-True-Timeou UINT32 0-0
34 USR-Last-Number-Dialed-In-
DNIS
String 1-253
35 USR-Last-Callers-Number-AN
I
String 1-253
36 USR-Mbi-Ct-PRI-Card-Slot UINT32 0-0
37 USR-Mbi-Ct-TDM-Time-Slot UINT32 0-0
38 USR-Mbi-Ct-PRI-Card-Span-L
ine
UINT32 0-0
39 USR-Mbi-Ct-BChannel-Used UINT32 0-0
40 USR-IP-Input-Filter String 1-253
41 USR-IPX-Input-Filter String 1-253
42 USR-IP-Output-Filter String 1-253
43 USR-IPX-Output-Filter String 1-253
44 USR-SAP-Output-Filter String 1-253
45 USR-VPN-ID UINT32 0-0
46 USR-VPN-Name String 1-253
47 USR-VPN-Neighbor String 1-253
48 USR-Framed-Routing-V2 ENUM:
RIP-V2-Off
RIP-V2-On
1-2
49 USR-VPN-Gateway String 1-253
50 USR-Tunnel-Authenticato String 1-253
51 USR-Packet-Index String 1-253
52 USR-Cutoff String 1-253
53 USR-Access-Accept-Packet String 1-253
54 USR-Primary-DNS-Server String 1-253
55 USR-Secondary-DNS-Server String 1-253
56 USR-Primary-NBNS-Server String 1-253
57 USR-Secondary-NBNS-Server String 1-253
58 USR-Syslog-Tap UINT32 0-0
59 USR-Chassis-Call-Slot UINT32 0-0
60 USR-Chassis-Call-Span UINT32 0-0
61 -Chassis-Call-Channel UINT32 0-0
62 USR-Keypress-Timeout UINT32 0-0
63 USR-Unauthenticated-Time UINT32 0-0
64 USR-Bearer-Capabilities UINT32 0-0
Table C-21 USR VSAs (continued)
SubAttr VSA Name Type
Min-Max
Value

C-71
Cisco Prime Access Registrar 6.1 User Guide
OL-29756-01
Appendix C RADIUS Attributes
Vendor-Specific Attributes
65 USR-Speed-Of-Connection UINT32 0-0
66 USR-Max-Channels UINT32 0-0
67 USR-Channel-Expansion UINT32 0-0
68 USR-Channel-Decrement UINT32 0-0
69 USR-Expansion-Algorithm UINT32 0-0
70 USR-Compression-Algorithm UINT32 0-0
71 USR-Receive-Acc-Map UINT32 0-0
72 USR-Transmit-Acc-Map UINT32 0-0
73 USR-Compression-Reset-Mod
e
UINT32 0-0
74 USR-Min-Compression-Size UINT32 0-0
75 USR-IP UINT32 0-0
76 USR-IPX UINT32 0-0
77 USR-Filter-Zones UINT32 0-0
78 USR-Appletalk UINT32 0-0
79 USR-Bridging UINT32 0-0
80 USR-Spoofing UINT32 0-0
81 USR-Host-Type String 1-253
82 USR-Send-Name UINT32 0-0
83 USR-Send-Password String 1-253
84 USR-Start-Time UINT32 0-0
85 USR-End-Time UINT32 0-0
86 USR-Send-Script1 String 1-253
87 USR-Reply-Script1 String 1-253
88 USR-Send-Script2 String 1-253
89 USR-Reply-Script2 String 1-253
90 USR-Send-Script3 String 1-253
91 USR-Send-Script3
USR-Reply-Script3
String 1-253
92 USR-Send-Script4 String 1-253
93 USR-Reply-Script4 String 1-253
94 USR-Send-Script5 String 1-253
95 USR-Reply-Script5 String 1-253
96 USR-Send-Script6 String 1-253
97 USR-Reply-Script6 String 1-253
98 USR-Terminal-Type String 1-253
Table C-21 USR VSAs (continued)
SubAttr VSA Name Type
Min-Max
Value

C-72
Cisco Prime Access Registrar 6.1 User Guide
OL-29756-01
Appendix C RADIUS Attributes
Vendor-Specific Attributes
99 USR-Appletalk-Network-Rang
e
UINT32 0-0
100 USR-Local-IP-Address String 1-253
101 USR-Routing-Protocol UINT32 0-0
102 USR-Modem-Group UINT32 0-0
103 USR-IPX-Routing UINT32 0-0
104 USR-IPX-Wan UINT32 0-0
105 USR-IP-RIP-Policies UINT32 0-0
106 USR-IP-RIP-Simple-Auth-Pass
word
String 0-253
107 USR-IDS0-Call-Type UINT32 0-0
108 USR-Call-Terminate-in-GMT UINT32 0-0
109 USR-Call-Connect-in-GMT UINT32 0-0
110 USR-Call-Arrival-in-GMT UINT32 0-0
111 USR-Channel-Connected-To UINT32 0-0
112 USR-Slot-Connected-To UINT32 0-0
113 USR-Device-Connected-To ENUM:
None
isdnGateway
quadModem
1-3
114 USR-NFAS-ID UINT32 0-0
115 USR-Q931-Call-Reference-Val
ue
UINT32 0-0
Table C-21 USR VSAs (continued)
SubAttr VSA Name Type
Min-Max
Value

C-73
Cisco Prime Access Registrar 6.1 User Guide
OL-29756-01
Appendix C RADIUS Attributes
Vendor-Specific Attributes
116 USR-Call-Event-Code ENUM:
notSupported
noFreeIGW
igwRejectCall
igwSetupTimeout
noFreeTdmts
bcReject
ieReject
chidReject
progReject
callingPartyReject
calledPartyReject
setup
blocked
analogBlocked
digitalBlocked
outOfService
busy
congestion
protocolError
noFreeBchannel
inOutCallCollision
usrSetup
telcoDisconnect
usrDisconnect
noFreeModem
modemsNotAllowed
modemsRejectCall
modemSetupTimeout
1-28
117 USR-DS0 UINT32 0-0
118 USR-DS0s String 1-253
119 USR-Gateway-IP-Address IP Address 0-0
120 USR-Physical-State UINT32 0-0
121 USR-Chassis-Temp-Threshold UINT32 0-0
Table C-21 USR VSAs (continued)
SubAttr VSA Name Type
Min-Max
Value

C-74
Cisco Prime Access Registrar 6.1 User Guide
OL-29756-01
Appendix C RADIUS Attributes
Vendor-Specific Attributes
122 USR-Card-Type ENUM:
SlotEmpty
QuadV32DigitalModemNAC
DualT1NIC
DualAlogMdmNIC
QuadDgtlMdmNIC
QuadAlogDgtlMdmNIC
TokenRingNIC
SingleT1NIC
EthernetNIC
ShortHaulDualT1NIC
DualAlogMgdIntlMdmNIC
X25NIC
122 USR-Card-Type (continued) ENUM:
QuadAlogNonMgdMdmNIC
QuadAlogMgdIntlMdmNIC
QuadAlogNonMgdIntlMdmNIC
QuadLsdLiMgdMdmNIC
QuadLsdLiNonMgdMdmNIC
QuadLsdLiMgdIntlMdmNIC
QuadLsdLiNonMgdIntlMdmNI
C
EthernetWithV35NIC
HSEthernetWithoutV35NIC
DualHighSpeedV35NIC
QuadV35RS122LowSpeedNIC
DualE1NIC
ShortHaulDualE1NIC
BellcoreLongHaulDualT1NIC
BellcoreShrtHaulDualT1NIC
SCSIEdgeServerNIC
QuadV32AnalogModemNAC
QuadV32DigAnlModemNAC
QuadV34DigModemNAC
QuadV34AnlModemNAC
QuadV34DigAnlModemNAC
SingleT1NAC
EthernetGatewayNAC
AccessServer
486TrGatewayNAC
SlotUnknown
Table C-21 USR VSAs (continued)
SubAttr VSA Name Type
Min-Max
Value

C-75
Cisco Prime Access Registrar 6.1 User Guide
OL-29756-01
Appendix C RADIUS Attributes
Vendor-Specific Attributes
122 USR-Card-Type (continued) ENUM:
486EthernetGatewayNAC
DualRS122NAC
486X25GatewayNAC
ApplicationServerNAC
ISDNGatewayNAC
ISDNpriT1NAC
ClkedNetMgtCard
ModemPoolManagementNAC
NetwMgtCard
ModemPoolNetserverNAC
(continued)
1-1027
122 USR-Card-Type (continued) ModemPoolV34ModemNAC
ModemPoolISDNNAC
NTServerNAC
QuadV34DigitalG2NAC
QuadV34AnalogG2NAC
QuadV34DigAnlgG2NAC
NETServerFrameRelayNAC
NETServerTokenRingNAC
X2524ChannelNAC
DualT1NAC
WirelessGatewayNac
EnhancedAccessServer
EnhancedISDNGatewayNAC
DualModemNAC
QuadModemNAC
TrGatewayNAC
X25GatewayNAC
DualV34ModemNAC
112 USR-Security-Login-Limit UINT32 0-0
124 USR-Security-Resp-Limit UINT32 0-0
125 USR-Packet-Bus-Session UINT32 0-0
126 USR-DTE-Ring-No-Answer-Li
mit
UINT32 0-0
Table C-21 USR VSAs (continued)
SubAttr VSA Name Type
Min-Max
Value

C-76
Cisco Prime Access Registrar 6.1 User Guide
OL-29756-01
Appendix C RADIUS Attributes
Vendor-Specific Attributes
127 USR-Final-Rx-Link-Data-Rate ENUM:
110_BPS
14.4K_BPS
16.8_BPS
19.2K_BPS
38.4K_BPS
75_BPS
450_BPS
UNKNOWN_BPS
57.6K_BPS
21.6K_BPS
24K_BPS
300_BPS
6K_BPS
28K_BPS
115K_BPS
31K_BPS
33K_BPS
25333_BPS
26666_BPS
28000_BPS
62666_BPS
9333_BPS
30666_BPS
600_BPS
(continued)
1-54
Table C-21 USR VSAs (continued)
SubAttr VSA Name Type
Min-Max
Value

C-77
Cisco Prime Access Registrar 6.1 User Guide
OL-29756-01
Appendix C RADIUS Attributes
Vendor-Specific Attributes
127 USR-Final-Rx-Link-Data-Rate
(continued)
32000_BPS
33333_BPS
34666_BPS
36000_BPS
37333_BPS
38666_BPS
40000_BPS
41333_BPS
42666_BPS
44000_BPS
1200_BPS
45333_BPS
46666_BPS
48000_BPS
49333_BPS
50666_BPS
52000_BPS
53333_BPS
54666_BPS
56000_BPS
57333_BPS
2400_BPS
58666_BPS
60000_BPS
61333_BPS
64000_BPS
800_BPS
7200_BPS
9600_BPS
12K_BPS
Table C-21 USR VSAs (continued)
SubAttr VSA Name Type
Min-Max
Value

C-78
Cisco Prime Access Registrar 6.1 User Guide
OL-29756-01
Appendix C RADIUS Attributes
Vendor-Specific Attributes
128 USR-Initial-Rx-Link-Data-Rat
e
ENUM:
110_BPS
14.4K_BPS
16.8_BPS
19.2K_BPS
38.4K_BPS
75_BPS
450_BPS
UNKNOWN_BPS
57.6K_BPS
21.6K_BPS
24K_BPS
300_BPS
26K_BPS
28K_BPS
115K_BPS
31K_BPS
33K_BPS
25333_BPS
26666_BPS
1-54
128 USR-Initial-Rx-Link-Data-Rat
e
28000_BPS
29333_BPS
30666_BPS
600_BPS
32000_BPS
33333_BPS
34666_BPS
36000_BPS
37333_BPS
38666_BPS
40000_BPS
41333_BPS
42666_BPS
44000_BPS
1200_BPS
45333_BPS
46666_BPS
48000_BPS
49333_BPS
50666_BPS
52000_BPS
53333_BPS
Table C-21 USR VSAs (continued)
SubAttr VSA Name Type
Min-Max
Value

C-79
Cisco Prime Access Registrar 6.1 User Guide
OL-29756-01
Appendix C RADIUS Attributes
Vendor-Specific Attributes
128 USR-Initial-Rx-Link-Data-Rat
e
54666_BPS
56000_BPS
57333_BPS
2400_XBPS
58666_BPS
60000_BPS
61333_BPS
62666_BPS
64000_BPS
4800_BPS
7200_BPS
9600_BPS
12K_BPS
129 USR-Event-Date-Time UINT32 0-0
130 USR-Chassis-Temperature UINT32 0-0
131 USR-Actual-Voltage UINT32 0-0
132 USR-Expected-Voltage UINT32 0-0
133 USR-Power-Supply-Number UINT32 0-0
134 USR-Channel UINT32 0-0
135 USR-Chassis-Slot UINT32 0-0
Table C-21 USR VSAs (continued)
SubAttr VSA Name Type
Min-Max
Value

C-80
Cisco Prime Access Registrar 6.1 User Guide
OL-29756-01
Appendix C RADIUS Attributes
Vendor-Specific Attributes
136 USR-Event-Id ENUM:
HUB_Temp_Out_of_Range
Fan_Failed
Watchdog_Timeout
Mgmt_Bus_Failure
In_Connection_Est
Out_Connection_Est
In_Connection_Term
Out_Connection_Term
Connection_Failed
Connection_Timeout
DTE_Transmit_Idle
DTR_True
DTR_False
Block_Error_at_Threshold
Fallbacks_at_Threshold
No_Dial_Tone_Detected
No_Loop_Current_Detected
Yel low_ Alarm
Red_Alarm
Loss_Of_Signal
Rcv_Alrm_Ind_Signal
Timing_Source_Switch
Modem_Reset_by_DTE
Modem_Ring_No_Answer
DTE_Ring_No_Answer
Pkt_Bus_Session_Active
Pkt_Bus_Session_Congestion
Pkt_Bus_Session_Lost
Pkt_Bus_Session_Inactive
User_Interface_Reset
Gateway_Port_Out_of_Service
Gateway_Port_Link_Active
Dial_Out_Login_Failure
Dial_In_Login_Failure
Dial_Out_Restricted_Number
Dial_Back_Restricted_Number
User_Blacklisted
Attempted_Login_Blacklisted
Response_Attempt_Limit_Exce
ed
Login_Attempt_Limit_Exceede
d
Dial_Out_Call_Duration
Dial_In_Call_Duration
Pkt_Bus_Session_Err_Status
NMC_AutoRespnse_Trap
(Continued)
Table C-21 USR VSAs (continued)
SubAttr VSA Name Type
Min-Max
Value

C-81
Cisco Prime Access Registrar 6.1 User Guide
OL-29756-01
Appendix C RADIUS Attributes
Vendor-Specific Attributes
136 USR-Event-Id (Continued) Acct_Server_Contact_Loss
Yellow_Alarm_Clear
Red_Alarm_Clear
Loss_Of_Signal_Clear
Rcv_Alrm_Ind_Signal_Clear
Incoming_Connection_Establis
h
Module_Inserted
Outgoing_Connection_Establish
Incoming_Connection_Terminat
e
Outgoing_Connection_Terminat
e
Connection_Attempt_Failure
Continuous_CRC_Alarm
Continuous_CRC_Alarm_Clear
Physical_State_Change
Module_Removed
Gateway_Network_Failed
Gateway_Network_Restored
Packet_Bus_Clock_Lost
Packet_Bus_Clock_Restored
D_Channel_In_Service
D_Channel_Out_of_Service
DS0s_In_Service
DS0s_Out_of_Service
T1/T1PRI/E1PRI_Call_Event
PSU_Voltage_Alarm
Psu_Incompatible
T1,T1-E1/PRI-Call-Arrive-Even
T1,T1-E1/PRI-Call-Connect-Ev
e
T1,T1-E1/PRI-Call-Termina-Ev
e
T1,T1-E1/PRI-Call-Failed-Even
6-84
137 USR-Number-of-Rings-Limit UINT32 0-0
138 USR-Connect-Time-Limit UINT32 0-0
139 USR-Call-End-Date-Time UINT32 0-0
140 USR-Call-Start-Date-Time UINT32 0-0
141 USR-Server-Time UINT32 0-0
Table C-21 USR VSAs (continued)
SubAttr VSA Name Type
Min-Max
Value

C-82
Cisco Prime Access Registrar 6.1 User Guide
OL-29756-01
Appendix C RADIUS Attributes
Vendor-Specific Attributes
142 USR-Request-Type ENUM:
Access-Request
Access-Challenge
Status-Server
Status-Client
Access-Accept
Reserved
Access-Reject
Accounting-Request
Accounting-Response
Access-Password-Change
Access-Password-Ack
Access-Password-Reject
1-255
143 USR-Old-Password String 0-253
144 USR-Expiration UINT32 0-0
145 USR-Prompt UINT32 0-1
146 USR-Char-Noecho UINT32 0-0
147 USR-User-Group-Name String 0-253
148 148
USR-Call-Reference-Number
UINT32 0-253
149 USR-Dial-In-Sec-Mode UNIT32 0-0
150 USR-Req-Db-Mdm-Sel UINT32 0-0
151 USR-Req-Db-Login-Valid UINT32 0-0
152 USR-Dialback-Group-Names String 0-253
153 USR-Dial-In-Call-Rest String 0-253
154 USR-Dial-Out-Call-Rest String 0-253
155 USR-Logins-Before-Blacklist UINT32 0-0
156 USR-Failed-Logins UINT32 0-0
157 USR-Allowed-DB-Modems String 0-253
158 USR-VPN-Encrypter String 0-253
159 USR-Acct-VPN-Gateway String 0-253
160 USR-Re-CHAP-Timeout UINT32 0-0
161 USR-RMMIE-Manufacutere-I
D
String 0-253
162 USR-RMMIE-Product-Code String 0-253
163 USR-RMMIE-Serial-Number String 0-253
164 USR-RMMIE-Firmware-Versi
on
String 0-253
165 USR-RMMIE-Firmware-Build
-Date
String 0-253
Table C-21 USR VSAs (continued)
SubAttr VSA Name Type
Min-Max
Value

C-83
Cisco Prime Access Registrar 6.1 User Guide
OL-29756-01
Appendix C RADIUS Attributes
Vendor-Specific Attributes
166 USR-RMMIE-Status ENUM:
notEnabledInLocalModem
notDetectedInRemoteModem
ok
1-3
170 USR-RMMIE-Last-Update-Ti
me
UINT32 0-253
171 USR-RMMIE-Last-Update-Ev
ent
ENUM:
None
initialConnection
retrain speedShift
plannedDisconnect
1-5
172 USR-RMMIE-Rcv-Tot-PwrLvl UNIT32 0-253
173 USR-RMMIE-Rcv-PwrLvl-33
00Hz
UNIT32 0-253
174 USR-RMMIE-Rcv-PwrLvl-37
50Hz
UNIT32 0-253
175 USR-RMMIE-PwrLvl-NearEc
ho-Canc
UNIT32 0-253
176 USR-RMMIE-PwrLvl-FarEcho
-Canc
UNIT32 0-253
177 USR-RMMIE-PwrLvl-Noise-L
vl
UNIT32 0-253
178 USR-RMMIE-PwrLvl-Xmit-L
vl
UNIT32 0-253
179 USR-IPX-SAP String 0-253
180 USR-MIC UNIT32 0-253
181 USR-Call-Tracking-ID UNIT32 0-253
182 USR-Log-Filter-Packet UNIT32 0-253
183 USR-CCP-Algorithm UNIT32 0-253
184 USR-ACCM-Type UNIT32 0-253
185 USR-Connect-Speed UNIT32 0-253
186 USR-Framed-IP-Address-Pool-
Name
UNIT32 0-253
187 USR-MP-EDO String 0-253
188 USR-Local-Framed-IP-Addr UNIT32 0-253
189 USR-IP-RIP-Input-Filter String 0-253
190 USR-IP-Call-Input-Filter String 0-253
191 USR-IPX-Call-Input-Filter String 0-253
192 USR-AT-Input-Filter String 0-253
Table C-21 USR VSAs (continued)
SubAttr VSA Name Type
Min-Max
Value

C-84
Cisco Prime Access Registrar 6.1 User Guide
OL-29756-01
Appendix C RADIUS Attributes
Vendor-Specific Attributes
193 USR-AT-RTMP-Input-Filter String 0-253
194 USR-AT-Zip-Input-Filter String 0-253
195 USR-AT-Call-Input-Filter String 0-253
196 USR-ET-Bridge-Input-Filter String 0-253
197 USR-IP-RIP-Output-Filter String 0-253
198 USR-IP-Call-Output-Filter String 0-253
199 USR-IPX-RIP-Output-Filter String 0-253
200 USR-IPX-Call-Output-Filter String 0-253
201 USR-AT-Output-Filter String 0-253
202 USR-ET-RTMP-Output-Filter String 0-253
203 USR-AT-Zip-Output-Filter String 0-253
204 USR-AT-Call-Output-Filter String 0-253
205 USR-ET-Bridge-Output-Filter String 0-253
206 USR-ET-Bridge-Call-Output-F
ilter
String 0-253
207 USR-IP-Default-Route-Option UINT32 0-253
208 USR-MP-EDO-HIPER String 0-253
209 USR-MP-MRRU UINT32 0-253
Table C-21 USR VSAs (continued)
SubAttr VSA Name Type
Min-Max
Value

C-85
Cisco Prime Access Registrar 6.1 User Guide
OL-29756-01
Appendix C RADIUS Attributes
Vendor-Specific Attributes
WiMax
Table C-22 lists the WiMax VSAs. The vendor ID for WiMax VSAs is 24757.
WISPr
Table C-23 lists the WISPr VSAs. The vendor ID for WISPr VSAs is 14122.
Table C-22 WiMax VSAs
SubAttr VSA Name Type
Min-Max
Value
1 HA-IP-MIP4 IPAddress 0-253
2 HA-IP-MIP6 IPAddress 0-253
3 GMT-Time-Zone-Offet String 0-253
4 NAP-ID String 0-253
5 NSP-ID String 0-253
6 Hotline-Indicator String 0-253
7 BS-ID String 0-253
Table C-23 WISPr VSAs
SubAttr VSA Name Type
Min-Max
Value
1 WISPr-Location-ID String 0-65535
2 WISPr-Location-Name String 0-253
3 WISPr-Logoff-URL String 0-253
4 WISPr-Redirection-UR
L
String 0-253
5 WISPr-Bandwidth-Min
-Up
UINT32 0-65535
6 WISPr-Bandwidth-Min
-Down
UINT32 0-65535
7 WISPr-Bandwidth-Ma
x-Up
UINT32 0-65535
8 WISPr-Bandwidth-Ma
x-Down
UINT32 0-65535
9 WISPr-Session-Termin
ate-Time
UINT32 0-65535
10 WISPr-Session-Termin
ate-End-Of-Day
UINT32 0-65535
11 WISPr-Billing-Class-O
f-Service
String 0-253

C-86
Cisco Prime Access Registrar 6.1 User Guide
OL-29756-01
Appendix C RADIUS Attributes
Vendor-Specific Attributes
XML
Table C-24 lists the XML VSAs, attributes for XML tags. The vendor ID for XML VSAs is 5842.
Table C-24 XML VSAs
SubAttr VSA Name Type
Min-Max
Value
1 XML-Address-format-IPv4 IPADDR 0-253
2 XML-Association String 0-253
3 XML-Request String 0-253
4 XML-Response String 0-253
5 XML-UserId-id_type-subscriber_id String 0-253
6 XML-UserIdRequest String 0-253

GL-1
Cisco Prime Access Registrar 6.1 User Guide
OL-29756-01
GLOSSARY
A
Access point A device that bridges the wireless link on one side to the wired network on the other.
Analog Channel A circuit-switched communication path intended to carry 3.1 KHz audio in each direction.
ARP Address Resolution Protocol is the TCP/IP protocol that translates an Internet address into the
hardware address of a network interface card.
ATM Asynchronous Transfer Mode is a virtual circuit, fast packet technology. Traffic of all kinds (data,
voice, video) is divided into 53-byte cells and conducted over very high speed media.
ATO Adaptive TimeOut is the time that must elapse before an acknowledgment is considered lost. After a
timeout, the sliding window is partially closed and the ATO is backed off.
C
Call A connection or attempted connection between two terminal end points on a PSTN or ISDN; for
example, a telephone call between two modems.
CHAP Challenge Authentication Protocol is a PPP cryptographic challenge/response authentication protocol
in which the clear text password is not passed in the clear over the line.
CLID Calling Line ID indicates to the receiver of a call, the phone number of the caller.
CM Cable Modem is usually a modem with an RF (cable) interface on one side and an Ethernet interface
on the other. A cable modem might also have a telephone interface for “telco return,” which is used
when only downstream capability exists in the cable plant.
CNR Cisco Network Registrar—A network management application which includes a DHCP server and a
DNS server.
Community String A string used to authenticate the trap message sender (SNMP agent) to the trap recipient (SNMP
management station).
Control Messages Control messages are exchanged between LAC, LNS pairs, and operate in-band within the tunnel
protocol. Control messages govern aspects of the tunnel and sessions within the tunnel.
CSG Cable Systems Group is a billing systems company.
CSR Customer Service Representative—the person you call to activate or obtain service for your account.

Glossary
GL-2
Cisco Prime Access Registrar 6.1 User Guide
OL-29756-01
CSU/DSU Channel Service Unit/Data Service Unit isolates your network from your exchange carrier’s network.
It also receives the timing, low-level framing information, and data passed from the termination point.
CSU/DSUs are specific to the general circuit type.
Customer A user of an ISP or an enterprise. The provider offers the customer MPLS VPN service. The enterprise
provides the customer remote user access to various sites. In the case of ISPs, MPLS BPN provides a
scalable wholesale access/open access solution.
C
D
DAP Directory Access Protocol is a heavyweight protocol that runs over a full OSI stack and requires a
significant amount of computing resources to run.
Data Source Sets of data and their associated environments which include operating system, DBMS, and network
platforms used to access the DBMS that an application wants to access.
DHCP Dynamic Host Configuration Protocol—a protocol that describes the service of providing and
managing IP addresses to clients on a network.
DHCP Client The IOS DHCP client used to generate requests for host addresses and subnets for non-PPP clients.
DHCP Proxy Client The IOS DHCP client used to request an address for a PPP user from a DHCP server.
Dial Use Dial Use is an end-system or router attached to an on-demand PSTN or ISDN, which is either the
initiator or recipient of a call.
Digital Channel Digital Channel is a circuit-switched communication path that is intended to carry digital information
in each direction.
DNIS Dialed Number Information String is an indication to the receiver of a call as to what phone number
the caller used to reach it.
Driver Manager A special library that manages communication between applications and drivers. Applications call
ODBC API functions in the driver managers which load and call one or more drivers on behalf of the
applications.
E
EAP Extensible Authentication Protocol is a framework for a family of PPP authentication protocols,
including cleartext, challenge/response, and arbitrary dialog sequences.

Glossary
GL-3
Cisco Prime Access Registrar 6.1 User Guide
OL-29756-01
F
FT Field Technician is someone who installs your cable modem in your house.
Frame Relay Frame Relay is a cost-effective, lightweight, many-to-many, medium-speed, virtual network, link-layer
technology.
G
GGSN GPRS Gateway Support Node, a network node that acts as a gateway between a GPRS wireless data
network and other networks such as the Internet or a private network.
GPRS General Packet Radio Service, a mobile data service available to users of GSM and IS-136 mobile
phones.
I
ISDN Integrated Services Digital Network enables synchronous PPP access.
ISP Internet Service Provider is a company that provides Internet connectivity.
H
HDLC High-level Data Link Control is both a point-to-point and multiparty link-layer technology. HDLC
provides reliable, acknowledged transfer across dedicated links.
L
L2TP Access
Concentrator (LAC)
LAC is a device attached to one or more PSTN or ISDN lines capable of PPP operation and of handling
the L2TP protocol. The LAC needs only to implement the media over which L2TP is to operate to pass
traffic to one or more LNSs. It might tunnel any protocol carried within PPP.
LAN Local Area Network consists of all of the components that create a system up to a router. These
components include cables, repeaters, bridges, and software up to the network layer.
LDAP Lightweight Directory Access Protocol provides a standard way for Internet clients, applications, and
WWW servers to access directory information across the Internet such as usernames, e-mail addresses,
security certificates, and other contact information.
LEAP Light Extensible Authentication Protocol—

Glossary
GL-4
Cisco Prime Access Registrar 6.1 User Guide
OL-29756-01
LLC Logical Link Control is an interface that defines several common interfaces between higher-level
protocols (for example, IP) and the networks they ride upon (for example, Ethernet, Token Ring, and
others).
L2TP Network
Server (LNS)
An LNS operates on any platform capable of PPP termination. The LNS handles the server side of the
L2TP protocol. Since L2TP relies only on the single media over which L2TP tunnels arrive, the LNS
can have only a single LAN or WAN interface, yet still be able to terminate calls arriving at any LAC's
full range of PPP interfaces (async, synchronous ISDN, V.120, etc.).
L
M
MIB Management Information Base—Database of network management information used and maintained
by a network management protocol such as SNMP. The value of a MIB object can be changed or
retrieved using SNMP commands. MIB objects are organized in a tree structure that includes public
and private branches.
MPLS Multi-Protocol Label Switching—
MPLS VPN MPLS-based Virtual Private Networks
MSO Multiple System Operators are typically cable companies that provide Internet access for regional
independent operators.
N
NAS Network Access Server is a device providing temporary, on-demand network access to users. This
access is point-to-point using PSTN or ISDN lines. A NAS operates as a client of RADIUS. The client
is responsible for passing user information to designated RADIUS servers.
In PPTP terminology, this is referred to as the PPTP Access Concentrator (PAC). In L2TP terminology,
the NAS is referred to as the L2TP Access Concentrator (LAC).
NCP Network Control Protocol is responsible for negotiating the protocol-specific particulars of the
point-to-point protocol (PPP) link.
Network Access
Identifier
In order to provide for the routing of RADIUS authentication and accounting requests, the UserID field
used in PPP and in the subsequent RADIUS authentication and accounting requests, known as the
Network Access Identifier (NAI), might contain structure. This structure provides a means by which
the RADIUS proxy locates the RADIUS server that is to receive the request. This same structure can
also be used to locate the tunnel end point when domain-based tunneling is used.

Glossary
GL-5
Cisco Prime Access Registrar 6.1 User Guide
OL-29756-01
O
ODBC Open Database Connectivity—a standard set of application programming interface (API) function calls
(supported by Microsoft and in general use) that can be used to access data store in both relational and
non-relational database management systems (DBMSs).
ODBC Driver Processes ODBC function calls, submits SQL requests to specific data source, and returns results to
applications. ODBC drivers for specific types of data files, including database files, spreadsheet files,
and text fields, are available from Microsoft Corporation.
P
packet A block of data in a standard format for transmission.
PAP Password Authentication Protocol is a simple PPP authentication mechanism in which a cleartext
username and password are transmitted to prove identity.
Payload The contents of a request packet.
PDU Protocol Data Unit—An SNMP compliant request, response, or trap message.
PE Router Provider Edge router—a router located at the edge of the provider’s MPLS core network.
POP Point of Presence is the dial-in point or connection point for users connecting to an ISP.
PPD Packet Processing Delay is the amount of time required for each peer to process the maximum amount
of data buffered in their offered receive packet window. The PPD is the value exchanged between the
LAC and LNS when a call is established. For the LNS, this number should be small. For an LAC
supporting modem connections, this number could be significant.
PPP Point-to-Point Protocol—a multiprotocol and includes UDP, Frame Relay PVC, and X.25 VC.
Profile A collection of one or more attributes that describe how a user should be configured; for example, a
profile can contain an attribute whose value specifies the type of connection service to provide the user,
such as PPP, SLIP, or Telnet. Profiles can be set up for a specific user or can be shared amongst users.
Provider Service Provider—A provider who operates the access networks and MPLS backbone and provides
MPLS VPN service on the backbone.
PSTN Public Switched Telephone Network enables async PPP through modems.
Q
Quality of Service
(QOS)
A given Quality of Service level is sometimes required for a given user being tunneled between an
LNS-LAC pair. For this scenario, a unique L2TP tunnel is created (generally on top of a new SVC) and
encapsulated directly on top of the media providing the indicated QOS.

Glossary
GL-6
Cisco Prime Access Registrar 6.1 User Guide
OL-29756-01
R
RAC Client The IOS DHCP client used to generate requests for host addresses and subnets for non-PPP clients.
RADIUS Remote Authentication Dial-In User Service. The RADIUS protocol provides a method that allows
multiple dial-in Network Access Server (NAS) devices to share a common authentication database.
RADIUS Client A Network Access Server (NAS) operates as a client of RADIUS. The client is responsible for passing
user information to designated RADIUS servers, and then acting on the response that is returned. A
RADIUS server can act as a proxy client to other RADIUS servers.
RADIUS Dictionary The RADIUS dictionary passes information between a script and the RADIUS server, or between
scripts running on a single packet.
RADIUS Proxy In order to provide for the routing of RADIUS authentication and accounting requests, a RADIUS
proxy might be employed. To the NAS, the RADIUS proxy appears to act as a RADIUS server, whereas
to the RADIUS server the proxy appears to act as a RADIUS client.
RADIUS Server A server that is responsible for receiving user connection requests, authenticating the user, and then
returning all of the configuration information necessary for the client to deliver the service to the user.
RAS Remote Access Services. See RADIUS Client.
Remote DHCP
Server
Usually a DHCP server in the service provider’s networks, however it might also be a DHCP server in
the customer’s VPN.
Remote Server A server that has been registered with the user interface, which can later be referenced as a proxy client
or as the method to perform a service; for example, a remote RADIUS server can be specified to act as
a proxy client.
REX RADIUS EXtension allows you to write C and C++ programs to affect the behavior of
Cisco Prime Access Registrar.
Roaming The ability to connect to a NAS that is not your normal POP (Point of Presence) and have the
Access-Request redirected to your normal RADIUS server. The ability to use any one of multiple
Internet server providers, while maintaining a formal, customer-vendor relationship with only one.
Router A network device that connects multiple network segments and forwards packets from one network to
another. The router must determine how to forward a packet based on addresses, network traffic, and
cost.
Routing Tables A table that lists all of the possible paths data can take to get from a source to a destination. Depending
on how routers are configured, they can build their tables dynamically by trading information with
other routers, or they can be statically configured in advance.
RTT Round-Trip Time is the estimated round-trip time for an Acknowledgment to be received for a given
transmitted packet. When the network link is a local network, this delay will be minimal (if not zero).
When the network link is the Internet, this delay could be substantial and vary widely. RTT is adaptive;
it adjusts to include the PPD (Packet Processing Delay) and whatever shifting network delays
contribute to the time between a packet being transmitted and receiving its acknowledgment.

Glossary
GL-7
Cisco Prime Access Registrar 6.1 User Guide
OL-29756-01
S
SAP Service Access Points (source and destination) identify protocols from which a packet has come and
to which a packet must be delivered.
Script Instructions that are run in the context of a RADIUS client/server session. Scripts can be specified for
servers, clients, vendors, and services. A script can be used as an incoming script, an outgoing script,
or both. Incoming scripts are executed during the Access-Request portion of a dial-in session. Outgoing
scripts are executed during the Access-Accept portion of a dial-in session. Scripts are referenced within
the User Interface by name. Scripts can be source code for a scripting language or a binary file.
Service A means of specifying the method to use to perform a function. A service can be specified for the
following functions: authentication, authorization, accounting, and authentication-authorization. For
example, a service can specify that authentication be performed using the local database, or a service
can specify that accounting be supported by logging information to a file.
Services Three default services are referenced by the server configuration and when processing scripts. They are
Default Authentication Service, Default Authorization Service, and Default Accounting Service. Each
service has a type and (if it is using remote servers) an ordered list of servers to use.
Session Each service provided by the NAS to a dial-in user constitutes a session, with the beginning of the
session defined as the point where service is first provided and the end of the session defined as the
point where service is ended. Depending on NAS support capabilities, a user can have multiple sessions
in parallel or in series.
SHA-1 Secure Hash Algorithm; a hashing algorithm that produces a 160-bit digest based upon the input. The
algorithm produces SHA passwords that are irreversible or prohibitively expensive to reverse.
Shared Secret Used to authenticate transactions between the client and the RADIUS server. The shared secret is never
sent over the network.
Shared Use
Network
An IP dial-up network whose use is shared by two or more organizations. Shared use networks typically
implement distributed authentication and accounting in order to facilitate the relationship amongst the
sharing parties.
Silently Discard RADIUS discards the packet without further processing. The server logs an error, including the
contents of the silently discarded packet, and records the event in a statistics counter.
SLIP Serial Line Internet Protocol is TCP/IP over direct connections and modems, which allows one
computer to connect to another or to a whole network.
SMDS Switched Multi-megabit Data Service is a high-speed Metropolitan-Area Networking technology that
behaves like a LAN.
SSHA Netscape’s (iPlanet) enhancement of the SHA-1 algorithm which includes salted password data.
SNAP SubNetwork Access Protocol is used when a SAP definition does not exist for the encapsulated user
data protocol.

Glossary
GL-8
Cisco Prime Access Registrar 6.1 User Guide
OL-29756-01
SSL Secure Socket Layer is the protocol defined by Netscape that is used for encryption and authentication
between two Internet entities. It uses public/private key certificates instead of shared secrets.
SVC Switched Virtual Circuit is an L2TP-compatible media on top of which L2TP is directly encapsulated.
SVCs are dynamically created, permitting tunnel media to be created dynamically in response to
desired LNS-LAC connectivity requirements.
S
T
TACACS Terminal Access Controller Access Control System, a an authentication server that validates user IDs
and passwords, thus controlling entry into systems.
Telnet A service that lets you log into a system over a network just as though you were logging in from a
remote character terminal attached to the system. It is commonly used to provide an Internet service
that is exactly the same as the one you would get if you dialed into the system directly with a modem.
Trap A network message of a specific format issued by an SNMP entity on behalf of a network management
agent application. A trap is used to provide the management station with an asynchronous notification
of an event.
Tunnel A tunnel is defined by an LNS-LAC pair. The tunnel carries PPP datagrams between the LAC and the
LNS; many sessions can be multiplexed over a single tunnel. A control connection operating in band
over the same tunnel controls the establishment, release, and maintenance of sessions and of the tunnel
itself.
Tunnel Network
Server
A server that terminates a tunnel. In PPTP terminology, this is known as the PPTP Network Server
(PNS). In L2TP terminology, this is known as the L2TP Network Server (LNS).
U
UDP User Datagram Protocol, a data packet protocol.
User List The list of users registered for dial-in access.
User Record The UserRecord contains all the information that needs to be accessed at runtime about a particular
user. This enables it to be read in one database operation in order to minimize the cost of authenticating
the user. The UserRecord is stored as an encrypted string in the MCD database, because it contains the
user’s password, amongst other things.
Users Users are represented by entities in specific UserLists. See User Record.

Glossary
GL-9
Cisco Prime Access Registrar 6.1 User Guide
OL-29756-01
V
Vendor Each NAS has a vendor associated with it. A vendor can specify attributes for the NAS that are not part
of the standard specification.
VHG Virtual Home Gateway—a Cisco IOS component that terminates PPP sessions. It is owned and
managed by the service provider on behalf of its customer to provide access to remote users of that
customer’s network. A single service provider device (router) can host multiple VHGs of different
customers. A VHG can be dynamically brought up and down based on the access pattern of the remote
users. Note that there is no single IOS feature called the VHG; it is a collection of function and features
(PPP, virtual profiles, VRFs, etc.).
VPN Virtual Private Network is a way for companies to use the Internet to securely transport private data.
VRF Virtual routing and forwarding. A per VPM routing table on the PE router. Each VPN instantiated on
that PE router has its own VRF.
W
WAP Wireless Application Protocol; an application environment and set of communication protocols for
wireless devices designed to enable manufacturer-, vendor-, and technology-independent access to the
Internet and advanced telephony services.
WPS Wireless Provisioning Service; provides a standards-based and integrated platform to simply provision
and manage their Wi-Fi hot spots. WPS allows users of Windows XP to connect to Wi-Fi hot spots with
a seamless sign-up process and enables a more secure wireless network access.
X
X.25 A reliable public data network technology consisting of private virtual circuits, virtual calling, and
per-packet charging.
X.500 Defines the Directory Access Protocol (DAP) for clients to use when contacting directory servers. DAP
is a heavyweight protocol that runs over a full OSI stack and requires a significant amount of computing
resources to run.

Glossary
GL-10
Cisco Prime Access Registrar 6.1 User Guide
OL-29756-01

IN-1
Cisco Prime Access Registrar 6.1 User Guide
OL-29756-01
INDEX
Symbols
/bin/arserver 17-4
Numerics
3gpp compliance 20-7
A
AAAFileServiceSyncInterval 4-62
AcceptAll 3-25, 4-12, 4-15, 4-17, 4-18, 4-19, 4-20, 4-25
Accepted-Profiles B-1
Access-Challenge 1-13
Access Registrar
definition 1-1
dictionaries 11-1
internal database 26-1
objects 1-2, 4-3
server 3-10, 4-2
Access-Reject B-13
Access-Request 5-2, 5-7, 5-8
Accounting 7-1
attributes 1-15
database 1-1
definition 1-1
log file 3-23, 4-14
MaxFileAge 7-2
MaxFileAge format 7-4
MaxFileSize 7-2
MaxFileSize format 7-3
RolloverSchedule 7-2
setting up 7-2
Start 7-1
Stop 7-1
Accounting records 16-11
Accounting-Service B-2
ACKaccounting 4-60
Acquire-Dynamic-DNS B-2
Acquire-Home-Agent B-2
addProfile method A-2
AdvancedDuplicateDetectionMemoryInterval 4-64, 4-74
agent_server_logs 29-4
AllowEAPRejectAttrs 4-68
AllowRejectAttrs 4-68
AltigaOutgoingScript 11-8
ANAAAOutgoing 11-8
APPEND A-2, A-5, A-8, A-9, A-10
arbug 17-33
aregcmd
Cisco Prime Access Registrar command 2-1
command performance 2-3
commands 2-4, 2-18
add 2-5
cd 2-5
delete 2-6
dia-stats 2-15
exit 2-6
filter 2-6
find 2-6
help 2-7
insert 2-7
login 2-7
logout 2-7
ls 2-8
next 2-8

Index
IN-2
Cisco Prime Access Registrar 6.1 User Guide
OL-29756-01
prev 2-8
pwd 2-9
query-sessions 2-9
quit 2-9
release-sessions 2-9
reload 2-10
save 2-10
set 2-11
start 2-12
stats 2-12
status 2-14
stop 2-14
trace 2-16
unset 2-18
validate 2-18
definition 2-1
error codes 2-20
save 6-4
session management commands 4-36
syntax 2-1
ARIsCaseInsensitive 4-66
arserver file 17-4
AscendIncomingScript 11-8
AscendOutgoingScript 11-8
Attribute Dictionary 1-15, 4-77, A-1
methods A-1
put method A-3
Attributes 4-46, C-1
alphabetical list C-1
check item 17-34
numeric list C-4
AttributesToBeReturned 17-7
AUGMENT A-2, A-3, A-8, A-9
Authentication-Service 1-8
Authorization 23-13
definition 1-1
Authorization-Service 1-8
B
BackingStoreDiscThreshold 3-81, 3-120, 4-58, 4-62, 4-73,
22-13
BackingStore-Env-Vars B-4
BaseProfile 3-13, 4-4, 4-5
BindName 4-52
BindPassword 4-52
blacklisting IMSI 23-11
Broadcast-Accounting-Packet B-4
C
CabletronOutgoing 11-9
Cache-Attributes-In-Session B-4
Callback-Number 1-15
callsPerSecond 5-11
Case insensitive commands
see also aregcmd
cd command 2-1
CertificateDBPath 4-63
change directory command
see also aregcmd
Change of Authorization (CoA) 17-39
CHAP
Access Request packet 5-3
CHAP_ PASSWORD
attribute type 4-78
Check item attributes 17-34
CIDR notation 3-105, 4-7
CiscoIncoming 11-9
CiscoOutgoing 11-9
Cisco Prime Access Registrar
backups 26-1
Cisco Subscriber Edge Services Manager 15-1
CiscoWithODAPIncomingScript 11-9, 13-1, 13-3
Classless Inter-Domain Routing 3-105, 4-7
ClassName 4-11
clear method A-2

Index
IN-3
Cisco Prime Access Registrar 6.1 User Guide
OL-29756-01
Client/server model 1-12
Client-Behind-the-Proxy 11-2
Clients
IPAddress 3-105, 4-7
list 4-73
vendor properties 3-105, 4-7
CoA requests 17-39
command authorization support 17-50
Commands
eap-trace 9-43
tunnel 9-43
config_mcd_server_logs 29-4
ConfigurationError reply message 4-76
Configuration Examples
Query-Notify feature 17-8
Configuration Objects 2-3
Configuring
check item attributes 17-34
LDAP RemoteServer 21-3
local service 6-2
ODBC RemoteServer 22-7
Configuring CoA requests 17-39
Configuring rules 18-2
containsKey method A-2
CRB-Prepaid billing
with SSG 16-15
D
Database
Cisco Prime Access Registrar backups 26-1
MCD 6-4
DataSourceConnections 4-53
DDNS 4-68
DefaultAccountingService 3-11, 4-3
DefaultAuthenticationService 1-4, 3-10, 4-3
DefaultAuthorizationService 3-10, 4-3
DefaultReturnedSubnetSizeIfNoMatch 4-65
DefaultSessionManager 3-10, 4-3
DefaultSessionService 3-11, 4-3
Destination-IP-Address B-4
Destination-port B-4
DetectOutOfOrderAccountingPacket 3-74, 4-65
DetectOutOfOrderAccountingPackets 4-65
diameter
session management 8-24
diameter-eap 8-2
Dictionaries
Types of 11-1
Dictionary
attribute 4-67
Disable-Accounting-On-Off-Broadcast B-7
DNSLookupAndLDAPRebindInterval 4-53, 21-6
DropPacket. 3-25, 4-12, 4-15, 4-17, 4-18, 4-19, 4-20, 4-25
Dynamic-DNS-HostName B-7
Dynamic-Search-Filter B-7
Dynamic-Service-Loop-Limit B-7
Dynamic-User-Password-Attribute B-7
E
EAP 4-14, 9-1
authentication mechanism 9-1
fatal error packet handling 4-74
SilentDiscard 4-74
EAP-Actual-Identity B-8
EAP-AKA’ 9-6
eap-aka’ 3-38
eap-aka-prime (eap-aka’) 9-6
EAP authentication 9-1
EAP-Authentication-Mode B-8
EapBadMessagePolicy 4-74
EAP-FAST
keystores 4-68
EAP-GTC 9-18, 9-19
EAP-LEAP 9-20
EAP-MD5 9-21
EAP-MSChapv2 9-23

Index
IN-4
Cisco Prime Access Registrar 6.1 User Guide
OL-29756-01
EAP-Negotiate 9-22, 9-23
EAP response messages 4-74
EAP-SIM 9-25
EAP-SIM authentication 9-27, 9-28
eap-trace command 9-43
EAP-Transport Level Security 9-29
Easysoft Open Source 22-12
Empty string 2-1
EnableNotifications 3-106, 4-9
EntryPoint 4-25
ENUM
attribute type 4-78
Environment Dictionary 1-4, 1-8, 11-1, 11-3
Environment Dictionary script 11-4
Environment variable
Accounting-Service B-2
Acquire-Group-Session-Limit B-2
Acquire-IP-Dynamic B-2
Acquire-IP-Per-NAS-Port B-2
Acquire-IPX-Dynamic B-2
Acquire-Subnet-Dynamic B-3
Acquire-User-Session-Limit B-3
Acquire-USR-VPN B-3
Allow-Null-Password B-3
Authentication-Service B-3
Authorization-Service B-3
Current-Group-Count B-4
Dynamic-Search-Path B-7
Group-Session-Limit B-8
Ignore-Accounting-Signature B-9
Incoming-Translation-Groups B-9
Misc-Log-Msg-Info B-10
Reject-Reason B-11
Remote-Server B-11
Remote-Servers-Tried B-11
Request-Authenticator B-11
Request-Type B-12
Require-User-To-Be-In-Authorization-List B-12
Response-Type B-13
Session-Key B-13
Session-Manager B-13
Session-Service B-14
Source-IP-Address B-14
Trace-Level B-15
Unavailable-Resource B-15
Unavailable-Resource-Type B-15
User Authorization-Script B-16
User-Group B-16
User-Group-Session-Limit B-16
User-Name B-16
User-Profile B-16
User-Session-Limit B-16
Error codes
aregcmd 2-20
EscapeSpecialCharInUserName 4-53
ExecCLIDRule 18-16
ExecDNISRule 18-16
ExecNASIPRule 18-17
ExecRealmRule 18-15
ExecTimeRule 18-12, 18-20
Extensible Authentiction Protocols 8-1, 9-1, 23-1
Extension points 11-2
F
Failover policy 3-44, 4-18, 4-19, 4-20
fastrules 3-53, 19-1
CLI 19-2
GUI 3-53
Fatal error packet 4-74
Filename 4-25
FilenamePrefix 4-15
file service 3-18, 3-23, 4-12, 4-14
FilenamePrefix 4-15
MaxFileAge 4-15
MaxFileSize 4-15
Filter 4-52
firstKey method A-2

Index
IN-5
Cisco Prime Access Registrar 6.1 User Guide
OL-29756-01
Force update 17-12
Framed-IP-Address 1-15
Framed Protocol 1-15
FramedRouting 4-44
G
Gateway
Description 4-41
IPAddress 4-41
LocationID 4-41
Name 4-41
SharedSecret 4-41
TunnelRefresh 4-41
Gateways 4-44
get method A-2
Grouping property 18-2
Group service 16-5, 16-13, 16-14
Group-Session-Limit Resource Manager 4-39
GUI
launching 3-1
logging in 3-3
log out 3-4
H
HiddenAttributes 4-4
Home-Agent-Ipv6 4-41
HostName 4-52
Hot configuration 12-6
Hot-lining 17-39
I
Identifier 4-44
imsi
blacklisting 23-11
IncomingScript 1-7, 3-10, 3-60, 3-104, 4-2, 4-7, 4-10, 4-32, 4-59
IncomingScriptFailed reply message 4-76
IncomingScript RejectedRequest reply message 4-76
Incoming scripts 1-3, 1-13
Information collection
automatic 17-33
InitEntryPoint 3-18, 4-11, 4-25
InitEntryPointArgs 4-25
InitialBackgroundTimerSleepTime 4-63
InitializeArg 4-11
InitialTimeout 4-60
Input queue
high threshold 24-4
Interfaces properties 4-1
InternalError reply message 4-76
internal script 11-14
internal scripts 3-18, 11-6, 11-14
CLI 11-14
GUI 3-18
IPADDR
attribute type 4-78
IPAddress 3-105, 4-7
IP-Dynamic Resource Manager 4-39
IP-Per-NAS-Port Resource Manager 4-39
IPX-Dynamic Resource Manager 4-39
isEmpty method A-2
J
Java service 4-17
JavaVMOptions 4-65
K
KeyStores 4-68
L
LDAP 21-1

Index
IN-6
Cisco Prime Access Registrar 6.1 User Guide
OL-29756-01
hostname 21-3
MultipleServersPolicy 21-2
protocol 4-51
RemoteServers 4-47
ldap
BindName 4-52
BindPassword 4-52
Filter 4-52
HostName 4-52
LDAPToEnvironmentMappings 4-54
LDAPToRadiusMappings 4-54
LimitOutstandingRequests 4-52
MaxOutstandingRequests 4-52
MaxReferrals 4-53
PasswordEncryptionStyle 4-53
ReferralAttribute 4-53
ReferralFilter 4-53
SearchPath 4-52
Timeout 4-52, 4-56
UserPasswordAttribute 4-52
UseSSL 4-54
LDAP Accounting 3-112
LDAP Rebind 21-6
failures 21-6
LDAP RemoteServer 21-3
LDAP server 1-16
LDAP service 21-2
LDAPToCheckItemMappings 4-54, 21-7
LDAPToEnvironmentMappings 4-54, 21-7
LDAPToRadiusMappings 4-54, 21-7
LEAP 9-20
Lightweight Directory Access Protocol 21-1
LimitOutstandingRequests 4-52
local 3-24, 4-18, B-16
UserList type 3-27, 4-3, 4-19
localhost 5-7
Local Service 6-2
local service 3-27, 4-3, 4-19
LogFileCount 4-64
Log files 29-3
file system 7-3
managing 7-3
LogFileSize 4-64
Logging in 2-7
GUI 3-3
Logging out 2-7
login command 2-7
Login page 3-3
log method A-2
LogServerActivity 4-61
M
m3ua service
map restore data 23-13
Malformed Request reply message 4-76
map restore data 23-13
authorization flow 23-13
CLI 23-15
insert subscriber data 23-14
map restore data authorization 23-13
CLI configuration 23-15
flow 23-13
insert subscriber data structure 23-14
MapSourceIPAddress 11-11
Master-URL-Fragment 17-11, B-9
MaxFileAge 4-15
MaxFileSize 4-15
MaximumIncomingRequestRate 4-69
Maximum NumberOf RadiusPackets 4-61
MaximumODBCResultSize 4-65
MaximumOutstandingRequests 4-70
MaxOutstandingRequests 4-52
MaxReferrals 4-53
MaxTries 4-60
MCD 26-1
mcdcd.d01-d03 26-2
mcdConfig.txt 26-2

Index
IN-7
Cisco Prime Access Registrar 6.1 User Guide
OL-29756-01
MCD database 6-4
mcddb.dbd 26-2
mcddb.k01-k03 26-2
mcdshadow 26-1
Measurements
prepaid billing 16-7
Message logging (Linux) 28-4
Message logging (Solaris) 28-3
Microsoft WPS 17-9
MinimumSocketBufferSize 4-63
Mobile Node-Home Agent 20-1
MPLS 13-1
multiple 1-1
MultipleServersPolicy 4-18, 4-19, 4-20, 21-2, 22-7
MVA
radclient 5-6
N
NAS 1-1, 7-1
NAS IP Address 4-77
NAS-IP-Address 1-15
NAS-Port 1-15
NAS-Vendor-Behind-the-Proxy 11-2
Neighbor 4-44
NetMask 3-106, 4-8
nextKey method A-3
NotificationProperties 3-107, 4-9
NumberOfRemoteUDPServerSockets 4-69
O
ODAP
accounting service 13-8
address ranges 13-2
AllowNullPassword property 13-6
CiscoIncomingScript 13-3
configuration summary 13-5
configuring 13-5
configuring clients 13-15
configuring Session Managers 13-14
detailed configuration 13-5
on-demand address pool 13-1
Resource Managers 13-9
service 13-7
Session Managers 13-8
userlist 13-5
users 13-6
vendor type 13-4
ODBC.ini file 22-2
ODBCDataSource 22-9, 22-11, 22-12
ODBC RemoteServer 22-7
ODBC service 22-6
ODBCToEnvironmentMappings 22-11
ODBCToRadiusMappings 22-11
ORACLE_HOME 22-2
Oracle Driver
Easysoft Open Source 22-12
Oracle functions 22-10
order dependent commands
see also aregcmd
OS paging size 3-92, 4-33
OutagePolicy 3-25, 4-12, 4-15, 4-17, 4-18, 4-19, 4-20, 4-25
OutageScript 3-25, 4-12, 4-15, 4-17, 4-18, 4-19, 4-20, 4-25
OutgoingScript 3-10, 3-60, 3-104, 4-3, 4-8, 4-10, 4-33, 4-59
OutgoingScriptFailed 4-76
OutgoingScriptRejectedRequest 4-77
Outgoing scripts 1-3, 1-8, 1-14
Outgoing-Translation-Groups B-10
Overview 1-1
P
Packet buffering 7-10
Packet fields 1-15
packet-identifier 5-4
Packet of disconnect 17-36

Index
IN-8
Cisco Prime Access Registrar 6.1 User Guide
OL-29756-01
Paging size
operating system 4-43
Paging size (operating system) 3-92, 4-33
ParseTranslationGroupsByCLID 18-10, 18-21
ParseTranslationGroupsByDNIS 18-10, 18-20, 18-21
ParseTranslationGroupsByReal 18-20
ParseTranslationGroupsByRealm 18-10
Password
length of 3-16, 4-4
Password change 17-12
PasswordEncryptionStyle 4-53
PCO-Parse-Client-Outgoing 16-15
PEAP Version 0 9-44
PEAP Version 1 9-49
Performance
aregcmd 2-3
PhantomSessionTimeOut 3-94, 4-35
Policies
configuring 18-1
validation 18-3
Policy 18-1
Policy engine
attribute translation 18-9
parsing translation groups 18-10
reducing overhead 18-13
time of day access restrictions 18-11
wildcard support 18-2
Port
LDAP 4-52
Port 8080 3-1
Ports 4-67
Ports properties 4-1
PPO-Parse-Prepaid-Outgoing 16-16
PPP 1-3, 1-15, 3-11, 4-45
Prepaid
AA service 16-5, 16-12
group service 16-5, 16-13, 16-14
Prepaid billing
measurements 16-7
Protected EAP 9-1
Proxy server 1-15
put method A-3
Q
Query-Notify 17-6
Query-Notify AttributeGroup
configuration example 17-9
Query-Notify client
configuration example 17-9
Query-Service B-10
query-sessions command 4-36
quintets-triplets conversion 9-29
R
radclient
callsPerSecond 5-11
multivalued attributes 5-6
syntax 5-1
testing EAP-TTLS 9-40
timetest 5-10
radclient commands 9-42
RADIUS
attribute name 5-5
attributes C-1
messages 1-14
packet type identifier 5-4
program flow 1-13
protocol 1-12
server 2-3, 2-7, 4-6, 5-3, 11-4
server test tool 5-1
RADIUS_WORKER_THREAD_COUNT 17-4
RADIUS EXtension. See REX
RADIUS packet fields 1-15
RadiusServer object 1-2, 4-1
radius to diameter 8-23

Index
IN-9
Cisco Prime Access Registrar 6.1 User Guide
OL-29756-01
Re-Accounting-Service B-10
ReactivateTimerInterval 4-48
Realm B-11
Re-Authentication-Service B-10
Re-Authorization-Service B-11
ReferralAttribute 4-53
ReferralFilter 4-53
RejectAll 3-25, 4-12, 4-15, 4-17, 4-18, 4-19, 4-20, 4-25
Reject-Reason B-11
release-sessions command 4-36
RemoteLDAPServiceThreadTimerInterval 4-63
RemoteRadiusServerInterface 4-66
RemoteServer
ODBC-Accounting 4-58
prepaid-crb 4-59
RemoteServers 21-2, 22-7
Remote servers
policy 4-18, 4-19, 4-20
RemoteServer types 4-48
REMOVE_ALL A-3, A-10
remove method A-3
Renewal 17-12
RepIPMaster 12-9
REPLACE A-2, A-3, A-5, A-8, A-9, A-10
Replication
archive 12-4
automatic resynchronization 12-5
configuration settings 12-6
data flow 12-3
data integrity 12-4
hot configuration 12-6
hot-standby 12-1
impact on request processing 12-6
RepIPAddress 12-8
RepTransactionArchiveLimit 12-2, 12-8
RepTransactionSyncInterval 12-2, 12-7, 12-10, 12-11
security 12-4
slaves 12-9
slave server 12-3
transaction order 12-5
transaction verification 12-4
Reply Messages 4-75
RepMasterIPAddress 12-9
RepMasterPort 12-9
RepPort 12-8
RepSecret 12-8
RepType 12-7
Request Dictionary 1-13, 11-1
script 11-3
Request-Type Packets
Access-Accept B-12
Access-Challenge B-12
Access-Reject B-12
Access-Request B-12
Accounting-Request B-12
Accounting-Response B-12
Ascend-IPA-Allocate B-12
Ascend-IPA-Release B-12
Status-Client B-12
Status-Server B-12
USR-Enhanced-Radius B-12
USR-NAS-Reboot-Request B-12
USR-NAS-Reboot-Response B-12
USR-Resource-Free-Request B-12
USR-Resource-Free-Response B-12
USR-Resource-Query-Request B-12
USR-Resource-Query-Response B-12
RequireNASsBehindProxyBeInClientList 4-61, 4-73
Resource allocation
dynamic 1-4
resource manager
3gpp 1-5, 3-96, 4-39
dynamic-dns 1-5, 3-96
group-session-limit 1-4, 3-96
home-agent 1-4, 3-96
home-agent-IPv6 1-4, 3-96
ip-dynamic 1-4, 3-95
ip-per-NAS-port 1-4, 3-95

Index
IN-10
Cisco Prime Access Registrar 6.1 User Guide
OL-29756-01
ipx-dynamic 1-4, 3-96
remote-group-session-limit 1-5, 3-96
remote-ip-dynamic 1-4, 3-96
remote-session-cache 1-5, 3-96
remote-user-session-limit 1-4, 3-96
session-cache 1-5, 3-96
subnet-dynamic 1-4, 3-96
user-session-limit 1-4, 3-96
usr-vpn 1-4, 3-96
Resource Managers 1-5, 4-39, 4-40
Group-Session-Limit 4-41
Home-Agent 4-41
IP-Dynamic 4-42
IP-Per-NAS-Port 4-42
IPX-Dynamic 4-42
subnet-dynamic 4-43
User-Session-Limit 4-44
USR-VPN 4-44
Response Dictionary 1-14, 11-1
script 11-4
Response-Type B-13
Resynchronization
automatic 12-5
full 12-5
REX
scripts 3-18, 4-11
REX attribute dictionary
getBytes method A-7
putBytes method A-9
REX environment dictionary
allocateMemory A-11
clear A-11
containsKey A-11
firstKey A-11
get A-12
isEmpty A-12
log A-12
nextKey A-12
put A-12
remove A-12
reschedule A-12
size A-13
trace A-13
rex service
EntryPoint 4-25
Filename 4-25
InitEntryPoint 4-25
InitEntryPointArgs 4-25
RFC
2866 7-1
RFC 2138 4-77, C-1
RFC Compliance 4-68
RolloverSchedule 7-3
time format 7-4
RoundRobin policy 3-44, 4-18, 4-19, 4-20
Routing requests 18-4
based on CLID 18-6
based on DNIS 18-5
based on NASIP 18-7
based on realm 18-4
based on User-Name Prefix 18-8
RPC services 2-4
Rules
script and attribute requirements 18-3
standard scripts 18-15
S
Scripting point 11-1
NAS IncomingScript 11-4
Scripts 11-6
ACMEOutgoingScript 11-8
adding script definition 11-4
AltigaIncomingScript 11-8
ANAAAOutgoing 11-8
AuthorizePPP 11-8
AuthorizeService 11-9
AuthorizeSLIP 11-9

Index
IN-11
Cisco Prime Access Registrar 6.1 User Guide
OL-29756-01
AuthorizeTelnet 11-9
choosing the type of script 11-3
determining goal 11-1
ExecCLIDRule 11-10
ExecDNISRule 11-10
ExecFilterRule 11-10
ExecRealmRule 11-10
extension points 11-2
ParseAAARealm 11-11
ParseAARealm 11-11
ParseAASRealm 11-12
ParseProxyHints 11-12
ParseServiceAndAAARealmHints 11-12
ParseServiceAndAAASRealmHints 11-12
ParseServiceAndAARealmHints 11-12
ParseServiceAndAASRealmHints 11-12
ParseServiceAndProxyHints 11-13
ParseServiceHints 11-13
ParseTranslationGroupsByCLID 11-13
ParseTranslationGroupsByDNIS 11-13
ParseTranslationGroupsByRealm 11-13
tParseAASRealm 11-12
tParseProxyHints 11-12
tParseServiceAndAAARealmHints 11-12
tParseServiceAndProxyHints 11-13
tParseServiceHints 11-13
types of 1-3
UseCLIDAsSessionKey 11-13
USROutgoingScript 11-14
writing 11-2
SCTP multihoming 23-21
SearchPath 4-52
SearchScope 4-53
SelectPolicy 18-1
Send-PEAP-URI-TLV 17-11
Server
master 12-1
primary 12-1
secondary 12-1
Server health 29-8
Services
file 3-23, 4-14
ldap 4-20
local 3-24, 3-27, 4-3, 4-18, 4-19, B-16
proxy requests 4-47
radius 4-20
tacacs-udp 4-20
used for 1-3
services 3-22, 4-12
Services objects 3-22, 4-12
ServiceUnavailable reply message 4-76
SESM 15-1
SessionBackingStoreSynchronizationInterval 4-62
session-cache 4-43
Session magic number 3-74, 4-65
Session Management
definition 1-1
types of 1-4
Session Managers 4-33
Session record size 3-92, 4-33, 4-43
Setting attributes
spaces in value 2-12, 6-9
Shadow backups 26-1
Shared key
MN-HA 20-1
Shared libraries A-1
SharedSecret 4-41, 4-59
Shared secret 3-105, 4-7
definition 1-13
Sign up 17-11
Sign-up URL 17-10
sigtran-m3ua
SCTP multihoming 23-21
size method A-3
SLIP 1-15
SNMP 4-67, 24-1
Trap recipents 24-7
traps 24-3

Index
IN-12
Cisco Prime Access Registrar 6.1 User Guide
OL-29756-01
SNMP Configuration
community string 24-8
SQLDefinition 22-9
SQL queries 22-10
SQLStatement 22-9
SQL syntax restrictions 22-10
SSG 15-1
stats command B-10
sticky commands 2-8
STRING
attribute type 4-78
SynthesizeReverseZone 4-68
syslog messages 28-1
T
TACACS+
command authorization 17-50
command authorization flow 17-52
tacacs-udp 4-47
Tcl attribute dictionary A-1, A-2
addProfile method A-2
clear method A-2
firstKey method A-2
get method A-2
isEmpty method A-2
log method A-2
nextKey method A-3
remove method A-3
size method A-3
trace method A-3
Tcl scripts 11-6
TerminationAction reply message 4-77
Timeout 4-52, 4-56
timetest 5-10
tMapSourceIPAddress 11-11
tParseAARealm 11-12
tParseServiceAndAAASRealmHints 11-12
tParseServiceAndAARealmHints 11-12
tParseServiceAndAASRealmHints 11-13
TraceFileCount 4-64
trace-file-count 2-17
TraceFileSize 4-64
trace method A-3
translation
diameter to radius 8-23
Trap recipents 24-7
Traps
carAccountingLoggingFailure 24-6
carInputQueueFull 24-4
carInputQueueNotVeryFull 24-5
carOtherAccServerResponding 24-6
carOtherAuthServeNotrResponding 24-6
carOtherAuthServerResponding 24-5
carServerStart 24-4
carServerStop 24-4
configuring 24-7
supported 24-4
Trusted ID
configuration overview 15-2
Trusted Identity 15-1
tunnel command 9-43
TunnelRefresh 4-41
U
UDPPacketSize 4-61
UINT32
attribute type 4-78
UnableToAcquireResource reply message 4-76
UNDEFINED
attribute type 4-78
UNIX directories 1-2
UnknownUser reply message 4-76
use_challenge parameter 5-3
UseAdvancedDuplicateDetection 4-64, 4-74
UseBinaryPasswordComparison 4-54
UserDefined 4-4

Index
IN-13
Cisco Prime Access Registrar 6.1 User Guide
OL-29756-01
User extensions. See Scripts.
UserGroups
check item attributes 17-35
UserList 1-3
check item attributes 17-34
UserNotEnabled reply message 4-76
User objects 1-3
UserPasswordAttribute 4-52
UserPasswordInvalid 4-76
User-Profile B-16
User profiles 1-3
User properties 4-4
UserService 9-21
User-Session-Limit B-16
User-Session-Limit Resource Manager 4-39
UseSSL 4-54
Using SESM with CAR 15-1
USRIncomingScript 11-14
USRIncomingscript-ignoreAccountingSignature 11-14
USR-VPN
FramedRouting 4-44
Gateways 4-44
Identifier 4-44
Neighbor 4-44
USR-VPN Resource Manager 4-39
V
valueAsInt 5-7
valueAsIPAddress 5-7
Variables
environment B-1
radclient 5-10
VENDOR_ SPECIFIC
attribute type 4-78
VendorID 4-78
Vendor specific attributes
XML C-86
Vendor-specific attributes C-13
3GPP2 C-13, C-15
ACC C-22
Altiga C-27
Ascend C-30
Bay Networks C-45
Cabletron C-46
Cisco C-48
Compatible C-51
Nomadix C-53
RedCreek C-53, C-56
Telebit C-59
WiMax C-85
WISPr C-85
VHG/PE router 13-1
VPN 1-9
VRF 1-9
VRFs 13-2
VSAs C-13
W
WAP 17-6, 1-9
Windows 95 Registry 1-2
Windows Provisioning Service (WPS) 17-9
Wireless Application Protocol 17-6
WPS 1-9
X
XML Query Identity 14-2

Index
IN-14
Cisco Prime Access Registrar 6.1 User Guide
OL-29756-01
