EN 01 User Manual MK350
User Manual: user manual-MK350-en
Open the PDF directly: View PDF ![]() .
.
Page Count: 19
Registration Web Page:
www.uprtek.com/english/Register_00.asp
Original / Authorized Agent Stamp
Product Serial Number:
Purchase Date:
v 2.1 © Copyright 2014 UPRtek All rights reserved.
TEL:+886-37-580-885
FAX:+886-37-580-398
Website:www.uprtek.com
Address:No.38, Keyi St., Zhunan Township, Miaoli County 35059, Taiwan, R.O.C.
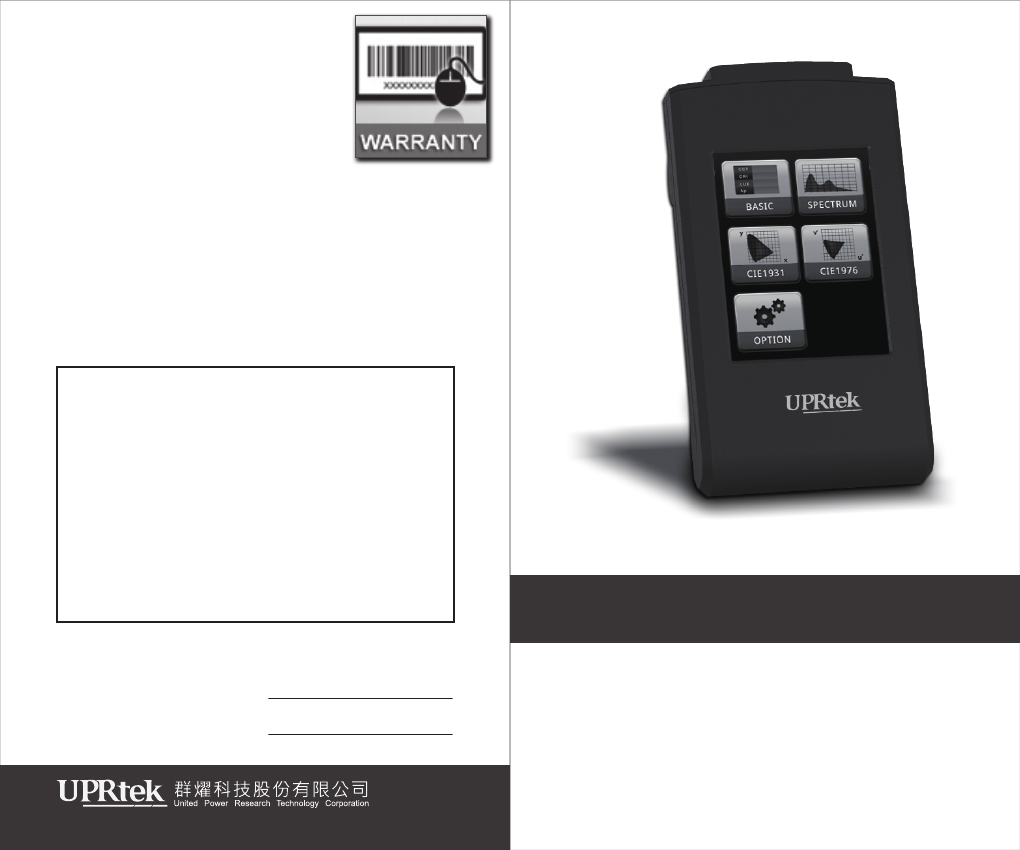
MK350N LED METER
User Manual and Warranty
*
Register online to extend your
warranty an additional 12 months
and to receive one freecalibration
after your 1st year of use. (freight
excluded)
To ensure your warranty validation, please place your agent's stamp
in the box and fill in the purchase date. If the agent stamp and
purchase date cannot be supplied, the warranty period will based on
the manufacturing date of the product.

Contents
MK350N Introduction
1.1 Packing Contents
1.2 Appearance Introduction
1.3 Product Features
1.4 Annual Product Calibration
1.5 Product Notes and Precautions
1
System Overview
3.1 Measurement Modes Introduction
3.2 Measurement Introduction
3.3 Measurement Setting Introduction
3.4 Continuous Measurement Introduction
3.5 Transferring Data with PC Connection
3
Specification
4.1 Product Specification
4
Troubleshooting Guide
5.1 FAQ
5
Appendix Warranty
6.1 Product Warranty
6
Preparing Before Use
2.1 Battery Installation and Charging
2.2 Memory Card Installation
2.3 Strap and Neck Strap Installation
2.4 Screen Wiper Usage Method
2.5 Power On / Off
2.6 Dark Calibration
2.7 Option Function Setting
2.8 System Reset
2
........................................ 1
................................................ 2
................................... 3
................................................ 4
................................ 5
......................... 6
......................................................... 27
....................................... 28
.................................... 30
.................................................................... 31
................................................ 19
................. 20
............................. 22
................. 24
......... 25
............ 26
........................................ 7
...................... 8
................................ 10
.................... 11
............................ 12
.................................................. 13
................................................ 14
................................... 16
.................................................... 18
MK350N Introduction
- 1 -
MK350N Introduction
1.1 Packing Contents
1.2 Appearance Introduction
1.3 Product Features
1.4 Annual Product Calibration
1.5 Product Notes and Precautions
1

MK350N Introduction - 4 -
Product Features1.3
1. 250g Only, Light and Easy to Carry
2. Measure at Any Time, High Mobility
3. 3.5" Color Touch Screen
4. Simple Interface, Easy to Use
5. SD Card Storage, Easy to Transfer Data
MK350N Introduction
- 5 -
Annual Product Calibration1.4
This product is a high-precision measurement
device with sensitive components–handle with
care. To ensure the accuracy of measurements, it is
recommended to have the unit calibrated once a
year. Please contact your agent or our customer
service department for calibration service.

MK350N Introduction - 2 -
Screen Wiper Strap Neck Strap
MK350N LED Meter
Battery USB Cable Power Adaptor
Protection Bag
Case
User Manual
and Warranty
LED 光譜計 MK350
使用者說明書
Packing Contents1.1
Please check MK350N packing before use, contact
your agent if there are missing items.
MK350N Introduction
- 3 -
Appearance Introduction1.2
Sensor Cover
Capture Key
Battery Cover
SD Card Slot
Power Key
Reset Key
Mini USB
Power Jack
Battery
3.5” Touch Screen Strap Hole

MK350N Introduction - 6 -
Product Notes and Precautions1.5
Please read the following precautions to avoid fire, excessive heat, chemical
leakage and explosion.
Do not disassemble or modify the battery.
Do not expose the battery to heat (fire) or water/moisture.
When disposing used/old batteries, wrap with insulation tape to shield
the battery from electrical contact with metallic objects, which might
ignite a fire or explosion.
If the unit is plugged into the power adapter and the battery seems to be
overheating, or if there is smoke or peculiar odors emanating from the
unit, unplug immediately to avoid the possibility of fire.
However, do not touch the cables if there is heat emanating from near the
cables as melted or deformed cables could expose wiring and result in
burns or electric shock.
Do not use cloth or anything to wrap or cover the equipment while
charging – this could cause the unit to overheat, melting the casing or
causing fire.
If the unit is accidently immersed in water, or if moisture has seeped
inside, or metal objects have dropped into the casing, immediately
remove the battery to avoid fire or electric shock.
Do not operate or store the battery in high-temperature environments -
it will cause battery leakage and/or shorten the life of the battery .
Do not use paint thinner, benzene or other organic solvents to clean the
equipment – this may damage the exterior finish or touch screen, and
may even ignite fire.
◆
◆
◆
◆
◆
◆
◆
◆
◆
1.
Precautions / Warnings
The MK350N LED Meter contains sensitive components. Please
unpack with care, as any trauma to the unit may damage the
equipment. Contact your agent if the unit appears not to be
operating normally. Do not attempt any repairs – all repairs
must be performed by qualified service agents.
2. Most LCD screens have a very small and inconsequential
defective pixel rate (usually less than 0.1%). This results in
occasional pinpoints of white or other colors but will not affect
the accuracy of measurements.
Preparing Before Use
- 7 -
Preparing Before Use
2.1 Battery Installation and Charging
2.2 Memory Card Installation
2.3 Strap and Neck Strap Installation
2.4 Screen Wiper Usage Method
2.5 Power On / Off
2.6 Dark Calibration
2.7 Option Function Setting
2.8 System Reset
2
Preparing Before Use - 8 -
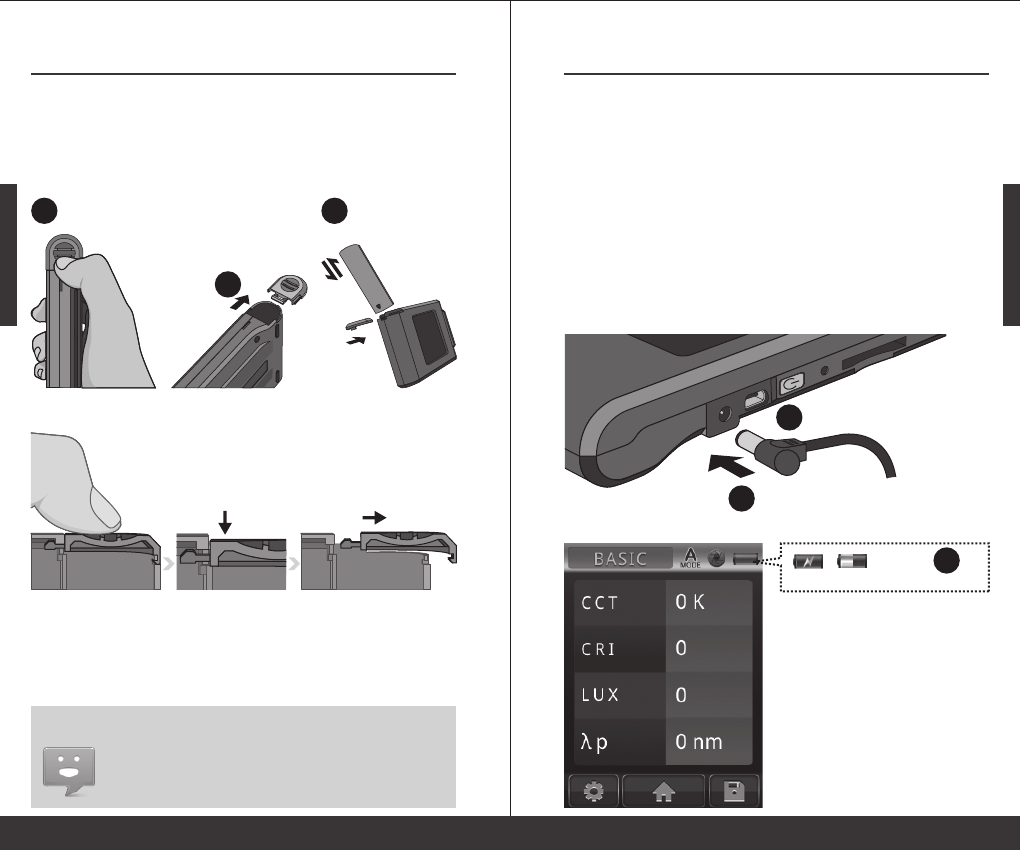
Battery Installation and Charging2.1
3
2
1
remove the cover smoothly from MK350N.
※ Press the battery cover down then you can
Battery installation:
Step1. Hold MK350N then press the battery cover.
Step2. Press the battery cover down to remove it.
Step3. Install the battery after remove battery cover.
1. Please charge the battery for 6 hours at first time usage.
2. To avoid any interruption while measuring, please check
battery status before use.
3. Please purchase a new battery if battery low easily after
fully charged, it means battery life end.
Preparing Before Use
- 9 -
Battery Installation and Charging2.1
Battery charging:
and light off after fully charged.
※ The power key will light up in red,
2
1
when charging and disappear
after fully charged.
※ Lightning symbol will appear
3
※ Battery capacity status while charging.
1.
2.
3.
Plug power charging cable into power jack to start
charging.
Power Off Status: Users can check power key, it will
light in red while charging and light off after fully
charged.
Power On Status: Users can check MK350N screen, it
will appear a lightning symbol to indicate charging,
and lightning symbol will disappear after fully
charged.
Preparing Before Use - 10 -
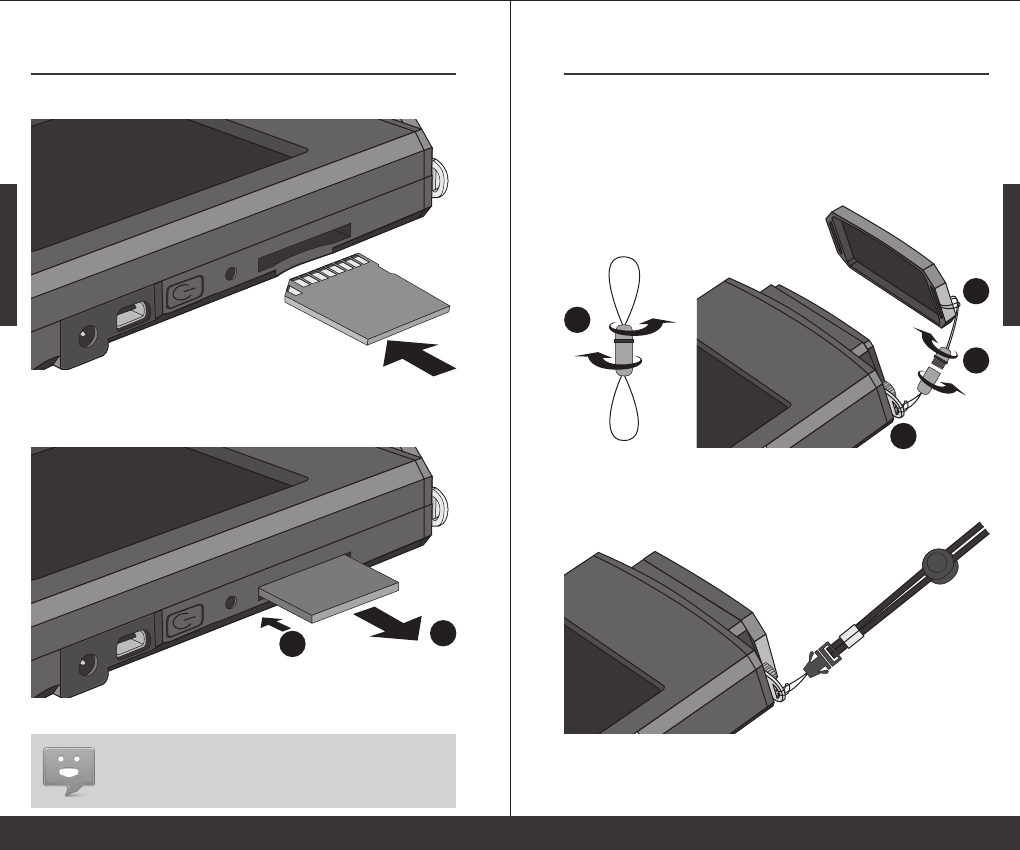
Memory Card Installation2.2
※ Press to remove the SD card
※ Insert the memory card
2
1
Installing the SD Card:
Remove the SD Card:
1. Check SD card status, refer 2.7 Storage
2. Check SD card storage method, refer 3.2 Save Measured
Data
according to the direction.
Preparing Before Use
- 11 -
Strap and Neck Strap Installation 2.3
3
2
1
4
Neck strap installation:
Tie on the strap hole of MK350N put on your neck
so you can use it at any time.
Strap installation:
Step1. Unscrew the strap
Step2. Tie the strap to the strap hole of MK350N
Step3. Tie the strap to the sensor cover
Step4. Screw the strap
Preparing Before Use - 12 -
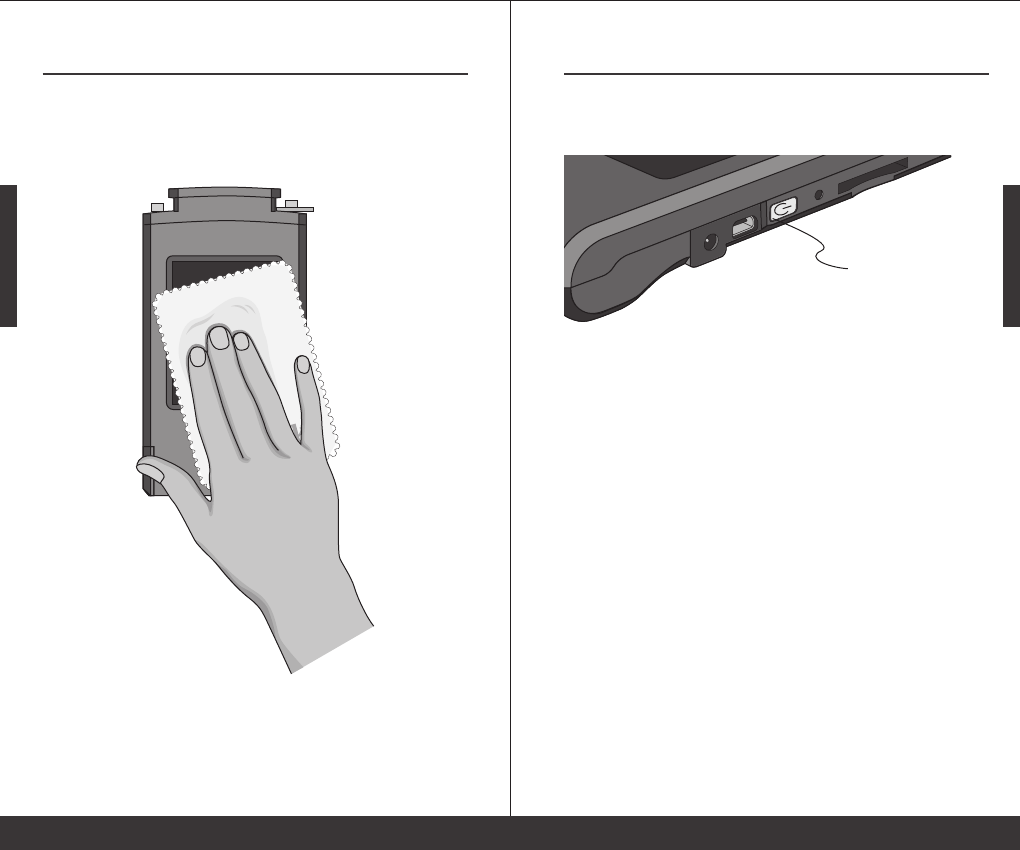
Screen Wiper Usage Method2.4
1. The wiper can remove the dirt easily.
2. Strong absorbent and no effect after repeated washing.
3. Can use bleach for wash but do not iron the wiper.
Preparing Before Use
- 13 -
Power On / Off2.5
Turn on the power:Press the power key for 1 second.
Turn off the power:Press the power key for 5 seconds.
Turn Off: The green light will turn off.
※ Turn On: Power key lights up in green light.
Preparing Before Use - 14 -
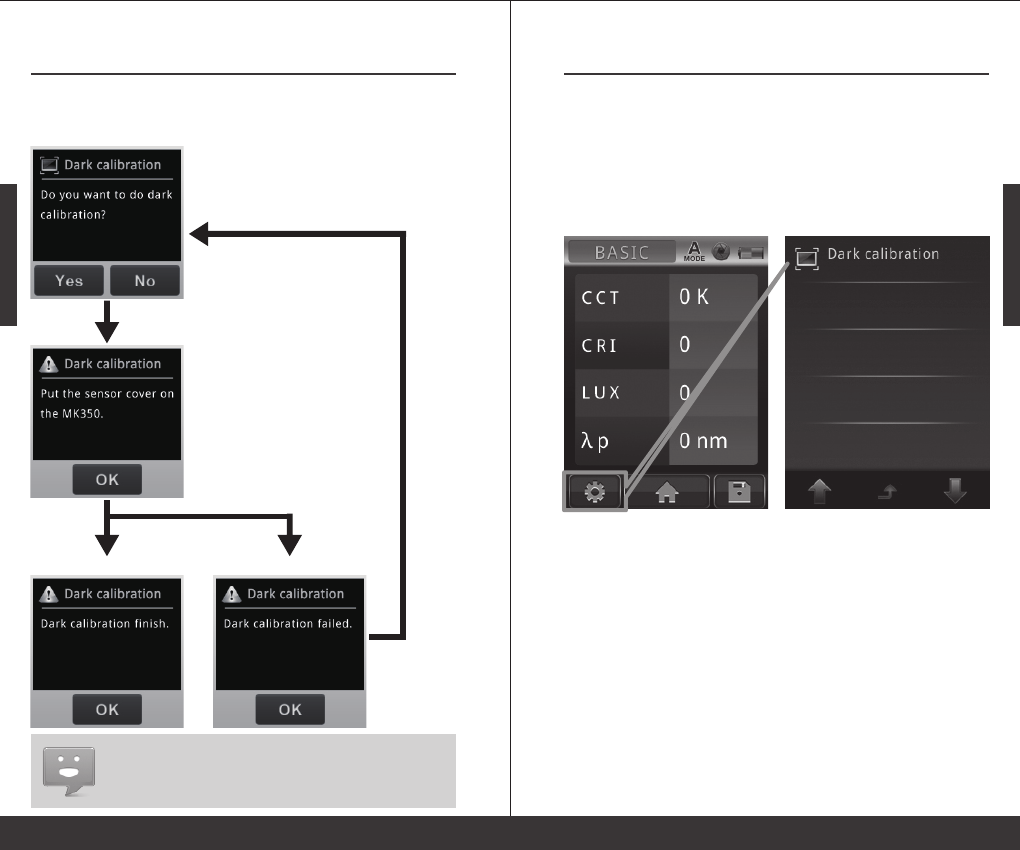
Dark Calibration2.6
1. Suggest to execute dark calibration when every time turn
on MK350N.
1. After turn on MK350N, system will process
dark calibration automatically.
Confirm
Success Failed
Re-do Dark Calibration
Preparing Before Use
- 15 -
Dark Calibration2.6
2. When using MK350N, users can execute
dark calibration manually.
Users can go to measurement page then select
MEASUREMENT SETTING --> DARK CALIBRATION
to execute dark calibration manually.
Preparing Before Use - 16 -
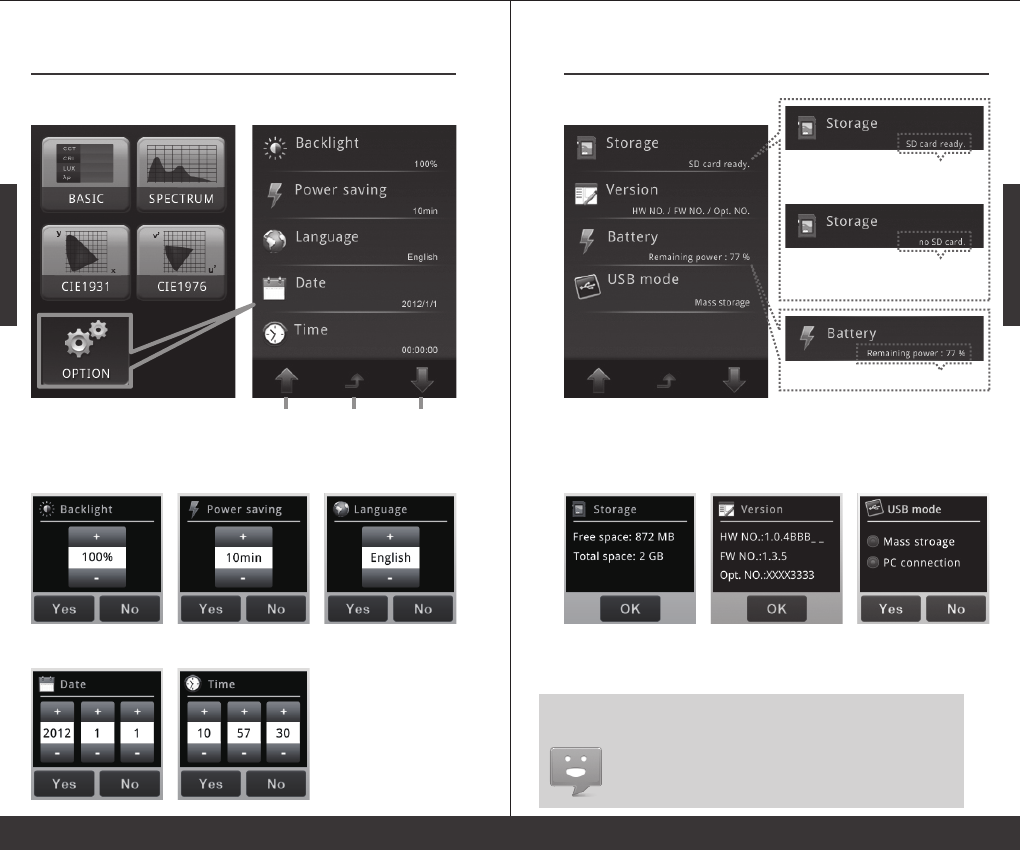
Option Function Setting2.7
Previous
page
Back to
main menu
Next
page
Go to main menu and select OPTION to start system setting.
+ / -:Adjust key
Yes / No:End of the setting
Date Setting: Time Setting:
Language Setting:Power Saving Setting:Backlight Setting:
Main Menu
Preparing Before Use
- 17 -
Option Function Setting2.7
No SD Card:System can't read the
SD card or no SD card inside.
SD Card Ready:Users can use
storage function.
Remaining Power
Check Storage Device: Check Version: USB Mode Setting:
1. Please setup date and time before save the files.
2. Users can setup auto power-off time to save battery power.
Default auto power-off setting is 10 minutes.
3. Users will need to fill up optical serial number when on line
regist, meantime, please go to version to check optical serial
number.
Preparing Before Use - 18 -
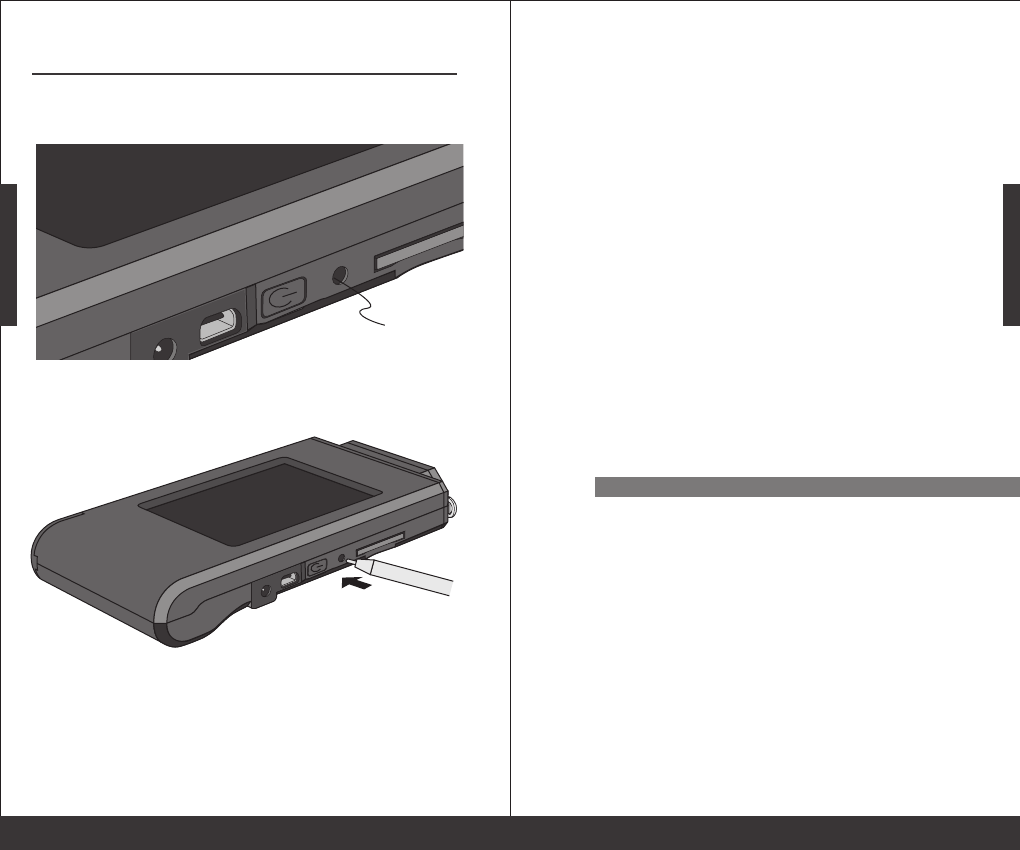
System Reset2.8
Users can press the reset key to turn off the system
if system crashed.
Reset Key
reset key to turn off the system.
※ Recommanded to use pen press the
System Overview- 19 -
System Overview
3.1 Measurement Modes Introduction
3.2 Measurement Introduction
3.3 Measurement Setting Introduction
3.4 Continuous Measurement Introduction
3.5 Transferring Data with PC Connection
3
System Overview - 20 -
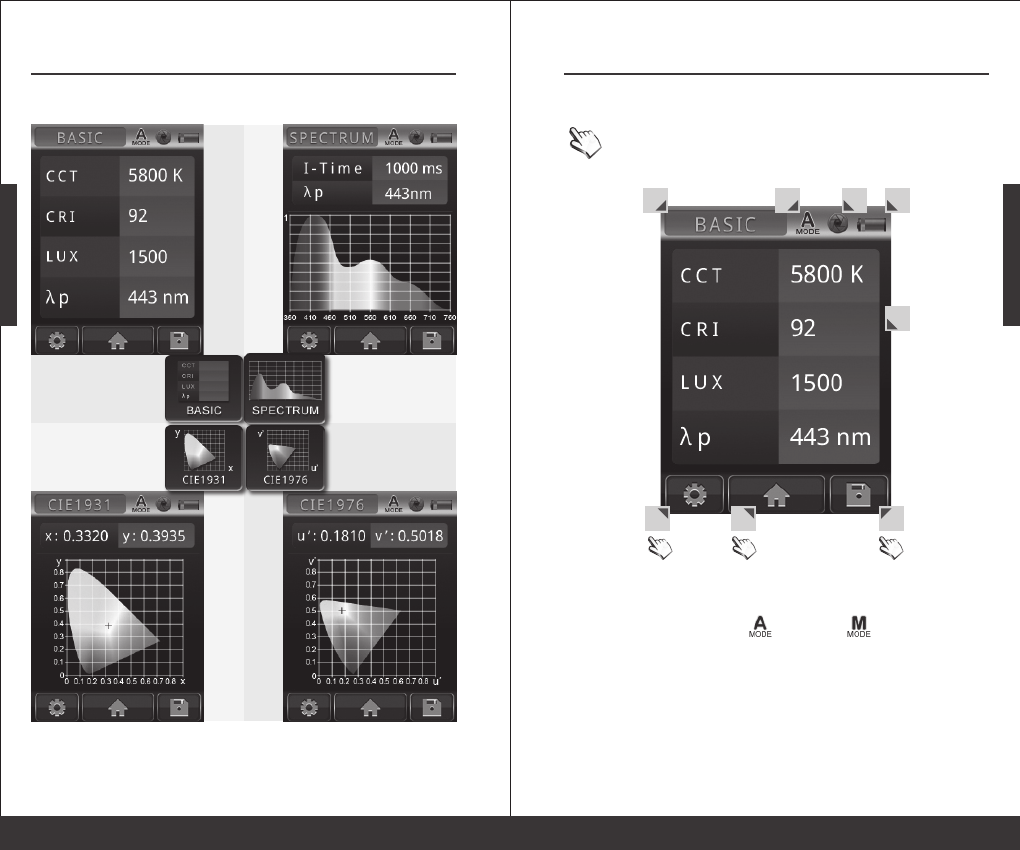
Measurement Modes Introduction3.1
4 kinds of measurement modes:
Basic mode:
view measured values
CIE 1931 mode:
view the
chromaticity coordinates
Spectrum mode:
view the spectrum graph
CIE 1976 mode:
view the
chromaticity coordinates
System Overview
- 21 -
Measurement Modes Introduction3.1
1. Measurement mode - BASIC / SPECTRUM / CIE1931 / CIE1976
2. Integration mode - Auto / Manual
3. Capture function - One time / Continuous
4. Battery capacity
5. Measurement result
6. Measurement setting
7. Back to main menu
8. Save data
1 2 3 4
5
6 7 8
Interface introduction:
Means button
System Overview - 22 -
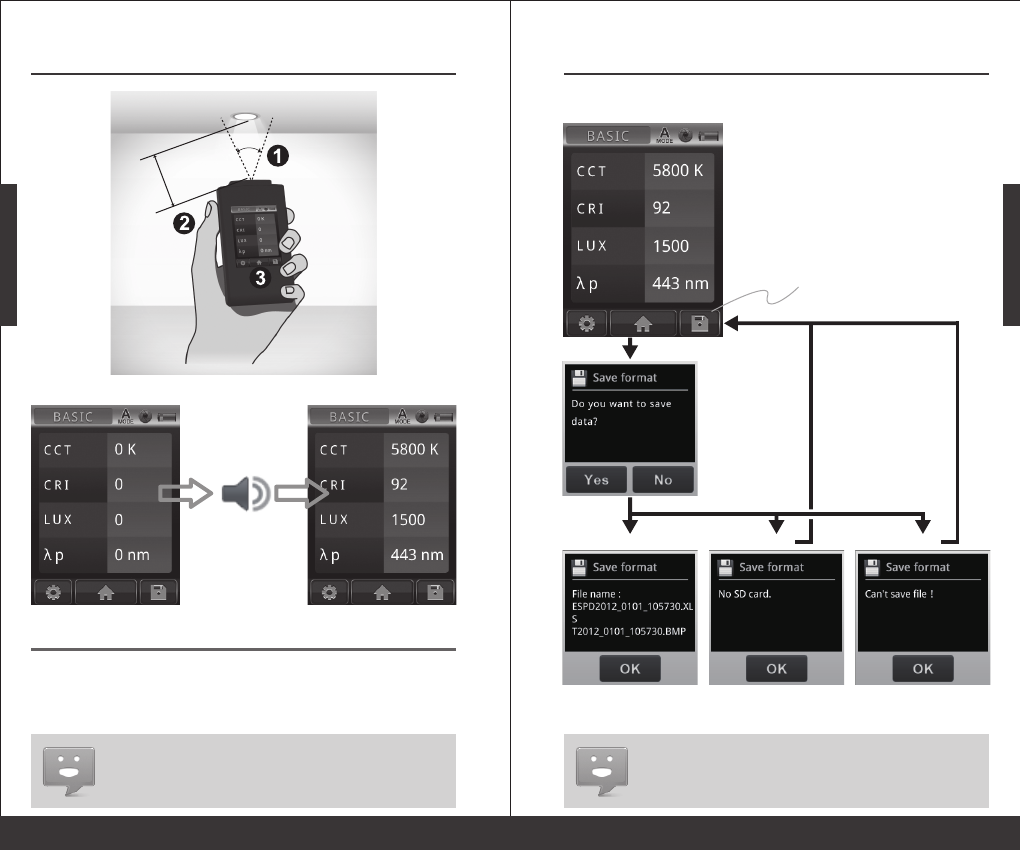
Measurement Introduction3.2
1. Operation sound setting, refer 3.3 Operation sound
Basic mode
( before measuremen)
Basic mode
(after measurement)
Display the measurement results
Beep sound
while measuring
Press capture key to
start the measurement
Appropriate
distance
Suggest
angle 30°
Step1. Point sensor head at light source with suggest angle 30°.
Step2. At appropriate distance then press capture key.
Step3. After beep sound, measured data will display on the screen.
< 30°
※ Please use MK350 at the place with stable light source.
System Overview
- 23 -
Measurement Introduction3.2
1. Save format setting, refer 3.3 Save format
2. Available capacity of SD card, refer 2.7 Storage
Save measured data:
Press save button
to save file
Confirm
Success Failed Failed
Please insert SD card
Please change SD card
System Overview - 24 -
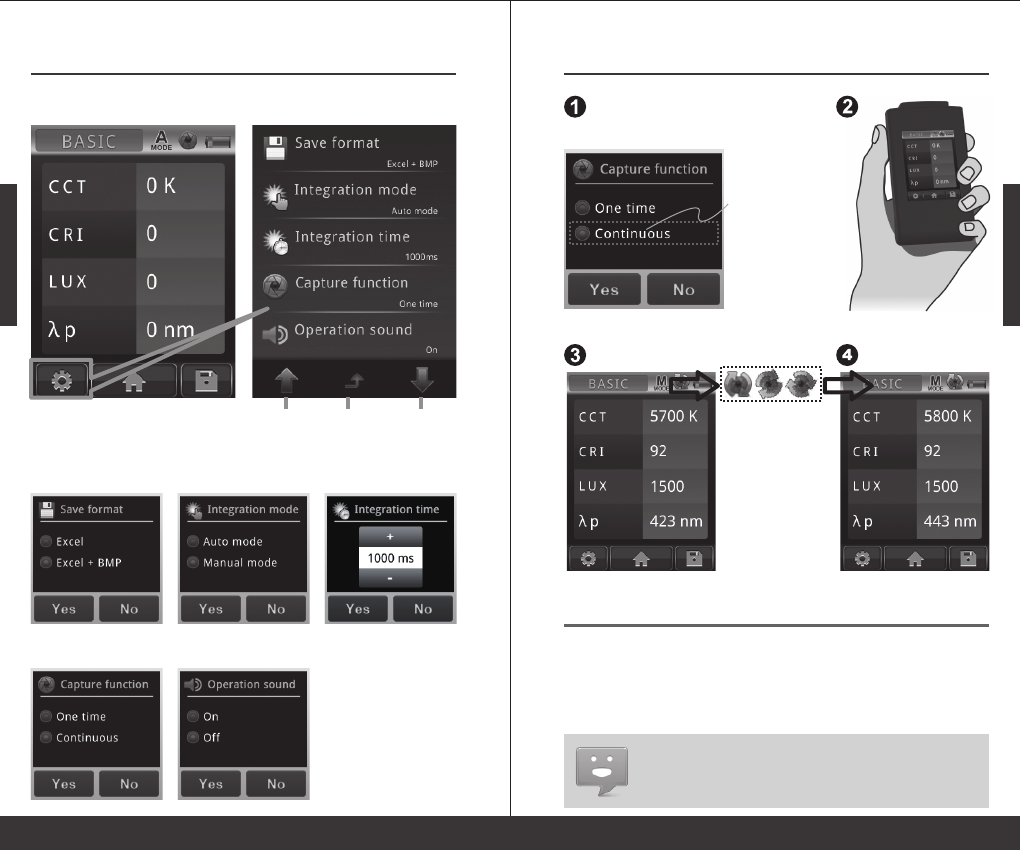
Measurement Setting Introduction3.3
Previous
page
Back to
measurement page
Next
page
Measurement page
Please go to measurement page to do measurement settings.
+ / -:Adjust key
Yes / No:End of the setting
Capture Function Setting: Operation Sound Setting:
Integration Time Setting:Integration Mode Setting:Save Format Setting:
System Overview
- 25 -
Continuous Measurement Introduction
3.4
※ View capture function setting, refer 3.3
1. Continuous measurement has no beep sound after press capture key.
2. Users cannot save the measurement data while processing continuous
measurement.
3. Adjust the integration time only can work in the manual mode.
Step1. Select the continuous capture
Step2. Press the capture key
Step3. Processing the continuous measurement
Step4. Press capture key again to stop continuous measurement
Basic mode
(start measurement)
press capture key
Basic mode
(after measurement)
Press the capture key again to
see the measurement results.
MK350N will process
measurement with
interval of 3 seconds.
※ The capture symbol
is rotating when MK350N
is processing continuous
measurement.
Select Continuous
System Overview - 26 -
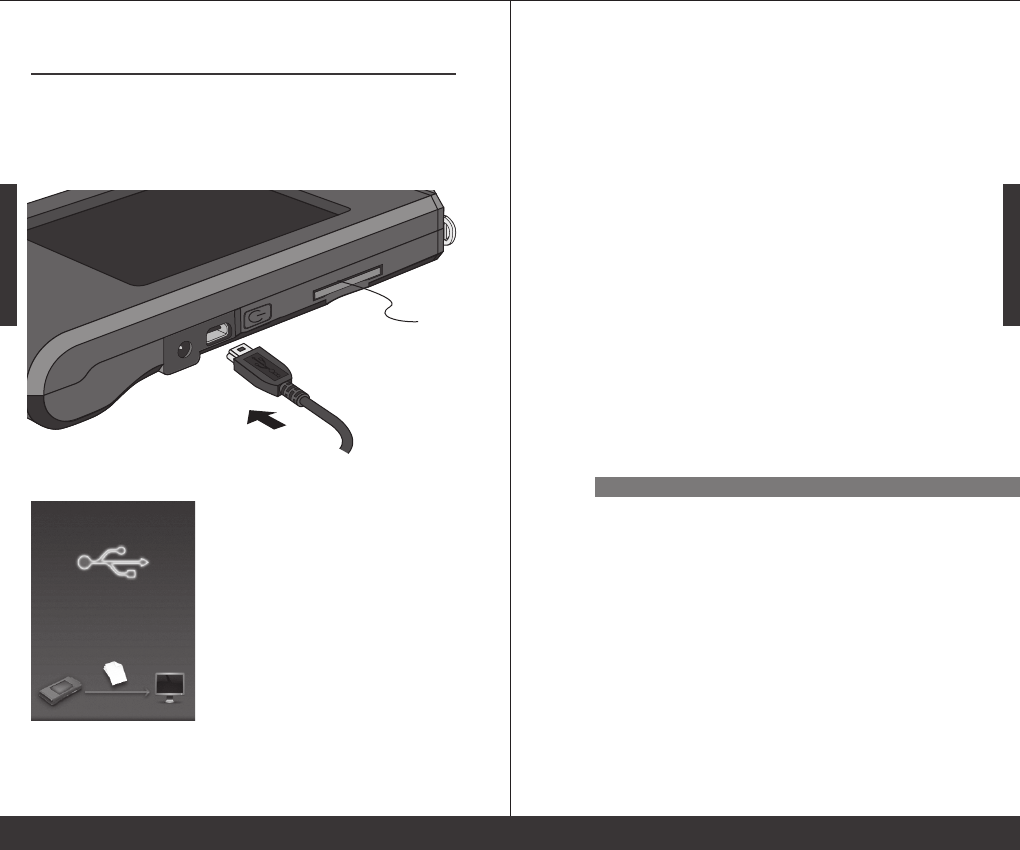
Transferring Data with PC Connection3.5
Storage the measurement data:
Inside the package has a USB cable, connect the mini USB to
MK350N and plug the USB to your PC then you can read the data
saved in SD card.
After connected USB cable, MK350N will display as below.
Insert SD card
Specification
- 27 -
Specification
4.1 Product Specification 4
Specification - 28 -
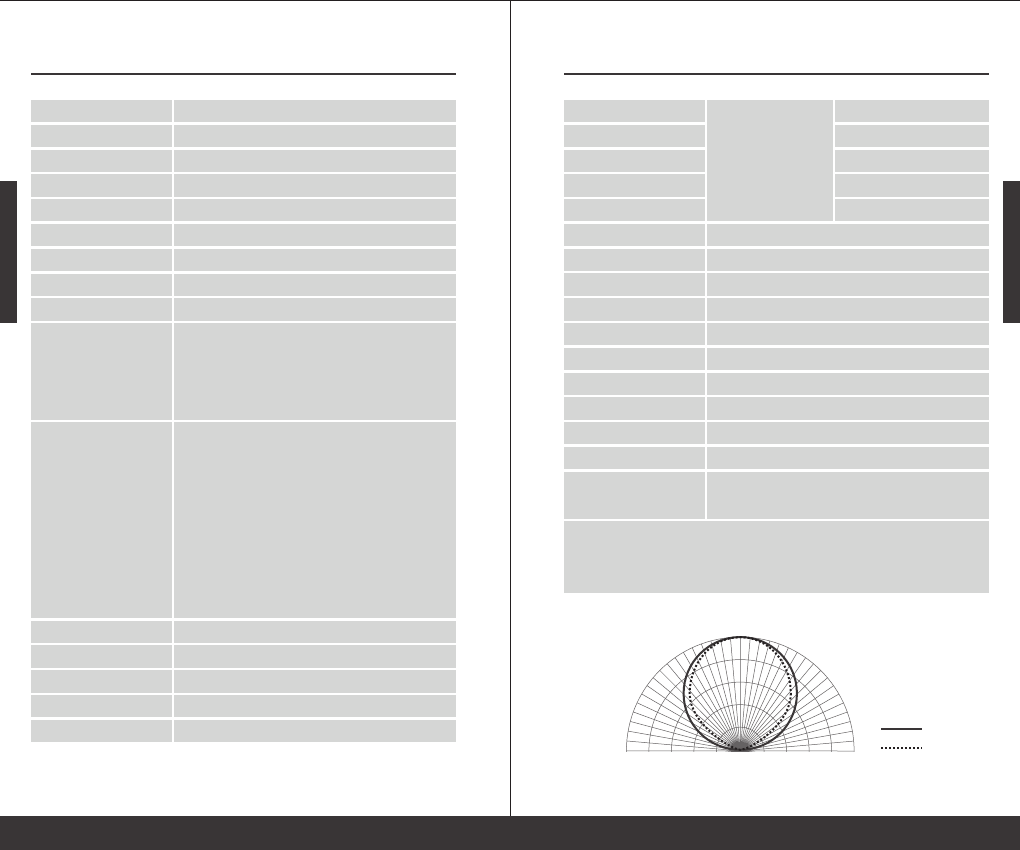
Product Specification4.1
Sensor
Spectral Bandwidth
Receptor Size
Cosine Correction
Measurement Range
Wavelength Range
Integration Time Range
Capture Function
Integration Mode
Measuring Modes
Measuring Capabilities
Digital Resolution
Dark Calibration
Stray Light
Wavelength Data Increment
Wavelength Reproducibility
CMOS linear image sensor
Approximately 12 nm(half bandwidth)
Ø 6.6 ± 0.1 mm
refer Figure 1.
70 ~ 70000 Lux
360 ~ 750 nm
8 ~ 1000 ms
One time / Continuous
Auto / Manual
1. Basic Value Mode
2. Spectrum Graph Mode
3. CIE 1931 Chromaticity Coordinates
4. CIE 1976 U.C.S Chromaticity Coordinates
1. Illuminance / Lux
2. Spectral Irradiance
3. C.I.E. Chromaticity Coordinates
(1) CIE 1931 x,y Coordinates
(2) CIE 1976 U.C.S u',v' Coordinates
4. Peak Wavelength
5. Correlated Color Temperature; CCT ( in Kelvins )
6. Color Rendering Index; Ra ( Rendering Average )
16 bits
Yes
-25 dB max.
1 nm
± 1 nm
*1
*2
Specification
- 29 -
Product Specification4.1
Illuminance Accuracy
Color Accuracy
Color Repeatability
CCT Accuracy
CRI Accuracy @ Ra
Display
Max. Files
Battery Operation Time
Battery
Data Output Interface
Data Format
Dimensions
Weight(with Battery)
Operating Temperature
Storage Temperature
Language Selection
± 5%
± 0.0025 in CIE 1931 x,y
± 0.0005 in CIE 1931 x,y
± 2%
± 1.5%
3.5" LCD 320X240 Touch Panel
≒ 2000 Files @ 2GB SD Card
≦ 5 hours / Fully Charged
2500 mAh / Rechargeable Li-ion Battery
SD Card / USB 2.0
Compatible Excel / BMP Data Format
144.2 x 78 x 24 mm ( H x W x D )
250 g ± 20 g
0 ~ 35 ℃
-10 ~ 40 ℃
English / Traditional Chinese / Simplified Chinese /
Japanese / German / French / Russian
*1 : Use the input of 550nm single-frequency and measurement the range of
optical ± 40nm.
*2 : Input source must be a stable light source.
The company reserves the right to change product specifications, if it has any changes will
not give any notice.
Illuminant A @ 2856K
at 20000 Lux
MK350
Ideal value
9
0
8
5
8
0
7
5
7
0
6
5
6
0
5
5
5
0
4
5
4
0
3
5
3
0
2
5
2
0
1
5
1
0
5
0
5
1
0
1
5
2
0
2
5
3
0
3
5
4
0
4
5
5
0
5
5
6
0
6
5
7
0
7
5
8
0
8
5
9
0
Figure 1:Cosine Correction

Troubleshooting Guide - 30 -
Troubleshooting Guide
5.1 FAQ 5
Troubleshooting Guide
- 31 -
FAQ5.1
If you still have other problems that is not in the FAQ,
please visit WWW.UPRTEK.COM
How long can I use after MK350N battery had fully charged?
Usage time will depends on battery life, MK350N battery can
operate 5 hours after fully charged.
Why the SD card always stuck on the slot while in / out the slot
?
This special designed is called "anti-fly card" functions, which
can prevent SD card write error if SD card was hit accidentally.
Could MK350N measure the UV or IR Spectrum?
No, MK350N measurement range is 360 ~ 750nm. You will need
to buy the equipment that compatible with UV and IR spectrum.
Could MK350N measure the light that except LED light? Such as:
fluorescent lamps(fluorescent lamps)?
MK350N is the measurement equipment for LED lamps, it will
not guarantee the results accuracy on other kind of lamps.
Do I need to execute dark calibration at every time power on the
machine?
The environment temperature changes will affect the
measurement results, it is recommended to execute dark
calibration when power on or execute the dark calibration after
a period time of use.
Q 1:
A:
Q 2:
A:
Q 3:
A:
Q 4:
A:
Q 5:
A:

Appendix Warranty
Appendix Warranty
6.1 Product Warranty 6
Appendix Warranty
Product Warranty6.1
Warranty Policy
UPRtek provides replacement or repair services to our customers for
defective products within the applicable warranty period.
1. DOA (Dead on Arrival) Returns:
■
■
2. RMA (Return Merchandise Authorization):
■
■
■
Limitation of Warranty
Please note that UPRtek is not responsible for providing repairs under
warranty if the product defect is caused by any of the following factors
:
1.
2.
In the event that you receive a product that is not working properly
or is defective, you should notify our service staff upon receipt of the
products. If defects in the product are discovered within 7 days after
receiving the product (except those due to willful damage or
customer misuse), you should notify us by email, facsimile, or phone
immediately upon noticing the defect, so we can process the return
as a DOA product. You will be issued a DOA number accordingly.
DOA products must be returned within 30 days of purchase and in
original condition. For products considered as “Dead on Arrival”,
we will replace it with a new product (in whole package) at no charge
and pay return and re-delivery shipping costs. International
customers should allow for additional transit time due to
international customs clearance.
For merchandise sent for repair or replacement with or without
warranty, you must first obtain an RMA number by contacting our
service staff by mail. The following information is required in order
to complete your RMA request: company name, contact person,
phone number and e-mail, customer ship-to address, product
model number, serial number, and a brief description of the
problem you are experiencing with the product you wish to return.
All returned products will be tested by our professional technicians
to verify the complaint / defect in question. However, if the defect in
question cannot be found by our technicians, you are responsible
for paying a testing fee plus shipping fee for NDF (No-Defect Found)
products.
Claims for loss or damage during shipment must be made to the
courier by the customer. For your protection, we strongly
recommend that you fully insure your return shipment for damages.
Please use a courier that is able to provide you with proof of delivery.
Damage caused by natural calamity or any inappropriate usage.
Product has been repaired or taken apart by unauthorized

Appendix Warranty
Product Warranty6.1
3.
4.
Disclaimer
■
■
Customers Eligible for Warranty Service
UPRtek warranty policy applies to all customers who purchased from
either UPRtek or through authorized agents of UPRtek.
Duration of Warranty
1. MK350 HOST :
The MK350 LED METER series all come with a 1-year product warranty.
We also provide an extended warranty service when customers visit
our official website and register their product within 120 days after
receiving the goods. This extended warranty also includes one free
calibration service by UPRtek after the product has been in use for 1
year (shipping costs will be incurred by the consumer).
2. Accessories:
UPRtek RMA policy is only for LED Meter repair and does not cover
maintenance or calibration services (aside from one time free
calibration on extended warranty). The policy also does not cover
accessories like tripods and straps, nor does it cover consumable items
like batteries.
Authorized Distributor/Dealer Services
■
technicians.
The warranty label is altered, damaged or missing.
Product serial number does not conform to our original system or
the label has been damaged.
UPRtek shall in no event be liable for any defect, damage or data loss
that has occurred during the delivery of in-warranty products. Prior
to claiming warranty service, UPRtek recommends that you make a
backup of your data and remove your data from in-warranty
products.
Under the maximum allowable range of applicable laws and
regulations, any business loss, expected cost loss, data
disappearance, or any other indirect, accidental, or derived loss or
damages due to the utilization of or related to the company product,
shall not be the responsibility of UPRtek for any compensation.
Product-based functional testing - Performed by distributors and
dealers todetermine whether the product needs to be returned to
the factory for furthercalibration services or technical repairs (All
UPRtek authorized distributors/dealers have a right to perform
“Product-based functional testing” for a reasonable charge).
Appendix Warranty
Product Warranty6.1
■
■
Additional Remarks
Product parts and components are not always manufactured by
UPRtek. On occasion, these 3rd party components may need to be
replaced but are already discontinued by the supplier. In this case,
UPRtek assures customers that it will fulfill it’s repair and replacement
responsibilities by using substitute parts or components of equal level
and quality.
Delivery Methods
Consumers can choose either of the two methods indicated below to
return the product to the factory for RMA Service:
■
■
Rules on Product Repairs After The Warranty Period
UPRtek provides product services after warranty expiration at
reasonable charges. In case of product defects, the customers are still
able to send products back to the UPRtek factory for service. The repair
charges will be based on the type of defect, and in some cases,
maintenance fees will be charged.
However, purchasing a new product is advised under these conditions:
■
■
■
■
■
RMA product delivery to and from factory - Distributors/dealers
can assist customers in sending/receiving RMA products to/from
the UPRtek factory.
Authorized distributors/dealers are listed on our website :
www.uprtek.com
Customers can send the products through UPRtek global
distribution channels that will send and return the products to and
from the factory for repair and warranty service.
Customers can return the product directly to the UPRtek factory for
servicing.
If the MK350 series or its accessories are no longer available.
If the product functionality is almost certain to be impossible to
recover from (e.g. total immersion in water, undergoing extreme
electrical shock, severe contamination or corrosion damage).
If the product was dropped or sustained such a traumatic impact
causing major structural damage, or if our technicians determine
that normal functionality cannot be recovered even after major
component replacement.
If multiple parts simultaneously fail due to normal wear and tear, or
poor handling.
Even if the product is within the service period of the warranty, yet
parts are no longer available.
