V2 Fixed Creality BLTOUCH Guide
User Manual:
Open the PDF directly: View PDF ![]() .
.
Page Count: 17

SIMPLEST Bltouch/3Dtouch guide for Creality CR-10/CR-
10s/Ender 2/Ender 3 printers V2 created by Danny
Walmsley.
The aim of this guide is to bring auto bed leveling to the masses by
making it simple and affordable for everyone. You can navigate the
guide by using the hyperlinks in the Contents, Hope this helps ☺
Contents
Before you start ............................................................................. 2
Printers .......................................................................................... 3
CR-10s /S4/S5/Mini ..................................................................... 3
Ender 2 ........................................................................................ 6
Ender 3/CR-10 ............................................................................. 9
Configuring Z offset ................................................................... 12
Start-up GCODE ........................................................................... 14
CR-10/s: .................................................................................... 14
Ender 2: ..................................................................................... 14
Ender 3: ..................................................................................... 15
Misc & Extras ............................................................................... 16
Remove all boot screens for faster boot times .......................... 16
Control ooze while bed levelling runs (Simplify3D) ..................... 16
CR-10 stock to CR-10s board ..................................................... 17

Before you start
Make sure you have already loaded a Bootloader to the mainboard if you
are using the CR-10, Ender 2 or Ender 3, if you haven’t already; find out
how to do this HERE. This is not necessary on the CR-10s.
This guide was made for this particular version of the TH3D firmware
which you can download HERE. If you follow the commands rather than
line numbers, this guide should work for any firmware.
Mounts used for y and x offsets -
https://www.thingiverse.com/thing:2763931 - Fang
https://www.thingiverse.com/thing:2493610 - Stock
Wanting to install the Bltouch/3Dtouch to your CR-10 or Ender 3? This
guide uses a Pin 27 adaptor you can get one here –
UK/Europe – https://www.ebay.co.uk/itm/CR-10-Pin-27-Board-for-BL-
Touch-Autobed-Levelling-or-filament-
sensor/173295377307?ssPageName=STRK%3AMEBIDX%3AIT&_trksid=p
2057872.m2749.l2649
USA – https://www.th3dstudio.com/product/ezout-cr-10-filament-
sensor-kit/
AUS -
https://www.ebay.com.au/itm/113099279570?ViewItem=&item=1130
99279570
A comment looks like this when editing the firmware ‘//’, uncomment
means to remove the // in front of a command. A commented
command will not run where as an uncommented command will. For
example if //#define CR-10 uncommented would be #define CR-10.
Printers
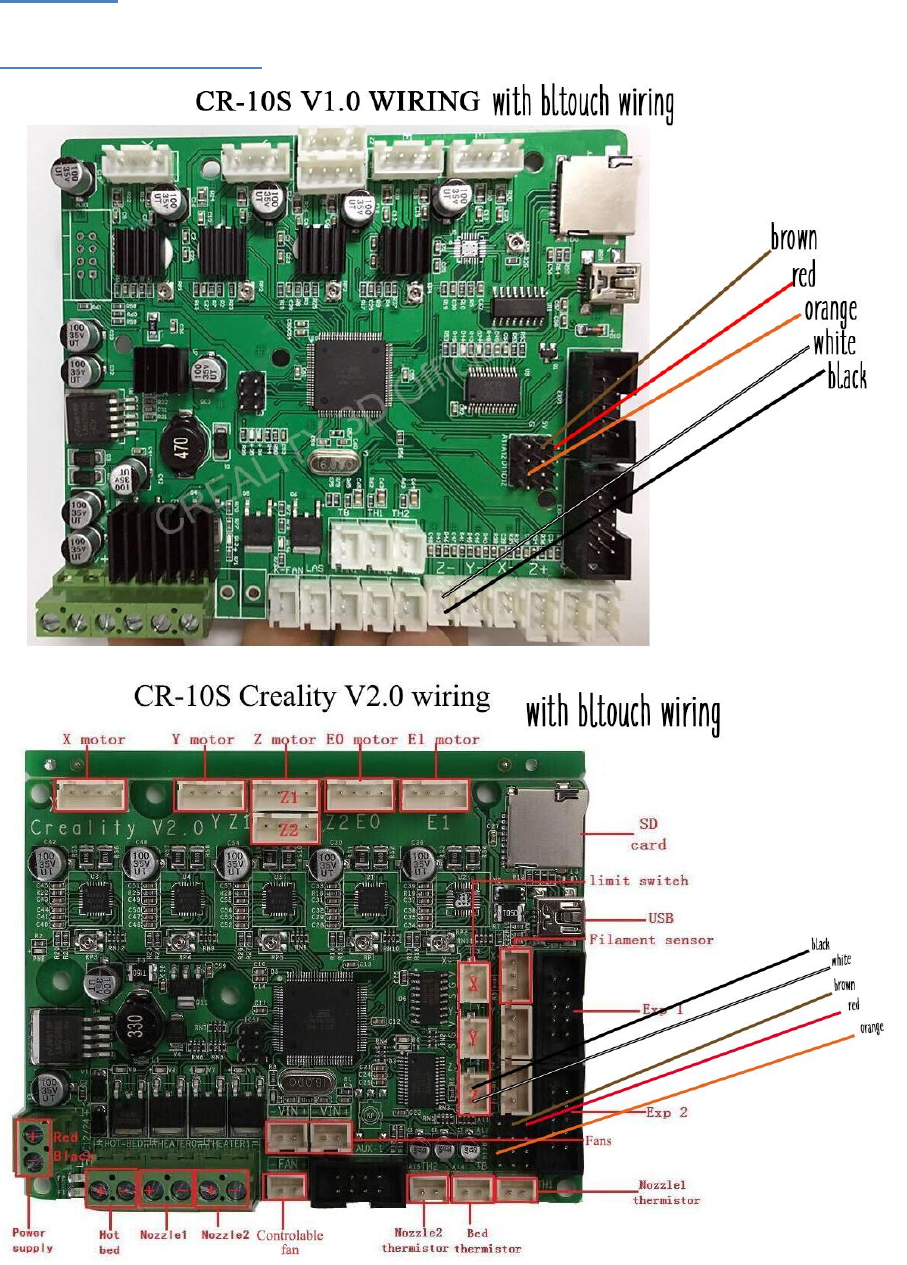
CR-10s /S4/S5/Mini
V2.0 & V2.1 board use the same pin-out for the BLtouch, if you
have the V2.1 board follow the wiring guide for V2.0.
If you connect your bltouch and when auto homing the sensor doesn’t register
& the z axis keeps dropping pressing into your bed, turn your printer off,
disconnect the power and invert the black and white connectors in the z limit
switch header (put black where white was, put white where black was).
Extract the firmware you have downloaded and open the .bat file named
‘OpenFirmwareWindows’.
In Configuration.h tab:
• Go to lines 72-75 and un-comment which suits your configuration.
Before uncommenting
After uncommenting
//#define CR10S
#define CR10S

• Make sure line 96 remains commented out.
• Click line 97 and hit enter twice, now paste this into line 98, you can see
an example of how this should look below:
#define AUTO_BED_LEVELING_BILINEAR
#define BLTOUCH
#define SERVO0_PIN 11
#define Z_SAFE_HOMING
• Uncomment line 110.
Before uncommenting
After uncommenting
//#define CUSTOM_PROBE
#define CUSTOM_PROBE
• Go to line 379 and set X offset to mount offset (recommended mounts
use -40 for the X offset.)
• Go to line 380 and set Y offset to mount offset (Recommended mounts
use -10 for the Y offset.)
• Go to and uncomment line 335 if you want to set printer name to display
on printer LCD.
• You should be done! Click upload in the top left of Arduino IDE.
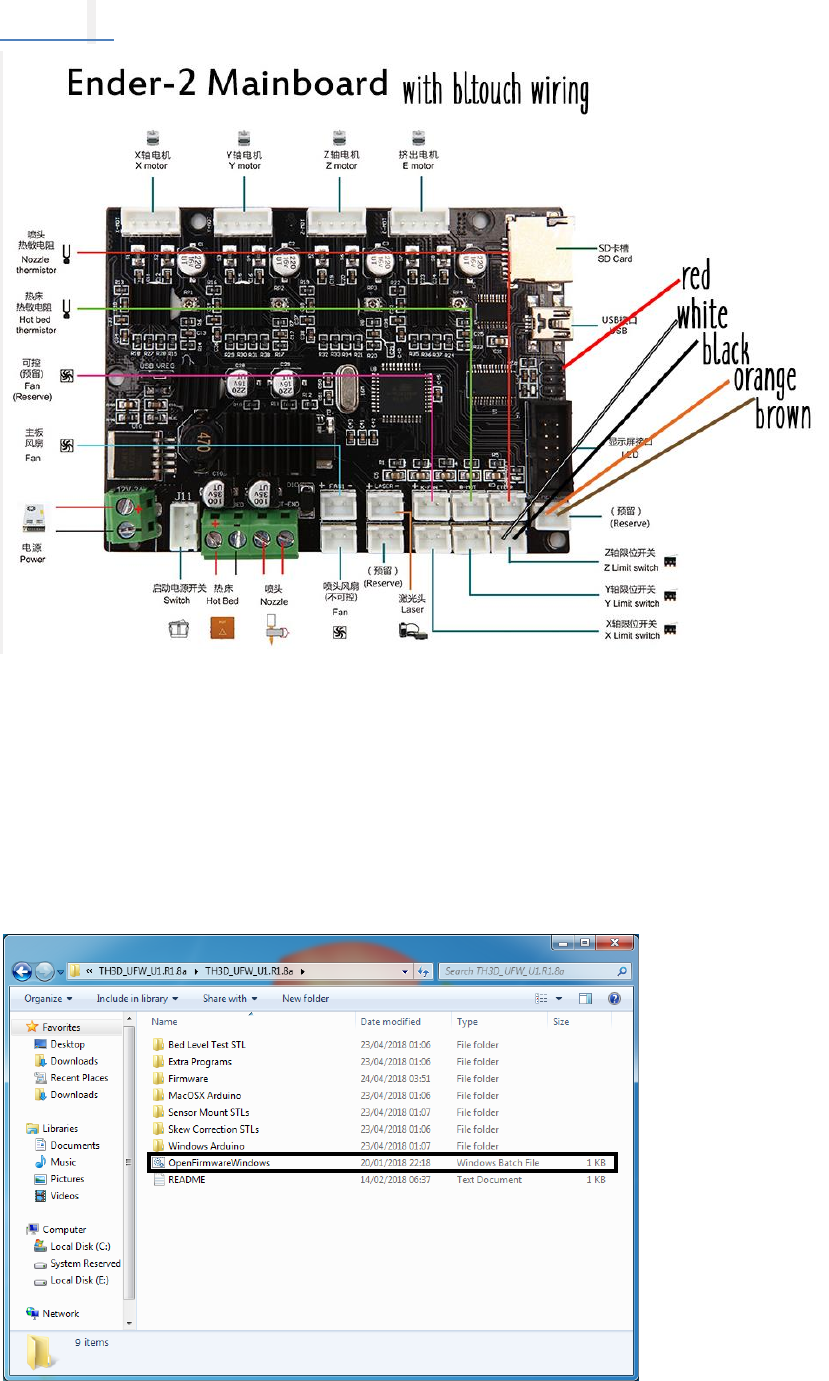
Ender 2
If you connect your bltouch and when auto homing the sensor doesn’t register
& the z axis keeps dropping pressing into your bed, turn your printer off,
disconnect the power and invert the black and white connectors in the z limit
switch header (put black where white was, put white where black was).
Extract the firmware you have downloaded and open the .bat file named
‘OpenFirmwareWindows’.
In Configuration.h tab:
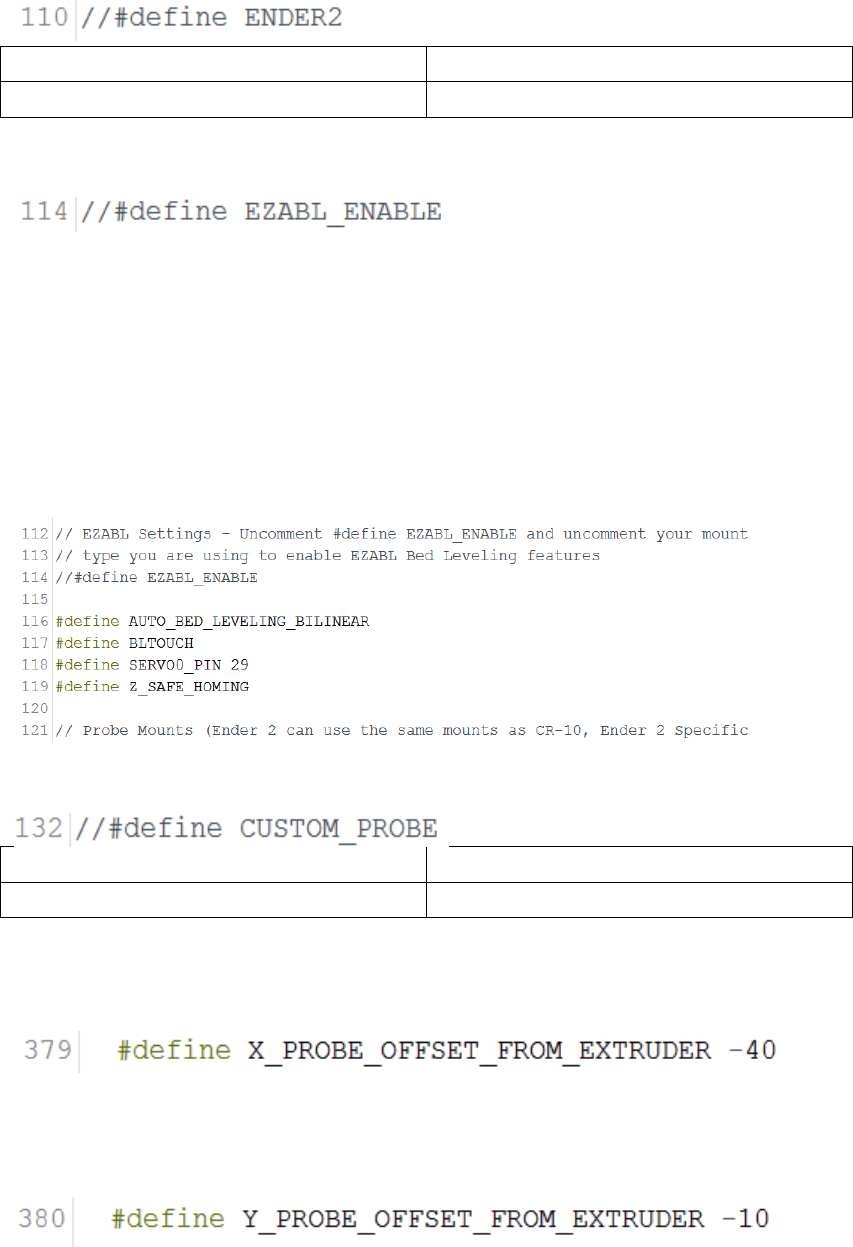
• Go to and uncomment Line 110.
Before uncommenting
After uncommenting
//#define ENDER2
#define ENDER2
• Make sure line 114 is commented out.
• Click line 115 and hit enter twice, now paste this into line 116:
#define AUTO_BED_LEVELING_BILINEAR
#define BLTOUCH
#define SERVO0_PIN 29
#define Z_SAFE_HOMING
• Go to and uncomment line 132.
Before uncommenting
After uncommenting
//#define CUSTOM_PROBE
#define CUSTOM_PROBE
• Go to line 379 and set X offset to mount offset (recommended mounts
use -40 for the X offset.)
• Go to line 380 and set Y offset to mount offset (Recommended mounts
use -10 for the Y offset.)
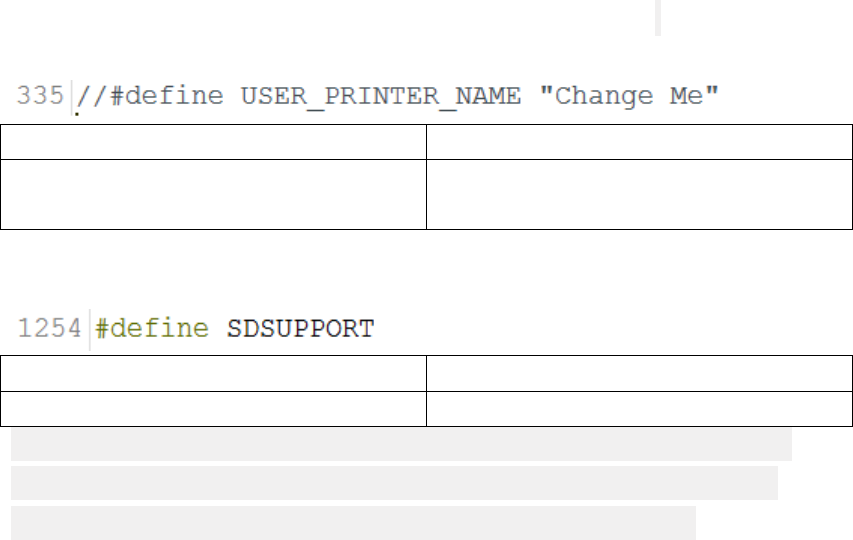
• Go to and uncomment line 335 if you want to set printer name to display
on printer LCD.
Before uncommenting
After uncommenting
//#define USER_PRINTER_NAME
"Change Me"
#define USER_PRINTER_NAME
"ChangednameE.g.CR-10BLTOUCH"
• Go to line 1319 in configuration_backend.h and comment it out.
Before commenting
After commenting
#define SDSUPPORT
//#define SDSUPPORT
We have to disable SD card support to allow enough memory for the
bltouch configuration, make sure you have something to print from
afterwards (I recommend a Raspberry Pi running Octoprint.)
• You should be done! Click upload in the top left of Arduino IDE.
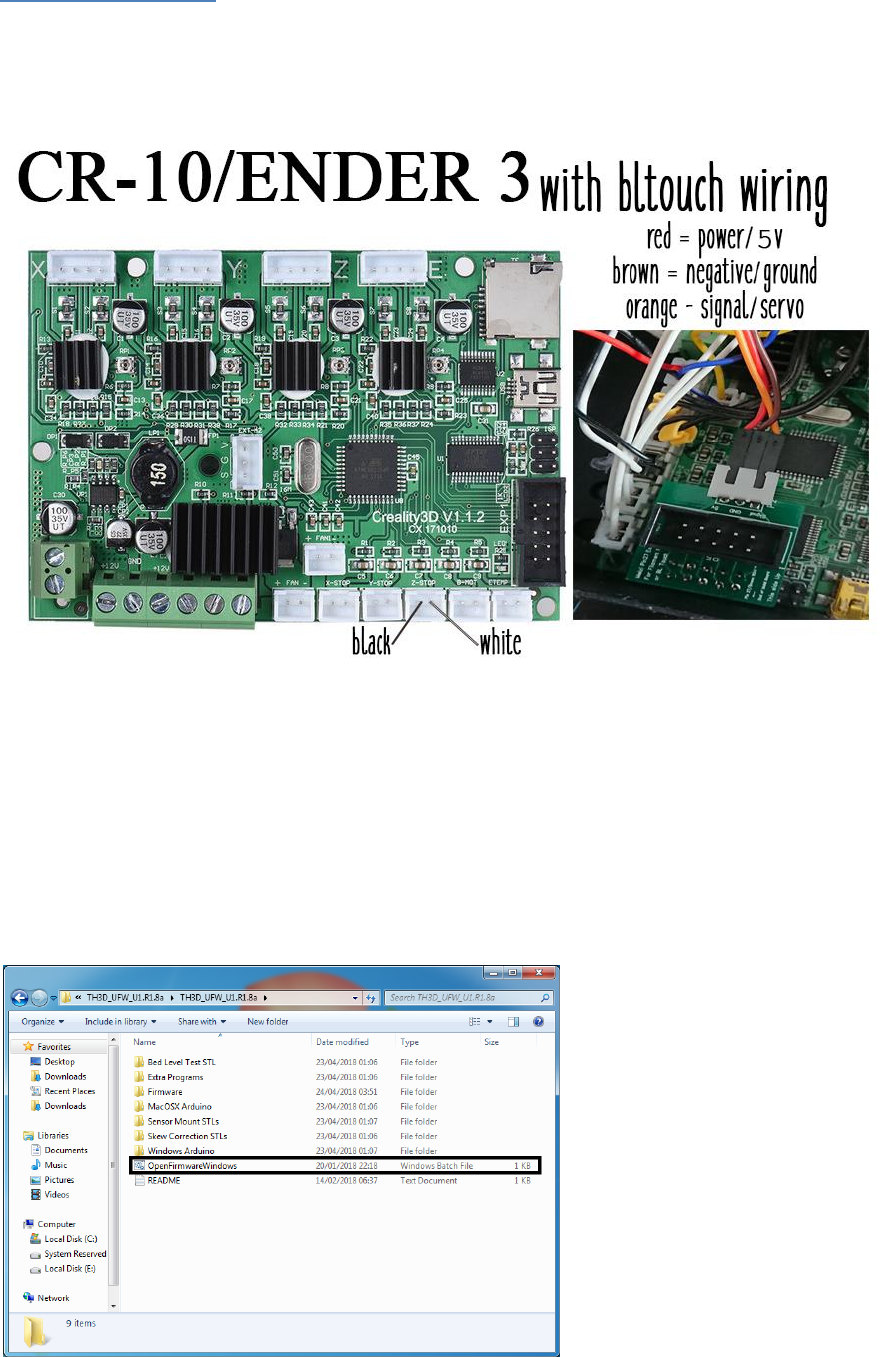
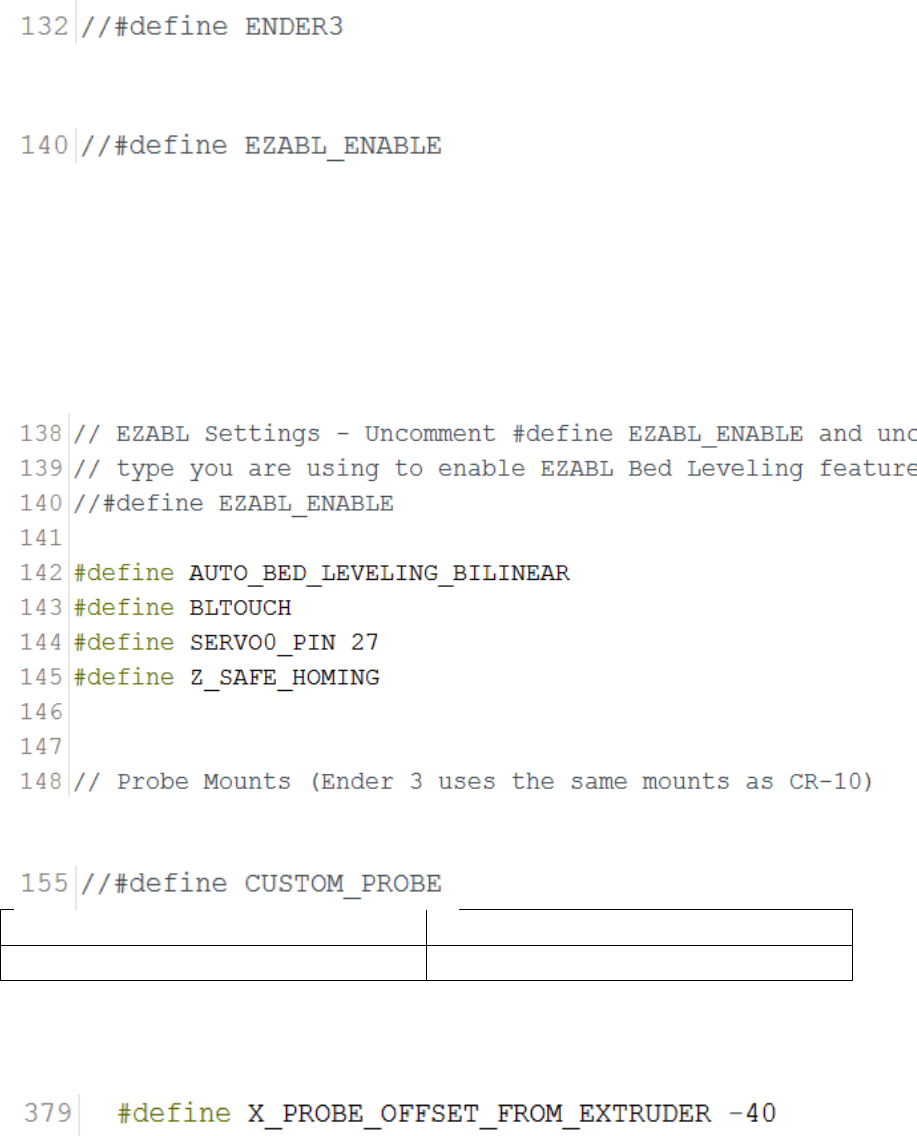
Ender 3/CR-10
Since the Ender 3 and CR-10 use the same main board with the pin 27 adaptor
this should work fine for both printers.
If you connect your bltouch and when auto homing the sensor doesn’t register
& the z axis keeps dropping pressing into your bed, turn your printer off,
disconnect the power and invert the black and white connectors in the z limit
switch header (put black where white was, put white where black was).
Extract the firmware you have downloaded and open the .bat file named
‘OpenFirmwareWindows’.
In Configuration.h tab:
• Go to and uncomment line 132.
• Make sure line 140 is commented out.
• Click line 141 and hit enter twice, now paste this into line 142:
#define AUTO_BED_LEVELING_BILINEAR
#define BLTOUCH
#define SERVO0_PIN 27
#define Z_SAFE_HOMING
• Uncomment line 155.
Before uncommenting
After uncommenting
//#define CUSTOM_PROBE
#define CUSTOM_PROBE
• Go to line 379 and set X offset to mount offset (recommended mounts
use -40 for the X offset.)
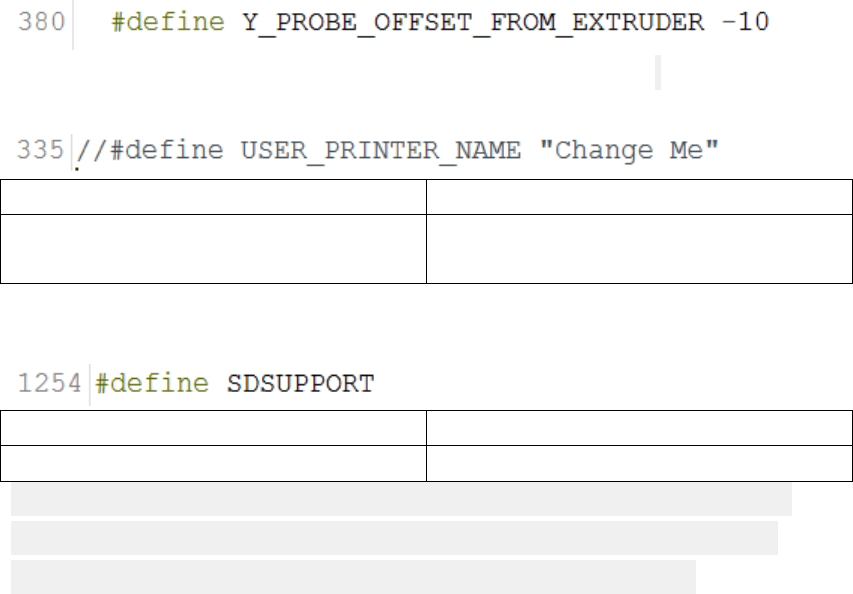
• Go to line 380 and set Y offset to mount offset (Recommended mounts
use -10 for the Y offset.)
• Go to and uncomment line 335 if you want to set printer name to display
on printer LCD.
Before uncommenting
After uncommenting
//#define USER_PRINTER_NAME
"Change Me"
#define USER_PRINTER_NAME
"ChangednameE.g.CR-10BLTOUCH"
• Go to line 1319 in configuration_backend.h and comment it out.
Before commenting
After commenting
#define SDSUPPORT
//#define SDSUPPORT
We have to disable SD card support to allow enough memory for the
bltouch configuration, make sure you have something to print from
afterwards (I recommend a Raspberry Pi running Octoprint.)
• You should be done! Click upload in the top left of Arduino IDE.

Configuring Z offset
Connect your printer over USB and Through your chosen terminal (Octoprint is
my favourite but you can use cura, S3D, slicer, pronterface whatever is best for
you) enter these commands -
M502 – Reset settings in printers EEPROM
M500 – Save settings in printers EEPROM
G28 – Auto home, this should home your printers axis’s then move to the
middle of the bed.
G1 F60 Z0 – This takes the nozzle to the printer’s absolute Z position defined by
the EEPROM.
From here in your chosen software find where you can control the printer and
start to move the Z down in 0.1 increments, put a piece of paper under the
nozzle and keep moving the Z down until the nozzle just scrapes the piece of
paper, just like how you usually level your bed.
For example I will show you how to do this in my chosen software, Octoprint.
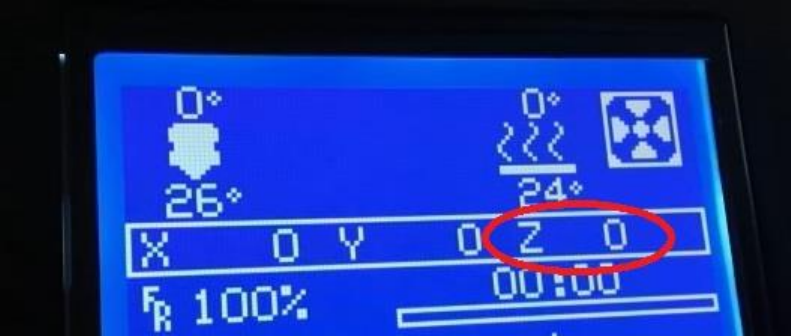
When you’re at the correct height check the front of your printers LCD screen
where it says Z on the right hand side, make a note of this.
Now to set that as your Z offset by going back to your terminal and entering
M851 followed by your offset you noted down in the last step, in the photo
above the command would be M851 Z0.00 but yours will look more like M851
Z-0.90.
M500 – Saves our offset we have just input to the printers EEPROM and you
are finished setting your Z offset, the offset can also be accessed by the
printers LCD under the motion tab for quick adjustments just be sure to save
them afterwards via M500 or Save to EEPROM on the printer.

Start-up GCODE
Once you have done all of the above you’re so close to auto bed levelling prints
but you need to add some GCODE to your Start-up script that your printer
uses, this is done through your slicer.
Here is my Start-up GCODE for the the CR-10/s, Ender 2 and Ender 3, copy and
paste this directly into your Start-up script in your slicer;
CR-10/s:
G21 ; (metric values)
G90 ; (absolute positioning)
M82 ; (set extruder to absolute mode)
M203 E80 ; (set extruder max to 80)
G28 ; (home all axis)
G29 ; (Auto Level)
G92 E0 ; (reset extruder)
G1 Z1.0 F3000 ; (move z up little to prevent scratching of surface)
G1 X0.1 Y20 Z0.2 F5000.0 ; (move to start-line position)
G1 X0.1 Y200.0 Z0.2 F1500.0 E15 ; (draw 1st line)
G1 X0.4 Y200.0 Z0.2 F5000.0 ; (move to side a little)
G1 X0.4 Y20 Z0.2 F1500.0 E30 ; (draw 2nd line)
; G1 E27 F1000 ; (retract filament 1mm)
G92 E0 ; (reset extruder)
G1 Z1.0 F3000 ; (move z up little to prevent scratching of surface)
M117 Printing...
Ender 2:
G21 ; (metric values)
G90 ; (absolute positioning)
M82 ; (set extruder to absolute mode)
M203 E80 ; (set extruder max to 80)
G28 ; (home all axis)
G29 ; (Auto Level)
G92 E0 ; (reset extruder)
G1 Z1.0 F3000 ; (move z up little to prevent scratching of surface)
G1 X0.1 Y20 Z0.2 F5000.0 ; (move to start-line position)
G1 X0.1 Y100.0 Z0.2 F1500.0 E15 ; (draw 1st line)
G1 X0.4 Y100.0 Z0.2 F5000.0 ; (move to side a little)
G1 X0.4 Y20 Z0.2 F1500.0 E30 ; (draw 2nd line)
; G1 E27 F1000 ; (retract filament 1mm)
G92 E0 ; (reset extruder)
G1 Z1.0 F3000 ; (move z up little to prevent scratching of surface)

M117 Printing...
Ender 3:
G21 ; (metric values)
G90 ; (absolute positioning)
M82 ; (set extruder to absolute mode)
M203 E80 ; (set extruder max to 80)
G28 ; (home all axis)
G29 ; (Auto Level)
G92 E0 ; (reset extruder)
G1 Z1.0 F3000 ; (move z up little to prevent scratching of surface)
G1 X0.1 Y20 Z0.2 F5000.0 ; (move to start-line position)
G1 X0.1 Y150.0 Z0.2 F1500.0 E15 ; (draw 1st line)
G1 X0.4 Y150.0 Z0.2 F5000.0 ; (move to side a little)
G1 X0.4 Y20 Z0.2 F1500.0 E30 ; (draw 2nd line)
; G1 E27 F1000 ; (retract filament 1mm)
G92 E0 ; (reset extruder)
G1 Z1.0 F3000 ; (move z up little to prevent scratching of surface)
M117 Printing...
You’re now all set to hit print and enjoy auto bed leveling prints.
Misc & Extras
Remove all boot screens for faster boot times
In Configuration_backend.h
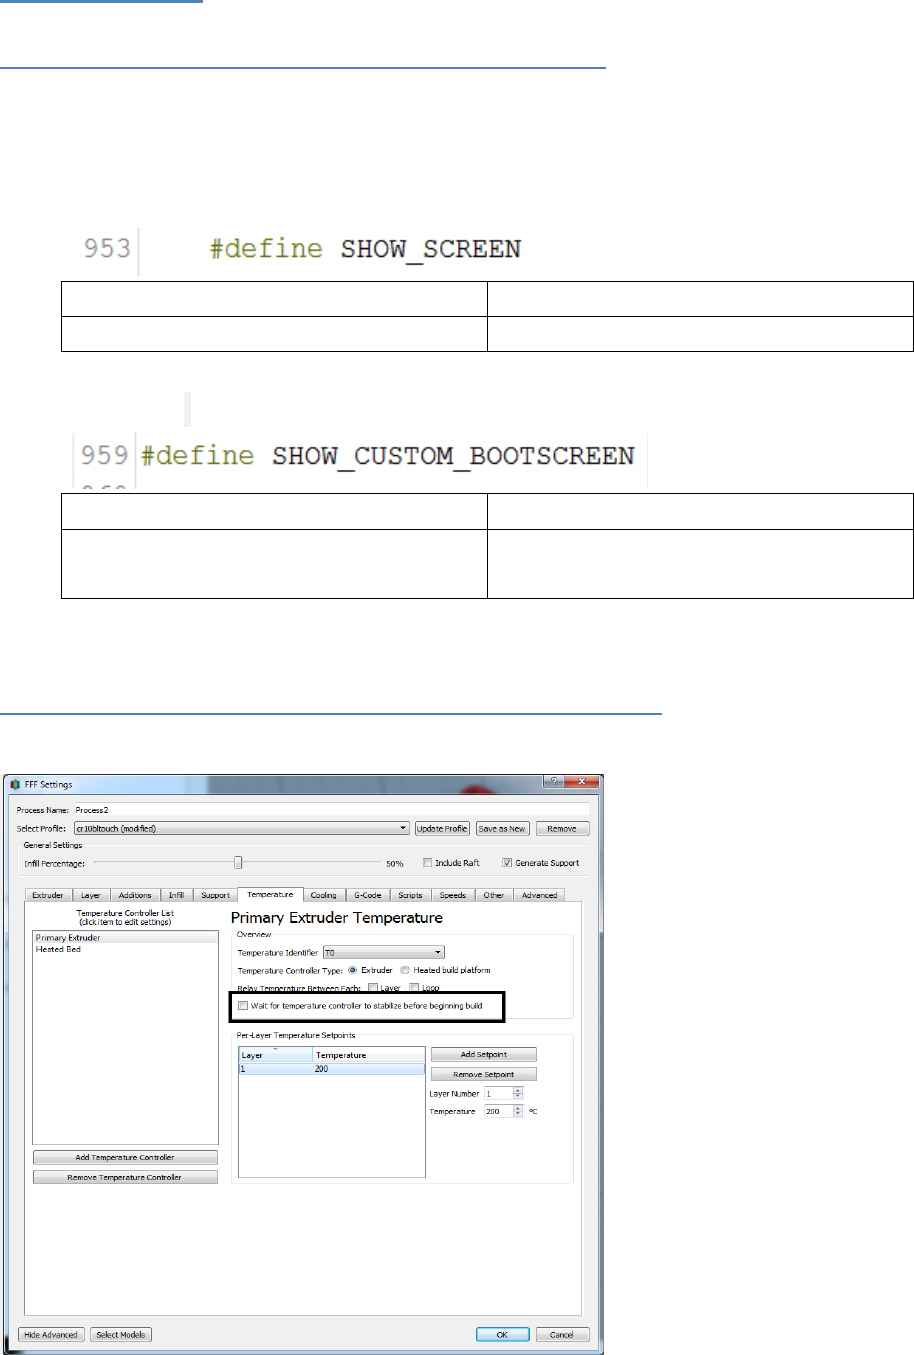
• Comment out line 953.
Before commenting
After commenting
#define SHOW_SCREEN
//#define SHOW_SCREEN
• Comment out line 959.
Before commenting
After commenting
#define
SHOW_CUSTOM_BOOTSCREEN
//#define
SHOW_CUSTOM_BOOTSCREEN
Control ooze while bed levelling runs (Simplify3D)
By un-checking this check box the auto leveling probing will begin before
waiting for the nozzle to heat up avoiding oozing while your nozzle heats up.
Only do this for the Primary Extruder.
CR-10 stock to CR-10s board
By un-checking this check box the auto leveling probing will begin before
waiting for the nozzle to heat up avoiding oozing while your nozzle heats up.
Only do this for the Primary Extruder.
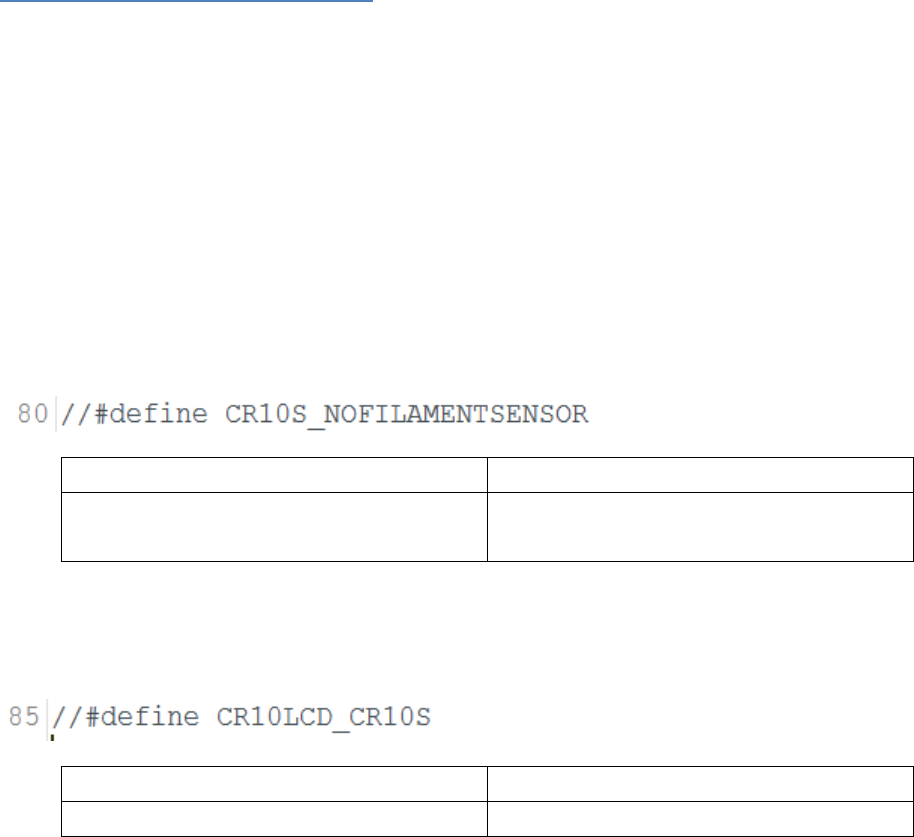
If you are using a CR-10 with a CR-10s board in it you can use the stock screen
and disable the none existent filament sensor easily.
In Configuration.h tab:
Uncomment Line 80 to disable the board looking for the sensor.
Before uncommenting
After uncommenting
//#define
CR10S_NOFILAMENTSENSOR
#define
CR10S_NOFILAMENTSENSOR
Uncomment line 85 and rotate your display cable 180 degrees and force into
the LCD slot, this will work and has been tested.
Before uncommenting
After uncommenting
//#define CR10LCD_CR10S
#define CR10LCD_CR10S
