MUC 1 Vbecs 2 3 0 Tech Security Guide
User Manual:
Open the PDF directly: View PDF ![]() .
.
Page Count: 119 [warning: Documents this large are best viewed by clicking the View PDF Link!]
- Revision History
- Table of Contents
- Introduction
- How This Technical Manual-Security Guide Is Organized
- Remote Desktop Configuration (Windows)
- Server Hardware and System Configuration
- VistA Maintenance Operations
- Troubleshooting
- Deleting the Remote Desktop Services Licensing Information on a VBECS Workstation
- Identity Verification Warning
- Stopping VBECS Services
- Starting VBECS Services
- VBECS Auditing
- VBECS Exception Logging
- VBECS Application Interfaces
- Zebra Printer Problems
- Scanner Problems
- Archiving and Recovery (Enterprise Operations Only)
- Restore the Databases
- VBECS responds to the new order request with an application reject (AR) acknowledgement message indicating Patient Name(s) not found in HL7 Message or Patient's Name(s) field size(s) exceed(s) VBECS maximum supported value. Rejected patient order messages due to invalid patient name message content are recorded on the Windows Event Log (Finding Application Log Entries from Email Alerts) and an email message containing the MSH segment of the rejected HL7 message.
- VBECS responds to the patient update request with an application reject (AR) acknowledgement message indicating Patient Name(s) not found in HL7 Message or Patient's Name(s) field size(s) exceed(s) VBECS maximum supported value. Rejected patient update messages due to invalid patient name message content are recorded on the Windows Event Log (Finding Application Log Entries from Email Alerts)
- Failover
- Performance
- Security
- Glossary
- Appendices
- Index

September 2018 VistA Blood Establishment Computer Software (VBECS) Version 2.3.0
Technical Manual-Security Guide Version 2.0
VistA Blood Establishment Computer Software
(VBECS) Version 2.3.0
Technical Manual-Security Guide
September 2018
Department of Veterans Affairs
Enterprise Project Management Office
September 2018 VistA Blood Establishment Computer Software (VBECS) Version 2.3.0
Technical Manual-Security Guide Version 2.0
This page intentionally left blank.

September 2018 VistA Blood Establishment Computer Software (VBECS) Version 2.3.0
Technical Manual-Security Guide Version 2.0
Revision History
Date
Revision
Description
Author
4/10/18
1.0
Modified VistA Blood Establishment Computer Software (VBECS)
2.2.1 Technical Manual-Security Guide, Version 2.0 to create the
VistA Blood Establishment Computer Software (VBECS) 2.3.0
Technical Manual-Security Guide, Version 1.0.
BBM team
9/13/18
2.0
Document updated to include Known Defects and Anomalies. (Task
791102)
BBM team
September 2018 VistA Blood Establishment Computer Software (VBECS) Version 2.3.0 Page iv
Technical Manual-Security Guide Version 2.0
This page intentionally left blank.
September 2018 VistA Blood Establishment Computer Software (VBECS) Version 2.3.0 Page v
Technical Manual-Security Guide Version 2.0
Table of Contents
REVISION HISTORY ............................................................................................................................... 3
INTRODUCTION ....................................................................................................................................... 1
VBECS VERSION NUMBERS ..................................................................................................................... 1
RELATED MANUALS AND REFERENCE MATERIALS ................................................................................. 3
HOW THIS TECHNICAL MANUAL-SECURITY GUIDE IS ORGANIZED ................................... 5
Terms .................................................................................................................................................... 5
Figures and Tables ............................................................................................................................... 5
Screen Shots ......................................................................................................................................... 5
Enterprise Operations Tasks ................................................................................................................. 5
Appendices ........................................................................................................................................... 5
REMOTE DESKTOP CONFIGURATION (WINDOWS) ..................................................................... 7
SERVER NAME AND SCREEN RESOLUTION ............................................................................................... 7
SOUND .................................................................................................................................................... 10
KEYBOARD ............................................................................................................................................. 11
CONNECTION SPEED ............................................................................................................................... 12
SAVE SETTINGS ...................................................................................................................................... 13
CREATE A REMOTE DESKTOP CONNECTION SHORTCUT FOR VBECS ................................................... 14
SERVER HARDWARE AND SYSTEM CONFIGURATION ............................................................ 15
REQUIRED PERIPHERALS ........................................................................................................................ 17
PRINTERS ................................................................................................................................................ 17
Report Printer ..................................................................................................................................... 17
Label Printer (Zebra ZM400, Z4Mplus and ZT410) .......................................................................... 23
SCANNERS ............................................................................................................................................... 24
WORKSTATION CONFIGURATION ........................................................................................................... 25
REPORT SHARE ....................................................................................................................................... 26
IMPLEMENTATION AND MAINTENANCE (ENTERPRISE OPERATIONS ONLY) ................ 27
PERIODIC SYSTEM MAINTENANCE ......................................................................................................... 27
SQL MAINTENANCE JOBS ...................................................................................................................... 28
SQL Maintenance Job Alerts ............................................................................................................. 29
SQL DATABASE BACKUPS ..................................................................................................................... 29
APPLYING WINDOWS UPDATES .............................................................................................................. 30
APPLYING UPDATES TO VBECS SQL SERVER SYSTEM ........................................................................ 32
EPOLICY AND VIRUS DEFINITIONS ......................................................................................................... 43
VISTA MAINTENANCE OPERATIONS ............................................................................................. 45
SET UP VBECS OUTBOUND LOGICAL LINKS ......................................................................................... 45
SET UP THE VBECS INBOUND LOGICAL LINK ....................................................................................... 47
START VISTA HL7 LOGICAL LINKS ....................................................................................................... 48
MONITOR VBECS HL7 LOGICAL LINKS ................................................................................................ 49
CONFIGURE VBECS VISTALINK LINKS ................................................................................................. 50
VBECS MAINTENANCE OPERATIONS .................................................................................................... 51
RECORD WORKLOAD DATA ................................................................................................................... 51
September 2018 VistA Blood Establishment Computer Software (VBECS) Version 2.3.0 Page vi
Technical Manual-Security Guide Version 2.0
EXTERNAL INTERFACES .................................................................................................................... 55
VISTALINK REMOTE PROCEDURE CALLS .............................................................................................. 55
VBECS WINDOWS SERVICES ................................................................................................................. 57
TROUBLESHOOTING ........................................................................................................................... 59
Remote Desktop Session Issues ......................................................................................................... 59
Remote Desktop Services Licensing Issues ....................................................................................... 60
Stopping and Starting VBECS Services ............................................................................................. 62
VBECS Auditing ................................................................................................................................ 63
VBECS Exception Logging ............................................................................................................... 63
VBECS Application Interfaces .......................................................................................................... 63
Zebra Printer Problems ....................................................................................................................... 73
Scanner Problems ............................................................................................................................... 75
Archiving and Recovery (Enterprise Operations Only) ..................................................................... 79
Restore the Databases ......................................................................................................................... 79
FAILOVER ............................................................................................................................................... 81
PERFORMANCE ..................................................................................................................................... 83
LOCKING ................................................................................................................................................. 83
SECURITY ................................................................................................................................................ 85
ACCESS REQUEST PROCESS .................................................................................................................... 85
ACTIVE DIRECTORY ................................................................................................................................ 85
GROUP POLICY ....................................................................................................................................... 85
SYSTEM CENTER OPERATIONS MANAGER ............................................................................................. 85
APPLICATION-WIDE EXCEPTIONS .......................................................................................................... 86
CONFIGURING THE APP SERVER AND LAB WORKSTATIONS ............................................... 89
SERVER TASKS (ENTERPRISE OPERATIONS ONLY) ................................................................................ 89
Grant User Permissions ...................................................................................................................... 89
Configure the Report Share ................................................................................................................ 91
WORKSTATION TASKS ............................................................................................................................ 96
Update the RDP Shortcut ................................................................................................................... 96
Configure a Shortcut to the Report Share ........................................................................................... 98
GLOSSARY ............................................................................................................................................ 101
APPENDICES ......................................................................................................................................... 103
APPENDIX A: INSTRUCTIONS FOR CAPTURING SCREEN SHOTS ............................................................ 103
APPENDIX B: DATA CENTER INSTRUCTIONS (ENTERPRISE OPERATIONS ONLY) ................................. 105
Purpose ............................................................................................................................................. 105
Server Configuration ........................................................................................................................ 105
Initial Setup Tasks ............................................................................................................................ 106
Ongoing Tasks .................................................................................................................................. 108
APPENDIX C: AUDITING ON VBECS SERVERS ..................................................................................... 109
INDEX ...................................................................................................................................................... 111
September 2018 VistA Blood Establishment Computer Software (VBECS) Version 2.3.0 Page 1
Technical Manual-Security Guide Version 2.0
Introduction
The main purpose of the VistA Blood Establishment Computer Software (VBECS) is to automate the
daily processing of blood inventory and patient transfusions in a hospital transfusion service.
Unauthorized access or misuse of this system and/or its data is a federal crime. Use of all data,
printed or electronic, must be in accordance with VA policy on security and privacy.
Do not change the system! The U.S. Food and Drug Administration classifies this software as a
medical device. Unauthorized modifications will render this device an adulterated medical device under
Section 501 of the Medical Device Amendments to the Federal Food, Drug, and Cosmetic Act. Acquiring
and implementing this software through the Freedom of Information Act require the implementer to
assume total responsibility for the software and become a registered manufacturer of a medical device,
subject to FDA regulations. Adding to or updating VBECS software without permission is prohibited.
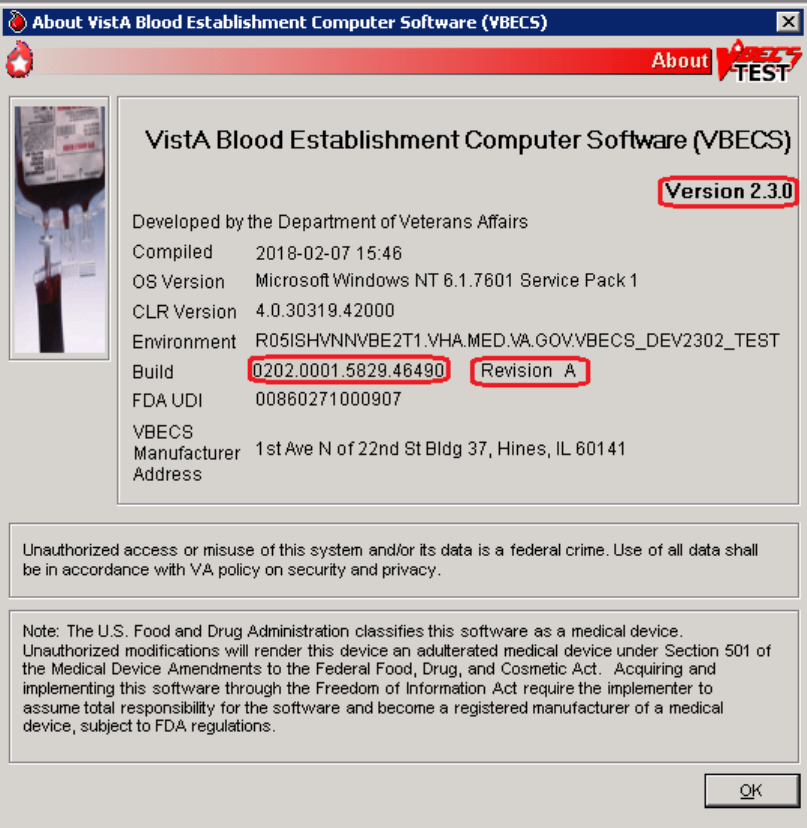
VBECS Version Numbers
In previous VBECS patch releases, the user documentation referred to the VBECS version in a 4-digit
format (e.g., 2.1.0.2 – where 2.1.0 represents the patch version and the last digit (2) is the patch build
number).
The VBECS version (Figure 1) is now represented with only the first three digits (e.g., 2.1.0) and appears that
way in all user documentation to simplify readability
The revision letter tracks database-only updates (e.g., blood product table updates, canned comments
updates). The revision letter is normally a single alpha character (e.g., C), but can be two characters (e.g.,
AA, AB, AC) in the unlikely event that more than 25 database updates are made before a code change is
implemented. The revision letter starts at A with each new code change and is incremented to B when the first
database-only update is made. The revision letter is then updated by one character in the alphabet for every
successive database-only update until a new code change is implemented, at which time the revision letter
reverts back to A. The version submitted for system testing is revision A, but the version customers receive can
be revision A, B or a higher revision letter.
September 2018 VistA Blood Establishment Computer Software (VBECS) Version 2.3.0 Page 2
Technical Manual-Security Guide Version 2.0
Figure 1: Example of Help, About VBECS
September 2018 VistA Blood Establishment Computer Software (VBECS) Version 2.3.0 Page 3
Technical Manual-Security Guide Version 2.0
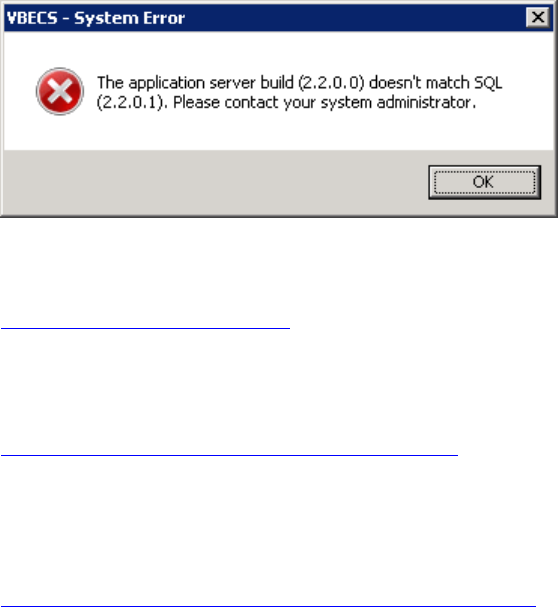
The VBECS Administrator and VBECS applications, when started, will verify that the application code
(binary build number) matches the SQL Server code (database build number) in order to ensure that
application servers and SQL servers are patched and remain in sync with each other. In the rare event that
they fall out of sync, the applications will present the following error message (Figure 2) and close until
both the code and the database are in sync.
Figure 2: Example of System Error
Related Manuals and Reference Materials
HL7 V2.3.1 Implementation Guide
CPRS-VBECS Interface (OR*3.0*212) Release Notes April 2009
PIMS V. 5.3 Technical Manual
Duplicate Record Merge: Patient Merge Technical Manual Version 7.3 April 1998 Revised December 2010
Kernel Systems Manual Version 8.0, Chapter 1: Sign-On Security/User Interface, pp. 13–20
Manage Open Sessions and Files in Windows 2008 R2
Health Product Support Release of Products and Patches Guide V2.3 Updated: February 2014
VistA Blood Establishment Computer Software (VBECS) 2.3.0 User Guide
VistA Blood Establishment Computer Software (VBECS) 2.3.0 Admin User Guide
VistA Blood Establishment Computer Software (VBECS) – <instrument> Configuration and Setup Guide
VistALink Version 1.5 Developer-System Manager Manual, Chapter 6: Security Management, pp. 34–35
Windows Server 2008R2 Security Guide, Microsoft Corporation
September 2018 VistA Blood Establishment Computer Software (VBECS) Version 2.3.0 Page 4
Technical Manual-Security Guide Version 2.0
This page intentionally left blank.

September 2018 VistA Blood Establishment Computer Software (VBECS) Version 2.3.0 Page 5
Technical Manual-Security Guide Version 2.0
How This Technical Manual-Security Guide Is
Organized
Outlined text is used throughout this guide to highlight warnings, limitations, and cautions:
Warnings, limitations, cautions
Terms
For consistency and space considerations, the pronouns “he,” “him,” and “his” are used as pronouns of
indeterminate gender equally applicable to males and females.
In many instances, a user may scan a barcode or enter data manually (by typing). The term “enter” is used
throughout this guide to mean “enter manually.”
See the Glossary for definitions of other terms and acronyms used in this guide.
Figures and Tables
If you refer to figures and tables from the Technical Manual-Security Guide in your local policy and
procedure documents, you may wish to use their titles only, without figure or table numbers: as the
technical manual-security guide is updated, those numbers may change.
Screen Shots
Because VBECS is a medical device, screen shots must be captured at various points throughout the
technical manual-security guide to meet FDA requirements for objective evidence and documentation. A
(camera) at the beginning of each step that requires a screen capture will identify these points. For
more information, see Appendix A: Instructions for Capturing Screen Shots.
Enterprise Operations Tasks
Some of the tasks in this guide are executed by members of Enterprise Operations (EO) affiliated with the
data center where VBECS Servers are hosted. These tasks are differentiated by the text in the headings
with (Enterprise Operations Only) noted in the heading.
Appendices
The appendices contain reference materials.
While pressing the Ctrl button, left-click on a section name or page number in the table of contents to
move to that section or page. The index does not incorporate this feature.
.
September 2018 VistA Blood Establishment Computer Software (VBECS) Version 2.3.0 Page 6
Technical Manual-Security Guide Version 2.0
This page intentionally left blank.
September 2018 VistA Blood Establishment Computer Software (VBECS) Version 2.3.0 Page 7
Technical Manual-Security Guide Version 2.0
Remote Desktop Configuration (Windows)
Configure the screen resolution, sound, and connection speed, and create a Remote Desktop Connection
shortcut on each VBECS workstation.
Server Name and Screen Resolution
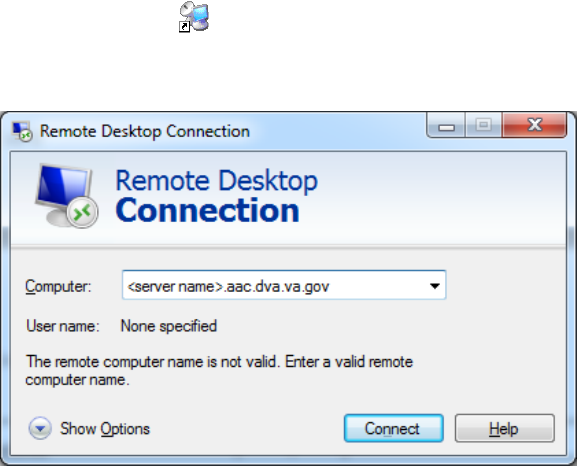
To set the screen resolution:
1) Double-click (the Remote Desktop Connection icon).
2) Click Show Options (Figure 3).
Figure 3: Example of Remote Desktop Connection Options
September 2018 VistA Blood Establishment Computer Software (VBECS) Version 2.3.0 Page 8
Technical Manual-Security Guide Version 2.0
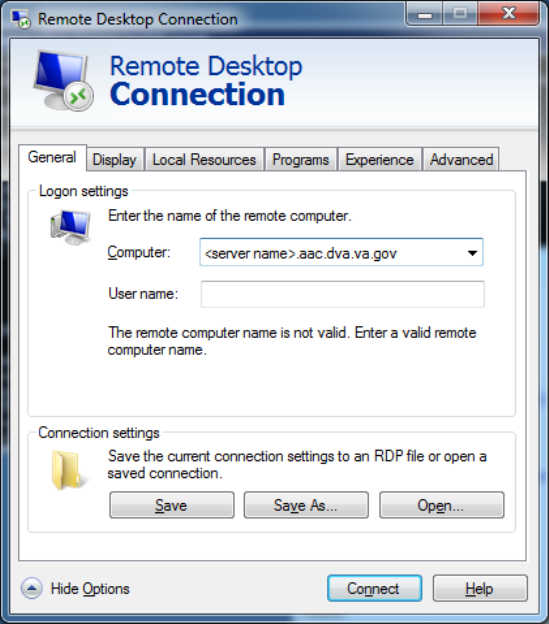
3) Click the General tab (Figure 4).
4) Enter the VBECS application server’s fully qualified domain name (FQDN) in the Computer
field. The name will always be your server name followed by .aac.dva.va.gov
Figure 4: Example of General Tab Computer and Domain
September 2018 VistA Blood Establishment Computer Software (VBECS) Version 2.3.0 Page 10
Technical Manual-Security Guide Version 2.0
Sound
To enable sound:
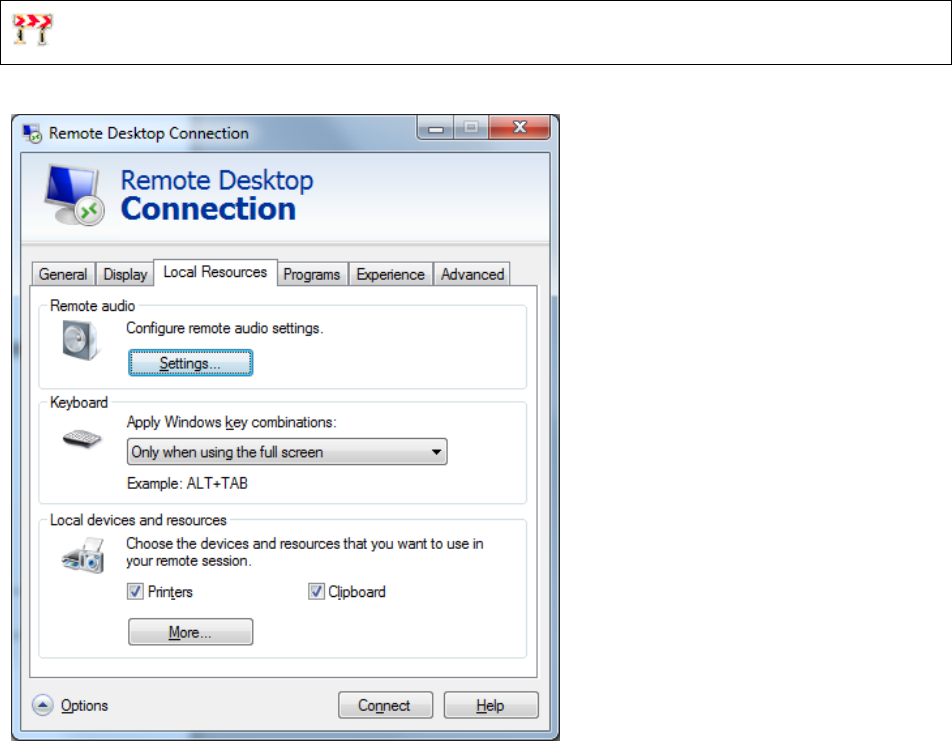
7) Click the Local Resources tab (Figure 6).
8) Click the Settings button.
Failure to properly configure the sound disables audible alerts throughout VBECS.
Figure 6: Example of Remote Computer Sound
September 2018 VistA Blood Establishment Computer Software (VBECS) Version 2.3.0 Page 11
Technical Manual-Security Guide Version 2.0
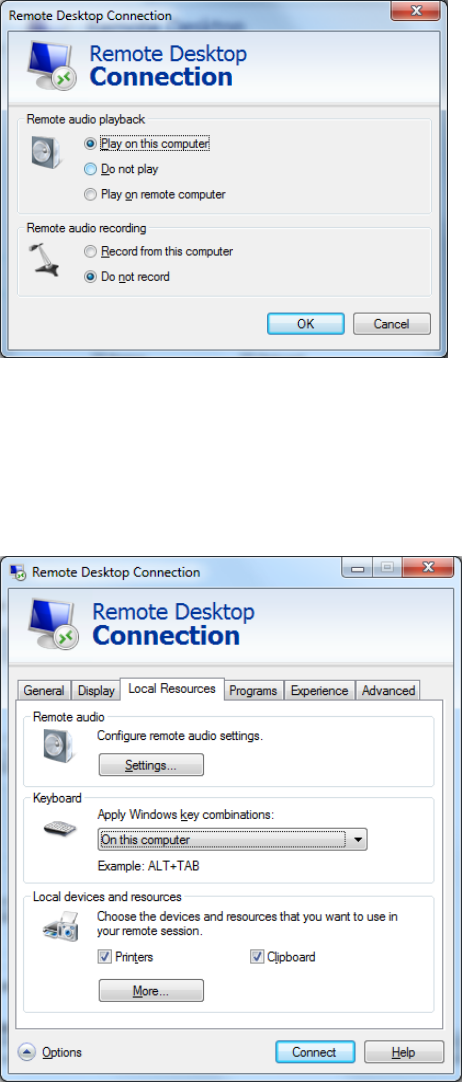
9) Select Play on this computer (Figure 7) from the Remote audio playback section.
10) Click the OK button.
Figure 7: Remote audio playback selection
Keyboard
To configure keyboard settings:
11) Click the Local Resources tab (Figure 8).
12) Select On this computer from the Keyboard drop-down list.
Figure 8: Example of Remote Computer Keyboard
September 2018 VistA Blood Establishment Computer Software (VBECS) Version 2.3.0 Page 12
Technical Manual-Security Guide Version 2.0
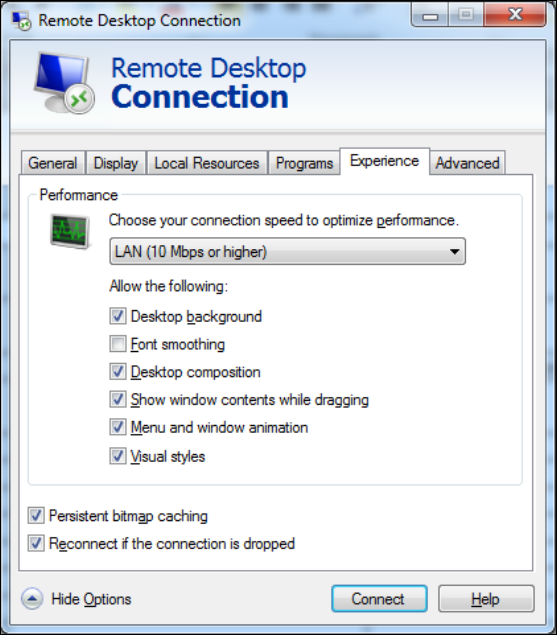
Connection Speed
To set the connection speed:
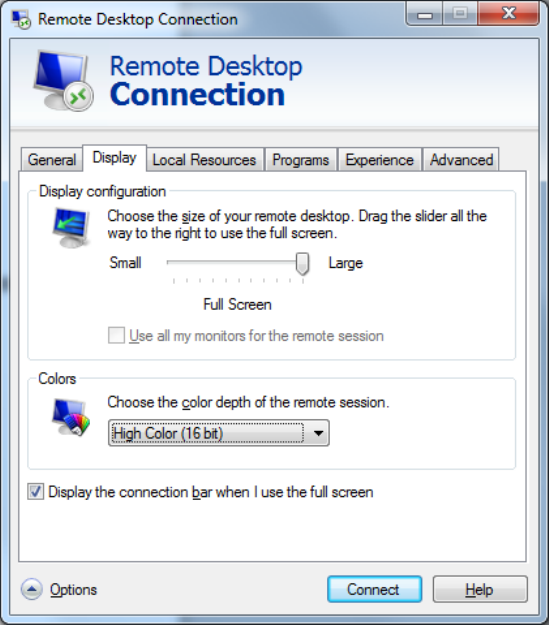
13) Click the Experience tab (Figure 9).
14) Select LAN (10 Mbps or higher) from the Choose your connection speed to optimize
performance drop-down list. Deselect Font smoothing.
Figure 9: Example of Connection Speed


September 2018 VistA Blood Establishment Computer Software (VBECS) Version 2.3.0 Page 14
Technical Manual-Security Guide Version 2.0
Create a Remote Desktop Connection Shortcut for VBECS
17) To create a Remote Desktop Connection shortcut for VBECS (Figure 11), save the file as
VBECS.rdp in the C:\Users\Public\Public Desktop folder.
Figure 11: Example of Remote Desktop Connection Shortcut for VBECS
18) Double-click the shortcut to launch the Remote Desktop Connection to VBECS. The Windows
start-up sound confirms that the sound functions.
September 2018 VistA Blood Establishment Computer Software (VBECS) Version 2.3.0 Page 15
Technical Manual-Security Guide Version 2.0
Server Hardware and System Configuration
The VBECS application requires hardware and system software to service the requirements of a user
population of five users in a standard configuration and up to twenty-five users in an integrated Veterans
Integrated Service Network (VISN) environment.
VBECS is installed in a virtualized environment using vSphere® as the virtualization platform. This
section focuses on the configuration of the virtual machines. Table 15 and Table 16 contain the virtual
machine specifications for the Application and SQL Servers respectively. The System Schematic diagram
(Figure 12) describes the major system components:
• Application Server (App Server): This is a Windows 2008 Server Enterprise Edition R2 (x64)
server and is the execution environment for the VBECS application (both Test and Production). It
also functions as a Remote Desktop Protocol (RDP) Server. Each VBECS instance (single or
multidivisional) has a unique App Server.
The App Server also communicates with and exchanges information with VistA applications and
other HL7 interfaces through messages formatted using Extensible Markup Language (XML) and
Health Level 7 (HL7) over Transmission Control Protocol/Internet Protocol (TCP/IP)
networking.
• SQL Server: This is a Windows 2008 Server Enterprise Edition R2 (x64) server that runs SQL
Server 2012. It hosts the VBECS’ databases for each single or multidivisional instance. Up to 15
sites share a single SQL Server.
SQL Servers exist in an AlwaysOn cluster, which consists of three nodes. The Primary and High
Availability servers reside at the primary site while a Disaster Recovery server resides at an
alternate location:
o Primary SQL Server: This server fields all requests. Its data are replicated to the High
Availability and Disaster Recovery servers.
o High Availability (HA) SQL Server: This server provides database backup services
through synchronous replication. Its data are guaranteed to be consistent with the
Primary. It becomes the Primary should the original Primary server fail or become
unreachable. Failover to this server is automatic.
o Disaster Recovery (DR) SQL Server: This server resides at a remote site and provides
database backup services through asynchronous replication. It becomes the Primary
server should both the Primary and HA server fail or become unreachable. Failover to
this server is a manual process.
• Windows Workstations: Users continue to access the VBECS application using Remote
Desktop Services.
September 2018 VistA Blood Establishment Computer Software (VBECS) Version 2.3.0 Page 16
Technical Manual-Security Guide Version 2.0
Figure 12: System Schematic
VBECS App Server Configuration
VistA System
VistA
VBECS Business
Objects
VBECS Data
Access
Components
VistALink M
Components
VistALink
Components
VBECS GUI
(User Interface)
VistA HL7
Components
Blood Bank User Systems
Windows
(Remote
Desktop
Connection)
BTRF and Report
Printer
Caution Tag
Printer
TCP/IP Sockets
Communication
passing HL7
TCP/IP Sockets
Communication
passing XML
Remote Desktop
Connection
BCE System
BCE
TCP/IP Sockets
Communication
passing HL7
BCE HL7
Components
HA SQL
Server
VBECS Database
Primary SQL
Server
DR SQL
Server
VBECS Database
VBECS Database
VistA HL7 M
Components
BCE HL7
Interface
Automated
Instrument (AI)
System
Automated
Instrument HL7
Components
Automated
Instrument
Middleware
TCP/IP Sockets
Communication
passing HL7
AI
External
IAM
Service
Provider

September 2018 VistA Blood Establishment Computer Software (VBECS) Version 2.3.0 Page 17
Technical Manual-Security Guide Version 2.0
Required Peripherals
Table 1 describes additional required hardware.
Table 1: Additional Required Hardware
Additional Required Hardware
Barcode Scanner
Hand-Held Model 4600 (This is the model distributed with the original VBECS deployment
and is now discontinued. The successor is the Honeywell Xenon 1900.)
Report Printer
HP LaserJet 9040dn (sites may elect to use a different report printer)
Label Printer
Zebra ZM400, Z4MPlus or ZT410; Must print at 300 DPI and have Ethernet connectivity.
Printers
Report Printer
A laser printer capable of printing 8.5" x 11" sheets may be used. VBECS supports duplex printing, but
not all printers are duplex capable. Consult the printer documentation to determine if it has this capability.
Installing a Printer (Server Administrators Only)
To install a printer, execute the following instructions:
1) Copy the printer driver to the C:\temp directory on the app server.
2) Log into the app server with administrative privileges.

September 2018 VistA Blood Establishment Computer Software (VBECS) Version 2.3.0 Page 18
Technical Manual-Security Guide Version 2.0
3) Click Start, Devices and Printers. The Device and Printers window is displayed (Figure 13).
Click the Add a printer button.
Figure 13: Example of Devices and Printers, Add a printer
4) In the Add Printer Wizard screen, select the Add a local printer button (Figure 14).
Figure 14: Example of Add Printer Wizard
September 2018 VistA Blood Establishment Computer Software (VBECS) Version 2.3.0 Page 19
Technical Manual-Security Guide Version 2.0
5) On the Choose a printer port window, select Create a new port radio button. From the Type of
port: drop-down, select Standard TCP/IP Port. Click Next (Figure 15).
Figure 15: Example of Add Printer Wizard
6) Enter the IP address of the printer in the Hostname or IP address field (the Port Name field will
populate automatically). Click Next (Figure 16).
Figure 16: Example of TCP/IP Settings
September 2018 VistA Blood Establishment Computer Software (VBECS) Version 2.3.0 Page 21
Technical Manual-Security Guide Version 2.0
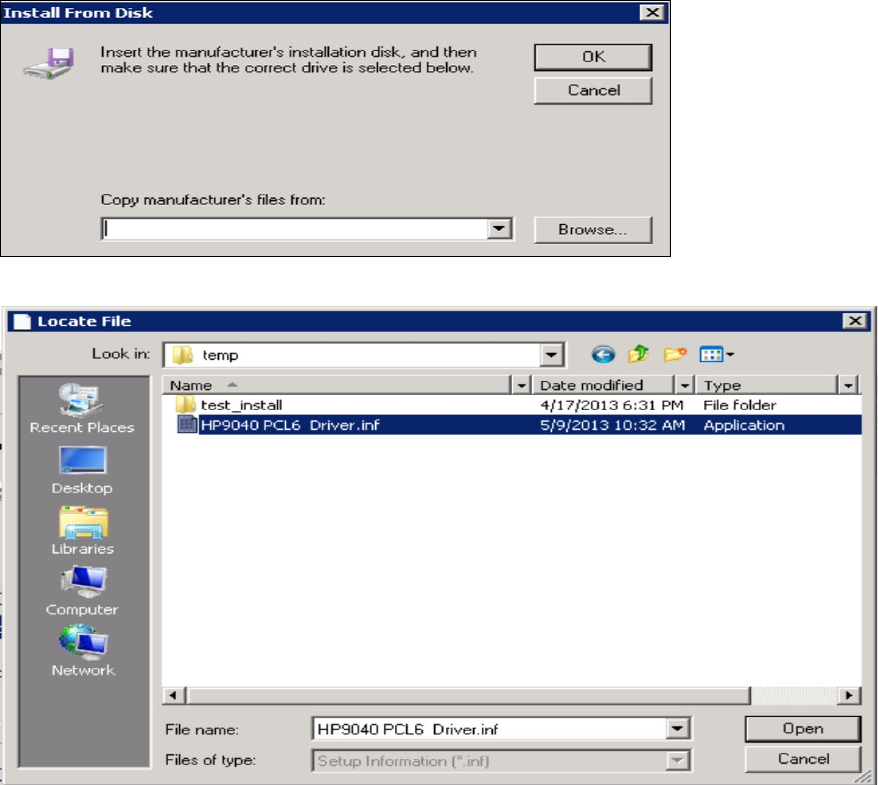
9) Click Browse (Figure 19). Navigate to the driver that you copied to C:\temp\ in Step 1. Click
Open (Figure 20).
Figure 19: Example of Install from Disk
Figure 20: Example of Select Driver

September 2018 VistA Blood Establishment Computer Software (VBECS) Version 2.3.0 Page 22
Technical Manual-Security Guide Version 2.0
10) Click OK (Figure 19).
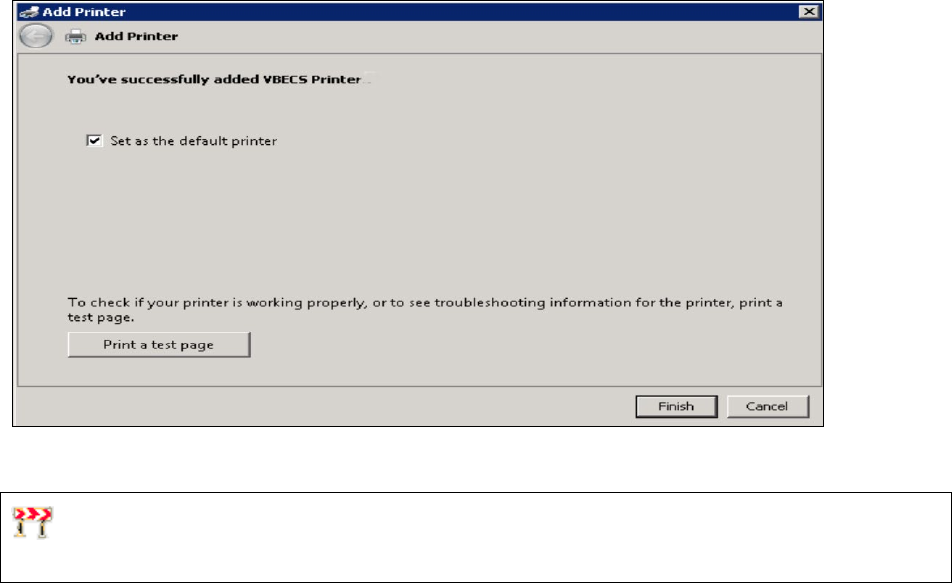
11) For a single-division site, enter VBECS Printer as the printer name. For a multidivisional site,
enter VBECS Printer and the site name (e.g., VBECS Printer Hines). Click Next (Figure 21)
Figure 21: Example of Add Printer Wizard
12) Click the Do not share this printer radio button. Click Next (Figure 22).
Figure 22: Example of Add Printer Wizard
September 2018 VistA Blood Establishment Computer Software (VBECS) Version 2.3.0 Page 23
Technical Manual-Security Guide Version 2.0
13) Click Next (Figure 23).
Figure 23: Example of Add Printer Wizard
Label Printer (Zebra ZM400, Z4Mplus and ZT410)
Do not install the label printer on the VBECS Server. Connectivity is configured in VBECS
Administrator (See the VBECS Administrator User Guide).
VBECS is configured to work only with Zebra printers: VBECS uses Zebra Programming Language to
communicate with the printer. Other requirements:
• Ethernet connectivity: the label printer must have an Ethernet card
• Must print on 4" x 4" label stock
• Must print at 300DPI
Prior to configuring the label printer, load the ribbon and label stock and ensure that the printer is on. If
the printer does not display PRINTER READY, there is a problem that must be resolved before
proceeding. Refer to the Zebra user guide or printer CD for more information.
September 2018 VistA Blood Establishment Computer Software (VBECS) Version 2.3.0 Page 24
Technical Manual-Security Guide Version 2.0
Scanners
Scanners used with VBECS must be able to scan Codabar, ISBT 128, and PDF-417 barcodes. To
configure a scanner. VBECS no longer supports entry of new Codabar units into the system.
1) Connect the scanner to the workstation.
a. To configure a Hand-Held 4600 scanner, scan the barcode in Figure 24.
Figure 24: Configuration Barcode for a Hand-Held 4600
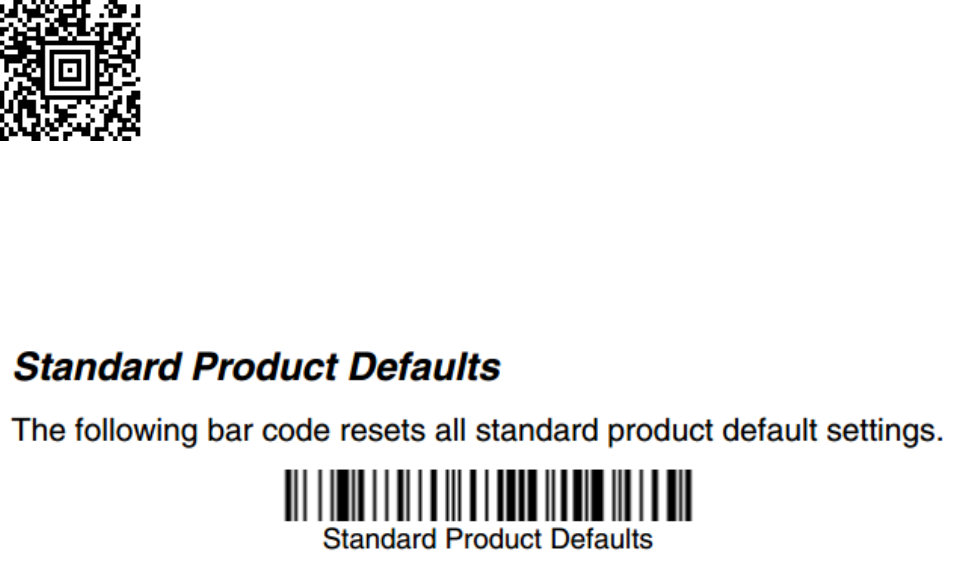
b. The configuration barcodes below only apply to the Honeywell Xenon 1900 series
scanner. Do not try to configure any other scanners with these barcodes. To configure a
Honeywell Xenon 1900 scanner, scan the Standard Product Defaults barcode in Figure
25 followed by the VBECS Default barcode in Figure 26.
Figure 25: Xenon 1900: Restore Defaults

September 2018 VistA Blood Establishment Computer Software (VBECS) Version 2.3.0 Page 25
Technical Manual-Security Guide Version 2.0
Figure 26: Xenon 1900: VBECS Settings
To test the scanner, open Notepad. Print and scan the barcodes in Figure 27, Figure 28 and Figure
29. The Codabar and ISBT barcodes must scan as “~123456789”; the PDF 417 must scan as
“~Testing.”
Save and print the Notepad file for validation records.
Figure 27: Codabar
Figure 28: ISBT 128
Figure 29: PDF 417
Workstation Configuration
Specifications are as follows:
• Memory: 2GB
September 2018 VistA Blood Establishment Computer Software (VBECS) Version 2.3.0 Page 26
Technical Manual-Security Guide Version 2.0
• Display: 17”
• Video: video card with 16-bit color and 1024 x 768 resolution
• Operating System: Microsoft Windows 7 Enterprise
• Input Devices: U.S. 101-key keyboard, mouse
• Audio: Sound card and speakers
• Personal Identity Verification (PIV) card reader: required for PIV card access
Report Share
The VBECS system provides a share for users to access reports from their workstations (see Configure a
Shortcut to the Report Share). While VBECS administrators have the ability to create and delete files and
folders, users have read-only access to the share.
September 2018 VistA Blood Establishment Computer Software (VBECS) Version 2.3.0 Page 27
Technical Manual-Security Guide Version 2.0
Implementation and Maintenance (Enterprise
Operations Only)
The U.S. Food and Drug Administration classifies this software as a medical device. Unauthorized
modifications will render this device an adulterated medical device under Section 501 of the Medical
Device Amendments to the Federal Food, Drug, and Cosmetic Act. Acquiring and implementing this
software through the Freedom of Information Act require the implementer to assume total responsibility
for the software and become a registered manufacturer of a medical device, subject to FDA regulations.
Periodic System Maintenance
The VBECS SQL Maintenance jobs run nightly from 10:00 PM to 1:00 AM (CST). Do not reboot the
server during this time interval. Doing so may cause consistency and allocation errors.
The system will fail to function as intended when maintenance checks are not performed or are not
performed correctly (Table 2).
Table 2: Periodic System Maintenance
Action Frequency Description
System Center
Operations Manager
(SCOM) Alerts
Daily SCOM emails alert messages to a Server Administrators mail group.
Investigate all alerts to completion.
Review Database
Integrity Reports
Daily Take action only upon receipt of a job failure email. See the SQL
Maintenance Jobs section for more details.
Apply Windows
Updates
Wednesday, two
weeks after 2nd
Tuesday of the
month
See Applying Windows Updates.
VBECS Reports
folder cleanup
Annually or as
needed
Users are able to export reports to the D:\VBECSReports folder on the
App Server. The D drive is 10 GB in size and logs are also stored
there.
On an annual basis or whenever the folder is over 90% full, old reports
must be deleted. This activity must be performed by a server
administrator and should be coordinated with blood bank personnel.
September 2018 VistA Blood Establishment Computer Software (VBECS) Version 2.3.0 Page 28
Technical Manual-Security Guide Version 2.0
SQL Maintenance Jobs
The VBECS databases are contained within Microsoft SQL Server and require regular maintenance jobs
to backup, validate integrity, and improve performance. The jobs are automated and configured to run
according to the specifications shown in Table 3, Table 4 and Table 5.
System Level Jobs: Each system level job executes against all databases found on the SQL system not
contained in an Availability Group. Email alerts are sent to VAOITVBECSSQLSupport@va.gov.
Table 3: System Level Jobs
Databases Affected
Job Name
Start Time
All databases not in an Availability Group
System_IntegrityCheck
10:00pm
All databases not in an Availability Group
(except TempDB)
System_FullBackups 11:00pm
n/a System_ResetServerLog Every Saturday at 12:00am
Availability Group Level Jobs: Each Availability Group level job executes against all VBECS
databases found within the Availability Group indicated by the job name (Table 4). Email alerts are sent
to the recipients defined in the targeted database’s CPRS interface (see SQL Maintenance Job Alerts
section).
Table 4: Availability Group Level Jobs
Databases Affected
Job Name
Start Time
All VBECS databases in
the Availability Group
AGVISNXX (XX is equal
to the VISN number)
AGVISNXX_DifferentialBackups
Every 6 hours between 3:00am and 10:00pm
AGVISNXX_TransactionalLogBackups
Every 2 hours between 2:00am and 11:00pm
AGVISNXX_ReIndexTables
10:00pm
AGVISNXX_UpdateStats
10:30pm
AGVISNXX_IntegrityCheck
11:30pm
AGVISNXX_FullBackups
12:15am
VBECS Level Jobs: Each VBECS level job targets a single VBECS database indicated in the job name
(Table 5). These jobs affect user data by expiring Component and Test Orders and marking units
Presumed Transfused. Email alerts are sent to the recipients defined in the targeted database’s CPRS
interface (see SQL Maintenance Job Alerts section).
Table 5: VBECS Level Jobs
Databases Affected
Job Name
Start Time
(Test SQL Server)
VBECS_SSS_TEST
(SSS is equal to the Site
Code)
AGVISNXX_VBECS_SSS_TEST_Background_Jobs
12:01am
(Production SQL Server)
VBECS_SSS_PROD
AGVISNXX_VBECS_SSS_PROD_Background_Jobs
September 2018 VistA Blood Establishment Computer Software (VBECS) Version 2.3.0 Page 29
Technical Manual-Security Guide Version 2.0
SQL Maintenance Job Alerts
Email alert messages are sent only when a SQL maintenance job fails. System Level job alerts are sent to
VAOITVBECSSQLSupport@va.gov and EOVBEDatabaseAdministration@va.gov. Refer to the VistA
Blood Establishment Computer Software (VBECS) Admin User Guide.
SQL maintenance job alerts are marked with High Importance and must be acted upon immediately. The
email will contain details of the failure and instructions for contacting the Service Desk Primary Contact.
When a SQL integrity job fails, a report will be included as an attachment with the alert – include this
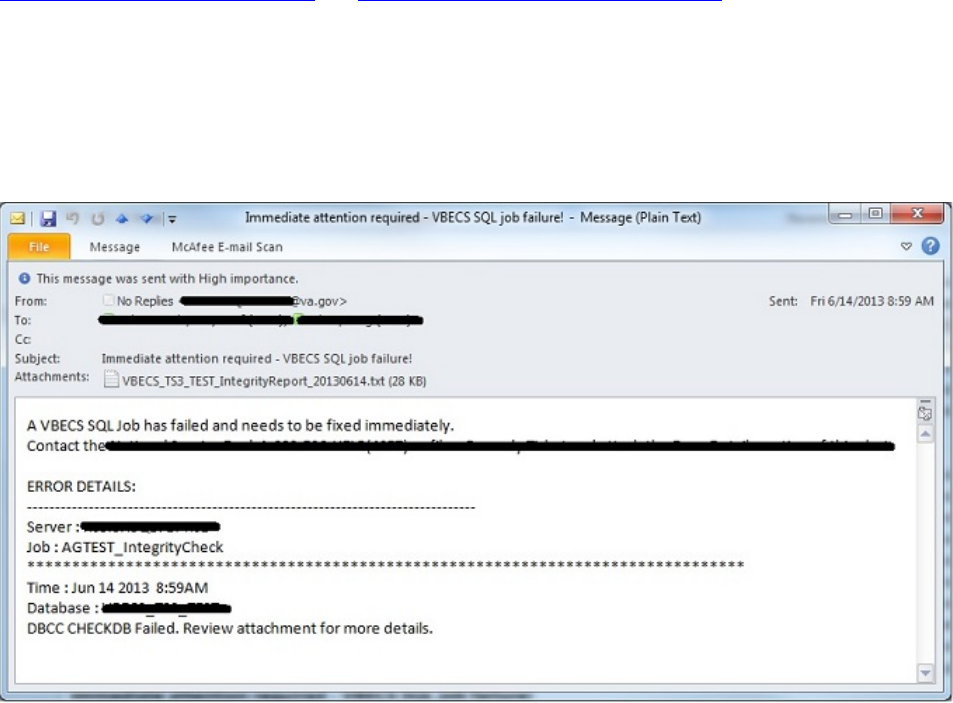
with any support ticket (Service Desk Primary Contact) or communication (Figure 30).
Figure 30: Example of a SQL Maintenance Job Failure Email
SQL Database Backups
To assist recovery and support options, database backup files and integrity reports are retained for 7 days
for each SQL database and can be found on the SQL Server at H:\Program Files\Microsoft SQL
Server\MSSQL11.MSSQLSERVER\MSSQL\Backup. If tape or offsite backups are desired, locate and
backup the folders associated with the 3-character site code (SSS). For example, on a production SQL
server, Hines (“HIN” site code) would backup the VBECS_HIN_PROD and
VBECS_HIN_PROD_MIRROR folders.
September 2018 VistA Blood Establishment Computer Software (VBECS) Version 2.3.0 Page 30
Technical Manual-Security Guide Version 2.0
Applying Windows Updates
App server updates require downtime, which is detailed in Table 6 and Table 7. SQL server updates
require no downtime.
The VistA Blood Establishment Computer Software (VBECS) systems are updated with Microsoft
Windows Security patches by Austin Information Technology Center (AITC) staff during defined
maintenance periods (Table 6 and Table 7).
The monthly maintenance schedule begins the second Tuesday of the month that Microsoft defines
as Patch Tuesday.
1) Enterprise Operations installs Windows Updates patches to VBECS maintenance team pre-
production servers.
2) VBECS maintenance team tests the patched pre-production servers and proves that the updates do
not affect VBECS.
3) After the VBECS maintenance team approves the updates, Enterprise Operations creates change
orders for the customer-test system and another for the production system.
4) Enterprise Operations will submit an ANR and then install the patches, using the approved
schedule, on the customer-test systems.
5) Enterprise Operations will submit an ANR and then install the patches, using the approved
schedule, on the production systems.
Table 6: Customer Test System Patch Schedule
Server
Day
App Servers
15 days after patch Tuesday, 10 AM local time (automatic with
notification)
Product Support Servers
10 days after patch Tuesday, 8-9 AM CST (manual)
Production Quorum Servers
11 days after patch Tuesday, 8-9 AM CST (manual)
SQL Server, Disaster Recovery node
10 days after patch Tuesday, 8-9 AM CST (manual)
SQL Server, High Availability node
10 days after patch Tuesday, 9-10 AM CST (manual)
SQL Server, Primary node
10 days after patch Tuesday, 10-11 AM CST (manual)
Table 7: Production System Patch Schedule
Server
Day
Application Servers
15 days after patch Tuesday, 10 AM local time (automatic with
notification)
SQL Server, Disaster Recovery node
15 days after patch Tuesday, 9-10 AM CST (manual)
SQL Server, High Availability node
15 days after patch Tuesday, 10-11 AM CST (manual)
SQL Server, Primary node
15 days after patch Tuesday, 11-12 PM CST (manual)
September 2018 VistA Blood Establishment Computer Software (VBECS) Version 2.3.0 Page 31
Technical Manual-Security Guide Version 2.0
The App Servers are updated differently than the SQL Servers:
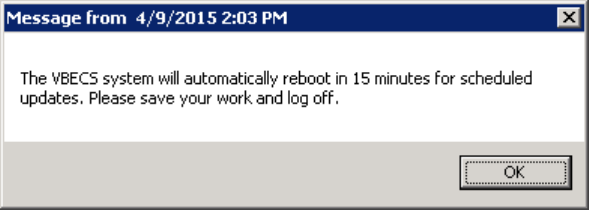
• App Servers: The App Servers are updated and rebooted by an automated process at 10:00am
local time on the day of patch release. VBECS users connected to the server receive a warning at
the following time intervals: 15 minutes, 10, 5, 4, 3, 2 and 1 (Figure 31).
• If the App Server is not operational by 10:15AM local time, contact the Service Desk Primary
Contact.
Figure 31: Example of Server Restart Warning
• SQL Servers: Due to clustering, the SQL Servers require manual update. The manual process is
described in the next section.
September 2018 VistA Blood Establishment Computer Software (VBECS) Version 2.3.0 Page 32
Technical Manual-Security Guide Version 2.0
Applying Updates to VBECS SQL Server System
Each VBECS SQL Server system is comprised of three servers that are setup for redundancy with the use
of Windows Failover Clustering and the Microsoft SQL AlwaysOn technology:
• Server 1: referred to as the Primary server
• Server 2: local secondary server, referred to as the High Availability (HA) server
• Server 3: remote secondary server, referred to as the Disaster Recovery (DR) server
Replica is another name for a server within a SQL Server AlwaysOn configuration.
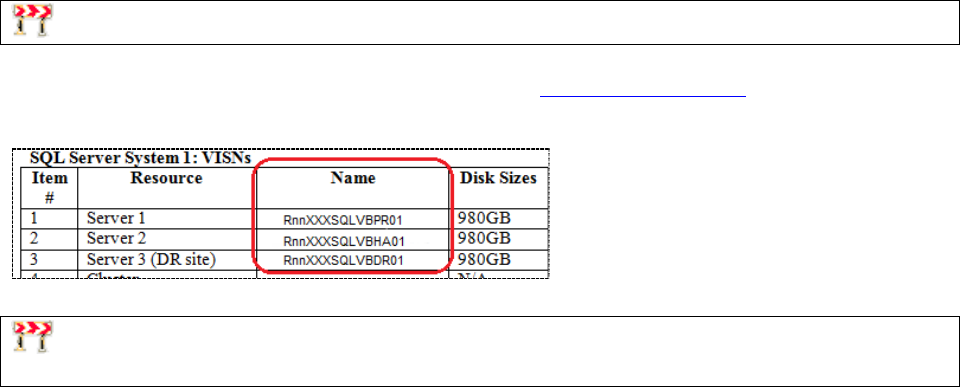
The names of the VBECS SQL servers can be found on the Data Center Worksheet (Figure 32).
Figure 32: Example Data Center Worksheet
Failure to adhere to these instructions could result in data loss and/or system failure. Always apply
updates to Server 3 first and the Primary Replica last.
September 2018 VistA Blood Establishment Computer Software (VBECS) Version 2.3.0 Page 33
Technical Manual-Security Guide Version 2.0
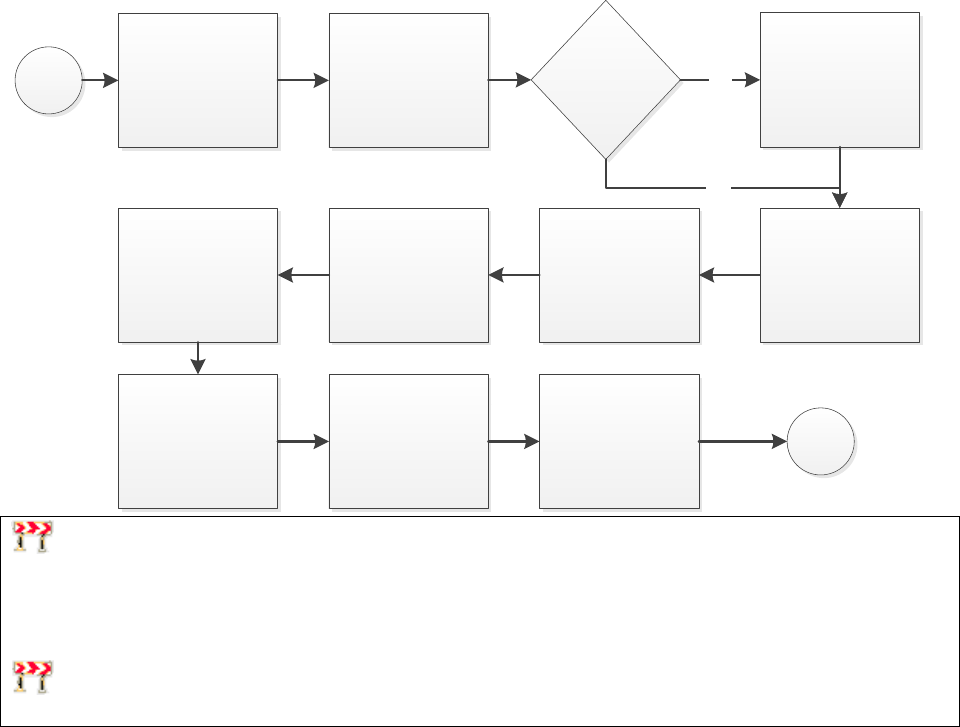
When updating a VBECS SQL Server system, refer to the flowchart in Figure 33 for the proper execution
order.
Figure 33: Updating a VBECS SQL Server System Process Flow
start
Identify the Primary
and Secondary
Replica
Apply Updates to
Server 3
*reboot if required
Change the Failover
Mode from Manual
to Automatic
Failover Availability
Groups to the
Secondary Replica
Apply Updates to
the Remaining
Server (Original
Primary Replica)
*reboot if required
end
Change the Failover
Mode from
Automatic to
Manual
Failover Availability
Groups to Primary
Replica
Are all
Availability
Groups Running
on the Primary
Replica?
Apply Updates to
the Secondary
Replica
*reboot if required
Failover Availability
Groups back to the
Original Primary
Replica
Create Backups
NO
YES
Failover is a term used to describe the process of changing which server in a SQL AlwaysOn
configuration is designated as the Primary Replica. Never use the following instructions to failover to
Server 3 (DR Server). Instructions for forcing a failover to Server 3 are provided in the VBECS Disaster
and Recovery guide.
A Server Administrator should only initiate manual failover when client usage of the system is
minimal. Users may briefly lose VBECS database connectivity depending on how long the failover takes.
Apply Updates to Server 3
1) Open a remote desktop connection to Server 3 of the VBECS SQL Server system.
2) Apply the Windows/Software Updates using the supplied instructions for the updates (reboot
Server 3 only if instructed).
Identify the Primary and Secondary Replica
3) Open a remote desktop connection to Server 1 of the VBECS SQL Server system. On the Start
menu, click All Programs, Microsoft SQL Server 2012, SQL Server Management Studio.

September 2018 VistA Blood Establishment Computer Software (VBECS) Version 2.3.0 Page 34
Technical Manual-Security Guide Version 2.0
4) When prompted to connect to a server, enter the name of Server 1 in the Server Name field and
click Connect (Figure 34). Note 1: VBECS Test system SQL Servers are named differently than
production SQL servers. Note 2: If you have issues connecting, use the fully qualified domain
name.
Figure 34: Example of the Connect to SQL Server Window
5) On the left side of the SQL Server Management Studio (SSMS) screen is the Object Explorer
pane. Within the Object Explorer pane, right-click on the AlwaysOn High Availability folder
and select Show Dashboard (Figure 35).
Figure 35: Example of Launching the SQL Dashboard
September 2018 VistA Blood Establishment Computer Software (VBECS) Version 2.3.0 Page 35
Technical Manual-Security Guide Version 2.0
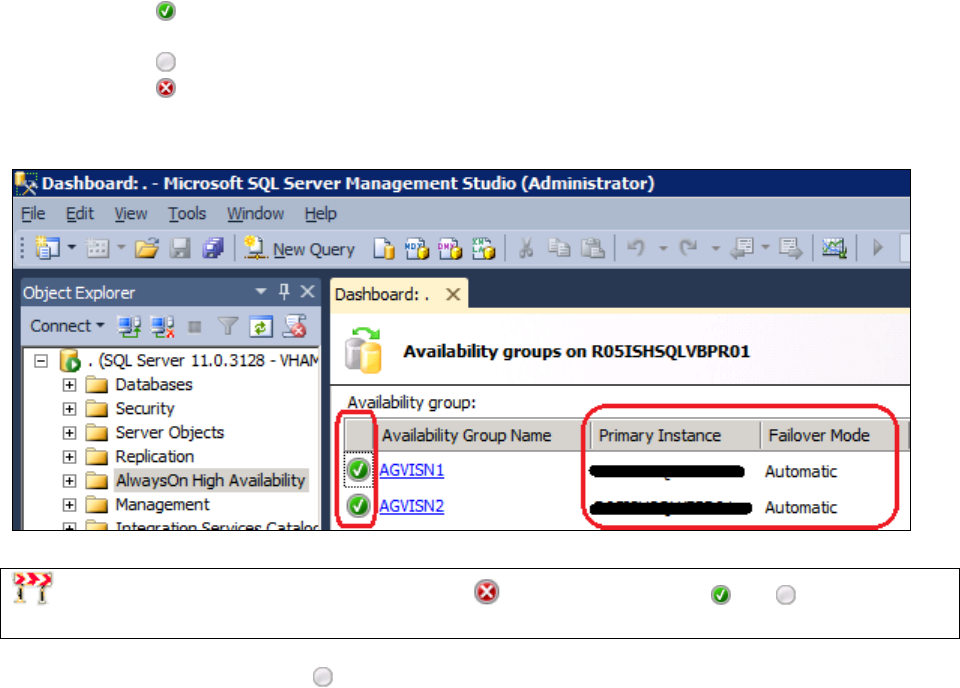
6) A Dashboard tab (Figure 36) displays the Primary Instance and Failover Mode of the VBECS
SQL Availability Groups (AG). Each AG has one of the following status indicator icons:
: your SSMS is connected to the AG’s Primary Instance server (i.e., the Primary
Replica)
: your SSMS is not connected to the AG's Primary Instance server
: there is a severe issue with the AG
Figure 36: Example of the SQL Server Dashboard
If any Availability Group status indicators are or if there are a mix of and indicators,
VBECS is down and the problem must be resolved immediately.
7) If all of the indicators are , close SSMS. Restart at Step 3 connecting to the server listed in the
Primary Instance column.
8) Make a note of the Primary and Secondary Replicas (i.e., if Server 1 is the Primary Replica, then
Server 2 is the Secondary Replica and visa-versa).
Create Backups
9) Now that all of the AGs are running under the Primary Replica, navigate to and expand the SQL
Server Agent, Jobs folder in the Object Explorer pane.
10) Double-click on Job Activity Monitor.
September 2018 VistA Blood Establishment Computer Software (VBECS) Version 2.3.0 Page 36
Technical Manual-Security Guide Version 2.0
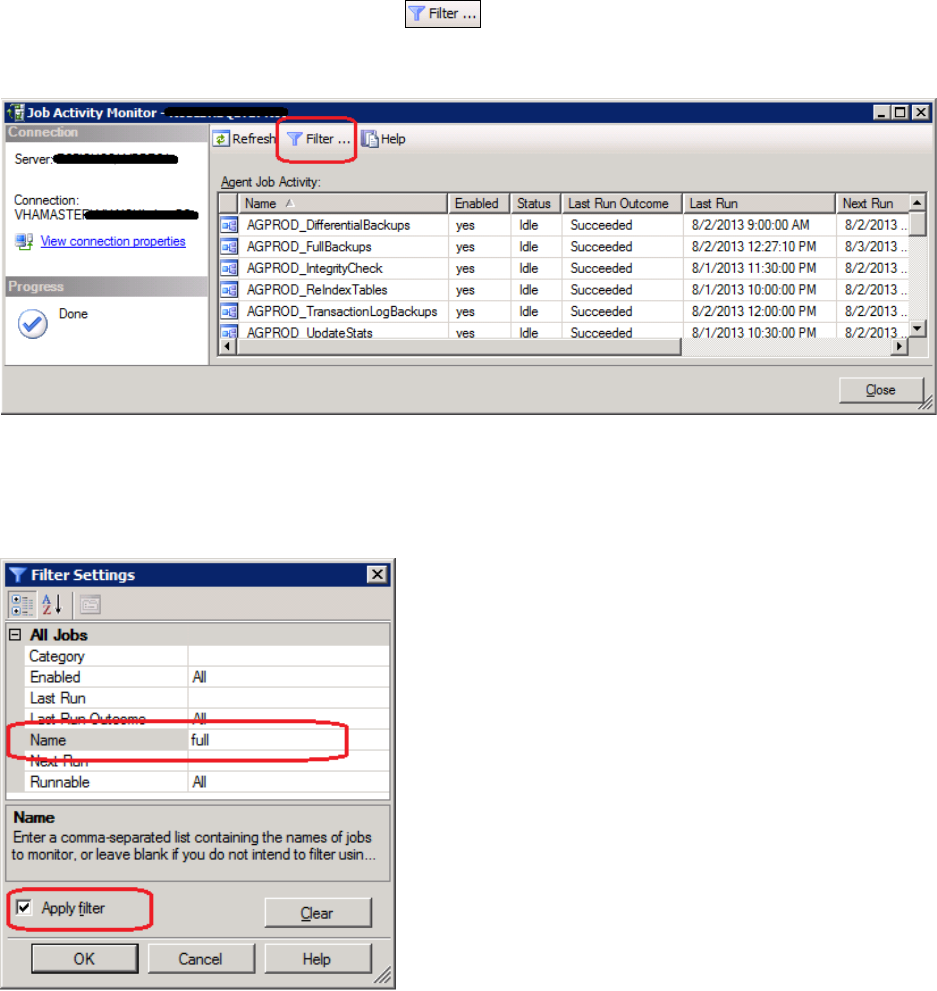
11) In the Job Activity window, click the button (Figure 37).
Figure 37: Example of Job Activity Monitor
12) In the Filter Settings window, enter full in the Name field, check the Apply filter box and click
OK (Figure 38).
Figure 38: Filter Settings

September 2018 VistA Blood Establishment Computer Software (VBECS) Version 2.3.0 Page 37
Technical Manual-Security Guide Version 2.0
13) Right-click the first job in the filtered list and select Start Job at Step… (Figure 39).
Figure 39: Example Starting a SQL Job
14) Wait for the job to finish (Figure 40). Verify the status indicator is Success before clicking Close.
Figure 40: Example Job Completion Message
15) Repeat Steps 13 and 14 for each job in the list.
If any of the jobs fail to complete successfully, please notify the appropriate support personnel
immediately by contacting the Service Desk Primary Contact.
16) Click Close on the Job Activity Monitor window.
September 2018 VistA Blood Establishment Computer Software (VBECS) Version 2.3.0 Page 38
Technical Manual-Security Guide Version 2.0
Change the Failover Mode from Automatic to Manual
17) In the Object Explorer pane, navigate to and expand the AlwaysOn High Availability,
Availability Groups folder.
18) Right-click on the first AG and select Properties; the Availability Group Properties window
opens.
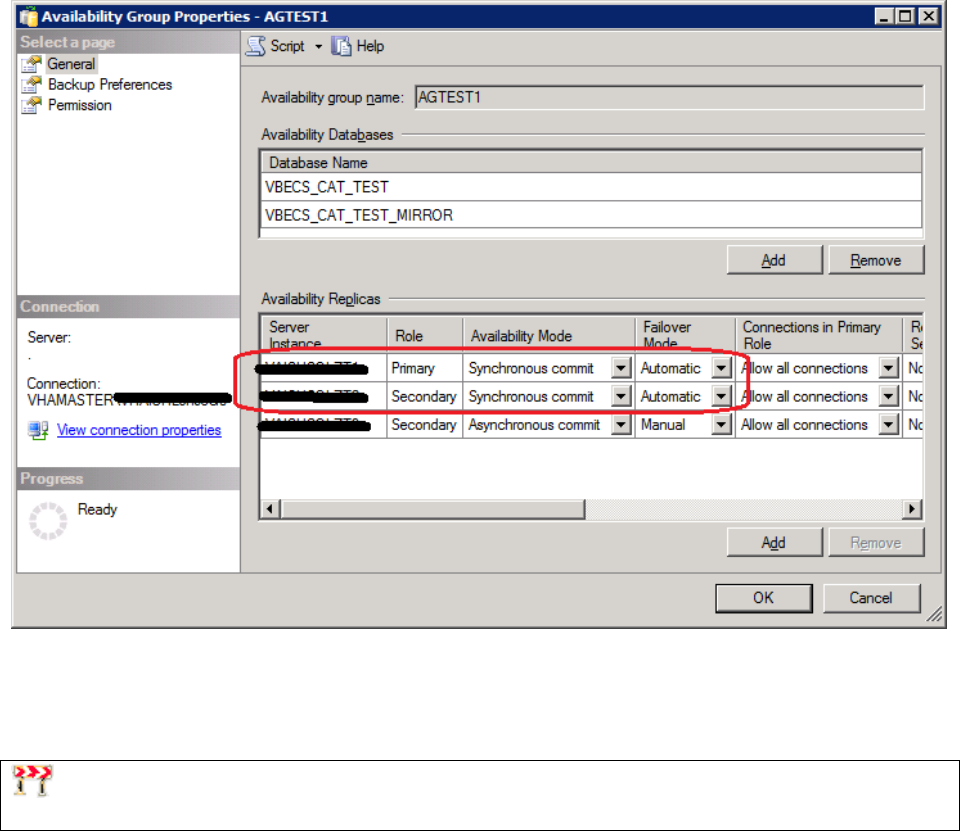
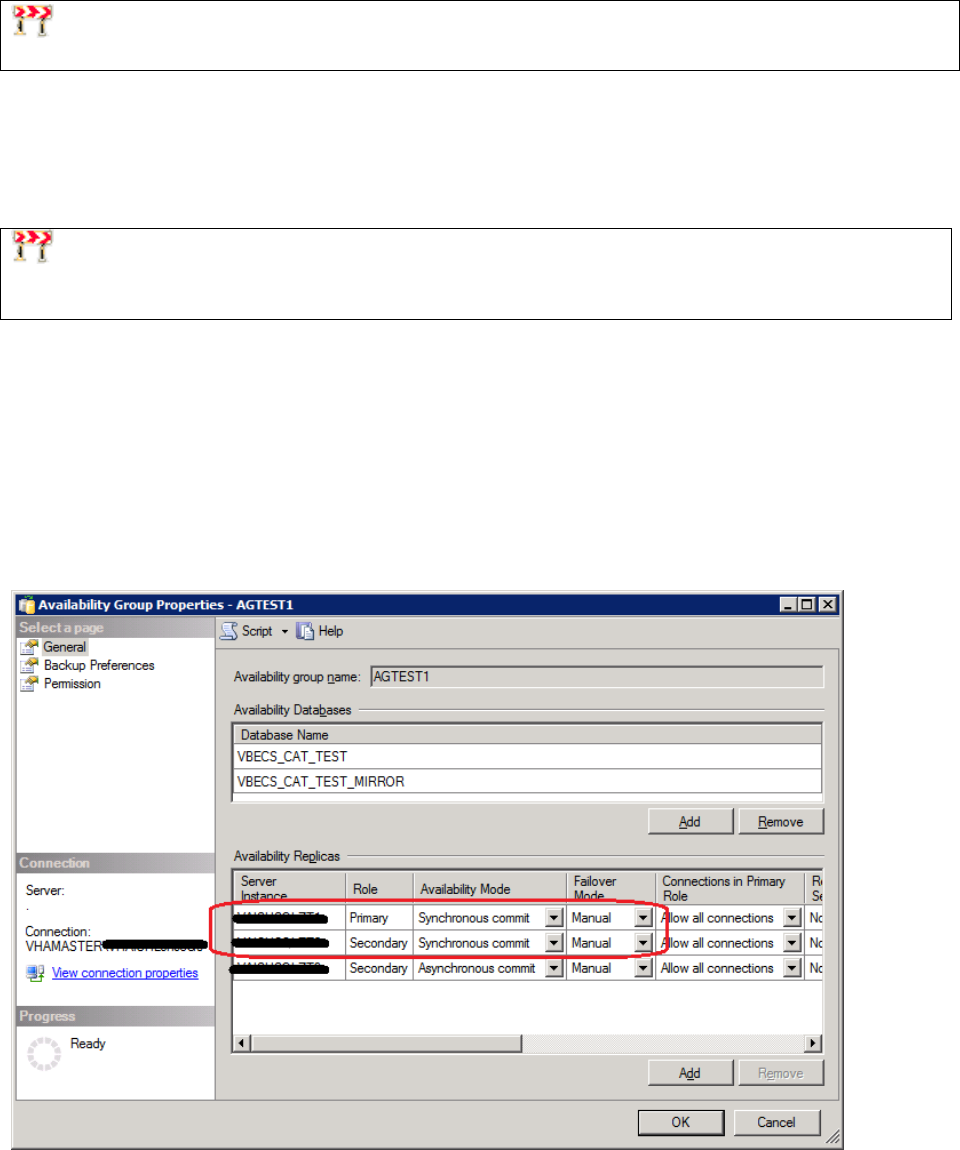
19) Locate the two servers with an Availability Mode of Synchronous commit (Figure 41). Change
both Failover Mode cells from Automatic to Manual and click OK. If the fields are greyed-out,
you are not connected to the Primary Replica: close SSMS, logoff the server and restart at Step 3.
Figure 41: Example of the Availability Group Properties
20) Repeat Steps 18 and 19 for each AG on the server until each has their Failover Mode set to
Manual.
21) Close SSMS.
To prevent an unintentional automatic failover during the upgrade process, the Failover Mode must
be set to Manual on each replica before performing a Manual Failover of the Availability Groups.
September 2018 VistA Blood Establishment Computer Software (VBECS) Version 2.3.0 Page 39
Technical Manual-Security Guide Version 2.0
Apply Updates to the Secondary Replica
22) Open a remote desktop connection to the Secondary Replica identified in Step 8 of the VBECS
SQL Server system.
23) Apply the Windows/Software Updates using the supplied instructions for the updates (reboot the
server only if instructed).
Failover the Availability Groups to the Secondary Replica
24) Open SSMS and connect to the Secondary Replica noted in Step 8.
25) Inside the Object Explorer pane, navigate to and expand the AlwaysOn High Availability,
Availability Groups folder.
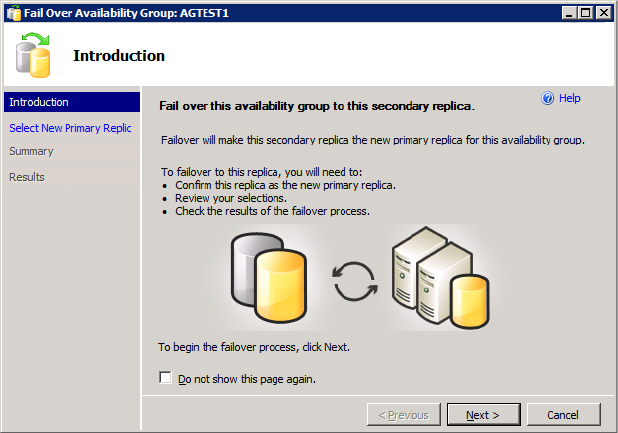
26) Right-click on the first AG and select Failover…; an Availability Group Failover wizard starts.
27) Click Next (Figure 42).
Figure 42: Example of the Availability Group Failover Wizard
September 2018 VistA Blood Establishment Computer Software (VBECS) Version 2.3.0 Page 40
Technical Manual-Security Guide Version 2.0
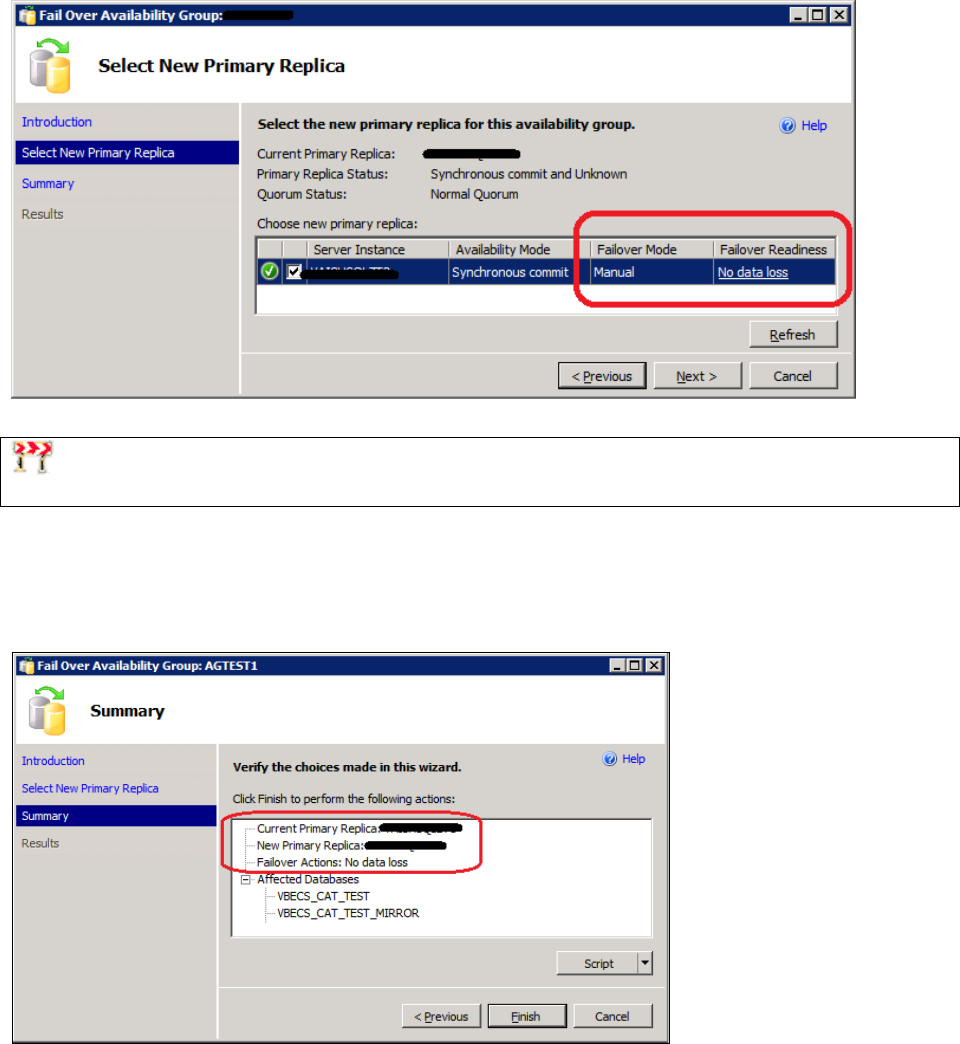
28) Verify the Failover Mode is Manual and Failover Readiness is No data loss. Click Next (Figure
43). Note: If two servers appear in the list, then you are connected to the Primary Replica. Click
Cancel and close SSMS. Restart at Step 24.
Figure 43: Example of Selecting the New Primary Replica
If the Failover Readiness field is not in a state of No data loss, notify SQL Server support personnel
immediately by contacting the Service Desk Primary Contact.
29) A Summary window is displayed (Figure 44). If any of the field values are incorrect (Failover
Actions must be No data loss), click Cancel and close SSMS. Restart at Step 24.
Figure 44: Example of Availability Group Failover Wizard Summary
September 2018 VistA Blood Establishment Computer Software (VBECS) Version 2.3.0 Page 41
Technical Manual-Security Guide Version 2.0
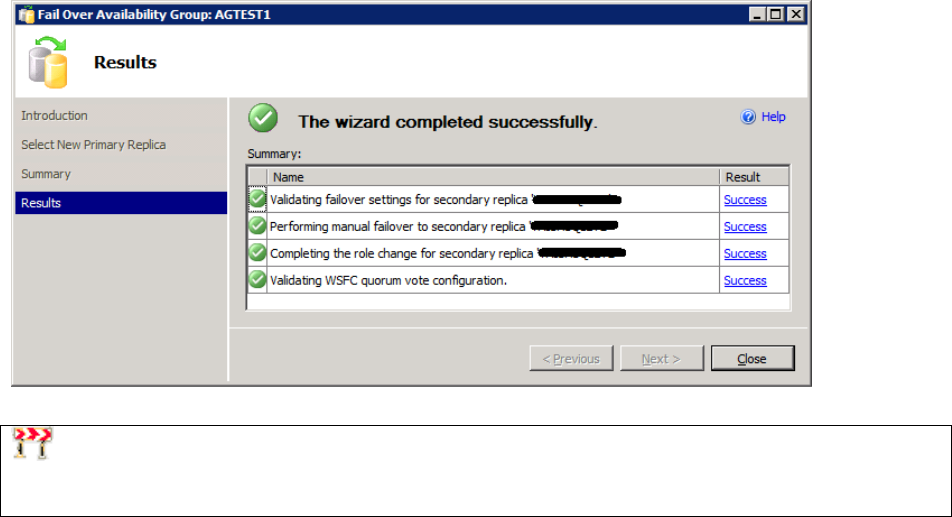
30) Click Finish to initiate the failover.
31) A failover may take several minutes to complete. Click Close (Figure 45).
Figure 45: Example of Successful Failover Wizard
If any of the Results indicate Error, Warning or Failure, contact SQL Server support personnel by
contacting the Service Desk Primary Contact. Databases contained in the problem Availability Group
will not be available for use until the problem is resolved.
32) Repeat Steps 26 through 31 for each AG on the server.
33) Close SSMS.
Apply Updates to the Remaining Server (Original Primary Replica)
34) Open a remote desktop connection to the Original Primary Replica (identified in Step 8) of the
VBECS SQL Server system.
35) Apply the Windows/Software Updates using the supplied instructions for the updates (reboot the
server only if instructed).
Failover the Availability Groups Back to the Original Primary Replica
36) Open SSMS and connect to the Primary Replica noted in Step 8.
37) Inside the Object Explorer pane, navigate to and expand the AlwaysOn High Availability,
Availability Groups folder.
38) Right-click on the first AG and select Failover…; an Availability Group Failover wizard starts.
Click Next (Figure 42).
39) Verify the Failover Mode is Manual and Failover Readiness is No data loss. Click Next (Figure
43). If two servers appear in the list, then you are connected to the Secondary Replica. Click
Cancel and close SSMS. Restart at Step 36.
September 2018 VistA Blood Establishment Computer Software (VBECS) Version 2.3.0 Page 42
Technical Manual-Security Guide Version 2.0
If the Failover Readiness field is anything other than No data loss, contact SQL Server support
personnel (contact the Service Desk Primary Contact).
40) A Summary window is displayed (Figure 44). If any of the field values are incorrect (Failover
Actions must be No data loss), click Cancel and close SSMS. Restart at Step 36.
41) Click Finish to initiate the failover.
42) The failover may take several minutes to complete. Click Close (Figure 45).
If any of the Results indicate Error, Warning or Failure. Databases contained in the problem,
contact SQL Server support personnel (contact the Service Desk Primary Contact). Availability Group
will not be available for use until the problem is resolved.
43) Repeat Steps 28 through 42 for each AG on the server.
Change the Failover Mode from Manual to Automatic
44) Right-click on the first AG and select Properties; the Availability Group Properties window
open.
45) Locate the two servers with an Availability Mode of Synchronous commit (Figure 46). Change
both Failover Mode cells from Manual to Automatic and click OK.
Figure 46: Example of the Availability Group Properties

September 2018 VistA Blood Establishment Computer Software (VBECS) Version 2.3.0 Page 43
Technical Manual-Security Guide Version 2.0
46) Repeat Steps 44 and 45 for each AG on the server until each has their Failover Mode set to
Automatic.
47) Close SSMS and log off the server.
ePolicy and Virus Definitions
Virus definitions are automatically updated on the VBECS system. The VBECS maintenance team
monitors the releases.
Do not change the system! The U.S. Food and Drug Administration classifies this software as a
medical device. Unauthorized modifications will render this device an adulterated medical device under
Section 501 of the Medical Device Amendments to the Federal Food, Drug, and Cosmetic Act. Acquiring
and implementing this software through the Freedom of Information Act require the implementer to
assume total responsibility for the software and become a registered manufacturer of a medical device,
subject to FDA regulations. Adding to or updating VBECS software without permission is prohibited.
September 2018 VistA Blood Establishment Computer Software (VBECS) Version 2.3.0 Page 44
Technical Manual-Security Guide Version 2.0
This page intentionally left blank.

September 2018 VistA Blood Establishment Computer Software (VBECS) Version 2.3.0 Page 45
Technical Manual-Security Guide Version 2.0
VistA Maintenance Operations
Four HL7 Logical Links and one VistALink connection must be established and configured to establish
proper communication with VBECS. The HL7 links are OERR-VBECS, VBECS-OERR, VBECSPTU,
and VBECSPTM. The VistALink connection configuration is the data that VistA will use to transmit data
in XML format to VBECS. The following set of instructions will aid in the proper configuration of these
links, and ensure reliable communication between VistA and VBECS. These links must be configured
during the initial installation of VBECS, and after any changes to the HL7 or VistALink configuration on
VBECS. The settings should also be updated after the VistA Test account has been remirrored.
Set Up VBECS Outbound Logical Links
At the “Select HL7 Main Menu Option:” prompt, enter Filer.
Shut down the logical link.
At the “Select Filer and Link Management Options Option:” prompt, enter Link Edit.
At the “Select HL LOGICAL LINK NODE:” prompt, enter OERR-VBECS (Figure 47).
Figure 47: HL7 Logical Link Edit Menu Navigation
HL7 Main Menu
Event monitoring menu ...
Systems Link Monitor
Filer and Link Management Options ...
Message Management Options ...
Interface Developer Options ...
Site Parameter Edit
Select HL7 Main Menu Option: FILER
SM Systems Link Monitor
FM Monitor, Start, Stop Filers
LM TCP Link Manager Start/Stop
SA Stop All Messaging Background Processes
RA Restart/Start All Links and Filers
DF Default Filers Startup
SL Start/Stop Links
PI Ping (TCP Only)
ED Link Edit
ER Link Errors ...
Select Filer and Link Management Options Option: ED
Select HL LOGICAL LINK NODE: OERR-VBECS
September 2018 VistA Blood Establishment Computer Software (VBECS) Version 2.3.0 Page 46
Technical Manual-Security Guide Version 2.0
Enter Enabled in the AUTOSTART field (Figure 48).
Move the cursor to the LLP TYPE field and press Enter (Figure 48).
Figure 48: HL7 Logical Link
HL7 LOGICAL LINK
-----------------------------------------------------------------------------
NODE: OERR-VBECS
INSTITUTION:
DOMAIN:
AUTOSTART: ENABLED
QUEUE SIZE: 10
LLP TYPE: TCP
_____________________________________________________________________________
_
COMMAND: Press <PF1>H for help
Insert
Change the value of the “TCP/IP ADDRESS” and “TCP/IP PORT” parameters to the Internet
Protocol (IP) address and port number of the Blood Bank medical device application server at
your site. Standard port numbers of 21993 for Test and 21994 for Prod are typically used.
Move the cursor to the “COMMAND:” prompt.
Enter Close to return to the previous screen.
At the “COMMAND:” prompt, enter Save.
Enter Exit.
Figure 49: TCP Lower Level Parameters: OERR-VBECS
HL7 LOGICAL LINK
-----------------------------------------------------------------------------
TCP LOWER LEVEL PARAMETERS
OERR-VBECS
TCP/IP SERVICE TYPE: CLIENT (SENDER)
TCP/IP ADDRESS: <IP address of VBECS application server>
TCP/IP PORT: <Port number of VBECS application server>
ACK TIMEOUT: 30 RE-TRANSMISION ATTEMPTS:
READ TIMEOUT: 30 EXCEED RE-TRANSMIT ACTION: restart
BLOCK SIZE: SAY HELO:
STARTUP NODE: PERSISTENT: NO
RETENTION: 15 UNI-DIRECTIONAL WAIT:
____________________________________________________________________________
COMMAND: Press <PF1>H for help
Insert
Repeat Steps 3 through 11 substituting “VBECSPTM” and “VBECSPTU” for “OERR-VBECS”
when prompted for the logical link name to change the IP address and port numbers for the
VBECSPTM and VBECSPTU logical links.

September 2018 VistA Blood Establishment Computer Software (VBECS) Version 2.3.0 Page 47
Technical Manual-Security Guide Version 2.0
Set Up the VBECS Inbound Logical Link
At the “Select HL7 Main Menu Option:” prompt, enter Filer.
At the “Select Filer and Link Management Options Option:” prompt, enter Link Edit.
At the “Select HL LOGICAL LINK NODE:” prompt, enter VBECS-OERR (as shown for
OERR-VBECS in Figure 47).
Enter Enabled in the AUTOSTART field (Figure 50).
Move the cursor to the LLP TYPE field and press Enter (Figure 50).
Figure 50: HL7 Logical Link
HL7 LOGICAL LINK
-----------------------------------------------------------------------------
NODE: VBECS-OERR
INSTITUTION:
DOMAIN:
AUTOSTART: ENABLED
QUEUE SIZE: 10
LLP TYPE: TCP
_____________________________________________________________________________
COMMAND: Press <PF1>H for help
Insert
No “TCP/IP ADDRESS” should be entered. Change the value of the “TCP/IP PORT” parameter
to the port number of the VistA HL7 Listener at your site. Regional support should be contacted
for the correct port numbers. Standard port numbers of 21993 for Test and 21994 for Prod can be
used if unique ports have not been assigned.
Move the cursor to the “COMMAND:” prompt.
Enter Close to return to the previous screen.
At the “COMMAND:” prompt, enter Save.

September 2018 VistA Blood Establishment Computer Software (VBECS) Version 2.3.0 Page 48
Technical Manual-Security Guide Version 2.0
Enter Exit.
Figure 51: TCP Lower Level Parameters: VBECS-OERR
HL7 LOGICAL LINK
-----------------------------------------------------------------------------
TCP LOWER LEVEL PARAMETERS
VBECS-OERR
TCP/IP SERVICE TYPE: SINGLE LISTENER
TCP/IP ADDRESS:
TCP/IP PORT: <VistA HL7 Listener Port>
ACK TIMEOUT: 30 RE-TRANSMISION ATTEMPTS:
READ TIMEOUT: 30 EXCEED RE-TRANSMIT ACTION:
BLOCK SIZE: SAY HELO:
STARTUP NODE: PERSISTENT: NO
RETENTION: UNI-DIRECTIONAL WAIT:
____________________________________________________________________________
COMMAND: Press <PF1>H for help
Insert
Start VistA HL7 Logical Links
Before data can be transmitted over the VBECS logical links, edit the link definitions as
described above.
To turn on the new VBECS logical links, select START/STOP LINKS [HL START].
Start the “OERR-VBECS” logical link.
Start the “VBECS-OERR” logical link.
Start the “VBECSPTM” logical link.
Start the “VBECSPTU” logical link.
Ensure that the VistA HL7 Link Manager is running; VBECS messaging cannot occur without it.
To check the status of the Link Manager (and, if necessary, restart it), access the HL
START/STOP LINK MANAGER menu option.

September 2018 VistA Blood Establishment Computer Software (VBECS) Version 2.3.0 Page 49
Technical Manual-Security Guide Version 2.0
Monitor VBECS HL7 Logical Links
Once two-way communication has been established, you can monitor the links.
Use the “System Link Monitor” to view the status of the VBECS Logical Links.
From the “HL7 Main Menu”, select System Link Monitor (Figure 52).
Figure 52: HL7 System Link Monitor Menu Navigation
HL7 Main Menu
Event monitoring menu ...
Systems Link Monitor
Filer and Link Management Options ...
Message Management Options ...
Interface Developer Options ...
Site Parameter Edit
Select HL7 Main Menu Option: System Link Monitor
When a list of VistA HL7 links defined at your site appears, press V at the “Select a Command:”
prompt (Figure 53).
At the “Select LINK MONITOR VIEWS:” prompt, enter VBECS (Figure 53).
Figure 53: System Link Monitor
SYSTEM LINK MONITOR for <your site name>
MESSAGES MESSAGES MESSAGES MESSAGES DEVICE
NODE RECEIVED PROCESSED TO SEND SENT TYPE STATE
LA7V 657 4 4 MM Halting
LL15VISN 105 105 394 105 NC Shutdown
MPIVA 0 0 322 0 NC Shutdown
NPTF 0 0 25 0 MM Halting
OERR-VBE 34 34 1019 1018 NC Idle
PSOTPBAA 28 28 52 28 NC Shutdown
VABAC 0 0 1 0 NC Shutdown
VAFAV 0 0 2 0 NC Shutdown
VAFHM 0 0 3 0 NC Shutdown
VAFRE 0 0 4 0 NC Shutdown
Incoming filers running => 1 TaskMan running
Outgoing filers running => 1 Link Manager running
Monitor OVERDUE
Select a Command:
(N)EXT (B)ACKUP (A)LL LINKS (S)CREENED (V)IEWS (Q)UIT (?) HELP: V
Select LINK MONITOR VIEWS: VBECS
September 2018 VistA Blood Establishment Computer Software (VBECS) Version 2.3.0 Page 50
Technical Manual-Security Guide Version 2.0
A screen similar to Figure 54 appears.
Figure 54: System Link Monitor
SYSTEM LINK MONITOR for <your site name>
MESSAGES MESSAGES MESSAGES MESSAGES DEVICE
NODE RECEIVED PROCESSED TO SEND SENT TYPE STATE
OERR-VBECS 0 0 0 0 NC Idle
VBECS-OERR 0 0 0 0 SS Idle
VBECSPTM 0 0 0 0 NC Enabled
VBECSPTU 0 0 0 0 NC Enabled
Incoming filers running => 1 TaskMan running
Outgoing filers running => 1 Link Manager Running
Monitor OVERDUE
Select a Command:
(N)EXT (B)ACKUP (A)LL LINKS (S)CREENED (V)IEWS (Q)UIT (?) HELP:
To exit the “System Link Monitor”, at the “Select a Command:” prompt, enter q to quit.
The volume of HL7 traffic over these links depends on the number of daily CPRS Blood Bank orders
and updates to the VistA clinical information at your site. These can be significant at large sites. Monitor
the links closely the first few days after the installation and purge the HL7 log data (as appropriate) in
accordance with your standard HL7 monitoring and purging procedures.
Configure VBECS VistALink Links
Use the “Edit Parameter Values” option on the “GENERAL PARAMETER TOOLS” menu to
edit the values for the VistALink connection to VBECS.
At the “Select Instance:” prompt, enter LISTENER IP ADDRESS.
At the “Value:” prompt, enter the VBECS application server IP address.
At the “Select Instance:” prompt, enter LISTENER PORT NUMBER.
At the “Value:” prompt, enter the VBECS VistALink listener port number. This is typically
21991 for Test and 21992 for Prod.

September 2018 VistA Blood Establishment Computer Software (VBECS) Version 2.3.0 Page 51
Technical Manual-Security Guide Version 2.0
Press Enter to exit the option.
Figure 55: VistALink Configuration
Select OPTION NAME: GENERAL PARAMETER TOOLS XPAR MENU TOOLS General
Parameter Tools
LV List Values for a Selected Parameter
LE List Values for a Selected Entity
LP List Values for a Selected Package
LT List Values for a Selected Template
EP Edit Parameter Values
ET Edit Parameter Values with Template
EK Edit Parameter Definition Keyword
Select General Parameter Tools Option: EP Edit Parameter Values
--- Edit Parameter Values
Select PARAMETER DEFINITION NAME: VBECS VISTALINK
---------------- Setting VBECS VISTALINK for Package: VBECS
Select Instance: LISTENER IP ADDRESS
Instance: LISTENER IP ADDRESS// LISTENER IP ADDRESS
Value: <IP address>// Enter the VBECS application server IP address here.
Select Instance: LISTENER PORT NUMBER
Instance: LISTENER PORT NUMBER Replace LISTENER PORT NUMBER
Value: 8000// Enter the VBECS VistALink listener port here.
Select Instance:
VBECS Maintenance Operations
Refer to the VistA Blood Establishment Computer Software (VBECS) Admin User Guide.
Record Workload Data
VBECS workload data is recorded in VBECS when records that qualify as Workload Events are saved in
VBECS. This data is transmitted to the VistA Laboratory workload recording system for national and
local workload reporting.
Assumptions
• Workload codes were assigned to VBECS processes using Workload Codes.
• Healthcare Common Procedure Coding System (HCPCS) codes were assigned to blood products using
Blood Products.
• A record was saved or inactivated immediately preceding workload data collection.
• The connection to VistA is active.

September 2018 VistA Blood Establishment Computer Software (VBECS) Version 2.3.0 Page 52
Technical Manual-Security Guide Version 2.0
Outcome
• Information was transmitted to VistA for inclusion in appropriate reports.
Limitations and Restrictions
None
Additional Information
• Workload Event data must include information required for Decision Support System (DSS), Patient
Care Encounter (PCE), and Billing Awareness. Once in VistA, existing VistA functionality will handle
required reporting.
• Billing Awareness is being developed concurrently and related requirements are anticipated based on
initial contact with the Billing Awareness team.
• The system accumulates and periodically transmits workload information to the VistA Lab workload
recording process. The data is transmitted from VBECS to VistA by the VBECS Workload Capture
Remote Procedure called by a nightly Lab background process.
• Workload multipliers for all blood bank activities in VistA File #64 must be set to one (1) to avoid
excessive Laboratory Management Index Program (LMIP) counts. This allows the workload multiplier
set in VBECS to be correctly reflected on VistA reports.
User Roles with Access to This Option
All users
Transmit Workload Data
These steps are associated with the “Save” function within any class that performs a Workload Event such
as recording a blood test result or interpretation for a unit or a patient, modifying a unit, and pooling units.
VBECS must know which classes perform Workload Events and how to classify the work accomplished
for reporting. When the database is updated, the VistA technologist ID of the updater, the division, and
the date and time of the update are recorded. In some instances, a mechanism to capture LMIP workload
information exists. In addition, for certain events that involve patient processing, the patient location,
treating specialty, service, etc., are captured to satisfy PCE or DSS reporting requirements.
These steps address the initial recording of these events.
User Action
VBECS
Click Save to save a record from
an option.
Creates a Workload Event for every process record saved.
Recognizes the activity as a new Workload Event.
Checks for required reporting properties based on the type of record
being saved.
Determines the proper workload codes and other related information to be
included.
NOTES
One or more workload codes can be collected with each
Workload Event saved. A workload code may be multiplied for
certain Workload Events.
Exit.

September 2018 VistA Blood Establishment Computer Software (VBECS) Version 2.3.0 Page 53
Technical Manual-Security Guide Version 2.0
Inactivate a Workload Event
VBECS updates VistA to inactivate the associated workload information (for a patient or a unit) so that
PCE and Billing Awareness can be updated to reflect that the transaction is not valid.
User Action
VBECS
Inactivate a saved record.
Recognizes the activity performed as an inactivation of an existing
Workload Event record.
NOTES
Complete the update and choose
to save.
Prompts to confirm the save. Saves workload data.
NOTES
When a previously saved workload-generating event is
invalidated (such as in Remove Final Status, Invalidate Test
Results, or invalidating previously logged-in units through Edit
Unit Information or Invalidate Shipment), VBECS must create
and transmit the same Workload Event information to VistA as a
negative number.
Confirm the save.
Saves workload data.
NOTES
When a saved Workload Event is associated with a patient,
VBECS needs to link the Workload Event to the patient for future
reports.
The option ends when the record
is saved.
September 2018 VistA Blood Establishment Computer Software (VBECS) Version 2.3.0 Page 54
Technical Manual-Security Guide Version 2.0
This page intentionally left blank.

September 2018 VistA Blood Establishment Computer Software (VBECS) Version 2.3.0 Page 55
Technical Manual-Security Guide Version 2.0
External Interfaces
VistALink Remote Procedure Calls
Remote Procedure Calls (RPCs) provide a method of data exchange through VistALink for VBECS. The
VBECS software provides data to or receives data from the VBECS Application Interfacing Support
Software (VAISS) located in the VistA M environment through RPCs. This data exchange is controlled
through Database Integration Agreements (DBIAs) between the blood bank medical device software and
the VAISS VistA M software.
The VAISS software provides a set of M Application Programmer Interfaces (APIs) that call VBECS
RPCs through the VBECS VistALink Listener Windows Service and return blood bank data to other
VistA applications. The VAISS software also provides a set of VistA RPCs under the VBECS namespace
in the Remote Procedure File (#8994) that are called by the VistA VistALink Listener client-server
software. These calls are not public utilities and may be subject to change.
Table 8: Remote Procedure Calls
RPC Name
Database
Integration
Agreement
(DBIA)
This RPC:
VBECS Order Entry
4619
Supports order entry of blood bank requests from the blood
bank order entry dialog in CPRS
VBECS Patient Available Units
4620
Provides a list of assigned, crossmatched, autologous and
directed blood units that are available for a patient
VBECS Patient Transfusion
History
4621
Provides a list of past transfusions performed for a patient
VBECS Blood Products
4622
Provides a list of orderable blood products, or component
classes, to the VistA Surgery package
VBECS Patient Report
4623
Provides patient specimen testing results, component requests,
and available blood units for a patient to be displayed in CPRS
VBECS Patient ABO_RH
4624
Provides the most current ABO Group and Rh Type identified
for a patient
VBECS Patient ABID
4625
Provides a list of antibodies identified for a patient
VBECS Patient TRRX
4626
Provides a list of transfusion reactions for a patient
VBECS Workload Capture
4627
Provides blood bank workload data to the VistA Laboratory
Service package for workload reporting to national and local
entities
VBECS Workload Update
Event
4628
Updates completed workload-related data into the VBECS
database after the VistA Laboratory Services package has
completed workload-reporting transactions. Upon completion of
the update, the RPC returns an XML response to the VAISS
that initiated the communication indicating a successful or
unsuccessful transaction.
VBECS Accession Area
Lookup
4607
Provides a list of all Laboratory Blood Bank Accession Areas in
VistA and their associated divisions to VBECS for workload
reporting purposes
VBECS Blood Bank User
Lookup
4608
Returns a list of all blood bank users identified in the VistA
system to VBECS. Blood bank users are identified by the
Security Keys of either LRBLOODBANK or LRBLSUPER.
VBECS Division Lookup
4609
Returns a list of all VAMC divisions associated with a VistA
system
VBECS HCPCS Codes
4610
Returns a list of blood bank related HCPCS codes to be

September 2018 VistA Blood Establishment Computer Software (VBECS) Version 2.3.0 Page 56
Technical Manual-Security Guide Version 2.0
RPC Name
Database
Integration
Agreement
(DBIA)
This RPC:
Lookup
associated with processes, or procedures, performed in
VBECS
VBECS Laboratory Test
Lookup
4611
Returns a list of VistA Laboratory tests to be associated with
blood components in VBECS
VBECS Lab Test Results
Lookup
4612
Returns a list of VistA Laboratory test results for a patient
VBECS Medication Profile
Lookup
4613
Returns a list of medications for a patient from the VistA
Pharmacy package
VBECS Lab Accession UID
Lookup
4614
Returns data from the VistA Laboratory Services package
based on a Lab order number. The data is used to validate a
VBECS specimen test request for a patient and specimen
received in the blood bank for that test.
VBECS Workload Codes
Lookup
4615
Returns a list of blood bank related workload related data that
is associated with processes in VBECS
VBECS Patient Lookup
4616
Provides a patient lookup function using standard VistA patient
lookup criteria. A list of matching patients found in the lookup is
returned to VBECS along with required patient identifiers and
demographics.
VBECS Provider Lookup
4617
Provides a lookup of VistA users that hold the PROVIDER
security key
VBECS Hospital Location
Lookup
4618
Returns a list of hospital locations associated with a division in
VistA
VBECS Lab Order Lookup by
UID
4633
Returns a list of Laboratory Services data related to an order
based on a specimen UID
VBECS Dss Extract
4956
Provides BloodBank post-transfusion related data to the VistA
DSS Blood Bank Extract application for DSS reporting
TCPConnect
N/A
The purpose of this RPC is to establish a Broker TCP IP
connection. This RPC initiates the initial connection between
VBECS and the Broker. This is not yet using the token; this is
an initial connection to the required Broker endpoint.
XUS SIGNON SETUP
N/A
The purpose of this RPC is to authenticate user with a Client
Agent token during each application’s session. This is the IAM
Sign on and Setup steps needed prior to validation.
XUS ESSO VALIDATE
N/A
The purpose of this RPC is to validate a user's token for each
session. This is the IAM token validation that occurs inside
VistA.
XUS GET TOKEN
N/A
The purpose of this RPC is to return a handle to a token that
will sign-on a new process for subsequent RPC calls.
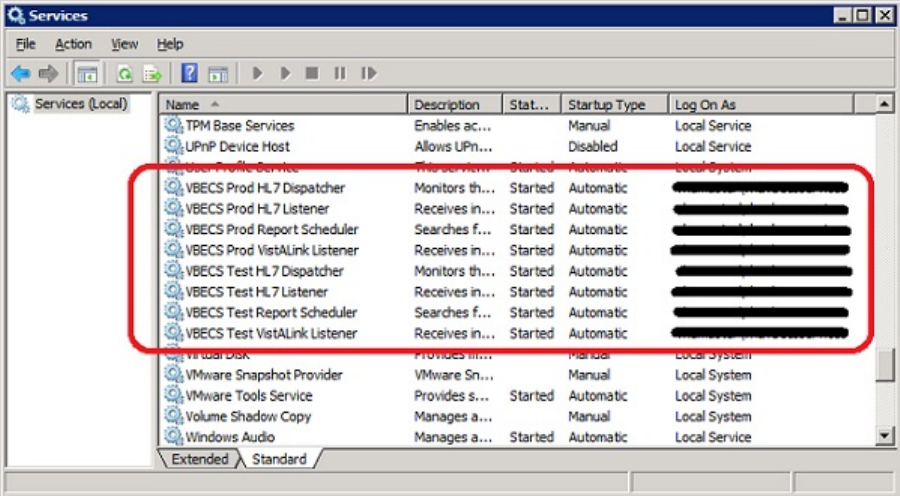
September 2018 VistA Blood Establishment Computer Software (VBECS) Version 2.3.0 Page 57
Technical Manual-Security Guide Version 2.0
VBECS Windows Services
VBECS uses Microsoft Windows Services (services) to provide minimal downtime and minimal user
interaction. These services are installed on each VBECS application server. For details on stopping and
starting VBECS services, see the Stopping VBECS Services and Starting VBECS Services sections. All
VBECS services start with the VBECS namespace prefix. There are duplicate services for production and
test accounts that provide functionality for their respective databases. See Figure 56 for a complete listing
of VBECS services.
Figure 56: Example of VBECS Services

September 2018 VistA Blood Establishment Computer Software (VBECS) Version 2.3.0 Page 58
Technical Manual-Security Guide Version 2.0
Table 9: VBECS Windows Services
Windows Service Name
Description
VBECS Prod HL7 Dispatcher
The startup type is set to automatic. It polls the VBECS Production database
for HL7 messages to be sent to CPRS or BCE in the VistA Production account.
VBECS Prod HL7 Listener
The startup type is set to automatic. This is the default HL7 listener service for
all Production HL7 interfaces
VBECS Prod Report Scheduler
The startup type is set to automatic. It runs scheduled VBECS reports for the
Production database.
VBECS Prod VistALink Listener
The startup type is set to automatic. It provides a client-server TCP/IP listener
service for VistALink RPC XML messages from the VAISS APIs. It calls
VBECS RPCs to provide blood bank data from the VBECS Production
database to VistA Production account applications.
VBECS Test HL7 Dispatcher
The startup type is set to automatic. It polls the VBECS Test database for HL7
messages to be sent to CPRS or BCE in the VistA Test account.
VBECS Test HL7 Listener
The startup type is set to automatic. This is the default HL7 listener service for
all Test HL7 interfaces.
VBECS Test Report Scheduler
The startup type is set to automatic. It runs scheduled VBECS reports for the
Test database.
VBECS Test VistALink Listener
The startup type is set to automatic. It provides a client-server TCP/IP listener
service for VistALink RPC XML messages from the VAISS APIs. It calls
VBECS RPCs to provide blood bank data from the VBECS Test database to
VistA Test account applications.

September 2018 VistA Blood Establishment Computer Software (VBECS) Version 2.3.0 Page 59
Technical Manual-Security Guide Version 2.0
Troubleshooting
Remote Desktop Session Issues
Occasionally remote desktop sessions require disconnection by a server administrator. Sessions may
become unresponsive and require disconnection. Additionally, if you need to apply a patch such as a
window update but sessions remain on the server you may need to force a session to disconnect. To
disconnect a remote session, navigate to the application or SQL server and click Start, Administrative
Tools, Remote Desktop Services, Remote Desktop Services Manager. Locate the session(s) that require
disconnection. Right-click on the session and select Disconnect (Figure 57).
Figure 57: Example of Remote Desktop Services Manager
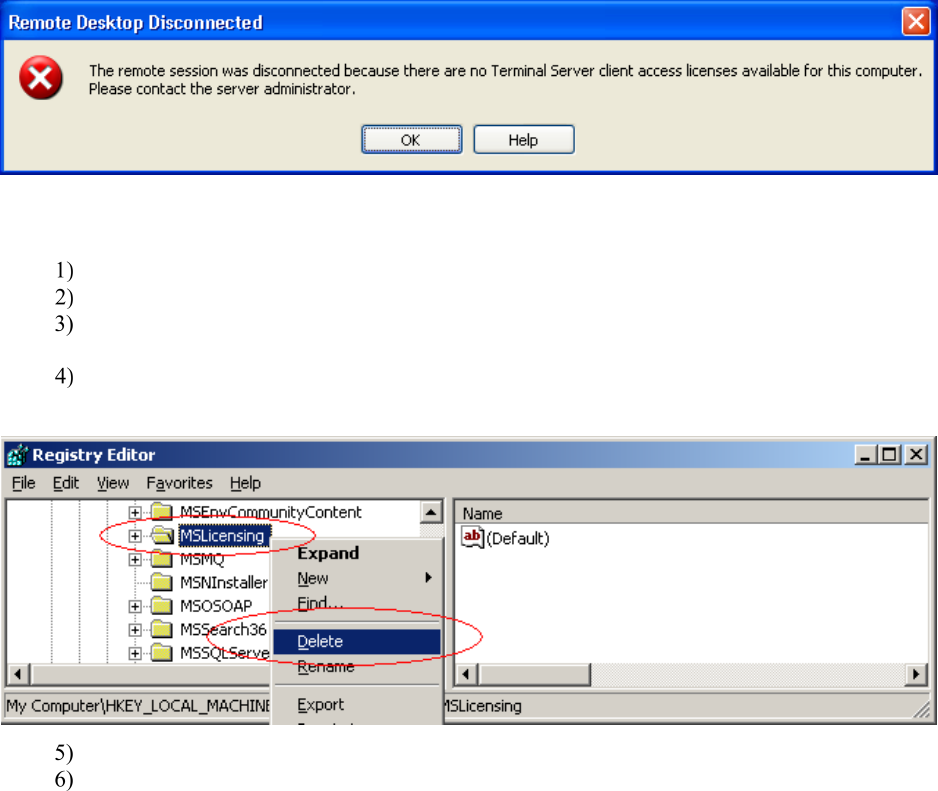
September 2018 VistA Blood Establishment Computer Software (VBECS) Version 2.3.0 Page 60
Technical Manual-Security Guide Version 2.0
Remote Desktop Services Licensing Issues
In order to connect to VBECS, a workstation must have a valid license from an active Remote Desktop
Services licensing server. A problem may occur when this license has expired on the workstation; the user
receives an error message when trying to establish a Remote Desktop Connection (Figure 58). Deleting
the Remote Desktop Services license information from the registry will cause the workstation to refresh
its license information and restore the ability to connect using remote desktop.
Figure 58: Example of Expired Remote Desktop License
Deleting the Remote Desktop Services Licensing Information on a VBECS Workstation
Administrative rights on the workstation are required to perform the following steps.
Log into the workstation that is receiving the error (Figure 58) and click Start, Run…
In the Run window, type regedit and click Enter.
In the Registry Editor window, expand the folders to the following location: Computer,
HKEY_LOCAL_MACHINE, SOFTWARE, Microsoft.
Locate and right-click the MSLicensing folder; select Delete (Figure 59).
Figure 59: Deleting the MSLicensing Registry Key
Make sure you are at the correct path and click Yes to confirm the deletion.
Close the Registry Editor.
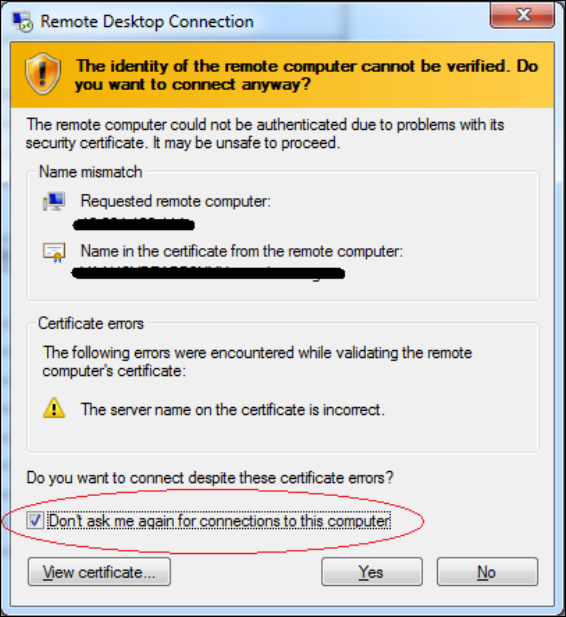
September 2018 VistA Blood Establishment Computer Software (VBECS) Version 2.3.0 Page 61
Technical Manual-Security Guide Version 2.0
Identity Verification Warning
Occasionally, a warning may appear when initiating an RDP session that states that the identity of the
remote computer could not authenticated (Figure 60). This is due to an archived certificate and is not
dangerous. Select Don’t ask me again… and click Yes.
Figure 60: Example of Identity Warning
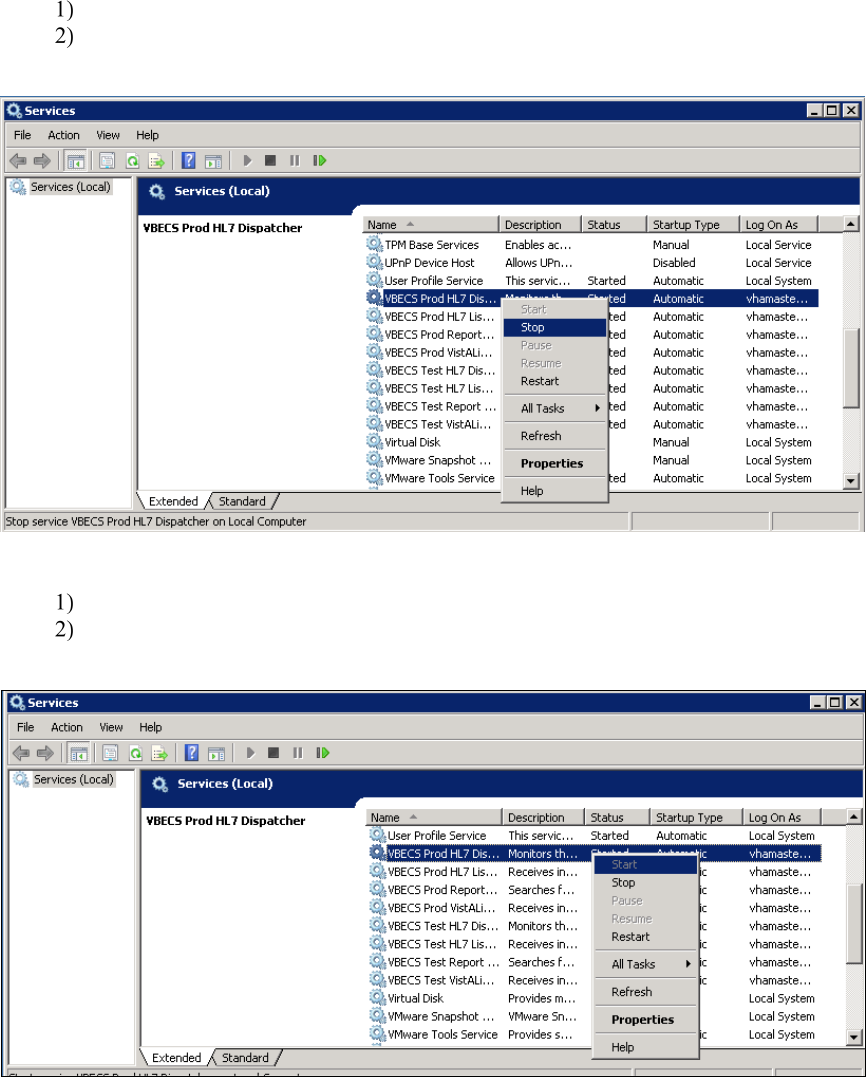
September 2018 VistA Blood Establishment Computer Software (VBECS) Version 2.3.0 Page 62
Technical Manual-Security Guide Version 2.0
Stopping and Starting VBECS Services
Stopping VBECS Services
Click Start, Administrative Tools, Services (Figure 61).
Right-click on the service you would like to stop and click Stop.
Figure 61: Example of Stopping a VBECS Service
Starting VBECS Services
Click Start, Administrative Tools, Services (Figure 62).
Right-click on the service you would like to start and click Start
Figure 62: Example of Starting a VBECS Service

September 2018 VistA Blood Establishment Computer Software (VBECS) Version 2.3.0 Page 63
Technical Manual-Security Guide Version 2.0
VBECS Auditing
For a complete list of audited server events, please see: Appendix C: Auditing on VBECS Servers.
VBECS Exception Logging
VBECS logs all errors that occur in the system in the Application log of Event Viewer on the application
server. A user defined as an administrator on the application server can connect to the server through
Remote Desktop Connection to view these errors.
Click Start, Control Panel, Administrative Tools.
Open the Event Viewer and open the Windows logs folder, then select Application to view the
errors that VBECS logs.
In the list view on the right side of the screen, click the date column header to sort the errors by
date.
Evaluate “Error” and warning errors that were logged at the same time a VBECS user reported an
error. Ignore informational messages. If you require assistance from the VBECS maintenance
team, file a support ticket (Service Desk Primary Contact).
VBECS Application Interfaces
When the HL7 Listener service encounters an error parsing an HL7 message it generates an event
description like the following:
VBECS Patient Update HL7 Parser: Error processing HL7 message:
Missing or invalid content in HL7 message:
ERR^MSH~1~12~203~
Upon troubleshooting an email message regarding an HL7 message, file a ticket with the Service
Desk Primary Contact and include the contents of the email for a description so that Health Product
Support can assist in identifying the patient associated with the failed HL7 message. Due to PII and
HIPAA constraints, patient information will not be sent over email. Product support will have access to
the event viewer and be able to identify the appropriate patient information. Table 10 describes the ERR
codes (e.g., 203 like in the above example) descriptions.
Table 10: Troubleshooting Rejected VBECS HL7 Messages
Error Code
Description of Problem
100 Segment Sequence Error
101
Required Field Missing
102
Data Type Error
103
Table Value Not Found
200
Unsupported Message Type
201
Unsupported Event Code
202
Unsupported Processing ID
203
Unsupported Version Id
See Table 11: VBECS HL7 Versions.
204
Unknown Key Identifier
205
Duplicate Key Identifier
206
Application Record Locked
207
Application Internal Error
208
Conflicting Processing Id
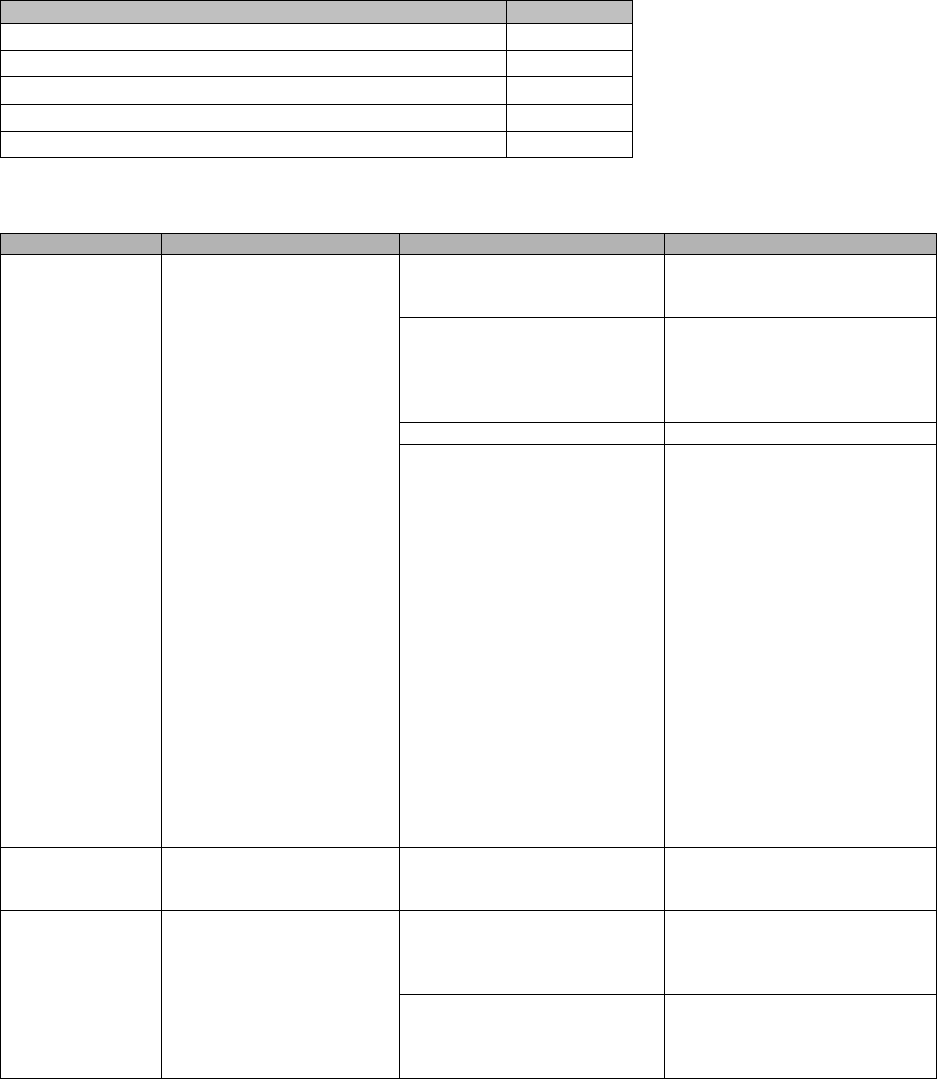
September 2018 VistA Blood Establishment Computer Software (VBECS) Version 2.3.0 Page 64
Technical Manual-Security Guide Version 2.0
Table 11: VBECS HL7 Versions
HL7 Interface
HL7 Version
VistA CPRS- Order Update – CPRS OERR
2.4
VistA PIMS Patient ADT Update – VAFC ADT
2.3
VistA MPI/PD PatientMerge – MPI TRIGGER
2.4
BCE COTS – Patient Blood Product Transfusion Verification
2.5
Automated Instrument
2.4
Table 12: Troubleshooting VBECS Application Interfaces
Source
Description of Problem
Possible Cause
Solution
VBECS: Order
Alerts and
Pending Order
List
New orders or
cancellations of existing
orders in CPRS are not
showing up in VBECS.
The OERR-VBECS Logical
Link is not running on the
VistA system.
Start the OERR-VBECS
Logical Link.
The VBECS <Prod or Test>
HL7 Listener Windows
Service is not running or is
locked on the application
server.
Start or restart the VBECS
<Prod or Test> HL7 Listener
Windows Service.
Network connectivity issue
Contact local system support.
The HL7 message is missing
patient name or one or more
name components length(s)
exceed(s) the VBECS
maximum supported value.
VBECS responds to the new
order request with an
application reject (AR)
acknowledgement message
indicating Patient Name(s) not
found in HL7 Message or
Patient's Name(s) field size(s)
exceed(s) VBECS maximum
supported value. Rejected
patient order messages due to
invalid patient name message
content are recorded on the
Windows Event Log (Finding
Application Log Entries from
Email Alerts) and an email
message containing the MSH
segment of the rejected HL7
message.
VBECS Admin:
Edit Division
New orders are not
showing up in VBECS.
Order mappings to institutions
within a division’s
configuration were changed.
Stop and restart the VBECS
<Prod or Test> HL7 Listener
Service.
VBECS: Patient
Update Alerts
VistA patient updates are
not showing up in VBECS.
The patient being updated in
VistA is not in the VBECS
Patient table and is, therefore,
not a blood bank patient.
No action is required.
The fields that were updated
in VistA are not stored in
VBECS; therefore, no data
will be updated.
No action is required.

September 2018 VistA Blood Establishment Computer Software (VBECS) Version 2.3.0 Page 65
Technical Manual-Security Guide Version 2.0
Source
Description of Problem
Possible Cause
Solution
The Taskman scheduled
option VAFC BATCH
UPDATE is not scheduled to
run or has not reached the
time limit in the schedule.
Schedule the VAFC BATCH
UPDATE option to run at the
desired frequency (the
recommended frequency is
every 10 minutes) or use the
option “One-time Option
Queue” in the Taskman
Management Options to start
the task.
The VBECSPTU Logical Link
is not running on the VistA
system.
Start the VBECSPTU Logical
Link.
The VBECS <Prod or Test>
HL7 Listener Windows
Service is not running or is
locked on the application
server.
Start or restart the VBECS
<Prod or Test> HL7 Listener
Windows Service.
Network connectivity issue
Contact local system support.
The HL7 message is missing
patient name or one or more
name components length(s)
exceed(s) the VBECS
maximum supported value.
VBECS responds to the patient
update request with an
application reject (AR)
acknowledgement message
indicating Patient Name(s) not
found in HL7 Message or
Patient's Name(s) field size(s)
exceed(s) VBECS maximum
supported value. Rejected
patient update messages due
to invalid patient name
message content are recorded
on the Windows Event Log
(Finding Application Log
Entries from Email Alerts)
and an email message
containing the MSH segment
of the rejected HL7 message
as a means to identify the
message in the server event
log is sent to the interface
failure alert recipient set in
VBECS Administrator for
immediate action.
VBECS: Patient
Merge Alerts
VistA Patient Merge
events are not showing up
in VBECS.
The two patient identifiers in
the merge do not exist in
VBECS and, therefore, cannot
be merged.
No action is required.
The VBECPTM Logical Link is
not running on the VistA
system.
Start the VBECSPTM Logical
Link.
The VBECS <Prod or Test>
HL7 Listener Windows
Service is not running or is
locked on the application
server.
Start or restart the VBECS
<Prod or Test> HL7 Listener
Windows Service.
Network connectivity issue
Contact local system support.

September 2018 VistA Blood Establishment Computer Software (VBECS) Version 2.3.0 Page 66
Technical Manual-Security Guide Version 2.0
Source
Description of Problem
Possible Cause
Solution
The HL7 message is missing
patient name or one or more
name components length(s)
exceed(s) the VBECS
maximum supported value.
Failed patient merge
messages due to invalid
patient name message content
are recorded on the Windows
Event Log and an email
message containing the MSH
segment of the rejected HL7
message as a means to
identify the message in the
server event log is sent to the
interface failure alert recipient
set in VBECS Administrator for
immediate action.
VistA: HL7
System Link
Monitor
The VistA HL7 System
Link Monitor shows more
MESSAGES TO SEND
than MESSAGES SENT
for the OERR-VBECS
Logical Link and is hung in
an “Open” state.
The VBECS <Prod or Test>
HL7 Listener Windows
Service is not running or is
locked on the VBECS
Application server.
Start or restart the VBECS
<Prod or Test> HL7 Listener
Windows Service.
Network connectivity issue Contact local system support.
The VistA HL7 System
Link Monitor shows more
MESSAGES TO SEND
than MESSAGES SENT
for the VBECSPTU Logical
Link and is hung in an
“Open” state.
The VBECS <Prod or Test>
HL7 Listener Windows
Service is not running or is
locked on the VBECS
Application server.
Start or restart the VBECS
<Prod or Test> HL7 Listener
Windows Service.
Network connectivity issue. Contact local system support.
The VistA HL7 System
Link Monitor shows more
MESSAGES TO SEND
than MESSAGES SENT
for the VBECSPTM
Logical Link and is hung in
an “Open” state.
The VBECS <Prod or Test>
HL7 Listener Windows
Service is not running or is
locked on the application
server.
Start or restart the VBECS
<Prod or Test> HL7 Listener
Windows Service.
Network connectivity issue. Contact local system support.
CPRS: Orders
Tab
CPRS does not display the
correct status of a blood
bank order after it was
updated in VBECS.
The VBECS <Prod or Test>
HL7 Dispatcher Windows
Service is not running or is
locked on the application
server.
Start or restart the VBECS
<Prod or Test> HL7 Dispatcher
Windows Service.
The VBECS-OERR Logical
Link is not running.
Start the VBECS-OERR
Logical Link.
Network connectivity issue
Contact local system support.
CPRS: Blood
Bank Order
Dialog
CPRS displays “Not able
to open port” message in
Patient Information screen
in Blood Bank Order
Dialog.
The VBECS <Prod or Test>
VistALink Listener Service is
not running or is locked on the
VBECS Application server.
Start or restart the VBECS
<Prod or Test> VistALink
Listener Service.
Network connectivity issue
Contact local system support.
CPRS: Reports
Tab, Blood Bank
Report
CPRS displays “----
BLOOD BANK REPORT
IS UNAVAILABLE----“
The VBECS <Prod or Test>
VistALink Listener is not
running or is locked on the
VBECS Application server.
Start or restart the VBECS
<Prod or Test> VistALink
Listener Service.
Network connectivity issue.
Contact local system support.
Incorrect parameters file
Verify settings are pointing to
the correct VBECS application
server and port.

September 2018 VistA Blood Establishment Computer Software (VBECS) Version 2.3.0 Page 67
Technical Manual-Security Guide Version 2.0
Source
Description of Problem
Possible Cause
Solution
CPRS: Blood
Bank Order
Dialog: Signing
an Order
CPRS displays an “Error
Saving Order” dialog
screen with the text “The
error, One or more orders
to the VBECS system
failed and are queued for
later delivery.”
An error occurred in the
VBECS <Prod or Test> HL7
Listener Windows Service,
which caused a failure to
respond to CPRS with
acceptance.
Log onto the application server
and review the System
Application Event Log for error
details.
Network connectivity issue. Contact local system support.
VBECS
Application
Server
Application Event
Log: Source is
VBECS
SimpleListener
An application error has
been logged to the Event
Log where the Message
under Exception
Information is “Could not
access ‘CDO.Message’
object.”
The VBECS <Prod or Test>
HL7 Listener Windows
Service has encountered an
error trying to send an email
message to the Interface
Administrator.
Disable port 25 blocking in
McAfee. Open the VirusScan
Console and select Access
Protection. Click the Task
menu option, the Properties.
Uncheck Prevent mass mailing
worms from sending mail, port
25 under Ports to block.
An application warning
was logged in the Event
Log with the description
stating, “An unsupported
HL7 message was
received from IP Address
[IP address].”
The IP address in the
description of the error will
indicate where the
message is coming from.
If the IP address is associated
with the local VistA system,
the HL7 Application
Parameters in VistA were not
set up correctly for the
supported protocols.
Refer to the VBECS
Application Interfacing Support
Software Installation and User
Configuration Guide for HL7
setup procedures in VistA.
If the IP address is not from
the local VistA system, a
rogue HL7 system is sending
messages to the VBECS
server.
Contact IRM to identify the
location of the server with
which the IP address is
associated. Notify the site that
the message is coming from
the problem so that the
messages can be routed to the
correct location.
VBECS
Application
Server
Application Event
Log: Source is
VBECS HL7
MailServer
An application error was
logged in the Event Log
with the source of VBECS
HL7 MailServer where the
Message under Exception
Information is, “Could not
access ‘CDO.Message’
object.”
The VBECS <Prod or Test>
HL7 Listener Windows
Service encountered an error
trying to send an email
message to the Interface
Administrator.
Disable port 25 blocking in
McAfee. Open the VirusScan
Console and select Access
Protection. Click the Task
menu option, Properties.
Uncheck Prevent mass mailing
worms from sending mail, port
25 under Ports to block.
VBECS
Application
Server
Application Event
Log: Source is
CPRS HL7
Parser
An HL7 message sent
from CPRS to VBECS was
rejected. The description in
the Event Log is
“Exception message:
Division [division] is not
supported by this instance
of VBECS.”
An invalid or unsupported
division associated with the
Patient Location was selected
in CPRS when the order was
created.
The order must be created in
CPRS again with a valid
Patient Location associated
with a VBECS-supported
division.
An HL7 message sent
from CPRS to VBECS was
rejected. The description in
the Event Log is
“Exception message:
Unable to find valid
Associated Institutions
information. Please check
configuration in VBECS
Admin.”
Clinician logs into VistA with a
division that is not mapped to
VBECS.
The order must be created in
CPRS again with a division
that is mapped to VBECS.

September 2018 VistA Blood Establishment Computer Software (VBECS) Version 2.3.0 Page 68
Technical Manual-Security Guide Version 2.0
Source
Description of Problem
Possible Cause
Solution
Automated
Instrument
Messages not being
received from the
instrument.
The VBECS <Prod or Test>
HL7 Listener Windows
Service is not running or is
locked on the VBECS
Application server.
Start or restart the VBECS
<Prod or Test> HL7 Listener
Windows Service.
CPRS
Transfusion Reactions
imported during initial
VistA conversion are being
displayed under the
VBECS section of the
CPRS Blood Bank Report.
The Unit ID fields display
“Unknown”.
This is a code defect. VBECS
is sending converted
transfusion reaction records to
populate both the VBECS
section and Legacy VistA
section.
Entries with a Unit ID field of
“Unknown” can be ignored.
Transfusion Reactions
processed in VBECS are
displayed correctly in the
VBECS section.
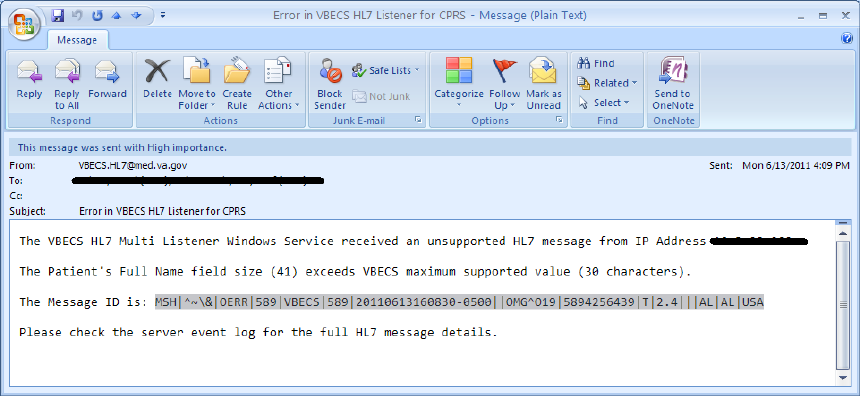
September 2018 VistA Blood Establishment Computer Software (VBECS) Version 2.3.0 Page 69
Technical Manual-Security Guide Version 2.0
Finding Application Log Entries from Email Alerts
When HL7 message patient last or first name components length(s) exceed(s) the VBECS maximum
supported value of 40, an email will be received (Figure 63).
Figure 63: Example of Error in VBECS HL7 Listener for CPRS
1) On the Application Server, click Start, Administrative Tools, Event Viewer.
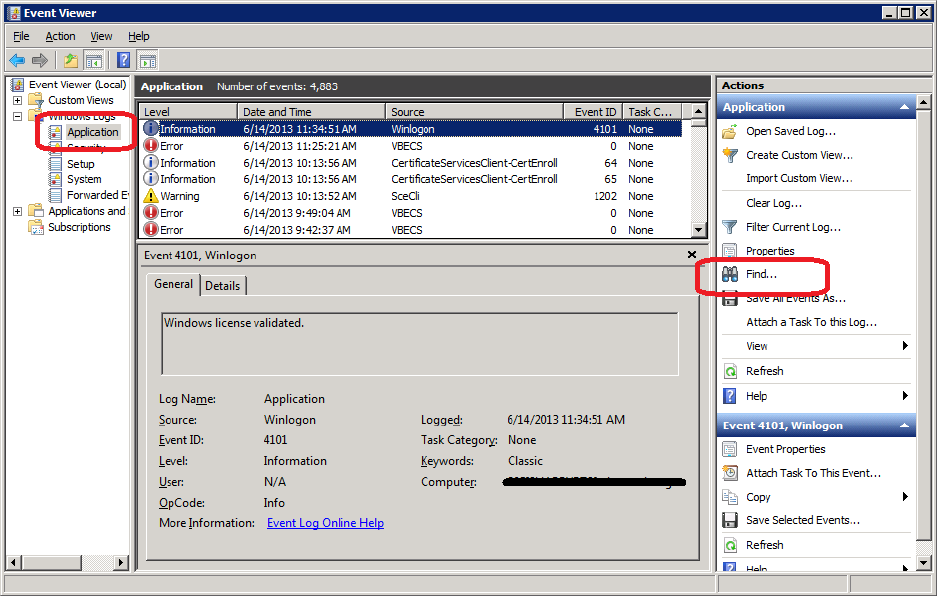
September 2018 VistA Blood Establishment Computer Software (VBECS) Version 2.3.0 Page 70
Technical Manual-Security Guide Version 2.0
2) On the Event Viewer Window, expand the Windows Logs and click on Application in the left-
hand tree; click the top event in the log table, then click Find on the right side of the window
(Figure 64).
Figure 64: Example of Event Viewer
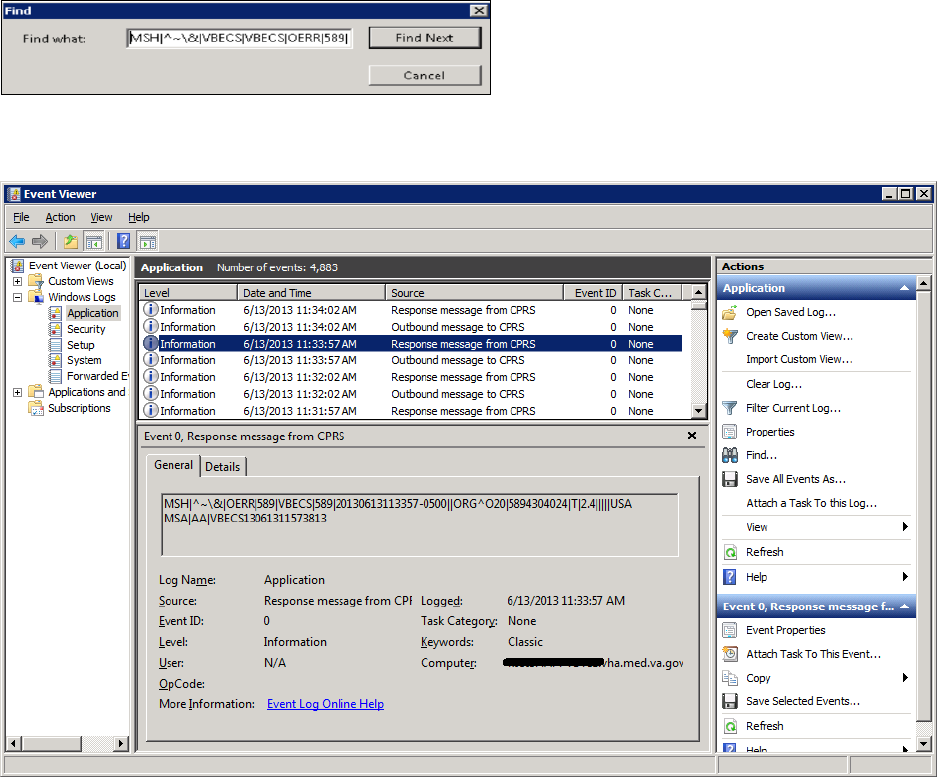
September 2018 VistA Blood Establishment Computer Software (VBECS) Version 2.3.0 Page 71
Technical Manual-Security Guide Version 2.0
3) Paste the MessageID highlighted in the email received (Figure 63) in the Find What text box.
Click Find Next (Figure 65).
Figure 65: Example of Find in Local Application
4) When the event record has been found, the row will be highlighted (Figure 66).
Figure 66: Example of Message ID Located in Event Log
5) Click Cancel to close the Find window (Figure 65).
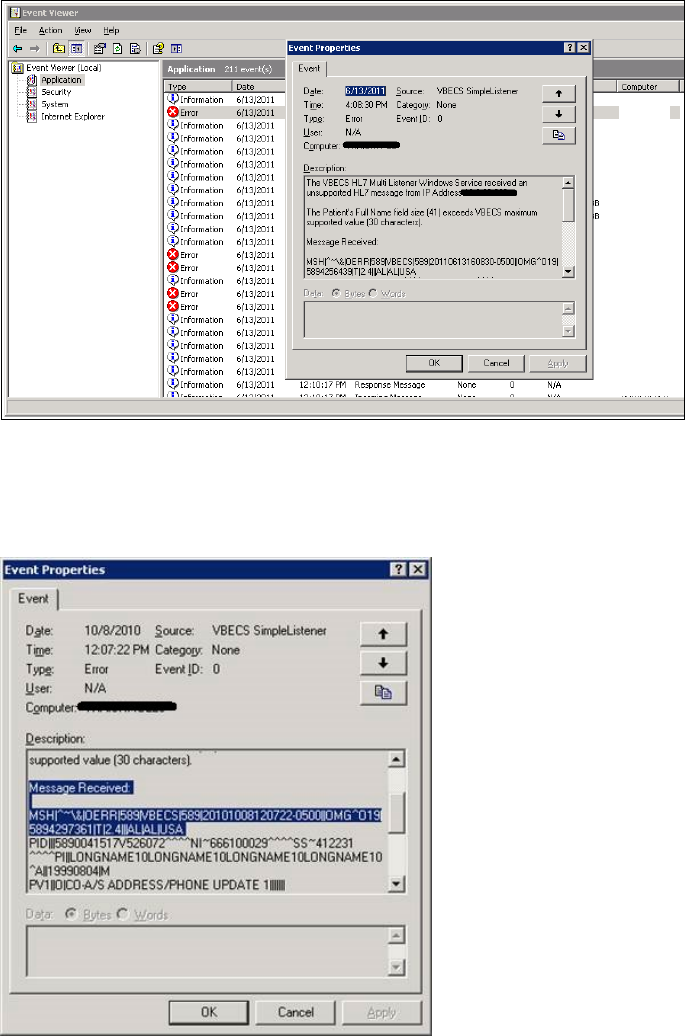
September 2018 VistA Blood Establishment Computer Software (VBECS) Version 2.3.0 Page 72
Technical Manual-Security Guide Version 2.0
6) Double-click on the highlighted row (Figure 67).
Figure 67: Example of Event Properties
7) If the Message ID in the email is part of the Message Receive information in the Event
Properties, analyze the detail message to identify the Patient Information causing the error (Figure
68).
Figure 68: Example of Analyzing Event Properties
8) If the Message ID in the email is not found in the Message Received, proceed to the next error by
repeating Steps 3 through 7.
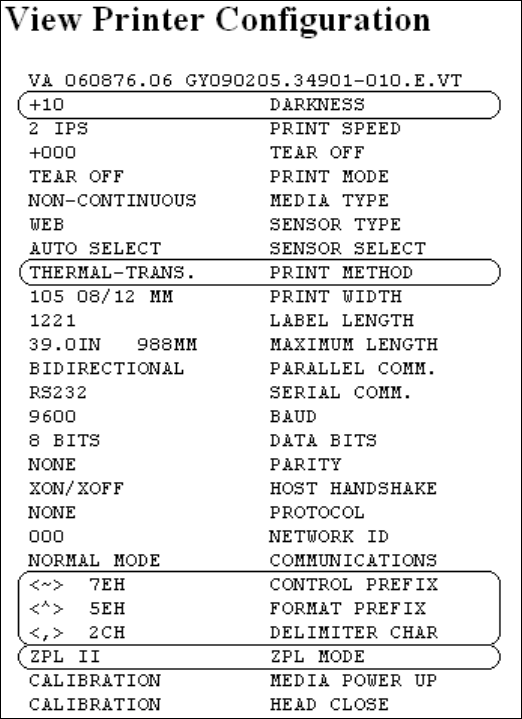
September 2018 VistA Blood Establishment Computer Software (VBECS) Version 2.3.0 Page 73
Technical Manual-Security Guide Version 2.0
Zebra Printer Problems
Problem: The printer prints, but there is no text on the label or text is too light.
Probable Cause: The printer is out of ribbon or the DARKNESS setting is too light (Figure 69).
Solution: Increase the DARKNESS setting after verifying printer has ribbon.
Figure 69: Example Zebra Printer Settings

September 2018 VistA Blood Establishment Computer Software (VBECS) Version 2.3.0 Page 74
Technical Manual-Security Guide Version 2.0
Problem: The printer does not print. It also cannot be pinged or be seen in a web browser (Figure 70).
Probable Cause: Network settings are not correct on the printer
Solution: Correct the printer’s network settings. All printer manuals may be found on the VBECS
SharePoint.
Figure 70: Example of Zebra Printer Web Console
Problem: The printer does not print and network settings have been verified (see previous).
Probable Cause: One or more settings are incorrect.
Solution: Verify that the PRINT METHOD, CONTROL PREFIX, FORMAT PREFIX, DELIMITER
CHAR and ZPL MODE match the settings in Figure 69.
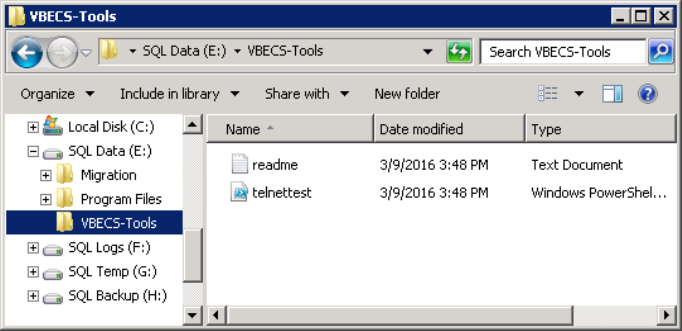
September 2018 VistA Blood Establishment Computer Software (VBECS) Version 2.3.0 Page 75
Technical Manual-Security Guide Version 2.0
Problem: The printer is online and network settings have been verified (see previous), but the printer fails
to print.
Probable Cause: The network is blocking the printer, most likely due to a firewall. Test with Telnet
PowerShell script. You may find it on D:\VBECS-Tools\ (App Server) (Figure 71). Read the
accompanying readme file for instructions.
Solution: Open the firewall to the printer on port 9100.
Figure 71: Example of Telnet test setup
Scanner Problems
Problem: When scanning, a ` character appears at the start of the scan.
Probable Cause: The Caps Lock is on.
Solution: Turn the Caps Lock off.
Problem: When scanning, characters appear in the field that do not match the label being scanned. Often,
the bad characters are not alphanumeric.
Probable Causes: Remote Desktop setting or network latency causes data to become corrupted.
Solution #1: First, try adjusting the keyboard settings in Remote Desktop Connection. Change the
Keyboard setting to On the local computer (Figure 8). If this does not work, try solution #2.
Solution #2: The lab supervisor will program an inter-character delay into the scanner to fix the issue.
This puts a small time-delay between each character as it is sent over the network, which results in
slightly slower scan speeds.
Figure 72 through Figure 79 are configuration barcodes arranged from a 10-millisecond inter-character
delay all the way up to an 80-millisecond delay respectively. We suggest that you start with the 10-

September 2018 VistA Blood Establishment Computer Software (VBECS) Version 2.3.0 Page 76
Technical Manual-Security Guide Version 2.0
millisecond delay. If that does not resolve the problem, proceed with larger delays until the problem is
corrected.
Note that these barcodes include all of the configuration information for the scanners. There is no need to
scan any additional barcodes to configure the scanner.
Figure 72: 10 milliseconds
Figure 73: 20 milliseconds
Figure 74: 30 milliseconds

September 2018 VistA Blood Establishment Computer Software (VBECS) Version 2.3.0 Page 77
Technical Manual-Security Guide Version 2.0
Figure 75: 40 milliseconds
Figure 76: 50 milliseconds
Figure 77: 60 milliseconds
Figure 78: 70 milliseconds

September 2018 VistA Blood Establishment Computer Software (VBECS) Version 2.3.0 Page 78
Technical Manual-Security Guide Version 2.0
Figure 79: 80 milliseconds

September 2018 VistA Blood Establishment Computer Software (VBECS) Version 2.3.0 Page 79
Technical Manual-Security Guide Version 2.0
Archiving and Recovery (Enterprise Operations Only)
The VBECS database will be backed up once daily and the backup to tape can be taken any time after
1:00 AM (CST).
Assumptions
• The SQL Server job that backs up the database is running correctly.
• Replacement hardware will have a tape drive that is compatible with the one lost in the disaster.
Outcome
• VBECS data is successfully recovered.
Limitations and Restrictions
None
Additional Information
None
Restore the Databases
If you find the need to perform a database restore and require assistance, file a support ticket
(Service Desk Primary Contact) for the VBECS Maintenance Team.
Service Desk Primary Contact
See Customer Support section of VBECS 2.3.0 Release Notes.
September 2018 VistA Blood Establishment Computer Software (VBECS) Version 2.3.0 Page 80
Technical Manual-Security Guide Version 2.0
This page intentionally left blank.
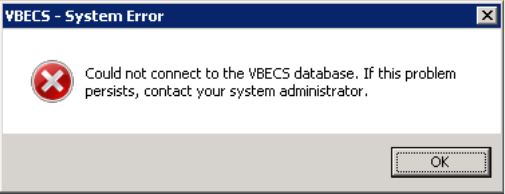
September 2018 VistA Blood Establishment Computer Software (VBECS) Version 2.3.0 Page 81
Technical Manual-Security Guide Version 2.0
Failover
VBECS does not have a seamless failover mechanism. If an application server fails, the user will receive
a message that the remote connection was lost. VBECS will lose information entered since the last save.
The user must reopen a Remote Desktop Connection session. The user will have to reenter all information
that was lost since the last save.
The connection between VBECS and VistA can be lost for a number of reasons:
An application server can fail or the VistA server can fail. When this connection is lost, no messages can be
exchanged. When the connection between VBECS and VistA is lost due to a failure of VBECS, the messages
are queued on the VistA side. Orders placed during this downtime will remain in the queue. Once the VBECS
system recovers and a connection is reestablished with VistA, the messages come across. The order alerts icon
located in the VBECS status bar will display the orders that were in the queue at the time of failure.
An application server can fail because of a vSphere failure. If the underlying physical host that VBECS resides
on fails, the VBECS servers will fail too. vSphere clustering will restore the server on another host.
If a user’s client workstation fails in the middle of a VBECS session, the session remains active on the
server for a period set by the server administrator. The standard session time-out is 15 minutes. If the user
resolves the issues with the client workstation and reconnects to the VBECS server through Remote
Desktop Connection before the session times out, the session will remain as it was when the client failed.
VBECS uses a feature within Microsoft SQL Server 2012 called AlwaysOn. SQL Server AlwaysOn
provides both High Availability (HA) and Disaster Recovery for VBECS databases. HA is implemented
within one datacenter through synchronous replication. If a primary SQL server should fail, the VBECS
application is automatically directed to use the databases on the HA SQL server. This is a seamless
failover and occurs automatically with no intervention needed. The previously defined HA server
becomes the new primary server and when the original primary server recovers, it becomes the new HA
server. This will occur during normal maintenance of the servers during Windows update deployment on
a monthly basis as those servers are rebooted. Using the same AlwaysOn technology, disaster recovery is
implemented through asynchronous replication between the primary data center and a disaster recovery
data center. Unlike the HA configuration, activating a disaster recovery server requires manual
intervention.
If the VBECS user is in the process of performing a query at the exact second a synchronous failover
takes place, they are presented with the message shown in Figure 80:
Figure 80: Synchronous Failover Message
September 2018 VistA Blood Establishment Computer Software (VBECS) Version 2.3.0 Page 82
Technical Manual-Security Guide Version 2.0
Once the VBECS user clicks OK, any open child dialogs automatically close to preserve data integrity.
They may proceed to use VBECS and will not see this message again. This message could present itself
in the event of a disaster recovery failover as well. In that case, the system will not recover automatically
and the VBECS user continues to see this message every time they try to query the database. Manual
failover recovery to the disaster recovery server takes place through written instructions defined in the
Disaster Recovery Plan and requires the intervention and expertise of the datacenter and VBECS
maintenance teams.
September 2018 VistA Blood Establishment Computer Software (VBECS) Version 2.3.0 Page 83
Technical Manual-Security Guide Version 2.0
Performance
VBECS may delay a critical function such as patient transfusion if the network suffers latency issues. File
a support ticket (Service Desk Primary Contact) per local procedures when latency issues arise.
VBECS was re-factored after performance testing results showed latency issues for VistA queries. As a
result, many queries are cached in the VBECS database. Due to the criticality of having correct and
current patient data, patient lookups cannot be cached.
Locking
VBECS is designed with pessimistic locking controlled within the application code: if one user selects a
record for edit, the record is locked by that user. If another user tries to edit that record, a message will tell
him that the record is locked and who has the record. The second user is not granted access to the record.
Locks have a timeout period defined in the edit divisions portion of the VBECS Administrator application
(refer to the VistA Blood Establishment Computer Software (VBECS) Admin User Guide). When a lock
times out or is released by a user completing his edit, another user can edit that record.
If the application code fails due to a logic bug, optimistic locking is in place to prevent data corruption.
When a record is retrieved, a row version is also retrieved. When a record is saved, the row in the
database gets an updated row version; before the save takes place, the save routine checks that the row
version supplied matches the row version in the table. If it does not match, the routine notifies the caller
that another user changed the data. The save does not complete; the user must retrieve the updated record
and start his edits again.
If VBECS had an application error resulting in the application terminating, locks may have to be
manually deleted. Contact the Service Desk Primary Contact.
September 2018 VistA Blood Establishment Computer Software (VBECS) Version 2.3.0 Page 84
Technical Manual-Security Guide Version 2.0
This page intentionally left blank.

September 2018 VistA Blood Establishment Computer Software (VBECS) Version 2.3.0 Page 85
Technical Manual-Security Guide Version 2.0
Security
VBECS contains sensitive data and performs a critical function, so it is critical to secure the system. It is
important to secure the server from both users and malicious attacks from an individual who is trying to
gain access to the system.
Access Request Process
To gain access to the VBECS server, reference the VBECS SharePoint site:
(http://vaww.oed.portal.va.gov/projects/vbecs/default.aspx).
A NMEA must be used at all times to access a VBECS server with administrator access.
Active Directory
Access to the VBECS servers is controlled through AD. Each VBECS site will have two groups set up in
AD, one for normal VBECS users and one for VBECS Administrators (this is not a server administrator).
Unless the user is a server administrator, he must be a member of one of these two groups to gain access
to the server.
These groups also play a role in application level security. Even if a user were able to access the server,
he would not be able to access VBECS.
Group Policy
Group policy controls the user experience (what the user sees and has access to on the VBECS server). To
configure this correctly, the recommendations in “Windows Server 2008 R2 Security Guide” (Microsoft
Web site) were followed to establish a baseline for group policy.
Group policy can be applied to user accounts or to the servers directly. In the case of VBECS, group
policy is applied to the servers (it is easier to manage). It is also undesirable to have group policy
associated with the user, which may inhibit his use of other systems. Enabling loopback processing
applies the policy to any user that logs into the server.
In some cases, group policy also enables VBECS to perform actions on the Windows operating system.
For example, there is a group policy setting that allows the VBECS services to be restarted after a
configuration change in VBECS Administrator.
System Center Operations Manager
SCOM is a proactive monitoring tool. SCOM will constantly monitor each server for system
abnormalities. If SCOM detects a problem, an email will be sent to the system administrator defined
during the SCOM installation process. SCOM will monitor these high-level categories:
• Windows Server 2008 R2 Operating System
• CPU health and usage
• Network interface cards
• SQL Server (SQL Clustering and SQL AlwaysOn)
• Memory usage
• Hard-disk health and usage
• VBECS files and services

September 2018 VistA Blood Establishment Computer Software (VBECS) Version 2.3.0 Page 86
Technical Manual-Security Guide Version 2.0
• Windows Services
Application-Wide Exceptions
Table 13 explains system exceptions to aid VA Health Product Support in determining the cause and
resolving system issues.
Table 13: Application-Wide Exceptions
System Exceptions
Description
ArgumentException
Base class for all argument exceptions
ArgumentNullException
Thrown by methods that do not allow an argument to be null
ArgumentOutOfRangeException
Thrown by methods that verify that arguments are in a given range
ComException
Exception encapsulating COM HRESULT information
Exception
Base class for all exceptions
ExternalException
Base class for exceptions that occur or are targeted at environments
outside the runtime
IndexOutOfRangeException
Thrown by the runtime only when an array is indexed improperly
InvalidOperationException
Thrown by methods when in an invalid state
NullReferenceException
Thrown by the runtime only when a null object is referenced.
SEHException
Exception encapsulating Win32 structured exception handling information
System.ArithmeticException
A base class for exceptions that occur during arithmetic operations, such
as System.DivideByZeroException and System.OverflowException
System.ArrayTypeMismatchException
Thrown when a store into an array fails because the actual type of the
stored element is incompatible with the actual type of the array
System.DivideByZeroException
Thrown when an attempt to divide an integral value by zero occurs
System.IndexOutOfRangeException
Thrown when an attempt to index an array via an index that is less than
zero or outside the bounds of the array
System.InvalidCastException
Thrown when an explicit conversion from a base type or interface to a
derived type fails at run time
System.NullReferenceException
Thrown when a null reference is used in a way that causes the referenced
object to be required
System.OutOfMemoryException
Thrown when an attempt to allocate memory (via new) fails
System.OverflowException
Thrown when an arithmetic operation in a checked context overflows
System.StackOverflowException
Thrown when the execution stack is exhausted by having too many
pending method calls; typically indicative of very deep or unbounded
recursion
System.TypeInitializationException
Thrown when a static constructor throws an exception, and no catch
clauses exist to catch it
SystemException
Base class for all runtime-generated errors
September 2018 VistA Blood Establishment Computer Software (VBECS) Version 2.3.0 Page 87
Technical Manual-Security Guide Version 2.0
Table 14 explains the event sources that VBECS uses to write to the Application log in Event Viewer
(Finding Application Log Entries from Email Alerts).
Table 14: Event Sources
Event Source
Description
VBECS Exception
A VBECS system crash
VBECS Prod
VBECS Production
VBECS Test
VBECS Test
VBECS Admin Prod
VBECS Administrator Production
VBECS Admin Test
VBECS Administrator Test
HL7Dispatcher Prod
VBECS Services
HL7Dispatcher Test
HL7Service Prod
HL7Service Test
ReportScheduler Prod
ReportScheduler Test
VistaLinkService Prod
VistaLinkService Test
September 2018 VistA Blood Establishment Computer Software (VBECS) Version 2.3.0 Page 88
Technical Manual-Security Guide Version 2.0
This page intentionally left blank.
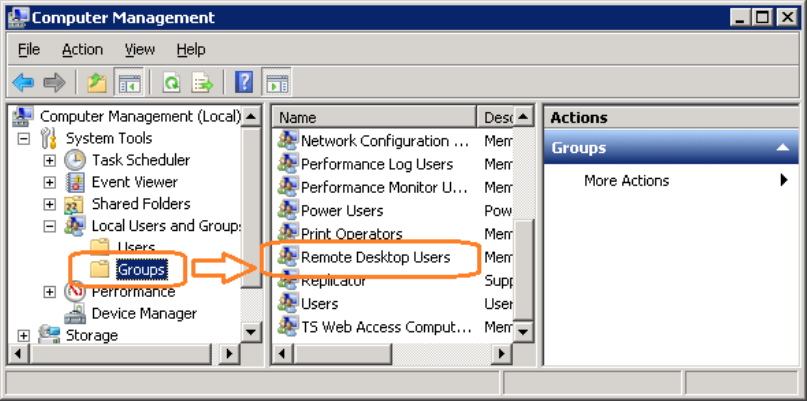
September 2018 VistA Blood Establishment Computer Software (VBECS) Version 2.3.0 Page 89
Technical Manual-Security Guide Version 2.0
Configuring the App Server and Lab Workstations
After the App Server is deployed, additional configuration will need to be performed on it and on the lab
workstations. On the server, install the printer, configure permissions and create the Report share. On the
workstation, create a shortcut to the report share.
Server Tasks (Enterprise Operations Only)
Perform the following tasks on the App Server only.
Grant User Permissions
1) Open a remote desktop connection to the VBECS App Server and login with server administrator
privileges.
2) Click Start, Administrative Tools, Computer Management. Expand Local Users and
Groups. Select Groups and double-click Remote Desktop Users (Figure 81).
Figure 81: Computer Management
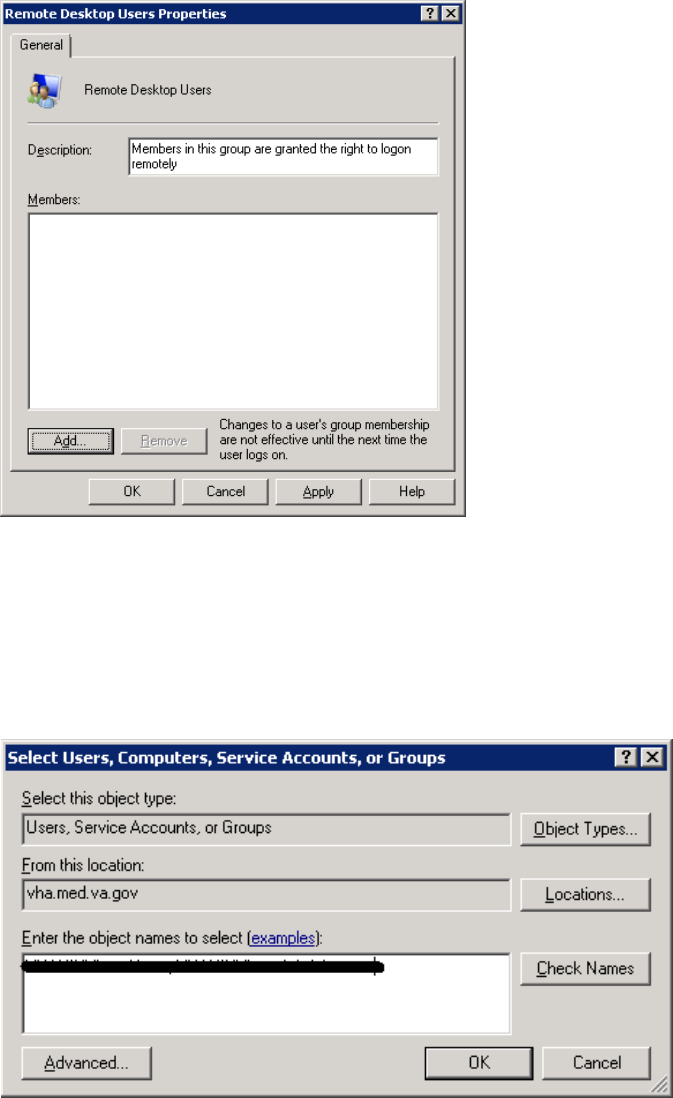
September 2018 VistA Blood Establishment Computer Software (VBECS) Version 2.3.0 Page 90
Technical Manual-Security Guide Version 2.0
3) Click Add (Figure 82).
Figure 82: Remote Desktop Users Properties
4) Specify the VBECS Users and VBECS Administrators group (Figure 83). Note that groups
typically follow this naming convention (substitute the 3-letter site code for sss):
• VBECS Users: VHAsssVbecsUsers
• VBECS Administrators: VHAsssVbecsAdministrators
Click OK to close the window. Click OK again to close the Properties window.
Figure 83: Example of Select Users, Computers...
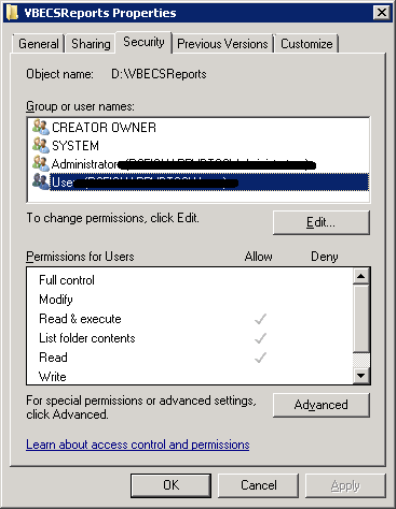
September 2018 VistA Blood Establishment Computer Software (VBECS) Version 2.3.0 Page 91
Technical Manual-Security Guide Version 2.0
Configure the Report Share
1) Open a remote desktop connection to the VBECS App Server and login with server administrator
privileges.
2) Open Windows Explorer and navigate to the D drive.
3) Right-click on VBECSReports and click Properties. Select the Security tab and click Edit
(Figure 84).
Figure 84: Example of VBECSReports Properties
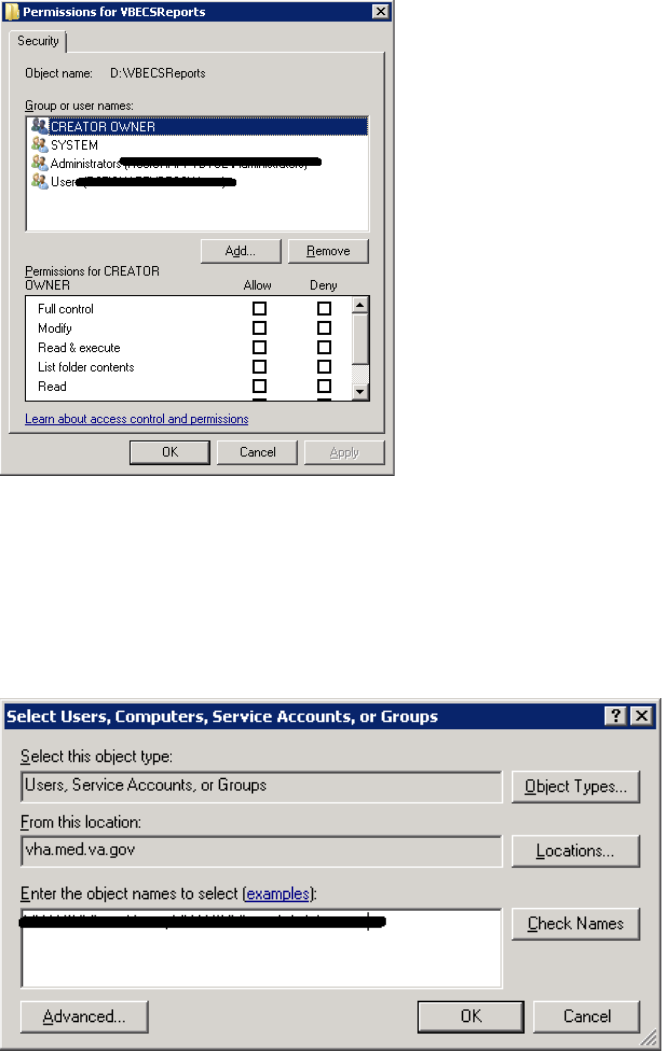
September 2018 VistA Blood Establishment Computer Software (VBECS) Version 2.3.0 Page 92
Technical Manual-Security Guide Version 2.0
4) Click Add (Figure 85).
Figure 85: Example of Permissions
5) Specify the VBECS Users and VBECS Administrators group (Figure 86). Note that groups
typically follow this naming convention (substitute the 3-letter site code for sss):
• VBECS Users: VHAsssVbecsUsers
• VBECS Administrators: VHAsssVbecsAdministrators
Click OK to close the window.
Figure 86: Example of Select Users, Computers...
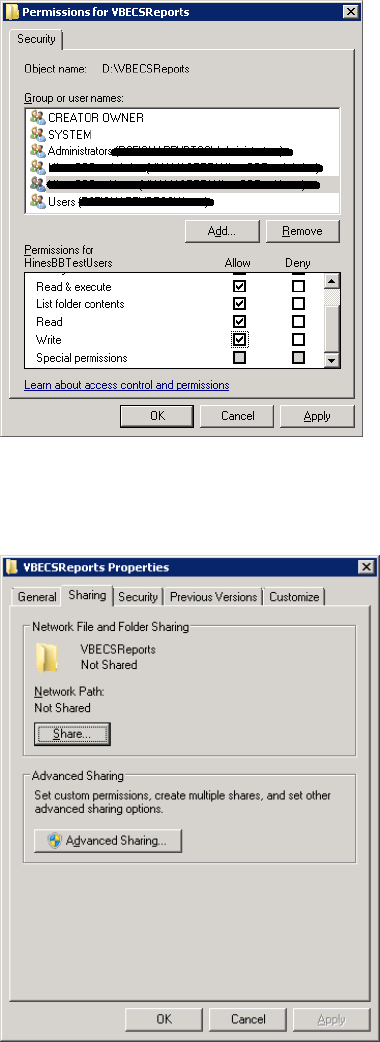
September 2018 VistA Blood Establishment Computer Software (VBECS) Version 2.3.0 Page 93
Technical Manual-Security Guide Version 2.0
6) In the Permissions window, assign Write access to both groups in addition to the rights granted
by default. Click OK (Figure 87).
Figure 87: Example of Permissions
7) Select the Sharing tab and click Advanced Sharing (Figure 88).
Figure 88: VBECSReports Properties
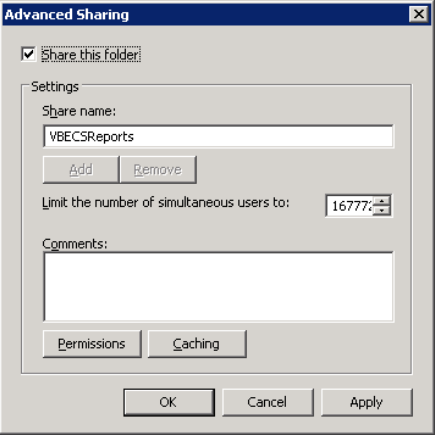
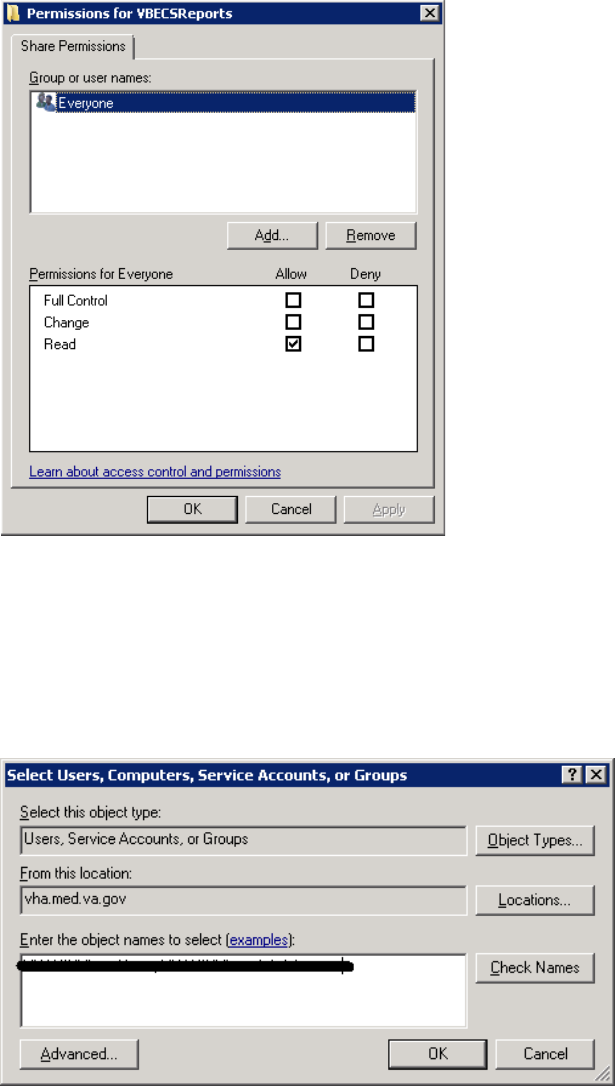
September 2018 VistA Blood Establishment Computer Software (VBECS) Version 2.3.0 Page 95
Technical Manual-Security Guide Version 2.0
9) Click Add (Figure 90).
Figure 90: Permissions
10) Specify the VBECS Users and VBECS Administrators group (Figure 91). Note that groups
typically follow this naming convention (substitute the 3-letter site code for sss):
• VBECS Users: VHAsssVbecsUsers
• VBECS Administrators: VHAsssVbecsAdministrators
Click OK.
Figure 91: Example of Select Users...
September 2018 VistA Blood Establishment Computer Software (VBECS) Version 2.3.0 Page 96
Technical Manual-Security Guide Version 2.0
11) Select the VBECS Administrators group and select Full Control. Leave the default permissions
for the VBECS Users group and click OK (Figure 92).
Figure 92: Permissions for VBECSReports
Workstation Tasks
Update the RDP shortcut and create a link to the report share on each lab workstation.
Update the RDP Shortcut
1) Log into the lab workstation with administrator privileges.
2) Right-click on the VBECs remote desktop shortcut and click Edit (Figure 93).
Figure 93: Edit shortcut

September 2018 VistA Blood Establishment Computer Software (VBECS) Version 2.3.0 Page 97
Technical Manual-Security Guide Version 2.0
3) In the Computer field, the VBECS application server’s fully qualified domain name. The name
will always be your server name followed by aac.dva.va.gov (Figure 94). Click Save.
Figure 94: Remote Desktop Connection
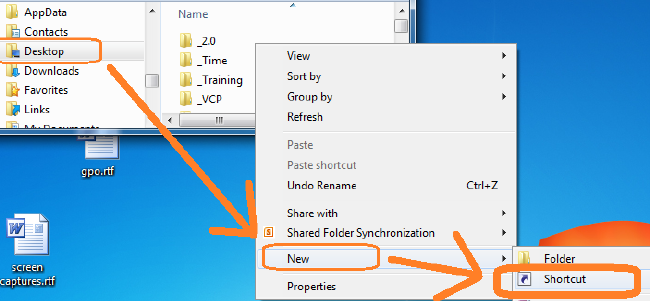
September 2018 VistA Blood Establishment Computer Software (VBECS) Version 2.3.0 Page 98
Technical Manual-Security Guide Version 2.0
Configure a Shortcut to the Report Share
The report share section (Configure the Report Share) must have been executed before proceeding with
this section. The report share contains patient identifiable information, so the shortcut must only be
accessible by authorized laboratory personnel. If the workstation will only be used by laboratory
personnel, the shortcut may be placed in the Public Desktop folder. Otherwise, create it separately in
each user’s folder.
1) Log into the lab workstation with administrator privileges. Navigate to the user’s desktop folder
(C:\Users\Public\Public Desktop), right-click on the Desktop folder and select New, Shortcut
(Figure 95). Note: If you cannot see the Public Desktop folder in the tree view type
C:\Users\Public\Public Desktop in the address bar and hit enter.
Figure 95: Example of New Shortcut
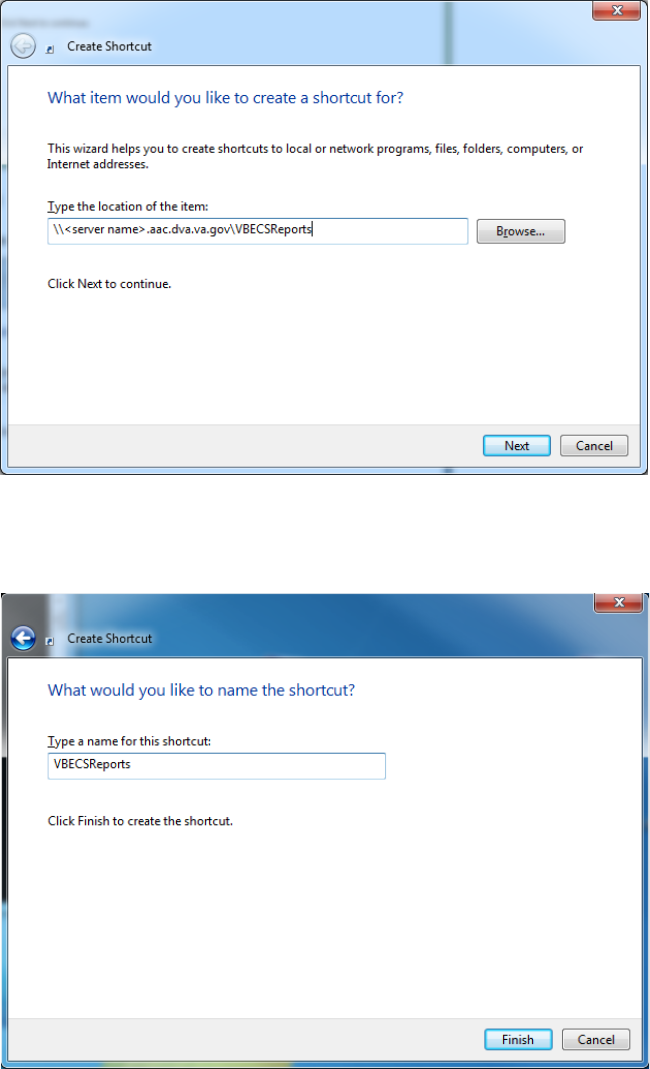
September 2018 VistA Blood Establishment Computer Software (VBECS) Version 2.3.0 Page 99
Technical Manual-Security Guide Version 2.0
2) Enter the share name (\\<VBECS application server fully qualified domain name
>\VBECSReports) and click Next (Figure 96).
Figure 96: Example of Report Share
3) Name the shortcut VBECSReports. Click Finish (Figure 97).
Figure 97: Create Shortcut
September 2018 VistA Blood Establishment Computer Software (VBECS) Version 2.3.0 Page 100
Technical Manual-Security Guide Version 2.0
This page intentionally left blank.

September 2018 VistA Blood Establishment Computer Software (VBECS) Version 2.3.0 Page 101
Technical Manual-Security Guide Version 2.0
Glossary
Acronym, Term Definition
ABO
A group for classifying human blood, based on the presence or
absence of specific antigens in the blood, which contains four blood
types: A, B, AB, and O. The ABO group is the most critical of the
human blood systems. It is used to determine general compatibility
of donor units to a recipient.
Access Code
A field in the VistA New Person file used to uniquely identify a user
on the VistA system.
Active Directory (AD)
A hierarchical directory service built on the Internet's Domain
Naming System (DNS).
ADPAC
Automated Data Processing Application Coordinator.
AG
Availability Group.
ANR
Automated Notification Report.
API
Application Programmer Interface.
AITC
Austin Information Technology Center.
BCE
Bar Code Expansion.
CPRS
Computerized Patient Record System.
DBIA
Database Integration Agreement.
DR
Disaster Recovery.
DSS
Decision Support System.
DUZ
Designated User.
EO
Enterprise Operations.
FQDN
Fully Qualified Domain Name.
HA
High Availability.
HCPCS
Healthcare Common Procedure Coding System.
HL7
Health Level Seven.
LAN
Local Area Network.
LLP
Lower Layer Protocol.
LMIP
Laboratory Management Index Program.
PCE
Patient Care Encounter.
PIV
Personal Identification Verification.
RDP
Remote Desktop Protocol.
RPC
Remote Procedure Call.
SQL
Structured Query Language.
SSMS
SQL Server Management Studio.
SCOM
System Center Operations Manager.
TCP/IP
Transmission Control Protocol/Internet Protocol.
VAISS
VBECS Application Interfacing Support Software.

September 2018 VistA Blood Establishment Computer Software (VBECS) Version 2.3.0 Page 102
Technical Manual-Security Guide Version 2.0
Acronym, Term Definition
VBECS
VistA Blood Establishment Computer Software.
VDL
VA Software Document Library.
Verify Code
A field in the VistA New Person file used to verify the identity of a
user associated with an Access Code.
VISN
Veterans Integrated Service Network.
XML
Extensible Markup Language.
September 2018 VistA Blood Establishment Computer Software (VBECS) Version 2.3.0 Page 103
Technical Manual-Security Guide Version 2.0
Appendices
Appendix A: Instructions for Capturing Screen Shots
Throughout the technical manual-security guide, the Administrator is asked to capture screen shots to
document configuration options. To capture a screen shot:
Open a blank document (for example, in Microsoft Word) and save it as (click File, Save As)
“mmddyy Technical-Security Validation Record,” or another easily identified file name.
If you wish to place a document on the server for ease of copying and pasting, assign file names
similar to “mmyydd Technical-Security Validation Record Server1” and “mmyydd Technical-Security
Validation Record Server2.”
When the screen you wish to capture is displayed, press the Print Screen key.
In the Technical-Security Validation Record document, place the cursor where you want to insert the
picture.
Click (the paste icon) or select Edit, Paste (Figure 98).
Figure 98: Paste
Label the screen shot within the document with the technical manual-security guide step, page number,
and server on which the picture was taken.
September 2018 VistA Blood Establishment Computer Software (VBECS) Version 2.3.0 Page 104
Technical Manual-Security Guide Version 2.0
This page intentionally left blank.
September 2018 VistA Blood Establishment Computer Software (VBECS) Version 2.3.0 Page 105
Technical Manual-Security Guide Version 2.0
Appendix B: Data Center Instructions (Enterprise Operations only)
Purpose
This appendix describes the server configuration as well as the tasks that must be completed by the data
center for a successful VBECS installation:
• Initial Setup Tasks: These tasks must be completed prior to installation of any VBECS systems.
• Ongoing Tasks: These are continual maintenance tasks.
Server Configuration
The U.S. Food and Drug Administration classifies this software as a medical device. Unauthorized
modifications will render this device an adulterated medical device under Section 501 of the Medical
Device Amendments to the Federal Food, Drug, and Cosmetic Act. Acquiring and implementing this
software through the Freedom of Information Act require the implementer to assume total responsibility
for the software and become a registered manufacturer of a medical device, subject to FDA regulations.
VBECS is a medical device; all updates and changes to it must be tested and documented. This will
be centrally managed. The VBECS servers must be added to site exclusion lists so they are not part of
local update mechanisms. Ensure that login scripts do not run on VBECS servers as they may attempt to
install unauthorized software. Do not install the ePolicy agent on the VBECS systems: exclude them from
Systems Management Server (SMS) updates. Install Windows updates only after approval is granted.
App and Database Server Virtual Machine Configurations
Table 15 and Table 16 describe the configurations of the App and Database Server virtual machines
respectively.
These configurations are designed to promote 24/7 availability and use of the application. At an App
Server level, replication provides high availability. At the Database Server level, AlwaysOn cluster
configuration provides near immediate failover in case the primary server fails.
Table 15: App Server Virtual Machine Configuration
App Server Specifications
Processor
2 virtual CPUs (vCPUs) with a speed of 2.67GHz
Memory
6 gigabyte (GB) main storage (RAM)
Storage
80GB system drive (C) with a 10GB (D) drive to host configuration and reports
Operating
System
Microsoft Windows Server 2008 Server Enterprise Edition R2 (x64)
Network
Controller
Two 10/100 network cards; one for network configuration and another for backups.
Backup
Servers are replicated at the disaster recovery site.
September 2018 VistA Blood Establishment Computer Software (VBECS) Version 2.3.0 Page 106
Technical Manual-Security Guide Version 2.0
Table 16: Database Server Virtual Machine Configuration
Database Server Specifications
Processor
4 vCPUs: Xeon(R) X5650 @ 2.67GHz
Memory
32GB main storage (RAM)
Storage
Server: 80GB system drive (C)
Shared storage: 4 x 980GB drives*: E (Data), F (Logs), G (TempDB) and H (Backup)
Operating
System
Microsoft Windows Server 2008 Server Enterprise Edition R2 (x64)
Network
Controller
Two 10/100 network cards; one for network configuration and another for backups.
Backup
Data is replicated to the disaster recovery site via SQL AlwaysOn.
*The drives used in the test servers will be scaled down.
Physical Host Configurations
Table 17 describes the requirements of the hosting hardware. Input/Output Operations per Second (IOPS)
is a storage benchmark. The Storage Totals row describes the total amount of storage that each region
must provide.
Table 17: App Server Virtual Machine Configuration
Specification
R01
R02
R03
R04
IOPS
Read (Avg/ Max)
654/ 5,265
2,435/ 10,435
658/ 5,326
2,445/ 10,543
985/ 7,959
3,663/ 15,761
646/ 5,143
2,418/ 10,220
Write (Avg/ Max)
Storage Totals
31.16 TB
31.32 TB
46.9 TB
30.84 TB
Initial Setup Tasks
Execute the tasks in this section prior to installation.
Group Policy
For Group Policy purposes, VBECS servers will reside in their own OU, which will contain only VBECS
servers. You may also create OUs under the main OU for organizational purposes. For more information,
see the Group Policy section.
Import the VHA VBECS Terminal Server Policy from the VHAMASTER domain. Place the group policy
in the top-level server OU. For more information about OUs and server organization, see the Active
Directory section.
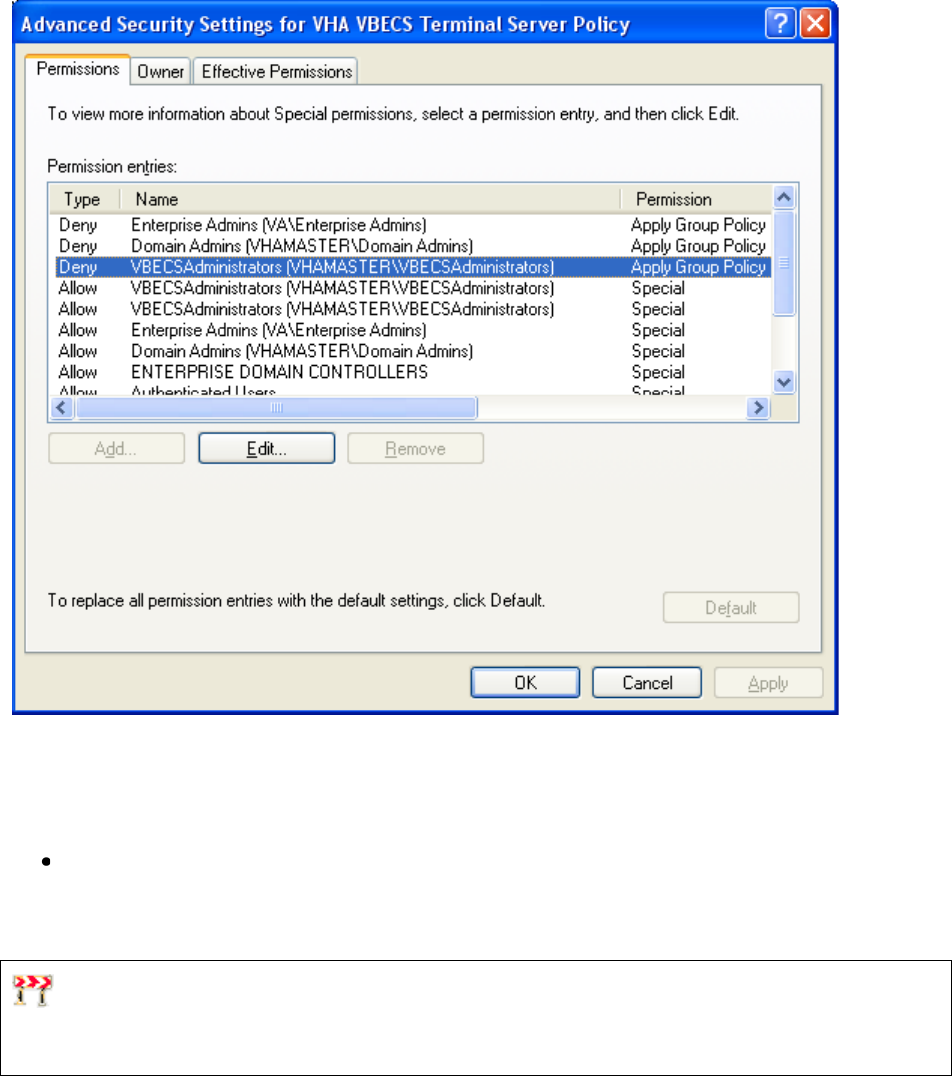
September 2018 VistA Blood Establishment Computer Software (VBECS) Version 2.3.0 Page 107
Technical Manual-Security Guide Version 2.0
Configure the policy so that it is not applied to the RxxVbecsServerAdmins Active Directory group. See
the example in Figure 99.
Figure 99: Example of a Group Policy Not Applied to VBECSAdministrators Group
RDP Server
VBECS is a RDP Server application and requires a license. Specify the license server in the group policy
at the following location:
Computer Configuration, Policies, Administrative Templates, Windows Components, Remote
Desktop Services, Remote Desktop Session Host, Licensing, Use the specified Remote Desktop
license servers (Enabled), License servers to use: <specify the VA’s license server with the
server’s fully qualified domain name>
Remote desktop is critical to VBECS. Failure to connect to a license server will result in widespread
outages. If you see errors related to Terminal Server licensing, contact the Enterprise Engineering group
immediately: VAITEngineeringCISIDM@va.gov.
September 2018 VistA Blood Establishment Computer Software (VBECS) Version 2.3.0 Page 108
Technical Manual-Security Guide Version 2.0
Ongoing Tasks
Execute the tasks in this section continually.
1) Back Up the VBECS Database
Back up the VBECS databases nightly (1am CST):
• Back up all folders and files in the <Primary Server> H:\Program Files\Microsoft SQL
Server\MSSQL11.MSSQLSERVER\MSSQL\Backup and <Secondary (HA) Server>
H:\Program Files\Microsoft SQL Server\MSSQL11.MSSQLSERVER\MSSQL\Backup
directories.
• Database backups are maintained for at least seven days on the Active Replica servers.
2) VBECS Updates
When the VBECS maintenance team releases a VBECS patch, install the patch in accordance
with instructions supplied by the VBECS maintenance team.
3) Windows Updates
The VBECS maintenance team tests every Microsoft Windows update. Once the VBECS
maintenance team certifies the Microsoft Windows update, EO staff at the AITC install the
updates during the monthly maintenance periods defined for the test and production servers.
Refer to Applying Windows Updates section for details.
September 2018 VistA Blood Establishment Computer Software (VBECS) Version 2.3.0 Page 109
Technical Manual-Security Guide Version 2.0
Appendix C: Auditing on VBECS Servers
The following events are audited on VBECS servers. These events may be viewed in Event Viewer logs
(under Administrative Tools):
• Account logon events (Success, Failure)
• Account management (Success, Failure)
• Directory service access (Success, Failure)
• Logon events (Success, Failure)
• Object access (Success, Failure)
• Policy Change (Success, Failure)
• System events (Success, Failure)
September 2018 VistA Blood Establishment Computer Software (VBECS) Version 2.3.0 Page 110
Technical Manual-Security Guide Version 2.0
This page intentionally left blank.
September 2018 VistA Blood Establishment Computer Software (VBECS) Version 2.3.0 Page 111
Technical Manual-Security Guide Version 2.0
Index
A
Active Directory ............................................................................................................................................................................. 85
Appendices ................................................................................................................................................................................... 103
Application-Wide Exceptions ......................................................................................................................................................... 86
Archiving and Recovery ................................................................................................................................................................. 79
B
Back Up the VBECS Database ..................................................................................................................................................... 108
C
Configuring the App Server and Lab Workstations ........................................................................................................................ 89
Connection Speed ........................................................................................................................................................................... 12
Create a Remote Desktop Connection Shortcut for VBECS ........................................................................................................... 14
D
Data Center Instructions ............................................................................................................................................................... 105
Database Conversion Updates ...................................................................................................................................................... 109
E
ePolicy and Virus Definitions ......................................................................................................................................................... 43
External Interfaces .......................................................................................................................................................................... 55
G
Glossary ........................................................................................................................................................................................ 101
Group Policy ........................................................................................................................................................................... 85, 106
H
Hardware and System Configuration .............................................................................................................................................. 15
Hardware Specifications and Settings ............................................................................................................................................... 7
How This Technical Manual-Security Guide Is Organized .............................................................................................................. 5
I
Implementation and Maintenance ................................................................................................................................................... 27
Instructions for Capturing Screen Shots ....................................................................................................................................... 103
Introduction ...................................................................................................................................................................................... 1
L
Locking ........................................................................................................................................................................................... 83
M
Maintenance Operations ................................................................................................................................................................. 51
Monitor VBECS HL7 Logical Links ........................................................................................................................................ 49, 50
September 2018 VistA Blood Establishment Computer Software (VBECS) Version 2.3.0 Page 112
Technical Manual-Security Guide Version 2.0
O
Ongoing Tasks ...................................................................................................................................................................... 106, 108
P
Performance .................................................................................................................................................................................... 83
Printers ............................................................................................................................................................................................ 17
Purpose ......................................................................................................................................................................................... 105
R
Related Manuals and Reference Materials ........................................................................................................................................ 3
Remote Desktop Configuration ........................................................................................................................................................ 7
S
Save Settings ................................................................................................................................................................................... 13
Scanners .......................................................................................................................................................................................... 24
Screen Resolution ............................................................................................................................................................................. 7
Screen Shots ..................................................................................................................................................................................... 5
Security ........................................................................................................................................................................................... 85
Server Configuration .................................................................................................................................................................... 105
Set Up the VBECS Inbound Logical Link ...................................................................................................................................... 47
Set Up VBECS Outbound Logical Links ........................................................................................................................................ 45
Sound .............................................................................................................................................................................................. 10
Start VistA HL7 Logical Links ....................................................................................................................................................... 48
System Center Operations Manager ............................................................................................................................................... 85
T
Terminal Server License Server .................................................................................................................................................... 107
Transmit Workload Data ................................................................................................................................................................ 51
V
VBECS Updates ........................................................................................................................................................................... 108
VBECS Windows Services ............................................................................................................................................................. 57
VistALink Remote Procedure Calls ................................................................................................................................................ 55
W
Windows Updates ......................................................................................................................................................................... 108
September 2018 VistA Blood Establishment Computer Software (VBECS) Version 2.3.0 Page 113
Technical Manual-Security Guide Version 2.0
This is the last page of the VistA Blood Establishment Computer Software (VBECS) 2.3.0 Technical
Manual-Security Guide.
