Film Camera Bessa R2 Voigtlander R2s R2c
User Manual: Film Camera Bessa-R2
Open the PDF directly: View PDF ![]() .
.
Page Count: 23
BEDIENUNGSANLEITUNG
INSTRUCTION MANUAL
MANUEL DE INSTRUCCIONES
Gebru iksaanwij i ng
Manuel
d'instructions
MANUALE DI ISTRUZIONI
BESSA-R25
-R2C
Seit 1756
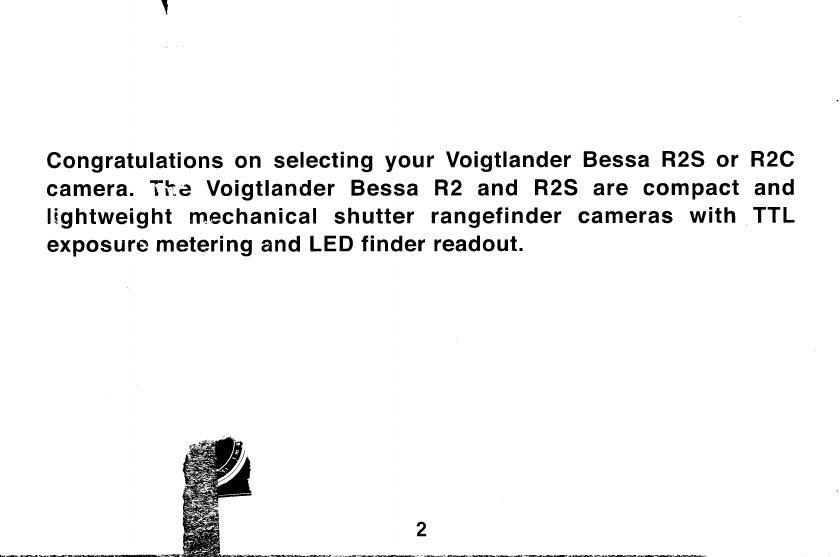
Congratulations
on selecting
your Voigtlander
camera. Tlqe Voigtlander Bessa R2 and R2S
lightweight mechanical shutter rangefinder
exposure
metering
and
LED
finder readout.
Bessa R2S or R2C
are compact and
cameras with TTL
www.butkus.us
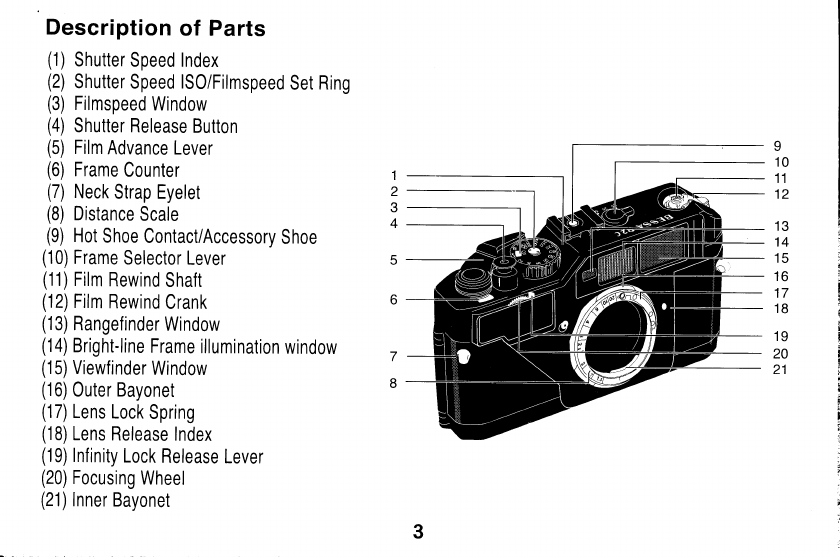
Description of Parts
(1)
Shutter
Speed Index
(21
Shutter
Speed
lsO/Filmspeed
Set
Ring
(3)
Filmspeed
Window
(4)
Shutter Release
Button
(5)
Film
Advance
Lever
(6)
Frame
Counter
(7)
Neck
Strap Eyelet
(8)
Distance
Scale
(9)
Hot
Shoe
Contact/Accessory
Shoe
(10)
Frame
Selector
Lever
(11)
Film
Rewind
Shaft
(12)
Film
Rewind
Crank
(13)
Rangefinder
Window
(1a)
Bright-line
Frame
illumination
window
(15)
Viewfinder
Window
(16)
Outer
Bayonet
(17)
Lens
Lock
Spring
(18)
Lens
Release
Index
(19)
Infinity
Lock
Release
Lever
(20)
Focusing
Wheel
(21)
lnner
Bayonet
1
2
3
4
I
10
11
12
13
14
15
16
17
18
19
20
21
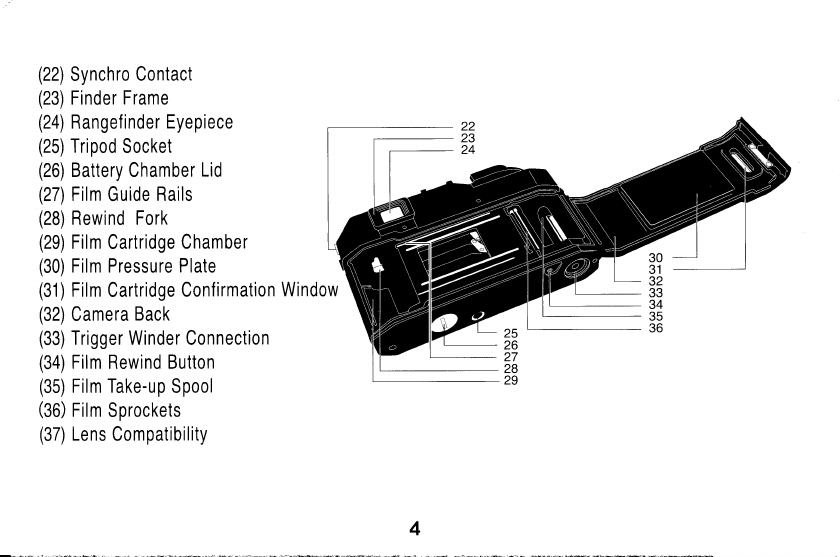
(22)
Synchro
Contact
(23)
Finder Frame
(24)
Rangefinder
Eyepiece
(25)
Tripod
Socket
(26)
Battery Chamber
Lid
(27)
Film
Guide
Rails
(28)
Rewind Fork
(29)
Film
Cartridge
Chamber
(30)
Film Pressure Plate
(31)
Film
Cartridge
Confirmation
Window
(32)
Camera
Back
(33)
Trigger Winder
Connection
(34)
Film Rewind Button
(35)
Film Take-up
Spool
(36)
Film
Sprockets
(37)
Lens
Compatibility
4
30
31
32
33
34
35
36
25
26
27
28
29
www.butkus.us
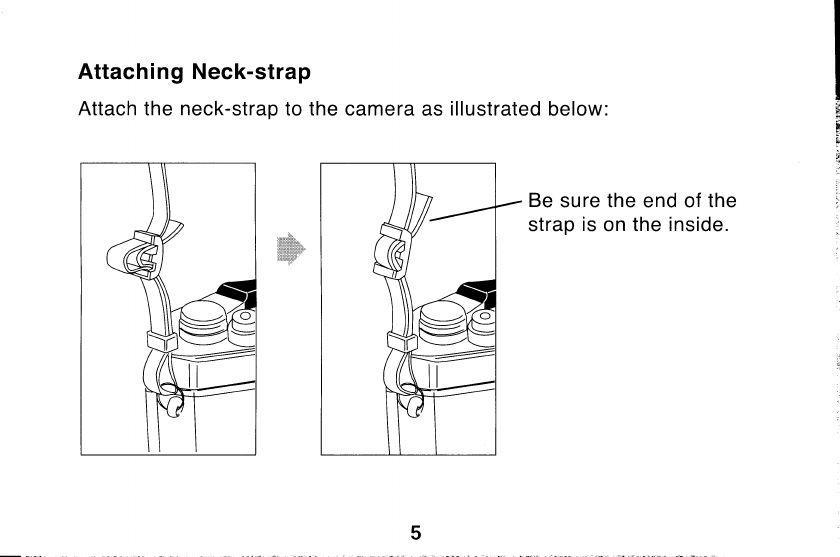
Attaching Neck-strap
Attach
the
neck-strap
to the
camera as
illustrated
below:
Be
sure
the
end of
the
strap
is
on the
inside.
5
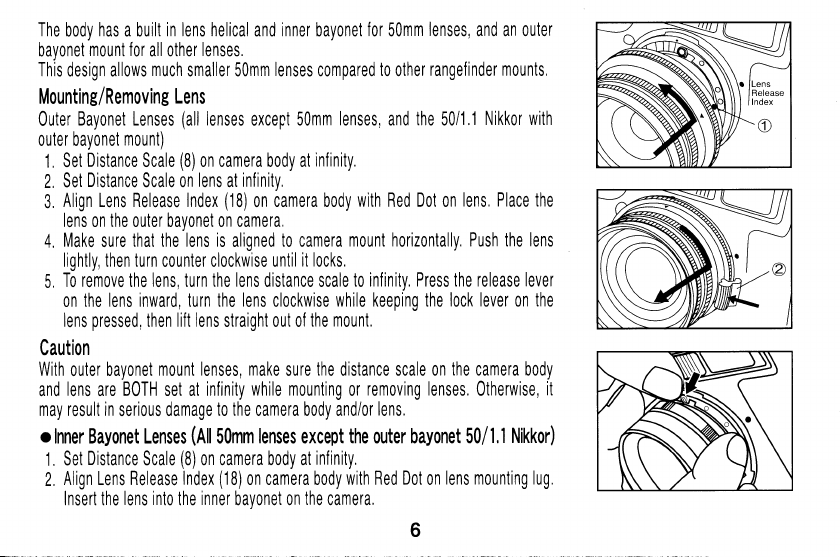
The
body
has
a built
in lens helical
and
inner
bayonet
for
50mm
lenses,
and an outer
bayonet
mount for
all other
lenses,
This
design allows
much
smaller 50mm
lenses
compared
to
other
rangefinder mounts,
Mounting/Removing
Lens
Outer
Bayonet Lenses
(all
lenses
except
50mm
lenses,
and
the
50i1
,1
Nikkor with
outer bayonet
mount)
1 Set
Distance
Scale
(B)
on camera body at
infinity,
2,
Set
Distance
Scale on
lens
at
infinity,
3.
Align Lens Release Index
(18)
on
camera body
with Red Dot
on
lens, Place the
lens
on
the
outer bayonet on camera,
4. Make
sure
that the lens is
aligned
to camera
mount horizontally, Push the
lens
lightly, then turn
c0unter clockwise
until
it locks,
5 To
remove
the
lens,
turn
the lens
distance scale
to
infinity, Press the release lever
on
the lens inward, turn the
lens
clockwise
while keeping the
lock lever
on
the
lens
pressed,
then
lift lens
straight out of
the
mount,
Caution
With
outer
bayonet
mount lenses,
make
sure
the distance scale on
the
camera body
and
lens
are
BOTH
set at
infinity while mounting
0r
remorling lenses,
Otherwise,
it
may result
in
serious damage
to the
camera body and/or
lens,
o Inner Bayonet Lenses
(Rtl
SOmm
lenses
except
the
outer bayonet
50/
1,1 Nikkor)
1.
Set
Distance
Scale
(8)
on camera body at
infinity.
2,
Align Lens Release
Index
(18)
on camera body
with Red Dot
on
lens mounting lug.
Insert the
lens into
the
inner
bavonet on
the
camera,
www.butkus.us
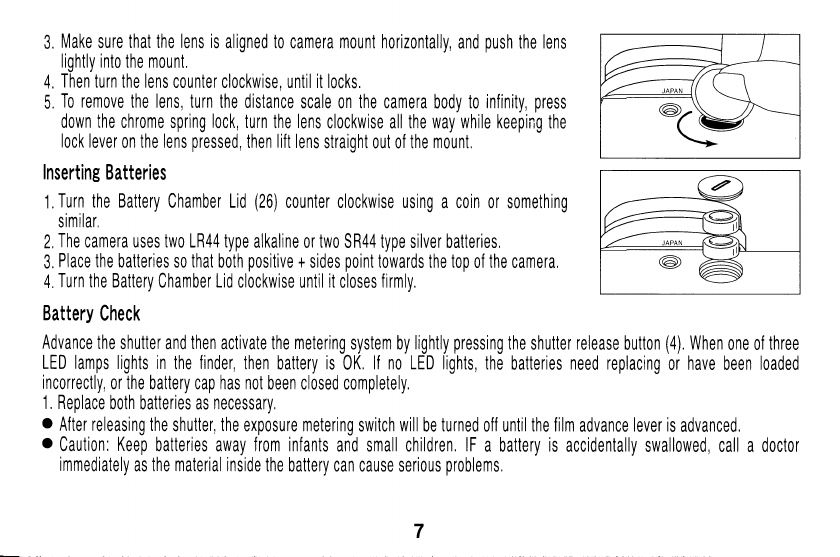
3.
Make
sure
that the
lens
is
aligned to
camera
mount horizontally,
and
push
the
lens
lightly into
the mount,
4.
Then
turn the lens
counter clockwise, until it locks,
5.
To remotle
the lens, turn
the
distance scale
on
the camera
body
to infinity,
press
down
the
chrome
spring
lock, turn
the
lens
clockwise all the
way while keeping
the
lock
lever
on
the lens
pressed,
then
lift
lens
straiqht
out of
the mount
Inserting
Batteries
1,
Turn the Battery
Chamber Lid
(26)
counter clockwise
using a coin or
something
similar,
2,
The
camera uses two LR44 type
alkaline
or
two
SR44 type silver batteries.
3,
Place
the batteries
so
that
both
positive
+
sides
point
towards the top
of
the
camera,
4,
Turn
the Battery
Chamber
Lid
clockwise
until
it
closes
firmly.
Battery
Check
Advance
the shutter and then activate the metering
system by
lightly
pressing
the shutter release
button
(4).
When
one of
three
LED lamps lights in
the
finder,
then battery is
0K.
ll no LED lights, the
batteries
need replacing
or have been loaded
incorrectly,
or the
battery cap
has not
been closed completely.
1. Replace
both batteries as necessary.
. After releasing the
shutter, the exposure metering switch will
be
turned
off until
the film
advance
lever is
advanced.
o Caution: Keep batteries
away
from infanls
and small children.
lF
a batlery is accidenlally
swallowed, call a doctor
immediately
as the material inside the
battery can cause serious
problems
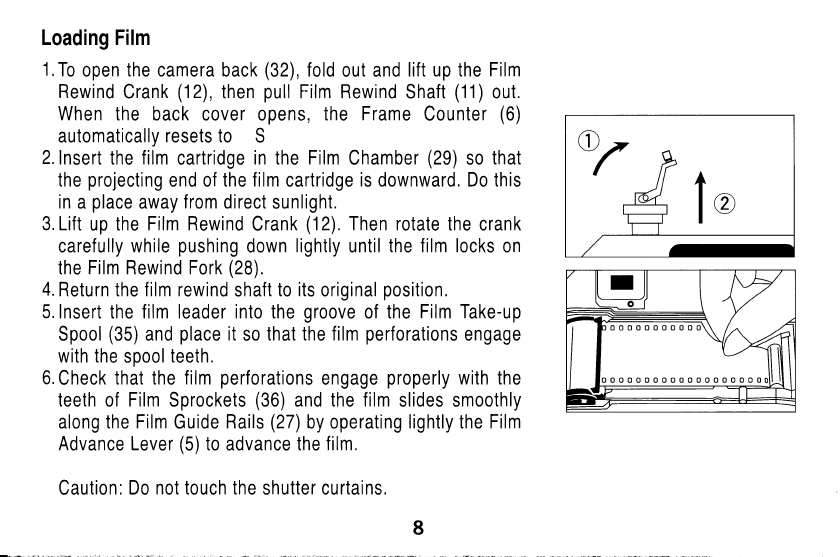
Loading Film
1.
To
open
the camera
back
(32),
fold
out and
lift up the
Film
Rewind
Crank
(12),
then
pull
Film Rewind
Shaft
(11)
out.
When
the back cover
opens,
the
Frame
Cou
nter
(6)
automatically
resets to S
2.lnsert
the film
cartridge
in the Film
Chamber
(29)
so
that
the
projecting
end of
the film
cartridge
is
downward.
Do this
in
a
place
away
from
direct
sunlight.
3. Lift
up
the Film Rewind
Crank
(12).
Then rotate
the
crank
carefully
while
pushing
down
lightly
until
the film locks
on
the
Film Rewind Fork
(28).
4.
Return
the
film rewind
shaft
to its
original
position.
5.
Insert the f ilm leader into the
groove
of
the
Film Take-up
Spool
(35)
and
place
it
so
that the film
perforations
engage
with the
spool
teeth.
6.
Check
that the
film
perforations
engage
properly
with the
teeth
of
Film
Sprockets
(36)
and
the film
slides smoothly
along
the Film
Guide
Rails
(27)
by operating
lightly the Film
Advance Lever
(5)
to advance the
film.
Caution:
Do not touch the
shutter curtains.
www.butkus.us
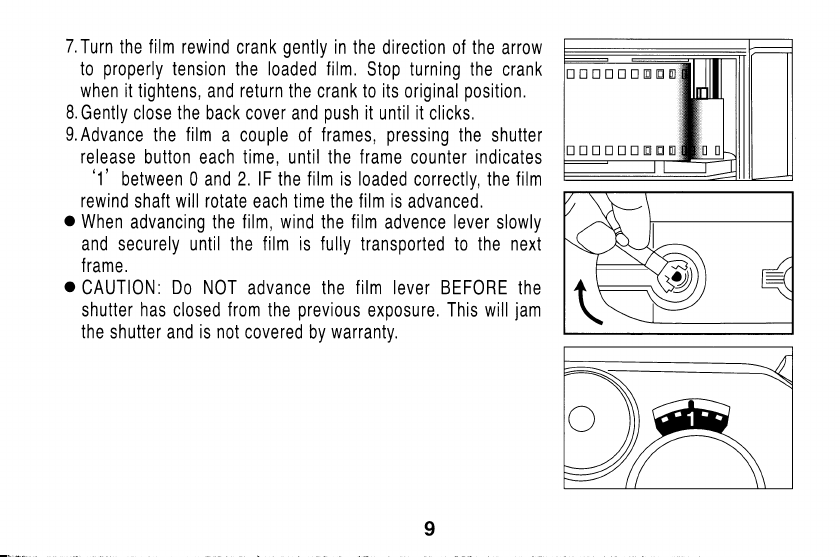
7.f
urn the
f
ilm rewind
crank
gently
in
the
direction of
the
arrow
to
properly
tension
the
loaded film.
Stop turning the crank
when it tightens,
and
return
the
crank
to its
original
position.
8.
Gently close
the
back cover
and
push
it
until
it
clicks.
9.
Advance
the f
ilm
a couple of
f rames,
pressing
the
shutter
release
button each
time,
until the
frame
counter
indicates
'1'
between 0 and
2. lF
the
film is loaded
correctly, the
f
ilm
rewind
shaft
will rotate
each
time the
film is
advanced.
o
When
advancing the
film, wind
the
film
advence
lever
slowly
and securely
until
the film is
fully
transported
to the
next
f rame.
o
CAUTION:
Do NOT
advance
the
f
ilm lever BEFORE
the
shutter
has
closed
from
the
previous
exposure.
This will
jam
the
shutter and
is not
covered
by
warranty.
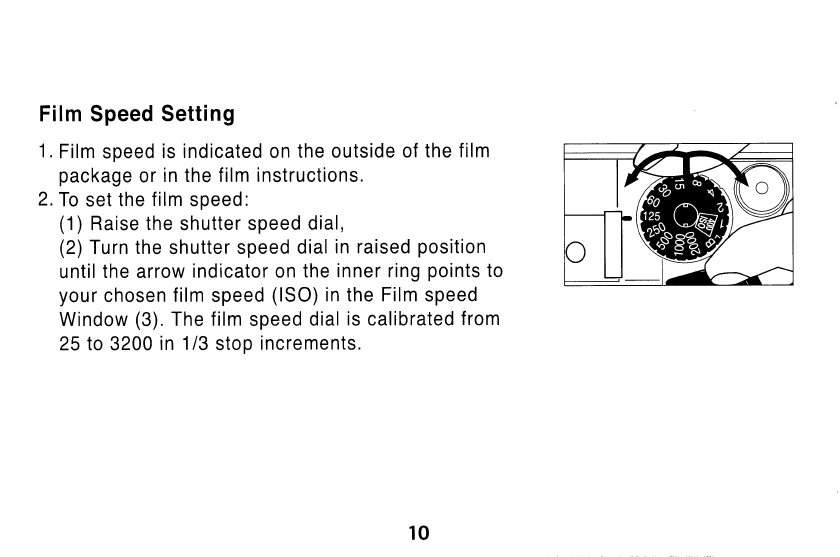
Film
Speed
Setting
1.
Film
speed
is indicated on
the outside
of the
film
package
or
in the film
instructions.
2.To
set
the
film
speed:
(1
)
Raise the
shutter
speed
dial,
(2)
Turn the
shutter
speed
dial
in
raised
position
until
the arrow
indicator on
the
inner ring
points
to
your
chosen
film
speed
(lSO)
in
the
Film
speed
Window
(3)
The f ilm
speed
dial
is
calibrated
f rom
25 to 3200
in
1/3
stop
increments.
10
www.butkus.us
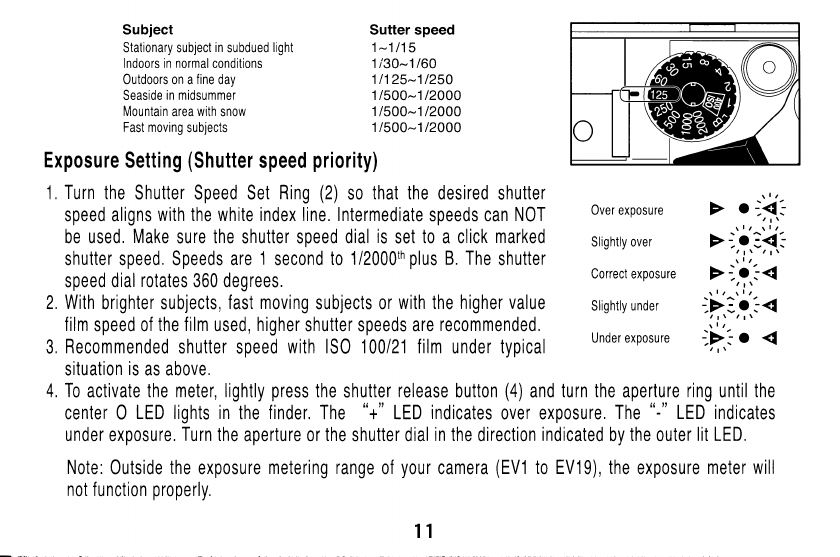
Subject
Stationary subject
in
subdued
light
Indoors in normal
conditions
Outdoors on a
fine
day
Seaside
in midsummer
Mountain
area
with
snow
Fast
moving
subjects
Note :
0utside
the
exposu
re mete ring range
not function
properly,
Over exposure
Slightly over
Correct exposure
Slightly
under
Under exposure
of
your
camera
(EV1
to EV19), the
exposure
meter will
11
Sutter speed
1-1115
1 i30-1160
11125-11250
1/500-1 t2000
1/500-1
12000
1/500-1 12000
Exposure
Setting
(Shutter
speed
priority)
1,
Turn
the
Shutter Speed Set
Ring
(2)
so
that the desired
shutter
speed aligns
with the white index line. Intermediate
speeds can
N0T
be used.
Make
sure
the
shutter speed
dial
is
set
t0
a
click
marked
shutter speed, Speeds are
1
second
to
1/2000th
plus
B. The
shutter
speed
dial
rotates
360 degrees.
2, With
brighter subjects,
fast moving
subjects or
with
the
higher value
film
speed of
the film
used,
higher
shutter
speeds
are
rec0mmended,
3,
Recommended
shutter
speed
with lS0 100121 film
under typical
situation
is
as above.
4. To activate the meter, lightly
press
the
shutter
release button
(4)
and turn the aperture ring until the
center 0 LED
lights in
the
finder.
The "+"
LED
indicates
over exposure.
The
"-"
LED indicates
under exposure.
Turn the
aperture or
the
shutter dial
in the
direction
indicaled
bV
the
outer
lit LED.
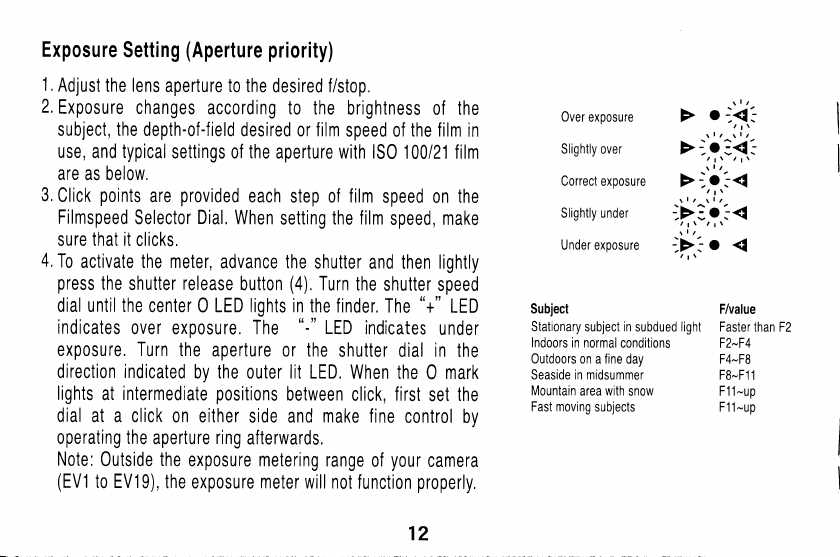
Exposure
Setting
(Aperture priority)
1,
Adjust
the lens
aperture
to
the desired f/stop.
2.
Exposure
changes according
to the
brightness
of
the
subject,
the
depth-of-field
desired
or
film
speed of
the film
in
use,
and
typical
settings of the
aperture
with lS0
100121 film
are
as below.
3,
Click
points
are
provided
each
step of
film
speed 0n
the
Filmspeed
Selector
Dial.
When
setting
the film
speed,
make
sure
that it
clicks,
4,
To
activate the meter,
advance the
shutter and then lightly
press
the
shutter
release
button
(a),
Turn
the
shutter speed
dial until the
center
O
LED lights in
the finder.
The
"+"
LED
indicates
0ver exposure. The t'-'1
LED
indicates
under
exposure. Turn
the
aperture
0r
the
shutter dial
in
the
direction indicated
by the
outer
lit LED.
When
the
0 mark
lights
at
intermediate
positions
between
click,
first
set
the
dial at a click
on either
side and
make
fine
control by
operating the
aperture
ring
afterwards.
Note:
0utside
the
exposure metering
range
of
your
camera
(EV1
to EV19),
the
exposure
meter
will not
function
properly,
Over exposure
Slightly
over
Correct
exposure
Slightly under
Under exposure
Subject
Stationary
subject
in
subdued light
lndoors
in normal
conditions
Outdoors
on a
fine
day
Seaside in midsummer
Mountain
area
with
snow
Fast moving
subjects
F/value
Faster
than F2
F2-F4
F4-F8
F8-F1
1
F1 1
-up
F1 1
-up
12
www.butkus.us
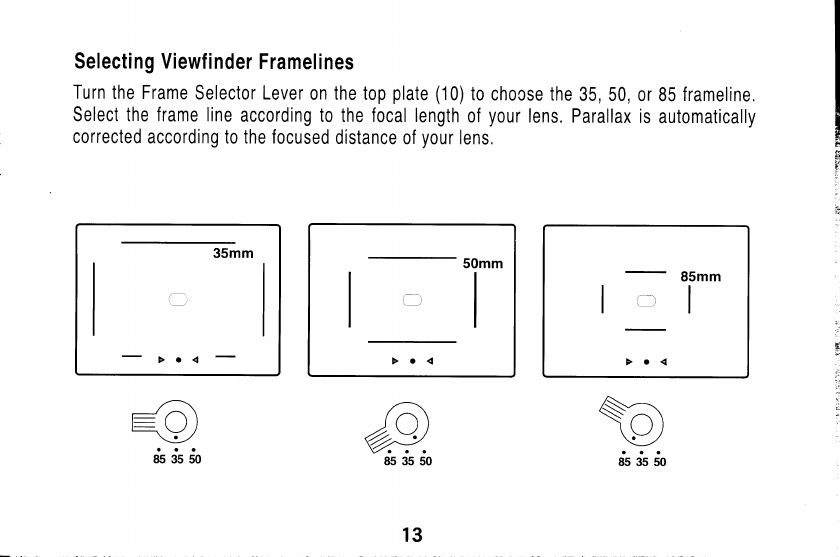
Selecting Viewf i nder
Framelines
Turn the Frame
Selector Lever
on the top
plate
(10)to
chocse the
35, 50,
or 85
frameline.
Select the frame line
according
to the focal length
of
your
lens. Parallax
is
automatically
corrected
according to the focused
distance of
your
lens.
Sa
\y
ds si do
6,
{t;
i"
;{
50mm
il
13
uSmm
I
)l I
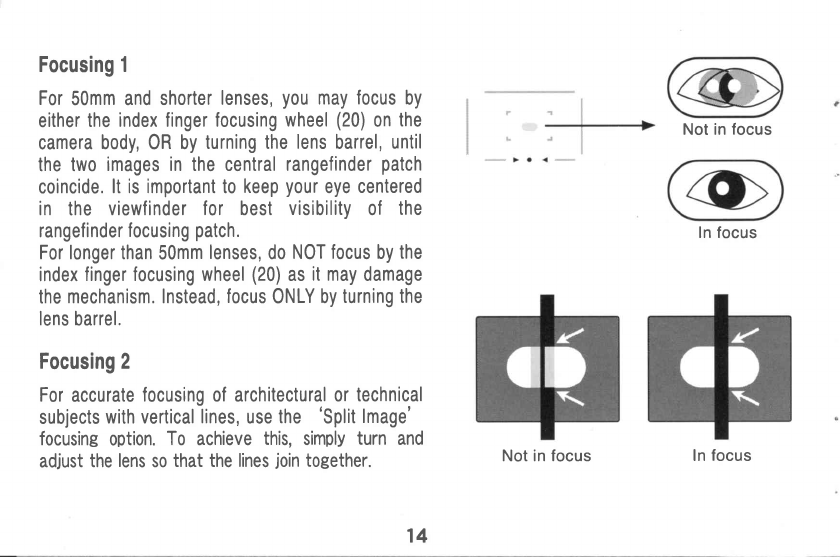
Focusing 1
For
50mm and shorter
lenses,
you
may focus
by
either
the
index finger focusing
wheel
(20)
on
the
camera
body,0R by
turning the
lens
barrel,
until
the two
images in the central
rangefinder
patch
coincide.
lt is important to
keep
your
eye
centered
in the viewfinder for best
visibility
of the
rangefinder
focusing
patch.
For longer than
50mm
lenses,
do
NOT
focus
by
the
index
finger focusing wheel
(20)
as
it may
damage
the
mechanism. Instead,
focus
ONLY
by
turning the
lens
barrel.
Focusing 2
For
accurate
focusing of architectural or
technical
subjects
with vertical
lines,
use
the 'Split
lmage'
focusing
option.
To achieve
this,
simply
turn
and
adjust
the
lens
so
that the lines
join
together.
Not in focus
In focus
Not in focus ln
focus
14
www.butkus.us
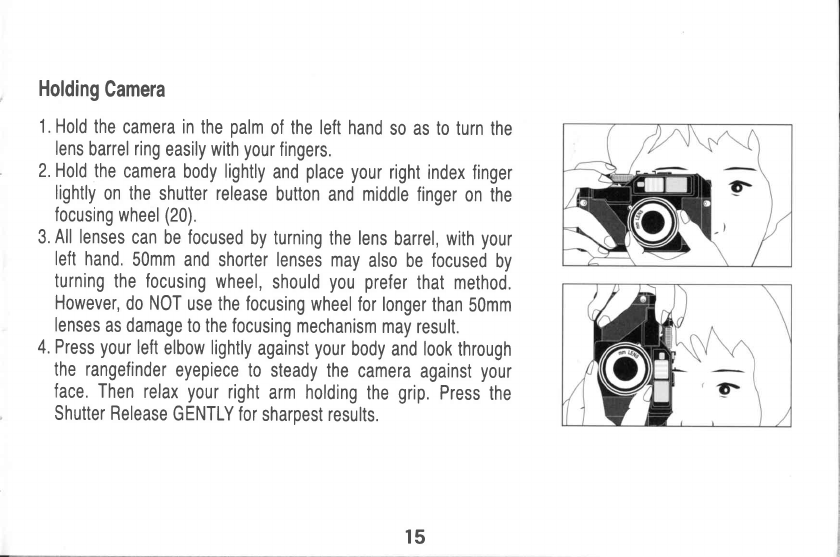
Holding
Camera
1.
Hold
the
camera in
the
palm
of the left hand
so as to turn
the
lens
barrel
ring
easily
with
your
fingers.
2. Hold
the
camera
body
lightly
and
place
your
right
index
finger
lightly
on the
shutter release
button
and
middle
finger
on the
focusing
wheel
(20).
3.
All lenses
can
be
focused
by turning
the lens
barrel, with
your
left
hand.
50mm
and
shorter
lenses
may
also be focused
by
turning
the focusing
wheel,
should
you prefer
that method.
However,
do
NOT
use the focusing
wheel for
longer
than
50mm
lenses
as damage to
the focusing
mechanism
may
result.
4. Press
your
left
elbow
lightly
against
your
body
and
look
through
the rangefinder
eyepiece to
steady
the
camera
against
your
face.
Then
relax
your
right
arm holding
the
grip.Press
the
Shutter Release
GENTLY
for
sharpest results.
15
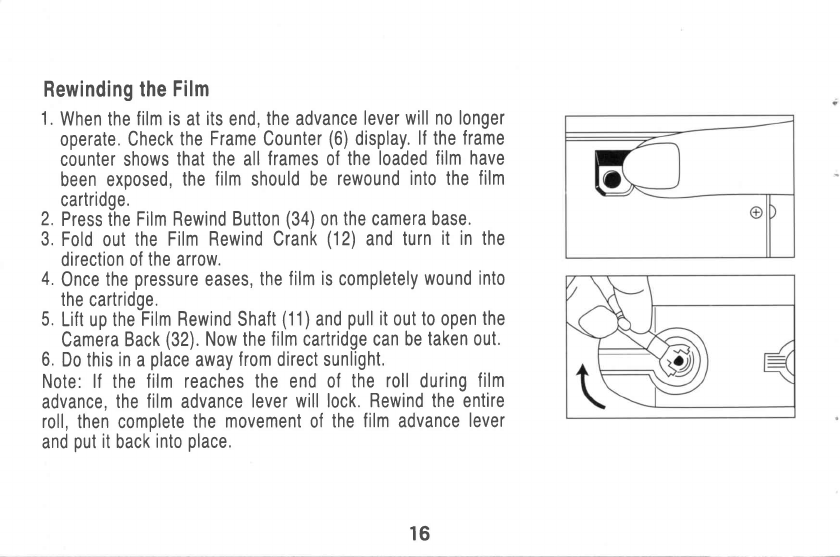
Rewinding
the
Film
1.
When the
film is
at
its
end,
the
advance
lever
will no longer
operate.
Check
the
Frame
Counter
(6)
display.
lf the
frame
counter shows
that the
all
frames
of
the
loaded
film have
been exposed,
the
film
should
be
rewound
into the
film
cartridge.
2.
Press the
Film Rewind
Button
(34)
on
the
camera
base.
3.
Fold
out
the
Film Rewind Crank
(12)
and
turn
it in the
direction of
the arrow.
4.0nce
the
pressure
eases,
the
film
is
completely
wound into
the
cartridge.
5.
Lift up theFitm
Rewind
Shaft
(11)and
pull
it
out
to
open
the
Camera
Back
(32).
Now
the
film cartridge can be
taken out.
6.
Do this
in
a
place
away
f rom direct sunlight.
Note: lf the
f ilm reaches
the
end
of the
roll
during
f ilm
advance,
the
film
advance
lever will lock.
Rewind the entire
roll,
then complete
the
movement
of
the
f ilm
advance
lever
and
put
it
back
into
place.
16
www.butkus.us
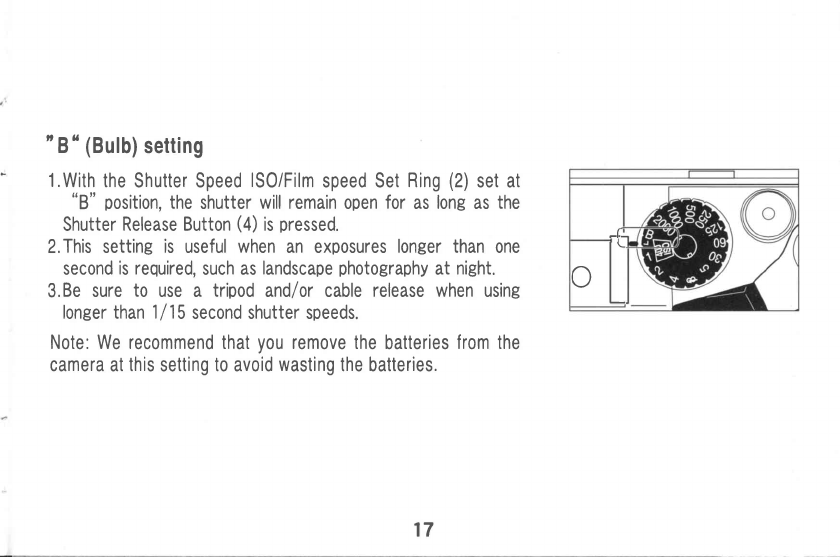
'B"
(Bulb)
setting
* 1.With
the
Shutter Speed
ISO/Film
speed Set
Ring
(2)
set at
"8" position,
the
shutter
will remain
open
for
as
long
as
the
Shutter
Release Button
(a)
is
pressed.
2.
This
setting
is
useful
when
an exposures
longer than
one
second
is required,
such
as
landscap€
photography
at
night.
3.
Be
sure
to use a tripod
andl or cable
release when
using
longer than 1l 15
second shutter speeds.
Note: We recommend that
you
remove the
batteries
from the
camera
at
this
setting
to
avoid
wasting
the
batteries.
J
cI
17
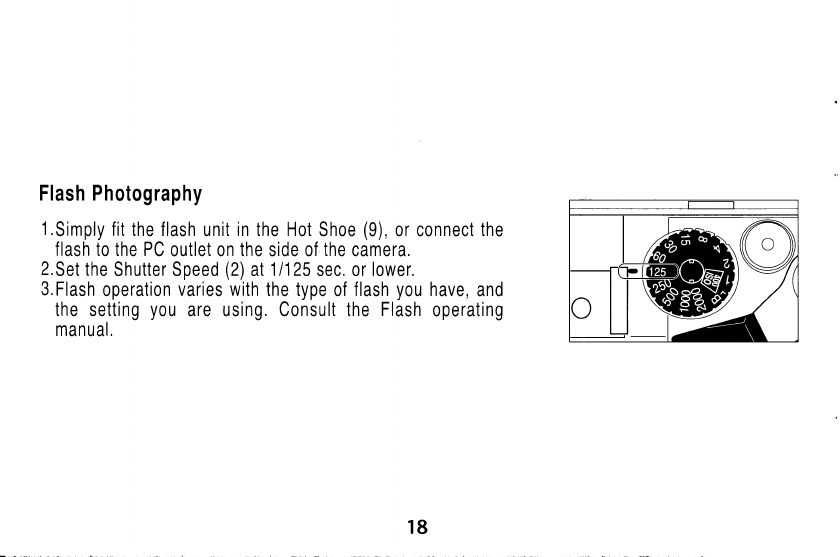
Flash Photog
raphy
l.Simply
fit
the flash
unit
in the Hot
Shoe
(9),
or connect the
flash
to the PC
outlet on
the
side of
the
camera.
2.
Set
the
Shutter Speed
(2)
at
11125
sec. or
lower.
3.Flash
operation
varies with
the type
of
flash
you
have,
and
the
setting
y0u
are using. Consult the
Flash
operating
manual.
18
www.butkus.us
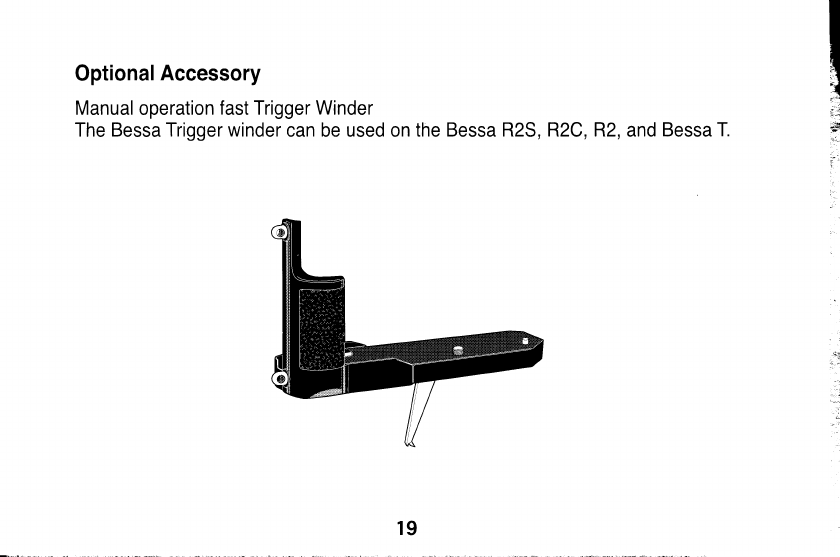
Optional
Accessory
Manual operation fast Trigger Winder
The
Bessa Trigger winder
can be used on the
Bessa R2S, R2C, R2,
and
Bessa T.
19
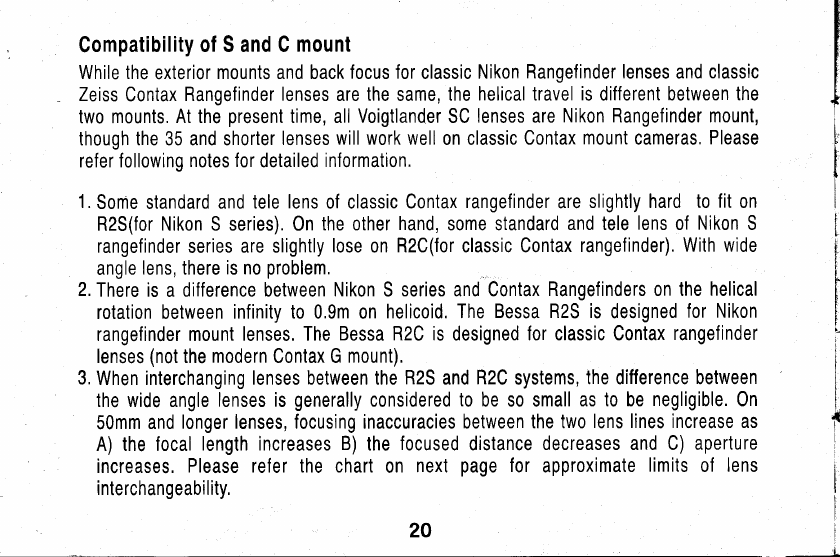
Compatibility
of S and C
mount
While the
exterior
mounts and back
focus for
classic
Nikon
Rangefinder lenses
and
classic
Zeiss
Contax
Rangefinder
lenses
are
the
same,
the helical travel
is
different between
the
two mounts.
At the
present
time, all
Voigtlander
SC
lenses are
Nikon Rangefinder mount,
though the 35 and shorter
lenses
will work well
on classic
Contax
mount
cameras,
Please
refer following
notes for
detailed
information,
1.
Some standard
and tele
lens
of classic Contax
rangefinder
are
slightly hard to
fit
on
R2S(for Nikon S series). 0n
the other
hand,
some standard
and tele
lens
of
Nikon
S
rangefinder
series
are slightly
lose
on
R2C(for classic Contax
rangefinder).
With wide
angle
lens, there
is no
problem,
2.
There is
a
difference between
Nikon
S
series and Contax
Rangefinders on the
helical
rotation between
infinity to 0,9m on
helicoid. The
Bessa R2S is
designed
for Nikon
rangefinder mount
lenses. The
Bessa R2C is
designed
lor classic Contax
rangefinder
lenses
(not
the
modern
Contax G
mount).
3,
When interchanging
lenses between the
R2S
and
R2C
systems,
the difference between
the wide angle
lenses is
generally
considered
to
be so small
as to be
negligible.
0n
50mm
and
longer lenses, focusing inaccuracies between
the two
lens lines increase as
A) the focal
length increases
B)
the
focused
distance
decreases and C) aperture
increases,
Please refer the chart
on next
page
for
approximate
limits
of lens
interchangeability,
f
20
www.butkus.us
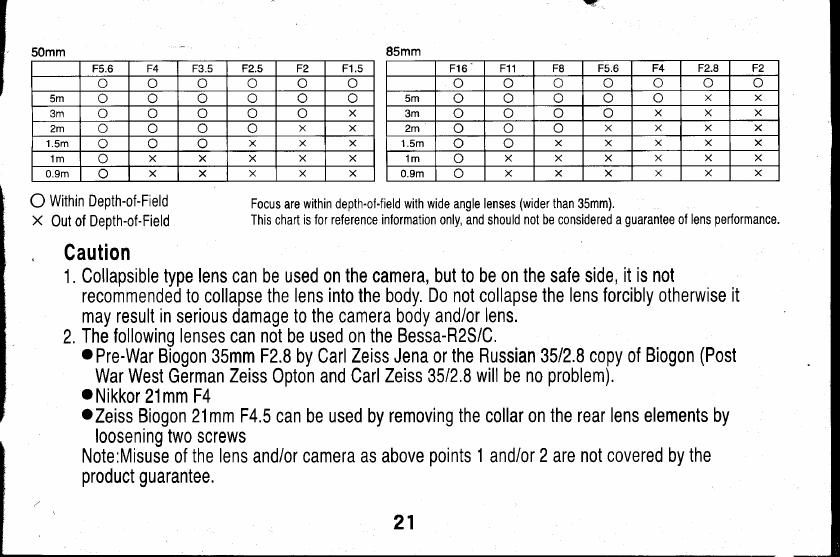
50mm
F5.6 F4 F3.5 F2.5 F2 F1.5
Uoa)
5m or) a\ o
3m (_.,r or) X
2m o o X X
1.5m ooXXX
'lm a) xXXx x
0.9m ox x X X X
85mm
F16 F11 TO F5.6 F4 F2.8 F2
ooo o
5m XX
3m X X
2m oa\ XXxX
1.5m oXXX
1m xX X XxX
0.9m oXxX
O Witnin Depth-of-Field
X Out
of Depth-of-Field Focus
are
within depth-ol-field with wide angle lenses
(wider
than 35mm).
This chart
is for reference information
only, and should
not be considered a
guaranlee
of
lens
performance.
Caution
1.
Collapsible
type
lens
can be used on
the camera, but to be on
the
safe side,
it is not
recommended to
collapse
the lens
into
the body.
Do not
collapse
the
lens forcibly
otherwise
it
may result
in
serious
damage
to the camera body
and/or
lens.
2.
The following
lenses
can
not
be used on
the Bessa-R2S/C,
o
Pre-War Biogon
35mm
F2.8
by Carl
Zeiss Jena or
the Russian
3512.8
copy of
Biogon
(Post
War West
German
Zeiss
Opton and Carl
Zeiss 35/2,8
will
be
no
problem).
oNikkor
21nnF1
oZeiss
Biogon
21mm F4.5
can be used by
removing the collaron
the rear lens elements by
loosening two screws
Note:Misuse
of
the
lens
and/or camera as above
points
1
and/or
2
are
not covered by the
product guarantee.
21
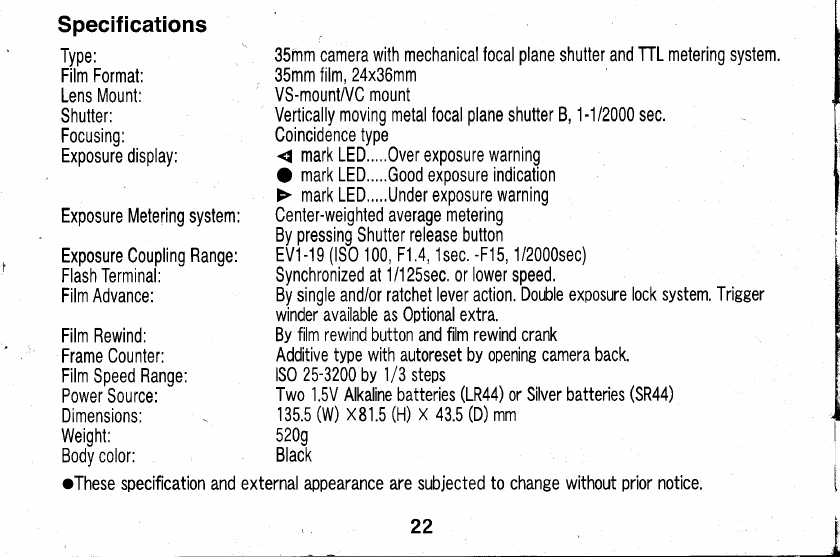
Specif
ications
Type:
Film Format:
Lens
Mount:
Shutter:
Focusing:
Exposure
display:
Exposure Metering
system:
Exposure Coupling
Range:
Flash Terminal:
Film Advance:
Film Rewind:
Frame Counter:
Film
Speed
Range:
Power Source:
Dimensions:
Weight:
Bodv color:
35inm camera
with mechanical
focal
plane
shutter and
TTL metering
system,
35mm film,
24x36mm
VS-mount/VC
mount
Vertically
moving metalfocal
plane
shutter
B, 1-1/2000 sec.
Coincidence
type
{ mark LED.....Over exposure
warning
O mark LED.....Good
exposure
indication
F mark LED,....Under exposure
warning
Center-weighted average
metering
By
pressing
Shutter
release
button
EV1-19
(lS0
100, F1.4, 1sec.
-F'15,
1/2000sec)
Synchronized
at
1/125sec.
or
lower
speed.
By
single and/or
ratchet lever action.
Double exposure
lock system. Trigger
winder availabb as Optional extra.
By
film rewind
button and
film rewind
crank
Additive
type with autoreset
by
opening camera back.
lS0
25-3200
by
1/3
steps
Two 1.5V Alkaline batteries
(1R44)
or Silver batteries
(SR44)
135.5
(W)
x81.5
(H)
x 43.5
(D)
mm
5209
Black
oThese
specification and external
appearance are subjected
to
change
without
prior
notice.
t.
22[
www.butkus.us
