32159 52B For PDF Winchester
Winchester 52B Winchester 52B
Winchester 52B The Eye | File Listing
User Manual: PDF T E X T F I L E S
Open the PDF directly: View PDF ![]() .
.
Page Count: 16

This is one of the famous line of Winchester
World Standard arms. As one of the Classic
Traditions models you can expect the same
quality and satisfaction as with the original
historic Model 52B introduced in 1919. And,
as with the original, you'll appreciate its
economy of design, quick handling properties
and smooth functioning.
IMPORTANT INSTRUCTIONS
FOR
MODEL 52B
.22 CALIBER BOLT ACTION RIFLE
U.S. REPEATING ARMS COMPANY, INC.
275 Winchester Avenue
New Haven, CT, U.S.A. 06511-1970
Administrative Offices:
275 Winchester Avenue,
Morgan, UT, U. S. A. 84050-9333
Winchester trademarks licensed from Olin Corporation.

Contents Page
Gun safety warnings . . . . . . . . . . . . . . . . . . . . . . . . .3
General features . . . . . . . . . . . . . . . . . . . . . . . . . . . .6
General description . . . . . . . . . . . . . . . . . . . . . . . . .8
Terminology and descriptions . . . . . . . . . . . . . . . . .8
Serial number . . . . . . . . . . . . . . . . . . . . . . . . . . . . .10
Ammunition . . . . . . . . . . . . . . . . . . . . . . . . . . . . .10
General operation . . . . . . . . . . . . . . . . . . . . . . . . .11
Initial cleaning . . . . . . . . . . . . . . . . . . . . . . . . . . . .11
Oiling the action . . . . . . . . . . . . . . . . . . . . . . . . . .11
Operation of the safety . . . . . . . . . . . . . . . . . . . . . .12
Cocking indicator . . . . . . . . . . . . . . . . . . . . . . . . .12
Inserting and removing the bolt . . . . . . . . . . . . . .13
Loading . . . . . . . . . . . . . . . . . . . . . . . . . . . . . . . . . .16
Unloading . . . . . . . . . . . . . . . . . . . . . . . . . . . . . . . .18
Trigger System . . . . . . . . . . . . . . . . . . . . . . . . . . . .19
Forearm adjustment screw . . . . . . . . . . . . . . . . . . .20
Scope mount and sights . . . . . . . . . . . . . . . . . . . . .20
Cleaning and maintenance suggestions . . . . . . . . .21
Ordering parts . . . . . . . . . . . . . . . . . . . . . . . . . . . .26
Service or repair . . . . . . . . . . . . . . . . . . . . . . . . . . 26
Questions & Winchester.com . . . . . . . . . . . . . . . .27
1
New gun owner’s record.
Use the space below to record information about your new
Winchester Model 52B rifle.
Serial Number ____________________________________
Caliber __________________________________________
Grade ___________________________________________
Purchase Price ____________________________________
Purchased From ___________________________________
Date of Purchase __________________________________
Winchester trademarks licensed from Olin Corporation
Made in USA. Printed in Japan.
©1997 • KP982/97360

GUN SAFETY WARNINGS
IT IS ESSENTIAL THAT THESE OPERATING
INSTRUCTIONS BE THOROUGHLY STUD-
IED BEFORE USING THIS FIREARM TO
ASSURE PROPER AND SAFE GUN HAN-
DLING. FAILURE TO FOLLOW THESE
INSTRUCTIONS OR FAILURE TO OBEY
ANY SAFETY WARNING MAY RESULT IN
INJURY TO YOURSELF OR OTHERS, OR
CAUSE DAMAGE TO YOUR GUN.
As a gun owner, you accept a set of demanding
responsibilities. How seriously you take these respon-
sibilities can be the difference between life and death.
There is no excuse for careless or abusive handling of
any firearm. At all times handle your rifle and any
other firearm with intense respect for its power and
potential danger.
PLEASE READ AND UNDERSTAND ALL OF
THE CAUTIONS, PROPER HANDLING PRO-
CEDURES AND INSTRUCTIONS OUTLINED
IN THIS BOOKLET BEFORE USING YOUR
NEW FIREARM.
1. Do not carry a loaded gun with a live round in the
chamber while walking, running, climbing a tree,
crossing a fence or anywhere you might slip or fall,
drop the gun or otherwise bump or jar the gun. A gun
that is dropped, bumped, or jarred with a chambered
round might accidentally discharge even with the
safety on, causing serious injury to you or someone
else. When a round is chambered keep the safety on
until you are ready to shoot.
2. Do not rely on the safety to prevent accidental dis-
charge. Many safeties merely block the trigger and
prevent firing by pulling the trigger. The safety may
not prevent an accidental discharge due to dropping,
3
MODEL 52B BOLT ACTION 22 RIMFIRE
The Model 52 is what legends are made of. Your
Model 52B offers the accuracy you want in a rimfire
bolt action. It has the renowned Micro Motion trig-
ger system. Producing a trigger system like this is
labor intensive and requires extraordinary precision.
Watch-like part fits like you see in a 52B are rare in
these modern days. The match chamber adds further
to the 52’s exceptional accuracy. You may have
already noticed how smooth and effortless it is to
work the bolt. The magazine system, with its five shot
capacity, is easy to operate and very reliable . . . just
like on the originals.
The history behind the Model 52 is equally extraordi-
nary. It first appeared in 1919 and was shot at the
National Rifle Matches that very year. It was a
favorite of returning veterans after World War I
because of its bolt action design that utilized a remov-
able magazine. Many consider it one of the most sig-
nificant factors in the growth of small-bore target
shooting in the United States.
2

ous injury in case of an accidental discharge. Never
load in the house or in your vehicle.
12. Never shoot at a hard, flat surface or at the sur-
face of water to avoid a ricochet and possible serious
personal injury to yourself or a bystander.
13. Store your gun in a clean, dry place out of the
reach of children and separated from stored ammuni-
tion.
14. Never alter any parts of your gun. Any alterations
or adjustments that may become necessary to the
operating mechanism should be performed by a quali-
fied gunsmith.
15. Hunting from elevated surfaces such as tree stands
is dangerous. Doing so may increase the risk of han-
dling any firearm. Always make certain that the stand
being used is safe, sturdy and stable. Always make
certain your firearm is unloaded when it is being
taken up and down from the stand. Always make cer-
tain that your firearm is not dropped from the stand
or dropped while it is being taken up or down from
the stand.
16. Discharging firearms in poorly ventilated areas,
cleaning firearms, or handling ammunition may result
in exposure to lead and other substances known to
cause birth defects, reproductive harm and other
serious physical injury. Have adequate ventilation at
all times. Wash hands thoroughly after exposure.
5
jarring, or bumping a gun.
3. Use only ammunition for which the gun is cham-
bered as indicated on the barrel, to prevent excessive
pressure and possible serious personal injury.
4. Incorrectly reloaded ammunition can cause serious
personal injury and damage to the firearm due to
excessive pressure. Reload only after proper instruc-
tion and in strict compliance with instruction and
data contained in current reloading manuals.
5. Never point a gun at anything you do not intend
to shoot. Always keep it pointed in a safe direction in
case of accidental discharge.
6. Always check to ensure that the barrel is free of
obstructions before loading and using the gun. If you
experience light recoil or off sound, check the barrel
for an obstruction.
7. Before firing, clean any grease or oil out of barrel
with cleaning rod and patch. Grease or heavy accu-
mulation of oil can cause excessive pressure and result
in serious personal injury.
8. Keep barrel, chamber and action free of rust. Rust
in the barrel and chamber can cause excessive pres-
sures resulting in serious injury. A rusted, pitted or
eroded barrel should be replaced.
9. Use hearing protection to prevent ear damage from
repeated exposure to gunfire.
10. Always use proper shooting glasses to prevent eye
injury from flying particles.
11. Never carry a loaded gun in a motor vehicle or
carry one into a dwelling. Always carefully unload
the gun before entering a motor vehicle, a dwelling or
an area such as a camp. Always point a gun in a safe
direction while loading or unloading to prevent seri-
4
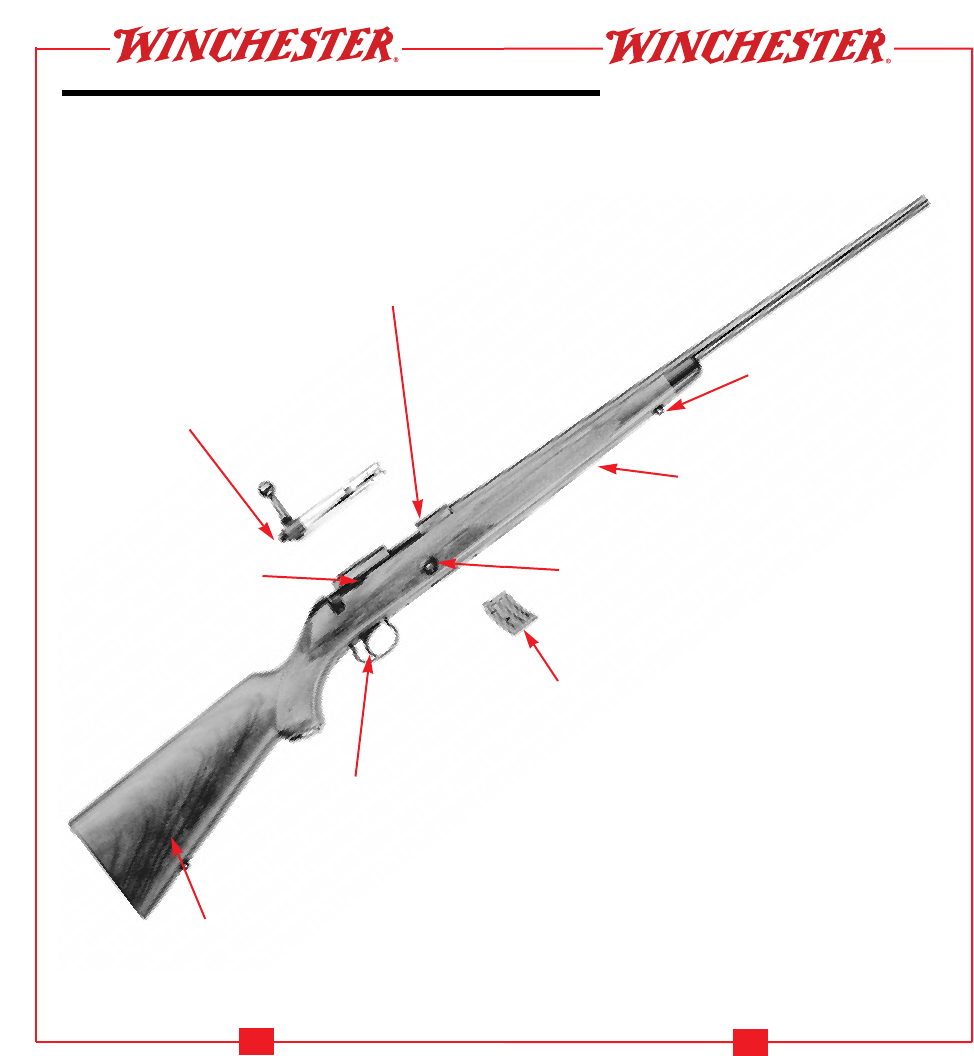
7
F
IGURE
1
The heart of the Model 52B is its incredible
trigger system. Over the years the name
“Micro Motion Trigger” has become syn-
onymous with accuracy.
The rear of the receiver is drilled and
tapped for mounting a peep sight. The
plain barrel can be fitted with a front
sight by a gunsmith, if you so desire.
The in-line, curved magazine offers reliable
feeds. The button on the right side releases
the magazine for re-filling.
Low profile swivel attach-
ments just like early versions
of half a century ago.
The magazine release button is conveniently
placed on the side of the stock, just below the
ejection port.
The forearm adjustment screw lets you
apply pressure or force against the underside
of the barrel in order to maximize accuracy.
6
MODEL 52B FEATURES
The stock is of beautifully fin-
ished selected walnut, careful-
ly cut checkered.
F
IGURE
1
The receiver top is drilled and
tapped for scope mounts. This
is a rifle with accuracy truly
worthy of the finest scopes.
The Model 52B’s Micro Motion
trigger system is famous for its
smooth, crisp let-off.
The thumb-operated safety is con-
veniently located on the right side
of the receiver, just forward of the
bolt handle.
A cocking indicator on the rear end
of the bolt makes it easy to deter-
mine your rifles cocking status.
The Model 52B comes with the receiver drilled and
tapped to accept commercially available rear peep
sights and scope mounts. A two-piece scope mount
base and high scope mount rings are available as ac-
cessories. (Front sights must be installed by a quali-
fied gunsmith.)
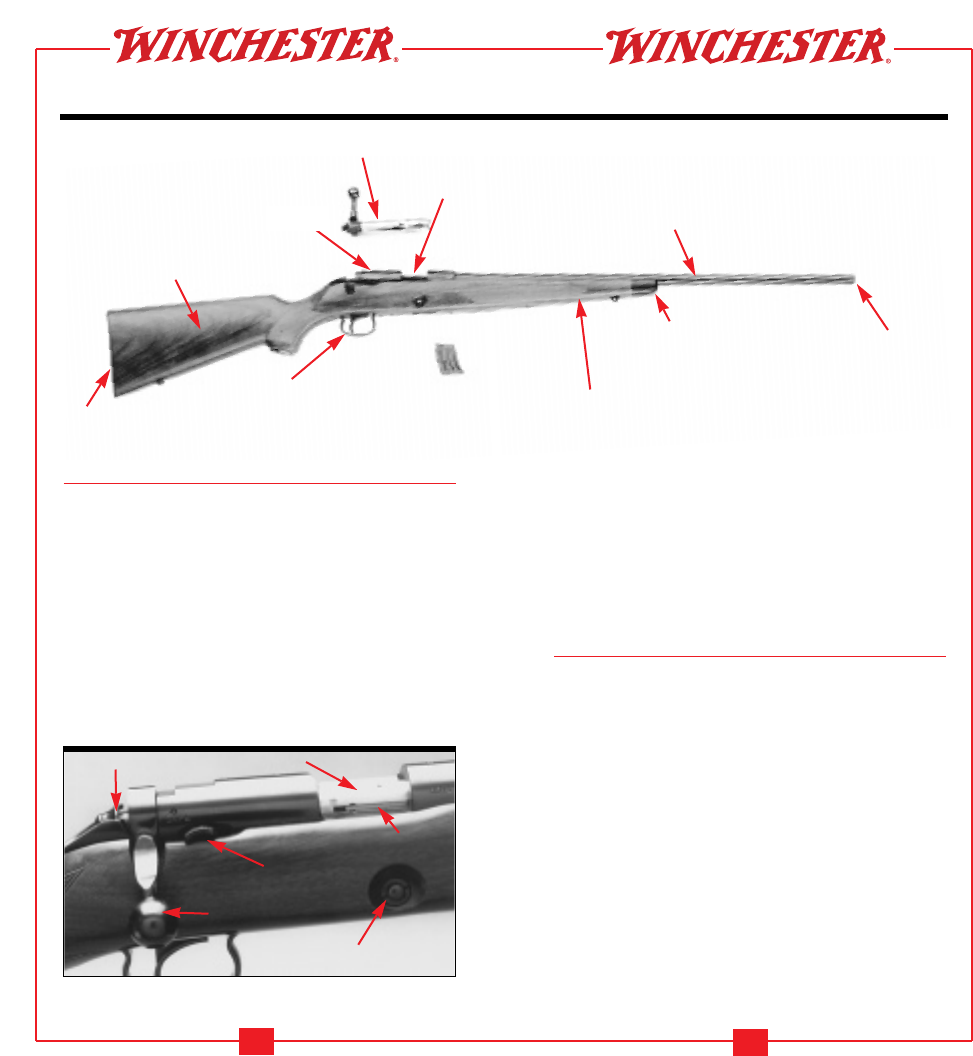
TERMINOLOGY AND DESCRIPTIONS
Descriptions in this booklet generally refer to the gun
in the horizontal position. That is, in the normal fir-
ing position. For example, the muzzle is forward or
front; the butt stock is rearward or rear; the trigger is
downward or underneath; the sights are upward or on
top. Figure 1 covers the general features and benefits
of the Model 52B design.
For general parts terminology, refer to Figure 2A and
2B. With the exception of magazine disassembly, fig-
ure 2A also shows the Model 52B disassembled to the
extent necessary in order to follow instructions con-
tained in this book.
Throughout this manual the “action” refers to the
9
F
IGURE
2
A
Muzzle
Fore-end
Fore-end tip
Barrel
GENERAL DESCRIPTION
Your new Winchester Model 52B is a reproduction of
the original Model 52B “Sporting” bolt action. It fea-
tures the highly regarded trigger system. Other fea-
tures of the Model 52B include the side safety, the
black forearm tip, the special quick-release swivel
mounts on the forearm and stock, and the conve-
nient five-shot removable magazine (additional spare
magazines can be purchased from your Winchester
firearms dealer).
8
F
IGURE
2
A
Magazine
Buttplate
Ejection Port
Trigger
Buttstock
Receiver
Bolt
Safety
Extractor
Cocking indicator
Magazine release button
Bolt
Bolt handle
F
IGURE
2B

GENERAL OPERATION
The Model 52B is a bolt action rifle that operates by
lifting the bolt handle, drawing the bolt rearward and
then sliding the bolt forward and rotating the bolt
downward until it locks into battery position. This
process takes a cartridge from the magazine and loads
it into the chamber for firing.
CAREFULLY READ THE FOLLOWING PRO-
CEDURES BEFORE ATTEMPTING TO
SHOOT YOUR MODEL 52B RIFLE.
INITIAL CLEANING
BEFORE THE FIRST FIRING, CLEAN THE
BORE WITH A CLEANING ROD & PATCH.
ALSO, CLEAN THE ANTI-RUST COM-
POUND FROM THE INSIDE OF THE RE-
CEIVER WITH A CLEAN RAG AND LIGHT
GUN OIL. SEE “CARE AND CLEANING”
LATER IN THIS MANUAL.
OILING THE ACTION
Before the first firing you should wipe the mechanism
completely clean, clean the bore and apply a few
drops of oil on the following surfaces:
• Along the breech bolt surface and where the sleeve
contacts the breech bolt.
• Along the breech bolt surfaces on the receiver
where the bolt contacts the receiver as it is worked.
Avoid applying too much oil. Only a light film is
necessary. Cleaning and Maintenance Suggestions
should be followed before each oiling.
11
mechanism of this rifle which loads and secures the
cartridges in the chamber.
SERIAL NUMBER
The serial number can be found on the right hand
side of the receiver. Record the serial number at the
front of this book for future reference.
AMMUNITION
The caliber of your Model 52B is inscribed on left
side of the barrel, toward the receiver.
The Model 52B must be used only with .22 Long
Rifle cartridges. It is unsafe to attempt loading mag-
num cartridges in a rifle designed for Long Rifle car-
tridges.
U.S. Repeating Arms Co. can assume no responsibili-
ty for incidents which occur through use of cartridges
of nonstandard dimension or those developing pres-
sures in excess of SAAMI (Sporting Arms and
Ammunition Manufacturer’s Institute) established
standards.
Winchester ammunition is always an excellent
choice for your new Winchester rifle, delivering the
unmatched performance and dependability you want.
DISCHARGING FIREARMS IN POORLY
VENTILATED AREAS, CLEANING
FIREARMS, OR HANDLING AMMUNITION
MAY RESULT IN EXPOSURE TO LEAD AND
OTHER SUBSTANCES KNOWN TO CAUSE
BIRTH DEFECTS, REPRODUCTIVE HARM
AND OTHER SERIOUS PHYSICAL INJURY.
HAVE ADEQUATE VENTILATION AT ALL
TIMES. WASH HANDS THOROUGHLY
AFTER EXPOSURE.
10
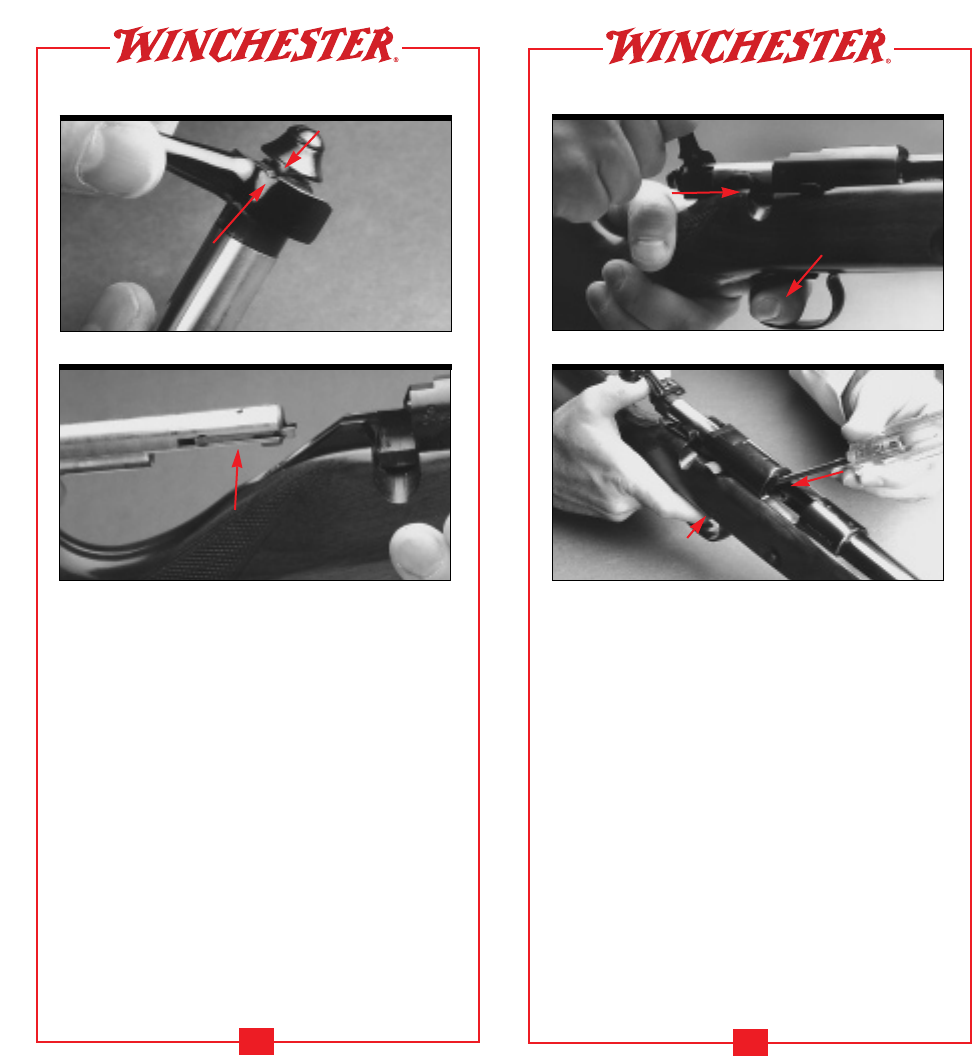
INSERTING AND REMOVING THE BOLT
INSERTING THE BOLT—
The Model 52 rifle comes packaged with the bolt re-
moved from the rifle. It is necessary to insert the bolt
into the receiver.
WARNING: REMOVE THE MAGAZINE AND
MAKE SURE THE RIFLE IS FULLY UN-
LOADED BEFORE PROCEEDING.
To insert the bolt the safety must be placed in the
“off safe’’position.
1. The front and rear portions of the bolt must be
aligned properly before it can be inserted. The bolt
handle (and connected locking surface) can rotate
with respect to the bolt body itself. If not already in
alignment the parts must be realigned. To do this:
a)Take the end of the bolt body in one hand and
the bolt handle in the other.
b)Twist the handle to align the top and bottom
pointers on the shroud with the grooves cut in
the bolt. The top groove is on the polished por-
13
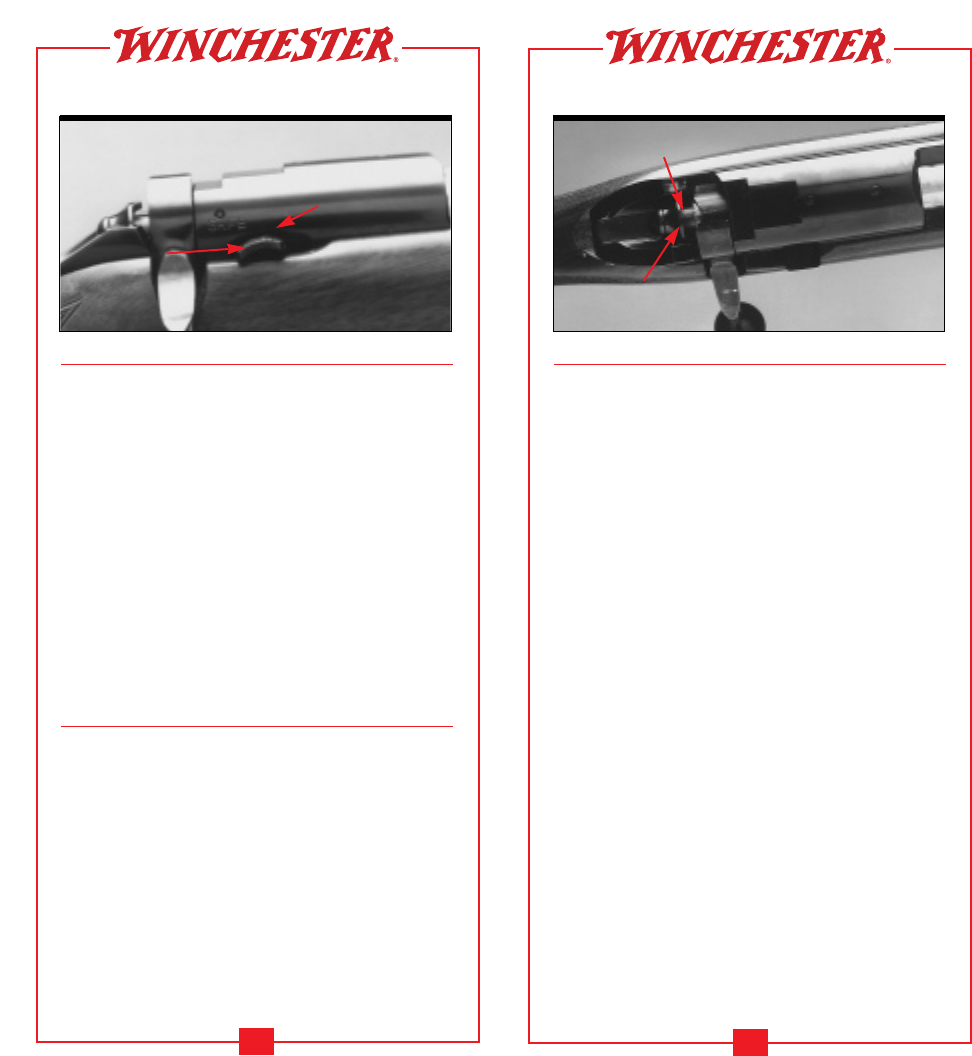
Cocking indicator
F
IGURE
4
Extends rearward when the
bolt is cocked
OPERATION OF THE SAFETY
The safety is located on the right side of the receiver
(Figure 3). When the safety is clicked (or is detented)
into position toward the rear, the gun is in the “on
safe’’ position as shown. In this position the trigger is
blocked. “Safe” is stamped on the receiver to mark
this “on safe” position .
WHENEVER A CARTRIDGE IS CHAM-
BERED, THE SAFETY SHOULD BE MOVED
TO THE “ON SAFE’’ POSITION UNTIL YOU
ARE READY TO FIRE IT.
When the safety is pushed forward, the rifle is in the
“off safe’’ position and ready to fire.
COCKING INDICATOR
The rear end (or shroud) of the bolt serves as a cock-
ing indicator. When the bolt is in the rifle and is
cocked the indicator will appear (see Figure 4) — ex-
tending rearward forming a gap between the pointed
surface on the indicator and the pointed recess on the
bolt (Note: there is a pointed surface on top and bot-
tom of the shroud). When the rifle is fired, the cock-
ing indicator (entire shroud) moves forward, closing
the gap.
12
Safety
F
IGURE
3
Pull fully rearward to place in “on safe” position
Push forward for off safe
5. Return the safety to the “On Safe” position. The
rifle is now assembled and may be operated normally.
REMOVING THE BOLT—
BEFORE REMOVING THE BOLT FULLY
UNLOAD YOUR RIFLE: REMOVE THE
MAGAZINE FROM THE RIFLE AND OPEN
THE BOLT. VISUALLY ASSURE THAT THE
CHAMBER IS EMPTY.
1. The firing mechanism must be uncocked before
the bolt can be removed. With the rifle fully unload-
ed and pointed in a safe direction, close the bolt,
then uncock the bolt by dry firing the rifle.
2. With the bolt now uncocked, insert your finger
15
Pull the trigger and then push the bolt
into place. It may take a little force.
F
IGURE
7
Pull the trigger, push the bolt and
depress the sear.
F
IGURE
8
Inserting the bolt, option 2.
Inserting the bolt, option 1.
tion of the top lug (see Figure 5). The bottom
groove is on the rear of the bottom lug.
2. Align the end of the bolt in the rear opening of the
receiver as shown (see Figure 6).
3. While pulling the trigger, push the bolt forward
and shove it in the receiver, past the point where it is
stopped by the sear (see Figure 7). This may take a
little force, but not too much. Optional: The sear can
be depressed with a screwdriver for easier insertion
(see Figure 8). This makes it much easier to insert the
bolt.
4. Release the trigger and rotate the bolt handle
down to lock it.
CAUTION: The chamber should be empty — if
there is a round in the chamber, the rifle can be fired
if the trigger is pulled.
14
Orient the bolt flat side down
before inserting.
F
IGURE
6
Aligning the bolt
F
IGURE
5
Front and rear parts of the bolt must be in alignment before
inserting into receiver. The small points must align with the
small grooves on the shroud and lug.

Load one cartridge at a time (see Figure 10). Repeat
until the magazine is filled to capacity (five rounds).
INSERTING THE MAGAZINE INTO THE RIFLE —
Before inserting the magazine into the rifle, close and
lock the bolt. Carefully push in the magazine until it
locks (detents) into place with an audible snap (Fig-
ure 11).
LOADING A CARTRIDGE INTO THE CHAMBER FROM
THE MAGAZINE —
With the magazine in place, close the bolt (if it is
open), and a round will be fed into the chamber. If
the bolt is closed, completely cycle the bolt to place a
17
Loading the magazine.
One cartridge at a time.
F
IGURE
10
Make sure the magazine snaps
into place.
F
IGURE
11
behind the trigger and push it forward as shown (Fig-
ure 9). You must push the trigger before you open the
bolt or the bolt will not release.
3. While still pushing forward on the trigger, open
the bolt, and pull the bolt rearward out of the
receiver.
4. To re-insert, refer back to “Inserting the Bolt”
section.
LOADING
The Winchester Model 52 is furnished with a five-
shot removable magazine. Follow the instructions be-
low for loading:
CAUTION: WHILE LOADING AND UNLOAD-
ING, MAKE SURE THE SAFETY IS IN THE
“ON SAFE’’ POSITION WHEN THE BOLT IS
CLOSED. ALWAYS POINT YOUR RIFLE IN
A SAFE DIRECTION.
LOADING THE MAGAZINE —
To load the magazine, always remove it from the rifle
(see Unloading Your Model 52 later in this manual).
16
Removing the bolt
F
IGURE
9
After releasing the bolt by dry firing, immediately push for-
ward on the back of the trigger and pull the bolt rearward.

horizontal, depress the magazine release button. Pull
the magazine out (see Figure 12).
2. Remove the cartridge from the chamber. Cycle
the bolt open and the cartridge will eject. Leave the
bolt open.
3. To fully unload the magazine, strip each cartridge
from the magazine until it is empty.
CHECK THE CHAMBER TO BE
ABSOLUTELY CERTAIN IT IS UNLOADED.
TRIGGER SYSTEM
The Model 52 trigger system is famous for its clean,
crisp pull. Trigger pull on the Model 52B is pre-set at
the factory at approximately 6 1/2 pounds.
ANY ADJUSTMENT, DISASSEMBLY OR
SERVICE OF ANY PART OF THE TRIGGER
SYSTEM MUST BE PERFORMED BY A
QUALIFIED GUNSMITH ONLY.
19
Depress the magazine release button and pull
on the magazine to remove.
F
IGURE
12
round from the magazine into the chamber.
CAUTION: THE RIFLE IS NOW READY TO
FIRE BY PULLING THE TRIGGER. IMMEDI-
ATELY PLACE THE SAFETY IN THE “ON
SAFE’’ POSITION UNLESS FIRING IS IMMI-
NENT.
LOADING TO FULL CAPACITY —
If you manually load a round in the chamber, the ca-
pacity of the Model 52 can be increased to six rounds.
After the round is in the chamber, close the bolt.
Then, insert the magazine.
CAUTION: MOVE THE SAFETY TO THE “ON
SAFE” POSITION. DO NOT CARRY A
ROUND IN THE CHAMBER UNLESS
SHOOTING IS IMMINENT.
Also, you can load the rifle to full capacity by, first,
cycling in a round from the magazine into the cham-
ber. Leave the bolt closed. Remove the magazine.
Refill it to capacity, then, reinsert it.
CAUTION: KEEP THE SAFETY IN THE “ON
SAFE’’ POSITION.
UNLOADING
ALWAYS REMEMBER TO PLACE THE
SAFETY IN THE “ON SAFE’’ POSITION
WHEN THE BOLT IS CLOSED. POINT THE
MUZZLE IN A SAFE DIRECTION WHEN UN-
LOADING.
1. Take the magazine out of the rifle. With the rifle
18

justment to your scope or sights. Adjust the scope and
sights you choose according to manufacturer’s in-
structions.
CLEANING AND MAINTENANCE
SUGGESTIONS
Your rifle will function better and more reliably over
a longer period of time if it is properly maintained
and kept clean.
BEFORE PERFORMING ANY CLEANING
PROCEDURES, ALWAYS MAKE CERTAIN
THERE ARE NO CARTRIDGES IN THE
CHAMBER, MAGAZINE OR ACTION/FEED
AREAS.
You should clean your rifle after every day of shooting
and more often if it becomes excessively dirty. If
shooting for extreme accuracy your rifle should be
cleaned after every 50 shots or even as few as every
25 shots under competitive conditions.
A minimum cleaning includes wiping down the
action and oiling key parts. Most regular mainte-
nance will also include cleaning the barrel. If you
encounter a function problem (tight action when
working the bolt), be sure to give your gun a thor-
ough cleaning to see if it solves the problem before
21
The receiver is drilled and tapped
for scope mounts on top and for a
peep sight on the left side.
F
IGURE
13
For peep sight
FOREARM ADJUSTMENT SCREW
Some original Model 52B rifles were supplied with a
forearm adjustment screw. Your new Winchester
Model 52B is also supplied with this feature. The
adjustment screw is located on the underside of the
fore-end, in the center of the middle checkering dia-
mond.
This feature was very popular with some avid target
shooters a number of years ago. It allows you to apply
pressure or force against the bottom of the barrel
itself — a feature used to aid in tuning a barrel to dif-
ferent ammunition.
You may wish to experiment with this feature, apply-
ing a slight bit of pressure by turning the screw clock-
wise with a small screwdriver until the end of the
screw contacts a special surface on the underside of
the barrel.
In our testing, with MODERN AMMUNITION, the
new Model 52B has shown to shoot its best with the
screw not touching the barrel and the barrel free
floating. Consequently the screw comes from the fac-
tory in the fully out position, not touching the barrel.
SCOPE MOUNT & SIGHTS
The receiver is drilled and tapped to accept scope
mount bases on the receiver (see Figure 13). A two-
piece scope mount base and high scope mount rings
are available as accessories. See your Winchester
firearms dealer for details.
The Model 52 also comes drilled and tapped for a
precision target-type peep sight (refer again to Figure
13). There are several types to choose from. Your
dealer can help you with this as well.
Always fully unload your rifle before making any ad-
20

residue can be expected and is not serious. It can usu-
ally be removed by repeating step one, using a patch
saturated with solvent. If or when fouling should
become heavy, it can be removed with a brass bore
brush. Dip or spray the brush with solvent and scrub
the chamber and bore until the fouling is removed.
To prevent brass bristles from breaking off, the brush
should be pushed completely through the bore before
being withdrawn.
3. After fouling has been removed the bore should be
wiped dry. Then pass a slightly oiled patch through
the bore, for preservation. A fine, light gun oil
is recommended.
4. Wipe all exposed metal surfaces of the receiver,
forearm and barrel with a clean rag. Finger marks
should be removed because they provide a place
where moisture can accumulate. Any dried oil in the
receiver area should also be removed.
5. Lightly oil your gun at the points described under
“Oiling the Action” explained earlier in this manual.
Ordinary good judgment will, of course, indicate that
the metal of the gun should receive a light film of oil
any time the rifle has been exposed to weather or
handling. This is very important and must be done
with every rifle — even stainless steel models.
Remember, the polished, finely fitted surfaces of the
receiver and action mechanisms must always have a
thin film of oil. Make sure that the surfaces of the
breech bolt are especially clean and lightly oiled with
a high quality gun oil. Do not use pure silicone
or lanolin.
6.
INSPECT THE BARREL AND CHAMBER.
TO MAKE CERTAIN THAT NO PATCHES
HAVE BEEN INADVERTENTLY LEFT IN
THEM.
Remove any that remain.
23
seeking the services of our service facility or a com-
petent gunsmith.
To clean your firearm, follow the general outline
below:
CLEANING PROCEDURES —
BE CERTAIN YOUR GUN’S CHAMBER AND
MAGAZINE ARE UNLOADED. ALWAYS
WEAR PROTECTIVE SAFETY GLASSES
DURING ALL CLEANING PROCEDURES.
KEEP AMMUNITION AWAY FROM THE
CLEANING AREA. DO NOT TEST THE
FUNCTION OF YOUR FIREARM WITH LIVE
AMMUNITION.
The correct procedure for cleaning your rifle is as
follows:
BE CERTAIN THE RIFLE IS UNLOADED
AND THE BOLT HAS BEEN REMOVED.
ALWAYS WEAR EYE PROTECTION WHEN
CLEANING YOUR RIFLE.
ALWAYS PLACE THE SAFETY IN THE
“ON” (SAFE) POSITION BEFORE BEGIN-
NING ANY CLEANING PROCEDURE.
REMOVE THE BOLT FROM YOUR RIFLE
AS EXPLAINED PREVIOUSLY.
1. Use a cleaning rod with a tip and patch suitable
for the caliber of your rifle’s bore. Make sure the
patch is large enough for a snug fit in the bore. Insert
the rod and patch into the barrel at the receiver end
and run it back and forth several times. Use a crown
protector if you are cleaning from the muzzle end of
the barrel. Damage to the crown of a barrel can
affect the accuracy of your rifle.
2. Inspect the chamber and bore for brass, copper
and powder fouling. A normal amount of powder
22
special Arnold, Missouri Service Facility.
OTHER CLEANING SUGGESTIONS —
• Never pour large quantities of oil into the receiver
or other parts. It can drain down to the wood and
soften it — and cause permanent damage and loosen-
ing of the stock.
• After extended periods of heavy use, your gun
should be taken to a qualified gunsmith to have the
action disassembled for professional cleaning and
lubrication.
NEVER ATTEMPT TO TAKE YOUR MODEL
52B APART FURTHER THAN EXPLAINED
IN THIS MANUAL.
This is a specialized, finely fitted mechanism. You
may permanently mar it by attempting to disassemble
the inner mechanism assemblies. If further disassem-
bly for service or cleaning is required, take your gun
to a U. S. Repeating Arms Company recommended
Service Center or a competent gunsmith as explained
under “Service or Repair.”
25
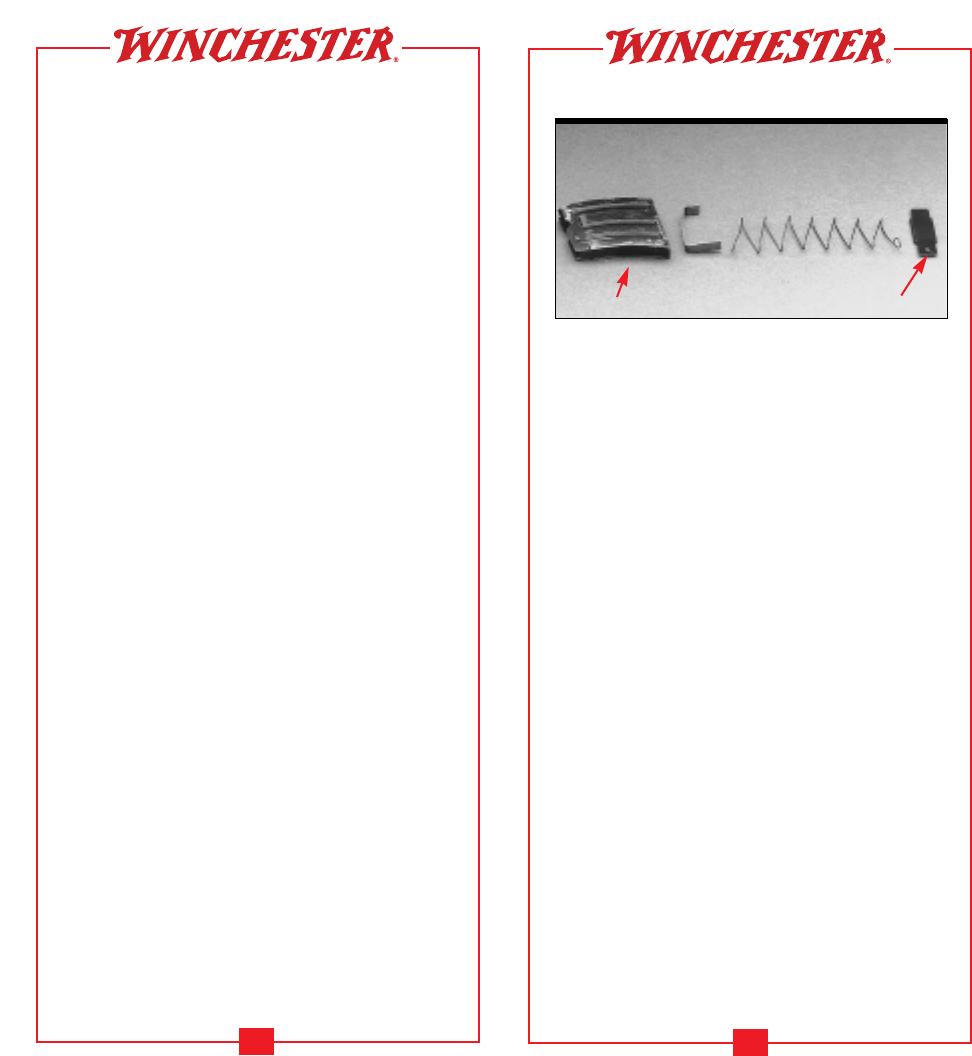
Front
F
IGURE
14
Follower Spring
Body
Magazine fully disassembled for cleaning
Base
Detent
7. Wipe all wood surfaces.
8. When transporting only, store your rifle in a quali-
ty protective case to prevent scratches and dents.
Store in a dry place to prevent corrosion. Store away
from children.
MAKE SURE YOUR RIFLE IS UNLOADED
AND ALWAYS STORE AMMUNITION
SEPARATELY.
CLEANING THE MAGAZINE —
Disassembly: Depending on how often you shoot, it
is helpful to disassemble the magazine for cleaning.
First, with one finger depress the retainer catch spring
button on the bottom of the magazine, and slide the
plate off, away from the rounded end of the magazine.
Remove the spring and follower and wipe clean. The
magazine is now fully disassembled (see Figure 14).
Lightly oil the internal parts.
Reassembly: Reinsert the spring, follower and base
retainer, then slide the plate back onto the magazine.
Be sure the magazine base retainer is correctly aligned
with the magazine and the spring’s loop is anchored
to the plate divot (refer again to Figure 14).
DO NOT TAKE YOUR GUN’S ACTION
APART BEYOND THE EXTENT EXPLAINED
IN THIS MANUAL.
This is a specialized, finely fitted mechanism, and you
may mar it for life by an attempt to disassemble the
inner mechanism assemblies. If further disassembly is
required, contact the U.S. Repeating Arms Company
24

QUESTIONS
If you have other questions about Winchester rifles
and shotguns, call or write our Customer Service
Department:
Customer Service
U.S. Repeating Arms Company, Inc.
275 Winchester Avenue
Morgan, Utah 84050-9333
Phone: 1-800-945-5237
WINCHESTER-GUNS.COM
U.S. Repeating Arms Company offers an information
resource for you on the world wide web.
• List of authorized repair centers.
• Customer service information.
• Answers to many technical and historical ques-
tions.
• Links to helpful sites.
Go to: www.winchester-guns.com
27
ORDERING PARTS
To order parts, please write our parts department and
furnish the following: your name, address, and tele-
phone number. Also specify the model and serial
number of your gun. When we receive your request,
we will send an order form and a parts breakdown
with prices.
Write to:
Parts Department
U.S. Repeating Arms Company, Inc.
275 Winchester Avenue
New Haven, Connecticut 06511-1970
CAUTION: PARTS ARE MADE FOR
WINCHESTER BRAND FIREARMS MANU-
FACTURED BY OR FOR U.S. REPEATING
ARMS COMPANY, INC., AND SHOULD NOT
BE USED IN OTHER GUNS EVEN THOUGH
MODELS MAY BE SIMILAR. IMPROPERLY
FITTED PARTS MAY BE DANGEROUS.
SERVICE OR REPAIR
If your Winchester firearm should ever need repair or
service, please utilize one of the world-wide network
of U.S. Repeating Arms Company Authorized Repair
Centers for Winchester firearms. If you have any
questions about how to obtain service for your
Winchester firearm, call or write the Authorized
Repair Center (ARC) nearest you. A list of ARCs is
packaged with your new gun. If you need to obtain a
new list of ARCs call us at:
1-203-789-5000
26

29
28
