1 Wsd Hd Hardware Upgrade
User Manual: wsd-hd hardware upgrade 1
Open the PDF directly: View PDF ![]() .
.
Page Count: 53

9301-0155-00
Document Revised: 28 September, 2001 @ 11:41 AM 2001 / Accom, Incorporated Page 1 of 53
Hardware Upgrade
Installation
28 September, 2001
§ Digital Audio Option Upgrade
— Installation of the Digital Audio PCI board, disk drive, associated
cables and SCSI extension connector into the WSD/HD
Universal Format digital video disk recorder. Requires WSD/HD Main Software:
VERSION 2.00 .
OR HIGHER
Read this FIRST!
Installing the Digital Audio Option in the WSD/HD requires five separate procedures — make sure you perform all five, in the order
defined in this document:
Page 3 Procedure-1 Software Upgrade Installation
Page 3 Procedure-2 WSD/HD Operational Test
Page 4 Procedure-3 Hardware Upgrade Installation
Page 21 Procedure-4 Audio Driver Installation & Disk Formatting
Page 53 Procedure-5 WSD/HD Operational Test
The first procedure upgrades the operating software in the WSD/HD, which also installs new drivers for use by the new Digital Audio
option. The second procedure tests the WSD/HD to make sure the software was installed properly. The third procedure guides you
through the process of installing the hardware for the new Digital Audio Option. The fourth procedure guides you through the installation
of the software drivers necessary for digital audio, and the audio disk format procedure. The fifth and final procedure tests the WSD/HD
to make sure all components of the new hardware option was installed properly.
Background
This document describes the installation of the Digital Audio Option into the WSD/HD high-definition digital video disk recorder. This
option provides internal storage for the digital audio media. The digital audio subsystem features eight independent tracks of AES/EBU
digital audio, sampled at 48kHz with 24-bit resolution. Before installing the Digital Audio option in your WSD/HD, make sure Version 2.00
Software or higher is installed in the WSD/HD and all video formats are working satisfactorily. If this not the case, please refer to the
Version 2.00 Software installation document.
All hardware and software are forward and backward compatible, except for the video board microcode — you will need to down-rev the
microcode if the main software is down-revisioned. Refer to the Software Installation documentation.
WSD/HD
Hardware Upgrade Installation
Page 2 of 53 2001 / Accom, Incorporated Document Revised: 28-Sep-01 @ 11:41 AM
¦ Tools Required
The following tools are required to perform this upgrade:
§ Phillips-Head Screwdriver, Medium Size
§ Flat-Blade Screwdriver, Medium Size
§ Flat-Blade "Tweaker" Screwdriver, Small Size
§ Long Needle-Nosed Pliers
§ Nut Driver, 3/16"
¦ Parts Included in this Upgrade Kit
(Accom Part # 9600-0373-00)
The following parts are included in this upgrade kit. Make sure you have all parts before starting the upgrade.
Part # QTY Description
§ 9400-0920-01 1 Digital Audio PCI Board
§ 9500-0328-00 1 Analog Audio Breakout Box
§ 1901-0251 8 Screw / 6-32 X 1/4 / Philips-head
§ 582-00012 2 Screw / Jack / 2-56FM / 4-40 Male
§ 1600-0133 1 Disk Drive / 18GB IBM SCSI (68)
LVD
§ 8900-1394-00 1 Disk Mounting Plate
§ 2500-0234 1 SCSI Terminator / TCC
§ 100598-01 2 Bracket Flange / PC Rear Panel
§ 1902-0493 1 Mounting Bracket / W-68P SCSI I/O
Part # QTY Description
§ 8900-1406-00 2 Audio Box / Leg Stands
§ 8900-1407-00 2 Audio Box / Rackmount Flange
§ 1902-0441 4 Rubber Foot / Button / Black 0.25
Hole
§ 9000-0741-00 1 Cable Assy. / Digital Audio / 26-Pin D
§ 9000-0776-00 2 Cable Assy. / Audio I/O Ribbon
§ 9000-0788-00 1 Cable Assy. / 10-Pin Mini Audio
§ 9000-8000-00 1 Cable Assy. / Audio SCSI Interface
§ 9000-0801-00 1 Cable Assy. / Audio Disk Power
§ 8901-1231-01 1 Label / PCI Board Location
Observe proper handling of all electrostatic sensitive devices,
including circuit boards, integrated circuits, and attached cable
assemblies.
Use a properly grounde
d electrostatic discharge wrist strap and/or
ankle strap when handling any and all of these parts!

WSD/HD
Hardware Upgrade Installation
Document Revised: 28 September, 2001 @ 11:41 AM 2001 / Accom, Incorporated Page 3 of 53
¦ Procedure-1 Software Upgrade Installation
The WSD/HD must be upgraded to the latest version of software (Version 2.00 or greater) prior to the installation of the Digital Audio
Option. The software upgrade process loads new drivers into the WSD/HD that the new Digital Audio hardware requires. Without these
drivers, the digital audio option will not operate properly.
1. Follow the Software Upgrade Procedure, as detailed in the accompanying document:
A. Choose the correct software update procedure, depending on the software version currently running in your WSD/HD:
— If your current software is below version 1.30:
"Software Upgrade Procedure — From Version 1.01 to Version 2.00 or Higher"
— If your current software is above version 1.30:
"Software Upgrade Procedure — From Version 1.30 to Version 2.00 or Higher"
¦ Procedure-2 WSD/HD Operational Test
After upgrading to the latest software version in the WSD/HD, be sure to test the operation of the WSD/HD to make sure the software
upgrade was successful.
1. Reboot the WSD/HD
A. If you've not yet rebooted the WSD/HD after installing the new software, please do so now. The new software does not take
effect until after you've rebooted the WSD/HD.
B. After the WSD/HD has finished rebooting, launch Internet Explorer on the WSD/HD to start up the NetPanel user interface.
2. Record & Replay New Clips on the WSD/HD
A. Route valid SDI digital video input into both the HDTV and SDTV digital video inputs on the WSD/HD.
B. Connect monitor equipment to the ANALOG and DIGITAL video outputs of the WSD/HD.
C. Using the NetPanel user interface, create and record a new HDTV (high definition) clip that includes VIDEO only, with a
duration of at least 1 minute.
D. On the NetPanel user interface, recall the HDTV clip that was just recorded, and verify the video plays properly on both the
analog and digital video outputs.
E. Using the NetPanel user interface, create and record a new SDTV (standard definition) clip that includes VIDEO only, with a
duration of at least 1 minute.
F. On the NetPanel user interface, recall the SDTV clip that was just recorded, and verify the video plays properly on both the
analog and digital video outputs.
WSD/HD
Hardware Upgrade Installation
Page 4 of 53 2001 / Accom, Incorporated Document Revised: 28 September, 2001 @ 11:41 AM
¦ Procedure-3 Hardware Upgrade Installation
Perform the entire hardware upgrade procedure in the order presented below.
Hardware Upgrade — WSD/HD Chassis Preparation
1. Prior to performing the following procedure, please first verify that the WSD/HD system is operating normally by first
performing Procedure-1 and Procedure-2 as described on Page 3 above.
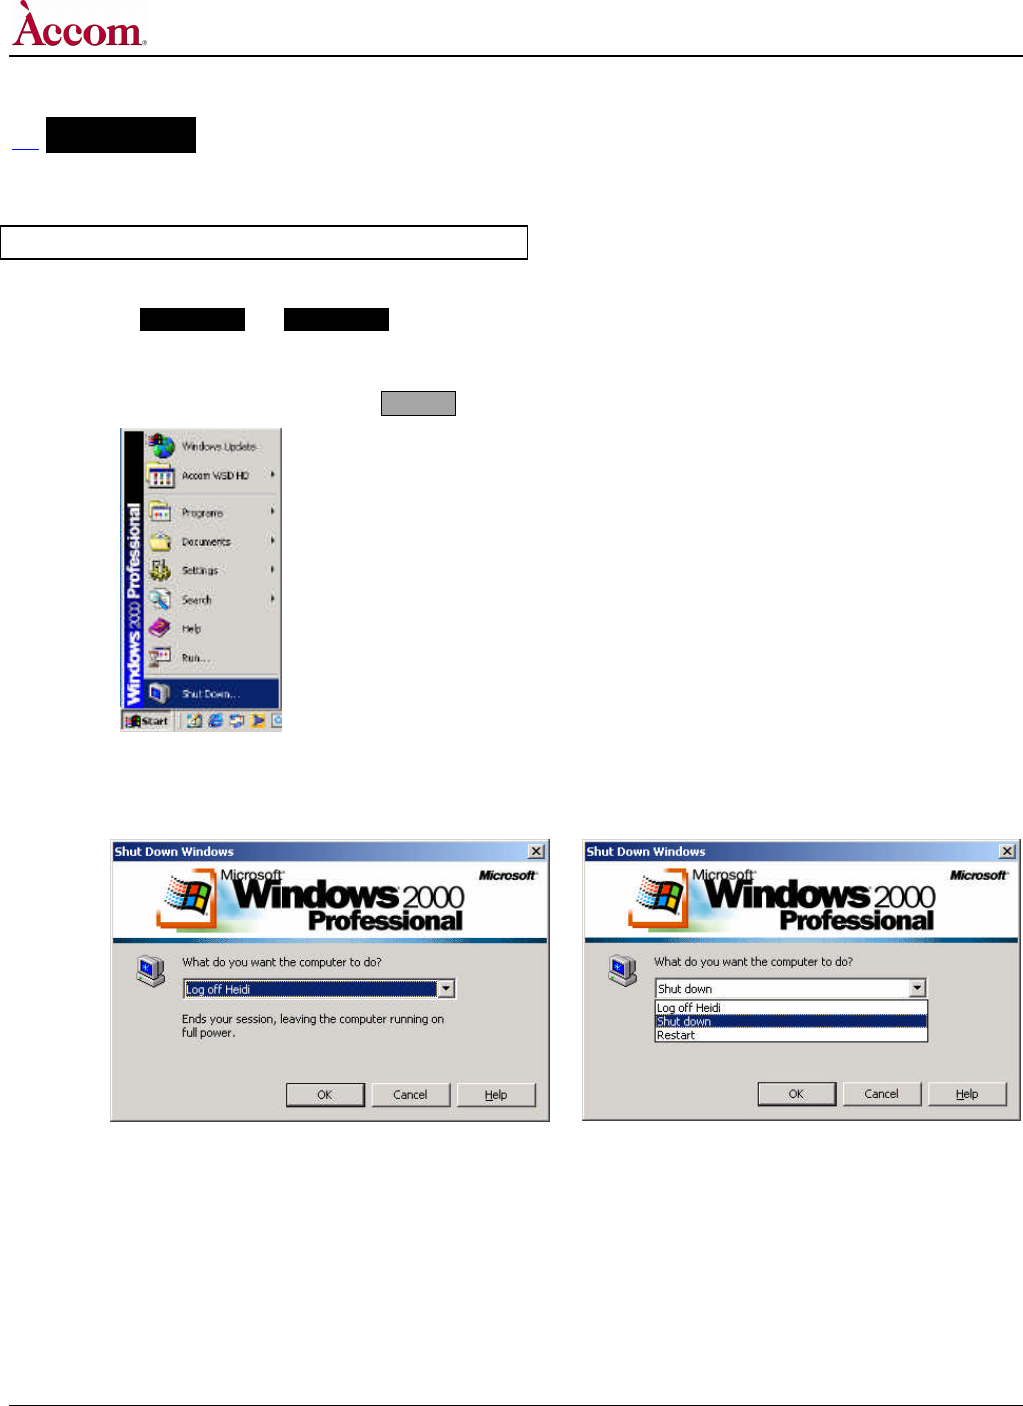
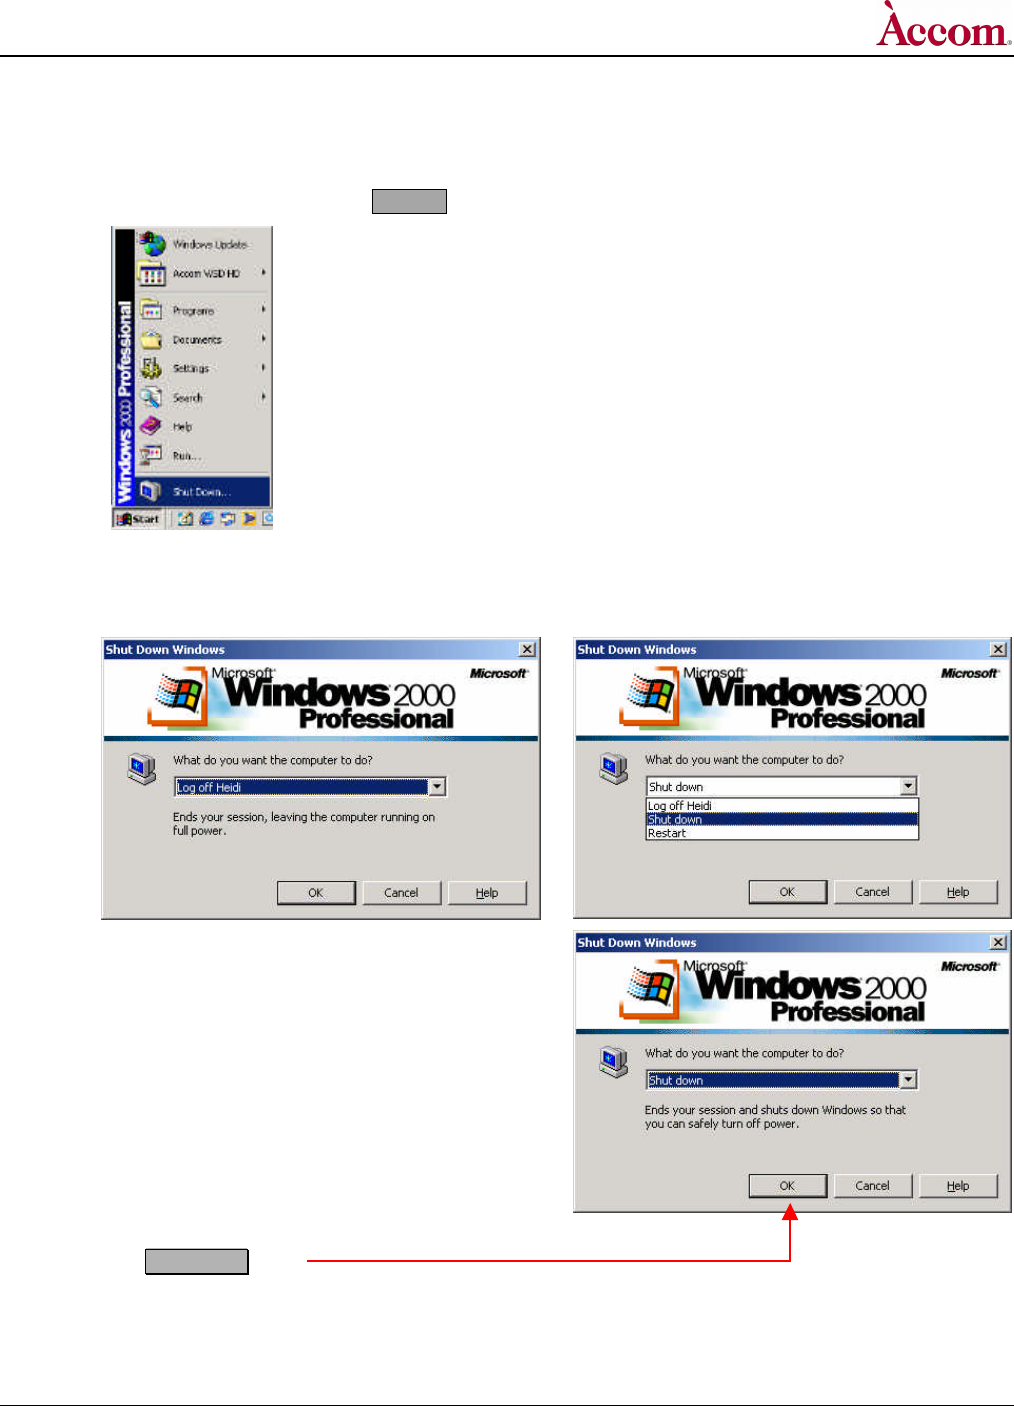
2. Shut down the Windows2000 Operating System and Power Down WSD/HD:
A. On the WSD/HD VGA monitor, click the ÿÿStart button on menu taskbar:
A
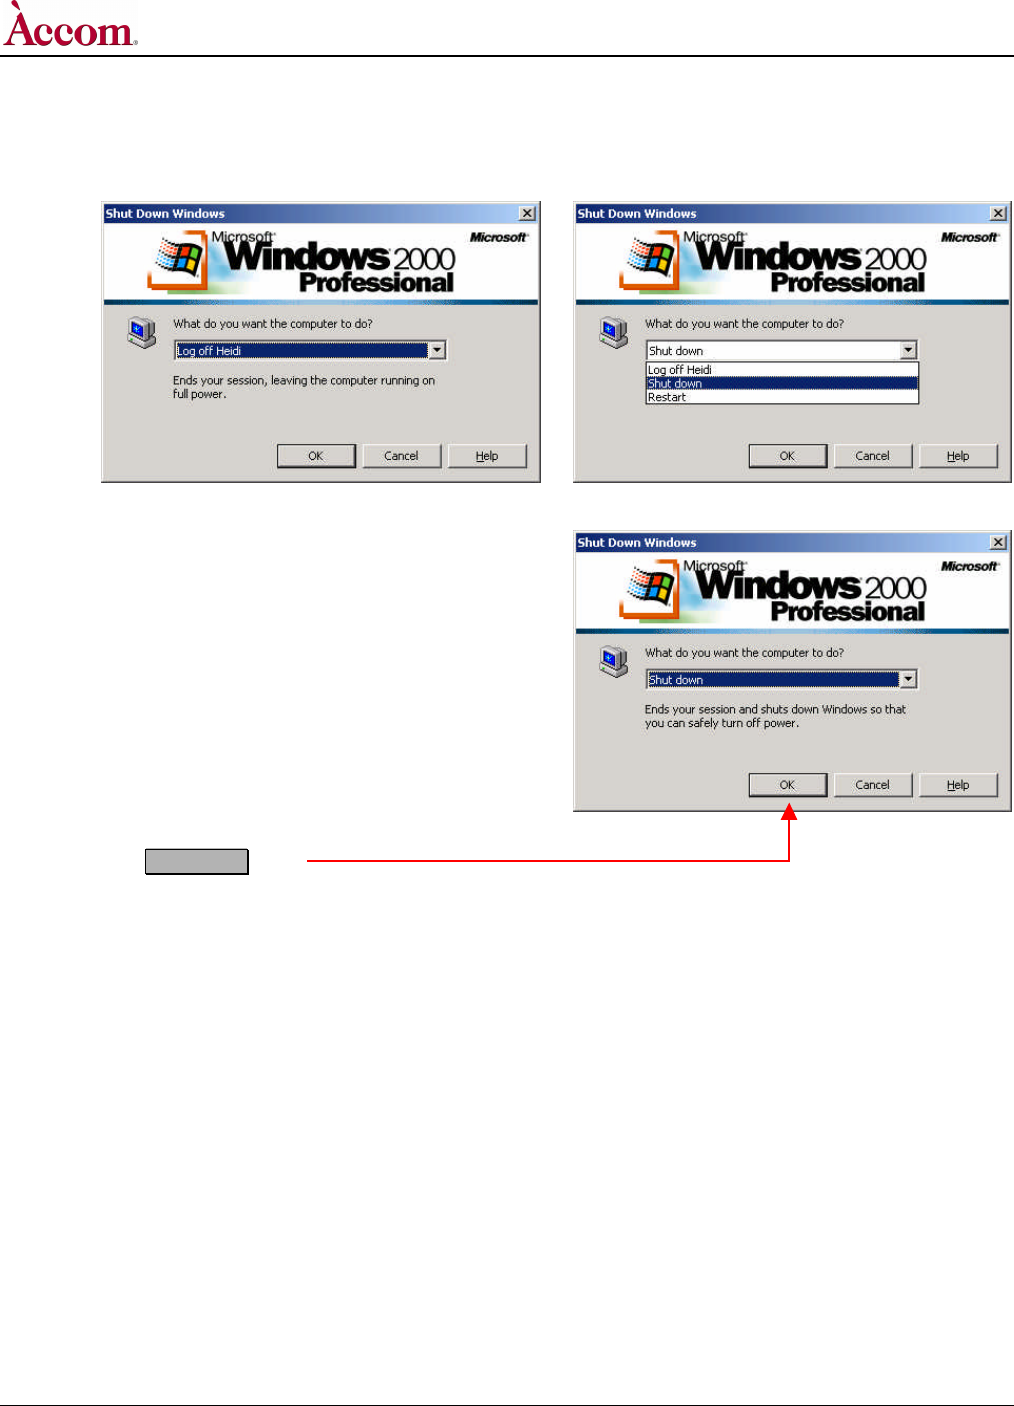
B. Select and click on the "Shut Down" item. This presents the "Shut Down Windows" dialog, as shown below.
C. Select the "Shut Down" item in the pull-down menu:
B
C
Continued…
WSD/HD
Hardware Upgrade Installation
Document Revised: 28 September, 2001 @ 11:41 AM 2001 / Accom, Incorporated Page 5 of 53
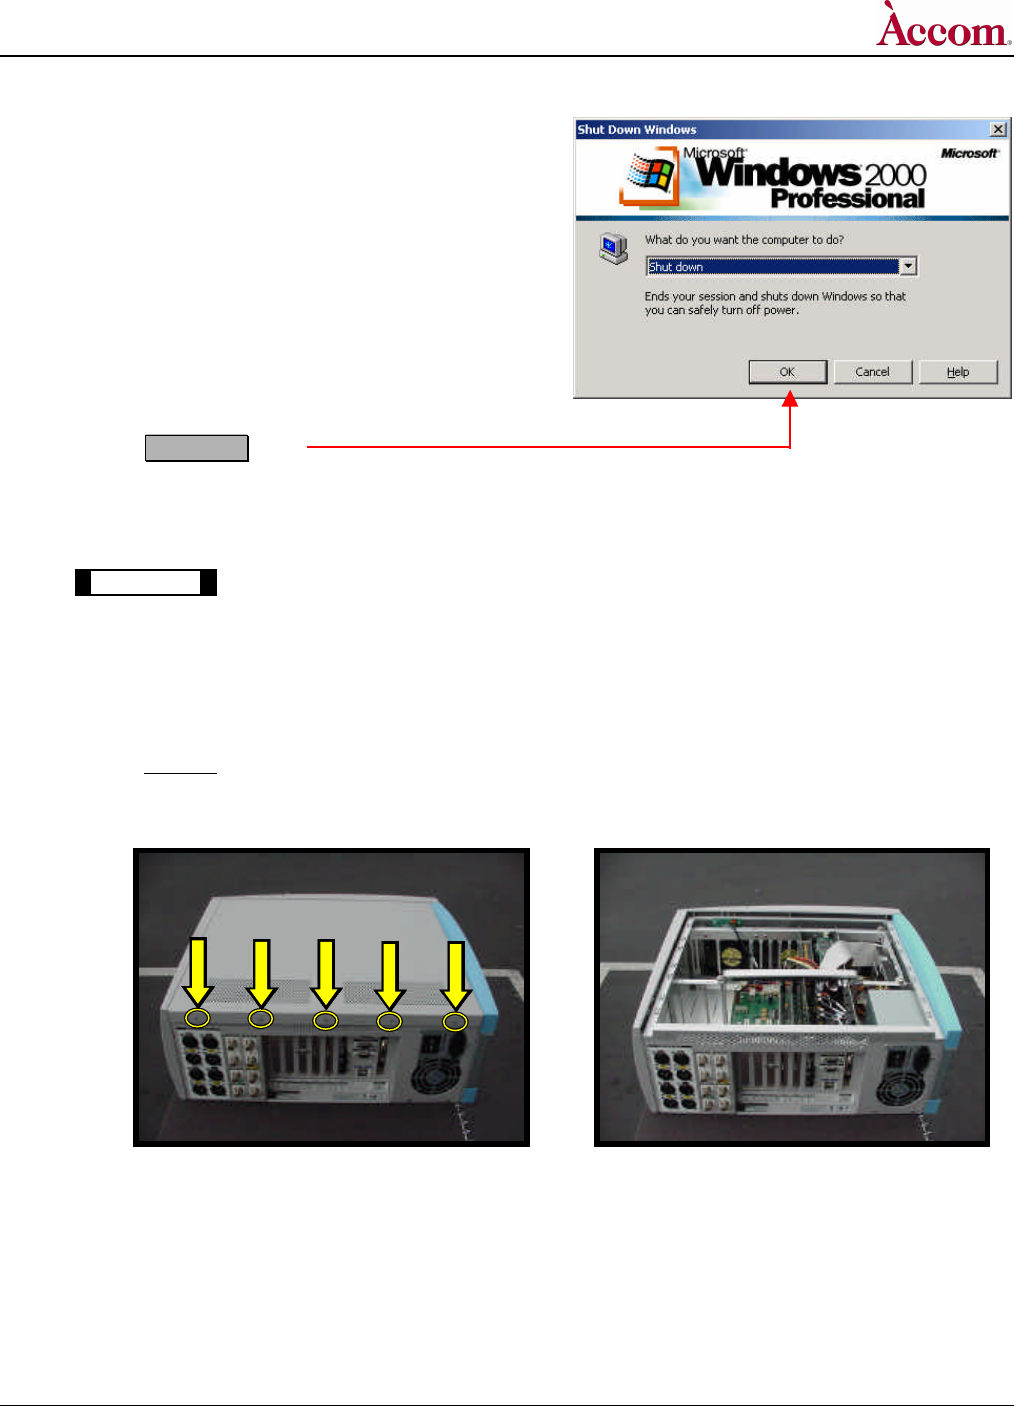
D
D. Click the OK button.
E. Once the O/S has shut down, turn OFF the AC power switch located on the rear panel of the WSD/HD main chassis.
3. Disconnect Cables from WSD/HD Main Chassis:
A. ! IMPORTANT ! Unplug the AC power cord from the WSD/HD main chassis.
B. Remove all video, RS422, USB and SCSI cables from the rear panel of the WSD/HD main chassis, being careful to mark the
cables as you go — so that you get them back into the correct connectors when you're finished with this upgrade.
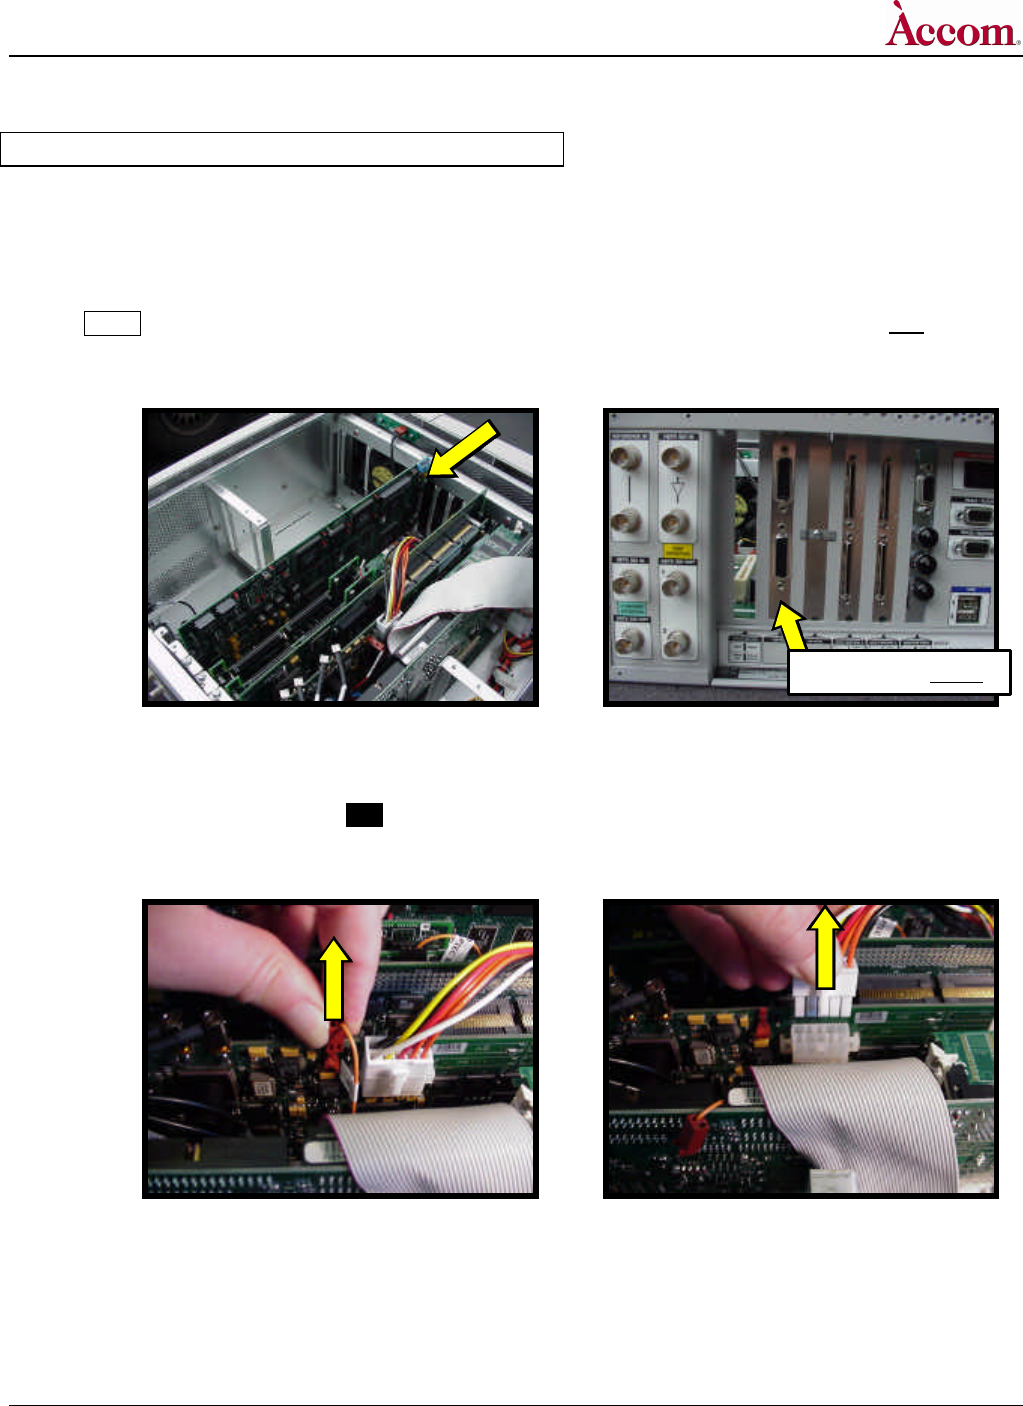
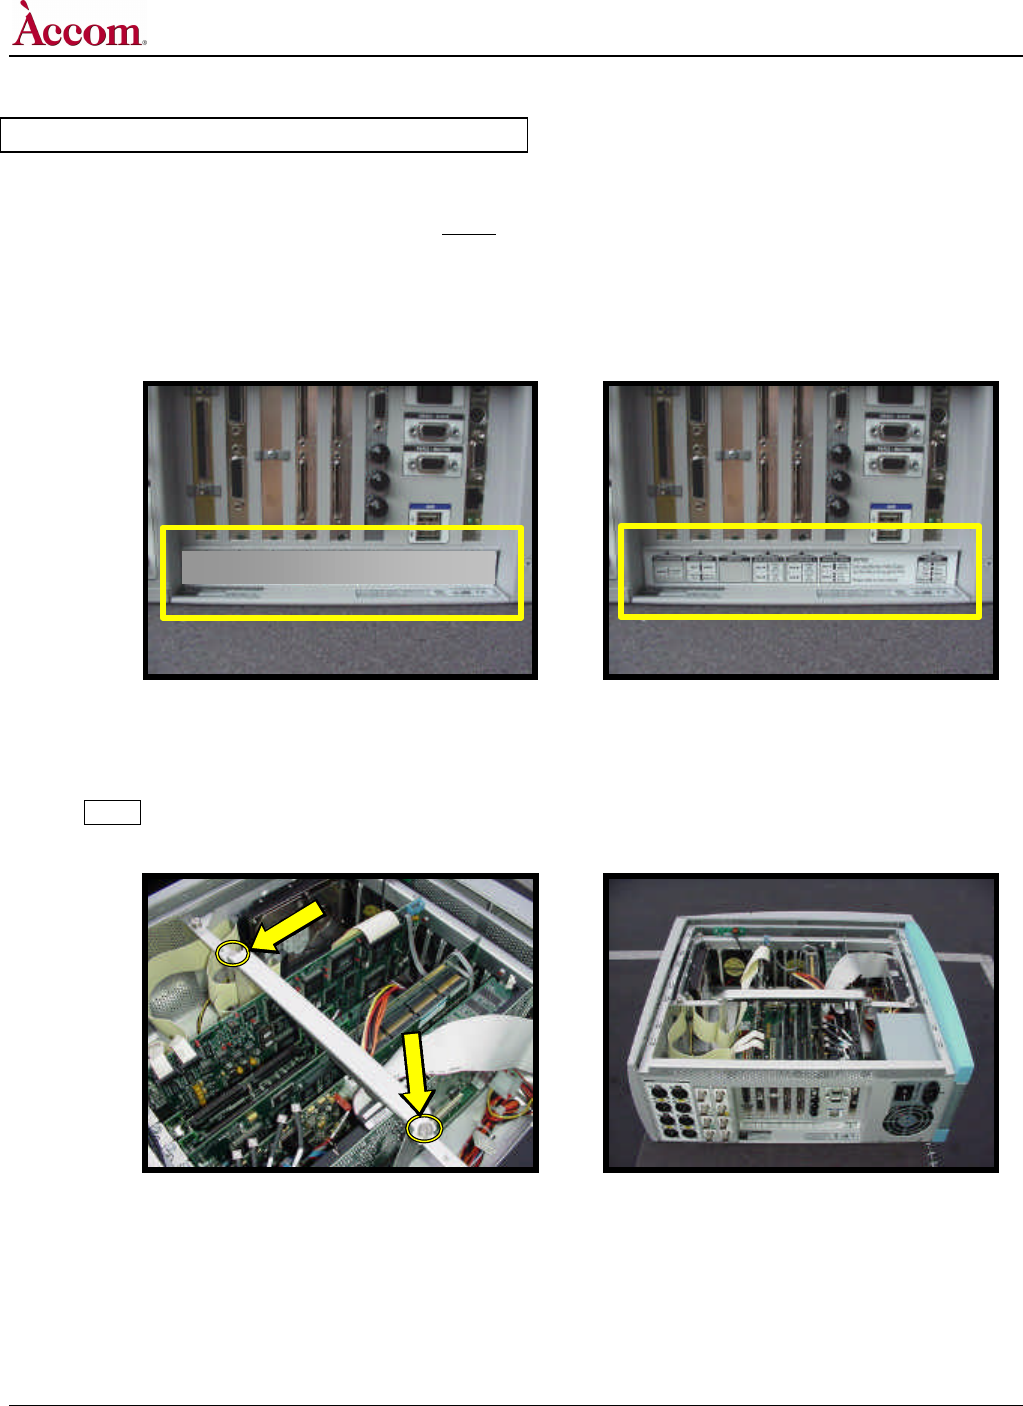
4. Remove the main cover plate from the WSD/HD Main Chassis:
A. Rest the WSD/HD main chassis on its side, as shown in the photographs below.
B. Unscrew and retain the (5) philips-head screws from the rear of the main cover plate (shown by the arrows in the photo).
C. Slide the main cover plate backward and remove the cover plate from the WSD/HD main chassis, to expose the interior of the
machine.
B
C
Continued…
WSD/HD
Hardware Upgrade Installation
Page 6 of 53 2001 / Accom, Incorporated Document Revised: 28 September, 2001 @ 11:41 AM
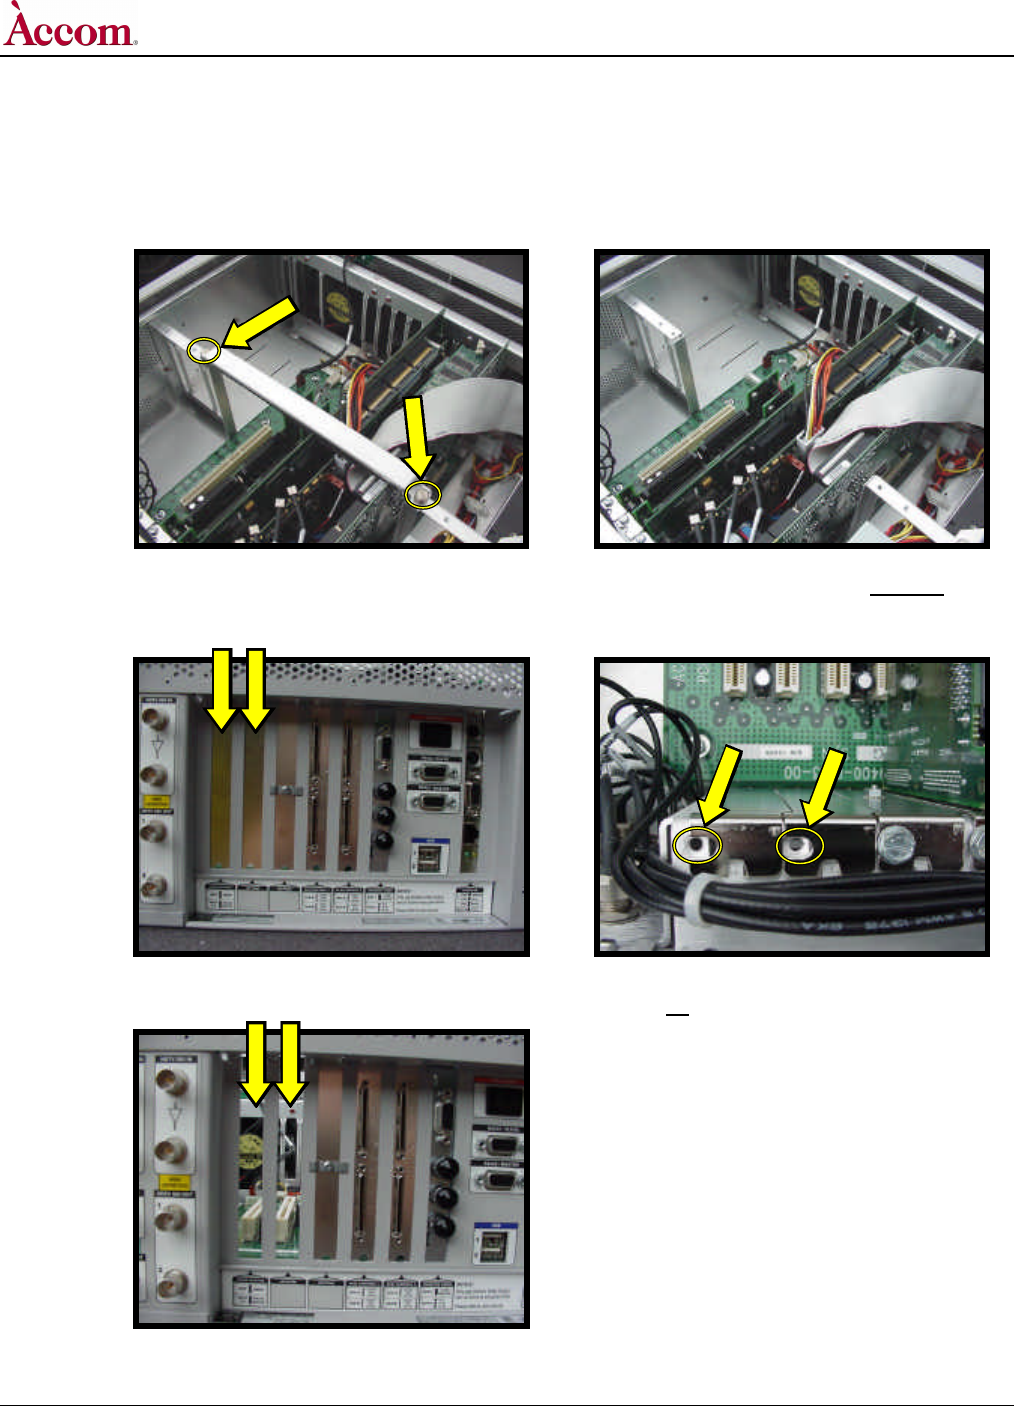
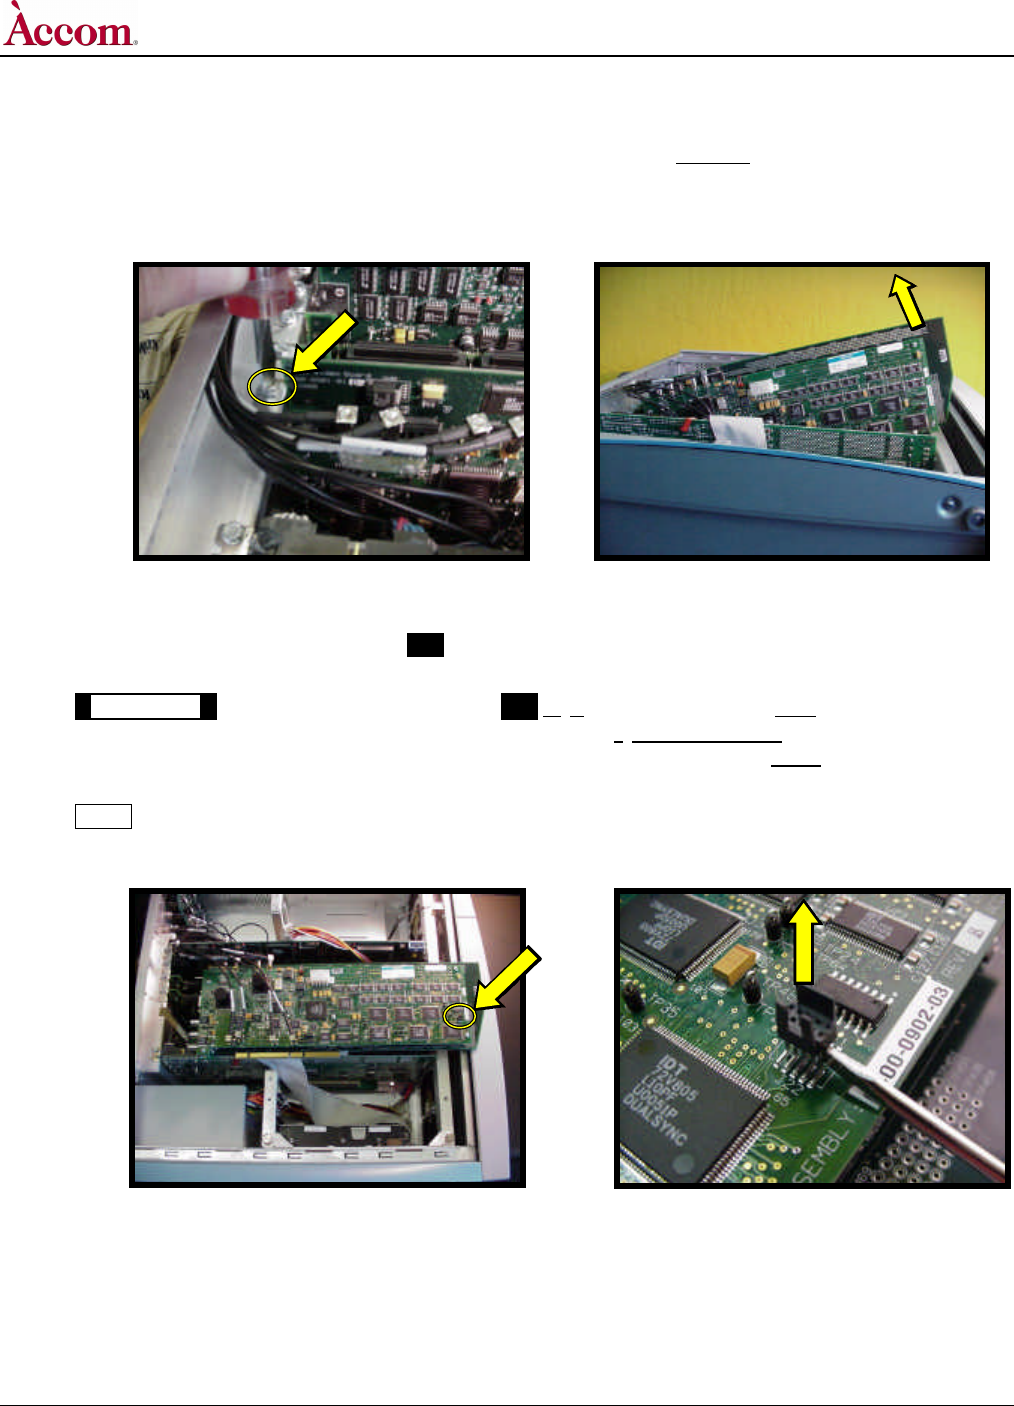
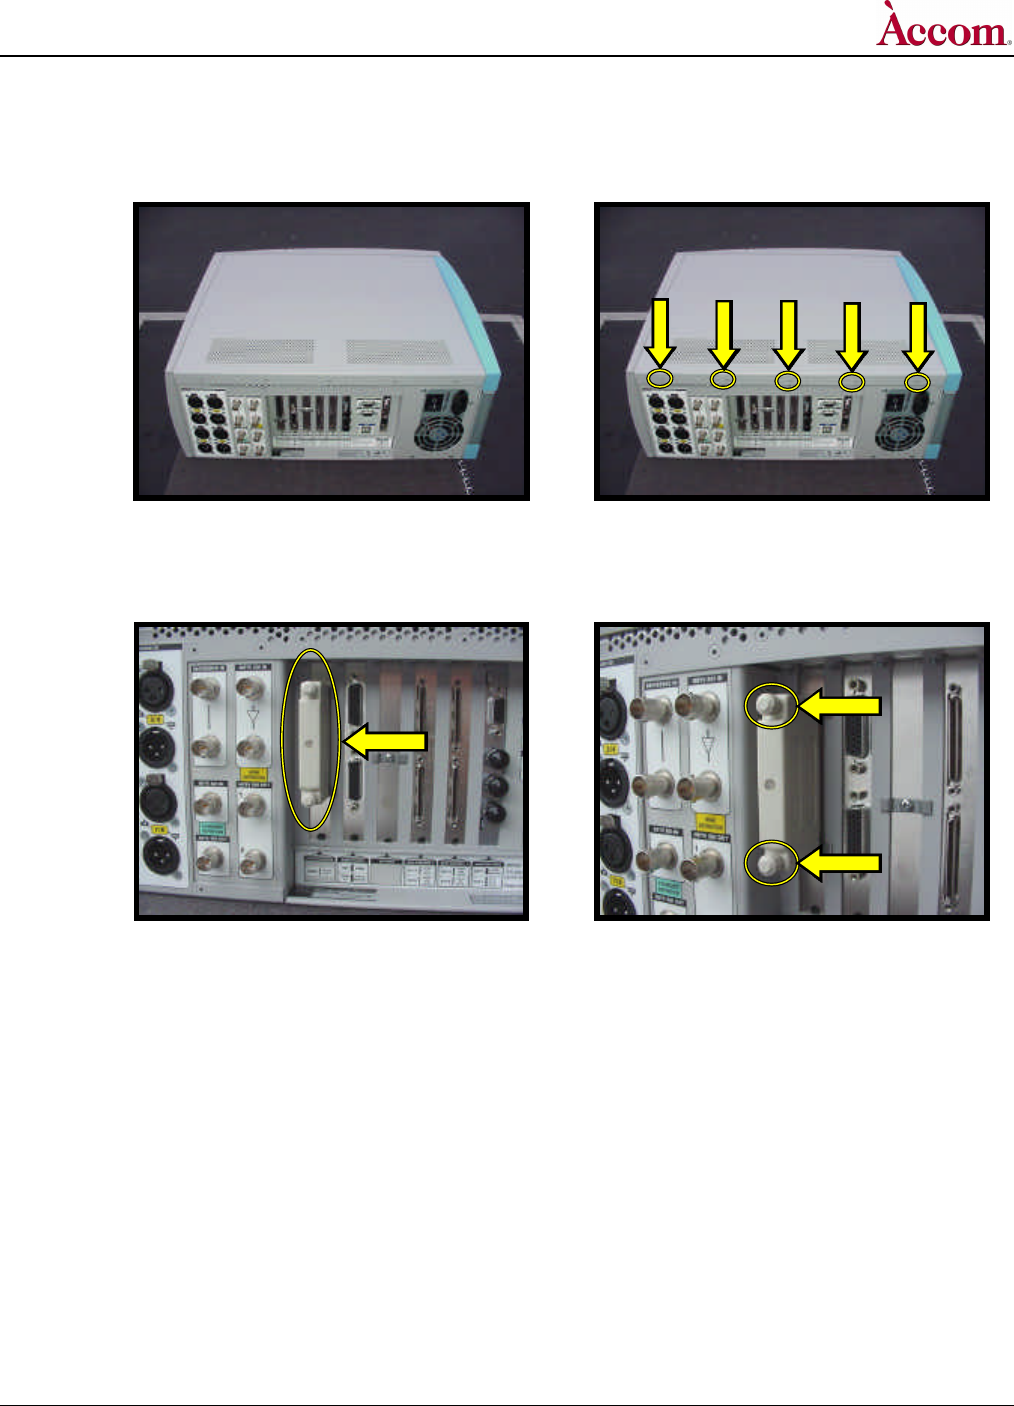
5. Remove the circuit board retainer and two PCI filler panels from inside WSD/HD Main Chassis:
A. Loosen the 2 slotted screws that secure the horizontal PCI board retainer, as shown by the arrows in the left-hand photo below.
B. Remove the PCI board retainer from the chassis.
A
B
C. At the rear of the WSD/HD chassis on the first two PCI board slots, there are two PCI filler panels. Remove and retain the
slotted screws from the top of these two panels, and loosen the philips-head screws on the retaining brackets on the rear
surface of each (if present — some panels don't have these retaining brackets).
C
C
D. Remove these two filler panels. The filler panels will not be used again, but you will later use the two slotted screws.
D
WSD/HD
Hardware Upgrade Installation
Document Revised: 28 September, 2001 @ 11:41 AM 2001 / Accom, Incorporated Page 7 of 53
Hardware Upgrade — Installing Digital Audio PCI Board
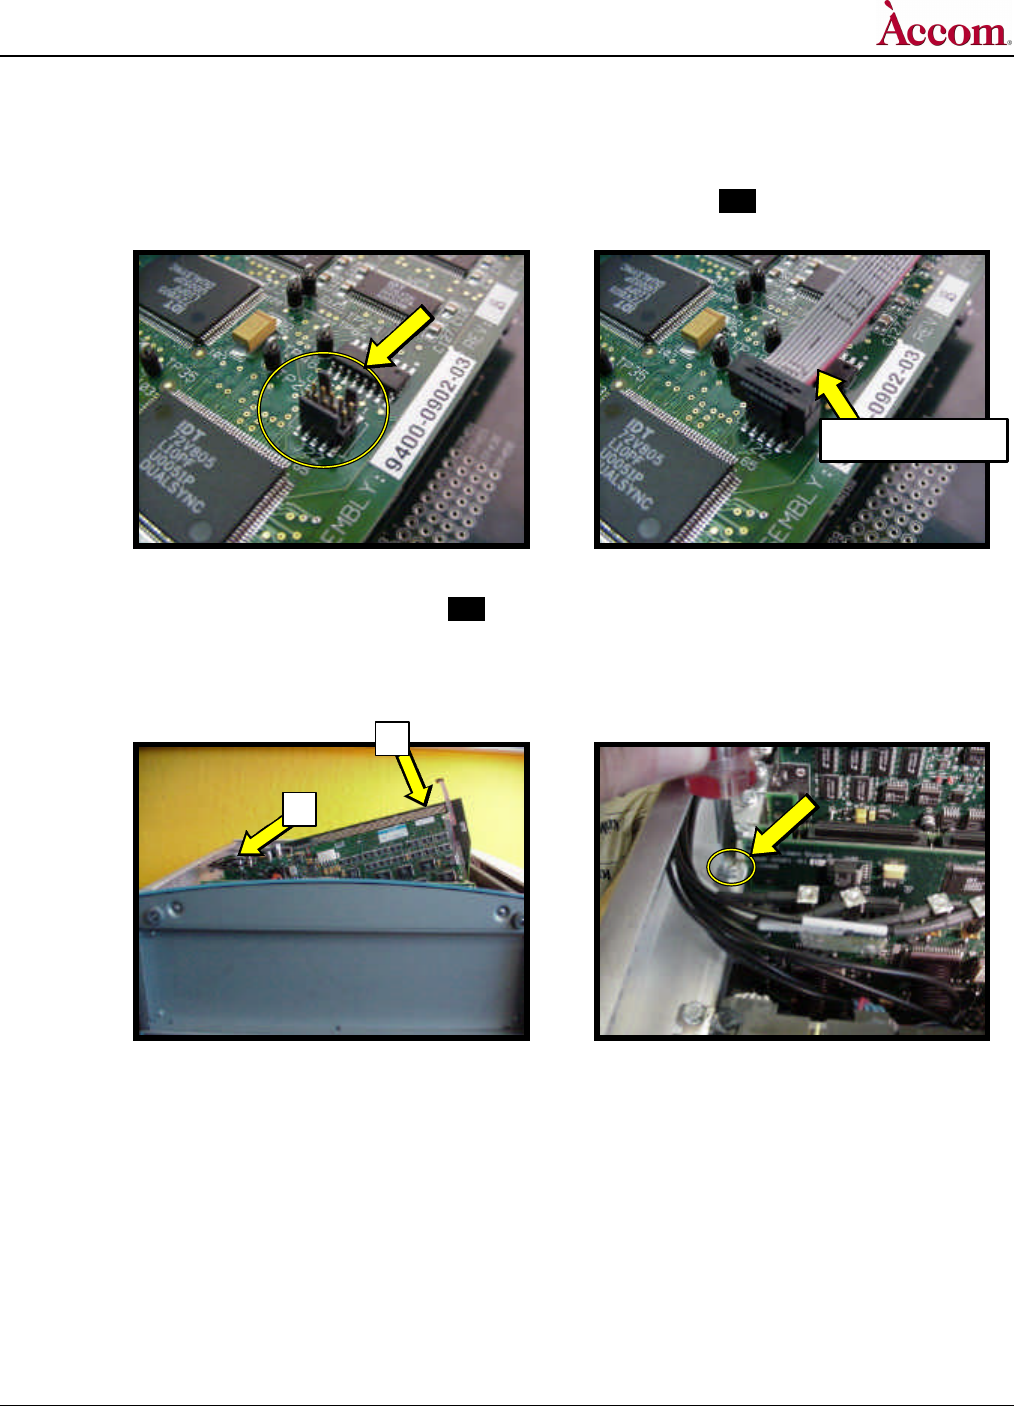
1. Install the new Digital Audio PCI Board:
A. Carefully insert the new Digital Audio PCI board (P/N 9400-0920-01) into PCI slot #2 (second from left, as you view the
chassis rear panel). Be sure the far edge of the board (nearest the front of the chassis, as shown by the arrow in the left-hand
photo below) is fitted into the guide slot.
NOTE The PCI board label on the rear of the WSD/HD chassis will be changed later in this procedure. Do NOT install the
new Digital Audio PCI board into slot #1 — install it into slot #2!
B. Use one of the slotted screws from one of the removed filler panels to secure the top flange on this circuit board.
A
A
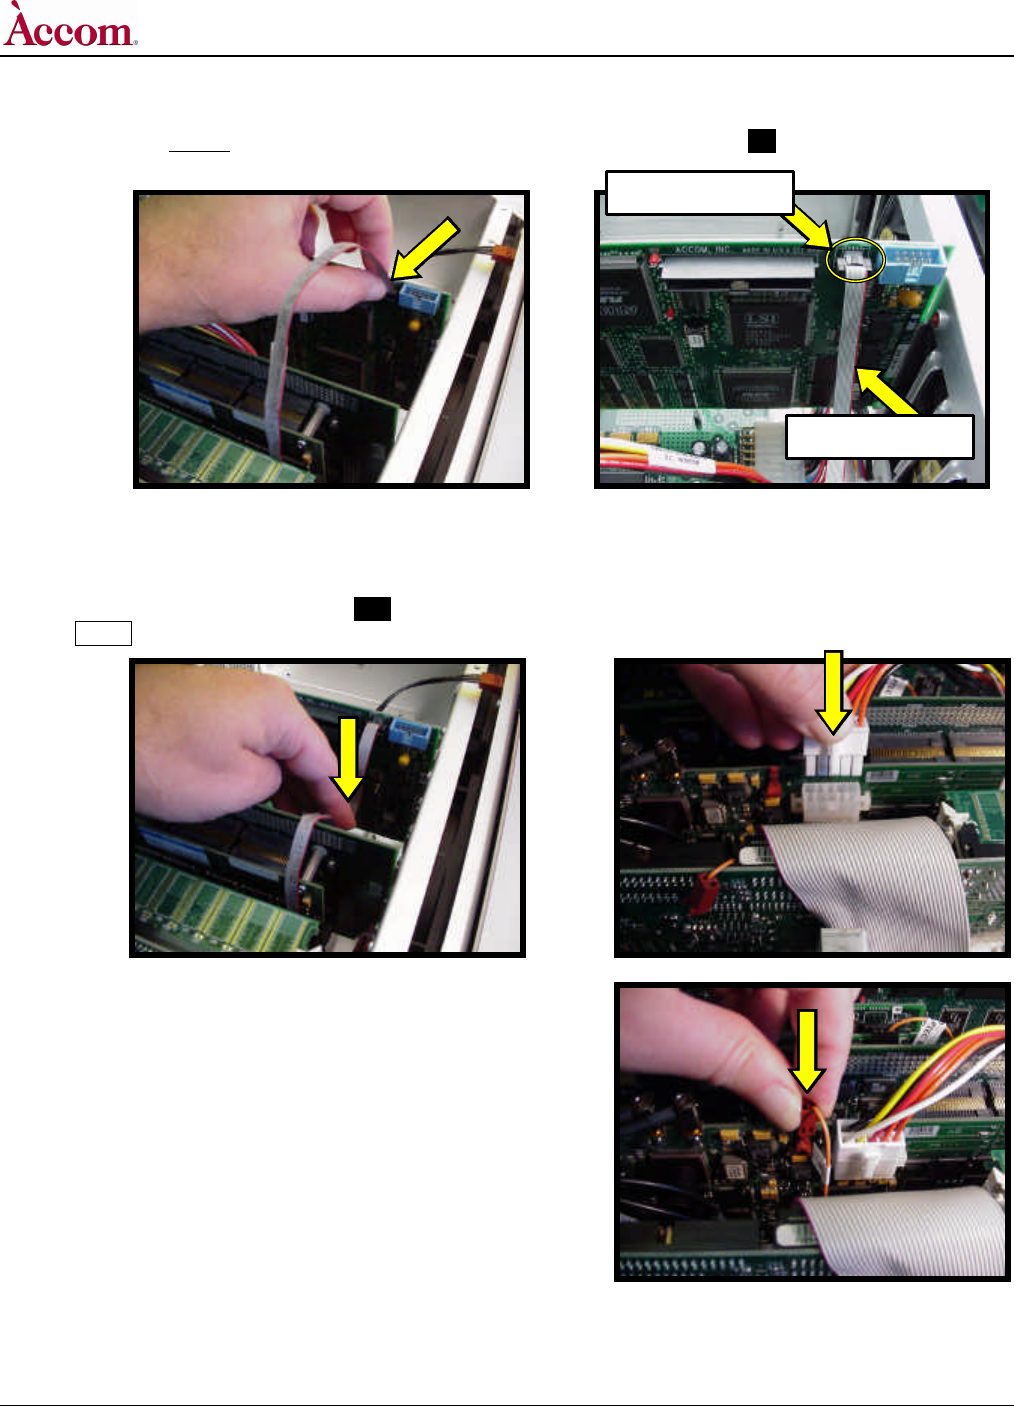
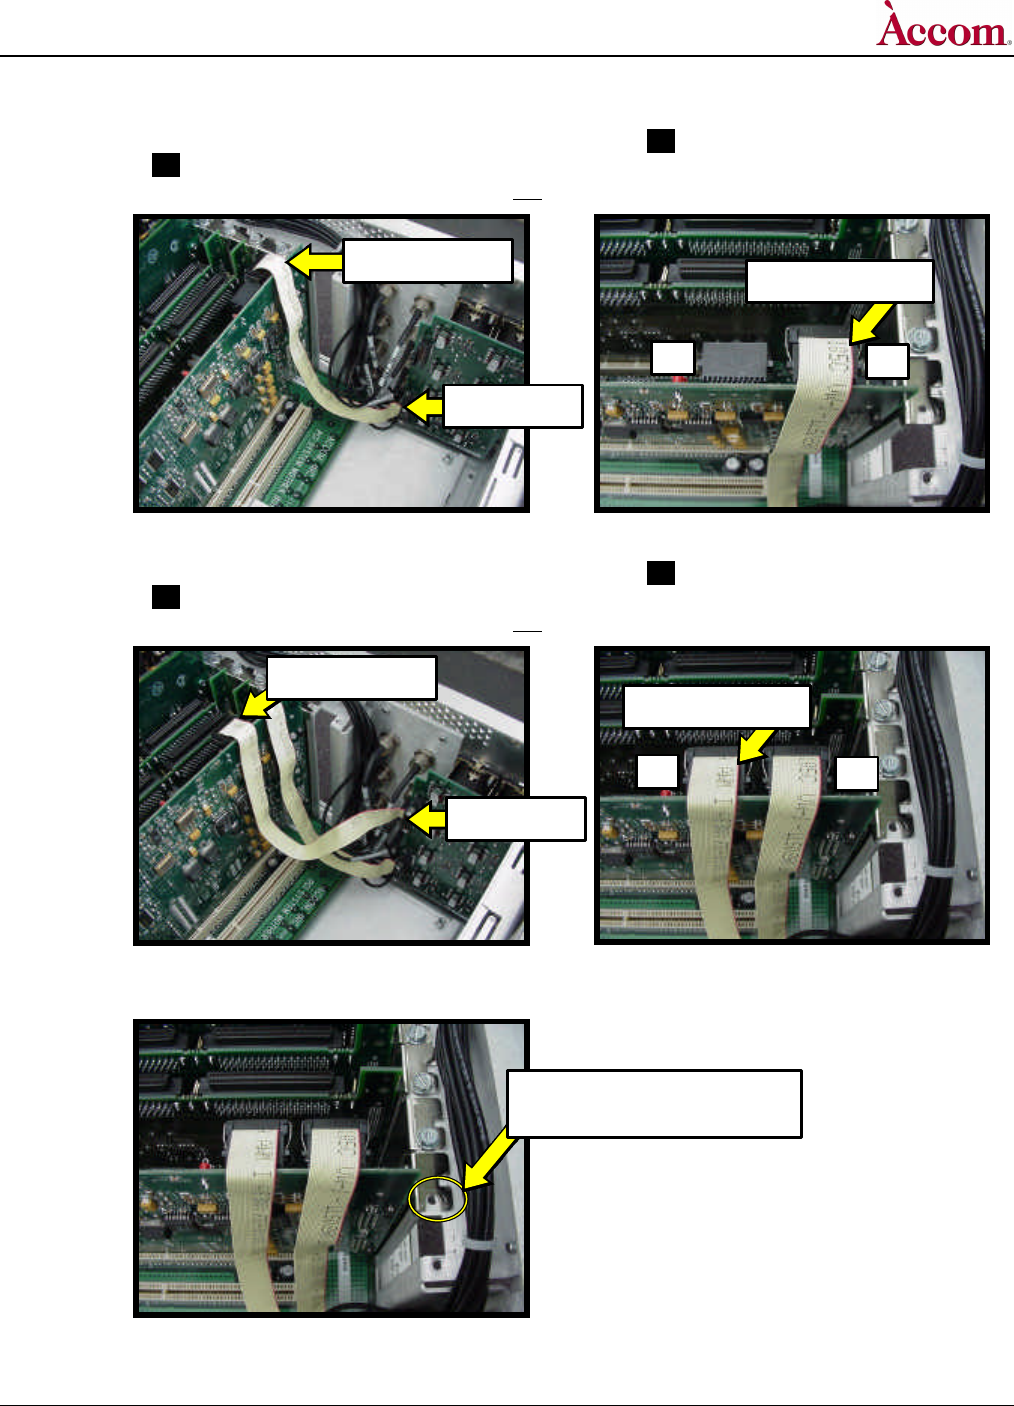
2. Temporarily Remove the Monitor Video PCI Board from the WSD/HD:
A. Remove the orange-wire connector J23 from the top edge of the Monitor Video Board as shown in the left-hand photo
below. Be careful not to remove the other end of the wire from the motherboard below!
B. Remove the 10-wire power connector from the top edge of the Monitor Video Board as shown in the right-hand photo below.
A
B
Continued…
Install Board in Slot #2
WSD/HD
Hardware Upgrade Installation
Page 8 of 53 2001 / Accom, Incorporated Document Revised: 28 September, 2001 @ 11:41 AM
C. At the rear of the WSD/HD chassis on the Monitor Video PCI board slot, remove and retain the slotted screw that secures the
top of PCI board.
D. Carefully lift the Monitor Video PCI board from the chassis, starting with the end of the board nearest the FRONT of the
WSD/HD chassis, as shown in the right-hand photo below.
C
D
E. Fully remove the Monitor Video PCI board from the chassis, rotate it and rest it on top of the WSD/HD chassis, as shown in
the left-hand photo below. Locate connector J22 on the Monitor Video PCI board. It's shown circled in the left-hand photo
below.
F. ! IMPORTANT ! The black plastic guide on connector J22 might be installed backward on some Monitor Video PCI
boards. If the connector is installed as shown in the right-hand photo below, then you will need to carefully
pry the black plastic guide off from the connector, and turn it around. The correct orientation of the black
plastic guide is shown in photo G on the following page.
NOTE If you must turn around this black plastic guide, please do so carefully with a very small "tweaker" screwdriver —
being very careful not to break the vertical guide posts on the plastic guide. But if you do happen to break the vertical
guide posts, don't worry. The connector guide will still work fine, without a problem.
E
F
Continued…
WSD/HD
Hardware Upgrade Installation
Document Revised: 28 September, 2001 @ 11:41 AM 2001 / Accom, Incorporated Page 9 of 53
G. After prying off the plastic connector guide (if necessary), turn it around and slide it onto the 10-pin connector. It should be
oriented as shown in the left-hand photo below.
H. Connect one end of the new reference ribbon cable (P/N 9000-0788-00) onto connector J22 on the Monitor Video PCI board.
Be sure the red stripe on the ribbon cable is oriented as shown in the right-hand photo below.
G
H
I. With the new ribbon cable inserted onto connector J22 on the Monitor Video PCI board, carefully insert the Monitor Video
PCI board back into its slot inside the WSD/HD chassis. Insert the back end first, then guide the front edge into the guide slot
located at the front of the WSD/HD chassis.
J. Secure the Monitor Video PCI board with the original slotted screw, as shown in the right-hand photo below.
I
J
Continued…
Red Stripe on Cable
1
2
WSD/HD
Hardware Upgrade Installation
Page 10 of 53 2001 / Accom, Incorporated Document Revised: 28 September, 2001 @ 11:41 AM
K. Connect the free end of the new reference ribbon cable (P/N 9000-0788-00) onto connector J8 on the new Digital Audio PCI
board, as shown in the two photos below.
K
K
L. Push the middle of the new reference ribbon cable between the boards, as shown in the left-hand photo below.
M. Reconnect the 10-wire power connector to the top edge of the Monitor Video Board as shown in the top right photo below.
N. Reconnect the orange-wire connector J23 to the top edge of the Monitor Video Board as shown in the bottom right photo.
NOTE Confirm that the other end of this wire is still secured to the motherboard below!
L
M
N
Continued…
J8 on Audio Board
Red Stripe on Cable
WSD/HD
Hardware Upgrade Installation
Document Revised: 28 September, 2001 @ 11:41 AM 2001 / Accom, Incorporated Page 11 of 53
O. Install the new audio I/O ribbon cable (P/N 9000-0776-00) between connector J7 on the new Digital Audio PCI board, and
connector J2 on the XLR I/O circuit board that's mounted to the rear panel of the chassis. On the Digital Audio board, be
sure to orient the red stripe on the ribbon cable towards the rear of the chassis, as shown in the right-hand photo below.
O
O
P. Install the new audio I/O ribbon cable (P/N 9000-0776-00) between connector J6 on the Digital Audio PCI board, and
connector J1 on the XLR I/O circuit board that's mounted to the rear panel of the chassis. On the Digital Audio board, be
sure to orient the red stripe on the ribbon cable towards the rear of the chassis, as shown above.
P
P
Q. If not yet done, secure the Digital Audio PCI board to the chassis with the slotted screw, as shown in the circled area below.
Q
Continued…
J7
J6
J7
J6
J2 on XLR I/O
J7 on Audio Board
Red Stripe on Cable
J6 on Audio Board
J1 on XLR I/O
Red Stripe on Cable
Secure board with slotted screw
from filler panel.

WSD/HD
Hardware Upgrade Installation
Page 12 of 53 2001 / Accom, Incorporated Document Revised: 28 September, 2001 @ 11:41 AM
R. On the new Digital Audio PCI board, slide switch S1 towards the rear panel of the WSD/HD chassis, as shown in the photo
below:
R
Slide switch S1 towards rear
panel of WSD/HD chassis.
WSD/HD
Hardware Upgrade Installation
Document Revised: 28 September, 2001 @ 11:41 AM 2001 / Accom, Incorporated Page 13 of 53
Hardware Upgrade — Installing SCSI Disk Drive
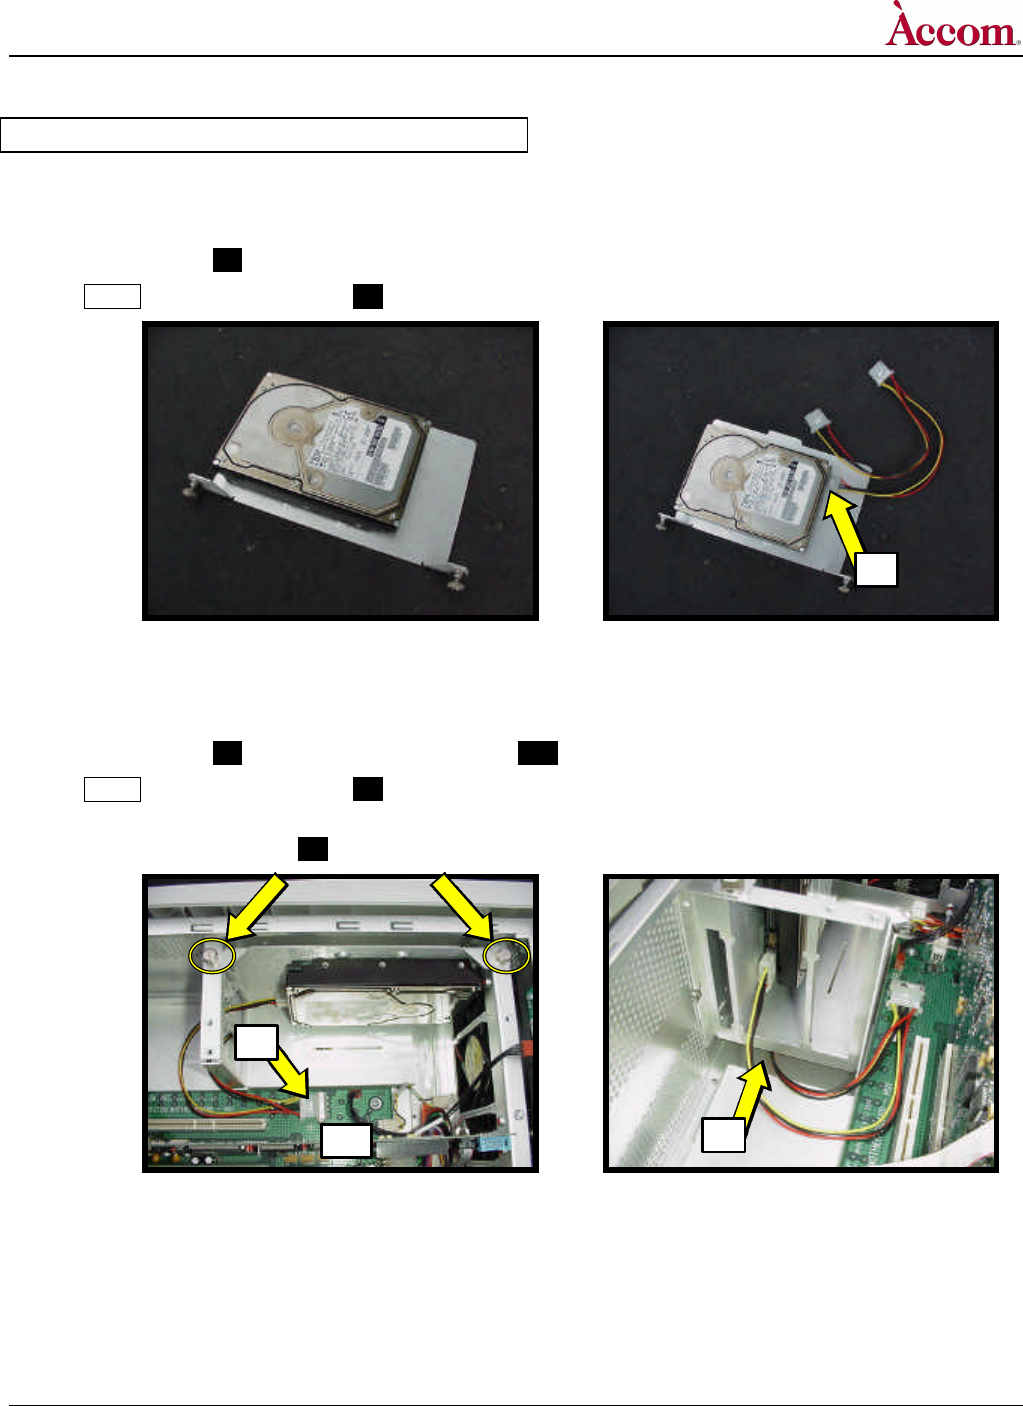
1. Secure the disk drive to the mounting plate:
A. Using the four screws provided (P/N 1901-0251), secure the new hard disk drive to the mounting plate.
B. Attach connector P2 of the new power cable (P/N 9000-0801-00) to the power receptacle on the hard disk drive.
NOTE Be sure to push connector P2 all the way into the socket — this may require a great deal of pressure!
A
B
C. Carefully insert the new hard disk drive (on the mounting plate) into the appropriate open drive bay slot inside the WSD/HD
main chassis, as shown below. Secure the drive to the frame with the two captive slotted screws that are attached to the drive
mounting plate.
D. Attach connector P1 of the new power cable to connector JR1 located nearby on the motherboard.
NOTE Be sure to push connector P1 all the way into the socket — this may require a great deal of pressure!
E. Tuck the (unused) connector P3 of the new power cable underneath the disk drive cage, as shown in the right-hand photo.
C - D
E
JR1
P2
P1
P3
WSD/HD
Hardware Upgrade Installation
Page 14 of 53 2001 / Accom, Incorporated Document Revised: 28 September, 2001 @ 11:41 AM
Installing SCSI Connector Panel & Ribbon Cable
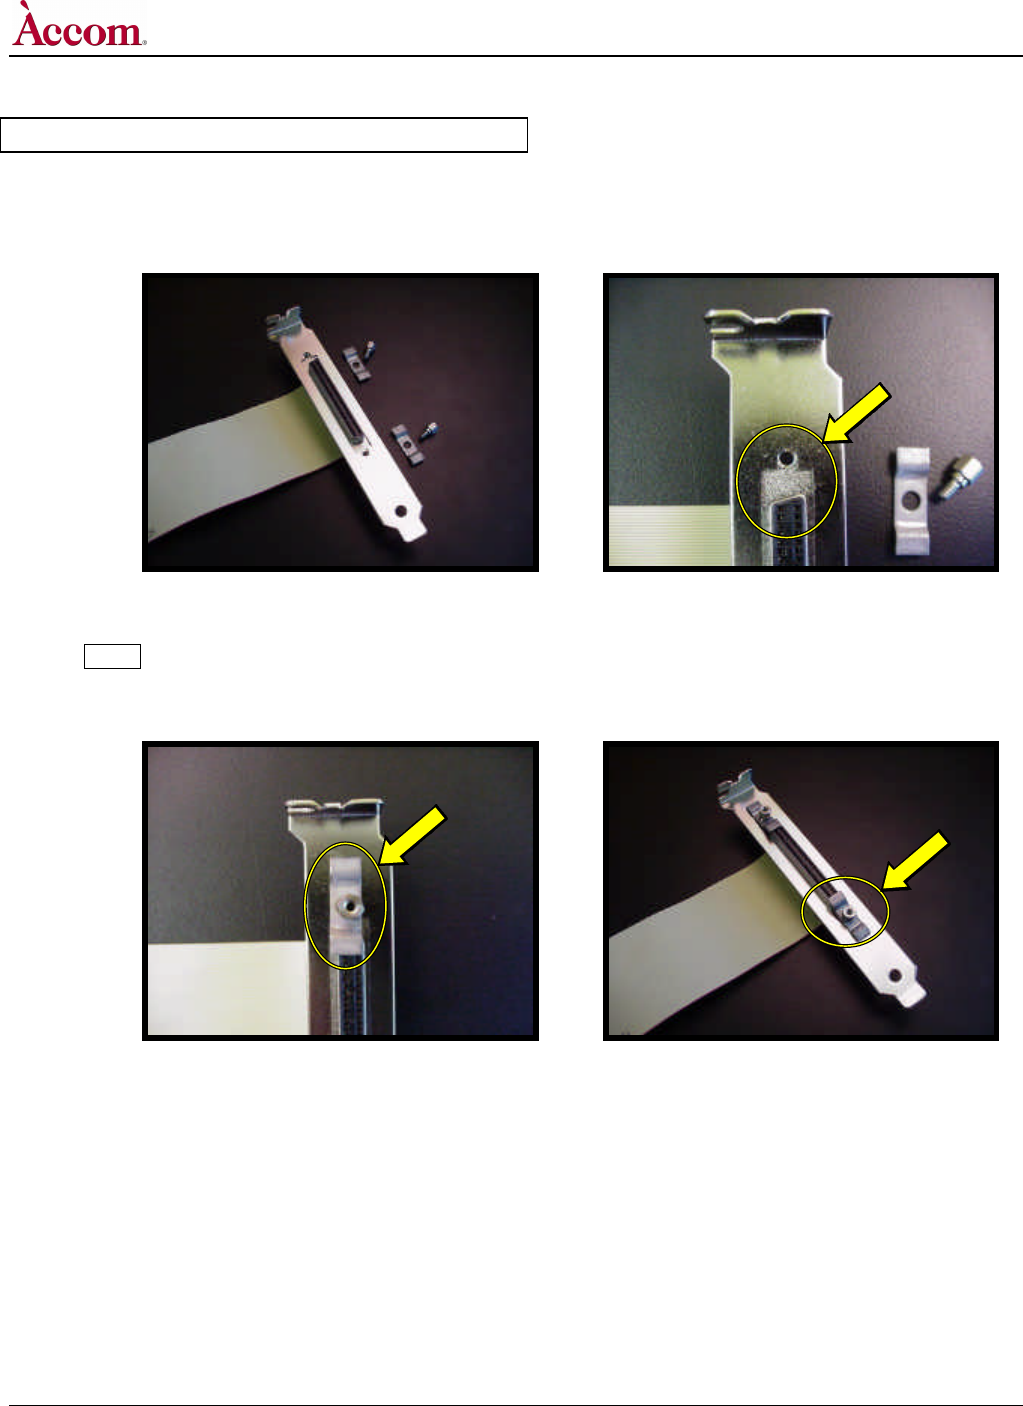
1. Prepare the new SCSI Connector Panel & Ribbon Cable:
A. Position the end of the new audio SCSI interface connector/cable (P/N 9000-8000-00) to the new SCSI mounting bracket (P/N
1902-0493) with the orientation shown in the two photos below.
A
A
B. Attach the top bracket flange (P/N 100598-01) using one of the 4-40 male jack screws (P/N 582-00012), as shown in the left-
hand photo below. Loosely hand-tighten the jack screw — don't over tighten, as you will need to loosen this again shortly.
NOTE Be sure to orient the flange vertically, as shown in the photograph!
C. Attach the bottom bracket flange using the other 4-40 male jack screw, as shown in the right-hand photo below. Again, loosely
hand-tighten the jack screw — don't over tighten, as you will need to loosen this again shortly.
B
C
Continued…
WSD/HD
Hardware Upgrade Installation
Document Revised: 28 September, 2001 @ 11:41 AM 2001 / Accom, Incorporated Page 15 of 53
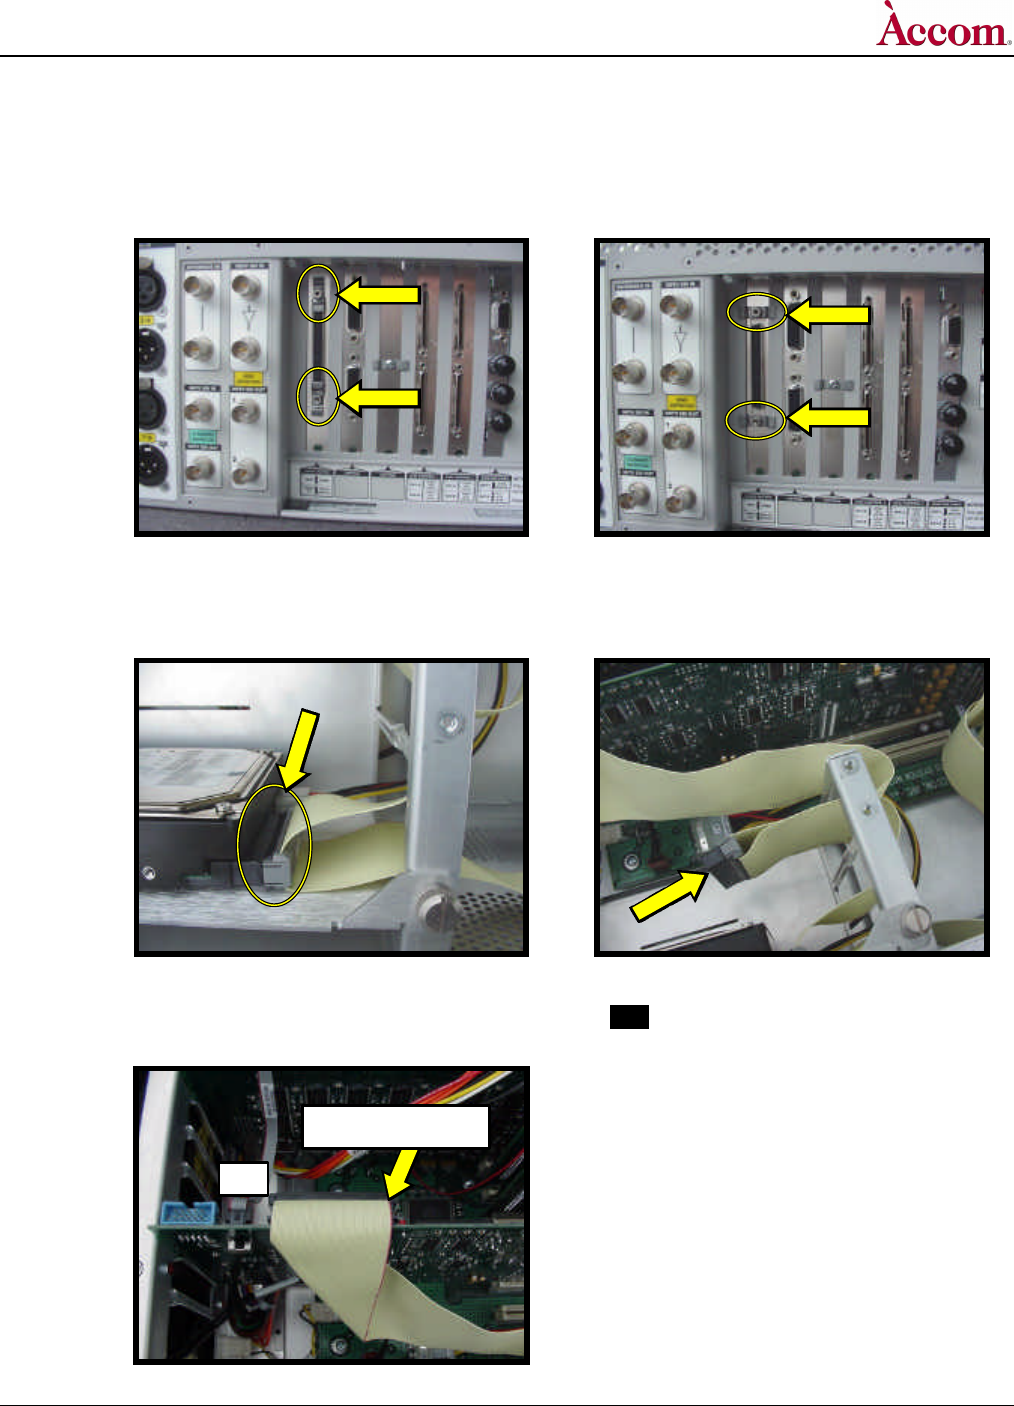
D. Insert the new SCSI connector panel into the main chassis, in slot #1 of the rear panel, as shown in the left-hand photo below.
Secure the top of this panel with the slotted screw used to hold the original "blank" filler panel in place.
E. Rotate the two securing flanges on the new SCSI connector panel, and rotate them 90º so they are perpendicular to the SCSI
connector, as shown in the left-hand photo below. Tighten (but don’t over-tighten) these two nuts using a 3/16" nut driver.
D
E
F. Attach the next SCSI connector of the ribbon to the connector on the new hard disk drive, shown in the left-hand photo below.
G. Thread the next connector of the SCSI ribbon cable through the disk mounting cage as shown in the right-hand photo below.
F
G
H. Connect the far free end of the SCSI ribbon cable to the SCSI connector JP2 on the top edge of the new Digital Audio PCI
board. Be sure to orient the red stripe on the ribbon cable as shown in the photo below.
H
JP2
Red Stripe on Cable
WSD/HD
Hardware Upgrade Installation
Page 16 of 53 2001 / Accom, Incorporated Document Revised: 28 September, 2001 @ 11:41 AM
Hardware Upgrade — Label Installation & Button-Up
1. Install new PCI Board Label:
A. On the rear panel of the WSD/HD main chassis, remove the OLD label from below the PCI circuit boards. The adhesive used
on this label is of the type that allows easy removal of the old label. You may need to pry the label away using a flat-blade
screw driver and a pair of needle-nosed pliers.
B. Remove the paper backing from the new PCI circuit board label (P/N 8901-1231-01), and apply the label to the chassis in the
space below the PCI circuit boards. It's easiest to insert the TOP edge of the label first, and then slide the BOTTOM edge
inward towards the chassis. Press the label firmly into place.
A
B
C. Reinstall the PCI board retainer, and secure the two mounting screws.
D. Check your work inside the WSD/HD main chassis. Be sure all the cables are in their proper place.
NOTE Make sure the new Digital Audio PCI board and the new SCSI connector panel are both secured at the top rear of the
chassis, each with a single slotted screw that was used on the former "filler" panels.
C
D
Continued…
WSD/HD
Hardware Upgrade Installation
Document Revised: 28 September, 2001 @ 11:41 AM 2001 / Accom, Incorporated Page 17 of 53
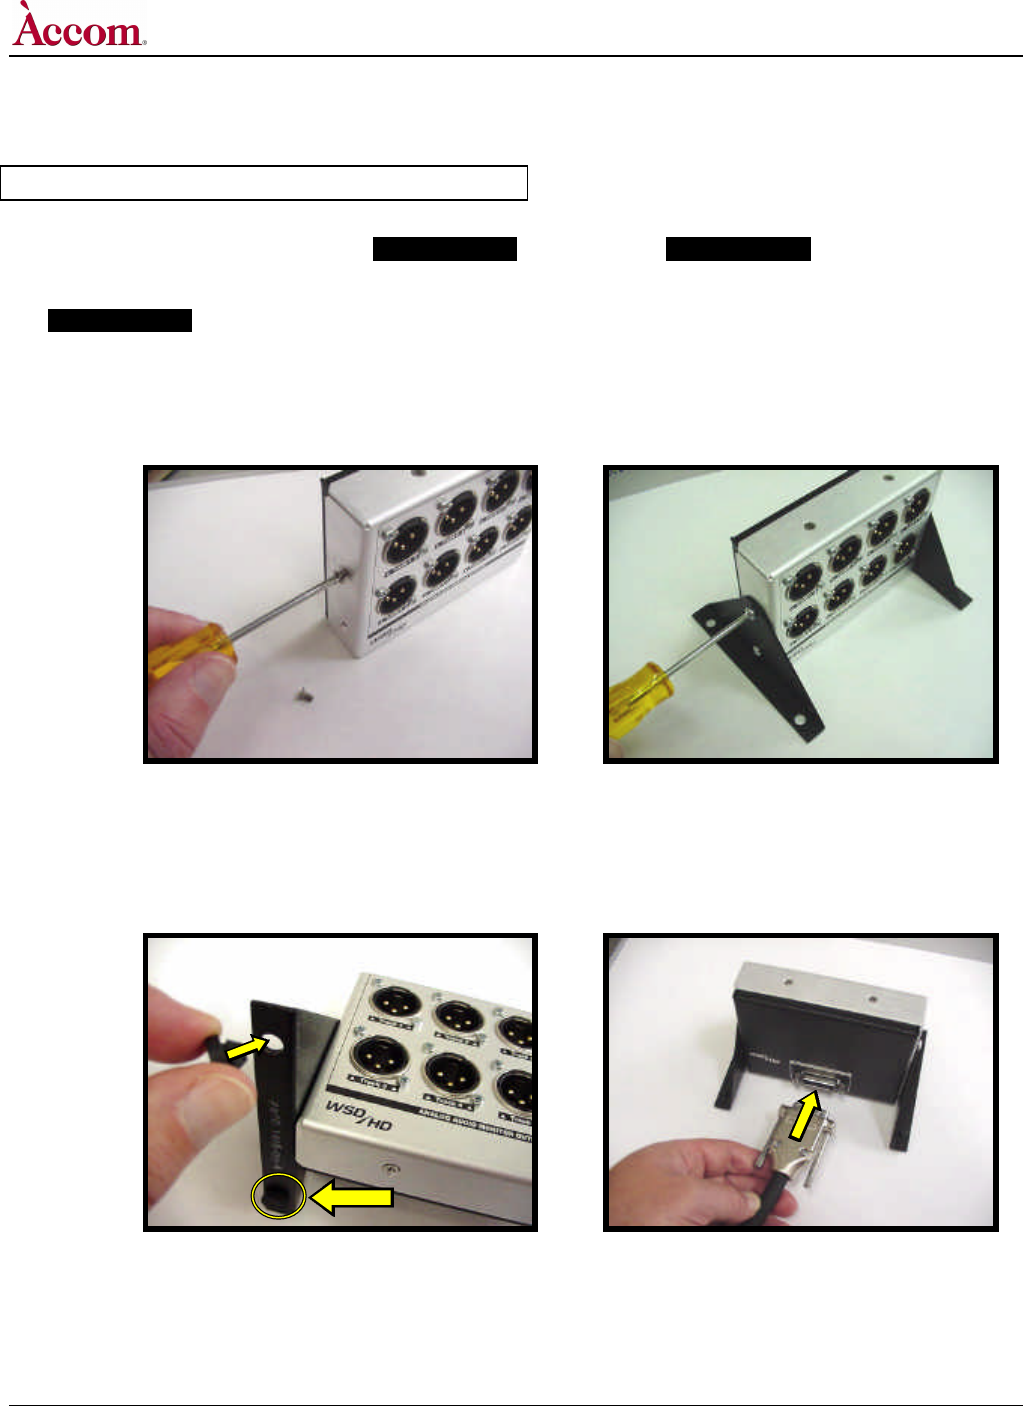
E. Slide the main cover plate onto the WSD/HD main chassis.
F. Screw in the (5) philips-head screws to secure the main cover plate (shown by the arrows in the photo).
E
F
G. Install the SCSI terminator (part number 2500-0234) onto the new SCSI connector on the rear panel of the WSD/HD.
H. Turn the two thumbscrews clockwise on the SCSI terminator to secure the terminator to the chassis connector.
G
H
WSD/HD
Hardware Upgrade Installation
Page 18 of 53 2001 / Accom, Incorporated Document Revised: 28 September, 2001 @ 11:41 AM
Analog Audio Monitoring Breakout Panel
The new Digital Audio Option comes standard with an analog output monitoring break-out panel, with 8 male XLR connectors. This
breakout panel can be either desk-top mounted ( ALTERNATIVE 1 ) or rack mounted ( ALTERNATIVE 2 ) . These instructions detail
how to configure the panel for the desired mounting configuration.
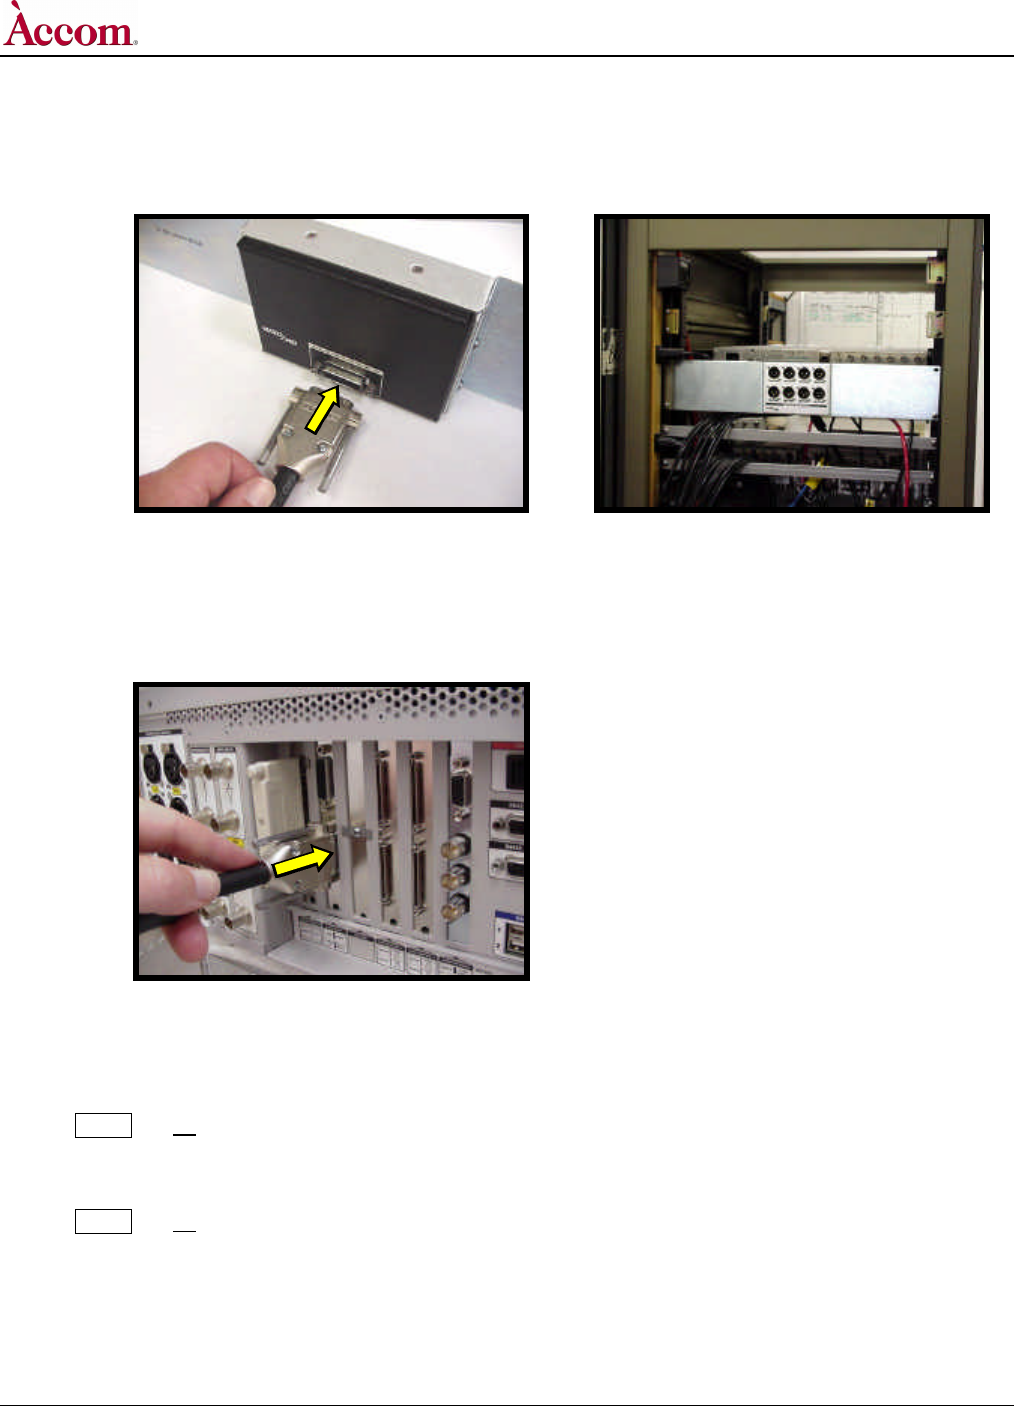
1. ALTERNATIVE 1 Desktop Mounting of Analog Audio Breakout Panel
A. Remove the four philips-head screws from the two ends of the Analog Audio Breakout panel, as shown in the left-hand photo
below. You may discard these screws, assuming you will not remove the mounting flanges at a later date.
B. Using four of the new pan-head screws (P/N 1901-0251), secure the two black metal desktop flanges (P/N 8900-1406-00) onto
either side of the breakout panel box, as shown in the right-hand photo below.
A
B
C. Insert the four rubber feet (P/N 1902-0441) into the four holes in the two desktop metal flanges, as shown in the left-hand photo
below.
D. Connect one end of the Analog Audio cable assembly (part number 9000-0741-00) to the 26-pin D connector located on the
rear of the Analog Audio Breakout panel. Turn the two thumbscrews clockwise to secure the connector to the panel.
C
D
Continued…

WSD/HD
Hardware Upgrade Installation
Document Revised: 28 September, 2001 @ 11:41 AM 2001 / Accom, Incorporated Page 19 of 53
E. Connect the other end of the Analog Audio cable assembly to the Analog Audio 26-pin D connector located on the rear panel of
the WSD/HD chassis. Turn the two thumbscrews clockwise to secure the connector to the panel.
F. Continue with (STEP 3) on page 20 below.
E
2. ALTERNATIVE 2 Rack Mounting of Analog Audio Breakout Panel
A. Remove the four philips-head screws from the two ends of the Analog Audio Breakout panel, as shown in the left-hand photo
below. You may discard these screws, assuming you will not remove the rack mounting flanges at a later date.
B. Using four of the new pan-head screws (P/N 1901-0251), secure the two metal rack mount flanges (P/N 8900-1407-00) onto
either side of the breakout panel box, as shown in the right-hand photos below.
A
B
Continued…
WSD/HD
Hardware Upgrade Installation
Page 20 of 53 2001 / Accom, Incorporated Document Revised: 28 September, 2001 @ 11:41 AM
C. Connect one end of the Analog Audio cable assembly (part number 9000-0741-00) to the 26-pin D connector located on the
rear of the Analog Audio Breakout panel. Turn the two thumbscrews clockwise to secure the connector to the panel.
D. Mount the completed assembly into the back of your equipment rack.
C
D
E. Connect the other end of the Analog Audio cable assembly to the Analog Audio 26-pin D connector located on the rear panel of
the WSD/HD chassis. Turn the two thumbscrews clockwise to secure the connector to the panel.
F. Continue with (STEP 3) below.
E
3. Reconnect Cables to WSD/HD Chassis
A. Reconnect all the video, audio, control, VGA, and monitoring cables to the rear panel of the WSD/HD chassis.
NOTE Do not connect the SCSI cables to the external media storage chassis. These cables should remain disconnected
from the WSD/HD chassis during the Digital Audio Driver installation procedure.
B. Connect the AC power lead to the rear panel of the WSD/HD chassis.
NOTE Do not turn on the power to the WSD/HD. Continue with the following procedure before applying power.
WSD/HD
Hardware Upgrade Installation
Document Revised: 28 September, 2001 @ 11:41 AM 2001 / Accom, Incorporated Page 21 of 53
¦ Procedure-4 Audio Driver Installation & Disk Formatting
Digital Audio Software Driver Installation
Follow this procedure to install the Digital Audio software drivers. You should have already installed both the main Version 2.00 Software
and the Digital Audio hardware for the WSD/HD. If you've not yet done both these procedures, do so before beginning the following.
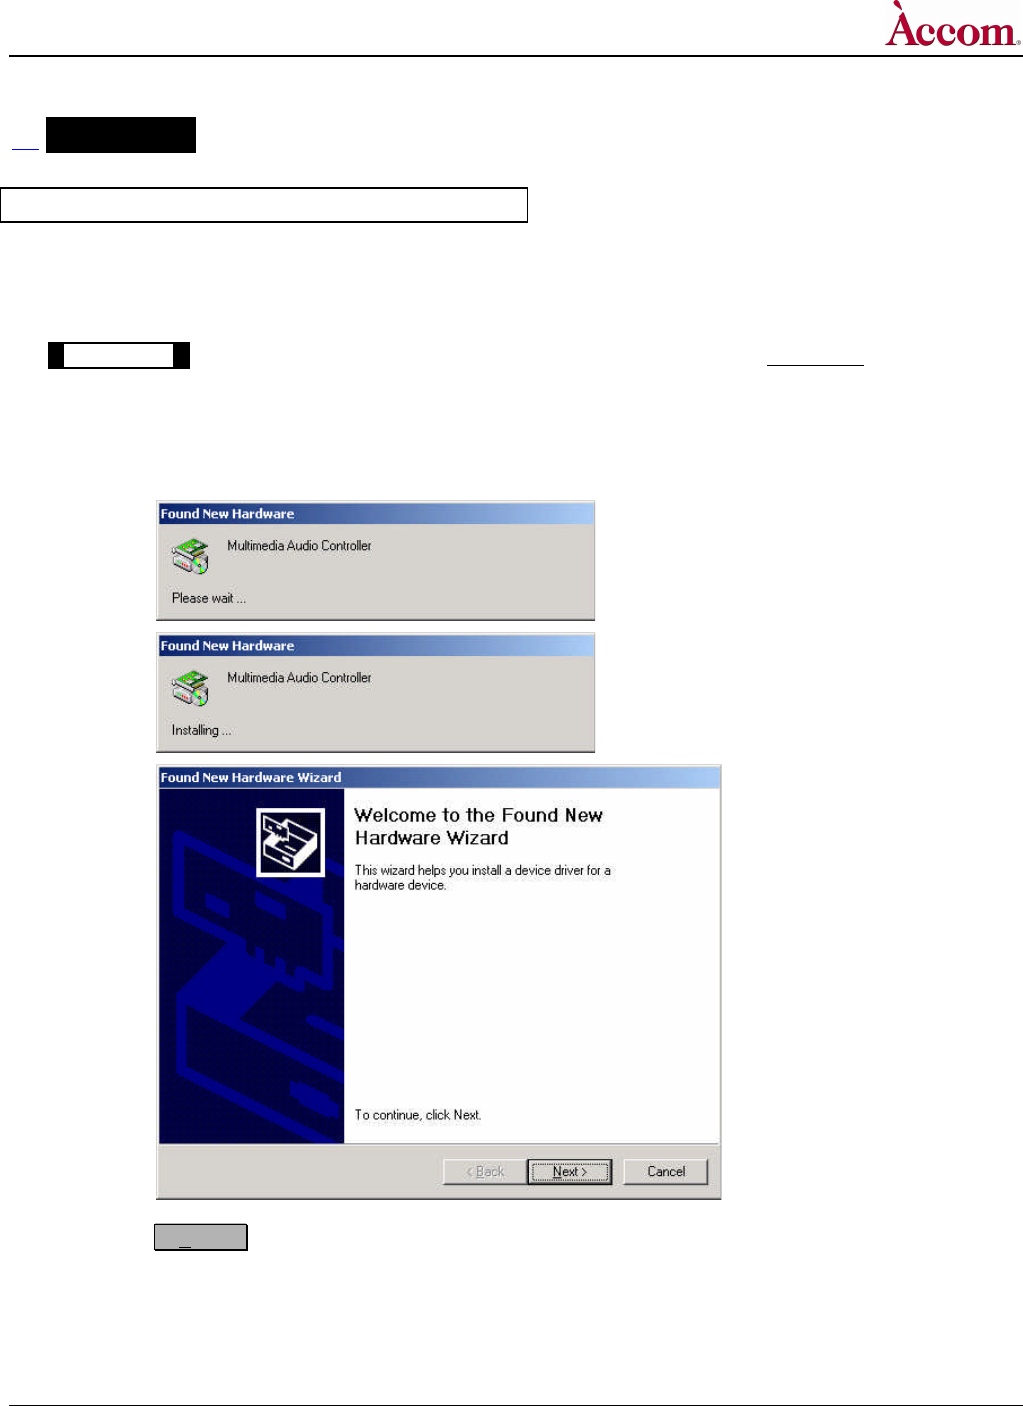
1. Installing the "WSD HD Audio Multimedia Device" Driver
! IMPORTANT ! Be sure all four of the SCSI cables to the external media storage chassis are disconnected from the rear of the
WSD/HD. These cables should remain disconnected during the Digital Audio Software Driver installation
procedure, to avoid accidental corruption of these disk drives!
A. After performing all of the above digital audio hardware installation procedures, power ON the WSD/HD main chassis.
B. After the Windows2000 operating system has finished booting, you will see a "Found New Hardware Wizard":
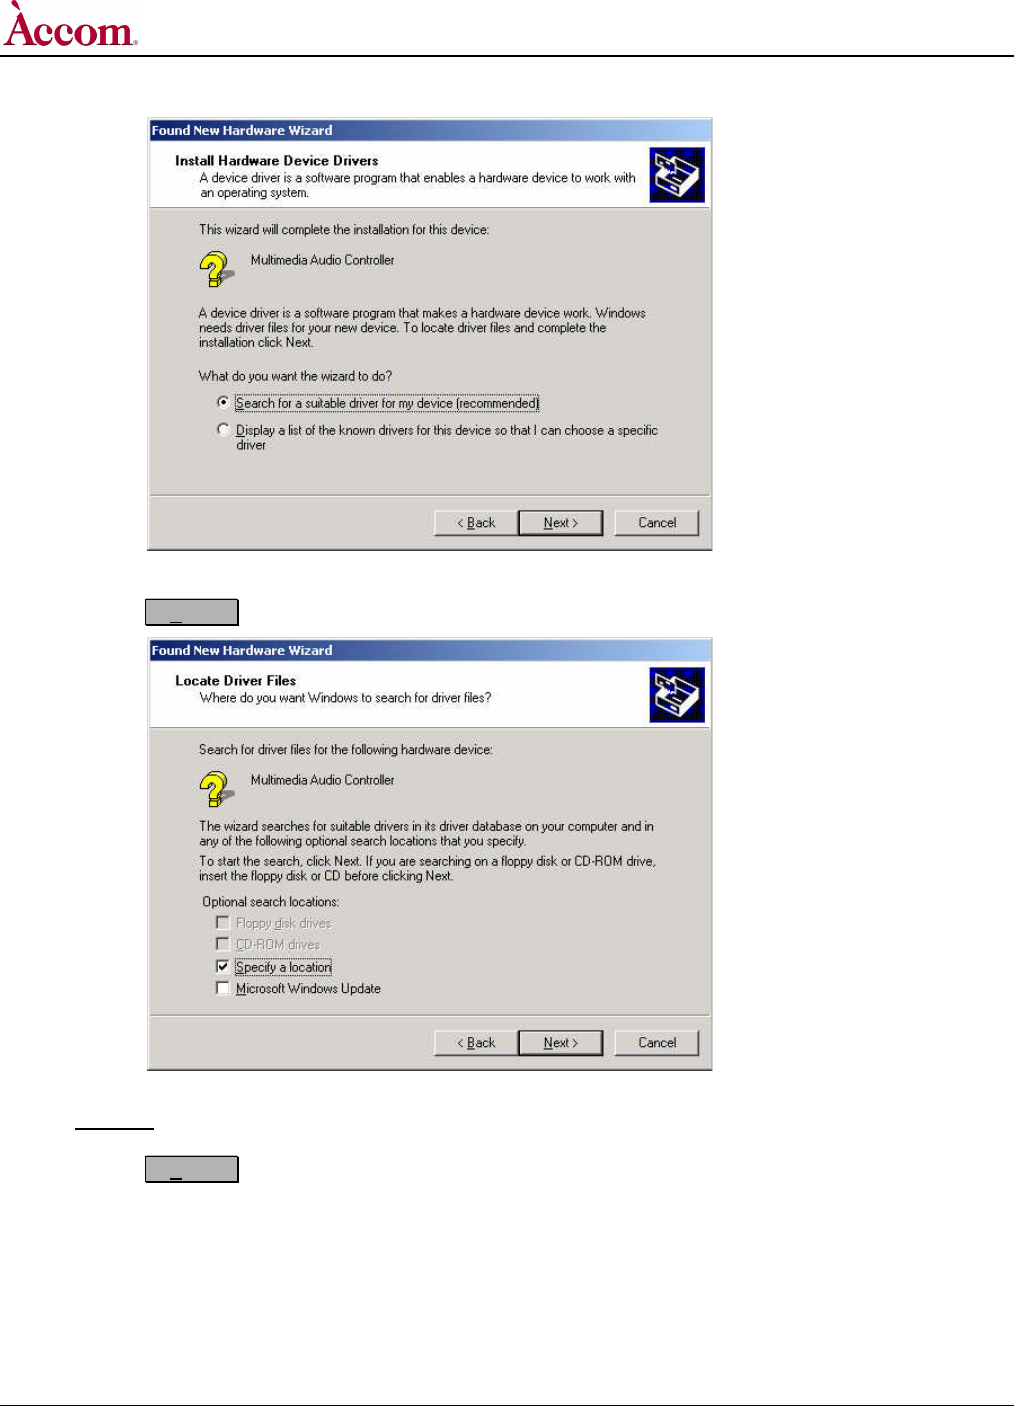
C. Click the Next > button. The "Install Hardware Device Drivers" dialog window will appear, as shown on the following
page.
Continued…
WSD/HD
Hardware Upgrade Installation
Page 22 of 53 2001 / Accom, Incorporated Document Revised: 28 September, 2001 @ 11:41 AM
D. Select the "Search from a suitable driver for my device (recommended)" item, which is the default wizard choice.
E. Click the Next > button. The "Locate Driver Files" dialog window will appear, as shown below.
F. Select the "Specify a location" item, which is the default wizard choice. Be sure the "Microsoft Windows Update" item is
unchecked.
G. Click the Next > button. The "Copy Manufacturer's Files From" dialog window will appear, as shown on the following
page.
Continued…

WSD/HD
Hardware Upgrade Installation
Document Revised: 28 September, 2001 @ 11:41 AM 2001 / Accom, Incorporated Page 23 of 53
H. In the entry space of this window, type the following path name. Be sure to obey the spaces and lower/upper-case letters:
C:\Program Files\Accom\WSD HD
The completed entry should appear as follows:
I. Click the OK button to continue. The "Driver Files Search Results" dialog window will appear, as shown below:
J. Verify that the "heidiaudiodriver.inf" file is indicated. If this is correct, continue with the next step. If this is not correct, then
click on the <Back button to return to the previous page and define the pathname correctly as outlined in step H above.
Continued…
(SPACE)
Make sure the
"heidiaudiodriver.inf " file is
indicated here.
WSD/HD
Hardware Upgrade Installation
Page 24 of 53 2001 / Accom, Incorporated Document Revised: 28 September, 2001 @ 11:41 AM
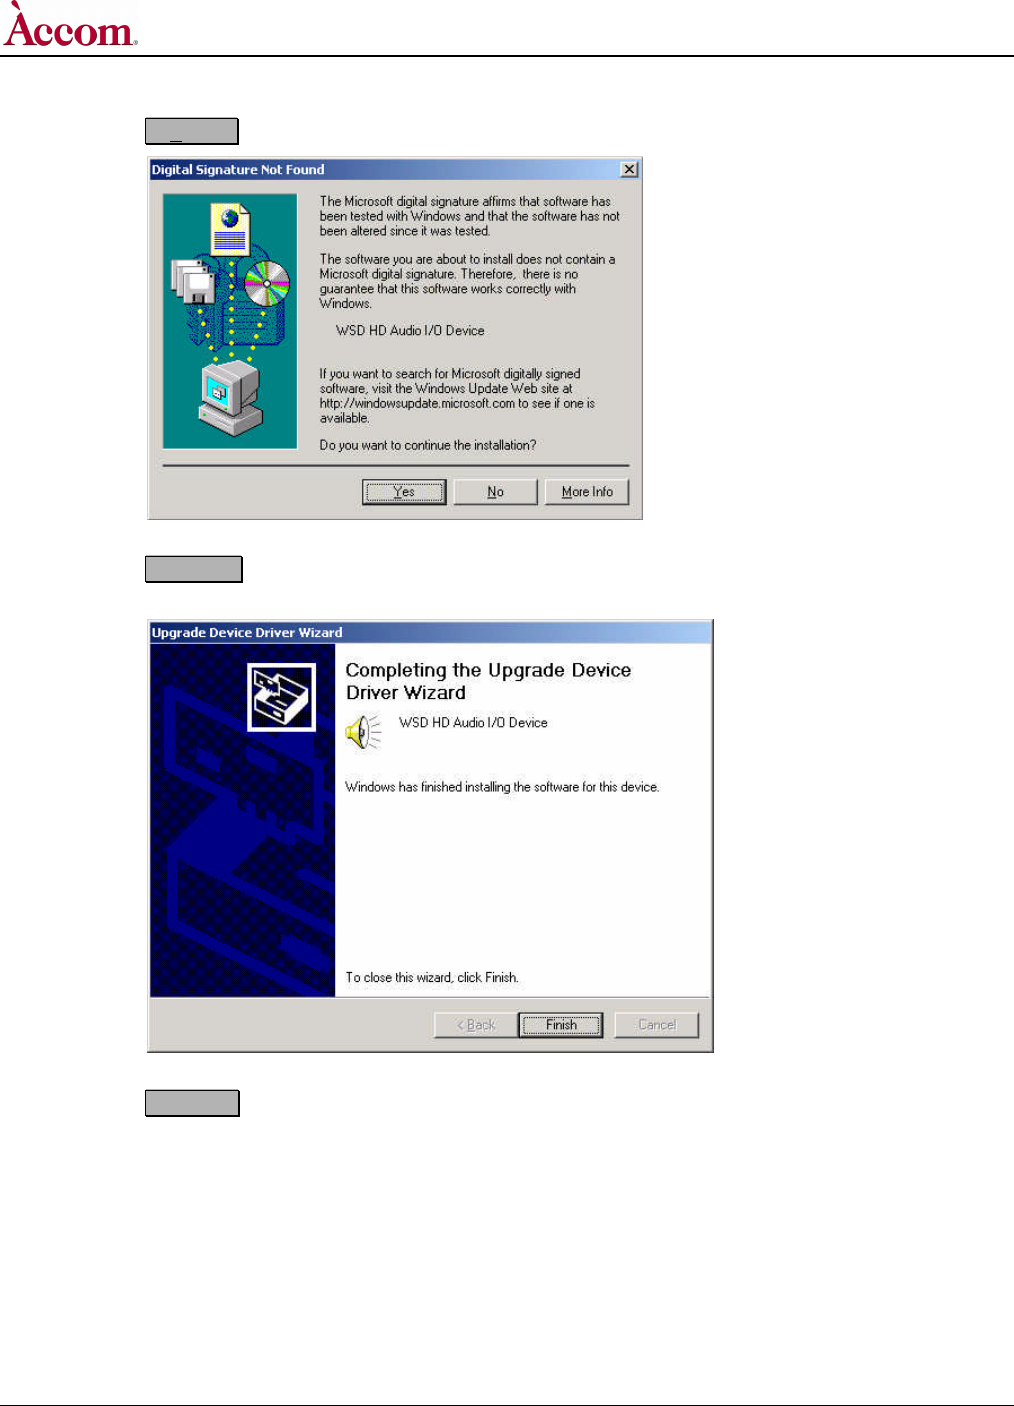
K. Click the Next > button. The "Digital Signature Not Found" dialog window will appear, as shown below:
L. Click the Yes button to continue. The "Completing the Found New Hardware Wizard" dialog window will appear,
as shown below:
M. Click the Finish button to continue. This will close the "Found New Hardware Wizard" window.
Continued…
WSD/HD
Hardware Upgrade Installation
Document Revised: 28 September, 2001 @ 11:41 AM 2001 / Accom, Incorporated Page 25 of 53
2. Installing the "WSD HD Audio Device RAM" Driver
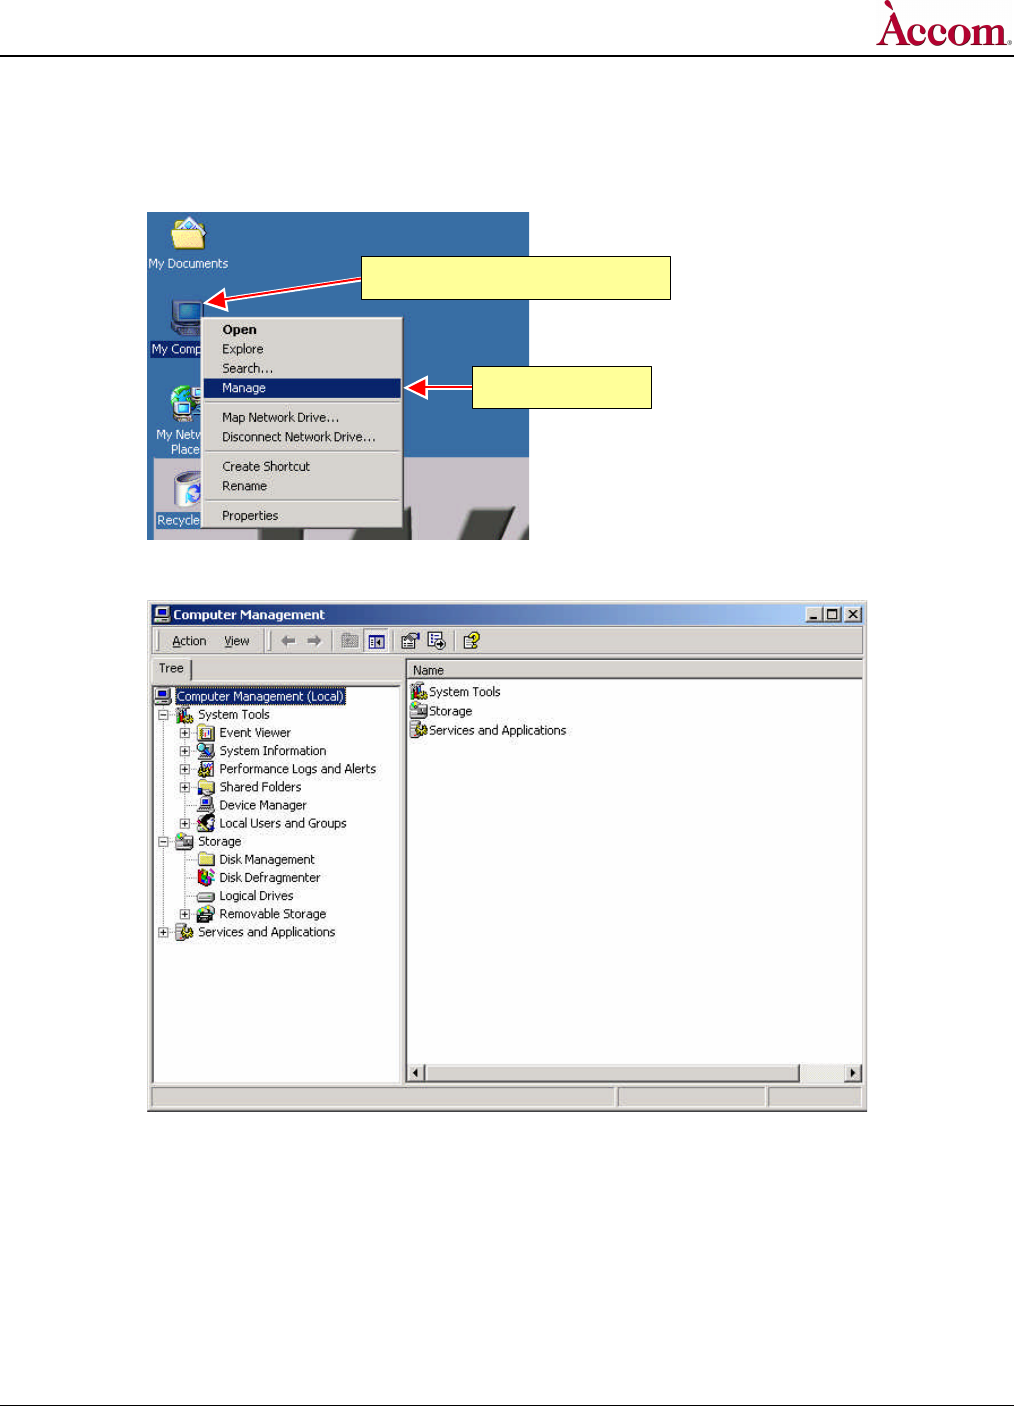
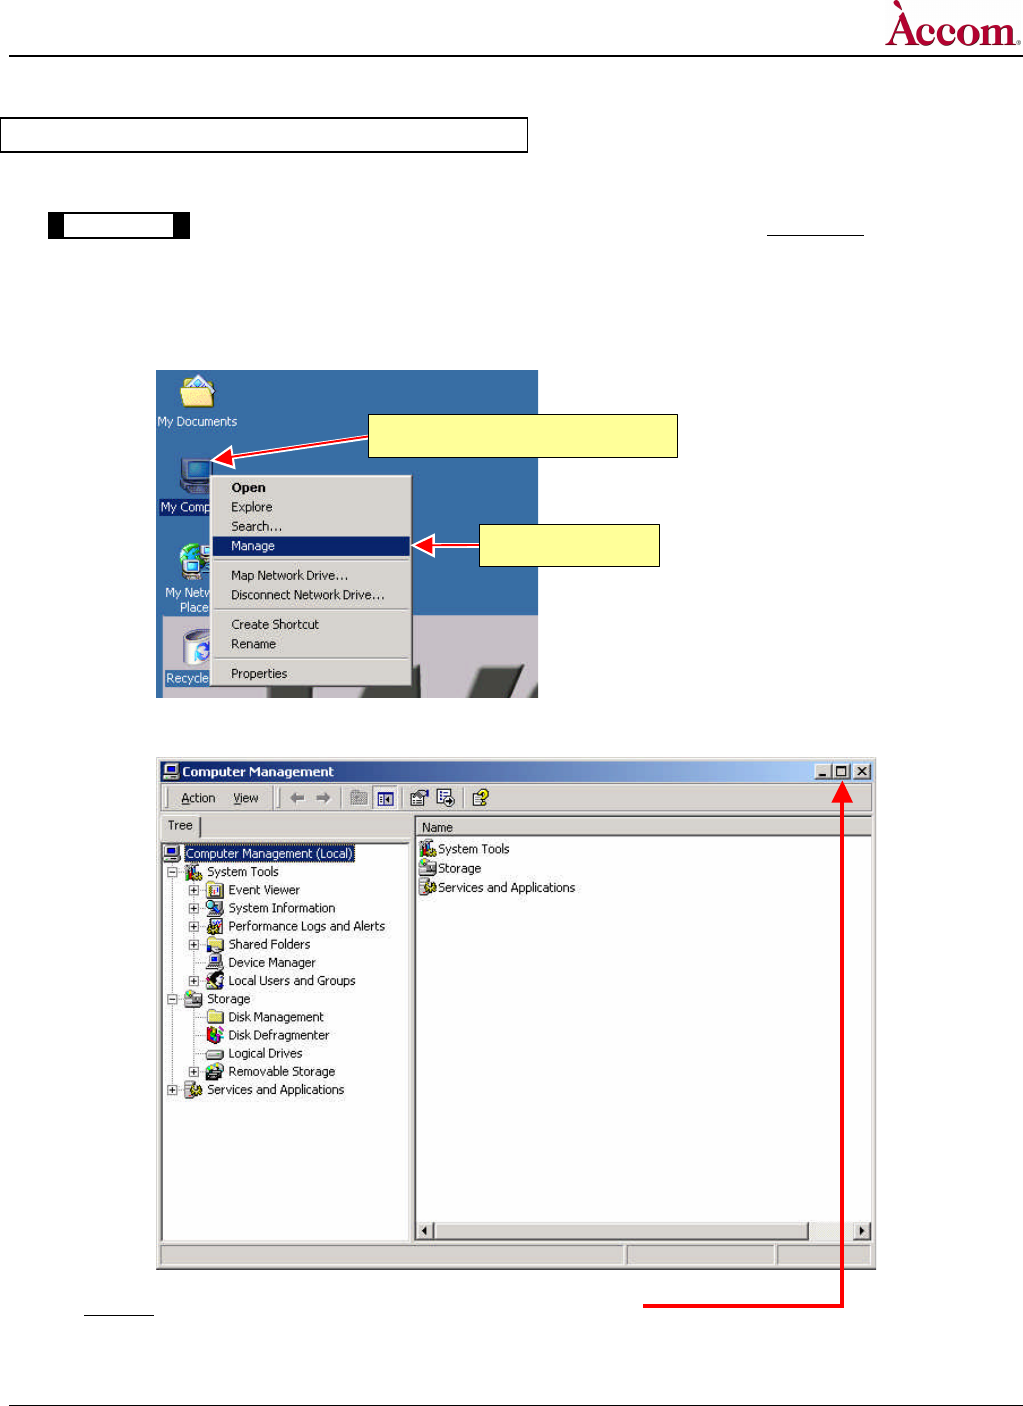
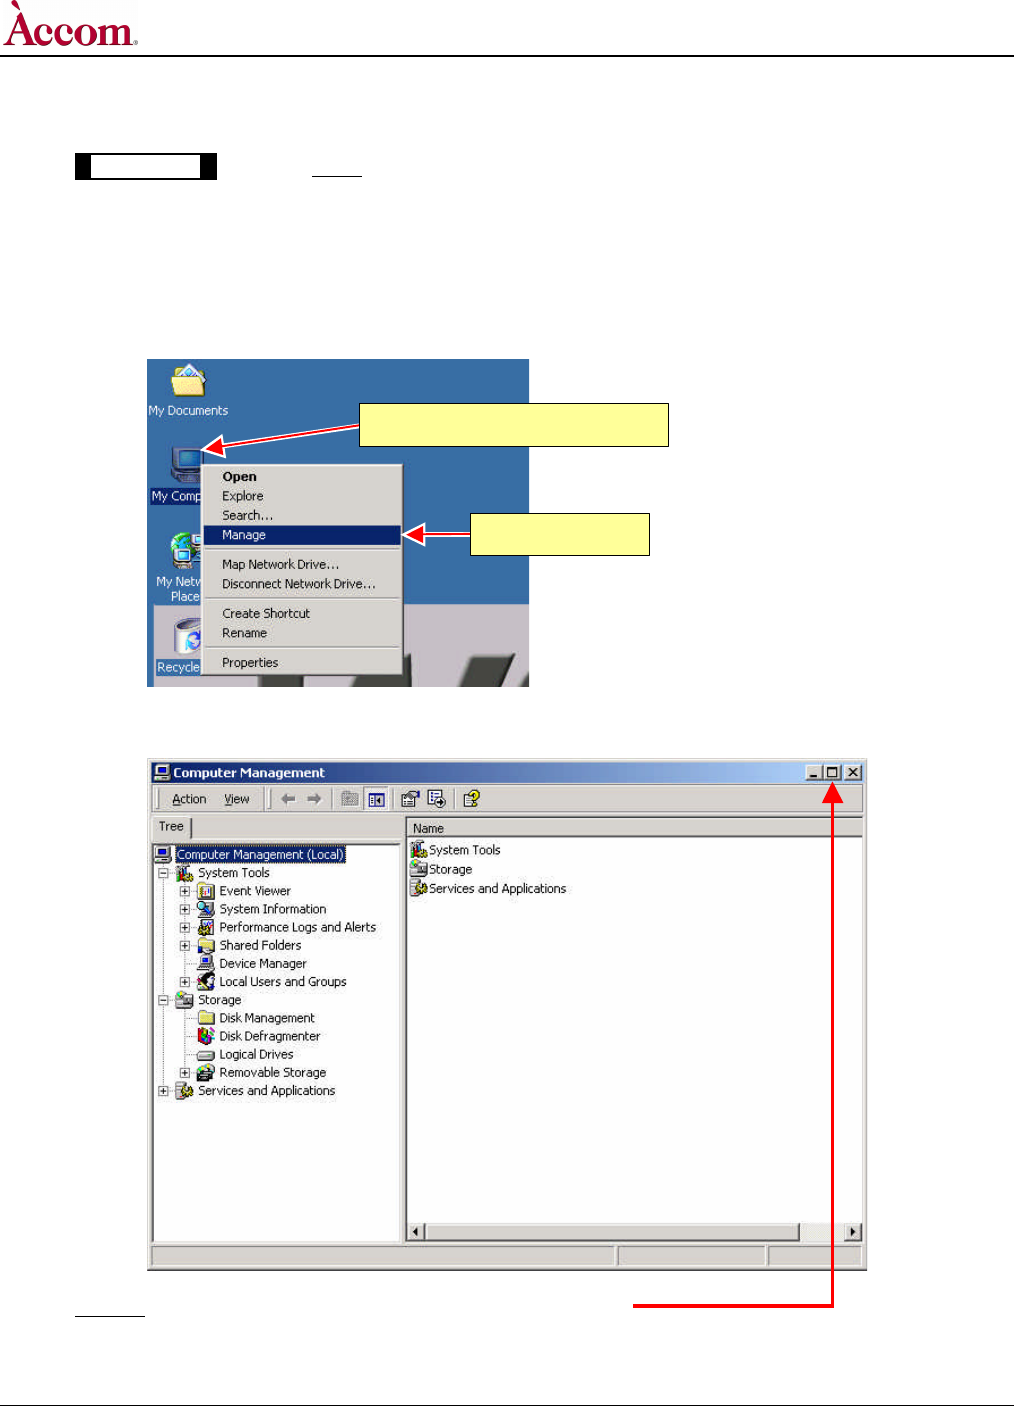
A. Right click on the "My Computer" icon on the desktop, then select the "Manage" option:
B. Click on the "Manage" item. This will open the "Computer Management" dialog window, as shown below:
Continued…
Right click "My Computer" icon.
Select "Manage"
WSD/HD
Hardware Upgrade Installation
Page 26 of 53 2001 / Accom, Incorporated Document Revised: 28 September, 2001 @ 11:41 AM
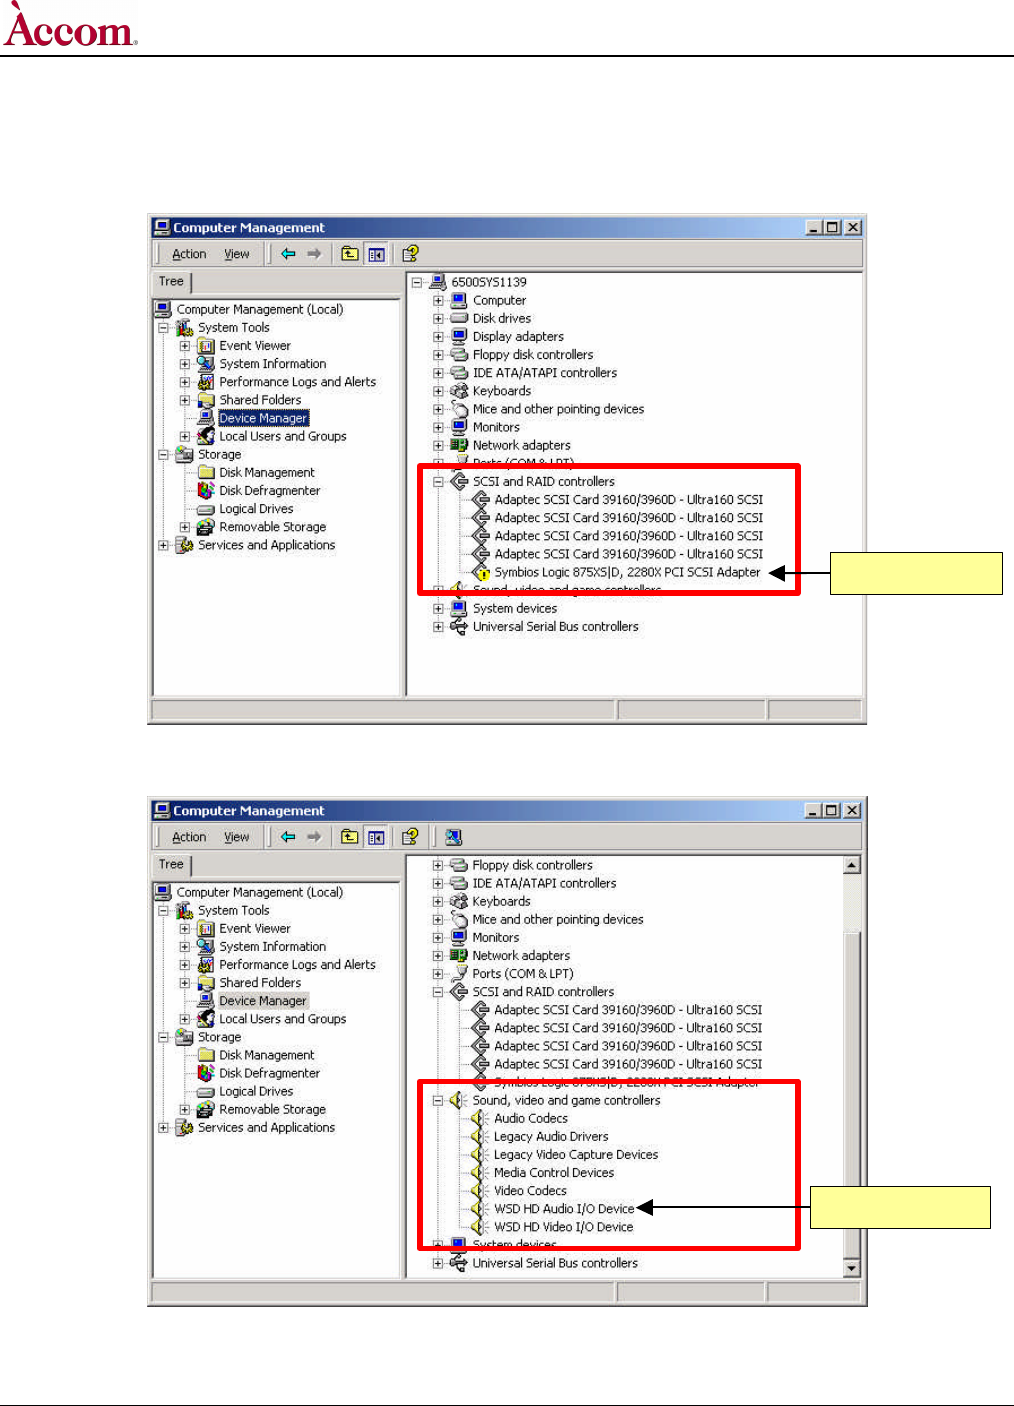
C. Click on the "Device Manager" item in the left-hand pane. In the right-hand pane, expand the "SCSI and Raid Controller"
item if it's closed. You will see a new SCSI device with a yellow flag: "Symbios Logic 875XS|D, 2280X PCI SCSI Adapter" as
shown below:
D. In the right-hand pane, expand the "Sound, Video and Game controllers" item, and you should see a new device in the
listing: "WSD HD Audio I/O Device" as shown below:
Continued…
New SCSI item.
New controller item.
WSD/HD
Hardware Upgrade Installation
Document Revised: 28 September, 2001 @ 11:41 AM 2001 / Accom, Incorporated Page 27 of 53
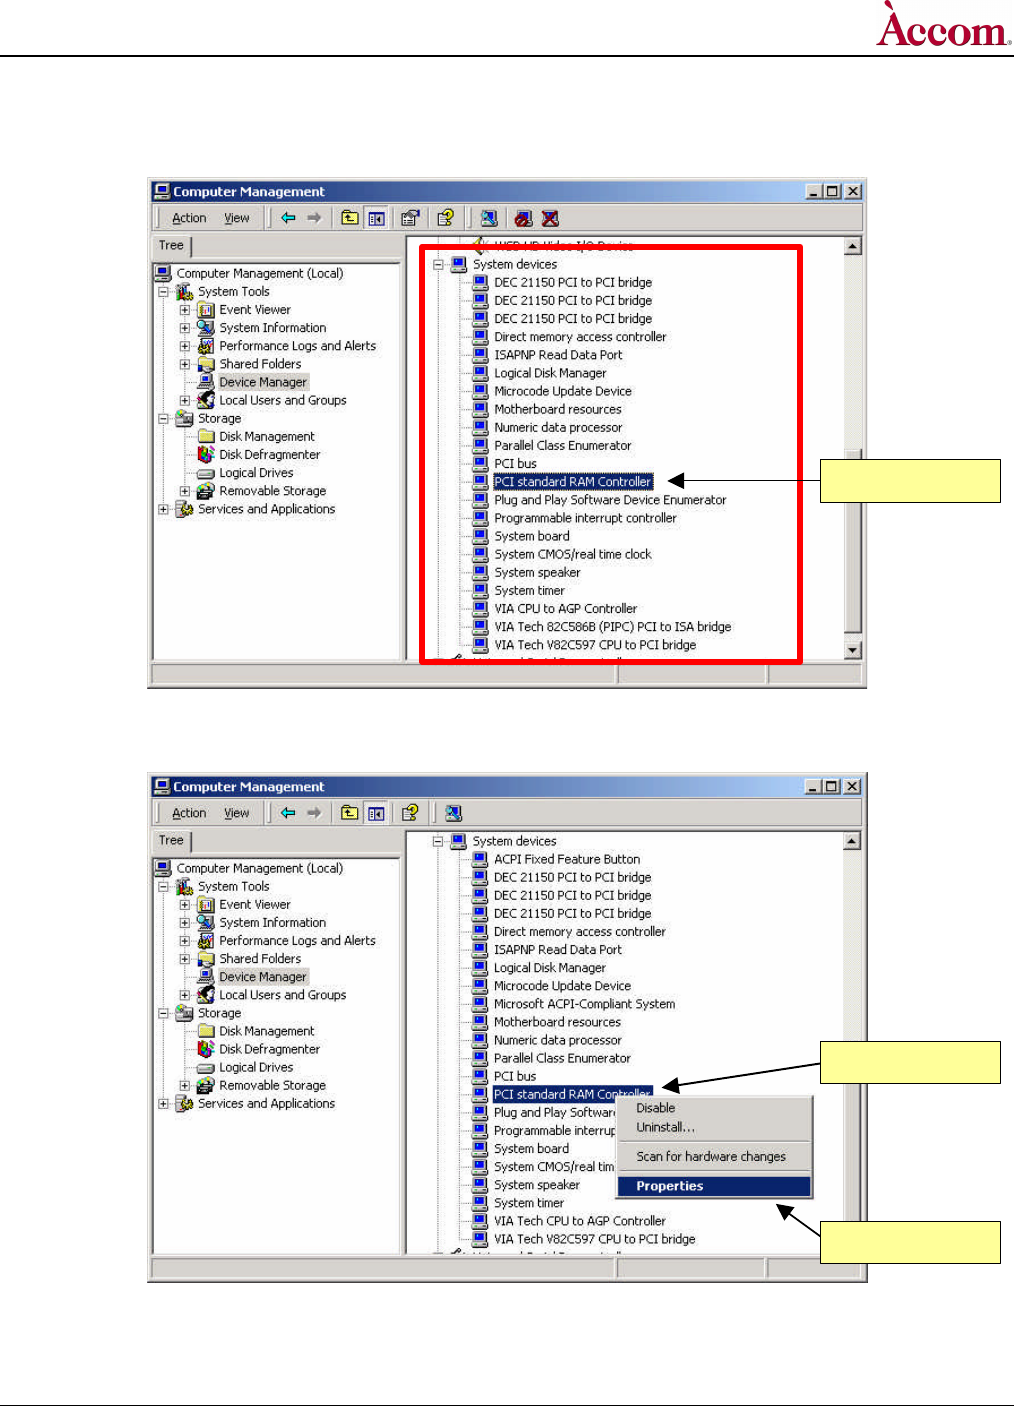
E. In the right-hand pane, expand the "System devices" item, and you should see a new device in the listing: "PCI Standard
RAM Controller" as shown below:
F. Position your mouse pointer over the "PCI Standard RAM Controller" item then right click your mouse. In the resulting pop-up
menu, select and click "Properties".
Continued…
New system device.
Right click on item.
Select "Properties"
WSD/HD
Hardware Upgrade Installation
Page 28 of 53 2001 / Accom, Incorporated Document Revised: 28 September, 2001 @ 11:41 AM
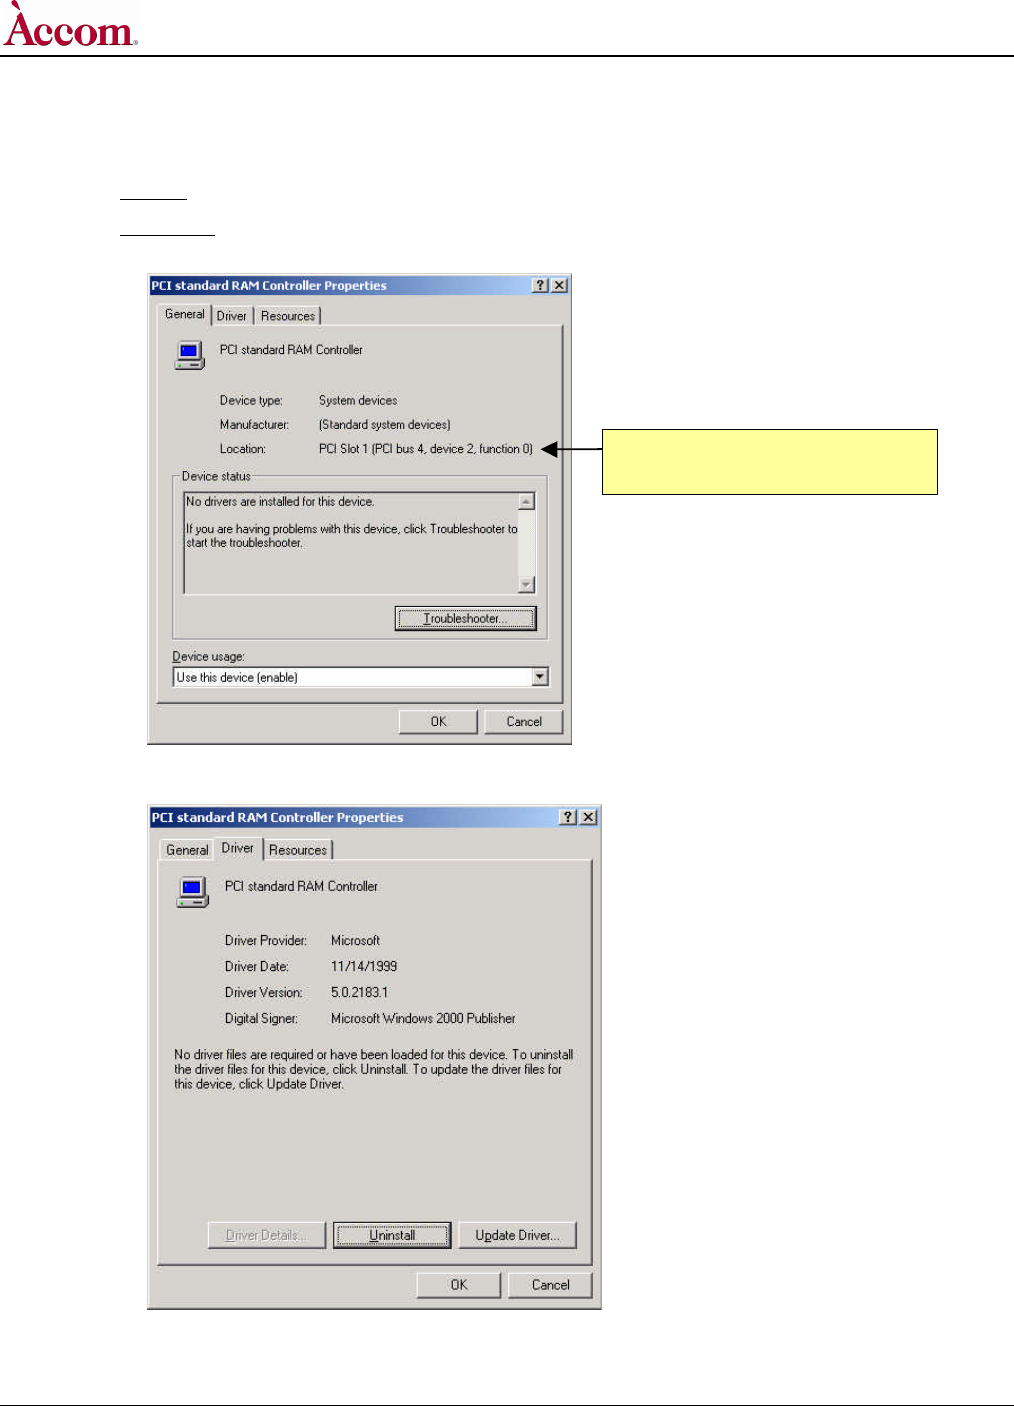
G. The previous step will present the "PCI standard RAM Controller Properties" window, as shown below. With the "General"
tab selected, verify the "Location:" information reads: "PCI Slot 1 (PCI Bus 4, device 2, function 0)".
If this is correct then proceed with the next step.
If this is not correct, then shut down the Windows2000 operating system and power down the WSD/HD. Repeat the entire
Digital Audio Software Driver Installation procedure, starting on page 21.
H. Click on the "Driver " tab to present the following dialog window:
Continued…
This should read:
PCI Slot 1 (PCI Bus 4, device 2, function 0)

WSD/HD
Hardware Upgrade Installation
Document Revised: 28 September, 2001 @ 11:41 AM 2001 / Accom, Incorporated Page 29 of 53
I. On this "Driver" page, click the Update Driver… button to continue. This will present the "Upgrade Device Driver Wizard"
as shown below:
J. Click the Next > button. The "Install Hardware Device Drivers" dialog window will appear, as shown below.
K. Select the "Search from a suitable driver for my device (recommended)" item, which is the default wizard choice.
Continued…
WSD/HD
Hardware Upgrade Installation
Page 30 of 53 2001 / Accom, Incorporated Document Revised: 28 September, 2001 @ 11:41 AM
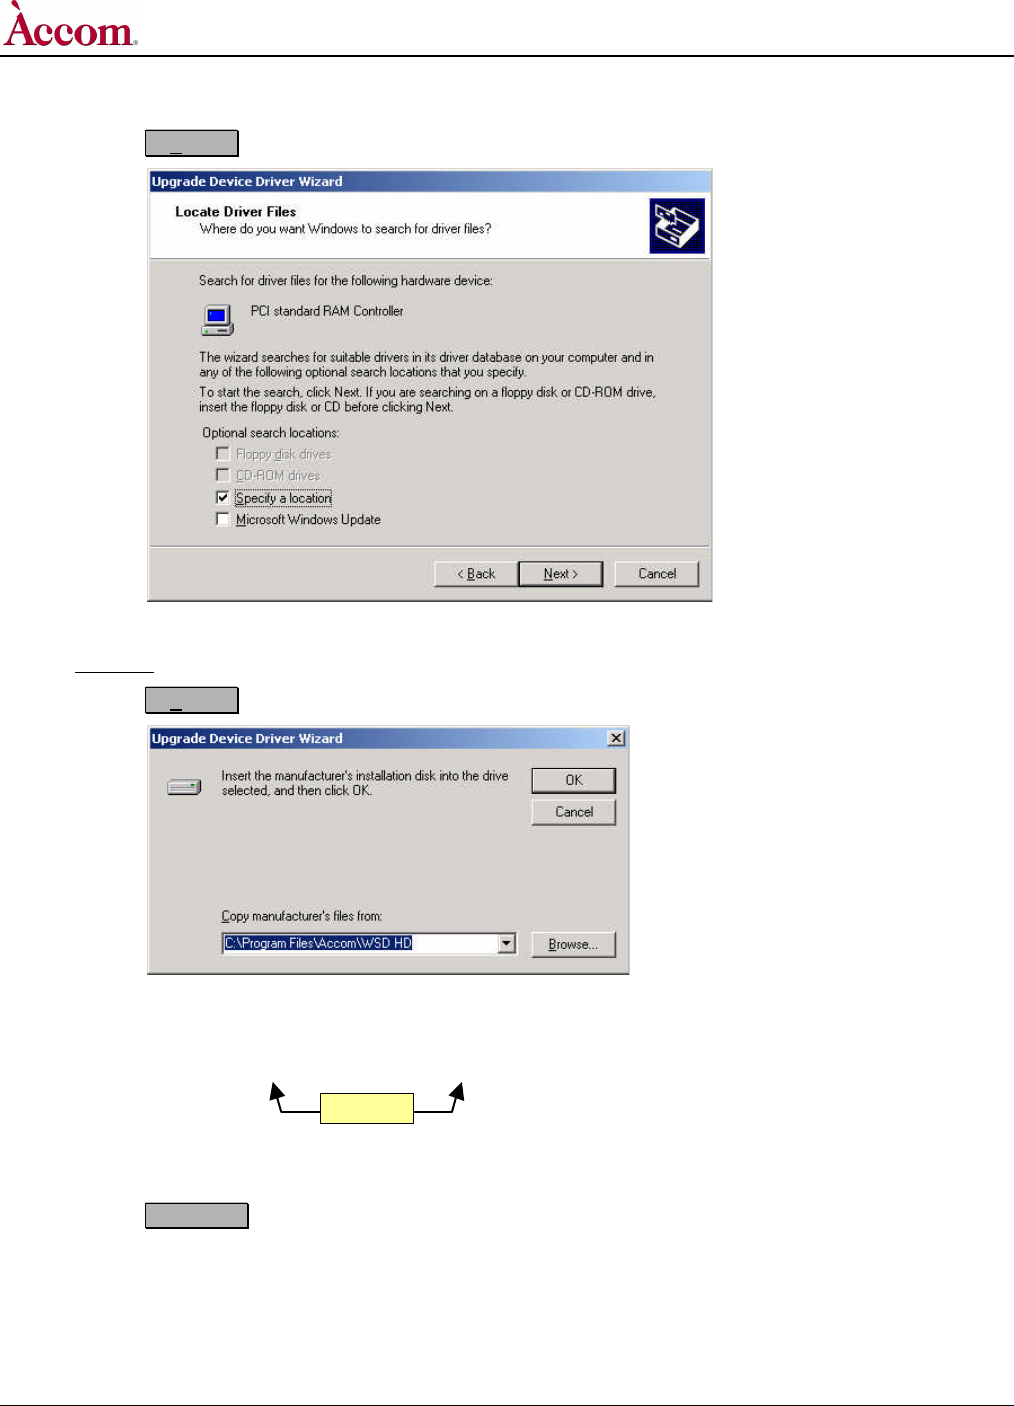
L. Click the Next > button. The "Locate Driver Files" dialog window will appear, as shown below:
M. Select the "Specify a location" item, which is the default wizard choice. Be sure the "Microsoft Windows Update" item is
unchecked.
N. Click the Next > button. The "Locate Driver Files" dialog window will appear, as shown below:
O. In the entry space of this window, verify the path name is shown as displayed in the image above. If it's not correct, type the
following path name. Be sure to obey the spaces and lower/upper-case letters:
C:\Program Files\Accom\WSD HD
The completed entry should appear as shown in the window above.
P. Click the OK button to continue. The "Driver Files Search Results" dialog window will appear, as shown on the
next page below.
Continued…
(SPACE)

WSD/HD
Hardware Upgrade Installation
Document Revised: 28 September, 2001 @ 11:41 AM 2001 / Accom, Incorporated Page 31 of 53
Q. Verify that the "heidiaudioramdriver.inf" file is indicated in this window, as shown below.
If this is correct, continue with the next step.
If this is not correct, then please click on the <Back button to return to the previous page and define the pathname
correctly as outlined in step O above.
R. Click the Next > button. The "Digital Signature Not Found" dialog window will appear, as shown below:
S. Click the Yes button to continue. The "Completing the Found New Hardware Wizard" dialog window will appear,
as shown on the next page below.
Continued…
This should read:
c:\program files\accom\wsd hd\heidiaudioramdriver.inf
WSD/HD
Hardware Upgrade Installation
Page 32 of 53 2001 / Accom, Incorporated Document Revised: 28 September, 2001 @ 11:41 AM
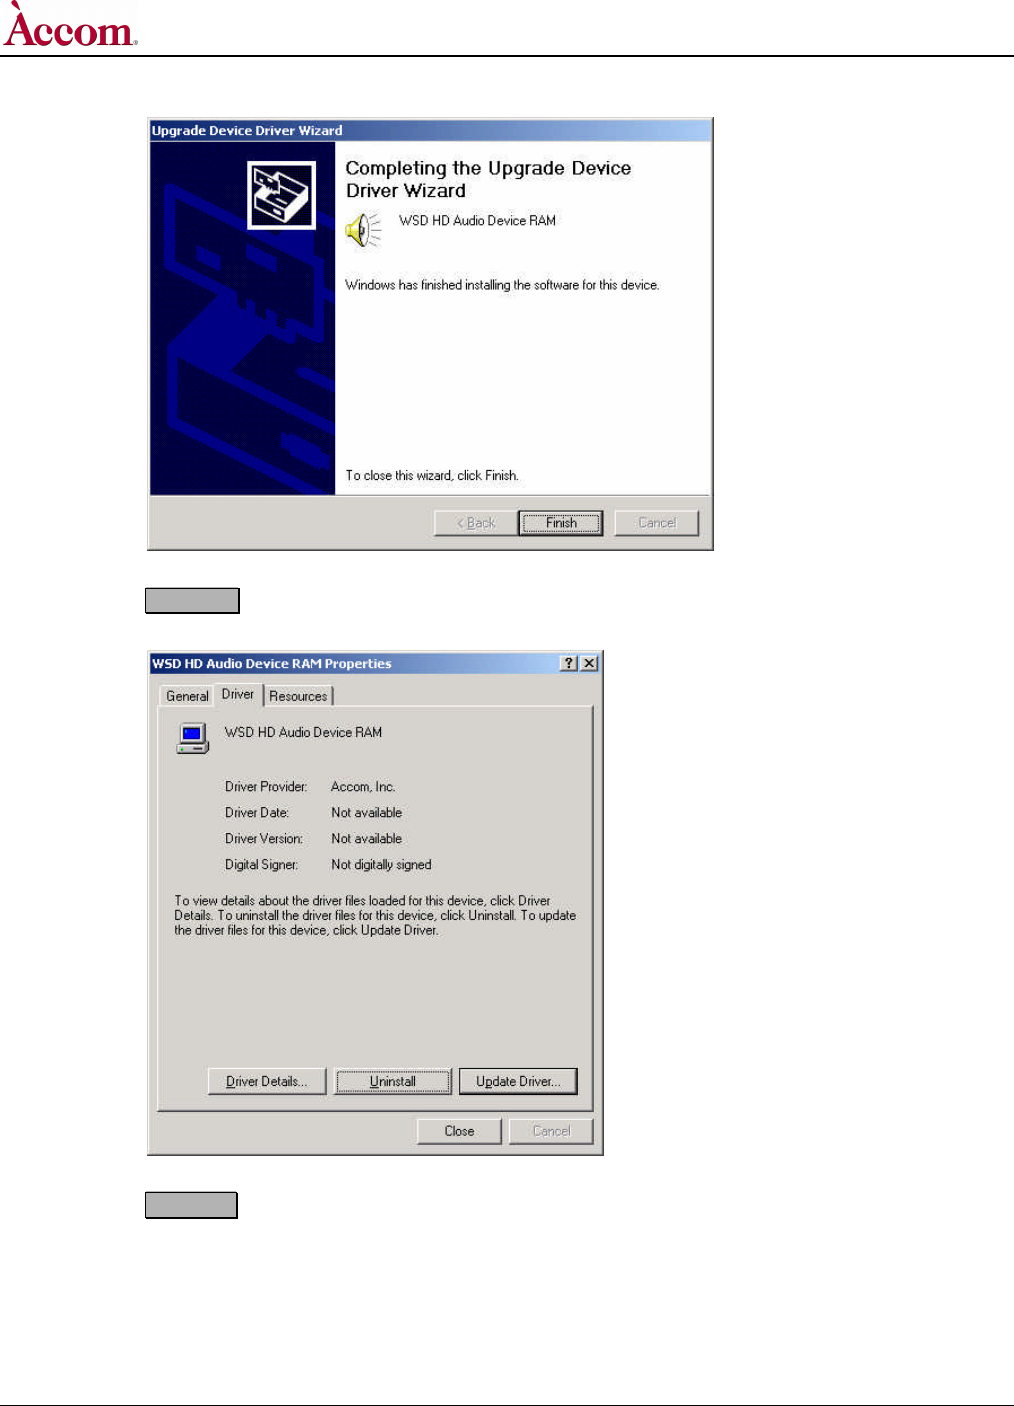
T. Click the Finish button to continue. This will close the "Found New Hardware Wizard" window, and will return into view
the "WSD HD Audio Device RAM Properties" window on the VGA screen as shown below.
U. Click the Close button to continue. This will close the "WSD HD Audio Device RAM Properties" window, and will
return into view the "Computer Management" window on the VGA screen as shown on the next page below.
Continued…
WSD/HD
Hardware Upgrade Installation
Document Revised: 28 September, 2001 @ 11:41 AM 2001 / Accom, Incorporated Page 33 of 53
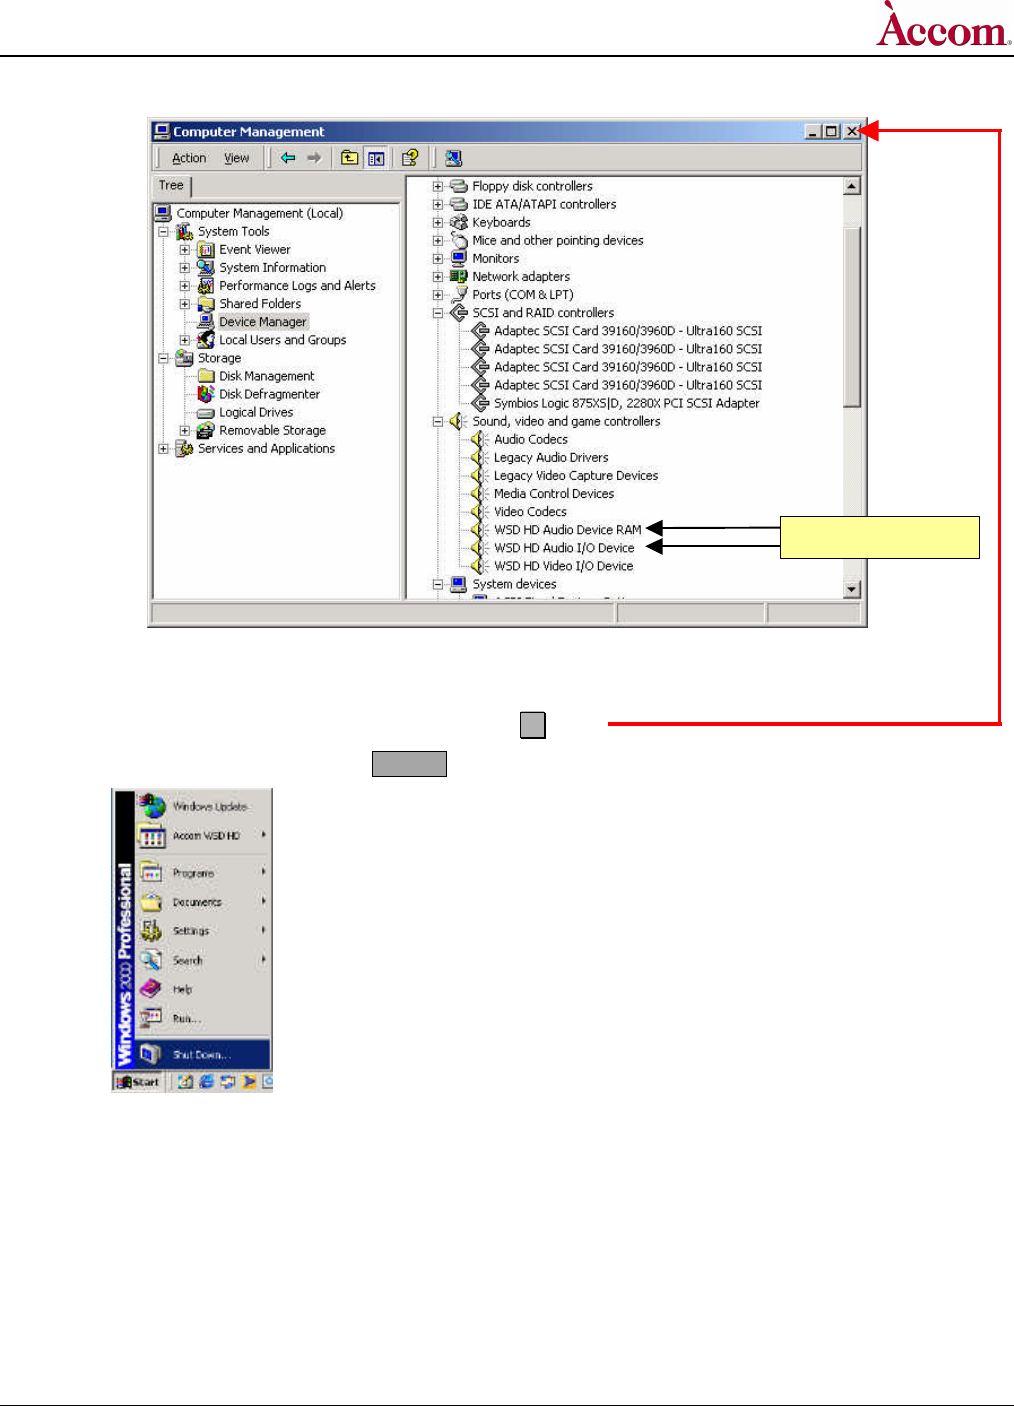
V. The right-hand pane in the "Computer Management" window should show two new devices "WSD HD Audio Device RAM"
and "WSD HD Audio I/O Device" under the "Sound, video and game controllers" category, as shown in the image above.
W. Close the "Computer Management" window by clicking the X button.
X. On the WSD/HD VGA monitor, click the ÿÿStart button on menu taskbar:
X
Continued…
New system devices.
WSD/HD
Hardware Upgrade Installation
Page 34 of 53 2001 / Accom, Incorporated Document Revised: 28 September, 2001 @ 11:41 AM
Y. Select and click on the "Shut Down" item. This presents the "Shut Down Windows" dialog, as shown below.
Z. Select the "Shut Down" item in the pull-down menu:
Y
Z
AA
AA. Click the OK button.
BB. Once the O/S has shut down, turn OFF the AC power switch located on the rear panel of the WSD/HD main chassis.
CC. Continue with the "Digital Audio Disk Signature & Formatting" procedure on the following page.
WSD/HD
Hardware Upgrade Installation
Document Revised: 28 September, 2001 @ 11:41 AM 2001 / Accom, Incorporated Page 35 of 53
Digital Audio Disk Signature & Formatting
1. Write Signature and Upgrade Disk / Creating the Digital Audio Disk Partition
! IMPORTANT ! Be sure all four of the SCSI cables to the external media storage chassis are disconnected from the rear of the
WSD/HD. These cables should remain disconnected during the Digital Audio Software Driver installation
procedure, to avoid accidental corruption of these disk drives!
A. If you haven't yet done so after the previous procedure, restart the Windows2000 operating system on the WSD/HD.
B. Right click on the "My Computer" icon on the desktop, then select the "Manage" option:
C. Click on the "Manage" item. This will open the "Computer Management" dialog window, as shown below:
D. Maximize the "Computer Management " window by clicking on this button.
Continued…
Right click "My Computer" icon.
Select "Manage"
WSD/HD
Hardware Upgrade Installation
Page 36 of 53 2001 / Accom, Incorporated Document Revised: 28 September, 2001 @ 11:41 AM
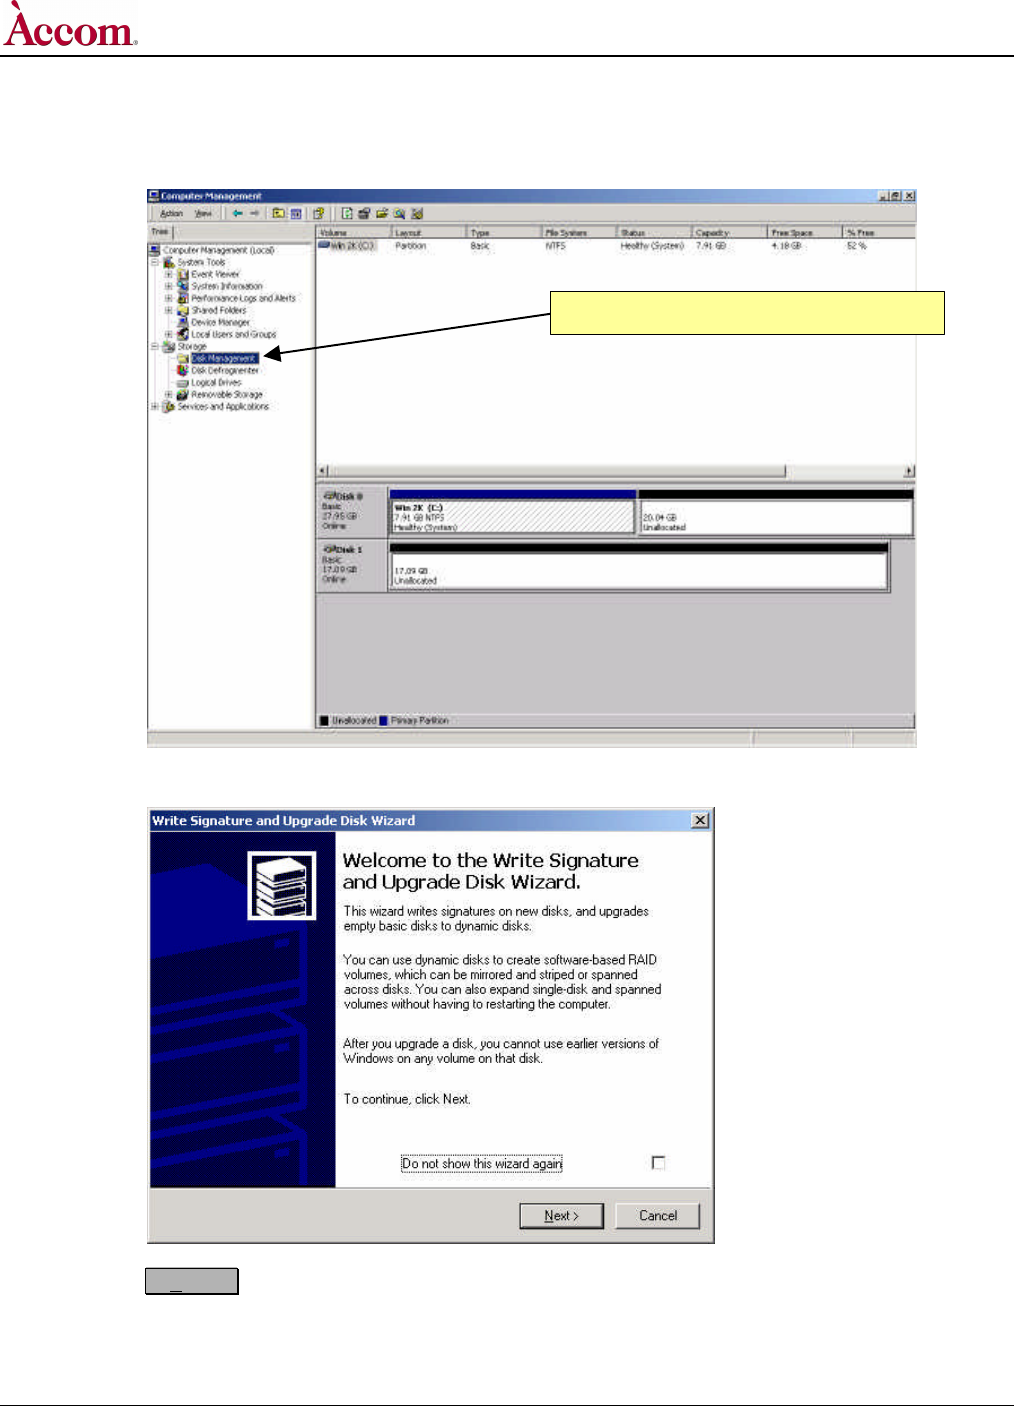
E. In the left-hand pane of the "Computer Management " window, click on the "Disk Management " folder. The right-hand pane
of the window will change to show the contents of the folder:
F. A few moments later, the "Write Signature and Upgrade Disk Wizard" dialog window will automatically appear:
G. Click the Next > button. The "Select Disk to Upgrade" dialog window will appear, as shown on the next page.
Continued…
Click on the "Disk Management" folder.
WSD/HD
Hardware Upgrade Installation
Document Revised: 28 September, 2001 @ 11:41 AM 2001 / Accom, Incorporated Page 37 of 53
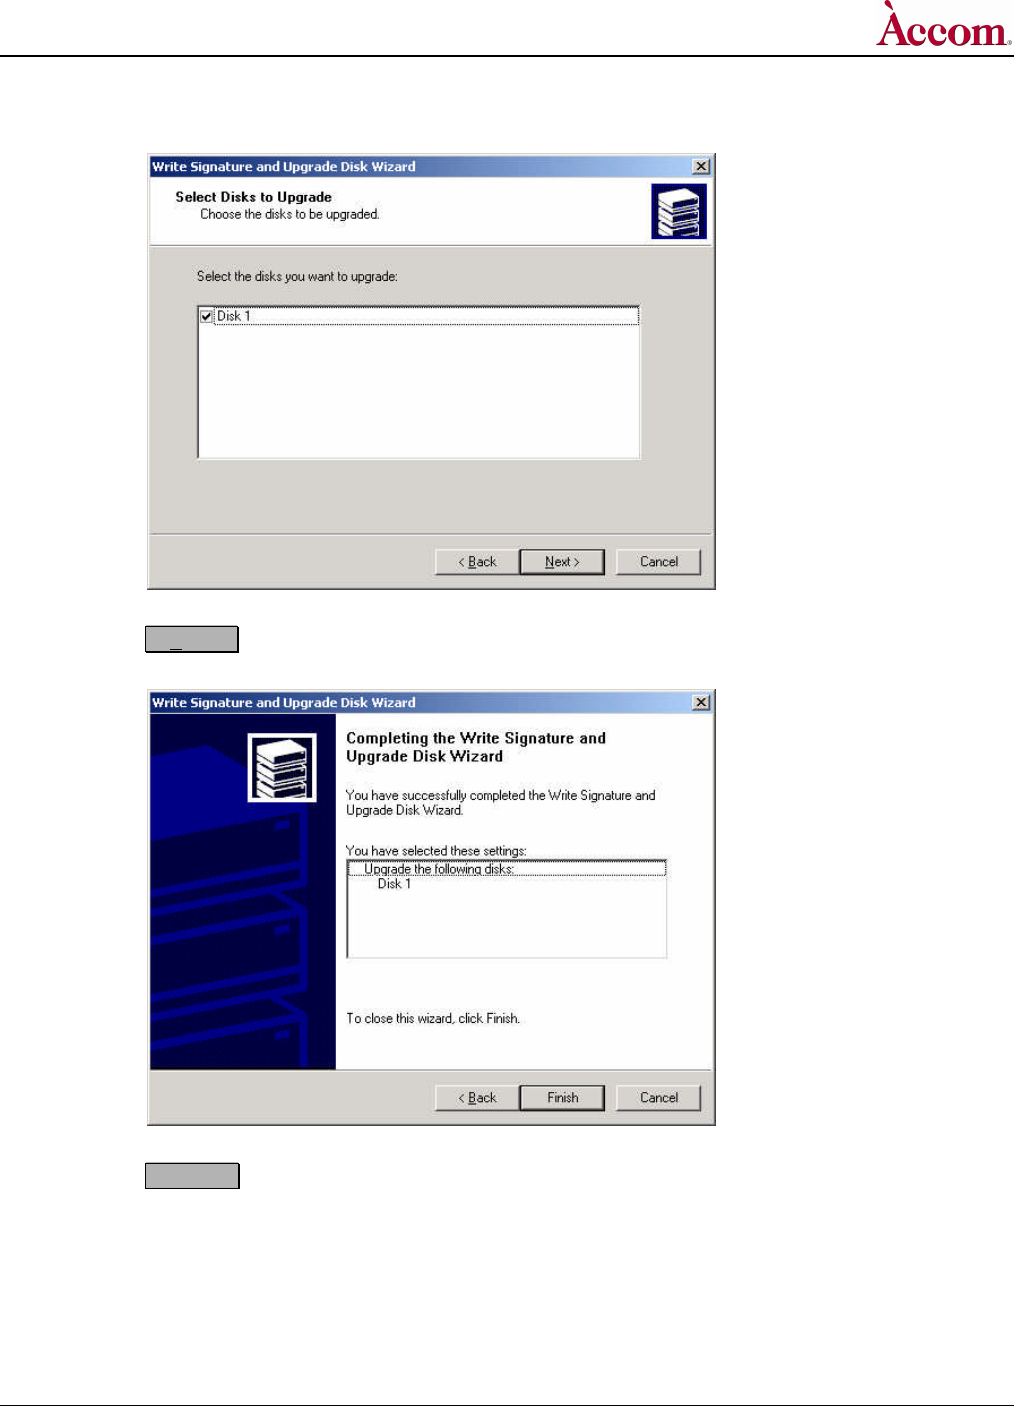
H. The "Disk 1" checkbox should automatically be checked. If it's not, then click on it to check it:
I. Click the Next > button. The "Completing the Write Signature and Upgrade Disk Wizard" dialog window will appear,
as shown below:
J. Click the Finish button to continue. This will close the "Write Signature and Upgrade Disk Wizard" window, and will
return into view the "Computer Management " window on the VGA screen as shown on the next page.
Continued…
WSD/HD
Hardware Upgrade Installation
Page 38 of 53 2001 / Accom, Incorporated Document Revised: 28 September, 2001 @ 11:41 AM
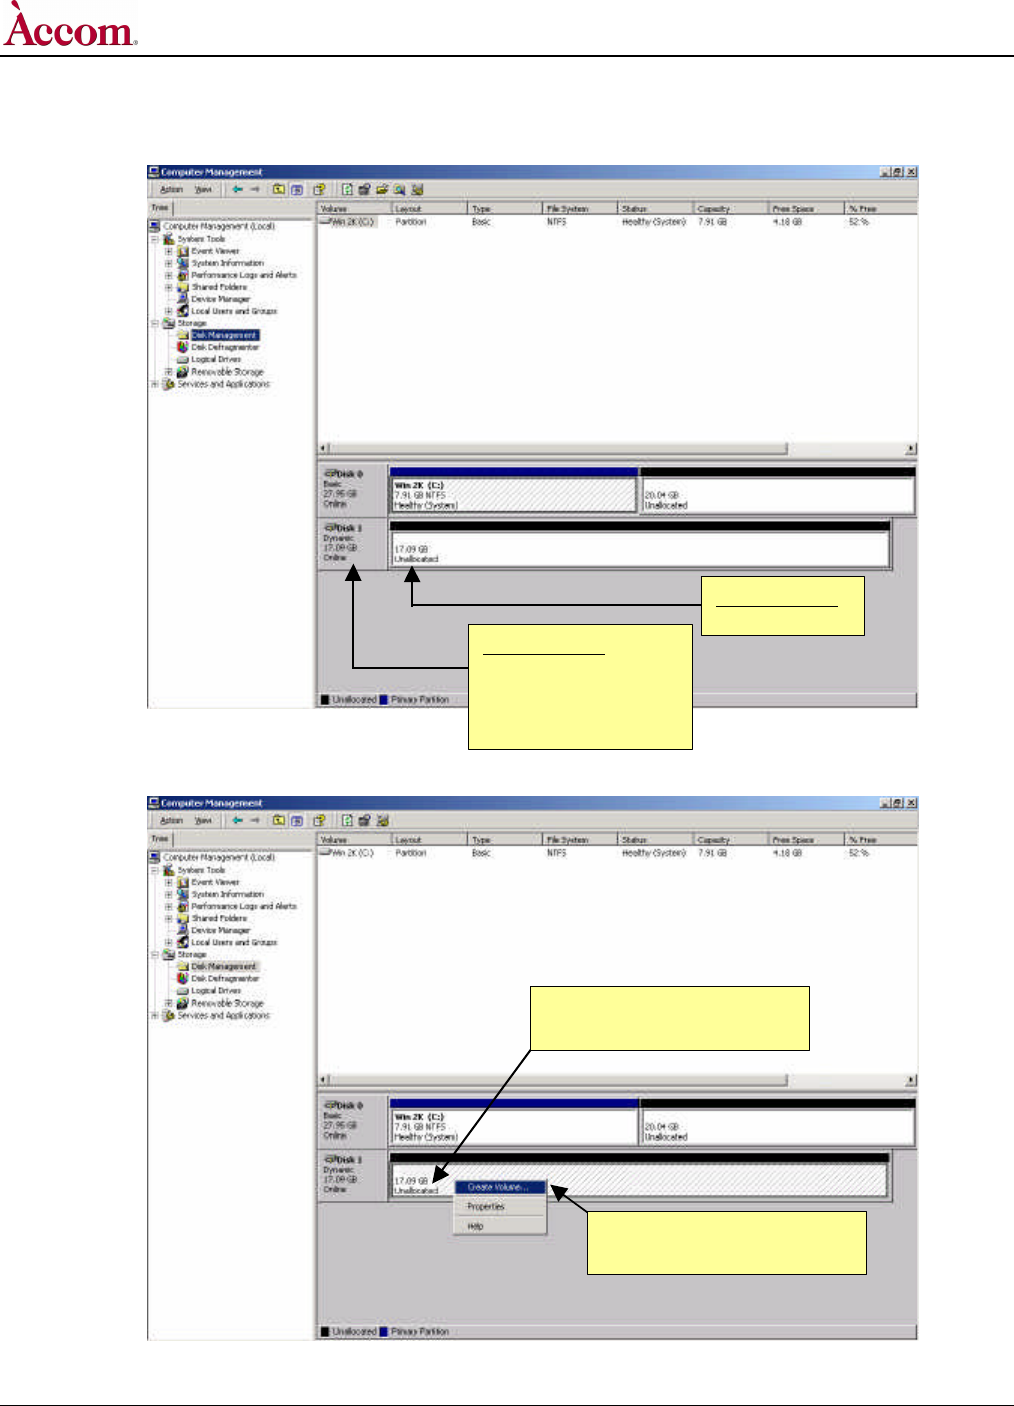
K. In the "Computer Management " window the "Disk 1" item should now read "Dynamic" and "Unallocated":
p
L. Position your mouse pointer over the "Unallocated" indicator in the right-hand pane of the window then right click your mouse.
Continued…
This should read:
Disk 1
Dynamic
17.09 GB (or other value)
Online
This should read:
Unallocated
Position your mouse pointer here.
Then right click.
Select "Create Volume…" item.
WSD/HD
Hardware Upgrade Installation
Document Revised: 28 September, 2001 @ 11:41 AM 2001 / Accom, Incorporated Page 39 of 53
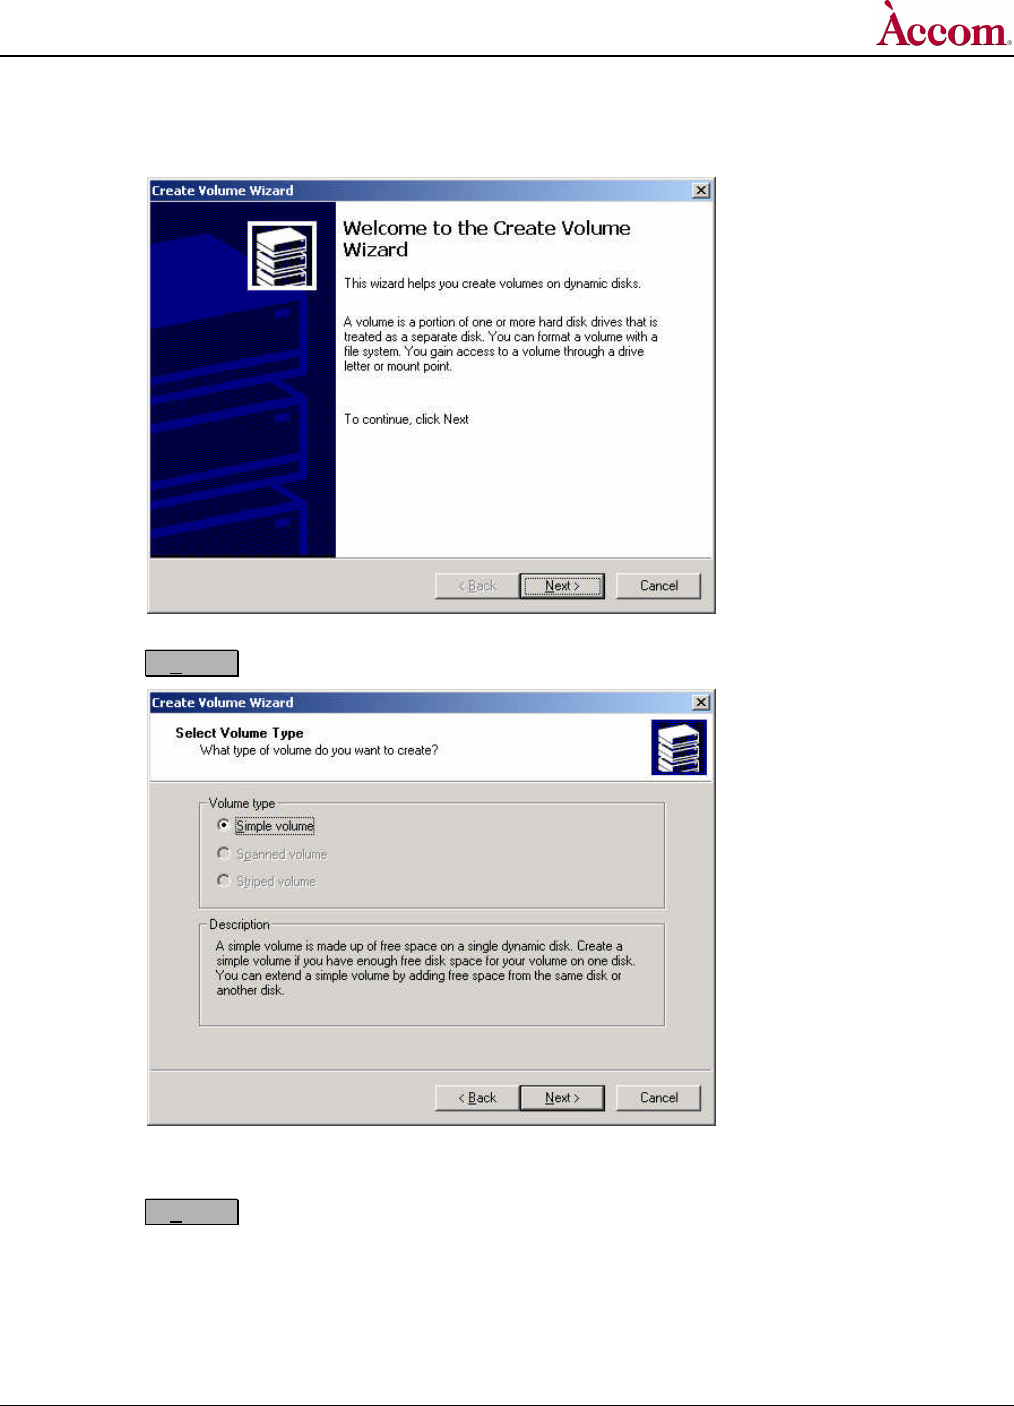
M. On the resulting pop-up menu list, select the "Create Volume…" item. This will present the "Create Partition Wizard" as
shown below:
N. Click the Next > button. The "Select Volume Type" dialog window will appear, as shown below:
O. Select the "Simple volume" radio button item, which is the default wizard choice.
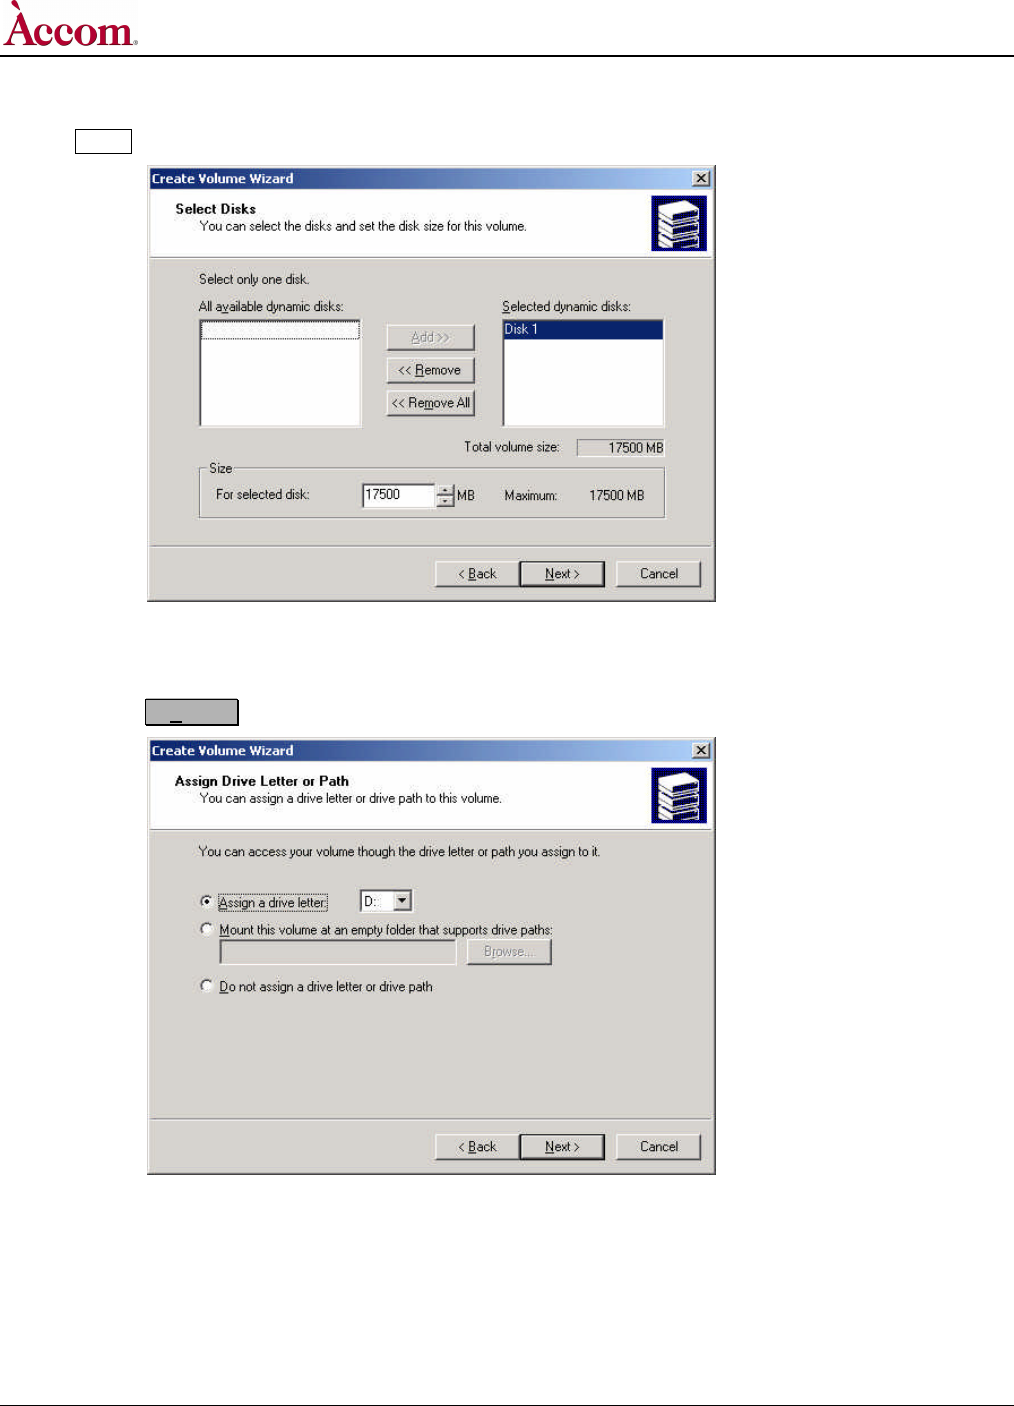
P. Click the Next > button. The "Select Disks" dialog window will appear, as shown on the next page below:
Continued…
WSD/HD
Hardware Upgrade Installation
Page 40 of 53 2001 / Accom, Incorporated Document Revised: 28 September, 2001 @ 11:41 AM
NOTE The amount of disk space may be different, depending on the exact size of the audio hard disk drive.
Q. The "Size / For selected disk: " parameter in this dialog window will be automatically filled with the proper amount of disk
space.
R. Click the Next > button. The "Assign Drive Letter or Path" dialog window will appear, as shown below:
Continued…
WSD/HD
Hardware Upgrade Installation
Document Revised: 28 September, 2001 @ 11:41 AM 2001 / Accom, Incorporated Page 41 of 53
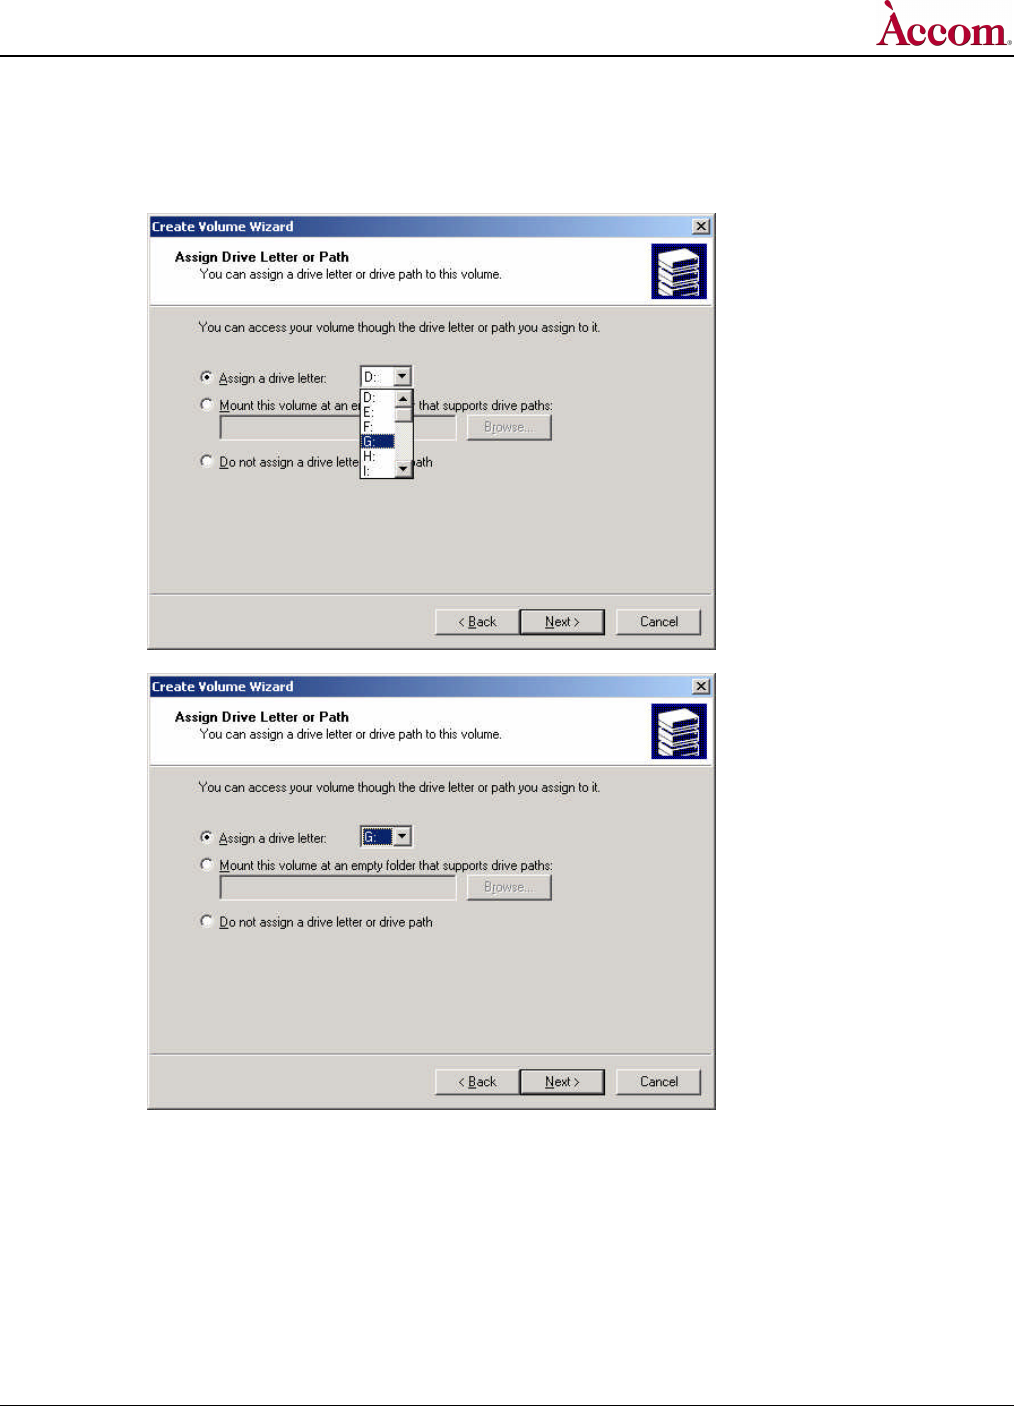
S. Click on the "Assign a drive letter: " radio button, then select "G:" as drive letter for audio:
Continued…
WSD/HD
Hardware Upgrade Installation
Page 42 of 53 2001 / Accom, Incorporated Document Revised: 28 September, 2001 @ 11:41 AM
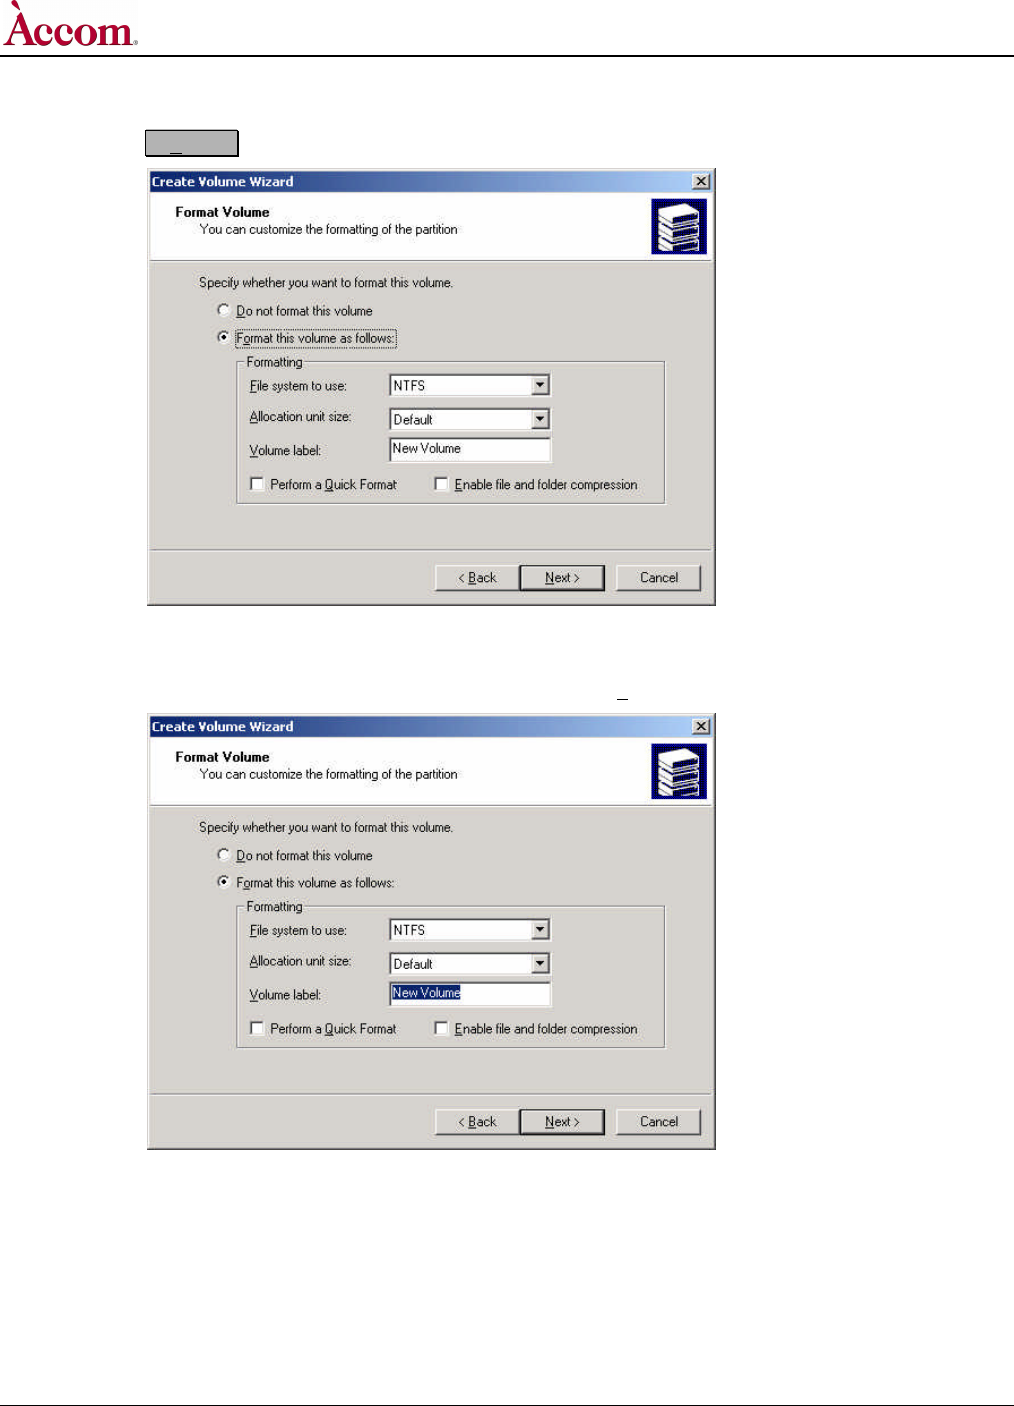
T. Click the Next > button. The "Format Volume" dialog window will appear, as shown below:
U. Click the "Format this volume as follows: " radio button, which is the default wizard choice.
V. Click and drag the mouse to highlight the "New Volume" label inside the "Volume label: " parameter:
Continued…
WSD/HD
Hardware Upgrade Installation
Document Revised: 28 September, 2001 @ 11:41 AM 2001 / Accom, Incorporated Page 43 of 53
W. Type on the QWERTY keyboard to change the volume label to read "Audio Data", and then click to place a check mark inside
the "Perform a Quick Format " checkbox:
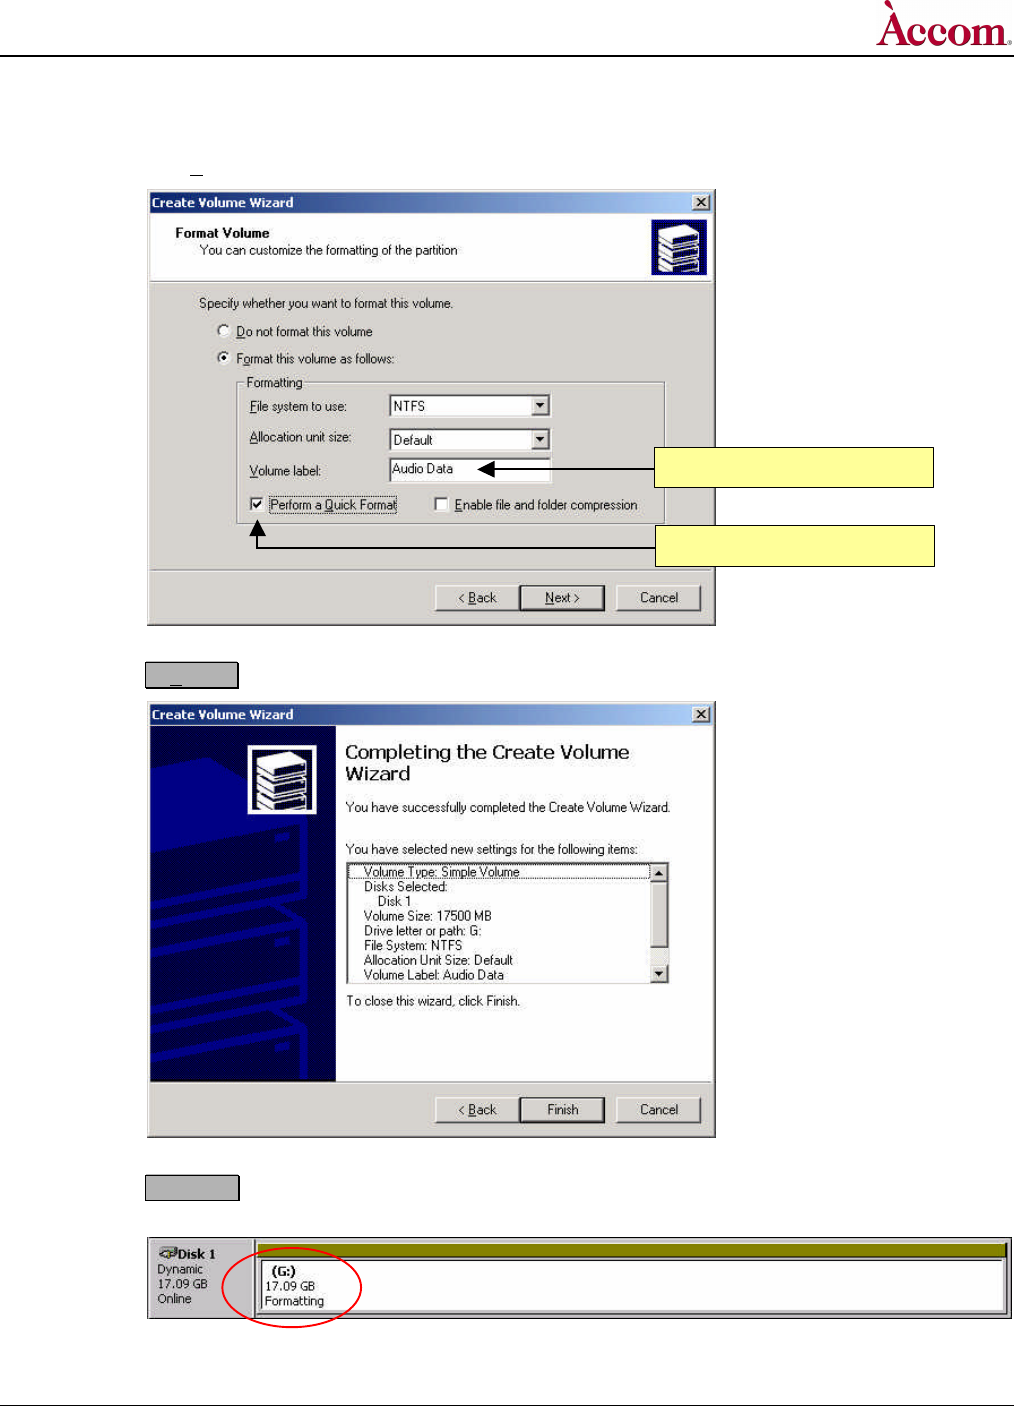
X. Click the Next > button. The "Completing the Create Volume Wizard " dialog window will appear, as shown below:
Y. Click the Finish button to continue. After a few moments, the disk will begin to format as indicated in the "Disk 1"
portion of the "Computer Management" window:
Continued…
Click on this checkbox.
Change to read "Audio Data"
WSD/HD
Hardware Upgrade Installation
Page 44 of 53 2001 / Accom, Incorporated Document Revised: 28 September, 2001 @ 11:41 AM
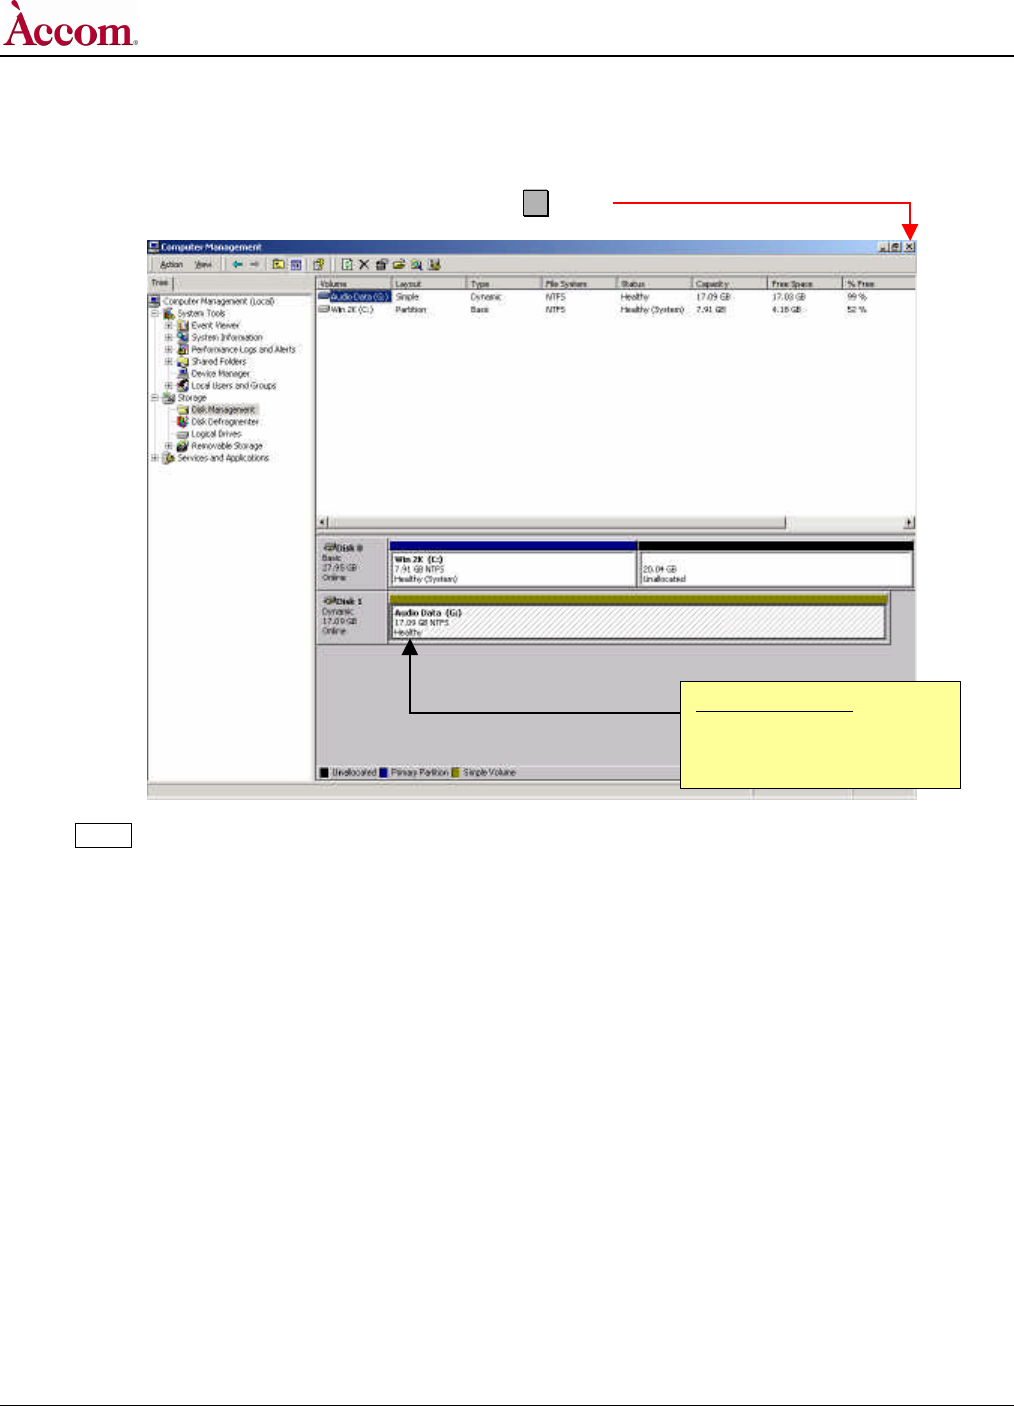
Z. The formatting process should finish in about a minute or so. You will know the formatting is completed when the "Disk 1"
portion of the "Computer Management " window indicates "Healthy", as shown below.
Close the "Computer Management " window by clicking the X button.
NOTE The amount of disk space may be different, depending on the exact size of the audio hard disk drive.
Continued…
This should now read:
Audio Data (G:)
17.09 GB NTFS (or other GB value)
Healthy
WSD/HD
Hardware Upgrade Installation
Document Revised: 28 September, 2001 @ 11:41 AM 2001 / Accom, Incorporated Page 45 of 53
2. Creating the "QTMovies" Folder on the new Audio Hard Disk Drive
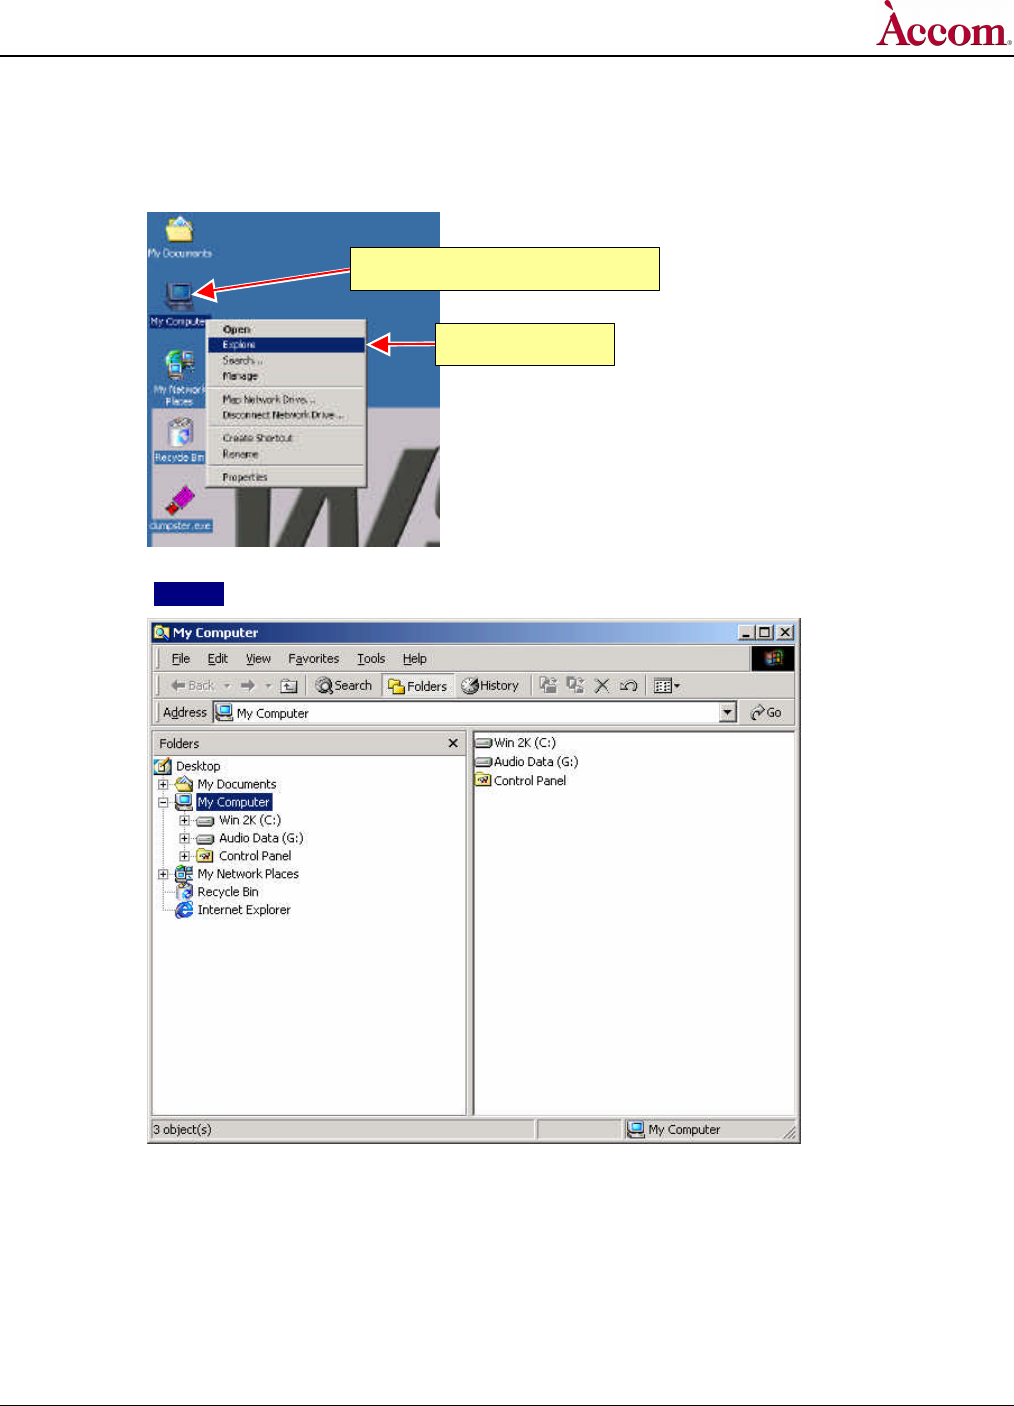
A. Right click on the "My Computer" icon on the desktop.
B. Select the Explore item in the pop-up menu. The "My Computer" explore window will appear as shown below:
Continued…
Right click "My Computer" icon.
Select "Explore"
WSD/HD
Hardware Upgrade Installation
Page 46 of 53 2001 / Accom, Incorporated Document Revised: 28 September, 2001 @ 11:41 AM
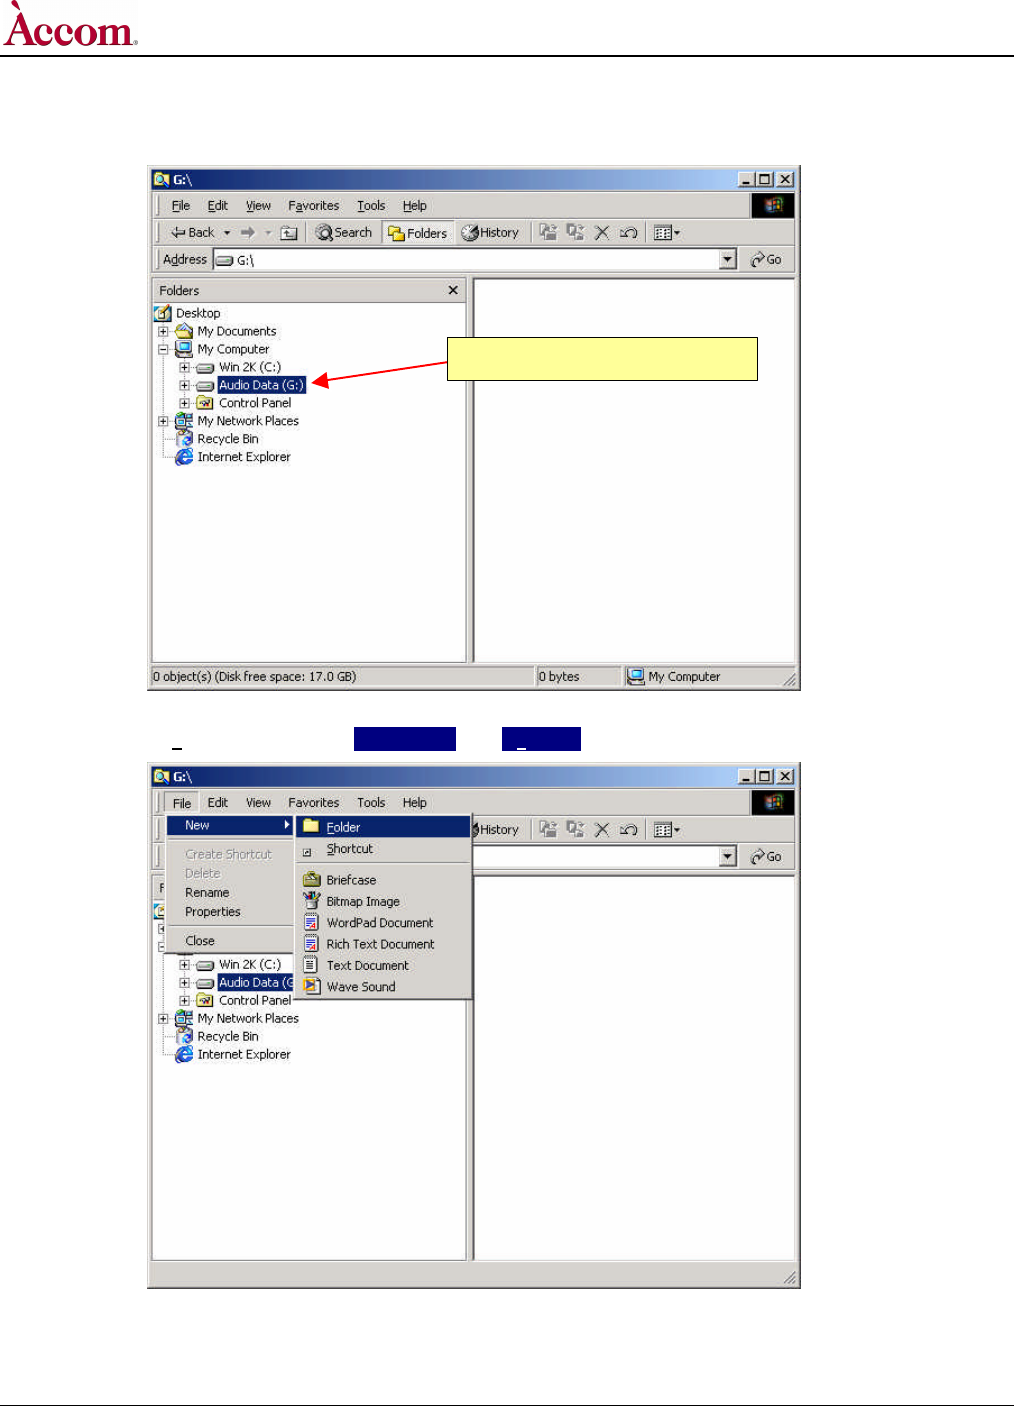
C. Click on the "Audio Data (G:)" drive, as shown below:
D. Click on the "File" menu item. Select New then Folder as shown below:
Continued…
Click "Audio Data (G:)"
WSD/HD
Hardware Upgrade Installation
Document Revised: 28 September, 2001 @ 11:41 AM 2001 / Accom, Incorporated Page 47 of 53
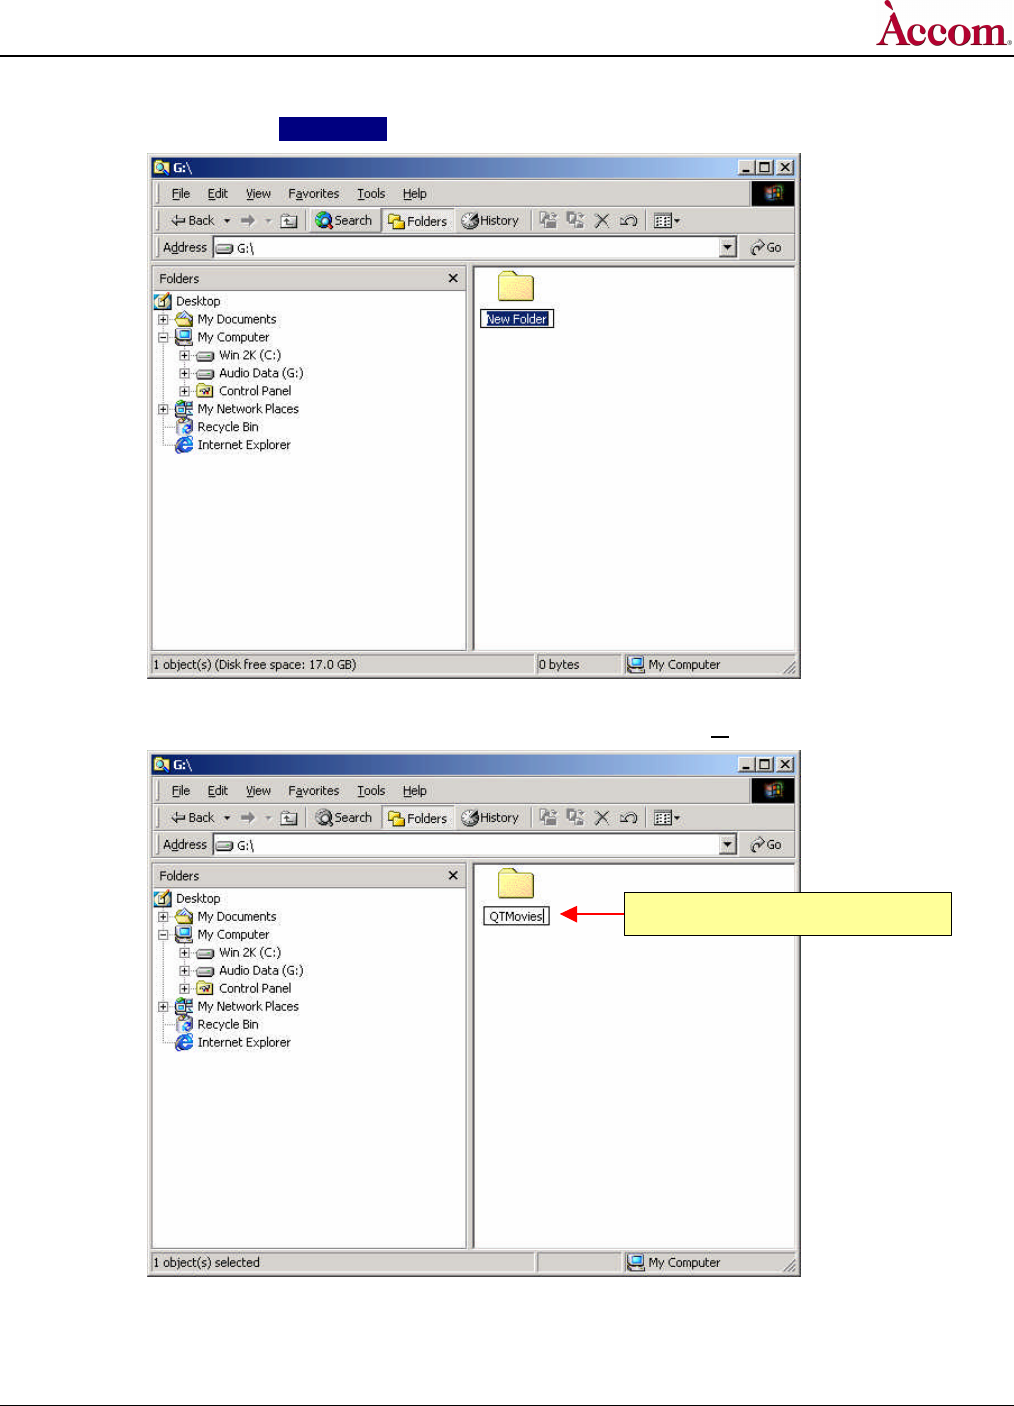
E. The above action creates a New Folder item as shown below:
F. Type a new name for this new folder, being sure to follow upper case / lower case and no spaces: QTMovies
Continued…
Type "QTMovies" (all one word)
WSD/HD
Hardware Upgrade Installation
Page 48 of 53 2001 / Accom, Incorporated Document Revised: 28 September, 2001 @ 11:41 AM
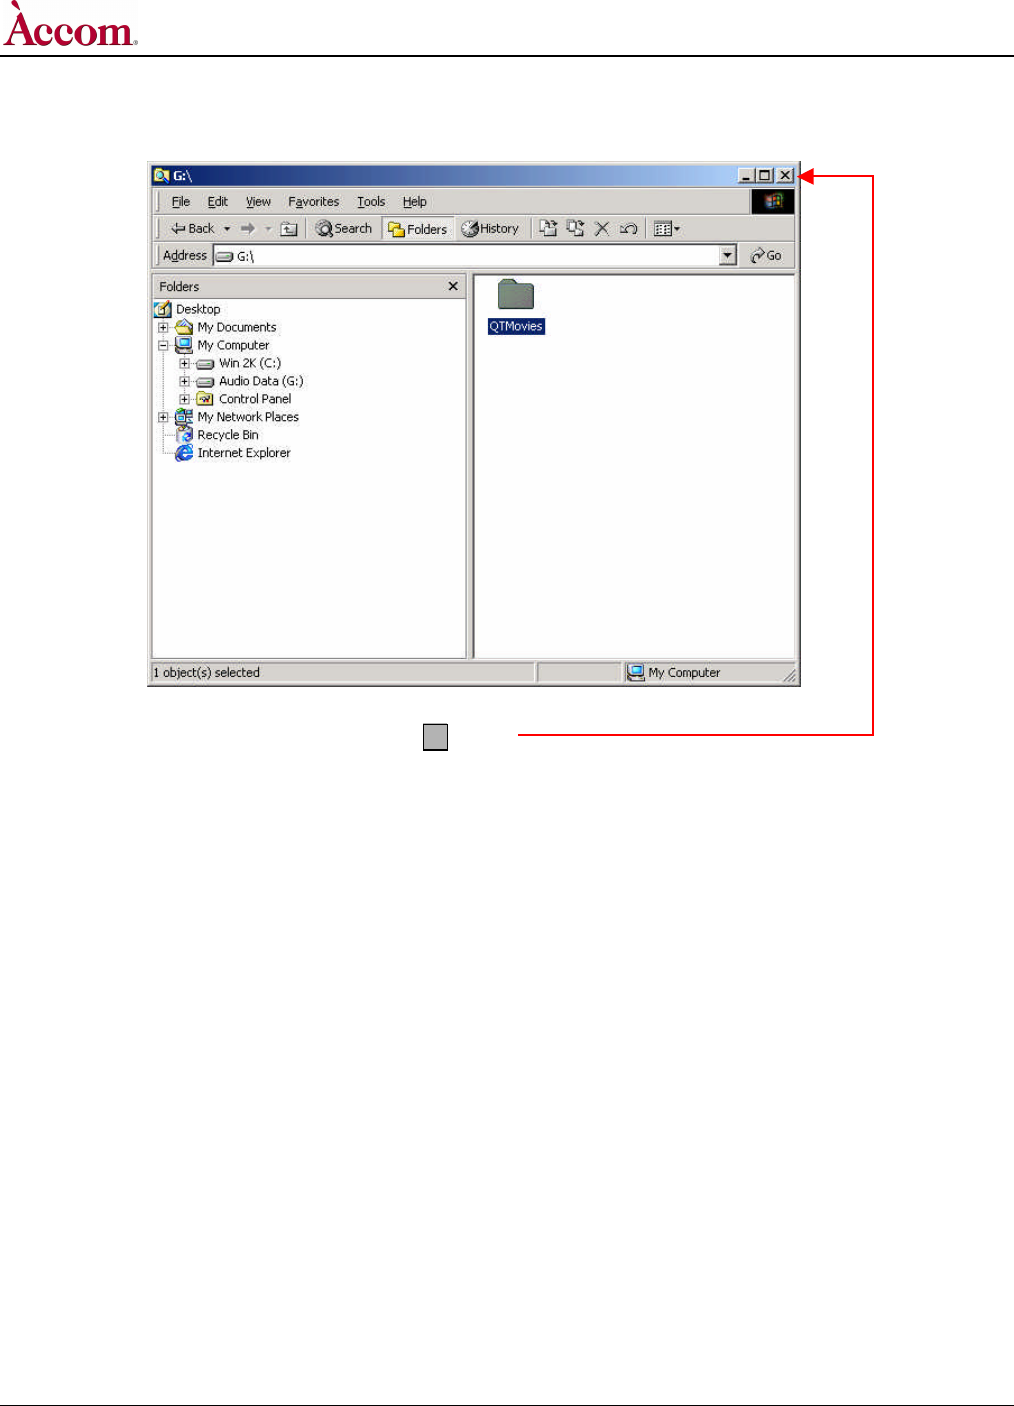
G. Press the r button. This changes the folder name to "QTMovies" as shown below:
H. Close the "G:\ " explore window by clicking the X button.
Continued…
WSD/HD
Hardware Upgrade Installation
Document Revised: 28 September, 2001 @ 11:41 AM 2001 / Accom, Incorporated Page 49 of 53
3. WSD/HD Shut-Down and External Media Reconnect RETURN HERE.
A. On the WSD/HD VGA monitor, click the ÿÿStart button on menu taskbar:
A
B. Select and click on the "Shut Down" item. This presents the "Shut Down Windows" dialog, as shown below.
C. Select the "Shut Down" item in the pull-down menu:
B
C
C
D. Click the OK button.
Continued…
WSD/HD
Hardware Upgrade Installation
Page 50 of 53 2001 / Accom, Incorporated Document Revised: 28 September, 2001 @ 11:41 AM
E. Once the O/S has shut down, turn OFF the AC power switch located on the rear panel of the WSD/HD main chassis.
F. ! IMPORTANT ! Reconnect all four SCSI cables for the external media disk drives to the appropriate connectors on the rear
panel of the WSD/HD chassis.
G. Turn ON the AC power to all the external media disk drive chassis'.
H. Turn ON the AC power to the WSD/HD main chassis.
I. Wait for the WSD/HD Windows 2000 operating system to be fully rebooted.
J. Right click on the "My Computer" icon on the desktop, then select the "Manage" option:
K. Click on the "Manage" item. This will open the "Computer Management" dialog window, as shown below:
L. Maximize the "Computer Management " window by clicking on this button.
Continued…
Right click "My Computer" icon.
Select "Manage"
WSD/HD
Hardware Upgrade Installation
Document Revised: 28 September, 2001 @ 11:41 AM 2001 / Accom, Incorporated Page 51 of 53
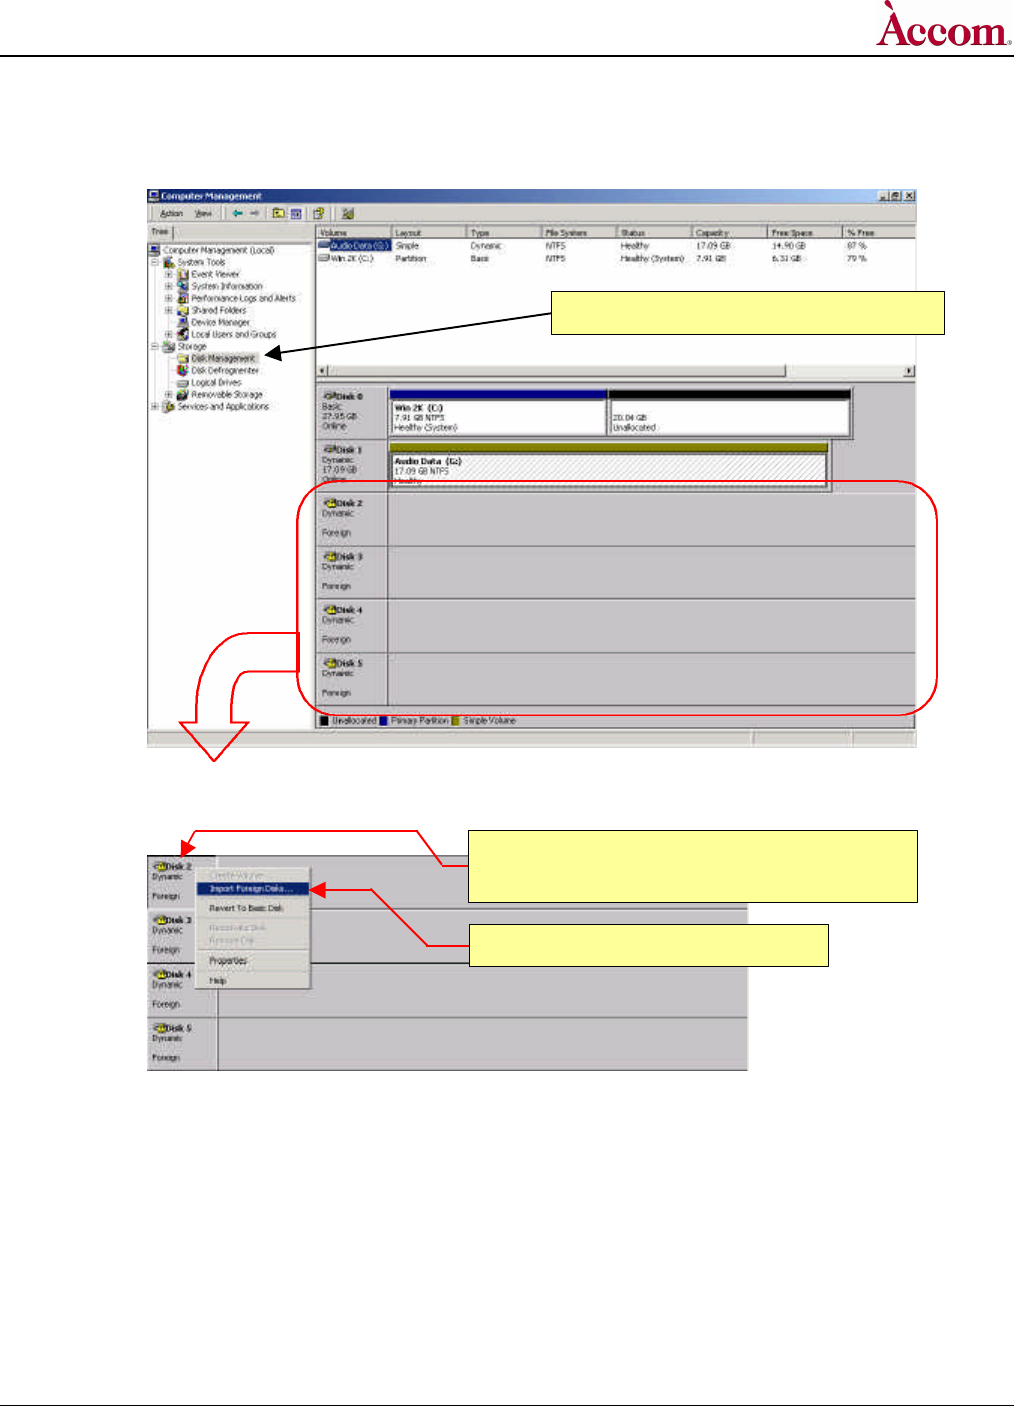
M. In the left-hand pane of the "Computer Management " window, click on the "Disk Management " folder. The right-hand pane
of the window will change to show the contents of the folder:
N. Position your mouse pointer over the "Disk 2" portion of the "Computer Management" window, then right click your mouse, as
shown below:
Continued…
Click on the "Disk Management" folder.
Position mouse pointer over "Disk 2" icon.
Right click the mouse to present menu listing.
Select "Import Foreign Disks…" item.
WSD/HD
Hardware Upgrade Installation
Page 52 of 53 2001 / Accom, Incorporated Document Revised: 28 September, 2001 @ 11:41 AM
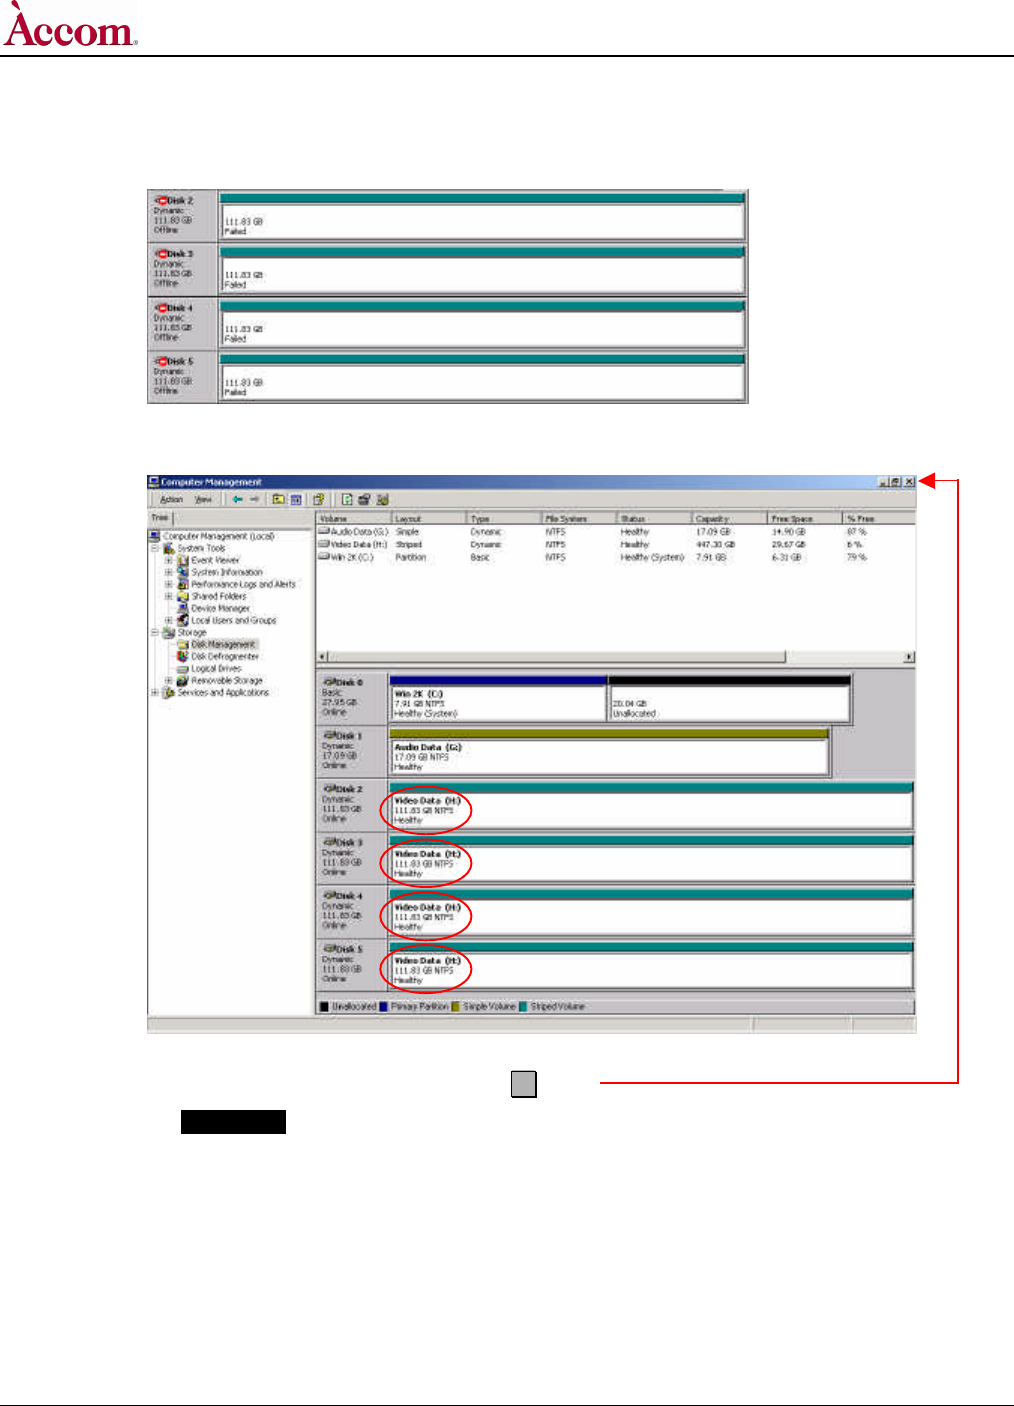
O. In the resulting pop-up menu, select and click "Import Foreign Disks…" item. For a few brief moments, the status indicator for
the four disk modules will read "Failed". Don't be alarmed, as this is normal.
P. After a few more moments, the status of the disk drive modules will read "Healthy" as shown below:
Q. Close the "Computer Mangement" window by clicking the X button.
R. Continue with Procedure-5 WSD/HD Operational Test.

WSD/HD
Hardware Upgrade Installation
Document Revised: 28 September, 2001 @ 11:41 AM 2001 / Accom, Incorporated Page 53 of 53
¦ Procedure-5 WSD/HD Operational Test
After performing the four main procedures above to install the Digital Audio Option into the WSD/HD, be sure to test the operation of the
WSD/HD to make sure the software and hardware upgrades were properly performed.
Testing the Digital Audio in the WSD/HD
1. Boot the WSD/HD
A. Assuming the WSD/HD is already booted, launch Internet Explorer on the WSD/HD to start up the NetPanel user interface.
2. Record & Replay New Clips on the WSD/HD
A. Route valid SDI digital video input into both the HDTV and SDTV digital video inputs on the WSD/HD.
B. Route valid AES/EBU digital audio input into all eight digital audio inputs of the WSD/HD.
C. Connect monitor equipment to the ANALOG and DIGITAL video and audio outputs of the WSD/HD.
D. Using the NetPanel user interface, create and record a new HDTV (high definition) clip that includes both VIDEO and 8-tracks
of AUDIO, with a duration of at least 1 minute.
E. On the NetPanel user interface, recall the HDTV clip that was just recorded, and verify both the video and all eight tracks of
audio play properly on both the analog and digital outputs.
F. Using the NetPanel user interface, create and record a new SDTV (standard definition) clip that includes both VIDEO and 8-
tracks of AUDIO, with a duration of at least 1 minute.
G. On the NetPanel user interface, recall the SDTV clip that was just recorded, and verify both the video and all eight tracks of
audio play properly on both the analog and digital outputs.
Notes:
