X Post V10
xPost v1.0 xPost v1.0
User Manual: xPost v10
Open the PDF directly: View PDF ![]() .
.
Page Count: 69

CAYIN Technology Co., Ltd.
8F, No. 577, Linsen N. Rd. Taipei City 104, Taiwan
TEL: +886-2-25951005 FAX: +886-2-25951050
Copyright © 2008 CAYIN Technology Co., Ltd. All Rights Reserved.

2
About CAYIN
CAYIN Technology is established by a group of professionals specializing in development, researches,
engineering, and international sales and marketing. CAYIN devotes itself to providing complete digital
signage solutions in various applications, such as transportation, education, retail, hospitality, corporation,
and financial and public institutions. In order to best facilitate the deployment of CAYIN products, we
also provide tailored hardware and software services to satisfy customers’ demands for almost limitless
applications.
Copyright Notice
Copyright © 2008 CAYIN TECHNOLOGY CO., LTD. All Rights Reserved.
All the contents in this manual are the intellectual property of CAYIN Technology Co., Ltd (“CAYIN”). No
part of this manual, including the products and software described in it, shall be reproduced, transferred,
distributed, stored in any form, or translated into any language without the prior written permission of CAYIN.
Specications and information in this manual are subject to change at any time without obligation to notify
any person of such revision or changes.
Trademark Notice
All brand names, icons, and trademarks appeared in this manual are the sole property of their respective
holders.
Disclaimers
THE CONTENTS OF THIS MANUAL ARE PROVIDED “AS IS.” CAYIN MAKES NO OTHER
REPRESENTATION OR WARRANTIES, EITHER EXPRESSED OR IMPLIED WITH RESPECT TO
THE CONTENTS HEREOF AND SPECIFICALLY DISCLAIMS THE IMPLIED WARRANTIES OF
MERCHANTABILITY OR FITNESS FOR A PARTICUAL PURPOSE. IN NO EVENT SHALL CAYIN, ITS
DIRECTORS, OFFICERS, EMPLOYEES OR AGENTS BE LIABLE FOR ANY INDIRECT, SPECIAL,
INCIDENTAL, OR CONSEQUENTIAL DAMAGES (INCLUDING DAMAGES FOR LOSS OF PROFITS,
LOSS OF USE OR DATA, AND THE LIKE), EVEN IF CAYIN HAS BEEN ADVISED OF THE POSSIBILITY
OF SUCH DAMAGES ARISING FROM ANY DEFECT OR ERROR IN THIS MANUAL OR PRODUCT.
MAXP10/EN/080709

APPLICATION SOFTWARE
3
Table of Contents
About CAYIN ..........................................................................................................................2
Copyright Notice ...................................................................................................................2
Trademark Notice ................................................................................................................. 2
Disclaimers ........................................................................................................................... 2
1. System Environment .........................................................................................................6
1-1 System Structure ................................................................................................... 6
1-2 System Requirements ............................................................................................ 7
1-3 Software Components ...........................................................................................7
2. Software Installation ......................................................................................................... 8
2-1 Install xPost ............................................................................................................8
2-2 Activate xPost ...................................................................................................... 11
2-3 Congure Firewall of xPost Server ...................................................................... 14
3. General Operation ........................................................................................................... 16
3-1 Remote Management - Login .............................................................................. 16
3-2 Introduction of User Interface .............................................................................. 17
3-2-1 Select a User Interface Language .................................................................... 17
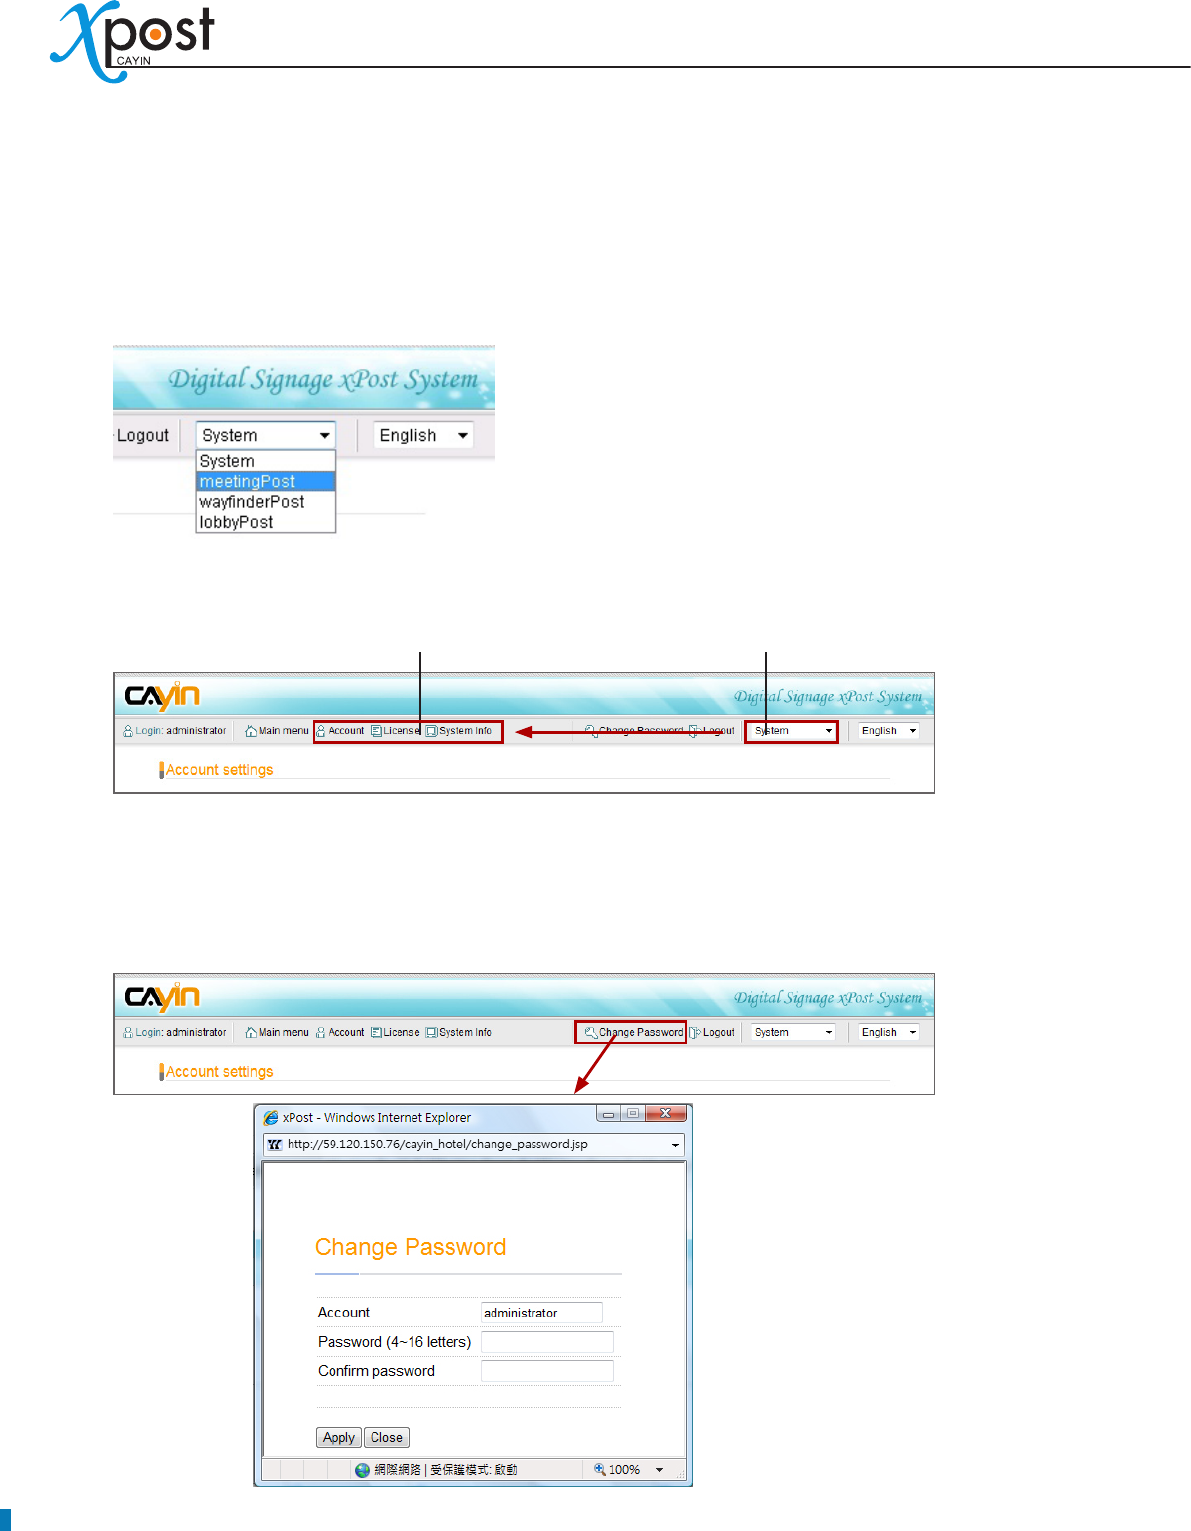
3-2-2 Switch between Modules .................................................................................. 18
3-2-3 Change Password ............................................................................................. 18
4. System Conguration ..................................................................................................... 19
4-1 Add/Edit Account ................................................................................................. 19
4-2 Software License Management ........................................................................... 21
4-3 System Info .......................................................................................................... 21
5. meetingPost Module .......................................................................................................22

4
5-1 Login meetingPost ...............................................................................................22
5-2 Set Up a Meeting Room Display .........................................................................23
5-2-1 Add a Meeting Room ......................................................................................... 23
5-2-2 Apply a Template .............................................................................................. 24
5-2-3 Upload a Template ........................................................................................... 25
5-3 Modify Template (Template Settings) ..................................................................26
5-4 Connect meetingPost to SMP Player .................................................................. 29
5-5 Arrange Meetings (Events) ................................................................................. 32
6. waynderPost Module .....................................................................................................36
6-1 Login waynderPost ............................................................................................36
6-2 Set Up a Waynding Display ............................................................................... 37
6-2-1 Add a Display .................................................................................................... 37
6-2-2 Apply a Template .............................................................................................. 38
6-2-3 Upload a Template ........................................................................................... 39
6-3 Modify Template (Template Settings) .................................................................. 40
6-4 Connect waynderPost to SMP Player ...............................................................43
6-5 Enter waynderPost Data ....................................................................................45
6-5-1 Enter waynder Data Manually ......................................................................... 45
6-5-2 Retrieve Data from meetingPost ....................................................................... 48
7. lobbyPost Module ............................................................................................................ 51
7-1 Login lobbyPost .................................................................................................... 51
7-2 Set Up a Lobby Display........................................................................................ 52
7-2-1 Add a Display ..................................................................................................... 52
7-2-2 Apply a Template .............................................................................................. 53
7-2-3 Upload a Template ........................................................................................... 54

APPLICATION SOFTWARE
5
7-3 Modify Template (Template Settings) ..................................................................55
7-4 Connect lobbyPost to SMP Player .......................................................................59
7-5 Enter lobbyPost Data ........................................................................................... 61
7-5-1 Room & Tariff .................................................................................................... 62
7-5-2 Currency Exchange ........................................................................................... 63
7-5-3 Weather ............................................................................................................. 65
7-5-4 General and Image Slideshow .......................................................................... 67
6
CAYIN xPost is the web-based application software, which offers a combination of essential tools to create
rich contents for digital signage in different vertical markets. It provides an easy-to-use platform for instant
data entry and further extends the usage of CAYIN SMP-WEB series players to meet users’ requirements of
frequent, daily maintenance.
CAYIN xPost contains the following three modules:
meetingPost:• It is the content editing software especially for meeting room management. It can display
information of a single meeting or the meeting list on the screen.
waynderPost:• It is content editing software especially for dynamic public sign and direction guiding.
lobbyPost:• It is content editing software especially for lobby screens which can display guest room
information, currency exchange, weather information, advertisements, commercial lms, and ticker.
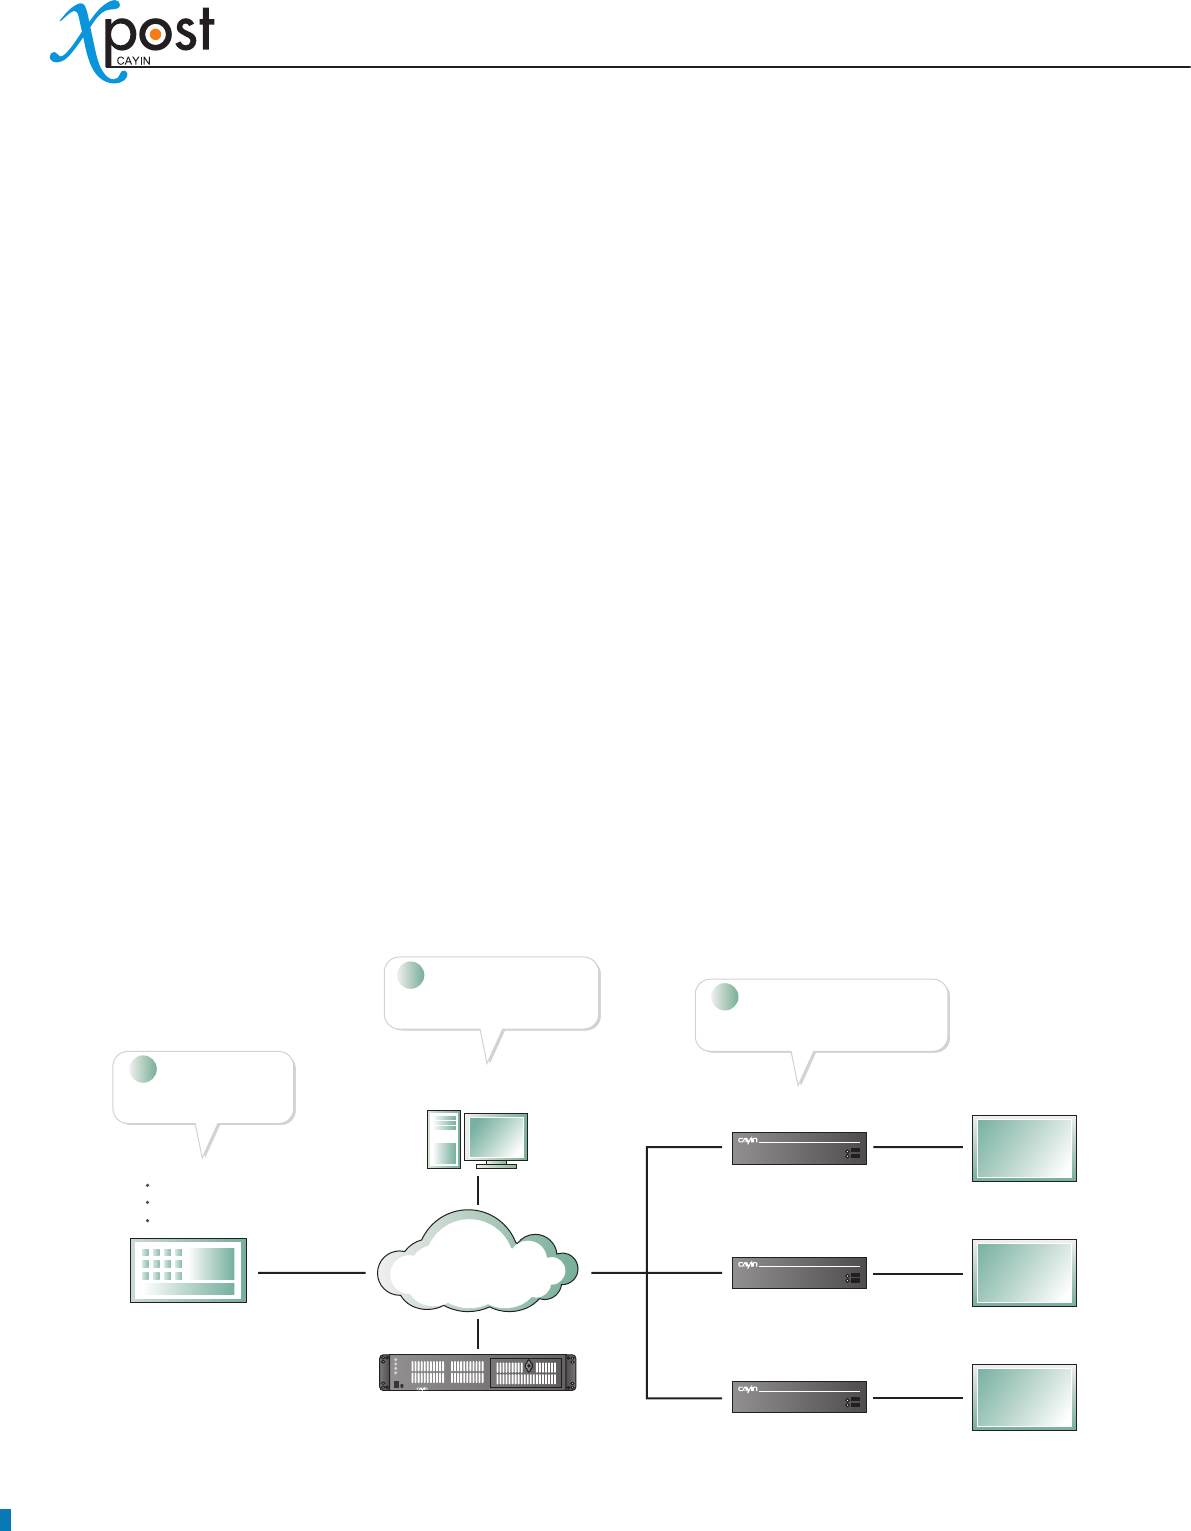
1. System Environment
1-1 System Structure
* We strongly suggest that xPost should be used in stable network environment.
LAN
WAN*
Intranet
Admin PC
Adminstrator
SMP-WEB
series player
SMP-WEB
series player
SMP-WEB
series player
xPost Server
wayfinderPost
lobbyPost
meetingPost
Screen
- lobby
Screen
- meeting room
Screen
- corridor
CMS (optional)
distribute video files
Install xPost server
Connect xPost to SMP player
Configure xPost settings
1
2
3
APPLICATION SOFTWARE
7
1-2 System Requirements
Operating System: Windows® XP or Windows® Vista
Display Resolution: 1024 x 768 or above is recommended
Processor: Intel® Pentium® 4 compatible CPU or above
Memory: 1024 MB or above is recommended
Hard Disk: 200 MB for program and congurations, 10GB minimum for storing data.
Browser: Internet Explorer® 6 or above, Firefox® 1.5 or above
Compatible SMP player: SMP-WEBPLUS, SMP-WEB3, SMP-WEB3N
1-3 Software Components
MySQL ver 5.0.41-community-nt for Win32 on ia32 [MySQL Community Edition (GPL)]
Tomcat 4.0
xPost 1.0
IMPORTANT
xPost can only be used with CAYIN SMP-WEB series player. You cannot use it with other SMP player (e.g.
SMP-PRO) or normal PC system.
8
2. Software Installation
2-1 Install xPost
You can install xPost software on any Windows-based PC. Computers that install xPost software will act as
xPost servers.
Before installing xPost software on a PC, please make sure the PC meets the system requirements
beforehand, and then follow the instructions below:
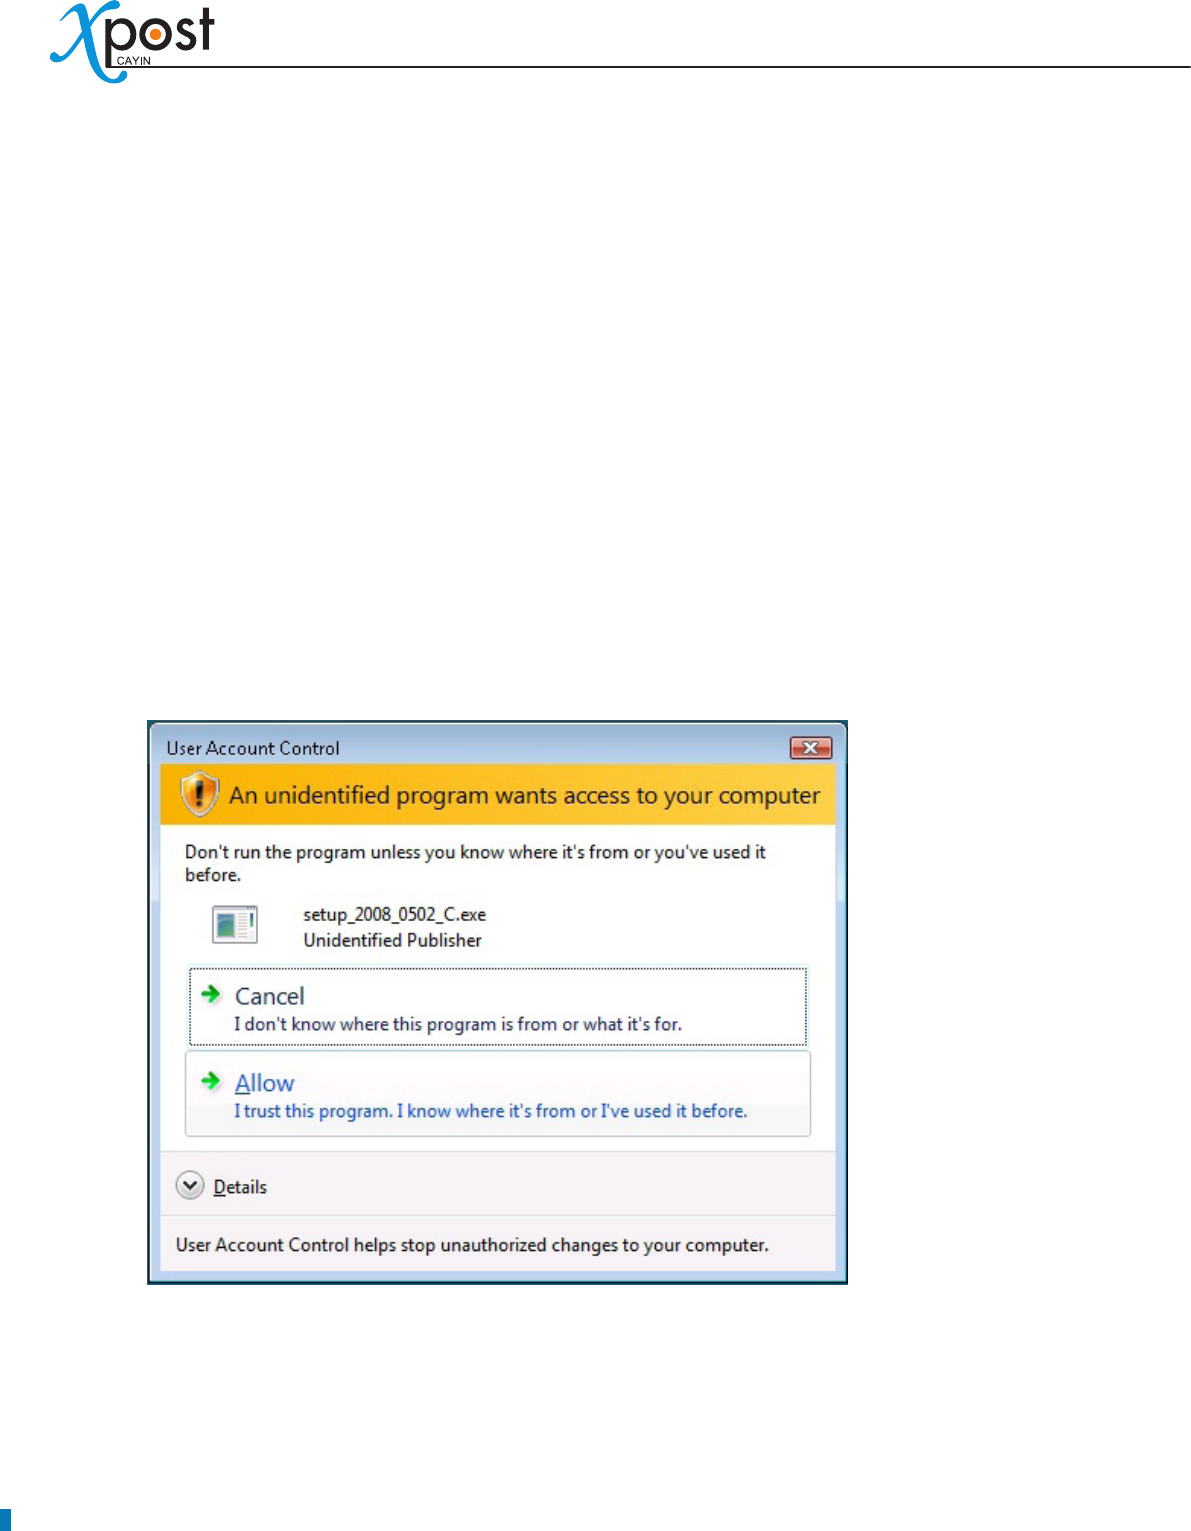
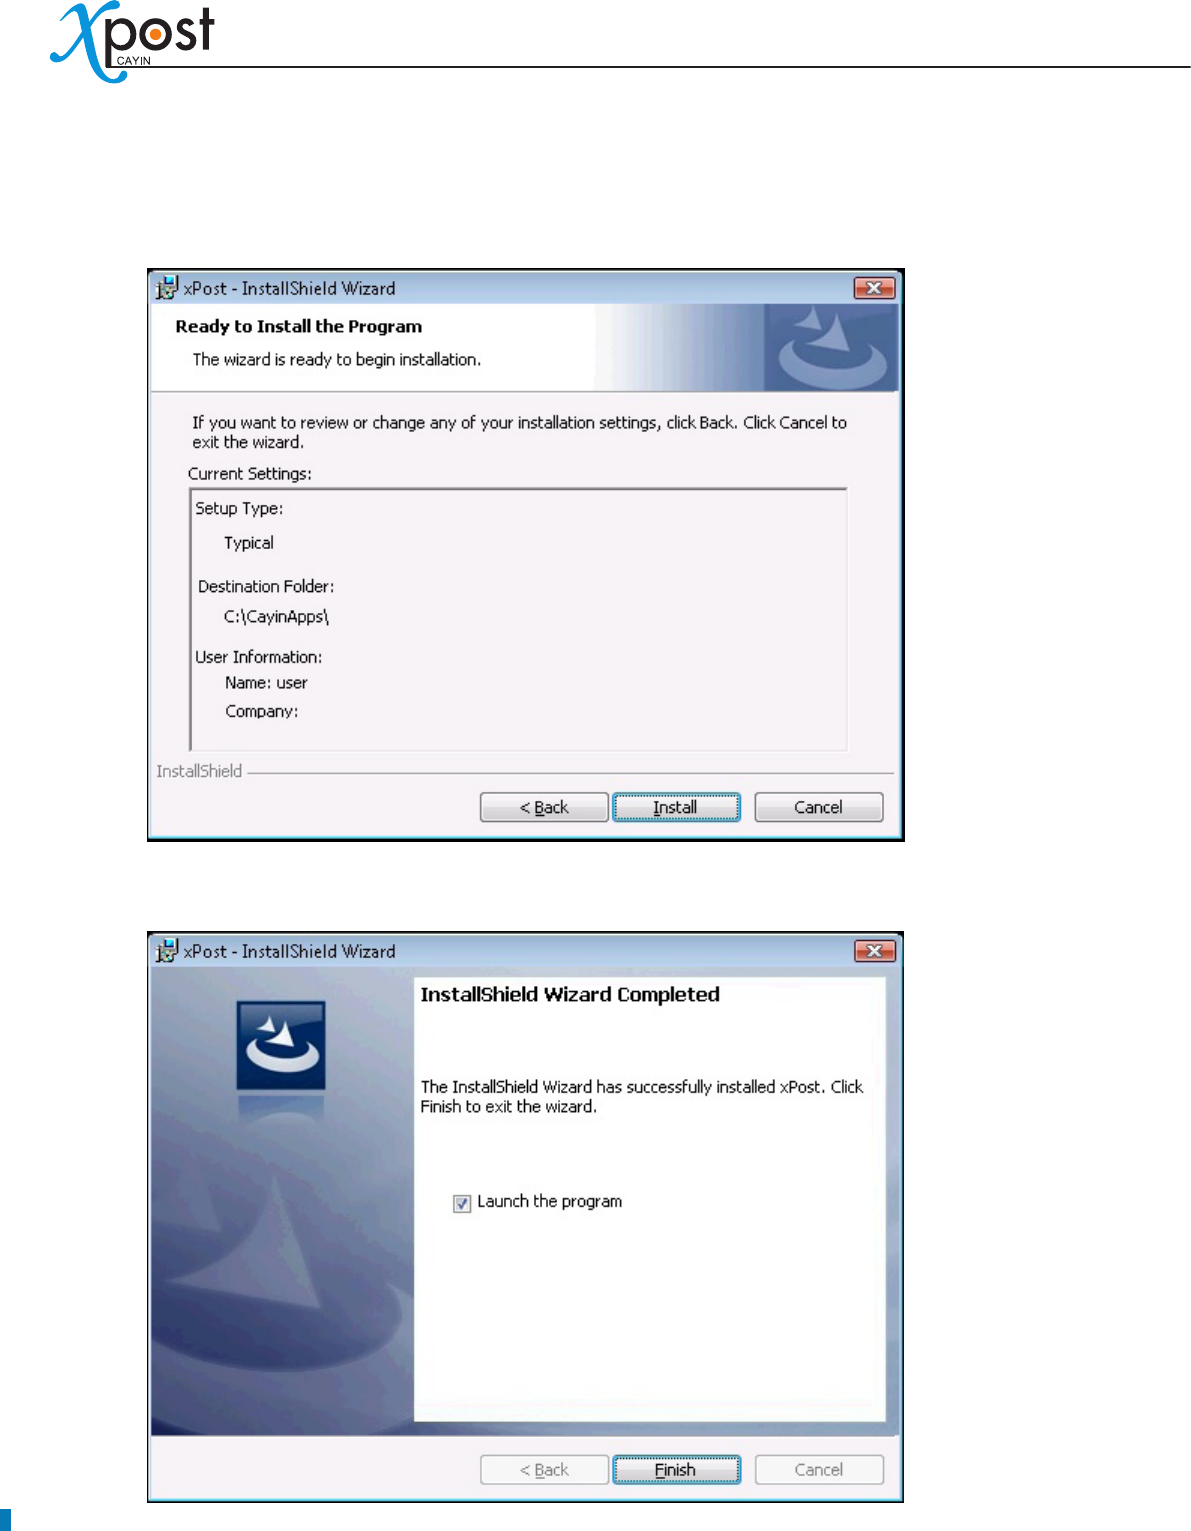
1. Login as system administrator.
2. Double click on setup executable le (.exe).
3. [Windows vista only] When Vista User Account Control appears, click [Allow].
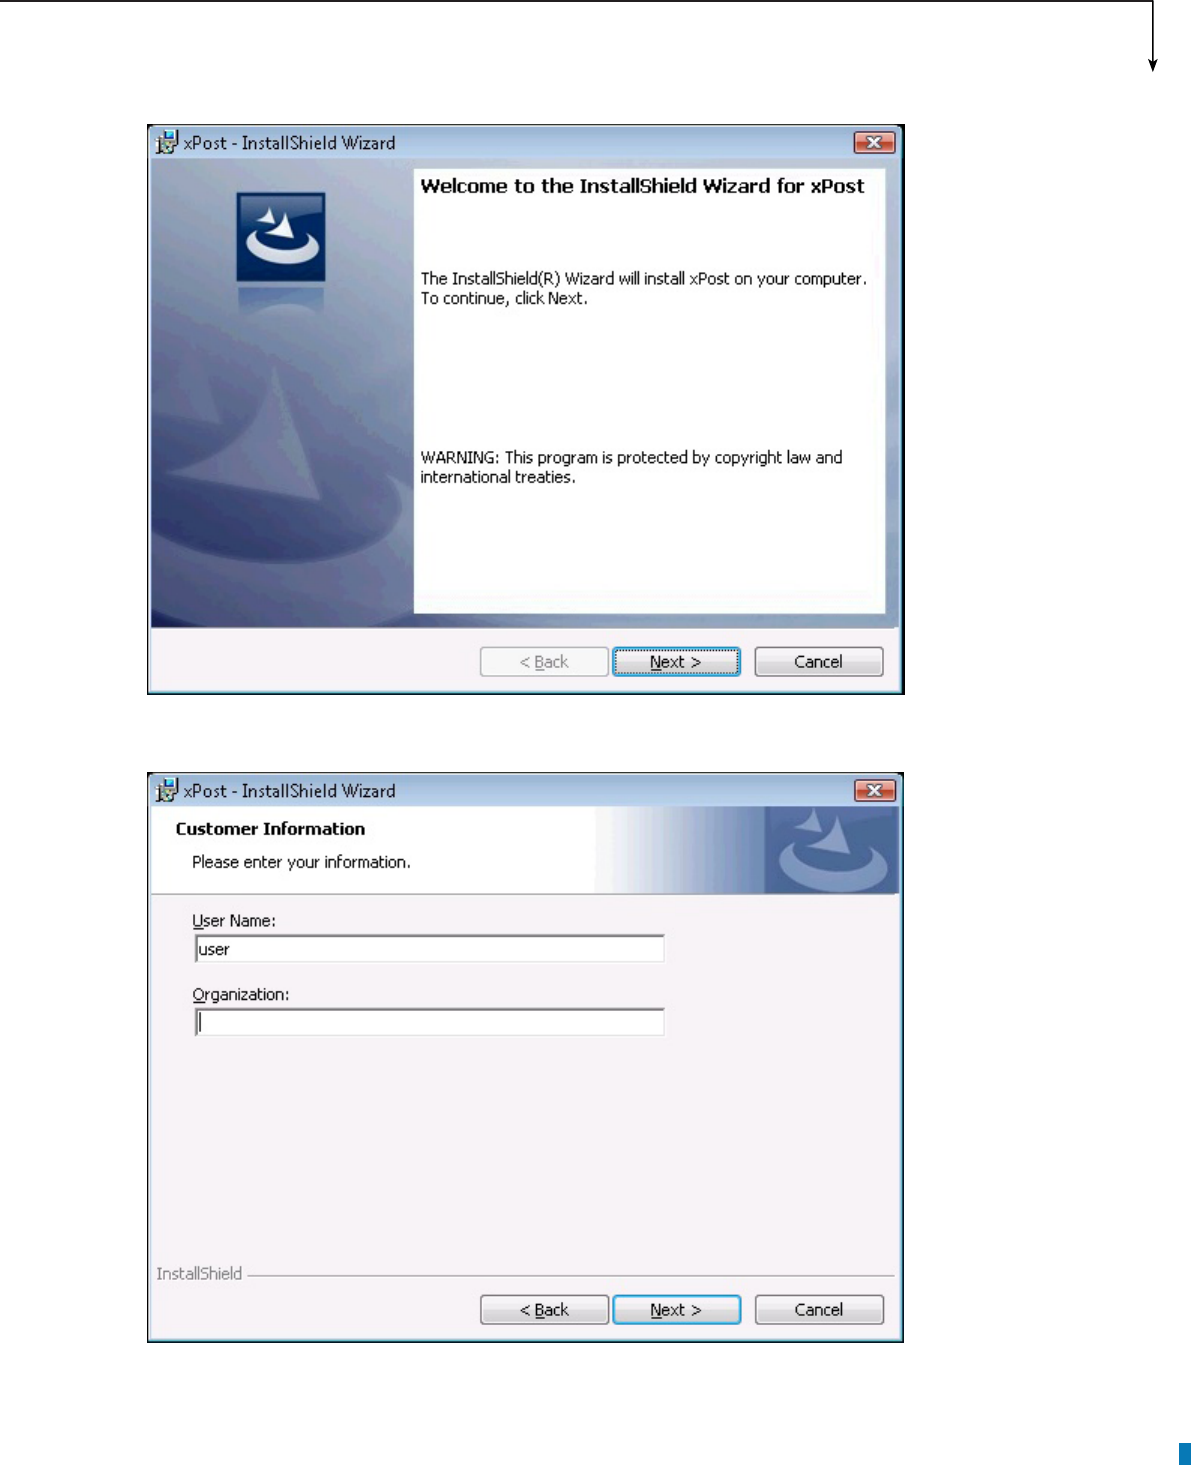
4. Click [Next] at the welcome page to continue the installation.
APPLICATION SOFTWARE
9
5. Enter “User Name”, “Organization”, and click [Next].
10
6. Enable Launch Program, click [Next], and wait a few seconds until the program finishes the
installation.
7. Leave “Launch the program” checked. xPost service will start automatically after installation.
APPLICATION SOFTWARE
11
2-2 Activate xPost
After installing xPost, you need to enter the software license number, so that xPost can be activated. By
doing so, please follow the steps below to connect to xPost’s Web Manager directly from the same PC (xPost
server).
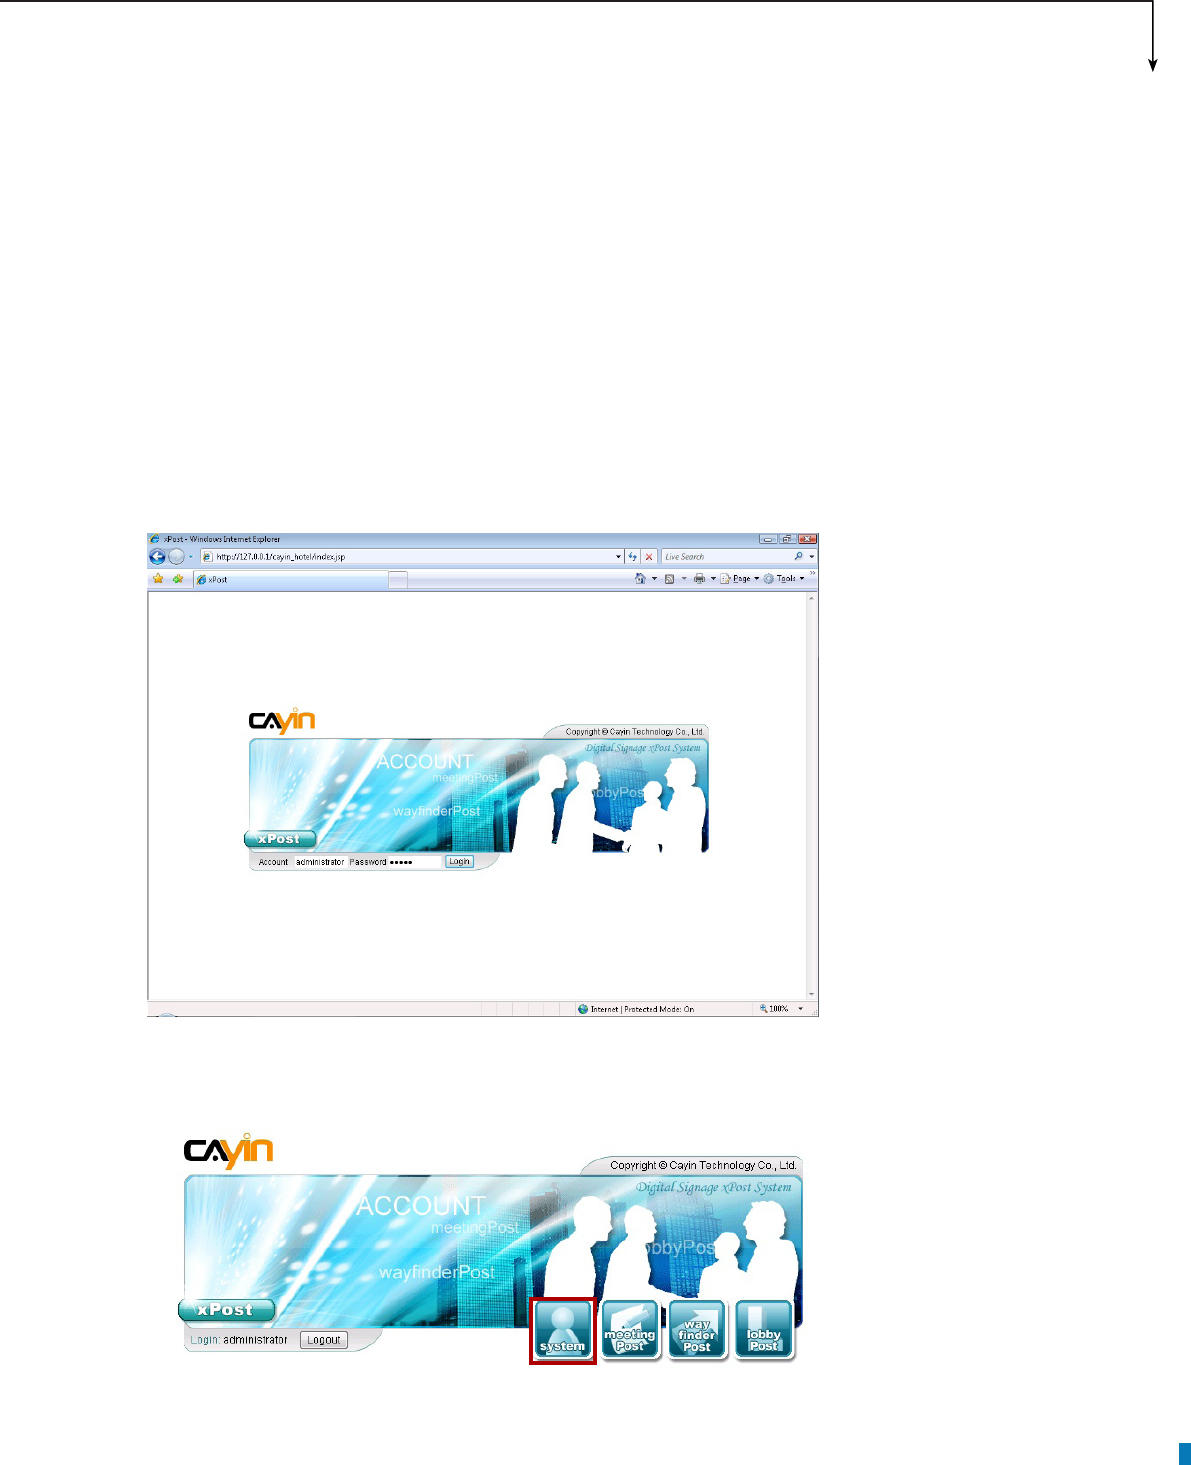
1. Open a browser (IE or Firefox), and enter http://127.0.0.1 in the URL field to connect xPost Web
Manager. Login the system with the default administrator account.
Account: administrator
Password: admin
2. After login, you will see the main menu of xPost. Please click [System].
12
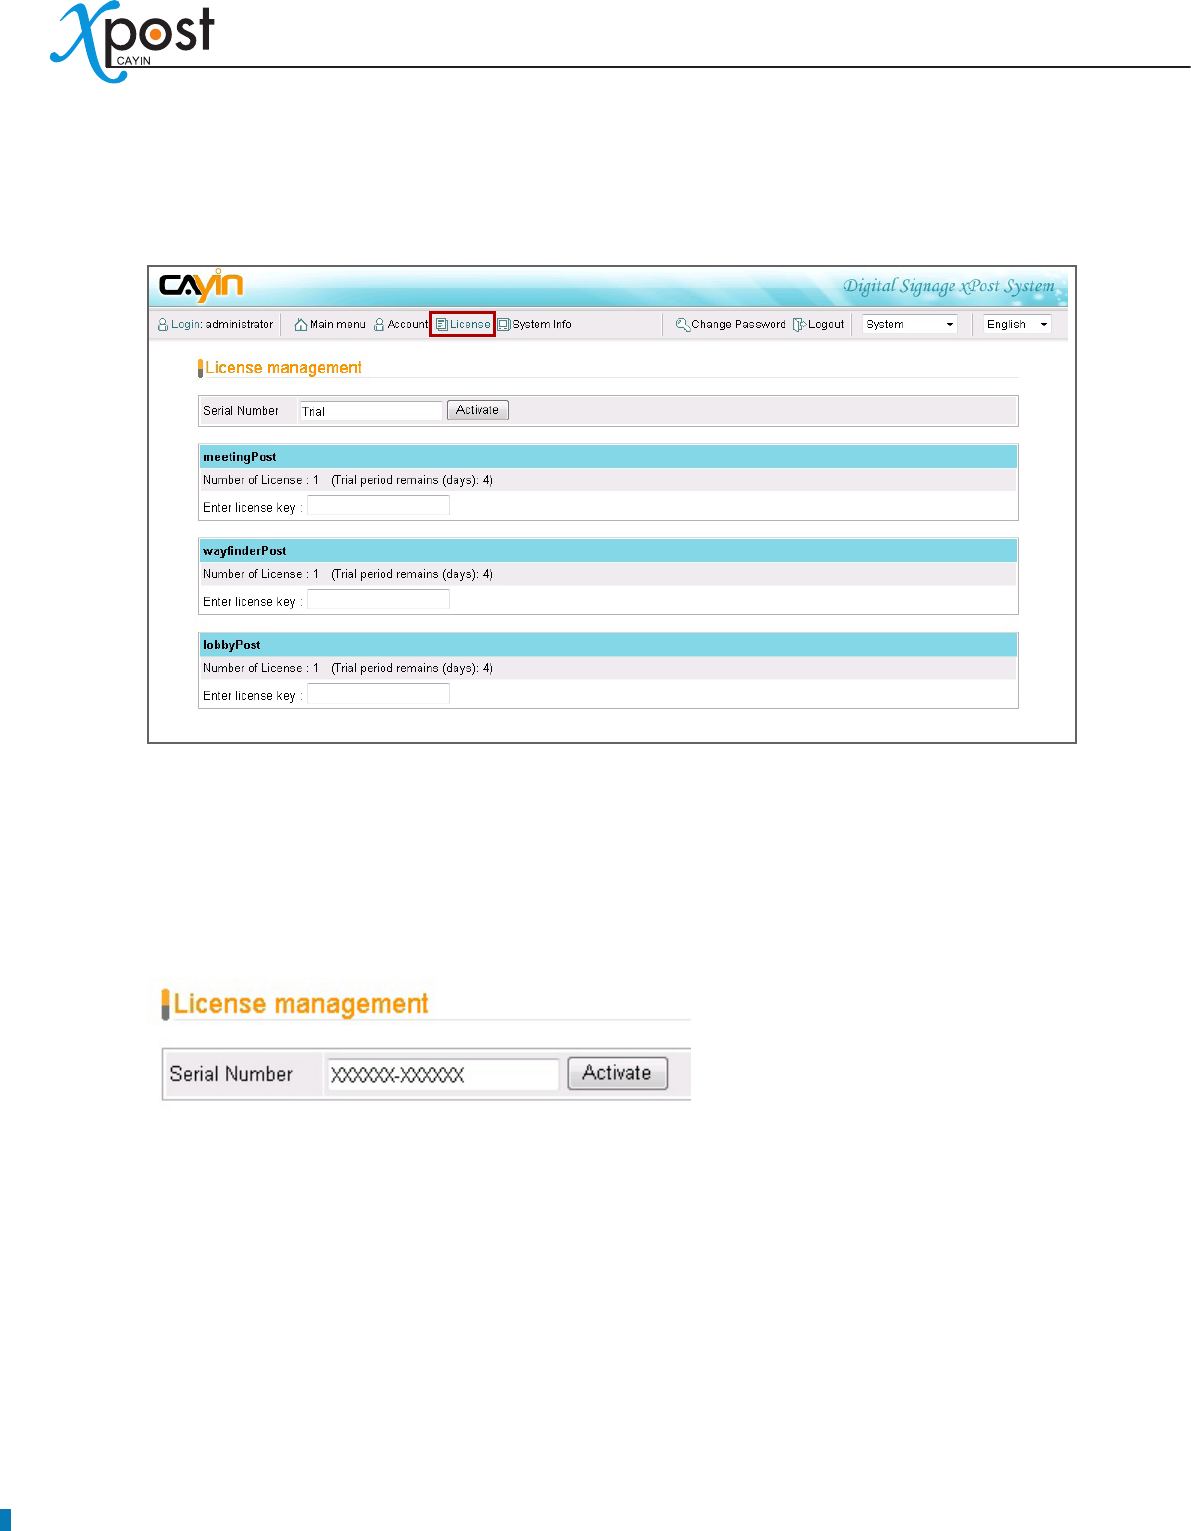
3. You can see 3 menu items on the top toolbar: Account, License, and System Info. Click [License];
then you can see the page of license management.
4. You need a “Serial Number” and “License Keys” to activate xPost. After purchasing xPost, you will get
Serial Number and Key(s) from CAYIN or CAYIN’s sales representative. If you plan to try xPost before
you buy, CAYIN provides a trial version for you to use xPost with 1 license for each module for 30
days.
5. Enter Serial Number and click [Activate].
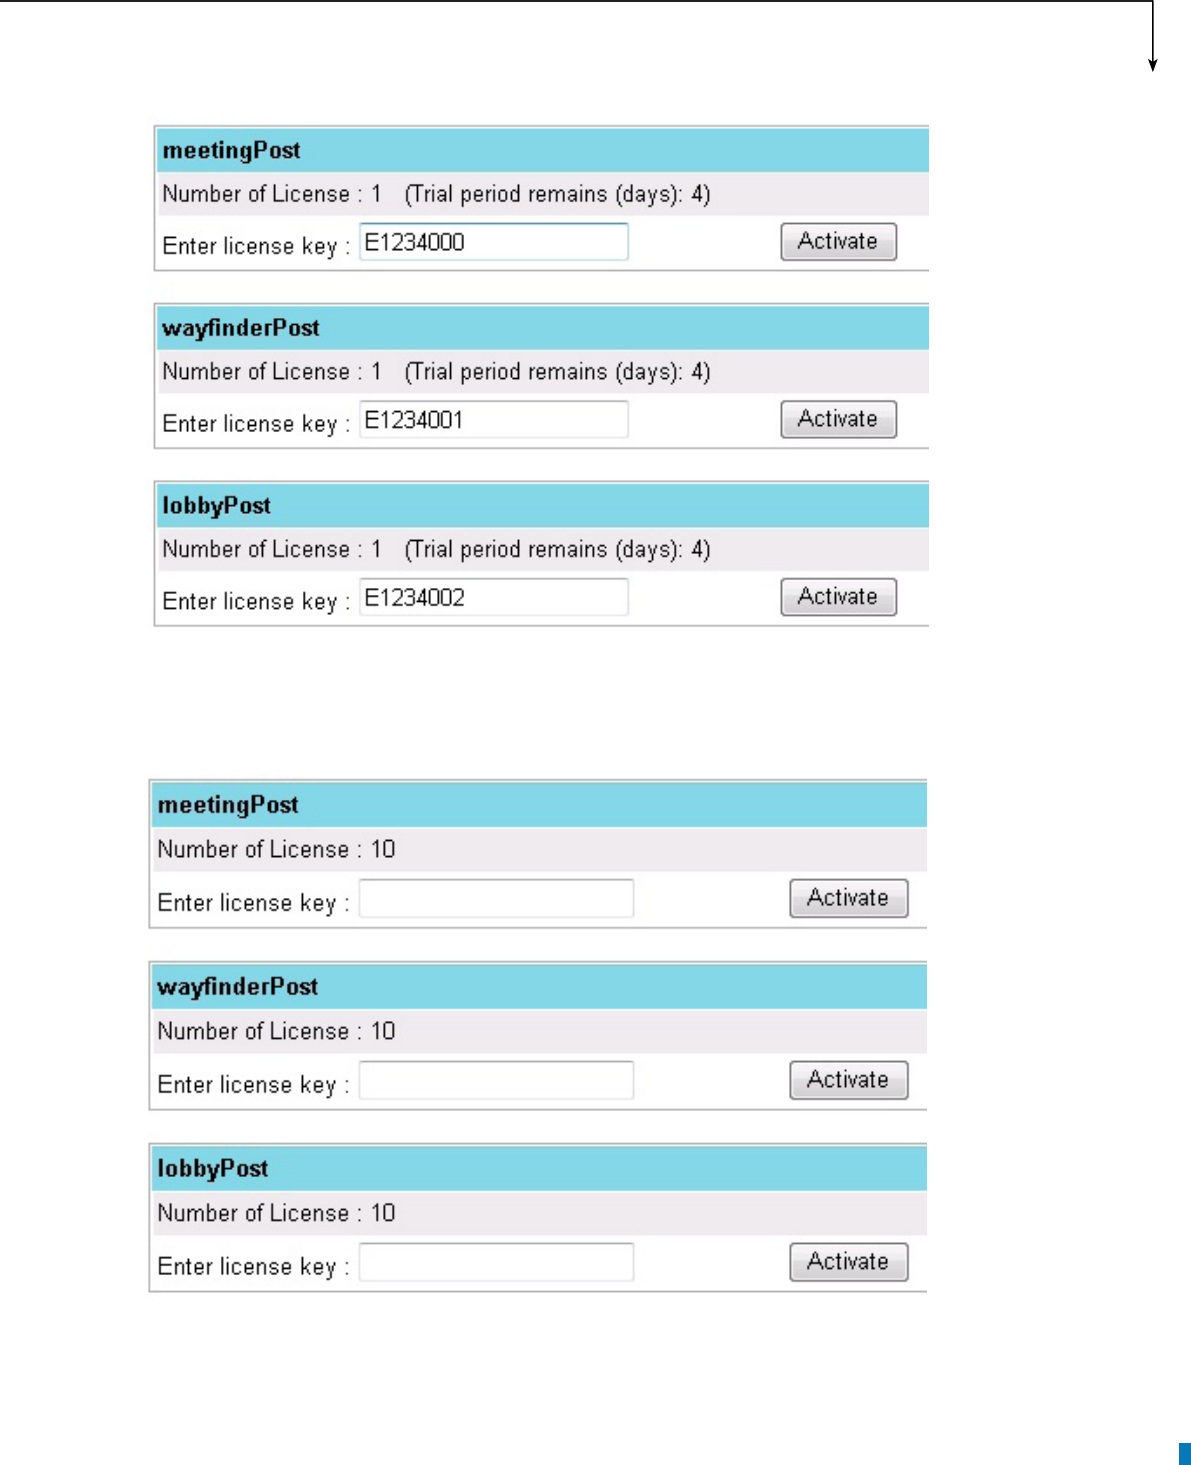
6. After xPost Serial Number is activated, you can enter a valid key for each module, and click [Activate]
one by one.
APPLICATION SOFTWARE
13
7. After valid keys are entered, you can see the license number is shown on respective sections as you
purchase.
8. Now, you nish activating xPost and are ready for using it.
14
2-3 Congure Firewall of xPost Server
To build the connection between xPost and SMP player and manage xPost from other PCs via network,
you need to turn off the rewall of xPost server, so that external devices and other PCs can connect to the
server.
The conguration of rewall is variable and depends on the rewall program you use.
We will try to explain the conguration of rewall with the case of Windows Vista as follows.
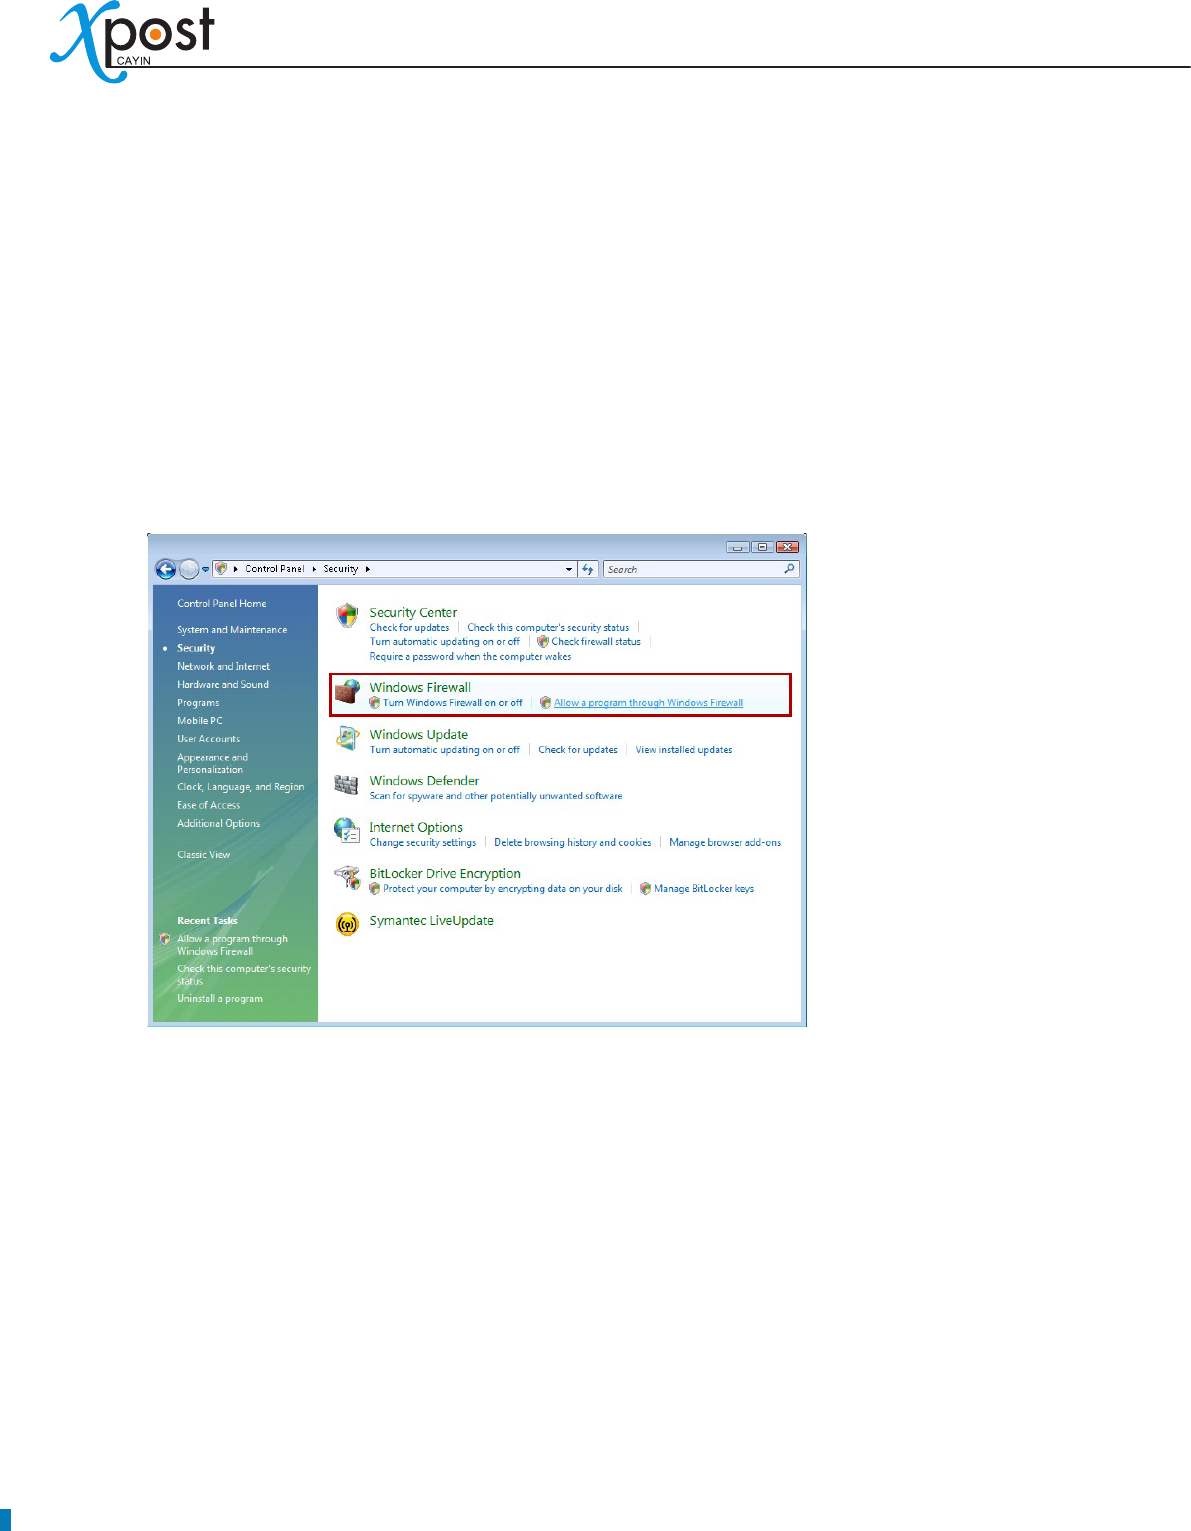
1. Click on “Control Panel” → “Security” → “Windows Firewall”
2. You can choose either “Turn Windows Firewall off” or “Allow a program through Windows Firewall”.
(1) Turn Windows Firewall off
The procedure will be completed right after you click “Turn Windows Firewall on or off”.
(2) Allow a program through Windows Firewall
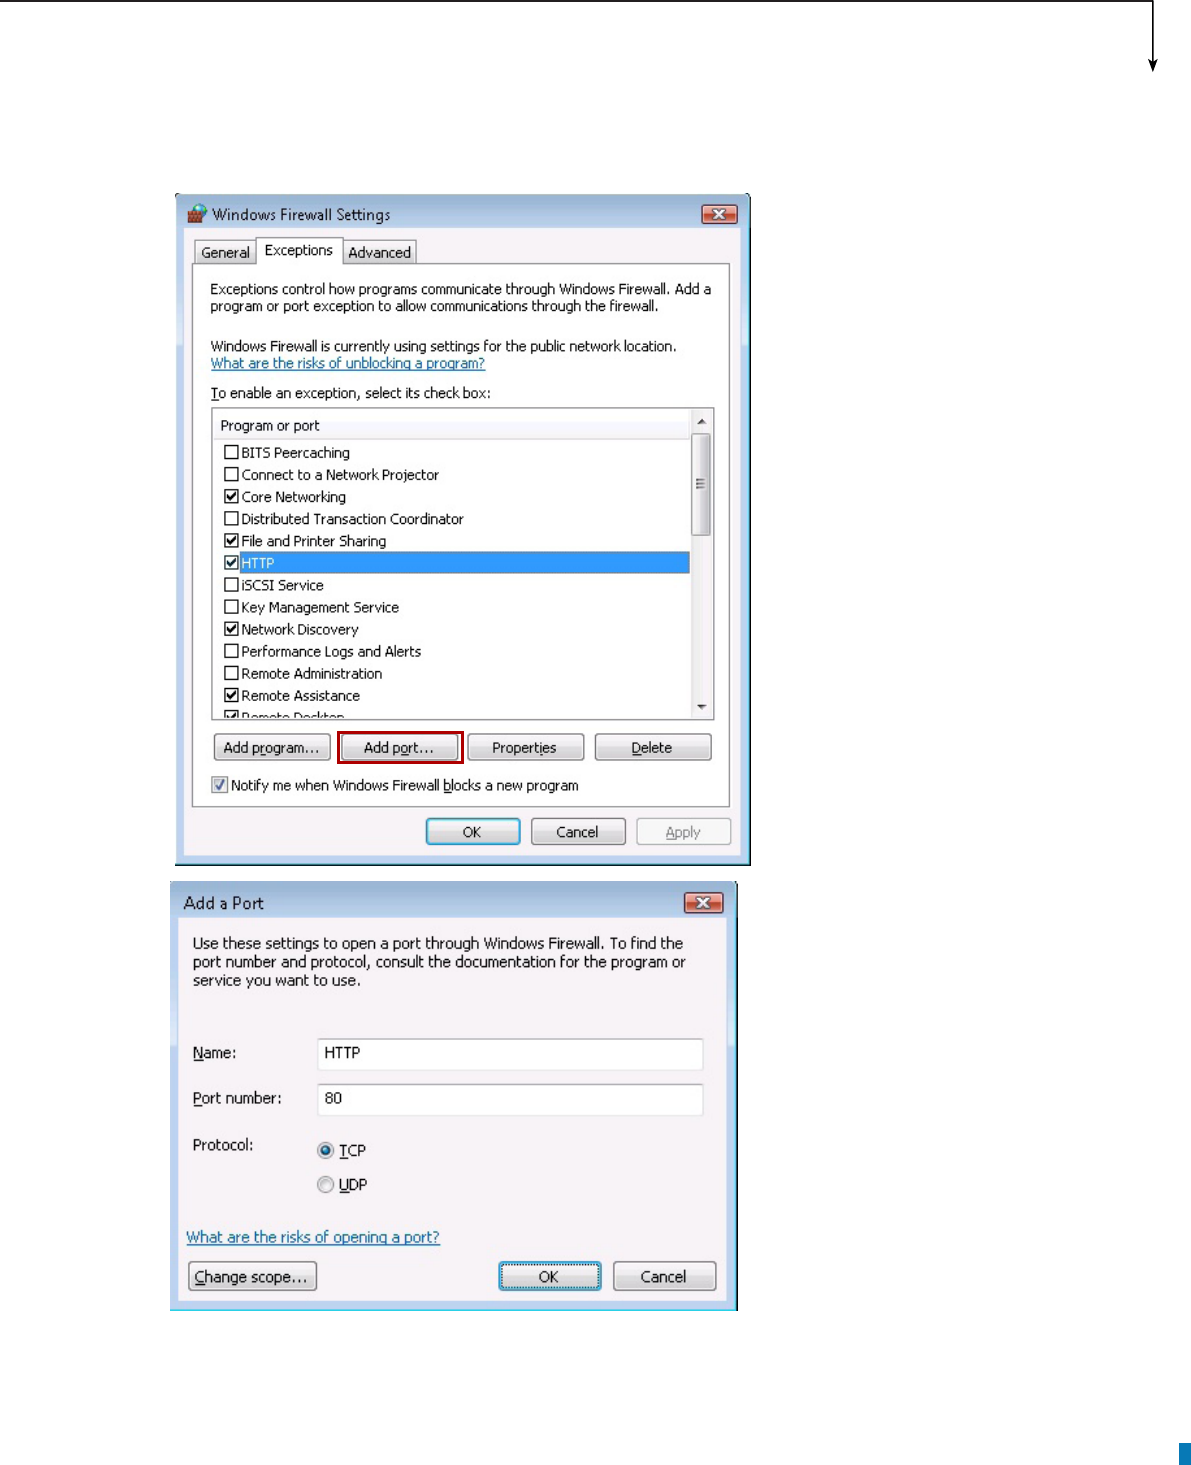
If you click this item, you will see a pop-up window, “Windows Firewall Settings”, and need to congure
more settings.
i. Click [Add port…] and enter:
Name: HTTP Port Number: 80 Protocol: TCP
APPLICATION SOFTWARE
15
ii. After completing the settings, please click [OK]. Then, you will see the item “HTTP” on the “Windows
Firewall Settings”.
iii. Conrm the port "HTTP" is checked; then click [OK].
16
3. General Operation
3-1 Remote Management - Login
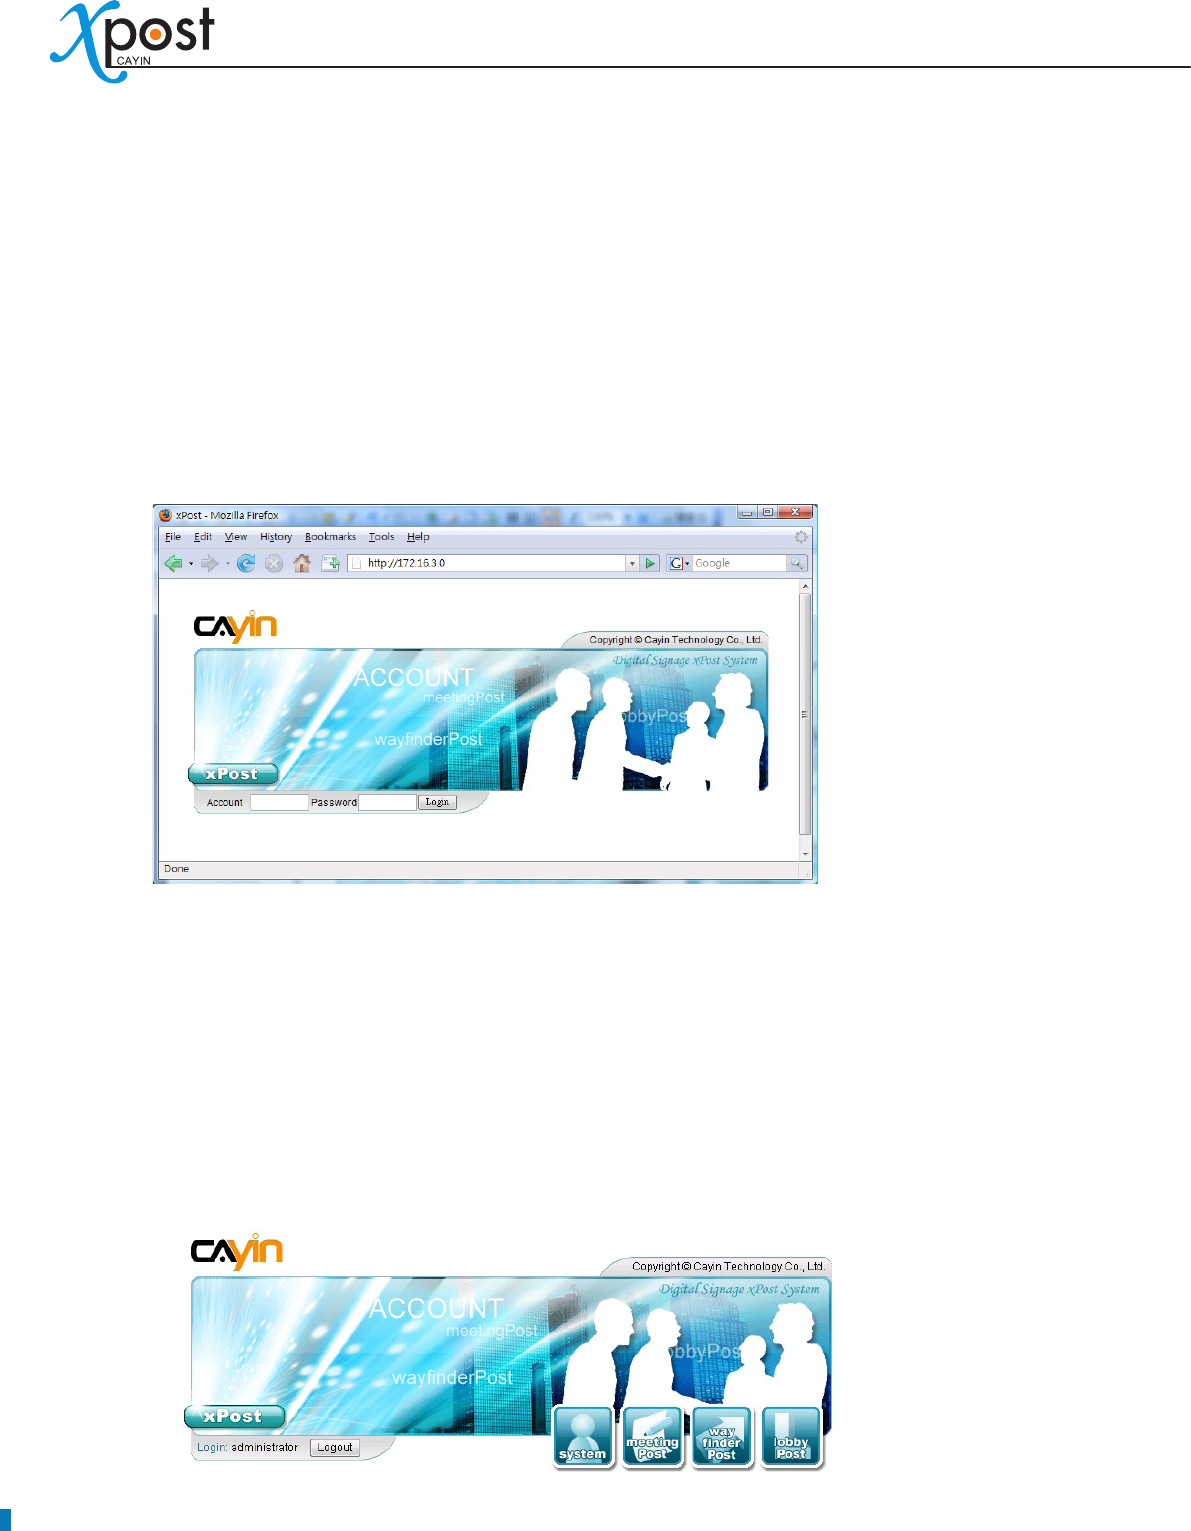
After you turn on the firewall of xPost server, you can access xPost Web Manager by using a browser
remotely.
1. Open a browser and type the IP address of your xPost server.
2. Login the system with the default administrator account.
Account: administrator
Password: admin
3. After login, you will see the main menu of xPost: system, meetingPost, waynderPost, and lobbyPost.
Click one of the buttons and start to operate xPost.
APPLICATION SOFTWARE
17
3-2 Introduction of User Interface
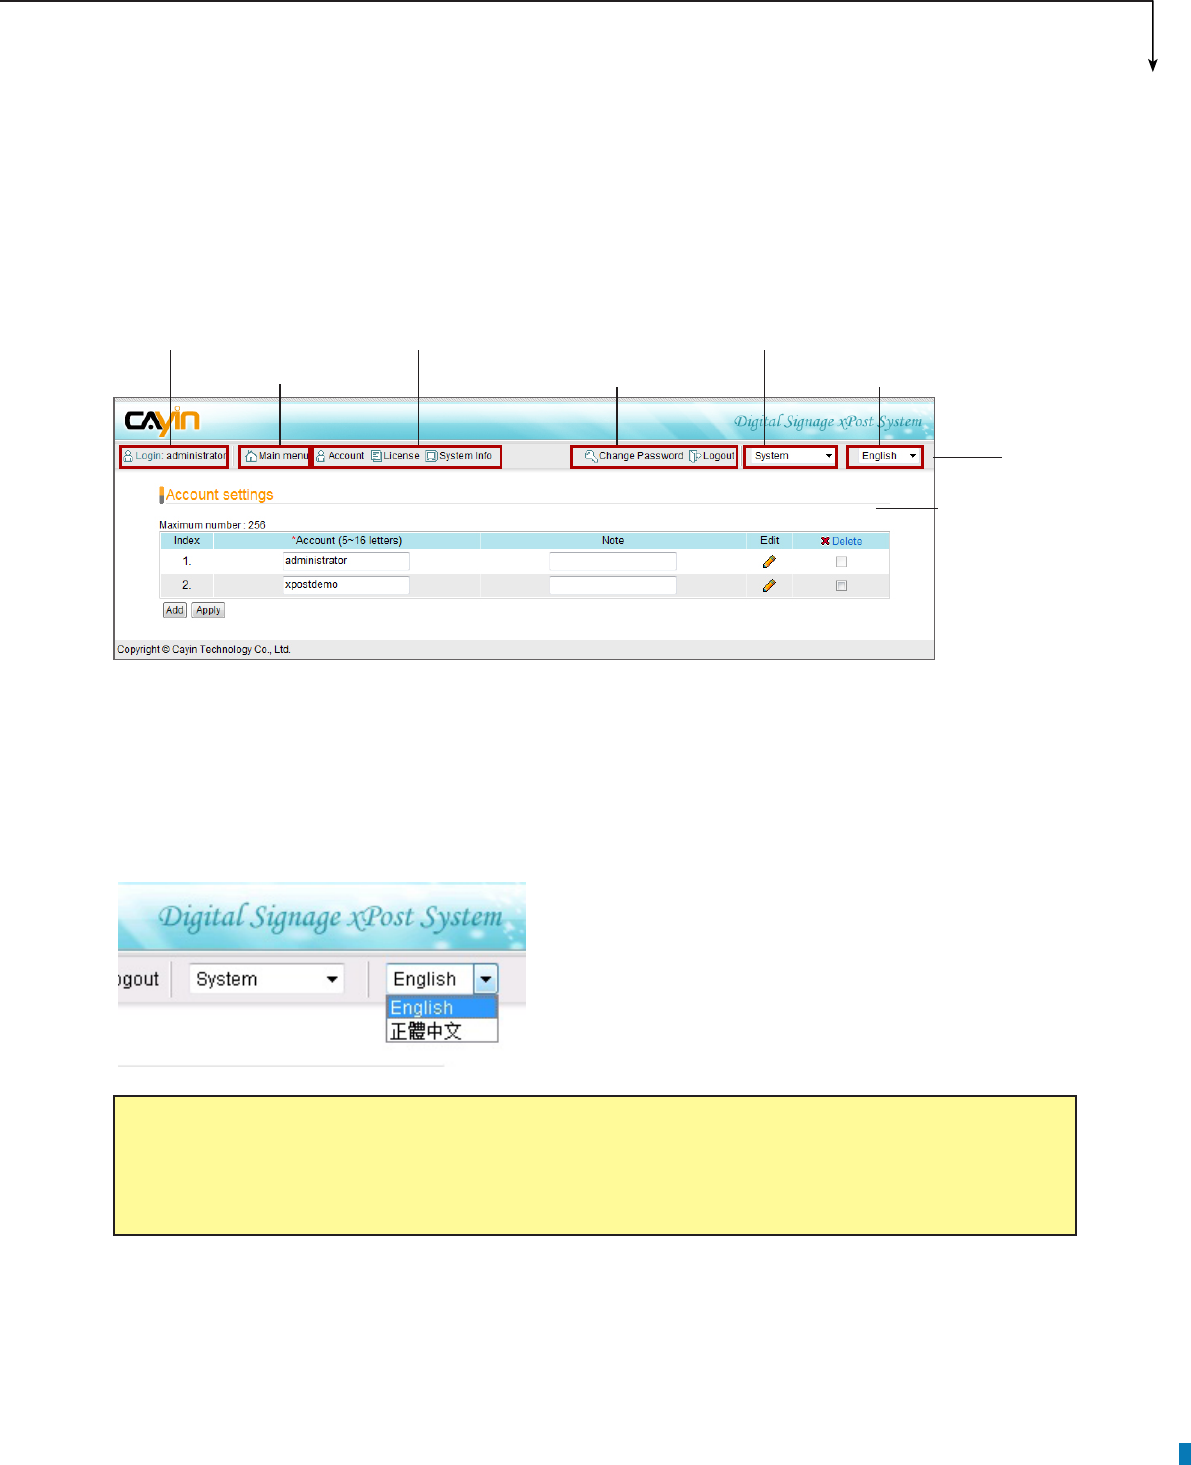
All main functions are placed on the toolbar. You can change settings and add data in the conguration area
of each function.
3-2-1 Select a User Interface Language
xPost supports “English” and “Traditional Chinese” web manager UI at the moment. You can switch between
these two languages on the right top side of the toolbar.
Toolbar
Login user
name Go to the
main menu
The sub-menu
of each module Change
password or
logout
Switch between
modules Select a UI
language
Configuration
area for each
function
NOTE
xPost is UTF-8 enabled application software. You can input data in many languages, not limited to English
and Chinese.
18
3-2-2 Switch between Modules
xPost contains four modules – System, meetingPost, wayfinderPost, and lobbyPost. You can switch
UI between these modules by clicking the correspondent button on the “Main menu” or selecting the right
program on the right top toolbar.
After you select a module, the sub-menu will display its correspondent functions.
3-2-3 Change Password
Users can change their own passwords by clicking the item “Change Password” on the toolbar. The
administrator will not keep the record of the user password in the system. Therefore, the administrator needs
to reset passwords in the “System” module (Account settings) if users forget passwords.
The sub-menu
of each module
Switch between
modules
APPLICATION SOFTWARE
19
4. System Conguration
You can congure “Account” and manage “License” on the “System” module. Login xPost Web Manager and
click on “System”.
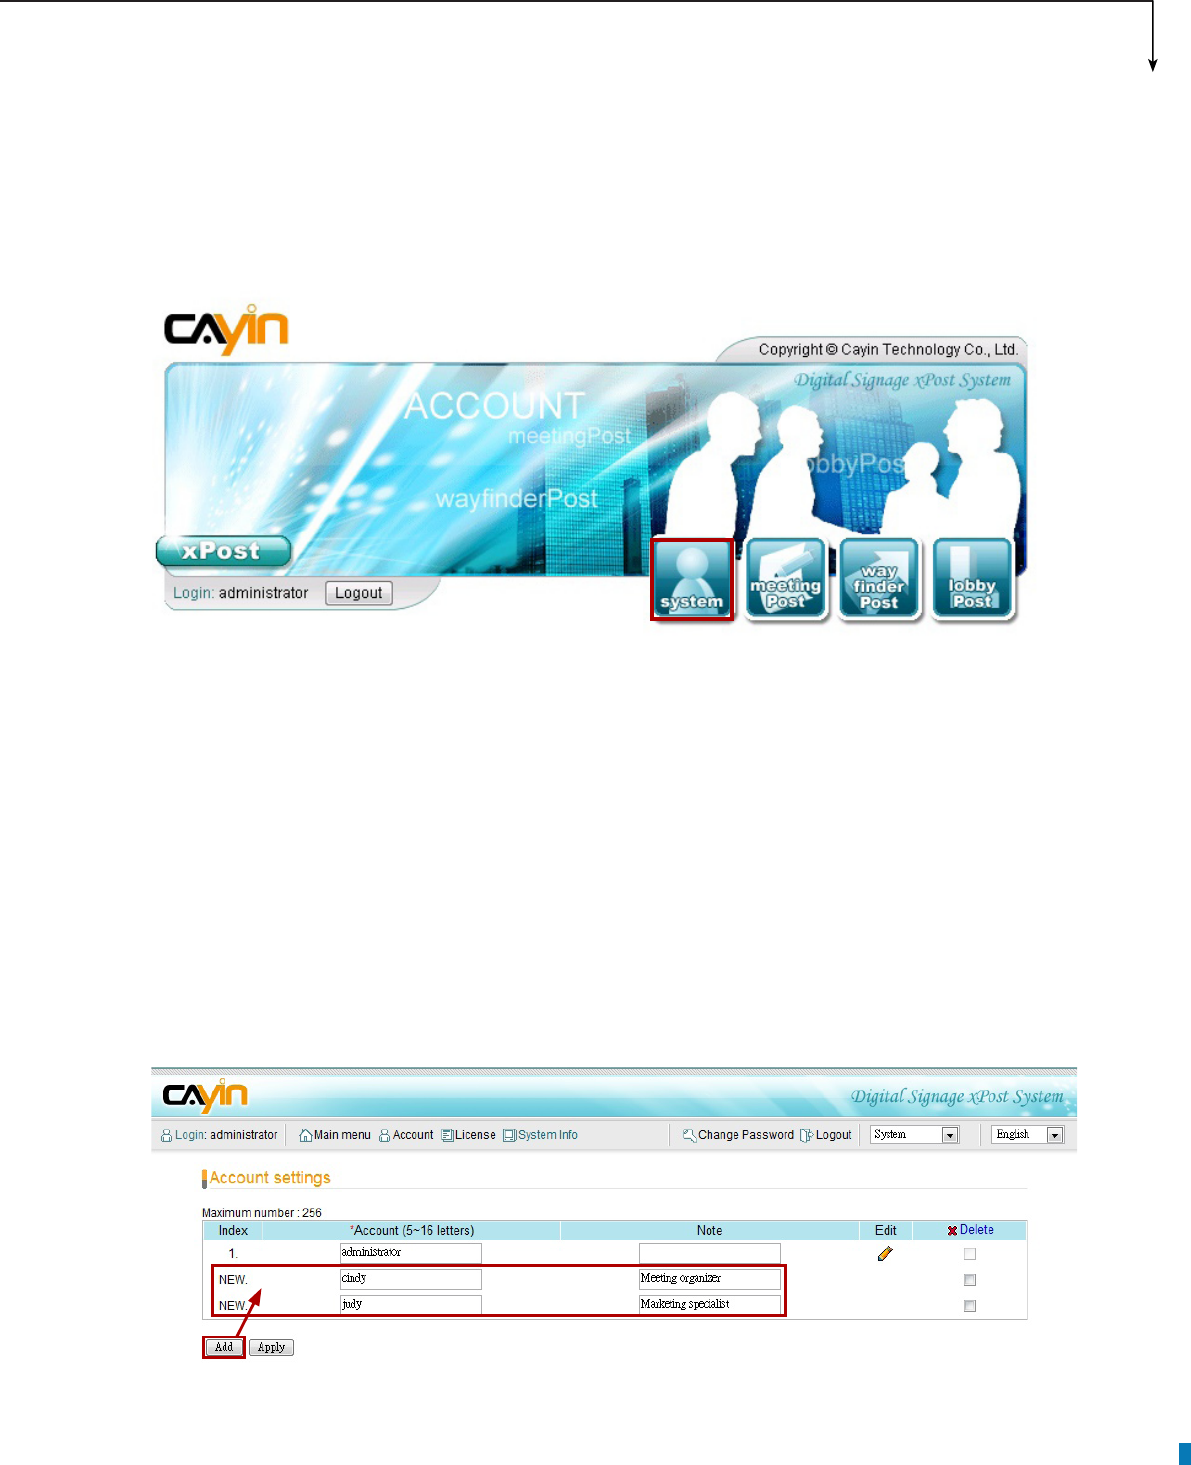
4-1 Add/Edit Account
Here you can add a new account (user) to manage xPost functions. You can also assign different access
rights to each account.
1. Login xPost and enter Web Manager
2. Click [SYSTEM] on the main menu, and [Account] on the toolbar; then you will see the page of
“Account settings”.
3. You can add several new users at a time by clicking the [Add] button on “Account settings” page.
4. Fill in “Account” names and “Note” (optional). After adding all accounts you need, please click [Apply].
20
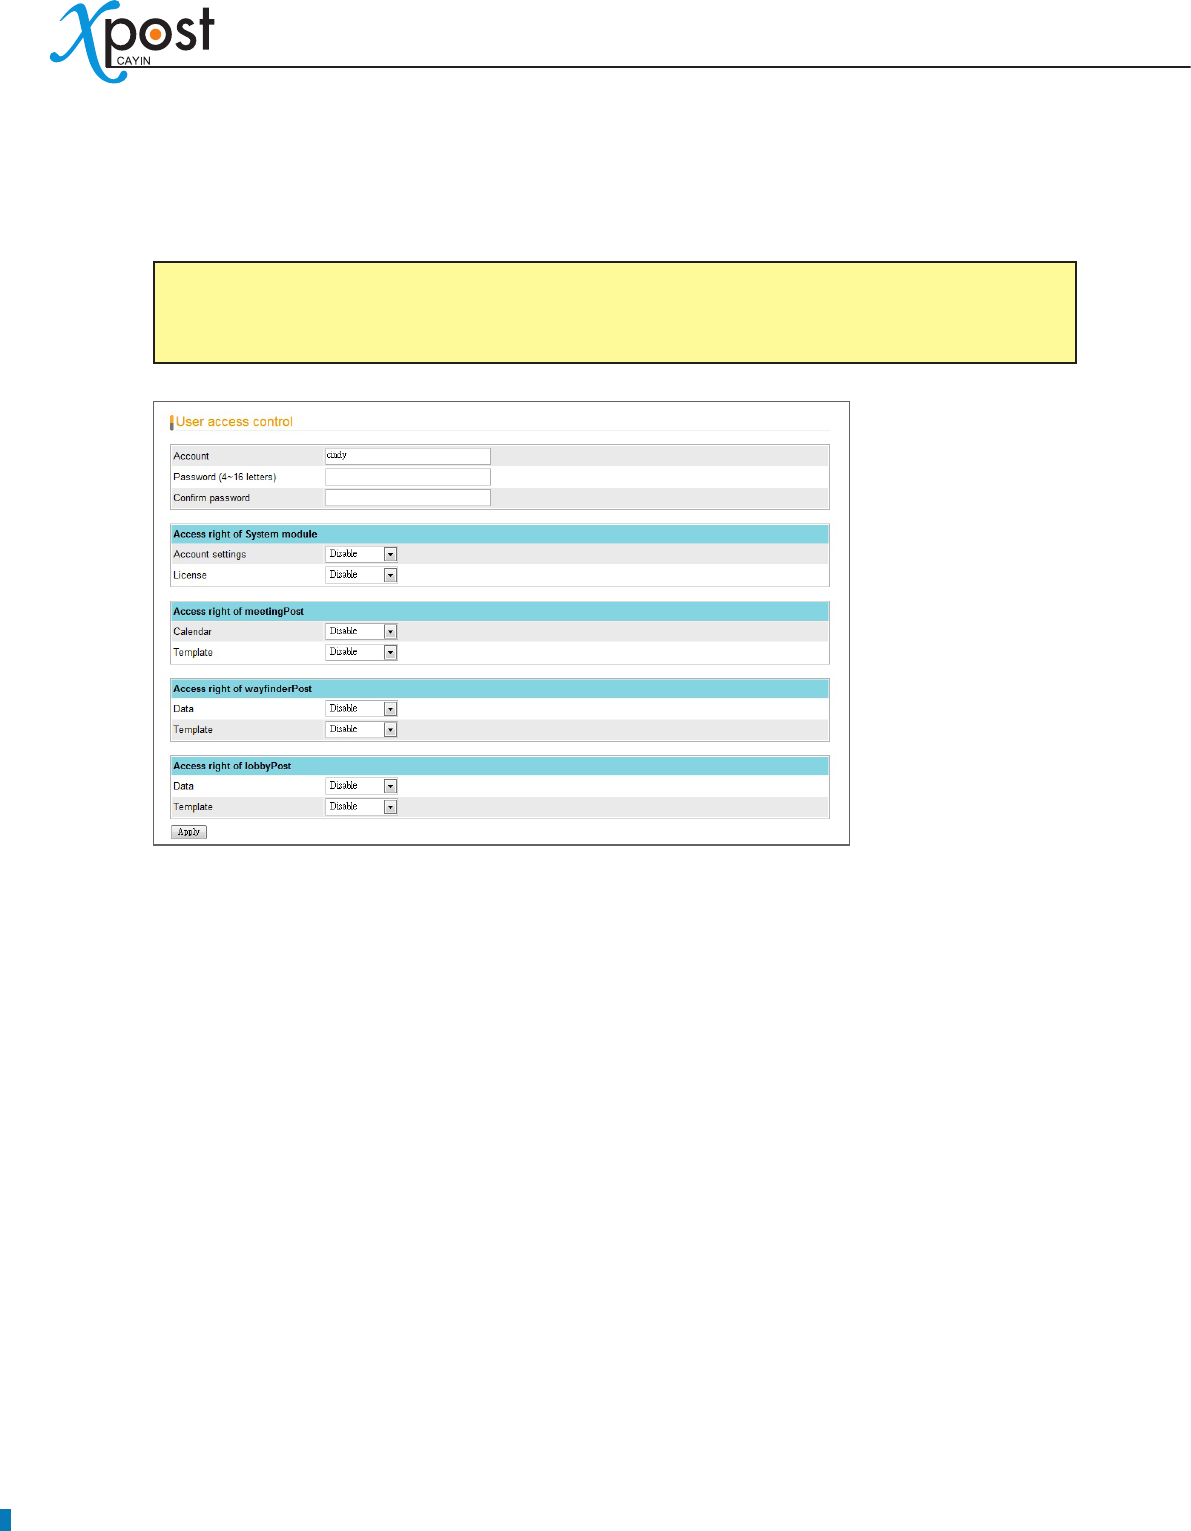
5. After an account is added, you can click the [Edit] button for each new account to set the password
and access rights for that account.
6. Enter the password and configure the access right to manage each module for this account. By
default, the access right of a new account is disabled. You can enable it by selecting “Read only” or
“Read & Write”.
Disable:
• This account cannot access this function or enter web manager
Read-only:
• This account can only view this function, but cannot modify it or enter data.
Read & Write:
• This account is authorized the full access rights to view, modify, and enter data.
7. After the account is congured, click [Apply] to save and apply changes.
NOTE
An account name must be minimum 5 characters.
APPLICATION SOFTWARE
21
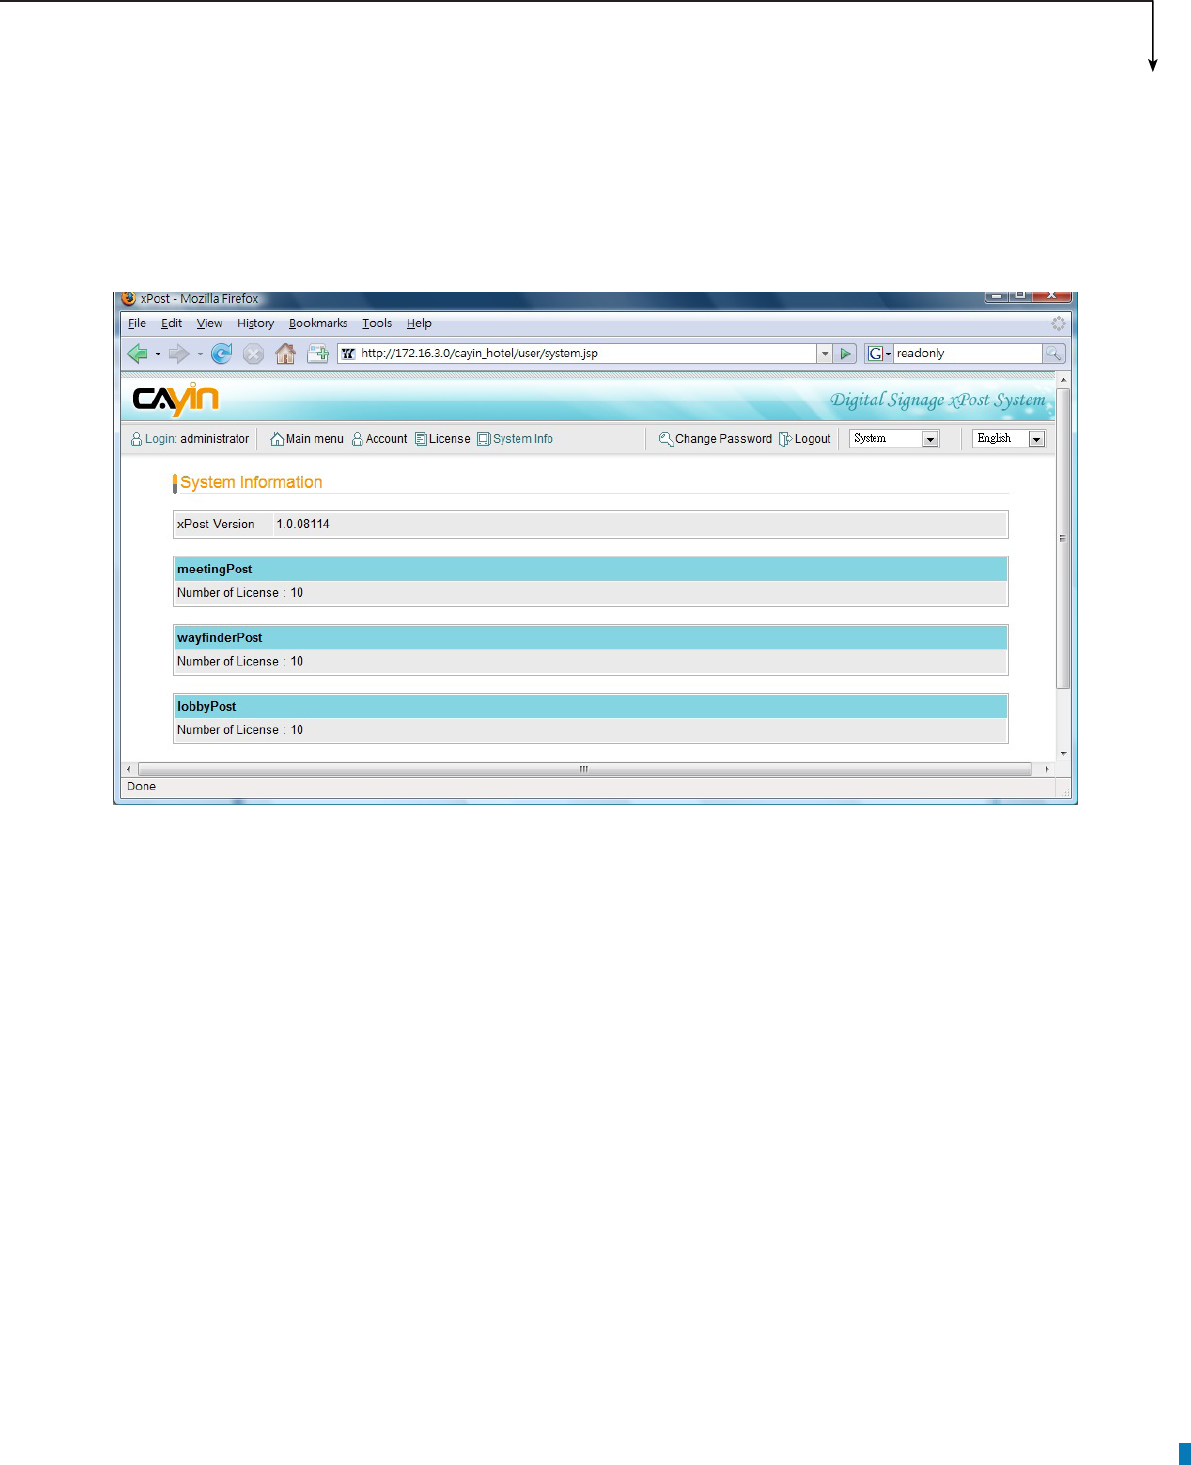
4-2 Software License Management
Normally, you only need to operate License Management once after an xPost is installed. Once you need to
change the license number or re-install the xPost, you may need to congure License Management again.
Please refer to 2-2 Activate xPost for detailed operation.
4-3 System Info
You can check xPost version and License number in the System Info page.
22
5. meetingPost Module
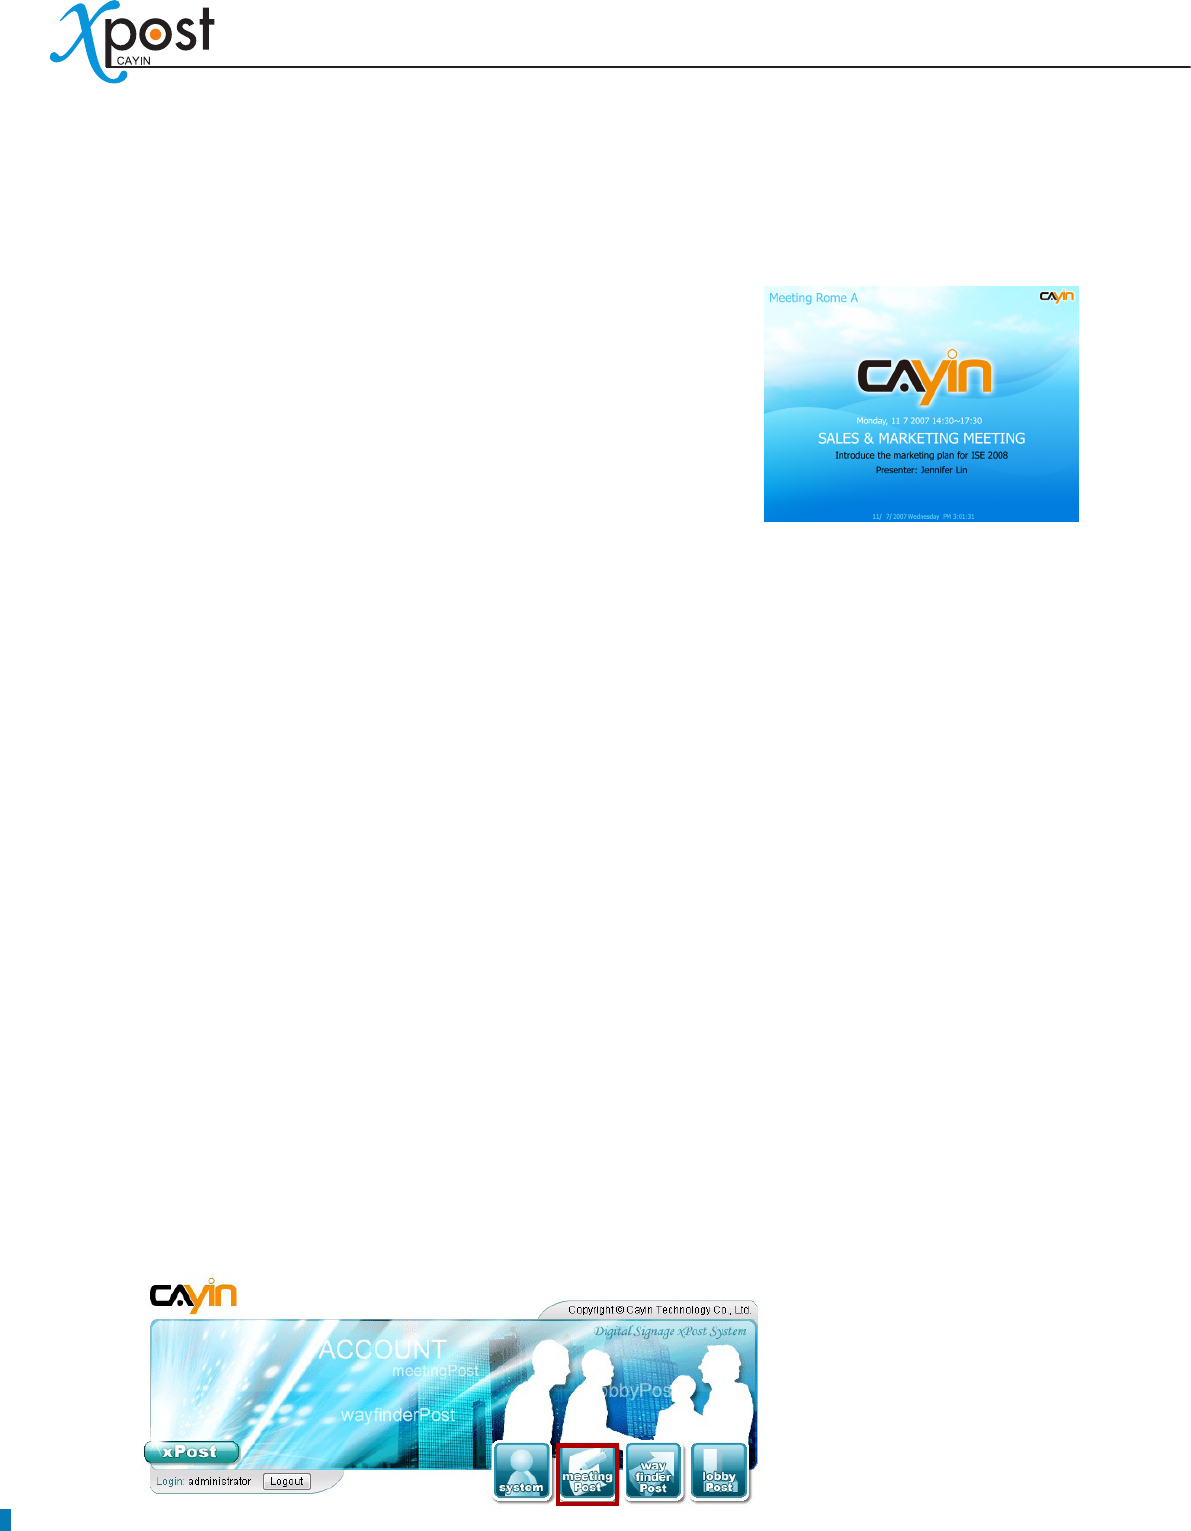
CAYIN’s meetingPost is dedicated to the needs of meeting rooms and
banquet halls that require exible arrangement on the meeting schedule
as well as frequent update on information post. meetingPost is designed
to incorporate with CAYIN SMP-WEB series products. By integrating
its function of meeting management, meetingPost can be used to
substitute traditional paper signs, displaying real-time information of the
event on the monitor outside each meeting room/banquet hall.
meetingPost provides a content editing tool with easy operation workow comprising the following steps:
STEP 1: Login meetingPost
STEP 2: Set Up a Meeting Room Display
STEP 3: Modify Template Settings
STEP 4: Connect meetingPost to SMP Player
STEP 5: Arrange Meetings (data entry)
Step 2 to 4 only have to be done on the rst-time use. For daily maintenance, users only need to do the 1st
and 5th step for data entry.
5-1 Login meetingPost
You can enter meetinPost via the following two methods:
Method 1:
Login xPost and then click [meetingPost] on the main menu.

APPLICATION SOFTWARE
23
Method 2:
If you are already in the Web Manager of xPost, you can switch to meetingPost from the upper side toolbar.
5-2 Set Up a Meeting Room Display
To use meetingPost, you must set up a display for a meeting room rst; then select and edit a template for it.
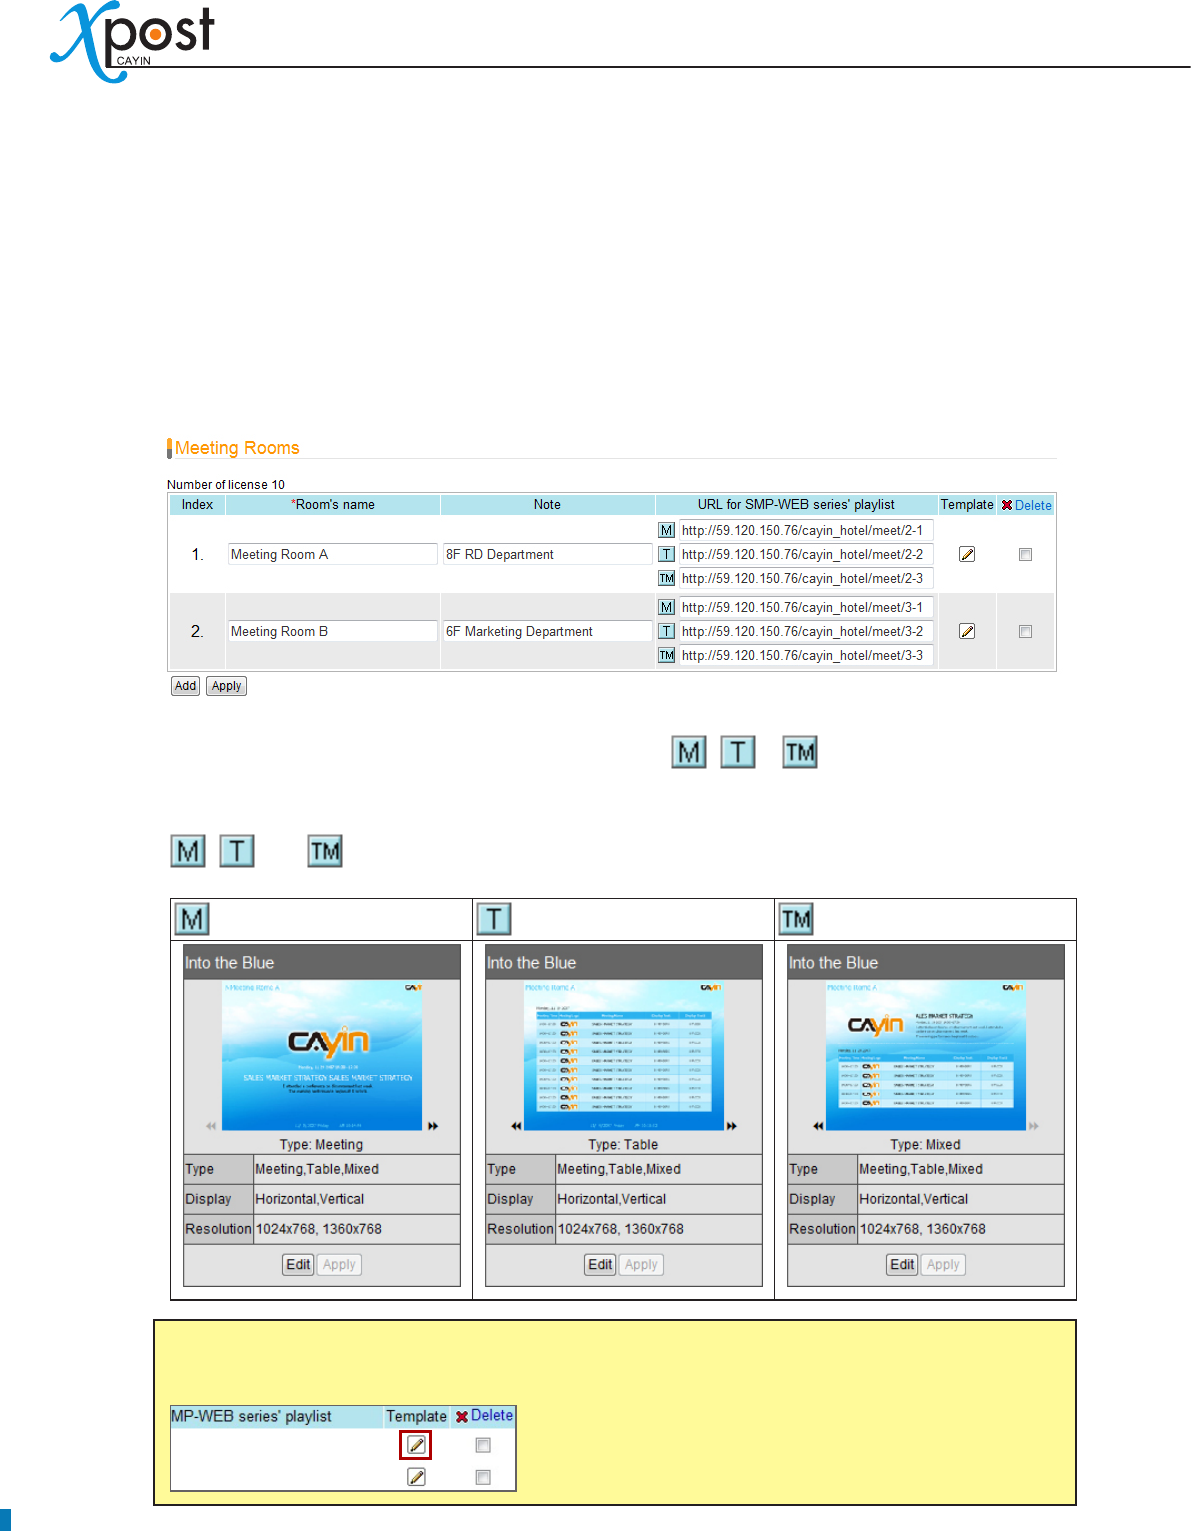
5-2-1 Add a Meeting Room
1. Select [Template] on the toolbar; then you will see the page of “Meeting Rooms”.
2. In the “Meeting Rooms” page, click [Add] to add a new meeting room. Fill in the “Room’s Name” and
an optional “Note” eld.
3. After all rooms are set, click [Apply] to save the changes.
NOTE
The number of meeting rooms you create here is limited by the license you purchase. You cannot
create more rooms than the license. If you need to use meetingPost for more rooms, please
purchase more licenses.
24
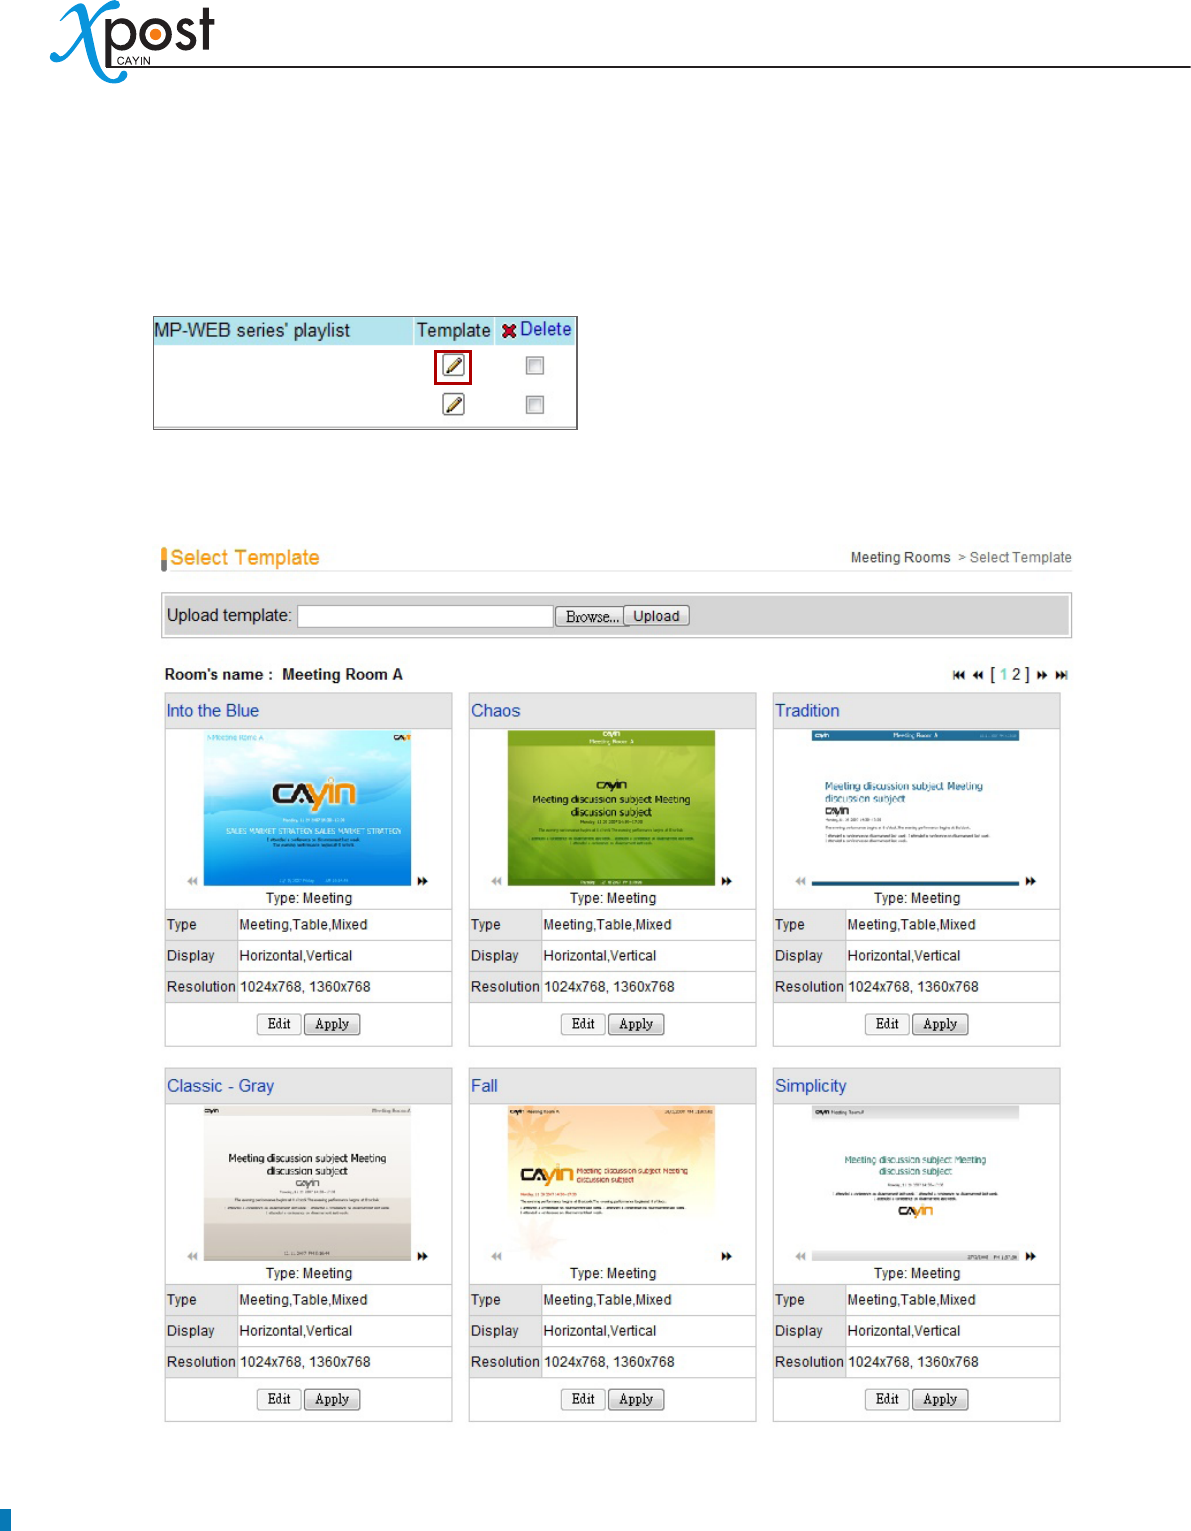
5-2-2 Apply a Template
1. Click on the edit button of “Template” on the right-hand side of the specic meeting room which you
want to edit.
2. In the “Select Template” page, you can choose a template from pre-loaded templates, and click [Apply]
to conrm your selection. For each template, you can see preview and information on this page.

APPLICATION SOFTWARE
25
5-2-3 Upload a Template
1. Click on the edit button of “Template” on the right-hand side of the specic meeting room which you
want to edit. Then, you can go to the “Select Template” page.
2. In the “Select Template” page, click [Browse…] to select a template le and click [Upload] to add a
new template.
:
• Click the arrow and check the preview of three types of this
template.
Type:
• Each template contains three types of presentation.
Meeting:
- Only show one current meeting on the screen.
Table:
- List out all the appointed meetings of the day on the screen.
Mixed:
- Mix “Meeting” and “Table” type in one display.
Display:
• Indicate supported display orientation, “horizontal”
(landscape) or “Vertical” (Portrait).
Resolution:
• Indicate supported display resolutions
NOTE
Templates must be prepared with suitable programs and adequate testing. Therefore, you can only
upload templates provided by CAYIN. Please contact CAYIN’s sales representatives if you need the
customization services.
26
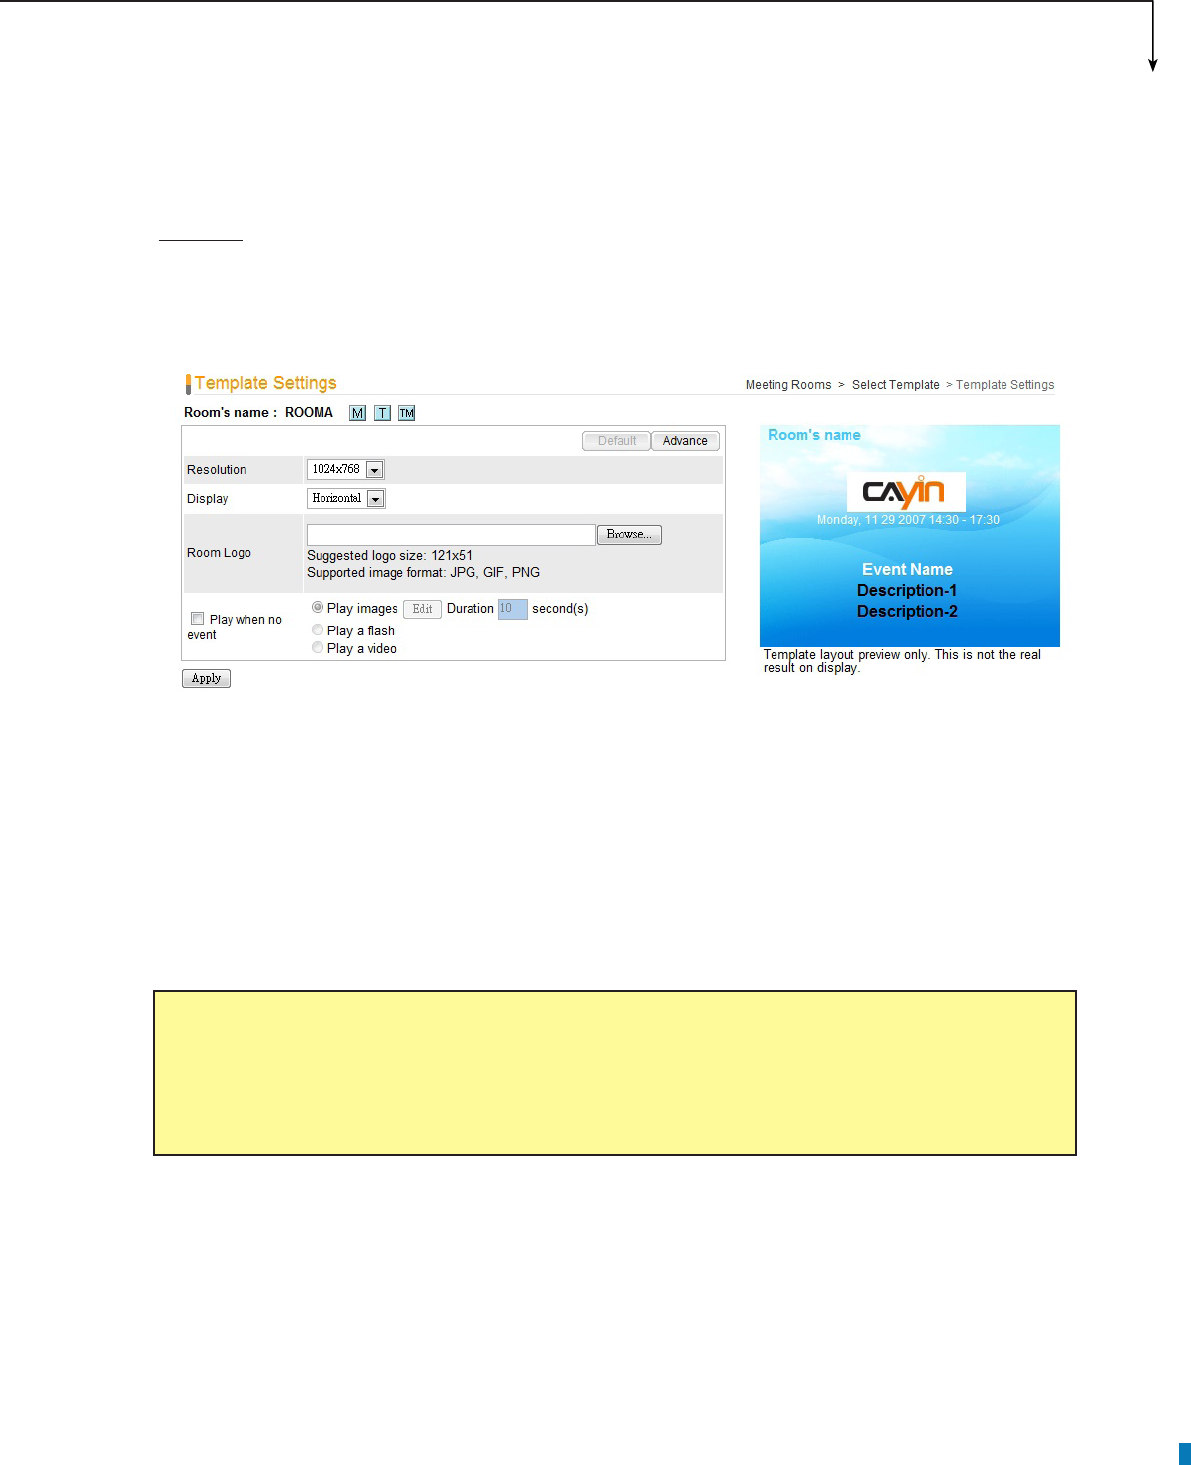
5-3 Modify Template (Template Settings)
After you select a template for a meeting room, you can further customize the meeting room template. If you
do not change settings of template, you still can start to input meeting data into the system with the default
presentation.
1. Go to “Meeting Rooms” page. (meetingPost → Template)
2. For each meeting room, you will see three small icons, , , , in front of the URL link. You
can click the icon and modify each template design in the “Template Settings” page.
, , and represent three different types of presentation.
: Meeting : Table : Mixed (Table + Meeting)
NOTE
You can also click on the edit button on the selected template to enter the “Template Settings” page.
APPLICATION SOFTWARE
27
3. You can modify settings for each template type. You can choose either “Default” or “Advance”
settings.
Default
Most of the settings will be kept as the original template design. Few parameters can be edited.
Choosing this option can keep the template settings simple and t the original design.
Resolution:
• Select an appropriate display resolution. You must congure the display settings of
SMP player with the same resolution as the template settings here so that the screen can display it
properly.
Display:
• Choose either Horizontal (landscape) or Vertical (portrait) display type.
Room Logo:
• Upload a logo le for this meeting room. It’s optional.
Play when no event:
• You can choose to play images, Flash, or videos during the time when there
is no event. If you want to play video les, please upload les in the “video” folder of SMP’s Media
Folder. Check the option, “Full Screen”, and you can play video in the full-screen mode.
NOTE
xPost DOES NOT support CMYK image format. Please DO NOT upload images files in CMYK
format. If you accidentally upload a CMYK image, it may cause some problems. Please contact
CAYIN for the solution.
28
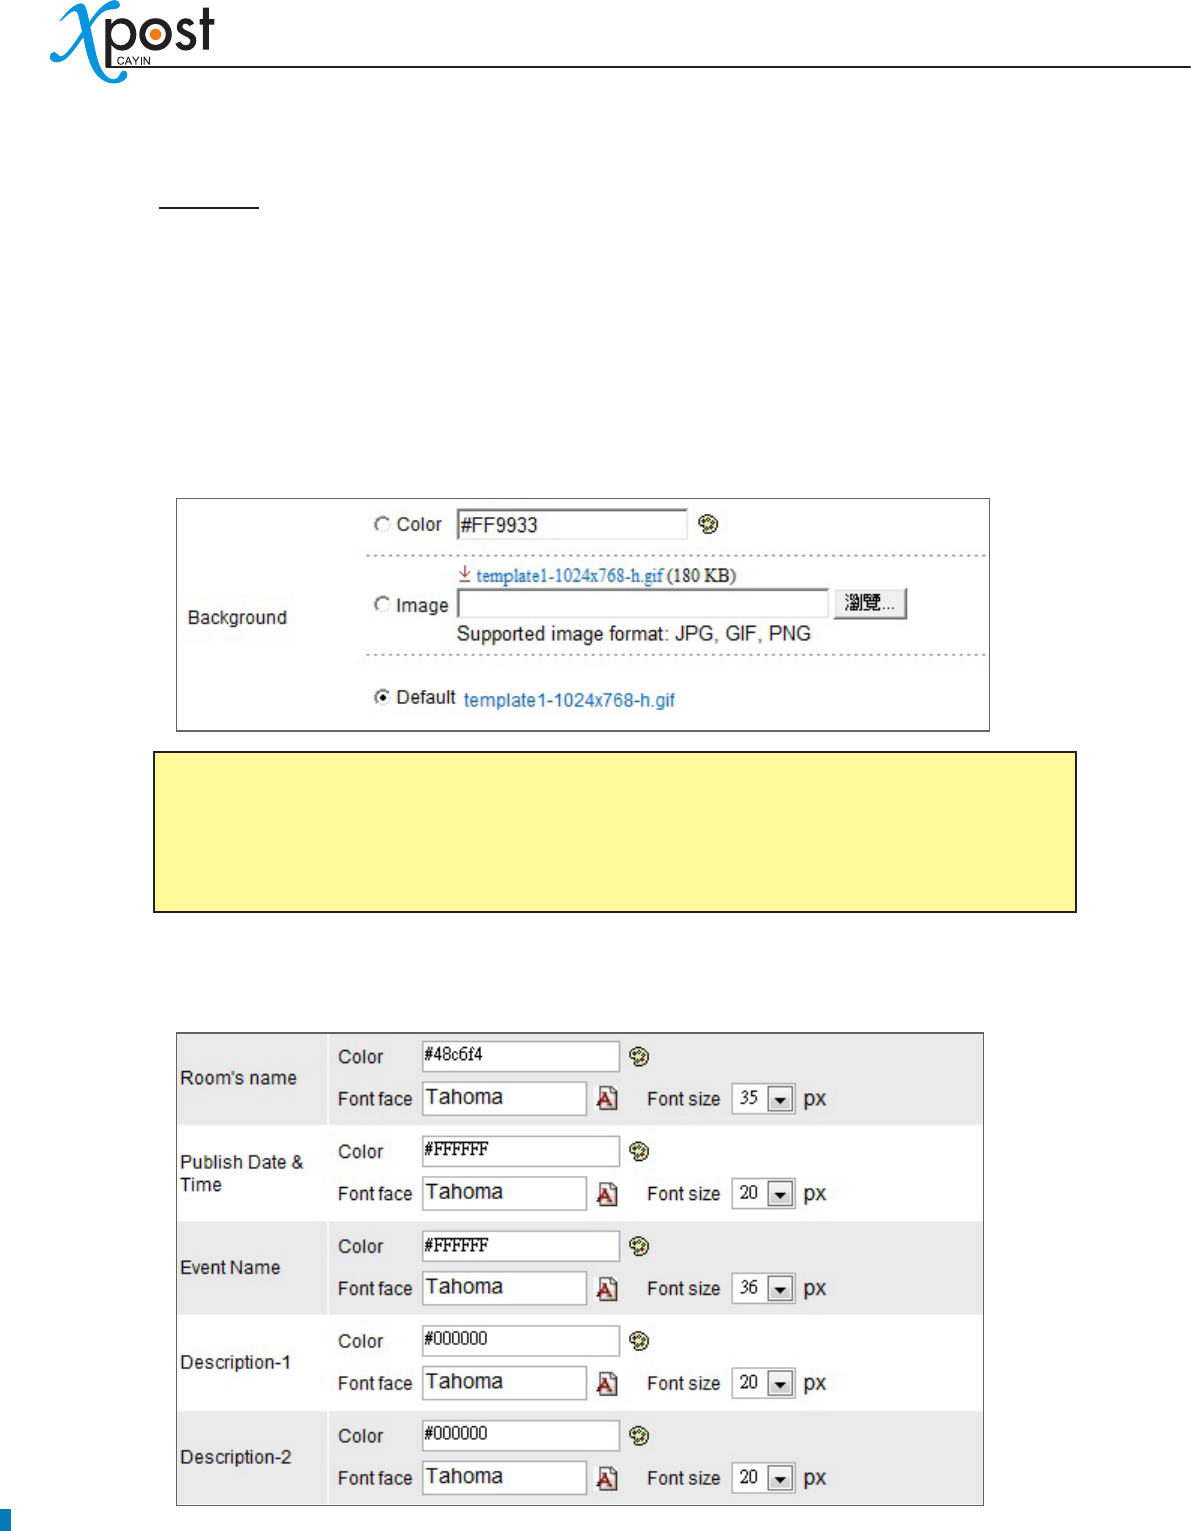
Advance
You can edit most of the template parameters, including changing background and font settings.
Resolution, Display, Room Logo, and Play when no event:
• These options are the same as
the ones in the “Default” mode.
Background:
• To replace the template background, you can choose to use a single color, an
image, or the default background.
Font settings:
• You can edit font and size of the texts in the following items – Room’s name, Date
& Time, Event name, and Descriptions.
NOTE
xPost DOES NOT support CMYK image format. Please DO NOT upload images files in CMYK
format. If you accidentally upload a CMYK image, it may cause some problems. Please contact
CAYIN for the solution.
APPLICATION SOFTWARE
29
Clock:
• You can choose to show a clock on the template. You can use the default clock or upload
your own Flash clock.
4. After you congure them, click [Apply] to conrm the changes.
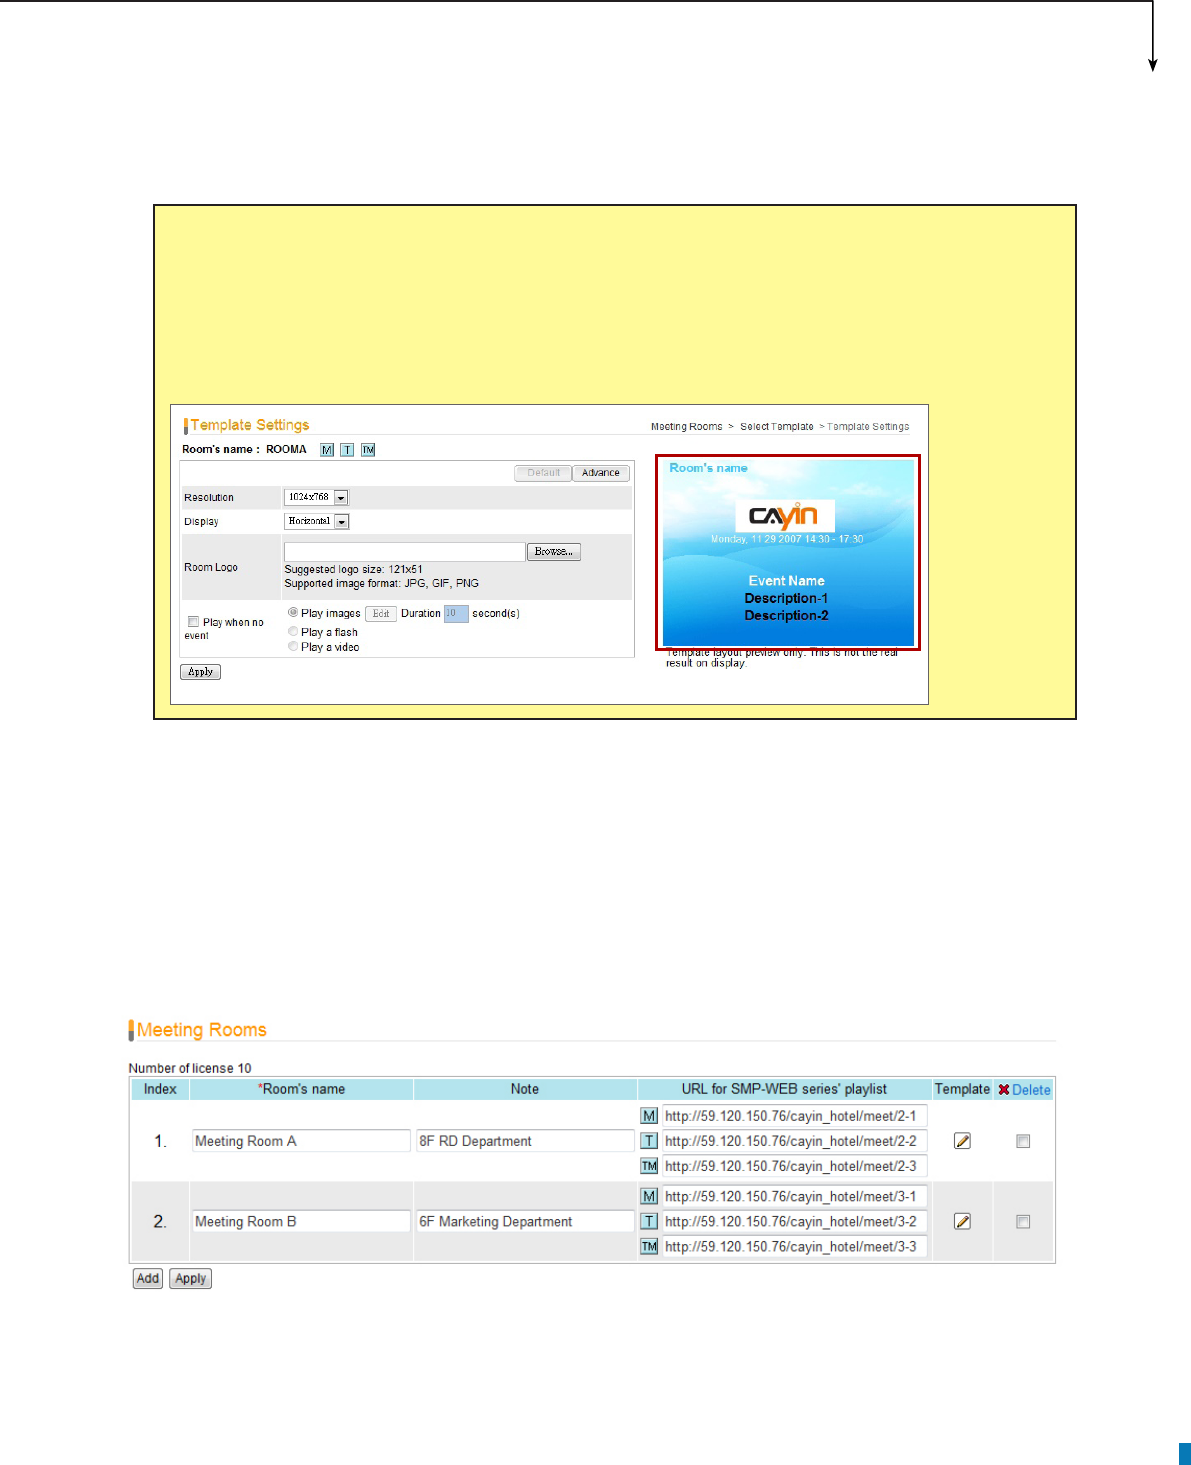
5-4 Connect meetingPost to SMP Player
After the meeting room template is selected and modied, please go back to the “Meeting Rooms” page. You
can see that each meeting room is equipped with 1 to 3 URLs (depends on how many types this template
supports). The URL is the link between meetingPost and SMP player.
To connect meetingPost to SMP player, you need to create a playlist on a SMP-WEB series player and copy
the correspondent URL shown on the “Meeting Rooms” page into the playlist.
NOTE
The preview image is only for your reference. When you change the font color, you will see the
correspondent texts in the preview image change the color, too. However, most congurations will
not be changed simultaneously in the preview image, so please conrm the nal presentation on
the screen.
30
1. Select one of the URLs of one meeting room, and copy it to the clipboard.
2. Open the Web Manager of the SMP-WEB series player, which will control the screen of this meeting
room. Click “Browser” and go to the “Browser” page. Click [Add new item] to create a playlist.
NOTE
You may need to modify the IP address of this URL if your network environment is complicated.
Please make sure the IP address or domain name can be connected from the SMP player to the
xPost server.
LAN
WAN
Intranet
Admin PC
Adminstrator
SMP 2
SMP 1
Screen
Meeting Room A
Screen
Meeting Room B
xPost Server
(IP: 59.120.150.76)
Set a playlist with the link:
http:// 59.120.150.76/cayin_hotel/meet/2-1
Set a playlist with the link:
http:// 59.120.150.76/cayin_hotel/meet/3-3
Meeting Room A:
http:// 59.120.150.76/cayin_hotel/meet/2-1
Meeting Room B:
http:// 59.120.150.76/cayin_hotel/meet/3-3
M
TM
APPLICATION SOFTWARE
31
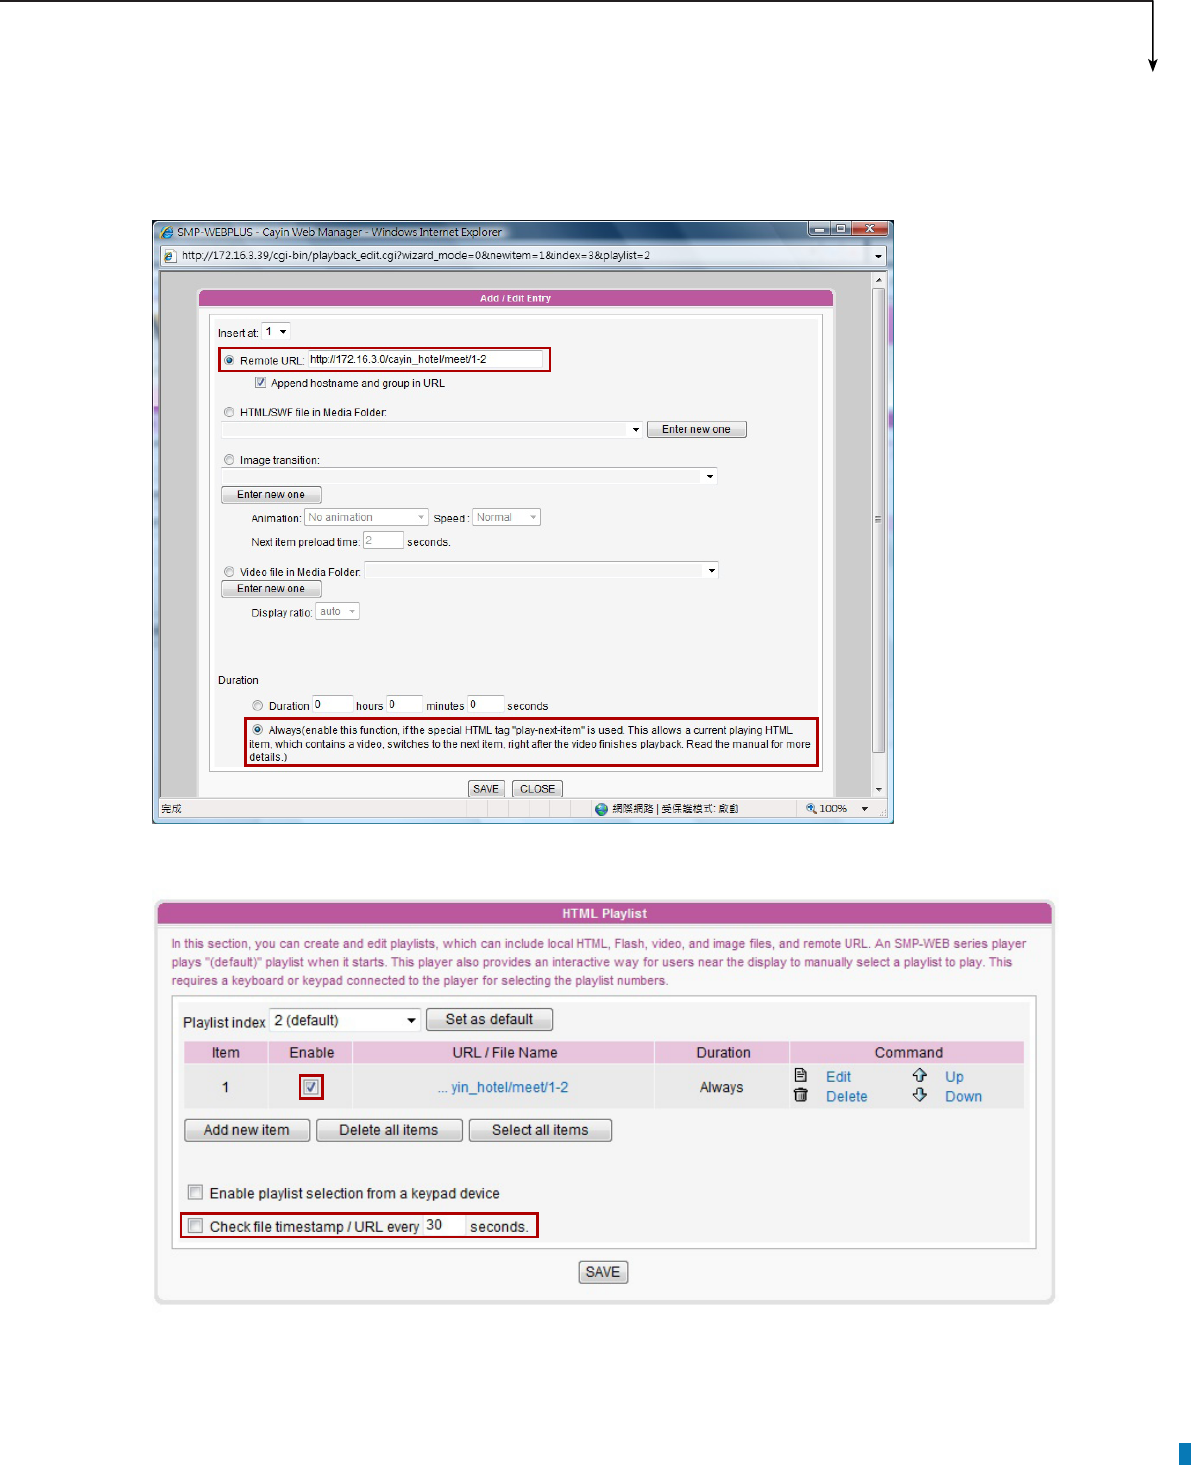
3. Paste the URL (from step 1) to the “Remote URL” field and set “Duration” to “Always”. Then, click
[SAVE].
4. Enable the added item and leave “Check le timestamp / URL every … seconds” unchecked.
5. Click [SAVE] → [A PPLY ]; then you will see the SMP player start to play the playlist and the meeting
template be shown on the screen.
32
5-5 Arrange Meetings (Events)
After you nish conguring the system and meeting room display, you can start to arrange meetings and edit
meeting information in meetingPost.
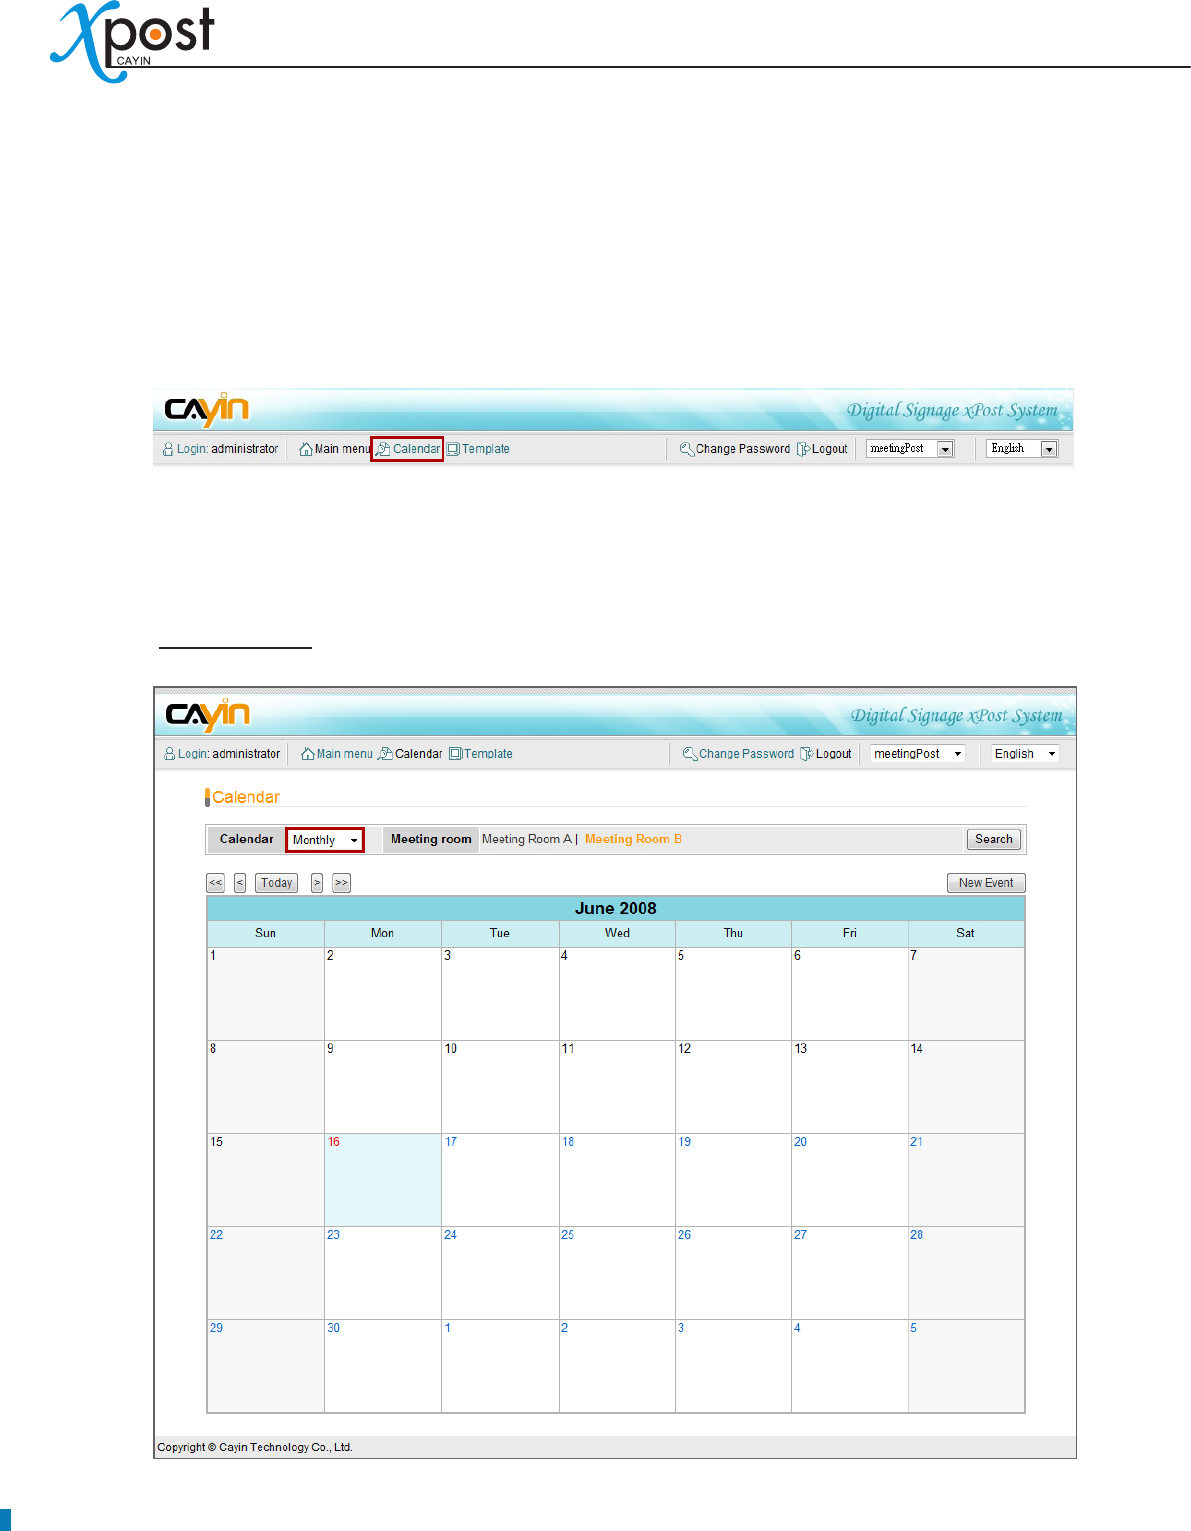
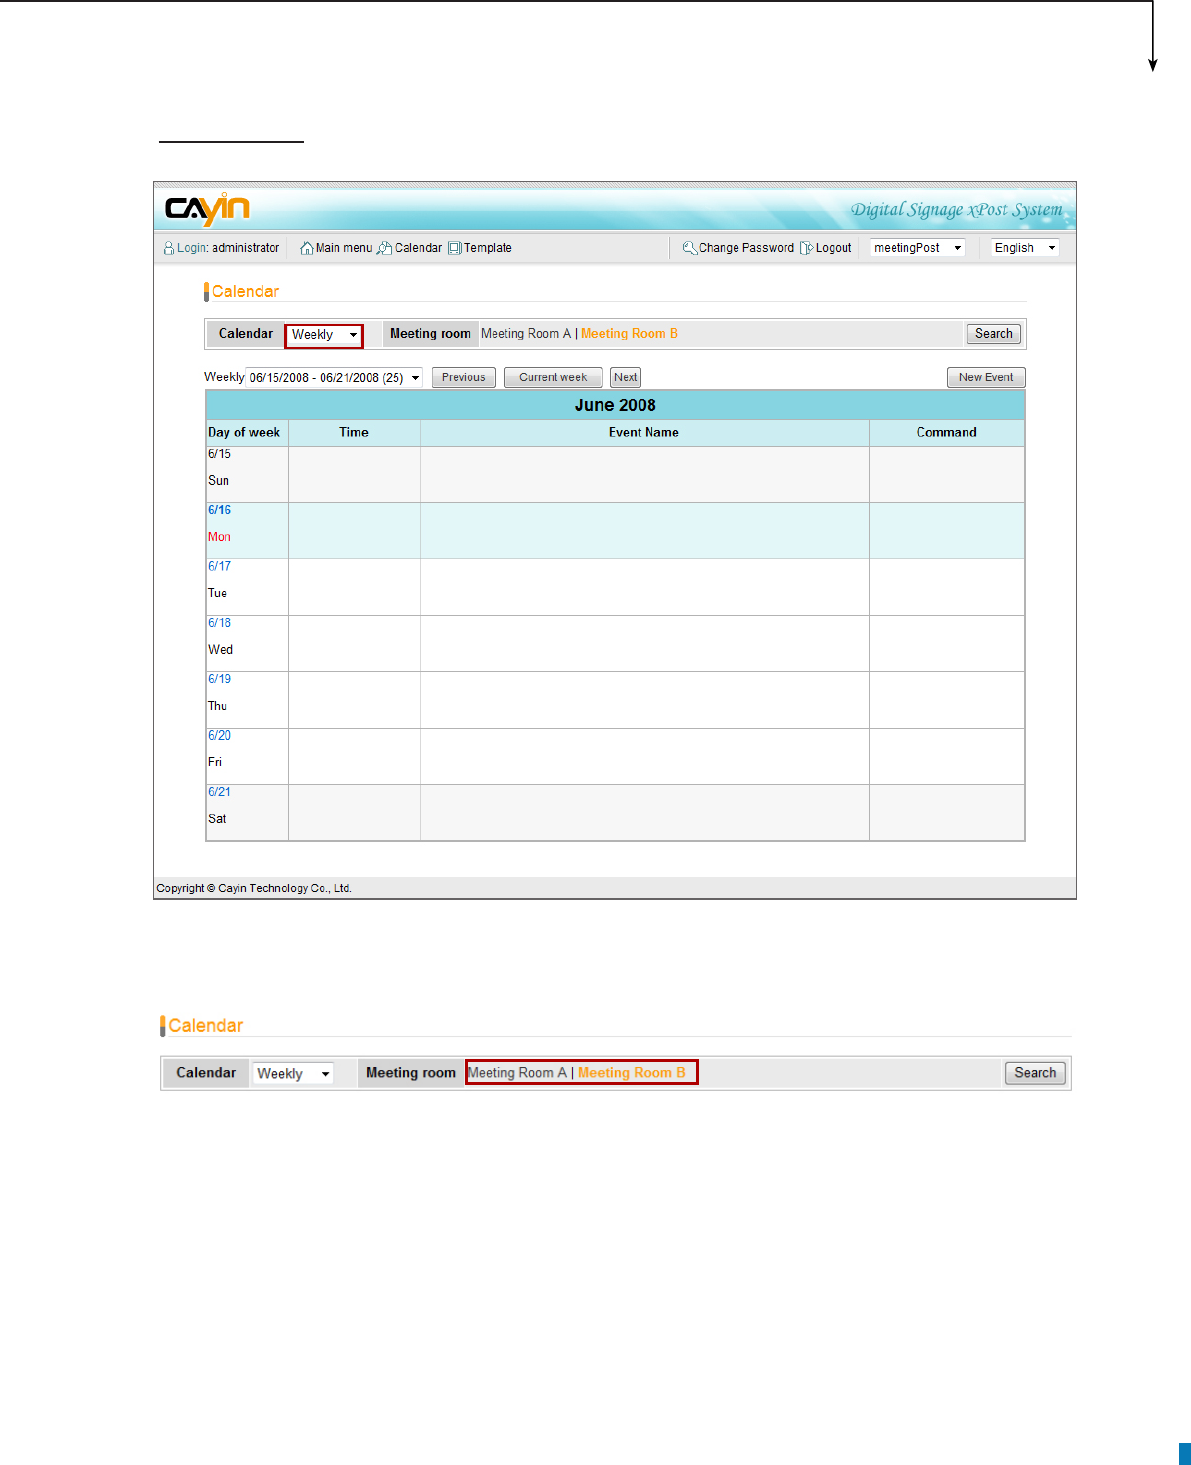
1. Select [Calendar] on the toolbar; then you will see the page of “Calendar”.
2. In "Calendar" user interface, you can choose “Monthly” or “Weekly” view.
The current date will be marked in blue.
Monthly view
APPLICATION SOFTWARE
33
Weekly view
3. If you have more than one meeting room, you can also switch to a different meeting room by clicking
on the name of that meeting room.
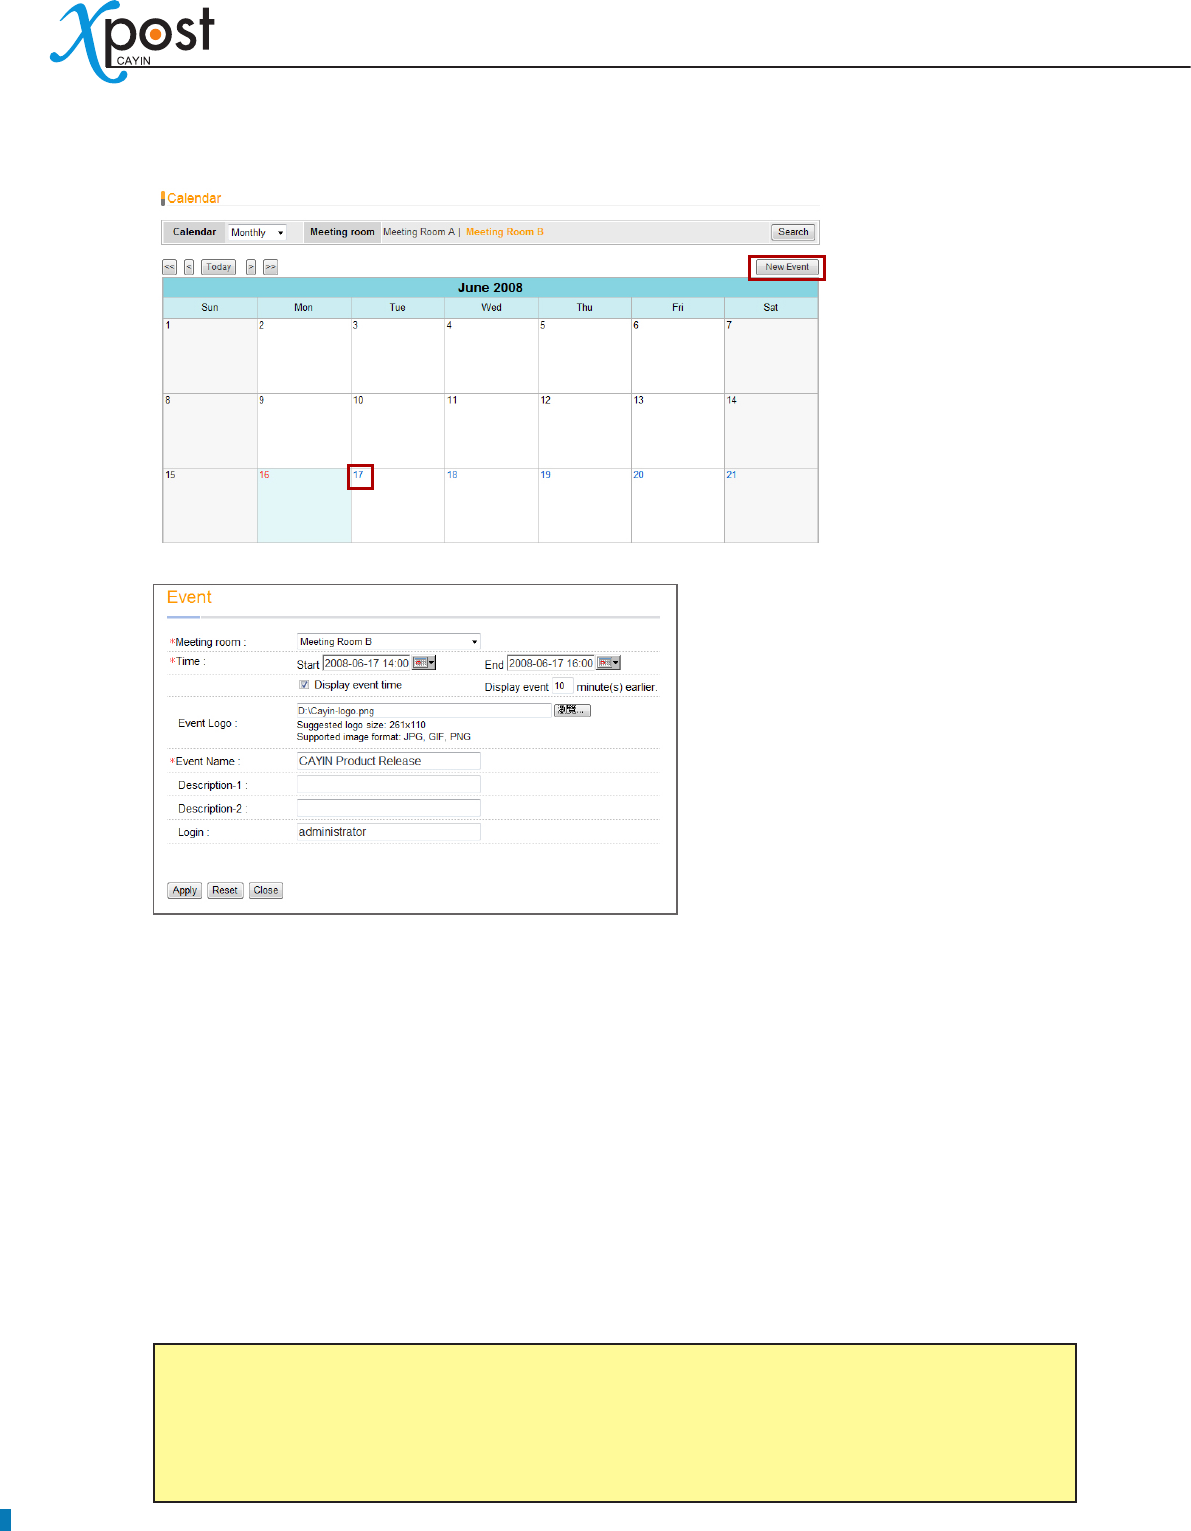
4. Click on “New Event” or the day number; then, you will see a pop-up window and can start to add a
new meeting/event.
34
5. In the New/Edit Event page, please ll in the necessary information in each eld.
Meeting room:
• Select one of the existing meeting rooms.
Time:
• Schedule the beginning and ending time of this event.
Display event time:
• Enable this function and the event time will be shown on the screen.
Display event […] minutes earlier:
• If the value is 10, this event will be shown on the screen 10
minutes earlier than the event time begins, so that visitors can learn about the upcoming meeting.
Event Logo (optional):
• Upload event logo file (jpg, gif, or png). The suggested image size for
selected template is listed on the UI. You cannot upload an image le which is larger than 1M bytes
or exceeds the width or height of the template.
NOTE
xPost DOES NOT support CMYK image format. Please DO NOT upload images files in CMYK
format. If you accidentally upload a CMYK image, it may cause some problems. Please contact
CAYIN for the solution.
APPLICATION SOFTWARE
35
Event name:
• Enter event name here, e.g. “CAYIN Product Release”.
Description 1 (optional):
• Optional description eld.
Description 2 (optional):
• Optional description eld.
Login:
• Show the login user. This eld will not be shown on the screen. It is only for your reference.
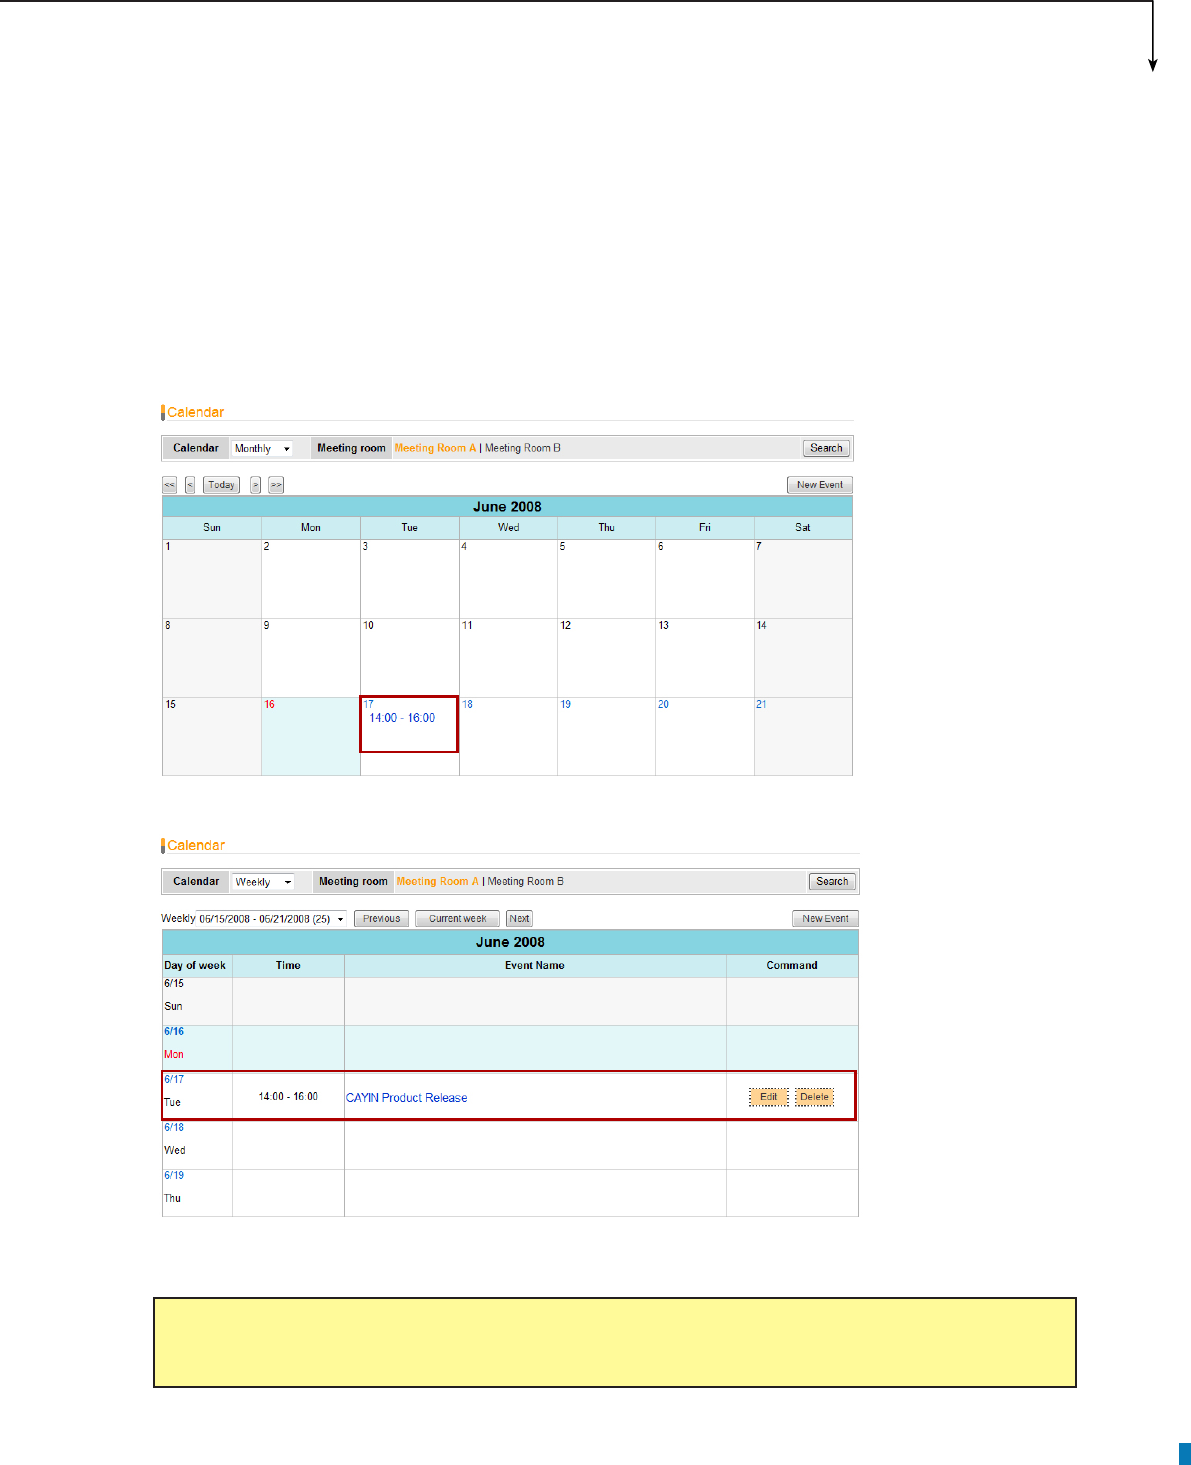
6. After “New Event” is added, you can see the event on calendar.
Or
You can modify or remove the event by clicking the [Edit] or [Delete] button.
NOTE
You cannot edit events in the past.
7. The event will be shown on the screen of the meeting room when it is due to start.
36
6. waynderPost Module
wayfinderPost is application software that CAYIN especially develops for public
spaces where conveying announcements, promoting events, and guiding directions
are crucial and changed frequently. This software is designed to incorporate with
CAYIN SMP-WEB series products. By integrating wayfinderPost’s editing and
managerial functions, CAYIN’s digital signage player can present dynamic public
announcements and direction guidance more easily.
wayfinderPost provides a content editing tool with easy operation workflow
comprising the following ve steps:
STEP 1: Login waynderPost
STEP 2: Set Up a waynding Display
STEP 3: Modify Template Settings
STEP 4: Connect waynderPost to SMP Player
STEP 5: Enter waynderPost Data
Step 2 to 4 only have to be done on the rst-time use. For daily maintenance, users only need to do the 1st
and 5th step for data entry.
6-1 Login waynderPost
You can enter waynderPost via the following two methods:
Method 1:
Login xPost and then click [wayfinderPost] on the main menu.
APPLICATION SOFTWARE
37
Method 2:
If you are already in the Web Manager of xPost, you can switch to waynderPost from the upper side toolbar.
6-2 Set Up a Waynding Display
To use waynderPost, you must set up a display rst, and then select and edit a template for it.
6-2-1 Add a Display
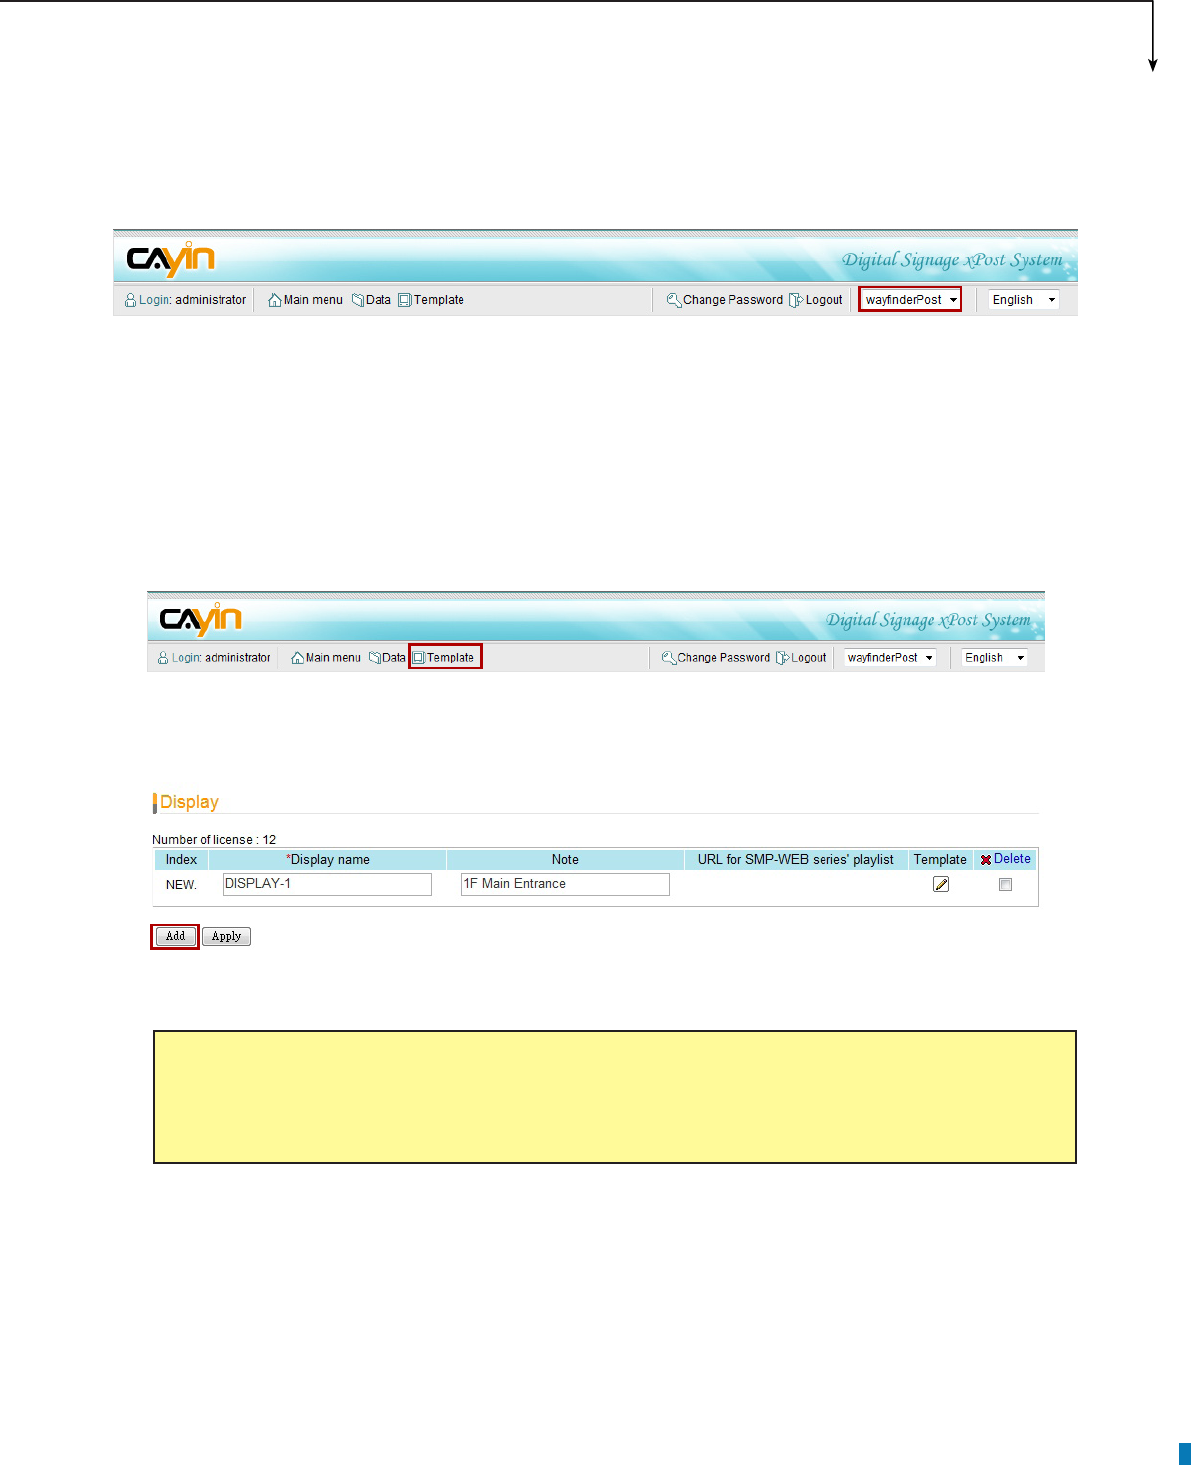
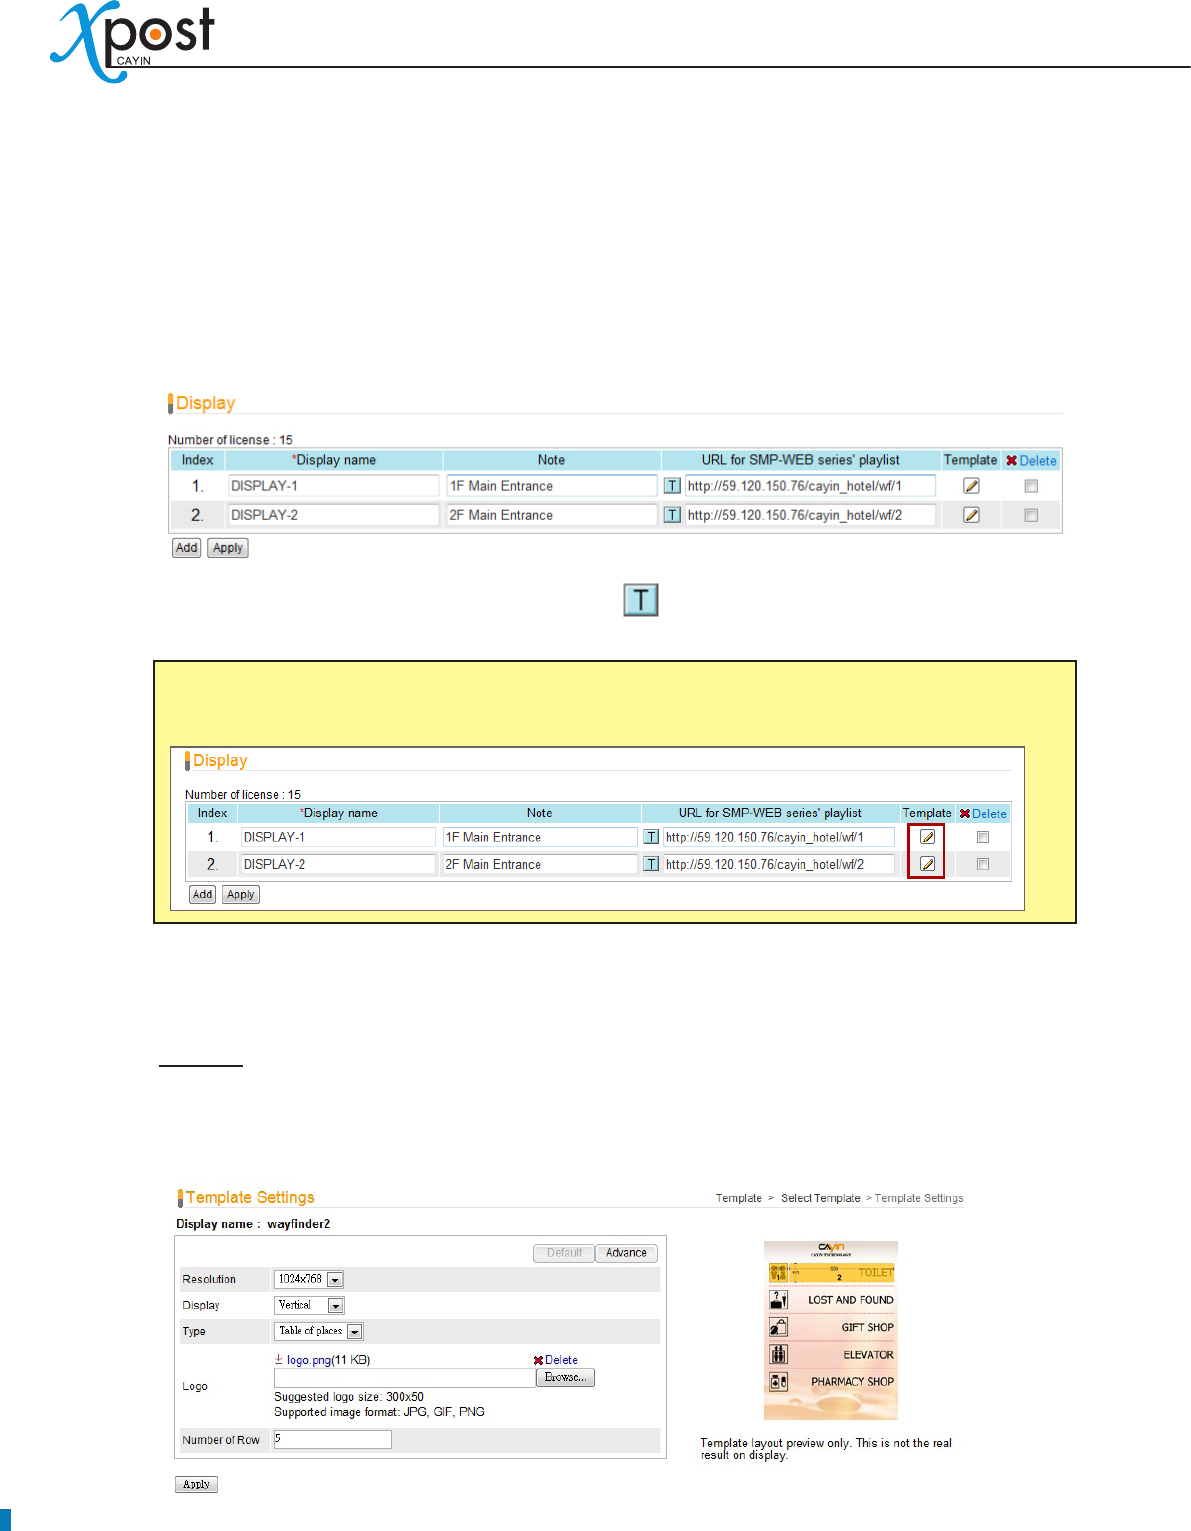
1. Select [Template] on the toolbar; then you will see the page of “Display”.
2. In the “Display” page, click [Add] to add a new display. Fill in the “Display Name” and an optional “Note”
eld.
3. After all rooms are set, click [Apply] to save the changes.
NOTE
The number of displays you create here is limited by the license you purchase. You cannot create
more displays than the license. If you need more displays, please purchase more licenses.
38
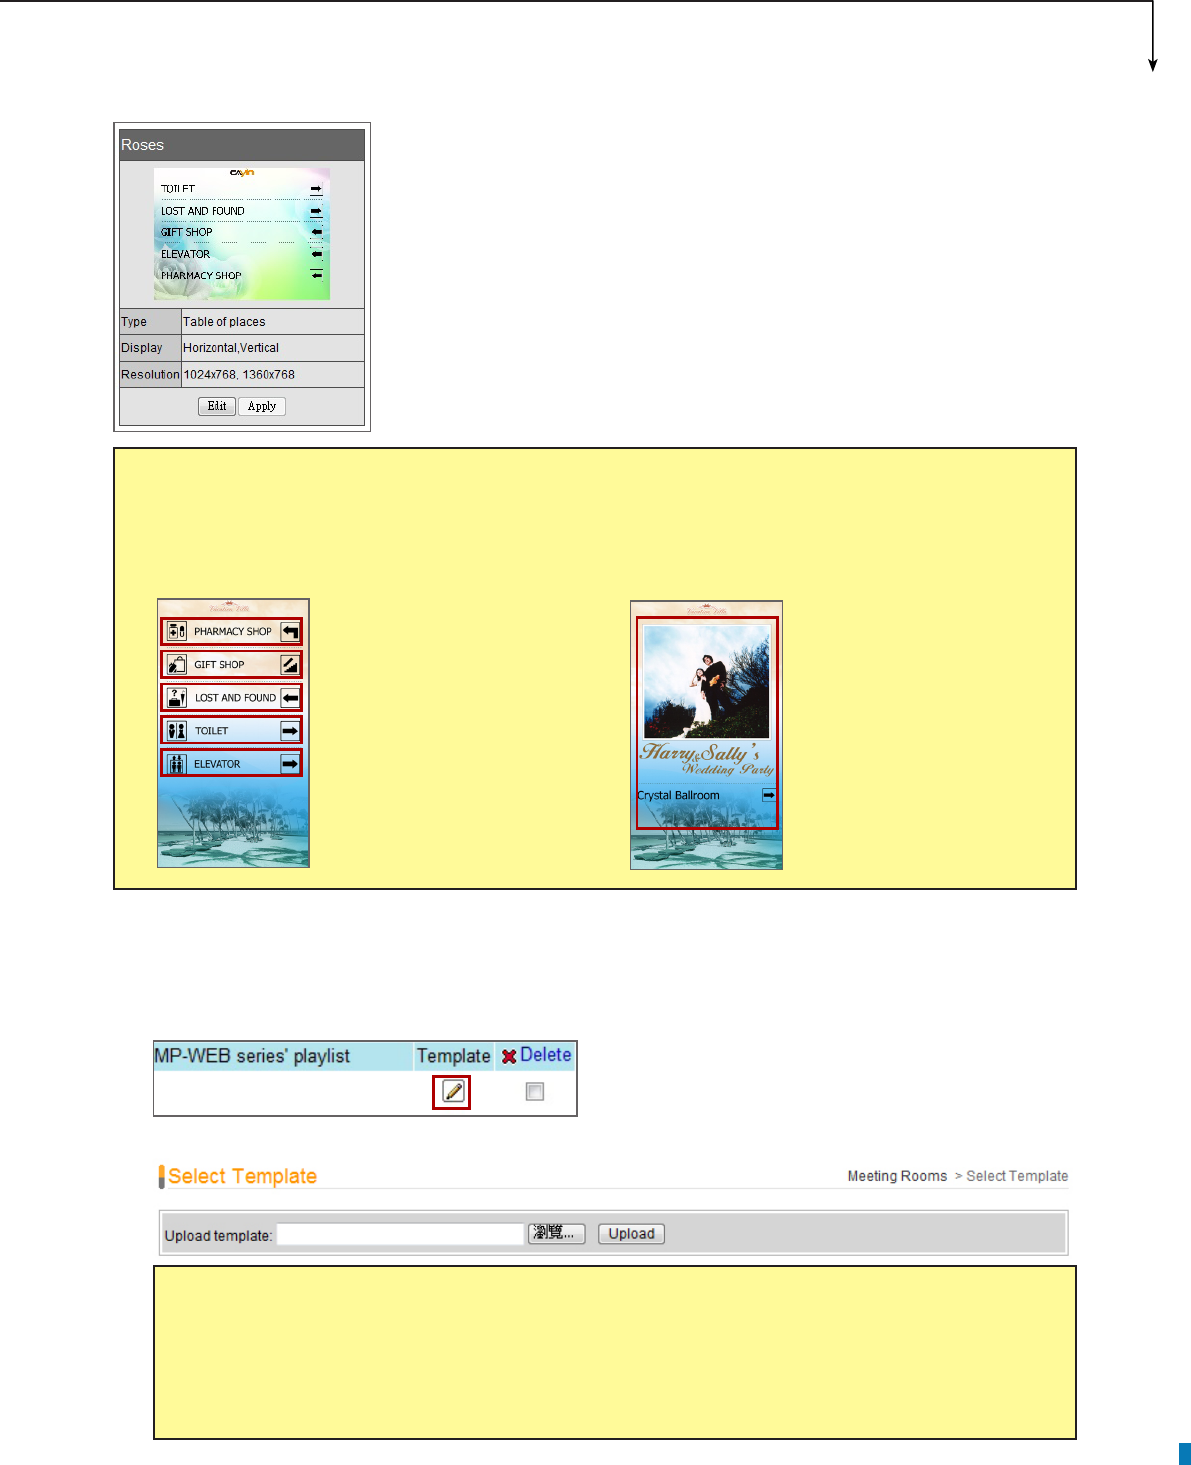
6-2-2 Apply a Template
1. Click on the edit button of “Template” on the right-hand side of the specic display which you want to
edit.
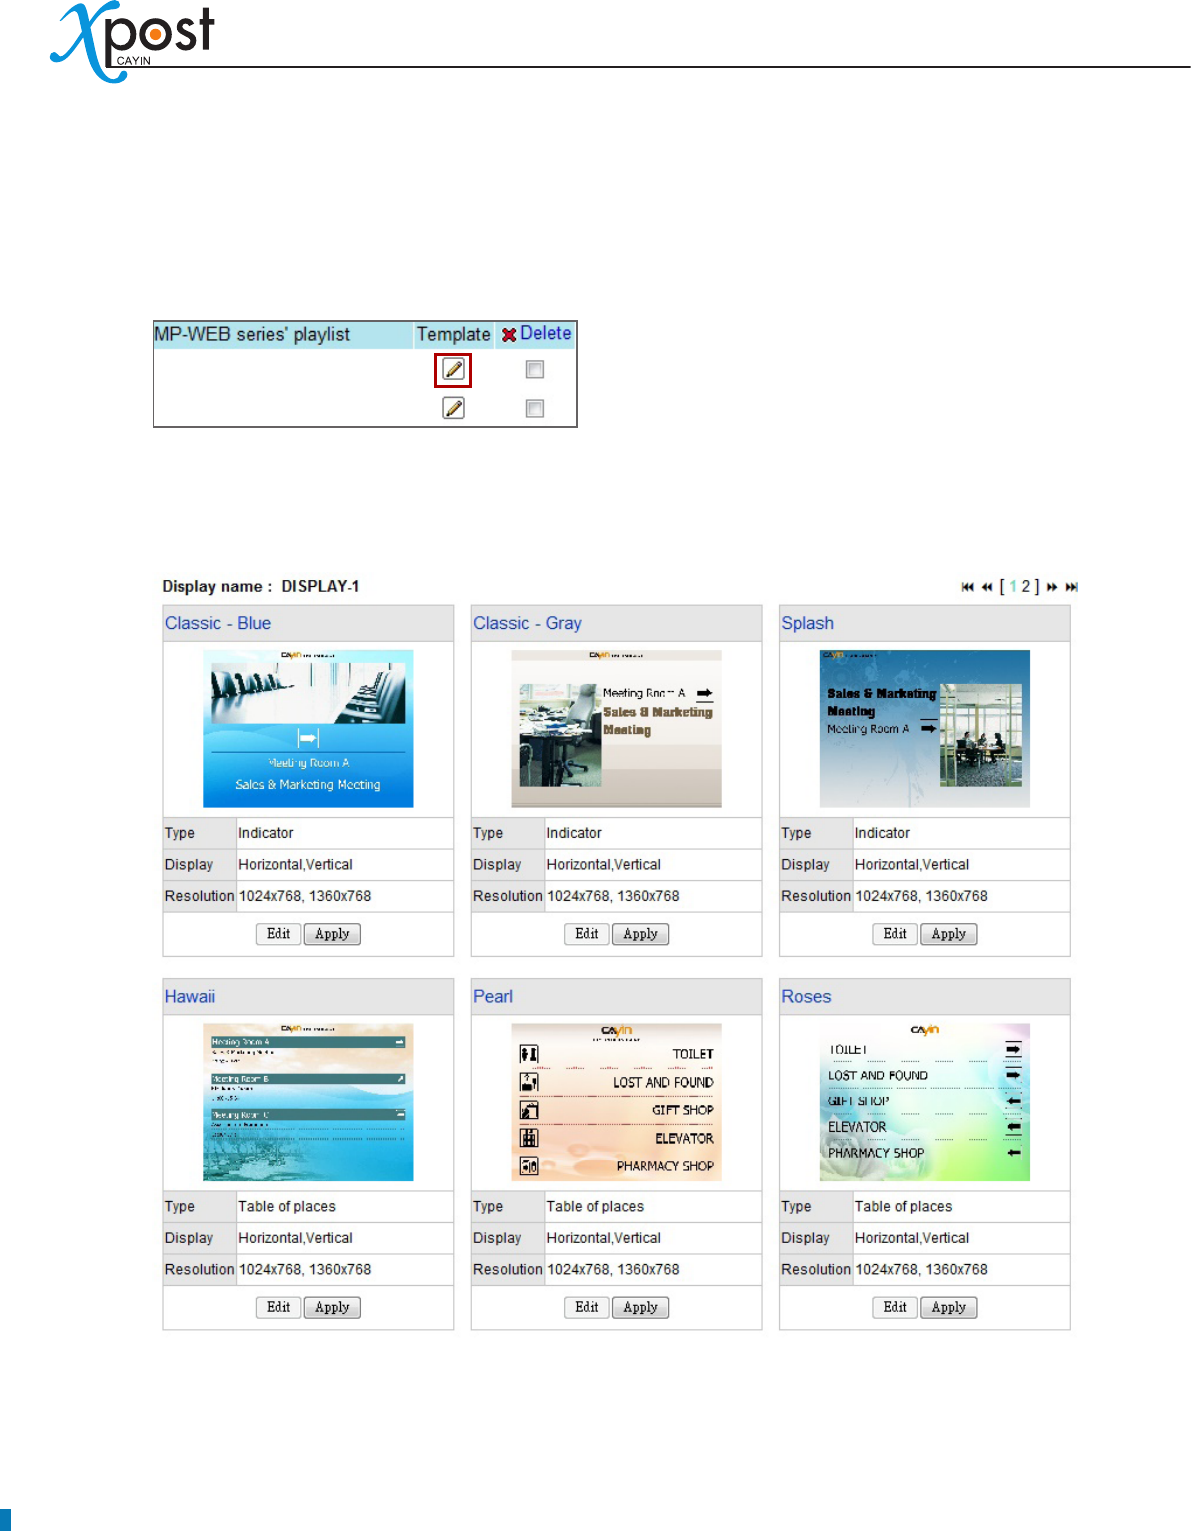
2. In the “Select Template” page, you can choose a template from pre-loaded templates, and click
[Apply] to conrm your selection. For each template, you can see preview and information on this
page.
APPLICATION SOFTWARE
39
6-2-3 Upload a Template
1. Click on the edit button of “Template” on the right-hand side of the specic meeting room which you
want to edit. Then, you can go to the “Select Template” page.
2. In the “Select Template” page, click [Browse…] to select a template le and click [Upload].
Type:
• Each template contains 1 or 2 types of presentation.
Table of places:
- Show multiple rows of data in a table.
Indicator:
- Show one set of data only.
Display:
• Indicate supported display orientation, “Horizontal” (landscape)
or “Vertical” (portrait).
Resolution:
• Indicate supported display resolutions.
NOTE
Templates must be prepared with suitable programs and adequate testing. Therefore, you can only
upload templates provided by CAYIN. Please contact CAYIN’s sales representatives if you need the
customization service.
NOTE
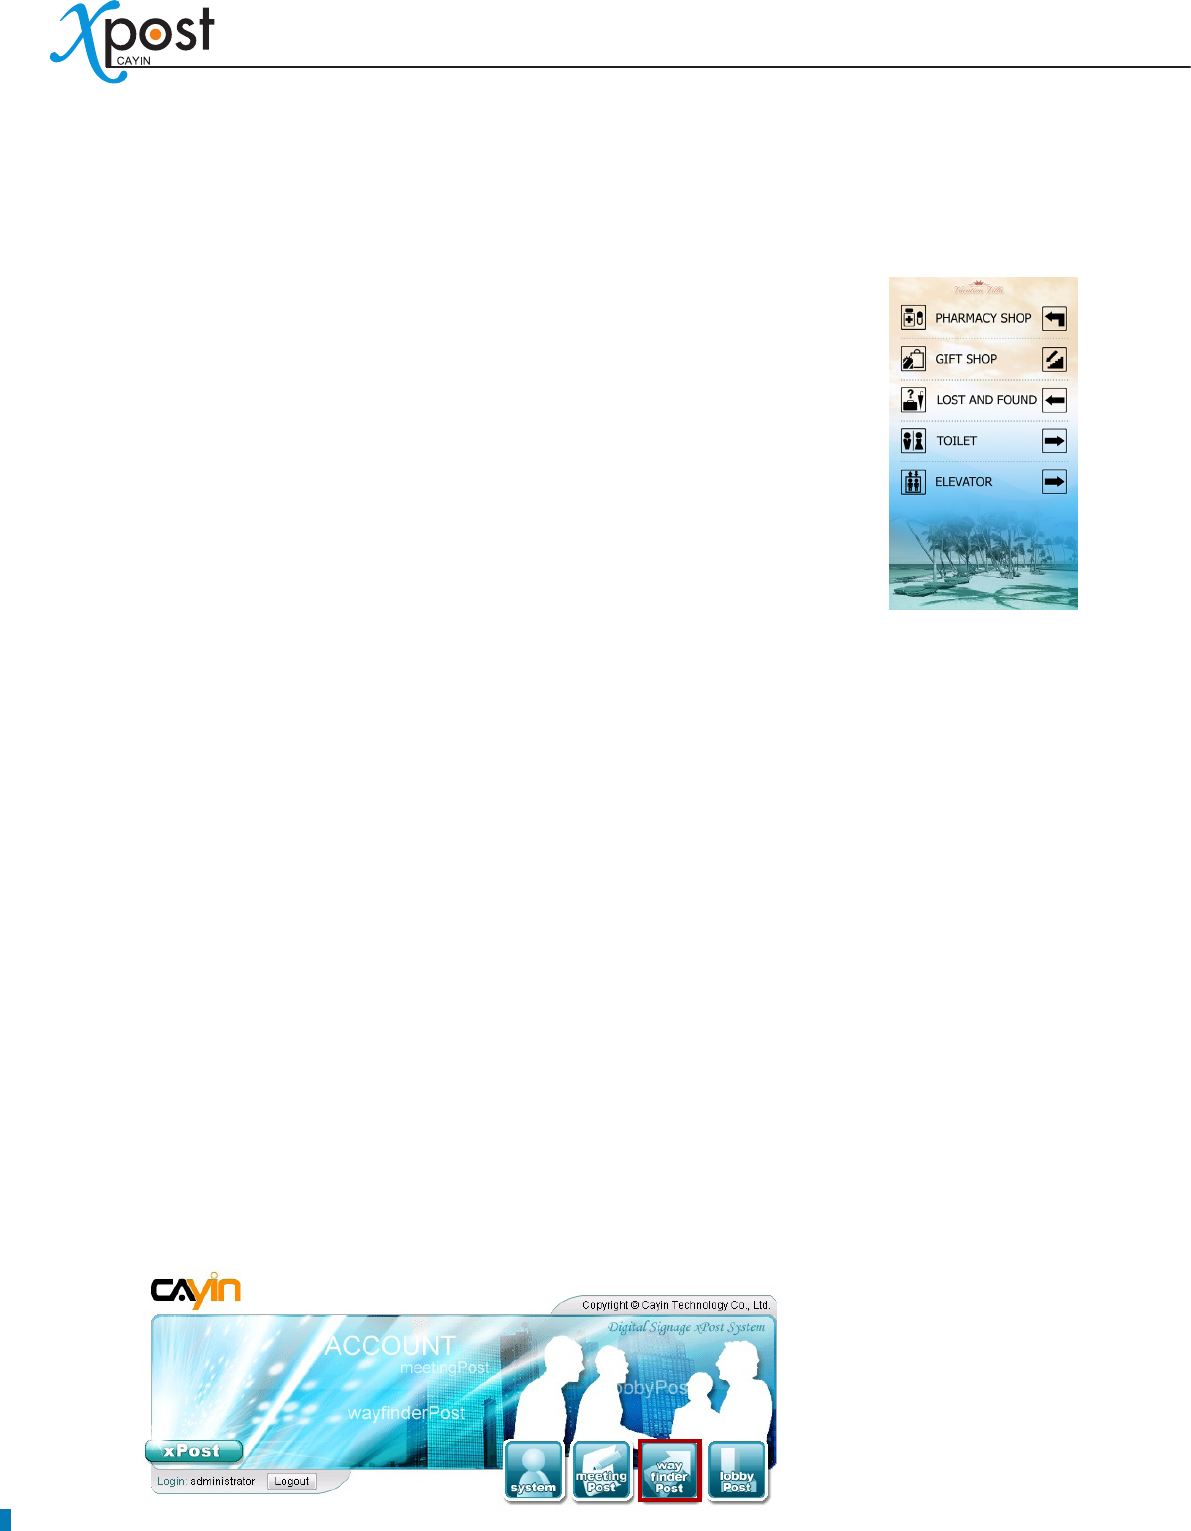
Table of places Indicator
The differences between these two types of waynderPost templates are indicated as follows:
Multiple rows of data in a
table
(e.g. Five sets of data. Each
set of data includes two
images and one description.)
One set of data
(e.g. One event with the
photo, even name, ballroom
name, direction)
40
6-3 Modify Template (Template Settings)
After you select a template for a display, you can further customize the template. If you do not change
settings of template, you still can start to input waynding data into the system with the default presentation.
1. Go to “Display” page. (waynderPost → Template)
2. For each meeting room, you will see a small icon, , in front of the URL link. You can click the icon
and modify each template design in the “Template Settings” page.
3. You can modify settings for each template type. You can choose either “Default” or “Advance”
settings.
Default
Most of the settings will be kept as the original template design. Few parameters can be edited.
Choosing this option can keep the template settings simple and t the original design.
NOTE
You can also click on the edit button on the selected template to enter the “Template Settings” page.
APPLICATION SOFTWARE
41
Resolution:
• Select an appropriate display resolution. You must congure the display settings of
SMP player with the same resolution as the template settings here so that the screen can display it
properly.
Display:
• Choose either Horizontal (landscape) or Vertical (portrait) display type.
Type:
• Each template may contain one or two types of presentation, “Table of places” and “Indicator”.
Please check the “Type” information of each template.
Logo:
• Upload a logo le for this display.
Number of Row (For the type “Table of places” only):
• You can set the number of rows per
page on the display.
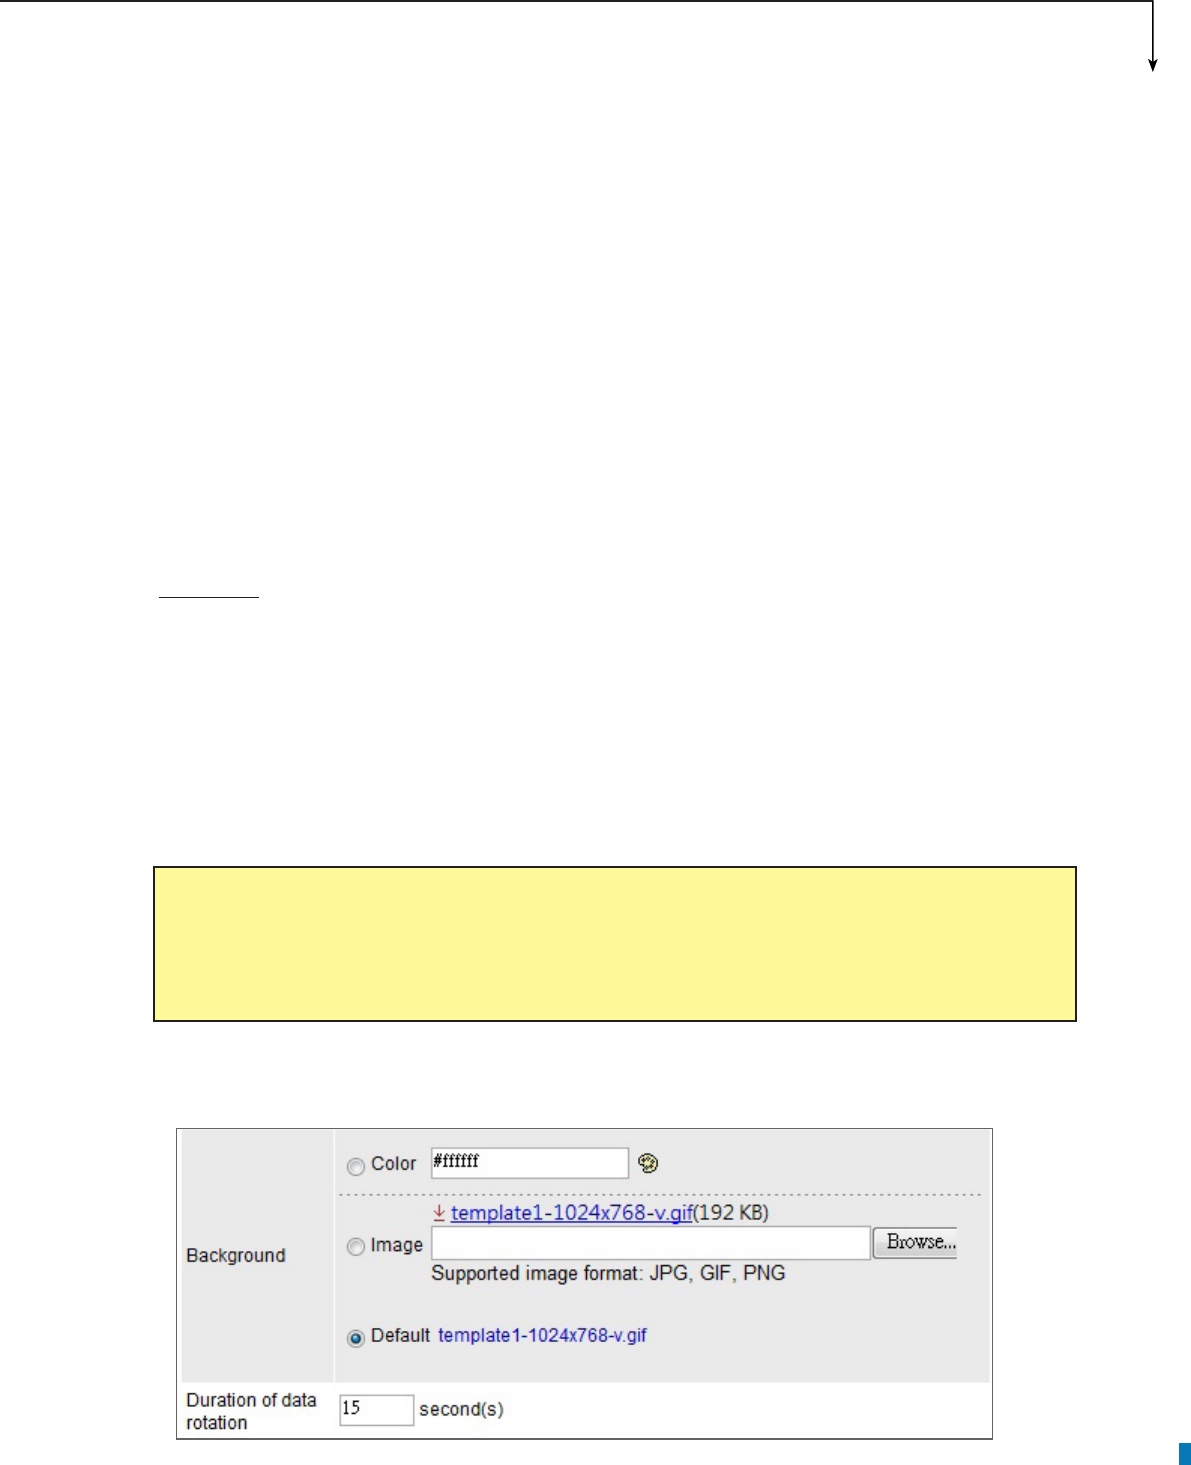
Advance
You can edit most of the template parameters, including changing background and font settings.
Resolution, Display, Logo, and Number of Row:
• These options are the same as the ones in
the “Default” mode.
Background:
• To replace the template background, you can choose to use a single color, an
image, or the default background.
Duration of data rotation:
• waynderPost can automatically rotate pages, in case the data is too
much to be fully shown on one page. You can set the duration per page here.
NOTE
xPost DOES NOT support CMYK image format. Please DO NOT upload images files in CMYK
format. If you accidentally upload a CMYK image, it may cause some problems. Please contact
CAYIN for the solution.
42
Font settings:
• You can edit font and size of the texts for each column.
4. After you congured, click [Apply] to conrm the changes.
NOTE
The preview image is only for your reference. When you change the font color, you will see the
correspondent texts in the preview image change the color, too. However, most congurations will
not be changed simultaneously in the preview image, so please conrm the nal presentation on
the screen.
APPLICATION SOFTWARE
43
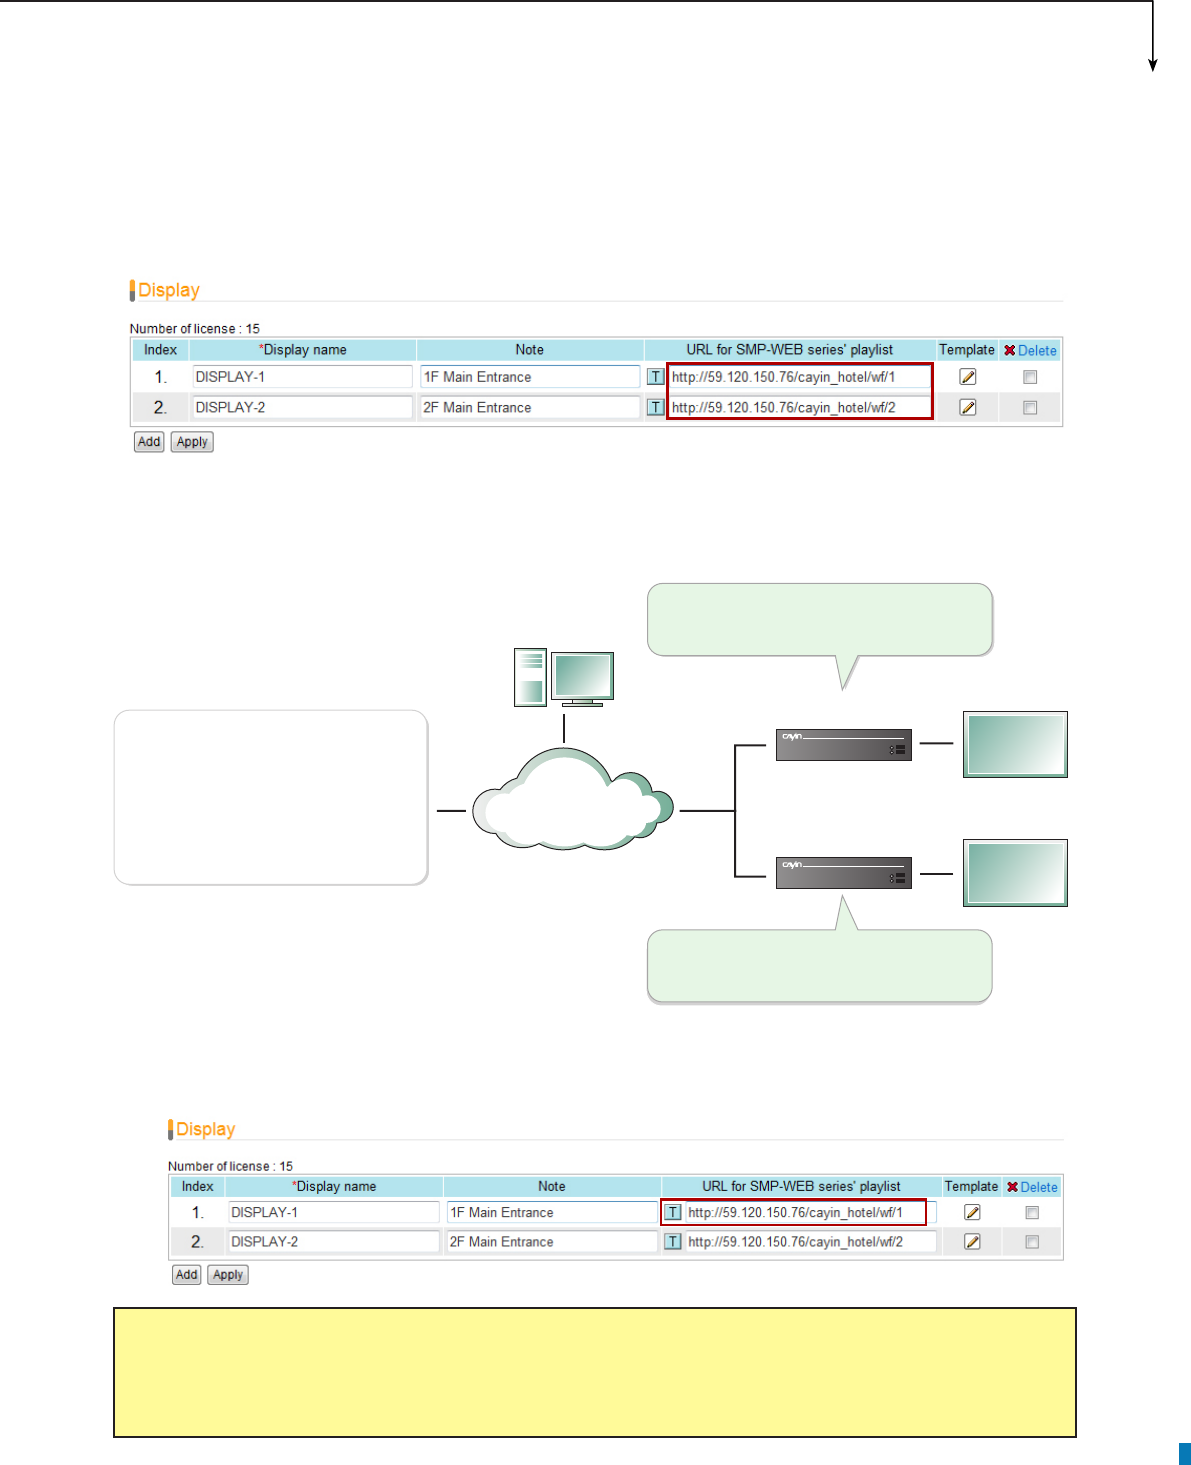
6-4 Connect waynderPost to SMP Player
After the display template is selected and modied, please go back to the “Display” page. You can see that
each display is equipped with one URL. The URL is the link between waynderPost and SMP player.
To connect waynderPost to SMP player, you need to create a playlist on a SMP-WEB series player and
copy the correspondent URL shown on the “Display” page into the playlist.
1. Select one of the URLs of one meeting room, and copy it to the clipboard.
NOTE
You may need to modify the IP address of this URL if your network environment is complicated. Please
make sure the IP address or domain name can be connected from the SMP player to the xPost server.
LAN
WAN
Intranet
Admin PC
Adminstrator
SMP 2
SMP 1
1F Main Entrance
2F Main Entrance
xPost Server
(IP: 59.120.150.76)
Set a playlist with the link:
http://59.120.150.76/cayin_hotel/wf/1
Set a playlist with the link:
http://59.120.150.76/cayin_hotel/wf/2
DISPLAY-1:
http://59.120.150.76/cayin_hotel/wf/1
DISPLAY-2:
http://59.120.150.76/cayin_hotel/wf/2
44
2. Open the Web Manger of the SMP-WEB series player, which will control the screen of this meeting
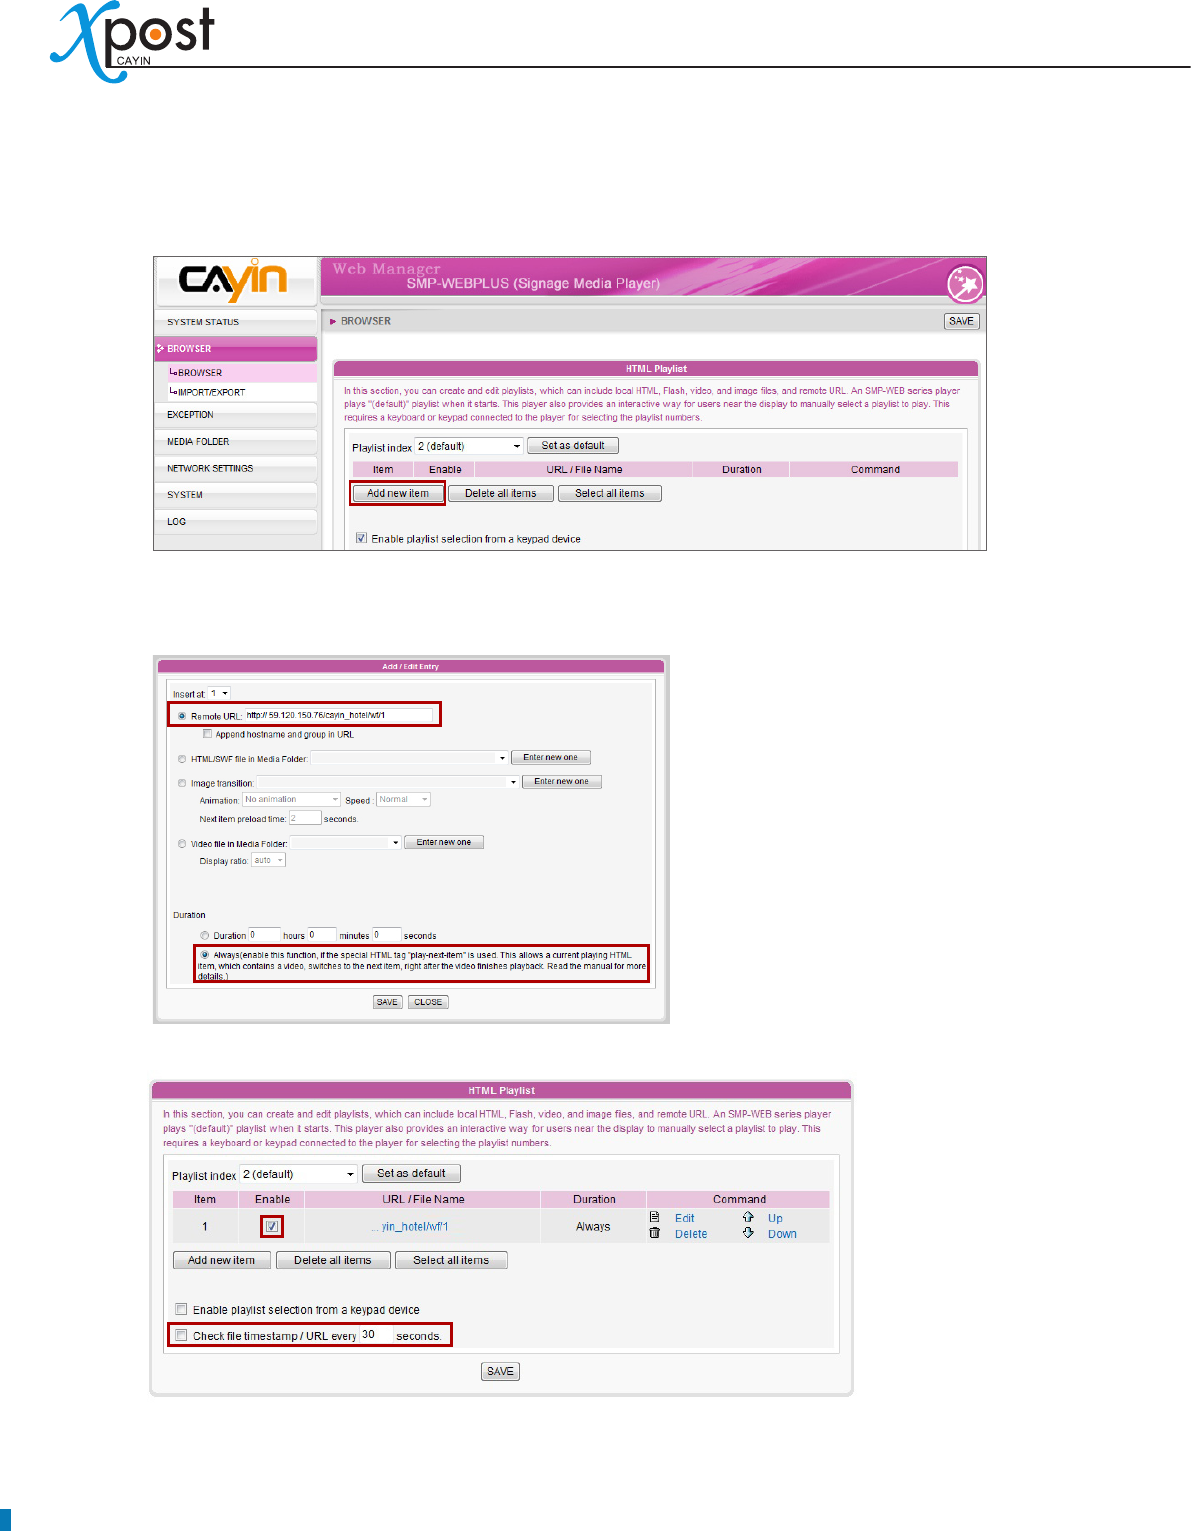
room. Click “Browser” and go to the “Browser” page. Click [Add new item] to create a playlist.
3. Paste the URL (from step 1) to the “Remote URL” field and set “Duration” to “Always”. Then, click
[SAVE].
4. Enable the added item and leave “Check le timestamp / URL every … seconds” unchecked.
5. Click [SAVE] → [APPLY ]; then you will see the SMP player start to play the playlist and the template
be shown on the screen.
APPLICATION SOFTWARE
45
6-5 Enter waynderPost Data
After you nish conguring the display, you can start to input data into waynderPost.
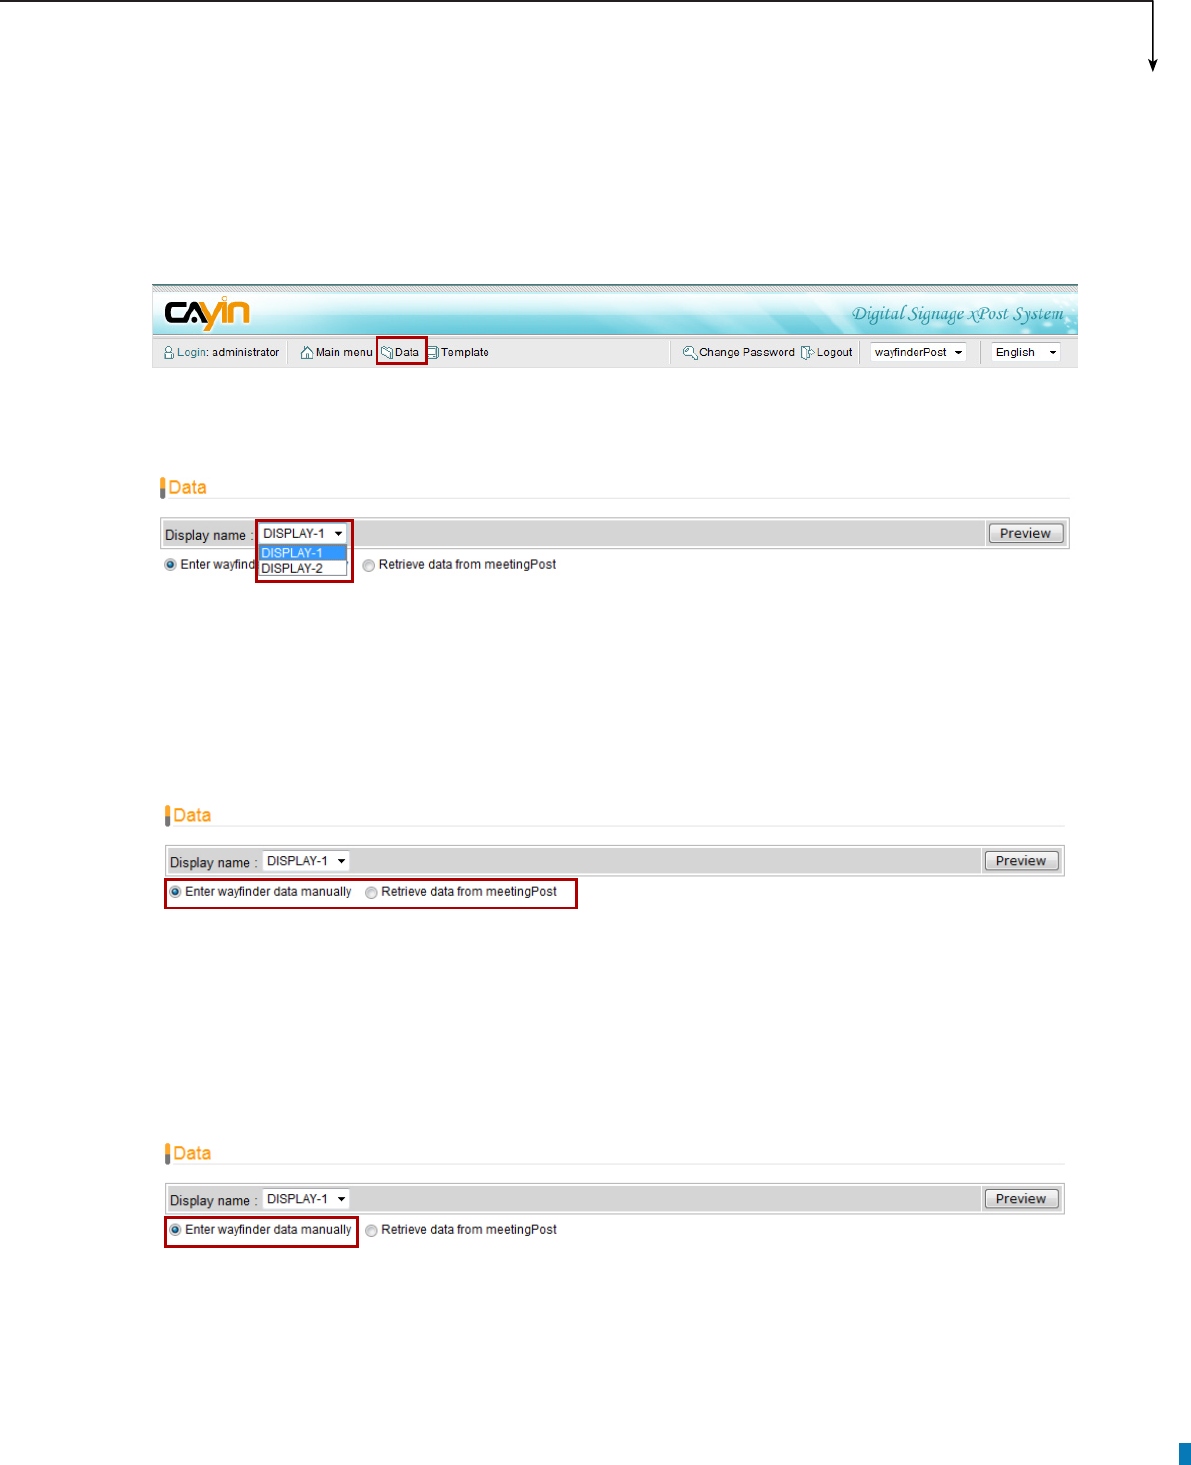
1. Select [Data] on the toolbar; then you will see the page of “Data”.
2. If you have more than one waynding display, you need to switch to the right display by clicking on the
display name.
3. In the page of “Data”, there are two data sources of waynderPost module:
Enter wayfinder data manually:
• Enter data row by row manually.
Retrieve data from meetingPost:
• wayfinderPost can import event data from meetingPost
automatically after congured.
We will introduce these two data sources in the following sections.
6-5-1 Enter waynder Data Manually
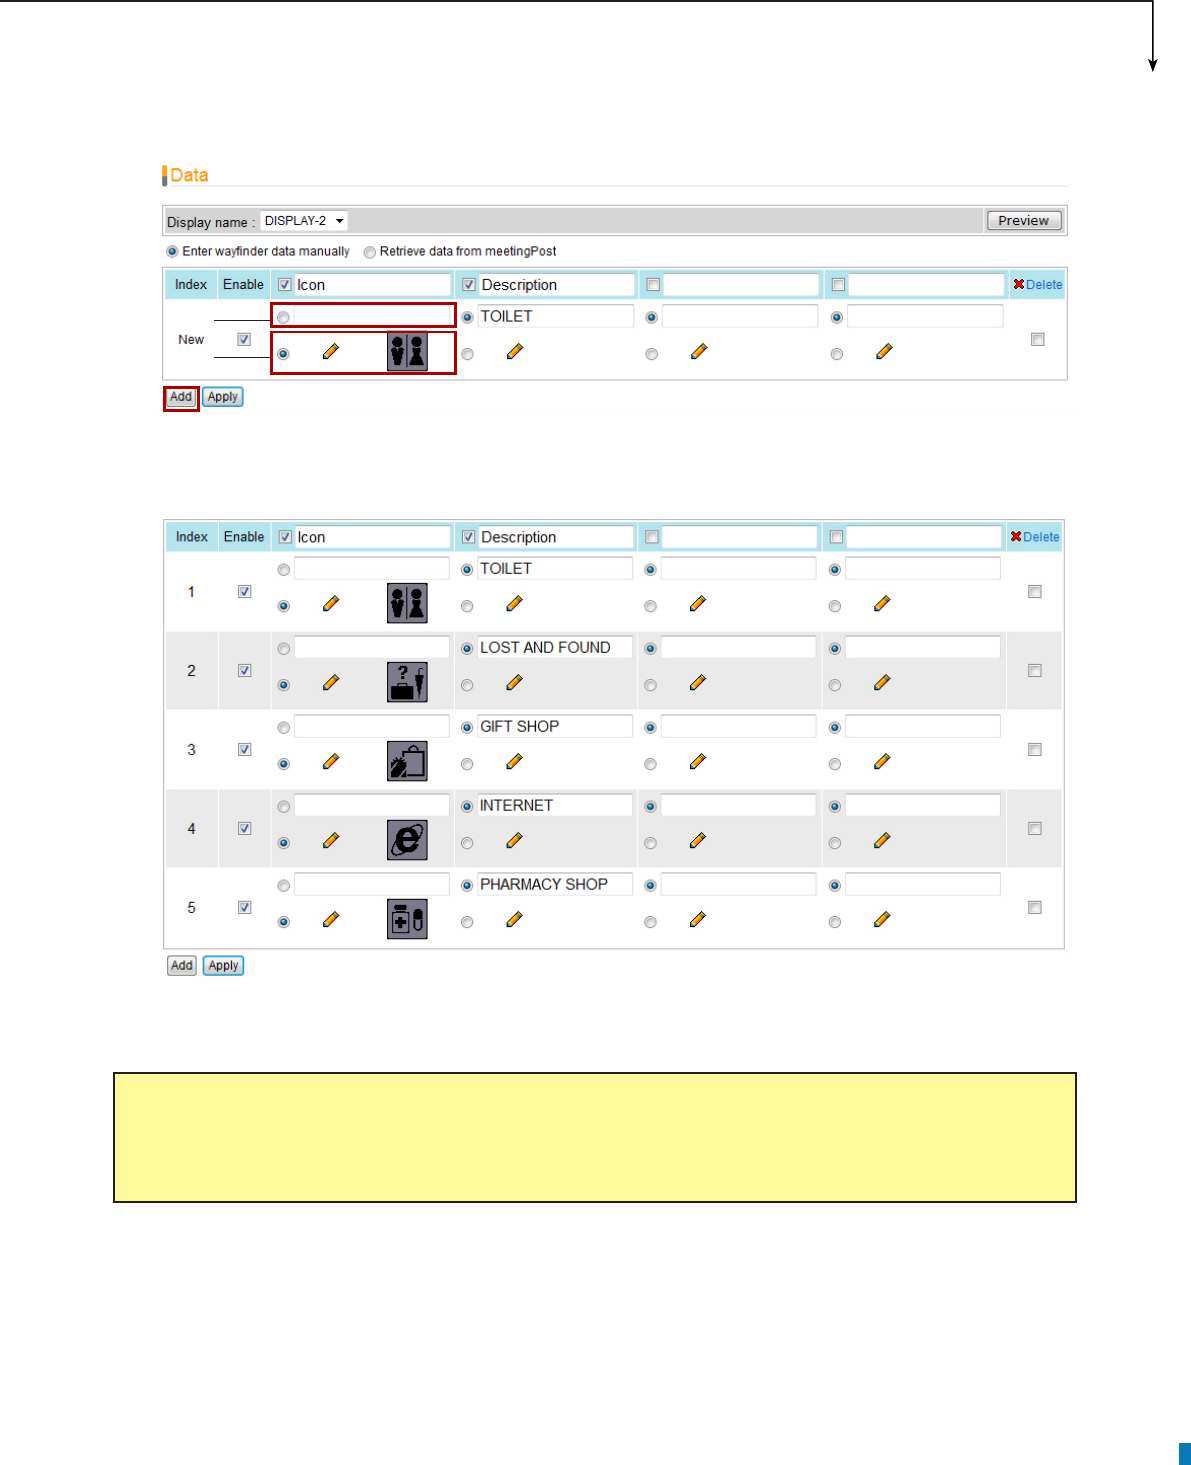
1. Select “Enter waynder data manually”.
2. Click [Preview]; then you can check the template which you apply to this display. The preview can
remind you about the nal presentation of the display and also the columns of data which you should
enter on the “Data” page.

46
3. On the preview picture, you can see the selected template with number on it. The numbers indicate
the column on the “Data” page. (e.g. 1 means the rst column).
4. The rst blue row of the table indicates the title of each column. The title is for your reference and may
not be shown on the display. Please check the template style to make sure if the title will be shown on
the nal presentation.
You can enable/disable data column. If you only need to show two columns, please tick the checkbox
of the rst two columns, and leave others unchecked.
1 2 3 4
NOTE
If you cannot see the preview clearly, you can also click on the preview image and download a full-
size picture of the preview that indicates the template and the size for each eld.
APPLICATION SOFTWARE
47
5. Click [Add] to add a new data record. For each row, you can choose to enter either “Texts” or “Pictures”.
6. You can add several rows of data by clicking [Add] and enter data in those elds.
7. After you ll in all elds, please remember to click [Apply] to conrm the changes.
NOTE
The elds that waynder template can contain will be different, ranging from 2 to 4 elds. You can click
[Preview] to check the suitable number of elds for this template.
Texts
Pictures
48
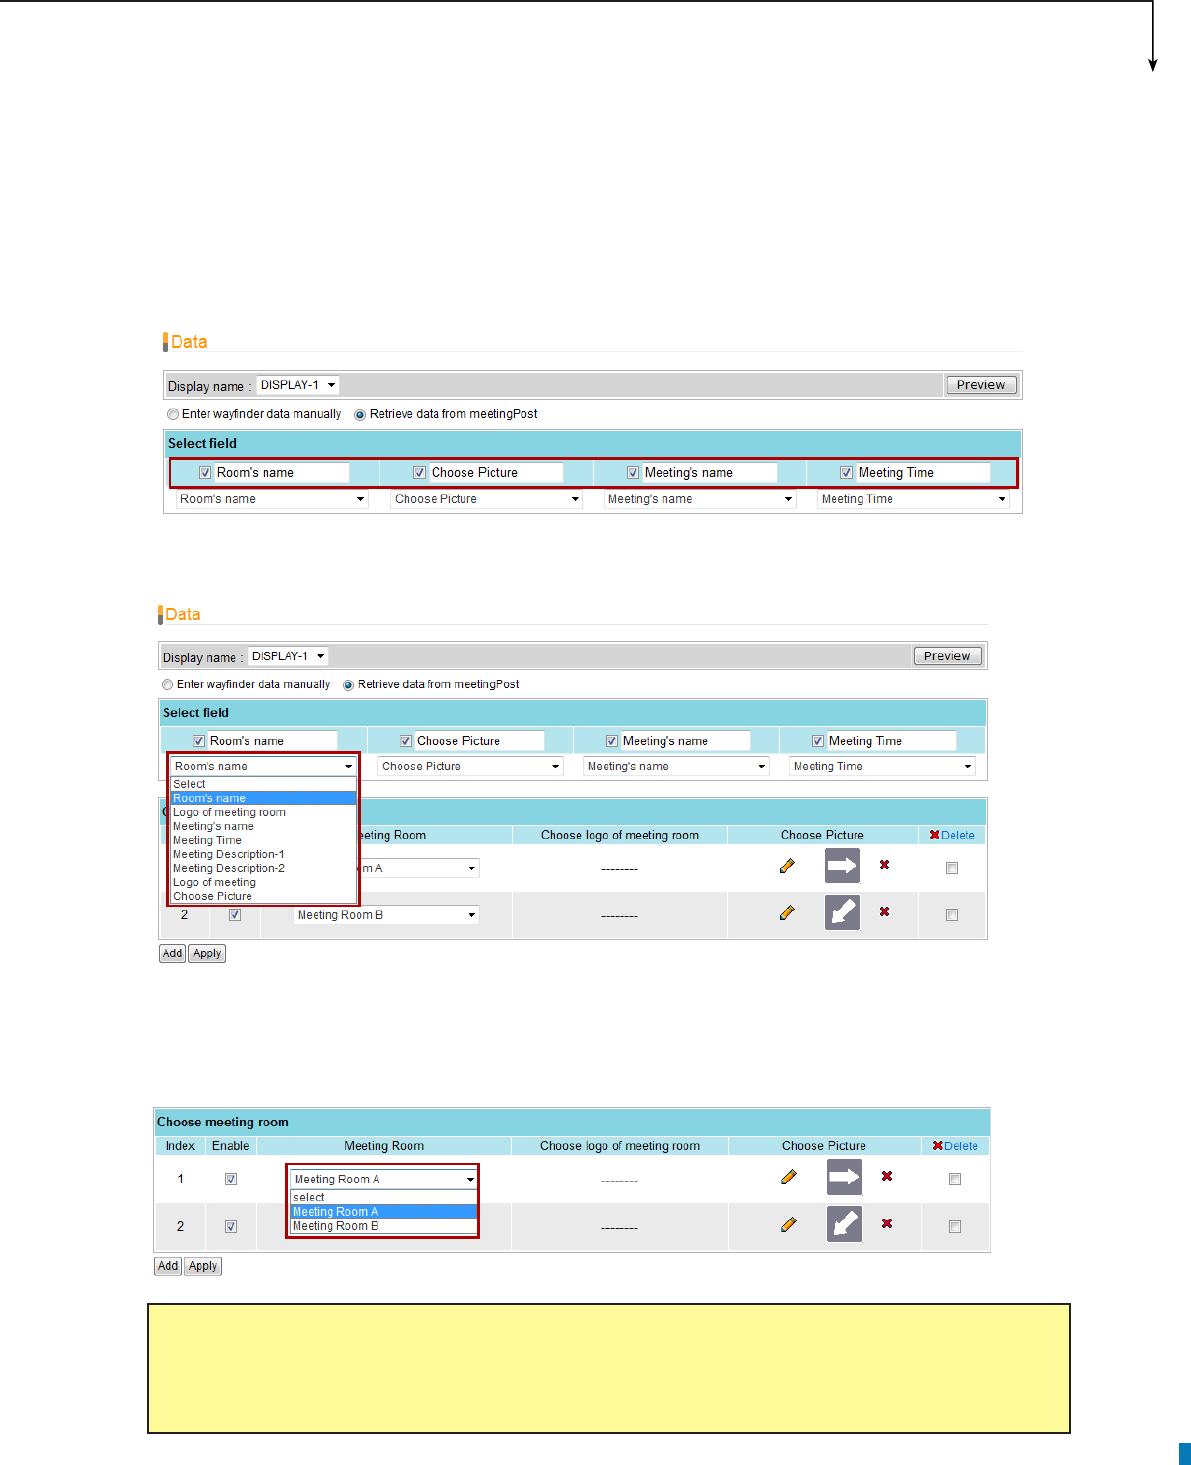
6-5-2 Retrieve Data from meetingPost
When you use this function, the screen will display the current meetings in different meeting rooms, and the
direction of each meeting room.
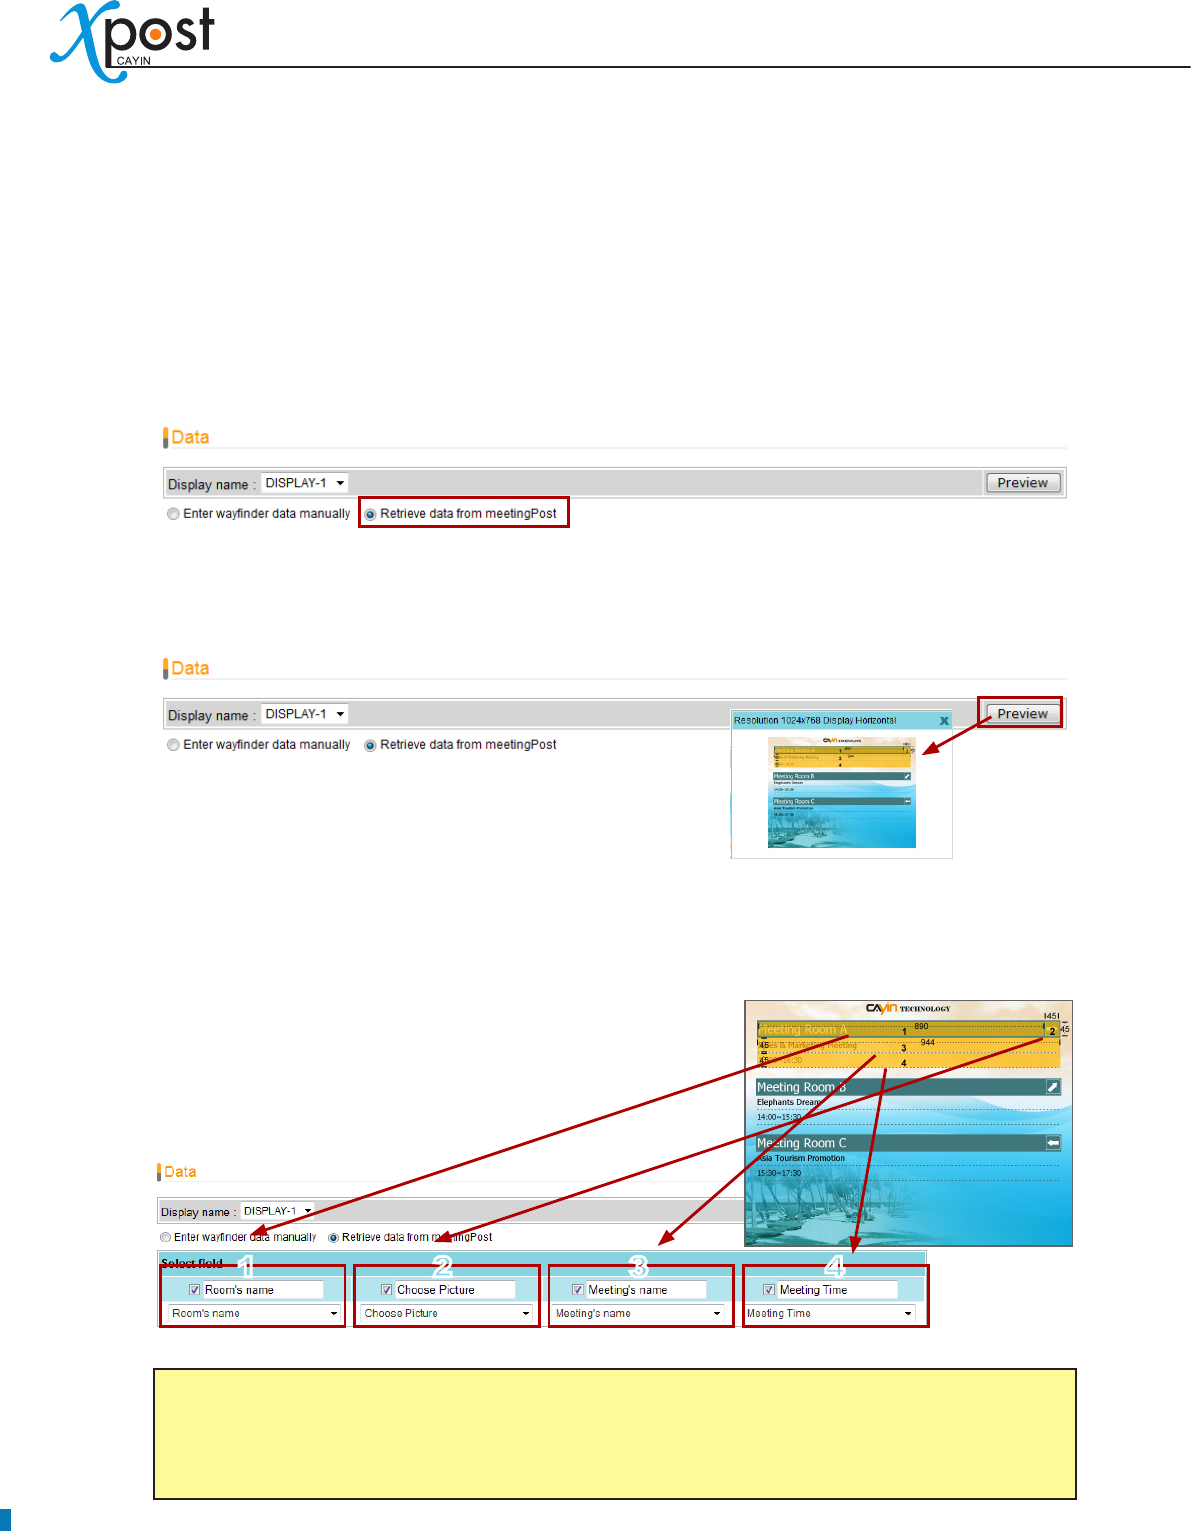
1. When wayfinderPost is integrated with meetingPost module, you can choose to retrieve wayfinder
data from meetingPost. Please select “Retrieve data from meetingPost”.
2. Click [Preview]; then you can check the template which you apply to this display. The preview can
remind you about the nal presentation of the display and also the columns of data which you should
enter on the “Data” page.
3. On the preview picture, you can see the selected template with number on it. The numbers indicate
the column on the “Data” page. (e.g. 1 means the rst column).
NOTE
If you cannot see the preview clearly, you can also click on the preview image and download a full-
size picture of the preview that indicates the template and the size for each eld.
1234
APPLICATION SOFTWARE
49
4. The second blue row of the table indicates the title of each column. The title is for your reference and
may be shown on the display. Please check the template style to make sure if the title will be shown
on the nal presentation.
You can enable/disable data column. If you only need to show two columns, please tick the checkbox
of the rst two columns, and leave others unchecked.
5. After you ll in the title, you can dene the item of each column, so that you can retrieve the right data
from meetingPost to match the right column.
6. After you configure the data type of each column, you should start to select those meeting
rooms which you would like to display on the screen. Click [Add] to add a meeting room in the
waynderPost.
NOTE
Before you use “Choose meeting room”, please conrm that you add at least one meeting room in
the meetingPost module.
50
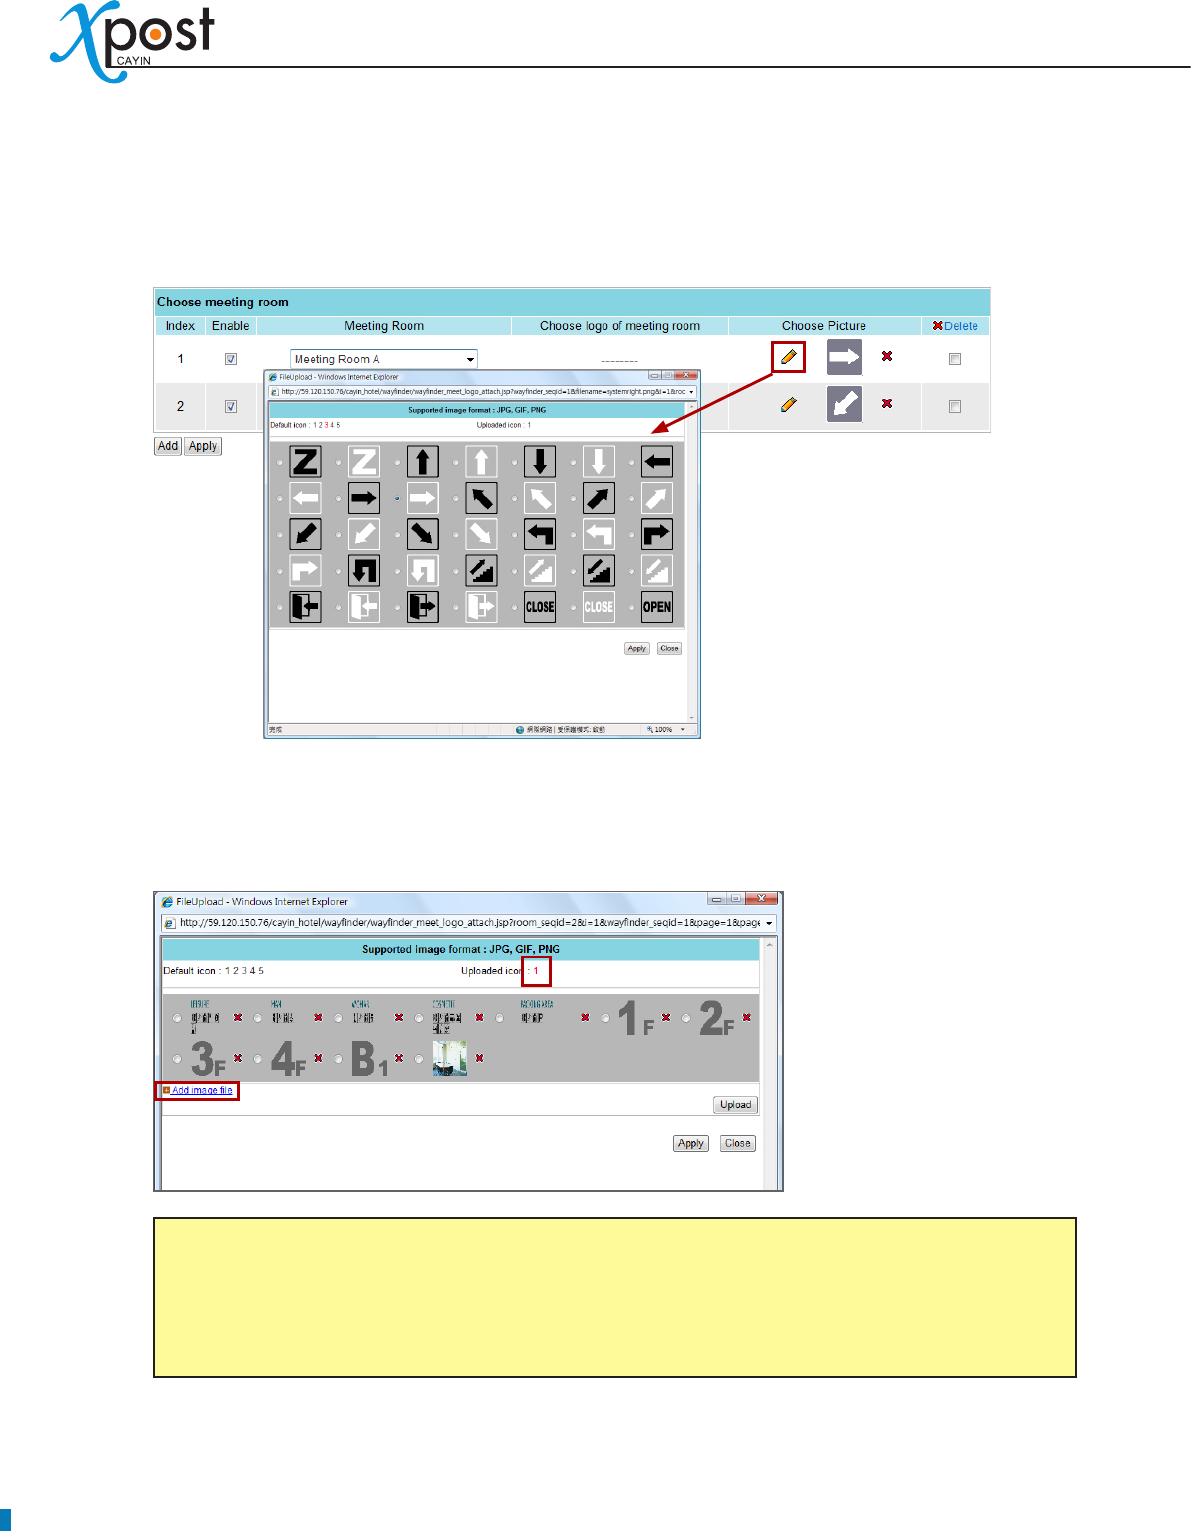
7. You can optionally choose one extra pictures for each meeting room, such as the arrow pointing the
direction of that meeting room.
If you want to upload your own icon, please click the number beside “Uploaded icon:”. Then, you will
see a pop-up window. Click “Add image le”, select a le, and click [Upload]. Then, the uploaded
images will be listed here for your choice.
NOTE
xPost DOES NOT support CMYK image format. Please DO NOT upload images files in CMYK
format. If you accidentally upload a CMYK image, it may cause some problems. Please contact
CAYIN for the solution.
8. Click [Apply] after you nish the conguration.
APPLICATION SOFTWARE
51
7. lobbyPost Module
CAYIN lobbyPost is application software especially designed for
lobby digital signage, such as for administrations of hotel and
convention center to communicate with guests in lobbies. Powered
by lobbyPost’s content and managerial tools, the software,
incorporating with CAYIN SMP-WEB series products, can be used
to easily display advertisements, room types and tariff, currency
exchange rate, weather and more information.
lobbyPost provides a content editing tool with easy operation workow comprising the following ve steps:
STEP 1: Login lobbyPost
STEP 2: Set Up a Lobby Display
STEP 3: Modify Template Settings
STEP 4: Connect lobbyPost to SMP Player
STEP 5: Enter lobbyPost Data
Step 2 to 4 only have to be done on the rst-time use. For daily maintenance, users only need to do the 1st
and 5th step for data entry.
7-1 Login lobbyPost
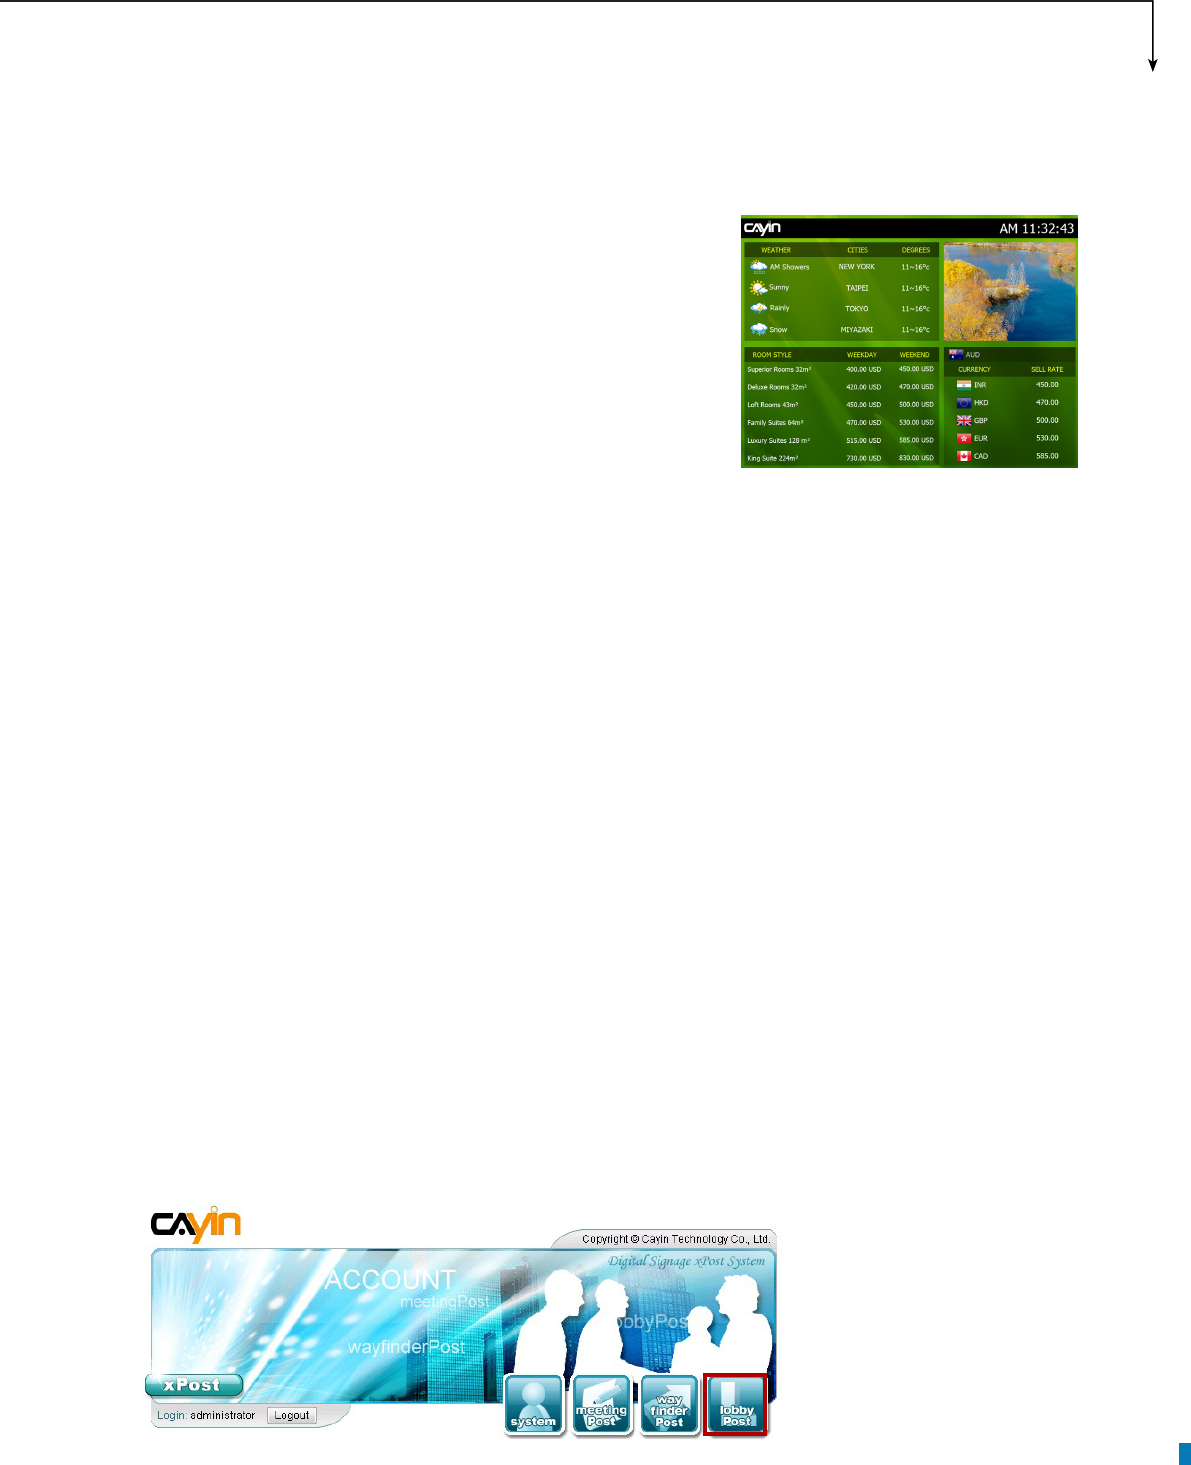
You can enter lobbyPost via the following two methods:
Method 1:
Login xPost and then click [lobbyPost] on the main menu.
52
Method 2:
If you are already in the Web Manager of xPost, you can switch to lobbyPost from the upper side toolbar.
7-2 Set Up a Lobby Display
To use lobbyPost, you must set up a display rst, and then select and edit a template for it.
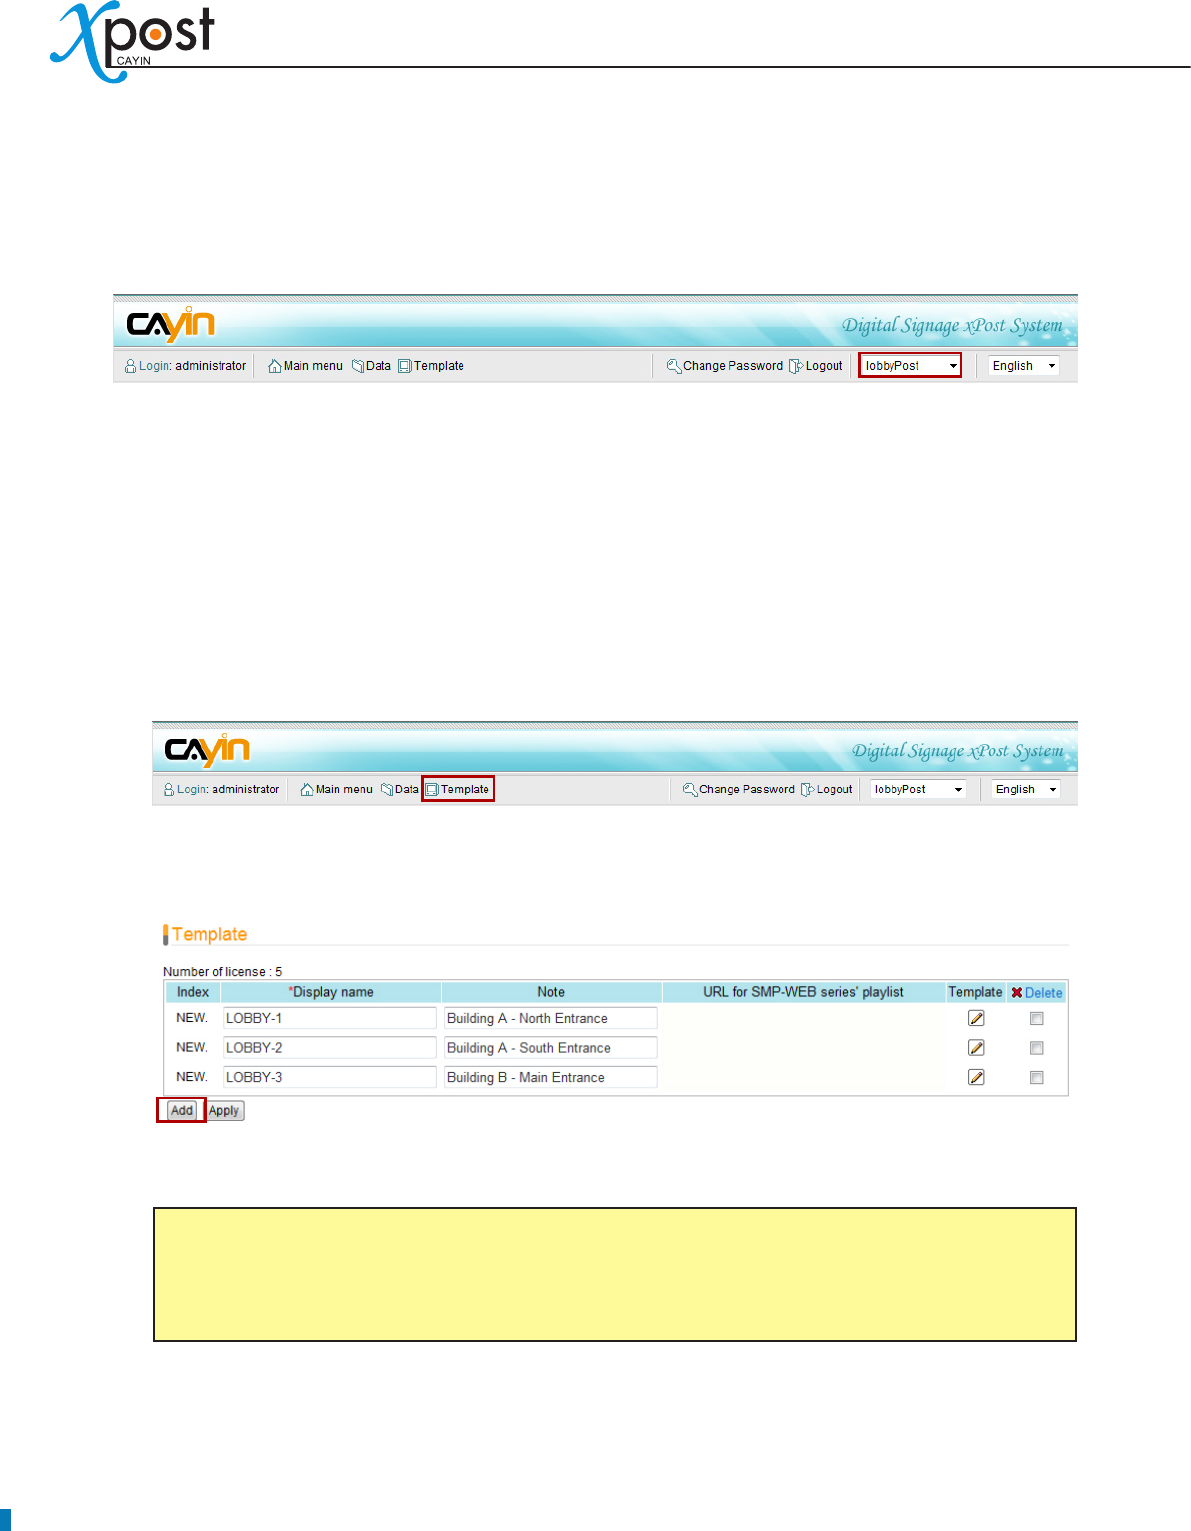
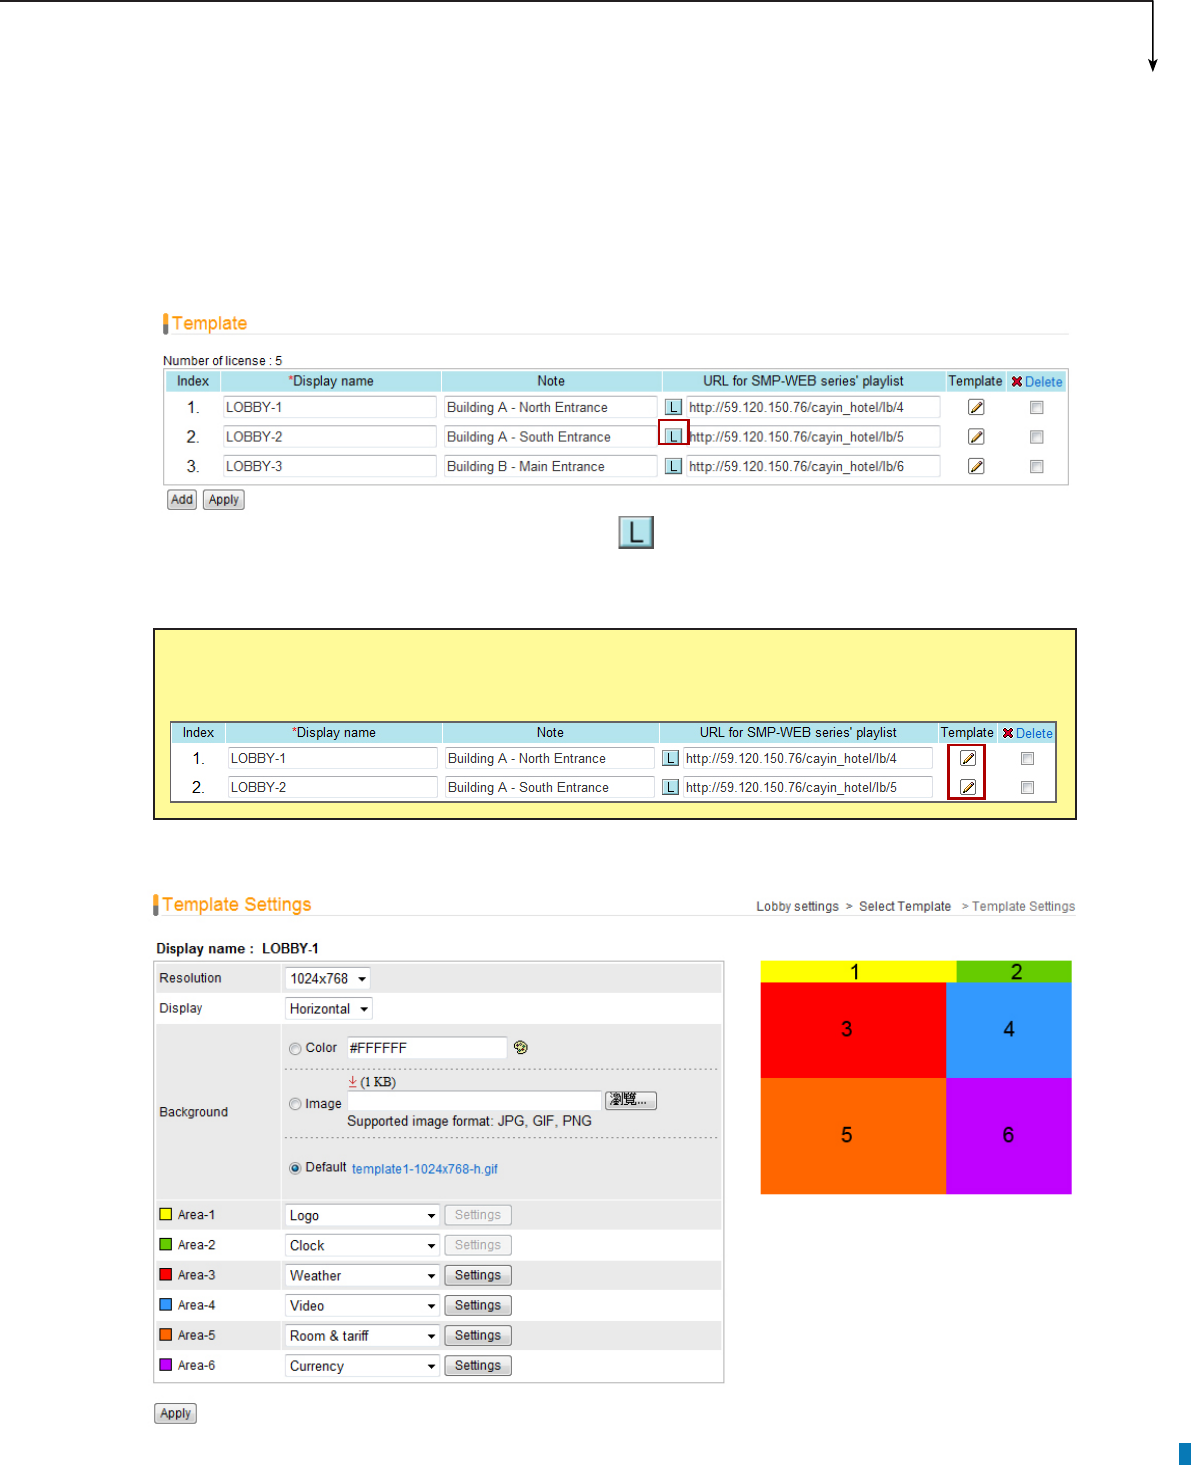
7-2-1 Add a Display
1. Select [Template] on the toolbar; then you will see the page of “Template”.
2. In the “Template” page, click [Add] to add a new display. Fill in the “Display Name” and the optional
“Note” eld.
3. After all rooms are set, click [Apply] to save the changes.
NOTE
The number of displays you create here is limited by the license you purchase. You cannot create
more displays than the license. If you need more displays, please purchase more licenses.
APPLICATION SOFTWARE
53
7-2-2 Apply a Template
1. Click on the edit button of “Template” on the right-hand side of the specic display which you want to
edit.
2. In the “Select Template” page, you can choose a template from pre-loaded templates, and click
[Apply] to conrm your selection. For each template, you can see preview and information on this
page.

54
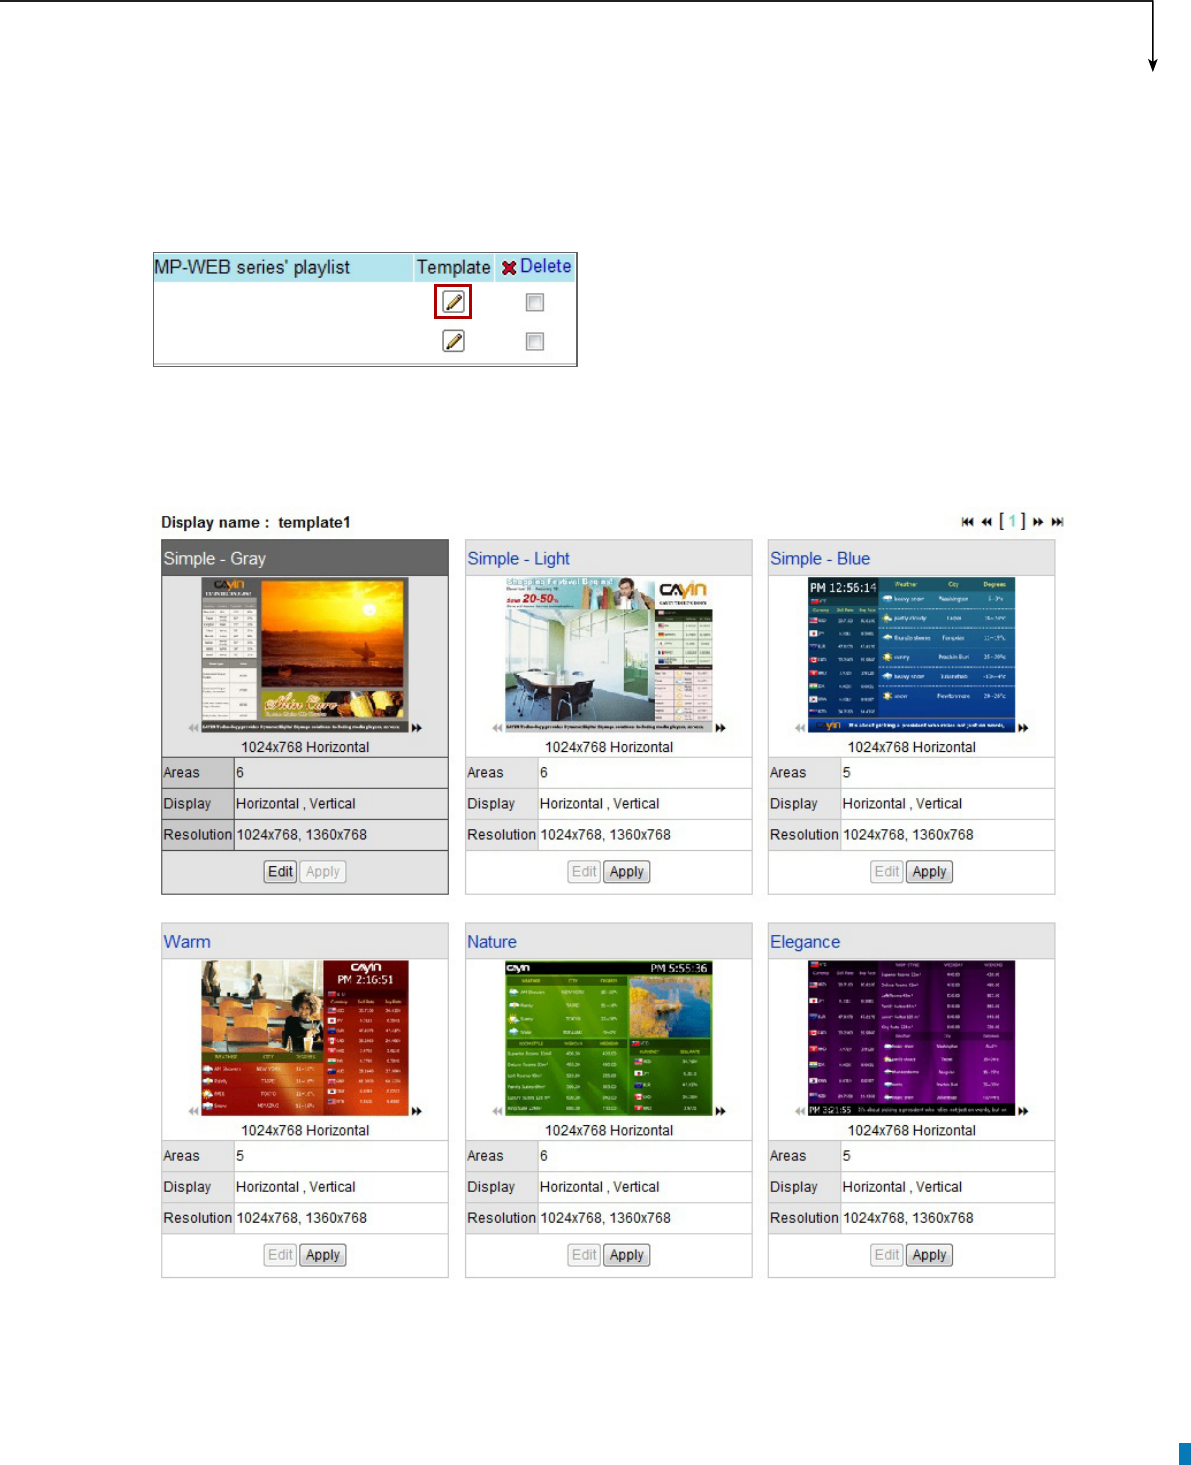
7-2-3 Upload a Template
1. Click on the edit button of “Template” on the right-hand side of the specic display which you want to
edit. Then, you can go to the “Select Template” page.
2. In the “Select Template” page, click [Browse…] to select a template le and click [Upload].
• : Click the arrow and preview different resolutions and display
types of this template.
• Areas: Each template contains at most six areas for a variety of
combinations of room type and tariff, currency exchange, weather
information, images, Flash, video, and ticker. You can follow the
pre-configured usages or modify the data type of each area to
create your own ideal lobby display.
Display:
• Indicate supported display orientation, “Horizontal”
(landscape) or “Vertical” (portrait).
Resolution:
• Indicate supported display resolutions.
NOTE
Templates must be prepared with suitable programs and adequate testing. Therefore, you can only
upload templates provided by CAYIN. Please contact CAYIN’s sales representatives if you need the
customization service.
APPLICATION SOFTWARE
55
7-3 Modify Template (Template Settings)
After you select a template for a lobby display, you can further customize the template. If you do not change
settings of template, you still can start to input data into the system with the default presentation.
1. Go to “Template” page. (lobbyPost → Template)
2. For each meeting room, you will see a small icon, , in front of the URL link. You can click the icon
and modify each template design in the “Template Settings” page.
3. You can congure different settings and areas for each template.
NOTE
You can also click on the edit button on the selected template to enter the “Template Settings” page.
56
Resolution:
• Select an appropriate display resolution. You must congure the display settings of
SMP player with the same resolution as the template settings here so that the screen can display it
properly.
Display:
• Choose either Horizontal (landscape) or Vertical (portrait) display type.
Background:
• To replace the template background, you can choose to use a single color, an
image, or the default background.
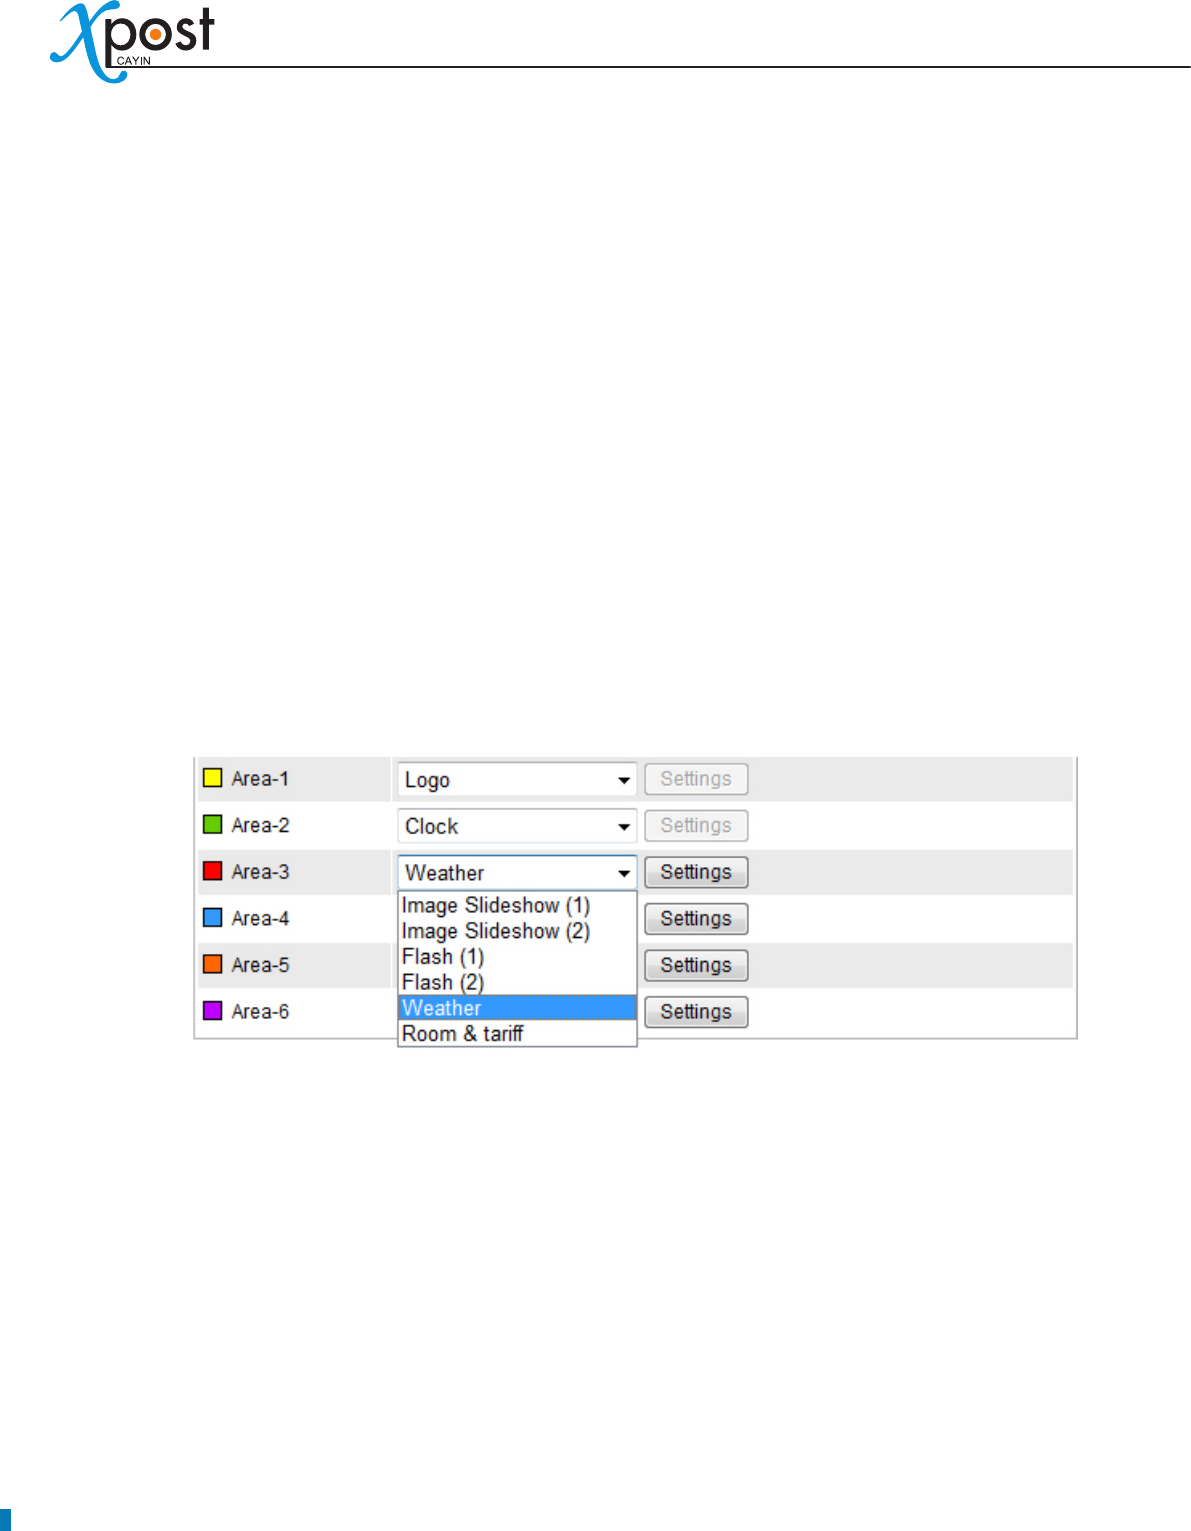
Areas:
• You can change data type of each area. The supported data type of each area varies from
template to template.
You can follow the pre-congured usages or modify the data type of each area to create your own
ideal lobby display. If you want to modify, just select a suitable data type for each area. You need
to congure more settings when you choose Weather, Room & Tariff, Currency, Image Slideshow,
Video, and Ticker.
APPLICATION SOFTWARE
57
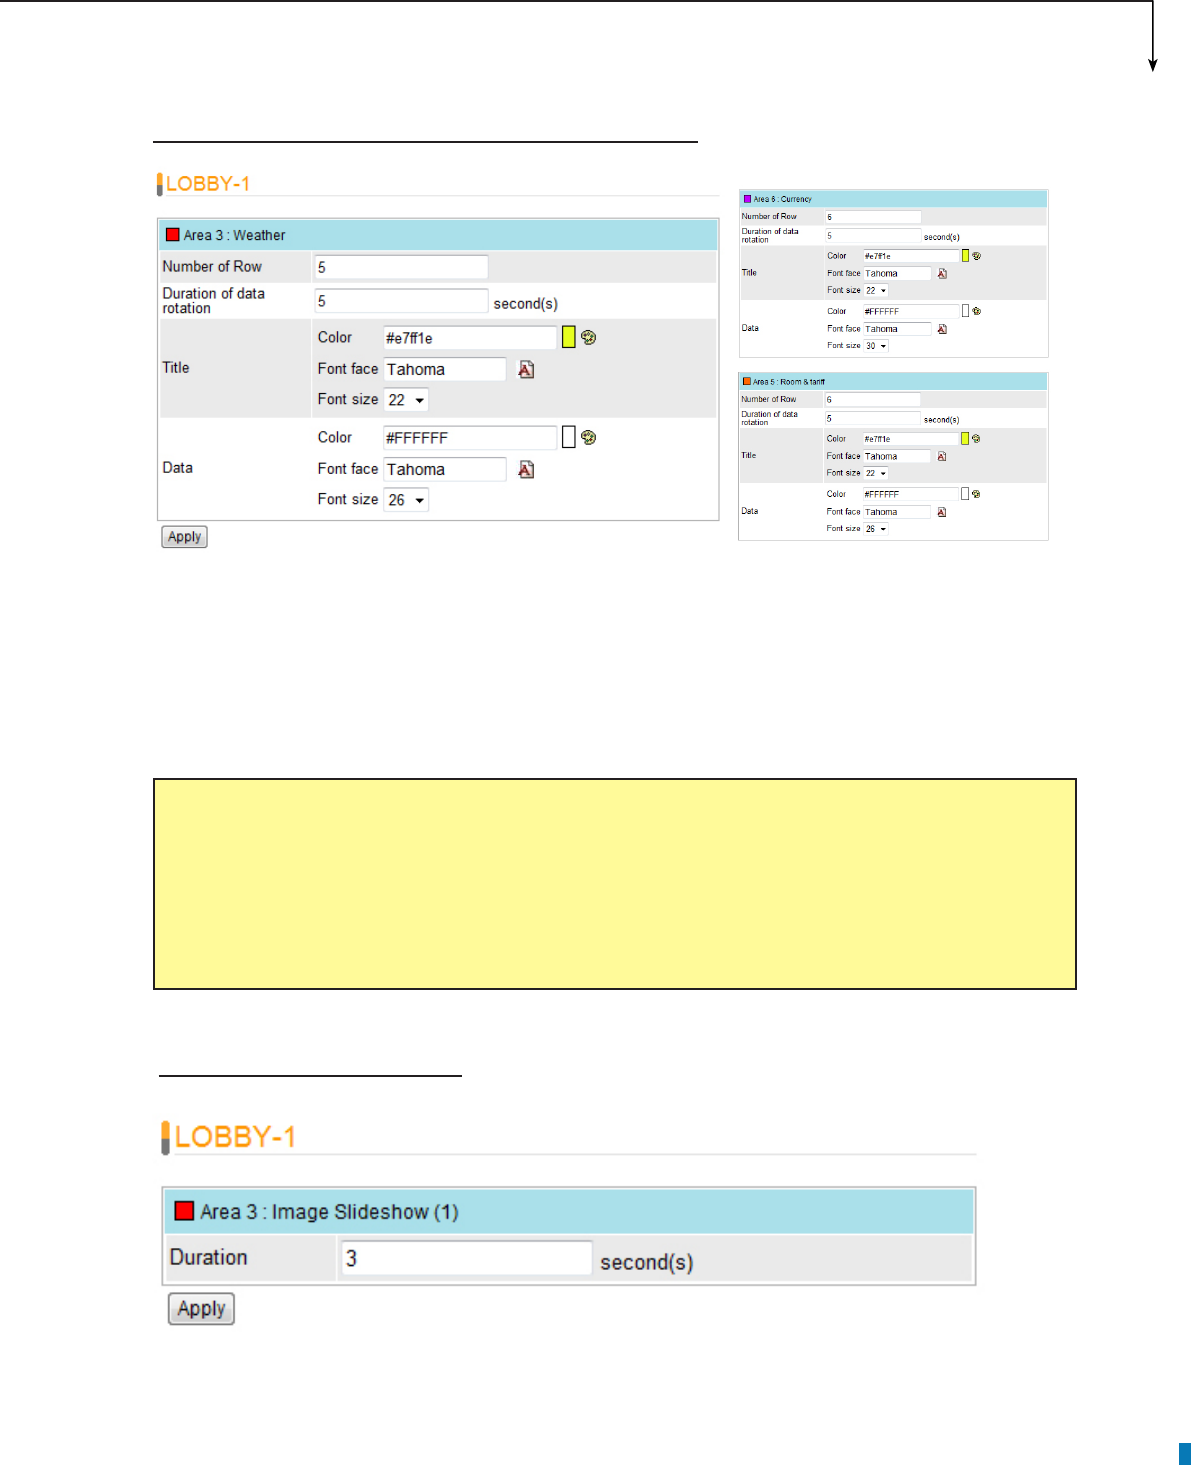
Weather, Room & Tariff, and Currency Settings
Number of Row:
• Specify how many rows you would like to show on the screen at a time.
Duration of data rotation:
• Specify how long one page of the data will display on the screen.
Title, Date:
• Modify the font color, type, and size of the texts of Title and Data.
EXAMPLE
You want to show the weather information of totally 15 cities, but you only have limited space on
this area. You can set “Number of Row” as 5 and 10 seconds for the duration. Then, the weather
information will be divided into 3 pages, and each of them will show information of 5 cities. The
screen will rotate these 3 pages every 10 seconds.
Image Slideshow Settings
Duration:
• Specify the duration of playing each image.
58
Video Settings
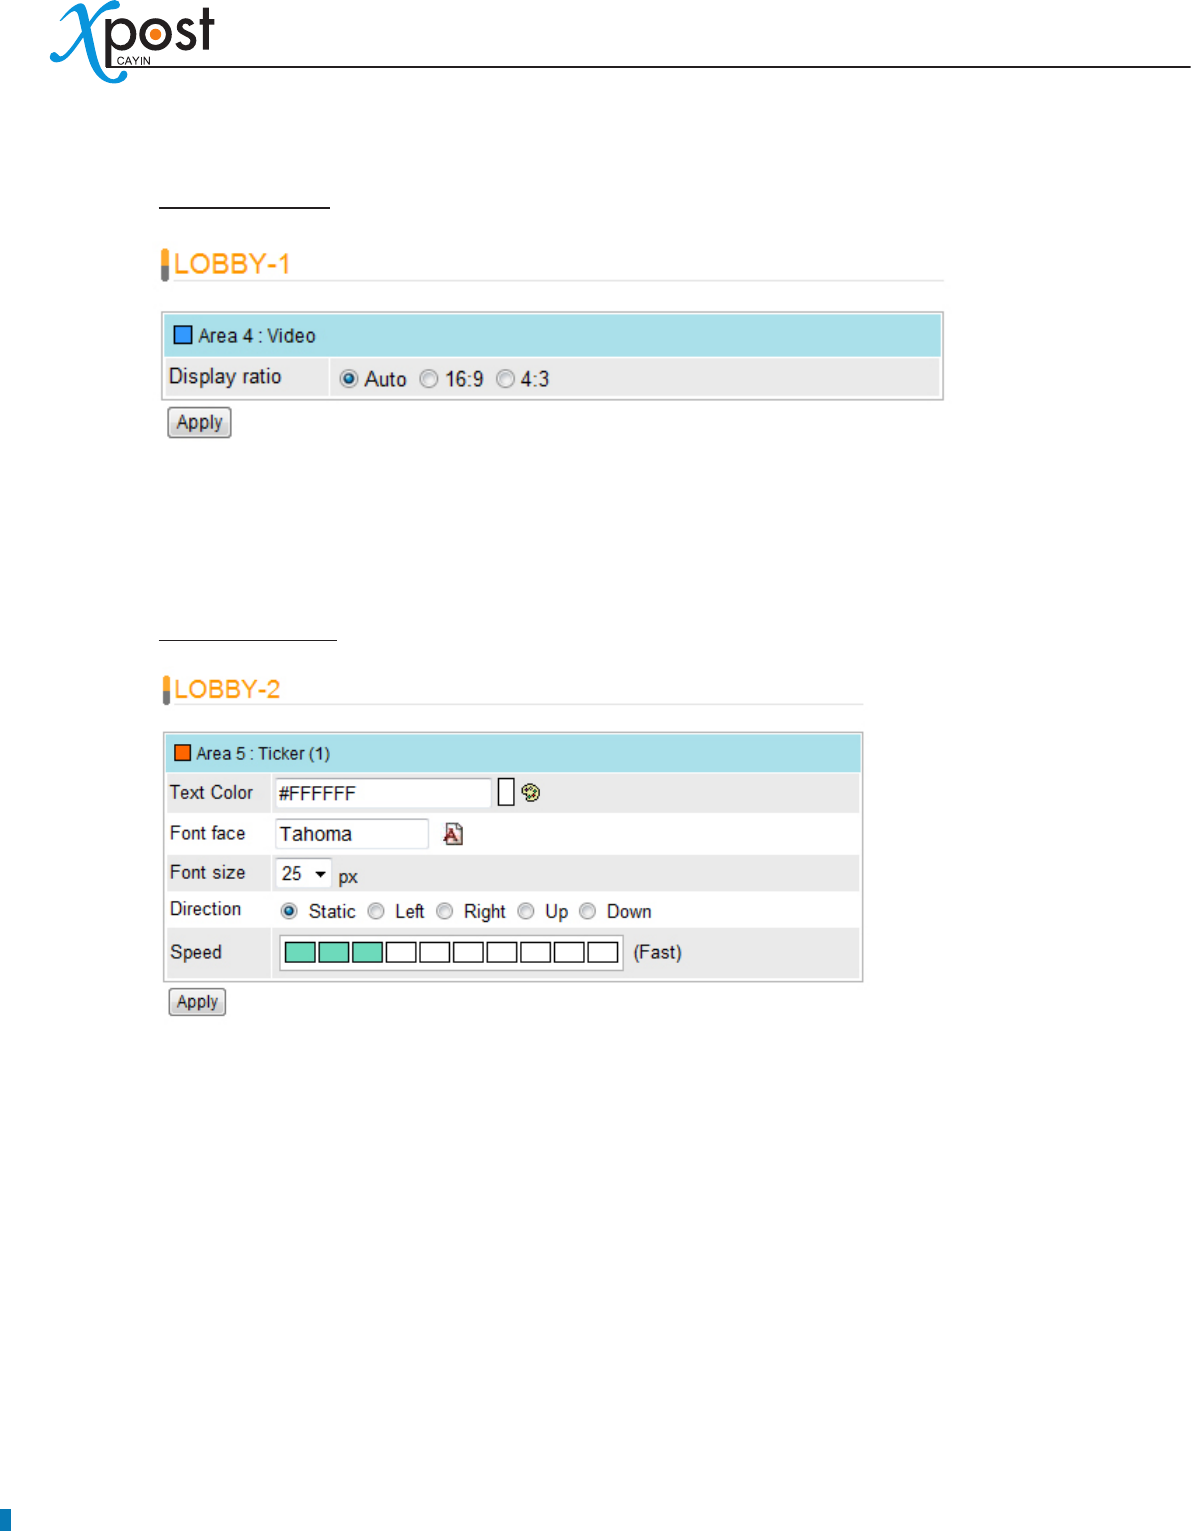
Display ratio: Specify the ratio of video showing on the screen.•
If you choose “Auto”, video will be shown based on the ratio of this selected area. If you play a video
with ratio 4:3 in an area with ratio 16:9, you can select 4:3 to keep the video in the original ratio.
Ticker Settings
Text Color, Font Face, Font Size:
• Modify the settings of the texts.
Direction:
• Dene the direction of the ticker. If you select “Left”, the texts will move from right to left.
Speed:
• Adjust the moving speed of the ticker.
4. After you congured, click [Apply] to conrm the changes.

APPLICATION SOFTWARE
59
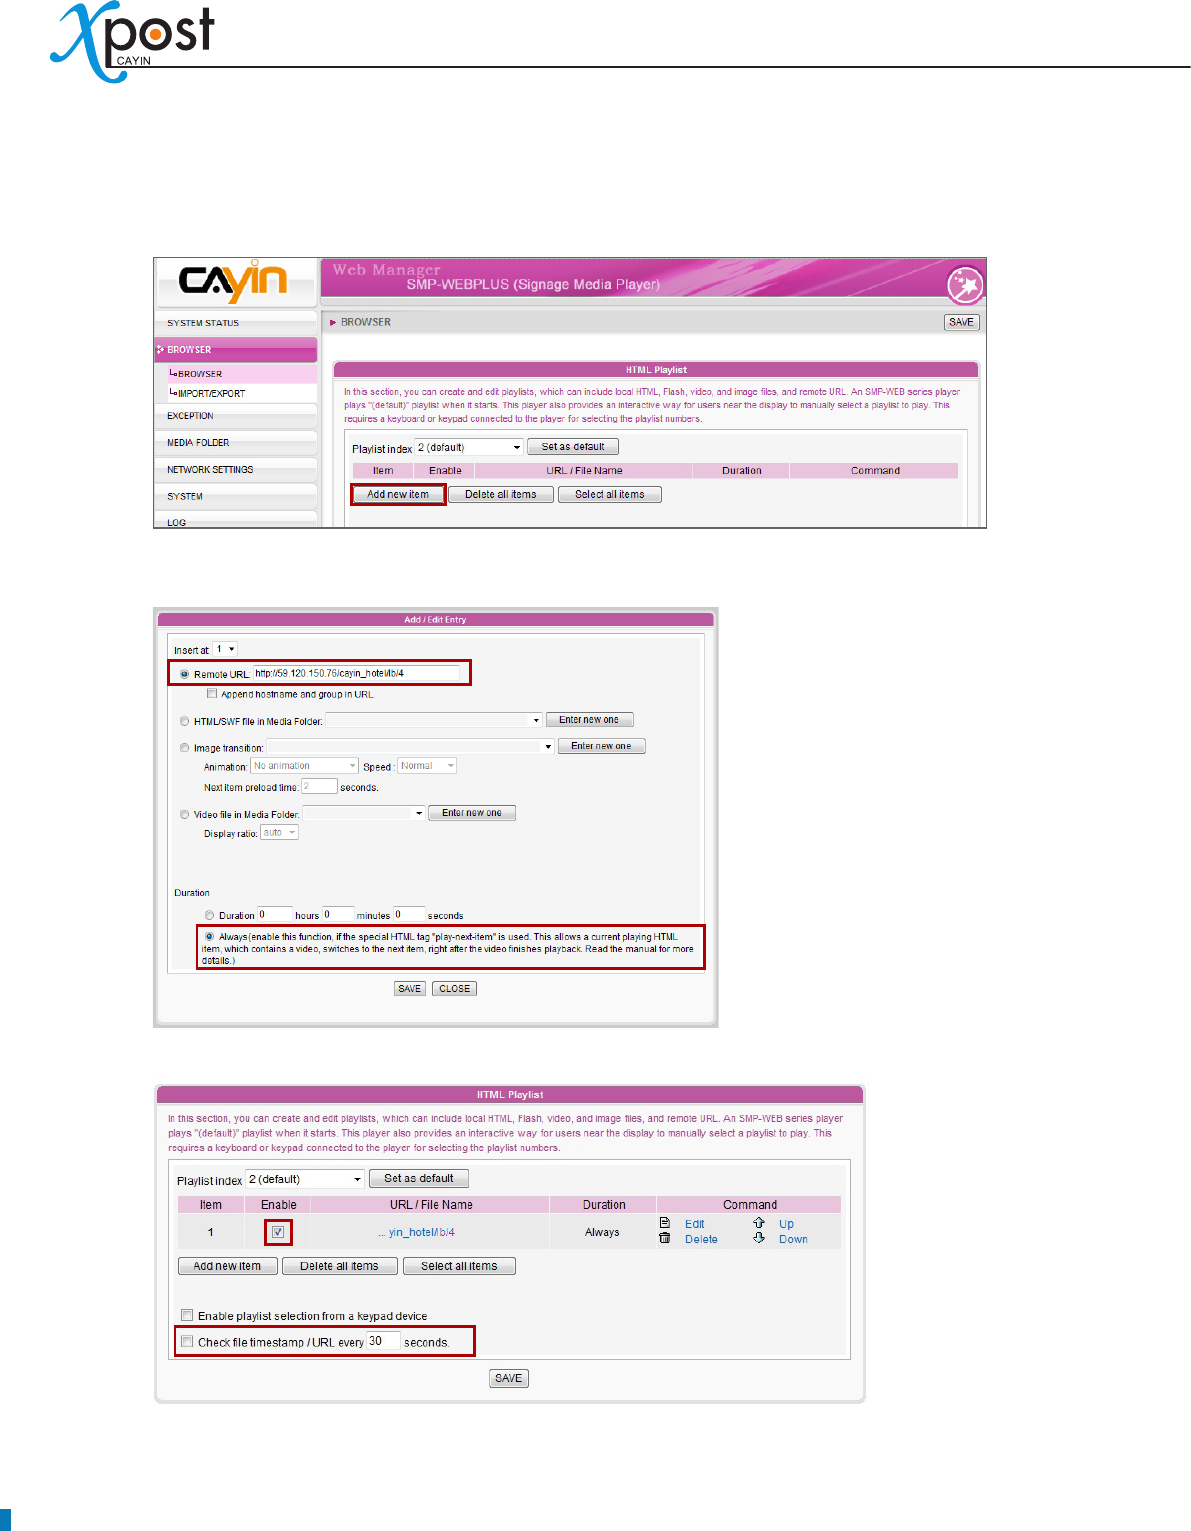
7-4 Connect lobbyPost to SMP Player
After the display template is selected and modied, please go back to the “Template” page. You can see that
each display is equipped with one URL. The URL is the link between lobbyPost and SMP player.
To connect lobbyPost to SMP player, you need to create a playlist on a SMP-WEB series player and copy
the corresponsive URL shown on the “Display” page into the playlist.
1. Select one of the URLs of one display, and copy it to the clipboard.
NOTE
You may need to modify the IP address of this URL if your network environment is complicated.
Please make sure the IP address or domain name can be connected from the SMP player to the
xPost server.
LAN
WAN
Intranet
Admin PC
Adminstrator
SMP 2
SMP 1
Building A -
North Entrance
Building A -
South Entrance
xPost Server
(IP: 59.120.150.76)
Set a playlist with the link:
http://59.120.150.76/cayin_hotel/lb/4
Set a playlist with the link:
http://59.120.150.76/cayin_hotel/lb/5
LOBBY-1:
http://59.120.150.76/cayin_hotel/lb/4
LOBBY-2:
http://59.120.150.76/cayin_hotel/lb/5
60
2. Open the Web Manger of the SMP-WEB series player, which will control the screen of this meeting
room. Click “Browser” and go to the “Browser” page. Click [Add new item] to create a playlist.
3. Paste the URL (from step 1) to the “Remote URL” field and set “Duration” to “Always”. Then, click
[SAVE].
4. Enable the added item and leave “Check le timestamp / URL every … seconds” unchecked.
5. Click [SAVE] → [A PPLY ]; then you will see the SMP player starts to play the playlist and the template
will be shown on the screen.

APPLICATION SOFTWARE
61
7-5 Enter lobbyPost Data
After you nish conguring the display, you can start to input data into lobbyPost.
In lobbyPost, there are several different types of data. In general, you can categorize them into two types:
1. Table type: All data are arranged in a table. Please note that the following three types of data will be
shared by all lobby displays. You cannot apply different data to different lobby displays.
i. Room & Tariff: Enter the name, tariff and related information of guest rooms.
ii.
Currency Exchange: Select country, currency and related information.
iii. Weather: Enter weather information manually or automatically.
2. Non-Table type: The content in this category is not arranged in a table. Most of them are multimedia
les.
i. Ticker 1 & 2: Text messages
ii. Flash 1 & 2: Flash area
iii. Logo: Logo image
iv. Clock: Clock made by Flash
v.
Video: Play video les in SMP player
vi. Image Slideshow 1 & 2: Image slideshow function
We will introduce each data type in the following sections.
62
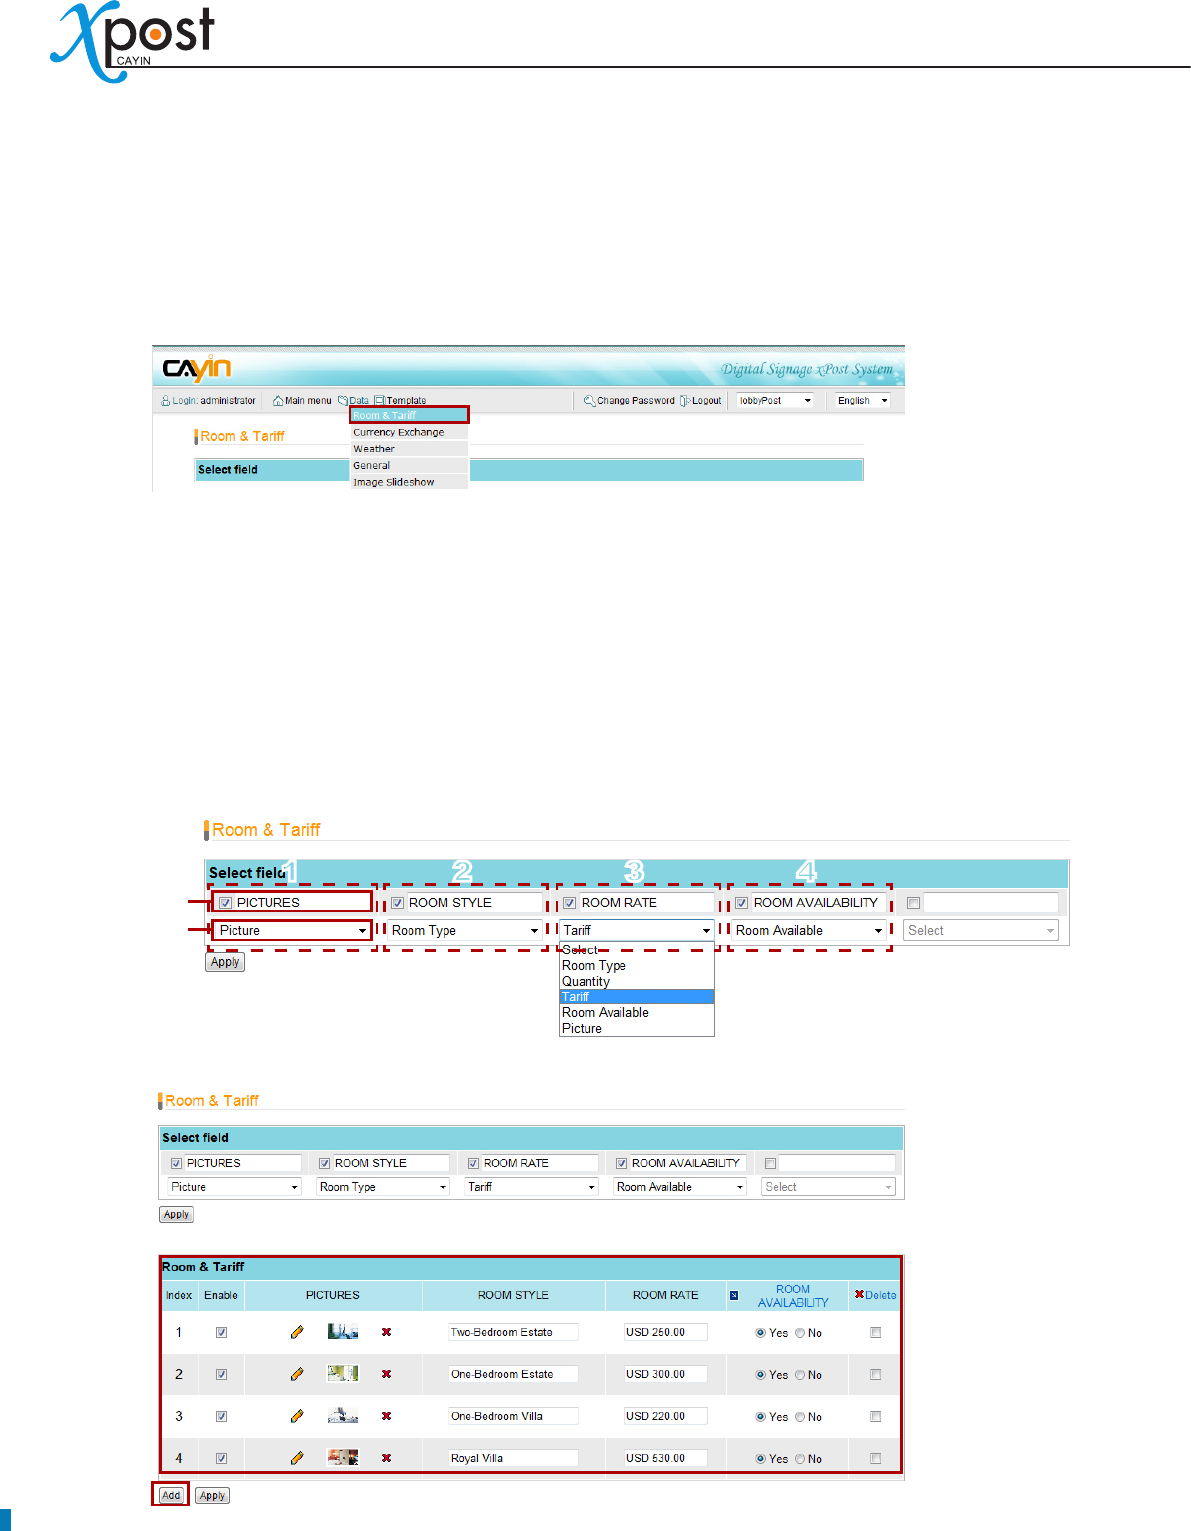
7-5-1 Room & Tariff
Setup Room & Tariff data, you must select appropriate elds and enter your room information accordingly.
1. Select [Data > Room & Tariff] on the toolbar; then you will see the page of “Room & Tariff”.
2. Select field: The elds selected here will be shown on the screen in left-to-right order.
Enter eld title and enable this column by clicking on the checkbox right beside the title. For Room &
Tariff, you can show maximum ve columns of data. The title may be shown on the screen based on
your selected template. Please check the template style to make sure if the title will be shown on the
nal presentation.
Please match the appropriate type to each eld (column), so that the data will be shown correctly in
the table on the screen. After conguration, please click [Apply].
3. Add Room & Tariff: After the elds are set, click [Add] to add rooms and related information.
Title
Data
Type
1 2 3 4 (column)
APPLICATION SOFTWARE
63
Picture:
• Upload picture images.
NOTE
xPost DOES NOT support CMYK image format. Please DO NOT upload images files in CMYK
format. If you accidentally upload a CMYK image, it may cause some problems. Please contact
CAYIN for the solution.
Room Type, Quantity, & Tariff:
• These three data types are text elds. After dening the title and
data type for each column, you can ll in the data here.
Room Availability:
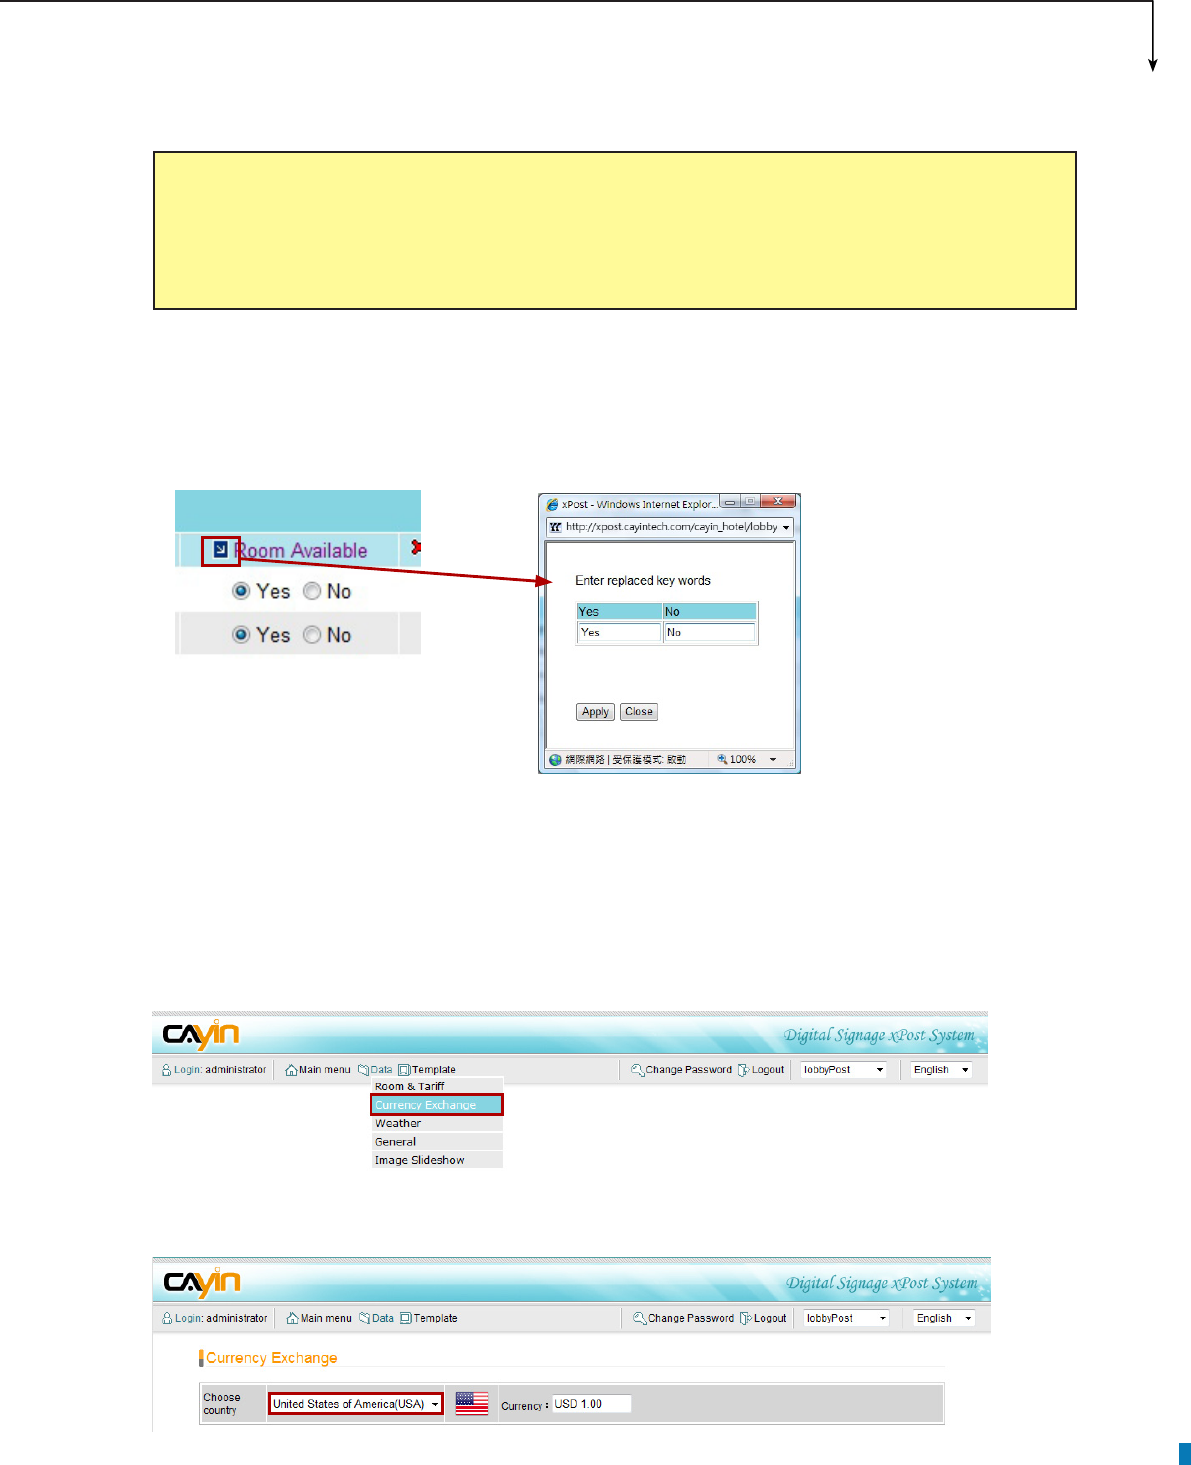
• Boolean value. Show visitors whether these rooms are available or not. You
can further click on the title to change the message to your own language.
4. After the rooms are set, click [Apply] to conrm the changes.
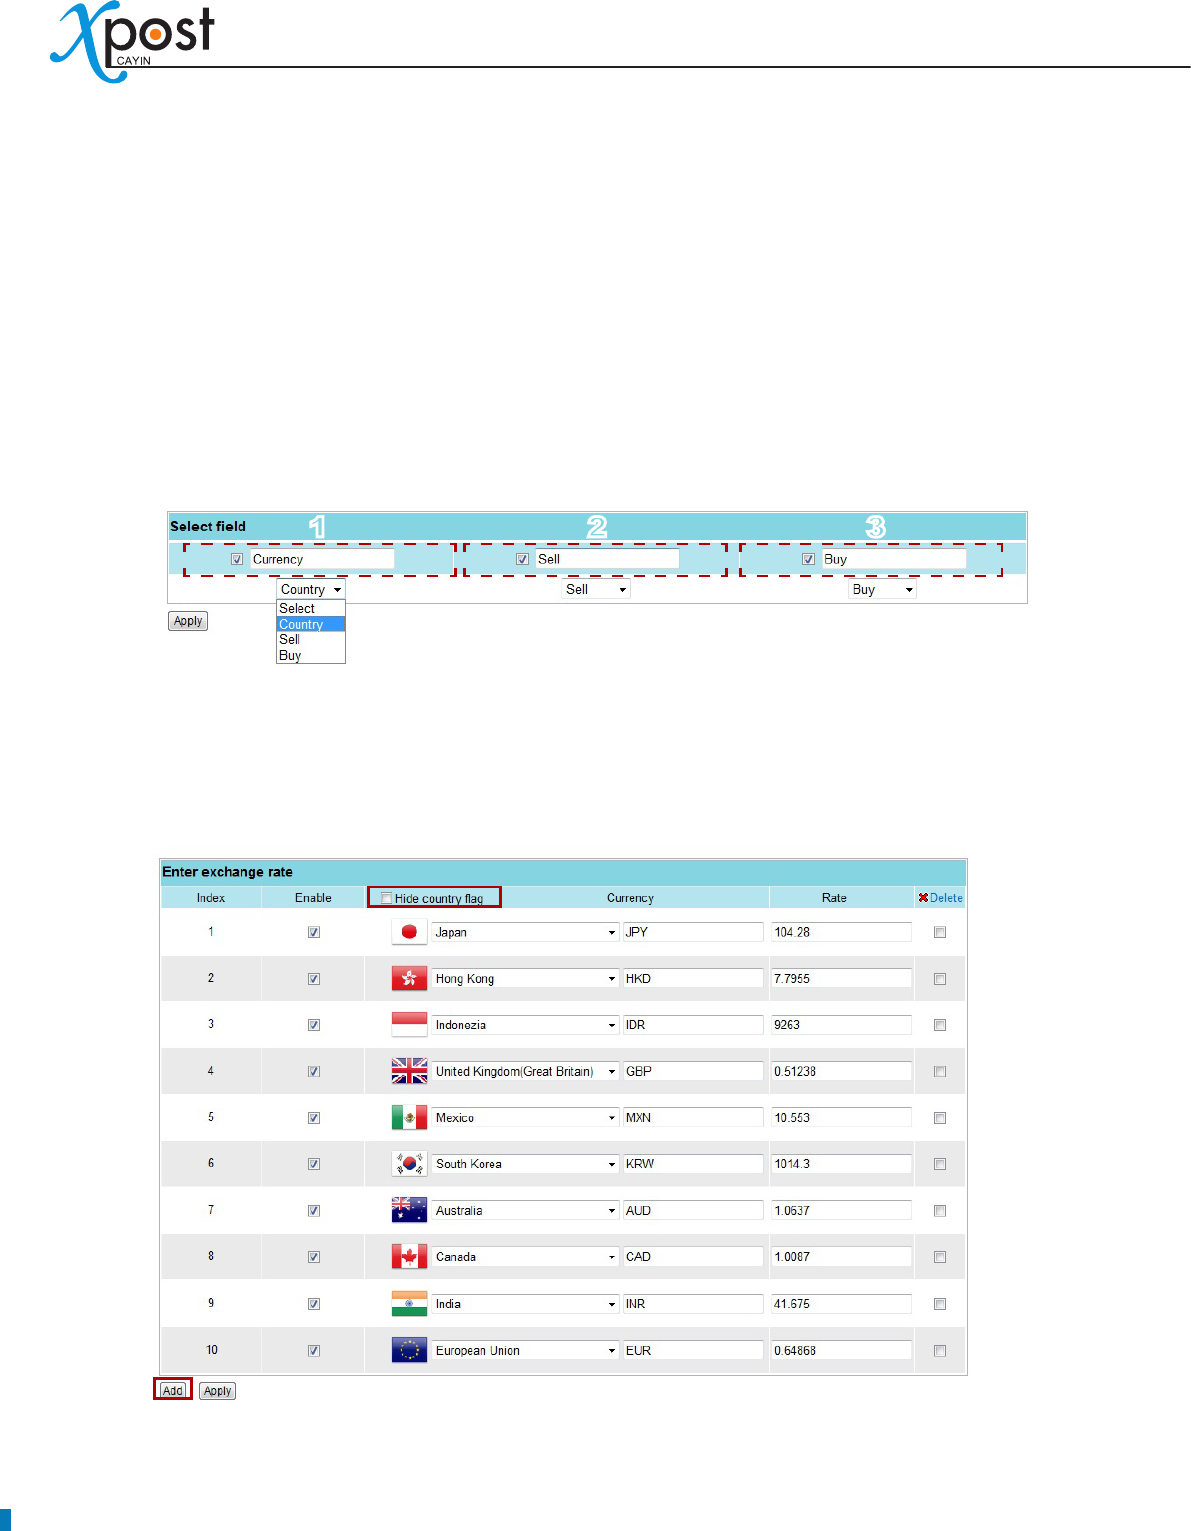
7-5-2 Currency Exchange
1. Select [Data > Currency Exchange] on the toolbar; then you will see the page of “Currency
Exchange”.
2. Select a base currency using the scrolling selection boxes. You can enter the message your want for
the base currency.
64
3. Select field: The elds selected here will be shown on the screen in left-to-right order.
Enter eld title and enable this column by clicking on the checkbox right beside the title. For “Currency
Exchange”, you can show maximum three columns of data, which are “currency (country)”, “buy”,
and “sell”. The title may be shown on the screen based on your selected template. Please check the
template style to make sure if the title will be shown on the nal presentation.
Please match the appropriate type to each eld (column), so that the data will be shown correctly in
the table on the screen. After conguration, please click [Apply].
4. After the elds are all set, click [Add] to add the target country (currency) and enter data. lobbyPost
supports to display national flags. You only need to select a country and its national flag will be
displayed automatically. If you do not want to show national ags on the screen, please click “Hide
country ag”.
5. After the rooms are set, click [Apply] to conrm the changes.
123
APPLICATION SOFTWARE
65
7-5-3 Weather
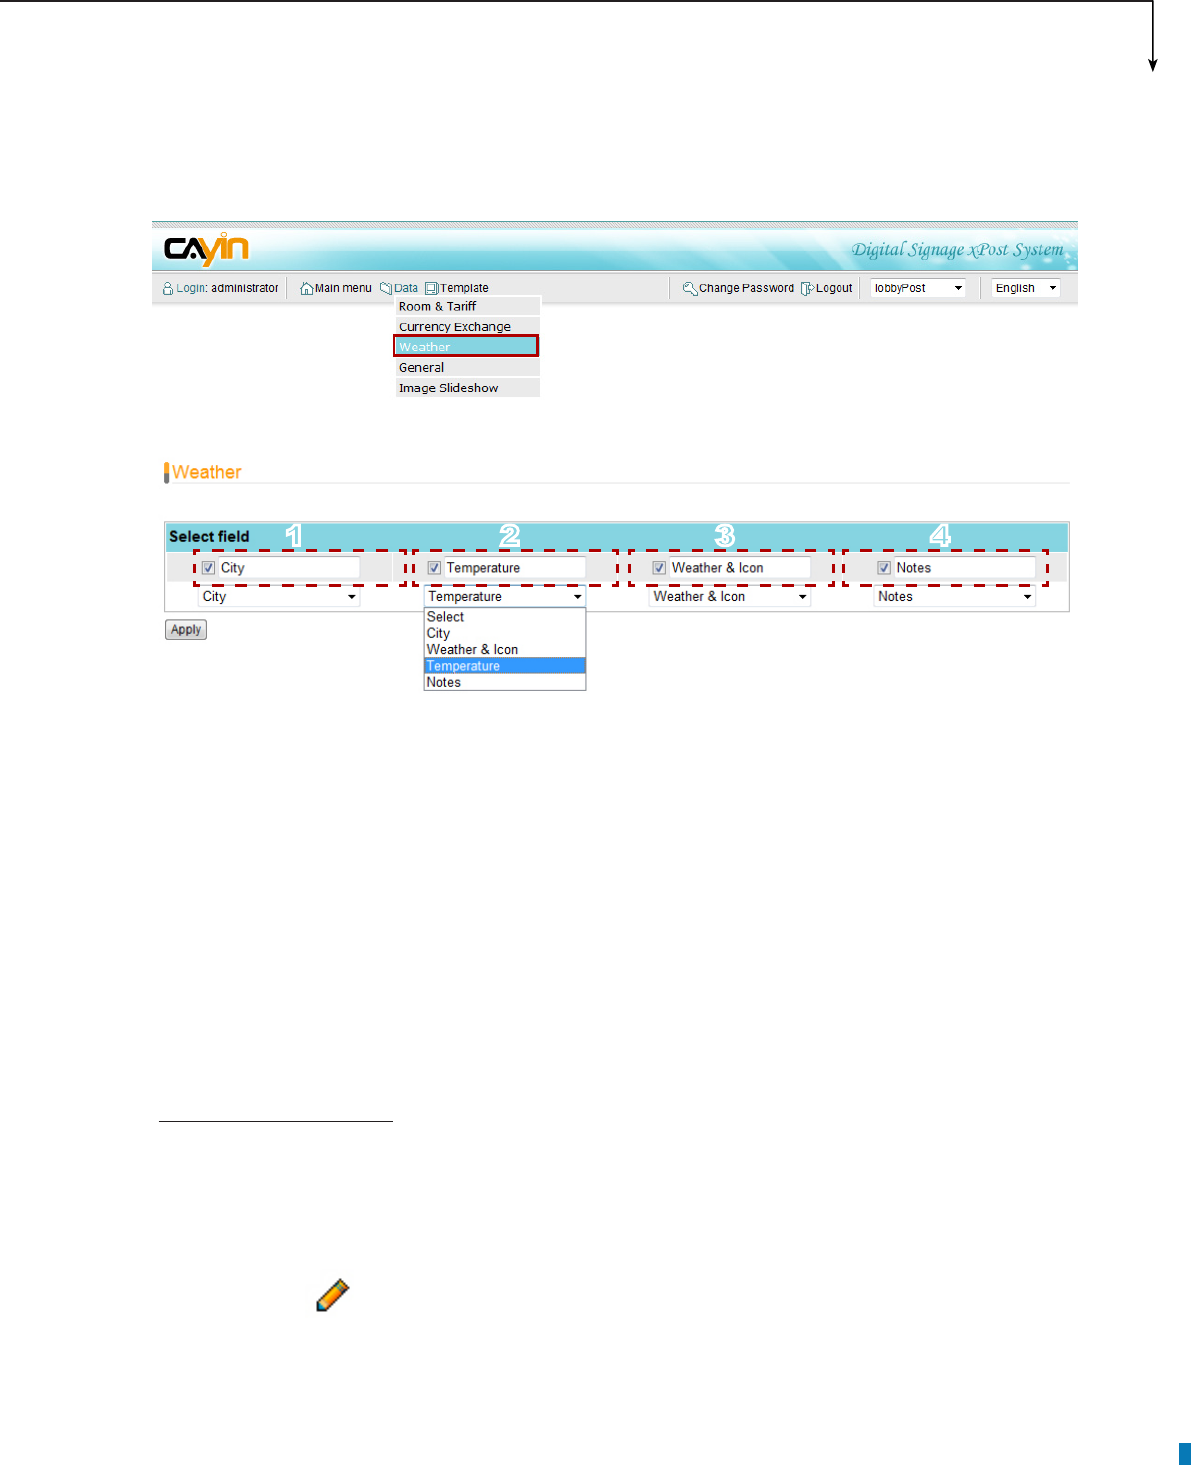
1. Select [Data > Weather] on the toolbar; then you will see the page of “Weather”.
2. Select field: The elds selected here will be shown on the screen in left-to-right order.
Enter field titles and enable these columns by clicking on the checkbox right beside the titles.
For “Weather”, you can show maximum four columns of data, which are “city”, “weather & icon”,
“Temperature”, and “Notes”. The titles may be shown on the screen based on your selected template.
Please check the template style to make sure if the titles will be shown on the nal presentation.
Please match the appropriate type to each eld (column), so that the data will be shown correctly in
the table on the screen. After conguration, please click [Apply].
3. After all fields are set, you can start to enter data. There are two options for you to enter weather
information: “Enter data manually” and “retrieve data automatically from the Internet”.
Enter data manually
Select “Enter data manually”. Then, click [Add] to add information.
City, Temperature, Weather, Notes:
• You can enter texts here.
Icon:
• Click and you will see a pop-up window. Choose a suitable icon and click on the
image.
1 2 3 4
66
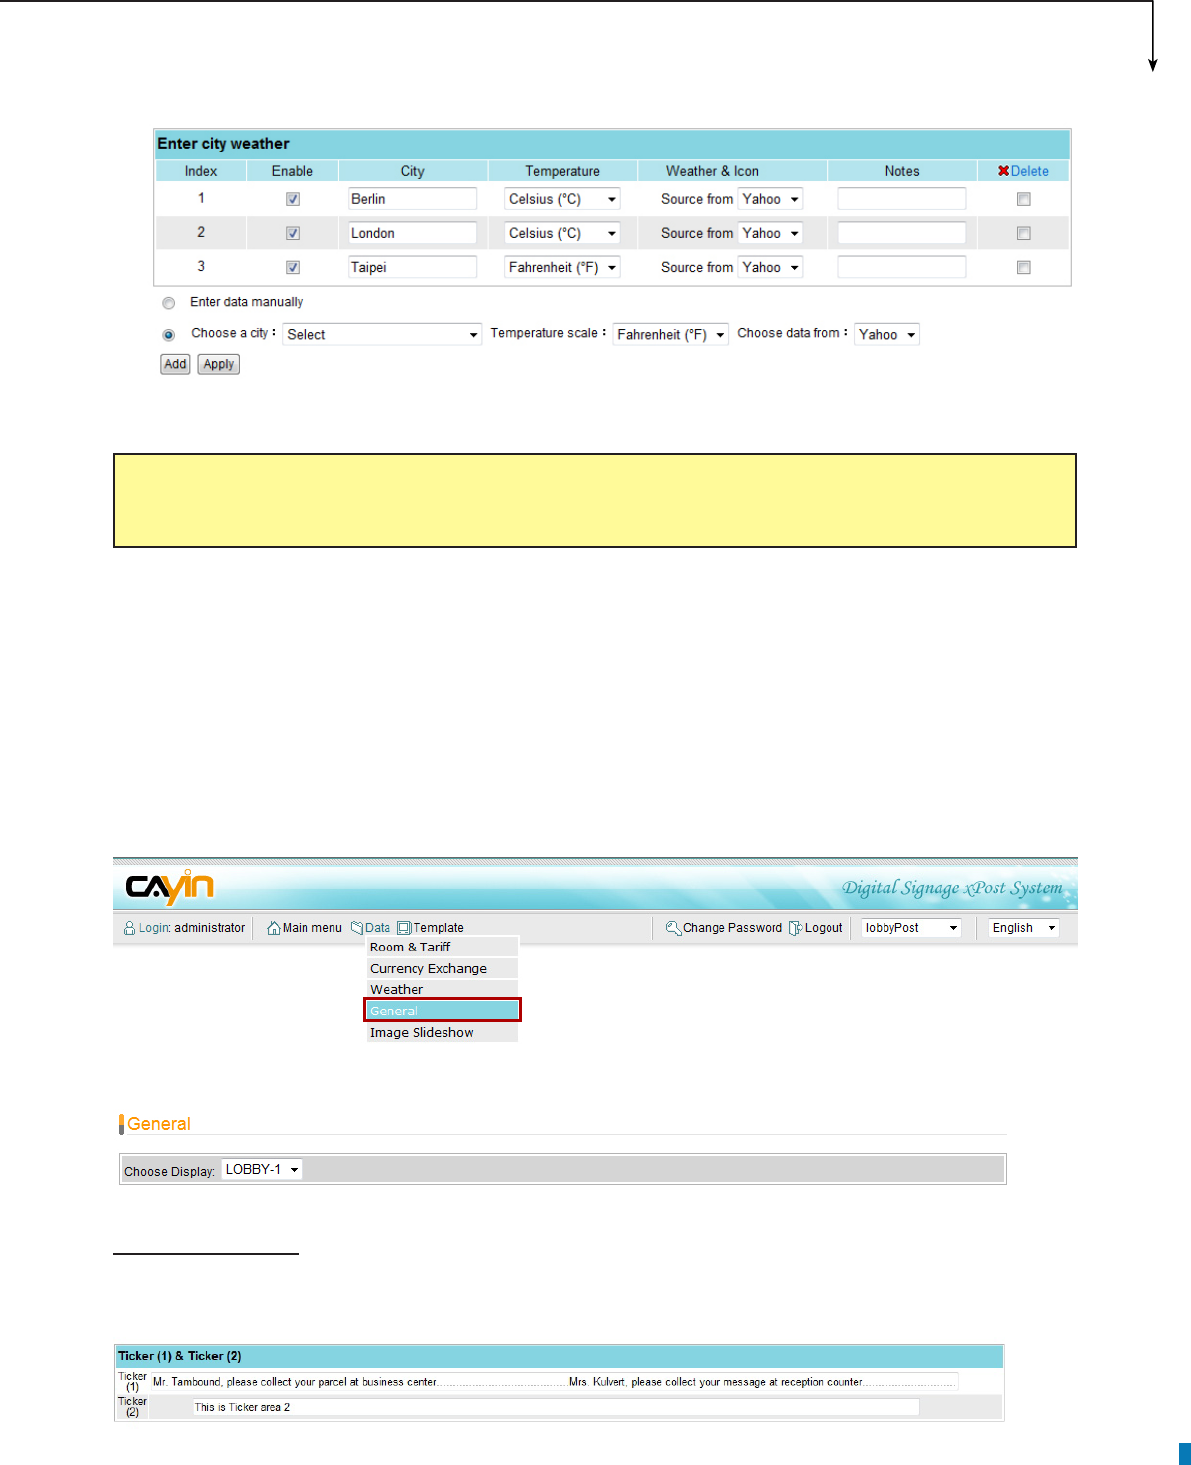
Retrieve data automatically from the Internet
Enable “Choose a city”. After you select a city, a temperature scale, and a data source, please click
[Add] to add information.
City and Notes:
• These are texts. You can change manually.
Temperature, Weather & Icon:
• This information will be retrieved automatically from Yahoo.
APPLICATION SOFTWARE
67
4. Click [Apply] after you conrm the changes.
NOTE
If you choose “Retrieve data online”, you must make sure the xPost server connect to Internet properly.
7-5-4 General and Image Slideshow
For all “Non-Table” type data, every display has its own settings. You must configure the information
individually for each display.
Select [Data > General or Image Slideshow] on the toolbar; then you will see the respective page.
Then, select display from the menu rst.
Ticker message
Enter text messages here.
68
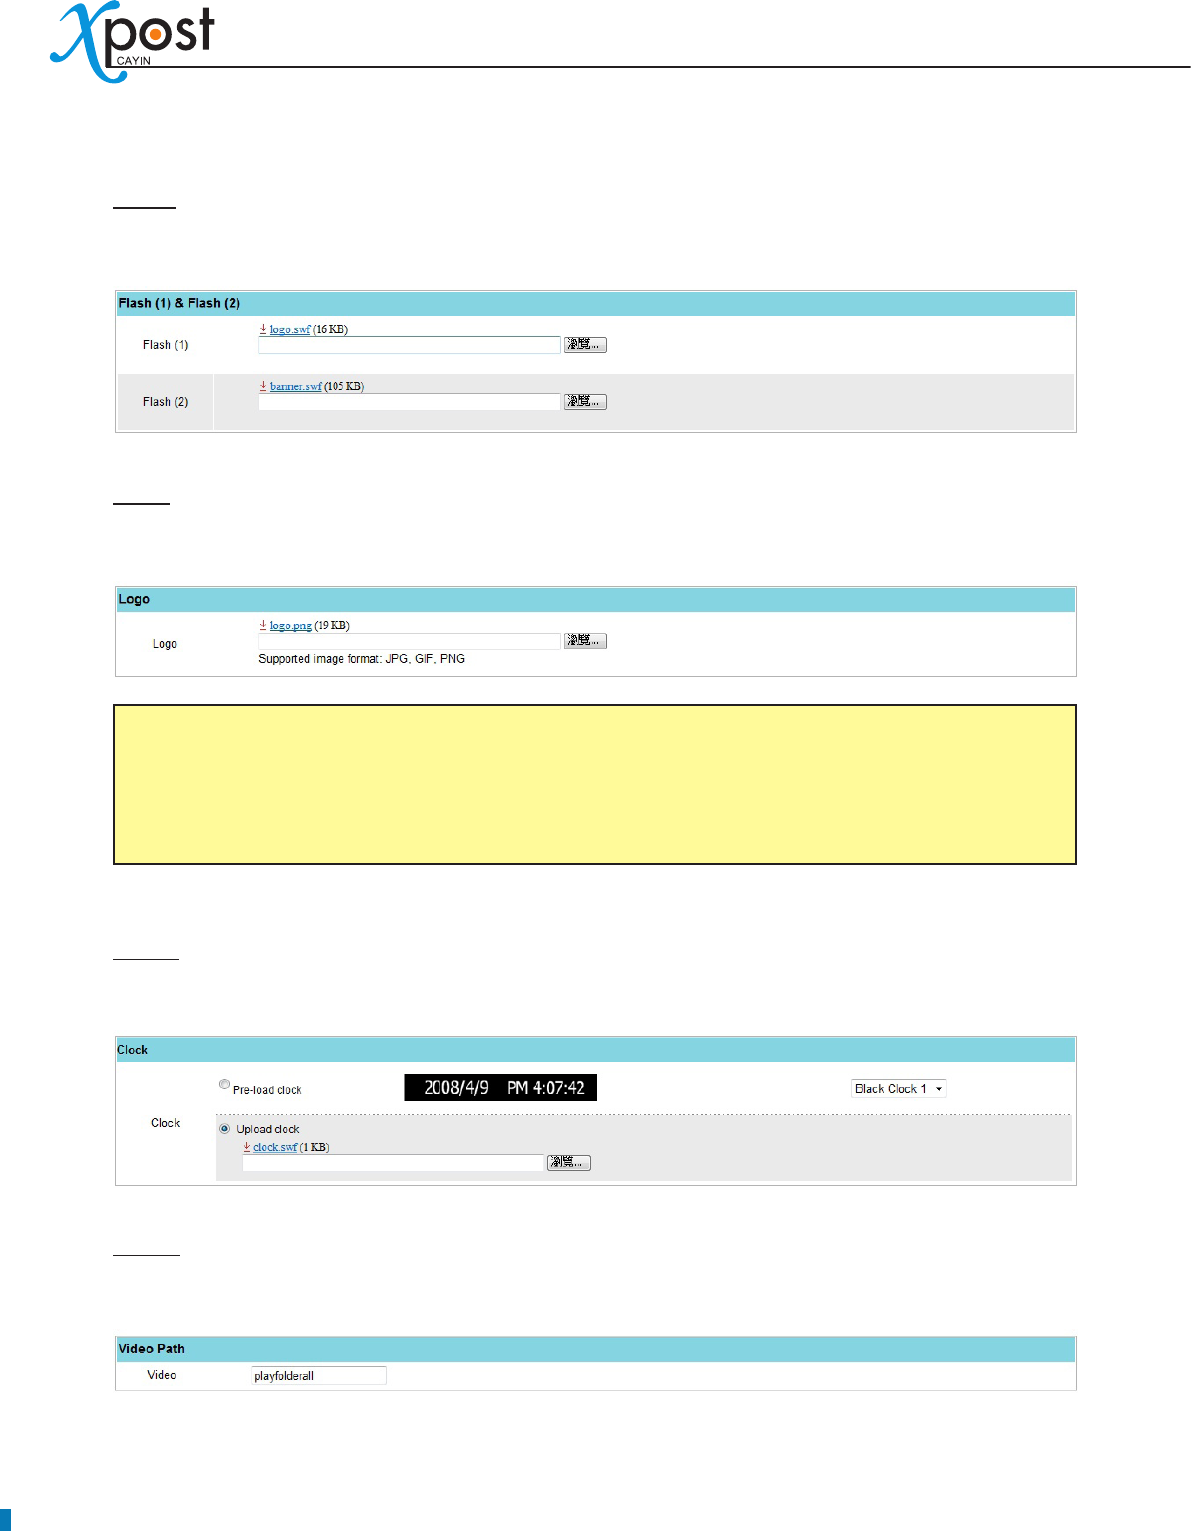
Flash
Click [Browse…] and upload you own Flash (.swf) le.
Logo
Upload a logo image (jpg, gif, or png).
NOTE
xPost DOES NOT support CMYK image format. Please DO NOT upload images les in CMYK format.
If you accidentally upload a CMYK image, it may cause some problems. Please contact CAYIN for the
solution.
Clock
Select the default, pre-loaded clock, or upload your own clock (format: .swf)
Video
Set the path of the video les in the Media Folder of the appointed SMP player.
APPLICATION SOFTWARE
69
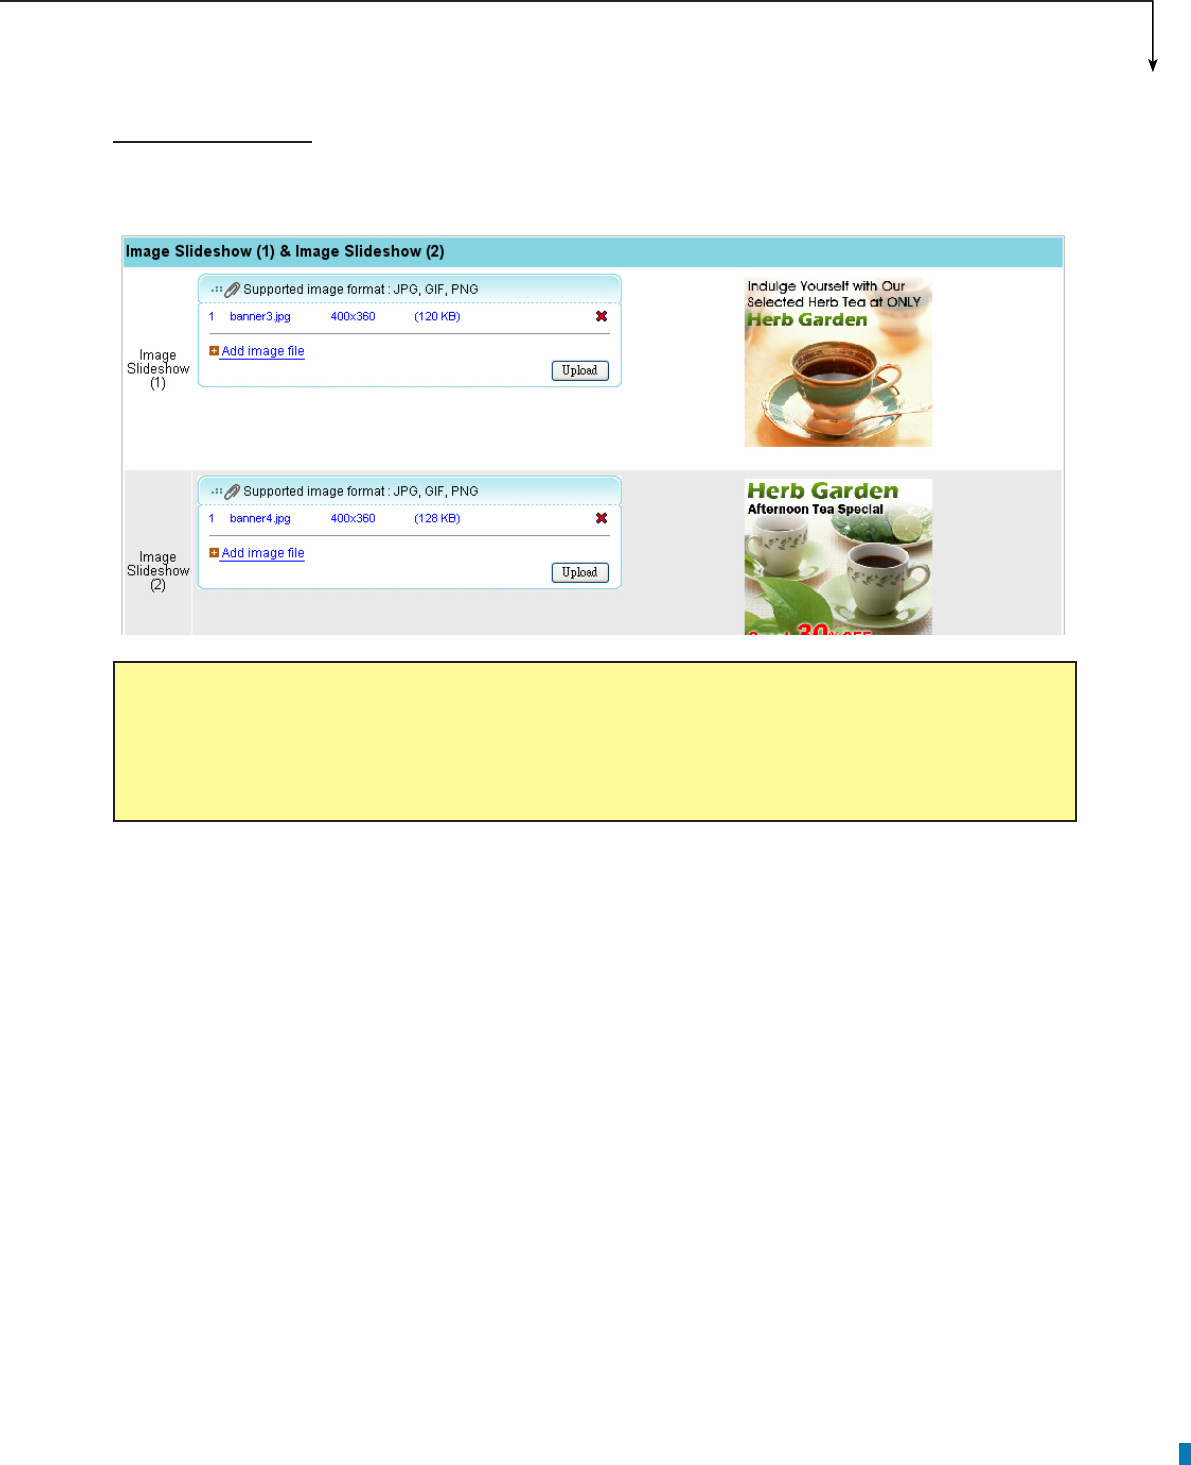
Image Slideshow
Upload image les (jpg, gif, png). Click “Add more image le”; then select les in your local PC.
NOTE
xPost DOES NOT support CMYK image format. Please DO NOT upload images les in CMYK format.
If you accidentally upload a CMYK image, it may cause some problems. Please contact CAYIN for the
solution.
