ZEvent App Z Event Administration Guide V2.1
User Manual:
Open the PDF directly: View PDF ![]() .
.
Page Count: 39
© Copyright IBM Corp.2016
zEvent Mobile Application
Administration Guide
Version 2.1

zEvent Administration Guide
2 © Copyright IBM Corp.2016
Content:
1. Introduction .................................................................................................................................... 4
2. zEvent Administration Dialog .......................................................................................................... 5
2.1 Load/Save .............................................................................................................................. 5
2.2 Settings .................................................................................................................................. 6
2.3 Projects .................................................................................................................................. 6
2.4 Users ...................................................................................................................................... 8
2.5 Groups ................................................................................................................................... 9
2.6 Attributes ................................................................................................................................ 9
2.7 Rules .................................................................................................................................... 10
2.8 Create .................................................................................................................................. 11
2.9 Event .................................................................................................................................... 12
2.10 GetIp .................................................................................................................................... 12
2.11 Rule test ............................................................................................................................... 12
2.12 Event, Chart and JSON ........................................................................................................ 12
3. zEvent Quick Start ....................................................................................................................... 13
3.1 Get the Administration Dialog ............................................................................................... 13
3.2 Specify cURL path ................................................................................................................ 13
3.3 Connect to IBM Bluemix ....................................................................................................... 13
3.4 Install IBM zEvent App.......................................................................................................... 14
3.5 Define a User in the Administration Dialog............................................................................ 15
3.6 Send Push Message ............................................................................................................ 15
3.7 Save your Data ..................................................................................................................... 16
4. Using z/OSMF notification interface ............................................................................................. 17
5. Setup the z/OS Message Processing Facility (MPF) for Notifications ........................................... 18
5.1 Overview .............................................................................................................................. 18
5.2 The zEvent MPF Exit Module MPF4REXX ........................................................................... 19
6. Setup RMF Monitor III Batch as Event Provider ........................................................................... 21
6.1 Preface ................................................................................................................................. 21
6.2 RMF Monitor III Batch and MPF Processing ......................................................................... 21
6.3 RMF Monitor III Batch and zEvent API Invocation ................................................................ 25
6.4 zEvent Notifications with RMF Context ................................................................................. 27
6.5 zEvent Notifications with z/OSMF Context ............................................................................ 29
7. zEvent API ................................................................................................................................... 30
7.1 Parameters for Rule Selection .............................................................................................. 30
7.2 Parameters to overwrite attributes ........................................................................................ 31
7.3 Other parameters ................................................................................................................. 32
8. Push Interface .............................................................................................................................. 32
8.1 Events Section ..................................................................................................................... 34
8.2 Charts Section ...................................................................................................................... 38

zEvent Administration Guide
3 © Copyright IBM Corp.2016
Figures:
Figure 1: zEvent main menu .................................................................................................................. 5
Figure 2: Load panel .............................................................................................................................. 6
Figure 3: Settings panel ......................................................................................................................... 6
Figure 4: Zosmf Project .......................................................................................................................... 7
Figure 5: Project settings ....................................................................................................................... 8
Figure 6: User settings ........................................................................................................................... 9
Figure 7: Attributes panel ..................................................................................................................... 10
Figure 8: Rule settings ......................................................................................................................... 11
Figure 9: zEvent API exec creation panel ............................................................................................ 11
Figure 10: zEvent notification flow ........................................................................................................ 19
Figure 11: ZEVENT System REXX invocation ..................................................................................... 20
Figure 12: System REXX parmlib member ........................................................................................... 21
Figure 13: ERBM3B exit procedures .................................................................................................... 22
Figure 14: ERBM3B example – RMF Monitor III CPC Report............................................................... 23
Figure 15: Sample rule for MPF processing ......................................................................................... 24
Figure 16: Sample attributes for MPF processing................................................................................. 24
Figure 17: Sample event for MPF processing ...................................................................................... 25
Figure 18: Sample Rule for zEvent API processing .............................................................................. 25
Figure 19: Sample Attributes for zEvent API processing ...................................................................... 26
Figure 20: Invocation of the zEvent API via RMF Monitor III Batch ...................................................... 26
Figure 21: zEvent notifications – RMF context ..................................................................................... 27
Figure 22: Connection Label and notification source ............................................................................ 28
Figure 23: RMF context launch ............................................................................................................ 28
Figure 24: zEvent notifications – z/OSMF context ................................................................................ 29
Figure 25: z/OSMF Dashboards for userid ibmdev ............................................................................... 29
Figure 26: z/OSMF context launch ....................................................................................................... 30
Figure 27: Sample Event and Charts tab ............................................................................................. 34

zEvent Administration Guide
4 © Copyright IBM Corp.2016
1. Introduction
In addition to the IBM zEvent mobile application, a server-side facility is required to manage the
submission of zEvent notifications. This facility is the zEvent administration dialog, which is described in
this document. The administration dialog allows to customize and automate all the parameters that are
part of the notifications:
Define users or groups of users that receive the notifications.
Define rules that trigger a notification to specific users or groups.
Configure the content of the notification.
Enable z/OS console message ids to trigger notifications.
Once the user has performed the required configurations, the administration dialog generates a System
REXX exec. This exec then connects to the platform specific push services, which are the Google
Cloud Messaging Services (GCM) for Android or the Apple Push Notification Services (APNS) for iOS,
in order to deliver the notifications for a certain event.

zEvent Administration Guide
5 © Copyright IBM Corp.2016
2. zEvent Administration Dialog
The zEvent administration dialog (cf. Figure 1) allows to customize zEvent data like users, devices,
rules etc. and build the zEvent API REXX exec which can be used to send push messages to a mobile
device. The zEvent exec (created by the administration dialog) can be called by another exec or an
MPF exit.
Figure 1: zEvent main menu
2.1 Load/Save
The customization data you enter in the zEvent dialog, can be loaded/saved to a JSON encoded
member of a partitioned data set. You can have one or more such members that can be seen as
configuration profiles. These configuration members are used by the dialog exec, only.
The DIALOG exec will remember the most recently used configuration member and tries to load this
member when the dialog is entered the next time. After a configuration member has been loaded, the
number of users, rules, etc. is shown in the lower part of the panel (cf. Figure 2).
If you want to create a new configuration member, you can load an existing member and save it with a
different name. To start from scratch you can load a non-existing member. The dialog exec will tell you
that this member does not exist but as soon as you save the member it will be created.
You find the load option in the main menu (cf. Figure 1) of the administration dialog in the Load/Save
section.
zEvent Administration Guide
6 © Copyright IBM Corp.2016
Figure 2: Load panel
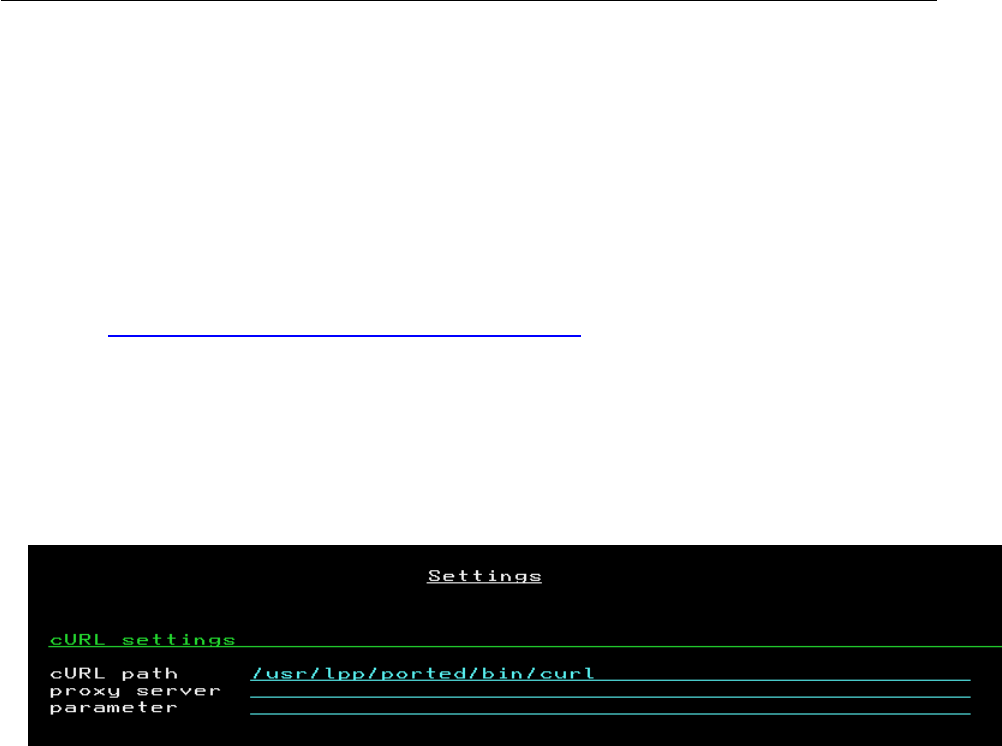
2.2 Settings
Starting with version 2.1 of the dialog, the zEvent communication is based on cURL which needs to be
installed in z/OS UNIX environment. If cURL is not installed on your systems, see here for more
information: www.ibm.com/systems/z/os/zos/features/unix/ported/
The settings panel allows to configure the path to cURL and to specify optional cURL parameters as a
proxy server for example. The syntax of the optional parameters can be found in the internet (e.g.
https://curl.haxx.se/docs/manpage.html)
Figure 3: Settings panel
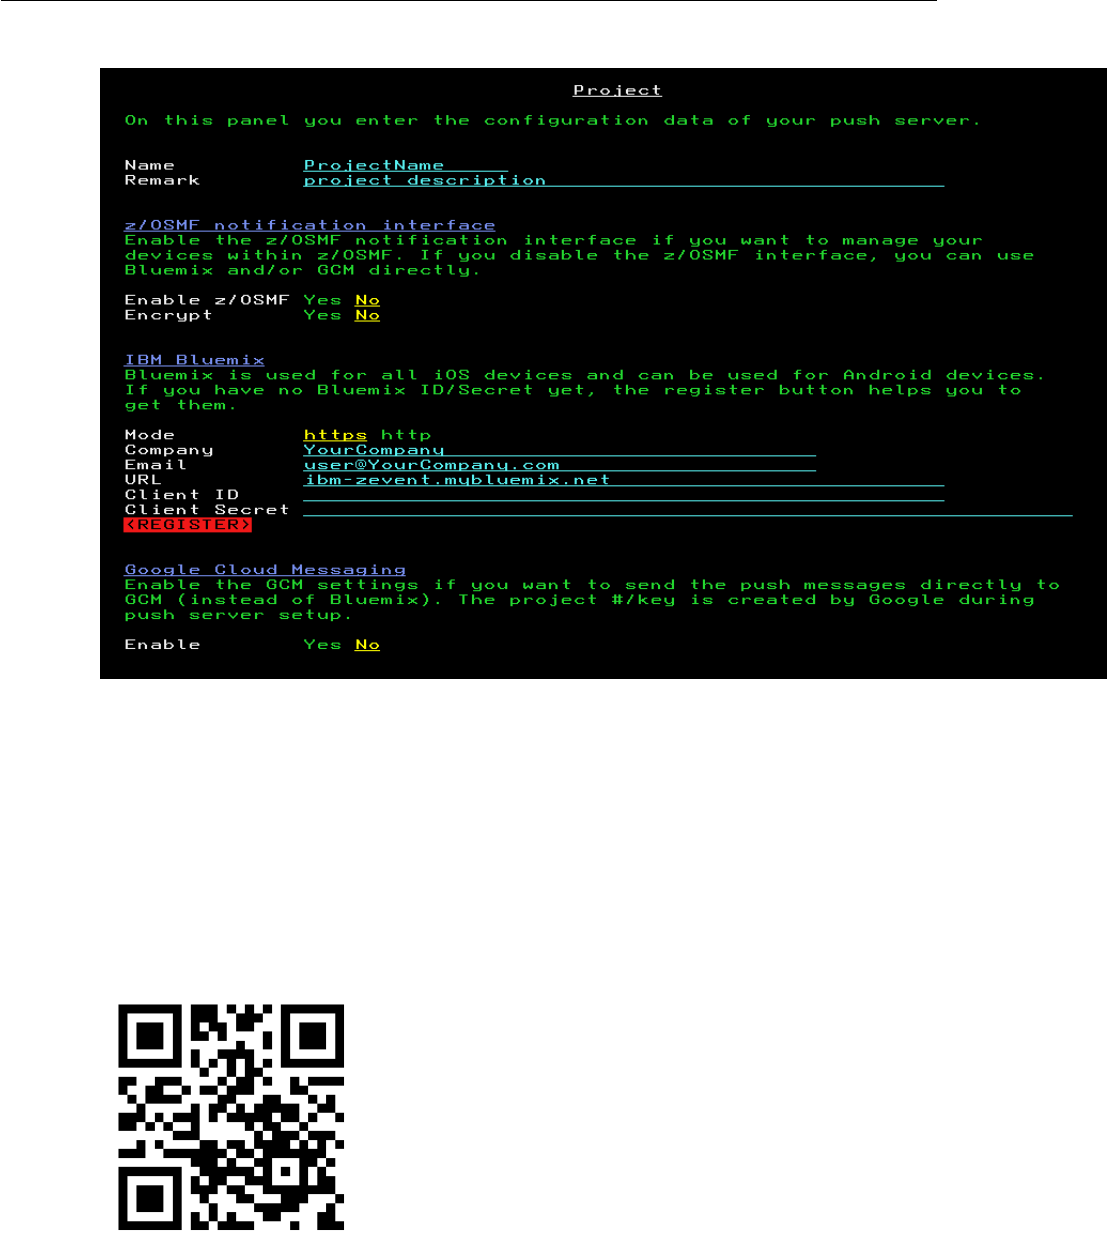
2.3 Projects
You need to define at least one Project that contains the attributes of the push servers. The Users (cf.
chapter 2.4) which are connected to the same project, will use the same push server settings.
If your system has z/OSMF 2.2 installed you have the option to use the z/OSMF notification interface
and manage your devices within z/OSMF. In this case your project setup consists only of the url of the
z/OSMF system and the user credentials.
The configuration of the devices, the encryption settings, etc. is then done in z/OSMF.
zEvent Administration Guide
7 © Copyright IBM Corp.2016
Figure 4: Zosmf Project
If you decide to not use z/OSMF there are two alternatives, the IBM Bluemix server and the Google
Cloud Messaging (GCM) service. All push messages sent to an Apple device will be pushed using the
IBM Bluemix server but for Android devices you have the choice to use Bluemix or GCM.
To use the Bluemix server, you need to register once to get a Client ID and a Client Secret. Each push
message will get authorized using this information. After specifying the company name and email
address you can use the register button to get the client id/secret.
It is highly recommended to use the HTTPS protocol for the communication to the Bluemix server.
If you want to use GCM directly, you need to have a Google account and set up your own push server.
During this setup you will receive a project number and a project authorization key.
For more details refer to the following URL: https://developers.google.com/cloud-messaging/
If you decide to encrypt the messages before you send them to the device, you need to specify an
encryption key. This key must be identical with the one that is specified in the zEvent app.
The project settings example below (cf. Figure 5) shows all settings which are possible for a project. As
long as there is no encryption key specified in your zEvent app, you need to select Encrypt=No. If you
did not setup your own Google push server ( you don’t need one ) you need to select Enable=No in the
Google Cloud Messaging section.

zEvent Administration Guide
8 © Copyright IBM Corp.2016
Figure 5: Project settings
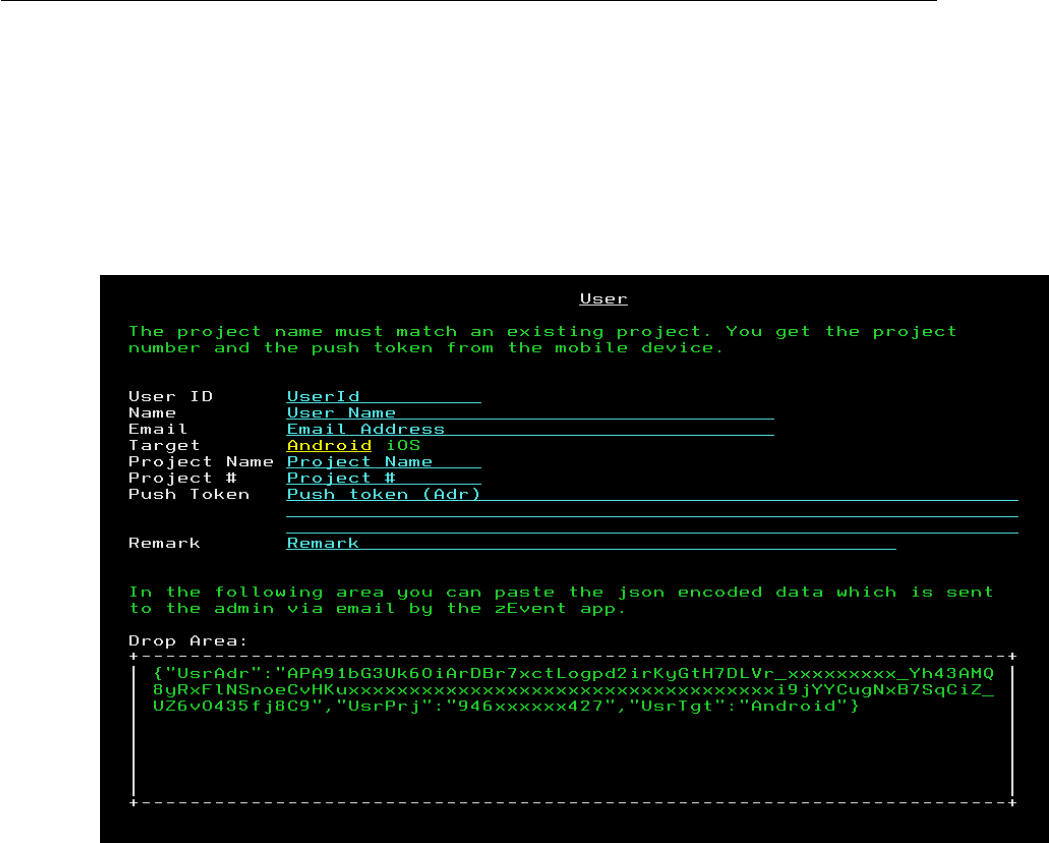
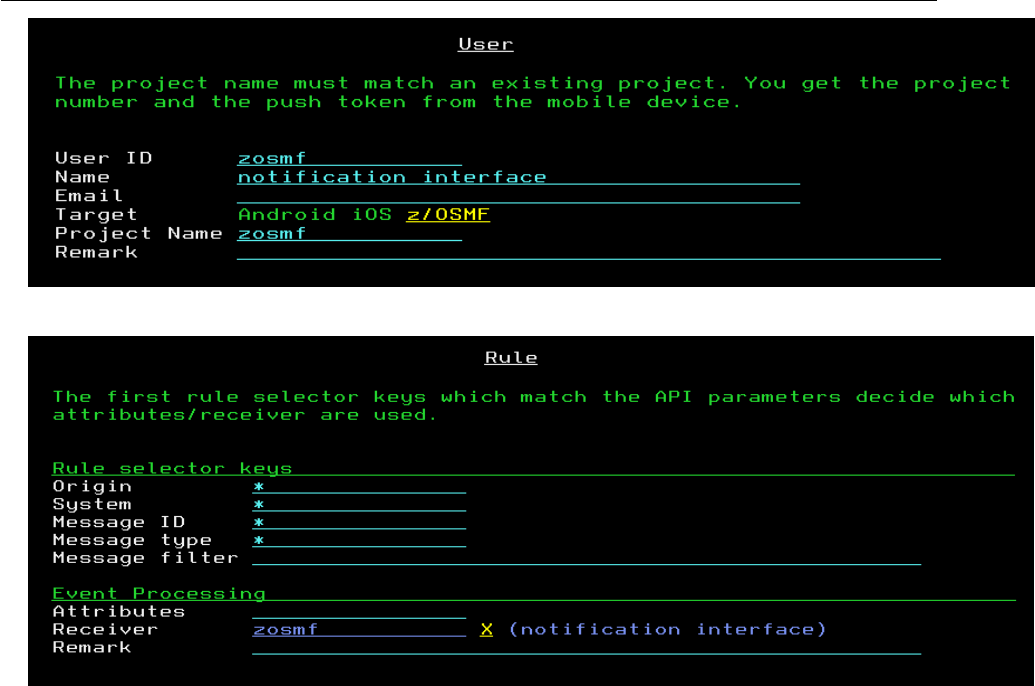
2.4 Users
You need to define a user for each device. A user needs to be connected to a project by specifying the
name of an existing project.
The zEvent app is sending an email to the administrator when the connect button in the push settings
of the app is used. In this email there is a JSON encoded string which can be pasted into the Drop
Area of the user panel (cf. Figure 6). Therefore it is not necessary to type the push token by hand.
zEvent Administration Guide
9 © Copyright IBM Corp.2016
Figure 6: User settings
2.5 Groups
User groups consist of one or more users.
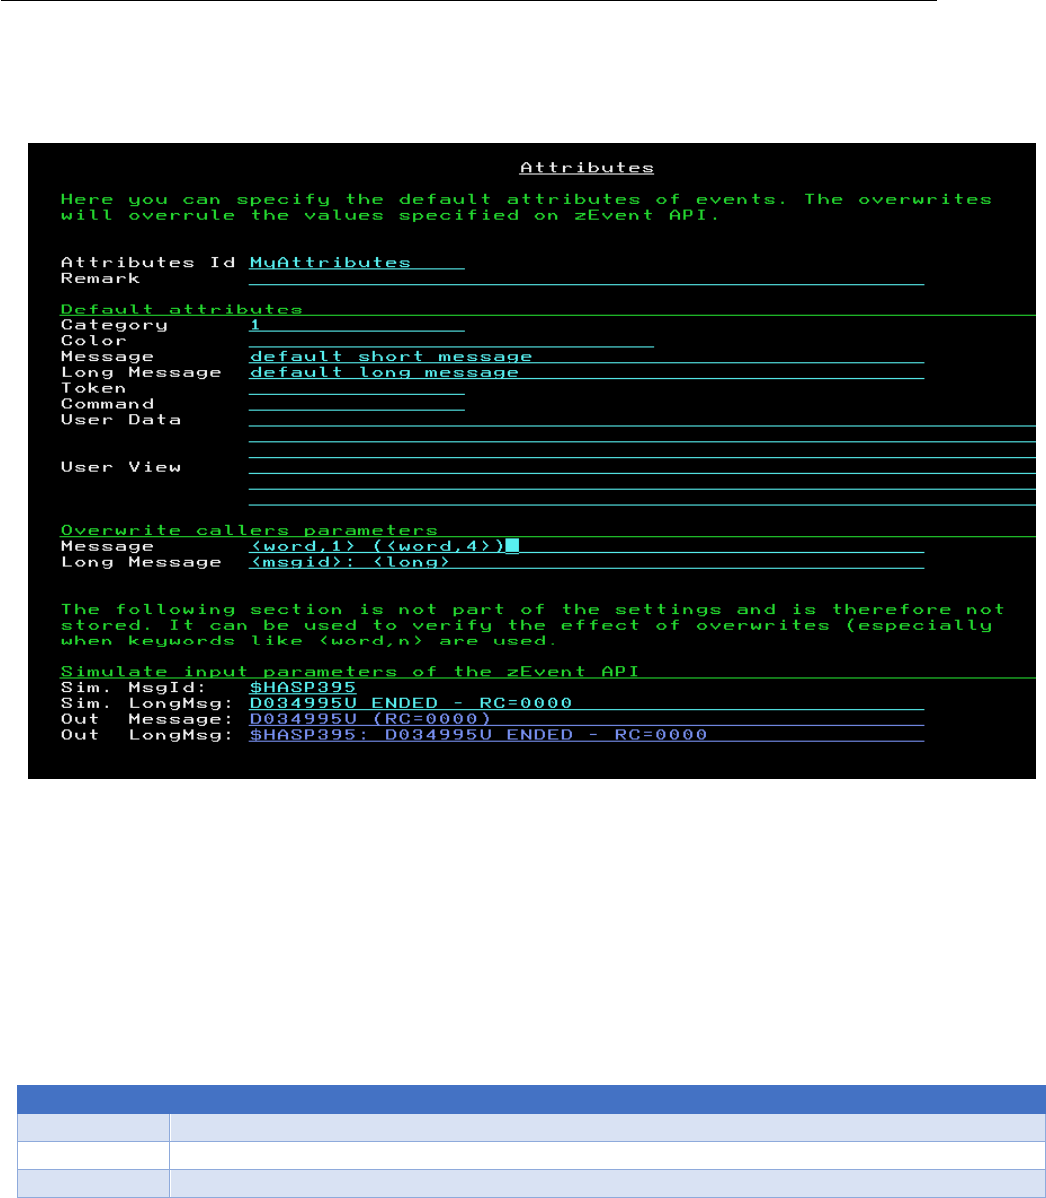
2.6 Attributes
The zEvent exec created by the dialog has parameters like category, color, etc. to tailor the push
message. The attributes provide defaults for the not specified parameters (Note: Token and Command
are not implemented, yet).
In the User data field you can enter JSON formatted key/value pairs which are shown in the zEvent app
without interpreting their content (e.g. {"key1":"val1"}, {"key2":"val2"}).
The User View field allows to specify link information which points for example to a specific dashboard
on the z/OSMF tab of the zEvent app. For an example how to use User View, see Chapter 6.4 and 6.5.
Additionally it is possible to overwrite the short and the long message by using the overwrite fields of
the attributes. Within the overwrite fields you can use one or more of the following keywords in your
text:
Keyword
Meaning
<MSGID>
Message id of the long message specified on zEvent API
<LONG>
Complete long message from API
<LEFT,nn>
The first nn characters of the long message
<RIGHT,nn>
The last nn characters of the long message
<WORD,n>
The n th word of the long message
<PART,s,n>
N characters from long message starting at position s
zEvent Administration Guide
10 © Copyright IBM Corp.2016
The last section of the panel allows to simulate a call to the zEvent API with a user defined message.
This allows to verify the effect of the attributes. In the example below (cf. Figure 7) you can see that the
overwrite section of the attributes has been used to customize a console message before it is sent to
the mobile device.
Figure 7: Attributes panel
2.7 Rules
The Rules (cf. Figure 8) allow to define which users are the receivers of the individual messages. If the
parameters of the zEvent exec match a rule, a push message will be sent to the specified receiver
using the specified attributes. If there is an asterisk in a field, the rule is considered as matching for any
zEvent parameter value.
In the Message filter field you can enter a string which needs to be part of the long message or you can
use one or more of the following keywords to define a more complex filter:
Keyword
Meaning
OR(text)
One of all OR texts needs to exist in the long message
AND(text)
All of the AND texts need to exist in the long message
NOT(text)
The NOT text must not exist in the long message

zEvent Administration Guide
11 © Copyright IBM Corp.2016
Figure 8: Rule settings
2.8 Create
After the configuration is complete, you can create the zEvent API exec (cf. Figure 9). This exec can be
invoked to send push messages based on caller’s parameters. All the rules, attributes, etc are stored in
this exec, so caller’s parameters are used to find a matching rule and choose the attributes and
receivers.
Note: If you change settings in the dialog ( users, rules, etc ) and just save the changes to the JSON
file by using the load/save option of the dialog, the changes have no effect in the zEvent API exec until
you create a new zEvent API exec.
If you want to use the zEvent exec as an MPF exit you can also build a template for the MPFLSTxx
member which is based on your rules. You need a MPFLSTxx member which forwards the messages
you are interested in to the zEvent exec. The zEvent exec will then search for a matching rule and send
a push message to the receivers (for more details see chapter 4).
Figure 9: zEvent API exec creation panel

zEvent Administration Guide
12 © Copyright IBM Corp.2016
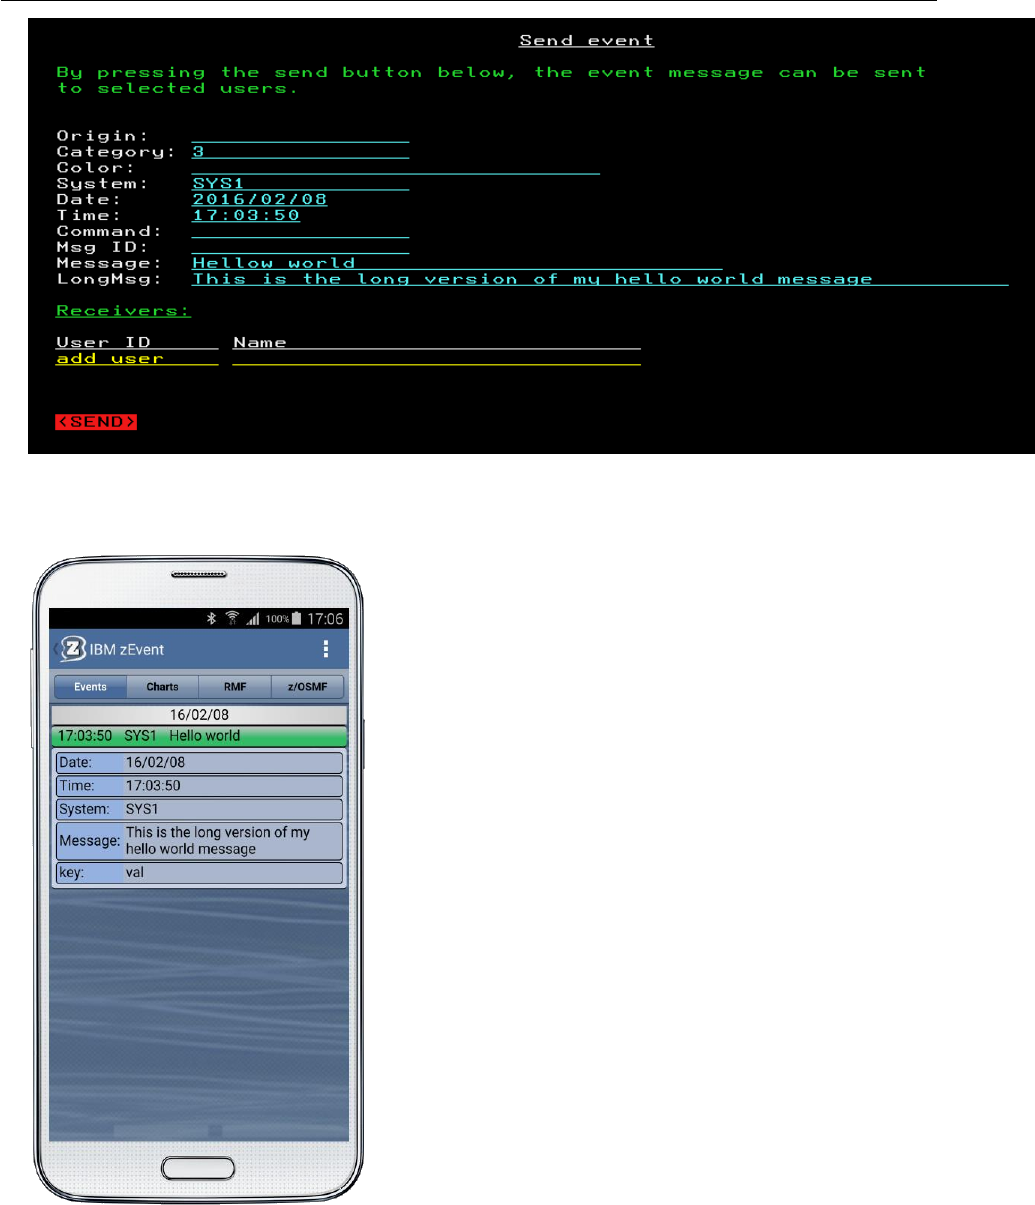
2.9 Event
The event option allows you to send a message to one or more users. This is helpful to test your setup
before creating the zEvent API exec. After sending a push message to a device you can switch to the
TRACE panel at the top of the screen to see what data has been sent to the push server and what
response was returned.
2.10 GetIp
If you choose to push your messages directly to your Google push server, you might want to use the
optional security feature from Google which allows only your hosts to push to your push server. To
configure this security feature, you need the IP address of the host(s) which sends the push messages
to GCM. That means, only registered ip addresses are allowed to push messages. To help you to find
out your external IP address, the GetIp option tries to consult an internet web site which returns your
external IP address.
When your internet gateway uses different ip addresses you may get different ip addresses when you
use this function multiple times. In this case you need to register all your ip addresses in the setup of
the Google push server.
2.11 Rule test
The Rule test allows to simulate zEvent API calls and you can verify if the selected rule is the one that
you expect. Furthermore you can see if the defaults and the overwrites work as you expected. This is
especially useful if you use keywords in the Message filter field of rules or in the overwrite section of the
Attributes panel.
2.12 Event, Chart and JSON
The Event, Chart and JSON option allow you to send event messages and charts to a mobile device.
This is for testing purposes. You can switch on/off the encryption and you can check the trace to see
the communication data.
zEvent Administration Guide
13 © Copyright IBM Corp.2016
3. zEvent Quick Start
By following the steps in this chapter you should be able to send your first message to the zEvent app.
3.1 Get the Administration Dialog
To send push messages from z/OS to the zEvent app, you need the zEvent Administration Dialog. The
administration dialog is an ISPF application which allows you to define projects, users, etc. and to
create a zEvent API exec. You can download the administration dialog from the zEvent home page and
upload it to your host system:
1. Download the file IBMDEV.ZEVENT.EXEC.VxRx (binary file) from the zEvent website
(www.ibm.com/systems/z/os/zos/features/zevent/)
2. Upload (ftp) the file in binary mode to a preallocated host dataset in fixed block 80 format
3. Receive from this dataset into a dataset of your choice:
TSO RECEIVE INDATASET(‘hlq.ZEVENT.EXEC.VxRx’)
3.2 Specify cURL path
For the communication with the push services, the program cURL needs to exist in your z/OS UNIX
environment. You need to specify the path to cURL in the settings panel:
3.3 Connect to IBM Bluemix
Since your network settings need to allow outbound connections to the internet, the first step is to
check if communication to the IBM Bluemix server is possible:
1. Execute the DIALOG exec
2. Select the Projects option and edit (E) the predefined entry
3. Define a name for your project
4. Leave z/OSMF=No, Encrypt=No and Google Cloud Messaging Enable=No for now
5. The Bluemix URL is: ibm-zevent.mybluemix.net
zEvent Administration Guide
14 © Copyright IBM Corp.2016
6. To get a client id/secret, provide your company’s name and your email address and select
REGISTER. This will fill the client id/secret fields:
7. Go back to the main menu (F3)
3.4 Install IBM zEvent App
In the previous step you verified if you are able to connect to IBM Bluemix. Now you need a mobile
device which will receive your push messages.
Install the zEvent APP which can be found in the app stores of Apple and Google.
1. Start the zEvent app
2. Navigate to the Settings menu
3. Select the Push option
4. Android only: Enter the Project # 344593236612 manually or use QR Scan with the following
QR-Code to get the project number of IBM Bluemix :
5. Enter (at least) the admin email of the person who has access to the zEvent Administration
Dialog
6. Use Connect and select your email client in the selection dialog. If your email client is
configured correctly, the admin should get an email with the device data
zEvent Administration Guide
15 © Copyright IBM Corp.2016
7. Open the received email because the included data is needed in the next step
3.5 Define a User in the Administration Dialog
The zEvent App sends an email to the administrator with the required information to create a user.
1. Go back to your Administration Dialog on the host
2. Select the Users option and edit (E) the predefined entry
3. Define a UserId for the new user
4. The email which has been sent to the administrator has a JSON encoded string with the user
information. Paste this string into the drop area on the users panel and press <Enter>:
5. Go back to the main menu (F3)
3.6 Send Push Message
Now you have the minimal setup to be able to send push messages to your mobile device. Navigate to
the Event option in the Send to mobile section.
Fill in the Message and LongMsg field, add a user (<Enter> on add user line ) and SEND the message
to your mobile device.
zEvent Administration Guide
16 © Copyright IBM Corp.2016
Now you should see your push message in the Events tab:
3.7 Save your Data

zEvent Administration Guide
17 © Copyright IBM Corp.2016
The configuration data you entered in the administration dialog can be saved in a JSON encoded
member. The save option can be found in the Load/Save section of the main menu:
4. Using z/OSMF notification interface
The z/OSMF notification interface is a third option for your push server setup beside Bluemix and GCM
(see Projects in chapter 2.3). When you create a zEvent API exec, it can use Bluemix, GCM or the
z/OSMF notification interface to send push messages. In case of Bluemix or GCM, all setup actions are
done in the zEvent dialogs. The devices are configured in the dialogs and also the mapping between
messages and devices is defined in the dialog rules.
The z/OSMF notification interface can be used differently. You can specify your devices and also your
mapping from messages to devices within z/OSMF. But even in this case you need a minimal setup in
the zEvent dialogs which is shown in the following description:
You need to specify the cURL path in the Settings option:
A Project is needed to configure the z/OSMF url and the z/OSMF user credentials:
You need a user which is connected to the z/OSMF project:
zEvent Administration Guide
18 © Copyright IBM Corp.2016
A minimal rule routes all messages to the zosmf user:
With this z/OSMF setup, all messages sent via the zEvent API are sent to z/OSMF notification interface
for further processing. Then the z/OSMF notification interface selects the receivers of the push
message and which push server is used. In z/OSMF notification interface you also have the choice
between Bluemix and GCM.
If you plan to use z/OSMF notification interface, you need z/OSMF 2.2 with PTF UI36316 installed.
For more details about the configuration steps, see z/OSMF documentation.
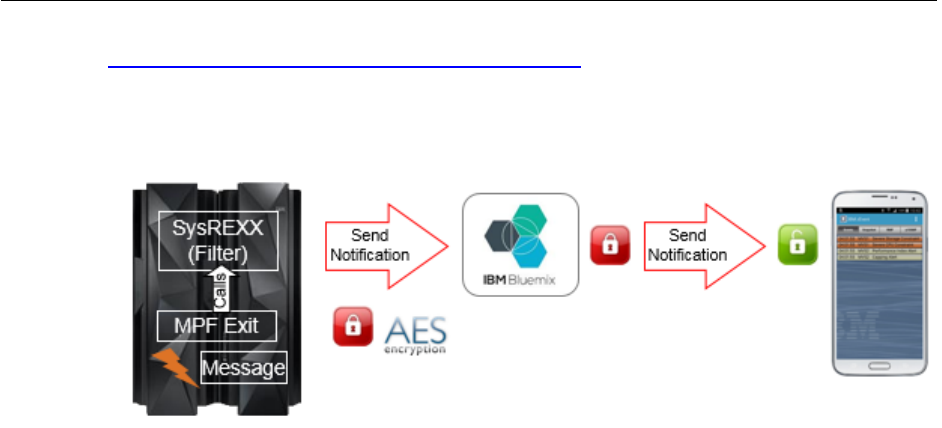
5. Setup the z/OS Message Processing Facility (MPF) for Notifications
5.1 Overview
As described in chapter 2 the submission of zEvent notifications to the mobile devices is performed by
a System REXX exec which is generated as result of the specifications provided with the zEvent
administration dialog. The caller of the System REXX exec can be any component on the z/OS system
that obeys to the calling conventions of the API for this exec.
Figure 10 shows that one potential caller of the REXX exec can be an MPF exit module.
This approach allows that any message on the operator console can trigger the submission of a
notification. Hence, the installation might decide to write a specific MPF exit module in order to react on
critical system events. But this is not needed with zEvent: it is more convenient to exploit the sample
MPF exit module MPF4REXX, which is delivered as part of the zEvent package (.cf chapter 5.2).
You can download the MPF4REXX module from the zEvent website and upload it to your z/OS system:
zEvent Administration Guide
19 © Copyright IBM Corp.2016
1. Download the file IBMDEV.ZEVENT.LINKLIB.VxRx (binary file) from the zEvent website
(www.ibm.com/systems/z/os/zos/features/zevent/)
2. Upload (ftp) the file in binary mode to a preallocated host dataset in fixed block 80 format
3. Receive from this dataset into a dataset of your choice:
TSO RECEIVE INDATASET(‘hlq.ZEVENT.LINKLIB.VxRx’)
Figure 10: zEvent notification flow
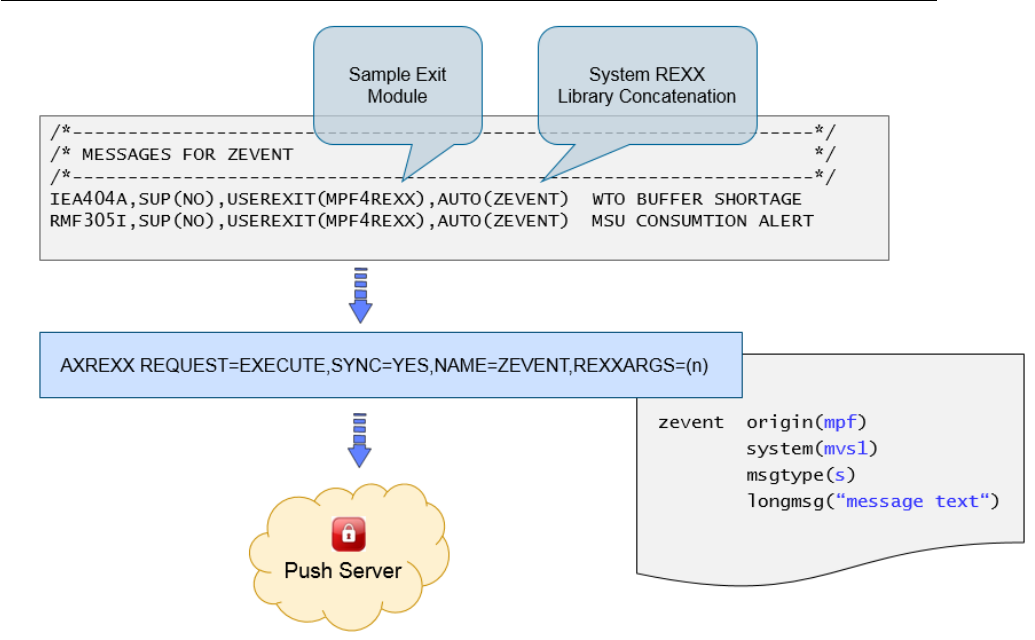
5.2 The zEvent MPF Exit Module MPF4REXX
The purpose of this module is to transfer control to the zEvent System REXX exec in case a specific
message with a certain message id appears on the operator console.
As shown in Figure 11, this is achieved by means of the AXREXX authorized assembler service.
In this context it is recommended to define the specific TSO userid ZEVENT on the z/OS system.
In case the MPF4REXX module can find this RACF userid, the zEvent System REXX will be invoked
on behalf the ZEVENT userid. The installation can take care that the ZEVENT user has RACF read
access to the library where the zEvent System REXX exec is located.
However, in case no ZEVENT userid has been defined by the installation the zEvent System REXX will
be invoked on behalf of the userid specified with the AXRUSER parameter in the active AXRxx parmlib
member (.cf also Figure 12).
zEvent Administration Guide
20 © Copyright IBM Corp.2016
Figure 11: ZEVENT System REXX invocation
zEvent Administration Guide
21 © Copyright IBM Corp.2016
The MPF sample exit module can be treated as any other z/OS MPF user exit: it must reside in a
linklist library and APF authorization is required as well. Furthermore the name specified with the AUTO
parameter in the MPFLSTxx member must match the name of the REXX target module used in the
zEvent setup and customization dialog.
Furthermore, in the active AXRxx parmlib member a line needs to be added which contains the dataset
where the zEvent API exec resides (cf. Figure 12).
Figure 12: System REXX parmlib member
In case the MPF4REXX exit module cannot find the ZEVENT System REXX exec specified with the
AUTO parameter the following console message will be displayed:
ZEVENT: MPF4REXX CALL TO SYSTEM REXX FAILED
In case of success the following message will be issued:
ZEVENT: MPF4REXX CALL TO SYSTEM REXX SUCCESSFUL
6. Setup RMF Monitor III Batch as Event Provider
6.1 Preface
Beyond the possibility to utilize any existing console message or message id as a trigger for a zEvent
notification, an installation can also setup other z/OS components than MPF as event provider.
E.g. a z/OS performance monitoring facility can inspect selected key metrics continuously and submit
push notifications based on the comparison of certain metric values and defined thresholds.
6.2 RMF Monitor III Batch and MPF Processing
The RMF Monitor III Batch Reporter is a standard component of the z/OS optional priced feature
Resource Measurement Facility aka RMF.
In a nutshell, once the ERBM3B Started Task is active, a certain RMF Monitor III report is invoked for
each Monitor III interval or reporting range. Thereby the installation is able to parse the values
contained in the report and react on defined thresholds by means of exit procedures.
For more details about RMF Monitor III Batch refer to the following documents:
RMF Users Guide, Chapter 21. Client Server Enabling
http://publibz.boulder.ibm.com/epubs/pdf/erb2ug10.pdf
The RMF2WTO Secret – From Exceptions to console Messages
ftp://public.dhe.ibm.com/eserver/zserieszos/rmf/RMF2WTO.pdf
/********************************************************************/
/* AXRZE - The SYSREXX parmlib member */
/* */
/********************************************************************/
CPF('REXX&MVSPID.',SYSPLEX) /* REXXNN AS A SYSPLEX WIDE CPF VALUE */
AXRUSER(AXRUSER) /* SECURITY=AXRUSER RESULTS IN THE EXEC
RUNNING IN A SECURITY ENVIRONMENT
DEFINED BY THE USERID AXRUSER */
REXXLIB ADD DSN(SYS1.SAXREXEC) /* 2ND DS OF REXXLIB CONCATENATION */
REXXLIB ADD DSN(ZEVENT.SAXREXEC) /* LIBRARY OF ZEVENT API EXEC */
zEvent Administration Guide
22 © Copyright IBM Corp.2016
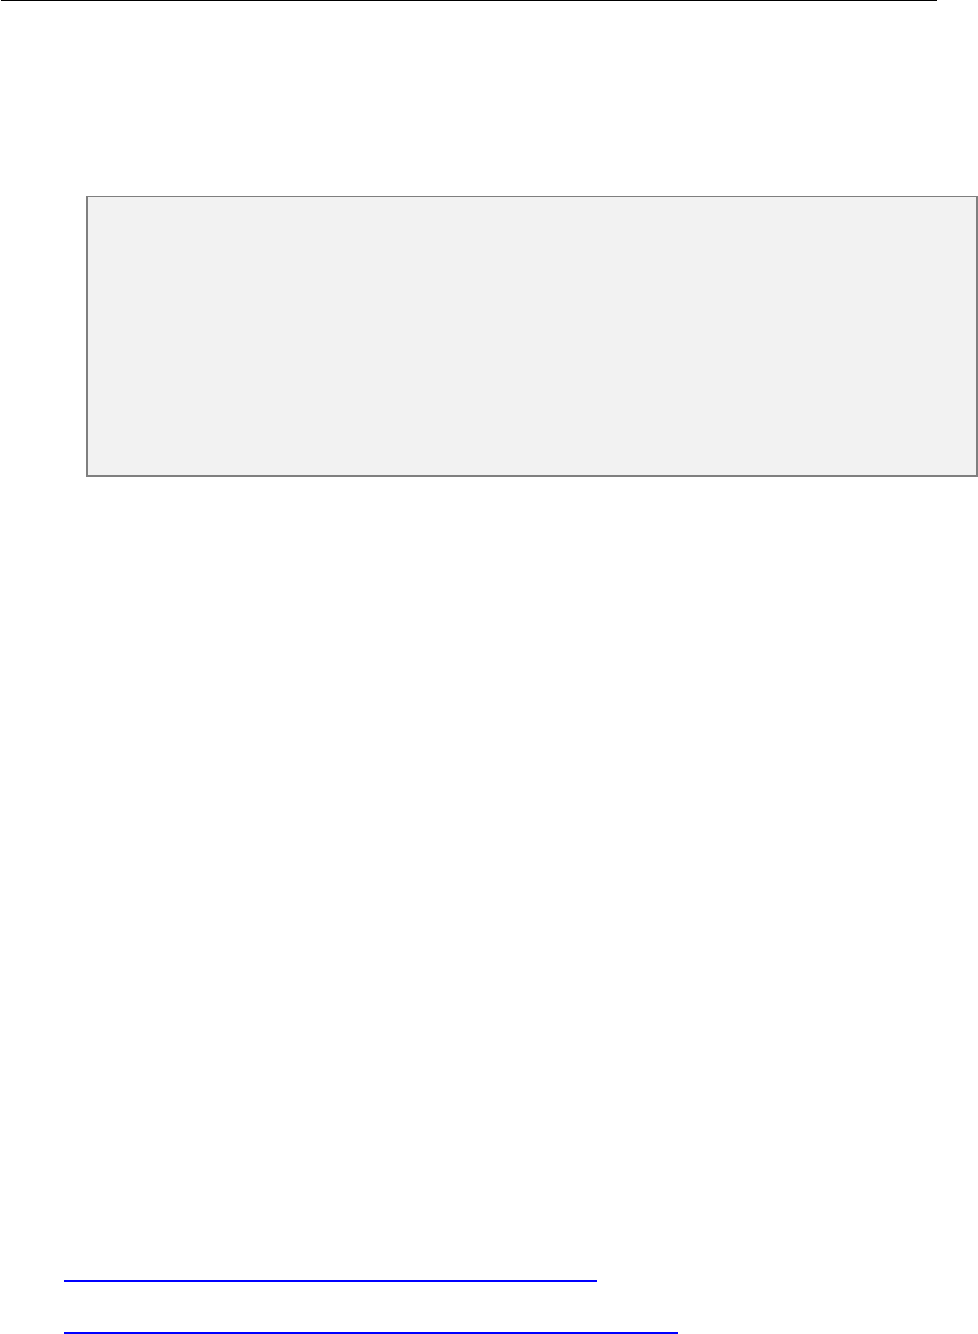
RMF delivers in SYS1.SERBCLS three sample exit procedures for the following Monitor III reports:
CPC ERBR3CPC
SYSINFO ERBR3SYS
WFEX ERBR3WFX
Depending on the report type, the actions shown in Figure 13 actions can be performed. All actions are
associated with a console message and a specific message id.
Figure 13: ERBM3B exit procedures
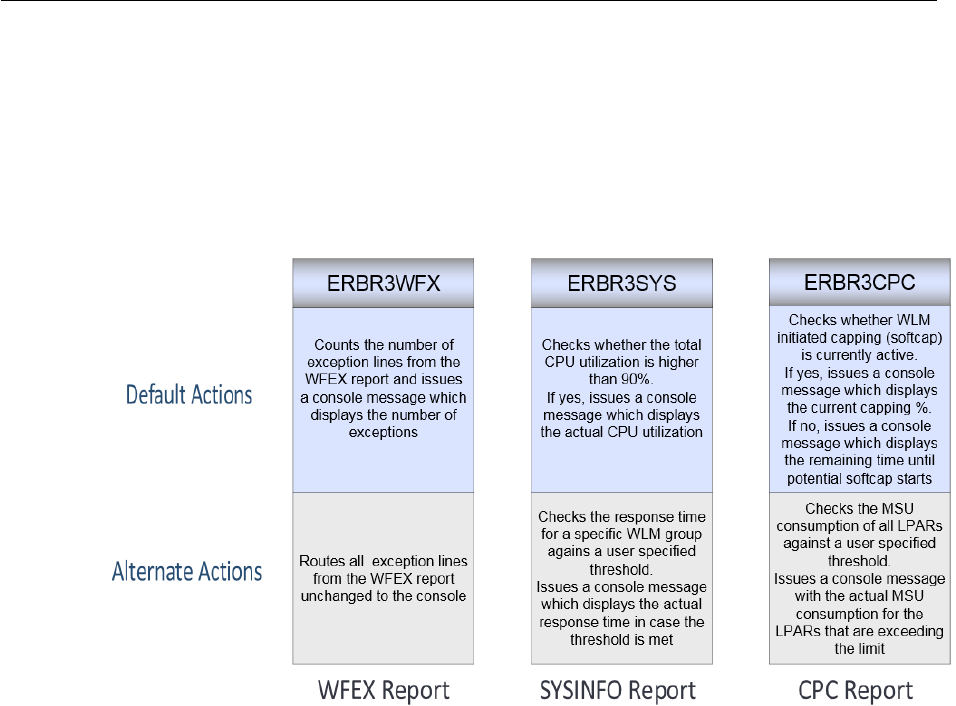
Figure 14 shows an example for procedure ERBR3CPC where the Monitor III CPC report is processed
and console message RMF305I is issued for every partition where the specified MSU threshold is
exceeded.
zEvent Administration Guide
23 © Copyright IBM Corp.2016
Figure 14: ERBM3B example – RMF Monitor III CPC Report
Now let’s combine both facilities – RMF Monitor III Batch and zEvent notifications:
Whenever message RMF305I appears on the console a notification to a certain mobile device is
supposed to be submitted.
This can be achieved by means of the zEvent Administration Dialog as described in chapter 2.
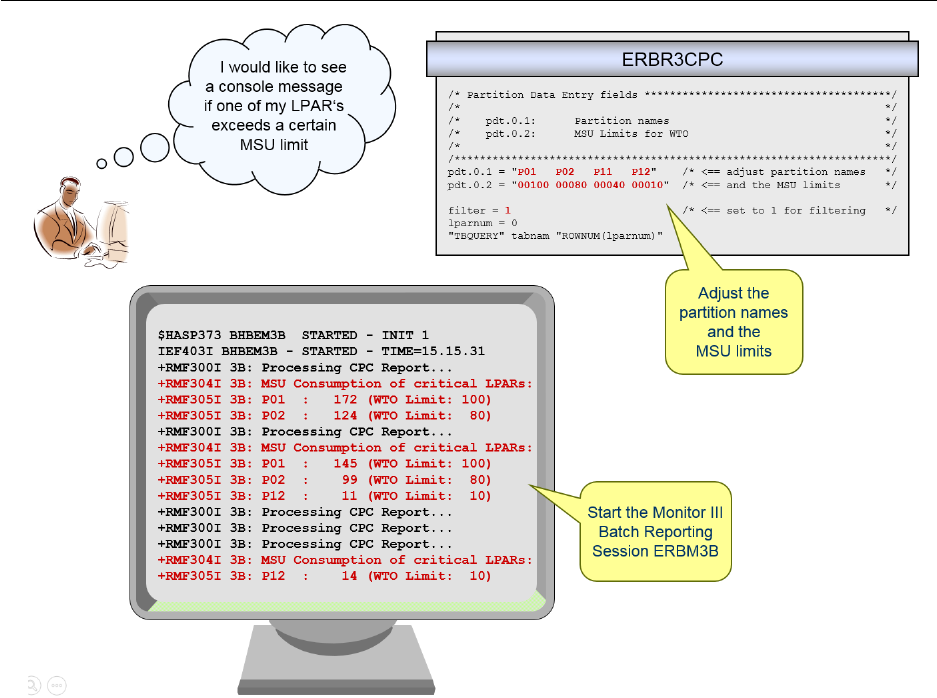
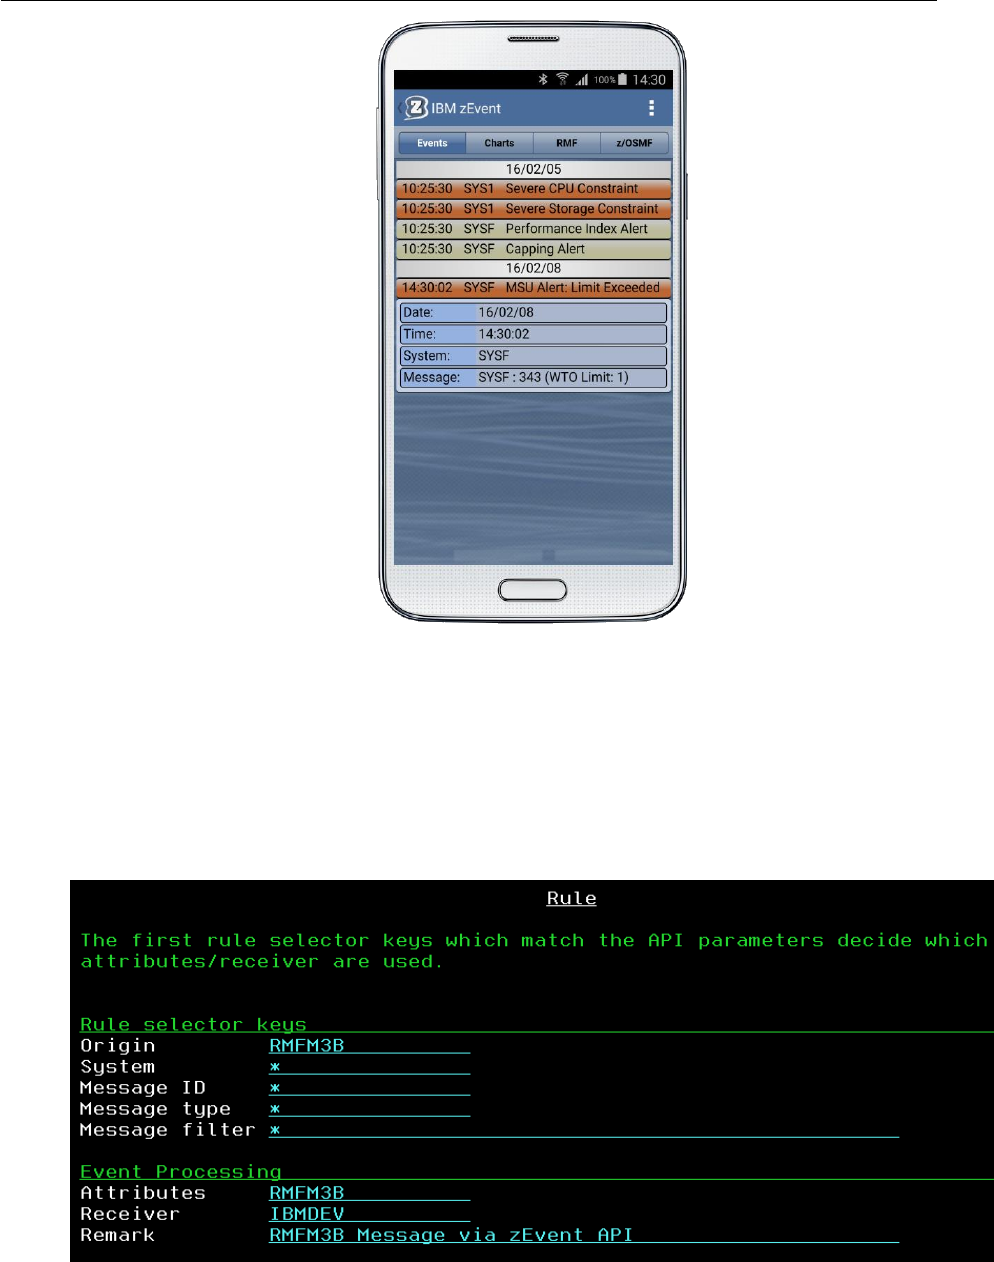
What we need is a corresponding rule together with specific attributes based on the console message
RMF305I. The figures below show an example implementation:
zEvent Administration Guide
24 © Copyright IBM Corp.2016
Figure 15: Sample rule for MPF processing
Figure 16: Sample attributes for MPF processing
When the ZEVENT exec based on the specifications above has been created and the setup for the
MPF exit module MPF4REXX has been performed as described in chapter 4 the ZEVENT exec is
called for all partitions where the specified MSU threshold is exceeded.
As final result a push notification as shown in Figure 17 is submitted to the receivers of the
corresponding rule specified in the Administration Dialog.
zEvent Administration Guide
25 © Copyright IBM Corp.2016
Figure 17: Sample event for MPF processing
6.3 RMF Monitor III Batch and zEvent API Invocation
As an alternative to the MPF based processing, the RMF Monitor III Batch facility can invoke directly
the ZEVENT exec which has been generated with the Administration Dialog.
This is the preferred method when no console messages are required and just a notification about the
exceeded threshold needs to be submitted to the mobile device.
In this case the corresponding rule and attributes may look like as follows:
Figure 18: Sample Rule for zEvent API processing

zEvent Administration Guide
26 © Copyright IBM Corp.2016
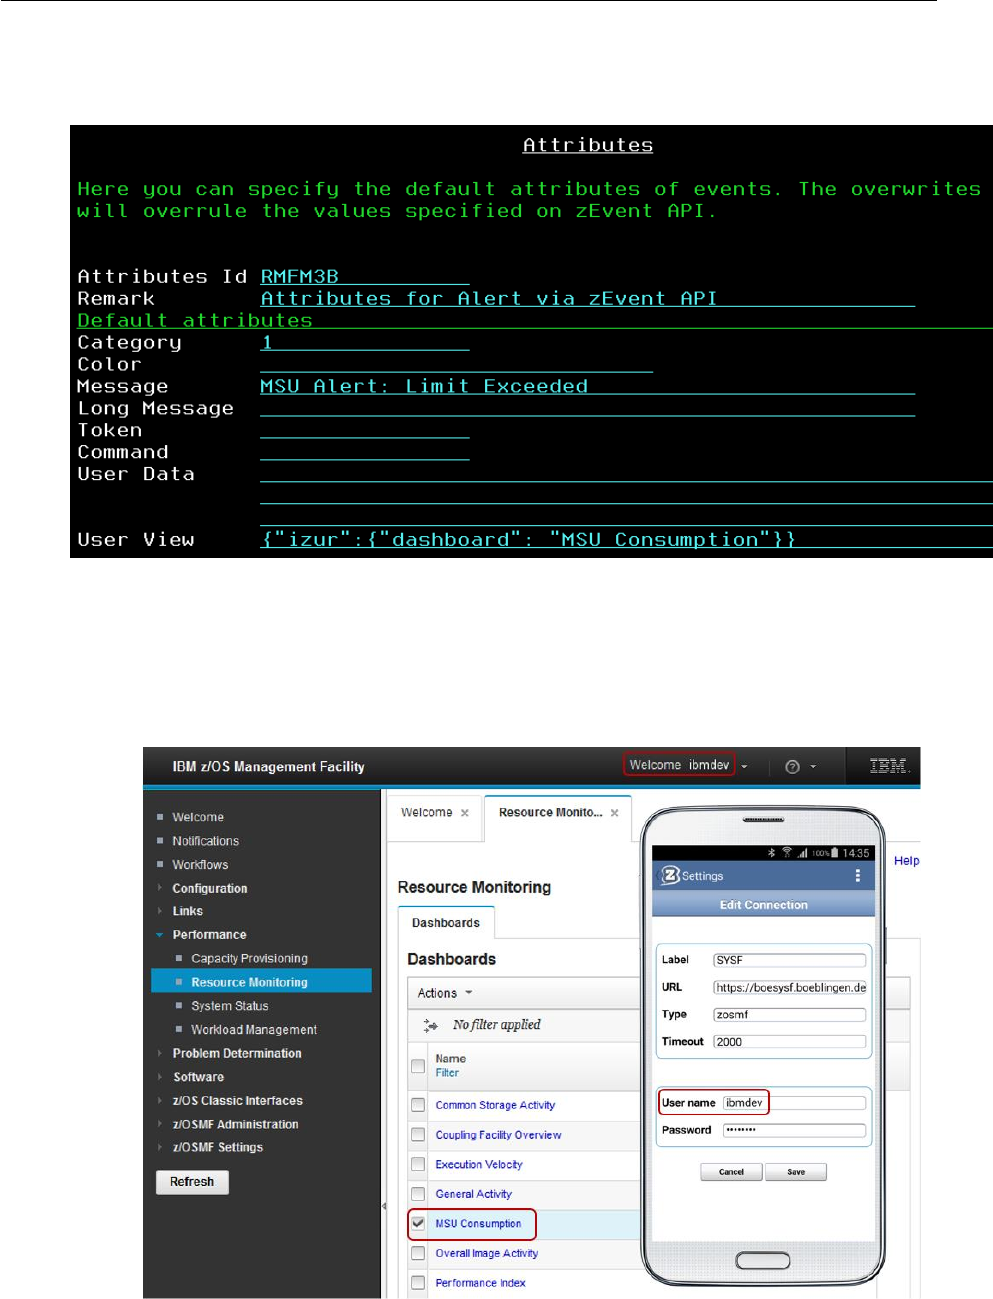
Figure 19: Sample Attributes for zEvent API processing
In order to call the zEvent API properly, the Monitor III Batch procedure ERBR3CPC needs to be
slightly extended:
Since we want to invoke the zEvent API now directly, the generation of console messages with module
ERBCSWTO is not needed anymore. Optionally the corresponding statements can be removed.
As shown in Figure 20, the last three lines have been inserted to setup the parameters and call the
zEvent API.
Figure 20: Invocation of the zEvent API via RMF Monitor III Batch
Please note that the z/OS system id is passed as part of the parameter list. For this reason the variable
erbsid needs to be retrieved in advance of the call. This can be achieved with the following statement:

zEvent Administration Guide
27 © Copyright IBM Corp.2016
When this changes are completed, the ERBM3B procedure can be restarted. Once a threshold is
exceeded, the notification will be sent to the mobile device and the message on the event tab of the
zEvent app is exactly the same than shown in Figure 17.
The only difference is that the zEvent API has been called directly without any exploitation of z/OS MPF
components.
6.4 zEvent Notifications with RMF Context
zEvent push notifications can be extended with a variety of additional information. This feature can be
used to provide context sensitive links to the monitoring facilities of the zEvent mobile app.
Hence, the receiver of a notification can switch instantly to the RMF tab or to the z/OSMF tab and
analyze selected performance metrics in order to decide whether the notification requires an immediate
action or not.
The additional information can be provided by means of the zEvent Administration Dialog in terms of
JSON strings. The content of the JSON string is specified together with the Attributes definition as User
View parameter (cf. Figure 21).
Figure 21: zEvent notifications – RMF context
On the mobile device, the User View specification is recognized and translated to a URL suffix which is
used to build the outbound request URL for the RMF Distributed Data Server (aka DDS).
Example:
For more details about the RMF DDS API refer to the RMF Programmers Guide, Chapter 3, Accessing
performance data using the RMF Distributed Data Server.
As shown in Figure 22, for a successful context launch it must be ensured that the label of the
connection profile matches the system name as source of the push notification.
http://ip.rmf:8803/gpm/perform.xml?resource=",*,SYSPLEX"&id=8D25F0

zEvent Administration Guide
28 © Copyright IBM Corp.2016
Figure 22: Connection Label and notification source
The actual RMF context launch is shown in Figure 23: Once the user clicks on the expanded
notification and selects the open in tab RMF option, the zEvent app switches to the RMF tab and
displays the required metric.
Figure 23: RMF context launch
zEvent Administration Guide
29 © Copyright IBM Corp.2016
6.5 zEvent Notifications with z/OSMF Context
Accordingly to RMF context, the User View specification of the Attributes definition supports also
z/OSMF context by using izur as component name and dashboard as keyword (Figure 24).
Figure 24: zEvent notifications – z/OSMF context
The dashboard name following the dashboard keyword can refer to any existing z/OSMF dashboard
that is defined for the z/OSMF user id which has been provided with the login information of the zEvent
connection profile. Specifically, the dashboard MSU Consumption must actually appear in the
dashboard list of the z/OSMF userid ibmdev (Figure 25).
Figure 25: z/OSMF Dashboards for userid ibmdev
zEvent Administration Guide
30 © Copyright IBM Corp.2016
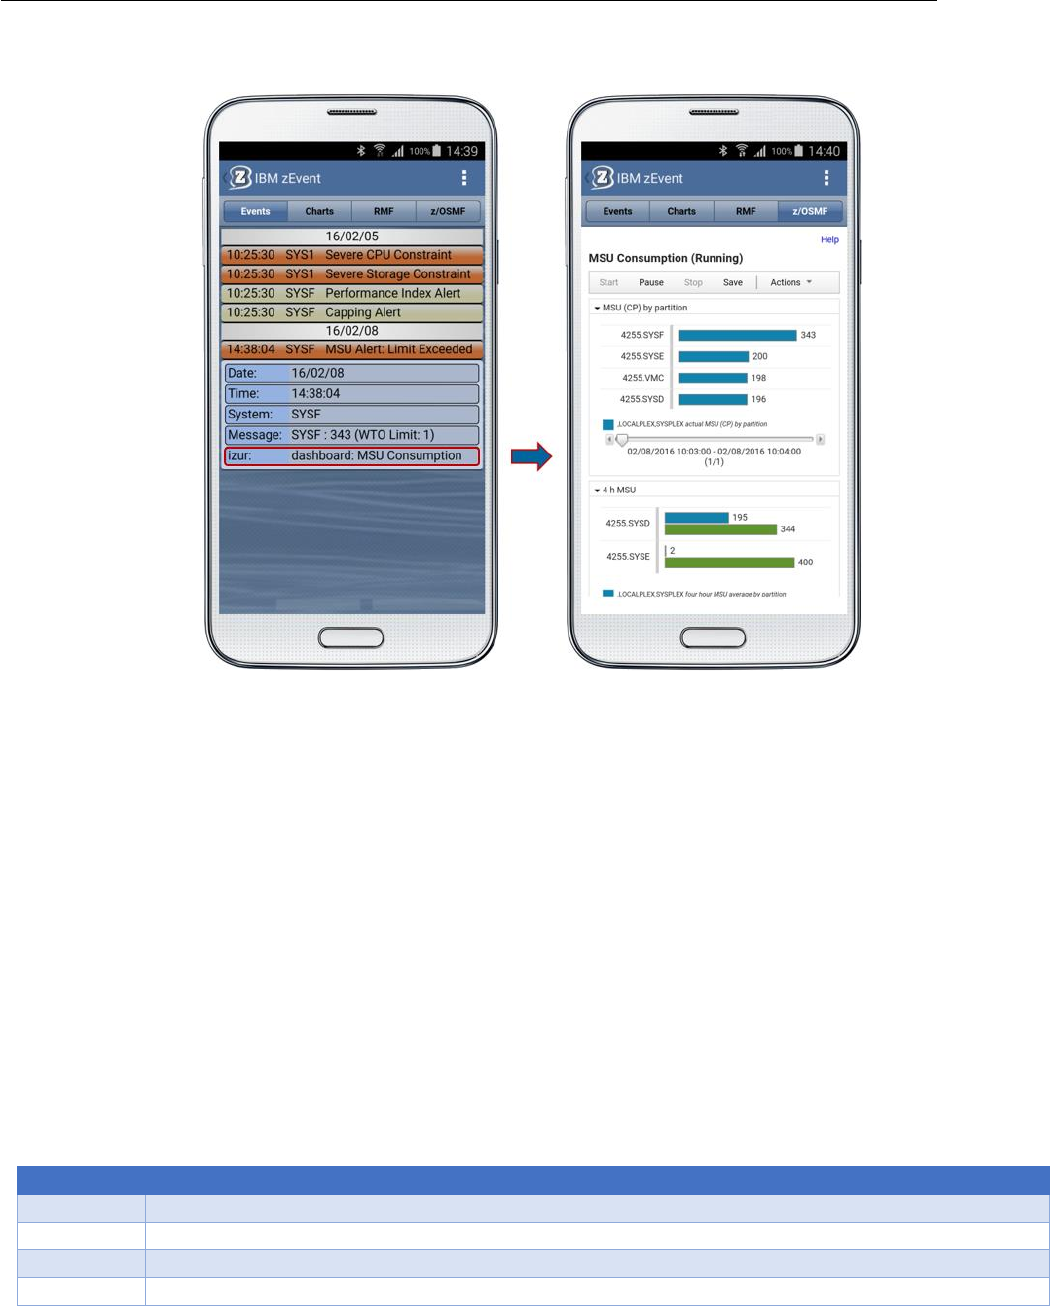
The actual z/OSMF context launch is shown in Figure 26: Once the user expands the notification and
clicks open z/OSMF, the zEvent app switches to the z/OSMF tab and displays the required dashboard.
Figure 26: z/OSMF context launch
7. zEvent API
The zEvent API exec is built by the zEvent Administration Dialog and can be used to push messages to
a mobile device. Since the API exec has all rules, users, etc. integrated at creation time, it does not
need to load external data. The parameters of the exec are used to find a matching rule and the
attributes of the matching rule are used to complete the parameters with defaults and overwrites.
7.1 Parameters for Rule Selection
If you have defined the proper rules, you just need one or more of the following four parameters to
identify the desired rule. The API exec will find the rule and use the receiver and the attributes which
are specified in this rule.
The main reason for these parameters is to select a rule. As soon as the zEvent API finds a rule
matching these parameters, a push message is sent to the receivers specified in the rule.
Parameter
Description
ORIGIN
Identifies the caller of the API
SYSTEM
Name of the issuing host system
MSGID
Message identifier
MSGTYPE
The type of a push message
zEvent Administration Guide
31 © Copyright IBM Corp.2016
Origin:
A name which identifies the caller of the API. This allows to distinguish between multiple callers when
evaluating the rules.
System:
Name of the issuing system. You could also send messages on behalf of another system and specify
the name of that system. If no system is specified, the API exec uses the content of REXX environment
variable SYSNODE instead.
MsgId:
The message id identifies one specific message.
MsgType:
The message type allows to subdivide your messages into different types.
7.2 Parameters to overwrite attributes
The following parameters are normally specified in the Attributes section of the administrative dialog
and selected by the rules, but you can overwrite these values via parameter:
Parameter
Description
CATEGORY
Can be used to classify event messages
COLOR
Color of an entry in the events/charts tab of the zEvent app
MESSAGE
Short message which will be displayed in the event list of the app
LONGMSG
Long message will be shown if you expand a message in event list
USERDATA
Allows to add user data to event messages
USERVIEW
Specifies the metric or dashboard which will be shown in the RMF or z/OSMF tab
TOKEN
Not implemented yet
COMMAND
Not implemented yet
Category:
The categories 1, 2 and 3 will default to the colors red, yellow and green (if color parameter is omitted).
Basically the category is a text that can be freely assigned by the caller. Since there are no filter options
in the zEvent app yet, the best use of category is to set the predefined colors red, yellow and green.
Color:
Specifies the color of an entry in the events/charts tab. The color can be specified in one of the
following formats: rgba(222,0,0,0.55), rgb(222,0,0), red, #ff0000
Message:
Is the short message which will be displayed in the event list of the zEvent app
LongMsg:
Long message will be shown if you expand a specific message in the event list. It can contain html
statements like <br> (for line break) in the message text.
UserData:
The user data allows to specify key/value pairs which are shown in the event list of the zEvent app. The
key/value pairs need to be encoded in JSON format (e.g. {"key1":"val1"},{"key2":"val2"}).

zEvent Administration Guide
32 © Copyright IBM Corp.2016
UserView:
Specifies the metric or dashboard which will be shown in the RMF or z/OSMF tab. For an example how
to use User View, see chapter 6.4 or 6.5.
7.3 Other parameters
Parameter
Description
DATE
yyyy/mm/dd
TIME
hh:mm:ss
CHART
Allows to send a pre-configured chart in JSON format
RECEIVER
Send a push event to a specific device
RC
Return code of the API
Date:
The current date. It can be empty if you want the zEvent API exec to fill in the date
Time:
The current time. It can be empty if you want the zEvent exec to fill in the time
Chart:
Allows to send a pre-configured chart in JSON format
Receiver:
You can specify a user or group of users for the push message which is known by the zEvent API exec.
Therefore it needs to be defined in the zEvent administrative dialog.
RC:
Return code of the zEvent API exec.
8. Push Interface
The push interface describes the data which is pushed to the mobile device. The payload can contain
an events and/or a charts section. The events are shown on the Events tab and the charts are shown
on the Charts tab of the zEvent app.
zEvent Administration Guide
33 © Copyright IBM Corp.2016
The above specifications will create a push message which contains an event and a chart.
Figure 27 shows the corresponding results in the zEvent app.
{
"events" : [ {
"dte" : "2016/02/05",
"tme" : "10:25:30",
"sys" : "SYS1",
"msg" : "4h avg reached in 10 min",
"lng" : "The capping limit will be reached in 10 min!",
…
} ],
"charts" : [ {
"dte" : "2016/02/05",
"tme" : "10:25:30",
"sys" : "SYS1",
"msg" : "4h avg reached in 10min",
"ttl" : "4h rolling average (MSU)",
"xax" : {
"ttl" : "Time (min)",
"lbl" : [0, 2, 4, 6, 8, 10]
},
"yax" : {
"ttl" : "MSU"
},
"ser" : [ {
"ttl" : "avg",
"typ" : "Lines",
"val" : [100, 110, 135, 160, 170, 175]
} ],
…
} ]
}
zEvent Administration Guide
34 © Copyright IBM Corp.2016
Figure 27: Sample Event and Charts tab
8.1 Events Section
An events section is an array of one or more events. When you push an event to a mobile device, a
new entry on the Events tab is created which shows the time, system and message attribute of the
event. After expanding the new entry you will see other available information about the event.
Syntax:
"events" : [ {
"dte" : "2015/12/31",
"tme" : "04:29:57",
"sys" : "SYS1",
"cat" : "2",
"col" : "red",
"msg" : "event 1 (of event list)",
"lng" : "long message",
"tok" : "myToken",
"cmd" : "",
"usr" : [{"key1":"val1"},{"key2":"val2"}],
"viw" : {"izur":{"dashboard": "Performance Index"}}
} ]
zEvent Administration Guide
35 © Copyright IBM Corp.2016
Keywords:
Keyword
Meaning
Description
dte
Date
Date of event creation (yyyy/mm/dd)
tme
Time
Time of event creation (hh:mm:ss)
sys
System
Issuing system
cat
Category
Category. If the color attribute is not set, category 1, 2, 3 are translated to color
red, yellow, green.
col
Color
rgba(222,0,0,0.55), rgb(222,0,0), red, #ff0000
msg
Message
Short message
lng
Long Msg.
Long message
tok
Token
Not implemented yet
cmd
Command
Not implemented yet
usr
User
User data ( Key:Value pairs )
viw
View
When opening another tab (RMF, z/OSMF, etc.) from this event, the view tag
allows to provide context information to display a specific metric, dashboard,
etc. The parameters which can be used for the launch in context are described
below. For further examples how to use View, see also chapter 6.4 or 6.5.
Parameters for Context Launch:
View Type
Keyword
Value
Description
rmfdds
xmldoc
perform
DDS XML document type for single metric
resource
resource name
DDS resource name
id
metric id
DDS metric id
rmfdds
xmldoc
rmfm3
DDS XML document type for Monitor III report
resource
resource name
DDS resource name
report
report type
Monitor III report type
rmfdds
xmldoc
rmfpp
DDS XML document type for Postprocessor report
reports
report types
Postprocessor report types
www
urltag
URL compliant substring
Segment to be appended to the connection URL
Table 1: Context launch – Open in tab RMF
Note: The view type rmfdds is intended for basic RMF requests. This might not be sufficient for more
specific requests where you want to exploit the extended facilities of the HTTP API provided by the
RMF Distributed Data Server (aka DDS). In this case you can choose the generic view type www.
This type simply appends the substring specified with the urltag parameter to the root URL of the
corresponding connection definition.
Example:
If you want to see on the RMF tab all volumes for your system SYS1 with a higher response time than
one millisecond and matching the label pattern *TSO*, you can simply specify the following urltag:
For more details about RMF DDS requests refer to the RMF Programming Guide, Chapter 3,
Accessing performance data using the RMF Distributed Data Server.
http://publibz.boulder.ibm.com/epubs/pdf/erb2pg10.pdf
gpm/perform.xml?resource=SYS1,*,ALL_VOLUMES&id=8D1120&filter=LB=1;PAT=*TSO*

zEvent Administration Guide
36 © Copyright IBM Corp.2016
View Type
Keyword
Value
Description
izur
dashboard
dashboard name
z/OSMF Resource Monitoring dashboard name
pdjsp
dashboard specification
z/OSMF Resource Monitoring dashboard (JSON)
Table 2: Context launch – Open in tab z/OSMF
Note: When you specify a dashboard name together with the view type rmfdds the name must refer to
an existing z/OSMF dashboard that is defined for the z/OSMF user id which has been provided with the
login information of the zEvent connection profile (see also Chapter 6.5).
In case you don’t have a predefined dashboard that fits to the matter of the event notification you can
supply a dashboard specification dynamically together with the pdjsp view type (example in Table 3).
The pdjsp view type can only be used on Android devices, it is NOT supported for the iOS platform.

zEvent Administration Guide
37 © Copyright IBM Corp.2016
View Parameters
Result
{ "rmfdds" : {
"xmldoc" : "perform",
"resource" : "SYSF,*,STORAGE",
"id" : "8D0BE0" } }
Displays metric # frames fixed by job for resource
SYSF,*,STORAGE
{ "rmfdds" : {
"xmldoc" : "rmfm3",
"resource" : "*,SYSF,MVS_IMAGE",
"report" : "PROCU" } }
Displays the RMF Monitor III PROCU report for system SYSF
{ "rmfdds" : {
"xmldoc" : "rmfpp",
"reports" : "CPU" } }
Displays the RMF Postprocessor CPU report
(Scope = Sysplex)
{ "rmfdds" : {
"xmldoc" : "rmfpp",
"reports" : "CPU,CHAN" } }
Displays the RMF Postprocessor CPU and CHANNEL report
(Scope = Sysplex)
{ "www" : {
"report" : "gpm/rmfpp.xml
?reports=CPU&sysid=SYSF" } }
Displays the RMF Postprocessor CPU report for system
SYSF
{ "izur" : {
"dashboard" : "Performance Index" } }
Displays the dashboard Performance Index
{ "izur" : {
"pdjsp" : {
"mgs" : [{
"n" : "Capping Projection",
"ms": [{
"p" : "M",
"id" : "8D2690",
"res" : { "label": ",*,SYSPLEX" }
}]
}],
"n": "Capping Overview",
"h": 350,
"c": 1 } }
Displays the dynamic dashboard Capping Projection.
This dashboard includes only one metric group with the
name Capping Overview. The metric group displays the
DDS metric remaining time until capping by partition.
The parameters are as follows:
pdjsp: dashboard specification in JSP format
mgs: metric group specification
n: metric group name
ms: metric specification
p: platform (MVS)
id: DDS metric id
res: DDS resource
label: DDS resource label
n: dashboard name
h: height of metric groups (pixels)
n: number of columns for metric groups
Table 3: Context Launch Examples
zEvent Administration Guide
38 © Copyright IBM Corp.2016
8.2 Charts Section
A charts section is an array of one or more charts. When you push a chart to a mobile device, a new
entry on the Charts tab is created which shows the time, system and message attribute of the chart.
After expanding the new entry you see the chart and eventually other available data.
Syntax:
Keywords:
Keyword
Meaning
Description
dte
Date
Date of chart creation (yyyy/mm/dd)
tme
Time
Time of chart creation (hh:mm:ss)
sys
System
Issuing system
cat
Category
Category. If the color attribute is not set, category 1, 2, 3 are translated to color
red, yellow, green.
col
Color
rgba(222,0,0,0.55), rgb(222,0,0), red, #ff0000
msg
Message
Short message
ttl
Title
Title of the chart
tok
Token
Not implemented yet
"charts" : [ {
"dte" : "2015/12/31",
"tme" : "04:45:57",
"sys" : "SYS4",
"cat" : "1",
"col" : "red",
"msg" : "chart message",
"ttl" : "chart 1 (of chart list)",
"tok" : "myToken",
"cmd" : "",
"lgd" : false,
"xax" : {
"ttl" : "Time (h)",
"lbl" : [ 1, 2, 3 ]
},
"yax" : {
"ttl" : "MSU"
},
"ser" : [ {
"ttl" : "CPU1",
"typ" : "Lines",
"col" : "#665260B4",
"mrk" : false,
"val" : [ 22, 16, 25 ]
} ],
"usr" : [{"key1":"val1"},{"key2":"val2"}]
} ]
zEvent Administration Guide
39 © Copyright IBM Corp.2016
cmd
Command
Not implemented yet
lgd
Legend
show/hide legend
xax
X Axes
Keeps the x-axes information
xax-ttl
Title
x-axes title
xax-lbl
Label
x-axes labels
yax
Y Axes
Keeps the y-axes information
yax-ttl
Title
y-axes title
ser
Series
Keeps the series information
ser-ttl
Title
Series title
ser-typ
Type
Series type (Lines, Columns)
ser-col
Color
Series color
ser-mrk
Marker
Use markers for this series (true, false)
ser-val
Values
Values of this series
usr
User
User data ( Key:Value pairs )
