Dogtra PT10U MURS radio with BT User Manual
Dogtra Co., Ltd. MURS radio with BT Users Manual
Dogtra >
Contents
- 1. Users Manual
- 2. User Manual
Users Manual
User Manual
PT10U / PC10U
Pathfinder
by Dogtra
GPS Tracker for dog
Please read this manual thoroughly before operating the Dogtra Pathfinder.
Caution
1.The Dogtra Pathfinder is intended for the sole purpose of tracking and training dogs. The
Pathfinder is NOT intended for human use or use on other animals. Dogtra does not
assume any liability for the improper use of the Dogtra Pathfinder.
2. The Dogtra Pathfinder is meant for use in open outdoor areas. Operating the Pathfinder
near tall buildings and other steel structures will reduce the range of the GPS.
3.Pay close attention to the signal range when operating the Pathfinder across long
distances and low line-of-sight view.
2. Dogtra highly recommends consulting a dog training professional when using the
Pathfinder e-collar to correct dogs that are aggressive towards other dogs or people.
3. The Dogtra Pathfinder connects to your phone using Bluetooth. Dogtra’s industry leading
technology filtering system ensures minimal interference with other electronic devices. Out
digital microprocessor offers thousands of unique codes to eliminate frequency match-up
with other Dogtra e-collars. Dogtra recommends consulting your physician if you are
going to use the e-collar and you have any type of medical devices.
4. If the constant button is held down for 12 seconds or more, the unit will automatically
shut down. It reactivates when the button is released and depressed again.
5. A loose fit can allow the receiver/collar to move around on the dog’s neck. When this
happens, the contact points may rub the skin and cause irritation. If the unit is too loose,
the contact points will not make proper contact and your dog will not receive consistent
stimulation.
6. Leaving the receiver/collar in the same location on the dog’s neck for an extended period
of time can cause skin irritation. If the dog is to wear the e-collar for long periods,
occasionally reposition the receiver/collar so that the contact points are moved to a
different location on the dog’s neck. Make sure you check for skin irritation each time you
use the unit. If your dog exhibits signs of skin irritation, consult with a veterinarian.
7. Every dog has a different tolerance and reaction to the stimulation. Please look at your dog’s
reaction to find just the right level of stimulation. The stimulation level may vary depending on
the situation and distractions. Normally a distracted dog (chasing another dog, squirrel, etc.) will
require a higher level of stimulation compared to when there is no distraction.
8. E-collars can be used with many different methods. If you have any concerns in the training
methods provided by Dogtra, consult with a dog training professional.
1. First
1.1 Charging the Pathfinder
1.2 Power,
1.3 Operational buttons
1.3.1 Connector
1.3.2 Collar
1.4 About The LED
1.4.1 connector
1.4.2 collar
1.5 Connector
1.5.1 Replacing the antenna
1.6 Collar
1.6.1 Test Light
1.6.2 Replacing the Antenna
1.6.3 How to find the right stimulation
1.6.4 The GPS is for outdoor use.
1.6.5 Tone
1.6.6 Can I increase the range?
2. Installing the Pathfinder app
2.1 Compatible phones
2.1.1 iOS down
2.1.2 Android down
2.2 iOS down Downloading from the App Store
2.3 Android down Downloading with Google Play
3. Pairing
3.1 Pairing a phone to the GPS Connector
3.2 Phone and GPS Connector range
3.3 Pairing the GPS Connector and GPS Collar
4. App Features
4.1 MAP
4.2 COMPASS
4.3 E-COLLAR
4.4 Device List
4.5 Options in Device List
4.6 Device Detail Info & Edit
4.7 Map Record
4.8 Map Select
4.9 Offline map
4.10 Geo-fence
5. Pathfinder Setting
5.1 Screen Saver
5.2 Shake Control
5.3 Volume Button Control
5.4 Distance Unit
5.5 Speed Unit
5.6 GPS DATA
5.7 Tracking only mode
5.8 Offline map data usage
5.9 Always Fit boundary
5.10 Alarm Setting – Settings for various alarms
5.11 Connector Pairing
6. User Guide
Maintain
Troubleshooting
1. First
1.1 Charging the Pathfinder
Charge the Pathfinder’s GPS Connector and GPS Collar before the first use.
The Pathfinder uses Lithium Polymer batteries.
-Fully charge the Pathfinder’s GPS Connector and GPS Collar before the first
use.
- Only use official Dogtra chargers with the Pathfinder.
- Do not charge the Pathfinder in near flammable substances.
- Fully charge the Pathfinder if storing for 1 month or longer.
* When to recharge the Pathfinder
- When the LED is red on the GPS Connector or GPS Collar.
- When the app displays a low battery percentage.
- When the LED does not turn on.
How to charge the Pathfinder
1) Connect the charger to the GPS Connector and GPS Collar using the splitter
cable.
2) Plug the charger into a 120v (220v in Europe) outlet.
3) When fully charged, detach the cables and plug the rubber caps over the
charging ports on the GPS Connector/Collar.
4) The GPS Collar turns off while charging and cannot be used, while the GPS
Connector functions while charging.
- The LED will display red while charging and green when the unit is fully
charged. The GPS Connector LED will be green when turned on while charging.
- A depleted battery requires 3.5 hours to fully charge.
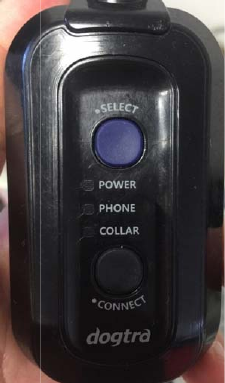
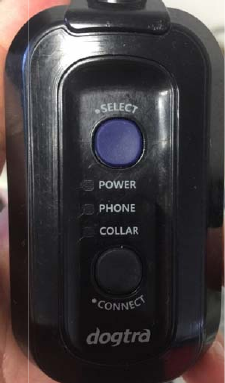
1.2 Power
To turn on the GPS Connector, press the blue select button until the LED turns
on.
To turn off the GPS Connector, press the blue select button until the red LED
turns off.
To turn on the GPS Collar, press the power button until the LED turns on. To
turn off the GPS Collar, press the power button until the LED turns red. A tone
will
1.3 Ope
r
1.3.
1
SELE
ON:
T
OFF
Whil
pres
s
CO
N
Afte
r
and
Con
n
※Us
i
GPS
to p
a
1.3.
2
CO
L
Po
w
LE
D
Po
w
tur
n
Co
n
be
g
blin
be played t
o
r
ational But
t
1
CONNE
C
CT – ON/
O
T
o turn on,
p
:To turn off
,
e turned on
s
the select
N
NECT –Sta
r
r
using the
S
hold down
t
n
ector will n
i
ng the Sele
Connector
t
a
ir the GPS
2
Collar
L
LA
R
–Powe
r
w
erON :To t
u
D
turns on.
w
erOFF :To t
n
s off.
n
nection mo
g
in with the
ks rapidly.
A
o
indicate t
h
t
ons
C
TO
R
O
FFOn/Off a
n
p
ress the se
l
,
press the s
, press the
s
button a se
c
r
t Pairing
S
elect butto
n
t
he Connec
t
ow be read
y
ct button t
o
t
o the GPS
C
Connector t
r
u
rn the GPS
urn the GP
S
de &pairin
g
device turn
e
A
melody wi
h
at the GPS
n
d pairing d
l
ect button
u
elect butto
n
s
elect butto
n
c
ond time t
o
n
to set the
t
button unt
y
for pairin
g
o
set the GP
S
C
ollar. Setti
n
o a phone.
Collar on,
p
S
Collar off,
p
g
mode :To p
e
d off and h
ll be played
Collar is sh
u
evice selecti
u
ntil the LE
D
n
until the L
E
n
once to s
e
o
set pairin
g
GPS Conne
c
il the LED b
l
g
.
S
Connecto
r
n
g the GPS
C
p
ress the po
w
p
ress the p
o
lace the GP
S
old down t
h
when the
G
u
tting down.
on
D
turns on.
E
D turns off
.
e
t pairing to
g
to the sm
a
c
tor to pho
n
l
inks rapidly
.
r
to Collar is
C
onnector t
o
w
er button
u
o
wer button
S
Collar int
o
h
e power b
u
G
PS Collar is
.
the GPS C
o
a
rtphone ap
p
n
e or collar,
.
The GPS
used to pa
i
o
Phone is u
u
ntil the gr
e
until the LE
o
pairing mo
u
tton until L
E
in pairing
m
o
llar,
p
.
press
i
r the
sed
e
en
D
de,
E
D
m
ode.
※T
h
Co
n
1.4 Abo
u
1.4.
1
Po
w
re
p
W
h
PH
O
W
h
bu
t
ra
p
CO
W
h
bu
t
ra
p
1.4.
2
h
e GPS Coll
a
n
nector. The
u
t the LED
1
connect
o
w
er :The po
w
p
resents the
h
ile charging
O
NE :Press
t
h
en set to P
h
t
ton will pla
c
p
idly in gree
n
LLAR Press
t
h
en set to C
o
t
ton will pla
c
p
idly in gree
n
2
collar
a
r pairing m
o
Pathfinder
s
o
r
w
er LED bli
n
battery life,
and turne
d
t
he Select b
u
h
one, a gre
e
c
e the GPS
C
n
.
t
he Select b
o
llar, a gree
n
c
e the GPS
C
n
.
o
de is used
s
et comes
w
n
ks every 2
s
with green
d
on, the LE
D
u
tton twice
t
e
n LED will s
C
onnector i
n
utton once
t
n
LED will s
t
C
onnector i
n
to pair the
w
ith both pa
s
econds whi
l
(~50%), ora
n
D
will blink
g
t
o set the G
tay on. Hol
d
n
to pairing
m
t
o set the G
t
ay on. Hold
n
to pairing
m
GPS Collar
a
rts paired t
o
l
e turned o
n
n
ge (~10%),
g
reen.
PS Connect
o
d
ing down t
h
m
ode and t
h
PS Connect
o
ing down t
h
m
ode and t
h
a
nd the GPS
o
each othe
r
n
. The LED c
o
and red (~
0
o
r to Phone
h
e Connect
h
e LED will
b
o
r to Collar.
h
e Connect
h
e LED will
b
r
.
o
lor
0
%).
.
b
link
b
link
Th
e
re
p
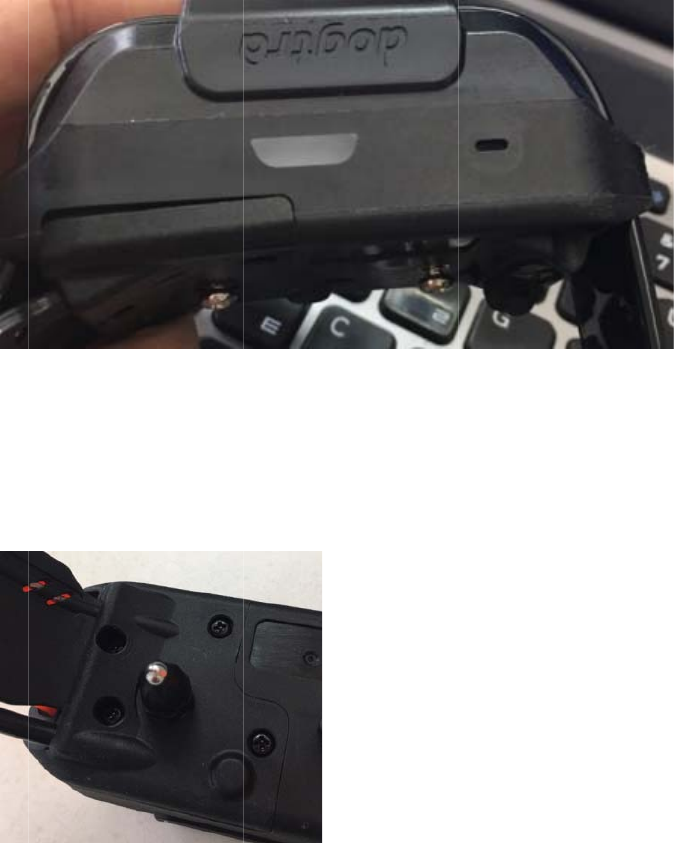
1.5 Con
n
1.5.
1
Tw
i
1.5.
2
1.6 Coll
a
1.6.
1
1.
T
2.T
h
the
pre
s
3.
T
1.6.
2
Ope
n
e
LED on th
e
p
resents the
n
ector
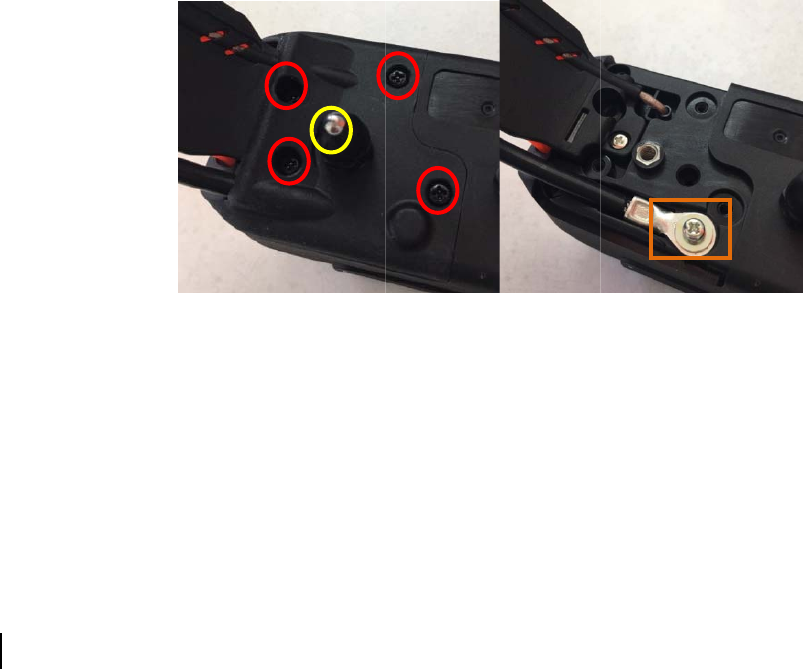
1
Replacin
i
st the ante
n
2
To maxi
m
with ant
e
a
r
1
Test Lig
h
T
urn on the
G
h
e test light
Pathfinder
a
s
sed in the
P
T
he test ligh
t
2
Replacin
n
the anten
n
e
GPS Colla
r
battery life,
g the anten
n
na counte
r
-
m
ize the sig
e
nna facing
h
t
G
PS Collar
a
will illumin
a
a
pp. The lig
h
P
athfinder a
t
will emit a
g the anten
n
a enclosur
e
r
blinks whil
e
with green
na
-
clockwise t
o
nal with the
up.
a
nd place th
e
a
te moment
a
h
t will stay l
pp, up to 1
2
brighter lig
h
na
e
by removi
n
e
turned on,
(~50%), ora
n
o
remove.
GPS Collar,
e
Ttest light
a
rily when t
h
it as long a
s
2
seconds.
h
t when the
n
g the 4 scr
e
and the LE
D
n
ge (~10%),
hold the G
P
over the c
o
h
e Nick but
t
s
the Consta
stimulation
e
ws and th
e
D
color
and red (~
0
P
S Connect
o
o
ntact point
s
t
on is press
e
nt button is
is increase
d
e
contact po
i
0
%).
o
r
s
.
e
d in
d
.
i
nts.
Rem
1.6.
3
-.O
p
sti
m
- T
h
- Al
- T
h
st
* N
o
w
e
1.6.
4
T
h
Path
the
G
may
1.6.
5
The
the
b
1.6.
6
- T
h
- H
o
t
h
ove the scr
e
3
How to
f
p
en the Pat
h
m
ulation lev
e
h
e stimulati
o
ways start
a
h
e appropri
a
imulation w
i
o
te: The ap
p
e
ight, and t
e
4
The GPS
h
e Pathfinde
r
finder near
t
G
PS. Not ac
q
indicate iss
u
5
Tone
tone sound
b
utton is he
6
Can I in
c
h
e Pathfind
e
o
lding the
G
h
e range.
e
w holding
t
f
ind the rig
h
h
finder app
e
l.
o
n levels are
a
t the lowes
t
a
te level can
i
th a mild r
e
p
ropriate sti
m
e
mperamen
t
is for outd
o
r
is meant f
o
t
all building
q
uiring a G
P
u
es with th
e
level canno
t
ld down.
c
rease the r
a
e
r has a 9-m
G
PS Connec
t
t
he antenna
h
t stimulatio
to the E-Co
l
from 0 (lo
w
t
level of sti
m
be found
w
e
action, suc
h
m
ulation le
v
t
.
o
or use
o
r use in op
s and other
P
S signal for
e
unit.
t
be adjuste
a
nge?
ile line of si
g
t
or high wit
h
in place to
n
l
lar tab and
w
est) to 100
m
ulation an
d
w
hen the do
g
h
as a tensin
v
el will depe
en outdoor
steel struct
u
prolonged
d and the t
o
g
ht range.
h
the anten
n
replace the
select your
(highest).
d
work your
g
responds
t
g of the ne
c
nd on your
areas. Oper
a
u
res will red
periods of t
o
ne will ring
n
a facing up
antenna.
dog and
way up.
t
o the
c
k muscles.
dog’s size,
a
ting the
uce the ran
g
ime while o
u
once even
will maximi
z
g
e of
u
tside
when
z
e
2. Installing the Pathfinder app
2.1 Compatible phones
1) iOS : iOS 8.1 and above
iPhone 5, 5C, 5S, 6, 6+, 6S, 6S+, 7, 7+
iPad Generation 3 and above
2) Samsung Galaxy S4 and above, Note 2 and above, and LG G3 and above
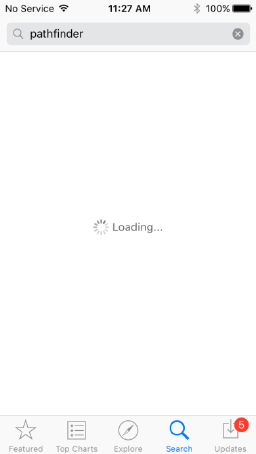
2.2 iOS down Downloading from the App Store
AppStore -> Pathfinder 검색 Search Pathfinder
2.3 Android down Downloading with Google Play

3. Pairing
3.1 Pairing a phone to the GPS Connector
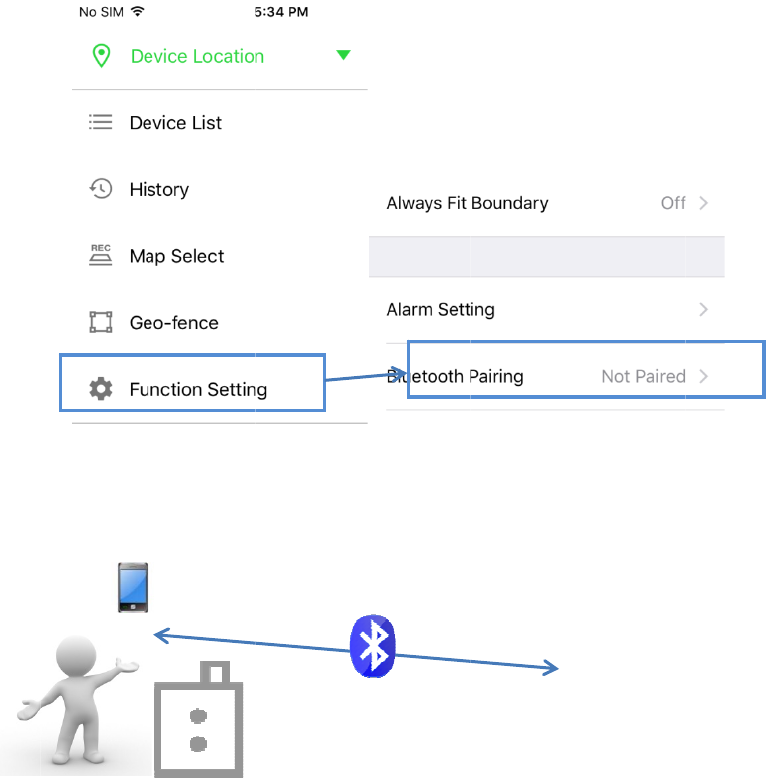
3.1.1 Launch the Pathfinder app
3.1.2 On Turn on the GPS Connector
3.1.3 Select Pathfinder App Side Menu -> Function Setting -> Bluetooth
Pairing
3.1.4 Set the GPS Connector to pairing mode and click search in the app.
※Once paired, launching the app when the GPS Connector is on will
automatically connect them together
※ The GPS Connector should be within Bluetooth range (33 feet) of your phone
to operate.
※ The GPS Connector will reconnect with the phone when it is within range.
※ Reinstalling the app will require pairing with the GPS Connector.
※ The Pathfinder app may need to be restarted for compatibility issues.
3.2 Pho
n
※ T
h
feet.
3.3 Pairi
Pair
can
u
3.3.
1
3.3.
2
3.3.
3
3.3.
4
3.3.
5
3.3.
6
n
e and GPS
h
e maximu
m
ng the GPS
the GPS Co
n
u
se the Pat
h
1
on Turn
2
Check t
h
3
Use the
4
Hold do
w
5
Hold do
w
played.
6
The mel
o
Collar w
i
Connector
r
m
communic
a
Connector
a
n
nector and
h
finder app
t
the GPS Co
h
at the GPS
select butt
o
w
n the con
n
w
n the pow
o
dy will sto
p
i
ll return to
r
ange
a
tion range
a
nd GPS Col
GPS Collar
t
o check if t
nnector on.
Collar is tur
n
o
n on the G
P
n
ect button
er button o
n
p
and the L
E
blinking in
n
1
for the GPS
lar
in close pr
o
he GPS Coll
n
ed off.
P
S Connect
t
for 5 secon
d
n
the GPS C
E
Ds on the
G
n
ormal inter
v
1
0m
Connector
o
ximity to e
a
ar is proper
t
o set the L
E
d
s until LED
ollar until t
h
G
PS Connec
t
v
als.
and phone
i
a
ch other. Y
o
ly paired.
E
D to Collar.
blinks rapid
h
e melody i
s
t
or and GPS
i
s 33
o
u
ly.
s
4. App Features
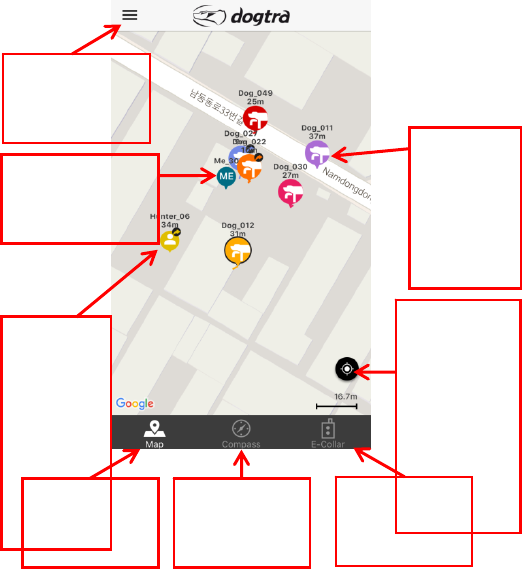
4.1 MAP
Main Map Compass E-Collar
Side Menu
Move
My
Location
My Location
My
Dog
Shared
Dog or
Hunter
4.1.1 Position display. With the GPS Connector paired to a GPS Collar and
phone or when receiving shared GPS Connector/GPS Collar devices,
their positions will be displayed on the map.
Alarm
Banner
Selected Dog
Dog state icon
Dog Moving Path
Collar Name
Collar Distance
Collar State icon
Connector(Me) location
※ Devices that are offline or hidden will not be displayed on the map.
4.1.2 Dog Alerts
4.1.2.1 Select a dog on the map to receive notification alerts for that dog.
4.1.2.2 Dog alerts are sent for the selected dog only. The current selected
dog is displayed with an outline around their icon.
4.1.3 Map Gestures
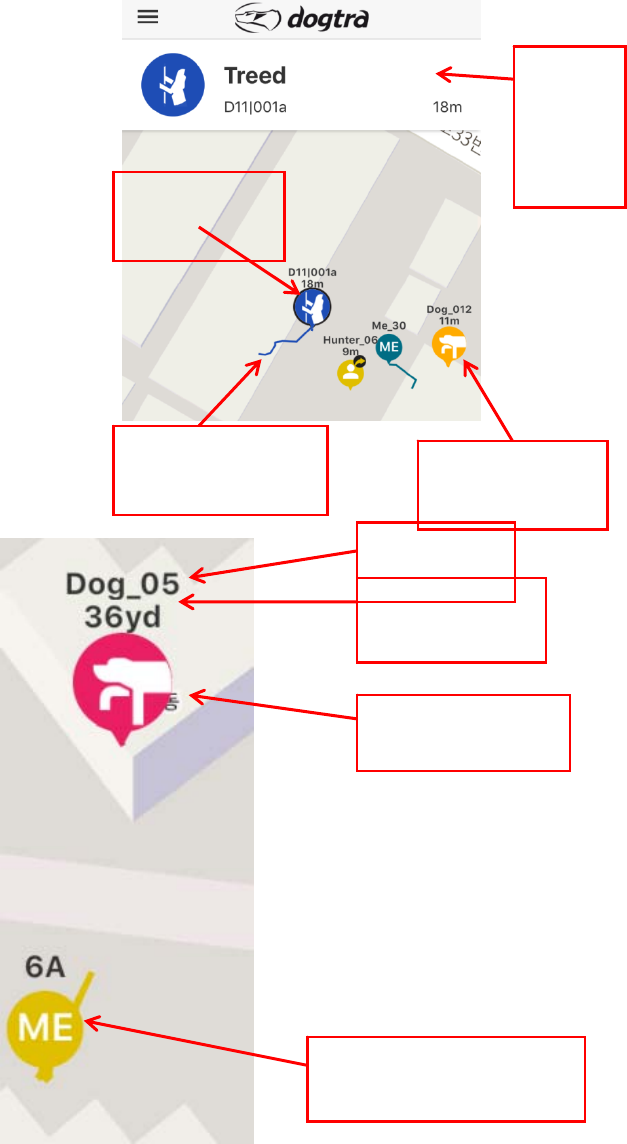
4.1.4 Dog position display
4.1.4.1 Your dog’s location is viewed on the map along with the collar
name and distance from your position. The dog icon displays your
dog’s current action status.
4.1.4.2 When your dog’s action changes, the icon action status will change
as well.
4.1.4.3 The dog display icon will change with poor connection, GPS signal
loss, or low battery, to an icon that represents these issues.
4.1.4.4 Devices shared will display the shared symbol on the device icon.
4.1.5 Connector position display
4.1.5.1 See the section on sharing/receiving devices.
4.1.5.2 When viewing shared GPS Connector devices, an icon will be
displayed along with the device name and distance from your
position.
4.1.5.3 The shared GPS Connector display icon will change with a poor
connection, GPS signal loss, or low battery, to an icon that
represents these issues.
4.1.6 My position
When the GPS Connector is paired with your phone, your current
position and tracks will be displayed.
4.1.7 Select between maps from Google (Normal, Satellite, Terrain) and
OpenStreetMap (Outdoors) from menu/map select.
4.1.8 The GPS Collars can be identified by name and color. Name and color
can be edited from menu/device list/device/edit.
4.1.9 GPS Collars shared with you can be identified by the shared symbol on
the icon.
4.1.10 Dog State Icon
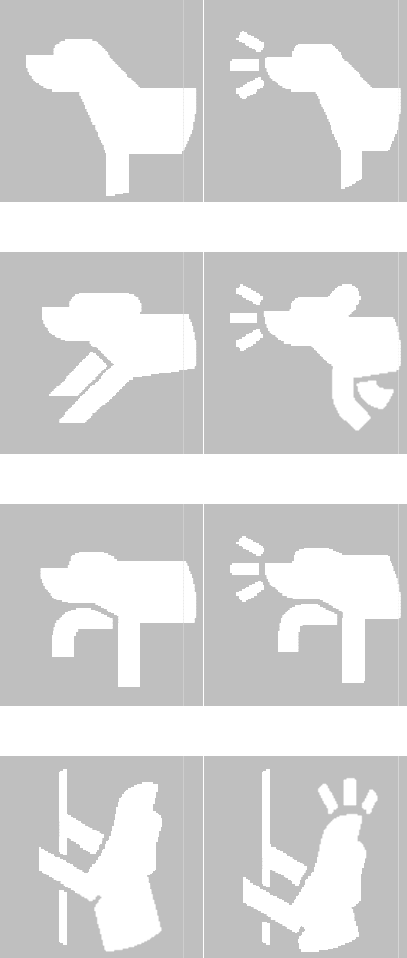
4.1.
1
Resting
Running
Pointing
Treedin
g
1
1 Long pr
e
g
e
ssing the
m
Resting
+
Running
Pointing
Treedin
g
m
ap opens u
+
Bar
k
+Bar
k
+Bar
k
g
+Bar
k
p the mark
e
e
r/ruler menu.
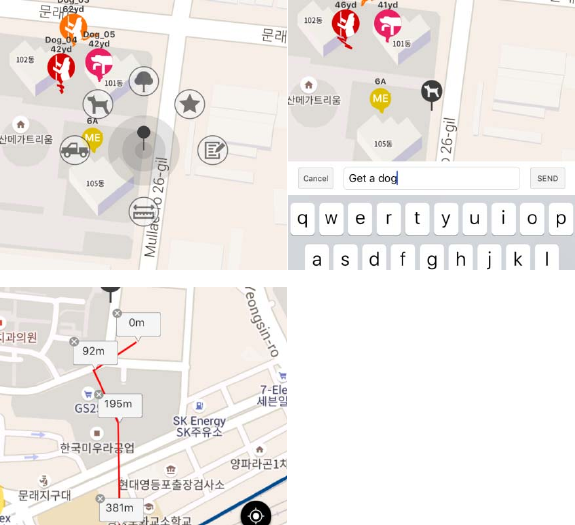
4.1.11.1 Map Sticker :The markers can be used to mark important locations.
Markers are also recorded onto history files and removed at the
start of a new hunt. Text can be saved along with the markers.
4.1.11.2 Distance ruler :The distance ruler can measure the distance between
multiple points. When finished, click x to exit out of the distance
ruler.
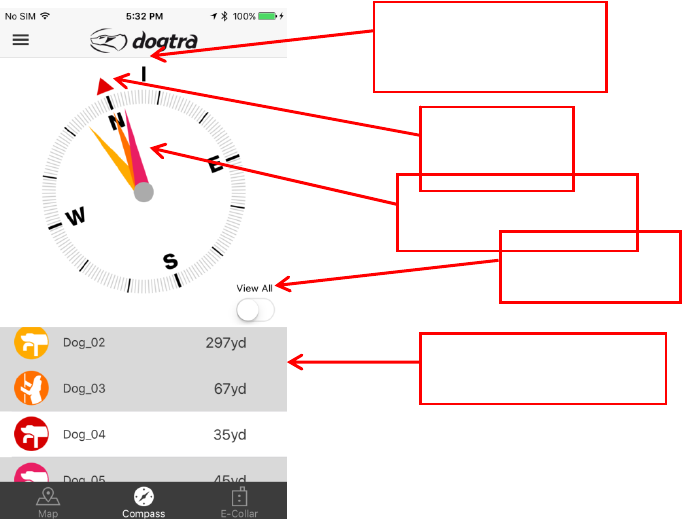
4.2 COMPASS
4.2.1 View the direction and distance of dogs and hunters at a glance.
4.2.2 Selecting dogs and hunters from the list will display them on the
compass.
※ pairing with 1 device will display that device at all times.
4.2.3 Use the View All button to view all dogs and hunters at once.
4.2.4 Dogs and hunters are not displayed when hidden or offline.
※ Phone cases made of metal or metal objects attached to the phone
will interfere with the compass.
※The phone may need to be calibrated for the compass.
3.3.3 View All
Direction faced
North
Dog direction
3.3.2 Dog Selected
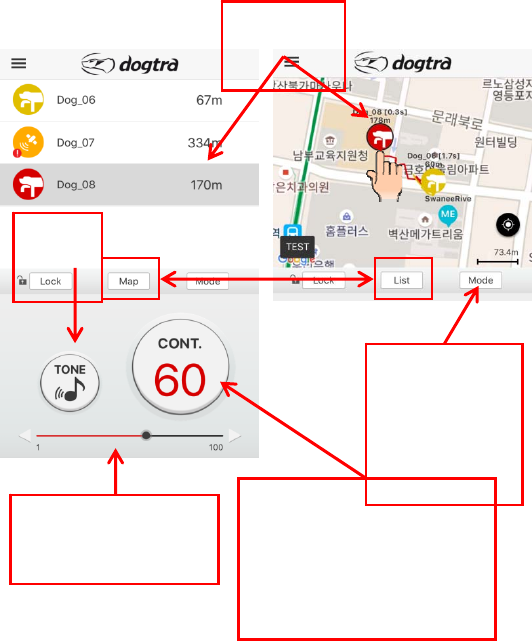
4.3 E-COLLAR
4.3.1 Nick or Constant stimulation or Tone can be sent to the selected dog.
4.3.2 Stimulation Level
4.3.2.1 Nick and Constant stimulation modes have stimulation levels from 1
to 100.
4.3.2.2 The stimulation level is controlled by the stimulation slider and
stimulation increase/decrease buttons on the left and right of the
slider.
4.3.2.3 The stimulation level can be set for individual dogs.
4.3.3 Dog selection
4.3.3.1 Dogs can be selected using the dog list or in map view.
4.3.3.2 List view displays dogs in a list along with their distance from you
and the recommended view when training multiple dogs.
4.3.3.3 Map view displays selectable dog icons on a map and can be used
to view recall.
※ Dogs are not displayed when hidden or offline.
4.3.4 Use the mode button to switch between Nick and Constant stimulation
Selected
Tone
Nick↔Cont.
Change
Stimulation Level Send Nick or
Constant
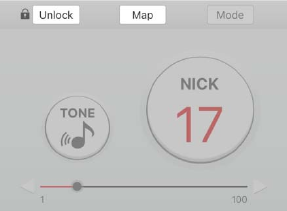
modes.
4.3.5 The lock button disables training functions until unlocked. Use the lock
feature so dogs are not accidentally stimulated.
4.3.6 Sending stimulation
4.3.6.1 Select a dog from list or map view.
4.3.6.2 Select the stimulation level using the stimulation slider or
stimulation increase/decrease buttons.
4.3.6.3 Set the stimulation to Nick or Constant using the mode button.
4.3.6.4 Nick :Stimulation is sent when the stimulation button is pressed.
Stimulation will be sent as long as the button is pressed, up to 12
seconds, when set to Constant.
Constant, Tone :A tone will sound as long as the button is pressed,
up to 12 seconds.
※ The E-Collar tab is disabled when the Tracking Only mode is turned on in
the Function Settings menu.
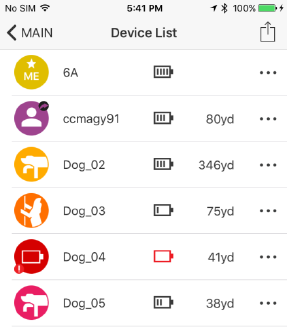
4.4 Device List
4.4.1 List of connected devices
4.4.1.1 Connected devices are displayed in Device List.
4.4.1.2 The dog icons display the dog’s current action.
4.4.1.3 Device battery life and distance from your location is displayed.
4.4.1.4 Selecting a device will display detailed information.
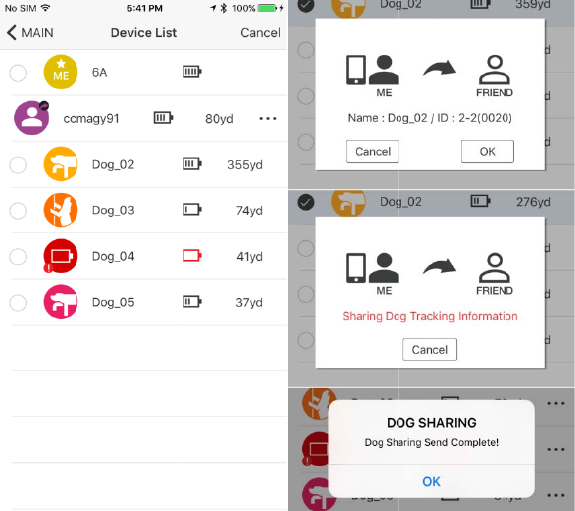
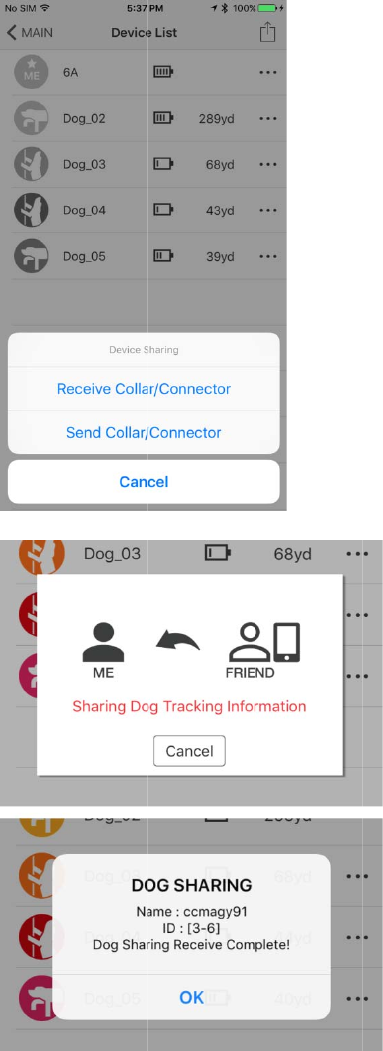
4.4.2 Device Sharing
Press the share icon to share and receive GPS Connector/GPS Collar
devices. Both Pathfinder users must you the device sharing feature at
the same time and within close proximity to each other.
4.4.2.1 Sharing a Device
You can share your position or your dog’s position.
Press the share button and select the device you want to share.
A pop up will appear when a device has been successfully shared.
4
4
.4.2.2 Rec
e
As anot
h
and rec
e
A pop u
Shared
d
tracks a
n
E-co
devi
c
GPS
e
iving a Dev
i
h
er Pathfind
e
e
ive from th
e
p will appe
a
d
evices are
d
n
d dog stat
u
llar and up
d
c
es.
settings ar
e
i
ce
e
r user is se
e
pop up m
e
a
r when a d
e
d
isplayed o
n
u
ses as they
d
ating GPS
s
e
disabled f
o
nding a de
v
e
nu.
e
vice has be
n
the Map a
n
update.
ettings are
d
o
r offline de
v
v
ice, press t
h
en successf
u
n
d Compas
s
d
isabled for
v
ices.
h
e share but
t
u
lly received
s
, along wit
h
received sh
t
on
.
h
the
ared
4.5 Options in Device List
Press the more options button (…) to bring up the options to hide or reorder
devices.
4.5.1 Hide
4.5.1.1 Hidden devices do not show up in the map, compass, and e-collar
tabs.
4.5.1.2 Use the more options button in the Device List to unhide a device.
4.5.2 Reorder
4.5.2.1 Reorder how the devices show in the app.
4.5.2.2 Press reorder to place the device in sorting mode.
4.5.2.3 Hold down the sort button and place the device in the desired
position.
4.5.2.4 The new order will be used in the map, compass, and e-collar tabs.
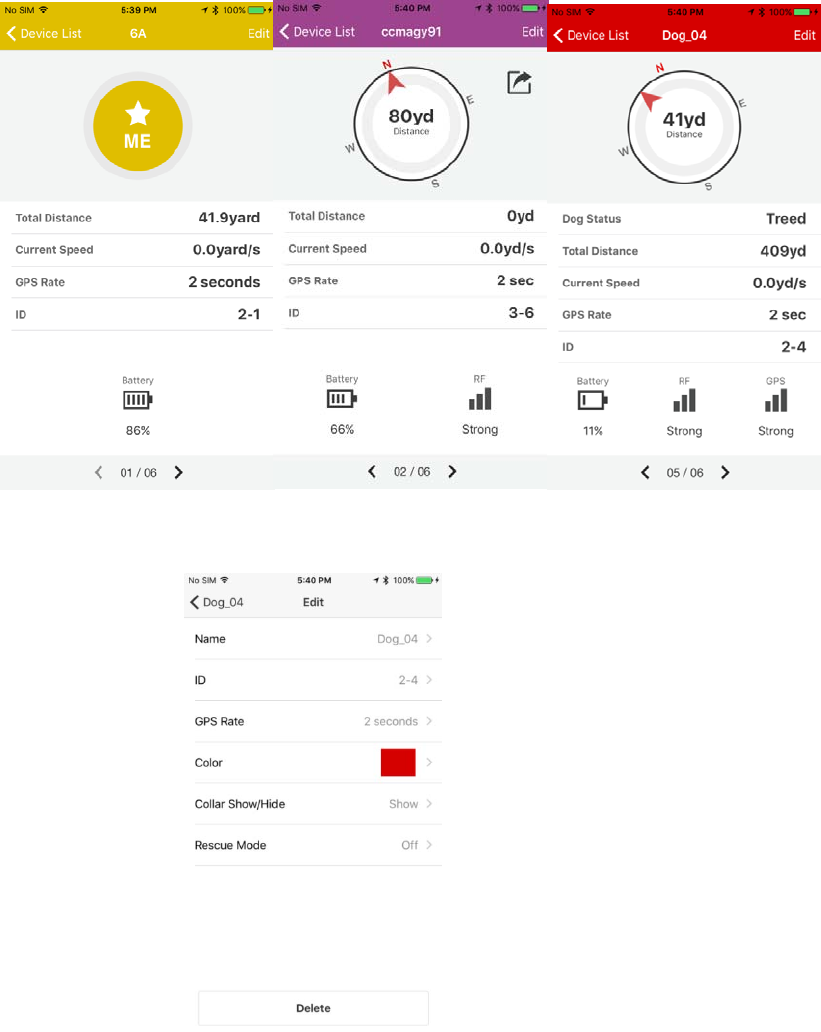
4.6 Device Detail Info & Edit
4.6.1 Device details
4.6.1.1 Press a device from the device list to go to the device details page.
4.6.1.2 The device details displays the total distance traveled, current speed,
ID, GPS strength, Radio Frequency strength, and battery level,
shared and hidden statuses.
4.6.1.3 Slide the device details page to view other devices.
4.6.2 Device settings edit
4.6.2.1 Press the edit button to change device settings.
4.6.2.2 Name Change :Edit the device name.
4.6.2.3 ID :The GPS Collar ID can be changed. Change the ID when the
signal conflicts with another GPS Collar. The ID of devices that are
shared with you cannot be changed.
The first number in the ID is the Channel and the second number is
the order. Do not use the same ID for additional GPS Collars.
4.6.2.4 GPS Rate :The GPS update rate can be changed for each device with
the options for 2 seconds, 6 seconds, 10 seconds, 30 seconds and
120 seconds. The update rate of devices that are shared with you
cannot be changed.
4.6.2.5 Color :The color associated with the GPS Collar can be changed. The
device color is used in the icon, tracks, compass needle, and in the
device list views.
4.6.2.6 Hide or show a hidden device.
4.6.2.7 Rescue Mode :
Turning on Rescue Mode activates when the GPS Collar battery life
is at 25% or less. The device is placed in sleep mode and the
update rate is changed to 120 seconds. At 25% battery life, rescue
mode increases the standby time by 8 hours. The rescue mode
setting cannot be changed for devices that are shared with you.
4.6.2.8 Delete :Delete removes pairing between the GPS Collar and GPS
Connector, or removes from the app devices shared with you. To
add back the GPS Collar, the GPS Collar and GPS Connector will
have to be paired. Previously shared devices will need to be shared
again.
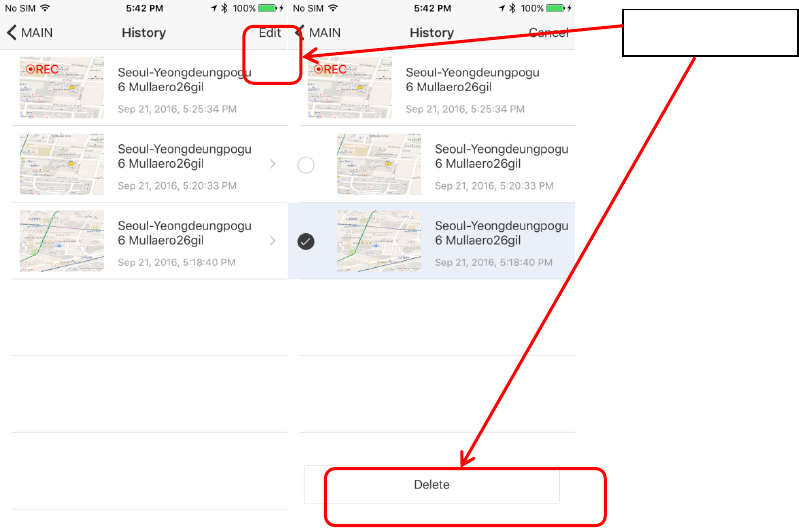
4.7 Map Record
View history files and delete using the edit button. History files currently
recording cannot be accessed until completed. Select completed history files to
play back and view details.
4.7.1 A history file begins recording when the GPS Connector is connected to
the phone and the app is opened.
4.7.2 History files currently recording cannot be accessed until completed.
4.7.3 Use the edit button to delete history files.
4.7.4 History Detail
3.7.3 delete
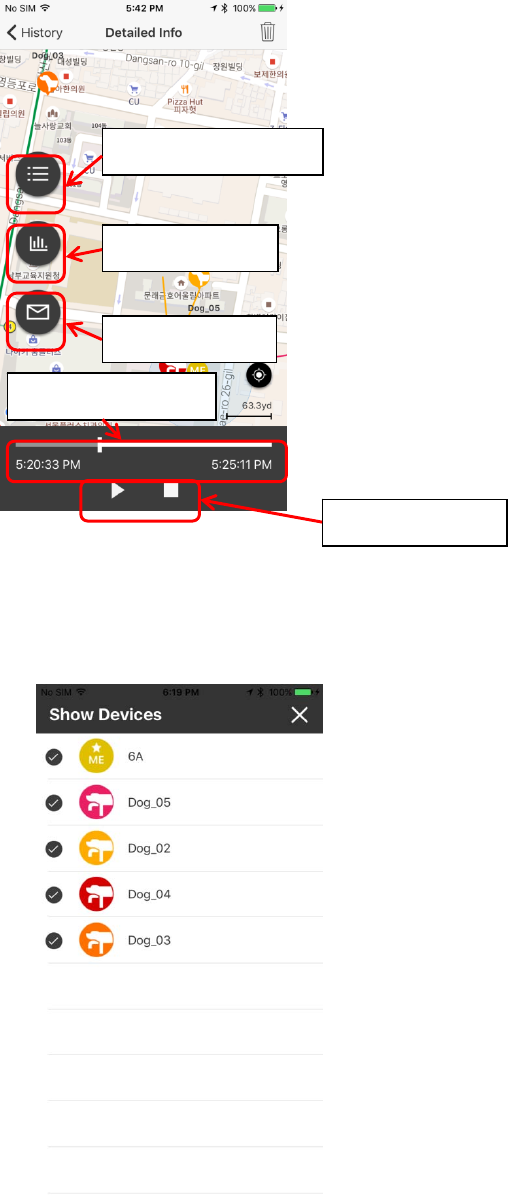
4.7.4.1 Play: The history file displays the track movement of dogs and
people. Use the play button to view the movement from start to
finish, or use the slider to jump to a specific time.
4.7.4.2 Show Devices: Select/deselect the devices you want to see/hide in
the history file playback.
3.6.5.1 Show
3.6.5.2
3.6.5.3 KML
3.6.5.5 Play-
3.6.5.4 Time

4.7.4.3 Send History File: Completed history files can be emailed as a KML
file. iPhone users can download the KML file using iTunes. KML files
can be viewed on a desktop computer using Google Earth.
4.8 Map Select
A preferred map view can be selected.
4.8.1 Google Map – Normal
4.8.2 Google Map – Satellite
4.8.3 Google Map – Terrain
4.8.4 Outdoors MapDisplays outdoor points of interest.
.
4.9 Offline Map
Download offline areas and view areas downloaded for offline use.

4.9.1 Offline Maps
4.9.1.1 View offline map area and details.
4.9.1.2 Use the edit button to rename or delete the offline map.
4.9.2 Map Download
4.9.2.1 The offline map is displayed when cellular data/wifi is unavailable.
4.9.2.2 Offline maps should be downloaded before entering areas with
limited data.
4.9.2.3 Navigate to the area you wish to download and use pinch and
zoom to specify the area.
4.9.2.4 To use the offline map, you must select Outdoors from the Map
Select menu.

4.10 Geo-fence
A Geo-fence can be created for an area specified.
The Geo-fence will be displayed on the Map tab. Dog alerts for the Geo-fence are
turned on by default and a notification will appear when dogs exit and enter the
Geo-Fence.
※ If the Geo-fence alerts do not go off, check the function settings to see if they
are turned off.
※ The Geo-fence alerts can be turned off in the Function Settings.
4.10.1 Geo-fence Info: The info button displays more information on setting up
the Geo-fence.
4.10.2 Saving a Geo-fence
4.10.2.1 Long press the map to create a Geo-fence point.
4.10.2.2 Geo-fence points must be created in clockwise order. Geo-fence
points cannot intersect and an invalid Geo-fence will be displayed in
red.
4.10.2.3 A valid Geo-fence is displayed in green.
3.10.1 Tutorial
4.10.2.4 An invalid Geo-fence is displayed in red.
4.10.2.5 Once a valid Geo-fence is created, use the save button to the save
the Geo-fence to the map.
4.10.2.6 An invalid Geo-fence cannot be saved.
4.10.3 : Geo-fence points can be edited before saving.
4.10.3.1 Hold and drag the Geo-fence points to edit its location.
4.10.4 Geo-fence reset
4.10.4.1 Use the reset button to start over.
5. Pathfinder Setting
5.1 Screen Saver
5.1.1 The phone screen turns off when covered or in a pocket and turns on
when viewed.
5.1.2 On Android, the screen will turn off when the proximity sensor is
covered and turns on when the sensor is exposed.
5.1.3 Turn this feature on and off using the On/Off button.
5.2 Shake Control
5.2.1 Shake your phone to jump between dogs or the main tabs.
5.2.2 Select between tabs, dogs and no action.
5.3 Volume Button Control
5.3.1 Use the volume buttons to jump between dogs or zoom in/out on the
map.
5.3.2 Select between zoom, dogs and no action.
5.4 Distance Unit
5.4.1 The distance is displayed on the main tabs, and device list.
5.4.2 Select between meters and yards.
5.5 Speed Unit :Select between seconds and hours.
5.6 GPS Data
5.6.1 The GPS Data Limit sets how far back the tracks are displayed. If 2
minutes is selected, only the tracks up to 2 minutes will be displayed.
5.6.2 Select between intervals in 1 to 10 minutes or unlimited.
5.7 : Tracking only mode
5.7.1 Tracking Only Mode disables the e-collar for use where e-collars are
restricted.
5.7.2 The history file will display a Tracking Only Mode watermark that cannot
be edited while in Tracking Only Mode.
※ A new history file will begin recording when the Tracking Only Mode is
turned on.
5.8 Offline Map Data Usage
5.8.1 Turn Offline Map Data on to use cellular data when available with
Offline maps. Turn Offline Map Data off to restrict data usage and only
display downloaded Offline Maps.
5.8.2 On (Allow data usage while using Offline Maps)/Off (Restrict data usage
while using Offline Maps) This feature needs to switch in the app!
5.9 Always Fit Boundary
5.9.1 Turn Always Fit Boundary on to view all dogs on the screen when
returning to a map view. Turn Always Fit Boundary off to view where
you left off when returning to a map view.
5.9.2
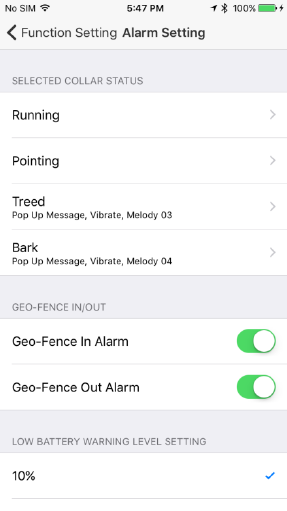
5.10 Alarm Setting –Settings for various alarms.
5.10.1 Selected Collar Status –Set the alert type for dog status changes.
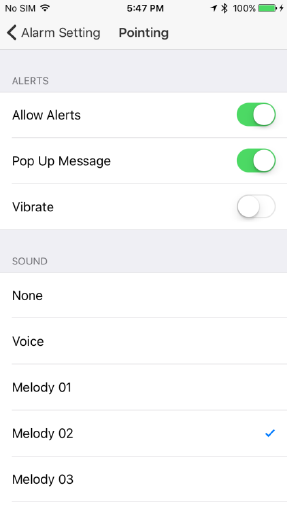
5.10.1.1 Separate alert types can be set for each dog status.
5.10.1.2 Options for alerts are pop up, vibration and sound and can be
turned on and off.
5.10.1.3 Sound alerts include 5 melody options and voice.
5.10.1.4 Allow Alerts –Turning off Allow Alerts disables all alerts for the dog
status.
5.10.1.5 Pop Up Message –Pop Up Message displays a pop up notification
alert.
5.10.1.6 Vibrate –Vibrate is a phone vibration alert.
5.10.1.7 Sound – Sound alerts include 5 melody options and voice. Turn off
sound alerts by selecting none.
5.10.2 Geo-Fence In/Out :Turn on/off Geo-fence In/Out alerts used with a
saved Geo-fence.
5.10.3 Low Battery Warning Level Setting
5.10.3.1 The battery warning changes the device icon and displays a
notification when the device battery reaches the battery percentage
selected.
5.11 Connector Pairing
5.11.1 Begin pairing mode on the phone to pair with the GPS Connector. Use
the pairing mode to pair with a new or replacement GPS Connector.
6. User Guide
6.1 The User Guide goes over the main features of the Pathfinder.
6.2 Review the User Guide when using the Pathfinder for the first time.
Maintain
- Be sure the rubber charging cap is securely in place on the GPS Connector/Collar when in
use.
- Carefully inspect the unit for any missing parts or damage to the casing after use.
Damaged or broken casing may affect the waterproof guarantee on the unit.
- The antenna must be securely in place for maximum range.
- Charge the unit for 2 hours before storing for extended periods. Charge the unit fully once
a month while in storage or before use.
- Do not keep the unit exposed to extreme climates.
- The Pathfinder uses Lithium Polymer batteries and can be replaced. Be careful not to damage
or puncture the batteries.
- Dogtra may include updates and improvements to the Pathfinder app which can be
downloaded through the App Store and Google Play.
Troubleshooting
If the unit is malfunctioning, please refer to the Troubleshooting Guide before sending it to
Dogtra for service. If you have any questions or concerns, you may email them to
info@dogtra.com or call customer service at 1-888-811-9111.
FCC Warning
This device complies with part 15 of the FCC Rules. Operation is subject to
the following two conditions: (1) This device may not cause harmful
interference, and (2) this device must accept any interference received,
including interference that may cause undesired operation.
This is a sensitive radio device. Any unauthorized changes or modifications
to this device that are not expressly approved by Dogtra Co.,Ltd will void the
devices warranty, and might void user’s authority to operate the equipment.
So don’t do it please.
Radio Frequency Radiation Exposure
This device is a mobile transmitter and receiver that uses an external
antenna to send and receive low levels of radio frequency (RF) energy for
data communications. The device emits RF energy below the published limits
when operating in its maximum output power mode and when used with
Dogtra Co.,Ltd authorized accessories. To comply with RF exposure
compliance requirements, the device should be installed and operated with a
minimum of 0.2m between the device and your body. The device should not
be used in other configurations
This device must not be co-located or operated in conjunction with any
other transmitter or antenna.

22912 Lockness Ave.
Torrance, CA. 90501
USA
TEL : 310-534-0101
FAX : 310-534-9111
Website :www.dogtra.com
Copyright©2015 Dogtra Company All rights reserved. (1)