Dongguan Newmen Electronics Technology 245IR-1 2.4G Wireless Dongle User Manual
Dongguan Newmen Electronics Technology Co.,LTD 2.4G Wireless Dongle
Users Manual
Model :
www.zalman.com
User's Manual
MS-245IR
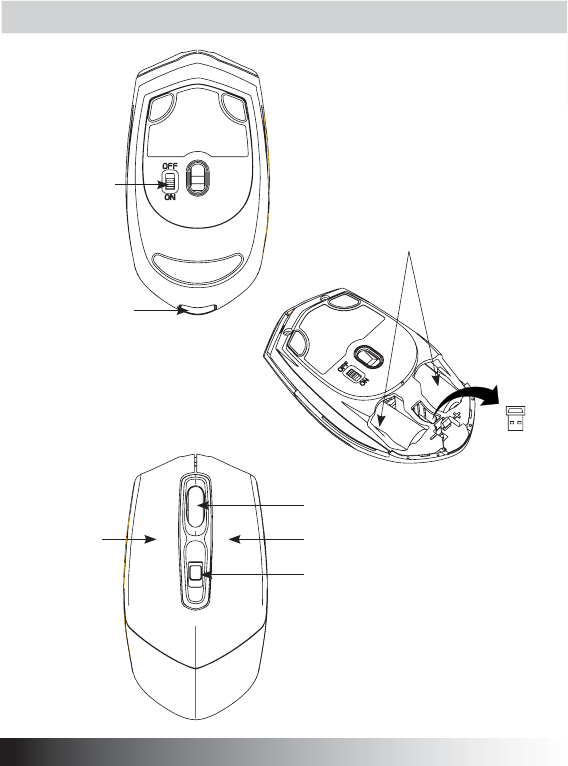
Diagram
On/Off Switch
Left Key
Battery Compartment
USB Nano Receiver
Bottom Cover Button
Scrol Wheel
Right Key
3-Function Key

Package Contents
Wireless Optical Mouse 1pcs
USB Nano Receiver 1pcs
1.5V AA alkaline battery 2pcs
User Manual 1pcs
Pouch 1pcs
Battery Installation
1. Open the bottom cover.
2. Remove USB Nano receiver.
3. Insert two new 1.5V AA batteries into the battery compartment. Make sure to properly orient the
SRVLWLYHDQGQHJDWLYHHQGVDVVSHFL¿HG
4. Close the bottom cover and make sure it is locked.
USB Nano Receiver Installation
1. Turn the switch off on the bottom of mouse.
2. Insert the USB Nano Receiver into a USB port of PC. It will be detected by OS automatically.
3. Turn the switch on, and the mouse will generate two beeps when communication with the USB
Nano Receiver is successful.
* ON/OFF Switch : Turn this off when not using the mouse to save the battery power.
Description of Keys and 3-Function Key
3-Function Key offers Forward, Backward, and DPI change.
By clicking, DIP can be switched to 1000DPI, 1500DPI, 3000DPI and back.
Low-battery Alert
When the battery power is low, the mouse will beep every 20 seconds. Replace with new batteries.
System Requirements
Compatible OS : Windows 2000/2003/XP/Vista/7
Compatible USB : 1.1 and higher
ENGLISH
MS-245IR

undesired operation.
(2) This device must accept any interference received, including interference that may cause
(1) This device may not cause harmful interference, and
he FCC Rules. Operation is subject to the following two conditions:
the user's authority to operate the
FCC Caution:
Any Changes or modifications not expressly approved by the party
responsible for compliance could void equipment.
This device complies with part 15 of t
ENGLISH
MS-245IR
responsible for compliance could void

Contenus de package
6RXULVRSWLTXHVDQV¿OSFV
Récepteur USB Nano 1pcs
pile alcaline 1.5V AA 2pcs
Manuel d’utilisation 1pcs
Sac 1pcs
Installation de la batterie
1. Ouvrir le couvercle inférieur
2. Enlevez le récepteur USB Nano.
3. Insérez les deux piles de 1.5V AA dans le compartiment de la batterie. Assurez vous que les
positions + et – soient correctement orientées.
4. Fermez le couvercle en prenant soin de le verrouiller.
Installation du récepteur USB Nano
1. Eteindre l’interrupteur situé sous la souris.
2. Insérez le récepteur USB Nano dans le port d’USB du PC. Il sera détecté automatiquement par
l’OS.
3. Allumez l’interrupteur, la souris émet deux bips quand la communication avec le récepteur USB
Nano est faite.
,QWHUUXSWHXU2Q2II(WHLQGUHO¶LQWHUUXSWHXUTXDQGODVRXUULVQ¶HVWSDVXWLOLVpHD¿Q
d’économiser la batterie.
Description des boutons et du bouton 3 en 1
Le bouton 3 en 1 offre les fonctions en avant, en arrière et le changement de DPI.
En cliquant, le DIP peut être changé en 1000DPI, 1500DPI, 3000DPI et arrière.
Alerte de batterie faible
Lorsque la batterie est faible, la souris émet un bip sonore toutes les 20 secondes. Remplacez
par des piles neuves.
&RQ¿JXUDWLRQUHTXLVH
OS compatible : Windows 2000/2003/XP/Vista/7
USB compatible : 1.1 et plus
français
MS-245IR

Paketinhalt
Kabellose Optische Maus 1
Nano USB Empfänger 1
1.5V AA alkalische Batterie 2
Bedienungsanleitung 1
Tasche 1
Installation der Batterie
1. Öffnen Sie den unteren Deckel.
2. Entfernen Sie den Nano USB Empfänger.
3. Legen Sie zwei neue 1.5V AA Batterien in das Batteriefach und stellen Sie sicher, dass die
angegebene Polung des positivem (+) und negativem (-) Endes, passt.
4. Schließen Sie nun den unteren Deckel und versichern Sie sich, dass der Deckel eingerastet ist.
Nano USB Empfänger Installieren
1. Schalten Sie die Maus mittels des ON / OFF Schalters aus, indem Sie OFF wählen.
2. Schließen Sie nun den Nano USB Empfänger an einen PC USB-Port an. Er wird automatisch
durch das Betriebssystem installiert.
3. Schalten Sie nun die Maus mittels des ON / OFF Schalters an indem Sie ON wählen. Die
Maus wird nun zwei Pieptöne abgeben, wenn die Kommunikation mit dem USB Nano Empfänger
HUIROJUHLFKVWDWW¿QGHW
* On/Off Switch : Ausschalten, der Maus bei nicht Benutzung spart Batteriestrom.
Beschreibung der Tasten und des 3-Funktions Key
3-Funktion Key bietet das Wechseln von Vorwärts, Rückwärts, und DPI Funktionen an.
Durch das Klicken, kann zwischen 1000DPI, 1500DPI, 3000DPI und zurück geschaltet werden.
Schwache-Batterie Alarmsignal
Wenn der Batteriestrom schwach wird, wird die Maus einen Piepton alle 20 Sekunden abgeben.
Bitte wechseln sie dann die Batterien.
System Anforderung
Kompatibeles OS : Windows 2000/2003/XP/Vista/7
Kompatibel zu USB : 1.1 und höher
Deutsch
MS-245IR
ኮአዙን␔⹈
ዌኁዉኖኇኴኣኀኈወኻኃኖSFV
86%ኧካዉኔዙክዙSFV
9$$ቿወኈℍ榊㻯SFV
∎䞷崻㢝㦇SFV
ኺዙኞSFV
ℍ榊㻯ቑ⏴ቯ㡈
ኹእኽኈክዙት㢝ሴₚሸሧᇭ
86%ኧካዉኔዙክዙት♥ቭ棳ሰቡሼᇭ
9ᇫ$$ኒኁኗቑ㠿ሺሧℍ榊㻯ትℍ榊㻯ኚአእ孔䧏ሺቡሼᇭሶቑ㣑ᇬኴኖ㰄ቋኻኁ
ኧኖ㰄ት栢拤ራቍሧቫሩ䭉崜ሺ㷲ሺሲ岼函ሺቡሼᇭ
ኹእኽኈክዙት栘ቤᇬሺቆሮቭ栘ቡቆሧቮሮ䭉崜ሺₚሸሧᇭ
86%ኧካዉኔዙክዙቑ岼函
ኻኃኖቑㄤ槱ሥቮኖኁአኞትኇኲሺቡሼᇭ
3&ቑ86%ኺዙእ86%ኧካዉኔዙክዙት㷲ሺሲぽሺ手ቢቡሼᇭ26ቫቭ呹╤䤓86%ሯ崜巧
ሸቯቡሼᇭ
ኖኁአኞትኇዐሺᇬ86%ኧካዉኔዙክዙሯ3&ቋ㷲デነኼዂከዙኔዄዐቊሰቮቋኻኃኖሯ
⥭ኰዙኴ檂ት䤉ሺቡሼᇭ
ኇዐኇኲኖኁአኞℍ榊㻯ቑ榊┪䀗劦ት㔠ራቮቂቤኻኃኖት∎䞷ሺቍሧ㣑ቒᇬኇኲሺₚሸሧᇭ
咻䤓ቍኊዙቋ᧯ቇቑኲቾዐኌኔዄዐኊዙቑ崻㢝
ቇቑኲቾዐኌኔዄዐኊዙቒᇬኲኆዌዙኦክአኌዌዙኦ'3,⮘㙪ት嫛ሩ㣑∎䞷ሺቡሼᇭ
ኌአኌሼቮሶቋቫቭᇬ'3,ሯ'3,ᇬ'3,ᇬ'3,檕䟹⮘㙪ሸቯᇬ㦃ኌአኌሼ
ቮቋ⏒㓊ቭቡሼᇭ
ℍ榊㻯ቑ⺎✌ቑ巵⛙
ℍ榊㻯ቑ榊┪ሯ⇝ₚሺቂ⫃⚗ᇬኻኃኖሯ䱡㹝ኰዙኴ檂ት䤉ሺቡሼᇭ㠿ሺሧℍ榊㻯ℳ㙪ሺₚ
ሸሧᇭ
╤⇫䜿⬒
℡㙪㊶26ኃኀዐኦኃኗ;3ኰኖኜ
℡㙪㊶86%ቋቀቯⅴₙቑክዙንዄዐ
㡴㦻崭
MS-245IR
̱͕͓͖͙͇͒͌͑͝͏ͦ
̨͖͕͉͕͔͇͕͖͙͌͗͋ͦ͘͏͇͓͙͌͑ͦͣ͘͢͟͟͞
86%͔͇͔͕͖͗͏͓͔ͧ͏͙͑͟
9$$͇͇͒͑͒͏͔͕͉͇͈͇͙͇͙ͦ͗͌ͦ͟
̷͚͕͉͕͙͉͕͖͕͎͕͉͇͙͙͑͋͒ͣ͌͒ͦ͘͟
͕͙̾͌͒͜͟
̺͙͇͔͕͉͇͈͇͙͇͑͗͌͘͏
̵͙͕͙͔͑͗͐͌͏͍͔͚ͥͥ͑͗͑͢͟
̯͎͉͒͌͑͏͙͌86%͔͇͔͕͖͗͏͓͔ͧ͏͑
3.
̩͙͇͉͙͉ͣ͌͋͌͘9$$͈͇͙͇͗͌͏̶͉͕͙͈͇͙͇͌͑͋͒ͦ͗͌͐͗͘͏͚͙͇͔͕͉͈͇͙͇͕͈͇͙͖͕͔͕͙͑͌͗͌͐͒ͥ͋͐͌͒ͦ͗ͣ͘͘͘
̮͇͕͙͔͑͗͐͌͏͍͔͚̺͈ͥͥ͑͗͑͌͋͢͟͏͙͙͕͇͎͇͙͇͖͕͙͔͕͌ͣ͑͗͑͑͗͒͘͢͟͢͞
̺͙͇͔͕͉͇͑͘86%͔͇͔͕͖͗͏͓͔ͧ͏͇͑
̺͙͇͔͕͉͘͏͙͖͇͙͉͖͕͕͍͔͌͌͗͌͑͒ͥ͌͒ͣ͒͌͞͏͌mRᚎ}͉͑͒͢
̩͙͇͉͙ͣ͌͘86%͔͇͔͕͖͗͏͓͔ͧ͏͉͑86%̵͖͕͙͕͓͖͙͇͖͇͗͑ͣͥ͌͗͌͗͝͏͕͔͔͇ͦ͘͏͙͓͇͇͉͙͕͓͇͙͌͘͏͌͞
͑͘͏͕͖͗͌͋͌͒͏͙͚͙͕͙͉͕͗͐͘͘
̺͙͇͔͕͉͘͏͙͖͇͙͉͖͕͕͍͔͌͌͗͌͑͒ͥ͌͒ͣ͒͌͞͏͌mRQ}͉̫͉͇͕͕͙͑͒͑͗͑͏͎͉͚͕͉͑͘͜͢͜͏͔͇͇͓͊͒͢͟͏
͈͚͚͙͋͘͏͔͇͊͒͏͎͏͕͉͇͙͕͈͚͖͔͕͓͖͕͔͗ͣ͌͋͑͒ͥ͌͘͟͞͏͏
2Q2ᚎ̶̩̱̲̩̱̲͇͙̫͕͇͔͔͂͌͗͌͑͒ͥ͌͒ͣ͒ͦ͗͌͘͜͞͏͎͇͇͈͇͙͇͖ͦ͗ͦ͋͗͌͐͌͗͌͑͒ͥ͞͏͙͉͖͕͌͒
͕͍͔͌͏͌mRᚎ}͕͇͉͔͑͊͋͌͢͏͖͕͎͚͙͓͒ͣ͌͌ͣ͘͢͟
̵͖͏͇͔͘͏͔͕͖͕͌͑͑͏͚͔͛͑͝͏͏͉
̻͚͔͑͝͏͕͔͇͔͇͔͕͖͇͒ͣͦ͑͑m͉}͓͕͍͙͈͙͌ͣ͢͏͖͕͎͕͉͇͔͇͇͔͕͖͇͒ͣ͑͑͑͑͘m͔͇͎͇͋}m͉͖͌͗ͧ͋}
͇͙͇͍͑͌͋͒ͦ͏͎͓͔͔͌͌͏͎͔͇͔ͦ͌͞͏ͦ'3,͇͎͔͗͗͌͌͟͏͌͏͚͉͙͉͘͞͏͙͔͕͙͓͌͒ͣͣ͘͢͟͏
̴͇͍͏͓͇͔͇͔͕͖͚ͦ͑͑͏͎͓͔͔͌͌͏͎͔͇͔ͦ͌͞͏ͦ'3,͉͓͕͍͙͚͙͇͔͕͉͌͌͘͢͏͙͎͔͇͔ͣ͌͞͏ͦ'3,'3,
͏'3,͕͕͙͉͙͙͉͔͔͕͌͌͘͘
̵͖͕͉͔͌͌͠͏͕͇͎͍͔͔͕͈͇͙͇͌͗͗ͦ͌͐͗͌͌
̱͕͇͈͇͙͇͇͎͍͔͇͓͈͚͙͊͋͗͌ͦ͗͗ͦ͌ͣ͋͌͢͟͏͎͇͉͇͙͕͕͙͋ͣ͑͗͑͏͎͉͚͕͉͌͑͌͘͢͏͔͇͇͍͚͔͊͒͑͋͌͌͑͋͘͢͢
̮͇͓͔͌͏͙͈͇͙͇͔͇͔͕͉͚͌͗͌ͥͥ
̸͏͙͓͔͙͈͕͉͇͔͌͌͗͌͘͢͏ͦ
̸͕͉͓͙͌͘͏̵̸͓͕͙ͣ͘͘:LQGRZV;39LVWD
̸͕͉͓͙͌͘͏͓͕͙ͣ͘͘86%͖͕͙͕͓͗͏͉͌͢͟
̷͚͑͘͘͏͐
MS-245IR

구성품
무선 마우스 1개
USB 수신기 1개
1.5V AA 건전기 2개
취급 설명서 1부
파우치 1개
건전지 장착
1. 마우스 뒷면 버튼을 눌러, 하단부 (Bottom Cover)를 벗겨냅니다.
2. USB 수신기 (USB Nano Receiver)를 꺼냅니다.
3. 1.5V AA 건전지 2개를 건전지 함에 넣습니다. 표시대로 양극(+)과 음극(-)을 맞추어주십시오.
4. 하단부를 장착하고 제대로 고정되었는지 확인합니다.
USB 수신기 장착
1. 마우스 하부에 있는 스위치 (Switch)를 끕니다. (Off 위치)
2. USB 수신기를 PC의 USB 포트에 꼽습니다. (운영체제가 자동인식함)
3. 스위치를 킵니다. (On 위치) 마우스와 USB 수신기의 통신이 성공하면 마우스에서 비프음이 2번 발생
됩니다.
* 스위치(On/Off) : 마우스를 사용하지 않는 경우 Off 위치로 두어 건전지가 허비되지 않도록 하십시오.
기본 키와 기능 키
기본 키의 역할은 상기 표와 같으며, 기능 키 (3-Functional Key)는 전진, 후진, DPI 변경을 가능케 합니다.
기능 키를 누를 때마다 1000, 1500, 3000DPI 순서로 DPI가 변경됩니다.
전력부족 알림 기능
건전지 전력이 부족해지면 마우스에서 20초당 1회씩 비프음이 발생됩니다. 새로운 건전지로 교환하시기
바랍니다.
시스템 요구사양
호환 운영체제 : 윈도우 2000/2003/XP/비스타/7
호환 USB : 1.1 및 그 이상 버전
뼑鞵
MS-245IR

품질보증 및 A/S 안내
1. 제품 보증기간: 제품 구입일로부터 1년(단, 구입 영수증이 있을 때)
2. 무상A/S: 품질 보증기간 내에 제품 자체 성능상의 하자 및 불량 발생시
3. 유상A/S: 품질 보증기간 이후에 제품 사용상의 문제 발생시. 단, 아래와 같은 사항에
대해서는 품질 보증기간 이내라도 무상A/S 처리가 되지 않으며 소비자 부담으로 처리됩니
다.
☞ 본 사용 설명서에 명시된 설치 전 주의사항 및 유의사항을 지키지 않은 경우
☞ 사용자의 고의나 과실 및 부주의로 인하여 변형/파손/파괴된 경우
☞ 사용자의 임의 개조에 의한 변형 및 고장이 발생된 경우
4. 교환 및 환불
1) 교환: 제품 구입일로부터 1개월 이내에 제품 자체 성능상의 하자 또는 불량 발생시 동일 제품으로
교환하여 드립니다.
2) 환불: 제품 구입 후 10일 이내에 제품 및 포장의 훼손이 없는 경우에만 구입처를 통해 환불 받으
실 수 있습니다(단, 제품 구입시 발급해 드린 영수증을 제시하셔야 환불 가능합니다).
5. A/S
1) 운영시간: 평일 09:00~18:00 (공휴일, 토・일요일 휴무)
2) 접수 방법
① 방문 접수: 본사를 직접 방문할 경우 사전 연락 후 방문해 주시기 바랍니다.
② 택배 접수: 택배(우편)를 이용하실 경우 아래의 주소로 성함, 주소, 연락처 및 불량 상태를 적
은 메모지를 넣어서 보내주십시오.
3) 접수처
◆ 본 사: 서울시 금천구 가산동 448 대륭테크노타운3차 1009호 ☏1588-3936
◆ 조용컴퓨터:
서울시 용산구 신계동 29-5번지 대양빌딩 지하 1층 ☏02)718-8960
※ A/S 의뢰 시 제품은 A/S접수처로 보내시는 것을 원칙으로 합니다.
※ 제품 교환은 구입처 또는 본사 및 총판 대리점(조용 컴퓨터)에서 가능하며, 기타 A/S는
본사에서만 가능합니다.
6. 제품 운송비용
1) 무상A/S의 경우: 전액 당사가 부담합니다.
2) 유상A/S의 경우: 당사로 보내시는 비용은 고객께서 부담하시고, A/S처리 후 발송하는
비용은 당사가 부담합니다.
3) 보증기간 이후: 전액 고객 부담입니다.