Dongguan Winn Technology WINNPAD7TABLET Tablet PC User Manual
Dongguan Winn Technology Co.,Ltd Tablet PC
User Manual
1
English User Manual
This manual is to introduce the functions of the device, as well as
matter which need attention, Please read this manual before using
the device.
2
Announcements
z Please keep the device from moist and dust.
z Do not put the device in high-temperature environment,
especially closed car in hot weather.
z Do not drop or strike the device.
z Do not shake the device violently, especially the LCD screen
part, which will cause abnormal display on the screen.
z Do not disconnect the device from PC when downloading,
uploading or formatting, or it will cause programming errors of
the device.
z Do not use alcohol, thinner or benzene-chemical to clean the
surface of the device.
z Do not use the device in forbidden place, like airplane.
z Please back-up your files in device's memory always,The
manufacture is not responsible for the formatting of disk after
damage or repair of the device.
z Do not refresh firmware privately without original manufacturer's
guidance. The manufacturer is not responsible for the
breakdown of the device caused by private firmware refresh.
3
Table of Contents
1 appearance and button: ............................................................................. 4
2 Basic Key Operation ................................................................................... 4
3 Port Definition: .......................................................................................... 5
4 Operation Interface of The Device ............................................................. 5
4.1 Main Interface Description .................................................................. 5
4.2 Application Program Interface ............................................................ 7
4.3 Pre-loaded Applications ...................................................................... 8
4.4 State Bar Description ........................................................................ 10
5 Touch Panel Usages ................................................................................. 11
6 Basic Setting of the Device ...................................................................... 12
6.1 WIRELESS&NETWORKS................................................................... 12
6.1.1 Wi-Fi setting ............................................................................ 13
6.1.2 Data usage information .......................................................... 14
6.1.3 More options ........................................................................... 14
6.2 Device ................................................................................................. 17
6.2.1 Sound: Sound Parameters Setting ....................................... 17
6.2.2 Display: Display Parameters Setting .................................... 18
6.2.3 Storage: Storage Parameters Information ........................... 19
6.2.4 Battery: Battery Parameters Information ............................. 20
6.2.5 Apps: Applications ................................................................. 21
6.3 Personal ............................................................................................. 22
6.3.1 Location services: .................................................................. 22
6.3.2 Security: .................................................................................. 22
6.3.3 Language & input: .................................................................. 23
6.3.4 Backup & reset: ...................................................................... 24
6.3.5 Add account ............................................................................ 24
6.4 System ................................................................................................ 25
6.4.1 Date & time: ............................................................................ 25
6.4.2 Accessibility: Miscellaneous Function Setting .................... 25
6.4.3 Developer options: ................................................................. 26
6.4.4 About tablet ............................................................................ 27
7 Application Management & usage ........................................................... 27
7.1 Application Management .................................................................. 27
7.1.1 Install Android Applications .................................................. 27
7.1.2 Applications uninstall ............................................................ 28
7.1.3 Application management ....................................................... 28
7.2Applications usage ............................................................................. 28
7.2.1Browser .................................................................................... 28
7.2.2 Camera .................................................................................... 29
7.2.3 Video Play& Photo browser ................................................... 30
7.2.4 Music Play ............................................................................ 31
8 FAQ ............................................................................................................ 32
9 About Firmware Upgrading ...................................................................... 33
4
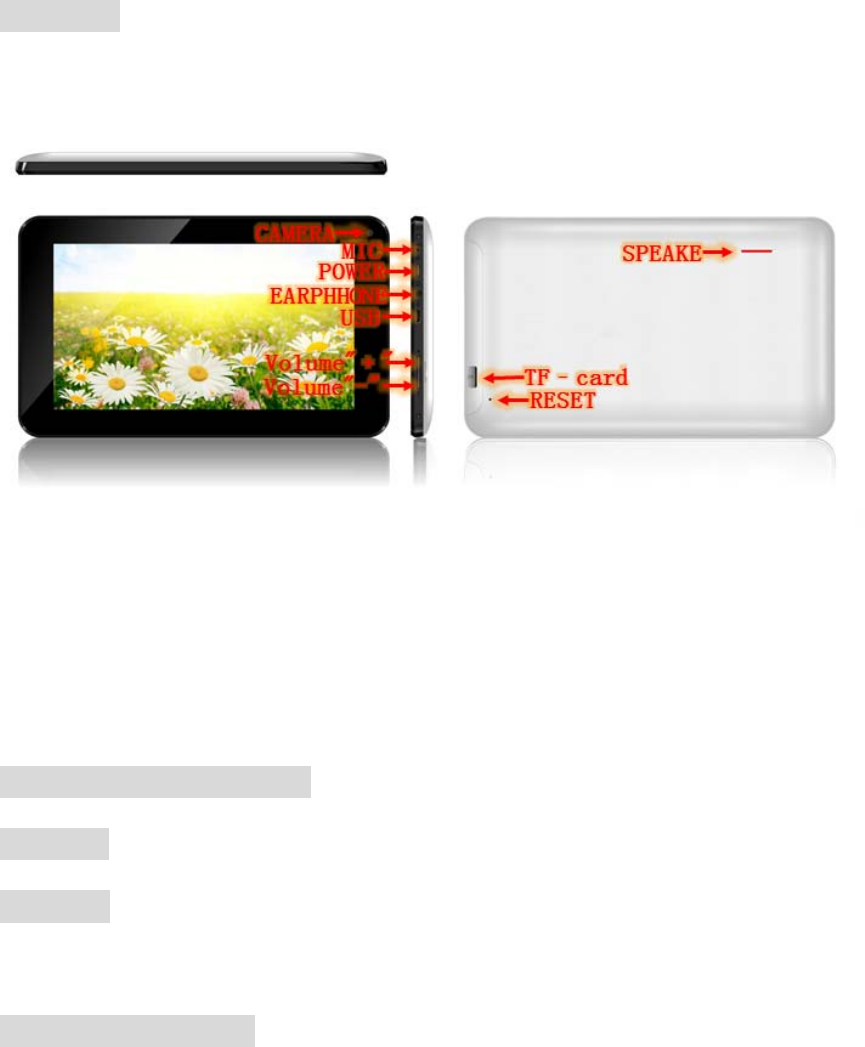
1 appearance and button:
1.1 Front:
2 Basic Key Operation
Power Button Definition of the Device
2.1 Power Button Usage:
Turn On: Press the power button and hold for 3-5 seconds.
Turn Off: Press the power button and hold for 3-5 seconds, →click
OK.
Sleep Mode On/Off: Press & release the power button quickly to
turn sleep mode on and off.
2. 3 MENU & BACK
MENU: Open the menu option

5
BACK:In different application program, you can return to last
interface by clicking the icon on the left bottom of the main screen
3 Port Definition:
3.1 TF Card:
3.11 Using TF Card: The device supports maximum 32GB TF card.
Insert your card into the TF slot until it clicks into place. It’s OK
3.12 Remove TF Card: Use the following methods to move the TF
card. Close all applications or documents which have been opened
on the card. Tap Settings → Storage → EXTSD → Unmount shared
storage → OK. Press the card lightly; it is partially ejected, allowing
you to pull the card out.
3.3 Reset: When the device is halted and can’t be turned off by
POWER button, users can launch the RESET function.
3.4 Micro USB:connect PC、charging 、OTG U-disk、USB
keyboard and USB mouse etc.
3.5 Earphone: 3.5 mm standard earphone jack.
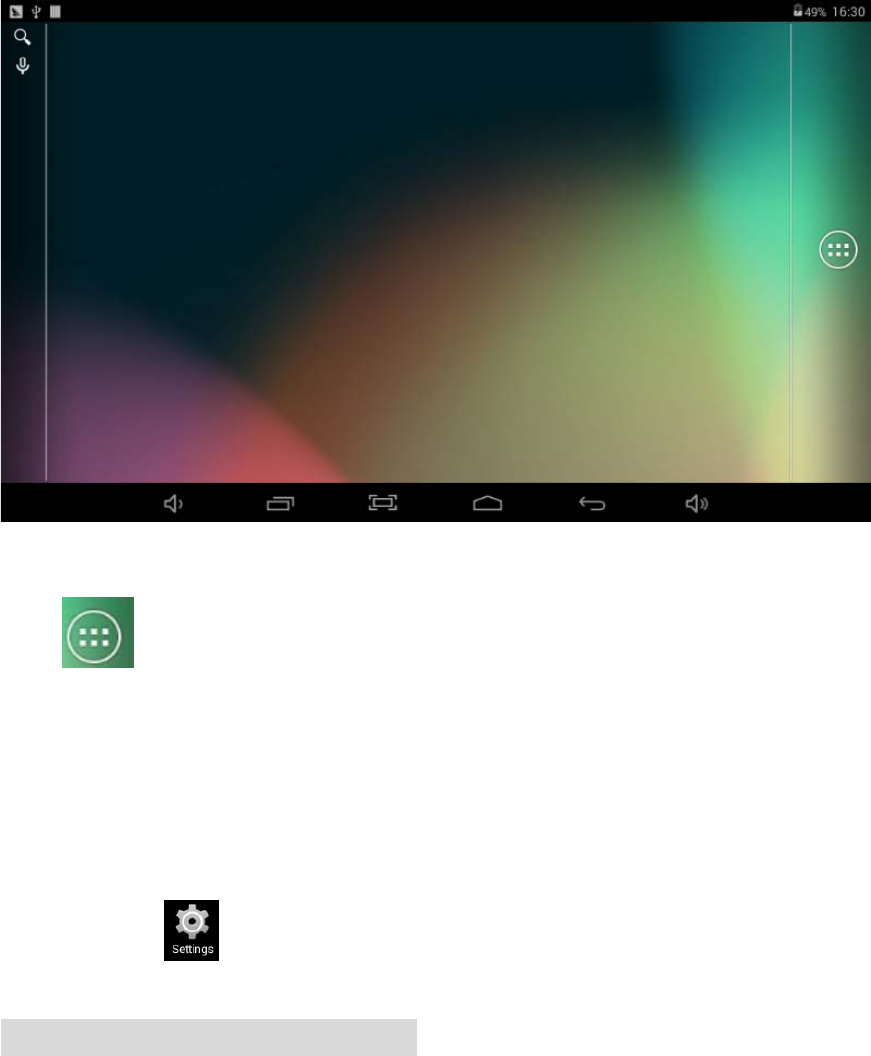
4 Operation Interface of The Device
4.1MainInterfaceDescription
4.1.1 Press lock icon and move it out of circle, the screen will be
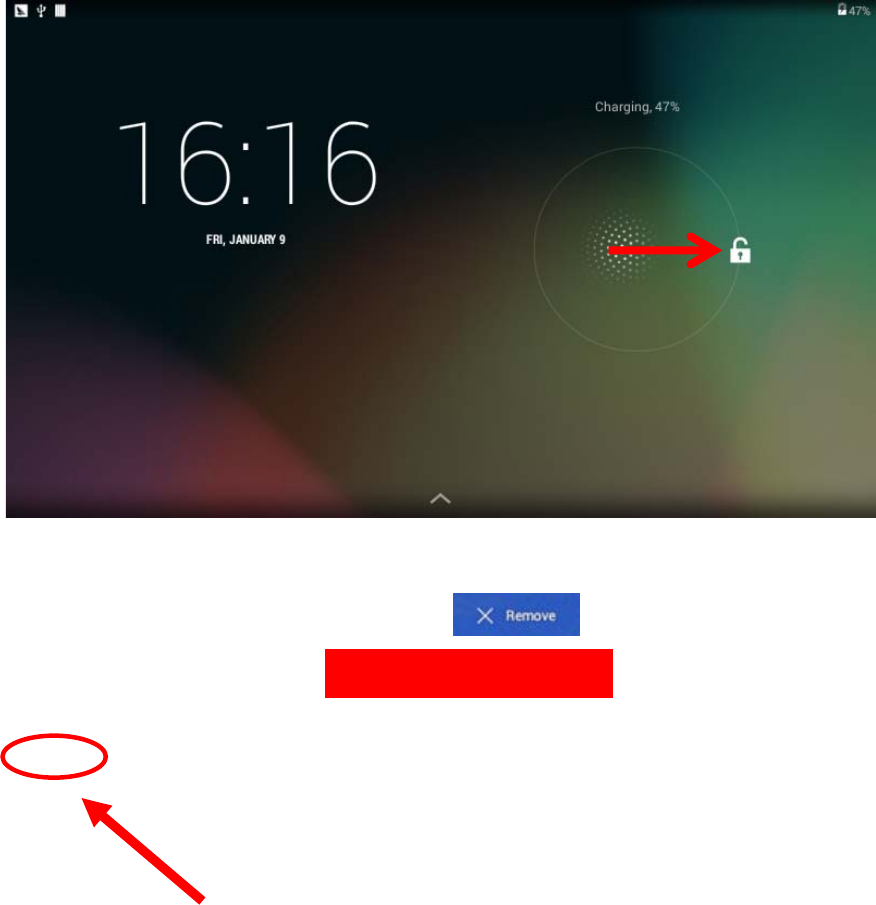
6
unlock.
Touch, hold a☆nd then slide icons to reposition then on the screen
Touch, hold and slide icons onto ☆ to remove them
from the Desktop screen, As the picture shown:
7
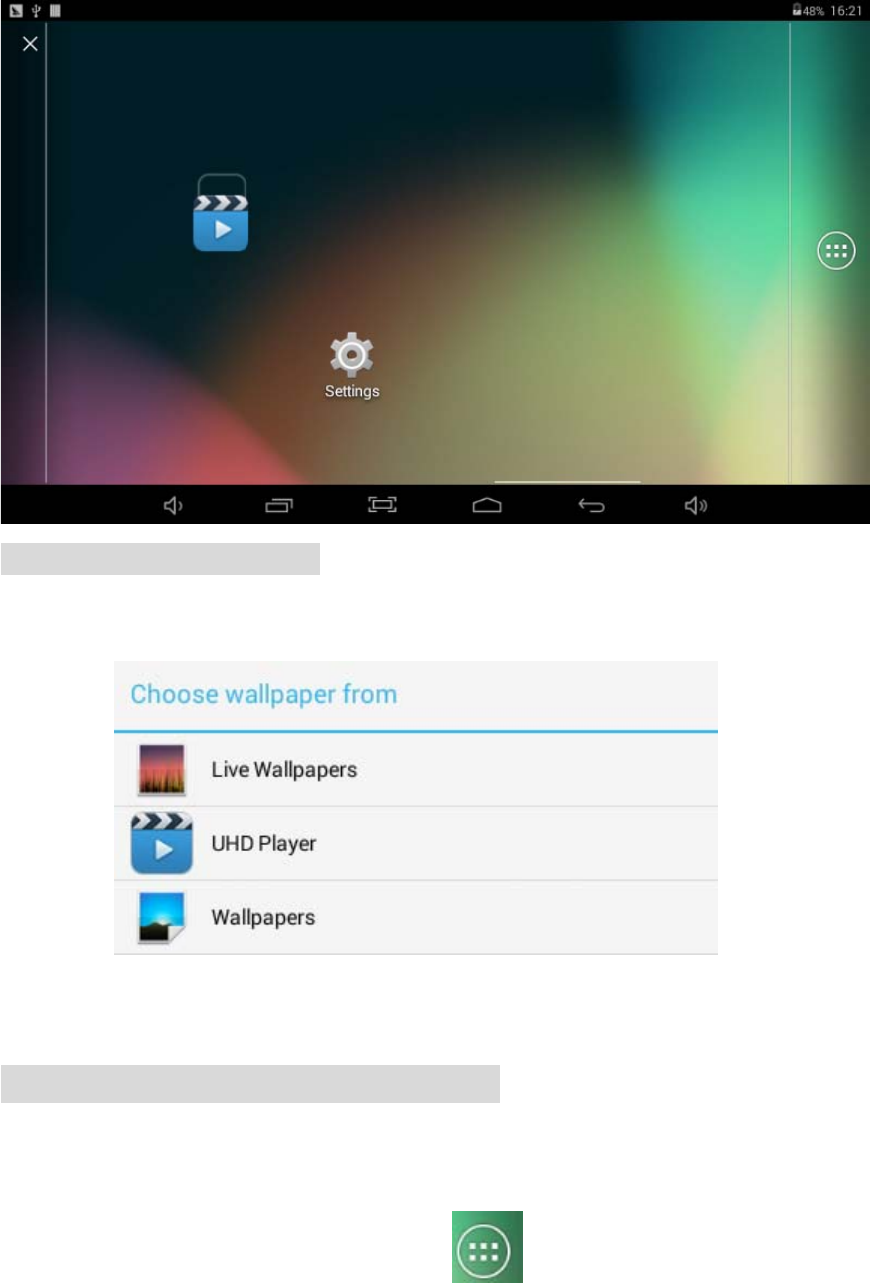
4.1.2 Change Wallpaper: Press screen until popup the following
interface
Choose the wallpaper that you need.
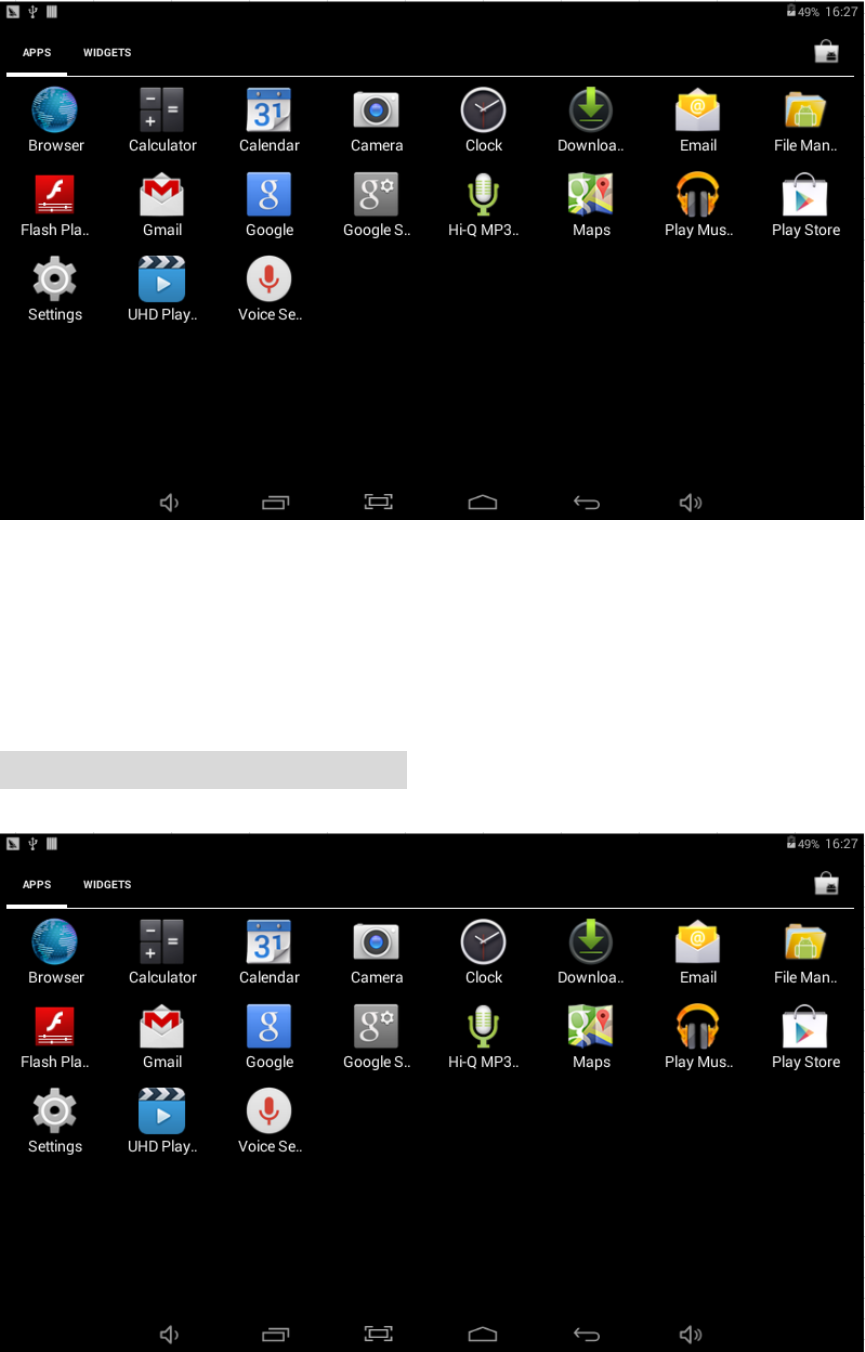
4.2ApplicationProgramInterface
Enter into Application program Interface to choose the program that
you need to run by clicking the icon directly:
8
☆To move an icon to the Desktop screen, touch & hold on the
icon, and then release it when it appears on the Desktop
screen.
4.3Pre‐loadedApplications
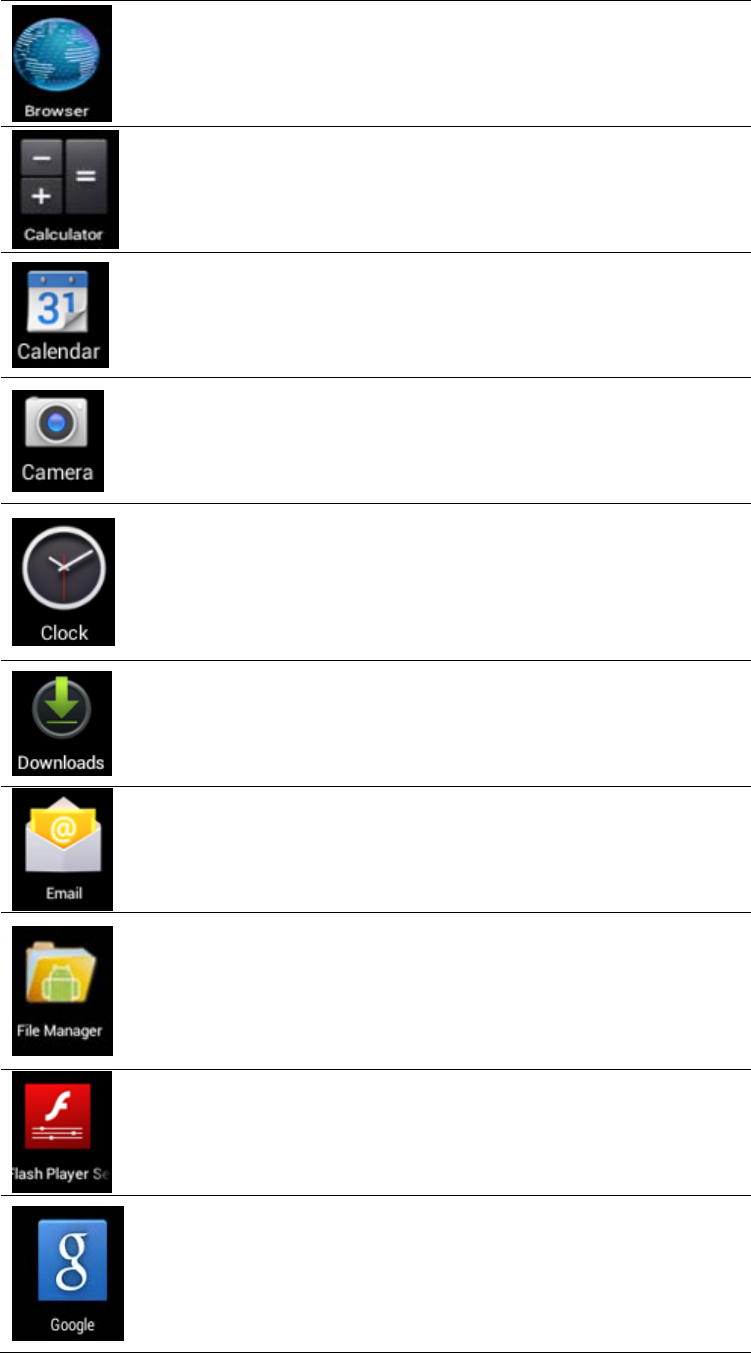
9
Browser
Access the Internet and “surf the
web” whenever desired.
Calculator Do calculation.
Calendar
Calendar with ability to set
events.
Camera
Take photos and save to internal
memory or your memory card.
Clock
Use as alarm clock with
scheduled alarms.
Downloads Downloads record
Email
Send/Receive email by using
your existing email addresses.
File
Manager
File manager application for
viewing and managing files and
apps. Use it to install Android
apps, and to backup files to your
SD card.
Flash
Player
Connect to the adobe Settings
Manager.
GoogIe GoogIe 搜索工具
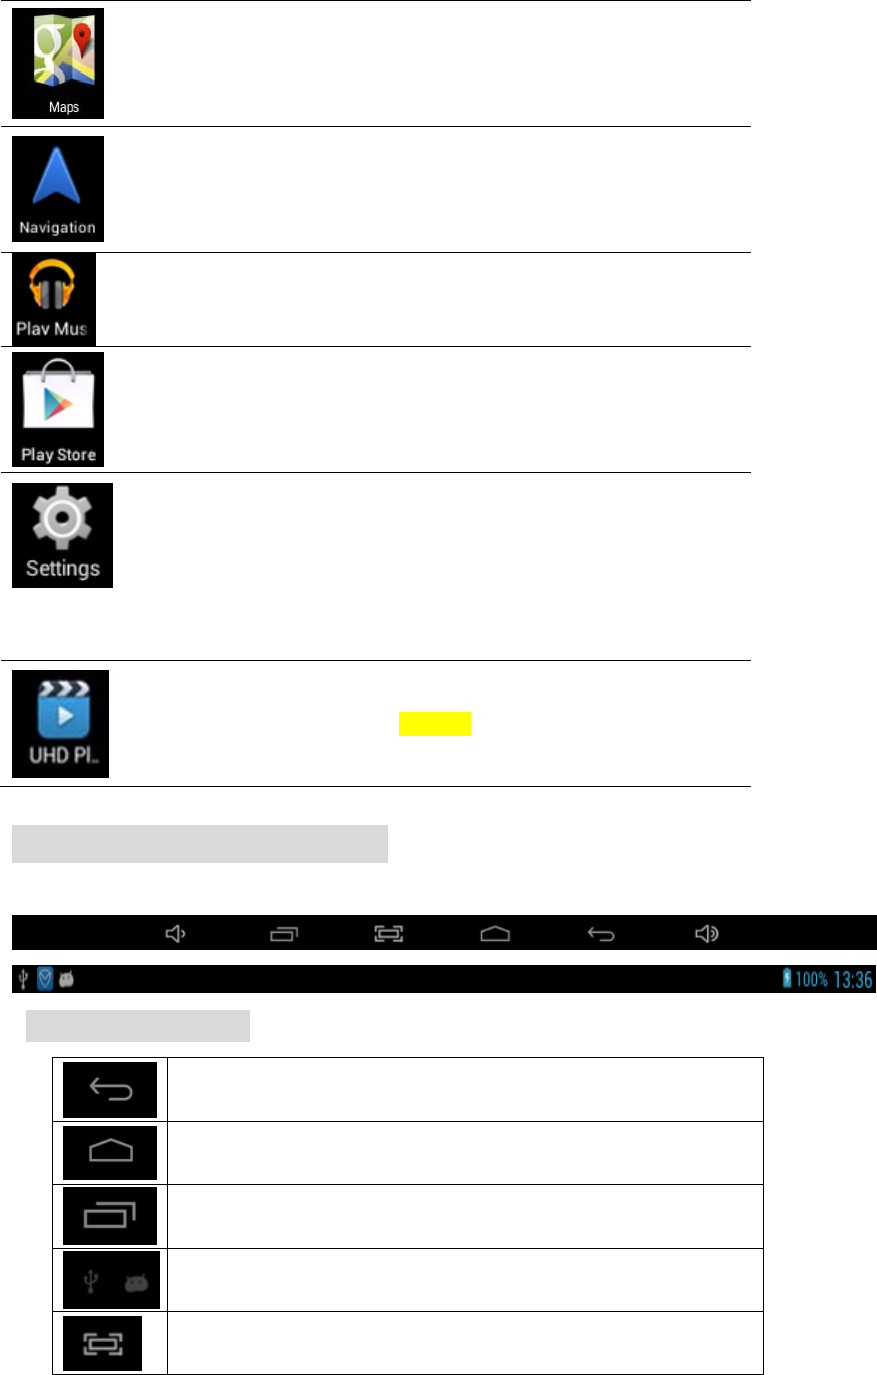
10
Maps Look up electronic map
Navigation Achieve the navigation function
Play music Play and manage audio files.
Play Store Download and install the app
Settings
Multiple settings for
personalizing and enhancing
your Device.
Player Video display tools
4.4StateBarDescription
Icons descriptions
Back key
Home page key
Multiple tasks viewer
USB connection information
Screenshot
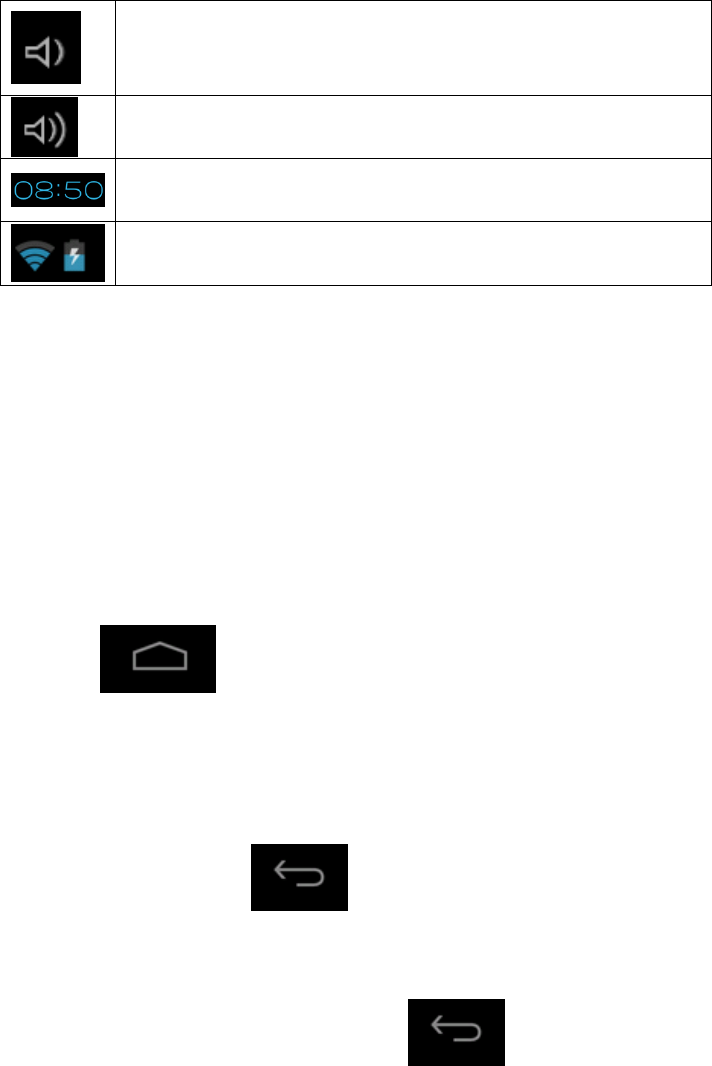
11
To reduce the volume
Increase the volume
Time & Date information
Battery & Network information
5 Touch Panel Usages
z This device with 7 inch screen. Following description is about
the main interface and introduce how to use touch panel. No
matter which interface you are in, you can press lightly to click
the icon on the left bottom of the screen to return to
main interface.
z In different application program, you can return to last interface
by clicking the icon on the left bottom of the main
screen.
【Note】:The function of the icon is the same as the
function of the Back button;
12
You can enter into the application program interface by clicking
icon . On the application program interface, you can click the
application program icon lightly to run the software
6 Basic Setting of the Device
z Click the icon in the menu to enter into setting interface
6.1WIRELESS&NETWORKS
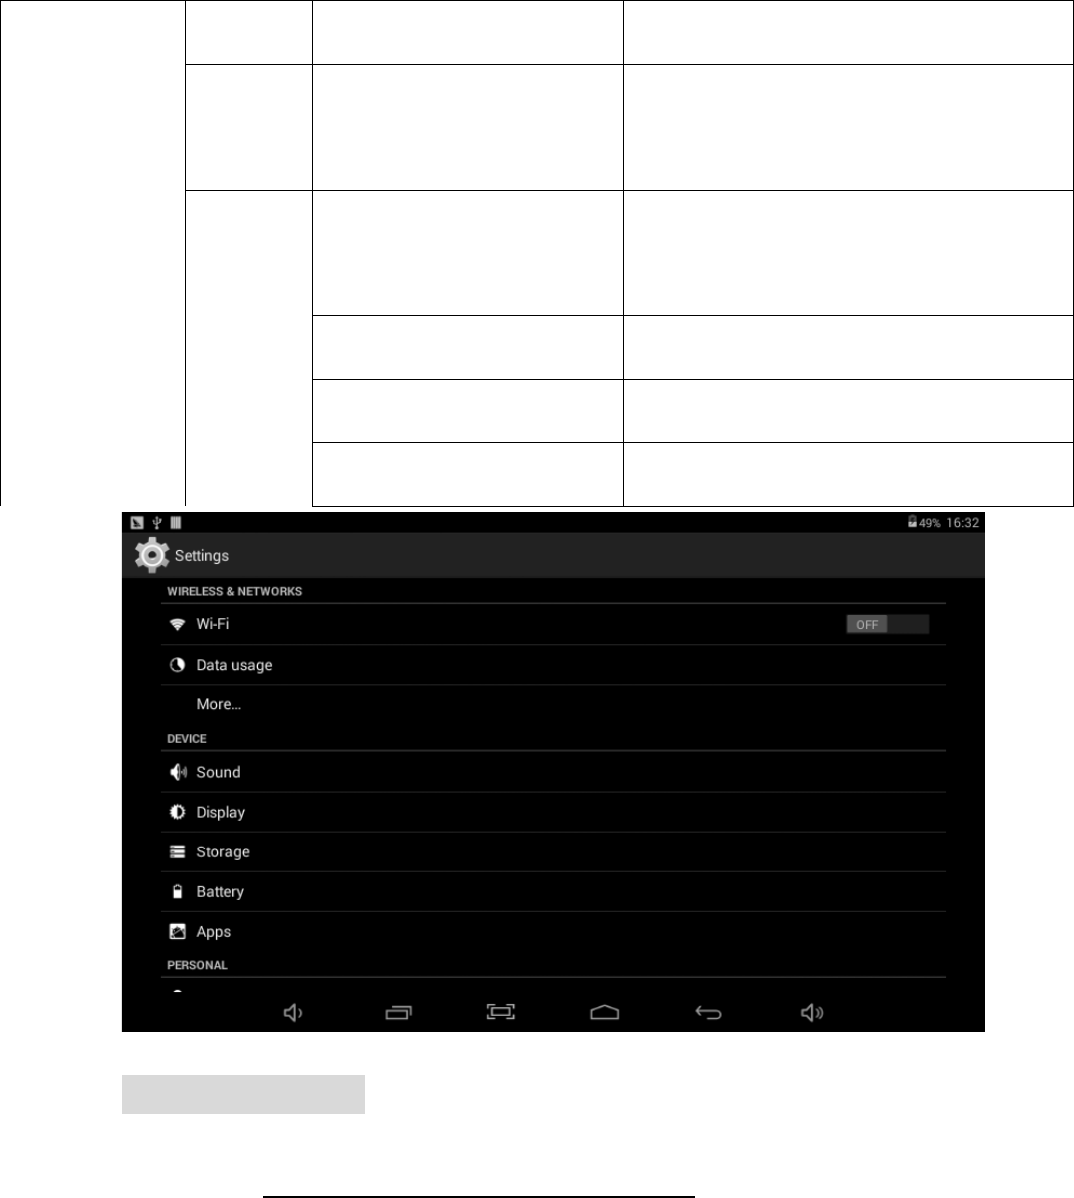
13
WIRLESS&
NETWORKS
OUTLINE
WI-FI WI-FI Turn On/Off
Data
usage
Data usage Display Mobile data
more
Airplane mode
Turn ON or Turn OFF all wireless
connection
VPN VPN Setting
Ethernet Ethernet settings
Mobile networks Mobile network settings
6.1.1Wi‐Fisetting
z Access setting-Wireless & Networks-Wi-Fi.
14
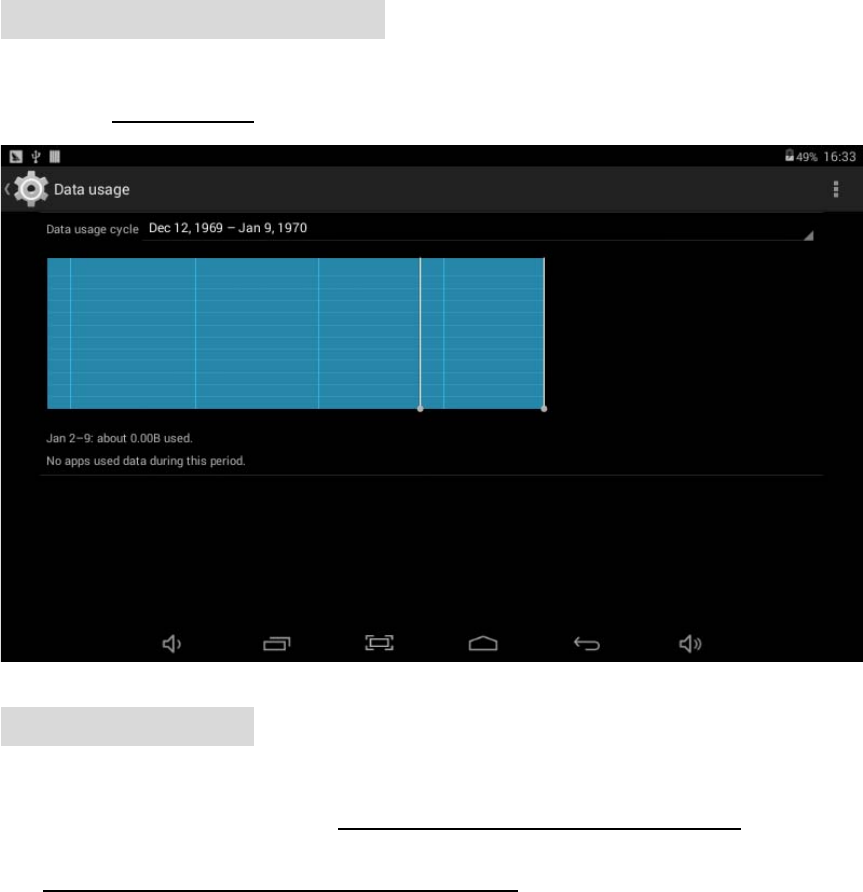
6.1.2Datausageinformation
z Click Data usage to view Mobile data.
6.1.3Moreoptions
z Click more...to switch to Ethernet, VPN, Mobile networks , and
Supporting information of USB LAN
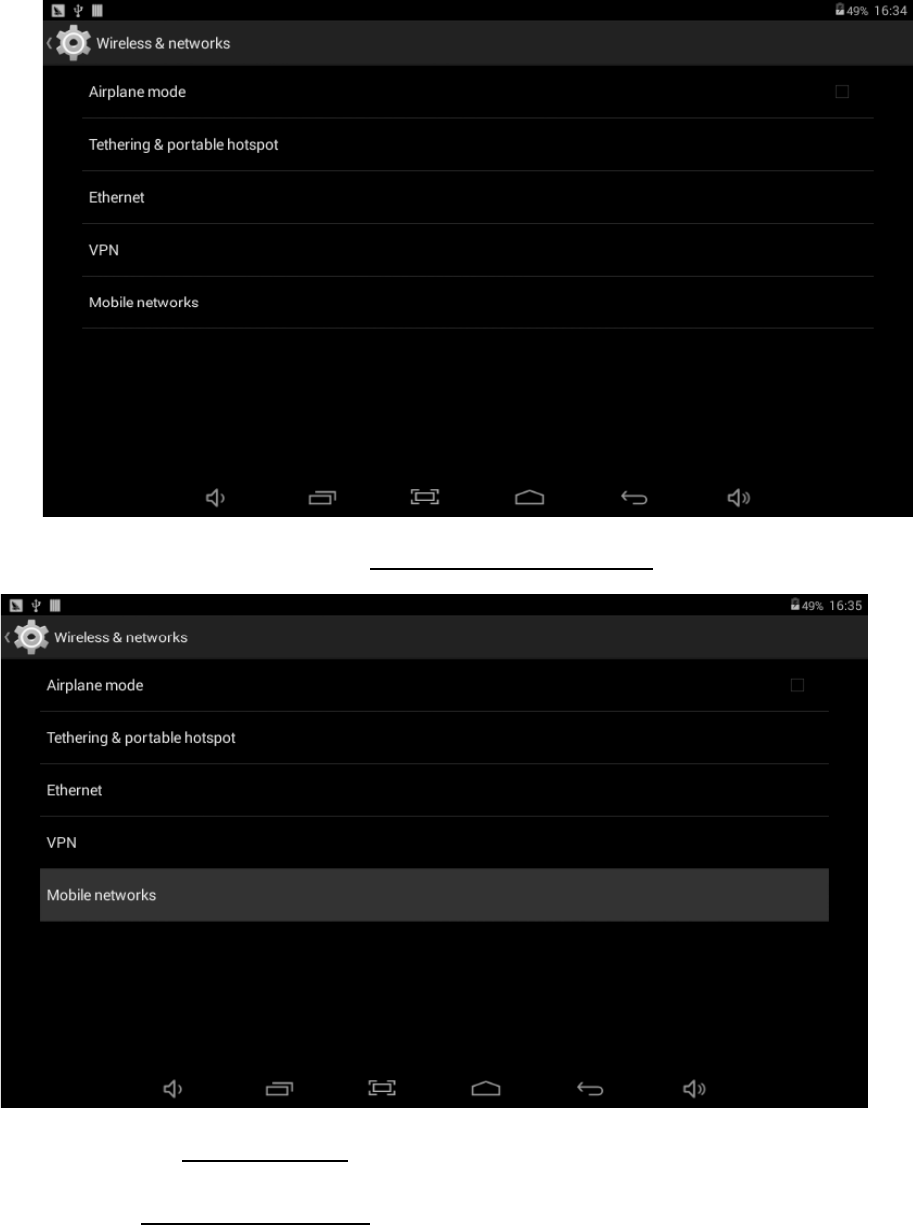
15
z Turn off WIFI, and access More-Mobile networks.
z Make sure Data enabled was chosen.
z Access Network operators, and search networks.
z You can select mobile networks automatically.
2) Network access via Ethernet
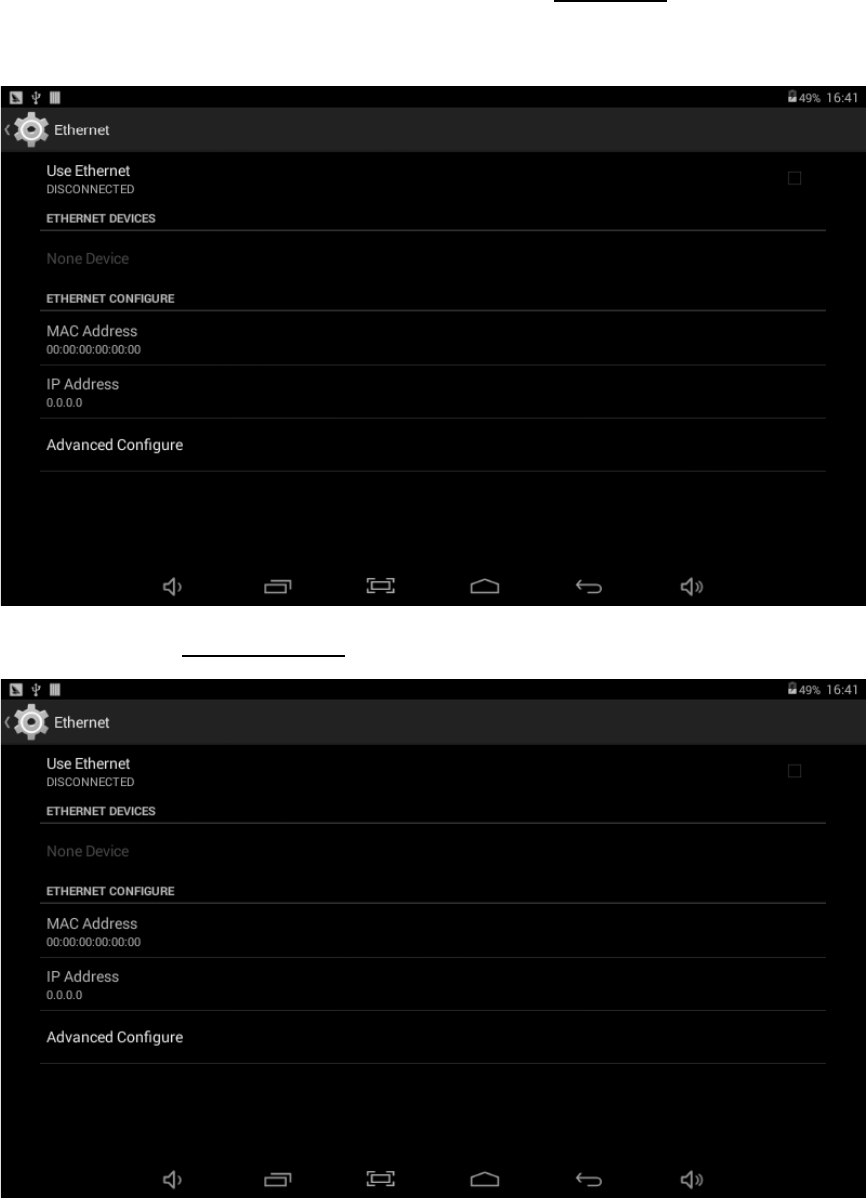
16
z Turn off WIFI or 3G network, and access Ethernet.
z Make sure Use Ethernet was chosen.
z Correct Ethernet network via Ethernet USB Adaptor. (The
manufacturer does not supply Ethernet USB Adaptor.)
17
z Ethernet Devices will show available network.
6.2Device
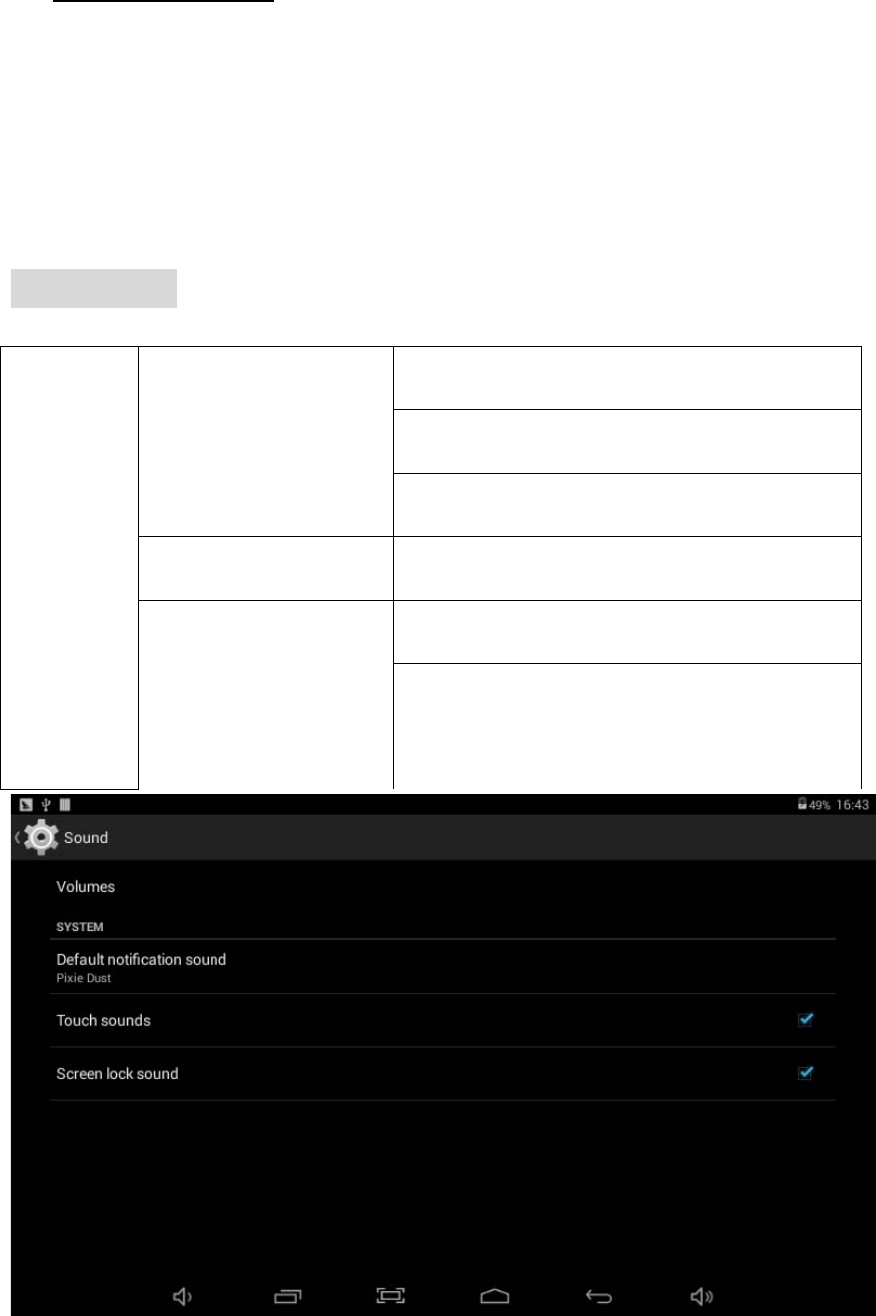
6.2.1Sound:SoundParametersSetting
Sounds
Volumes
Music, video, games, &other media.
Ringtone & notifications.
Alarms.
Default notification Setting NOTIFICATIONS.
SYSTEM
Touch sounds
Screen lock sound
18
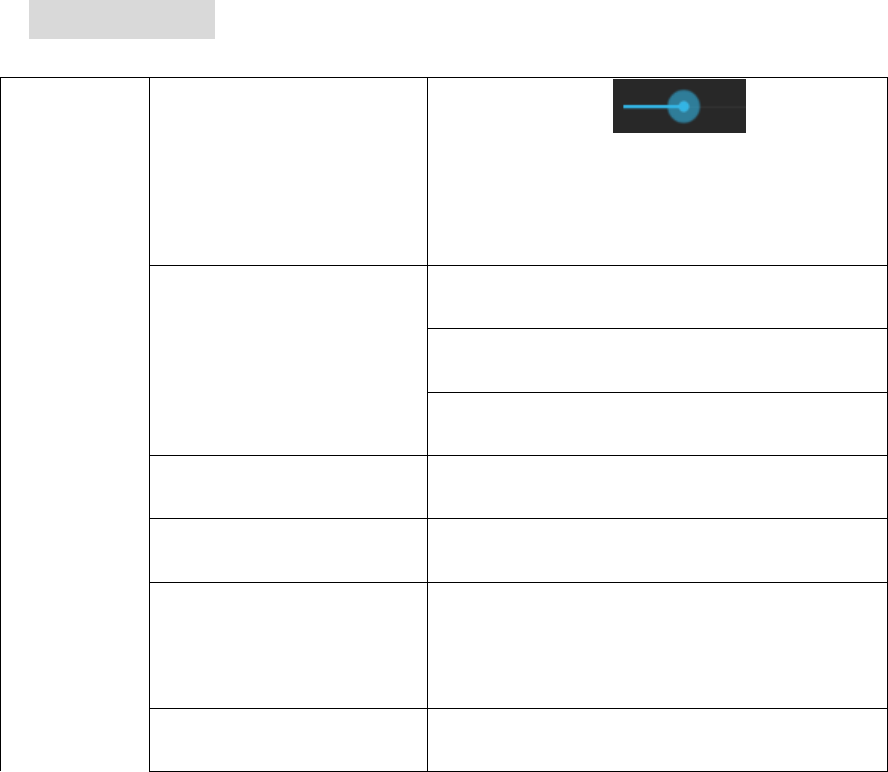
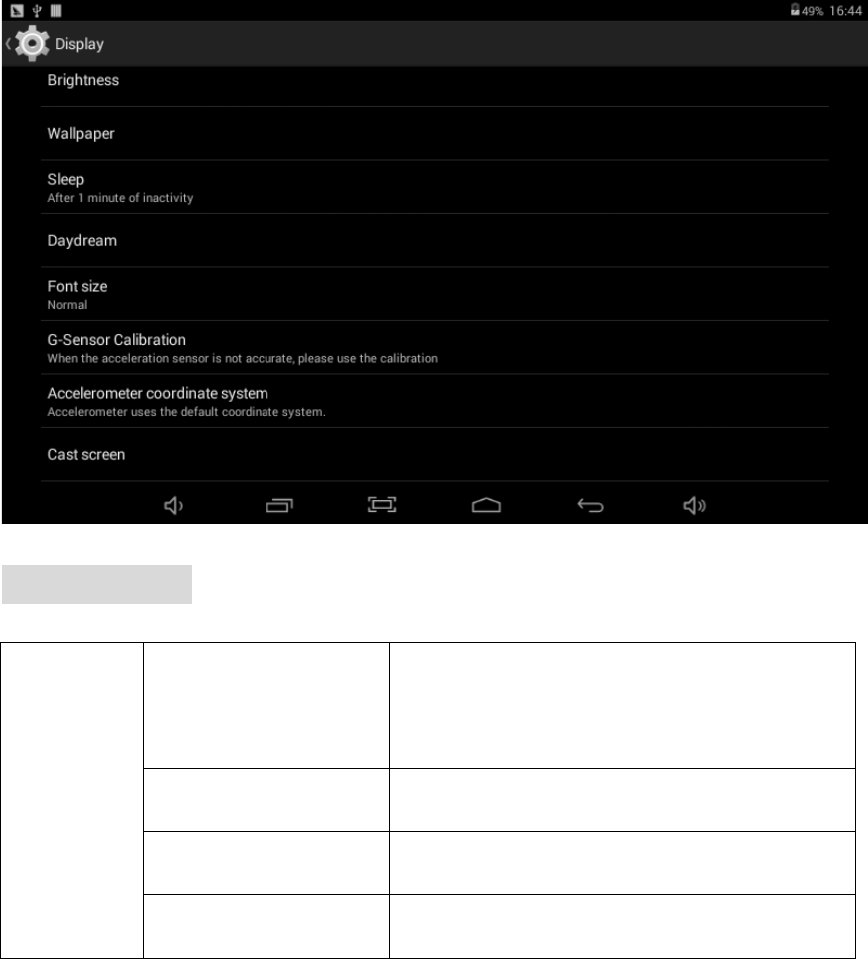
6.2.2Display:DisplayParametersSetting
Display
Brightness
Tap & slide to adjust
the screen brightness as desired,
and then tap OK.
Wallpaper
Choose Live Wallpapers
Choose Super-HD Player
Choose Wallpapers
Sleep Choose sleep time
Font size Small , Normal , Large , Huge
Accelerometer
coordinate system
Default or Special coordinate
system
Screen adaption Enable screen adaption
19
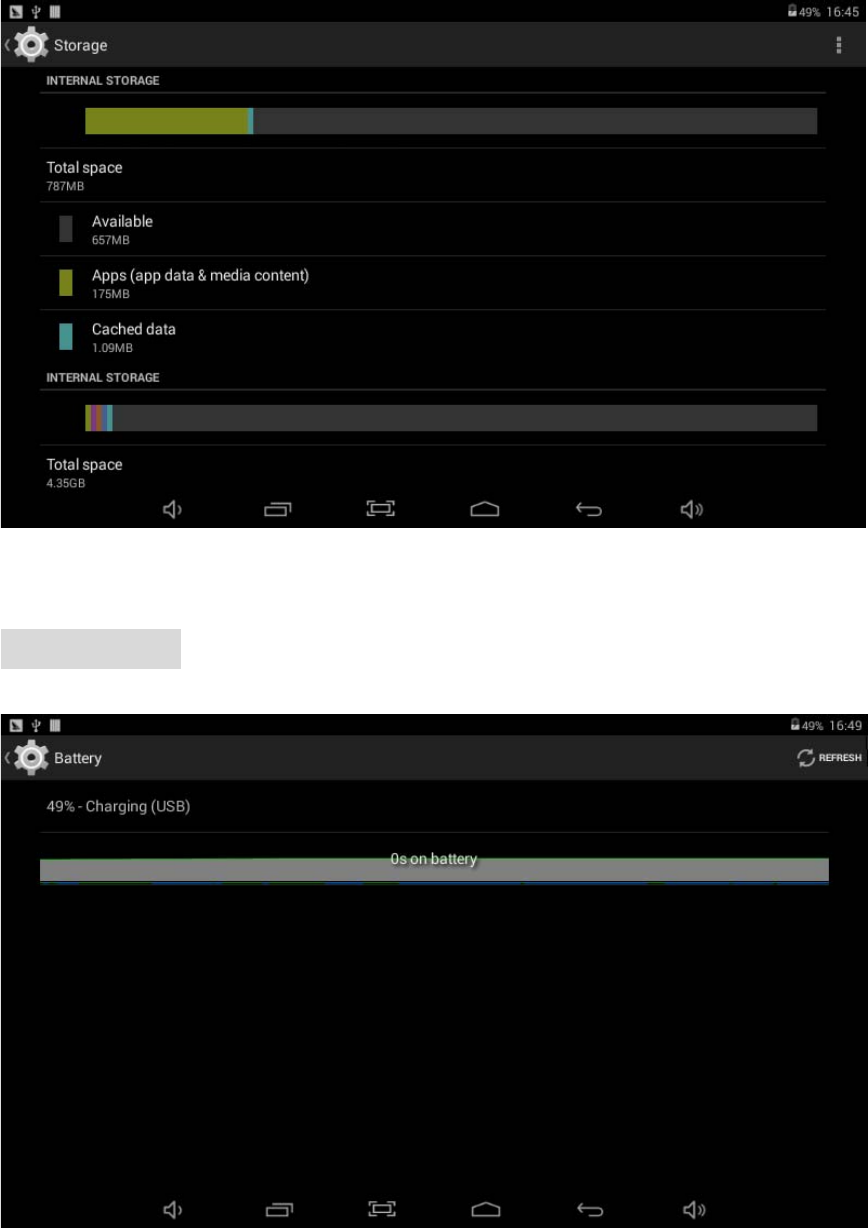
6.2.3Storage:StorageParametersInformation
SD card
& device
storage
Media Scan
Enable media scanning on SD and
USB
Internal Storage Display Storage information
Extsd Micro SD information
USBHOST1 USBHOST1 Storage information
20
6.2.4Battery:BatteryParametersInformation
21
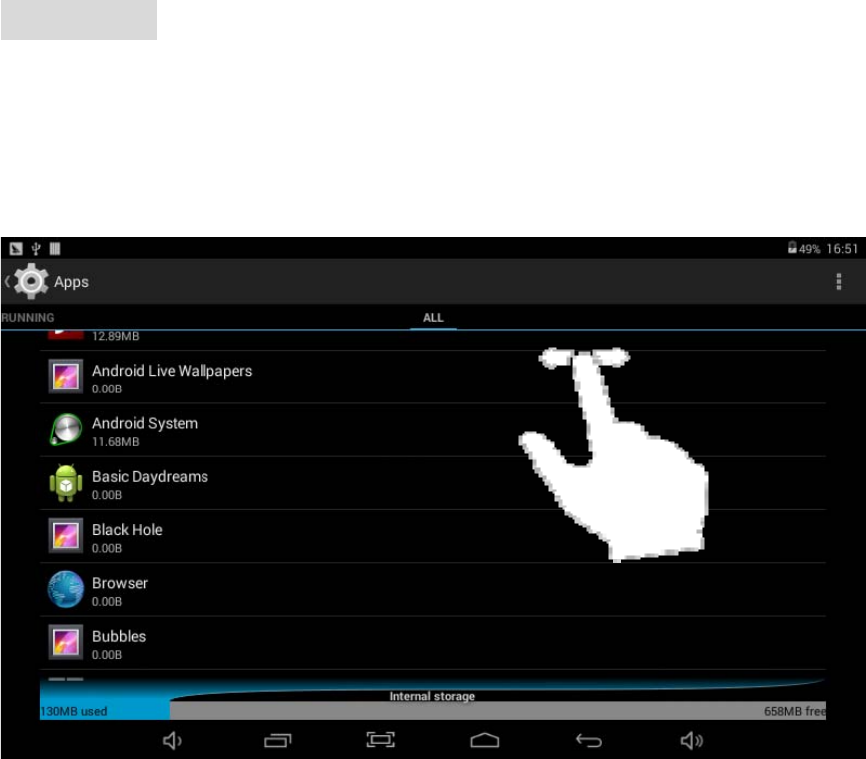
6.2.5Apps:Applications
Program Information,including DOWNLOADED,ON FLASH,
RUNNING,ALL four item;
22
6.3Personal
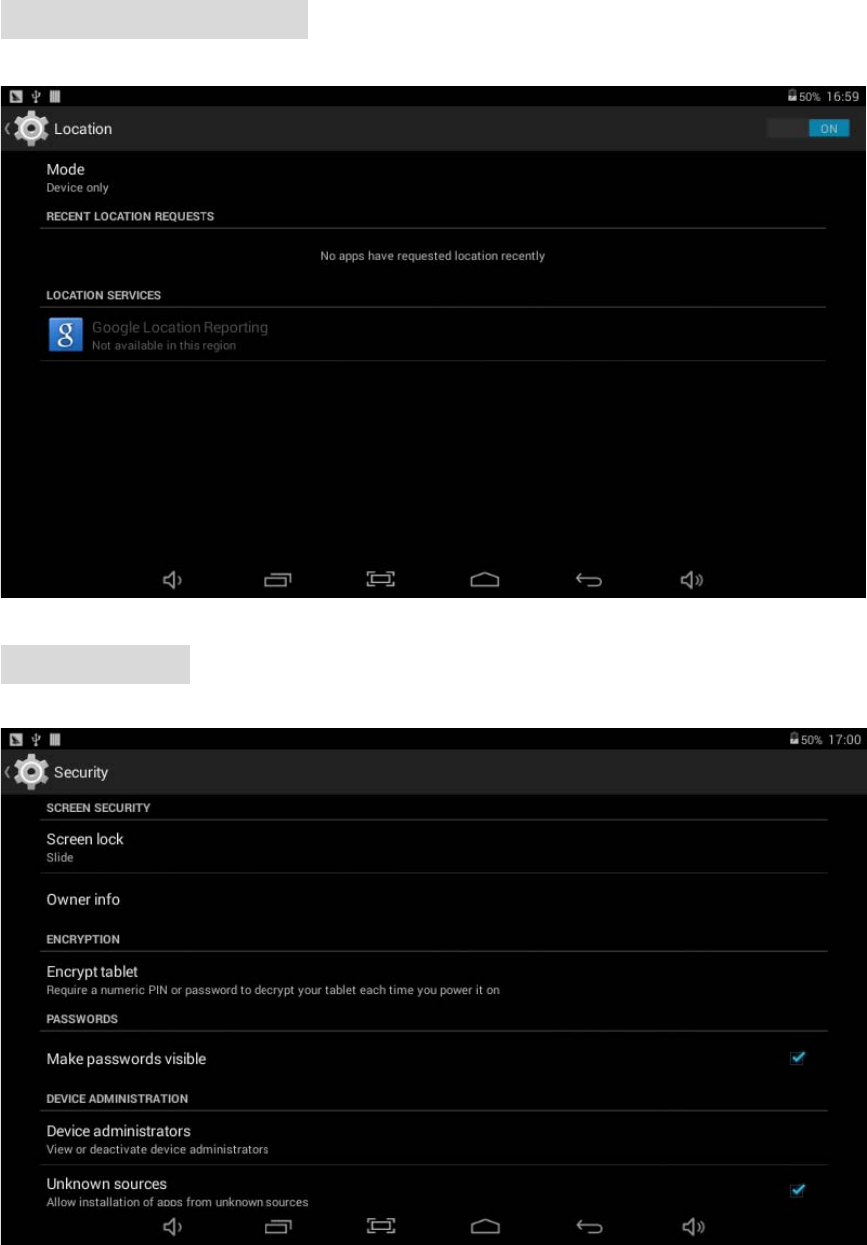
6.3.1Locationservices:
6.3.2Security:
23
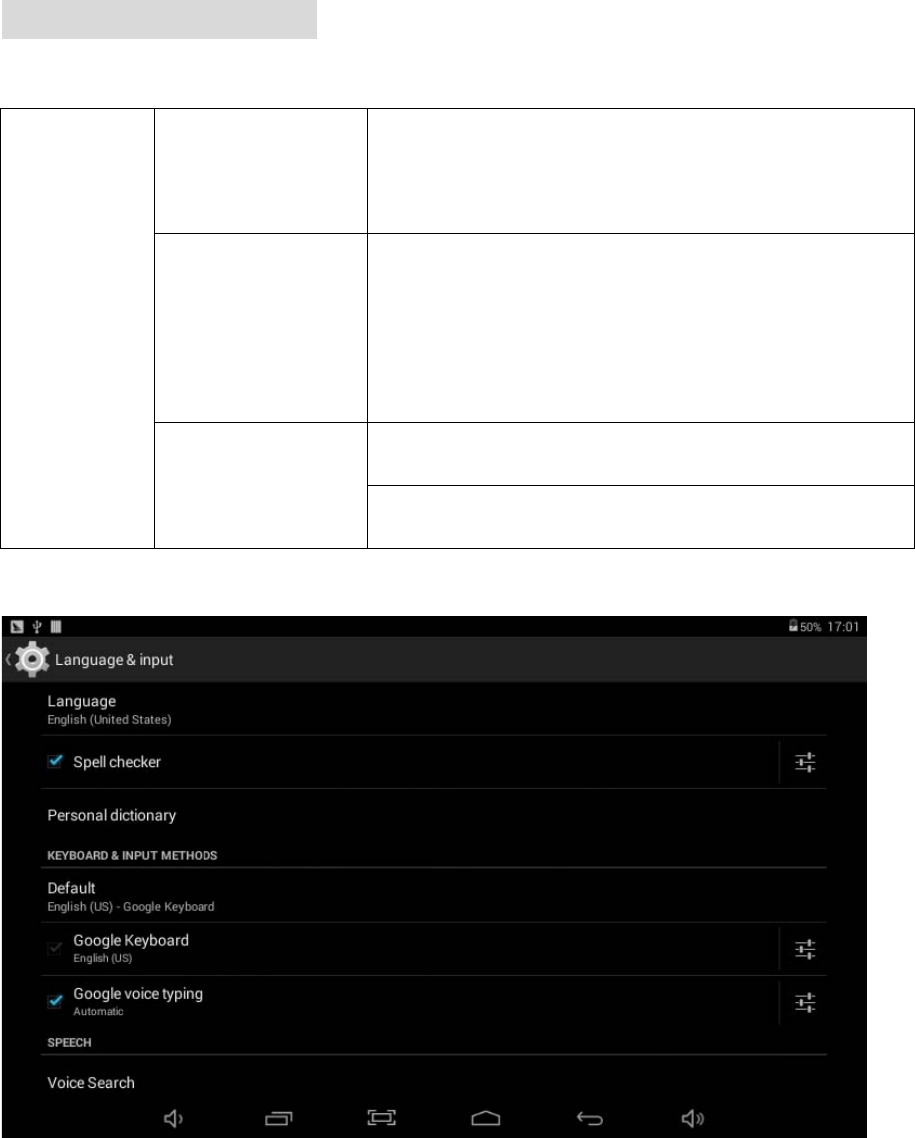
6.3.3Language&input:
Language
&
keyboard
Select
language
Select the language and region according
to your location.
Keyboard &
Input Methods
Android keyboard/Google
speech-to-text/Japanese IME/Google
Pinyin input
Speech
Voice search
Text-to-speech output
24
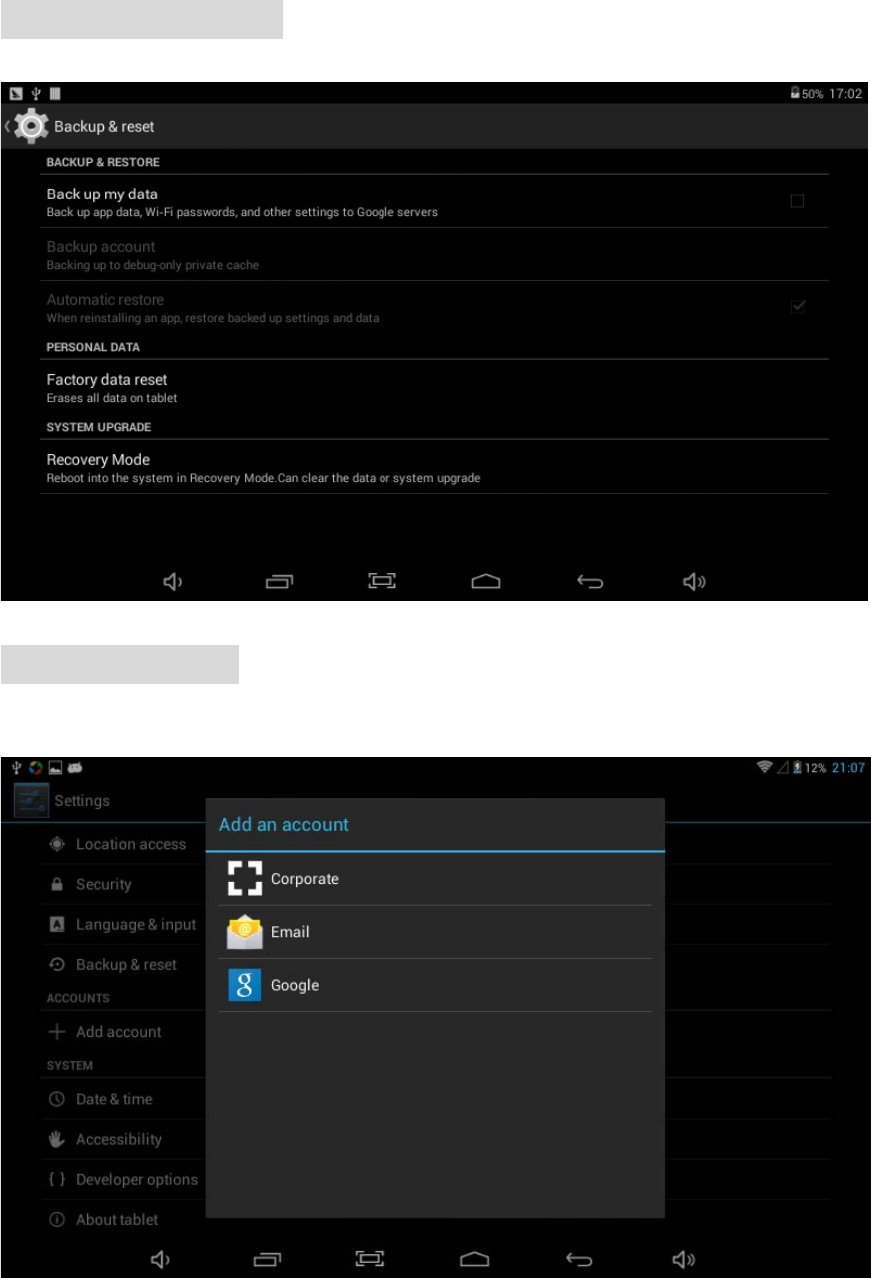
6.3.4Backup&reset:
6.3.5Addaccount

25
6.4System
6.4.1Date&time:
Date
&
time
Automatic date & time Use network-provided time.
Automatic time zone Use network-provided time zone.
Use 24-hour format
You can choose to use 24-hour
format or 12-hour format.
Select date format You can select the date format.
6.4.2Accessibility:MiscellaneousFunctionSetting
Accessibility
SERVICES services
SYSTEM
Large text
Auto-rotate screen
Speak passwords
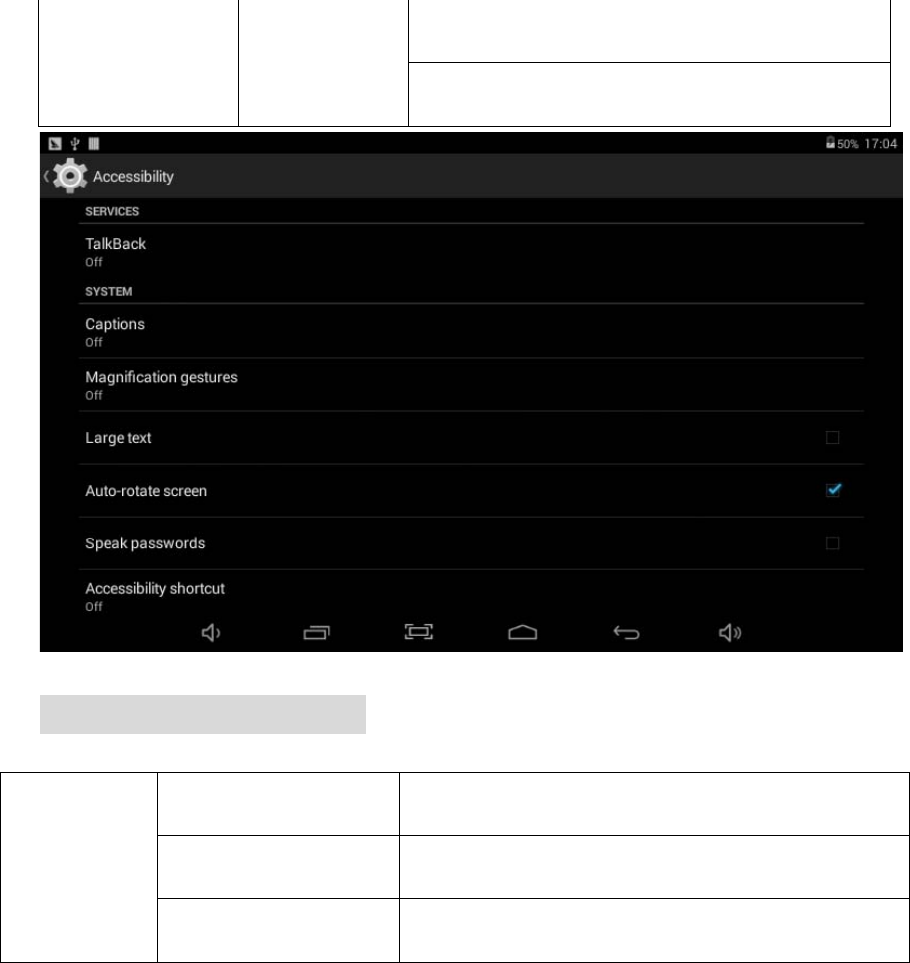
26
Touch & hold delay
Install web scripts allow /Not allow
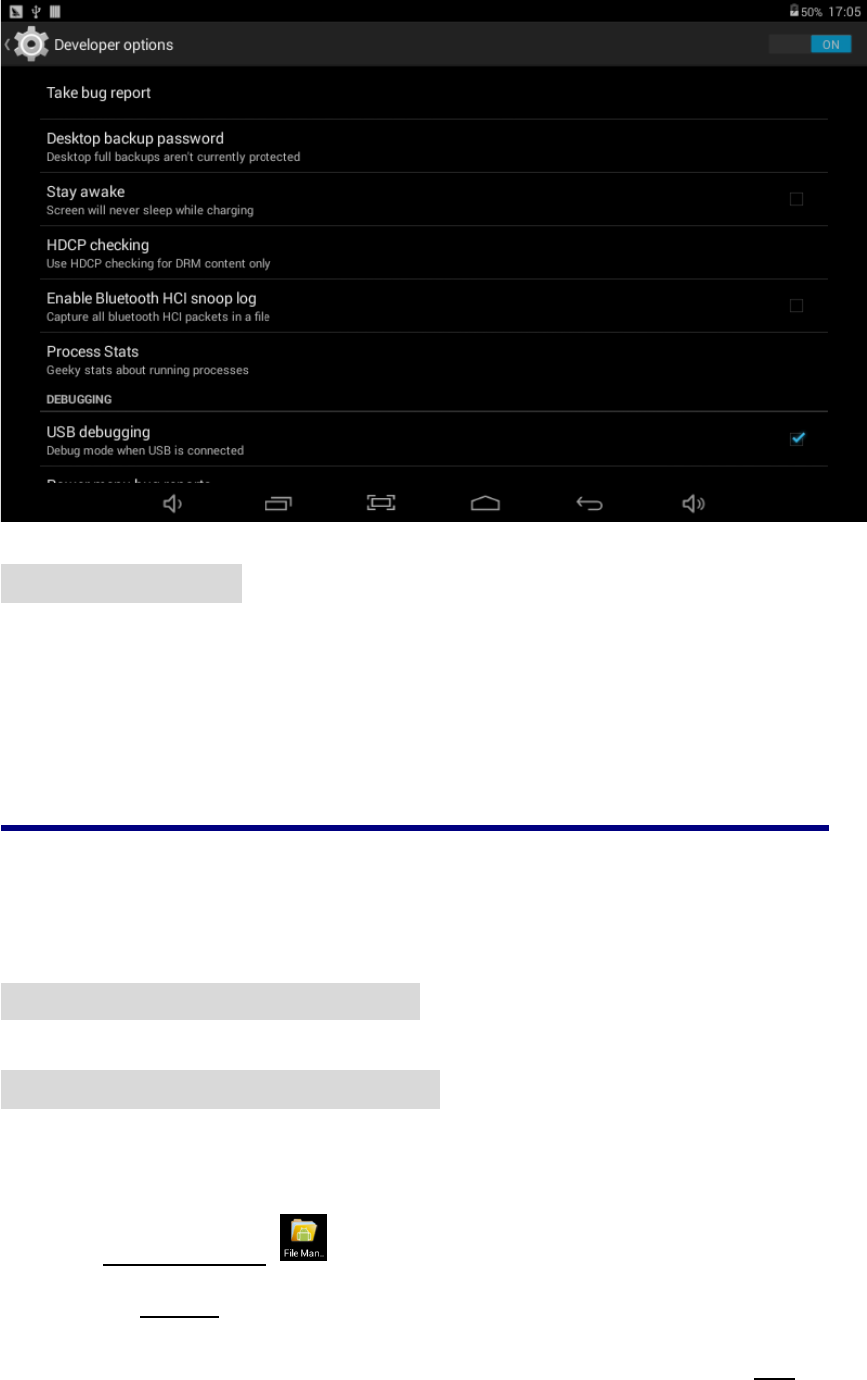
6.4.3Developeroptions:
Developer
options
USB debugging Development device ID, Stay awake…
User Interface Strict mode enabled ,Pointer location…
Apps Background process limit…
27
6.4.4Abouttablet
The information is about parameters, including model No.
firmware version ect.
7ApplicationManagement&usage
7.1ApplicationManagement
7.1.1InstallAndroidApplications
z Copy APK installation package into device.
z Run File Manager , find the package and click it.
z Choose install to continue.
z If the application already exists in the device, choose OK to

28
replace it by latest versions of package.
7.1.2Applicationsuninstall
z Go to setting-Apps-All.
z Choose the application and click it.
z Choose uninstall.
7.1.3Applicationmanagement
z Go to setting-Apps-All.
z Choose the application and run Force stop, Uninstall, Clear data
or Move to SD card.
7.2Applicationsusage
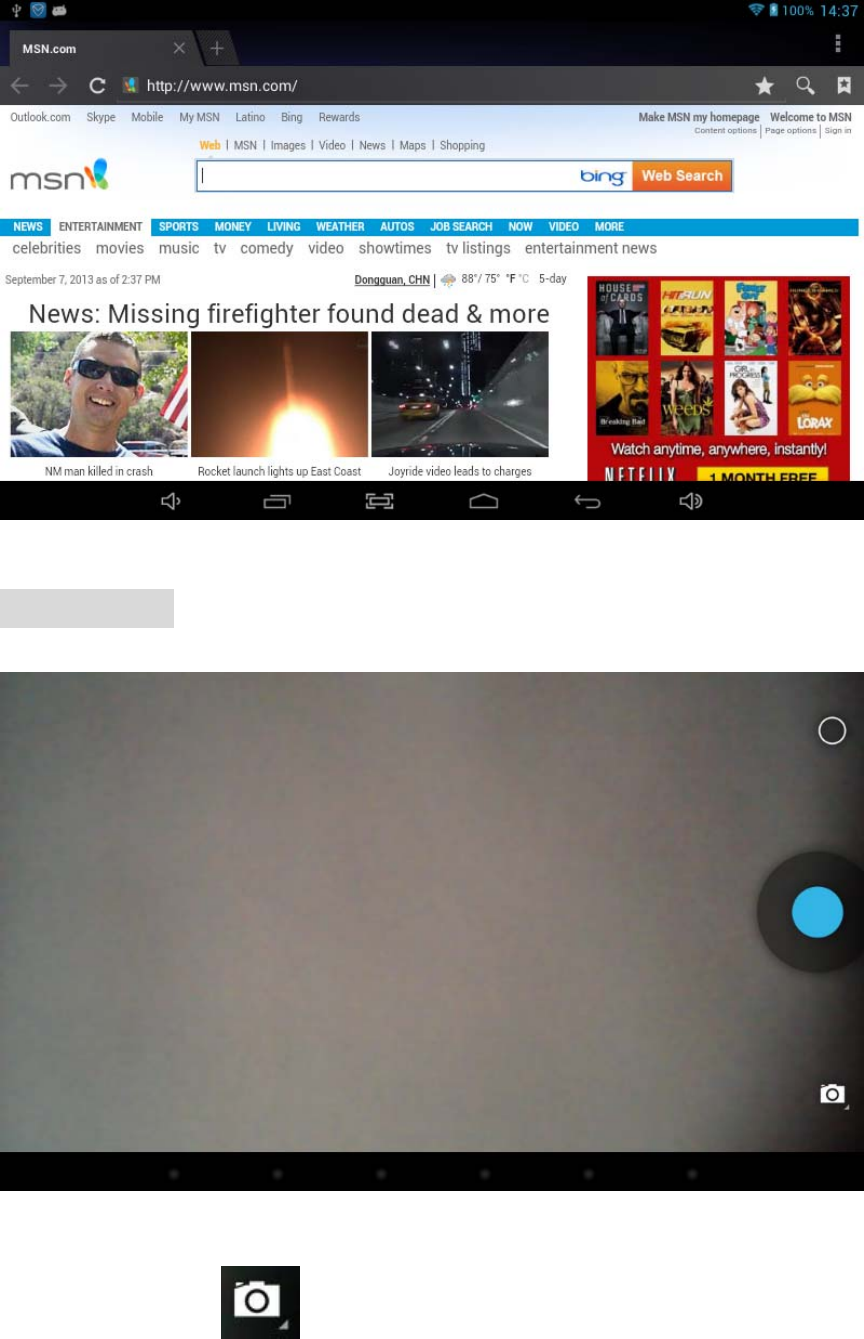
7.2.1Browser
z Users can connect to the Internet through a browser.
z Click the browser icon on the Desktop , and then you can
open the Web browser.
29
7.2.2Camera
z Photos Mode
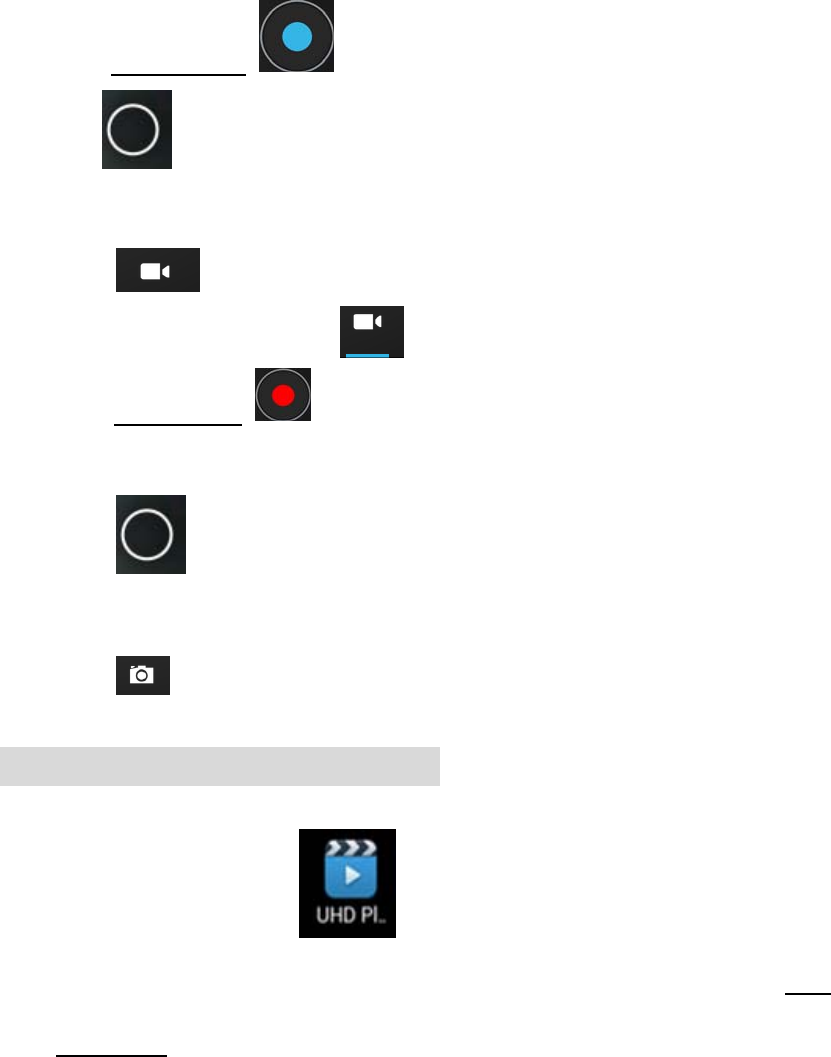
30
z Click Blue Circle to take picture.
z Click to access photographing options.
z Click the thumbnail picture to view saved pictures.
z Click to switch to video recording mode.
z Video Recording Mode
z Click Red circle to start video recording, click it again to
stop and save the video.
z Click to access video recording options
z Click the thumbnail picture to view saved videos.
z Click to switch to photos mode.
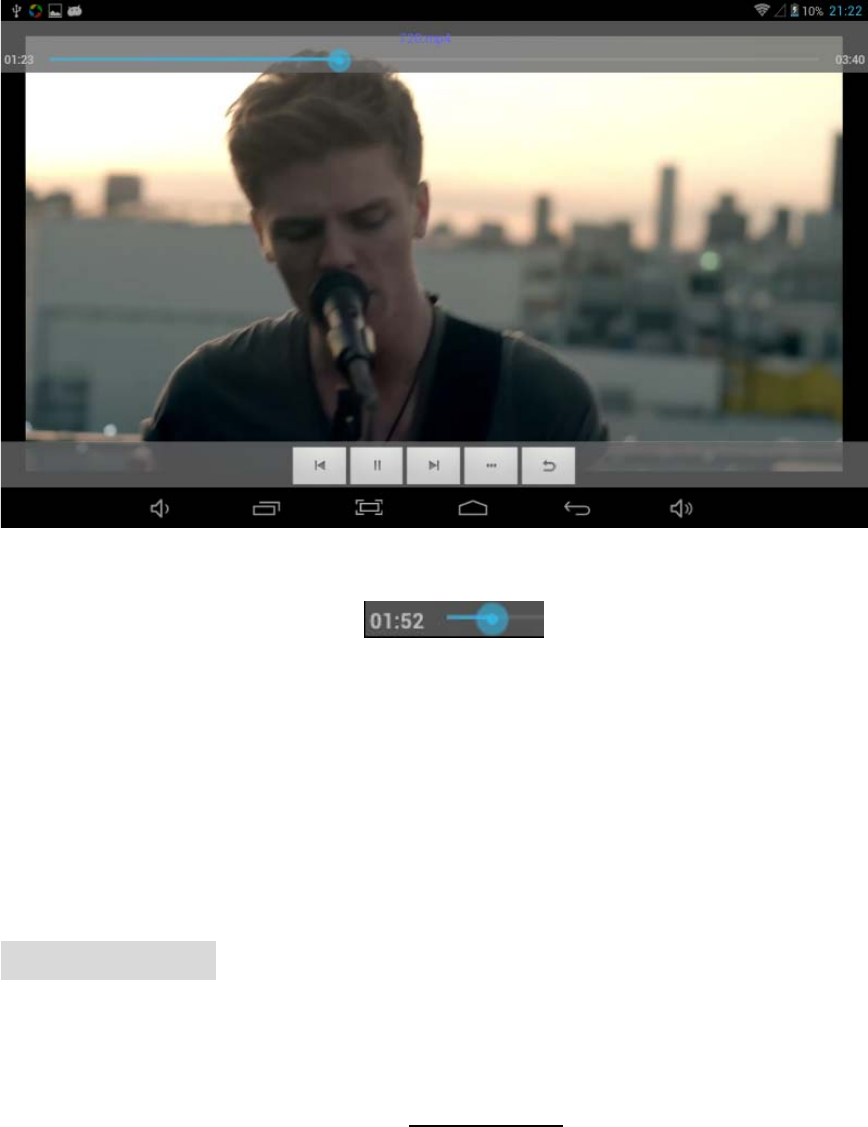
7.2.3VideoPlay&Photobrowser
z Click the player icon to enter the video player & Photo
browser interface, or open the video/photo files from File
Manager directly.
* The device supports the following formats of video files: AVI
(H.264, DIVX, XVID, rm, rmvb , MKV(H.264, DIVX, XVID),
WMV, MOV, MP4(H.264, MPEG, DIVX, XVID), MPEG, MPG,
FLV(H.263,H.264) (support 1080P)and more…
z When there is no video in the playlist, system will automatically
31
load the video files from the memory card after running video
player.
z Click the progress bar , you can adjust the
playback progress.
* Image formats supported: JPG, JPEG, GIF, BMP, and PNG
z Picture browser support multipoint touch, realize the function of
zoom in and zoom out
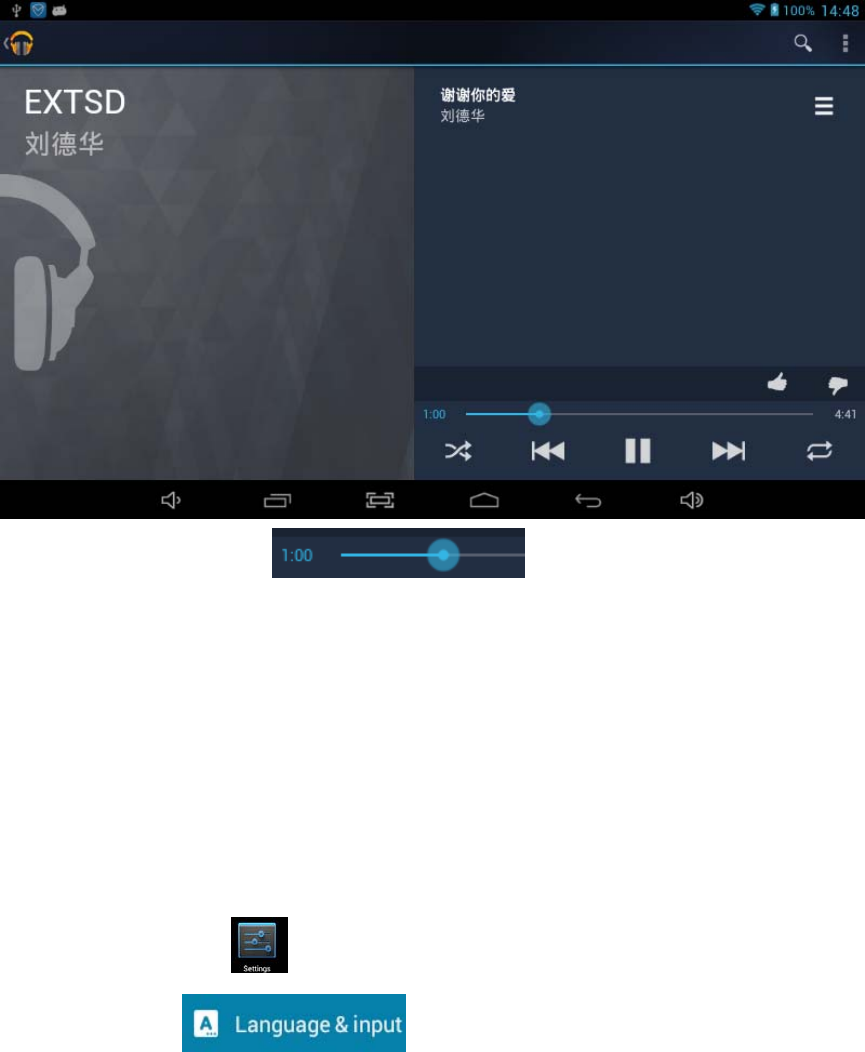
7.2.4MusicPlay
z Clic11k the Music player icon to enter the music player interface,
or open the music files from File manage directly.
z The device supports the following formats of audio files:
MP3,WMA,MP2,OGG,AAC,M4A,MA4,FLAC,APE,3GP,WAV,
32
and more.
z When there is no audio in the playlist, system will automatically
load the audio from the memory card after running music
player.
z Click the progress bar ,you can adjust the
playback progress.
8FAQ
8.1 How can I change languages if i mistakenly choose an
unknown language?
8.1.1 Find setting icon and access Settings
8.1.2 Choose icon to language&input setting, the
first options is language setting.
33
8.2 How can I change input?
Access Setting-Language&input--, and set default input.
8.3 I already installed some applications, but I can’t find them now,
why?
Some applications are installed in external TF card, so if you
fetched out the TF card from the device, you will not see these
applications.
8.4 There are problems of your system, many popup of error.
8.4.1 Restart the device by POWER button, or Reset, Use a stick to
prick the reset for 5 seconds, and restart the device.
8.4.2 If you have restarted the device and error popup still exist,
you can check active applications to see if there is any unknown
8.4.3 There may be virus in the device, please install security
applications and protect your device.
9AboutFirmwareUpgrading
We do not suggest any form of private firmware flashing
without guidance of the original manufacturer. The original
manufacturer is not responsible for any possible breakdown
of the device caused by user's private firmware flashing.
34
FCCWarning
This device complies with Part 15 of the FCC Rules. Operation is
subject to the following two conditions:
(1) This device may not cause harmful interference, and (2) this
device must accept any interference received, including
interference that may cause undesired operation.
NOTE 1: This equipment has been tested and found to comply with
the limits for a Class B digital device, pursuant to part 15 of the FCC
Rules. These limits are designed to provide reasonable protection
against harmful interference in a residential installation. This
equipment generates, uses and can radiate radio frequency energy
and, if not installed and used in accordance with the instructions,
may cause harmful interference to radio communications. However,
there is no guarantee that interference will not occur in a particular
installation. If this equipment does cause harmful interference to
radio or television reception, which can be determined by turning
the equipment off and on, the user is encouraged to try to correct
the interference by one or more of the following measures:
- Reorient or relocate the receiving antenna.
- Increase the separation between the equipment and receiver.
35
-Connect the equipment into an outlet on a circuit different from that
to which the receiver is connected.
-Consult the dealer or an experienced radio/TV technician for help.
NOTE 2: Any changes or modifications to this unit not expressly
approved by the party responsible for compliance could void the
user's authority to operate the equipment.