Dorma 8616 AF/AFJ/AFP Installation Instructions 08279001 Af Afj Afp Ins 1019
User Manual: Dorma 8616 AF/AFJ/AFP Installation Instructions Installation Instructions
Open the PDF directly: View PDF ![]() .
.
Page Count: 9

8616 AF/AFJ/AFP
Flat arm for regular, top jamb and parallel mounts
No hold open
Installation instructions
08279001 – 10-2019
| EN |
28600 Surface Applied Closers 10-2019
08279001
dormakaba 8616 AF/AFJ/AFP Installation Instructions Table of Contents
Table of contents
1 Technical specifications 3
. Overview
. Tools recommended
. Handing the door
2 Installation - regular mount 4
. Surface closer system
. Installing the surface closer and
backplate (optional)
. Installing main arm
3 Instructions - top jamb mount 5
. Surface closer system
. Installing the surface closer and
(optional) plate
. Installing main arm
4 Instructions - parallel mount 6
. Surface closer system
. Installing the surface closer and
drop plate (optional)
. Installing PA bracket and main arm
5 Adjustments 7
. Adjust closing speeds: sweep, latch, backcheck,
delayed action
. Adjust spring force
6 Install covers 8

dormakaba 8616 AF/AFJ/AFP Installation Instructions
08279001 10-20198600 Surface Applied Closers 3
Technical specifications
1 Technical specifications
. Overview
Caution: sex nuts are required for attachment
of components to unreinforced doors and to
wood or plastic faced composite type fire doors,
unless an alternative method is identified in the
individual door manufacturer’s listings.
Maximum door opening degree is 180°.
Maximum 4-1/2” reveal on top jamb mounts for
180° degree openings.
Know the swing of the door which is being
installed prior to installation.
Verify closer spring size prior to installation.
Make sure door efficiently operates prior to
installing closer.
Drill bits: # Phillips screwdriver
Metal: /” drill bit; /-
tap
/” flat head screwdriver
Wood: /” and /” bit mm hex key
/” box wrench /” box wrench
. Tools recommended
Table
. Handing the door
Fig.
Hinge Hinge
Exterior side of door
Interior side of door
Left hand door (LH) Right hand door (RH)
dormakaba 8616 AF/AFJ/AFP Installation Instructions
08279001 10-20198600 Surface Applied Closers
4
Regular mount
. Surface closer system
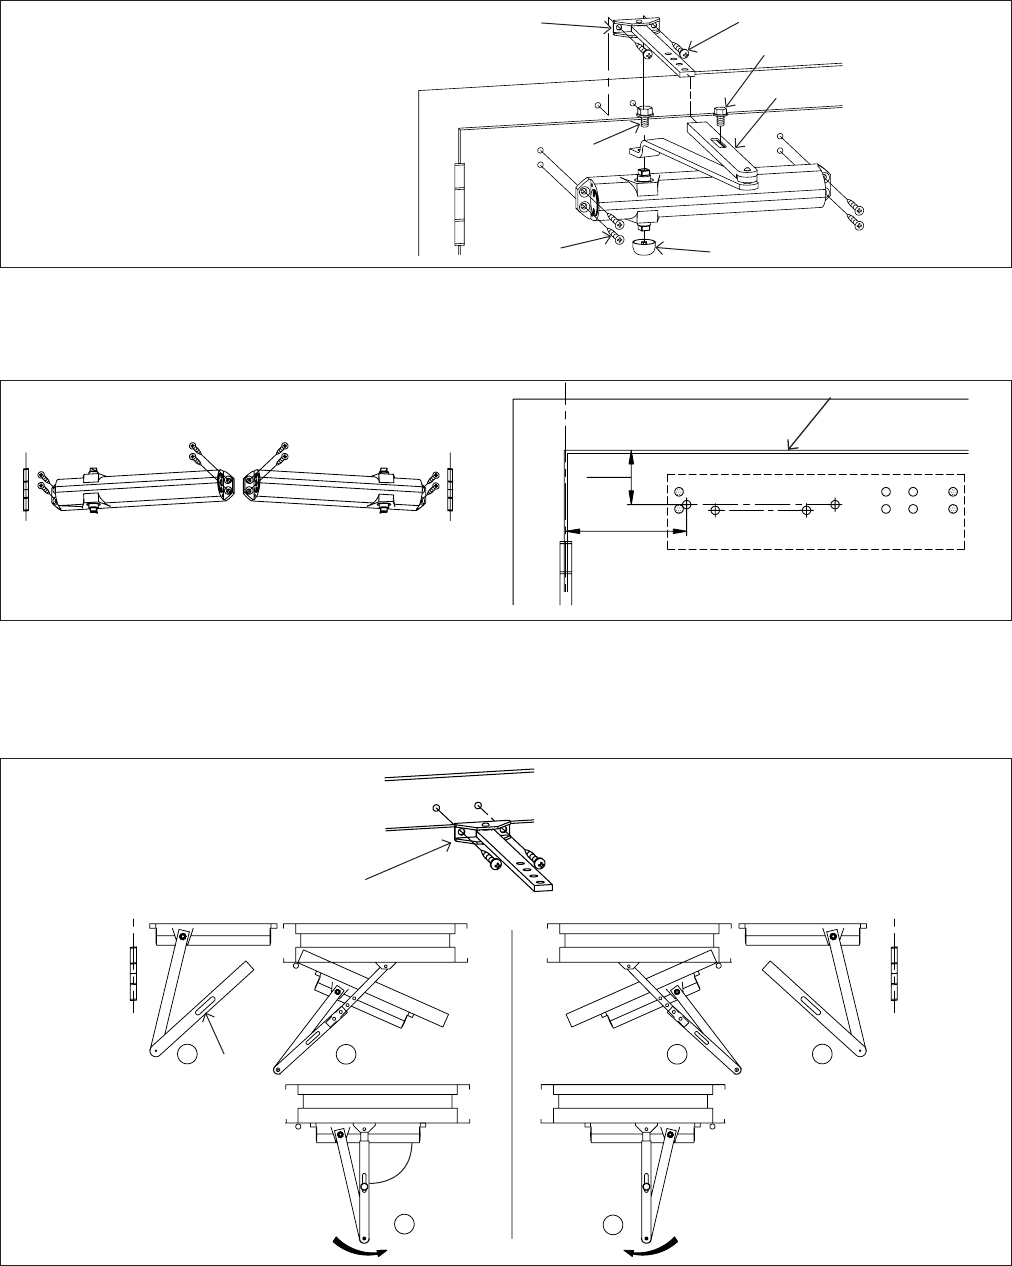
2 Installation - regular mount
NOTE: Orient pinion toward the hinge. .. Secure closer body and/or backplate to door.
. Installing the surface closer and backplate (optional)
. Installing main arm
Fig.
Fig.
Fig.
Flat arm
shoe
RH
RH LH
RH LH
.. Secure the flat arm shoe to
frame.
.. Use the included fasteners.
°
Main
arm
. Door closer
. Connecting arm
. Bar and shoe
. Dust cap
. Flat head combo screws
. Pan head combo screws
. Pinion screw
. Connecting arm screw
(RH)
2
1
3
7
7
8
64
9
L
C
(RH)
L
C
C
LC
L
12
-/”
[]
-/”
[] BP
Bottom of frame
L
C
L
C
A
B
C
B
C
A
dormakaba 8616 AF/AFJ/AFP Installation Instructions
08279001 10-20198600 Surface Applied Closers 5
Top jamb mount
Fig.
Fig.
. Surface closer system
. Installing the surface closer and (optional) plate
. Installing main arm
Fig.
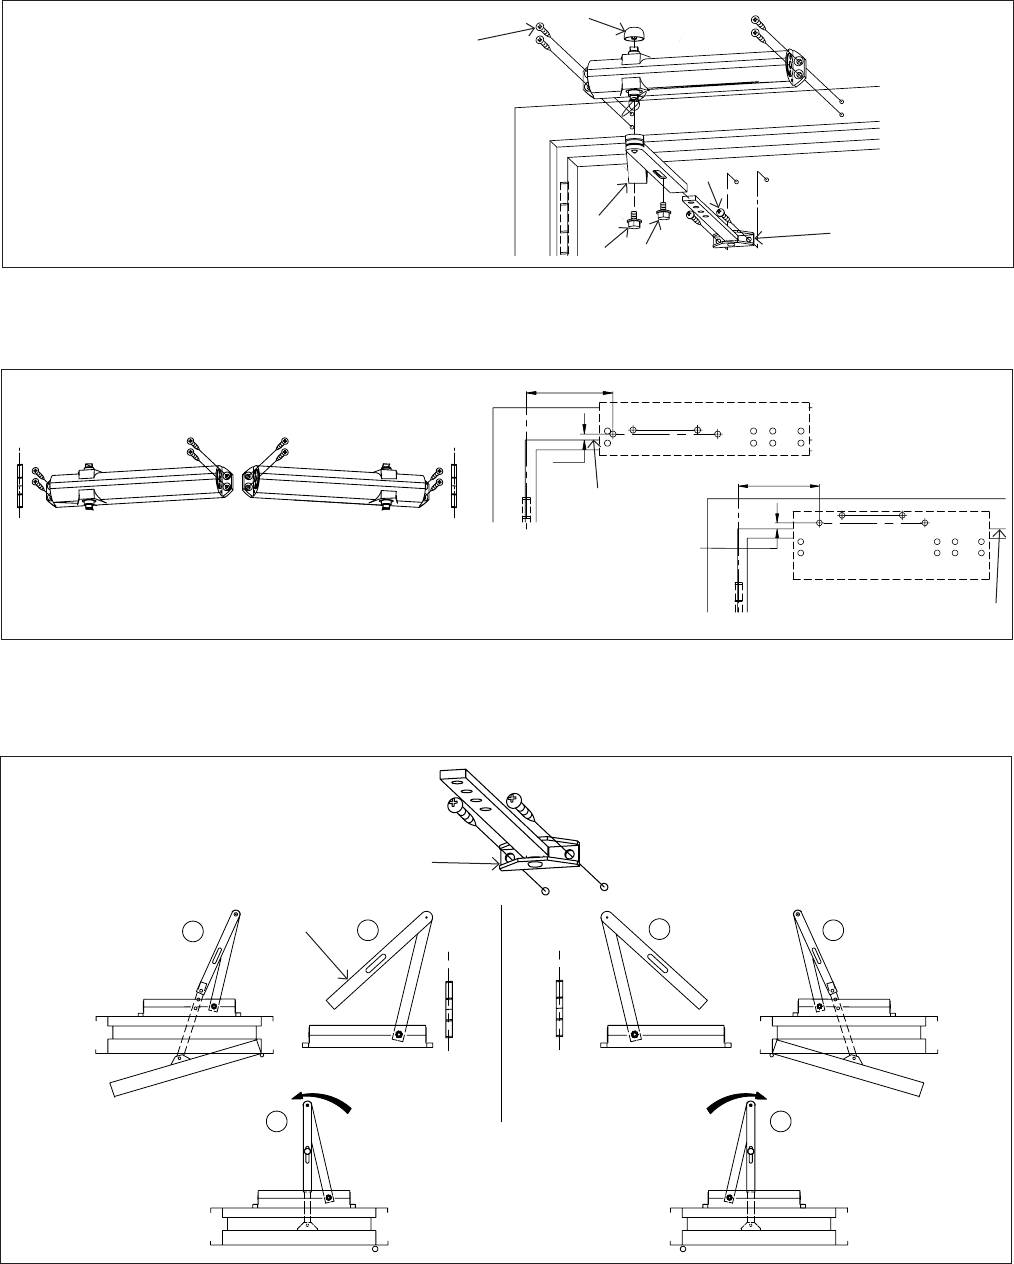
3 Instructions - top jamb mount
LH
NOTE: Orient pinion toward hinge.
.. Secure closer and/or optional plate.
LH RH
Flat arm
shoe
RH
LH
.. Secure the flat arm shoe
to door.
Main
arm
. Door closer
. Connecting arm
. Bar and shoe
. Dust cap
. Flat head combo screws
. Pan head combo screws
. Pinion screw
. Connecting arm screw
6
1
4
2
6
7
7
9
8
3
L
C
L
C
12
12
BP
DP
-/”
[]
Bottom of frame
/”
[] -/”
[]
”
[]
Bottom of frame
C
LL
C
A
B
C C
B
A
dormakaba 8616 AF/AFJ/AFP Installation Instructions
08279001 10-20198600 Surface Applied Closers
6
Parallel mount
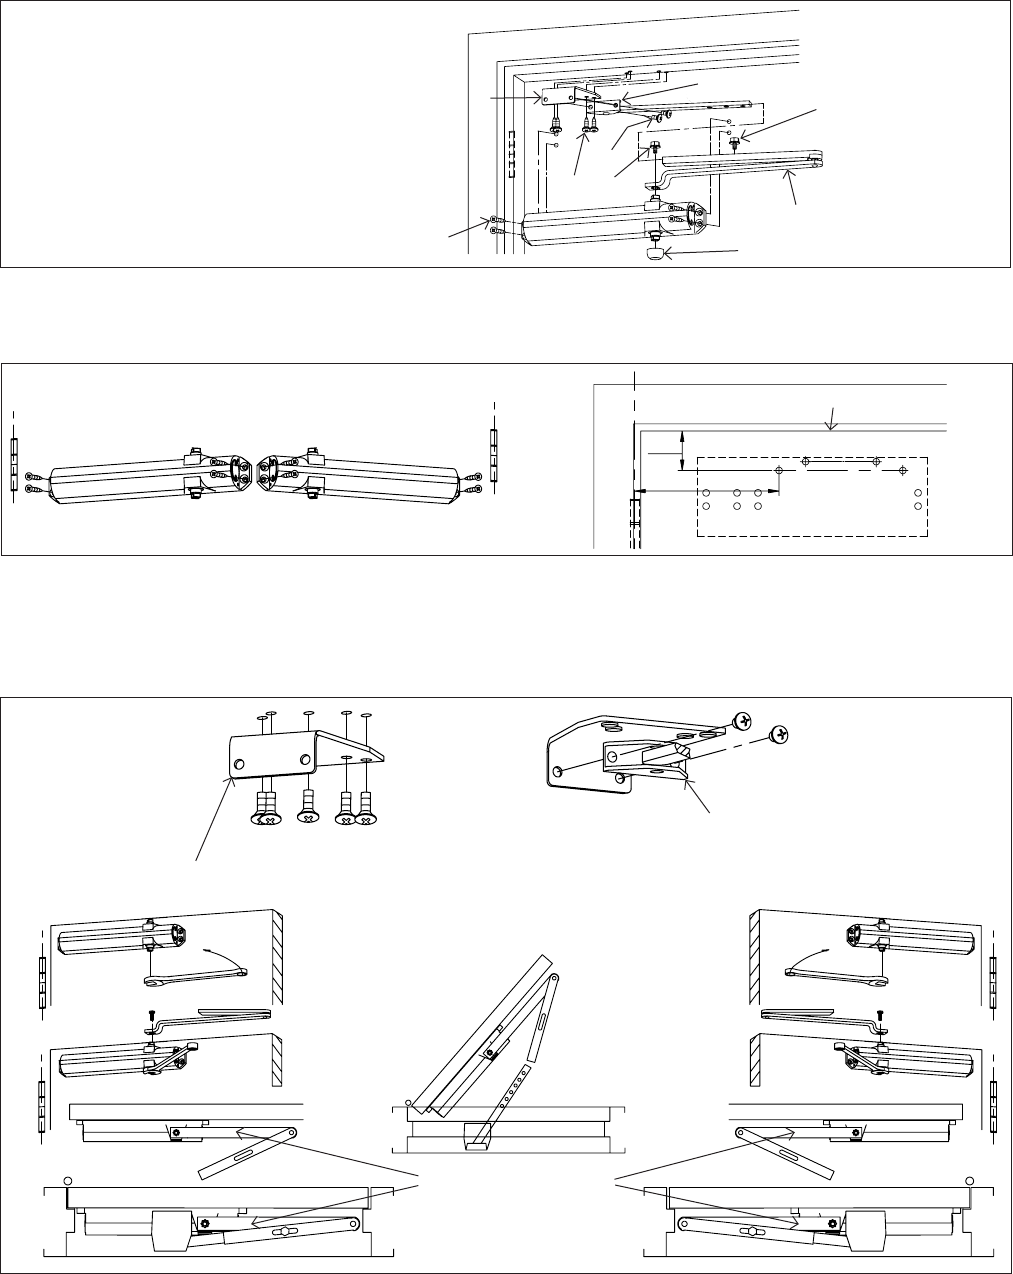
4 Instructions - parallel mount
. Surface closer system
NOTE: Orient pinion away from hinge. .. Secure closer body and/or drop plate to door.
. Installing the surface closer and drop plate (optional)
. Installing PA bracket and main arm
Fig.
Fig.
Fig.
LH
LH RH
.. Secure PA
bracket to
frame.
.. Use included
fasteners.
.. Rotate pinion ° to pre-load.
.. Secure flat
arm shoe to
bracket.
.. Use included
fasteners.
Flat arm
shoe
PA
bracket
. Door closer
. Connecting arm
. Bar and shoe
. Dust cap
. Flat head combo screws
. Pan head combo screws
. Pinion screw
. Connecting arm screw
. PA bracket
. PA shoe screws
11
9
2
3
7
6
1
8
4
10
6
12
L
C
L
C
DP
-/”
[]
Bottom of stop
-/”
[]
45° 45°
L
C
L
C
C
L
C
L
.. Keep
connecting arm
PARALLEL to
door.
dormakaba 8616 AF/AFJ/AFP Installation Instructions
08279001 10-20198600 Surface Applied Closers 7
Adjust closing speeds
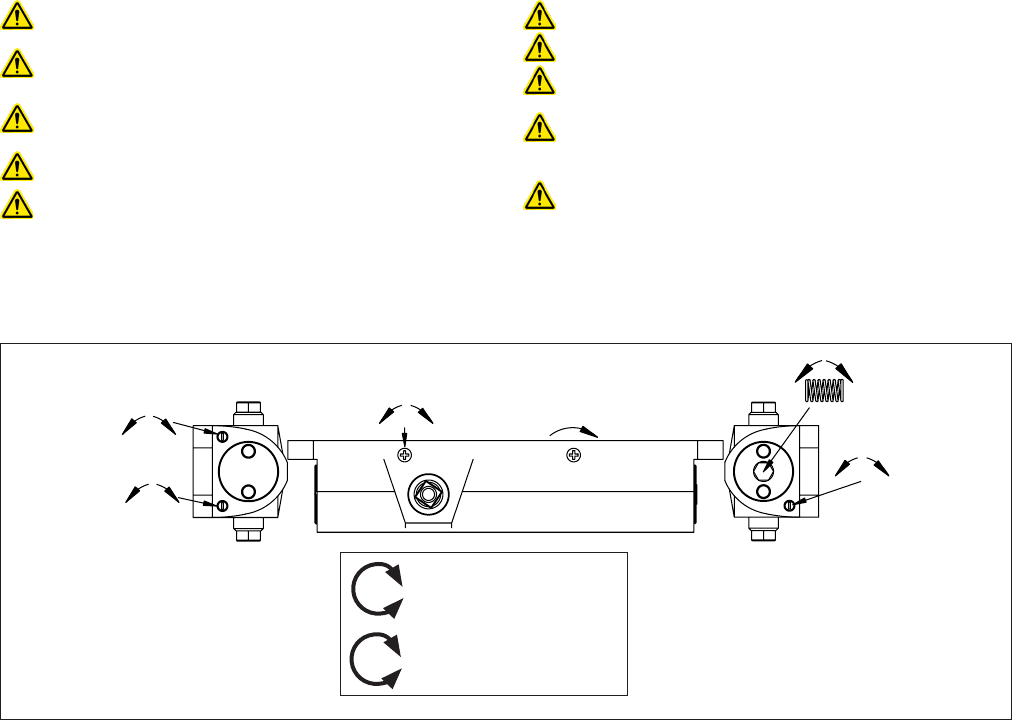
5 Adjustments
Confirm closer spring size prior to making any
closing speed adjustments.
Do not back valve heads out beyond closer casting. Door should close in to seconds from º.
Maximum opening angle is º.
Do not close valves completely.
. Adjust closing speeds: sweep, latch, backcheck, delayed action
Fig.
Increase
Decrease
Increase
Decrease
Backcheck
Sweep, Latch
& Delayed Action
Backcheck positioning MUST be turned “ON” for
parallel arm applications.
Backcheck position will advance approximately °.
Check delayed action (DEL) function if supplied.
meets lb interior barrier-free requirements.
If necessary, adjust closer spring and test pull
forces until proper forces are obtained.
Ball bearing hinges and pivots should always be
used.
+
-
+
-
+
-
+
-
-
+
BC
DA
L
S
dormakaba 8616 AF/AFJ/AFP Installation Instructions
08279001 10-20198600 Surface Applied Closers
8
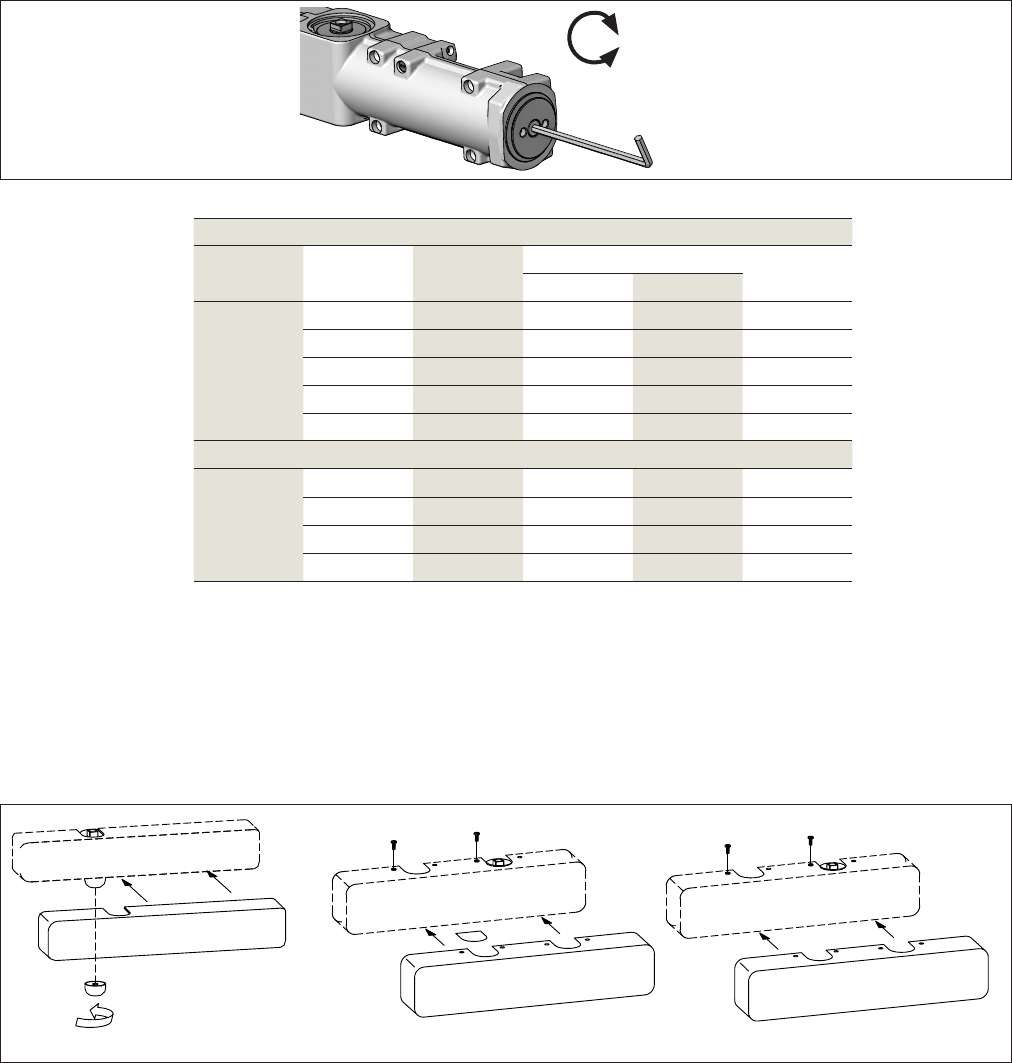
Adjust spring force
Secure covers
. Adjust spring force
Fig.
Increase
Decrease
Regular and top jamb mounts
Closer size Max door
weight (lbs)
Door width Full turns
Interior Exterior
'" --- -
' '" -
'" '
' '" +
--- ’ +
Parallel mount
’” ---- -
’ ’”
’” ’ +
’ ’” +
6 Install covers
Fig.
13
13
6
COV
FC
FCSL FMC

www.dormakaba.us
dormakaba
DORMA USA, Inc.
T: 800-523-8483
