Doro DORO341G GSM TRI-BAND DIGITAL MOBILE TELEPHONE User Manual
Doro AB GSM TRI-BAND DIGITAL MOBILE TELEPHONE Users Manual
Doro >
Users Manual
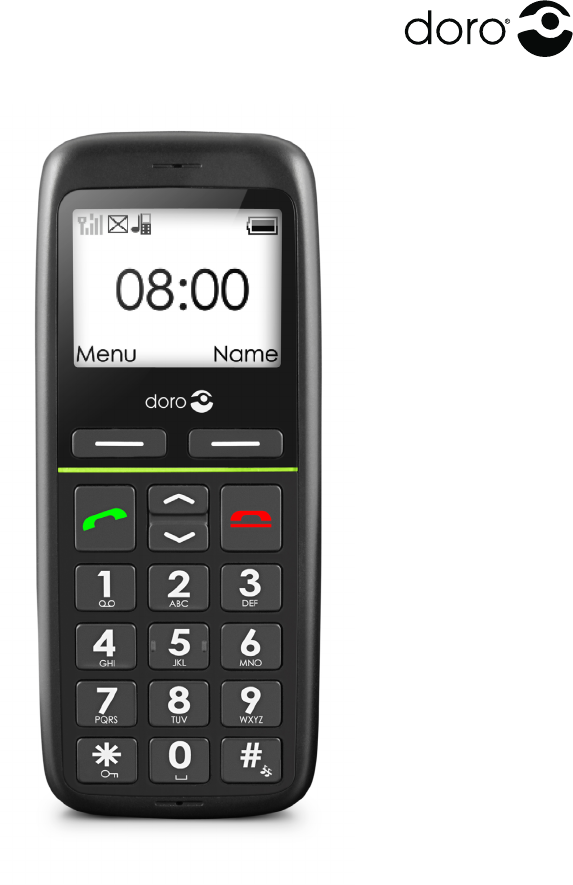
PhoneEasy
341gsm
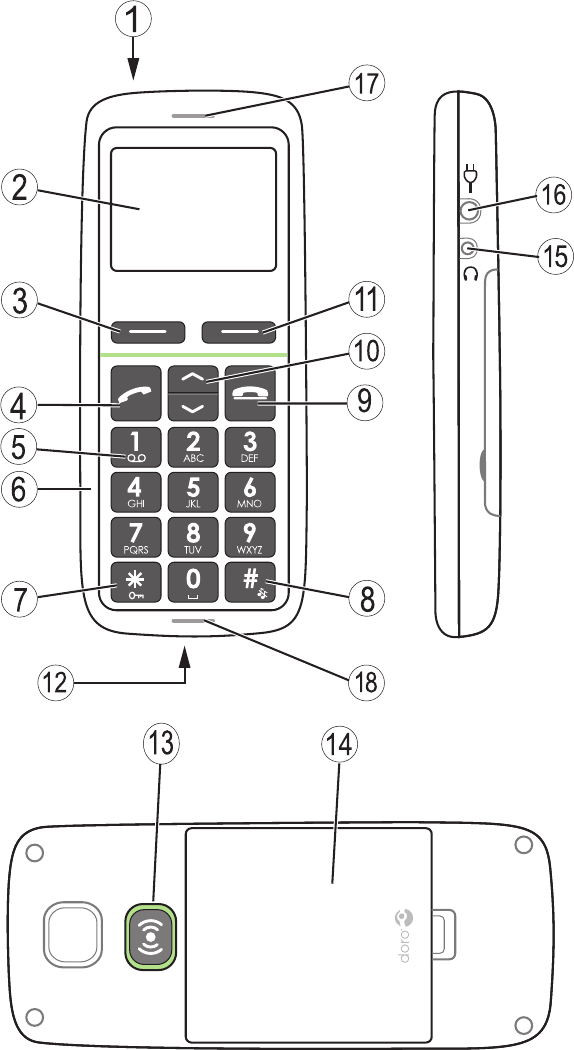
Power on/off
Display
Left soft key
Call key
1 / Voice mail
Numeric keypad
* / Key lock
# / Change prole
End call
Arrow keys
1.
2.
3.
4.
5.
6.
7.
8.
9.
10.
Right soft key
Charging contacts (for use
with charging stand)
Emergency call key
Battery cover
Headset socket
Charging socket
Loudspeaker
Microphone
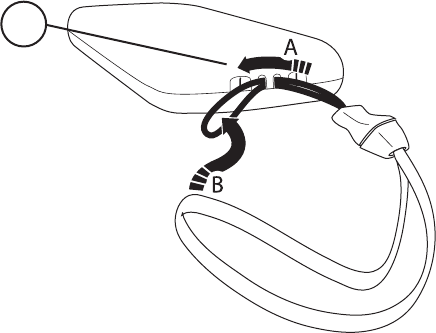
Lanyard
11.
12.
13.
14.
15.
16.
17.
18.
19.
English
19

1
English
Contents
Installation .................................... 3
Installing the SIM card and battery . . . . . . . . . . . . . . . . . . 3
Charging .................................... 4
Operation ...................................... 5
Activating the phone ............................ 5
Making a call ................................. 6
Making a call from the Phonebook . . . . . . . . . . . . . . . . . . 6
Receiving a call ............................... 6
Volume control ................................ 6
Display symbols ................................. 7
Additional functions .............................. 8
Call options .................................. 8
Call waiting .................................. 9
Call information ............................... 9
Call log ..................................... 9
Phonebook .................................. 10
Key lock .................................... 12
Headset .................................... 12
SOS calls 999/911/112 . . . . . . . . . . . . . . . . . . . . . . . . 12
Silent mode ................................. 13
Emergency Call key ............................ 13
Text input ................................... 14
SMS messaging ................................ 15
Creating and sending messages . . . . . . . . . . . . . . . . . . . 15
Outgoing messages (Outbox) . . . . . . . . . . . . . . . . . . . . . 15
Incoming messages (Inbox) . . . . . . . . . . . . . . . . . . . . . . 16

2
English
Settings ...................................... 18
Time & date ................................. 18
User setup .................................. 19
User prole (rings & tones) ....................... 20
Blocking functions ............................ 22
Emergency .................................. 22
Voice mail .................................. 23
Speed dial .................................. 24
Call setup ................................... 24
SMS settings ................................ 26
Network setup ............................... 27
Services .................................... 27
Security settings .............................. 28
Task reminders ............................... 30
Calculator ................................... 30
Safety instructions .............................. 31
Troubleshooting ................................ 34
Care and maintenance ........................... 38
Warranty and technical data . . . . . . . . . . . . . . . . . . . . . . . 39
3
English
Installation
Warning!
Turn off the phone and disconnect the charger before removing
the battery cover.
Installing the SIM card and battery
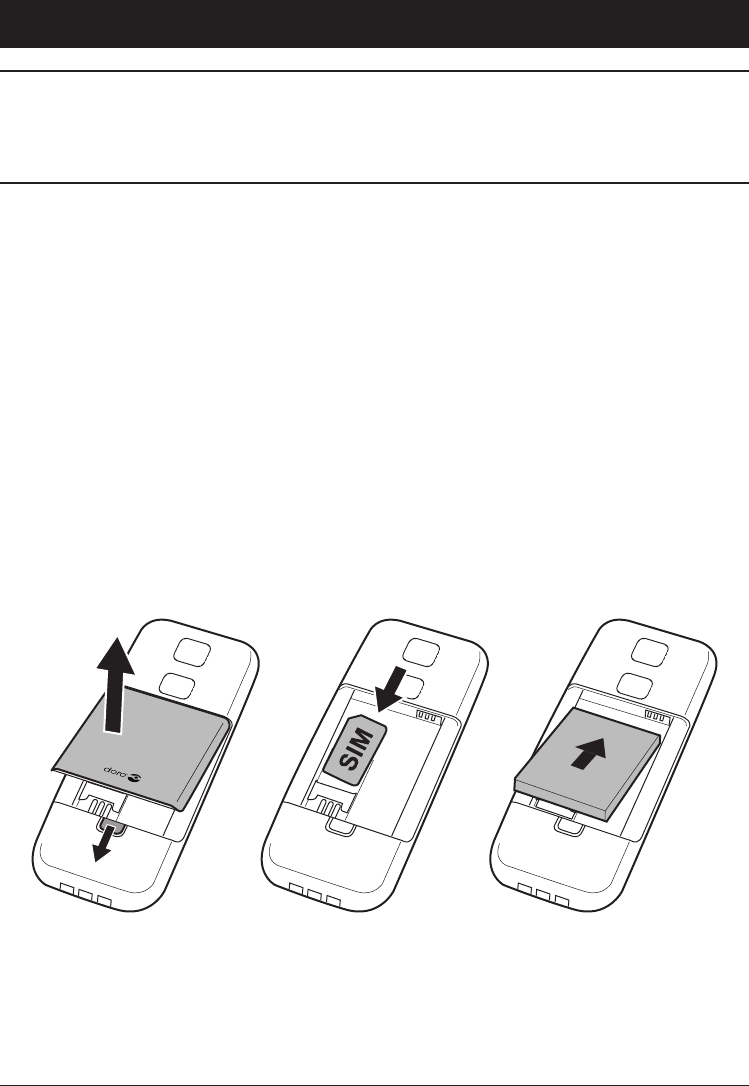
The SIM card holder is located behind the battery.
Remove the battery cover and the battery if it is already
installed.
Insert the SIM card by carefully sliding it into the holder.
Make sure that the SIM card’s contacts are facing inwards
and that the cut-off corner is pointing upwards. Take care not
to scratch or bend the contacts on the SIM card.
Insert the battery by sliding it into the battery compartment
with the contacts facing upwards to the right.
Replace the battery cover.
1.
2.
3.
4.
4
English
Charging
Warning!
Only use batteries, charger and accessories that have been
approved for use with this particular model. Connecting
other accessories may be dangerous and may invalidate the
phone’s type approval and guarantee.
When the battery is running low, is displayed and a warning
signal is heard. To charge the battery, connect the mains adapter
to the wall socket and to the charging socket y.
If the phone is turned on when the charger is connected to the
phone is displayed briey in the display and when it
is disconnected. The battery charge indicator is displayed while
charging.
If the phone is turned off when the charger is connected to the
phone only the battery charge status indicator will be shown in
the display.
It takes approximately 3 hours to fully charge the battery.
is displayed when charging is completed.
Note!
To save power the LCD backlight goes off after a short while
but the phone is still charging. Press any key to illuminate the
display.
Full battery capacity will not be reached until the battery has
been charged 3–4 times.
The ambient temperature must be in the range 0 °C to +40 °C
when charging.
Batteries degrade over time, which means that call time and
standby time will normally decrease with regular use.
5
English
Operation
Activating the phone
Press and hold 1 on the top of the phone to turn it on/off. The
following messages may be displayed:
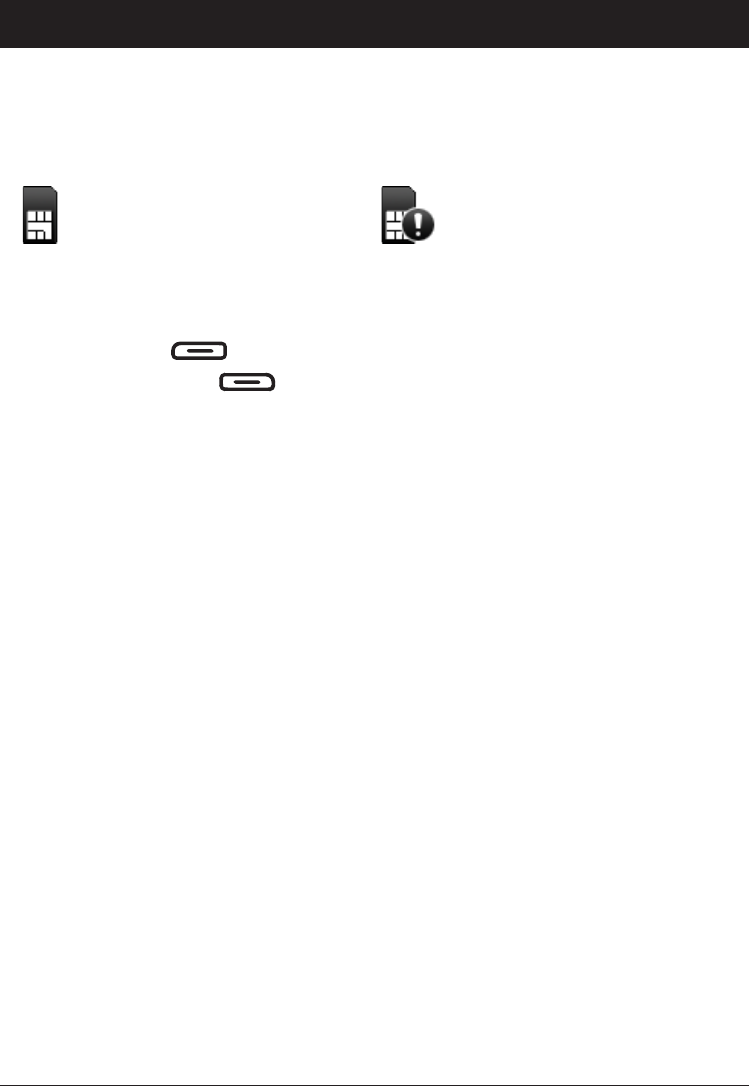
SIM card missing or
incorrectly inserted.
SIM card damaged or not
valid.
If the SIM card is valid but protected with a PIN code (Personal
Identication Number), PIN: is displayed. Enter the PIN code
and press OK ( upper left corner of keypad).
Delete with Clear ( upper right corner of keypad).
Note!
If PIN and PUK codes were not provided with your SIM card,
please contact your network operator.
Trials: # shows the number of PIN attempts left. When no
more attempts remain, SIM blocked is displayed. The SIM
card must now be unlocked with the PUK code (Personal
Unblocking Key).
1. Enter the PUK code and conrm with OK.
2. Enter a new PIN code and conrm with OK.
Changing the language, time and date
The default language is determined by the SIM card. See Settings
on how to change language, time and date.

6
English
Making a call
Enter the phone number. Delete with Clear.
Press q to dial. Press Abort to cancel dialling.
Press L to end the call.
Note!
When making international calls, press * twice for the
international prex "+". Always use ”+” before the country
code (instead of 00 or similar) for best operation.
Making a call from the Phonebook
Press Name to open the phonebook.
Use the arrow keys / to scroll through the
phonebook, or quick search by pressing the key corresponding
to the rst letter of the entry, see Text input.
Press Call to dial the selected entry, or press Back to return
to standby mode.
Receiving a call
Press q to answer, or press Silent to switch off the ring
signal and then Reject to reject the call (busy signal).
Alternately, press L to reject the call directly.
Press L to end the call.
See also Call options.
Volume control
Use the arrow keys / to adjust the sound volume, during
a call. The volume level is indicated on the display.
1.
2.
3.
1.
2.
3.
1.
2.
7
English
Display symbols
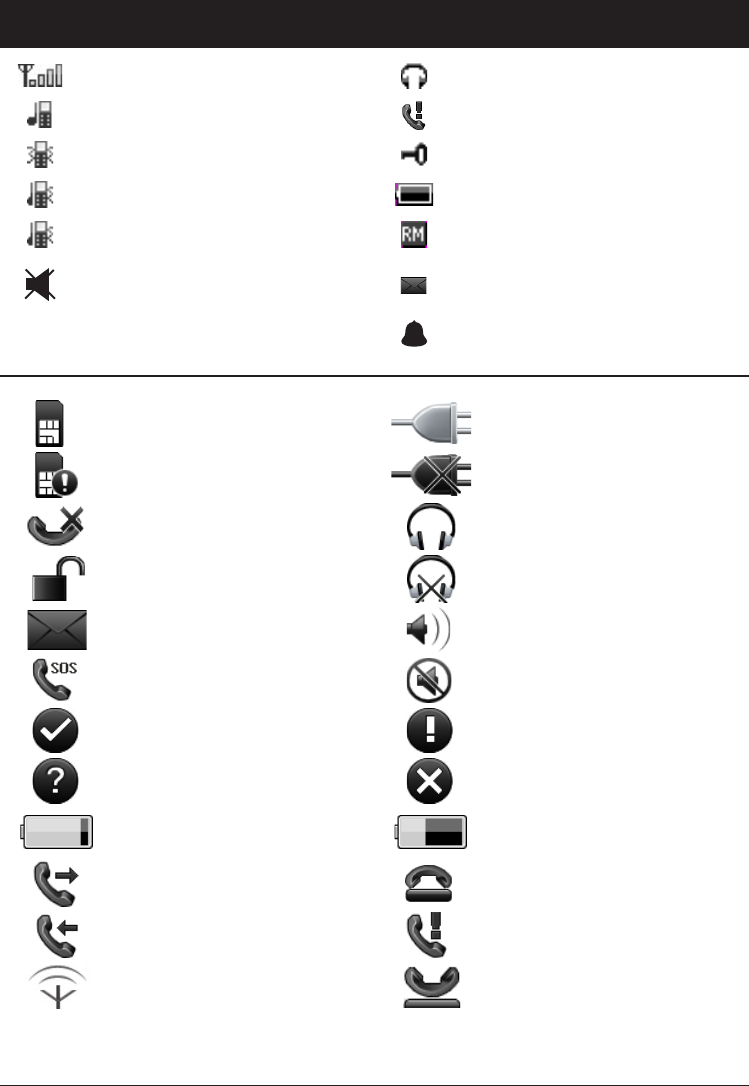
Signal strength Headset connected
Ring only Missed call
Vib only (vibration only)vibration only) Keylock on
Vib & ring Battery level
Vib -> ring Roaming (in other network)
Light only
(no ring/no vibration)no ring/no vibration) New message
Alarm active
SIM card missing Charger connected
SIM card error Charger disconnected
Mute Headset connected
Unlocking keypad Headset disconnected
New SMS message Handsfree on
SOS calls only Handsfree off
OK (conrmed) Warning
Query Error
Battery level low Charging (animated)
Calling Call ended
Incoming call Missed call
Searching Call on-hold
8
English
Additional functions
Call options
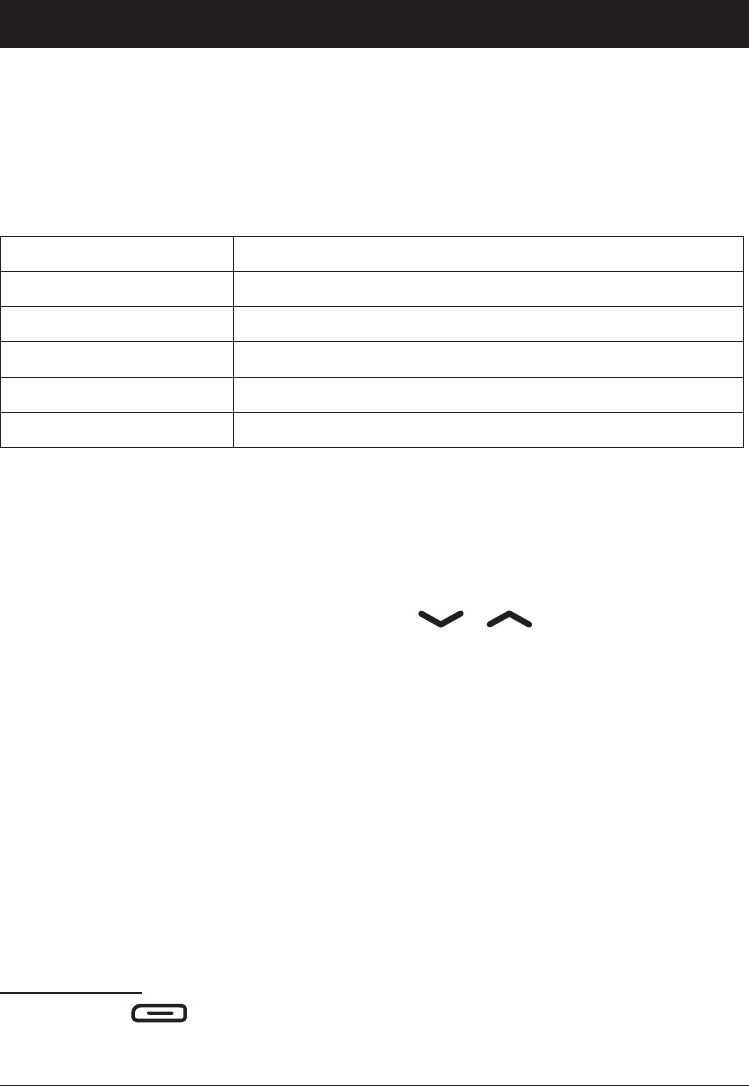
During a call the soft keys1 give access to additional functions:
Options (left soft key)
A menu with the following options is displayed:
Hold single call Hold the current call
End single call End the current call (same as L)
New call Call another number (three-party call)
Phonebook Search the phonebook
Msg centre Write or read SMS messages
Mute Disable the microphone (mute)
SPK on (right soft key)
Activates handsfree mode, which allows you to speak without
holding the phone.
Speak clearly into the microphone at a maximum distance of
1 meter (3 feet). Use the arrow keys / to adjust theto adjust the
loudspeaker volume.
Press SPK off to return to normal mode.
Note!
The handsfree function allows only one person at a time
to talk. Switching between talk/listen is triggered by the
sound of the person talking. Loud noises (music, etc.) in the
background may interfere with the handsfree function.
1 Soft keys have multiple functions. The current key function is
shown above the soft key on the display.

9
English
Call waiting
An alert tone will be heard if there is an incoming call while
talking. To put the current call on hold and answer the incoming
call, press Options.
This service must be activated, see Settings/Call setup.
Call information
During a call, the called or calling phone number and the elapsed
call time is displayed.
If the identity of the caller is withheld, Unknown is displayed.
Call log
Answered, missed, and outgoing calls are saved in a combined
call log. 20 calls of each type can be stored in the log. For
multiple calls related to the same number, only the most recent
call is saved.
Retrieving and dialling
Press q.
Use the arrow keys / to scroll through the call list.
= Incoming call
= Outgoing call
= Missed call
Press q to dial the number or press Options for the
following settings:
View Show details for the selected call
Delete Delete the call
Delete all Delete all calls in the call log
Save Save the number in the Phonebook
1.
2.
3.

10
English
Phonebook
The phonebook can store 100 entries with 3 phone numbers in
each entry.
Creating a phonebook entry
Press Menu, scroll to and press OK.
Select -New contact- and press Add.
Select Name and press Edit.
Enter a name for the contact, see Text input. Delete with Clear.
Press Done.
Select Mobile, Home number or Ofce number, and
enter the phone number, then press Save.
Press L to return to standby mode.
Note!
For international phone numbers, always use ”+” before the
country code (instead of 00 or similar) for best operation.
Managing phonebook entries
Press Menu, scroll to and press OK.
Select an entry and press Options.
Select one of the following options and press OK.
View
Show details for the selected call.
Edit
Edit the name/number. To edit the name, you rst need to
press Edit. Use / to move the cursor.to move the cursor.
Delete with Clear.
Press Save.
Add new
See Creating a phonebook entry above.
1.
2.
3.
4.
5.
6.
7.
1.
2.
3.
1.
2.

11
English
Call
Press OK to call the contact.
Send SMS
Press OK to write an SMS message, see SMS messaging.
Top 10 setting
Press OK then Add to set the entry as one of the rst 10
numbers in the phonebook. To delete a Top 10 entry, select the
entry in the Top 10 list and press options, then Delete.
Delete
Press OK to delete the selected phonebook entry. Press Yes to
conrm or No to abort.
Delete all
Select From SIM or From Phone and press OK to delete all
phonebook entries from the SIM card or phone memory.
Enter the phone code and press OK to conrm.
Copy all
Select From SIM and press OK to copy all phonebook entries
from the SIM card to the phone memory. Press Yes to conrm or
No to abort.
Select From Phone and press OK to copy all phonebook entries
from the phone memory to the SIM card. Press Yes to conrm or
No to abort.
Storage
Select SIM or Phone and press OK to select the default storage
for new phonebook entries.
Send vCard
Select Send by SMS and press OK to send the selected
phonebook entry as a vCard via SMS. Enter the phone number of
the recipient (or press Search) and press OK to send.

12
English
Key lock
Press and hold * to lock/unlock the keypad.
Incoming calls can be answered by pressing q even if the
keypad is locked. During the call, the keypad is unlocked. When
the call is ended or rejected, the keypad is locked again.
See Settings for key lock options.
Note!
The emergency number 999, 112 and 911 can be dialled
without unlocking the keypad.
Headset
When a headset is connected, the internal microphone in the
phone is automatically disconnected.
When receiving a call you can use the answer key on the headset
cable to answer and end calls.
Warning!
Using a headset at high volume can damage your hearing.
Adjust the sound volume carefully when using a headset.

13
English
SOS calls
Warning!
Mobile phones such as this unit use radio signals, the
mobile phone network, the terrestrial network and user-
programmed functions. This means that connection cannot
be guaranteed in all circumstances. Therefore, you should
never rely solely on a mobile phone for very important calls
such as medical emergencies.
When the phone is turned on, the right soft key shows SOS
before the SIM card is activated or if the phone lock is on.
Press SOS and then press Yes to automatically call 911. Press
No to return to the activation screen. If you pressed Yes by
mistake, press Abort immediately to abort.
As long as the phone is switched on, it is always possible to place
an SOS call by entering 911 followed by q.
Most – but not all – networks accept calls to 911 without a valid
SIM card. Sometimes an emergency call cannot be placed due to
network, environment or interference issues.
Silent mode
Silent mode is a xed prole with SMS and ring signals disabled,
while vibration and key tone settings are unchanged. Press and
hold # to activate/deactivate Silent mode.
See also Settings/User prole (rings & tones).

14
English
Emergency Call key
To make an emergency call, press and hold the Emergency Call
key on the back of the phone for 3 seconds, or press it two times
within 1 second. The phone will send an emergency SMS text
message to all numbers in the Emergency numbers list. The
phone will then dial the rst number on the list. If the call is not
answered within 25 seconds, the next number is dialled.
Dialling is repeated 3 times or until the call is answered, or until
L is pressed.
The Emergency Call function must be activated before use.
See Settings on how to activate this function, enter Emergency
Numbers, and edit the emergency SMS message.
Note!
When an emergency call is activated the phone is pre-set to
handsfree mode.
Automatic calls to 911 is normally not allowed. Do not save
this number in the list of numbers to be called automatically.
Some private security companies can accept automatic calls
from their clients. Always contact the security company before
programming in its number. The function is set to interact
with most voice mail systems to avoid that the call sequence
is interrupted.
Warning:
Do not hold the device near your ear when the handsfree
mode is in use, because the volume may be extremely loud.

15
English
Text input
Text is entered by pressing the numerical keys repeatedly
to select characters. When writing SMS messages in some
languages you can use the Smart ABC (eZiType™) input method
which uses a dictionary to suggest words. See Settings on how to
change input method.
Entering text
Press the key repeatedly until the desired character is shown.
Wait a few seconds before entering the next character.
Press * for a list of special characters. Select the desired
character and press OK to enter it.
Use the keys / to move the cursor within the text.
Press # to cycle upper case, lower case and numerals.
Entering text with Smart ABC
Press each key once, even if the displayed character is not the
one you want. The dictionary will suggest words based on the
keys you have pressed. Use the arrow keys to select a word, then
press OK and continue with the next word.
If none of the suggested words are correct, press # to change
to manual input mode. The icon on the top left of the display
indicates the input mode:
eZi
ABC UPPER CASE with SmartABC
eZi
abc lower case with SmartABC
ABC UPPER CASE
abc lower case
123 Numerals

16
English
SMS messaging
Creating and sending messages
Press Menu, scroll to and press OK.
Select Write message and press OK.
Type your message (see Text input) then press Done.
Select one of the Send options below and press OK to conrm.
Save and send Send the message and save it in the Outbox
Send only Send the message without saving
Send to many Add more recipients for the message
If Send to many was selected, do the following:
Select Recipients and press OK.
Select one of the empty entries and press Edit.
Enter a phone number or press Search to open the
phonebook. After entering or selecting a number, press OK.
Repeat step 2–3 to add additional recipients. When nished,
press Done.
Note!
For international phone numbers, always use ”+” before the
country code (instead of 00 or similar) for best operation.
Outgoing messages (Outbox)
Press Menu, scroll to and press OK.
Select Outbox and press OK.
Select a message and press OK. Use the arrow keys to scroll
the message up/down.
Press Options, see Incoming messages (Inbox).
1.
2.
3.
4.
1.
2.
3.
4.
1.
2.
3.
4.

17
English
Incoming messages (Inbox)
Press Menu, scroll to and press OK.
Select Inbox and press OK.
Select a message from the list and press Read. Use the
arrow keys to scroll the message up/down.
Press Options.
Send (Outbox)
Select one of the Send options and press OK to conrm, (see
Creating and sending SMS).
Reply (Inbox)
Type your reply, then press Done.
The message will be sent immediately.
Delete
Press Yes to delete the message, or No to return to the menu.
Edit
Edit the message, then press Done to show the Send options
(see Creating and sending messages).
Forward (Inbox)
Shows the Send options.
Delete all
Press Yes to delete all messages in the Inbox. Press No to return
to the menu.
1.
2.
3.
4.

18
English
Use number
Displays all phone numbers contained in the message as well as
the number of the sender.
Use the arrow keys to select one of the displayed numbers.
Press Options.
Select one of the following options and press OK.
Call Call the selected number
Save Save the number in the phonebook
Send SMS Write a new SMS message
1.
2.
3.

19
English
Settings
Note!
The settings described in this chapter are carried out in
standby mode.
Time & date
Setting the time and date
Press Menu, scroll to and press OK.
Select Time & date and press OK.
Select Set time and press OK.
Enter the time (HH:MM), then press OK.
Select Set date and press OK.
Enter the date (YYYY/MM/DD), then press OK.
Setting the time/date format
Press Menu, scroll to and press OK.
Select Time & date and press OK.
Select Set format and press OK.
Select Time Format and press OK.
Select 12 hours or 24 hours and press OK.
Select Date Format and press OK.
Select the desired date format and press OK.
Setting Auto time on/off
To set the phone to automatically update the time and date
according to the current time zone, select On. (Does only work
with some operators.)
Press Menu, scroll to and press OK.
Select Time & date and press OK.
Select Auto time and pressand press OK.
Select On/Off and press OK.
1.
2.
3.
4.
5.
6.
1.
2.
3.
4.
5.
6.
7.
1.
2.
3.
4.

20
English
User setup
Changing the language
The default language for the phone menus, messages etc. is
determined by the SIM card. You can change this to any other
language supported by the phone.
Press Menu, scroll to and press OK.
Select User setup and press OK.
Select Language and press OK.
Scroll up/down to select a language, then press OK.
Display information
In standby mode the display can present date, time, and the
connected network, or just the time.
Press Menu, scroll to and press OK.
Select User setup and press OK.
Select Idle display and press OK.
Select Clock only or All info and press OK.
Display backlight
Sets the delay time before the display backlight is turned off.
Press Menu, scroll to and press OK.
Select User setup and press OK.
Select LCD backlight and press OK.
Select 15 sec. or 30 sec. and press OK.
1.
2.
3.
4.
1.
2.
3.
4.
1.
2.
3.
4.

21
English
User prole (rings & tones)
The phone has 3 available user proles. Each prole can have
different settings for ring signals, ring volume, etc.
Silent is a xed prole with SMS and ring signals disabled, while
vibration and key tone settings are unchanged. Press and hold #
to activate/deactivate Silent.
Selecting a user prole
Press Menu, scroll to and press OK.
Select User proles and press OK.
Select a user prole and press Options.
Select Activate and press OK.
Tone setup
Press Menu, scroll to and press OK.
Select User proles and press OK.
Select a user prole and press Options.
Select Customise and press OK.
Select Tone setup and press OK.
Select Ring tone and press OK.
Select one of the available tones, the tone will be played.
Press OK to conrm, or press Back to discard changes.
Set up the Alarm, SMS tone and Keypad tone in the same way.
Ring volume
Press Menu, scroll to and press OK.
Select User proles and press OK.
Select a user prole and press Options.
Select Customise and press OK.
Select Volume and press OK.
Scroll up/down to change the ring volume, then press OK.
1.
2.
3.
4.
1.
2.
3.
4.
5.
6.
7.
8.
1.
2.
3.
4.
5.
6.

22
English
Alert type (ring/vibrate)
Incoming calls can be signalled by a ring tone and/or vibration, or
by light only.
Press Menu, scroll to and press OK.
Select User proles and press OK.
Select a user prole and press Options.
Select Customise and press OK.
Select Alert type and press OK.
Select the desired signalling mode and press OK.
Warning and error tones
Warning and error tones are used to alert the user of low battery
power, phone and SIM card errors, etc.
Press Menu, scroll to and press OK.
Select User proles and press OK.
Select a user prole and press Options.
Select Customise and press OK.
Select Extra tone and press OK.
Select a tone and press On/Off to enable/disable it.
Press Done to save.
1.
2.
3.
4.
5.
6.
1.
2.
3.
4.
5.
6.
7.
23
English
Blocking functions
You can disable some functions to simplify use of the phone.
Press Menu, scroll to and press OK.
Select Block function and press OK.
Select each function you want to disable and press On.
Press Done to conrm.
Emergency
Settings for the Emergency Call key function.
See also Operation/Emergency call.
Press Menu, scroll to and press OK.
Select Emergency and press OK for the following settings:
Activation
Select one of the following options and press OK.
Off Emergency call key disabled.
On Normal Emergency Call key enabled. To activate, hold key
for >3 seconds, or press 2 times within 1 second.
On (3) Emergency Call key enabled.
To activate, press key 3 times within 1 second.
Numbers list
The list of numbers that will be called when the Emergency Call
key is pressed.
To add a new emergency number, select Empty and press Add.
Repeat until you have max. 5 emergency numbers.
See Phone book on how to add names/numbers.
To edit or delete an existing entry, select it and press Options.
1.
2.
3.
4.
1.
2.

24
English
Message
The SMS text message to be sent when the Emergency Call key is
pressed. Enter/edit text, then press OK to save.
Alarm information
Please read this important safety information before enabling the
Emergency Call function:
Be careful about including numbers with automatic answering
in the call list, as the alarm sequence stops once the call is
answered.
Voice mail
Press Menu, scroll to and press OK.
Select Voice mail and press OK, then Options.
Select Connect and press OK to call the voice mailbox.
The voice mailbox can also be called by pressing and holding 1.
If no number has been added yet, the line will show Empty.
Adding or editing the voice mailbox number
Press Menu, scroll to and press OK.
Select Voice mail and press OK.
Select Empty and press Options.
Select Edit and press OK.
Press Edit and enter the name and then press Done.
Press .
Enter the phone number to your voice mailbox.
Press Save to save the number.
Note!
The voice mailbox number is provided by your network operator.
1.
2.
3.
1.
2.
3.
4.
5.
6.
7.
8.
25
English
Speed dial
The numerical keys 0 and 2–9 can be used for speed dialling.
Adding speed dial numbers
Press Menu, scroll to and press OK.
Select Speed dial and press OK.
Select 0 and press Add.
Select an entry from the phonebook and press OK.
Repeat to add speed dial entries for keys 2–9.
To speed dial an entry, press and hold the corresponding number key.
To edit an existing entry, select it and press Options, then select
Edit or Delete and press OK.
Call setup
Press Menu, scroll to and press OK.
Select Call setup and press OK for the following settings:
Caller ID
Controls display of your phone number on the recipients phone.
Select an option and press OK.
Set by network Use default setting by the network
Hide ID Never show your number
Send ID Always show your number
Call waiting
Select an option and press OK. See also Operation - Call waiting.
Activate Enables the function
Deactivate Disables the function
Query status Displays if the service is active or not
1.
2.
3.
4.
5.
1.
2.
26
English
Call divert
Set up which calls should be diverted.
Select a condition and press OK, then select Activate,
Deactivate or Query status (see Call waiting above) for each.
Div. voice calls Diverts all voice calls.
Div. unreach Diverts incoming calls if the phone is turned off orturned off or
out of range.
Div. no reply Diverts incoming calls if unanswered.
Divert if busy Diverts incoming calls if the line is busy.
Cancel diverts Do not divert calls
Call barring
The phone can be restricted to disallow certain types of calls.
Note!
To change these settings a password is needed. Contact your
network operator to get the password.
Outgoing calls Press OK then select:
All calls User can answer incoming calls but not dial out.
Internat. calls User can not call international numbers.
Int. except home User can not call international numbers except to
the country associated with the SIM card.
Incoming calls Press OK then select:
All calls User can dial out but not receive incoming calls.
When roaming User can not receive incoming calls while roaming
(operating in other networks).
Cancel all Cancel all call barring (password needed)
Set barr. PW Change the barring password (password needed)
Answer mode
Select Any key and press On to be able to answer incoming
calls by pressing any key.

27
English
SMS settings
Press Menu, scroll to and press OK.
Select SMS settings and press OK for the following settings:
Predictive text
Press OK.
Select On/Off to enable/disable it, and press OK.
Select a dictionary (language) to enable Smart ABC/
eZiType™, see Text input, and press OK.
Prole set
This number is needed to use the SMS function. The number can
be obtained from the network operator.
Add/edit the message service phone number. Use the side
keys to move the cursor. Press Clear to erase.
Press Save to save the new number.
Memory status
Displays the percentage of memory space used in the SIM card
and phone memory.
Pref. storage
Select SIM to store messages on the SIM card, or Phone to
store messages in the phone memory.
Press OK to conrm.
1.
2.
1.
2.
3.
1.
2.
1.
2.

28
English
Network setup
Press Menu, scroll to and press OK.
Select Network setup and press OK.
Select one of the following options and press OK to conrm.
Automatic Network is selected automatically.
Manual
A list of available network operators is displayed
(after a short delay).
Select the desired operator and press OK.
Services
This menu may contain pre-programmed services from your
network provider.
* Depending on network support and subscription.
1.
2.
3.
29
English
Security settings
Press Menu, scroll to and press OK.
Select Security and press OK.
SIM lock
The SIM card is protected with a PIN code (Personal Identication
Number). The phone can be set to ask for the PIN code on startup.
Select On/Off and press OK to enable/disable SIM card lock.
Note!
You need to input the current PIN code to disable/enable SIM lock.
Phone lock
Select On/Off and press OK to enable/disable the Phone lock.
Note!
You need to input the current Phone code to change this
setting. The default Phone code is 1234.
Keypad lock
Select one of the following options and press OK.
Auto key lock Select the time delay for automatic keypad locking
and press OK to conrm.
Unlock mode
Select Single key to unlock the keypad with * or
Dual key to unlock with right soft key and *.
Press OK to conrm.
PIN / PIN2 / Phone password
To change the PIN codes or the phone lock password:
Enter the current code and conrm with OK
Enter a new code and conrm with OK.
Enter the new code again and conrm with OK.
Reset
Resets the phone to the factory settings.
Input the phone lock password and press OK to reset.
1.
2.
1.
2.
3.

30
English
Alarms
Press Menu, scroll to and press OK.
Select Alarms and press OK.
Select one of the alarms Alarm 1 – Alarm 5, then press Edit.
To disable an alarm select Off, to enable it select On, then
press OK.
Enter the alarm time using the keypad, then press OK.
For a single occurrence, select Single and press OK.
For a repeated alarm, select Repeated and press OK.
Scroll through the list of weekdays and press On/Off to
enable/disable the alarm for each weekday, then press Done.
Enter a description for the alarm (see Text input), then press
Save to save the alarm.
Note!
The alarm function will work even when the phone is switched off.
Do not press Yes when wireless phone use is prohibited or
when it may cause interference or danger.
Press Stop to turn off the alarm or press Snooze to repeat the
alarm after 9 minutes.
1.
2.
3.
4.
5.
6.
7.
8.

31
English
Task reminders
Press Menu, scroll to and press OK.
Select Tasks and press OK.
To add a new task, press Add.
Enter a date for the task, then press .
Enter a time for the task, then press .
Press Edit, enter a description for the task (see Text input),
then press Done.
Press Save to save the task.
At the recorded date/time, an alert tone will be played and the
task description will be shown on the display.
Note!
The tasks function will work even when the phone is switched
off. Do not press Yes when wireless phone use is prohibited or
when it may cause interference or danger.
Calculator
The Calculator can perform basic math operations.
Press Menu, scroll to and press OK.
Enter the rst number. Use # to enter decimal points.
Use the arrow keys to select an operation (+ - * /) and
press OK.
Enter the next number and press OK.
Repeat steps 2–4 as necessary. The result is shown after
each entry. Alternatively, select and press OK to calculate
the result.
1.
2.
3.
4.
5.
6.
7.
1.
2.
3.
4.
5.
32
English
Troubleshooting
Phone cannot be switched on
Battery charge low Connect the power adapter and
charge the battery for 12 hours.
Battery incorrectly installed Check the installation of the
battery.
Failure to charge the battery
Battery or charger damaged Check the battery and charger.
Battery recharged in temperatures
< 0°C or > 40°C
Improve the charging environment.
Charger incorrectly connected to
phone or power socket
Check the charger connections.
Standby time decreases
Battery charge capacity too low Install a new battery.
Too far from base station, phone is
constantly searching for signal
Searching the network consumes
battery power. Find a place with a
stronger signal, or temporarily turn
off the phone.
Failure to place or receive calls
Call barring activated Deactivate call barring. If this does
not solve the problem, contact the
network operator.
PIN code not accepted
Wrong PIN code entered too many
times
Enter the PUK code to change the
PIN code, or contact the network
operator.

33
English
SIM card error
SIM card damaged Check the condition of the SIM card.
If it is damaged, contact the network
operator.
SIM card incorrectly installed Check the installation of the SIM card.
Remove the card and reinstall it.
SIM card dirty or damp Wipe the contact surfaces of the SIM
card with a clean cloth.
Failure to connect to network
SIM card invalid Contact the network operator.
No coverage of GSM service Contact the network operator.
Signal too weak See Weak signal below.
Weak signal
Too far from base station Try again from another location.
Network congestion Try calling at a later time.
Echo or noise
Regional problem from bad network
relay
Hang up and redial. This may
switch to another network relay.
Failure to add a contact
Phonebook memory full Delete contacts to free up memory.
Failure to set a function
Function not supported or
subscribed from network
Contact the network operator.

34
English
Safety Instructions
Warning!
The unit and the accessories can contain small parts. Keep
all of the equipment out of the reach of small children.
Operating environment
Follow the rules and laws that apply wherever you are, and always turn off the unit
whenever its use is prohibited or can cause interference or hazards. Only use the unit
in its normal user position.
This unit complies with guidelines for radiation when it is used either in a normal
position against your ear, or when it is at least 7/8 of an inch (2.2cm) from your
body. If the unit is carried close to your body in a case, belt holder or other holder,
these holders should not contain any metal, and the product should be placed at the
distance from your body specied above. Make sure that the distance instructions
above are followed until the transfer is complete.
Parts of the unit are magnetic. The unit can attract metal objects. Do not keep credit
cards or other magnetic media near the unit. There is a risk that information stored
on them can be erased.
Medical units
The use of equipment that transmits radio signals, for example, mobile phones, can
interfere with insufciently protected medical equipment. Consult a doctor or the
manufacturer of the equipment to determine if it has adequate protection against
external radio signals, or if you have any questions. If notices have been put up at
health care facilities instructing you to turn off the unit while you are there, you
should comply. Hospitals and other health care facilities sometimes use equipment
that can be sensitive to external radio signals.
Pacemakers
The Health Industry Manufacturers Association recommends that a minimum separation
of 6 inches (15 cm) be maintained between a handheld wireless phone and a pacemaker
to avoid potential interference with the pacemaker. Persons with pacemakers:
Should always keep the unit more than 6 inches (15cm) from their pacemaker
when the it is turned on
Should not carry the unit in a breast pocket
Should use the ear opposite the pacemaker to minimize the potential for interference
If you have any reason to suspect that interference is taking place, turn the phone off
immediately.
•
•
•

35
English
Areas with explosion risk
Always turn off the unit when you are in an area where there is a risk of explosion.
Follow all signs and instructions. There is a risk of explosion in places that include
areas where you are normally requested to turn off your car engine. In these areas,
sparks can cause explosion or re which can lead to personal injury or even death.
Turn off the unit at lling stations, and any other place that has gas pumps and auto
repair facilities.
Follow the restrictions that apply to the use of radio equipment near places where
fuel is stored and sold, chemical factories and places where blasting is in progress.
Areas with risk for explosion are often – but not always – clearly marked. This also
applies to below decks on ships; the transport or storage of chemicals; vehicles that
use liquid fuel (such as propane or butane); areas where the air contains chemicals
or particles, such as grain, dust or metal powder.
Emergency calls
Warning!
Mobile phones such as this unit use radio signals, the
mobile phone network, the terrestrial network and user-
programmed functions. This means that connection cannot
be guaranteed in all circumstances. Therefore, you should
never rely solely on a mobile phone for very important calls
such as medical emergencies.
Vehicles
Radio signals can affect electronic systems in motor vehicles (for example, electronic
fuel injection, ABS brakes, automatic cruise control, air bag systems) that have been
incorrectly installed or are inadequately protected. Contact the manufacturer or its
representative for more information about your vehicle or any additional equipment.
Do not keep or transport ammable liquids, gases or explosives together with the unit
or its accessories. For vehicles equipped with air bags: Remember that air bags ll
with air with considerable force.
Do not place objects, including xed or portable radio equipment in the area above
the airbag or the area where it might expand. Serious injuries may be caused if the
mobile phone equipment is incorrectly installed and the airbag lls with air.
It is prohibited to use the unit while in ight. Turn off the unit before you board a
plane. Using wireless telecom units inside a plane can pose risks to air safety and
interfere with telecommunications. It may also be illegal.

36
English
Driving safely2
Warning!
Use of this unit alone or with headphones (even if used only
in one ear) while driving a motor vehicle or riding a bicycle is
dangerous and is illegal in some areas, and the user should
not engage in such conduct. Driving while operating a mobile
phone is distracting and could cause serious injury or death.
If you decide to use this unit while driving or riding a bicycle, keep in mind the
following guidelines:
Give full attention to driving and to the road.
Using a mobile device while driving may be distracting. If you nd it disruptive or
distracting while operating any type of vehicle, riding a bicycle, or performing any
activity that requires your full attention, pull off the road and park before making
or answering a call if driving conditions require.
Get to know your phone and its features such as phone book, call memory, and
speakerphone.
These features help you to place your call without taking your attention off the
road. See the applicable portion of this user’s guide for more information.
Use a hands-free device.
Add an extra layer of convenience and safety to your unit with one of the many
hands-free accessories available.
Use of a headset or other hands-free device may be legally required.
Several states have in recent years passed laws making it unlawful to operate a motor
vehicle while talking on a wireless phone without use of a headset, speakerphone,
or other hands-free device. County and municipal ordinances may also limit or ban
wireless conversations for automobile drivers. You should therefore check the status of
such laws in your area and in locations to which you travel by car, whether or not you
otherwise follow the preferred safety practice of routinely using a hands-free device.
For SMS text messaging, it is a recommended safety practice that you never send
or view received text messages while driving; in California, and likely other states
in the future, SMS messaging by a driver is also a legal violation.
Position phone within easy reach.
Keep your eyes on the road. If you get an incoming call at an inconvenient time,
let your voice mail answer it for you.
Assess the trafc before dialing, or place calls when you are not moving or before
pulling into trafc.
Try to plan calls when your car will be stationary. Never dial, send SMS text
messages, or enter other text while you are driving. Driving while operating a
mobile phone is distracting and could cause serious injury or death.
2 Adapted from CTIA-The Wireless Association ®
•
•
•
•
•

37
English
Let the person you are speaking with know you are driving.
If necessary, suspend the call in heavy trafc or hazardous weather conditions.
Driving in rain, sleet, snow, ice, fog, and even heavy trafc can be hazardous.
Do not take notes, look up phone numbers, or perform any other activities that
require your attention while driving.
Jotting down a to-do list or ipping through your address book takes attention away
from your primary responsibility, driving safely.
Do not engage in stressful or emotional conversations that may be distracting.
Make people you are talking with aware you are driving and suspend conversations
that have the potential to divert your attention from the road.
RF exposure information (SAR)
This model phone meets the government’s requirements for exposure to radio
waves. This phone is designed and manufactured not to exceed the emission limits
for exposure to radio frequency (RF) energy set by the Federal Communications
Commission of the U.S. Government.
The exposure standard for wireless mobile phones employs a unit of measurement
known as the Specic Absorption Rate, or SAR. The SAR limit set by the FCC is
1.6W/kg. *Tests for SAR are conducted using standard operating positions accepted
by the FCC with the phone transmitting at its highest certied power level in all
tested frequency bands. Although the SAR is determined at the highest certied
power level, the actual SAR level of the phone while operating can be well below the
maximum value. This is because the phone is designed to operate at multiple power
levels so as to use only the poser required to reach the network. In general, the closer
you are to a wireless base station antenna, the lower the power output.
The highest SAR value for the model phone as reported to the FCC when tested
for use at the ear is 0.686 W/kg and when worn on the body, as described in this
user guide, is 0.590 W/kg (Body-worn measurements differ among phone models,
depending upon available enhancements and FCC requirements.)
While there may be differences between the SAR levels of various phones and at
various positions, they all meet the government requirement.
The FCC has granted an Equipment Authorization for this model phone with all
reported SAR levels evaluated as in compliance with the FCC RF exposure guidelines.
SAR information on this model phone is on le with the FCC and can be found under
the Display Grant section of http://www.fcc.gov/oet/ea/fccid after searching on
FCC ID: WS5DORO341G
For body worn operation, this phone has been tested and meets the FCC RF exposure
guidelines for use with an accessory that contains no metal and the positions the
handset a minimum of 5/8 inch (1.5 cm) from the body. Use of other enhancements
may not ensure compliance with FCC RF exposure guidelines. If you do no t use a
body-worn accessory and are not holding the phone at the ear, position the handset a
minimum of 5/8 inch (1.5 cm) from your body when the phone is switched on.
•
•
•

38
English
*In the United States and Canada, the SAR limit for mobile phones used by the
public is 1.6 watts/kilogram (W/kg) averaged over one gram of tissue. The standard
incorporates a substantial margin of safety to give additional protection for the public
and to account for any variations in measurements. SAR values may vary depending
on national reporting requirements and the network band.
IC Radiation Exposure Statement
This EUT is compliance with SAR for general population/uncontrolled exposure limits
in IC RSS-102 and had been tested in accordance with the measurement methods
and procedures specied in IEEE 1528. This equipment should be installed and
operated with minimum distance 1.5cm between the radiator & your body.
This device and its antenna(s) must not be co-located or operating in conjunction
with any other antenna or transmitter.
TTY compatibility
This unit does not support TTY signaling. If you intend to connect a TTY to the unit,
this unit should not be purchased and, if already purchased, it should be returned for
a refund.
FCC ID: WS5DORO341G
IC: 8175A-DORO341GSM

39
English
Disclaimer and Limitation of Liability
Doro AB and its afliates, licensees and retailers assume no responsibility for any
damage or loss resulting from the use of this guide. Doro AB and its afliates,
licensees and retailers assume no responsibility for any loss or claims by third parties
that may arise through the use of this software. Doro AB and its afliates, licensees
and retailers assume no responsibility for any damage or loss caused by deletion of
data as a result of malfunction, dead battery, or repairs. Be sure to make backup
copies of all important data on other media to protect against data loss.
TO THE MAXIMUM EXTENT PERMITTED BY APPLICABLE LAW, UNDER NO
CIRCUMSTANCES SHALL DORO AB OR ANY OF ITS AFFILIATES, LICENSEES
AND RETAILERS BE RESPONSIBLE FOR ANY LOSS OF DATA OR INCOME
OR ANY SPECIAL, INCIDENTAL, CONSEQUENTIAL OR INDIRECT DAMAGES
HOWSOEVER CAUSED. THE CONTENTS OF THIS DOCUMENT ARE PROVIDED
“AS IS.” EXCEPT AS REQUIRED BY APPLICABLE LAW, NO WARRANTIES OF ANY
KIND, EITHER EXPRESS OR IMPLIED, INCLUDING, BUT NOT LIMITED TO, THE
IMPLIED WARRANTIES OF MERCHANTABILITY AND FITNESS FOR A PARTICULAR
PURPOSE, ARE MADE IN RELATION TO THE ACCURACY, RELIABILITY, OR
CONTENTS OF THIS DOCUMENT. DORO AB RESERVES THE RIGHT TO REVISE
THIS DOCUMENT OR WITHDRAW IT AT ANY TIME WITHOUT PRIOR NOTICE.
FCC/INDUSTRY CANADA NOTICE
This device complies with part 15 of the FCC Rules. This Class B digital apparatus
complies with Canadian ICES-003. Operation is subject to the following two conditions:
(1) This device may not cause harmful interference, and (2) this device must accept
any interference received, including interference that may cause undesired operation.
This equipment has been tested and found to comply with the limits for a Class
B digital device, pursuant to part 15 of the FCC Rules/Canadian ICES-003. These
limits are designed to provide reasonable protection against harmful interference
in a residential installation. This equipment generates, uses and can radiate radio
frequency energy and, if not installed and used in accordance with the instructions,
may cause harmful interference to radio communications. However, there is
no guarantee that interference will not occur in a particular installation. If this
equipment does cause harmful interference to radio or television reception, which
can be determined by turning the equipment off and on, the user is encouraged to try
to correct the interference by one or more of the following measures:
Reorient or relocate the receiving antenna.
Increase the separation between the equipment and the receiver.
Connect the equipment to an outlet on a circuit different from that to which the
receiver is connected.
Consult the dealer or an experienced radio/TV technician for help.
The FCC or Industry Canada can require you to stop using your telephone if such
interference cannot be eliminated.
Cet appareil numérique de la classe B est conforme à la norme NMB-003 du Canada.
Doro has not approved any changes or modications to this device by the user. Any
changes or modications could void the user’s authority to operate the equipment.
•
•
•
•

40
English
Care and Maintenance
Your unit is a technically advanced product and should be treated with the greatest
care. Negligence may void the warranty.
Protect the unit from moisture. Rain/snowfall, moisture and all types of liquid can
contain substances that corrode the electronic circuits. If the unit gets wet, you
should remove the battery and allow the unit to dry completely before you replace it.
Do not use or keep the unit in dusty, dirty environments. The unit’s moving parts
and electronic components can be damaged.
Do not keep the unit in warm places. High temperatures can reduce the lifespan
for electronic equipment, damage batteries and distort or melt certain plastics.
Do not keep the unit in cold places. When the unit warms up to normal
temperature, condensation can form on the inside which can damage the
electronic circuits.
Do not try to open the unit in any other way than that which is indicated here.
Do not drop the unit. Do not knock or shake it either. If it is treated roughly the
circuits and precision mechanics can be broken.
Do not use strong chemicals to clean the unit.
Maintain the battery and phone during operation between 32° F - 86° F° F - 86° F - 86° F° F
(0° C - 30° C). If the phone and battery become too warm or too cold, the° C - 30° C). If the phone and battery become too warm or too cold, the - 30° C). If the phone and battery become too warm or too cold, the
phone and battery may not work temporarily, even if the battery is fully charged.
Subjecting the phone and battery to excessive temperatures can create a safety
hazard resulting in re, explosion or other hazards.
Do not disassemble or open crush, bend or deform, puncture or shred.
Do not modify or remanufacture, attempt to insert foreign objects into the battery,
immerse or expose to water or other liquids, expose to re, explosion or other
hazard.
Only use the battery for the system for which it is specied.
Only use the battery with a charging system that has been qualied with the
system per IEEE-Std- 1725-2006. Use of an unqualied battery or charger may
present a risk of re, explosion, leakage, or other hazard.
Do not short circuit a battery or allow metallic conductive objects to contact
battery terminals.
Replace the battery only with another battery that has been qualied with the
system per this standard, IEEE-Std-1725-2006. Use of an unqualied battery may
present a risk of re, explosion, leakage or other hazard.
Promptly dispose of used batteries in accordance with local regulations.
•
•
•
•
•
•
•
•
•
•
•
•
•
•
•

41
English
Battery usage by children should be supervised.
Avoid dropping the phone or battery. If the phone or battery is dropped, especially
on a hard surface, and the user suspects damage, take it to a service center for
inspection.
Improper battery use may result in a re, explosion or other hazard.
The advice above applies to the unit, battery, mains adapter and other accessories.
If the phone is not working as it should, please contact the place of purchase for
service. Don’t forget the receipt or a copy of the invoice.
Battery disposal and recycling information
When the battery in this unit has reached the end of its useful life, please dispose of
it according to your local environmental laws and regulations. For information about
recycling cell phone batteries, go to: http://www.rbrc.org
The symbol above means that according to local laws and regulations your
product should be disposed of separately from household waste. When the
battery in this unit has reached the end of its useful life, take it to a collection
point designated by local authorities. Some collection points accept products for free.
The separate collection and recycling of your unit will help conserve natural resources
and ensure that it is recycled in a manner that protects human health and the
environment.
•
•
•

42
English
Warranty and Technical Data
This product is guaranteed for a period of 12 months from the date of purchase. In
the unlikely event of a fault occurring during this period, please contact the place of
purchase. Proof of purchase is required for any service or support needed during the
guarantee period.
This guarantee will not apply to a fault caused by an accident or a similar incident
or damage, liquid ingress, negligence, abnormal usage, non-maintenance or any
other circumstances on the user’s part. Furthermore, this guarantee will not apply to
any fault caused by a thunderstorm or any other voltage uctuations. As a matter of
precaution, we recommend disconnecting the charger during a thunderstorm.
Batteries are consumables and are not included in any guarantee.
This guarantee does not apply if batteries other than DORO original batteries are used.
Support
For assistance, please contact:
Telephone: 1-888-551-doro (1-888-551-3676)
TTY/TDD: 1-888-561-doro (1-888-561-3676)
E-Mail: support.usa@doro.com
Further information are available on our website: www.doro.com
Specications
Network: 850/1800/1900 Triple Band
Dimensions: 4.9 in x 2 in x .24 in (125 mm x 52 mm x 6 mm)
Weight: 3.4 oz (95 g) (including battery)
Battery: 3.7V/800 mAh Li-ion battery
© 2009 Doro AB. All rights reserved.
eZiType™ is a trademark of Zi Corporation.
vCard is a trademark of the Internet Mail Consortium.

43
English

English (US)
Version 1.0