Dremel Moto Tool 275 Users Manual
572610030 572610030 CRAFTSMAN DREMEL MOTO-TOOL - Manuals and Guides L0903722 View the owners manual for your CRAFTSMAN DREMEL MOTO-TOOL #572610030. Home:Tool Parts:Craftsman Parts:Craftsman DREMEL MOTO-TOOL Manual
CRAFTSMAN Rotary Tool Manual L0903722 CRAFTSMAN Rotary Tool Owner's Manual, CRAFTSMAN Rotary Tool installation guides
285 to the manual 7ef4bcfb-0798-403c-907e-8da1a4698ebb
2015-02-02
: Dremel Dremel-Moto-Tool-275-Users-Manual-396683 dremel-moto-tool-275-users-manual-396683 dremel pdf
Open the PDF directly: View PDF ![]() .
.
Page Count: 8

DREMEi o
Moto-Tool °Owner's Manual
Models 275, 285, 395 -2
HONESTLY NOW... Have you read this
OWNER'S MANUAL?
This manual will tell you how to get the
most out of your new Moto-Tool. It will
give youtips on some of the many
different do-it-yourself jobs the
tool will perform around your
home and workshop.
assembly • operation • safety instructions.
WARNING
For your own safety
read your
Owner's Manual
before operating
your
Dremel Moto-Tool
OREMEL _.o.,o__
Racine, Wisconsin 53401
1/88
5296077
PRINTED IN U.S.A.

For Your Safety... When using electric tools, basic safety precautions
should always be followed to reduce the risk of fire,
electric shock, and personal injury, including the following:
READ AND SAVE ALL THE FOLLOWING INSTRUCTIONS:
1. Keep work area clean -- Cluttered areas
and benches invite injuries.
2. Avoid dangerous environment -- Don't
expose tools to rain. Don't use power tools in
damporwetlocations. Don't use power tools
in the presence of flammable liquids or gases.
Avoid chemical or corrosive environments
Keep work area welt lit.
3. Guard against electric shock -- Prevent
body contact with grounded surfaces. For
example: pipes, radiators, refrigerator
enclosures.
4. Keep children away -- Do not let visitors
contact tool or extension cord. All visitors
should be kept away from work areas.
5o Store idle tools -- When not in use, tools
should be stored in dry, and high or locked-
up place - out of reach of children.
6. Don't force t,:ol -- It will do the job better
and safer at the rate for which it was intended.
7. Use right tool - Don't force small tool or
attachment to do the job of a heavy-duty tool.
Don't use tool for purpose not intended - for
example - don't use circular saw for cutting
tree limbs or logs.
8, Dress properly _ Do not wear loose cloth-
ing or jewetry. They can becaught in moving
parts. Rubber gloves and non-skid footwear
are recommended when worR.ing out-
doors. Wear protective hair coyering to con-
tain long hair.
9. Use safety glasses -- Also use face or dust
mask if cutting operation is dusty.
10. Don't abuse cord -- Never carry tool by
cord or yank it to disconnect from recep-
tacle. Keep cord from t_eat, oil, and sharp
edges.
11. Secure work -- Use clamps or vise to
hold work. It's safer than using your hand and
it frees both hands to operate tool.
12. Don't over-reach _ Keep proper footing
and balance at all times,
13. Maintain tools with care -- Keep tools
sharp and clean for be_er and safer perfor-
mance. Follow instructions for lubricating
and changing accessories. Inspect tool cords
periodically and if damaged, have repaired,
by authorized service facility. Inspect exten-
sion cords periodically and replace if damaged.
Keep handles dry, clean, and free from oil
and grease.
14. Disconnect tools -- Wh en not in use, before
servicing, and when ohanging accessories,
such as blades, bit, cutters.
15. Remove adjusting keys and wrenches--
Form habit of checking to see that keys and
adjusting wrenches are removed from tool
before turning it on.
16. Avoid unintentional starting -- Don't
carry plugged-in tool with finger on switch.
Be sure switch is off when plugged in.
17. Outdoor use extension cords -- When
tool is used outdoors, use only extension
cords intended for use outdoors and so
marked.
18. Stay alert -- Watch what you are doing.
Use common sense. Do not operate tool
when you are tired. Don't use power tools
after taking drugs, alcohol or medications.
19, Do not alter or misuse tool -- These tools
are precision built. Any alteration or mod-
ification not specified is misuse and may
result in a dangerous condition.
20. Avoid gaseous areas -- Do not operate
portable electric tools ingaseous or explosive
atmospheres, Motors in these tools normally
spark, and the sparks might ignite fumes.
21 Check for damaged parts-- before further
use of the toot, check for damaged parts.
Check for alignment of moving parts, binding
of moving parts, breakage of parts, mount-
ing, and any other conditions that may affect
its operation. Apart that is damaged should
be properly repaired or replaced by authorized
service center before further use of the tool.
Have defective switches replaced by authorized
service center. Do not use tool if switch does
not turn it on and off.
22. Your tool is double insulated -- And no
grounding is necessary. The tool is equipped
with atwo wire cord and two prong plug which
can be used instandard 120 volt A.C° curriers.
Use only identical replacement part= when
service is required.
23. EXTENSION CORDS -An undersize
cord will cause a drop in line voltage, result-
ing in toss of power and over-heating. Use 18
gauge or heavier cord. NOTE: The smaller
the gauge number, the heavier the cord.
(Extension cords are available.)
24. WARNING: Use of damaged cords can
shock, burn or electrocute.
READ AND SAVE ALL THE PRECEDING INSTRUCTIONS
Dremel Limited Warranty
Your Dremet product is warranted against defective material or
workmanship for a period of one year from date of purchase. In
the event of a failure of a product to conform to this written
warranty you should return the product, along with proof of
purchase date and a written statement about the nature of the
problem, to:
Dremel Service Center
4915 Twenty-first Street
Racine, Wisconsin 53406
or
Oreme! Service Center
4631 E. Sunny Dunes
Palm Spring, California 92264
No employee, agent, dealer or other person is authorized to give
any warranties on behalf ofDremel. IfOremelinsoeclionshows
that the problem was caused by defective material or work-
manship within the limitations of the warranty, Dremel will repair
or replace the product free of charge and return product pre-
paid. Repairs made necessary by normal wear or abuse, or
repair for product outside the warranty period, if they can be
made, will be charged at regular factory prices.
OREMEL MAKES NO OTHER WARRANTY OF ANY KIND
WHATEVER, EXPRESSED OR IMPLIED, AND ALL IMPLIED
WARRANTIES OF MERCHANTASILITY AND FITNESS FOR A
PARTICULAR PURPOSE WHICH EXCEED THE ABOVE
MENTIONED OBLIGATION ARE HEREBY DISCLAIMED BY
DREMEL AND EXCLUDED FROM THIS LIMITED WARRANTY.
This warranty gives you specific legal rights and you may also
have Diner rights which vary from state to state. The obligation of
the warrantor is soley to repair or replace the product. The
warrantor is not liable for any incidental or consequential
damages due to such defect. Some states do not allow the exclu-
sion or limitations of incidental or consequential damages, so the
above limitations or exclusion may not apply to you.
For prices and warranty fulfillment in Ihe continental United States,
contact your local Dremel distributor,
Page 2
:.%
introduction
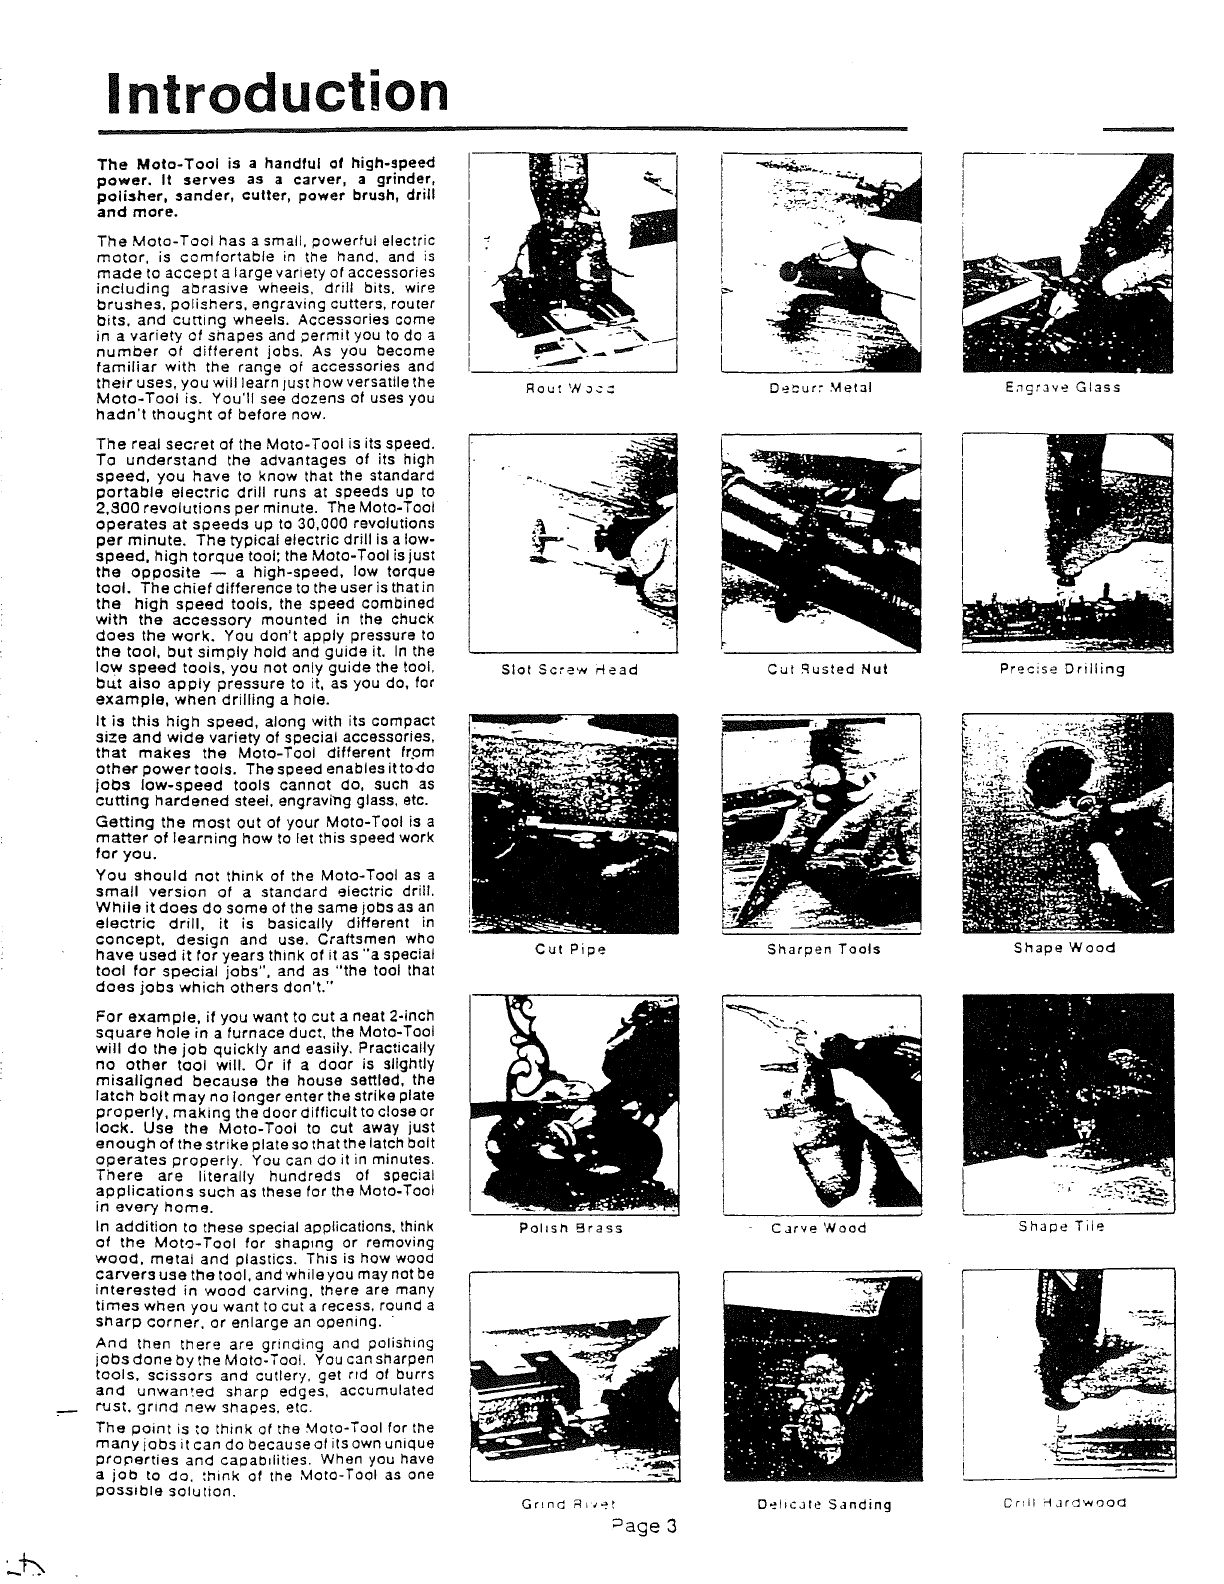
The Moto-Tool is a handful of high-speed
power. It serves as a carver, a grinder,
polisher, sander, cutter, power brush, drill
and more.
The Mote-Tool has a small, powerful electric
motor, is comfortable in the hand. and is
made to accept a large variety of accessories
including abrasive wheels, drill bits, wire
brushes, polishers, engraving cutters, router
bits, and cutting wheels. Accessories come
in avariety of shapes and permit you to do a
number of different jobs. As you become
familiar with the range of accessories and
their uses, you will learn just how versatile the
Moto-Toolis. You'll see dozens of uses you
hadn't thought of before now.
The real secret of the Mote-Tool is its speed.
To understand the advantages of its high
speed, you have to know that the standard
portable electric drill runs at speeds up to
2,800 revolutions per minute. The Mote-Tool
operates at speeds up to 30,000 revolutions
per minute. The typical electric drill is a low-
speed, high torque tool; the Mote-Tool is just
the opposite -- ahigh-speed, low torque
tool. The chief difference to the user is that in
the high speed tools, the speed combined
with the accessory mounted in the chuck
does the work. You don't apply pressure to
the tool, but simply hold and guide it. In the
low speed tools, you not only guide the tool,
bu.t also apply pressure to it, as you do, for
example, when drilling a hole.
It is this high speed, along with its compact
size and wide variety of special accessories,
that makes the Mote-Tool different from
other power tools. The speed enables ittodo
jobs low-speed tools cannot do, such as
cutting hardened steel, engraving glass, etc.
Getting the most out of your Mote-Tool is a
matter of learning how to let this speed work
for you.
You should not think of the Mote-Tool as a
small version of a standard electric drill.
While it does do some of the same jobs as an
electric drill, it is basically different in
concept, design and use. Craftsmen who
have used it for years think of it as "a special
tool for special jobs", and as "the tool that
does jobs which others don't."
For example, if you want to cut a neat 2-inch
square hole in a furnace duct, the Mote-Toot
will do the job quickly and easily, Practically
no other tool will. Or if a door is slightly
misallgned because the house settled, the
latch bolt may no longer enter the strike plate
properly, making the door difficult to close or
lock. Use the Mote-Tool to cut away just
enough of the strike plate so that the latch bolt
operates properly. You can do it in minutes.
There are literally hundreds of special
applications such as these for the Mote-Toot
in every home.
In addition to these special applications, think
of the Mote-Tool for shaping or removing
wood, metal and plastics. This is how wood
carvers use the tool, and while you may not be
interested in wood carving, there are many
times when you want to cut a recess, round a
slnarp corner, or enlarge an opening. "
And then there are grinding and polishing
jobs done by theMoto-Toot. You can sharpen
tools, scissors and cutlery, get nd of burrs
and unwanted sharp edges, accumulated
rust. grind new shapes, etc.
The point is to think of the Mote-Tool for the
many jobs it can do because of its own unique
properties and capabdities. When you have
a job to do, think of the Mote-Toot as one
possible solution,
Slot Screw Head
Cut Pipe
Polzsn Brass
Grlnd R_ ,_et
_age 3
DeCur; Metal
Cut Rusted Nut
Sharpen Tools
1
J
Carve Wood
Delicate Sanding
Engrave Glass
Precise Drilling
Shape Wood
.
Shape Tile
Crlil Hjrdwood
Operation Guidelines
Read the next sections carefully. They will
help you use your MolD-TOOl correctly and
help you select the correct accessory for
your job.
Using the Moto-Tool
The first step in learning to use the Moto-Tool
is to get the "feel" of it. Hold it in your hand
and feel its weight and balance. Feel the
taper of the housing. This taper permits the
Moto-Tool to be grasped much like a pen or
pencil. If you nave a variable speed model,
turn iron by sliding the switch speed indicator
to each of the speed settings (1 Ihru 5), allowing
the toot to maintain full speed at each
setting. If you have a two-speed model, turn
it on by sliding the switch indicator to the LOW
speed setting. You will notice a detent at this
setting. Then slide the switch indicatortothe
HIGH speed setting. You will also notice a
detent at this setting. If you have a single
speed model, turn it on by sliding the switch
indicator to the on position, you will also
notice adetent at this setting.
When you turn on the tool for the first time,
hold it away from your face. Accessories can
be damaged during handling, and can fly
apart as they come up to speed. This is not
common, but it does happen.
Practice on scrap materials first to see how
the Moto-Tool cuts. Keep in mind that the
work']s done by the speed of the tool and by
the accessory in the chuck. You should not
lean on or push the tool into the work.
Instead, lower the spinning accessory lightly
to the work and allow it to touch the point at.
which you want cutting (or sanding or etch-"
ing, etc.) to begin. Concentrate'on guiding
the tool over the work using very little pros-
sure from your hand. Allow the accessory to
do the work.
Usually, it is best to make a series of passes
with the tool rather than attempt to do all the
work in one pass. To make a cut. for example,
pass the tool bacX and forth over the work,
much as you would asmall paint brush.
Cut a little material on each pass until you
reach the desired depth. For most work, the
deft, gentle touch is best. With it, you have
me best control, are less likely to make
errors, and will get the most efficient work out
of the accessory.
The pencil grip we described is one way to
hold the Moto-Tool. A second way to grip the
tool much as you would the handgrip on a
bicycle, with your hand wrapped around the
housing and the chuck extending just beyond
your thumb and forefinger. This grip must be
used for cutoff wheels and saws for maximum
control and is often used with polishing,
brushing, and grinding accessories.
When using the steel saws
(No.s. 400, 406) or cutoff
wheels (Nos. 409, 420, 426) always have the
work securely clamped. Never attempt to
hold the work with one hand while using
either of these accessories. The reason is
that these wheels will grab if they become
slightly canted in the groove, and can kick-
back causing loss of control resulting in
serious injury. Your second hand should be
used to steady and guide the hand holding
the tool. When acutoff wheel grabs, the
wheel itself usually breaks. When the steel
saw wheel grabs, it may jump from the
groove and you could lose control of the
tool.
f,'
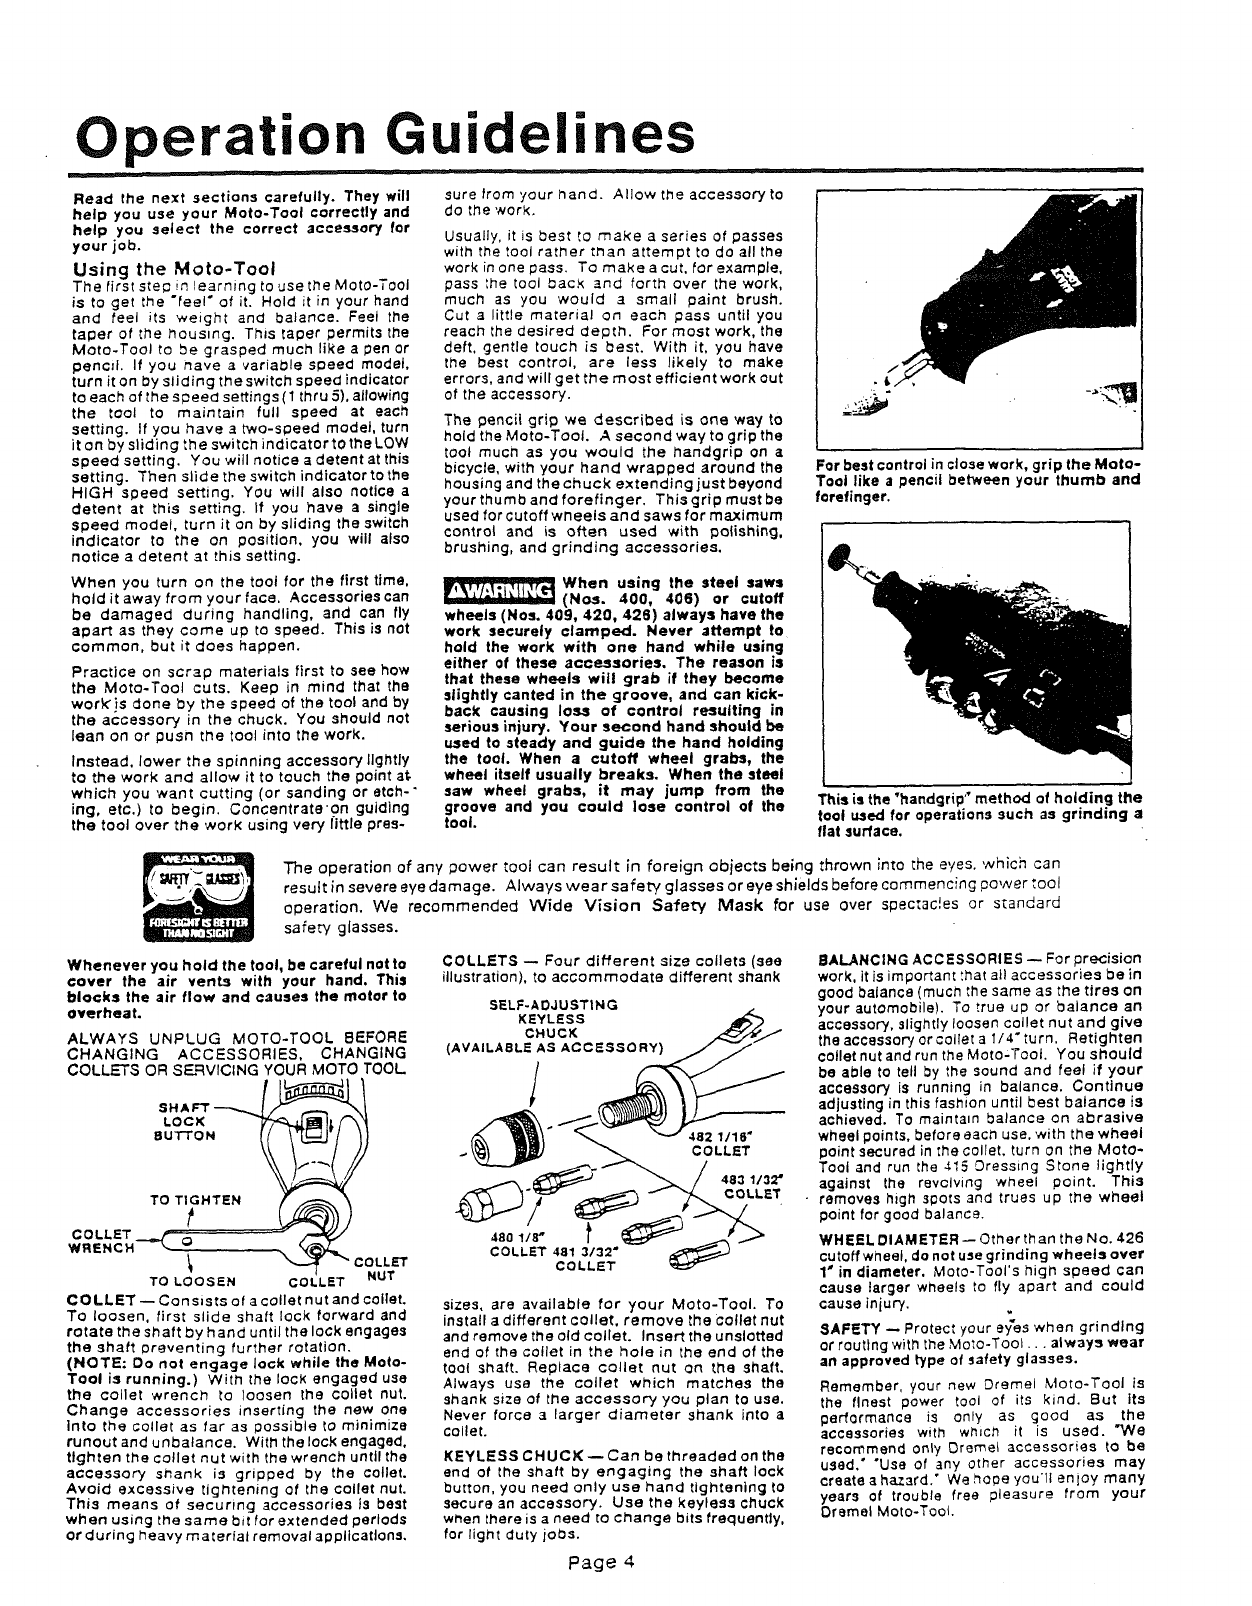
For best control in close work, grip the Moto-
Tool like a pencil between your thumb and
forefinger.
This is the "handgrip" method of holding the
tool used for operations such as grinding a
flat surface.
The operation of any power tool can result in foreign objects being thrown into the eyes. ,which can
result in severe eye damage. Always wear safety glasses or eye shields before commencing oo,,ver tool
operation. We recommended Wide Vlsion Safety Mask for use over spectac!es or standard
safety glasses.
Whenever you hold the tool, be careful not to
cover the air vents with your hand. This
blocks the air flow and causes the motor to
overheat.
ALWAYS UNPLUG MOTO-TOOL BEFORE
CHANGING ACCESSORIES, CHANGING
COLLETS OR SF--=_VlCING YOUR MOTO TOOL
LOCK 77._IB)_ f_,l
BUT'tON
COLLET _
WRENCH o
l \ COLLET
TO LOOSEN COLLET NUT
COLLET -- Consists of a collet nut and toilet.
To loosen, first slide shaft lock forward and
rotate the shaft by hand until the lock engages
the shaft preventing further rotation.
(NOTE: Do not engage lock while the Moto-
Tool is running.) With the lock engaged use
the collet wrench to loosen the collet nut.
Change accessories inserting the new one
Into the collet as far as possible to minimize
runout and unbalance. With the lock engaged,
tighten the collet nut with the wrench until the
accessory shank is gripped by the poller.
Avoid excessive tightening of Ihe oollet nut.
This means of securing accessories is best
when using the same bit for extended periods
or during heavy material removal applications.
COLLETS -- Four different size toilets (see
illustration), to accommodate different shank
SELF-ADJUSTING
KEYLESS
CHUCK
AVAILABLE AS ACCESSORY)
/
482 1116"
COLLET
483 1132"
COLLET
sizes, are available for your Moto-Tool. To
install a different toilet, remove the cotlet nut
and remove the old collet. Insert the unslotted
end of the cotlet in the hole in the end of the
tool shaft. Replace collet nut on the shaft.
Always use the collet which matches the
shank size of the accessory you plan to use.
Never force a larger diameter shank into a
collet.
KEYLESS CHUCK--Can be threaded on the
end of the shaft by engaging the shaft lock
button, you need only use hand tightening to
secure an accessory. Use the keyless chuck
when there is a need to change bits frequently,
for light duty jobs.
BALANCING ACCESSORIES -- For precision
work, it is important that all accessories be in
good balance (much the same as the tires on
your automobile). To true up or balance an
accessory, slightly loosen collet nut and give
the accessory or collet a I/4" turn. Retighten
toilet nut and run the Moto-Toot. You should
be able to tell by the sound and feel if your
accessory is running in balance. Continue
adjusting in this fashion until best balance is
achieved. To maintain balance on abrasive
wheel points, before each use, with the wheel
point secured in me toilet, turn on the Moto-
Tool and run the 415 Dressing Stone lightly
against the revolving wheel point. This
removes high soots and trues up the wheel
point for good balance.
WHEEL DIAMETER -- Other than the No. 426
cutoff wheel, do not use grinding wheels over
1" in diameter, Mote-Tool's high speed can
cause larger wheels to fly apart and could
cause injury.
SAFETY -- Protect your ey_es when grinding
or routing with the Moto-Tool... always wear
an approved type of safety glasses.
Remember. your new Dremel Moto-Tool is
the finest power tool of its kind. But its
performance is only as good as the
accessories with wmct_ it is used. "_'e
recommend onb/ Oreme{ accessories to be
used," "Use of any other accessories may
create ahazard." We hope you'll enjoy many
years of trouble free pleasure from your
Oremel Moto-Tool.
Page 4
Operating Speeds & Accessories
Set the speed indicator to fit the job -To
achieve the best job results when working
with different materials, the speed of the
Moto-Tool should be regulated. Only a full
wave output speed control such as the
Dremel Models 217 and 219 should be used
with the Model 275. Model 285 and 395
Moto-Tool has an integral speed control and
an external speed control should never be
used with these tools.
To select the right speed for each job, use a
practice piece of material. Vary speed to
find the best speed for the accessory you are
using and the job to be done.
There are three basic types of Moto-Tools:
single speed, :wo-soeed and variable speed
models. On the single speed model, thereis
an ON-OFFswitcn. When the switch is on, the
tool runs at 28,000 F_PM. On the two-speed
model, there is a LO and HI switch. When the
switch indicator is on the low setting, the tool
runs at about 15,000 RPM. When the switch
indicator is on the high setting the tool runs
about 28,000 RPM. On the variable speed
model, there is a switch indicator; with a white
line on it. Slide to the number on the housing
to select the operating speed needed
from 5,000-- 30,000 R.P.M, You can referto
the charts on page 6 to determine the
proper speed, based on the material being
worked and the type of cutter or other
accessory being used. These charts enable
you tO select both the correct accessory and
the optimum speed at a glance.
If you have a single speed or two-speed
model, you wil be able to use many acces.-.
sories to do a wide assortment of jobs. For.
the majority of applications, all models of the
Moto-Tool should be used at top'speed.
Needs for Slower Speeds
However certam materials (some plastics,
for example) require a relatively slow speed
because at mgh speed me frtotion of the tool
generates neat and causes ti'le plastic to melt.
Most work is done at top spe_:l on all Moto-Tooi
models. Lower speeds are needed only for
certain tasks.
Slow speeds ( 15,000 R PM or less) usually are
best for polishing o_erations employing the
felt polisning accessories. They may also be
best for working on delicate projects as
"eggery" work, delic:_te wood cawing, and
fragile model parts. You should always do
polishing with wire brush accessories at slower
speeds and never higher than 15,000 RPM.
Higher speeds are better for cawing, cutting,
routing, shaping, cutting dadoes or rabbets
in wood.
Hardwoods, metals, and glass require high
speed operation, and drilling should also be
done at high speeds.
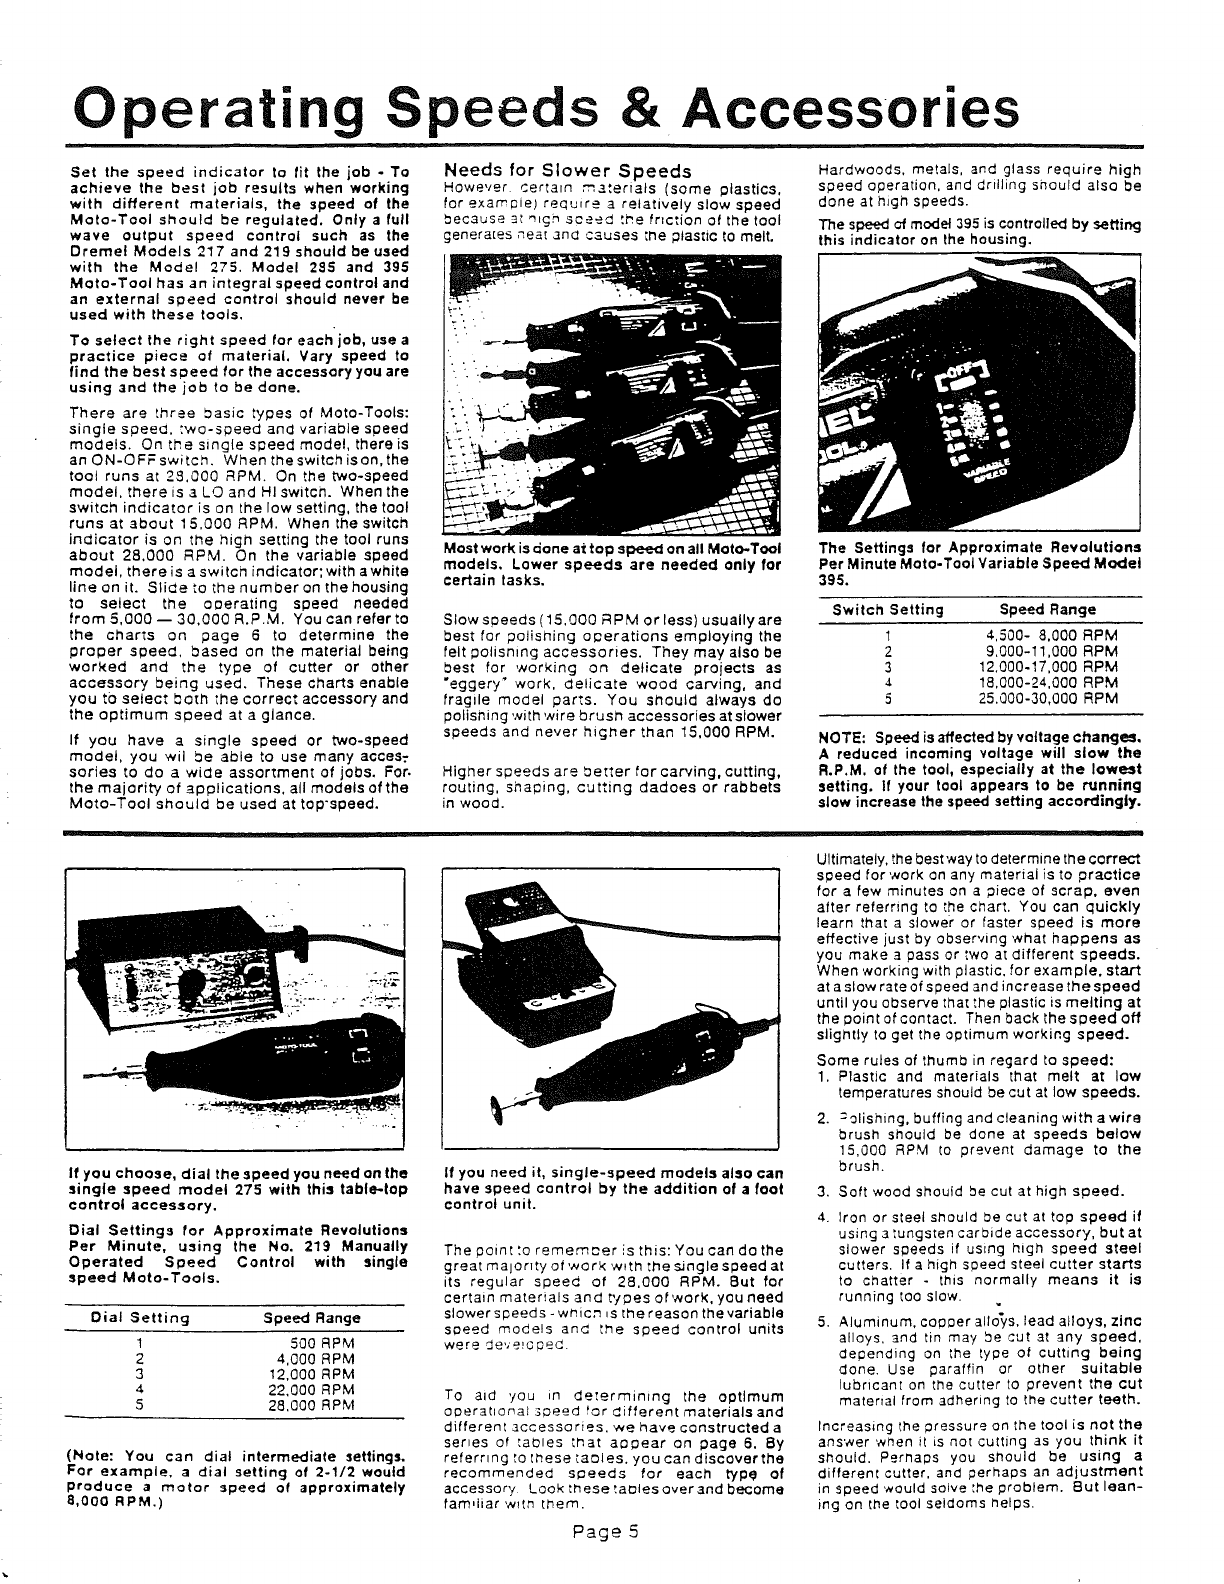
The speed of model 395 is controlled by setting
this indicator on the housing.
The Settings for Approximate Revolutions
Per Minute Moto-Tool Variable Speed Model
395.
Switch Setting Speed Range
1 4,500- 8,000 RPM
2 9,000-11,000 RPM
3 12.000-17,000 RPM
4 18,000-24,000 RPM
5 25,000-30,000 RPM
NOTE: Speed is affected by voltage changes°
Areduced incoming voltage will slow the
R.P.M. of the tool, especially at the lowest
setting. If your tool appears to be running
slow increase the speed setting accordingly.
I
If you choose, dial the speed you need on the
single speed model 275 with this table-top
control accessory.
Dial Settings for Approximate Revolutions
Per Minute, using the No. 219 Manually
Operated Speed Control with single
speed Moto-Tools.
Dial Setting Speed Range
1 500 RPM
2 4,000 RPM
3 12,000 RPM
4 22,000 RPM
5 28,000 RPM
(Note: You can dial intermediate settings.
For example, a dial setting of 2-1/2 would
produce amotor speed of approximately
8,000 RPM.)
If you need it. single-speed models also can
have speed control by the addition of afoot
control unit.
The point to remember is this: You can do the
great malonty of work wtth the single speed at
its regular speed of 28,000 RPM. But for
certain materials and t'/pes of work, you need
slower speeds - which _sthe reason the variable
speed models and t_e speed control units
were de,,'e_c #e_.
To aid you in determining the optimum
ooera[_onalaoeed for gifferent materials and
different accessories. 'we have constructed a
series of to[ales tl_at acapear on page 6. By
referring to _nese tables, you can discover the
recommended speeds for each type of
accessory Looktheseta_lesoverandbecome
faro,liar w!tn [hem.
Page 5
Ultimately, the best way to determine the correct
speed for work on any material is to practice
for afew minutes on a piece of scrap, even
after referring to _he chart. You can quickly
learn that a slowe? or faster speed is more
effective just by observing what happens as
you make a pass or two at different speeds.
When working with plastic, for example, start
at a slow rate of speed and increase the speed
until you observe that the plastic is melting at
the point of contact. Then back the speed off
sligntly to get the optimum working speed.
Some rules of thumb in regard to speed:
1. Plastic and materials that melt at low
temperatures should be cut at low speeds.
2. :olishing, buffing and cleaning with awire
brush should be done at speeds below
15,000 RPM Io prevent damage to the
brush.
3. Soft wood should be cut at high speed.
4. Iron or steel should be cut at top speed if
using atungsten carbide accessory, but at
slower speeds if using high speed steel
cutters. If a high speed steel cutter starts
to chatter - this normally means it is
running too slow.
5. Aluminum, coplber alloys, lead alloys, zinc
alloys, and tin may be cut at any speed,
depending on the type of cutting being
done• Use paraffin or omer suitable
lubricant on the cutter to prevent the cut
material from adhering to the cutter teeth.
Increasing the pressure on me tool is not the
answer when it is not cutting as you think it
should. Pernaps you should be using a
different cutter, and perhaps an adjustment
in speed would solve the problem. But lean-
ing on the tool seldoms helps.

Speed Settings
CATALOG
NUMBER
100. 121.131.141
114.124,134.144
189.190
118.191.193
192,194
118,117,125,196
115,178
197
198
199
105.108
108, 109
107,110
111
112
113
Ace Set 201
Acc Set 202
425.427
400
406
409,420,428
610
612, 813,814,832.840
650,652
654
7103.7105,7117.
7120.7122,7123,
7134.7144
915, 923,924,
945.997.8153
913. 914,943.953,954,
963, 964,974.992
8160,8162,8163
904.922.932
941,952,984
8173,8174,8175
911,921,962
973,8184
903.971,8193
981,8200,8202
8215
83322.83642.
83702.86442
83142.84382
84922
85422
85562
85342.85602
85622
9901.9902,
9903,9904.
9905.9906.9912
9907,9908,
9909.9910,9911
I
"Speed for light cuts, caution burning on deep grooves.
t" Depending on cutting direction relative to grain.
WOOD WOOD PLJ_STIC BRASS, ETO, STONE
HIGH SPEED CUTTERS
5. 5 3t 2 4
5 3 2 t 1-2 2
552 4 5
5523 5
552 3 5
5 3 22 2
5 5 2 1-2 1-2
4 2 21 3
4 2 2 2 3
4 2 1-2 2 2
SMALL ENGRAVING CUTTERS
5 5 4 4 3
553 4 3
5 5 3 4 2
5" 5" 4" 43
5" 5" 3" 4 3
5" 5" 3" 42
RUBBER POLISHING POINT
2 1 1
1
2 1
CUTTING ACCESSORIES -- SEE WARNING PAGE 7
5" 5
55
5
HIGH SPEED ROUTER BITS
3 3
3 21"
5 5t
5 21"
DIAMOND WHEEL POINTS
IIII
ALUMINUM OXIDE GRINDING STONES
13 1/3
11-2 1/1
11-2 1/1
1 1 1/1
1
11/1
1 I/I
SILICON CARBIDE GRINDING STONES_
21
2 1
1-2
11
2 1
2 1
2 1
TUNGSTEN CARBIDE CUTTERS
4 4 12 3
551 2 3
CERAMIC
!
2
2
2
2
2
2
Page 6
t
I
2
1-2
1 .
1
1
1
Moto-Tool Accessories
The number and variety of accessories for the
Moto-Tool are almost limitless. There is a
category suited to almost any job you might
have to do--and a variety of sizes and shapes
within each category which enables you to get
the perfect accessory for ever,,, need.
Refer to the DREMEL BITS OF INFORMATION
ACCESSORY ORDER FORM for illustratiorts of
ttte acces_orie-J available. These accessories
may be found at your local hardware, hobby
or home center dealers.
Collets (_=====__
If you expect to use a variety of accessories,
we recommend that in the beginning you
purchase a corn plate set of four cotlets. Store
these so that you will have the proper size of
toilet for any accessory or drill bit you want to
use. Currently, the 1/8" and 3/32 ncollet_
accommodate all of the available Dremel
accessories.
Mandrels
A mand rei is ashank with a threaded or screw
head, and mandrels are required when you
use polishing accessories, cutting wheels,
sanding discs, and polishing points. The
reason mandrels are used is that sanding
disc.s, cutting wheels and similar accessories
must be replaced frequently. The mandrel is
a permanent shank, allowing you to replace
only the worm head when necessary, thus
saving the expense of replacing the shaft
each time.
Screw Mandrel No. 401
This is a screw mandrel used with the felt;
polishing tip and felt polishing wheels
Small Screw Mandrel No. 402
This is a mandrel with asmall screw at its tilS,
and is used with emery cutting wheels, sanding
discs, and polishing wheels.
Threaded Tip Mandrel No. 424
This is amandrel with threaded tip which
threads into the polishing point accessory
No. 427.
High Speed Cutters
Available in 24 shapes, high speed cutters
are used in carving, cutting, and slotting in
wood, plastics, and soft metals such as
aluminum, copper, and brass. These arethe
accessories to use for freehand routing or
carving in wood or plastic, and for precision
cutting.
Tungsten Carbiae Cutters
These are tough, long-lived cutters for use on
hardened steel, fired ceramics, and other very
hard materials. They can be used for engraving
on tools and garden equipment.
Small Engraving Cutters
This group has a wide variety of sizes and
shapes, and are made for intricate work on
ceramics (greenware), wood carvings, jewelry,
and scrimshaw. They often are used in making
complicated printed circuit boards. They
should not be used on steel and other very
hard materials but are excellent on wood,
plastic, and soft metals. Needs 3/32"toilet.
Structured Tooth
Tungsten Carbide Cutters
Fast cutting, needle-sharp teeth for greater
material removal, minimum loading. Use on
fiberglass, wood, plastic, epoxy and rubber.
Aluminum Oxide Grinding Stones
Round, pointed, flat -- you name the shape
and there is one available in this category.
These are made of aluminum oxide and cover
virtually every possible kind of grinding
application. Use them for sharpening lawn
mowers blades, screwdriver tips, knives,
scissors, chisets and other cutting tools. Use
to remove flash from metal castings, debur-
ring any metal after cutting, smoothing
welded joints, grinding off rivets and removing
rust. In macnineshops, high soeed drtllsand
cutters normally are ground with aluminum
oxide wheels.
Silcon Carbide Grinding Stones
Tougher than aluminum oxide points, these
are made especially for use on hard materials
such as glass and ceramics. Typical uses
might be the removal of stilt marks and
excess glaze on ceramics and engraving on
glass.
Diamond Wheel Points
Excellent for fine detail work on wood. jade,
ceramic, glass and other hard material. Bits
are covered with diamond particles. 3/32 °
shanks.
Polishing Accessories
These include an impregnated polishing point
and an impregnated polishing wheel for
bringing metal surfaces to smooth finish; a
felt polishing tip and felt polishing wheel, and
cloth polishing wheel, all used for polishing
plastics, metals, jewelry small parts. Also
included in this group is a polishing compound
(No. 421) for use with the felt and cloth
polishers.
Polishing points make a very smooth surface,
but a high luster is obtained using felt or cloth
wheels and polishing compound.
No polishing compound is needed when
using the 425 Polishing Wheel, 427' Polishing
point.
Aluminum Oxide Abrasive Wheels
Use to remove paint, deburr metal, polish
stainless steel and other metals. Available in
fine and medium grits.
O
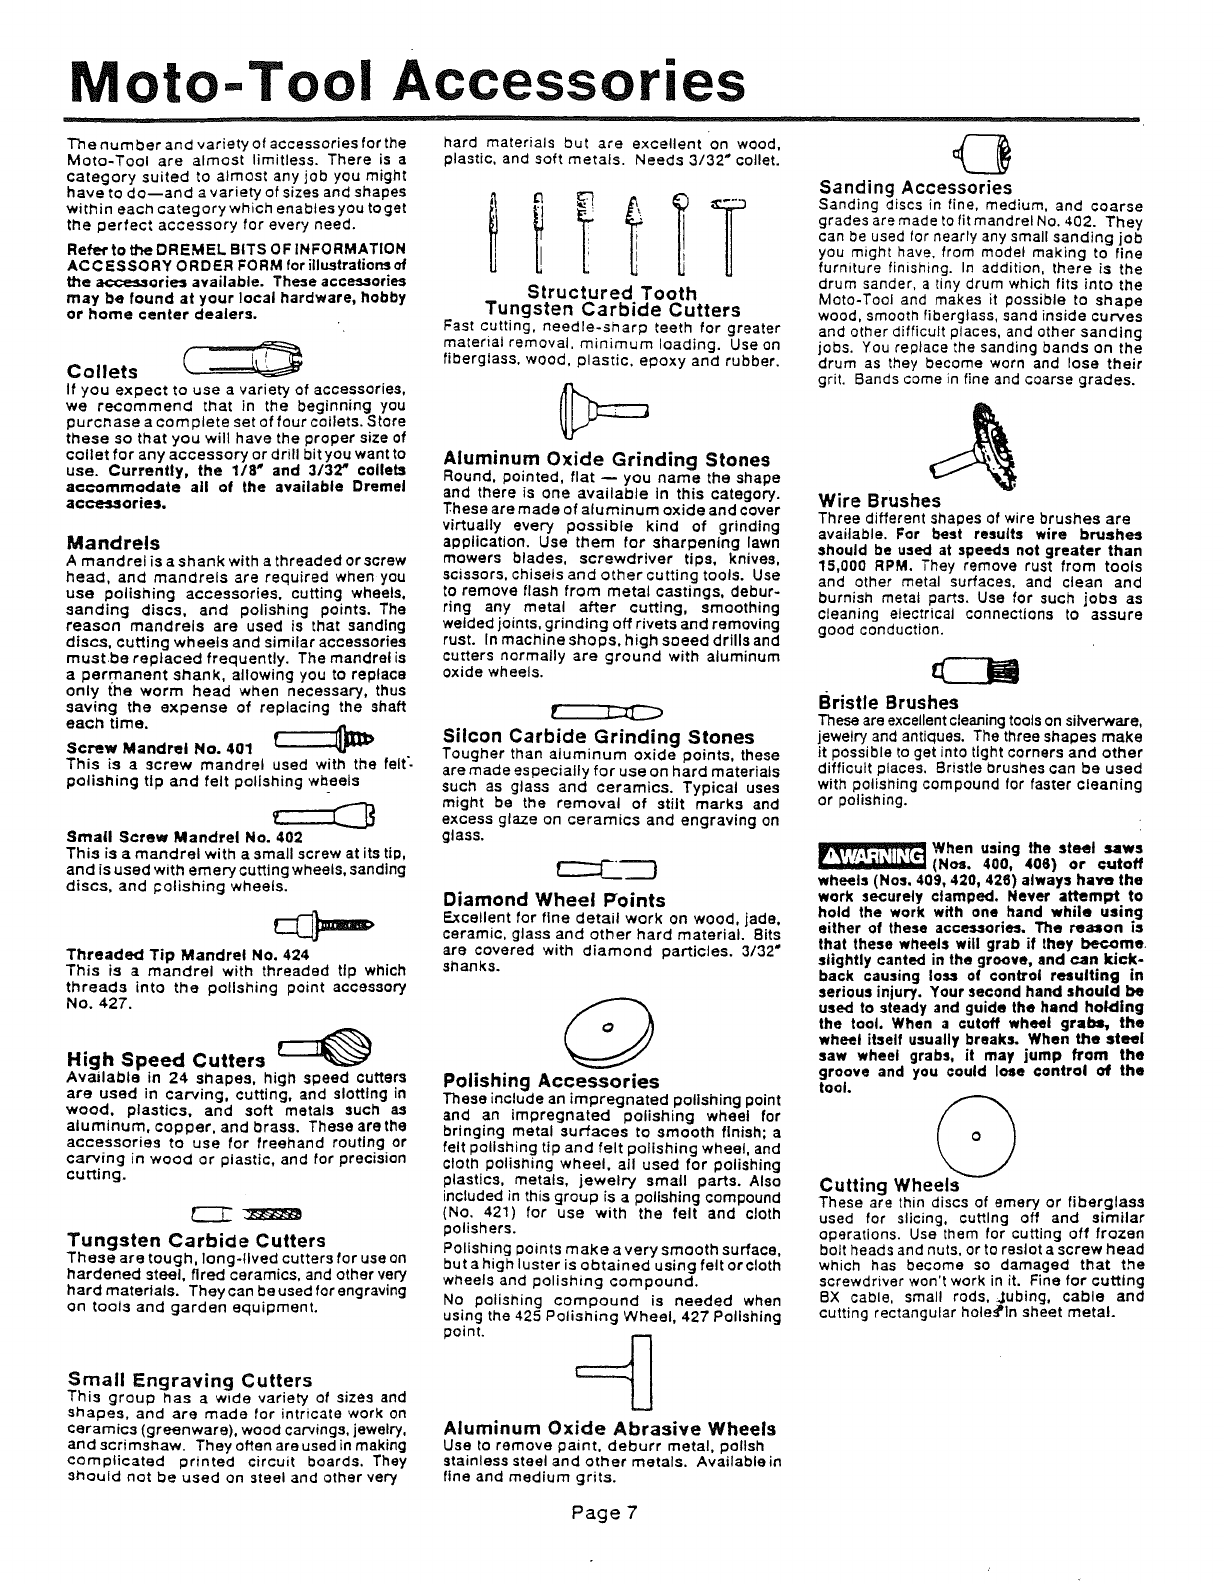
Sanding Accessories
Sanding discs in fine, medium, and coarse
grades are made to fit mandrel No. 402. They
can be used for nearly any small sanding job
you might have, from model making to fine
furniture finishing. In addition, there is the
drum sander, atiny drum which fits into the
Moto-Tool and makes it possible to shape
wood, smooth fiberglass, sand inside curves
and other difficult places, and other sanding
jobs. You replace the sanding bands on the
drum as they become worn and lose their
grit. Bands come in fine and coarse grades.
Wire Brushes
Three different shapes of wire brushes are
available. For best results wire brushes
should be used at speeds not greater than
15,000 RPM. They remove rust from tools
and other metal surfaces, and clean and
burnish metal parts. Use for such jobs as
cleaning electrical connections to assure
good conduction.
Bristle Brushes
These are excellent cleaning tools on silverware,
jewelry and antiques. The three shapes make
it possible to get into tight corners and other
difficult places. Bristle brushes can be used
with polishing compound for faster cleaning
or polishing.
When using the steel saws
(Nos. 400, 406) or cutoff
wheels (Nos, 409, 420, 426) always have the
work securely clamped. Never attempt to
hold the work with one hand while using
either of these accessories. The reason is
that these wheels will grab if they become
slightly canted in the groove, and can kick-
back causing loss of control resulting in
serious injury. Your second hand should be
used to steady and guide the hand holding
the tool. When acutoff wheel grabs, the
wheel itself usually breaks. When the steel
saw wheel grabs, it may jump from the
groove and you could lose control of the
tool.
Cutting Wheels
These are thin discs of emery or fiberglass
used for slicing, cutting off and similar
operations. Use them for cutting off frozen
bolt heads and nuts, or to reslot a screw head
which has become so damaged that the
screwdriver won't work in it. Fine for cutting
BX cable, small rods, jubing, cable and
cutting rectangular holes_ln sheet metal.
Page 7
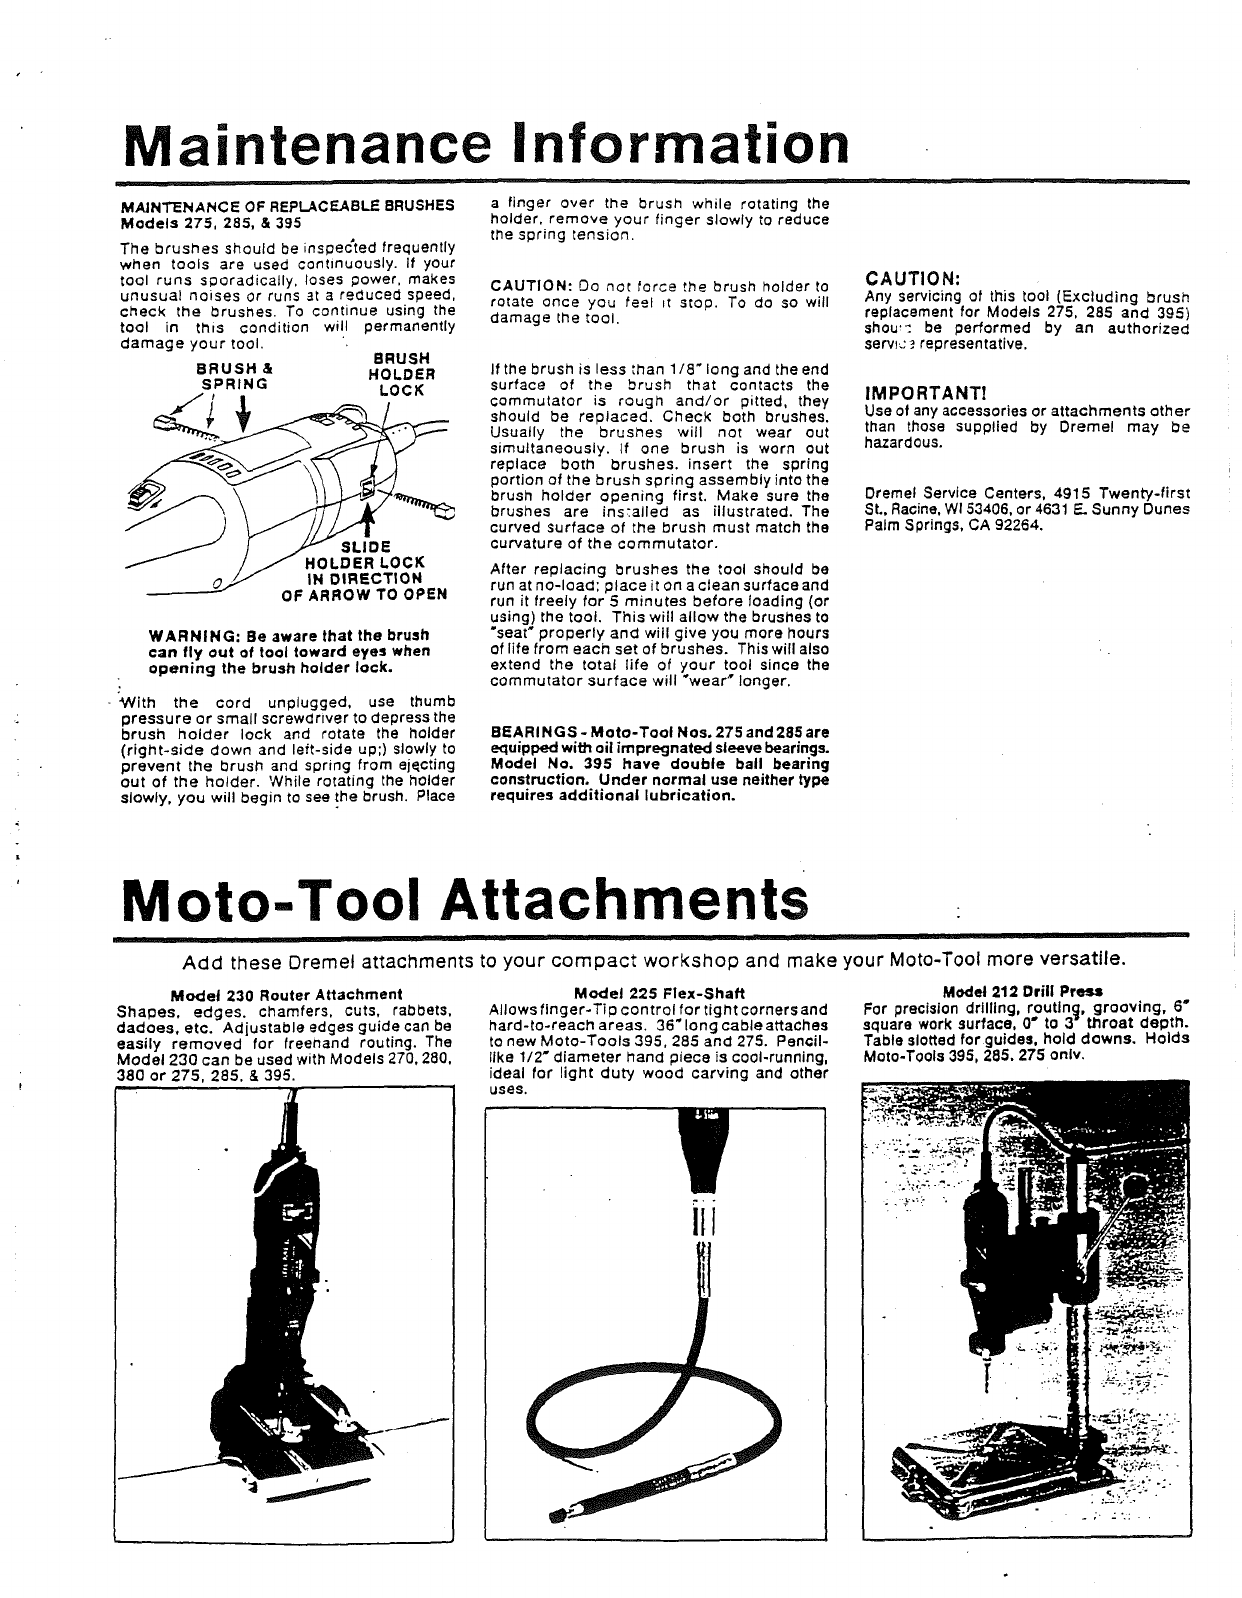
Maintenance Information
MAJNT'ENANCE OF REPLACEABLE BRUSHES
Models 275,285, & 395
The brushes should be inspected frequently
when tools are used continuously. If your
tool runs s_oradicatly, loses power, makes
unusual noises or runs at a reduced speed,
check the brushes. To continue using the
tool in this condition will permanently
damage your tool. BRUSH
BRUSH & HOLDER
SPRING LOCK
SLIDE
HOLDER LOCK
IN DIRECTfON
OF ARROW TO OPEN
WARNING: Be aware that the brush
can fly out of tool toward eyes when
opening the brush holder lock.
"With the cord unplugged, use thumb
pressure or small screwdriver to depress the
brush holder lock and rotate the holder
(right-side down and left-side up;) slowly to
prevent the brush and spring from ejffcting
out of the holder• While rotating the holder
slowly, you will begin to see the brush. Place
a finger over the brush while rotating the
holder, remove your finger slowly to reduce
the spring tension.
CAUTION: Do no_ force the brush holder to
rotate once you feel _t stop. To do so will
damage the tool.
If the brush is less than 1/8" long and the end
surface of the brush that contacts the
commutator is rough and/or pitted, they
should be replaced. Check both brushes.
Usually the brushes will not wear out
simultaneously. If one brush is worn out
replace both brushes, insert the spring
portion of the brush spring assembly into the
brush holder opening first. Make sure the
brushes are ins:ailed as illustrated. The
curved surface of the brush must match the
curvature of the commutator.
After replacing brushes the _ool should be
run at no-load; place it on a clean surface and
run it freely for 5 minutes before loading (or
using) the tool. This will allow the brushes to
"seat" properly and will give you more hours
of life from each set of brushes. Thiswill also
extend the total life of your tool since the
commutator surface will "wear _ longer.
BEARINGS -Moto-Tool Nos. 275 and 285 are
equipped wi_ oil impregnated sleeve bearings.
Model No. 395 have double ball bearing
construction. Under normal use neither type
requires additional lubrication.
CAUTION:
Any servicing of this tool (Excluding brush
replacement for Models 275. 285 and 395)
shou_ be performed by an authorized
serve- _. representative.
IMPORTANT!
Use of any accessories or attachments other
than those supplied by Dremel may be
hazardous.
Dremel Service Centers, 4915 TwenW-first
St., Racine, W153406, or 4631 E. Sunny Dunes
Palm Springs, CA 92264.
Moto-Tool Attachments
i i
Add these Dremel attachments to your compact workshop and make your Moto-Tool more versatile.
Model 230 Router Attachment
ShaDes, edges, chamfers, cuts, rabbets,
dadoes, etc. Adjustable edges guide can be
easily removed for freehand routing. The
Model 230 can be used with Models 270, 280,
380 or 275, 285, &395.
Model 225 Flex-Shaft
Allows finger-Tip control for tight corners and
hard-to-reach areas. 36" long cable attaches
to new Moto-Tools 395,285 and 275. Pencil-
like 1/2" diameter hand piece is cool-running,
ideal for light duty wood carving and other
uses. Y
iii
Model 212 Drill Press
For precision drilling, routing, grooving, 6°
square work surface, 0° to 3" throat depth.
Table slotted for guides, hold downs. Holds
Moto-Tools 395, 285. 275 onlv,
