Drift Innovation FD9963 STEALTH 2 User Manual
Drift Innovation Ltd STEALTH 2 Users Manual
UserManual.wiki
>
Drift Innovation
>
FD9963 User Manual
Users Manual
Navigation menu
Upload a User Manual
Namespaces
Wiki Guide
HTML
PDF
Info
Views
User Manual
Discussion / Help
Navigation
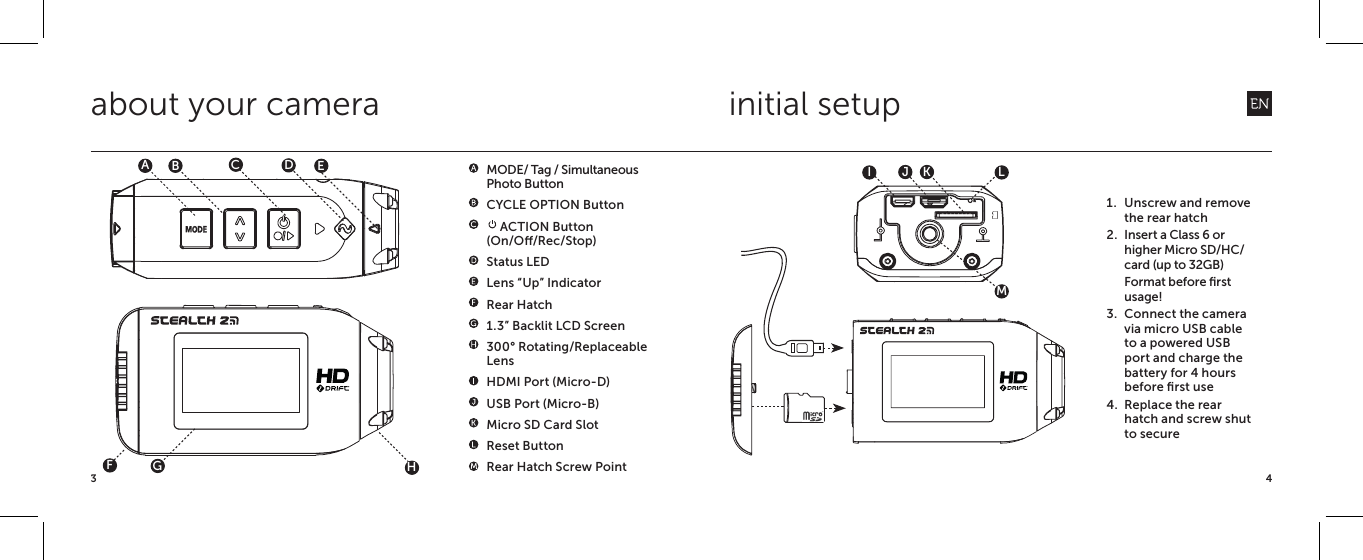
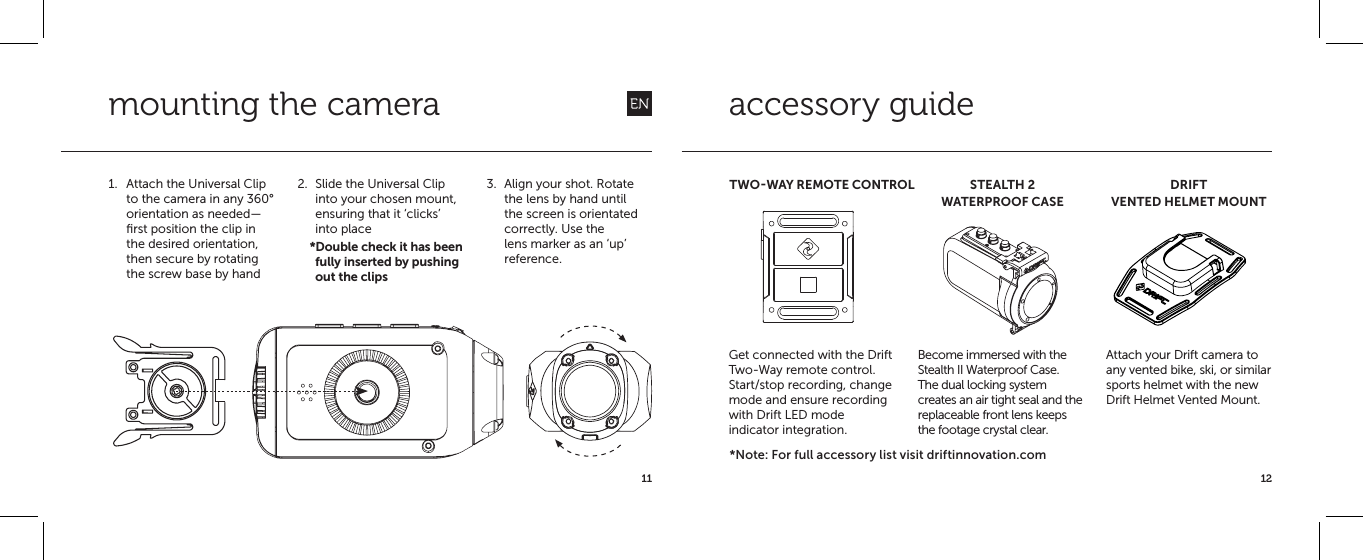
![5*Note: The camera will power on in the same mode it powered o in.MODE SETTINGSTo change the settings of the current camera mode press the CYCLE [ ] button. This will change the settings between a selection of presets. package contentsUSB Cable (Micro-B)Universal ClipMount Kit Goggle Mountgetting startedGNITTEExposureSelf Timer XSXPOWER ON AND OFF1. Press and hold the ACTION button to power on2. The screen will power on, show the welcome display.3. The camera is now ready to record video, or take still photos4. The current camera mode is indicated by the icon in the top left of the display and by the LED indicator (for details, see p7-8)5. To power o, press and hold the ACTION button for 3 secondsVIDEO INTERFACESETTINGS INTERFACEWi-Fi0.06MODE NAVIGATIONTo change the current camera recording mode press the [MODE] button, changing between; Video, Photo, Timelapse, Photoburst and the camera general setting modes.25 FPS 1080p12:05:59EXP -2 90% 87%](https://usermanual.wiki/Drift-Innovation/FD9963/User-Guide-2324182-Page-4.png)
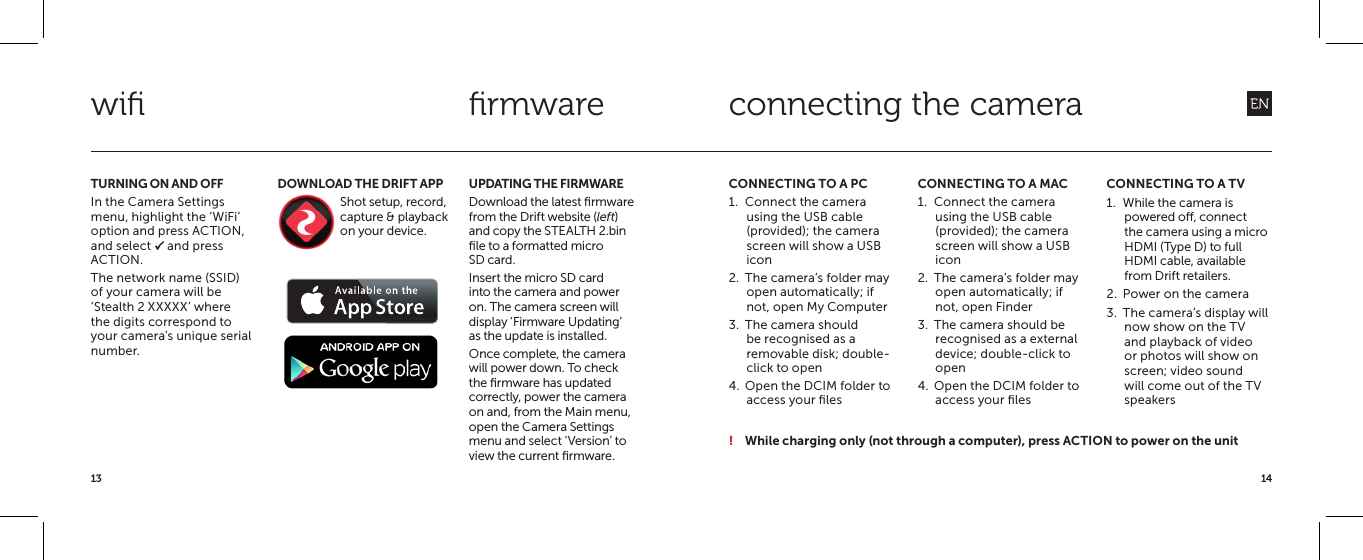
![7 8settingsmode selection TIMELAPSE MODE(Purple LED) The camera will capture a series of still images at a specified rate when ACTION is pressed on the camera or remote. To stop recording, press ACTION on the camera or STOP on the remote. PHOTO MODE(Yellow LED) The camera will capture still images when ACTION is pressed on the camera or remote. The LED will blink red every time a photo is taken (this applies for Timelapse and Photoburst modes also). PHOTOBURST MODE(Cyan LED) The camera will capture a burst of still images for an allotted duration, when ACTION on the camera or remote is pressed (for best results, use a Class 6 or higher micro SD card).CAMERA SETTINGS•EXPOSURE -2.0 / -1.0 / 0 / +1.0 / +2.0•SELF-TIMER OFF / 3S / 5S / 10S•WI-FI OFF / ON •VIDEO TAGGING ON / OFF•TAGGING INTERVAL 10S / 30S / 1MIN / 2MIN / 5MIN / 10MIN•CAR DVR MODE ON / M / OFF•CAR DVR INTERVAL 1MIN / 3MIN / 5MIN / 10MIN / 15MIN•VIDEO STANDARD NTSC (30) / PAL (25)•MIC SENSITIVITY OFF / LOW / MED / HIGH•SPEAKER VOLUME OFF / LOW / MED / HIGH•RC 1-1 ON / OFF•RC 1-ALL ON / OFF•RC LED ON / OFF•CAMERA LED ON / OFF•CAMERA OFF OFF / 2MIN / 5MIN•LCD BACKLIGHT ON / OFF•LCD BACKLIGHT TIMER OFF / 5S / 10S / 20S / 1MIN•DATE YEAR / MONTH / DAY•DATE / TIME STAMP ON / OFF•LANGUAGE [List of Languages]•RESET SETTINGS YES / NO•FORMAT MEMORY CARD YES / NO• FIRMWARE VERSION CURRENT VERSION*Note: In settings mode, pressing the CYCLE button once will move the selection down one setting. Holding the CYCLE button will move the selection back up the list to facilitate navigation.VIDEO PRESETS(NTSC VIDEO STANDARD]1080P @ 30 FPS960P @ 30 FPS720P @ 30 FPS720P @ 60 FPSWVGA @ 30 FPSWVGA @ 120 FPSPHOTOBURST PRESETS5MP @ 3/s, 1s5MP @ 3/s, 2s5MP @ 3/s, 5sTIMELAPSE PRESETS5MP @ 0.5s5MP @ 1s5MP @ 2s5MP @ 3s VIDEO MODE(Green LED) The camera will record video when ACTION is pressed on the camera or remote. The LED will flash red while recording. Press ACTION on the camera, or STOP on the remote, to end recording.NTSC vs PALThe camera records in both NTSC and PAL video standards (changeable from the settings menu) NTSC delivers frame rate intervals of 30 (30, 60, 120) FPS whereas PAL uses frame rate intervals of 25 (25, 50, 100) FPS.](https://usermanual.wiki/Drift-Innovation/FD9963/User-Guide-2324182-Page-5.png)