Dual Xml8100 Users Manual
xml8100 xml8100
xml8100 de9403d1-b2ed-4463-b550-d8abf12689f2 Dual MP3 Docking Station XML8100 User Guide |
2015-01-21
: Dual Dual-Xml8100-Users-Manual-351439 dual-xml8100-users-manual-351439 dual pdf
Open the PDF directly: View PDF ![]() .
.
Page Count: 24

INSTALLATION/OWNER'S MANUAL
In-Dash AM/FM/Bluetooth® Ready Docking Station
XML8100
READY
2
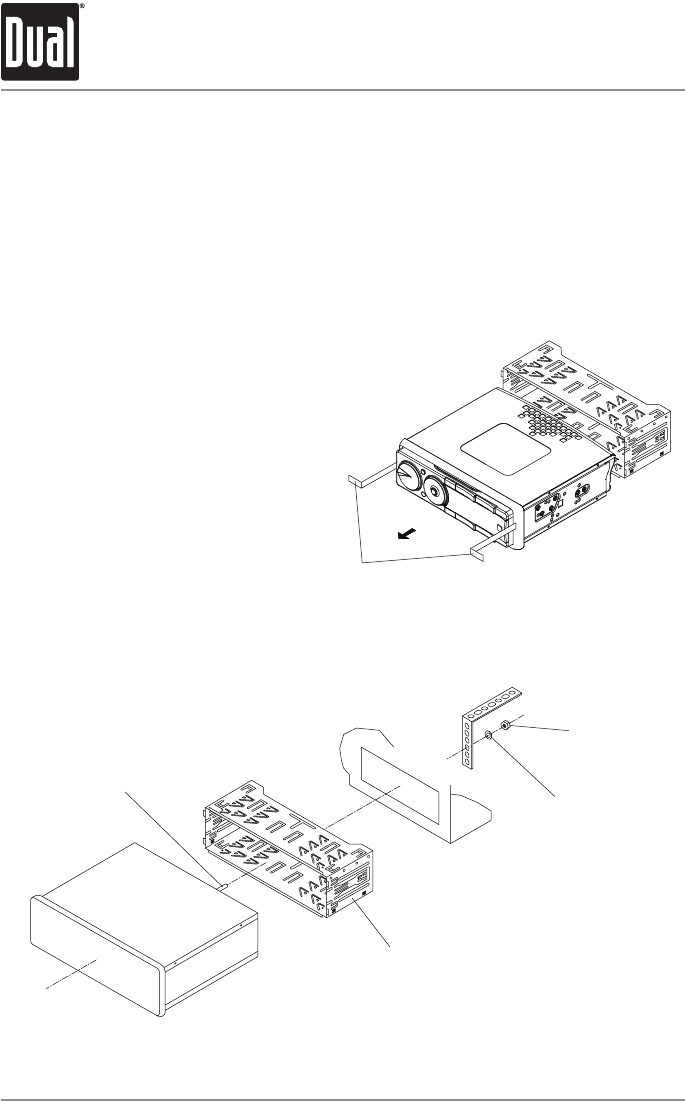
TYPICAL FRONT-LOAD DIN MOUNTING METHOD
Please read entire manual before installation.
Before You Start
•Disconnectnegativebatteryterminal.Consultaqualifiedtechnicianforinstructions.
•Avoidinstallingtheunitwhereitwouldbesubjecttohightemperatures,suchasfrom
directsunlight,orwhereitwouldbesubjecttodust,dirtorexcessivevibration.
Getting Started
•Removetrimringfromunit,
•Insertthesuppliedkeysintothe
slotsasshown,andslidetheunit
outofthemountingsleeve.
•Installmountingsleeveinto
opening,bendingtabstosecure.
•Connectwiringharnessand
antenna.Consultaqualified
technicianifyouareunsure.
•Certainvehiclesmayrequirean
installationkitand/orwiring
harnessadapter(soldseparately).
•Testforcorrectoperationandslide
intomountingsleevetosecure.
•Snaptrimringintoplace.
XML8100 INSTALLATION
Preparation
KEYS
HEX BOLT
MOUNTING SLEEVE
PLAIN WASHER
HEX NUT
MOUNTING STRAP
3
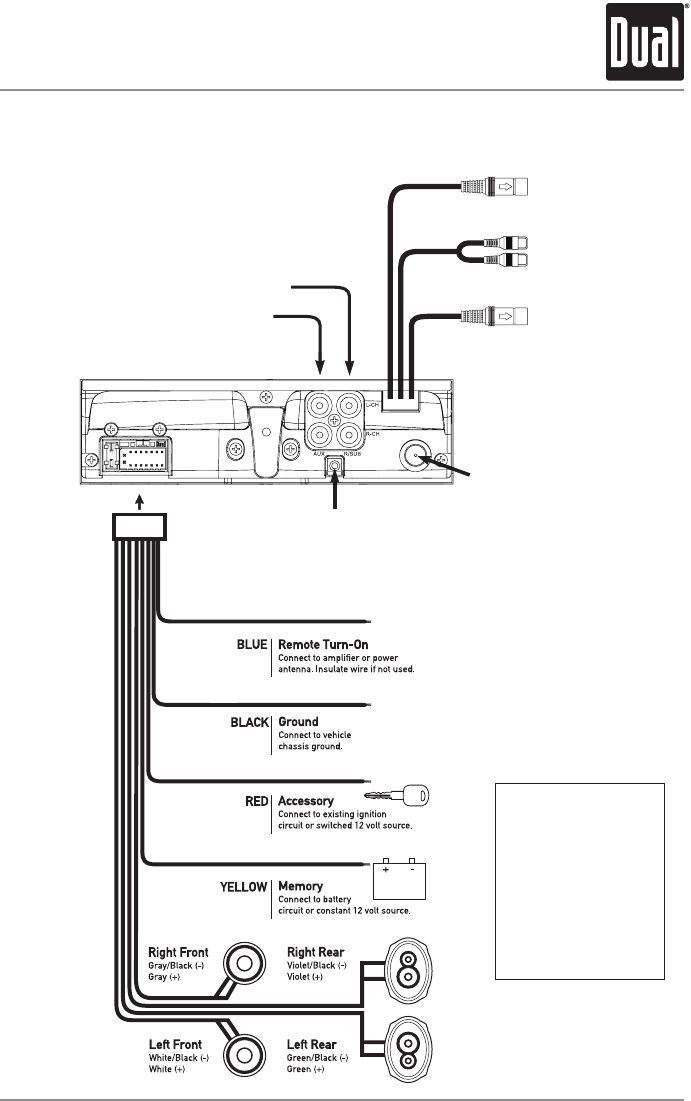
FUSE
Whenreplacingthefuse,
makesurenewfuseisthe
correcttypeandamperage.
Usinganincorrectfuse
coulddamagetheradio.
TheXML8100usesone
10ampATMfuselocated
besidethewiringconnector.
XML8100 INSTALLATION
Wiring Diagram
Antenna
Connector
REAR/SUB Preamp Output
(selectable)
RCA Preamp Connections
FRONT RCA Preamp Output
Steering Wheel Interface Input
(PAC SWI-PS required)
BLACK 8-pin Female Mini-DIN
BTM60 Connection (sold separately)
RCA Auxiliary Input
iplug™ Connection
GREEN 8-pin Male Mini-DIN
External Accessory Connection
4
XML8100 OPERATION
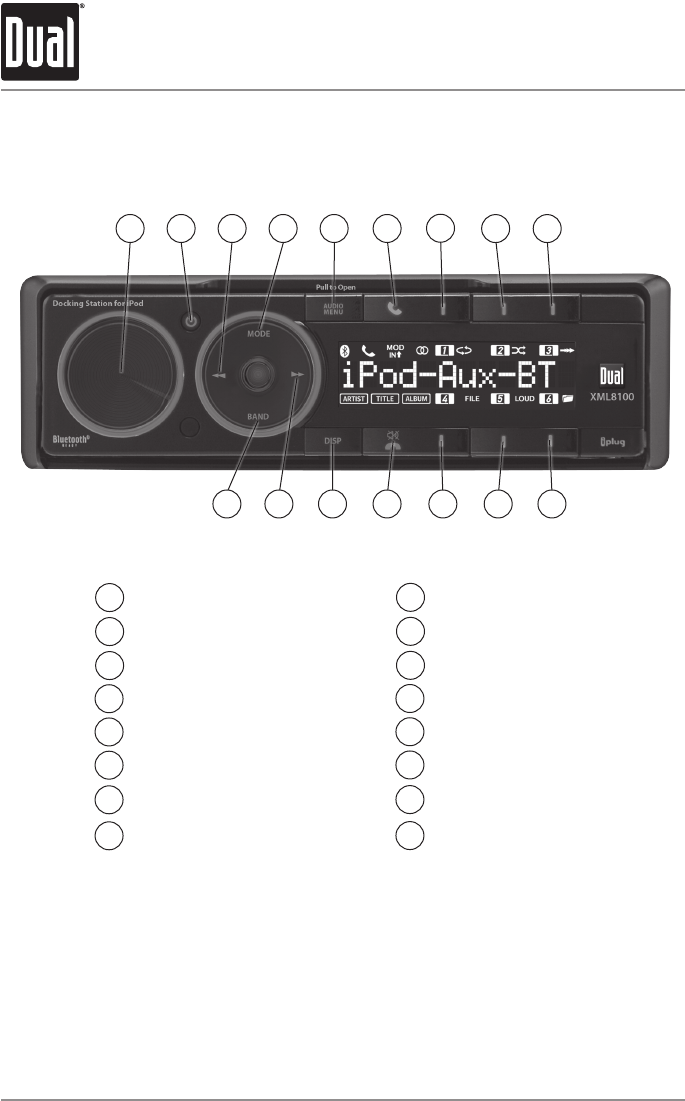
Control Locations - Receiver (Closed)
Volume
Power
Tune/TrackDown
Mode
Audio/Menu
Talk
Preset1
Preset 2
1
2
3
4
5
6
Preset 3
Preset 6
Preset 5
Preset 4
EndCall/Mute
Display
Tune/TrackUp
Band/Play/Pause
7
8
15 14 1316 101112
9
10
11
12
13
14
15
16
1 2 63 4 78 9
5
5
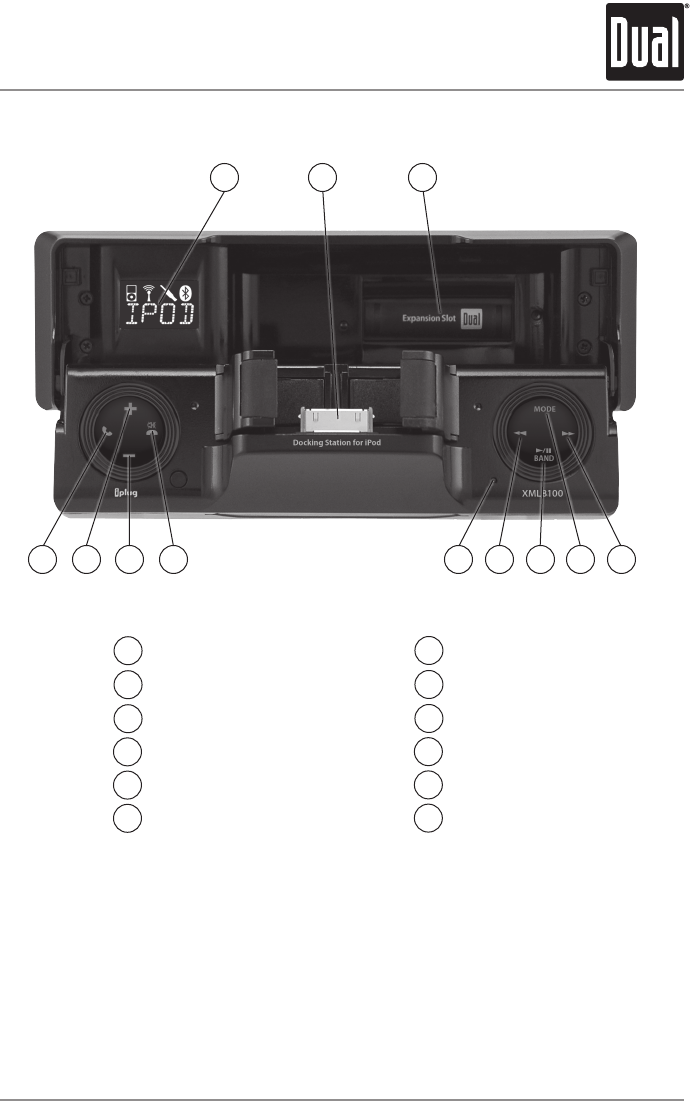
Control Locations - Receiver (Open)
XML8100 OPERATION
LCDDisplay
DockforiPod®
ExpansionSlot
Tune/TrackUp
Mode
Play/Pause/Band
1
2
3
4
5
6
Tune/TrackDown
Reset
EndCall/Mute
VolumeDown
VolumeUp
Talk
7
8
9
10
11
12
11 10 912 4567
8
21 3
6
XML8100 OPERATION
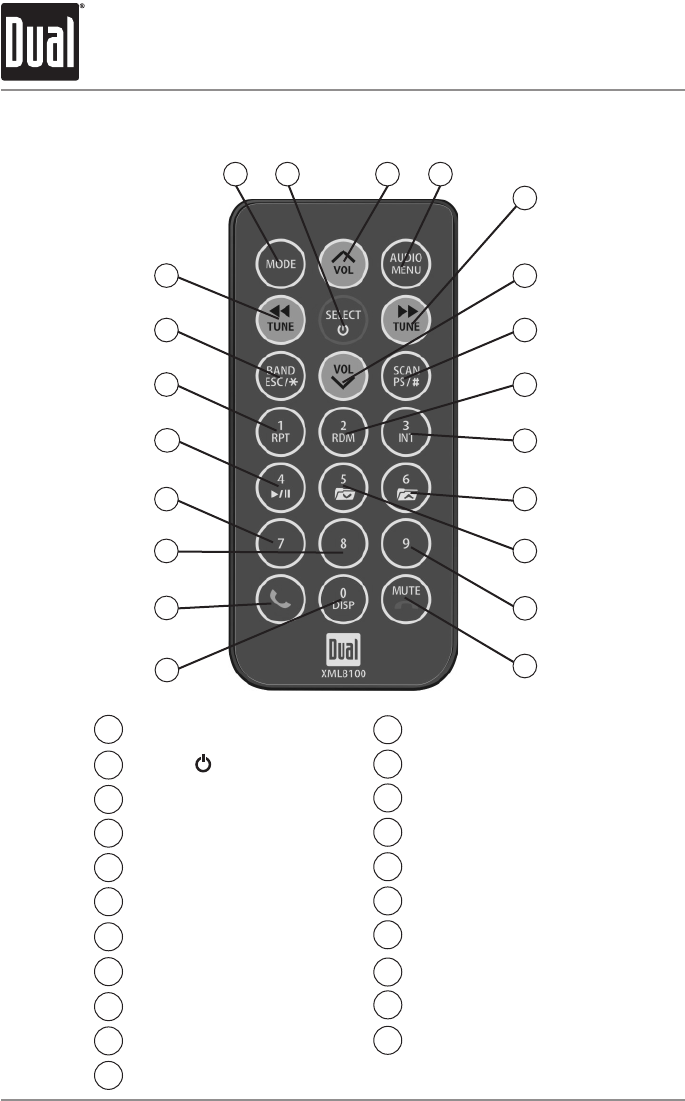
Control Locations - Remote
Key9
Mute/EndCall
Key0/Display
Talk
Key8
Key7
Preset4/Play/Pause
Preset1/Repeat
Band/ESC/Key*
Tune/TrackDown
1
2
3
4
5
6
7
8
9
10
12
13
14
15
16
17
18
19
20
Mode
Power( )/Select
VolumeUp
Audio/Menu
Tune/TrackUp
VolumeDown
Scan/PS/Key#
Preset2/Random
Preset3/Intro
Preset6/FolderUp
Preset5/FolderDown
2 3
6
5
8
7
10
19
12
13
17
18 9
20
15
16
21
1 4
14
11
21
11

7
XML8100 OPERATION
Power On/Off
Mode
Steering Wheel Interface
Input
Volume
Mute
Reset
Display
Set the Clock
12/24-Hour Clock
Expansion Slot
General Operation
Presstheredpowerbuttonoranyotherbuttontoturnthe
uniton.Pressandholdtheredpowerbuttontoturntheunit
off.
Press MODEtoselectbetweenAM/FM,Auxiliaryinput,
BluetoothandoperationofiPodmodes.Modesofoperation
areindicatedinthedisplay.
Note:OperationofiPodmodewillnotappearunlessan
iPoddevicehasbeenconnectedusingthein-dashdockfor
iPodlocatedbehindthefrontpanel.Bluetoothmodewillnot
appearunlesstheBTM60Bluetoothmoduleisconnected.
Thesteeringwheelinterfaceinputlocatedonthebackofthe
headunitallowsconnectiontothePAC (Pacific Accessory
Corporation) SWI-PSinterfacemodule(soldseparately).Visit
www.pac-audio.comfordetails.
Toconfiguresteeringwheelcontrols,followtheinstructions
providedwiththePAC SWI-PSinterfacemodule.After
installingtheinterfacemodule,insertthemodule's3.5mm
jackintotheportonthebackoftheheadunit.
Adjustvolumeusingvolumeknob(00-46).
Press tosilencetheaudio.“MUTE”willflashinthe
display.Press againtocancel.
Press to RESETtheunituponinitialinstallationorif
abnormaloperationoccurs.Theresetbuttonislocatedtothe
rightofthedock,whenthefrontpanelisopen.
Press DISPtotogglebetweenitemssuchasclockandradio
frequency.
Withtheuniton,pressandholdDISPuntiltheclockbegins
toflash,thenrelease.PressTUNE
nn
toadjustthe
hoursandTUNE
ll
toadjusttheminutes.PressDISP
momentarilytosavetheselectedtime.
Theclockwilldisplay12-hourAM/PMtimeinUSAfrequency
spacingmode(PM10:00).InEuropeanfrequencyspacing
mode,theclockwilldisplay24-hourtime(22:00).
Theexpansionslotprovidesaneasywaytoupgradethe
XML8100withnewfeatures.Checkwww.dualav.comfor
more details.

8
PressandholdAUDIO/MENUformorethan3secondsto
accessthesetupmenu,thenpressAUDIO/MENUtocycle
throughmenuoptions.Whendesiredoptionappearsinthe
display,rotatethevolume knobleft/righttoadjustoractivate
thedesiredfunction.
Press BANDtoexitanymenuorsubmenu.
Setup Menu
Menu Exit
General Operation
Setup Menu
Menu Function Options Action
Auto Station
Store AutoStore PressthecenterSELECTtoseekandsave6strongstationsinthecur-
rent band. Note:ThisoptiononlyappearsinTunermode.
Tuner Frequency
Spacing
FrequencyUS ProgramsunittoUSAtunerspacing.
(200kHzforFMand10kHzforAM)
FrequencyEU ProgramsunittoEuropeantunerspacing.
(50kHzforFMand9kHzforAM)
Auxiliary
Input
AuxiliaryOn EnablestherearRCAauxiliaryinput.
AuxiliaryOff Disablestheauxiliaryinput.
Rear/Sub
RCA output
Rear/SubSub ProgramstheRear/SubRCApreampoutputtorear.
Rear/SubRear ProgramstheRear/SubRCApreampoutputtosubwoofer.
Loudness
Curve
LoudOff Disablestheloudnessfunction.
LoudOn Enablestheloudnessfunction.Activatingthisfeaturewillenhancethe
bassandtreblefrequencieswhenlisteningtomusicatlowvolumes.
Clock
Display
ClockOff Programsunittonotdisplaytheclockwhenthepowerisoff.
ClockOn Programsunittodisplaytheclockwhenthepowerisoff.
Beep Confirmation BeepOff Disablestheconfirmationbeep.
BeepOn Enablestheconfirmationbeep.
Programmable
Turn On Volume Prog-Vol# Programsunittoturnonataspecificvolume
(defaultisOFF).
Local/Distance
Tuning
LocalOff Activatesdistancetuning.
LocalOn Activateslocaltuningforstrongstationreceptiononly.
Power on Message MessageOff Disablespoweronmessage.
MessageOn Enablespoweronmessagetobedisplayed.
Scrolling
Option
ScrollOnce Programsunittoscrollonce,thenshowthefirst10charactersonthe
display.
ScrollOn Programsunittoscrollcontinuously.
ScrollOff Programsunittoshowthefirst10charactersonthedisplay.
Illumination
Dimmer
DimmerHigh Programsunittothebrightestilluminationlevel.
DimmerMed Programsunittothemiddleilluminationlevel.
DimmerLow Programsunittothedimmestilluminationlevel.
Demonstration
Mode
DemoOff Disablesthedemonstrationmessage.
DemoOn Enablesthedemonstrationmessage.
XML8100 OPERATION

9
XML8100 OPERATION
Press AUDIO/MENUmomentarilytoselectbetweenBass,
Treble,Balance,Fader,EQ,Subwoofer*andSourceVolume
Level.
Press AUDIO/MENU until Bassappears,thenrotatethe
volume knobleft/righttoadjust(-6minimum/+6maximum).
Press AUDIO/MENU until Trebleappears,thenrotatethe
volume knob left/righttoadjust(-6minimum/+6maximum).
Note: AnyadjustmenttotheBassorTreblesettingsare
automaticallysavedastheUserEQ.
BassandTreblesettingsareretainedforeachmode
individually.
Press AUDIO/MENU until Balanceappears,thenrotatethe
volume knobleft/righttoadjustL12(left)toR12(right).
BalanceL=Rrepresentsequalbalance.
Press AUDIO/MENU until Faderappears,thenrotatethe
volume knob left/righttoadjust(F12(front)toR12(rear).
FaderF=Rrepresentsequalfader.
Press AUDIO/MENU until EQappears,thenrotatethevolume
knobleft/righttoselectbetweenFlat,Pop,Rock,Jazz,Classic,
BeatorUserequalizationcurves.AnyadjustmenttotheBass
orTreblesettingsareautomaticallysavedastheUserpreset
EQ.
Thesourcevolumelevelcontrolallowsagainadjustmentfor
eachaudiosource:AM,FM,Auxiliaryinput,operationofiPod
andBluetooth.Setthesourcevolumelevelforeachmode,
dependingontherelativevolumeofeachaudiosource.
Tosetthesourcevolumelevel,pressAUDIO/MENU until
SRCLEVELappears.Afteronesecond,thecurrentmodewill
appearonthedisplay.Turnthevolume knobtoadjustthe
audiolevelofthecurrentsource(-6minimum/+6maximum).
Note: Onlythecurrentmodewillbeavailableforadjustment.
Toadjustanothermodeofoperation,pressMODEuntilthe
desiredmodeisselected,thensetthesourcevolumelevelfor
thatmode.
Press AUDIO/MENU until Sub-Wappears,thenpressSELECT
toconfirm.Rotatevolumeknobleft/righttoadjust(0-12).
Adjustinglevelsto0turnsthesubwooferoff.
Audio
Bass
Treble
Balance
Fader
EQ
Source Volume Level
Subwoofer
General Operation
BASS TREBLE BALANCE FADER EQ SUBWOOFER* SOURCE LEVEL

10
Seek Tuning
Manual Tuning
Band
Storing and Recalling
Station Presets
Auto Station Store
Press TUNE
nn
or TUNE
ll
formorethanonesecondto
seekthenextstrongstation.
Press TUNE
nn
or TUNE
ll
momentarilytomoveradio
frequencyupordownonestepatatime.Pressandholdto
advancequickly.
Press BANDtoselectbetweenFM1,FM2,FM3,AM1and
AM2bands.Uptosixpresetscanbesavedforeachband.
Upto18FMstationsand12AMstationscanbestored.To
storeastation,selectthedesiredbandandstation.Press
andholdthedesiredpresetbutton(1-6)formorethan
twoseconds.Whenstored,aboxwillappeararoundthe
correspondingpresetnumberinthedisplay.Thestationcan
berecalledanytimebypressingthecorrespondingpreset
button.
Toautomaticallystorethe6strongeststationstopreset
buttons1-6inthecurrentband,pressandholdAUDIO/
MENUfromtunermodetoenterthesetupmenu.While
"AutoStore"isflashingonthedisplay,pressthecenter
selectbuttontobegintheautomaticstationstoringprocess.
AM/FM Tuner Operation
XML8100 OPERATION
11
XML8100 OPERATION
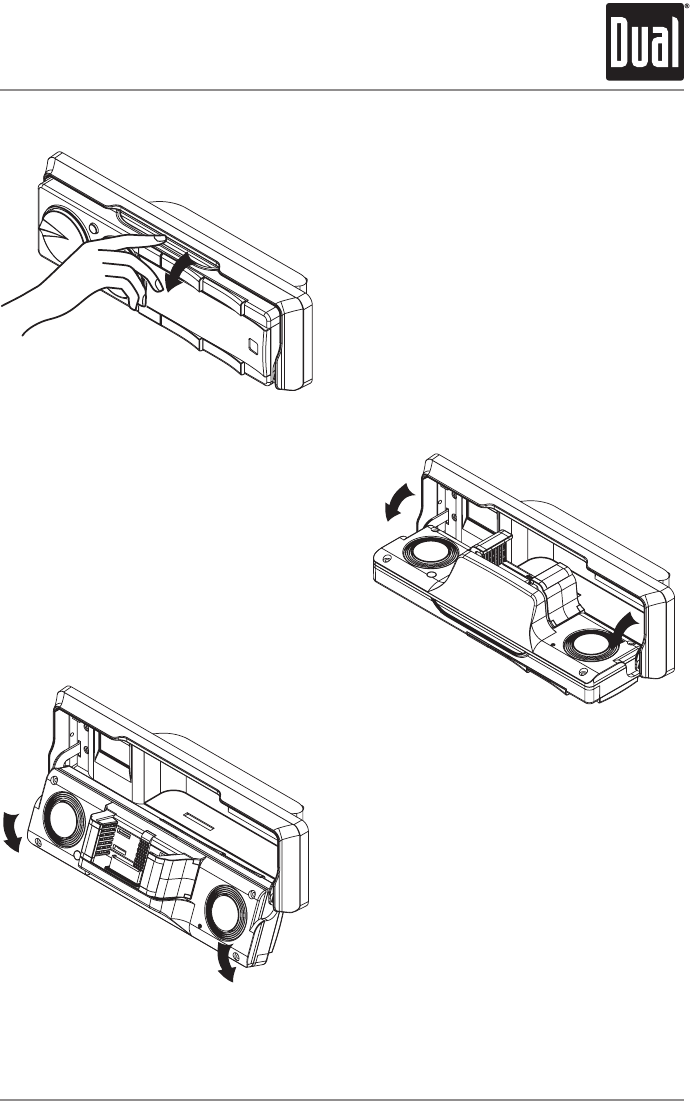
ToopentheXML8100anduse
thedock,pulloutwardfromthe
topofthefrontpanel.
Thefrontpanelstopswhenit
reachesthefullyopenposition.
Thefrontpanelwillrotateopen.
Continuerotatingthefront
paneldownward.
Dock for iPod Operation
12
XML8100 OPERATION
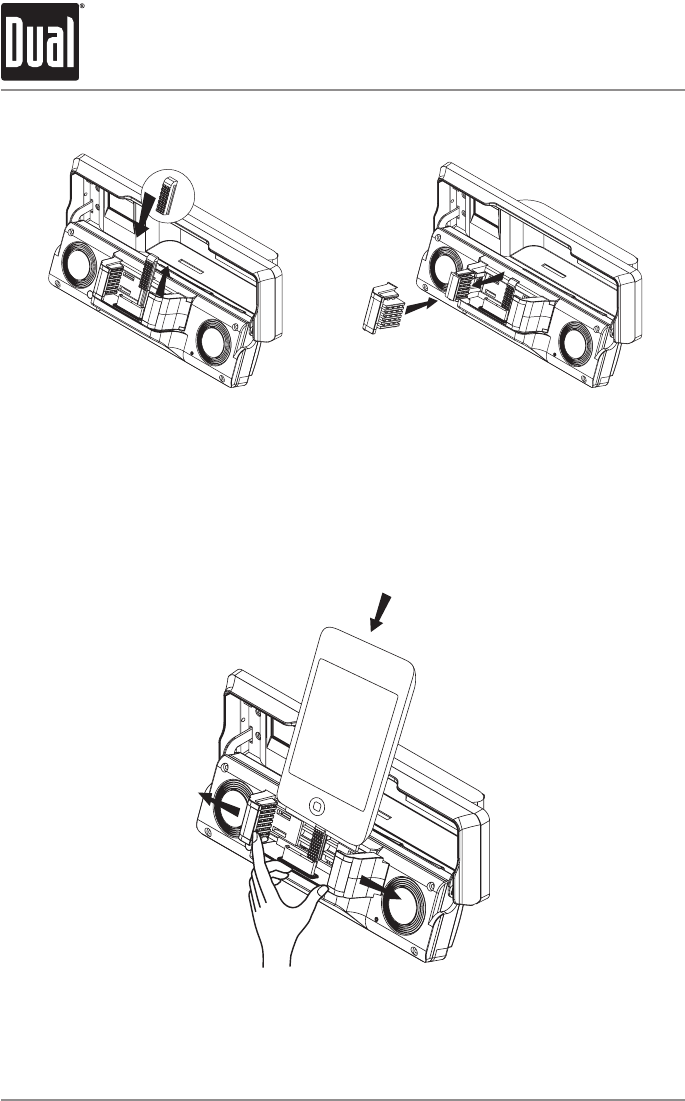
Dock for iPod Operation
SomeiPoddeviceshaveathinnerdesign,and
mayrequirechangingtherearrubbersupportat
thebackofthedockforthebestt.
Tochangetherearrubbersupport,pullupward
onsupporttoremoveit.Thenreplacethesupport
withthethickerrubbersupportthatisincluded
inthebox.
Forthe1stgeneration,2ndgenerationand4th
generationiPodNanodevices,theleftsidedock
supportcanbereplacedwithalargerrubber
support,forthebestt.
Tochangetheleftsiderubbersupport,pull
outwardontherubbersupporttoremoveit.Then
replacethesupportwiththelargerrubbersupport
thatisincludedinthebox.
TodockaniPoddevice,rstspreadaparttheside
supportsofthedock.Thenlineupthedockconnector
andinserttheiPoddeviceintothedock.Releasethe
sidesupportstosecurethedevice.
13
XML8100 OPERATION
Operation of iPod
InserttheiPoddeviceintotheXML8100'sDock,following
theinstructionsonpages11and12.
TheiPoddevicecanbecontrolleddirectlyfromtheiPod
device'sinterface,orcontrolledusingtheinsidepanel
buttonsshownbelow:
Press
ll
toskiptothebeginningofthenextsong.
Press
nn
toreturntothebeginningofthecurrentsong.
Pressing
nn
againskipstothebeginningoftheprevious
song.
Press
l
/
II
totemporarilystopplayback.
Press
l
/
II
againtoresumeplayback.
WhenplayinganiPoddevice,thevolumeisadjustable
usingthevolumecontrolsoninsidepanel.When
connected,thevolumecontrolsintheiPoddevice's
interfacearenotadjustable.
Using the In-Dash
Dock for iPod
Control for iPod
Song Select
Pause
Volume
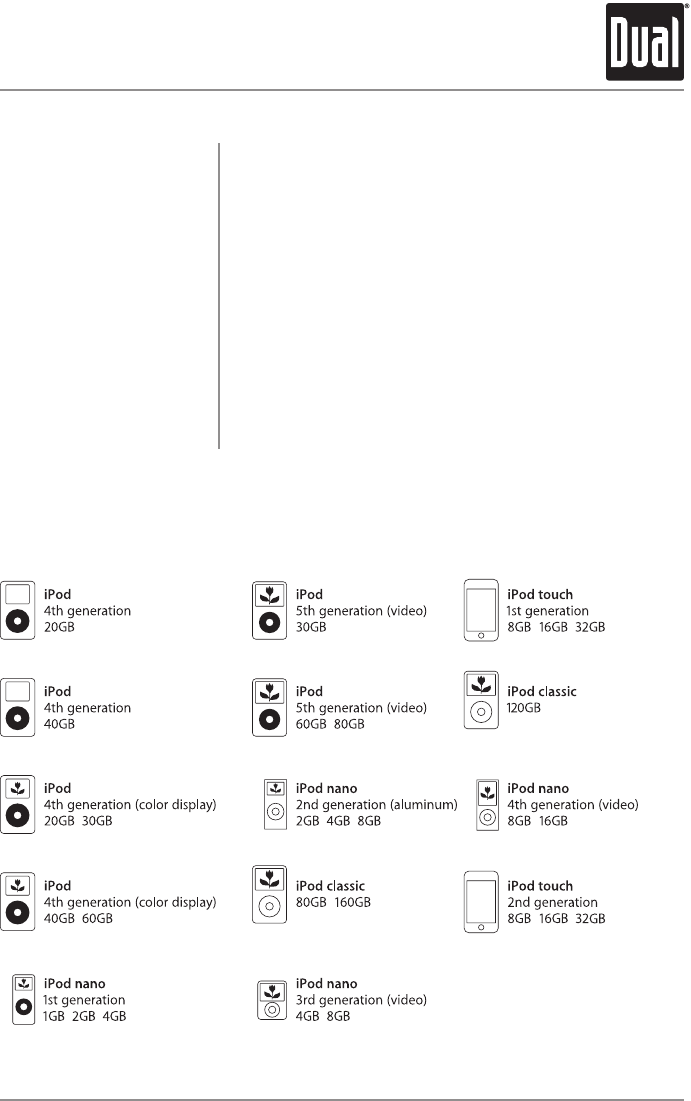
iPod Device Compatibility

14
Bluetooth® Operation
XML8100 OPERATION
Overview
ConnectingaBluetoothdevicerequiresfirstinstallingandconnectingtheDual BTM60
Bluetoothinterfacemodule(soldseparately).WhenconnectedtoaDualBluetoothready
headunit,theBTM60supportstheHFP(hands-freeprofile),A2DP(advancedaudio
distributionprofile)andAVRCP(audiovideoremotecontrolprofile).
Preparation
Beforeyoucanuseamobiledevicewiththisheadunit,itmustbepairedandconnected.
PleasemakesurethatBluetoothisactivatedonyourmobiledevicebeforeyoubeginthe
pairingprocess.Refertotheowner'smanualofyourmobiledeviceformoredetails.
Bluetooth Pairing
1)TopairaBluetoothenabledmobilephonetoyourheadunit,press ontheheadunit
orBTM60,orpressMODEuntil"DUAL_BTM60"isdisplayed.
2)Pressandhold ontheheadunitorBTM60for5seconds,until"PAIRING"is
displayed,theBluetoothiconwillflasheverysecond.Theheadunitwillbeginto
broadcastthepairingsignalfor90seconds.
3)CompletethepairingfromtheBluetoothmenuofyourmobiledevicebysearching
fornewdevices.Pleaserefertoyourmobiledeviceinstructionsforfurtherinformation
onBluetoothpairingandconnections.TheBluetoothiconwillilluminatesolidwhen
connected.
The BTM60 device name is "DUAL_BTM60."
The password for the DUAL BTM60 is 1234.
Compatibility
•DuetothedifferencesinBluetoothtechnology,somemobiledevicesmaybe
incompatibleorfunctionimproperlywhenusedwiththeBTM60.
Paired Devices List
TheXML8100willrememberthelast8devicesthatwereparied.Toaccessthelistof
previouslypaireddevices,followtheseinstructions:
•Disconnectanymobiledevicethatmaybeconnectedbypressing once.
•PressDISPmomentarilytocyclethroughthelistof8previouslypaireddevices.
•Whenstoppedonadevicenumber1-8,wait5secondstoseethenameofthedevice.
•IfthedeviceisnotinrangeoftheBTM60,"Unknown"willbedisplayed.
•Oncethedesireddeviceisdisplayed,press orthecenterselectbuttontoconnect.
Connection Notes
•IfAUTO-CON is set to OFF,youmustpress toconnectafterpairing,andeverytime
theXML8100isturnedon.
•FromBluetoothstandbymode,press todisconnectyourmobiledevicefromthe
BTM60.Ifdisconnected,press toreconnectthemobiledevicethatwasconnectedlastto
theBTM60.
15
Bluetooth® Operation
XML8100 OPERATION
Function Description
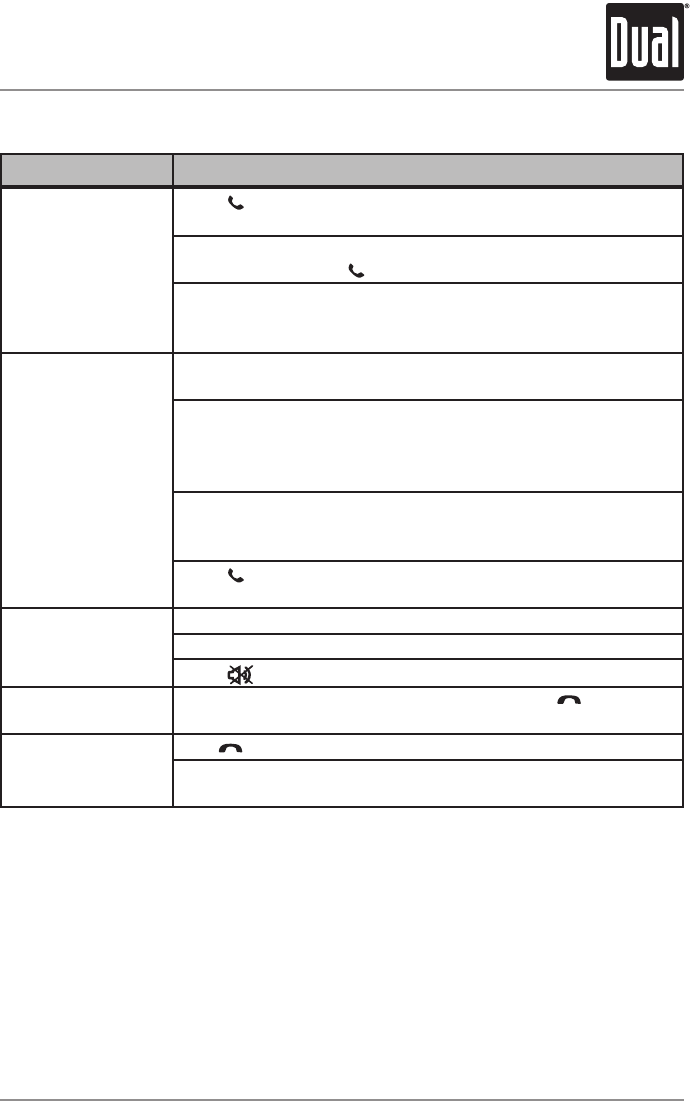
Making a Phone Call
Press once."EnterNumber"willbeshown,thenAn"_"will
appearonthedisplay.
Inputthedesiredphonenumberusingthe0-9,*,#buttonsonthe
remotecontrol.Press tobegindialing.
Aphonecallmayalsobeplacedfromyourmobiledeviceusing
thekeypad,phonebookorspeeddial.Whenacallisplacedfrom
amobiledevice,“DIALING”willappearontheheadunitdisplay.
Receiving a Phone
Call
Ifanincomingcallisdetected,theheadunitwillautomatically
switchtoBluetoothmode,mutinganycurrentaudio.
Theincomingphonenumberwillscrollacrossthedisplay,the
phoneiconwillflashonthedisplay,andaringtonewillbe
audiblefromthevehiclespeakers.SeeBluetoothSettingsfor
speakerconfigurations.
Note:Theringaudiolevelwilldependthemobiledeviceandhead
unitringvolumeandaudiosettings.Iftheringeronthemobile
deviceisoff,youmaynothearanincomingringtone.
Press toreceiveacall.Thephoneiconinthedisplaywill
illuminate.
During a Phone Call
Theheadunitwilldisplaytheelapsedtimeofthephonecall.
Thevolumeknobwilladjustthevolumeofthecall.
Press tomutetheBTM60'smicrophoneduringacall.
Refusing a Call Torefuseanincomingphonecall,pressandhold for 3
seconds.
Ending a Phone Call
Hold for3ormoresecondstoendacall.
Ifthephonecallwasreceived,theheadunitwillreturnto
previousmodewhencallisended.
16
Bluetooth® Operation
XML8100 OPERATION
Function Description
Recent Call List
Toviewthe10mostrecentcalls,press ,thenpress asecond
time."RecentCalls"willbedisplayed.
Alistofthemostrecentmissed,dialed,orreceivedcallswillappear,
sortedbytime,beginningwiththemostrecentcall.
Press
ll
or
nn
tocyclethroughthelistofrecentcalls.When
thedesirednumberappearsonthedisplay,pressthecenterselect
button or todialthephonenumber.
Audio Transfer
Totransferthephonecallbetweentheheadunitandthemobile
device,pressandholdDISPfor3secondsduringacall.Tip: transfer
audiotoyourmobiledevicebeforeturningtheheadunitoff.
Call Waiting
Whenasecondcallisincoming,press toactivatecallwaiting.The
currentcallwillbeplacedonhold,andthesecondcallwillbeactive.
Press againtoreturntothefirstcall.
Call Hold Press toplacethecurrentcallonhold.Toresumethephonecall,
press again.
MenuFunction Options Action
Bluetooth Mode BluetoothON
EnablestheBTM60BluetoothInterfaceModule
(included).TheBluetoothiconwillflashevery10
secondswhenadeviceisnotconnected.
BluetoothOFF DisablesBluetoothsupport.
Auto Connect
Auto-ConON
AllowstheBTM60toautomatically(re)connecttothe
mostrecentlyconnectedmobiledevice.Note:Some
mobiledevicesdonotsupportthisfeature.
Auto-ConOFF Disablestheautoconnectfeature.Youmustpress
everytimetoconnectamobiledevice.
Auto Answer
Auto-AnsOFF Disablestheautoanswerfeature.Press to
receiveanincomingcall.
Auto-AnsON Allincomingcallswillbeansweredautomatically-
withoutnotification.
Bluetooth Audio Speaker2-CH DirectstheBluetoothaudiotothefrontspeakers.
Speaker4-CH DirectstheBluetoothaudiotoall4speakers.
Bluetooth Setup Menu
*Seepage7forSetupMenunavigation

17
Bluetooth® Operation
XML8100 OPERATION
TheXML8100supportsA2DP(advancedaudiodistributionprofile)wirelessstreaming
audiofromyourBluetoothmobiledevicedirectlytoyourheadunit.Youcanalsocontrol
yourmusicfromthefrontpaneloftheheadunitusingAVRCP(audiovideoremotecontrol
profile).
Notes:
•Tostreammusictoyourheadunit,yourmobiledevicemustsupportA2DPandAVRCP
Bluetoothprofiles.Checktheowner'smanualofyourmobiledevice
•Streamingaudiomustbeenabledfromyourmobiledevice.Thisoptionwillvary
dependingonthedevice.Somedevicesallowstreamingaudiotobedisabled.
Afterpairing,connectingandenablingstreamingaudiofromacompatiblemobiledevice,
beginplayingmusicusingthemusicplayeronyourmobiledevice.Oncethemusicis
playing,thefollowingfunctionscanbeusedtocontrolmusic:
XML8100frontpanel:
•The
ll
buttonwillskiptothenextavailableaudiotrack.
•The
nn
buttonwillskiptothepreviousaudiotrack.
•TheBANDbuttonwilltogglebetweenplayandpauseduringplayback.
•The buttonwillstoptheaudioplayback.
Remotecontrol:
•The
ll
buttonwillskiptothenextavailableaudiotrack.
•The
nn
buttonwillskiptothepreviousaudiotrack.
•The
l
/
II
buttonwilltogglebetweenplayandpauseduringplayback.
•The buttonwillstoptheaudioplayback.
Bluetooth Reset
ResettingtheBluetoothmodulewillremovethelistofpairedphonesanddeletethelistof
recentdialed,received,andmissedcallsfrommemory.
ToresettheBTM60Bluetoothmodule,pressMODEtoenterBluetoothstandbymode.
Press todisconnectyourmobiledevice,ifitisconnected.PressandholdMODE for 3
secondstoresettheBTM60module.Theunitwilldisplay"ResetOK"asconfirmation.
Bluetooth Streaming Audio Operation

18
Thiswarrantygivesyouspecificlegalrights.
Youmayalsohaveotherrightswhichvaryfrom
state to state.
DualElectronicsCorp.warrantsthisproductto
theoriginalpurchasertobefreefromdefectsin
materialandworkmanshipforaperiodofone
yearfromthedateoftheoriginalpurchase.
DualElectronicsCorp.agrees,atouroption,
duringthewarrantyperiod,torepairanydefect
inmaterialorworkmanshiportofurnishan
equalnew,renewedorcomparableproduct
(whicheverisdeemednecessary)inexchange
withoutcharges,subjecttoverificationofthe
defectormalfunctionandproofofthedateof
purchase.Subsequentreplacementproducts
arewarrantedforthebalanceoftheoriginal
warrantyperiod.
Who is covered? Thiswarrantyisextendedto
theoriginalretailpurchaserforproducts
purchasedandusedintheU.S.A.
What is covered? Thiswarrantycoversall
defectsinmaterialandworkmanshipinthis
product.Thefollowingarenotcovered:
installation/removalcosts,damageresulting
fromaccident,misuse,abuse,neglect,product
modification,improperinstallation,incorrect
linevoltage,unauthorizedrepairorfailureto
followinstructionssuppliedwiththeproduct,
ordamageoccurringduringreturnshipmentof
theproduct.
What to do?
1.Beforeyoucallforservice,checkthe
troubleshootingguideinyourowner’s
manual.Aslightadjustmentofanycustom
controlsmaysaveyouaservicecall.
2.Ifyourequireserviceduringthewarranty
period,youmustcarefullypacktheproduct
(preferablyintheoriginalpackage)andship
itbyprepaidtransportationwithacopyofthe
originalreceiptfromtheretailertoan
authorizedservicecenter.
3.Pleasedescribeyourprobleminwritingand
includeyourname,areturnUPSshipping
address(P.O.Boxnotacceptable),anda
daytimephonenumberwithyourshipment.
4.Formoreinformationandforthelocationof
thenearestauthorizedservicecenterplease
contactusbyoneofthefollowingmethods:
•Callustoll-freeat1-866-382-5476
•E-mailusatcs@dualav.com
ExclusionofCertainDamages:Thiswarranty
isexclusiveandinlieuofanyandallother
warranties,expressedorimplied,including
withoutlimitationtheimpliedwarrantiesof
merchantabilityandfitnessforaparticular
purposeandanyobligation,liability,right,
claimorremedyincontractortort,whether
ornotarisingfromthecompany’snegligence,
actualorimputed.Nopersonorrepresentative
isauthorizedtoassumeforthecompanyany
otherliabilityinconnectionwiththesaleof
thisproduct.Innoeventshallthecompanybe
liableforindirect,incidentalorconsequential
damages.
XML8100 OPERATION
Limited One Year Warranty
19
XML8100 OPERATION
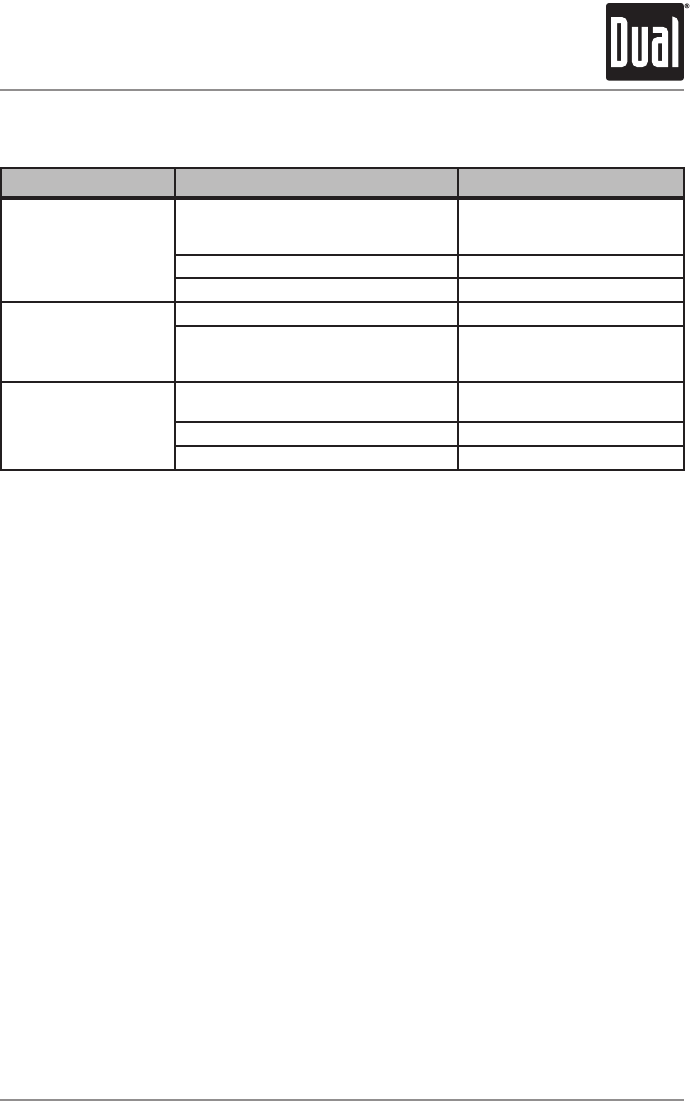
Problem Cause Action
Unit will not turn on
(no power)
Yellowwirenotconnectedorincorrect
voltageRedwirenotconnectedor
incorrectvoltage
Checkconnectionsforproper
voltage(11~16VDC)
Blackwirenotconnected Checkconnectiontoground
Fuseblown Replacefuse
Unit has power
(but no sound)
Speakerwiresnotconnected Checkconnectionsatspeakers
Oneormorespeakerwirestouching
eachotherortouchingchassisground
Insulateallbarespeakerwires
fromeachotherandchassis
ground
Unit blows fuses
Yelloworredwiretouchingchassis
ground Checkforpinchedwire
Speakerwirestouchingchassisground Checkforpinchedwire
Incorrectfuserating Usefusewithcorrectrating
Troubleshooting - General

20
Specifications
Tuningrange: 87.5MHz-107.9MHz
Usablesensitivity: 8.5dBf
50dBquietingsensitivity: 10dBf
Stereoseparation@1kHz: 40dB
Frequencyresponse: 30Hz-13kHz
Tuningrange:530kHz-1710kHz
Usablesensitivity: 22uV
Frequencyresponse: 30Hz-2.2kHz
Operatingvoltage: 11-16 VDC, negative ground
Speakeroutputimpedance: 4~8 ohms
Lineoutputvoltage:2 Volts RMS
Dimensions: 7" x 7" x 2" (178 x 178 x 51 mm)
Designandspecificationssubjecttochangewithoutnotice.
FM Tuner
AM Tuner
General
CEA-2006PowerStandardSpecifications
(reference:14.4VDC+/-0.2V,20Hz~20kHz)
PowerOutput:17WattsRMSx4channelsat4ohmsand<1%THD+N
SignaltoNoiseRatio:80dBA(reference:1wattinto4ohms)
XML8100 OPERATION

21
XML8100 OPERATION
FCC Compliance
ThisdevicecomplieswithPart15oftheFCCRules.Operationissubjecttothe
followingtwoconditions:
(1)thisdevicemaynotcauseharmfulinterference,and
(2)thisdevicemustacceptanyinterferencereceived,includinginterferencethatmay
causeundesiredoperation.
Warning:Changesormodificationstothisunitnotexpresslyapprovedbytheparty
responsibleforcompliancecouldvoidtheuser’sauthoritytooperatetheequipment.
Note:ThisequipmenthasbeentestedandfoundtocomplywiththelimitsforaClass
Bdigitaldevice,pursuanttoPart15oftheFCCRules.Theselimitsaredesigned
toprovidereasonableprotectionagainstharmfulinterferenceinaresidential
installation.Thisequipmentgenerates,usesandcanradiateradiofrequency
energyand,ifnotinstalledandusedinaccordancewiththeinstructions,maycause
harmfulinterferencetoradiocommunications.However,thereisnoguaranteethat
interferencewillnotoccurinaparticularinstallation.Ifthisequipmentdoescause
harmfulinterferencetoradioortelevisionreception,whichcanbedetermined
byturningtheequipmentoffandon,theuserisencouragedtotrytocorrectthe
interferencebyoneormoreofthefollowingmeasures:
Reorientorrelocatethereceivingantenna.•
Increasetheseparationbetweentheequipmentandreceiver.•
Connecttheequipmentintoanoutletonacircuitdifferentfromthattowhichthe•
receiverisconnected.
Consultthedealeroranexperiencedradio/TVtechnicianforhelp.•

22
Notes

23
Notes

DualElectronicsCorp.
TollFree:1-866-382-5476
www.dualav.com
©2010DualElectronicsCorp.Allrightsreserved.
iPodisatrademarkofAppleInc.,registeredintheU.S.andothercountries.
“MadeforiPod”meansthatanelectronicaccessoryhasbeendesignedtoconnectspecicallytoiPodandhasbeencertied
bythedevelopertomeetAppleperformancestandards.
Appleisnotresponsiblefortheoperationofthisdeviceoritscompliancewithsafetyandregulatorystandards.
TheBluetooth®wordmarkandlogosareownedbytheBluetoothSIG,Inc.andanyuseofsuchmarksbyNamsung is under
license.
Othertrademarksandtradenamesarethoseoftheirrespectiveowners.
NSA0110-V03
