Duncan Parking Technologies X3W Handheld computer for parking enforcement User Manual AutoCITE X3 Training 3
Duncan Parking Technologies Inc. Handheld computer for parking enforcement AutoCITE X3 Training 3
User Manual

Citation Management AutoCITE Reference Guide
AutoCITE X3 Handheld Training Reference
AutoCITE X3 Training (3).doc Page 1 o f 33 Date/Time Printed: 9/19/2008 8:36 AM
AutoCITE Series X3
Automated Citation Issuance
System
Training Reference

Citation Management AutoCITE Reference Guide
AutoCITE X3 Handheld Training Reference
AutoCITE X3 Training (3).doc Page 2 o f 33 Date/Time Printed: 9/19/2008 8:36 AM
Table of Contents
AutoCITE X3 Handheld...................................................................................................................3
FCC Compliance Statements……………………………………………………………………...4
General Overview .............................................................................................................................5
Handheld Features............................................................................................................................5
Basic Concepts/Functions.................................................................................................................6
Module Overview..............................................................................................................................7
Handheld Operation.........................................................................................................................7
Field Entry & General Navigation................................................................................................11
Logging on the X3 Handheld.........................................................................................................13
Main Menu ......................................................................................................................................13
Issuing Application .........................................................................................................................15
Issuing a New Parking Ticket........................................................................................................15
Header Screen .................................................................................................................................16
Location Screen...............................................................................................................................17
Violation Screen..............................................................................................................................18
Vehicle Screen .................................................................................................................................19
Hotsheet Considerations.................................................................................................................20
Remarks Screen ..............................................................................................................................21
Finish Screen ...................................................................................................................................22
Marking Vehicles ............................................................................................................................26
Host PC Operation..........................................................................................................................30
System Overview Diagram.............................................................................................................33
Citation Management AutoCITE Reference Guide
AutoCITE X3 Handheld Training Reference
AutoCITE X3 Training (3).doc Page 3 o f 33 Date/Time Printed: 9/19/2008 8:36 AM
AutoCITE X3 Handheld

Citation Management AutoCITE Reference Guide
AutoCITE X3 Handheld Training Reference
AutoCITE X3 Training (3).doc Page 4 o f 33 Date/Time Printed: 9/19/2008 8:36 AM
FCC Compliance Statements:
• Warning: Any changes or modifications not expressively approved by Duncan Technologies
could void the user’s authority to operate this equipment.
• Use only the supplied antenna. Unauthorized antennas, modifications or attachments could
impair quality and/or damage device or result in violation of FCC regulations.
• SAR compliance for body-worn operations is restricted to supplied strap.
• This device complies with Part 15 of the FCC Rules. Operation is subject to the following
two conditions: (1) this device may not cause harmful interference, and (2) this device must
accept any interference received, including interference that may cause undesired operation.
NOTE:
This equipment has been tested and found to comply with the limits for a Class A digital device,
pursuant to part 15 of the FCC Rules. These limits are designed to provide reasonable protection
against harmful interference when the equipment is operated in a commercial environment. This
equipment generates, uses, and can radiate radio frequency energy and, if not installed and
used in accordance with the instruction manual, may cause harmful interference to radio
communications. Operation of this equipment in a residential area is likely to cause harmful
interference in which case the user will be required to correct the interference at his own
expense.
Citation Management AutoCITE Reference Guide
AutoCITE X3 Handheld Training Reference
AutoCITE X3 Training (3).doc Page 5 o f 33 Date/Time Printed: 9/19/2008 8:36 AM
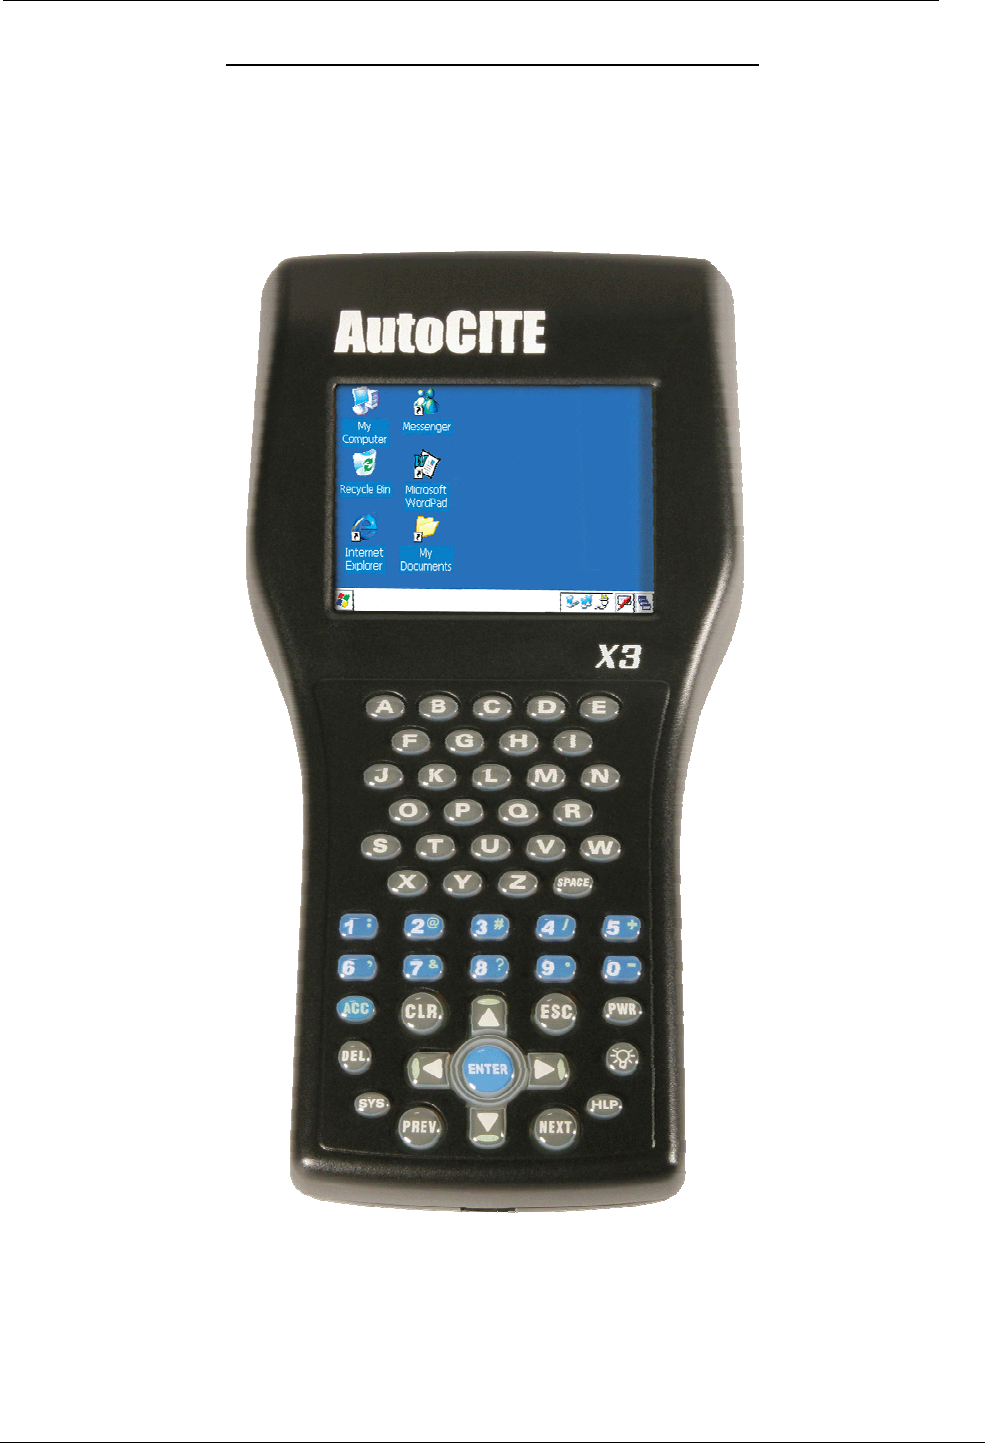
General Overview
Handheld Features
- Display
Layout
Active Screen Line
Buttons/Tabs
Forms/Entry Area
Status Line
- Key Pad
Alpha/Space Characters Entry
Numeric Characters Entry
Special Characters Entry (ACC & Numeric key combination)
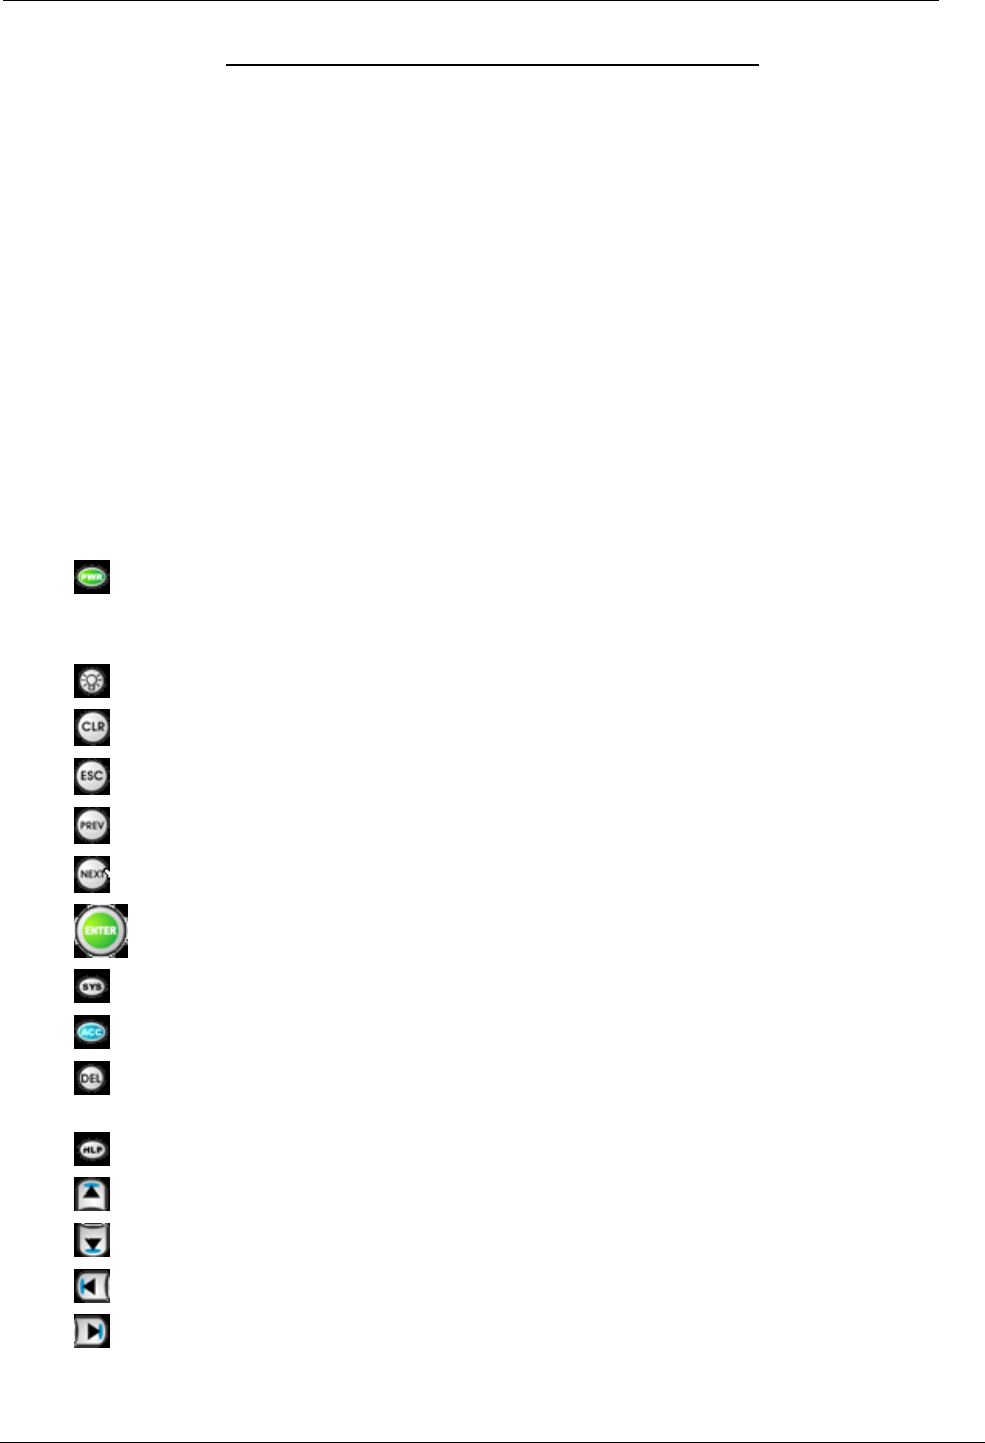
Special Keys
PWR – Power On/Off
(note – power goes off automatically in 30 seconds to conserve battery life; when
powered on, unit returns to last screen displayed)
Backlight activation for operation in darkness
CLR – Clears field of data
ESC – Escapes to previous requested Button/Function
PREV – Backs up to previous field
NEXT – Steps forward to next field/function/screen
ENTER – When cursor is on a list supported field, submits request for list detail
SYS – Initiates request for system functions (e.g. Paper Loading)
ACC – Activates/Accelerates action of selected functions & special characters
DEL – When at end/middle of field, deletes characters from right to left (backspace);
when at beginning of field, deletes characters left to right)
HELP – Activates Handheld help function
Up arrow moves upward in a list of displayed table entries
Down arrow moves upward in a list of displayed table entries
Move left character-by-character in a displayed field
Move right character-by-character in a displayed field

Citation Management AutoCITE Reference Guide
AutoCITE X3 Handheld Training Reference
AutoCITE X3 Training (3).doc Page 6 o f 33 Date/Time Printed: 9/19/2008 8:36 AM
Basic Concepts/Functions
- Data entry, data selection & overrides
- Lists
Selecting by typing one character at a time
Displaying detail using enter key
Overriding list entries
- Remarks & Notes (printing, entry, skipping)
- Additional Notes
- Printing
Print (print & hold on current display)
Done (print & return to Header display)
- Citation frozen after printing
- Void
- Reissue
- Paper Loading, Form Feed
- Help
- Power Saving
Auto-turnoff (30 seconds)
Backlight management
- Troubleshooting
Sticky keys
All others please call CM
Advanced Concepts/Functions
- Multiple citations
- Hot Sheets
- Touch screen management
- Reset Feature (Reset key & type “GO”)
Citation Management AutoCITE Reference Guide
AutoCITE X3 Handheld Training Reference
AutoCITE X3 Training (3).doc Page 7 o f 33 Date/Time Printed: 9/19/2008 8:36 AM
Module Overview
AutoCITE’s Parking Module records citations and may be configured with the following features:
• Office Activity Logging
• Basic Search Mode
• Time Limit Marking
• Permit Cross Reference
• Meter Location Cross Reference
• Broken Meter Reporting
• Damage Sign Reporting
• Visitor Information.
The focus of this document will be citation entry, issuance and time limit marking.
Handheld Operation
The X3 handheld units can be operated either by pressing the keys on the keypad or by using the
touch-sensitive display window (also referred to as the touch screen).
A stylus pointer is provided with each unit for the officer’s convenience, if desired, when using the
touch method of operation. The stylus can be inserted and stored in the strap on the back of each
unit when not use. Please contact your Citation Management sales representative if you wish to
obtain a replacement stylus.
Fields are set up such that allow ease of entry while requiring essential information to be recorded.
Citation entry requirements are organized into logical information blocks that can be accessed by
pressing the associated keys on the keypad or by ‘touching’ the menu options or fields on the X3
display window. This includes screens for Location, Violation, Vehicle, Remarks and finalizing the
ticket as shown below.
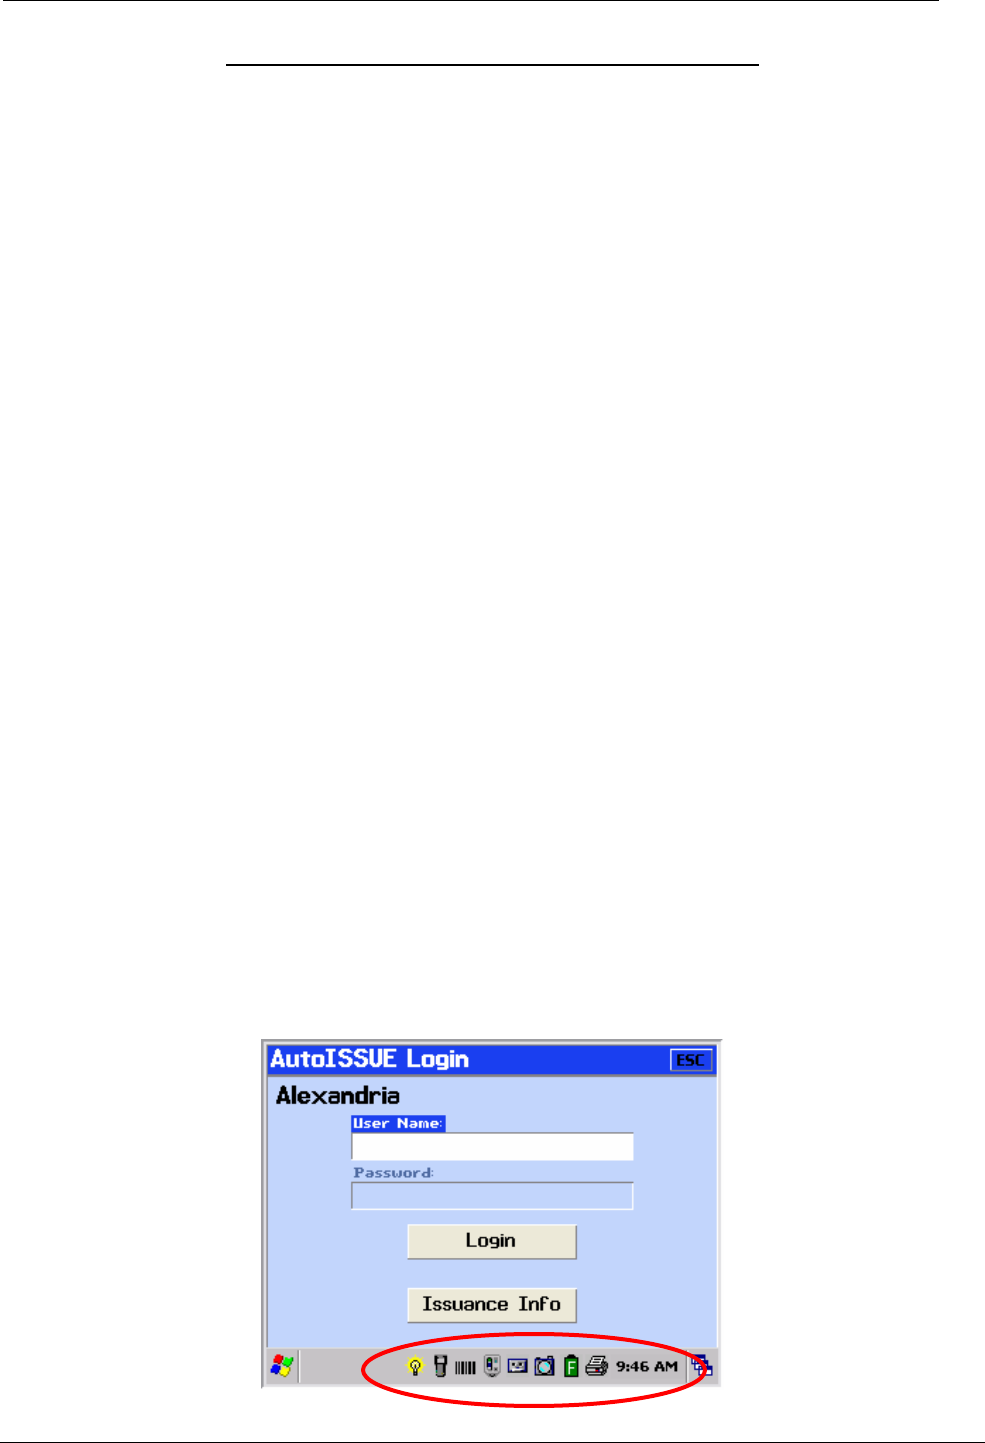
Status Line Descriptions
Depending on the configuration for your installation, one or all of the following icons will appear at
the bottom of the screen. By touching the icons with your stylus you are able to access instant
information about the status of your handheld.
Citation Management AutoCITE Reference Guide
AutoCITE X3 Handheld Training Reference
AutoCITE X3 Training (3).doc Page 8 o f 33 Date/Time Printed: 9/19/2008 8:36 AM
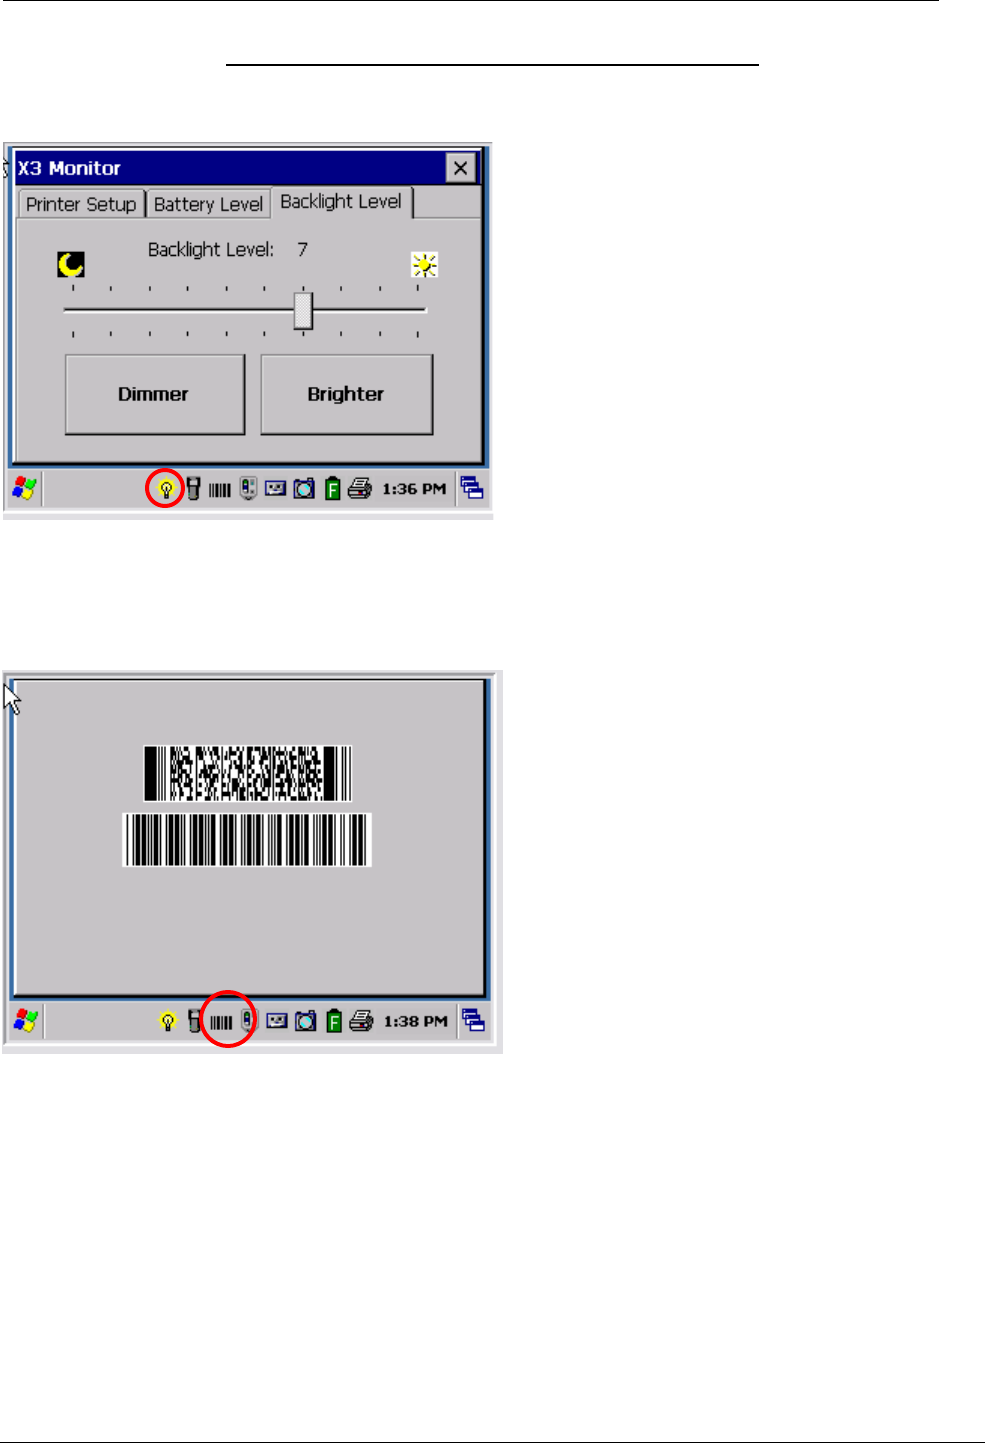
Backlight
This is an emulation of the X3's backlight applet. The backlight applet can be launched by touching
the icon in the system tray. Here you can adjust the brightness level of the backlight.
Barcode Scanner
This is an emulation of the X3's barcode scanner. In an actual X3 handheld, touching the barcode
icon or pressing the 'ACC' and 'B' keys will activate the barcode scanner. Aim the red laser to read
1D or 2D barcodes.
Citation Management AutoCITE Reference Guide
AutoCITE X3 Handheld Training Reference
AutoCITE X3 Training (3).doc Page 9 o f 33 Date/Time Printed: 9/19/2008 8:36 AM
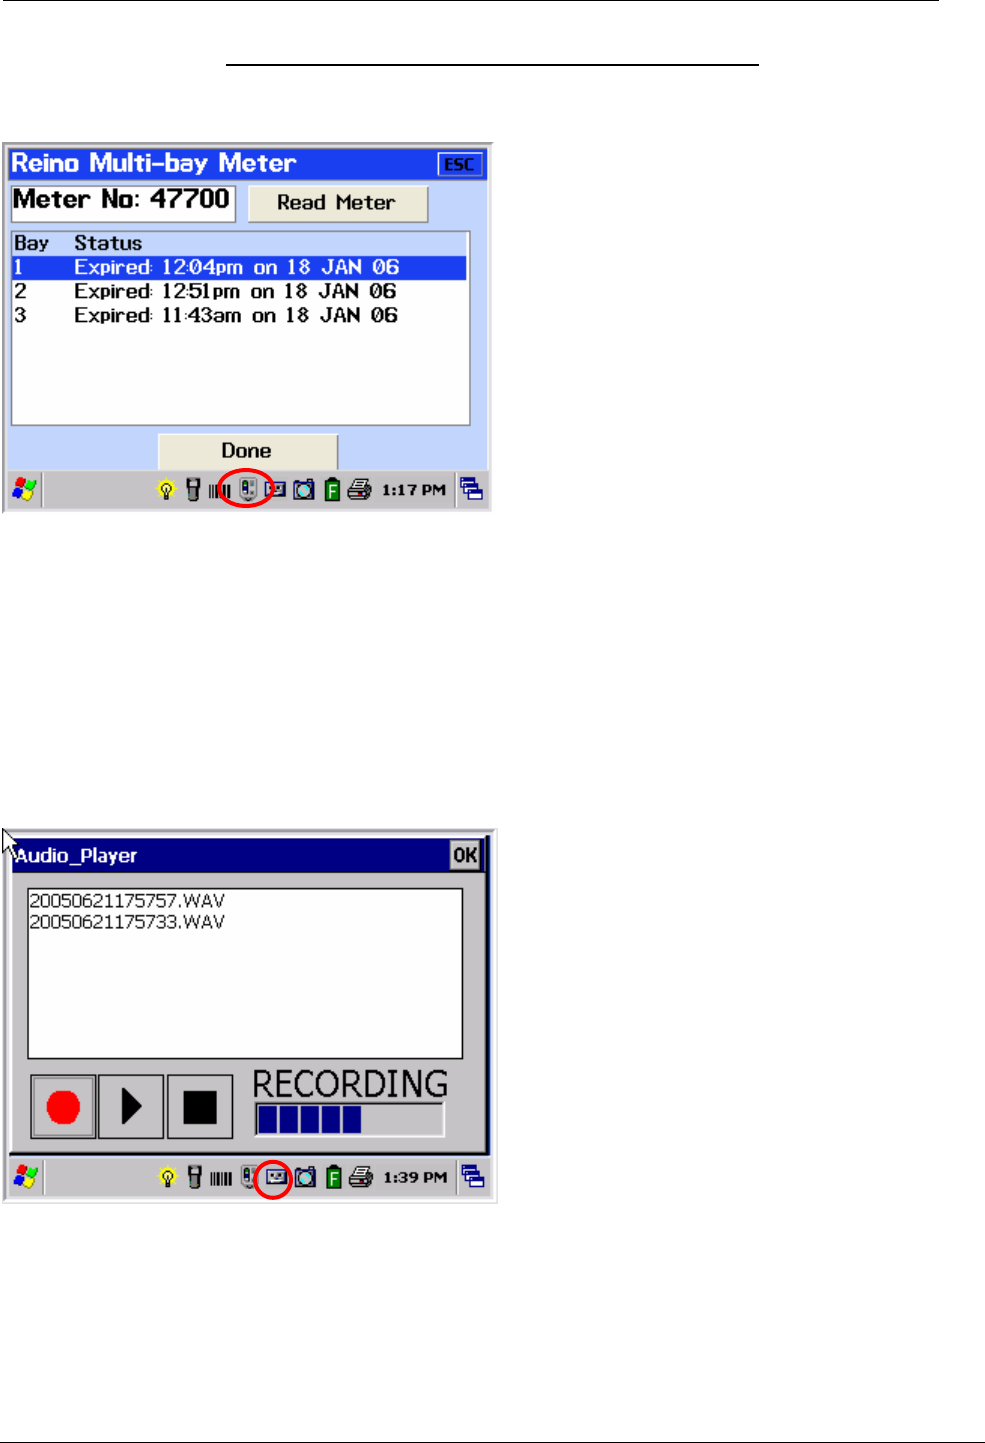
Reino Multi Bay Meter
Through Reino’s patent pending SneakerNet system, Reino meters are able to communicate meter
information to the X3 AutoCITE, through its infrared interface located on the keyboard. This meter
information includes:
Paid parking status
Equipment identification and location
Operational status of the equipment
Voice Recording
This is an emulation of the X3's audio applet. The audio applet can be launched by touching the
icon in the system tray, or by pressing the 'ACC' and 'A' keys at the same time. The audio applet will
automatically begin recording when launched. To stop recording and exit the applet, touch the
square stop button. Recordings made during citation issuance will automatically be attached to the
citation.
Citation Management AutoCITE Reference Guide
AutoCITE X3 Handheld Training Reference
AutoCITE X3 Training (3).doc Page 10 o f 33 Date/Time Printed: 9/19/2008 8:36 AM
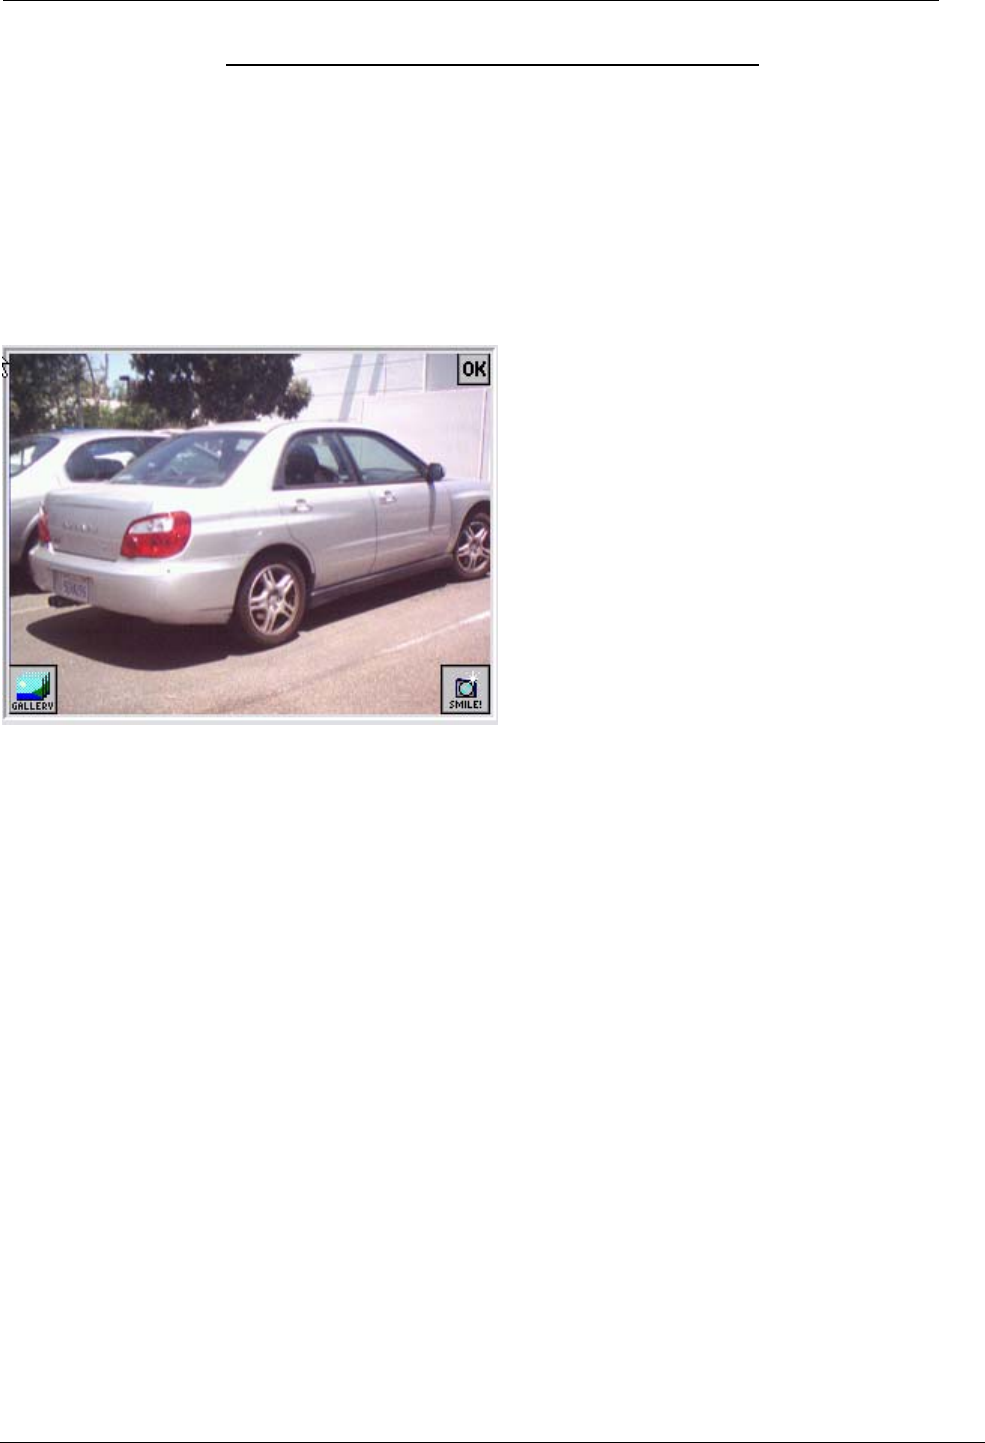
Camera
This is an emulation of the X3 's camera applet. The camera applet can be launched by touching
the icon in the system tray, or by pressing the 'ACC' and 'C' keys at the same time. When an actual
X3 camera is active, you will see a preview of the image you are aiming the camera lens toward.
Press the ESC key or touch the OK button in the upper right to close the camera applet without
taking a picture. Press the ENTER key or touch the SMILE! button in the lower right to take a
picture and close the camera applet. The GALLERY button in the lower left allows you to browse
and review pictures you have already taken. Pictures taken during citation issuance will
automatically be attached to the citation.
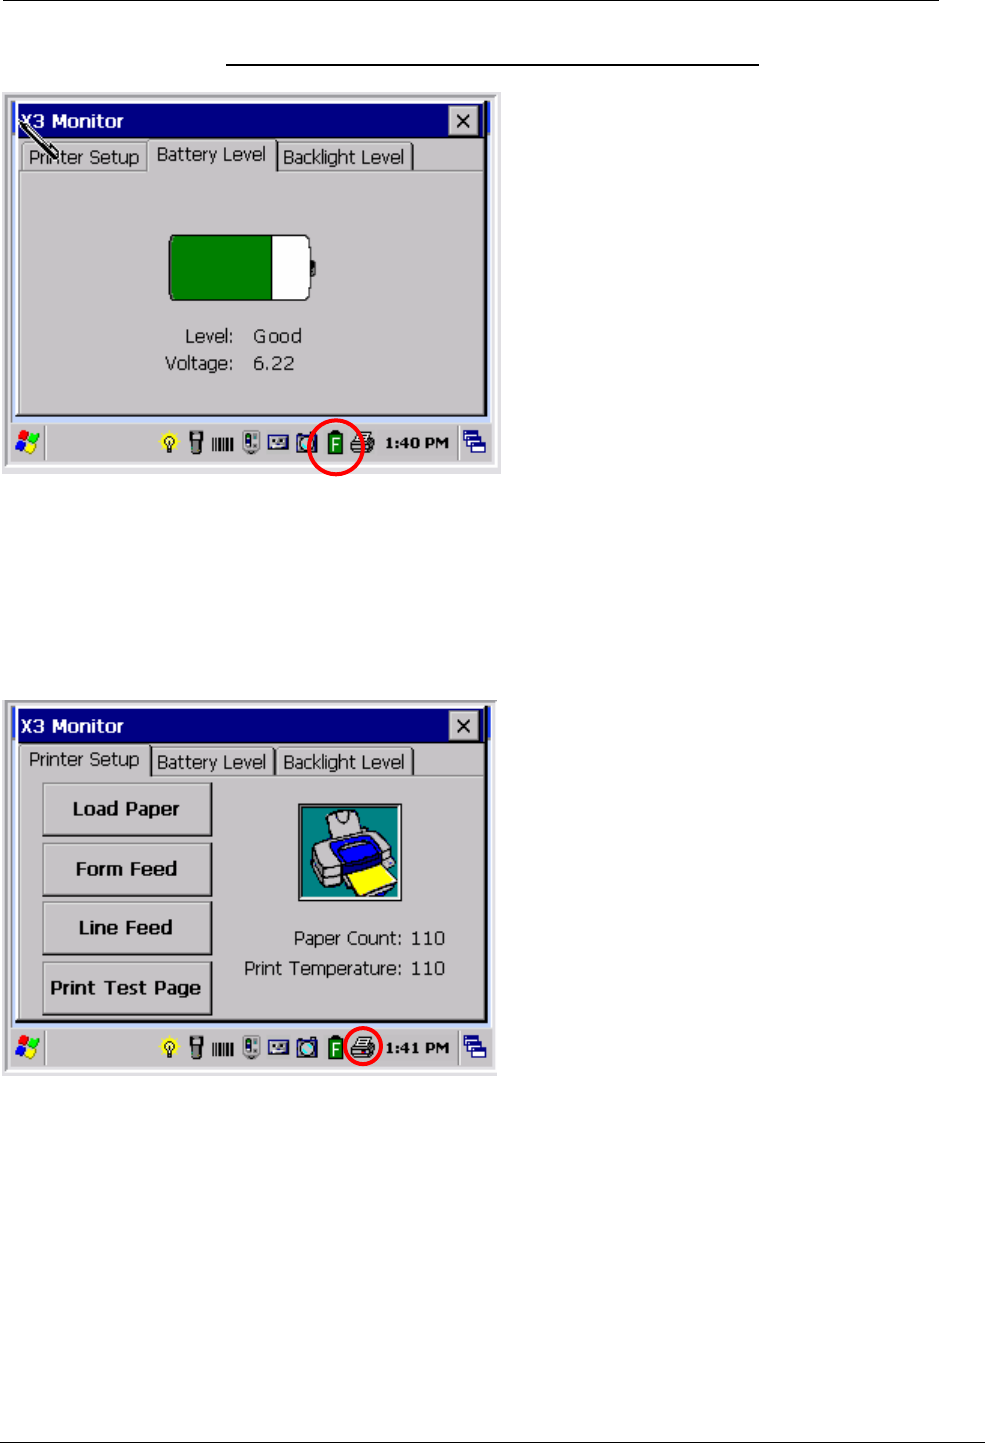
Battery
Citation Management AutoCITE Reference Guide
AutoCITE X3 Handheld Training Reference
AutoCITE X3 Training (3).doc Page 11 o f 33 Date/Time Printed: 9/19/2008 8:36 AM
This is an emulation of the X3's battery applet. The battery applet can be launched by touching the
icon in the system tray. The battery applet displays the current battery levels.
Printer
This is an emulation of the X3's printer applet. The printer applet can be launched by touching the
icon in the system tray. Here you can load new paper and run maintenance tests.
Field Entry & General Navigation
The citation entry process is organized into logical groups of information.
• You can either use the keypad or the touch screen to navigate within the various screens on
the X3 handheld unit. (A stylus, or plastic pointer, is provided with each unit for your
convenience.)
• NEXT and PREV can be used to move to the next field or backward to a field

Citation Management AutoCITE Reference Guide
AutoCITE X3 Handheld Training Reference
AutoCITE X3 Training (3).doc Page 12 o f 33 Date/Time Printed: 9/19/2008 8:36 AM
• NEXT also allows you to advance to the next screen of information when you have
completed entry of all fields on the current screen; such as when moving from the Violation
screen to the Vehicle screen.
• You can also use the letters on the keypad to navigate to a particular menu. For example,
pressing the key with the letter “P” on the keypad is a shortcut to Parking Issue New menu.
• ENTER is used to display the submenu options under an option on the main menu; for
example, to move the focus from the menu item P=Parking to PARKING Issue New.
• Pressing ENTER when in a field that has an associated drop-down list will display the
contents of the list, allowing you to select an individual value to populate the field.
• UP ARROW and DOWN ARROW keys can be used to position the cursor on the desired
value within a particular menu or drop-down list.
• Right ARROW and LEFT ARROW keys can be used to move from character to character
within a given field’s value, which is helpful when you need to manually revise a displayed
value, such as when entering NOTES or REMARKS.
Note: When entering values for fields with validation lists, the software provides a feature called
Anticipation.
For example, when an Officer enters “F” as the first character of vehicle type, the system presents
the first value in the list that begins with “F” (e.g. FIAT). If this is the correct value, the Officer may
use the Next key to move to the next field or screen. If this is not the correct value, the operator may
enter “O” and the first entry with “FO” will be presented. (E.g. FORD).
Citation Management AutoCITE Reference Guide
AutoCITE X3 Handheld Training Reference
AutoCITE X3 Training (3).doc Page 13 o f 33 Date/Time Printed: 9/19/2008 8:36 AM
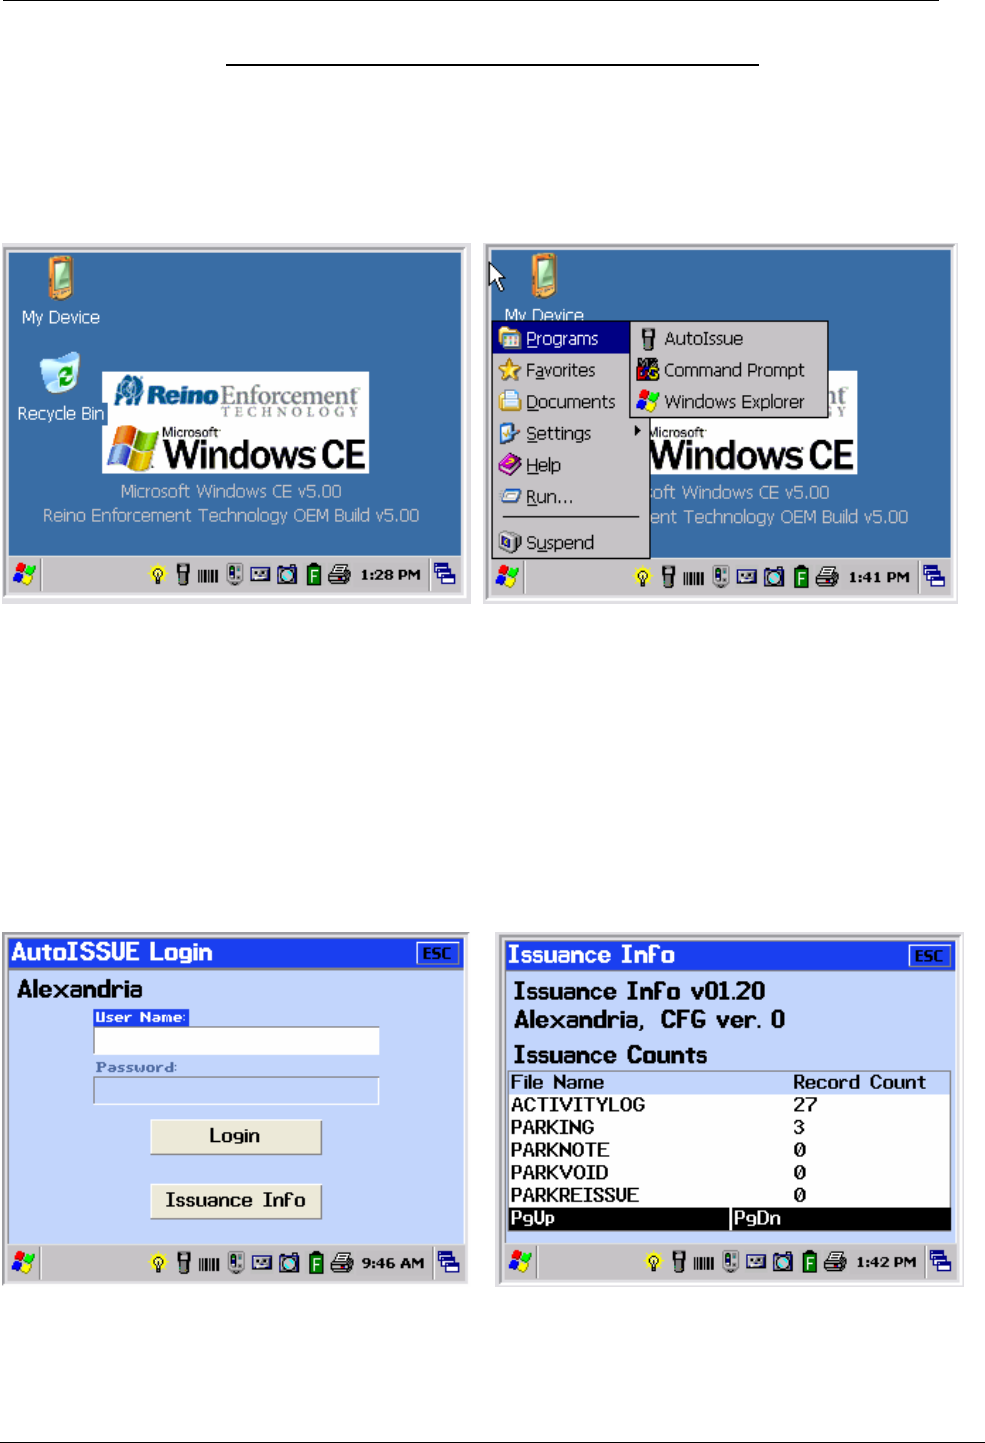
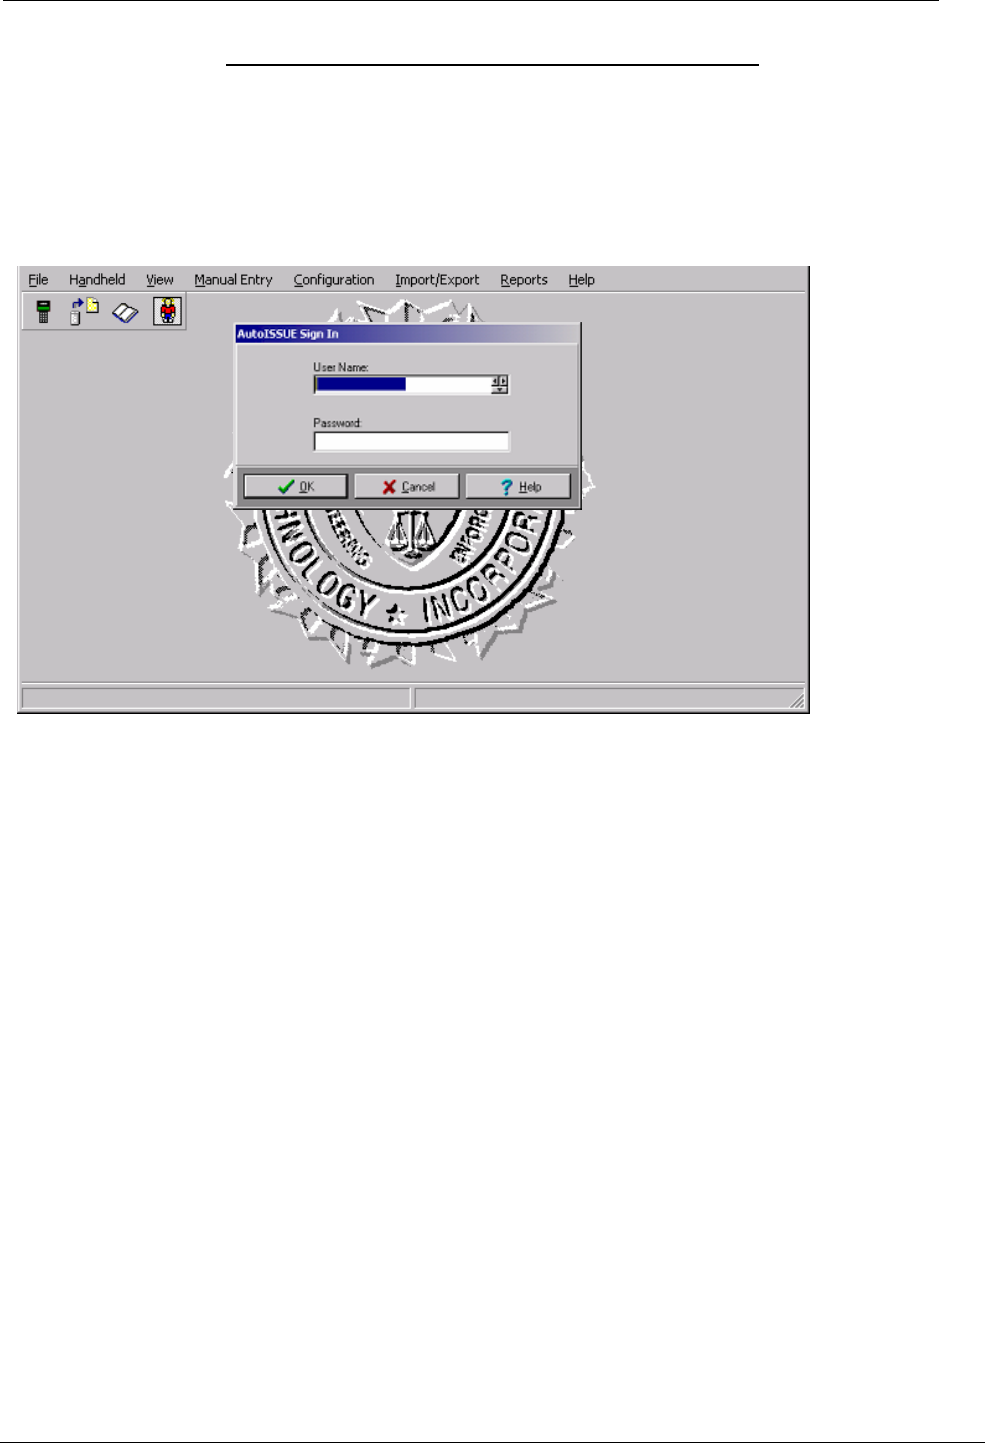
Accessing the AutoISSUE Application
To access the application from the Windows CE desktop, you must first “launch” the application from
the desktop. Using your stylus tap the Windows icon in the lower left hand corner to bring up the
menu of options.
Tap the “Programs” option, then tap the AutoISSUE option. This will launch the AutoISSUE
Application and take you to the login screen for AutoISSUE.
Logging on the X3 Handheld
To begin using the handheld, the Officer must first log on using his or her User Name and Password,
which is assigned by the AutoISSUE system administrator. Please contact your supervisor if you
don’t remember or your User ID and Password. It is important that you log in using your individual
ID for ticket tracking and data reporting purposes. Selecting Login in will take you to the main menu
for citation issuance. Selecting Issuance Info will display record counts that are currently in the
handheld.
Main Menu
There are 4 primary options on the Main Menu which will be discussed in this document,
Citation Management AutoCITE Reference Guide
AutoCITE X3 Handheld Training Reference
AutoCITE X3 Training (3).doc Page 14 o f 33 Date/Time Printed: 9/19/2008 8:36 AM
P=Parking, S=Search, R=Report and Issue Application information.
As you navigate the list of menu options along the left side of the Main Menu, you will note that each
main menu option has an associated submenu.
To navigate the list of menus, use the UP and DOWN arrows or simply touch the menu option using
the touch screen. The keys on the keypad marked P, S and R provide an alternate method for
selecting the corresponding menu option.
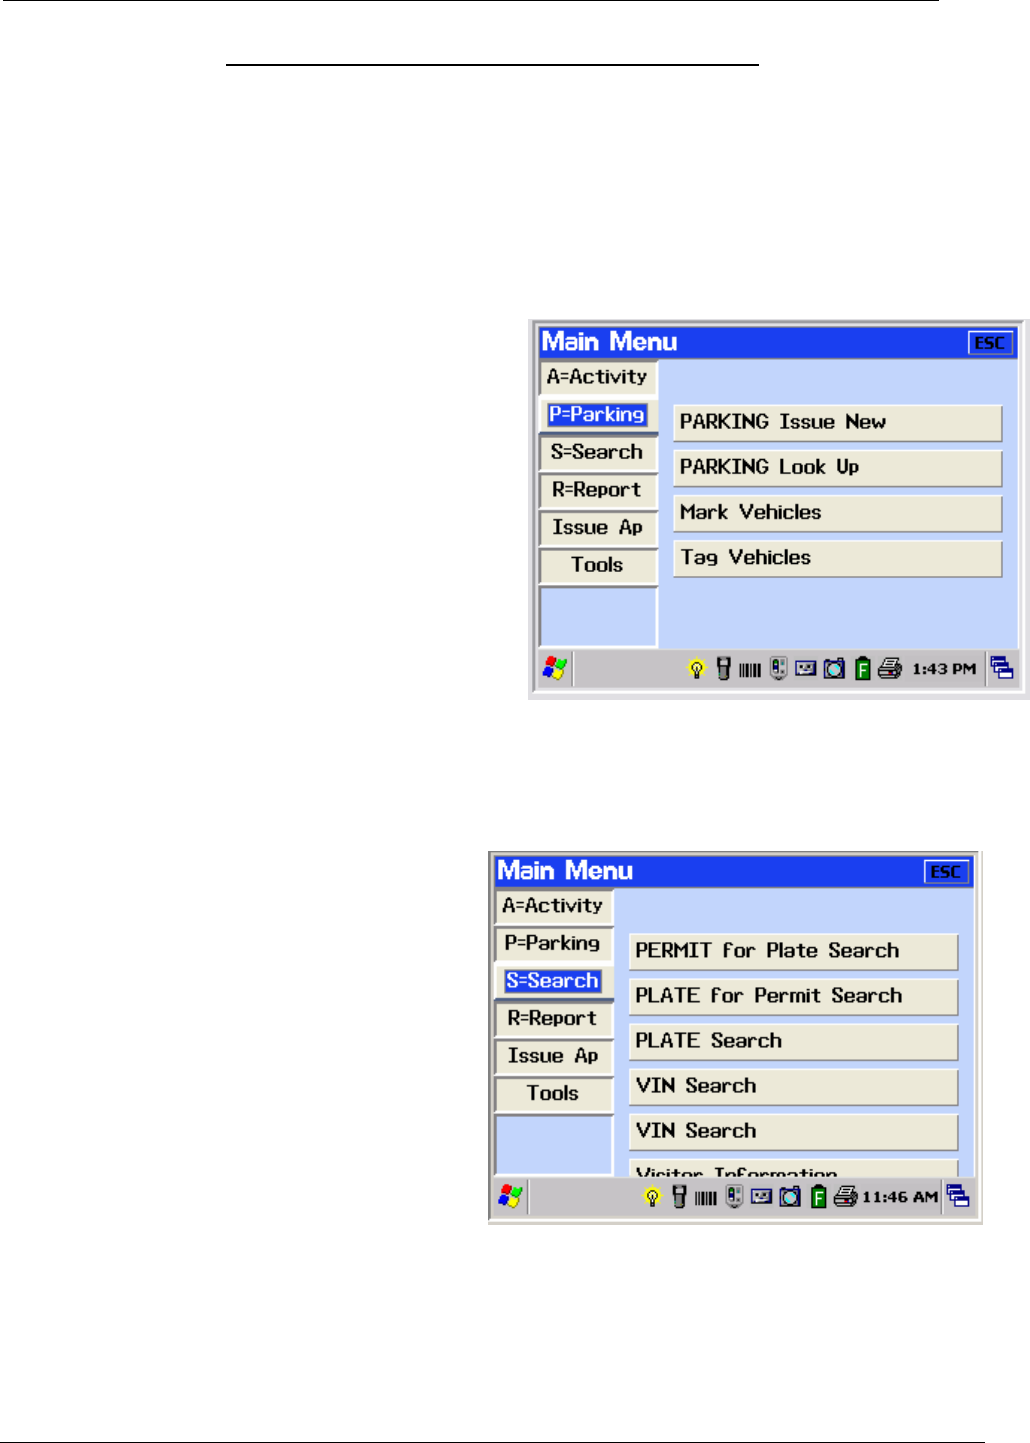
P=Parking will present a submenu for issuing
new citations. The submenu contains
functions that allow you to look up citations
currently in the handheld and to electronically
mark vehicles and record time-limit parking
information (useful when the weather does not
permit marking with chalk, for example).
The Search only mode enables the Officer to
search for a permit match (if applicable) or
determine if a vehicle has been recorded on a
Hotsheet due to Scofflaw, stolen or other
criteria. This feature provides for look up by
License Plate or VIN depending on how the
vehicle information was captured for Hotsheet
reporting. In addition, this option also enables
display of Visitor Information such as commonly
requested directions if previously entered.
Citation Management AutoCITE Reference Guide
AutoCITE X3 Handheld Training Reference
AutoCITE X3 Training (3).doc Page 15 o f 33 Date/Time Printed: 9/19/2008 8:36 AM
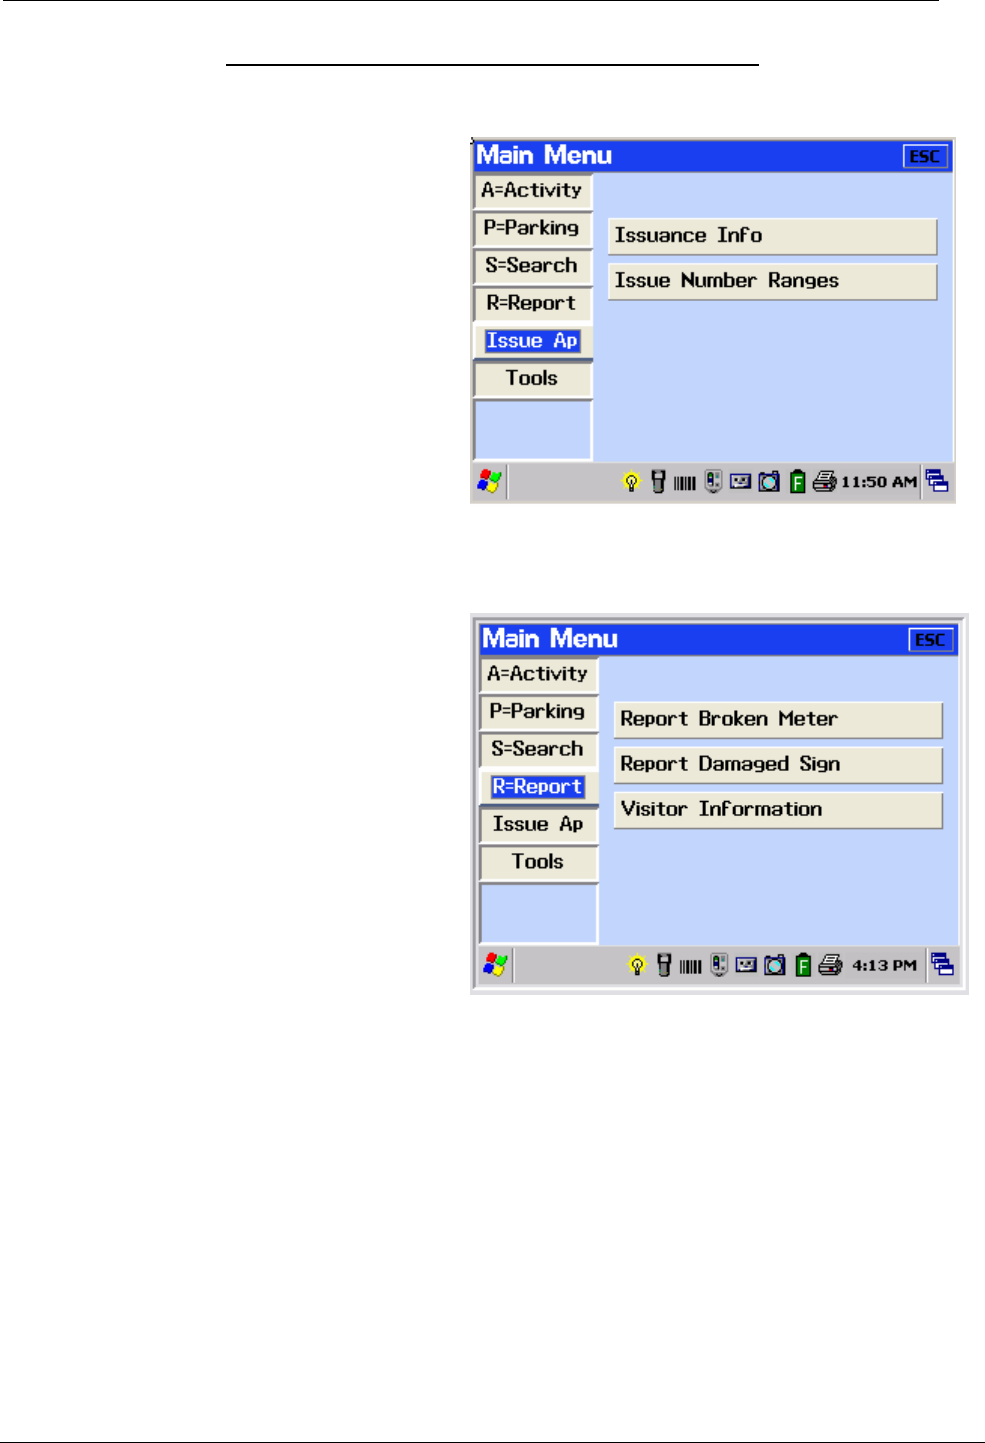
Issuing Application
The Issue Application mode allows the
Officer to review information regarding
citation/ticket number allocation to this
handheld unit and consumption to date.
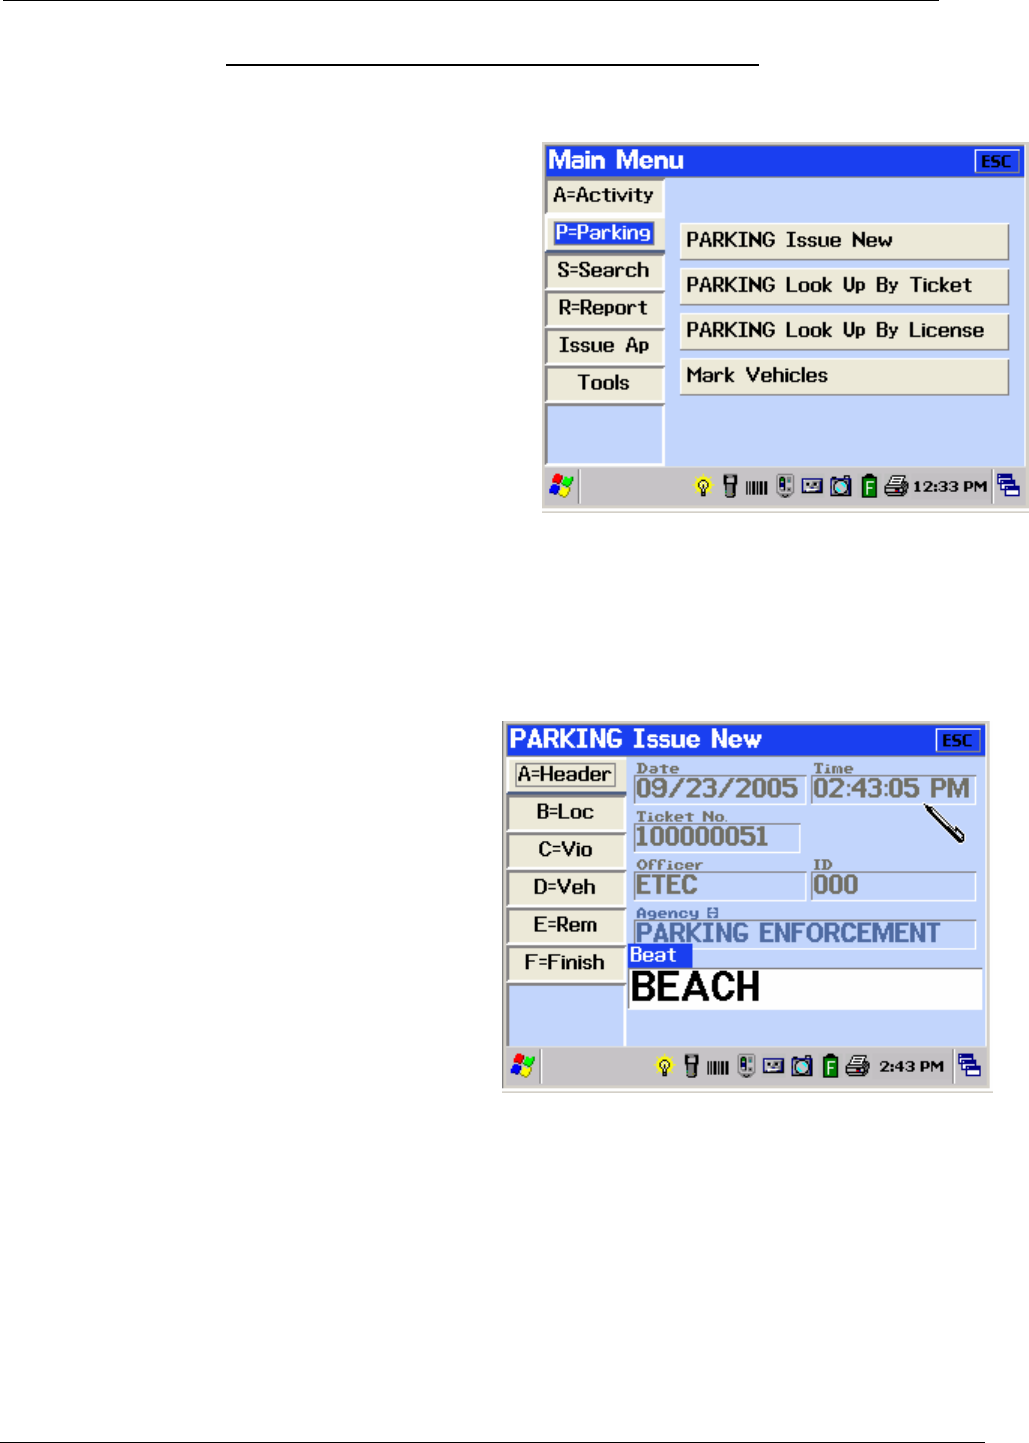
Reports Application
The Reports Application allows the user to
record information in the field regarding the
status and condition of parking meters and
City signs (stop, yield, street, traffic markers,
etc…) That information can then be printed
into a report and delivered to the City
department responsible for investigating and
repairing the meters and signs.
Citation Management AutoCITE Reference Guide
AutoCITE X3 Handheld Training Reference
AutoCITE X3 Training (3).doc Page 16 o f 33 Date/Time Printed: 9/19/2008 8:36 AM
Issuing a New Parking Ticket
From the Main Menu, use the PREV or NEXT keys
on the X3 handheld unit to move up and down the
menu options.
When P=Parking highlighted, press the ENTER key.
The menu option - Parking Issue New - will become
highlighted. Pressing and the ticket Header screen
will display.
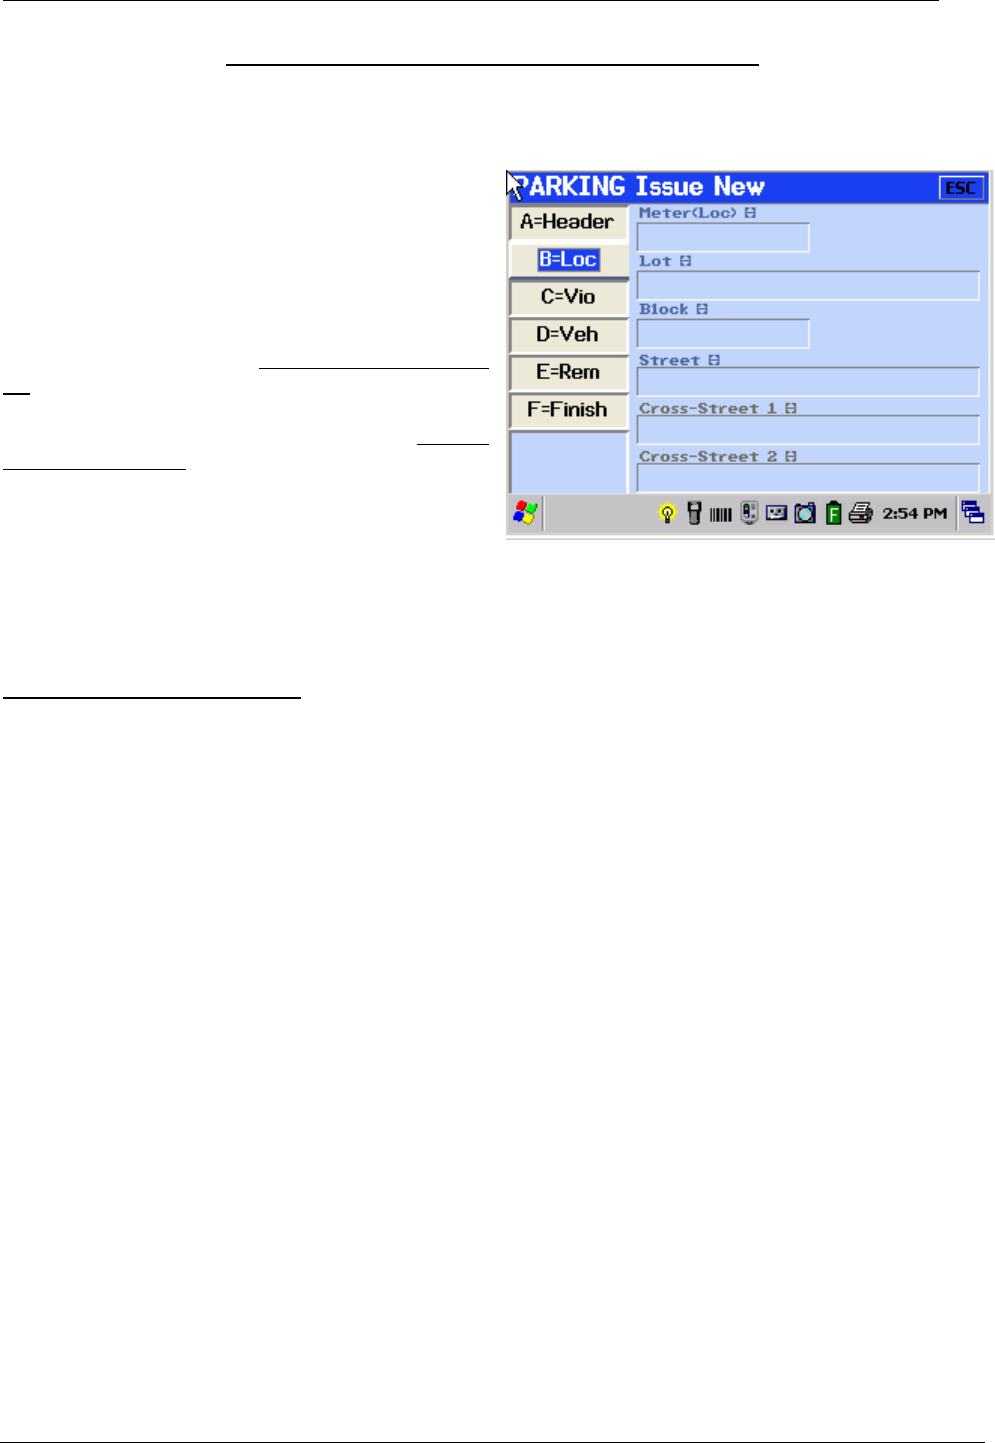
Header Screen
The Header screen provides for display of basic
information including Current Date, Time, Ticket
Number, Officer Name and Badge Number,
Agency and Beat. With the exception of the
Beat, all fields are filled in automatically by the
system.
While date, time and Issue Numbers change
automatically, the Officer, Agency and Beat
values do not need to be re-entered for
subsequent tickets. Once the Beat field has
been filled in, the Officer can either press the
NEXT key or touch B=Loc to proceed to the
Location information screen.
Citation Management AutoCITE Reference Guide
AutoCITE X3 Handheld Training Reference
AutoCITE X3 Training (3).doc Page 17 o f 33 Date/Time Printed: 9/19/2008 8:36 AM
Location Screen
The Location screen enables the operator to
enter key information regarding the location of the
vehicle.
The Officer may enter or select a Meter Location
for which he would like to enter a parking
violation. Entering, or selecting a Meter
Location, which is in the Meter Cross-Reference
list (if applicable), will populate other Location
information. This entry will also populate the
Meter Number field that appears on the Vehicle
information screen. Rules for valid combinations
of Location information are contained below. The
Location information can be modified, for this
citation, if it is incorrect.
The Officer may enter or select a parking Lot or garage which he is patrolling. In this case, no other
fields on this screen will be allowed for entry. Upon entering or selecting the Lot and pressing the
Next key, the operator will be taken to the Violation screen.
Location Combination Rules
If the Officer enters a Block (general street number or house address), only the Street the violation
occurred on is asked for (cross streets are not applicable).
If Lot and Block are skipped, then Street and Cross streets are available for entry.
Examples of location entries
- SHOPPING MALL is selected for the Lot
Lot SHOPPING MALL will print on the citation
- 123 is selected or entered for Block and Jones Street is selected for Street
Location 123 JONES STREET will print on the citation
- Lot and Block are skipped and Street, Cross-Street 1and 2 are entered or selected
Location JONES STREET
Cross Streets ALLEN RD / ARDEN AVE will print on the citation
Upon entering the appropriate Location fields, the Officer presses the NEXT key to proceed to the
Violation information screen.
Citation Management AutoCITE Reference Guide
AutoCITE X3 Handheld Training Reference
AutoCITE X3 Training (3).doc Page 18 o f 33 Date/Time Printed: 9/19/2008 8:36 AM
Sample of Dates & Fees to print on Citation & Notices based on Issue Date: 09/07/05
Due Now After 09/22/05 After 10/07/05
$20.00 $30.00 $45.00
Days after Issue +15 +30
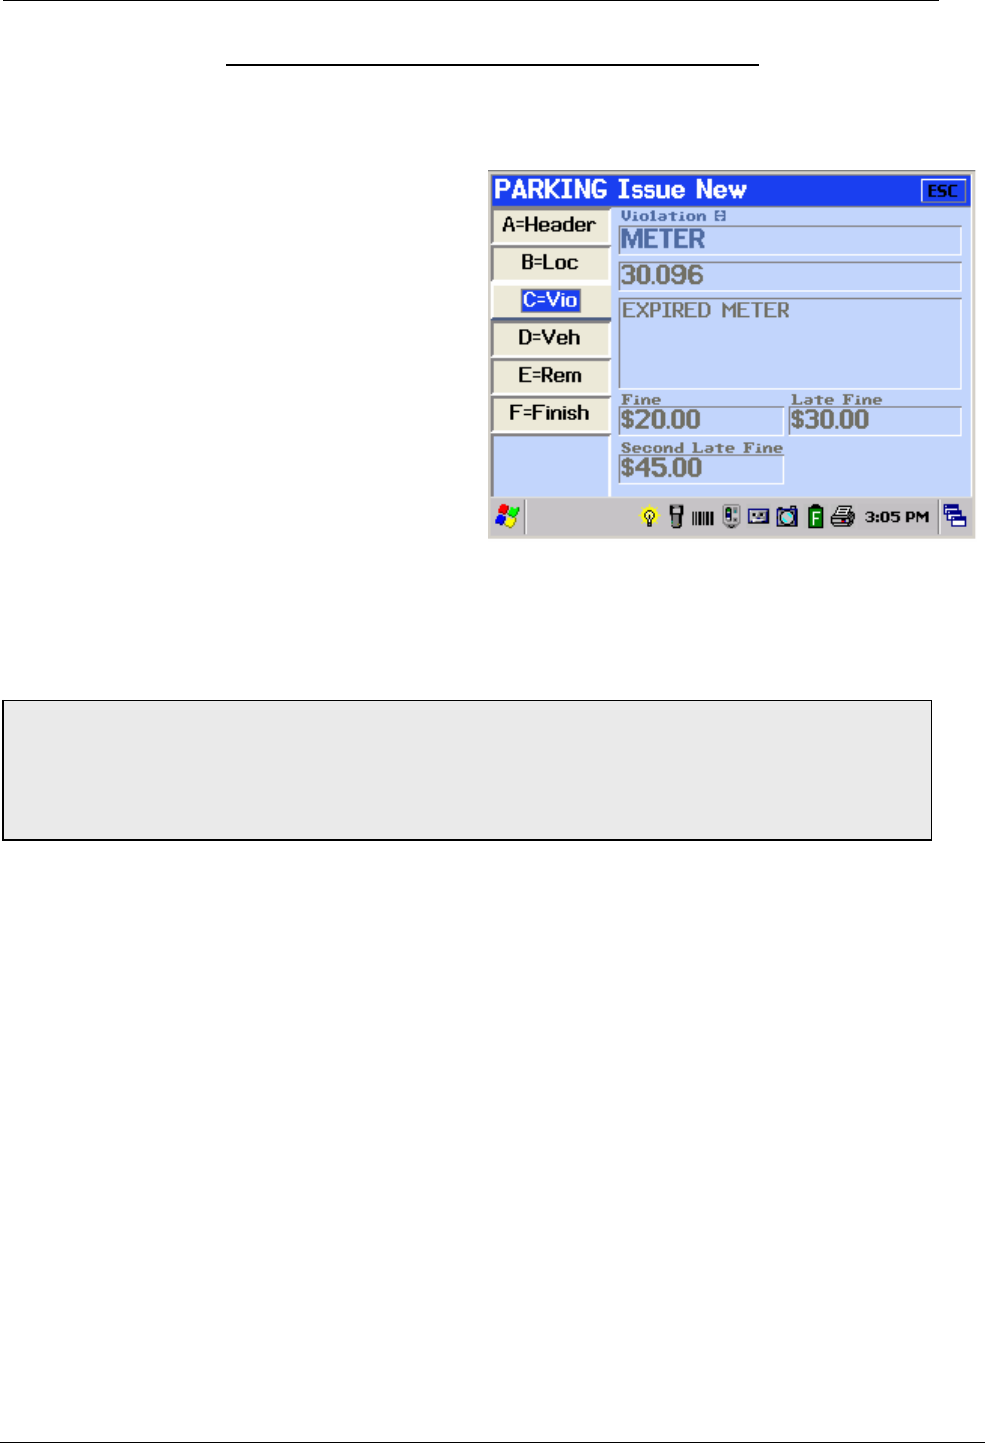
Violation Screen
The Violation screen enables the operator to
enter information regarding the violation to be
recorded.
Violations are selected from a list by use of a
HOTKEY or short form of the violation
description. In the following example, an
Officer typed in “M” and the list
anticipates/presents the associated violation.
The ordinance number and violation
description, which will be printed on the citation,
will be displayed.
Fines and Late Fees are presented based on
the violation selected. The due dates are set using the citation issued date. Late fees are
calculated using predefined days from the issue date for Late Fee 1 and, if required, for Late Fee2.
The due dates for Late Fines vary by violation and, if applicable, will print on your citations as shown
in the following example:
Upon entering/selecting the appropriate Violation, the Officer presses the NEXT key to proceed to
the Vehicle information screen.
Citation Management AutoCITE Reference Guide
AutoCITE X3 Handheld Training Reference
AutoCITE X3 Training (3).doc Page 19 o f 33 Date/Time Printed: 9/19/2008 8:36 AM
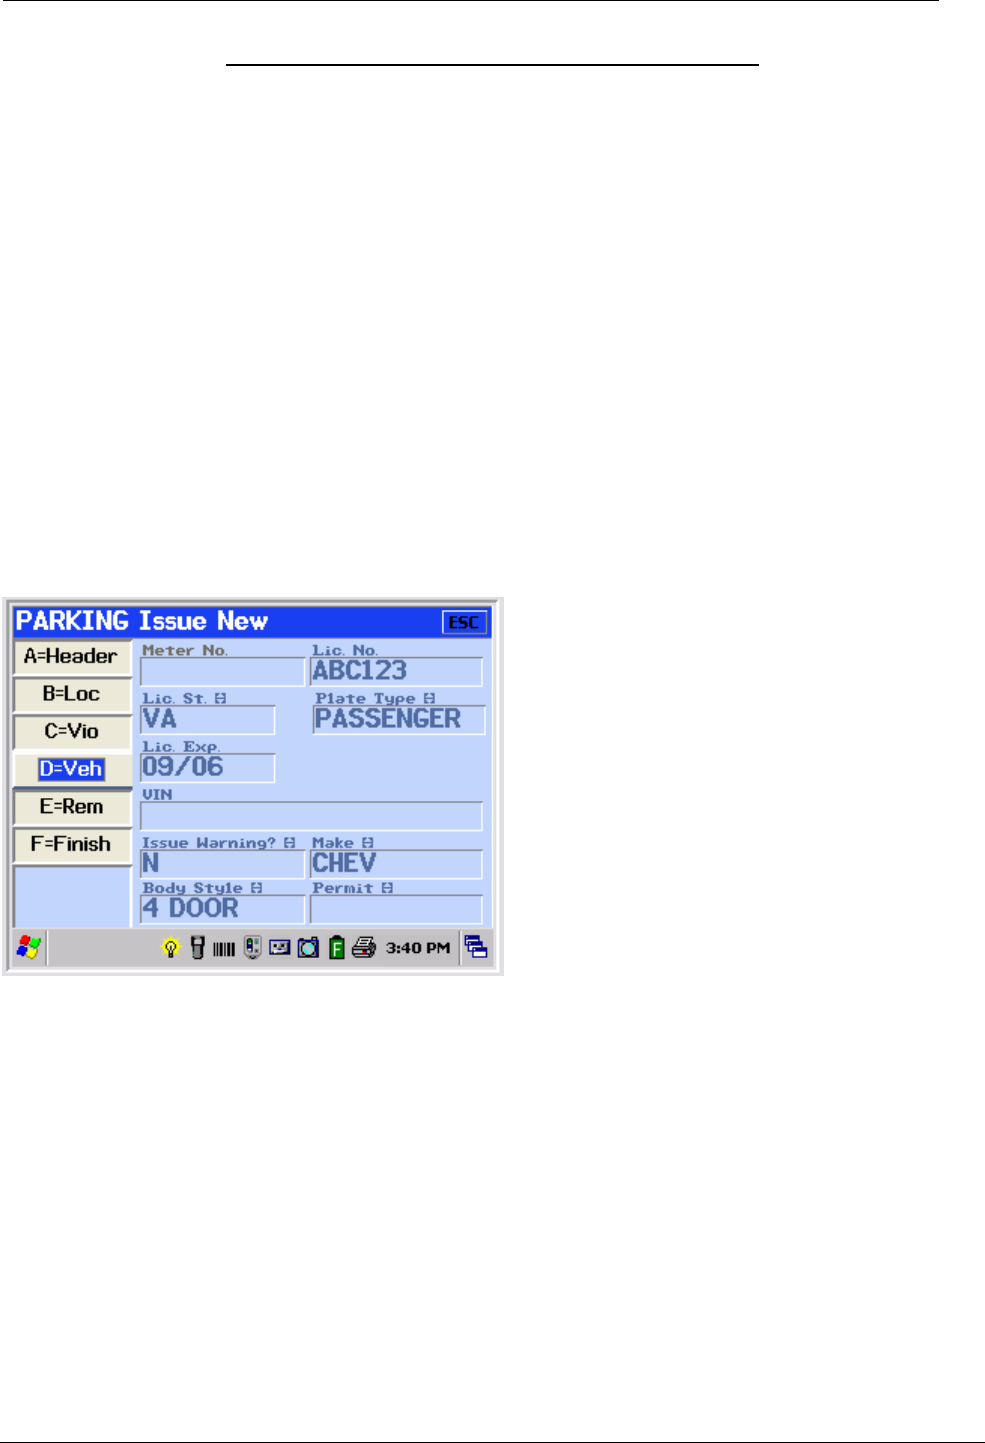
Vehicle Screen
The Vehicle screen enables the operator to enter information regarding the vehicle to be cited.
If the Meter Location previously entered is not the correct Meter Number, the Meter Number may be
entered or changed at this point.
The Officer must enter License Plate and State or VIN from the vehicle. The State is defaulted to
VA for Virginia, but may be overridden to the State or Province code from a predefined list.
If Plate Type exists on the vehicle screen for your agency, the plate type will default to AUTO, but
may also be overridden with another valid Plate Type selected from the associated drop-down list.
The Officer must also enter/select a valid Vehicle Make and Body Style from the corresponding list.
Expiration date (Lic. Exp.), Issue Warning and Permit number are optional fields. If the Officer
enters “Y” for Issue Warning, a zero dollar figure is printed on the citation and a remark will be
printed on the citation noting this citation is only a warning.
Upon entering/selecting the appropriate Vehicle information, provided no special conditions exist
(per next page), the Officer presses the NEXT key or, alternatively, can touch the Remarks (Rem)
menu option to proceed to the Remarks information screen.
Citation Management AutoCITE Reference Guide
AutoCITE X3 Handheld Training Reference
AutoCITE X3 Training (3).doc Page 20 o f 33 Date/Time Printed: 9/19/2008 8:36 AM
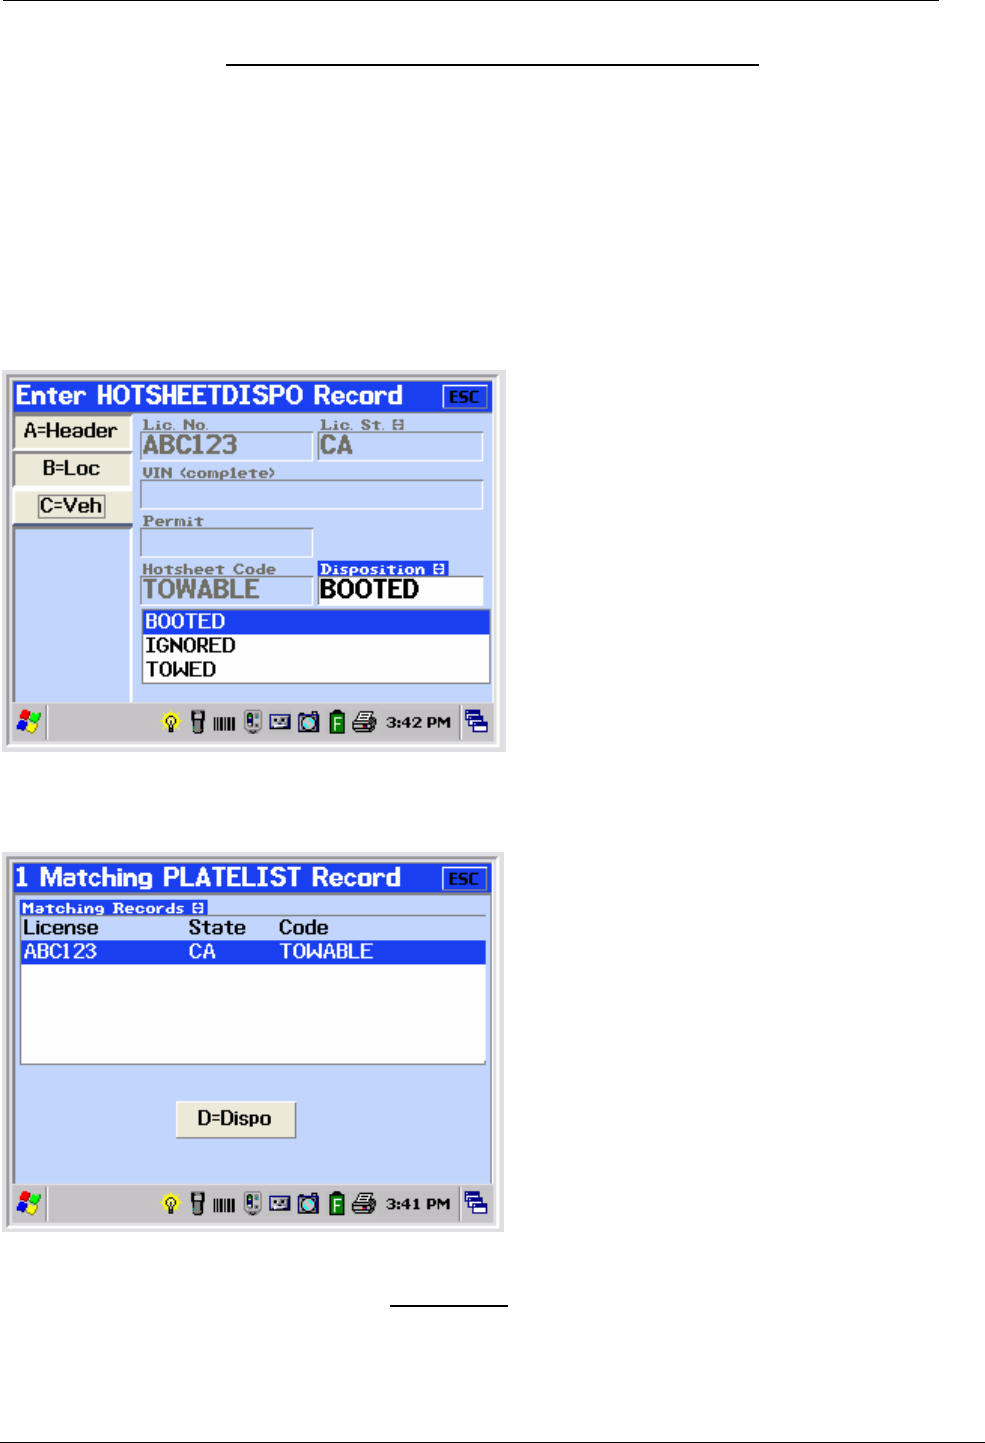
Hotsheet Considerations
A special feature exists to alert Officers to considerations which may exist for selected vehicles.
Hotsheets are used to list License Plates or VINs where these special conditions exist. This may
include such situations as Stolen Vehicles, Scofflaw violators, or VIP/Exempt vehicles. Once a
License Plate and State, or a VIN has been entered, the appropriate list is searched for an existing
Hotsheet condition.
In the example below, a License Plate and State was entered and the following screen appeared.
The Officer will then have the opportunity to exercise department procedures to address this alert.
The Officer will be required to enter the action taken (disposition) and will then be returned to the
citation entry process.
This Hotsheet process will function the same when identifying a vehicle by Plate/State or VIN.
Citation Management AutoCITE Reference Guide
AutoCITE X3 Handheld Training Reference
AutoCITE X3 Training (3).doc Page 21 o f 33 Date/Time Printed: 9/19/2008 8:36 AM
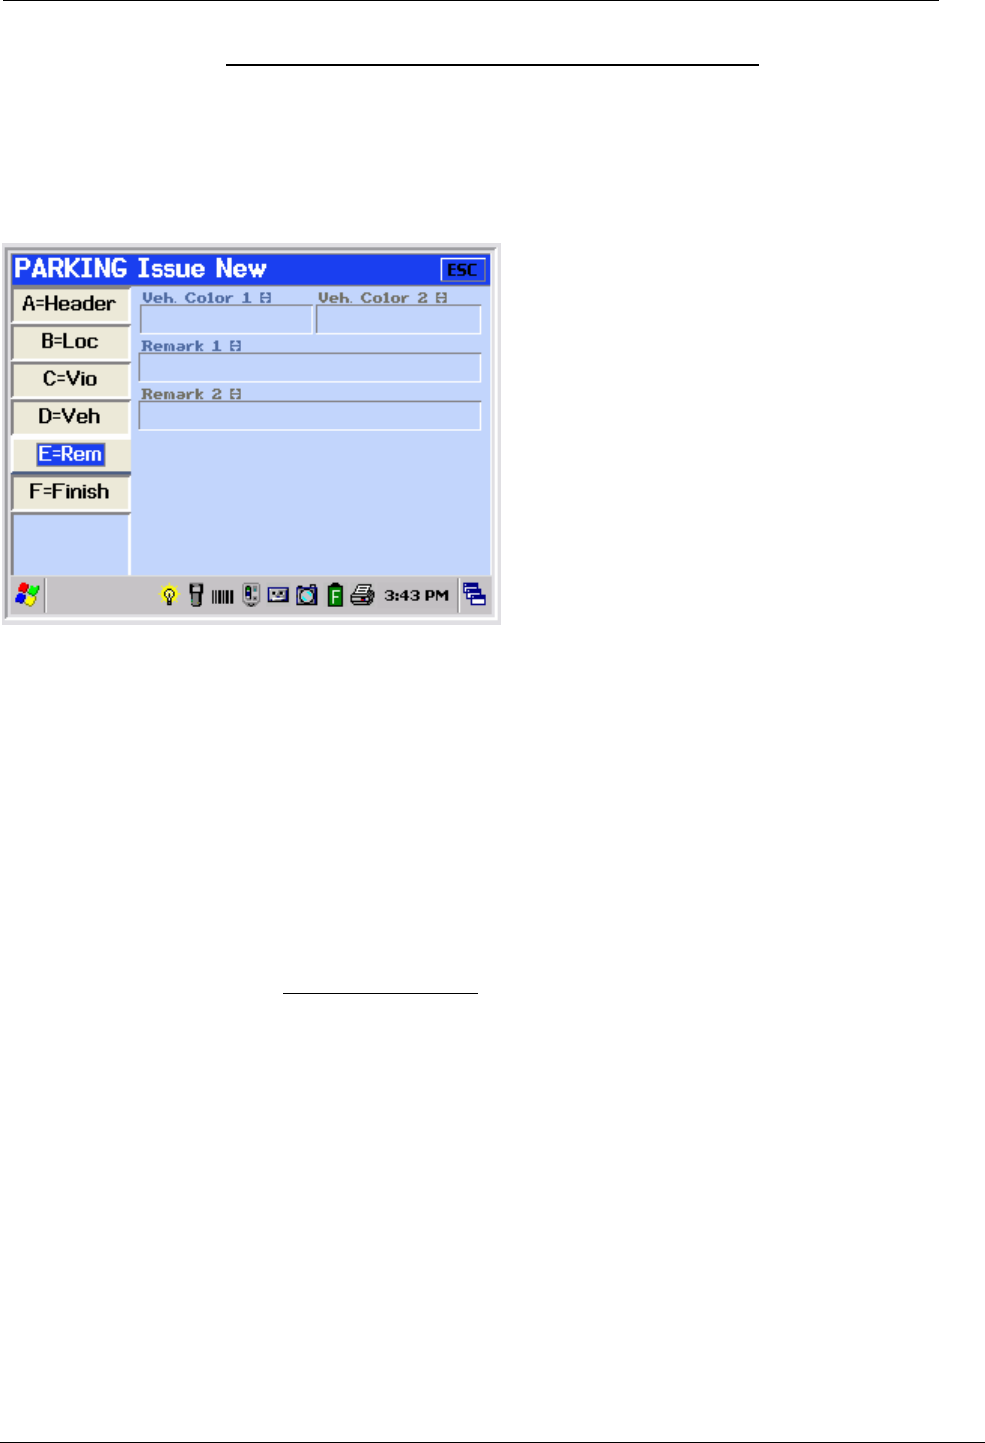
Remarks Screen
The Remarks screen enables the operator to enter additional information regarding the vehicle as
well as Remarks to be printed on the citation. (This screen may vary in appearance by agency.)
If available to the agency, Vehicle Colors are selected from a drop-down list. Up to two colors can
be selected.
Remarks can be selected from a list or can be entered free form. Remark 1 must be entered before
Remark 2.
Note:
Remark 1 will not clear for subsequent citations until changed or cleared by the Officer
Remarks will print on the citation...
Depending on the agency’s configuration, the Officer may have the option to enter an optional Case
reference number. This is reference data only and is meant to support cross-reference to other
Police Department systems such as dispatching systems.
Upon entering/selecting colors and remarks, the Officer presses the Next key to proceed to the
Finish information screen.
Citation Management AutoCITE Reference Guide
AutoCITE X3 Handheld Training Reference
AutoCITE X3 Training (3).doc Page 22 o f 33 Date/Time Printed: 9/19/2008 8:36 AM
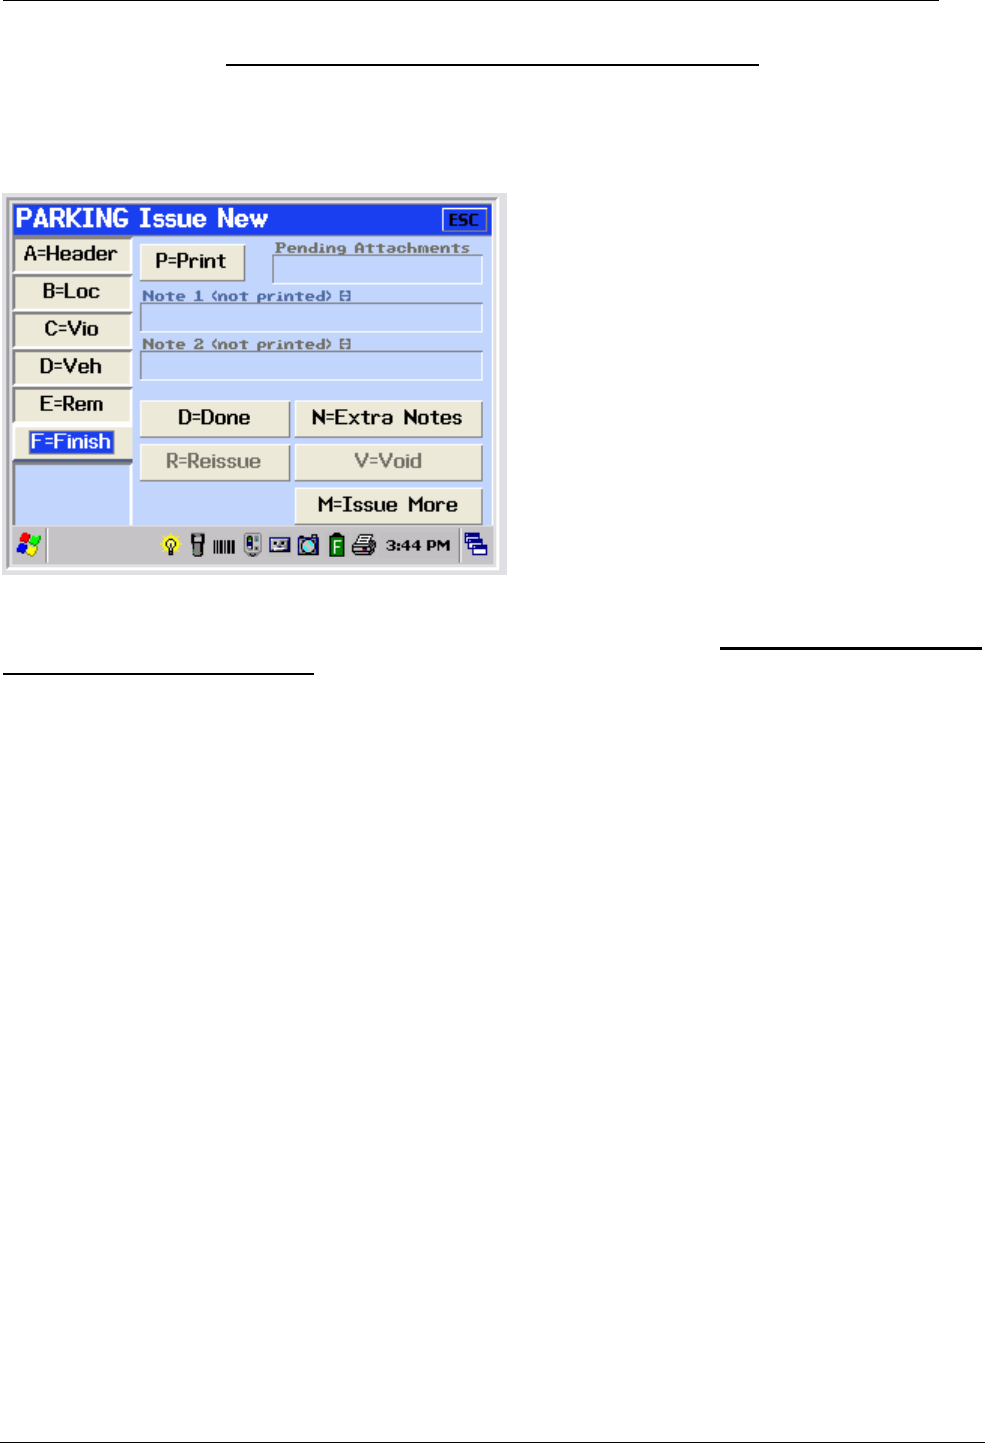
Finish Screen
The Finish screen provides a number of features to finalize entry and printing of the citation.
P=PRINT Press P to print the citation or print a copy of the citation. Selecting Print does not
complete the citation process and does not prepare the handheld for next citation entry. You may
wish to enter Notes that do not print on the citation, Void or Re-Issue the citation due to an entry
error. You must press Done to complete the citation entry process. If you select Done after Print,
the citation will not reprint. After a citation is printed, you will not be able to edit the printed portions
of the citation.
Note 1 & 2 - There are two 60-character note fields for recording short notes which do not appear on
the citation. The citation can be printed prior to entering these notes.
D=DONE Done prints and saves the citation and prepares the handheld unit for issuance of the next
citation to a different vehicle. Values from the previous citation are retained until the Officer returns
to the first field and starts to type in the new value. At that point, all the fields set to pre-clear
become blank.
M-ISSUE MORE This is used to issue multiple violations to the SAME vehicle. Selecting Issue
More prints the citation that was just entered, creates a new citation and takes the Officer to the
Violation tab retaining all the information from the previous citation
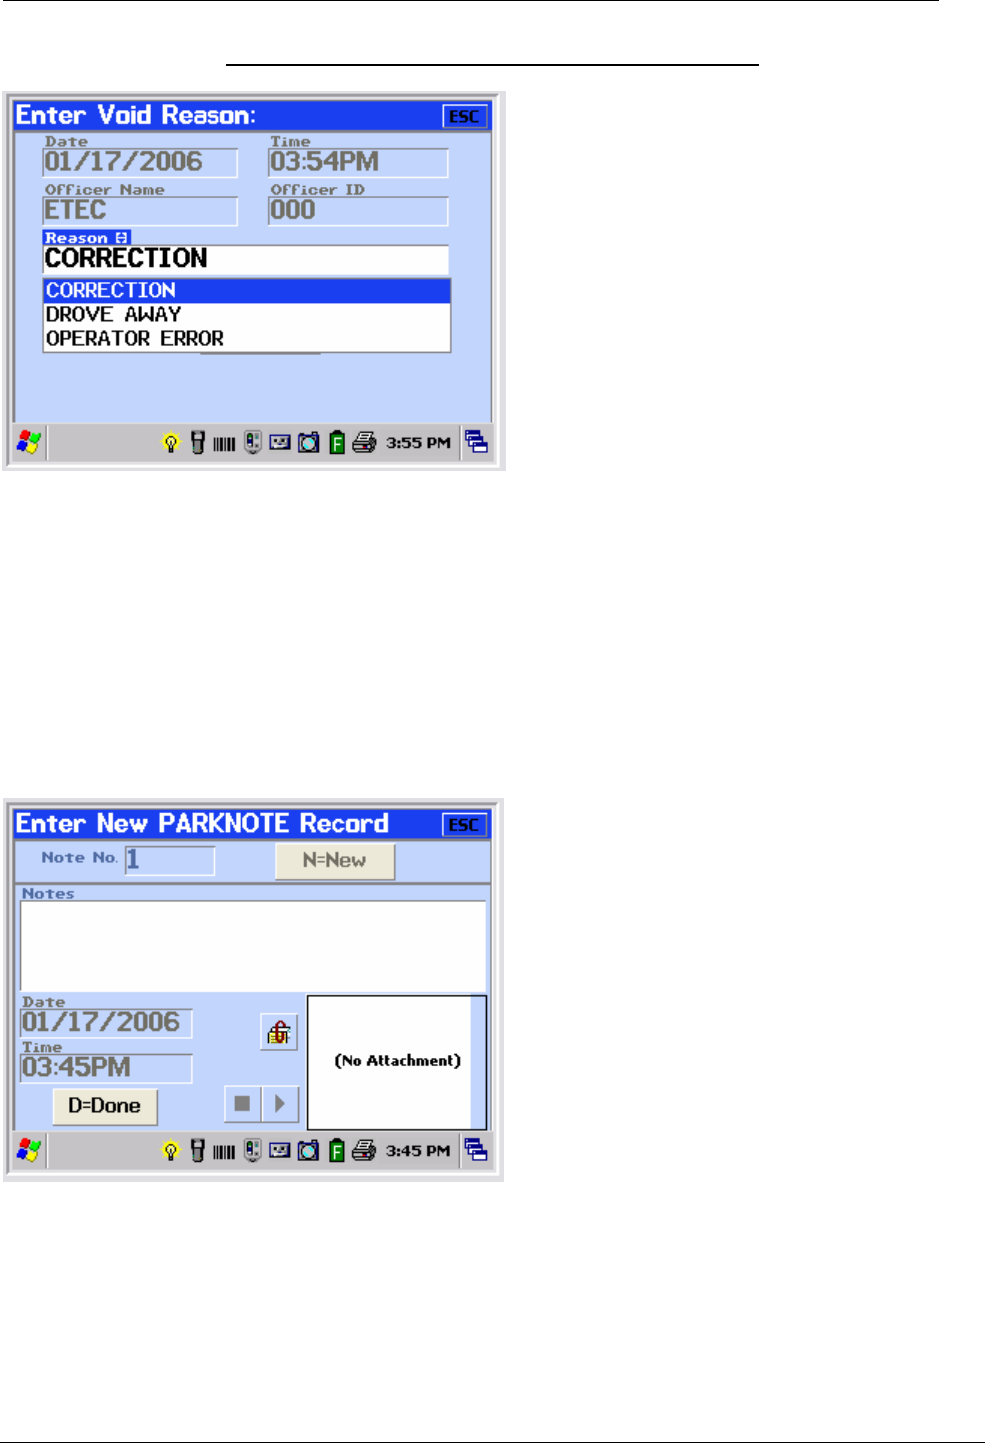
V=VOID This is used to Void a citation and creates a void record for the citation number voided.
The Officer is required to enter a void reason. Once completed, the Officer is returned to the Finish
screen. Issue Date and Time are initialized to the current date and time. The citation number is NOT
reused. This feature would be used after the citation is BOTH printed and saved. If the citation has
been printed, the citation should be collected.
R=ReISSUE. This is used to Void the current citation and enable entry of a new citation due to
possible entry error. All information entered will be retained for ease of correction and the Officer is
returned to the citation Header screen. The Officer is required to enter a void reason. Issue Date and
Citation Management AutoCITE Reference Guide
AutoCITE X3 Handheld Training Reference
AutoCITE X3 Training (3).doc Page 23 o f 33 Date/Time Printed: 9/19/2008 8:36 AM
Time is initialized to the current date and time. The citation number is NOT reused. When viewed
the new citation will also have the void record attached. It is important to note that the original
citation should be collected. This feature is used after the citation is BOTH printed and saved.
The important thing to remember is:
- VOID is used when a ticket should never have been issued
- ReISSUE is used when a mistake needs to be corrected.
N=EXTRA NOTES – Enables entering of additional notations or the preparation of a diagram. Note
fields are 500 characters per record and multiple note records can be attached to each citation.
These are more like memo field used for long narratives. Clicking Done will take you back to the
Finish screen.
Upon completion of the citation entry and printing, the Officer will generally be taken to the Vehicle
information screen to enable citation entry for the next vehicle.
Citation Management AutoCITE Reference Guide
AutoCITE X3 Handheld Training Reference
AutoCITE X3 Training (3).doc Page 24 o f 33 Date/Time Printed: 9/19/2008 8:36 AM
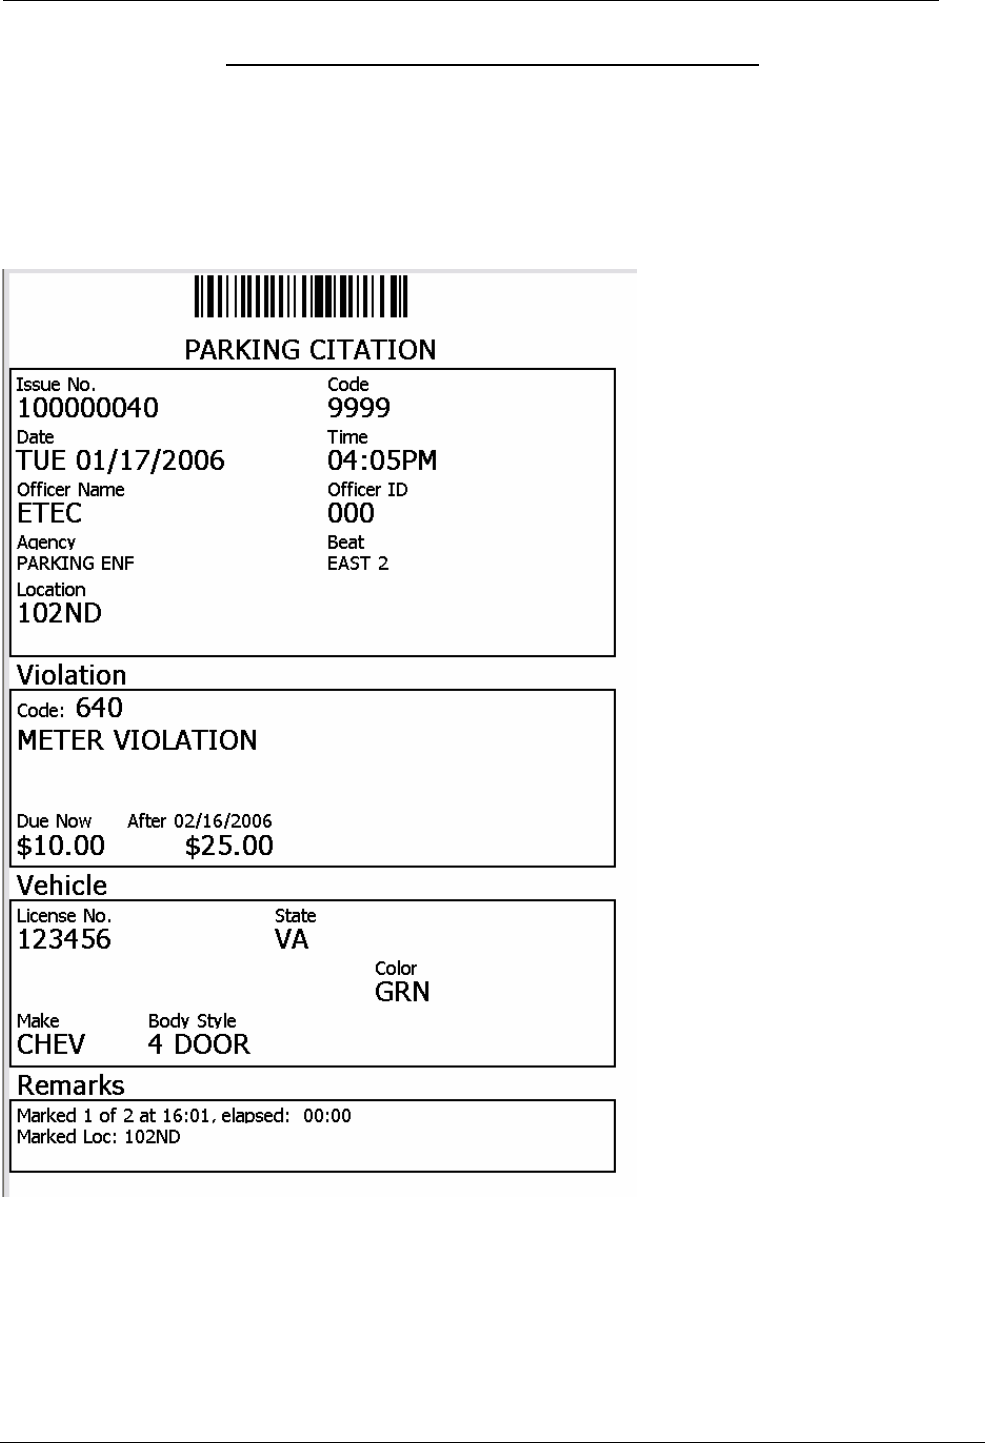
Print Ticket (Sample)
Citation Management AutoCITE Reference Guide
AutoCITE X3 Handheld Training Reference
AutoCITE X3 Training (3).doc Page 25 o f 33 Date/Time Printed: 9/19/2008 8:36 AM
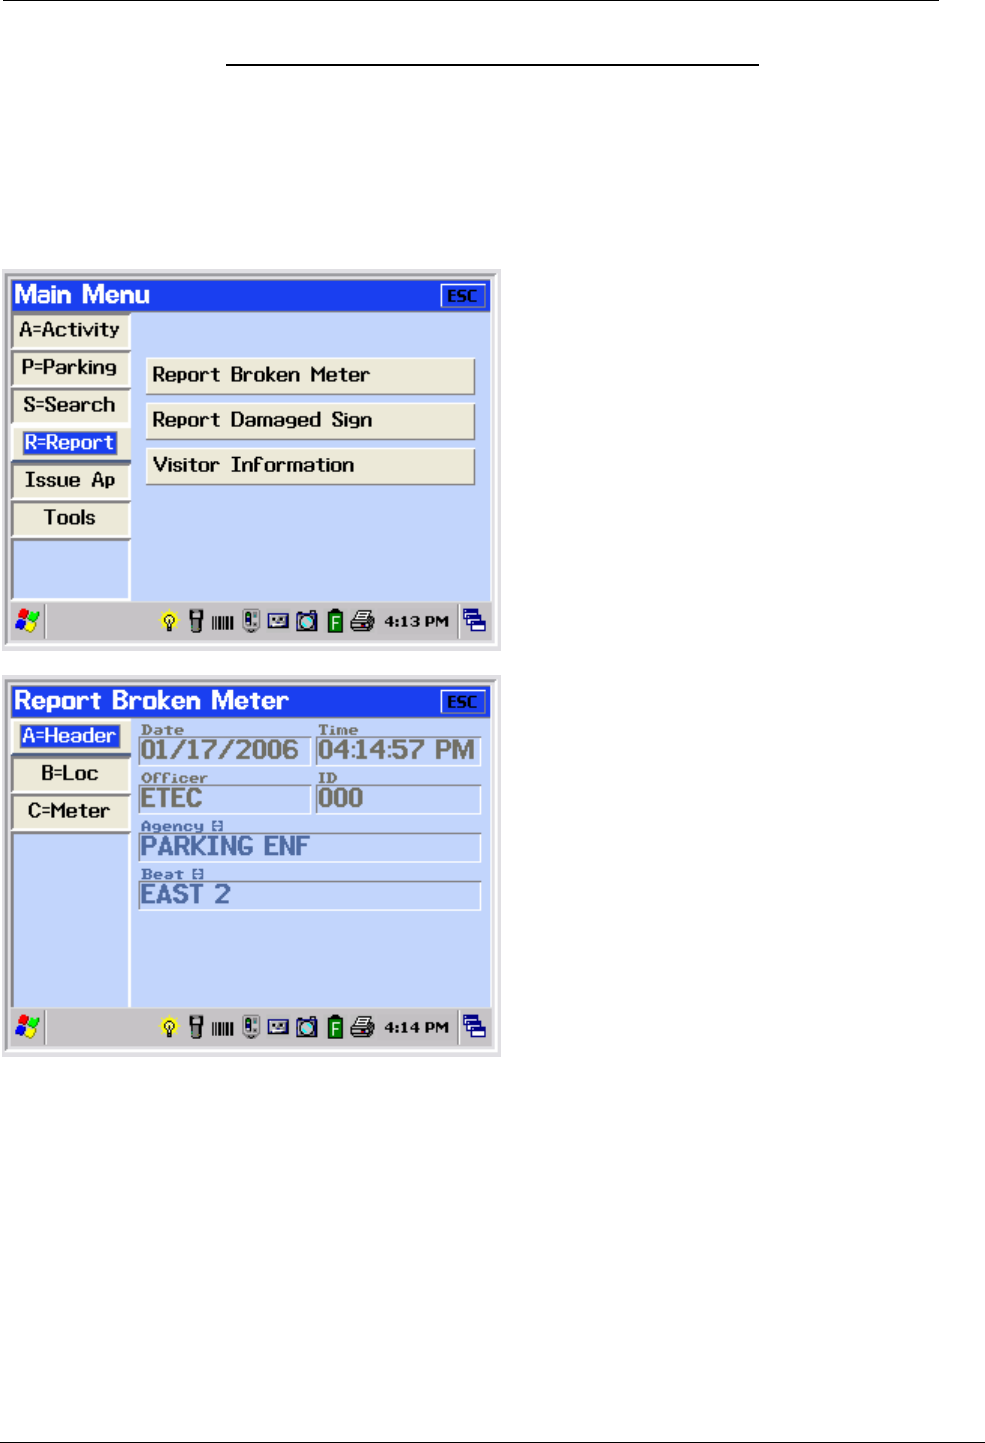
Report Broken Meters and Damaged Signs
Report Broken Meters and Report Damaged Signs features operate very similarly. This function
allows the user to record information in the field regarding a broken meter or damaged sign. Once
the information is downloaded at the end of the day, a report can be created for the Meter and sign
repair departments to go out and investigate, and if need be to repair the meter or sign.
The first screen to be displayed is the Header screen. As in the Citation Issuance process
described earlier, the Officer must enter Agency and may optionally enter a Beat.
Citation Management AutoCITE Reference Guide
AutoCITE X3 Handheld Training Reference
AutoCITE X3 Training (3).doc Page 26 o f 33 Date/Time Printed: 9/19/2008 8:36 AM
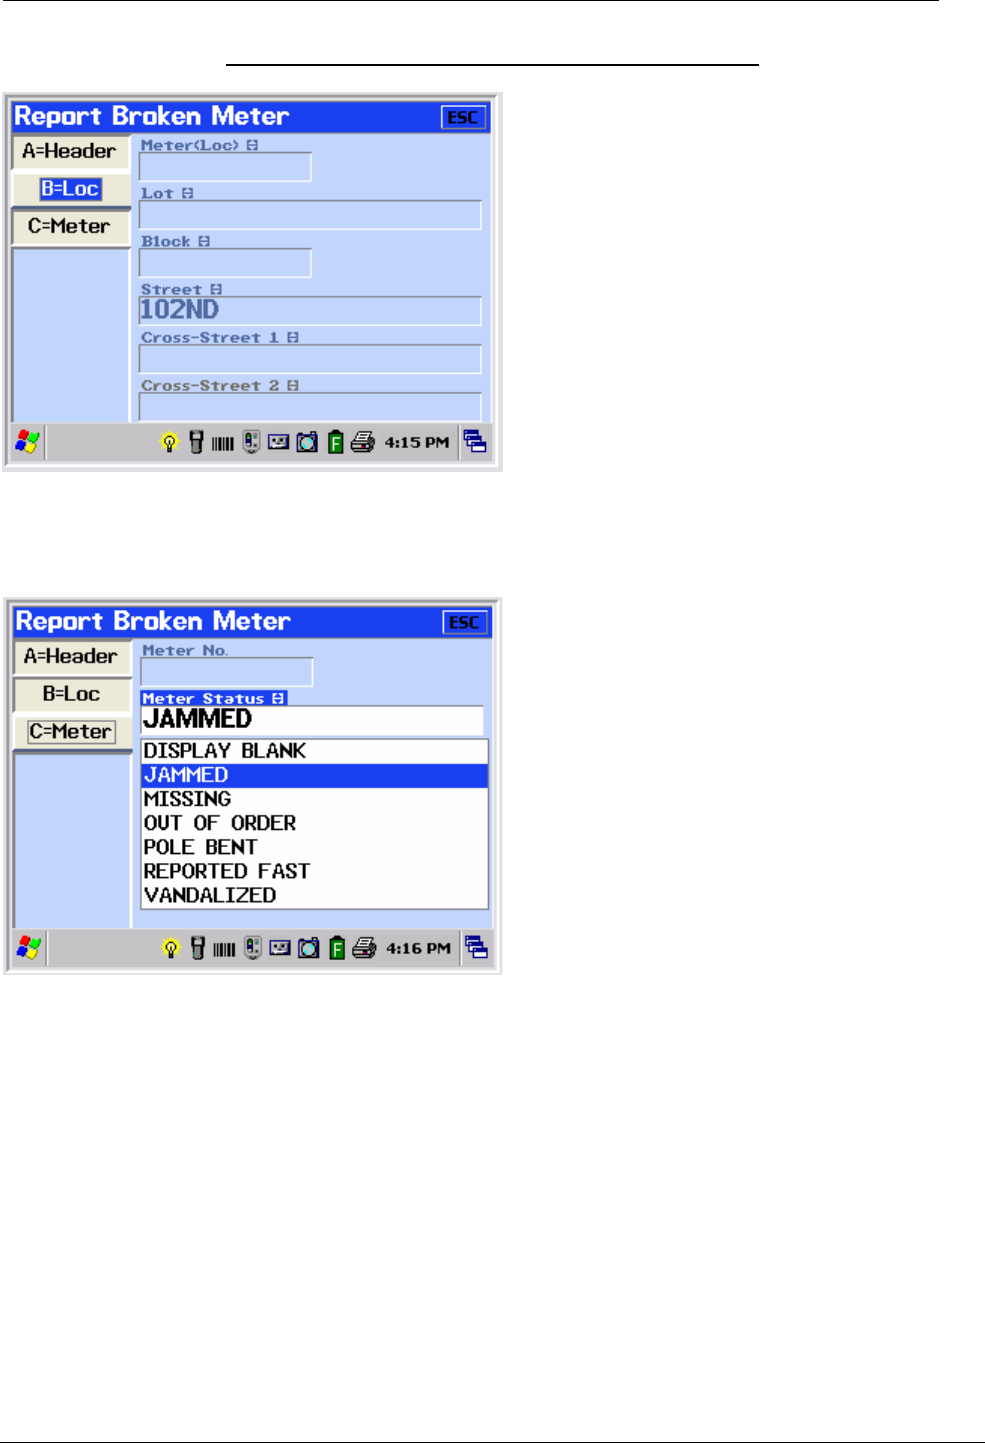
The next screen to be displayed is the Location screen. As in the Citation Issuance process
described earlier, the Officer must enter location information where the broken meter or damaged
sign is located.
The last screen to be displayed is the Meter/ Sign screen. The officer must record the meter number
or sign and disposition the meter or sign that they are reporting as broken or damaged.
Citation Management AutoCITE Reference Guide
AutoCITE X3 Handheld Training Reference
AutoCITE X3 Training (3).doc Page 27 o f 33 Date/Time Printed: 9/19/2008 8:36 AM
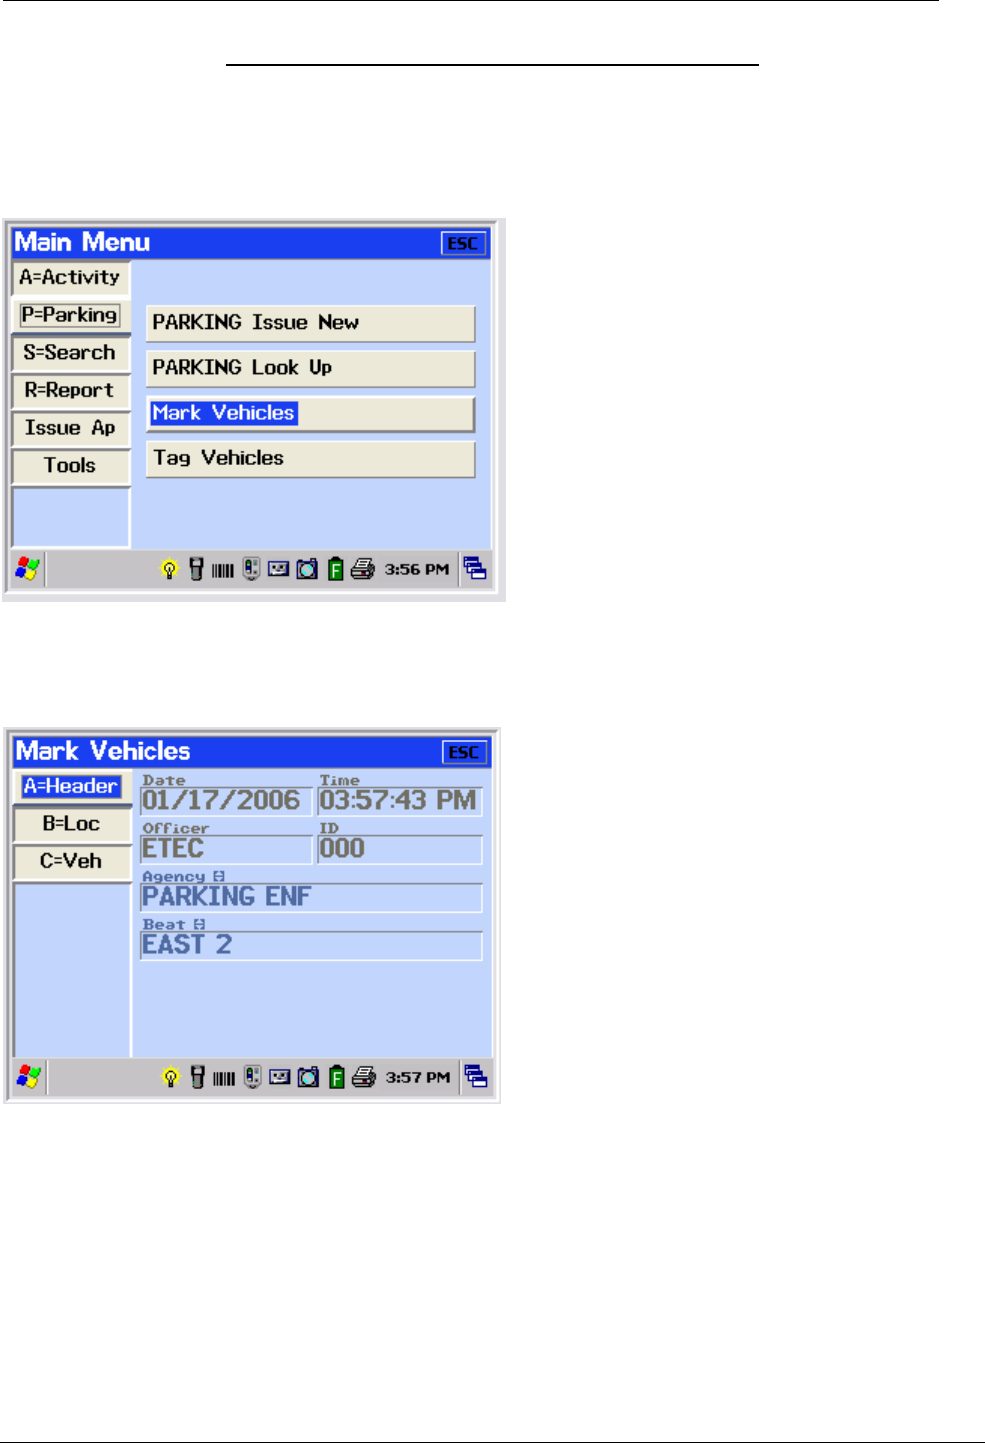
Marking Vehicles
The Mark Mode enables electronic time limit marking of vehicles. From the Main Menu, the Officer
selects Parking then Mark Vehicles. The following screen will be displayed.
The first screen to be displayed is the Header screen. As in the Citation Issuance process
described earlier, the Officer must enter Agency and may optionally enter a Beat.
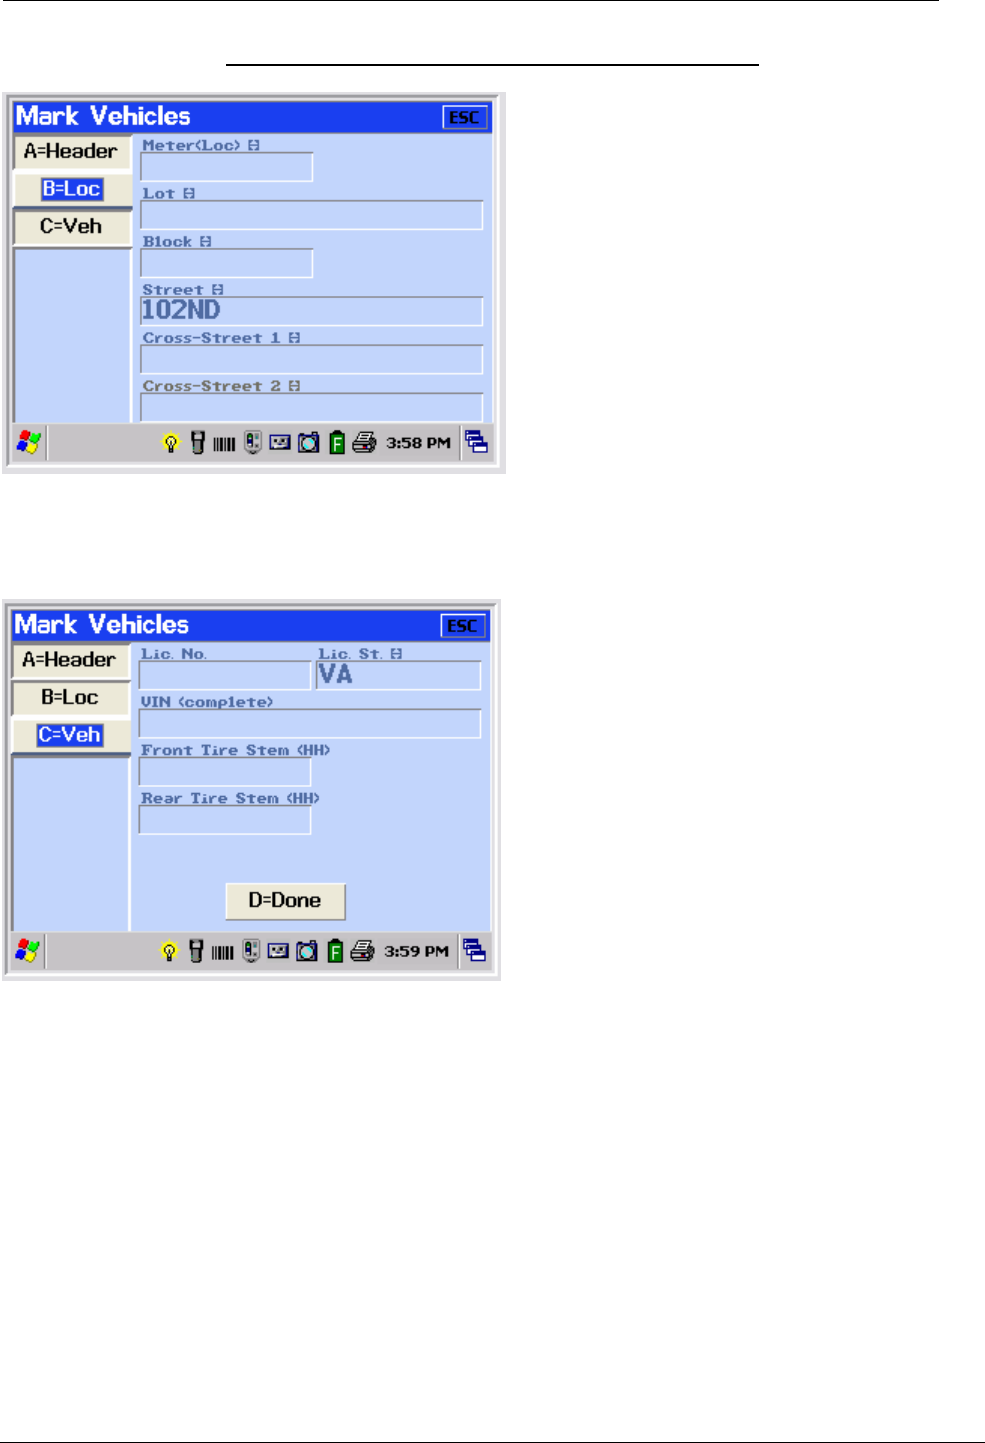
The next screen to be displayed is the Location screen. As in the Citation Issuance process
described earlier, the Officer must enter location information where vehicle Marking activity is being
performed.
Citation Management AutoCITE Reference Guide
AutoCITE X3 Handheld Training Reference
AutoCITE X3 Training (3).doc Page 28 o f 33 Date/Time Printed: 9/19/2008 8:36 AM
The next screen to be displayed is the Vehicle identification screen. As in the Citation Issuance
process described earlier, the Officer must enter specific identification information about the vehicle.
In addition to entering License Plate or VIN, the Officer must enter the position of the valve stem
from the front and rear tires of one side of the vehicle. This entry is based on position relative to a
12 hour clock.
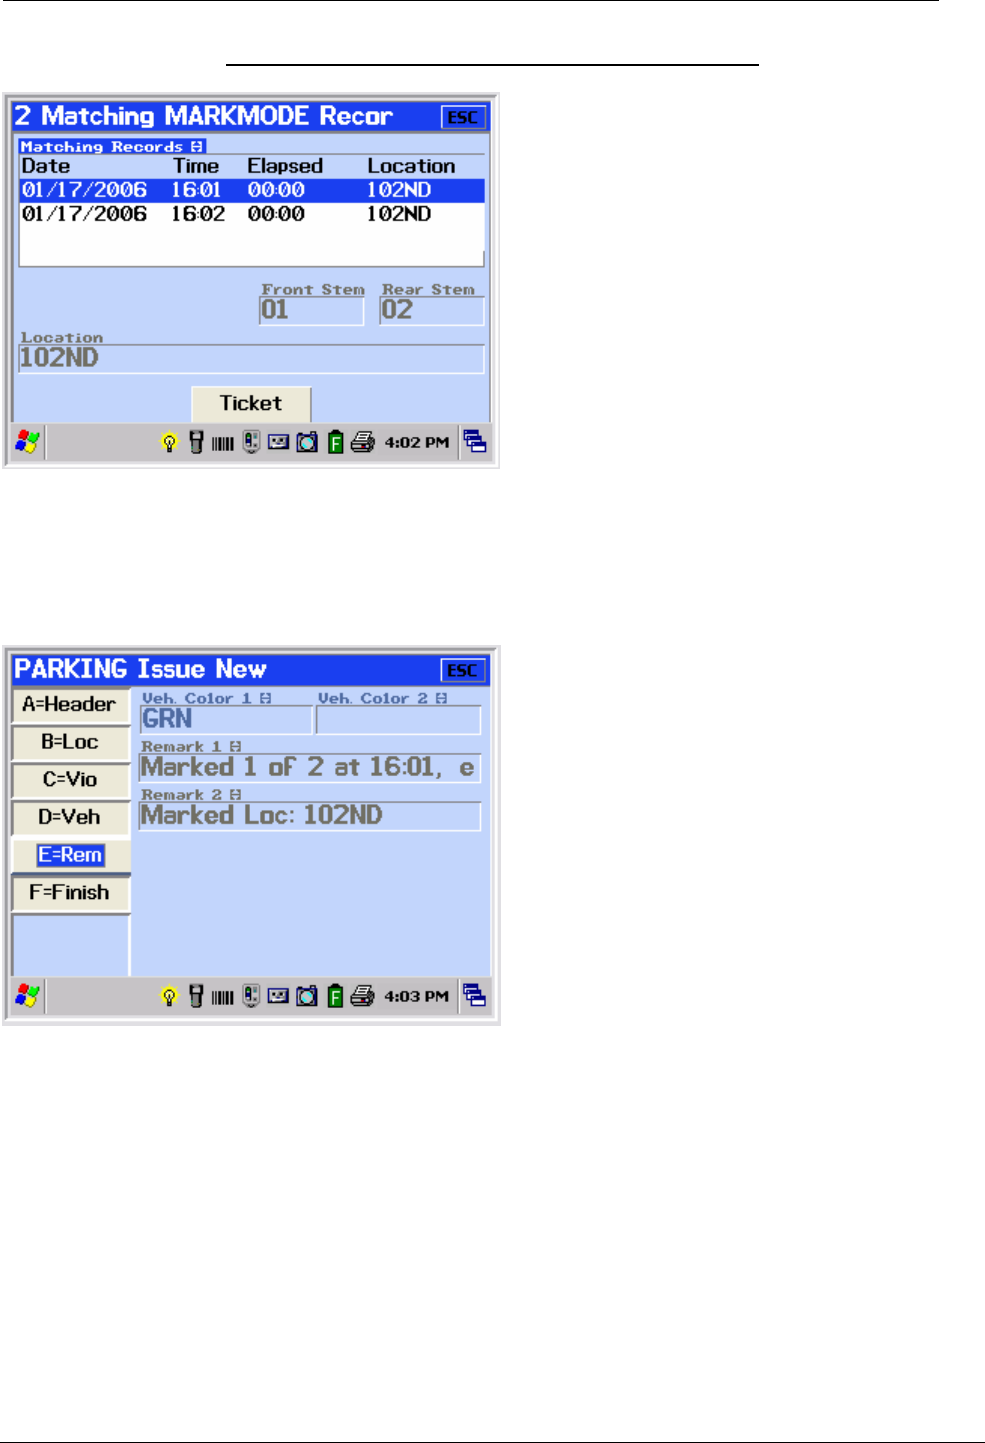
The system will automatically check for a matching Mark Mode entries from earlier on the Officer’s
shift and alert the Officer if there was a match. On a succeeding sweep the same plate is marked
again, and this screen notifies the officer that the vehicle was previously marked.
The officer must enter a street the same as the succeeding marks to be considered a match. If you
were to enter Garfield for your first pass and Jones on your second pass, the handheld unit would
not alert the officer.
If a match is found, the following screen will be displayed.
Citation Management AutoCITE Reference Guide
AutoCITE X3 Handheld Training Reference
AutoCITE X3 Training (3).doc Page 29 o f 33 Date/Time Printed: 9/19/2008 8:36 AM
The elapse time is displayed allowing the Officer to determine if the vehicle is in violation of the
posted time limit. If a time limit violation exists and the Officer wishes to issue a citation, the Officer
can select the Ticket option and will be taken to the violation screen. The Header and Location
screens are already filled in based on what was entered during the marking of the vehicle.
The Remarks are already populated with notes regarding the location and elapsed time. Advancing
to the Finish screen and selecting DONE saves & prints the citation and returns the Officer back to
the vehicle screen in the Mark Vehicles mode to mark the next vehicle.
Citation Management AutoCITE Reference Guide
AutoCITE X3 Handheld Training Reference
AutoCITE X3 Training (3).doc Page 30 o f 33 Date/Time Printed: 9/19/2008 8:36 AM
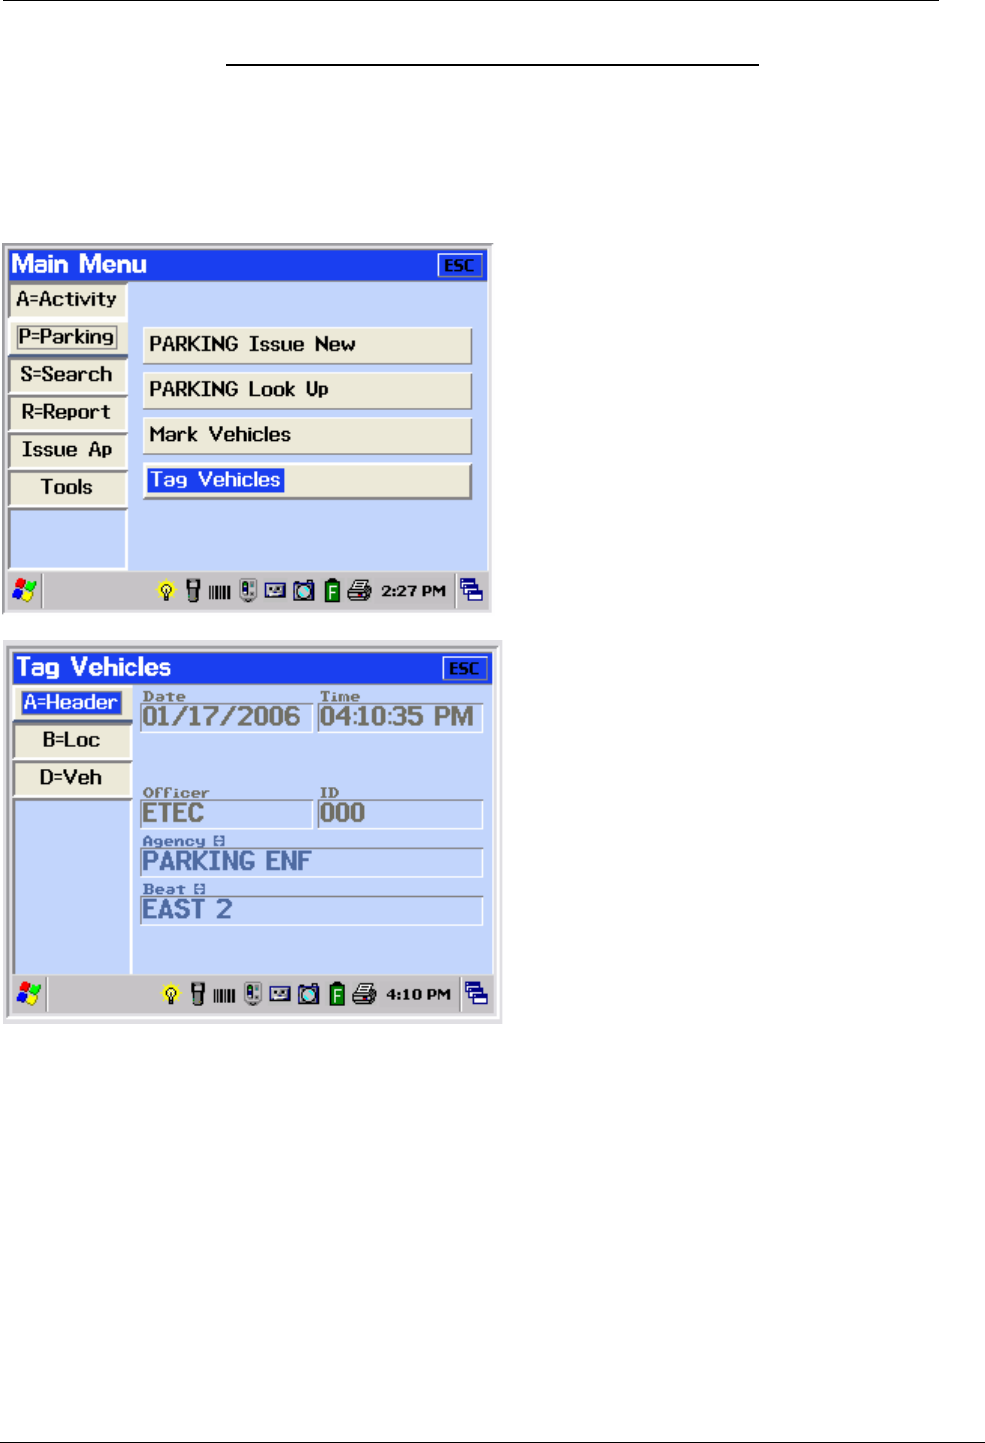
Tag Vehicles
The Tag Vehicles function is a customized application that allows the user to record plate
information about vehicles and cross-references those plates with a list of citizens who have
purchased permits and have authorization to park on city streets.
The first screen to be displayed is the Header screen. As in the Citation Issuance process
described earlier, the Officer must enter Agency and may optionally enter a Beat.
Citation Management AutoCITE Reference Guide
AutoCITE X3 Handheld Training Reference
AutoCITE X3 Training (3).doc Page 31 o f 33 Date/Time Printed: 9/19/2008 8:36 AM
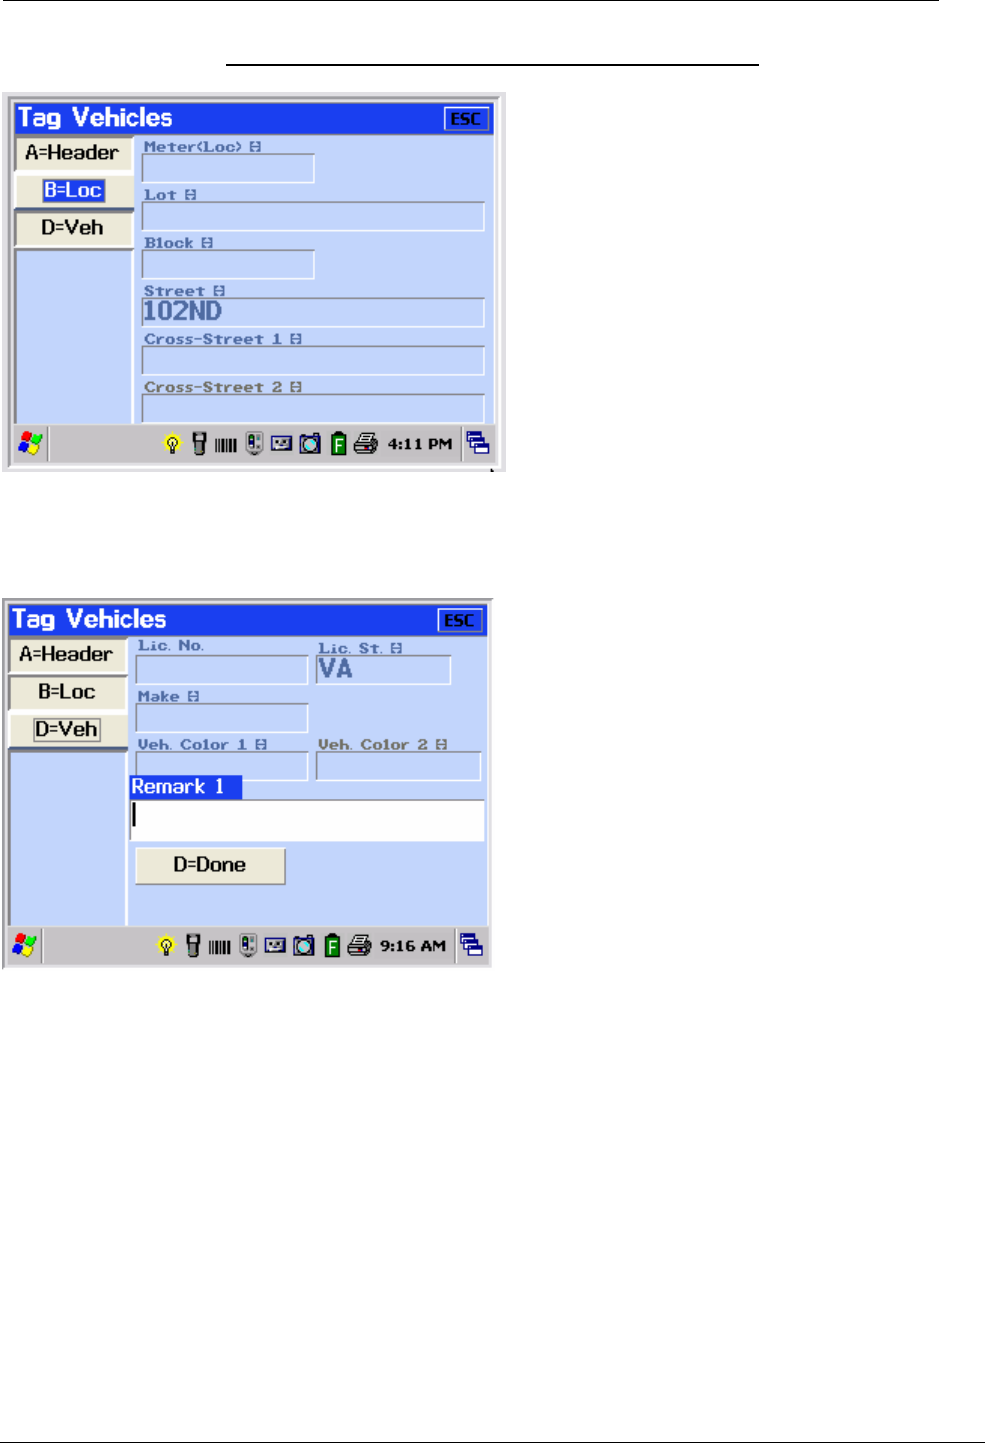
The next screen to be displayed is the Location screen. As in the Citation Issuance process
described earlier, the Officer must enter location information where vehicle tagging activity is being
performed.
The final screen to be displayed is the vehicle information screen. The Officer is presented with the
option to enter remarks, that will print on the citation. Once the information is entered, the system
will automatically check for a matching Tag entries from earlier on the Officer’s shift and alert the
Officer if there was a match. On a succeeding sweep the same plate is tagged again, and this
screen notifies the officer that the vehicle was previously tagged.
Citation Management AutoCITE Reference Guide
AutoCITE X3 Handheld Training Reference
AutoCITE X3 Training (3).doc Page 32 o f 33 Date/Time Printed: 9/19/2008 8:36 AM
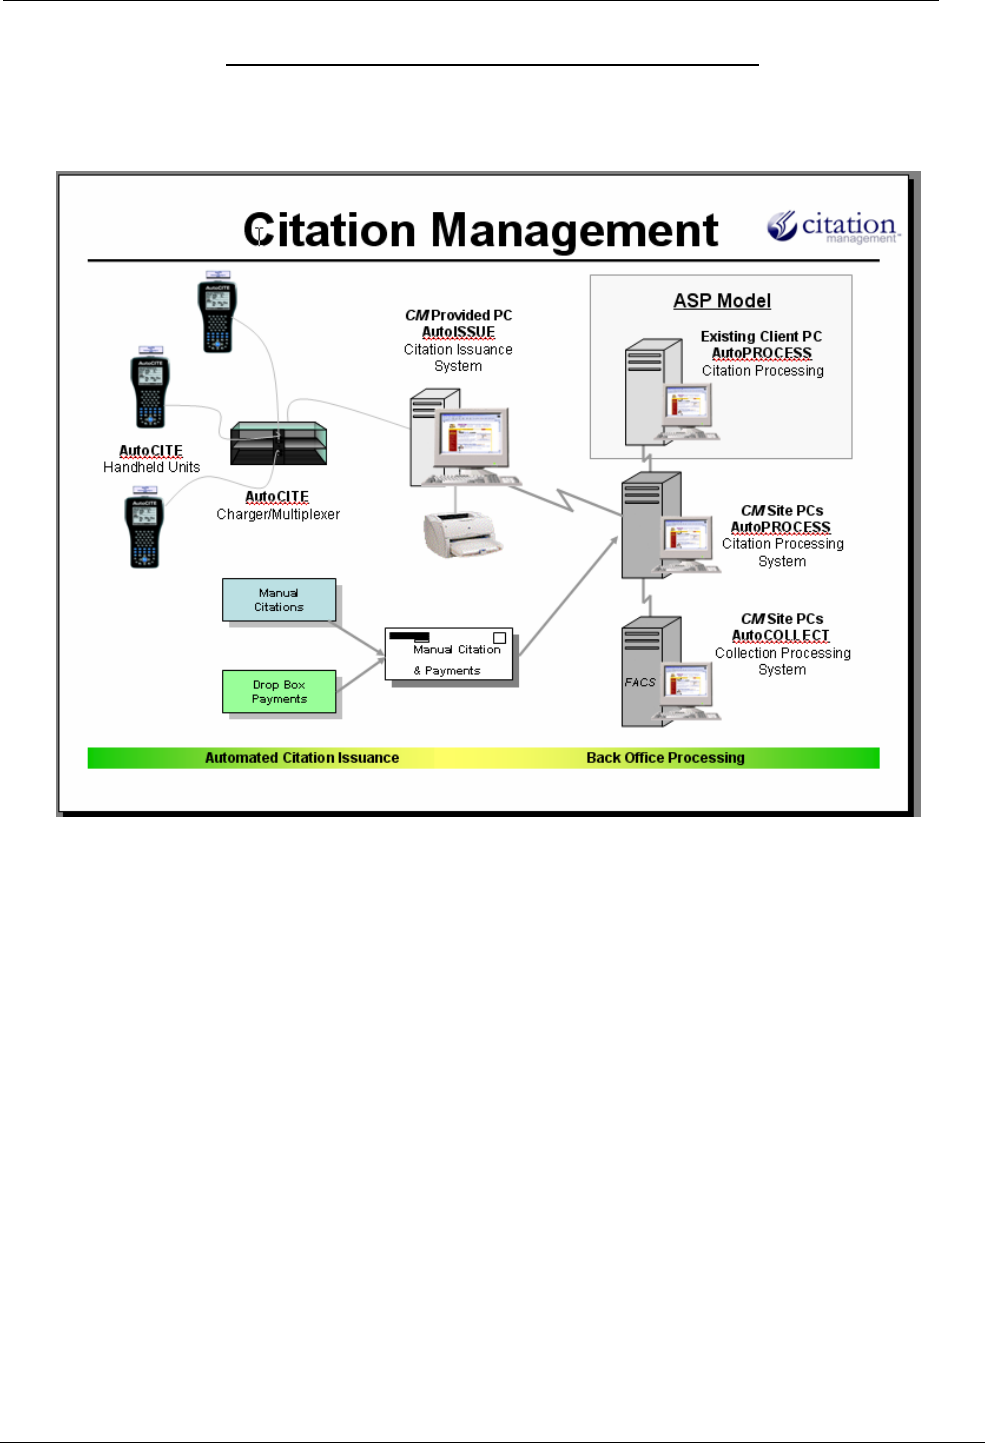
Host PC Operation
The Desktop host PC software uses the familiar Windows graphic user interface. Drop down menus
are listed across the top of the screen and once logged in functionality can be restricted via
password editor and user profiles. Details are included under a separate cover entitles AutoISSUE
Training.
Citation Management AutoCITE Reference Guide
AutoCITE X3 Handheld Training Reference
AutoCITE X3 Training (3).doc Page 33 o f 33 Date/Time Printed: 9/19/2008 8:36 AM
System Overview Diagram