DynaPoint H393E23 MOUSE User Manual H39 manual 1 233
DynaPoint (Dong Guan) Inc. MOUSE H39 manual 1 233
Users Manual
H39 manual
1. Product description:
1.1 This mouse sets with 800dpi resolution.
1.2 Ergonomics design offers comfortable use for both left and right hand users.
1.3 Streamline appearance design, not novel but fashionable in design.
1.4 Capacity: 8M, Supports bmp and jpg format.
1.5 Display function could be adjusted automatically and manually.
1.6 USB interface, plug and play.
1.7 Compatible with windows95、windows98、windows2000、windows XP、Vista and
windows 7.
1.8 This mouse includes three keys—left, right and middle, plus 3D and scroll function.
1.9 1.5 Inch TFT color LCD.
2. Installation:
2.1 Plug the mouse into PC USB port directly, plug and play, no need to install other drivers.
3. Display manual:
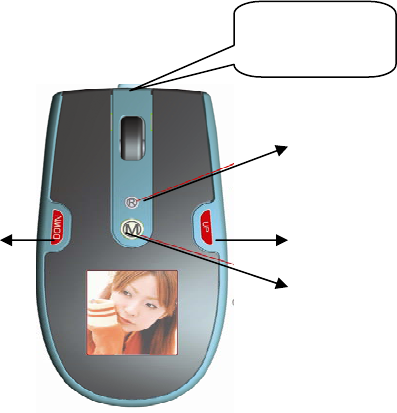
3.1 Appearance and key function(picture as below):
3.2 Buttons.
1. Menu: Press and hold to power on and off.
2. Up: Go back to the previous item/picture.
3. Down: Go to the next item/picture.
4. Reset: To restart the unit when it has been stopped or connect with computer error.
Reset
UP
MENU
DOWN
USB cable

3.3 Menu Introduction:
A. Press Menu button to access the Menu:
Use “Up/Down” buttons to navigate then press Menu button to access the selected item.
-The menu including:USB connect, Slide Show, Clock, Auto off, Backlight, Contrast,
Delete, Power off and Exit.
Note: Hold Menu button for 2 seconds. The unit will power off. It is not acceptable power off
in the main menu interface.
B. USB connect:
-Connect the unit with computer. Select “USB connect” and press Menu button to enter the
sub-menu.
-Select “Yes” to connect it with computer, please refer to section “4. Picture File
Conversion” .
-Select “No” to exit.
C. Slide Show:
-Select “Slide Show” and press Menu button to enter.
- Select “on”, adjust the setting by using “Up/Down” buttons (the slide time range is
00-15). Press Menu button to exit the setting and back to “Menu” after adjusting.
- Select “off”, no slide function, press Menu button to exit the setting and back to “Menu”.
- Select “Cancel”, press Menu button to exit the setting and back to “Menu”.
D. Power Off(for LCD):
-Select “Power off” and press Menu button to shut LCD display.
-Press Menu button again several seconds, the screen will display just as before.
E. Auto off(for LCD):
-Select “Auto off ”and press Menu button to enter.
Main Menu
USB Connect
Slide Show
Auto off
Backlight
Contrast
Delete
Power Off
Exit
Main Menu
USB Connect
Slide Show
Auto off
Backlight
Contrast
Delete
Power Off
Exit

-Press “On”, then press “up” button or “down” button to adjust time for Auto off, (the time
arrange is 00-30 minutes), show as blow.
- Select “off”, press Menu button to exit the setting and back to “Menu”.
- Select “Cancel”, press Menu button to exit the setting and back to “Menu”.
F. Backlight Adjusting:
-Select “Backlight” and press Menu button to enter.
-Adjust the setting by using “Up/Down” buttons (the brightness arrange is 0-21).
G. Contrast Adjusting:
-Select “Contrast” and press Menu button to enter.
-Adjust the setting by press “Up/Down” buttons (the contrast arrange is 0-6).
H. Delete:
Delete one:
-Select “Delete” and press “Menu” to enter.
-Select sub-menu “Delete one” press Menu button to enter.
-Select one picture by using “Up/Down” buttons.
-Select “Yes” and press “Menu” to delete the picture.
-Select “No” and press “Menu” to exit.
Delete All:
-Select “Delete” and press “Menu” to enter.
- Select sub-menu “Delete All” press Menu button to enter.
-Select “Yes” and press “Menu” to delete all pictures.
-Select “No” and press “Menu” to exit.
I. Exit:
-Select “Exit” and press Menu button to exit the menu.
J. If there are not any pictures in the unit, the screen will display“No photo”, show as blow:
4. Picture File Conversion:
-Connect the unit to the computer with the USB cable.
- Select “Connect” then press Menu button.
-Select “No” and press Menu button to exit.
-Select “Yes” and press Menu button to enter “connect” mode.
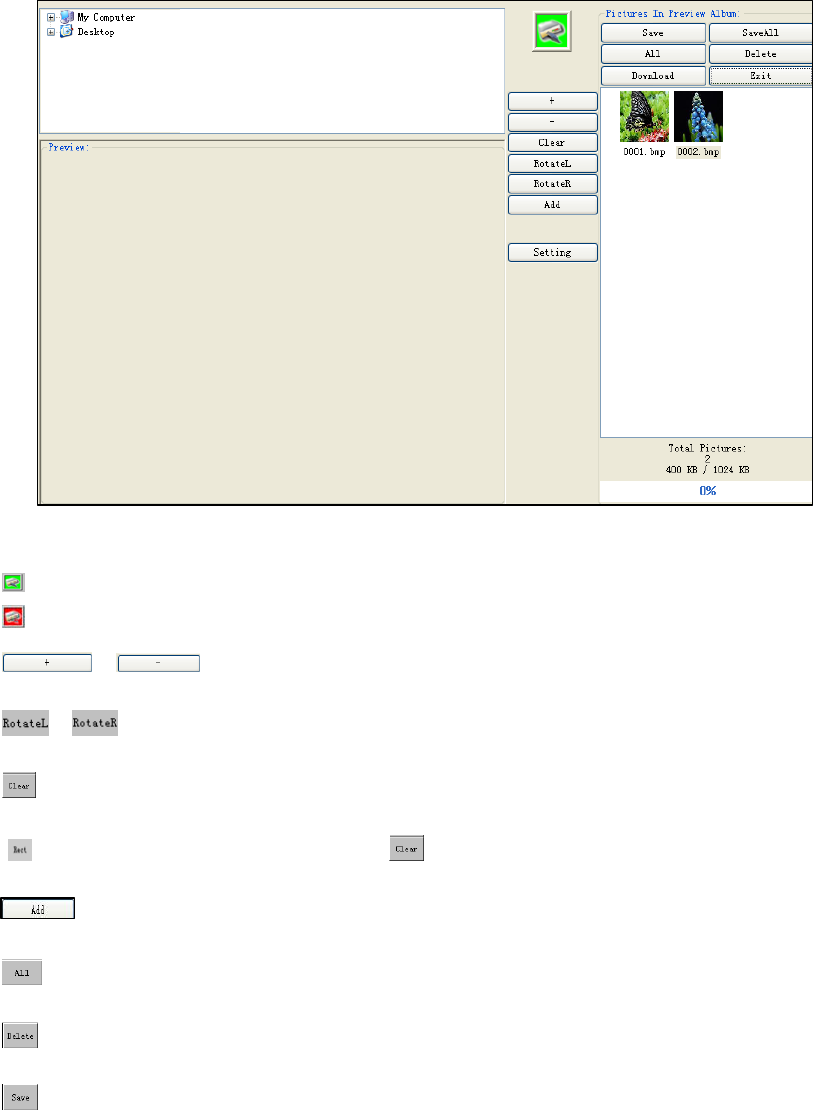
-The computer will open a window of the tool.
-Select the picture file need to be converted.
Green means the unit was connected with computer.
Red means the unit was disconnected with computer.
, :Zoom in/out the picture for selected the picture.
, :Rotates the picture.
:Cut the picture to correct size.
:Whole picture convert, shift for .
:Add the selected picture.
:Select all pictures in the unit.
: Delete the selected picture.
: Save the selected pictures in the unit to computer.
:Save all pictures in the unit to computer.
: Exit.
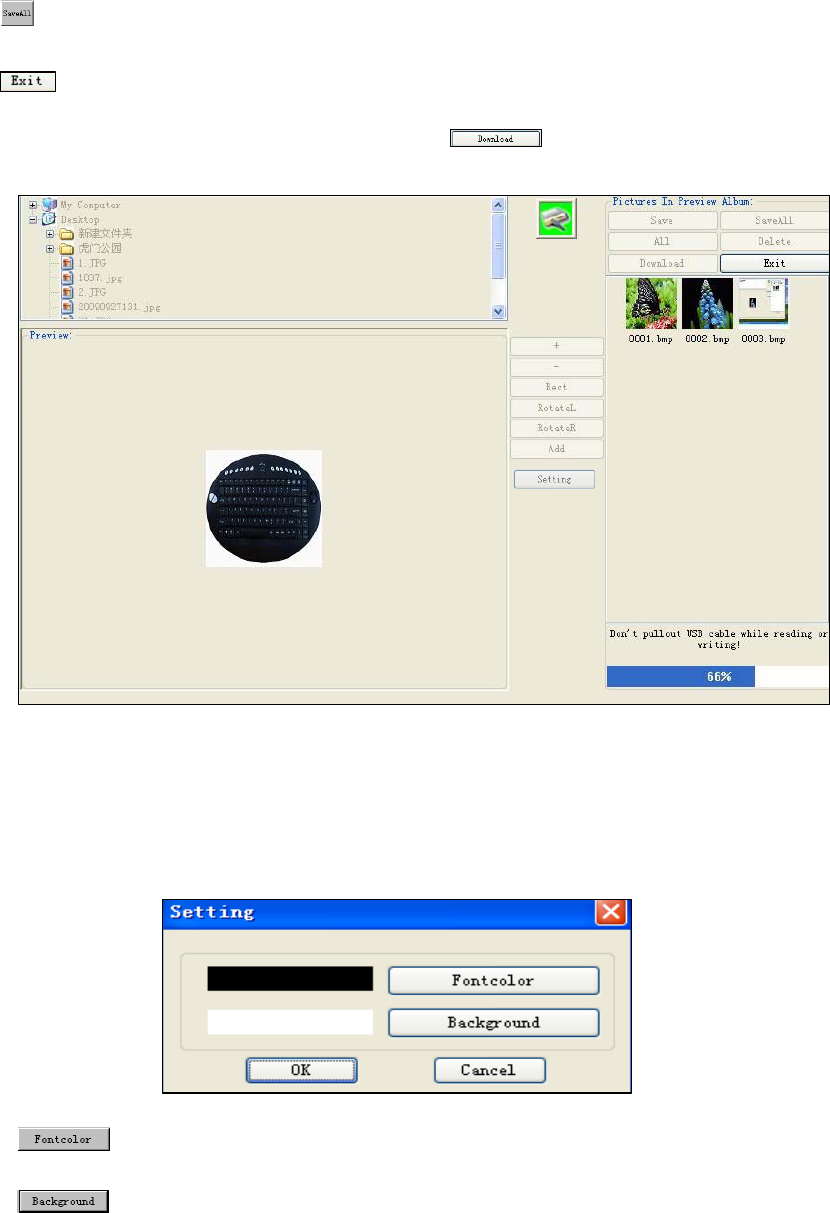
-After the whole pictures are converted, click “ ” button to transfer the pictures to
the unit.
-Press the reset button and turn back the normal display mode after loading completely.
5. Display setting:
-Click “setting” can change the front color and the background color of the menu.
to select the font color.
to select the background color.
6. Auto-play setup for computer system
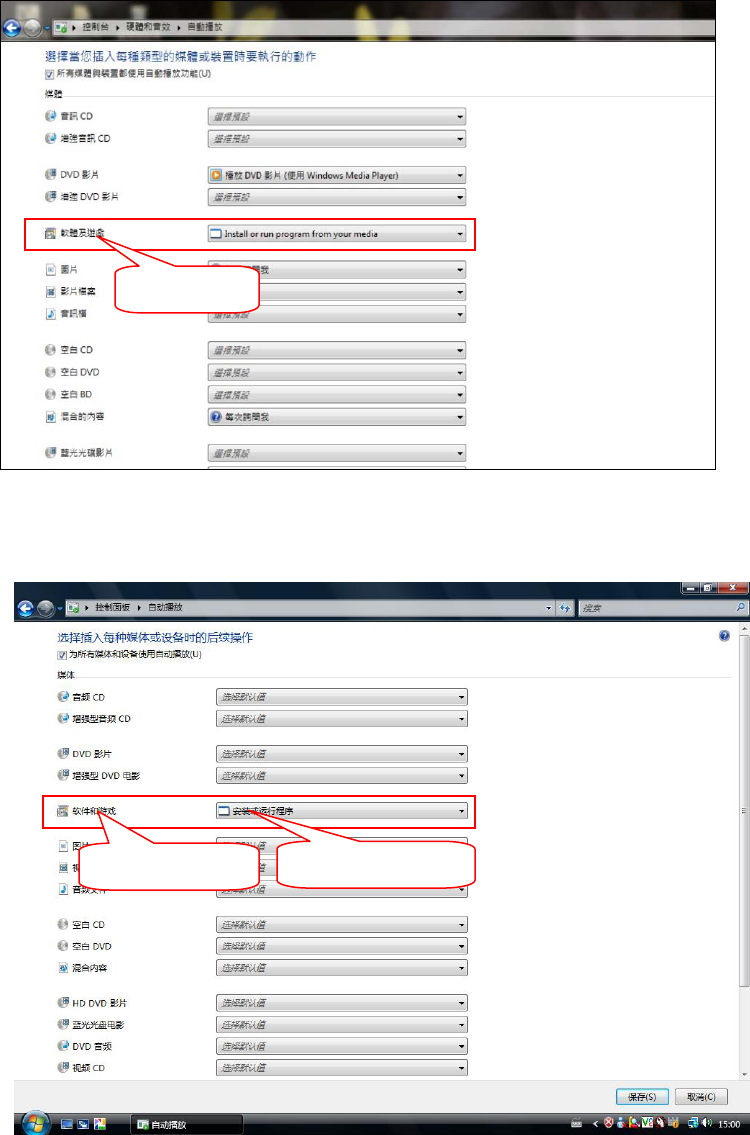
6.1 Windows7systemsetup:
Enter“Controltable‐‐‐‐Hardwareandvoiceeffect‐‐‐‐Auto‐play”option,thenchoose
“Installorrunprogramfromyourmedia”inthesub‐optionof“Softwareandgame”,see
theredmarkintheimageasbelow:
6.2 Vistasystemsetup:
Enter“Controlpanel”,choosethe“Auto‐play”,andchoose“Installorrunprogram”in
thesub‐optionof“Softwareandgame”,seetheredmarkintheimageasbelow:
Software and game
Software and game Install or run program
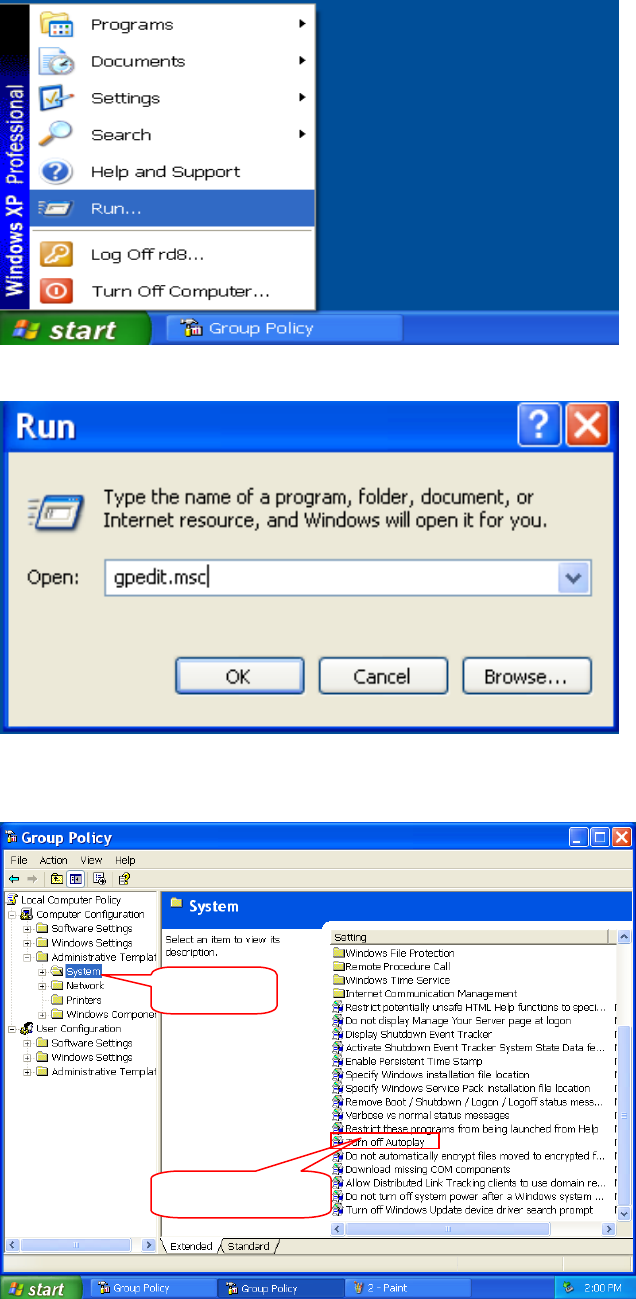
6.3 TheissuebelowWindowXPsystem:
6.3.1.Click“Start”,chooseandenter“Run”,seebelowimage:
6.3.2. Input “gpedit.msc ” in the Run blank column and click “OK”, see below image.
6.3.3.Open the folder “System” and double click “Turn off Autoplay”, see the red mark in
the image as below:
Open System
Double click here
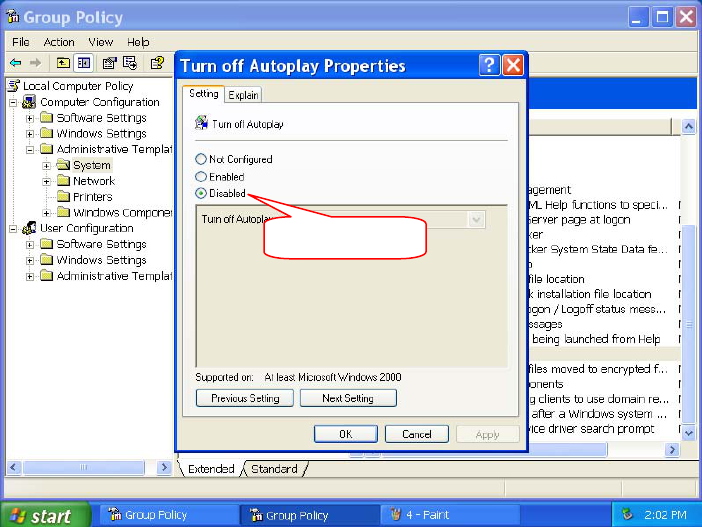
6.3 4. Enter“Turn off Autoplay Properties” interface as follow, choose “Disabled” and click
“OK”, see the red mark in the image as below:
Choose Disabled
FCC Notice
This device complies with Part 15 of the FCC Rules. Operation is
subject to the following two conditions:
(1) this device may not cause harmful interference, and (2) this device must accept any
interference received, including interference that may cause undesired operation.
NOTE 1: This equipment has been tested and found to comply with the limits for a Class B
digital device, pursuant to part 15 of the FCC Rules. These limits are designed to provide
reasonable protection against harmful interference in a residential installation. This equipment
generates, uses and can radiate radio frequency energy and, if not installed and used in
accordance with the instructions, may cause harmful interference to radio communications.
However, there is no guarantee that interference will not occur in a particular installation. If
this equipment does cause harmful interference to radio or television reception, which can be
determined by turning the equipment off and on, the user is encouraged to try to correct the
interference by one or more of the following measures:
- Reorient or relocate the receiving antenna.
- Increase the separation between the equipment and receiver.
-Connect the equipment into an outlet on a circuit different from that to which the receiver is
connected.
-Consult the dealer or an experienced radio/TV technician for help.
Any changes or modifications not expressly approved by the manufacturer could void the
user’s authority to operate the equipment.
NOTE 2: The manufacturer is not responsible for and radio or TV interference caused by
unauthorized modifications to this equipment. Such modifications could void the user’s
authority to operate the equipment.