Dynabook UPA3613WL 802.11b/g PCIExpress Minicard User Manual NB100 Series User s Guide
Toshiba Corporation 802.11b/g PCIExpress Minicard NB100 Series User s Guide
UserManual.wiki
>
Dynabook
>
UPA3613WL User Manual
User manual
Navigation menu
Upload a User Manual
Namespaces
Wiki Guide
HTML
PDF
Info
Views
User Manual
Discussion / Help
Navigation


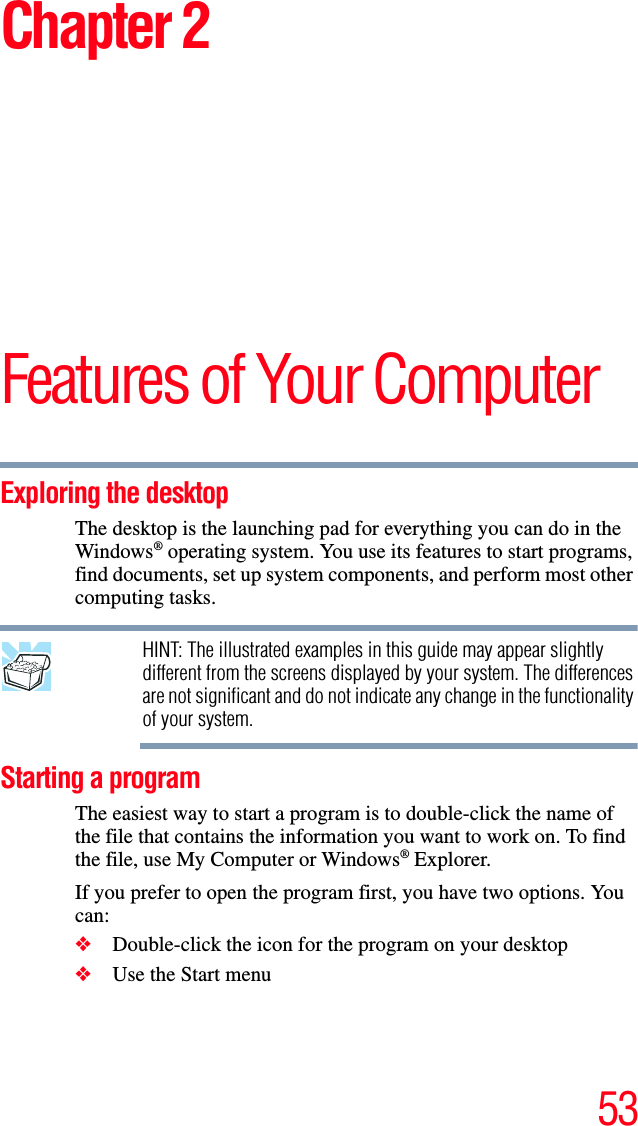
![74 If Something Goes WrongThe Windows® operating system is not working❖Use the PING command to verify a connection to the gateway at 192.168.1.1 (a default gateway for most wireless routers).1Click Start, then click Run...2Enter Cmd and press Enter.3Enter PING 192.168.1.1 at the command prompt, and press Enter.If “Request Timed Out” or another error message appears in response, then the problem is probably Wi-Fi®-related.❖If you have enabled any security provisions (closed system, MAC address filtering, Wired Equivalent Privacy [WEP], etc.), check the access point vendor's Web site for recent firmware upgrades. Problems with WEP keys, in particular, are frequently addressed in new firmware releases.The Windows® operating system wireless management facility does not work.If you are using an external Wi-Fi® adapter (USB adapter or other variety), check if the adapter comes with its own management utility. If it does, the utility may be disabling the Windows® operating system wireless management facility, in which case you must use the adapter's management utility. If the documentation that accompanies the adapter does not provide enough information to determine if this is the case, contact that vendor's support group for further advice.](https://usermanual.wiki/Dynabook/UPA3613WL/User-Guide-1004947-Page-74.png)
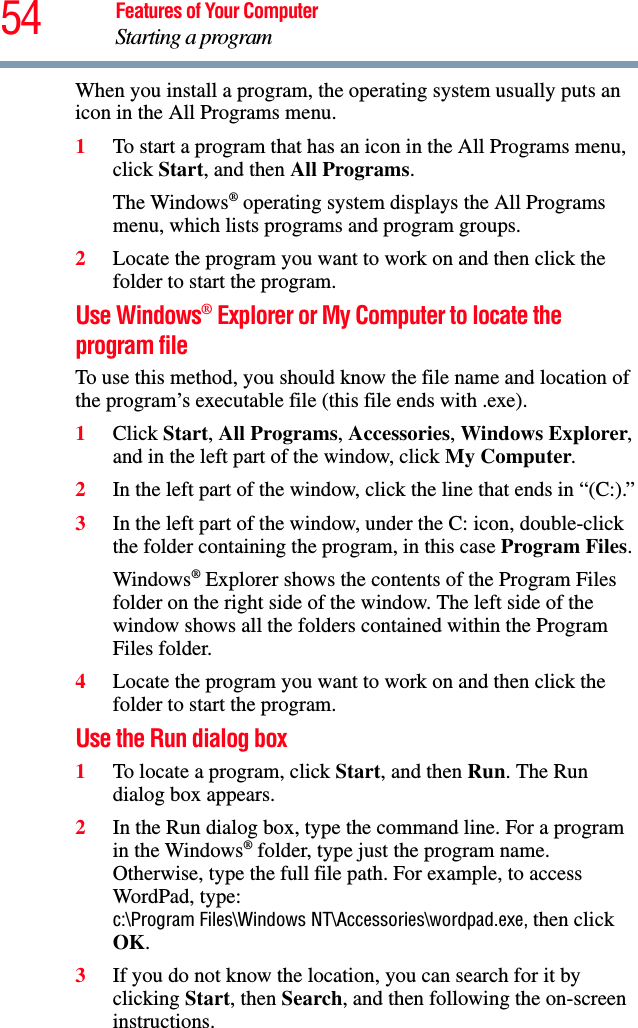
![Glossary 81double-click — To press and release the pointing device’s primary button rapidly twice without moving the pointing device. In the Windows® operating system, this refers to the pointing device’s left button, unless otherwise stated.double-density diskette — A 3.5-inch diskette that can hold up to 720 KB of information (half the capacity of a high-density diskette). See also diskette, high-density diskette.download — (1) In communications, to receive a file from another computer through a modem or network. (2) To send font data from the computer to a printer. See also upload.drag — To hold down the mouse button while moving the cursor to drag a selected object. In the Windows® operating system, this refers to the left mouse button, unless otherwise stated.driver — See device driver.DVD — An individual digital versatile (or video) disc. See also DVD-ROM.DVD-ROM (digital versatile [or video] disc read-only memory) — A very high-capacity storage medium that uses laser optics for reading data. Each DVD-ROM can hold as much data as several CD-ROMs. Compare CD-ROM.Eemulation — A technique in which a device or program imitates another device or program.enable — To turn on a computer option. See also disable.executable file — A computer program that is ready to run. Application programs and batch files are examples of executable files. Names of executable files usually end with a .bat or .exe extension.expansion device — A device that connects to a computer to expand its capabilities. Other names for an expansion device are port expander, port replicator, docking station, or network adapter.extension — See file extension.external device — See device.](https://usermanual.wiki/Dynabook/UPA3613WL/User-Guide-1004947-Page-81.png)