Dynafine LEGEND Pager Receiver User Manual users manual
Dynafine Inc Pager Receiver users manual
Dynafine >
users manual
MANUAL FOR INSTALLATION
AND OPERATING INSTRUCTION
Model : Legend
CONTENTS
1. PAGER STANDARD FEATURES •••••••••••••• 5
2. BUTTONS ••••••••••••••••••••••• 6
3. DEFINITION AND TYPE OF ICONS •••••••••••• 7
4. INSERTING / REPLACING BATTERY ••••••••••• 8
5. SELECTION OF ALERT MODE••••••••••••••• 9
6. OVERVIEW OF OTHER BUILT IN FUNCTIONS ••••••• 11
7. SELECTING BEEP / CHIRP / MELODY ALERT ••••••• 12
8. KEY TONE ON / OFF ••••••••••• ••••••• 13
9. ERASE ALL •••••••••••••••••••••• 14
10. SETTING THE TIME AND DATE ••••••••••••• 15
11. SETTING THE ALARM ••••••••••••••••••16
12. SETTING AUTO ON / OFF •••••••••••••••• 18
13. TURNING ON/OFF THE PAGER •••••••••••••• 20
14. RECEVING AND READING MESSAGE •••••••••••21
15. READING STORED & LOCKING MESSAGES •••••••• 23
16. LOCKING AND UNLOCKING MESSAGE •••••••••• 26
17. DELETING MESSAGE •••••••••••••••••• 29
1. PAGER STANDARD FEATURES
The LEGEND provides the following features as standard:
1. 1 line display (1 line x 12 digit)
2. Total memory capacity : 400 digits (20digit x 20 messages)
3. Locks up to 20 messages
4. 3 Standard alert modes : Sound, Vibrate & Silent
5. 4 Beep, 1 Chirp & 8 Melody alerts
6. Key tone On/Off
7. Real time clock (12 hours) with calendar date display
8. Alarm clock
9. Delete individual message or erase all
10. Message time stamping
11. Service area indication
12. Automatic Power On/Off
13. Low battery indication
14. Back lighting
15. Reminder Alert
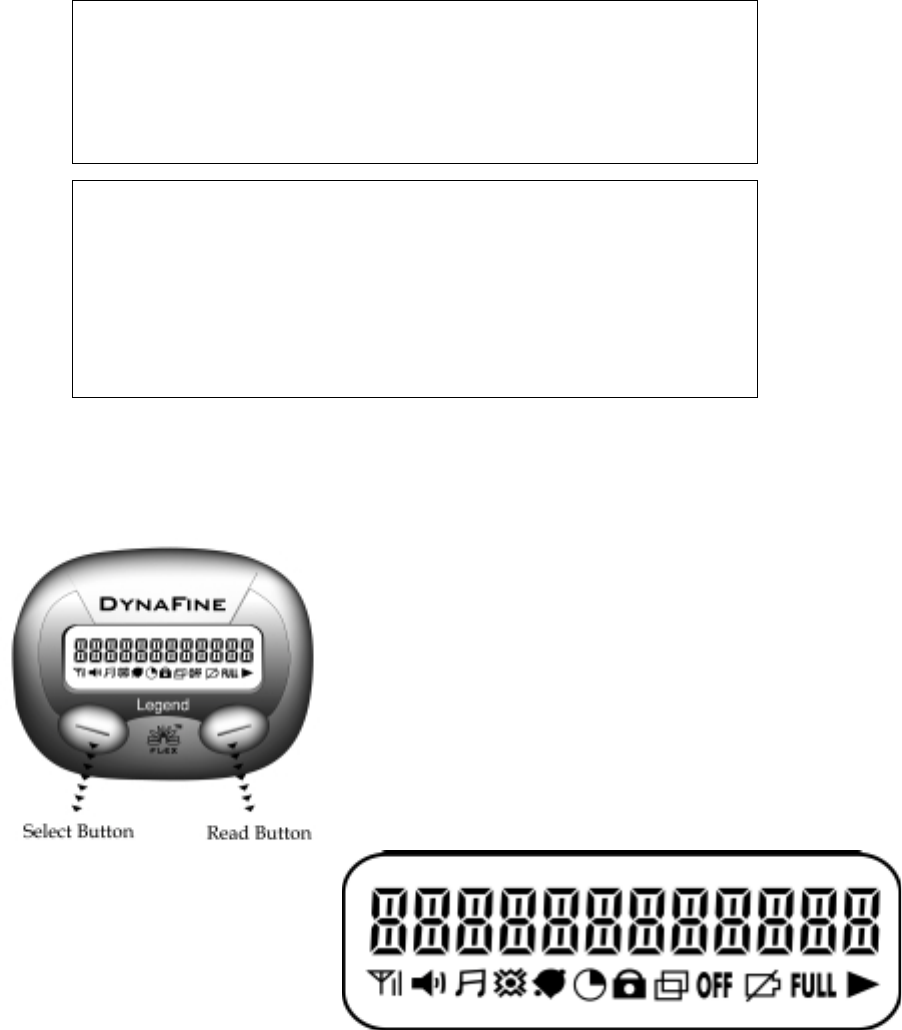
2. BUTTONS
The pager has 2 push buttons (Read and select buttons) for the pager controls and operations.
A. Select Button
Turn the back light on and enter into the function
change mode.
B. Read Button
Read message and set the pager function mode.
3. DEFINITION AND TYPE OF LCD ICONS
This device complies with Part 15 of the FCC Rules.
Operation is subject to the following two conditions: (1)
this device may not cause harmful interference, and (2)
this device must accept any interference received,
including interference that may cause undesired
operation.
Caution : Any change or modifications in constructions o
f
this device which are not expressly approved by the party
responsible for compliance could void the user’s authority
to operate the equipment.
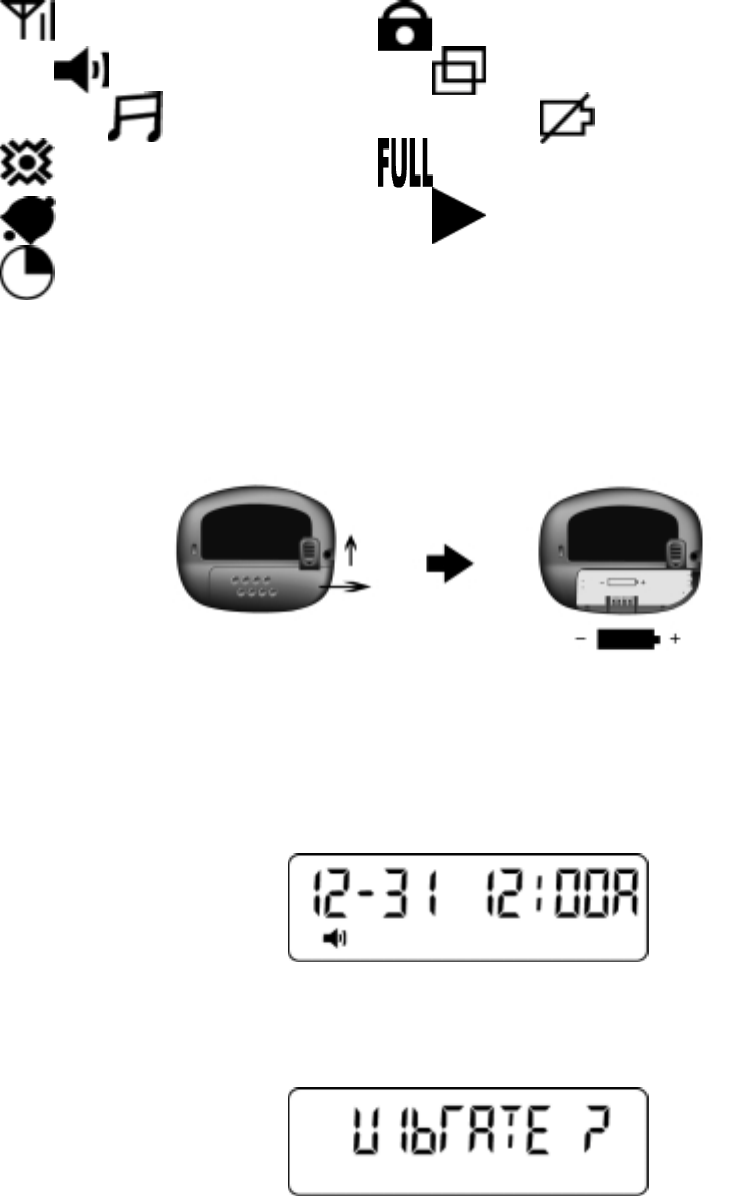
Receivable Area Message Lock
Sound Duplicate Message
Melody Low Battery
Vibration Message Full
Alarm Message Extension
Auto On/Off
4. INSERTING / REPLACING BATTERY
1. Slide the battery locking switch to the unlock position.
2. Slide the battery cover and separate it from the pager.
3. Insert the battery paying attention to the battery polarity marked in the battery compartment.
4. Slide the battery cover back on the pager and slide the battery locking switch to the locked position.
5.SELECTION OF ALERT MODE
- Alert Tone Mode, Vibration Mode, Silent Mode –
You can change the alert mode in a serial order of Alert Tone Mode, Vibration Mode and Silent Mode.
After inserting battery, the initial alert mode is Alert Tone Mode.
<Alert Tone Mode>
If you want to change Alert Tone Mode to Vibration Mode, press the SELECT button twice, then
“VIbRATE ? ” will appear.
If you press the SELECT button once more, the pager will return to the standby mode displaying the current time and
the vibration icon will appear indicating the change.
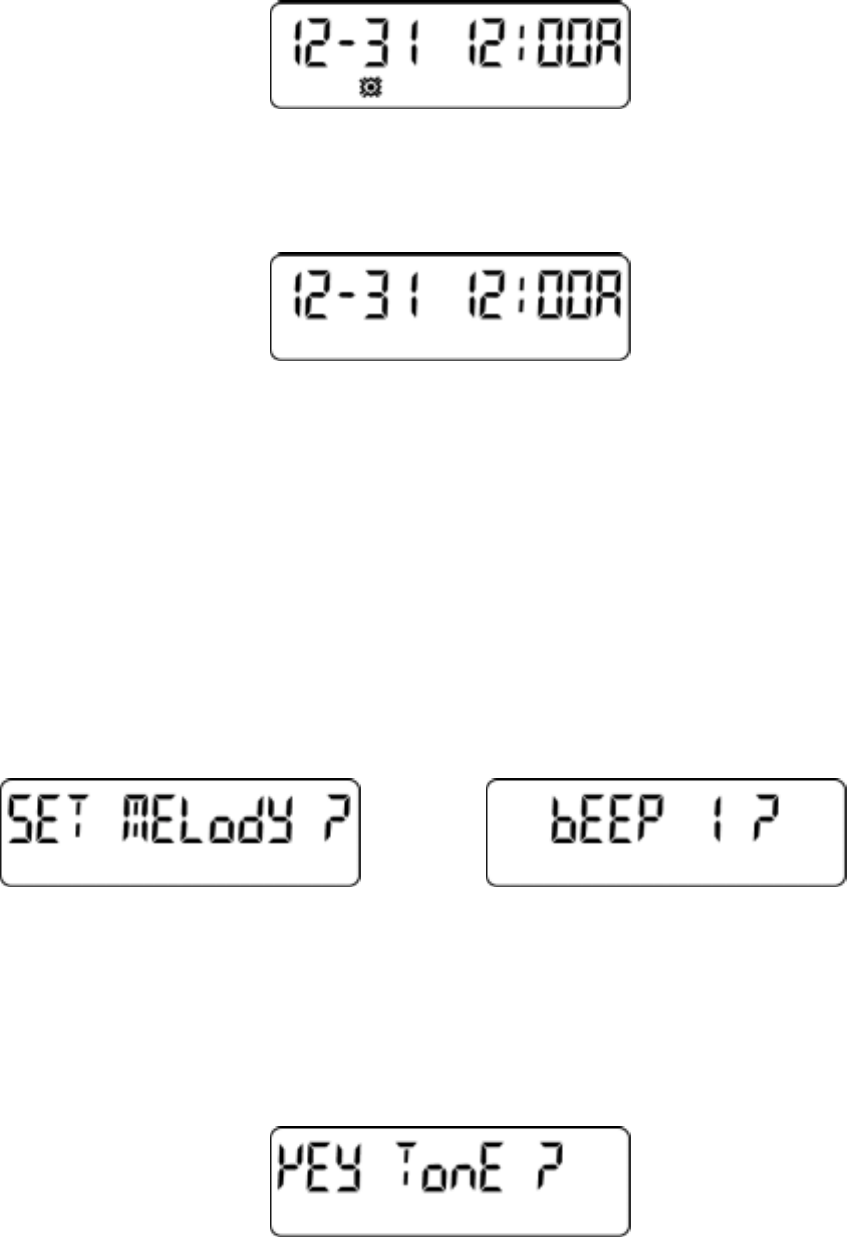
<Vibration Mode>
As this, you can also change Vibration Mode to Silent Mode or Silent Mode to Alert Tone Mode in the
same method.
<Silent Mode>
6. OVERVIEW OF OTHER BUILT IN FUNCTIONS
The LEGEND has 7 menu functions. These are “SET MELODY”, “KEY TONE ON/OFF”, “ERASE
ALL”, “SET TIME”, “SET ALARM”, “SET AUTO ON/OFF”, “POWER OFF”.
By pressing the SELECT button twice and the READ button once you’ll enter into the menu functions.
7. SELECTING BEEP/ CHIRP/ MELODY ALERT
Press the SELECT button twice and the READ button once to the “SET MELodY ?” mode.
You can choose any one of desired beep tone, chirp or melody.
Press the SELECT button again the current tone will sound and its corresponding number will appear as
displayed below.
If you press the SELECT button once more, the next alert tone number is displayed and the
corresponding alert tone will sound. Press SELECT button to select the desired alert. Pager returns to
standby after that.
8. KEY TONE ON / OFF
Press the SELECT button twice and the READ button twice, “KEY TonE ?” menu will appear.
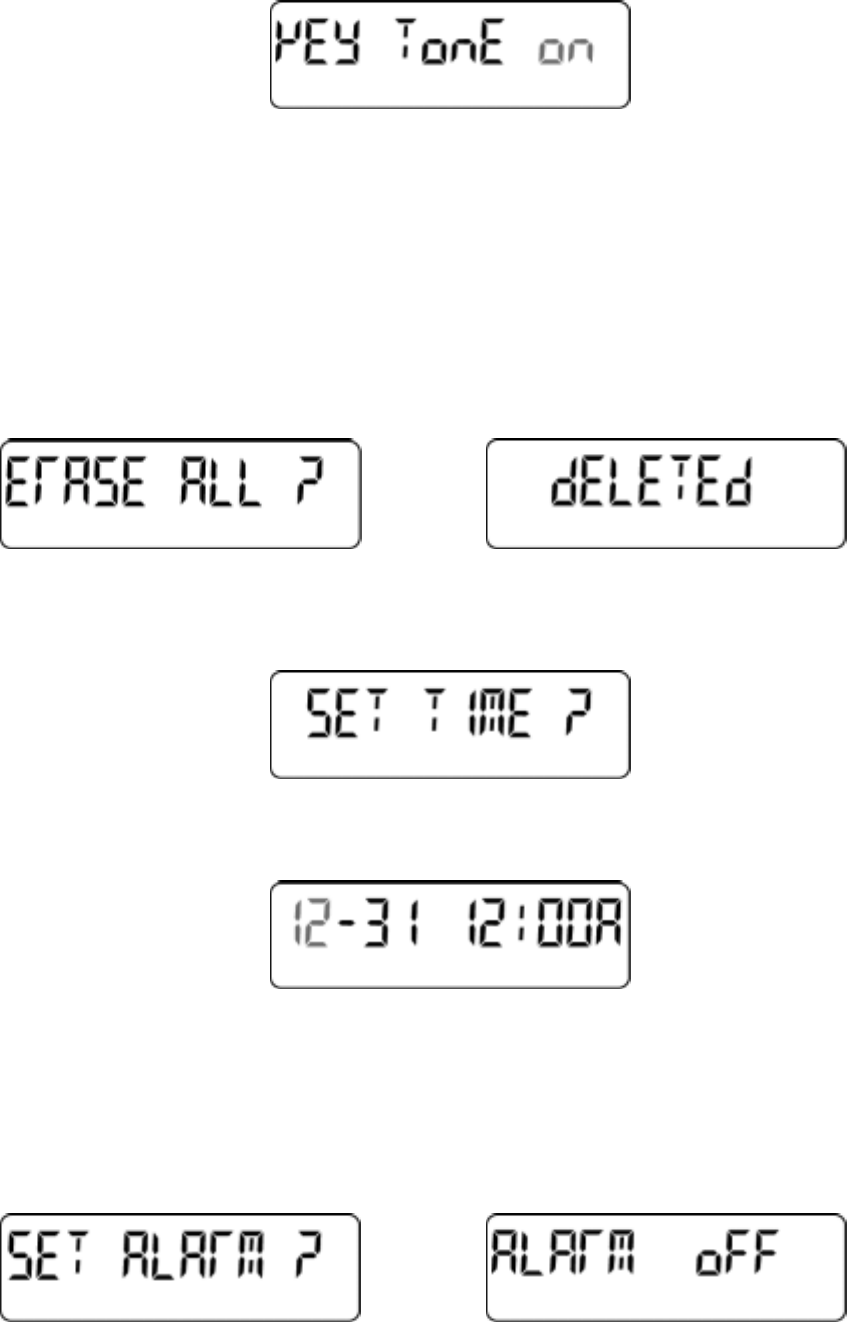
If you press the SELECT button, the current setting will be displayed and blinking.
To change “ON/OFF” setting, press the READ button and the setting will be toggled between “On” and
“Off”.
After selecting “On” or “Off”, press the SELECT button to return to the standby mode.
9. ERASE ALL
If you want to erase all stored unlocked messages, press the SELECT button twice and the READ button
three times to the “ERASE ALL” mode. Press the SELECT button once and the “dELETEd” is displayed
and all stored messages except for locked messages are erased.
10. SETTING THE TIME AND DATE
Press the SELECT button twice and the READ button four times, “SET TIME ?” menu will appear.
Press the SELECT button, and the month number will be blinking, press the READ button to the desired
month and then press SELECT button.
After that the day number will be blinking and you can set the desired day. Repeat the procedure for hour,
minute, and AM/PM selections.
11. SETTING THE ALARM
Press the SELECT button twice and the READ button five times, “SET ALARM ?” menu will appear.
Press the SELECT button and “ALARM oFF” will be displayed.
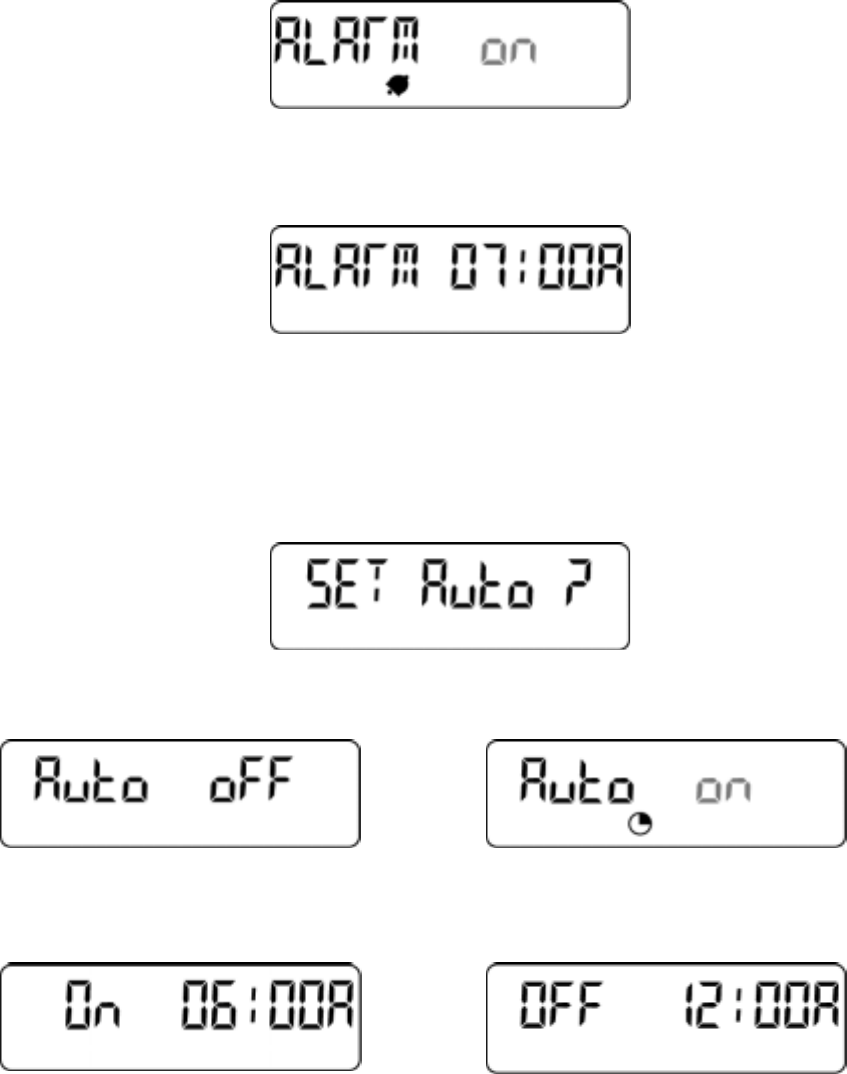
This can be toggled between “ON” and “OFF” by pressing the READ button.
If you want to use the ALARM function, select “ALARM ON” and press the SELECT button, and you
can set the desired ALARM time by the procedure in “SETTING TIME”.
If you press the SELECT button in the state of displaying “ALARM oFF”, pager will return to the
standby mode.
12. SETTING AUTO ON/OFF
Press the SELECT button twice and the READ button six times, “SET Auto?” menu will appear.
Press the SELECT button, “Auto oFF” will be displayed.
If you want to use the AUTO ON/OFF function, select “Auto on” by pressing the READ button, press the
SELECT button, and you can set the desired AUTO ON/OFF time by the procedure in “SETTING
TIME”.
If you press the function button in the state of displaying “Auto oFF”, the pager will return to the standby
mode.
13. TURNING ON/OFF THE PAGER
Press the SELECT button twice and the READ button seven times, the “PoWER oFF” menu will appear.
Press the SELECT button again and the pager will be off.
If you want to turn on your pager that is off, press the READ button for one second, and two short beeps
emit and the pager enters into the standby mode.
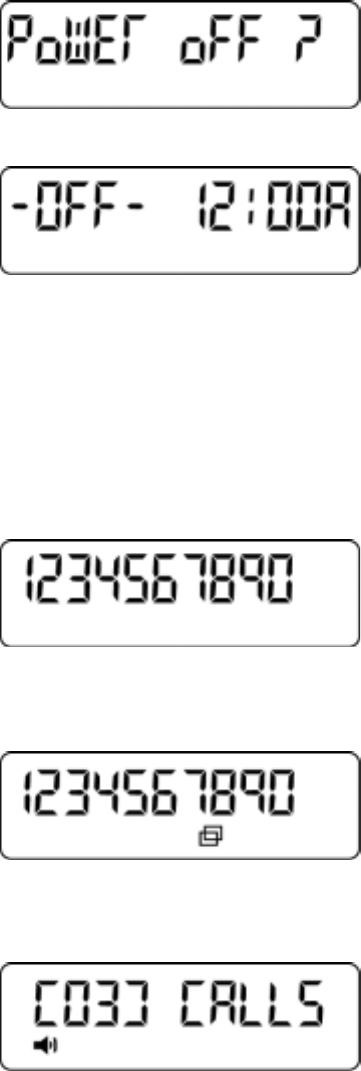
14. RECEIVING AND READING MESSAGES
When a message is received by your pager, the alert will last for 8 seconds, and the received message is
displayed as below for example.
If you press the SELECT button or the READ button the alert stops.
If the message is exactly the same as one in memory, the duplication icon will appear.
In the standby mode if there are unread messages, the LCD is displayed as below instead of displaying the
current time.
The number between the brackets is the number of unread messages.
15. READING STORED & LOCKED MESSAGES
Press the READ button, the message is displayed on the LCD as below.
Messages are from the most recent to the oldest messages in memory.
If the stored message is more than 12-characters long, the message extension icon will appear.
If you press the READ button again, the rest of message will be displayed.
If you press the READ button after reading the message, the following information will be displayed.
01]: storage number
31 : Date message received
12:50P : Time message received.
Press the READ button and the next message will be displayed.
You can read the locked message after you read all the stored messages.
In case of locked messages, the locked icon will appear and there is no information of the message.
If the current message is the last one, the pager returns to the standby mode.
If there are no stored messages, “No CALL” will be displayed.
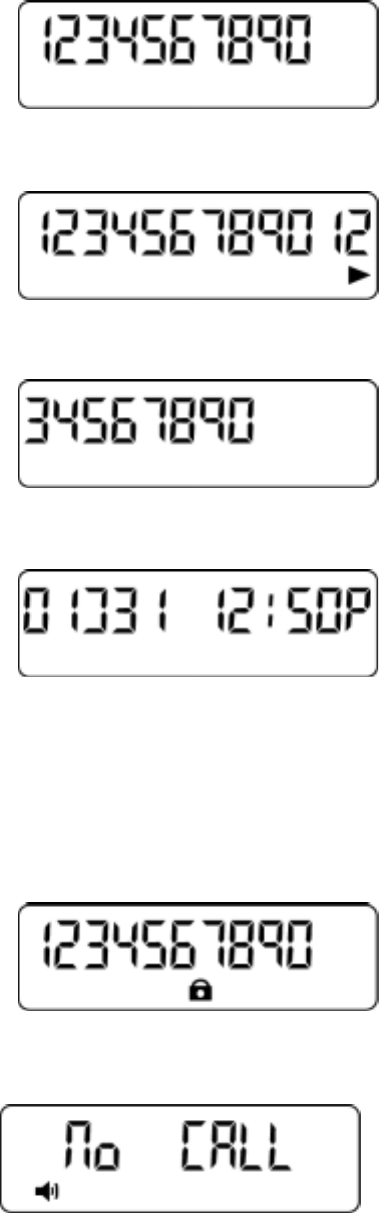
16. LOCKING AND UNLOCKING MESSAGE
To lock a stored message, press the READ button to the message you want locked, press the SELECT
button once in the state of reading a message, and the pager ask you w hether you want to lock the
message or not.
If you press the READ button, the message is locked and “LocKEd” is displayed.
If the message is exactly the same as one being already locked, “duPLICATE” will be displayed.
If the locked message is full (20 messages), “MSG FuLL” will be displayed.
(NOTE: The pager will lock 20 messages and still receive additional 20 messages.)
To unlock a locked message, press the buttons in the same order as one in the above locking process,
UnLocK ?” will be displayed. If you press the READ button, the message is unlocked and “UnLocKEd”
is displayed. If you press the SELECT button not the READ button, the message is displayed again.
17. DELETING MESSAGE
To delete a message selectively, press the function button twice in the state of displaying the message you

want to delete, and “dELETE ?” is asked of you.
At this time if you want to delete the message, press the read button and the message is deleted and
“dELETEd” is displayed. If you press the function button, the message is displayed again.