Dynamics ACQUA Mobile Phone User Manual
Dynamics Hong Kong Limited Mobile Phone Users Manual
Dynamics >
user manual

User Manual
ACQUA
GSM Mobile Phone
FCC ID:C89ACQUA

SIM card or service provider
of ACQUA cell phone to help you better use this
Thank you for purchasing ACQUA Mobile
Contents
WELCOME
Phone. This guide describes the basic functions
phone.
The content of this manual is correct. But some
of the manual may be different from the mobile
phone because of the difference of software,
. Some features
require phone support, please check carefully for
use. The company retains the right to amend the
technical specifications without notice.
WELCOME......................................................................II
GETTING STARTED.......................................................4
BATTERY USE...........................................................4
Installing the battery................................................4
Charge the battery...................................................4
SIM CARD INFORMATION........................................5
Installing the SIM card.............................................5
Access codes..........................................................5
INSERT MEMORY CARD..........................................6
EARPHONE...............................................................6
STANDBY MODE............................................................6
PHONE LAYOUT.......................................................7
ENTER TEXT.............................................................8
CALL FUNCTIONS.........................................................9
MAKE A CALL...........................................................9
To make an international call...................................9
To Make a call from the phonebook........................9
ANSWERING OR REJECTING AN INCOMING CALL
.............................................................................10
To answer the incoming call..................................10
To reject an incoming call......................................10
To send message (SMS) during a call or conference
call.................................................................................10
CALL WAITING.........................................................10
MAKE A CONFERENCE CALL................................10
TIPS FOR CALL OPTIONS......................................11

MAIN MENU..................................................................11
OVERVIEW OF MENU FUNCTIONS.......................11
PHONEBOOK...............................................................12
SEARCH..................................................................12
ADD NEW CONTACT..............................................12
CALLER GROUPS...................................................12
SPEED DIAL............................................................12
BLACKLIST..............................................................12
COPY ALL................................................................12
MOVE ALL................................................................13
DELETE ALL CONTACTS........................................13
SETTINGS...............................................................13
MESSAGES13
WRITE MESSAGE...................................................13
Text Message........................................................13
Multimedia message.............................................13
INBOX......................................................................13
DRAFTS...................................................................13
OUTBOX..................................................................13
SENT MESSAGES...................................................14
DELETE MESSAGES..............................................14
BROADCAST MESSAGE........................................14
MESSAGE SETTINGS.............................................14
CALL CENTER.............................................................14
CALL HISTORY........................................................14
Missed calls..........................................................14
Dialed calls............................................................14
Received calls.......................................................14
Delete Call Log......................................................15
CALL SETTINGS......................................................15
SETTINGS.....................................................................16
USER PROFILE.......................................................16
PHONE SETTINGS..................................................16
NETWORK SETUP..................................................17
SECURITY SETTINGS.............................................17
SIM Security Setup................................................17
Phone lock.............................................................18
Auto Keypad Lock.................................................18
Change Password.................................................18
RESTORE FACTORY SETTINGS............................18
MULTIMEDIA.................................................................18
CAMERA..................................................................18
IMAGE VIEWER.......................................................19
VIDEO RECORDER.................................................19
VIDEO PLAYER........................................................19
AUDIO PLAYER........................................................19
SOUND RECORDER...............................................20
ORGANIZER............................................................21
FILE MANAGER.......................................................21
FUN & GAMES.........................................................21
SERVICES................................................................21
Data account.........................................................21
Internet..................................................................22
SIM Tool Kit..............................................................22
EBOOK READER.....................................................22
CALCULATOR..........................................................23

1
CALENDAR..............................................................23
ALARM.....................................................................23
FM RADIO....................................................................24
◆
food, or other inappropriate materials. Do not drop,
knock, or shake the phone. Rough handling can break
internal circuit boards.
◆ In a thunderstorm, do not use the phone while
charging, or use the phone outdoors, to avoid being
struck by lightning or other damage.
◆ Do not leave the battery in hot places, it may
cause fire or explosion.
◆ Do not store or carry flammable liquids, gases,
or explosive materials in the same compartment as the
phone, its parts, or accessories.
◆ Remember to follow any special regulations in
force in the area you are in, and always switch off your
phone whenever it is forbidden to use it, or when it
may cause interference or danger.
◆ Do not put the phone in or on heating devices,
such as a microwave oven, stove, or radiator. The
phone may explode when overheated.
◆ Do not attempt to open the phone’s casing. Non-
expert handling of the phone may cause damages to
your phone. If the phone or any of its
accessories are not working properly, take them to
your nearest qualified service center. The personnel
there will assist you, and if necessary, arrange for the
phone to be repaired.
◆ Use only accessories and charging devices
approved by the phone manufacture! Otherwise you
risk serious damage to health and property. The
Don’t expose your phone to dust, dirt, sand,

32
battery could explode, for instance.
◆ Do not short-circuit the battery. Accidental short-
circuiting can occur when a metallic object like a coin,
clip or pen causes a direct connection between the +
and – terminals of the battery (metal strips on the
battery). For example, do not carry a spare battery in
a pocket or bag where the battery may contact metal
objects. Short-circuiting the terminals may damage
the battery or the object causing the short-circuiting.
◆ The battery can be charged and discharged
hundreds of times, but it will gradually wear out. When
the operation time is noticeably shorter than normal, it
is time to buy a new battery. Do not continue to use
the broken USB data cable or battery charger.
◆ If you use any other personal medical devices,
consult the manufacturer of your device to determine
if it is adequately shielded from external RF energy.
Your physician may be able to assist you in obtaining
this information. Switch off your phone in health care
facilities when regulations posted in these areas
instruct you to do so.
◆ Do not use mobile phones when driving. When
driving a car, driving is your first responsibility. When
using your wireless phone while driving, follow local
regulations in the country or region you are in.
◆ Keep the phone and all its parts and
accessories out of the reach of small children and
pets. They accidentally damage these things or choke
on small parts.
◆ Do not clean the phone while charging the
phone. You may be electric-shocked if you use the
phone while charging the phone with the USB data
cable or the battery charger. Make sure to disconnect
the USB data cable or the charger before using the
phone.
◆ Do not use harsh chemicals, cleaning solvents,
or strong detergents to clean the phone. Wipe it with a
soft cloth slightly dampened in a mild soap-and-water
solution.
◆ Dispose of worn out batteries and phone in
accordance with local provisions!
◆ Extreme heat or cold ;Avoid temperatures below
0°C/32°F or above 40°C/104°F

54
Getting started
You need to insert the SIM card and charge the
battery before using the phone.
Battery use
To extend the battery life of your device:
1. Use the standard wall charger to charge the
battery for the first time.
2. During the first 3-4 charge cycles, charge the
battery until the battery
indicator on the display stops scrolling.
3. Avoid partial charging. Also, wait for the battery to
discharge completely before charging it again.
4. Charge the battery using the USB cable only if
the recommended wall charger isn’t readily
available.
5. Avoid keeping the device on vibrate mode.
Installing the battery
1. Mobile phones with built –in battery can by
professional maintenance engineers replacement. If
using the wrong type of battery, may explode. Please
be sure to according to the manufacturer's instructions
to handle used batteries.
2. Replace the battery. Align the contacts of the
battery with the corresponding connectors in the
battery compartment.
Charge the battery
To charge the device battery:
1. Take the USB cable from the device
packaging, and attach it to power adapter. Now
connect the power adapter into a standard AC wall
outlet.
2. Connect the micro USB connector on the cable
into its designated port on the device (left side). The
battery level indicator on the device screen will start
scrolling horizontally to indicate that the battery is
being charged.
NOTE: Exercise extreme caution while
connecting the charger to the device. The
connectors on the charger and on the phone may
get damaged if too much force is applied while
connecting them. If the battery is completely
discharged, it may take a while before the on-
screen charging indicator starts scrolling.
3. When the battery is fully charged, the battery
level indicator on the device screen will stop
scrolling horizontally. Once charging is complete,
disconnect the charger from the device, and then
from the wall outlet.
SIM card information
When you subscribe to a cellular network, you
receive a plug-in SIM (Subscriber Identity Module)
card loaded with your subscription details, such as
your PIN, and available optional services.
Be careful to handle, insert or remove the SIM card
since the SIM card and the contacts inside can easily
be damaged by scratching or bending.
Note:Before installing/removing the SIM card,

76
always make sure that the phone is switched
off.
Installing the SIM card
Insert the SIM cards into their respective slots.
Make sure that the contact area on the cards is facing
the connectors on the device.
Access codes
There are access codes for your SIM card. These
codes help you to protect the phone against
unauthorized use.
When requested for any of the code explained
below, key-in the appropriate code (displayed as
asterisks) and press the OK key.
PIN
The Personal Identification Number or PIN (4-
8digits) protects your SIM card against unauthorized
use. The PIN comes with the SIM card; see the SIM
card instruction provided with your card.
If you enter an incorrect PIN three times in
succession, the code will be disabled and cannot be
used until you re-enable it by entering the PUK.
PUK
The 8-digit PUK (Personal Unblocking Key) is
required to change a disabled PIN. The PUK may be
supplied with the SIM card. If not, or in case you have
lost it, please contact your service provider.
To re-enable your PIN, proceed as follows.
1. Key-in the PUK and press the OK key.
2. Enter a new PIN of your choice and press the
OK key.
3. When the Confirm New PIN message is
displayed, key-in the same code again and press
the OK key.
If you enter an incorrect PUK ten times in
succession, the SIM card becomes invalid. Please
contact your service provider for a new card.
Insert memory card
Insert memory card. Take compatible micro SD
card, and place it into its
slot.
Earphone
Connect the micro USB connector on the cable into
its designated port on the device (top).
Standby mode
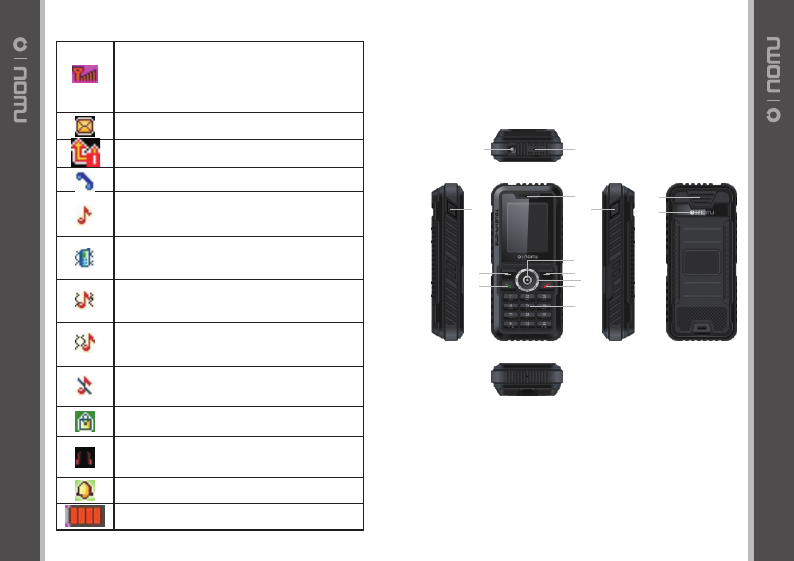
In the main display, you may see several icons
displayed on your status bar. The meaning for each
icon is explained below:
98
Phone layout
Vertical bars indicate the signal strength of
the GSM network signal. Five bars indicate
that your current position has the best
reception.
Indicates new text message(s).
Indicates that the SIM call divert is activated.
Indicates a missed call in SIM
Indicates that the alert type of your phone is
set as ring.
Indicates that the alert type of your phone is
set as vibrate.
Indicates that the alert type of your phone is
set as ring and vibrate.
Indicates that the alert type of your phone is
set as vibrate then ring.
Indicates that the alert type of your phone is
set as mute.
Indicates your phone is locked.
Indicates that the alert type of your phone is
set as headset.
Indicates the alarm clock is set.
Indicates the battery charge level.
10
12
2
15
1
3 4 6
5
7
9
14
8
13
1110
No.
1
2
3
4
5
6
7
8
9
10
11
12
13
14
15
Key note
Left soft key
(LSK)
Right soft key
(RSK)
Send key
End key
Navigation
keys
OK key
Numeric keypad
receiver
USB port
Earphone jack
LED
viewfinder
loudspeaker
Functional Description
Press to perform the function currently
displayed in the lower left corner of the
screen.
Long press to activate the flashlight
Press to perform the function currently
displayed in the lower right corner of
the screen.
Press to make a call.
Hold to redial the last number called.
To hand up on a call during a call or
power on/off.
In the standby mode, quick access to
(Up key) QQ
(Left key) Music Player
(Right key) SMS
(Down key) MSN
Move the cursor to select the menu
you want.
Input numbers or characters
receiver
USB port
Earphone jack
loudspeaker
Confirm key
Flashlight
Mic
Reset button
Flashlight key to open
viewfinder
Enter text
ABC, T9, Number, and Symbol modes
You can enter text in some features such as
Messages, Phonebook, or Calendar, using ABC mode,
T9 mode, Number mode, and Symbol mode.
You can enter text by pressing the alphanumeric
keys on the phone.
Text Input Options:
While you are in text editing mode, you will be in
several modes.
When you see [Option] and [Clear] in the soft key,
press the soft key (left) for option: you can save the
entry or change the Text Input Method. To erase a
character, press the soft key (right) next to the
character you want to erase.
T9 Text Editing Mode
T9 Text Editing Mode is a predictive text input mode
that allows you to key in any character using single
keystrokes.
While you are in T9 editing mode, press the
alphanumeric key once for one character. You will see
T9 suggested words.
For example, press 4,3,5,5 and 6 key to enter
“hello” in English word mode. T9 predicts the word that
you are typing, and it may change with each key that
you press. And press the [Select] soft key (left) to
select the word you want to write.
You can define the default Input Method of your
phone and change input methods time to time.
To define your preferred input method, go to Phone
Setup sub menu in Settings menu. Then select
Mic
Reset button
LED open

1312
Preferred Input Method. Once you set the preferred
input method, next time you edit in text input mode,
the setting will be applied until you change to another.
If you want to change the text input method
temporarily, in the text input mode, press [Option] soft
key, and select “Input Method” from the option.
• You can change the text input method with the [#]
key; the input methods will swap when you press the
[#].
• Press the [*] key to select Symbols.
• Press and hold the [*] key to activate silent profile
mode..
• Press [1] to enter periods or apostrophes
automatically.
• Press [0] to insert a space,long press to enter
“+\p\w” in idle screen..
Call functions
Make a call
This gives you information about the calling service
supported in your phone.
In standby mode, key in the number, including the
area code, and press send key. Your phone will dial
out based on your default dial setting.
To make an international call
For international calls, long press [0] for the
international prefix (character +).
Key in the country code, area code and the phone
number.
Press send key to call.
To Make a call from the phonebook
In the standby mode, press right soft key (RSK) to
enter Phonebook. Scroll to the desired contact name
or type the name in the input box, and then press
send key to make the call.
You can also press Menu and choose Phonebook
submenu. Use navigation keys to select Search
option. You can directly select a name from the
phonebook list or enter the name in the quick search
field. Then press send key to make the call.
Answering or rejecting an incoming call
To answer the incoming call
• Press send key to answer the call.
To reject an incoming call
• Press end key to reject the call.
To send message (SMS) during a call or
conference call
You are also allowed to send SMS during an incoming
call.
• Select Options and Messages.
• Under Messages menu, select Messages and
press OK. Select Write Messages. For details on
SMS, please see “To write a SMS”.
Call waiting
You can answer another incoming call while you
have a call in progress.
During a call, press left soft key (LSK) to enter the
21 1514
Option menu to hold the current call and switch to the
new incoming call. You can swap back anytime by
pressing left soft key (LSK) again and select Swap.
Make a conference call
You can make conference call while you have multi
calls in progress.
1. In the standby mode, select SIM card.
2. Make a call to the first participant.
3. Press Options and call the second participant
during an active call, and select New call to
make a new call during an active call.
4. Press LSK and select Conference. This joins the
calls to the conference.
5. Repeat steps 2 and 3 to allow new participants to
be connected to the conference call.
6. Press Options and select End All to end the
call. Or press end key..
7. Any call (participant) can be disconnected by
pressing Options and select End single call.
Tips for call options
A call can be connected to any single caller by
pressing Options. When you press Options during an
active call, you would have following functions as
listed in below:
• Hold single call: put a call on hold
• End single call: end a call.
• New Call: make a new call during an active call.
• Phonebook: shortcut to Phonebook menu.
• Messages: shortcut to Messages menu to write
text message.
• Sound Recorder: to record your conversation
during an active phone call.
• Mute: set On/ Off to mute the call during the
conversation.
• DTMF: set On / Off for DTMF (Dual Tone Multi-
Frequency) tone dialing system.
During a conference call, you can use the following
functions also:
• Swap: switch between calls on hold and active.
• Conference: make a multi-party conversation.
• End all calls: end a multi-party call.
Main menu
To access Menu mode, press [Menu] in Idle mode.
Some menus are operator, network and
subscription dependent.
Overview of menu functions
Phonebook
Messages
Call center
Settings
Multimedia
Organizer
FM radio
Basic menu

1716
Phonebook
You can store phone numbers on your SIM card
and in your phone’s memory. The SIM card and
phone’s memory are physically separate, but they are
used as a single entity called Phonebook. To access
this menu, press [Menu] in Idle mode and select
Phonebook or press RSK key to enter Phonebook .
Search
Search names and numbers saved in the
Phonebook.
Select the one you wish to call, and press Send Key
to make a call.
In the search mode, you might press key to change
the input method.
Add New Contact
Use this menu to add a new contact to Phonebook,
SIM card, private phonebook.
Caller groups
There are five default caller groups on the phone.
You can edit each group’s name, caller ring tone,
caller picture, caller video in the group settings. You
can add, delete a member (all members) in the
specified group. With the caller group function, you
can send a message to all members of a group at the
same time.
Speed dial
If you assign the number to one of the speed dialing
keys (from 2 to 9 ) saved in the phonebook list, you
can call the phone number by long pressing the key in
the standby mode.
Blacklist
Allows you to filter and block incoming calls or
messages.
Your phone provides the following options for
Blacklist:
• Settings: Allows you to reject calls, SMS, and
MMS from SIM card. You can select to reject from the
blacklist, accept only from contact, or all.
• Blacklist: Allows you to add or edit phone
numbers on the Blacklist.
Reject Log: Allows you to check reject log on calls
or messages.
Copy All
Allows you to copy contacts among two different
storage locations, such as from Phone to SIM card or
SIM card to Phone.
Move All
Allows you move all contacts information to different
storage location.
Delete all contacts
You can delete all phonebook data in SIM card,or
Phone.
Settings
Your phone provides you various setting options to

1918
personalize your phone, including Owner
number,Memory status,Preferred storage and so
on.
Messages
Use the Messaging menu to send and receive short
messages and multimedia messages. You can also
use a voice-mail, MSN, and cell broadcast message
features. To access this menu, press [Menu] in Idle
mode and select Messages. Message functions are
available depending on network services that your
service provider supports.
Write Message
Text Message
Use this menu to create and send a message.
Multimedia message
Use this menu to create and send a multimedia
message.
Multimedia Message Service (MMS) delivers
messages containing a combination of text, image,
and audio, from phone to phone or from phone to e-
mail.
Note:
• The maximum size allowed for a message can
differ, depending on your service provider.
• Depending on the file type or DRM (Digital
Rights Management) system, some files may not be
able to be forwarded.
Inbox
This folder stores all of the messages you have
received, except for e-mails.
Drafts
This folder stores messages you have saved to
send at a later time.
Outbox
You can view the messages that the phone has
failed to send.
Sent messages
This folder stores messages you have send.
Delete messages
This folder helps you to delete all messages in
selected folder as Inbox, Outbox, Draft and Delete All
Folders.
Broadcast Message
This network service allows you to receive the
broadcast messages on various topics such as
weather, traffic, local district code, local hospitals, taxis
or pharmacy in your area.
For more information about broadcast message
topics, please contact your service provider.
Note: This service may not be available on all

2120
networks. For more information about the available
subjects, please contact your network service provider.
Message Settings
Within the Message Settings sub-menu, you can
define default values on common parameters for
mobile-originated messages.
Call Center
Enter the call center menu, you can check out call
history, setting general call settings and setting auto
answer and record. To access this menu, press [Menu]
in Idle mode and select Call center .
Call history
Use this menu to view the calls you have dialed,
received, or missed, and the length of the calls. You
can also check the cost of your calls, if the SIM card
supports this function.
Missed calls
In Call Record menu, choose Missed Calls, and
press OK to view the records. This menu displays the
most recent received calls that you did not answer.
Dialed calls
This menu displays the most recent calls you have
dialed.
Received calls
This menu displays the most recent calls you have
received.
Delete Call Log
All call record can be deleted. You may select
deletion of all latest talk record or only missed calls,
dialed calls or received calls in the checklist.
Call settings
This option enables you to set the general call
settings of the phone.
The options are:
• Caller ID:–Set by network, Hide ID or Send ID.
• Call waiting: You can activate this function or
deactivate it, and also view the current settings via
query.
• Call divert: You can set to forward the
incoming call in different conditions and enable to
Activate/Deactivate call diversion and check the Query
status.
• Call barring: In order to activate this service, it
requires the services provided by the network service
provider. When you change barring password, you
need to input the old password.
• Line switching: Enables you to touch Line ½
for the phone.
• Advanced settings:
• Auto redial : You can touch to redial the
number automatically when a call is not connected.
• Call time reminder : After setting this function
to ‘on’, it will offer a warning tone towards the single or

2322
periodic setting as your own during the call process,
so you will be reminded of the call time at periodic
intervals during a call.
• Reject by SMS : When this feature is enabled
and you reject a call, an SMS text message will be
send to the calling party.
• Answer mode :. Including Cover answer any
key(there are two answer mode in the headset
mode,they are any key,auto) .
Settings
The Settings menu provides you with various
setting options to customize the phone to your
preferences and needs. You can also reset the
settings to their default values.
To access this menu, press [Menu] in Idle mode
and select Settings.
User profile
The available profiles are General, Silent, Meeting,
Outdoor, Headset, and Bluetooth. You can also set the
tone, volume, alert, ring, and so forth with Options,
Customize option, so that whenever you receive an
incoming call or a new message, you can customize
the use of your phone to different types of call
environments.
Phone settings
You have following options listed under phone
settings:
Date and Time:Let you set time zone, time and
date, time and date format and so forth on the phone.
Schedule power on/off: Let you set a particular
time on the phone when the phone should power
on/off itself.
Language: This phone allows you to set a
language for the display in this phone.
Preferred input methods: This enables you to
touch the text input method.
Display settings: Under Display you can set a host
of different characteristics of the Wallpaper, Screen
saver, standby mode.
Shortcut: The phone allows you to customize
shortcuts for phone functions frequently used. Press
the navigation left key to enter Shortcut menu.
Dedicated Key: This function allows you to re-
assign the quick-access-feature default setting in 4-
way navigation keys.
Flight Mode: Switch into flight mode while being on
board, screening off partial function of telecom ,
normal mode or decide on when boot up .
Other settings: You can set a host of different
characteristics of LCD backlight.
Network setup
Network Setup helps you in Network Selection,
selection of Preferred Network, and GPRS connection
for SIM
Network Selection
The Network Selection feature enables you to
select automatically or manually the network used

2524
when roaming outside of your home network.
Note: You can select a network other than your
home network only if it has a valid roaming agreement
with your home network.
Security Settings
Use this menu to protect the phone against
unauthorized use by managing the several access
codes of your phone and SIM card.
There are six types of security setting categories,
and you can optimize security mode by choosing sub
menus in “Security Settings” in “Settings” menu.
These security settings will help you to keep privacy
and to prevent other people from using the phone
without your permission.
SIM Security Setup
This function allows you to activate password to
protect your phone against unauthorized use.
Your phone provides the following selections for
your option:
• PIN Lock: This function allows you to lock the
phone with a specific SIM card. The feature is
designed to prevent the use of your SIM cards by
means of another person’s phone if your SIM cards
lost. You can switch on or off to activate the PIN Lock
function.
• Fixed Dial: This function dials only the
numbers in the fixed dialing number (FDN). To save
and edit numbers on the list, you need the PIN2 code.
• Barred Dial: Allows you to switch on or off
restricted call function. However, you need to check if
your SIM supports this function.
• Change Password: Allows you to change PIN
code.
Phone lock
You can switch on or off to activate the phone lock
function to protect your phone. If you switch Phone
Lock on, you need to enter the password to set the
request on. The default password is “0000”.
Auto Keypad Lock
This allows you to lock the phone’s keypad to
prevent accidental key pressed. In Auto Keypad
Lock submenu, select the time that after the last key
press will be disabled, and press OK.
Change Password
Allows you to change the phone lock password.
Restore factory settings
This feature would reset the phone to the same
settings as those configured at the factory. In this
case, it does not delete the downloaded objects and
phonebook records.
You will need to input password to restore factory
settings. The initial password is 1122.

2726
Multimedia
Camera
To take a picture, press Options in the preview
mode, you can adjust the setting.
Photo Album: You can review pictures you
have taken by pressing OK.
Camera settings: Set EV/Banding/Delay
timer/Cont. short.
Image settings: Set Image size/Image
quality.
White balance:
Auto/Daylight/Fluorescent/Incandescent
Scene mode: Auto/Night
Effect settings: Normal/Grayscale/Sepia/Sepia
green/Sepia blue/Color invert
Storage: Allows you to select the storage for
saving images.
Restore default: This menu allows you to
restore to the camera’s default settings.
Image viewer
All images can be reviewed from the phone or
memory card. You may choose to view your
images in List Style or Matrix Style.
Your phone provides the following selections
for your option:
• View: Allows you to view the pictures saved in
Photo Album.
• Delete: Allows you to delete the pictures in
the Photo Album.
• Send: Allows you to forward a photo image
via MMS or Bluetooth
• Browse style: Allows you to select between
List Style or Matrix Style when you browse pictures.
• Rename: Allows you to rename the file.
• Delete all: Allows you to delete the pictures in
the Photo Album.
• Sort by: Allows you to view the related
information about the selected image.
Video recorder
In Multimedia menu, select Video Recorder and
press OK. You can press ok key to start recording and
press RSK to stop recording. On the preview mode,
you can press Options. you can adjust the settings.
Camcorder settings: Night mode, Banding.
Restore default: Restore default settings.
Video player
Play videos stored on the micro SD card or the
phone memory. The supported video formats are 3GP
and MP4. Press Options to perform additional
functions.
Audio player
You may enter the music player via main menu or

2928
use the side quick key for quick access. Another way
to access the music player is through the navigation
left key. You may listen to the music, speech, or even
listen to an English lesson in MP3 and AAC format.
You may also download the music content via USB or
other connection. Music tracks must be saved in My
Music folder in File Manager in order to be
automatically detected and added into the default play
list. You may listen to the music through the headset or
loudspeaker. The user-friendly interface is specially
designed to enable users to control, play, pause, and
stop the music player as you wish.
If you are a first-time user, your music player will
automatically detect and add all the music tracks into
the default play list. When you use the music player
next time, select any music track to access the
following options:
• Now Playing: Allows you to view a list of now
playing.
• My Play lists: Allows you to create 2 play lists
according to your personal preference, in addition to
the default play list. Select one song in any play list,
and access the following options:
• Tracks: Allows you to view my play lists.
• Settings: Allows you to turn on auto refresh
play list. In the Music Player menu, choose Settings.
The setting options include:
• Player Settings
List auto gen.: You can choose to refresh play
list automatically or not.
Repeat: You can choose to repeat all songs, one
songs or turn off this function.
Shuffle: This function is to mix the music tracks
with different order.
Background Play: This function allows the phone
to play the music continuously if you go back to
the idled mode.
Sound recorder
With this menu, you can record sound in AMR,
WAV and AWB format and use it as ring tone,
message tone, caller ring tone, alarm tone.
Your phone provides the following selections for
your option:
• Record: Allows you to record the sound
during your phone call or other situation.
• Play: Allows you to play the sound record.
• Append: Allows you to record in the same file.
• Rename: Allows you to rename a file.
• Delete: Allows you to delete the file saved in
the Voice Recorder.
• Delete all : Allows you to delete all file saved
in the Voice Recorder.
• Settings: Allows you to choose your preferred
storage, file format, and audio quality.
• Set As: Allows you to set the sound record file
as ring tone, message tone, caller ring tone, or alarm
tone.
• Send: Allows you to forward the file to user
profile or share with friends via MMS.

3130
Organizer
File manager
In this menu, you can manage images, audio,
music, photos, and other contents you have
downloaded. Two menus will be displayed: Phone,
Memory. Scroll to Phone and press Options, the
options include: Open and Format. Scroll to Memory
card and press Options, the options include: Open,
Rename, Memory Status and Format.
Fun & Games
This phone is built with three creative games (
Copter, Puzzle, Chicken). You may use the navigation
keys to select the game you like to play. Then press
OK to select the game.
You can also adjust the game setting at the
beginning when you enter the game menu. The Game
Setting in the phone offers the following options:
BGM: Allows you to run on or off the sound effect
while playing games. Sound effect, Vibration,
Volume.
Services
Service describe in the following are supported by
your service provider.
Service describe in the following are supported by
your service provider. If you cannot connect either
one of those services, you might contact with your
service provider for further information.
Data account
Default data accounts based on major operators at
the time this phone is manufactured are provided.
GSM data
Press Edit to change the data account settings,
including: Account Name, Number, User Name,
Password, Line Type, Speed and DNS.
GPRS
Press Edit to change the data account settings,
including: Account Name, APN, User Name, Password
and so on.
Internet
The Wireless Application Protocol (WAP) on your
phone allows you to access the wireless web. Using
the web browser, you can access up-to-date
information and a wide variety of media content.
Note: To activate wap service, you need to contact
your service provider.
To access this menu, press [Menu] and select
Services then Internet.
Homepage
Once connected, the homepage is displayed. The
content depends on the service provider. To exit the
browser, press end key.

3332
Bookmarks
You can use this menu to save URL addresses to
quick access a web site.
Go to address
You can edit URL addresses to access a web site.
Recent pages
You can view the recent pages you have visited.
Setting
If the settings have made by the service provider,
you may begin immediately.
If the accessed profiles have been assigned by
your service provider, select a profile and activate it.
Otherwise, you may key in setting manually. For
appropriate settings, contact your network operator or
service provider.
SIM Tool Kit
In addition to the functions available in the phone,
your service provider may offer additional applications
such as weather or stock market information via the
SIM card. This function is only supported when SIM
card inserted.
Ebook reader
You can read any file in TXT format saved in the
memory card. Just copy the file in the folder of
[eBook] in the memory card under the directory [File
management], and run the ebook feature. If the file is
not in the folder, just “open the electronic book”
through the options of the file, and the file will be
moved to the folder automatically.
Calculator
The calculator applies simple calculate function
such as addition, subtraction, multiplication and
division.
Calendar
This feature allows you to keep track of your
schedule and event saved in the calendar. You can
also switch on the alarm with the task for reminding.
Your phone provides the following selections for
your option:
• View: To view the note stored in a specified
date.
• View all: To view all notes stored in a
specified date.
• Add event: To add a new event in a specified
date.
• Delete event: To delete a specific task,
multiple tasks or all tasks.
• Jump To Date: To jump to a specific date.
Alarm
This function allows you to set the alarm to ring at
the time specified. The alarm clock works even when
the phone is switched off.

3534
• In the menu, choose Alarm Clock and press
OK.
• Press Edit to set alarm time.
• To set the alarm, directly input the hours and
minutes via numeric keys, using either 12-hour or 24-
hour time format. You can change the time format from
24-hour to 12-hour in Time Format under Date And
Time submenu of Settings menu.
• Choose Once/ Mon-Fri/ Mon-Sat/ Everyday in
Repeat option for your ring mode, and press Done.
• In Audio Tone option, you may customize the
alarm tone from Audio selections provided or from an
FM Radio channel. Press the navigation left/right keys
to switch between Audio/ Radio options.
FM radio
To listen to the FM radio on your phone connects
the compatible headset connector on the left side of
the phone. Note that the quality of the radio broadcast
depends on the radio station’s coverage in that
particular area.
When the radio is on, press LSK key and select:
• Stations: To save the channel you have
found, press and select edit. Key in the name of the
channel and frequency press OK. You can save 9
radio channels in the handset.
• Set Frequency: If you know the frequency of
the radio channel you would like to listen to (between
87.5 and 108.0 MHz), key it in press OK.
• Auto Search: If you want to search radio
channel, press Yes when Preset list confirm message
show up. The search stops when channels has been
found and show channel in Channel list.
• Settings: FM radio setting options:
Background play: Turn on/off Background play
function.
On: allow radio continuing playing when exit FM
radio
Off: when user exits FM radio, radio will stop.
Record format: Select the record format,
AMR/WAV.
Audio quality: Adjust audio quality.
Record storage: save the radio file in the phone
or memory card
• Record: Beginning record FM radio.
• Append: To append new radio with the
already existing file.
• File list: Show amount of record files.
Note: Before use FM radio, please insert the
headset first.

FCC RF EXPOSURE INFORMATION:
WARNING!! Read this information before using your phone
In August 1986 the Federal Communications Commission (FCC) of the United States with its action in
Report and Outer FCC adopted an updated safety standard for human exposure to radio frequency (RF)
electromagnetic energy emitted by FCC regulated transmitters. Those guidelines are consistent with the
safety standard previously set by both U.S. and international standards bodies. The design of this phone
complies with the FCC guidelines and these international standards. Use only the supplied or an
approved antenna. Unauthorized antennas modifications, or attachments could impair call quality,
damage the phone, or result in violation of FCC regulations. Do not use the phone with a damaged
antenna. If a damaged antenna comes into contact with the skin, a minor burn may result. Please contact
your local dealer for replacement antenna.
BODY-WORN OPERATION:
This device was tested for typical body-worn operations with the back of the phone kept 1.5cm from the
body. To comply with FCC RF exposure requirements, a minimum separation distance of 1.5cm must be
maintained between the user's body and the back of the phone, including the antenna, whether
extended or retracted. Third-party belt-clips, holsters and similar accessories containing metallic
components shall not be used. Body-worn accessories
that cannot maintain 1.5cm separation distance between the user’s body and the back of the phone, and
have not been tested for typical body-worn operations may not comply with FCC RF exposure limits
and should be avoided.
For more information about RF exposure, please visit the FCC website at www.fcc.gov
Your wireless handheld portable telephone is a low power radio transmitter and receiver. When it is
ON, it receives and also sends out radio frequency (RF) signals. In August, 1996, the Federal
Communications Commissions (FCC) adopted RF exposure guidelines with safety levels for hand-held
wireless phones. Those guidelines are consistent with the safety standards previously set by both U.S.
and international standards bodies:
<ANSIC95.1> (1992) / <NCRP Report 86> (1986) / <ICIMIRP> (1996)
Those standards were based on comprehensive and periodic evaluations of the relevant scientific
literature. For example, over 120 scientists, engineers, and physicians from universities, government
health agencies, and industry reviewed the available body of research to develop the ANSI Standard
(C95.1). Nevertheless, we recommend that you use a hands-free kit with your phone (such as an
earpiece or headset) to avoid potential exposure to RF energy. The design of your phone complies with
the FCC guidelines (and those standards).
Use only the supplied or an approved replacement antenna. Unauthorized antennas, modifications, or
attachments could damage the phone and may violate FCC regulations.
NORMAL POSITION:
Hold the phone as you would any other telephone with the antenna pointed up and over your shoulder.
RF
Exposure Information:
FCC RF Exposure requirements: The highest SAR value reported under this standard during product
certification for use next to the body with the minimum separation distance of 1.5cm is 1.061
W
/
kg
,
next to the head is 1.107
W/kg.
This transmitter must not be collocated or operating in conjunction
with any other antenna or transmitter.
This device complies with part 15 of the FCC rules. Operation is subject to the following two
conditions:
(1) this device may not cause harmful interference, and
(2) this device must accept any interference received, including interference that may cause
undesired operation.
NOTE: The manufacturer is not responsible for any radio or TV interference caused by unauthorized
modifications to this equipment. Such modifications could void the user’s authority to operate the
equipment.
NOTE: This equipment has been tested and found to comply with the limits for a Class B digital device,
pursuant to part 15 of the FCC Rules. These limits are designed to provide reasonable protection against
harmful interference in a residential installation. This equipment generates uses and can radiate radio
frequency energy and, if not installed and used in accordance with the instructions, may cause harmful
interference to radio communications. However, there is no guarantee that interference will not occur in
a particular installation. If this equipment does cause harmful interference to radio or television
reception, which can be determined by turning the equipment off and on, the user is encouraged to try
to correct the interference by one or more of the following measures:
- Reorient or relocate the receiving antenna.
- Increase the separation between the equipment and receiver.
-Connect the equipment into an outlet on a circuit different from that to which the receiver is connected.
-Consult the dealer or an experienced radio/TV technician for help
Do not use the device with the environment which below minimum -10℃ or maximum over 50℃,the
device may not work.
Changes or modifications to this unit not expressly approved by the party responsible for compliance
could void the user’s authority to operate the equipment.