user manual

1
User’s Manual
Charm
GSM Mobile Phone
FCC ID: C89CHARM
2
TABLE OF CONTENT
1.BASIC INFORMATION .................... 8
1.1.BRIEF INTRODUCTION ........................................... 8
1.2.SAFETY NOTICE .................................................... 9
1.3.SAFETY ALERT AND CAUTIONS ........................... 10
1.3.1.General Cautions ..................................... 10
1.3.2.Cautions of Using the Phone ................... 12
1.3.3.Cautions of Using the Battery ................. 14
1.3.4.Cautions of Using the Charger ................ 16
1.3.5.Cleaning and Maintenance ...................... 17
2.BEFORE USE ................................... 18
2.1.NAME AND EXPLANATION OF EACH PART ........... 18
3
2.1.1.Description of the Standby Pictures ........ 19
2.1.2.Description of Keys ................................ 23
2.2.INSTALL SIM CARD AND MEMORY CARD ........... 25
2.2.1.SIM Card ................................................. 25
2.2.2.Inserting and Taking out SIM Card ........ 26
2.2.3.Memory Card .......................................... 26
2.3.BATTERY ............................................................ 27
2.3.1.Install the Battery .................................... 27
2.3.2.Charging .................................................. 27
2.4.SECURITY PASSWORD ......................................... 28
3.QUICK USER GUIDE ..................... 29
3.1.FEATURE FUNCTIONS .......................................... 29
3.2.FUNCTION HOT KEY ........................................... 32
3.3.DIAL A CALL ....................................................... 32
3.4.REJECT A CALL ................................................... 33
3.5.RECEIVE A CALL ................................................. 33
3.6.END A CALL ........................................................ 33
3.7.EMERGENCY SERVICES ....................................... 34
3.8.EXTENSION SPEED DIAL ..................................... 34
3.9.DIALED CALLS/MISSED CALLS/RECEIVED
CALLS/REJECTED CALLS .............................................. 34
4
3.10.CALL FORWARD .................................................. 34
3.11.CALL WAITING ................................................... 35
3.12.CALL BARRING ................................................... 35
3.13.POWER OFF THE PHONE ...................................... 35
3.14.T-FLASH CARD ................................................... 36
3.15.USB CABLE ........................................................ 36
4.FUNCTION MENU .......................... 37
4.1STRUCTURE OF FUNCTION MENU ....................... 37
1-1Call logs .................................................. 38
1-2Contacts ................................................... 38
1-3ICE SMART ZONE ................................ 39
1-4Multimedia .............................................. 39
1-5Message ................................................... 40
1-6Tools ....................................................... 40
1-7Profiles .................................................... 40
1-8File management ..................................... 41
1-9Settings .................................................... 41
4.2CALL LOGS ......................................................... 43
4.2.1Dialed calls .............................................. 44
4.2.2Received calls ......................................... 44
4.2.3Missed calls ............................................. 45
5
4.2.4Rejected calls .......................................... 45
4.2.5Delete all ................................................. 45
4.2.6Call timers ............................................... 45
4.3CONTACTS .......................................................... 46
4.3.1NEW ....................................................... 46
4.3.2Search ...................................................... 46
4.3.3Write SMS .............................................. 47
4.3.4Dial .......................................................... 47
4.3.5Send vCard .............................................. 47
4.3.6Delete ...................................................... 47
4.3.7Mark ........................................................ 47
4.3.8Copy ........................................................ 48
4.3.9Copy all ................................................... 48
4.3.10Others ...................................................... 48
4.4ICE SMART ZONE ................................ 49
4.4.1Internet .................................................... 49
Input URL 49
Homepage 50
Bookmark 50
History 50
Offline 51
4.4.2MSN ........................................................ 54
4.4.3Facebook ................................................. 54
6
4.4.4Yahoo message ....................................... 54
4.4.5Twitter ..................................................... 54
4.4.6Sokoban ................................................... 54
4.5MULTIMEDIA ...................................................... 55
4.5.1Image browser ......................................... 55
4.5.2Recorder .................................................. 56
4.5.3Camera .................................................... 57
4.5.4Audio player ............................................ 58
4.5.5Video player ............................................ 60
4.5.6FM radio .................................................. 60
4.6MESSAGE ............................................................ 63
4.6.1.Write message ......................................... 63
4.6.2.Inbox ....................................................... 65
4.6.3.Outbox ..................................................... 65
4.6.4.Drafts ....................................................... 66
4.6.5.Sentbox ................................................... 67
4.7TOOLS ................................................................ 67
4.7.1Alarm ...................................................... 67
4.7.2Bluetooth ................................................. 68
4.7.3Calendar .................................................. 69
4.7.4Calculator ................................................ 70
4.7.5STK ......................................................... 71
4.8PROFILES ............................................................ 71
7
4.9FILE MANAGEMENT ............................................ 72
4.10SETTINGS ............................................................ 72
4.10.1Call Settings ............................................ 73
4.10.2Phone settings ......................................... 78
4.10.3Display settings ....................................... 78
4.10.4Security settings: ..................................... 80
4.10.5Profiles: ................................................... 83
4.10.6Connection management: ........................ 85
5.TEXT INPUT .................................... 85
6.ACCESSORIES ................................ 87
7.CARE AND MAINTENANCE ........ 88
8.ADDITIONAL SAFETY
INFORMATION .................................... 90
8
1. Basic Information
1.1. Brief Introduction
Thanks for selecting SA200P_B2B_ICEMOBILE color
screen GSM digital mobile phone. Through reading the manual,
you can fully know how to use SA200P_B2B_ICEMOBILE
mobile phone, appreciate its complete function and simple
operating method.
SA200P_B2B_ICEMOBILE color screen mobile phone is
designed aiming at GSM network environment; the phone is Two
Card Two Standby, but you can not call another SIM card when
one SIM card is under phone call. Besides basic call functions,
SA200P_B2B_ICEMOBILE also provides many kinds of practical
functions, such as name card holder, scene mode, message, audio
and video player, camera and video, game, Bluetooth, alarm
clock, calculator, STK, time and date, auto power-on and
shut-down and etc. so that convenient for your work and leisure
activities. In addition, SA200P_B2B_ICEMOBILE adopts
personalized human-computer interface design, its complete
function can meet your different requirements.
SA200P_B2B_ICEMOBILE color screen mobile phone
9
accords with GSM criterion, has obtained the certification of
competent authority.
The company reserves the rights to revise the contents of the
manual without prior notice.
1.2. Safety Notice
If your phone is lost or stolen, please immediately inform the
telecom department or commission agents of forbidding the use of
SIM card, so that avoid the economic loss caused by false calling
of others.
When you contact with telecom department or commission
agents, they need to know your phone IMEI number (printed
on the label on the back of the phone and can be found after
taking down the battery). Please copy the number and keep it
safe for future use.
In order to use the phone more safely, please adopt preventive
measures, for example: set up the PIN code of SIM card, PIN
code can prevent your SIM card from being used by others
without permission. When leaving the car, please don’t place
the phone in a place easy to be seen, you had better to carry
with you or lock in the suitcase.
10
1.3. Safety Alert and Cautions
Before using the phone, please read these cautions carefully
so that make sure to use the phone correctly.
1.3.1. General Cautions
On the plane, in the hospital and other places that forbidden to
use the mobile phone, please turn off the phone; otherwise it
may affect the normal operation of electronic equipments and
medical instruments. Please comply with the relevant
regulations if using the phone in these places.
Please strictly comply with the laws and regulations about the
phone use in the driving place. If you use the phone while you
are driving, please comply with the following rules:
concentrate on driving, pay attention to the road conditions; if
the phone has hands-free function, please make a phone call
hands free; if the driving conditions are not good, please stop
the car, and then dial or receive a call.
When approaching the places that storing fuel, chemicals or
explosives, and etc., please comply with the laws, regulations
and the relevant signs.
Please place the phone, battery and charger in the place out of
children’s reach, for fear that the children use them as tools
and cause personal injury.
11
Your phone only can use the batteries, chargers and other
accessories specified by the company for fear that the phone
is damaged. If using other batteries and chargers, it may cause
liquid leaking, overheat, explosion, fire breakout and other
failures of batteries.
Please don’t use the phone close to weak signal or high
precision electronic equipments. Wireless wave interference
may cause the mis-operation of these electronic equipments.
The phone has the function of timely auto power-on, please
check the auto power-on and shut down settings of the phone,
so that confirm that the phone will not power on
automatically during the flight.
Please don’t strike, shake or sling the phone violently for fear
that the phone is failed or fire breakout.
Please don’t place the battery, the phone and the charger in
the micro-wave oven or high-voltage equipment; otherwise
may cause circuit damage or fire breakout and other
accidents.
Please don’t use the phone in the places with inflammable and
explosive gas; otherwise may cause phone failure or fire
hazard.
Please don’t place the phone in the places with high
temperature, high humidity or a large amount of dust;
12
otherwise it may cause phone failure.
Please don’t place the phone in the uneven or unstable phone,
prevent the phone from falling off and then cause failure or
damage.
Please only use the original antenna or the antenna being
approved by the company. Unapproved and modified antenna
or the antenna with additional accessories may damage the
phone. Please don’t touch the antenna during a call. Touching
the antenna may affect the call quality and make the phone
power higher than the required power in normal use. In
addition, using the unapproved antenna may violate the
regulations in your country.
1.3.2. Cautions of Using the Phone
Don’t take down or modify the phone; otherwise it may cause
the damage, creepage and circuit failure of the phone.
Please don’t knock the LCD by force or use the LCD to knock
other things; otherwise may cause the damage of liquid
crystal plate and the leaking of liquid crystal. If liquid crystal
enters the eyes, it may cause ablepsia. At this time, please
rinse the eyes immediately with clean water (don’t rub the
eyes), and see a doctor immediately.
In very rare cases, if the phone is used in some types of
vehicles, it may have bad effect on the electronic equipments
13
in the vehicle. At this time, please don’t use the phone for fear
of losing the safety guarantee.
If your vehicle is equipped with the air bag, please don’t place
the phone above the air bag or the area that can be touched
after the air bag is swelled, for fear that the phone is applied
very strong external force and cause serious damage on the
vehicle owner when the air bag is swelled.
Please don’t touch the keystoke using needles, pen nibs and
other sharp objects; otherwise it may damage the phone or
cause mis-operation.
If the antenna is damaged, please don’t use the phone;
otherwise it may cause the personal injury.
Don’t make the phone approach to the magcard and other
magnetic objects too closely; radiation wave of the phone
may clean out the information stored in the floppy disks,
stored value cards and credit cards.
Please place the drawing pin and other small metal objects in
the place that far from the headphone of the phone. The
loudhailer is magnetic when it is working and will attract
these small metal objects so that may cause personal injury or
damage the phone.
Avoid phone damping, prevent water and other liquid from
entering the phone, and then cause short circuit, creepage or
14
other failures of the phone.
Please use the phone in the place that far from fixed telephone,
radio and office automation equipments, for fear that it may
affect the using effects of these equipments and the phone.
1.3.3. Cautions of Using the Battery
Please don’t take down or modify the battery; otherwise it
may cause liquid leaking, overheat, explosion or fire breakout
of battery.
Don’t throw the old battery into general life rubbish. Treat the
battery according to the regulated indication in the place that
definitely regulates the waste battery treatment.
Please don’t throw the battery into the fire, otherwise it may
cause the fire breakout or explosion of the battery.
When installing the battery, don’t apply pressure forcefully;
otherwise it may cause liquid leaking, overheat, explosion or
fire breakout of the battery.
Please don’t make the battery short circuit using the electrical
wire, needle and other metal objects; don’t place the battery,
necklace and other metal objects together; otherwise it may
cause liquid leaking, overheat, explosion or fire breakout of
the battery.
Please don’t solder the battery contact; otherwise it may cause
liquid leaking, overheat, explosion or fire breakout of the
15
battery.
If battery liquid enter the eyes, it may cause ablepsia; at this
time, please don’t rub the eyes using the hand, please rinse the
eyes with clean water, and then see a doctor immediately.
Please don’t use or place the battery near the fire or oven and
other high temperature places; otherwise it may cause liquid
leaking, overheat, explosion or fire breakout of the battery.
If the battery is increasing the temperature abnormally, color
change, distortion and other phenomena during the using,
charging or storing process, please stop using it and then
change new battery.
If leaking liquid of the battery contacts with the skin and
clothing, it may cause skin burn, please rinse it with clean
water immediately, and see a doctor if necessary.
If the battery is leaking liquid or giving out strange odor,
please take the battery away from open fire immediately,
avoid fire breakout or explosion.
Please don’t make the battery damp, otherwise it may cause
overheat, smoking or corrosion of the battery.
Please don’t use or place the battery under direct sunlight and
other high temperature places, otherwise it may cause liquid
leaking or overheat, reduce the performance and shorten the
service life.
16
Please don’t charge the battery continuously for more than 24
hours.
Please place the battery in the cool and ventilated place away
from direct sunlight.
Service life of the battery is limited. Service time of the
battery is gradually shortened after the frequent charging. If
many times of charging is failed, it means that battery life is
drained, please replace the new battery of designated type.
1.3.4. Cautions of Using the Charger
Please don’t take down or modify the charger; otherwise it
may cause personal injury, electric shock, fire breakout or
charger damage.
Please use 220V alternating current. Using other voltage may
cause creepage, fire breakout and damage the phone and the
charger.
Short circuit of the charger is forbidden; otherwise it may
cause electric shock, smoking and charger damage.
Please don’t use the charger when the power cord is damaged;
otherwise it may cause fire breakout or electric shock.
Please clean the dirt that accumulates in the power socket in
time.
Please don’t place the water container, and etc. near the
charger, for fear of water splashing and then cause short
17
circuit, creepage or other failures.
If the charger contacts water or other liquid, please cut off
power supply immediately, so that prevent short circuit, fire
breakout, electric shock or charger failure.
Don’t use the charger in the bathroom and other high
humidity places; otherwise may cause electric shock, fire
breakout or charger damage.
Please don’t contact the charger, electrical wire and power
socket with wet hands; otherwise it may cause electric shock.
Don’t place heavy object on the power cord or reconstruct the
electrical wire; otherwise may cause electric shock or fire
breakout.
Please pull out the charger plug from power sockert before the
cleaning and maintenance.
Seize the charger when pulling the plug, pulling the power
cord will damage the electrical wire, cause electric shock or
fire breakout.
Don’t charge in the following places: direct sunlight and other
high temperature places; wet and ashy place or the place with
large vibration (will cause failure); near radio and other home
appliances (will affect the image and sound effects).
1.3.5. Cleaning and Maintenance
Please don’t use the phone, the battery and the charger in the
18
bathroom and other high humidity places, and prevent them
from rain.
Please clean the phone, the battery and the charger using soft
and dry cloth.
Please don’t wipe the phone using alcohol, thinner or benzene
and other chemical reagents.
The socket with dirt may cause poor contact and power-off,
so that can’t be charged, please clean it regularly.
2. Before Use
2.1. Name and Explanation of Each Part

19
2.1.1. Description of the Standby Pictures
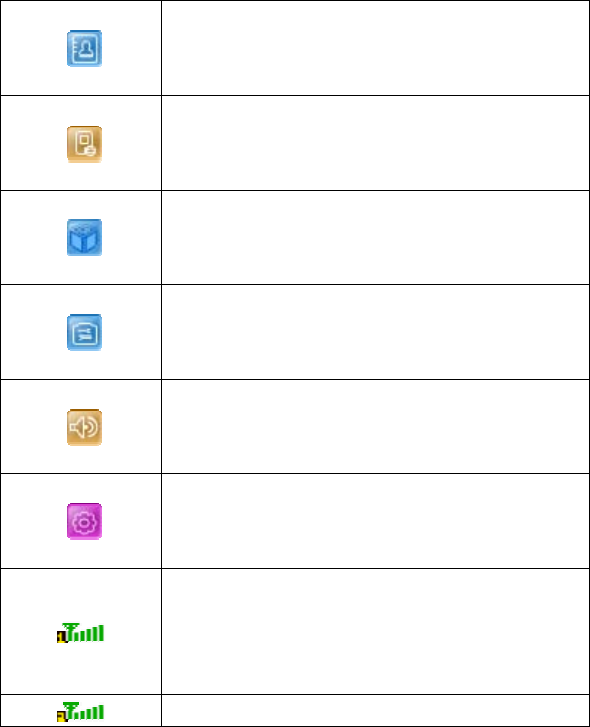
Icon Description of functions
File manager
Multimedia
Messaging
20
Contacts
Call logs
ICE SMART ZONE
Tools
Profiles
Settings
Network signal strength
The more the stripe is, the stronger the signal is. When
SIM card 1s inserted in card slot 1, standby screen will
show the icon.
Network signal strength
21
The more the stripe is, the stronger the signal is. When
SIM card 1s inserted in card slot 2, standby screen will
show the icon.
Battery strength
The full the fill is, the more electric quantity is. Standby
screen will show the icon.
Alarm clock on and off
It means that alarm clock is set and started. If alarm
clock is set as off, the icon will disappear automatically.
Unread SMS
When there is unread SMS in the inbox, standby screen
will show the icon.
Missed call
When there is missed call, standby screen will show the
icon.
Call forward in SIM card 1
When call forward unconditionally is started in SIM
card 1, standby screen will show the icon.
Call forward in SIM card 2
When call forward unconditionally is started in SIM
card 2, standby screen will show the icon.
Silent mode
When scene mode is set as mute mode, standby screen
22
will show the icon.
Vibrate mode
When scene mode is set as vibrate mode, standby
screen will show the icon.
Indoor mode
When scene mode is set as indoor mode, standby
screen will show the icon.
Outdoor mode
When scene mode is set as normal mode, standby
screen will show the icon.
Earphone
When the earphone connects with the phone normally,
standby mode will show the icon.
Memory card
When the memory card is inserted in card slot, standby
screen will show the icon.
Bluetooth
When Bluetooth is started and select Visible, standby
screen will show the icon.

23
2.1.2. Description of Keys
Keys Function
Left soft key/
Right soft key
1. Execute functions that the
left-down/right-down corner indicator
shows.
2. In the standby mode, press Left Soft
key to access Message, Right Soft key
to access Contacts.
End key
1. Mainly used as power on/off.
2. Press to return to standby screen in
any interface.
3. End calls or reject incoming calls.
OK key
On the standby interface:
1. Press to enter the selected menu.
2. Long press to open flashlight.
Dial key
1. Press this key to dial or receive an
incoming call.
2. When in the standby mode, press this
key to access Dialed Calls of SIM1/2.

24
Camera key On the standby interface,press “camera
key”,enter camera interface.
Number key
It is used to dial and input numbers or
characters.
Press and hold Number key 1 or 2 to
get through the preset voice inbox.
* Key
On the standby interface, input *; after
inputting telephone number, if you want
to input extension number, please press
twice asterisk key, after the display
screen shows “+”, please input your
extension number.
# Key 1. In text editing interface, press "#"
key to switch text the input method.
2. On the standby interface Press and
hold "#" key to transfer the profile of
Standard/Silent.
25
2.2. Install SIM Card and Memory Card
2.2.1. SIM Card
Before using the phone, you must insert valid SIM
(Subscriber Identity Module) card in the phone. SIM card 1s
provided by network supplier.
All the information related to network connection are
recorded in the chip of SIM card, also the names, telephone
numbers and SMS that storing in the name card holder of SIM card.
You can take out SIM card from your phone, and use it in any
GSM mobile phone (new mobile phone can read SIM card
automatically).
In order to avoid losing or damaging the information saves in
SIM card, please don’t touch the metal contact surface, and place
SIM card in the place that away from electricity and magnetic
force. Once SIM card is damaged, you can’t use the phone
normally.
Prompt: Please make sure to power off the phone before taking
out SIM card. It is absolutely forbidden to insert or take
out SIM card with external power supply; otherwise it
may damage SIM card and the phone.
26
2.2.2. Inserting and Taking out SIM Card
Metal contact surface of SIM card is easily scratched. You
must take out SIM card carefully before the assembly.
Power off the phone, remove the rear cover, battery or other
external power supply.
Make the end of SIM card without cutting angle inside and
aim at the card slot of the phone and metal surface of SIM
card face downward, then insert SIM card to the card slot of
the phone, the other SIM card is also inserted in this way.
When taking out SIM card, directly pull it outward and then
can take out SIM card.
Prompt: Without special explanation inserting two SIM cards
are defaulted in the manual. If you just insert one
SIM card, maybe some options of the menu will not
be shown.
2.2.3. Memory Card
Aim at the T card slot and push the T card gently, and the card
will be inserted correctly.
Prompt: If the memory card is failed, please check whether it
is correctly placed and good contact of metal point.
27
2.3. Battery
2.3.1. Install the Battery
Take off the rear cover, of the mobile.
Make one end of battery with metal surface aim at the battery
connector.
Then gently press the battery downward using the finger, and
then press the other end to install the battery.
Prompt: Please operate correctly to avoid damaging the
battery connector.
2.3.2. Charging
Insert the charger on the charging interface at the side end of
the phone.
After inserting the charging plug, battery strength icon stripe
at the top right corner of the screen is scrolling, which means that
the charging is processing; when the stripe is full of the whole icon
and stop scrolling, which means that the battery charging is
completed; when the charging is completed, please pull out the
plug.
28
When electric quantity is not enough, warning message will
be sent; and electric quantity shows empty. When electric quantity
is too low, the phone will power off automatically. Please don’t
make the battery in the status of not enough electric quantity for a
long time; otherwise it may damage the battery quality and service
life. Please don’t charge the battery for a long time.
Prompt: In order to ensure normal operation of the phone,
please make sure to use the designated charger.
2.4. Security Password
PIN
PIN (Personal Identification Number) is used to prevent your
SIM card from being used illegally. PIN is usually provided with
SIM card together. If you input wrong PIN for continuous three
times, please input PUK to unlock it. Please contact with network
operations company for more details.
PIN 2
You need to input PIN2 when entering some functions (such
as call charge); if you input wrong PIN2 for continuous three times,
you need to input PUK2 to unlock it. Please contact with network
operations company for more details.
PUK
When changing the locked PIN, you need to input PUK
29
(Personal Unlock Key). PUK is provided with SIM card together.
If it is not provided, please contact with your service provider. If
you input wrong PUK for continuous ten times, the SIM card can’t
be used again. Please contact with your service provider to buy
new card. You can’t change PUK. If you lose the code, please
contact with your service provider.
PUK2
When changing the locked PIN2, you need to input PUK2. If
you input wrong PUK2 for continuous ten times, you can’t use the
functions that need PIN2. Please contact with your service provider
to buy new card. You can’t change PUK 2. If you lose the code,
please contact with your service provider.
3. Quick User Guide
3.1. Feature Functions
The phone has not only the basic functions of mobile phone,
but also support rich, practical and rapid feature functions, can be
briefly introduced as follows:
Contacts:me card holder record stored in the phone can be
related with several telephone numbers at most, the phone can
30
store 100 records at most; can send SMS in the name card
holder; you can copy name card holder record between SIM
card and the phone.
Profiles: Custom the ringtone (include ring settings, adjust
volume, call alert, message alert, alarm&calendar remind, key
tone, battery low alert, power on/off tone) according to
different events or environment.
Call logs: The phone will automatically store the information
of call log for you to check; support to call the telephone
number in the call log; support to save the telephone number
in the call log to name card holder and set as rejected call;
support the function of sending SMS, and etc. to the telephone
numbers in the call log.
Message: The phone supports storing SMS and 50 pieces at
most. The phone supports the storing status of SMS in SIM
card and the phone.
Multimedia: Your phone provides all kinds of entertainment
services including image browser, recorder, camera, player,
FM radio and other functions.
Camera: The phone supports camera function. You can
customize the camera.
ICE MOBILE ZONE: The phone supports the game function.
Tools: The phone supports various practical functions.
31
Supports bluetooth, calendar, calculator, alarm, STK and other
functions.
Settings: You can customize the phone according to the needs,
include phone settings, display settings, call settings, security
settings and other functions.
File management: You can check the specific content and
service condition of the phone memory via this function.
Meanwhile, you can format memory, too.
Choose one folder and press left soft key, then you can
operate as follows:
New folder: Create a new folder.
Delete: Delete the folder.
Detail: Check details of the folder,filename, date, size,
position and so on..
Edit: Rename or copy the folder.
Search: Search the file in the folder.
Sort: To sort according to name, time, size and type.
Mark: Mark one or all the folders in phone memory.
More: View the service condition of the phone memory. In
this interface you can format the phone memory by pressing
left soft key, but this operation will cause the data in it lose
forever.
Prompt: There is no own memory capacity in the phone.

32
3.2. Function Hot Key
Function Hot key Status description
Power on Press and hold
power-on and
power-off key
Power-off mode
Power off Press and hold
power-on and
power-off key
Power-on mode
Enter function list Press OK key or left
soft key
Standby mode
Enter contacts Press right soft key Standby mode
Enter call log Press Dial key Standby mode
Enter camera Press camera key Standby mode
Input telephone number Press Number key Standby mode
3.3. Dial a Call
In standby mode, press numerical keys to input phone
number to dial phone number. When you finish inputting phone
number, press the dial key to make a call. If you're making a long
distance call, add the area code preceding the telephone number.
Press left soft key to access Options.
33
-Add to contacts: Add a phone number to telephone directory
-Add to Existing Contact: Add a phone number to the name
already existed
-Send SMS: Send message to a certain number
-Insert WPN: Pause P/Wait W
-SIM Call : Dial the number of SIM card
-IP Call: Dial IP phone
3.4. Reject a Call
You can press End key to reject an incoming call.
3.5. Receive a Call
When an incoming call arrives, the phone will give out the
corresponding prompt (such as ringtone, and etc.); if network
support, the phone screen will show the name and telephone
number of the caller; at this time, you can press Dial key to receive
an incoming call.
3.6. End a Call
After finishing a call, you can press End key to end a call.
34
3.7. Emergency Services
You can directly dial an emergency service call without SIM
card.
Different network uses different emergency numbers, please
consult your network operations company for more details.
3.8. Extension Speed Dial
After inputting telephone number, if you want to input branch
number, please press and hold “*”, input your extension number
after the display screen shows “P”. After getting through the call, it
will directly dial the extension.
3.9. Dialed Calls/Missed Calls/Received
Calls/Rejected Calls
You can enter call log to check the relevant details of dialed
calls, missed calls, received calls and rejected calls.
Prompt: The record of incoming call from blacklist number
will be saved in Rejected Calls.
3.10. Call Forward
After call forward function is started, according to different
forward conditions settings (Call Forward Unconditionally,
35
Forward Busy, Forward No Answer, Forward Can Not Reach), you
can select to switch the incoming call to voice inbox or other
telephone numbers.
3.11. Call Waiting
After call waiting function is started, when you are calling,
the other call can be put through.
3.12. Call Barring
After call barring function is started, according to different
restricted conditions settings (all the dialed calls, all the incoming
calls, incoming calls when roaming, dialed international calls,
outgoing international calls when roaming), you can restrict the
call under the corresponding conditions (need to apply to network
operator for business).
3.13. Power off the Phone
In the standby mode, press and hold End key to power off
the phone.
36
3.14. T-flash Card
Insert the T-Flash card into phone from the background.
This will expand the Flash memory of the phone.
Tap Multimedia menu, you can browse MP3, MP4, picture, video,
photograph etc.
3.15. USB Cable
You can transfer and store files, such as MP3, MP4 and
pictures from PC, through USB cable, to the U-disk in phone or
identified SD card that is inserted.
The operating method is as follows:
-Connect: Plug the IO port of the cable into your phone, and the
USB port into the PC.
Read & write mode:
T-Flash card: Install the T-Flash card, and connect the phone set to
PC, if the phone set is power off, it can be charged or used as a
U-disk.
-File transfer
·File folder instruction: Find the mobile memory (T-FLASH card)
in "my computer", double click it, and you will find the folders as
follows:
37
"Photos" is used to store the picture.
"Videos" is used to store the MP4 format file.
These folders is preset by the system, don’t change the folders’
name.
·Read &Write: You can copy the files in T-Flash to PC hard disk,
or copy the files in PC hard disk to the folder of the T-Flash card.
-Quit: On the PC side, select taskbar->delete hardware safely,
exit the T-Flash card identified states, stop the T-Flash card, and
pull out the USB cable.
4. Function Menu
4.1 Structure of Function Menu
In standby screen, select the home icon and press ok key to
access the main menu. The main menu includes items: (1) Call
logs (2) Contacts (3) ICE SMART ZONE (4) Multimedia (5)
Message (6) Tools (7) Profiles (8)File management (9) Settings, all
together 9 items.
List of main menus and sub menus as below
38
1-1 Call logs
1-1-1 Dialed calls
1-1-2 Received calls
1-1-3 Missed calls
1-1-4 Rejected calls
1-1-5 Delete all
1-1-6 Call timers
1-2 Contacts
1-2-1 New
1-2-2 Search
1-2-3 Write SMS
1-2-4 Dial
1-2-5 Send vCard
1-2-6 Delete
1-2-7 Mark
1-2-8 Copy
39
1-2-9 Copy all
1-2-10 Others
1-3 ICE SMART ZONE
1-3-1 Internet
1-3-2 MSN
1-3-3 Facebook
1-3-4 Yahoo message
1-3-5 Twitter
1-3-6 Sokoban
1-4 Multimedia
1-4-1 Image browser
1-4-2 Recorder
1-4-3 Camera
1-4-4 Audio player
1-4-5 Video player
1-4-6 FM radio
40
1-5 Message
1-5-1 Write Message
1-5-2 Inbox
1-5-3 Outbox
1-5-4 Drafts
1-5-5 Sentbox
1-6 Tools
1-6-1 Alarm
1-6-2 Bluetooth
1-6-3 Calendar
1-6-4 Calculator
1-6-5 STK
1-7 Profiles
1-7-1 Normal
1-7-2 Silent
41
1-7-3 Vibrate
1-7-4 Indoor
1-7-5 Outdoor
1-8 File management
1-8-1 New Folder
1-8-2 Delete
1-8-3 Details
1-8-4 Edit
1-8-5 Search
1-8-6 Sort
1-8-7 Mark
1-8-8 More
1-9 Settings
1-9-1 Call Settings
Dual-SIM
Network selection
Call divert
42
Call barring
Call waiting
Hide ID
Select line
Flight mode
Others
1-9-2 Phone settings
Time and date
Select language
Auto power on/off
Power management
Restore setting
1-9-3 Display Settings
Wallpaper settings
Idle screen style
Idle display settings
Contrast
Backlight
Keypad light
Animation effect
43
1-9-4 Security Settings
Pin
Pin1
Privacy
Auto keypad lock
Lock screen by end-key
Power-on password
Guardlock
1-9-5 Profiles
Standard
Silent
Vibrate
Low ring
High ring and vibrate
1-9-6 Connection management
Network account
4.2 Call logs
Display your recent call log.
44
4.2.1 Dialed calls
Display the list of your recent dialed numbers.
On the interface of Dialed, choose one record, then press left soft
key “Option” to enter the Option interface and you could go on the
following operations.
Detail: Display the information of dial calls (Number, Date, Time,
Call time, , Type and SIM Name)
Dial directly: Recall the number.
Save: Save the number to Phone/SIM1/SIM2
Send SMS: You could send SMS to this number.
Add to existing contact: Add this number to the existing record of
the name card holder.
Add to blacklist : Add this number to the blacklist.
IP call: Call this number by IP dialing.
Delete: Delete this record.
Delete all: Delete all the records in the Dialed list.
4.2.2 Received calls
Display the list of your recent answered numbers. The operation is
the same as the Dialed.
45
4.2.3 Missed calls
Display the list of your recent missed numbers. The operation is
the same as the Dialed.
4.2.4 Rejected calls
Display the incoming call records in the blacklist. The operation is
the same as the Dialed.
4.2.5 Delete all
You could delete all the records of the Dialed, Received, Missed
and Rejected.
4.2.6 Call timers
Display information details of SIM1/SIM2: Last Call, Received
Calls, Dialed Calls, and All Calls. Press left soft key to "Reset".
46
4.3 Contacts
This function could help you browse the name card holder, store,
edit and delete the names and phone numbers in the phone and
SIM card. To facilitate the management of the records, this phone
sets the group function, collecting the similar items into a group.
The storage capacity of the SIM card varies and the maximum
storage capacity of this phone is 100.
On the standby interface, press right soft key to enter the interface
of the name card holder. When the record of the name card holder
is not empty, press left soft key for the following operation:
Prompt: Take the records in SIM card 1 for example.
4.3.1 NEW
Create new name card holder records to SIM card or the mobile
phone.
4.3.2 Search
Search the record stored in the phone or the SIM cards.
47
4.3.3 Write SMS
Send message to this record.
4.3.4 Dial
Dial this record directly or by means of IP call.
4.3.5 Send vCard
Send this record to others by SMS or Bluetooth.
4.3.6 Delete
Delete this record.
4.3.7 Mark
Choose one record or all records, and cancel what you choose
are also allowed.
48
4.3.8 Copy
Copy the record to SIM cards or memory card.
4.3.9 Copy all
Copy all cecords:SIM1 to MemoryCard,SIM2 to
MemoryCard,MemoryCard to phone.
4.3.10 Others
――Speed Dial Settings: Set this record into shortcut dial. After
setting, on the standby interface, long press the number key you’ve
set can call this record.
Prompt: On standby interface, long press number key 1 will
enter the voice mailbox of SIM card 1.
On standby interface, long press number key 2 will enter the
voice mailbox of SIM card 2.
――Caller ID: You can view or edit the number of this phone.
――Memory status: You could status the capacity of SIM1, SIM2
and the phone.
――Single /Double line display: You can set the display mode of
49
record list as one line or two lines.
4.4 ICE SMART ZONE
The device is compatible with WAP service. You can visit
various WAP services, for instance, news, weather forecast and
airlines etc. The services are specially designed for the device and
are maintained by WAP service supplier.
WAP service requires network backup. You can consult the
network operator or service supplier about the availability, rates
and tax of WAP services.
Select SIM/SIM2 to enter:
4.4.1 Internet
Input URL
Enter the website to connect with this WAP page
50
Homepage
Enter the homepage; it will connect with default page
automatically.
Bookmark
Enter bookmark page, you can add new bookmark. You can
also do the following operations with the bookmark: get
started, view, edit, delete, and delete all.
――Access: Get started to visit the web page which
bookmark marked.
――View: View the bookmark website.
――Edit: Edit the website and name of bookmark.
――Delete: Delete the bookmark.
――Delete all: Delete all bookmarks.
History
Record the websites you visited before. On the history record
interface you can also do the following operation with the
visited web pages: get started, view, delete, and delete all.
51
――Access: Get started to visit the web page which
bookmark marked.
――View: View the bookmark website.
――Delete: Delete the history record.
――Delete all: Delete all the history records.
Offline
If you want to browse the page but not update if frequently,
you can save it and browse it in the Snapshot.WAP settings
Browser Settings:
——Clear cache: Clear the temporary files you visited.
——Clear cookie: Clear the cookie files you visited.
——SIM1 network account: Set your internet account of SIM card
1 in order to visit internet correctly.
——SIM2 network account: Set your internet account of SIM card
2 in order to visit internet correctly.
——Download image: You can shut down or start up “picture
download”.
——Play background sound: You can shut down or start up “play
background tone”.
——Accept push: You can shut down or start up “receive Push
message”.

52
Prior Storage Medium:
——Picture
——Music
——Video
GPRS setting:
You can set GPRS connection as “GPRS always open” or “GPRS
open when needed”.
Restore default:
You can restore the default of WAP settings.
On “website browse” interface, press left function key, the cursor
will go to the icon at the bottom of the screen. Then press left
function key again, the cursor will go to address bar of the web
page.
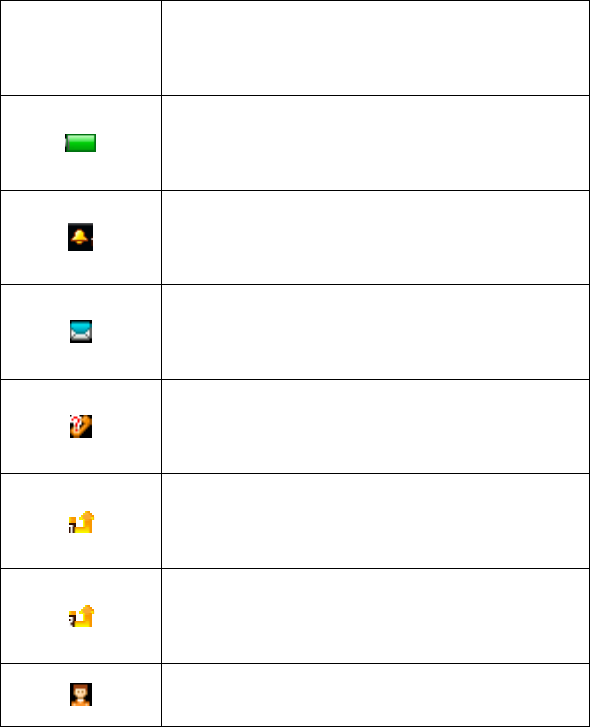
Introduction to the detailed functions of icons is as follows:
Icon Introduction to Function
Enter WAP homepage
53
Refurbish the page
Stop to refurbish the page
Back to the previous page
Turn to the next page
Add to bookmark
Setting homepage
Check history record.
Save document, photo, picture and music.
EXIT WAP page.
54
4.4.2 MSN
You can use MSN application.
4.4.3 Facebook
You can use Facebook application.
4.4.4 Yahoo message
You can use Yahoo Messenger application.
4.4.5 Twitter
You can use Twitter application.
4.4.6 Sokoban
·New Game: You can start a new push cases game.
·Resume: You can continue to play the game you didn’t finish last
time.
·Select level: You can choose the level of the game.
55
·Help
4.5 Multimedia
4.5.1 Image browser
You can view the pictures saved in the phone memory as well as
edit them freely.
In the picture list interface press left soft key you can do operations
as follows:
Change folder: Change the folder in which pictures are saved.
Send: Send the pictures to others via Bluetooth.
Slide play: Play the pictures in the list in a slide show manner.
Delete: Delete the selected pictures.
Set image as wallpaper: Set the picture as standby wallpaper.
Rename: Rename the picture.
Mark: Choose one or all of the pictures in the list.
Details: View the details of the picture, including name, date ,time
and size.
Slide setting: You can set “select effect” or “slide delay time”
56
4.5.2 Recorder
Use this function you can record or listen to your own record. The
record file format: wav.
Press left soft key and select “record”. You can also do the
following.
——Start recording: Select “record” and continue the following
steps;
——Records file list: Select “records list”.
Enter “record” interface, move the cursor to the record icon and
press OK key to record. During the process, press left soft key can
make a pause, press it again will continue the record. Press right
soft key can stop and save the record. You can press left soft key
again and do the following.
――Audition: Audition the tape you just recorded.
――Record again
――Delete: Delete the tape you just recorded.
――Send: Send the tape to others via Bluetooth.
――Record file list: Enter the tapes list.
Prompt: Call record is saved in the tapes list.

57
4.5.3 Camera
The device is equipped with a webcam with high pixels. You can
take photo at any time and save the photo in the device or TF card.
The photo can be used as wallpaper of your device or you can send
it to your friends through Bluetooth.
In camera preview interface press left soft key you can enter
options menu as follows:
――Gallery:View all photos
――Settings:Quality/Banding/Shutter sound/Auto save/Display
parameters/Camera Flash Light
――Srorage: MemoryCard.
――Reset Setting: Restore the default parameters of the camera
――Help
when you press left or right arrow key ,OSD menu will pop
up,then you can adjust the parameters.
――Shoot mode:DC mode/DV mode
―Size: Can set Photo size176*220/320*240/640*480/1280*960
――Profiles:Normal/Night
――Brightmess
――Contrast
58
――Exposure bias
――Frame:No frame/Frame 1
――Cont.shot:Disable/3 shots/6 shots
――White balance:Auto/Incandescence/Fluorescent
If the camera supports zoom function,you can press up or down
arrow key to adjust the focal length.
Prompt: Observe photographing related local laws and
regulations. Do not use the function in illegal way.
4.5.4 Audio player
This phone could play the MP3 stored in the memory card and
support the background play.
Press the left soft key or "OK" key to enter and use the Navigation
keys to operate the MP3 player.
Press "up" key and "down" key to adjust volume. Press left soft
key to access Options:

59
Press “right key” can play previous MP3;
Press”left key” can play next MP3;
Press “OK key”can suspend/resume MP3;
Under the MP3 list interface, press left soft key, then you can do
operations as follows:
--Music list: Display MP3 files list which are playing now and paly
list you’ve saved..
--Music mark: Mark the selected MP3 to play.
--Add: Add the selected MP3 to saved play list,new play list or
music mark.
--Set as ringtone: Set the selected MP3 as the caller ringtone or
alarm ringtone
--Play mode:Set music play mode as repeat or shuffle.
--Setting: Set the music style as Regular, Classic, Odeum, Jazz,
Rock or Soft rock.And can set lyrics display.

60
--Open review:Music open repeat function.
--Exit:Close audio player
Prompt:
In the main interface of “Play MP3’ press hang-up key to
return, the background broadcasting status will remain .
4.5.5 Video player
This phone supports the video format of 3pg and mp4.
Enter the video play list interface, press left soft key, you could
go on the following operations.
――Play list: Into the video player interface
――Fullscreen play: Play the video full screen
――Order play
――Set as:Set as power on animation or Set as power off
animation
――File attribute: View video details
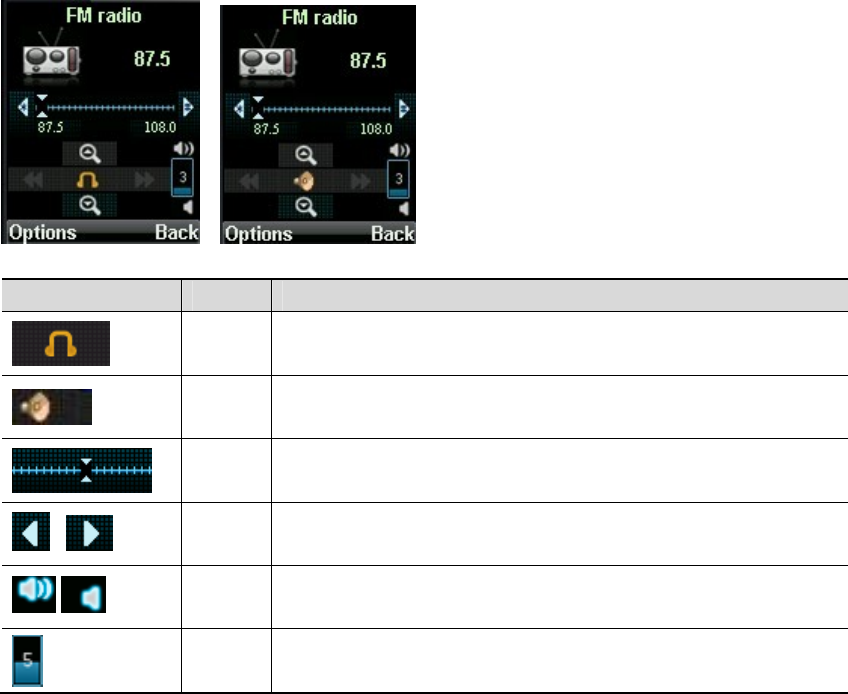
4.5.6 FM radio
You can listen to Fm radio freely. Enter the radio interface, search
61
the frequency by pressing the up and down direction keys, and
change previous or next channel by pressing the left and right
direction keys。
On the interface of the Radio playing, press left soft key you could
enter the options menu and do operations as follows:
--Auto search and save: Search frequency available
automatically and save it to broadcasting station list.
-- Channel list: You can view all the broadcasting stations
you saved.
--Save: Save the frequency you searched to the list.
--Manual search: Search the broadcasting station by input
frequency manually.
--Open speaker: You can start up loudspeaker to make the
sound louder.
--Background play: When the function is on, you can do
other operations while listening to the radio.
62
Icon Do Show
Display By earphone
Display By Speaker
Display Frequency scroll
/ Press Left / right adjust radio frequency
/ Press */# adjust radio volume
Display radio volume

63
/ Press Down/up adjust radio frequency
/ Press Left / right adjust radio frequency
Prompt: Please connect with the earphone before you listen to
the radio, for the device is equal to radio antenna. When the
battery of your cell is insufficient, you may not enter the Radio
channel.
4.6 Message
4.6.1. Write message
You could write new message by using this function. When you
input the message to be sent, press left soft key to send, to insert
the templates, to add contact person information and symbol, and
to save, etc.
64
--Send: Enter the interface of input number, you can dial the phone
number directly, or press left soft key to enter the name card holder
and choose the number to send.
--Insert template: Enter the templates interface and you could
insert the template to the message.
--Add contact info: Enter the Name card holder interface and you
could insert the name card holder information to the message.
--Add phiz: Enter the symbol interface and add the symbols to the
message.
--Save: Save this message to the drafts.
When you input the MMS to be sent, MMS interface you can do
the following:
――Send:
――Recipients
――Cc
――Bcc
――Subject: MMS theme editor
――Edit content
--Text/Add(Next slide/Picture/Audio/Video)/Delete/Page
timer(1s-600s)
――Preview: Preview edited MMS
65
4.6.2. Inbox
Store the SMS you’ve received.
Choose one SMS and press left soft key, then you will do several
options, for example, reply the SMS, delete, dial and mark. Press
OK key directly you can read this SMS.
――Reply: You could choose to reply the addresser by SMS.
――Delete: Delete this message.
――Call: Call the addresser.
--Lock/unlock: Lock the message or unlock it.
――Mark: Choose this message or all messages in the inbox, or
only choose the messages saved in SIM 1, SIM 1, SIM1storage
SMS or SIM1 storage SMS
――Sort: Sort the messages in the inbox by time, contacts subject
or type.
――Delete same number:Delete all messages from the same
number.
4.6.3. Outbox
Store the SMS you’ve sent in failure.
Choose one SMS and press left soft key, you could send, delete,
66
lock, mark, sort, and so on.
--Send: Send this SMS
--Delete: Delete this message.
--Lock/unlock: Lock the message or unlock it.
――Mark: Choose this message or all messages in the inbox, or
only choose the messages saved in SIM 1, SIM 1, SIM1 storage
SMS or SIM1 storage SMS.
――Sort: Sort the messages in the inbox by time, contacts ,subject
or type.
4.6.4. Drafts
Store the SMS you’ve edited.
Choose one SMS and press left soft key, you could delete, edit,
lock, mark, sort.
--Delete: Delete this message.
--Edit: Edit this message.
--Lock/unlock: Lock the message or unlock it.
――Mark: Choose this message or all messages in the inbox, or
only choose the messages saved in SIM 1, SIM 1, SIM1 storage
SMS or SIM1 storage SMS.
――Sort: Sort the messages in the inbox by time, contacts, subject
or type.
67
4.6.5. Sentbox
Store the SMS you’ve sent successfully.
Choose one SMS and press left soft key, you could delete, forward,
lock, mark, sort, and so on.
--Delete: Delete this SMS.
--Forward: Forward this message to others.
--Lock/unlock: Lock the message or unlock it.
――Mark: Choose this message or all messages in the inbox, or
only choose the messages saved in SIM 1, SIM 1, SIM1 storage
SMS or SIM1 storage SMS.
――Sort: Sort the messages in the inbox by time, contacts, subject
or type.
4.7 Tools
4.7.1 Alarm
You can edit alarm, time, ring and repeated ring mode.
68
In “ alarm edit” mode, you can scroll up or down direction key,
when the cursor goes to the desired option, press “OK”, then you
can select desired settings.
The alarm clock feature sounds an alert at a time you specify.
-Alarm1
·Edit: Set alarm of name, time, ring and mode.
·Enable/Disable: Set alarm1 activate or deactivate.
-Alarm2: Refer to "Alarm1".
-Alarm3: Refer to "Alarm1".
4.7.2 Bluetooth
Open/Close Bluetooth
You can choose to “open” or “close” Bluetooth.
Bluetooth visibility
You can choose “show phone” or “hidden” Bluetooth. If the
Bluetooth is hidden, others cannot search your phone.
Paired device
You can search different Bluetooth equipments and find
compatible ones (as long as the PIN codes of two Bluetooth
equipments are identical with each other, the match will be
successful. The PIN code of Bluetooth earphone is different due to
69
different type, and you can find the code in operating manual of the
Bluetooth earphone.).
My Bluetooth name
You can change the name of the phone.
Storage
MemoryCard only
Help
You can view the operating instruction of Bluetooth.
4.7.3 Calendar
You can use this feature to view the year, date and solar term easily.
Use up/down/left/right direction key to navigator other date.
-Add task
·Subject: Enter the schedule name.
·Date: Edit the schedule date.
·Time: Edit the schedule time
·Ring tone: Ring1/ Ring2/Ring3/More ringtones
·Type: Set Freq: Once/ Daily/ Weekly/ Monthly/ Yearly/ No
reminding.
·Deadline: Press left soft key to save and right soft key to return.
-View tasks
70
-All tasks: Display all schedules.
·View
·Edit
·Add task
·Delete
·Delete All
-Clear tasks today: Delete today schedule.
-Clear All: Delete all schedules.
-Go to Date: Enter the Solar calendar and it can go to the date
you want to check.
-Weekly
·Add task
·View tasks
·All tasks
·Clear tasks today
·Clear All
·Go to Date
·Monthly
4.7.4 Calculator
The function will make your device a calculator with which you
71
can carry out simple math calculation.
Write by stylus to enter the numbers. Use following direction keys
to calculate:
Up, down, left, right key: +、-、×、/
OK key: Show the calculation result.
* Key: Decimal point
4.7.5 STK
Enter STK submenu, you can use the additional services that the
network service operator provided.
The device has STK function. The service is provided by network
operator. If SIM card or network operator fails to provide the
service, the function can not be available. Contact network service
operator, if you want to have more information.
4.8 Profiles
You can choose the profile you need.
72
4.9 File management
You can check the specific content and service condition of the
phone memory via this function. Meanwhile, you can format
memory, too.
Choose one folder and press left soft key, then you can operate as
follows:
New folder: Create a new folder.
Delete: Delete the folder.
Detail: Check details of the folder, name, date, size, position and so
on.
Edit: Rename or copy the folder.
Search: Search the file in the folder.
Sort: To sort according to name, date, size and type.
Mark: Mark one or all the folders in phone memory.
More: View the service condition of the phone memory. In this
interface you can format the phone memory by pressing left soft
key, but this operation will cause the data in it lose forever.
Prompt: There is no own memory capacity in the phone.
4.10 Settings
You can customize the settings, such as time and date,
73
language, call settings etc.
4.10.1 Call Settings
Dual-SIM
――Standby mode: Only SIM1 enable/Only SIM2
enable/Dual SIM dual standby
――Main SIM settings: SMS/Speed dial/Reply by original
have been setted priorities.
――Set SIM Name: You can set any name you like as the
name of SIM card slot.
Network selection:
This function can let you select the network manually or
automatically when the phone is in the roaming state. You can use
this function only after you have made an effective roaming.
Select SIM1/SIM2 and then access:
-Auto Select: Press the left key and Ok, the mobile phone will
search various networks. This operation will let your phone
register the most suitable network.
-Manual Select: Press the left soft key and Ok, the mobile phone
will search various networks. You can select the suitable network
from the listed networks.
74
Call divert: When “call divert” function is started up, you
can transfer the incoming call to voice inbox or other phone
number according to the scheduled “ call divert” conditions.
――Unconditional transfer: All incoming calls will be
transferred to voice inbox or other
phone number according to the
setup.
――Divert if busy: When your number is busy, the
incoming calls will be transferred to
voice inbox or other phone number
according to the setup.
――Divert if no answer options: When there are
missed calls in your phone, they
will be transferred to voice inbox or
other phone number according to
the setup.
――Divert if unreachable: When your phone is power
off or out of the service area, the
incoming calls will be transferred to
voice inbox or other phone number
according to the setup.
――Cancel all diverts: You can delete all settings of
75
call divert.
Call barring: All outgoing calls, incoming calls, roaming
incoming calls, international outgoing calls, roaming
international outgoing calls are available.
――All outgoing calls: Activated/Off/Query status
――All incoming calls: Activated/Off/Query status
――Incoming calls when roaming:
Activated/Off/Query Status
――International calling : Activated/Off/Query status
――Dial when INTL ROAMING:
Activated/Off/Query Status
――Cancel all barring: Cancel all restrictions on the
call.
――Change Password: You can consult your network
operator about the call
barring password.
Prompt: The above-mentioned function will have to need
network support. To use the function, please contact
your network service provider.
76
Call waiting: You can start up or shut down the function.
When it is started up, even when you are making a call, you
can also receive another income call.
Hide ID: This function must be supported by network.
Select SIM1/SIM2
-Hide ID
-Display own ID
-Display ID by Network
Select line: There are two lines can be selected: line 1
and line 2. But the function just for the phone which has one
SIM card and two numbers. If your phone is not the type
like that, please just select line 1, because if you choose line
2, dialing will be limited.
Select SIM1/SIM2
—Line 1
—Line 2
Flight mode: You can start up the function directly or
77
choose when power on. It is used on flight. When flight
mode is working all the functions connect with network,
such as SMS, dialing back, will be unavailable, to avoid
interfering the signal of the flight you take.
—Activate
—Select when power on
Others:
――IP shortcut key: In this function, you can set IP call to
enter the number.
Select SIM1/SIM2 first and then use the up/down
navigation key to select the number and press left soft
key to access:
SIM1
—Active/ Cancel
—Modify
SIM2
—Active/ Cancel
—Modify
――50 sec voice call alert :Activated/Off
――Connect prompt: Activated/Off
――Answer/Reject mode: Reply SMS after reject/Any-key
answer
78
――Auto redial: Activated/Off
4.10.2 Phone settings
Time and date: You can set up the date and time on the
phone as well as their display mode.
Select language: You can select phone language.
Auto Power on/off: You can set the time and repeat mode of
power-on and power-off.
Power management: You can view the electric quantity of
your battery.
Restore settings: You can restore part of the phone settings
as factory settings. The default code of restoring factory
settings is: 1234.
4.10.3 Display settings
Wallpaper settings: You can set as default wallpaper image as
well as more other wallpaper images.
Idle screen style:
79
―― Standard style
―― Smart style
Idle display settings:
――Time & date
――Service provider
――Today’s task
――Customized word
Contrast: On the screen backlight interface you can set
different lightness of your phone by pressing the left/right
direction key.
Backlight:
――Always on
――30 secs
――20 secs
――15 secs
――10 secs
――5 secs
Keypad light:
――20 secs
――10 secs
――5 secs
――Night mode
――Off
80
Animation effect:
――Main menu effect
――Power on display
――Power off display
――Others
4.10.4 Security settings:
――PIN
You can start up, shut down or modify PIN code.
Correct PIN code shall be input when you unlock or
shut down PIN code. If PIN code verification is
started up, each time when you switch on your
phone, you will have to input PIN code. If you input
mistaken PIN codes three times in a row, SIM card
will be locked. You will have to get PUK1 code to
unlock it. Please contact network operator to get
PUK1 code when necessary.
The default PIN code is 1234.
――PIN2:
You can review PIN2 code. For details, please
contact network operator.
――Privacy
81
You can review privacy protection password. Besides,
you can also set passwords for some menus, in this
way, you will have to input password each time
when you desire to open the menus.
The default password of privacy protection mode is
1234.
――Auto keypad lock
-off
-5 secs
-15 secs
-30 secs
-1 min
-5 min
――Lock screen by end-key
-Activated
-Off
――Power-on password
You can start up or shut down “phone password” or revise it. When
“phone password” is started up, you will have to input “password”
each time when you use the phone.
The default phone password is 1234.
――Guardlock
You can start up or shut down anti-theft function or revise
82
anti-theft function password (the password shall be 6-digit).
When “anti-theft” function is started up, your can only use your
SIM card. If different SIM card 1s used, the phone will
automatically check it when you switch it on, and the phone will
require you to input protection password. If the password is correct,
you can set up the SIM card so that it is compatible with the
anti-theft function.
If three mistaken passwords are input, when you switch on the
phone, it will send warning SMS to your original SIM card every
24 hours If the phone is switched off, the warning messages will be
sent when you switch on the phone. The warning messages will
indicate the existing SIM card and the neighborhood number.
When 15 warning SMS were sent out, the phone cannot be used.
You will have to take the purchase evidence to ask for the dealer’s
help.
To guarantee the safety of your phone, you are suggested to start
up the function when you purchased the phone.
-Activate: Start up anti-theft function.
-Deativate: To shut down anti-theft function, you will have to
input the protection password you set for the phone.
-Modify PWD: To revise protection password, you will have to
input the protection password you set for the phone.
The default anti-theft password is 123456.
83
4.10.5 Profiles:
You could set different scene modes.
——Standard
——Silent
——Vibrate
——Low ring
——High ring and vibrate
You could actived, settings, rename or enhance sound.
Ring Settings
――SIM1 call ring: You could set the ringtone of SIM1 into
fixed ringtone or more ringtones.
――SIM2 call ring: You could set the ringtone of SIM2 into
fixed ringtone or more ringtones.
――SIM1 msg ring: You could set the message tone when
the SIM1 receives the message.
――SIM2 msg ring: You could set the message tone when
the SIM2 receives the message.
Adjust Volume
――Callre ringtone: You could set the ringtone volume
84
when there is an incoming call.
――message ringtone: You could set the ringtone volume
when there is an incoming message.
――Call volume: You could set the volume when you are
calling.
――Alarm volume: You could set the volume of the alarm
clock when it rings.
――Power on/off tone: You could set the volume when power
on or power off.
Call Alert
You could set the incoming call alert for the SIM1 and SIM2 and
there are five options for you to choose: Ring,Vibrate,
Silent,Vibrate then ring,Ring and vibrate.
Message Alert
You could set the incoming message alert for the SIM1 and SIM2
and there are four options for you to choose: Ring, Vibrate ,Silent,
Ring and vibrate.
Alarm&calendar remind
You could set the alarm clock alerts into Ring, Vibrate ,Silent, Ring
and vibrate.
Key Tone
You could set the keypad tone into Silent, Ringtone1 and
Ringtone2.
85
Battery Low alert
You could set to start or close the low voltage alarms. After starting
this function, when the electric quantity of the battery is low, the
low voltage alarm will ring.
Power on/off tone
You could set the tones when starting up and shutting down the
phone.
4.10.6 Connection management:
Network account:
You can select network count which you want to use.
——CMCC GPRS
——CMCC MMS
——CUCC WAP
5. Text Input
The device provides several text input modes so that you can
86
write text or input data in your “contacts”, edit “contacts” record,
search English names and write SMS and to-do list.
In “text input” mode, if you want to change the input way,
you can press “#” key. The selected input way will appear on the
top left of the screen.
Letter (Capital, Normal)
Enter edit page, press “#”and switch the input mode to
“letter”, then press the keys on keypad, selected letters will
appear on the screen.
Press the number key can get the first letter marked on the key,
press twice quickly can get the second letter marked on the key.
Similarly, if the letter you want to input have the same key with the
former letter, please wait until the cursor appears again, then input
the new letter.
For example, if you want to input “ok”, you need to press the
“6” key three times continuously and get “o”, then press the
key”5” twice, “ k” will appear on the screen. Press right soft key,
you can delete the text you input.
Number
Enter “edit” mode, press “#” key you can change the input
way to “ number”. Then press the keys, number will appear on the
screen. The key 0-8 separately represents the figure from 0 to 8.
87
You can press corresponding key to get desired number. Press right
soft key can delete the number you input.
Punctuation
Enter the “edit” mode, press key “1”, the punctuations will
appear. You can scroll the direction key so that the cursor can
select desired punctuation. Press left soft key can select the desired
punctuation.
6. Accessories
You may choose following enhancements of the device. You can
also check with your dealer.
Additional battery ( The customer is suggested to confirm whether
it is supplied.)
You can purchase the lithium batteries with different capacity
provided by this company.
Travel Charger (The customer is suggested to confirm whether it is
supplied.)
Ultra-light, applicable quick charger. It can quickly charge
88
the phone. Plug the charger into electrical outlet, and the other
terminal shall be plug into the charger connector at the bottom of
the phone.
Earphone (The customer is suggested to confirm whether it is
supplied.)
USB cable (The customer is suggested to confirm whether it is
supplied.)
Charger (The customer is suggested to confirm whether it is
supplied.)
You can check the charging status on display screen of the phone.
You can press the power key and switch on the phone.
7. Care and Maintenance
Maintenance of battery
·Your device is powered by a rechargeable battery. It is necessary
to have the battery charged when it is going to wear out. The full
performance of a new battery is achieved only when it is fully
wore out.
·Unplug the charger from the electrical plug and the device when
not in use. Do not leave fully a charged battery connected to a
89
charger over a week, since overcharging may shorten its lifetime.
·Temperature tends to affect the limit of battery to be charged.
Therefore, it is necessary for the battery to be cooled or warmed
before it is charged. If the temperature of batter exceeds 20ºC ,the
battery cannot be charged.
·Use the battery only for its intended purpose and avoid
short-circuiting. Accidental short-circuiting can occur when a
metallic object causes direct connection of the positive (+) and
negative (-) terminals of the battery.
·Do not use damaged battery.
·Leave the battery in hot or cold places will reduce the capacity
and lifetime of the battery. A device with a hot or cold battery may
not work temporarily, even when the battery is fully charged.
·Do not dispose of batteries in a fire as they may explode. Dispose
of batteries according to local regulations.
Care of maintenance of your device
The suggestions below will help you protect your warranty
coverage.
·Keep the device and accessories out of the reach of small children.
·Keep the device dry. All types of liquids or moisture will corrode
electronic circuits.
· Do not store the device in hot areas. High temperatures can
shorten the life of electronic devices and warp or melt certain
90
plastics.
·Do not attempt to open the device other than as instructed in this
guide. Non-professional handling may damage the device.
·Do not use harsh chemicals or strong detergents to clean the
device.
·Use only the supplied or an approved replacement attachments,
for the unauthorized ones could invalidate the warranty of
maintenance.
8. Additional Safety Information
Remember to follow any special regulations in force and use the
device only in its normal operation positions.
Traffic Safety
·Unless there is an emergency, otherwise do not use the device
when you are driving a vehicle without safety wireless equipment.
Please park the vehicle in a safe place before you use the device in
order to guarantee that you pay all attention to drive. Observe
related regulations.
·In case there is no adequate protection, certain electronic systems
of the vehicle may be affected by the electric wave of the device.
91
·You are suggested to use the device only in vehicles with antenna.
·Only qualified personnel should install the device in a vehicle.
Aircraft Safety
Switch off your device before boarding an aircraft. The use of
wireless teledevices in an aircraft may be dangerous to the
operation of the aircraft, disrupt the wireless telephone network,
and may be illegal. The GSM service will be unavailable. When
you are in flying aircraft, using your device t is prohibited.
Environment Safety
·Remember to follow any special regulations in force in any area,
and always switch off your device when its use is prohibited or
when it may cause interference or danger.
· Operation of any radio transmitting equipment, including wireless
phones, may interfere with the functionality of inadequately
protected medical devices. Consult a physician or the manufacture
of the medical device to determine if you have any questions.
·Your device may interfere with some hearing aids, pacemakers
and other medical devices. Please obey the suggestions provided
by physicians or medical device manufacturers.
· You are suggested to switch off the device in any area with
potentially explosive atmosphere, such as gas station, chemical
factories etc.
·Observe restrictions on the use of radio equipment.

FCC RF EXPOSURE INFORMATION:
WARNING!! Read this information before using your phone
In August 1986 the Federal Communications Commission (FCC) of the United States with its
action in Report and order FCC 96-326 adopted an updated safety standard for human
exposure to radio frequency (RF) electromagnetic energy emitted by FCC regulated transmitters.
Those guidelines are consistent with the safety standard previously set by both U.S. and
international standards bodies. The design of this phone complies with the FCC guidelines and
these international standards. Use only the supplied or an approved antenna. Unauthorized
antennas modifications, or attachments could impair call quality, damage the phone, or result in
violation of FCC regulations. Do not use the phone with a damaged antenna. If a damaged
antenna comes into contact with the skin, a minor burn may result. Please contact your local
dealer for replacement antenna.
BODY-WORN OPERATION:
This device was tested for typical body-worn operations with the back of the phone kept 1.5cm
from the body. To comply with FCC RF exposure requirements, a minimum separation distance
of 1.5cm must be maintained between the user's body and the back of the phone, including the
antenna, whether extended or retracted. Third-party belt-clips, holsters and similar accessories
containing metallic components shall not be used. Body-worn accessories
that cannot maintain 1.5cm separation distance between the user’s body and the back of the
phone, and have not been tested for typical body-worn operations may not comply with FCC RF
exposure limits and should be avoided.
For more information about RF exposure, please visit the FCC website at www.fcc.gov
Your wireless handheld portable telephone is a low power radio transmitter and receiver. When
it is ON, it receives and also sends out radio frequency (RF) signals. In August, 1996, the Federal
Communications Commissions (FCC) adopted RF exposure guidelines with safety levels for
hand-held wireless phones. Those guidelines are consistent with the safety standards previously
set by both U.S. and international standards bodies:
<ANSIC95.1> (1992) / <NCRP Report 86> (1986) / <ICIMIRP> (1996)
Those standards were based on comprehensive and periodic evaluations of the relevant
scientific literature. For example, over 120 scientists, engineers, and physicians from universities,
government health agencies, and industry reviewed the available body of research to develop
the ANSI Standard (C95.1). Nevertheless, we recommend that you use a hands-free kit with
your phone (such as an earpiece or headset) to avoid potential exposure to RF energy. The
design of your phone complies with the FCC guidelines (and those standards).
Use only the supplied or an approved replacement antenna. Unauthorized antennas,
modifications, or attachments could damage the phone and may violate FCC regulations.
NORMAL POSITION:
Hold the phone as you would any other telephone with the antenna pointed up and over your
shoulder.
TIPS ON EFFICIENT OPERATION:
For your phone to operate most efficiently:
• Extend your antenna fully.
• Do not touch the antenna unnecessarily when the phone is in use. Contact with the antenna
affects call quality and may cause the phone to operate at a higher power level than otherwise
needed.
RF
Exposure Information:
FCC RF Exposure requirements: The highest SAR value reported under this standard
during product certification for use next to the body with the minimum separation
distance of 1.5cm is 0.394W/kg, next to the head is 0.538W/kg. This transmitter must not
be collocated or operating in conjunction with any other antenna or transmitter.
This device complies with part 15 of the FCC rules. Operation is subject to the following
two conditions:
(1) this device may not cause harmful interference, and
(2) this device must accept any interference received, including interference that may
cause undesired operation.
NOTE: This equipment has been tested and found to comply with the limits for a Class B
digital device, pursuant to part 15 of the FCC Rules. These limits are designed to provide
reasonable protection against harmful interference in a residential installation. This
equipment generates uses and can radiate radio frequency energy and, if not installed and
used in accordance with the instructions, may cause harmful interference to radio
communications. However, there is no guarantee that interference will not occur in a
particular installation. If this equipment does cause harmful interference to radio or
television reception, which can be determined by turning the equipment off and on, the user
is encouraged to try to correct the interference by one or more of the following measures:
- Reorient or relocate the receiving antenna.
- Increase the separation between the equipment and receiver.
-Connect the equipment into an outlet on a circuit different from that to which the receiver is
connected.
-Consult the dealer or an experienced radio/TV technician for help
Do not use the device with the environment which below minimum -10℃ or maximum over
50, the device may not work.
Changes or modifications to this unit not expressly approved by the party responsible for
compliance could void the user’s authority to operate the equipment.