Dynamics FUEGO GSM Mobile Phone User Manual Fuego User s manual
Dynamics Hong Kong Limited GSM Mobile Phone Fuego User s manual
Dynamics >
User Manual

1
Fuego
Thank you for choosing colors mobile phone.
Please read this manual before operating your phone
and keep it for future refrence.
FCC ID: ZGRFUEGO
Model Name:Fuego
Brand Name:Ice Mobile
Dynamics Hong Kong Limited

2
Contents
User Manual ...................................................................................................................................... 4
1. Safety and Precaution ................................................................................................................. 4
2. Understand Your Phone .............................................................................................................. 5
2.1 Instruction to Accessories ................................................................................................ 5
2.2 Key Instruction ................................................................................................................. 6
2.3 Icon Instruction ................................................................................................................ 7
3. Begin to Use ............................................................................................................................... 8
3.1 Install SIM Card and Battery ........................................................................................... 8
3.2 Charge the Battery ............................................................................................................ 8
3.3 Power the phone on/off .................................................................................................... 9
3.4 Memory Card ................................................................................................................... 9
3.5 USB Data Cables.............................................................................................................. 9
4. Basic Function .......................................................................................................................... 10
4.1 Call ................................................................................................................................. 10
4.1.1 Dial ...................................................................................................................... 10
4.1.2 Answer Incoming Call ........................................................................................ 10
4.1.3 View Missed Incoming Call ................................................................................ 10
4.1.4 Function During Call ........................................................................................... 10
4.2 Text Input ....................................................................................................................... 11
Use Keypad ..................................................................................................................... 11
Function of Functional List ............................................................................................................. 11
1. File manager ........................................................................................................................ 11
2. Phonebook ........................................................................................................................... 12
3. Call center ........................................................................................................................ 12
3.1 Call history ................................................................................................................ 12
3.2 Call settings ............................................................................................................... 13
4. Services ............................................................................................................................... 13
4.1 STK ........................................................................................................................ 14
4.2 Internet service ....................................................................................................... 14
5. Messaging ........................................................................................................................ 14
5.1 Write message ........................................................................................................ 14
5.2 Inbox ...................................................................................................................... 14
5.3 Drafts ...................................................................................................................... 15
5.4 Outbox .................................................................................................................... 15
5.5 MMS ...................................................................................................................... 15
5.6 Broadcast message ................................................................................................. 16
5.7 Templates ............................................................................................................... 17
5.8 Message settings ..................................................................................................... 17
6. Multimedia ....................................................................................................................... 17
6.1 Imichat ................................................................................................................... 17

3
6.2 TV .......................................................................................................................... 17
6.3 Camera ................................................................................................................... 17
6.4 Image viewer .......................................................................................................... 18
6.5 Video recorder ........................................................................................................ 18
6.6 Video player ........................................................................................................... 18
6.7 Audio player ........................................................................................................... 19
6.8 Sound recorder ....................................................................................................... 19
6.9 FM radio ................................................................................................................. 19
7. Fun&Games ..................................................................................................................... 20
7.1 Dynamic Menu .......................................................................................................... 20
7.2 MSN .......................................................................................................................... 20
7.3 Game Center ............................................................................................................. 20
7.4 Yahoo ......................................................................................................................... 20
7.5 Skype ......................................................................................................................... 20
7.6 Facebook ................................................................................................................... 20
7.7 Google ....................................................................................................................... 21
7.8 EBuddy ...................................................................................................................... 21
7.9 Java ............................................................................................................................ 21
7.10 Java settings ............................................................................................................ 21
7.11 Java default security ................................................................................................ 21
8. Extra .................................................................................................................................... 21
8.1 Calculator ............................................................................................................... 21
8.2 Ebook reader .......................................................................................................... 21
9. Organizer ............................................................................................................................. 21
9.1 Calendar ................................................................................................................. 21
9.2 Tasks ....................................................................................................................... 22
9.3 Alarm ..................................................................................................................... 22
9.4 WorldClock ............................................................................................................ 23
10. Settings ........................................................................................................................... 23
10.1 Dual SIM settings ................................................................................................. 23
10.2 Phone Settings ...................................................................................................... 23
10.3 Network Settings .................................................................................................. 23
10.4 Security Settings ................................................................................................... 23
10.5 Connectivity ......................................................................................................... 24
10.6 Restore factory settings ........................................................................................ 24
11. User profiles ...................................................................................................................... 24
12. Bluetooth ........................................................................................................................... 25
Important Security Information ....................................................................................................... 28

4
User Manual
1. Safety and Precaution
You should read the following information carefully before using the phone in order for you to use it
safely and effectively.
1.1 Power the phone on safely
Do not use the phone at the location where the phone is prohibited using or the phone can cause the
disturbance or risks.
1.2 Traffic safety is first
Do not use the phone when driving in hindrance of safe drive.
1.3 Power the phone off at the limited regions
Please abide by all the pertinent regulations or provisions. You should power the phone off near to the
flammable articles, chemicals or medical equipment.
1.4 Disturbance
The mobile communication can be subject to the radio disturbance, thus affecting its performance.
1.5 Waterproof
Please keep it dry because the phone is not a waterproof device.
1.6 Place the phone beyond stretch of kids
The phone and its total accessories (including attachments) shall be placed beyond the stretch of the
kids.
1.7 Accessories and batteries
Please use the batteries and adapter designed by our company, or otherwise resulting in explosion.
1.8 Specialized service
Do not bold to disassemble the phone and its accessories. The phone can only be maintained by the
authorized institutes.

5
2. Understand Your Phone
2.1 Instruction to Accessories
Please confirm the intact articles as follows after unpacking the package of the phone. Please contact
with the local distributer in case of the missed parts.
z A Phone
z An adapter
z Batteries
z USB data cable
z Earphone
z User’s manual
6
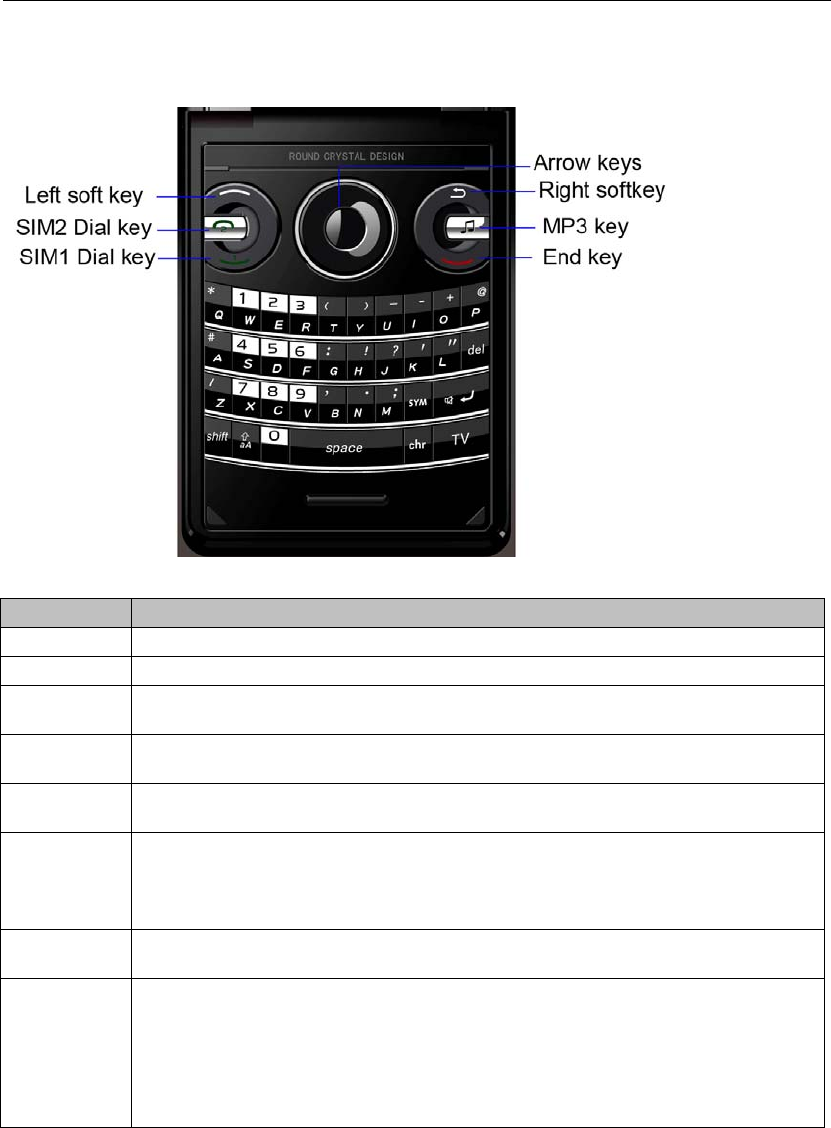
2.2 Key Instruction
Key Description(Under Standby Mode)
Left soft key Enter in functional list (Main menu).
Right soft key Enter in the contact list in phonebook.
SIM1 Dial key 1.Enter in SIM1 calls history.
2.dial-up.
SIM2 Dial key 1.Enter in SIM2 calls history.
2.dial-up.
End key Press to terminate a call or refuse a call.
Press and hold to power the phone off (or power the phone on under power-off mode).
Arrow keys
1. OK:Enter in menu
2. Up : Enter in camera (default)
3. Down: Enter in Alarm(default).
4. Left/ Right: Enter in Focus menu.
1 Press to enter in dialing window and input number 1.
Press and hold to dial the voice mailbox number.
0,2~9
Long press:
1. In quick dialing set to open, direct and rapid dialing the number of corresponding
locations
2. In quick dialing set to close, with short according to settle into dial-up input interface
7
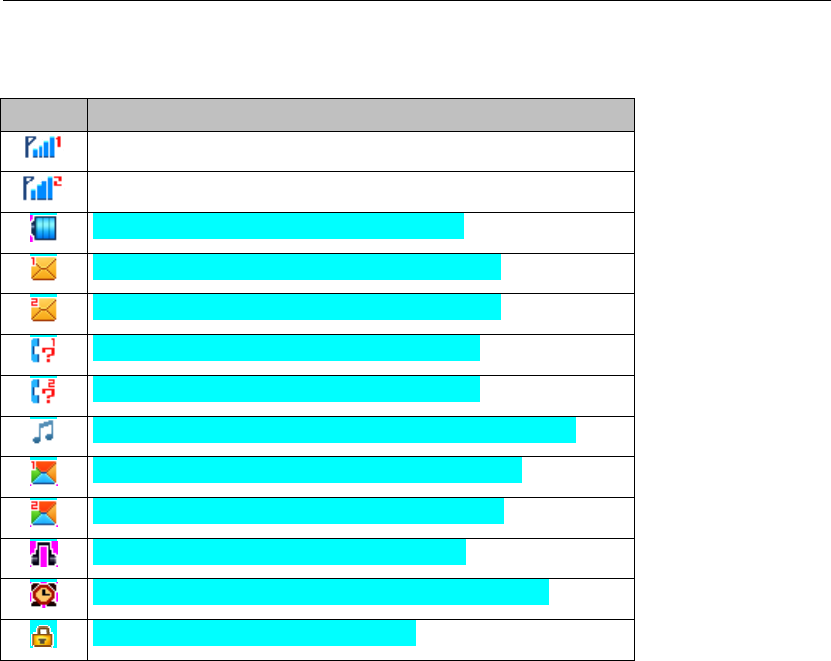
2.3 Icon Instruction
Icon Description
Indicate the network signal strength for SIM card 1.
Indicate the network signal strength for SIM card 2.
Indicate the current battery capacity for battery
Indicate that there is an unread SMS in SIM card 1.
Indicate that there is an unread SMS in SIM card 2.
Indicate that there is a missed call in SIM card 1.
Indicate that there is a missed call in SIM card 2.
Indicate that the current profile mode is the General mode.
Indicate that there is an unread MMS in SIM card 1.
Indicate that there is an unread MMS in SIM card 2.
Indicate that the current ear is set as activated.
Indicate that the current alarm clock is set as activated.
Indicate the current keypad-locked state.
8
3. Begin to Use
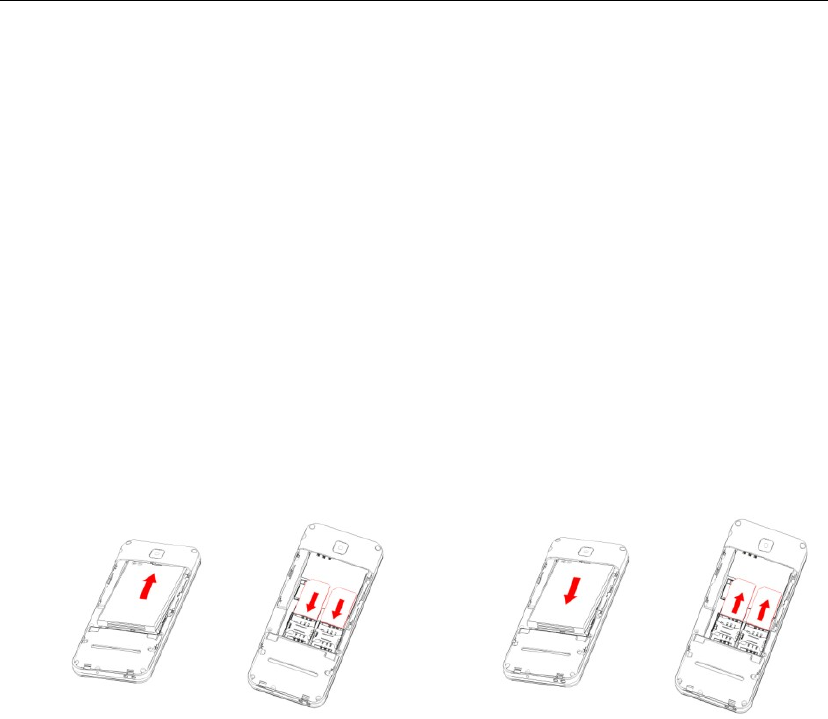
3.1 Install SIM Card and Battery
Please be sure to disconnect the phone with the adapter before disassembling the battery.
This version is a dual-card dual-standby phone which can be inserted with 2 SIM cards. Both SIM cards
can register onto an identical network. Each SIM card is included in the socket generally. The SIM card
1 is inserted in the Socket 1 and SIM card 2 in Socket 2. You should be careful to use, insert and
disassemble the SIM card because the contact of the SIM card is easy to be scraped or bent to
damage.
1 Disassemble the battery cover.
2 Disassemble the battery.
3 Slide the SIM card into the socket.
4 Insert the battery.
5 Cover the battery.
3.2 Charge the Battery
The phone will release the warning tone displaying the insufficient battery capacity with the indication of
the empty battery icon when the battery capacity is lower. Under this case, the phone may not be used
in partial functions.
The phone will power off automatically when the battery capacity is too lower. Please charge the
battery.
The battery icon on the screen will flash when the phone is being charged. After completion of charging,
the full battery icon will display on the screen. The charging animation will be displayed on the screen
when the phone is being charged under the power-off state. After completion of charging, the screen
will display the prompt system of finishing charging. Under the standby mode, it takes 2-3 hours to
charge the battery.
Unpack the rubber protective cover on the charging interface and connect the adapter with the phone.
1. Insert the adapter in AC electric outlet.2. Open the rubber protective cover of the charging
interface of the phone and connect the adapter to the phone.
3. The symbol indication of charging the battery appears on the screen. (the symbol indication of
charging the battery can appear after waiting for a few minutes if the battery capacity is exhausted).
4. Pull the adapter apart from the power supply socket and then pull the adapter out of the phone after
completion of the charge.
This is the principle of the battery.
z Not charging: If the phone power is supplied by the battery 1 in default, the battery 2 will be

9
automatically switched to till the battery 1 is used up (i.e. the battery 1 is a main power supply).
z Charging: Firstly the battery that is supplying is charged, after charged fully, the other battery is
switched to for charging and supplies.(after the adapter is taken out, return to a state of no charging,
namely, the battery 1 supplies in default).
Note the following cases:
I Switch to the other battery and charge it after the battery being charged is pulled out.
II Conditions that the phone is powered off and charged (requires understanding furthermore).
III Automatically switch to the other battery for power after the battery at supply is taken out.
IV Automatically switch to the other battery when the battery at supply is used up.
V Automatically switch to the battery 1 for power supply when the battery 1 is inserted if merely battery
2 presents.
3.3 Power the phone on/off
z Press and hold [End] to power the phone on under the power-off state
z Press and hold [End] to power the phone off under the power-on state.
3.4 Memory Card
The phone supports the T-Flash card (otherwise purchased), which is a multimedia memory card used
to multiple the memory of the phone. The T-flash card is small and should be pulled out and installed
carefully and prudently in order to avoid in damaging.
1 Open the external cover of the T-Flash card socket.
2 Slide the T-Flash card into its socket.
3 Cover the T-Flash card socket.
3.5 USB Data Cables
This version supports the USB interface. You can connect your phone with the PC via the USB&data
cable, copying or moving the files amid the phone and PC, or browsing the images, record files and
video files saved in the phone via the PC.
1 Insert the USB data cable connector into the USB interface of the phone.
2 Connect the other terminal of the USB data cable with the USB interface of the PC.
3 The phone pops up window with 3 modes at your choice: Mass storage.

10
4. Basic Function
4.1 Call
The phone will select the main network automatically after powered on if it is located within the
coverage of the main network. The phone can use other network, called as roaming, if the phone is not
located within the coverage of the main network when the network operator protocol permits.
You can dial or answer a call when the symbol of the network operator appears on the screen.
4.1.1 Dial
You can dial with several ways as follows:
z Input the phone number (should affix the international/national/regional code or district code if
necessary) and then press [Dial Key] under the standby mode.
z Press [Dial Key] to dial a phone number listed in the recent call log under the standby mode.
z Press and hold numeric keys [2]-[9] to dial the shortcut phone number set on the numeric keys
under the standby mode.
z Dial with the contact name or phone number in the phone book.
The phone supports dialing the international emergency phone number, such as 112 and 911 etc.
With the phone, you can dial an emergency call at any country or region under the normal situation
regardless of SIM card inserted when the phone is located within the coverage of the GSM network.
Input the emergency phone number and press [[Dial Key] to dial out.
4.1.2 Answer Incoming Call
You can perform as follows when there is an incoming call:
z Press [Dial Key] to receive the incoming call. You can use the earphone to answer the call when
the generic earphone or Bluetooth earphone is inserted in the phone.
z Press [End] to decline an incoming call.
4.1.3 View Missed Incoming Call
The quantity of missed incoming calls will display on the screen under the standby mode if there are
missed incoming calls. You can press <View > to view the information of missed incoming calls.
4.1.4 Function During Call
You can use many functions during the call process.
4.1.5 Option During call
Press <Option> to use the following options:
z Hold single call: temporarily hold the current call.
z End single call: end the current call.
z New Call: call the opposite party to build a Call to Many.
z Phonebook: enter in the phonebook menu.
z Call history: view the information of the missed, dialed or answered calls in SIM card 1 or 2.
z Messaging: enter in the SMS menu.
z Sound recorder: record the current call.
z Mute: open or close the mute mode.
z DTMF: open or close the DTMF function during the call.
4.1.6 Launch or Close Hand-free Function
Press <H-free>/<H-Held> to open or close the hand free function.

11
4.2 Text Input
Use Keypad
Change Text Input Method
Press [chr] key to select the desired input methods:
Multitap ABC, Multitap abc , Multitap 12, Multitap Fr , Multitap es , Multitap Pt
Multitap ABC/ Multitap abc
Press the key corresponding to English letters to input capital letters. The times of pressing a key will
rely on the letter to be input.
French
Press the key corresponding to french letters to input capital letters. The times of pressing a key will rely
on the letter to be input.
Spanish
Press the key corresponding to Spanish letters to input capital letters. The times of pressing a key will
rely on the letter to be input.
Portuguese
Press the key corresponding to portuguese letters to input capital letters. The times of pressing a key
will rely on the letter to be input.
Numeric Input
Press the key corresponding to the desired number.
Other operation
z Press key [sym] under all input methods to input the punctuation symbols.
z Press key [space] to insert a space character under all input methods excepting the number input
method.
Function of Functional List
1. File manager
Entering in the file manager window. With the function, you can view the data saved in the Phone
and Memory card. After the T-Flash card is inserted, there are 2 operating window pertaining to the file:

12
Open, Format,Details. Please confirm the store path when opening the folder.
2. Phonebook
You can save the phone number in the memories of SIM cards or phone.
Press <Menu> under the standby mode and then select Phonebook if you desire to enter in the
function.
Select a contact in the contact list window and press<Option> to perform:
View: view the detailed info of a selected contact.
Send text message: send an SMS to the current contact.
Send Multimedia message: send an MMS to the current contact.
Call: Call use SIM1 or SIM2 selected contact
Edit: edit the current contact.
Delete: delete the current contact.
Copy: You can copy the contact information to phone,SIM1,SIM2 or file.
Move: move the contact from phone to the SIM card 1 or SIM 2, move the contact from SIM 1 to SIM
2 or phone, move the contact from SIM2 to SIM 1 or phone.
Send contact: send text message/multimedia message/via Bluetooth to the contact
Add to Blacklist: Add to blacklist the contact.
Phonebook settings: You can manage the phonebook with this function.
Speed dial: Set up to quickly dial under the standby mode, press OK button to enter in for
setting operation.
My number: Add my number.
Extra numbers: set the SIM1/SIM2 owner number and turn on/off the fixed dial.
Memory status: View memory details.
Copy contacts: From the phone/SIM1/SIM2 copy contacts to SIM1/SIM2/phone.
Move contacts: From the phone/SIM1/SIM2 move contacts to SIM1/SIM2/phone.
Delete all contacts: Delete all the contacts.
3. Call center
With this function, you can view the information of call log in SIM card 1 or 2.
Press <Menu> and select Call center under the standby mode if you are desired to enter in this
function.
3.1 Call history
With this function, you can view the information of the missed, dialed or answered calls in SIM card 1 or
SIM 1/SIM 2
Call List
All Calls: view all call records.
Dialled calls: Display the recently dialed calls in SIM cards upon entering in this function.
Missed calls: Display the recently missed calls in SIM cards upon entering in this function.
Received alls: Display the recently answered calls in SIM cards upon entering in this function.

13
3.2 Call settings
3.2.1 SIM1 call settings
Call waiting: After this function is launched, the network will inform you for the newly incoming call
during the call. Please contact with your network operator for details. Perform as follows:
Activate: launch the Call Wait function.
Deactivate: not launch this function.
Query status: view the present status of this function.
Call divert: divert the incoming call of a service to a designated phone number under the presetting
condition in the function of forwarding the network service. Please contact with your network supplier
to launch this function.
Call barring: Set up the right of calling and answering. This function requires the network support.
You can launch or close the function.
Line switching: set the Line 1 or Line 2.
3.2.2 SIM2 call settings
Call waiting: After this function is launched, the network will inform you for the newly incoming call
during the call. Please contact with your network operator for details. Perform as follows:
Activate: launch the Call Wait function.
Deactivate: not launch this function.
Query status: view the present status of this function.
Call divert: divert the incoming call of a service to a designated phone number under the presetting
condition in the function of forwarding the network service. Please contact with your network supplier
to launch this function.
Call barring: Set up the right of calling and answering. This function requires the network support.
You can launch or close the function.
Line switching: set the Line 1 or Line 2.
Connect Notice
You can set up None or Vibrate. If you set it Vibrate, when the telephone connection, the handset can
vibrate the way to prompt you, you may through this function reduction handset digit dialing process to
your radiation.
3.2.3 Advanced settings
Blacklist: Set up to open or close the blacklist for incoming calls. Input the phone number to be
refused in the blacklist or press OK button to enter in the contact phone number window to select the
phone number to be added in the blacklist.
Auto redial: Set up whether the phone is redialed when the call is not connected. Press the
Activate/Deactivate button to launch or shut down the function.
Call time reminder:Select to release prompt tone during the call in each integral minute time.
Answer mode: Set the answer mode button.
Auto Call Recorder:you can on/off this function.
4. Services
You can use the network-related service with this function.
Press <Menu> under the standby window and then select Services if you desire to enter in this

14
function.
4.1 STK
STK service, such as M-zone and GoTone, is provided by network service provider. If it is not supported
by SIM card and network service provider, you cannot use this function. For more information,please
contact with the network provider.
4.2 Internet service
You can surf on the network with this function. After entering in the function, you can perform:
Homepage: indicate the default website of the internet.
Bookmarks: used to save the commonly-used website.
Input address: input the website to be searched and press OK button to access to the network
directly.
Recent pages: browse the saved record of the browsed WebPages.
Settings: set up WAP-related service.
Homepage: set the default or user defined of the network
Browser options: you can clear away the cache remained when at access to the network and
clear away the personal data related when at registration of the network and authentication to
the network.
Data account: View data account information.
Preferences: set up the timeout,show picture,cache,cookies.
5. Messaging
You can send and receive the SMS and MMS as well as use the voice mailbox and cell broadcast with
this function.
Press <Menu> under the standby mode and then select Messages if you desire to enter in the function.
5.1 Write message
You can write and send a SMS with this function.
Text message
Input the SMS and press <Option> under the current window to perform:
Send to: directly input the contact phone number or search a phone number of the receiver and
finally press Send button.
Input method: change the input method.
Advanced: Insert the number,name,bookmark.
Save to Drafts: save to SMS drafts.
5.2 Inbox
You can view the received SMS with this function.
Select a SMS/MMS entry and press <Option> under the inbox list window to perform:
View: view the MMS.
Reply by SMS: reply the message to the sender.

15
Reply by MMS: reply the MMS to sender.
Call sender: You can call the sender.
Forward: forward the entry to other;
Delete: delete the entry of the message;
Delete all: delete all MMS in the inbox.
Save to Phonebook: to SIM1, to SIM2 or to phone.
5.3 Drafts
With this menu, you can create and save SMS/MMS as draft. You can perform for some SMS/MMS as
follows:
View: view the MMS.
Send: send the selected MMS.
Edit: edit the sent MMS.
Delete: delete the selected MMS.
Delete all: delete all MMS in the outbox.
5.4 Outbox
You can view the received SMS with this function.
Select a SMS/MMS entry and press <Option> under the outbox list window to perform:
View: view the SMS/MMS.
Resend: resend the selected SMS/MMS.
Edit: edit or revise the entry of the message.
Delete: delete the selected SMS/MMS.
Delete all: delete all MMS in the outbox.
5.5 MMS
Select one entry of SMS/MMS and press right soft key to enter in options:
Write Message
Input the MMS and press <Option> under the current window to perform:
Send to: directly input the contact phone number or search a phone number of the receiver and
finally press Send button.
Input method: change the input method.
Add picture: Add the picture in MMS.
Add sound: Add the sound in MMS
Add video: Add the video in MMS
Add subject: Add the subject in MMS
Preview MMS: can preview multimedia messages.
Slide options: options of senting MMS
Advanced: Insert the attachment,bookmark.
Save to Drafts: save to MMS drafts.
1 Press <Done> after finishing edition and pop up the following options:
Send only: send the MMS only.
Save to Drafts: send the MMS in the draft-box for future sending.

16
Send options: options of senting MMS.
Exit: leave the editing window.
2 Select Send to send the MMS.
Inbox
You can view the received MMS.
View: View the MMS.
Reply : Sender of current MMS sending a MMS.
Reply by sms: Send a SMS to current MMS sender.
Reply all: Send a MMS to current MMS sender and all receivers.
Forward: Forward current MMS to other people.
Delete: Delete the current MMS
Delete All: Delete all the MMS in Inbox.
Properties:To see the details of the current MMS
User Details:User number in MMS.
Outbox
Display list of MMS under sending or those failed to be sent out.
View: View the chosen MMS.
Send: Send the chosen MMS to other people.
Delete: Delete the current MMS.
Delete All: Delete all the MMS in Outbox.
Properties: View the information of the chosen MMS.
User Details: User number in MMS.
Drafts
MMS not send out at once can be stored here. A MMS after being sent out will be transferred to Sent
Items.
View: View the current MMS.
Send: Send the current MMS.
Edit: Edit the chosen MMS.
Delete: Delete the current MMS.
Delete All: Delete all the MMS in draft.
Properties: View the information of the chosen MMS.
User Details: This function can view the number of recipients
MMS settings:Where relevant parameters of sending and receiving concerning multimedia can be set.
5.6 Broadcast message
You can receive information of various topics, such as weather, taxi and hospital etc from the network
operator.
SIM1/SIM2 boradcast message
Receive mode: select to open or close the function.
Channel settings: set the channel of the cell broadcast, operating Select, Add, Edit and Delete.
Languages: set up to receive the cell broadcast of all language or not.
Read messages: read the message.

17
5.7 Templates
Create some common sentences in common messages to avoid repeating input when sending
message; edit or delete after finishing it.
5.8 Message settings
You can set UP various SMS service options with this function.
Text message: Set up the SMS related settings.
Multimedia message: Set up the MMS related settings
Service message: can set the enable push, enable service loading .
6. Multimedia
With this function, you can perform the multimedia functions, such as snap, shoot or record the voice.
Press <Menu> and then select Multimedia under the standby mode if desired to enter in this function.
6.1 Imichat
Imichat is a available in the global networks ,with no call charge or roaming fee. As long as your
cell-phone is equipped with imichat , text ,voice ,video communication with similar phones or PCs at any
time , in any place is simplicity itself . imichat requires mobile network connection , a flow rate is
therefore produced and the fee collected by service providers. The flow rate is approximately 12 k
bit/second .
6.2 TV
Enter TV. You can select an area, TV will automatically retrieval into the region's television
channels. Press the left soft key to access Options: Country & Region, Auto Search, Manual Search,
Channel List, Sound Setting, Loud speaker
6.3 Camera
Please insert the T-Flash card before using this function.
Press the [LSK] key to select it, enter in the camera window, press [OK] key to snap. Press the
[LSK] key to select the option and you can perform
Use Camera Option
Press <Option> to use the following options under the following view-finding window.
Self capture: set on , you can take a photo for self.
Photos: enter in the album to view the photos.
Camera settings: set the Shutter sound, EV,Anti-flicker,Contrast,Delay timer, Cont. shot.
Image settings:set the Image size and Image quality.
White balance: adjust the color balance of the photo.
Scene mode: select the snapping mode.
Effect settings: change the hues or use the special effects for the photos snapped in the normal
mode.
Storage: Set the path to preserve photos.
Restore default: recover all settings into the initial values.

18
6.4 Image viewer
You can view the photos snapped with the camera through this function.
Photo list option
Select a photo file and press <Options> under the photo list window and perform:
View: view the selected image.
Browse style : Select browsing mode
Send: send the selected image file to multimedia message or Bluetooth.
Use as: use the selected image file to the wallpaper, to the screen saver, to power on display, to
power off display and call picture.
Rename: change the name of the image.
Delete: delete the selected image.
Sort by: sort the images by the name, type, time, size or None.
Delete all files: delete all selected images.
Storage: Set the path to preserve photos.
6.5 Video recorder
Please insert the T-Flash card before using this function.
Press the left soft key to select it, enter in the Digital Camcorder window, press OK key to snap. Press
the left soft key to select the Option and you can perform.
Use Digital Video Camera Options
Press <LSK> under the video-finding window and perform:
Camcorder Settings: set up the video camera parameters.
E V: adjust the exposure to highlight the definition of the image.
Night mode: set the function on or off.
Anti-flicker:set the anti-flicker value.
Video settings: set the video parameters.
Video quality: select video quality.
Size limit reached: set video size
Time limit reached: set video time.
White balance: select from options: Auto, Daylight, Tungsten, Fluorescent, Cloud and
Incandescence.
Effect settings: set the effect settings: Normal, Grayscale, Sepia , Sepia green, Sepia blue and
Color invert.
Storage: Set the path to preserve video.
Restore default: recover to the initial state.
6.6 Video player
Please insert the T-Flash card before using this function.
Enter in the video player window, select a video file, press the [LSK] key to select it, performing: Play,
Send, Rename, Delete, Delete all files, Sort by, storage .
Play: play the Video file.
Send: send the selected video file to multimedia message or Bluetooth.
Rename: change the name of the current video file.

19
Delete: delete the currently-selected video file.
Delete all files: delete all the currently-selected video files.
Sort by: sort the video files by menu: name, type, time 、size or None.
Storage: Set the path to preserve video.
6.7 Audio player
You can enjoy the music with this function.
Play Music
You can use the following keys during the play.
Select a music file, press [LSK] to use the following options:
Play: play the currently-selected song.
Details: view the detailed information of the currently-selected song.
Add to ring tones : add the currently-selected song to ringtones.
Refresh list: Update the music player list.
Settings: set up the music player.
Pre. playlist: Set the playlist path.
List auto gen: set up to turn on/off the function.
Repeat: set up to open/close in two menus: Single Song Cycle and All Songs Cycle.
Shuffle: set up to open/close the function.
Background play: set up to open/close the function.
6.8 Sound recorder
Press the [LSK] to select it, entering in the recorder window to record file.
You can record the voice with this function.
6.8.1 Record
Select Record option in the record file option and begin to record.
Select <Pause> to stop recording temporarily and select < Cont. > to continue to record.
Select <Stop> to stop recording.
6.8.2 Record file list option
Select a record file and press <Option> under the record file list window and perform:
New record: New call recording.
List: View recorded documents.
Play: play the selected record file.
Append: Selected to continue recording after the recording.
Rename: rename the selected record file.
Delete: delete the selected record file.
Delete all files: delete all record files.
Use as : set the selected record files as user profiles.
Send: send to multimedia message, to Bluetooth.
Settings: set up the Storage location and File format,and Audio quality
6.9 FM radio
You can receive the FM broadcast with this function.
Receive FM Broadcast

20
Press [OK] under the radio window to receive the FM broadcast.
You can use the following keys when you hear the FM broadcast.
Key Function
OK Press to enter FM radio options function or pause the recording.
UP Press to searing the channel automatically.
DOWN Press to open/off the FM radio.
Left Press to previous channel.
Press and hold to continuously tune up.
Right Press to next channel.
Press and hold to continuously tune up.
+ Press to reduce the volume.
- Press to increase the volume.
FM Radio option
Press <Option> under the radio window to use the following options:
Channel list: play, edit or delete the saved channels.
Manual input: manually input the channel to search.
Auto search: automatically search the channel.
Settings: Can set the background play, loudspeaker turn on/off, record formats: AMR / WAV, the
audio quality low / high, recorded files are stored.
Record: Recording the current FM program.
Append: continuously record after the previous record file and append it after the record file.
File list: list all recorded files.
7. Fun&Games
Enter in the game window. With the game setting menu, you can set the background music effect and
sound effect.
Select a game, press the soft key to select it, you can perform:
7.1 Dynamic Menu
Enter in the Dynamic Menu , you can connect the network to get more about dynamic menu.
7.2 MSN
You can connect the MSN directly via the Internet services.
7.3 Game Center
Enter in the Game Center , you can connect the network to get more games.
7.4 Yahoo
You can connect the Yahoo directly via the Internet services.
7.5 Skype
You can connect the skype directly via the Internet services.
7.6 Facebook
You can connect the Facebook directly via the Internet services.

21
7.7 Google
You can connect the Google directly via the Internet services.
7.8 EBuddy
The mobile phone supports eBuddy function for enjoyment at your leisure time. You can connect the
eBuddy Webpage directly.
7.9 Java
You can download the Java procedures to mobile phones, and then run.
7.10 Java settings
Enter in the java settings. With the java setting menu, you can set the java music,java backlight ,java
vibration .select SIM ,java sim1 profile and Heap size.
7.11 Java default security
Enter in the java default security. With the java setting menu, you can set Third party, Untrusted domain ,
Restore default and Domain options
8. Extra
8.1 Calculator
You can conduct the basic arithmetic operations.
1 Input the first number.
2 Press one of directional keys to select the arithmetic operation sign.
3 Input the second number.
Press [LSK] or [OK] to view the calculation results.
8.2 Ebook reader
Open ebook: View the selected document.
Clean up bookshelf: Updated list of e-books.
Global settings: set the system contents of the default.
Book info: E-book shows the details of the selected.
Delete: delete the selected e-books.
Delete all files: delete all File List in the e-books.
Sort by: sort the e-books files by menu: Name, Type, Time, Size or None.
Apply global settings: Return to system default.
Help: instruction to the game operation.
9. Organizer
9.1 Calendar
View the routines or the memo saved in the calendar.
The phone will prompt you with the related affairs in assisting you to manage your daily schedule.

22
Select Date in Calendar
The screen will highlight the date of today after displays the monthly calendar when you enter in the
calendar function.
I Press [Left/Right] to move by day.
II Press [UP/DOWN] to move by week.
Calendar Option
Press <Options> under the calendar window to use the following options:
View: enter in the routines of the predetermined date to view the event
View all: view the reminder, meeting, course.
Add event: create affairs under the selected date.
Delete event: delete the event.
Jump to date: return to the calendar window after inputting the designated date with the cursor
stopping on the inputting date.
Go to today: Back to today date.
Go to weekly view: use the weekly view to see the calendar.
9.2 Tasks
Press the left soft key to select it, entering the To-do-list window, performing: View, Add, Edit, Delete,
Delete All, and Send To-do List.
Press the left soft key to select Add routine if the to-do-list information is not added.
If the to-do-list is added, press the up and down navigation keys to select a to-do-list, press Option
button to perform:
View: view the current to-do-list arrangement.
Add: add a new to-do-list entry.
Edit: press the up and down navigation keys to select and modify various options of to-do-list.
Search: search the to-do-list.
Delete: delete the to-do-list.
Delete overdue: delete the overdue to-do-list
Delete all: delete all to-do-lists.
Jump to date: return to the calendar window after inputting the designated date with the cursor
stopping on the inputting date.
View uncompleted:view the uncompleted tasks.
9.3 Alarm
Set that the alarm clock will ring at specific time with this function.
Set up alarm clock
1 Select an alarm clock and enter into alarm clock setup window.
2 Set up the alarm clock with the following setting:
Set the alarm clock status as on or off.
Set the alarm clock time.
Select the ring mode as Everyday, Once or Days.
Select the Alarm tone.
Select the Snooze time.
Select alert type.

23
3 Press<done>.
9.4 WorldClock
Use direction keys to browse the current time.
10. Settings
You can set various functions of the phone with these functions.
Press <Menu> under the standby window and then select Settings if you desire to enter in this
function.
10.1 Dual SIM settings
Realize to switch amid the Dual SIM open, Only SIM1 open, Only SIM2 open.
10.2 Phone Settings
You can customize your favorite phone functions based your interest with this function.
Time and date: you can set up time/date and time zone for your phone.
Schedule power on/off: you can set up to power the phone on/off at the set time. This function can
be opened or closed.
Language: select the language used for the phone.
Display:
Wallpaper: select your favorite picture as the wallpaper of the standby window.
Screen saver: select your favorite picture as the screen protection.
Power on display: press the up and down navigation keys to select the animation upon
powering the phone on.
Power off display: press the up and down navigation keys to select the animation upon
powering the phone off.
Misc. settings: set the brightness and time.
10.3 Network Settings
Set up the phone network with this function.
SIM1/ SIM2 network settings:
Network selection: press the up and down navigation keys to select the ways of connecting
with the network in Re-search, Select network and search mode and press the OK button to
finish the setup.
Preferences: select the priority Network.
10.4 Security Settings
You can manage your phone safely with this function.
The phone password, SIM card password and PIN2 support 4-8digits, do not support other characters.
The original password of the phone when leaving the factory is 1234. The password and PIN2 and SIM
card are provided by the network operator
When the PIN/PIN2 is input wrongly in successively three times, the SIM card will be locked.
The PUK (personal unlock key)/PUK2 are required to input if you want to unlock the SIM card. The

24
PUK/PUK2 is provided by the network operator.
If the PUK is input wrongly in successively 10 times. The SIM card will be locked and discarded
permanently.
SIM1 /SIM2 security
PIN lock: open or close the PIN lock function. When PIN lock is launched, the PIN shall be input
upon each power-on.
Change PIN: you can change the PIN.
Change PIN2: you can change the PIN2.
Phone lock: turn on/off the phone lock. When phone lock is enabled, power on to enter phone
password. The preset password is: 1234. You can change the password.
Change password: you can change password you want to change, (the default password is
1234). .
10.5 Connectivity
Data account
Enter in GSM account list; select an entry to edit its contents:
Edit: select an entry to edit its contents
Account name: edit the name of the account.
APN: edit the accessed APN.
User name: the user’s name accessing to APN server.
Password: edit the access password to APN server.
Auth.type: select one of certification modes used by the WAP identity certificate.
SIM selection: select the SIM card.
Advanced settings: Set up homepage, connection type, use proxy, proxy address,prixy
port,prixy user name, proxy password, primary DNS, secondary DNS, IP address, subnet mask.
Add PS account: Add one more data account.
Delete: Delete the data account.
Change default: Change the default data account.
10.6 Restore factory settings
Recover the setting of the phone into the initial values with this function.
11. User profiles
You can set up the personalized ringtones for incoming calls and phone-pertinent prompt tone etc under
the different scenes with this function.
Press <Menu> under the standby mode and then select User Profile Mode if you desire to enter in the
function.
Enter in the function; display the profile mode list including General, Meeting ,
Outdoor ,Indoor,Headset.

25
Select a profile mode and press <Options>, you can use the following options:
Activate: activate the profile mode.
Customize: customize the profile mode as per the Tone settings , Volume ,Alert type, Ring type,
Extra tone ,Answer mode,ect.
12. Bluetooth
You can activate the Bluetooth function with this function, can connect the antenna of the phone with
the other Bluetooth in the wireless and exchange data, call in hand-free way or remotely control the
phone with these device.
12.1 Power
Open or close the Bluetooth with this function.
12.2 Inquiry audio device
you can search for and connect audio devices
12.3 My device
you can search for new devices.
12.4 Active devices
Show all connect devices.
12.5 settings
Enter in settings ,you can set the device visibility ,change device name ,audio path ,storage and FTP
settings
Visibility: display or hide the local phone in view of other Bluetooth device. Set up turn on/off the
function.
Change device name: rename the device name you want to ..
Audio path: set up voice to transfer path for Bluetooth headset or remain in the machine..
Storage: set up the storage,such as phone, memory card,or always ask..
12.6 About
Service records.

26
FAQ and Solutions
You can check the phone simply before contacting with the post sales server in order for you to avoid
the excessive maintenance time and expense waste.
Cannot power the phone on
z Check whether the Powering-on key is pressed and hold for 1 second or above;
z Check whether the battery is contacted badly or not. Please remove the battery firstly and then try
to power the phone on;
z Check whether the battery capacity is used up or not; please charge the battery;
Upon power-on, there is information displayed
z Input phone lock password: select the locking function and should input the phone password before
use.
z Input PIN: select the function of inputting PIN when the phone is powered on. The PIN shall be
input;
z Input PUK: after the PIN is input wrongly for successively 3 times, the phone will be locked. The
PUK provided by the network operator should be input;
SIM card error
z There is some dirt o the metal surface of the SIM card. Please wipe the metal contacts of the SIM
card with a clean cloth ;
z SIM card is not installed. You should install the SIM card based on the User’s Manual.
z SIM card is damaged. Please contact with your network supplier;
Cannot access to network
z The signal is weak, please move to the place where the signal is strong and retry;
z Beyond the coverage of the network of the network server;
z SIM card is invalid, please contact with your network supplier;
Cannot dial out
z Please confirm whether the dial key is pressed after the number is dialed;
z Please confirm whether the call is barred due to owned toll;
z Please confirm whether the SIM card is valid or not;
z Please confirm whether the call restriction function is set up;
z Please confirm whether the fixed dial function is set up;
Bad call quality
z Check whether the volume is adjusted appropriately;
z Use the phone at the place where the receiving quality is not good, such as near to the building or in
the basement where the radio wave cannot reach.
z Use the phone at the peak time, such as at the time of going on/off the duty, the channel is
congested;
Failed to call you
z Please confirm that the phone is powered on and is uplinked with network;
z Please confirm that the call is barred because of owned toll;
z Please confirm whether the SIM card is valid;
Please confirm whether the fixed dial function is set up;
Failed to hear you
z Please confirm that the microphone is opened;

27
z Please keep the microphone at the bottom of the phone close to your mouth.
Short standby time
The stand-by time is relevant to the system setup. The phone is possibly at the place where the
signal state is bad. When the phone cannot receive the signal, the phone will transmit to search the
base station continuously; consuming a great deal of battery capacity and shortening the stand-by
time of the battery. Please move to the place where the signal is strong to use the phone or
temporarily power the phone off.
z The battery requires to be displaced with a new battery ;
Cannot charge
z Bad connection; inspect whether the plug is connected well or not;
z Wipe the interfaces of the phone and battery with soft and dry clothing.
z Charge at the environment below -0℃ or beyond 45℃. Please change the charging environment;
z The battery or adapter is damaged and requires to be replaced;
Please record the phone model and SN, authorized or insurance information and detailed statement
and then contact with the local after sales servicer if the aforementioned instruction cannot facilitate you
to conquer these problems.

28
Important Security Information
Battery
Do not use the damaged adapter or battery.
Please use the battery correctly, do not make the battery short circuit, or otherwise produced heat will
cause the fire.
Prohibit putting the battery into the fire, or otherwise the battery will explode.
Should return the waste battery to the supplier or at the designated recycling location, and should not
discard with the life trash.
The battery charging time depends on the remained capacity, type and adapter. The battery may be
charged for thousands of times, but will wear out gradually. Please purchases new battery when the
standby time is shorter than the normal time obviously.
Please use the adapter and battery dedicated to or authorized for the phone.
Please disconnect the adapter and the power supply when the adapter is not used.
Please do not charge the battery for too long time, or otherwise damage the battery and shorten the
service life of the battery.
Please cool or heat the battery to the normal temperature because the temperature extremes will affect
the charging (because the lithium ion battery will be affect when the temperature is lower than 0℃).
Traffic Safety
The phone has a strong wireless voice communication function. With it, you can call at any time and
any place, thus the subscriber shall undertake some important responsibilities.
To drive is your first duty when you are driving. Should be aware of answering the call and abide by the
local regulations during the drive.
Understand the wireless phone and its function, such as quick dial and redial, which can help you to dial
out conveniently without distraction during the drive.
Should use the hand-free device if there is and use any hand-free attachment currently-offered if
possible to enhance the convenience and safety for the use of the wireless phone.
Place the wireless phone at an easy-to-find place. Do not distract from the road to sue the phone.
Should use the voice mailbox as far as possible to answer the call if receiving a call at an inconvenient
time.
Tell the caller that you are driving. If necessary, hang up during the traffic congestion and bad weather. It
is dangerous in rainy, snowy, freeze, icy and traffic congestion situation.
Safety airbag, brake, speed control system and fuel injection system shall not be affected by the
wireless transmission. Please contact with automobile distributor in case of the above problems.
Please close your mobile phone when fueling or at any place where the bidirectional wireless devices
are prohibited using. Please do not place the phone together with the flammable and explosive articles
because the internal sparkle can ignite.
Please close the mobile phone before the plane takes off. Be sure not use the phone during the flight in
order to prevent the phone form disturbing the plane communication system. To use the phone before
the plane takes off shall be approved by the screw members based on the safety regulation.
Please confirm that the phone alarm clock will not be opened automatically during the flight.
Operating Environment
Please abide by this regulation at any place. Please close the phone at place where the phone is
prohibited using or the phone may cause the risks.

29
Should read the User’s Manual; understand the security instruction when the phone is connected with
other device. The phone is prohibited connecting with other incompatible devices.
The subscriber shall use the phone at the correct location (to the ear with the antenna pointing to top of
the arm) in order to operate satisfactorily and protect your health.
Please use the phone at applicable temperature range -10℃ to 50℃.
Electronic Apparatus
Most electronic devices shield the radio information. Please contact with the manufacturer for related
information.
z Pacemaker: keep the phone 6 inches (15cm) or above apart from the pacemaker; should not carry
the phone in the chest pocket; answer the incoming call with the ear at the other side of the
pacemaker to lower the possible disturbance. Please close the phone if you concern about the
disturbance of the phone.
z Hearing aid: partial digital wireless phones disturb the hearing aid possibly. Please contact with the
hearing aid manufacturer in case of disturbance.
z Other medical apparatus: please consult with manufacturer if you use other personal medical
apparatus in confirmation of wireless shield wave. The doctor may assist you obtaining the
information. Please close the phone if the phone is prohibited using near the healthcare facilities.
z Automobile device: please consult the manufacturer in confirmation of the information because the
wireless signal may affect the electronic devices installed in the automobile.
Emergency Call
The phone uses the wireless signal similarly with other ropeless phone and cannot be ensured to
connect under all cases. Thus, the important calls should do not rely on the wireless phone only, in
stance medical emergency call.
The phone shall be kept on with enough strong signals within the network coverage.
Please input the emergency call under the standby mode and then press the Dial key to dial out if you
want to dial the emergency call.
Other Important Safety Information
z Please use the accessories of the original manufacturer or the accessories approved by the
manufacturer. The usage of any unapproved accessory will affect the phone performance and
damage the phone, even result in the human body risks or in violation of the related national
regulations on the communication terminals.
z Please clean the phone with the slightly-wet and static-free clothing. Do not use the dry or
static-prone clothing. Please note not to use the chemicals such as detergents when cleaning the
phone surface. Please power the phone off when cleaning the phone.
z Please do not place your phone near to the magnetic memory medium such as PC disk. The phone
may disturb the TV, radio, PC, thus affecting the call performance when using the phone near them.
z Do not let the phone exposed to the strong sunlight in avoidance of being heated.
z Do not enter various liquids in to the phone in avoidance of be damaged.
z Do not throw and strike the phone, do not crudely treat and damage the internal circuit board of the
phone.
z Do not connect the phone with other device not supporting the phone.

30
FCC RF EXPOSURE INFORMATION:
WARNING!! Read this information before using your phone
In August 1986 the Federal Communications Commission (FCC) of the United States with its action in
Report and Outer FCC ID: ZGRFUEGO adopted an updated safety standard for human exposure to
radio frequency (RF) electromagnetic energy emitted by FCC regulated transmitters. Those guidelines
are consistent with the safety standard previously set by both U.S. and international standards bodies.
The design of this phone complies with the FCC guidelines and these international standards. Use
only the supplied or an approved antenna. Unauthorized antennas modifications, or attachments
could impair call quality, damage the phone, or result in violation of FCC regulations. Do not use the
phone with a damaged antenna. If a damaged antenna comes into contact with the skin, a minor burn
may result. Please contact your local dealer for replacement antenna.
BODY-WORN OPERATION:
This device was tested for typical body-worn operations with the back of the phone kept 1.5cm from
the body. To comply with FCC RF exposure requirements, a minimum separation distance of 1.5cm
must be maintained between the user's body and the back of the phone, including the antenna,
whether extended or retracted. Third-party belt-clips, holsters and similar accessories containing
metallic components shall not be used. Body-worn accessories
that cannot maintain 1.5cm separation distance between the user’s body and the back of the phone,
and have not been tested for typical body-worn operations may not comply with FCC RF exposure
limits and should be avoided.
For more information about RF exposure, please visit the FCC website at www.fcc.gov
Your wireless handheld portable telephone is a low power radio transmitter and receiver. When it is
ON, it receives and also sends out radio frequency (RF) signals. In August, 1996, the Federal
Communications Commissions (FCC) adopted RF exposure guidelines with safety levels for
hand-held wireless phones. Those guidelines are consistent with the safety standards previously set by
both U.S. and international standards bodies:
<ANSIC95.1> (1992) / <NCRP Report 86> (1986) / <ICIMIRP> (1996)
Those standards were based on comprehensive and periodic evaluations of the relevant scientific
literature. For example, over 120 scientists, engineers, and physicians from universities, government
health agencies, and industry reviewed the available body of research to develop the ANSI Standard
(C95.1). Nevertheless, we recommend that you use a hands-free kit with your phone (such as an
earpiece or headset) to avoid potential exposure to RF energy. The design of your phone complies with
the FCC guidelines (and those standards).
Use only the supplied or an approved replacement antenna. Unauthorized antennas, modifications, or
attachments could damage the phone and may violate FCC regulations.
NORMAL POSITION:
Hold the phone as you would any other telephone with the antenna pointed up and over your
shoulder.

31
RF
Exposure Information:
FCC RF Exposure requirements: The highest SAR value reported under this standard during product
certification for use next to the body with the minimum separation distance of 1.5cm is 0.406
W
/
kg
,
next to the head is 0.141
W/kg.
This transmitter must not be collocated or operating in conjunction
with any other antenna or transmitter.
This device complies with part 15 of the FCC rules. Operation is subject to the following two
conditions:
(1) this device may not cause harmful interference, and
(2) this device must accept any interference received, including interference that may cause
undesired operation.
NOTE: The manufacturer is not responsible for any radio or TV interference caused by unauthorized
modifications to this equipment. Such modifications could void the user’s authority to operate the
equipment.
NOTE: This equipment has been tested and found to comply with the limits for a Class B digital device,
pursuant to part 15 of the FCC Rules. These limits are designed to provide reasonable protection against
harmful interference in a residential installation. This equipment generates uses and can radiate radio
frequency energy and, if not installed and used in accordance with the instructions, may cause harmful
interference to radio communications. However, there is no guarantee that interference will not occur in
a particular installation. If this equipment does cause harmful interference to radio or television
reception, which can be determined by turning the equipment off and on, the user is encouraged to try
to correct the interference by one or more of the following measures:
- Reorient or relocate the receiving antenna.
- Increase the separation between the equipment and receiver.
-Connect the equipment into an outlet on a circuit different from that to which the receiver is connected.
-Consult the dealer or an experienced radio/TV technician for help
Do not use the device with the environment which below minimum -10℃ or maximum over 50℃,the
device may not work.
Changes or modifications to this unit not expressly approved by the party responsible for compliance
could void the user’s authority to operate the equipment.