Dynamics PRIME4-0 Mobile Phone User Manual
Dynamics Hong Kong Limited Mobile Phone Users Manual
Dynamics >
user manual
1
User Guide
3G Mobile Phone
Brand Name: Ice Mobile
Model Name: prime 4.0
FCC ID: C89PRIME4-0
2
Directory
1 Install......................................................................................................................................... 4
1.1 Install the SIM card or USIM card and battery ............................................................. 4
1.2 Battery charging ............................................................................................................ 5
1.3 Insert the storage card ................................................................................................... 5
1.4 Remove the storage card ............................................................................................... 6
1.5 Format the storage card ................................................................................................. 6
1.6 Use the storage card as U disk ...................................................................................... 7
1.7 Standby screen .............................................................................................................. 7
2 Custom mobile phone ............................................................................................................... 8
2.1 Wireless and internet ..................................................................................................... 8
2.2 Equipment ..................................................................................................................... 8
2.3 Personal ......................................................................................................................... 9
2.4 System ......................................................................................................................... 10
2.5 Install and unload apps ................................................................................................ 10
3 First Interface .......................................................................................................................... 11
3.1 Dial .............................................................................................................................. 11
3.2 Contacts ....................................................................................................................... 12
3.3 Message ....................................................................................................................... 12
3.4 Browser ....................................................................................................................... 14
3.5 E-mail .......................................................................................................................... 14
3.6 Camera & Vidicon ...................................................................................................... 15
3.7 Multi-media file management ..................................................................................... 16
3.8 Music player ................................................................................................................ 17
3.9 Recorder ...................................................................................................................... 18
3.10 Calendar ...................................................................................................................... 19
3.11 calculator ..................................................................................................................... 20
3.12 FM Radio .................................................................................................................... 21
To listen to the FM radio, you must connect a headset. The FM radio searches and saves
available stations automatically. .............................................................................................. 21
3.13 Other functions ............................................................................................................ 21
4 Use and Maintenance .............................................................................................................. 21
Thank you for using Ice Mobile; it’s the world's premiere, the best classic 4.0 inches screen,
gesticulation control. Provide you the high quality of mobile communication and entertainment
enjoy.
This user guilds specially used to guide you understand the mobile phone function and
characteristic.
3
Please read the instruction file first
Before you use this phone, please read all the safety cautions in the instructions
in detail, to ensure safety and correct use.
The descriptions are based on the default settings
The pictures and screen shots may different from the actual product.
The phone with sound resource, wall paper and picture are permitted to use
limited in Cross or among all the owners. Against the commercial and other reason
to extract and use these file will violate the copyright law. Cross is not
responsible for this behave of right violation.
Receive and send message, upload and download, automatic synchronism or GPRS
service may cause other kinds of fee. If you want to avoid the extra fee, choose
the probable charging plan. Any relevant information, please contact the service
supplier.
To the unknown software, be careful when install, the strange website pop up
when browsing the internet, you can click but better to avoid the operation or
the phone will be poisoned.
Please properly keep this instruction book for the future reference.
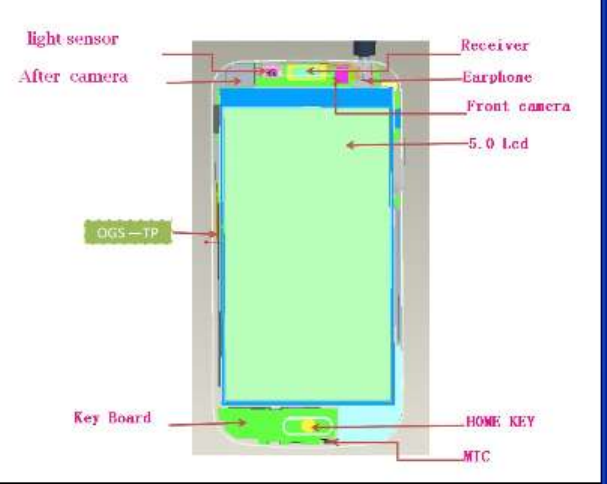
Mobile phone parts diagram
4
1 Install
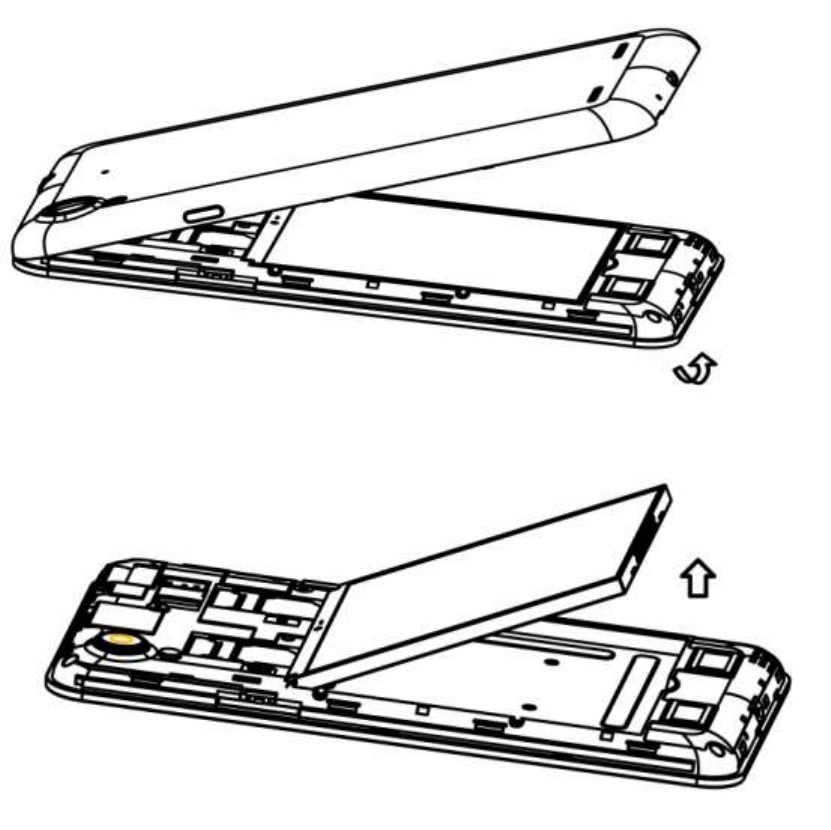
1.1 Install the SIM card or USIM card and battery
1, If the phone is on power, please turn it off, press the power off key->choose
power off->confirm to turn off the phone, take off the battery
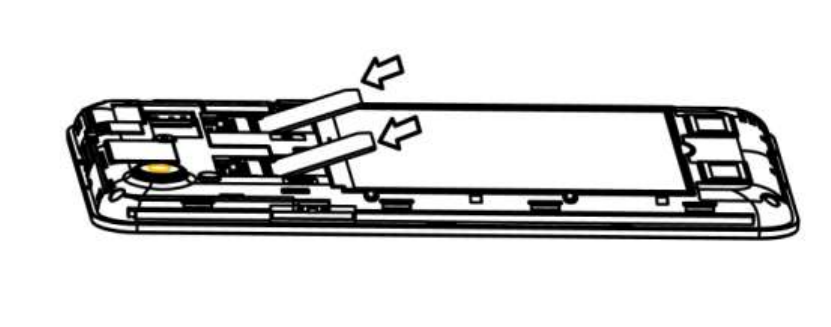
2, Take off the battery, put the SIM card into the corresponding card slot
5
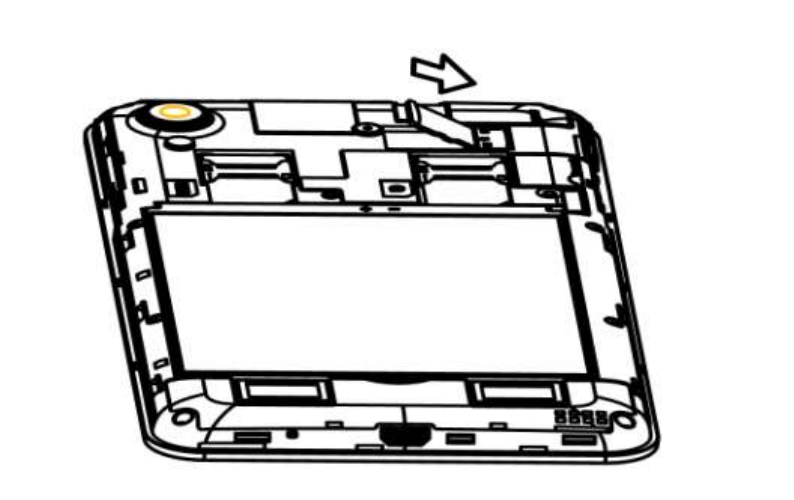
3, Put back the battery and battery cover
1.2 Battery charging
When using the phone at the first time, need to charge for the phone, can use charger or
connect the phone with the computer via data cable.
The phone will issue warning tone and display electricity shortage information when
low battery, the battery icon will turn red, moreover, the phone will turn off
automatically when electricity is too low. Need to charge then you can use the phone.
If the battery is power off, can't turn on the phone immediately even connect to the
charger, before you turn on the phone, please charge for several minutes.
When charging with the charger, Please put the small end plug of the charger into the
mobile phone in the multi-function socket, put the big end into the standard power
socket, be attention the improper charger connection will lead to serious damage to the
phone, to the damage caused by misoperation, will not guarantee to repair.
Can use the phone when charging, but thus will influence the charging time of the phone,
the phone may get hot when charging, this is normal phenomenon, do not affect the
using life and performance.
When the batteries get full electricity (battery icon doesn’t move), please disconnect the
charger and the phone, and take down the charger from the socket. Do not take off the
battery when charging, this might damage the phone.
Reduce battery loss
If launched automatic synchronization, bluetooth functon or WLAN function in the background,
the battery will consumes faster. If you want to save electricity, please shut down unnecessary
application. You can also reduce background light time and the brightness of the display screen, or
press the power off key to switch over to sleep patterns.
1.3 Insert the storage card
If you want to store more multi-media file, you should insert storage card, the biggest storage card
can be used in this phone is 32GB (depending on the storage card manufacturer and category)
6
Karbonn use the public storage card industry standard, but some brand may can't compatible with
the phone, if use incompatible storage card might damage the phone and storage card, and also
damage the data in the card.
Install the storage card:
1, Take down battery cove and battery, insert the storage card into the phone, let the golden
electric shock surface downward.
2, Push the storage card into the socket until it lock in place.
3, Put back the battery and battery cover.
1.4 Remove the storage card
Before you remove the storage card, please uninstall for safely remove.
1, Under standby pattern, setting>storage>uninstall SD card>confirm.
2, Take down the battery cover and battery.
3, Slightly push the storage card to drop from the phone, take out the card.
4, Put back the battery and battery cover
Attention: when upload or download data, please do not take out the storage card, or may lead to
data loss or damage the phone and storage card.
1.5 Format the storage card
Format the storage card on the computer may lead to incompatibility between the card and the
phone, please format the card on the phone.
Under standby pattern, setting>storage>format SD card>OK
Before you format the storage card, remember to back up the important file to the phone.
7
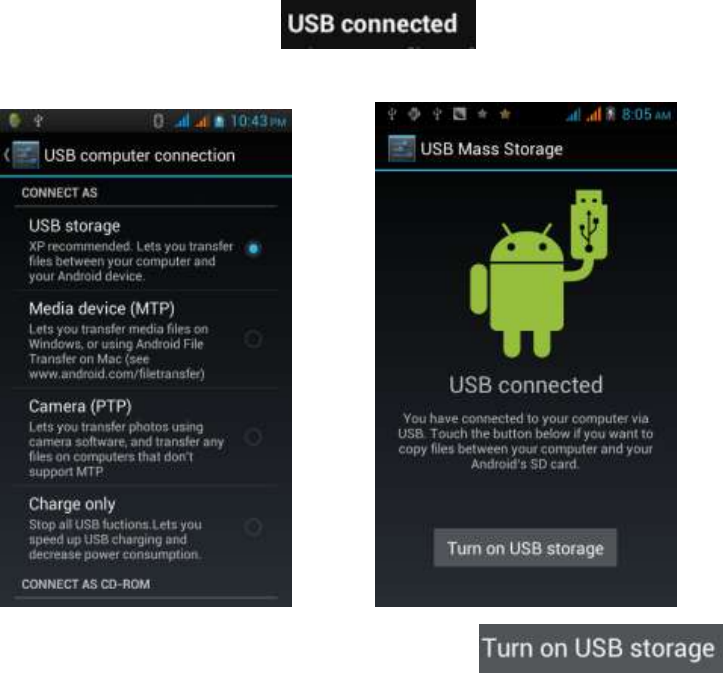
1.6 Use the storage card as U disk
If you want to transfer the file from computer to the storage card of the equipment, please set the
equipment to U disk pattern.
1, Use USB cable to connect the equipment and the computer, At this time will drop-down the
shortcut list, choose USB already connected.
2, In the pop-up interface, click to open the USB storage equipment,
Attention: after open the USB equipment, some applications may can't be used, such as
camera, music player etc. If want to close U disk pattern, please click to close the USB
storage equipment.
1.7 Standby screen
When the phone is under standby pattern, can see standby screen. In the standby screen, can
view the state of the phone and access program, and the standby screen have multiple panel,
sliding to the left or right to choose a screen panel.
Can add application or the application project, the group file or folder shortcuts to custom the
standby screen: under standby mode, long hold application icon click on the standby screen
blank area.
Move the project in the standby screen, click on the project, and drag to the position you
want.
Delete project from standby screen: click on the project, the recycle bin appear above the
8
screen, drag the project to the recycle bin, loosen when project turn red.
Use shortcuts surface; under standby pattern or use the application, click on the indicator icon
area and drag down to open the shortcut panel, can cancel or start data connection function
and access notice list, such as information, call, activity or processing condition. If you want
to hide list, drag up the list will be OK. On the shortcut panel can also start or shut down the
following options: data connection, off-line mode, the screen brightness, standby, automatic
roll screen and contextual model switching.
2 Custom mobile phone
Standby interface->main menu->setting
2.1 Wireless and internet
SIM card management: can set SIM card and voice calls, information, data connection to start or
close.
Flow use situation: can check the current flow use situation, so that you can more clearly to
control the flow use.
Other mode setting: start or close flight mode, and the internet setting.
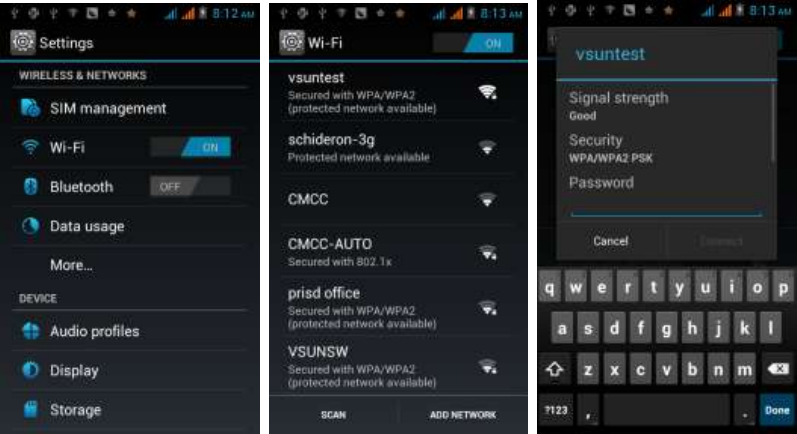
Use WIFI: setting>WLAN setting>open, will appear the wireless internet nearby, choose your
internet, enter the password will be ok.
2.2 Equipment
Audio Profiles: In audio profiles, it has General mode, Silent mode, Meeting mode, and Outdoor
mode. You also can add Custom mode according to your demand, and reset all the audio profiles
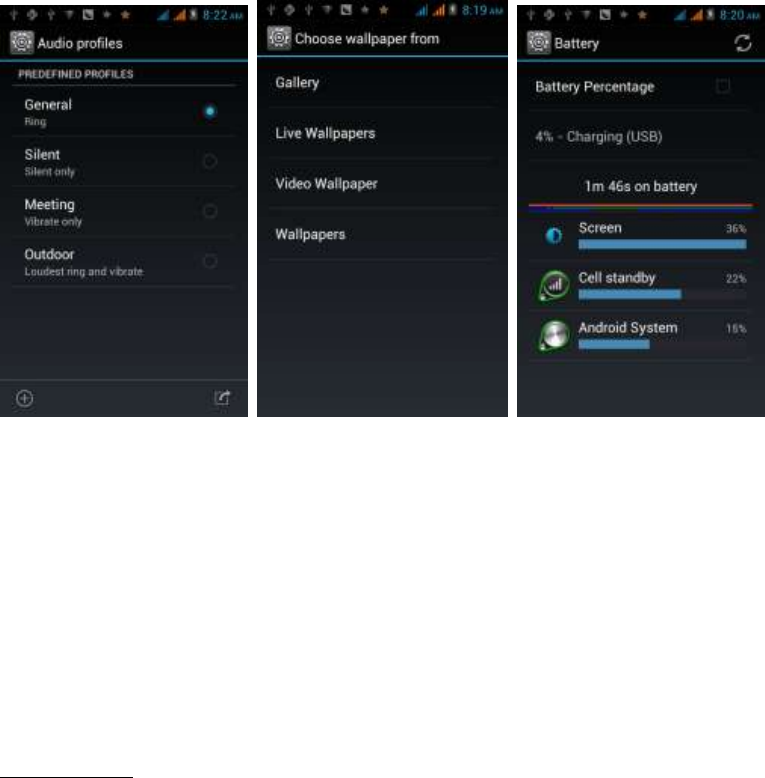
9
to default.
Display: You can custom the display settings.
Brightness: Set the brightness of the screen.
Wallpaper: Wallpaper setting has four modes, Live Wallpapers, Gallery, Wallpapers, Video
Wallpapers. You can choose your style by yourself, also can download from the Internet
Theme: change the Theme UI.
Auto-rotate screen: On/Off.
Sleep: 15seconds/30seconds/1min/2min/5min/10min/30min, you can set the sleep time
according to your habit. Sleep time is shorter, you can save more electricity, increase your
mobile using time.
Font size: Set the size of System fonts.
Storage: Check the use condition, and install, unload, erase SD card.
Battery Percentage: Start or Close the battery percentage, know about the using condition of the
battery.
Apps: check and manage the downloaded apps, and unload the unnecessary apps.
2.3 Personal
Accounts & sync: On/Off.
Location services: set the location services.
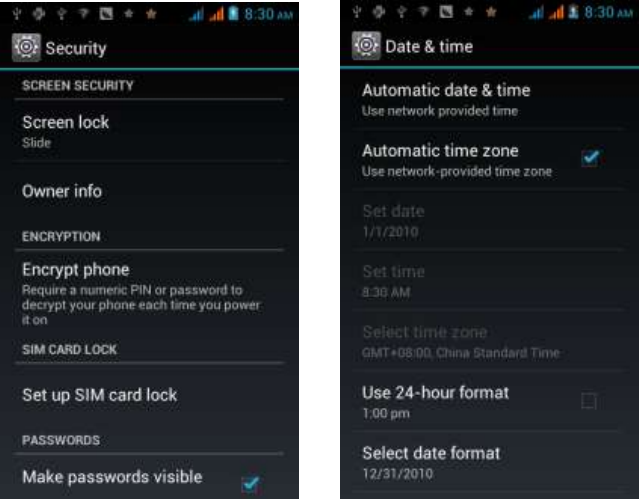
Security: Security settings can set screen lock mode, encrypt the phone, set SIM card lock and
device administrators, and set the use and install of the unknown sources and apps.
Language & Input: Set the system languages and input methods.
Backup & reset: DRM reset, Factory data reset. Note that the data of your mobile will be erased
when reset factory data.
Location access
My Location: Select a source for determining your location: Wireless networks, or GPS satellites.
Typically GPS will be more accurate (to street level) but it consumes more battery power.
10
2.4 System
Date & time: Manual setting time, automatic time mode.
Automatic date & time: can choose use network provided time and off.
Automatic time zone: On/Off.
Set date/time/ Select time zone: Manually set date, time and time zone.
Use 24-hour format: On/Off.
Select date format: Select the format according to your habit.
Accessibility: some special functions settings.
About Phone: Include Status, Legal information, Model number, Android, Baseband version and
Kernel version.
2.5 Install and unload apps
Install apps: download the app through e-market or browser, click install. Android system is APK
format. You also can down from your computer, copy it to T-Flash card, then get into
the T-Flash card through file manager, choose APK file, click install.
Unload apps: Click the menu> Manage applications, click the app you want to unload, click
“unload” or “erase the data” to erase the app record, release the space.
Note: If the app downloaded from the browser can not be installed, please choose Setting >
Security> Unknown sources. And you can find it from the download content.
11
3 First Interface
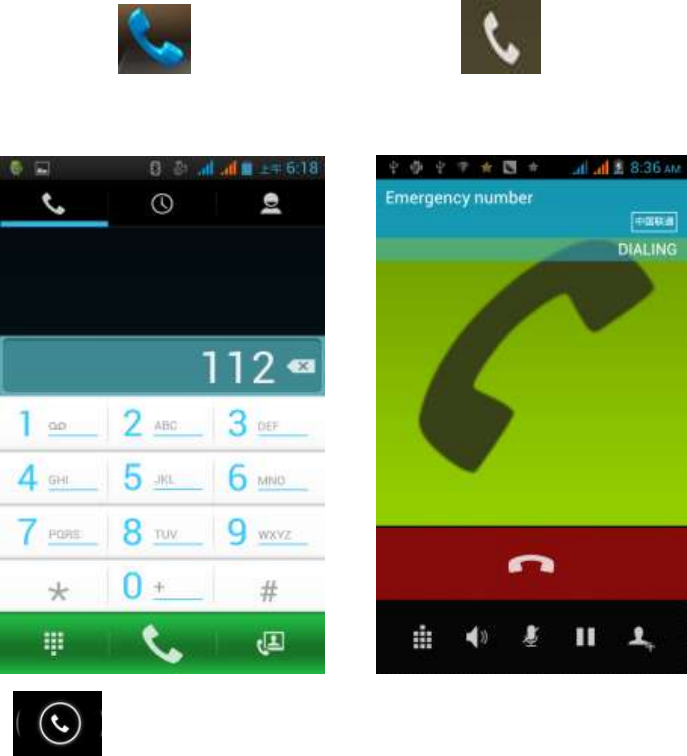
3.1 Dial
In homepage, click ,input the numbers then click
Press when incoming calls,Slide to left is rejecting the calls, slide to the top is
rejecting the SMS, slide to right is answering the calls.
Note: When receive the incoming calls, will display the name, number, contacts photo,
etc, information. And will choose ringtone hint and Vibration hint according to
cell phone settings. If the incoming calls are not in the contacts list, it will
only display the number and default photo.
12
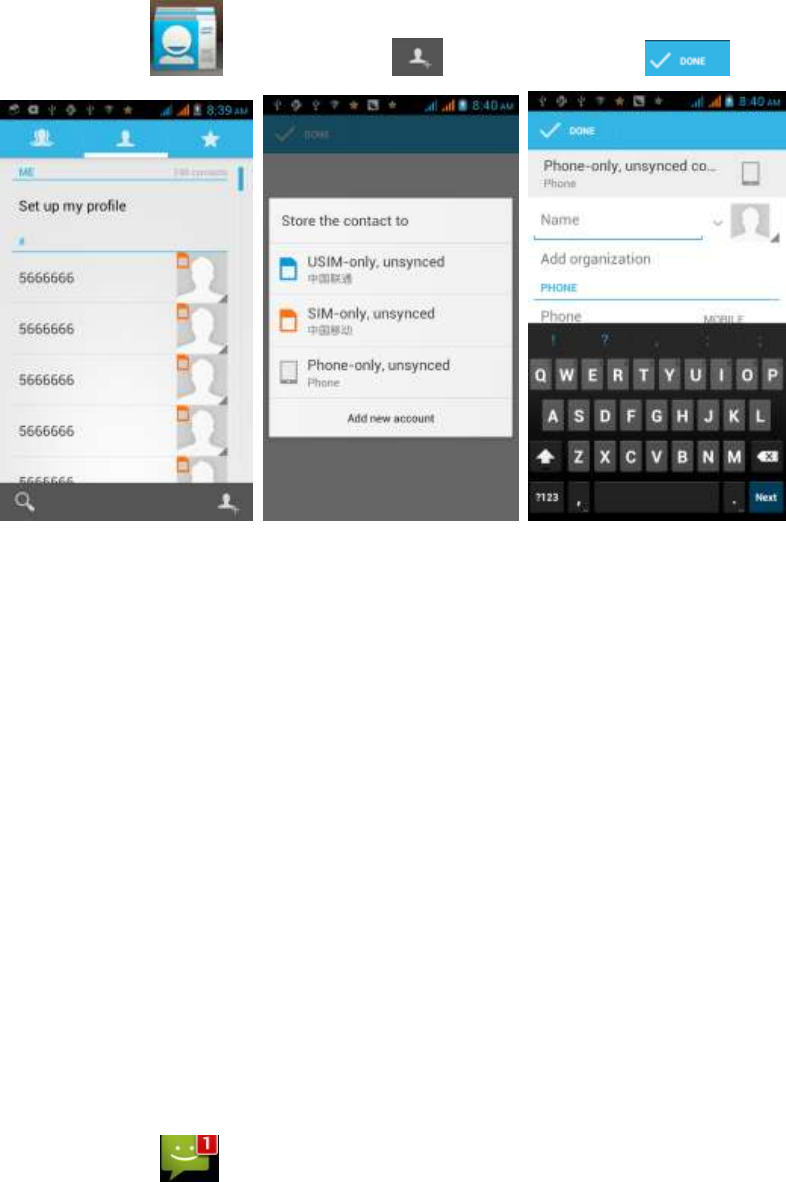
3.2 Contacts
In homepage, click Contact。Choose new contact,display is OK。
Import Contacts
1, In contacts list, press menu, click import/export, choose the contact in the list.
Choose next, you can import or export the message according to the steps.
Note: If the contacts are too many, it will take some time to read the contacts
information, please wait with patiently.
Search contacts
1. Press “search” in contacts list.
2. Input the contact name, then contact meet the requirements will display in the bottom
of the input box.
Note: find the contacts, you can click it to make the phone call or send SMS/MMS/Emails,
etc.
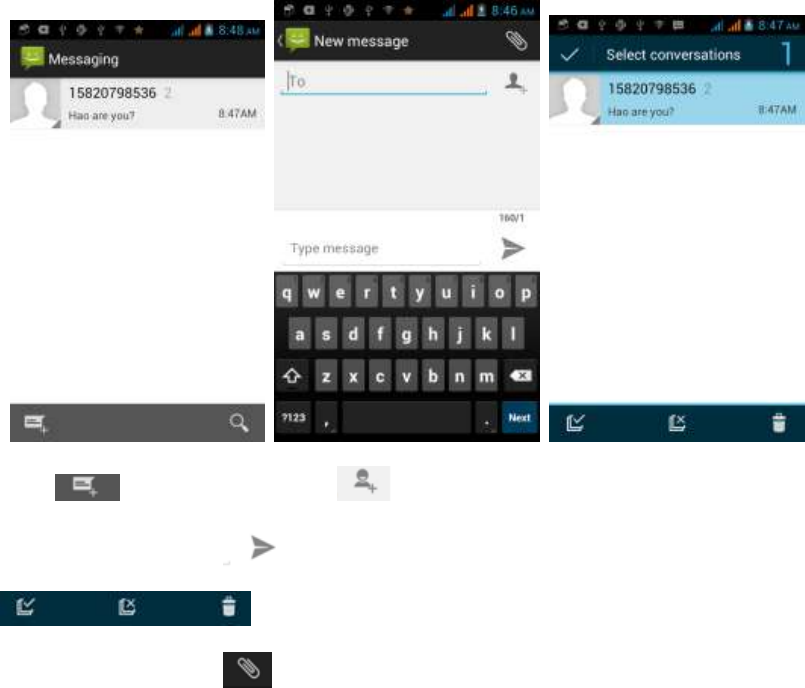
3.3 Message
In homepage, click > message
13
Click to type messages, click add contacts, also you can input the number. After
type messages, click to send message. Long press the message, choose
can delete, multi-choose, and select all messages.
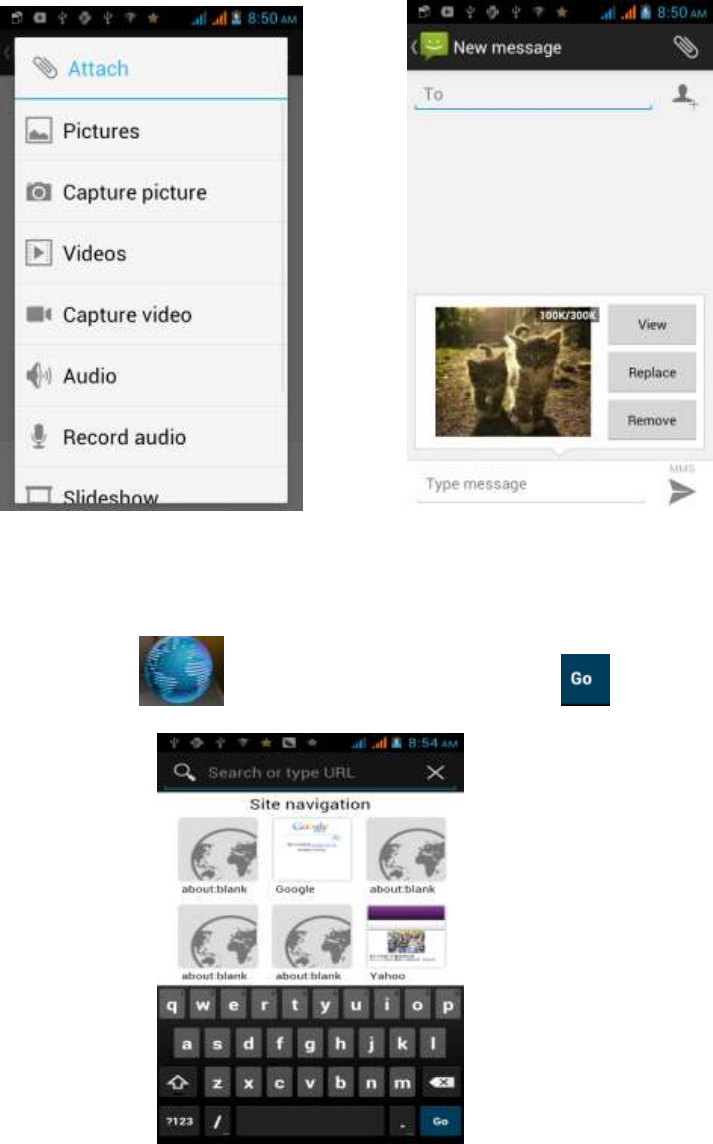
Send MMS, please click in information editor interface,choose the attachments, it will
convert to MMS. Or:
1, Click “Menu”, click “add theme”, type theme content.
2, Click “input content” box, type your message.
3, Click “Menu”, add attachment.
Note: In attachment adding window, you can add pictures, videos, audios, records, PPT, contacts,
calendar, etc. After adding the attachments, you can also check, replace, and delete them.
14
3.4 Browser
In homepage, click to search or input the websites, click
Click “Menu”, can realize more functions.
3.5 E-mail
1, In homepage, click “Email” > input email account and password>click next step, system will
extract mail setting automatically.

15
2, Send-receive emails
Click to edit the mail>input the address in recipients’ box> type theme> edit mail
content>click to send the mail out. You also can press “menu” to add attachment and
set the sent mails. When your cell phone connect to the internet, enter into Email, the inbox
will receive the mails automatically.
Note: Click can search the mails. Click can refresh the mails. Click
can get into mail folder list to check the draft and sent mails.
3.6 Camera & Vidicon
Take Picturesque
In homepage, click >camera>Camera alignment to shooting objects>click
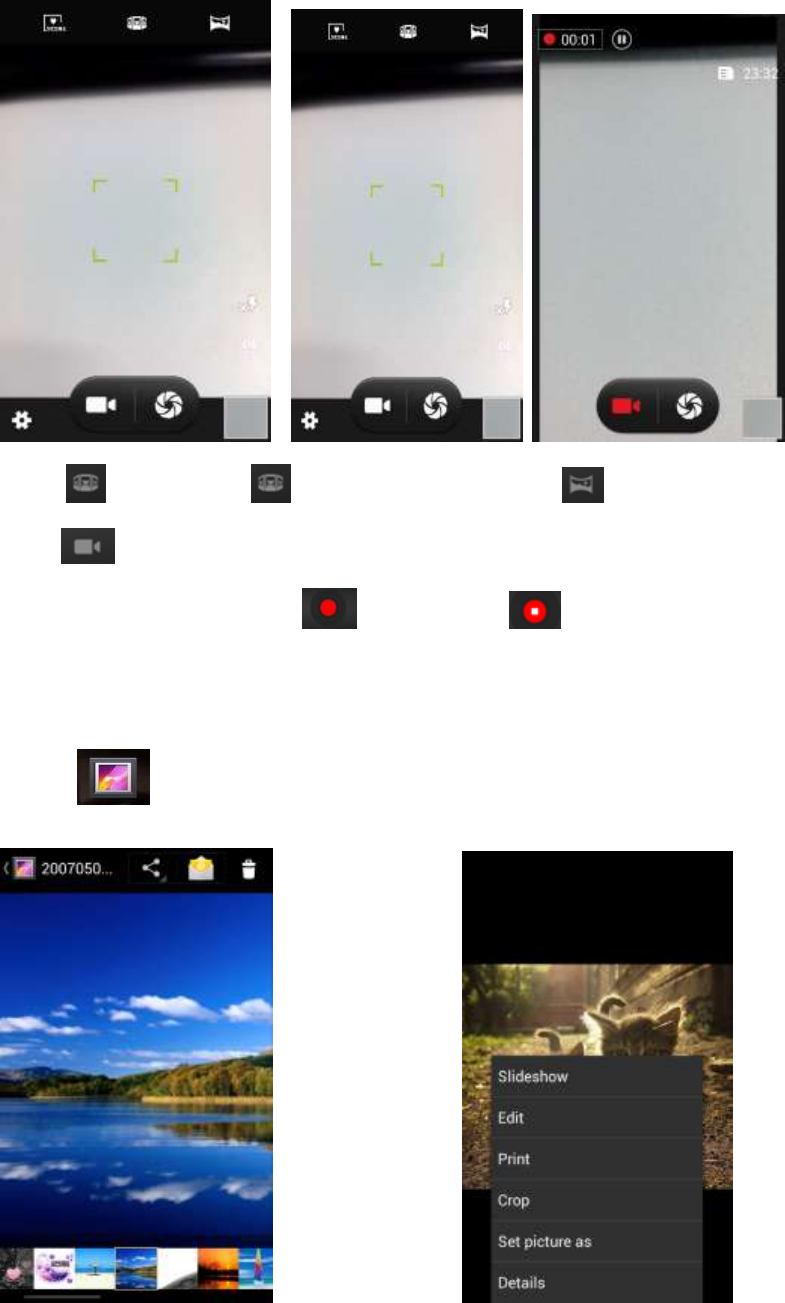
16
Click icon and choose for continuous shooting, Select for Panorama shooting.
Select Video shooting.
Cameras frame your subject, Click Shooting, Click to end shooting.
3.7 Multi-media file management
1, Click in menu to enter into pictures list interface

17
Choose picture and click,change pictures via horizontal left and right slide. Click menu button to
choose play film slide.
Click to send email or massage for the selected picture. Click to delete pictures.
2, Click in menu to enter into pictures list interface, choose video for play
Click to transfer to full screen for the playing
video.
Also could click in menu to enter into video playing list to play video.
3.8 Music player
Click main menu interface > music list. Choose the music for play.
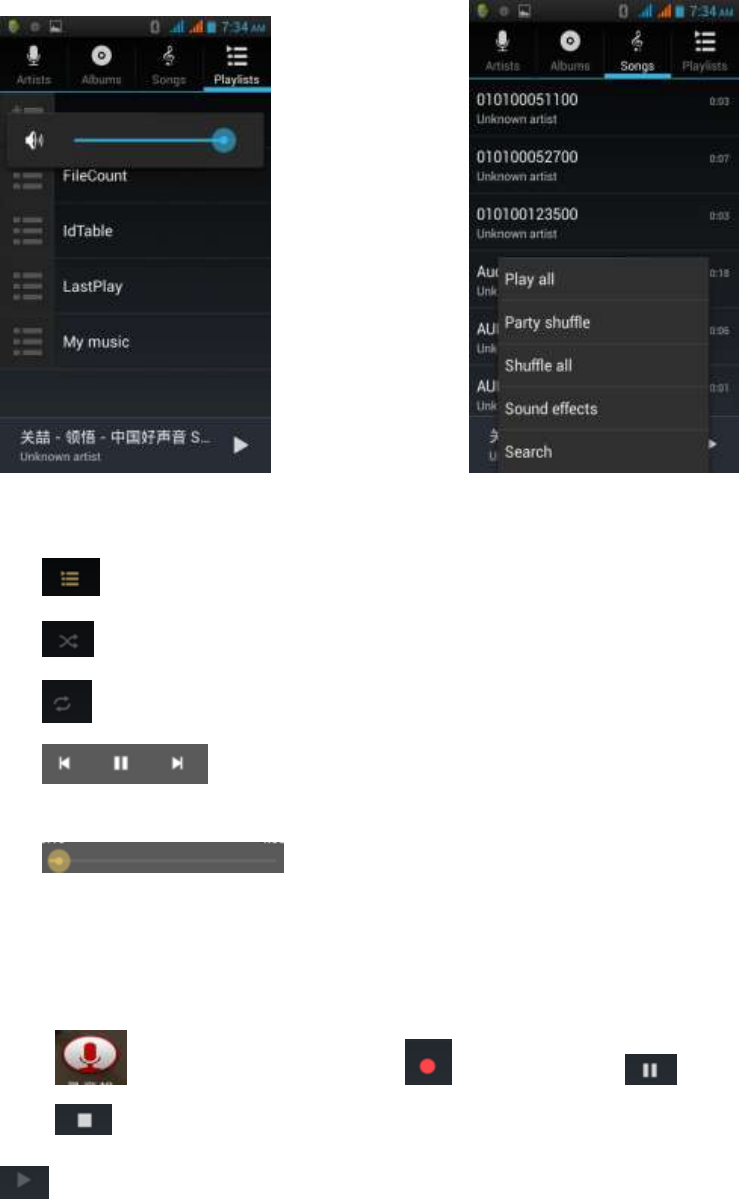
18
Choose music to into playing interface:
: Enter into music list interface.
: On or off random play.
: Replay switch.
: Music switch, last or next item, and pause.
: Music fast reverse and fast forward.
Note: for more operation please click menu button, see above picture.
3.9 Recorder
Click in main menu > recorder, click into record, click for pause
Click for stop, and remind to save or abandon the record file. Choose save and click
to play the file.
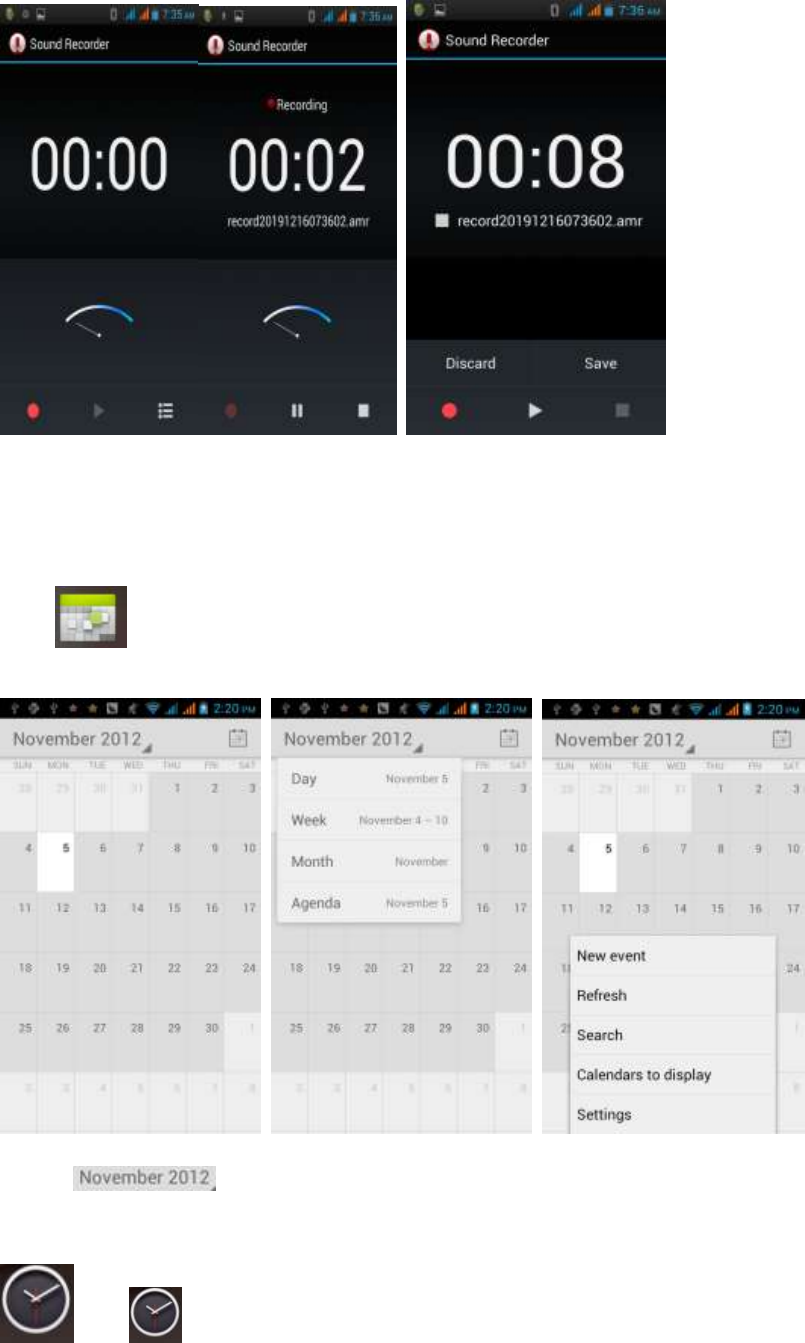
19
3.10 Calendar
Click in main menu > calendar
Choose to switch the calendar interface, display per date, week, month or
schedule.
Press menu button for more info set.
Click in main menu>clock
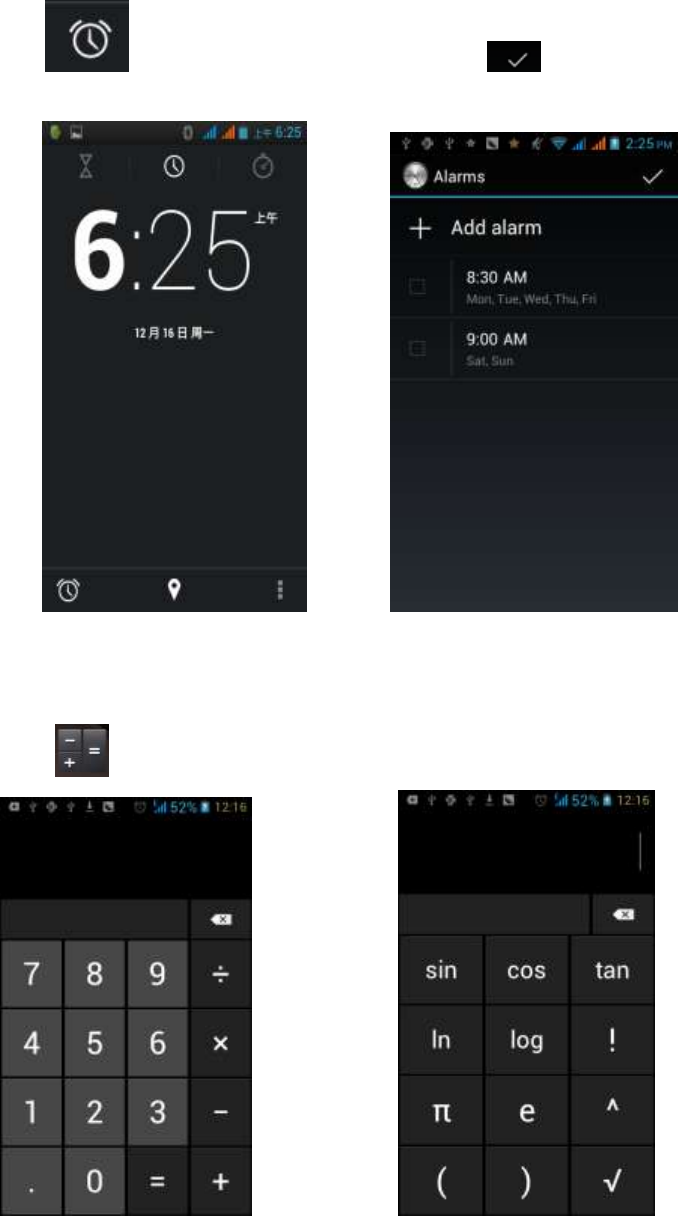
20
Click to into interface for alarm setting, click after set and then add ok.
3.11 calculator
Click in main menu>calculator
Press menu key>choose high grade panel to get the high grade usage.
21
3.12 FM Radio
To listen to the FM radio, you must connect a headset. The FM radio searches and saves
available stations automatically.
3.13 Other functions
1, SIM card application: this will be differ per your operators
2, Search: shortcut of search engine
4 Use and Maintenance
Far from any liquid, do not put your mobiles in water, raining or expose in any wet
places.
Far from extreme cold or hot, avoid expose the mobile in below 10℃ or above 45 ℃.
Far from dust and dirt, do not put mobile in dust, dirt, sandy, food and other improper
physical environment.
Please use dry and soft cloth to clear mobile, do not use alcohol or other kinds of
cleanser
Use carefully and prevent mobile from falling.
FCC RF EXPOSURE INFORMATION:
WARNING!! Read this information before using your phone
In August 1986 the Federal Communications Commission (FCC) of the United States
with its action in Report and Outer FCC 96-326 adopted an updated safety standard for
human exposure to radio frequency (RF) electromagnetic energy emitted by FCC
regulated transmitters. Those guidelines are consistent with the safety standard
previously set by both U.S. and international standards bodies. The design of this phone
complies with the FCC guidelines and these international standards. Use only the
supplied or an approved antenna. Unauthorized antennas modifications, or attachments
could impair call quality, damage the phone, or result in violation of FCC regulations.
Do not use the phone with a damaged antenna. If a damaged antenna comes into contact
with the skin, a minor burn may result. Please contact your local dealer for replacement
antenna.
BODY-WORN OPERATION:
This device was tested for typical body-worn operations with the back of the phone kept
22
0.5cm from the body. To comply with FCC RF exposure requirements, a minimum
separation distance of 0.5cm must be maintained between the user's body and the back
of the phone, including the antenna, whether extended or retracted. Third-party
belt-clips, holsters and similar accessories containing metallic components shall not be
used. Body-worn accessories
that cannot maintain 0.5cm separation distance between the user’s body and the back of
the phone, and have not been tested for typical body-worn operations may not comply
with FCC RF exposure limits and should be avoided.
For more information about RF exposure, please visit the FCC website at www.fcc.gov
Your wireless handheld portable telephone is a low power radio transmitter and receiver.
When it is ON, it receives and also sends out radio frequency (RF) signals. In August,
1996, the Federal Communications Commissions (FCC) adopted RF exposure
guidelines with safety levels for hand-held wireless phones. Those guidelines are
consistent with the safety standards previously set by both U.S. and international
standards bodies:
<ANSIC95.1> (1992) / <NCRP Report 86> (1986) / <ICIMIRP> (1996)
Those standards were based on comprehensive and periodic evaluations of the relevant
scientific literature. For example, over 120 scientists, engineers, and physicians from
universities, government health agencies, and industry reviewed the available body of
research to develop the ANSI Standard (C95.1). Nevertheless, we recommend that you
use a hands-free kit with your phone (such as an earpiece or headset) to avoid potential
exposure to RF energy. The design of your phone complies with the FCC guidelines
(and those standards).
Use only the supplied or an approved replacement antenna. Unauthorized antennas,
modifications, or attachments could damage the phone and may violate FCC
regulations.
NORMAL POSITION:
Hold the phone as you would any other telephone with the antenna pointed up and over
your shoulder.
TIPS ON EFFICIENT OPERATION:
For your phone to operate most efficiently:
• Extend your antenna fully.
• Do not touch the antenna unnecessarily when the phone is in use. Contact with the
antenna affects call quality and may cause the phone to operate at a higher power level
than otherwise needed.
RF Exposure Information:
This product is compliance to FCC RF Exposure requirements and refer to FCC website
23
search for FCC ID: C89PRIME4-0 to gain further information include SAR Values.
This device complies with part 15 of the FCC rules. Operation is subject to the
following two conditions:
(1) this device may not cause harmful interference, and
(2) this device must accept any interference received, including interference that may
cause undesired operation.
NOTE: The manufacturer is not responsible for any radio or TV interference caused by
unauthorized modifications to this equipment. Such modifications could void the user’s
authority to operate the equipment.
NOTE: This equipment has been tested and found to comply with the limits for a Class
B digital device, pursuant to part 15 of the FCC Rules. These limits are designed to
provide reasonable protection against harmful interference in a residential installation.
This equipment generates uses and can radiate radio frequency energy and, if not
installed and used in accordance with the instructions, may cause harmful interference to
radio communications. However, there is no guarantee that interference will not occur in
a particular installation. If this equipment does cause harmful interference to radio or
television reception, which can be determined by turning the equipment off and on, the
user is encouraged to try to correct the interference by one or more of the following
measures:
- Reorient or relocate the receiving antenna.
- Increase the separation between the equipment and receiver.
-Connect the equipment into an outlet on a circuit different from that to which the
receiver is connected.
-Consult the dealer or an experienced radio/TV technician for help
Do not use the device with the environment which below minimum -10℃ or over
maximum 50℃, the device may not work.
Changes or modifications to this unit not expressly approved by the party
responsible for compliance could void the user’s authority to operate the equipment.
Ad Hoc function is supported but not able to operate on non-US frequencies.