E Core Technology HL8860 2.4G Wireless Device User Manual
E-Core Technology (China) Co., Ltd. 2.4G Wireless Device Users Manual
Users Manual

HL8860 Audio 2.4GHz RF
INSTRUCTION MANUAL
E-CORE TECHNOLOGY (CHINA) CO., LTD.
Federal Communications Commission (FCC) Statement
You are cautioned that changes or modifications not expressly approved
by the part responsible for compliance could void the user’s authority to
operate the equipment
FCC- Class B
This equipment has been tested and found to comply with the limits for a
Class B digital device, pursuant to part 15 of the FCC Rules. These
limits are designed to provide reasonable protection against harmful
interference in a communications. However, there is no guarantee that
interference will not occur in particular installation. If this equipment
does cause harmful interference to radio or television reception, which
can be determined by turning the equipment off and on, the user is
encouraged to try to correct the interference by one or more of the
following measures:
- Reorient or relocate the receiving antenna.
- Increase the separation between the equipment and receiver.
- Connect the equipment into an outlet on a circuit different from that
to which the receiver is connected.
- Consult the dealer or an experienced radio/TV technician for help.
Thanks for select our RF 2.4G Audio controller! For play more
conviently and correctly, please read the manual carefully before
playing.
Product brief Introduction
HL8860 wireless Audio controller adopt 2.4GHz RF technology,
with steady connection capacity, far distance, low function wastage;
beautiful outlook, good handle , make you ear be personally on the
scene!
Technology Specification
1. Application: Wireless Home TV Headphone
Wireless Portable Headphone
2. GFSK modulation
3. Long distance > 50m (Line of sight)
4. RF frequency hopping in 34 channels
5. USB and analog dual audio inputs
6. Audio format 16bit , 48KHz sampling rate
7. Robust packet error correction
8. Power On/Off pop noise reduction
9. Work voltage:TX DC5V,RX DC3.0V
10. Low power consumption
11. No RF induced audio noise
12. Support no audio detection function
13. Work current :Transmit Controller work current 170mA ,
Receiver Controller work current 40mA
14. Frequency Range 2406 ~ 2472 MHz
15. Tx RF Radiation Power Typ. 18 dBm
16. RX RF sensivity Typ.-79 dBm
17. Size:TX 14.5*100*60mm; RX 200×170×75mm
Product Introduction
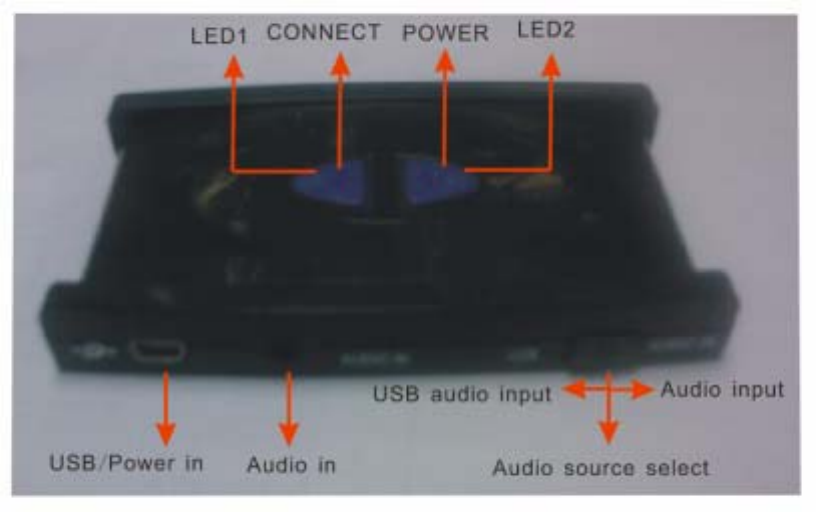
SW1
Transmit Controller function sketch map (TX)
TX LEDand Key Function Description
Connector Description
Audio in Analog audio source input
USB / Power in USB audio input / 5V Power source
Switch Function Description
CONNECT ID
Learning
Trigger
When simultaneously press the
buttons both on Tx and Rx system
board longer than 3 seconds, the
ID learning process will be enable.
POWER (Option)
RF switch
RF on / off switch
SW1 Audio
Source
Select
Analog input or USB audio input
Near Right is Analog input,
Near Left is USB input.
LED Function Description
LED1 ID /
Sync
1. When audio input and RF On LED on
2. When RF Off or No audio input LED
blinking by 1s on /1s off
3. When ID learning LED blinking 15sec
by 0.25s on /0.25s off.
4. When Sleep mode LED blinking by
0.5s on /2s off.
LED2 Power in 1. When USB input DC 5v LED will
keep on.
Receiver function sketch map (RX)

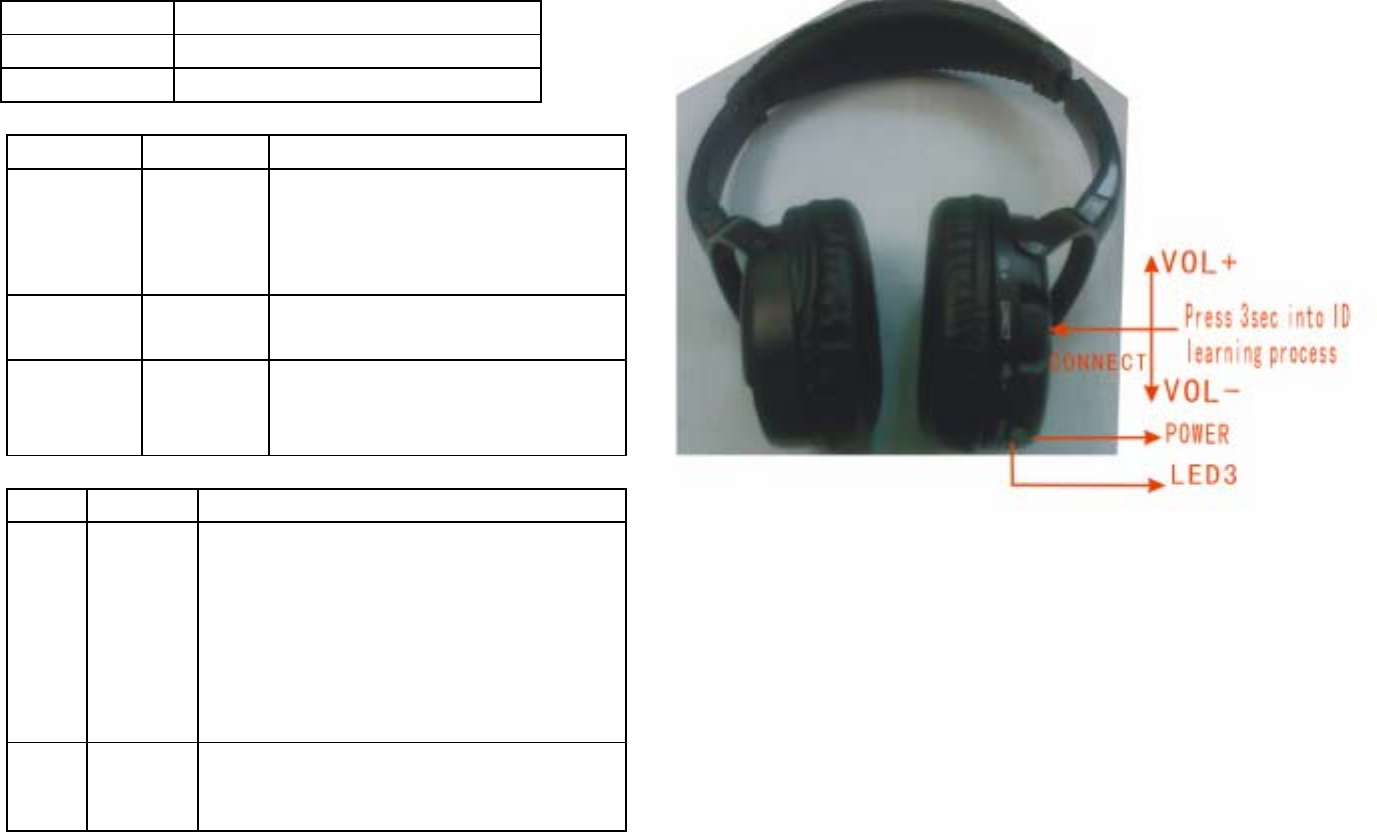
RX LED and Key Function Description
Switch Function Description
POWER RF switch RF on / off switch
Volume
control
Volume up / down pull CONNECT
ID
Learning
Trigger
When simultaneously press the
buttons both on Tx and Rx module
longer than 3 seconds, the ID
learning process will be enabled.
LED Function Description
LED3 ID /
Sync
1. When sync and audio playing LED on.
2. When No Sync or No audio input or
Low battery LED blinking by 1s on / 1s
off.
3. When ID learning LED blinking by
0.25s on/0.25s off, then keeping on
after learning success.
4. LED off after auto shut down.
Use Introduction
1) Open RX battery cover,put in 2pcs 1.5V AAA batteries as
battery box polarity indication, then close it.
2) Insert DC 5V power adapter into the USB slot of transmitter,
then “LED1” will blink slowly, and “LED2” will keep on
3) Input audio signature into “USB/Audio” of transmitter
4) Move the switch to be ”USB/Audio in” to make sure the
switch position match the audio input
5) Press Power of Headset to be power on, then “LED3” will
blink slowly
6) Press the “CONNECT” button of transmitter and headset at
the same time for 3 second, then “LED1” and “LED3”will
change to keep on from quick blink
7) Adjust the Volume after connect successfully
8) The end。
Attention
1) When put in battery, please set as battery box polarity indication, don’t
put in different class battery
2) When no using, switch to the power switch to “OFF”, avoiding power
waste
a) When warn of low voltage, please change battery immediately.
b) No work for long time, please take out battery , avoid leaking
from battery to damage inner current.
c) Don’t dismantle this products.
d) The final explantation right for this manual belong to ECORE
TECHNOLOGY(CHINA) CO., LTD.

This device complies with Part 15 of the FCC Rules. Operation is subject to
the following two conditions”
(1).This device may not cause harmful interference, and
(2).This device must accept any interference received, including interference
that may cause undesired operation.
This device complies with Part 15 of the FCC Rules. Operation is subject to
the following two conditions:
(1).This device may not cause harmful interference, and
(2).This device must accept any including interference that may cause
undesired operation.