E Core Technology HX2030 KICKSTAND MICRO User Manual Users manual
ECORE TECHNOLOGY COMPANY LIMITED KICKSTAND MICRO Users manual
Users manual

®
kickstand micro

2

3
6 Product Overview
7 Features
8 Interface
10 Entry Level Operation
14 Video/Photo Source Connection
18 Customized Settings
21 Wireless connection operation for iPhones
24 Wireless connection operation for Androids
27 Specications
28 FAQ
29 FCC Statement
30 Safety Instructions
32 Warranty

4
Thank you for purchasing the Bem Wireless Kickstand Micro Projector!
Wehopethatyoundourproductseasyandfuntouse,aswellas
innovative.Inorderforyoutobetterinteractwiththeproduct,please
read the User Guide carefully and save it for future reference.
1. Read the instructions
Beforeusingthedevice,pleasereadallsafetyandoperating
instructions.
2. Cautions and Warnings
Our product has been designed to include a variety of protective
measures,butimproperuseoftheprojectormaycauseelectric
shockorre.Pleasefollowtheinstructions,payingcarefulattention
to all recommendations for proper use.
3. Clean
Beforecleaning,unplugtheprojectorpowercordfromthewall
outlet. Use a dry cloth to wipe the projector case. Do not use liquid
or aerosol-based cleaners.
4. Install
Donotputtheprojectoronanunstablecart,stand,ortable.This
may result in serious damage to the projector due to a fall. All
plasticpackagingmaterials(forprojector,accessories,andoptional
parts)shouldbeputoutofthereachofchildren.Otherwise,bags
and other packaging materials may cause suffocation.
5. The light source
To protect your vision when using the Bem Kickstand Micro
projector,donotstareorlookdirectlyintothelensandthe
projection beam.

5
6. Ventilation
This projector is equipped with intake and exhaust vents.
WARNING: Donotblocktheseopenings,otherwisetheheatmay
accumulate inside and effect picture quality or cause damage to the
projector.
7. Power
Please use the supplied power cord for the product.
8. Maintenance
Do not attempt to service this projector. It is better to contact
professional and technical personnel for any maintenance needed.
9. Replacement Parts
Whenreplacementpartsarerequired,besuretousereplacement
partsspeciedbythemanufacturer.Unauthorizedsubstitutions
maycausere,electricshock,orotherhazards.
10. Condensation
When the Micro projector is experiencing a major change in
temperature(fromverycoldtoveryhotenvironments),moisture
may condense on the lens and on the internal critical components.
Topreventdamagetotheprojector,youshouldwaitatleast2
hours before using when the temperature abruptly or suddenly
changes. Please refer to the listed operating temperatures.

6
Product Overview
ThebemwirelessKickstandMICROProjectorisahighperformance,
extraportableprojector.It’ssmallenoughtotintoyourbriefcaseor
purseforeasytransportandsetupisabreeze–kickouttheleg,stand
itup,andturniton!TheKickstandMicro'seaseofuseismatched
byit’squality.Thislittletechnologicalwonderhasasleeknishwith
amazing performance specs to match.
Package Contents
Your bēm Kickstand Micro should have included all of the following:
Kickstand MICRO x 1
Power Adapter x 1
HDMI Cable x 1
Aux Cable x 1
Quick Start Guide x 1
User Guide x 1
(Warranty can be found on page 32 in the User Guide)
Ifanyitemsaremissingordamaged,pleasecallbemwireless
customer support at 1-855-839-8616 or email
support@bemwireless.com to arrange for replacements.

7
Your Kickstand Micro has been awarded U.S. Patents and also includes
advanced projector technology:
1.DLP®technology,upto93-inchoptimalscreensizeforyourenjoy-
ment.
2. Compact and portable with an integrated stand (utility patented) to
simply carry and set up.
3. *Built-in 3000mAh rechargeable battery supports up to 2 hours
4. **Mirroring your screen can be seamlessly transferred from your
mobile phone to your projector’s big screen.
5.Automatickeystonecorrection,freefromimageangleadjustment
issues.
6. Long-life LED light source: No need to replace light bulbs.
7. Aux out: Good for setting up a speaker
8.ContainingHDMIport,AUXport,includingfullsupportforgame
consoles(PS3,PS4,XBOX360,XBOXONE,WiiU)foraudioand
video output devices via HDMI cable and Aux cable.
*Batterychargetimemayvary,dependingonthemodeofoperation.(For
example,videostreamingmayresultinlessbatterytime).
**Mobilephonedevicesvary.Pleaserefertoyourspecicphone’suserguideto
identify and properly use the mirror function.
NOTE:PS3,PS4,XBOX360,XBOXONE,WiiUareregisteredtrademarksof
the corresponding companies.
Features of your Kickstand Micro
8
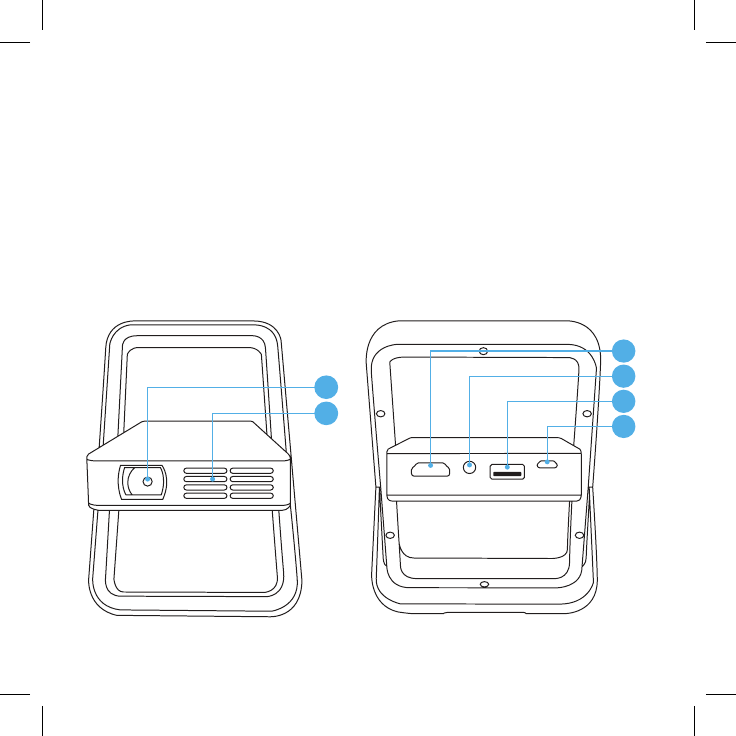
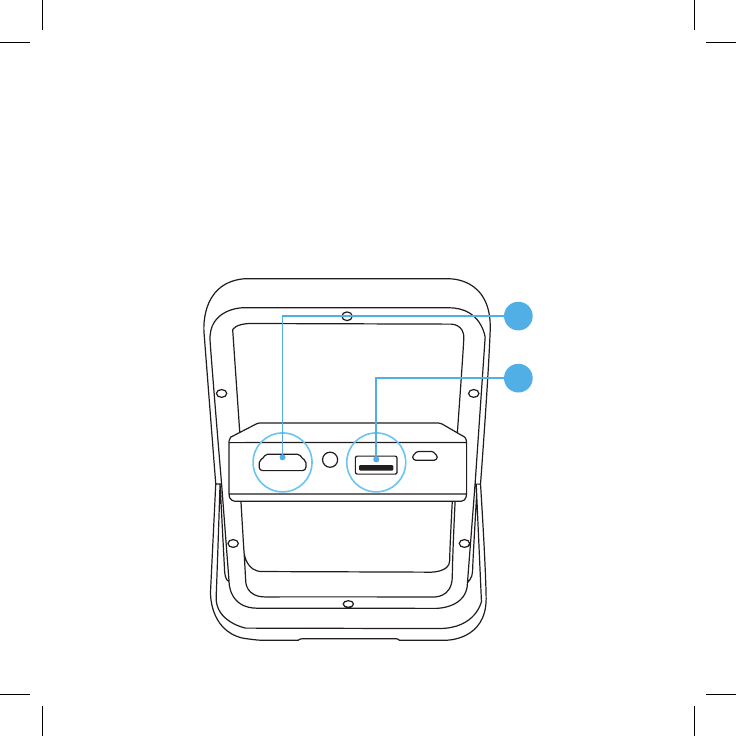
1. Lens
2. Cooling air outlets
3. HDMI input connector
Interface Ports and Functions
4. Earphone/ Speaker output
5. USB input
6. DC input (Power)
2
1
4
5
6
3
FRONT BACK
9
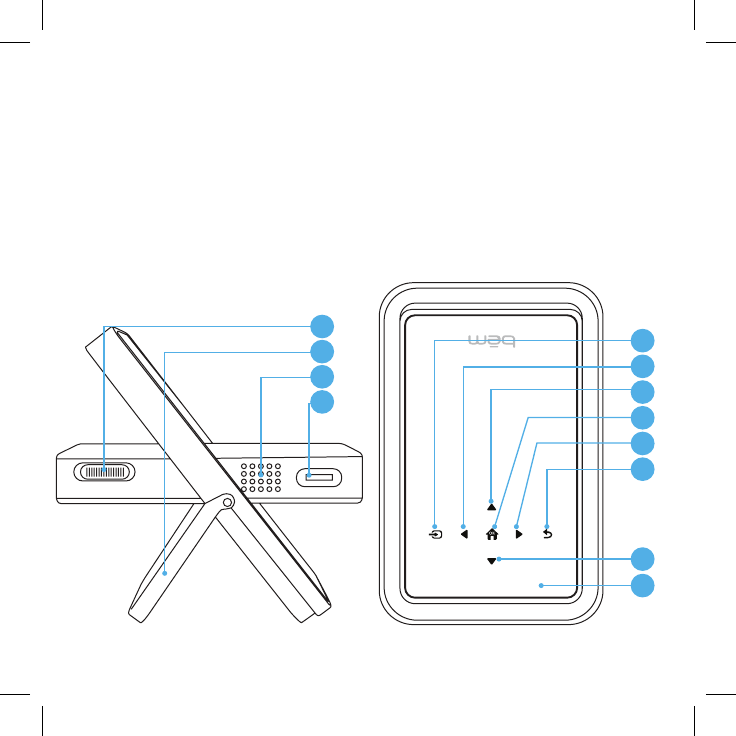
Interface Ports and Functions
7. Power switch
8. Support Kickstand
9. Speaker output
10. Focus Adjustment Wheel
11. Signal input key
12. Left selection key
13. Up key
8
9
10
7
11
12
13
14
15
16
17
18
14. Home key/OK
15. Right key
16. Return to prior screen key
17. Down selection key
18. Power indicator LED
light(charging)
SIDE TOP
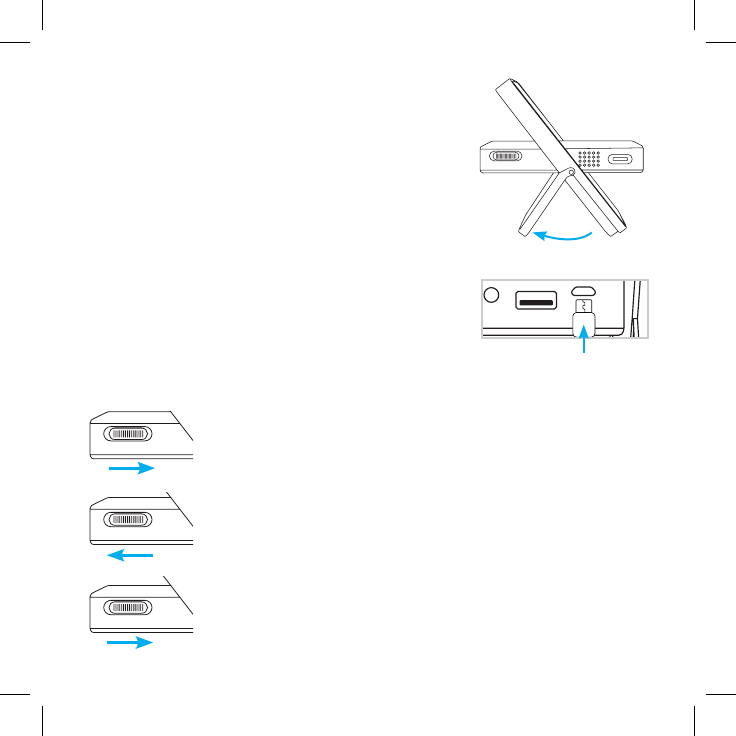
10
Connect the power adapter to charge/use the
Kickstand Micro projector.
2.PlugthepoweradapterintoDCportontheMicroprojector,then
you can start to use the product while charging.
Entry Level Operation
focus
power
focus
power
power
focus
power
3. To Charge: Slide the power switch forward and hold
it in position. (You will see charging light on top of
housing turn on)
One minute installation guide
SetupyourMicroprojectoronasmooth,even
horizontal surface. Kick out the leg.
Werecommendthatyourstfullychargethe
product before using. Charge for approximately
3hours,ifportableuseisintended.(see3.below)
1. Slide power button in the Power ON direction for
3 seconds. You will see the main Bem screen
projected.
4. Power On: Slide the power switch back for 3
seconds.TheblueLEDlightsturnon,thesystem
starts.
5. Power Off: Slide the power switch forward
momentarily to power off.
Kick Out Leg
Power Adapter
11
Entry Level Operation
Entry Level Operation (con’t)
Starting up the Micro Projector
Main Menu- Projected screen at start up.
• You can use the focus adjustment
wheel to make the picture sharp
and clear.
focus
power
Power On: Slide the power switch back for 3 seconds. The blue LED
lightsturnon,thesystemstarts.
Turn wheel to focus

12
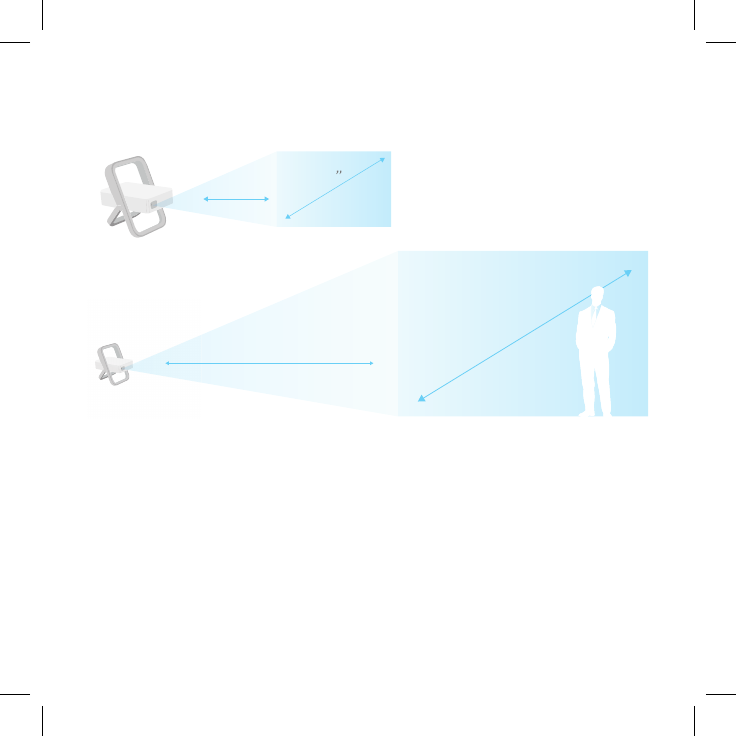
Adjust the projection size and resolution
• Dimensions vary based on the distance between the Micro
projector and the surface being projected onto.
• Thegreaterthedistance,thelargertheprojectedimage
• 1meter(3feet)distancecanproject31inches,
• 3 meters (9 feet) can project roughly 93 inches
Entry Level Operation (con’t)
13
Automatic Adjustment: Keystoning
Withroughly40degreesofautomaticimageshapecorrection,
theMicroprojectorwillholdthepictureinarectangularformat,
regardless of your projector angle. This is known as Keystone
Correction
*NOTE: Low-light environments can help you get a
better picture quality
1’ meter 31
(3 ft)
93”
3’ meters (9 feet)
Entry Level Operation (con’t)
1.
2.
14
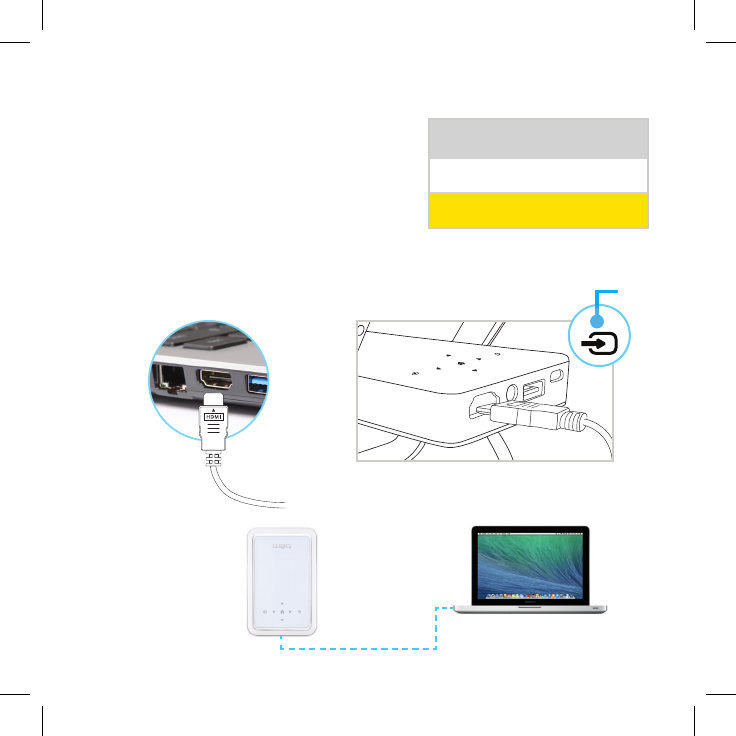
Video source connection
Whenconnectinganexternalsourcetotheprojector,pleasebesure:
1. Turn off all equipment before making any connections.
2. Use the correct source to make the connection. (HDMI or USB)
3.Ensurethecablesarermlyinserted.
(4)HDMIinput,(5)USBinput
5
4
Video/Photo Source Connection
15
Video/PhotoSourceConnection(con't)
Video/Photo Source Connection
HDMI Connection
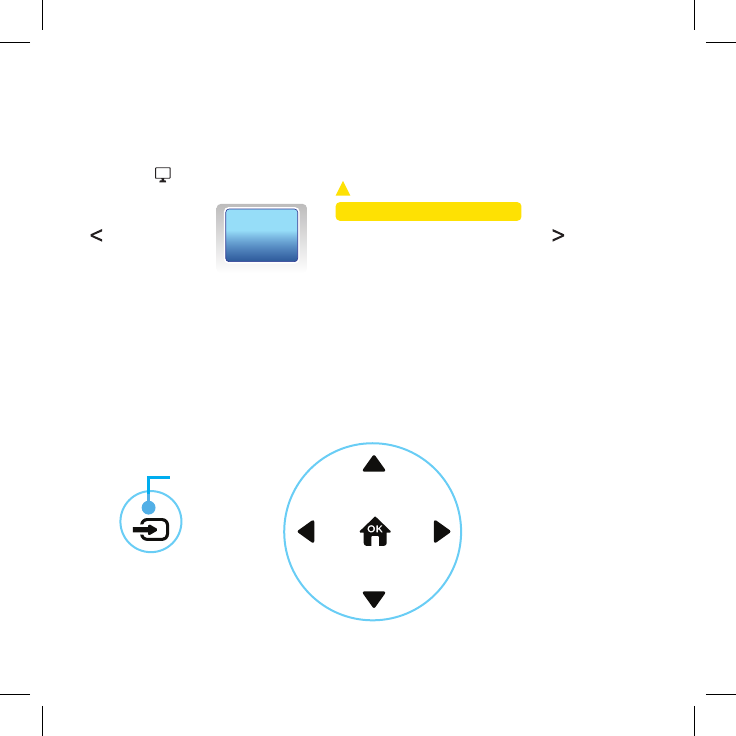
Press the signal input key to transfer into
HDMI input mode.
Use the UP/DOWN keys to navigate
NOTE: Many devices + laptop computers
do not automatically turn on their external video port when connected
totheprojector.Pleaseseethelaptop’suserguidetonditssource
keyforconnection,ifneeded.
USB HOST
DCIN
HDMI IN
Input Source
USB
HDMI
HDMI to Micro
HDMI to
Laptop
11
12
13
14
15
16
17
18
11
Note: Make sure your
laptop model or other
device has the correct
adaptor to connect to
the Micro. You may
need an adaptor that is
NOT included.
16
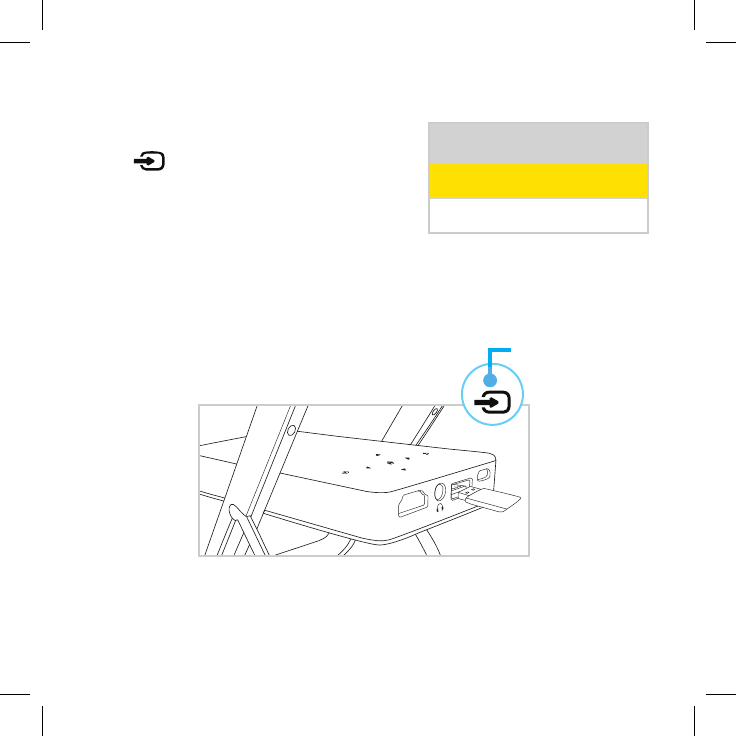
USB Connection:
Press signal input key to transfer
into USB mode. You can play movies
and photos that are loaded on your USB
device
11
12
13
14
15
16
17
18
USB HOST
DCIN
HDMI IN
Video/PhotoSourceConnection(con't)
Input Source
USB
HDMI
11
12
13
14
15
16
17
18
11
17
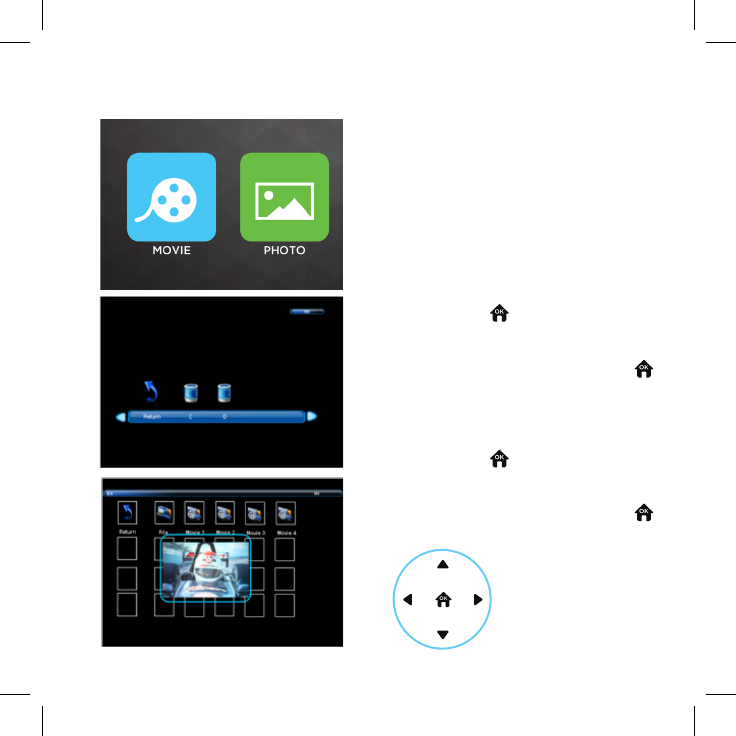
A. Video le viewing: Select “Movie”
mode and press key to enter the
followinggureBscreen,usethe
navigation keys to select the video
lefromtheUSBdeviceandpress
to playback.
B. Photo viewing: Select “picture”
mode and press key to enter the
followinggureCscreen,usethe
navigation keys to select the picture
lefromtheUSBdeviceandpress
to playback.
A
B
C
Video/PhotoSourceConnection(con't)
Video/PhotoSourceConnection(con't)
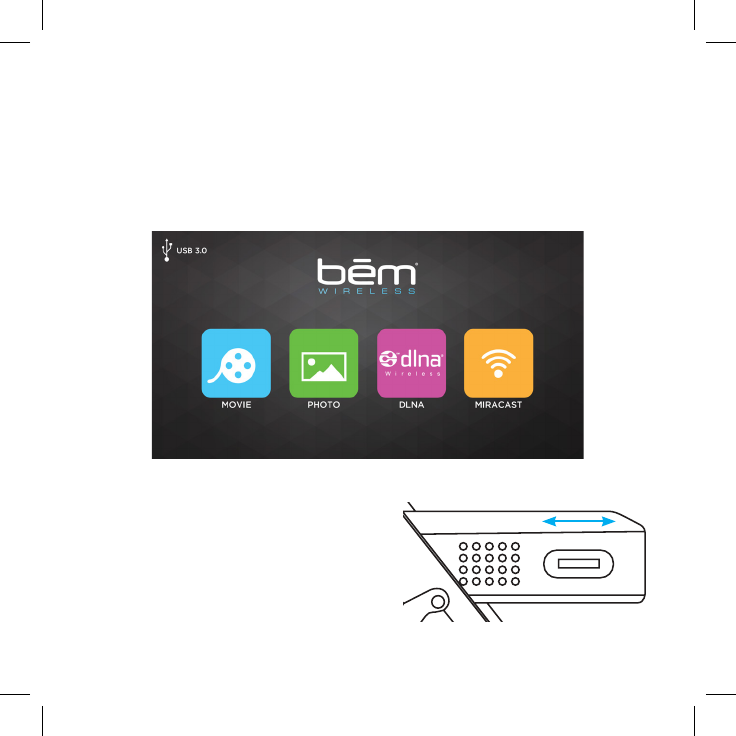
Media Selection
The main startup screen will be
projected,selecteitherMovieor
Photo.
Use these keys to
Navigate through
either video or
picturelesonthe
USB device
11
12
13
14
15
16
17
18
11
12
13
14
15
16
17
18
11
12
13
14
15
16
17
18
11
12
13
14
15
16
17
18
18
Customized Settings
1.) Picture Screen
Theprojectorallowscustomizedadjustmentsforthepicture,sound,
and options screens.
Press the source input key for 3 seconds to get to customized
settings.
Toadjust,pleaseusetheUp,Down+Rightarrows.Selectthemode
preferred.
Picture Mode Standard
Color Temperature
Aspect Ratio
Noise Reduction
Sound Mode Standard
Balance
Auto Volume
Sorround Sound
SPDIF Mode
EQ
OSD Language English
Restore Factory Default
Blending
PICTURE
SOUND
OPTION
(Choose language)
Top of Micro
Use these keys to
Navigate through
customized settings
11
12
13
14
15
16
17
18
11
Hold for 3 seconds
19
Customized Settings
Top of Micro
Use these keys to
Navigate through
customized settings
2.) Sound Screen
Picture Mode Standard
Color Temperature
Aspect Ratio
Noise Reduction
Sound Mode Standard
Balance
Auto Volume
Sorround Sound
SPDIF Mode
EQ
OSD Language English
Restore Factory Default
Blending
PICTURE
SOUND
OPTION
(Choose language)
20
2.) Option Screen
Picture Mode Standard
Color Temperature
Aspect Ratio
Noise Reduction
Sound Mode Standard
Balance
Auto Volume
Sorround Sound
SPDIF Mode
EQ
OSD Language English
Restore Factory Default
Blending
PICTURE
SOUND
OPTION
(Choose language)
Customized Settings
Top of Micro
Use these keys to
Navigate through
customized settings
21
Micro-xxx
iPhone
AirplaySettings
Mirroring On
100%9:41 AMCarrier
Cancel
192.168.49.1
100%9:41 AMCarrier
AirPla
y
AirDrop:
Everyone
1515
Artist Name — Album Name
Track Name
-3
:
36
0
:
42
Do Not Disturb: Off
100%9:41 AMCarrier
Device Name
DEVICES
Other…
Network Name
Network Name
Network Name
CHOOSE A NETWORK…
LTE
Rusty Mitchell’s iPhone…
PERSONAL HOTSPOTS
Micro-xxx
Wi-Fi
Wi-FiSettings
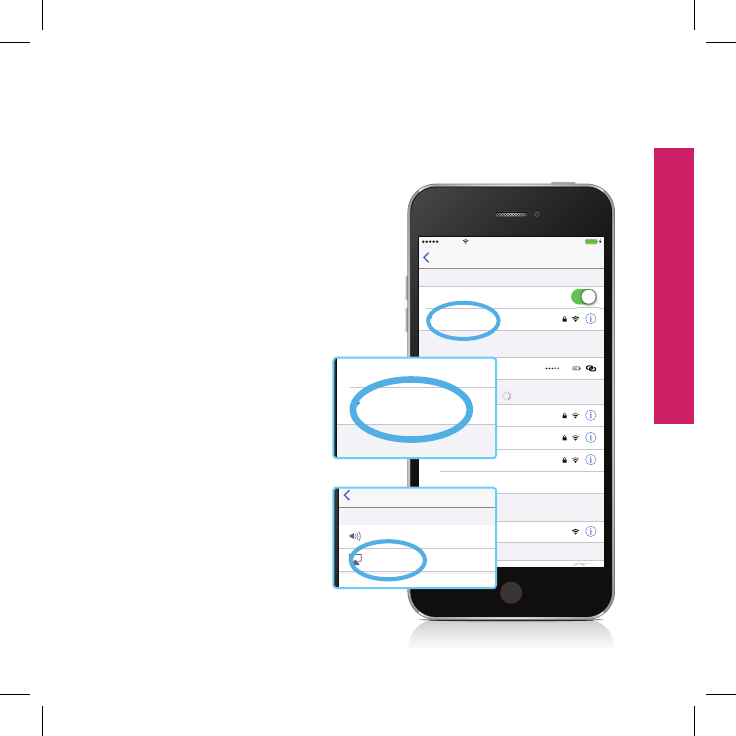
100%9:41 AMCarrier
1. Open your Wi-Fi setting of
your smart device
2. Search connector “Micro-
xxx” hot spots. The initial
password is: 12345678.
3. Go to iphone screen and
swipe up to get to Airplay.
4. If you have issues please
go to DLNA icon on
the main screen of the
Micro and it will walk you
through the steps.
Wireless connection operation for iPhones
Micro-xxx
iPhone
AirplaySettings
Mirroring On
100%9:41 AMCarrier
Cancel
192.168.49.1
100%9:41 AMCarrier
AirPla
y
AirDrop:
Everyone
1515
Artist Name — Album Name
Track Name
-3
:
36
0
:
42
Do Not Disturb: Off
100%9:41 AMCarrier
Device Name
DEVICES
Other…
Network Name
Network Name
Network Name
CHOOSE A NETWORK…
LTE
Rusty Mitchell’s iPhone…
PERSONAL HOTSPOTS
Micro-xxx
Wi-Fi
Wi-FiSettings
100%9:41 AMCarrier
Micro-xxx
iPhone
AirplaySettings
Mirroring On
100%9:41 AMCarrier
Cancel
192.168.49.1
100%9:41 AMCarrier
AirPla
y
AirDrop:
Everyone
1515
Artist Name — Album Name
Track Name
-3
:
36
0
:
42
Do Not Disturb: Off
100%9:41 AMCarrier
Device Name
DEVICES
Other…
Network Name
Network Name
Network Name
CHOOSE A NETWORK…
LTE
Rusty Mitchell’s iPhone…
PERSONAL HOTSPOTS
Micro-xxx
Wi-Fi
Wi-FiSettings
100%9:41 AMCarrier
iPhone
22
Wireless connection operation for iPhones (cont)
Micro-xxx
iPhone
AirplaySettings
Mirroring On
100%9:41 AMCarrier
Cancel
192.168.49.1
100%9:41 AMCarrier
AirPla
y
AirDrop:
Everyone
1515
Artist Name — Album Name
Track Name
-3
:
36
0
:
42
Do Not Disturb: Off
100%9:41 AMCarrier
Device Name
DEVICES
Other…
Network Name
Network Name
Network Name
CHOOSE A NETWORK…
LTE
Rusty Mitchell’s iPhone…
PERSONAL HOTSPOTS
Micro-xxx
Wi-Fi
Wi-FiSettings
100%9:41 AMCarrier
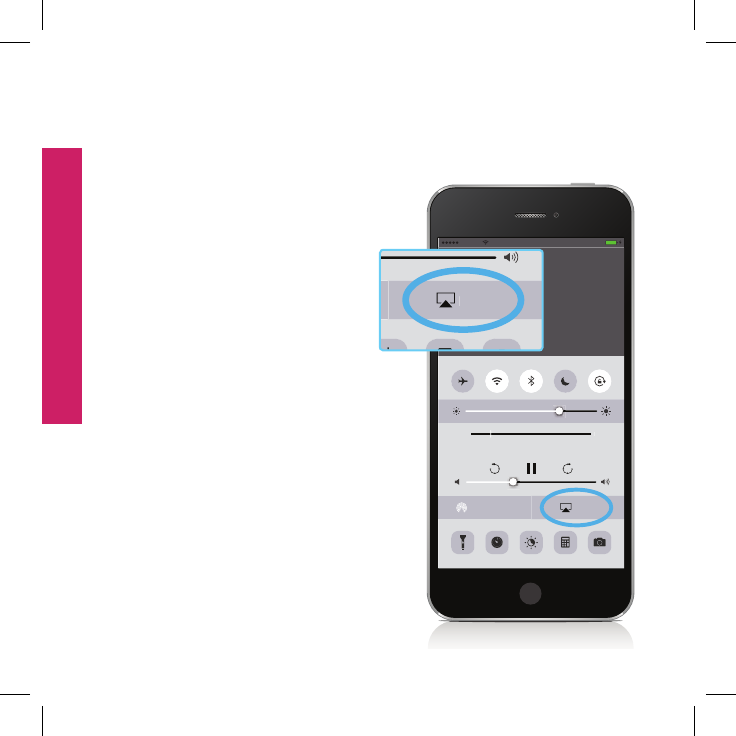
3. If your smart device supports
DLNAwirelesstransmission,
then you can directly push
image,music,videostothe
projector.
Micro-xxx
iPhone
AirplaySettings
Mirroring On
100%9:41 AMCarrier
Cancel
192.168.49.1
100%9:41 AMCarrier
AirPla
y
AirDrop:
Everyone
1515
Artist Name — Album Name
Track Name
-3
:
36
0
:
42
Do Not Disturb: Off
100%9:41 AMCarrier
Device Name
DEVICES
Other…
Network Name
Network Name
Network Name
CHOOSE A NETWORK…
LTE
Rusty Mitchell’s iPhone…
PERSONAL HOTSPOTS
Micro-xxx
Wi-Fi
Wi-FiSettings
100%9:41 AMCarrier
iPhone
* Optional: Add a Bluetooth Speaker from
your mobile device to get full sound for your
entertainment needs
23
Micro-xxx
iPhone
AirplaySettings
Mirroring On
100%9:41 AMCarrier
Cancel
192.168.49.1
100%9:41 AMCarrier
AirPla
y
AirDrop:
Everyone
1515
Artist Name — Album Name
Track Name
-3
:
36
0
:
42
Do Not Disturb: Off
100%9:41 AMCarrier
Device Name
DEVICES
Other…
Network Name
Network Name
Network Name
CHOOSE A NETWORK…
LTE
Rusty Mitchell’s iPhone…
PERSONAL HOTSPOTS
Micro-xxx
Wi-Fi
Wi-FiSettings
100%9:41 AMCarrier
Micro-xxx
iPhone
AirplaySettings
Mirroring On
100%9:41 AMCarrier
Cancel
192.168.49.1
100%9:41 AMCarrier
AirPla
y
AirDrop:
Everyone
1515
Artist Name — Album Name
Track Name
-3
:
36
0
:
42
Do Not Disturb: Off
100%9:41 AMCarrier
Device Name
DEVICES
Other…
Network Name
Network Name
Network Name
CHOOSE A NETWORK…
LTE
Rusty Mitchell’s iPhone…
PERSONAL HOTSPOTS
Micro-xxx
Wi-Fi
Wi-FiSettings
100%9:41 AMCarrier
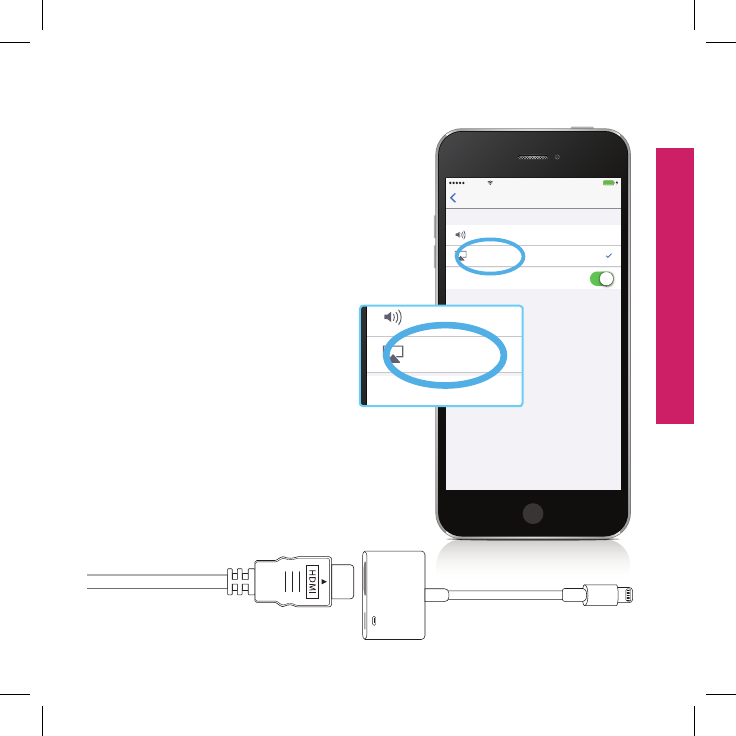
5. Select “Micro-xxx” as your
device from smart phone.
*Asarecommendedstreamingoption,
you can purchase a lightning to HDMI
Cable(not included) for your iPhone
Wireless connection operation for iPhones (cont)
HDMI
Apple authorized
HDMI adapter cable
HDMI cable
iPhone
24
Micro-xxx
Micro-xxx
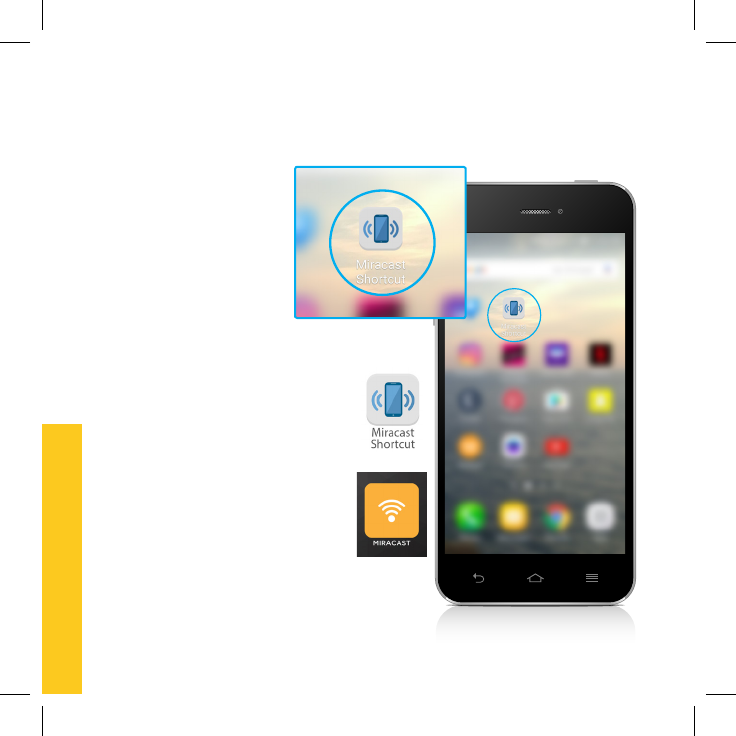
D. Miracast Android wireless transmission
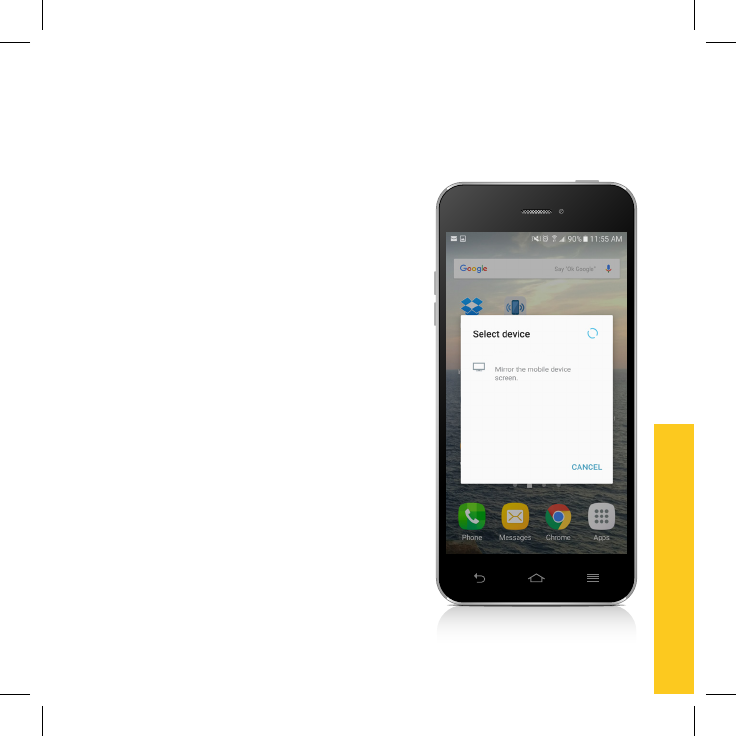
Wireless connection for Android
1. Download “Miracast Widget and
Shortcut” App or similar from
Google Store.
2.OpenMiracastApponPhone,
3. Select Miracast from Kickstand
Micro projector main menu.
Micro-xxx
Micro-xxx
Android
25
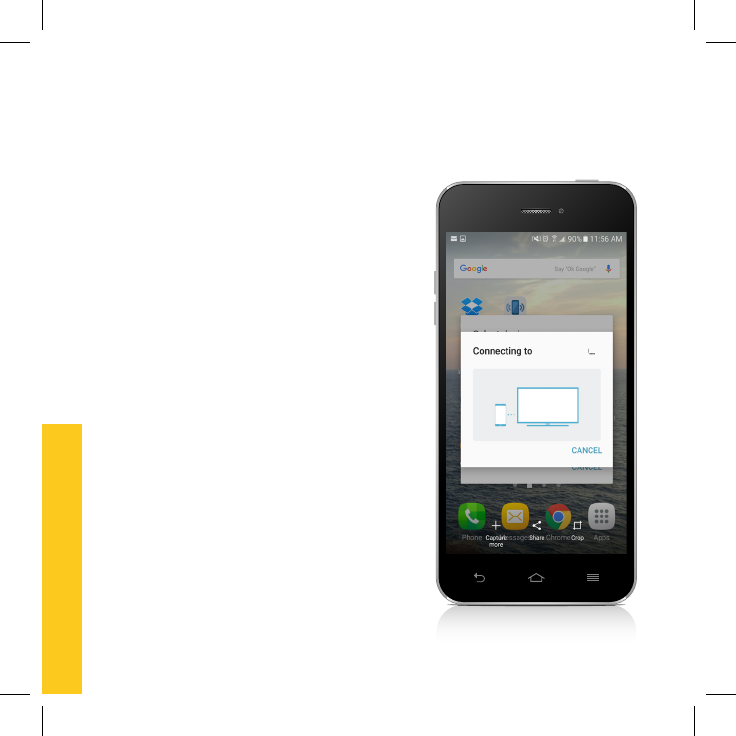
Micro-xxx
Micro-xxx
4. Select Kickstand “Micro-xxx” as
your device from smart phone.
Wireless connection for Android (cont)
Android
26
Audio output:
Plug 3.5mm port into the audio
outputsonthebackoftheprojector,
enabling a connection to an audio
speaker.
* Optional: Add a Bluetooth Speaker from
your mobile device to get full sound for your
entertainment needs
Micro-xxx
Micro-xxx
5. Allow 5-10 seconds for the Kickstand
Micro and app to communicate
Wireless connection for Android
Android
27
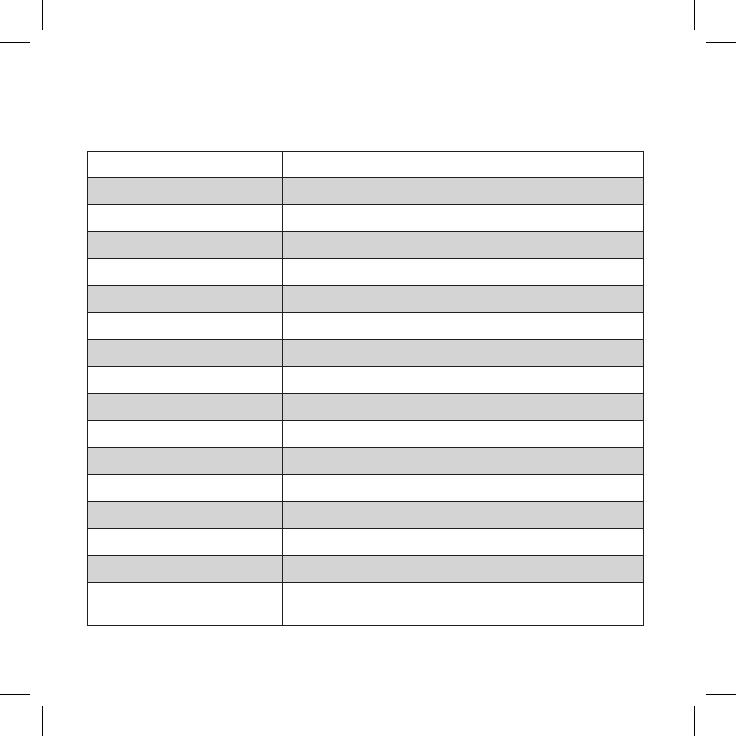
Power Input: AC 100-240V
Power Output: DC 5V 3A
Dimensions 144 x 93 x 20mm (5.6” x 3.6“ x .8”)
Technology DLP 0.2EM DMD
Resolution (854 x 480)
Brightness 300 Lumens
Contrast 800 : 1
Ratio 16 : 9 Native
Light Source 3 x LED (RGB)
Source Lifetime 20,000 Hours
Projected Image Size 31” @ 1m (39”) | 93” @ 3m (118”)
Focus Method Focus Adjustment Wheel
Keystone Correction Automatic +/- 40 degrees
Input HDMI & USB
Audio Output 3.5mm audio output
Built-in Speaker 0.5W x 1
Video Format MPEG1, MPEG2, MPEG4, H264, RM,
RMVB, MOV, AVI, MP4, FLV, MJPEG, VC1
Specications

28
Video Output
No image is displayed or no signal
1. Please check to see whether your projector normally started.
2. Please check whether the power is switched on & the battery is fully
charged.
3. Please check whether to switch to HDMI or USB mode.
4. Please check the DC power cord connection.
Projection screen icker or color cast
1. Make sure Kickstand Micro battery is fully charged. (Full charge is
approximately 3 hours)
2. Please check the DC power cord connection or source input (HDMI
cable or USB Device).
Internet connection
1. Unable to connect a wireless WiFi device: Make sure your mobile de-
vice has it’s WiFi mode turned on.
Frequently Asked Questions
29
http://bemwireless.com/|be¯mwirelessLLC.Algonquin,IL.60102USA|MadeinChina
FCC Statement
1. This device complies with Part 15 of the FCC Rules.
Operation is subject to the following two conditions:
(1) This device may not cause harmful interference.
(2)Thisdevicemustacceptanyinterferencereceived,
including interference that may cause undesired operation.
2.Changesormodicationsnotexpresslyapprovedbythepartyresponsible
forcompliancecouldvoidtheuser'sauthoritytooperatetheequipment.
NOTE: This equipment has been tested and found to comply with the limits
foraClassBdigitaldevice,pursuanttoPart15oftheFCCRules.Theselimits
are designed to provide reasonable protection against harmful interference in
a residential installation.
Thisequipmentgeneratesusesandcanradiateradiofrequencyenergyand,if
notinstalledandusedinaccordancewiththeinstructions,maycauseharmful
interferencetoradiocommunications.However,thereisnoguaranteethat
interference will not occur in a particular installation. If this equipment does
causeharmfulinterferencetoradioortelevisionreception,whichcanbe
determinedbyturningtheequipmentoffandon,theuserisencouragedto
try to correct the interference by one or more of the following measures:
• Reorient or relocate the receiving antenna.
• Increase the separation between the equipment and receiver.
• Connect the equipment into an outlet on a circuit different from that to
which the receiver is connected.
• Consult the dealer or an experienced radio/TV technician for help.
FCC Radiation Exposure Statement
This equipment complies with FCC radiation exposure limits set forth for an
uncontrolled environment. This equipment should be installed and operated
with a minimum distance of 20cm between the radiator & your body.
30
• Always position the unit on a stable
and level surface. Unstable surface
cancauseafall,resultinginpossible
damage or injury
• Do not drop, unpack, open, beat,
curve,prinkandburntheunit
• Avoid using the unit nearby basins or
sinks where it may come in contact
with water
• Do not place anywhere with water
neartheunit,suchasvase,glass,pot.
• Protect using the projector device
from any heating devices (such as
radiator,heatinginstallation,cooking
stove or other heat-related devices)
• Foranyunitdamage,pleaseaskfor
the maintenance personnel to repair
• Forcleaning,pleaseturnofftheunit
and unplug the power cable from the
outletrst
• Set the volume properly to prevent
injury to the device and to your
personal hearing.
Safety Instructions
Correct Disposal of this
product. This marking
indicates that this product
should not be disposed
with other household
wastes throughout the
EU. To prevent possible harm to
the environment or human health
from uncontrolled waste disposal,
recycle it responsibly to promote
the sustainable reuse of material
resources.Toreturnyouruseddevice,
please use the return and collection
systems or contact the retailer where
the product was purchased. They can
take this product for environmental
safe recycling.
WARNING:
• The battery (battery or batteries or
battery pack) shall not be exposed
toexcessiveheatsuchassunshine,
reorotherhighheatenvironment.
• No naked ame sources, such as
lighted candles, should be placed
on the apparatus.
• CAUTION: Danger of explosion
if battery is incorrectly replaced.
Replace only with the same or
equivalent type.
This product is specially designed based on the full attention to safety;
inordertomakesuretheaccident-freeoperation,pleaseabidethe
guidelines listed below:
31
Forquestions,commentsortopurchasemorebe¯mwireless
products go to: bemwireless.com
You can also follow us at:
facebook.com/bemwireless
youtube.com/bemwireless
Stay in Touch!

32
90 day LIMITED WARRANTY
bēm wireless warranties this product against defects in materials and/
or workmanship under normal use for a period of ONE YEAR from the
date of purchase by the original purchaser (“Warranty Period”). If a
defectarisesandavalidclaimisreceivedwithintheWarrantyPeriod,
at its option bēmwilleither1)Repairthedefectatnocharge,usingnew
or refurbished replacement parts or 2) Replace the product with a new
product that is at least functionally equivalent to the original product. A
replacementproductorpart,includingauser-installablepartinstalled
in accordance with instructions provided by bēmwireless,assumesthe
remaining warranty of the original product. When a product or part
isexchanged, anyreplacement itembecomes yourproperty andthe
replaced item becomes bēm wireless’s property.
ObtainingService:Toobtainwarrantyservice,callbēm wireless at 1-855-839-
8616 or e-mail support@bemwireless.com. Please be prepared to describe
the product that needs service and the nature of the problem. A
purchase receipt will be required. All repairs and replacements must be
authorizedinadvance.Serviceoptions,partsavailabilityandresponse
times will vary. You are responsible for delivery including the cost of
delivery of the product or any parts to the authorized service center for
replacements,perourinstructions.

33
LIMITED WARRANTY (con’t)
Limits and Exclusions: Coverage under this Limited Warranty is limited
totheUnitedStatesofAmerica,includingtheDistrictofColumbiaand
theU.S.TerritoriesofGuam,PuertoRicoand U.S. Virgin Islands. This
warrantygivesyouspeciclegalrights andyoumayalsohaveother
rights which vary from state to state. This Limited Warranty applies
only to products manufactured by or for bēm wireless that can be
identiedbythebēmwirelesstrademark,tradename,orlogoafxed
to them or its packaging. The Limited Warranty does not apply to any
non-bēm wireless products.
bēm wireless
Algonquin,IL60102USA
www.bemwireless.com
©2016 bēm wireless All Rights Reserved.
Made in China

be¯mwireless.com
bēm wireless
Algonquin,IL60102USA
www.bemwireless.com
©2016 bēm wireless All Rights Reserved.
Made in China