E Lead Electronic EL101 Smart HUD User Manual EN EL 311 R 101 20140603
E-Lead Electronic Co., Ltd Smart HUD EN EL 311 R 101 20140603
Users Manual
Head up Display
User Manual
Thank you for purchasing the Head Up Display! The User Manual will teach you how to operate the product.
Please read the User Manual before starting using the product to make sure you operate the HUD correctly.
After reading the User Manual please save it in case if you need any information later
2
Safety Warning
The product operates safely as a design and manufacture were given priority in development. To avoid any
potential risks, please follow the instructions when you are going to install, operating and cleaning the product.
● Before using the product, please read and understand all instructions, and save all instructions as they may be
useful in the future.
● You are required to follow all warning instructions for the product.
▼ Do not use water or any chemical products to soak the console and sensor for cleaning.
▼ When cleaning, please use a piece of smooth cloth to clean the monitor surface.
▼ Don’t touch the machine with wet hands. Stop using the product and turn off the power when you find
water inside, and ask qualified mechanics to fix it.
● The product is only for assistance; driver still need be aware of all situations, and must pay Note to driving and
safety.
● Please update the map software when you find out map information has not been updated and is different from
the current roads.
3
Federal Communication Commission Interference Statement
This equipment has been tested and found to comply with the limits for a Class B digital device, pursuant to Part 15 of the FCC
Rules. These limits are designed to provide reasonable protection against harmful interference in a residential installation.
This equipment generates, uses and can radiate radio frequency energy and, if not installed and used in accordance with the
instructions, may cause harmful interference to radio communications. However, there is no guarantee that interference will
not occur in a particular installation. If this equipment does cause harmful interference to radio or television reception, which
can be determined by turning the equipment off and on, the user is encouraged to try to correct the interference by one of the
following measures:
Reorient or relocate the receiving antenna.
Increase the separation between the equipment and receiver.
Connect the equipment into an outlet on a circuit different from that to which the receiver is connected.
Consult the dealer or an experienced radio/TV technician for help.
FCC Caution: Any changes or modifications not expressly approved by the party responsible for compliance could void the
user's authority to operate this equipment.
4
This device complies with Part 15 of the FCC Rules. Operation is subject to the following two conditions: (1) This device may
not cause harmful interference, and (2) this device must accept any interference received, including interference that may cause
undesired operation.
FCC RF Radiation Exposure Statement:
This equipment complies with FCC radiation exposure limits set forth for an
uncontrolled environment. End users must follow the specific operating
be co-located or operating in conjunction with any other antenna or
instructions for satisfying RF exposure compliance. This transmitter must not
transmitter.
5
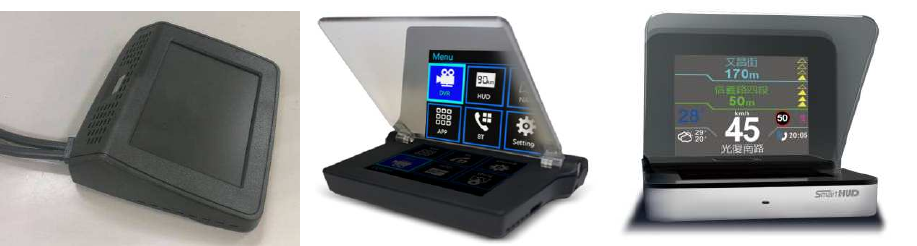
Product Introduction
一、Product outline(EL-311R)

6
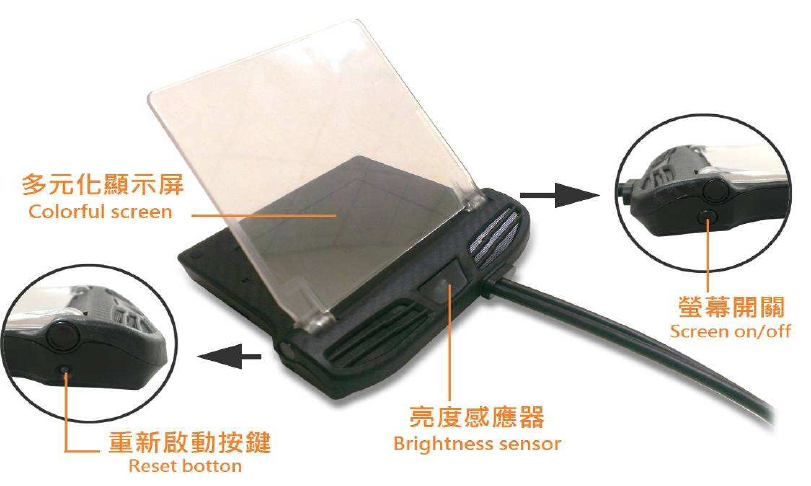
一、Product Outline(EL-101)
麥克風口:microphone input/多元化顯示螢幕: Multiple Display Layout SCreen
Micro SD卡槽: Micro SD input / 行車記錄器影像輸入:Entering for Digital video recording
倒車鏡頭影像輸入: Entering for Reversing monitor view
二、Product features
● 4” TFT high-resolution image with multiple display layouts, information full, bright screen but does not hurt the
eyes.
● Lighting sensor: automatic detection when light reaches the sensor.
● Special and newly innovative GPS built-in/ with speeding reminding.
● Blue tooth message indications.

7
三、Specification
Voltage DC 12V
Storage Temperature -40℃ ~ +85℃
Working temperature -30℃ ~ +80℃
Current consume Single operation 1A/ with event data record 2.5A
After turning off car engine, the products current consume
≦0.13mA
311 overall size (body) Length 122.2mm*Width111.4mm*height 29.7mm
311R overall size (body with
cover)
Length146.3mm*Width116mm*Height17.2mm
101 overall size (body with
cover)
Length122mm*Width187mm*Height22mm
8
四、Instructions for starting the Product
[Preface] Before using the product, please follow the procedures in order to sure the regular
connections.
View for first power on
View of normal power on
9
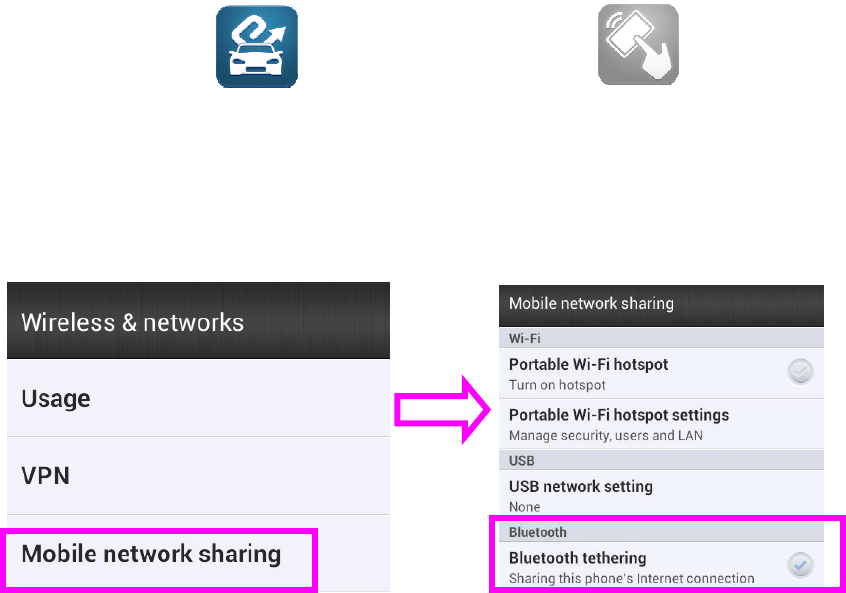
Connect Setting(Android System)
Procedure 1 Install E-where on your phone and EZ-Remote APP。E-where APP function
when you are doing route planning, you can share all hot spot (scenery) to SmartHUD. EZ-Remote is an app that
functions as a remote controller for the HUD monitor.
Procedure2 Open Mobile Functions:Setting > Wireless and networks > Mobil network sharing > Bluetooth
tethering (Note: Different mobile console with different text description)
10
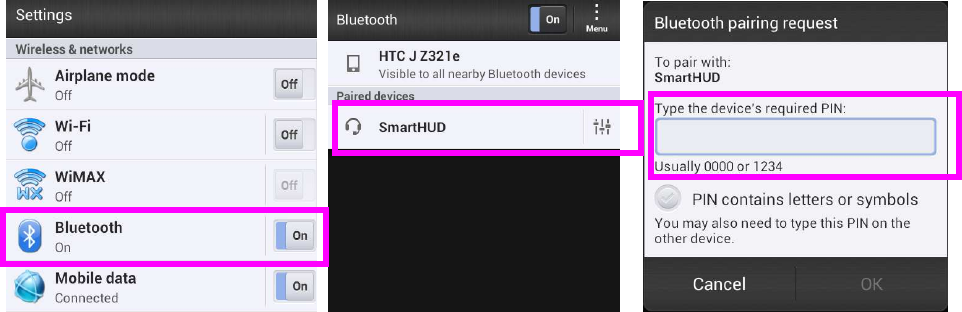
Procedure 3Enable the blue tooth function:Setting>Bluetooth>Open,Choose console
equipped 「Smart HUD」,Enter password 「1234」。
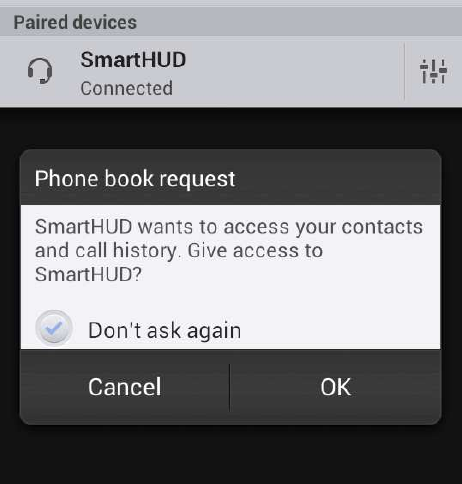
When building a connection, SmartHUD will ask for confirmation to make sure you want to
give the telephone saving authorization. Please choose “yes”
11
12
Connection Setting(iOS System)
Procedure 1 Install E-where on your phone and EZ-Remote APP。E-where APP function
when you are doing route planning, you can share all hot spot (scenery) to SmartHUD. EZ-Remote is an app
function its can control HUD monitor.
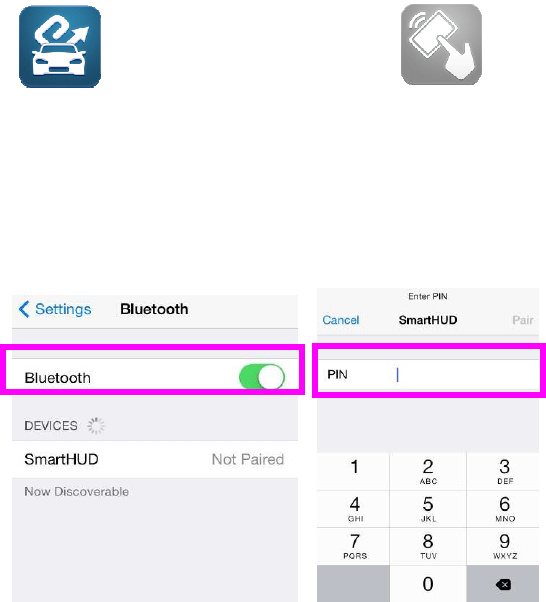
Procedure 2Turn on the blue tooth function:Setting>Bluetooth>Open,Choose Equipped console「Smart
HUD」,entering password 「1234」。
13
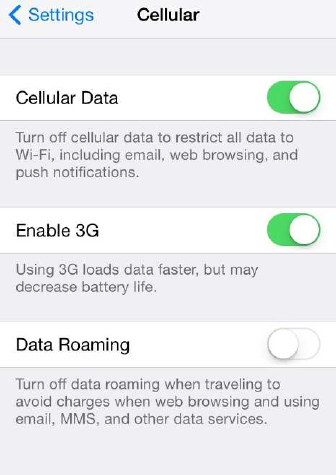
Procedure3 Enable Cellular:Settings>Cellular >Cellular Data
14
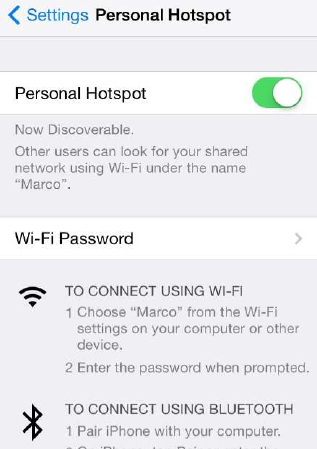
Procedure 4 Enable Personal Hotspot:Settings>Personal Hotspot>Personal Hotspot
15
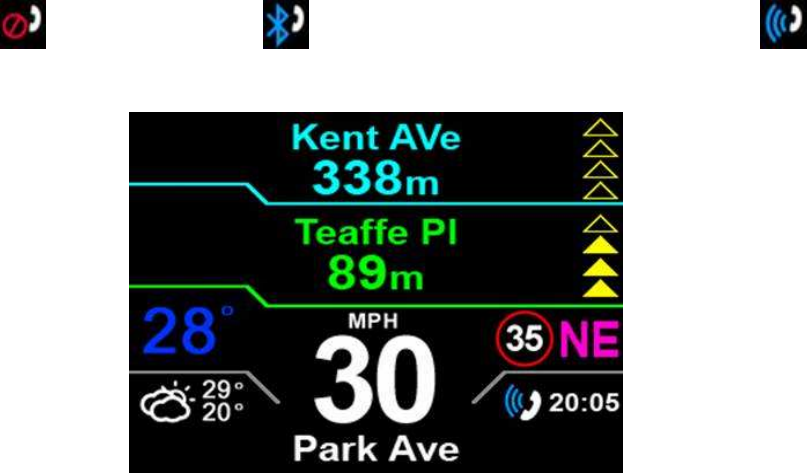
Note:How to make sure the PAN is connected?
You can get information about the Data connection or wireless base station is enabled*
from mobile phone information. Also, the bottom left will tell you the status; if
connected (no connection)→(blue tooth connection established)→(PAN
connection established)。
16
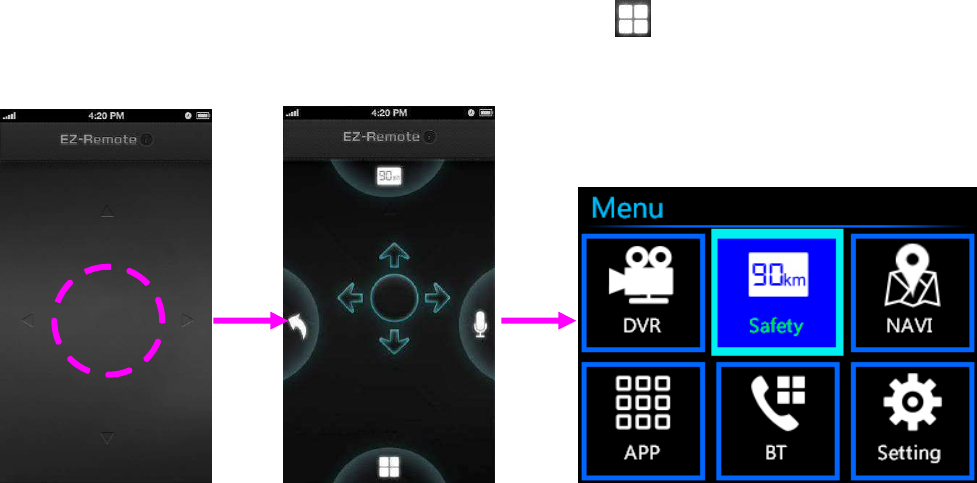
After establishing PAN, you can enable EZ-Remote operation, press for one second and
it will jump out another window, then screen down to (as the photos followings),The
gesture operation is the same as using a Mouse Mode.
(Kinescope without action) (Kinescope after long press 1 sec)
17
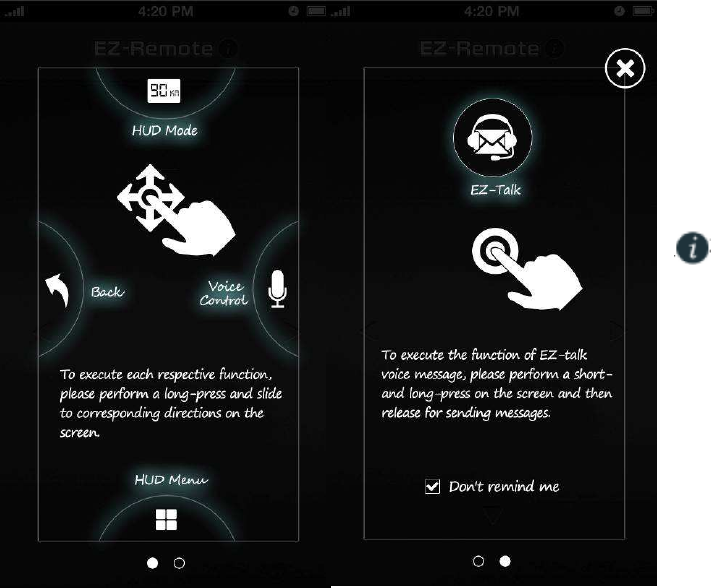
Note:
EZ-Remote will present functional
teaching during first installation.
Click on the EZ-Remote right side
can review the functional
teaching again after completing
installation.
Note: When EZ-Remote is in digital
video record mode or safe mode,
use long press follow by a down
gesture to go back the main screen,
do not use go back gesture to go
back to
the primary links.
18
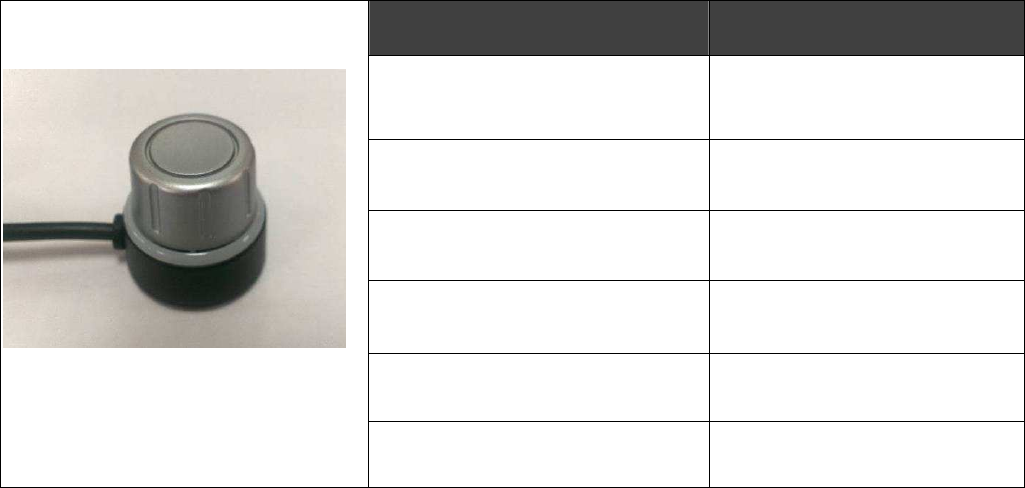
Knob
Operating Gesture Display Response
1 second long press Enter to primary links
3 seconds long press Start voice control
Short press Go to Enter Function
Short Press+Long press Start EZ-Talk (program is
developing)
left rotate/right rotate Focus to left/right
Press down+ rotate left Focus move up area
19
Press down+ rotate right Focus move down area
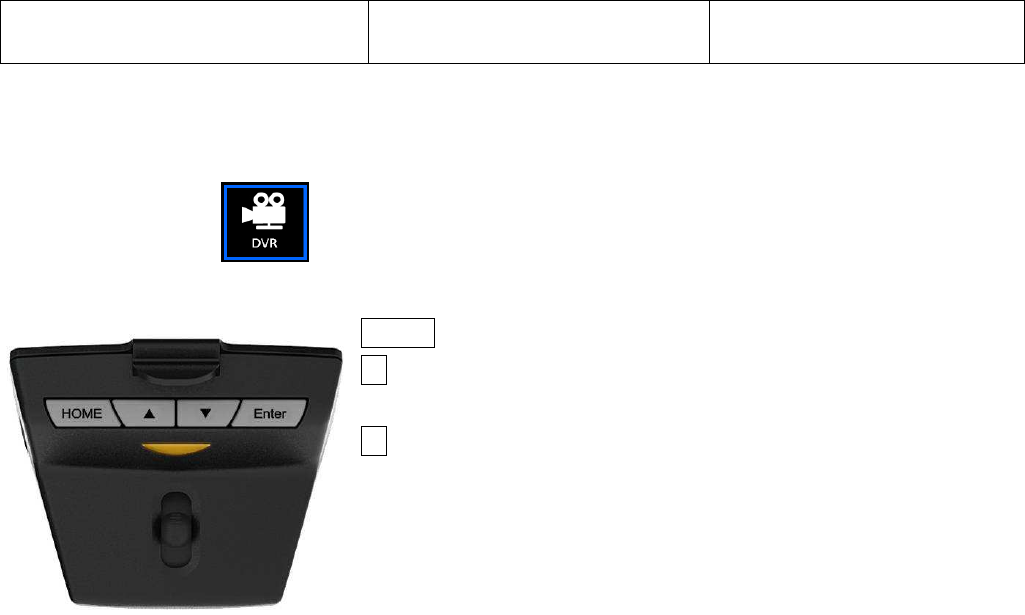
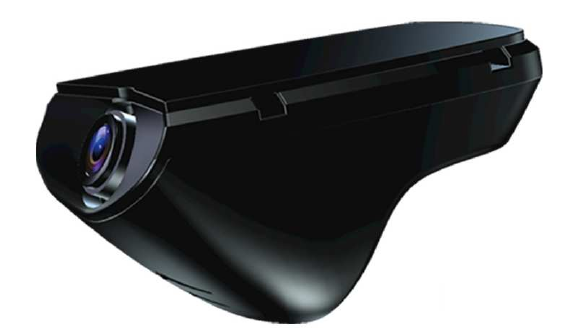
1. Digital Video Record(DVR) equipped with 311 type
Select Primary links function,switch to DVR vision. Also you can use actuated button
function of DVR to fast entering main menu.
HOME Button Long time press:Enter to primary links
▲ Button long press: DVR and image recognition vision
switch.
▼ Button long press:IR assistance light switch
(the
pre-setting is open for switch for image recognition)
(Note: EZ-Remote APP cannot control DVR or related
settings, must DVR console with four buttons, more details
please refer to EL-660-H001 manual.

20
1、
Digital Video Recording(DVR) equipped with 111 type
Select primary links function, switch to DVR screen. (The details of operating
instruction please refer to EL-640-HUD1 manual.)
21
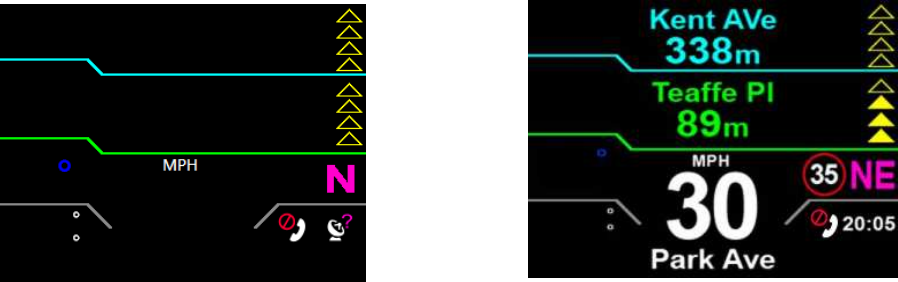
2. Safety Mode
【
【【
【
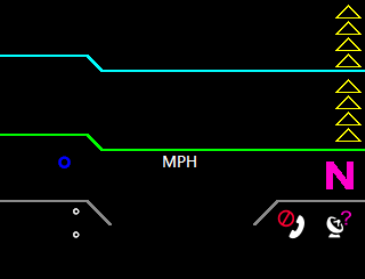
Visual layout without route planning
】
】】
】
22
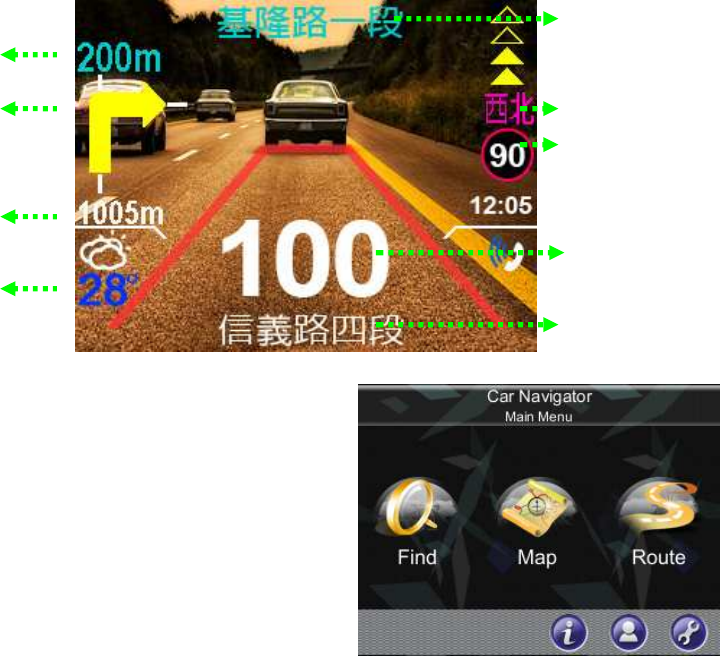
Note: The triangles in the upper right corner indicate how close you are to your destination or
next direction change. The first triangle will indicate to you at 200m to the destination. More
triangles will become colored as you near your destination or direction change starting at 200m,
and following with indications at 150m, 100m and 50m to your destination.
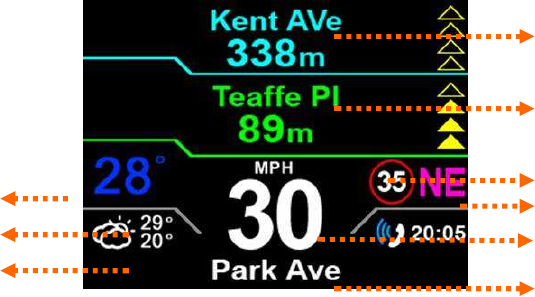
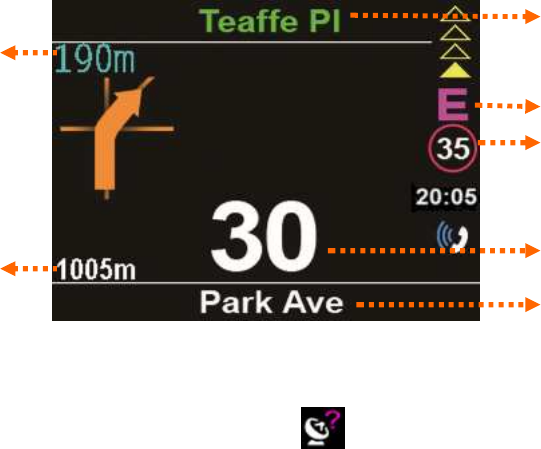
【 Visual layout with route planning】
Current road name
Current speed limit
(Red circle will flash while speeding)
Driving Directions
Road name of one block ahead.
Current driving speed
Road name of two blocks ahead
Current Temperature
Highest temperature today
Lowest temperature today
Name of road two sections
23
• GPS Positioning Status: This icon located at the bottom right of the main screen informs you
on your GPS status and connectivity. After setting a course, if your GPS status is fully
connected the GPS icon will change from
to current time. This indicates that your
inputs were successful.
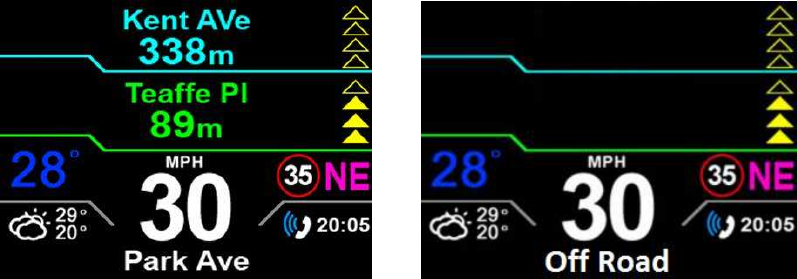
• After successful positioning of the vehicle in the event of an unexpected course changed,
the screen will update and show your current location and direction without future directions
as shown. The screen will also show the upcoming road names. If the road information is
not created in local map database, the current road name will show “off road”.
Current road name
Current speed limit.
Red circle will flash while speeding.
Current speed limit
The distance of one block ahead
Distance to destination
Driving Directions
24
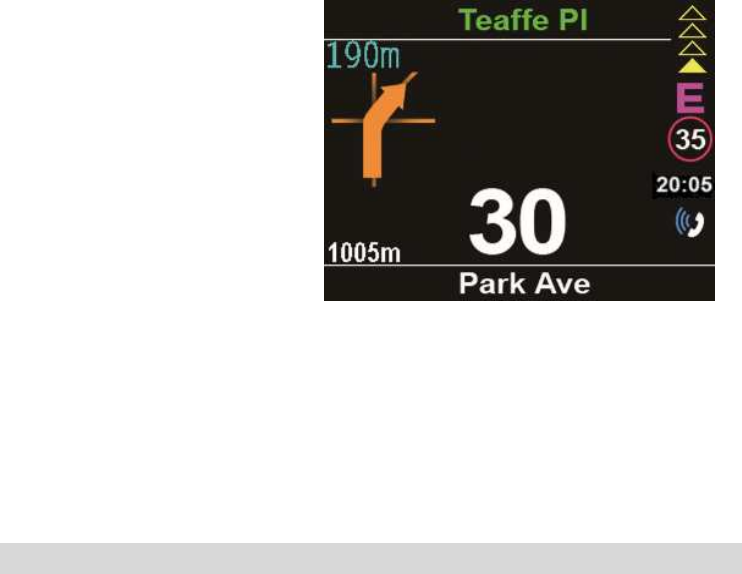
After setting location in route planning set-up the photo shows up as follows.
Location at the map information can not support.
Screen of freerun
25
※Select equipped Digital Video Recording (DVR) add-value function
Without Route-planning and connected DVR layout
26
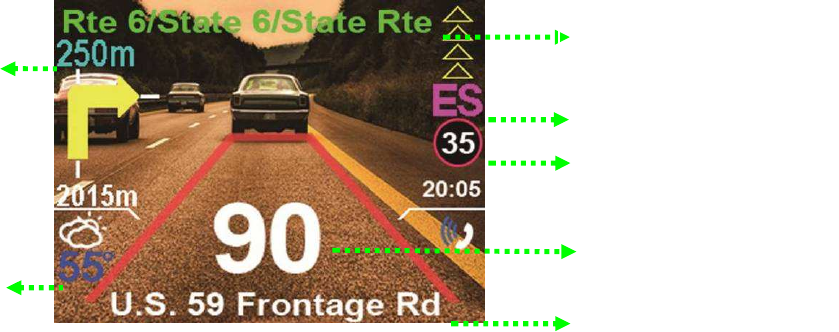
Route-planning and connected DVR layout
Current road name
Current speed limit, Red circle
will flash while speeding.
Current speed limit
Distance of one
section ahead
Current Weather
Driving Directions
Road name of one block ahead.
27
三、Navigation
For more details info please refer to navigation user
manual.
Name of road one section ahead.
Current road section with road name
Current speed limit, The indicator will
flash when you are speeding.
Current speed limit
Driving Directions
The distance of one section
a head
Current Weather
Directions to next
direction or course
Distance to Destination
28
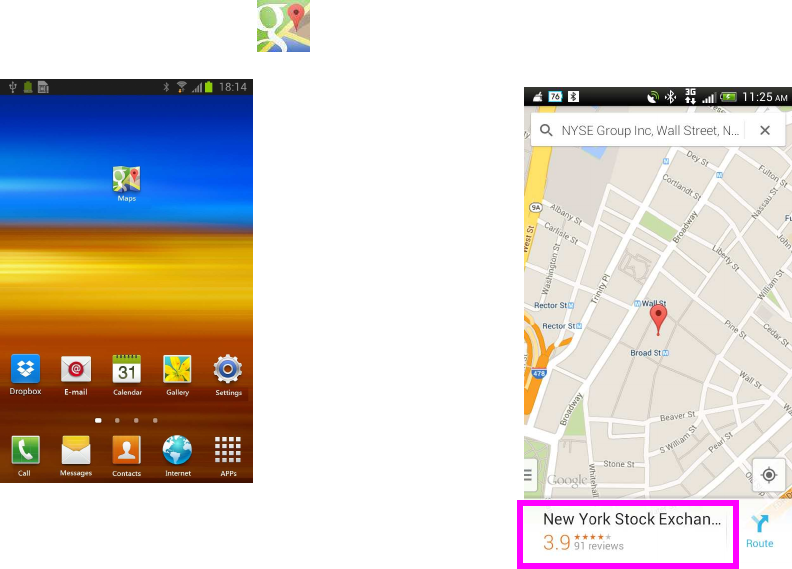
Using Google Maps to Share Scenic Areas (Android System)
Step 1: Connect to Google Map
Step 2: Look for scenic area (enter
address or location into the search bar
or pick a specific scenic area with
address)
29
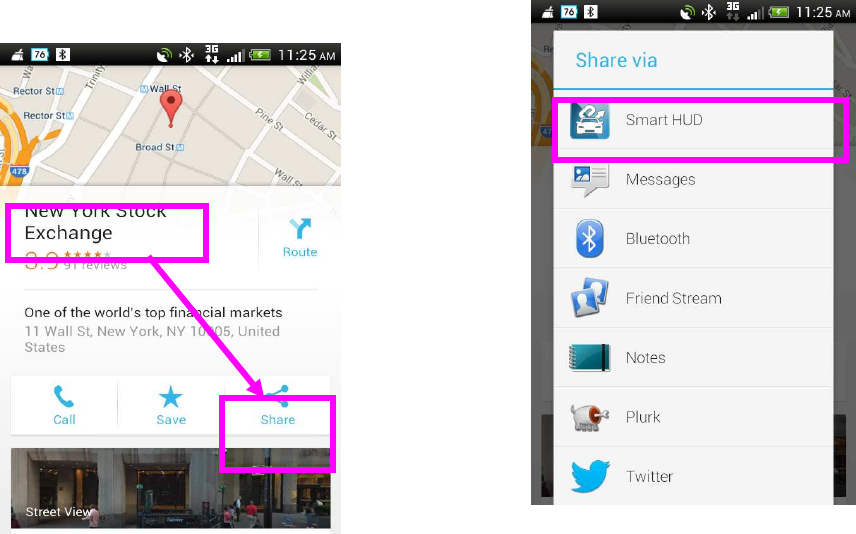
Step 3: Sharing the Scenic Area
Step 4: Sharing to Smart HUD
30
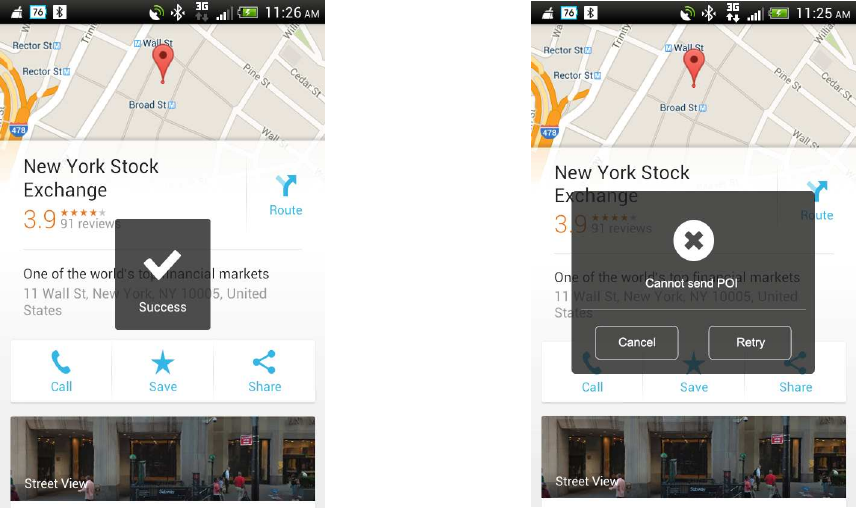
“Success” view
Failure view “Cannot send POI”
31
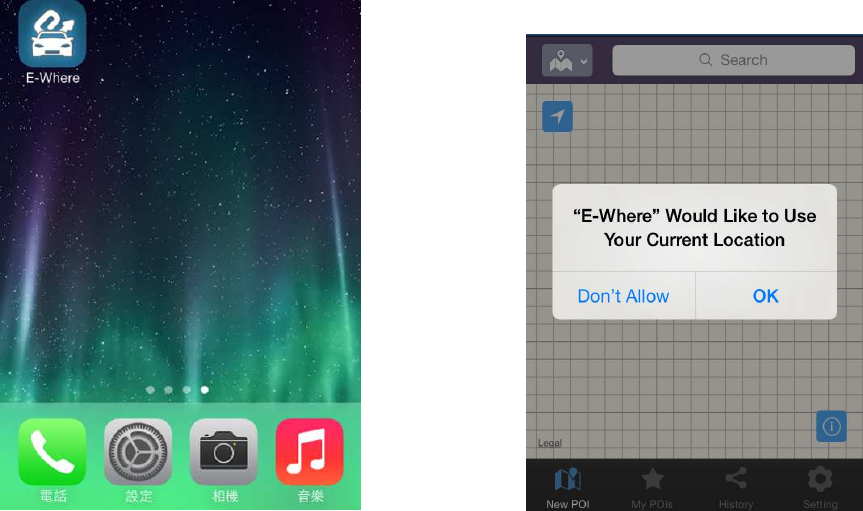
Using Apple Maps to Share Scenic Areas (iOS System)
Step 1: connect phone E-Where
Step 2: Allow E-Where to use your current
location, so you are able to continue.
32
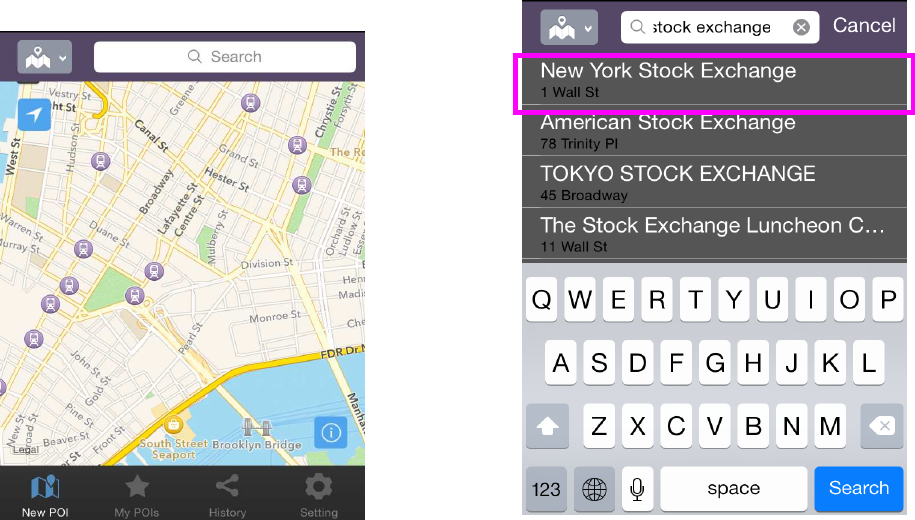
Step 3: Initial view after E-Where has
accessed your current location.
Step 4: Enter keyword in search bar
using an address, click items you
need.
Step 5: Available for pre-view the selected
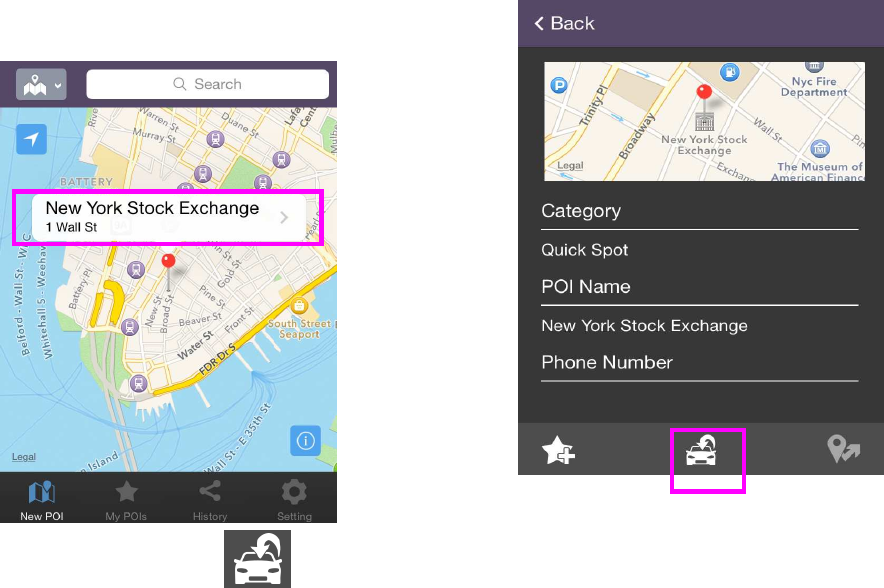
33
place in map. Click the address row for
detail spot information.
Step 6: Click the icon for
sharing spot to SmartHUD.
View of “Send Successully”
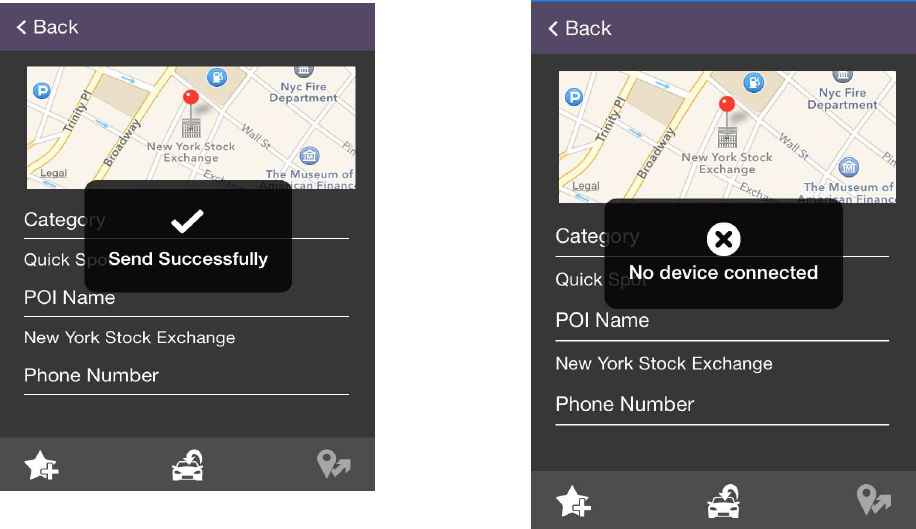
34
View of “No device connected”.
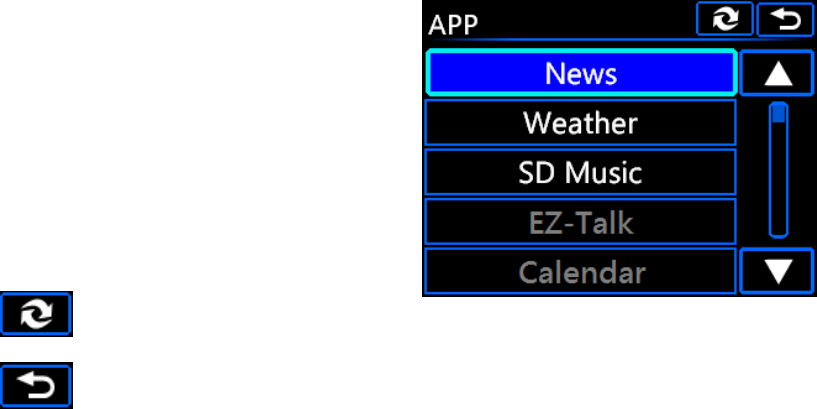
四、Applications
Content:
Weather:Resourced from Yahoo
Weather
News:Resourced from Yahoo News
SD Music:Support for playing with
Micro SD card MP3 and WAV music
EZ-Talk and calendar function are
under development.
:Update
:Back

(一)Weather
Default weather information if not using GPS location is 1: Alabama city, 2: Taipei city.
For other cities information you can select to enter another city and select this city.
After the selection, you are able to set the cities you would like to display.
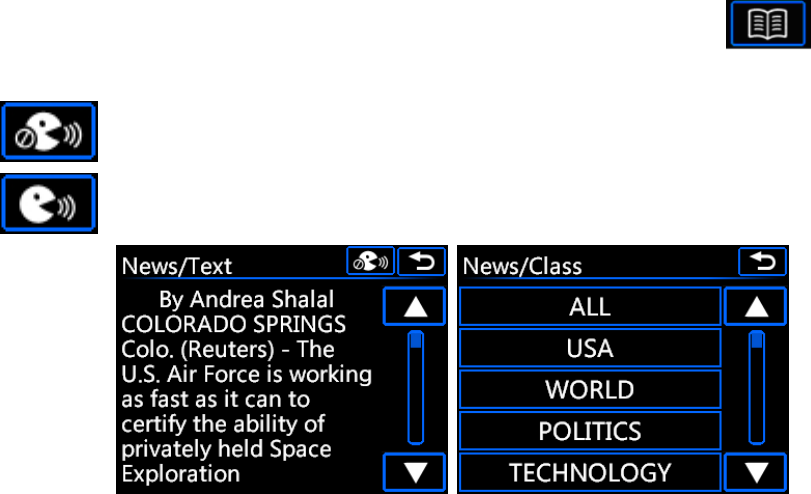
(二)News
Default setting is instant news, to switch to a different setting, click enter new
page.
: Status – playing stopped
: Status - playing
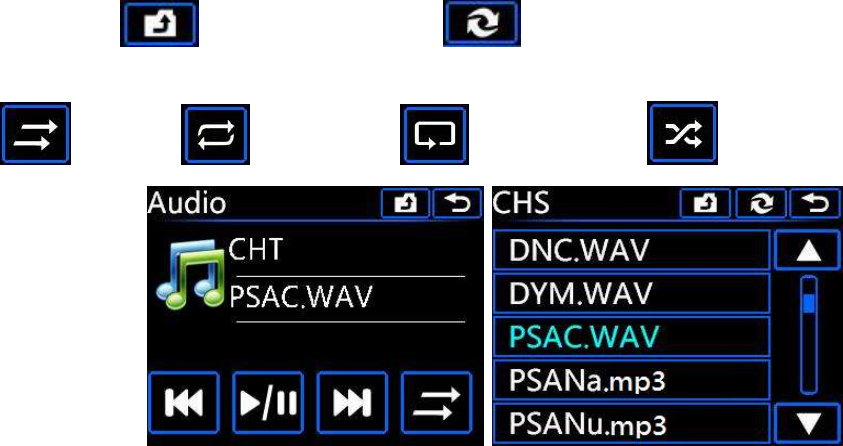
(三) SD Music
This icon go back one folder, is used to update data. The console
supports play from the Micro SD slot and can read MP3 and WAV music files
Order / All repeat / Single repeat / Random
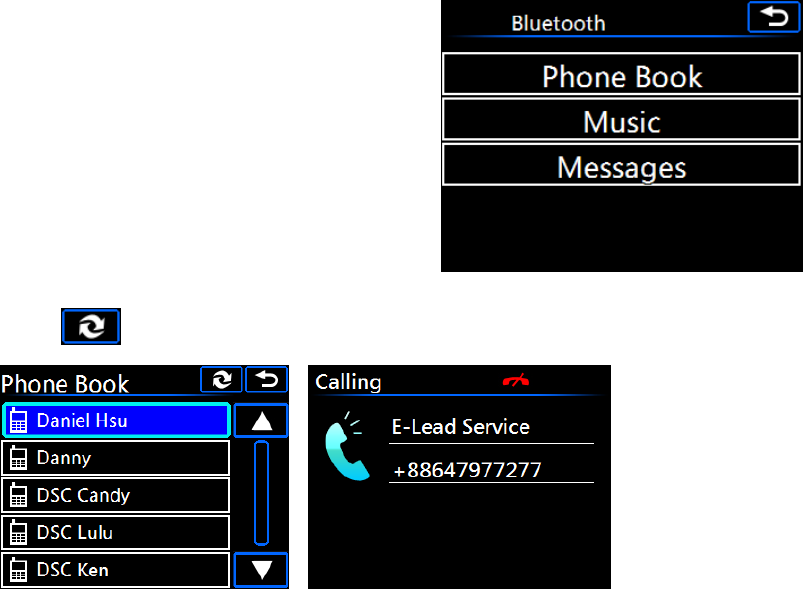
五、Blue tooth
Provide PhoneBook, music, message function
Note: iOS
system is not supported for blue tooth message
function.
(一
一一
一) PhoneBook
Top right of screen is ,used to update your contact info to the PhoneBook.
※
Blue tooth phone function:Please use all functions in a safe manner, navigation can use the
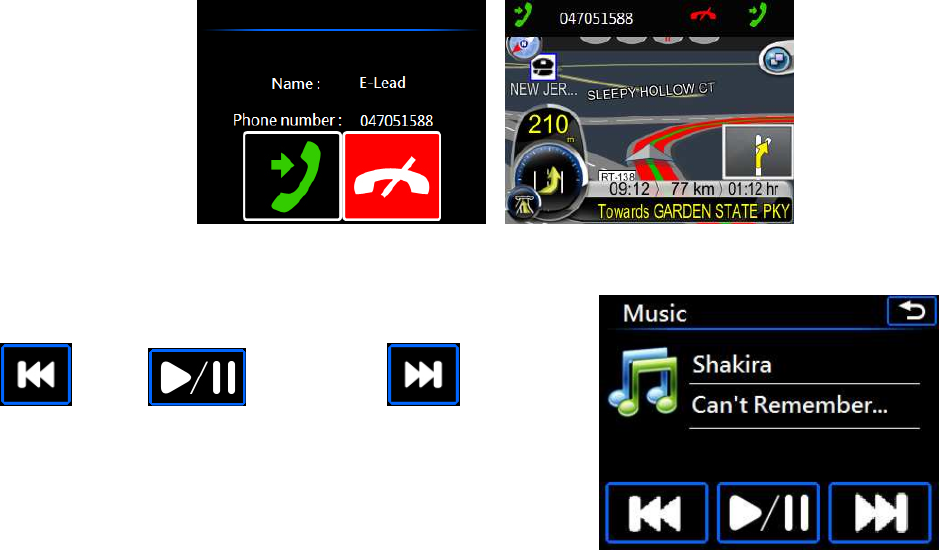
updating image layout to inform you, and the default operational layout for an incoming phone call -
below left photo. If phone number is not within Contact list it will be presented as unknown. During
this interim screen the console is unable to show the other functions.
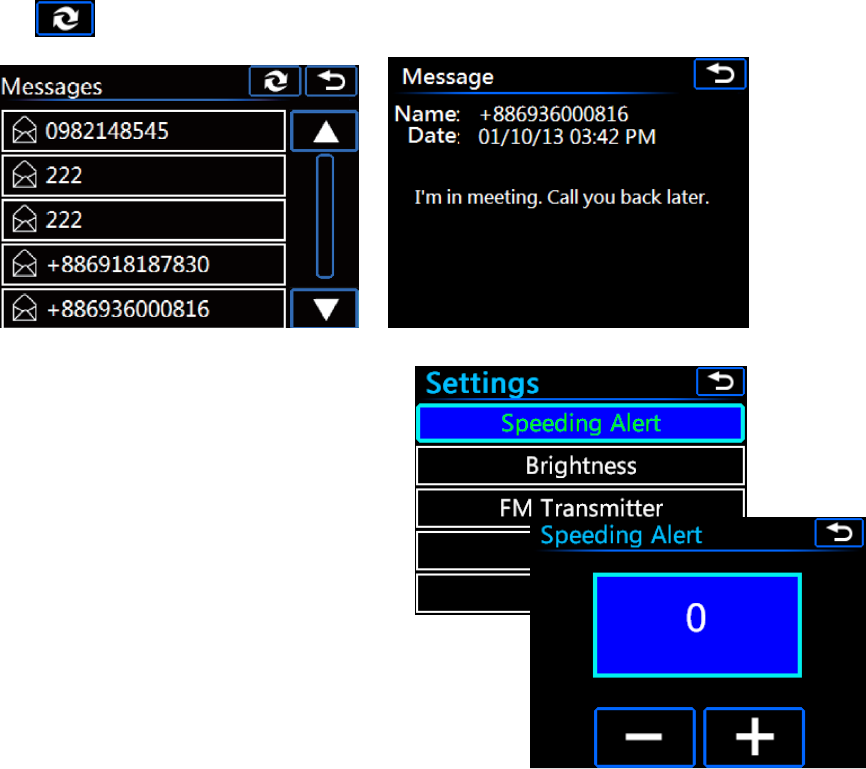
(二) Music
Provides music functions for the phone
last / play/pause / next
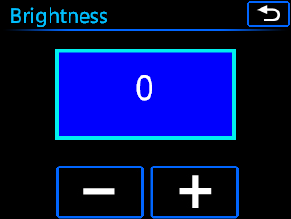
(三) Message
Select at top right ,updates and retrieves all new messages.
6、Setting
Setting Information:
Speeding Alert/Brightness/ FM
Transmitter/Volume/Language
(1)Speeding Alert
Provides a speeding reminder service using a Flashing function, and you can set the value from 0.
The setting range is 50~50. You can add or subtract 1 Use + and - .
(2)Brightness
The product auto detects outside light to automatically switch screen
presentation. As personal preference you can switch by yourself, switch
range is -5 to + 5. Add or subtract by 1, use + and -.
(3) FM Transmitter
The ability to use FM transmitter to listen to FM channels, using the car's
video player's channels and switch to listen to HUD music signal. (FM
range: 88.1-107.9M MHZ)
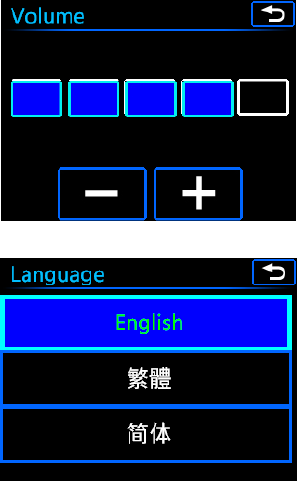
(4) Voice volume
Change to your personal preference. Use + and – to switch. As right photo
example.
(5) Language
According your personal preference you can set the language.
The console support English, Traditional Chinese and Simplified
Chinese, use photo as an example.
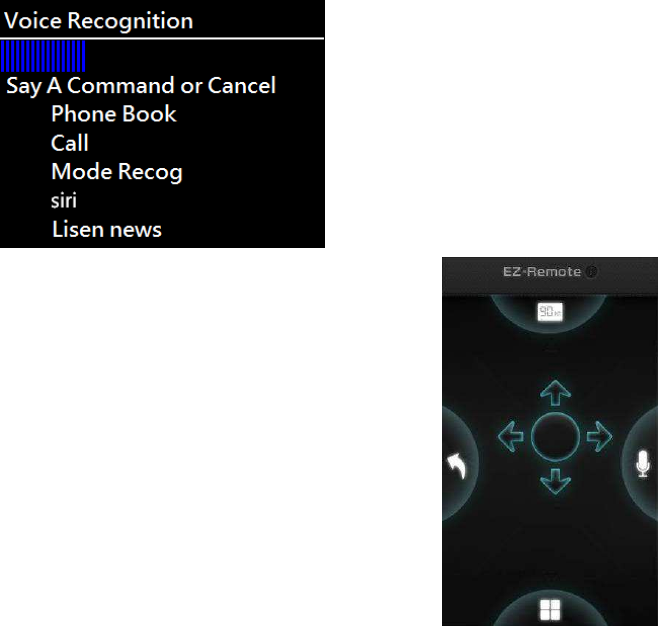
7. Voice Recognition
Voice recognition will give you an option to say a command or cancel, speak into the
microphone to access different functions.
How to start voice recognition:
Knob:long press 3 seconds
EZ-Remote:long press 1 second and slide to the right
After start, system will play indicated words, such as ‘Say a
command or cancel.
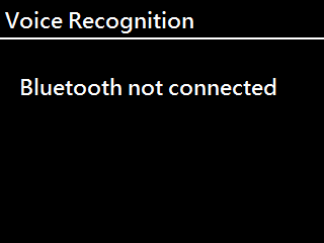
(1)Phone book
Before using this function, please have your phone to connect with Bluetooth and go to
the phonebook page to download contact lists first, then you would be able to start using
this function. If you haven't finished connecting, then the screen will show you haven't
connect the Bluetooth as indicated(example to the right)
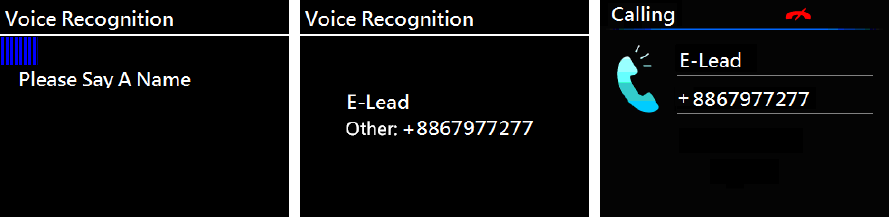
1. After a short beep along with indication words ”please
say a command or cancel”, give order “phonebook”.
2. After a short beep along with indication words ”say please say a name”, speak any
name in the contact list or cancel.
3. After a short beep along with indication words say”Please Say Dial or Correction”, give
your order or cancel.
4. Please refer to below photos for above processes.
(2)Number calling
To use this function, please have your phone to connect with Bluetooth.
1. After a short beep along with indication words ”please say a command or cancel”, give
order “call”.
2. After a short beep along with indication words “Please say a number”, say the number
clearly you want to call. Then system will show the result after recognition.
3. After a short beep along with indication words “Please say Dial or Correction “, give
your order or cancel.
4. Please refer to below photos for above processes.

(3) Mode Recog
1. After a short beep along with indication words “Please say a command or cancel”, give
order “mode recog”.
2. After a short beep along with indication words ”please say a
name”, give your order or cancel.
3. Say “safety”, then you can access to safety mode.
4. Say “DVR”, then you can enter the DVR mode.
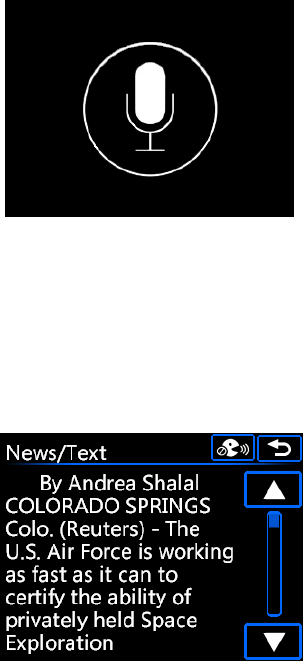
(4) Siri
1. This function is only available for iOS systems
2. After a short beep along with indication words ”please say a
name”, give order “Siri”, then system will reach Siri functions
on your smartphone.
3. Recording page as right example.
(5)Listen News
1. After a short beep along with indication words ”please say a name”, give order “Listen
News”, you will access the news page and directly start speaking news text from first one.
Troubleshooting
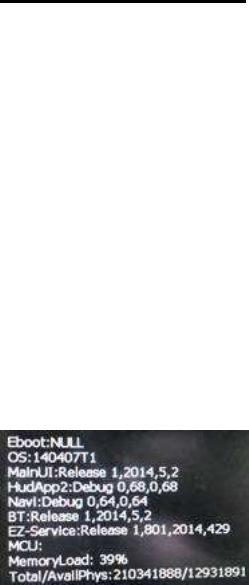
Version checking( the page only avalible for EL-311(R) instruction)
Step 1:Please enter to primary links/setting /language's screen
Step2:Please practice how to use actuated button turn left move, and select a target toward
to up one space gesture.
Step 3:Please practice using rotated button turn right move, then select a target to move
down once space gesture.
Step4:Continues doing the following actions:「up、up、down、down、up、down、up、down」,
then you will access manual mode(as the photo below shows) and check software version。
The actions may have no effect if you select an of the target options. In the procedure, you
can not pause or stop for too long of time.
Please inform the Service Specialist of your version number to let them solve your problem as
soon as possible.
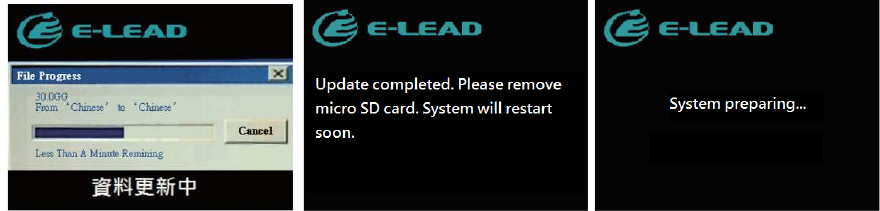
System Programs Automatic Updates
Step1:Please put update program on a Micro SD, please notice you are not allowed to put
same profile name on the same card, if you do this you be unsuccessful when updating.
Step2:Put Micro SD card inside the console's SD card slot, And at the same time turn off your
car.。
Step3:Turn on car engine and the automatic system will begin to update, please be patient
and wait for the update. The program will alert you when you are able to remove the SD card.
The console will also automatically restart after the update is complete. 。
Step4:The preparation time before the update starts may be 1 minute.
Step5:When screen switch the normal starting layout you are able to begin using the console.