E Lead Electronic EL311 Smart HUD User Manual EL 311 R 101 En 201410
E-Lead Electronic Co., Ltd Smart HUD EL 311 R 101 En 201410
User Manual
Head up Display
User Manual
EL-311 EL-311R EL-101
Thank you for purchasing the Head Up Display! The User Manual will teach you how to
operate the product. Please read the User Manual before starting using the product to make
sure you operate the HUD correctly. After reading the User Manual, please save it in case if
you need any information later.
- 2 -
Safety Warning
The product operates safely as a design and manufacture were given priority in development. To avoid any
potential risks, please follow the instructions when you are going to install, operating and cleaning the product.
●Before using the product, please read and understand all instructions, and save all instructions as they may be
useful in the future.
●You are required to follow all warning instructions for the product.
▼ Do not use water or any chemical products to soak the console and sensor for cleaning.
▼ When cleaning, please use a piece of smooth cloth to clean the monitor surface.
▼ Don’t touch the machine with wet hands. Stop using the product and turn off the power when you find
water inside, and ask qualified mechanics to fix it.
●The product is only for assistance; driver still need be aware of all situations, and must pay Note to driving and
safety.
●Please update the map software when you find out map information has not been updated and is different from
the current roads.
●EL-101 is included lithium battery. If the battery is not replaced correctly, there will be a risk of explosion. Only
allow replacing with the same brand or recommended by the manufacturer of the same type of battery. Used
batteries must be handled in accordance with the manufacturer's instructions.
- 3 -
Federal Communication Commission Interference Statement
This equipment has been tested and found to comply with the limits for a Class B digital device, pursuant to Part 15
of the FCC Rules. These limits are designed to provide reasonable protection against harmful interference in a
residential installation. This equipment generates, uses and can radiate radio frequency energy and, if not installed
and used in accordance with the instructions, may cause harmful interference to radio communications. However,
there is no guarantee that interference will not occur in a particular installation. If this equipment does cause
harmful interference to radio or television reception, which can be determined by turning the equipment off and on,
the user is encouraged to try to correct the interference by one of the following measures:
Reorient or relocate the receiving antenna.
Increase the separation between the equipment and receiver.
Connect the equipment into an outlet on a circuit different from that to which the receiver is connected.
Consult the dealer or an experienced radio/TV technician for help.
FCC Caution: Any changes or modifications not expressly approved by the party responsible for compliance could
void the user's authority to operate this equipment.
- 4 -
This device complies with Part 15 of the FCC Rules. Operation is subject to the following two conditions: (1) This
device may not cause harmful interference, and (2) this device must accept any interference received, including
interference that may cause undesired operation.
FCC RF Radiation Exposure Statement:
This equipment complies with FCC radiation exposure limits set forth for an uncontrolled environment. End users must
follow the specific operating instructions for satisfying RF exposure compliance. This transmitter must not be co-
located or operating in conjunction with any other antenna or transmitter.
This equipment should be installed and operated with a minimum distance of 20 centimeters between the radiator and
your body.
- 5 -
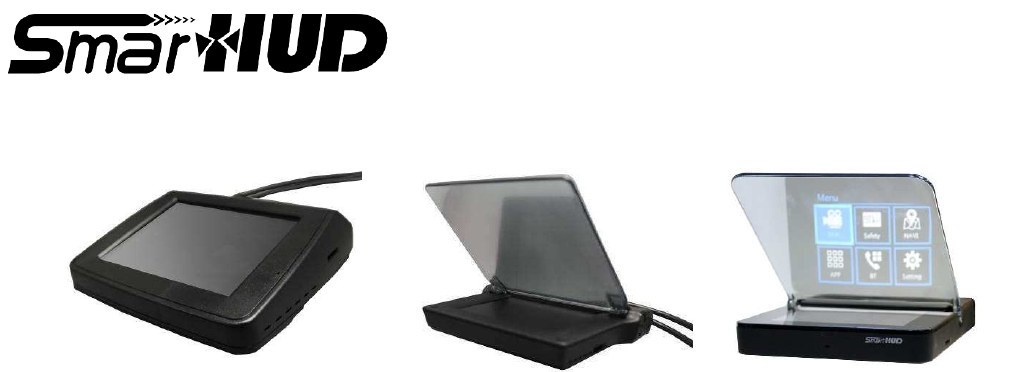
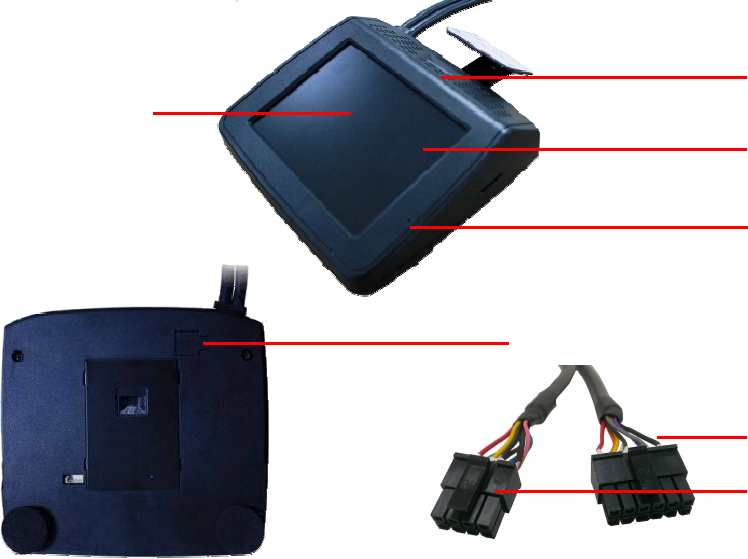
I. Product appearance
EL-311
Brightness sensor
Full-color and high
brightness screen Micro SD card port
Reset button
Microphone
DVR connector
(Option)
12V Power input
- 6 -
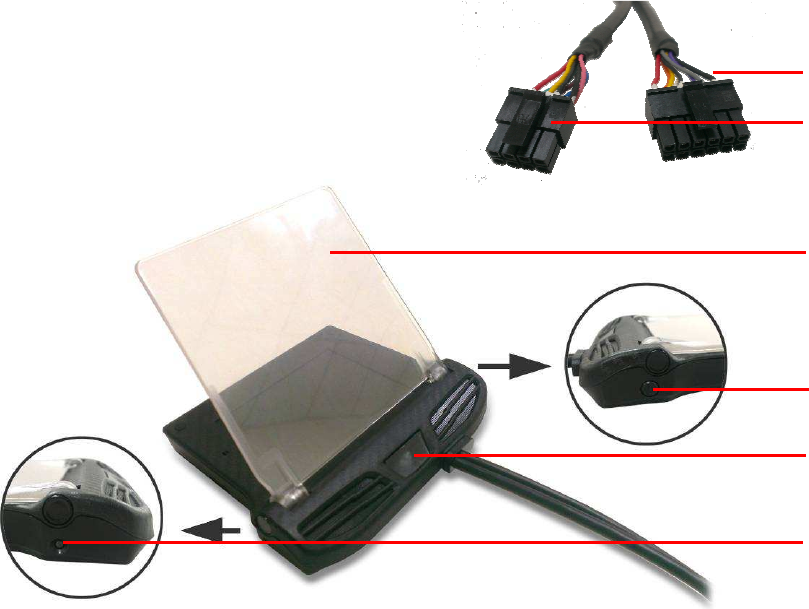
EL-311R
12V Power input
DVR connector
(Option)
Screen on/off
Brightness sensor
Reset button
Reflective cover

- 7 -
EL-101
Note:
::
:Long press the power button with 5 seconds for RESET device
Reflective cover
Screen on/off & brightness sensor
Full-color and high brightness
Micro SD card port
Microphon
DVR Video input
Rear camera video
5V Power input (USB Knob)
- 8 -
II. Product features
● 4” TFT high-resolution image with full-color display layouts indicate rich information.
● Bright screen does not hurt the eyes.
● Brightness sensor: automatic detection when light reaches the sensor.
● Built-in navigation
● Speeding alert
● Blue tooth message and indications

- 9 -
III. Specification
EL-311
Voltage DC 12V
Storage Temperature -40℃ ~ +85℃
Working temperature -30℃ ~ +80℃
Current consume 1A
After turning off car engine, the products current
consume ≦0.13mA
311 Overall size(L*W*H) 122.2mm*111.4mm* 29.7mm

- 10 -
EL-311R
Voltage DC 12V
Storage Temperature -40℃ ~ +85℃
Working temperature -30℃ ~ +80℃
Current consume 1A
After turning off car engine, the products current
consume ≦0.13mA
311R Overall size(L*W*H) Length146.3mm*Width116mm*Height17.2mm

- 11 -
EL-101
Voltage 5V
Storage Temperature -40℃ ~ +75℃
Working temperature -30℃ ~ +75℃
Current consume 2A
101 Overall size(L*W*H) Length122mm*Width187mm*Height22mm
- 12 -
IV. Instructions for starting the product
[Preface] Before using the product, please follow below steps in order to sure the regular
connections.
View for first power on
View of normal power on
13
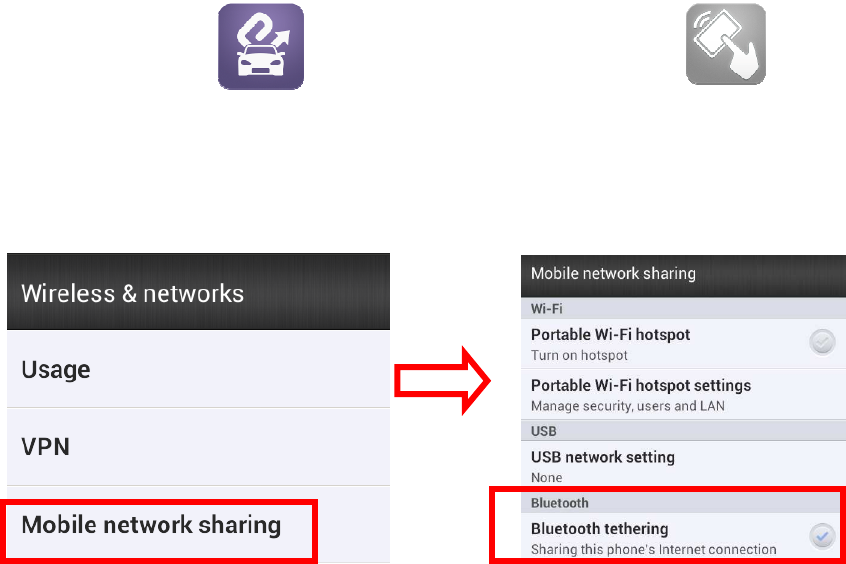
Bluetooth Connect Setting (Android System)
Step 1 Install E-Where on your phone and HUD Remote APP. When you
are doing route planning, you can share all hot spot (scenery) to SmartHUD via E-Where.
HUD Remote is like a controller to remote HUD.
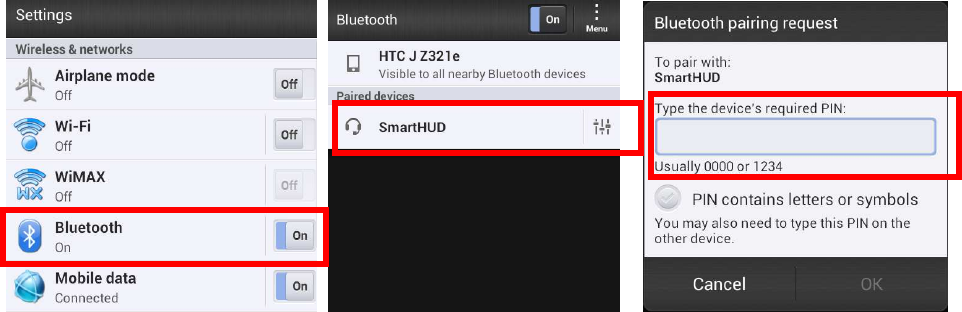
Step 2 Turn on the blue tooth function:Setting>Bluetooth>Open, choose device named
“SmartHUD”, and entering password 0000 for pairing.
14
Step 3 Enable the blue tooth function:Setting>Bluetooth>Open,Choose console equipped
「Smart HUD」,Enter password 「0000」。
15
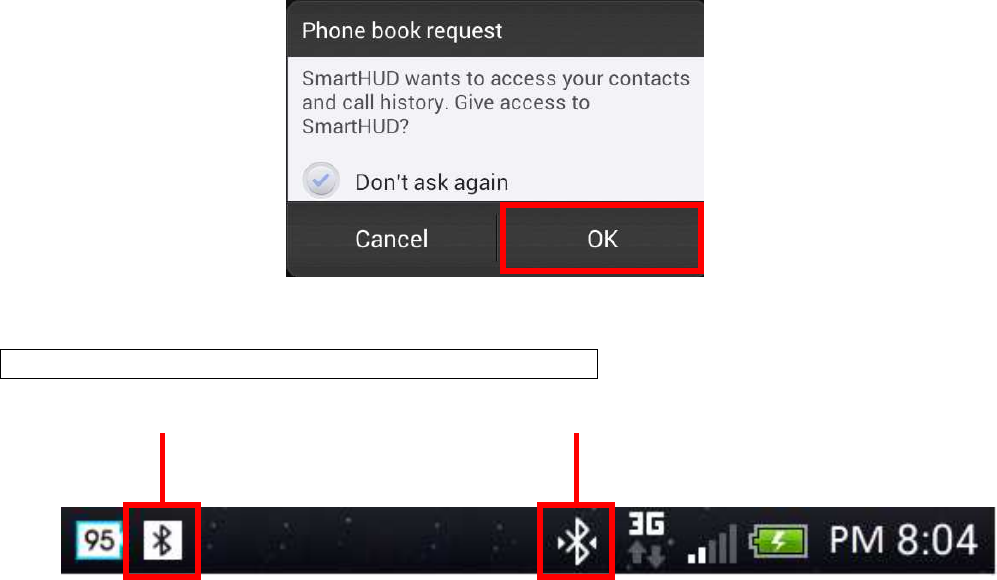
When building a connection, SmartHUD will ask for confirmation to make sure you want to
give the telephone saving authorization. Please choose “yes”
Bluetooth connect successful screenshot on mobile
Tethering or hotspot active BT connected successfully
16
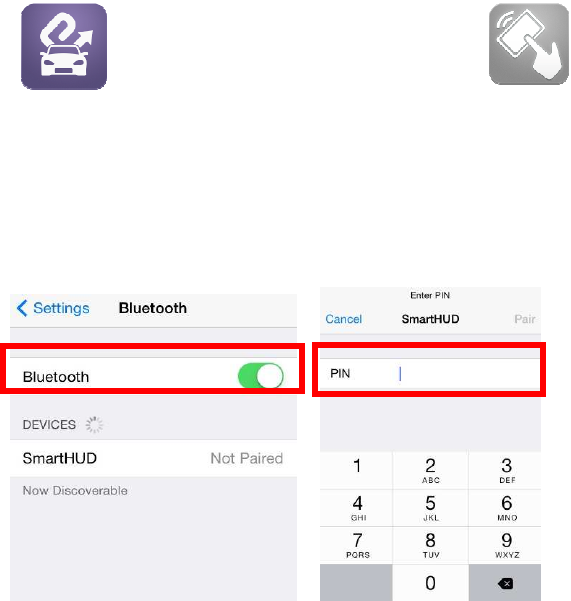
Bluetooth Connect Setting (iOS System)
Step 1 Install E-Where on your phone and HUD Remote APP. When you
are doing route planning, you can share all hot spot (scenery) to SmartHUD via E-Where.
HUD Remote is like a controller to remote HUD.
Step 2 Turn on the blue tooth function:Setting>Bluetooth>Open, choose device named
“SmartHUD”, and entering password 0000 for pairing.
17
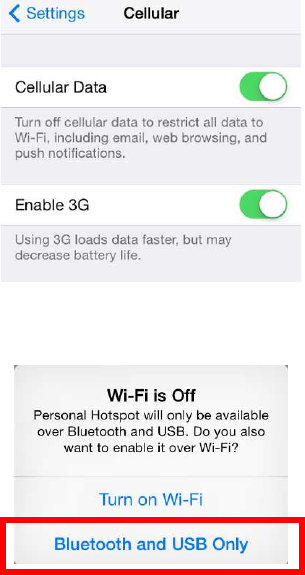
Step 3 Turn on Cellular:Settings>Cellular >Cellular Data
Step 4 Select Bluetooth and USB only
18
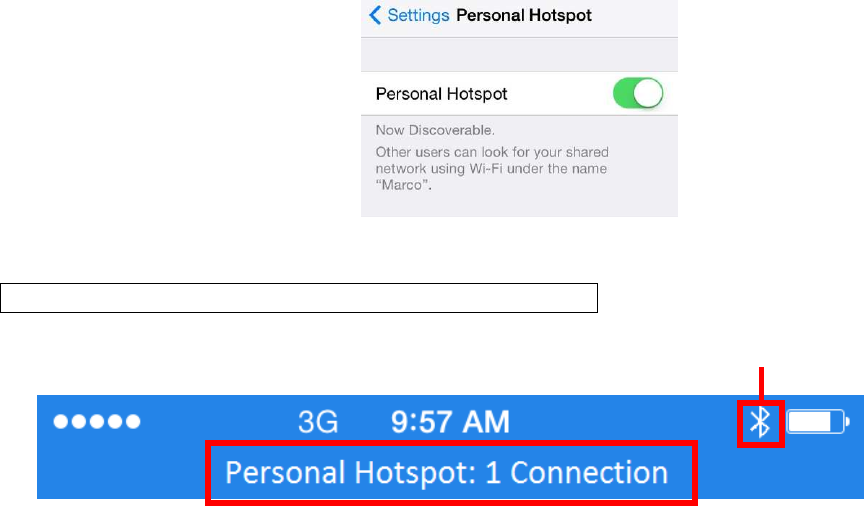
Step 5 Turn on personal Hotspot:Settings>Personal Hotspot>Personal Hotspot
Bluetooth connect successful screenshot on mobile
Color change from gray to white

19
Bluetooth connect successful on SmartHUD
You can check connecting status at down-left side in safety mode. The icon will indicate
status from (no connected)→(Bluetooth connected)→(PAN connected).
20
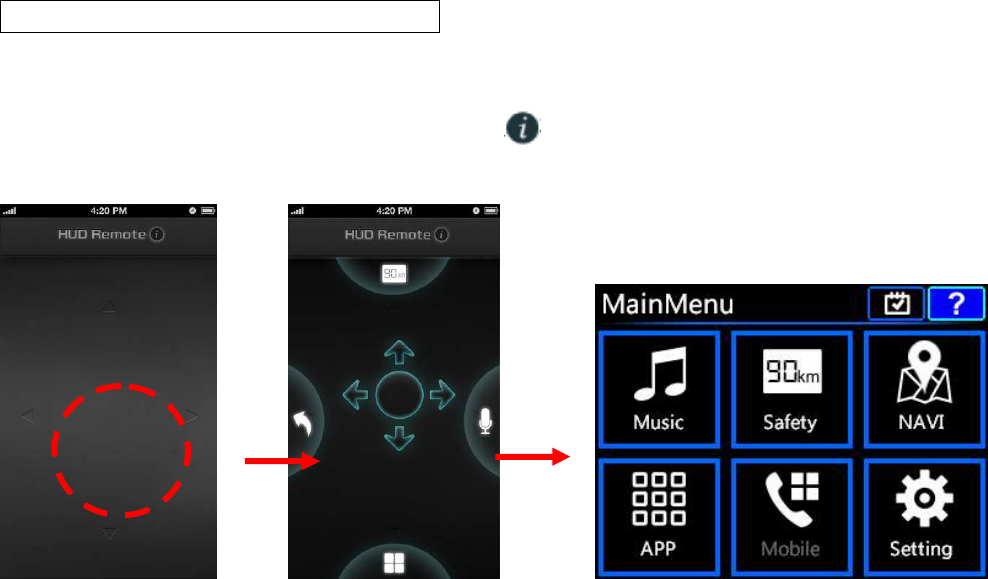
Product Operation─
──
─HUD Remote APP
After establishing PAN, you can enable HUD Remote operation. The gesture operation is the
same as using a mouse mode. HUD Remote will indicate functional teaching window at first
operation. Click on the HUD Remote right side can review the functional teaching again
after completing installation.
(No action) (Press and hold for 1 sec)

21
Note:
When HUD Remote is in
digital video record mode or
safe mode, use long press
follow by a down gesture to
go back the Main Menu, do
not support go back gesture
to go back to Main Menu.
22
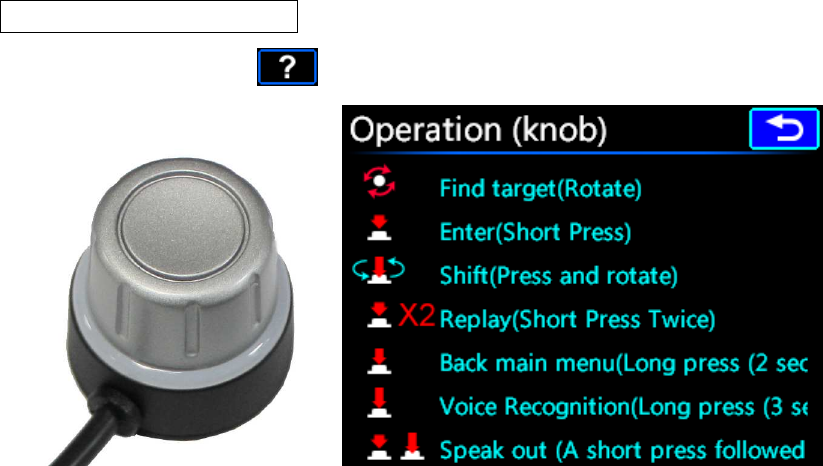
Product Operation─
──
─Knob
Choose up-right corner at Main Menu for checking the operation gesture.
Note: Long press 3 seconds can start up voice recognition function on mobile (iOS system will
start up Siri). If Siri is started up from mobile under connecting with HUD condition, HUD
screen will pop up incoming call page.
23
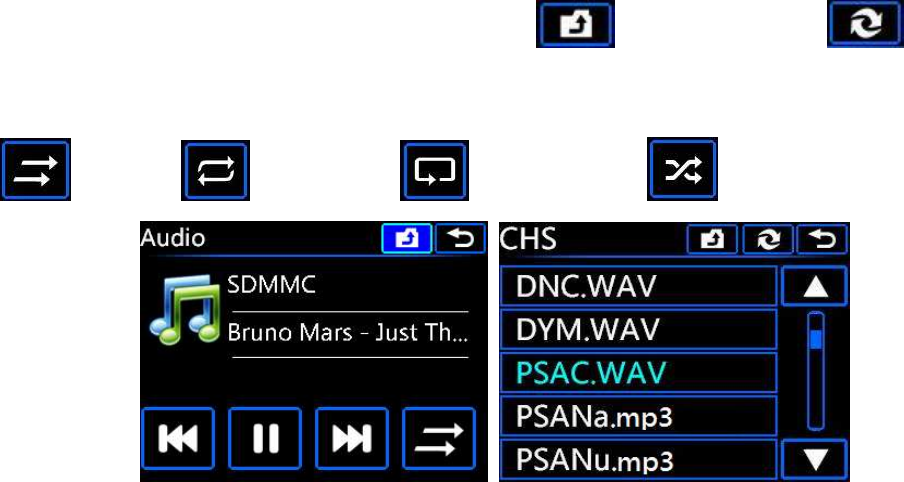
Music
1. SD Music
Playing page shows as below pictures. This icon go back to folder, refresh
folder’s list. Support external capacity up to 32GB maximum and available to read MP3 and
WAV music files.
Order / All repeat / Single repeat / Random
24
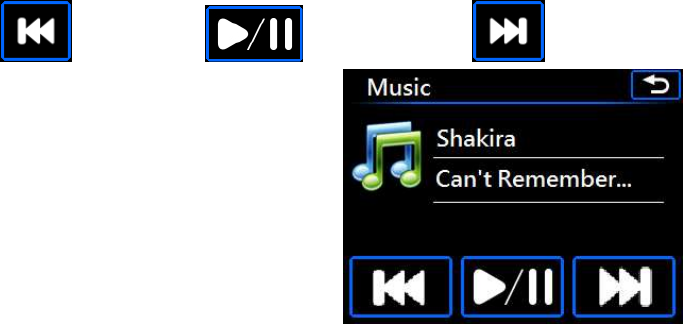
2. BT Music
Support to read the music list from mobile and work function as below indicated.
last song / play/pause / next song
25
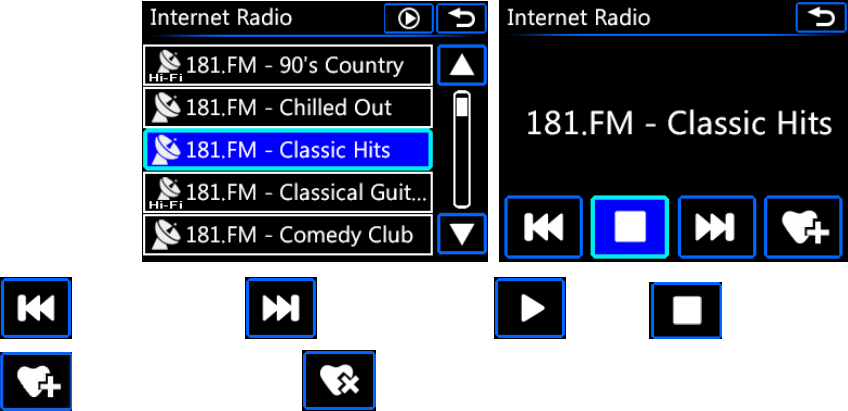
3. Internet Radio
Data source is MUZEE. Channel list is synchronize
Last channel / Next channel / Play / Stop
Add to my favorite / Remove from my favorite
26
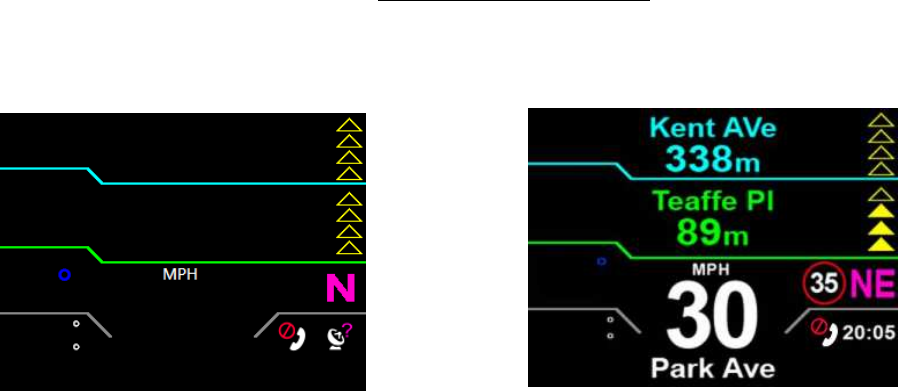
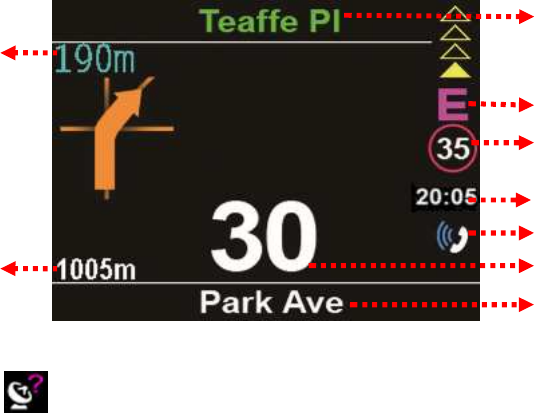
Safety
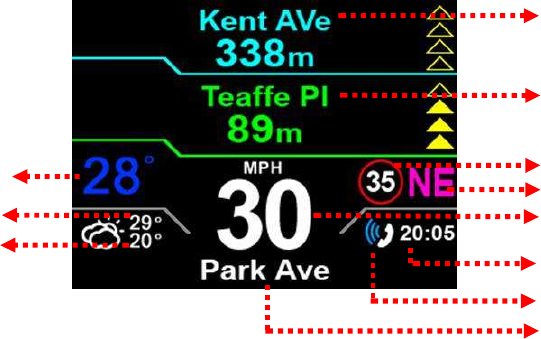
Free run / No route planning
Note: The triangles in the up-right corner indicate how close to your destination or next direction
change. The first triangle will indicate to you at 200m to the destination. More triangles will
become colored when you near your destination or direction change starting at 200m, and
following with indication at 150m, 100m and 50m to your destination.
Current road name
Current speed limit
(Red circle will flash while speeding)
Driving directions
Road name of one block ahead
Current driving speed
Road name of two blocks ahead
Current Temperature
Next hour’s temp.
Next 2 hours’ temp. Current time(show after GPS positioned)
PAN connected
27
With route planning
GPS Positioning Status: Check icon located at the right side of the main screen if changed
from (No GPS signal) to current time, that means your GPS is positioned successfully.
If you can’t get good position in your car, please use with GPS stronger to enhance GPS
positioning capability.
Current road name
Current speed limit
(Red circle will flash while speeding)
Current speed limit
The distance
of one block ahead
Distance to
destination
Driving Directions
Name of road one block ahead
Current time(show after GPS positioned)
PAN connected
28
V. Navigation
For more details info please refer to navigation user manual. You can share POI(Point Of
Interest) on your mobile via E-Where as destination to SmartHUD.
29
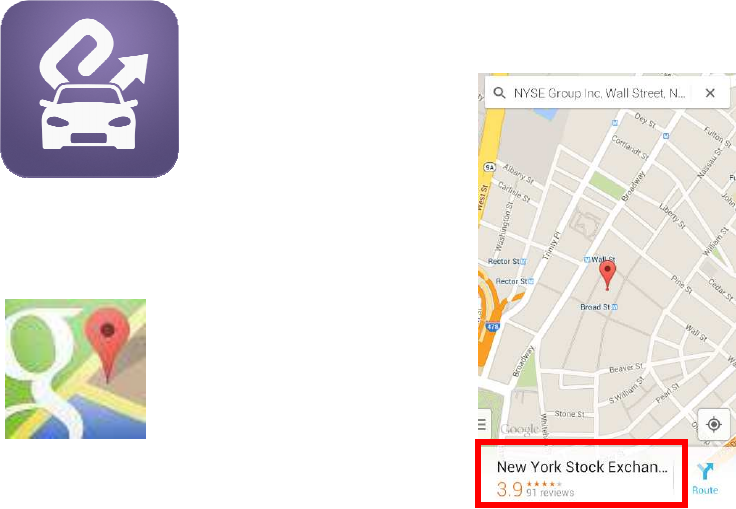
Android System (Share scenic from Google Maps)
Step 1: Download E-Where APP
E-Where
Step 2: Enter Google Map on your mobile
Step 3: Look for scenic area (enter
address or location into the search bar or
pick a specific scenic area with address)
30
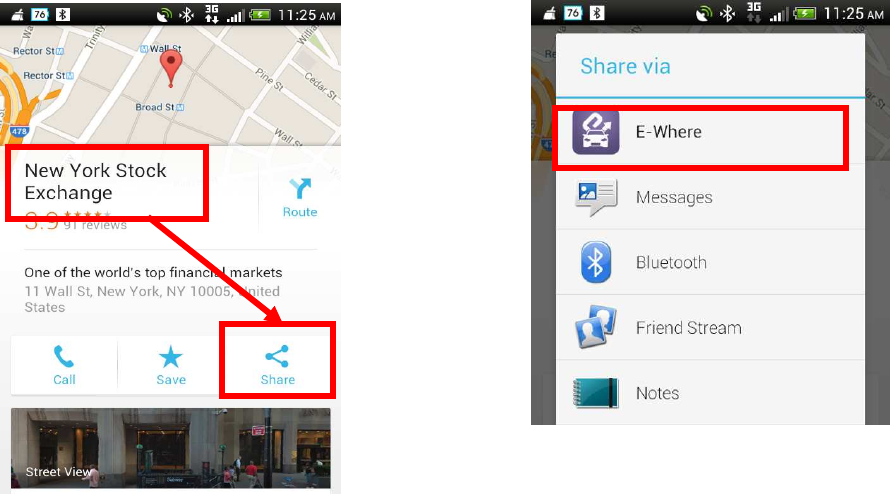
Step 4: Sharing the Scenic Area
Step 5: Sharing to SmartHUD
31
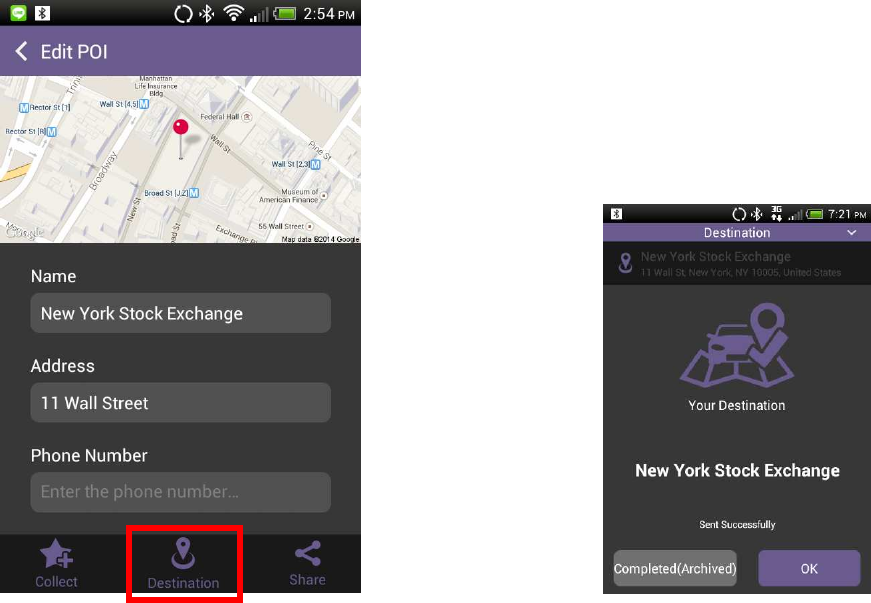
Step 6: Set as destination
Step 7: Sent successfully
System will indicate text as “Sent
successfully” if your mobile is connected
with HUD.
System will indicate text as “No
connected car device. E-Where will send to
device by server.” If your mobile is not
connected with HUD.
32
iOS System (Share scenic from Apple Maps)
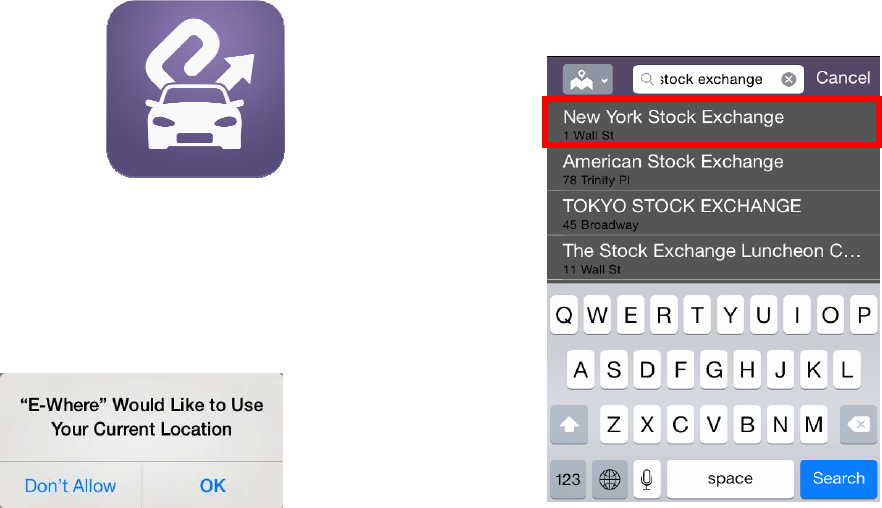
Step 1: Download E-Where APP
E-Where
Step 2: Allow E-Where to use your current
location, so you are able to continue.
Step 3: Enter keyword in search bar using
an address, select one place you want to
go.
33
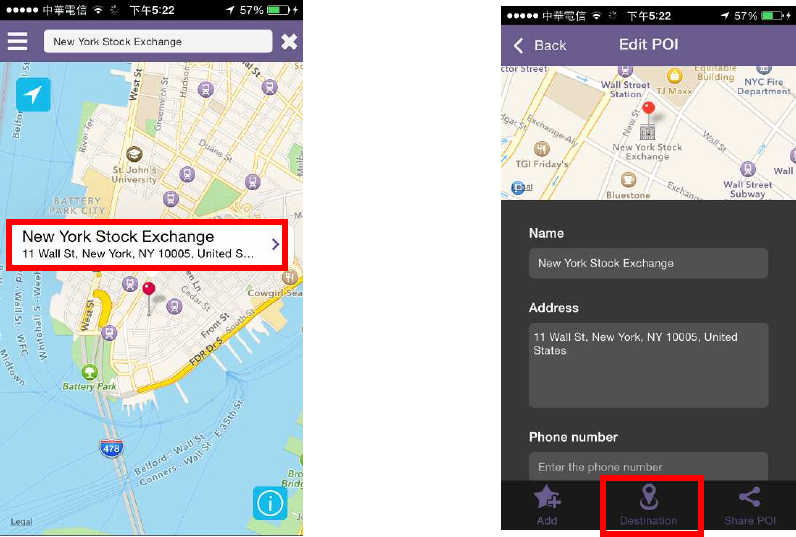
Step 4: Available for previewing the
selected POI in map. You can also use
your finger to move the map to select POI.
Step 5: Click the scenic information on the
pin to enter edit page, then set it as
destination.
34
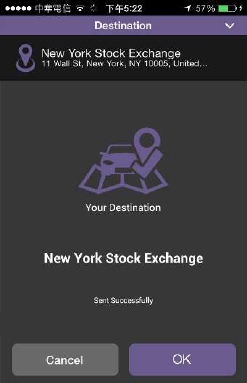
Step 6: Sent successfully
System will indicate text as “Sent
successfully” if your mobile is connected
with HUD.
System will indicate text as “No
connected car device. E-Where will send to
device by server.” If your mobile is not
connected with HUD.
- 35 -
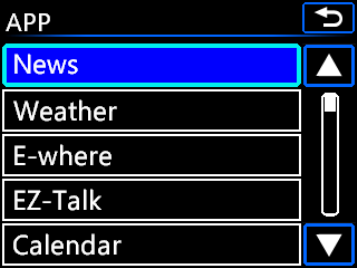
VI. Applications
Content:
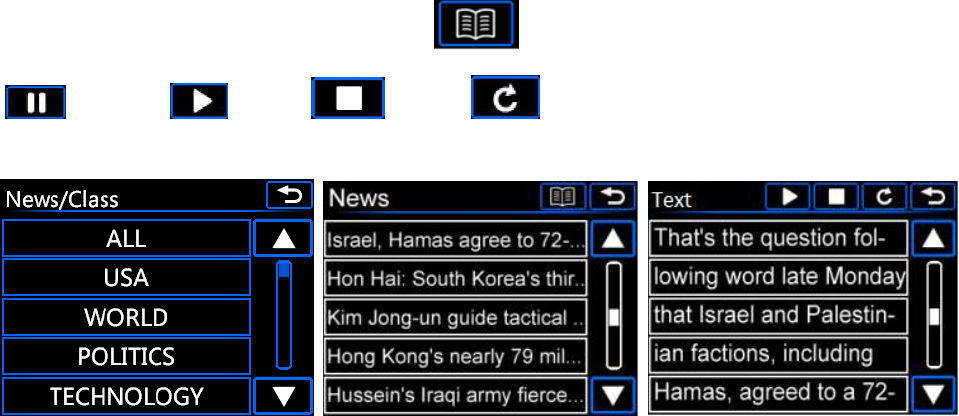
News: Support to read news with Text to speech technique.
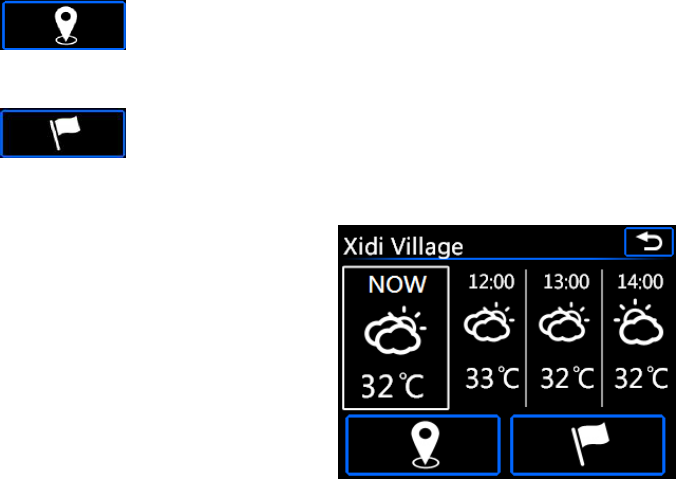
Weather: Indicate current temperature and
next three hours’ temperature.
E-Where: Available to edit scenic to prefer
group, pre-saving POI and share POI…etc.
EZ-Talk: In-time communication software,
need to work with installed APP on mobile.
Available to send text, voice message, current location, and pictures…etc. to
your contacts.
Calendar: Need to use with EZ-Account APP to connect your Google account.
- 36 -
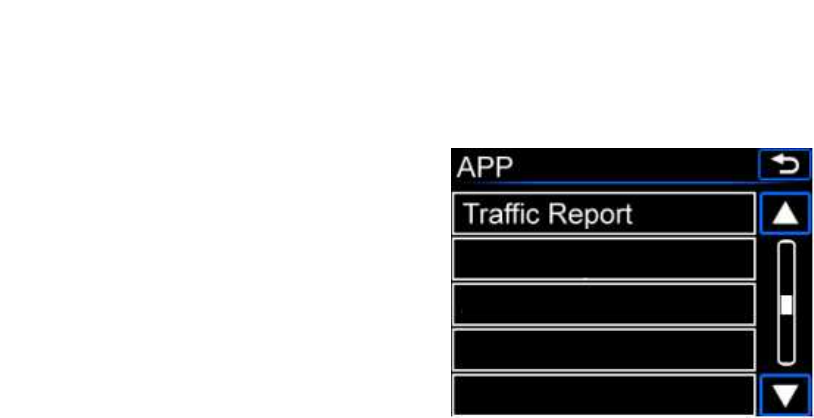
Traffic Report:
The active traffic report enables the user to pass along
information to those upcoming drivers about issues or incidents on the
road ahead.
- 37 -
News
Default setting is real-time news. Click to switch to different kind of news.
Pause / Play / Stop / Repeat
- 38 -
Weather
Indicate the weather information of your current located GPS position. The area
description is written with local default language. Besides local language and English, system
will directly indicate as English once the setting is changed to others.
:
Indicate the weather information of current position, data will be updating
automatically per 5 minutes under stable internet connecting environment.
: Supports to indicate the weather information of destination if your destination is
transmitted from E-Where APP.
- 39 -
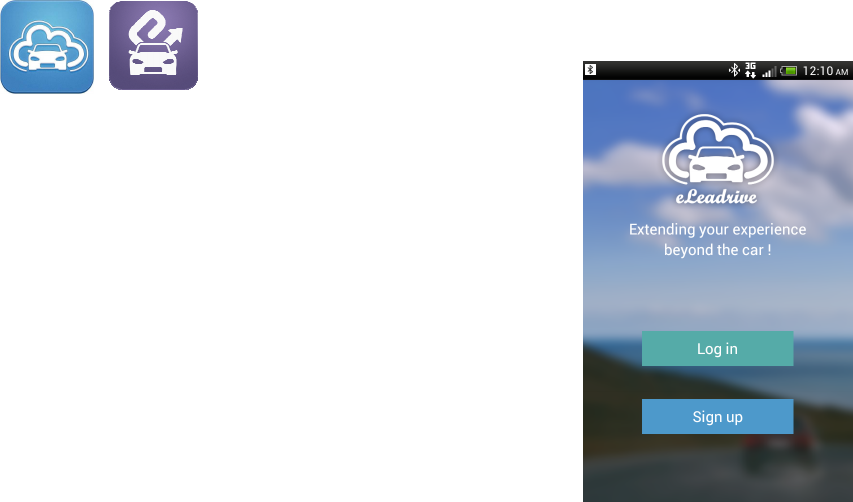
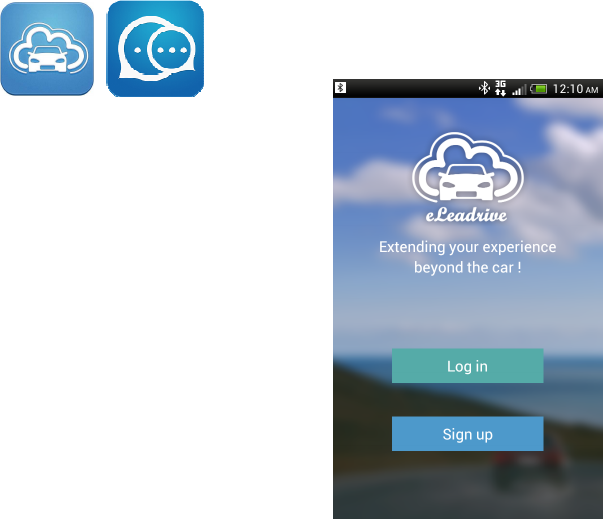
E-Where
To use this function, please download eLeadrive and E-Where APPs on your mobile in
advance.
eLeadrive: The main entrance of E-LEAD cloud service, you
can access the related information more easily by this
application.
Features:
- Bridge between your mobile and E-LEAD products
- Profile picture settings
- Supports E-Where& EZ-talk login
- 40 -
Connect with SmartHUD:
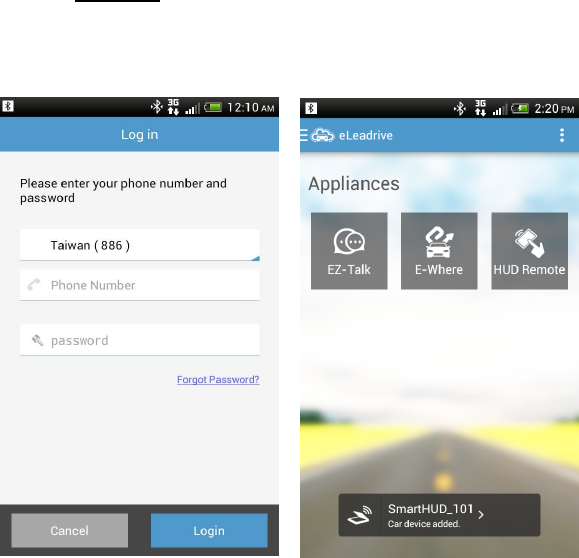
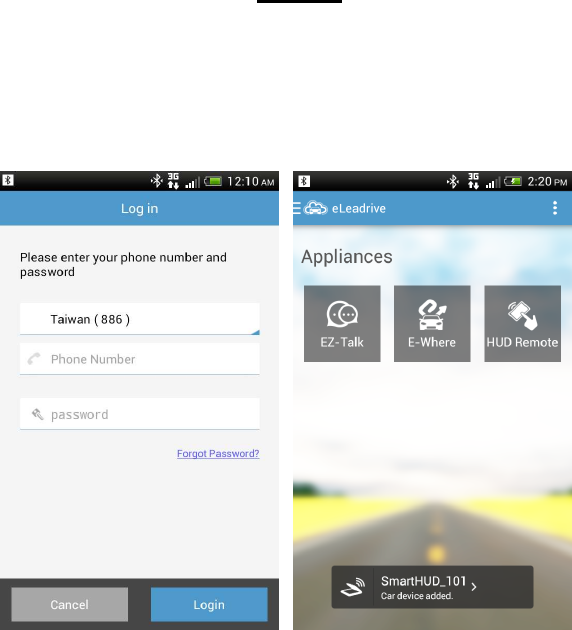
1. Click eLeadrive on your mobile to enter logging screen.
Enter your account and password.
(For initial operation, please select sign up and follow the indicated steps to finish
signing process)
2. Please enter your phone number or e-mail address and password to log in. (Refer to
the left picture as below)
3. After logging, eLeadrive
will indicate the message of
car device added at the
bottom.

- 41 -
E-Where: By E-Where, you can search/collect POIs and share it with friends. It provides a
more effective way to locate and navigate on SmartHUD.
Feature:
- Search POI: Integrate with Google maps / iOS built-in map, and locate where you are
immediately
- Favorites: collect the locations you like and save them by category
- Share Records: record the locations you sent or received from your friends
- Except for POI searching, you can set a location through map browsing
Support function at SmartHUD device:
- Synchronize the scenic list from favorite record
- Connect to Bluetooth hand-free function
- Select scenic and set as destination
: Call scenic’s phone number / : Set as destination and start navigating
- 42 -
EZ-Talk
To use this function, please download eLeadrive and EZ-Talk APPs on your mobile in advance.
eLeadrive: The main entrance of E-LEAD cloud service, you
can access the related information more easily by this
application.
Features:
- Bridge between your mobile and E-LEAD products
- Profile picture settings
- Supports E-Where& EZ-talk login
Connect with SmartHUD:
1. Click eLeadrive on your mobile to enter logging screen.
- 43 -
2. Enter your account and password.
(For initial operation, please select sign up and follow the indicated steps to finish
signing process)
3. Please enter your phone number or e-mail address and password to log in. (Refer to
the left picture as below)
4. After logging, eLeadrive will indicate the message of car device added at the bottom.
- 44 -
EZ-Talk Messenger: EZ-Talk Messenger is a FREE intstant messaging app make you be
able to chat with your friends anywhere, anytime. This app not only supports mobile
phones but also specific E-LEAD head units. You can send voice messages and location
in car, and receive overall messages on phone. What we want to provide is a seamless
experience from insinde of vehicle to outside of vehicle.
Features:
- Sync chats to SmartHUD
- Supports 4 message types: text, voice, location, picture
- One-to-one, one-to-many, and many-to-many
- Create chat or join chat room
- Personalized name of chat room
- Find EZ-Talk users nearby
- 45 -
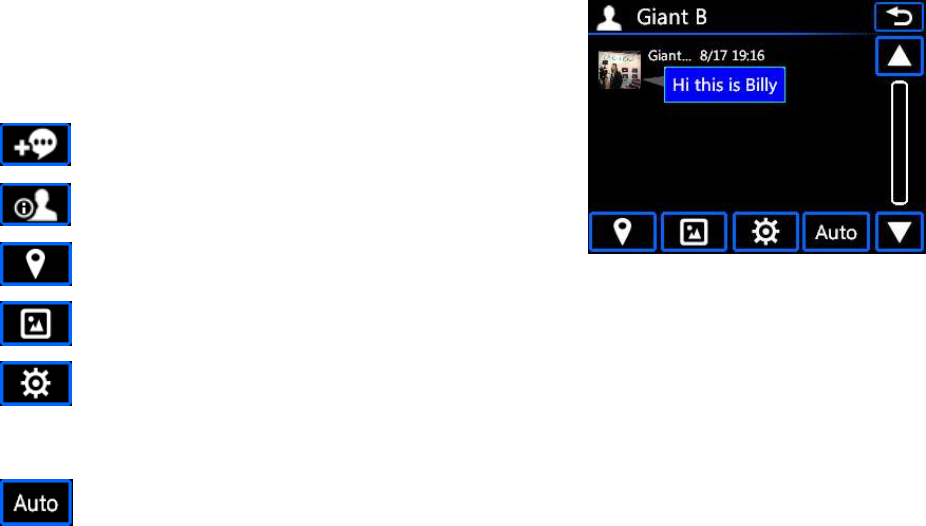
Support function at SmartHUD device:
- Sync chats from mobile
- : create new chat
- : Account information
- : Scenic transmits record, select one scenic and set it as destination to navigation
- : Picture transmits record
- : Add new member at this chatting room/Check members/Share current
position(linked with Google Maps for preview)/Leave chat
- : Set as Auto talk, turn on Auto play and Auto send function at same time.
Auto Play: auto play incoming message.
Auto Send: auto send message to this chatting room by a short press followed by
- 46 -
a hold at any page.
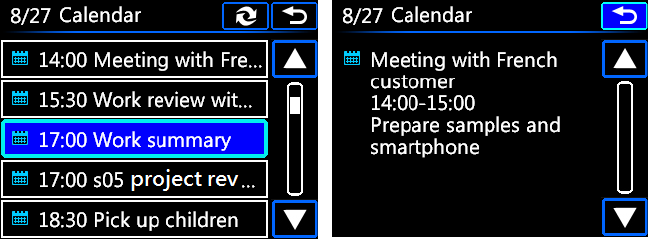
Calendar
Click EZ-Account APP on your mobile, and set your Google account to connect with
SmartHUD. After setting, you would be able to see the edited schedule.
- 47 -
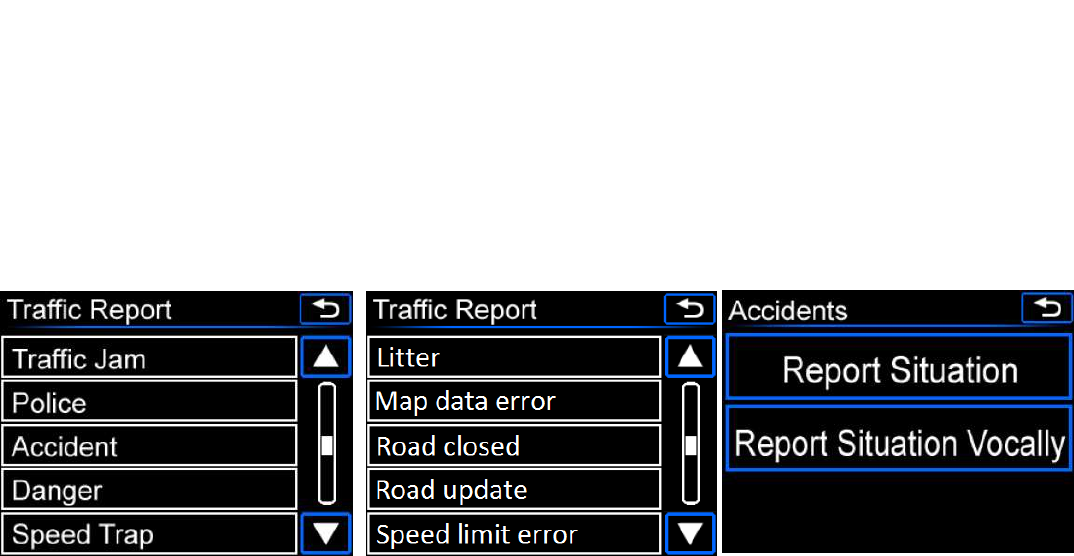
Traffic Report
The active traffic report enables the user to pass along information to those
upcoming drivers about issues or incidents on the road ahead. It also enables the
user to report problems or issues with your current position. You can choose to
report situation directly or report vocally by uploading additional voice message to
our server. While entering recording page, system will directly start recording voice
for maximum time limit as 20 seconds. If you want to end recording earlier, please
click recording button again for select send, repeat or cancel.

- 48 -
- 49 -
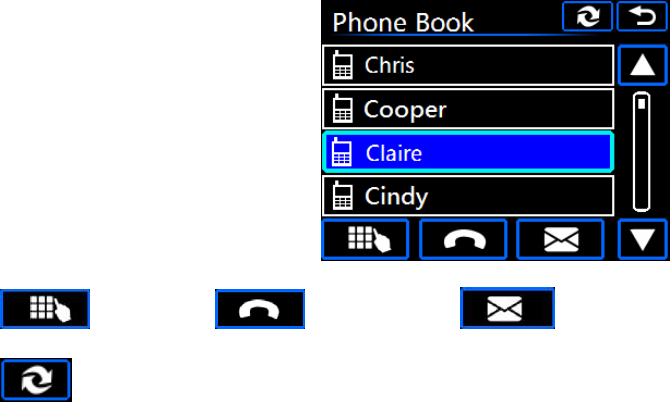
VII. Mobile
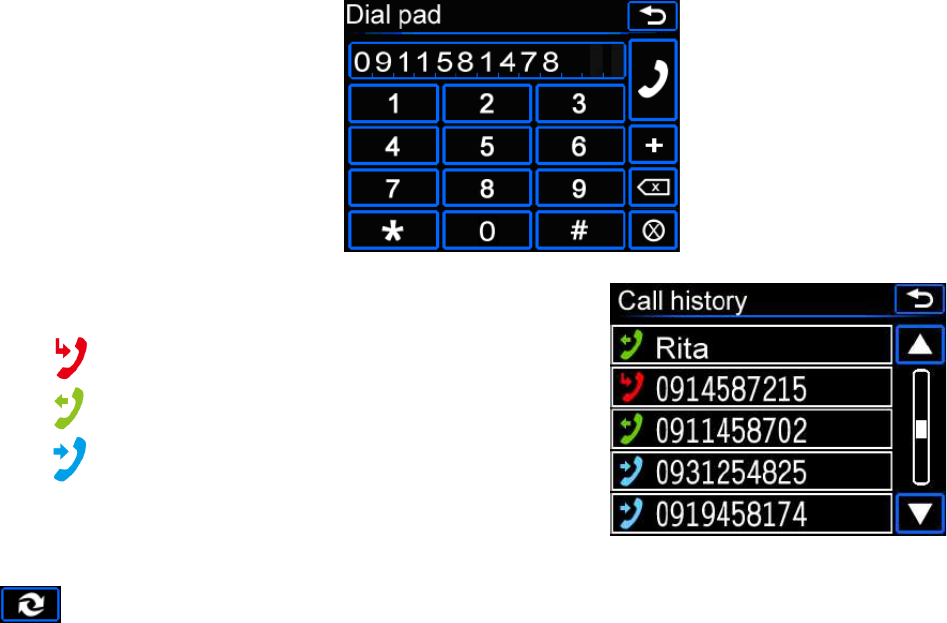
Support to loading dial pad, phoneBook, call history and messages from mobile.
Note: iOS system is not supported for blue tooth message function.
Dial pad / Call history / Message /
: Update contact list to phone book.
※
Blue tooth phone function: Based on driver’s safety is top priority, all incoming calls will
be popped up as full-screen notification besides you are staying at navigation and safety
mode. At these two modes, incoming call will inform you as notify bar from top of screen.
During the calling, it only allows to swift mode to navigation, not allows to operate other’s
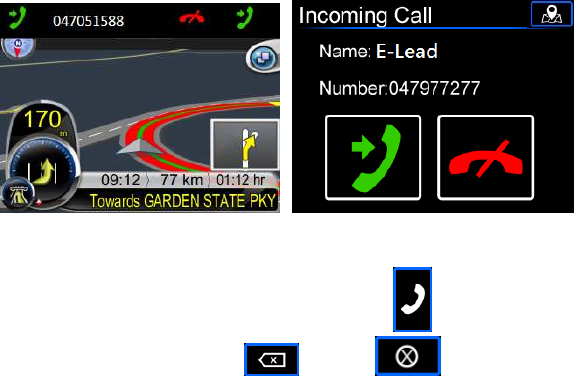
- 50 -
function. If the incoming phone number is not within contact list, it will be presented as
unknown.
Dial pad
Click the number you want to call. After keying, click for calling. If there is any mistake
during entering process, please use delete , clear for cancel.
- 51 -
Call history
Downloading from the calling history on mobile.
Missed calls
Outgoing calls
Incoming calls
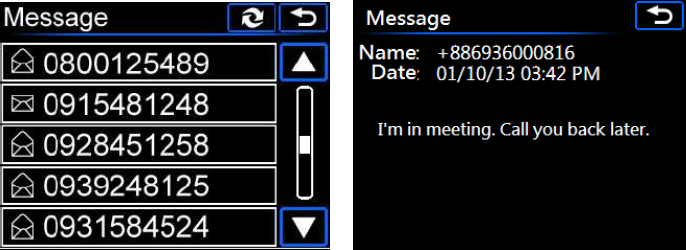
Message
: update new messages.
- 52 -
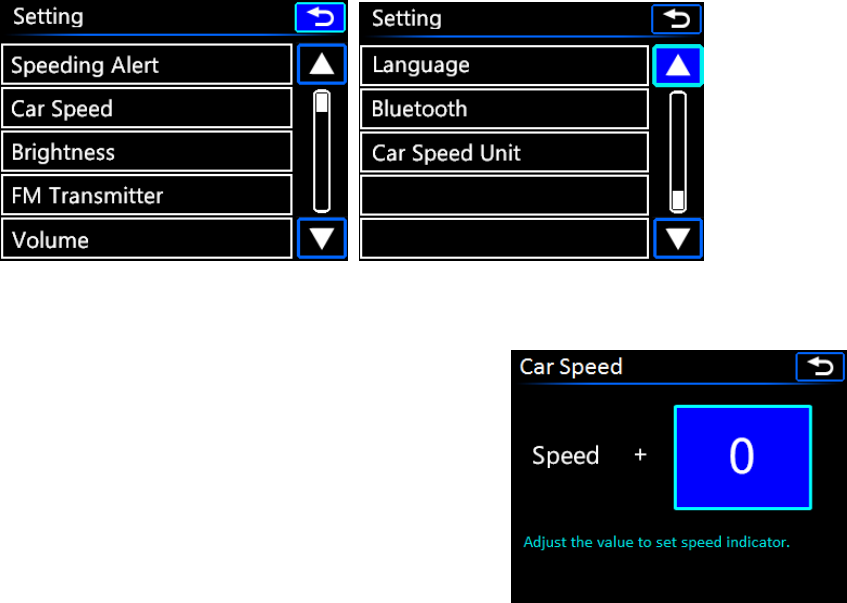
VIII. Setting
Provide personal favorite setting for Speeding Alert / Car Speed / Brightness / FM Transmitter
/ Volume / Language / Bluetooth / Car speed unit.
- 53 -
Car speed
Set the number to adjust the indicated value from 0. The
setting range is -50~50.
- 54 -
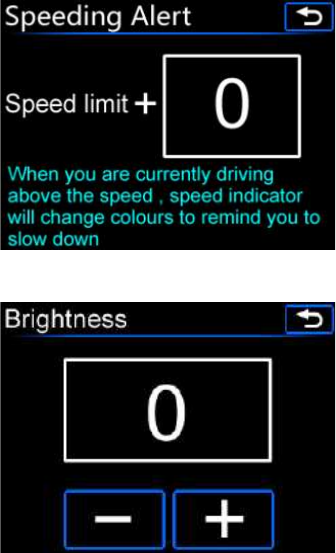
Speeding Alert
The speeding indicator will remind you by color change
when you are driving above the speed. You can set the
value from 0. The setting range is -50~50.
Brightness
The device is able to detect outside light to switch screen presentation automatically. As
personal preference you can switch by yourself, switch range is -5 to 5. Add or subtract by 1,
use + and -.
- 55 -
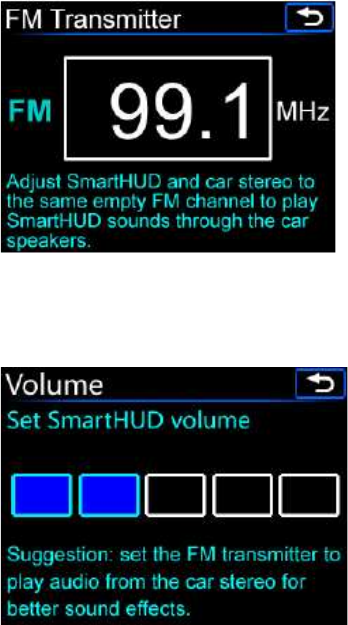
FM Transmitter
The ability to use FM Transmitter to listen to FM channels,
using the car stereo channels and switches to listen to HUD
music signal. (FM range: 88.1-107.9 MHZ)
Volume
Change to your personal preference.
- 56 -
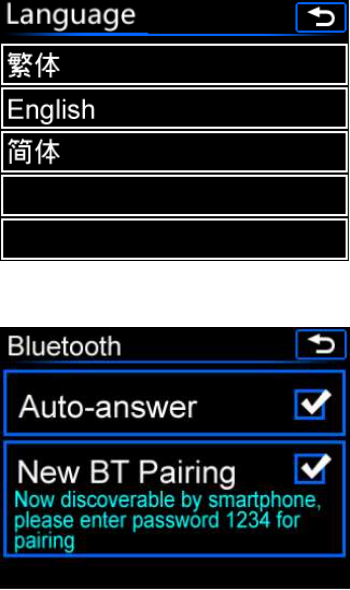
Language
According your personal preference you can set the
language. The console support English, Traditional Chinese
and Simplified Chinese.
Bluetooth
Auto-answer: Default is on. HUD will directly
answer the incoming call after it keeps ringing till 10
seconds. For turning off this function, please
cancel the block.
New BT Pairing: Default is off for auto-connecting
function. If you want to pair with other device,
please turn on the block and find device named
SmartHUD, then enter password 0000 for pairing.
- 57 -
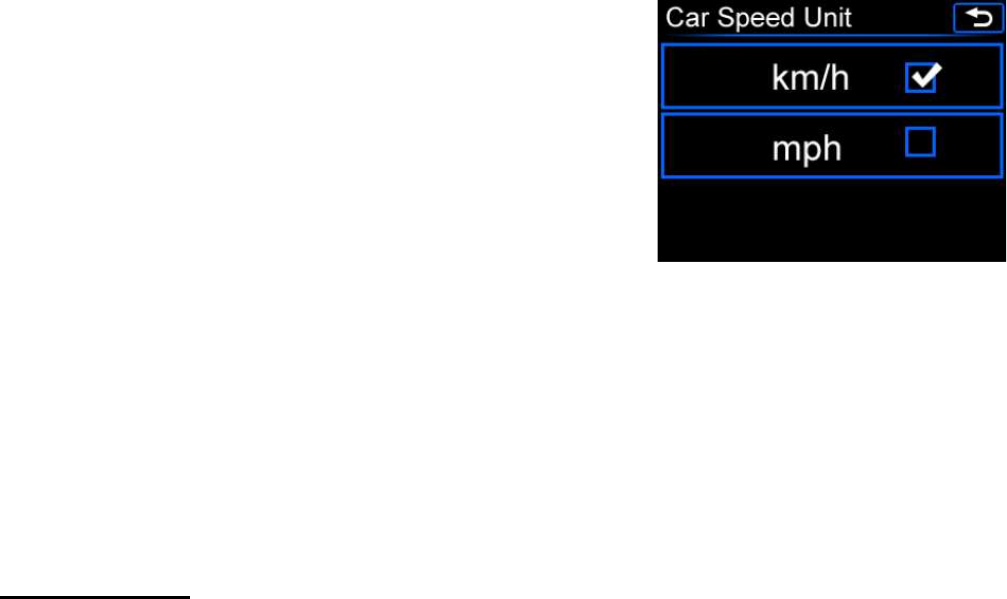
Car Speed Unit
Change the unit to your personal preference.
Troubleshooting
- 58 -
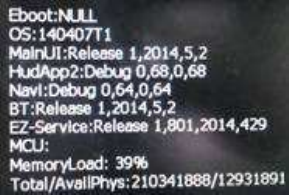
Version checking
Step 1:Please enter to primary links/setting /language's screen
Step2:Please practice how to use actuated button turn left move, and select a target toward
to up one space gesture.
Step 3:Please practice using rotated button turn right move, then select a target to move
down once space gesture.
Step4:Continues doing the following actions:「up、up、down、down、up、down、up、down」,
then you will access manual mode(as the photo below shows) and check software version。
The actions may have no effect if you select an of the target options. In the procedure, you
can not pause or stop for too long of time.
Please inform the Service Specialist of your version number to
let them solve your problem as soon as possible.
System Programs Automatic Updates
Step1:Please put update program on a Micro SD, please
notice you are not allowed to put same profile name on the same card, if you do this you be
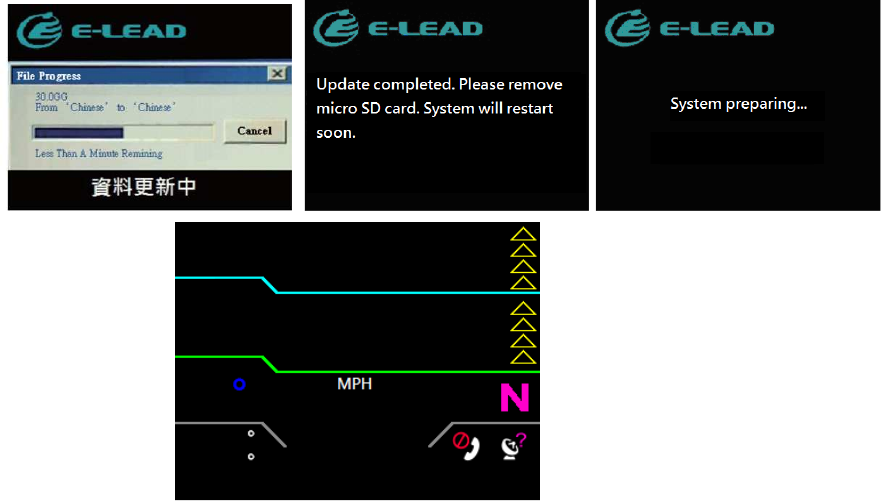
- 59 -
unsuccessful when updating.
Step2:Put Micro SD card inside the console's SD card slot, And at the same time turn off your
car.。
Step3:Turn on car engine and the automatic system will begin to update, please be patient
and wait for the update. The program will alert you when you are able to remove the SD card.
The console will also automatically restart after the update is complete.
Step4:The preparation time before the update starts may be 1 minute.
Step5:When screen switch the main screen,
please wait at least 15 seconds for continuing to use
the device.