E Lead Electronic EL451A Tire Pressure Monitoring System (TPMS) User Manual 52014510003 00 EL 451 Eng 10312014
E-Lead Electronic Co., Ltd Tire Pressure Monitoring System (TPMS) 52014510003 00 EL 451 Eng 10312014
Users Manual
Tire Pressure Monitoring System
(TPMS)
User Manual
Standalone Display Unit Type
0RGHO(/$

Content
01.Notice .........................................................................................................................
02.Accessory Line Up .....................................................................................................
03.Display Module Functions, Operations & Settings .....................................................
Appendix ........................................................................................................................
1. Signal Description .......................................................................................................
2. Unit Conversion ..............................................................................................................
3. Trouble Shooting .........................................................................................................
4. Federal Communication Commission Interference Statement...................................................
2
3
4
16
16
16
16
18
1

Notice
System Scope of Use and Warnings
ɎSystem Installation and Usage
Use of the TPMS requires that qualified personnel according to the instructions here have properly installed it.
This system is suitable for use on a passenger car, SUV and 4X4 tires.
TPMS can monitor and provide tire pressure and tire temperature in real time to help the driver control and keep
the n
ormal tire
pressure in order to reduce the fuel consumption and extend the tire life, and also reduce the
possibility of vehicle breakdown on the road or heavy incident or crash to occur.
ɎReacting to Alerts
When an alert or warning is received, reduce vehicle’s speed and proceed to a safe location to stop where the tire
can be inspected and /or serviced.
The low-pressure alert indicates that the air pressure has dropped to a selected minimum and a high-temperature
alert indicates that the temperature of the tire content has surpassed the threshold value set.
Caution
The system is a wireless RF product; therefore, it may not receive a signal due to poor environmental conditions or
incorrect installation. When the system continuously cannot receive any signal from any tire sensor for more than 10
minutes since the system has been switch on, the display will show “ERROR” and activate the alert sound. In this case,
a RF interference environment may have caused it; a driver will need to drive the vehicle to a different location.
If the display is still unable to receive any correct signal from tire sensor, the driver will need to find a nearby qualified
tire maintenance service to check or carry out maintenance. This abnormality may be caused by a damaged tire sensor
or excessive battery power consumption.
2
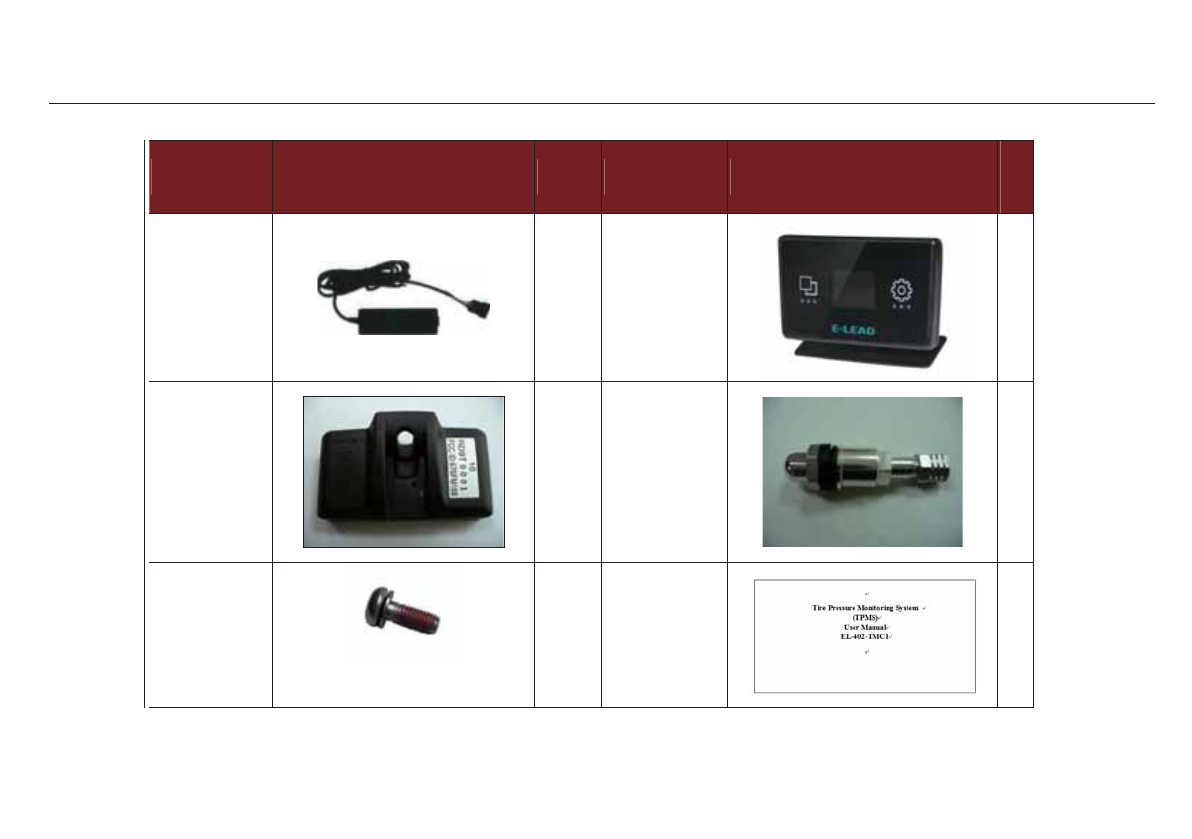
Accessory Line Up
Accessories Pictures QTY Accessories Picture QT
Y
Receiver
Module 1 Display
Module 1
Tire Sensor 4 Aluminum
Valve 4
Nylok Screw 4 User Manual 1
3
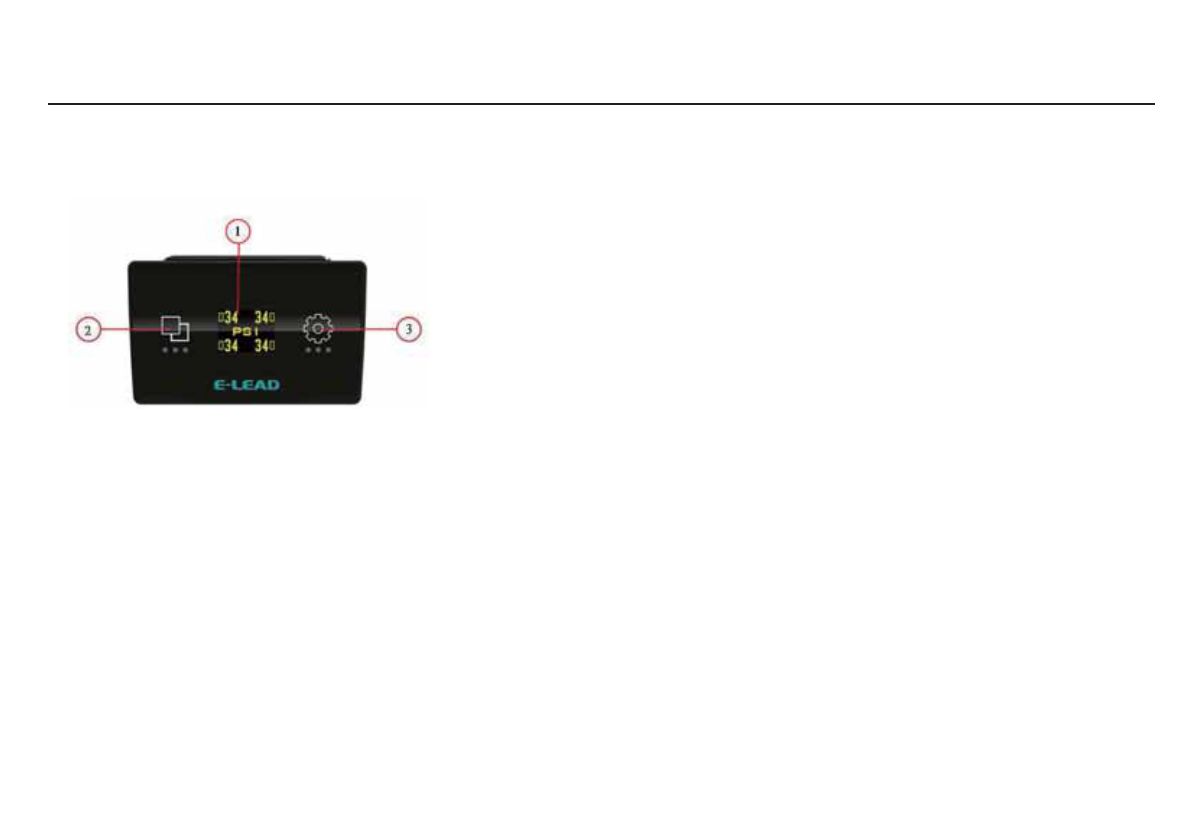
Display Module Functions, Operations & Settings
Display module operation introduction / Key press timeouts
Note:Note you are not allowed to:turn off the keypad touch sound .
(1)Display Screen: shows tire pressure, temperature and warning information etc.
(2)Touch Key:short press to select tire pressure/temperature information.
(3)Touch Key: long press to go to pair mode or setting mode. Short press to
change page,confirm or cancel alarm.
Touch Key Instructions:
1.Short press(0.5sec~2sec):change page.
2.long press(2sec):confirm.
3.long press(over 5sec):
(1)go back to the main page
(2)Turn off the alarm on warning page. (If you would like to turn on the alarm,
touch and hold the key over 5 seconds again or turn off and on the ACC
to go back to the default set.)
4.Not touch any key for 10 seconds:go back to the main page.(It does not work
on pair and swap pages. )
4
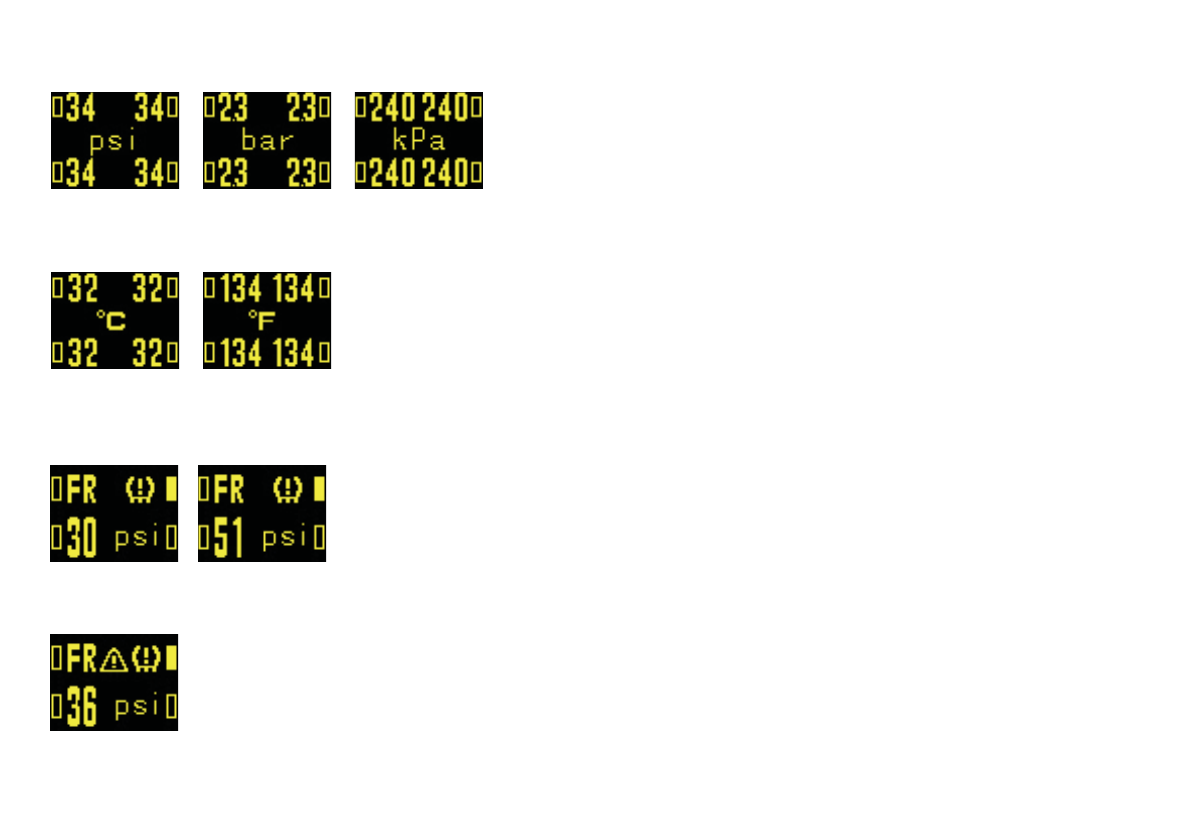
Tire Pressure Display
(1)TPMS system would detect 4 vehicle tires’ pressure and show on the
display screen, pressure unit could be switched to psi/bar/kPa.
(refer to TIRE UNIT setting)
(2)Short press to switch to tire temperature mode.
Tire Temperature Display
Warning Display
[1] Tire Pressure Abnormal
[2] Rapid Tire Leakage
(1)TPMS system would detect 4 vehicle tires’ temperatu
re and show on
the display
screen, temperature unit could be switched to degree C /
degree F
( refer to TEMP UNIT setting)
(2)Short press to switch to tire pressure mode.
(1)The display would show warning message with sound alarm if tire
pressure is lower than 75% or higher than 125% of tire pressure value
setting (refer to TIRE SET setting)
(1)When tire pressure lost 2psi (2 psi=0.1 bar=10kPa) within 30 sec.,
system would show warning screen with sound alarm.
5
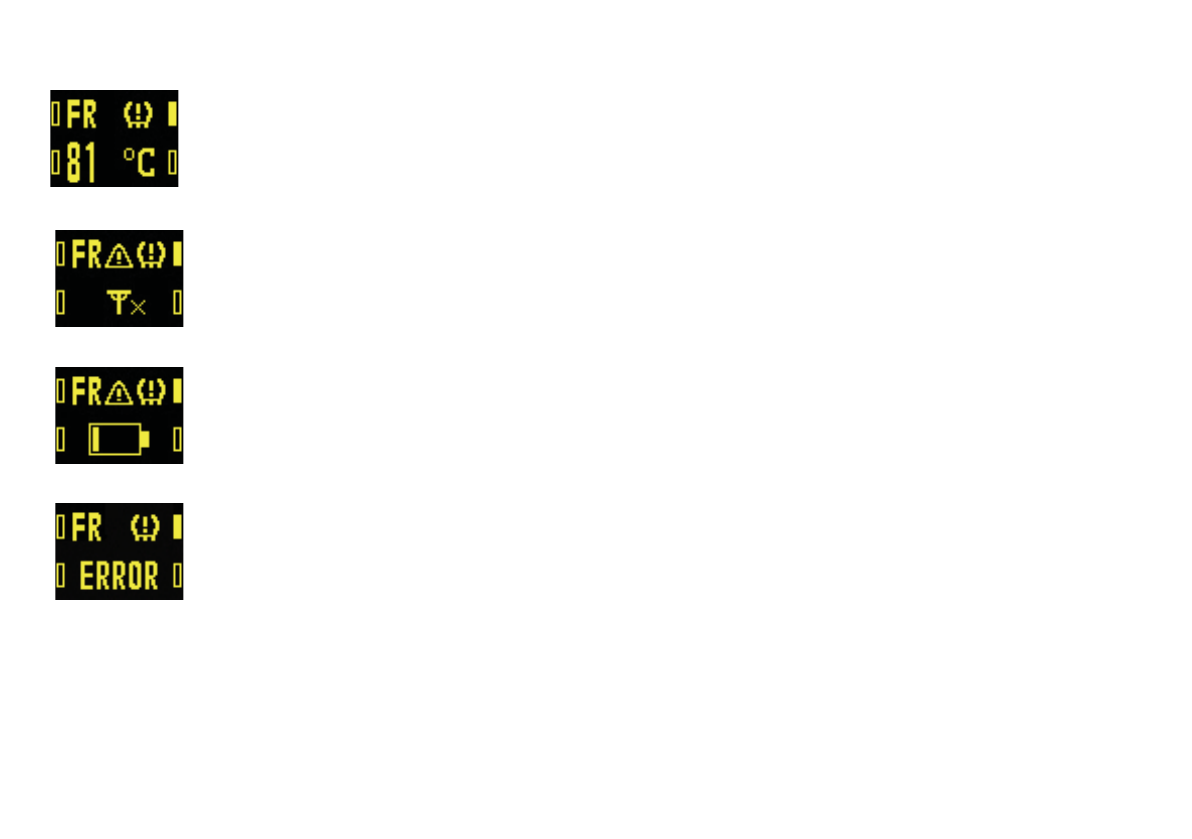
[3] Tire Temperature Abnormal
[4] Tire Sensor Signal Abnormal
(1)When tire temperature reaches 85 degree C or higher than 85 degree
C (185 degree F),system would show warning screen with sound alarm.
(1)When receiver module didn’t receive the signal of any of the tire sensors over 10
minutes, system would show warning screen with sound alarm.
[5] Tire Sensor Low Battery
[6] TPMS System Abnormal
(1) When TPMS sensor battery voltage is lower than required supply level,system
would show warning screen with sound alarm.
(1)When power on, receiver module initial process error and could not obtain signal
from tire sensors, system would show warning screen with sound alarm.
Note:Long press for 5 seconds to cancel sound alarm. If it is done, the system will have continuous
triple Beep Sound.
6
(1)Long press to enter main menu on temperature/pressure page.
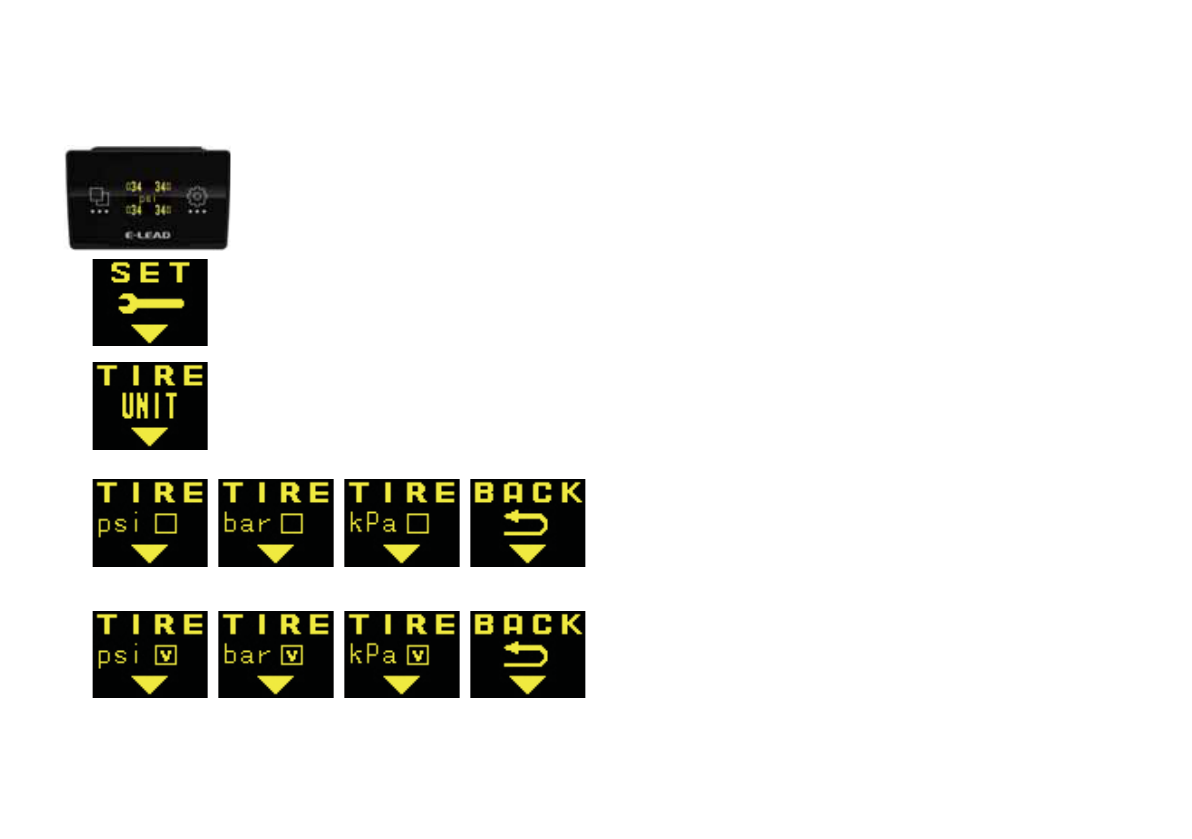
(2)Short press to switch to setting page and long press to enter setting page.
(3)Short press to Tire Pressure Unit page and long press to enter setting mode of tire pressure unit
on setting page.
(4)Short press to change psi,bar and kPa.
After selecting desired tire pressure unit,
you can touch and hold the key to put the
tick on the box to confirm the setting.
(5)Return:
a. Short press to go to return page and long
press to go back to setting page.
b. Long press for 5 seconds to go to the main
menu.
Settings
[1]TIRE UNIT: change tire pressure display format, psi/bar/kPa.
7
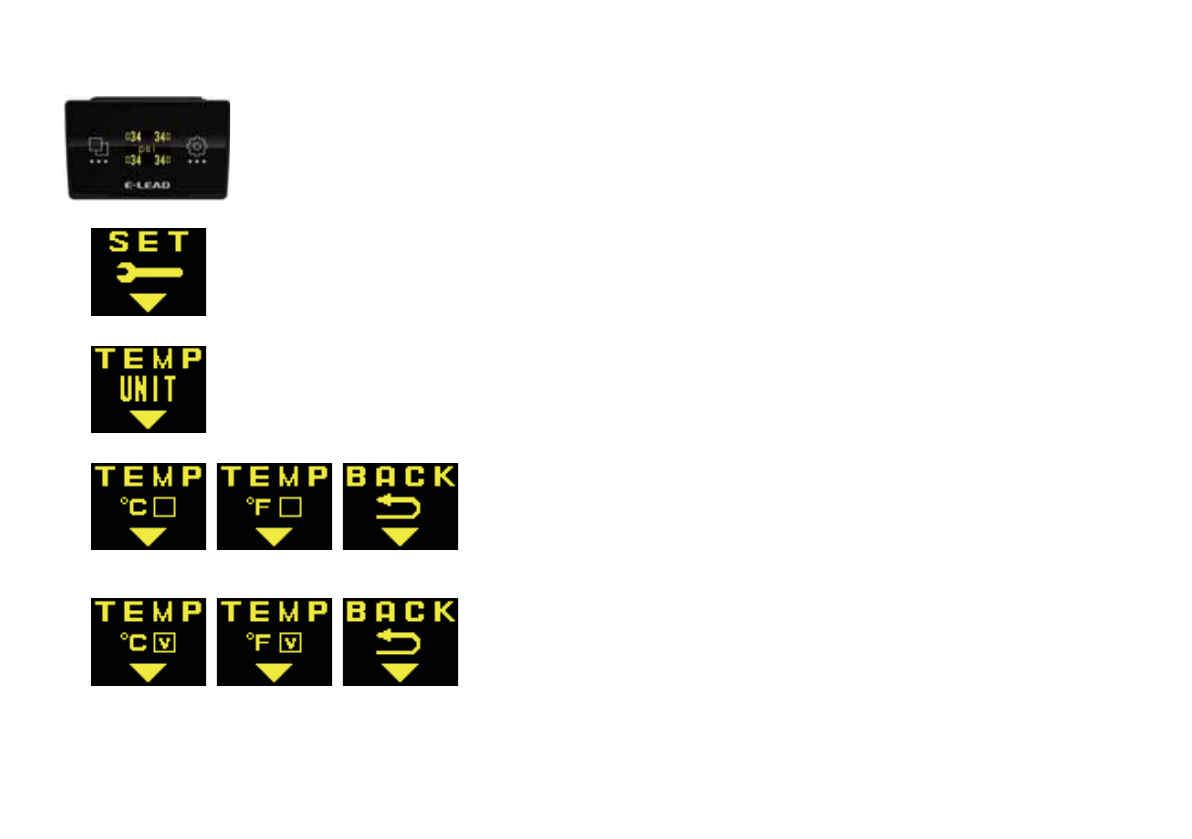
(1)Long press to enter main menu on temperature/pressure page.
(2)Short press to switch to setting page and long press to enter setting page.
(3)Short press to Tire Temperature Unit page and long press to enter setting mode of tire
temperature on setting page.
(4)Short press to change between degree C and degree F.
After selecting desired tire temperature format, you can
touch and hold the key to put the tick on the box to
confirm the setting.
(5)Return:
a. Short press to go to return page and long press to go
back to setting page.
b. Long press for 5 seconds to go to the main menu.
[2]TEMP UNIT: change tire temperature display format, degree C/ degree F.
8
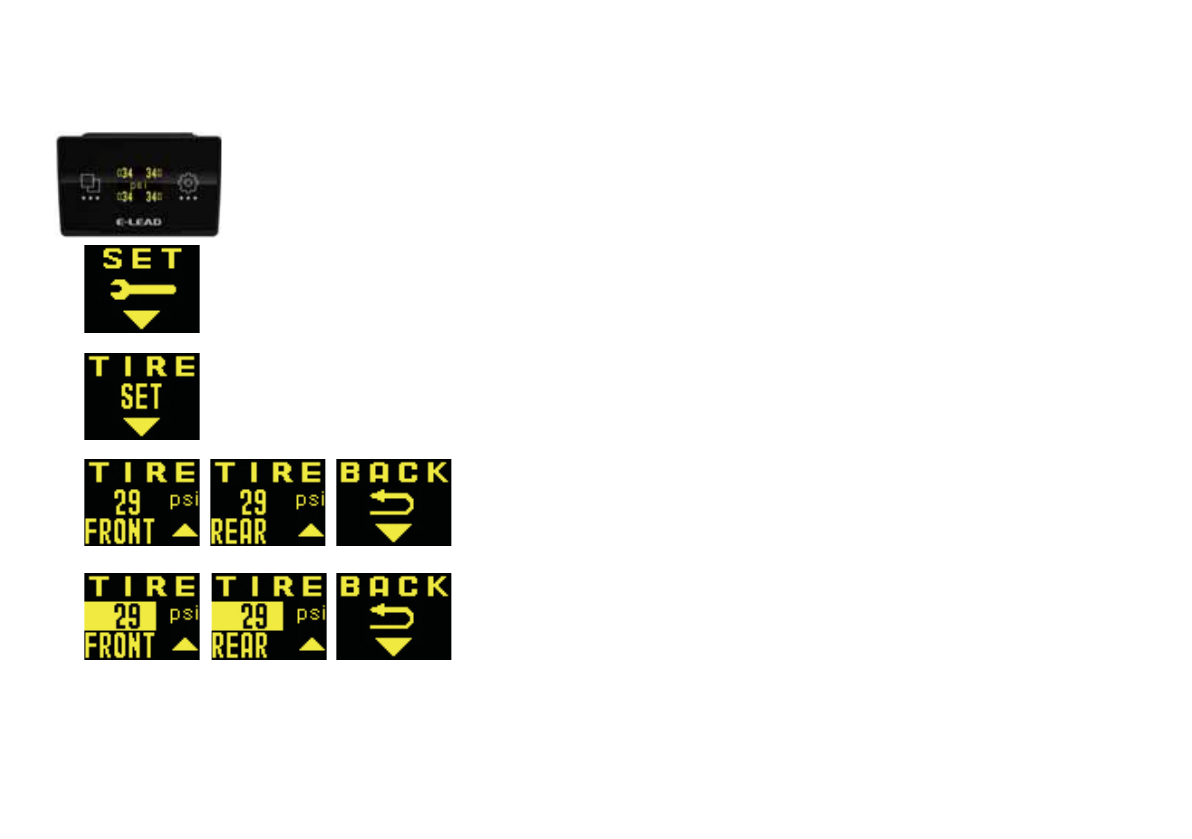
(1)Long press to enter main menu on temperature/pressure page.
(2)Short press to switch to setting page and long press to enter setting page.
(3)Short press to Tire Set page and long press to enter setting mode of Tire Set on setting page.
(4) Short press to change between front tire, rear tire and back.
After selecting desired option, you can touch and hold the key to enter
the setting of standard tire pressure value. At that time, the number area
will be highlighted and you can touch the key to add up the 1 psi(0.1 bar
,10 kPa).Once number is selected, long press to confirm and highlight
will disappear.
(5)a. Short press to go to return page and long press to go back to setting
page. b. Long press for 5 seconds to go to the main menu.
[3]TIRE SET:
Setting standard tire pressure value, so if actual tire pressure is lower than 75% or higher 125%
of it, system will alarm.
Ɂ!
Standard tire pressure setting value adjustable range.24~66 psi / 1.7~4.5bar / 170~450 kpa
Ɂ!Tire temperature setting value is 85 degree C (185 degree F), and this value is not adjustable by user.
9
Parings
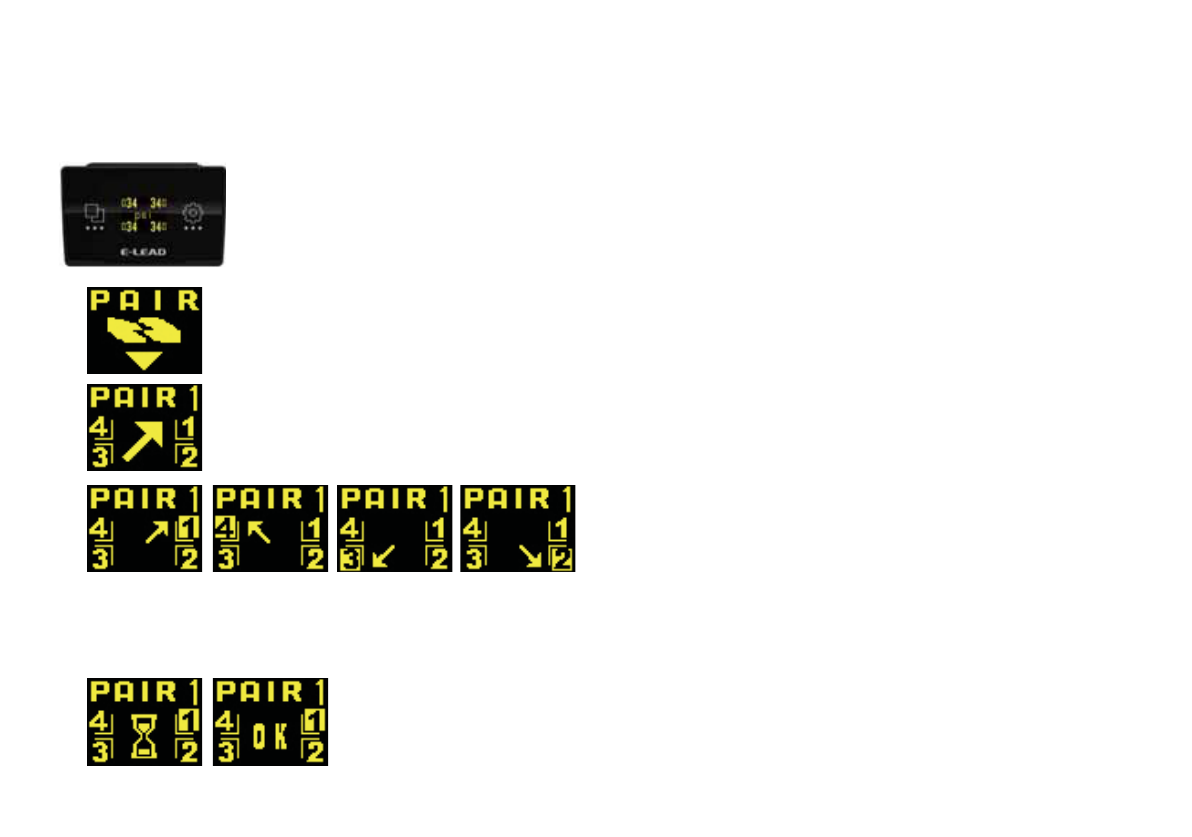
[1]PAIR 1: Once one of the vehicle tire sensors is replaced, to pair the new tire sensor with receiver module
follows single tire pairing process.
(1)Long press to enter main menu on temperature/pressure page.
(2)Short press to switch to pair page and long press to enter it.
(3)Short press to select pair 1 and long press to enter setting of pair l.
(4)Short press to select desired pairing tire senor
and long press to start pairing.
(5)Return:
a.Pairing is done.
b.During pairing process, short press to return and long press to cancel pairing.
c.Long press for 5 seconds to go to the main menu.
Ɂ
Pairing requires actual tire pressure change for
up or down over 2 psi,0.1 bar or 10 kPa within
30 sec. to activate the paring process.
Please flat or inflate the tire. When you heard
beep sound, the pairing has done.
10
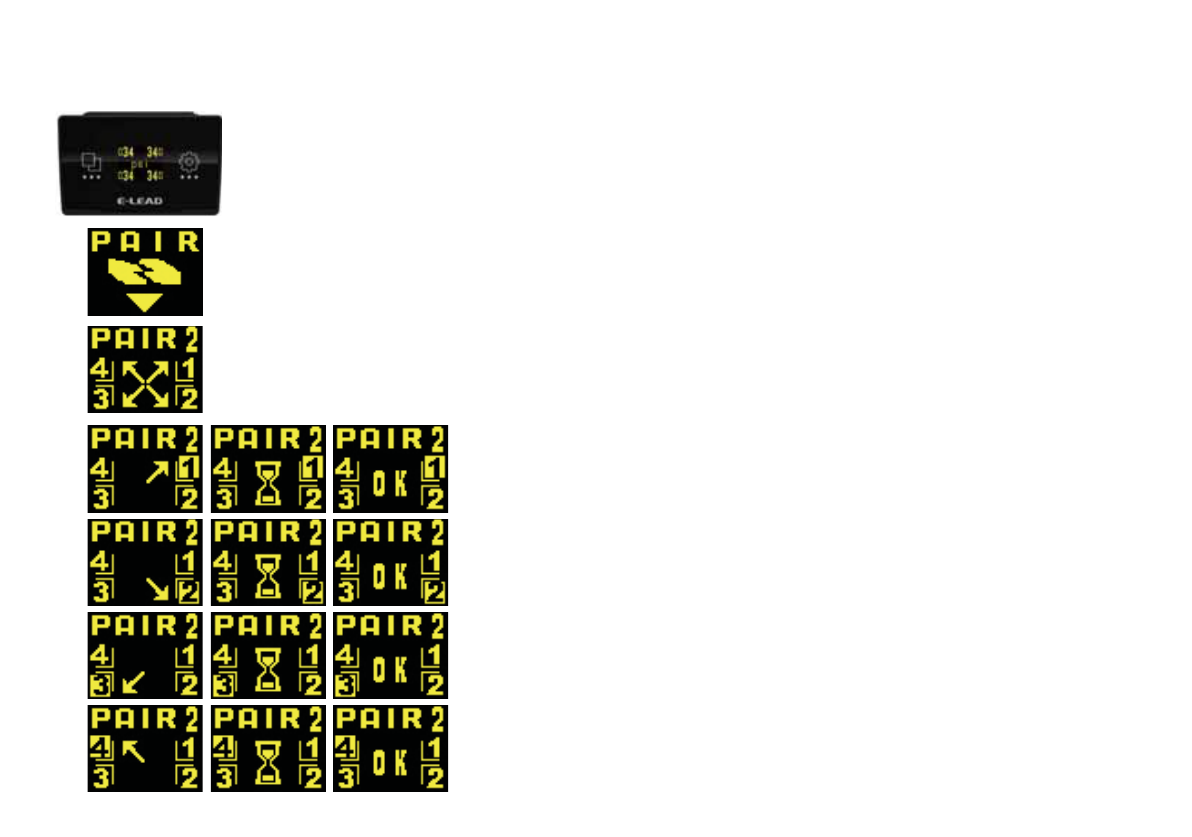
(1)Long press to enter main menu on temperature/pressure page.
(2)Short press to switch to pair page and long press to enter it.
(3)Short press to select pair 2 mode and long press to enter setting of pair 2.
(4)Short press to select desired pairing tire senor and long press
to start pairing process following sequence of RF/RR/LR/LF.
Ɂ
Pairing requires actual tire pressure change for up or down
over 2 psi,0.1 bar or 10 kPa within 30 sec. to activate the
paring process. Please flat or inflate the tire corresponding
to pairing sequence.
(5)Return:
a. Pairing is done.
b. During pairing process, short press to return and long press
to cancel pairing.
c. When stopping the pairing suddenly,the pairing process will
start from RF.
d. Long press for 5 seconds to go to the main menu.
[1]PAIR 2: Once 4 vehicle tire sensors are replaced; to pair the new tire sensors with receiver module
follows 4 tires pairing process.
11
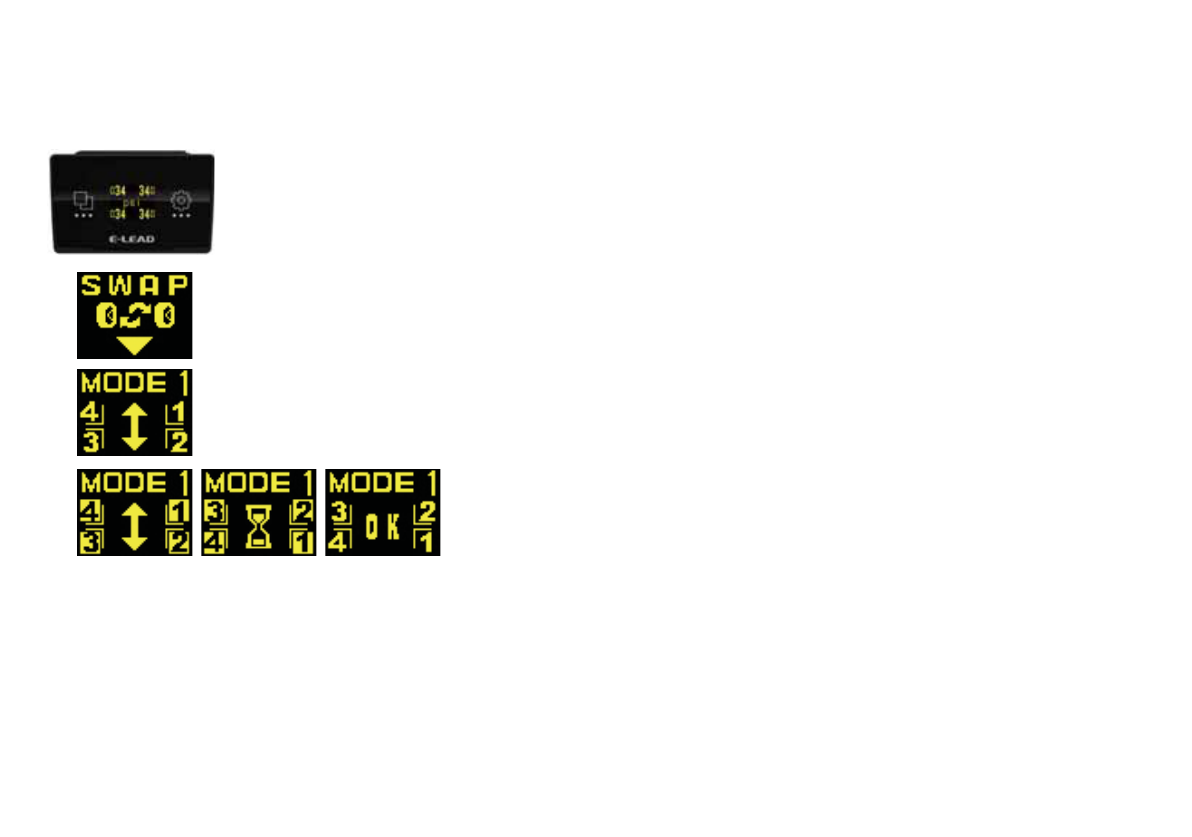
(1)Long press to enter main menu on temperature/pressure page.
(2)Short press to switch to swap page and long press to enter it.
(3)Short press to select MODE 1 and long press to enter setting of it.
(4)Before pairing, users need to exchange front and rear tire
parallel. After that, touch and hold key till heard beep sound,
it means the swap process has done.
(5)Return:
a.Swap has been done.
b.During pairing process, short press to return and long
press to cancel pairing.
c.Long press for 5 seconds to go to the main menu.
Swaps
[1]MODE 1: Front and Rear Tire Parallel Exchange, to let sensors have correct display position follows
mode 1 switching process.
12

(1)Long press to enter main menu on temperature/pressure page.
(2)Short press to switch to swap page and long press to enter it.
(3)Short press to select MODE 2 and long press to enter setting of it.
(4)Before pairing, users need to make tire diagonal exchanged.
After that,touch and hold key till heard beep sound, it means
the swap process has done.
(5)Return:
a.Swap has been done.
b.During pairing process, short press to return and long
press to cancel pairing.
c.Long press for 5 seconds to go to the main menu.
[2]MODE 2: Tire Diagonal Exchange, to let sensors have correct display position follows mode 2
switching process.
13

(1)Long press to enter main menu on temperature/pressure page.
(2)Short press to switch to swap page and long press to enter it.
(3)Short press to select MODE 3 and long press to enter setting of it.
(4)Before pairing, users need to make tire exchanged.
After that, touch and hold key till heard beep sound,
it means the swap process has done.
(5)Return:
a.Swap has been done.
b. During pairing process, short press to return and long
press to cancel pairing.
c. Long press for 5 seconds to go to the main menu.
[3]MODE 3: Swap front pair of tires to rear and exchange left
and right position, to let sensors have correct
display position follows mode 3 switching process.
14
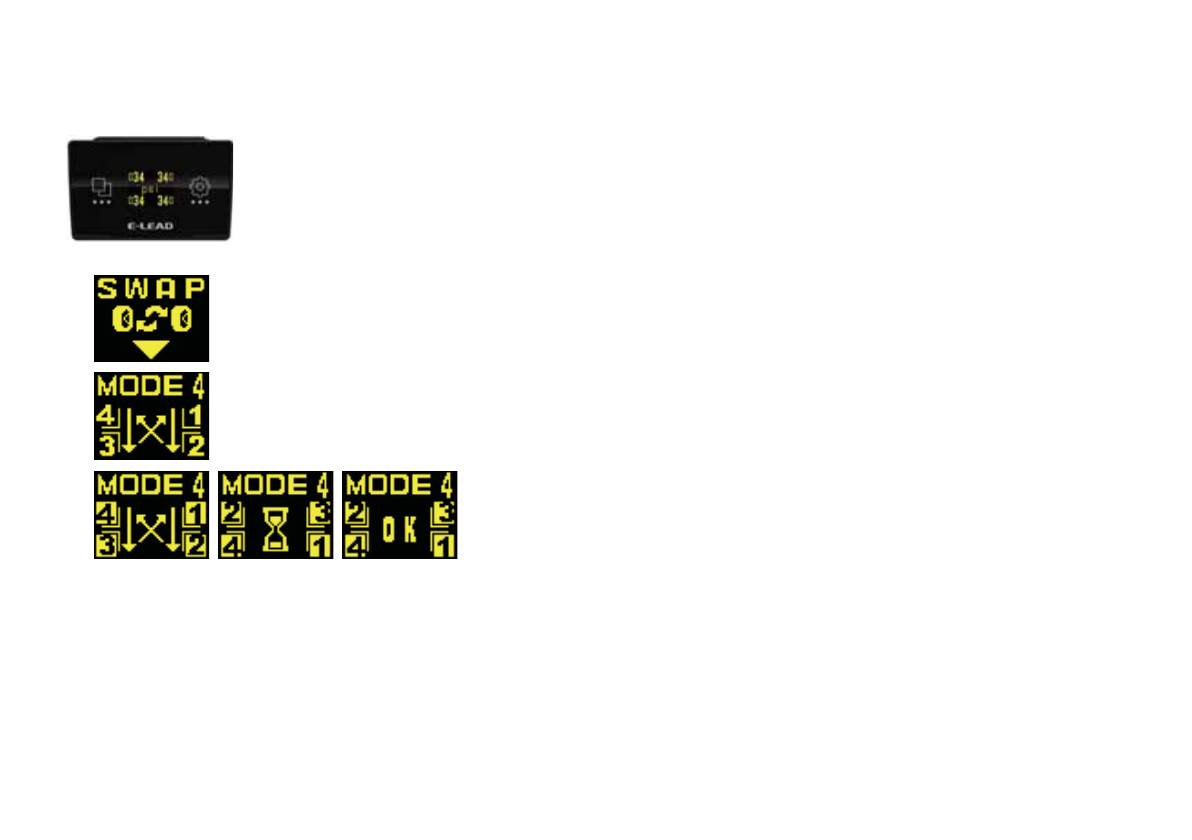
(1)Long press to enter main menu on temperature/pressure page.
(2)Short press to switch to swap page and long press to enter it.
(3)Short press to select MODE 4 and long press to enter setting of it.
(4)Before pairing, users need to make tire exchanged.
After that,touch and hold key till heard beep sound,
it means the swap process has done.
(5)Return:
a.Swap has been done.
b. During pairing process, short press to return and long press
to cancel pairing.
c. Long press for 5 seconds to go to the main menu.
[4]MODE 4: Right Side and Left Side Tire Parallel Exchange, to let sensors have correct display position
follows mode 4 switching process.
15
Appendix
1. Signal Description
2. Unit Conversion: 0.1 bar=10 kPa=14.5psi
bar Pressure unit, 1bar=0.1N/mm
2
(Newton=kg x acceleration gravity, mm
2
Km
square area)
psi Tire pressure unit
kPa Tire pressure unit
ʚDegree C unit, Degree C = (Fahrenheit-32)*5/9
ʛFahrenheit
3. Trouble Shooting
Failure Phenomenon Possible Cause Troubleshooting steps
1. ACC and GND clips didn’t well
connect to car wires.
Make sure ACC and GND clips
well connected to car wires
1. No Response after
connecting to the
power. 2. Faulty of the display and
receiver module device.
Return the product, get the new
product from distributors and
conduct a pairing process again.
16

1. Failure on ID pairing or do not
conduct a pairing process.
Conduct a pairing process again.
Conduct a pairing process again.
2. Display not receiving
any signal from the 4
sensors after
connecting the power. 2.Failure on the display or receiver. Return the product, get the new
product from distributors and
conduct a pairing process again.
1. Failure on ID pairing.3. Display is not receiving
any signal of tire sensor. 2. Failure on the Tire Sensor. Return the product, get the new
product from distributors and
conduct a pairing process again.
4. No response on the
touch button.
Failure on the receiver's circuit. Return the product, get the new
product from distributors and
conduct a pairing process again.
1. Tire on the wrong position. Ask the Tire Shop to place the
tires in the correct position.
5. Pressure (or Temperature)
shows in wrong number
and position . 2. Wrong ID setting on 4 tires.
Failure on the receiver's circuit.
Failure on the receiver's circuit.
Reset the ID using PAIR 2 (4
wheels) setting.
Return the product, get the new
product from distributors and
conduct a pairing process again.
Return the product, get the new
product from distributors and
conduct a pairing process again.
6. No alarm sound of the
display module.
7.The number on display
shows wrong information.
17

4. Federal Communication Commission Interference Statement
This equipment has been tested and found to comply with the limits for a Class B digital device, pursuant to Part 15 of the
FCC Rules. These limits are designed to provide reasonable protection against harmful interference in a residential
installation. This equipment generates, uses and can radiate radio frequency energy and, if not installed and used in
accordance with the instructions, may cause harmful interference to radio communications. However, there is no guaran-
tee that interference will not occur in a particular installation. If this equipment does cause harmful interference to radio or
television reception, which can be determined by turning the equipment off and on, the user is encouraged to try to correct
the interference by one of the following measures:
Reorient or relocate the receiving antenna.
Increase the separation between the equipment and receiver.
Connect the equipment into an outlet on a circuit different from that to which the receiver is connected.
Consult the dealer or an experienced radio/TV technician for help.
FCC Caution: Any changes or modifications not expressly approved by the party responsible for compliance could void
the user's authority to operate this equipment.
This device complies with Part 15 of the FCC Rules. Operation is subject to the following two conditions: (1) This device
may not cause harmful interference, and (2) this device must accept any interference received, including interference that
may cause undesired operation.
.
18