E Lead Electronic EL707D In-Vehicle Entertainment System Transceiver User Manual DVDM800 Operation Manual 1119
E-Lead Electronic Co., Ltd In-Vehicle Entertainment System Transceiver DVDM800 Operation Manual 1119
Users Manual

DVDM800 Operational Manual
FCC
This device complies with part 15 of FCC Rules. Operation is subject to the
following two conditions: (1) This device may not cause harmful interference (2)
This device must accept any interference received, including interference that
may cause undesired operation.
Tested to comply with FCC Standards FOR HOME OR OFFICE USE.
Caution: Any changes or modifications in construction of this device which are
not expressly approved by the party responsible for compliance could void the
authority to operate the equipment.
Note: This equipment has been tested and found to comply with the limits for a
Class B digital device, pursuant to part 15 of the FCC Rules. These limits are
designed to provide reasonable protection against harmful interference in a
residential installation. This equipment generates uses and can radiate radio
frequency energy and, if not installed and used in accordance with the
instruction, may cause harmful interference to radio communications. However,
there is no guarantee that interference will not occur in a particular installation.
If this equipment does cause harmful interference the radio or television
reception, which can be determined by turning the equipment off and on, the
user is encouraged to try to correct the interference by one or more of the
following measured:
- Reorient or relocate the receiving antenna.
- Increase the separation between the equipment and receiver.
- Connect the equipment into an outlet on a circuit, different from that to
which the Receiver is connection.
- Consult the dealer or an experienced / TV technician for help.
Warning
To reduce the risk of fire or shock hazard, do not expose this DVD player to
rain or moisture.
Caution
This product utilizes laser. Use of controls or adjustments or performance of
procedures other than those specified herein may result in hazardous radiation
exposure. Do not open cover and do not repair yourself. Refer servicing to
qualified Personnel.

Contents
l Precaution
l Check point before operating
l General Features
l Identifications of controls
n Changing AV Source Signal
n Watching TV (Optional)
n Adjusting Volume Control
l Playing Disc
l Set up
l Controlling Monitor Function
l Components
l Products Standards
Precaution
1. Do not remove the cover.
To reduce the risk of electric shock and keep the quality of product, please
do not remove the cover.
Please follow up by the instruction of wiring Diagram in installation Guide.
2. Keep small articles out of the reach of children.
Store small articles (screws etc.) in places not accessible to children. If
swallowed, consult physician immediately.
3. Stop using immediately if a problem appears.
When problems appear, stop using the system immediately and contact
the dealer from whom you purchased the equipment. Some problems
which may warrant immediate attention include a lack of sound, noxious
smoke being emitted from the unit, or foreign objects dropped inside the
unit.
4. Do not operate the equipment while driving.
Do not change setting while driving. If operation requiring a prolonged
view of the display is required, stop the vehicle in a safe location before
attempting operation.
5. Do not insert 3.5 Inch Disc.
Disc size of 3.5 Inchs will be not acceptable to operate.

6. Do not use this equipment outside vehicle. Do not use this equipment for
purposes other than those listed for a vehicle. Failure to do so may result
in an electric shock or an injury.
7. Keep foreign objects out of the monitor compartment.
Keep foreign objects out of the monitor compartment. Also, avoid placing
your hands in the area where it might interfere with the monitor’s
operation.
8. Stop the vehicle before carrying out any operation that could interferes
with your driving.
If the operation of the unit (such as opening or closing of the monitor, etc.)
interferes with your driving, stop the vehicle in a safe location before
attempting operation.
9. Temperature
Be sure the temperature inside the vehicle is between +60 and ℃-10 ℃
before turning your unit on.
10. Maintenance
If you have problems, do not attempt to repair the unit by yourself. Return
it to your purchasing dealer.
Check point before operating
1. Turning On or Off
i. Push the OPEN switch forward will release the TFT-LCD monitor and
it will drop down slightly. Pull the monitor downward until a comfortable
viewing angle is reached. The internal friction will hold the screen in
position while the system is in use.
ii. Press the POWER button on the unit or the remote control will turn the
system on or off alternately. When in use, the internal backlighting will
illuminate the controls.
iii. After the unit has been turned on and is displayed in a picture, adjust
the viewing angle by pivoting the screen to optimize the picture
quality.
iv. Remember to turn the unit off the pivot the LCD to the locked position
when not in use.
2. Dome Lights Operations
i. The lights are controlled by one position, a dip switch.
ii. Press the button to the ON position will turn the lights on.
iii. The OFF position will need to press the button again.
Note: Refer to the Installation Manual for the wire connections. Do not
leave the vehicle unattended with the dome light switch in the ON position,
as this could result in a discharged battery.
3. Connect Additional AV Input
i. The Audio/Video inputs may be connected to Audio/Video device
directly or a Junction Box which connected to Video Cassette
Player (VCP), video game system, or other Audio/Video devices.
ii. The additional AUX Video Input will accept audio/video input
through the RCA jacks located on the side of the unit. The
audio/video device could be a video game system, video Camera,
or other input device.
4. Regional Code
i. Both the DVD player and disc are coded by region.
ii. These regional code numbers must match in order for the disc to
play.
iii. This unit’s code number is region number 1. Other regional
codes cannot be played in this unit. If not, the unit will display
“Invalid Region.”
iv. Types of Discs your DVD will play:
DVD disc – DVD disc which contain video.
Audio disc – A disc that contain audio files (for example, a Cd-R
with downloaded MP3 files).
VCD disc – VCD disc which contain video.
5. FM Transmitter Mode (Optional)
i. If this unit has FM Transmitter function, please adjust FM
frequency which you can hear the clean Audio sound.
ii. For the details, please refer FM Transmitter Mode.

Operation Manual
Important Notice
It is unlawful in most jurisdictions for a person to drive a motor vehicle which is
equipped with a television viewer or screen that is located in the motor vehicle
at any point forward of the back of the driver’s seat, or that is visible directly or
indirectly to the operator of the motor vehicle.
Warnings
Do not use any solvents or cleaning materials when cleaning the video
monitor.
Do not use any abrasive cleaners as they may scratch the screen. Use only a
lightly dampened lint free cloth to wipe the screen if it is dirty.
Lock the LCD screen in the fully closed position when not in use.
Before putting on headphones always adjust the volume setting at the lowest
position.
Remember to leave the dome light switch in the off when the vehicle is
unattended, as the dome lights, if left on, can drain the vehicle’s battery.
Caution children to avoid touching or scratching the screen, as it may become
dirty or damaged.
Safety Precaution
For safety reasons, when changing video media it is recommended that the
vehicle is not in motion, and that you do not allow children to unfasten
seat-belts to change video media or make any adjustments to the system.
System adjustments can be accomplished using the remote control unit, while
seat belts remain fastened. Enjoy your DVDM800 entertainment system but
remember-safety of all passengers remains the number one concern.

Precaution
1. Do not operate the equipment while driving.
Do not change setting while driving. If operation requiring a prolonged view
of the display is required, stop the vehicle in a safe location before
attempting operation.
2. Stop using immediately if a problem occurs.
When problems occur, stop using the system immediately and contact the
dealer from whom you purchased the equipment. Some problems which
may warrant immediate attention include a lack of sound, noxious smoke
being emitted from the unit, or foreign objects dropped inside the unit.
3. Do not use this equipment outside vehicle.
Do not use this equipment for purposes other than those listed for a vehicle.
Failure to do so may result in an electric shock or an injury.
4. Keep foreign objects out of the monitor compartment.
Keep foreign objects out of the monitor compartment. Also, avoid placing
your hands in the area where it might interfere with the monitor’s operation.
5. Do not remove the cover.
To reduce the risk of electric shock and keep the quality of product, please
do not remove the cover.
6. Keep small articles out of the reach of children.
Keep small articles such as screws etc. in places not reachable to children.
7. Stop the vehicle before carrying out any operation that could
interferes with your driving.
If the operation of the unit such as opening or closing of the monitor, etc
interferes with your driving. Stop the vehicle in a safe location before
attempting operation.
8. Temperature
Be sure the temperature inside the vehicle is between -60℃ and -10℃
before turning your unit on.
9. Read and understand the operating instructions before you operate
the unit.
Do not allow other persons to use this system until they have read and
understood the operating instructions.
10. Maintenance
If you have problems, do not attempt to repair the unit by yourself. Return it
to your purchasing dealer.
Operation Manual
DVDM800
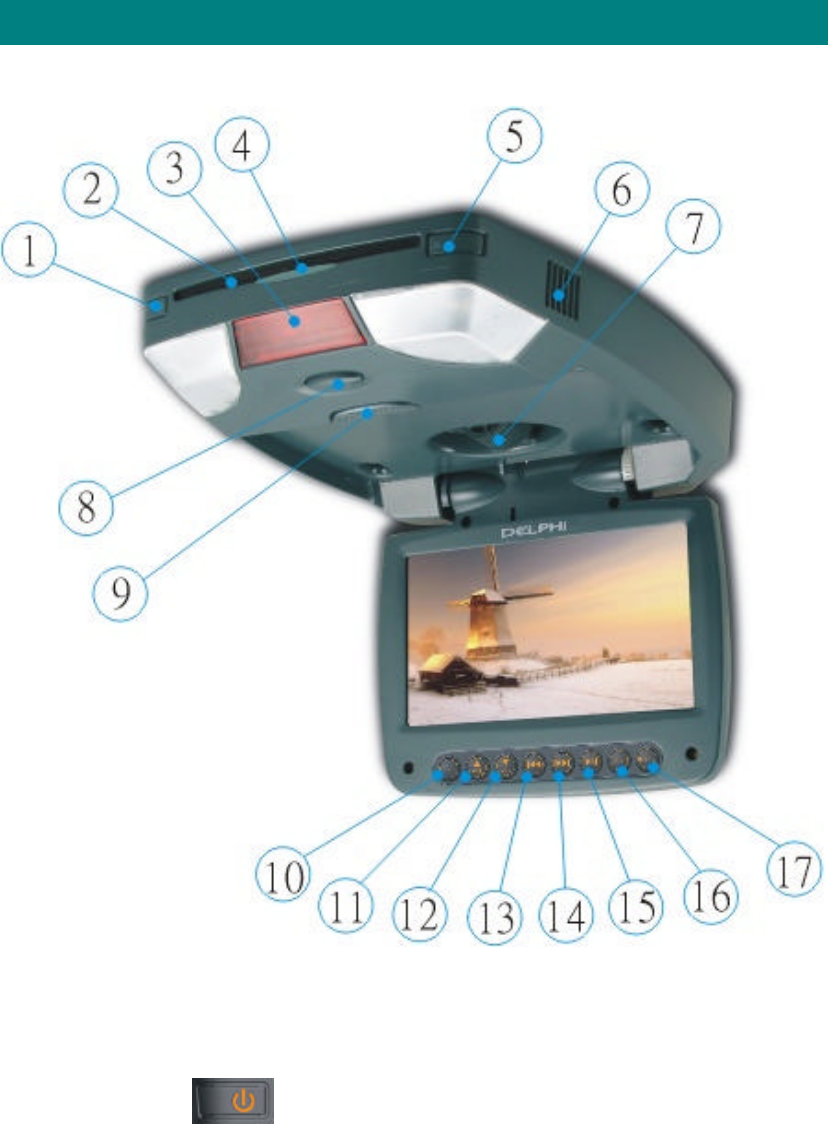
Figure 1: Control and Indicators of DVDM800 Diagram
Main Function Descriptions
1. Power Button
The Power button is backlighted in orange color when the system power is
off but the vehicle’s engine is turned on. The backlighted Power button is off
when vehicle’s engine is turned off.
2. DVD Disc Insertion Slot
3. Infrared Transmitter and Sensor
Use to transmit audio to infrared (wireless) headphones. It also allows the

remote control to operate the DVDM800.
4. DVD Disc Slot Indicator
A green backlighted LED that indicates disc slot location so users could see
where to insert a disc. The LED will not be on when there is no disc in the
DVD player.
5. Eject Button
Eject button will be backlighted in orange color. Once the vehicle’s
accelerator is turned, the EJECT button LED would be on in orange color.
As long as there is a disc in the DVD player, the EJECT pushbutton LED is
on in orange color no matter the power is on or off. On the other hand,
when there is no disc in the DVD player, the EJECT pushbutton is off. It
also can eject a disc without the system power on.
6. DVDM800 Ventilation Opening
There are two cooling fan vents on both sides of the DVDM800. They are
designed to flow out inside hot air to cool down the DVDM800 when it
reaches certain high temperature.
7. TFT Angle Adjusting Knob
Turn the knob to the right is to adjust TFT angle to a larger obtuse angle. In
contrast, turn the knob to the left is to adjust TFT to a smaller angle.
8. Dome Light Switch
Control dome light power. Press once to turn on the light; press again to
turn it off.
9. Release Button
Release TFT panel when it is closed.
10. OSD (On Screen Display) Button
This OSD pushbutton provides you to access to DVD function specific
without a remote control. Button actuation accesses on-screen display of
player functions/adjustment.
11. Volume Up Button
During playing movies and music, the Volume Up works as a sound
adjuster to turn up the audio volume. However, when an OSD function is
enabled, the Volume Up pushbutton works as a direction guider that leads
the OSD highlighter in upwards direction. It also could be called Up
Pushbutton.
12. Volume Down Button

During playing movies and music, the Volume Down works as a sound
adjuster to turn down the audio volume. However, when users enable the
OSD function, the Volume Down pushbutton works as a direction guider
that leads the OSD highlighter in downwards. It also could be called Down
Pushbutton.
13. Previous Button
During playing DVD movies and CD or MP3 music, the Previous button
offers users an option to skip to go back last chapter or last song. However,
when users enable the OSD function, the Previous pushbutton works as a
direction guider that leads the OSD highlighter in leftwards. It also could be
called Left Pushbutton.
14. Next Button
During playing DVD movies and CD or MP3 music, the Next pushbutton
offers users an option to skip to next chapter or next song. However, when
the user enables the OSD function, the Next button works as a direction
guider. This will lead the OSD highlighter in rightwards. It also could be
called Right Button.
15. Play/Pause
This button is compounded used to enter the play mode and to pause the
playing disc.
16. A/V Switch Button
This button offers a function for users to switch among A/V1, A/V2, A/V3,
and DVD player. When users have connected a video game console in
A/V2, they need to switch to the A/V2 to play the video game and so forth.
17. Mute
Mute button offers a function for users to eliminate movie’s sound
immediately. When the sound is muted, the movie still plays without
sounding. Users press mute again would resume audio back.
Remote Control Operation
Battery Installation
Before attempting to operate DVDM800 Remote Controller, please install the
batteries as described below.
1) Turn the Remote Control face down. Take the battery cover up by

using a fingernail.
2) Install two “AAA” batteries. Make sure that proper polarity (+ or -) is
observed.
3) Align the cover tabs with the remote control and press down until the
cover clicks.
The remote control will operate the DVDM800. It is not a universal remote
control and will not control other equipment that was made by other
manufacturers.
If the remote controller doesn’t operate properly:
1. Check the polarity + / - of the batteries. (Dry-Cell)
2. Check if the batteries are drained.
3. Check if remote sensor is blocked by obstacles.
4. Check if there is any fluorescent lighting near by.
DVD Remote Function Descriptions
1. DVD Power ON/OFF Button (is also available on the DVDM800 unit)
Press this button to turn the DVDM800 on. The DVD or selected video
source will be displayed on screen and the picture will appear in a few
seconds. Press the button again to turn the DVDM800 off.
2. Eject Button
The disc will be ejected from disc mechanism.
3. Number Buttons
This button allows the user to enter the numbers from 0 to 10 for selection
of CD tracks and chapters.
4. OSD (On Screen Display) Button
Display and adjust DVD player’s functions that allow the user to access
the main menu that includes four main sections DVD/VDC/CD/MP3,
Monitor, FM Transmitter, A/V Source, and Exit.
5. Menu Button
This button allows the user to access the DVD player main menu.
6. Status Button
Displays and adjusts DVD functions
7. Return Button
Return a main menu of VCD
8. Display Button
Display Menu, this include Title, Chapter, Time, Audio, Subtitle, Angle, and
Repeat.

9. A/V Switch Button
Select A/V channels among AV1, AV2, AV3, and DVD
10. Mute Button
Press this button to mute the audio. Press the button again resumes
sound to the previously set level.
11. Scan Backward Button
This allows the user to search in a backward direction at 2, 4, 8, and 15
times the normal speed.
12. Scan Forward Button
This allows the user to search in a forward direction at 2, 4, 8, and 15 times
the normal speed.
13. Stop Button
DVD disc play will be stopped.
14. Play/Pause Button
Press this button to activate the play mode while a disc is loaded into the
disc compartment. Press this button again while in playing mode will
freeze the disc. Press this button again after paused the disc, it resumes
back to playing.
15. Previous Button
This could select the previous chapter or track on a disc.
16. Next Button
This could select the next chapter or track on a disc.
17. Zoom/Program Button
This is a compound button that could zoom in and out scene when it is
playing DVD and VCD discs. In addition, under CD mode, this could
choose songs to memorize playing type such as 3rd > 9th > 5th > 2nd. The
player will play the songs in order.
18. Subtitle Button
This function is available only if the DVD discs support multilingual
pronunciation and subtitles. Press this button to choose your language.
19. Search Button
Press this button to skip to targeted time and chapter so the user could
choose what s/he wants to watch movie clips or songs in the timeframe.
20. Slow Motion Button
Press this button to search forward at slow motion, CD & MP3 has no this
function.
21. Up (Increase) Button
Use this button to increase volume of any specific subject. Or, it could
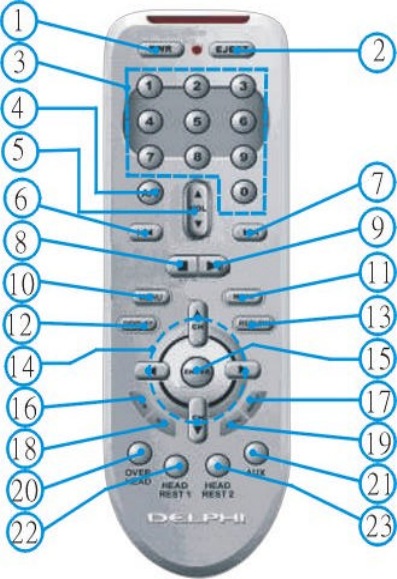
move OSD highlighter to upwards.
22. Down (Decrease) Button
Use this button to decrease volume of any specific subject. Or, it could
move OSD highlighter to downwards.
23. Enter Button
This button is used to confirm a selected item to process its function.
24. Audio Button
Press this button to enter the Audio Menu to setup sound track and stereo
sound effect selection functions. This function is available when discs have
supported this feature.
25. RND/INT Button
This is a compound button that allows the user to listen songs for a short
period of time. Under the CD and MP3 modes, each song could have
ten-second trail for users to listen to the songs whether they like it or not.
26. A-B Button
This button allows the user to repeat play of a DVD, CD or MP3 from point
A to point B.
27. Repeat
This button is used to repeat various positions. Repeat key could choose
single trace, single song, or all discs repeating play function. DVD: repeat
DISC, TITLE, and CHAPTER. VCD: is unavailable. CD & MP3: repeat
DISC and Trace.

Turning the DVDM800 On or Off
1. Pressing the TFT LCD release button that will unlock the LCD screen and it
will drop down smoothly about three seconds. After the TFT LCD screen is
dropped down, you could use your thumb to turn the TFT LCD angle adjust
knob to the right. The angle will be increasing slightly until a comfortable
viewing angle is reached. The TFT LCD angle adjust knob will hold the
screen in your desired position while the system is in use.
2. Pressing the power button on the DVDM800 unit or the remote control will
turn the system on or off alternately. When the system is in use, the internal
backlighting will illuminate the controls on the TFT LCD panel.
3. After the DVDM800 unit has been turned on and is displaying an initial DVD
logo picture, the system is ready to use. You may adjust the TFT LCD angle
to view the best picture quality.
4. It is strongly recommended that you should remember to turn the
DVDM800 off and close the TFT LCD to the locked position when not in
use.
The Use of the DVDM800 Dome Lights
Operation
The dome lights are integrated into the DVDM800. Those dome lights are
controlled by a two step pushbutton switch. Press the dome lights switch in dip
position to turn on the lights. Press it again to release the pushbutton from the
dipped position to turn off the lights. Do not leave the vehicle unattended with
the dome light switch in the on position, as this could result in a discharged
battery.
Remote Sensor
The DVDM800 incorporates infrared sensors which relay signals from the
remote control to allow the unit to be controlled simply by pointing its remote
control at the remote sensor eye. Please keep dust off from the infrared cover.
Too much dust may affect the efficiency of remote controller.
Accessories
Wireless (Infrared) Headphones
The DVDM800 includes a built-in infrared transmitter for use with Delphi
wireless headphones (Part Number XXXXXX). The headphones have a dual
band design, which has two bands, which are A band and B band. The

frequency for the A band is from 2.3 MHz to 2.8 MHz. The B band’s frequency
is from 3.2 MHz to 3.8 MHz. On the headphones, there is a switch that can be
switched between A and B band. The volume can be adjusted by using the
controls on each headphone. The wireless headphones must be used within a
line of sight from the transmitter as infrared transmission. See the
documentation accompanying your Delphi wireless headphones. The
headphones need to have two AAA batteries to power on.
Wireless Headset Special Features
• Dual band channels
• Uses high frequency infrared light to assure a clean signal for clear
reception
FM Modulator
The DVDM800 is compatible with an RF modulator that allows you to listen to
the DVDM800 audio signal by turning your vehicle’s radio to the selected
frequency, (90.1 to 100; a total of 100 channels). This feature is accessed by
using the FM transmitter interface on the OSD functions (On/Off, select).
Whenever the RF modulator is on, broadcast reception on the vehicle’s radio
will be poor. Turning off the FM modulator will allow normal radio reception.
AV Switch Box and the AV1, AV2, and AV3
The AV1 input may be connected to an outside system of DVD player, video
game system, or other audio/video device. To access the AV1, AV2, and AV3
inputs, simply just connect the desired player A/V jacks into the AV Switch Box
anyone on the AV1 or AV2 or AV3. Then press A/V-switch pushbutton on the
bottom of TFT front panel. Press AV switch pushbutton once to AV1; press AV
switch pushbutton again to switch to AV2; press AV switch pushbutton again to
switch to AV3. On the remote controller AV pushbutton will be the same
procedure as the AV pushbutton on the TFT front panel. Turn the video source
component on with its power button or remote control. The DVDM800 is now
ready to play the audio and video signals from the source connected to any AV
input on the AV switch box.
DVD Basics
To get the optimum use out of the DVD section, make sure you read this
section completely.
Regional Coding
Both the DVD player and disc are coded by region. These regional codes must
match in order for the disc to play. If the codes don’t match, the disc won’t play.
This unit’s code is region 1. Other regional codes cannot be played in this unit.
The unit will display “REGION ERROR”
NOTE: The DVDM800 is used with Macronvision Anti-duplicate Technology,
which means you cannot use this product to copy any types of discs.
Types of Discs your DVD will play
DVD Discs – DVDs which contain video.
CD Discs – Audio CDs containing musical or sound content only.
MP3 Discs – A disc that contains audio files (for example, a CD-R with
downloaded MP3 files).
VCD Discs – VCD discs which contain video.
Loading and Playing Discs
Before you load a disc, make sure that it is compatible with the player and that
there has no a disc inserted in the player already.
NOTE: The following Discs CANNOT be used with this player.
MiniDisc
CD-I, CD-ROM, CD-RW, DVD-ROM
To load and Play a Disc
When you press the Power button the unit will turn on and display the source
selected. Select DVD mode and insert the disc (Label Up) into the disc
compartment. When the disc is half way in it will be automatically pulled in and
play will begin.
NOTE: If the DVDM800 is not in DVD mode, it will not accept the disc. Do Not
Force the disc into the slot as this could damage mechanism.
Setting and Adjustments
This chapter describes how to set and how to adjust using the on-screen
SETUP menu.
Using the Setup Display
Using the setup display, you can do the initial setup, adjust the picture and
sound quality, and set the various outputs. You can also set a language for the
subtitles and the setup display and limit play back by children.
NOTE: You can display the OSD only when the player is in stop mode.
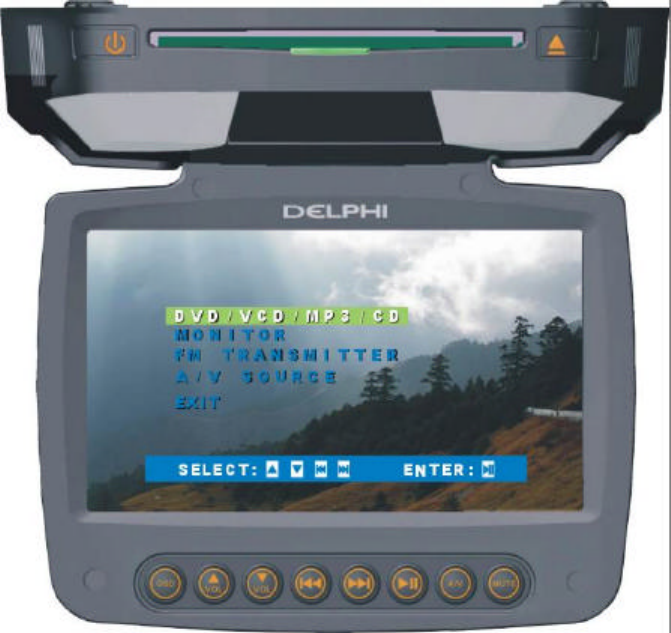
OSD (On-Screen Display) Language Menu
Press OSD pushbutton, users could enter the four main selections for
setting. Once users get into the main screen as shown in Figure, user
could use VOLUME DOWN pushbutton to move the highlighter to a
desired section, for example, the user wants to set up
DVD/VCD/MP3/CD format, s/he places the highlighter on the first
selection of the four as shown in Figure. The options of
DVD/VCD/MP3/CD are various depending on the format of discs. The
options would display only if the disc has the built-in features; otherwise,
it would not display.
Figure: Main section of OSD
As soon as the desired selection is highlighted, you should press
pushbutton to confirm that this selection is chosen. So, you would enter
the main screen of DVD/VCD/MP3/CD selection as shown in Figure
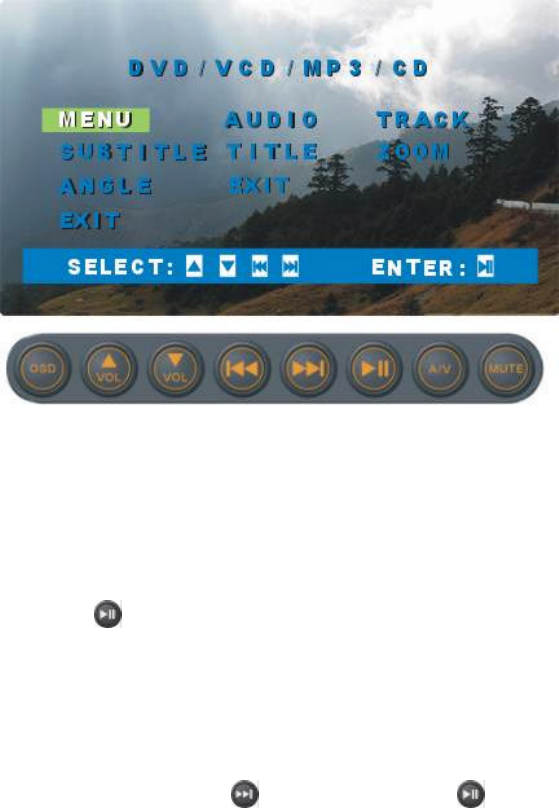
below.
Figure: The main Menu of DVD/VCD/MP3/CD
Under the DVD/VCD/MP3/CD selection, there are seven options that
users could choose from:
1. Menu setting: move the highlighter on the Menu option and
press button to enter the sub-options of DVD/VCD/MP3/CD. The
Menu options could vary with different discs (DVD/VCD/MP3/CD)
from one to another.
2. Audio setting: you should move the highlighter to the right on Audio
option by pressing button. Then press to confirm that you want
to make some settings in Audio as shown in Figure. The Audio
option is designed to choose audio features that have been built in
discs, such as stereo, mono, different languages pronunciation,
Dolby and so on. However, this Audio option varies with
DVD/VCD/CD discs.
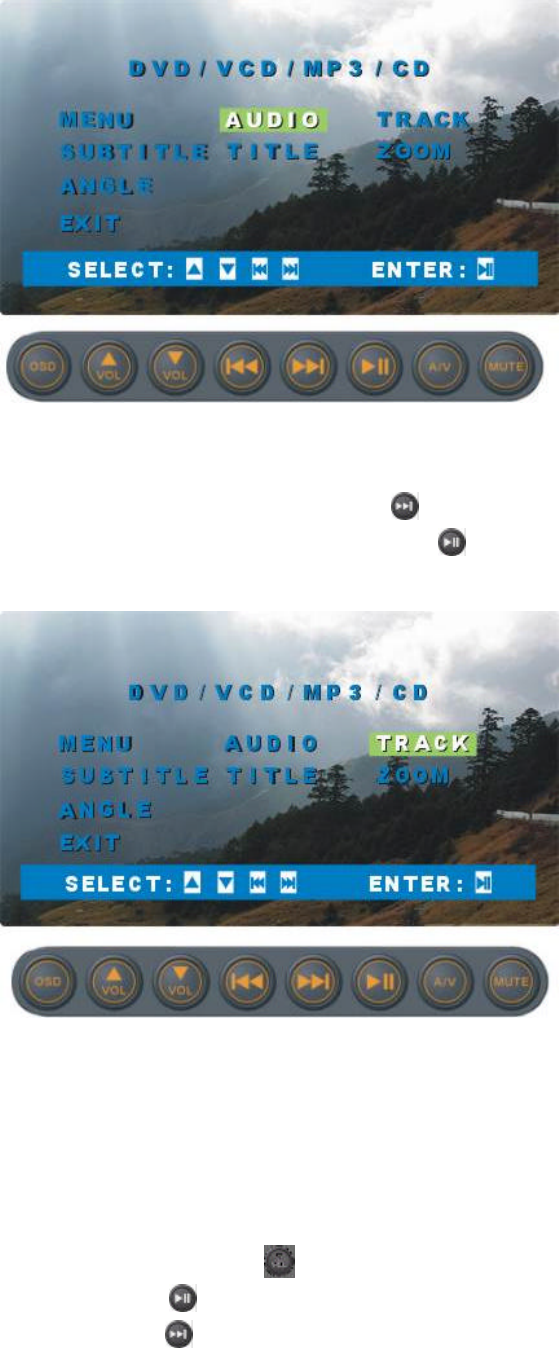
Figure : Audio Setting
3. Track selection: you should press to move the highlighter to the
right on the Track option then presses to confirm for getting into
the Track option. See Figure for Track Setting.
Figure : Track Selection
As soon as the user has entered the Track option setup, a
single-numerical screen would pop up for users to choose. See
Figures ?, ?, and ? For example, when you want to choose the 87th
track, you may do:
1. Press Volume Down to highlight “8” then press
Play/Pause pushbutton to move the “8” into the green bar.
2. Press Next pushbutton to choose “7” then press
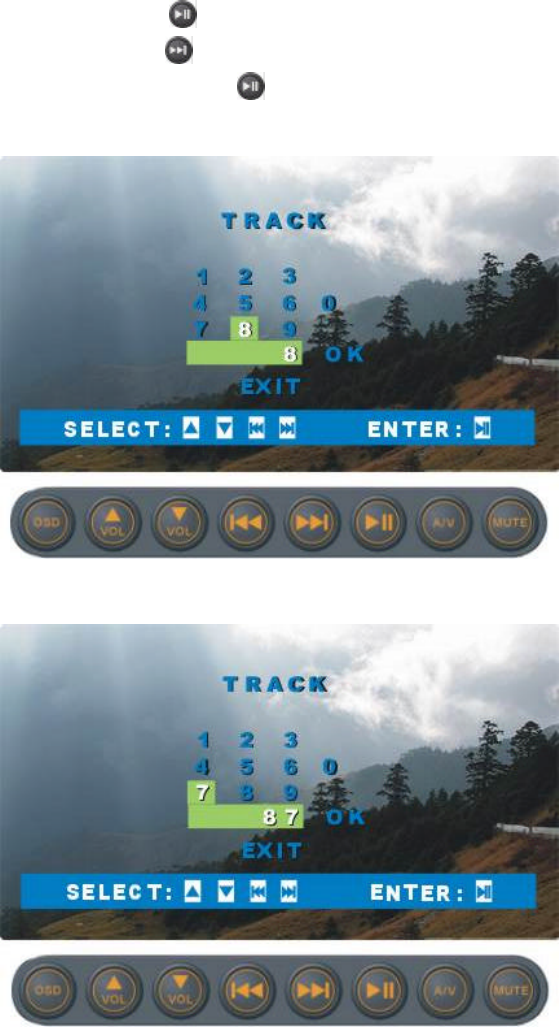
Play/Pause pushbutton to move the “7” into the green bar.
3. Press Next pushbutton to move the highlighter on the “OK”.
4. Press Play/Pause pushbutton to confirm that the “87th” track has
been chosen.
Figure : Select Track number
Figure : Track number selecting
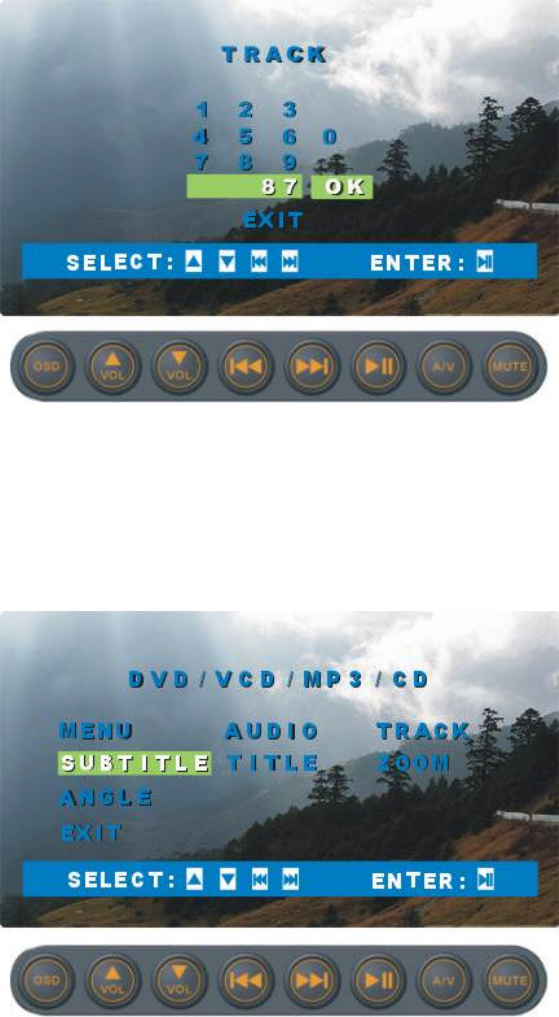
Figure : Track setting confirmation
5. Subtitle selecting: this feature also varies with different discs. You
could highlight the subtitle option to set your owned languages that
would be displayed during the movie play. See Figure .
Figure : Subtitle selecting
6. Zoom selecting: to zoom in the object, you could use remote to
directly zoom an object when movie is playing. From the OSD, you
may only have one step to zoom in the object. Zoom in or zoom out
are the two steps available for you. Zoom in could enlarge the
screen as large as 1.5 times.
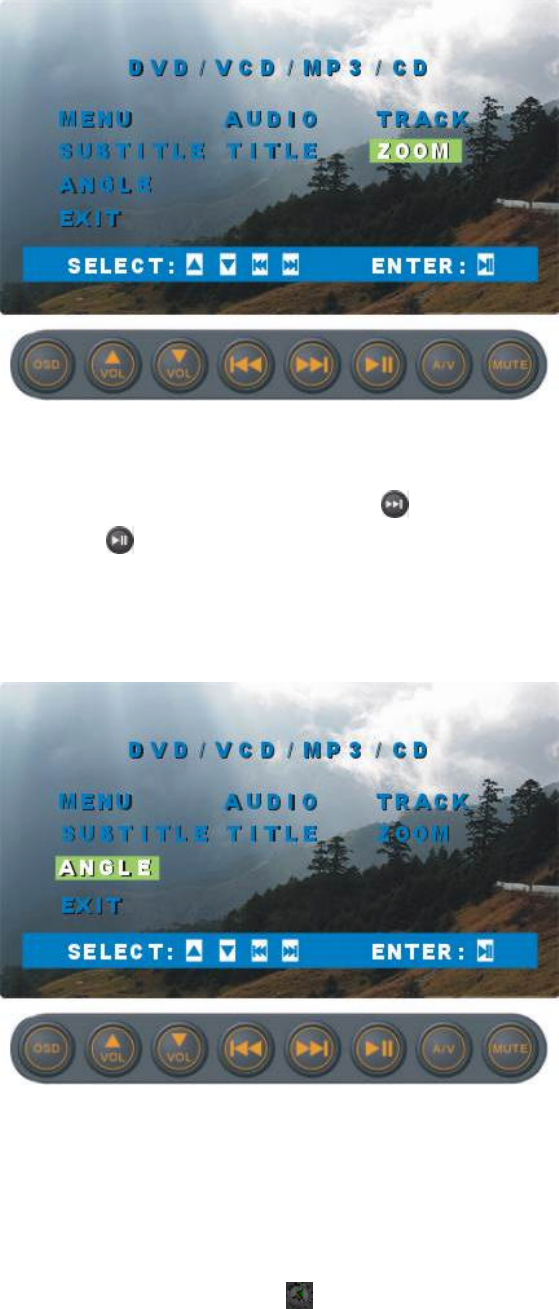
Figure : Zoom feature
7. Angle feature: the user presses to highlight Angle option then
press to get different angles of camera shooting. See Figure .
This feature also varies with different discs. Some DVD discs have
built in these features; however, some DVD discs do not support
the angle setting feature.
Figure: Different Angle Viewing
B. Monitor Setting
1. Users could adjust monitor displaying mode by setup the features
under the four main selections of Monitor selection as shown in
Figure. You could press pushbutton to move the highlighter
downward direction. Then highlight the Monitor and
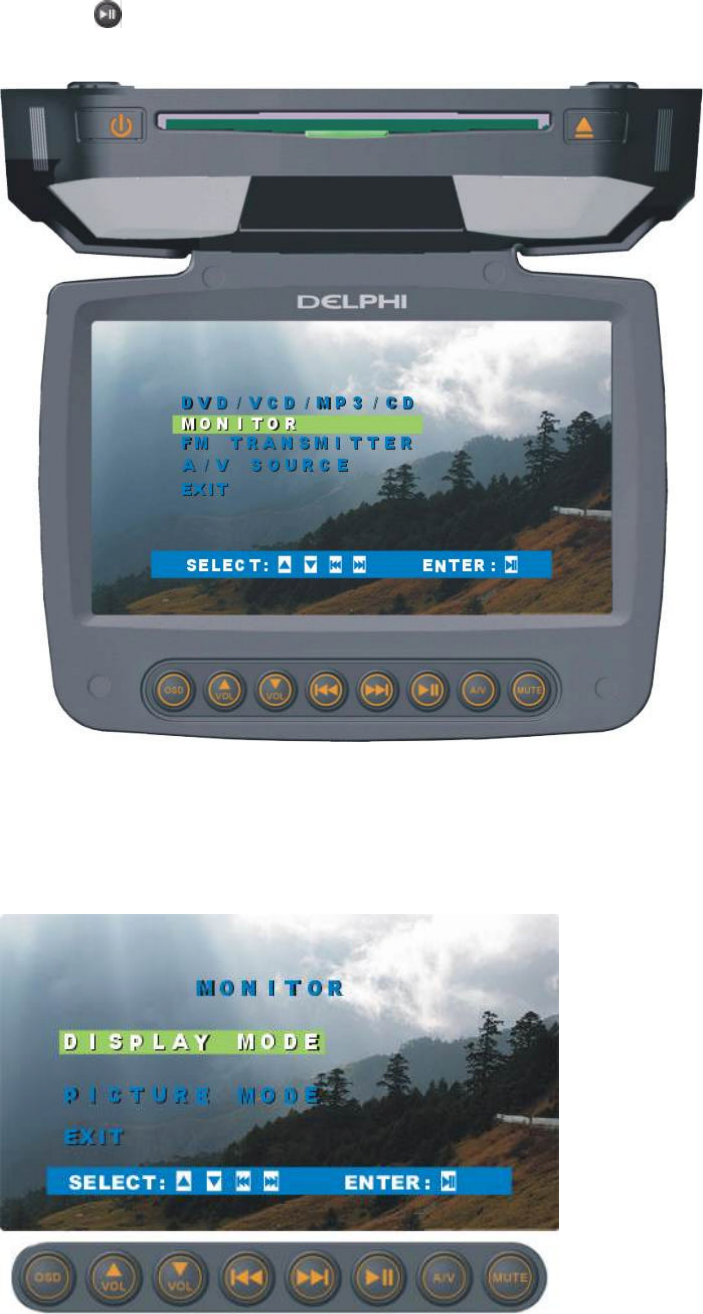
press pushbutton to confirm Monitor Setting’s option.
Figure . Monitor setting
The monitor setting has two kinds of mode. One is Display Mode
Setting. The other is Picture Mode Setting as shown in Figure .
Figure 29: Monitor setting
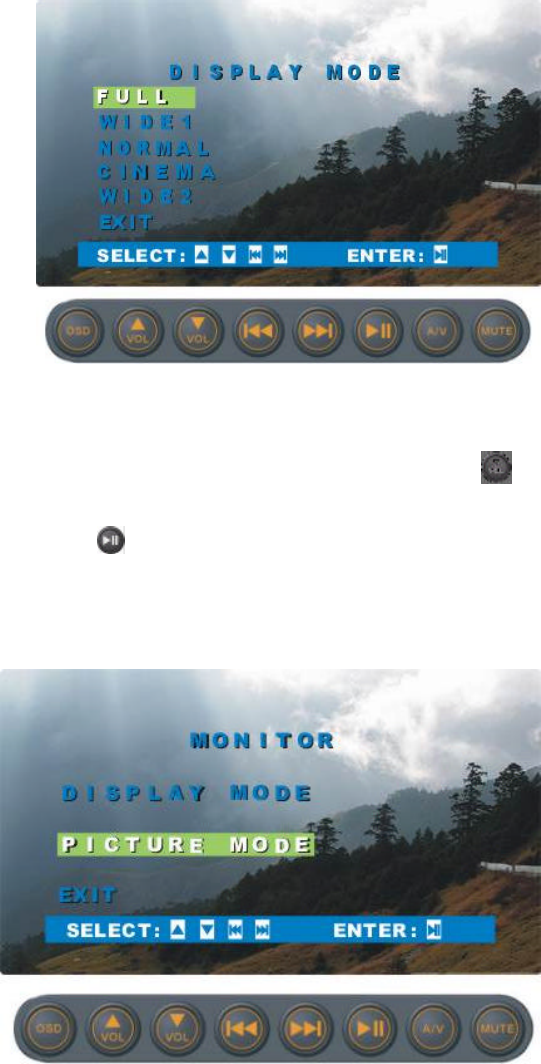
2. Display mode setting: once you enter into the Monitor setting, there
are three options that are Full, Wide1, Normal, Cinema, and Wide2
of which you could choose.
Figure : Display mode setting
3. Picture mode setting: press Volume Down pushbutton to highlight
the Picture Mode under the Monitor main Selection.
Press pushbutton to confirm the choice. Once you have entered
into the Picture Mode main screen, there are five selections that you
could do the picture’s settings as shown in Figure.
Figure : Picture mode setting
There are picture’s Brightness, Contrast, Color, Tint, and Reset. Each of
them has value from 0 to 60. If you adjust the brightness of picture in the
30-value, then the color would be adjusted at the neutral balance, so do
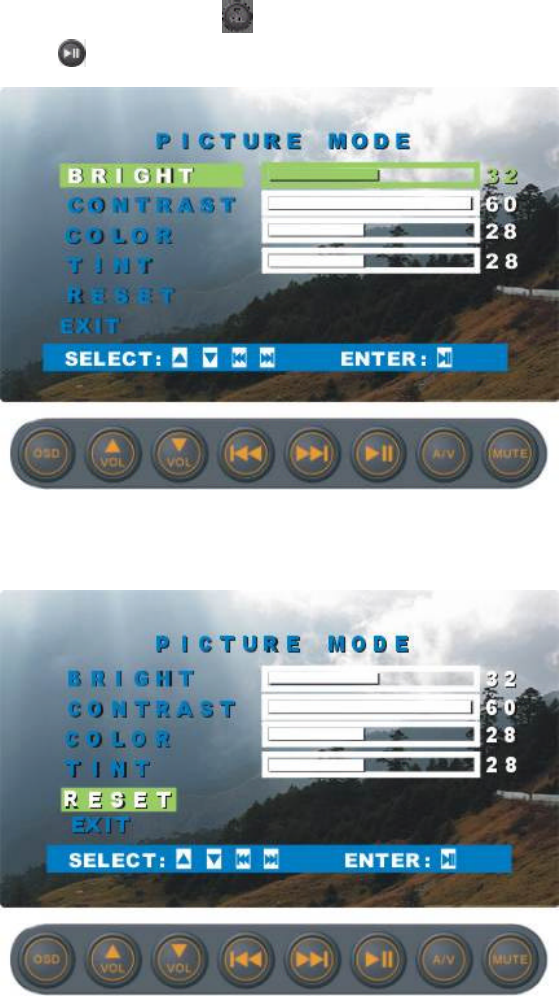
the contrast, color, and tint. To reset the settings that you have just set,
then you could press pushbutton to highlight the Reset option and
press to confirm. See Figures and .
Figure : Brightness setting
Figure : Reset option
C. FM Transmitter Setting
Users could setup the Frequency and FM transmitter availability under
the FM Transmitter main menu.
1. Press VOLUME DOWN to move the highlighter to the FM
TRANSMITTER as shown in Figure.
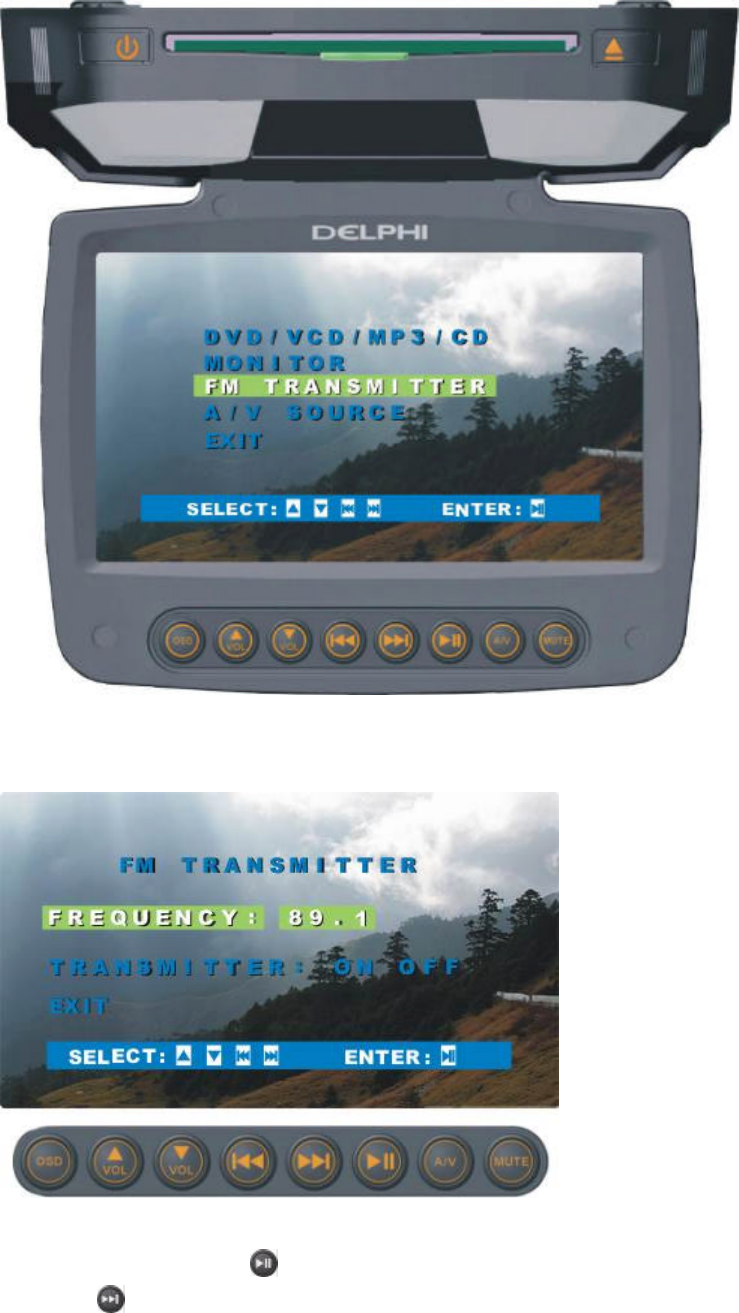
Figure : FM Transmitter Setting
Figure 35: Frequency Setting
1. Press PLAY/PAUSE to enter FM TRANSMITTER setting.
2. Press pushbutton to go to next value on the Frequency. The
smallest value is 88.1 MHz and the biggest value is 98.0MHz. Each
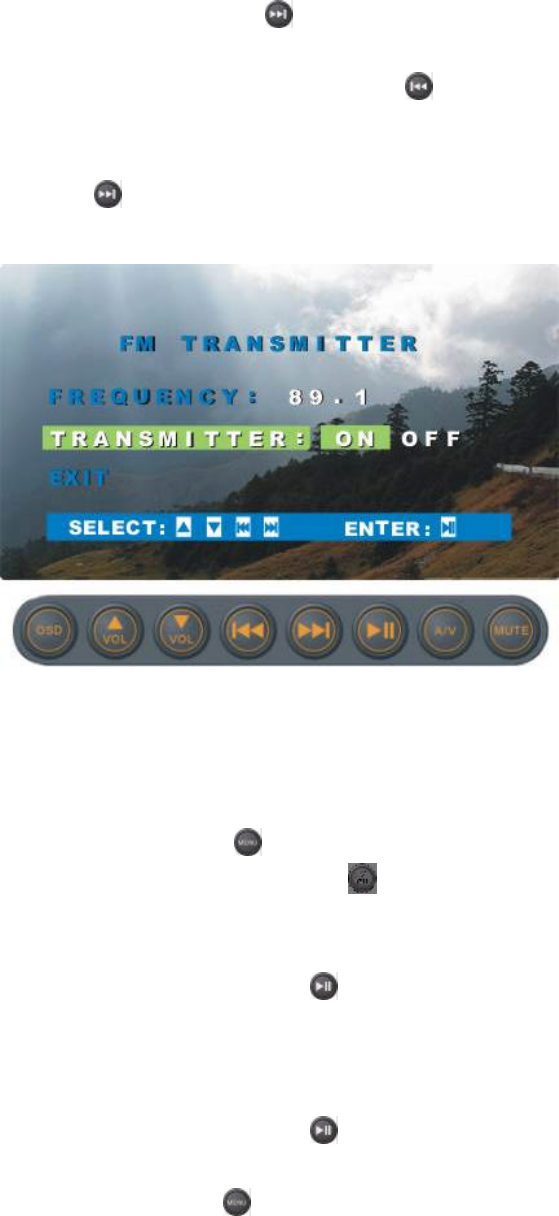
time the user presses pushbutton, the Frequency would increase
and the audio frequency will pick up and show the effect. On the
other hand, when the user presses pushbutton, the value would
be decreased. Each increment of adjustment is 0.1MHz.
3. Move the highlighter downward the Transmitter section,
press pushbutton to choose the availability (On/Off) of FM
Transmitter.
Figure 36: Transmitter availability setting
D. A/V Source Setting
Setup A/V Source:
1. Press MENU pushbutton
2. Press VOLUME DOWN pushbutton to move the highlighter
to the A/V Source
3. Highlight AUTO option in the A/V1 set
4. Press PLAY/PAUSE pushbutton to confirm the selection.
The screen would switch to A/V1 screen.
5. Move the highlighter to highlight the AUTO on the A/V2 set as
shown on Figure .
6. Press PLAY/PAUSE pushbutton to confirm the selection.
The screen would switch to A/V2 screen.
7. Press Menu pushbutton to Exit A/V Source
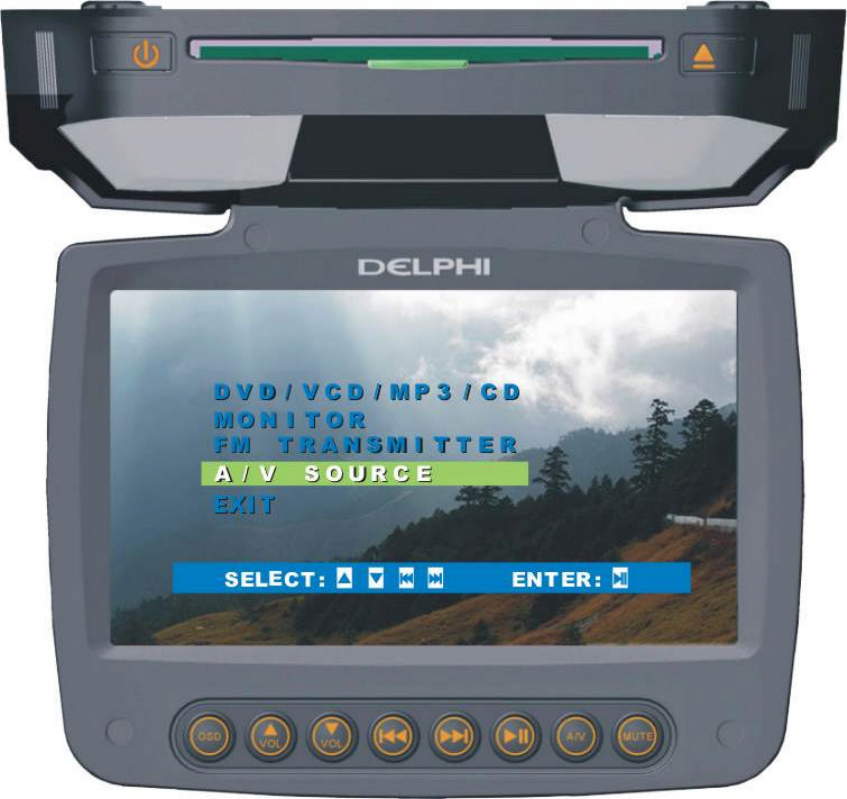
Figure 37: A/V Source Setting
Auto: In this mode, it would detect what modes of the DVD currently
playing, NTSC or PAL. Then it would automatically switch the system to
either one.
NTSC: European, North American, and Asian countries are belonged to
NTSC system.
PAL: Some countries such as China and Japan are PAL system.
Playing DVD, CD and MP3
Using the On-screen Icons Display
The on-screen icons display contains many playback features. To see the icon
display, use the DISPLAY button on the remote while a disc is playing. Each
feature of the icon display is illustrated with an icon. Use the left/right arrow
buttons on the remote to move through the different icons in the icon display.

When an icon is highlighted, use the up/down arrow buttons on the remote to
scroll through the choices displayed in the text box under the icon. Remember,
you can only access the icon display when you are playing a disc. Also, the
icon display features are only available if the disc was created with that
particular (i.e., if you select the Subtitle icon, you will not be able to change the
subtitle language unless the author of the disc created the disc with different
subtitle languages).
The invalid symbol appears on the screen when you press a button that does
not have any function. To make the icon display disappear from the screen,
press display on the remote unit it would disappears.
Troubleshooting
Problem Solution
Poor in vehicle radio reception (FM
modulator installed)
ü Check the condition of the
vehicle’s radio antenna.
ü Verify that the antenna is fully
raised.
ü If a wired RF modulator has been
installed, verify that it is turned
OFF by using remote.
IR sensor inoperative ü Verify that the batteries in the
remote are fresh.
ü Verify that the remote sensor eye
is not obstructed.
ü Verify that the infrared transmitter
is affixed over the sensor eye of
the component to be controlled.
Disc won’t play ü Insert a disc with the label side
facing up.
ü
Check the type of disc you put into
disc try. This DVD only plays
digital video discs, audio CDs and
MP3s.
ü Both the unit and the disc are
coded by region. If the regional
codes don’t match, the disc can’t

be played. This DVD is Region
Number 1.
Play starts, but then stops immediately
ü The disc is dirty. Clean it.
ü Condensation has formed. Allow
player to dry out.
No sound or distorted sound ü
Make sure your DVD is connected
properly. Make sure all cables are
securely inserted into the
appropriate jacks.
ü If you are using the IR
headphones, make sure you turn
on the IR power.
ü Make sure Modulator is ON and
the proper Frequency have been
selected.
Can’t advance through a movie ü You can’t advance through the
opening credits and warning
information that appears at the
beginning of movies because the
disc is programmed to prohibit
that action.
The icon (the stop sign) appears on
screen
The feature or action cannot be
completed at this time because:
1. The disc’s software restricts it.
2. The disc’s software doesn’t
support the feature (e.g.,
angles)
3. The feature is not available at the
moment.
4. You’ve requested title or chapter
number that is out of range.
Picture is distorted ü The disc might be damaged. Try
another disc.
ü It is normal for some distortion to
appear during forward or reverse
scan.
No forward or reverse scan ü Some discs have sections that
proh
ibit rapid scanning or title and

chapter skip.
ü If you try to skip through the
warning information and credits at
the beginning of a movie, you
won’t be able to. This part of the
movie is often programmed to
prohibit skipping through it.
Replacement Parts
Remote control kkkkkkkkk(module number)
Left protective cover for IR sensor kkkkkkkkk
Right protective cover for HeadphonesJacks lkkkkkkkkk
Specification
LCD Backlighting Edge light tube
Resolution 1440 x 234
Pixels 336,960
Operation Temperature -10 to 6℃0℃
Storage Temperature -20 to ℃70℃
Backlight life 10,000 Hours
Video Display System NTSC/PAL/AUTO
Headphone Audio Output 0.03W @ 16 ohms
Low Level Audio Output 620 mvp-p
1kHz @ -15dB
Video Output 1.0Vp-p @ 75 ohms
Power source 12V DC
12 MONTH LIMITED WARRANTY
Applies to DVDM800 Products
E-LEAD Electronic Co. Ltd. warrants to the original retail purchaser of this
product that should this product or any part thereof, under normal use and
conditions, be proven defective in material or workmanship within 12 months
from the date of original purchase, such defect(s) will be repaired or replaced
with reconditioned product (at the Company’s option) without charge for parts
and repair labor. To obtain repair or replacement within the terms of this
Warranty, the product is to be delivered with proof of warranty coverage (e.g.
dated bill of sale), specification of defect(s), transportation prepaid, to the
Company at the address shown below.
This Warranty does not extend to the elimination of externally generated static
or noise, to correction of antenna problems, to costs incurred for installation,
removal or reinstallation, mishandling, misuse, neglect, accident, or by
removal or defacement of the factory serial number/ bar code label(s). THE
EXTENT OF THE COMPANY’S LIABILITY UNDER THIS WARRANTY IS
LIMITED TO THE REPAIR OR REPLACEMENT PROVIDED ABOVE AND, IN
NO EVENT, SHALL THE COMPANY’S LIABILITY EXCEED THE PURCHASE
PRICE PAID BY PURCHASER FOR THE PRODUCT.
This Warranty is in lieu of all other express warranties or liabilities. ANY
IMPLIED WARRANTIES, INCLUDING ANY IMPLIED WARRANTY OF
MERCHANTABILITY, SHALL BE LIMITED TO THE DURATION OF THIS
WRITTEN WARRANTY. ANY ACTION FOR BREACH OF ANY WARRANTY
HEREUNDER INCLUDING ANY IMPLIED WARRANTY OF
MERCHANTABILITY MUST BE BROUGHT WITHIN A PERIOD OF 24
MONTHS FROM DATE OF ORIGINAL PURCHASE. IN NO CASE SHALL
THE COMPANY BE LIABLE FOR ANY CONSEQUENTIAL OR INCIDENTAL
DAMAGES FOR BREACH OF THIS OR ANY OTHER WARRANTY,
EXPRESS OR IMPLIED, WHATSOEVER. No person or representative is
authorized to assume for the Company any liability other than expressed
herein in connection with the sale of this product.
Some states do not allow limitations on how long an implied warranty lasts or
the exclusion or limitation of incidental or consequential damage so the above
limitations or exclusions may not apply to you. This Warranty gives you specific
legal rights and you may also have other rights which vary from state to state.
USA: Globalcom Electronic Technology Inc., 20653 Lycoming St.,

#A1/Walnut,CA 91789. 1-909-468-1894USA
Taiwan: E-LEAD Electronic CO.,LTD, NO.Gungdung 1ST RD.,Shengang
Shiang,Changhua,509,Taiwan,R.O.C. 886-4-797277
URL: http://www.e-lead.com.tw