User manual

User’s Manual
Ematic 10.1” HD Quad-Core Tablet with Android™ 5.1, Lollipop
EGQ223
Since the tablet software updates regularly, the user
manual may not cover all aspects of new features.
• The new battery will be in its best condition after
being fully charged and discharged 2-3 times.
• While using earphones, if the volume is excessively
high it may cause hearing damage. Please adjust
the volume to a safe level and moderate use.
• Do not disconnect the tablet suddenly when for-
matting, uploading, or downloading.
• Do not dismantle the tablet. Do not use alcohol,
thinner or benzene to clean its surface.
• Do not use the tablet while driving or walking.
• The tablet is not moisture and water resistant.
Please do not use it in a damp environment.
• Do not drop or hit the tablet against a hard surface
or the screen may be damaged or cracked.
• Do not upgrade the firmware by yourself. The
tablet should be upgraded with the right firmware
and right methods offered by us. If an upgrade is
needed, please contact us.
Important Notices
Section 1: Tablet Overview
Tablet Overview
Screen Basics
Touch Screen Basics
Section 2: Initial Setup
Charging
Turn on
Setting up your Google™ Account
Getting Started
Section 3: Your Home Screen
Icons
Adding Icons
Moving Icons
Removing Icons
Take a Screenshot
Sleep Mode
Notications
ManageNotications&Interruptions
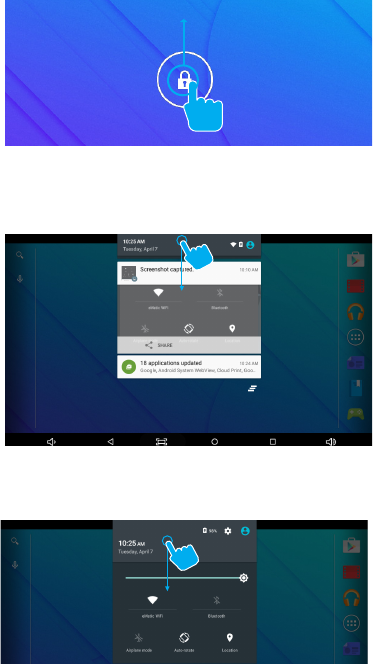
Change the Wallpaper
Section 4: Network Connection
Turn On/Off Wi-Fi
Adding a Wi-Fi Network
Forget a Wi-Fi Network
Section 5: Connecting to a Computer
PC
Mac
Section 6: Using the Keyboard
Entering Text
Gesture Typing
Basic Editing
Keyboard settings
Section 7: Exploring Apps
Clock
Camera
Included Apps
Uninstalling Apps
Section 8: Google Accounts
Why use a Google Account?
Add a Google Account
Remove a Google Account
4
4
5
5
6
6
6
7
7
8
8
9
9
9
9
10
10
11
11
12
12
13
13
14
14
15
16
16
17
18
18
19
19
19
20
22
23
23
24
24
25
Google Play™
Google Play recommendations
Google Play Store app
Section 9: Google Now
Google Now Cards
Location Access
Google Now Settings
Section 10: Voice Actions
Voice Commands
Section 11: Tablet Settings
Section12:Tips&Tricks
Extending Battery Life
Reset/Restore
Troubleshooting
TechnicalSpecications
Customer Support
Limitations of Liability Statement
25
26
26
27
27
27
29
30
31
32
32
33
33
34
34
35
35
4
Camera
Camera
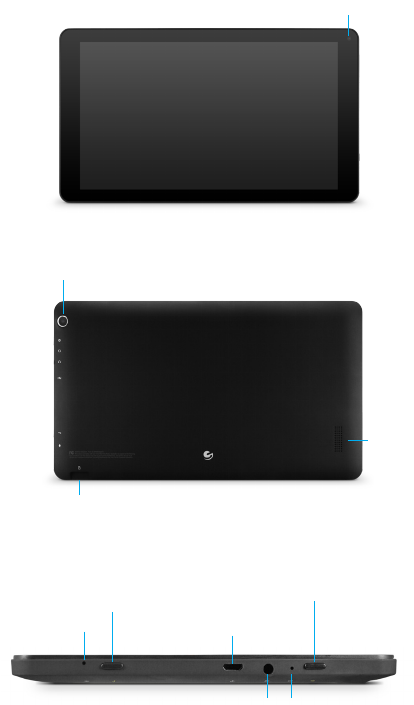
1. Tablet Overview
3.5mm audio jack Reset
Back
Microphone
Hold for 2 seconds
to turn on/off.
Press to sleep/wake up.
Micro USB connection
Speaker
MicroSD card slot
5
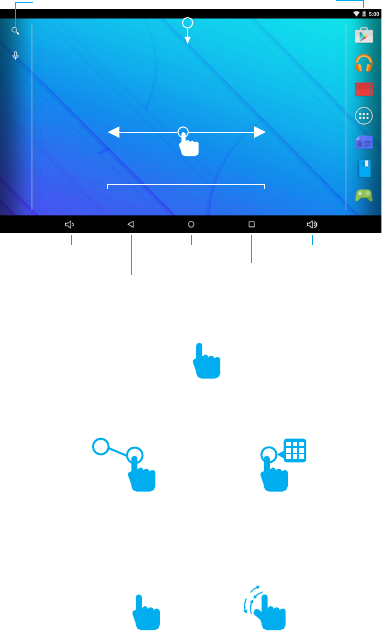
Zooming: Double tap quickly to zoom into a webpage,
picture, or map. Some apps allow you to zoom in
andoutbytouchingthescreenwithtwongers,and
pinching them together.
Search
Tap the screen once to activate or open something.
Touch and hold to move an item by dragging.
*In many apps touch and hold can offer more options.
TIP:Youcanickthescreenwithyourngertoquickly
scroll through a long list, such as a library of music.
Tapaspeciclocationonthescreenwhereyouwould
like to enter text. The on-screen keyboard will pop up.
Screen Basics
Touch Screen Basics
Slide down to reveal
yournoticationsandsettings
Swipe left or right to switch
between home screens.
Hold for 2 seconds
to turn on/off.
Press to sleep/wake up. x2
Back
Volume UpHome
Volume Down
Recent apps
Battery
Dock
6
2. Initial Setup
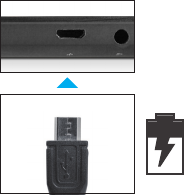
Charging
Turn on
Fullychargeyourtabletfor6hoursbeforetherstuse.
Attention: Charging by connecting to a computer will
be extremely slow. We recommend only using the
included wall charger.
To start your tablet, press and hold the power key for
2 seconds. The Ematic logo indicates that the tablet is
loading.
Once the screen loads, choose your language and
connect to your Wi-Fi network. You will then be
prompted to sign in to your Google Account.
Use the included USB wall
charger.
The battery indicator will show
that your device is charging.
7
Getting Started
Setting up your Google Account
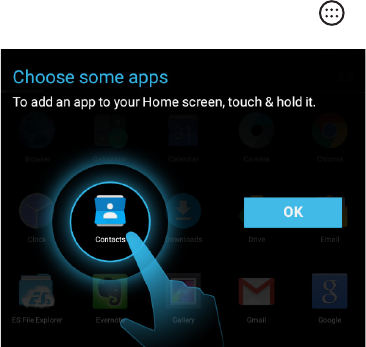
Once your tablet loads, you will see a Welcome Screen.
Tap OK to begin using your tablet. Tap to custom-
ize your Home Screen with apps and widgets.
Sign in using the email address and password from
your Google Account. If you don’t have one yet, create
one.
An email address that you use for any of the following
counts as a Google Account:
•Gmail™
•YouTube™
•GoogleApps™
•AdWords™
•AnyotherGoogleproduct
When you sign in with a Google Account, all your
email, contacts, Calendar events, and other data as-
sociated with that account are automatically synced
with your tablet. You can also add multiple Google
Accounts later.

8
3. Your Home Screen
Icons
Youcanllthehomescreenwithanycombinationsof
shortcuts, widgets, and folders you like.
Whenyoupowerupyourtabletforthersttime,you’ll
see the main home screen panel. This panel is typically
centered; you can access additional panels on either
sideofthemainonebyswipingyourngerleftor
right.
Battery Level: The white battery level indicator
will decrease and change to red as the battery
is drained.
Wi-Fi Signal: As the Wi-Fi signal strength de-
creases, the blue bands will change to grey.
All Apps: Tap to view all apps.
Back: Go back to the previous screen.
Recent apps: Open a list of recent apps. Tap an
app to open or swipe left/right to remove the
thumbnail.
Home: Go back to the home screen. Hold and
slide up to open Google Now.
Increase Volume
Decrease Volume
9
Make sure the image you want is displayed on the
screen. Press the Screenshot icon on the status bar to
take a screenshot.
You can also display or hide the screenshot button on
the status bar in the settings menu.
The screenshot is automatically saved to your Gallery.
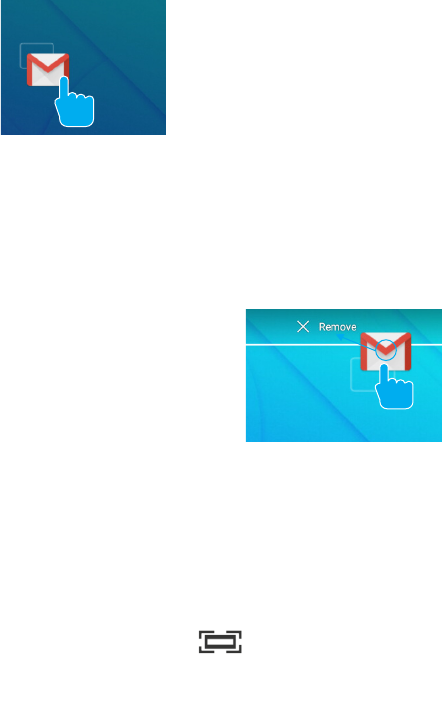
Adding Icons
Moving Icons
Take a Screenshot
Removing Icons
Within the All Apps menu,
choose an app or swipe right to
choose a widget. Tap and hold
desired app or widget for about
2 seconds until the Home screen
appears. Slide it wherever you
want and let go.
Touch&holdtheicon.
Slideyourngertothenewposition.
(To move between Home screens, slide toward the
edge of the screen. To bump another icon out of the
way, slide slowly towards it.)
Liftyourngertodroptheiconintoitsnewposition.
Touch and hold the app or
widget and drag to the X icon
at the top of the screen.
10
To save battery, you should put your tablet in sleep
mode by turning off the LCD display. To do this, press
the power key and immediately release it. Do it again
to bring up the lock screen.
Sleep Mode
Swipe down from the top of your Home Screen to view
yourNotications.
UsetwongerstoswipefromthetopofyourHome
Screenorswipedownagainfromnoticationstoview
your Quick Settings.
Quick Settings & Notications
11
Swipe down from the top of your Home Screen to view
yourNotications.
Tapandholdyourngeronanyopenspaceonyour
home screen. A list of options appears.
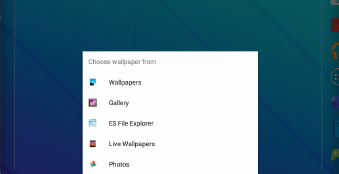
Wallpapers: Choose from thumbnails of default images
Gallery: Choose a wallpaper from your personal gallery
ESFileExplorer:Chooseawallpaperfromaspecic
folder on your tablet
Live Wallpapers: Choose from a scrolling list of
animated wallpapers
Photos: Choose a wallpaper from your personal photos
TaponSound¬icationintheSettingsMenu.You
canmanagewhatnoticationsyousee,setnotication
priority level by app, and see what apps have access to
yournotications.Youcansetupyourdevicesothat
noticationsonlyappearonatcertaintimes,forcertain
typesofnotications,andfromspeciccontacts.
Manage Notications and Interruptions
Change the Wallpaper
12
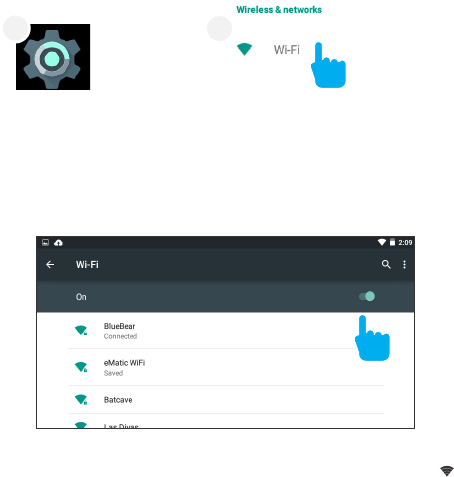
Within the All Apps
menu, tap Settings.
UnderWireless&Networks,
tap on Wi-Fi.
Yourtabletwilllistthenetworksitndswithin
range. Switch the button at the top to on and scan
for networks. Tap a network to connect.
When connected, the wireless indicator appears in the
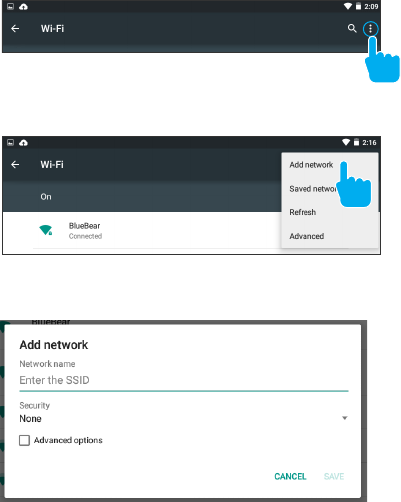
status bar. The white lines indicate connection strength.
TaptheWi-FiONswitchunderWireless&Networks.
Turn off Wi-Fi when you’re not using it to extend the
life of your battery between charges.
Wi-Fi can only be used when it connects with a Wi-Fi
Access Point (AP) or a free unsecured Wi-Fi hotspot.
Turn on Wi-Fi
Turn off Wi-Fi
4. Network Connection
2
1
13
Users may also add a Wi-Fi network by pressing the
Menu icon in the top right corner.
Select Add network.
Add the network information to connect.
In the Wi-Fi settings screen, tap the name of the net-
work. Tap “Forget” in the dialog that opens.
Adding a Wi-Fi Network
Forget a Wi-Fi Network
14
Connect to your
computer by USB.
EGD078 (E:)
EGQ223 (E:)
PC
5. Connecting to a Computer
The device driver
will install.
Choose open
folder to view
lesorselectthe
removable disk.
You will now be
able to drag and
dropthelesfrom
your computer
onto your tablet
just as you would
withaUSBash
drive.
2
3
4
EGQ223 (E:)
1
15
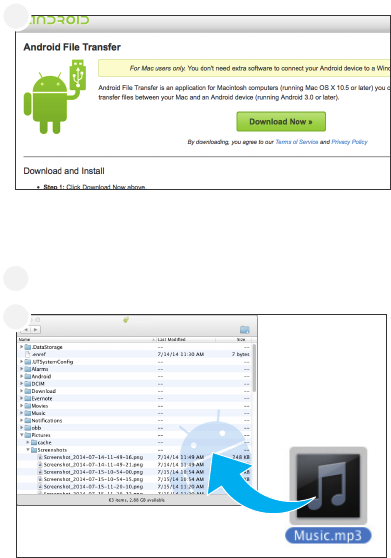
First, install the Android File Transfer application for
Mac.Gotoandroid.com/letransferonyourMacand
choose download now.
The Android File Transfer application will launch
automaticallywhenyouconnectyourtablet.Drag&
droplestotransfer.
Install the application.
3
4
Mac
2
EQG223
16
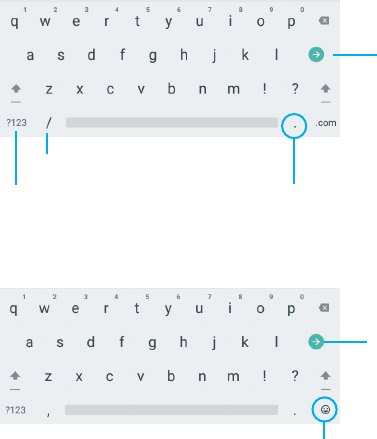
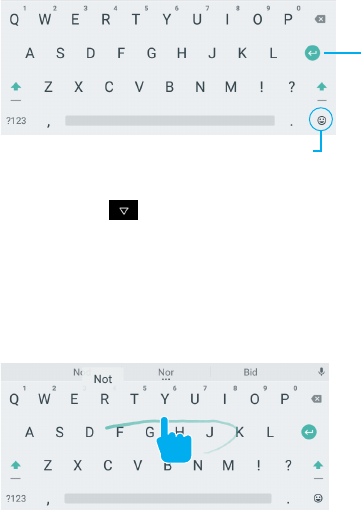
Enter text using the onscreen keyboard. In most apps
it will open automatically. In others, open the keyboard
by touching where you want to type.
*Depending on what you are doing, some of the keys
onthekeyboardmaylookdifferent.KeyboardsA&B
appears when you are searching or browsing the net.
Keyboard C appears when you are writing emails,
documents, or messaging.
Keyboard A:
Keyboard B:
6. Using the Keyboard
Entering text
Insert numbers or
symbols
Touch&holdforkeyboardsettings
Insert Smileys
Touch&holdtotype
special characters
and symbols
Search
Search
17
Swipeyourngeroverlettersyouwanttotype,andlift
after each word. The keyboard will anticipate and predict
the next word in your sentence.
Keyboard C:
Tomakethekeyboardgoaway,touchthemodied
Back button at the bottom of the screen.
Gesture Typing
Enter
Insert smileys
18
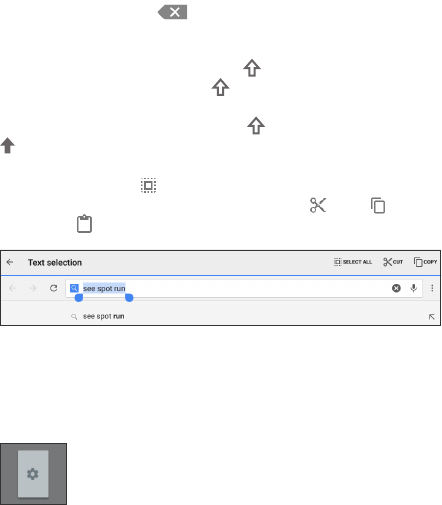
Keyboard Settings
Input languages: Select different languages
to be included when typing.
Android Keyboard Settings: Edit keyboard
settings such as Auto-capitalization, Sound,
Autocorrection,andInputmethods&styles.
Move the insertion point: Touch where you want to
type. The cursor will blink in the new position and a
blue tab will appear below it. Drag the tab to move the
cursor.
Selecttext:Touch&holdordouble-tapwithinthetext.
The nearest word will be highlighted and blue tabs
with appear. Drag tabs to edit selection.
Delete text: Touch to delete characters or se-
lected text.
Insert Capital Letters: Tap the key once to insert
one capital letter. Or hold key while you type.
Turn on caps lock: Double-tap key. It will turn into
. Tap again to return to lowercase.
Cut, Copy, Paste: Select the text you want to
manipulate. When highlighted, touch Cut,
Copy, or Paste.
Basic Editing

19
7. Exploring Apps
Open up some Apps to better familiarize yourself with
your new tablet.
Tap the Clock app to access your alarm clock,
timer, or stopwatch.
Tap the camera app to take pictures and videos
to share with your friends and family.
Timer
Alarm
Clock
Tap to change Time Zone
Night Mode/
Settings
Clock Stopwatch
Taking Photos:
•Makesuretheiconbarontheleftisthecameraicon
•Tapthecameraicontotakeaphoto
•Tozoompinchtwongerstogetheronthescreen.
•Tapthemenuiconinthetoprightcornerfor
camera settings
To switch to video record, swipe right from the left icon
bar. Select the video icon. You can also change the
resolution settings and try advanced features.
Recording Video:
•Makesuretheiconbarontheleftisthevideoicon
•Tapthevideoicontostartrecording
•Tozoompinchtwongerstogetheronthescreen.
•Tapthevideoiconagaintostoprecording
•Whilerecordingyoucantapanywhereonthescreen
to take take a picture.
•Tapthemenuiconinthetoprightcornerfor
video settings

20
Included Apps
Clock: Set the time and alarms
Contacts: Manage your contacts
Downloads: Manage your downloads
Drive:ShareyourGoogleDocsandles
Email: Sync your email accounts
ES File Explorer:Browseforlestoopen,
delete, etc.
Evernote: Keep notes and to-do lists
Gallery: View and edit your photos
Calculator: Basic calculator functions
Browser: Browse the web
Camera: Take photos and record videos
Chrome™: Browse the web with Google Chrome.
Calendar: Keep track of your schedule and set
reminders

21
Gmail: Fast, searchable email from Google
Google: Stay up to date with Google Now cards
Google Settings: Edit your Google Account
settings
Google+™: Stay connected and share life as it
happens with Google+
Hangouts™: One-on-one and group conversa-
tions with photos, emoji, and video calls for free.
Kingsoft Ofce: Type documents, make
spreadsheets and presentations
Chrome™: Browse the web with Google Chrome.
Play Books: Read your favorite e-books
Photos: Share photos and back them up on
Google.
Play Newsstand: Read magazines and the latest
headlines
Play Games: Discover new games. Track
achievments and scores
Play Movies & TV:Streammovies&TVshows
instantly
Play Music: Discover, play, store and share the
music you love
Maps™: Find directions and locations
22
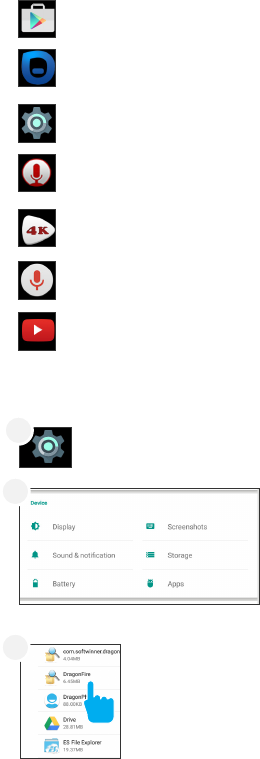
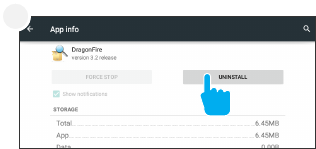
Uninstalling Apps
To Uninstall an unwanted App:
Tap Settings
Under
Device,
tap Apps.
1
2
Tap the
App
that you
want to
uninstall.
3
Sound Recorder: Record audio using the built-in
microphone
Settings: Adjust settings on your tablet
YouTube: Stream your favorite videos on the web
Voice Search: Search the web by speaking instead
of typing
VideoPlayer: Video and image gallery
Pogoplug: Connect to the internet to access and
shareyourles.Includes5GBofcloudstorage
Play Store: Shop for music, books, magazines,
movies, TV shows, games and apps
23
Tap Uninstall
4
8. Google Accounts
Why use a Google Account?
Google Accounts let you organize and access your
personal information from any computer or mobile
device.
Sync & Back-up: Whether you draft an email, add a
contact, or add an event to your calendar, your work
continuously gets backed up and synchronizes with
any computer with the same Google Account.
Accessibility: Check your latest emails, events, or text
messages wherever you are on any computer or mo-
bile device.
Security: Google works round the clock to ensure your
private information stays secure.
Shopping: Connect your Google Account with your
Google Wallet™ to easily purchase music, books, apps,
and more on Google Play and other online stores.
Services: Your Google Account also lets you take full
advantage of other Google apps and services such as
YouTube, Google Play, Hangouts, Google Maps, Mes-
saging, and more.
24
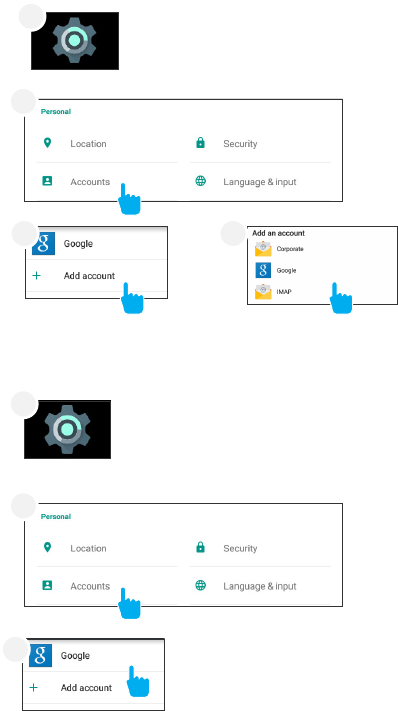
Remove a Google Account
Tap Settings
Tap on the type of
account that you
want to remove.
Tap what kind of account
you want to add and sign in.
Tap Add account.
1
3
3 4
Under Personal,
tap Accounts.
Under Personal,
tap Accounts.
2
2
Add a Google Account
Tap Settings.
1
25
Google Play
Google Play brings together all of your
favorite content in one place. Access mov-
ies, TV shows, music, books, magazines,
apps, and more when you sign in with your
Google Account. You can also shop for
more games, books, magazines, and more
in the Google Play Store app.
Tap Menu icon. Tap Remove
account.
Tap the account that
you want to remove.
4
5 5
Google Play
My Library: Displays your most recently used books,
music, and so on. Tap any of the images to view your
content.
Recommended Apps: Recommends apps that you can
add to your home screen.
All Google Play recommendations work the same way:
Tap to avoid future suggestions like this
Hold and drag blue dots to resize
Tap to see a different suggestion
26
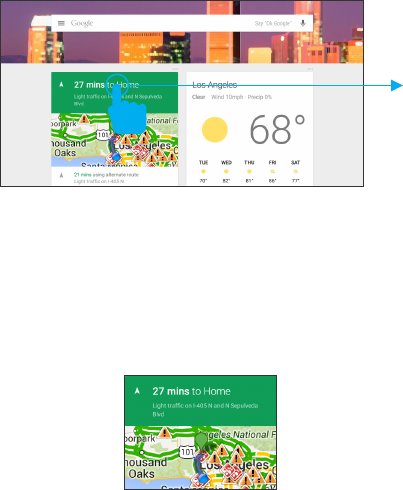
Google Now uses contextual data from your tablet and
from other Google products to supply you with just the
right information at just the right time.
You can download the Google Search app on Google
Play.
After you have downloaded and installed the Google
Search app, tap the icon on the Home screen or
swipe up from the icon to open Google Now.
Google Now displays cards when they’re most likely to
be useful and relevant based on the current time and
your current location.
9. Google Now ™
Google Now Cards
Purchase music, games, books, magazines,
movies, TV shows, and apps on the Google
Play Store app
With Google Play, shop the world’s largest
eBookstore now with over 5 million books-
available on web, tablet, and phone.
With Google Play Newsstand, discover
more of the news and magazines you love
with a newsstand made for you.
Choose from thousands of movies and TV
shows on Google Play and stream them
instantly on your Android phone, tablet or
the web.
Buy now, listen now, sync never, with
music on Google Play.
Play Store
Play Books
Play Newsstand
Play Music
PlayMovies&TV
27
To dismiss a card from the Google Now screen, swipe
it away. The card will return the next time it’s relevant,
which may be hours or days from now.
You can turn Google Now cards on or off at any time.
To do so from the main Google Now screen go to
Menu<Settings<GoogleNowandchooseaspecic
card. You can then check or uncheck when you would
like that card to appear.
Find out what the weather is like or how the commute
toworkwillbebyconrmingyourhomeandwork
locations.
Location Access
In order to get to your Google Now settings from the
Google Now Main Screen, touch the Menu icon at the
bottom right of the screen. Then touch Settings. 4
types of settings will be available.
Google Now Settings
Findoutwhattheweatherislike,howmuchtrafcto
expect before you leave for work, or how your favor-
ite sports team is doing.
28
Tablet Search: Select which apps in your tablet are
included in Google searches.
Privacy&Accounts:Controlsearch-relatedprivacyop-
tions for your Google Account.
•Managelocationhistory:OpensGoogleMapsset-
tings, where you can turn location settings and location
reporting on or off.
•Location:Allowsyoutoturnlocationaccessbyall
Google apps on or off.
•Showrecentsearches:Checkifyouwantsearchsug-
gestions based on your recent searches.
•ManageWebHistory:ViewyourWebHistoryafter
signing in
Google Now: These settings allow you to turn Google
Now On or Off. It will also take you through a brief
introduction to Google Now and you will be given the
chance to opt in. From the settings screen you can also
change the priority of cards and also sound settings for
notications.
Voice settings: Voice settings control different aspects
of speech input and output.
•Language:SelectalanguagetouseforVoiceSearch-
es. The Voice Search language can be different from
the language displayed by your tablet.
•SpeechOutput:SelectHands-freeonlytoturnon
speech output only when using a headset.
•Blockoffensivewords:Checktoensurethatsearch
results with offensive language are blocked.
•Hotworddetection:Whenthisischecked,youcan
say “Google” when viewing the Google Now screen to
initiate a voice search or action.
29
10. Voice Actions
After installing the Google Search app you can use
Voice Actions to get directions, send messages, and
perform a number of other common tasks.
To initiate a Voice Action you can:
•TaptheMicrophoneintheGoogleSearchBaronyour
Home Screen
•TaptheMicrophoneinyourkeyboard
Next, speak the Voice Action you want to use. Here are
some typical examples:
“Set alarm for 8:30 a.m”
“Send email to Marcus Foster. Subject: Coming to-
night? Message: Hope to see you later.”
“Navigate to Mike’s Bikes in Palo Alto”
As you speak, Voice Search analyzes your speech and
initiates the action. If Voice Search doesn’t understand
you, it lists a set of possible meanings. Just tap the one
you want.
Some Voice Actions, such as “send email” and “note to
self,” open a panel that prompts you to complete the
action by speaking or typing more information.
When prompted, you can:
•Touchanytextalreadyinthepaneltoadd,oredit
the text by typing. (You can tap the Microphone icon
again to continue speaking instead of typing)
•Touchunderlinedwordsorphrases,dragacrossmul-
tiple words to view a list of alternate transcriptions, or
edit by speaking or typing.
•Touchabuttonatthebottomofthewindowtoadd
anyoptionalelds(youcanalsospeakthenameand
contentofanyoftheseelds)
•Whenyouaredone,touchthebuttonappropriateto
complete the action, such as Send.
30
Some handy voice commands are:
Say
[Words you want
to search for]
“Map of”
“Go to”
“Note to self”
“Dene”
“Weather”
“Movie”
“Pictures of”
“Translate to”
[A math phrase]
Followed By
Address, name,
business name, or
other destination
Search string or
URL
Message text
Wordtodene
Location
Movie location and
Movie name
Topic
Language&Phrase
Examples
“bike shoes”
“Navigate to Union
Square” or “1299
Colusa Ave, Berke-
ley, CA”
“Go to Google.com”
“Note to self: re-
member to buy milk”
“Denecampanile”
“Weather Detroit”
“Movie, Los Angeles,
London After Mid-
night”
“Pictures of cats”
“Translate to French,
Where is the rest-
room?”
“75 divided by 6”
To initiate a Voice Action touch the Microphone
icon
*Voice Actions will only be available after down-
loading the Google Search app.
Voice Commands
31
Some handy voice commands are:
11. Tablet Settings
Wi-Fi: Turn Wi-Fi on to see available networks and connect.
Bluetooth: Turn on Bluetooth to sync to another device.
Display: Adjust brightness, change your wallpaper, turn on/off
screen rotation, sleep settings, and font size.
Sound¬ication:Adjustthevolume,notications,and
alarm sounds.
Battery: Provides battery usage data.
Users:Addusers&proleswiththeirownappsandcontent.
Screenshots: Display or hide the screenshot button in the
status bar.
Storage: Provides storage use data.
Apps: Tap an app to force stop, uninstall, clear data, move to
SD card, or clear data.
Location: Allow google to use data to determine your location
for improved search results.
Accounts: Tap to add or remove Email accounts.
Backup&reset:Backupdataandfactoryresetyourtablet.
Security: Adjust settings to make your tablet more secure. Al-
low installation of non-Market apps.
Language&input:Setlanguage,spellingcorrection,keyboard
and voice settings.
Date&time:Setthedate,time,andtimezone.
Printing: Set up Google Cloud Print to connect your printer to
the web.
Accessibility: Adjust settings for users with poor vision.
About tablet: Model number and general tablet information.
32
12. Tips & Tricks
Extending Battery Life
Reducing the Brightness of your screen can help extend
your battery life.
Use a Quick Screen Timeout.
Switch off Wi-Fi if you’re not close to a strong signal.
Disable Location Services.
In Settings, tap Display.
In Settings tap Display.
1
1
Tap Brightness level.
Tap Sleep.
2
2
Use the slider to adjust the
brightness. Then tap OK.
3
33
Tap Brightness level.
Tap Sleep.
Reset/Restore
Troubleshooting
Reset Device
Reset the device by
pressing the reset
button with a small
object sush as a
paper clip.
Factory Restore
TapBackup&reset
in the settings app.
Then select Factory
data reset to restore
factory settings. This
will erase all data on
the tablet.
Cannot turn on the tablet.
Check the tablet’s power level. Please charge it before start-
ing it. If your tablet still cannot be turned on, you may reset it
before you turn it on.
No sound from earphones.
Check if volume is set to ‘0’. Or earphone may be broken,
please try another one.
Loud static noise.
Check if there is dust in the earphone or speaker. Check if the
leisbroken.
Frozen to any operation.
Press and hold the power button for 6 seconds to reset the
device.
Application is not working.
Possible reasons may be that this app is not compatible with
yourOSorthedownloaded.apkleisbroken.Youmayneed
to download a full version.
How do I delete a Google account?
If an account is added, the account is shown in Accounts of
Settings, where you may also add another account. To delete
an undesired account, tap the account, then tap the menu icon
in the upper right hand corner and choose Remove account.
34
•Android5.1,Lollipop
•10.1”1024x600Screen
•1.2GHzQuad-CoreProcessor
•1GBRAM
•16GBashmemory(formattedcapacitywillbeless)
•Front.3MP,Back2MPCameras
•MicroSDcardslotsupportsupto32GB
•USB2.0
•Accelerometer
•Wi-Fi(802.11b/g/n)
•Bluetooth
•SoftTouchBody
Visit ematic.us/support for customer support
regarding your device.
Tosubmitarequest,llouttherequiredinformation
online. You will be provided a ticket number regarding
your issue which you can refer to when contacting us
further.
Technical Specications
Customer Support
35
The Ematic User Manual may contain or reference links to third-party sites, however,
please be aware that Ematic is not responsible for and cannot control these other sites.
Ematic makes no representations or warranties whatsoever about any other website
which you may access as a result of reading this user manual, or otherwise. When you
access a website that is not owned or operated by Ematic (a “non-Ematic website”),
even one that may contain an Ematic logo, please understand that it is independent
from Ematic, and that Ematic has no direct control over the content on such website(s).
In addition, a link to any such non-Ematic website does not mean Ematic endorses or
accepts any responsibility for the content, or of any functionalities or services, of such
website(s). Furthermore, Ematic makes no promise, representation or warranty that any
non-Ematic website you navigate to will be free of viruses, worms, Trojan horses and
otheritemsofadestructivenature.TheEmaticUserManualisforyourexclusivebenet
and you assume all risks, losses and/or damages of whatever nature that may result
arising out of your use of the Ematic User Manual.
To the maximum extent permitted by applicable law, Ematic shall not be liable for any
damages suffered as a result of using, modifying, contributing, copying, distributing, or
downloading the materials, use of the Ematic User Manual or use of any Ematic product
and/or software. In no event shall Ematic be liable for any indirect, extraordinary, exem-
plary, punitive, special, incidental, or consequential damages (including, without limita-
tion,lossofdata,revenue,prots,useorothereconomicadvantage)howeverarising,
whether for breach of contract or in tort, even if Ematic has been previously advised of
the possibility of such damage. You agree that you have sole responsibility for adequate
protection and backup of data and/or equipment used in connection with the product
and software and will not make a claim of any nature against Ematic for lost data, inac-
curateoutput,workdelaysorlostprotsresultingfromtheuseofthematerials.You
agreetoindemnify,holdharmlessanddefendEmatic,togetherwithitsafliates,parent
and subsidiary entities, successors, assigns, partners, managers, members, employees,
ofcers,directorsandshareholders,fromandagainstanyandalldamages,liens,liabili-
ties, losses, demands, actions, causes of action, claims, costs and expenses (including,
without limitation, reasonable attorneys’ fees, charges and disbursements, as well as the
cost of in-house counsel and appeals) arising from or related to Ematic, the use of The
Ematic User Manual or any Ematic product and/or software. Some jurisdictions do not
allow the exclusion or limitation of incidental or consequential damages, so the above
limitation or exclusion may not apply to you.
Windows™ is a registered trademark of Microsoft Corp. in the United States and other
countries; Mac OS® is a registered trademark of Apple Inc.; Linux™ is a registered trade-
mark of Linus Torvalds. Android, Google, Google Play, Google Now and other marks
aretrademarksofGoogleInc.EmaticisnotafliatedwithGoogleInc.Wi-Fi®,theWi-Fi
CERTIFIED logo, and the Wi-Fi logo are registered trademarks of the the Wi-Fi Alliance.
EmaticisnotafliatedwithMicrosoft,Apple,Inc.,Linux,orGoogle,Inc.,(including
Android).
This device complies with Part 15 of the FCC Rules. Operation is subject to the following
two conditions: (1) this device may not cause harmful interference, and (2) this device
must accept any interference received, including interference that may cause undesired
operation.
The Ematic brand and products are owned by Shaghal, Ltd.
Limitations of Liability Statement
Limitations of Liability Statement
Limitation of Liability and Indemnity
FCC Warning Statement
Changes or modifications not expressly approved by the party responsible for compliance
could void the user’s authority to operate the equipment.
This device complies with Part 15 of the FCC rules. Operation is subject to the following two
conditions: 1) this device may not cause harmful interference, and 2) this device must
accept any interference received, including interference that may cause undesired
operation.
Note: This equipment has been tested and found to comply with the limits for a Class B
digital device, pursuant to part 15 of the FCC Rules. These limits are designed to provide
reasonable protection against harmful interference in a residential installation. This
equipment generates, uses and can radiate radio frequency energy and, if not installed and
used in accordance with the instructions, may cause harmful interference to radio
communications. However, there is no guarantee that interference will not occur in a
particular installation. If this equipment does cause harmful interference to radio or
television reception, which can be determined by turning the equipment off and on, the user
is encouraged to try to correct the interference by one or more of the following measures:
—Reorient or relocate the receiving antenna.
—Increase the separation between the equipment and receiver.
—Connect the equipment into an outlet on a circuit different from that to which the receiver
is connected.
—Consult the dealer or an experienced radio/TV technician for help.

36