Manual

User’s Manual
Ematic 8.9” Tablet with Windows 8.1
EWT900
Since the tablet software updates regularly, the user
manual may not cover all aspects of new features.
• The new battery will be in its best condition after
being fully charged and discharged 2-3 times.
• While using earphones, if the volume is excessively
high it may cause hearing damage. Please adjust
the volume of the player to a safe level and mod-
erate during use.
• Do not disconnect the tablet suddenly when for-
matting or uploading and downloading, which can
lead to program errors.
• Do not dismantle the tablet by yourself, and do
not use alcohol, thinner or benzene to clean its
surface.
• Do not use the tablet while driving or walking.
• The tablet is not moisture and water resistant.
Please do not use it in a damp environment.
• Do not drop or hit the tablet against a hard sur-
face, or the screen may be damaged or cracked.
• Do not upgrade the firmware by yourself. The
tablet should be upgraded with the right firmware
and right methods offered by us. If upgrade is
needed, please contact us.
Important Notices
Section 1: Tablet Overview
Tablet Overview
Touch Screen Basics
Charms
Take a Screenshot
Section 2: Initial Setup
Turn on or Wake
Charging
Battery Status
Getting Started
Section 3: Personalize Your Tablet
Personalize Your Start Screen
Create Tiles
Customize Your Tiles
Background & Color
Personalize Your Lock Screen
Notications
Personalize Your Desktop
Section 4: Networks
Turn On/Off Wi-Fi
Forget a Wi-Fi Network
Connect/Disconnect to a VPN
Join a Homegroup or Workplace
Section 5: Connect to Devices
Pair with a Bluetooth Devices
Printing
Scan
Connect to TV, Monitor, or Projector
Section 6: Keyboard Settings
On-screen Keyboard
Other On-Screen Keyboard Options
Access On-screen Keyboard Settings
On-screen Keyboard Tips
Typing Cover (keyboard)
Pair Typing Cover to Tablet
Typing Cover Functions
Charging Typing Cover
Section 7: Apps
Finding Apps
Switch Between Apps
4
4
5
6
7
7
7
8
8
9
10
10
10
11
11
12
12
12
13
13
14
14
14
15
15
15
16
16
17
17
17
18
18
19
19
20
21
22
22
22
Dual Screen Apps
Close Apps
App Commands
Uninstall Apps
App Help & Settings
Explore Apps
Alarm
Camera
Included Apps
Section 8: User Accounts
Microsoft Account or Local Account
Manage Your Accounts
Unlock & Sign-in
Sign-In Options
Change Your Password
Lock or Sign Out
Section 9: Ease of Access
Section 10: PC Settings
Section 11: Tips & Tricks
Extending Battery Life
Refresh/Reset
Troubleshooting
TechnicalSpecications
Customer Support
Limitations of Liability Statement
23
23
23
24
24
25
25
25
26
29
29
29
30
30
31
31
32
32
33
33
34
35
35
35
36
4
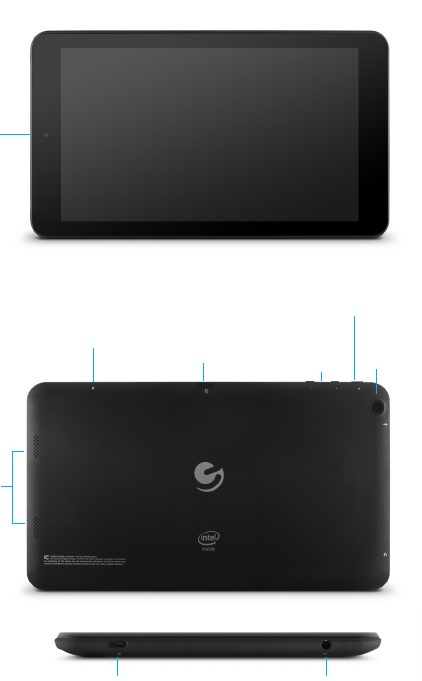
1. Tablet Overview
Camera
Camera
Speakers
Microphone MicroSD
Card Slot
3.5 mm audio jack
MicroUSB
connection
Volume Up/Down
Hold for 2 seconds to
turn on/off.
Press to sleep/wake.
5
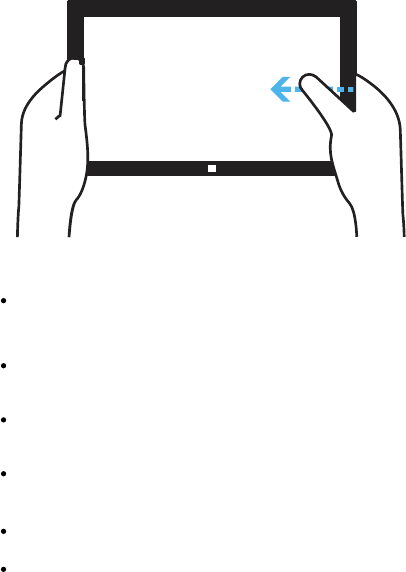
Touch Screen Basics
Swipe in from the right edge to reveal charms.
You can also return to the Start screen from here.
Swipe in from the left edge to switch to the last
used app.
Swipe in from the bottom edge to reveal app
commandsspecictothecurrentapp.
Drag from the top edge of the screen down to the
bottom to close the current app.
Pinchorstretchyourngerstozoominandout.
Slideyourngersacrossthescreentoseemore.

6
Charms
Charms provide you easy access to commands you
perform most often. Charms allow you to do things like
search, share, and change the settings wherever you
are.
Touch: Swipe from right edge of the screen
and tap the charm you want to open.
Keyboard: F3 (only in Android/iOS mode)
Note: see Typing Cover Functions on pg. 20
Search
To open the charms:
SearchtondthingsanywhereonSurface,
in apps, and on the web.
Shareles,photos,music,andlinks.
Brings you to the Start Screen. If you’re
already at Start, it will take you to the last
opened app.
Play, print, and project from other devices
when you connect with them.
Change Surface settings, or app settings
when apps are opened.
7
2. Initial Setup
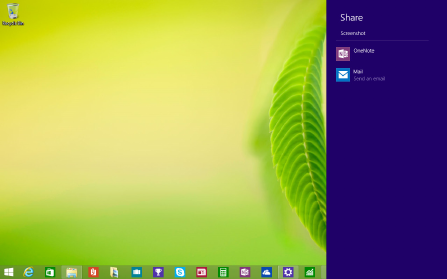
Take a Screenshot
To take a snapshot of your screen:
1. Open the share charm.
2. Underneath Share, tap Screenshot.
3. Choose how you want to share your screenshot. You
can share via mail, facebook or save it to OneNote.
Note: Sometimes the Screenshot option doesn’t ap-
pear, depending on what app you are in. Just tap the
rstbuttonunderneathShare,andtheScreenshotop-
tion will appear.
Turn on or Wake
To turn on your tablet, press and hold the power key
for 2 seconds.
Once the screen loads, connect to your Wi-Fi network.
To wake, press the power button and the lock screen
should appear. Swipe up to unlock and sign in.
8
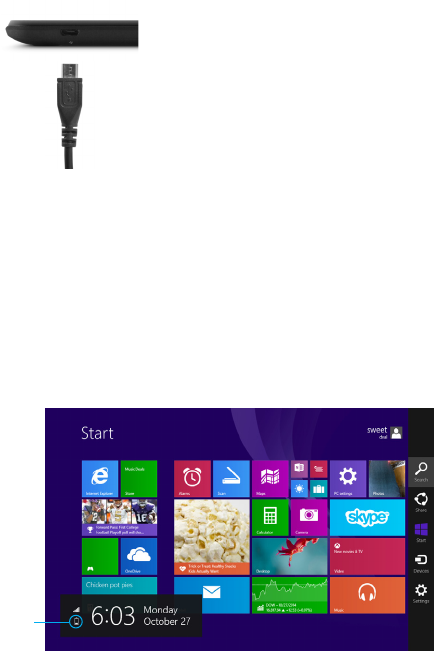
Charging
Battery Status
Battery
Status
Fullychargeyourtabletfor6hoursbeforetherst
use.
There are a few places you can check on your battery
status:
The lower left corner of the screen when you open
charms.
Attention: Charging by connecting to a computer will
be extremely slow. We recommend only using the
included wall charger.
Use the included wall
charger.
The battery indicator will
show that your device is
charging.
9
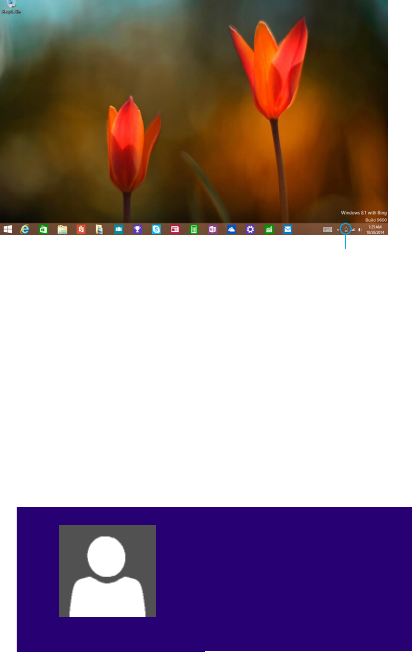
Getting Started
Your information is used to create an account on the
tablet. You can use this account to create, modify, or
remove other accounts on your tablet.
The lower left corner of the lock screen.
The lower right corner of the Desktop taskbar.
Attention: Plug your tablet into the charger when
you see a low battery warning.
Battery Status
Ema Tic
ematic@ematic.com
10
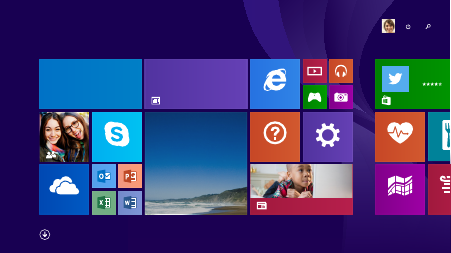
3. Personalize Your Tablet
Personalize Your Start Screen
Create Tiles
Pin your favorite apps, websites, and contacts to the
Start Screen.
To pin a website:
1. Go to website.
2. Swipe down from top edge of screen.
3. Tap Favorites button. Then tap Pin button.
4. Tap Pin to Start.
To pin an app:
1. Swipe up from Start Screen.
2. Press and hold an app, then select Pin to Start.
Reading List
Maps
Innovative ways to teach computers
to kids
OneDrive
Health & Fitness
Food & Drink
Internet Explorer
Los Angeles
Sunny
Today
18°/11° Mostly sunny
Tomorrow
20°/12° Partly sunny
20°
Weather
Skype
Twitter
Essential App
Free
8,628
Settings
Office hours
Sheila’s office
9∶30 AM — 10∶30 AM 9
Wednesday
RE∶ Pick up the kids on Thursday?
That sounds great. See you then!
Mail 5
Regina Roberts
Help + Tips
�Sheila
Marchand
11
To pin a contact:
1. Open People app and select a contact.
2. Swipe down from top edge of screen.
3. Tap Favorites button. Then tap Pin button.
4. Tap Pin to Start.
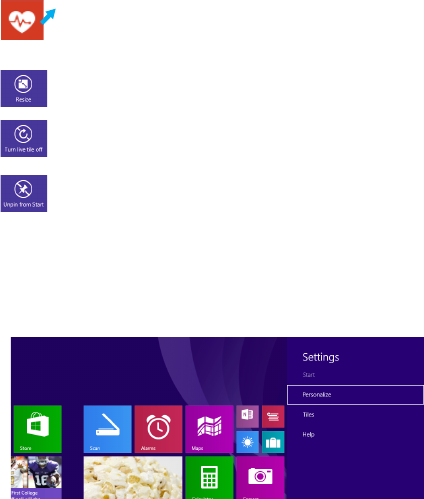
Customize Your Tiles
Background & Color
Customize your start screen by changing around the
tiles any way you like.
You can also customize the Start screen colors and
background. At your Start screen, open the Settings
Charm, and tap Personalize.
To resize a tile: Press and hold a tile. Select
Resize. Choose the size you want.
To move a tile: Tap and drag to where you
want it.
To turn off a live tile: Press and hold a tile.
Select Turn live tile off.
To unpin tile from Start: Press and hold a
tile. Select Unpin from Start.

12
Personalize your Lock Screen
Notications
Open the Settings Charm. Tap Change PC settings.
Tap PC and devices. Then Tap Lock Screen.
Noticationsshouldappearinthetoprightcornerof
thescreen.Tohidenotications,opentheSettings
charmandtapnotications.
Tochangemorenoticationsettings,tapChangePC
settings in the Settings charm. Tap Search and apps,
thentapNotications.
Lock Screen Notications: Toeditappnoticationson
the lock screen, tap Change PC Settings in the Settings
charm, Tap PC and Devices, then Tap Lock Screen.
Personalize your Desktop
Customize your desktop how you want it.
Go to the desktop and open the Settings Charm. Tap
Personalization. Here you can change the theme,
desktop background, colors, and sound.
13
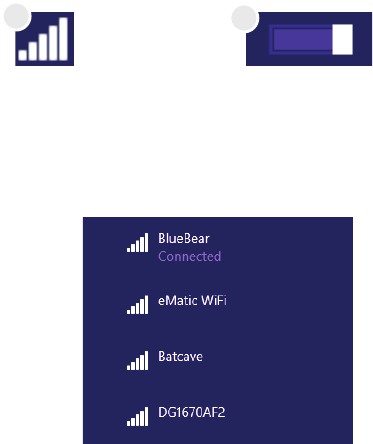
Within the Settings
Charm menu, tap the
wireless Network icon.
Under Networks, tap
the Wi-Fi switch to
turn it on and scan for
networks.
Yourtabletwilllistthenetworksitndswithinrange.
Tap a network to connect.
When connected, the wireless indicator appears in
the status bar. The white lines indicate connection
strength.
Tap the Wi-Fi OFF switch under Networks.
Turn off Wi-Fi when you’re not using it to extend the
life of your battery between charges.
Wi-Fi can only be used when it connects with a Wi-Fi
Access Point (AP) or a free unsecured Wi-Fi hotspot.
Turn on Wi-Fi
Turn off Wi-Fi
4. Networking
2
1
14
Go to Change PC settings after you open the Settings
Charm. In the Network settings screen, tap Connec-
tions. Then tap Manage known networks, select a net-
work and tap “Forget” in the dialog box that opens.
You can connect to a Virtual Private Network (VPN).
Note: This tablet has built-in support for VPN. You can
also install third-party VPN software, if available in the
Windows Store.
1. Open the Settings Charm. Tap Change PC settings.
2. Tap on Network. Then Tap Connections.
3. Tap Add a VPN connection and enter VPN info to
connect.
Forget a Wi-Fi Network
Connect to a VPN
Disconnect from a VPN
Join a Homegroup or Workplace
Tap the VPN OFF switch under Networks. Turn off
VPN when you’re not using it to extend the life of your
battery between charges.
Go to Change PC Settings in the Settings Charm. Tap
on Network. Then Tap HomeGroup or Workplace and
follow the on-screen instructions.
15
Connect to Devices
Pair with a Bluetooth Device
Printing
You can connect your tablet to different devices with a
USB cable or wirelessly.
1. Turn on your Bluetooth device to make it discover-
able.
1. Make sure what you want to print is open on your
screen.
To print from your tablet:
2. Open Settings Charm, and tap Change PC Settings.
2. Open Devices Charm. Tap Print.
3. Go to PC and devices, and tap Bluetooth.
3. Select your printer from the list.
4. Turn on your Bluetooth and wait for your tablet
to search for Bluetooth devices. When the bluetooth
device appears, follow the on-screen instructions to
nishpairing.
4. Select your printing options. Tap Print.
5.

16
Scan
Connect to TV, Monitor, or Projector
Connect your tablet to a TV or monitor to watch mov-
ies, work with multiple apps, and share presentations.
Use the scan app to scan images and
documentstoavarietyofleformats.
1. Swipe up from center of Start screen.
1. Open Devices charm. Tap Project.
2. Tap Scan.
2. Tap Add a wireless display.
3. Choose your wireless display and follow the on-
screen instructions.
To Scan:
To Connect to a wireless display:

17
Keyboard Settings
On-screen Keyboard
Other On-screen Keyboard Options
The on-screen, touch keyboard appears whenever you
need it.
The thumb keyboard makes typing easier when holding
the tablet in your hands.
Writewiththetouchofyourngeroracapacitivepen.
Tap the screen where text can be entered, and the
keyboard will automatically appear.
You can also manually access the on-screen keyboard
from wherever you are.
1. Open settings charm.
2. Tap on the Keyboard.
3. Tap on Touch keyboard and handwriting panel.
To close on-screen keyboard:
Thumb Keyboard
Handwriting Keyboard
Tap anywhere on the screen where text can’t be en-
tered, or tap the close keyboard icon and press Hide
keyboard on the on-screen keyboard.
When your on the desktop, you can access
the on-screen keyboard from the keyboard
icon in the lower right icon.
6.
18
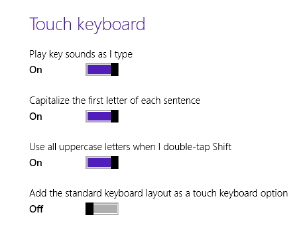
Access On-Screen Keyboard Settings
On-Screen Keyboard Tips
1. Open settings charm.
Numbers Tap &123 key or swipe
upwards on the buttons in
the top row.
Tap Ctrl key + another
key that shows a shortcut
option.
Double-tap Up Arrow Key.
The key should turn white
when Caps Lock is on.
Press down a key. Slide
yourngertotheaccented
character or option you
want.
Diacritical Marks/
More character
options
Keyboard Shortcuts
Caps Lock On/Off
2. Tap Change PC settings.
3. Tap PC and devices. Tap Typing.
4. Change your on-screen keyboard settings under
Touch keyboard.
19
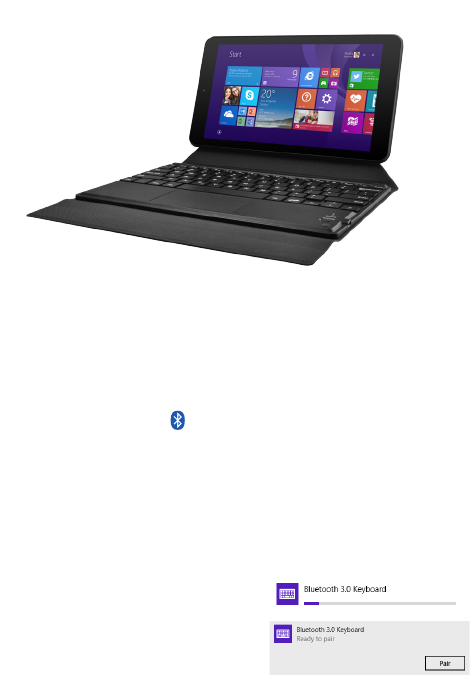
1. Open Settings Charm. 2. Tap Change PC settings.
3. Tap PC and Devices 4. Tap Bluetooth
5. Tap Bluetooth 3.0 Keyboard
6. Then Tap Pair.
1.SwitchtoOn.Thepowerlightshouldbrieyturn
green.
2. Press the Fn and buttons at the same time. The
statuslightwillashblue.
On your Typing Cover:
On your Tablet:
Typing Cover (keyboard)
Pair Typing Cover to Tablet
20
Opens Charms bar.
Scroll forward.
Scroll backwards.
Opens Desktop Settings.
Volume Up/Volume Down.
Scroll up/down and left/right.
Open app or open link
Arrow Keys
Enter
Win
F1
Tab
Switch between Start screen and
last opened app.
Opens Search bar.
Shift + Tab
F3
F5
F9/F10
Key Function
When in Fn+Q/Fn+E (For Android/ For IOs) mode
First select what typing mode you want to use.
Different modes have different key functions.
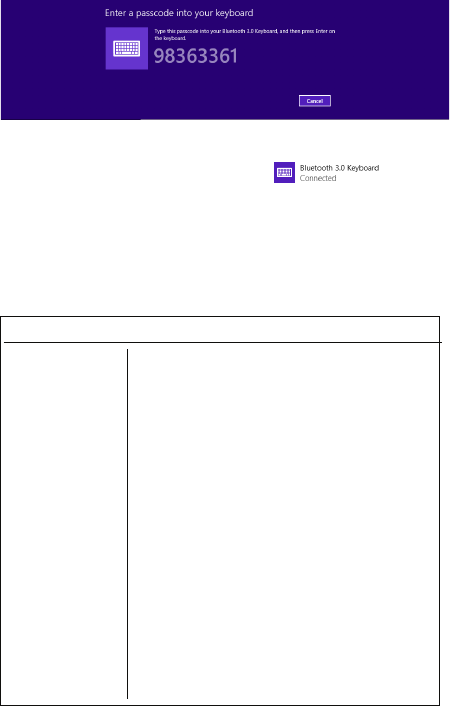
7. On your typing cover, type in the passcode shown
on the screen and press enter.
8. Your typing cover is now
connected and ready to use.
Typing Cover Functions

21
Scroll forward.
Opens Internet Explorer.
Scroll backwards.
Scroll up/down and left/right.
Open app or open link.
Arrow Keys
Enter
Win
Tab
IE
Switch between Start screen and
Internet Explorer.
Shift + Tab
Key Function
When in Fn+W (For Win) mode
Connect included USB cable to your computer’s
USB port.
Charginglightwillashwhencharging.
Powerlightwillashwhenthepowerislow.
Charging Typing Cover
22
7. Apps
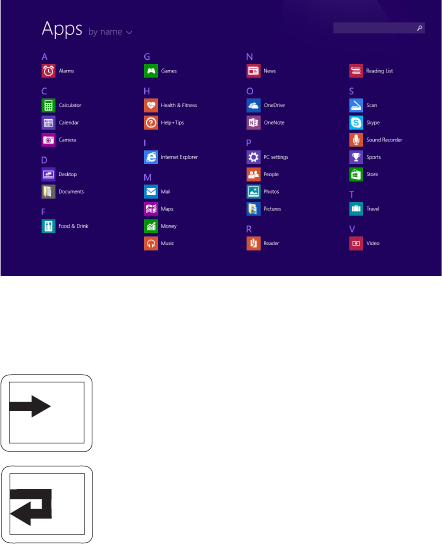
Find Apps
Switch Between Open Apps
Swipe up from middle of Start screen. A list of your
apps will appear. Scroll through the list or search to
ndanapp.
Note:YoucanalsoopentheSearchcharmtond
an app.
Touch: Swipe in from left edge of screen.
Touch: Drag in from left edge of screen,
then drag out. Choose the app you want
to open.
Go Back To Previous App
Go To Specic App
23
Dual Screen Apps
You can arrange and view two apps side-by-side.
1. Open the apps you want to use.
2. Open your recently used apps tab (swipe in from
left edge, then swipe out).
3. Choose the app you want and drag until you see a
black vertical line divide the screen in half. Let the app
go.
To change one of the apps, open a new app from the
Start screen or Apps view. The new app will appear
above the other two apps. Tap left or right to choose
where to place the app.
From the top edge, swipe and drag app down off the
screen.
Close Apps
App Commands
Swipe down from the bottom edge of the screen to
pull up the app commands.
24
Uninstall Apps
App Help & Settings
Press and hold an app until the app is highlighted,
and app commands appear at the bottom of the
screen. Tap on Uninstall.
OpenSettingsCharmandndHelp.Ifthereisnohelp,
check the company’s website for information.
Open Settings Charm inside an app.
For App Help:
For App Settings:
Uninstall

25
Open up some apps to better familiarize yourself with
your new tablet.
Tap the Alarm app to access your alarm,
timer, or stopwatch.
Timer
Exploring Apps
Alarm
Tap the camera app to take pictures and videos to
share with your friends and family.
Taking Photos:
•Tapthecameraicontotakeaphoto
•SwipedownfromthetoporbottomedgeforCamera
Settings.
Recording Video:
•Tapthevideoicontostartrecording
•Tapthevideoiconagaintostoprecording
•SwipedownfromthetopedgeonforVideoSettings
Camera
Tap the camera app to take pictures and
videos to share with your friends and
family.

26
Included Apps
Documents: Easily store and save your docu-
ments on your tablet.
Food & Drink: The hands-free cooking mode
makes trying new recipes easy and fun.
Games: Discover the latest Xbox games for
Windows 8.1
Health & Fitness: This app has tons of exercise
videos, exercise and diet trackers, and nutrition
and medical guides.
Help + Tips: This informational app helps you
navigate around your tablet with ease.
Internet Explorer: This tablet has two ver-
sions of Internet Explorer: a desktop app,
and a touch-friendly app.
Mail: Use the mail app to respond to messages
from all your e-mail accounts.
Calculator: Basic calculator functions
Camera: Take photos and record videos
Desktop: Use your tablet like a PC.
Calendar: Keep track of your schedule and set
reminders
Maps: Maps provides you with directions and
trafcconditionstohelpyougetwhereyou
need to go.

27
Music: Play, stream, and buy music from the
Xbox Music Store.
News: A photo-rich app that keeps you up to
date with what’s happing in the world.
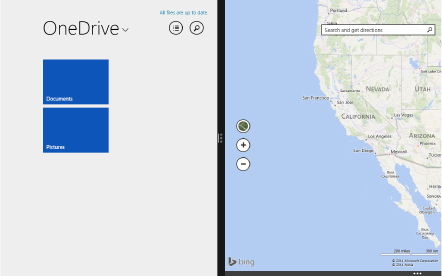
OneDrive:Easilysharelessecurelywith
friends.Cloudstoragemakesyourlesacces-
sible from any of your devices.
Photos: View, edit, and import photos on your
tablet and OneDrive.
People: An address book and a social media
app in one. Here you get all the latest up-
dates from your friends on Facebook, Twitter,
Google, etc.
Reader:AllowsyoutoreadlesinPDF/XPS
formats.
Pictures: View and store photos on your desk-
top app.
OneNote: A digital notebook where all your
notes, to-do lists, and pictures are saved in the
cloud for easy access.
PC Settings: Adjust the settings on your tablet.
Reading List: Bookmark content you want to
read later.
Money: Global sources help you keep track of
nancialnewsandmarketdata.

28
Sound Recorder: Record audio using the built-in
microphone
Store: Get the latest apps from the Windows
Store.
Travel: This app helps you plan your trip with
travel guides, booking tools, currency conver-
sion, and weather forecasts.
Video: Xbox video lets you watch the latest
movies and tv shows, and offers recommenda-
tions based on what you like to watch.
Weather: This app shows you hourly, daily, and
10-day forecasts.
Sports: Live updates from your favorite sports
and teams.
Skype: Use Skype calls and chat to connect and
stay in touch with family and friends.
Scan: Scan pictures or documents.

29
Microsoft Account or Local Account
Manage Your Accounts
User Accounts
Choose whether you want to use a Microsoft account
or a local account.
Your user account controls how you use your tablet.
When you want to use your tablet, sign in with your
user account.
Microsoft Account
Local Account
PC Settings
You use this account to sign into Windows, and shop
forappsintheWindowsStore.Allyourlesarealso
saved to OneDrive by default so that you can access
them from any PC.
You can only use a local account on your tablet and
cannot connect to the cloud.
There are two ways you can manage your accounts:
1. Open the Settings Charm and tap Change PC
Settings.
2. Tap Accounts. Then Tap Other Accounts.
8.
30
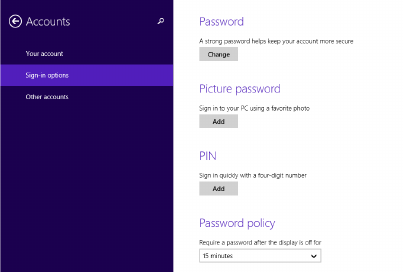
Unlock & SIgn-in
Sign-in Options
Control Panel
1. Open the Search Charm.
1. Press and release power button. The lock screen
should appear.
2. Swipe up to dismiss lock screen, and type in
your password (if required).
You can also create a pin or use a picture pass-
word to sign in to your tablet.
To access other sign in options, go to Change PC
Settings in the Settings Charm. Tap Accounts,
then tap Sign-in options and follow the on-screen
instructions.
2. Type “user accounts” into the search bar.
3. Choose user accounts from search results.
sign in options
31
Change Your Password
Lock or Sign Out
1. Open the Settings Charm. Tap Change PC Settings.
2. Tap Accounts. Then Tap Sign-in options.
3. Choose user accounts from search results.
3. Under password, tap Change and follow the on-
screen instructions.
Your tablet will be automatically locked when you
don’t use it for awhile.
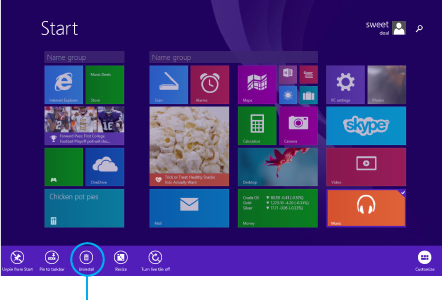
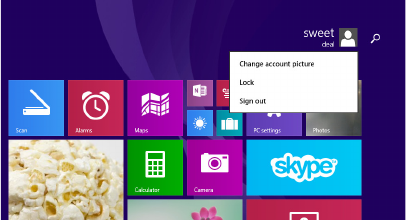
You can manually lock or sign out from the Start
screen by tapping your account picture in the top
right corner of the screen. Choose Lock or Sign
Out.
32
Ease of Access
9.
The Ease of Access settings allows you to change
your tablet the way you want, making your PC
easier to use.
To go to Ease of Access Settings:
1. Open Settings Charm. Tap Change PC Settings.
2. Tap Update and recovery.
3. Tap Recovery.
10.PC Settings
Activate Windows: Install the latest version of Windows on your
tablet with your product key.
PC and devices: Manage your tablet settings such as display,
typing, power, and sleep. Manage Bluetooth devices and other
devices. Get PC info.
Accounts: Manage and create different user accounts.
OneDrive: Manage OneDrive storage, sync settings, and me-
tered connections.
Search and apps: Control your search experience, share op-
tions,notications,andchoosedefaultapps.
Privacy: Change your privacy settings, location settings, web-
cam settings, microphone settings, and other devices.
Network: Manage your network connections.
Time and language: Set date and time. Set region and language.
Ease of Access: Control accessibility settings. Narrator, magni-
er,highcontrast,abdkeyboardoptionscanbeadjustedto
your needs.
Update and recovery: Update Windows, save copies of your
les,andrecoverorreinstallyourtablet.
33
11. Tips & Tricks
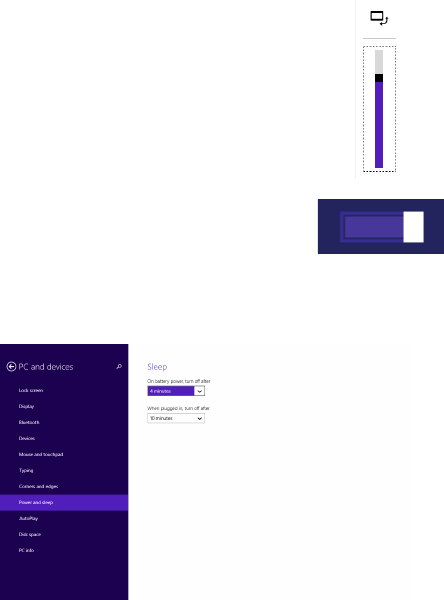
Extending Battery Life
Reducing the Brightness of your screen can help extend
your battery life.
You can also adjust your power and sleep settings
to save battery.
Switch off Wi-Fi if you’re
not close to a strong signal.
1. In the Settings Charm, Tap Screen.
2. Drag the slider to adjust brightness.
34
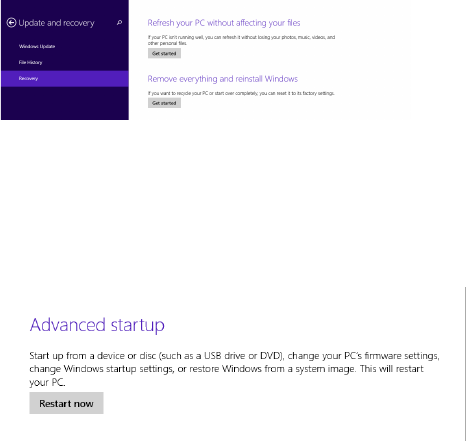
1. In the Settings Charm, tap on Change PC Settings.
1. In the Settings Charm, tap on Change PC Settings.
2. Tap on Update and recovery. Tap Recovery.
2. Tap on Update and recovery. Tap Recovery.
2. Choose how you want to refresh the tablet.
2. Choose “Remove everything and reinstall Windows.
Refresh/Reset
Refresh Device
Reset Device
Warning: Resetdeletesallyourpersonallesand
settings. The tablet restores to its factory settings.
12.
35
Troubleshooting
Cannot turn on the tablet.
Check the tablet’s power level. Please charge it before start-
ing it. If your tablet still cannot be turned on, you may reset it
before you turn it on.
No sound from earphones.
Check if volume is set to ‘0’. Or earphone may be broken,
please try another one.
Loud static noise.
Check if there is dust in the earphone or speaker. Check if the
leisbroken.
Frozen to any operation.
Reset the device by pressing the reset button with a small
object such as a paperclip.
Application is not working.
Possible reasons may be that this app is not compatible with
yourOSorthedownloaded.apkleisbroken.Youmayneed
to download a full version.
How do I delete a Microsoft account?
If an account is added, the account is shown in Other accounts,
where you may also add another account. To delete an unde-
sired account, tap the account, then tap Remove. Tap Delete
account and data.
13.
36
•Windows8.1
•8.9”1024x600Screen
•1.3GHzQuad-CoreIntelAtomProcessor
•1GBRAM
•16GBashmemory(formattedcapacitywillbeless)
•Front&BackCameras
•G-sensor
•MicroSDcardslotsupportsupto32GB
•USBConnection
•Wi-Fi(802.11b/g/n)
•HDVideoPlayer-supportsupto1080p
•Bluetooth
Technical Specications
Visit ematic.us/support for customer support
regarding your device.
Tosubmitarequest,llouttherequiredinformation
online. You will be provided a ticket number regarding
your issue which you can refer to when contacting us
further.
Customer Support
37
The Ematic User Manual may contain or reference links to third-party sites, however,
please be aware that Ematic is not responsible for and cannot control these other sites.
Ematic makes no representations or warranties whatsoever about any other website
which you may access as a result of reading this user manual, or otherwise. When you
access a website that is not owned or operated by Ematic (a “non-Ematic website”),
even one that may contain an Ematic logo, please understand that it is independent
from Ematic, and that Ematic has no direct control over the content on such website(s).
In addition, a link to any such non-Ematic website does not mean Ematic endorses or
accepts any responsibility for the content, or of any functionalities or services, of such
website(s). Furthermore, Ematic makes no promise, representation or warranty that any
non-Ematic website you navigate to will be free of viruses, worms, Trojan horses and
otheritemsofadestructivenature.TheEmaticUserManualisforyourexclusivebenet
and you assume all risks, losses and/or damages of whatever nature that may result
arising out of your use of the Ematic User Manual.
To the maximum extent permitted by applicable law, Ematic shall not be liable for any
damages suffered as a result of using, modifying, contributing, copying, distributing, or
downloading the materials, use of the Ematic User Manual or use of any Ematic product
and/or software. In no event shall Ematic be liable for any indirect, extraordinary, exem-
plary, punitive, special, incidental, or consequential damages (including, without limita-
tion,lossofdata,revenue,prots,useorothereconomicadvantage)howeverarising,
whether for breach of contract or in tort, even if Ematic has been previously advised of
the possibility of such damage. You agree that you have sole responsibility for adequate
protection and backup of data and/or equipment used in connection with the product
and software and will not make a claim of any nature against Ematic for lost data, inac-
curateoutput,workdelaysorlostprotsresultingfromtheuseofthematerials.You
agreetoindemnify,holdharmlessanddefendEmatic,togetherwithitsafliates,parent
and subsidiary entities, successors, assigns, partners, managers, members, employees,
ofcers,directorsandshareholders,fromandagainstanyandalldamages,liens,liabili-
ties, losses, demands, actions, causes of action, claims, costs and expenses (including,
without limitation, reasonable attorneys’ fees, charges and disbursements, as well as the
cost of in-house counsel and appeals) arising from or related to Ematic, the use of The
Ematic User Manual or any Ematic product and/or software. Some jurisdictions do not
allow the exclusion or limitation of incidental or consequential damages, so the above
limitation or exclusion may not apply to you.
Windows™ is a registered trademark of Microsoft Corp. in the United States and other
countries;MacOS®isaregisteredtrademarkofAppleInc.Ematicisnotafliatedthe
Wi-Fi CERTIFIED logo, and the Wi-Fi logo are registered trademarks of the the Wi-Fi
Alliance. ©2010 Bluetooth SIG, Inc. All rights reserved.
EmaticisnotafliatedwithMicrosoftorApple,Inc.
This device complies with Part 15 of the FCC Rules. Operation is subject to the following
two conditions: (1) this device may not cause harmful interference, and (2) this device
must accept any interference received, including interference that may cause undesired
operation.
The Ematic brand and products are owned by Shaghal, Ltd.
Limitations of Liability Statement
Limitations of Liability Statement
Limitation of Liability and Indemnity
FCC Caution: Any changes or modifications not expressly approved by the party responsible
for compliance could void the user's authority to operate this equipment.
This device complies with Part 15 of the FCC Rules. Operation
is subject to the following two conditions:
(1)This device may not cause harmful interference, and (2) this device must accept any
interference received, including interference that may cause undesired operation.
NOTE: This equipment has been tested and found to comply with the limits for a Class B
digital device, pursuant to Part 15 of the FCC Rules.
These limits are designed to provide reasonable protection against harmful interference in a
residential installation. This equipment generates, uses and can radiate radio frequency
energy and, if not installed and used in accordance with the instructions, may cause harmful
interference to radio communications.
However, there is no guarantee that interference will not occur in a particular installation.
If this equipment does cause harmful interference to radio ortelevision reception, which can be
determined by turning the equipment off and on, the user is encouraged to try to correct
the interference by one or more of the following measures:
FCC RF Radiation Exposure Statement:
This equipment complies with FCC radiation exposure limits set forth for an uncontrolled
environment.End users must follow the specific operating instructions for satisfying RF
exposure compliance. This transmitter must not be collocated or operating in conjunction with
any other antenna or transmitter.
The device has been evaluated to meet general RF exposure requirement. The device can
beused in portable exposure condition without restriction.