ELANsat Technologies VC-103 2.4 GHz Wireless Night Vision Bear Camera User Manual VC S103A0 6060401303 11
ELANsat Technologies Inc. 2.4 GHz Wireless Night Vision Bear Camera VC S103A0 6060401303 11
Users Manual

BEFORE OPERATING THE UNITS, PLEASE READ THIS MANUAL THOROUGHLY
Night Vision Bear Camera
Handheld Video Monitor
2.4GHz
2.4GHz
Users Manual
Wireless Surveillance System
3.CONTROLS ...........................
4.FIVE-WAY KEY LAYOUT........
6.CHARGING THE BATTERIES..
2
3
8
1
7.TROUBLE SHOOTING ........... 11
8.SPECIFICATION....................13
1. INTRODUCTION ..................
~TABLE OF CONTENTS~
2. PACKAGE CONTENTS........... 2
5.OPERATION .........................3

CAUTION
RISK OF ELECTRONIC
SHOCK DO NOT OPEN
CAUTION:
DO NOT REMOVE THE COVER FOR REDUCING THE RISK OF ELECTRIC SHOCK.
NO USER-SERVICEABLE PARTS INSIDE REFER SERVICING TO QUALIFIED SERVICE PERSONNEL.
GENERAL SAFETY SUMMARY
WARNING
To prevent fire or shock hazard , do not expose the unit to rain or moisture.
IMPORTANT SAFETY INSTRUCTIONS
All the safety and operating instructions should be followed and read before the product is operated.
This product is intended for personal, non-commercial, non-industrial, household use in providing
video surveillance. Do not use outdoors.
All warnings on the product and in the operating instructions should be adhered to.
Keep the product out of the reach of children and pets. Children do not intend this product for
electrical outlet when it is not in use.
Do not use this product near water - for example, near a bath tub, wash bowl, kitchen sink, or laundry
tub, in a wet basement, or near a swimming pool; and the like.
1.
2.
5.
3.
4.
6.
7.
8.
9.
The safety and operating instructions should be retained for future reference.
This product is not a toy. Do not use the product for any other purpose.
Keep the product away from direct sunlight, open flame or other heat sources, humidity or dusty
environment.
Do not plug or unplug the product from the electrical outlet with wet hand, as a risk of electrical shock
exists.
Do not block any ventilation openings. Install the product in accordance with the operating instructions.
10.

Unplug this product from the wall outlet and refer servicing to qualified service personnel under the
following conditions.
When the power cord or plug is damaged.
If liquid have been spilled, or objects have fallen into the products
If the product does not operate normally by following the operating instructions, adjust only
those controls that are covered by the operating instructions as an improper adjustment of other
control may result in damage and will often require extensive work by a qualified technician to
restore this product to its normal operation.
If the products has been dropped or damaged in any way.
When the product exhibits a distinct change in performance - this indicates a need for service.
Disconnect the plug (do not pull on the Power Cord) from the electrical outlet.
Do not allow the Power Cord to hang (i.e., Over the edge of a table or counter) where it may be tripped
over or pulled.
Protect the power cord from being walked on or pinched, particularly at plugs, convenience
receptacles, and the point where the exit the product.
If using an extension cord, the marked electrical rating of the cord set or extension cord should be at
least as great as the electrical rating of the product.
Never operate this product if it has a damaged Power Cord or plug, malfunctions or is not working
properly, has been dropped, or damaged. This product has no user-serviceable parts. Do not
attempt to examine or repair this product yourself. Only qualified service personnel should perform
any servicing.
Plug the product into a standard 120V/230V AC electrical outlet.
Do not use this product with a voltage converter.
Unplug the product from the wall outlet before cleaning. Do not use liquid cleaners or aerosol cleaners.
16.
17.
18.
19.
20.
21.
14.
15.
13.
Do not use attachments not recommended or sold by the product manufacturer, as a risk of fire,
electrical shock, or serious personal injury may result.
Unplug the product from the electrical outlet prior to putting on or removing parts.
11.
12.

1
INTRODUCTION
Overview
Main Features
The attractive Bear Camera works with a handheld LCD monitor is just as a lovely nanny
taking care of your children. No complicated installation, containing a 2.4GHz hidden
transmitter, without running wires throughout your infant's bedroom. It suits for the active
parents while out in the garden or while moving from room to room.
High Resolution Color CMOS Camera
Built-in Microphone for Audio Monitoring.
Hz
Operating frequency of ISM band 2.4-2.4835 G
High Performance Audio/Video Receiver
Antenna embedded
Four channels selectable
Range up to 150 feet (Open side/LOS)
Enhancing function of IR LED Night Vision
1.75-inch color TFT-LCD monitor
Design to work with four high- resolution cameras
Operating frequency of ISM band 2.4 - 2.4835 GHz
Built-in speaker for audio monitoring
Low power consumption
2xAA rechargeable batteries (2000mAh) up to 4 hours
Audio or Audio/Video two-mode switchable
Four channels selectable
Transmission range up to 300 feet (L.O.S)
Handheld Video Monitor (Receiver)
Bear Camera ( Transmitter)
2
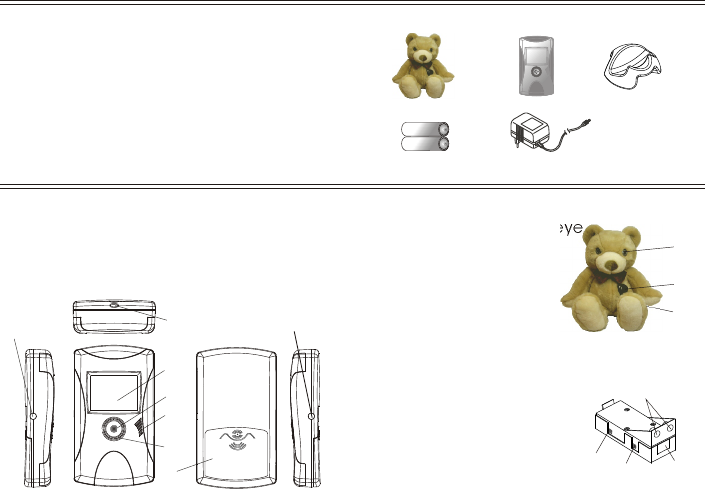
1. Bear Video Camera/Transmitter
2. Handheld video monitor (Receiver)
4. 1.5V AA ALKALINE battery
6. Users Manual
(X1)
(X1)
(X1)
3. Power Adaptor (X2)
(X1)
5. Stand
(X2)
PACKAGE CONTENTS
Power Adaptor
+
_
+
_
Battery
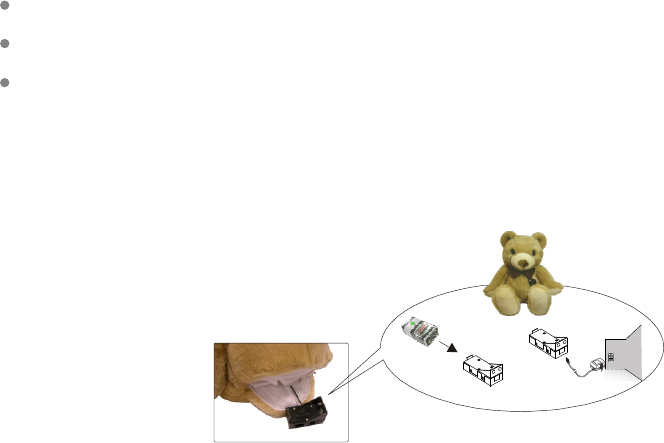
CONTROLS
Bear Video Camera
Handheld Baby Monitor
8. Earphone jack
3. LCD monitor
2. Strap eyelet
4. 5-way key
7. Battery cover
5. Speaker
1. DC jack
6. Power/Channel indicator LED 2. IR LED Illuminator
1. Bear Camera real eye
1.
3.
1. 2. 3.
4.
3. Power Adaptor Jack
2. Power Switch
1. Channel Switch
Battery room and SW board
4. 9V Battery Connecter
Check all of the components shown as below are included in box before using.
Receiver
Bear Video Camera Stand
3. Battery room and
SW board on back 2.
12
4
5
6
7
8
3

NOTE: The transmission range of the Bear video camera at open side up to 150ft.
Real distance is depends on its operating environment. If you are receiving poor
video images from the camera, try shortening the transmission range.
Reposition and/or adjust the Bear video camera if video transmission is being
degraded by obstructions in its operating environment.
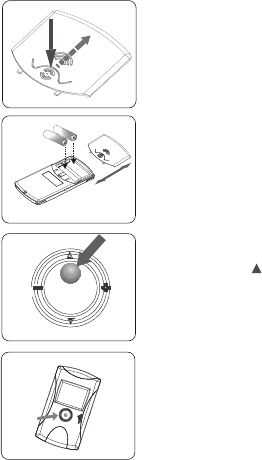
2.Position the video camera in the desired location.
1.Power by either the Battery or DC power of the Bear video camera.
Bear Video Camera
OPERATION
Select the desired transmission channel for the Bear video camera.
3.
NOTE: The Bear video camera has four different transmission channels.
The Bear video camera has been set to transmit on CH1at the factory.
Do not set and/or use more than one video camera on the same transmission
channel in order to prevents signal interference and unclear picture reception.
Continue.....
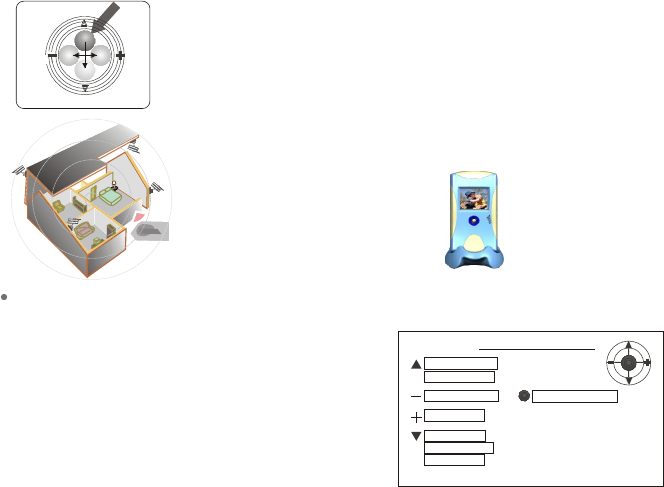
Channel selection
Brightness / Audio only
Down-key ( ):
Volume control ( )
+/+/
Power on-off / Mute
Up-key ( ):
1.
2.
3.
4.
1
2
3
4
FIVE-WAY KEY LAYOUT
3
4
Continue.....
8. When DV 9V Plug in Jack, the Battery
power will Auto switch off.
7. Slide the ON/OFF Switch to the ON position.
Then, plug the AC Power Adaptor into a standard 120V /230V
AC electrical outlet.
6. OR connect the AC Power Adaptor into adaptor jack.
NOTE: Make sure to move the batteries out of battery
compartment before plugging AC Power Adaptor.
OR
Please use 9V ALKALINE Battery for battery source.
5.
4. Zip back of the Bear Camera and pull out of the battery zoom.
Put a 9V battery into battery compartment.
NOTE: Reference the "Handheld LCD Monitor" section to update the receiver channel
selection.
Securely reattach the Channel Switch rubber grommet onto the video camera base.
Use a small, blunted, pointed object to slide Channel Switch inside of the base
opening, as desired (Channel 1-4)
Remove the Channel Switch rubber grommet from the Bear video camera front
base. (Refer to the diagram in the " Controls" section.)
Continue.....
2. Open the battery cover on the rear of
the Receiver and insert 2 AA- size batteries.
3. Close the battery cover, make sure it is
locked with a click.
++
__
++__
1. Press with a click and push the
battery cover as the figure indication.
4. Push up and HOLD the button two
seconds to power on/off Receiver.
( )
Click
Press
Push
Open the battery cover
Power on/off the Receiver
5. Check the LED around Five-way key
rightly light up in green after you
turn on the Receiver.
LED
LED in green
5
Handheld Video Monitor
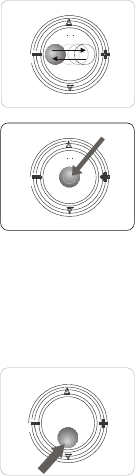
6. Push the button left (volume down)or
right ( volume up) to adjust volume.
Volume control
7. Press the button to choose Receiver's
Channel the same as Transmitter.
The power/channel indicator LED will
flash in green to indicate channel
number.
Channel I : Flash once
Channel II : Flash twice
Channel III : Flash thrice
Channel IV : Flash quartic
OR press and hold the channel button
two seconds to scan the channel.
Select the channel
8. Push down and HOLD the button two
seconds to switch into audio mode
(Audio mode: To Turn off the LCD monitor
for power-saving.)
9. Push down and HOLD the button two
seconds again to turn back A/ V mode.
Audio mode
Continue.....
6
10. Push up the button to mute the Receiver.
11. Push the button up again(left, right are
also available), or push down and hold a
few seconds, let Receiver get back
voice- mode.
Mute the Receiver
12. Work with one to four 2.4GHz wireless
camera for baby caring or
environment security, easily
watch anywhere you
would like to monitor.
7
Power On/Off: push & HOLD
Five-way Key Memo
"HOLD": Last for 2 seconds
Mute On/Off: push
Volume down
Volume up
Audio only:
push & HOLD
Brightness: push
Audio-Video:
push & HOLD
press
Channel Select:
LED flash to indicate
Channel number
A piece of "Five-way Key Memo" label attached in package.
You can stick it on back of Receiver for your operation
reminder.

Continue.....
CHARGING THE BATTERIES
2. Plug power adaptor into DC jack to
charge rechargeable batteries when
batteries' power is at a low level.
1. If the batteries are unable to supply enough power to
Receiver. The power/channel indicator LED will flash
in red till the Receiver shuts off.
The Receiver was made to work by power from 2XAA size
batteries(1.5V) or a power adaptor. Rechargeable batteries
are always chosen the level of 1.2V/2000mAh.
LED
3. The LED around Five-way key will light
up in red when the batteries are being
charged.
4. Unplug the power adaptor when the LED
switches off which means the batteries
have been fully charged.
8

Caution:
Using a specialized battery charger comes with the rechargeable batteries you
bought to charge is always recommended.
The Receiver can not charge the batteries when it is being used.
Before you get start first time, the rechargeable batteries have to be charged
about 6 hours until the Power LED turns off.
Non-rechargeable batteries can not be recharged.
Must not mix-charged the batteries of Ni-MH and Ni-Cd at the same time.
Take out the batteries if you are going to shelf the Receiver for a long time.
9
Always use ALKALINE batteries or the types of Ni-MH, Ni-Cd Rechargeable
battery.
Never mix-using the new and used batteries or different types of battery.

Caution:
10
To avoid electrical shock, do not open the Power Adaptor. The outlet of the power
supply must have the same voltage as the local area.
Do not plug or unplug the power adaptor from the electrical outlet with a wet hand.
Disconnect the plug from the electrical outlet, do not pull on the Power Cord.
Do not allow the Power Adaptor to be hung over the edge of a table or counter where
it may be tripped over or pulled.
Power supply cord should be routed so that they are not likely to be walked on or
pinched by items placed upon or against them.
Do not overload wall outlets, extension cords, or integral convenience receptacles as
this can result in a risk of fire or electric shock.
Only batteries of the same or equivalent type as recommended are to be used.
The Receiver with residual warm is normal condition after rechargeable batteries
full-charged.

11
TROUBLE SHOOTING
Please read this users manual carefully before using the Wireless Audio Product.
If you still have difficulties to use the product, consult the following syndrome,
which will guide you to solve most common problems.
Check the power supply.
1.
Ensure the transmitter is properly connected and set.
Ensure both the transmitter and receiver power indicators illuminate.
2.
No picture or sound
3.
4.
5.
Shorten the transmission range/distance between the transmitter and receiver
and/or adjust the video camera.
Unclear picture reception
1.
2. Shorten the transmission range/distance between the transmitter and receiver.
Reposition and/or adjust the Bear Camera. Check 9V Battery power is running out
or not.
Check to ensure the receiver channel is set properly for the desired video camera.
Check volume level is set properly for desire.
Make sure the batteries have been inserted into receiver's battery compartment.
Check both of the Receiver and Transmitter are surely turned on.
Make sure the power cables are connected rightly if you use power adaptor.
Check if the Receiver is in the mute or audio mode.
Make sure the batteries are full charged.
6.
7.
8.

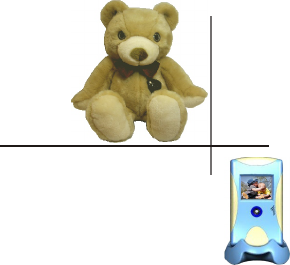
Unclear picture focus
1. The video camera is set at 4.9ft (1.5m) with a Free focus feature.
Interference in the Image and Sound
Check if there is any interference radio frequency source near your Receiver,
such as microwave oven or other 2.4GHz electronic products.
Make sure the range between Receiver and Transmitter is within 300 feet (L.O.S).
Make sure the Receiver and Transmitter are set to the same channel.
Important Information Required By The FCC
Warning : Changes or modifications to this unit not expressly approved by the party
responsible for compliance could void the user authority to operate the equipment.
This device complies with Part 15 of the FCC Rules. Operation is subject to the
following two conditions: (1) this device may not cause harmful interference, and
(2) this device must accept any interference received, including interference that
may cause undesired operation.
The user manual or instruction manual for an intentional or unintentional radiator
shall caution the user that changes or modifications not expressly approved by the
party responsible for compliance could void the user's authority to operate the
equipment.
12
1.
2.
3.

SPECIFICATION
13
CAUTION
Description
2:1 Interlace 2:1 Interlace
NTSC PAL
1/4" CMOS Image Sensor
510 (H) X 492 (V) 628 (H) X 582 (V)
15750 Hz 15625 Hz
60 Hz 50 Hz
Internal
More than 300 TV Lines
3 LUX (F1.2)
More than 45 dB (AGC OFF)
1.0 Vpp / 75 ohm composite Video Signal
1/60 ~ 1/2000 seconds 1/50 ~ 1/2000 seconds
Auto
9V
120 mA
F3.6mm, F2.0 (Fix Board Lens)
1.0Vpp/600ohm load for Mono
620g
16.93 x 12.98 x 6.69 in
Item
Scanning System
Image Sensor
Efficiency Pixels
Horizontal Scan Frequency
Vertical Scan Frequency
Synchronize
Min. Illumination
S/N Ratio
Video Input
Auto Electronic Exposure
Auto White Balance
Supply Voltage
Power Consumption
Operation Environment
Lens (Optional)
Audio Input
Weight
Dimension (mm)
Resolution
0 C ~ +40 C
1/3" CMOS Image Sensor
Bear Camera (Transmitter)

14
To provide the latest technologies product to our customer is our responsibility;
therefore, we reserve the right to change the specifications without prior notice.
Item Description
Display type
Display area
Resolution
Brightness
Display color
Frequency
Numbers of Channel
Receiver Sensitivity
L.O. Stability
Audio Output Power
Power consumption
Adaptor voltage
Rechargeable battery
Antenna
Volume
Dimensions
Operation Environment
TFT-LCD
1.75-inch diagonal
280x220(61,600 pixels)
180 nit
Full-color
2.4GHz - 2.483GHz
4 selectable channels
-85 dBm (min.)
+/-100kHz (typ.)
0.5w
500mA@2.4V
9V/300mA
2xAA; 1.2V/2000mAh
Inverted-F
Digital volume control
111(H) x 62.7(W) x 24(D)mm
-10 C ~ +50 C
Handheld Video Monitor (Receiver)

This equipment has been tested and found to comply with the limits for a Class B digital
device, pursuant to Part 15 of the FCC Rules. These limits are designed to provide
reasonable protection against harmful interference in a residential installation.
Federal Communication Commission Interference Statement
This equipment generates, uses and can radiate radio frequency energy and, if not
installed and used in accordance with the instructions, may cause harmful interference
to radio communications. However, there is no guarantee that interference will not occur
in a particular installation. If this equipment dose cause harmful interference to radio or
television reception, which can be determined by turning the equipment off and on, the
user is encouraged to try to correct the interference by one of the following measures:
Reorient or relocate the receiving antenna.
Increase the separation between the equipment and receiver.
Connect the equipment into an outlet on a circuit different from that to which the
receiver is connected.
Consult the dealer or an experienced radio/TV technician for help.
15
6060401303-11
Wireless Surveillance
2.4GHz
2.4GHz