ELECTRONICS TECHNOLOGY M75D MID User Manual 4 User s Manual
ELECTRONICS TECHNOLOGY(DONG GUAN)COMPANY LIMITED MID 4 User s Manual
Users Manual
1
User’s Manual
Dear users,
First of all, thank you for giving us the opportunity to serve you!
Before using this product, please read the instructions carefully.
This "manual" is intended to introduce you the basic characteristics of
this product, in order to help you using it at the best way. This manual
describes the product's features and information in details, as well as
recommendations and attentions to help you fully understand the technical
characteristics of the product.
In the annex provided with the product, you will find "warranty card",
which indicates the effectiveness of the relevant provisions of maintenance, as
well as additional services provided to users, please read it carefully in order
to avoid unnecessary problems. The product has powerful functions and high
performance, it will greatly improve your enjoy and satisfaction online.
Special note:
All the information in this manual is correct at time of publication.
However, as we continue to update and improve the product, so the software
on your device may be described slightly different in appearance and
functions.
(We reserve the right to improve products, specifications and designs are
subject to change without notice!)
2
Content
Technical parameters.............................................................................4
Appearance Preview ..............................................................................5
1. Appearance Introduction...................................................................5
2. TF card.................................................................................................6
3. Charge .................................................................................................6
First experience......................................................................................6
1. Boot the MID .......................................................................................7
2. Shutdown ............................................................................................7
3. Lock-screen and power-saving mode..............................................9
4. Main interface description.................................................................9
5. Custom Screen .................................................................................10
7. Connection of USB cable. ...............................................................12
Internet Function ..................................................................................14
1. Network connection .........................................................................14
1-1WI-FI..................................................................................................14
2. Internet ..............................................................................................15
Software Management .........................................................................16
1.Explorer..............................................................................................16
2. Software installation.........................................................................16
Applications..........................................................................................16
1. Music Playing....................................................................................16
2. Picture browsing ..............................................................................17
3. E-mail.................................................................................................18
3. E-mail............................................................................................................................19
4. Camera and video recording ......................................................................................19
5. Apk Installer .................................................................................................................20

3
Prompt
... Do not disassemble the product; do not use alcohol, thinner or benzene to clean the
surface of the product, if there is any problem, please contact us.
... The product should be charged more than 12 hours in the first three times.
... Do not put the product in a place with high temperature, humidity or dust; do not put the
product in a vehicle with windows closed especially in summer.
... To avoid dropping or strong impact to the product, do not let the touch screen be shaken
violently, otherwise, it may cause damage to the touch screen or display incorrectly.
... Please select the appropriate volume, volume should not be too high when using
earphones, if you feel tinnitus, please turn down the volume or stop using the product.
... Please charge the product in the following cases:
A. The battery icon shows no power.
B. The system is automatically shut down, reboot it will be shut down again soon. (Low
battery, the system will be automatically shut down)
C. No response when press keys.
Note: Please use the attached adapter to charge the machine, it can not be charged by
any other rechargers; otherwise the machine may be burned.
... Please do not suddenly disconnect the machine when it has been formatting or
uploading and downloading in progress, otherwise it may cause a program error.
... After improperly shutdown, the machine will scan and repair the disk when reboot, the
interface may stay a long time in the progress.
... For memory loss caused by product damage, repair or other reasons, the company is not
responsible; please properly use the product by following the manual.
... Does not use the product in places prohibit the use of electronic device, for example, on
an aircraft.
... Please do not use the product when driving or walking in a street, otherwise it may cause
a car accident.
... USB is used for data transmission only, can't charge.
... This machine has no water resistance.

4
Technical parameters
CPU InfoTMIC X15 Cortex A5 1.0GHz
Operating system Android 4.1.1
Browser Google Browser
Hard disk 4GB NAND Flash
Memory 1GB DDR3
Expansion slot MicroSD Card Slot, Support up to 32GB flash
Screen 7” TFT Touch Panel
Camera Front: 0.3 megapixels
Resolution 1024x600 Pixels
Input method Soft-keyboard on touch panel
Built-in speakers 1W 8ohm built-in speaker
Earphone 3.5mm
USB cable Micro USB
Battery Li-polymer Rechargeable Battery 3000mAh 3.7V
Size 191mm×116.5mm×11mm
Weight 0.302kg
Voltage AC 100~240V 50/60Hz; DC 5V/2A
Working temperature -10℃~+55℃
Music formats OGG、AAC、FLAC、MP2、WAV、M4A、WMA、etc…
Video formats RM、RMVB、AVI、3GP、MP4、MOV、FLV、ASP、MPG、
VOB、 MKV
Picture formats JPEG,BMP,PNG
E-mail Email, Gmail(Optional)
Maps Google map, Navigation map(Optional)
Machine
Network access WiFi (802.11 b/g/n)
5
Appearance Preview
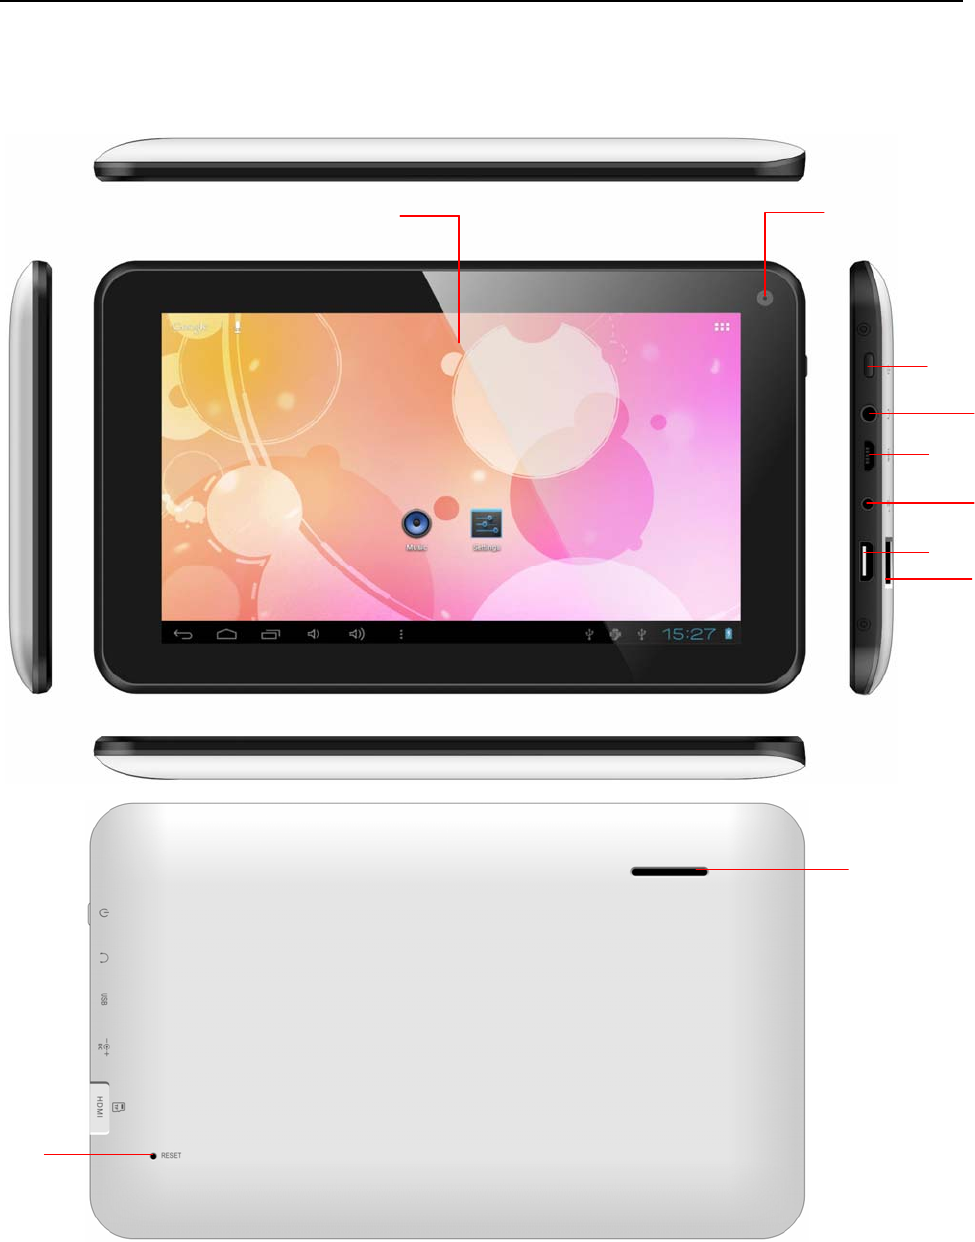
1. Appearance Introduction
This chapter describes the appearance of the machine, including buttons and ports; it will
guide you to understand the features and accessories.
(1) Touch screen (2) Power switch key (3) Earphone slot (4) USB slot
(5) DC slot (6) HDMI slot (7) TF card slot (8) Speakers (9)Reset
(10) Camera
(1)
(9)
(8)
(10)
(3)
(4)
(5)
(6)
(7)
(2)
6
Appearance Preview
Note: (1) The LCD is a touch screen; you can carry out clicking and dragging operations in
the touch area; please do not use pen, pencil or other sharp objects to click on the screen
to avoid scratching.
(2) Please keep the speakers clean to avoid the dirt blocking the hole and affect the
sound.
(3) The back of the MID has antenna and model, please do not cover with metal
objects to avoid weak signal.
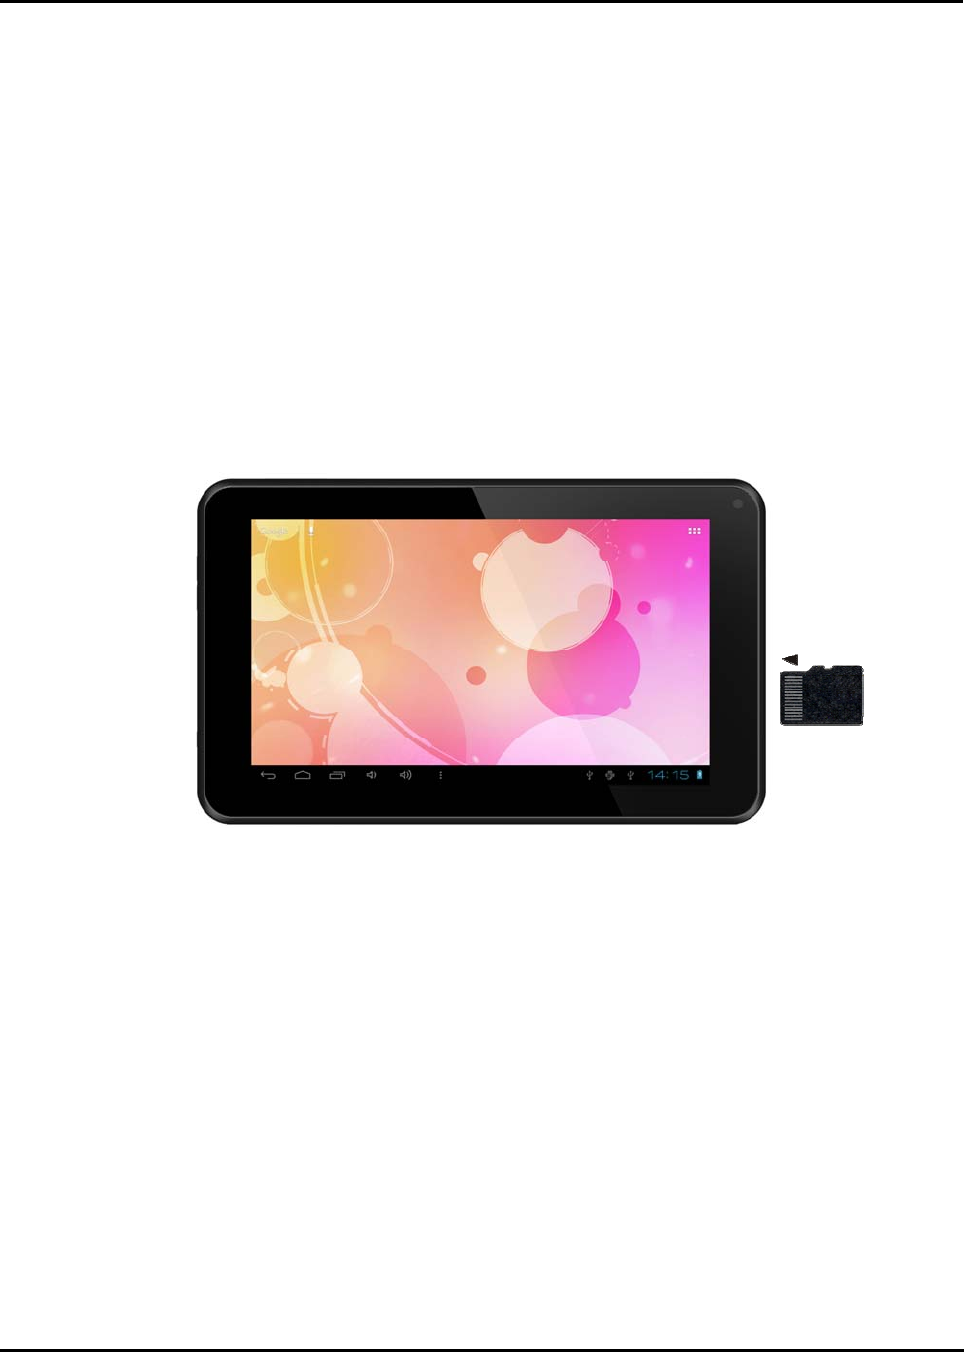
2. TF card
When plug a TF card, please do follow the icon on the machine, pay attention to the
direction of oblique angle.
(When remove the card, press the card with your thumb and release, the card will be
automatically ejected.)
Note: (1) Do not let objects come into the card slot. (In order to prevent the harm of dust or
moisture, please put cards back into box or package when don’t be used)
(2) When remove a TF card, be sure that the machine is power off.
(3) To remove a TF card with the machine is working, please don’t pull out the TF card
indirectly.
3. Charge
This product uses 5V/2A standard voltage; Please use the attached power charger, other
chargers may cause failure and risk.
Do not use the charger in humid environment. If your hands and feet are wet, please do not
touch the charger.
When using the charger or charging the product, please maintain good ventilation, do not
cover the machine with paper or other items resulting in reduced cooling effect.
First experience
The MID can achieve a variety of operating modes: (1) Clicking. (2) Holding. (3) Sliding. (4)

7
Dragging. (5) Rotating.
Keys action definition: (1) Short press: the time is less than 1.2 seconds. (2) Long press:
the time is longer than 3 seconds. There are all short presses in this manual without special
instructions.
360 degree rotation: for most interfaces or images, it can automatically rotate the screen
from horizontal into vertical as long as rotate the MID.
1. Boot the MID
1-1. Press the power switch key at the side of the machine (long press), the machine will be
booted. The LCD screen will display booting screen and animation first, a few seconds later;
it will enter into the Lock screen interface, shown as below.
1-2. Hold unlock button,there will be a white wire frame around. Drag unlock button to the
right unlock icon, and then unfasten.
Or the user can press the menu key indirectly to unlock.
2. Shutdown
When the MID is running, press the power switch key (long press), the system will display
the shutdown screen.

8
First experience
Click the "Power off" options, "Power off" three function, choose "Power off" into the
following screen.
* * * When electricity to 15%, the system will prompt charge. When battery is running low,
the system will automatically shut down.
9
First experience
3. Lock-screen and power-saving mode
When the machine is on, press the power switch or the screen is inactivity a certain time,
the MID will enter into screen-off / lock-screen status for power saving. Then MID programs
are still running, but the screen is blank.
When press the power switch again, MID will open the unlock menu.
Hold and drag unlock button to the right unlock icon, the MID will resume normal state.
4. Main interface description
Shortcut icon
Notice/ Fast setting column
Back
H
o
m
e
Apps having been
Widgets
Voice search icon Apps icon
Text search icon
V
o
l +
/
-

10
First experience
In the main interface, the system sets 5 display menus. You can browse them freely
through sliding screen from left and right. You can add/delete different icons in each the
main menu.
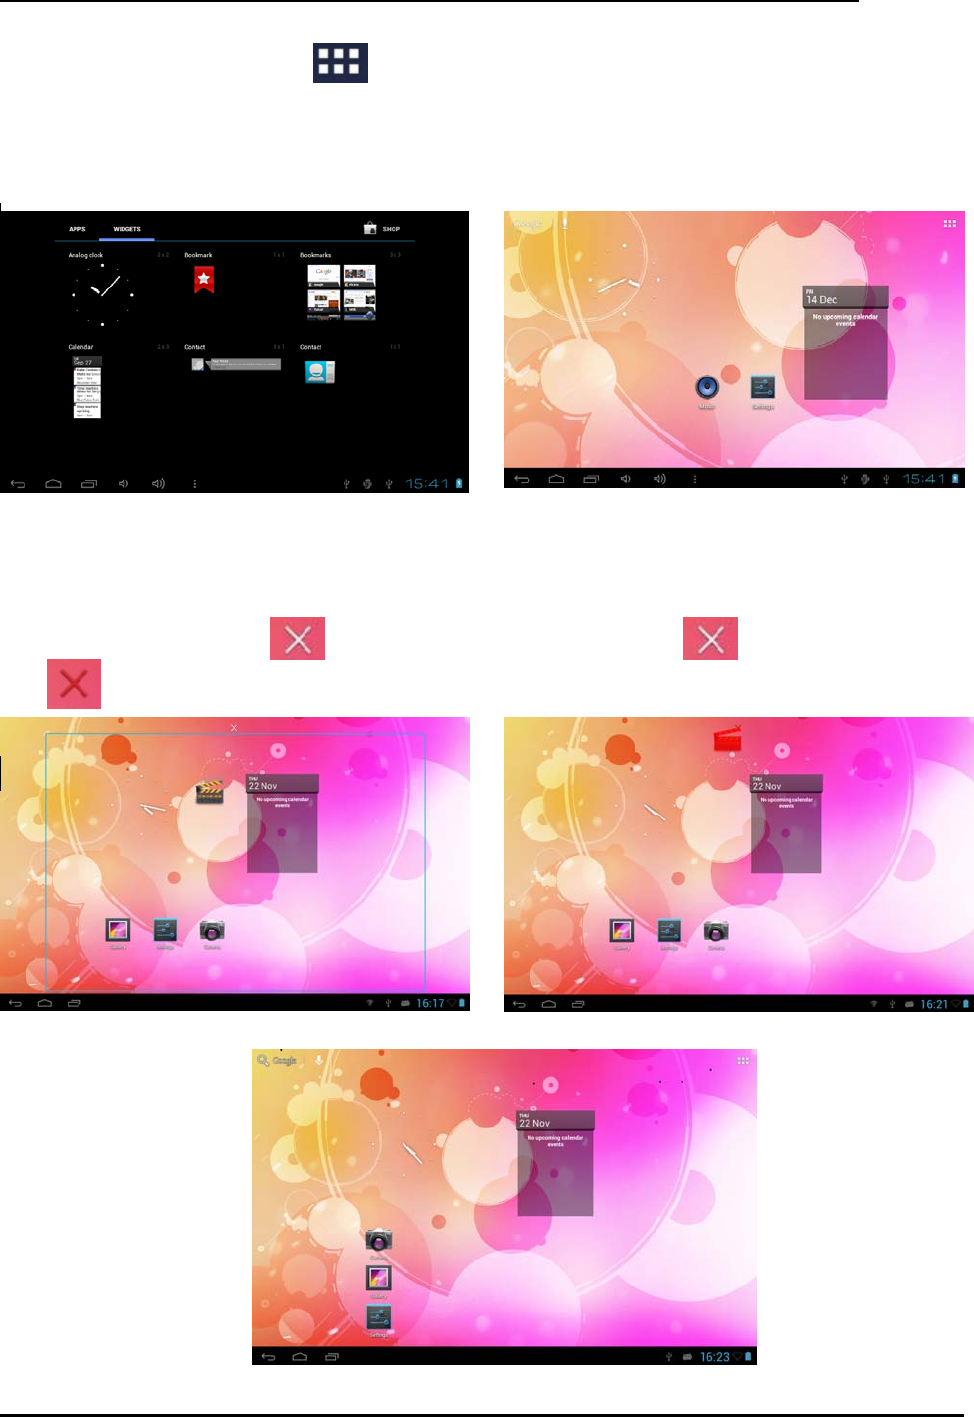
5. Custom Screen
Add shortcut
In the main interface, click button to open Application Program menu. Press and hold
the icon,will open the add shortcut interface, move the icon to the place you want to place,
the program will add shortcut to the main interface.
Text search icon Under the system has used a correct network, click to enter into
the Text search menu. Input a key word and search.
voice search icon Under the system has used a correct network, click to enter into
the voice search menu. Aim straight the MIC and say a key word.
APPS icon Click to enter into the applications menu.
Shortcut icon Shortcut icons add/delete will be covered later.
Widgets Widgets add/delete will be covered later.
Back key In pop-up menu, press it to cancel operation.
In the other menu, press it to back the front menu.
Home key In any menu, press it to back the main interface.
Apps having been
opened
Click to display all APPS programs that have been opened. Click
each of the application to enter into its relevant menu.
Notice/Fast setting
column
Click to display more information: USB, WIFI, Date etc. Click each
item to enter into its setting menu.
Vol +/- key In any menu, press it to adjust the volume.
11
First experience
Add widgets
Inthe main interface, click button, will open Application Program menu. Press
the ”WIDGETS” options,will open the widgets interface, Press and hold the icon,will open
the add widget interface, move the icon to the place you want to place, the widget will add
to the main interface.
Delete shortcut/widgets
In the main interface, press and hold the shortcut icon and Widgets until the top of the
screen appears the icon . Then drag the icon to the icon , theicon will turn
red , the icon will be deleted after release the button.
*** In the main interface, users can click and drag any shortcut icon and Widgets to the
place to achieve personalized arrangement.
First experience
12
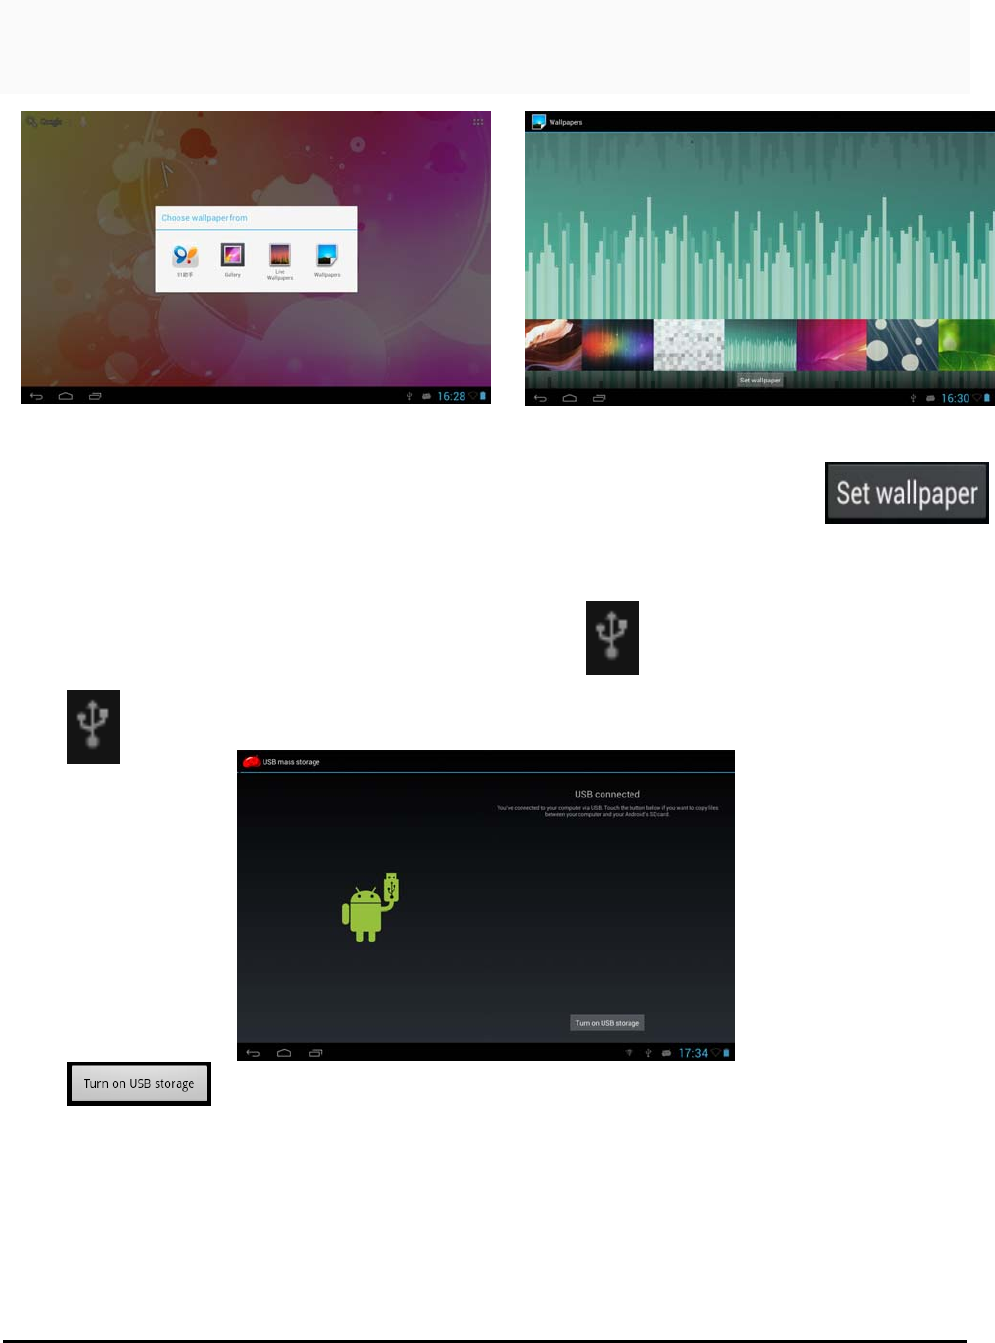
6. Change your wallpaper
In order to decorate personalized main interface, users can set their favorite pictures,
photos ... as wallpaper of the main interface.
6-1 If press and hold touch screen in the main interface, the machine will pop-up the wall
paper dialog box. .
6-2 Select one item, for example: click ”Wallpaper” options to enter its sub menu.
6-4 Slide the screen, browse and select the appropriate picture, after clicking ,
MID will return to the settings interface and display the selected wallpaper.
7. Connection of USB cable.
When connect the MID to computer with a USB cable, icon will be displayed in the
Notice/Fast setting column of the main interface.
Click ,
will show the following interface.
Click , it can realize synchronized operation between MID and computer.
At this time, files in TF card and memory of MID will be displayed on the computer; you can
copy and transfer the data.
System setting
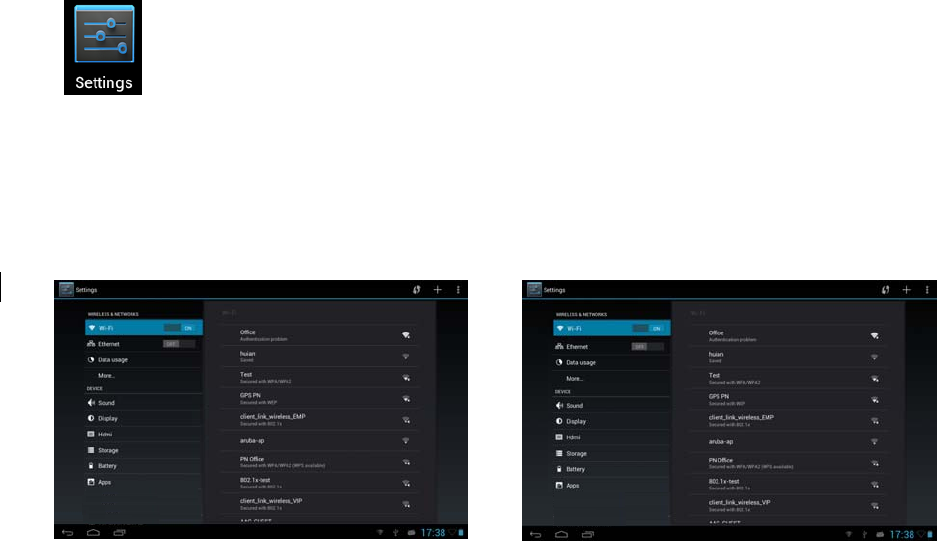
13
In the setting interface, user can complete many custom settings and inspect the
relevant information of all the software that being installed.
Click in the
Application Program menu to enter into its setting menu.
“APPS”
In the apps settings interface, user can see all installation applications. If you open
one application, you can browse its relevant information. As to not be used
application again, you can select to delete it.
14
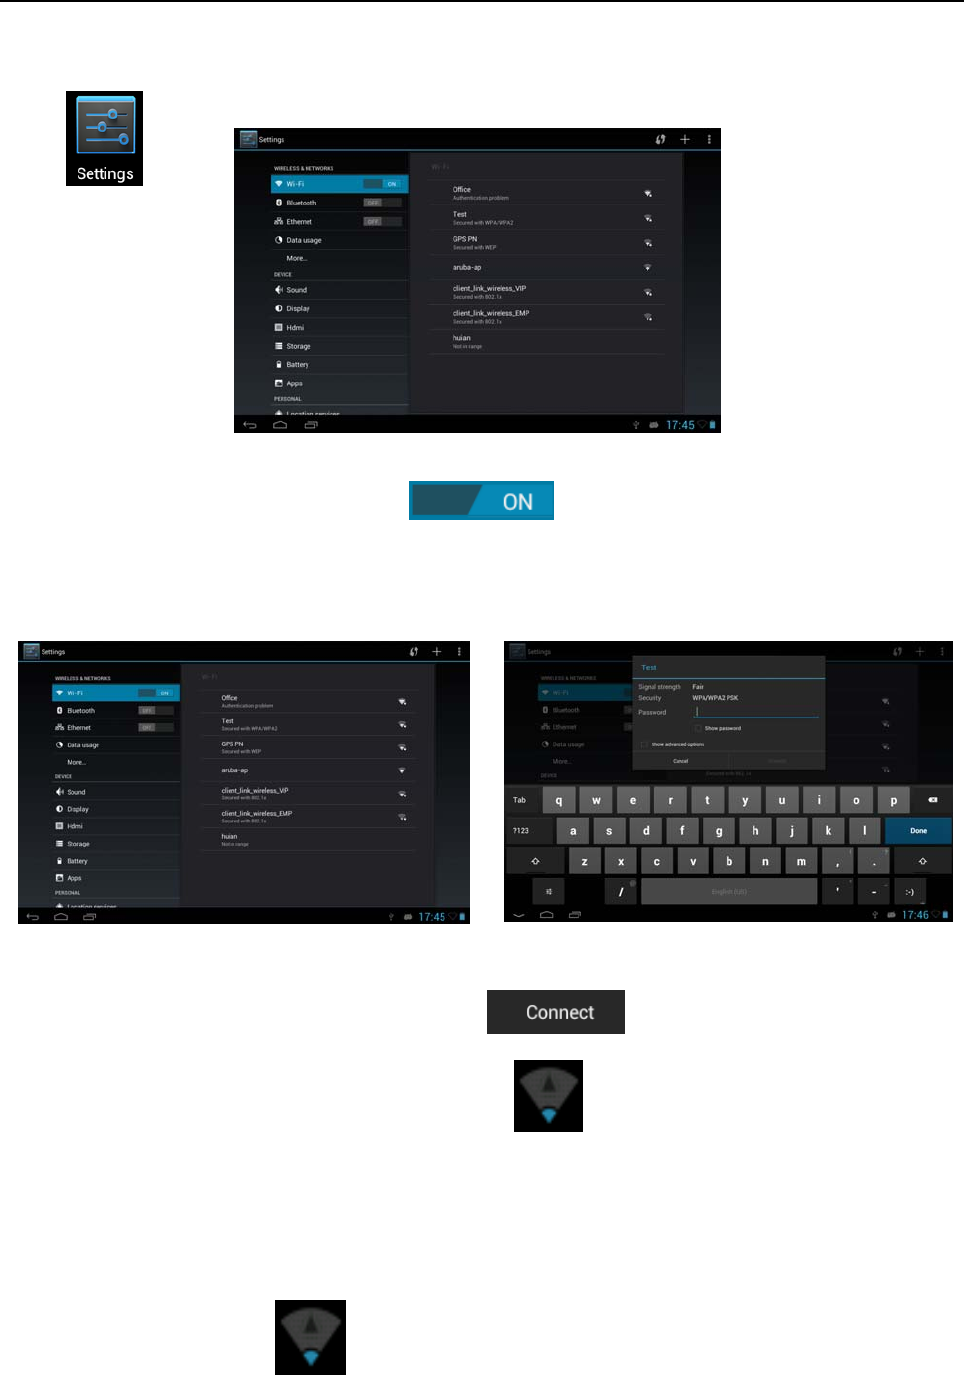
Internet Function
1. Network connection
The MID achieves internet access through built-in WI-FI .
Click , MID will pop-up settings menu.
1-1WI-FI
1-1-1 Sliding the “Wife” switch button to open the Wi-Fi.
1-1-2 Click “Wi-Fi” to enter into the Wi-Fi setting menu.
1-1-3 The system will automatically search and add the nearby networks can be connected,
and display the name of network.
(2-3) Clicking a wireless network, MID will pop-up messages menu. Click space, keyboard
will appear, after entering the password, click .
If the connection is successful, the network icon will be displayed in the
Notice/Fast
setting column of the main interface.
Special note:
As to the Wi-Fi router which have been connected before, this machine will keep
record automatically. Next, when the status of Wi-Fi set-up is open, the machine will
search the Wi-Fi router automatically and then connect to it .
When the network icon will be displayed in main interface, the machine
has connected WIFI successfully.
15
Internet Function
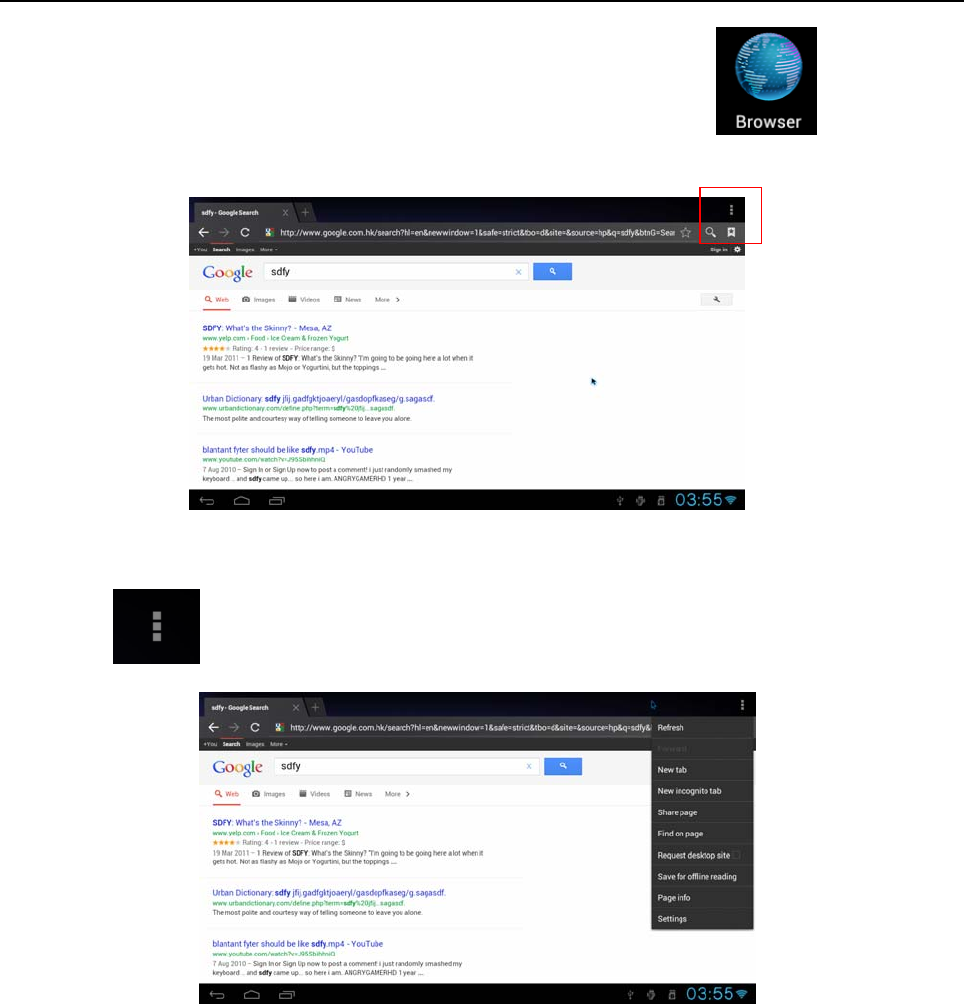
2. Internet
2-1 Under the normal statue of the network connection, Click in the main
interface to enter into its menu. There will display all
the Web of having been opened.
2-2 Click the input frame, keyboard menu will pop-up, input a new Web site and open.
2-3 Click icon(see the red frame),the machine will pop-up the operation
function menu.
16
Software Management
The product supports third-party applications on android platform, most applications can be
obtained and downloaded from the Internet.
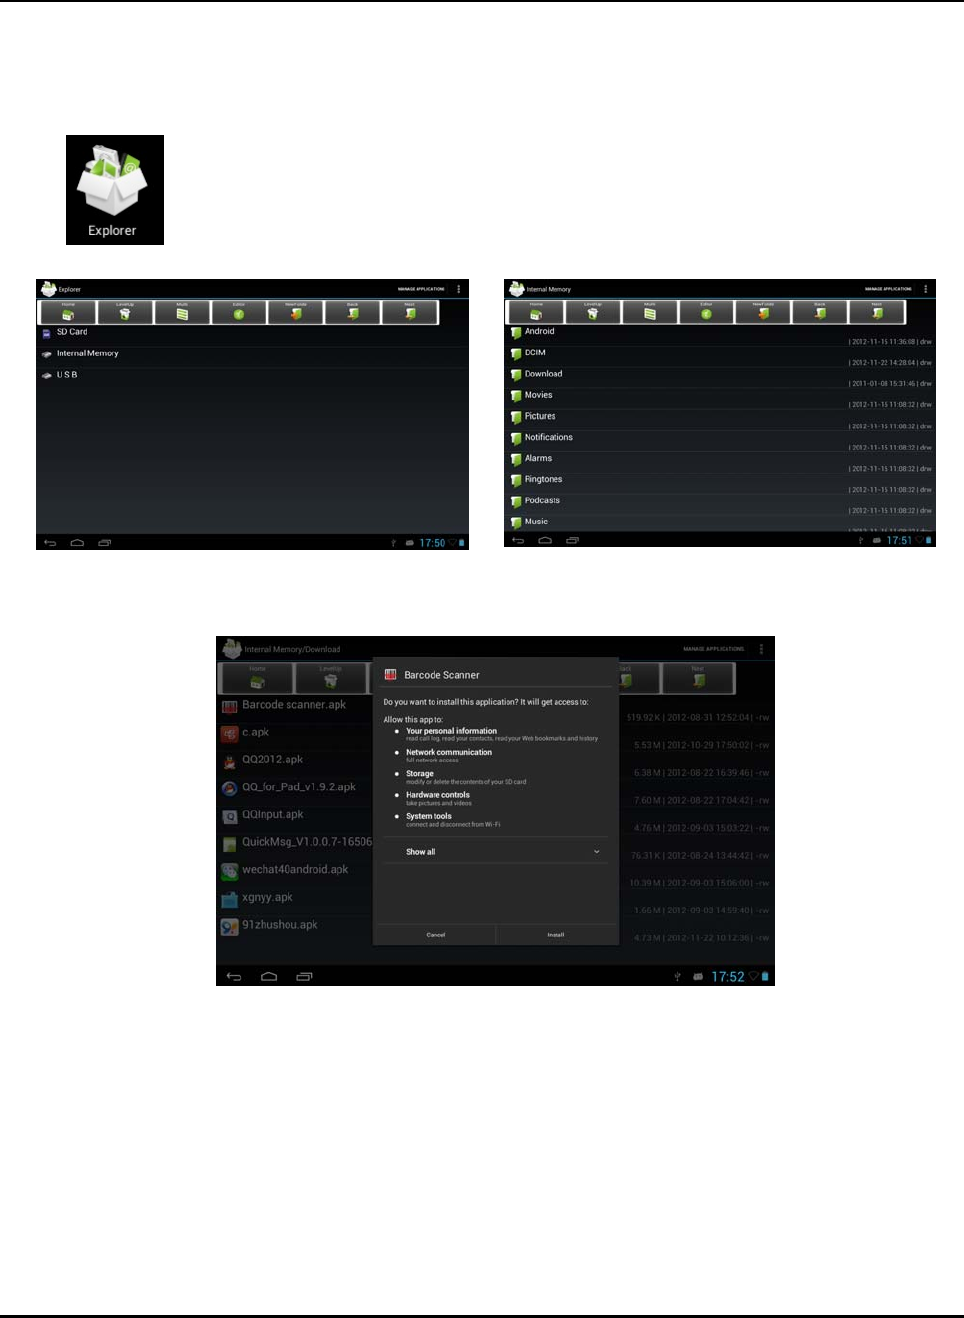
1.Explorer
Click in Application Program Interface to enter into explorer, you can browse,
copy, delete, move, rename, and other editing operations to the files in the machine and TF card.
2. Software installation
2-1 Click the software to be installed in the "Explorer", MID will open the installer interface.
2-2 Click "Install", MID will show the progress bar, after installation, it will display
"Application is already installed.
2-3 "Click "Finish" to exit, thus its shortcut icon will be displayed in "Application function key
menu".
2-4 Click the icon to open the software.
Special note:
You can download chat tools to install. Such as: QQ, MSN....
Applications
1. Music Playing
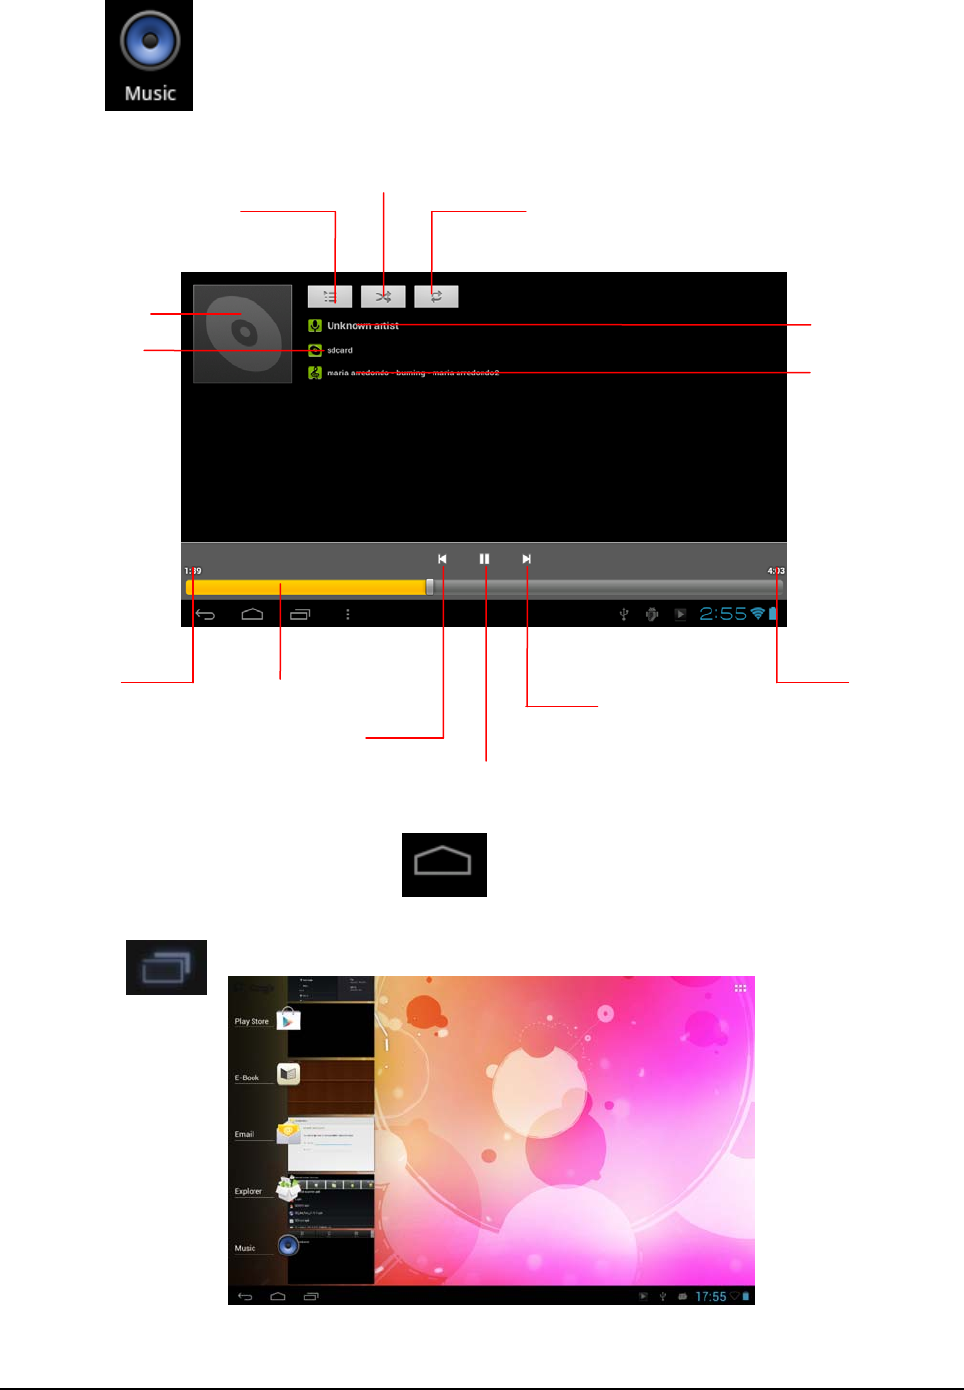
17
1-1 Click in the “Application Program Interface” to enter into the playlist.
1-2 Click a music file to open the player and play it.
1-3 Backstage play
When have playing a music, click to back the main interface,the machine
will enter into a backstage play mode.
1-3-1 Click in the main interface to display its menu.
1-3-2 Select the music player to back the player menu.
Applications
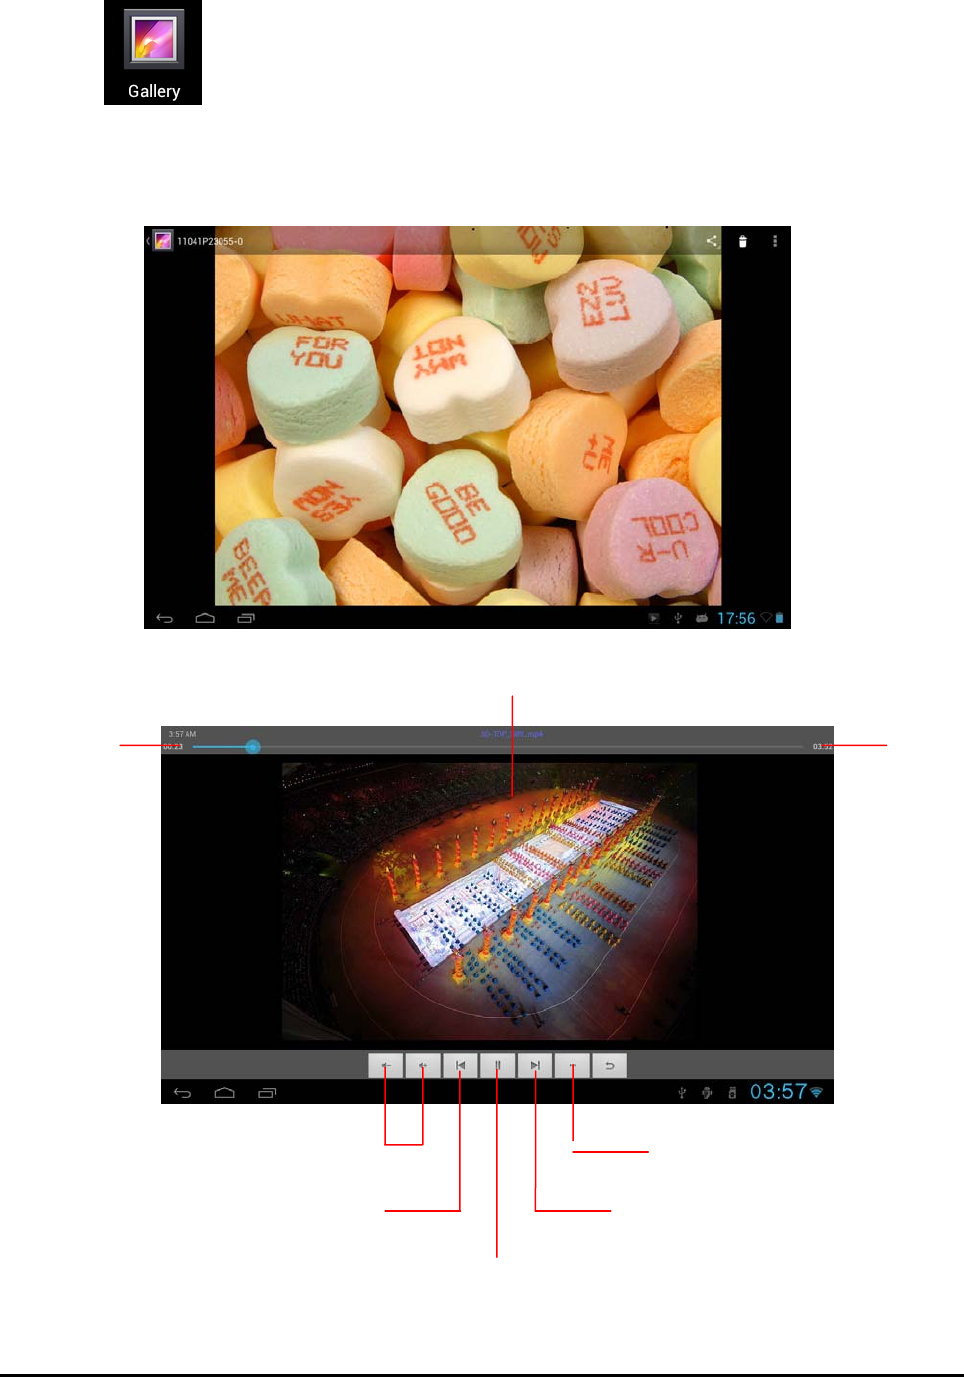
2. Picture browsing
Schedule
Play time Total time
previous
next
Play/Pause
Playlist Random
Play mode
Artist
Song name
Special name
Special cover
18
2-1 Click In ” Application Program Interface” to enter into picture browsing
interface. there are all the picture and video data stored in the machine and a TF card.
2-2 Select a picture to browse.
2-3 Select a video data to play.
Applications
3. E-mail
Vo lum e
Play time Total time
Playlist
Previous Next
Schedule
Play/Pause
19
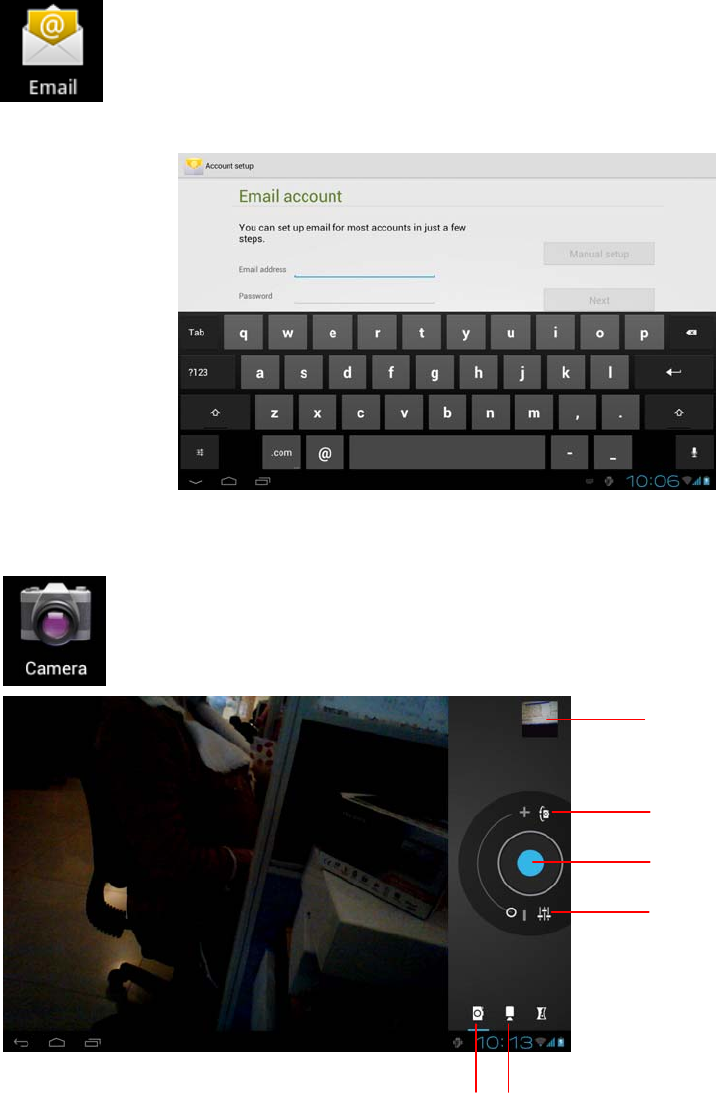
Click in” Application Program Interface" to enter into E-mail settings, input the
email address and password, you can send and receive email messages.
4. Camera and video recording
Click in” Application Program Interface"to enter into its interface.
Photo Preview
Front / rear camera
Settings menu
Photo
Photo / Video recording
Video
20
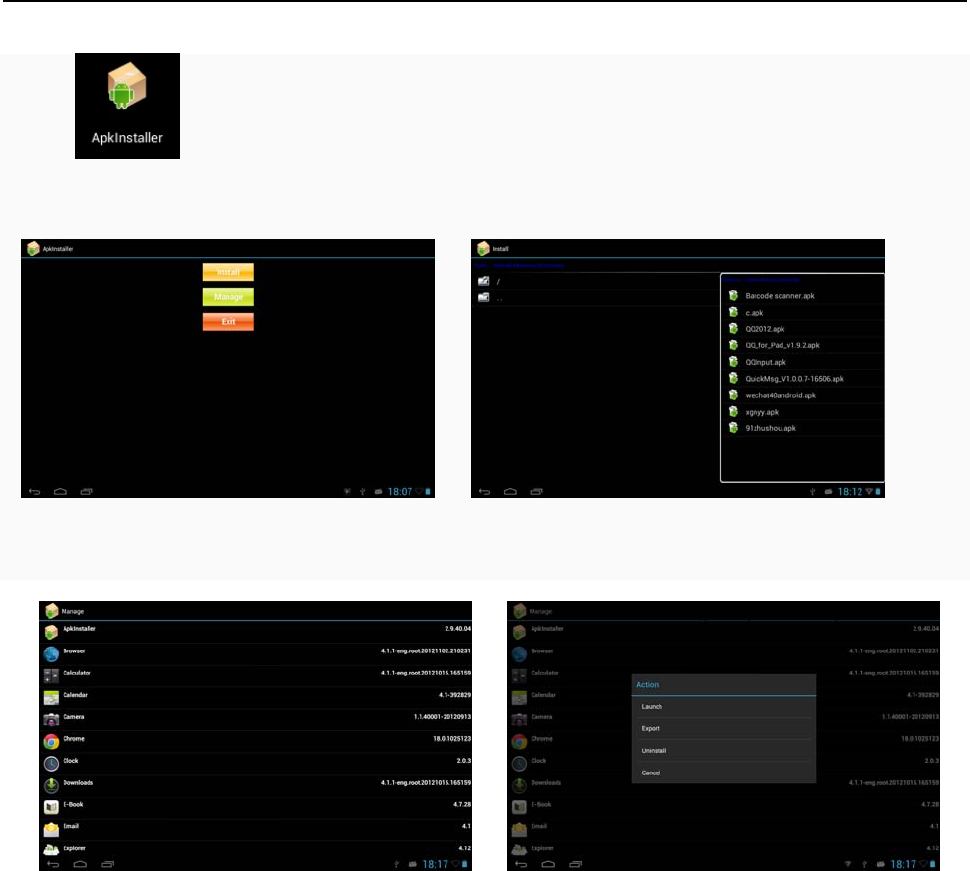
Applications
5.Apk Installer
Click "Apkinstaller" choose "Install", then select the "Internal Memory" can be
installed need software.
Click on the "Manage" for application, Launch, Export, Uninstall, Cancel the operation.
FCC Caution:
Any Changes or modifications not expressly approved by the party responsible for compliance could void the
user's authority to operate the equipment.
This device complies with part 15 of the FCC Rules. Operation is subject to the following two conditions: (1)
This device may not cause harmful interference, and (2) this device must accept any interference received,
including interference that may cause undesired operation.
FCC Radiation Exposure Statement:
This equipment complies with FCC radiation exposure limits set forth for an uncontrolled
environment .
21
This transmitter must not be co-located or operating in conjunction with any other antenna or transmitter.
Note: This equipment has been tested and found to comply with the limits for a Class B digital device,
pursuant to part 15 of the FCC Rules. These limits are designed to provide reasonable protection against
harmful interference in a residential installation. This equipment generates, uses and can radiate radio
frequency energy and, if not installed and used in accordance with the instructions, may cause harmful
interference to radio communications. However, there is no guarantee that interference will not occur in a
particular installation. If this equipment does cause harmful interference to radio or television reception, which
can be determined by turning the equipment off and on, the user is encouraged to try to correct the
interference by one or more of the following measures:
—Reorient or relocate the receiving antenna.
—Increase the separation between the equipment and receiver.
—Connect the equipment into an outlet on a circuit different from that to which the receiver is connected.
—Consult the dealer or an experienced radio/TV technician for help.