ELITEGROUP COMPUTER SYSTEMS GWS-RFID RFID Reader User Manual GWS RFID En 20170621 AUDIX
ELITEGROUP COMPUTER SYSTEMS CO., LTD RFID Reader GWS RFID En 20170621 AUDIX
User Manual
Quick Manual
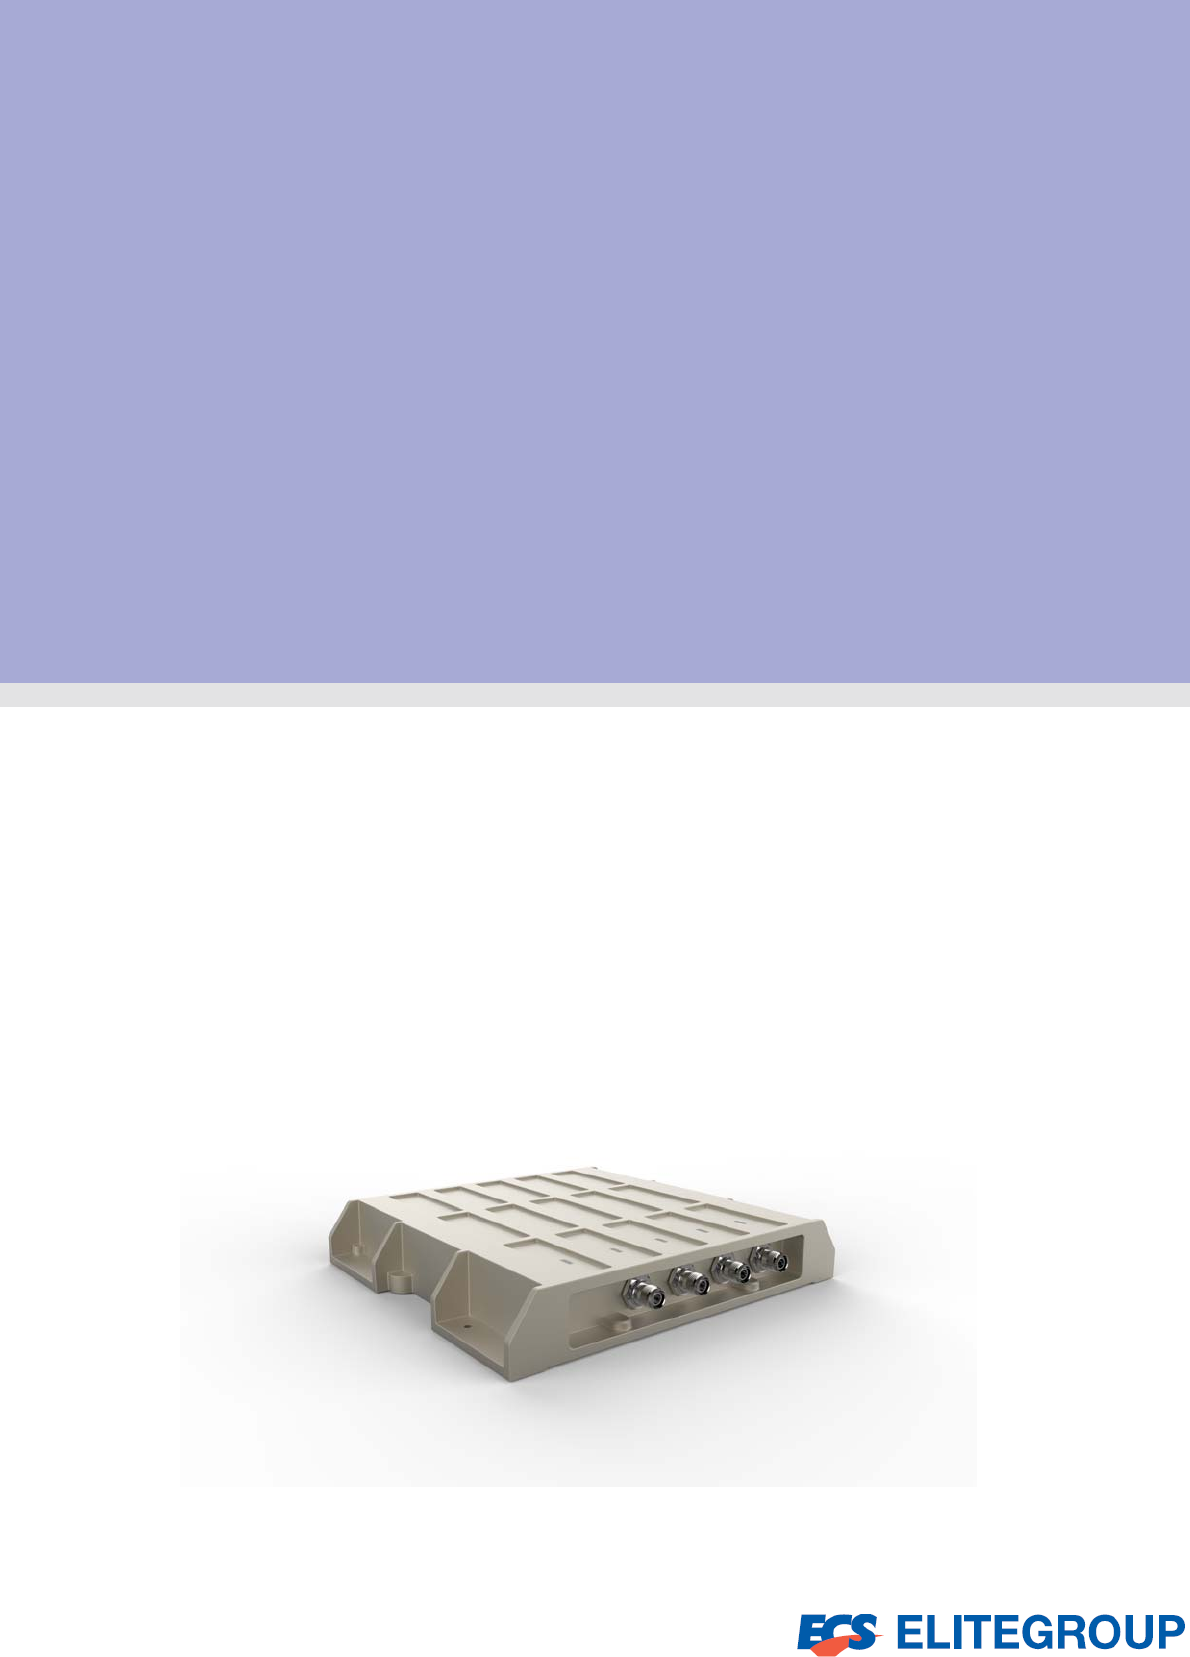
RFID Reader
GWS-RFID
Copyright
The documentation and the software included with this product are copyrighted 2017 by
ECS Co., Ltd. All rights are reserved. ECS Co., Ltd. reserves the right to make
improvements in the products described in this manual at any time without notice. No part
of this manual may be reproduced, copied, translated or transmitted in any form or by any
means without the prior written permission of ECS Co., Ltd. Information provided in this
manual is intended to be accurate and reliable. However, ECS Co., Ltd. assumes no
responsibility for its use, nor for any infringements of the rights of third parties, which may
result from its use.
Acknowledgements
Intel® Quark SoC X1021 series are trademarks of Intel Corporation.
McAfee* Embedded Control* and the Wind River* Intelligent Device Platform*
All other product names or trademarks are properties of their respective owners.
Declaration of Conformit
y
FCC Class
A
Note: This equipment has been tested and found to comply with the limits for a Class A
digital device, pursuant to part 15 of the FCC Rules. These limits are designed to provide
reasonable protection against harmful interference when the equipment is operated in a
commercial environment. This equipment generates, uses, and can radiate radio
frequency energy and, if not installed and used in accordance with the instruction manual,
may cause harmful interference to radio communications. Operation of this equipment in a
residential area is likely to cause harmful interference in which case the user will be
required to correct the interference at his own expense.
GWS-RFID RFID Reader ii
FCC Label Compliance Statement:
This device complies with Part 15 of the FCC Rules. Operation is subject to the
following two conditions:
(1) This device may not cause harmful interference
(2) This device must accept any interference received, including interference that may
cause undesired operation.

Waste disposal instruction
Do not throw this electronic device into the trash can when discarding.
To minimize pollution and ensure utmost protection of the global environment,
please recycle it in European WEEE (waste electrical and electronic
equipment) directive system or recycle system in Taiwan.
MPE 警語
ExposuretoRadioFrequencyRadiation:
To comply with FCC RF exposure compliance requirements, a separation distance of at least 20cm must be
maintained between the antenna of this device and all persons. This device must not be co-located or operating in
conjunction with any other antenna or transmitter.
NCC 警語
本產品符合低功率電波輻射性電機管理辦法第十二條、第十四條等條文規定
1. 經型式認證合格之低功率射頻電機,非經許可,公司、商號或使用者均不得擅自變更頻率、加大功率或變更原設
計之特性及功能。
2. 低功率射頻電機之使用不得影響飛航安全及干擾合法通信;經發現有干擾現象時,應立即停用,並改善至無干擾
時方得繼續使用。
前項合法通信,指依電信法規定作業之無線電通信。
低功率射頻電機須忍受合法通信或工業、科學及醫療用電波輻射性電機設備之干擾。
露量
電磁波曝 MPE標準值 1mW/cm2,送測產品實測值為:0.0937mW/cm2
Caution! Danger of explosion if battery is incorrectly replaced.
Replace only with the same or equivalent type recommended by the
manufacturer.
Dispose of used batteries according to the manufacturer's
instructions
Warning! Any changes or modifications made to the equipment which are not
expressly approved by the relevant standards authority could void your
authority to operate the equipment.
A
ttention
!
Toutemodification apportéeàl'équipement quin'estpasexpressément
approuvé par l'autorité des normes pertinentes peuvent annuler votre
droit à faire fonctionner l'équipement.
A
ttention
!
Danger d'explosion si la pile est remplacée de façon incorrecte.
Remplacez-la uniquement avec le même type ou équivalent recommandé
par le fabricant. Jetez les piles usagées selon les instructions du fabricant
Part No. Edition 1
Printed in China Dec 2017
iii GWS-RFID RFID Reader

Packing List
Before setting up the system, check that the items listed below are included and in good
condition. If any items are missing, please contact your dealer immediately.
GWS-RFID x1
User Manual x1
Additional Information and Assistance
1. Visit the ECS websites at www.ECS.com.tw where you can find the latest information
about the product.
2. Contact your distributor, sales representative, or ECS's customer service center for
technical support if you need additional assistance. Please have the following
information ready before you call:
- Product name and serial number
- Description of your peripheral attachments
- Description of your software (operating system, version, application software, etc.)
- A complete description of the problem
- The exact wording of any error messages
- This equipment is a source of electromagnetic waves. Before use, please make
sure that there are not EMI sensitive devices in its surrounding which may
malfunction therefore
Warnin
g
!
To
p
revent electric shock, Do not remove cover.
No user serviceable
p
arts inside, refer servicin
g
to qualified personnel.
Warning! Maintenance: to properly maintain and clean the surfaces, use
only approved products or clean with a dry applicator
A
ttention
!
Pour éviter un choc électrique, ne pas retirer le couvercle.
Aucune pièce réparable par l'utilisateur, voir l'entretien à du personnel
qualifié.
A
ttention
!
Entretien: bien entretenir et nettoyer les surfaces, utiliser uniquement
des produits approuvés ou nettoyer avec un applicateur sec
GWS-RFID RFID Reader iv
v GWS-RFID RFID Reader
Safety Instructions
1. Read these safety instructions carefully.
2. Keep this User Manual for later reference.
3. Disconnect this equipment from any AC outlet before cleaning. Use a damp cloth.
Do not use liquid or spray detergents for cleaning.
4. For plug-in equipment, the power outlet socket must be located near the equipment
and must be easily accessible.
5. Keep this equipment away from humidity.
6. Put this equipment on a reliable surface during installation. Dropping it or letting it fall
may cause damage.
7. The openings on the enclosure are for air convection. Protect the equipment from
overheating. DO NOT COVER THE OPENINGS.
8. Make sure the voltage of the power source is correct before connecting the
equipment to the power outlet.
9. Position the power cord so that people cannot step on it. Do not place anything over
the power cord.
10. All cautions and warnings on the equipment should be noted.
11. If the equipment is not used for a long time, disconnect it from the power source to
avoid damage by transient overvoltage.
12. Never pour any liquid into an opening. This may cause fire or electrical shock.
13. Never open the equipment. For safety reasons, the equipment should be
opened only by qualified service personnel.
14. If one of the following situations arises, get the equipment checked by service
personnel:
a. The power cord or plug is damaged.
b. Liquid has penetrated into the equipment.
c. The equipment has been exposed to moisture.
d. The equipment does not work well, or you cannot get it to work according to the
user's manual.
e. The equipment has been dropped and damaged.
f. The equipment has obvious signs of breakage.
15. DO NOT LEAVE THIS EQUIPMENT IN AN ENVIRONMENT WHERE THE STORAGE
TEMPERATURE MAY GO BELOW -20° C (-4° F) OR ABOVE 55°C (131° F). THIS
COULD DAMAGE THE EQUIPMENT. THE EQUIPMENT SHOULD BE IN A
CONTROLLED ENVIRONMENT.
16. If your computer is losing time significantly or the BIOS configuration resets itself
to the default
,
the batter
y
ma
y
have no
p
ower.
17. IMPROPER INSTALLATION OF VESA MOUNTING CAN RESULT IN SERIOUS
PERSONAL INJURY! VESA mount installation should be performed by a
professional technician; please contact the service technician or your retailer if you
need this service.
18. Maintenance: to properly maintain and clean the surfaces, use only the
approved products or clean with a dry applicator.
Contents
Chapter 1 General Information ............................1
1.1 Introduction .............................................................................................. 2
1.2 Specifications .......................................................................................... 2
1.3 Cleaning/Disinfecting ............................................................................... 4
Cha
p
ter 2 Gettin
g
Started.....................................5
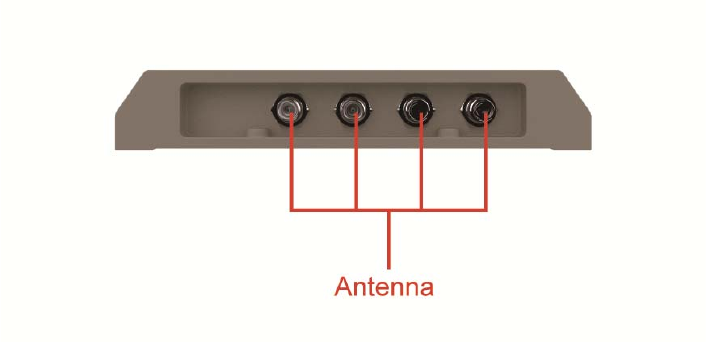
2.1 A Quick Tour of GWS-RFID ..................................................................... 6
Figure 2.1 Top View .................................................................. 6
Figure 2.2 I/O Side View............................................................. 7
2.2 PIN Definition ……………………………………………...……..………....... 8
2.3 Sample code ………..………………………………………………………..10
GWS-RFID RFID Reader vi
Chapter 3 Using GWS-RFID................................12
3.1 Distribution Description ......................................................................... 13
3.2 Powering the System …………………..…………………….…..……....... 13
Figure 1: Location of PoE injector............................................... 13
3.3 Login……………….……………………………………………….………....14
Figure 2: Location of eth1 connector.......................................... 15
3.4 LAN Configuration..…………………………………………...……………..17
3.5 Reference…………….……………………………………………………….19

Chapter 1
1 General Information

SystemSpec
Processor SOC Intel®QuarkSoCX1021
400MHz
Memory Memory DDR3LSDRAM512M
Storage Storage eMMC4G
Ethernet M12forLAN
10/100MbEthernet
MACswith802.3at
PoEW8
I/OInterface
M8forUSB Console
M12forDI+DO+RS232 Console
RFconnector RPTNCJackInterface
Expansion
RTC Support
Button Reset,Reboot
Board
1xMTIRU00‐M03‐X001
RFIDCarrierCard
1XLEDBoard
Switchconnector forcaseopen
PinHeaders USB2.0header USB2.0header
Intrusiondetectheader 2*1pin
Software OS MI3.1
Dimension (WxHxD)System 220x205x37mm
Weight System 1.5kg
1.1 Introduction
GWS-RFID RFID Reader solutions was based on the Intel® Quark SoC X1021 series. The
processors are supported by software components, including McAfee* Embedded Control*
and the Wind River* Intelligent Device Platform*, needed to connect, manage, and secure
gateways.
Common industrial applications include factory automation systems, precision machinery
,
and production process control. It is also suitable for many non-industrial applications
,
including interactive kiosk systems, entertainment management, and car park automation
.
Users can securely aggregate, filter, and share data from edge devices to the cloud in area
s
such as energy, industrial, and transportation infrastructure.
GWS-RFID is a reliable, cost-effective solution to meet an application’s processing
requirements
1.2 S
p
ecifications
GWS-RFID RFID Reader 2

SystemSpec
Environmental
OperatingTemperature ‐20˚~55˚C
Humidity 5‐95%RHat25‐35˚C
(Non‐Condensation)
Chassis IngressProtectionRatingIP67
Certifications EMC CE,FCC,NCC
SafetyCertifications UL,CB
RFID
Frequency
(UHFBand)
902to928MHzband
902.75~927.25MHz
RFIDPower
Output 27.76dBm
Network
Service
DHCP,HTTPS,SSH
IPaddressing StaticandDynamic
Firmware
Upgrade
Networkfirmwareupgradecapabilities
Security SecureBoot
Antenna Model:PAA‐001,PANELAntenna(TNCType),8dBi
Cable:1.0m
Note:
1. A DC 24V power supply from device or sensor is necessary for the AI port.
2. If DO is designed to drive a relay, a diode must been applied to the relay’s coil side.
3. This product is intended to be supplied by an UL certified DC source rated 48 Vdc;
600mA. Tma 55 degree C minimum and output meets SELV, Non-hazardous
energy level, if need further assistance, please contact ECS for further information.
3 GWS-RFID RFID Reader

1.3 Cleaning/Disinfecting
During normal use GWS-RFID may become soiled and should, therefore, be cleaned
regularly.
Steps:
1. Wipe GWS-RFID with a clean cloth that has been moistened in the cleaning solution.
2. Prepare agent per manufacturer’s instructions or hospital protocol.
3. Wipe thoroughly with a clean cloth.
Caution! Do not immerse or rinse GWS-RFID or its peripherals. If you accidentally spill
liquid on the device, disconnect the unit from the power source. Contact your
Biomed personnel regarding the continued safety of the unit before placing it
back in operation.
Do not spray cleaning agent on the chassis.
Do not use disinfectants that contain phenol.
Do not autoclave or clean GWS-RFID or its peripherals with strong aromatic,
chlorinated, ketone, ether, or other solvents, sharp tools or abrasives. Never
immerse electrical connectors in water or other liquids.
GWS-RFID RFID Reader 4
A
ttention
!
Ne pas immerger ou rincer GWS-RFID ou ses périphériques. Si vous
renversez par accident un liquide sur l'appareil, débranchez l'appareil de la
source d'alimentation. Contactez votre Biomed concernant la sécurité
continue de l'unité avant de la remettre en service.
Ne pas pulvériser l'agent de nettoyage sur le châssis.
Ne pas utiliser de désinfectants contenant du phénol.
Ne pas passer à l'autoclave ou GWS-RFID propre ou ses périphériques avec
fortes, cétone, éther, ou d'autres solvants, des outils tranchants ou abrasifs
aromatiques chlorés. Ne jamais plonger connecteurs électriques dans l'eau
ou d'autres liquids.

Chapter 2
2 Gettin
g
Started
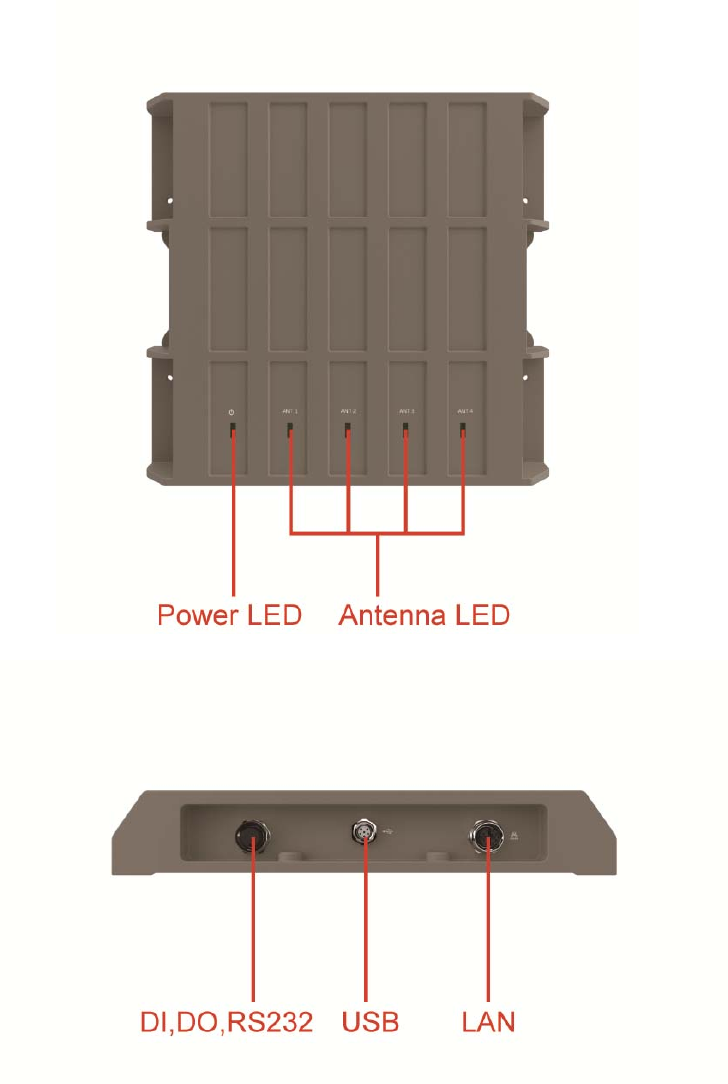
2.1 A Quick Tour of GWS-RFID
Before you start to set up GWS-RFID, take a moment to become familiar with the locations
and purposes of the controls, drives, connections and ports, which are illustrated in the
figures below.
When placed upright on the desktop, the GWS-RFID top side appears as shown in
Figure 2.1.
Fi
g
ure 2.1 Top
V
iew
GWS-RFID RFID Reader 6
Fi
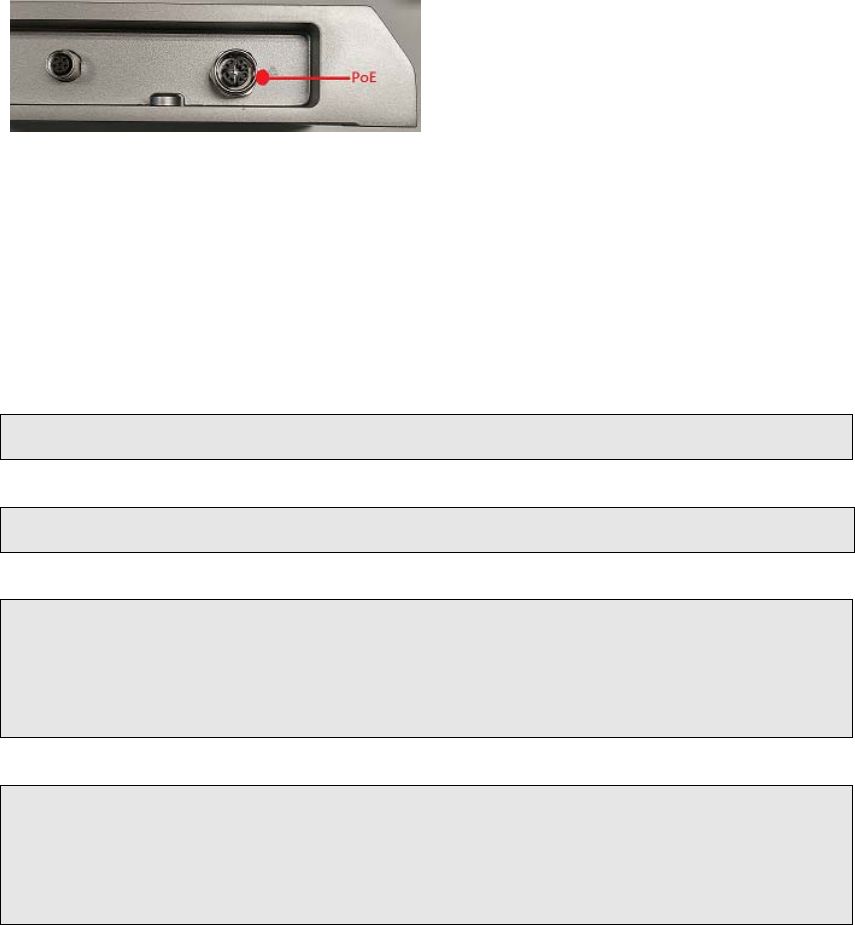
g
ure 2.2 IO Side View
7 GWS-RFID RFID Reader
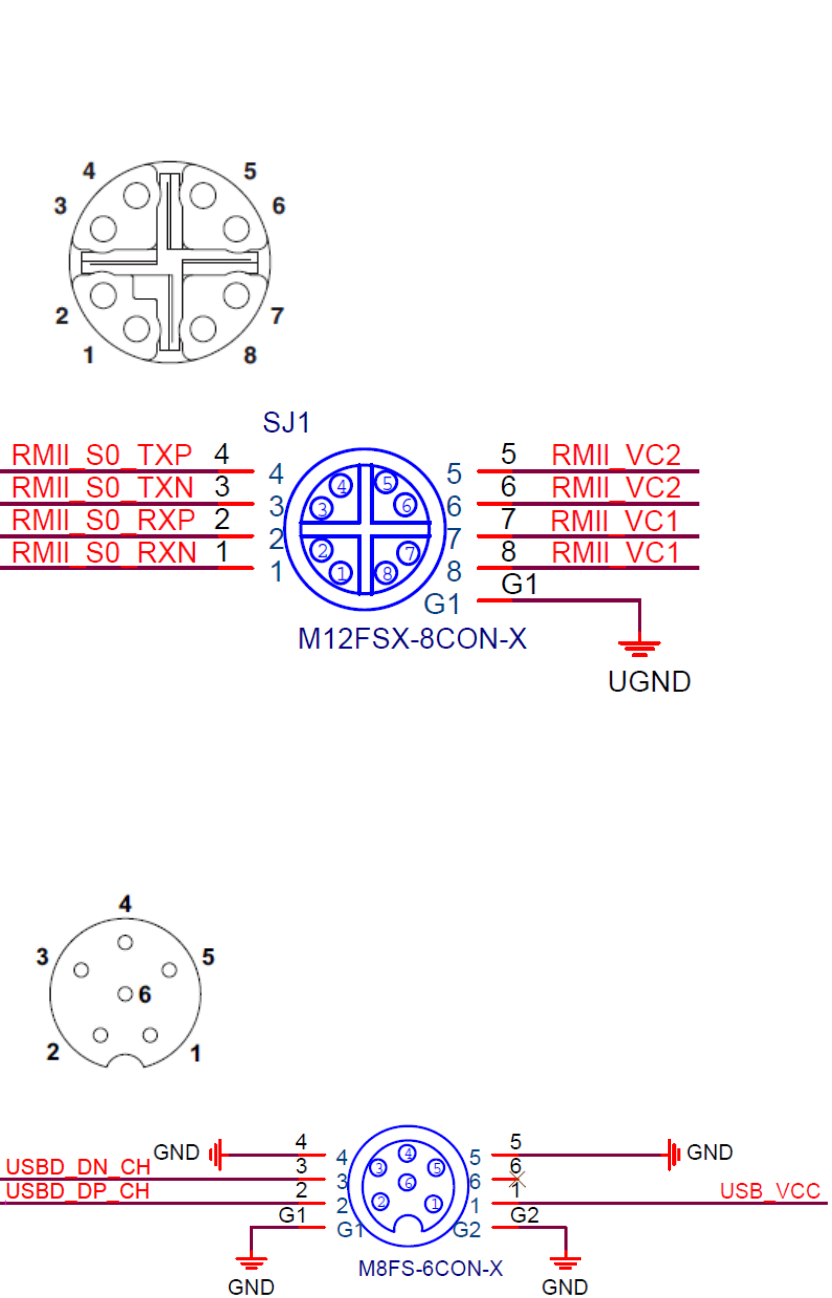
M12 8 pin PIN Definition:
M12 6 pin PIN Definition:
2.2 PIN Definition
GWS-RFID RFID Reader 8
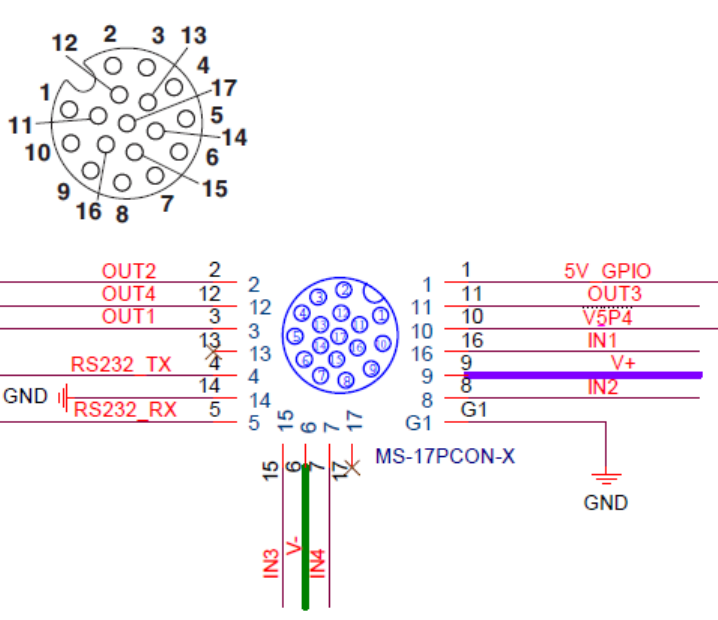
M12 17 pin PIN Definition:
9 GWS-RFID RFID Reader

Intel Quark - Programming GPIO From Linux
Most of GPIO capabilities of ECS board are exposed through Linux Sysfs interface, and can be
controlled using file based I/O. I will show how to use some of these capabilities using simple shell
commands. Of course instead of shell you can implement I/O using file manipulations from your
program written using your favorite programming language.
Digital GPIO - Sysfs Interface
GPIO Information
The following command gives information about GPIO in the system and shows if an IO port was
allocated to a module or Sysfs (user).
root@WR‐IDP‐B072:~#cat/sys/kernel/debug/gpio
GPIOs0‐7,platform/sch_gpio.2398,sch_gpio.2398:
gpio‐5(pcal9555a‐exp0‐int)inhi
GPIOs8‐15,intel_qrk_gip_gpio:
GPIOs16‐31,i2c/0‐0025,pcal9555a,cansleep:
As you can see from the output all the GPIOs of ECS board is divided into 5 chunks:
1. GPIOs 0-1 - Intel Quark X1021 - GPIO[8:9] pins. These are GPIO pins on Legacy I/O bridge.
They are powered and active in S0 state only.
2. GPIOs 2-7 - Intel Quark X1021 - GPIO_SUS[0:5] pins. These are GPIO pins on Legacy I/O
bridge. They are powered and active in S3 (suspend) and S0 states.
3. GPIOs 8-15 - Intel Quark X1021 - GPIO[0:7] pins. These are GPIO pins on GPIO controller.
They are powered and active in S0 state only.
4. GPIOs 16-31 – pcal9555a(pcal9535a) I/O expander.
Exporting a GPIO Port to Sysfs
To make GPIO port controllable from sysfs you'll need to export it. This is done by writing GPIO port
number to /sys/class/gpio/export:
root@WR‐IDP‐B072:~#echo‐n"27">/sys/class/gpio/export
When this operation completes successfully a directory corresponding to the GPIO port number will
appear in sysfs. In this case /sys/class/gpio/gpio27. Once you finished working with I/O you should un-
export it by writing the GPIO port number to /sys/class/gpio/unexport.
Setting GPIO Port Direction
I/O direction is set by writing "in" (for input) or "out" (for output) to /sys/class/gpio/gpioXX/direction file.
root@WR‐IDP‐B072:~#echo‐n"out">/sys/class/gpio/gpio27/direction
2.3 Sample code
GWS-RFID RFID Reader 10

Setting GPIO Port Drive Configuration
When configured for output GPIO ports that are connected to PCAL9555A/PCAL9535A can be
configured to one of the following drive modes:
Resistive high, strong low (drive = pullup)
o This is the default, but it not suitable for driving devices that source significant current,
for example for driving an LED connected between GPIO port and GND (it will work
though if the LED is connected between GPIO and 5V or 3.3V rails)
Resistive low, strong high (drive = pulldown)
Strong low and high (drive = strong)
o This mode is appropriate for most applications.
High Z state (drive = hiz)
(PCAL9555A/PCAL9535A also supports open drain and open source drive modes, but it is not
currently exposed through SysFS)
The drive mode is set by writing the mode string ("pullup", "pulldown", "strong", or "hiz") to
/sys/class/gpio/gpioXX/drive.
root@WR‐IDP‐B072:~#echo‐n"strong">/sys/class/gpio/gpio27/drive
Reading and Writing GPIO Port
When GPIO port is configured for input the input value (0 or 1) can be read from
/sys/class/gpio/gpioXX/value file.
root@WR‐IDP‐B072:~#cat/sys/class/gpio/gpio27/value
0
When GPIO port is configured for output the output value can be written to the same file:
root@WR‐IDP‐B072:~#echo‐n"1">/sys/class/gpio/gpio27/value
root@WR‐IDP‐B072:~#echo‐n"0">/sys/class/gpio/gpio27/value
11 GWS-RFID RFID Reader

Chapter 3
1 Usin
g
GWS-RFID
3.1 Distribution Description
The operating system of GWB-RFID/GWS-RFID is based on Wind River IDP XT 3.1(RCPL23 or above).
This Linux distribution is based on the Linux 3.4.91 kernel and the GNU 4.6.3 tool chain.
3.2 Powering the System
Connecting the PoE injector, the system will start up automatically.
Figure 1: Location of PoE injector.
NOTE:
You’d better shut down or reboot the system using a console or a secure shell connection (see next
section for login).
— Powering off by disconnecting power cord could cause problems. —
Login as ‘root’ and then issue a ‘poweroff’ or ‘reboot’ command.
root@WR‐IDP‐B072:~#poweroff
root@WR‐IDP‐B072:~#reboot
Or send ssh remote command to gateway
ecs@ecs‐IoT:~$sshroot@192.168.
1
.
1
p
oweroff
root@192.168.1.1'spassword:
ecs@ecs‐IoT:~$
ecs@ecs‐IoT:~$sshroot@192.168.1.1
r
eboot
root@192.168.1.1'spassword:
ecs@ecs‐IoT:~$
13 GWS-RFID RFID Reader
3.3 Login
The system can be accessed and controlled via a Linux shell called 'console'. The users may invoke
Linux commands to configure something in the procedures of the following sections.
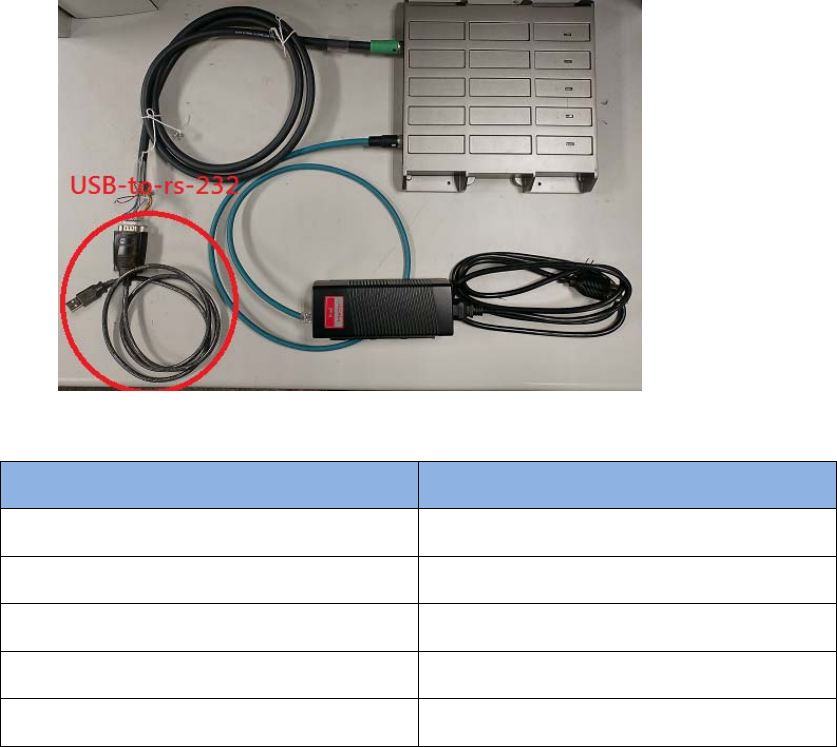
You should plug an usb-to-RS-232 with d’sub cable to USB port for a serial console. GWB-RFID/GWS-
RFID supports two kinds of chip drivers for the cables, FTDI and PL2303.
If using serial console or terminal emulator, the serial port settings are
Setting Value
Baud 115200
Parity No
Data Bit 8
Stop Bit 1
Flow Control No
If using secure shell (called SSH), it listens on eth0, the IP depend on DHCP assigned. The eth0 is the
RJ45 connector nearby the DC-In jack on PoE. The secure shell service is disabled by default. You
should enable it via a serial console first.
GWS-RFID RFID Reader 14
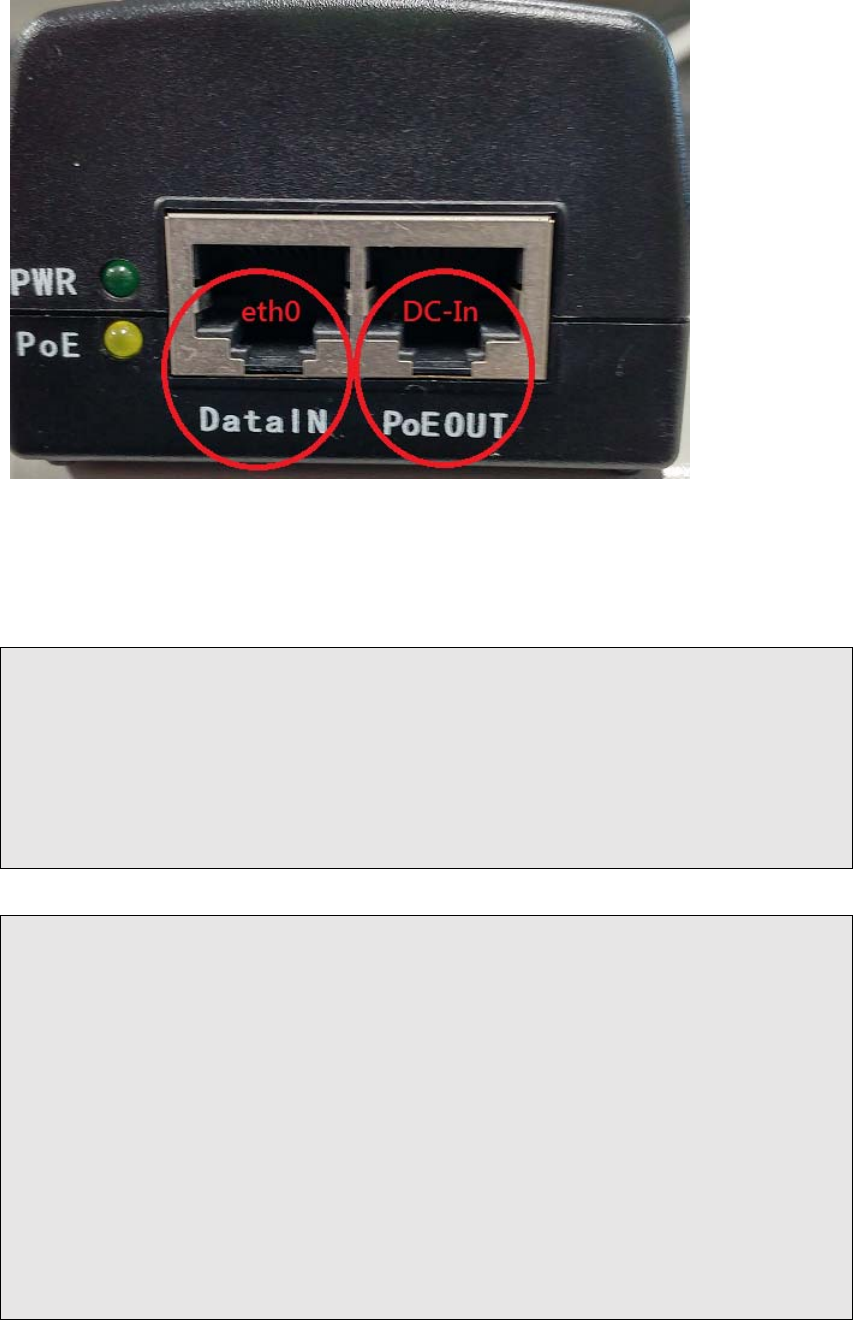
Figure 2: Location of eth1 connector
The login account for both is ‘root’ with password ‘root’.
WindRiverLinux7.0.0.16WR‐IDP‐B072ttyS1
WR‐IDP‐B072login:root
Password:
root@WR‐IDP‐B072:~#
ecs@ecs‐IoT:~$sshroot@<DHCPIP>
Theauthenticityofhost'192.168.1.1(192.168.1.1)'can'tbeestablished.
ED25519keyfingerprintis5a:3b:0a:ce:8b:04:8e:0b:7e:b0:a7:2e:92:54:3c:b9.
Areyousureyouwanttocontinueconnecting(yes/no)?yes
Warning:Permanentlyadded'192.168.1.1'(ED25519)tothelistofknown
hosts.
Password:
Lastlogin:ThuMar3015:56:462017
root@WR‐IDP‐B072:~#
For security concern, administrator should change password for ‘root’ account or do not permit to login as
‘root’. To prohibit ‘root’ login, please set PermitRootLogin option in the file /etc/ssh/sshd_config to no.
15 GWS-RFID RFID Reader

The following table lists available default login accounts.
Account Password Description
root root Privileged User Account
GWS-RFID RFID Reader 16

3.4 LAN Configuration
The steps below are used to configure the local area networking (LAN) of GWB-QX/GWS-QX.
If you use a serial console, you might setup networking by manual. Otherwise the networking is workable.
Step 1. Check a network interface.
root@WR‐IDP‐B072:~#ifconfig
eth0Linkencap:EthernetHWaddrf4:4d:30:53:b0:72
inet6addr:fe80::f64d:30ff:fe53:b072/64Scope:Link
UPBROADCASTRUNNINGMULTICASTMTU:1500Metric:1
RXpackets:0errors:0dropped:0overruns:0frame:0
TXpackets:227errors:0dropped:0overruns:0carrier:0
collisions:0txqueuelen:1000
RXbytes:0(0.0B)TXbytes:76754(74.9KiB)
Interrupt:40Baseaddress:0xc000
loLinkencap:LocalLoopback
inetaddr:127.0.0.1Mask:255.0.0.0
inet6addr:::1/128Scope:Host
UPLOOPBACKRUNNINGMTU:65536Metric:1
RXpackets:1884errors:0dropped:0overruns:0frame:0
TXpackets:1884errors:0dropped:0overruns:0carrier:0
collisions:0txqueuelen:0
RXbytes:122028(119.1KiB)TXbytes:122028(119.1KiB)
Step 2. Enable a network interface, e.g. eth0.
root@WR‐IDP‐B072:~#ifconfigeth0up
17 GWS-RFID RFID Reader

Step 3. Edit /etc/config/network to take effect during boot if the configuration is not fit.
For DHCP,
root@WR‐IDP‐B072:~#vi/etc/config/network
...
configinterface'wan'
optionifname'eth0'
optionproto'dhcp'
...
root@WR‐IntelligentDevice:~#
For fixed-IP,
root@WR‐IDP‐B072:~#vi/etc/config/network
...
configinterface'wan'
optionifname'eth0'
optionproto'static'
optionipaddr'192.168.2.1'
optionnetmask'255.255.255.0'
...
root@WR‐IDP‐B072:~#
GWS-RFID RFID Reader 18

3.5 Reference
Wind River® Intelligent Device Platform XT Release Notes, 2.0 -
http://www.intel.com/content/dam/www/public/us/en/documents/release-notes/wind-river-idp-release-notes.pdf
19 GWS-RFID RFID Reader

www.ECS.com.tw
Please verify specifications before quoting. This guide is intended for referenc
e
purposes only.
All product specifications are subject to change without notice.
No part of this publication may be reproduced in any form or by any means
,
electronic, photocopying, recording or otherwise, without prior written permis
-
sion of the publisher.