ELITEGROUP COMPUTER SYSTEMS WA0NR22CR1 Smart Watch User Manual D Draft WA068CR UM 20161214x
ELITEGROUP COMPUTER SYSTEMS CO., LTD Smart Watch D Draft WA068CR UM 20161214x
User Manual

User Guide
For
Smart Watch
WA068CR
ECS ELITEGROUP
Regulatory Compliance
Information
FCC Declaration of Conformity
This device complies with Part 15 of the FCC Rules. Operation
is subject to the following two conditions: (1) this device may
not cause harmful interference, and (2) this device must accept
any interference received, including interference that may
cause undesired operation.
This equipment has been tested and found to comply with the
limits for a Class B digital device, pursuant to part 15 of the
FCC Rules. These limits are designed to provide reasonable
protection against harmful interference in a residential
installation. This equipment generates, uses and can radiate
radio frequency energy and, if not installed and used in
accordance with the instructions, may cause harmful
interference to radio communications. However, there is no
guarantee that interference will not occur in a particular
installation. If this equipment does cause harmful interference
to radio or television reception, which can be determined by
turning the equipment off and on, the user is encouraged to try
to correct the interference by one or more of the following
measures:
z Reorient or relocate the receiving antenna.
z Increase the separation between the equipment and
receiver.
z Connect the equipment into an outlet on a circuit different
from that to which the receiver is connected.
z Consult the dealer or an experienced radio/TV technician
for help.
For questions related to the EMC performance of this product,
contact:
Elitegroup Computer Systems Co., Ltd
No.239, Sec. 2, Ti Ding Blvd., Taipei, Taiwan 11493
886-2162-1177

Canadian Department of Communications Compliance
Statement
This digital apparatus does not exceed the Class B limits for
radio noise emissions from digital apparatus set out in the
Radio Interference Regulations of the Canadian Department of
Communications. This device complies with Industry Canada
licence-exempt RSS standard(s). Operation is subject to the
following two conditions: (1) this device may not cause
interference, and (2) this device must accept any interference,
including interference that may cause undesired operation of
the device.
Le présent appareil numerique német pas de bruits radio
électriques dépassant les limites applicables aux appareils
numériques de la classe B prescrites dans le Réglement sur le
broullage radioélectrique édicté par le ministére des
Communications du Canada. Le présent appareil est conforme
aux CNR d’Industrie Canada applicables aux appareils radio
exempts de licence. L’exploitation est autorisée aux deux
conditions suivantes : (1) l’appareil ne doit pas produire de
brouillage, et (2) l’utilisateur de l’appareil doit accepter tout
brouillage radioélectrique subi, même si le brouillage est
susceptible d’en compromettre le fonctionnement.
CE mark. Declaring compliance to all the applicable
European Union (EU) directives. For CE mark related
questions:
Elitegroup Computer Systems Co., Ltd
No.239, Sec. 2, Ti Ding Blvd., Taipei, Taiwan 11493
886-2162-1177
French SAR/DAS
Votre ordinateur tablette a un DAS. Pour plus d'informations,
voir le portail radiofréquences-sante-environnement:
www.radiofrequences.gouv.fr
In the European Union, this symbol indicates that
this product including battery must not be disposed
of with household waste. It is your responsibility to
hand it over to a designated collection point for the
recycling of waste electrical and electronic
equipment. For more information, please contact

your local waste collection center or the point of
purchase of this product.
Japan VCCI Statement
この装ク m は。B ア。ウ処 z 装ク m オ・ケ q ェ i サルョ`ヲロ・D ウ W ィ鈺 ウ会 (VCCI)
のー ヌにーづくクラス ア。ウ ゙ウ N 装ク m です。C この装ク m は。Bョaョxタ メ
でィマ・ホすることを・リェコとしていますが。B この装ク m がラジオやテレビジョ
ンィ・H セに オしてィマ・ホされると。B ィ・H サルョ`を、゙きー_こすことがありま
す。C
ィ摠説愰峵ムに従って・ソしいィり摠いをして惕 U さい。C
Taiwan battery recycling:
Translation – please recycle batteries

Attention: Teachers, Parents and Adult
Supervisors
This product is an educational tool designed for school children,
ages 6 and up. There must be supervision by an adult on
school children under 10 when using this laptop. It is a must to
have a thorough explanation to students on safe and proper
handling of the laptop, power supply, battery pack, and power
cord.
Be sure to keep the power cord away from
younger children
Please ensure that students understand the following:
As with all electrical products, precautions should be
observed during handling and use to prevent electric
shock. The power supply (adapter) should not be
handled by the children.”
Emphasize to students that this device is an
educational tool and not a toy. The computer, power
supply, battery pack or power cord should not be
dropped, crushed, stepped on or otherwise abused.
Ensure students understand the safe and proper
handling of power cord and power supply. Misuse
could result in serious injury.
The teacher, parent or adult supervisor should
periodically inspect the computer; power supply and
power cord for damage and replace it, if necessary.
Students should report any damage or loose parts to
their teacher, parent or adult supervisor, immediately.
Do not leave the PC plugged in or “on” when enclosed
in a non-vented container, such as a school backpack,
as overheating may occur.
It is recommended that students should take a 5
minute break every 30 minutes of use.
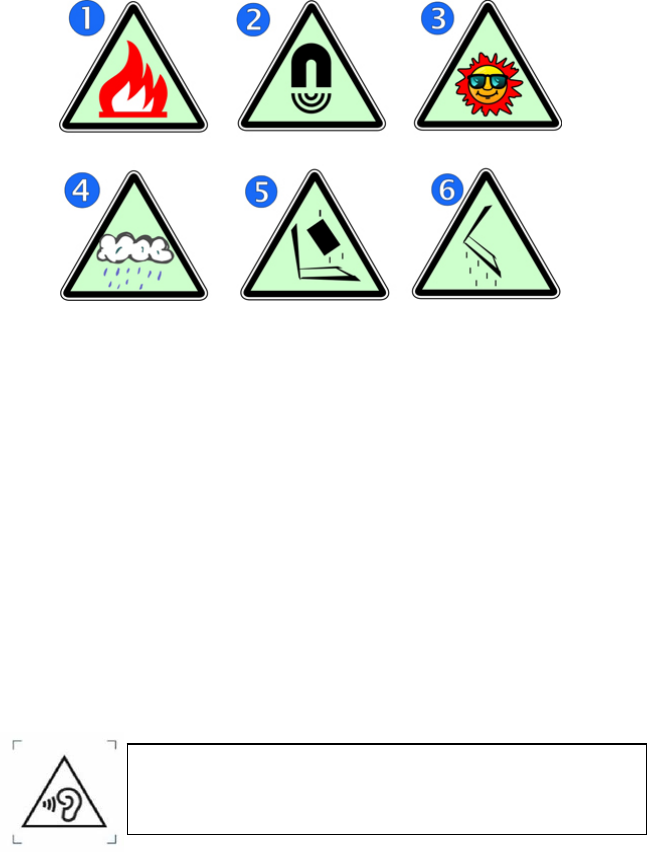
Safety Precautions
The following are lists of precautionary measures the students
must understand before using this computer inside the
classroom or home environment:
1. Do not place near the fire or other sources of heat.
2. Do not expose to magnetic fields.
3. Do not expose to direct sunlight.
4. Do not expose to rain or moisture.
5. Do not place heavy objects to add heavy pressure on the
computer.
6. Do not drop the computer.
CAUTION
RISK OF EXPLOSION IF BATTERY IS REPLACED BY AN INCORRECT
TYPE. DISPOSE OF USED BATTERIES ACCORDING TO THE
INSTRUCTIONS. ATTENTION
RISQUE D'EXPLOSION SI LA BATTERIE EST REMPLACÉE PAR UN
TYPE INCORRECT. RECYCLEZ LES BATTERIES USAGÉES SELON LES
INSTRUCTIONS.
IT IS RECOMMENDED TO USE THIS TABLET IN AN ENVIRONMENT
WHERE THE AMBIENT TEMPERATURE IS NO MORE THAN 35°C.
TO PREVENT POSSIBLE HEARING DAMAGE, DO
NOT LISTEN AT HIGH VOLUME LEVELS FOR LONG
PERIODS.

Contents
1. Checking and inspecting.............................................................. 1
Packagecontents................................................................................................................. 1
Layout ...................................................................................................................................... 2
Views ............................................................................................................................ 2
zFront.......................................................................................... 2
Back ........................................................................................... 3
2. Using your smart watch............................................................. 4
Connectingtoyourtablet................................................................................................. 4
Operatinggestures .............................................................................................................5
Watchmodes......................................................................................................................... 6
3. Software............................................................................................... 7
Mybody................................................................................................................................... 9
Settingspage ............................................................................................................. 9
Sleep ............................................................................................................................11
Pedometer.................................................................................................................12
Sedentariness ..........................................................................................................13
Firstpage...............................................................................13
Secondpage..........................................................................14
zSedentarinessnotification ..............................................16
Pets ........................................................................................................................... 16
MyMemo..............................................................................................................................17
zblackboard.............................................................................17
zMemoarea ............................................................................17
Addinganewmemoanditsnotification .....................................................18
Notifications ............................................................................................................19
MyHelper .............................................................................................................................20
Findyourwatch.....................................................................................................20
InitializationFlow..................................................................................................20
zSync..........................................................................................20
zMyMemo...............................................................................21
zMyBody .................................................................................21
UserManual.............................................................................................................22
Mysettings...........................................................................................................................23
Sync .............................................................................................................................23
Mywatchinfo..........................................................................................................24
Mode............................................................................................................................26
Wristplacement.....................................................................................................27
4. Battery................................................................................................29
Chargingyourbattery.....................................................................................................29
Inspectingyourbatterystatus .....................................................................................29
BatteryStatus ..........................................................................................................29
Batteryalarming ....................................................................................................30
7. Specification....................................................................................31
1
1. Checking and
inspecting
Package contents
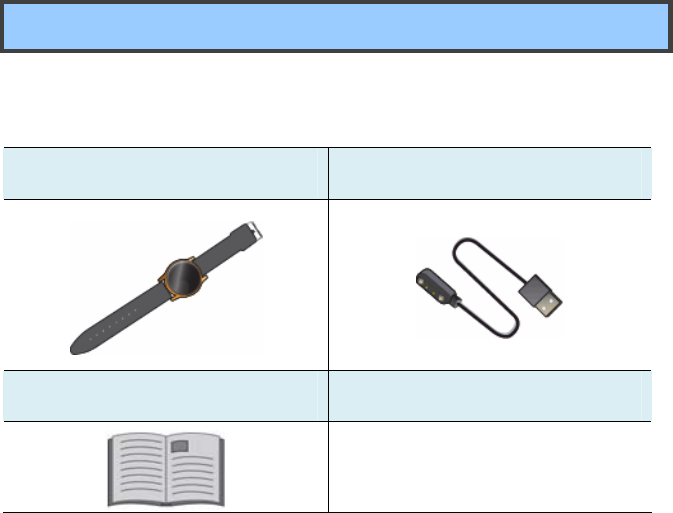
Carefully unpack your box and take out the items listed as below. If any
of the items is missing or damaged, contact your dealer immediately:
• One smart watch • One magnetic charging cable
• This manual
2
Layout
Views
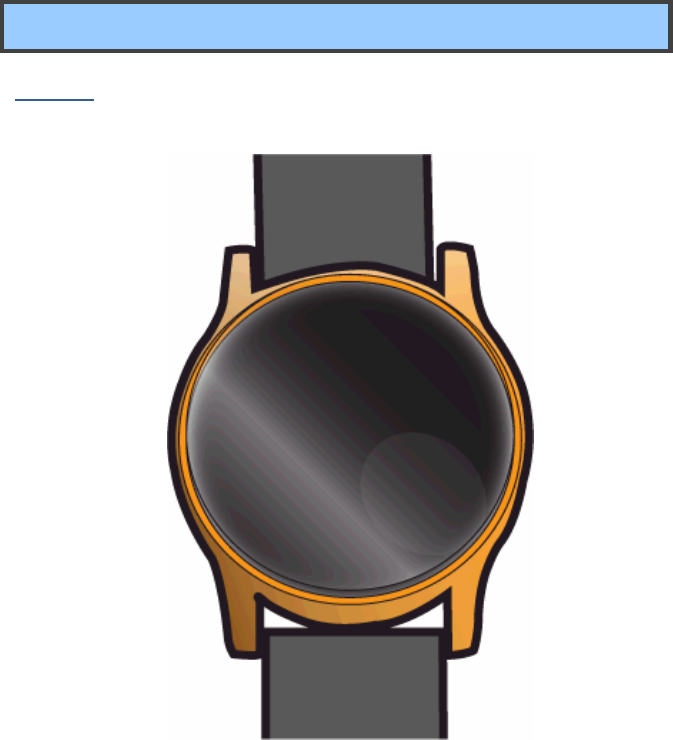
z Front
The front panel is the screen that displays information and can be wake
up from sleeping by double tapping.
3
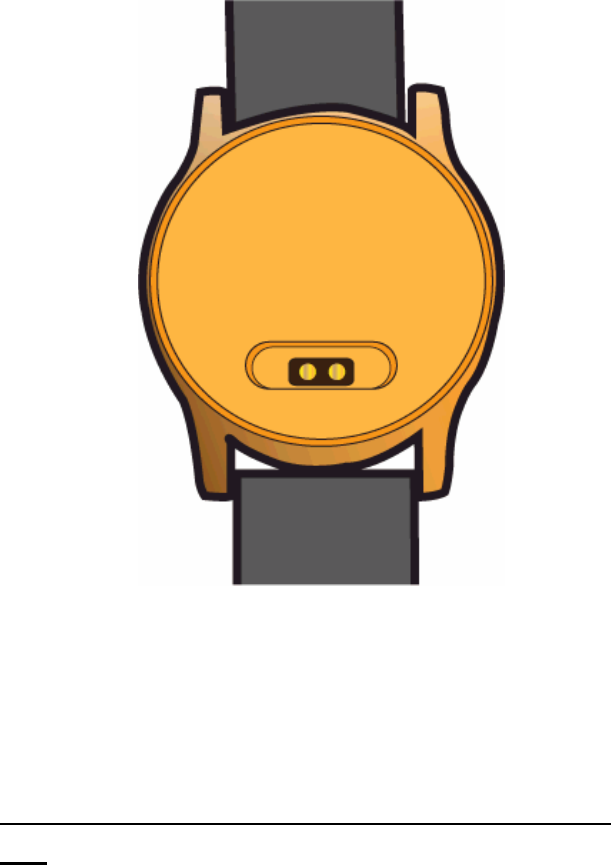
z Back
On the back of your smart watch, there is the pogo pin connector that
allows you to connect the provided magnetic charging cable in right
direction.
If you want to turn off this watch, just short circuit the two pogo
pins.
4
2. Using your smart
watch
Connecting to your tablet
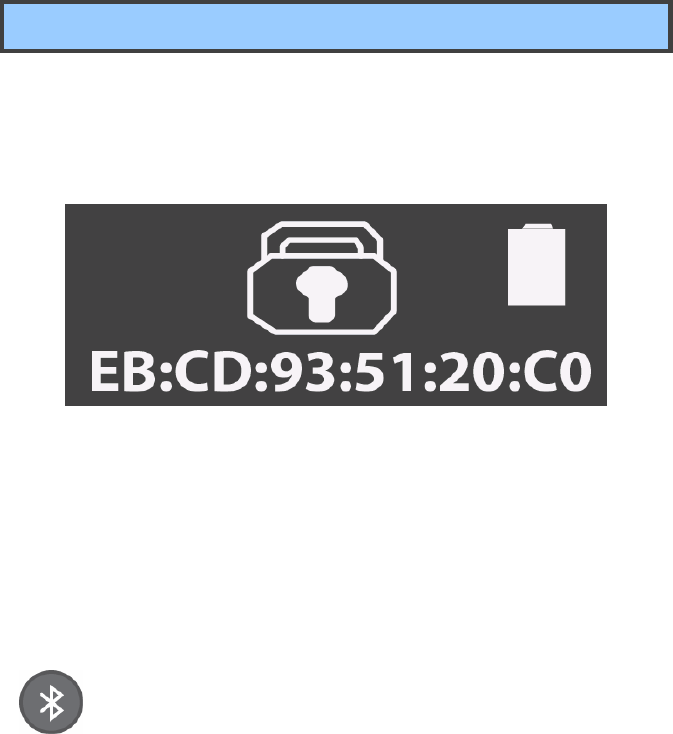
For the first time using this product, the smart watch is in lock mode.
Double tap the front screen, you shall see the screen similar to the one
shown below.
Where the string “EB:CD:93:51:20:C0” is the assigned Bluetooth
address for your watch (the actual address may vary from case to case ).
From here, you need to pair it with your tablet through Bluetooth to
unlock it. To establish the Bluetooth connection, do the following steps:
1. Make sure the Bluetooth feature on your table has been
turned on.
5
2. Your tablet will automatically start detecting and adding it as an
available device. Click it from the available device list to pair with it.
When it is done, your watch shall be added to the paired devices list.
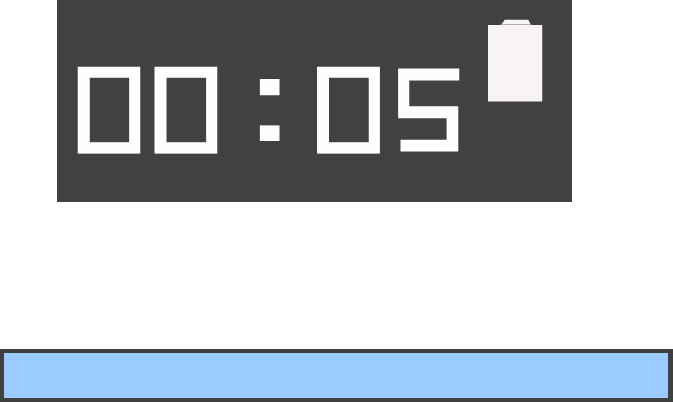
3. Double tap your watch on the front panel, and you shall see the
image similar to the one shown below.
Your smart watch goes into sleep mode if no operation for 7 seconds.
You can double tap the display to wake it up.
Operating gestures
Double tapping: this can switch between modes and wakeup the watch.
Regular arm swing movement: this can trigger the pedometer count.
6
Watch modes
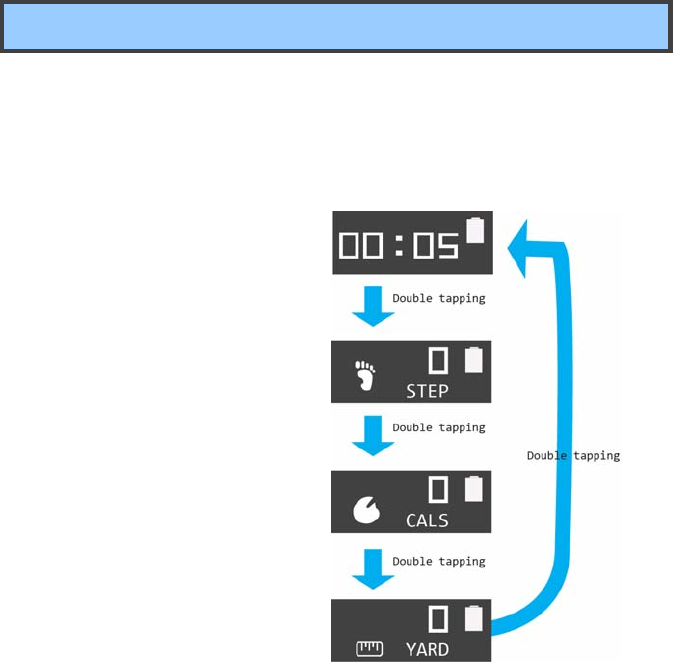
From the sleep mode, you can switch to and view different modes in
sequential order by double-tapping the display, where the modes are:
1. Time mode
To set time, please see
page 8 for detail.
2. Pedo mode
Please see page 17 for detail.
3. Cal mode (optional)
4. Mil mode (optional)
For how to set the modes, please see page 25..
7
3. Software
ThesoftwareusinghereistheonecalledMy
Square,theiconofwhichisasshownontheleft.
Tousingthissoftware,youshall:
1. TurnonthetheBluetoothandWiFifeaturesonyour
studenttablet.
2. MakesureyourWiFiconnectionisestablished.
3. TaptheMySquareicontoactivatethesoftware.
4. EnteryourschoolIDandpassword.
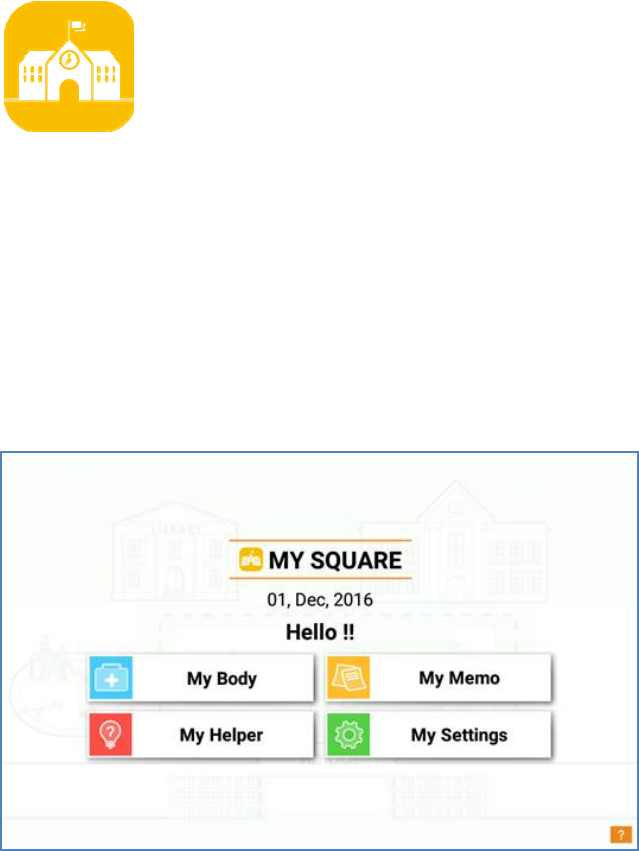
5. Onceyourtableandsmartwatcharepairedup,themain
pagewillbedisplayedastheoneshownbelow.

8
Thesoftwarecomeswithfollowingfeatures:
Mybody
(seepage9)
MyMemo
(seepage16)
MyHelper
(seepage19)
Mysettings
(seepage22)
Clickonthedesireoptiontoviewandsettheinformation.
9
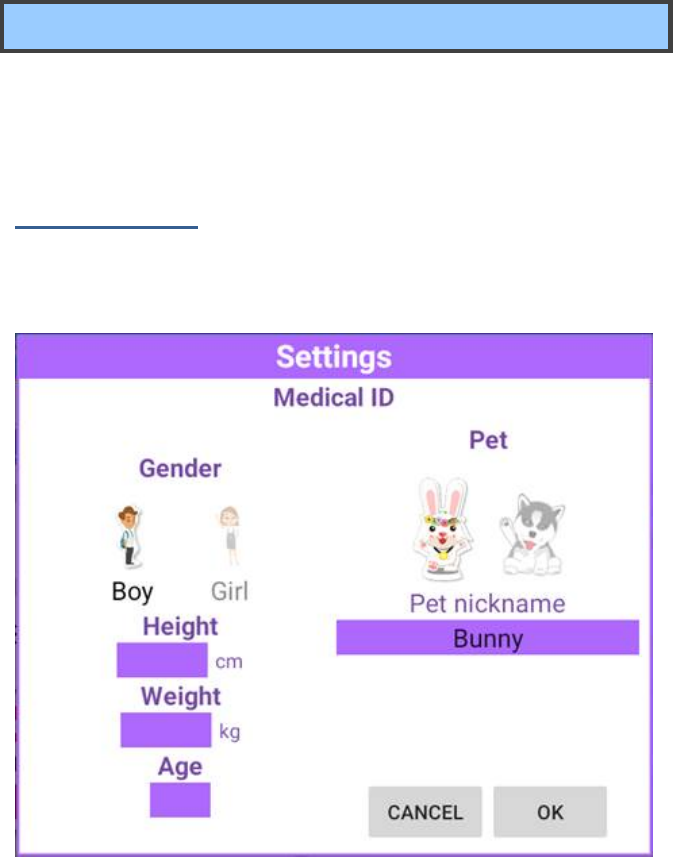
My body
ThisiswheretosetyourGenderandPet,andenter
informationincludingyourheight,weight,ageandyourpet’s
nickname.
Settings page
Whenthisisyourfirsttimeaccessing“MyBody“page,this
pagewillshowupandguideyouthroughtheinitialsettings.
Baseonthegendersettings,thesystemwillpreparethedefault
pedometertargetsteps.
Afteryoucompletethesettings,youwillseeyou’reMyBody
pageasshownbelow.
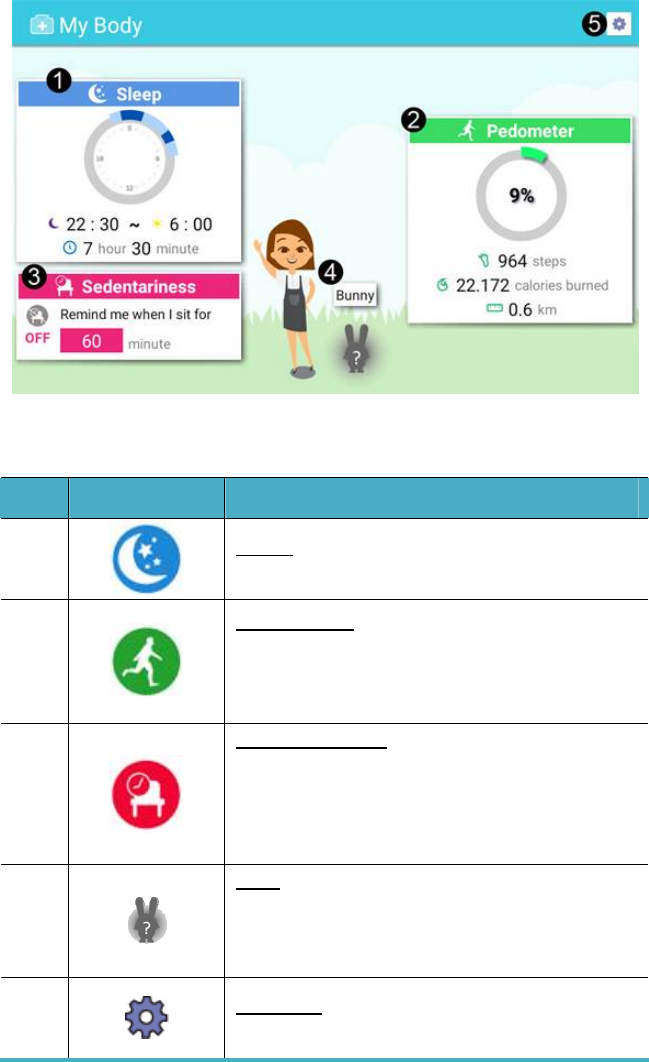
10
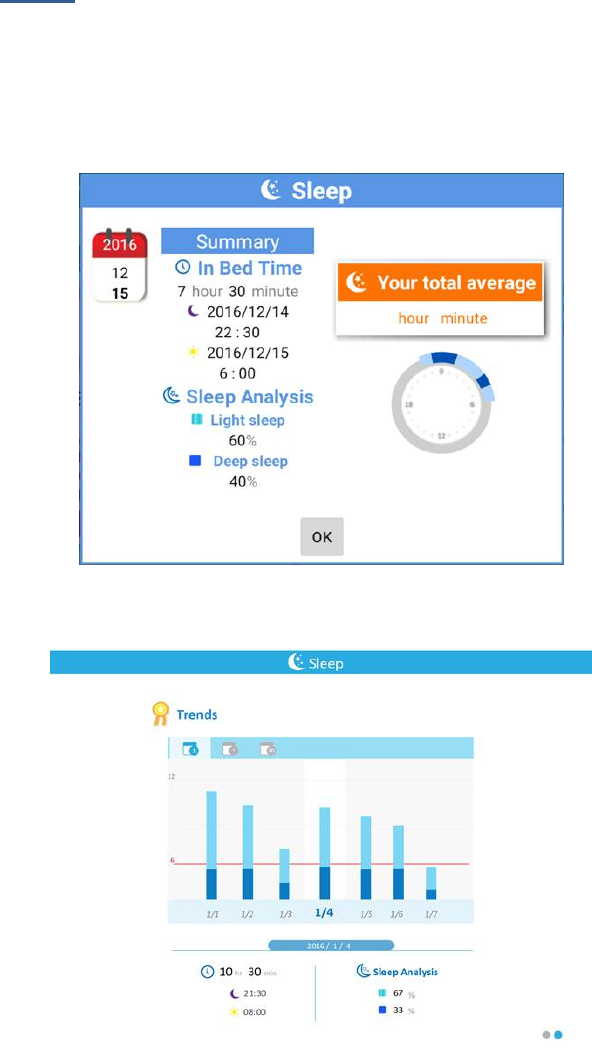
Thispageconsistsoffieldsasshownbelow:
No.
IconsDescription
1
Sleep: shows your sleep duration and
sleepquality.(Seepage11fordetail)
2
Pedometer: shows your pedometer
performanceandrecordssuchassteps,
caloriesburnedanddistance.(Seepage
12fordetail)
3
Sedentariness:allowsyoutoseta
timeout after which the system will
remindyouifitdetectsnomovement
fromyoubeforethetimeout.(Seepage
13fordetail)
4
Pets:showsyourrewardbasedonyour
yesterday’s performance on Sleep,
Pedometer,andSedentariness.(See
page15fordetail)
5
Settings: Opens the Settings page that
isdescribedinprevioussection.
11
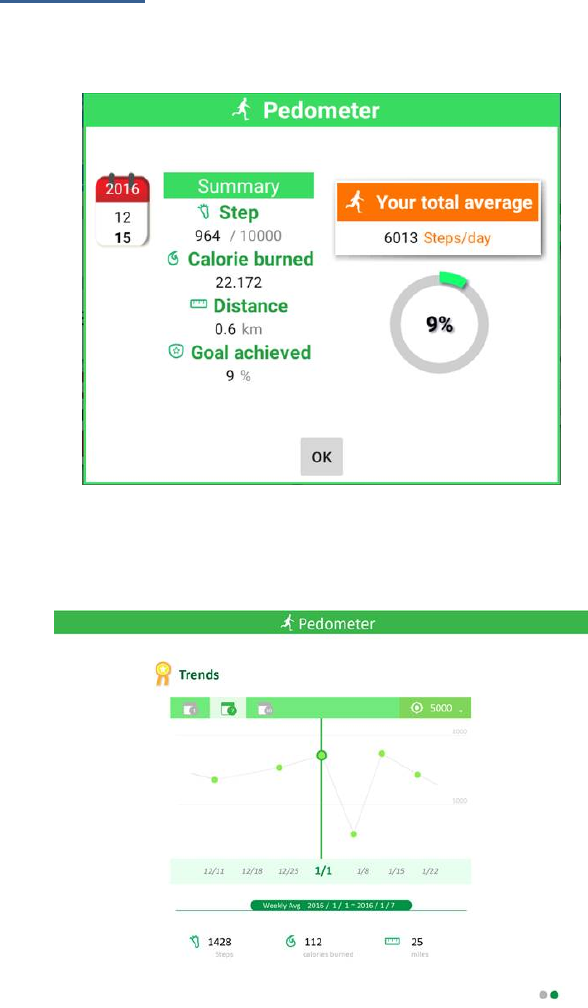
Sleep
Yoursmartwatchcantracksyoursleepingactivity,andcan
sendtherelateddatatoyourtabletthroughtheBluetooth
connection.Afteranalyzingthedata,theresultisdisplayedin
thispage.
Slidetothesecondpage,youcanviewthetendencyofyour
sleepstatusasshownbelow.
12
Pedometer
Thispagecangraphicallydisplaytherecordssynchronized
fromyoursmartwatch.
Slidetothesecondpage,youcanviewthestaticsofyour
performancetrendovertimeasshownbelow.
13
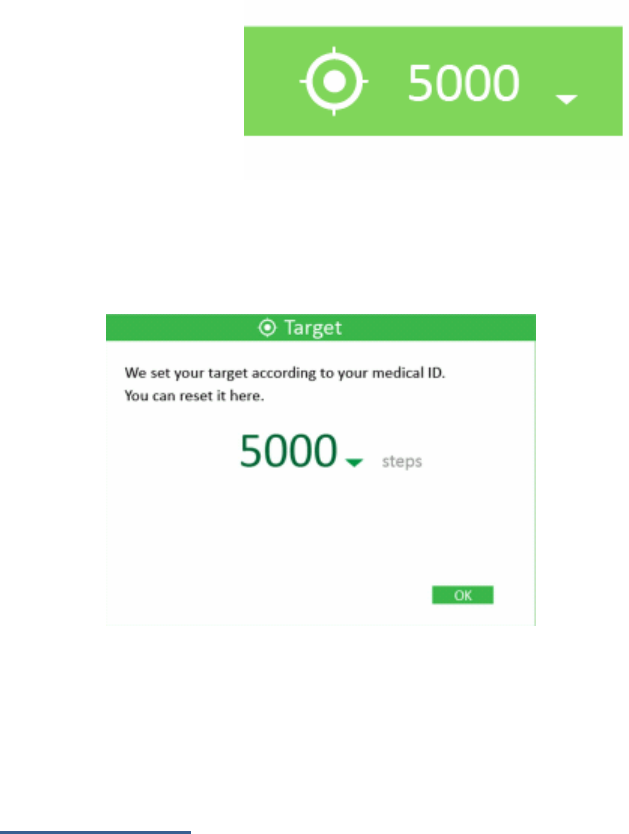
Inthispage“Trends”,
theupperright
corneristhetarget
setbythesystem
basedonyourbody
settings.Ifyouwanttochangeit,justclicktheretoopenthe
dialogboxasshownbelow.
IfyourgenderissettoBoy,youcanmanuallymodifyittoany
from10000to16000;IfGirl,anyfrom8000to14000.After
modification,justtapOKtoclosethedialogbox.
Sedentariness
Onceyoursmartwatchdetectsnomovementafteradesignated
timeperiodduring07:00~22:00,thisfeaturewillremindyou
totakesomeaction.
Onceanymovementisdetectedbeforetimeout,thetime
countdownwillrestartagain.
z First page
14
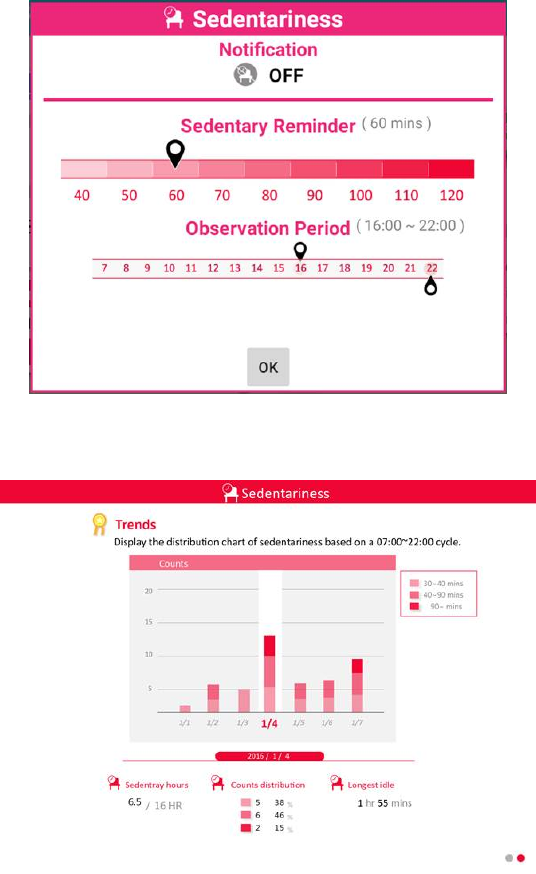
Youcanenableordisablethereminderofsedentariness.
Ifenable,youcanfurtherset:
z Remindertime(inminutes):theoptionsare
40,50,60(default),70,80,90,100,110,and120.
z Sedentarinessobservationperiod:theoptionsare
07:00~22:00and16:00~20:00(default).
z Second page
15
Youcanviewyoursedentarinesstendencyinthissummary
page.
16
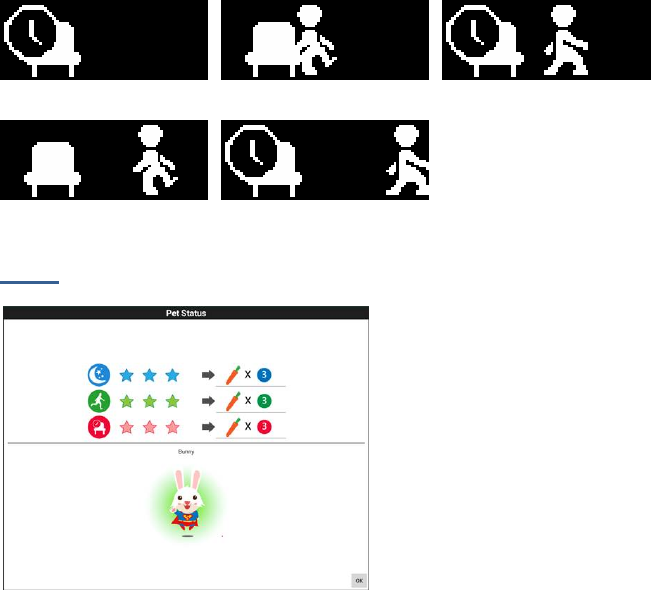
z Sedentariness notification
Whenasedentarinessnotificationismadetoyoursmartwatch,
itwillshowasshownbelow:
Pets
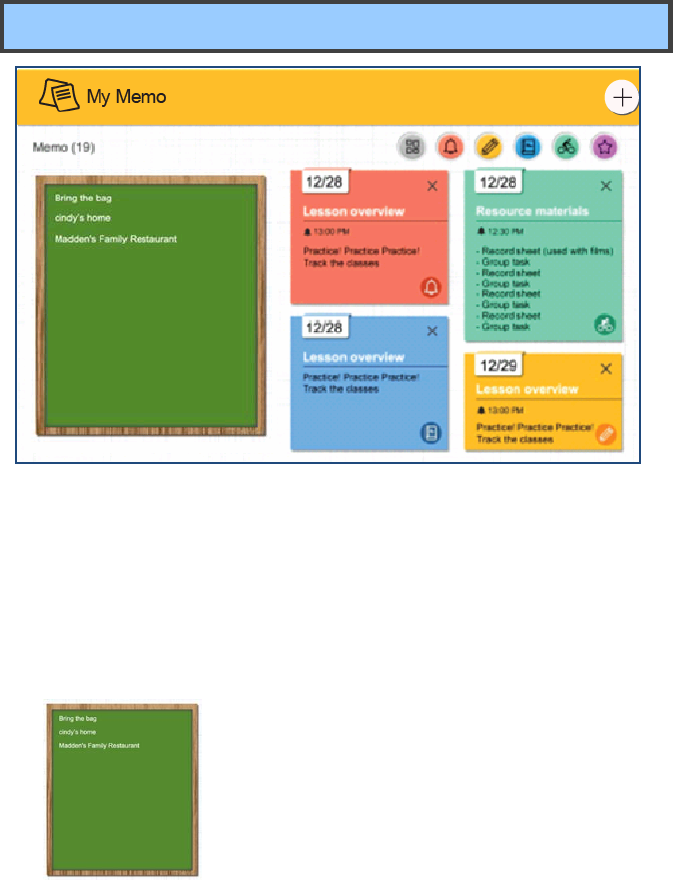
Byataponthepet,you
canopenasummaryfor
youryesterday
performancesimilarto
theoneshownonthe
le f t .
Thesummaryshows
yourbodystatusof
yesterdayandtherewardsgivenbasedonyourperformance.
17
My Memo
Youcansetyourmemoandletthesystemnotifiesyouabout
thememoatyourdesignatedtime.Thenotificationwillbe
madethroughthewatchandalsothetablet.
z blackboard
Ontheleftareaofthispage,itisthe
blackboardthatallowsuserstoscratch
arbitrarilyandhavenocharacters
limitation.
z Memo area
Ontherighthandside,theareawilldisplayallmemos,
scheduledinthepastandforthefuture,andyoucanslide
upanddowntoviewthememosscheduled.
18
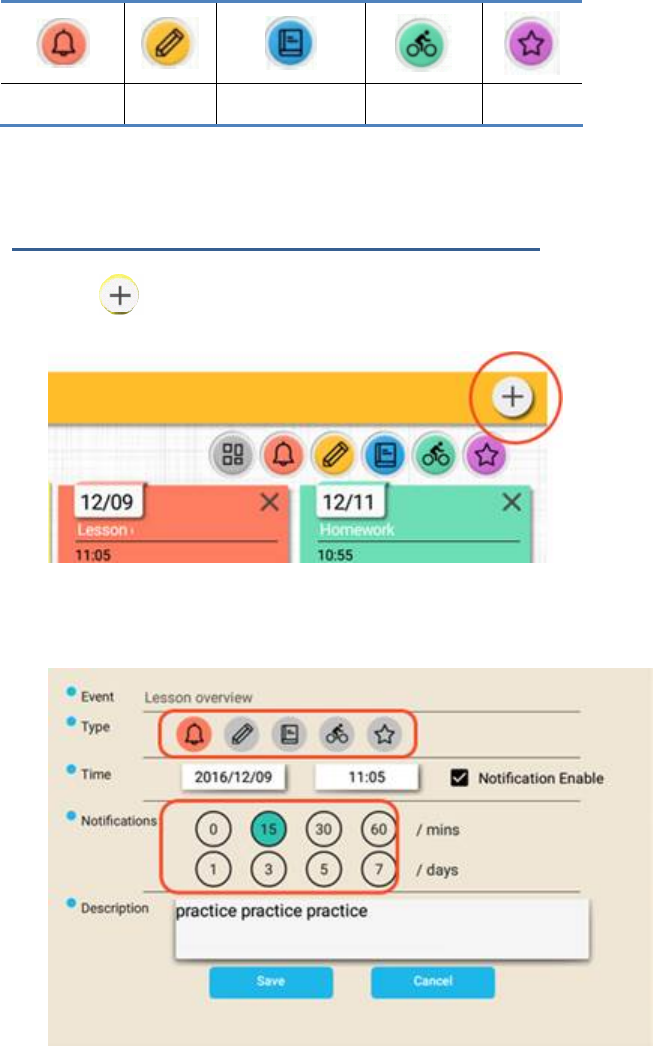
Youcanclickononeofthefollowingiconstoshowspecific
memo.
Reminder Test Homework Activity Others
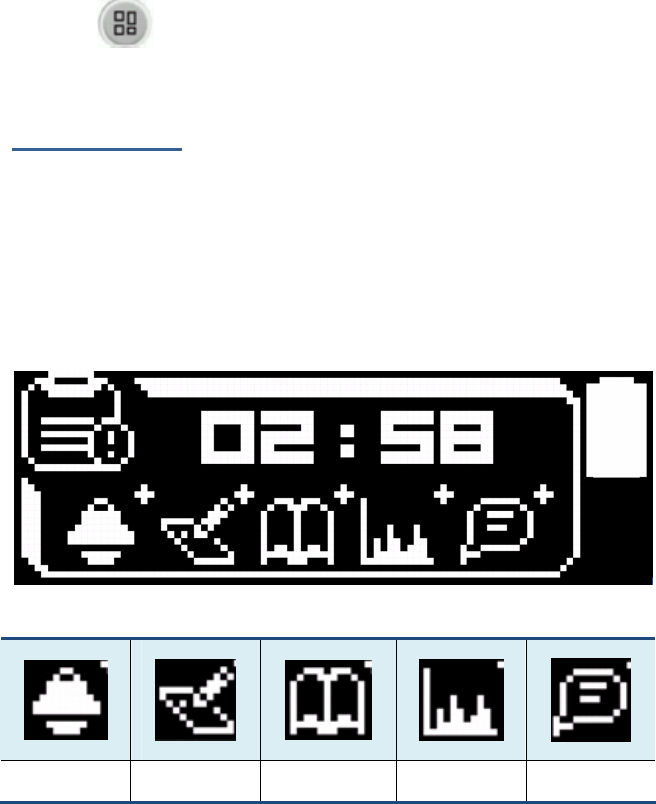
Adding a new memo and its notification
1. Tap“ ”thatcanbefoundontheupperrightcorner.
2. Enteryourdesiredeventname,memotype,eventstarttime,
notificationtime,eventdescription.
19
Thetotalnumberofcharactersallowedin“Event
Description”is120.
3. Choose“Save”.Thenewmemowillbeaddedtoand
displayedinMyMemo.
4. Tap togobacktoMyMemopage.
Notifications
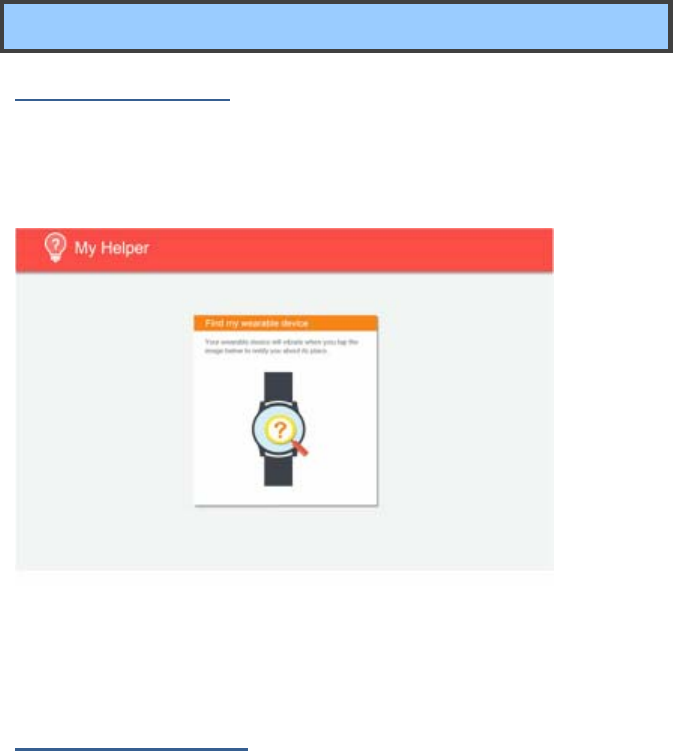
When a notification is made to your smart watch, it will show the
corresponding icon to let you know the type of the notification.
When at the same time there are two or more notifications of the same
type, a “+” will be added to the upper right comer of the icon.
Where
Reminder Test Homework Activity Others
20
My Helper
Find your watch
Afterhavingyourwatchpairedwithyourtablet,itwillbe
appointedoneuniqueMACaddress.WiththisMACaddress,
youareabletolocateyourwatchusingyourtablet.
Tapthewatchimageonyourtablettostartsearching.Oncethe
tabletlocatesthewatch,itwillvibratetonotifyyouaboutthat.
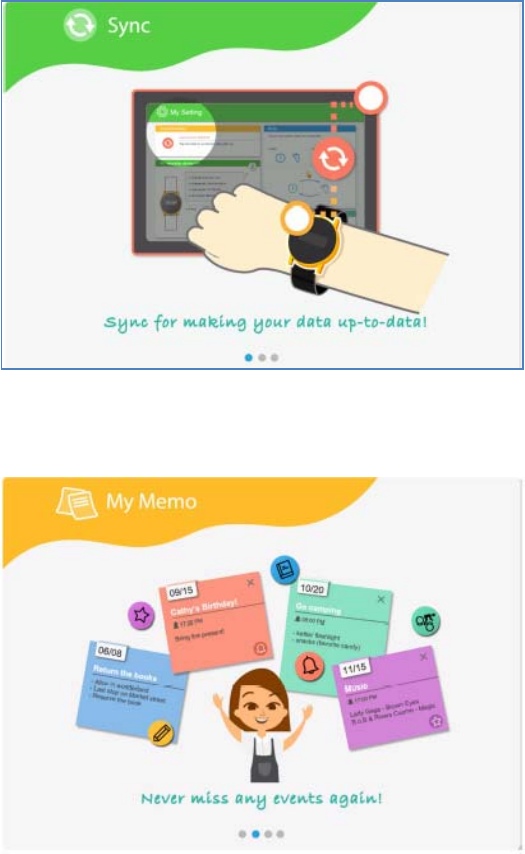
Initialization Flow
ProvideconceptualIntroduceoftheapplication,including
“Sync”,”MyMemo”,“MyBody”,and“MyHelper”.
z Sync
Displaysyncingconcept.
21
z My Memo
DisplayMyMemoconcept.
z My Body
DisplayMyBodyconcept.

22
User Manual
Tapping“?”inthemainpagewilldirectyouto“UserManual”
pageinwhichyoucanfindthedetailregardingMyBody,My
Memo,MyHelperandMySettings.
23
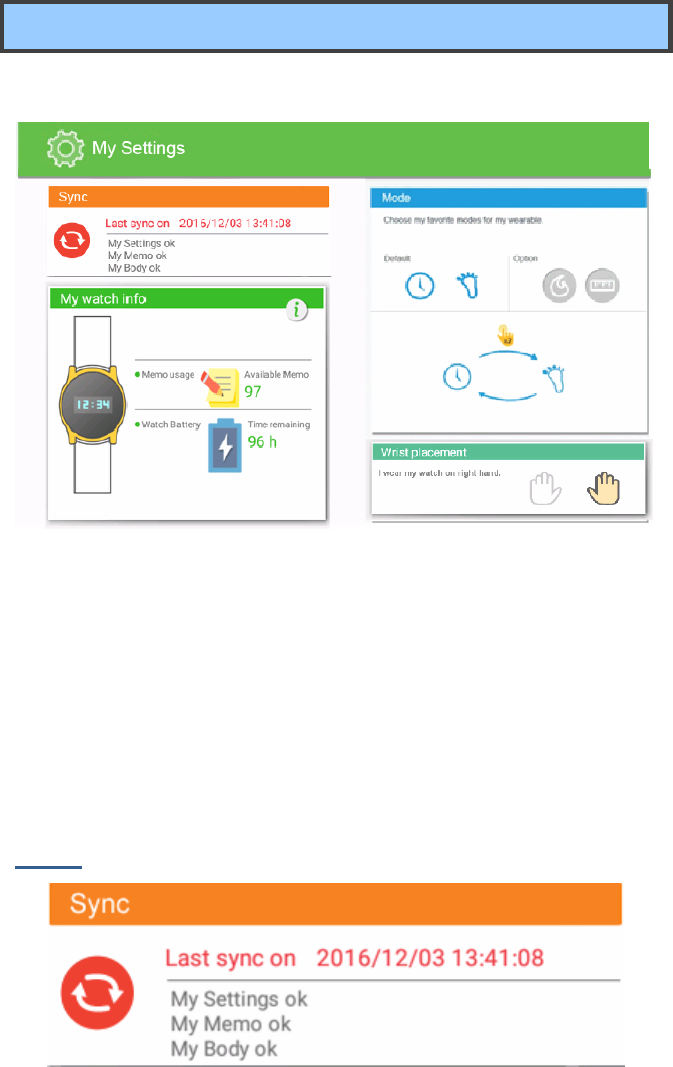
My settings
Thispageshowsyouthebasicsettingsandstatusaboutyour
smartwatch.Thispageconsistsoffourfields,whichare:
z Sync
z Mywatchinfo
z Mode
z Wristplacement
Sync
24
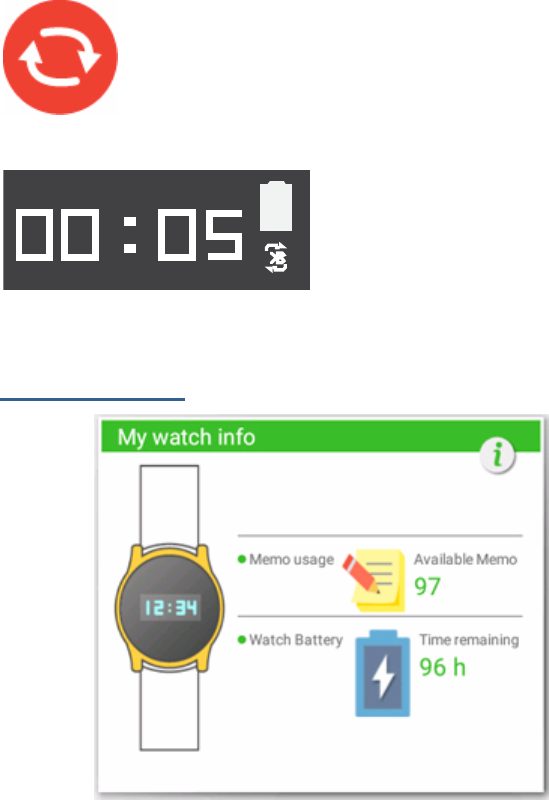
Tosetyourtimeandupdateyourdata,clickthe
iconinthisfieldtosynchronizeyoursmartwatch
withyourtabletimmediately.
Then,onyoursmartwatch,a
Bluetoothiconappearsinthe
bottomrightcornerofthe
displayasshownontheleft.
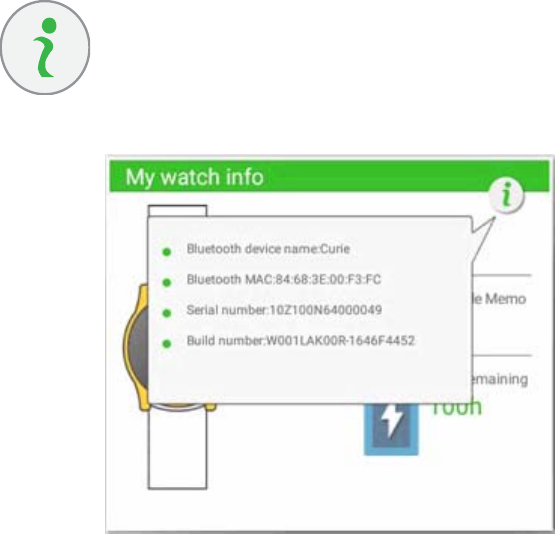
My watch info
Itshowsyouthecurrentmemousageandpowerstatus:
z Memousage:itshowstheestimatedremainingspacefor
notificationevents.Forexample,ifitshows“97”,itmeans
thatthemaximumnumberofmemoscanbefurther
handlebyyoursmartwatchislimitedto97memos.
Indefault,themaximumnumberofmemoscanbe
synchronizedwithyourtabletis100.Oncethetotal
numberofmemoisover100,thisfieldshowsthenumber
ofunsynchronizedmemos.
25
Onlytodayandthedayaftertoday’smemoswillbe
synchronizedtoyourwearabledevice.
z Watchbattery:itshowstheestimatedremainingpower.
Forexample,ifitshows“96hr”,itmeansyourwearable
devicecanstillrunforabout96hrs.
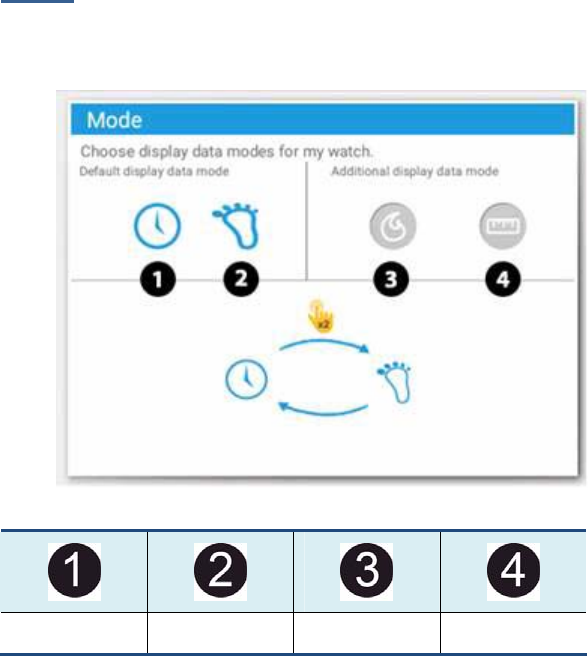
Byclickingthisicon,youcanviewthedetailed
informationofyourwearabledevice,including
Bluetoothdevicename,BluetoothMAC,Serial
number,andBuildnumber.
26
Mode
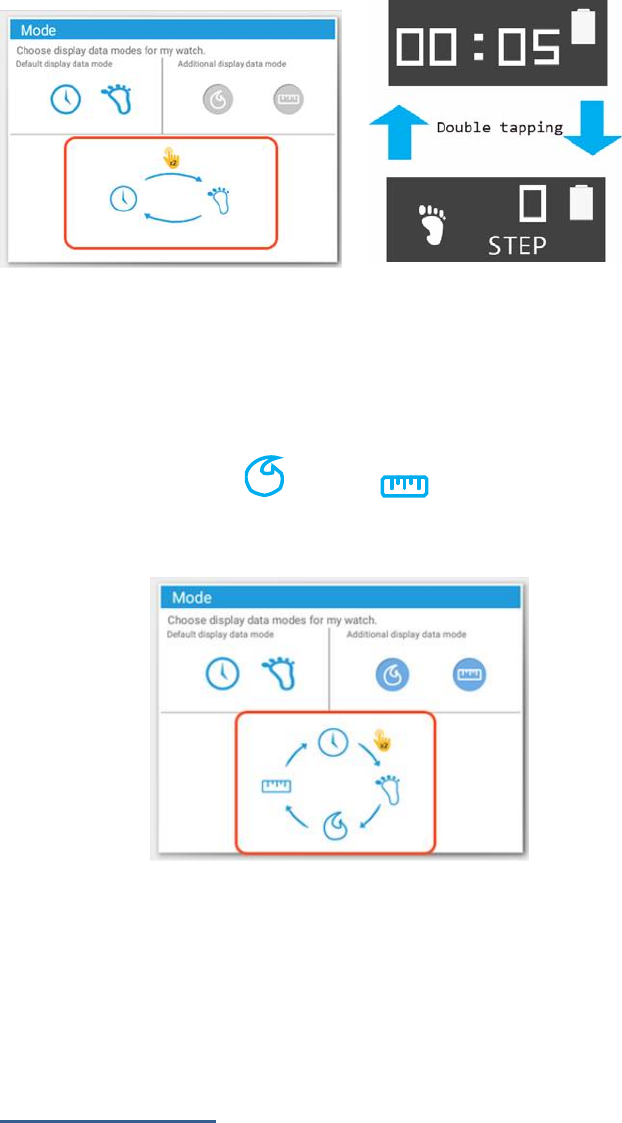
Youcanselectthemodesthatyouwanttoviewonyoursmart
watch.
The modes available here are:
Time Pedometer Calorie Distance
Indefault,theselectedmodesareTime”and“Pedometer”.You
canswitchthesetwodisplaymodesbydouble‐tapsthedisplay
ofyoursmartwatch,asshownbelow.
27
Toaddmodes,justclickonyourdesiredmodeicons.
Forexample,ifyouwanttoaddtheCaloriemodeor/and
Distancemode,dothefollowing:
1. Clickthemodeicon or/and .
2. Themodefieldwillreflectyourselection.
3. Afteryoursmartwatchissynchronizedwithyourstudent
watch,youcannowdouble‐tapthewatchtoswitchbetween
yourdesiredmodes.
Wrist placement

28
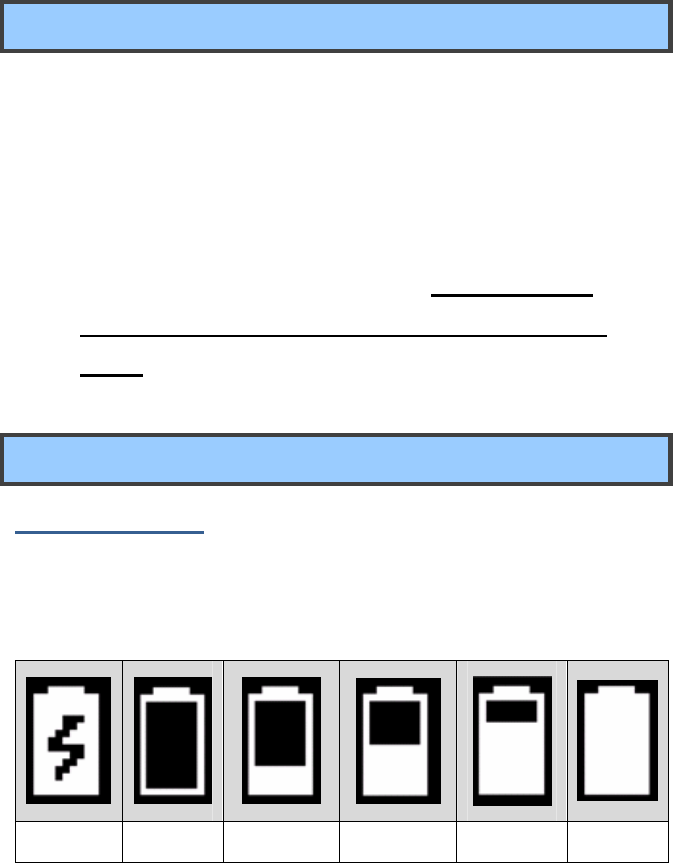
Hereyoucanclickoneofthehandiconstochooseonwhich
handyouwillwearyoursmartwatch.
Thesystemcanadjustitsdatacollectionandalgorithmbased
onthesettingshere.Thelefthandisselectedindefault.
29
4. Battery
Charging your battery
1. With the provided magnetic charging cable, connect the pogo
connecting head to the pogo connector on the back of your smart
watch.
2. Plug the USB head of the charging cable to the provided wall mount
charger and plug the charger to a wall socket.
3. After the charging sequence is complete, unplug the pogo
connector first before unplug the charger from the wall
socket.
Inspecting your battery status
Battery Status
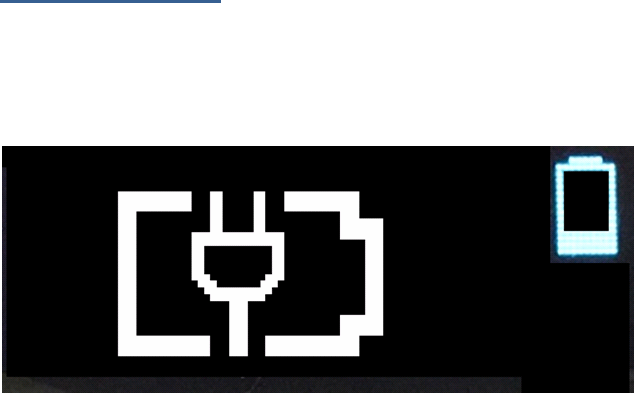
You can view your battery by inspecting the battery status of your smart
watch.
Charging 0%~9% 10%~49% 50% ~79% 80% ~99% 100%
30
Battery alarming
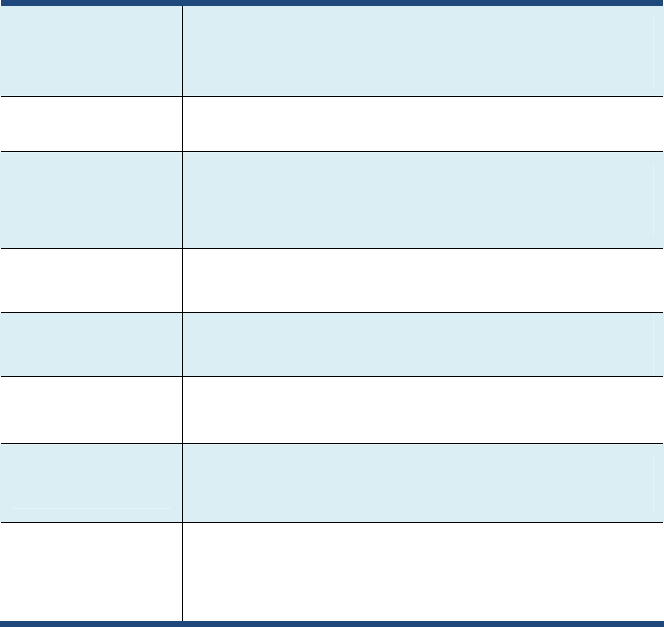
When the battery capacity is lower than 20%, if you double tap to wake
up your smart watch, it will go into alarm mode and show the alarm as
shown below.
In the alarm Mode, you can double tap it to switch to the time Mode. Or,
after 7 seconds, it will go into the sleep Mode..
31
7. Specification
System Thunderdome platform with Zephyr OS
Intel Curie module
Quark SE SOC
Memory Internal 80kb SRAM
Storage
Internal total storage 384kB Flash, 80kB
SRAM
External total storage 4MB
Wireless Bluetooth: BLE Radio with BT4.1 stack
Sensor Accelerometer & Gyro: BMI160, 6 Axis
Sensor
Display 96x32 Dot Matrix OLED
Battery Li-Ion Battery Charger
Battery Life (5 days)
RFID Tag
(optional)
Passive UHF RFID Tag
Notice:
Any changes or modifications not expressly approved by the party responsible for
compliance could void your authority to operate the equipment.
Note: This equipment has been tested and found to comply with the limits for a Class
B digital device, pursuant to part 15 of the FCC Rules. These limits are designed to
provide reasonable protection against harmful interference in a residential installation.
This equipment generates, uses and can radiate radio frequency energy and, if not
installed and used in accordance with the instructions, may cause harmful interference
to radio communications. However, there is no guarantee that interference will not
occur in a particular installation. If this equipment does cause harmful interference to
radio or television reception, which can be determined by turning the equipment off
and on, the user is encouraged to try to correct the interference by one or more of the
following measures:
—Reorient or relocate the receiving antenna.
—Increase the separation between the equipment and receiver.
—Connect the equipment into an outlet on a circuit different from that to which the
receiver is connected.
—Consult the dealer or an experienced radio/TV technician for help.
Notice:
This device complies with Part 15 of the FCC Rules. Operation is subject to the
following two conditions:
(1) this device may not cause harmful interference and (2) this device must accept any
interference received, including interference that may cause undesired operation.
This equipment complies with FCC radiation exposure limits set forth for an
uncontrolled environment. End users must follow the specific operating instructions
for satisfying RF exposure compliance. This transmitter must not be co-located or
operating in conjunction with any other antenna or transmitter.