ELPRO Technologies 450UE UHF NARROW BAND LICENSED RADIO BAND TRANSCEIVER MODULE WITH ETHERNET PORT User Manual 945U E
ELPRO Technologies Pty Ltd UHF NARROW BAND LICENSED RADIO BAND TRANSCEIVER MODULE WITH ETHERNET PORT 945U E
USER MANUAL
Version 1.4.0
Cooper Bussmann
-
Read and
Retain for
Future
Reference

Elpro Technologies 450U-E Wireless Ethernet Modem & Device Server User Manual
2 www.cooperbussmann.com/wirelessresources Rev Version 1.4.0
ATTENTION!
Incorrect termination of the supply wires may cause internal damage and will void the warranty. To ensure that your
450U-E enjoys a long life, before turning the power on double-check ALL connections by referring to this User Manual.
CAUTION
To comply with FCC RF Exposure requirements in section 1.1310 of the FCC Rules, antennas used with this device must
be installed to provide a separation distance of at least 20 cm from all persons to satisfy RF exposure compliance.
DO NOT
Operate the transmitter when anyone is within 20 cm of the antenna.
Operate the transmitter unless all RF connectors are secure and any open connectors are properly terminated.
Operate the equipment near electrical blasting caps or in an explosive atmosphere.
All equipment must be properly grounded for safe operations. All equipment should be serviced only by a qualified
technician.
FCC Notice:
15.19:
THIS DEVICE COMPLIES WITH PART 15 OF THE FCC RULES. OPERATIONIS SUBJECT TO THE FOLLOWING TWO
CONDITIONS: (1) THIS DEVICE MAY NOT CAUSE HARMFUL INTERFERENCE, AND (2) THIS DEVICE MUST ACCEPT
ANY INTERFERENCE RECEIVED, INCLUDING INTERFERENCE THAT MAY CAUSE UNDESIRED OPERATION.
15.21:
NOTE: THE GRANTEE IS NOT RESPONSIBLE FOR ANY CHANGES OR MODIFICATIONS NOT EXPRESSLY
AUTHORITY TO OPERATE THE EQUIPMENT.
15.105(b):
NOTE: This equipment has been tested and found to comply with the limits for a Class B digital device, pursuant to part
15 of the FCC Rules. These limits are designed to provide reasonable protection against harmful interference in a
residential installation. This equipment generates, uses and can radiate radio frequency energy and, if not installed and
used in accordance with the instructions, may cause harmful interference to radio communications. However, there is no
guarantee that interference will not occur in a particular installation. If this equipment does cause harmful interference to
radio or television reception, which can be determined by turning the equipment off and on, the user is encouraged to try
to correct the interference by one or more of the following measures:
Reorient or relocate the receiving antenna.
Increase the separation between the equipment and receiver.
Connect the equipment into an outlet on a circuit different from that to which the receiver is connected.
Consult the dealer or an experienced radio/TV technician for help.
Part 90
This device has been type accepted for operation by the FCC in accordance with Part90 of the FCC rules (47CFR Part
90). See the label on the unit for the specific FCC ID and any other certification designations.
Note: This device should only be connected to PCs that are covered by either a FCC DoC or are FCC
certified.

Elpro Technologies 450U-E Wireless Ethernet Modem & Device Server User Manual
Rev Version 1.4.0 www.cooperbussmann.com/wirelessresources 3
Manufacturer
Model Number
Coax Kit
Net
ELPRO
UDP400-3
Includes 3m Cellfoil
1dB Gain
ELPRO
UDP400-5
Includes 5m Cellfoil
Unity Gain
ELPRO
BU-3/400
CC10/450
2.5dB Gain
ELPRO
BU-6/400
CC10/450
5.5dB Gain
ELPRO
YU3/400
CC10/450
3.5dB Loss
ELPRO
YU6/400
CC10/450
6.5dB Gain
ELPRO
YU9/400
CC20/450
5dB Gain
ELPRO
YU16/400
CC20/450
10dB Gain
Safety Notices:
Exposure to RF energy is an important safety consideration. The FCC has adopted a safety standard for human exposure
to radio frequency electromagnetic energy emitted by FCC regulated equipment as a result of its actions in Docket 93-62
and OET Bulletin 65 Edition 97-01.
UL Notice:
1. The Wireless Ethernet module is to be installed by trained personnel / licensed electricians only and installation
must be carried out in accordance with the instructions listed in the Installation Guide and applicable local
regulatory codes.
2. The units are intended for Restricted Access Locations.
3. The Wireless Ethernet module is intended to be installed in a final enclosure, rated IP54, before use outdoors.
4. The Equipment shall be powered using an external Listed Power Supply with LPS outputs or a Class 2 Power
Supply.
5. The Wireless Ethernet module must be properly grounded for surge protection before use.
6. If installed in a hazardous environment coaxial cable shall be installed in a metallic conduit
GNU Free Documentation License:
Copyright (C) 2009 ELPRO Technologies.
ELPRO Technologies is using a part of Free Software code under the GNU General Public License in operating the
450U-E
program whose authors commit by using it. The Free Software is copyrighted by Free Software Foundation, Inc. and the
ontact ELPRO Technologies for instructions
450U-E
"
A copy of the license is included in Appendix H - GNU Free Doc License
Important Notice:
ELPRO products are designed to be used in industrial environments, by experienced industrial engineering personnel with
adequate knowledge of safety design considerations.
ELPRO radio products are used on unprotected license-free radio bands with radio noise and interference. The products
are designed to operate in the presence of noise and interference, however in an extreme case, radio noise and
interference could cause product operation delays or operation failure. Like all industrial electronic products, ELPRO
products can fail in a variety of modes due to misuse, age, or malfunction. We recommend that users and designers
design systems using design techniques intended to prevent personal injury or damage during product operation, and
provide failure tolerant systems to prevent personal injury or damage in the event of product failure. Designers must warn
users of the equipment or systems if adequate protection against failure has not been included in the system design.
Designers must include this Important Notice in operating procedures and system manuals.
These products should not be used in non-industrial applications, or life-support systems, without consulting ELPRO first.
1. A radio license is not required in some countries, provided the module is installed using the aerial and equipment
configuration described in the 450U-E Installation Guide. Check with your local distributor for further information
on regulations.

Elpro Technologies 450U-E Wireless Ethernet Modem & Device Server User Manual
4 www.cooperbussmann.com/wirelessresources Rev Version 1.4.0
2. Operation is authorized by the radio frequency regulatory authority in your country on a non-protection basis.
Although all care is taken in the design of these units, there is no responsibility taken for sources of external
interference. Systems should be designed to be tolerant of these operational delays.
3. To avoid the risk of electrocution, the aerial, aerial cable, serial cables and all terminals of the 450U-E module
should be electrically protected. To provide maximum surge and lightning protection, the module should be
connected to a suitable earth and the aerial, aerial cable, serial cables and the module should be installed as
recommended in the Installation Guide.
4. To avoid accidents during maintenance or adjustment of remotely controlled equipment, all equipment should be
first disconnected from the 450U-E module during these adjustments. Equipment should carry clear markings to
indicate remote or automatic operation. E.g. "This equipment is remotely controlled and may start without
warning. Isolate at the switchboard before attempting adjustments."
5. The 450U-E module is not suitable for use in explosive environments without additional protection.
6. The 450U-E Operates using the same Radio frequencies and communication protocols as commercially available
off-the shelf equipment. If your system is not adequately secured, third parties may be able to gain access to
your data or gain control of your equipment via the radio link. Before deploying a system make sure you have
considered the security aspects of your installation carefully.
Release Notice:
This is the July 2012 release of the 450U-E Ethernet Modem User Manual version 1.4.0 which applies to Modem firmware
version 1.4
Follow Instructions
Read this entire manual and all other publications pertaining to the work to be performed before installing, operating, or
servicing this equipment. Practice all plant and safety instructions and precautions. Failure to follow the instructions can
cause personal injury and/or property damage.
Proper Use
Any unauthorized modifications to or use of this equipment outside its specified mechanical, electrical, or other operating
limits may cause personal injury and/or property damage, including damage to the equipment. Any such unauthorized
thereby excluding
warranty coverage for any resulting damage; and (2) invalidate product certifications or listings.

Elpro Technologies 450U-E Wireless Ethernet Modem & Device Server User Manual
Rev Version 1.4.0 www.cooperbussmann.com/wirelessresources 5
CHAPTER 1 - INTRODUCTION ................................... 7
NETWORK TOPOLOGY ........................................... 7 1.0
Access Point vs. Client ............................................. 7
Bridge vs Router ....................................................... 9
GETTING STARTED QUICKLY ................................ 10 1.1
CHAPTER 2 - INSTALLATION .................................. 11
GENERAL .......................................................... 11 2.0 ANTENNA INSTALLATION ...................................... 11 2.1Bench test and Demo System setup ............................... 11
Antennas ........................................................................ 12
Dipole and Collinear antennas ......................................... 12
Directional antennas. ....................................................... 13
Installation tips ................................................................ 13
POWER SUPPLY ................................................. 13 2.2 SERIAL CONNECTIONS ........................................ 14 2.3
RS232 Serial Port ................................................... 14
DB9 Connector Pin outs ................................................. 14
RS485 Serial Port ................................................... 14
Failsafe Biasing ............................................................... 15
USB Ports ............................................................... 15
INPUT/OUTPUT CONNECTIONS ............................. 16 2.4
Analog Input ............................................................ 16
Digital Output .......................................................... 16
Digital Input ............................................................. 17
CHAPTER 3 - OPERATION....................................... 18
START-UP ......................................................... 18 3.0
Access Point Start-up ............................................. 18
Client Start-up ........................................................ 18
Link Establishment .................................................. 18
How a Link connection is lost .......................................... 18
Roaming Clients .............................................................. 18
LED Indication ......................................................... 19
RADIO OPERATING PARAMETERS .......................... 20 3.1
Frequency Bands .................................................... 20
Data Rate ................................................................ 20
Receiver .................................................................. 20
INITIAL CONNECTION ........................................... 21 3.2
First Time Configuration ......................................... 21
Default Configuration Switch .................................. 21
Setting the PC to same network as 450U-E .................... 21
Locale Configuration ....................................................... 23
QUICKSTART ..................................................... 24 3.3 GENERAL CONFIGURATION .................................. 25 3.4Connecting to Existing Networks..................................... 25
NETWORK CONFIGURATION........................... 26 3.5Network Settings Webpage Fields................................... 26
Device Mode................................................................... 27
Bridge STP (Spanning Tree Protocol) .............................. 28
SECURITY MENU ................................................ 28
3.6
WEP (128 bit) .......................................................... 29
Encryption Keys 1 to 4 .................................................... 29
Default WEP Key ............................................................. 29
WPA2 ...................................................................... 29
RADIO CONFIGURATION ....................................... 30 3.7
Radio Menu .................................................................... 30
Data Compression .................................................. 31
SERIAL ............................................................. 32 3.8
Modbus RTU Master .............................................. 32
Expansion I/O ......................................................... 33
Modbus RTU Slave ................................................ 33
Serial Gateway ....................................................... 34
Modbus TCP/RTU Converter ................................. 34
Modbus RTU Mappings Example .................................... 35
REPEATERS (WDS) ............................................. 36 3.9Important Notes: ............................................................. 37
WDS Connections: ................................................. 37
Example 1 Extending range using WDS ............. 37
Example 2 - Roaming with WDS Access Points .... 38
IP ROUTING ..................................................... 39 3.10 FILTERING ....................................................... 41 3.11
Filter Example .................................................................. 42
MAC Address Filter Configuration: ................................... 42
IP Address Filter Configuration: ....................................... 43
ARP Filter Configuration .................................................. 43
MODBUS TCP ................................................. 44 3.12
Modbus TCP Server ............................................... 44
Modbus TCP Client ................................................ 44
TCP Mapping Example .................................................... 45
INPUT/OUTPUT CONFIGURATION ......................... 47 3.13
I/O Configuration .................................................... 47
Analog Input Configuration .............................................. 47
Analog Input configuration parameters ............................ 48
Digital Output .................................................................. 48
Digital Input ..................................................................... 49
I/O Register locations ............................................. 49
Digital Outputs Coils ........................................................ 49
Digital Input Bits .............................................................. 50
Analog Input Registers .................................................... 50
Expansion I/O ................................................................. 50
Failsafe Blocks ....................................................... 51
...................................................... 52
CONFIGURATION EXAMPLES ............................... 52 3.14
Extending a wired network (Bridged Network) ...... 52
Connecting two different networks together (Routed
Network) ................................................................. 53
Extending range of a network with a Repeater hop .......... 55
CHAPTER 4 - DIAGNOSTICS ................................... 56
DIAGNOSTICS CHART .......................................... 56 4.0 CONNECTIVITY ................................................... 57 4.1 THROUGHPUT TESTING ........................................ 58 4.2
Radio Throughput................................................... 58
Modbus TCP. .................................................................. 58
FTP Transfer ................................................................... 58
Iperf Throughput Test ............................................. 59
STATISTICS........................................................ 59 4.3Network Traffic Analysis .................................................. 60
CHANNEL SURVEY (UTILISATION) ........................... 60 4.4 CUSTOM SURVEY ............................................... 62 4.5

Elpro Technologies 450U-E Wireless Ethernet Modem & Device Server User Manual
6 www.cooperbussmann.com/wirelessresources Rev Version 1.4.0
NETWORK DIAGNOSTICS ..................................... 64 4.6Ping ................................................................................ 64
IO DIAGNOSTICS ................................................ 65 4.7Modem Module Information Registers ............................. 65
Expansion I/O Diagnostic/Error Registers ........................ 66
MONITOR RADIO COMMS .................................... 67 4.8 MONITOR IP COMMS .......................................... 67 4.9 SYSTEM TOOLS ............................................... 68 4.10
Setting a 450U-E to Factory Default Settings ........ 68
MODULE INFORMATION CONFIGURATION .............. 68 4.11
Module Information Webpage Fields ............................... 68
DHCP Client Configuration ............................................. 69
UTILITIES ........................................................ 69 4.12 ............................................................................. 69
........................................................................ 70
........................................................................... 71
CHAPTER 5 - SPECIFICATIONS ............................... 72
Appendix A - Firmware Upgrades .......................... 74
Firmware Upgrade USB (Full Firmware Upgrade) .......... 74
Web based Upgrade ............................................... 77
Appendix B - USB Ethernet connection ................. 78
Connecting to the Secondary Ethernet Port ..................... 78
Appendix C - GLOSSARY ...................................... 80
Appendix D - Expansion I/O Registers ................... 84
I/O store for a 115S-11 Expansion I/O module ................ 84
I/O store for a 115S-12 Expansion I/O module ................ 84
I/O store for a 115S-13 Expansion I/O module ................ 84
Appendix E - Modbus Error Codes ........................ 85
Appendix F - Power Conversion ............................ 86
Power Conversion ........................................................... 86
Appendix G - External Iperf Test ............................ 87
Materials ......................................................................... 87
Installation ....................................................................... 87
Iperf Applications ............................................................. 87
JPerf Application ............................................................. 88
Appendix H - GNU Free Doc License ..................... 89
Elpro Technologies 450U-E Wireless Ethernet Modem & Device Server User Manual
Rev Version 1.4.0 www.cooperbussmann.com/wirelessresources 7
CHAPTER 1 - INTRODUCTION
The 450U-E Industrial 802.11 based Wireless Ethernet module provide wireless connections between Ethernet devices
and/
450U-E, 5 Watt max power
The 450U-E is a fixed frequency wireless transceiver that operates in the 360MHz to 512 MHz frequency communications
band. There are various frequency bands available depending on the model purchased.
The 450U-E unit provides two serial connections as well as the Ethernet connection. It is possible to use all three data
connections concurrently, allowing the 450U-E to act as a Device Server where wireless connections can be made
between serial devices and Ethernet devices. The 450U-E also
devices and Ether . Appropriate driver applications will be required in the host devices to
handle other protocols.
The modem is capable of passing VLAN tagged frames.
The 450U-E has a standard RJ45 Ethernet connection which will operate at up to 100Mbit/sec. The module will transmit
the Ethernet messages on the wireless band at rates between 1 and 19.2Kbit/sec depending on model, band, encryption
methods, and radio paths.
Network Topology 1.0
The 450U-E is an Ethernet device, and must be configured as part of an Ethernet network. Each 450U-E must be
configured as an:
nt (Station)
You can also connect to the 450U-E via a RS232 or RS485 serial port using serial server and allowing the 450U-E to
connect the serial communications into the Ethernet network.
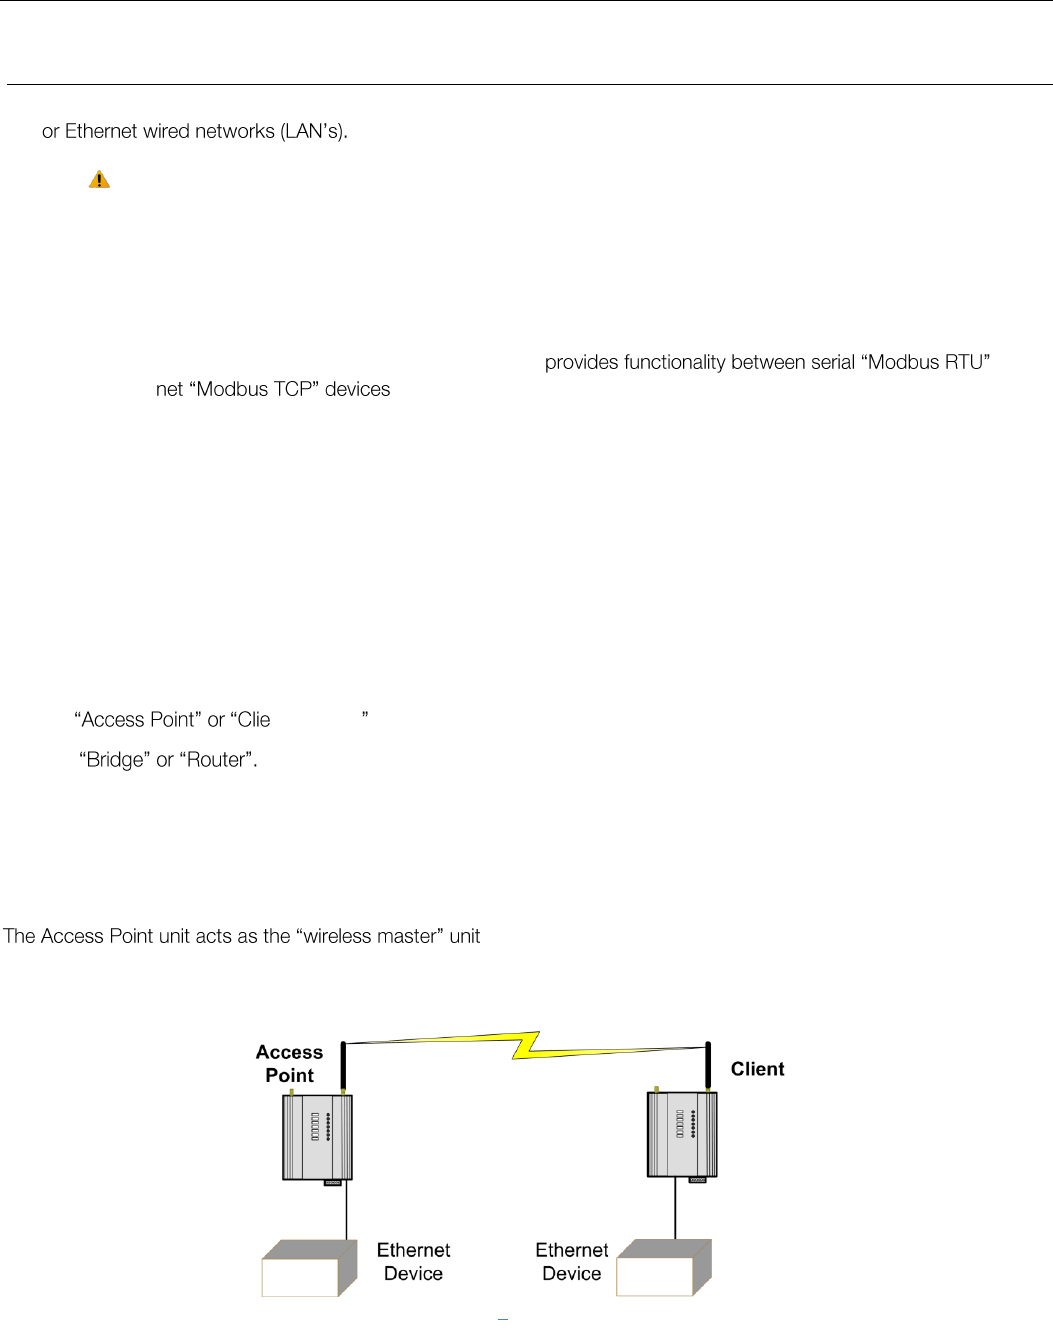
Access Point vs. Client . The Access Point accepts and authorises links initiated by the
client units, and controls the wireless communications.
Clients (Stations) are slave units and when connected to the Access Point becomes transparent Ethernet links.
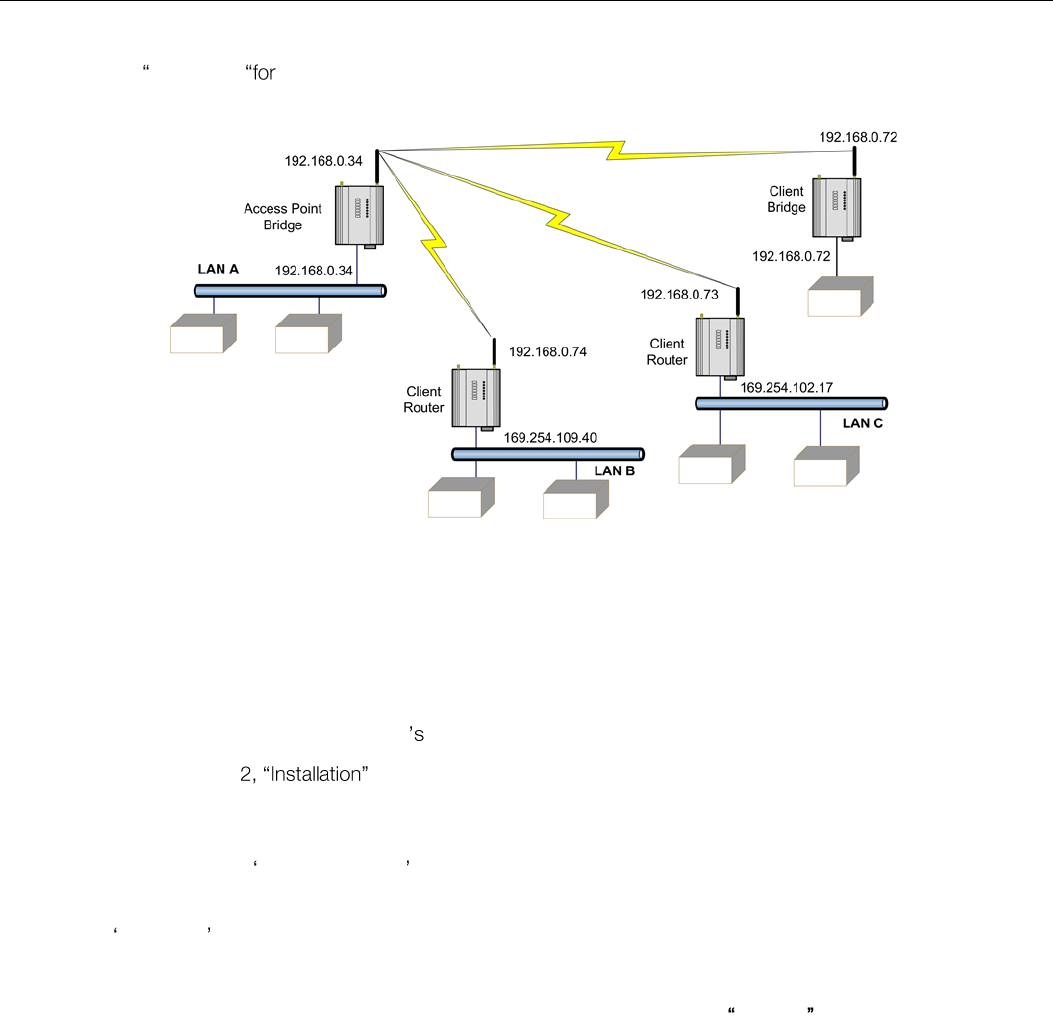
The first diagram shows a connection between two Ethernet devices using 450U-E Ethernet modems. In this example
one 450U-E is configured as an Access Point and the other as a Client.
Figure 1 AP-Client
Elpro Technologies 450U-E Wireless Ethernet Modem & Device Server User Manual
8 www.cooperbussmann.com/wirelessresources Rev Version 1.4.0
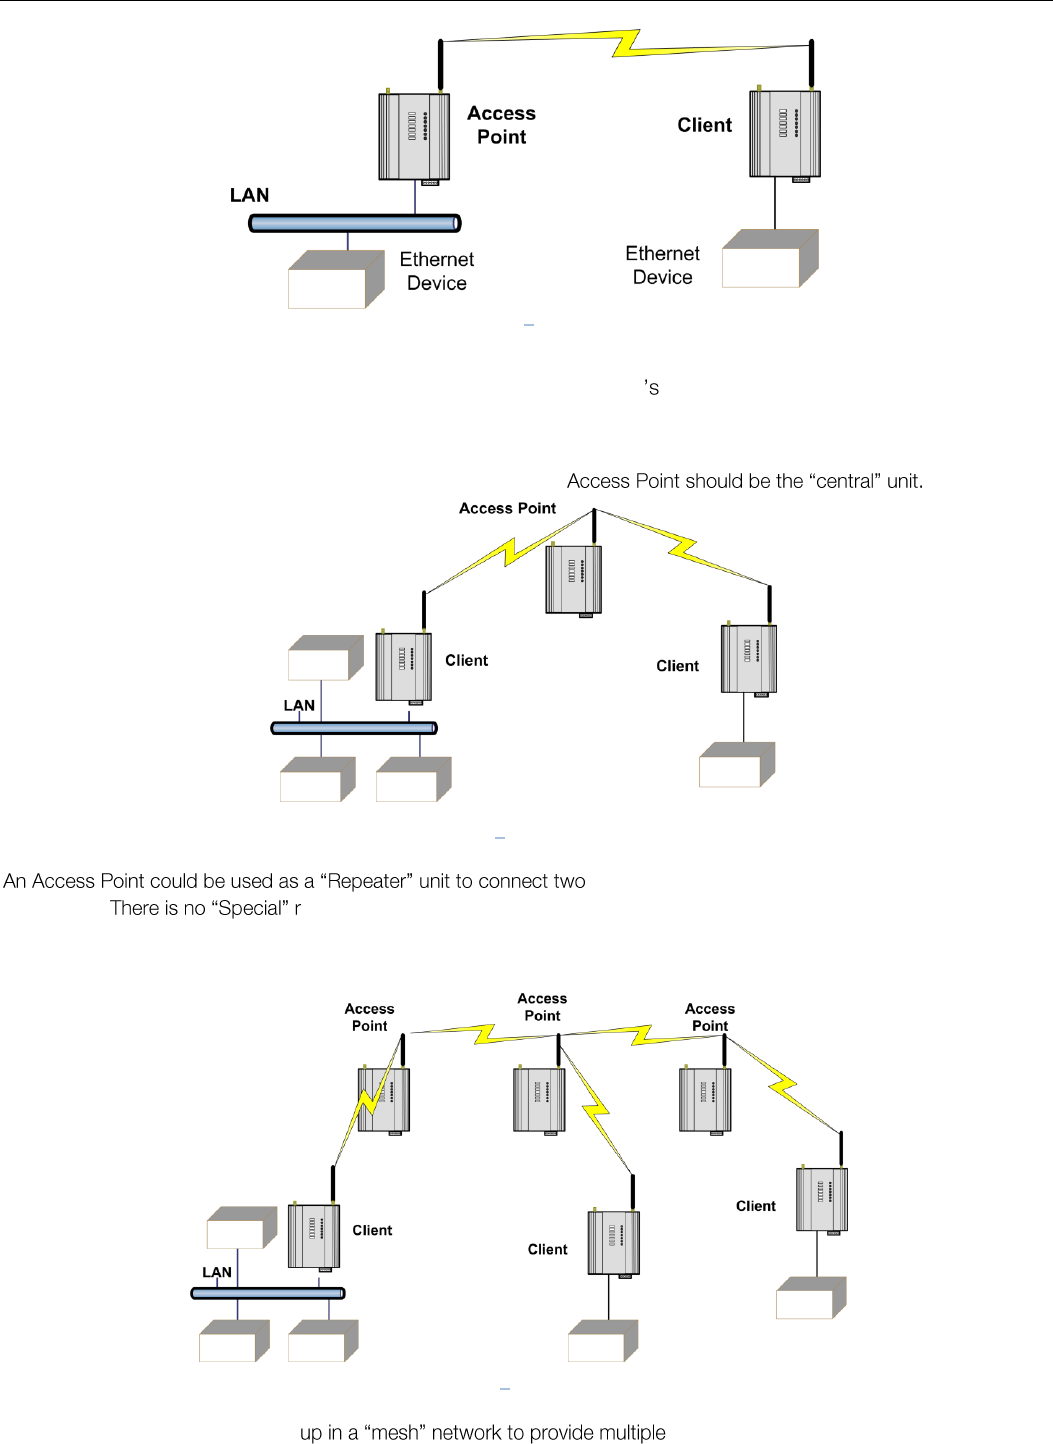
The second diagram shows an existing LAN being extended using 450U-E . In this example, the Access Point is
configured at the LAN end - although the wireless link will still work if the Client is at the LAN end.
An Access Point can connect to multiple Clients. In this case, the
450U-E Clients, which do not have direct reliable
radio paths. epeater module, any 450U-E can be a repeater and at the same time, can be
connected to an Ethernet devices or on a LAN
Multiple Access Points can be set- repeaters.
Figure 2 AP-Client2
Figure 3 Multi Client
Figure 4 Multi AP
Elpro Technologies 450U-E Wireless Ethernet Modem & Device Server User Manual
Rev Version 1.4.0 www.cooperbussmann.com/wirelessresources 9
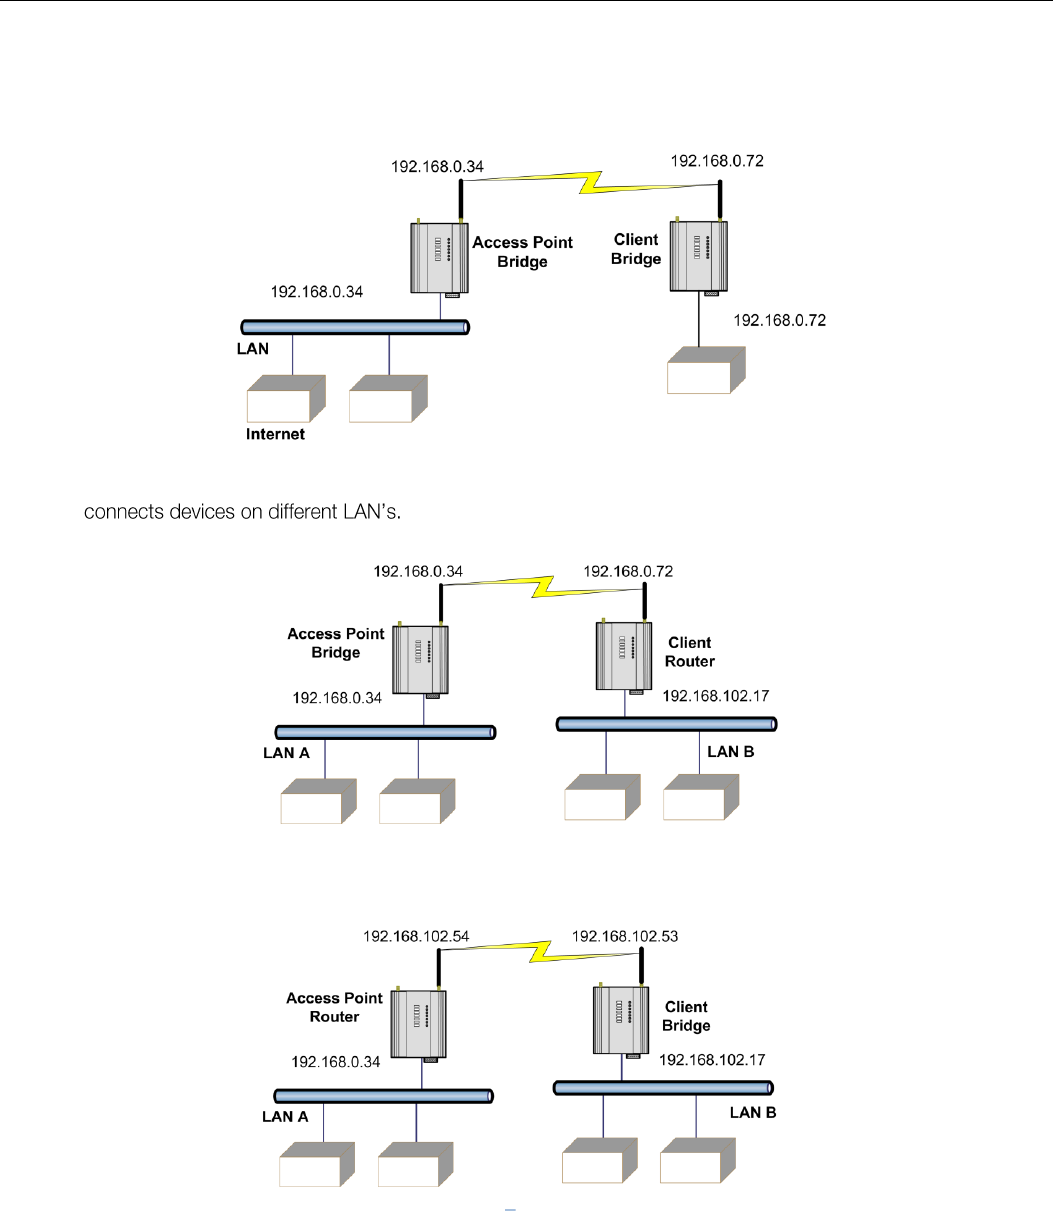
Bridge vs Router
Each 450U-E when configured as a bridge uses a single IP address for Ethernet and Wireless connections. A Bridge
connects devices within the same Ethernet network - for example, extending an existing Ethernet LAN.
A Router The IP addresses for the Ethernet and the Wireless sides must be
different. In this example, the wireless link is part of LAN A, with the Client (Station) unit acting as the Router between LAN
A and LAN B.
Alternately, the Access Point could be configured as a Router. The wireless link is then part of LAN B.
Figure 5 - Bridge
Figure 6 - Client Router
Figure 7 AP Router
Elpro Technologies 450U-E Wireless Ethernet Modem & Device Server User Manual
10 www.cooperbussmann.com/wirelessresources Rev Version 1.4.0
If more than two routers are required within the same radio network, then routing rules may need to be configured (refer
to section 3.10 IP Routing more details). There is no limit to the number of Bridges in the same network - although
there is a limit of 128 Client units linked to any one Access Point.
Getting Started Quickly 1.1
This instruction will explain what sections of the manual should be read to get the modems configured quickly and easily.
The out of the box basic configuration should cover most applications and require little configuration, however if more
advanced applications are required the 450U-E have many sophisticated features, which can be adjusted if need be.
First, read Chapter . This will explain the connections that are required for successful operation, i.e. Power, Antenna, Serial, Ethernet and I/O.
Power the 450U-E and make an Ethernet connection from your PC (for further information on how to do this, refer to section 3.2 Initial Connection
Set the 450U-E address, and other necessary configuration parameters by using the Quick Start as per section 3.3 Quickstart
Save the configuration - The 450U-E is now ready to use.
If the modems are connected to an existing network read section 3.11 Filtering some form of filtering (MAC, IP and ARP) will reduce the amount of Ethernet network traffic being sent over the radio network.
Before installing the 450U-E, bench test the system. It is a lot easier to locate problems with all the equipment located on
the bench.
Figure 8 - Multi Router

Elpro Technologies 450U-E Wireless Ethernet Modem & Device Server User Manual
Rev Version 1.4.0 www.cooperbussmann.com/wirelessresources 11
CHAPTER 2 - INSTALLATION
General 2.0
The 450U-E modules are housed in a rugged aluminium case, suitable for DIN-rail mounting. Terminals will accept wires
up to 2.5 mm2 (12 gauge) in size.
All connections to the module must be SELV (Safety Extra Low Voltage). Normal 110-250V mains
supply must not be connected to any terminal of the 450U-E module. Refer to Section 2.2 Power
Supply .
Before installing a new system, it is preferable to bench test the complete system. Configuration problems are easier to
recognize when the system units are close to one another. Following installation, the most common problem is poor
communications caused by incorrectly installed antennas, radio interference on the same channel, or the radio path being
inadequate. If the radio path is a problem (i.e. path too long, or obstructed), a higher performance antenna or a higher
mounting point for the antenna may rectify the problem. Alternately, use an intermediate 450U-E module as a repeater.
The 450U-E Installation Guide provides an installation drawing appropriate to most applications. Further information is
detailed below.
Each 450U-E module should be effectively earthed via the "GND" screw on the back of the module - this is to ensure that
the surge protection circuits inside are effective.
Antenna Installation 2.1
The 450U-E module will operate reliably over large distances however the achievable distances will vary with the
application, radio configuration, location of antennas, the degree of radio interference, and obstructions (such as buildings
or trees) to the radio path.
A 450U-E can achieve up to 50 Km (31 miles) with a directional antenna attached.
To achieve the maximum transmission distance, the antennas should be raised above intermediate obstructions so the
, although the
reliable distance will be reduced. Obstructions which are close to either antenna will have more of a blocking affect than
obstructions in the middle of the radio path.
The 450U-E modules provide a diagnostic feature which displays the radio signal strength of transmissions (refer Chapter
Diagnostics ).
Line-of-sight paths are only necessary to obtain the maximum range. Obstructions will reduce the range, or degrade a
reliable path. A larger amount of obstruction can be tolerated for shorter distances however an obstructed path requires
testing to determine if the path will be reliable - refer to section CHAPTER 4 - of this manual for more information on
determining a reliable path.
Where it is not possible to achieve reliable communications between two 450U-E modules, then a third 450U-E module
may be used to receive the message and re-transmit it. This module is referred to as a repeater. This module may also
have a host device connected to it.
Bench test and Demo System setup
Care must be taken with placement of antenna in relation to the radios and the other antennas. Strong radio signals can
saturate the receiver, hindering the overall radio communications.
When setting up a bench test/demo or a short range system the following considerations should be taken into account
for optimum radio performance and reduced signal saturation.
If using Demo antennas on each end, fit 20dB 5W coax attenuator in-line with the coax cable.
Antennas must be kept a suitable distance from each other. Check the receive signal strength on the of the module and ensure the level is not greater than -45dB
Elpro Technologies 450U-E Wireless Ethernet Modem & Device Server User Manual
12 www.cooperbussmann.com/wirelessresources Rev Version 1.4.0
Antennas
Antennas can be either connected directly to the module connectors or connected via 50 ohm coaxial cable (e.g. RG58
Cellfoil or RG213) terminated with a male SMA coaxial connector. The higher the antenna is mounted, the greater the
transmission range will be, however as the length of coaxial cable increases so do cable losses.
The net gain of an antenna/cable configuration is the gain of the antenna (in dBi) less the loss in the coaxial cable (in dB).
The 450U-E maximum net gain will depend on the licensing regulation for the country of operation and the operating
frequency
Typical antennas gains and losses are:
Antenna
Gain (dBi)
Dipole
2 dBi
Collinear
5 or 8 dBi
Directional (Yagi)
6 15 dBi
Cable Type
Loss (dB per 30 m / 100 ft)
RG58 Cellfoil Cable kits (3m,10m, 20m)
-1dB, -2.5dB, -4.8 dB
RG213 - per 10m (33ft)
-1.8 dB
LDF4-50 per 10m (33ft)
-0.5 dB
The net gain of the antenna/cable configuration is determined by adding the antenna gain and the cable loss.
For example, an 8dBi antenna with 10 meters of Cellfoil (-2.5dB) has a net gain of 5.5dB (8dB 2.5dB).
Dipole and Collinear antennas
A dipole or collinear antenna transmits the same amount of radio
power in all directions - as such that are easy to install and use. The
dipole antenna does not require any additional coaxial cable;
however a cable must be added if using any of the other collinear
or directional antennas.
Collinear and dipole antennas should be mounted vertically,
preferably 1 wavelength away (see Figure 9 for distances) from a
wall or mast and at least 3ft (1m) from the radio module to obtain
maximum range.
Figure 9 Collinear/Dipole Antenna

Elpro Technologies 450U-E Wireless Ethernet Modem & Device Server User Manual
Rev Version 1.4.0 www.cooperbussmann.com/wirelessresources 13
Directional antennas.
Directional antennas can be
Yagi antenna with a main beam and orthogonal elements.
Directional radome, which is cylindrical in shape.
Parabolic antenna.
A directional antenna provides high gain in the forward direction, but lower gain in other
directions. This may be used to compensate for coaxial cable loss for installations with
marginal radio path.
Yagi antennas should be installed with the main beam horizontal, pointing in the forward
direction. If the Yagi is transmitting to a vertically mounted omni-directional antenna, then the
Yagi elements should be vertical. If the Yagi is transmitting to another Yagi, then the elements at
each end of the wireless link need to in the same plane (horizontal or vertical).
Directional radomes should be installed with the central beam horizontal and must be pointed
exactly in the direction of transmission to benefit from the gain of the antenna. Parabolic
antennas s , with the parabolic grid at
Installation tips
Connections between the antenna and coaxial cable should be carefully taped to
prevent ingress of moisture. Moisture ingress in the coaxial cable is a common
cause for problems with radio systems, as it greatly increases the radio losses.
We recommend that the connection be taped, firstly with a layer of PVC Tape,
PVC UV Stabilized insulating tape. The first layer of tape allows the joint to be
easily inspected when trouble shooting as the vulcanizing seal can be easily
removed.
Where antennas are mounted on elevated masts, the masts should be effectively
earthed to avoid lightning surges. For high lightning risk areas, approved ELPRO
-SMA- -N-
should be fitted between the module and the antenna. If using non ELPRO surge
suppression devices then the devices must have a 'TURN ON' voltage of less
than 90V. If the antenna is not already shielded from lightning strike by an
adjacent earthed structure, a lightning rod may be installed above the antenna
to provide shielding.
Power Supply 2.2
The 450U-E module can be powered from a 9 30 VDC
supply. The supply should be rated in accordance with the
Supply voltage and Radio power level. The power
requirements for the 450U-E unit are shown in the table below.
The positive side of the supply must not be connected to
earth. The supply negative is connected to the unit case
internally. The DC supply may be a floating supply or negatively
grounded.
Figure 10 Directional Antenna
Figure 12 - Power Supply
Figure 11 - Vulcanizing Tape
Elpro Technologies 450U-E Wireless Ethernet Modem & Device Server User Manual
14 www.cooperbussmann.com/wirelessresources Rev Version 1.4.0
A Ground Terminal is provided on the back of the module. This Terminal should be connected to the Main Ground point
of the installation in order to provide efficient surge protection for the module (refer to the Installation Diagram)
Serial Connections 2.3
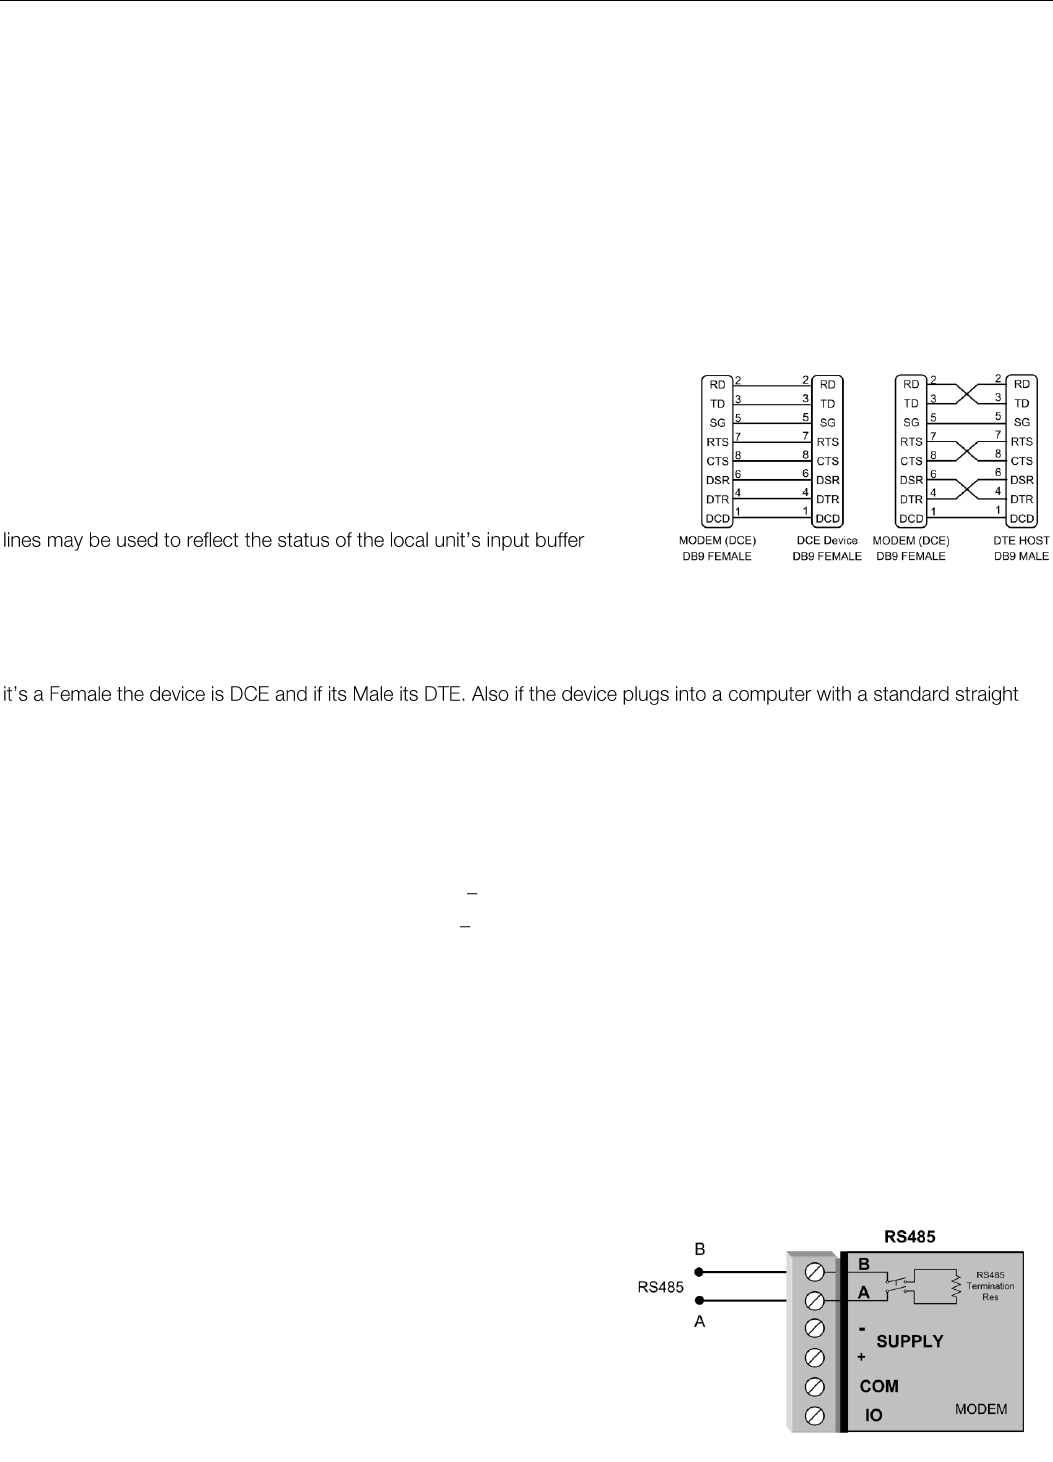
RS232 Serial Port
The RS232 serial port on the 450U-E is a 9 pin DB9 female connector which
provides connection for host devices as well as providing a connection point
for diagnostics, field testing and factory testing. Communication is via
standard RS232 signals and the 450U-E is configured as a DCE device.
Hardware handshaking using the CTS/RTS lines is provided. The CTS/RTS
. The
Example cable drawings for connecting to a DTE host (PC) or another DCE device (modem) are detailed in Figure 13 -
Serial Cable. A General rule of thumb for determining if the device is DCE or DTE is to look at the DB9 Connector and if
through cable and works the device is a DCE.
DB9 Connector Pin outs
Pin
Name
Direction
Function
1
DCD
Out
Data carrier detect
2
RXD
Out
Transmit Data Serial Data Output (from DCE to DTE)
3
TXD
In
Receive Data Serial Data Input (from DTE to DCE)
4
DTR
In
Data Terminal Ready
5
GND
Signal Ground
6
DSR
Out
Data Set Ready - always high when unit is powered on.
7
RTS
In
Request to Send
8
CTS
Out
Clear to send
9
RI
Ring indicator
RS485 Serial Port
The RS485 port provides a communication link from the 450U-E unit to
a host device using a multi-drop cable. Up to 32 devices may be
connected in each multi-drop network.
As the RS485 communication medium is shared, only one of the units
on the RS485 cable may send data at any one time. Thus,
communication protocols based on the RS-485 standard require some
type of arbitration.
13.8VDC
24VDC
Quiescent
120mA
70mA
TX @500mW
400mA
220mA
TX @ 5W
1.2 - 1.5Amps
550mA - 650mA
Figure 13 - Serial Cable
Figure 14 - RS485
Elpro Technologies 450U-E Wireless Ethernet Modem & Device Server User Manual
Rev Version 1.4.0 www.cooperbussmann.com/wirelessresources 15
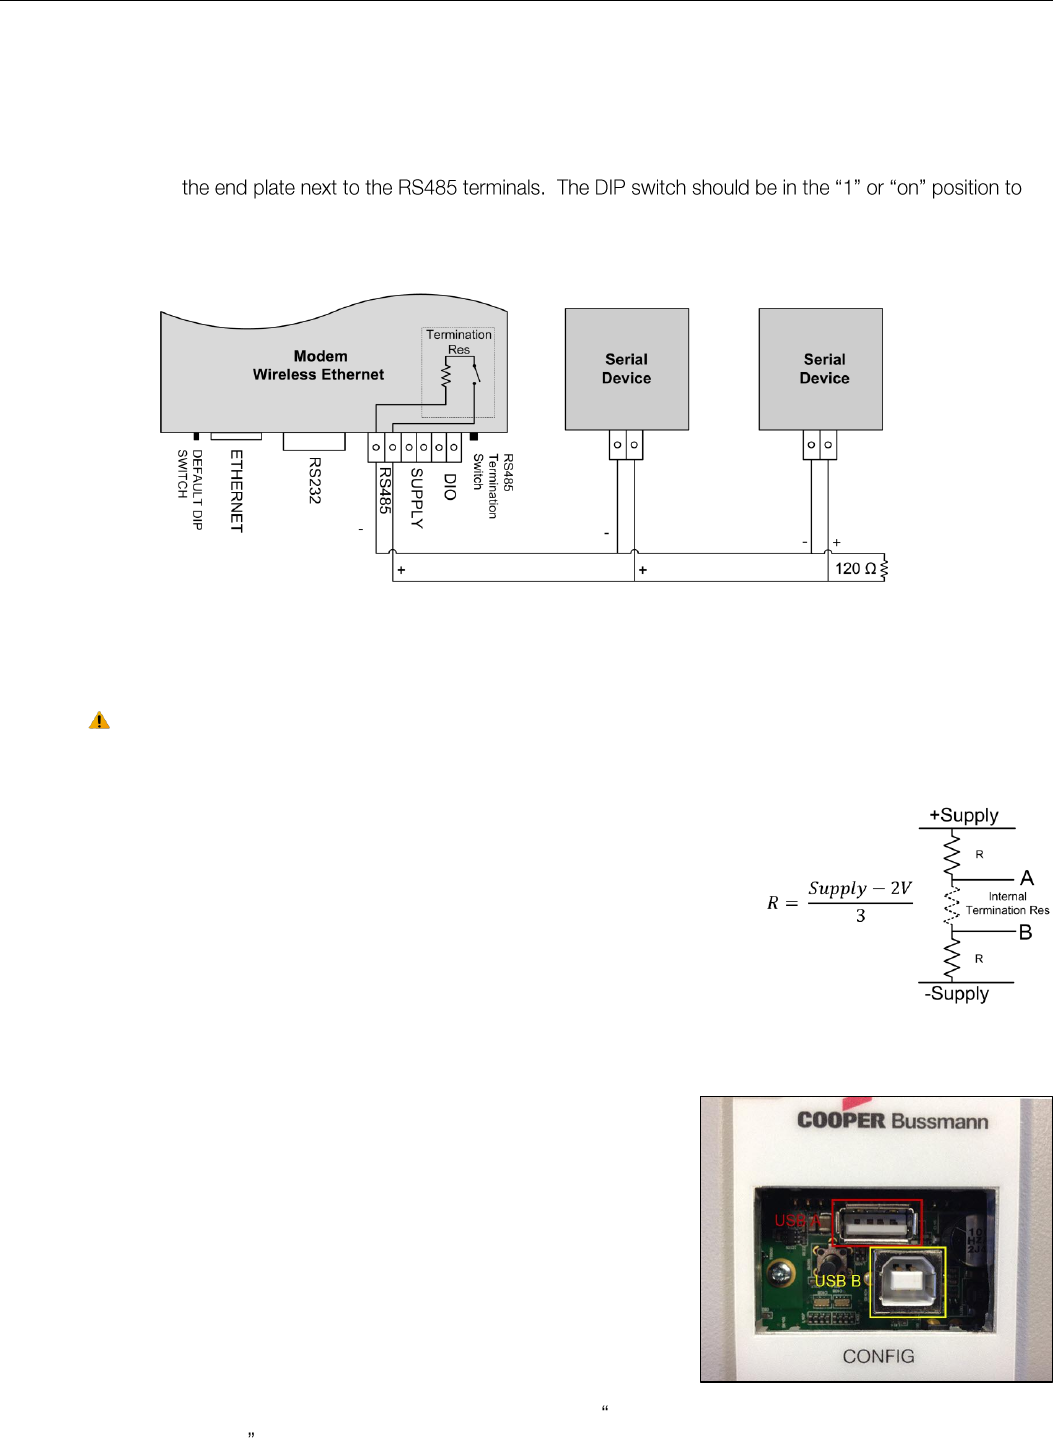
RS485 is a multi-drop communication link or bus that can span relatively large distances (up to 1.2Km (4000ft)) using a
balanced differential paired cable. It is recommended that the cable be shielded or twisted pair to reduce potential RF
Interference.
An RS485 network should be wired as indicated in the diagram below and terminated at each end of the network with a
120-ohm resistor. An on-board terminating resistor is provided in the modem which can be engaged by operating the
single DIP switch on
connect the resistor. If the RS485 device that the modem is being connected to does not have a termination switch a
120ohm resistor must be fitted manually across the RS485 terminals. Only devices at each end of the multi-drop RS485
cable will need to have a termination resistor enabled or fitted.
Failsafe Biasing
The 450U-E does not support Failsafe Biasing on the RS485 unless a 115S serial expansion module
is also connected and has its termination switch enabled.
Failsafe Biasing is a simple voltage divider that is connected to the RS485 bus and
pulls the terminal voltages (high or low) when the communication state is idle rather
than be left at a floating state which could cause data corruption.
If connecting a serial device that does not support Failsafe Biasing and a 115S
expansion I/O module is also not fitted then Biasing resistors must be wired to each
RS485 terminal to ensure correct operation. Resistor values will depend on the
Supply voltage; see diagram for resistor value calculation and wiring.
USB Ports
Module has a two USB ports housed under the plastic bung on the top plate.
USB A Host port is used for upgrading the module firmware and can
only be used for full upgrades. Patches files are not loaded via the
USB but through the web interface. The procedures for performing a
full firmware upgrade and the patch file upgrade can be found in
Section Appendix A - Firmware Upgrades
USB B Device connector which is used as a secondary Ethernet
connection point. Essentially this is a USB to Ethernet converter that
will allow you to connect to the modules web interface without the
need for disconnecting the existing Ethernet connection or the need to
install a hub or switch to allow more ports. See Appendix B - USB
Ethernet connection
Figure 15 -Multidrop Serial
Figure 16 - USB connections

Elpro Technologies 450U-E Wireless Ethernet Modem & Device Server User Manual
16 www.cooperbussmann.com/wirelessresources Rev Version 1.4.0
Input/Output Connections 2.4
The 450U-E has a single physical on-board I/O channel that can be configured as either a Digital or an Analog via the web
interface. The Digital channel can act as an input or an output. It can be monitored, set remotely, or alternatively used an
output for a communications alarm status. If more I/O is required, you can add 115S serial expansion I/O modules via the
RS232 or RS485 ports. See section 3.13 for more details on this.
Analog Input
The I/O channel can be configured to accept a 0-20mA current sinking analog input.
The current source must be externally powered and the ADIO must be configured for Analog Input rather than Digital
Input/Output. This can be configured by going to the / screens see
section 3.13 for details.
Digital Output
The I/O channel can also be used as a discrete output. The digital output uses a FET transistor rated at 30VDC 500 mA,
and can be used to switch a load, i.e. relay coil or contactor.
The output can be activated by manually writing a value of re
by utilising the onboard Modbus TCP Server or Serial Modbus Master to turn
on the output. It could also be accessed from an external Modbus Server, i.e. a PLC, DCS, Scada,
etc. via the Ethernet network or Serial interface.
When activating the output the I/O indication on the front panel of the module will be lit RED when
the output is on.
Note: The Digital Output will override the Digital Input operation, i.e. if the output is activated while
the DIO is being read the indication will show the input as being on (1).
Figure 18 - DIO Output
Figure 17 - Analog Input
Elpro Technologies 450U-E Wireless Ethernet Modem & Device Server User Manual
Rev Version 1.4.0 www.cooperbussmann.com/wirelessresources 17
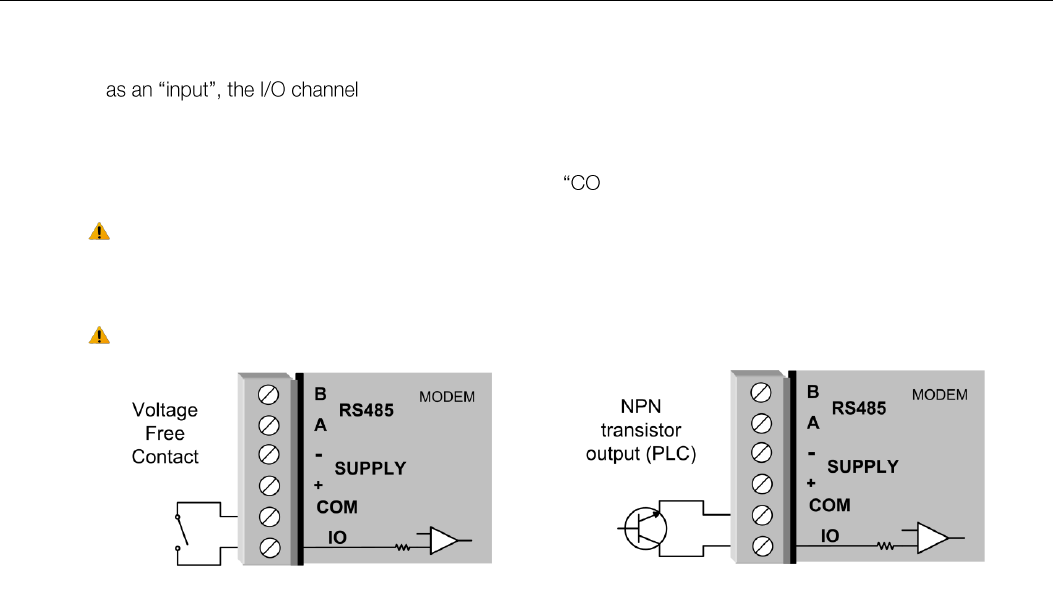
Digital Input
When used supports voltage free contact connection such as a mechanical switch or a
NPN transistor device such as an electronic proximity switches.
Contact wetting current of the input is approximately 5mA and is provided to maintain reliable operation for driving relays.
The digital input is activated by connecting between the "IO" and M" terminals.
When activating the input the I/O indication on the front panel of the module will be lit GREEN when
the input is switched on (closed/shorted). Provided the resistance of the switching device is less than
200 ohms, the device will be able to activate the digital input.
PNP transistor devices are not suitable.
Figure 20- DIO Input (Switch)
Figure 19 - Digital Input (Transistor)

Elpro Technologies 450U-E Wireless Ethernet Modem & Device Server User Manual
18 www.cooperbussmann.com/wirelessresources Rev Version 1.4.0
CHAPTER 3 - OPERATION
Start-up 3.0
Access Point Start-up
Normal module startup time is approximately 1 minute and 20 Seconds from when first powered on to where you can
connect to the IP address. When the Access Point (AP) has completed its startup process it will immediately begin
broadcasting periodic messages, called beacons on the configured channel using the default beacon interval time of 15
seconds.
Beacons include information that a Client may examine in order to identify if the Access Point is suitable for link
establishment. Clients will only attempt to establish a link with an Access Point whose beacon indicates a matching SSID.
Access Points do not initiate link establishment.
Client Start-up
Normal module startup time is approximately 1 minute and 20 Seconds from when first powered on to where you can
connect to the IP address. When a Client completes its startup process it will begin scanning its configured frequency for
a suitable Access Point. The Client will attempt to establish a link with an Access Point only if it has matching SSID,
Encryption method and the correct password. If more than one suitable Access Point is discovered, the client will attempt
to establish a link with the Access Point that has the strongest radio signal.
Link Establishment
Once a Client identifies a suitable Access Point for link establishment it attempts to link using a two-step process
if their configurations permit
them to establish a link. Once the Client has been authenticated, it will then request an Association to establish a link.
Status of the wireless link is indicated via the TX/LINK LED. For an Access Point, the TX/LINK LED will be OFF while no
links have been established. Once one or more links have been established, the TX/LINK LED is on GREEN. For a Client,
of the web interface.
After the link is established, data may be transferred in both directions. The Access Point will act as a master-unit and will
control the flow of data to the Clients linked to it. Clients can only transmit data to the AP to which they are connected.
When a Client transfers data to another Client, it first transmits the data to the AP, which then forwards the data to the
destined Client.
over radio.
If the encryption keys are incorrect between units in the same system, or a dissimilar encryption
scheme is configured, the LINK led will light, however data cannot be passed over the wireless
network.
A maximum of 127 Clients may be linked to an Access Point.
How a Link connection is lost
A Client monitors beacon messages from an Access Point to determine whether the link is still present. If the Client can
no longer hear the Access Point beacons it will wait 7 beacon times (7 x 15 seconds) and then send a link check
message and if it still does not receive an acknowledgment it will drop the link and clear its connectivity list. If an Access
Point is connected to a single Client and the Client fails or is turned off, the Access Point will wait 5 minutes before
dropping the link and clearing the connectivity list.
Roaming Clients
Clients can roam within a system however there are some limitations due to the link timeouts. If when connected to an
Access Point the link fails because of a hardware problem or the signal level falls below the minimum threshold (-99dB,
25KHz channel @19200 baud or -100dBm @ 9600 baud) the Client will scan for beacon signals and connect to the
Access Point with the strongest RSSI level (If more than one Access Points can be heard and provided the SSID and any
Encryption methods/keys are the same). This functionality allows clients to roam to a stronger Access Point when the
signal level gets too low or the link completely fails, etc. The timeframe for the changeover will be approximately 105
seconds due to link retires and timeouts.

Elpro Technologies 450U-E Wireless Ethernet Modem & Device Server User Manual
Rev Version 1.4.0 www.cooperbussmann.com/wirelessresources 19
LED Indication
The following table details the status of the indicating LEDs on the front panel for all operating conditions.
LED Indicator
Condition
Meaning
OK
GREEN
Normal Operation
OK
Flashing RED / GREEN
Module Boot Sequence
OK
RED
Default Quick start Mode (Unconfigured)
Radio RX
GREEN flash
Radio receiving data (Good Signal Strength)
Radio RX
RED flash
Radio receiving data (Low Signal strength)
TX/LINK
GREEN
Radio Connection Established
TX/LINK
RED
Radio Transmitting
RS-232
GREEN flash
Data sent from RS-232 Serial Port
RS-232
RED flash
Data received to RS-232 Serial Port
LAN
ON
Link Established on Ethernet port
LAN
ORANGE flash
Activity on Ethernet port.
RS-485
GREEN flash
Data sent from RS-485 Serial Port. If expansion I/O is being
used this will flash constantly
RS-485
RED flash
Data received to RS-485 Serial Port
IO
GREEN
Digital Input is On.
IO
RED
Digital Output is active
IO
OFF
Digital Output OFF and Input is open circuit.
IO
GREEN different intensity
Analog input current loop.
dim = 4mA, bright= 20mA
The Ethernet RJ45 connector on the end of the module incorporates two indication LEDs. The LINK LED which comes on
to indicate a connection on the Ethernet port, and it will blink OFF briefly when activity is detected, similar to the LAN Led
on the front panel. The 100MB LED indicates that the LAN connection is at 100 MBit/Sec. The 100MB LED will be off for
10MB/Sec connection.
Other conditions indicating a fault are described in CHAPTER 4 - DIAGNOSTICS.

Elpro Technologies 450U-E Wireless Ethernet Modem & Device Server User Manual
20 www.cooperbussmann.com/wirelessresources Rev Version 1.4.0
Radio Operating Parameters 3.1
Frequency Bands
The radios will operate within the range 360-512MHz; however the radio must be factory set to one of the 20MHz
frequency bands shown below. Care must be taken when ordering to select the correct band for your locale as the
frequency cannot be configured outside of its band.
The following Frequency bands are available.
370
360 380 MHz
390
380 400 MHz
410
400 420 MHz
430
420 440 MHz
440
430 450 MHz
460
450 470 MHz
480
470 490 MHz
500
490 512 MHz
Note: Modems must be ordered to operate in the chosen band; modems cannot be tuned to a
frequency that is outside of this band.
Data Rate
The 450U-E can be configured with different radio transmission rates. Selections available are 9600 and 19200 bps for
wide band radios or 4800 & 9600 bps for narrow band. The Data Rate only applies to transmit messages as the radio is
able to receive on all available data rates.
Reducing the data rate can increase the reliable communication range of the module, i.e. if the received signal level is a
little low, the data rate could be reduced to improve the communications.
It is important that the Data Rates on the Client radios be configured appropriately for the radio link. The default Data Rate
will be set to the high level depending on the bandwidth, i.e. 19.2kbps if the radio is wide band (25 KHz) and 9.6kbps if
the radio is narrow band (12.5 KHz). If the signal strength (RSSI) for the radio is les than -100dBm for narrow band and -
110dBm for wide band radios it is recommended that the Radio Data Rate is reduced to the lower rate. The Receiver
Signal Strength Indication (RSSI) can be viewed on the Connectivity page (see Section 4.1 Connectivity for details)
When an Access Point first communicates with a Client it remembers what data rate it is using and
from then on will communicate at that rate. All UDP broadcast traffic and beacon messages for the
will use the lowest date rate from all the modules in the system.
Receiver
The Radio Receive Sensitivity will vary depending on the radio channel width, whether it is a wide band radio using 25
KHz channels or if it a narrow band radio using 12.5 KHz channel. The transmit data rate will also vary the receiver
sensitivity. Refer to the table below for Receiver Sensitivity
Receiver Sensitivity
Baud Rate
Bandwidth
4.8kbits
9.6kbits
19.2kbits
25KHz Channel
N/A
-110 dBm
-99 dBm
12.5 KHz Channels
-111 dBm
-100 dBm
N/A

Elpro Technologies 450U-E Wireless Ethernet Modem & Device Server User Manual
Rev Version 1.4.0 www.cooperbussmann.com/wirelessresources 21
Initial Connection 3.2
The 450U-E has a built-in web server, for configuration and diagnostics. The preferred web browser is Microsoft®
internet explorer version 7 or greater. This program is shipped with Microsoft windows or may be obtained freely
via the Microsoft® website or Google chrome which is also downloadable from the web. Other browsers may not
be fully compatible on all beta web pages.
Note: Microsoft Internet Explorer Version 6 will not load web pages due to a compatibility issue
between IE6 and SSL-security web sites.
First Time Configuration
If the modem is new and never been configured before or the module has been factory defaulted it will need to have the
Locale set. The Locale is a set of parameters that define the basic radio configuration setup, they include Frequency
Range and channel step size. When connecting to the Default IP address which is shown on the label on the underside of
the module the first page to load will be the Locale Configuration page as shown at the end of this section
Locale Configuration .
Modem with no Locale configured will be indicated by a Red OK Led and the Transmitter will be
unable to transmit.
If the module has been previously configured and the IP address is unknown the module can be put into a mode that will
temporary load the default address and allow configuration. See Default Configuration Switch below and follow the
procedure to gain access to the module.
Default Configuration Switch
The 450U-E will temporarily load factory-default settings if powered on with the RUN/SETUP switch (on the end-plate of
the module) in SETUP position. The previous configuration remains stored in non-volatile memory and will only change if a
configuration parameter is modified and the change saved.
When in SETUP mode, wireless operation will be disabled.
Do not forget to set the switch back to the RUN position and cycle power at the conclusion of
configuration for resumption of normal operation.
The default factory configuration of the 450U-E is
Client / Bridge
IP address192.168.0.1XX, where XX is the last two digits of the serial number (the default IP address is shown on the printed label on the back of the module)
Netmask 255.255.255.0
Because the Default IP address of the modem will be within the IP range 192.168.0.XXX it may not be compatible with
the network or PC that you are using to configure it with. You will temporarily need to change the computers IP address
to allow connection to the module. See below for instruction on how this can be done.
Setting the PC to same network as 450U-E
This procedure will run you through the process for changing your computer settings so that the configuring PC is on the
same network as the 450U-E - for
connection between the PC Ethernet port and the 450U-E. Connect the Ethernet cable between the module and the
PC configuring the module.
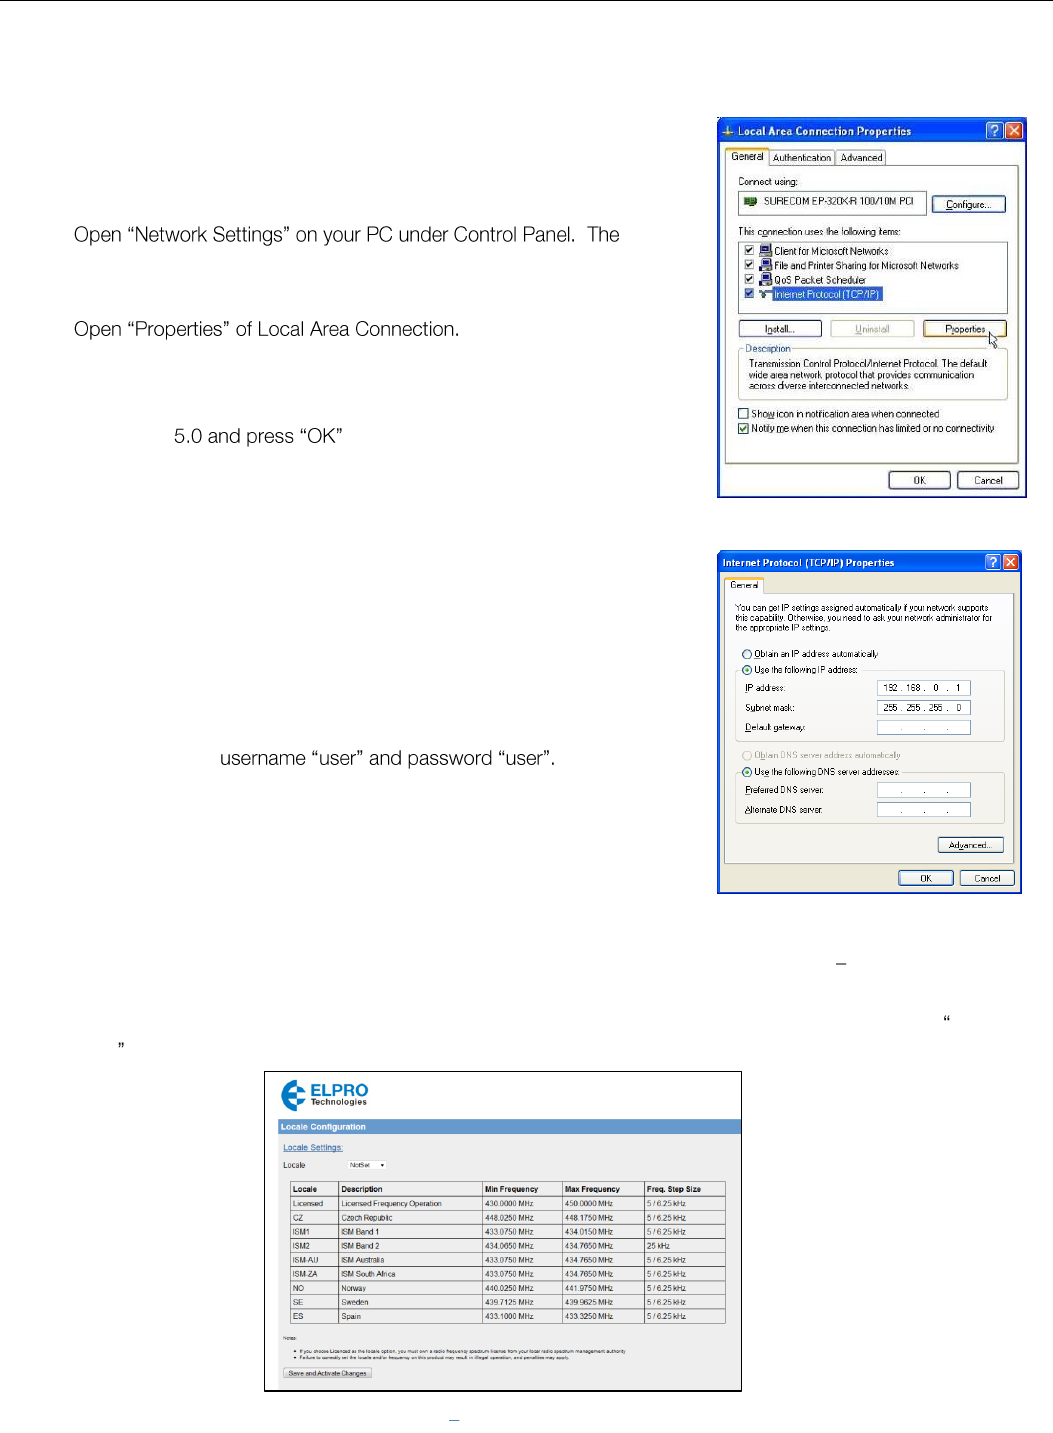
Elpro Technologies 450U-E Wireless Ethernet Modem & Device Server User Manual
22 www.cooperbussmann.com/wirelessresources Rev Version 1.4.0
Figure 22 - TCP/IP Properties
Set the RUN/SETUP Switch to the SETUP position. This will start the 450U-E with a default Ethernet IP address,
subnet mask, gateway IP address and the radio will be disabled. The default Ethernet address will be within the
IP range 192.168.0.1XX where XX is the last two digits of the serial number and should be shown on the label on
the back of the module. Do not forget to set the dip switch back to the
RUN position and restart the module at the conclusion of configuration.
Power up the 450U-E module.
following description is for Windows XP - other Windows operating
systems have similar settings.
Select Internet Protocol (TCP/IP) and click on Properties.
On the General tab enter IP address 192.168.0.1, Subnet mask 255.255.25
Open Internet Explorer and ensure that settings will allow you to connect
to the IP address selected. If the PC uses a proxy server, ensure that
Internet Explorer will bypass the Proxy Server for local addresses.
This option may be modified by opening Tools -> Internet Options -> Connections Tab -> LAN Settings->Proxy Server -> bypass proxy for
local addresses.
Enter the default IP address for the 450U-E 192.168.0.1XX where XX is the last two digits of the serial number.
Enter the default
You should now be connected to the Locale Configuration page on the modem as per Figure 23 Locale Configuration
below.
You will now need to configure the modem with radio specification that conforms to the country of operation. Locale
Configuration below will explain this configuration process.
Figure 21 - Local Area Connection
Figure 23 Locale Configuration
Elpro Technologies 450U-E Wireless Ethernet Modem & Device Server User Manual
Rev Version 1.4.0 www.cooperbussmann.com/wirelessresources 23
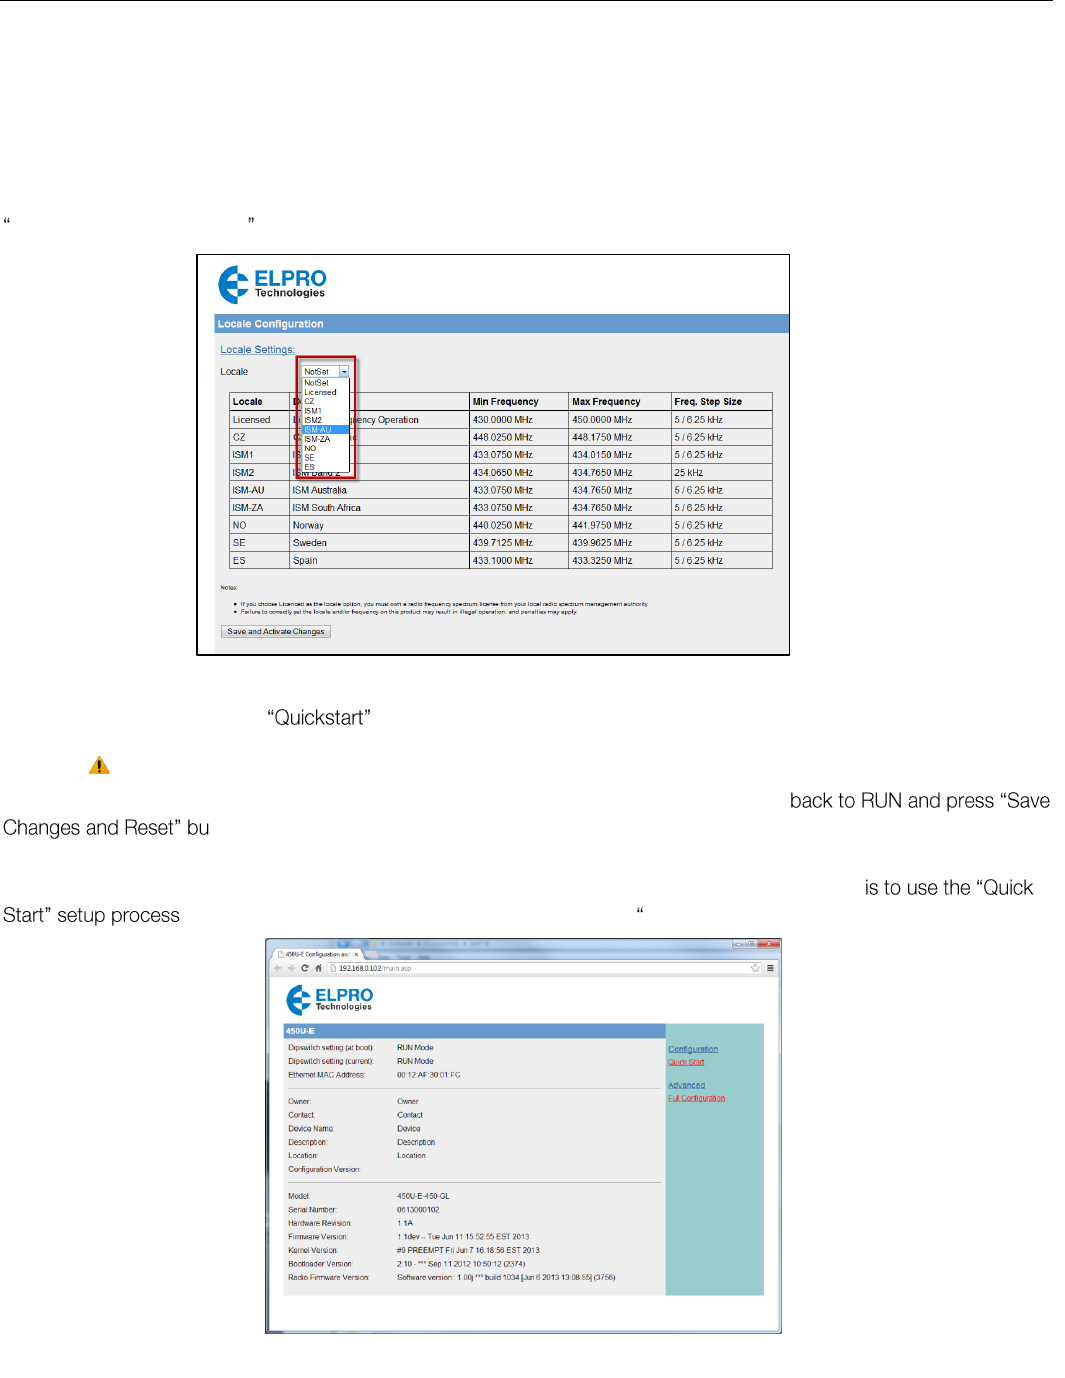
Locale Configuration
When connecting to the module for the first time (new or factory defaulted module) you will need to configure the model
Locale and a number of other radio configuration parameters before the modems can be used, these include Transmit
and Receive Frequency the channel step size and the Transmit Power level as per the country regulation.
The main Locale screen requires you select the appropriate Locale from the drop down list, the table will shows the
available Locales and frequency ranges based on the radio hardware. When the correct Locale is selected, press the
Save and Activate Changes button at the bottom of the screen.
The next page will display the Default Quick Start page. This opening screen will guide you through the initial radio
configuration parameters. See below for complete parameter descriptions.
You cannot navigate away from this page until the operating parameters have been set.
When all configuration parameters have been entered ensure the RUN/SETUP switch is set
tton to apply the configuration. When the modem has reset you will be directed to the Main home
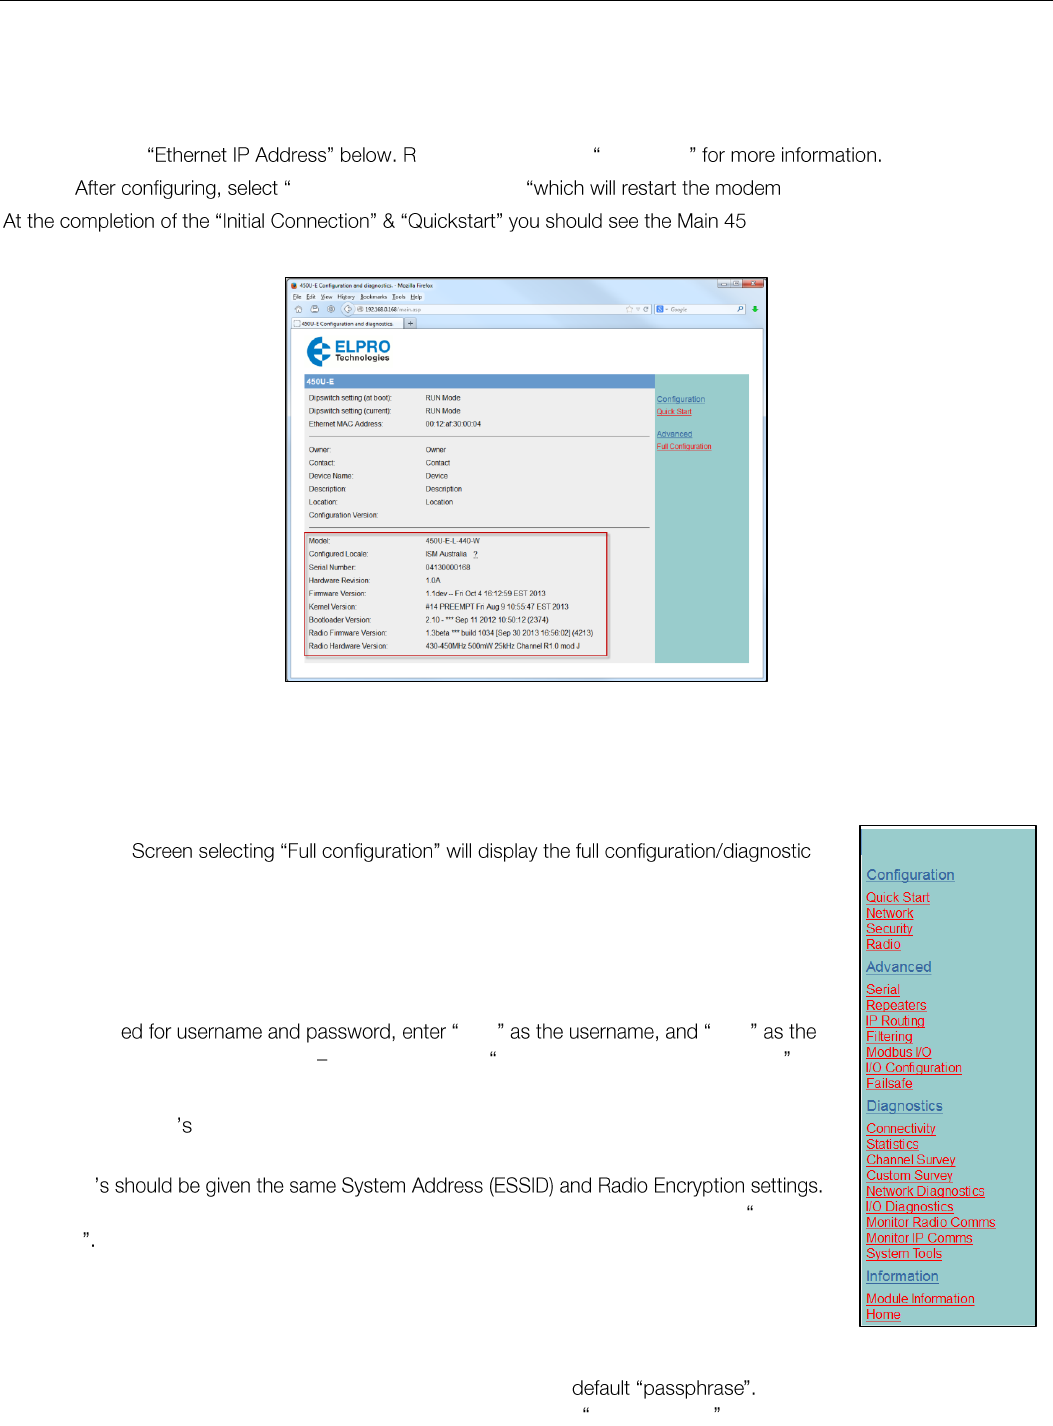
screen as per Figure 24 - Main Screen below.
From here you can configure the modem as you wish. From the Main Screen the easiest way to this
which is explained in the next section 3.3 Quickstart
.
Figure 24 - Main Screen
Elpro Technologies 450U-E Wireless Ethernet Modem & Device Server User Manual
24 www.cooperbussmann.com/wirelessresources Rev Version 1.4.0
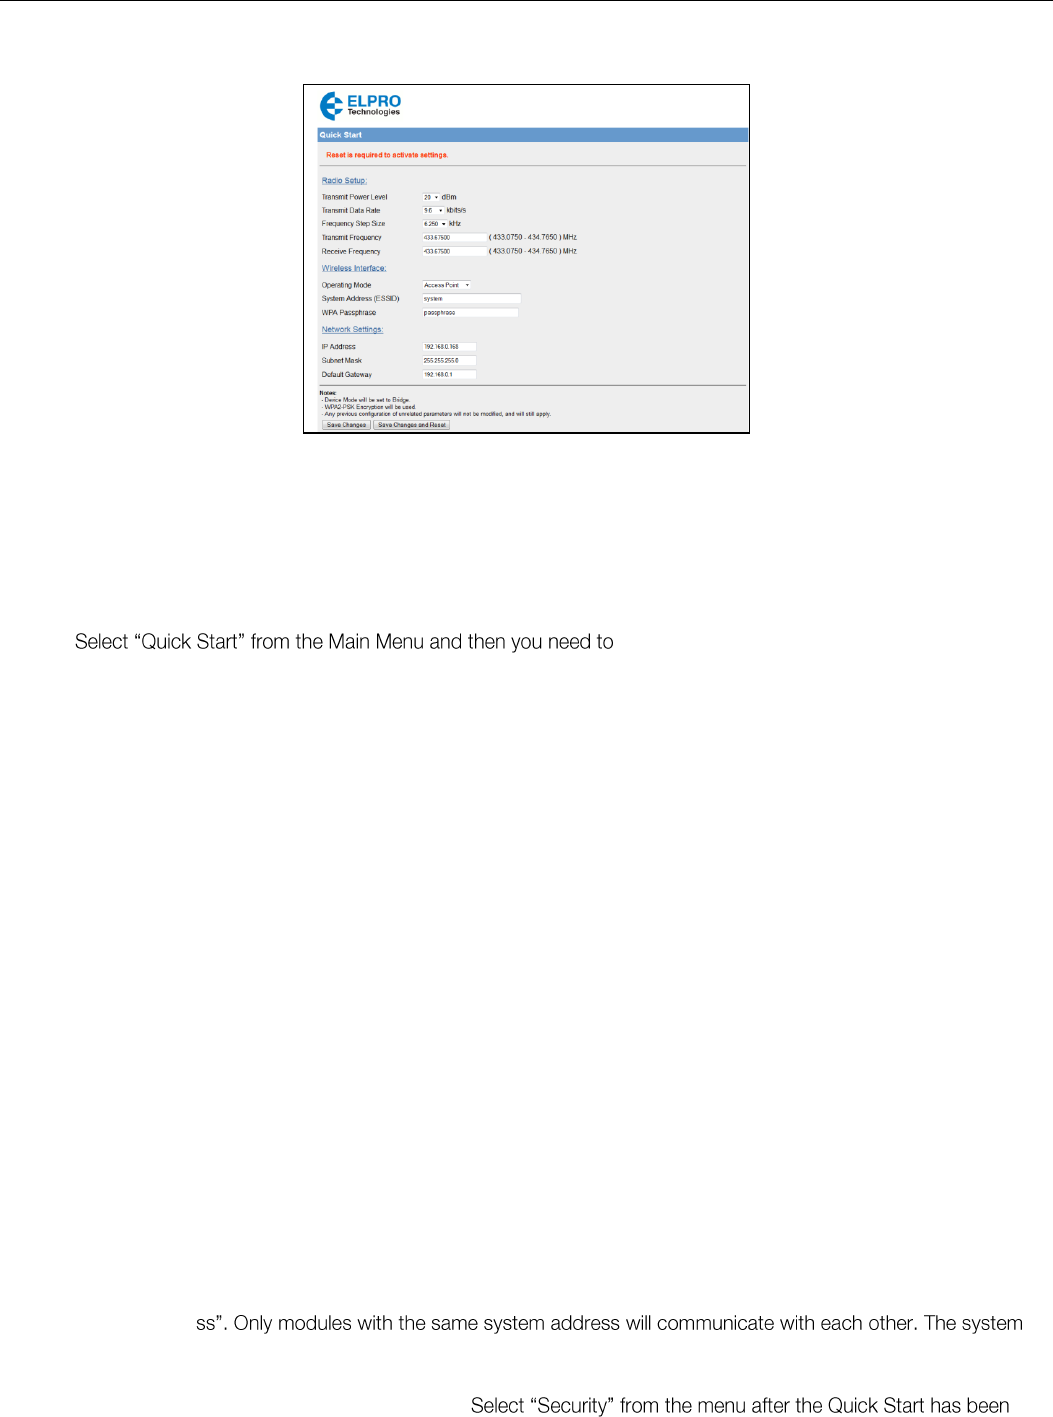
Quickstart 3.3
Figure 25 - Quick Start
The Quick Start Configuration option is designed to guide you through the configuration process with minimal effort. You
can access it any time by selecting it from the right hand menu. This is a simple first stage configuration tool that will help
configure the basic parameters that are needed to get a connection between two modules. For most applications, no
further configuration should be needed however if more advanced options are required the normal configuration pages
can be edited after the Quick Start configuration has been saved.
1. configure the following parameters if necessary:
Transmit Power Level - This allows adjustment of the radio power. Depending on the Locale the
maximum radio power level may be limited to the maximum allowable for the locale. You can reduce the
power for short range applications, or to allow the use of high gain transmitter antennas while still
complying with the emission requirements of your license. For dBm to mW conversion table see
Appendix C.
Transmit Data Rate - The 450U-E can be configured with different radio transmission rates. Note:
reducing the configured data rate may increases the reliable range of the module (transmission
distance).The radio baud rate in kilobits per second (kbps) for point to point radio transmissions. Select a
fixed rate for the radio to use from the drop down list. Selections available are 9600 and 19200 kbps for
wide band radios or 4800 & 9600 kbps for narrow band. The Transmit Data Rate only applies to the
Transmit messages as the radio can receive on all data rates.
Frequency Step Size - The Frequency Step size is the spacing between frequencies that you can select
when configuring the TX and RX frequencies. The steps sizes available are 5Khz or 6.25KHz.
Transmit Frequency - The Frequency that you wish to configure for the radio Transmitter. Frequency
selection will be automatically adjusted to the frequency step size configured in the previous parameter.
E.g. 450.00500, 450.01000, 450.01500, 450.02000, etc. for 5Khz or 450.00625, 450.01250,
450.01875, 450.02500, etc. for 6.25KHz frequency step size.
Receive Frequency - The Frequency that you wish to configure for the radio Receiver. Frequency
selection will be automatically adjusted to the frequency step size configured in the previous parameter.
E.g. 450.00500, 450.01000, 450.01500, 450.02000, etc. for 5Khz or 450.00625, 450.01250,
450.01875, 450.02500, etc. for 6.25KHz frequency step size.
Operating Mode - Used to select Access Point or Client. The default is set to Client.
System Address (ESSID) - A 450U-E wireless network comprises modules with the same "system
addre
address is a text string 1 to 31 characters in length. Select a text string which identifies your system.
WPA Passphrase - It is assumed that WPA2-PSK (AES) Encryption will be used. Enter in the Encryption
key passphrase that you wish to use.
saved if a different Encryption Method is required. (See section below for details)
IP Address - The IP address of the 450U-E module.
Subnet Mask - The IP address of the 450U-E module.
Elpro Technologies 450U-E Wireless Ethernet Modem & Device Server User Manual
Rev Version 1.4.0 www.cooperbussmann.com/wirelessresources 25
Default Gateway - This is the address that the device will use to forward messages to remote hosts that
are not connected to any of the local bridged network (Ethernet or Wireless). This is only required if the
wired LAN has a Gateway unit which connects to devices beyond the LAN - for example, Internet
access. If there is no Gateway on the LAN, set to the same address as the Access Point - that is, the
efer to section 3.10 IP Routing
2. Save Changes and Reset .
0U-E web page as shown in the
figure below with the correctly configured Model, Locale and Frequency.
General Configuration 3.4
Connecting to Existing Networks.
From the Main
menu as shown in Figure 27 - Right hand Menu.
Module Configuration can be viewed or modified by selecting each of the right hand heading.
Selecting each heading will open a new configuration page displaying configuration parameters
associated with that link.
The following sections explain each of the configuration pages.
When prompt user user
password (This is the factory default See section 4.11 Module Information Configuration
General Configuration Comments
A system of 450U-E must have at least one Access Point configured as a master with one or
more Clients.
All 450U-E
For further information and examples on wireless network topologies refer section 1.0 Network
Topology
The 450U-E supports two radio encryption methods, WEP128 and WPA2-PSK which can be
configured on the Security Page. The default encryption method is WPA2 and is setup during the
Quickstart process by simply entering a Password.
If utilising any form of encryption, all modules in the system will need the same encryption method
and keys. It is advisable to enter a new password and not use the The
available encryption methods are described in detail in Section 3.6 Security Menu below.
Figure 26 - Main Screen with Description
Figure 27 - Right
hand Menu
Elpro Technologies 450U-E Wireless Ethernet Modem & Device Server User Manual
26 www.cooperbussmann.com/wirelessresources Rev Version 1.4.0
Note: If making changes to a remote module via the radio link make sure all changes are compliant
and accurate before Changes and R top
the radio link from working and will require a hard wire connection to change back.
Care should be tken when connecting the modem to existing Networks - When configured as a
Bridge (default), all broadcast messages appearing at its wired Ethernet port will be transmitted over
the radio. As the modem has a low data throughput any unnecessary traffic being sent over the radio
could compromise the reliability of the wireless link. In many cases, the intended recipient of the
broadcast traffic that is heard on the Ethernet port does not lie at the opposite end of a radio link.
Therefore it is recommended that the radios be configured with some basic filtering or be configured
as a routing network to limit unnecessary broadcast traffic being sent over the radio. Refer to Section
3.11 Filtering
Network Configuration 3.5
. The Network Configuration page
allows configuration of parameters related to the wired and wireless Ethernet interfaces. In general, IP address selection
will be dependent upon the connected wired Ethernet device(s) before connecting to an existing LAN consult the
network administrator.
Default configuration of the module will be Client and Bridge. When in Bridged Mode the modules wired and wireless IP
address will be the same, meaning only one IP Address is required. If the Device Mode is changed to Router the page will
display two IP addresses, one for Ethernet and one for Wireless. For more information on Bridging Networks see section
3.10 IP Routing
Network Settings Webpage Fields
Operating Mode
Used to select Access Point, Client. Default is set to Client.
System Address (ESSID)
A 450U-E wireless network comprises modules with the same "system
with each other. The system address is a text string 1 to 31 characters in
length. Select a text string which identifies your system.
Desired BSSID
To force a client/station to always connect to the same Access Point enter
the MAC address of that Access Point in the Desired BSSID field
(Note that the ESSID of the Access Point must also match the configured
ESSID of the client).
Radio Encryption
Select the desired radio Encryption level.
Encryption key, passphrase, etc.
Figure 28 Network

Elpro Technologies 450U-E Wireless Ethernet Modem & Device Server User Manual
Rev Version 1.4.0 www.cooperbussmann.com/wirelessresources 27
section 3.6 below for details)
Device Mode
Used to select Bridge or Router mode.
IP addresses and Netmasks are required for the Ethernet and Wireless
interfaces.
By default this is set to Bridge.
Bridge STP
Checking this box enables Spanning Tree protocol in bridged networks. See
to section 0.0 Bridge STP (Spanning Tree
Obtain IP Address
Automatically
Checking this item enables DHCP client on the 450U-E. A DHCP client
requests its IP address from a DHCP server which assigns the IP Address
automatically. For more information, refer to section 4.11 DHCP Client
Configuration default is unchecked.
IP Address
Bridge Mode - The IP address of the 450U-E module. Both wired (Ethernet
Interface) port and wireless (Wireless Interface) ports will take on this
address.
Router Mode Separate IP addresses are required for each interface. IP
addresses must be different.
IP Subnet Mask
The IP network mask of the 450U-E module. This should be set to
appropriate subnet mask for your system (Typically 255.255.255.0). In
Router mode each interface will have its own Netmask.
Default Gateway
This is the address that the device will use to forward messages to remote
hosts that are not connected to any of the local bridged network (Ethernet or
Wireless). This is only required if the wired LAN has a Gateway unit which
connects to devices beyond the LAN - for example, Internet access. If there
is no Gateway on the LAN, set to the same address as the Access Point -
3.10 IP Routing
for more information.
Save Changes
Save changes to non-volatile memory. The module will need to be restarted
before the changes take effect.
Save Changes and Reset.
Save settings to non-volatile memory, and reboot 450U-E. Once the module
has completed the reboot sequence, all changes are in effect.
Device Mode
The Device Mode allows selection between a Bridge and a Router, each mode is explained in more detail below. When
Router is selected you will notice the screen will display a separate IP address for each interface (Ethernet and Wireless).
The default mode is Bridge which only requires one interface IP address.
Bridge Operation (Transparent Network)
A bridge connects several Ethernet networks together, and makes them appear as a single Ethernet network to higher
protocol layers.
By default, the 450U-E is configured as a transparent bridge. When a transparent bridge is started, it learns the location of
other devices by monitoring the MAC address of all incoming traffic. Initially it forwards all traffic between the wired
Ethernet port and the wireless port, however by keeping a list of devices heard on each port, the transparent bridge can
decide which traffic must be forwarded between ports - it will only transfer a message from the wired port to the wireless
port if it is required.
A bridge will forward all Broadcast traffic between the wired and wireless ports. If the wired network is busy with
broadcast traffic, the radio network on the 450U-E can be unnecessarily overburdened. Use filtering to reduce broadcast
traffic sent over the radio. Refer Section 3.11 Filtering
By default, a transparent bridge does not handle loops within the network. There must be a single path to each device on
the network. Loops in the network will cause the same data to be continually passed around that loop. Redundant
wireless links may be set up by enabling the bridge Spanning Tree Protocol (see section 0.0 Bridge STP (Spanning Tree
Protocol)
Elpro Technologies 450U-E Wireless Ethernet Modem & Device Server User Manual
28 www.cooperbussmann.com/wirelessresources Rev Version 1.4.0
Router Operation (Routed Network)
A router joins separate IP sub-networks together. The router has different IP addresses on its wired and wireless ports,
reflecting the different IP addresses of the separate Ethernet sub networks.
All of the devices in these separate networks
identify the router by IP address as their gateway to the other network. When devices on one network wish to
communicate with devices on the other network, they direct their packets to the router for forwarding.
As the router has an IP address on each of the networks it joins, it inherently knows the packet identity. If the traffic
directed at the router cannot be identified for any of the networks to which it is connected, the router must consult its
routing rules as to where to direct the traffic to. For details on configuring routing rules, see section 3.10 IP Routing
Bridge STP (Spanning Tree Protocol)
network loops and provide redundant paths in networks. To enable tick
the STP box on the configuration page.
For example, consider this network with a redundant wireless link. If the
bridge Spanning Tree Protocol is enabled, one of the two wireless links
will be disabled - that is, all wireless data will be transferred by one link
only. If the active link fails, the other link will automatically start
transferring the wireless data.
The Spanning Tree Protocol implemented is IEEE 802.1d compatible. The algorithm forms a loop-free network by
blocking traffic between redundant links in the network. These blocked links are placed in a standby condition, and may
be automatically enabled to repair the network if another link is lost. The Spanning Tree Algorithm maintains a single path
between all nodes in a network, by forming a tree-like structure. The Bridge Priority determines where the node sits in the
tree. A Bridge configured with the lowest priority (0) will become the root node in the network, and will direct traffic
between each of its branches. The root node is typically the
unit that handles the majority of traffic in the network. The 450U-E is configured with a Bridge Priority of 32768 by
default. The intention is to reduce traffic that the 450U-E must handle, by placing it at the branch level in the network tree.
As a branch, the 450U-E
There is some overhead in maintaining a network utilizing the Spanning Tree Algorithm. Users wishing to increase their
throughput, at the expense of redundancy should disable Spanning Tree. The Spanning Tree Protocol can be configured
on the
Repeaters
configuration page.
Security Menu 3.6
Select the Radio Encryption level from the drop down menu on the Network page and
button.
Available encryption levels are listed below and explained in greater detail later in the section:
None
WEP128 (Wired Equivalent Privacy)
WPA2-PSK (AES) (Wi-Fi Protected Access 2)
When selection has been made, it is important to save the configurat
When all selections have been made the configuration needs to be saved and the module restarted by
Changes and
Figure 29 - Spanning Tree Protocol
Figure 30 - Security Menu
Elpro Technologies 450U-E Wireless Ethernet Modem & Device Server User Manual
Rev Version 1.4.0 www.cooperbussmann.com/wirelessresources 29
WEP (128 bit)
WEP128 (Wired Equivalent Privacy) encryption is the weakest encryption method, defined by the original IEEE802.11
standard and uses a 104bit key with a 24bit initialization vector to give a 128bit WEP encryption level. WEP is not
considered an effective security scheme, and should only be used if it is necessary to interoperate with other equipment
which does not support more modern encryption methods.
Encryption Keys 1 to 4
These are the keys used to encrypt radio data to protect
data from unwanted eavesdroppers when WEP Encryption
is selected. These keys should be the same for all 450U-E
units in the same system.
WEP keys must be entered as pairs of hexadecimal digits
separated by colons. Hexadecimal digits are in the range
0...9 and A...F.
128bit WEP requires 26 Hexadecimal digits. For example,
12:AB:EF:00:56:15:6B:E4:30:C8:05:F0:8D for 128bit
encryption
Encryption keys must not be all zeros, i.e. 00:00:00:00:00
Default WEP Key
One of the four keys may be selected as the default key, and is used to encrypt transmitted messages from the
configured unit. A 450U-E can receive and decrypt a message from a module that has a different default key index as
long as each module has the same key configured at the same index.
WPA2
WPA2-PSK (AES) (Wi-Fi Protected Access 2) replaced WPA and provides significant security improvements over this
method. In particular, it introduces CCMP, a new AES-based encryption mode with strong security. WPA2 AES
(Advanced Encryption Standard) is the most secure encryption method, is also based on 128 bit encryption key.
When WPA Encryption is selected, 128bit Encryption keys are
internally generated based on the Passphrase and System
Address (ESSID). The Passphrase must be between 8 and 63
characters in length, and the Passphrase must be the same
for all 450U-E units in the same system.
For optimal security consider using a passphrase consisting of a combination of letters and numbers (i.e. not just a simple
word or phrase) as well as upper and lower c
Figure 31 - WEP
Figure 32 WPA2
Elpro Technologies 450U-E Wireless Ethernet Modem & Device Server User Manual
30 www.cooperbussmann.com/wirelessresources Rev Version 1.4.0
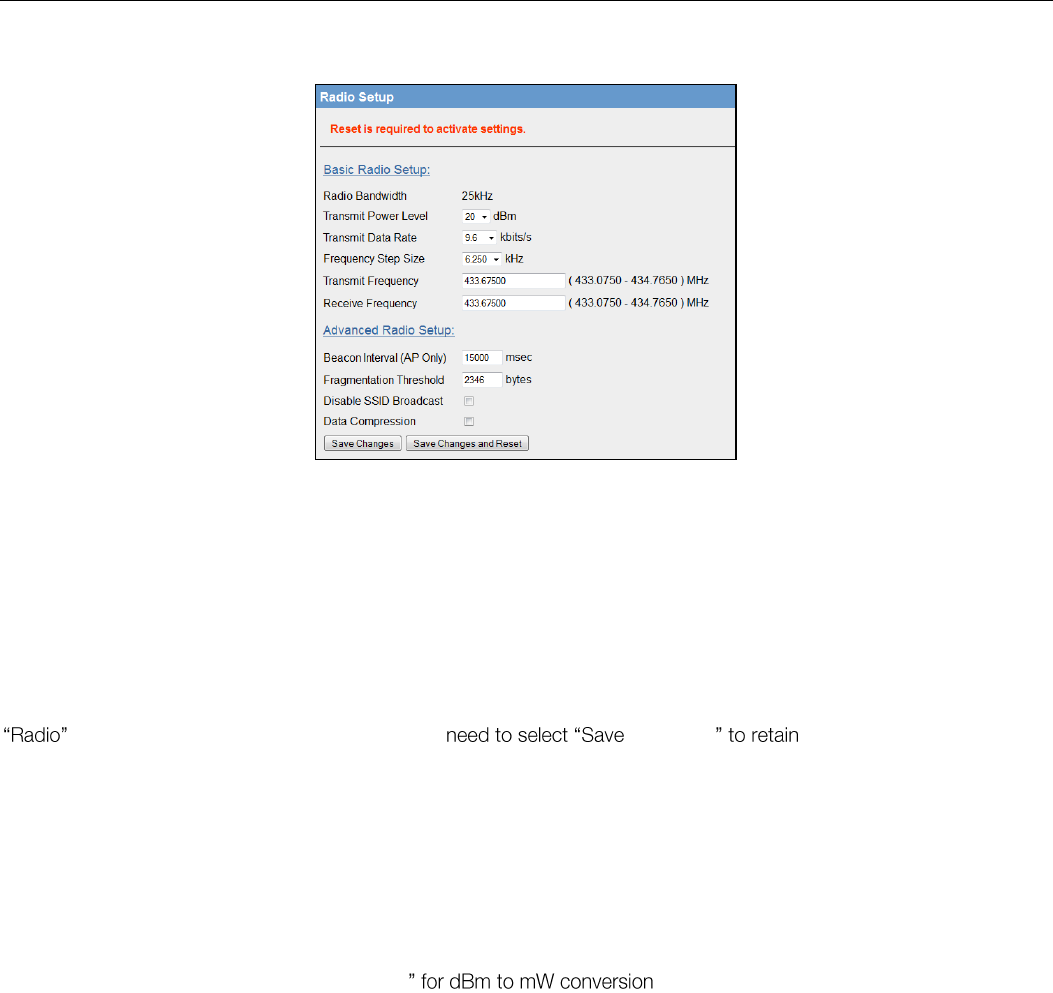
Radio Configuration 3.7
Figure 33 - Radio Config
The Radio Configuration page is where configuration parameters associated with the radio can be adjusted or configured.
The first time out of the box configuration will run a configuration wizard that will step you through some radio questions
that will allow you to select radio configuration for your country of operation and license.
The factory-default parameters of the radio will be set to values that will allow the radio to be powered up safely, without it
interfering with radio equipment that may be available in the country of operation. I.e. transmit and receive frequencies will
be set to zero.
After the initial out of the box configuration you will be able to configure available radio parameters by selecting the
page. When all changes are made, you will & Activate the changes.
Radio Menu
Radio Bandwidth
This is the Bandwidth of the radio and it is factory set. It will be either 12.5KHz
(narrow band) or 25Khz (wide band)
Transmit Power Level
This allows adjustment of the radio power. Do not set the radio power above the
allowed setting for your country or radio license. You can reduce the power for
short range applications, or to allow the use of high gain transmitter antennas
while still complying with the emission requirements of your license.
See Appendix F -
Transmit Data Rate
The 450U-E can be configured for different radio transmission rates. Note:
reducing in the configured data rate may increases the reliable range of the
module (transmission distance).
The radio baud rate in kilobits per second (kbps) for point to point radio
transmissions. Select a fixed rate for the radio to use from the drop down list.
Selections available are 9600 and 19200 kbps for 25KHz wide band or 4800 &
9600 kbps for 12.5KHz narrow band.
The Transmit Data Rate only applies to the Transmit messages as the radio can
receive on either data rate.
Frequency Step Size
The Frequency Step size is the spacing between frequencies that you can select
when configuring the TX and RX frequencies. The steps sizes available are 5Khz or
6.25KHz.
Transmit Frequency
The Frequency that you wish to configure for the radio Transmitter. Frequency
selection will be in multiples of the frequency step configured in the previous
parameter. E.g. 450.00500, 450.01000, 450.01500, 450.02000, etc. for 5Khz or
450.00625, 450.01250, 450.01875, 450.02500, etc. for 6.25KHz frequency step
size.
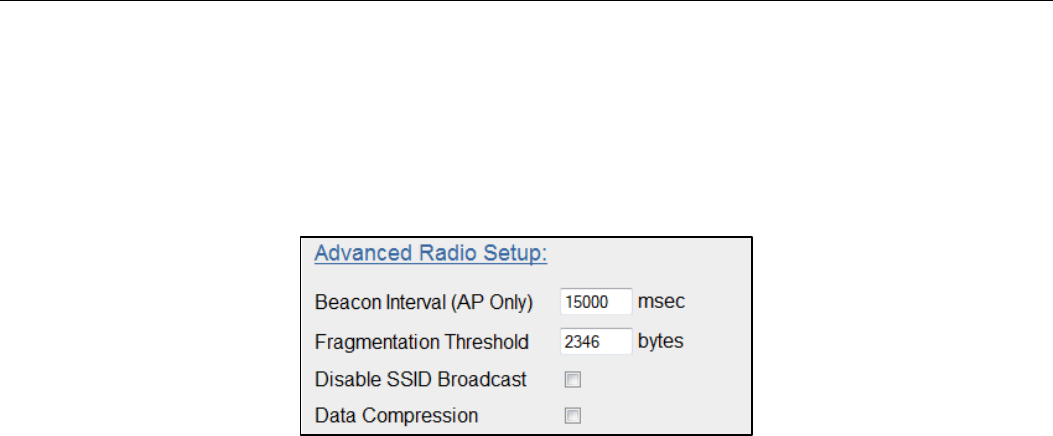
Elpro Technologies 450U-E Wireless Ethernet Modem & Device Server User Manual
Rev Version 1.4.0 www.cooperbussmann.com/wirelessresources 31
Receive Frequency
The Frequency that you wish to configure for the radio Receiver. Frequency
selection will be in multiples of the frequency step configured in the previous
parameter. E.g. 450.00500, 450.01000, 450.01500, 450.02000, etc. for 5Khz or
450.00625, 450.01250, 450.01875, 450.02500, etc. for 6.25KHz frequency step
size.
The following are advanced settings and care should be taken when making changes to the parameters on this
page.
Figure 34 - Advanced Radio
Beacon Interval (AP only)
This interval is the period between beacon transmissions sent by an Access
Point. The default value is 15 seconds, and it may be adjusted from 1 to 60
seconds. Reducing the Beacon Interval will increase the amount of radio
messages in the system which could compromise normal communications.
Do not change unless advised by an Elpro Systems Engineer.
Fragmentation Threshold
(Client Stations only). The maximum transmission unit (MTU) of data over the
radio. If more than this number of bytes is input into the module, it will be
transmitted in more than one message (or fragmented).
Disable SSID broadcast.
(AP only)
This should be used to reduce bandwidth eavesdroppers from detecting the
radio network System Address (SSID) by passively listening to beacon
transmissions from the Access Point. When disabled, Access Points will not
transmit the System Address openly in Beacon messages. This is particularly
useful in unencrypted radio networks and where all stations know the SSID of
the Access Point.
Data Compression
Enable/Disable Data compression. See below for details
Save Changes
Save changes to non-volatile memory
Save Changes and
Reset
Save changes to non-volatile memory and activate the process
Data Compression
The radios incorporate a data compression algorithm based on RFC1951 specifications. This algorithm is similar to the
one used in file compression utilities such as PKZip, etc. which simply matches duplicate strings within the data frame
with pointers to previous data patterns. It keeps a running image of previous received data frames which it uses to
compare with the current data frame. When it finds a data string that is the same as a previous data string a pointer to
this location is sent instead of the data. Depending on the data this could considerably reduce the amount of data that
needs to be sent.
Performance is dependent on the type of data frames that are being sent. Typical improvements in throughputs that can
be expected when compression is enabled are:
15-40% improvement if using Modbus, depending on the radio baud rate
70% improvement for web page download
40% improvement if using FTP download

Elpro Technologies 450U-E Wireless Ethernet Modem & Device Server User Manual
32 www.cooperbussmann.com/wirelessresources Rev Version 1.4.0
Serial 3.8
The Serial page allows configuration of the onboard serial ports. The 450U-E has two ports, one RS-232, and one RS-
485 port which are used for serial communications with other devices. These ports are completely independent of the
other and can be configured for different functions even utilised at the same time.
The 450U-E offers five different and each port is configured separately by selecting from the drop down list
the appropriate parameters associated with this function.
The Available Port Types are:
Modbus RTU Master This type should be selected when the port is operating as a Modbus Master, i.e. Modbus RTU slave devices are connected directly to the serial port. Modbus mappings will need to be
configured in the table provided, see below for details on how this is done.
Expansion I/O This type should be selected when Elpro Serial Expansion modules (115S-XX) are connected to
the modem.
Modbus RTU Slave This type should be used if the port is being used as a Modbus RTU slave, i.e. being connected to from a Modbus Master (DCS, Scada, etc.) via the serial port.
Serial Gateway This type should be selected if you wish to allow point to point or point to multipoint transparent serial data transfers.
Modbus TCP/RTU Converter This Port Type allows Modbus TCP to Modbus RTU conversion.
Modbus RTU Master
Port Type
Select Modbus RTU Master from the drop down list.
Data Rate
Serial Data Rate will need to be configured to match that of the serial device that is connected
and communicating via the port. Baud rates available from 110 to 230400 baud.
Data Format
Serial Data Format defines the number of data bits, parity and start/stop bits that is used to
communicate with the serial device.
Flow Control
Flow Control is used by some serial devices to regulate the flow of data by turning on/off flags
that are used to tell the connected serial devices to start or stop transmitting data. The RS232
supports CTC/RTS hardware flow control.
Modbus Scan
Rate
Configures the frequency with which the Slave Device will be polled. Default is 100msec.
Modbus Response
Timeout
This is the time the RTU Master / TCP Client waits for a response from the slave from the
previous poll.
Mapping Master
Mapping Table
Local Register Enter the starting onboard I/O register number that the specified
Modbus Master transaction will transfer I/O to/from depending on whether it is a read or
a write mapping.
I/O count Specify the number of consecutive I/O register that will be transferred in the
mapping.
Function Code Modbus Function Code used for the transaction. Standard Function
codes are:
o 01: Read Coil - Read from a Coil (Output) register.
o 02: Read Discretes - Read from a Discrete Input register.
o 03: Read Registers - Read from an Analog Output register.
o 04: Read Inputs - Read from an Analog Input register.
o 15: Write Coils- Write to a Coil (output) register.
o 16: Write Registers - Write to an Analog Output register.

Elpro Technologies 450U-E Wireless Ethernet Modem & Device Server User Manual
Rev Version 1.4.0 www.cooperbussmann.com/wirelessresources 33
Destination Register Enter the starting I/O register number in the destination device
that the Modbus mapping will transfer I/O to/from.
Device ID Enter the Modbus Device ID of the destination device
Comms Fail Register Enter the onboard local I/O Register number to store the
communication status for the specified mapping. The register will be set to 0 if
communications is successful, 0xFFFF if there is no connection to the specified server,
or 0xFFxx where xx is the Modbus Exception Code (see Appendix E - for more
information on Exception codes)
Save Changes and
Activate
Save changes to non-volatile memory and activate the process
Expansion I/O
Port Type
Select Expansion I/O from the drop down list.
Data Rate
Serial Data Rate will need to be configured to match that of the serial device that is connected
and communicating via the port. Baud rates available from 110 to 230400 baud.
Data Format
Serial Data Format defines the number of data bits, parity and start/stop bits that is used to
communicate with the serial device.
Flow Control
Flow Control is used by some serial devices to regulate the flow of data by turning on/off flags
that are used to tell the connected serial devices to start or stop transmitting data. The RS232
supports CTC/RTS hardware flow control.
Maximum Device
ID to Poll
The maximum number of Modbus address that will be polled on the serial interface. The default
for RS232 is one and three addresses will be polled on the RS485.
Save Changes and
Activate
Save changes to non-volatile memory and activate the process
Modbus RTU Slave
Port Type
Select Modbus RTU Slave from the drop down list.
Data Rate
Serial Data Rate will need to be configured to match that of the serial device that is connected
and communicating via the port. Baud rates available from 110 to 230400 baud.
Data Format
Serial Data Format defines the number of data bits, parity and start/stop bits that is used to
communicate with the serial device.
Flow Control
Flow Control is used by some serial devices to regulate the flow of data by turning on/off flags
that are used to tell the connected serial devices to start or stop transmitting data. The RS232
supports CTC/RTS hardware flow control.
Modbus Slave
Device ID
Address of the onboard Modbus RTU Slave/TCP Server. This is the Address that will be polled
by an external Modbus Master / TCP Client. Default address is 255 and can be set here or on
the Modbus TCP page.
Save Changes and
Activate
Save changes to non-volatile memory and activate the process

Elpro Technologies 450U-E Wireless Ethernet Modem & Device Server User Manual
34 www.cooperbussmann.com/wirelessresources Rev Version 1.4.0
Serial Gateway
Port Type
Select Serial Gateway from the drop down list.
Data Rate
Serial Data Rate will need to be configured to match that of the serial device that is connected
and communicating via the port. Baud rates available from 110 to 230400 baud.
Data Format
Serial Data Format defines the number of data bits, parity and start/stop bits that is used to
communicate with the serial device.
Flow Control
Flow Control is used by some serial devices to regulate the flow of data by turning on/off flags
that are used to tell the connected serial devices to start or stop transmitting data. The RS232
supports CTC/RTS hardware flow control.
Serial Gateway
Mode
Server When configured as a Server the modem will wait for a TCP connection to be
initiated by a remote Client.
Client When configured as a Client the modem will automatically attempt to connect
to a specific remote server that matches the configured Device IP Address and Port
Character Timeout
Enter the maximum delay (in msec) between receiving the last serial character on the serial port
and the radio transmitting the whole packet. Data will be sent when this time is exceeded.
Packet Size
The Maximum number of received bytes that will be buffered before the packet is sent. Data will
be sent when packet size is exceeded.
Listen Port
Only available when Server is selected in the Serial Gateway Mode. Enter a TCP Port
number on which the Server must listen for incoming connections. Default will be 24
Remote Device
Port
Only available when Client is selected in the Serial Gateway Mode. Enter the TCP Port
number configured on the Listen Port of the remote Server. Default will be 24
Remote Device IP
Address
Only available when Client is selected in the Serial Gateway Mode. Enter the IP Address of
the remote Server you wish to communicate with.
Save Changes and
Activate
Save changes to non-volatile memory and activate the process
Modbus TCP/RTU Converter
The Modbus TCP/RTU Converter allows an Ethernet Modbus TCP Client (Master) to communicate with a serial Modbus
RTU Slave. The 450U-E makes this possible by internally performing the necessary protocol conversion. The conversion
is always performed by the 450U-E which is directly connected to the Modbus serial device (i.e. only this module needs to
have the Modbus TCP/RTU Conversion enabled).
Figure 35 - Modbus TCP/RTU demonstrates how a Modbus/TCP Client (Master)
can connect to one or more Modbus RTU Slave devices. In this example the
450U-E Access Point is configured with the RS232 serial port set
TCP/RTU Converter When using this Port Type the module converts the
Modbus/TCP query from the Client into a Modbus RTU frame and forwards it
out the appropriate serial port to the Slave device. When the serial device
responds the query is received on the serial port, it is then converted into a
Modbus/TCP response and forwarded via the network to the
Modbus/TCP Client.
The Modbus TCP/RTU Converter may be configured to operate on either the RS-232 or RS-485 port.
Port Type
Select Modbus TCP/RTU Converter from the drop down list.
Data Rate
Serial Data Rate will need to be configured to match that of the serial device that is connected and
communicating via the port. Baud rates available from 110 to 230400 baud.
Data Format
Serial Data Format defines the number of data bits, parity and start/stop bits that is used to
Figure 35 - Modbus TCP/RTU Converter
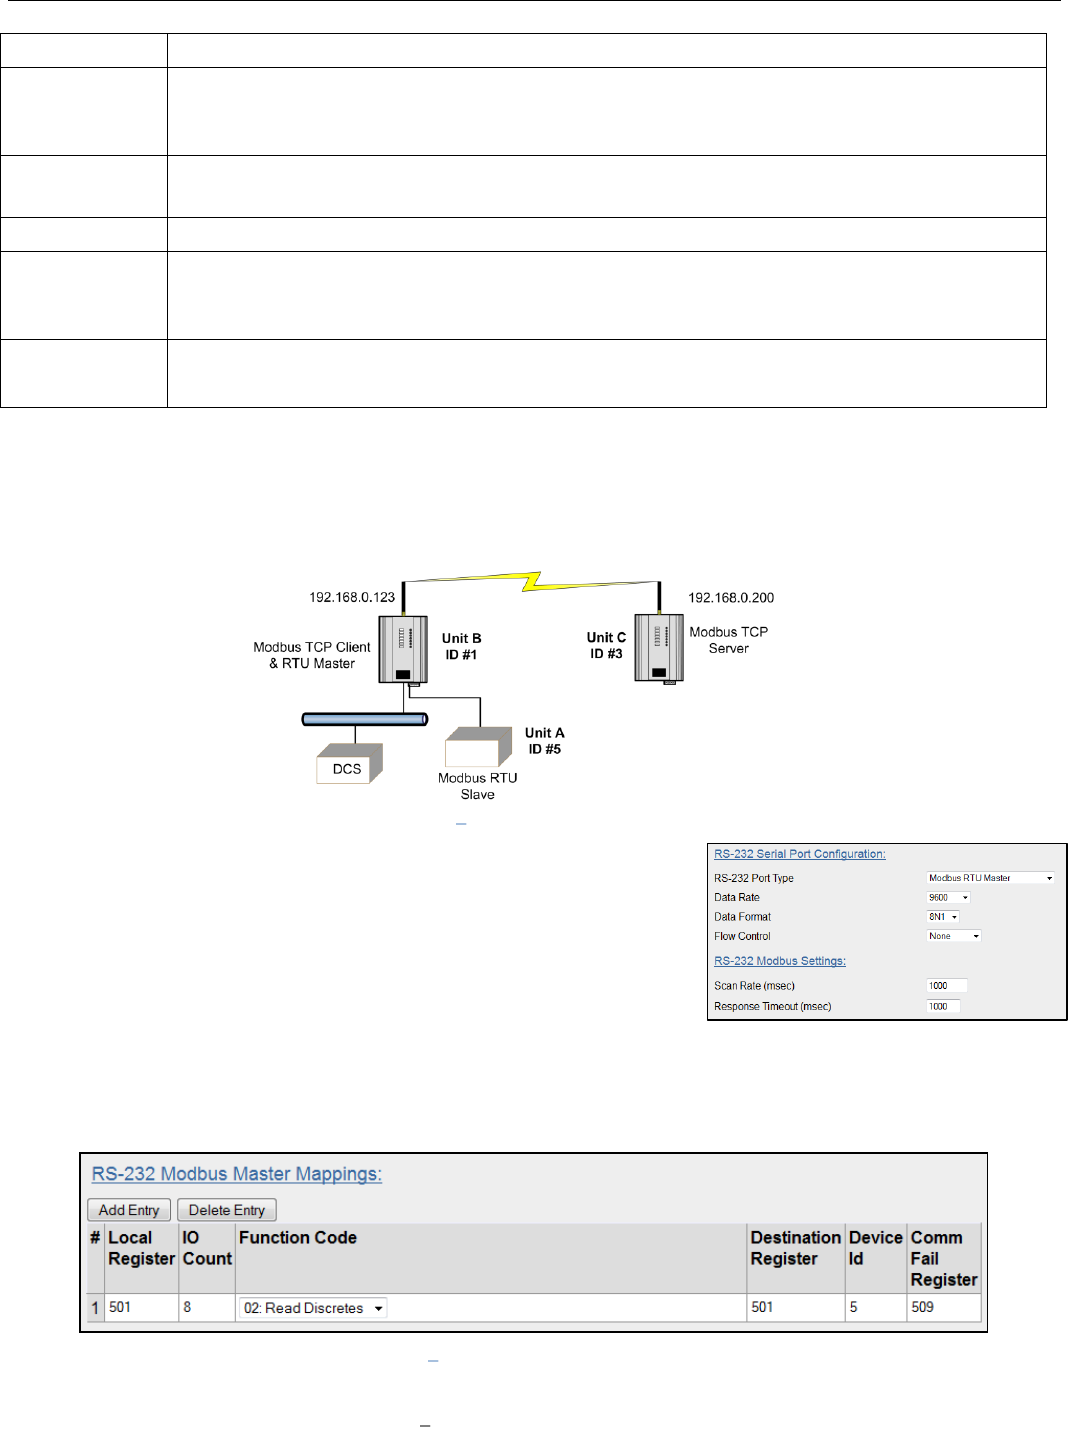
Elpro Technologies 450U-E Wireless Ethernet Modem & Device Server User Manual
Rev Version 1.4.0 www.cooperbussmann.com/wirelessresources 35
communicate with the serial device.
Flow Control
Flow Control is used by some serial devices to regulate the flow of data by turning on/off flags that
are used to tell the connected serial devices to start or stop transmitting data. The RS232 supports
CTC/RTS hardware flow control.
Response
Timeout
This is the time the TCP/RTU Converter waits for a response from the slave before sending the next
poll.
TCP Port
Fixed to 502.
Device ID
Address of the onboard Modbus RTU Slave/TCP Server. This is the Address that will be polled by
the Modbus Master / TCP Client. Default address is 255 and is fixed on this screen; however it can
be modified on the Modbus TCP page.
Save Changes
and Activate
Save changes to non-volatile memory and activate the process
Modbus RTU Mappings Example
The system in Figure 36 below shows that Unit B is a Modbus RTU Master that is configured to poll the RTU Slave Device
at Unit A via the serial interface and read the status of eight onboard I/O registers which will then be reflected to eight
local I/O registers at Unit B.
Firstly the Modbus RTU Master needs to be enabled on the dropdown list of
whatever serial port is going to be used to communicate with the Slave device.
Then the serial Data rate, Data format and Flow control need to match that of
the device and then the Scan rate and Response time need to be appropriate
for the application. The Scan Rate in this example is set for 1 second and it will
also wait 1 second for a response from the slave before flagging a Comms
Failure.
As the module is also communicating with a Modbus RTU slave device (Device #5) it will need to have an RTU Master
Mapping configured.
The RTU Mapping example shown in Figure 38 Unit B Modbus RTU Mapping is configured to read 8 x Discrete values
starting at register 501 from a Modbus Slave Device ID #5 connected to the RS232 port and store the values at its own
local internal register 501.
Figure 38 Unit B Modbus RTU Mapping
Figure 36 Modbus Example
Figure 37 - Modbus RTU Serial Settings
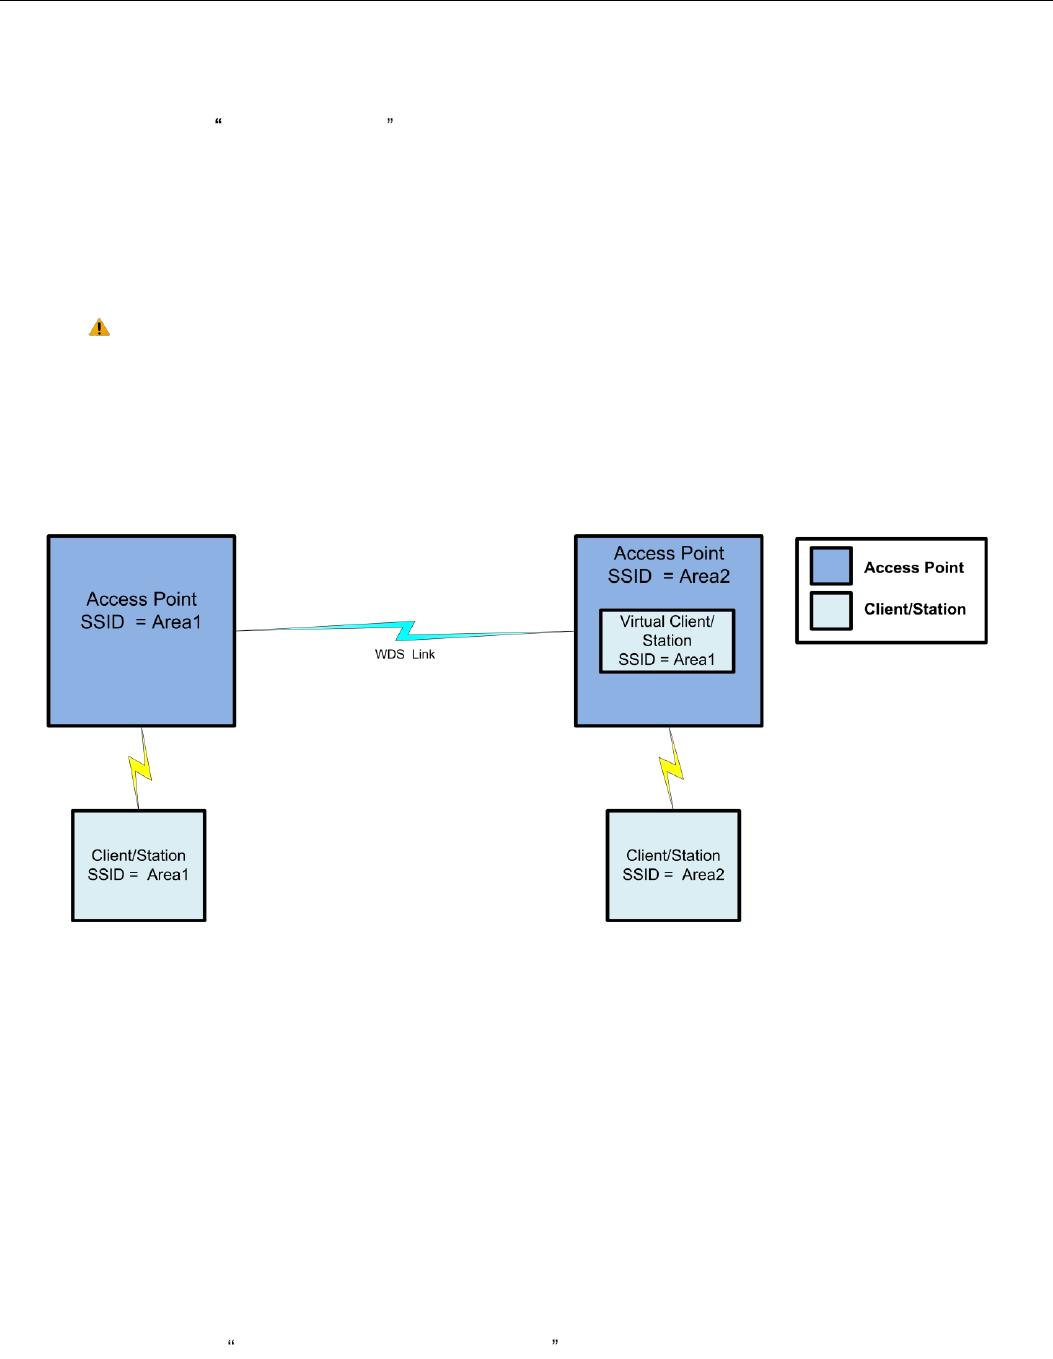
Elpro Technologies 450U-E Wireless Ethernet Modem & Device Server User Manual
36 www.cooperbussmann.com/wirelessresources Rev Version 1.4.0
Local Register
(501) specifies a general purpose Bit Storage area in the local module (Unit B).
I/O Count
(8) specifies that it is passing 8 I/O points.
Function Code
02: Read Discretes specifies the standard Modbus function code to read a digital input.
Destination Register
(501) specifies the register location on the remote Modbus RTU Slave (Unit A).
Device ID (
5) is the Device ID of the Modbus RTU Slave at Unit A.
Comms Fail Register (
509) is the local Register location that will indicate a communication failure for this mapping.
Care should be taken to ensure that the Device ID (i.e. Modbus Address) of the remote serial device
is different to the Device ID of the onboard Modbus TCP Server (if its enabled, the TCP Server only
needs to be enabled if the I/O registers are to be read from another external TCP Client).
Repeaters (WDS) 3.9
Wireless networks can be extended by allowing Access Points to behave as repeaters and forward traffic to other Access
Points. Access Point to Access Point communications is also known as WDS (Wireless Distribution System). The 450U-E
offers very powerful WDS configuration, allowing mesh network technology with self-healing functionality. Alternatively,
fixed AP to AP links can be configured for optimized throughput.
Each 450U-E Access Point supports up to 3 Virtual Access Point or 5 virtual Station/Client connections to other devices.
The WDS virtual interfaces will always be bridged with the main wireless interface
A WDS
bridge
interface allows traffic to be bridged to another Access Point on the same IP network. WDS bridge
interfaces do not require additional IP Address configuration, as they are bridged with the standard
wireless interface
that
is used for connections to associated clients. All of the WDS interfaces on the one Access Point may be bridged if
required.
WDS bridge interfaces have the advantage that redundant paths are permitted when using the bridge Spanning Tree
Protocol (see section 0.0 Bridge STP (Spanning Tree Protocol) ), thus behaving as a self-healing mesh network. Bridged
networks are also not as configuration intensive as routed networks. Since WDS bridge interfaces generally do not require
IP address configuration (they inherit the IP address of the standard wireless interface).
Figure 39 - WDS Repeaters

Elpro Technologies 450U-E Wireless Ethernet Modem & Device Server User Manual
Rev Version 1.4.0 www.cooperbussmann.com/wirelessresources 37
Important Notes:
All Access Points must be configured on the same radio frequency.
Specify SSID for AP/STA modes.
SSID and Encryption is not inherited from the main network page.
Each WDS interface can be configured with a different encryption algorithm; however each side of a single WDS link must specify the same encryption algorithm and keys.
A maximum of 3 virtual AP or 5 virtual Client/STA applies per unit.
WDS Connections:
Add Entry Button
Add an entry to the WDS Connections table. This adds a virtual station to the
device.
Delete Entry Button
Delete the currently selected entry in the WDS Connections table. To select a row,
click anywhere in the row with the mouse, to highlight the entire row.
Connection Mode
Specify the connection mode for this link.
AP (Downlink) configures the connection as a virtual Access Point.
Sta (Uplink) configures the connection as a virtual Station/Cient.
SSID
AP Mode: Specify the SSID that this virtual access point will use. Stations
connecting to this virtual access point use this SSID.
Sta Mode: Specify the SSID that this virtual station will use when connecting to
other access points.
Encryption
Select the required Encryption (if any) for this WDS link.
Encryption Key
Enter the Encryption key (for WEP encryption) or the passphrase (for WPA
encryption). For WEP encryption, the encryption key is set as WEP Key 1. For Sta
Mode, this must match WEP Key 1 on the Access point this virtual client will
connect to. For AP mode, clients must configure their WEP Key 1 to the same value
as this key and select the Default WEP Key to be WEP Key 1.
There are many different ways to setup wireless networks; often it depends on the devices you wish to connect and the
existing network topology.
The following pages show some examples of how to connect devices into different types of systems.
Example 1 Extending range using WDS
Figure 40 - Extending Range
Elpro Technologies 450U-E Wireless Ethernet Modem & Device Server User Manual
38 www.cooperbussmann.com/wirelessresources Rev Version 1.4.0
One of the most common uses for WDS is to extend the range of the wireless network using repeaters. The diagram in
Figure 40 above illustrates a simple example where the four Access Points are all at fixed locations (each of the Access
Points could, of course, have one or more client/stations connected). Since the locations are fixed, there is no chance of
network loops so we can avoid the overhead of using the Bridge Spanning Tree protocol by configuring fixed WDS links
to ensure that each Access Point will only connect to the next Access Point in the chain. Any number of additional
intermediate repeaters could be added to the chain in a similar way.
The WDS configuration is accessed by selecting the
Repeaters
link on the configuration web page. Configuration for Site
A is shown above in Figure 41. Site A is configured with a virtual Client that will connect to the Access Point at Site B
, likewise Site B also has a Virtual Client
configured that connects with the Access Point at Site C who also has a Virtual Client that connects to the Access Point
at Site D.
In this example each Virtual connection is using the same Encryption method (WPA2-PSK (AES) with a key of
passp or even disabled (no encryption)
however it is recommended the encryption method be equal to or greater than the main system so as to maintain system
security. Also since it is a bridged network the Spanning Tree Protocol is disabled on the network configuration page as
there is no possibility of network loops.
Example 2 - Roaming with WDS Access Points
Another common use for WDS is extending the range across a large wireless network but allowing roaming connections
between access points or being able to switch to the next Access Point when out of range of the previous Access Point.
The diagram in Figure 42 above shows a bridging network with a number of Access Points all with the same SSID,
network structure, etc. (so as the Roaming Client/Stations can freely roam between Access Points)
Each Access Point then needs a separate connection to the next Access Point, which is done using the WDS Virtual
Access Points and Client/Stations
Figure 42 - WDS Roaming
Figure 41 - Site A WDS Configuration
Elpro Technologies 450U-E Wireless Ethernet Modem & Device Server User Manual
Rev Version 1.4.0 www.cooperbussmann.com/wirelessresources 39
The configuration for Site B is shown below in Figure 43. The WDS is configured with a Virtual Access Point for the virtual
clients configured at Sites A & C. The Encryption Method and key are configured the same as the main network for
simplicity.
The WDS configuration for Site A & Site C will be exactly the
same as Site B except the Connection Mode will need to be
.
The main network configuration settings for all sites will all be
the same for each site (as shown).
This setup can be replicated many times which will allow
Roaming Stations full connectivity across the network.
IP Routing 3.10
When a 450U-E receives an IP frame that is destined for an IP address on a different network, it checks if the
network
address
matches the network address of one of its own interfaces (i.e. hard-wired Ethernet, or wireless Ethernet, or WDS)
and forwards the frame appropriately. However, if the IP network address does not match the network address of any of
its interfaces, the 450U-E will forward the frame to its default gateway. In this case it is assumed that the default gateway
has a valid route to the destination.
In some cases, it is not practical to have just one default gateway (i.e. routed wireless networks with more than two 450U-
E routers; and in some cases when WDS router interfaces are used). If more than one -
450U-E allows for up to 100
routing rules
to be configured. A routing rule specifies a destination network (or host) IP
address and the corresponding next-hop router that messages for the specified destination will be forwarded to. It is
assumed that the next-hop router (or
gateway
) will then deliver the data to the required destination (or forward it on to
another router that will).
Figure 45 - Routing
Figure 43 - Site B WDS Configuration 2
Figure 44 - System Network Settings

Elpro Technologies 450U-E Wireless Ethernet Modem & Device Server User Manual
40 www.cooperbussmann.com/wirelessresources Rev Version 1.4.0
The above network diagram illustrates a situation where routing rules may need to be configured. In this example, the
450U-E clients need only specify the Access Point as their default gateway (i.e. they require no routing rules to be
configured). However, for the Access Point to be able to deliver traffic to LAN B and LAN C it needs to have routing rules
configured that specify the respective 450U-E client/routers as next-hop routers (i.e. gateways) to networks B and C.
Note that devices on LAN A should specify the 450U-E Access Point as their default gateway. An
alternative to adding routing rules to the 450U-E in this example would be for each device on LAN A
that needs to communicate with LANs B and C to have independent routing rules specifying the
450U-E clients at B and C as gateways to those networks.
The routing rules for the Access Point in the above example are shown below in Figure 46. The first entry shows the route
to LAN B. The gateway for the route to LAN B is configured as the wireless IP address of the 450U-E client connected to
LAN B. The destination for the route is configured as the
network
address of LAN B. Because the
host
id of the
destination IP address is 0, it specifies a network address. Consequently, any traffic received at the Access Point with
destination IP address 169.254.109.x (where x is any host id) will be forwarded to the 450U-E at LAN B.
Devices on LAN B & LAN C that needs to send messages back to LAN A will need to have their Gateway addresses
directed to the 450U-E on their respected networks. I.e. a LAN B device needs to send data back to LAN A. The
Gateway address will need to be configured as 169.254.109.40 as this is the IP address of the wired side of the LAN B
450U-E. Any message coming in with a 192.168.0.X IP address will be directed across the wireless interface to LAN A.
The Routing Rules configuration page can be accessed any of the configuration web
pages. Up to 30 routing rules may be added to each 450U-E. The table below summarizes the configurable parameters
of a routing rule.
Note: Entering dedicated Ethernet Routes can also be added to the wired Ethernet LAN in place of
generating / adding routing rules into the modems.
Name
A name that describes the routing rule (Max 32 characters).
Destination
The destination network (or host) IP address (to specify a network address set the host
address to 0. i.e. for an IP address 192.168.0.0 with Netmask 255.255.255.0 would
specify a destination network, while 192.168.0.16 specifies a destination host).
Subnet Mask
The subnet mask for the destination network.
Gateway
The IP address of the next-hop router for the specified destination.
Enabled
Check this box to enable the rule. You can uncheck the box to disable a routing rule
without needing to re-enter the information at a later time.
Figure 46 - Routing Rules @ AP

Elpro Technologies 450U-E Wireless Ethernet Modem & Device Server User Manual
Rev Version 1.4.0 www.cooperbussmann.com/wirelessresources 41
Filtering 3.11
The 450U-E has a filtering feature to help reduce unnecessary wireless transmissions and enhance security.
The 450U-E may be configured to reject or accept messages to and from certain Addresses. To accept wireless
. Filtering applies only to messages appearing at the wired
Ethernet port of the configured 450U-E.
The Filter comprises of three lists: MAC Addresses, IP Address/Protocol/Port and ARP Filters. Each list may be set as
either a Blacklist (to block traffic for listed devices and protocols), or as a Whitelist (to allow traffic for listed devices and
protocols). The Filter operates on four rules listed below.
The MAC Address filter is always checked before the IP Address filter.
If a message matches a MAC filter entry, it will not be subsequently processed by the IP filter. If the MAC filter list is a Whitelist, the message will be accepted. If the MAC filter list is a Blacklist, the message will be dropped.
The MAC address list checks the Source address of the message only.
The IP Address filter checks both the source address and the destination address of the message. If either address match, then the rule is activated.
ARP filtering applies only to ARP request packets (typically these are broadcast packets) which are sourced from the Ethernet interface and destined for the wireless interface. (ARP requests from devices on the wireless network
will always be passed to the Ethernet interface. ARP response packets will always be passed).
When configuring a Whitelist it is important to add the Addresses of all devices connected to the 450U-E wired Ethernet
port, that communicate over the wireless link. It is particularly important to add the Address of the configuration PC to the
Whitelist. Failure to add this address will prevent the configuration PC from making any further changes to configuration.
Design of the filter may be simplified by monitoring network traffic and forming a profile of traffic on the wired network.
Network Analysis software, such as the freely available Wireshark program, will list broadcast traffic sent on the network.
Figure 47 - Filtering
Elpro Technologies 450U-E Wireless Ethernet Modem & Device Server User Manual
42 www.cooperbussmann.com/wirelessresources Rev Version 1.4.0
Filter Example
Device B needs to communicate with Device E via modems C & D. The Filtering requires that Modem C has Device B in
its Whitelist , any traffic from Device E will be passed back into the
LAN via Modem C because the destination matches the IP for device B. This works because Device B is a Modbus
Master and it initiates all communications. If the communications was being initiated from each end, i.e. a non-polling
system you would need to put a filter list in each modem to allow the communications to be passed from each end.
With this filter configuration Device A will not be able to access Device E, as Device A is not present in the Whitelist in
Modem C.
ARP filters is also recommended as it would filter out broadcast ARP requests from other devices on the LAN which
would normally be sent over the radio. ARP (Address Resolution Protocol) is a communication protocol used by Ethernet
devices for associating MAC addresses and IP addresses and is a crucial part of normal network communications. When
a device on a LAN wishes to communicate with another device it needs to know the MAC Address. If the MAC address is
not already known or is in its lookup table it will broadcast an ARP request which subsequently would be passed over the
radio if the modems were setup in bridging mode. If this is a small network it may not matter however in larger systems
there can be a considerable amount of broadcast ARP traffic which if sent over the radio would compromise the reliability
of the wireless link.
It should be noted that adding ARP filters will only filter out ARP traffic and IP filters will only filter out
IP traffic.
Also if using an IP filter any Ethernet traffic that is not IP would be passed, this could include Netbios,
IPX, PPP, etc. These protocols could be more effectively filtered by using MAC filtering or configuring
the modems in a Router configuration instead of a Bridge.
If after configuring the modem with filteriing, you no longer have access to the modem, this probably
means the Computer IP or MAC address was not added to the filter list. SETUP mode must be
enabled to restore operation.
MAC Address Filter Configuration:
MAC addresses are uniquely assigned to each device and so can be used to permit or deny network access to specific
devices through the use of Blacklists and Whitelists.
In theory, MAC filtering allows a administrators to permit or deny network access to hosts associated with the MAC
address, though in practice there are methods to circumvent this form of access control through address modification.
The MAC filter entry will match only the source MAC address in the packet.
Note: It is important to add the MAC Address of the configuration PC when creating a Whitelist. If the
configuration PC is not on the Whitelist, it will be unable to communicate with the module for further
configuration.
Figure 48 - Filtering Example

Elpro Technologies 450U-E Wireless Ethernet Modem & Device Server User Manual
Rev Version 1.4.0 www.cooperbussmann.com/wirelessresources 43
Blacklist will prevent all listed devices from accessing the module and using the
radio link.
Whitelist will allow devices with the MAC addresses listed to communicate with
the module and utilize the radio link. All other devices are blocked.
Add Entry
Add a row to the table of Mac Address filter rules
Delete Entry
Delete the currently selected MAC address filter rule.
Enable
Check to enable the rule.
Mac Address
Enter the desired source MAC Address
Save Changes
Save changes to non-volatile memory (Reset is required to activate)
Save Changes and Reset
Save to non-volatile memory And restart to activate changes
IP Address Filter Configuration:
The IP filter allows can be used to permit or deny network access to specific devices through the use of Blacklists
(blocking of traffic that matches a rule) and Whitelists (allow traffic that matches a rule).
The IP filter entry will match either source or destination address in the packet. That is, if either the source or destination
IP address falls within the address range specified in the rule, the packet is matched and will be discarded (Blacklist) or
allowed (Whitelist).
If the protocol is specified, the protocol of the packet must also match. If the protocol is TCP or UDP the source or
destination TCP/UDP can also be inspected. If the IP address and protocol matches and the source or destination port
number falls within the range specified, the packet is matched.
Note: Configuration pages use TCP protocol on ports 80 and 443. Create Whitelist rules specifying
the configuration PC's IP address, with TCP protocol, ports 80 and 443.
ARP Filter Configuration
ARP (Address Resolution Protocol) is a broadcast message and is primarily used for identifying MAC addresses when
only the IP or some other Network Layer address is known.
On large networks, you generally tend to get a high proportion of broadcast messages. ARP filters are useful for reducing
broadcast traffic that is generated on the wired side of the network on to the wireless network. This is done by only
allowing ARP requests for the devices that are on the wireless network, or blocking ARP requests for high use addresses.
This means that all other ARP requests for devices on the wired network will not be passed over the radio. As the 450U-E
Blacklist will prevent all listed devices from accessing the module and using the radio
link.
Whitelist will allow devices with the IP addresses listed to communicate with the
module and utilize the radio link. All other devices are blocked.
Add Entry
Add a row to the table of IP Address filter rules
Delete Entry
Delete the currently selected IP address filter rule.
Enable
Check this box to enable the rule
IP Address Min,
IP Address Max
These set the range of IP addresses. All addresses within the specified range are
affected by the rule.
Port Min,
Port Max
When the protocol is set to TCP or to UDP, this is the range of port addresses to
which the rule applies. When protocol is set to All or to ICMP, these settings have no
effect.
Protocol
This chooses the protocol to which the rule applies. The rule can apply to Any
protocol (All), or to only one of TCP, UDP, or ICMP (Ping).
Save Changes
Save changes to non-volatile memory (Reset is required to activate)
Save Changes and
Reset
Save to non-volatile memory and restart to activate changes
Elpro Technologies 450U-E Wireless Ethernet Modem & Device Server User Manual
44 www.cooperbussmann.com/wirelessresources Rev Version 1.4.0
has a reduced throughput compared with other Ethernet modems it is very important that any unnecessary traffic is not
broadcast over the radio, therefore it is highly recommended that the ARP filters are enabled and configured.
what is required is to add the IP address for all remote
modems and any device that is connected to these remote radios in the ARP filter table.
modem has rebooted it will only pass ARP traffic for the IP addresses configured.
Modbus TCP 3.12
The 450U-E also has an on-board Modbus TCP Server and Modbus TCP Client that provide connectivity for a range of
Modbus applications. The Modbus TCP Client and the Modbus TCP Server can be enabled simultaneously, and when
combined with the built in Modbus TCP/RTU Converter (enabled on the Serial page) the 450U-E can transfer I/O to/from
almost any combination of Modbus TCP or RTU devices.
Modbus TCP Server
Modbus TCP Server enables the 450U-E to accept connections from
Modbus TCP Clients.
All Modbus transactions routed to the onboard Modbus TCP Server are
directed to/from the onboard general purpose I/O registers. The Modbus
TCP Server can also be shared with the Modbus TCP/RTU Converter (if
enabled) must be a unique address which is why the
default is set to 255. Care should be taken to ensure any serially
connected Modbus devices use a different Modbus Device ID (i.e. Modbus
Slave Address) to that of the onboard Modbus TCP Server. Up to 32
separate connections to the Modbus TCP Server are supported.
Modbus TCP Client
The Modbus TCP Client enables the 450U-E to connect to one or more Modbus TCP Servers.
All Modbus Mappings are directed to/from the onboard I/O registers depending on configuration which is described
below.
Communications with the Remote TCP Servers is achieved with the use of Mappings. All Mappings are directed to/from
the onboard I/O registers and are setup
button and a new default mapping will be added to the table. You will then need to edit this entry and configure the
parameters to match the application. Each column is described in the table below.
Se
A Blacklist will block ARP requests that match the entry.
A Whitelist will allow only ARP Requests that match the entry. All other devices are
blocked.
Add Entry
Add a row to the table of ARP Address filter rules
Delete Entry
Delete the currently selected ARP address filter rule.
Enable
Check this box to enable the rule
IP Address
This sets the IP address that you wish to filter.
IP Netmask
Sets the IP Netmask
Save Changes
Save changes to non-volatile memory (Reset is required to activate)
Save Changes and
Reset
Save to non-volatile memory and restart to activate changes
Figure 49 -Modbus TCP Server
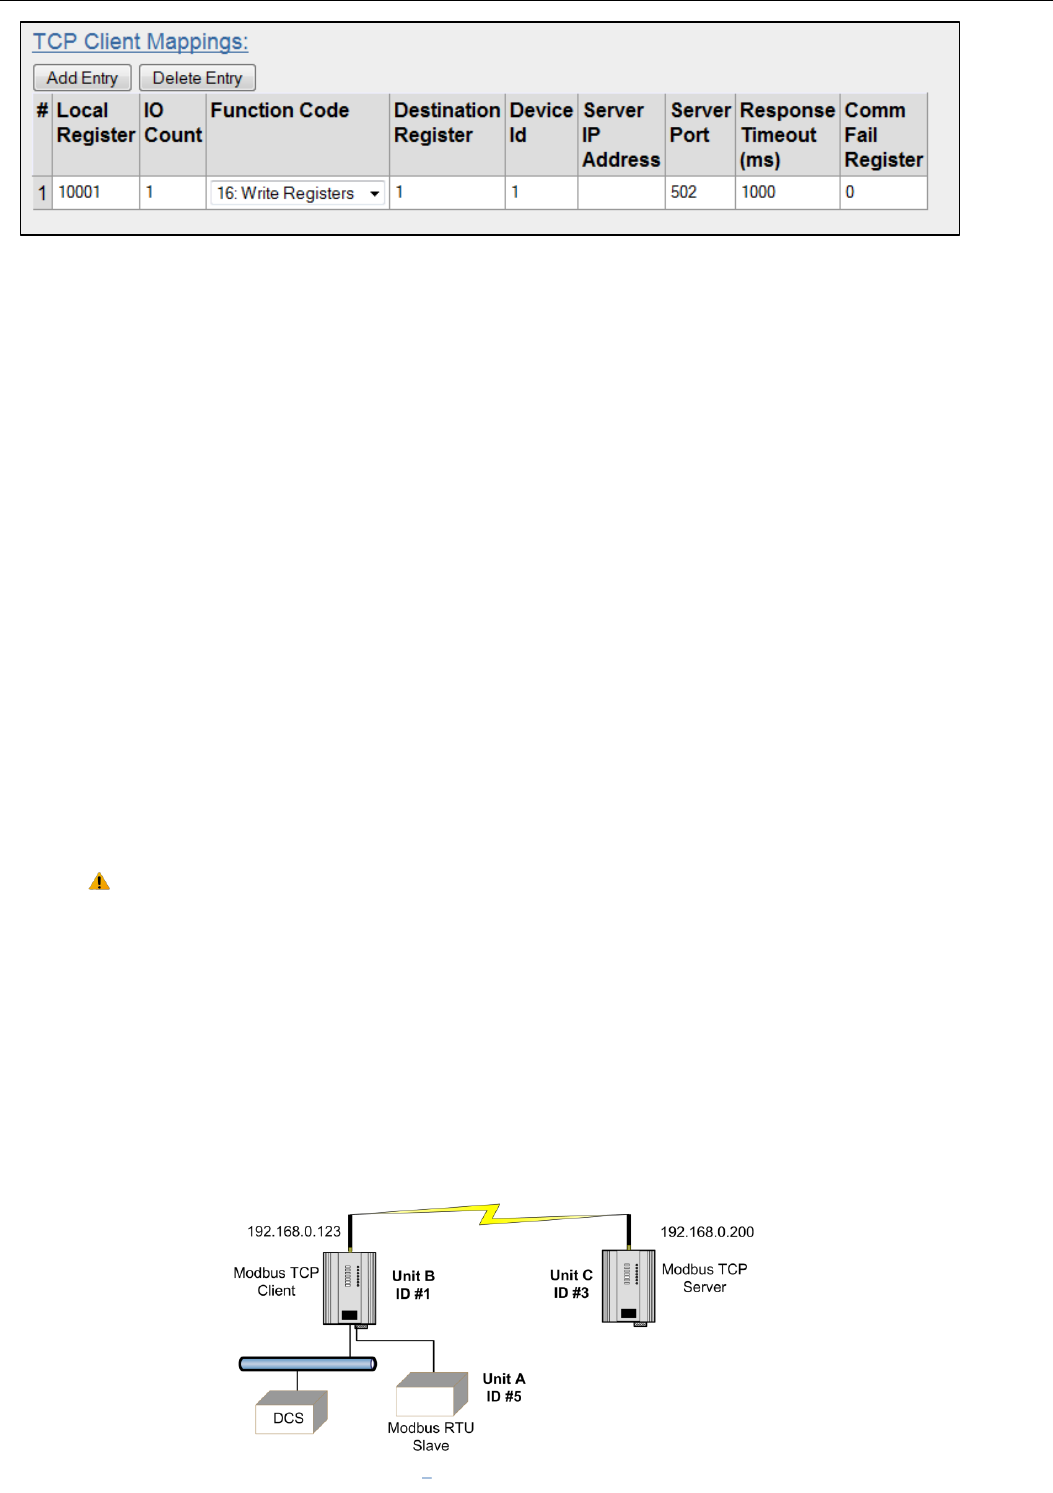
Elpro Technologies 450U-E Wireless Ethernet Modem & Device Server User Manual
Rev Version 1.4.0 www.cooperbussmann.com/wirelessresources 45
Modbus TCP Client Mappings:
Local Register
Enter the starting onboard I/O register number that the specified Modbus Master
transaction will transfer I/O to/from.
I/O Count
Specify the number of consecutive I/O registers to be transferred for the specified
transaction.
Function Code
Specify the Modbus Function Code for the transaction.
Destination Register
Enter the starting I/O register number in the destination device that the specified Modbus
Master transaction will transfer I/O to/from.
Device ID
Enter the Modbus Device ID of the destination Modbus device
Server IP Address
Specify the IP Address of the destination Modbus TCP Server for the specified
transaction.
Sever Port
Server Port number used for Modbus TCP. Default/standard port number is 502
Response Timeout
Enter the timeout (in milliseconds) to wait for a response to the specified transaction.
Response time should be configured in conjunction with the Response time for the serial
ports if utilising TCP to RTU communications.
Comm Fail Register
Enter the onboard I/O Register number to store the communication status of the specified
transaction. The Specified register will be set to 0 if communications is successful,
0xFFFF if there is no connection to the specified server, or 0xFFxx where xx is the
Modbus Exception Code
Note: When entering the Local or Destination registers you do not need to enter in the full Modbus
Address, i.e. 30001 or 10001 only the I/O address is needed as the Function Code determines what
type of command is being used.
E.g. if you wish to read from Destination register 30001 you need to select Function Code 04: Read
Inputs and then enter the Destination Register of 1.
Or if you wish to read register 10501 you need to select Function Code 02: Read Discretes and then
enter the Destination Register of 501.
TCP Mapping Example
The system in Figure 47 below shows that Unit B is a Modbus TCP Client that will poll the TCP server at Unit C via the
Wireless Ethernet interface to gather the status of the on board DIO (Digital Input) which will then be reflected on its own
DIO (Digital Output).
Figure 51 Modbus Example
Figure 50 - Modbus TCP Client Mapping
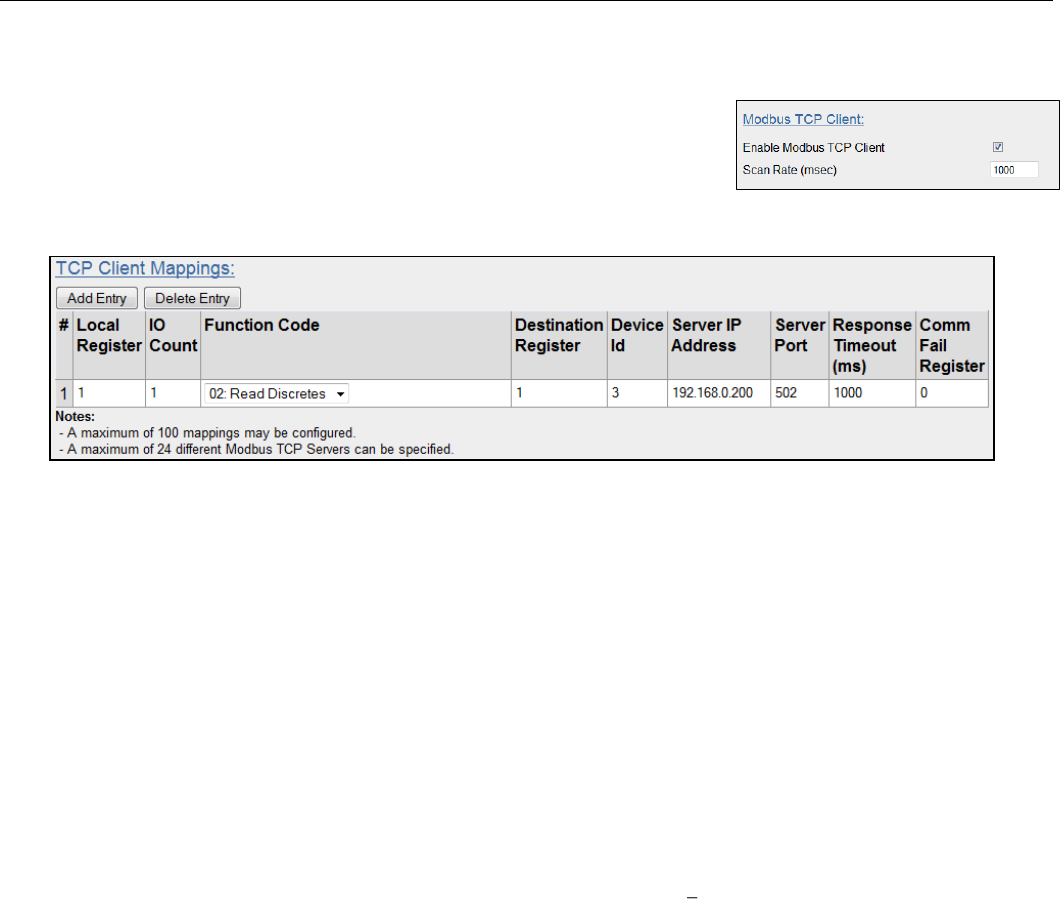
Elpro Technologies 450U-E Wireless Ethernet Modem & Device Server User Manual
46 www.cooperbussmann.com/wirelessresources Rev Version 1.4.0
Enabling the Modbus TCP Server within Unit B provides a register location for the polled values from Unit C to be stored.
It will also allow an external Modbus TCP Client (DCS or Scada) to monitor the stored I/O values from units A & C.
Firstly the Modbus TCP Client must be enabled and a suitable scan rate be
selected, the default time will be 1000msec meaning that there will be a 1 second
delay between the Client mappings directed at any Modbus server.
Next the mappings need to configured, see below for the explanation.
The Example TCP mapping in Figure 53 - Unit B Modbus TCP Mappings is configured to transfers the status of the
onboard digital input at Unit C (Device ID#3) to the onboard digital output at Unit B.
Local Register
(1) specifies the register for the onboard digital output at B. This register is configured
with 1 which is the register used to turn on the Digital Output.
I/O Count
(1) specifies that only one I/O point is being transferred (i.e. the single digital I/O).
Function Code
(02: Read Discretes) specifies the standard Modbus function code to read discrete (i.e.
digital) inputs.
Destination Register
(1) specifies the register for the onboard digital input (1) As the Function Code is a
Read Discrete, this indicates that the Destination register will be in the range 10XXX range and so we
only need to put in the register location and not the function designator (10XXX).
Device ID (
3) is the ID of the onboard Modbus TCP Server at C.
Server IP Address
(192.168.0.200) is the IP address of unit C which is the Modbus TCP Server we are
reading from.
Server Port
is the TCP port used.
Response Timeout
(1000ms) specifies that unit C must respond to this message within 1000ms.
Comm Fail Register
(0) specifies the local register where the communications status for this mapping
will be stored.
Modbus TCP Client functionality allows a maximum of 100 mappings to be configured and a maximum of 24 different
Modbus TCP Servers.
Figure 53 - Unit B Modbus TCP Mappings
Figure 52 - TCP Client
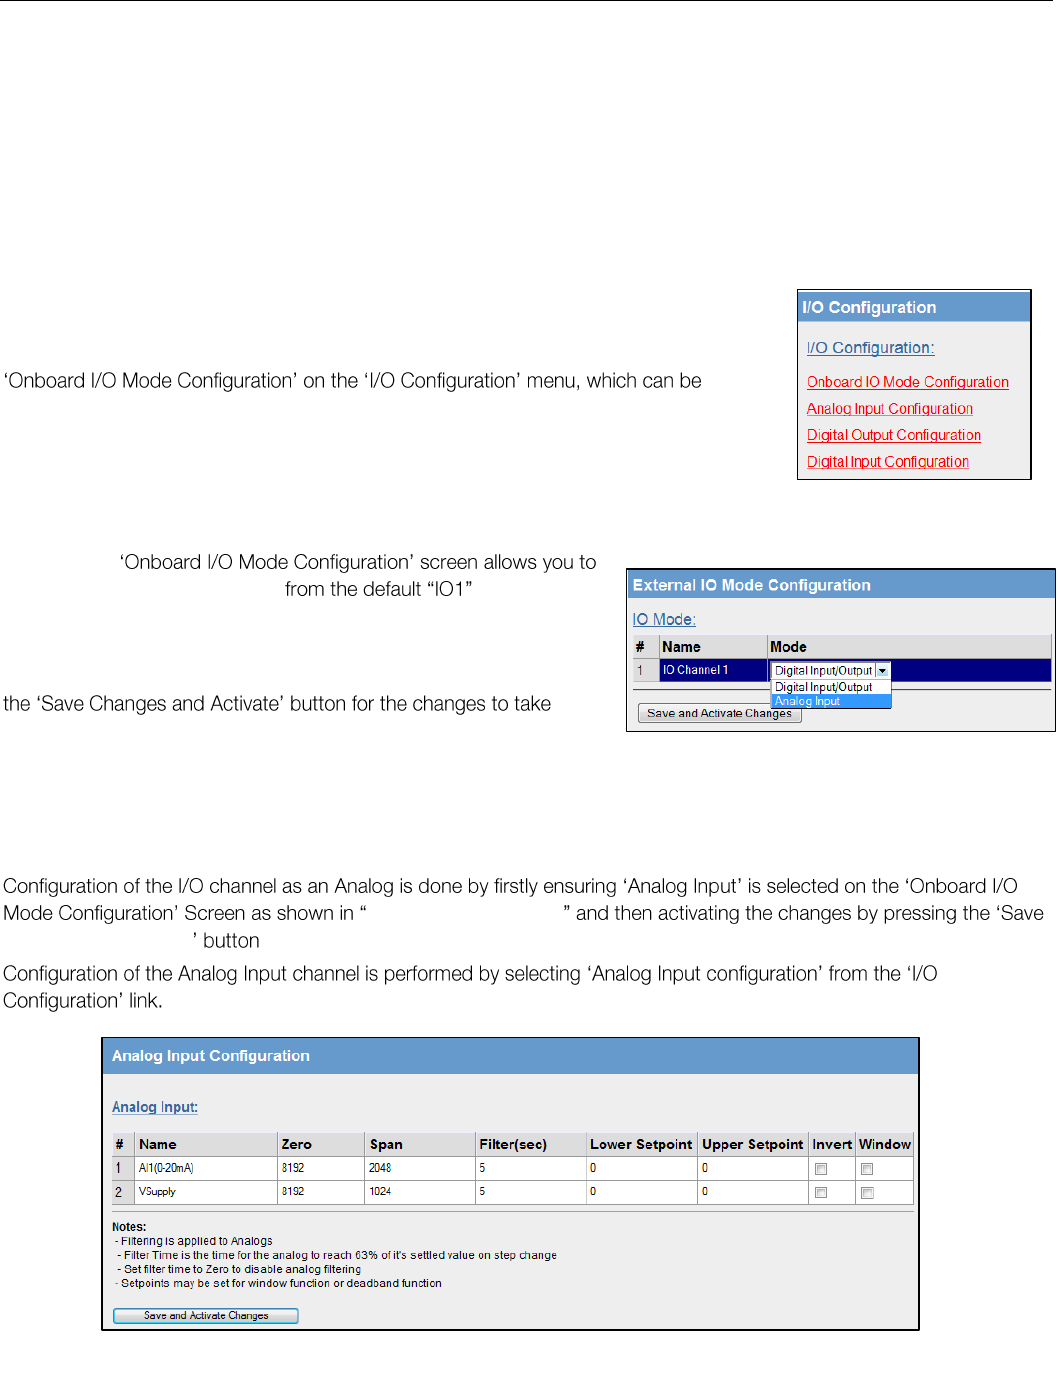
Elpro Technologies 450U-E Wireless Ethernet Modem & Device Server User Manual
Rev Version 1.4.0 www.cooperbussmann.com/wirelessresources 47
Input/Output Configuration 3.13
The 450U-E has a single physical on-board I/O channel that can be configured as either a Digital or an Analog via the web
interface. The Digital channel can also act as an input or an output.
The 450U-E also has a number of internal register locations that are used for monitoring internal I/O, general purpose I/O
registers and module information as well as an area of memory that will hold the values from any expansion I/O modules
that maybe connected to the serial ports.
I/O Configuration
Configuration of the physical I/O (Analog Input or the Digital Input/output) is done by select
accessed from the main right hand web links.
Selecting the
change the name of the channel to something
more descriptive, i.e. Tank Level, etc and it also allows you to change
the input mode from Digital Input /Output to Analog.
When the I/O mode and name have been changed you must press
effect.
The default I/O Mode is Digital Input/Output
Analog Input Configuration
Figure 55 - Input Mode
and Activate Changes
The I/O channel can be configured to accept a 0-20mA current sinking analog input.
The default settings should suffice for most applications however the following parameters can be adjusted to suit the
application if needed.
Figure 54 - I/O Configuration
Figure 55- Input Mode
Figure 56 - Analog Input
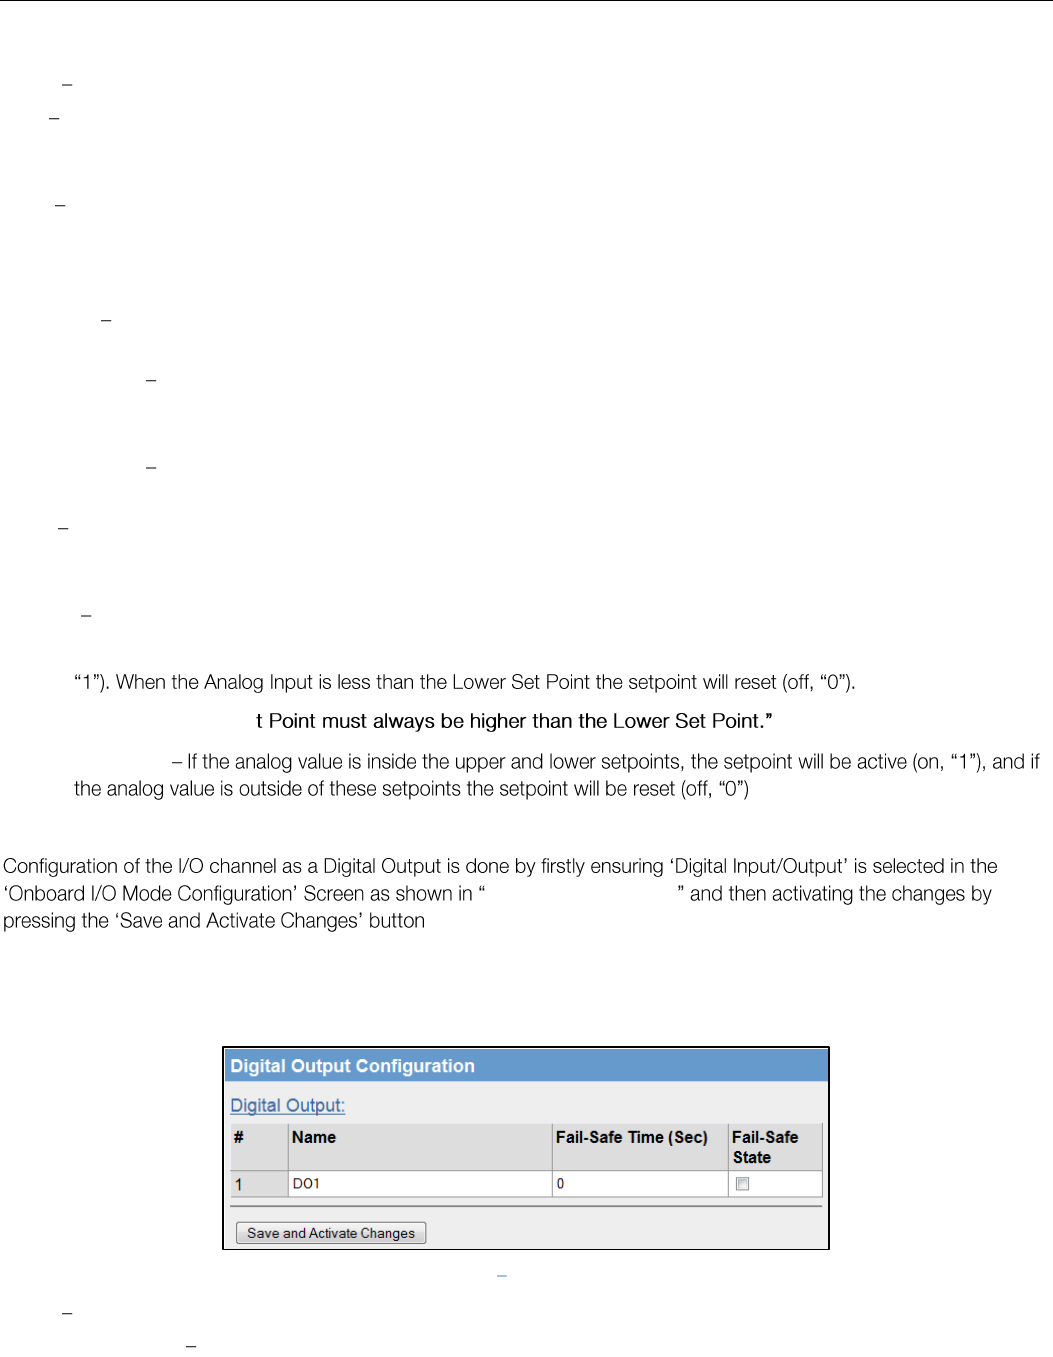
Elpro Technologies 450U-E Wireless Ethernet Modem & Device Server User Manual
48 www.cooperbussmann.com/wirelessresources Rev Version 1.4.0
Analog Input configuration parameters
Name Configure a descriptive name for the Analog input.
Zero This parameter is used to configure the scale of the analog input. This is the starting variable (in counts) when the
analog input is at the bottom or zero scale. Default is 8192 which equates to the number of raw counts in the register
when the input is at the zero or minimum value, i.e. 0mA on the analog input.
Span This parameters is used to configure the scale of the analog input. This is the number of counts per measured
value, i.e. 1 mA, 1 V, 1 HZ, etc.). Default is 2048 which equates to 20mA on the analog input. E.g. the register range has
a total range of 32768 counts with a total mA range of 16mA; therefore the Span is calculated by dividing the total range
in counts by the total range in mA, V, Hz, etc. (32768 / 16 = 2048)
Filter (sec) The Filter time Constant is the time the analog takes to settle on a step changed of an analog value. By
default, inputs have a time constant of 5 seconds.
Lower Setpoint This parameter is the lower control point value that is used in conjunction with the Upper Setpoint to
turn on and off the Analog Setpoint register. AI1 setpoint location is at register 10002 and VSupply setpoint is located at
register 10003.
Upper Setpoint This parameter is the upper control point value that is used in conjunction with the Lower Setpoint to
turn on and off the Analog Setpoint register.
Invert This option toggles the Setpoint control logic between the default normal and inverted state. The function does
not change, only the operation is inverted, e.g. if setpoint is on in its normal state, inverting the signal will mean the
setpoint will be off in the normal state. Default state is not inverted (not ticked)
Window This parameter toggles the Set point operation between the Default and the Windowed modes.
Default (un-ticked) - If the Analog Input is greater than the Upper Set point, the set-point status will be active (on,
Note: The Upper Se
Windowed
Digital Output
Figure 55- Input Mode
The default parameters for the digital output should suffice for normal operation however if you wish to configure the
output to have a failsafe indication you will need to configure the parameters below.
Digital Output Configuration Parameters
Name A descriptive name can be configured for the Digital Output, up to 30 characters including spaces.
Fail-Safe Time (sec) The time before the output actives its Failsafe state if it does not receive an update or a COS
message from the sending input. If the Fail Safe Timer counts down to zero the output will be set to the ON /OFF Fail Safe
state depending on how it is configured. When an update or a COS message is received the Failsafe timer is then
restarted.
It is recommend this Fail Safe Time be configured for a little more than twice the update time of the input that is turning it
on, that way the output will reset if it fails to receive two update messages.
Figure 57 Digital Output
Elpro Technologies 450U-E Wireless Ethernet Modem & Device Server User Manual
Rev Version 1.4.0 www.cooperbussmann.com/wirelessresources 49
Fail-Safe State The state that the output will be set to if countdown has elapsed.
If the Failsafe state is enabled (ticked), the LED and the digital output will be turned ON.
If the Failsafe state is disabled (unticked), the LED and the digital output will be turned OFF.
Digital Input
Configuration of the I/O channel as a Figure 55- Input Mode
If you wish to adjust the digital input parameters see below for details.
Digital Input Configuration Parameters
Name A descriptive name that can be given to the input to help with configuration, up to 30 characters including
spaces or use the default,
Debounce Time (Sec) Debounce is the time which an input must stay stable before the module decides that a change
of state has occurred. If a digital input changes (on - off) and changes again (off - on) in less than the debounce time, then
the module will ignore both changes. Default debounce time is 0.5 seconds.
I/O Register locations
There are over 5000 x 16bit general purpose registers that are available for Modbus (including the onboard Analog/Digital
Input/Output) and are shared with both Modbus Client and Server.
Along with the physical DIO status the internal I/O can be accessed by reading or writing to the following register
locations. The Register locations are structured into standard Modbus I/O types and can be accessed using the local
onboard Modbus TCP Server, Modbus serial Master or an external Modbus Master device.
The layout of the 450U-E I/O Registers are summarized in the table below. Each register is internally saved as a 16bit
unsigned integer value. A Modbus transaction may access the entire 16 bit value of any register, or alternatively the most
significant bit of a register may be accessed as a discrete value. The main use for the general purpose I/O registers is for
intermediate storage, i.e. when transferring I/O from one Modbus Slave device to another. Also provided is the status of
the onboard digital I/O, as well as the status of the wireless link and any serial or TCP connections.
The different I/O Types and Registers are shown below.
Digital Outputs Coils
Registers
Purpose
0001
Local Digital Output Register
0021 - 0500
I/O Space for locally attached 115S expansion I/O modules. 20 registers per
module address. Max 24.
0501 - 3000
General Purpose Bit Storage Area assigned in memory for Modbus Mapping
storage.
Figure 58 Digital Input

Elpro Technologies 450U-E Wireless Ethernet Modem & Device Server User Manual
50 www.cooperbussmann.com/wirelessresources Rev Version 1.4.0
Digital Input Bits
Registers
Purpose
10001
Local Digital Input Register
10002
10003
Setpoint status Register for Analog Input 1
Setpoint status Register for VSupply
10021 - 10500
I/O Space for locally attached 115S expansion I/O modules. 20 registers per
module address. Max 24.
10501 - 12500
General Purpose Bit Storage Area assigned in memory for Modbus Mapping
storage.
Analog Input Registers
Registers
Purpose
30001
30002
Local Analog Input Register)
Local Supply Voltage (8-40VDC)
30021
30493
I/O Space for locally attached 115S expansion I/O modules. 20 registers per
module address. Max 24.
30494 - 30500
Internal information registers Serial Number, Firmware Version and Patch Level.
30501 - 32500
General Purpose Bit Storage Area assigned in memory for Modbus Mapping
storage.
38001
38003
Local DIO register (as a Floating Point value)
Local Supply Voltage (8-40VDC) as a Floating Point)
Expansion I/O
115S Serial Expansion I/O modules can be added to provide additional I/O.
When adding expansion I/O modules to the 450U-E the appropriate serial port must be configured .
The default serial parameters of the port should be 9600, N, 8, 1 which match the defaults of the 115S serial expansion
modules. These parameters can be changed, to increase poll speeds in larger systems however the 115S serial port and
the 450U-E serial port will need to match.
If more than 3 serial expansion mod
adjusted.
Connect the serial expansion module and take note of the address (Rotary switches on the bottom) as this address will
be used as an offset to locate the I/O within the 450U-E.
Make sure the devices at either end of the RS485 cable have the termination switch enabled (on), this includes the 450U-
E. Failure to terminate the RS485 correctly could result in the modules not operating correctly.
115S Expansion I/O Memory Map
I/O data on the 115S module is read into memory locations according to their Modbus address. The maximum number of
Modbus addresses is 24.
Each 115S module
Modbus address (selected on the rotary switch on the end of the 115S expansion I/O module) multiplied by 20.
E.g. If connecting a 115S-11 (16 x DIO) with address #15
Digital input 1 will be at register location 10301. ((15*20) +10001)
Digital Output 1 will be at register location 301 ((15*20) +1)
If using a 115S-12 (8 x DIO & 8 AIN) with address 16
Digital input 1 will be at register location 10321 ((16*20) +10001)
Elpro Technologies 450U-E Wireless Ethernet Modem & Device Server User Manual
Rev Version 1.4.0 www.cooperbussmann.com/wirelessresources 51
Analog input 1 will be at register location 30321 ((16*20) +30001)
See Appendix D - Expansion I/O Registers
When adding expansion I/O modules to the 450U-E, there are two inbuilt registers used to indicating the communication
status of the module.
ocated at register location 10020 + offset value. This register will
Failsafe Blocks
Fail Safe Block configuration allows the internal registers to be set to a pre-configured value on start-up as well as
configuring the DIO to reset to a predefined value after a timeout period has elapsed. Also if a remote device is sending
I/O to the local DIO and it is in communications fail the output can set to the configured after a pre-configured
time.
In the screenshot above, register 40501 holds an analog value that is being updated from another module every 60
seconds.
The module is configured so that on start-up a value 16384 will be written into register 40501 and then start counting
130 seconds which is a little over two times the 1 minute update period from
the sending module. If after 130 seconds, the module still has not received an update from the other module, register
ted value (~).
below. will be inhibited from
sending has been updated with a real value.
Also if the register is being read by a Modbus Master or Client an exception response will be returned as the register is
invalid. If a Modbus Master or Client is writing from a register with an invalid state to another device the message will not
be sent. The maximum number of Fail Safe blocks you can have is 50.
Registers
Purpose
First Register
First local register were the Failsafe block will start from.
Count
Number of registers to incorporate in the Failsafe block
Timeout
Time allocated to the failsafe block before triggering a failsafe state.
Initialise at Startup
Initialise the value on startup (if un ticked the register will be uninitialized (~))
Startup Value
Value to Initialise the register to on startup of the module.
Invalidate on Fail
Register will be invalidated on failure
Fail Value
Value to set the Register when a fail occurs
Figure 59 - Failsafe Block Analog
Elpro Technologies 450U-E Wireless Ethernet Modem & Device Server User Manual
52 www.cooperbussmann.com/wirelessresources Rev Version 1.4.0
All registers within the module can have various states depending on what type of register it is and what sort of value it
holds, a typical analog range is between 0 and 65535 and a digital can be 0 or 1.
Registers can also have
so does not hold a value but more a non-value or null. as a shown above.
Any mapping with an invalid register will be inhibited from sending. This is to ensure the data that
gets to the destination is valid and not just default values that the module starts up with.
Configuration Examples 3.14
Extending a wired network (Bridged Network)
Access Point Configuration
Connect straight through Ethernet cable between PC and 450U-E.
Ensure configuration PC and 450U-E are setup to communicate on the same network
Set dipswitch to SETUP mode.
Power up unit, and wait for the OK LED to cease flashing.
Adjust PC network settings
Set Configuration PC network card with network setting of IP address 192.168.0.1, Netmask 255.255.255.0
Open configuration webpage with Internet Explorer at address 192.168.0.1XX/ where XX is the last two digits of the
serial number
When prompted for password,
screen.
On this screen select the Transmit Power level, Transmit Data Rate, Frequency Step size and Transmit & Receive
Figure 61 - Example Config 1
Figure 60 - Invalid Register State
Elpro Technologies 450U-E Wireless Ethernet Modem & Device Server User Manual
Rev Version 1.4.0 www.cooperbussmann.com/wirelessresources 53
Select Operating Mode as Access Point.
Enter a System Address (ESSID) string. And record as this will need to be exactly the same for all radios in the example.
The Radio Encryption is configured for WPA2 AES and will require an encryption key which will also need to be the same
on all radios in the example.
Change the IP addresses to 192.168.0.100
Leave the Subnet masks at the default 255.255.255.0
Leave the Gateway IP Address at the default 192.168.0.1 as it is not used in this example.
Set dipswitch to RUN
Save the changes and unit will restart with new settings.
Client 1 Configuration
Perform the same configuration steps as the Access Point configuration with the following differences:
Ensure that the Radio, System Address (ESSID) and Encryption key are the same as the Access Point.
Set the Operating Mode to Client.
Change the IP addresses to 192.168.0.101
When complete, set the dipswitch back to RUN ave
Client 2 Configuration
As for Client1 above, however set the IP address as 192.168.0.102
Connecting two different networks together (Routed Network)
LAN A Configuration
In this example, network A is connected to the internet via a router at IP address 192.168.0.1.
Devices on LAN A that require a connection to devices on LAN B, should set their Gateway IP addresses to the Ethernet
Address of the 450U-E Access Point/Router, i.e.192.168.0.200.
Devices on LAN A, that interact with devices on the internet and LAN B should set their Gateway IP Address to the
Internet Router (192.168.0.1) and then apply a routing rule for devices on Network B.
On PCs, this may be achieved with the MS-DOS command ROUTE. For example2 this would be: ROUTE ADD
169.254.102.0 MASK 255.255.255.0 192.168.0.200
4.12 Utilities
Figure 62 - Example Config 2

Elpro Technologies 450U-E Wireless Ethernet Modem & Device Server User Manual
54 www.cooperbussmann.com/wirelessresources Rev Version 1.4.0
LAN B Configuration
All devices on LAN B should be configured so their Gateway IP addresses are configured with the IP address
169.254.102.54 which is the 450U-E Access Point/Router.
Access Point Configuration
Connect straight through Ethernet cable between the PC and the 450U-E.
Ensure configuration PC and 450U-E are setup to communicate on the same network
Set dipswitch to SETUP
Power up unit, and wait for OK led to cease flashing.
Adjust PC network settings
Set Configuration PC network card with network setting of IP address 192.168.0.2, Netmask 255.255.255.0
Open configuration webpage with Internet Explorer at address 192.168.0.1XX where XX is the last two digits of the
mber
screen.
On this screen select the Transmit Power level, Transmit Data Rate, Frequency Step size and Transmit & Receive
Select Operating Mode as Access Point.
Enter a System Address (ESSID) string. And record as this will need to be exactly the same for all radios in the example.
The Radio Encryption is configured for WPA2 AES and will require an encryption key which will also need to be the same
on all radios in the example.
Change the IP addresses to 192.168.0.200
Leave the Subnet masks at the default 255.255.255.0
Leave the Gateway IP Address at the default 192.168.0.1 as it is not used in this example.
make some other changes to
the configuration before resetting the module.
This will then display separate IP address fields for Ethernet and Wireless.
As the Access Point is now configured as a Router it will route the IP traffic from one network to another.
Change the Wireless IP address to the 169.254.102.54 which is the IP address on the Wireless network.
Set dipswitch back to RUN
Client Configuration
Perform the same configuration steps as the Access Point configuration with the following differences:
Ensure that the Radio, System Address (ESSID) and Encryption key are the same as the Access Point.
Set the Operating Mode to Client.
Because the radio network is on a different IP range change the IP addresses to 168.254.102.53
Elpro Technologies 450U-E Wireless Ethernet Modem & Device Server User Manual
Rev Version 1.4.0 www.cooperbussmann.com/wirelessresources 55
Extending range of a network with a Repeater hop
Configure units as described in example above. Place the Access Point at the remote
intermediate repeater location. Additional repeaters can be added using Wireless Distribution System (WDS) refer
Section 3.9 Repeaters (WDS) for further details.
Figure 63 - Example Repeaters

Elpro Technologies 450U-E Wireless Ethernet Modem & Device Server User Manual
56 www.cooperbussmann.com/wirelessresources Rev Version 1.4.0
CHAPTER 4 - DIAGNOSTICS
Diagnostics Chart 4.0
LED Indicator
Condition
Meaning
OK
GREEN
Normal Operation
OK
RED Solid
Factory Default Mode, Supply voltage low or Internal Module Fault
OK
RED At Power On
Boot Loader delay at start-up
OK
Fast Flash RED / GREEN
Module Boot Sequence
OK
Slow Flash RED / GREEN
Module Boot Sequence
Radio RX
GREEN flash
Radio is receiving a valid Elpro 450U-E data frame.
Radio RX
RED flash
Radio is receiving a data frame with a low signal level. Threshold is
-100dBm for 2 level FSK and -90dBm for 4 level FSK
TX/LINK
GREEN
Connection Established to remote device
TX/LINK
RED Flash
Radio Transmitting
RS-232
GREEN flash
Data sent from RS-232 Serial Port
RS-232
RED flash
Data received to RS-232 Serial Port
LAN
ON
Link Established on Ethernet port
LAN
Flash
Activity on Ethernet port.
RS-485
GREEN flash
Data sent from RS-485 Serial Port
RS-485
RED flash
Data received to RS-485 Serial Port
I/O
GREEN
Digital Input is turned on (shorted to GND).
I/O
RED
Digital Output is active
I/O
Off
Digital Output OFF and Input is open circuit.
I/O
GREEN varying intensity
Analog input current in circuit (Dim =4mA, bright=20mA)
The green OK LED on the front panel indicates correct operation of the unit. This LED turns red for a number of reasons,
i.e. module has been reset to Factory default and will remain on until the module has been configured and reset. Also if
the module has a processor fault or the supply voltage is low.
When the OK LED turns red shutdown state is indicated. On processor failure, or on failure during start-up diagnostics,
the unit shuts down, and remains in shutdown until the fault is rectified. During Module, boot-up the OK LED flashes RED-
GREEN until the boot sequence is complete.
Boot Status LED Indication during Start-up
The OK LED indicates the status of the module during the boot up process. At power on, the OK LED comes on RED.
During kernel boot the OK LED flashes Red-Green at a 1Hz rate (½ second red, ½ second green). During module
initialisation, the OK LED flashes Red-Green at 0.5Hz rate (1-second red, 1-second green). When initialisation is complete,
the OK LED switches to green continuously.
If the OK LED remains red at power on, this could indicate either low supply voltage (The module will not attempt to boot
until supply voltage is within range); Module fault; or module is in Factory Default mode.
Elpro Technologies 450U-E Wireless Ethernet Modem & Device Server User Manual
Rev Version 1.4.0 www.cooperbussmann.com/wirelessresources 57
Connectivity 4.1
The Connectivity webpage displays information on the current connection with either the Client or the Access Point
depending on how it is configured. Wireless information will display the MAC address, IP
address, which interface is being used, the radio data rate, received signal strength (RSSI), authentication status and the
inactive time. The readings displayed are based upon the last received data message from the Client.
Note: When updating the Connectivity webpage, it is necessary to hold down the <ctrl> key while
pressing the refresh button to ensure the most up to date information is displayed.
Connectivity Parameters
Mac Address
Mac address of the connected device.
IP Address
IP Address of the connected device.
Interface
Interface being used for the connection. Will indicate Radio0 Radio5
depending on the interface. Radio0 is the main Network interface and
Radio 1-5 indicates the virtual WDS interfaces.
RATE
Radio Data Rate:
RSSI
The last radio receive signal strength from that site.
Auth
Shows if the modem is authenticated, i.e. modem has the correct SSID
s the modem has the correct SSID but
the wrong Encryption method/key, etc.
Inactive
Shows the last time data was received from the connected device.
If the default Run/Setup switch is enabled the radio is disabled and you will not see anythink in the
connectivity list. s Point can be heard
multiple entries will be displayed as per Figure 65. The table will display certain configuration parameters for each Access
Point, i.e. Mac Address, RSSI, SSID, etc.
To scan for a list of available Access Point, configure the Client with an SSID that is not available for connection, i.e. there
are no Access Points it can connect to. Save the Config and when the module has been restarted the Site Survey will
display a list of Access Points and their RSSI values. This information is useful for determining the best connection if
multiple Access Points are available.
This list is only refreshed when the module starts up and only if the Client is not connected to an
existing Access Point. When the Client does connect to an Access Point it will refresh the scan list
and so only indicate the Access Point it is connected to.
Site Survey Parameters
Mac Address
Mac address of the Access Point.
RSSI
The last radio receive signal strength from that AP. Only Scanned on
Figure 64 - Connected Wireless Devices
Figure 65 Site Survey

Elpro Technologies 450U-E Wireless Ethernet Modem & Device Server User Manual
58 www.cooperbussmann.com/wirelessresources Rev Version 1.4.0
startup.
Beacon Interval
Shows the Beacon Interval configure on the AP
SSID
Shows the Access Points SSID
Throughput Testing 4.2
Radio Throughput
There are a number of throughput estimations that may help to determine the amount of data that can be successfully
transmitted through the modems. These throughput estimations are based on perfect radio conditions, i.e. little to no
outside radio interference present while data is being passed and they are calculated using real life conditions and
communication constraints.
The performance of a wireless link is best measured in terms of the maximum throughput that can be achieved. The
recommended methods for measuring modem throughput are to use an external Modbus Client to poll the internal
Modbus Server on the remote modem or to use a FTP Server/Client arrangement and transfer a file, measuring the time it
takes to send. It is recommended that the throughput tests be performed on point to point link with minimal radio
interference, i.e. no communications from other wireless network traffic.
Modbus TCP.
Below is a table showing the maximum number of polls per minute (ppm) based on the radio receiver signal level.
Results show two different test polls using two different data speeds and with and without Data Compression. For more
details on what data compression is and how to implement it, read section 3.7 Data Compression
The test is designed to simulate a Modbus TCP Client polling a Modbus TCP server through the radio modems utilising
the two different data rates (2 Level FSK and 4 Level FSK) and scanning a different number of I/O points.
Setup for the Modbus Client was made to simulate the fastest polling rate possible and then determine the number of
messages that were successfully polled in a one minute period. TCP Client scan rate was 5msec, poll delay was 5msec
and the Slave response time was 10seconds.
Typical results for this setup are shown below.
Data Throughput Modbus (Polls per Minute)
4800 baud (2 level FSK)
9600 baud (4 Level FSK)
20 Words @ maximum Scan rate No Compression
72 Ppm
91 Ppm
20 Words @ maximum Scan rate With Compression
89 Ppm
113 Ppm
120 Words @ maximum Scan rate No Compression
50 Ppm
58 Ppm
120 Words @ maximum Scan rate With Compression
89 Ppm
113 Ppm
FTP Transfer
Another means for gauging the data throughput performance of the modem is to transfer a known data file using FTP (File
Transfer Protocol) and time how long it takes for the file to download. l need to run an FTP server
application, i.e. Fillzilla, Cerberus Server, etc and the other as an FTP client. Because the 450U-E has a reduced
throughput compared with other Ethernet modems you will need to adjust the connection timeout under the settings
within the application. Below are some estimated throughputs for ftp transfer using different radio baud rates.
Note: the results will vary depending on the type of file that is being sent and if Compression is
enabled or not.
Data Throughput FTP (file transfer)
4800 baud (2 level FSK)
9600 baud (4 Level FSK)
100k text file No Compression
294sec @ 0.34kB/s
185sec @ 0.72kB/s
100k text file With Compression
65sec @ 1.54kB/s
46sec @ 2.17kB/s
134k jpg file No Compression
404sec @ 0.33kB/s
185sec @ 0.72kB/s
134k jpg file With Compression
215sec @ 0.62kB/s
183sec @ 0.73kB/s
Elpro Technologies 450U-E Wireless Ethernet Modem & Device Server User Manual
Rev Version 1.4.0 www.cooperbussmann.com/wirelessresources 59
Iperf Throughput Test
A more thorough test is to perform a throughput test which will check the amount of data that can be reliably achieved via
the Wireless link. There are a number of software tools that we can use to check the data throughput, i.e. FTP - file
transfer protocol, Iperf, Qcheck, etc. bandwidth measurement application that is run on a
Laptop or PC at each end of the radio link. The Iperf/Jperf application can be downloaded from
http://sourceforge.net/projects/iperf/
a over the link, calculate the results and then display the throughput
accordingly.
See Appendix G - External Iperf Test
throughput.
All of the above procedures measure the raw data throughput and from these throughput measurements we can
determine if interference is a contributing factor in the overall performance of the modems.
Statistics 4.3
The Statistics webpage is used for advanced debugging of 450U-E. This webpage details the state of the 450U-E and
performance information. This page is typically useful to ELPRO technical support personnel in diagnosing problems with
the module.
Note: When updating the Statistics webpage, it is necessary to hold down the <Ctrl> key while
pressing the refresh button to ensure the most up to date information is displayed.
The Statistics Page is used for gathering information about how the module is connected and communicating. It is
comprised of a number of dynamic list boxes with each showing particular statistics about its function.
Interface Statistics: will show the number of bytes transmitted and received as well as the number of CRC errors,
dropped packets, fifo alarms and the different types of frames (fragmented, compressed or multicast).
tion as this will indicate how the Radios are
communicating.
Time: shows the amount of time the module has been running since its last reset.
System Log: shows a running log of information about how the modules operating system is running. This log will also
log any errors and resets.
Figure 66 - Statistics

Elpro Technologies 450U-E Wireless Ethernet Modem & Device Server User Manual
60 www.cooperbussmann.com/wirelessresources Rev Version 1.4.0
Routes: will display the current IP routes configured in the module.
IP statistics: show a number of statistics for each interface
TCP/UDP Statistics: shows the number of TCP and UDP connections currently established
Memory Statistics: shows the amount of memory available for each function.
Serial Statistics: shows the current status of each of the serial ports.
Network Traffic Analysis
There are many devices and PC programs that will analyse performance of an Ethernet network. A freely available
a simple cost effective means for more advanced analysis. By monitoring traffic on
the wired Ethernet, a better idea of regular traffic can be discovered.
Network Analysis programs make configuration of a filter for the 450U-E a simple task.
Channel Survey (Utilisation) 4.4
Channel Utilisation gives a visual display of how busy the current radio channel is over a given period of time.
Channel Utilisation is logged by the radio over three separate time intervals: 1 Second which will cover the last 60
seconds; 1 Minute which covers the last 60 minutes; and 1 Hour which covers the last 60 hours.
At any given time, an Access Point and its associated clients occupy a radio channel. This radio channel, or frequency,
may contain interference from other radio transmitters. When installing or diagnosing the 450U-E modem, the potential
capacity of a given radio channel will be reduced by the existence of these other interfering RF signals.
Channel Utilisation allows us to see how much RF activity is on a given channel as a percentage of the total utilisation.
When looking at the utilisation graph you need to look at the average percentage level rather than the peak bursts, also
look at the average percentage over a longer time period. If the graph shows bursts of 60-80% utilisation then this is
normal as the 450U-E uses the majority of the channel when transmitting due to the lowers bandwidth.
If most of the graph is filled to 60-80% then this would indicate there is excessive traffic. A channel that is very busy will
have high channel utilisation. Conversely a channel that is quiet will have low channel utilisation.
Channel Survey and Custom Survey can therefore be valuable tools to use when performing site surveys as it allows you
to determine how much of the frequency is being used. It is also a valuable diagnostics tool for identifying possible
sources of interference.
Channel Utilisation on a Live System:
Channel Utilisation can be used on a live system and is the simplest method for determining how busy the channel is and
to get an indication of how much spare capacity the channel has for additional data transfers. Performing a standard
Channel Survey Scan on a live system will show all Transmit & Receive packet from the system. It may also show
Transmit & Receive packet for other systems if they happen to be on the same frequency.
To identify possible interference on the current channel you can use the selection on the Custom Survey
page. If possible, temporarily disable all data transfer on the system, and if the Channel Utilisation remains high this will
confirm the presence of outside interference.
Diagnosing Low Throughput:
If normal communications between modems is poor, i.e. data throughput measurements from the previous section are
lower than estimated it could be attributed to interference. The Channel Utilisation graphs can be used to confirm how
much other radio traffic or interference is present. If the Channel Utilisation is high, then this could be the contributing
factor for the poor throughput performance. If the Channel Utilisation was low (indicating little interference), then this could
be attributed to a low RSSI, which can be checked on the Connectivity of the menu.

Elpro Technologies 450U-E Wireless Ethernet Modem & Device Server User Manual
Rev Version 1.4.0 www.cooperbussmann.com/wirelessresources 61
Channel Utilisation Graphs:
The Channel Survey screen displays a graph showing the percentage of time that a channel is being utilised by any of the
following causes:
1. The connected modem is transmitting.
2. The connected modem is receiving valid data from other Elpro 450U-E modems in the system.
3. The connected modem is receiving valid data from other 450U-E modems not in the system but on the same
frequency or from modems in the same system that are not communicating directly but through repeaters.
There are three different time periods displayed on the page, 1 second, and 1 minute and 1 hour. Each one shows the
channel utilisation and background noise level over that time period.
Figure 67 - Channel Utilization Seconds
The first screen shows the radio traffic on the channel over the last 60 seconds as well as a calculated average
percentage of utilisation for the 1 minute period.
Figure 68 Background Noise (Sec)
The next screen shot shows the radio background noise level for the last 60 seconds.
Figure 69 - Channel Utilisation Minutes
Elpro Technologies 450U-E Wireless Ethernet Modem & Device Server User Manual
62 www.cooperbussmann.com/wirelessresources Rev Version 1.4.0
The third screen shot shows the Channel utilisation for each minute over a one hour period. Each minute is calculated
from the running average of the 60 second scan.
Figure 70 - Background Noise Minutes
The last screen shot shows the running radio background average noise level for each minute over the last 0ne hour
period.
The Channel Survey page also shows two other screen shots (not shown here) which indicate the Percent Channel
Utilisation (average readings from each minute) and the Noise Floor in one hour intervals (The screens will only show the
last 60 hour period.
Custom Survey 4.5
Custom Survey is made up of two separate charts that can be configured to display different radio channel characteristics
over three different time scales (Seconds, Minutes or Hours).
The custom survey is essentially the same as the channel survey (explained in the previous section) except it allows
different channel related data to be displayed which is useful for diagnosing channel utilisation s problems.
The default selection on the custom page will display the total percentage of transmitted frames over a 60 second period
in chart one and the total percentage of received frames over a 60 second period in chart two. From this default view we
can determine if there are too many transmissions being sent from this radio or if there is too many radio messages being
received from other sites in the radio network.
To display different data select the appropriate parameter from the drop down list and select the
to refresh the chart.
As there are two separate charts different data values can be displayed and compared at the same time.
The data components available for graphing are displayed in the following table:
Custom selections
Description
All TX & RX Frames
All ELPRO transmissions sent and received by the radio being monitored. This
option is the same as the normal channel survey which is explained in the previous
section.
All TX Frames
All data frames transmitted by the radio being monitored. This is the default for
chart one and will help to segregate the overall channel utilisation into transmissions
from the radio in question or transmissions from other radios. This option
encompasses TX first attempt, TX retries and TX Ack messages from below.
All RX Frames
All data frames received by the radio being monitored. This is the default for chart
two and will display only received ELPRO data frames.
TX First Attempt Messages
The amount of time spent transmitting first attempt messages from the modem, i.e.
All messages will be retried if the first do not succeed. This option allows us to log
the number of times messages fail to get through on the first attempt, which can
indicated some level of interference as the message may have clashed with other
radio messages. This option and the following two are useful for breaking down the
amount of time that is spent transmitting messages into normal transmissions,
retries and acknowledgements.
TX Retries
The percentage of time spent transmitting retry messages from the modem. This is

Elpro Technologies 450U-E Wireless Ethernet Modem & Device Server User Manual
Rev Version 1.4.0 www.cooperbussmann.com/wirelessresources 63
useful for determining if the communications get through after the first retry or it
continues to fail
TX Acknowledge messages
The percentage of time spent transmitting acknowledgment messages from the
modem and Broadcast messages.
Radio Hold off
The percentage of time that the radio has spent holding off from transmitting data,
possibly because the channel is busy.
RX to this radio
The percentage of time receiving messages specifically for the radio being
monitored, i.e. valid Elpro radio communication frames from other modems in the
system that are specifically addressed to this modem.
RX to other radios
The percentage of time receiving valid ELPRO messages addressed to other radios
within the system i.e. radios that maybe talking through a repeater and the host can
hear the message directly. Useful for determining how much radio traffic the
modem can hear that it may not need to.
RX acknowledgements
The percentage of time receiving acknowledge messages
RX Errors
The percentage of time dealing with radio receive error messages, i.e. corrupted
data, Data Collisions, etc.
By configuring the different chart options from above we can get a clear idea of the percentage of time spent handling
transmit and receive messages and/or the amount of other receive data that can be heard at the radio.
Configure what is to be logged from the drop down list, select a time interval, hanges and the charts will
then redraw the graphs and display below the settings. Each graph will display a percent channel utilisation using the
selected criteria and time interval (Seconds, Minutes or Hours).
Example One.
A good test would be to configure chart one to show ll data frames transmitted over the
radio link and chart two to show Rx valid data frames received from any source (ELPRO 450U-E
data frames). We can see from the results in Figure 71 - Custom Survey 1 that there is a large amount of data
being transmitted at the end of the chart and the receive data in chart two also shows a slight increase in traffic. From this
we can deduce that the radio itself or a device on the Ethernet network of the radio is transmitting a large amount of data.
If the charts showed an increased number of RX Frames instead of TX frames then this would indicate one or all of the
remote radios are transmitting excessive data and it would be advisable to perform the same TX/RX Custom survey on
these remote site/sites to determine the cause for the excessive data.
Figure 71 - Custom Survey 1
Elpro Technologies 450U-E Wireless Ethernet Modem & Device Server User Manual
64 www.cooperbussmann.com/wirelessresources Rev Version 1.4.0
Example Two.
In the second example we can see chart one shows the radio is transmitting a large amount of data in the last half of the
sixty second scan. We can configure the second chart to read specific information about the radio link which can help us
determine what shows that the radio is holding off from
transmitting around 36% of the time which is a clear indication that the radio frequency is busy. The other two charts
show that it is not transmitting many acknowledgements but is send a number of first attempts indicating that it is
initiating the increase in communications.
Network Diagnostics 4.6
Network Diagnostics allows you to check the communications path to other modules within the system.
Ping
Ping is a standard Network instruction that sends out a small data probe to the IP address configured letting you know if
you have a communication path or not.
You will receive a response for each Ping, which will show a packet size, IP Address, Sequence number and a time in
milliseconds.
Followed by a summary showing the number of packets transmitted, the number of packets received, any lost packets
and the Minimum, Average and Maximum Ping times in milliseconds.
A Ping can be done on either the Radio Network or Ethernet Network. The ping command will automatically select the
correct network interface according to the address selected.
Figure 72 - Custom Survey 2
Figure 73 Network Diagnostics
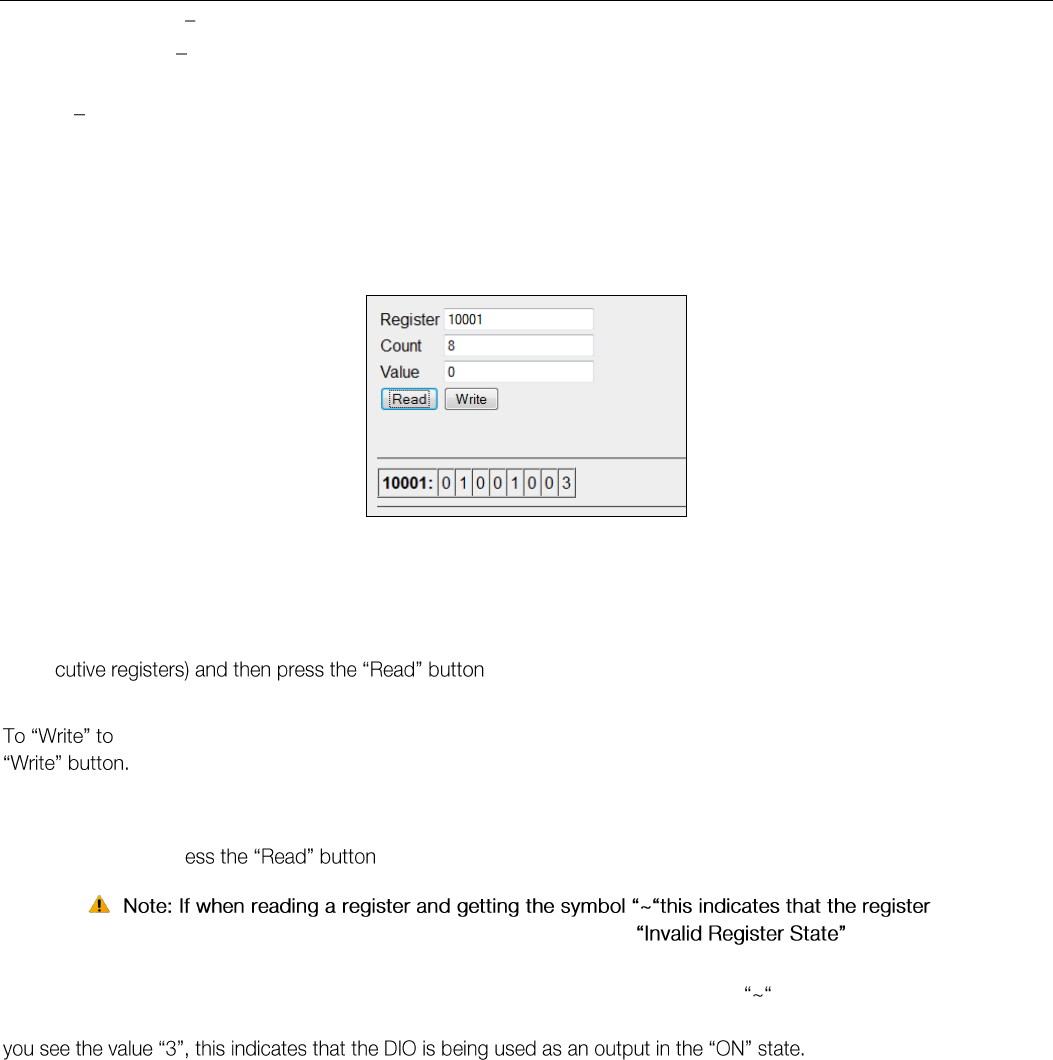
Elpro Technologies 450U-E Wireless Ethernet Modem & Device Server User Manual
Rev Version 1.4.0 www.cooperbussmann.com/wirelessresources 65
Remote IP Address This is the IP address that you want to Ping
Count / Max Hops This is the number of Ping probes that are send out. You should see this many responses come
back.
Interval Wait time between ping requests. Default is 5 seconds and generally will not need to be changed unless using
repeaters.
When pinging on the radio network, the response time for the first ping will be longer if the device needs to establish a
network route to the destination.
IO Diagnostics 4.7
Selecting this option from the main screen will allow some basic reading and writing of the I/O store registers within the
module.
To read a register location, enter an address location, e.g. 10001-12500 (for digital Inputs), enter a count (number of
conse
Below the buttons, you will see the returned address location and the returned values
an Output register location, E.g. 1-2500, enter the address location, count, and value and then press the
E.g. Write to Register 1 with a count of 1 and a value of 1 will turn the Local Digital Output on.
To Read an Analog register location, enter an address location, e.g. 30001-32500 enter a count (number of consecutive
registers) and then pr
is in an
invalid state and has no value (not even zero). see 3.13 for more details on
Invalid register states.
Using the I/O Diagnostics enables you to check the register locations for invalid states , read Digital or Analog input
states and even write values to internal register or the DIO if required. If when reading the Status of the DIO on the module
Modem Module Information Registers
There are registers available in the module that show a number of the modules characteristics, i.e. Serial Number,
Firmware version, etc.
This information is available on the main Web page of the module however having the information available in registers
allows a Host system to read the values via Modbus (provided the Modbus has been activated)
Register 30494, 30495 & 30496 = Module Serial number
Register 30497, 30498 & 30499 = Module Firmware version
Register 30500 = Firmware patch level.
Figure 74 - I/O Diagnostics

Elpro Technologies 450U-E Wireless Ethernet Modem & Device Server User Manual
66 www.cooperbussmann.com/wirelessresources Rev Version 1.4.0
Expansion I/O Diagnostic/Error Registers
The 450U-E has a number of diagnostics registers that are allocated for Expansion I/O diagnostic information. Every
connected module will have its own diagnostic information which will indicate the module type, error counts, error codes,
etc. The Register locations are dynamic with regard to the module address and require an offset to read the correct
location. modules Modbus address, which can be read on the rotary switches on the
end on the expansion module and multiply this by the 20
E.g. If connecting a module that has an address of 2 the offset will be (2 x 20) = 40, or if the address of 18 the offset will
be (18 x 20) = 360.
Each Expansion I/O module has the following diagnostic registers. Add the offset to the fixed register number to get the
actual register location
Fixed Register
Description - Example
30017
Modbus Error Counter, Number of Modbus errors the modules has had since powered on) E.g. If
the module address is #2 then the register location will be 30017+ (2*20) = 30057
30018
Last 115S Status Code / Modbus Error Code that the module has had. E.g. If the module address
is #2 then the register location will be 30018 + (2*20) = 30058
30019
Modbus Lost Link Counter, (Number of communication errors) E.g. If the module address is #2 then
the register location will be 30019 + (2*20) = 30059
30020
Expansion I/O Module Type. E.g. If the module address is #2 then the register location will be
30020 + (2*20) = 30060
dec 257 (101hex) indicates a 115S-11 module
dec 513 (201hex) indicates a 115S-12 module
dec 769 (301hex) indicates a 115S-13 module
115S Expansion I/O Error Codes
These Error codes are initiated by the 450U-E when trying to communicate with 115S expansion I/O modules and will
only be available if Expansion I/O has been selected in the serial configuration.
Dec
Code
Hex
Code
Name
Meaning
1
0x0001
No Response
No response from a poll
2
0x0002
Corrupt/invalid
Corrupt or invalid data
3
0x0003
CRC Fail
CRC error check does not match the message, Different message or
possible data corruption.
4
0x0004
Response did not
match request.
The response heard was not the correct ID, possibly heard other RS485
traffic.
5
0x0005
Message type did
not match
request.
The response heard did not match the requested poll, i.e. different
command response, possibly heard other RS485 traffic.
81
0x0129
Problem
accessing local
memory
Could not access register location, possibly because the register is not
initialised
There are other Modbus Error Response Codes explained in Appendix D which are responses from the Slave device
showing any errors it has with the communications.
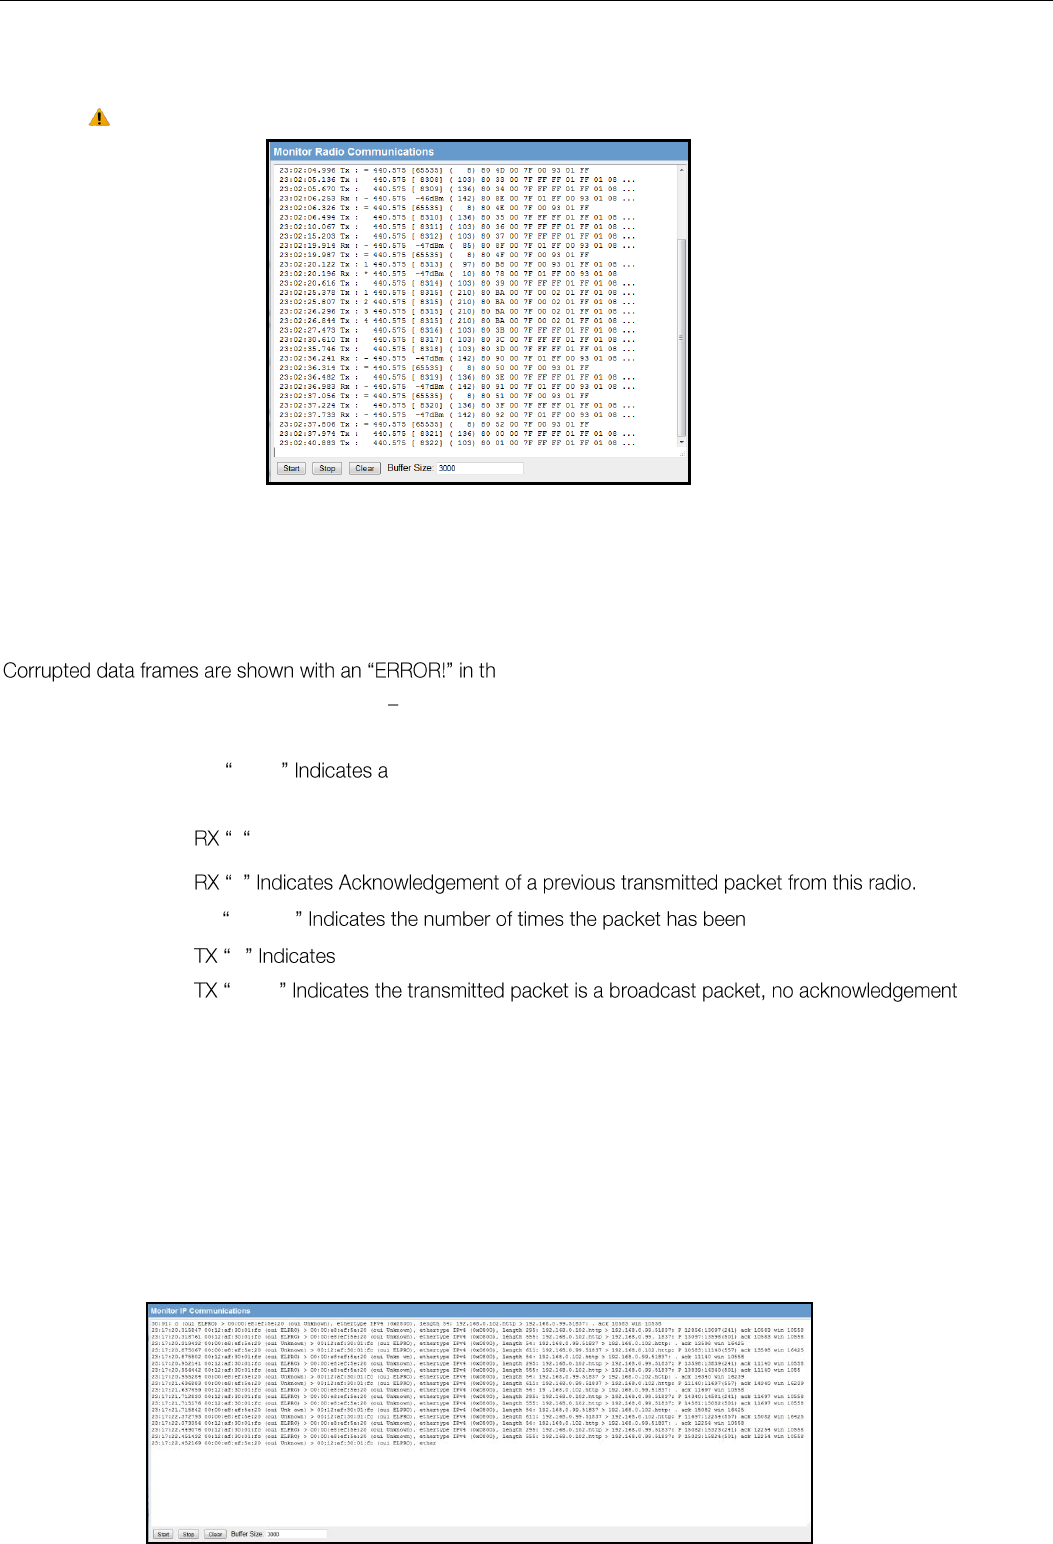
Elpro Technologies 450U-E Wireless Ethernet Modem & Device Server User Manual
Rev Version 1.4.0 www.cooperbussmann.com/wirelessresources 67
Figure 75 - Monitor Radio Comms
Comms
Monitor Radio Comms 4.8
The Monitor Radio Comms page shows radio communication frames that are received or transmitted by the radio.
Note: Comms log will display Elpro 450U-E data frames only.
Figure 75 - Monitor Radio Comms
Comms above shows typical data frames from the communication log screen.
Below is a table explaining each of the fields within the data frame.
e frame.
Monitor IP Comms 4.9
This option shows the standard IP communication data frames and allows you to see the Source and Destination MAC
addresses along with some other IP Comms data. More information on standard IP Comms can be found on the internet.
Time
Message Time Stamp Time from when module was last started
Message Type
Displays if message is a Transmit (Tx) or a Receive (Rx) Ethernet frame
Frame
designator
RX blank Received packet is a broadcast packet, no acknowledgement is
required.
-Indicates Received packet requires a message acknowledgement
*
TX 1,2,3,4 transmitted, i.e. reties
=the Transmitted packet is the acknowledgement of a previous received frame.
blank
required.
Frequency
Shows the Frequency of the RX/TX frame
Signal /Seq
Number
Shows the Receive Signal Level on any received message or an internal sequence number for
the transmitted message.
Data Length
Total length of the transmitted or received message
Data
Data packet
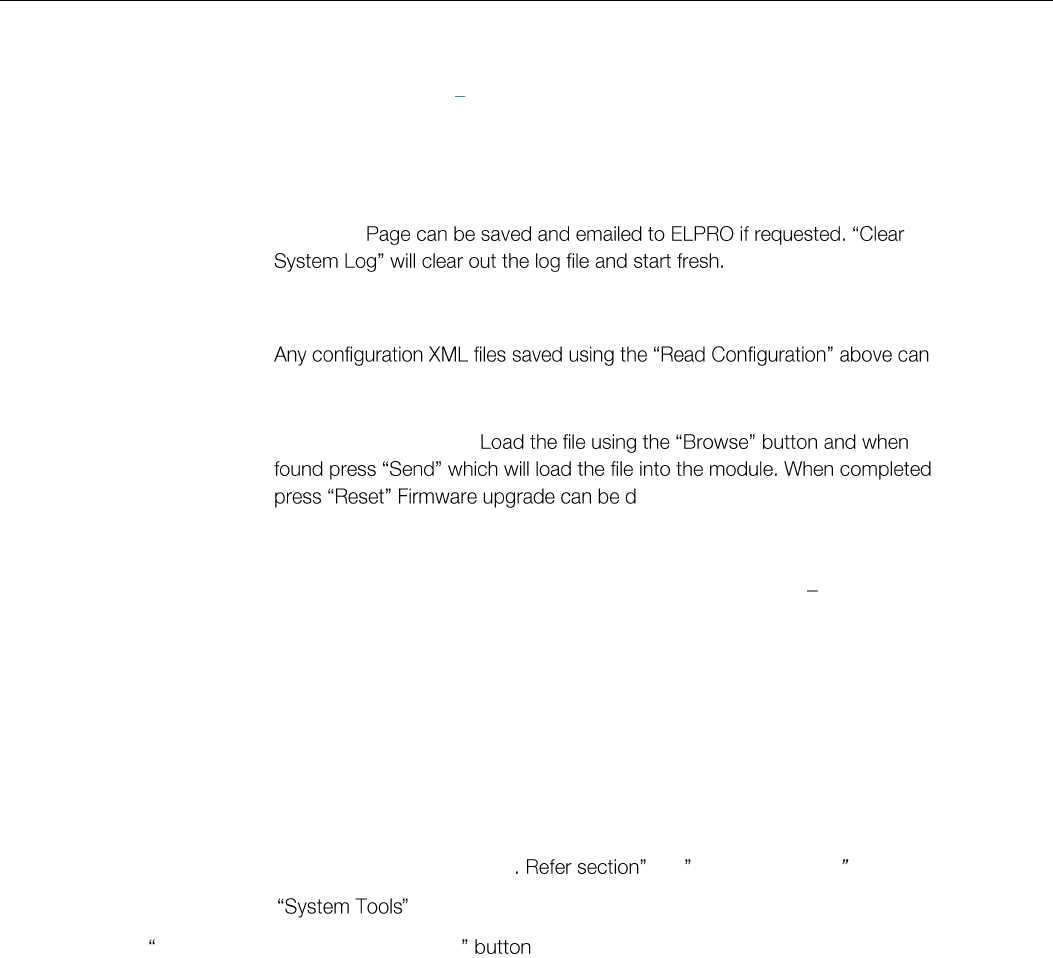
Elpro Technologies 450U-E Wireless Ethernet Modem & Device Server User Manual
68 www.cooperbussmann.com/wirelessresources Rev Version 1.4.0
System Tools 4.10
The System Tools Page has a number of tools that help maintain the module firmware and configuration.
System Log File
Shows an event log of the modules operation, used for diagnosing
problems.
Read Configuration File
This option will show the module configuration in XML format. This file can
be saved for future reference or backup.
Write Configuration File
be loaded back into the module
Firmware Upgrade
This option is used for Patch firmware upgrades only. See Appendix A - for
full upgrade procedure.
one locally or remotely via the
radio.
Reset
Resets the module
Factory Default
Configuration
Loads the Factory default configuration and resets. CAUTION Doing this
will overwrite any current configuration
Setting a 450U-E to Factory Default Settings
Access the configuration webpages on the 450U-E 3.2 Initial Connection .
Click on the menu item from the main menu.
Click on Factory Default Configuration Reset , and wait for unit to reset. While the module executes the reset sequence the OK LED will flash. The OK LED will turn green when the reset sequence is complete.
When complete you should be able connect to the modules default IP address which will be displayed on the label on the bottom of the module.
Module Information Configuration 4.11
Module Information Webpage Fields
This configuration page is primarily for information purposes. With the exception of the password, the information entered
here is displayed on the home configuration webpage of the 450U-E.
Username
Configuration of Username. This is the username used to access the
configuration on the 450U-E. Take care to remember this username if you
change it as it will be needed to access the 450U-E in future.
Password
Configuration of Password. This is the password used to access the
configuration on the 450U-E. Take care to remember this password if you
change it as it will be needed to access the module in future.
Device Name
A text field if you wish to label the particular 450U-E. This is also the DNS
Figure 76 Monitor IP Comms
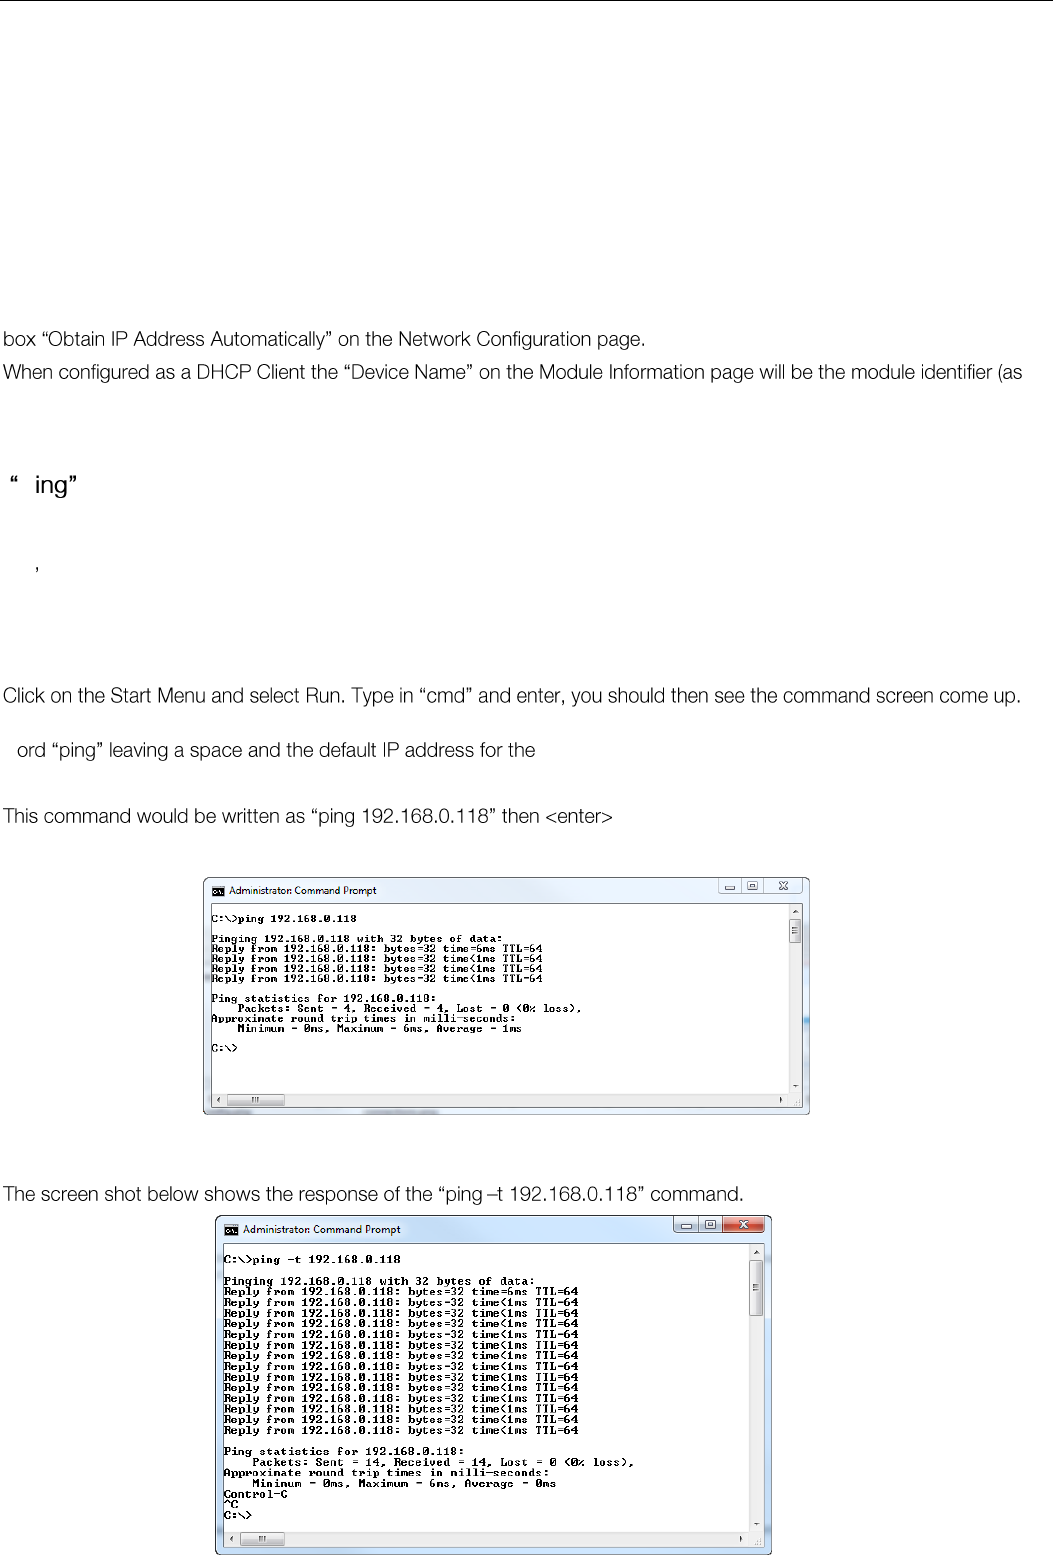
Elpro Technologies 450U-E Wireless Ethernet Modem & Device Server User Manual
Rev Version 1.4.0 www.cooperbussmann.com/wirelessresources 69
name (hostname) of the device if you are using DNS.
Owner
A text field for owner name.
Contact
A text field for owner phone number, email address etc.
Description
A text field used for a description of the purpose of the unit.
Location
A text field used to describe the location of the 450U-E.
Configuration Version
A text field used to enter in a version for the configuration
DHCP Client Configuration
DHCP (Dynamic Host Configuration Protocol) allows DHCP Clients to automatically obtain their IP Address at start-up.
This simplifies network administration, as there is no need to manually configure each device with a separate IP Address.
The 450U-E is able to act as a DHCP client. To set the 450U-E to acquire its IP address from a DHCP Server, check the
the IP address will be unknown) and so should be given a unique name.
Utilities 4.12
P
Ping is a basic Internet program that lets you verify that a particular IP address exists and can accept requests. Ping is
used diagnostically to ensure that a host computer you are trying to reach is actually operating. If, for example, a user
can t ping a host, then the user will be unable to send files to that host. Ping operates by sending a packet to a
designated address and waiting for a response. The basic operation of Ping can be performed by following these steps in
any Windows operating system.
There will be a certain directory specified (unique to your own PC) with a flashing cursor at the end. At the cursor type the
w 450U-E at first start-up.
to send the ping command. The PC will reply with
an acknowledgement of your command and if your 450U-E is correctly configured the reply will look something like this.
Figure 77 - Ping
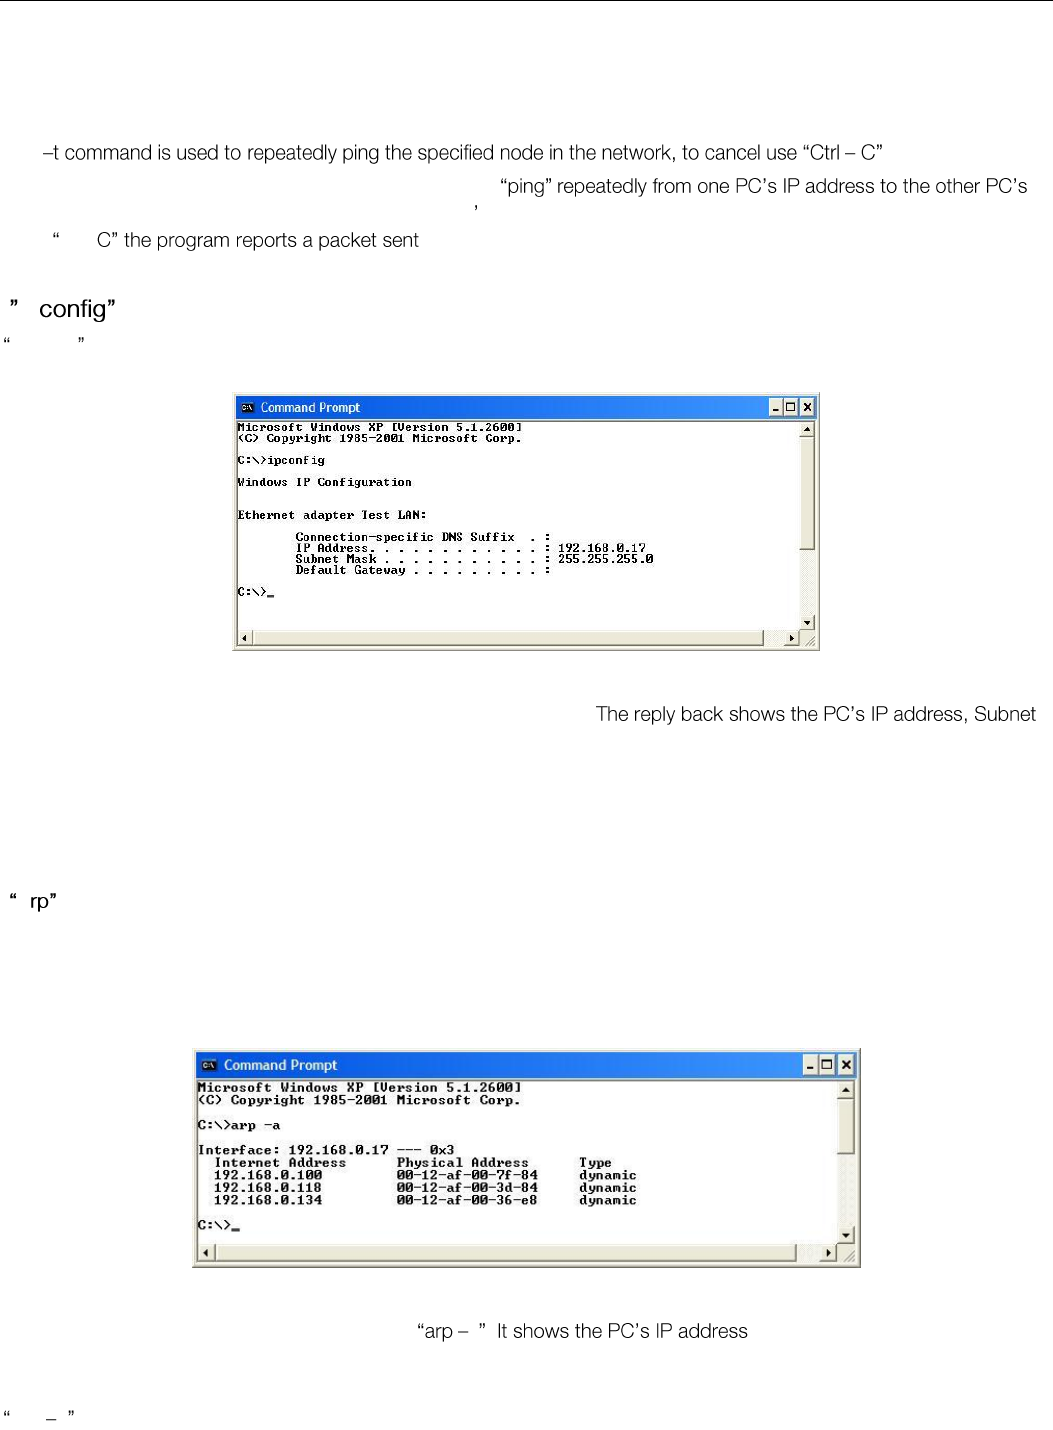
Elpro Technologies 450U-E Wireless Ethernet Modem & Device Server User Manual
70 www.cooperbussmann.com/wirelessresources Rev Version 1.4.0
This
A good test for the network once it is first set up is to use
IP address. This gives a good indication of the network s reliability and how responsive it is from point to point. When you
enter Ctrl- -received-lost percentage.
Ip
ipconfig can be used to show your current TCP/IP information, including your address, DNS server addresses, adapter
type and so on.
Figure 79 - Ipconfig
In the above example ipconfig was entered in the command prompt.
mask and the gateway it is connected to.
Other ipconfig commands will return back more information. The hardware or MAC address of the computer may be
discovered using the command ipconfig /all.
Ipconfig /? Lists all of the commands and their usages available for use.
A
Displays and modifies the IP-to-Physical address translation tables used by Address Resolution Protocol (ARP).
Once a remote computer has been pinged, this can be used to see the IP address & MAC address of the remote
computer. It will also show any other devices on the network that it may be connected to.
Figure 80 - Arp
The command used in the screen shot above is a . like the previous ipconfig
command, in this case the IP address is still 192.168.0.17. It also shows the IP address and its associated MAC address
of any another device that has a connection to it.
Arp ? Lists the commands available for this function.
Figure 78 - Ping-t
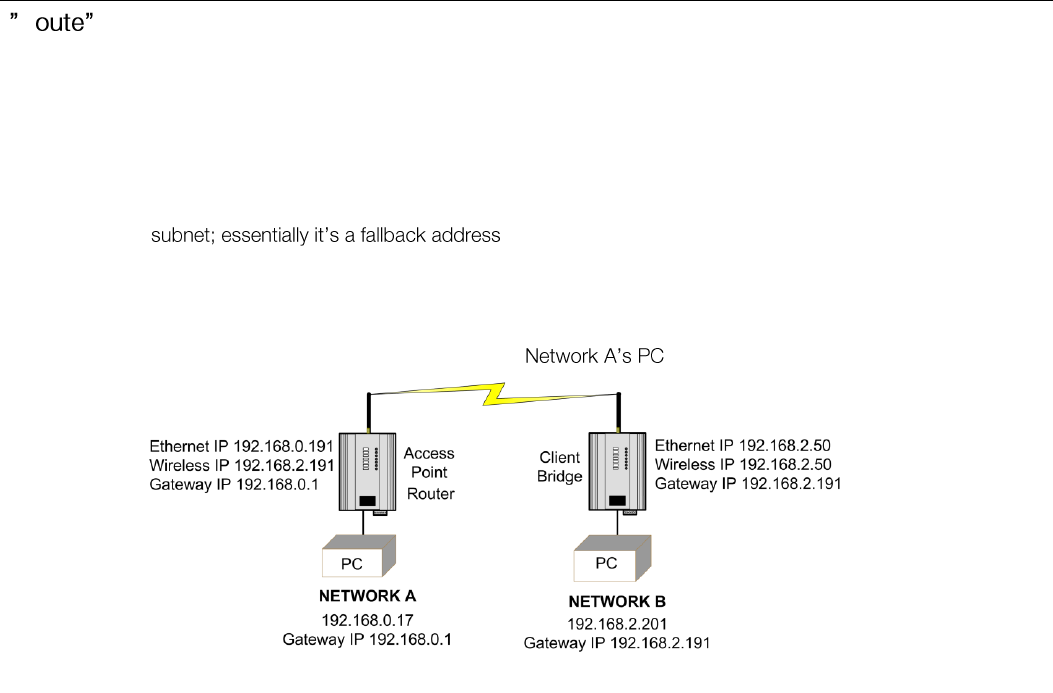
Elpro Technologies 450U-E Wireless Ethernet Modem & Device Server User Manual
Rev Version 1.4.0 www.cooperbussmann.com/wirelessresources 71
R
Route is used when joining two or more different networks together via the 450U-E. Refer to Section 1.1 for more details.
When routing from one subnet to another devices on one subnet need to know where to pass the message to get it to
the other subnet. This is done one of two ways;
Setting up a route within the device which is a lookup table showing a list of subnets and which IP address to use
as the Gateway.
Setting up a default Gateway address on the modem. This is a link to an IP address that knows how to get to the
required where if it does not know where to send the message it will
sent it to the default Gateway.
If there are multiple networks each with a different IP range, routing rules must be used as the Default Gateway only
allows one address to be configured.
In the example below a routing rule needs to be entered into which will allow access from Network A to
Network B.
To enter a Routing rule:
Open a DOS command window and enter the following command at the prompt.
Route ADD 192.168.2.0 MASK 255.255.255.0 192.168.0.191
This routing rule states that if you wish to access any IP address on network B (192.168.2.0) with the Netmask of
255.255.255.0 the message needs to be sent to 192.168.0.191.
Devices on Network B should also have their Default Gateway Address set to the Routers Wireless address
(192.168.2.191). This will ensure that any traffic destined for the 192.168.0.0 network can be returned successfully.
There are a number of Route commands that can be used to edit, manipulate, and delete routing rules. They are briefly
explained below.
Route PRINT: will show all active routes on PC,
Route ADD: will add a routing table to network, format: Route<IP Address> Mask<Subnet Mask> <Route IP Address>
Route DELETE: will delete the unwanted routing table, format: Delete <Destination IP >
Route CHANGE modifies an existing route, format: Change<IP Address> Mask<Subnet Mask> <Route IP Address>
Figure 81 - Route

Elpro Technologies 450U-E Wireless Ethernet Modem & Device Server User Manual
72 www.cooperbussmann.com/wirelessresources Rev Version 1.4.0
CHAPTER 5 - SPECIFICATIONS
Transmitter/Receiver
Frequency
360-512MHz (8 x 20MHz bands)
Transmit Power
Licensed - 5 Watt (+37dBm), Unlicensed 0.5Watt (+27dBm)
Data Encoding
2-FSK, 4-FSK
Receiver Sensitivity
25 KHz channel : -99dBm @19,200 baud, -110dBm @ 9600 baud
12.5 KHz channel : -100dBm @9600 baud, -111dBm @ 4800 baud
Channel Bandwidths
25 KHz channel
12.5 KHz channel
Data Rate
25 KHz channel : 4800 baud, 9600 baud
12.5 KHz channel : 9600 baud, 19,200 baud
Range, Line of Site (LoS)
50Km (31mi.) @ 5Watts
10Km (6mi.) @ 0.5Watts
Antenna Connector
Female SMA Standard Polarity
Input/Output
Discrete I/O (1)
Discrete Input - Voltage-Free Contact Max 30VDC, 5mA Wetting Current
Discrete Output - FET 30Vdc 500mA
Analog Input - Current sinking, 4-24mA +/- 0.2% Accuracy, 150 Ohm
Impedance
Ethernet Port
Ethernet Port
10/100baseT; RJ45 Connector IEEE 802.3, Auto MDIX
Link Activity
Link, 100baseT via LED
Serial Port
RS232
DB9 Female DCE; RTS/CTS/DTR/DCD
RS485 (2)
2-Pin Terminal Block Non-Isolated
Data Rate (Bps)
1200, 2400, 4800, 9600, 14400, 19200, 38400, 57600, 76800, 115200,
230400 Bps
Serial Settings
7/8 Data Bits; Stop/Start/Parity (Configurable)
Protocols/Configuration
System Address
ESSID; 1 31 Character Text String
Protocols Supported
TCP/IP, UDP, ARP, SNMP, RADIUS/802.1x, DHCP, DNS, PPP, ICMP,
HTTP, FTP, TFTP, TELNET, MODBUS and MODBUS-TCP
User Configuration
User Configurable Parameters via HTTPS Embedded Web Server
Configurable Parameters
Access Point/Client/Bridge/Router
Point-to-Point, Point-to-Multi-Point
Wireless Distribution System (AP - AP repeater)
Modbus TCP/RTU Gateway
Serial Client/Server/Multicast
Simultaneous RS232/485 connection

Elpro Technologies 450U-E Wireless Ethernet Modem & Device Server User Manual
Rev Version 1.4.0 www.cooperbussmann.com/wirelessresources 73
Embedded Modbus Master/Slave for I/O transfer
Security
Data Encryption 802.11i With CCMP 128bit AES
Support for 802.1x Radius Server
Secure HTTP Protocol
Bandwidth Protection
MAC Address Whitelist/Blacklist
IP Filtering Whitelist/Blacklist
ARP/GARP Filtering Whitelist/Blacklist
LED Indication/Diagnostics
LED Indication
Power/OK; RX; TX/Link; RS232; LAN; RS485; Analog/Digital I/O status
Please refer to product manual for further information
Reported Diagnostics
RSSI Measurements (dBm); Connectivity Information/Statistics; System Log
file
Network Management
Compatible with Cooper Network Management System
Compliance
EMC
USA - FCC CFR47 P 90,15; CAN - IC RSS 119; EU - EN301 489-3; AS/NZS
- CISPR22
RF (Radio)
USA- FCC CFR47 P 90,15, CAN - IC RSS 119, EU - EN300113-2/
EN300220-2, AS/NZS - AS/NZS4295
Hazardous Area
CSA Class I, Div 2; ATEX IEC Ex zone2
Safety
UL Listed, IEC 60950 (RoHS Compliant)
General
Size
186 x 115x 36mm (7.3 4 4
Housing
IP20 Powder-Coated Aluminum
Mounting
DIN Rail
Terminal Blocks
Removable; Max conductor 12AWG (2. 5mm2)
Temperature Rating
-40 to +70°C ; -40 to +120°F
Humidity Rating
0 99% RH Non-condensing
Weight
0.55kg (1.2lb).
Pollution Degree
2 - Not sealed, not subject to dust, dirt, condensation
Installation Category
2- Transient voltages are not higher than 2.5 kV at 250 V ac supply
Altitude
0 - 2000m (6500ft)
Power Supply
Nominal Supply
9 to 30Vdc; Under/Over Voltage Protection
Average Current Draw
120mA @ 13.8V (Idle);70mA @ 24V (Idle)
Transmit Current Draw
1.2-1.5A @ 13.8V (5Watts); 550-650mA @ 24V (5Watts)
Note: Specifications subject to change.
1) Can be used to transfer I/O status or Communications Failure Output
2) Maximum Distance 1200 Meters

Elpro Technologies 450U-E Wireless Ethernet Modem & Device Server User Manual
74 www.cooperbussmann.com/wirelessresources Rev Version 1.4.0
Appendix A - Firmware Upgrades
You can check the firmware version that is present in the module by viewing the Home webpage of the module.
Firmware upgrades should be done locally with a PC connected directly to the module, remote firmware upgrades are not
recommended over the radio link due to bandwidth limitations.
Firmware Upgrade USB (Full Firmware Upgrade)
Firmware can be upgraded using a USB flash drive with the firmware files installed. Typically a full USB upgrade is
required if the existing firmware is a much older version and requires multiple patch files to upgrade to the latest version or
a patch file may not be available for the particular version to version.
The following procedure will guide you through performing a full USB firmware upgrade on a 450U-E
Requirements
USB memory stick
Firmware files contact ELPRO Technical Support for these files.
Ethernet Cable
PC for transferring files
Preparing the USB memory stick for firmware upgrade.
Not all USB flash drives are configured correctly and can be used for firmware upgrade on the 450U-E. The following
procedure describes how to check and if necessary re-configure the USB drive for use as a Firmware upgrade drive.
1. Plug in the USB drive, and wait until windows has recognised the drive and completed software installation.
2. Diskpart utility.
C:\>diskpart
Microsoft DiskPart version 6.1.7601
Copyright (C) 1999-2008 Microsoft Corporation.
On computer: TEST_COMPUTER
3. below the USB drive is a 1911 MB (2GB) drive, which corresponds to Disk 1).
DISKPART> list disk
Disk ### Status Size Free Dyn Gpt
-------- ------------- ------- ------- --- ---
Disk 0 Online 232 GB 0 B
Disk 1 Online 1911 MB 0 B
4. When
Warning: The commands that follow this step can destroy the contents of the selected disk, make
sure that you have selected the correct drive before continuing.
DISKPART> select Disk 1
Disk 1 is now the selected disk.
5. correctly configured for use as a firmware upgrade drive on the 450U-E.
The drive should contain only one partition, and the Offset value should be non-zero as shown below.

Elpro Technologies 450U-E Wireless Ethernet Modem & Device Server User Manual
Rev Version 1.4.0 www.cooperbussmann.com/wirelessresources 75
DISKPART> list partition
Partition ### Type Size Offset
------------- ---------------- ------- -------
Partition 1 Primary 1910 MB 64 KB
You can now
format the drive using the diskpart utility.
If the or if there is more than one Partition, as indicated in the examples below, follow steps 6 and
7 below to re-configure the drive.
Partition ### Type Size Offset
------------- ---------------- ------- -------
Partition 1 Primary 1911 MB 0 B
Partition ### Type Size Offset
------------- ---------------- ------- -------
Partition 1 Primary 100 MB 64 KB
Partition 2 Primary 1810 MB 101 MB
6. fre
DISKPART> list disk
Disk ### Status Size Free Dyn Gpt
-------- ------------- ------- ------- --- ---
Disk 0 Online 232 GB 0 B
* Disk 1 Online 1911 MB 0 B
DISKPART> clean
DiskPart succeeded in cleaning the disk.
DISKPART> list disk
Disk ### Status Size Free Dyn Gpt
-------- ------------- ------- ------- --- ---
Disk 0 Online 232 GB 0 B
* Disk 1 Online 1911 MB 1910 MB
7. command, and note that there is only one partition, and that the offset is non-zero.
DISKPART> create partition primary
DiskPart succeeded in creating the specified partiti Type Size Offset
------------- ---------------- ------- -------
* Partition 1 Primary 1910 MB 64 KB
8. Finally, the drive can be formatted using the diskpart command line. The file system format should be selected
DISKPART> format fs=fat32 label=FW_UPGRADE
100 percent completed
DiskPart successfully formatted the volume.
Alternatively the drive can be formatted from within the Windows GUI environment by performing the procedure
below.
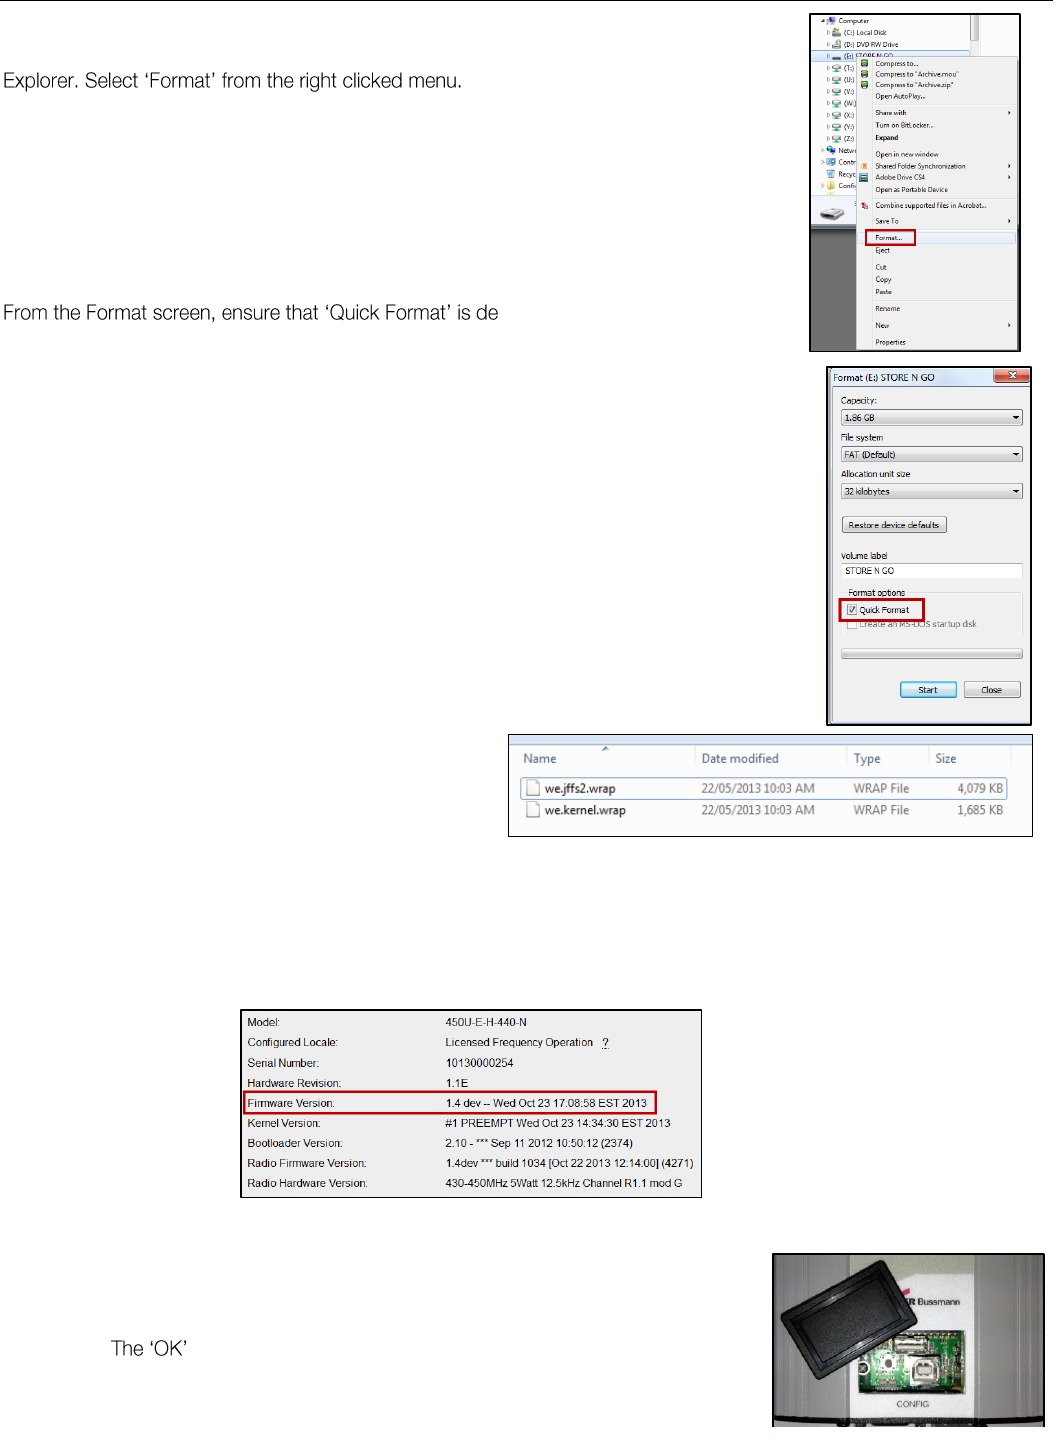
Elpro Technologies 450U-E Wireless Ethernet Modem & Device Server User Manual
76 www.cooperbussmann.com/wirelessresources Rev Version 1.4.0
Formatting USB Memory Stick
Plug the USB stick in to the PC, select and right click the stick from within Windows
-selected before pressing the
Start button.
Upgrade Procedure
1. Prior to performing the upgrade you will
need to copy the supplied firmware files to
the USB Stick root directory. They should
look something like the screenshot shown
in Figure 84.
2. When the files have been copied, remove the USB stick from the PC. Note the current firmware version of
the 450U-E by connecting to the modules home webpage. This will allow you to compare this version with
the final version to confirm the upgrade procedure has been performed successfully.
3. Remove the black plastic cover on the front of the Module which will reveal
a USB port and a reset push button switch.
4. Plug USB stick into the USB A port and press the Reset button.
5. LED will flash as per diagram below.
6. When complete, remove USB stick from 450U-E and refit the hatch
cover.
7. Upgrade is now complete; Navigate to the Home page and check
Figure 82 - Format USB
Figure 83 - Quick Format
Figure 84 - Firmware Files
Figure 85- firmware version
Figure 86 - Side access panel
Elpro Technologies 450U-E Wireless Ethernet Modem & Device Server User Manual
Rev Version 1.4.0 www.cooperbussmann.com/wirelessresources 77
firmware version has been updated and that all other configuration settings are ok, configuration should not
have been changed or erased during this process.
DO NOT remove the Flash drive or interrupt the power to the module while this is happening. If the
upgrade process is interrupted module could become unserviceable and will need to be returned to
ELPRO for repair.
Web based Upgrade
.
File will typically be named as 450U-E_X.X- are version and the
version it will be upgraded to.
If the device firmware version has fallen multiple versions behind the desired version, it may be necessary to upload
When
the patch files have been eset the module to perform the firmware upgrade. You will receive more
detailed instructions if it is necessary to upgrade the module firmware.
Figure 88 Webpage Firmware Upgrades
Figure 87 - Firmware Update LEDs
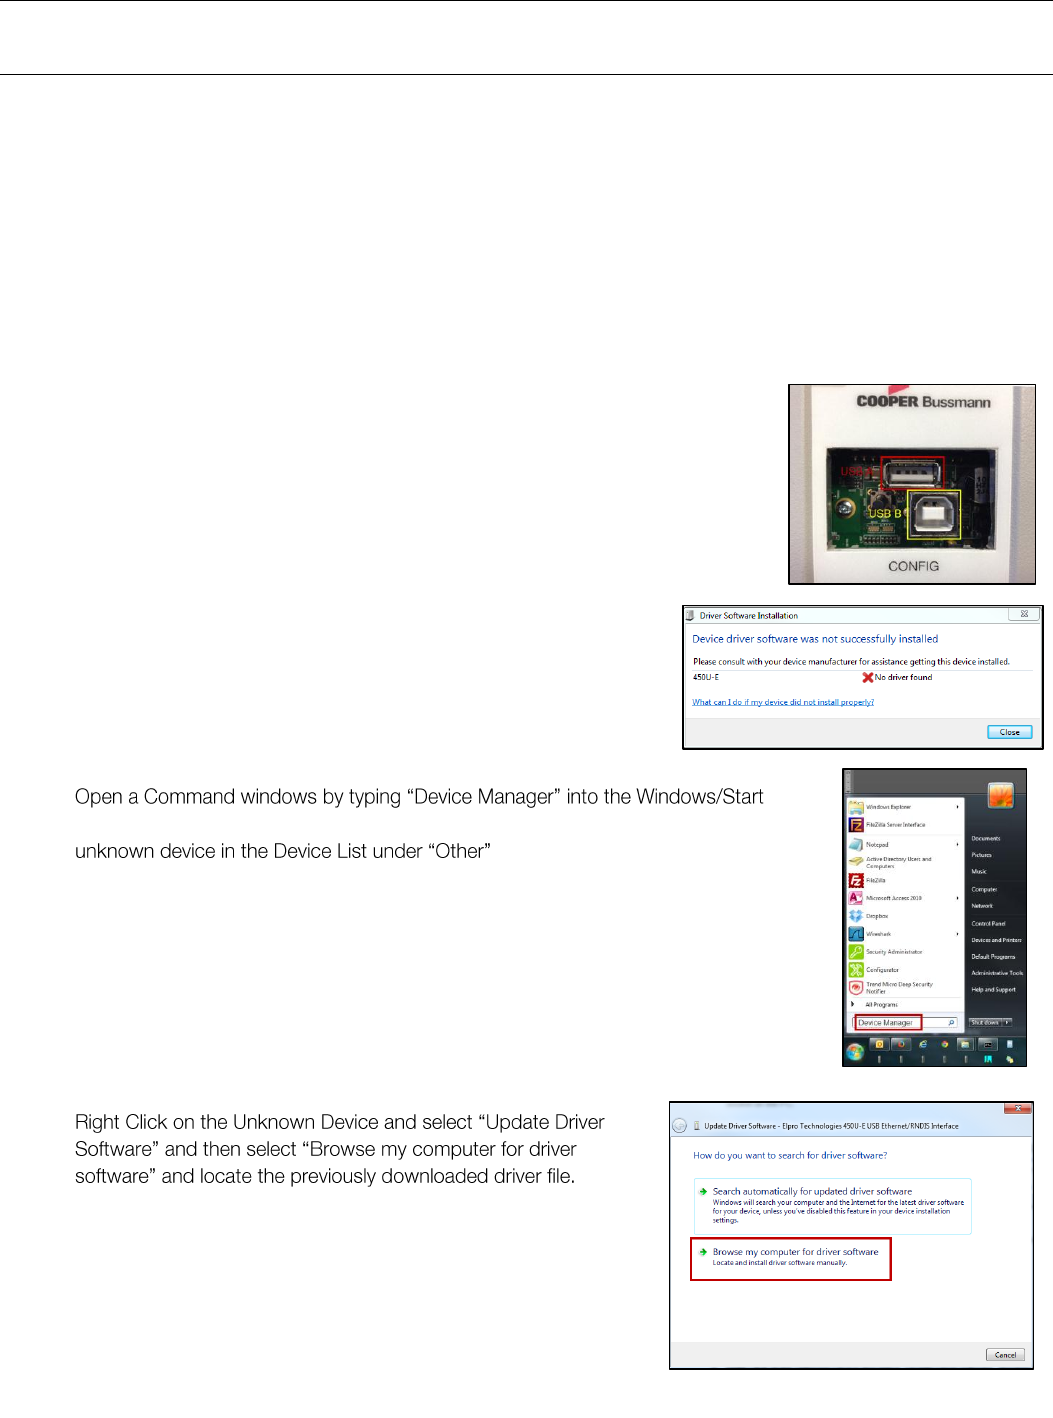
Elpro Technologies 450U-E Wireless Ethernet Modem & Device Server User Manual
78 www.cooperbussmann.com/wirelessresources Rev Version 1.4.0
Appendix B - USB Ethernet connection
Connecting to the Secondary Ethernet Port
To use the secondary Ethernet port you first need to install the USB Driver file, which can be downloaded from our
Technical Resource Library at www.cooperbussmann.com/wirelessresources. Save the file in a known location as you will
need to find further on in the procedure.
You will also require a USB A to USB B cable which is a standard USB Printer cable and can be purchased from any
electrical store.
The steps for installing the driver on a Windows 7 System as explained below. Installation on other Windows version may
not be exactly the same but will have a similar install process.
1. Connect a suitable power source to the modem and wait for it to power up.
2. Open the plastic cover on the front of the module and connect the USB cable to
the USB B socket and then connect the other end of the cable to a free USB
socket on the PC.
3. When the Cable is connected you will notice Windows will show a
new device has been connected and you will get a popup indicating
no Driver was found.
4. Menu/Search box which will open the Device Manager window where you will see a
5.
Figure 89 - USB ports
Figure 90 - Driver not found
Figure 91 - Open
Device Manager
Figure 92 - Unknown Device
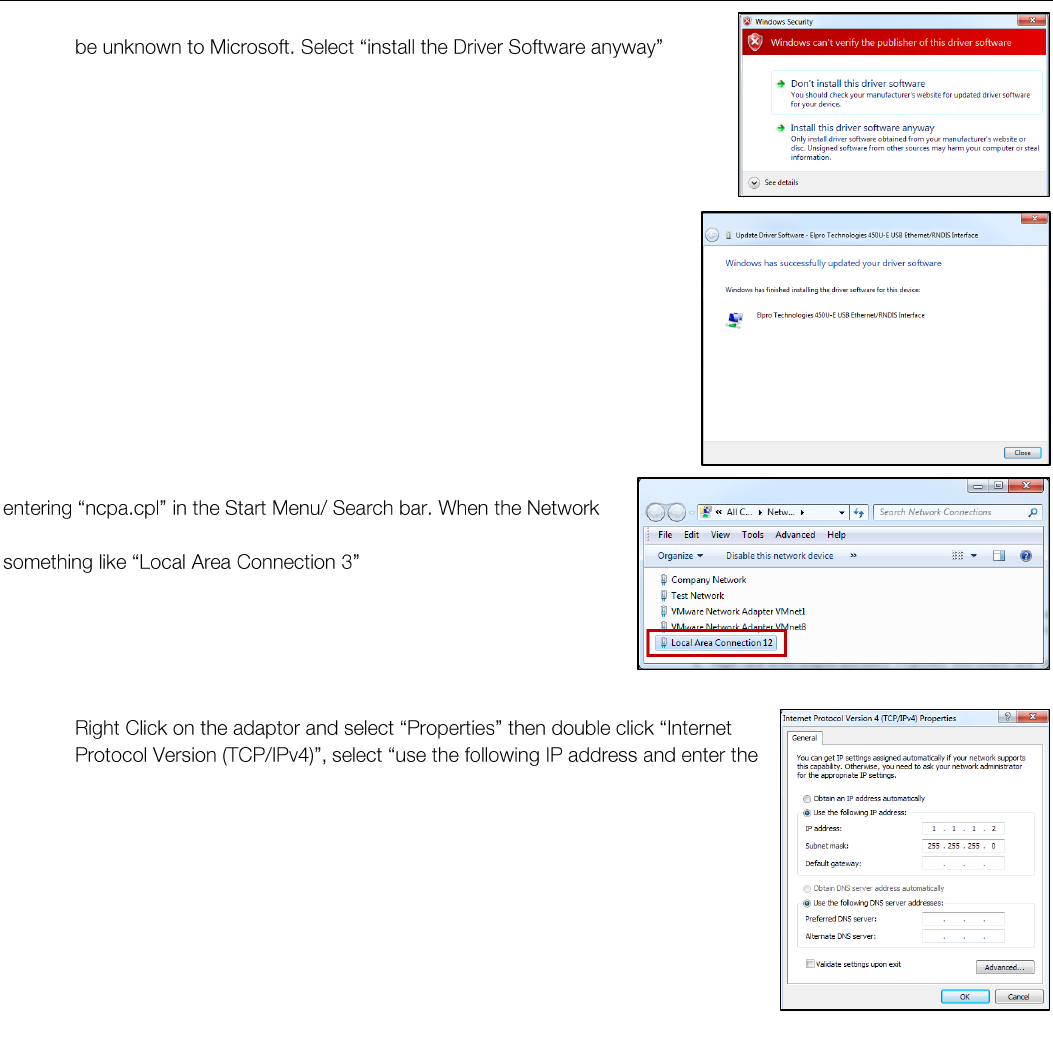
Elpro Technologies 450U-E Wireless Ethernet Modem & Device Server User Manual
Rev Version 1.4.0 www.cooperbussmann.com/wirelessresources 79
6. You will probably get a Windows Security alert as the Driver publisher will
7. When successfully installed close the window
Now you will then need to open the Network connections window by
Connections window open you will see a new Network adaptor called
8.
IP address 1.1.1.1 and Subnet Mask 255.255.255.0. When entered press Ok
and then Ok again to get back to the Network Connections page.
9. You should now be able to open a web browser and browse the modules IP
address of 1.1.1.1.
Figure 93 - Windows Security
Figure 94 - Success
Figure 95 - New Network Adaptor
Figure 96 Network Properties

Elpro Technologies 450U-E Wireless Ethernet Modem & Device Server User Manual
80 www.cooperbussmann.com/wirelessresources Rev Version 1.4.0
Appendix C - GLOSSARY
ACK
Acknowledgment.
Access Point
An access point connects wireless network Stations (or Clients) to other Stations within the
wireless network and also can serve as the point of interconnection between the wireless
network and a wired network. Each Access Point can serve multiple users within a defined
network area. Also known as a base station.
Antenna Gain
Antennae don t increase the transmission power, but focus the signal more. So instead of
transmitting in every direction (including the sky and ground) antenna focus the signal usually
either more horizontally or in one particular direction. This gain is measured in decibels
Bandwidth
The maximum data transfer speed available to a user through a network .
Bridge
A bridge is used to connect two local area networks together. Bridges are typically used to
connect wireless networks to wired networks. Typically, bridges will transfer messages
between networks only when the message destination is on the other network. Messages
that are destined for the same network as they originated on are not passed to the other
network, therefore reducing traffic on the entire network.
Collision
avoidance
A network node procedure for proactively detecting that it can transmit a signal without
risking a collision with transmissions from other network nodes.
Client / Sta /
Station
A device on a network that gains access to data, information, and other devices through a
Server (Access Point).
Crossover
cable
A special cable used for networking two computers without the use of a hub. Crossover
cables may also be required for connecting a cable or DSL modem to a wireless gateway or
access point. The cable is wired so that the signals crossover , connecting transmit signal
on one side to receiver signals on the other.
CSMA/CA
Carrier Sense Multiple Access/Collision Avoidance is a listen before talk method of
minimizing (but not eliminating) collisions caused by simultaneous transmission by multiple
radios. IEEE 802.11 states collision avoidance method rather than collision detection must be
used, because the standard employs half duplex radios radios capable of transmission or
reception but not both simultaneously. Unlike conventional wired Ethernet nodes, a WLAN
station cannot detect a collision while transmitting. If a collision occurs, the transmitting
station will not receive an ACKnowledge packet from the intended receive station. For this
reason, ACK packets have a higher priority than all other network traffic. After completion of
a data transmission, the receive station will begin transmission of the ACK packet before any
other node can begin transmitting a new data packet. All other stations must wait a longer
pseudo randomized period of time before transmitting. If an ACK packet is not received, the
transmitting station will wait for a subsequent opportunity to retry transmission.
CSMA/CD
Carrier Sense Multiple Access/Collision Detection is the access method used on an Ethernet
network. A network device transmits data after detecting that a channel is available.
However, if two devices transmit data simultaneously, the sending devices detect a collision
and retransmit after a random time delay.
DHCP
Dynamic Host Configuration Protocol A utility that enables a server to dynamically assign IP
addresses from a predefined list and limit their time of use so that they can be reassigned.
Without DHCP, an IT Manager would have to manually enter in all the IP addresses of all the
computers on the network. When DHCP is used, whenever a computer logs onto the
network, it automatically gets an IP address assigned to it.
Dial-up
A communication connection via the standard telephone network, or Plain Old Telephone
Service (POTS).
DNS
Domain Name Service A program that translates URLs to IP addresses by accessing a
database maintained on a collection of Internet servers. The program works behind the
scenes to facilitate surfing the Web with alpha versus numeric addresses. A DNS server
converts a name like mywebsite.com to a series of numbers like 107.22.55.26. Every

Elpro Technologies 450U-E Wireless Ethernet Modem & Device Server User Manual
Rev Version 1.4.0 www.cooperbussmann.com/wirelessresources 81
website has its own specific IP address on the Internet.
DSL
Digital Subscriber Line Various technology protocols for high-speed data, voice and video
transmission over ordinary twisted-pair copper POTS (Plain Old Telephone Service)
telephone wires.
Encryption
key
An alphanumeric (letters and/or numbers) series that enables data to be encrypted and then
decrypted so it can be safely shared among members of a network. WEP uses an encryption
key that automatically encrypts outgoing wireless data. On the receiving side, the same
encryption key enables the computer to automatically decrypt the information so it can be
read. Encryption keys should be kept secret
Firewall
A device or computer program that keeps unauthorized users out of a private network.
Everything entering or leaving a system's internal network passes through the firewall and
must meet the system's security standards in order to be transmitted. Often used to keep
unauthorized people from using systems connected to the Internet.
Hub
A multiport device used to connect PCs to a network via Ethernet cabling or via 802.11.
Wired hubs can have numerous ports and can transmit data at speeds ranging from 10
Mbps to multi-Gigabyte speeds per second. A hub transmits packets it receives to all the
connected ports. A small wired hub may only connect 4 computers; a large hub can connect
48 or more.
Hz
Hertz. The international unit for measuring frequency, equivalent to the older unit of cycles
per second. One megahertz (MHz) is one million hertz. One gigahertz (GHz) is one billion
hertz. The standard US electrical power frequency is 60 Hz, the AM broadcast radio
frequency band is 535 1605 kHz, the FM broadcast radio frequency band is 88 108 MHz,
and wireless 802.11b/g LANs operate at 2.4 GHz.
IEEE
Institute of Electrical and Electronics Engineers, New York, www.ieee.org. A membership
organization that includes engineers, scientists and students in electronics and allied fields. It
has more than 300,000 members and is involved with setting standards for computers and
communications.
Infrastructure
mode
An 802.11 setting providing connectivity to an AP. As compared to Ad-Hoc mode, whereby
802.11 devices communicate directly with each other, clients set in Infrastructure Mode all
pass data through a central AP. The AP not only mediates wireless network traffic in the
immediate neighbourhood, but also provides communication with the wired network. See
Ad-Hoc and AP.
I/O
Input / Output. The term used to describe any operation, program or device that transfers
data to or from a computer.
Internet
appliance
A computer that is intended primarily for Internet access is simple to set up and usually does
not support installation of third-party software. These computers generally offer customized
web browsing, touch-screen navigation, e-mail services, entertainment and personal
information management applications.
IP
Internet Protocol. A set of rules used to send and receive messages across local networks
and the Internet.
IP telephony
Technology that supports voice, data and video transmission via IP-based LANs, WANs, and
the Internet. This includes VoIP (Voice over IP).
IP address
A 32-bit number that identifies each sender or receiver of information that is sent across the
Internet. An IP address has two parts: an identifier of a particular network on the Internet and
an identifier of the particular device (which can be a server or a workstation) within that
network.
IPX-SPX
Internetwork Packet Exchange, a networking protocol used by the Novell NetWare operating
systems. Like UDP/IP, IPX is a datagram protocol used for connectionless communications.
Higher-level protocols, such as SPX and NCP, are used for additional error recovery services.
Sequenced Packet Exchange, SPX, a transport layer protocol (layer 4 of the OSI Model) used
in Novell Netware networks. The SPX layer sits on top of the IPX layer (layer 3) and provides

Elpro Technologies 450U-E Wireless Ethernet Modem & Device Server User Manual
82 www.cooperbussmann.com/wirelessresources Rev Version 1.4.0
connection-oriented services between two nodes on the network. SPX is used primarily by
client/server applications.
ISDN
A type of broadband Internet connection that provides digital service from the customer's
premises to the dial-up telephone network. ISDN uses standard POTS copper wiring to
deliver voice, data or video.
ISO Network
Model
A network model developed by the International Standards Organization (ISO) that consists
of seven different levels, or layers. By standardizing these layers, and the interfaces in
between, different portions of a given protocol can be modified or changed as technologies
advance or systems requirements are altered. The seven layers are: Physical , Data Link,
Network, Transport, Session, Presentation, Application.
LAN
Local Area Network. A system of connecting PCs and other devices within the same physical
proximity for sharing resources such as an Internet connections, printers, files and drives.
Receive
Sensitivity
The minimum signal strength required to pick up a signal. Higher bandwidth connections
usually have less receive sensitivity than lower bandwidth connections.
Router
A device that forwards data from one WLAN or wired local area network to another.
SNR
Signal to Noise Ratio. The number of decibels difference between the signal strength and
background noise.
Transmit
Power
The power usually expressed in mW or dBm that the wireless device transmits at.
MAC Address
Media Access Control address. A unique code assigned to most forms of networking
hardware. The address is permanently assigned to the hardware, so limiting a wireless
network's access to hardware -- such as wireless cards -- is a security feature employed by
closed wireless networks. But an experienced hacker -- armed with the proper tools -- can
still figure out an authorized MAC address, masquerade as a legitimate address and access
a closed network.
Every wireless 802.11 device has its own specific MAC address hard-coded into it. This
unique identifier can be used to provide security for wireless networks. When a network uses
a MAC table, only the 802.11 radios that have had their MAC addresses added to that
network's MAC table will be able to get onto the network.
NAT
Network Address Translation: A network capability that enables a number of computers to
dynamically share a single incoming IP address from a dial-up, cable or xDSL connection.
NAT takes the single incoming IP address and creates new IP address for each client
computer on the network.
NIC
Network Interface Card. A type of PC adapter card that either works without wires (Wi-Fi) or
attaches to a network cable to provide two-way communication between the computer and
network devices such as a hub or switch. Most office wired NICs operate at 10 Mbps
(Ethernet), 100 Mbps (Fast Ethernet) or 10/100 Mbps dual speed. High-speed Gigabit and
10 Gigabit NIC cards are also available. See PC Card.
Proxy Server
Used in larger companies and organizations to improve network operations and security, a
proxy server is able to prevent direct communication between two or more networks. The
proxy server forwards allowable data requests to remote servers and/or responds to data
requests directly from stored remote server data.
RJ-45
Standard connectors used in Ethernet networks. RJ-45 connectors are similar to standard
RJ-11 telephone connectors, but RJ-45 connectors can have up to eight wires, whereas
telephone connectors have four.
Server
A computer that provides its resources to other computers and devices on a network. These
include print servers, Internet servers and data servers. A server can also be combined with a
hub or router.
Site survey
The process whereby a wireless network installer inspects a location prior to installing a
wireless network. Site surveys are used to identify the radio- and client-use properties of a

Elpro Technologies 450U-E Wireless Ethernet Modem & Device Server User Manual
Rev Version 1.4.0 www.cooperbussmann.com/wirelessresources 83
facility so that access points can be optimally placed.
SSL
Secure Sockets Layer. A commonly used encryption scheme used by many online retail and
banking sites to protect the financial integrity of transactions. When an SSL session begins,
the server sends its public key to the browser. The browser then sends a randomly
generated secret key back to the server in order to have a secret key exchange for that
session
Sub network
or Subnet
Found in larger networks, these smaller networks are used to simplify addressing between
numerous computers. Subnets connect together through a router.
Switch
A type of hub that efficiently controls the way multiple devices use the same network so that
each can operate at optimal performance. A switch acts as a networks traffic cop: rather
than transmitting all the packets it receives to all ports as a hub does, a switch transmits
packets to only the receiving port.
TCP
Transmission Control Protocol. A protocol used along with the Internet Protocol (IP) to send
data in the form of individual units (called packets) between computers over the Internet.
While IP takes care of handling the actual delivery of the data, TCP takes care of keeping
track of the packets that a message is divided into for efficient routing through the Internet.
For example, when a web page is downloaded from a web server, the TCP program layer in
that server divides the file into packets, numbers the packets, and then forwards them
individually to the IP program layer. Although each packet has the same destination IP
address, it may get routed differently through the network. At the other end, TCP
reassembles the individual packets and waits until they have all arrived to forward them as
single message.
TCP/IP
The underlying technology behind the Internet and communications between computers in a
network. The first part, TCP, is the transport part, which matches the size of the messages
on either end and guarantees that the correct message has been received. The IP part is the
user's computer address on a network. Every computer in a TCP/IP network has its own IP
address that is either dynamically assigned at startup or permanently assigned. All TCP/IP
messages contain the address of the destination network as well as the address of the
destination station. This enables TCP/IP messages to be transmitted to multiple networks
(subnets) within an organization or worldwide.
VoIP
Voice Over Internet Protocol. Voice transmission using Internet Protocol to create digital
packets distributed over the Internet. VoIP can be less expensive than voice transmission
using standard analog packets over POTS (Plain Old Telephone Service).
VPN
Virtual Private Network. A type of technology designed to increase the security of information
transferred over the Internet. VPN can work with either wired or wireless networks, as well as
with dial-up connections over POTS. VPN creates a private encrypted tunnel from the end
user's computer, through the local wireless network, through the Internet, all the way to the
corporate servers and database.
WAN
Wide Area Network. A communication system of connecting PCs and other computing
devices across a large local, regional, national or international geographic area. Also used to
distinguish between phone-based data networks and Wi-Fi. Phone networks are considered
WANs and Wi-Fi networks are considered Wireless Local Area Networks (WLANs).
WEP
Wired Equivalent Privacy. Basic wireless security provided by Wi-Fi. In some instances, WEP
may be all a home or small-business user needs to protect wireless data. WEP is available in
40-bit (also called 64-bit), or in 108-bit (also called 128-bit) encryption modes. As 108-bit
encryption provides a longer algorithm that takes longer to decode, it can provide better
security than basic 40-bit (64-bit) encryption.
Wi-Fi
Wireless Fidelity: An interoperability certification for wireless local area network (LAN)
products based on the Institute of Electrical and Electronics Engineers (IEEE) 802.11
standard.

Elpro Technologies 450U-E Wireless Ethernet Modem & Device Server User Manual
84 www.cooperbussmann.com/wirelessresources Rev Version 1.4.0
Appendix D - Expansion I/O Registers
Adding 115S Expansion I/O modules to the 450U-E the I/O will automatically be added to the 450U-E modules I/O store.
To calculate the register location, add the address of the I/O point from the tables below to the offset.
The offset ids calculated by finding the address of the Modbus Slave X 20.
E.g1. Digital input #1 on an 115S-11 with address 5 would be: (5x20) +10001 = 10101
E.g2. Digital output #2 on an 115S-11 with address 6 would be: (6x20) +2 = 122
E.g3. Analog input #3 on an 115S-12 with address 3 would be: (3x20) +30003 = 30063.
E.g4. Analog Output #8 on an 115S-13 with address # 7 would be: (7x20) + 40007 = 40147
I/O store for a 115S-11 Expansion I/O module
I/O store for a 115S-12 Expansion I/O module
0001 - 0008 + Offset
DIO Outputs 1 - 8
10001 - 10008 + Offset
DIO Inputs 1 - 8
10019 + Offset
Modbus Error indication for 115S module
10020 + Offset
Detected indication for this 115S module
30001 - 30008 + Offset
Inputs AIN 1 AIN8
30017 + Offset
Modbus Error Counter for this 115S module
30018 + Offset
Modbus Last Error Code for this 115S module. (Appendix E - Modbus Error Codes)
30019 + Offset
Modbus Lost Link Counter for this 115S module
30020 + Offset
Module type (0x0201) = 513. / Error Status
40009 - 40016 + Offset
Pulsed Output target 1 8 (1 register per output)
I/O store for a 115S-13 Expansion I/O module
0001 - 0008 + Offset
DIO Outputs 1 - 8
10001 - 10008 + Offset
DIO Inputs 1 - 8
10019 + Offset
Modbus Error indication for 115S module
10020 + Offset
Detected indication for this 115S module
30017 + Offset
Modbus Error Counter for this 115S module
0001 - 0016 + Offset
DIO Outputs 1 - 16
10001 -10016 + Offset
DIO Inputs 1 - 16
10019 + Offset
Modbus Comms Fail indication for this 115S module
10020 + Offset
Modbus Comms Fail indication (Inverse) for this 115S module
30001 -30004 + Offset
115S-11 pulsed input rate 1 4
30005 - 30012 + Offset
115S-11 Pulsed input count
30017 + Offset
Modbus Error Counter for this 115S module
30018 + Offset
Modbus Last Error Code for this 115S module. (Appendix E - Modbus Error Codes)
30019 + Offset
Modbus Lost Link Counter for this 115S module
30020 + Offset
Module type (0x0101) = 257. / Error Status
40009 - 40016 + Offset
Pulsed Output target 1 8 (1 register per pulsed output)

Elpro Technologies 450U-E Wireless Ethernet Modem & Device Server User Manual
Rev Version 1.4.0 www.cooperbussmann.com/wirelessresources 85
30018 + Offset
Modbus Last Error Code for this 115S module. (Appendix E - Modbus Error Codes)
30019 + Offset
Modbus Lost Link Counter for this 115S module
30020 + Offset
Module type (0x0301) = 769. / Error Status
40001 - 40008 + Offset
Analog Output 1 8
40009 - 40016 + Offset
Pulsed Output target 1 8 (1 register per pulsed output)
Appendix E - Modbus Error Codes
The following are Modbus Error Response codes that are sent from the Slave device in response to a poll where there is
some sort of problem executing the command. They can be used by utilising the Modus mapping fail register and
selecting a General Purpose Analog Register (30501, 40501, etc.) instead of a General Purpose Digital register (10501,
501, etc.) This way instead of just indicating the error with a digital output an analog output can be used which will display
the error code.
Dec
Code
Hex
Code
Name
Meaning
65281
FF01
Illegal Function
The function code received in the query is not an allowable action for the
server (or slave). This may be because the function code is only applicable to
newer devices, and was not implemented in the unit selected. It could also
indicate that the server (or slave) is in the wrong state to process a request
of this type.
65282
FF02
Illegal Data
Address
The data address received in the query is not an allowable address for the
server (or slave). More specifically, the combination of reference number and
transfer length is invalid. For a controller with 100 registers, the PDU
addresses the first register as 0, and the last one as 99. If a request is
submitted with a starting register address of 96 with a quantity of 4
registers, then this request will successfully operate on registers 96, 97, 98,
99. If a request is submitted with a starting register address of 96 and a
quantity of registers of 5, then this request will fail with Exception Code 0x02
65283
FF03
Illegal Data Value
A value contained in the query data field is not an allowable value for server
(or slave). This indicates a fault in the structure of the remainder of a
complex request, such as that the implied length is incorrect. It specifically
does NOT mean that a data item submitted for storage in a register has a
value outside the expectation of the application program, since the
MODBUS protocol is unaware of the significance of any particular value of
any particular register.
65384
FF04
Slave Device
Failure
An unrecoverable error occurred while the server (or slave) was attempting
to perform the requested action.
65285
FF05
Acknowledge
Specialized, use in conjunction with programming commands.
The server (or slave) has accepted the request and is processing it, but a
long duration of time will be required to do so. This response is returned to
prevent a timeout error from occurring in the client (or master).
65286
FF06
Slave Device
Busy
Specialized, use in conjunction with programming commands.
The server (or slave) is engaged in processing a long duration program
command. The client (or master) should retransmit the message later when
the server (or slave) is free.
Elpro Technologies 450U-E Wireless Ethernet Modem & Device Server User Manual
86 www.cooperbussmann.com/wirelessresources Rev Version 1.4.0
65288
FF08
Memory Parity
Error
Specialized, use in conjunction with function codes 20 and 21 and reference
type 6, to indicate that the extended file area failed to pass a consistency
check.
65290
FF0A
Gateway Path
Unavailable
Specialized, use in conjunction with gateways. Indicates that the gateway
was unable to allocate an internal communication path from the input port to
the output port for processing the request. Usually means that the gateway
is misconfigured or overloaded.
65291
FF0B
Gateway Device
Failed to
Respond
Specialized, use in conjunction with gateways. Indicates that no response
was obtained from the target device. Usually means that the device is not
present on the network
65024
FE00
Invalid Response
from Slave
Command type or Slave address did not match request (probably another
unit)
64512
FC00
Server Offline
63488
F800
Invalid Local
Memory Address
Local address invalid in command - Memory location does not exist or is not
initialised.
65535
FFFF
No Response to
the Poll
No response to poll message
Appendix F - Power Conversion
Power Conversion
dBm to mW Conversion
Watts
dBm
Watts
dBm
10 mW
10 dB
200 mW
23 dB
13 mW
11 dB
316 mW
25 dB
16 mW
12 dB
398 mW
26 dB
20 mW
13 dB
500 mW
27 dB
25 mW
14 dB
630 mW
28 dB
32 mW
15 dB
800 mW
29 dB
40 mW
16 dB
1.0 W
30 dB
50 mW
17 dB
1.3 W
31 dB
63 mW
18 dB
1.6 W
32 dB
79 mW
19 dB
2.0 W
33 dB
100 mW
20 dB
2.5 W
34 dB
126 mW
21 dB
3.2 W
35 dB
158 mW
22 dB
4.0 W
36 dB
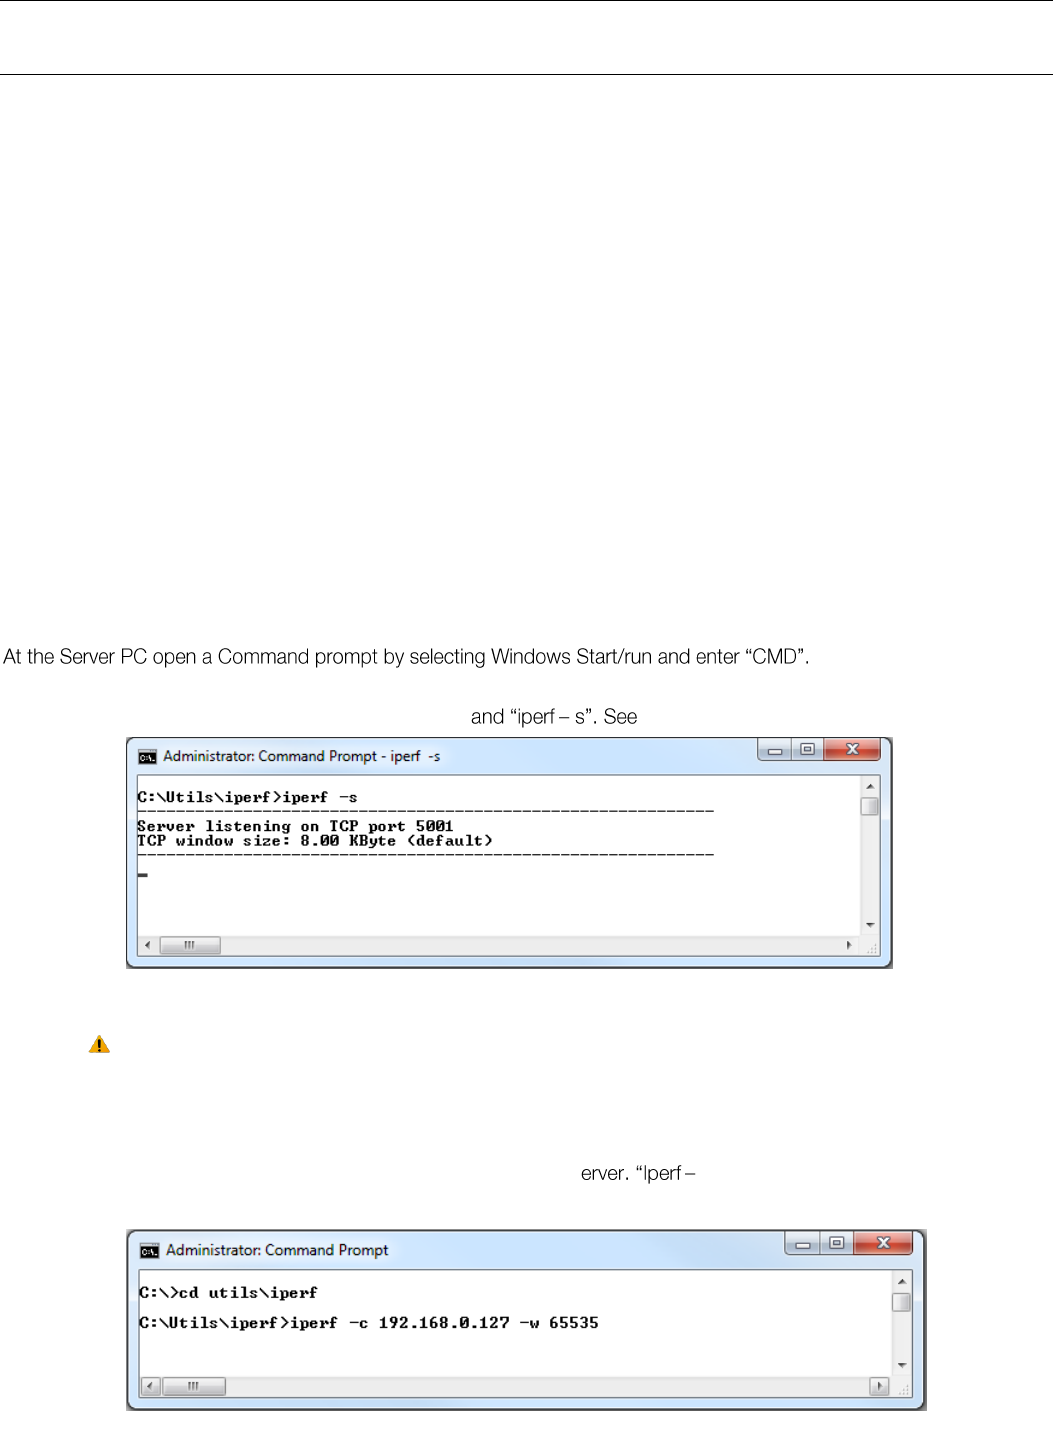
Elpro Technologies 450U-E Wireless Ethernet Modem & Device Server User Manual
Rev Version 1.4.0 www.cooperbussmann.com/wirelessresources 87
Appendix G - External Iperf Test
This Appendix shows how to set up and use the Iperf application to test the throughput of Ethernet Modems.
Iperf is a tool used to measure the throughput and quality of a network link. Jperf can be used in conjunction with Iperf to
graphically display the Iperf data results. This instruction covers both Iperf and Jperf; it does not cover the setup and
configuration of the modems. Details of this can be found in previous sections.
Materials
2 x Ethernet Modems configured as a bridge
2 x PC Computers with Ethernet Ports and cables
Suitable Power Supplies for the Ethernet Modems
Iperf / Jperf Application
Installation
The Application can be downloaded from the following link, http://sourceforge.net/projects/iperf/ ,which you will need to
save to a location on your PC.
Extract the zip file to the ROOT directory on your PC, i.e. C:\. This folder contains the main Iperf application as well as the
Jperf graphical interface.
Copy this folder to the 2nd PC or download to the second PC and extract as per above instructions.
Iperf Applications
The Iperf /Jperf application needs to be run on the PC or laptop at each end of the wireless link that is to be tested.
When command prompt appears we need to set the directory to where the Iperf application resides, i.e. where it was
saved above, and from here run the Iperf server comm Figure 97.
Note: If you get a security pop up on PC select Unblock for the application to run.
This will run the Iperf application in Server mode which is configured to respond to any communication frames sent to it
from the Client.
On the Client PC open up a CMD window and change to the directory that Iperf is located, in this case it is c:/utils/iperf.
Enter the Iperf command to start the Client communication to the S c <IP address of Server PC> -w 65535.
See Figure 98.
Figure 97 - Iperf Server
Figure 98 - Iperf Client
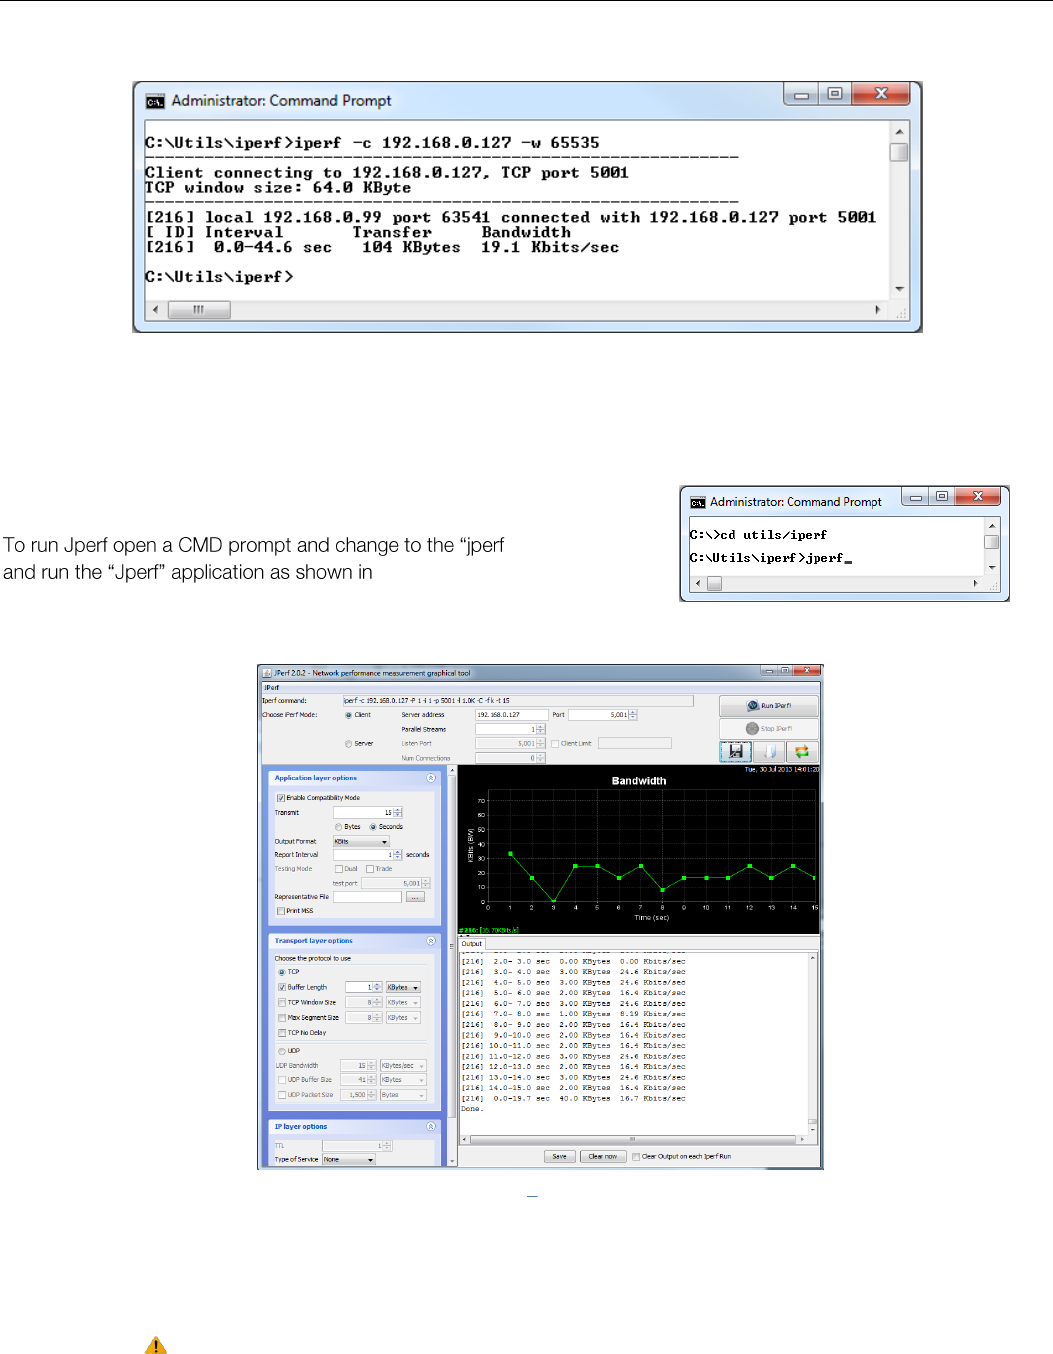
Elpro Technologies 450U-E Wireless Ethernet Modem & Device Server User Manual
88 www.cooperbussmann.com/wirelessresources Rev Version 1.4.0
This will run a test over the radio link to the Server PC and report back results as seen in Figure 99.
These results show the Bandwidth (Throughput) of the test as 19.2 Kbits/sec.
It is recommended that the test be run a number of times to get an average.
JPerf Application
Jperf is a graphical interface that runs over the top of Iperf. It will display a
graph result from the Iperf test. -2.0.2: directory
Figure 101Figure 100. The CMD
screen will disappear and the Jperf Screen will appear as seen in Figure 101.
When Jperf screen appears select Client Mode, enter in the IP address of the Server PC; leave Port as default and press
Run Iperf button. The test will run and then display the measured Bandwidth (Throughput) versus time. You can run this
test as often as you like to try and gather a more accurate average.
Note: Jperf is written in Java which might mean that further installation or updates may be
required, depending on how the PC is setup.
Figure 99 - Iperf Results
Figure 101 Jperf Screen
Figure 100 - Command line

Elpro Technologies 450U-E Wireless Ethernet Modem & Device Server User Manual
Rev Version 1.4.0 www.cooperbussmann.com/wirelessresources 89
Appendix H - GNU Free Doc License
Version 2, June 1991
Copyright (C) 1989, 1991 Free Software Foundation,
Inc.
51 Franklin Street, Fifth Floor, Boston, MA 02110-1301,
USA
Everyone is permitted to copy and distribute verbatim
copies of this license document, but changing it is not
allowed.
Preamble
The licenses for most software are designed to take
away your freedom to share and change it. By contrast,
the GNU General Public License is intended to
guarantee your freedom to share and change free
software--to make sure the software is free for all its
users. This General Public License applies to most of the
Free Software Foundation's software and to any other
program whose authors commit to using it. (Some other
Free Software Foundation software is covered by the
GNU Lesser General Public License instead.) You can
apply it to your programs, too.
When we speak of free software, we are referring to
freedom, not price. Our General Public Licenses are
designed to make sure that you have the freedom to
distribute copies of free software (and charge for this
service if you wish), that you receive source code or can
get it if you want it, that you can change the software or
use pieces of it in new free programs; and that you
know you can do these things.
To protect your rights, we need to make restrictions that
forbid anyone to deny you these rights or to ask you to
surrender the rights. These restrictions translate to
certain responsibilities for you if you distribute copies of
the software, or if you modify it.
For example, if you distribute copies of such a program,
whether gratis or for a fee, you must give the recipients
all the rights that you have. You must make sure that
they, too, receive or can get the source code. And you
must show them these terms so they know their rights.
We protect your rights with two steps: (1) copyright the
software, and (2) offer you this license which gives you
legal permission to copy, distribute and/or modify the
software.
Also, for each author's protection and ours, we want to
make certain that everyone understands that there is no
warranty for this free software. If the software is modified
by someone else and passed on, we want its recipients
to know that what they have is not the original, so that
any problems introduced by others will not reflect on the
original authors' reputations.
Finally, any free program is threatened constantly by
software patents. We wish to avoid the danger that
redistributors of a free program will individually obtain
patent licenses, in effect making the program
proprietary. To prevent this, we have made it clear that
any patent must be licensed for everyone's free use or
not licensed at all.
The precise terms and conditions for copying,
distribution and modification follow.
Terms and Conditions
This License applies to any program or other work which
contains a notice placed by the copyright holder saying
it may be distributed under the terms of this General
Public License. The "Program", below, refers to any
such program or work, and a "work based on the
Program" means either the Program or any derivative
work under copyright law: that is to say, a work
containing the Program or a portion of it, either verbatim
or with modifications and/or translated into another
language. (Hereinafter, translation is included without
limitation in the term "modification".) Each licensee is
addressed as "you".
Activities other than copying, distribution and
modification are not covered by this License; they are
outside its scope. The act of running the Program is not
restricted, and the output from the Program is covered
only if its contents constitute a work based on the
Program (independent of having been made by running
the Program). Whether that is true depends on what the
Program does.
1. You may copy and distribute verbatim copies of the
Program's source code as you receive it, in any
medium, provided that you conspicuously and
appropriately publish on each copy an appropriate
copyright notice and disclaimer of warranty; keep intact
all the notices that refer to this License and to the
absence of any warranty; and give any other recipients
of the Program a copy of this License along with the
Program.
You may charge a fee for the physical act of transferring
a copy, and you may at your option offer warranty
protection in exchange for a fee.
2. You may modify your copy or copies of the Program
or any portion of it, thus forming a work based on the
Program, and copy and distribute such modifications or
work under the terms of Section 1 above, provided that
you also meet all of these conditions:
a) You must cause the modified files to carry prominent
notices stating that you changed the files and the date
of any change.
b) You must cause any work that you distribute or
publish, that in whole or in part contains or is derived
from the Program or any part thereof, to be licensed as

Elpro Technologies 450U-E Wireless Ethernet Modem & Device Server User Manual
90 www.cooperbussmann.com/wirelessresources Rev Version 1.4.0
a whole at no charge to all third parties under the terms
of this License.
c) If the modified program normally reads commands
interactively when run, you must cause it, when started
running for such interactive use in the most ordinary
way, to print or display an announcement including an
appropriate copyright notice and a notice that there is
no warranty (or else, saying that you provide a warranty)
and that users may redistribute the program under these
conditions, and telling the user how to view a copy of
this License. (Exception: if the Program itself is
interactive but does not normally print such an
announcement, your work based on the Program is not
required to print an announcement.)
These requirements apply to the modified work as a
whole. If identifiable sections of that work are not
derived from the Program, and can be reasonably
considered independent and separate works in
themselves, then this License, and its terms, do not
apply to those sections when you distribute them as
separate works. But when you distribute the same
sections as part of a whole which is a work based on
the Program, the distribution of the whole must be on
the terms of this License, whose permissions for other
licensees extend to the entire whole, and thus to each
and every part regardless of who wrote it.
Thus, it is not the intent of this section to claim rights or
contest your rights to work written entirely by you;
rather, the intent is to exercise the right to control the
distribution of derivative or collective works based on the
Program.
In addition, mere aggregation of another work not based
on the Program with the Program (or with a work based
on the Program) on a volume of a storage or distribution
medium does not bring the other work under the scope
of this License.
3. You may copy and distribute the Program (or a work
based on it, under Section 2) in object code or
executable form under the terms of Sections 1 and 2
above provided that you also do one of the following:
a) Accompany it with the complete corresponding
machine-readable source code, which must be
distributed under the terms of Sections 1 and 2 above
on a medium customarily used for software interchange;
or,
b) Accompany it with a written offer, valid for at least
three years, to give any third party, for a charge no more
than your cost of physically performing source
distribution, a complete machine-readable copy of the
corresponding source code, to be distributed under the
terms of Sections 1 and 2 above on a medium
customarily used for software interchange; or,
c) Accompany it with the information you received as to
the offer to distribute corresponding source code. (This
alternative is allowed only for non-commercial
distribution and only if you received the program in
object code or executable form with such an offer, in
accord with Subsection b above.)
The source code for a work means the preferred form of
the work for making modifications to it. For an
executable work, complete source code means all the
source code for all modules it contains, plus any
associated interface definition files, plus the scripts used
to control compilation and installation of the executable.
However, as a special exception, the source code
distributed need not include anything that is normally
distributed (in either source or binary form) with the
major components (compiler, kernel, and so on) of the
operating system on which the executable runs, unless
that component itself accompanies the executable.
If distribution of executable or object code is made by
offering access to copy from a designated place, then
offering equivalent access to copy the source code from
the same place counts as distribution of the source
code, even though third parties are not compelled to
copy the source along with the object code.
4. You may not copy, modify, sublicense, or distribute
the Program except as expressly provided under this
License. Any attempt otherwise to copy, modify,
sublicense or distribute the Program is void, and will
automatically terminate your rights under this License.
However, parties who have received copies, or rights,
from you under this License will not have their licenses
terminated so long as such parties remain in full
compliance.
5. You are not required to accept this License, since you
have not signed it. However, nothing else grants you
permission to modify or distribute the Program or its
derivative works. These actions are prohibited by law if
you do not accept this License. Therefore, by modifying
or distributing the Program (or any work based on the
Program), you indicate your acceptance of this License
to do so, and all its terms and conditions for copying,
distributing or modifying the Program or works based on
it.
6. Each time you redistribute the Program (or any work
based on the Program), the recipient automatically
receives a license from the original licensor to copy,
distribute or modify the Program subject to these terms
and conditions. You may not impose any further
restrictions on the recipients' exercise of the rights
granted herein. You are not responsible for enforcing
compliance by third parties to this License.

Elpro Technologies 450U-E Wireless Ethernet Modem & Device Server User Manual
Rev Version 1.4.0 www.cooperbussmann.com/wirelessresources 91
7. If, as a consequence of a court judgment or allegation
of patent infringement or for any other reason (not
limited to patent issues), conditions are imposed on you
(whether by court order, agreement or otherwise) that
contradict the conditions of this License, they do not
excuse you from the conditions of this License. If you
cannot distribute so as to satisfy simultaneously your
obligations under this License and any other pertinent
obligations, then as a consequence you may not
distribute the Program at all. For example, if a patent
license would not permit royalty-free redistribution of the
Program by all those who receive copies directly or
indirectly through you, then the only way you could
satisfy both it and this License would be to refrain
entirely from distribution of the Program.
If any portion of this section is held invalid or
unenforceable under any particular circumstance, the
balance of the section is intended to apply and the
section as a whole is intended to apply in other
circumstances.
It is not the purpose of this section to induce you to
infringe any patents or other property right claims or to
contest validity of any such claims; this section has the
sole purpose of protecting the integrity of the free
software distribution system, which is implemented by
public license practices. Many people have made
generous contributions to the wide range of software
distributed through that system in reliance on consistent
application of that system; it is up to the author/donor to
decide if he or she is willing to distribute software
through any other system and a licensee cannot impose
that choice.
This section is intended to make thoroughly clear what is
believed to be a consequence of the rest of this License.
8. If the distribution and/or use of the Program is
restricted in certain countries either by patents or by
copyrighted interfaces, the original copyright holder who
places the Program under this License may add an
explicit geographical distribution limitation excluding
those countries, so that distribution is permitted only in
or among countries not thus excluded. In such case,
this License incorporates the limitation as if written in the
body of this License.
9. The Free Software Foundation may publish revised
and/or new versions of the General Public License from
time to time. Such new versions will be similar in spirit to
the present version, but may differ in detail to address
new problems or concerns.
Each version is given a distinguishing version number. If
the Program specifies a version number of this License
which applies to it and "any later version", you have the
option of following the terms and conditions either of
that version or of any later version published by the Free
Software Foundation. If the Program does not specify a
version number of this License, you may choose any
version ever published by the Free Software Foundation.
10. If you wish to incorporate parts of the Program into
other free programs whose distribution conditions are
different, write to the author to ask for permission. For
software which is copyrighted by the Free Software
Foundation, write to the Free Software Foundation; we
sometimes make exceptions for this. Our decision will
be guided by the two goals of preserving the free status
of all derivatives of our free software and of promoting
the sharing and reuse of software generally.
NO WARRANTY
11. BECAUSE THE PROGRAM IS LICENSED FREE OF
CHARGE, THERE IS NO WARRANTY FOR THE
PROGRAM, TO THE EXTENT PERMITTED BY
APPLICABLE LAW. EXCEPT WHEN OTHERWISE
STATED IN WRITING THE COPYRIGHT HOLDERS
AND/OR OTHER PARTIES PROVIDE THE PROGRAM
"AS IS" WITHOUT WARRANTY OF ANY KIND, EITHER
EXPRESSED OR IMPLIED, INCLUDING, BUT NOT
LIMITED TO, THE IMPLIED WARRANTIES OF
MERCHANTABILITY AND FITNESS FOR A
PARTICULAR PURPOSE. THE ENTIRE RISK AS TO
THE QUALITY AND PERFORMANCE OF THE
PROGRAM IS WITH YOU. SHOULD THE PROGRAM
PROVE DEFECTIVE, YOU ASSUME THE COST OF ALL
NECESSARY SERVICING, REPAIR OR CORRECTION.
12. IN NO EVENT UNLESS REQUIRED BY
APPLICABLE LAW OR AGREED TO IN WRITING WILL
ANY COPYRIGHT HOLDER, OR ANY OTHER PARTY
WHO MAY MODIFY AND/OR REDISTRIBUTE THE
PROGRAM AS PERMITTED ABOVE, BE LIABLE TO
YOU FOR DAMAGES, INCLUDING ANY GENERAL,
SPECIAL, INCIDENTAL OR CONSEQUENTIAL
DAMAGES ARISING OUT OF THE USE OR INABILITY
TO USE THE PROGRAM (INCLUDING BUT NOT
LIMITED TO LOSS OF DATA OR DATA BEING
RENDERED INACCURATE OR LOSSES SUSTAINED
BY YOU OR THIRD PARTIES OR A FAILURE OF THE
PROGRAM TO OPERATE WITH ANY OTHER
PROGRAMS), EVEN IF SUCH HOLDER OR OTHER
PARTY HAS BEEN ADVISED OF THE POSSIBILITY OF
SUCH DAMAGES.